www.comfortzoneproducts.com
Save These Instructions
Features:
• 2 heat settings :
Low (750W)
High (1,500W)
• Eco Mode setting
• Full functioning remote control
• 12 hour timer function
• Electronic controls with Digital thermostat
• Grounded cordset
• 120V AC / 60Hz / 12.5A / 5,120 BTU
CZ2018 Series
Digital Infrared Quartz
Heater With Remote Control
2
2
www.comfortzoneproducts.com
INTENDED USE:
This product is intended for indoor residential and ofce use only,
not for industrial or other commercial application. Use only with
electrical wiring that is in good working order and that meets
applicable codes and ordinances. This heater must be plugged
in to a 120V AC, 15 Amp (or larger) circuit. Do not plug anything
additional into the same circuit. If you have any questions
whether your wiring is adequate, consult a qualied electrician.
Risk of re, overheating, malfunction, property damage, injury or
even death may result if not adhered to.
Use your heater only with a working smoke detector located in
the vicinity of your heater.
While using your heater, you should follow the IMPORTANT
INSTRUCTIONS listed below. As part of those instructions, we
have used the word “WARNING” to indicate the level of hazard:
WARNING indicates a hazard which, if not avoided, could result
in injury or death.
IMPORTANT INSTRUCTIONS
When using electrical appliances, basic safety precautions should always
be followed to reduce the risk of re, electric shock and injury to persons,
including the following:
• Read all the instructions before using this heater.
• This heater is hot when in use. To avoid burns, do not let bare skin
touch hot surfaces. Use provided handle when moving this heater. Keep
combustible materials, such as furniture, pillows, bedding, papers,
clothes and curtains at least 3 feet (0.9 meters) from the front of the
heater and keep them away from the sides and rear.
• Do not use heater unattended. Use of extreme caution is necessary
when any heater is used by or near children, invalids, disabled persons
or pets.
• Do not operate the heater with a damaged power cord or after the
heater malfunctions, has been dropped or damaged in any manner.
Return heater to authorized service facility for examination, electrical or
mechanical adjustment or repair.
• Do not use heater outdoors
• Use your heater only in dry environments. This heater is not intended
for use in a bathroom, laundry area, or similar locations, or near sinks,
washing machines, swimming pools or other sources of water. Never
locate heater where it may fall into a bathtub or other water container.
Do not use in damp environments such as ooded basements.
• Do not place the fan on a small, unlevel, uneven or any surface which
might allow heater to tip or fall.
• For proper operation, heater should be placed on a smooth,
non‑combustible, level surface. Do not place on rugs, carpet, vinyl
ooring or other plastic surfaces. Not for use outdoors or in wet areas.
• This heater is not designed as a primary heat source.
• Always plug heaters directly into a wall outlet/receptacle. Never use with
an extension cord or relocatable power tap (outlet/power strip). Always
unplug heater when not in use.
• Do not run power cord under carpeting. Do not cover cord with throw
rugs, runners or similar coverings. Arrange cord away from trafc area
where it will not be tripped over.
• To disconnect heater, turn controls off then remove plug from outlet.
• Do not insert or allow foreign objects to enter any ventilation or exhaust
opening as this may cause an electric shock or re or damage the heater.
• To prevent a possible re, do not block air intakes or exhaust in any
manner. Do not use on soft surfaces like a bed, where openings may
become blocked.
• A heater has hot and arcing or sparking parts inside. Do not use it in
areas where gasoline, paint or ammable liquids are used or stored.
• Use this heater only as described in this manual. Any other
use not
recommended by the manufacturer may cause re, electric shock
or injury to persons or property.
READ & SAVE THESE
INSTRUCTIONS
WARNING: SHOCK HAZARD
Use your heater only in dry environments. This heater is not intended
for use in a bathroom, laundry area, or similar locations, or near sinks,
washing machines, swimming pools or other sources of water. Never
locate heater where it may fall into a bathtub or other water receptacle.
Do not use in damp environments such as ooded basements.
WARNING: HOT SURFACES
Do not touch body of heater when in use. This heater is hot when in use,
to avoid burns, do not let bare skin touch hot surfaces. If provided, use
handles when moving this heater.
WARNING: FIRE HAZARD
Heater has hot and arcing or sparking parts inside. Do not use near
combustible materials or ammable gases or sources of heat. DO NOT
USE in areas where gasoline, paint or ammable materials are used or
stored. Keep combustible materials such as furniture, pillows, bedding,
papers, clothes and curtains at least 3 feet (0.9 m) from the front of
the heater and keep them away from the sides and rear.To prevent a
possible re, do not block air intakes or exhaust in any manner. Do not
use on soft surfaces, like a bed, where openings may become blocked.
Do not place the heater near a bed because objects such as pillows or
blankets can fall off the bed and be ignited by the heater. Do not insert
or allow foreign objects to enter any ventilation or exhaust opening as
this may cause an electric shock, re, or damage the heater.
WARNING: ELECTRICAL SHOCK HAZARD
Do not use with damaged cord or plug. Use with adequate electrical
system that is up to code.
CAUTION: TO PREVENT ELECTRIC SHOCK,
this product has a three prong grounded plug that must be inserted into
a matching properly grounded outlet to reduce the risk of electrical shock.
Do not attempt to defeat this safety feature.
DO NOT
operate any heater with a damaged cord or plug or after
heater malfunctions, has been dropped or damaged in any
manner. Do not operate heater with a broken heating element or ceramic
cone or any visual imperfections. Disconnect power before servicing. For
repairs covered under warranty, see warranty statement. For all other
repairs contact Comfort Zone® Customer Service by telephone or mail
for information and assistance.
PET OWNERS NOTE:
The health of birds and some small pets are extremely sensitive to the
fumes given off during the initial use of many appliances. Although these
fumes are not harmful to humans, it is recommended that this heater
not be used around birds and small pets during its initial use until the
manufacturing corrosion coatings burn off.
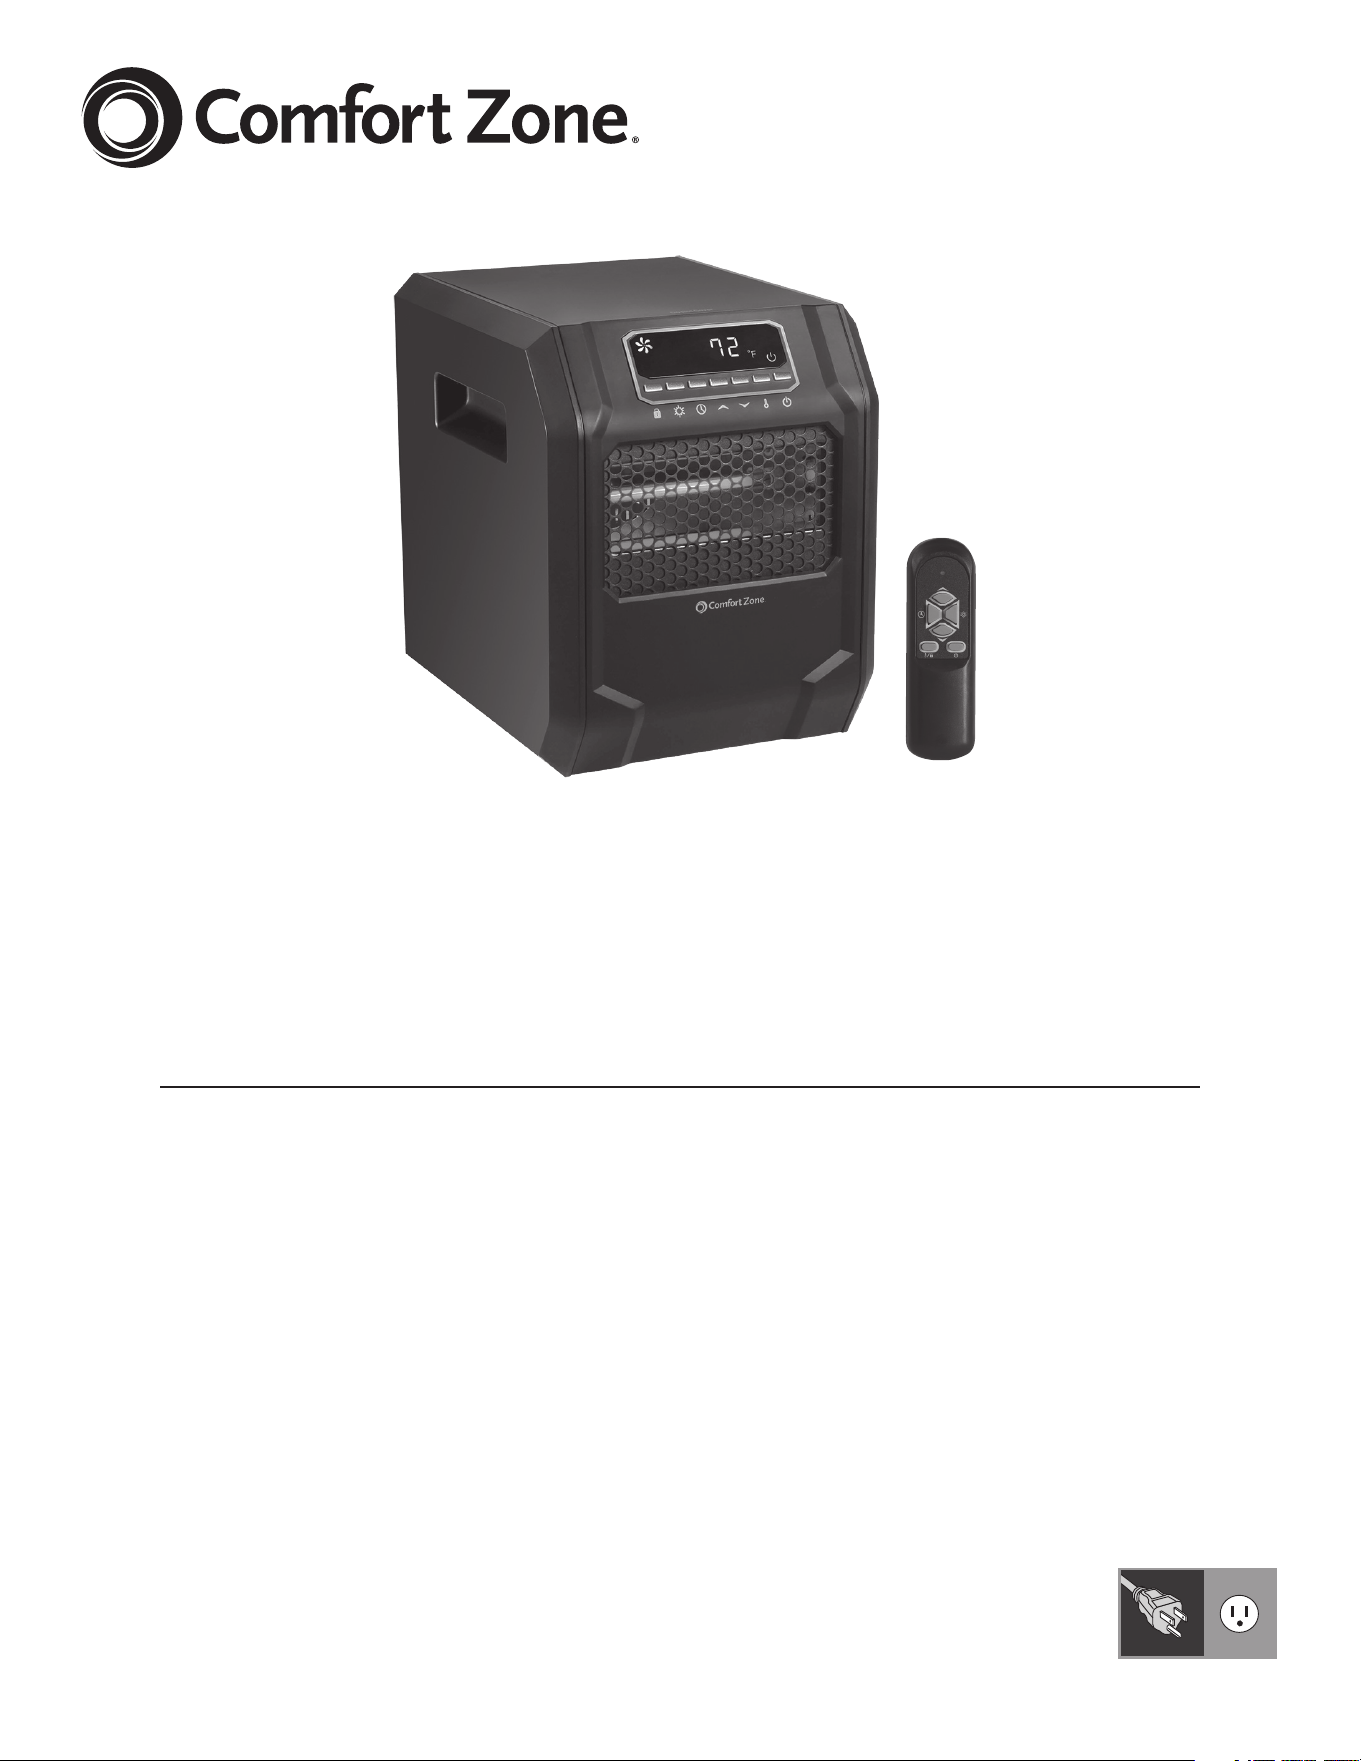
WARNING:
This heater has a voltage rating of 120 volts. The cord has a
3‑prong grounding‑type plug (A) which ts the 3‑slot grounded receptacle
(A2). DO NOT remove the grounding prong (A1) if only a 2‑slot receptacle (B) is
available.
For connecting 3‑prong grounding‑type plug to 2‑slot receptacle, use an
ADAPTER (C). The grounding lug (C1) extending from the adapter must be
connected to a permanent ground with a Metal Screw (D) such as a properly
grounded outlet box (E).
The adapter should not be used if a 3‑slot grounded receptacle is available.
DO NOT DEFEAT THE SAFETY PURPOSE OF EITHER
A GROUNDED PRONG OR A GROUNDING LUG.
(A)
(A2) (B)
(D)
(E)
(C)
(C1)
(A1)
3
3
www.comfortzoneproducts.com
PRODUCT
REMOTE CONTROL:
CONTROL PANNEL
OPERATING INSTRUCTIONS
1. Turn the heater on or off by pressing
the Power button on the control panel
or by pressing the Power button on the
remote control.
Once the power is off, heating elements
will stop working rst. The fan will continue
working for up to 90 seconds to dispense
residual heat inside the heater. This
is a normal function.
1
B
C
D
E
A
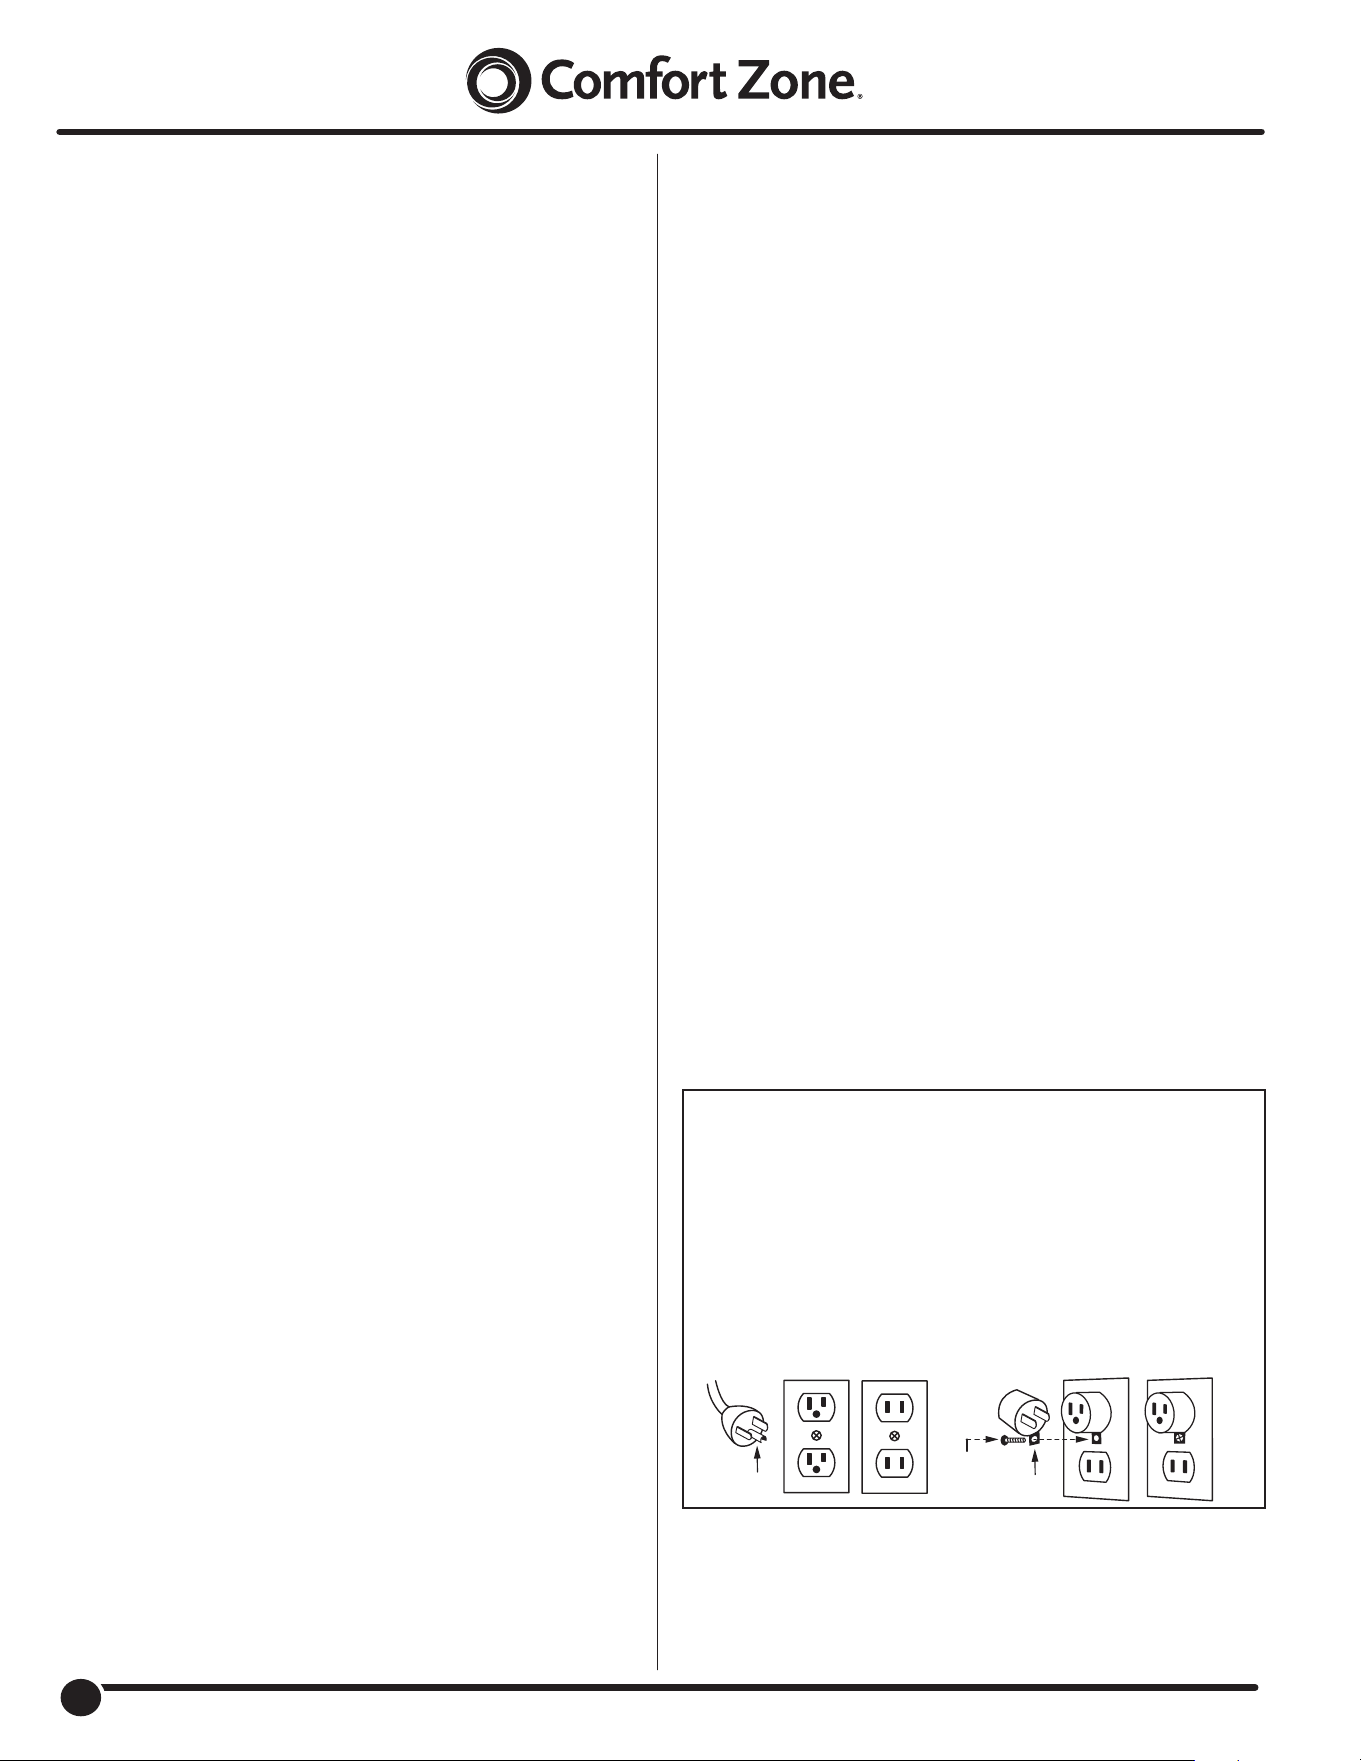
PART DESCRIPTION
A Remote Control
B Control Panel
C Filter Cover
D Temperature Sensor
E Master Power Switch
1
3
4
2
5
6
PART NAME DESCRIPTION
1 Temp Up Button Increases the set temperature
value
2 Mode Button Toggles between Hi / Low/ Eco
Modes
3 Temp Down Button Decreases the set temperature
value
4 Power Button Powers the heater on or off
5 Ambient Temperature /
Safety Lock Button
Shows ambient temperature /
Hold to engage or disengage
safety lock
6 Timer Button Engages the on/off timer
C
°
F
°
1
2
3
4
5
6789101112
13
14
15
16
PART NAME DESCRIPTION
1 Timer Indicator Light Indicates when the timer function
is active
2 Digital Display Readout of the set room
temperature or timer value
3 Celsius Indicator Light Indicates that the temperature is
being displayed in Celsius
4 Fahrenheit Indicator
Light
Indicates that the temperature is
being displayed in Fahrenheit
5 Power Indicator Light Indicates when the unit is
receiving power from the wall
outlet
6 Power Switch Button Powers the heater ON or OFF
7 Ambient Temp. Button Indicates ambient temp / hold to
toggle between °C/°F
8 Temp‑Down Button Decreases the set temperature
9 Temp‑Up Button Increases the set temperature
10 Timer Button Engages the on / off timer function
11 Heater Mode Button Toggles between Hi / Low/ ECO
Modes
12 Safety Lock Button Hold to Lock / Unlock heater’s
control panel
13 Eco Indicator Indicates when ECO mode is on
14 High Heat indicator Indicates when High Heat mode
is on
15 Low Heat Indicator Indicates when Low Heat mode
is on
16 Fan Indicator Indicates when the Fan is on
4
4
www.comfortzoneproducts.com
2. Select a heat setting by pressing
the HEAT button on either the
control panel or the remote control
to toggle between the three heat
settings.
Power for heat‑up mode is 1,500 Watts;
heat‑down is 750 Watts. ECO mode is an
Economic Energy Saving Function.
When ECO mode is chosen, the heater
will operate to maintain a constant warm
68°F / 20°C.
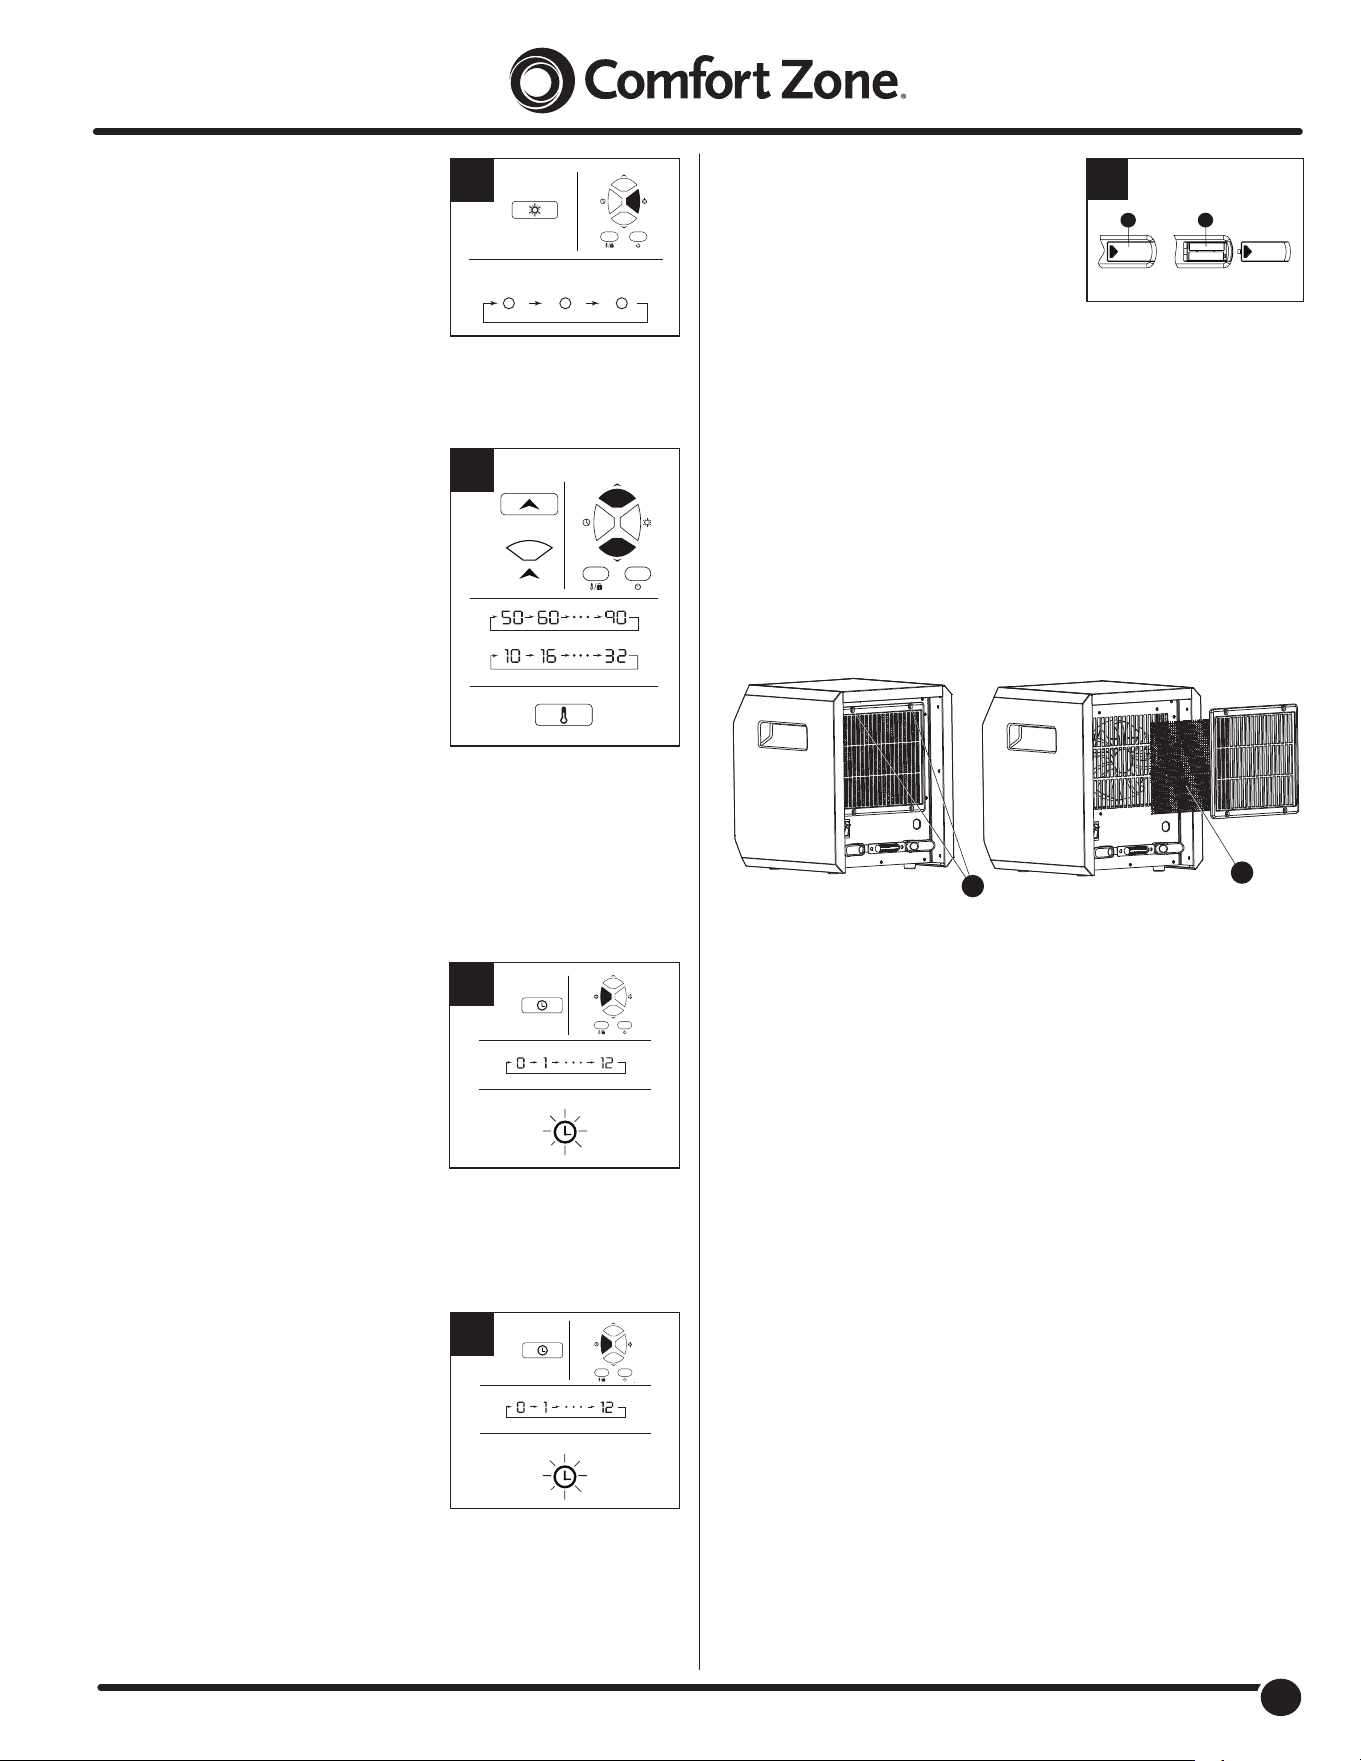
3. Set the temperature by pressing
the arrows on the control panel or
the remote control. You can set the
temperature on the heater anywhere
between 50°F and 90°F or between
10°C and 32°C. Once you have chosen
the desired temperature, the heater will
remain on until the room temperature
increases to the temperature on the
digital display. The heater will cycle on
and off to maintain the desired room
temperature.
To view the ambient temperature press
the ambient temperature button on the
control panel.
Note: Press and hold the ambient temperature button on the control
panel for 5 seconds to switch the digital display indicator on the heater
between Fahrenheit and Celsius. On the remote, short press the ambient
temperature button to engage Ambient Temperature, long press for 3
seconds to engage Child Lock.
4. To set the timer power off, start the
unit and press the Timer button on
the control panel or remote control.
Note: The timer‑power‑off function can
only be set when the heater is in
power‑on mode. The digital display on
the control panel changes from the set
temperature readout to a time value for
the timer. Press the Timer button
repeatedly to change the number value
between a range of 0 to 12 hours
(in 1‑hour intervals).
The Timer light turns on when the timer is set.
5. To set the timer power on, while
powering off the unit press the
Timer button on the control panel.
Note: The timer‑power‑on function
can only be set when the heater is in
power‑off mode. The digital display on
the control panel will indicate time value
for the timer. Press the Timer button
repeatedly to change the number value
between a range of 0 to 12 hours
(in 1‑hour intervals).
The Timer light turns on when the timer is set.
2
HIGH LOW ECO
OR
3
4
TIMER
5
TIMER
6. To replace the batteries, remove the
battery cover (1) from the remote by
applying pressure to the battery cover
(1) and sliding it away from the remote.
Insert two AAA batteries (not included)
(2) and close the remote by placing the
battery cover (1) back on the remote.
Note: Do not mix old and new batteries. Do not mix alkaline, standard
(carbon‑zinc), or rechargeable (NiCad, ni‑mh, etc) batteries.
CARE AND MAINTENANCE
CLEANING THE AIR FILITER:
1. Clean the air lter (2) after three months or if it appears to be blocking
airow. With the heater unplugged, remove the two lter screws (1) as
illustrated below. Clean all parts of the lter assembly and allow parts to
completely dry.
2. Reassemble and reinstall the lter (2).
Warning: Do not use the heater without the lter assembly in place.
CLEANING:
CAUTION – Before cleaning the heater be sure to
disconnect power cord and allow the heater to cool completely.
This heater should be cleaned at least once a year to maintain proper
performance. Clean the outside surface with a clean damp cloth. Do
not use harsh chemical or abrasive cleaners. DO NOT IMMERSE THE
HEATER IN WATER. Allow heater to dry completely before use.
REPAIR:
DO NOT OPERATE THE HEATER WITHOUT THE GRILLE
IN PLACE. DO NOT USE THE HEATER IF IT HAS MALFUNCTIONED
OR BECOME DAMAGED IN ANY WAY. RETURN HEATER TO
AUTHORIZED FACILITY FOR EXAMINATION, ELECTRICAL OR
MECHANICAL ADJUSTMENT OR REPAIR.
STORAGE:
Keep original carton for storage of the heater. Coil and tie
the power cord to avoid damage during storage.
6
1
2
1
2
5
5
www.comfortzoneproducts.com
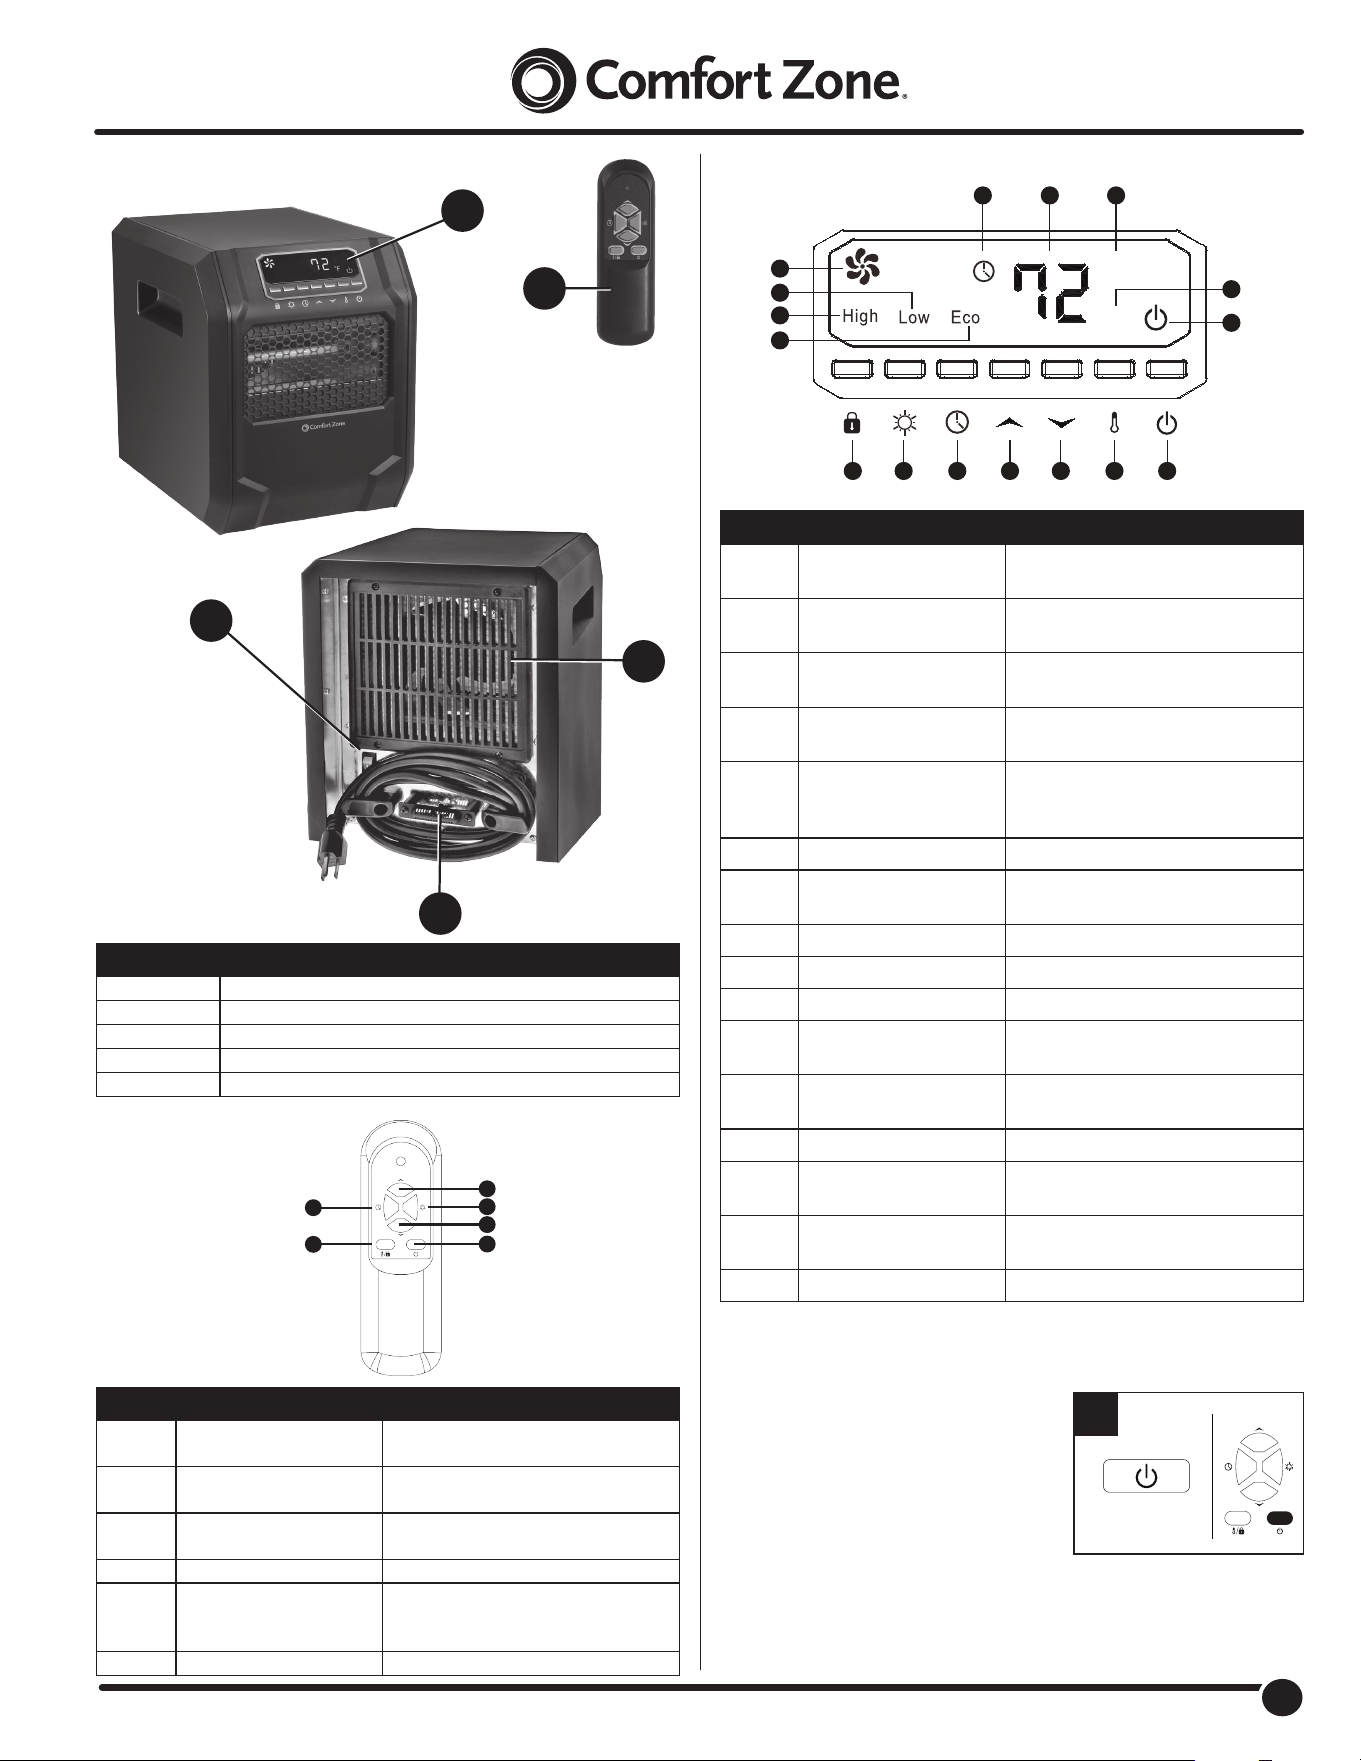
Issue/Problem Possible Cause Solution
The control panel is all
black except the power
indicator.
The overheat protection system has been
engaged.
1. Turn off the master power switch on the back of the heater and
unplug the heater for 10 minutes until it cools down.
2. Restart the heater by plugging the heater back in and turning on
the master power switch on the back of the heater.
3. Turn on the heater by pressing the power button on the control
panel. Set a heat setting by pressing the heat button.
4. The heater should be functioning normally.
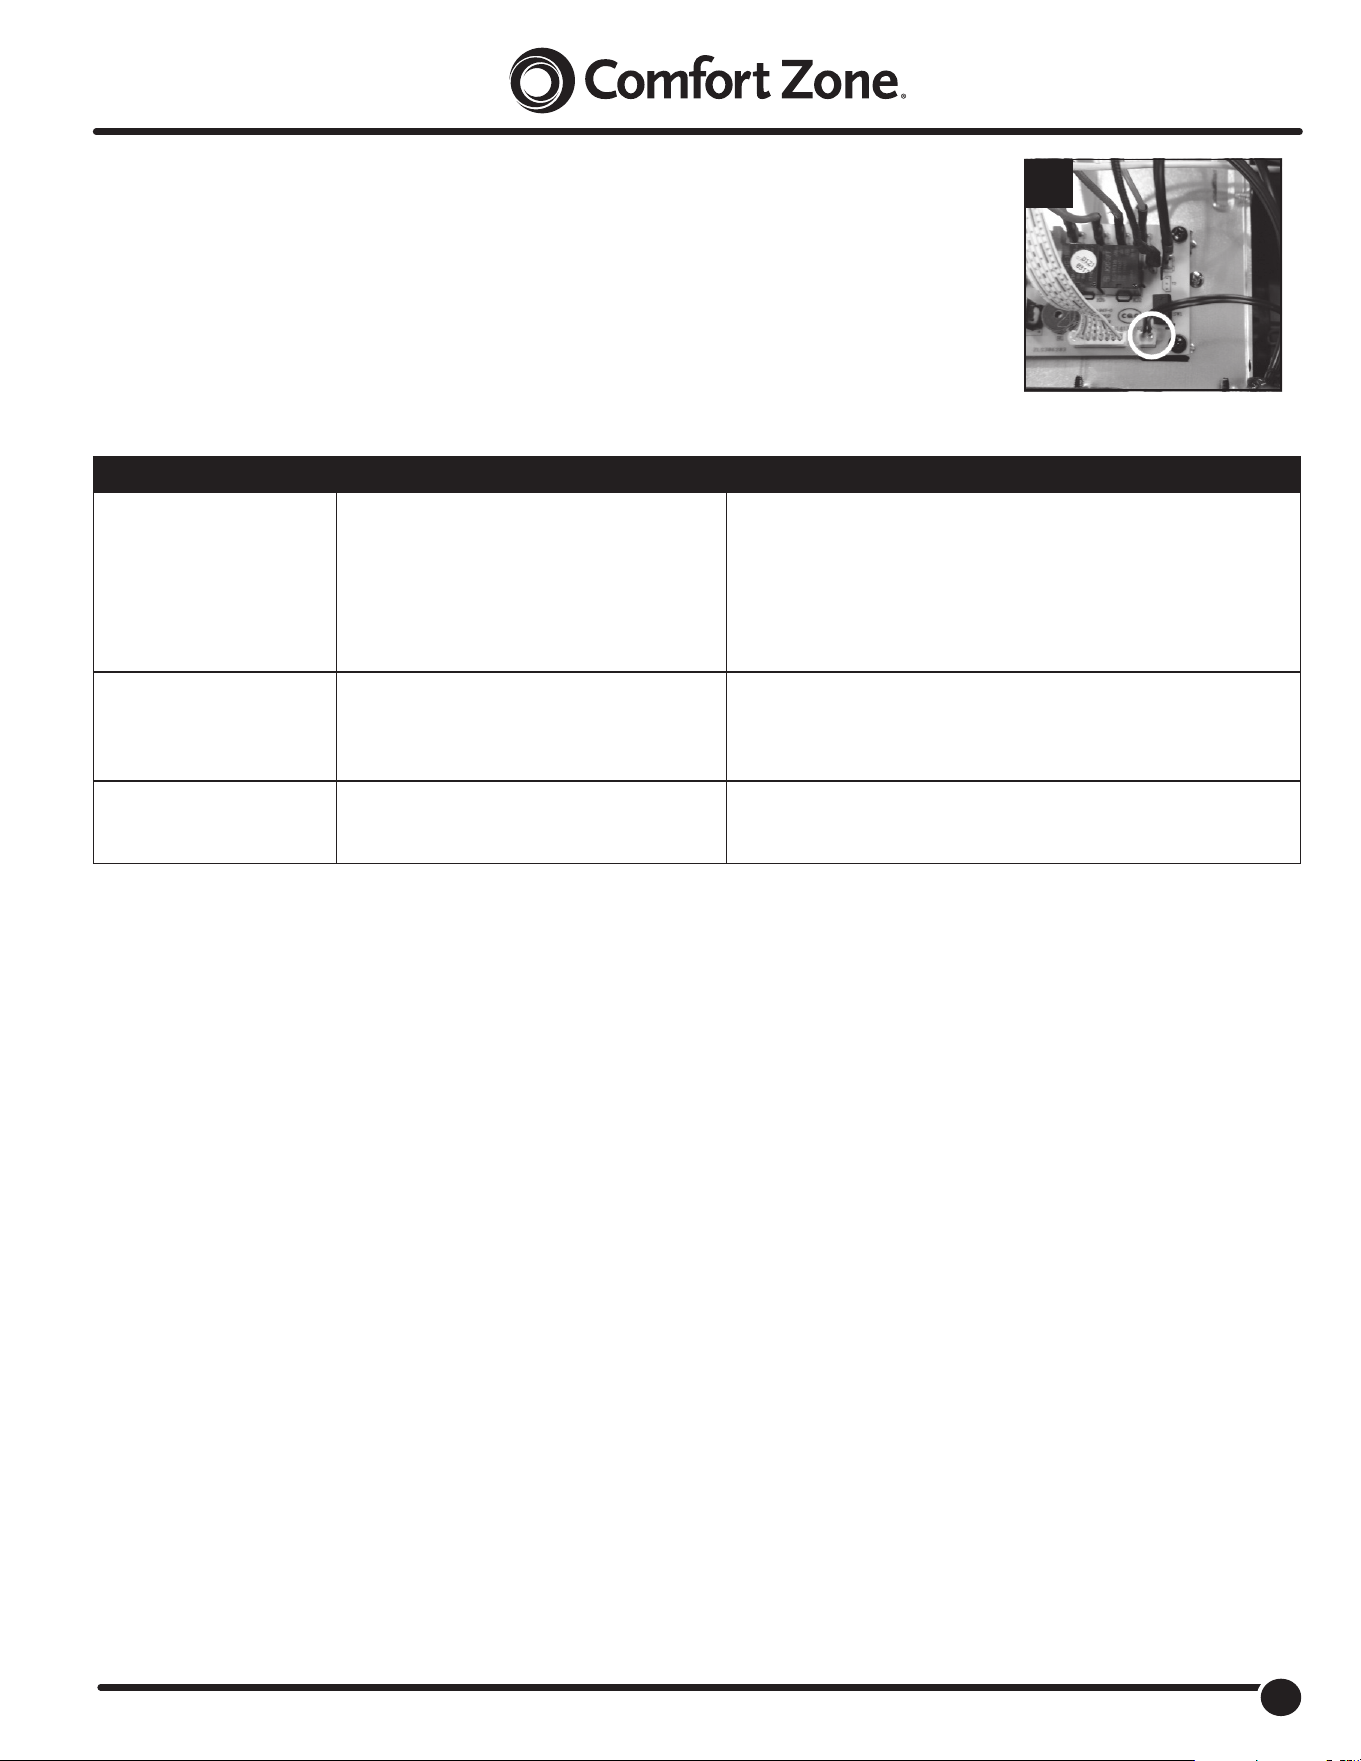
There is an E2 error code
displayed on the control
panel.
The temperature sensor malfunction
connection may be loose.
1. Power off the heater
2. Open the heater housing
3. Re‑plug the inner wire and make sure the connection is solid
(See Fig. 1).
The Power indicator is
blinking
The tip over safety switch has been engaged. 1. Place the heater in an upright position.
2. Turn the heater on by using the supplied remote control or by
using the control panel on the heater.
1
TROUBLESHOOTING:
If the heater will not operate, please check the following before seeking repair of service:
1. Check if the power cord is plugged into an electrical outlet, if not, plug in.
2. Check if electricity to the main fuse is working.
3. Check if the battery in remote control is not dead and if the insulating lm is pulled out.
4. Check if the main power switch at the back of the unit is on.
NOTE: The heater may not operate if the thermostat is set lower than the room temperature.
To begin operation, raise the thermostat temperature setting.

6
6
www.comfortzoneproducts.com
LIMITED WARRANTY
This unit is guaranteed to the origin‑al retail purchaser against defects in quality or workmanship for a period of one year from the date of original
purchase. If this unit fails because of a manufacturing defect within 30 days of purchase, return the unit, with your receipt, to the retailer. After 30 days,
but within the warranty period, if the unit was purchased within the continental United States, return it, freight prepaid, to World and Main for repair or
replacement. If the unit was purchased outside the continental United States, return the unit to the place of purchase. This warranty does not cover
damage caused by misuse, abuse, overheating or alteration. Repairs made by anyone other than World and Main are not covered in this warranty.
World and Main will not be held liable for any losses due to neglectful operation. All implied warranties, including the warranties of merchantability
and of tness of purpose, if applicable, are hereby limited in duration to the period of one year from the date of original retail purchase. Some states
do not allow limitations on how long an implied warranty lasts, so the above limitations may not apply to you. Incidental or consequential damages
arising from a breach of either express or implied warranties are hereby disclaimed and excluded. Some states do not allow the exclusion of limitation
of incidental or consequential damages, so this limitation or exclusion may not apply to you. Upon the expiration of this warranty all such liability will
terminate. No other warranties are expressed or implied.
This warranty gives you specic legal rights, and you may also have other rights which vary from state to state. No informal dispute settlement
mechanisms are available. This limited warranty is given in lieu of all other warranties.
Manufactured for:
World and Main (Cranbury), LLC
324A Half Acre Rd.
Cranbury, NJ 08512 USA
800‑221‑6895
www.comfortzoneproducts.com
Rev. 04/13/2022

