MODEL NO.:
BI62220AB, BI62220AX, BI62220ABGUK
EN
User and Installation Manual
Built-in Electric Oven

The appliance is not to be used by persons (including children) with reduced physical,
sensory or mental capabilities, or lack of experience and knowledge, unless they have
been given supervision or instruction. children being supervised not to play with the
appliance.
During use the appliances becomes hot. Care should be taken to avoid touching heating
elements inside the oven, for cooking ranges and ovens.
WARNING: Accessible parts may become hot during use. Young children should be kept
away.
Do not use harsh abrasive cleaners or sharp metal scrapers to clean the oven door glass
since they can scratch the surface, which may result in shattering of the glass.
If during the test of Clause 11, the temperature rise at the centre of the internal bottom
surface of a storage drawer exceeds that specified for handles held for short periods in
normal use, the instruction shall state that these surfaces can get hot.
The oven must be switched off before removing the guard and that, after cleaning, the
guard must be replaced in accordance with the instructions.
Details indicating the correct installation of the shelves.
A steam cleaner is not be used.
Ensure that the appliance is switched off before replacing the lamp to avoid the
possibility of electric shock.
The appliance must not be installed behind a decorative door in order to avoid
overheating.
Disconnection of the appliance after installation, by accessible plug or a switch in the
fixed wiring.
If the supply cord is damaged, it must be replaced by the manufacturer, its service agent
or similarly qualified persons in order to avoid a hazard.
This appliance should be connected to a circuit which incorporates an isolating switch
which can accessible by the user after installation providing full disconnection from the
power supply. The disconnection may be achieved by incorporating a switch in the fixed
wiring in accordance with the wiring rules.
This appliance can be used by children aged from 8 years and above and persons with
reduced physical, sensory or mental capabilities or lack of experience and knowledge if
they have been given supervision or instruction concerning use of the appliance in a
safe way and understand the hazards involved. children shall not play with the
appliance. cleaning and user maintenance shall not be made by children without
supervision.
WARNING: The appliance and its accessible parts become hot during use.
Care should be taken to avoid touching heating elements.
WARNING
●
●
●
●
●
●
●
●
●
●
●
●
●
●
●
●
●
●

Children less than 8 years of age shall be kept away unless continuously supervised.
This appliance can be used by children aged from 8 years and above and persons with
reduced physical, sensory or mental capabilities or lack of experience and knowledge if
they have been given supervision or instruction concerning use of the appliance in a
safe way and understand the hazards involved. Children shall not play with the
appliance. Cleaning and user maintenance shall not be made by children without
supervision.
WARNING
●
●

DEAR CUSTOMER
The oven is exceptionally easy to use and extremely efficient.After reading the instruction
manual,operating the oven will be easy.
Before being packaged and leaving the manufacturer,the oven was thoroughly checked
with regard to safety and functionality.
Before using the appliance,please read the instruction manual carefully.
By following these instructions carefully you will be able to avoid any problems in using
the appliance.
It is important to keep the instruction manual and store it in a safe place so that it can be
consulted at any time.
It is necessary to follow the instructions in the manual carefully in order to avoid possible
accidents.
Caution!
Do not use the oven until you have read this instruction manual.
The oven is intended for household use only.
The manufacturer reserves the right to introduce changes which do
not affect the operation of the appliance.

SAFETY INSTRUCTIONS…………………………………..……………………1
…..………..………..………..………..…..……….3HOW TO SAVE ENERGY
…………………………………………4DESCRIPTION OF THE APPLIANCE
……………………………………………………………..………6INSTALLATION
……………………………………………………………..………8OPERATION
CLEANING AND MAINTENACE……………………………..……………… 13
OPERATION IN CASE OF EMERGENCY………………………16
TECHNICAL DATA………………………………………………………………17
CONTENTS

The appliance becomes hot during operation.Take care not to touch the hot parts
inside the oven.
This appliance is not intended for use by persons (including children) with reduced
physical, sensory or mental capabilities, or lack of experience and knowledge, unless
they have been given supervision or instruction concerning use of the appliance by a
person responsible for their safety. Children should be supervised to ensure that they do
not play with the appliance.While in operation direct contact with the cooker may cause
burns!
Ensure that small items of household equipment,including connection leads,do not
touch the hot oven or the hob as the insulation material of this equipment is
usually not resistant to high temperatures.
Do not leave the cooker unattended when frying.Oils and fats may catch fire due to
overheating or boiling over.
Do not put pans weighing over 15 Kg on the opened door of the oven and pans
over 25 kg on the hob.
Do not use harsh cleaning agents or sharp metal objects to clean the door as they
can scratch the surface,which could then result in the glass cracking.
Do not use the cooker in the event of a technical fault.Any faults must be fixed by an
appropriately qualified and authorised person.
In the event of any incident caused by a technical fault,disconnect the power and
report the fault to the service centre to be repaired.
SAFETY INSTRUCTIONS
NOTE:
Ensure there is a grounded socket nearby (behind the unit)
A dedicated power circuit is recommended for the unit but not required. Additional
electrical appliances on the same circuit may exceed the current(amperage)rating for
that circuit. If after the installation of your unit. the circuit breaker trips or the fuse
fails on a repeated basis,then a dedicated circuit will likely be required.
!The appliance must be installed only by a qualified person in compliance with the
instructions provided. Incorrect installation may cause harm to persons,animals or
may damage property.
The manufacturer declines all responsibility for improper installation which may harm persons
and animals and damage property.
Important:The power supply to the appliance must be cut off before any adjustments or
maintenance work is done on it.
WARNING:
When using this product,basic precautions should always be taken,including the following:
Your built-in oven is a classified electrical appliance. As with any electrical appliance and
particularly with electric heaters,basic precautions must be followed in order to reduce
the risk of fire,burns,electrical shocks and/or other serious injuries or death.
●
●
●
●
●
●
●
●
●
●
1

The rules and provisions contained in this instruction manual should be
strictly observed. Do not allow anybody who is not familiar with the contents
of this instruction manual to operate the cooker.
The cooker should not be cleaned using steam cleaning equipment.
The panels adjacent to the oven must be made of heat-resistant material.
Cabinets with a veneer exterior must be assembled with glues which can
withstand temp- erature of up to 100℃.
Keep combustible materials,such
as:curtains,drapes,furniture,pillows,clothing,linens,bedding, paper,etc.,at
least 3 feet(0.9 meters)from the front sides and rear of the heater.Do not
use this unit in areas where gasoline,paint or other flammable liquids or
their associated vapors may be present.
To reduce the risk of fire,do not place or install this unit in areas where the
ventilation or circulation ducts may become blocked.
The unit's power cord must be connected to a properly grounded and
protected,220-240V electrical outlet.Always use ground fault protection where
required by the electrical code.To reduce the risk of fire,avoid running the
power cord under rugs,carpets,etc.Keep the power cord away from high
traffic areas where it may pose as a tripping hazard.
Avoid the use of an extension cord,which may overheat and cause a fire.
When transporting or storing the unit,keep it in a dry location,free from
dust,excessive vibration or other factors,which may damage the unit.
Do not operate any oven with a damaged cord or plug or after the heater
malfunctions,has been dropped or damaged in any manner.Return the oven to
an authorised service centre to be checked.
If the supply cord is damaged, it must be replaced by a special cord or assembly
available from the manufacturer or its service agent.
Use this oven only as described in this manual.Any other use not recommended
by the manufacturer may cause fire,electric shock,or injury to persons.
This appliance is not intended for use by persons (including children) with
reduced physical, sensory or mental capabilities, or lack of experience and
knowledge, unless they have been given supervision or instruction concerning
use of the appliance by a person responsible for their safety. Children should be
supervised to ensure that they do not play with the appliance.
Never add cold water to food on a hot universal tray or baking tray or directly
onto food in a hot oven.The steam created could cause serious burns or
scalding and the sudden change in temperature can damage the enamel.
Do not lift the oven by the handle.
●
●
●
●
●
●
●
●
●
●
●
●
●
●
●
2

HOW TO SAVE ENERGY
Using energy in a respon- sible way not only saves money but also helps the
environment. So let' s save energy! And this is how you can do it:
Do not uncover the pan too often( a watched pot never boils!)
Do not open the oven door unnecessarily often.
Switch off the oven in good time and make use of residual heat.
For long cooking times, switch off heating zones 5 to 10 minutes before finishing cooking, This
saves up to 20% on energy.
Only use the oven when cooking larger dishes.
Meat of up to 1kg can be prepared more economically in a pan on the cooker hob.
Make use of residual heat from the oven.
If the cooking time is greater than 40 minutes switch off the oven 10 minutes before the end
time.
Make sure the oven door is properly closed.
Heat can leak through spillages on the door seals. Clean up any spillages immediately.
Do not install the cooker in the direct vicinity of refrigerators/ freezers.
Otherwise energy consumption increases unnecessarily.
Important! When using the timer, set appropriately shorter cooking times
according to the dish being prepared.
During transportation,protec-
tive packaging was used to
protect the appliance against
any damage.After unpack-
ing,please dispose of all
elements of packaging in a
way that will not cause damage to the
environment.
All materials used for packaging the
appliance are environmentally friendly;they
are 100% recyclable and are marked with the
appropriate symbol.
Caution! During unpacking, the packaging
materials( polythene bags,polystyrene pieces,
etc.) should be kept out of reach of children.
Old appliances should not sim-
ply be disposed of with normal
household waste,but should
be delivered to a collection and
recycling centre for electric and
electronic equipment.A symbol
shown on the product,the instruction manual
or the packaging shows that it is suitable for
recycling.
Materials used inside the appliance are
recyclable and are labelled with information
concerning this.By recycling materials or other
parts from used devices you are making a
significant contribution to the protection of our
environment.
Information on appropriate disposal centres
for used devices can be provided by your
local authority.
3
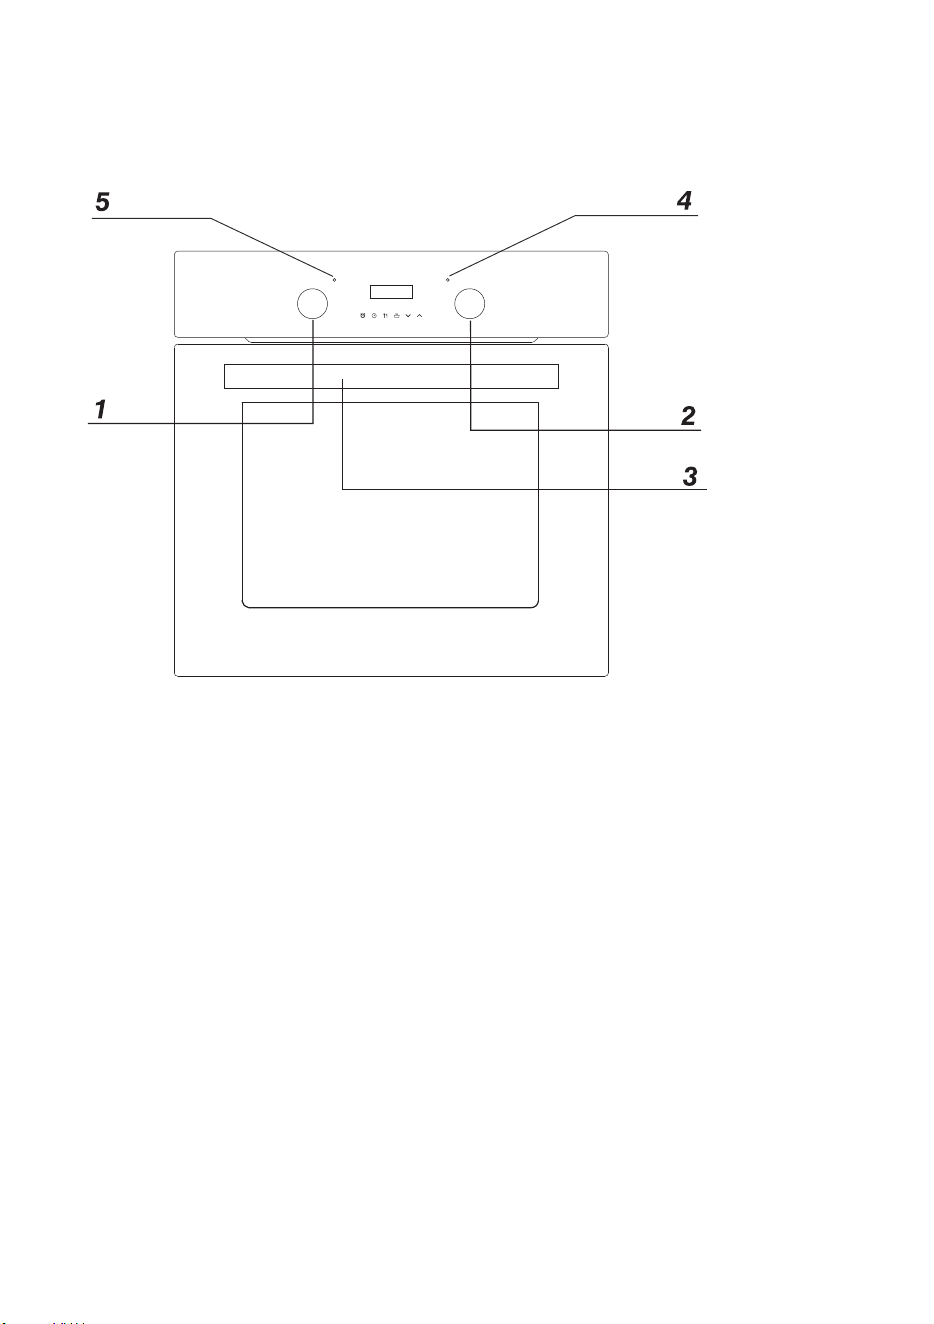
1
Oven function selection knob
2
Temperature control knob
3
Oven door handle
4
Red temperature regulator signal light
5
Orange function operation signal light
DESCRIPTION OF THE APPLIANCE
4
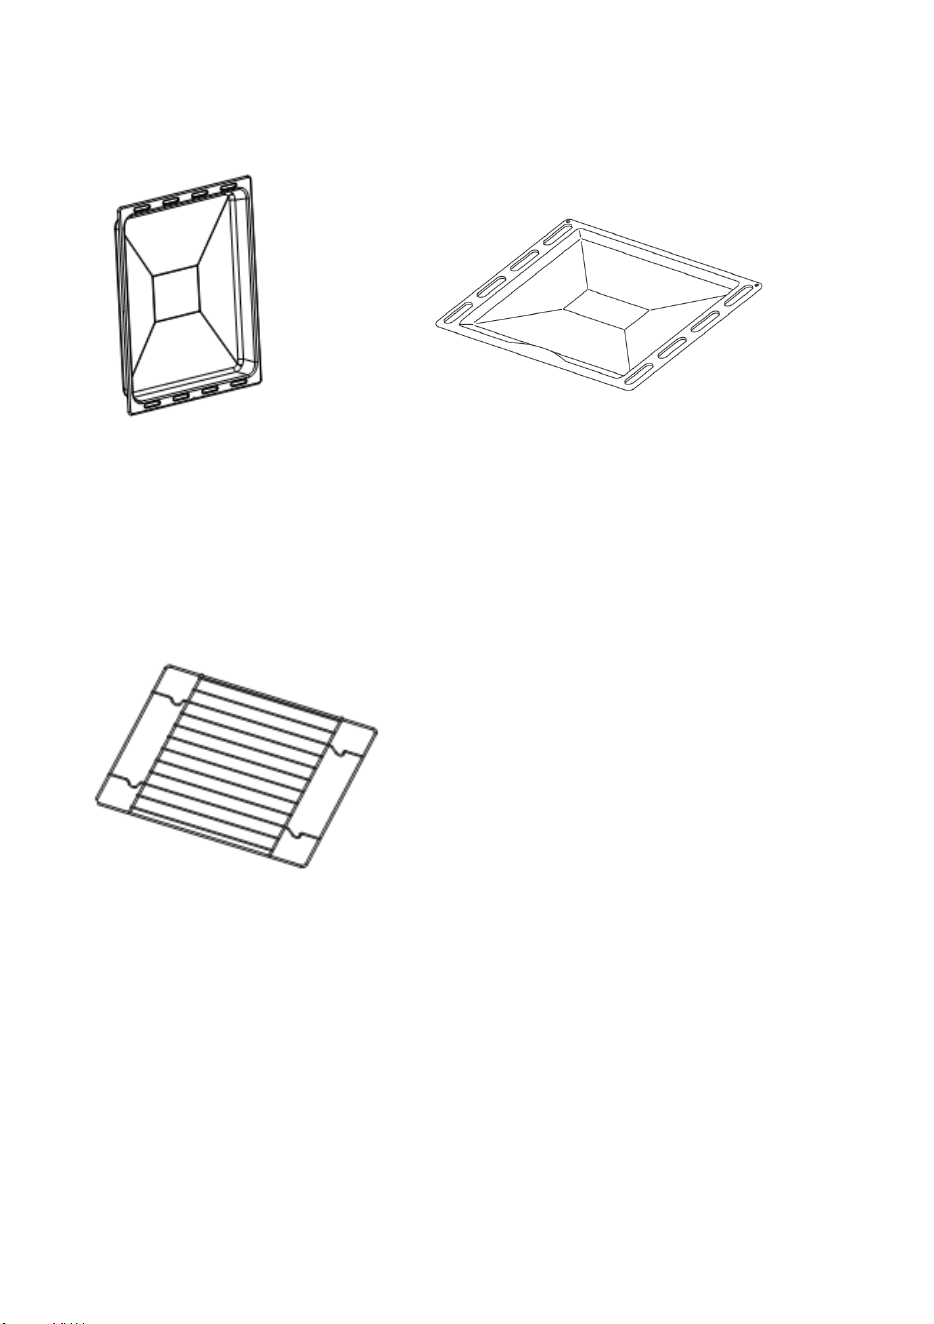
Oven shelf
Deep t
r
a
y
SPECIFICATIONS OF APPLIANCE
5
Baking tray
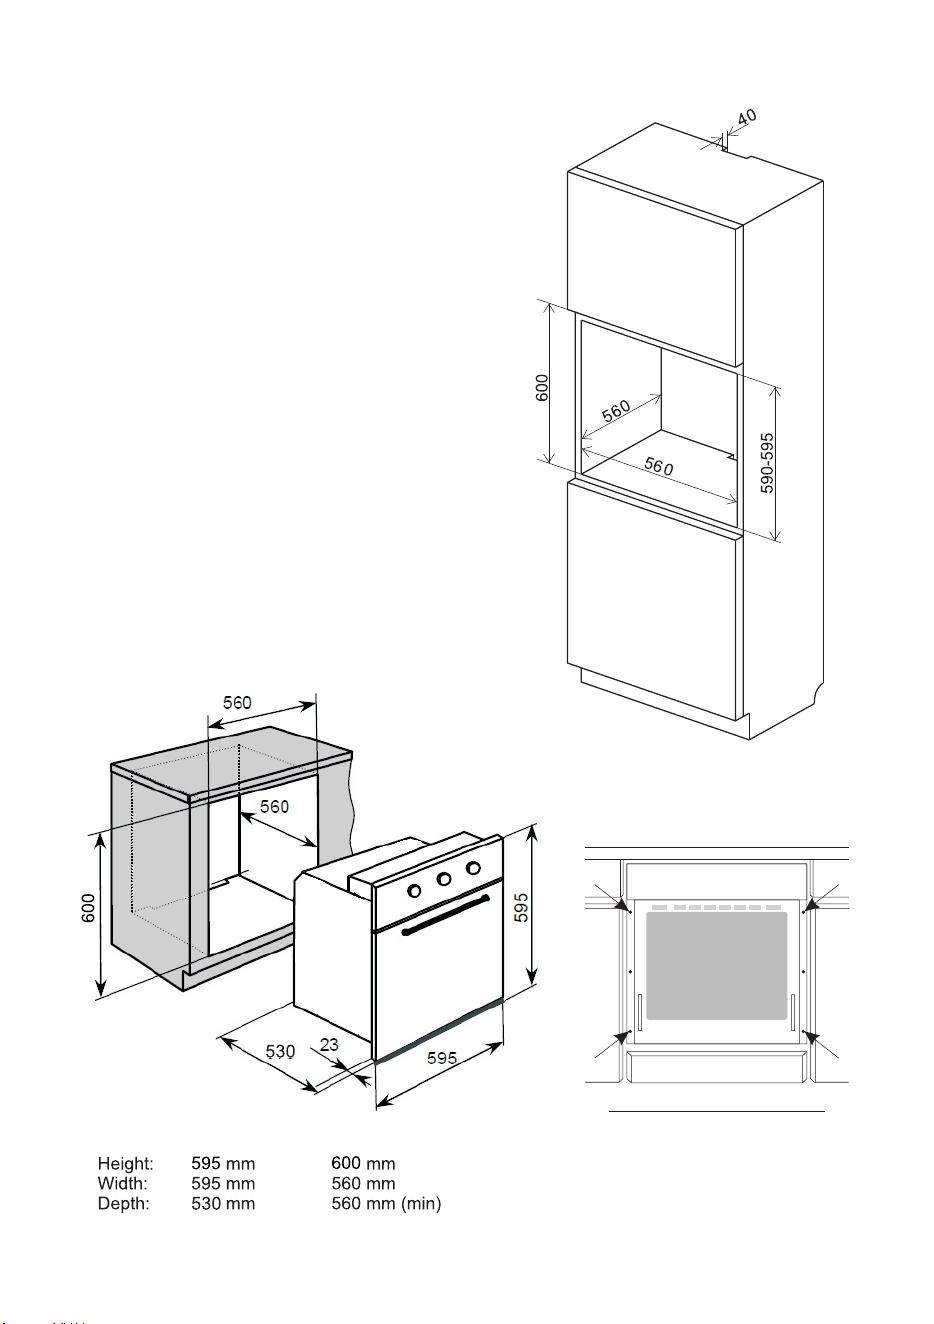
INSTALLATION
The kitchen area should be dry and aired and
equipped with efficient ventillation. When
installing the oven, easy access to all control
elements should be ensured.
This is a built- in oven, and its back wall and one
side wall can be placed next to a high piece of
furniture or a wall. Coating or veneer used on
fitted furniture must be applied with a heat-
resistant adhesive( 100°C
). This prevents
surface deformation
or detachment of the
coating.
Make an opening with the dimensions given in the
diagram for the oven to be fitted.
Make sure the mains plug is disconnected and
then connect the oven to the mains supply.
Insert the oven completely into the opening
without allowing the four screws in the places
shown in the diagram to fall out.
●
●
●
●
●
ProductDimensionsApertureDimensions
6
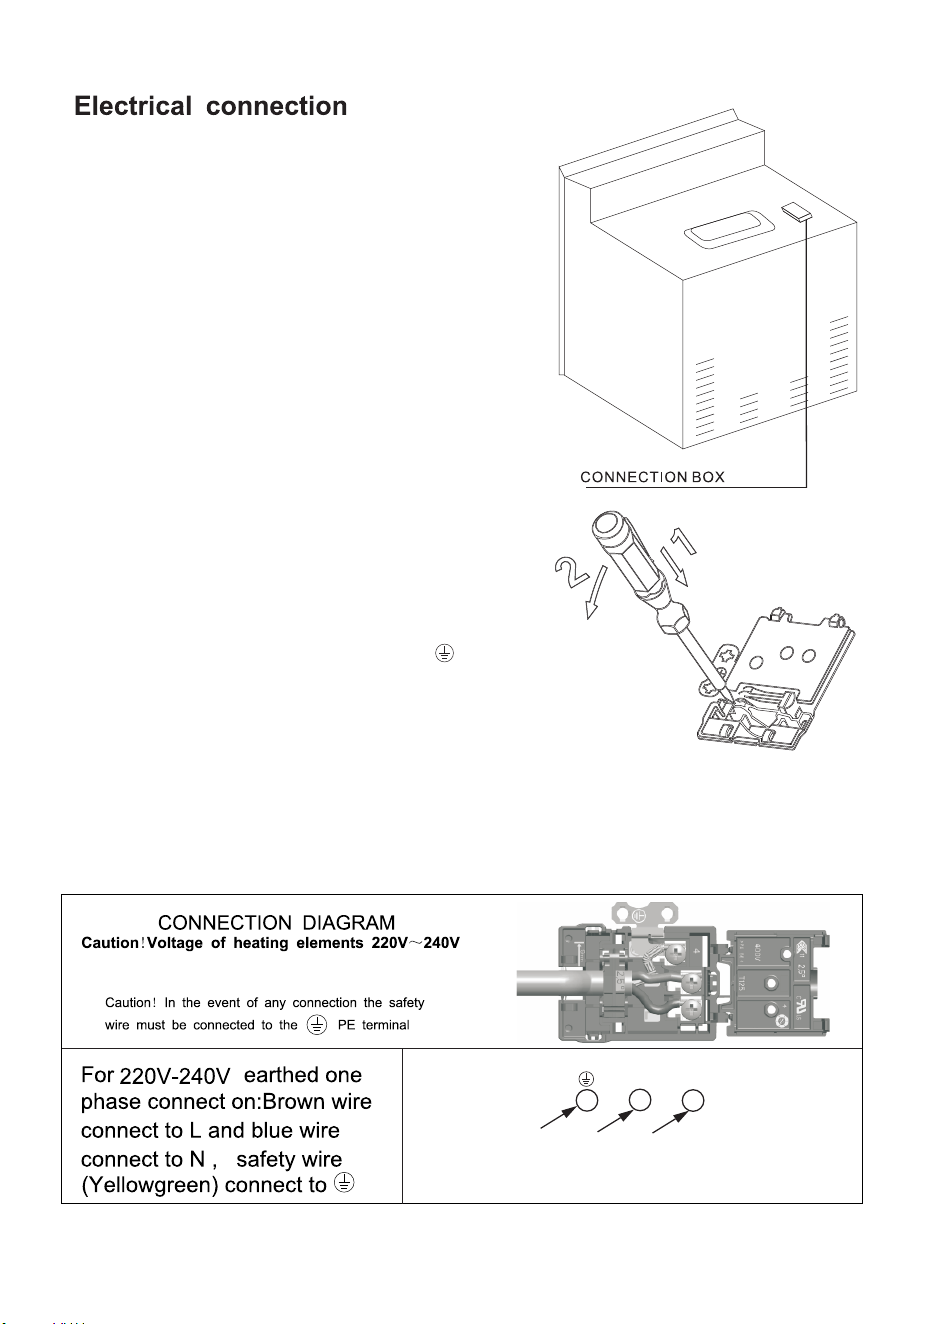
PE
N
N L
L
220V-240V~
Warning!
All electrical work should be carried out by a
suitably qualified and authorised eletrician.No
alterations or wilful changes in the electricity
supply should be carried out.
Fitting guidelines
The oven is manufactured to work with three-
phase alternating current(220V-240V/
50Hz).The connection diagram is also found on
the cover of the conncction box. Remember
that the connection wire should match the
connection type and the power rating of the
oven.
The connection cable must be secured in a
strain-relief clamp.
Warning!
Remember to connect the safety circuit to the
connection box terminal marked with .The
connection box terminal marked with
.The electricity supply for the oven must have a
safety switch which enables the power to be
cut off in case of emergency. The distance
between the working contacts of the safety
switch must be at least 3 mm.
Before connecting the oven to the power
supply it is important to read the information on
the data plate and the connection diagram.
7
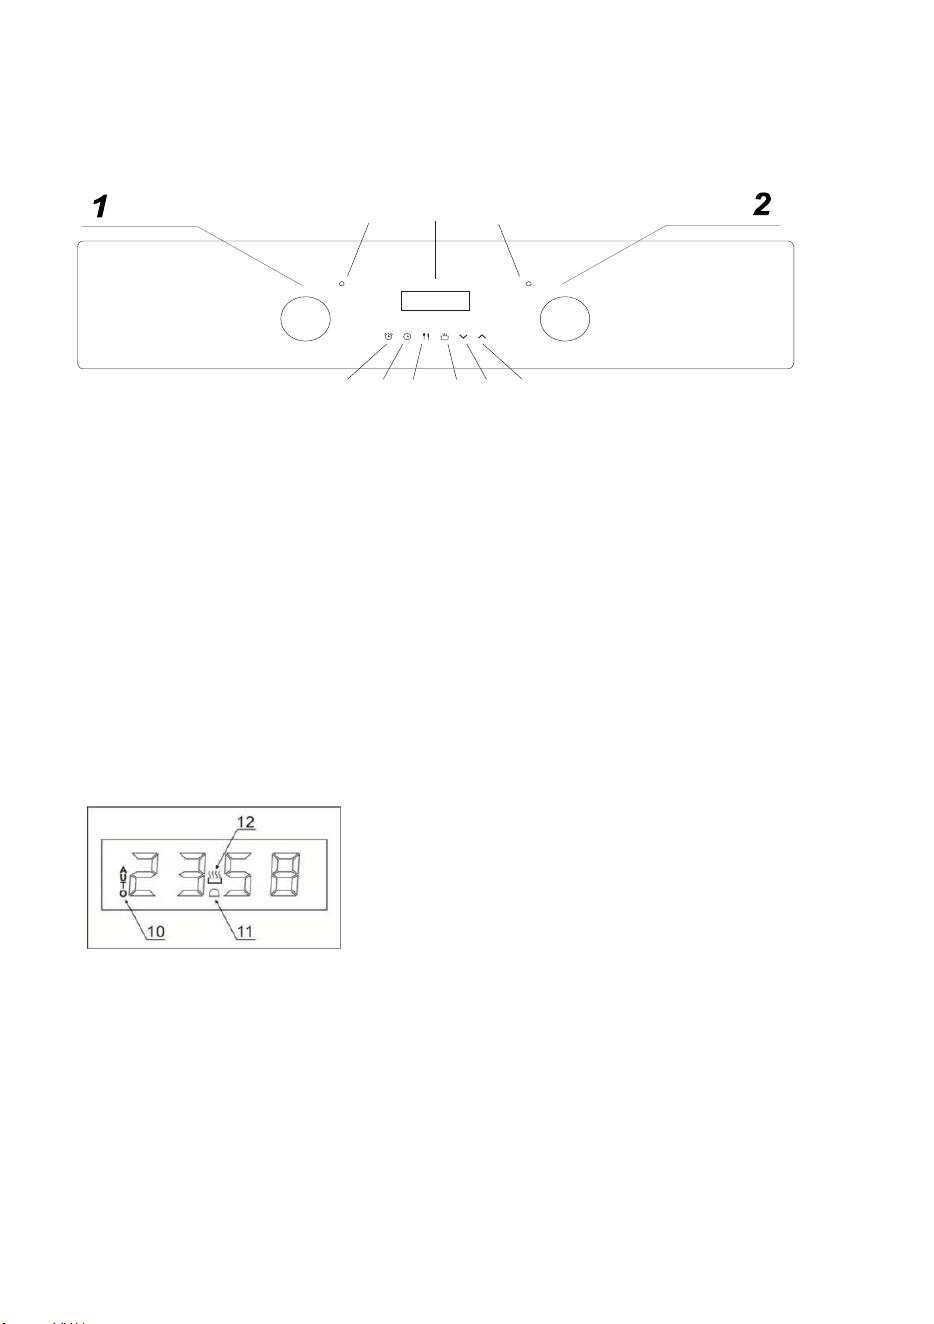
Control Panel
1) Oven function selector knob
2) Thermostat control knob
3) Minute minder button
4) Duration button
5) End cook button
6) Manual operation button
7) Minus button
8) Plus button
9) LED display
A) Power indicator light
B) Oven operating light
Oven programmer/timer display
10)
Auto function symbol
11)
Minute minder symbol
12)
Manual operation symbol
Setting and using the oven programmer/timer
Selecting manual operation mode
After your appliance is connected to your mains supply for the first time, the numbers
on the timer display will flash. Before you can select a cooking function or set a
temperature,you must set the appliance into manual operation mode
o To select manual operation mode, press the manual operation button (6)
on the control panel.
Setting clock (the time of day)
After setting your oven for manual operation, you
should also set the time of day.
A
B
9
3 4 5 6 7 8
OPERATION
8

o
After pressing the manual operation button (6), use the minus button (7) and plus
button (8) to adjust the time that appears in the display. After getting the display to the
correct time, release the minus and plus buttons. After a few seconds the time will fix in
the display and you will be able to use your oven.
The oven timer
o
Only the minute minder can be used with the defrost oven function. None
of the other timer modes will work with the defrost function.
Before first use
o
To remove any residue from the oven that may have been left from the
manufacturing process, you should select the fan oven function and set the
thermostat to its maximum temperaturesetting.
o
It is perfectly normal for a smell to be produced during this process.
o
You should make sure that any windows in the room are left open during this
process.
o
It is advisable for you not to remain in the room whilst the burning off
process is taking place.
o
You should leave the oven on maximum setting for 30 – 40minutes.
o
After the oven cavity has cooled, it should then be cleaned with warm soapy
water, using either a sponge or soft cloth. No abrasive cleaners should be used.
o
Outer parts of the oven should be cleaned with warm soapy water, using
either a sponge or soft cloth. No abrasive cleaners should be used.
o
We would recommend that an appropriate stainless steel cleaner and polish is
regularly used on the stainless steel surfaces of this appliance.
Setting the minute minder function
You are able to set the minute minder at any time, regardless of whether an oven
function has been selected. You can set a period of time using the minute minder
function and an alarm will sound when that period of time has elapsed.
o
Press the minute minder button (3), the display will show a value of 00:00.
Set the period of time that you wish the minute minder to countdown for, by using the
minus (7) and plus (8)buttons.
o
Once the display has got to your desired countdown time, let go of the minus
and plus buttons. The minute minder symbol (11) will appear on the timer display.
o
Once a countdown time has been set, it is possible to shorten or lengthen the
time by using the minus or plus buttons.
o
An alarm will sound when the countdown time has elapsed. The alarm can be
silenced by pressing the minute minder button.
o
Important: The oven will continue to heat once the alarm has been silenced. If
you have finished cooking, then you should turn the oven function selector and
thermostat control knob to 0.
Setting the duration function
This function will allow you to set a countdown time similar to the minute minder
function. However the oven will no longer continue to heat, once the countdown period
has elapsed.
Use the thermostat control knob (2) to set the temperature that you require. The manual
o operation symbol (12) will appear on the display.
9

o
Use the oven function selector knob (1) to select the mode of cooking that you
require.
o
It is then possible to set the duration of the cooking time that you require.
o
Press the duration button (4) and the display will show a value of 00:00. Set the
period of the duration function to countdown for,by using the minus (7) and plus (8)
buttons.
o
Once the display has got to your desired countdown time, let go of the minus
and plus buttons. The countdown will start immediately and the word AUTO will appear
on the timer display.
o
Once a countdown time has been set, it is possible to shorten or lengthen the time
by using the minus or plus buttons.
o
An alarm will sound when the countdown time has elapsed and the oven will switch
off. The word AUTO will flash and the heating symbol will disappear. The alarm can be
silenced by pressing the duration button.
o
You will need to return the oven to manual operation mode, once the duration
function has been used. To do this you should press the “manual operation” button, the
word AUTO will disappear from the display and the manual operation symbol will
appear instead.
o
Important: If you do not turn the thermostat control knob and oven function selector
knob to 0, then the appliance will continue to operate as soon as you press the manual
operation button.
Setting the end cook function
This function is similar to the duration function, however instead of selecting a period
of time that you wish the oven to switch off after. You select the time of day that you
wish the oven to switch off at.
o
Use the thermostat control knob (2) to set the temperature that you require. The
manual operation symbol (12) will appear on the display.
o
Use the oven function selector knob (1) to select the mode of cooking that you
require.
o
Press the end cook button (5) and the display will show a value of 00:00. Set the
time of day that you wish the oven to stop cooking at by using the minus (7) and plus
(8) buttons. The timer will calculate how long the cooking time will be, based on the time
of day that you have selected and show it on the display.
o
Once the display has got to the time of day that you want the oven to stop
cooking at, let go of the minus and plus buttons. The countdown will start immediately and
the word AUTO will appear on the timer display.
o
When the time is set, it can be modified by pressing the minus and plus buttons.
o
When the time of day reaches the end of cooking time that you set, the oven will
switch off and an alarm will sound. The word AUTO will flash and the heating symbol will
disappear. The alarm can be silenced by pressing the end cook or duration button.
o
You will need to return the oven to manual operation mode, once the start and end
time function has been used. To do this you should press the manual operation button, the
word AUTO will disappear from the display and the manual operation symbol will appear
instead.
o
Important: If you do not turn the thermostat control knob and oven function selector
knob to 0, then the appliance will continue to operate as soon as you press the manual
operation button.
10
11
Caution!
At this oven function knob position,
wh
e
n setting the temperature regula-
to
r to a position other than zero,the
re
d light may go on,although the oven
is not being warmed up.
as well as the temperature regulator knob
-to
set a required function you should turn
the knob to the selected position.
The
oven can be switched off by setting both of
these knobs to the position “●”/”○”.
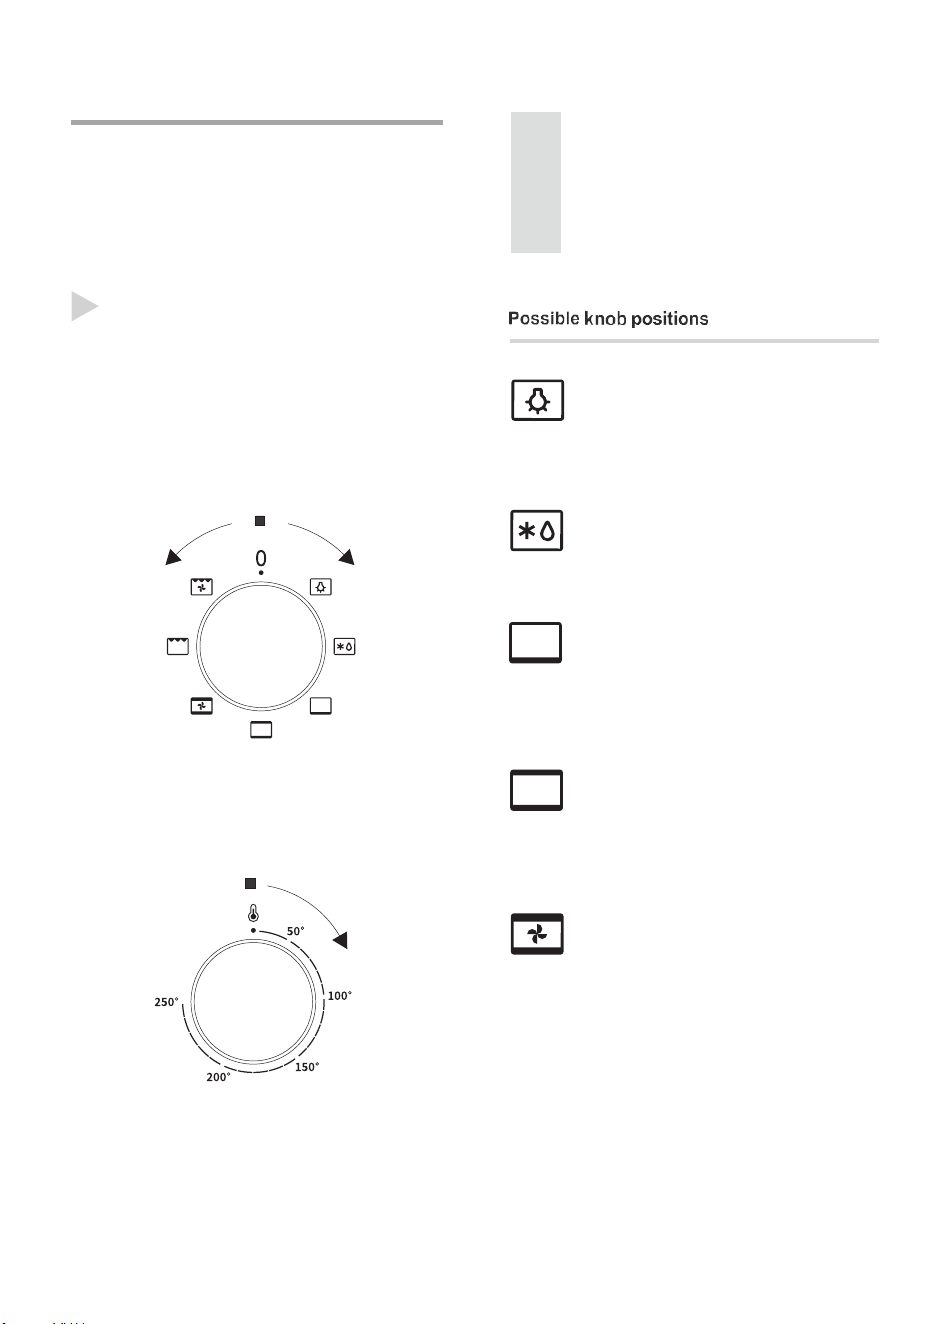
Separate oven lighting
By setting the knob to this posi-
tion,the lighting inside the oven is
switched on.Use,for example,when
washing the oven chamber.
Defrosting
This function allows all frozen foods
to be rapidly and delicately thawed
thanks to the internal fan.
Bottom heater on
When the knob is set to this position
the oven is heated using only the
bottom heater. Use for e.g. final
baking from the bottom.
Bottom and top heaters on
setting the konb to this position
allows the oven to be heated
conventionally.
Fan , bottom and top heaters
on At this knob position the
oven ex
ecutes the cake
function . Con-ventional oven
with a fan.
Oven on and off
set required working conditions of the
oven,it’s temperature and a mode of heating.
Set the knob to the required position,turning
it right.
!
!
Inordertoswitchontheovenyouneed to:
Oven functions and operation.
Natural convection oven
(conventional)
The oven can be warmed up using the
bottom and top heaters. Operation of the
oven is controlled by the oven function
knob-to set a required function you should
turn the knob to the selected position.

12
Caution!
When selecting any heating
function(switching a beater on
etc.) the over will only be
switched on after the
temperature has been set by
the temperature regulator knob.
Switching on the oven is indicated by
two signal lights, yellow and red,
turning on.The yellow light, turned on
means the oven is work- ing . If the red
light goes out, it means the oven has
reached the set temperature, If a
recipe recommends placing dishes in a
warmed-up oven , this should be not
done before the red light goes out for
the first time .When baking, the red
light will temporarily come on and go
out (to maintain the temperature inside
the oven). The yellow signal light may
also turn on at the knob position of
“oven chamber lighting”.
Combined grill
(Grill and the top heater)
When the “combined grill” is active it
enables grilling with the grill and with
the top heater switched on at the
same time. This function allows a
higher temperature at the top of the
cooking area,which causes more
intense browning of the dish and
permits larger portions to be grilled.
Fan and combined grill on. When
the knob is turned to this position,the
oven activates the combined grill and
fan function. in practice,this function
allows the grilling process to be
speeded up and an improvement in
the taste of the dish,You should only
use the grill with the oven door shut.

13
By ensuring proper cleaning and mainte-
nance of your cooker you can have a sig-
nificant influence on the continuing fault-free
operation of your appliance.
Before you start cleaning ,the cooker must
be switched off and you should ensure
that all knobs are set to the “ ● ” / ”0” posi-
tion. Do not
start cleaning until the cooker
has completely cooled.
Caution ! The sharp blade should always
be protected by adjusting the cover (just
push it with your thumb).Injuries are
possible so be careful when using this
instru-ment-keep out of reach of reach of
children.
! Appropriate light cleaning or washing
products are recommended, such as e.g.
any kind of liquids or emulsions for fat
removal. In particular, special cleaning
products such as COLLO Luneta, Sidol
Stahlglanz ,Stahl-Fix for washing and
cleaning and Cera Fix for maintenanc are
recommended. If the recommended products
are not available, it is advisable to use a
solution of warm water with a little washing-
up liquid or cleaning products for stainless
steel sinks.
Caution!
Do not use cleaning products
contain- ing abrasive materials
for the cleaning and maintenance
of the glass front panel.
! steam cleaning:
-pour 250ml of water(1 glass)into a bowl
placed in the oven on the first level from
the bottom,
-close the oven door,
-set the temperature knob to 50℃ ,and
the function knob to the bottom heater
position,
-heat
the oven chamber for
approximately 30 minutes,
-open the oven door, wipe the
chamber inside with a cloth or sponge
and wash us- ing warm water with
washing-up liquid. Caution! Possible
moisture or water residues under the
cooker can result from steam cleaning.
! After cleaning the oven chamber wipe
it dry.
CLEANING AND MAINTENANCE
14
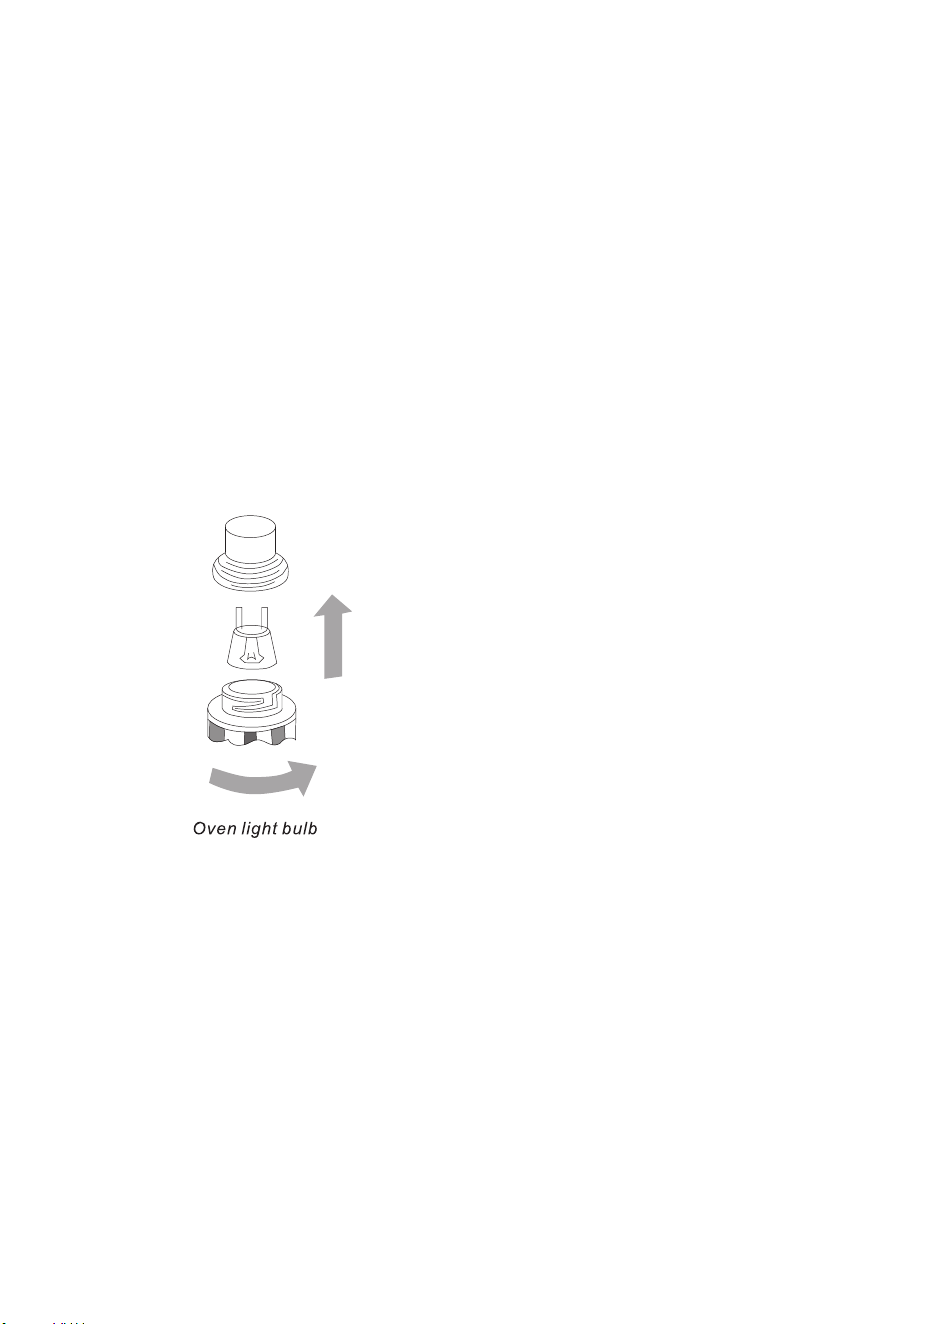
Replacement of the oven light bulb
In order to avoid the possibility of an
electric shock ensure that the appliance
is switched off before replacing the bulb.
! Set all control knobs to the position”●”/”0” and
disconnect the mains plug,
! unscrew and wash the lamp cover and then
wipe it dry.
! unscrew the light bulb from the socket, replace
the bulb with a new one-a high temperature bulb
(300℃ )with the following parameters:
-voltage230 V
-power 25 W
-G9
! Screw the bulb in , making sure it is prop-
erly inserted into the ceramic socket.
! Screw in the lamp cover.
15
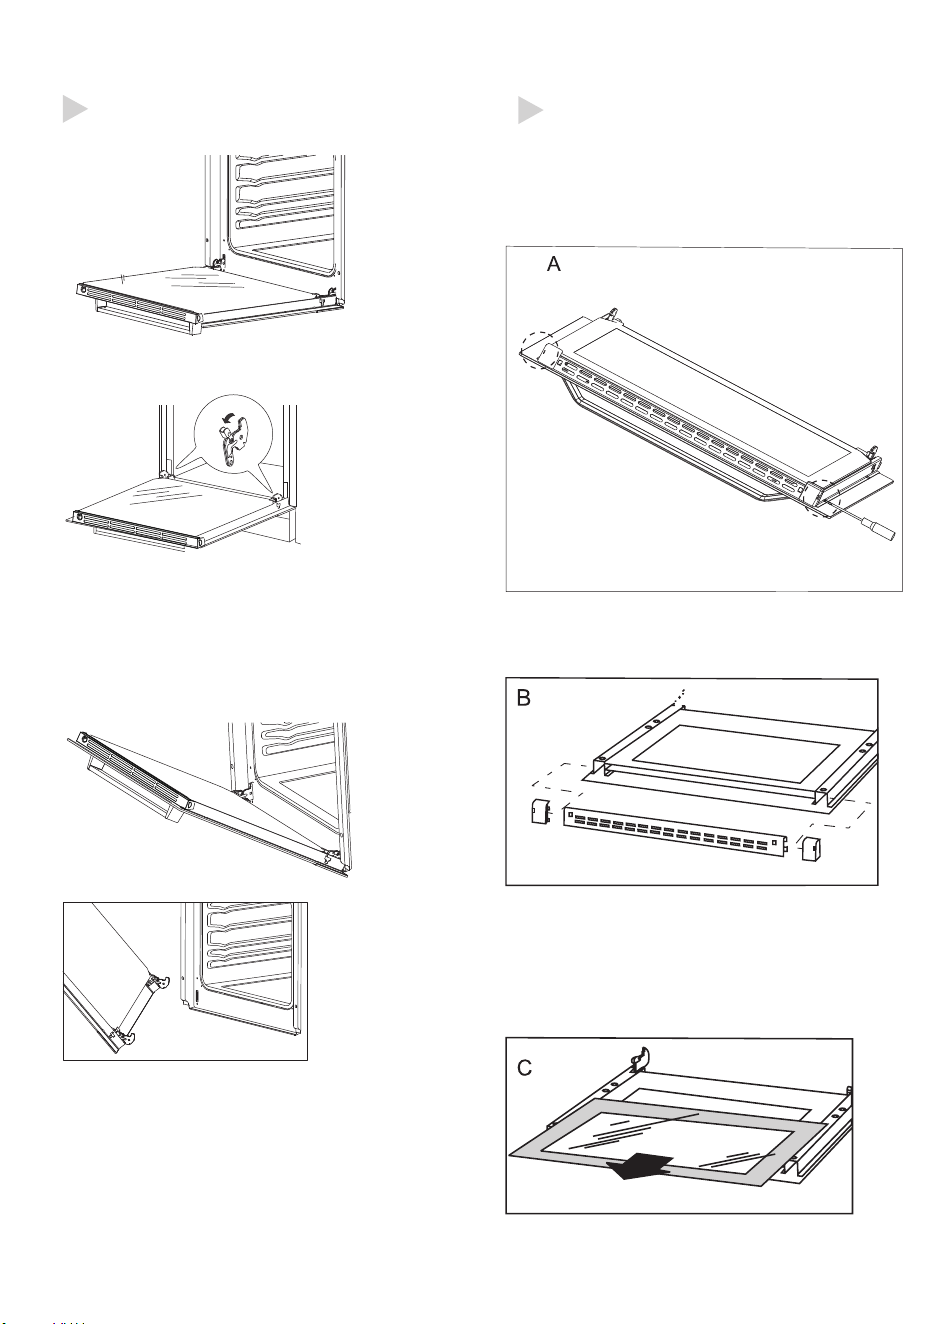
Removing the doors
a. The oven door is fully open。
b. The latch hinges completely lifted。
c. Gently close the oven door until you
hear the sound of engagement, once
they reach a clamping position, with
both hands holding the door and
continue to push, pull up at the same
time so that the hinge bolt removed from
the oven
a.After cleaning, the hinge is aligned
with the oven door latch push until bite
each other
b.The oven door is fully open and fully
push the latch down to its original
position. Oven door installation
Remove the inner glass panel
b.Remove the fixed block and the top
ends of the plastic ventilation grid.
c. The inner glass pulled out from
beneath plastic fixed block. After
cleaning, the inner glass insert the
following plastic fixed block, then install
the above plastic mounting block .
a.Glass door has two plastic fixed
blocks.Use a slotted screwdriver to insert
into the hole of the plastic fixed block and
gently pry it.
16
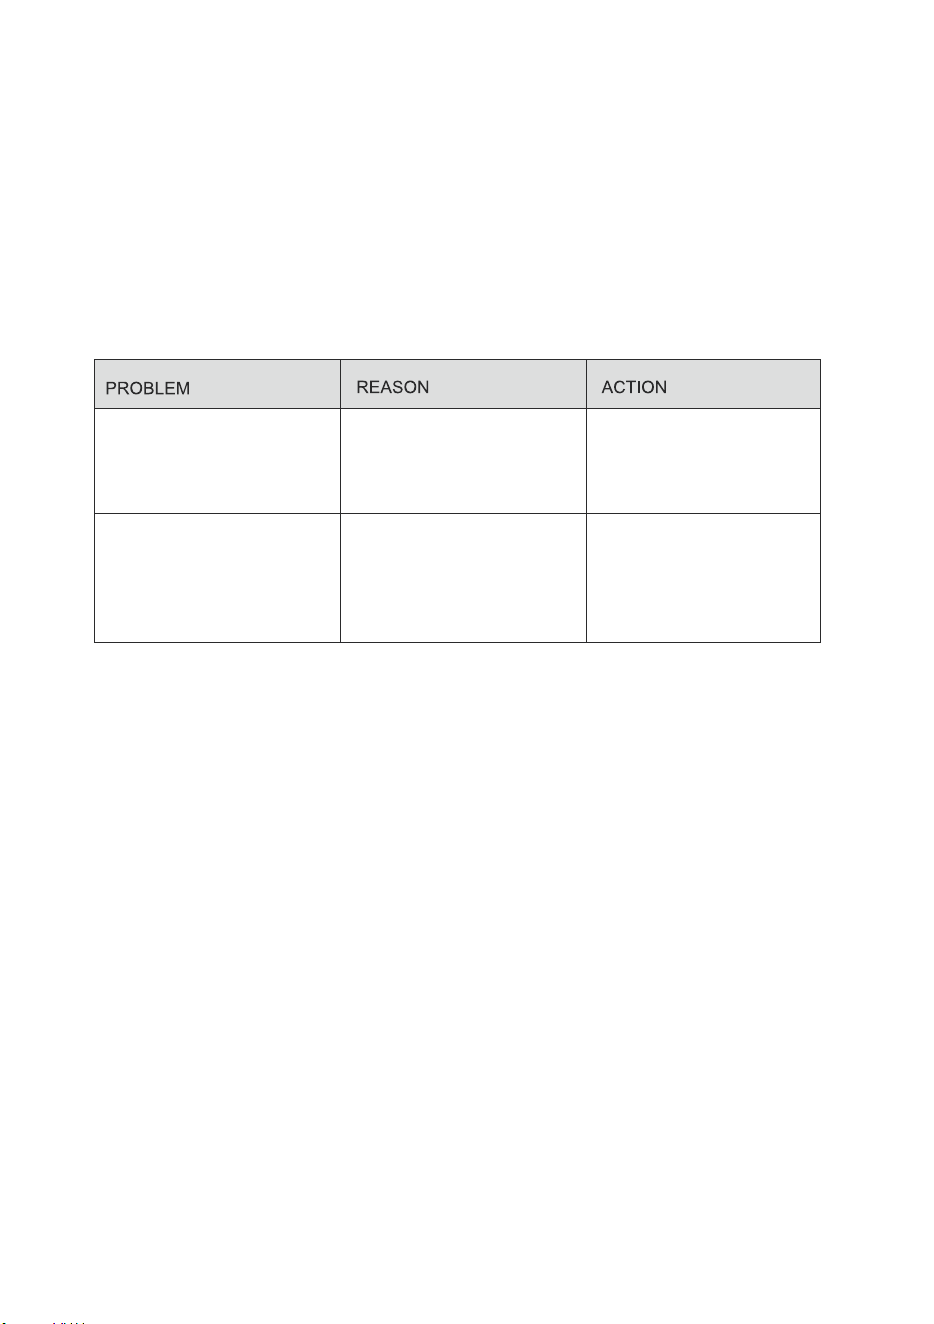
OPERATION IN CASE OF EMERGENCY
In the event of an emergency, you should:
! Switch off all working units of the cooker
! Disconnect the mains plug
! Call the service centre
! Some minor faults can be fixed by referring to the instructions given in the table
The appliance does not
work.
The oven lighting
does not work
Break in power supply
The bulb is loose or
damaged
check the household
fuse box, if there is a
blown fuse replace it
with anew one
Tighten up or replace
the blown bulb (see
chapter Cleaning and
Maintenance)

17
220V-240V~; 50/60Hz
max. 2.9kw
595/ 530/ 595 mm
61 liters
on the energy label
Approx. 28kg
Voltage rating
Power rating
Cooker dimensions W/D/H
Usable capacity of the oven Energy
rating
Weight
TECHNICAL DATA