
Technical Support and E-Warranty Certificate www.vevor.com/support
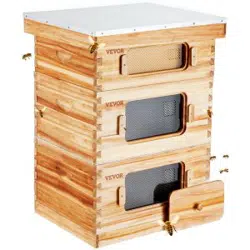
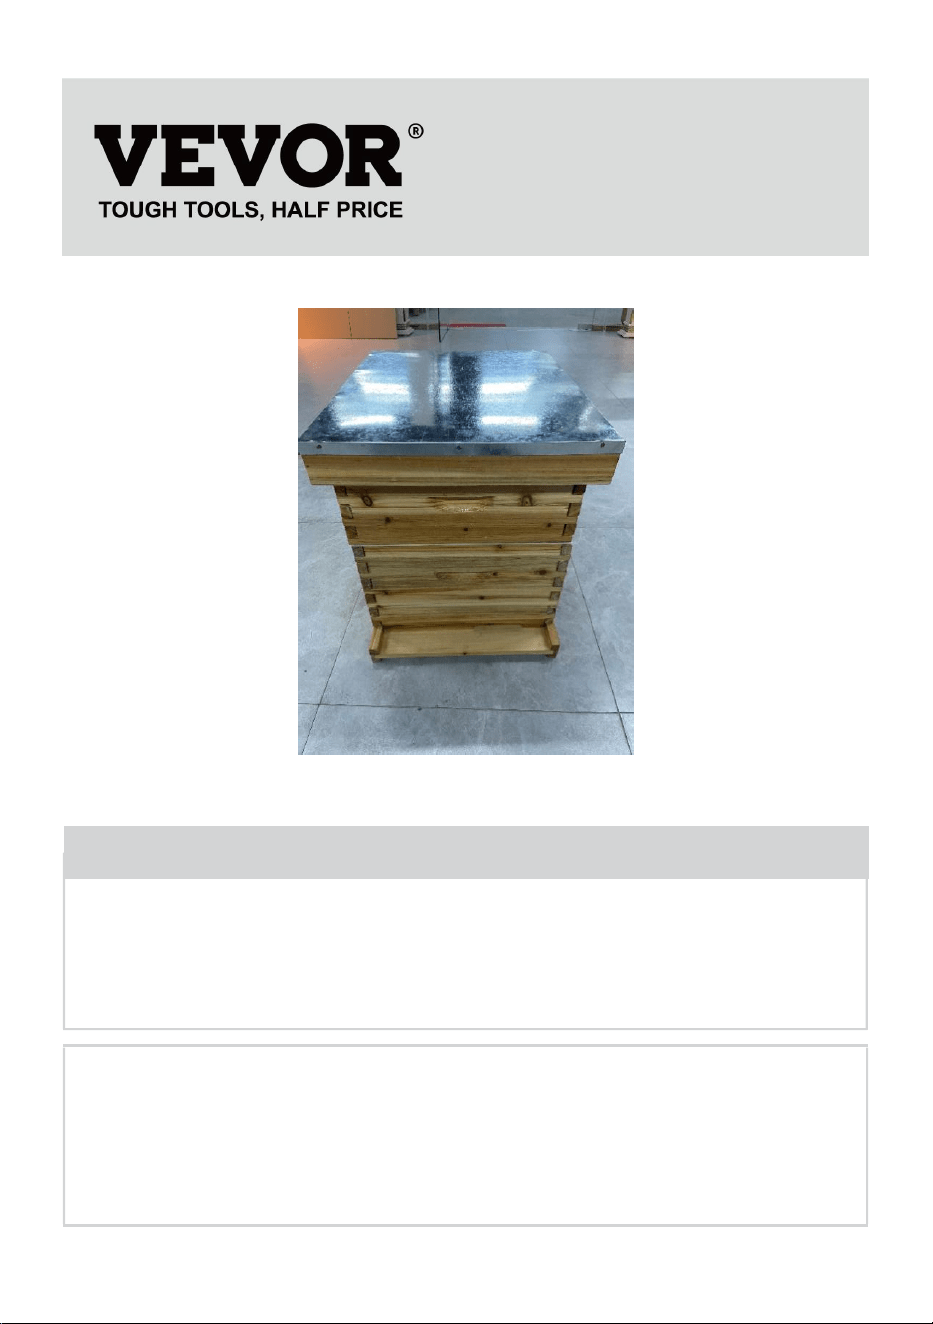
BEE HIVE
MODEL: FX1+1
We continue to be committed to provide you tools with competitive price.
"Save Half", "Half Price" or any other similar expressions used by us only represents an
estimate of savings you might benefit from buying certain tools with us compared to the major
top brands and does not necessarily mean to cover all categories of tools offered by us. You
are kindly reminded to verify carefully when you are placing an order with us if you are
actually saving half in comparison with the top major brands.
- 1 -
MODEL: FX1+1
Have product questions? Need technical support? Please feel free to
contact us:
Technical Support and E-Warranty Certificate
www.vevor.com/support
NEED HELP? CONTACT US!
This is the original instruction, please read all manual instructions
carefully before operating. VEVOR reserves a clear interpretation of our
user manual. The appearance of the product shall be subject to the
product you received. Please forgive us that we won't inform you again if
there are any technology or software updates on our product.
BEE HIVE
- 2 -
Warning-To reduce the risk of injury, user must read instructions
manual carefully.
INSTALLATION NOTES
NOTES:
1. Try to choose hard ground for installation.
2. Prepare installation tools in advance (Rubber hammer and wood).
3. Carefully read this installation manual and confirm the quantity of
accessories according to the list.
MODEL AND PARAMETERS
Model
FX1+1
Product size
562*462*515mm
Cabinet material
Fir wood
Surface treatment
Wax boiling process
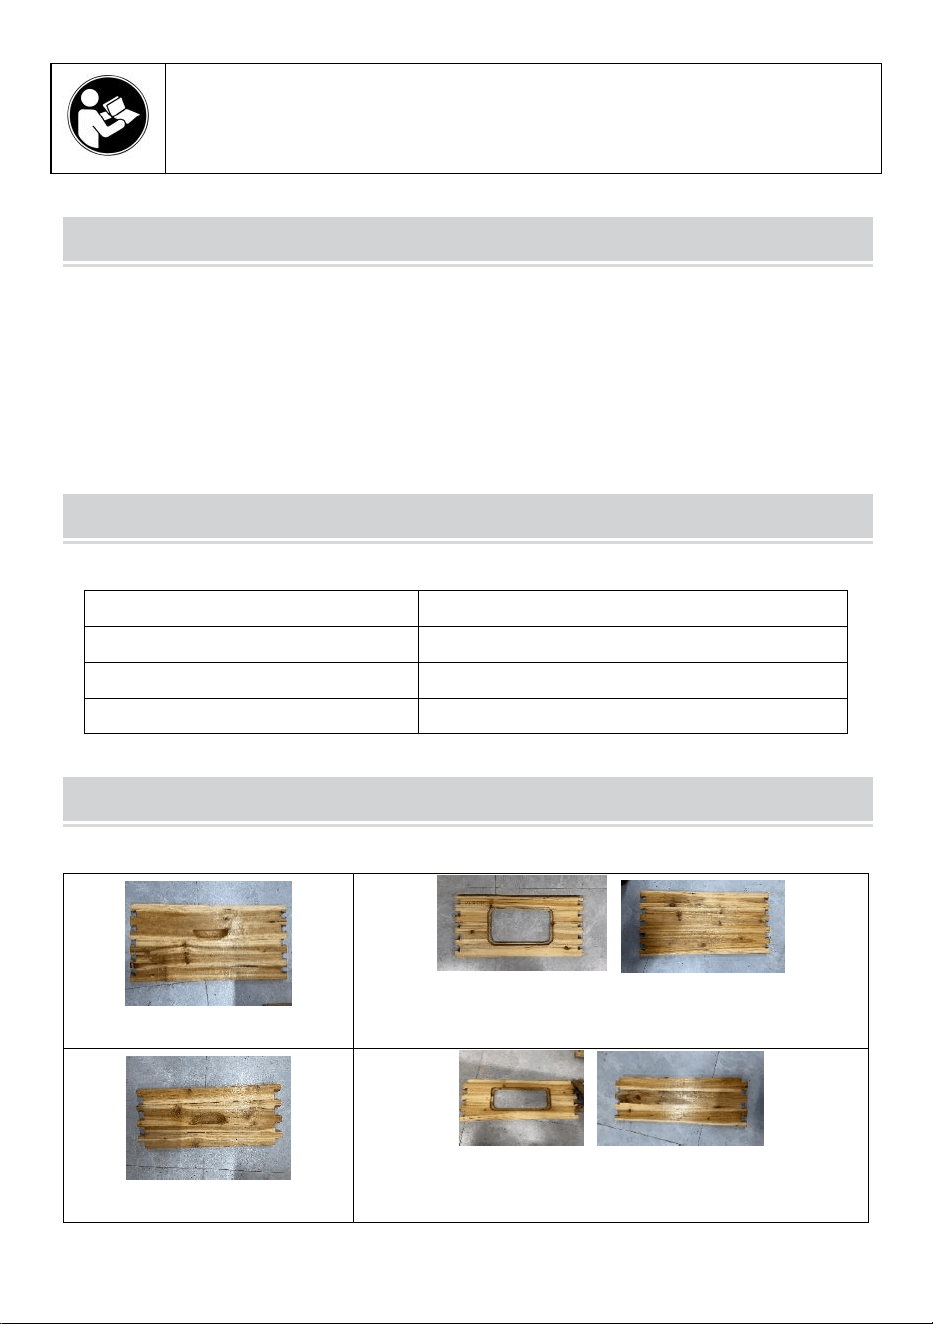
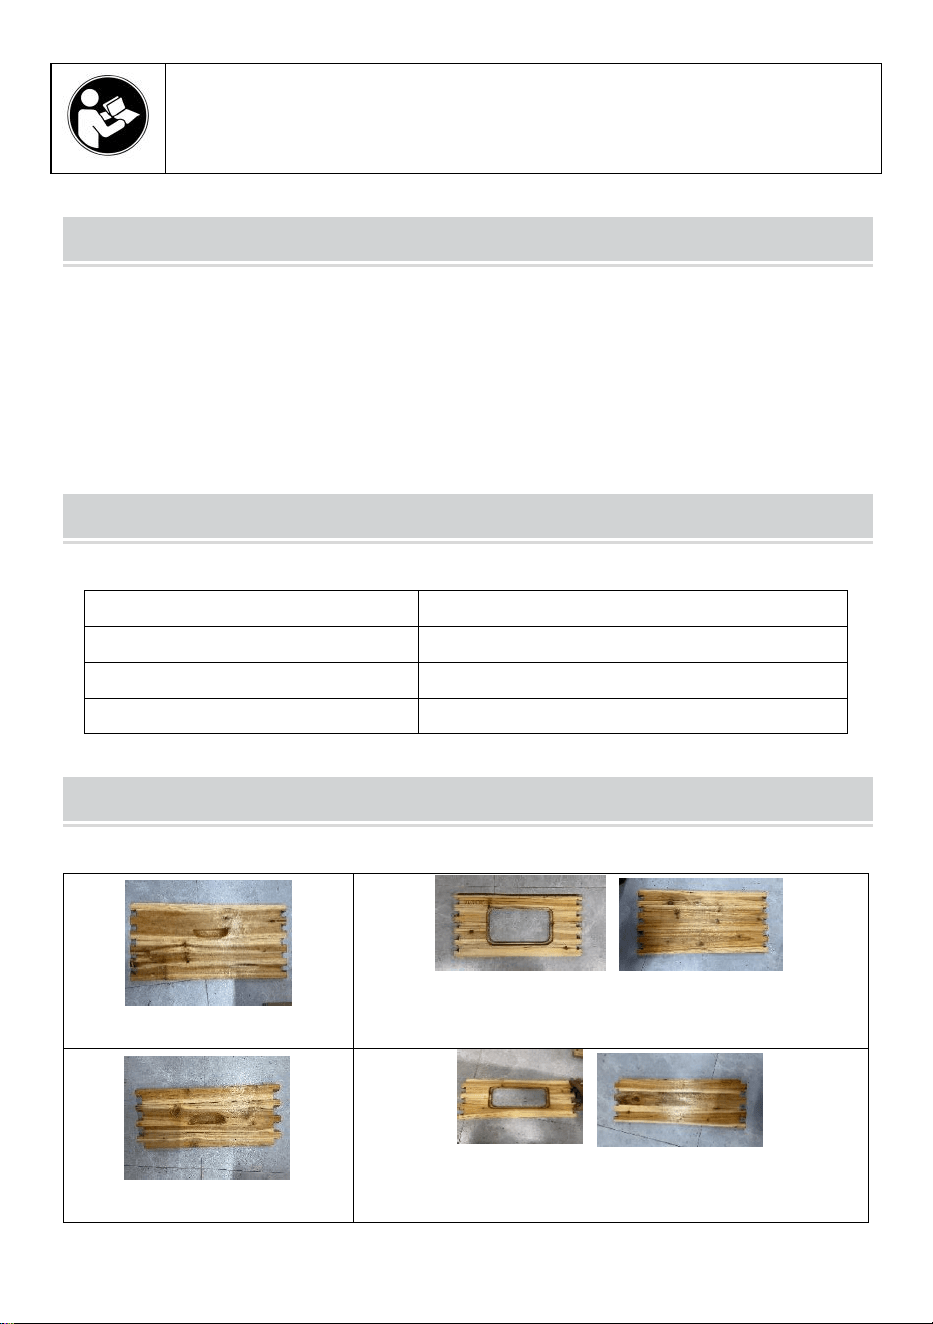
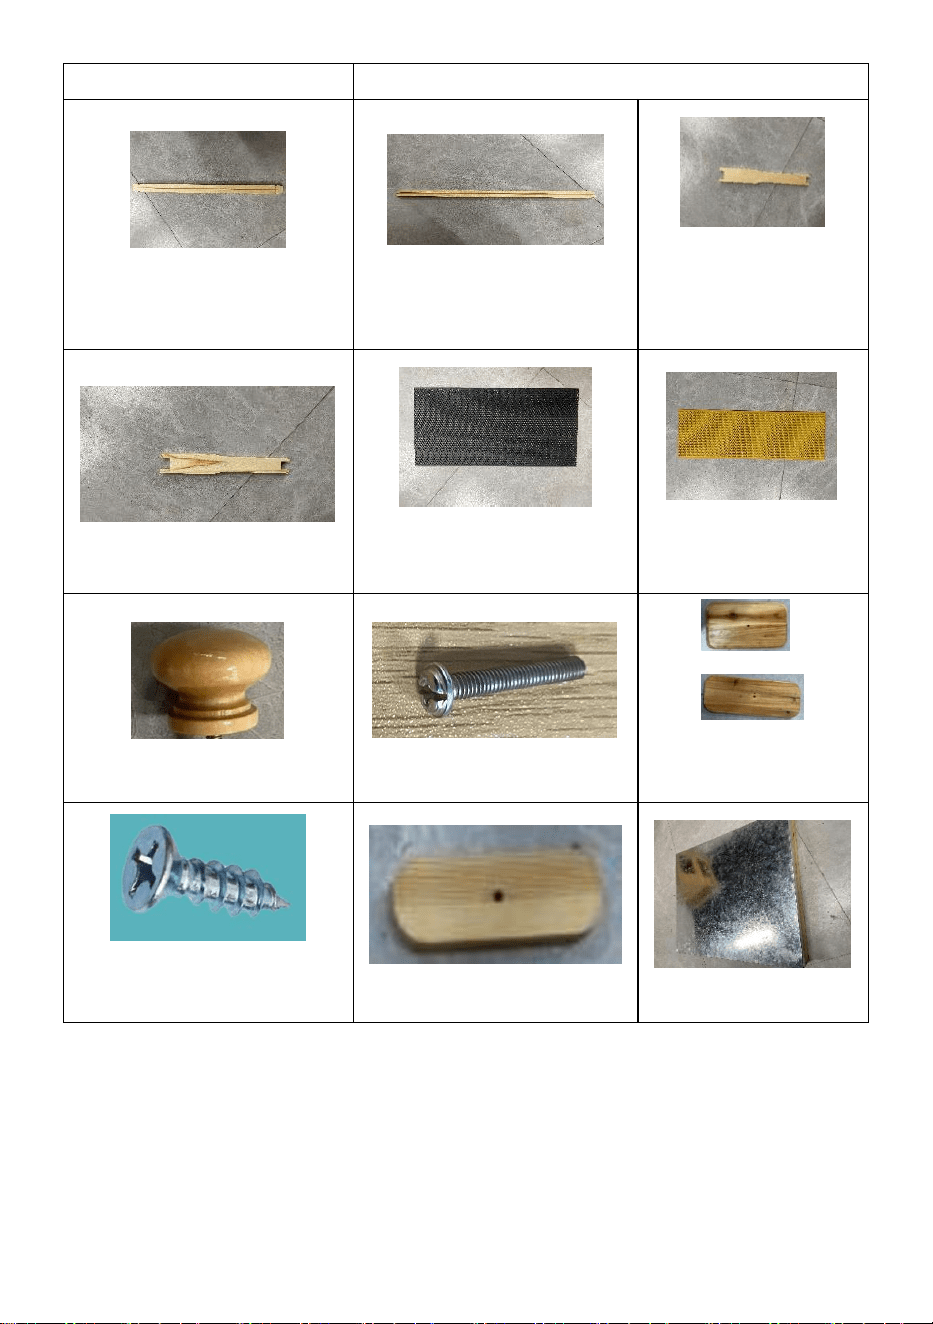
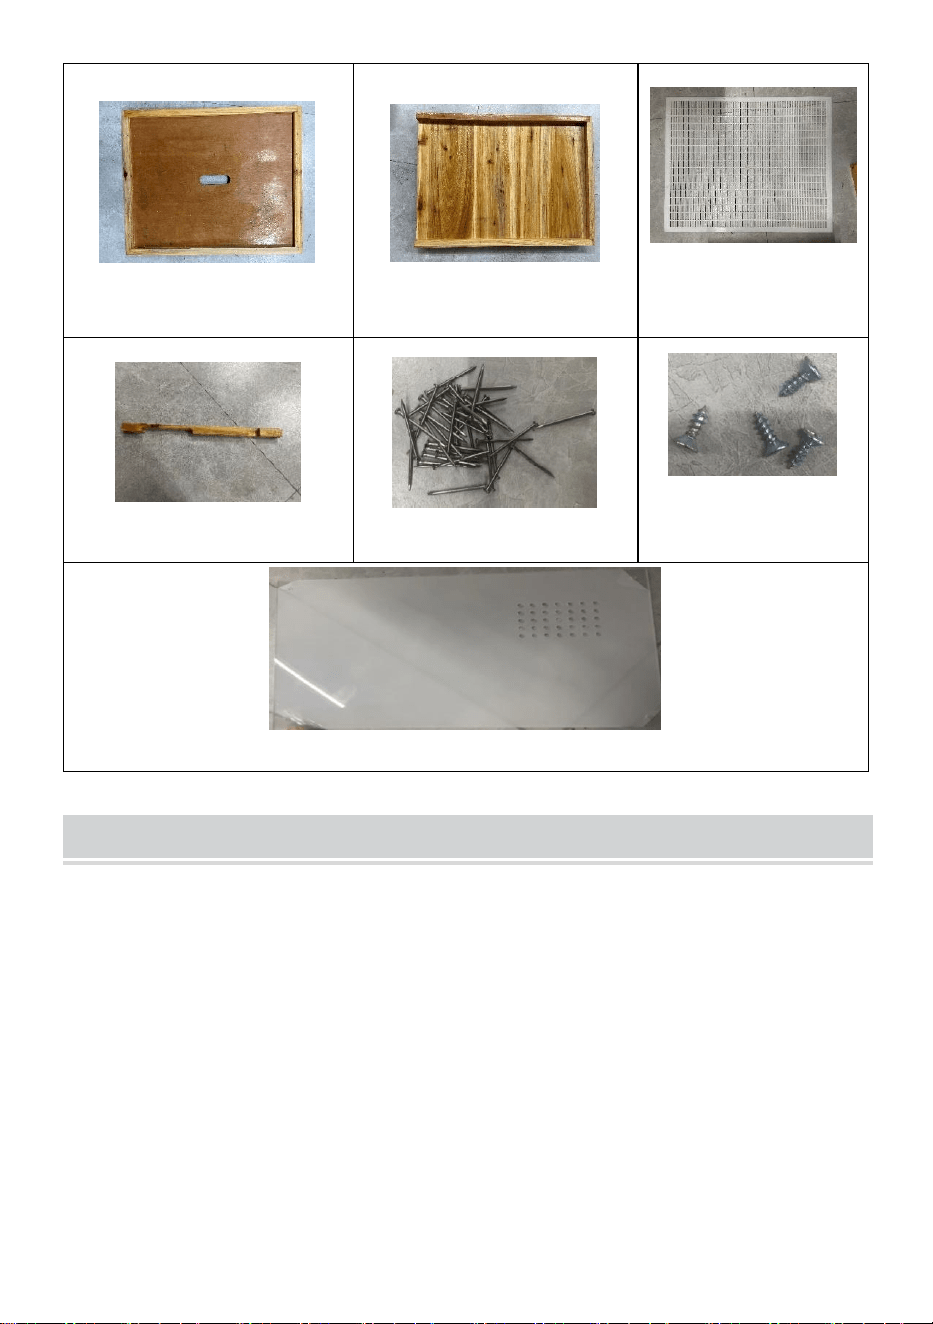
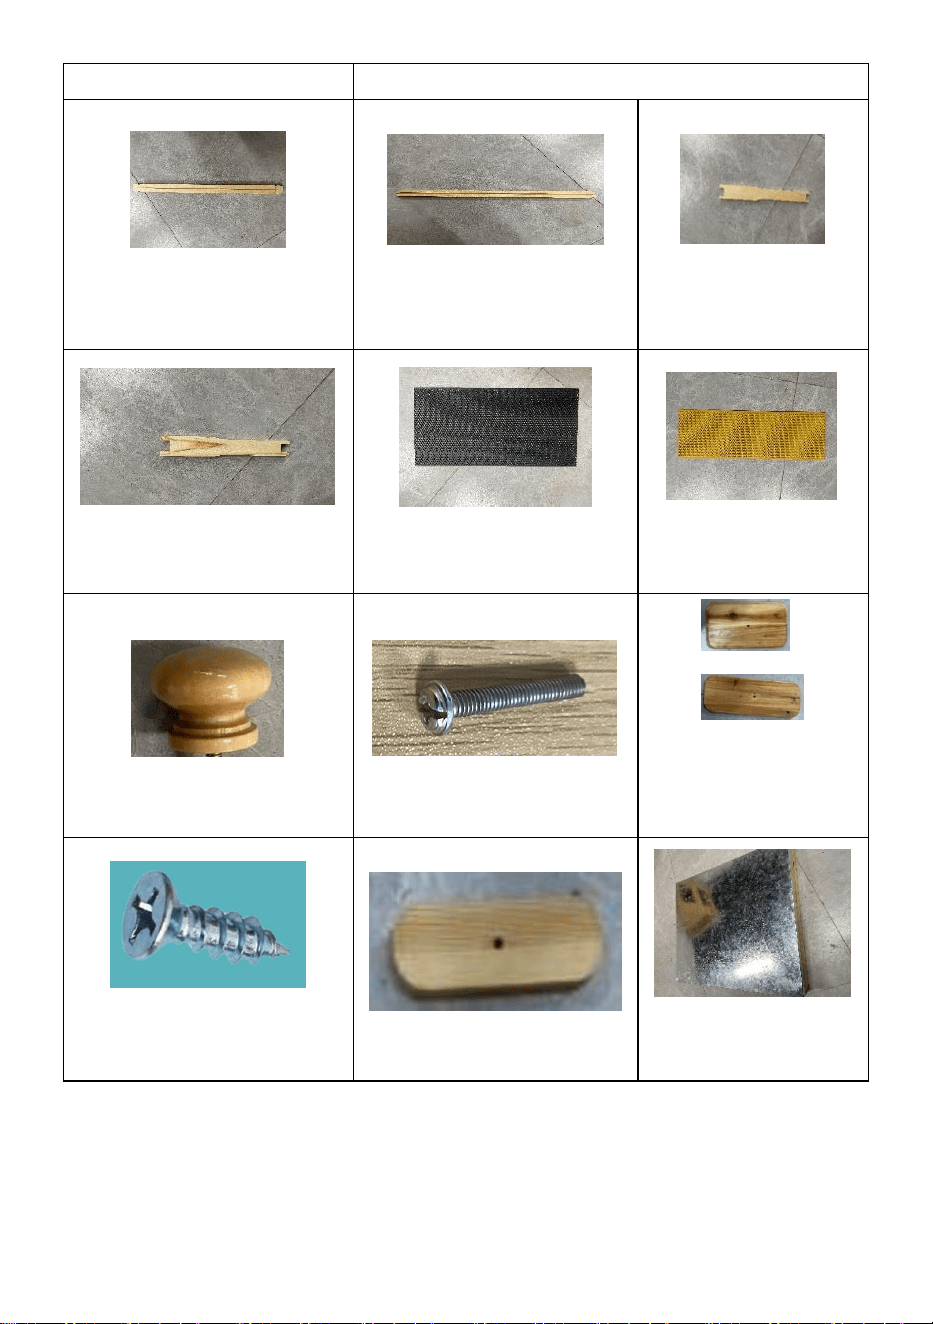
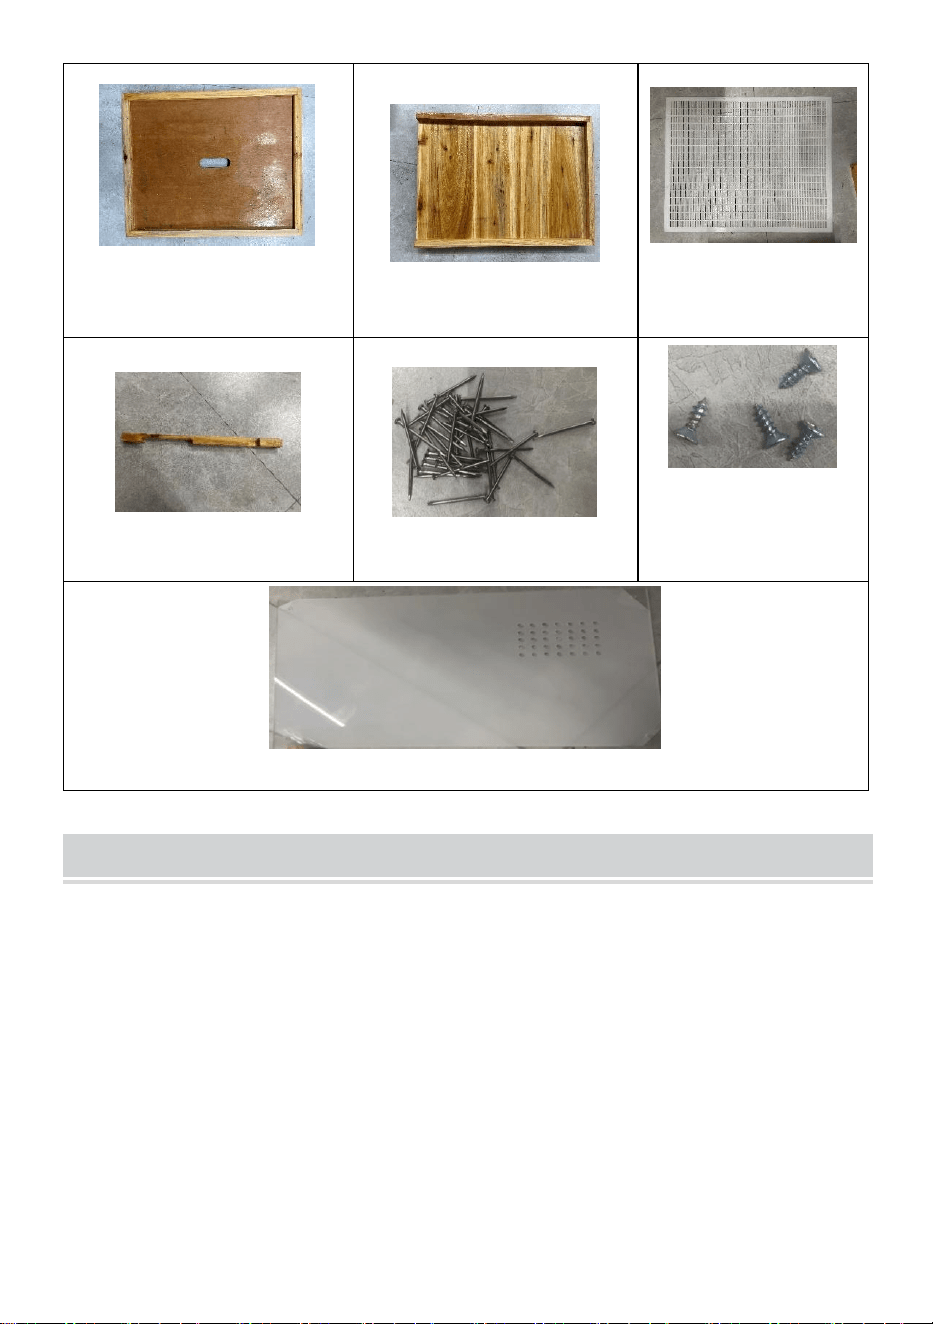
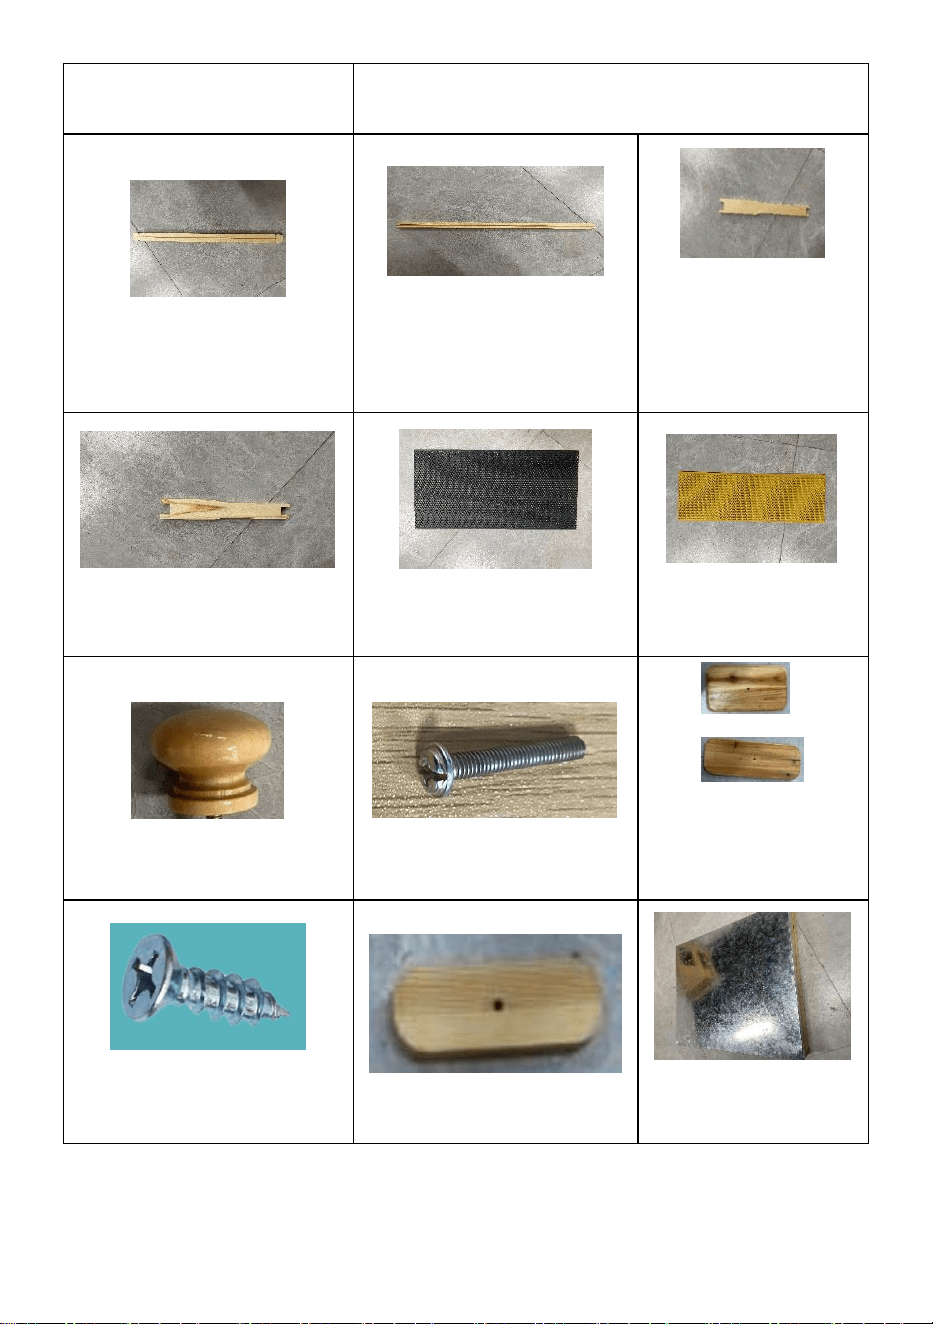
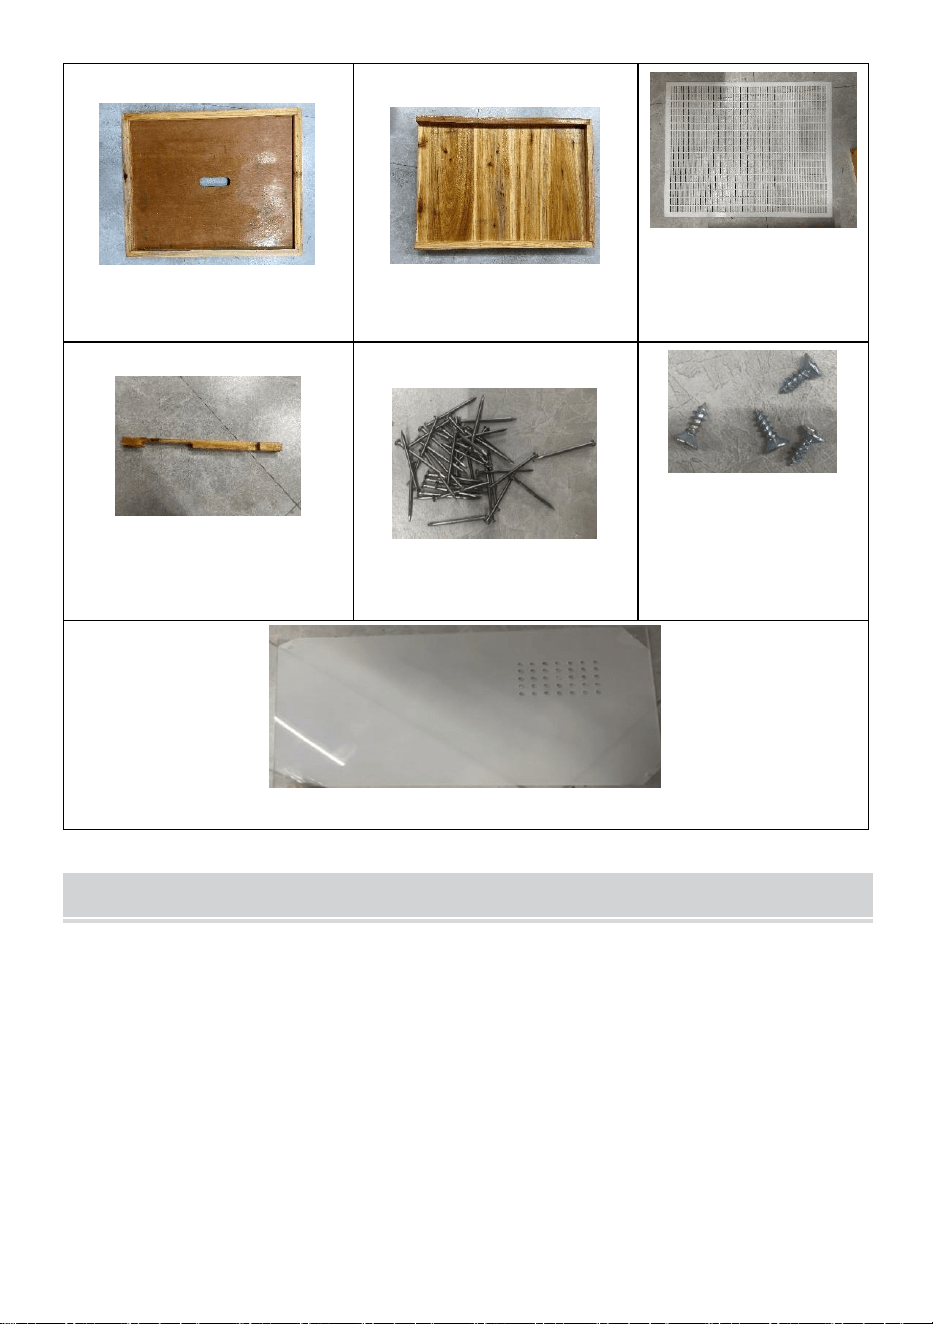
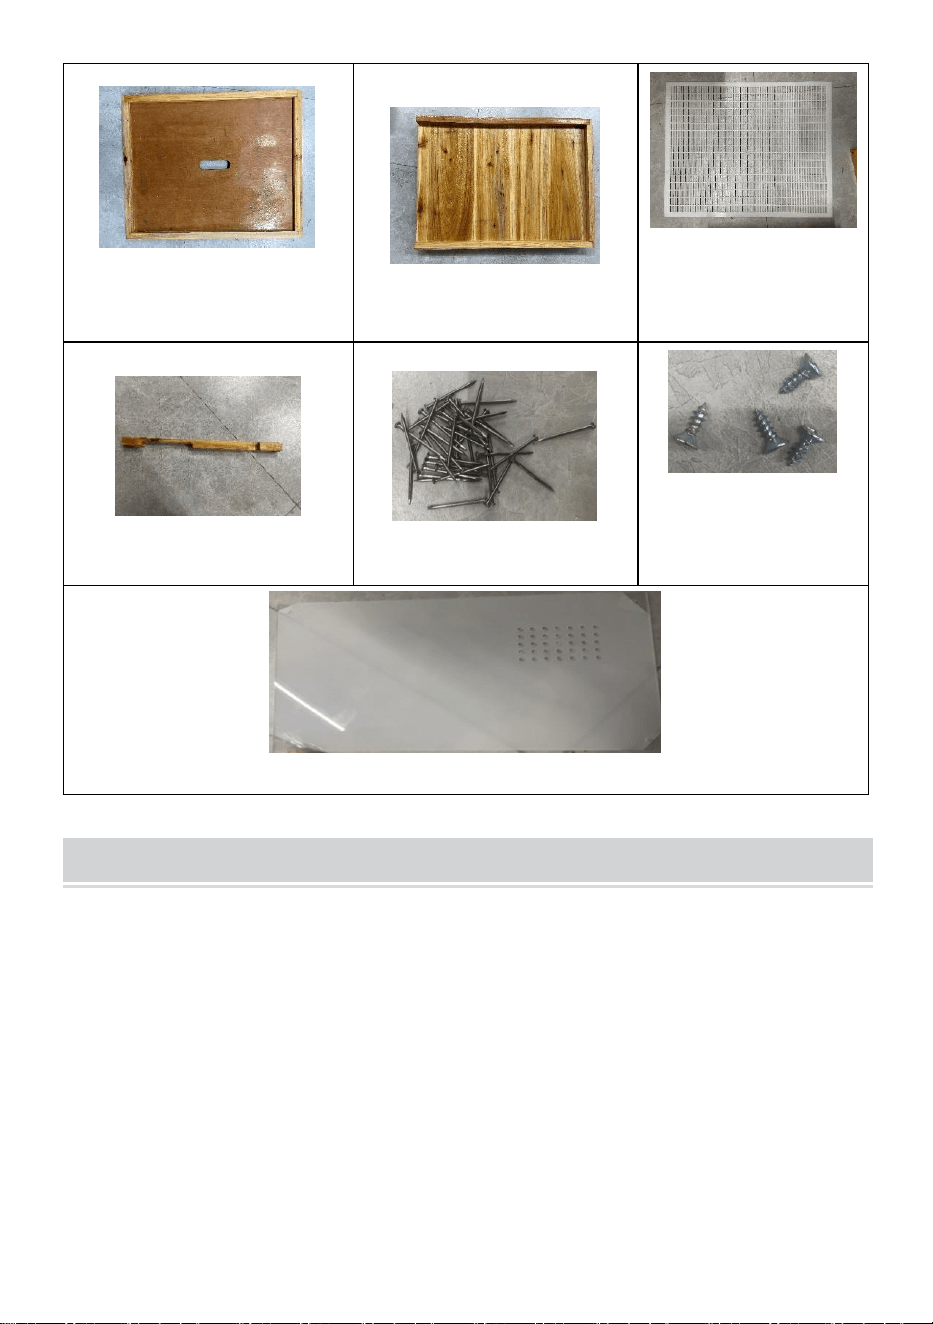
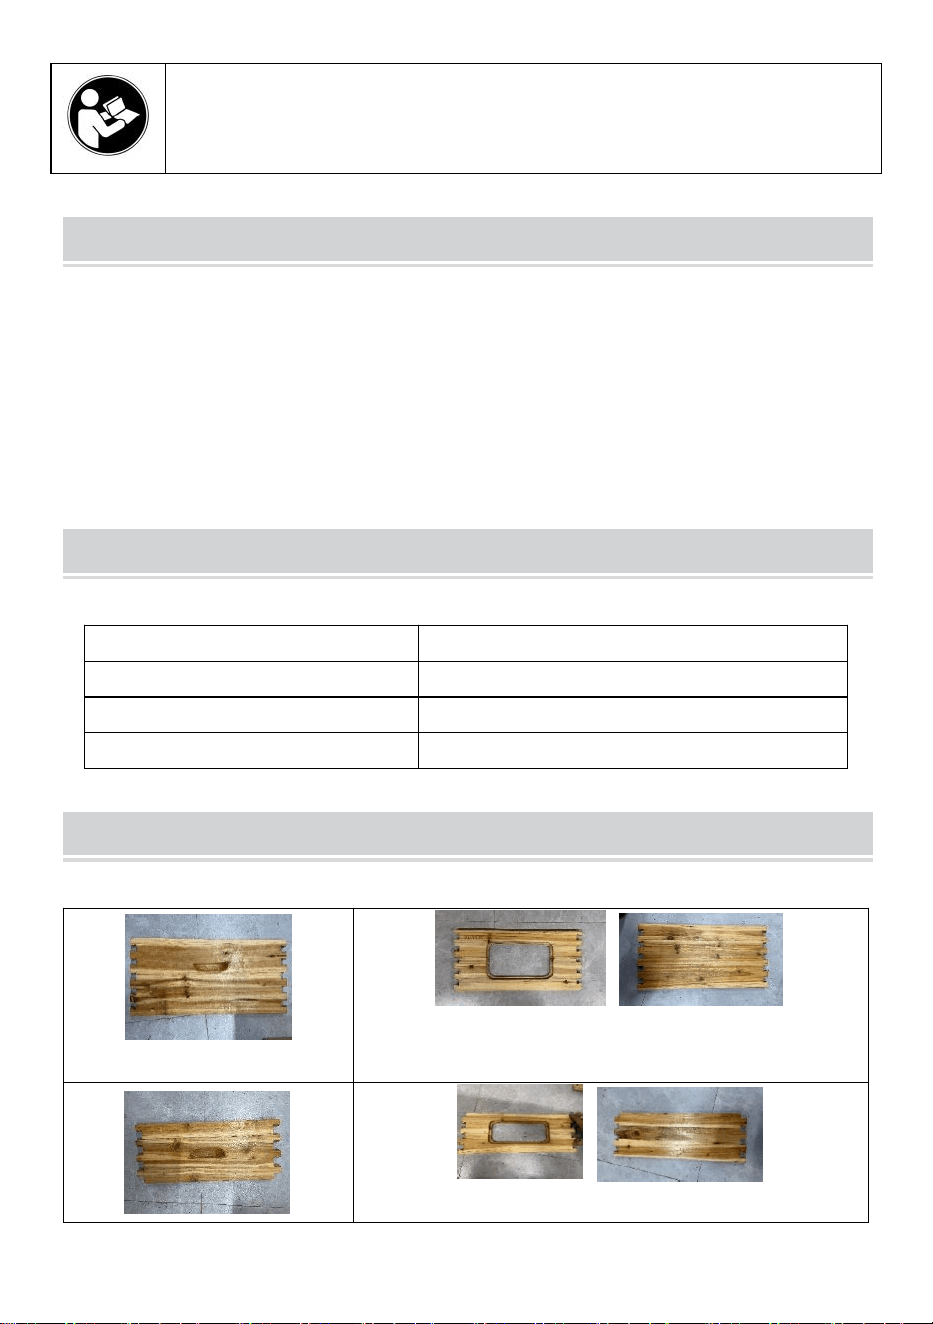
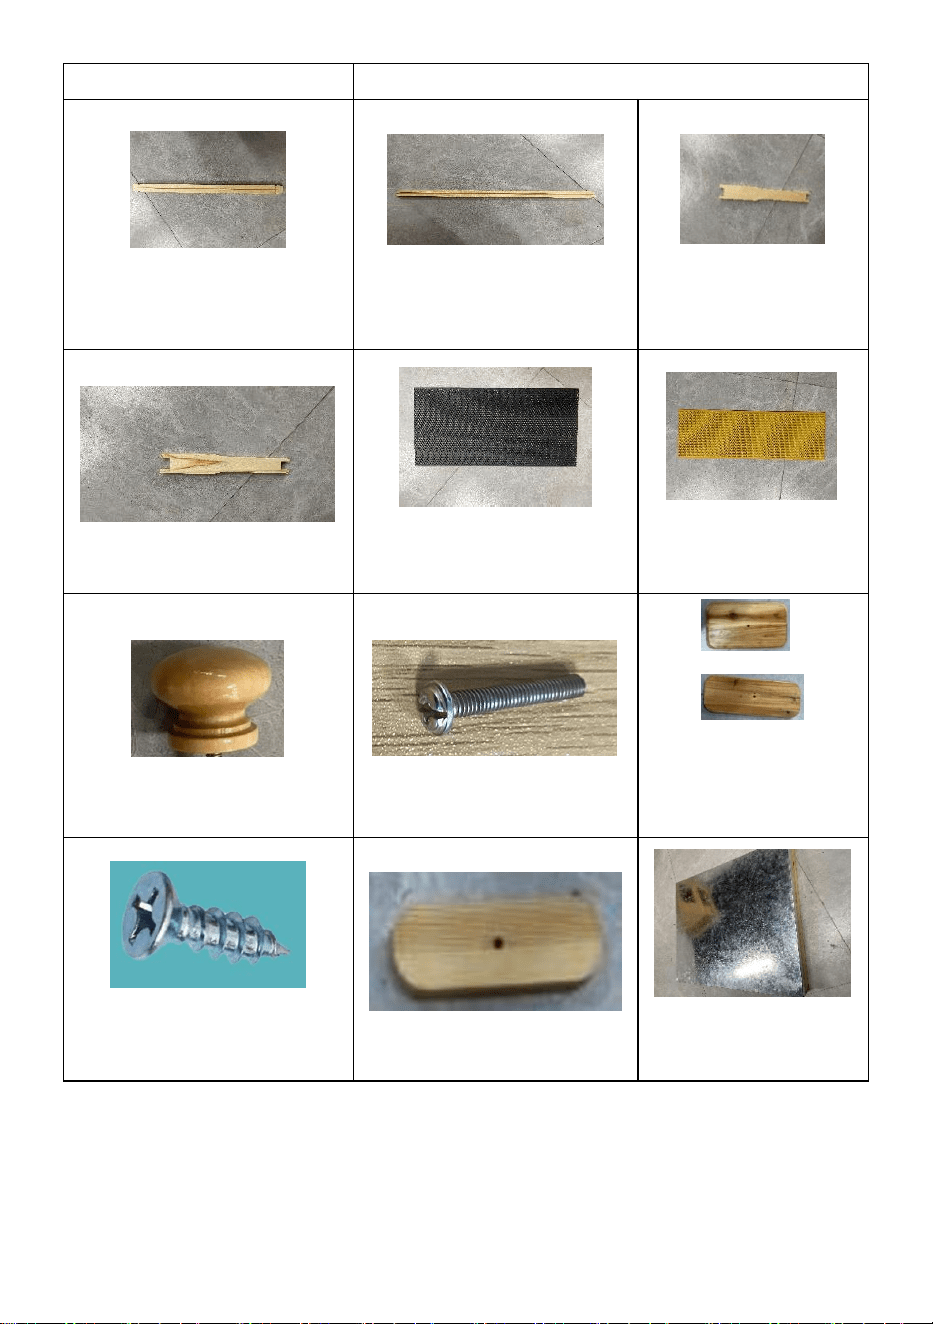
COMPONENTS
A1 240 Coaming 1(×2)
+
B1-1 B1-2
B1 240 Coaming 2(×2)
A2 170 Coaming 1(×2)
+
B2-1 B2-2
B2 170 Coaming 2(×2)
- 3 -
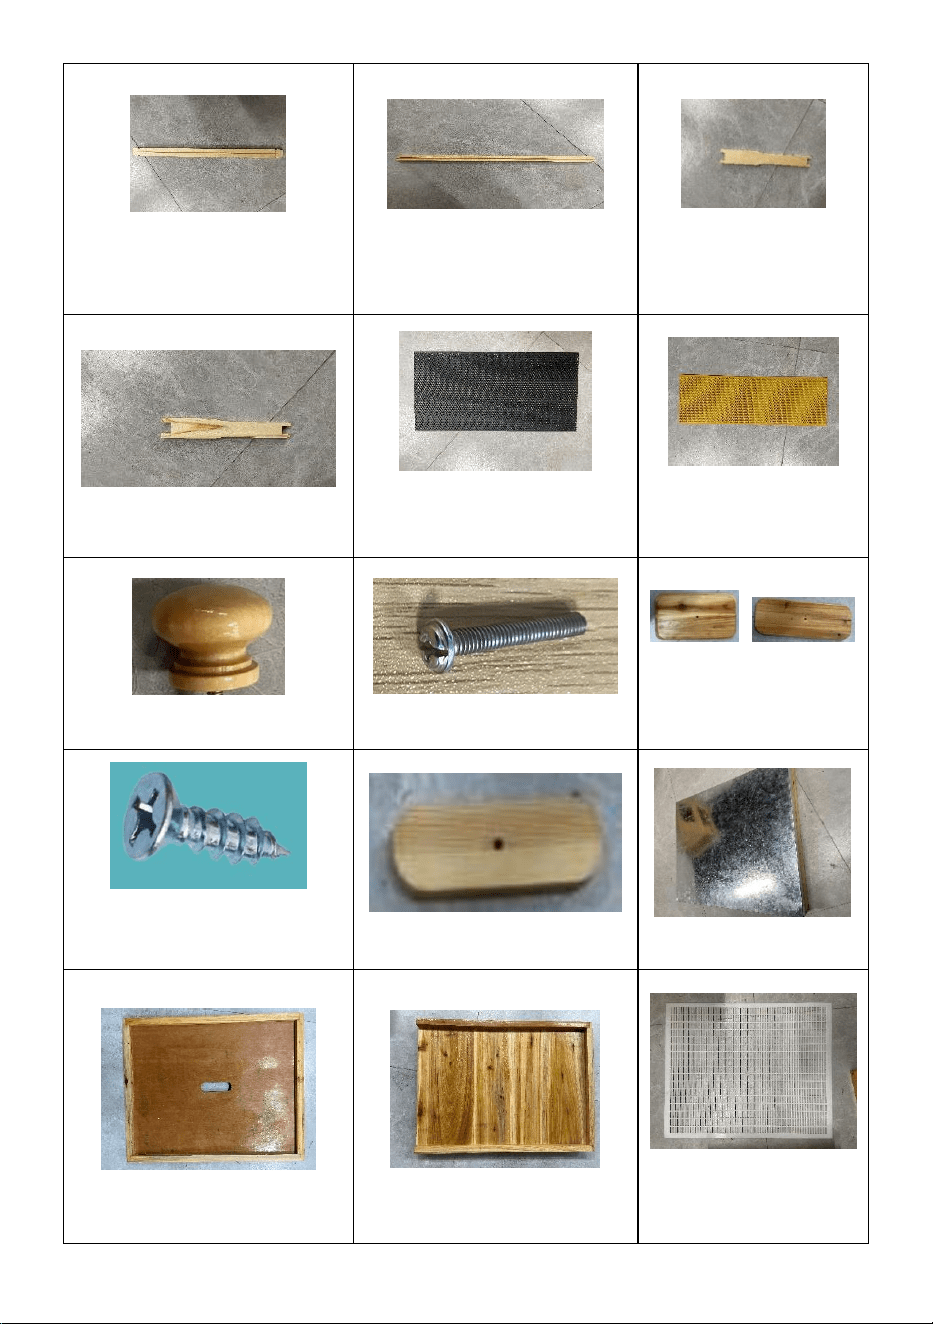
C 170/240 Main
frame bar 1(×20)
D 170/240 Main frame bar
2(×20)
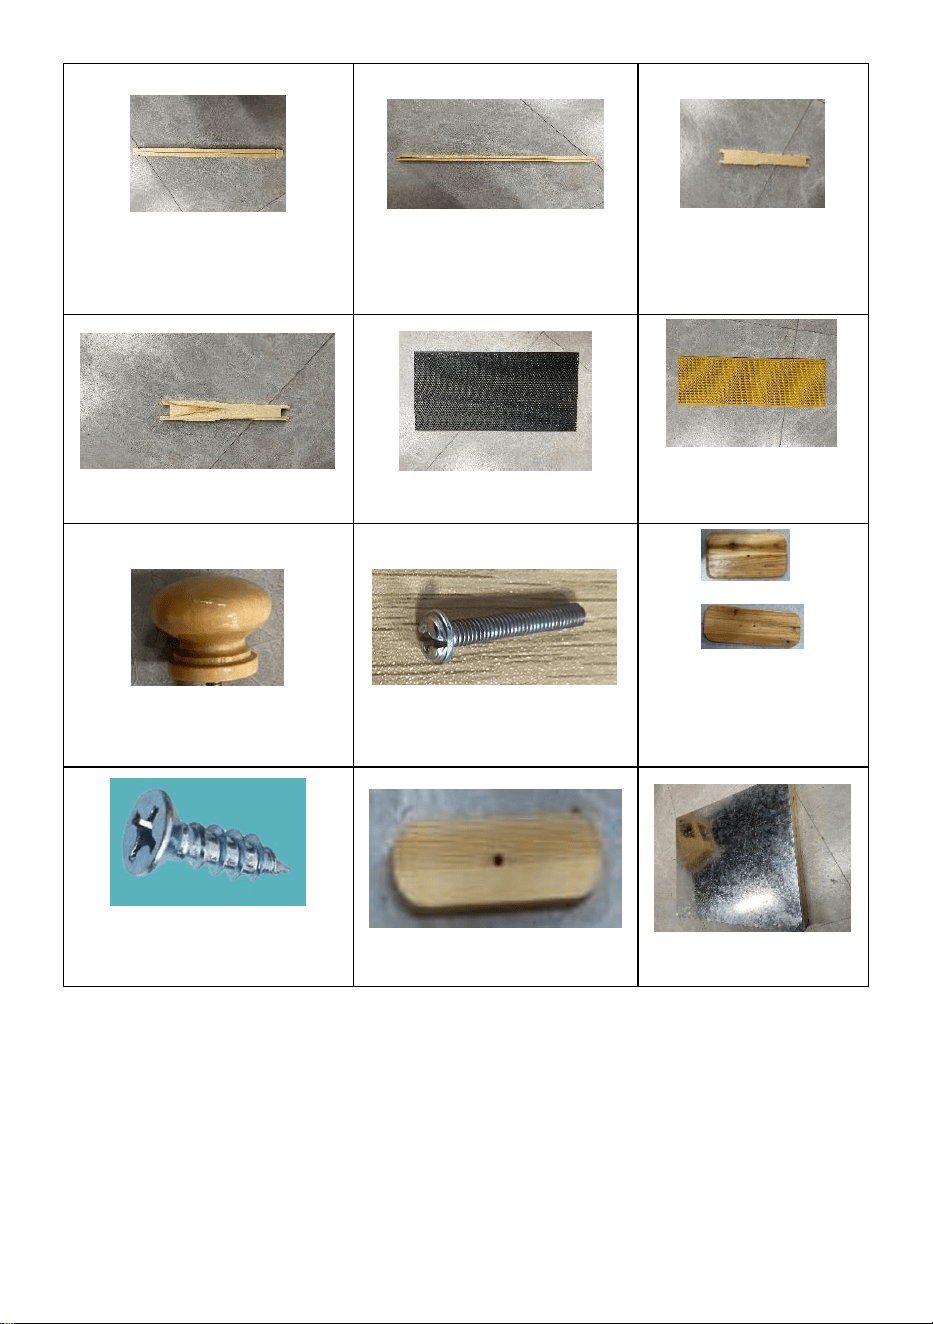
E1 240 Frame bar
(×20)
E2 170 Frame bar (×20)
F1 240 Foundation sheet
(×10)
F2 170 Foundation
sheet (×10)
G Handle (×2)
H Screw M4x30 (×2)
+
I-1 I-2
I Window pane (×2)
J Self-tapping screw
M4x20 (×4)
K Small plank (×4)
L Top Cover (×1)
M Inner Cover (×1)
N Bottom Board(x1)
O Queen Excluder
(x1)
- 4 -
P Entrance Reducer(x1)
Q iron nails (x80)
R Self-tapping screw
M3x12 (×8)
S Acrylic panel window (x2)
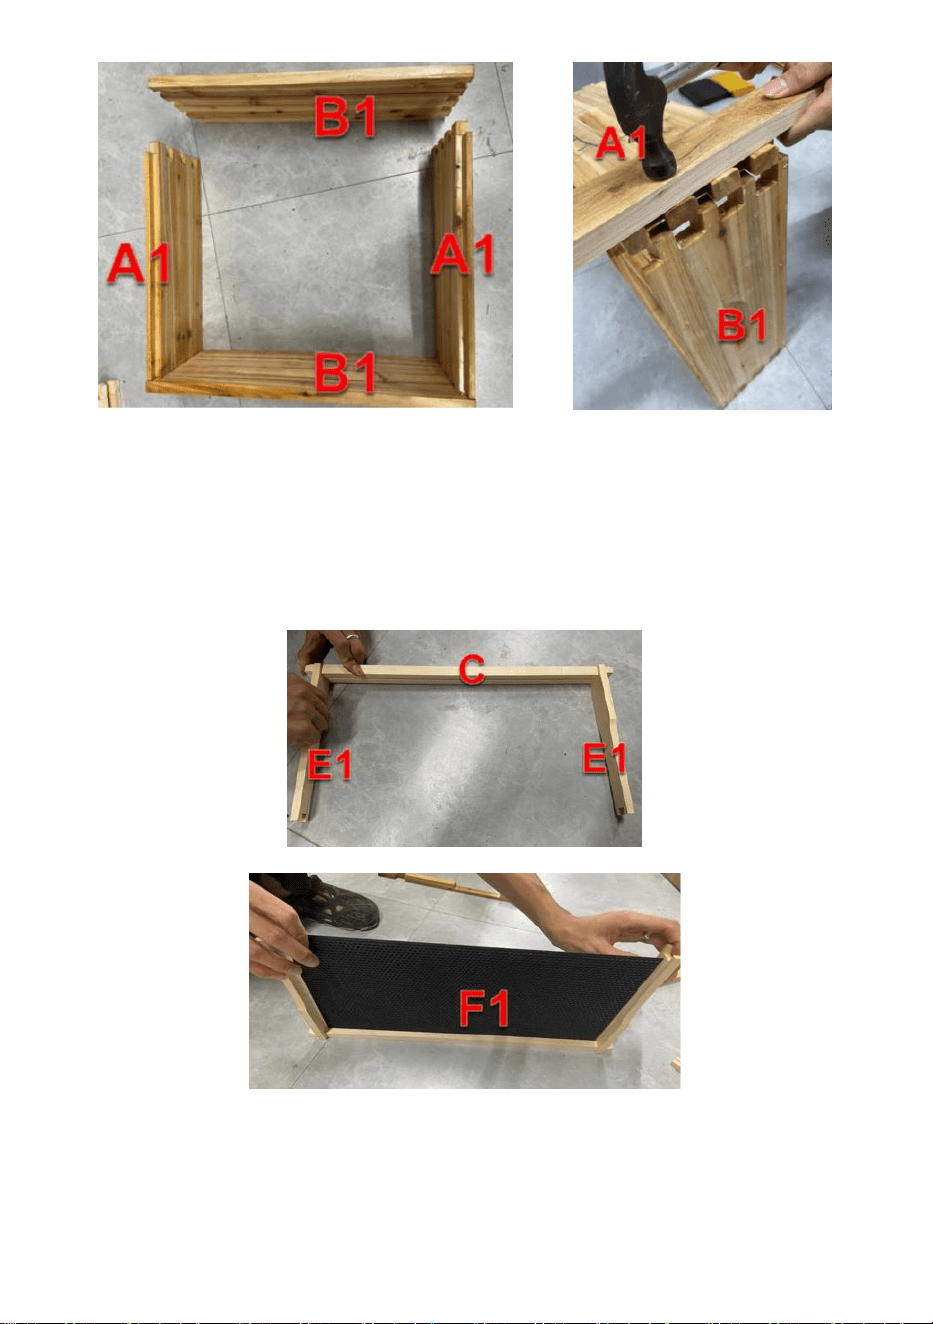
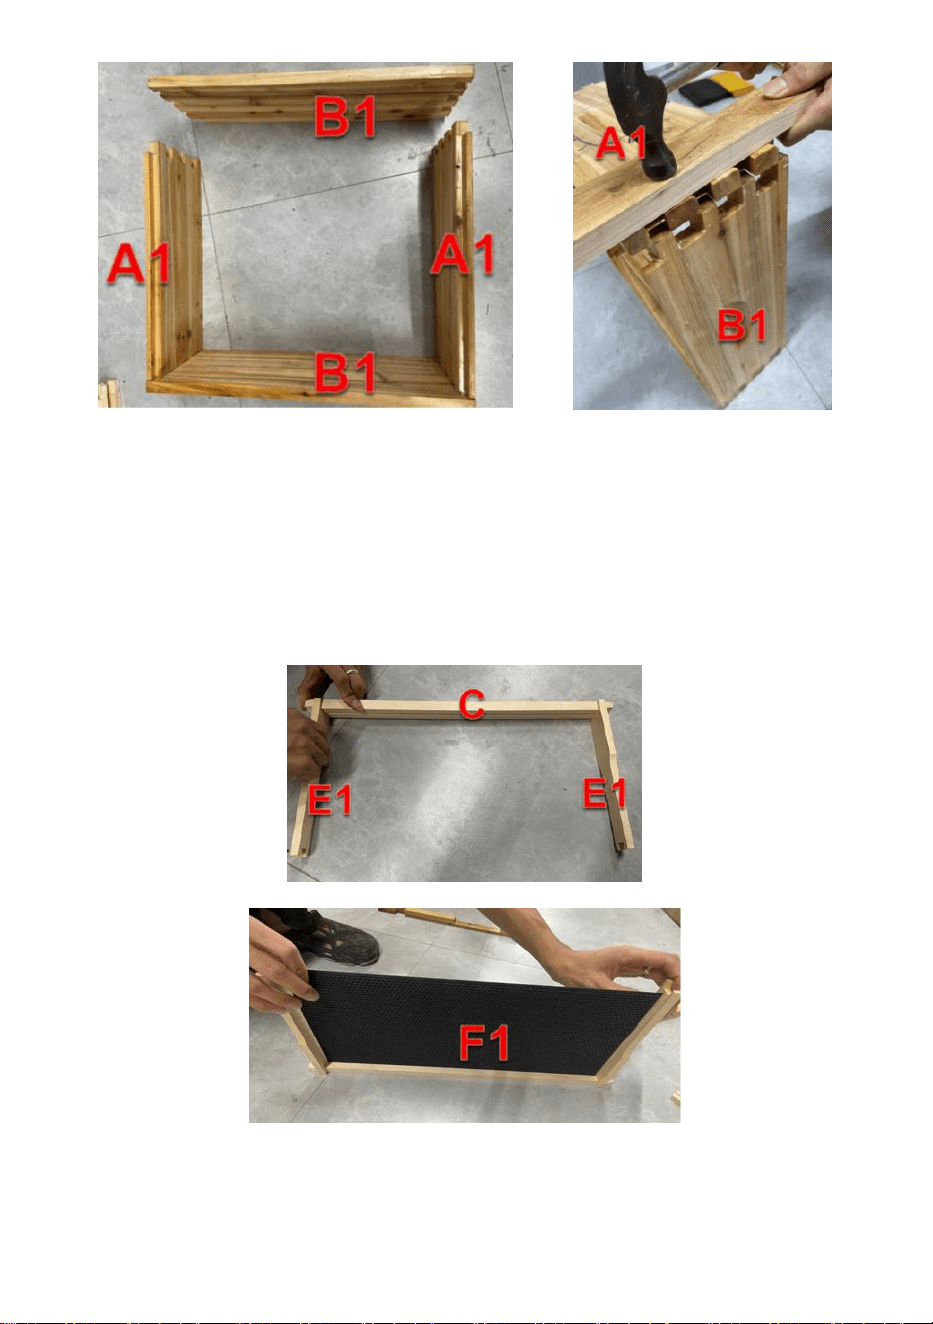
ASSEMBLY
240 BOX
1. Installation of 240 box
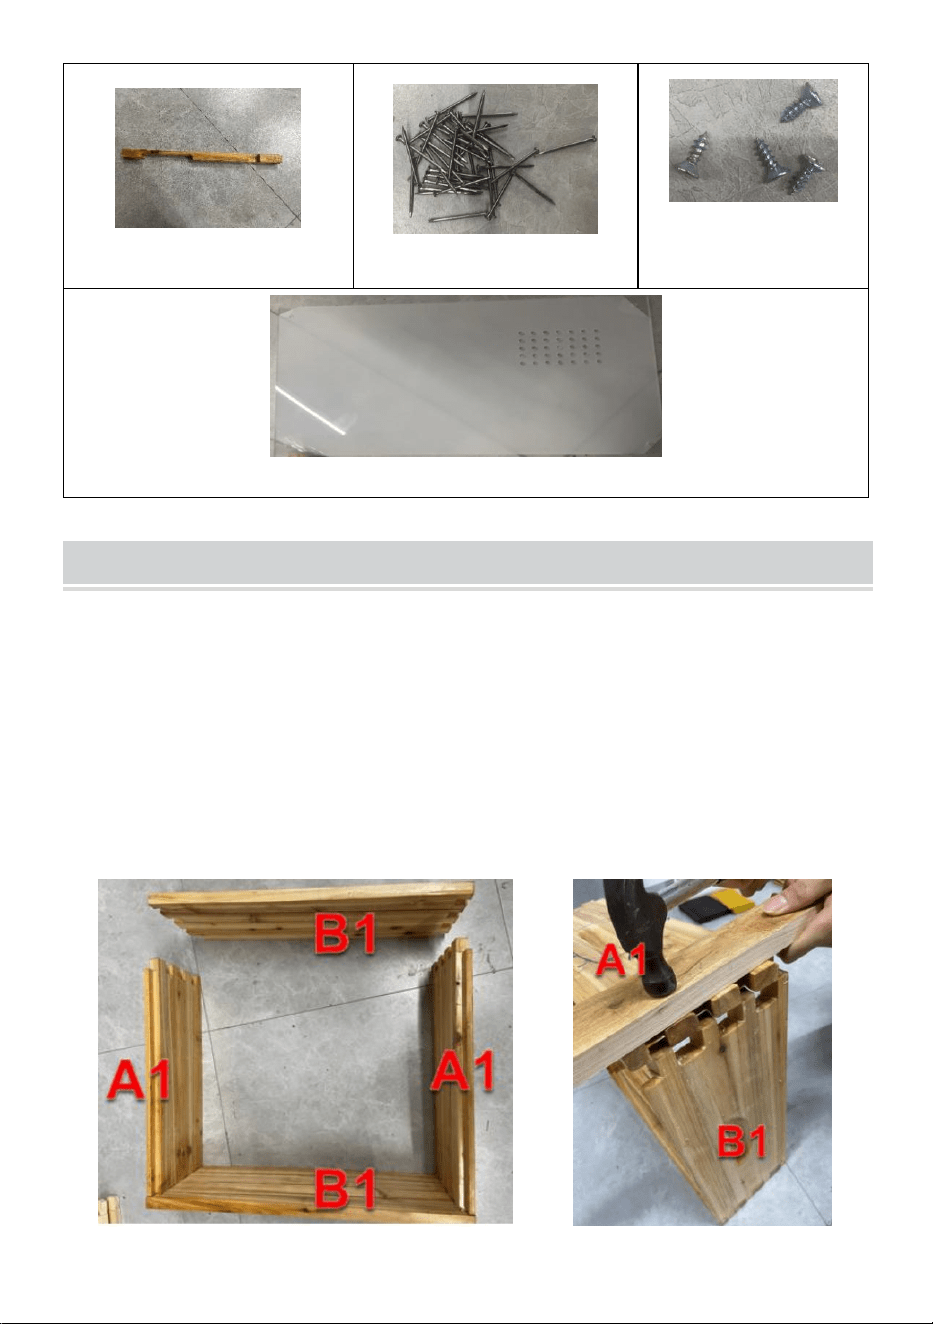
Step 1: Take two pieces of A1 and two pieces of B1(B1-1&B1-2)
respectively, and connect them with a rubber hammer (note that it is not
allowed to knock them directly, but put a board or cardboard on them and
knock them in evenly).
- 5 -
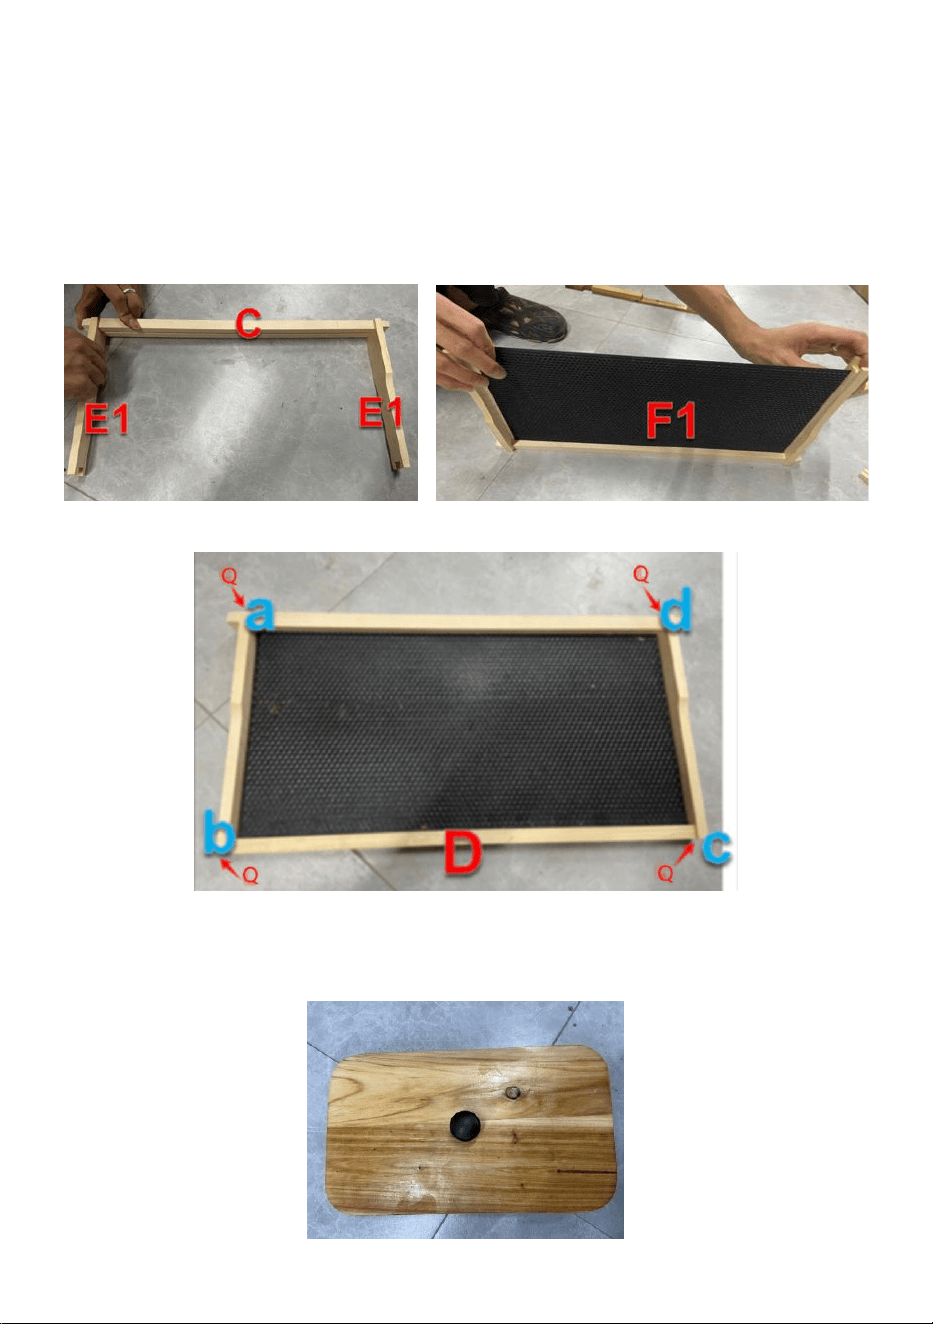
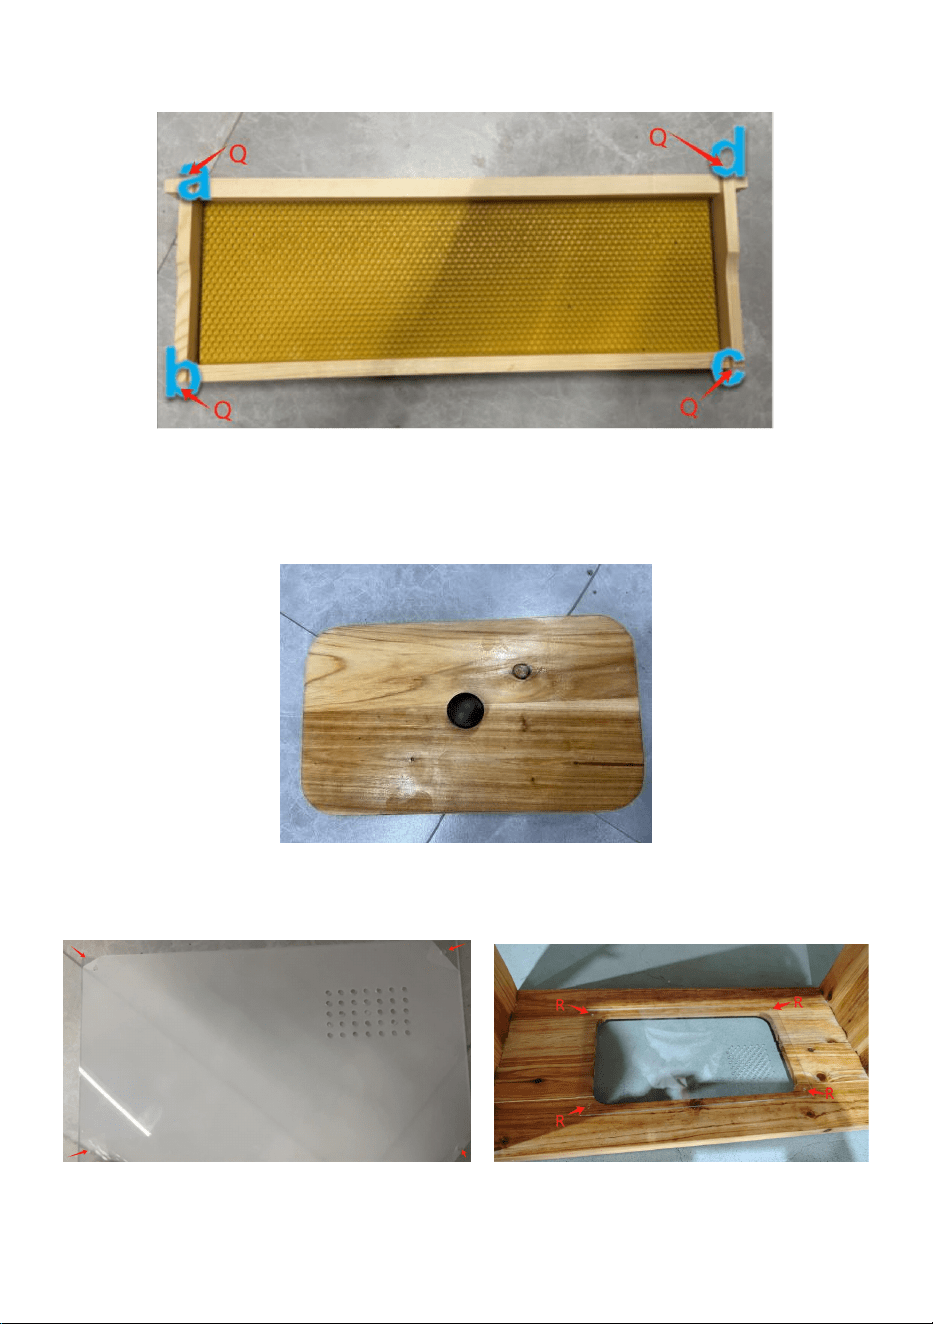
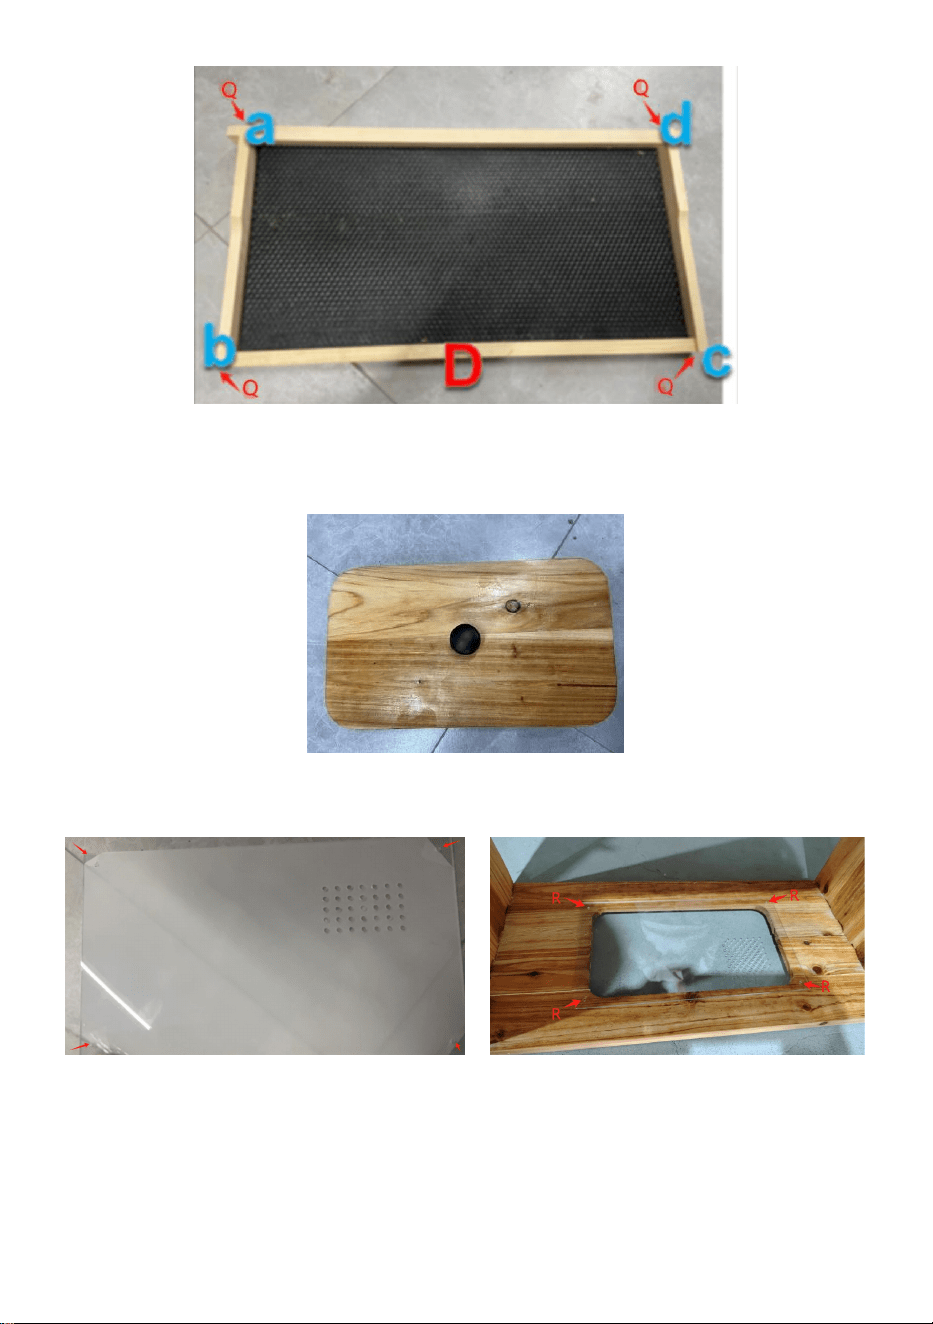
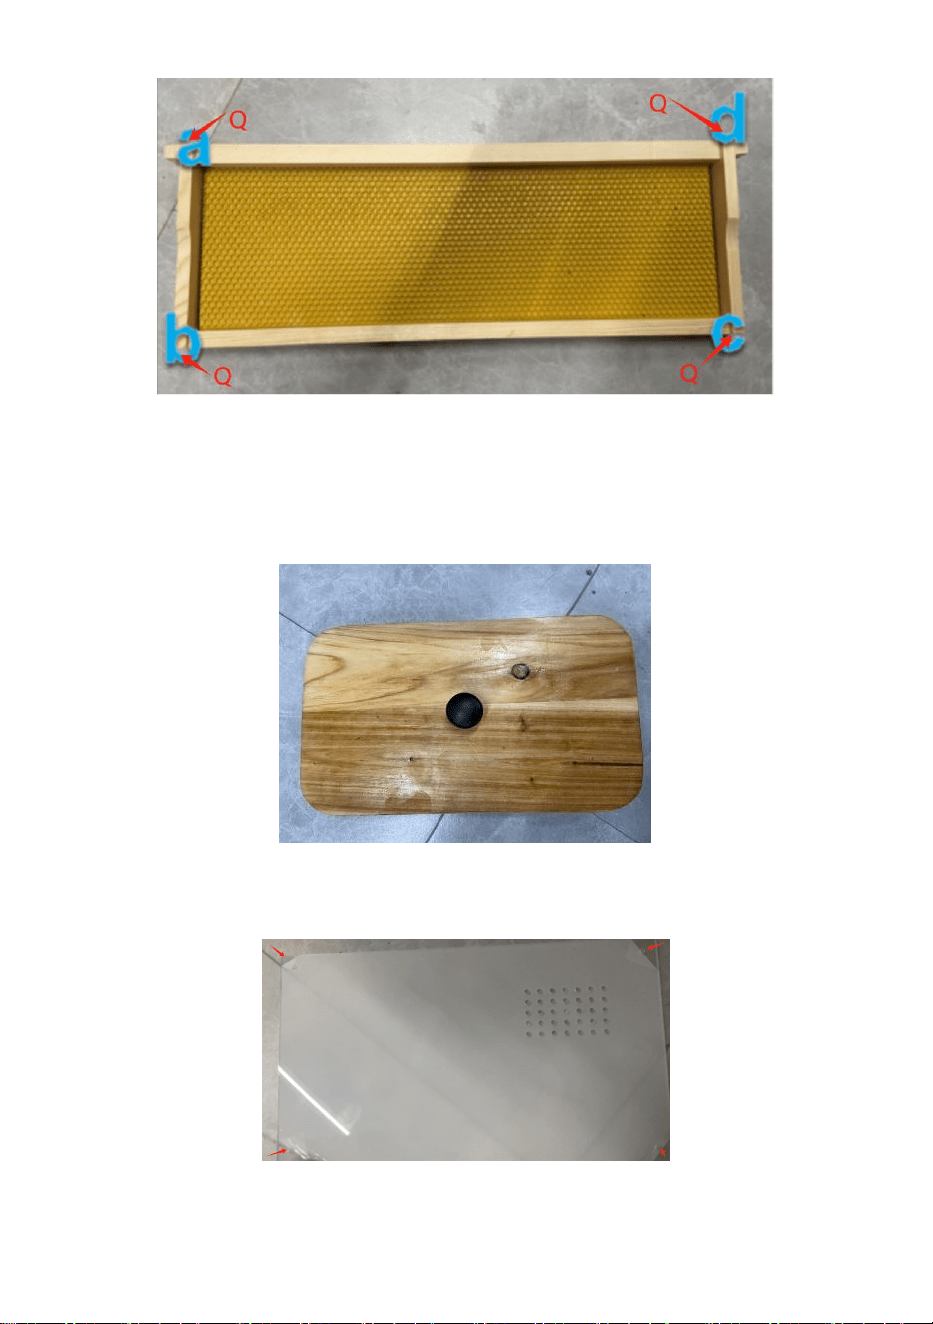
2. Installation of 240 frame
Step 1: Take 2 pieces of E1 and 1 piece of C, insert them into the card slot
to connect them, then take 1 piece of F1 and insert it into the slot, and
finally take 1 piece of D and insert it into the slot to complete a set of 170
frames.
Step 2: Connect with 4 pieces of Q at a/b/c/d 4 positions.
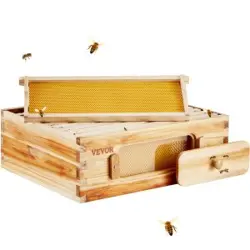
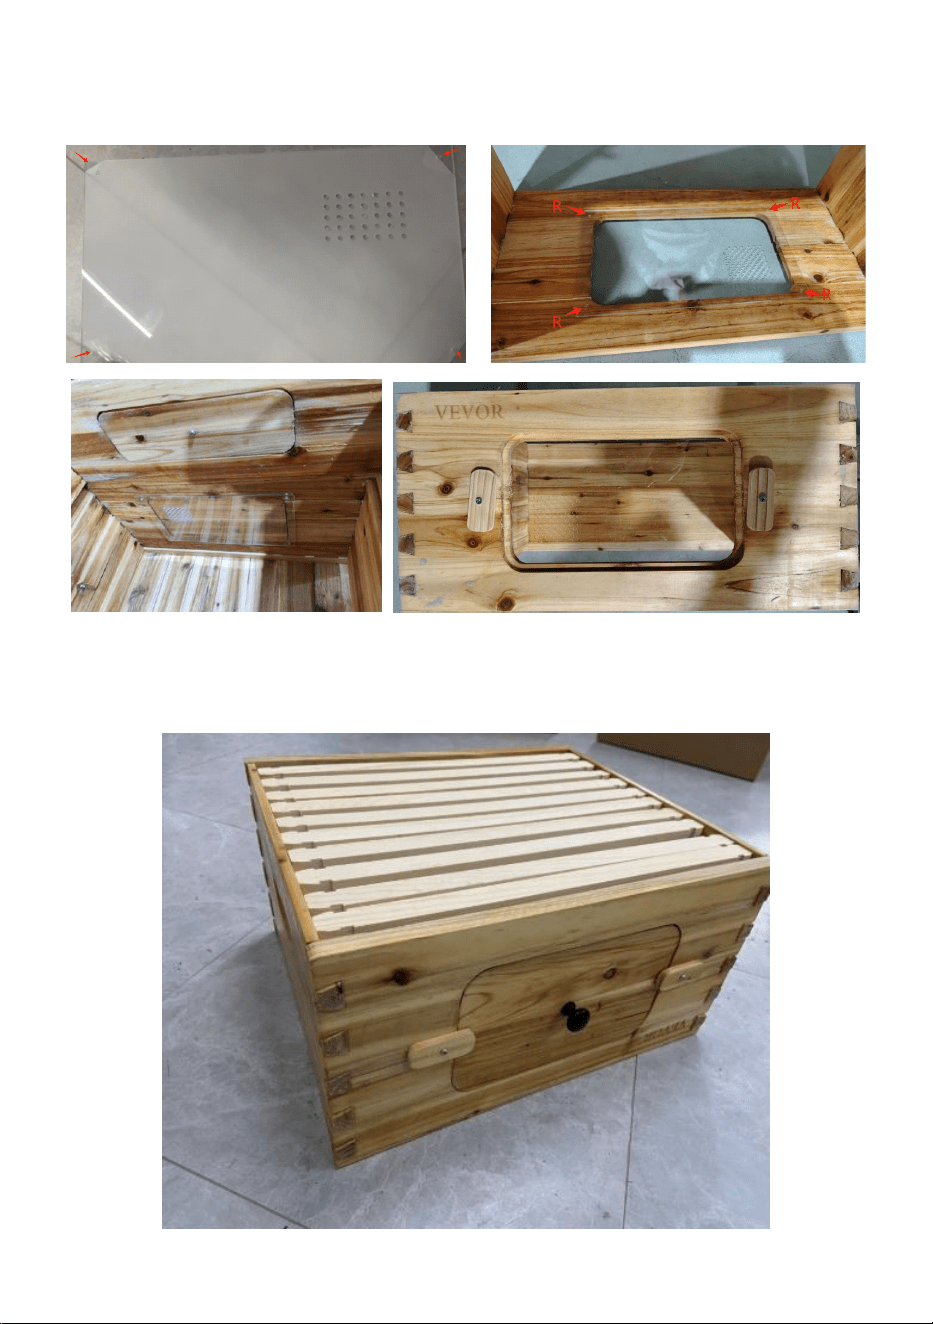
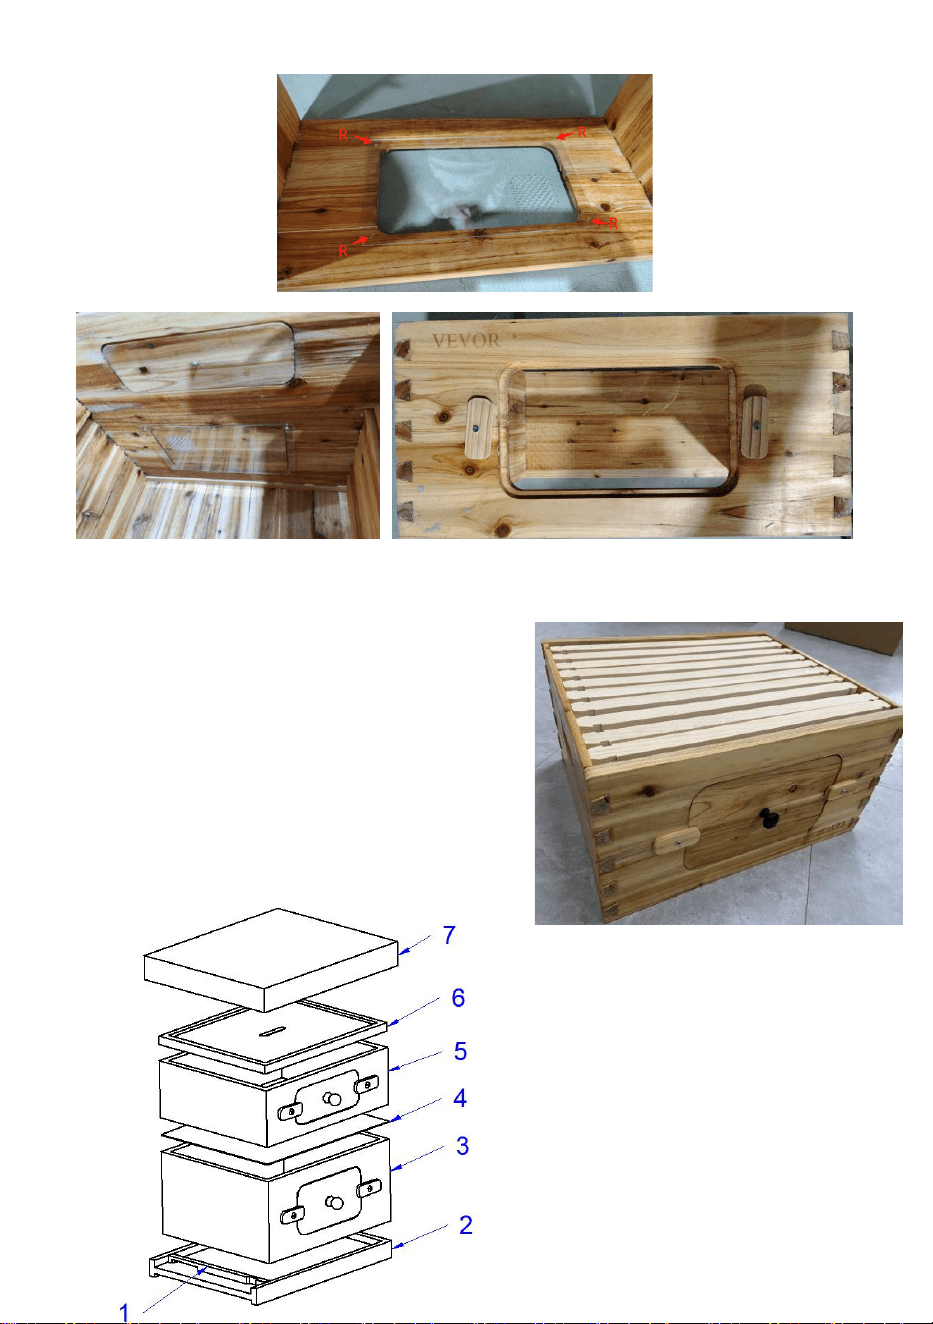
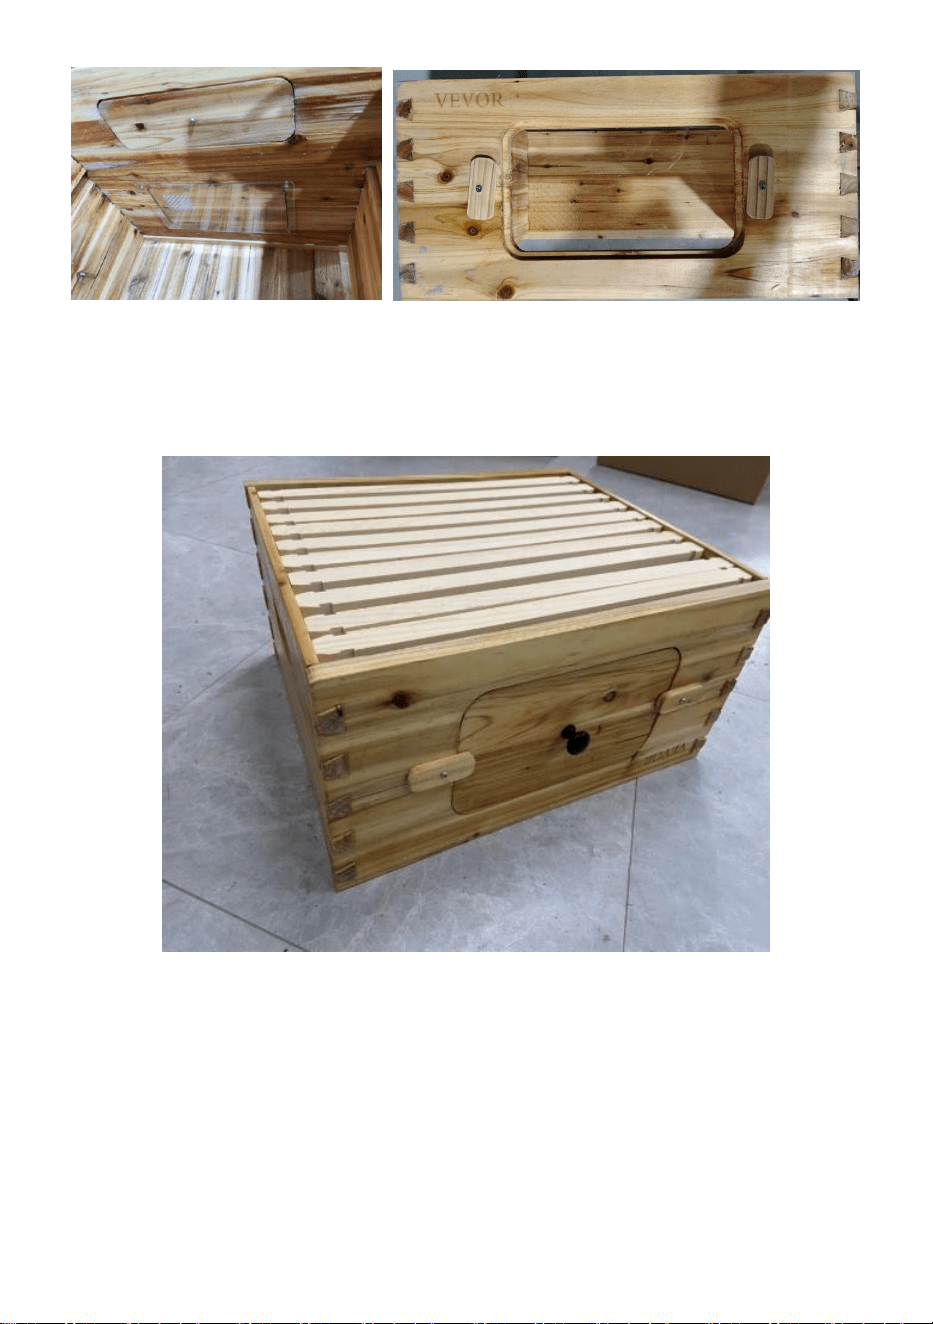
3. Installation of the window
Step 1: Take G, H and I-1 to assemble the cover plate.
- 6 -
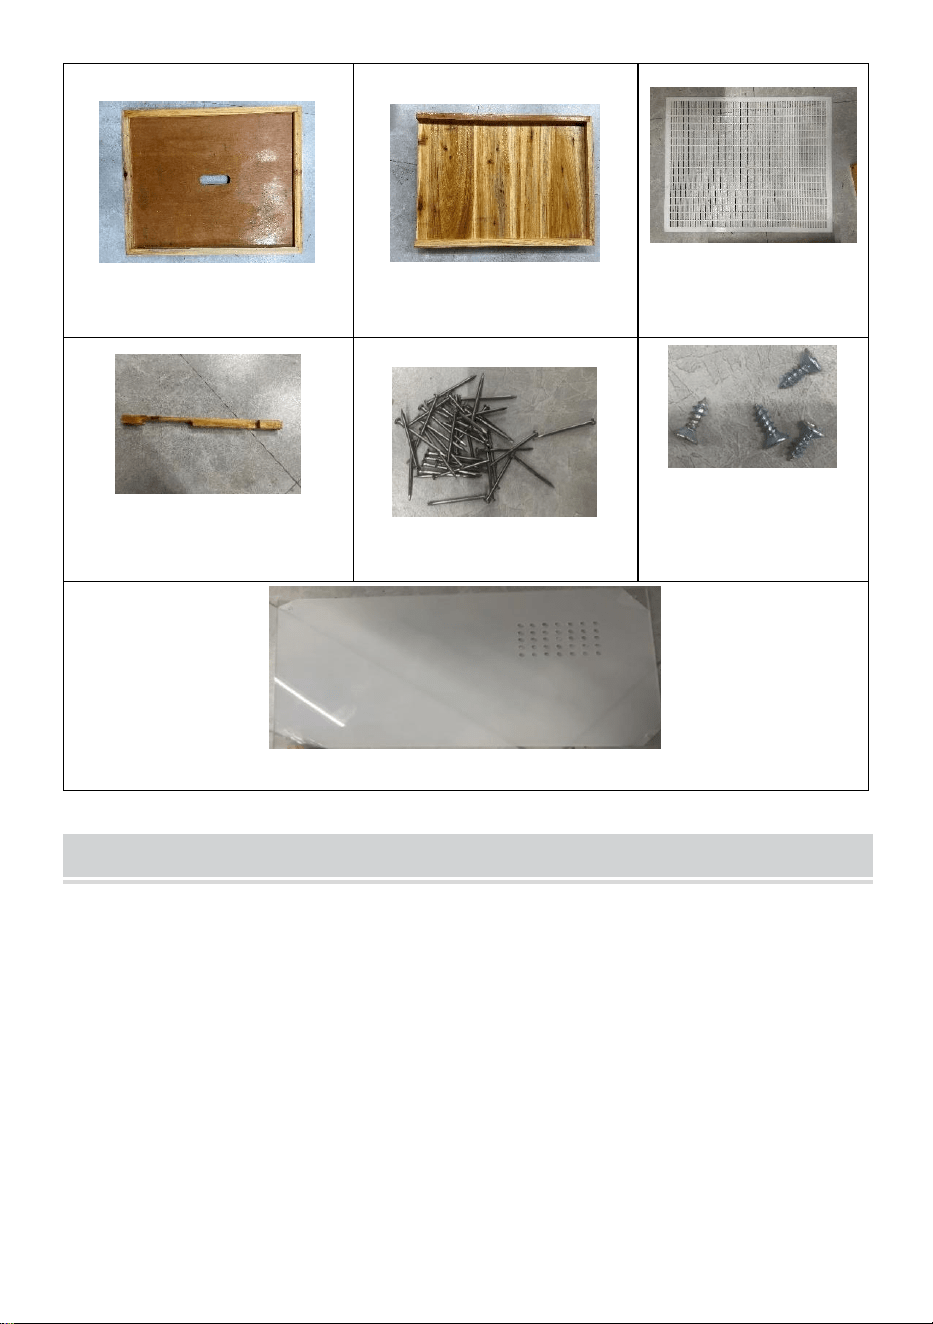
Step 2: Take S and Peel off the film from the corners, then Take S and R to
assemble the Coaming.
Step 3: Take J and K to assemble the window pressing plates on both
sides and put 10 sets of foundations and frames into the box.
- 7 -
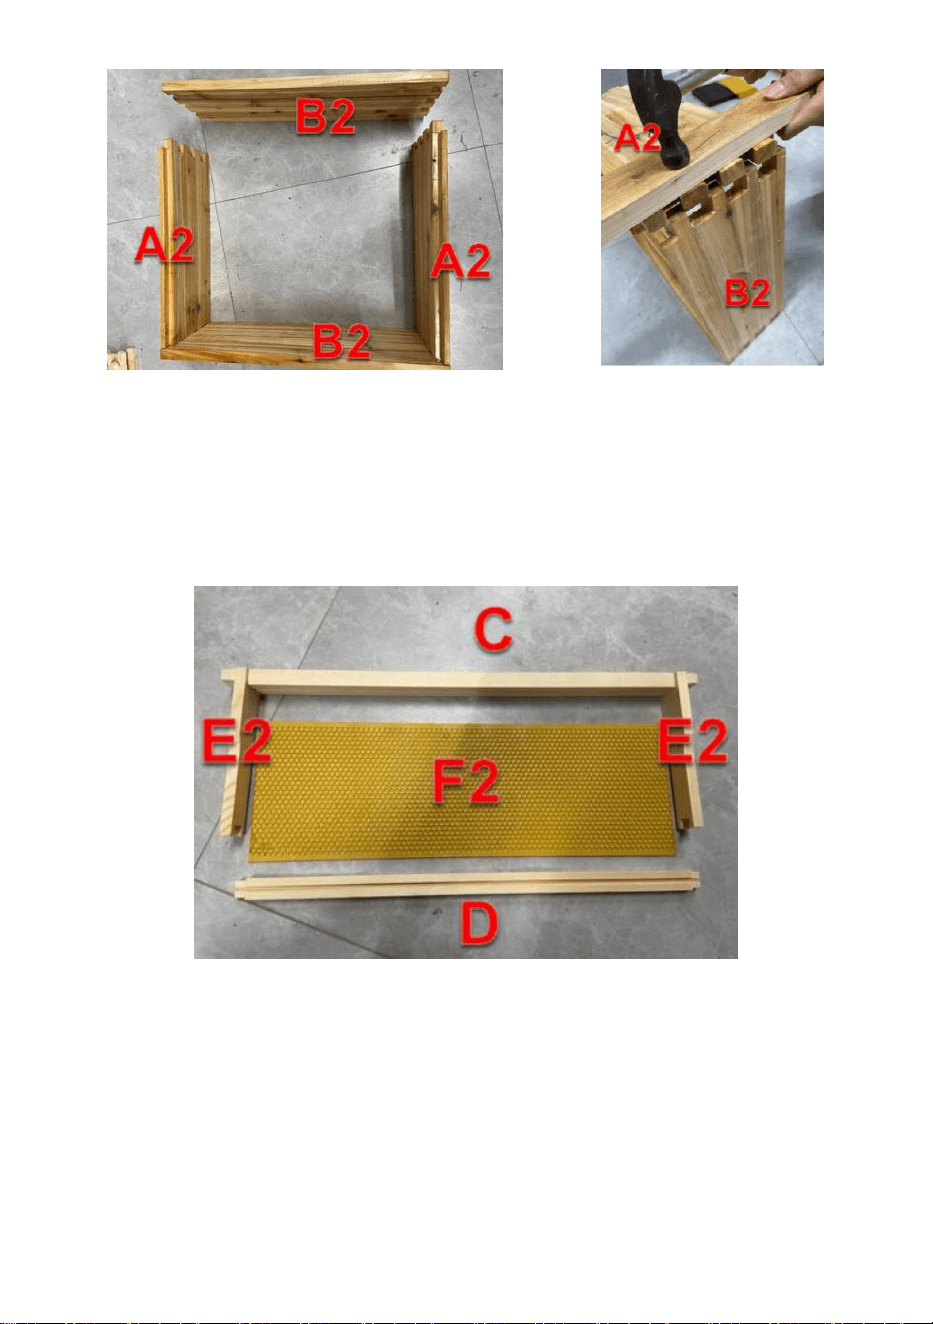
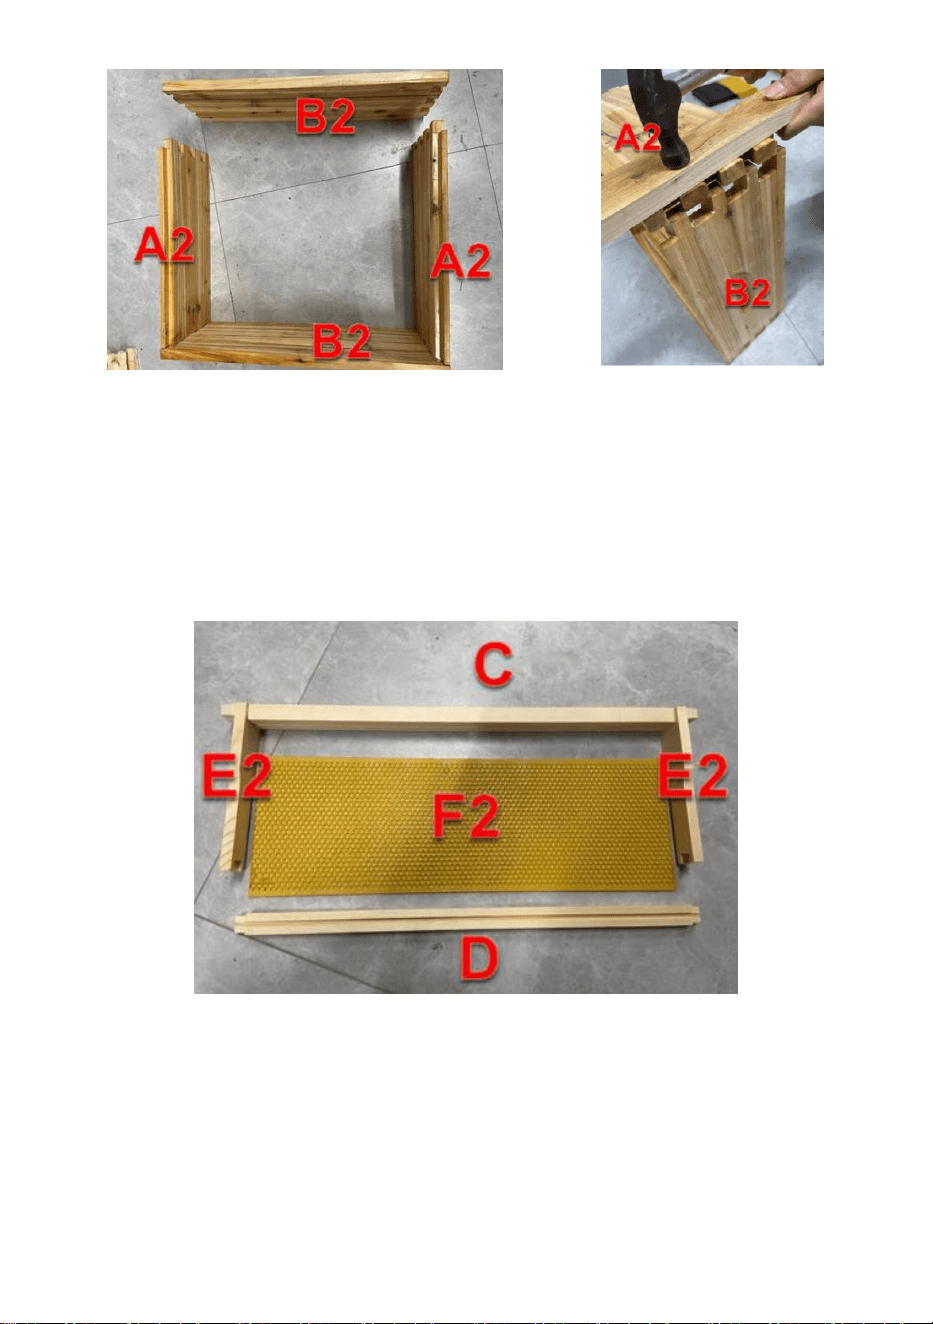
170 BOX
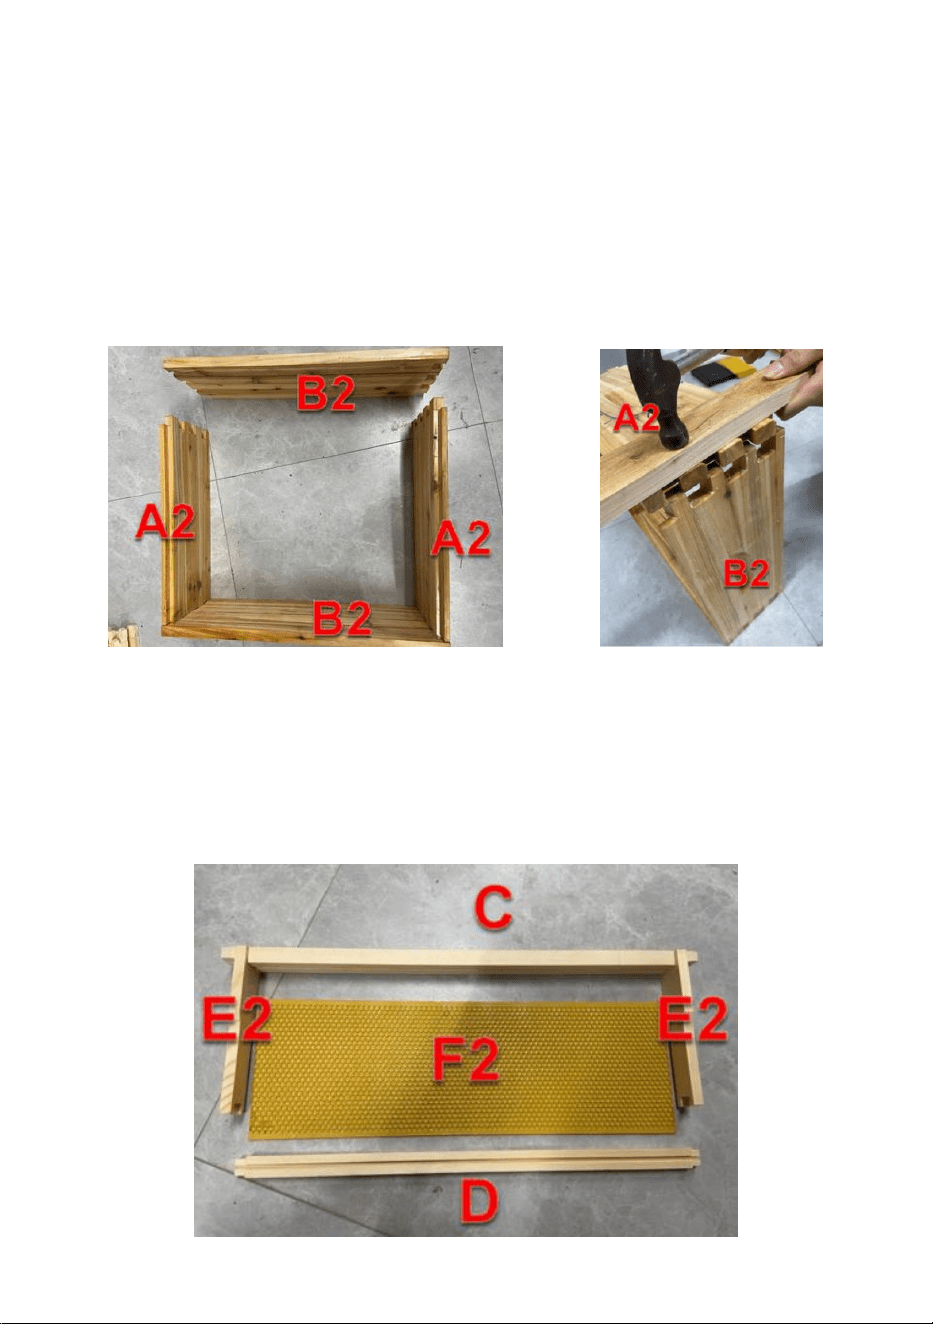
4. Installation of 170 box
Step 1: Take two pieces of A2 and two pieces of B2(B2-1&B2-2)
respectively, and connect them with a rubber hammer (note that it is not
allowed to knock them directly, but put a board or cardboard on them and
knock them in evenly).
5. Installation of 170 frame
Step 1: Take 2 pieces of E2 and 1 piece of C, insert them into the card slot
to connect them, then take 1 piece of F2 and insert it into the slot, and
finally take 1 piece of D and insert it into the slot to complete a set of 170
frames.
- 8 -
Step 2: Connect with 4 pieces of Q at a/b/c/d 4 positions.
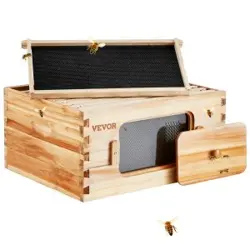
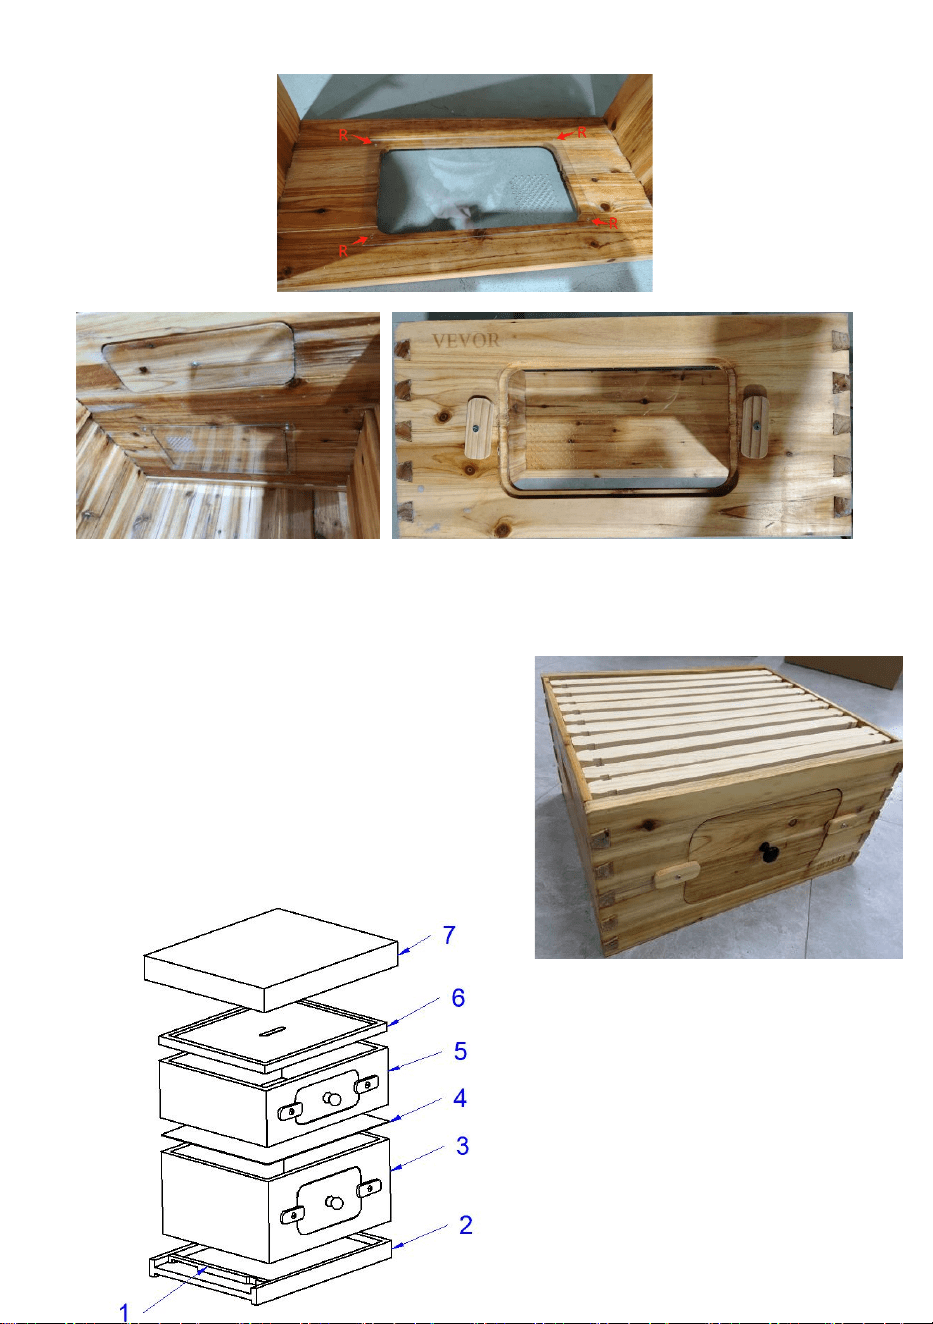
6. Installation of the window
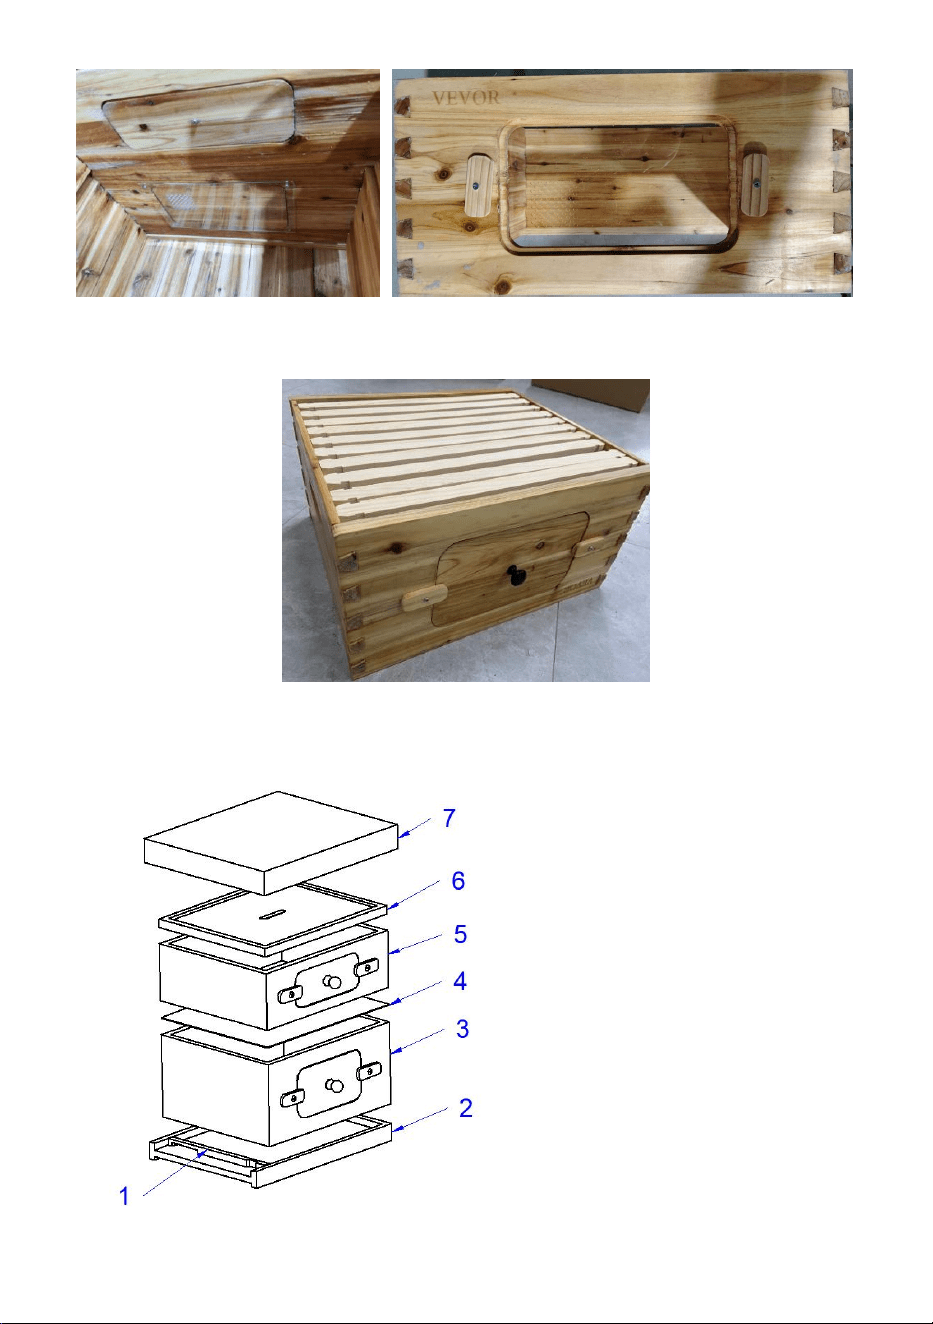
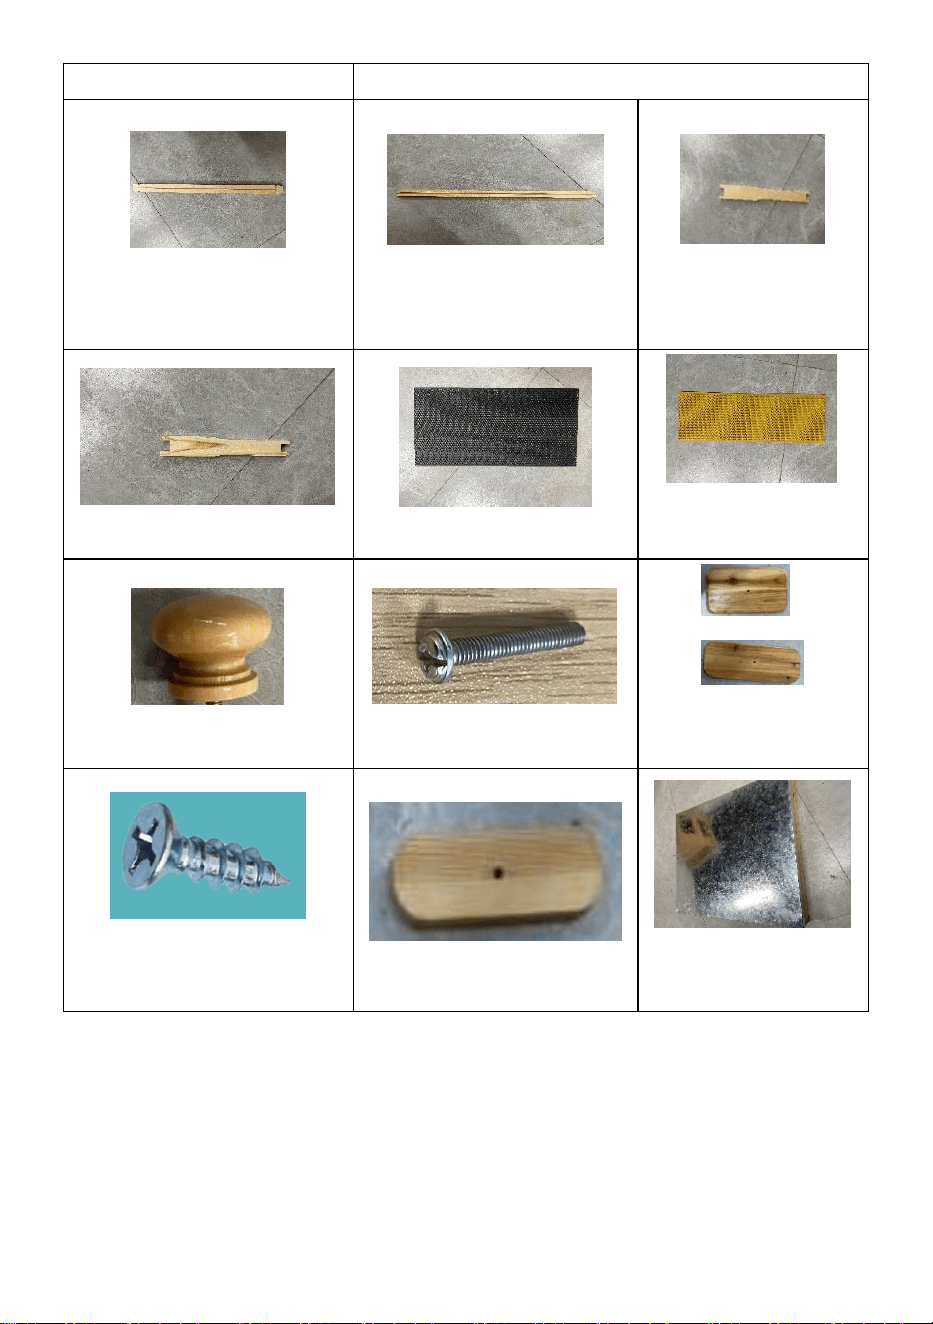
Step 1: Take G, H and I-2 to assemble the cover plate.
Step 2: Take N and Peel off the film from the corners, then Take N and M to
assemble the Coaming.
- 9 -
Step 3: Take J and K to assemble the window pressing plates on both
sides and put 10 sets of foundations and frames into the box.
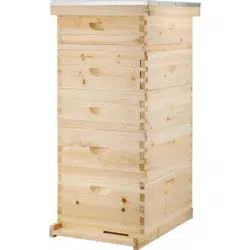
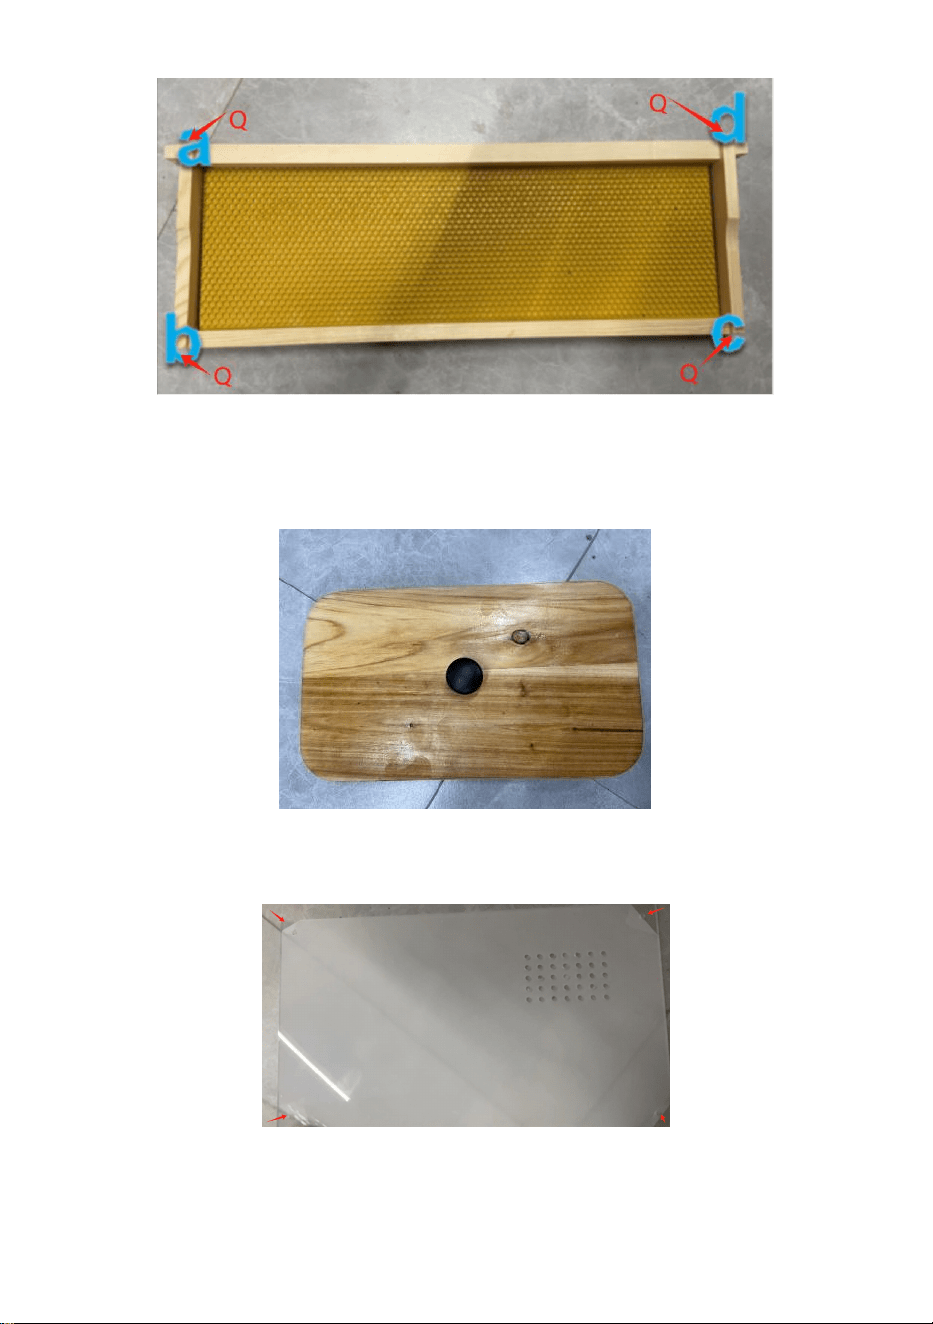
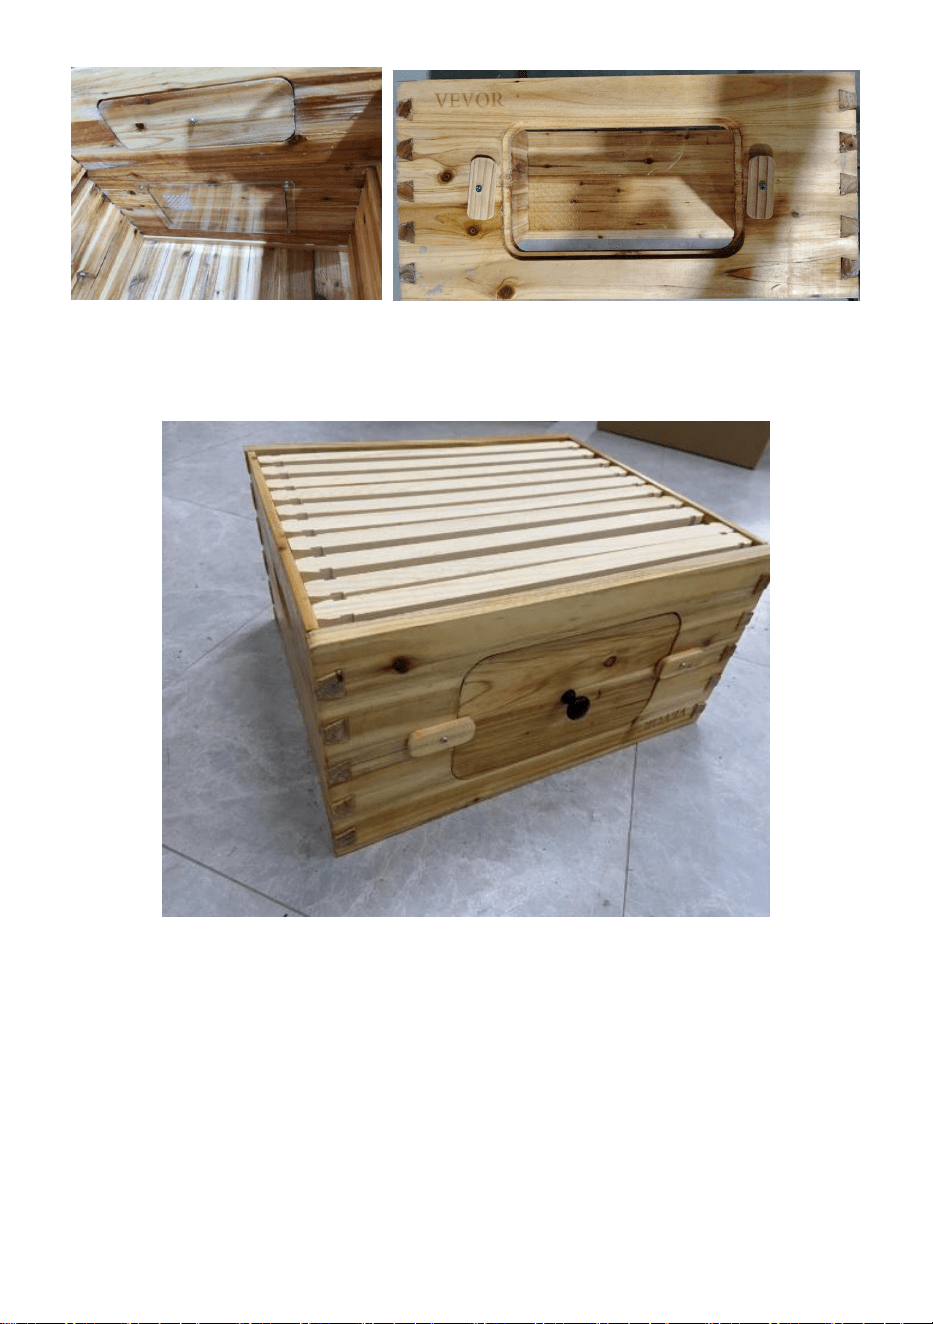
Finally, please assemble according to the following figure:
1.Entrance Reducer
2. Bottom Board
3.240 Box
4.Queen Excluder
5.170 Box
6.Inner Cover
7.Top Cover

- 10 -
MAINTENANCE
1. Please use beeswax regularly for maintenance.
2. Close the bee window in cold, rainy, and windy weather.
Manufacturer: Shanghaimuxinmuyeyouxiangongsi
Address:Baoshanqu Shuangchenglu 803long 11hao 1602A-1609shi
Shanghai
Imported to AUS: SIHAO PTY LTD, 1 ROKEVA STREETEASTWOOD
NSW 2122 Australia
Imported to USA: Sanven Technology Ltd., Suite 250, 9166 Anaheim
Place, Rancho Cucamonga, CA 91730
Made In China


Técnico Certificado de soporte y garantía electrónica www.vevor.com/support
COLMENA
MODELO: FX1+1
We continue to be committed to provide you tools with competitive price.
"Save Half", "Half Price" or any other similar expressions used by us only represents an
estimate of savings you might benefit from buying certain tools with us compared to the major
top brands and does not necessarily mean to cover all categories of tools offered by us. You
are kindly reminded to verify carefully when you are placing an order with us if you are
actually saving half in comparison with the top major brands.

- 1 -
MODELO: FX 1+1
Have product questions? Need technical support? Please feel free to
contact us:
Technical Support and E-Warranty Certificate
www.vevor.com/support
NEED HELP? CONTACT US!
This is the original instruction, please read all manual instructions
carefully before operating. VEVOR reserves a clear interpretation of our
user manual. The appearance of the product shall be subject to the
product you received. Please forgive us that we won't inform you again if
there are any technology or software updates on our product.
BEE HIVE

- 2 -
Advertencia: para reducir el riesgo de lesiones, el usuario debe
leer atentamente el manual de instrucciones.
INSTALLATION NOTES
NOTAS :
2. Intente elegir un terreno duro para la instalación.
2. Prepare las herramientas de instalación con anticipación ( martillo de
goma y madera ) .
3. Lea atentamente este manual de instalación y confirme la cantidad de
accesorios según la lista.
MODEL AND PARAMETERS
Modelo
FX1+1
Tamaño del producto
562*462*515mm
Material del gabinete
Madera de abeto
Tratamiento de superficies
Proceso de ebullición de cera
COMPONENTS
A1 240 Llegando 1(× 2 )
+
B 1-1 B 1-2
B 1 24 0 Brazona 2( × 2)
+
B 2-1 B 2-2

- 3 -
un 2 17 0 Llegando 1(× 2 )
B2 170 Brazola 2( × 2)
C 170/240 Principal
barra del marco 1( ×2 0)
D 170/240 Barra del
marco principal 2 (×20)
mi 1 24 0 Barra del
marco ( × 20)
E2 170 Barra del marco ( ×
20)
F1 240 Hoja de cimentación
(×10)
F2 170 Hoja de
cimentación (×10)
G (×2)
Tornillo H M4x30 (×2)
+
yo -1 yo -2
I Panel de ventana
(×2)
J Tornillo autorroscante
M4x20 (×4)
K Tablón pequeño (×4)
Cubierta superior L
(× 1 )
- 4 -
M Cubierta interior (× 1 )
N Tablero inferior (x1)
Oh reina excluyente
(x1)
P Reductor de
entrada(x1)
Clavos de hierro Q (x80)
R Tornillo
autorroscante
M3x12 (×8)
S Ventana de panel acrílico ( x2)
ASSEMBLY
CAJA 240
7. Instalación de caja 24 0
Paso 1: Tome dos piezas de A1 y dos piezas de B1 (B1-1 y B1-2)
respectivamente y conéctelas con un martillo de goma (tenga en cuenta
que no está permitido golpearlas directamente, pero coloque una tabla o
cartón sobre ellas y golpéelos uniformemente).

- 5 -
8. Instalación de marco 24 0 .
Paso 1: Tome 2 piezas de E1 y 1 pieza de C , insértelas en la ranura para
tarjetas para conectarlas, luego tome 1 pieza de F1 e insértela en la ranura,
y finalmente tome 1 pieza de D e insértela en la ranura. para completar un
conjunto de 170 cuadros.
Paso 2: Conecte con 4 piezas de Q en las 4 posiciones a/b/c/d.

- 6 -
9. Instalación de la ventana
Paso 1: Tome G , H e I-1 para ensamblar la placa de cubierta.
Paso 2: Tome S y retire la película de las esquinas, luego tome S y R para
ensamblar la brazola.

- 7 -
Paso 3: Tome J y K para ensamblar las placas de presión de la ventana
en ambos lados y coloque 10 juegos de cimientos y marcos en la caja.
17 0 CAJA
10.Instalación de caja de 170
Paso 1: Tome dos piezas de A2 y dos piezas de B2 (B2-1 y B2-2)
respectivamente y conéctelas con un martillo de goma (tenga en cuenta
que no está permitido golpearlas directamente, pero coloque una tabla o
cartón sobre ellas y golpéelos uniformemente).

- 8 -
11. marco 170.
Paso 1: Tome 2 piezas de E2 y 1 pieza de C , insértelas en la ranura para
tarjetas para conectarlas, luego tome 1 pieza de F2 e insértela en la ranura,
y finalmente tome 1 pieza de D e insértela en la ranura. para completar un
conjunto de 170 cuadros.
Paso 2: Conecte con 4 piezas de Q en las 4 posiciones a/b/c/d.
- 9 -
12.Instalación de la ventana
Paso 1: Tome G , H e I-2 para ensamblar la placa de cubierta.
Paso 2: Tome N y retire la película de las esquinas, luego tome N y M para
ensamblar la brazola.

- 10 -
Paso 3: Tome J y K para ensamblar las placas de presión de la ventana
en ambos lados y coloque 10 juegos de cimientos y marcos en la caja.
Finalmente, monte de
acuerdo con la siguiente
figura:
1.Reductor de entrada
2. Tablero inferior
3.240 Caja

- 11 -
4.Excluidor de reina
5.170 Caja
6.Cubierta interior
7.Cubierta superior
MAINTENANCE
1. Utilice cera de abejas con regularidad para el mantenimiento.
2. Cierra la ventana de las abejas en climas fríos, lluviosos y ventosos.
Fabricante: Shanghaimuxinmuyeyouxiangongsi
Dirección: Baoshanqu Shuangchenglu 803long 11hao 1602A-1609shi
Shanghai
Importado a AUS: SIHAO PTY LTD, 1 ROKEVA STREETEASTWOOD
NSW 2122 Australia
Importado a EE. UU.: Sanven Technology Ltd., Suite 250, 9166 Anaheim
Place, Rancho Cucamonga, CA 91730
Hecho en china

- 12 -


Teknisk Support och e-garanticertifikat www.vevor.com/support
BEE HIVE
MODELL: FX1+1
We continue to be committed to provide you tools with competitive price.
"Save Half", "Half Price" or any other similar expressions used by us only represents an
estimate of savings you might benefit from buying certain tools with us compared to the major
top brands and does not necessarily mean to cover all categories of tools offered by us. You
are kindly reminded to verify carefully when you are placing an order with us if you are
actually saving half in comparison with the top major brands.

- 1 -
MODELL: FX 1+1
Have product questions? Need technical support? Please feel free to
contact us:
Technical Support and E-Warranty Certificate
www.vevor.com/support
NEED HELP? CONTACT US!
This is the original instruction, please read all manual instructions
carefully before operating. VEVOR reserves a clear interpretation of our
user manual. The appearance of the product shall be subject to the
product you received. Please forgive us that we won't inform you again if
there are any technology or software updates on our product.
BEE HIVE
- 2 -
Varning - För att minska risken för skada måste användaren
läsa instruktionerna noggrant.
INSTALLATION NOTES
ANMÄRKNINGAR :
3. Försök att välja hård mark för installation.
2. Förbered installationsverktyg i förväg ( gummihammare och trä ) .
3. Läs denna installationsmanual noggrant och bekräfta mängden tillbehör
enligt listan.
MODEL AND PARAMETERS
Modell
FX1+1
Produktstorlek
562*462*515 mm
Skåpsmaterial
Gran trä
Ytbehandling
Vaxkokningsprocess
COMPONENTS
A1 240 C oaming 1(× 2 )
+
B 1-1 B 1-2
B 1 24 0 Coaming 2( × 2)
A 2 17 0 C oaming 1(× 2 )
+
B 2-1 B 2-2
B2 170 Coaming 2( × 2)
- 3 -
C 170/240 Main
ramstapel 1( ×2 0)
D 170/240
Huvudramstång 2 (×20)
E 1 24 0 ramfält ( ×
20)
E2 170 ramstång ( × 20)
F1 240 Grundblad (×10)
F2 170 Grundblad
(×10)
G- handtag (×2)
H- skruv M4x30 (×2)
+
Jag -1 Jag
-2
I Fönsterfönster (×2)
J Självgängande skruv
M4x20 (×4)
K Liten planka (×4)
L Topplock (× 1 )

- 4 -
M Inre lock (× 1 )
N Bottenbräda (x1)
O Queen Excluder
(x1)
P Entréreducerare (x1)
Q järnspik (x80)
R Självgängande
skruv M3x12 (×8)
S Akrylpanelfönster ( x2)
ASSEMBLY
240 BOX
13.Installation av 24 0 box
Steg 1: Ta två bitar av A1 respektive två bitar av B1(B1-1&B1-2) och
koppla ihop dem med en gummihammare (observera att det inte är tillåtet
att slå dem direkt, utan lägg en tavla eller kartong på dem och slå in dem
jämnt).

- 5 -
14.Installation av 24 0 ram
Steg 1: Ta 2 bitar av E1 och 1 bit C , sätt in dem i kortfacket för att ansluta
dem, ta sedan 1 bit F1 och sätt in den i kortplatsen, och slutligen ta 1 bit D
och sätt in den i kortplatsen för att slutföra en uppsättning med 170
bildrutor.
Steg 2: Anslut med 4 bitar av Q i a/b/c/d 4 positioner.
- 6 -
15.Installation av fönstret
Steg 1: Ta G , H och I-1 för att montera täckplattan.
Steg 2: Ta S och dra av filmen från hörnen, ta sedan S och R för att
montera Coaming.

- 7 -
Steg 3: Ta J och K för att montera fönsterpressplattorna på båda sidor och
lägg 10 uppsättningar fundament och ramar i lådan.
17 0 LÅDA
16.Installation av 170 box
Steg 1: Ta två bitar av A2 respektive två bitar av B2(B2-1&B2-2) och
koppla ihop dem med en gummihammare (observera att det inte är tillåtet
att slå dem direkt, utan lägg en tavla eller kartong på dem och slå in dem
jämnt).

- 8 -
17.Montering av 170 ram
Steg 1: Ta 2 stycken E2 och 1 stycke C , sätt in dem i kortfacket för att
ansluta dem, ta sedan 1 stycke F2 och sätt in det i facket, och slutligen ta 1
stycke D och sätt in det i facket för att slutföra en uppsättning med 170
bildrutor.
Steg 2: Anslut med 4 bitar av Q i a/b/c/d 4 positioner.

- 9 -
18.Installation av fönstret
Steg 1: Ta G , H och I-2 för att montera täckplattan.
Steg 2: Ta N och dra bort filmen från hörnen, ta sedan N och M för att
montera ihop kojen.

- 10 -
Steg 3: Ta J och K för att montera fönsterpressplattorna på båda sidor och
lägg 10 uppsättningar fundament och ramar i lådan.
Till sist, montera enligt
följande figur:
1.Entréreducerare
2. Bottenbräda
3.240 kartong
4.Queen Excluder

- 11 -
5.170 Box
6. Innerskydd
7.Topplock
MAINTENANCE
1. Använd bivax regelbundet för underhåll.
2. Stäng bifönstret i kallt, regnigt och blåsigt väder.
Tillverkare: Shanghaimuxinmuyeyouxiangongsi
Adress: Baoshanqu Shuangchenglu 803long 11hao 1602A-1609shi
Shanghai
Importerad till AUS: SIHAO PTY LTD, 1 ROKEVA STREETEASTWOOD
NSW 2122 Australien
Importerad till USA: Sanven Technology Ltd., Suite 250, 9166 Anaheim
Place, Rancho Cucamonga, CA 91730
Tillverkad i Kina


Technisch Ondersteuning en e-garantiecertificaat www.vevor.com/support
BIJENKORF
MODEL: FX1+1
We continue to be committed to provide you tools with competitive price.
"Save Half", "Half Price" or any other similar expressions used by us only represents an
estimate of savings you might benefit from buying certain tools with us compared to the major
top brands and does not necessarily mean to cover all categories of tools offered by us. You
are kindly reminded to verify carefully when you are placing an order with us if you are
actually saving half in comparison with the top major brands.

- 1 -
MODEL: FX 1+1
Have product questions? Need technical support? Please feel free to
contact us:
Technical Support and E-Warranty Certificate
www.vevor.com/support
NEED HELP? CONTACT US!
This is the original instruction, please read all manual instructions
carefully before operating. VEVOR reserves a clear interpretation of our
user manual. The appearance of the product shall be subject to the
product you received. Please forgive us that we won't inform you again if
there are any technology or software updates on our product.
BEE HIVE

- 2 -
Waarschuwing-Om het risico op letsel te verminderen, moet de
gebruiker de handleiding zorgvuldig lezen.
INSTALLATION NOTES
OPMERKINGEN :
4. Probeer een harde ondergrond te kiezen voor installatie.
2. Bereid vooraf het installatiegereedschap voor ( rubberhamer en hout ) .
3. Lees deze installatiehandleiding aandachtig door en bevestig het aantal
accessoires volgens de lijst.
MODEL AND PARAMETERS
Model
FX1+1
Product grootte
562*462*515mm
Materiaal kast
Sparrenhout
Oppervlakte behandeling
Was kookproces
COMPONENTS
A1 240 C oamen 1(× 2 )
+
B1-1B1-2 _ _ _
B1 _ 24 0 Bekleding 2( × 2)
Een 2 17 0 C oamen 1(×
+
B2-1B2-2 _ _ _
B2 170 Bekleding 2( × 2)
- 3 -
2 )
C 170/240 Hoofd
framebalk 1( ×2 0)
D 170/240
Hoofdframebalk 2 (×20)
E 1 24 0 Framebalk
( × 20 )
E2 170 Framebalk ( × 20)
F1 240 Funderingsplaat
(×10)
F2 170
Funderingsplaat (×10)
G- handvat (×2)
H Schroef M4x30 (×2)
+
ik -1 ik -2
I Ruit (×2)
J Zelftappende schroef
M4x20 (×4)
K Kleine plank (×4)
L Bovenklep (× 1 )
- 4 -
M Binnenafdekking (× 1 )
N Bodemplaat (x1)
O Koningin Excluder
(x1)
P Ingangsverkleiner(x1)
Q ijzeren spijkers (x80)
R Zelftappende
schroef M3x12 (×8)
S Acrylpaneelvenster ( x2)
ASSEMBLY
240 DOOS
19.Installatie van 24 0-doos
Stap 1: Neem respectievelijk twee stukken A1 en twee stukken B1
(B1-1&B1-2) , en verbind ze met een rubberen hamer (let op: het is niet
toegestaan om er direct op te kloppen, maar leg er een plank of karton op
en klop ze er gelijkmatig in).

- 5 -
20.Installatie van 24 0 -frame
Stap 1: Neem 2 stukjes E1 en 1 stuk C , steek ze in de kaartsleuf om ze
met elkaar te verbinden, neem dan 1 stuk F1 en plaats dit in de sleuf, en
neem ten slotte 1 stuk D en steek het in de sleuf om een set van 170
frames te voltooien.
Stap 2: Verbind met 4 stuks Q op a/b/c/d 4 posities.

- 6 -
21.Installatie van het raam
Stap 1: Neem G , H en I-1 om de afdekplaat te monteren.
Stap 2: Neem S en verwijder de film uit de hoeken, neem vervolgens S en
R om de Coaming te monteren.

- 7 -
Stap 3: Neem J en K om de raamaandrukplaten aan beide zijden te
monteren en plaats 10 sets funderingen en kozijnen in de doos.
17 0 DOOS
22.Installatie van 170 doos
Stap 1: Neem respectievelijk twee stukken A2 en twee stukken B2
(B2-1&B2-2) en verbind ze met een rubberen hamer (let op: het is niet
toegestaan om er direct op te kloppen, maar leg er een plank of karton op
en klop ze er gelijkmatig in).
- 8 -
23.Installatie van 170- frame
Stap 1: Neem 2 stukjes E2 en 1 stuk C , steek ze in de kaartsleuf om ze
met elkaar te verbinden, neem dan 1 stuk F2 en plaats dit in de sleuf, en
neem ten slotte 1 stuk D en steek het in de sleuf om een set van 170
frames te voltooien.
Stap 2: Verbind met 4 stuks Q op a/b/c/d 4 posities.

- 9 -
24.Installatie van het raam
Stap 1: Neem G , H en I-2 om de afdekplaat te monteren.
Stap 2: Neem N en verwijder de film uit de hoeken, neem vervolgens N en
M om de Coaming te monteren.
- 10 -
Stap 3: Neem J en K om de raamaandrukplaten aan beide zijden te
monteren en plaats 10 sets funderingen en kozijnen in de doos.
Monteer ten slotte volgens
de volgende afbeelding:
1. Ingangsverkleiner
2. Onderplaat
3.240 doos
4.Koningin Excluder

- 11 -
5.170 Doos
6. Binnenkap
7. Bovenklep
MAINTENANCE
1. Gebruik regelmatig bijenwas voor onderhoud.
2. Sluit het bijenraam bij koud, regenachtig en winderig weer.
Fabrikant: Shanghaimuxinmuyeyouxiangongsi
Adres: Baoshanqu Shuangchenglu 803long 11hao 1602A-1609shi
Shanghai
Geïmporteerd naar AUS: SIHAO PTY LTD, 1 ROKEVA
STREETEASTWOOD NSW 2122 Australië
Geïmporteerd naar de VS: Sanven Technology Ltd., Suite 250, 9166
Anaheim Place, Rancho Cucamonga, CA 91730
Gemaakt in China


Technique Assistance et certificat de garantie électronique
www.vevor.com/support
RUCHE D'ABEILLES
MODÈLE : FX1+1
We continue to be committed to provide you tools with competitive price.
"Save Half", "Half Price" or any other similar expressions used by us only represents an
estimate of savings you might benefit from buying certain tools with us compared to the major
top brands and does not necessarily mean to cover all categories of tools offered by us. You
are kindly reminded to verify carefully when you are placing an order with us if you are
actually saving half in comparison with the top major brands.


- 1 -
MODÈLE : FX1 +1
Have product questions? Need technical support? Please feel free to
contact us:
Technical Support and E-Warranty Certificate
www.vevor.com/support
NEED HELP? CONTACT US!
This is the original instruction, please read all manual instructions
carefully before operating. VEVOR reserves a clear interpretation of our
user manual. The appearance of the product shall be subject to the
product you received. Please forgive us that we won't inform you again if
there are any technology or software updates on our product.
BEE HIVE

- 2 -
Avertissement : Pour réduire le risque de blessure, l'utilisateur
doit lire attentivement le manuel d'instructions.
INSTALLATION NOTES
REMARQUES :
5. Essayez de choisir un sol dur pour l'installation.
2. Préparez les outils d'installation à l'avance ( marteau en caoutchouc et
bois ) .
3. Lisez attentivement ce manuel d'installation et confirmez la quantité
d'accessoires selon la liste.
MODEL AND PARAMETERS
Modèle
FX1+1
Taille du produit
562*462*515mm
Matériau du meuble
Bois de sapin
Traitement de surface
Processus d'ébullition de la cire
COMPONENTS
A1 240 C oaing 1(× 2 )
+
B1-1B1-2 _ _ _
B1 _ 24 0 Hiloire 2( × 2)
+
B2-1B2-2 _ _ _
- 3 -
Un 2 17 0 C oaing 1(× 2 )
B2 170 Hiloire 2( × 2)
C 170/240 Principal
barre de cadre 1( ×2 0)
D 170/240 Barre du cadre
principal 2 (×20)
E1 _ 24 0 Barre de
cadre ( × 20)
E2 170 Barre de cadre ( ×
20)
F1 240 Feuille de fondation
(×10)
F2 170 Feuille de
fondation (×10)
G (×2)
Vis H M4x30 (×2)
+
Je -1 Je -2
I Volet de fenêtre
(×2)
J Vis autotaraudeuse
M4x20 (×4)
K Petite planche (×4)
L Capot supérieur (×
1 )
- 4 -
Couvercle intérieur M (×
1 )
N panneau inférieur (x1)
Ô reine exclue
(x1)
P (x1)
Clous en fer Q (x80)
R Vis
autotaraudeuse
M3x12 (×8)
S Fenêtre panneau acrylique ( x2)
ASSEMBLY
240 BOÎTE
25.Installation d' une box 24 0
Étape 1 : Prenez respectivement deux morceaux de A1 et deux morceaux
de B1 (B1-1 et B1-2) et reliez-les avec un marteau en caoutchouc (notez
qu'il n'est pas permis de les frapper directement, mais placez une planche
ou un carton dessus et frappez-les uniformément).
- 5 -
26.Installation du cadre 24 0
Étape 1 : prenez 2 morceaux de E1 et 1 morceau de C , insérez-les dans
la fente pour carte pour les connecter, puis prenez 1 morceau de F1 et
insérez-le dans la fente, et enfin prenez 1 morceau de D et insérez-le dans
la fente. pour compléter un ensemble de 170 cadres.
Étape 2 : Connectez-vous avec 4 morceaux de Q aux 4 positions a/b/c/d.

- 6 -
27.Installation de la fenêtre
Étape 1 : Prenez G , H et I-1 pour assembler la plaque de recouvrement.
Étape 2 : prenez S et décollez le film des coins, puis prenez S et R pour
assembler le surbau.
- 7 -
Étape 3 : Prenez J et K pour assembler les plaques de pressage des
fenêtres des deux côtés et placez 10 jeux de fondations et de cadres dans
la boîte.
17 0 BOÎTE
28.Installation d'un coffret 170
Étape 1 : Prenez respectivement deux morceaux de A2 et deux morceaux
de B2 (B2-1 et B2-2) et reliez-les avec un marteau en caoutchouc (notez
qu'il n'est pas permis de les frapper directement, mais placez une planche
ou un carton dessus et frappez-les uniformément).

- 8 -
29.cadre 170
Étape 1 : prenez 2 morceaux de E2 et 1 morceau de C , insérez-les dans
la fente pour carte pour les connecter, puis prenez 1 morceau de F2 et
insérez-le dans la fente, et enfin prenez 1 morceau de D et insérez-le dans
la fente. pour compléter un ensemble de 170 cadres.
Étape 2 : Connectez-vous avec 4 morceaux de Q aux 4 positions a/b/c/d.

- 9 -
30.Installation de la fenêtre
Étape 1 : Prenez G , H et I-2 pour assembler la plaque de recouvrement.
Étape 2 : prenez N et décollez le film des coins, puis prenez N et M pour
assembler le surbau.
- 10 -
Étape 3 : Prenez J et K pour assembler les plaques de pressage des
fenêtres des deux côtés et placez 10 jeux de fondations et de cadres dans
la boîte.
Enfin, veuillez assembler
selon la figure suivante :
1. Réducteur d'entrée
2. Panneau inférieur
3.240 Boîte

- 11 -
4.Excluseur de reine
5.170 Boîte
6. Couverture intérieure
7. Couverture supérieure
MAINTENANCE
1. Veuillez utiliser régulièrement de la cire d'abeille pour l'entretien.
2. Fermez la fenêtre abeille par temps froid, pluvieux et venteux.
Fabricant : Shanghaimuxinmuyeyouxiangongsi
Adresse : Baoshanqu Shuangchenglu 803long 11hao 1602A-1609shi
Shanghai
Importé en Australie : SIHAO PTY LTD, 1 ROKEVA STREETASTWOOD
NSW 2122 Australie
Importé aux États-Unis : Sanven Technology Ltd., Suite 250, 9166
Anaheim Place, Rancho Cucamonga, CA 91730
Fabriqué en Chine

- 12 -


Technisch Support- und E-Garantiezertifikat www.vevor.com/support
BIENENSTOCK
MODELL: FX1+1
We continue to be committed to provide you tools with competitive price.
"Save Half", "Half Price" or any other similar expressions used by us only represents an
estimate of savings you might benefit from buying certain tools with us compared to the major
top brands and does not necessarily mean to cover all categories of tools offered by us. You
are kindly reminded to verify carefully when you are placing an order with us if you are
actually saving half in comparison with the top major brands.

- 1 -
MODELL: FX 1+1
Have product questions? Need technical support? Please feel free to
contact us:
Technical Support and E-Warranty Certificate
www.vevor.com/support
NEED HELP? CONTACT US!
This is the original instruction, please read all manual instructions
carefully before operating. VEVOR reserves a clear interpretation of our
user manual. The appearance of the product shall be subject to the
product you received. Please forgive us that we won't inform you again if
there are any technology or software updates on our product.
BEE HIVE

- 2 -
Warnung: Um das Verletzungsrisiko zu verringern, muss der
Benutzer die Bedienungsanleitung sorgfältig lesen.
INSTALLATION NOTES
ANMERKUNGEN :
6. Versuchen Sie, für die Installation einen harten Untergrund zu wählen.
2. Bereiten Sie im Voraus Installationswerkzeuge vor ( Gummihammer und
Holz ) .
3. Lesen Sie diese Installationsanleitung sorgfältig durch und überprüfen
Sie die Menge des Zubehörs anhand der Liste.
MODEL AND PARAMETERS
Modell
FX1+1
Produktgröße
562*462*515mm
Schrankmaterial
Tannenholz
Oberflächenbehandlung
Prozess des Wachskochens
COMPONENTS
A1 240 S oaming 1(× 2 )
+
B 1-1 B 1-2
B 1 24 0 Süll 2( × 2)
+
B 2-1 B 2-2
- 3 -
Eine 2 17 0 S oaming 1(×
2 )
B2 170 Süll 2( × 2)
C 170/240 Haupt
Rahmenleiste 1( ×2 0)
D 170/240
Hauptrahmenstange 2
(×20)
E 1 24 0
Rahmenleiste ( ×
20 )
E2 170 Rahmenstange ( ×
20)
F1 240 Fundamentplatte
(×10)
F2 170
Fundamentplatte (×10)
G- Griff (×2)
H- Schraube M4x30 (×2)
+
Ich -1 Ich -2
I Fensterscheibe
(×2)
J Blechschraube M4x20
(×4)
K Kleines Brett (×4)
L obere Abdeckung
(× 1 )
- 4 -
M Innenabdeckung (× 1 )
N- Bodenplatte (x1)
O Königin
Ausschließer
(x1)
P- Eingangsreduzierer
(x1)
Q- Eisennägel (x80)
R
Selbstschneidende
Schraube M3x12
(×8)
S Acrylfenster ( x2)
ASSEMBLY
240 BOX
31.Installation einer 24 0-Box
Schritt 1: Nehmen Sie zwei Stücke A1 bzw. zwei Stücke B1 (B1-1 und
B1-2) und verbinden Sie sie mit einem Gummihammer (beachten Sie,
dass Sie nicht direkt darauf klopfen dürfen, sondern ein Brett oder eine
Pappe darauf legen und gleichmäßig einklopfen).
- 5 -
32.Einbau eines 24 0 Rahmens
Schritt 1: Nehmen Sie 2 Stück E1 und 1 Stück C , stecken Sie sie in den
Kartensteckplatz, um sie zu verbinden, nehmen Sie dann 1 Stück F1 und
stecken Sie es in den Steckplatz, und nehmen Sie schließlich 1 Stück D
und stecken Sie es in den Steckplatz um einen Satz von 170 Rahmen zu
vervollständigen.
Schritt 2: Verbinden Sie mit 4 Q -Stücken an den 4 Positionen a/b/c/d.

- 6 -
33.Einbau des Fensters
Schritt 1: Nehmen Sie G , H und I-1 , um die Abdeckplatte
zusammenzubauen.
Schritt 2: Nehmen Sie S und ziehen Sie die Folie von den Ecken ab.
Nehmen Sie dann S und R , um den Süll zusammenzubauen.

- 7 -
Schritt 3: Montieren Sie mit J und K die Fensterpressplatten auf beiden
Seiten und legen Sie 10 Sätze Fundamente und Rahmen in den Karton.
17 0 BOX
34.Installation einer 170er-Box
Schritt 1: Nehmen Sie zwei Stücke A2 bzw. zwei Stücke B2 (B2-1 und
B2-2) und verbinden Sie sie mit einem Gummihammer (beachten Sie,
dass es nicht erlaubt ist, direkt darauf zu klopfen, sondern legen Sie ein
Brett oder eine Pappe darauf und gleichmäßig einklopfen).
- 8 -
35.Einbau des 170er Rahmens
Schritt 1: Nehmen Sie 2 Stück E2 und 1 Stück C , stecken Sie sie in den
Kartensteckplatz, um sie zu verbinden, nehmen Sie dann 1 Stück F2 und
stecken Sie es in den Steckplatz, und nehmen Sie schließlich 1 Stück D
und stecken Sie es in den Steckplatz um einen Satz von 170 Rahmen zu
vervollständigen.
Schritt 2: Verbinden Sie mit 4 Q -Stücken an den 4 Positionen a/b/c/d.
- 9 -
36.Einbau des Fensters
Schritt 1: Nehmen Sie G , H und I-2 , um die Abdeckplatte
zusammenzubauen.
Schritt 2: Nehmen Sie N und ziehen Sie die Folie von den Ecken ab.
Nehmen Sie dann N und M , um den Süll zusammenzubauen.

- 10 -
Schritt 3: Montieren Sie mit J und K die Fensterpressplatten auf beiden
Seiten und legen Sie 10 Sätze Fundamente und Rahmen in den Karton.
Zum Schluss montieren Sie
bitte gemäß der folgenden
Abbildung:
1. Eingangsreduzierer
2. Unteres Brett
3.240 Karton

- 11 -
4. Queen Excluder
5.170 Karton
6. Innere Abdeckung
7. Obere Abdeckung
MAINTENANCE
1. Bitte verwenden Sie regelmäßig Bienenwachs zur Pflege.
2. Schließen Sie das Bienenfenster bei kaltem, regnerischem und
windigem Wetter.
Hersteller: Shanghaimuxinmuyeyouxiangongsi
Adresse: Baoshanqu Shuangchenglu 803long 11hao 1602A-1609shi
Shanghai
Importiert nach AUS: SIHAO PTY LTD, 1 ROKEVA STREETEASTWOOD
NSW 2122 Australien
In die USA importiert: Sanven Technology Ltd., Suite 250, 9166 Anaheim
Place, Rancho Cucamonga, CA 91730
In China hergestellt

- 12 -


Techniczny Certyfikat wsparcia i e-gwarancji www.vevor.com/support
UL PSZCZELI
MODEL: FX1+1
We continue to be committed to provide you tools with competitive price.
"Save Half", "Half Price" or any other similar expressions used by us only represents an
estimate of savings you might benefit from buying certain tools with us compared to the major
top brands and does not necessarily mean to cover all categories of tools offered by us. You
are kindly reminded to verify carefully when you are placing an order with us if you are
actually saving half in comparison with the top major brands.

- 1 -
MODEL: FX 1+1
Have product questions? Need technical support? Please feel free to
contact us:
Technical Support and E-Warranty Certificate
www.vevor.com/support
NEED HELP? CONTACT US!
This is the original instruction, please read all manual instructions
carefully before operating. VEVOR reserves a clear interpretation of our
user manual. The appearance of the product shall be subject to the
product you received. Please forgive us that we won't inform you again if
there are any technology or software updates on our product.
BEE HIVE

- 2 -
Ostrzeżenie — aby zmniejszyć ryzyko obrażeń, użytkownik
musi uważnie przeczytać instrukcję obsługi.
INSTALLATION NOTES
UWAGI :
7. Spróbuj wybrać twarde podłoże do instalacji.
2. Przygotuj wcześniej narzędzia montażowe ( młotek gumowy i drewno ) .
3. Przeczytaj uważnie niniejszą instrukcję montażu i potwierdź ilość
akcesoriów zgodnie z listą.
MODEL AND PARAMETERS
Model
FX1+1
Rozmiar produktu
562*462*515mm
Materiał szafki
Drewno jodłowe
Obróbka powierzchniowa
Proces gotowania wosku
COMPONENTS
A1 240 Coating 1(× 2 )
+
B 1-1 B 1-2
B 1 24 0 Nadejście 2( × 2)
2 _ 17 0 Nadchodzący 1(×
+
B 2-1 B 2-2
B2 170 Zręb 2 ( × 2)
- 3 -
2 )
C 170/240 Główny
pasek ramki 1( ×2 0)
D 170/240 Główny pręt
ramy 2 (×20)
mi 1 24 0 Pasek
ramy ( × 20)
Belka ramy E2 170 ( × 20)
F1 240 (×10)
F2 170 Arkusz
fundamentowy (×10)
G (×2)
H Śruba M4x30 (×2)
+
ja -1 ja -2
I Szyba okienna (×2)
J Wkręt samogwintujący
M4x20 (×4)
K Mała deska (×4)
L Górna pokrywa (×
1 )
- 4 -
M Osłona wewnętrzna (×
1 )
N Płyta dolna (x1)
O Królowo
Wykluczona
(x1)
P (x1)
Gwoździe żelazne Q (x80)
R Wkręt
samogwintujący
M3x12 (×8)
S Okno z panelu akrylowego ( x2)
ASSEMBLY
240 PUDEŁKO
37.Montaż skrzynki 24 0
Krok 1: Weź odpowiednio dwa kawałki A1 i dwa kawałki B1(B1-1 i B1-2) i
połącz je gumowym młotkiem (pamiętaj, że nie wolno w nie uderzać
bezpośrednio, ale połóż na nich deskę lub karton i wbij je równomiernie).

- 5 -
38.Montaż ramy 24 0
Krok 1: Weź 2 elementy E1 i 1 element C , włóż je do gniazda karty, aby je
połączyć, następnie weź 1 element F1 i włóż go do gniazda, a na koniec
weź 1 element D i włóż go do gniazda aby skompletować zestaw 170
klatek.
Krok 2: Połącz 4 części Q w 4 pozycjach a/b/c/d.

- 6 -
39.Montaż okna
Krok 1: Weź G , H i I-1, aby zamontować pokrywę.
Krok 2: Weź S i zdejmij folię z rogów, następnie weź S i R , aby złożyć
zrębnicę.

- 7 -
Krok 3: Weź J i K , aby zamontować płyty dociskowe okna po obu
stronach i włóż do pudełka 10 zestawów fundamentów i ram.
17 0 PUDEŁKO
40.Montaż skrzynki 170
Krok 1: Weź odpowiednio dwa kawałki A2 i dwa kawałki B2(B2-1 i B2-2) i
połącz je gumowym młotkiem (pamiętaj, że nie wolno w nie uderzać
bezpośrednio, ale połóż na nich deskę lub karton i wbij je równomiernie).

- 8 -
41.Montaż ramy 170
Krok 1: Weź 2 elementy E2 i 1 element C , włóż je do gniazda karty, aby je
połączyć, następnie weź 1 element F2 i włóż go do gniazda, a na koniec
weź 1 element D i włóż go do gniazda aby skompletować zestaw 170
klatek.
Krok 2: Połącz 4 części Q w 4 pozycjach a/b/c/d.

- 9 -
42.Montaż okna
Krok 1: Weź G , H i I-2, aby zamontować pokrywę.
Krok 2: Weź N i zdejmij folię z rogów, następnie weź N i M , aby złożyć
zrębnicę.

- 10 -
Krok 3: Weź J i K , aby zamontować płyty dociskowe okna po obu
stronach i włóż do pudełka 10 zestawów fundamentów i ram.
Na koniec zmontuj zgodnie z
poniższym rysunkiem:
1. Reduktor wejściowy
2. Płyta dolna
Pudełko 3.240
4. Wykluczenie królowej

- 11 -
Pudełko 5.170
6. Wewnętrzna osłona
7. Górna pokrywa
MAINTENANCE
1. Do konserwacji należy regularnie używać wosku pszczelego.
2. Zamknij okno dla pszczół, gdy jest zimno, deszczowo i wietrznie.
Producent: Shanghaimuxinmuyeyouxiangongsi
Adres: Baoshanqu Shuangchenglu 803long 11hao 1602A-1609shi
Szanghaj
Import do AUS: SIHAO PTY LTD, 1 ROKEVA STREETEASTWOOD NSW
2122 Australia
Import do USA: Sanven Technology Ltd., Suite 250, 9166 Anaheim Place,
Rancho Cucamonga, CA 91730
Wyprodukowano w Chinach


Tecnico Supporto e certificato di garanzia elettronica www.vevor.com/support
ALVEARE DELLE API
MODELLO: FX1+1
We continue to be committed to provide you tools with competitive price.
"Save Half", "Half Price" or any other similar expressions used by us only represents an
estimate of savings you might benefit from buying certain tools with us compared to the major
top brands and does not necessarily mean to cover all categories of tools offered by us. You
are kindly reminded to verify carefully when you are placing an order with us if you are
actually saving half in comparison with the top major brands.

- 1 -
MODELLO: FX 1+1
Have product questions? Need technical support? Please feel free to
contact us:
Technical Support and E-Warranty Certificate
www.vevor.com/support
NEED HELP? CONTACT US!
This is the original instruction, please read all manual instructions
carefully before operating. VEVOR reserves a clear interpretation of our
user manual. The appearance of the product shall be subject to the
product you received. Please forgive us that we won't inform you again if
there are any technology or software updates on our product.
BEE HIVE
- 2 -
Avvertenza: per ridurre il rischio di lesioni, l'utente deve leggere
attentamente il manuale di istruzioni.
INSTALLATION NOTES
APPUNTI :
8. Prova a scegliere un terreno duro per l'installazione.
2. Preparare in anticipo gli strumenti di installazione ( martello di gomma e
legno ) .
3. Leggere attentamente questo manuale di installazione e verificare la
quantità di accessori in base all'elenco.
MODEL AND PARAMETERS
Modello
FX1+1
Taglia del prodotto
562*462*515mm
Materiale del mobile
Legno di abete
Trattamento della superficie
Processo di ebollizione della cera
COMPONENTS
A1 240 C oaming 1(× 2 )
+
B1-1 B1-2 _ _
B1 _ 24 0 Mastra 2( × 2)
+
B2-1 B2-2 _ _
- 3 -
Un 2 17 0 C oaming 1(× 2 )
B2 170 Mastra 2( × 2)
C 170/240 Principale
barra del frame 1( ×2 0)
D 170/240 Barra del telaio
principale 2 (×20)
E1 _ 24 0 Barra del
telaio ( × 20)
Barra telaio E2 170 ( × 20)
F1 240 Foglio di fondazione
(×10)
F2 170 Foglio di
fondazione (×10)
G (×2)
H Vite M4x30 (×2)
+
Io -1 Io -2
I Riquadro della
finestra (×2)
J Vite autofilettante M4x20
(×4)
K Asse piccola (×4)
L Coperchio
superiore (× 1 )

- 4 -
M Copertura interna (× 1 )
N Pannello inferiore (x1)
O Regina Esclusiva
(x1)
P Riduttore ingresso(x1)
Chiodi in ferro Q (x80)
R Vite autofilettante
M3x12 (×8)
S Finestra con pannello acrilico ( x2)
ASSEMBLY
240 SCATOLA
43.Installazione della scatola 24 0
Passaggio 1: prendere rispettivamente due pezzi di A1 e due pezzi di B1
(B1-1 e B1-2) e collegarli con un martello di gomma (notare che non è
consentito colpirli direttamente, ma mettere una tavola o un cartone su di
essi e inserirli uniformemente).

- 5 -
44.Installazione del telaio 24 0
Passaggio 1: prendi 2 pezzi di E1 e 1 pezzo di C , inseriscili nello slot della
scheda per collegarli, quindi prendi 1 pezzo di F1 e inseriscilo nello slot,
infine prendi 1 pezzo di D e inseriscilo nello slot per completare un set di
170 fotogrammi.
Passaggio 2: Connettiti con 4 pezzi di Q nelle 4 posizioni a/b/c/d.

- 6 -
45.Installazione della finestra
Passaggio 1: prendere G , H e I-1 per assemblare la piastra di copertura.
Passaggio 2: prendi S e rimuovi la pellicola dagli angoli, quindi prendi S e
R per assemblare la mastra.
- 7 -
Passaggio 3: prendi J e K per assemblare le piastre di pressatura delle
finestre su entrambi i lati e metti 10 set di fondazioni e telai nella scatola.
17 0 SCATOLA
46.Installazione di scatola da 170
Passaggio 1: prendere rispettivamente due pezzi di A2 e due pezzi di B2
(B2-1 e B2-2) e collegarli con un martello di gomma (notare che non è
consentito colpirli direttamente, ma mettere una tavola o un cartone su di
essi e inserirli uniformemente).

- 8 -
47.telaio 170
Passaggio 1: prendi 2 pezzi di E2 e 1 pezzo di C , inseriscili nello slot della
scheda per collegarli, quindi prendi 1 pezzo di F2 e inseriscilo nello slot,
infine prendi 1 pezzo di D e inseriscilo nello slot per completare un set di
170 fotogrammi.
Passaggio 2: Connettiti con 4 pezzi di Q nelle 4 posizioni a/b/c/d.

- 9 -
48.Installazione della finestra
Passaggio 1: prendere G , H e I-2 per assemblare la piastra di copertura.
Passaggio 2: prendi N e rimuovi la pellicola dagli angoli, quindi prendi N e
M per assemblare la mastra.

- 10 -
Passaggio 3: prendi J e K per assemblare le piastre di pressatura delle
finestre su entrambi i lati e metti 10 set di fondazioni e telai nella scatola.
Infine, assemblare secondo
la seguente figura:
1.Riduttore d'ingresso
2. Pannello inferiore
3.240 Scatola
4.Escludi Regina

- 11 -
5.170 Scatola
6. Copertura interna
7.Coperchio superiore
MAINTENANCE
1. Si prega di utilizzare regolarmente la cera d'api per la manutenzione.
2. Chiudi la finestra delle api in caso di tempo freddo, piovoso e ventoso.
Produttore: Shanghaimuxinmuyeyouxiangongsi
Indirizzo: Baoshanqu Shuangchenglu 803long 11hao 1602A-1609shi
Shanghai
Importato in AUS: SIHAO PTY LTD, 1 ROKEVA STREETEASTWOOD
NSW 2122 Australia
Importato negli Stati Uniti: Sanven Technology Ltd., Suite 250, 9166
Anaheim Place, Rancho Cucamonga, CA 91730
Made in China