1
Model/Modèle
❍ CM3004SC
12-Cup Programmable Coffee and Tea Maker
Cafetiére/théière programmable de 12 Tasses
Customer Care Line:
USA 1-800-231-9786
Accessories/Parts (USA)
1-800-738-0245
For online customer service
and to register your product, go to
www.prodprotect.com/applica
Service line à la clientèle :
Canada 1-800-231-9786
Accessoires/Pièces (Canada)
1-800-738-0245
Pour accéder au service à la clientèle en
ligne ou pour inscrire votre produit en
ligne, rendez-vous à
www.prodprotect.com/applica
IMPORTANT
WASH CARAFE BEFORE
FIRST USE!
IMPORTANT
LAVER LA CARAFE AVANT
LA PREMIÈRE
UTILISATION!

2
3
Please Read and Save this Use and Care Book
IMPORTANT SAFEGUARDS
When using electrical appliances, basic safety precautions should
always be followed including the following:
❍
Read all instructions.
❍
do not touch hot surfaces. Use handles or knobs.
❍
To protect against fire, electric shock and injury to persons do not
immerse cord, plugs or appliance in water or other liquid.
❍
Close supervision is necessary when any appliance is used by or
near children.
❍
Unplug from outlet when not in use and before cleaning. Allow to
cool before putting on or taking off parts, and before cleaning the
appliance.
❍
do not operate any appliance with a damaged cord or plug, or
after the appliance malfunctions or has been damaged in any
manner. Return appliance to the nearest authorized service facility
for examination, repair or adjustment.
❍
The use of accessory attachments not recommended by the
appliance manufacturer may result in fire, electric shock or injury
to persons.
❍
do not use outdoors.
❍
do not let cord hang over edge of table or counter, or touch hot
surfaces.
❍
do not place on or near a hot gas or electric burner, or in a
heated oven.
❍
To disconnect, turn any control to oFF (o), then remove plug
from wall outlet.
❍
do not use this appliance for other than intended use.
❍
Keep lid on the carafe when in use.
❍
Scalding may occur if the lid is removed during the brewing
cycles.
❍
The carafe is designed for use with this appliance. It must never be
used on a range top.
❍
do not set a hot carafe on a wet or cold surface.
ENGLISH
❍
do not use a cracked carafe or a carafe having a loose or
weakened handle.
❍
do not clean carafe with cleansers, steel wool pads or other
abrasive material.
SAVE THESE INSTRUCTIONS.
This product is for household use only.
POLARIZED PLUG (120V Models Only)
This appliance has a polarized plug (one blade is wider than the other). To reduce
the risk of electric shock, this plug is intended to fit into a polarized outlet only one
way. If the plug does not fit fully into the outlet, reverse the plug. If it still does not
fit, contact a qualified electrician. do not attempt to modify the plug in any way.
TAMPER-RESISTANT SCREW
Warning: This appliance is equipped with a tamper-resistant screw to prevent
removal of the outer cover. To reduce the risk of fire or electric shock, do not
attempt to remove the outer cover. There are no user-serviceable parts inside.
Repair should be done only by authorized service personnel.
ELECTRICAL CORD
a) A short power-supply cord (or detachable power-supply cord) is to be
provided to reduce the risk resulting from becoming entangled in or tripping
over a longer cord.
b) longer detachable power-supply cords or extension cords are available and
may be used if care is exercised in their use.
c) If a long detachable power-supply cord or extension cord is used,
1) The marked electrical rating of the detachable power-supply cord
or extension cord should be at least as great as the electrical rating
of the appliance,
2) If the appliance is of the grounded type, the extension cord should
be a grounding-type 3-wire cord, and
3) The longer cord should be arranged so that it will not drape over
the countertop or tabletop where it can be pulled on by children
or tripped over.
Note: If the power supply cord is damaged, it should be replaced by qualified
personnel; in latin America, by an authorized service center.

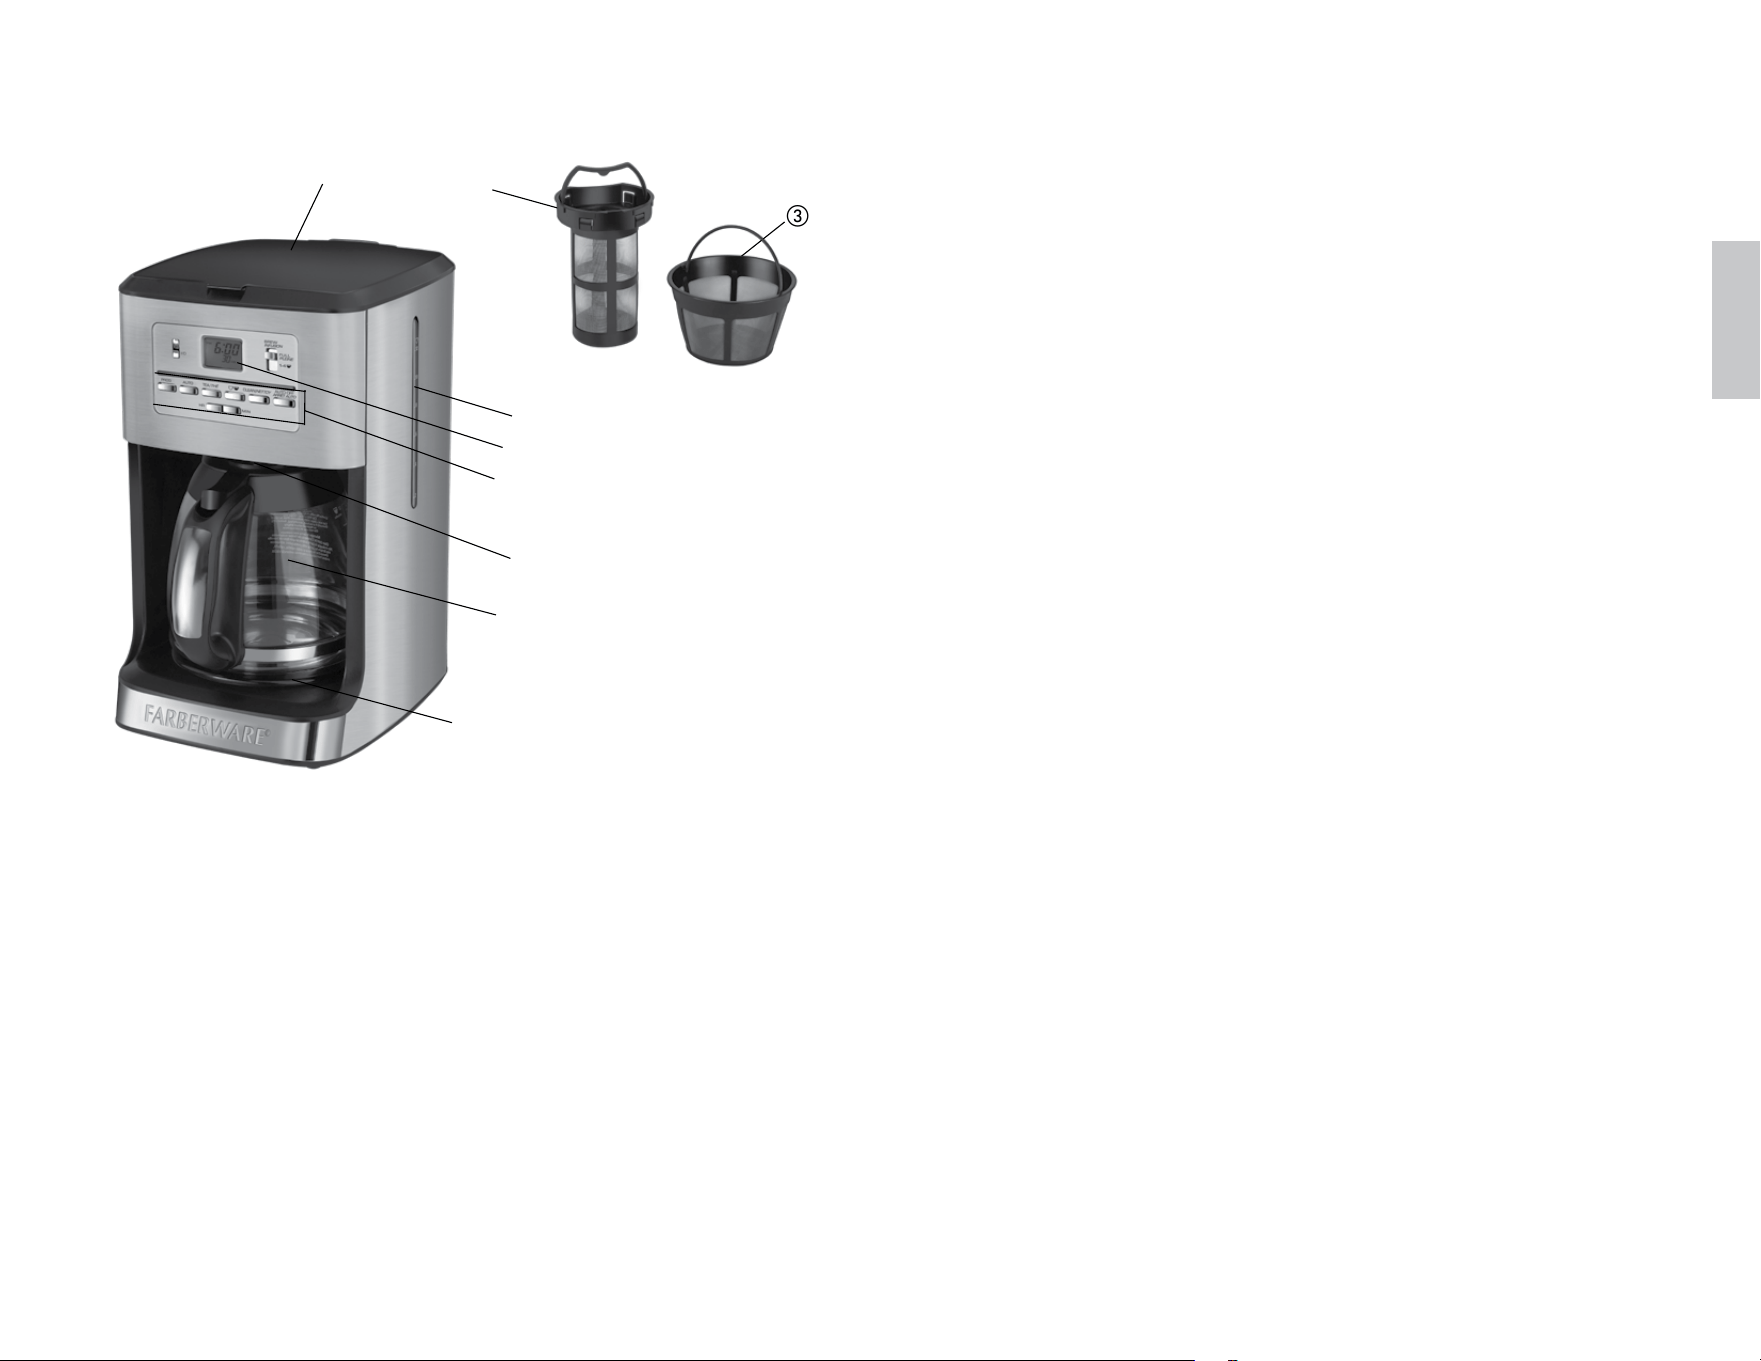
4
5
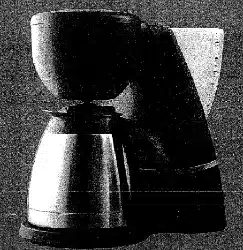
1. Cover
† 2. Permanent tea filter (Part # CM3000S-03)
† 3. Removable filter basket (Part # CM3000S-02)
4. Easy-view water window
5. Blue backlit digital display
6. Control panel
7. Sneak-A-Cup
® interrupt feature (coffee only)
† 8. Perfect Pour
® glass carafe (Part # CM3000S-05)
9. Nonstick “keep hot” carafe plate
10. Built-in cord storage (not shown)
Note: † indicates consumer replaceable/removable parts
ENGLISH
How to Use
This product is for household use only.
GETTING STARTED
•Pleasegotowww.prodprotect.com/applicatoregisteryourwarrantyandforinformation
about replaceable parts.
•WashremovablepartsasinstructedinCAREANDCLEANINGsection.
•Opencoverandpourfreshcoldwaterintothewaterreservoirupto12-cup(MAX)
mark.
•Placepermanentfilterorpaper8–12cupbasket-stylepaperfilterintofilterbasket
•Closecover.
•Makesurethecarafelidisinplaceandplaceemptycarafeonthe“KeepHot”
carafe plate.
•Plugelectriccordintoanoutlet.
•BrewwaterthroughappliancefollowingtheBREWINGCOFFEEinstructions—without
adding coffee grounds.
•Discardwaterfromthecarafe;rinsepermanentfilterordiscardpaperfilter.
•Turnofftheappliance,unplugandallowittocooldown.
SETTING THE CLOCK
1. Plug appliance into standard electrical outlet.
2. The digital clock display flashes 12:00.
Note:YoumustsettheclockinordertousetheDELAYEDBREWINGfeature.
3. Tochangethetime:PressHRbuttonuntilthecorrecttimeappearsonthedisplay.
Whenthetimepassesnoon“PM”illuminatestoletyouknowyouareinPMtime.
If the "PM" is not illuminated it is AM time.
4. RepeatthesameprocedurewiththeMINbuttontoselecttheminutes.
Note: If the appliance is unplugged or power is interrupted even momentarily, the time
may need to be reset.
BREWING COFFEE
1. open cover.
2. Fill water reservoir using the carafe with desired amount of cold tap water. do not
exceedthe12-cup(MAX)levelonthewaterreservoir.
Important: There are two overflow holes at the back of the coffeemaker. Be careful not
to overfill the water reservoir to avoid leaking onto the counter or work surface.
3. Insert removable filter basket into filter basket holder.
4.Placepermanentfilteroran8–12cupbasket-stylepaperfilterintotheremovable
filter basket.
5. Add desired amount of ground coffee.
6. Close cover.
7. Make sure carafe lid is properly attached to the empty carafe. Close the lid.
Note: Coffee may overflow if carafe lid is not properly placed.
8.Placeemptycarafeonthe“KeepHot”carafeplate.
9. Plug power cord into an outlet.
10. If regular brew strength is desired, your coffeemaker is set to brew coffee. (Make sure
theBREWbuttonisinthe“Full”position.).
11. If strong coffee is desired, press the brew strength button to select the strong brew.
(MakesuretheBREWbuttonisinthe“Full”position.).
12. Press I/o button; its light illuminates and brewing begins.
Product may vary slightly from what is illustrated.

6
7
ENGLISH
13. When coffee stops flowing into carafe, the brew cycle is complete. Coffeemaker beeps
when brew cycle is finished. The time since brewing will be visible at the bottom of the
digital display.
14. once coffee grounds have cooled, carefully open the cover and, using basket handle,
remove and discard used grounds. Close cover.
15. The coffeemaker will keep brewed coffee hot for 2 hours and then automatically turn off.
(SeeKEEPINGCOFFEEHOT-AUTOOFFsection.)
16. To turn off the coffeemaker at any time press the I/o button. The I/o light shuts off.
BREWING 1 TO 4 CUPS
Note: This feature slows down the brewing to extract the best flavor when brewing a small
amount of coffee.
1. Addtheappropriateamountofwaterforthenumberofcupstobebrewed(from1–4)
2. Fill the permanent filter or paper filter with desired amount of coffee grounds.
3.PresstheBREWbuttondownsothatthebuttonisinthe1–4
position.
Note: When using this feature coffee will be brewed at regular strength only.
4. Press the I/o button, its light illuminates and the brewing cycle begins.
Note: Press the I/o button to cancel this function.
SNEAK-A-CUP
®
FEATURE (TO BE USED ONLY FOR COFFEE)
Remove the carafe and brewing is paused. The carafe must be placed back on the carafe plate
in30secondstopreventoverflow.Brewingbeginsagain.
Important: The Sneak-A-Cup
®
feature cannot be used when making tea because the filter
basket holder is removed when brewing tea. You must wait until the tea has finished
brewing.
KEEPING COFFEE AND TEA HOT - AUTO OFF FUNCTION
Oncecoffeehasbrewed,thecoffeemakerwillkeepthe“KeepHot”carafeplatehotbetween
1 and 2 hours then it shuts off automatically. during that time the time since brewing is visible
at the bottom of the display.
There are 2 preset AUTo oFF times you can select:
•PresstheAUTOOFFbuttontoselect2hours(2).
•PresstheAUTOOFFbuttonasecondtimetoselect1hour(1).
BREW STRONG
1. If stronger coffee is desired, press the
button before pressing the I/o button. Its light
illuminates and function is activated.
2. Ifusingdelayedbrewing,followsteps1through5underDELAYEDBREWING,pressthe
button and then press the AUTo button. To cancel, press the button again
and the light turns off.
BREWING TEA
Note: It is not necessary to set the clock to brew tea unless you want to use delAYed
BREWING.
1. open cover.
2. Fill water reservoir with desired amount of cold tap water. do not exceed the 12-cup
(MAX)levelonthewaterreservoir.
3. Remove the permanent filter and the filter basket from the coffeemaker to avoid getting
coffee flavor in the tea.
4. Close cover. Fill the removable stainless steel permanent tea filter with the desired amount
of loose tea leaves.
5. Insert the tea filter with the arc at the top of the basket placed toward the pour spout on
the carafe; press down until it is securely in place.
6. Make sure carafe lid is properly attached to the carafe. Close the lid.
Note:Hotwatermayoverflowifcarafelidisnotproperlyplaced.
7.Placecarafeonthe“KeepHot”carafeplate.
8. Plug power cord into an outlet.
9. Press the TeA button. Its light illuminates.
10. Press the I/o button; its light illuminates and brewing begins.
11. When water stops flowing into carafe, the tea will be held for 5 minutes to steep.
12. When tea is ready, the coffeemaker beeps when steeping cycle is complete. The time
since brewing is illuminated at the bottom of the lCd.
Important: Sneak-A- Cup
®
feature cannot be used when making tea. You must wait until
the tea has finished brewing.
13. The coffeemaker will keep brewed tea hot for 2 hours and then automatically turn off.
(SeeKEEPINGCOFFEEandTEAHOT-AUTOOFFsection.)
14. To turn off the coffeemaker at any time press the I/o button. The I/o light shuts off.
15. Unplug appliance when not in use.
Note: do not leave tea in the tea pot or tea leaves in the stainless steel permanent filter
overnight.
DELAYED BREWING FOR COFFEE AND TEA
FOR COFFEE
1. Followsteps1through10underBREWINGCOFFEE.
2. Make sure clock has been set to correct time of day.
3. Presstheprogram(PROG)button.
Note: If the coffeemaker has not been unplugged the last delayed brewing time will
appear on the digital display.
4. Tochangethetime:pressHRbuttonuntilthedesiredcorrecttimeappearsonthe
display.PresstheMINbuttontoselecttheminutes.
Note:IfthehourisnotchangedtheclockwillCONTINUETOFLASH12:00.
5. Press the AUTo button to activate the delayed brewing. The AUTo light illuminates.
6.Tocheckthepresetautotime,pressPROGbuttonandholdit.Oncebuttonis
released, the clock time displays again.
7. If you want to change the preset auto time, press the AUTo button to cancel the
preset time. The light turns off.
8.Followsteps3through6underDELAYEDBREWING.
9. To cancel delayed brewing, press the AUTo button. The AUTo light shuts off. To brew
coffee, immediately press the I/o button.
FOR TEA
1. Followsteps1through10underBREWINGTEA.
2. Followsteps2through10forDELAYEDBREWINGforcoffee.
Care and Cleaning
Thisproductcontainsnouserserviceableparts.Referservicetoqualiedservice
personnel.
CLEANING
•Besuretheunitisunpluggedandhascooled.
•Openthecover.
•Toremovethelterbasket,gripthehandleandliftstraightup.Discardthepaperlter,if
used, and the coffee grounds.
•Washthelterbasket,permanentcoffeelter,tealter,carafeandcarafelidin
dishwasher, top rack or wash by hand in hot water and soap.
8
9
ENGLISH
•Wipetheappliance’sexteriorsurface,controlpaneland“KeepHot”platewithasoftdamp
cloth.Donotuseabrasivecleansersorscouringpads.Neverimmersethecoffeemakerin
water.
•Tocleantheinsideofthecover,openthecoverandleaveintheopenposition.Wipe
surfaces with a damp cloth.
CLEAN FUNCTION
We recommend cleaning your coffeemaker once a month.
1. Combine 6 cups of white vinegar and 4 cups of cold water in carafe.
2. Pour into water reservoir.
3. Placean8to12cupconestylepaperlterintheremovablelterbasket.Insertlterbasket
intolterbasketholderandcloselid.
4. Makesurethelidofthecarafeisinplaceandplaceemptycarafeonthe“KeepHot”carafe
plate.
5. Plug power cord into an outlet.
6. PressCLEANtoactivatecleaningcycle;theCLEANlightashes.
7. Part of the mixture will brew through. Remaining mixture will be held in coffeemaker for
30 minutes before completing its brew through.
Note: The entire cleaning cycle will take 45-60 minutes to complete.
8. WhenthecoffeemakercompletestheCLEANcycle,itbeepsandshutsoffautomatically.
9. BrewfreshwaterthroughappliancefollowinginstructionsinGETTINGSTARTEDbefore
brewing coffee again.
WARNING
RISK OF FIRE OR ELECTRIC SHOCK. DO NOT OPEN.
The lightning symbol refers to “dangerous voltage”; the
exclamation symbol refers to maintenance instructions. See
below.
Warning: To reduce the risk of fire or electric shock, do
not remove the cover of the coffeemaker. There are no user-
serviceable parts inside. Repair should be done by authorized
service personnel only.
NEED HELP?
For service, repair or any questions regarding your appliance, call the
appropriate800numberoncoverofthisbook.PleaseDONOTreturnthe
producttotheplaceofpurchase.Also,pleaseDONOTmailproductbackto
manufacturer, nor bring it to a service center. You may also want to consult the
website listed on the cover of this manual.
Three-Year Limited Warranty
(Applies only in the United States and Canada)
What does it cover?
•Anydefectinmaterialorworkmanshipprovided;however,Applica’sliability
will not exceed the purchase price of product.
For how long?
•Threeyearsfromthedateoforiginalpurchasewithproofofsuchpurchase.
What will we do to help you?
•Provideyouwithareasonablysimilarreplacementproductthatiseithernew
or factory refurbished.
How do you get service?
•Saveyourreceiptasproofofdateofsale.
•Checkouron-lineservicesiteatwww.prodprotect.com/applica,orcallour
toll-free number, 1-800-231-9786, for general warranty service.
•Ifyouneedpartsoraccessories,pleasecall1-800-738-0245.
What does your warranty not cover?
•Damagefromcommercialuse
•Damagefrommisuse,abuseorneglect
•Productsthathavebeenmodifiedinanyway
•Productsusedorservicedoutsidethecountryofpurchase
•Glasspartsandotheraccessoryitemsthatarepackedwiththeunit
•Shippingandhandlingcostsassociatedwiththereplacementoftheunit
•Consequentialorincidentaldamages(Pleasenote,however,thatsome
states do not allow the exclusion or limitation of consequential or incidental
damages, so this limitation may not apply to you.)
How does state law relate to this warranty?
•Thiswarrantygivesyouspecificlegalrights,andyoumayalsohaveother
rights that vary from state to state or province to province.
MadeandPrintedinPeople’sRepublicofChina
Copyrights and Trademarks of Farberware Licensing Company, LLC, including
FARBERWARE
TM
and FARBERWARE
®
, are used under license from Farberware Licensing
Company, LLC

10
11
Veuillez lire et conserver ce guide d’entretien et d’utilisation.
IMPORTANTES CONSIGNES DE
SÉCURITÉ
Lorsqu’onutilisedesappareilsélectriques,ilfauttoujoursrespecter
certaines règles de sécurité fondamentales, notamment les
suivantes :
❍
lire toutes les directives.
❍
Nepastoucherauxsurfaceschaudes;utiliserlespoignéesetles
boutons.
❍
Afind’éviterlesrisquesd’incendie,dechocélectriqueoude
blessures, ne pas immerger le cordon, la fiche ou la base de
l’appareildansl’eauoutoutautreliquide.
❍
Exerceruneétroitesurveillancelorsquel’appareilestutiliséparun
enfantouprèsd’unenfant.
❍
Débrancherl’appareillorsqu’ilnesertpasouavantdelenettoyer.
Laisserl’appareilrefroidiravantd’yplaceroud’enretirerdes
composantes, et de le nettoyer.
❍
Nepasutiliserunappareildontlaficheoulecordonestabîmé,
qui fonctionne mal ou qui a été endommagé de quelque façon que
ce soit. Pour un examen, une réparation ou un réglage, rapporter
l’appareilàuncentredeserviceautorisé.Oucomposerlenuméro
sans frais inscrit sur la page couverture du présent guide.
❍
L’utilisationd’accessoiresnonrecommandésparlefabricantde
l’appareilprésentedesrisquesd’incendie,dechocélectriqueoude
blessures.
❍
Nepasutiliserl’appareilàl’extérieur.
❍
Nepaslaisserpendrelecordonsurlebordd’unetableoud’un
comptoir ni le laisser entrer en contact avec une surface chaude.
❍
Nepasplacerl’appareilsurledessusouprèsd’unélément
chauffant électrique ou à gaz ni dans un four chaud.
❍
Toujoursbrancherlafichedel’appareild’abord,puisbrancherle
cordondanslaprisemurale.Pourdébrancherl’appareil,placer
toutes les commandes à la position « off » (arrêt) et retirer la fiche
de la prise.
❍
Utiliserl’appareiluniquementauxfinspourlesquellesilaété
conçu.
❍
Garderlecouverclesurlacarafelorsquel’appareilestutilisé.
❍
des brûlures peuvent de produire si le couvercle de la carafe est
retirépendantlescyclesd’infusion.
❍
Nepasdéposerlacarafechaudesurunesurfacefroideou
mouillée.
❍
Nepasseservirdelacarafesileverreenestfêléousila
poignée est lache ou affaiblie.
❍
Nepasnettoyerlacarafeavecdesproduitsnettoyantsabrasifs,
delalained’aciernitoutautreproduitabrasif.
CONSERVER CES MESURES.
Cet appareil est conçu pour un usage domestique seulement.
FICHE POLARISÉE (Modèles de 120 V seulement)
l'appareil est muni d'une fiche polarisée (une lame plus large que l'autre). Afin
de minimiser les risques de secousses électriques, ce genre de fiche n'entre que
d'une façon dans une prise polarisée. lorsqu'on ne peut insérer la fiche à fond
dans la prise, il faut tenter de le faire après avoir inversé les lames de côté. Si la
fiche n'entre toujours pas dans la prise, il faut communiquer avec un électricien
certifié.
Il ne faut pas tenter de modifier la fiche.
VIS INDESSERRABLE
Avertissement : L’appareil est doté d’une vis indesserrable empêchant
l’enlèvement du couvercle extérieur. Pour réduire les risques d’incendie
ou de secousses électriques, ne pas tenter de retirer le couvercle extérieur.
L’utilisateur ne peut pas remplacer les pièces de l’appareil. En confier la
réparation seulement au personnel des centres de service autorisés.
CORDON
a) Lecordond’alimentationdel’appareilestcourt(ouamovible)afinde
minimiserlesrisquesd’enchevêtrementoudetrébuchement.
b)Ilexistedescordonsd’alimentationamoviblesouderallongepluslongsetil
fauts’enserviravecprudence.
c) Lorsqu’onutiliseuncordond’alimentationamovibleouderallongeplus
long,ilfauts’assurerque:
1) latensionnominaleducordond’alimentationamovibleouderallonge
soitaumoinségaleàcelledel’appareil,etque;
2) lorsquel’appareilestdetypemisàlaterre,ilfaututiliseruncordonde
rallonge mis à la terre à trois broches, et;
3) lecordonpluslongsoitplacédesortequ’ilnesoitpasétalésurle
comptoiroulatabled’oùdesenfantspourraientletirer,niplacéde
manière à provoquer un trébuchement.
Note : Lorsquelecordond’alimentationestendommagé,ilfautlefaire
remplacer par du personnel qualifié ou, en Amérique latine, par le personnel
d’uncentredeserviceautorisé.
FRANÇAIS
12
13
Le produit peut différer légèrement de celui qui est illustré.
1. Couvercle
† 2. Filtre à thé permanent (pièce nº CM3000S-03)
† 3. Filtre à café permanent (pièce nº CM3000S-04)
4. Indicateur du niveau d'eau facile à lire
5. Écran numérique rétroéclairé
6. Panneau de commande
7. Fonction d'interruption Sneak-A-Cup
MD
† 8. Carafe en verre Perfect Pour
MD
(pièce nº CM3000S-05)
9. Réchaud antiadhésif
10. Range-cordon intégré (non illustré)
Remarque : † le symbole † indique une pièce amovible/remplaçable par l'utilisateur.
Utilisation
Cet appareil est conçu pour un usage domestique seulement.
POUR COMMENCER
•Visiterlewww.prodprotect.cm/applicapourenregistrerlagarantieetobtenirdes
renseignements sur les pièces remplaçables.
•LavertouteslespiècesamoviblesensuivantlesdirectivesdelasectionENTRETIEN
ETNETTOYAGE.
•Ouvrirlecouvercleetverserdel'eaufraîchefroidedansleréservoiràeau,jusqu'àla
marquede12tasses(MAX).
•Placerlefiltredorépermanentouunfiltreenpapierdetypepanierde2à3litres
(8 à 12 tasses) dans le panier-filtre.
•Refermerlecouvercle.
•Veilleràcequelecouvercledelacarafesoitenplaceetdéposerlacarafevidesurle
réchaud.
•Brancherlaficheducordondansuneprisedecourant.
•Faireeffectueruncycled'infusionàl'appareilensuivantlesinstructionsdelasection
INFUSIONDUCAFÉ,sansajouterdecafé.
•Viderl'eaudelacarafe;rincerlefiltrepermanentoujeterlefiltreenpapier.
•Éteindrel'appareil,ledébrancheretlelaisserrefroidir.
RÉGLAGE DE L’HORLOGE
1. Brancherl'appareildansuneprisedecourantstandard.
2. les chiffres « 12:00 » clignotent sur l'horloge numérique.
Remarque :L’horlogedoitêtrerégléepourquelafonctiond’infusiondifféréepuisse
être utilisée.
3. Pourchangerl’heure:Appuyersurleboutonderéglagedesheures(HR)jusqu’à
cequel’heureexactesoitaffichée.Lorsquemidiestdépassé,letémoind'heurede
l'après-midi(PM)s'allume.SiletémoinPMestéteint,ils’agitdel’heuredumatin.
4. RépéterlamêmeprocédureavecleboutonMINpoursélectionnerlesminutes.
Remarque : Si la cafetière est débranchée ou si le courant est interrompu, même
momentanément,l’horlogepourraitdevoirêtrerégléedenouveau.
INFUSION DU CAFÉ
1. ouvrir le couvercle.
2. À l'aide de la carafe, remplir le réservoir à eau avec la quantité voulue d'eau froide
durobinet,sanstoutefoisdépasserleniveaude12tasses(MAX)inscritsurle
réservoir à eau.
Important : Il y a deux orifices de trop-plein à l’arrière de la cafetière. Veiller à ne pas
excéder le niveau maximal du réservoir pour éviter que de l’eau ne s’écoule sur le
comptoir ou sur la surface d’utilisation
3. Insérer le panier-filtre amovible dans le porte-panier.
4. Placer le filtre permanent ou un filtre en papier de style panier de 2 à 3 litres
(8 à 12 tasses) dans le panier-filtre amovible.
5. Ajouter la quantité désirée de café moulu.
6. Fermer le couvercle.
7.Veilleràcequelecouvercledelacarafesoitcorrectementfixéàlacarafevide.
Fermer le couvercle.
Remarque : Lecafépeutdébordersilecouvercledelacarafen’estpasbienplacé.
8. déposer la carafe vide sur le réchaud.
9.Brancherlaficheducordondansuneprisedecourant.
FRANÇAIS

14
15
10.Siledegréd’infusionmoyennementcorséestsouhaité,lacafetièreestprêteàinfuserle
café.(S'assurerqueleboutonINFUSIONestàlapositiond'«infusionpleine».)
11.Poursélectionnerledegréd’infusioncorsé,appuyersurleboutondesélection
dudegréd’infusionetchoisirledegréd'infusioncorsé.(S'assurerquelebouton
INFUSIONestàlapositiond'«infusioncomplète».)
12.AppuyersurleboutonI/O;letémoinlumineuxs’allumeetl'infusioncommence.
13.Lorsquelecafécessedecoulerdanslacarafe,lecycled’infusionestterminé.
l'afficheur numérique indique au bas le temps écoulé depuis l'infusion.
14. Une fois que le marc de café a refroidi, ouvrir délicatement le couvercle monopièce et,
en saisissant la poignée du panier, retirer et jeter le marc. Fermer le couvercle.
15. la cafetière conservera le café chaud pendant deux heures, puis s'éteindra
automatiquement.(VoirlasectionMODECHALEUR-ARRÊTAUTOMATIQUE.)
16. Pour éteindre la cafetière en tout temps, appuyer sur le bouton marche/arrêt. le témoin
lumineux marche/arrêt s'éteint. laisser l'appareil débranché quand il ne sert pas.
INFUSION DE 1 À 4 TASSES DE CAFÉ
Remarque :Cettefonctionralentitl’infusionafind’extraireleplusdesaveurpossible
lorsqu’unepetitequantitédecaféestutilisée.
1. Ajouterlaquantitéd’eauconvenantaunombredetassesdecaféàinfuser
(de 1 à 4).
2. Placer la quantité désirée de café moulu dans le filtre permanent ou le filtre en papier.
3.AppuyersurleboutonINFUSIONdefaçonàcequ'ilsetrouveàlapositiond'infusion
de1à4tasses(1–4
).
Remarque : lorsque cette fonction est utilisée, le café est infusé au degré moyennement
corsé.
4. AppuyersurleboutonI/O;letémoinlumineuxautourduboutons’allumeetlecycle
d'infusion commence.
Remarque : Appuyer sur le bouton marche/arrêt pour annuler cette fonction
FONCTION SNEAK-A-CUP
MD
(POUR LE CAFÉ SEULEMENT)
enlever la carafe; l'infusion s'interrompt alors. la carafe doit être replacée sur le réchaud
dans les 30 secondes suivantes pour éviter les débordements. l'infusion reprend.
Important : La fonction Sneak-A-Cup
MD
ne doit pas être utilisée pendant l'infusion du
thé, parce que le porte-panier ne se trouve alors pas dans l'appareil. Il faut attendre que
l'infusion du thé soit terminée.
MODE CHALEUR POUR LE CAFÉ ET LE THÉ - FONCTION D'ARRÊT AUTOMATIQUE
Unefoisl’infusionterminée,lacafetièregardeleréchaudenfonctionpendantuneheure
ou deux heures et s'éteint automatiquement après ce délai. Pendant ce temps, l'afficheur
numérique indique au bas le temps écoulé depuis l'infusion.
Choisir parmi les deux délais d'arrêt automatique préprogrammés :
•Appuyerunefoissurleboutond'ARRÊTAUTO pour sélectionner le délai de deux
heures.
•Appuyerunedeuxièmefoissurleboutond'ARRÊTAUTO pour sélectionner le délai
d'une heure.
DEGRÉ D'INFUSION CORSÉ
1. Poursélectionnerundegréd'infusionpluscorsé,appuyersurlebouton1–4
avant
d'appuyersurleboutonI/O.Letémoinlumineuxs’allume,etlafonctionestactivée.
2. Si la fonction d'infusion différée est utilisée, suivre les étapes 1 à 5 de la section
INFUSIONDIFFÉRÉE,puisappuyersurlesboutons1–4
et AUTo. Pour annuler,
appuyerdenouveausurlebouton1–4
; le témoin lumineux s'éteint
INFUSION DU THÉ
Remarque :Iln’estpasnécessairederéglerl’horlogepourinfuserduthé,saufpour
utiliserlafonctiond’infusiondifférée.
1. ouvrir le couvercle.
2. Remplir le réservoir à eau avec la quantité voulue d'eau froide du robinet, sans
toutefoisdépasserleniveaude12tasses(MAX)inscritsurleréservoiràeau.
3. Retirer le filtre doré permanent et le panier-filtre de la cafetière afin d'éviter de
donner un goût de café au thé.
4. Fermer le couvercle. Remplir le filtre à thé permanent et amovible en acier
inoxydable avec la quantité désirée de feuilles de thé libres.
5. Insérer le filtre à thé, l'arc sur le dessus du panier placé vers le bec verseur de la
carafe; appuyer sur le filtre jusqu'à ce qu'il soit solidement en place.
6.Vérifierquelecouvercledelacarafeestcorrectementfixéàlacarafe.Fermerle
couvercle.
Remarque : Del'eauchaudepourradébordersilecouvercledelacarafen’estpasbien
placé.
7. déposer la carafe sur le réchaud.
8.Brancherlaficheducordondansuneprisedecourant.
9.AppuyersurleboutonTHÉ.Letémoinlumineuxautourduboutons’allume.
10.AppuyersurleboutonI/O;letémoinlumineuxs’allumeetl'infusioncommence.
11. Une fois toute l'eau écoulée dans la carafe, la cafetière laisse le thé reposer
pendant cinq minutes.
12. lorsque le thé est prêt, la cafetière émet un bip indiquant que le cycle d'infusion
est terminé. l'afficheur numérique indique au bas le temps écoulé depuis l'infusion
Important : La fonction Sneak-A-Cup
MD
ne peut pas être utilisée pendant l'infusion du
thé. Il faut attendre que l'infusion du thé soit terminée.
13. la cafetière conservera le thé chaud pendant deux heures, puis s'éteindra
automatiquement.(VoirlasectionMODECHALEURPOURLECAFÉETLETHÉ-
FONCTIOND'ARRÊTAUTOMATIQUE.)
14. Pour éteindre la cafetière en tout temps, appuyer sur le bouton marche/arrêt. le
témoin lumineux marche/arrêt s'éteint.
15. laisser l'appareil débranché quand il ne sert pas.
Remarque :Nepaslaisserpasjusqu'aulendemaindethédanslacarafeoudefeuilles
de thé dans le filtre permanent en acier inoxydable.
INFUSION DIFFÉRÉE DU CAFÉ ET DU THÉ
POUR LE CAFÉ
1.SSuivrelesétapes1à10delasectionINFUSIONDUCAFÉ.
2.S’assurerquel’horlogeestrégléeàlabonneheure.
3.Appuyersurleboutondeprogrammation(PROG).L’horlogenumériqueindique
12:00.
Remarque :Silacafetièren’apasétédébranchée,ladernièreheured’infusiondifférée
programméeapparaîtàl’afficheurnumérique.
4.Pourchangerl'heure:appuyersurleboutonderéglagedesheures(HR)jusqu’à
cequel’heureexactesoitaffichée.Appuyersurleboutonderéglagedesminutes
(MIN)poursélectionnerlesminutes.
Remarque : Si l'heure n'a pas été changée, l'horloge continuera de clignoter et
d'indiquer 12:00.
5.AppuyersurleboutonAUTOpouractiverlemoded’infusiondifférée.Letémoin
lumineux AUTo s'allume.
FRANÇAIS

16
17
6.Pourvérifierl'heureprogrammée,appuyersurleboutonPROGetlemaintenirenfoncé.
lorsque le bouton est relâché, l'horloge réaffiche l'heure.
7. Pour changer l'heure programmée, appuyer sur le bouton AUTo afin d'annuler l'heure
préalablement programmée. le témoin lumineux s'éteint.
8.Suivrelesétapes3à6delasectionINFUSIONDIFFÉRÉE.
9.Pourannulerl’infusiondifférée,appuyersurleboutonAUTO.Letémoinlumineux
AUTo s'éteint. Pour infuser du café immédiatement, appuyer sur le bouton marche/
arrêt.
POUR LE THÉ
1. Suivrelesétapes1à9delasectionINFUSIONDUTHÉ.
2. Suivre les étapes 2 à 10 des instructions indiquées pour le café dans la section
INFUSIONDIFFÉRÉEDUCAFÉ.
Entretien et nettoyage
Cetappareilnecontientaucunepièceréparableparl’utilisateur.Confierlaréparationàun
technicien qualifié
NETTOYAGE
• S’assurerquelacafetièreestdébranchéeetarefroidi.
• Ouvrirlecouvercle.
• Retirerlepanier-filtreenlesaisissantparsapoignéeetenlesoulevantbiendroit.Jeterle
filtre en papier, le cas échéant, et le marc de café.
• Laverlepanier-filtre,lefiltreàcafépermanent,lefiltreàthé,lacarafeetlecouverclede
lacarafesurlepaniersupérieurdulave-vaisselle,oulesnettoyeràlamaindansdel’eau
chaude savonneuse.
• Essuyerlasurfaceexternedel’appareil,lepanneaudecommandeetleréchaudàl’aide
d’unlingedouxhumide.Nepasutiliserdenettoyantsabrasifsoudetamponsàrécurer.
Nejamaisimmergerlacafetière.
• Pournettoyerl’intérieurducouvercle,ouvrirlecouvercleetlelaisserenposition
ouverte. essuyer les surfaces à l'aide d'un linge humide
FONCTION DE NETTOYAGE AUTOMATIQUE CLEAN
Il est recommandé de nettoyer la cafetière une fois par mois.
1. Verser1,5litre(6tasses)devinaigreblancet1litre(4tasses)d’eaufroidedanslacarafe.
2. Verserlemélangedansleréservoiràeau.
3. Placer un filtre en papier de style conique de 2 à 3 litres (8 à 12 tasses) dans le panier
d’infusionamovible.Insérerlepanier-filtredansleporte-panieretrefermerlecouvercle.
4. Veilleràcequelecouvercledelacarafesoitenplaceetdéposerlacarafevidesurle
réchaud.
5. Brancherlaficheducordondansuneprisedecourant.
6. AppuyersurleboutondenettoyageautomatiqueCLEANpouractiverlecyclede
nettoyage; le témoin lumineux clignote.
7. Une partie du mélange sera infusée. le reste demeurera dans la cafetière pendant 30
minutesavantd’êtreinfusécomplètement.
Remarque : le cycle de nettoyage complet prend de 45 à 60 minutes.
8. À la fin du cycle de nettoyage automatique, la cafetière émet un bip et s'éteint
automatiquement.
9. Avantd’infuserducaféànouveau,infuserdel’eaufraîchedanslacafetièreensuivant
lesinstructionsdelasectionPOURCOMMENCER.
AVERTISSEMENT
RISQUES D’INCENDIE OU DE SECOUSSES. ÉLECTRIQUES.
NE PAS OUVRIR.
L’éclair représente une tension dangereuse. Le point d’exclamation
indique qu’il s’agit d’importantes consignes d’entretien. Voir plus
bas.
AVERTISSEMENT : Afin d’éviter les risques d’incendie ou de
secousses électriques, ne pas retirer le couvercle de la cafetière.
L’utilisateur ne peut réparer aucune des pièces internes. En
confier les réparations uniquement au personnel d’un centre de
serviceutorisé.
FRANÇAIS

18
19
BESOIN D’AIDE?
Pourcommuniqueraveclesservicesd’entretienouderéparation,oupour
adresser toute question relative au produit, composer le numéro sans frais
appropriéindiquésurlapagecouverture.Nepasretournerleproduitoùila
étéacheté.Nepasposterleproduitaufabricantnileporterdansuncentre
de service. on peut également consulter le site web indiqué sur la page
couverture.
GARANTIE LIMITÉE DE TROIS ANS
(Valable seulement aux États-Unis et au Canada)
Quelle est la couverture?
•Toutdéfautdemain-d’oeuvreoudematériau;toutefois,laresponsabilitéde
lasociétéApplicaselimiteauprixd’achatduproduit.
Quelle est la durée?
•Troisannéesàcompterdeladated’achatinitiale,avecunepreuved’achat.
Quelle aide offrons nous?
•Remplacementparunproduitraisonnablementsemblablenouveauou
réusiné.
Comment se prévaut-on du service?
•Conserversonreçudecaissecommepreuvedeladated’achat.
•Visiternotresitewebauwww.prodprotect.com/applica,oucomposersans
frais le 1 800 231-9786, pour obtenir des renseignements généraux relatifs à
la garantie.
•Onpeutégalementcommuniqueravecleservicedespiècesetdes
accessoires au 1 800 738-0245.
Qu’est-ce que la garantie ne couvre pas?
•Desdommagesdusàuneutilisationcommerciale.
•Desdommagescausésparunemauvaiseutilisationoudelanégligence.
•Desproduitsquiontétémodifiés.
•Desproduitsutilisésouentretenushorsdupaysoùilsontétéachetés.
•Despiècesenverreettoutautreaccessoireemballésavecleproduit.
•Lesfraisdetransportetdemanutentionreliésauremplacementduproduit.
•Desdommagesindirects(ilfauttoutefoisprendrenotequecertainsétatsne
permettentpasl’exclusionnilalimitationdesdommagesindirects).
Quelles lois régissent la garantie?
•Lesmodalitésdelaprésentegarantiedonnentdesdroitslégauxspécifiques.
L’utilisateurpeutégalementseprévaloird’autresdroitsselonl’étatoula
provincequ’ilhabite.
Copyrights et marques déposée de Farberware Licensing Company, LCC, y compris
FARBERWARE
MC
et FARBERWARE
MD
sont utilisées sous licence de Farberware Licensing
Company, LCC.
Fabriqué e Imprimé en République populaire de Chine
FRANÇAIS
NOTES / NOTES

2011/4-7-44e/F
© 2011 Applica Consumer Products, Inc.