Applicable for T800 Series
User Manual
Applicable for T8 Series
Robotic Vacuum Cleaner
T8
Please read the instructions carefully before using this product and keep it properly.

Congratulations on the purchase of your Lefant ROBOTICS!
We hope it brings you many years of satisfaction. We trust the purchase of
your new robot will help keep your home clean and provide you more quality
time todo other things.
Wisdom Inspired Freedom
Should you encounter situations that have not been properly addressed in
this Instruction Manual, please contact our Customer Service Center where
atechniciancanaddressyourspecificproblemorquestion.
Formoreinformation,pleasevisittheLefantROBOTICSofficialwebsite:
www.lefantlife.com or send email to [email protected]
The Company reserves the right to make technological and/or design changes
to this product for continuous improvemen.

Contents
1
1.Important Safety Instructions
·······························
2.Product Composition
·········································
3.Operating and Programming
································
3.1 Notes Before Cleaning··············································
3.2 Quick Start·························································
3.3 Cleaning Mode Selection············································
3.4 Scheduling setting··················································
3.5APPdownloadandnetworkconfiguration·····························
4.Maintance
························································
4.1 Dust Bin and Filters················································
4.2 Roller Brush and Side Brushes······································
4.3 Other Components·················································
5.Indicator Light
··················································
6.Troubleshooting
················································
7.Technical Parameters
········································
2
4
6
6
7
10
11
13
17
17
18
19
20
21
23

1.Important Safety Instructions
2
When using an electrical appliance, basic precautions should always be followed, including the following:
READ ALL INSTRUCTIONS BEFORE USING (THIS APPLIANCE)
WARNING: Read all safety warnings and instructions.
1.Do not leave appliance when plugged in. Unplug from outlet when not in use and before
servicing.
2.Do not use outdoors or on wet surfaces.
3.Do not allow to be used as a toy. Close attention is necessary when used by or near children.
4.Do not unplug by pulling on cord. To unplug, grasp the plug, not the cord.
5.Do not handle plug or appliance with wet hands.
6.Keephair,looseclothing,fingers,andallpartsofbodyawayfromopeningsandmovingparts.
7.Turnoffallcontrolsbeforeunplugging.
8.Use extra care when cleaning on stairs.
9.Donotusetopickupflammableorcombustibleliquids,suchasgasoline,oruseinareas
where they may be present.
10.Do not pick up anything that is burning or smoking, such as cigarettes, matches, or hot
ashes.
11.Donotusewithoutdustbagand/orfiltersinplace.
12.Preventunintentionalstarting.Ensuretheswitchisintheoff-positionbeforeconnectingto
batterypack,pickinguporcarryingtheappliance.Carryingtheappliancewithyourfingeron
the switch or energizing appliance that have the switch on invites accidents.
13.Disconnect the battery pack from the appliance before making any adjustments, changing
accessories, or storing appliance. Such preventive safety measures reduce the risk of starting
the appliance accidentally.
14.Rechargeonlywiththechargerspecifiedbythemanufacturer.Achargerthatissuitablefor
onetypeofbatterypackmaycreateariskoffirewhenusedwithanotherbatterypack.
15.Useappliancesonlywithspecificallydesignatedbatterypacks.Useofanyotherbattery
packsmaycreateariskofinjuryandfire.
16.When battery pack is not in use, keep it away from other metal objects, like paper clips,
coins, keys, nails, screws or other small metal objects, that can make a connection from one
terminaltoanother.Shortingthebatteryterminalstogethermaycauseburnsorafire.
17.Under abusive conditions, liquid may be ejected from the battery; avoid contact. If contact
accidentallyoccurs,flushwithwater.Ifliquidcontactseyes,additionallyseekmedicalhelp.
Liquid ejected from the battery may cause irritation or burns.
18.Donotuseabatterypackorappliancethatisdamagedormodified.Damagedormodified
batteriesmayexhibitunpredictablebehaviorresultinginfire,explosionorriskofinjury.
19.Donotexposeabatterypackorappliancetofireorexcessivetemperature.Exposuretofire
or temperature above 130°C may cause explosion. The temperature of 130°C can be replaced
by the temperature of 265°F.
20.Follow all charging instructions and do not charge the battery pack or appliance outside of
thetemperaturerangespecifiedintheinstructions.Chargingimproperlyorattemperatures
outsideofthespecifiedrangemaydamagethebatteryandincreasetheriskoffire.
21.Haveservicingperformedbyaqualifiedrepairpersonusingonlyidenticalreplacementparts.
This will ensure that the safety of the product is maintained.
22.Do not modify or attempt to repair the appliance or the battery pack (as applicable) except
as indicated in the instructions for use and care.
SAVE THESE INSTRUCTIONS
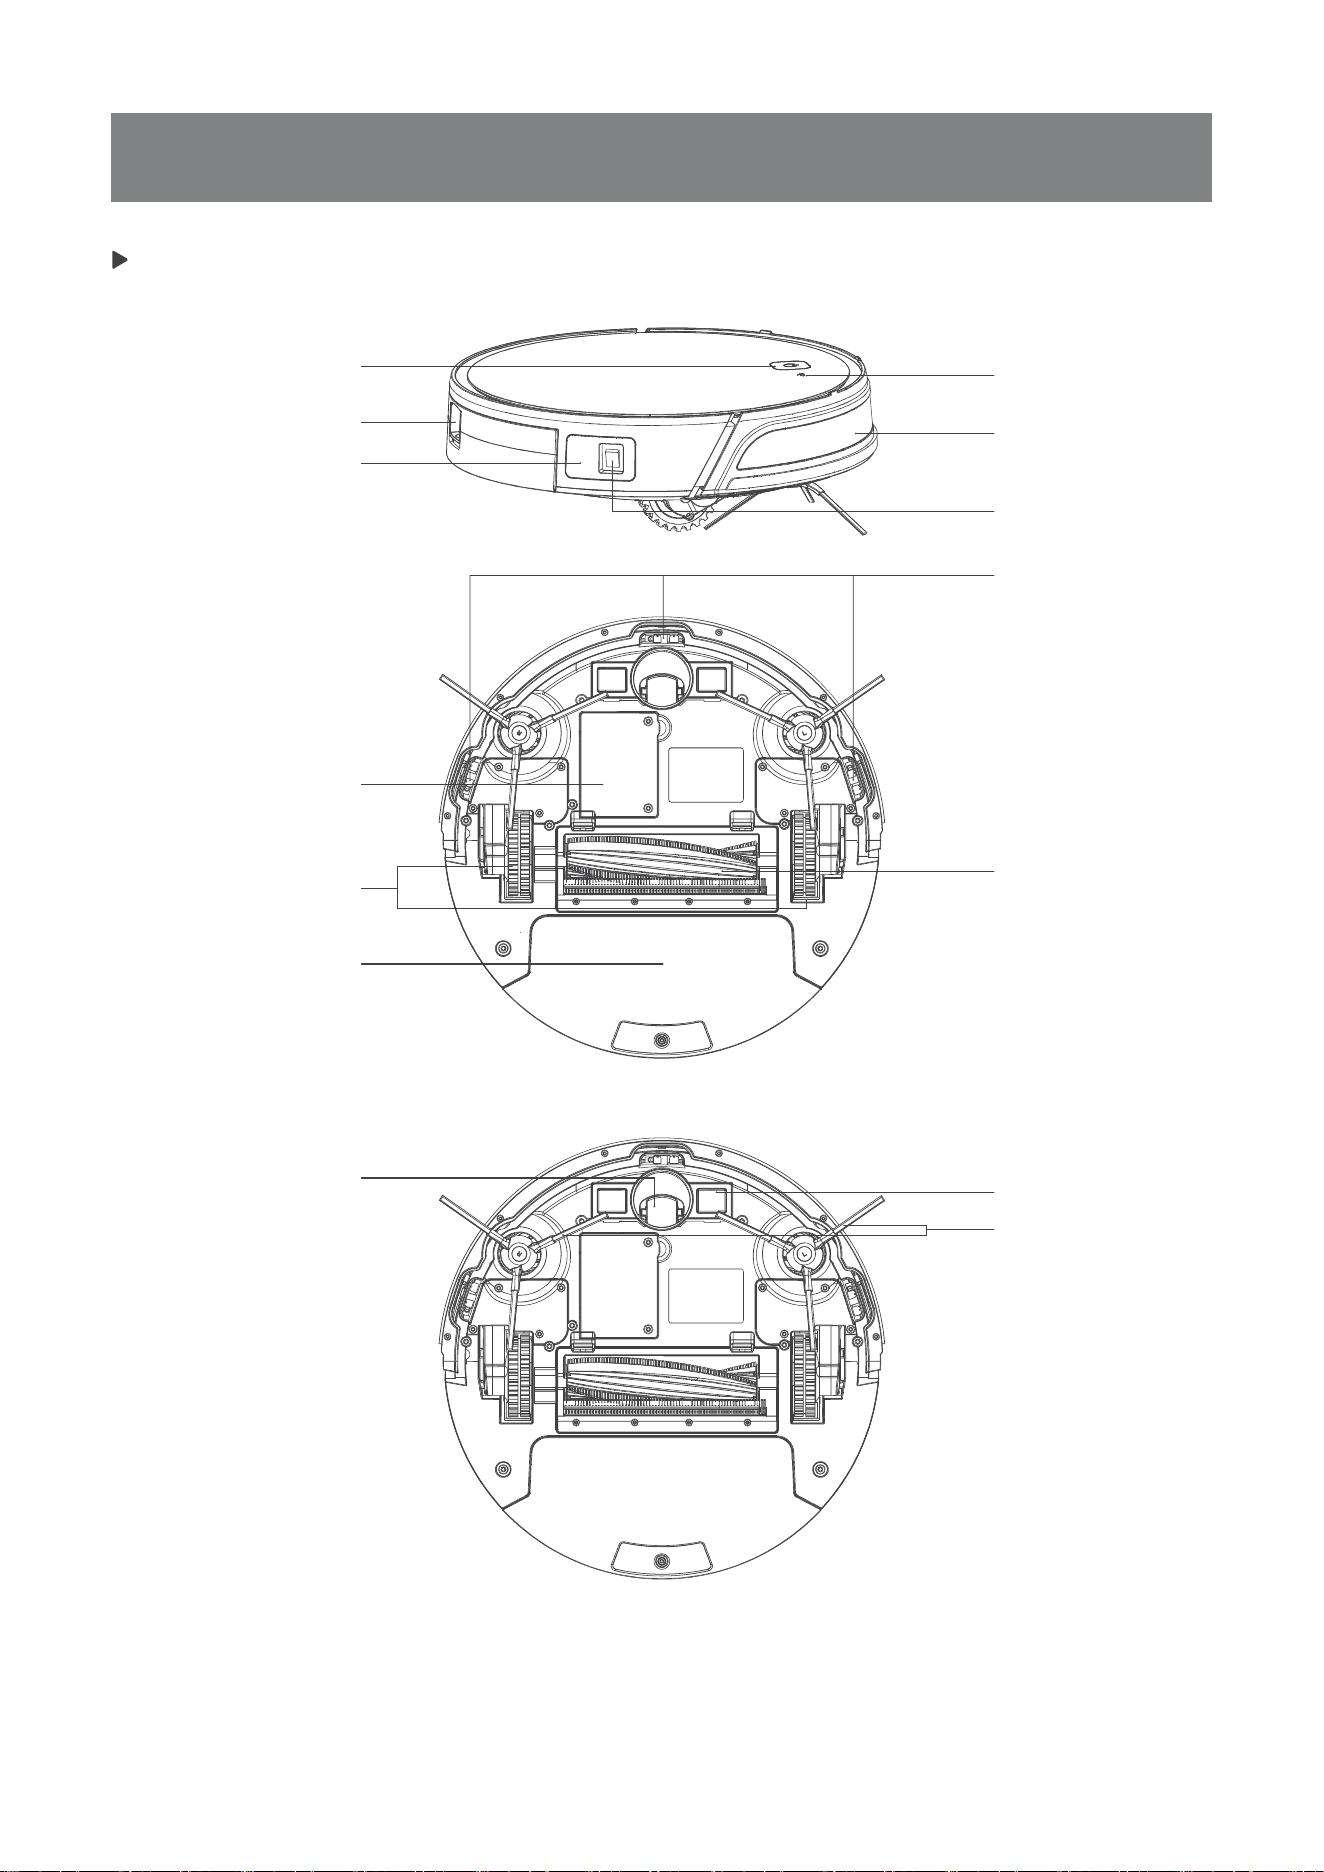
2.Product Composition
3
Robot
Start/Pause Button
Wi-FiIndicatorLight
Anti-dropSensors
Roller Brush
Anti-collisionSensor
Battery Cover
Driving Wheels
Dust Bin
Dust Bin/Water Tank
Infrared Receiver
Power Switch
Charging Contacts
Side Brushes
Universal Wheel
and Bumper
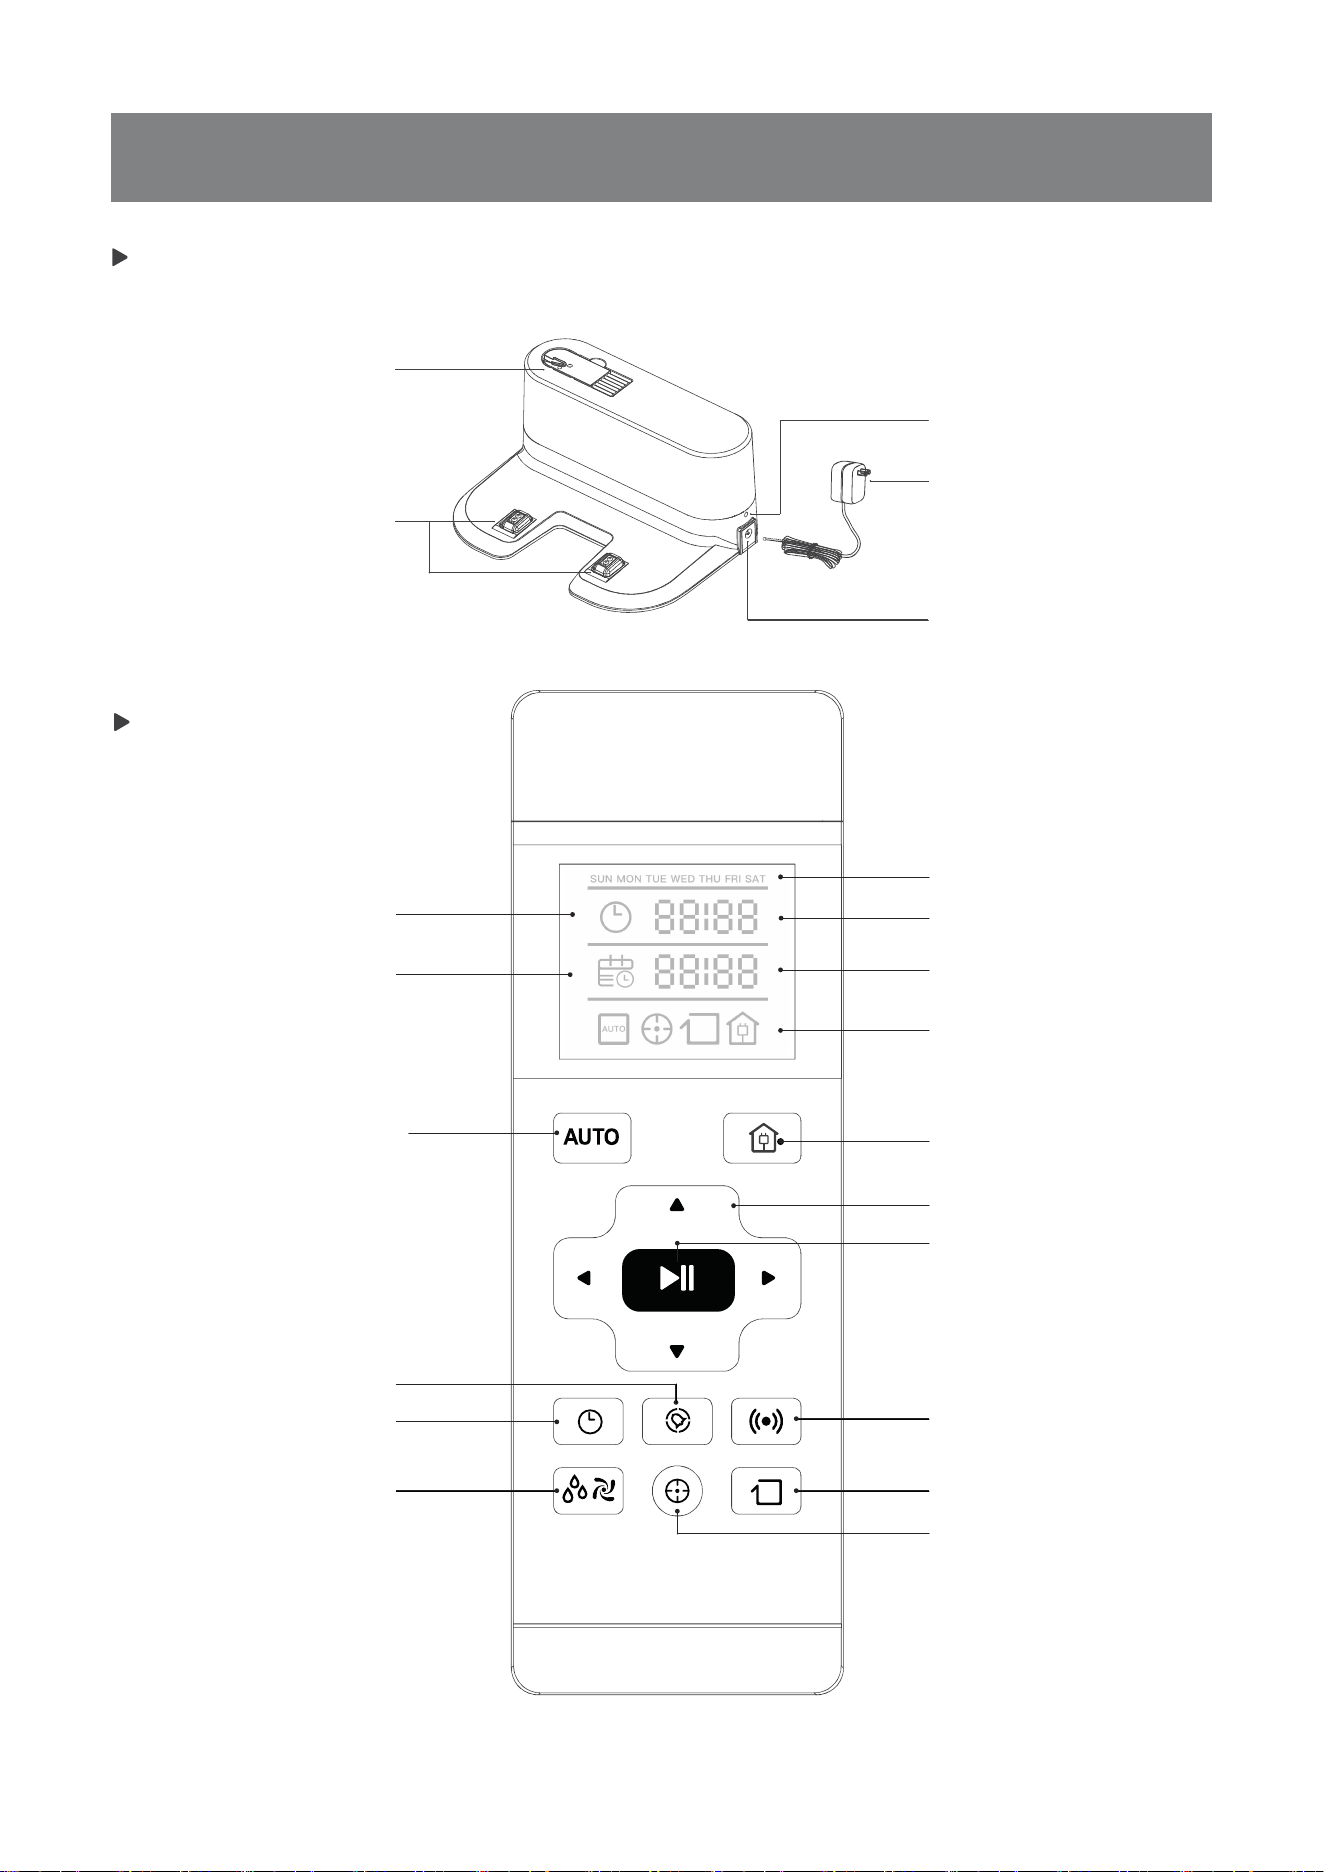
2.Product Composition
4
Charging Dock
Cleaning Tool
Charging Dock Pins
Power Indicator Light
Power Adapter
Power Adapter Port
Remote Control
clock icon
Appointment icon
AUTO Mode Button
Time Scheduling Button
Set Current Time Button
Suction/water volume
adjustment
Week display bar
Clock time display
Schedule time display
Mode status display
Return to Charger
Mode Button
Direction Control Button
START/PAUSE Button
Programmed Cleaning Mode
Button
Spot Cleaning Mode Button
Edge Cleaning Mode Button
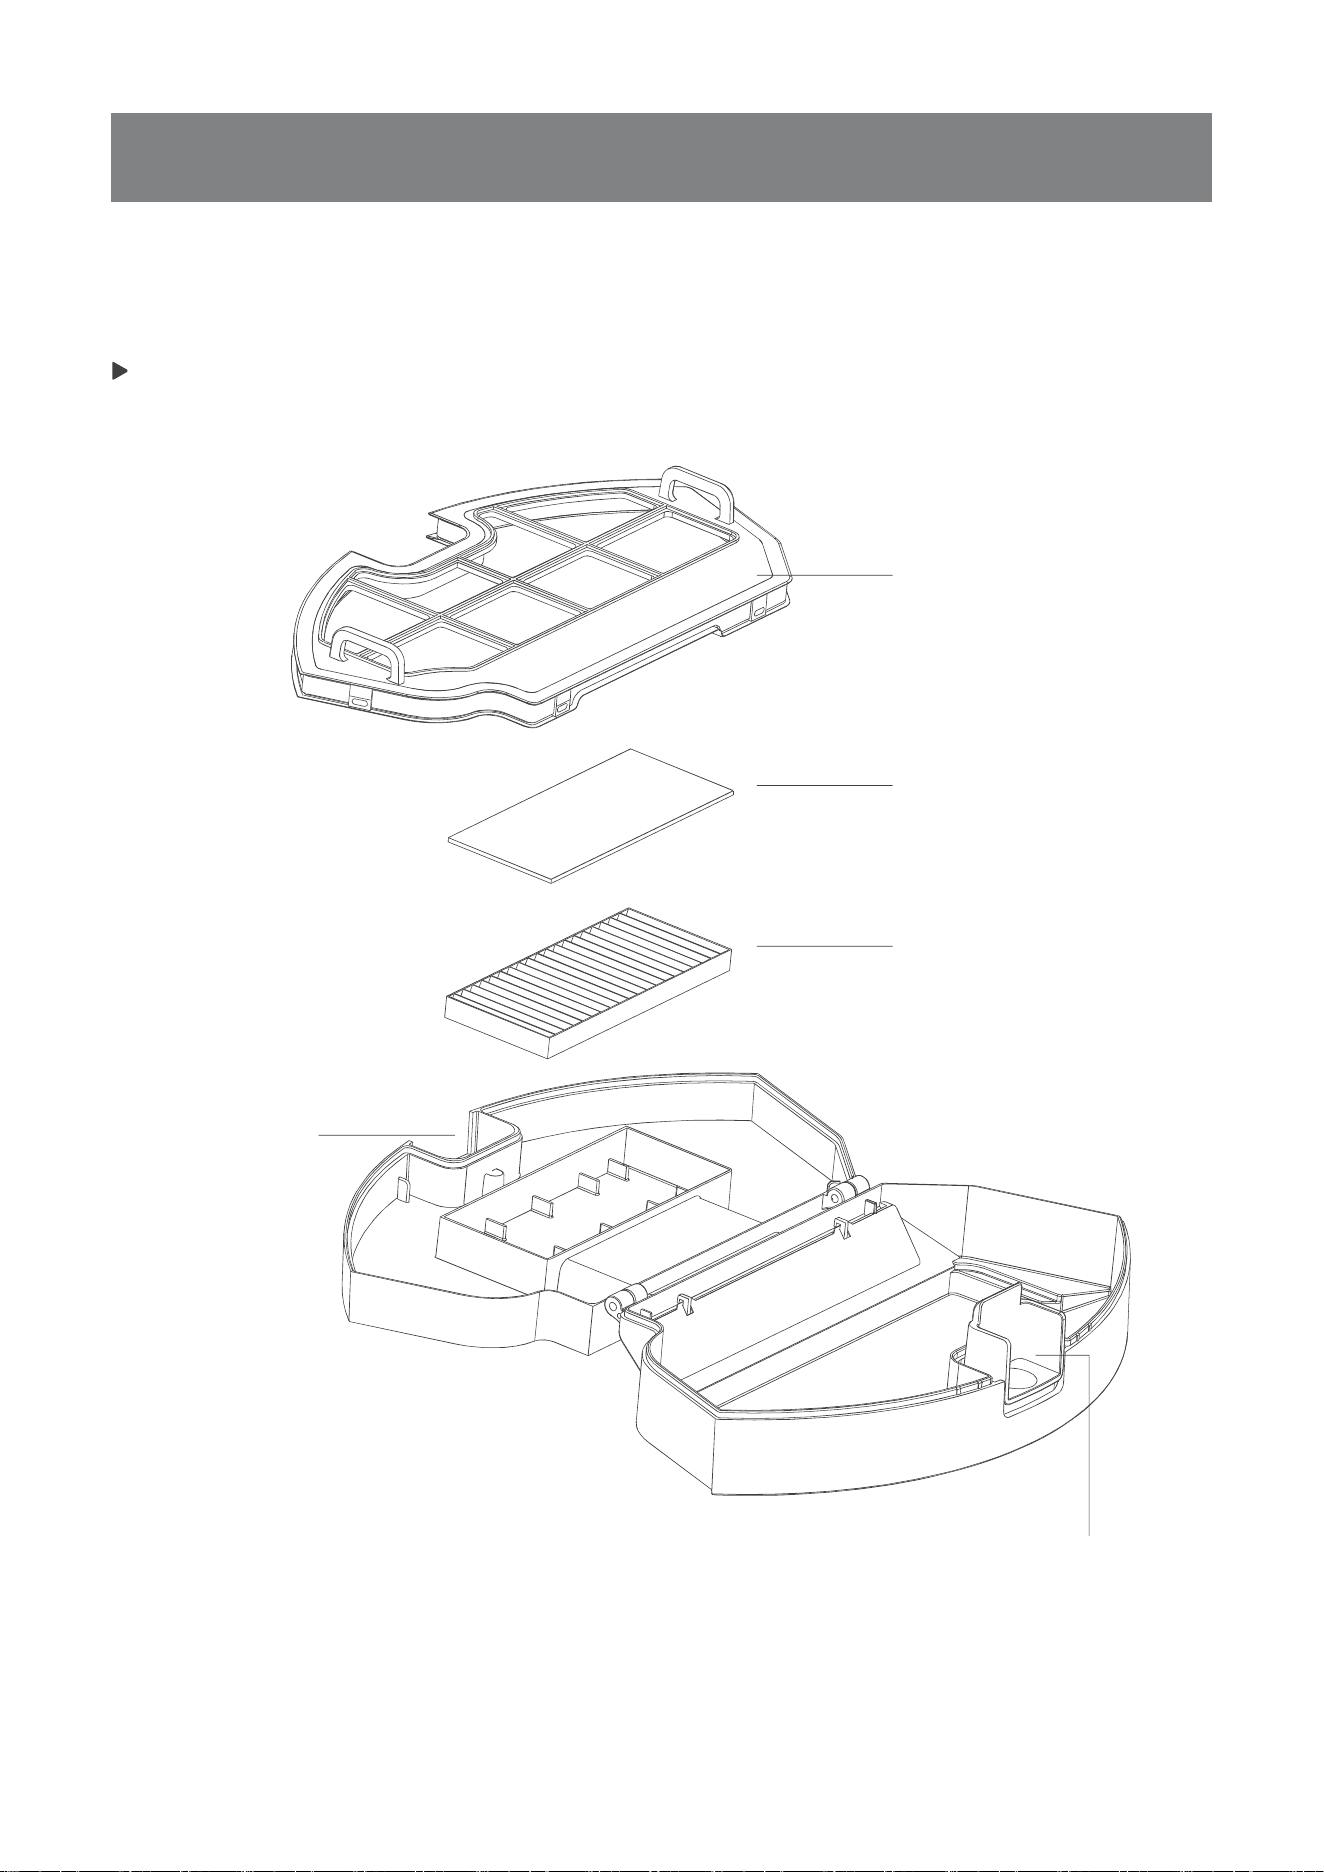
2.Product Composition
5
Dust Bin
Dust Bin Cover
Filter Net
Sponge Filter
Dust Bin Release Button
HighEfficiencyFiler(HEPA)
3.1Notes Before Cleaning
6
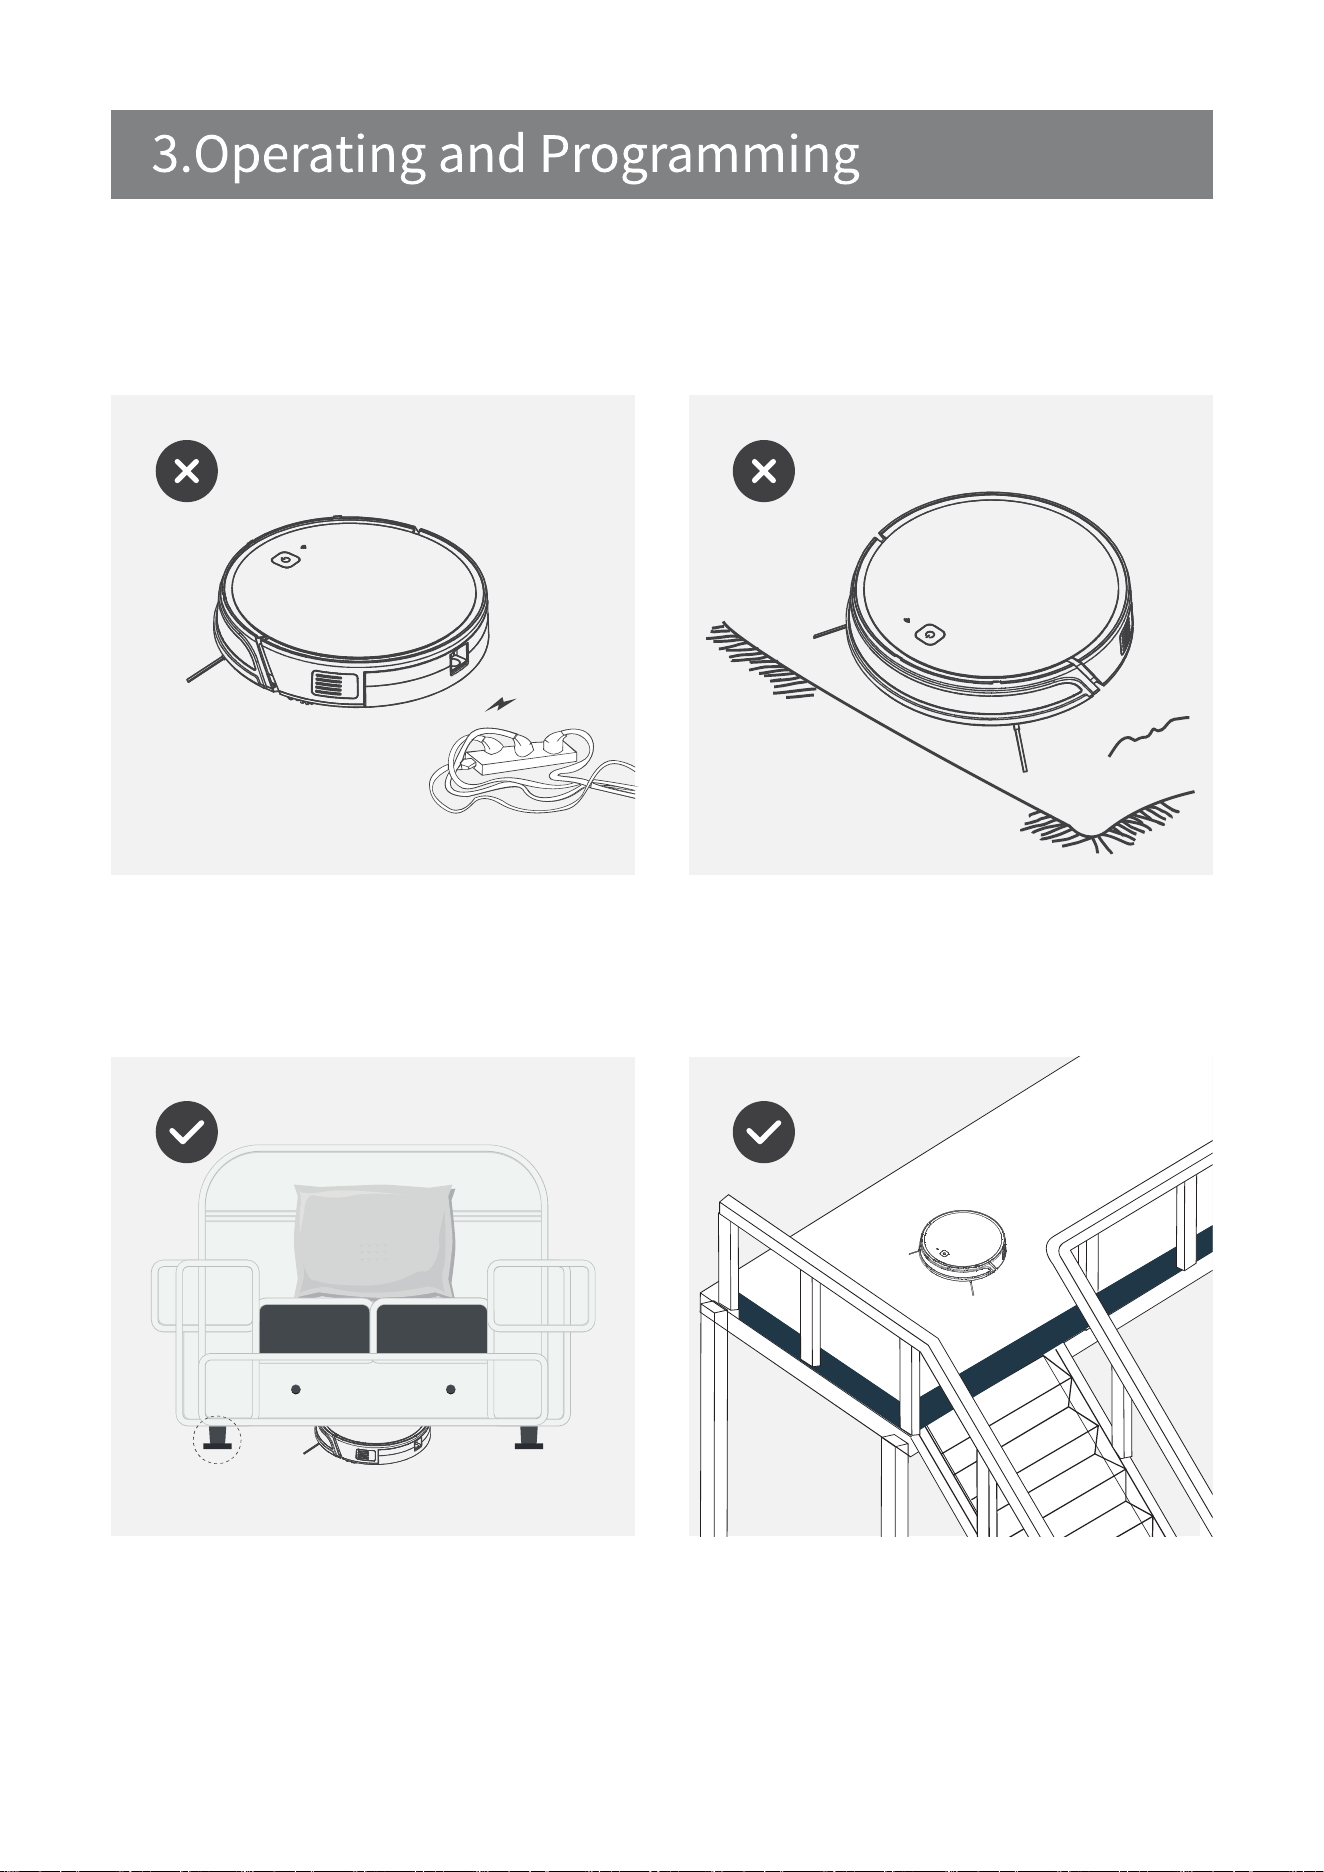
Please refer to the following guidelines to check the cleaning area before
using the robot.
Remove power cords and small objects from the
Floor that could entangle the products.
Theproductisnotsuitableforuseonlong-pile
carpet. Before using the product near an area rug
oronashort-pilearearugwithtasselededges,
please fold area rug edges under themselves.
If there is a step or stairs in the cleaning area,
pleaseoperaterobottoensureitsAnti-DropSensors
candetectthedropoff.ltmaybenecessarytoplace
aphysicalbarrierattheedgeofthedropofftokeep
the unit from falling over the edge.
Please be aware that the robot needs at least an
8 cm(3”)clearance to clean under furniture without
complications.
3.2 Quick Start
7
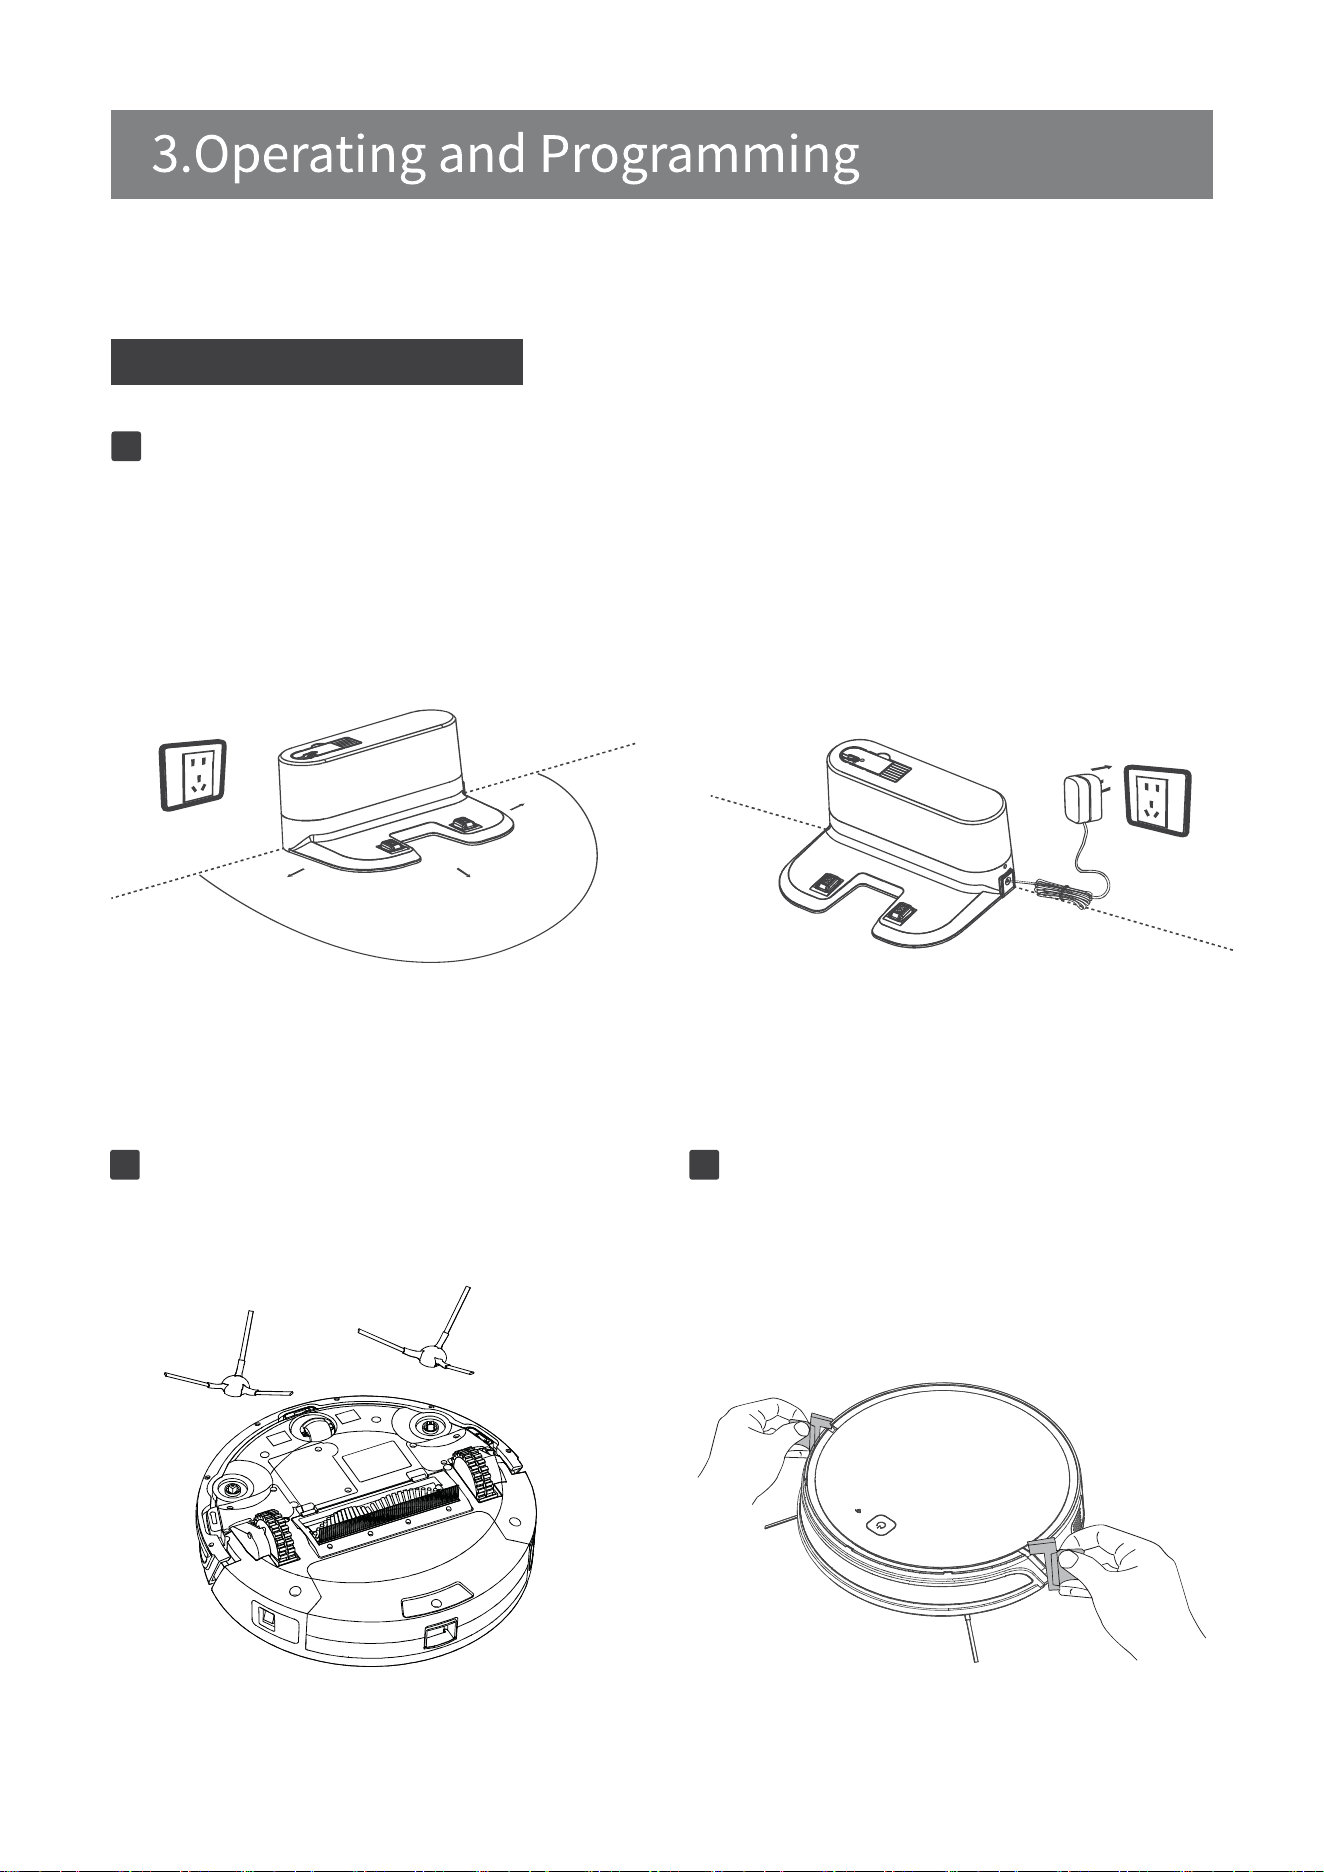
PlacetheChargingDockonalevelfloorsurfaceagainstthewallwiththebaseperpendicular
to the ground.Keep the immediate area 2m(6.6’) in front of the charger and 1m(3.3’) on both
sidesofthechargerclearofobjectsandreflectivesurfaces.
Plug the Charging Dock in. The Power Indicator Light on the Charging Dock glows.
Place the charging Dock Connect the power supply
Charging Dock Placement
Connect the adapter to the charging Dock
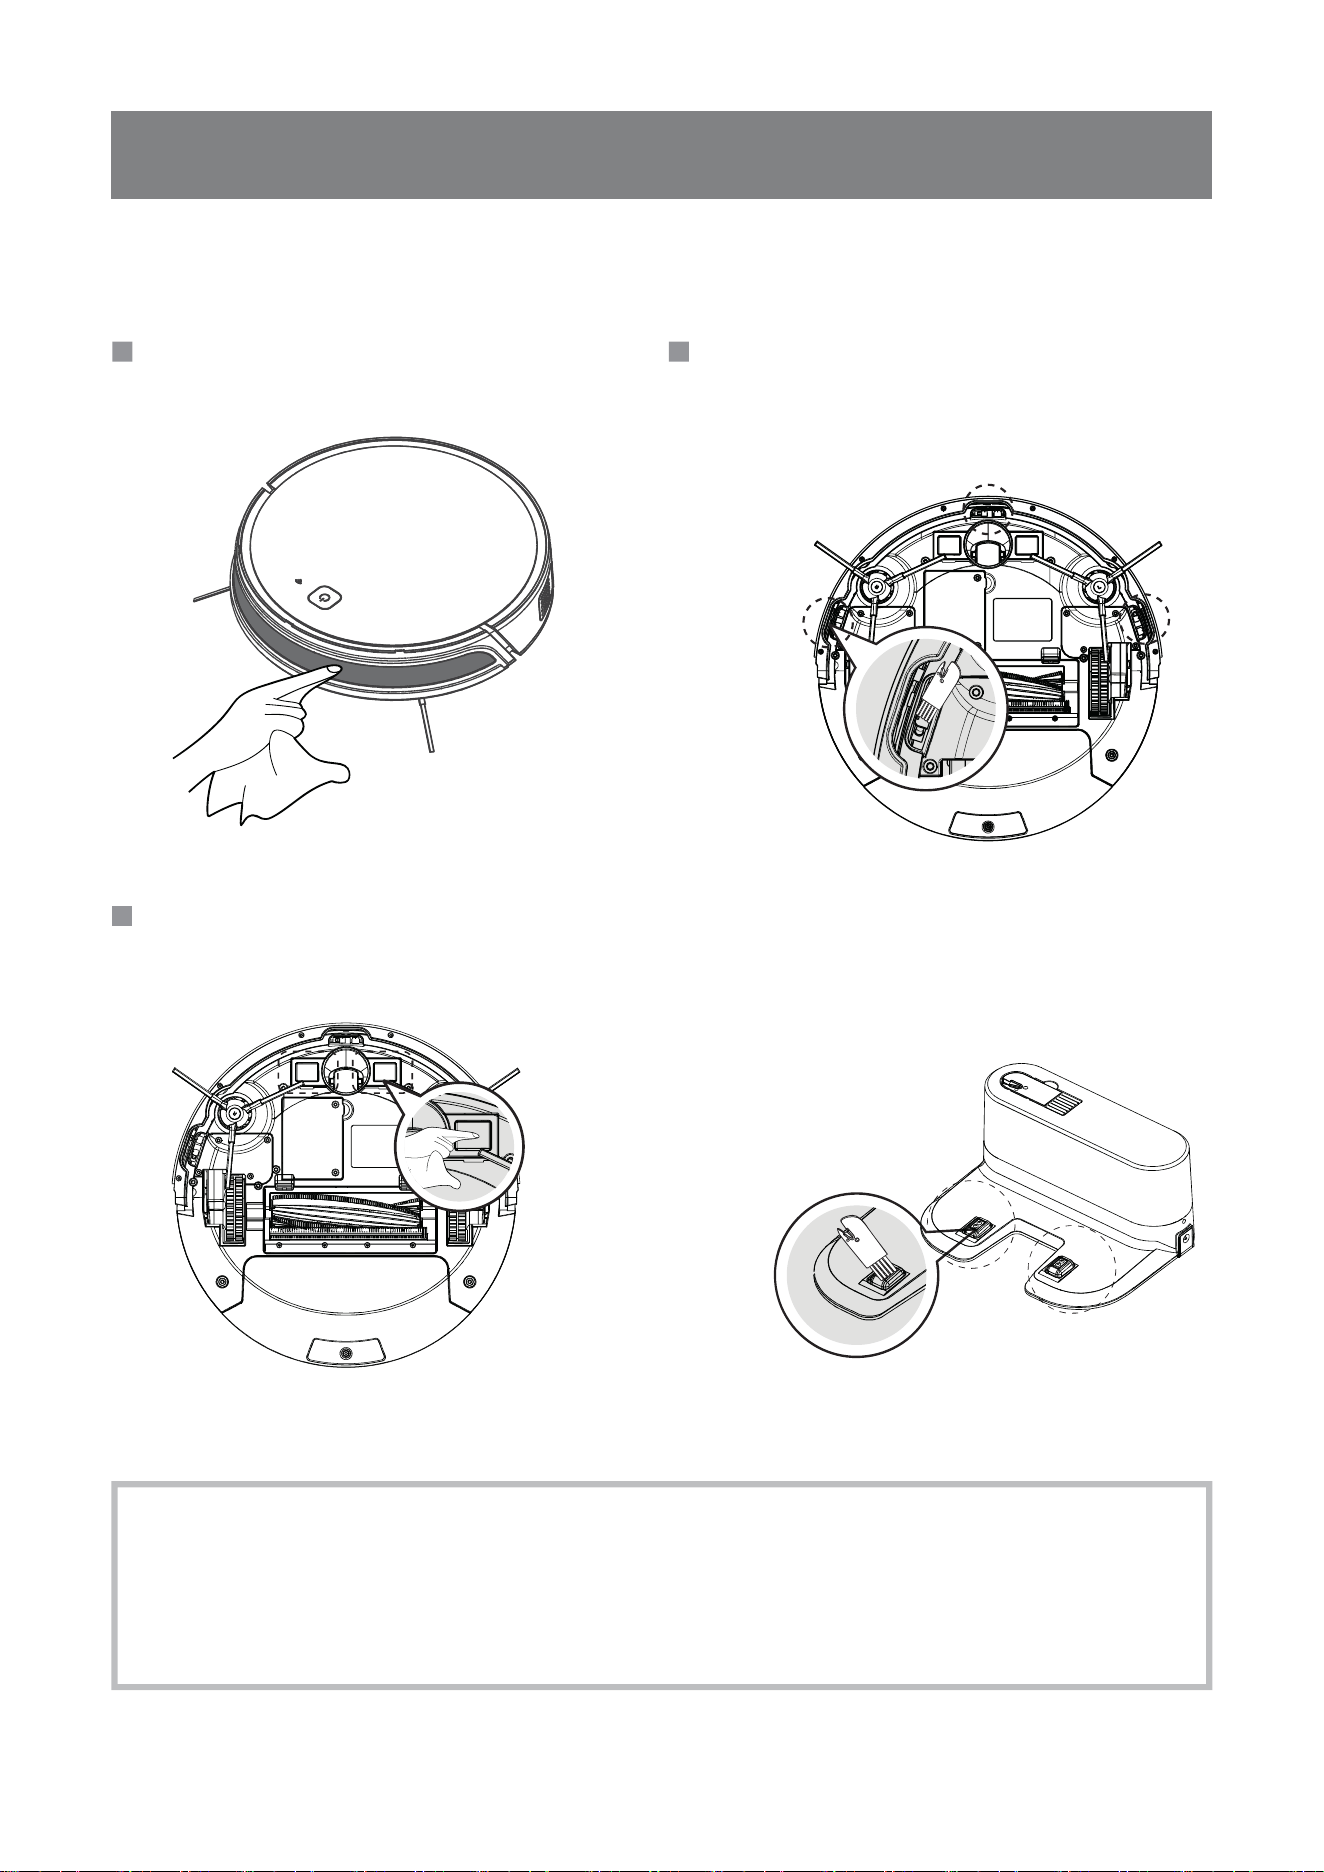
1
Attach Side Brushes to the bottom of
robot by pressing a brush into each
slot until it clicks.
Install Side Brushes
2
Before using the Robot, please remove the
front bumper and charging station Protective
stripandprotectivefilm.
Remove Protector
32
1
M
1
M
2
M
8
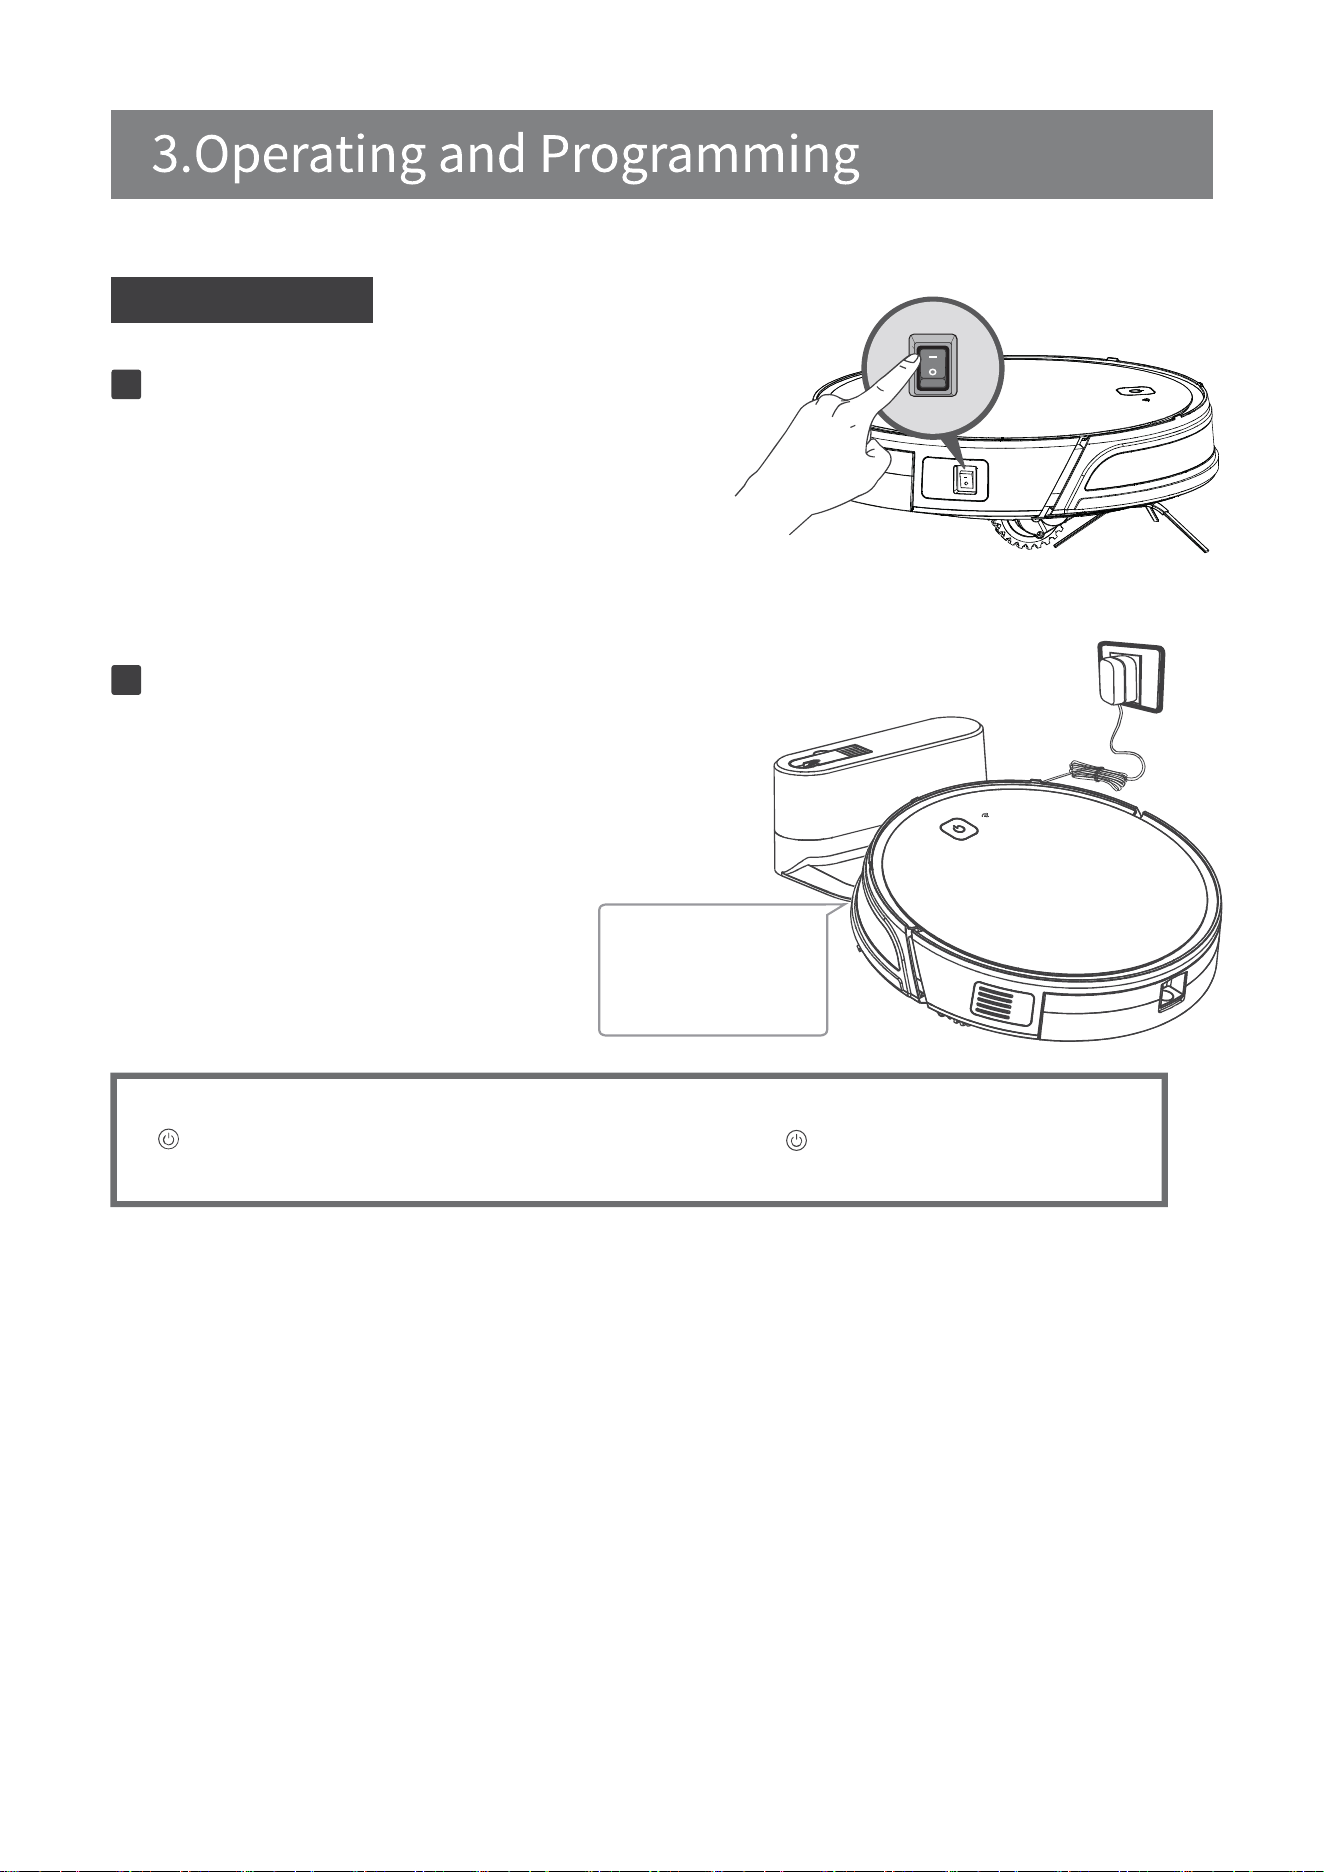
Turn the robot’s Side Power Switch to the ON
position.“-”indicatesONand“O”indicatesOFF.
Robot is powered ON when button glows a
continuous BLUE.
Start to Charge
Turn on the Robot
1
Charge Robot
2
Place robot on the Charging Dock making sure the
Charging Contacts on robot and the Charging Dock
Pins make a connection. Charge Robot for at least
4hoursbeforethefirstuse.
making sure the Charging
Contacts on robot and
the Charging Dock Pins
make a connection.
* Usually take 5.5 hours from low battery mode to fully charged.
* button in breathing status when robot is charging. button stops glowing after
robot is fully charged.
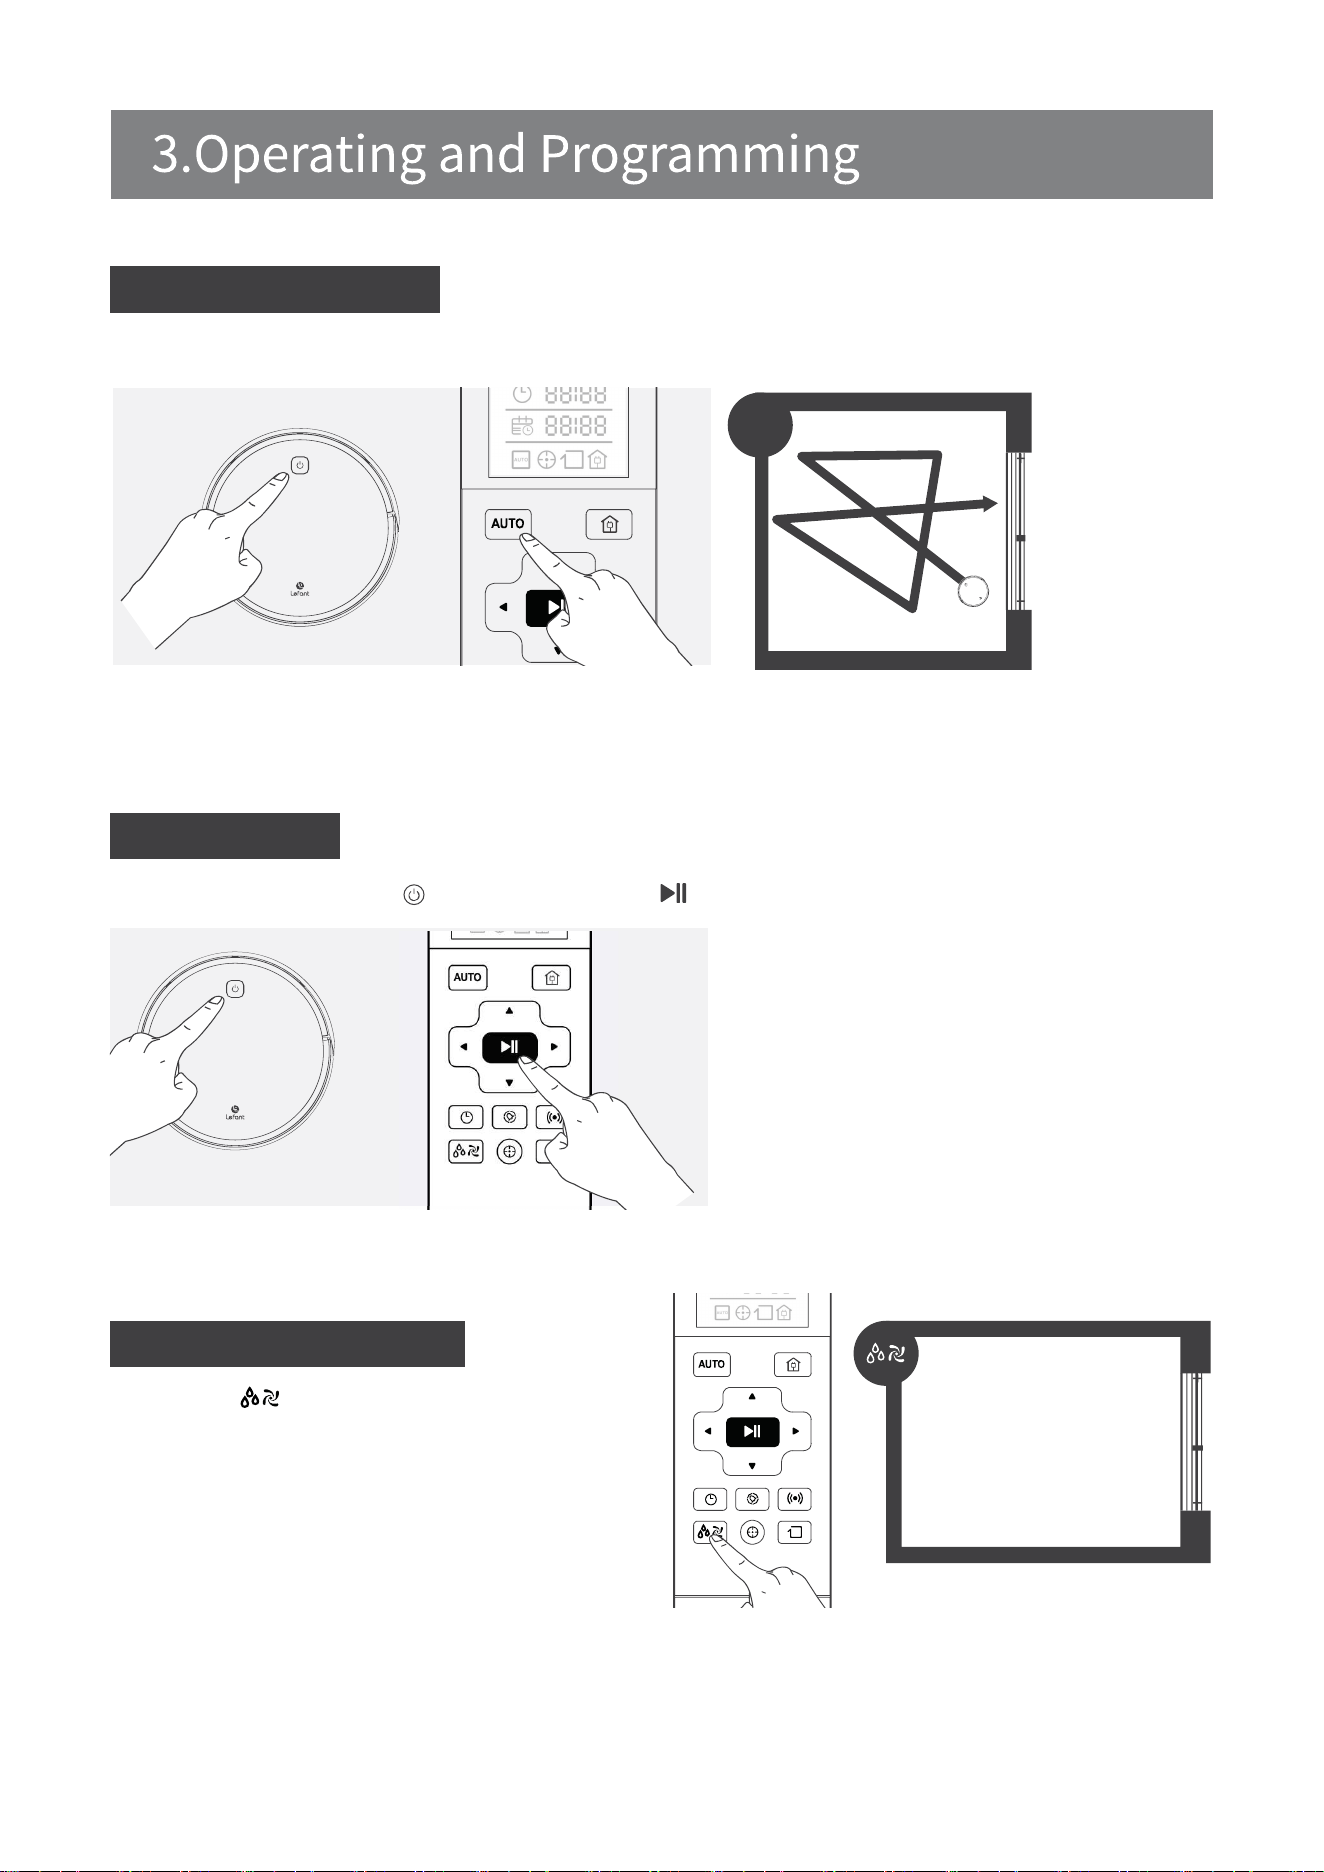
Pause robot by pressing the button on robot or the button on the Remote Control.
Suction power control
9
Pause
Small Medium High
L N H
* when the Robot is Pause, the robot can be moved
forward or left or right by remote control as needed.
Through the button on the remote control,
you can adjust the suction power of the robot .
There are three level adjustment:
L-Low M-Medium H-High The default level is
Medium. Sort by HLNH
Therobotwillenterssleepmodeafterstandbyfor10minutes,andtheAUTObuttonlightgoesoff.Ifyou
need to select another mode, please refer to the section (mode selection).
Auto Cleaning Mode
Robot will clean in Random Cleaning Pattern designed for carpet cleaning by default.
AUTO
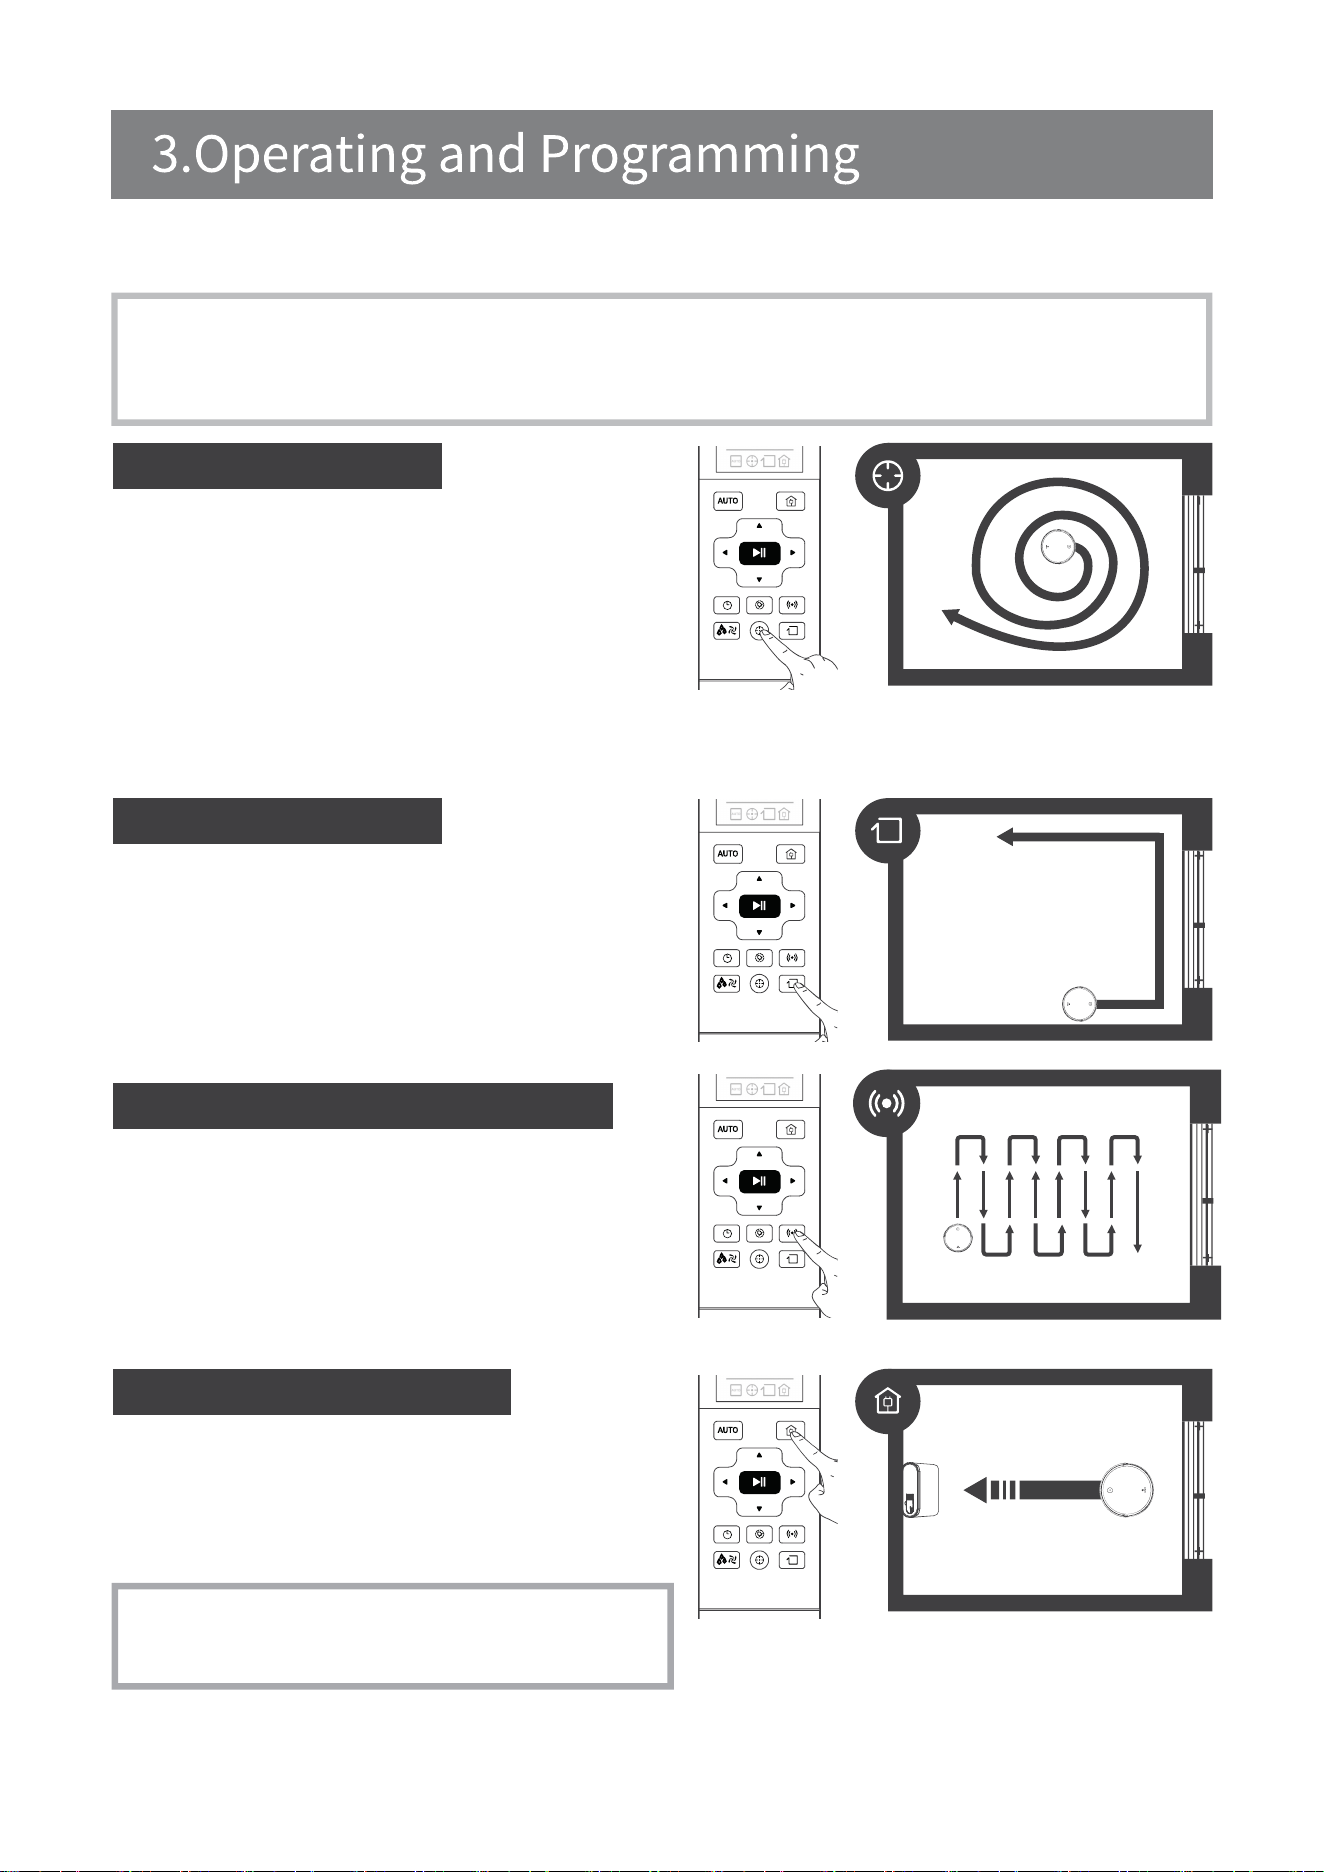
3.3 Cleaning Mode Selection
10
TheRobothasseveralcleaningmodestochoosefromtoeffectivelycleandifferentfloors.
Cleaning modes are selected using the Remote Control.
Edge Cleaning Mode
Return to Charger Mode
*Robot can also be sent back to the Charging Dock
at any time by pressing the Return to Charger Button
on the Remote Control.
Spot Cleaning Mode
This mode is applicable for an area of highly concentrated
dirt or duct. In Sport Cleaning Mode, Robot focuses on a
specificareatoclean.Robotcleanstheareainaspiral
pattern using MAX suction power and stops when it
completes Spot Cleaning.
To start Spot Cleaning Mode,press Spot Cleaning Mode
on the Remote Control
This mode is good for cleaning the edges and corners
of a room. In Edge Cleaning Mode, Robot cleans along
a border using MAX suction power (e.g.wall).
To start Edge Cleaning Mode, press the Edge Cleaning
Mode Button on the Remote Control.
(lessthan3minutes)
Routed Planning Cleaning Mode
Routed planning cleaning mode is applied to hard
surfacessuchastilesandwoodenfloorsformore
efficientcleaning.
When battery power gets low, Robot automatically
switches to Return to Charger Mode and returns to
the Charging Dock to recharge itself. Alternatively double
click on the Start/Pause button on the robot to start
the Return to Charger Mode.
Robot has a Time Scheduling function. Robot can be programmed to automatically
cleanataspecifictimeusingtheRemoteControl,evenifnobodyisathome.The
current time of day and the cleaning times are scheduled using the Remote Control.
The remote control is 24-hour system.
* Before setting the current time and Schedule cleaning time, make sure that the Start/Pause button is always
on in blue and the robot is awake.
* If the robot does not wake up, please press the Start/Pause button on the robot or remote control button to
wake it up.
* Remote control Scheduling settings are not related to APP Scheduling settings, the scheduling cleaning that
setbyremotecontrolwillnotaffecteachother.
* SchedulingsettingsonAPPwillnotaffecttheremotecontroltimeandSchedulingsettings.
11
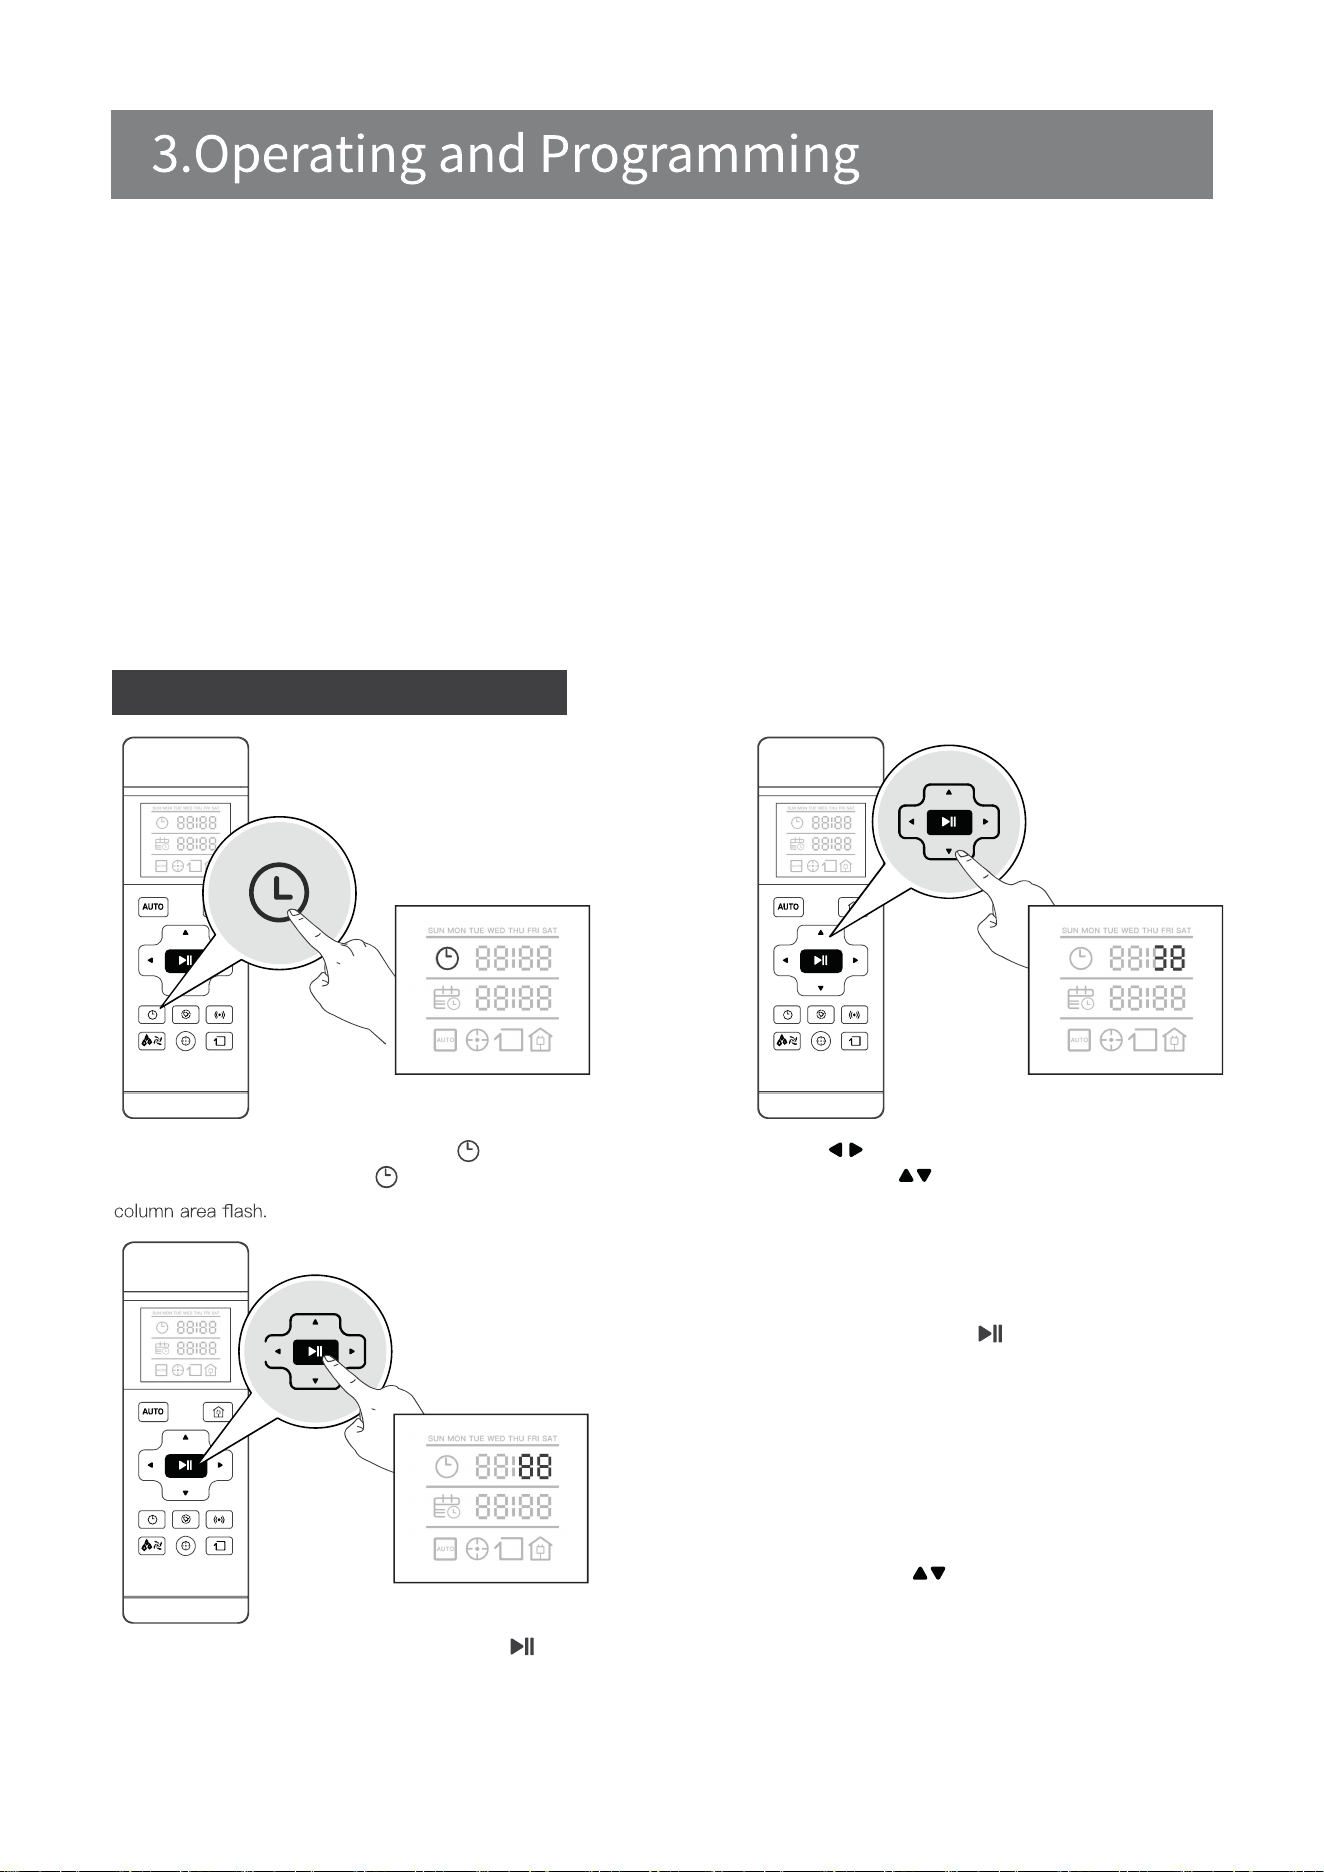
3.4 Scheduling setting
Set the Current Time of Day
[Week day and time setting] Short press button, the
remote control screen displays The icon and the week
Press the Buttons to switch “hour” “minute” and
“week”. Press the Buttons to adjust “hour”, “minute”
After the time adjustment is completed,press to save,
the robot will give a “beep”sound, and the current time is
set successfully.
*Englishabbreviation for MondaytoSunday,
sorted as MON TUE WED THU FRI SAT SUN
* If you do not press button tosave,
the current time setting will not be saved; the
clock setting is automatically exited after 10s
without operation.
*Note:Adjust the hour each time you press
buttonhours+1/-1,adjusttheminutes
time you press button minutes +5/-1.
SUN MON TUE WED THUSUN MON TUE WED THU FRI SAT FRI SAT
SUN MON TUE WED THU FRI SAT
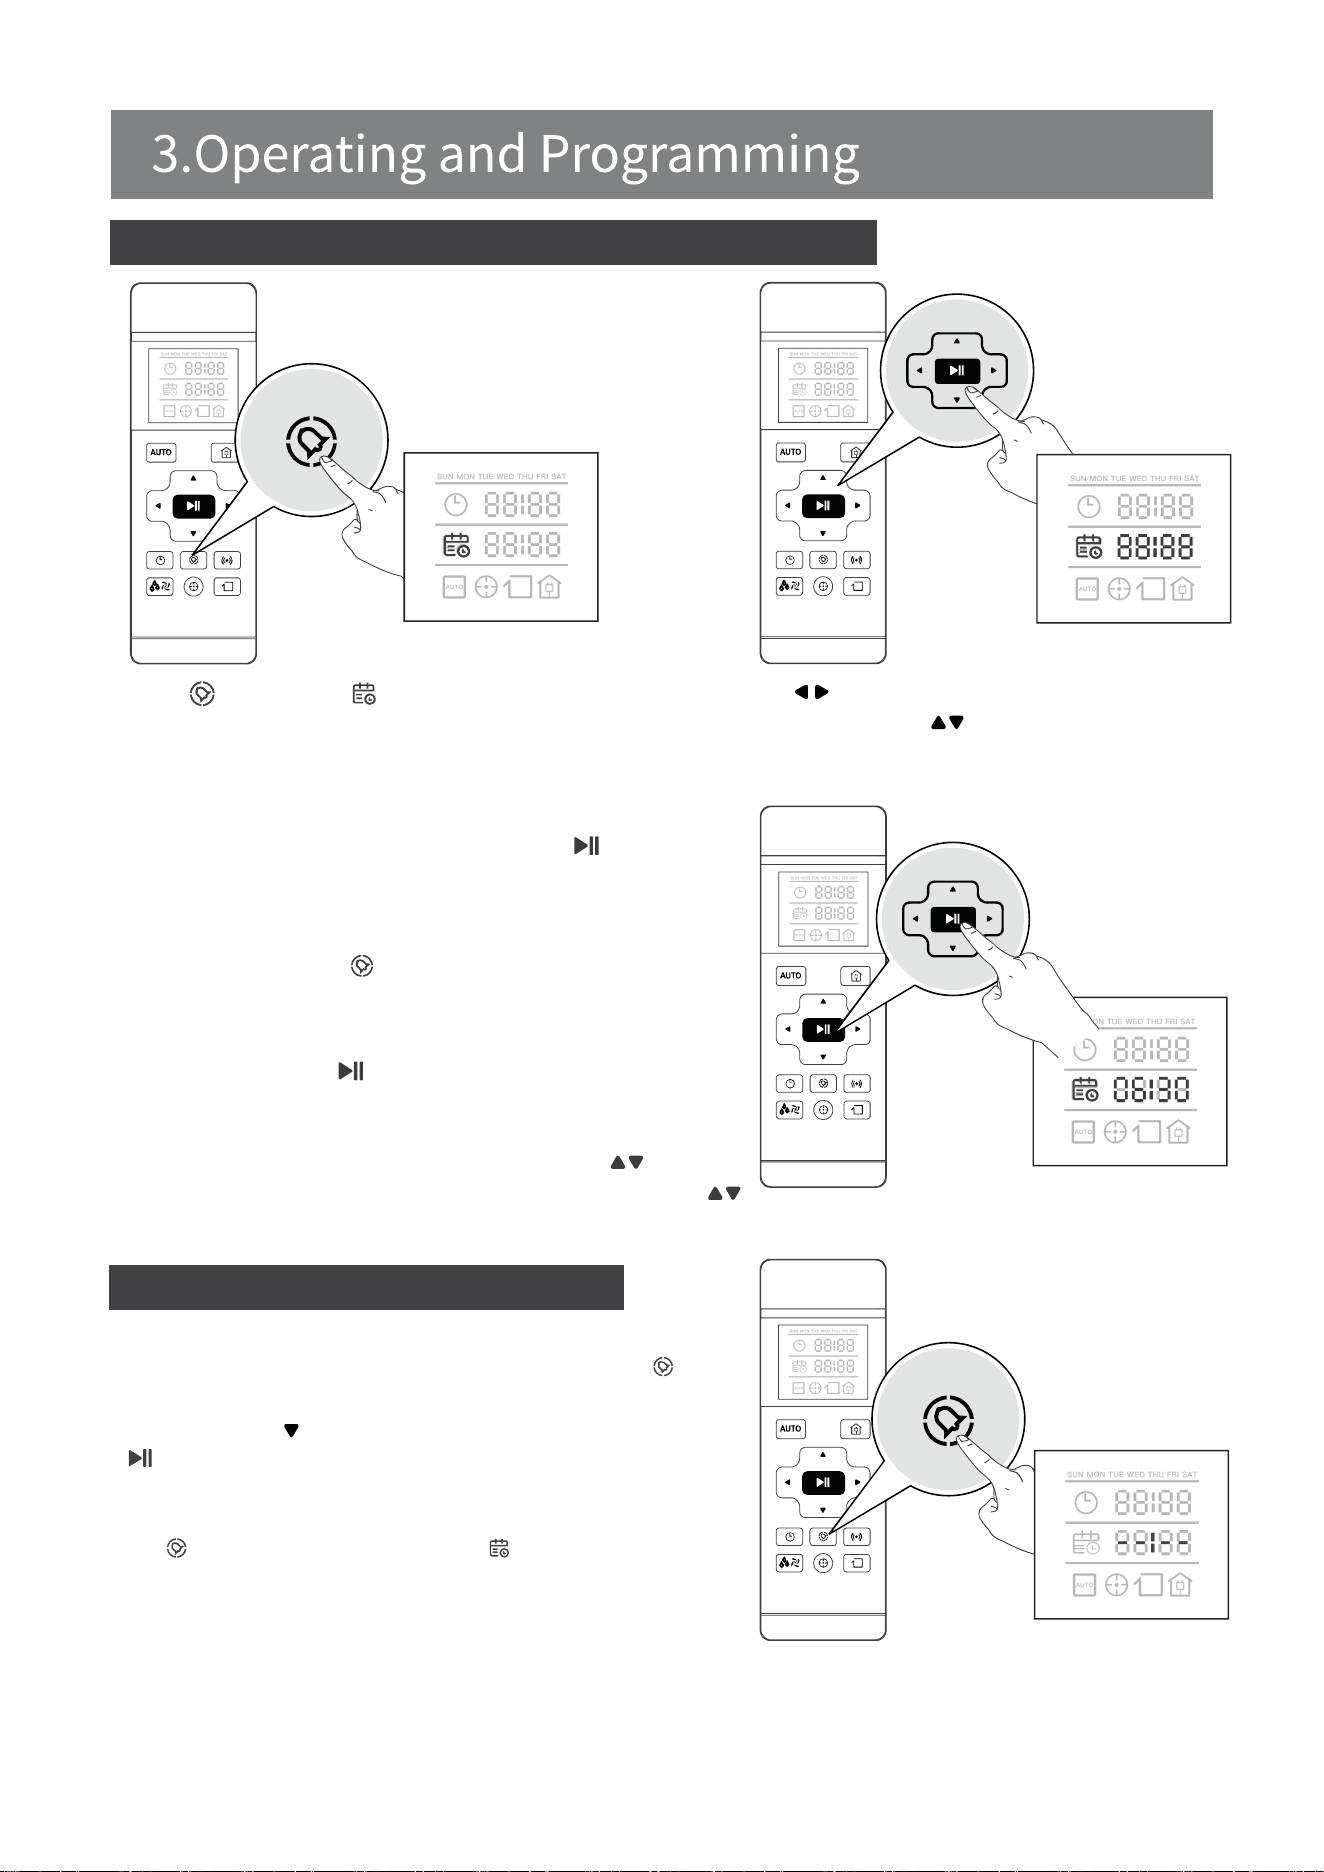
12
Schedule the Cleaning Time using Remote Control
Cancel Scheduled Cleaning Time
Press button, the icon and the week
columnareaflashontheRemoteControl
screen.
Using Remote Control
[Cancel the Scheduled cleaning time]Press the and
Setthetimeto00:00.Whentheminutedigitflashes
and press the button to change to --:--, then press
to cancel the Scheduled cleaning time of the day,
The robot will give a “beep’sound.
[Cancelallscheduledcleaningtime]Pressandhold
the button for 3 seconds, the icon disappears on
the screen to display --:--, the robot gives a“beep”
sound, canceling the scheduled cleaning time function.
*Whentherobotispoweredoffortheremotecontrol
battery is removed, You need to reset the current time and scheduled cleaning time setting.
If you do not press button to save, the scheduled
cleaning time setting is unsuccessful; the clock setting
is automatically exited after 10s without operation.
*Note: Adjust the hour each time you press button
hours +1/-1, adjust the minute each time you press
button minutes +5/-1.
After the scheduled cleaning time is adjust, align the
remote control with the robot, press the button on
the remote control to save the settings, the robot will
give a “beep”sound, and go to the scheduling time
settingofthenextday.Aftertheconfigurationis
complete, press the button to exit the setup, and the
robot will automatically cleans at the scheduled cleaning
times.
Press the Buttons to switch “hour” “minute”
and“week”. Press the Buttons to adjust
“hour”, “minute”and “selected day of the week".
SUN MON TUE WED THU FRI SAT
SUN MON TUE WED THU FRI SAT
SUN MON TUE WED THU FRI SAT
SUN MON TUE WED THU FRI SAT

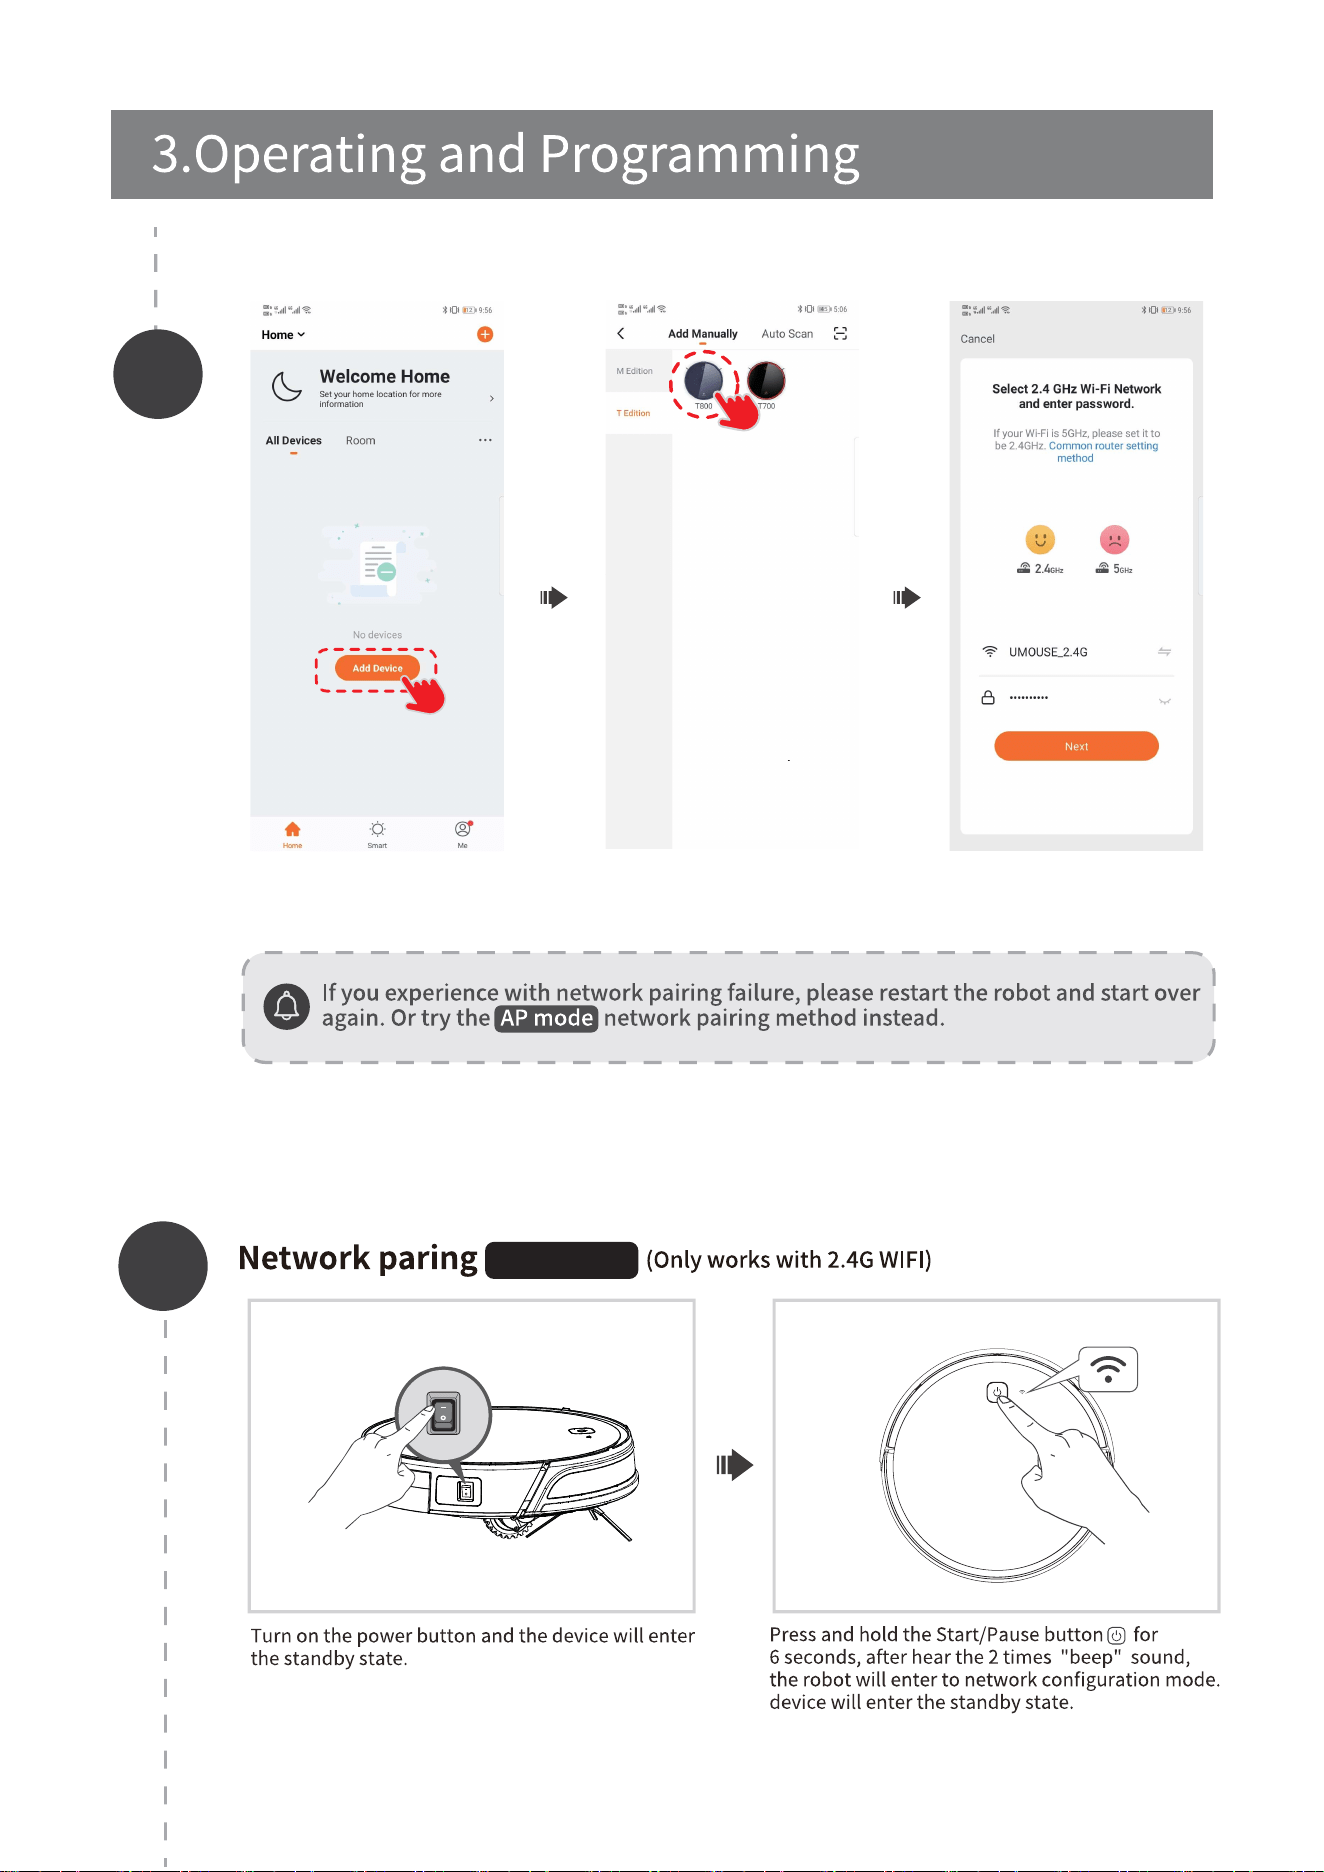
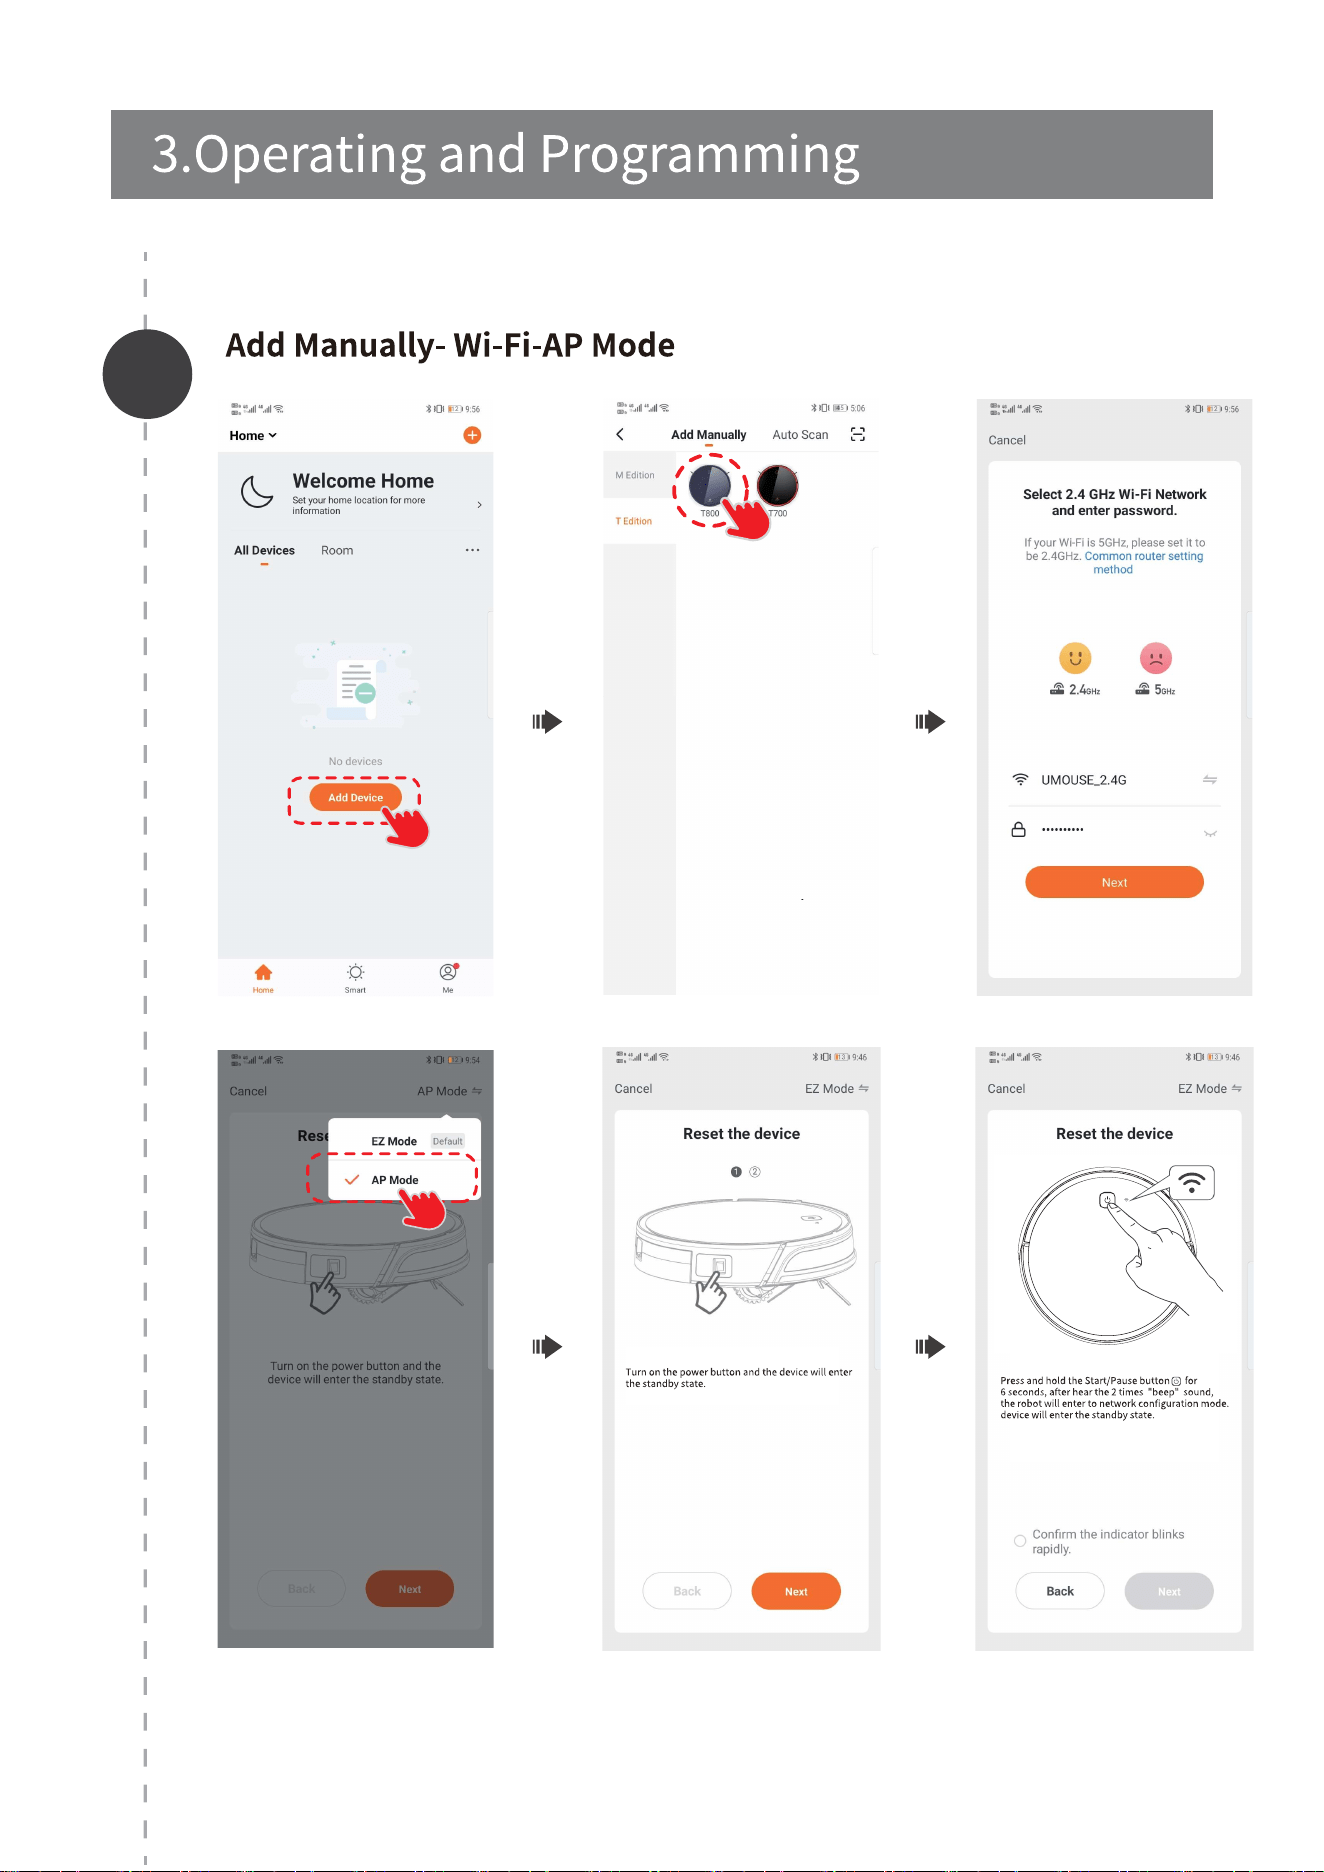
3.5APPdownloadandnetworkconfiguration
1
EZ mode
EZ MODE
13
AP mode
2
1
AP MODE
14
2
15
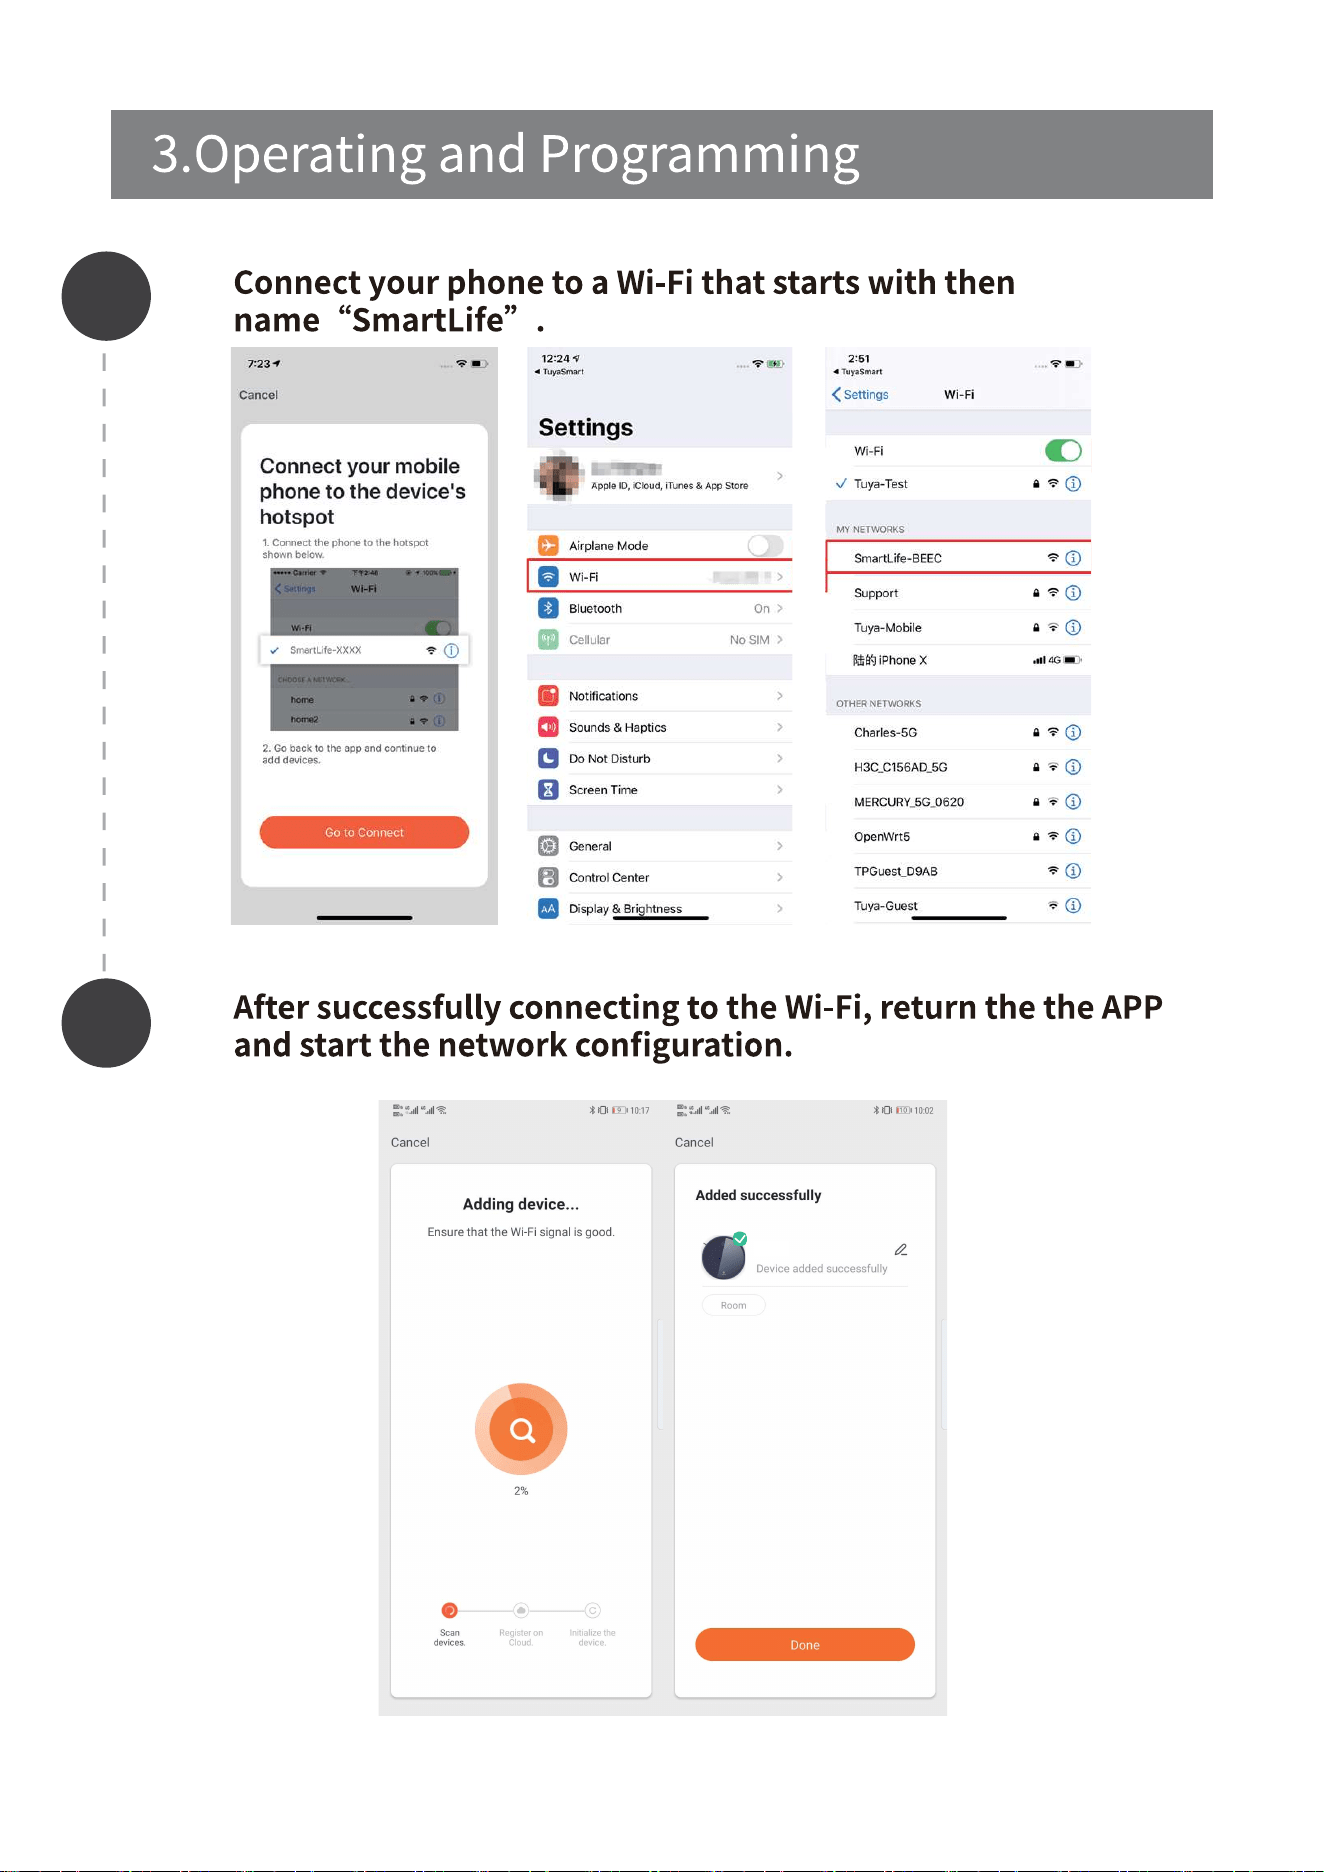
3
4
16
T800
17
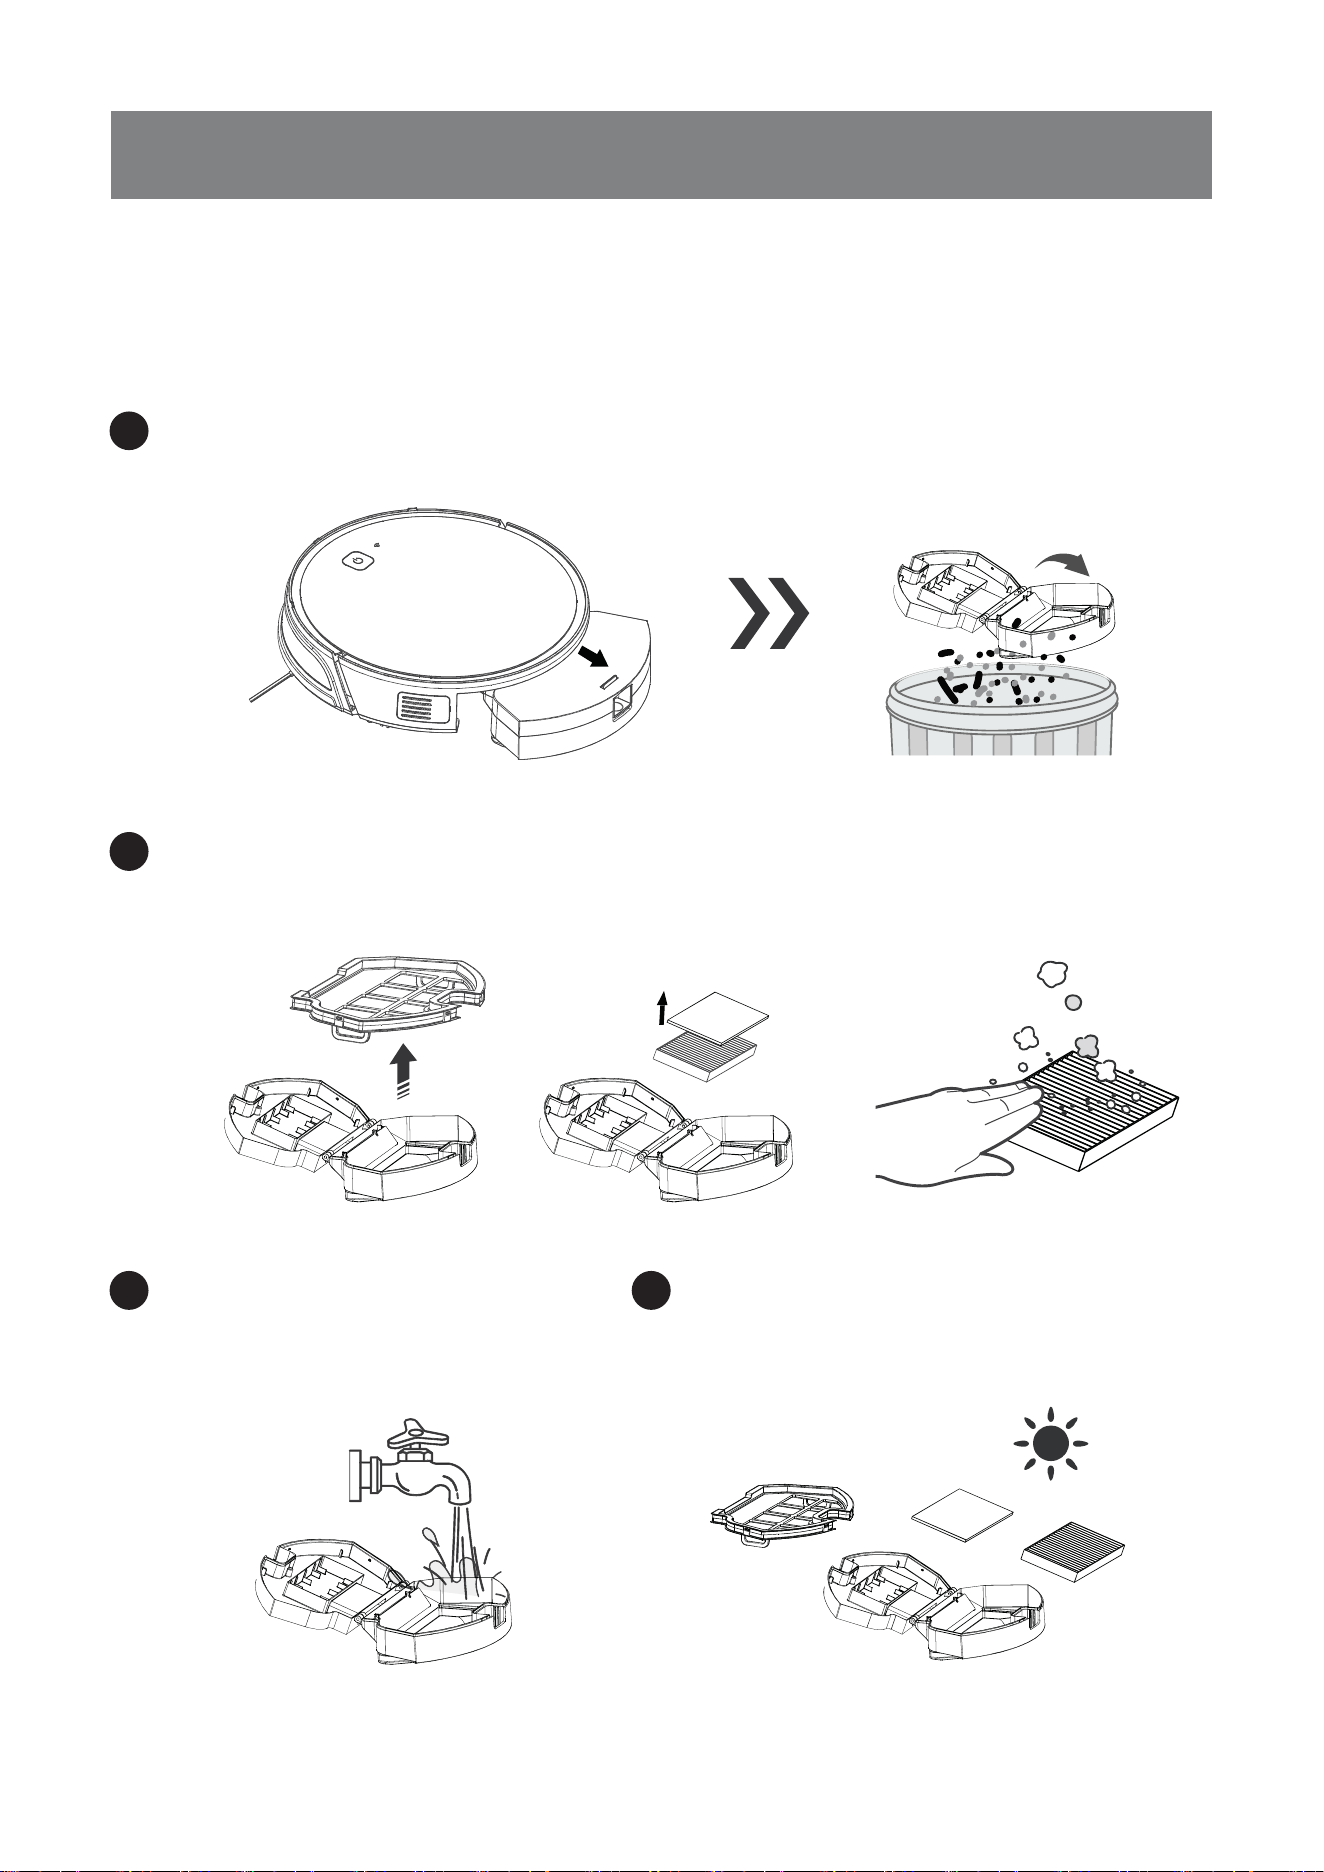
4.1 Dust Bin and Filters
Remove the dustbin, open the dustbin cover,and empty the Dust Bin.
Removethedustfilter.HEPAisnotrecommendedforwashing.
PattheHighEfficiencyFilterclean.
4.Maintance
1
2
Flush the Dustbin and
thefilternet.
DrytheSpongefilter,DustBin
and Filter Net completely
before reinstalling.
3 4
Whencleaningandmaintainingtherobotanditsaccessories,turnoffthe
robot and unplug the Charging dock.
18
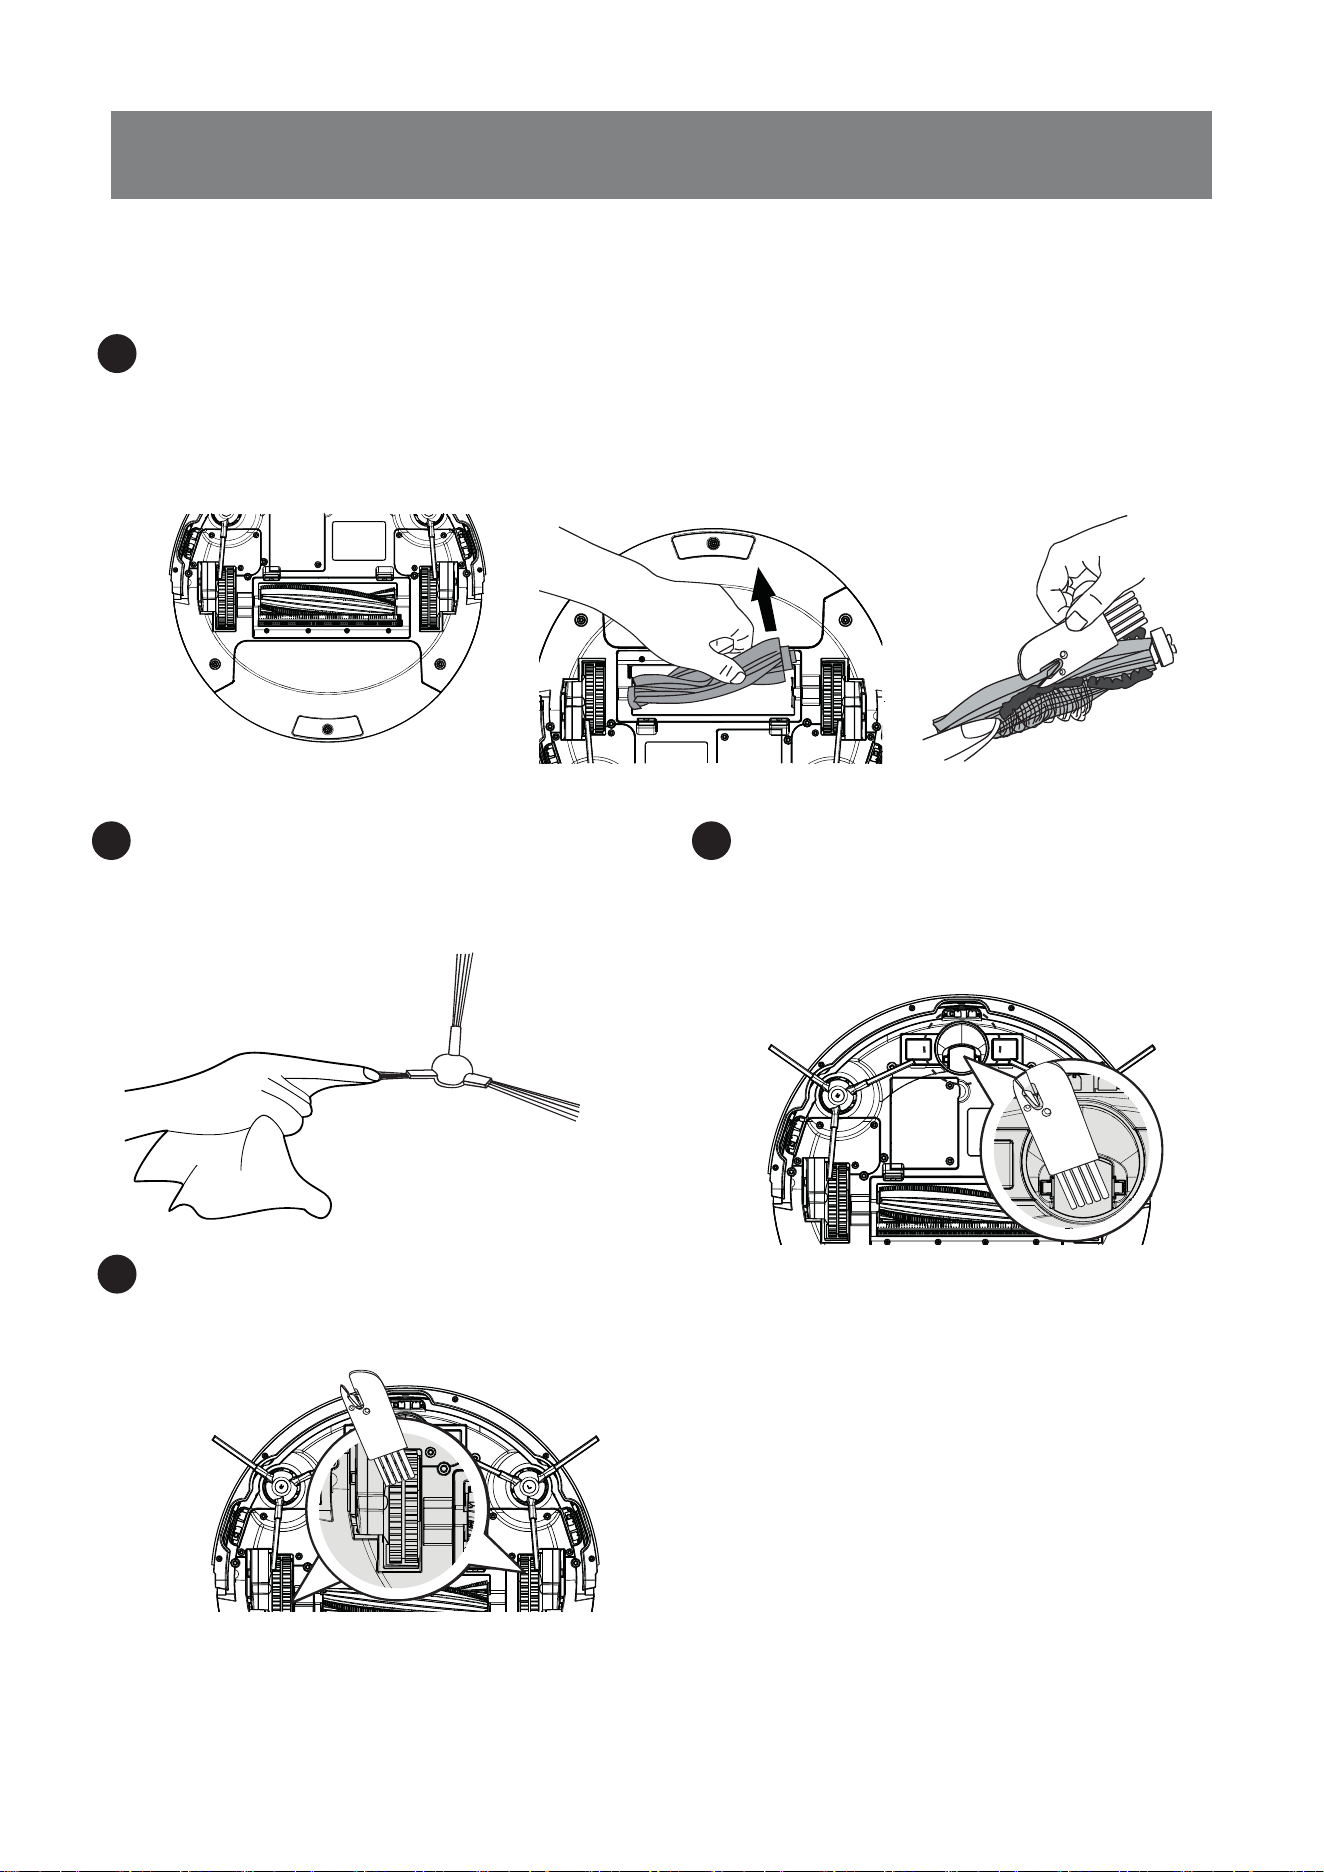
4.Maintance
4.2 Roller Brush and Side Brushes
Turn the robot over. Push both buttons on the Roller Brush Cover and remove it.
RemovetheRollerBrush.UsetheMulti-FunctionCleaningTooltocutoffand
remove any hair tangled around the Roller Brush.
RemovetheRollerBrush.UsetheMulti-FunctionCleaningTooltocutoffand
remove any hair tangled around the Roller Brush.
Cleaning Roller Brush
1
Use the Multi-Function
CleaningTooltocutoff
and remove any hair tagled
around the Universal Wheel.
Cleaning the Side Brushes
Remove the Side Brushes. Wipe
the Side Brushes and their slots
with a dry cloth.
2
Clean the driving wheel to maintain
it’seffectiveness.
4
3
Clean the anti-collision sensor
panel.
19
4.Maintance
Wipe the Charging Contacts and Charging Dock Pins with the brush of the
Multi-FunctionCleaningTooloradrycleanclothtomaintaintheireffectiveness.
If you do not use this product for a long time, please take out the battery and keep it properly.
If the battery leaks, remove the battery, And wipe the battery cell clean. This product has a
Long life battery and does not need to be replaced frequently. If you need to replace it, you can
contact our after-sales service for replacement.
4.3 Other Components
Wipe the Anti-Drop Sensors with
the brush or the felt side of the Multi-
Function Cleaning Tool to maintain
theireffectiveness.
16
5.Indicator Light
1
2
Therobotvacuumproducesacombinationoflightandsoundindicatorswhenit
detects an internal error.The following table indicates the cause of each
combination.
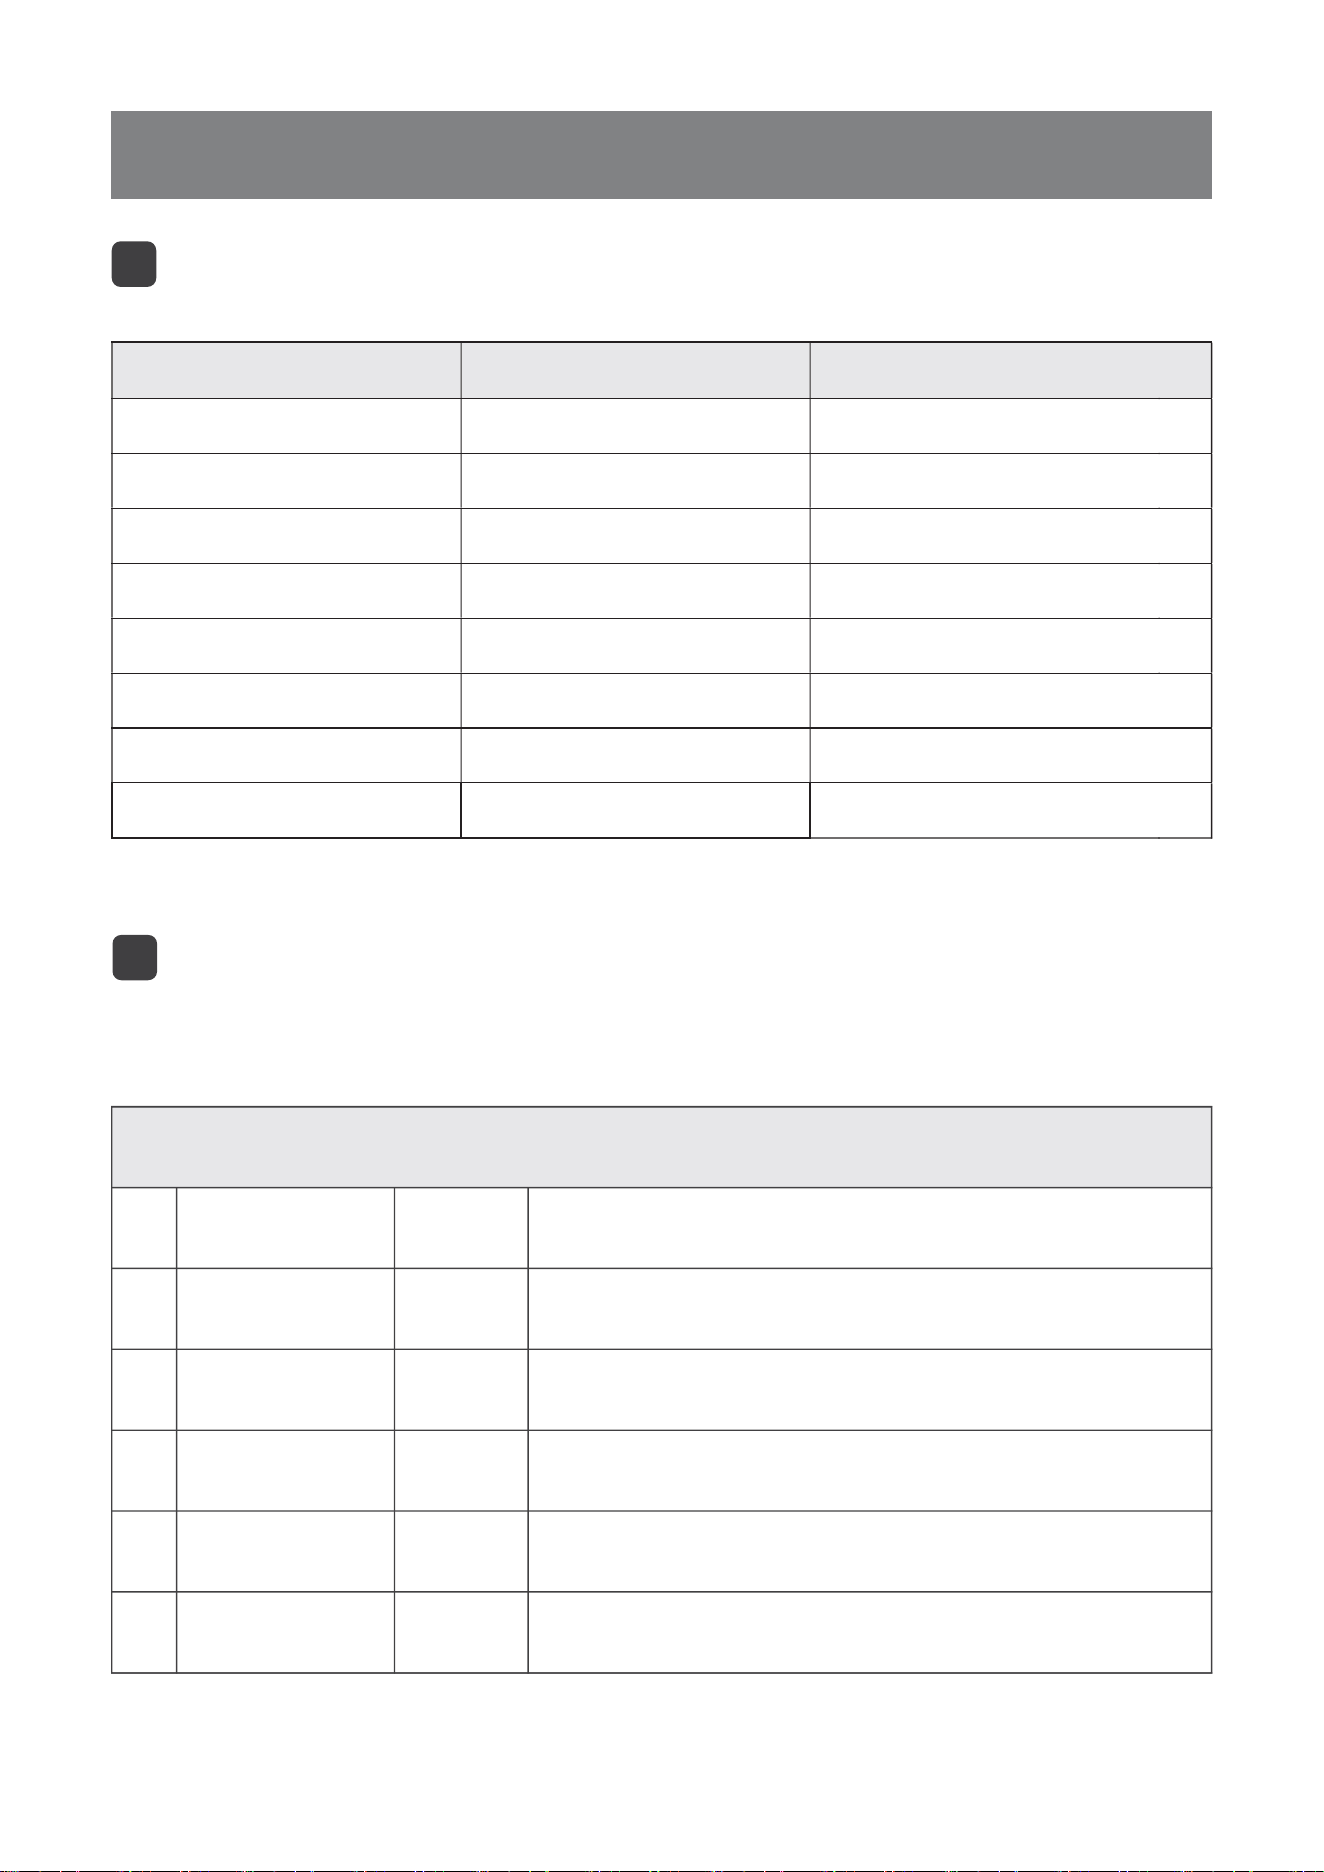
Common alarm tips
LightingEffects
Robot Status AUTO Display Status WiFi Display Status
Charging
When the machine fails
Blue light is always on
Exit the distribution network after 5
minutes, light is always on
Distribution process/
Loss of signal reconnection
Before starting distribution network
Cleaning Mode Blue light is always on
Blue light is always on
Blue light is always on
Blue light is always on
Low Battery
Connect to Wi-Fi
Red light is always on
Red light flashesorlightsup
Red lightgoesoff
Blue lightgoesoff
Finished Charging
Red light/pink light/
blue light breathing
As per current networking status
As per current networking status
As per current networking status
As per current networking status
As per current networking status
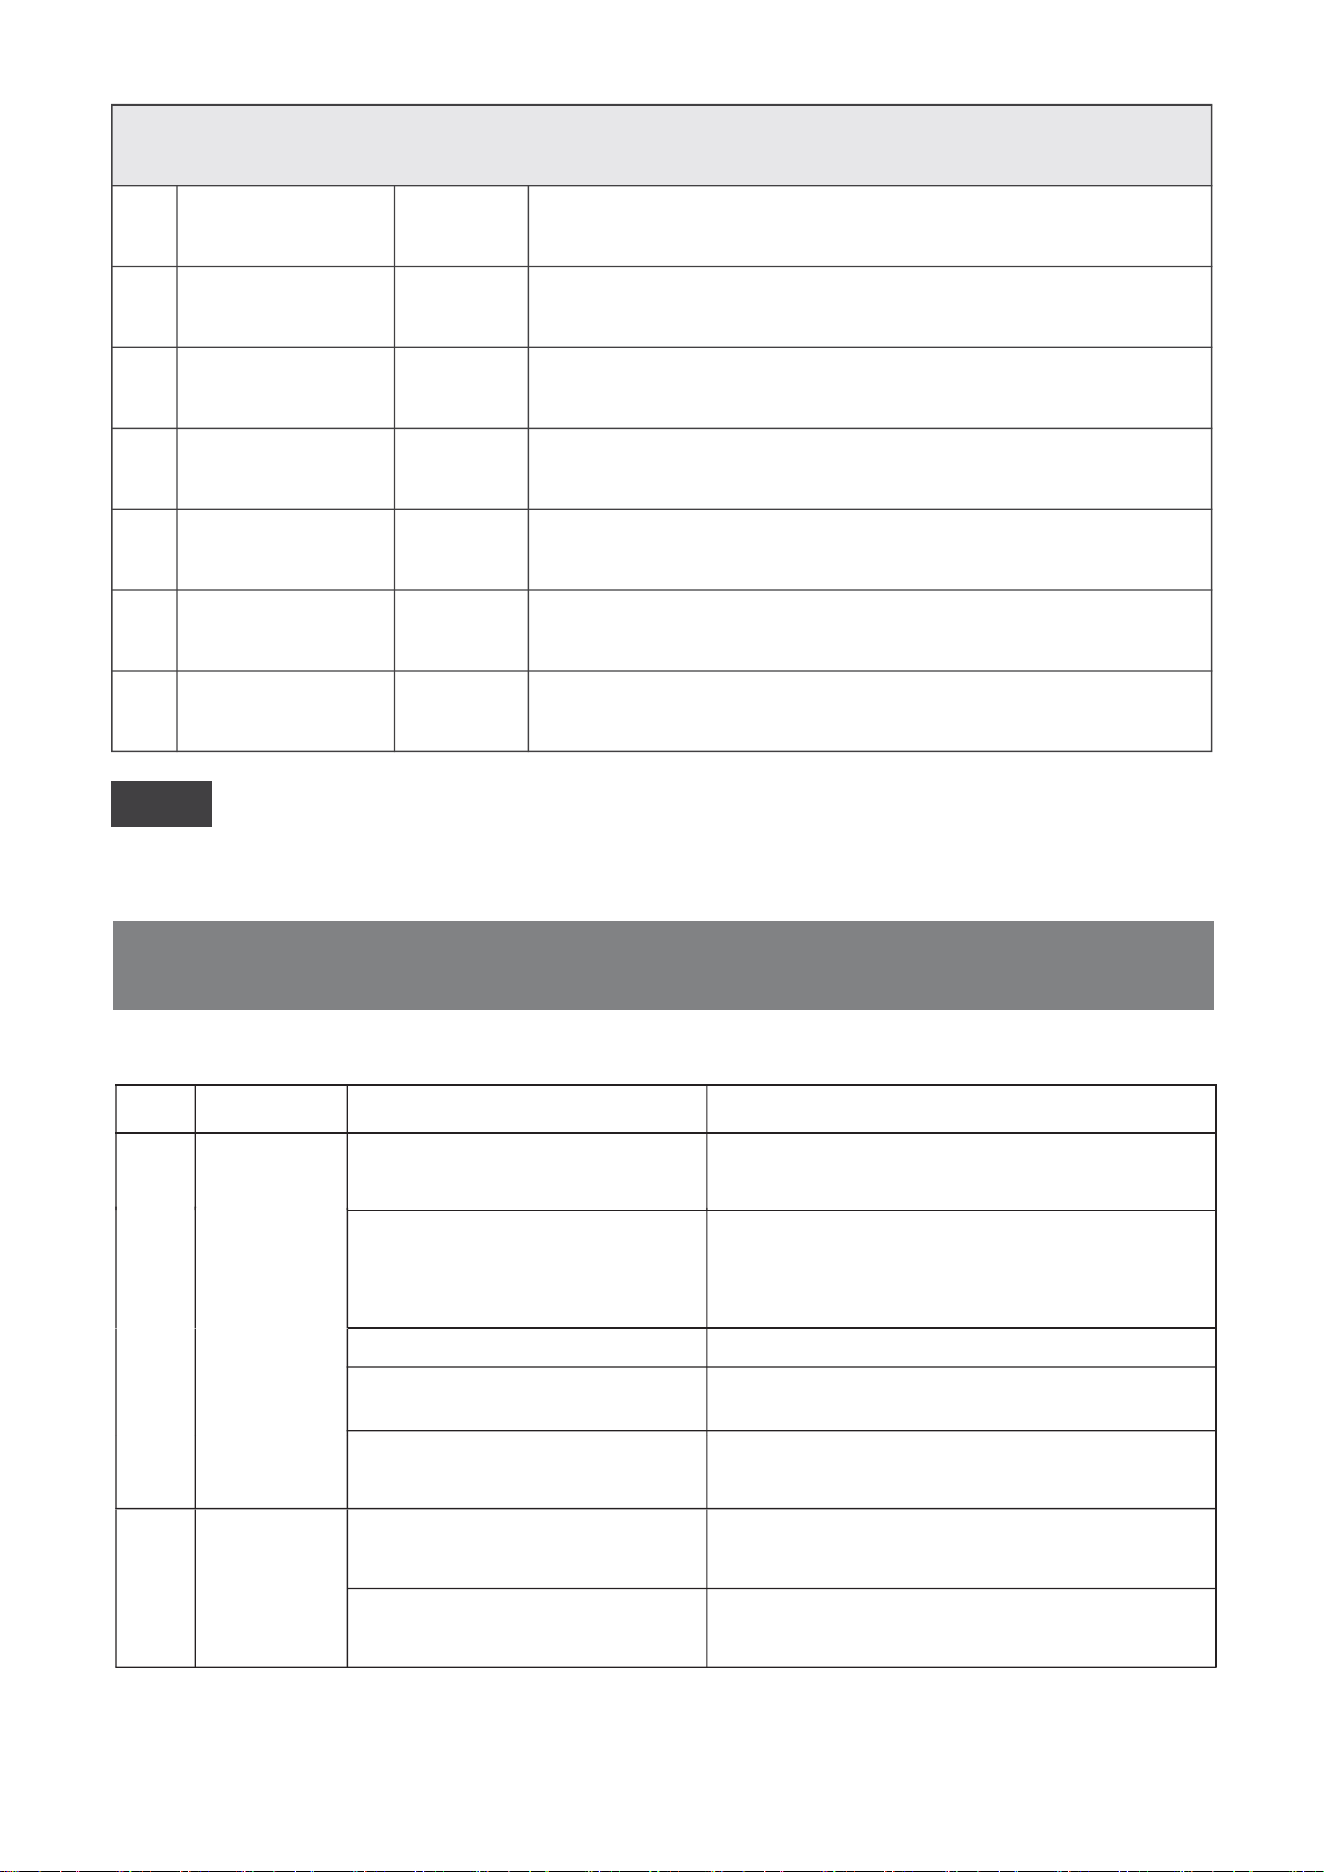
No. Cause of Issue
water tank detection
Roller brush
Fan abnormal
Side Brushes
Drive wheel
No water tank is detected.
The roller brush is abnormal. Please check if they are entangled.
The suction power is abnormal. Please clean the dustbin
and/or air duct.
The side brushes are abnormal. Please check if they are entangled.
The drive wheel is abnormal. Please check if they are entangled.
5
4
3
2
1
Beep Solutions
The Start/Pause button glows in red
3 groups
of 5 beep
3 groups
of 4 beep
3 groups
of 3 beep
3 groups
of 2 beep
3 groups
of 1 beep
20
21
Please use this chart to troubleshoot common problems using robot.
6.Troubleshooting
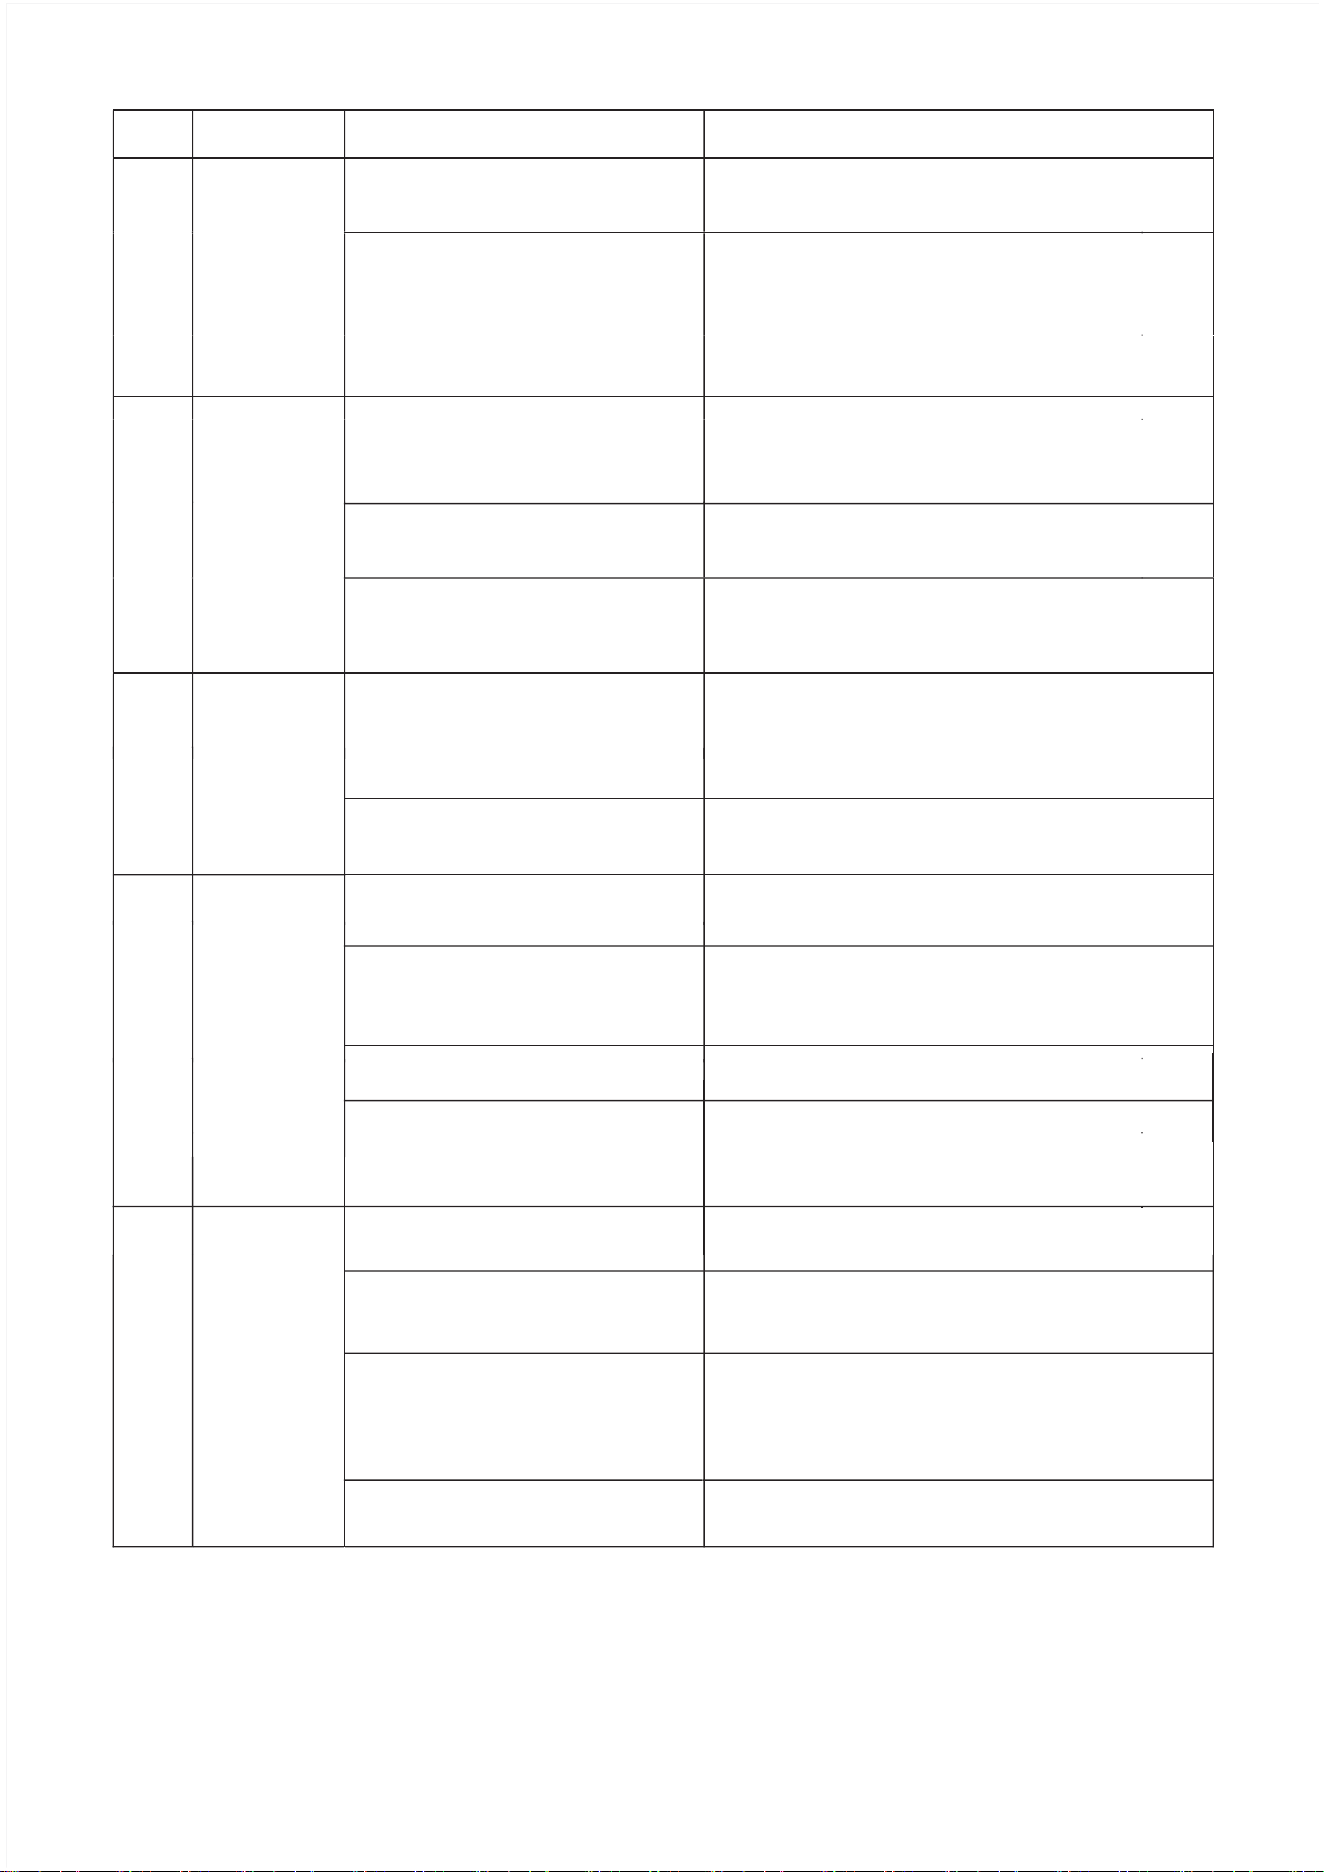
NO Malfunction Possible Causes Solutions
iftheabovemethoddoesnotsolvetheproblem,pleasetrythefollowing:
re-open the power switch on the side of the robot to restart the machine.
01
02
Cannot
connect to
WIFI.
The robot
is too noisy.
Incorrect WIFI name or Password.
Make sure the robot is less than
Robot isn't in network pairing mode.
Download the incorrect APP
Side brush, rolling brush,entangled,
dustbin Filter material blocked, etc.
The robot is in MAX suction
power mode.
5 feet(0.5 meter)away from the
router and your phone - the
closer the better!
Please make sure the WIFI name and the
password are entered correctly.
Ensure the robot is under WIFI signal coverage.
Make sure the robot is in the network pairing mode.
Didn't connect to 2.4G Wi-Fi signal.
The robot doesn't connect compatible with 5G WiFi
signal, Please connect to 2.4G WiFi signal.
Please scan the QR code in the user manual or
search“Lefant life”on google play or app store.
It is recommended to clean and maintain the
brush,rollerbrush,dustbinandfiltersregularly.
ChangethesuctionpowermodetoMediumorLow.
Tips
No. Cause of Issue
Adapter Exception
Low battery
Out of Trouble
Anti-Dropsensor
The charging voltage is abnormal. Please consider replacing
the adapter.
The battery is too low. Please charge immediately.
The robot is stuck.
The robot issuspendedandthewheelsmaybeofftheground.
5
Abnormal charging
status
The charging process is abnormal. Please check if the
power switch is on.
6
4
3
2
Front infrared
Anti-collision bumper
The front bumper is abnormal. Please check if it is
stuck/damaged.
1
Beep Solutions
3 groups
of 5 beep
3 groups
of 4 beep
3 groups
of 3 beep
3 groups
of 2beep
3 groups
of 6 beep
3 groups
of 1 beep
The Start/Pause button glows in red
18
NO Malfunction Possible Causes Solutions
03
Robot will
notCharge.
Robot has not made a connection
withtheChargingDock.
ChargingDockisunplgged
while robot is powered ON,
which causes battery.
consumption.
The robot is entangled or Robot will try various ways to get itself out of trouble.
If it is unsuccessful, manually remove the obstacles and
restart.
obstructed by scattered wires on the
ground, drape curtains or carpet edges.
PlugintheChargingDockandensurerobotis
poweredON.KeeprobotontheChargingDockto
make sure it has a full battery to work at any time.
Besurethatrobot’sChargingContactshavemade
aconnectionwiththeChargingDockPins.
04
Robot gets
into trouble
while working
and stops.
Side Brush is stuck or the rotation
speed of the Side Brush decreases.
Roller Brush is stuck or the rotation
speed of the Roller brush decreases.
05
Robot returns to
theCharging
Dock before it
finishescleaning.
RemoteControl
failure(effective
control range of
RemoteControl
is 5m(16’).
This is normal. No solution necessary.
Workingtimevariesaccordingtofloor
surface,room complexity and the selected
CleaningMode.
This is normal. No solution necessary.
When battery power gets low, robot
automatically switches to Return to
ChargerModeandreturnstothe
ChargingDocktorechargeitself.
Remove the debris tangled around the roller Brush with the
providedMulti-FunctionCleaningTool.lftheRollerBrush
stillrotatesslowly,contactCustomerService.
Remove the debris tangled around the Side Brush. If the
SideBrushstillrotatesslowly,contaceCustomerService.
06
07
Robot will not
clean
automatically at
scheduled time.
Time Scheduling function is cancelled.
ThebatteriesintheRemoteControl
need to be replaced.
Robot is powered OFF or robot’s
battery is low.
There is other equipment interfering
with the infrared signal to robot.
The robot’s battery is low.
The robot’s components are tangled
with debris.
Robot is powered OFF(once the robot
ispoweroff,thetimescheduling
settings via remote control will be
removed).
Turn on the power switch of the robot, reconnect the
network and use the APP to check the scheduled settings.
Replace the battery with a new one and install it properly.
Power OFF robot, clean the Dust Bin, and invert the
robot.CleanSideBrushesandtheRollerBrushas
described in section 4.
Make sure robot is powered ON and fully charged.
UseadryclothortheMulti-FunctionCleaningToolto
wipethelnfraredEmitteronRemoteControlandthe
Infrared Receiver on robot.
The infrared signal cannot be
transmitted because the Infrared
EmitterontheRemoteControlor
robot’s lnfrared Receiver on robot is
dirty.
AvoidusingtheRemoteControlnearotherequipment
using infrared signals.
KeeprobotpoweredONandontheChargingDockto
make sure it has a full battery to work at any time.
The images are only for reference, please refer to the actual item as the standard.
Lohas reserves the right to update products without prior notice.
If the trouble cannot be eliminated according to the above operation,
Please contact support@lefantlife.com
Power on the robot and make the schedule using the
remote control over again.
22

23
7. Technical Parameters
T800Product Model
Vacuum Cleaner Rating
19V,0.6A
Changing Dock Rating
19V,0.6A
AD-0121900060US
lnput:100-240V~50-60Hz;0,5A
Output:DC 19V;0,6A;Class II;
AC adapter model
AC adapter rating

T8-LH20201120
ShenzhenlohasTechnologyCo.,LTD
http://www.lefantlife.com / support@lefant.com
Part of the eastern section,level 4 Building 3, Longcheng Industrial Park, Huanggekeng
Community, Longcheng Street, Longgang District, Shenzhen
Officialwebsite