

Technical Support and E-Warranty Certificate
www. vevor. com/support
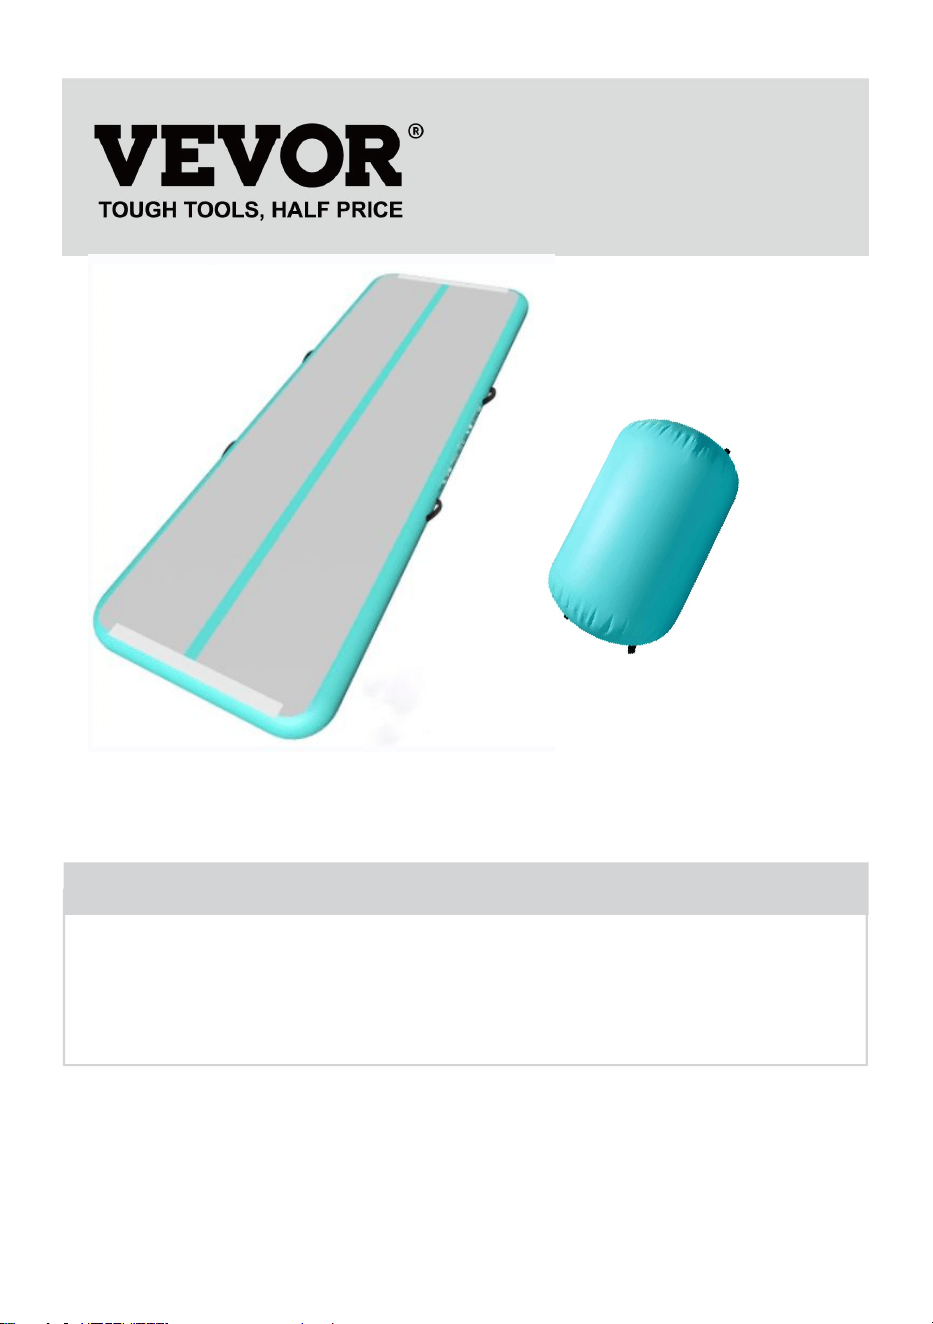
AIR TUMBLING MAT
We continue to be committed to provide you tools with competitive price.
"Save Half", "Half Price" or any other similar expressions used by us only represents an
estimate of savings you might benefit from buying certain tools with us compared to the major
top brands and does not necessarily mean to cover all categories of tools offered by us. You
are kindly reminded to verify carefully when you are placing an order with us if you are
actually saving half in comparison with the top major brands.

- 1 -
Product color is subject to actual configuration
Have product questions? Need technical support? Please feel free to
contact us:
Technical Support and E-Warranty Certificate
www. vevor. com/support
NEED HELP? CONTACT US!
This is the original instruction, please read all manual instructions
carefully before operating. VEVOR reserves a clear interpretation of our
user manual. The appearance of the product shall be subject to the
product you received. Please forgive us that we won't inform you again
if there are any technology or software updates on our product.
AIR TUMBLING MAT

- 2 -
IMPORTANT SAFEGUARDS
CAUTION: Anv activity involving motion, rotation, and height creates the
possibility of catastrophic injury, paralysis, or even death. You assume the
risk of serious injury when using this equipment; this equipment is intended
for use only by properly trained and qualified participants under supervised
conditions. Before using, know your imitations. If in doubt, always consult a
teacher. Qualified instructor. Always inspect for loose fittings or damage,
and test stability before each use. Use mats only on firm ground
surrounded by appropriate mats. Ensure the mat's surface is dry and in
good condition before use. Always check air pressure meets minimum
requirements. Please do not leave the mat partially inflated in an area
where it can be used without supervision. The mat can move during use.
Always check for proper positioning of the product before use. Check
pressure periodically to ensure proper inflation. Note that external
temperature changes will alter the internal pressure of the mat.
CAUTION:This equipment is not intended for use by persons (including
children) with reduced physical, sensory, or mental capabilities, or lack of
experience and knowledge, unless they have been given supervision or
instruction concerning use of the equipment by a person responsible for
their safety.
CAUTION:Children should be supervised .
CAUTION:Please dispose of all plastic bags carefully and keep them away
from children and pets.
CAUTION
:
The product should be placed on a flat surface.
SAFETY INSTRUCTIONS OF AIR PUMP
WARNING:Read all safety warnings, instructions, illustrations and
specifications provided with this air pump. Failure to follow all instructions
listed below may result in electric shock, fire and/or serious injury.
Basic Safety Information:
1. This product is for pumping up only.
2. Pulling or dragging the product with the power line is not allowed.
3. When pulling out the plug, please hold the plug itself; do not pull the
Power line.
4. Do not cut and replace the power plug by yourself. Otherwise, serious

- 3 -
consequences may incur.
5. Operation of the product is not allowed in case of damage to the power
line or the shell.
6. Disassembling and dismounting of the product by lay-people is not
allowed.
7. In case the air pump drops into water, please cut off the power supply
before dredging it out. Then it should be handed over to professionals for
check and maintenance.
8. Electrical shock hazard: Do not touch the air pump with wet hands or
while standing on a wet surface. Always use the air pump in a dry
environment and plug it into a properly grounded outlet.
9. Fire hazard: Do not use the air pump near flammable or combustible
materials. Keep the air pump away from sources of heat or sparks, such as
flames, cigarettes, or electrical appliances.
10. Explosion hazard: Do not use the air pump with gases that are
flammable, explosive, or poisonous. Always check the safety data sheet
(SDS) of the gas before using it with the air pump. Additionally, do not
exceed the specified pressure range for the air pump.
11. Corrosion hazard: Do not use the air pump with gases that can corrode
metals or exert chemical charges. Check the compatibility of the gas with
the materials of the pond aeration and its accessories. Always use
protective gloves and eyewear when handling corrosive materials.
12. Do not use a damaged plug or outlet, as this can cause electrical shock
or fire.
13. If the supply cord is damaged, it must be replaced by the manufacturer,
its service agent or similarly qualified persons in order to avoid a hazard.
14. This appliance can be used by children aged from 8 years and above
and persons with reduced physical, sensory or mental capabilities or lack

- 4 -
of experience and knowledge if they have been given supervision or
instruction concerning the use of the appliance in a safe way and
understand the hazards involved. Children shall not play with the appliance.
Cleaning and user maintenance shall not be made by children without
supervision.
SAVE THESE INSTRUCTIONS
FCC INFORMATION OF AIR PUMP
CAUTION: Changes or modifications not expressly approved by the party
responsible for compliance could void the user's authority to operate the
equipment!
This device complies with Part 15 of the FCC Rules. Operation is subject to
the following two conditions:
1) This product may cause harmful interference.
2)This product must accept any interference received, including
interference that may cause undesired operation.
WARNING: Changes or modifications to this product not expressly
approved by the party.responsible for compliance could void the user's
authority to operate the product.
Note: This product has been tested and found to comply with the limits for
a Class B digital device pursuant to Part 15 of the FCC Rules, These limits
are designed to provide reasonable protection against harmful interference
in a residential installation.
This product generates, uses and can radiate radio frequency energy, and
if not installed and used in accordance with the instructions, may cause
harmful interference to radio communications. However, there is no
guarantee that interference will not occur in a particular installation. If this
product does cause harmful interference to radio or television

- 5 -
reception,which can be determined by turning the product off and on, the
user is encouraged to try to correct the interference by one or more of the
following measures.
· Reorient or relocate the receiving antenna.
· Increase the distance between the product and receiver.
· Connect the product to an outlet on a circuit different from that to which
the receiver is connected.
· Consult the dealer or an experienced radio/TV technician for assistance.
CORRECT DISPOSAL OF AIR PUMP
This product is subject to the provision of european Directive
2012/19/EU. The symbol showing a wheelie bin crossed
through indicates that the product requires separate refuse
collection in the European Union. This applies to the product
and all accessories marked with this symbol. Products marked as such
may not be discarded with normal domestic waste, but must be taken to
acollection point for recycling electrical and electronic devices.
- 6 -
PRODUCT PARAMETERS
MODEL
SIZE/COLOR
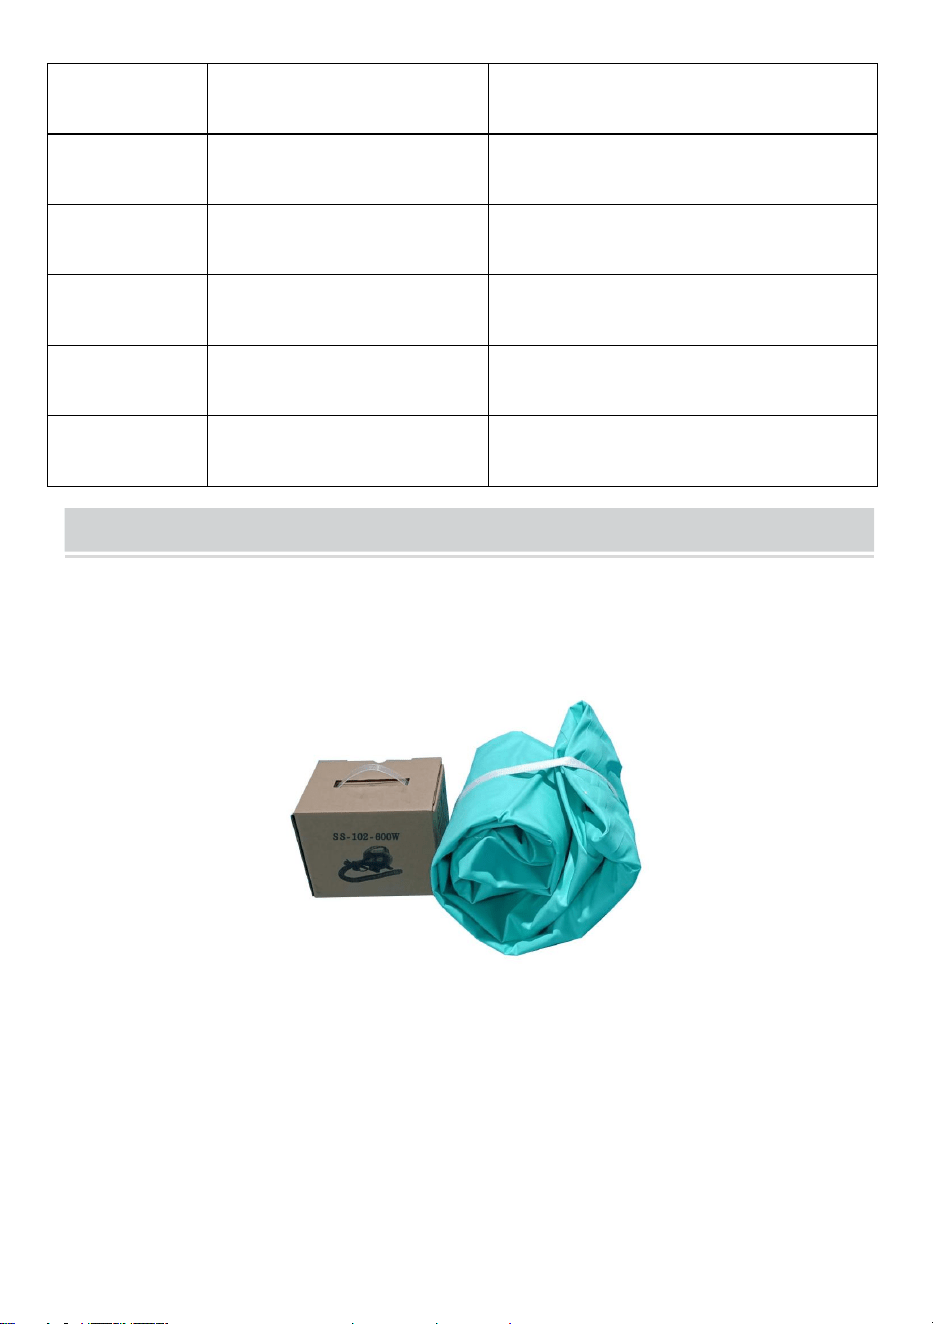
AIR PUMP
TT-M-40-24
40×Φ24inch /Pink
US PLUG(AC110-120V 60Hz 600W)
TT-E-40-24
40×Φ24INCH /PINK
EU PLUG(AC220-240V 50/60Hz 600W)
TT-M-40-31.5
40×Φ31.5inch /Green
US PLUG(AC110-120V 60Hz 600W)
TT-E-40-31.5
40×Φ31.5inch /Green
EU PLUG(AC220-240V 50/60Hz 600W)
TT-M-40-24-10
Suit:10ft+40×Φ24inch/Pink
US PLUG(AC110-120V 60Hz 600W)
TT-E-40-24-10
Suit:10ft+40×Φ24inch/Pink
EU PLUG(AC220-240V 50/60Hz 600W)
TT-M-10-G
10ft/Green
US PLUG(AC110-120V 60Hz 600W)
TT-E-10-G
10ft/Green
EU PLUG(AC220-240V 50/60Hz 600W)
TT-M-10-P
10ft/Pink
US PLUG(AC110-120V 60Hz 600W)
TT-E-10-P
10ft/Pink
EU PLUG(AC220-240V 50/60Hz 600W)
TT-M-10-B
10ft/Blue
US PLUG(AC110-120V 60Hz 600W)
TT-E-10-B
10ft/Blue
EU PLUG(AC220-240V 50/60Hz 600W)
TT-M-13-G
13ft/Green
US PLUG(AC110-120V 60Hz 600W)
TT-E-13-G
13ft/Green
EU PLUG(AC220-240V 50/60Hz 600W)
TT-M-13-P
13ft/Pink
US PLUG(AC110-120V 60Hz 600W)
TT-E-13-P
13ft/Pink
EU PLUG(AC220-240V 50/60Hz 600W)
TT-M-13-B
13ft/Blue
US PLUG(AC110-120V 60Hz 600W)
TT-E-13-B
13ft/Blue
EU PLUG(AC220-240V 50/60Hz 600W)
TT-M-16-G
16ft/Green
US PLUG(AC110-120V 60Hz 600W)
TT-E-16-G
16ft/Green
EU PLUG(AC220-240V 50/60Hz 600W)
TT-M-16-P
16ft/Pink
US PLUG(AC110-120V 60Hz 600W)
TT-E-16-P
16ft/Pink
EU PLUG(AC220-240V 50/60Hz 600W)
TT-M-16-B
16ft/Blue
US PLUG(AC110-120V 60Hz 600W)
TT-E-16-B
16ft/Blue
EU PLUG(AC220-240V 50/60Hz 600W)
TT-M-20-G
20ft/Green
US PLUG(AC110-120V 60Hz 600W)
TT-E-20-G
20ft/Green
EU PLUG(AC220-240V 50/60Hz 600W)
TT-M-20-P
20ft/Pink
US PLUG(AC110-120V 60Hz 600W)
TT-E-20-P
20ft/Pink
EU PLUG(AC220-240V 50/60Hz 600W)
TT-M-20-B
20ft/Blue
US PLUG(AC110-120V 60Hz 600W)
TT-E-20-B
20ft/Blue
EU PLUG(AC220-240V 50/60Hz 600W)
- 7 -
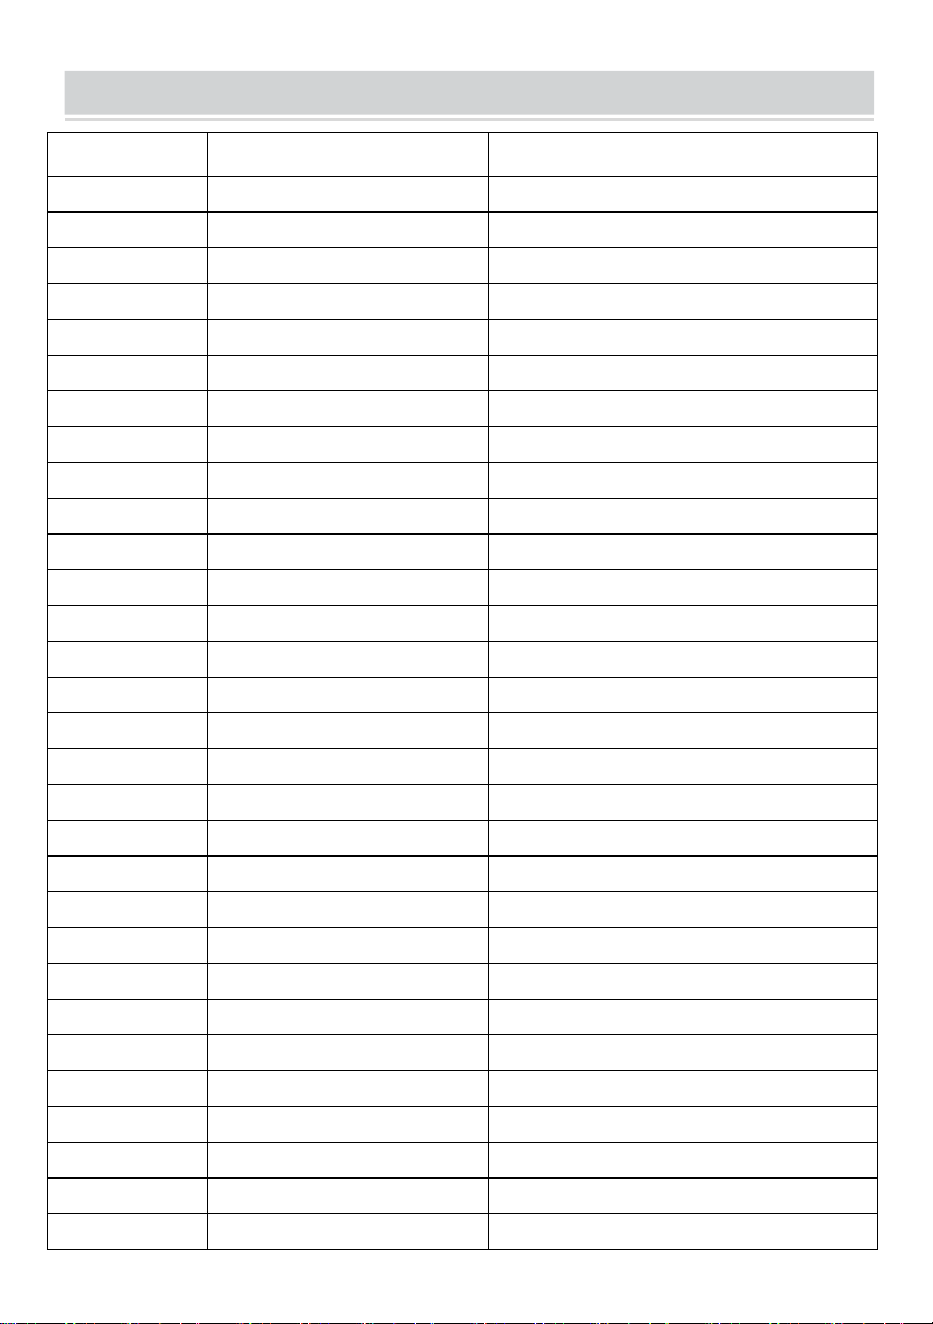
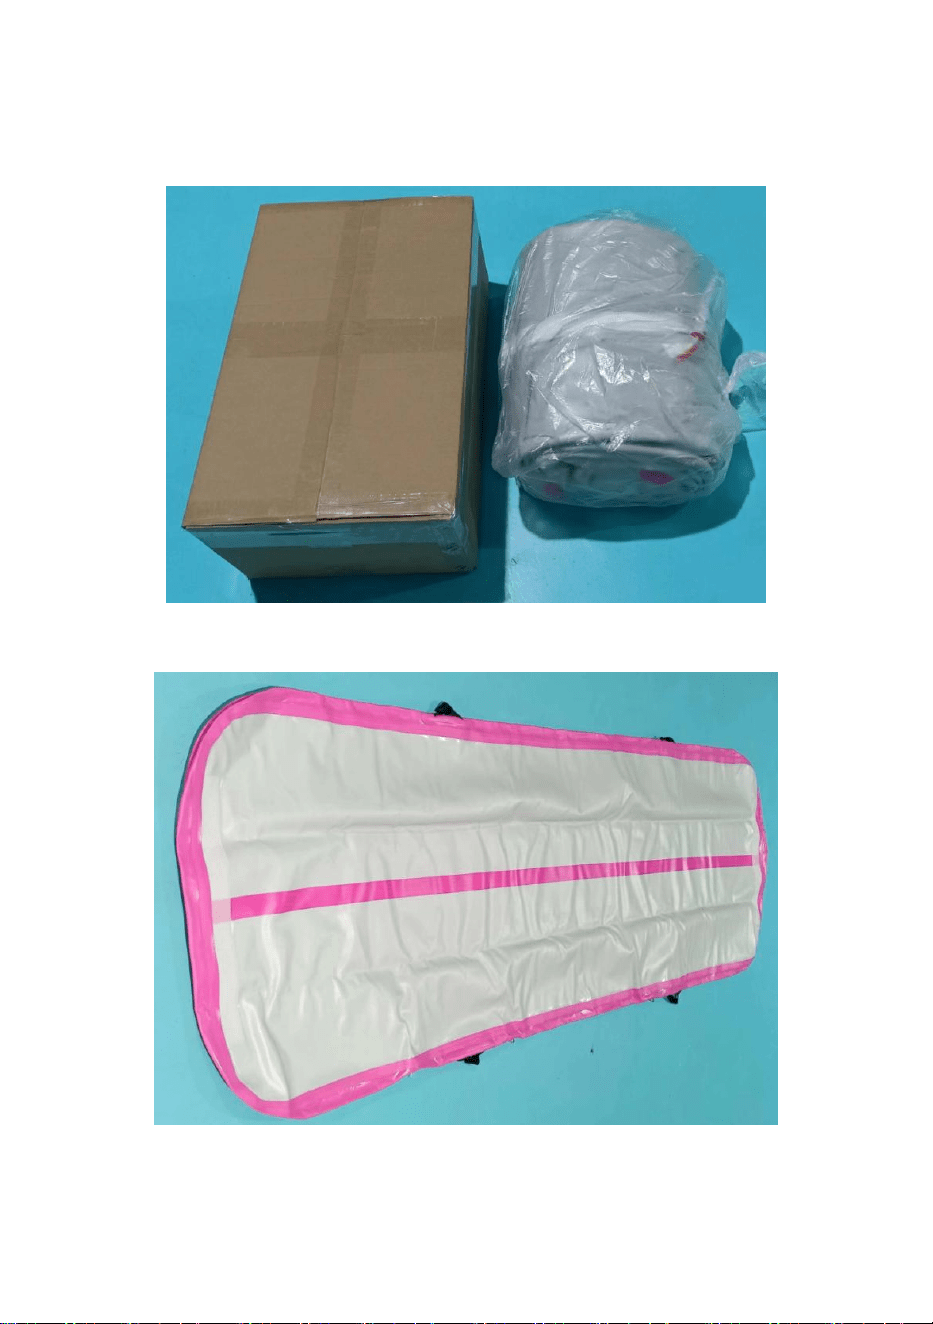
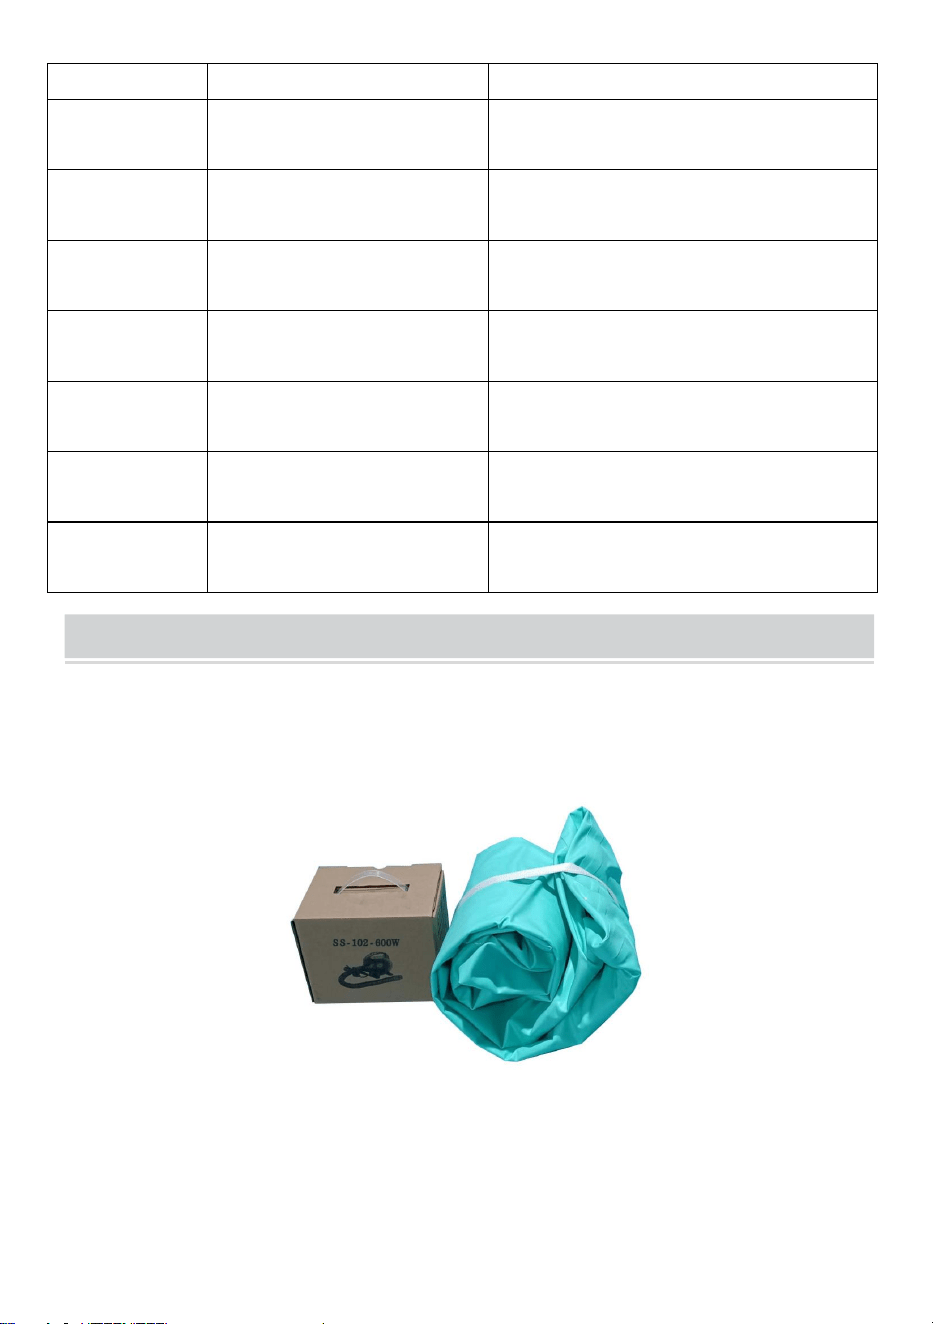
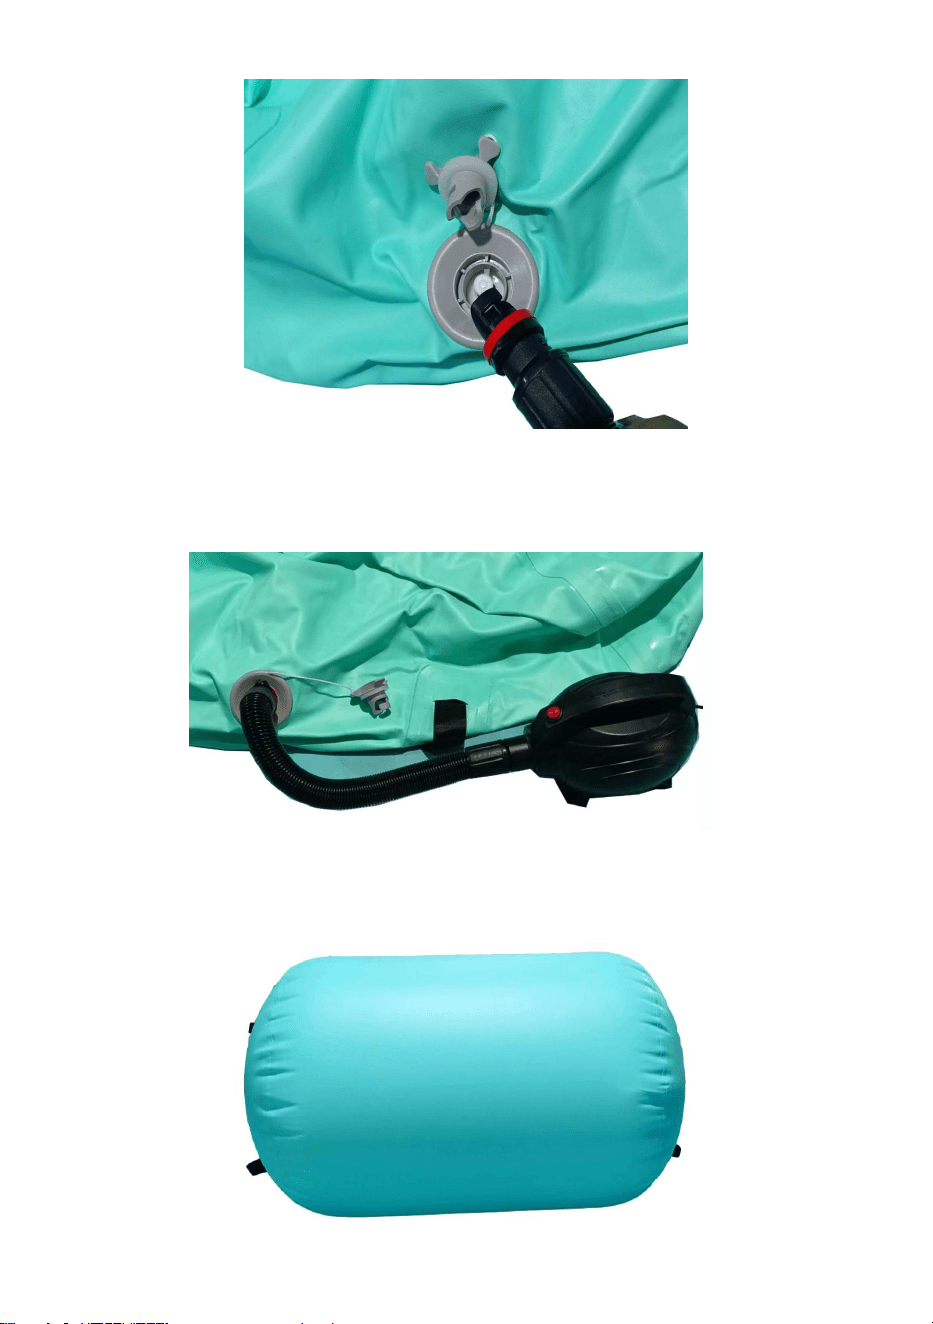
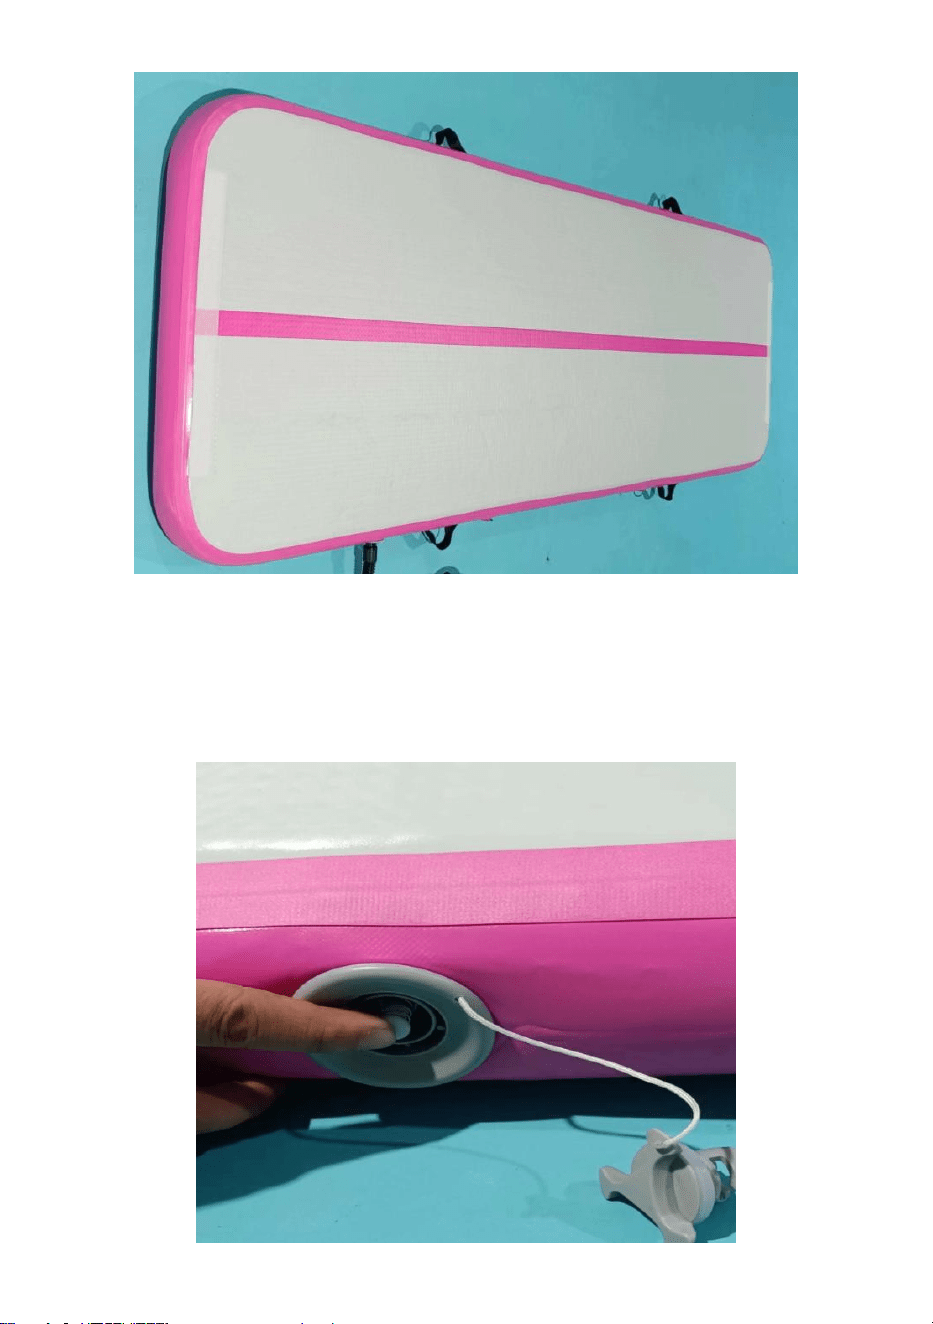
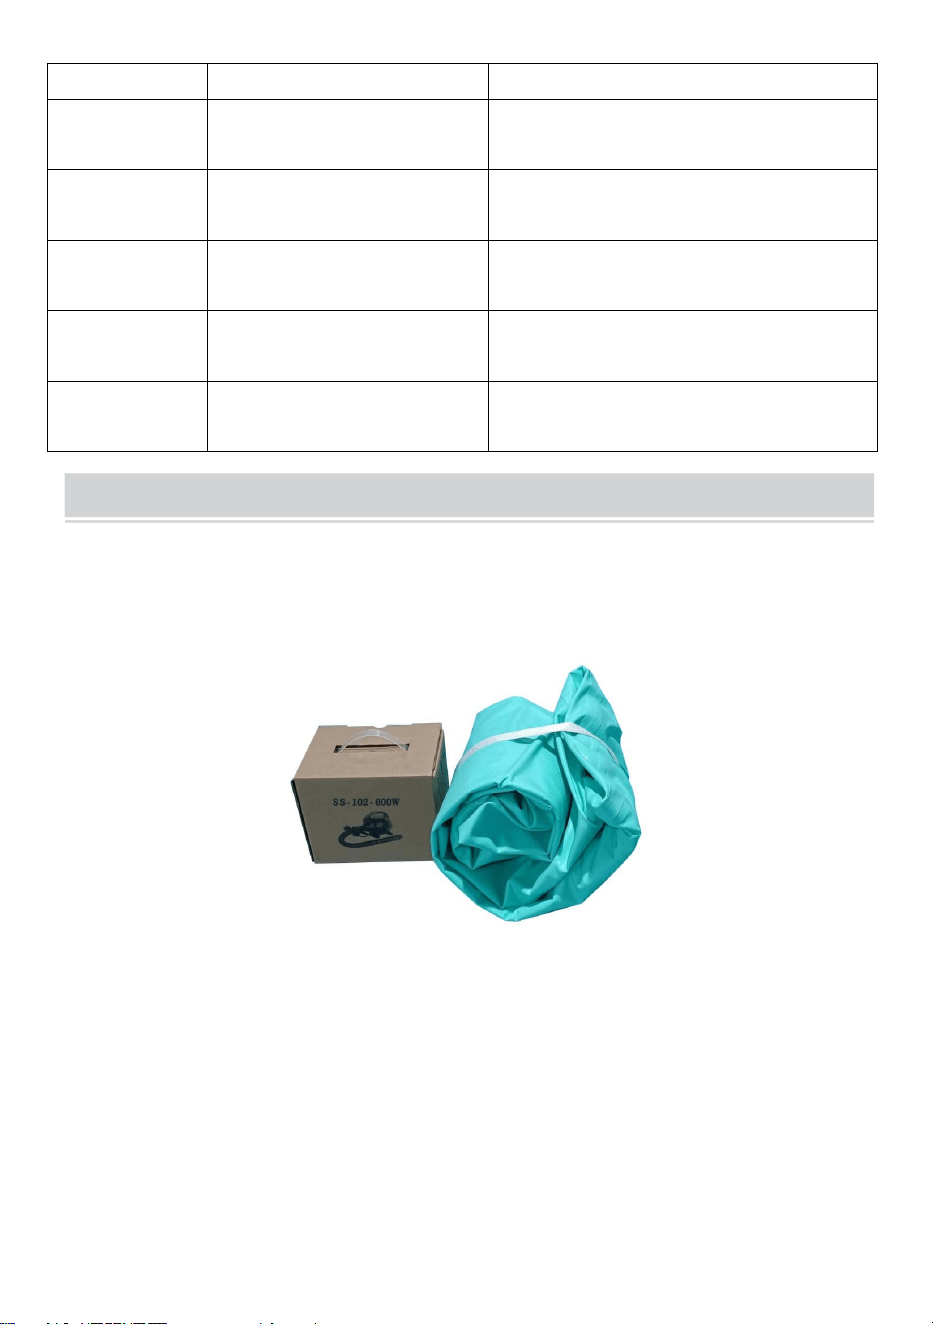
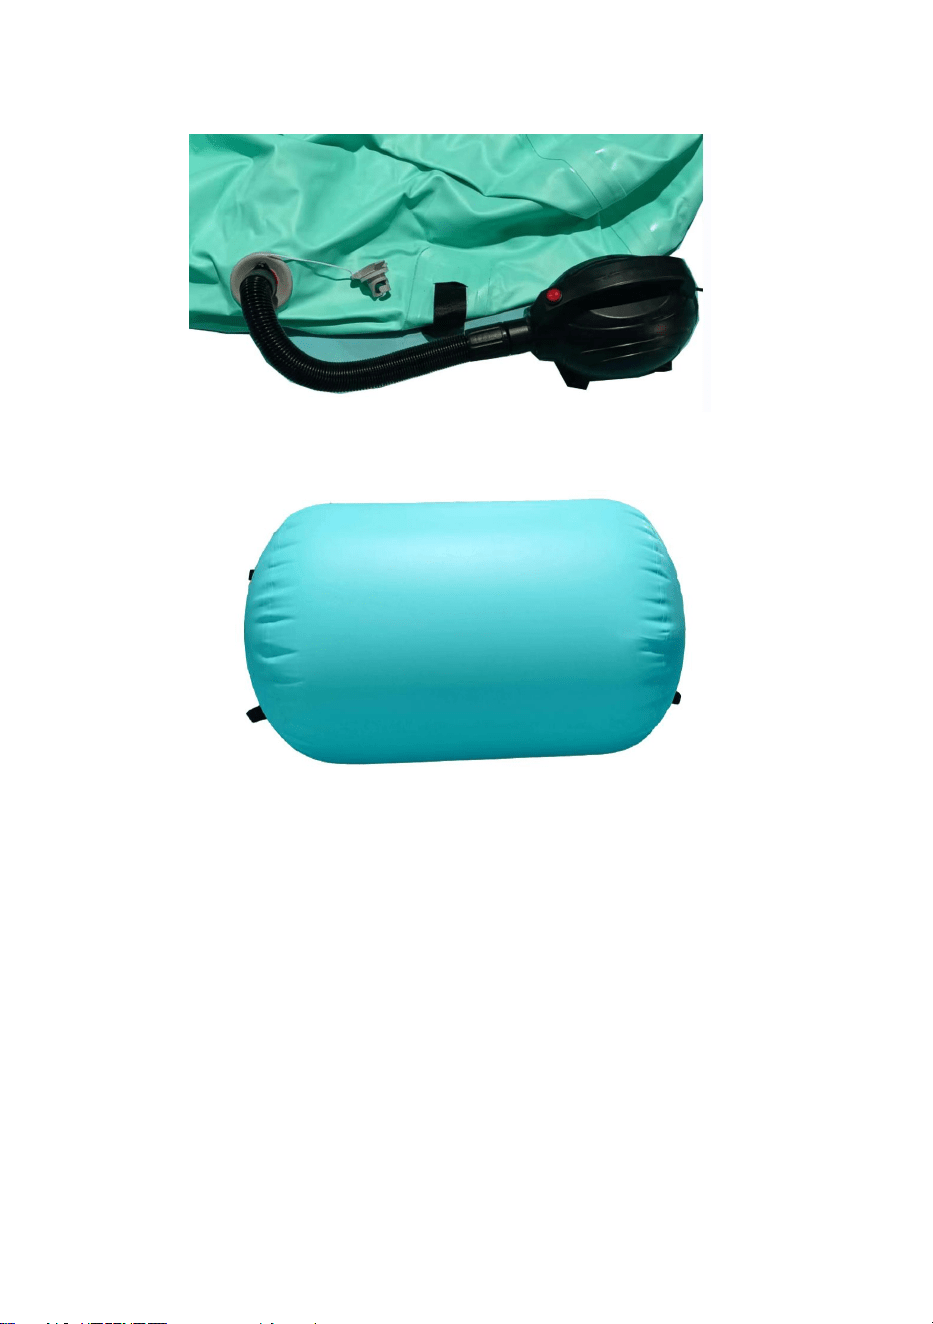
INSTALLATION STEPS
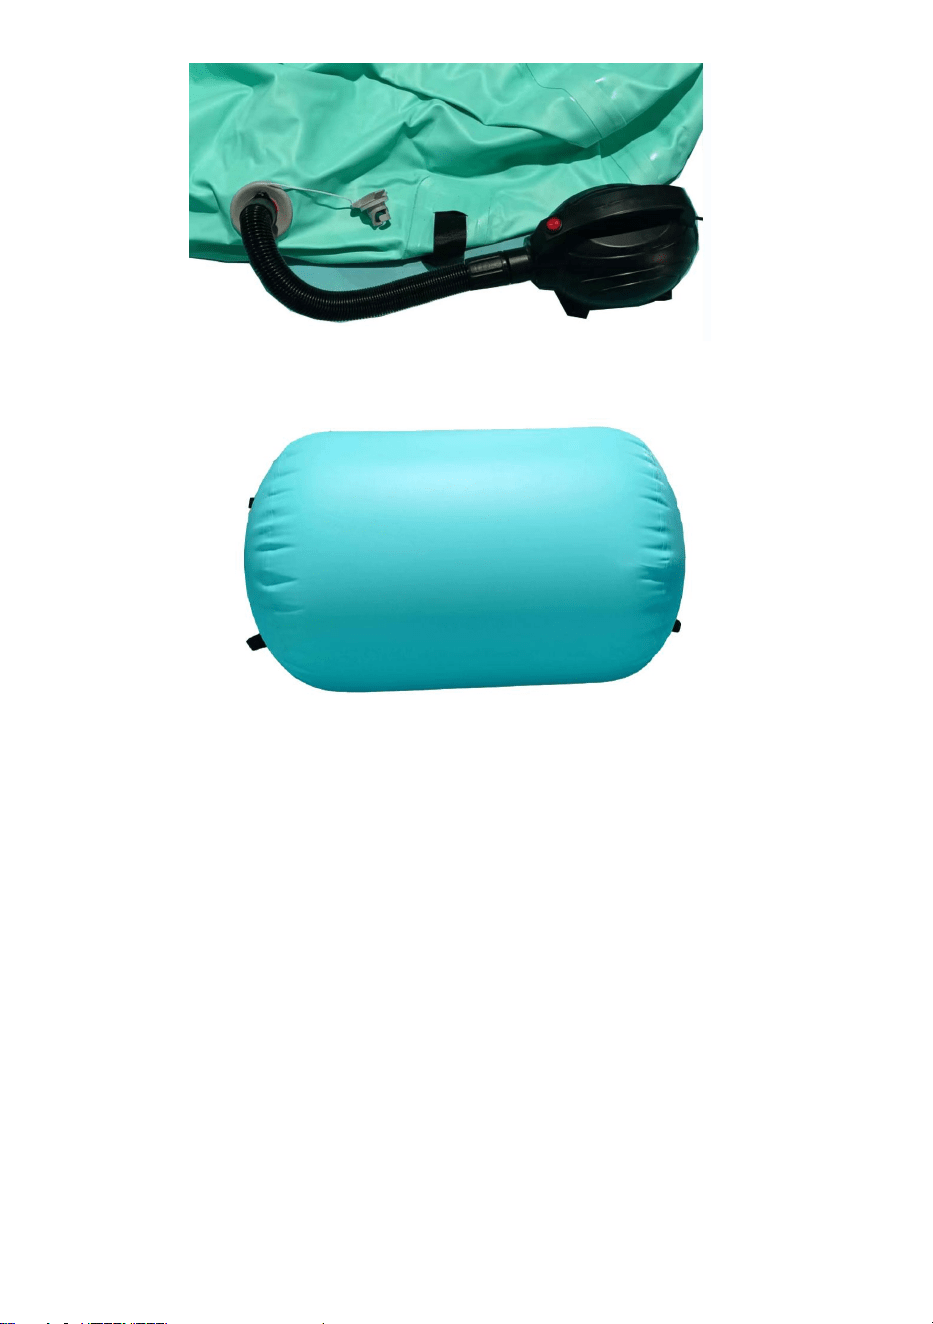
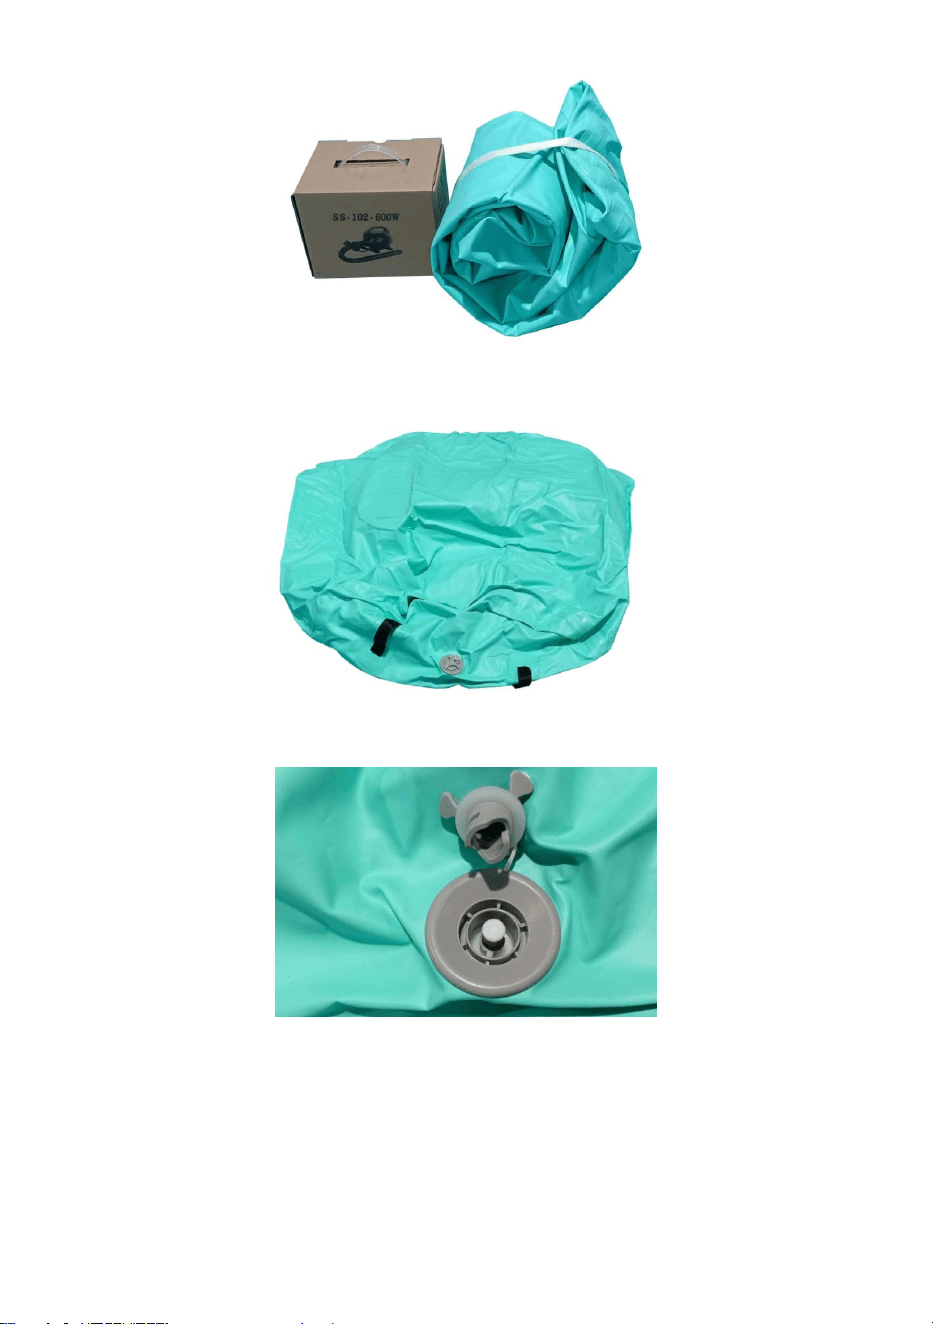
A: Roller (Product color is subject to actual configuration)
1.Make sure the packing is complete and takeout the inflatable from the
packing box.
2.Place the air cushion on the ground to open.
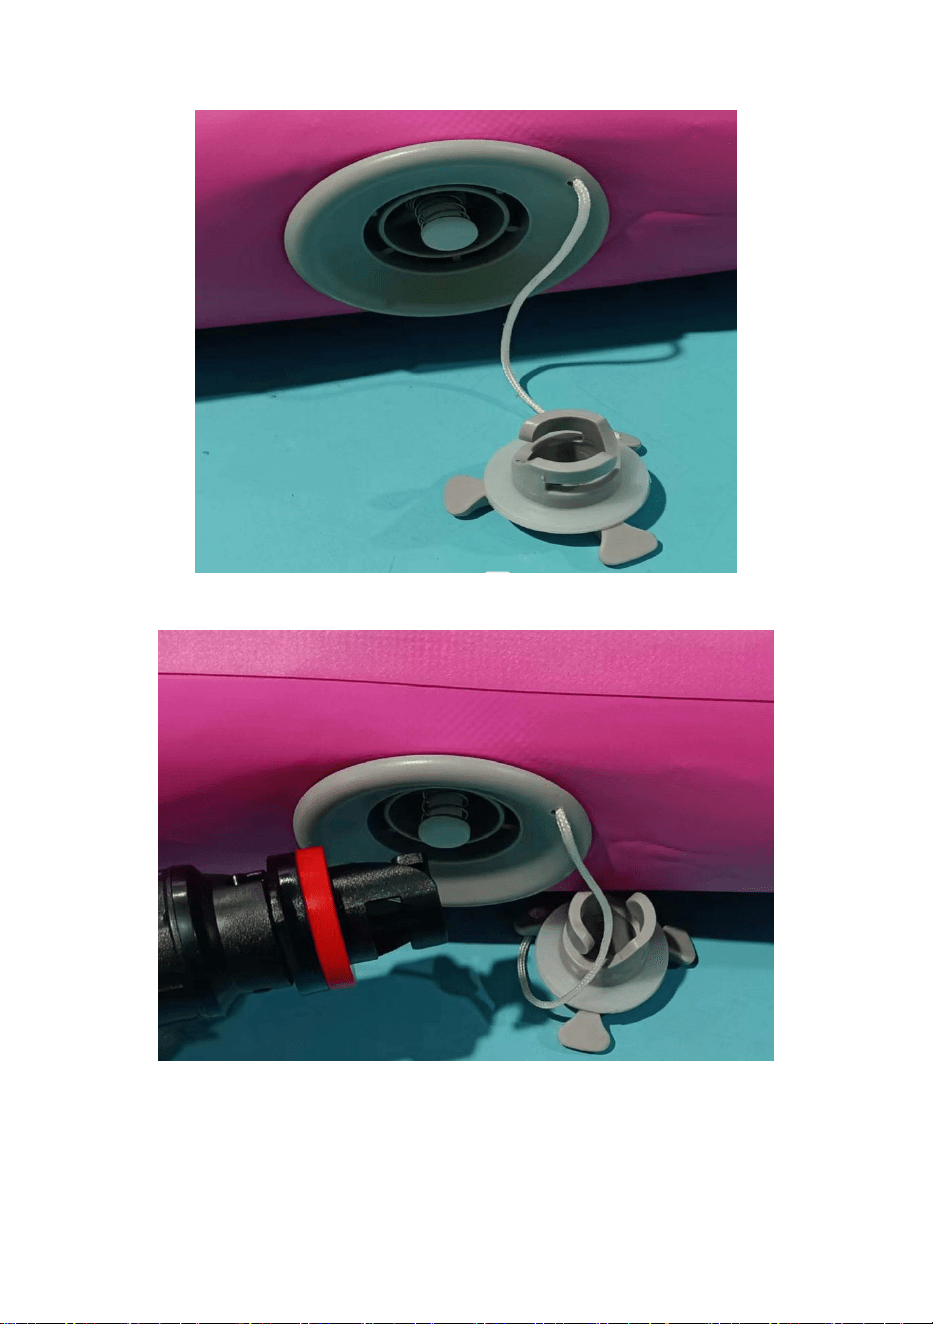
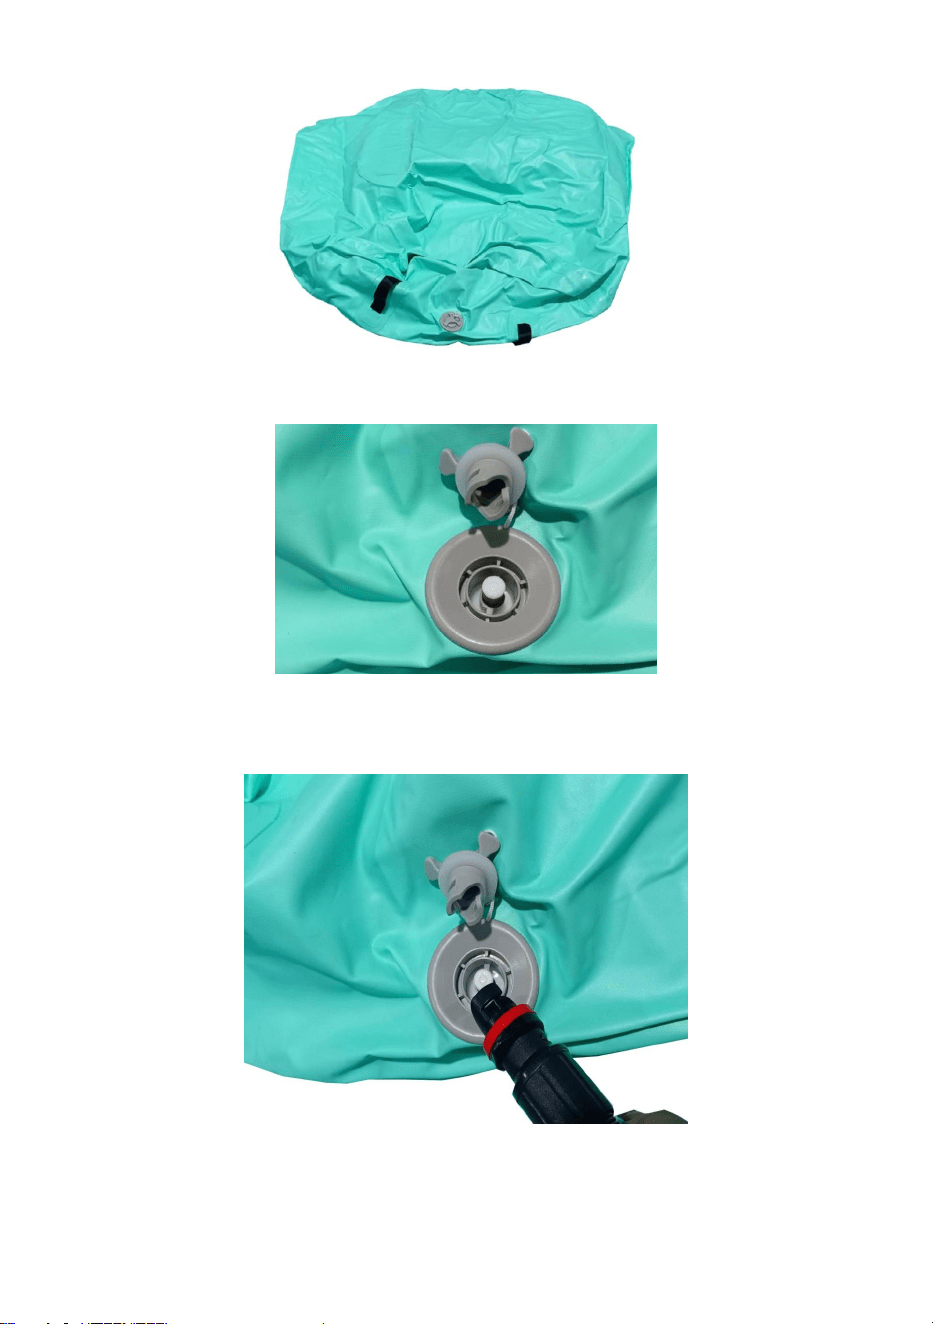
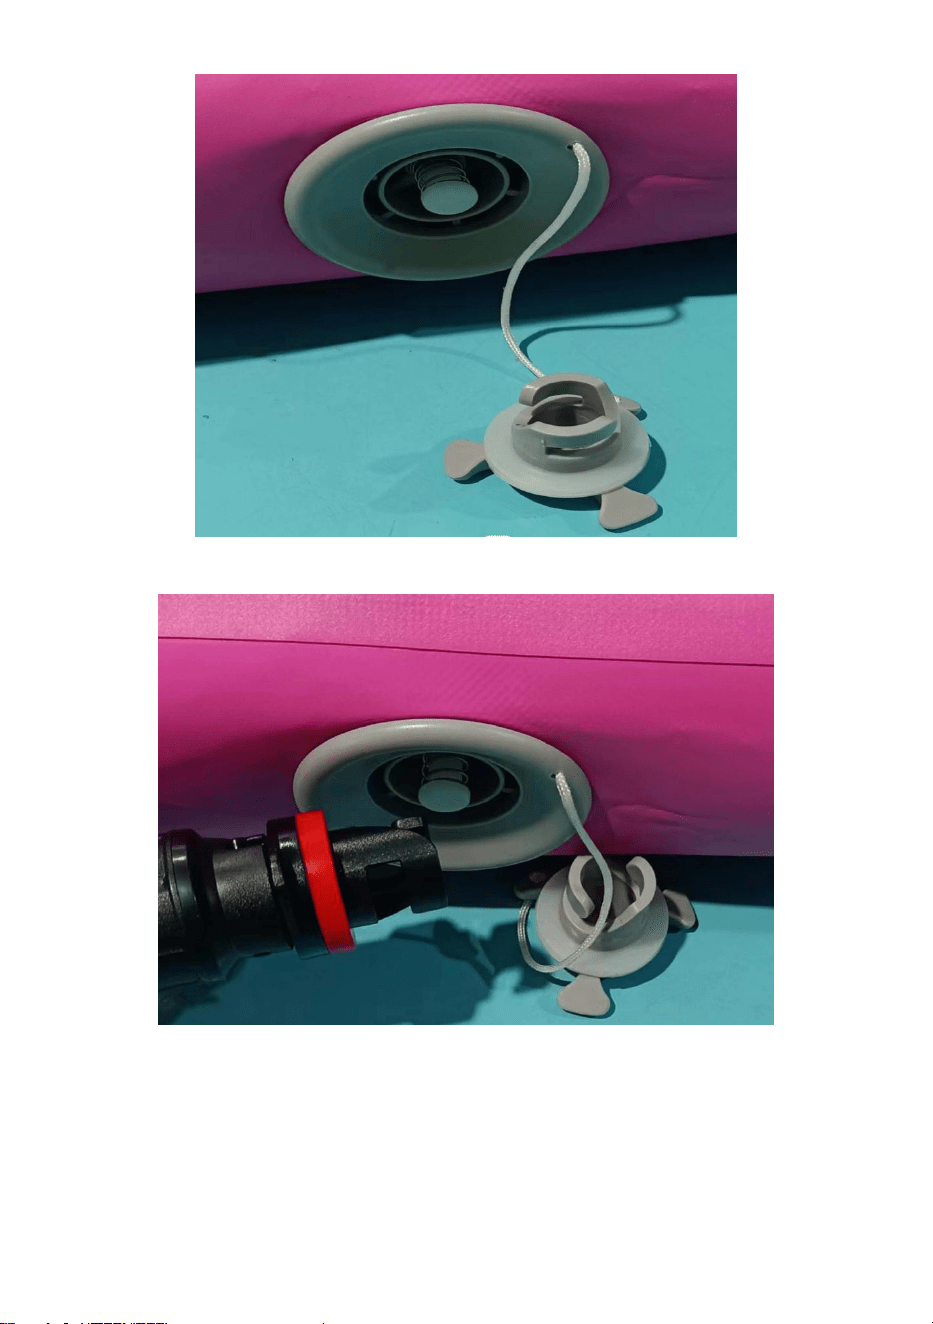
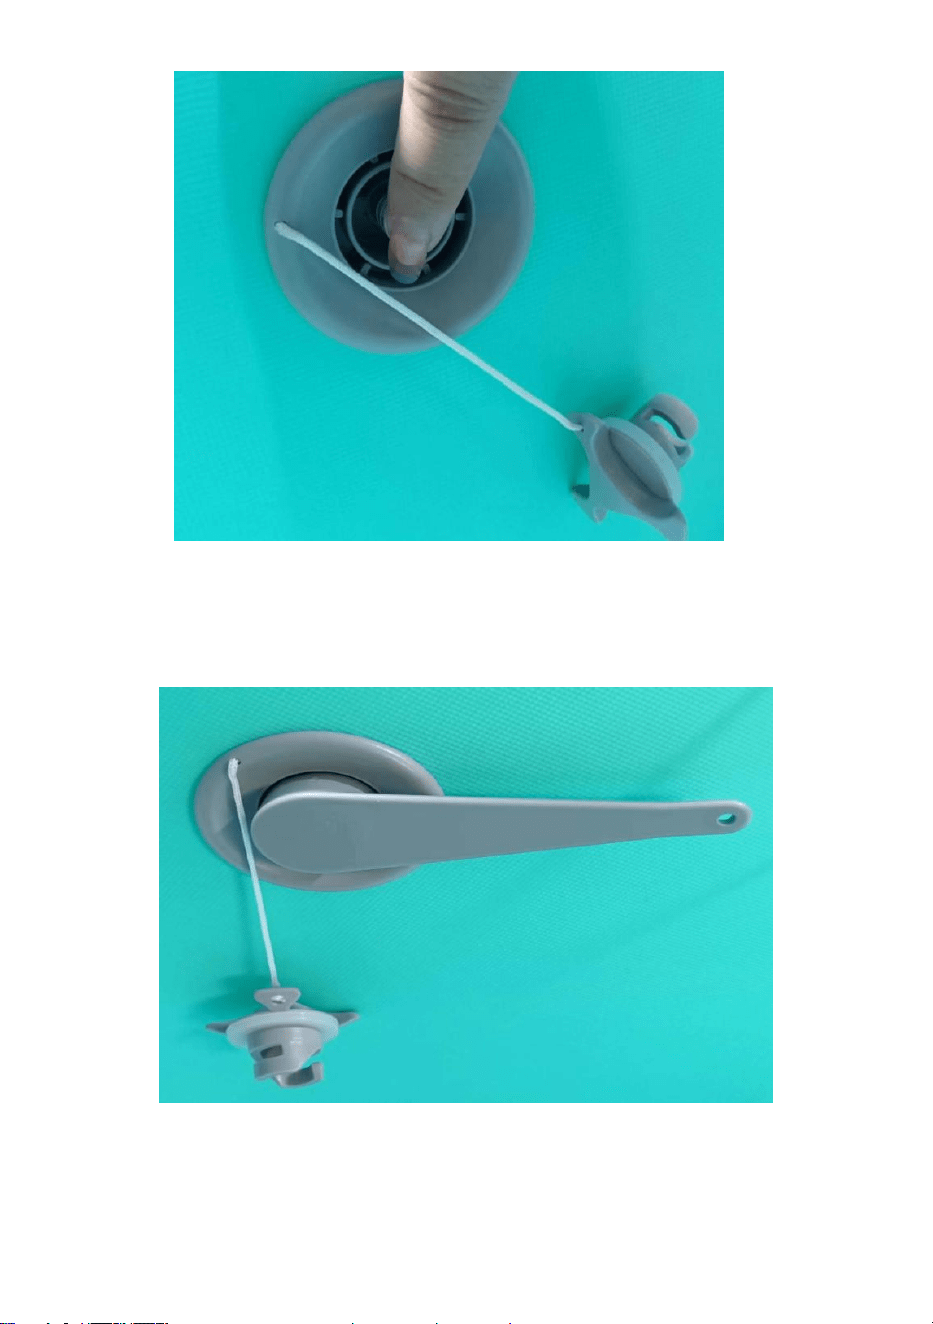
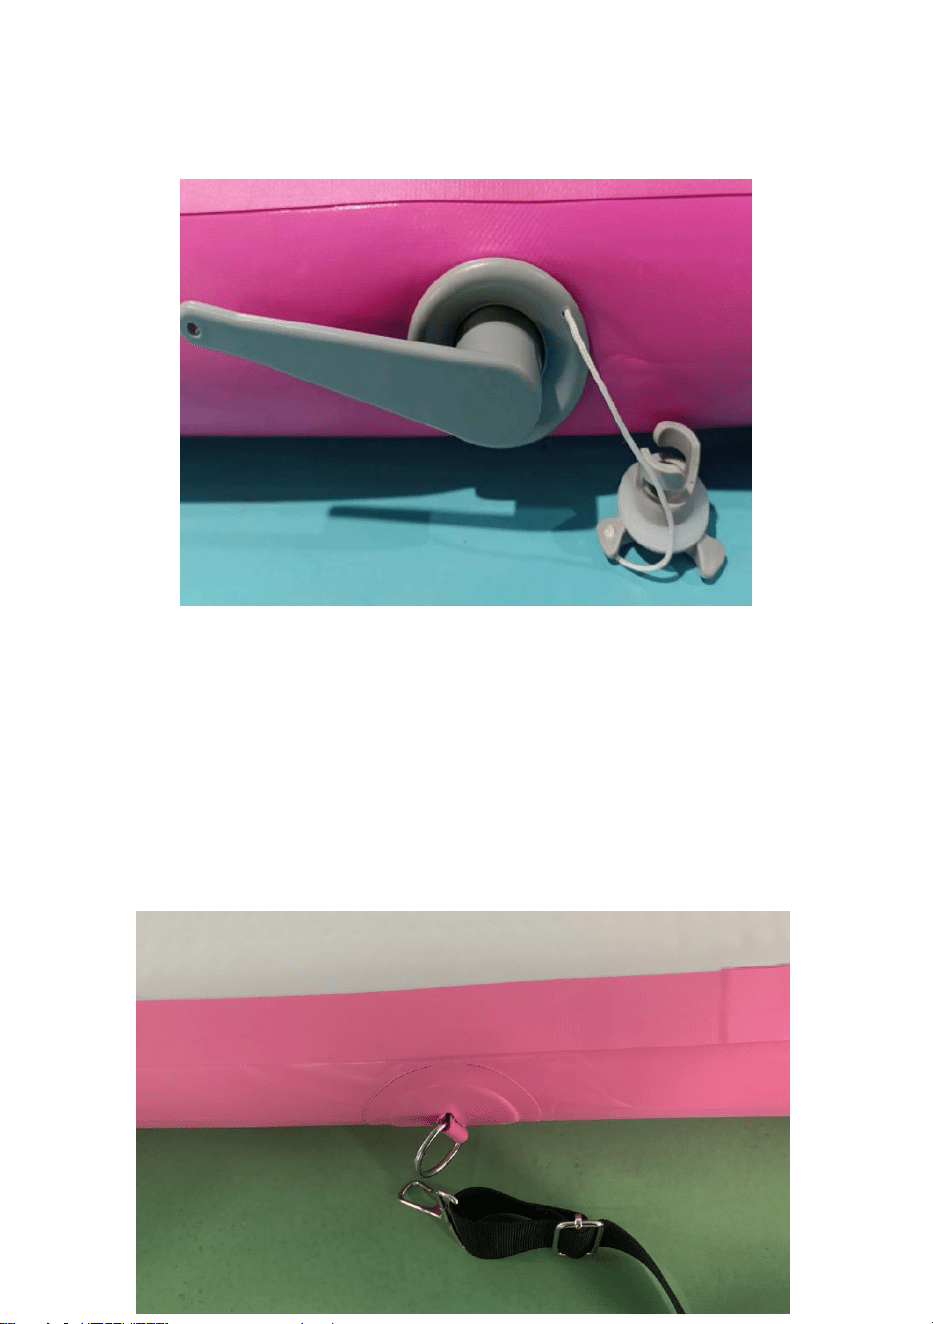
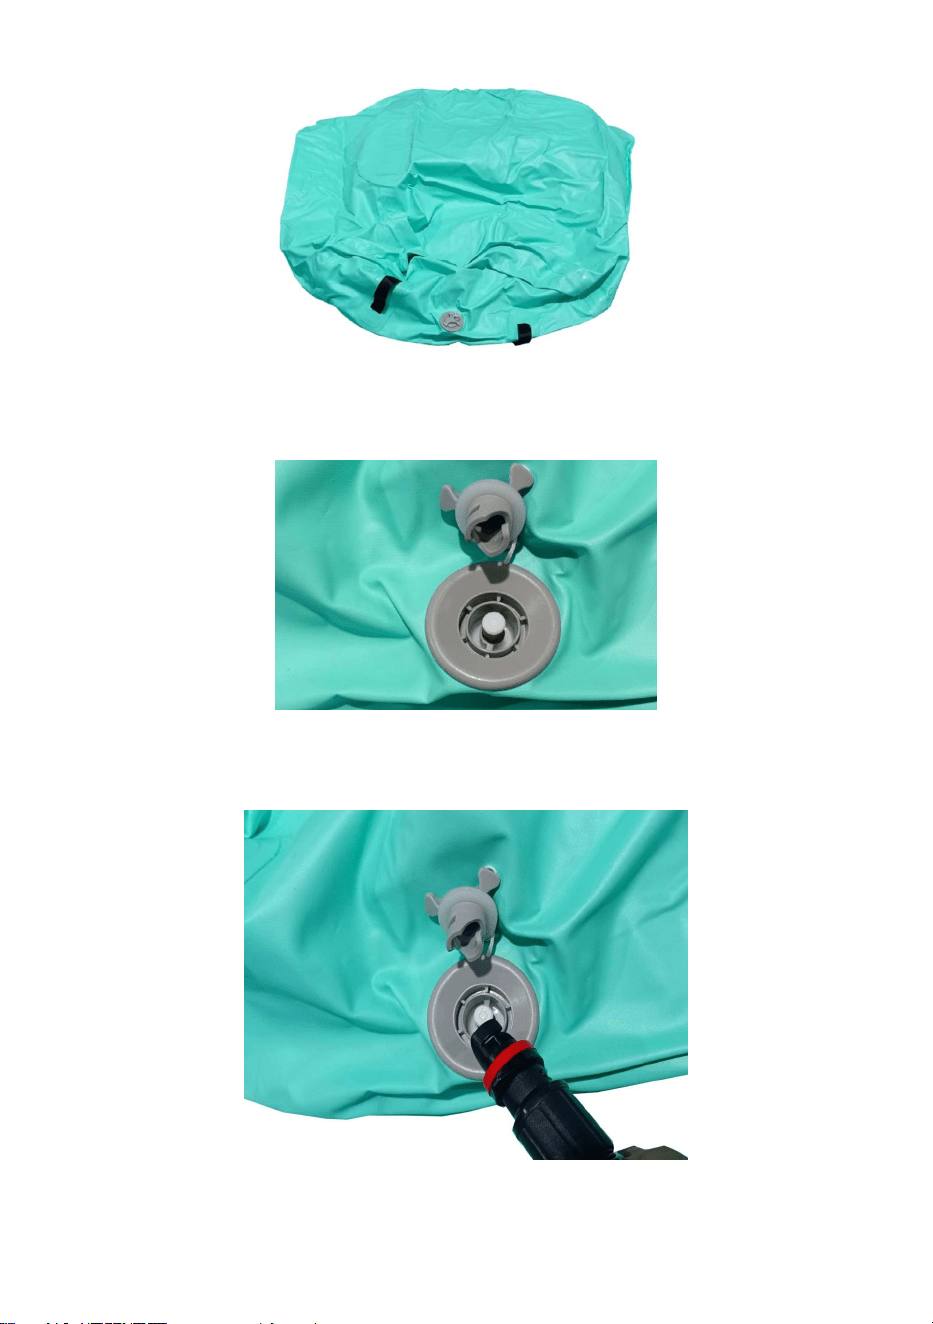
3.Turn the inflatable valve open against clockwise.
- 8 -
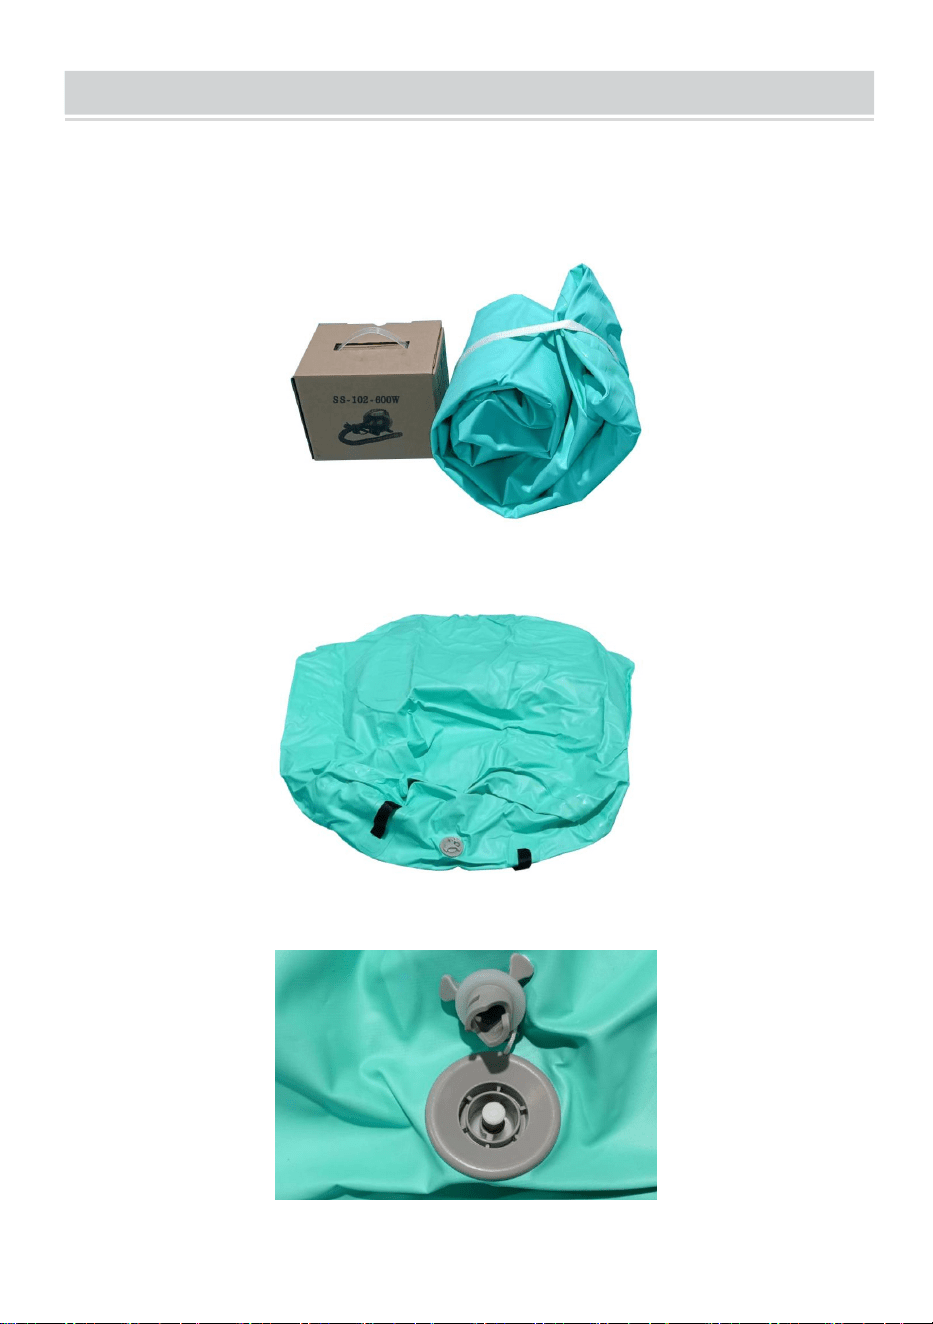
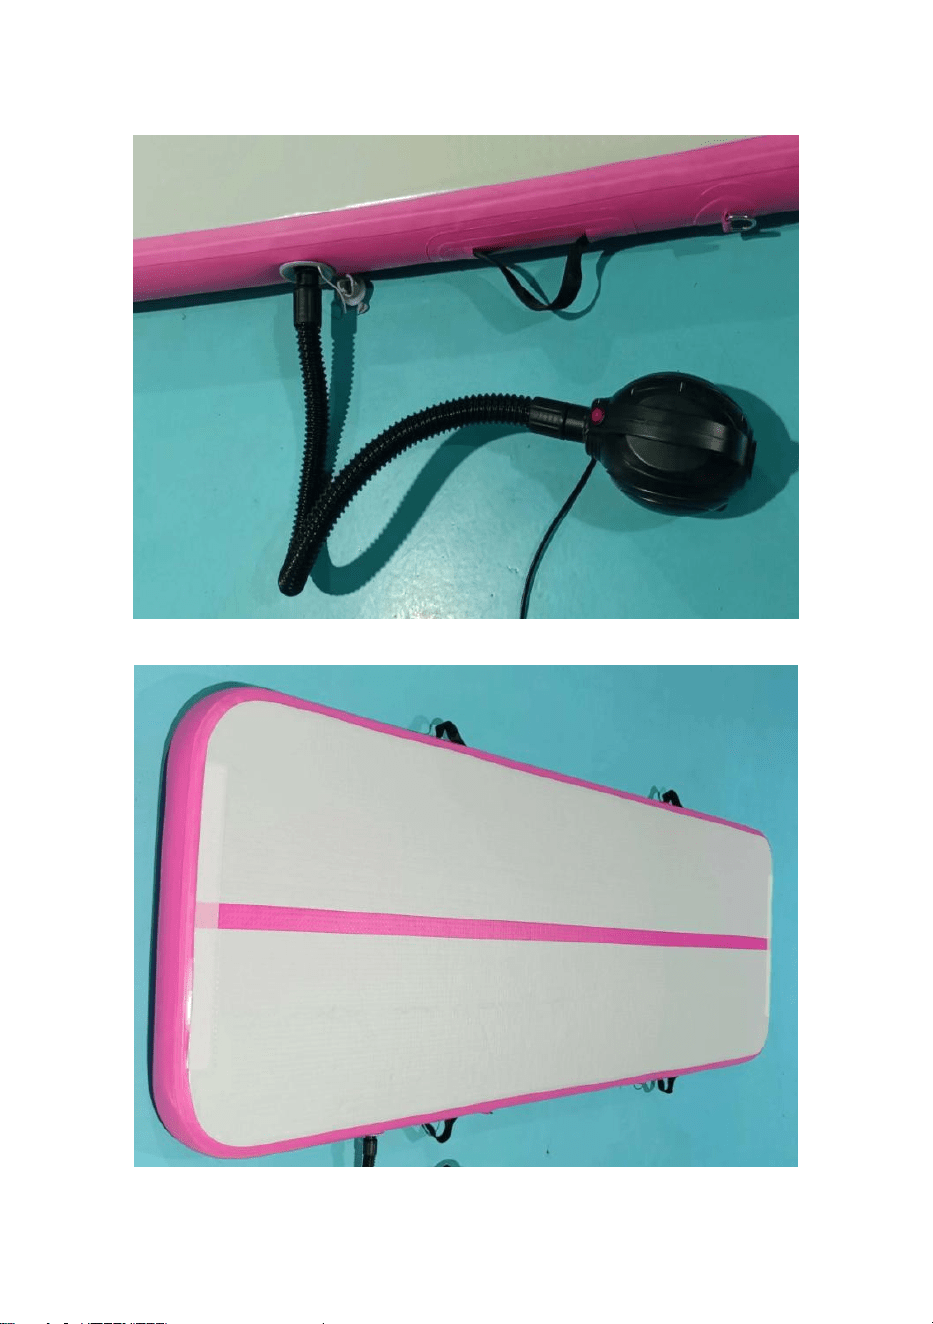
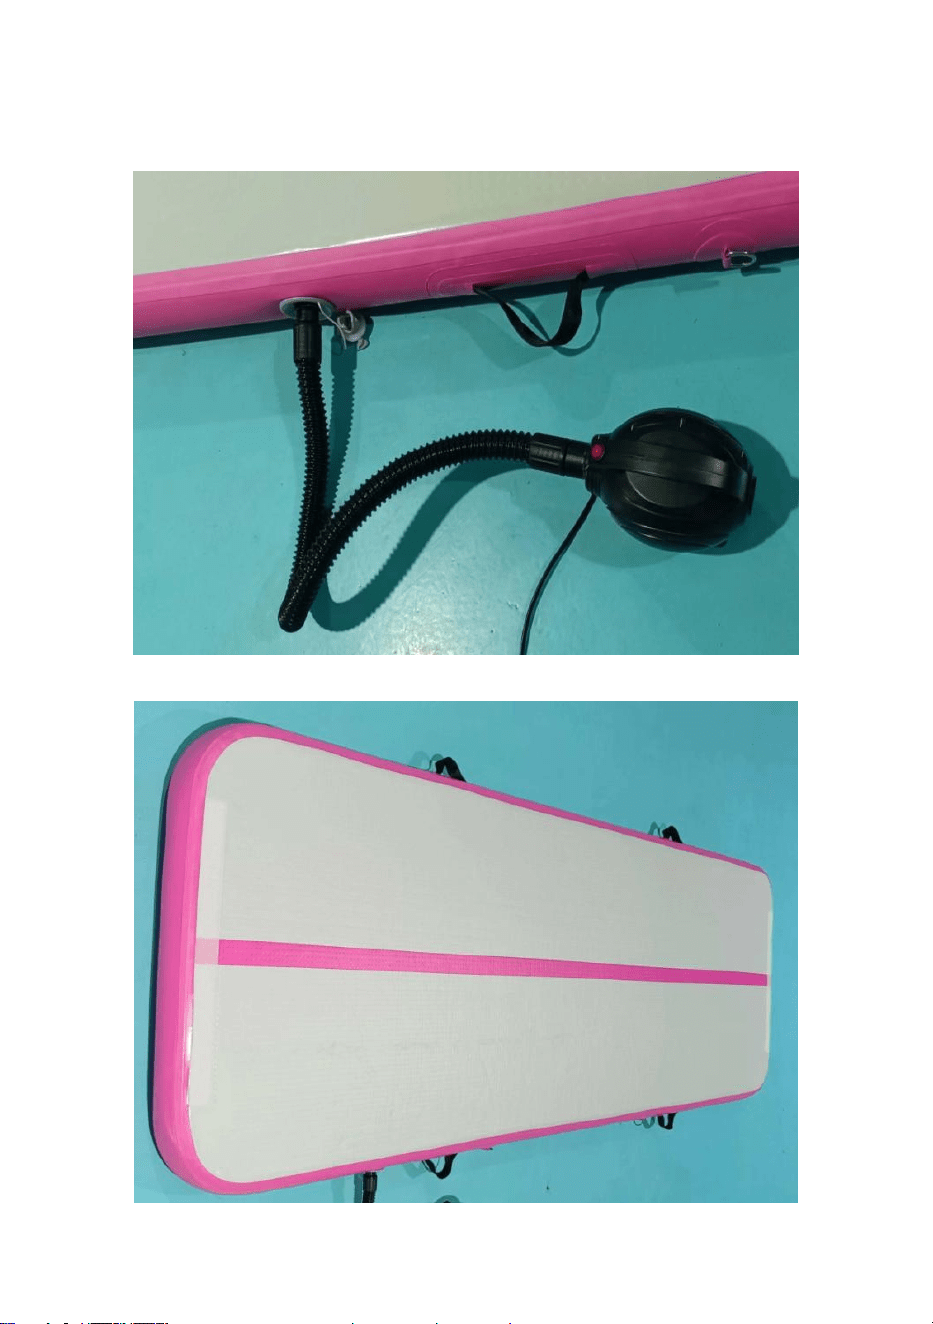
4.Air pipe and inflation valve connection.
5.Air pipe and air pump connection air pump plug.
Turn on the air pump and press the switch to start inflating.
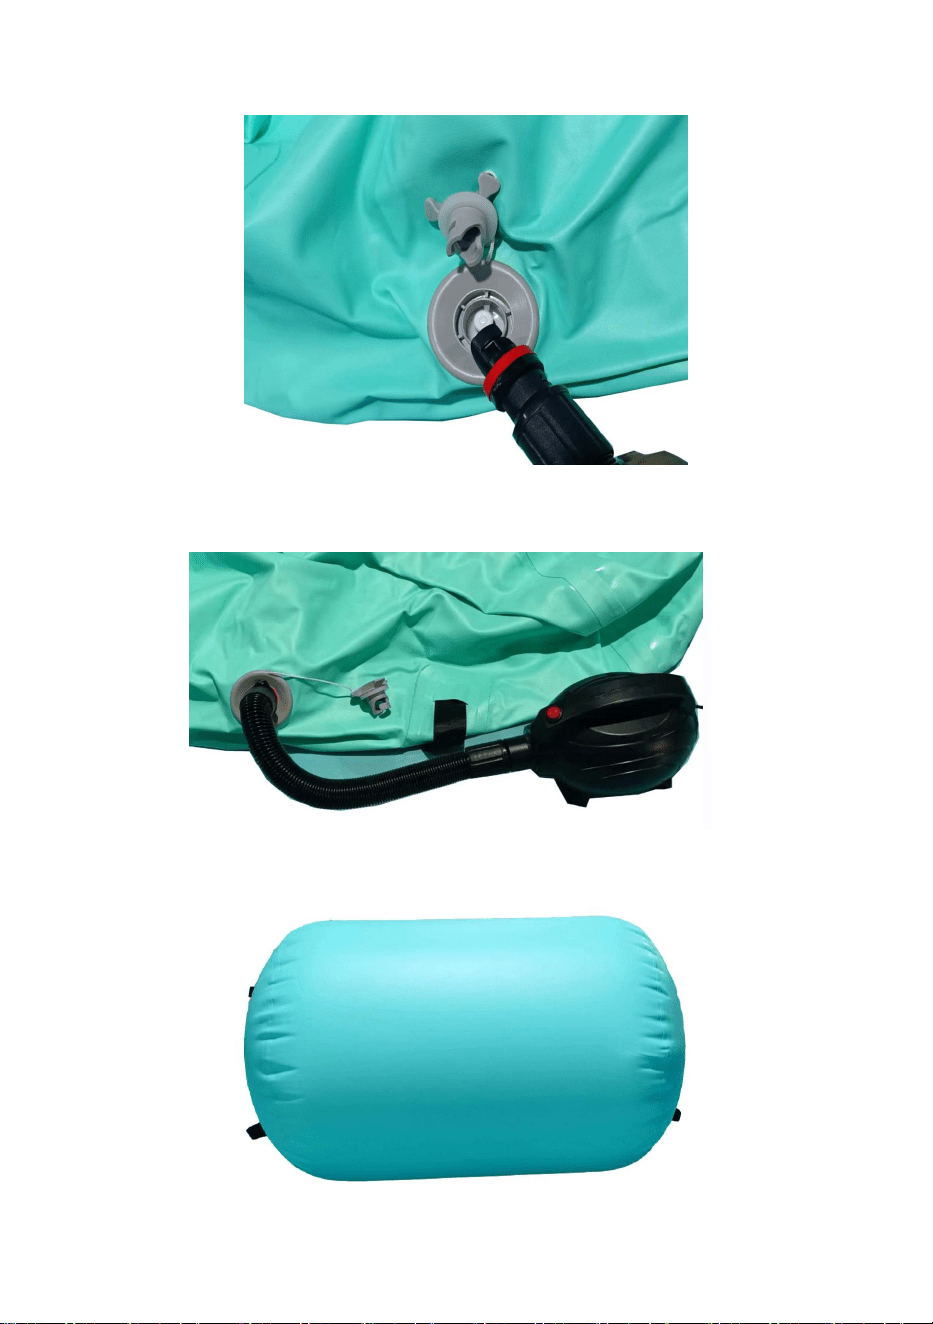
6.Please turn off the switch when the air cushion is full of air.
- 9 -
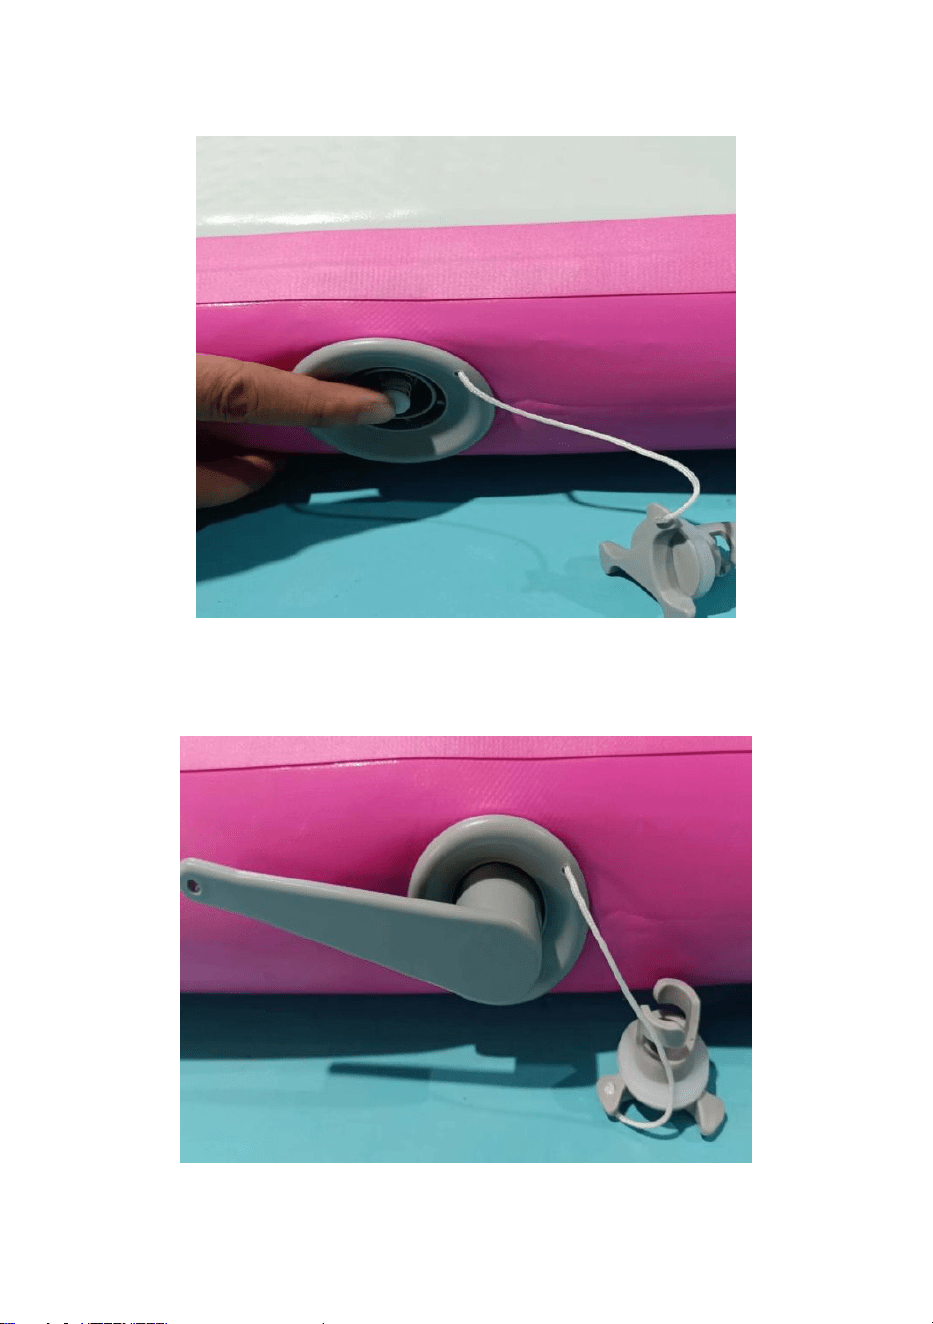
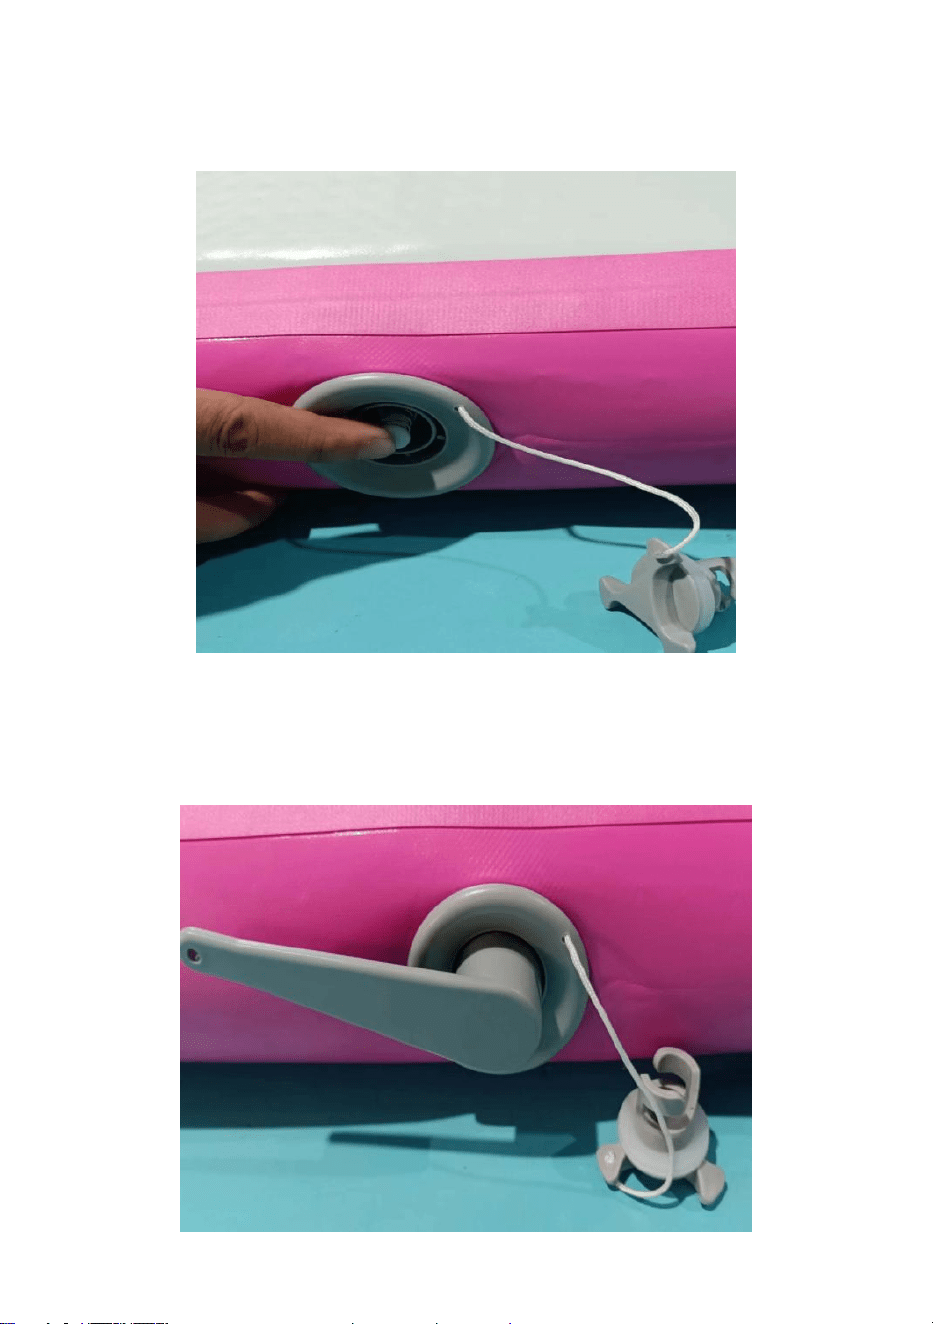
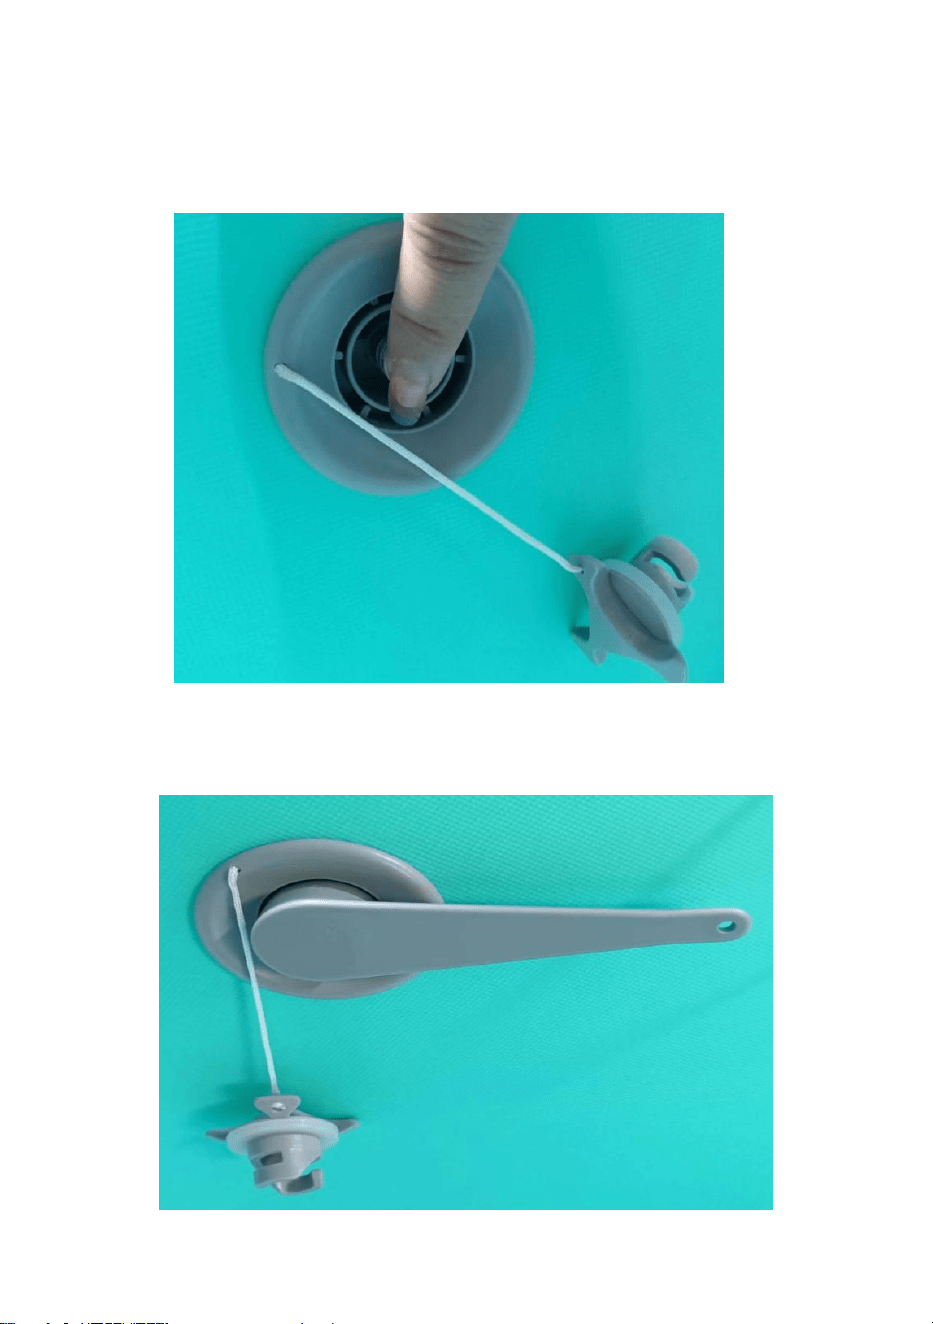
7.Take out the inflatable tube.(When the valve does not pop up
automatically, please press it to close manually.
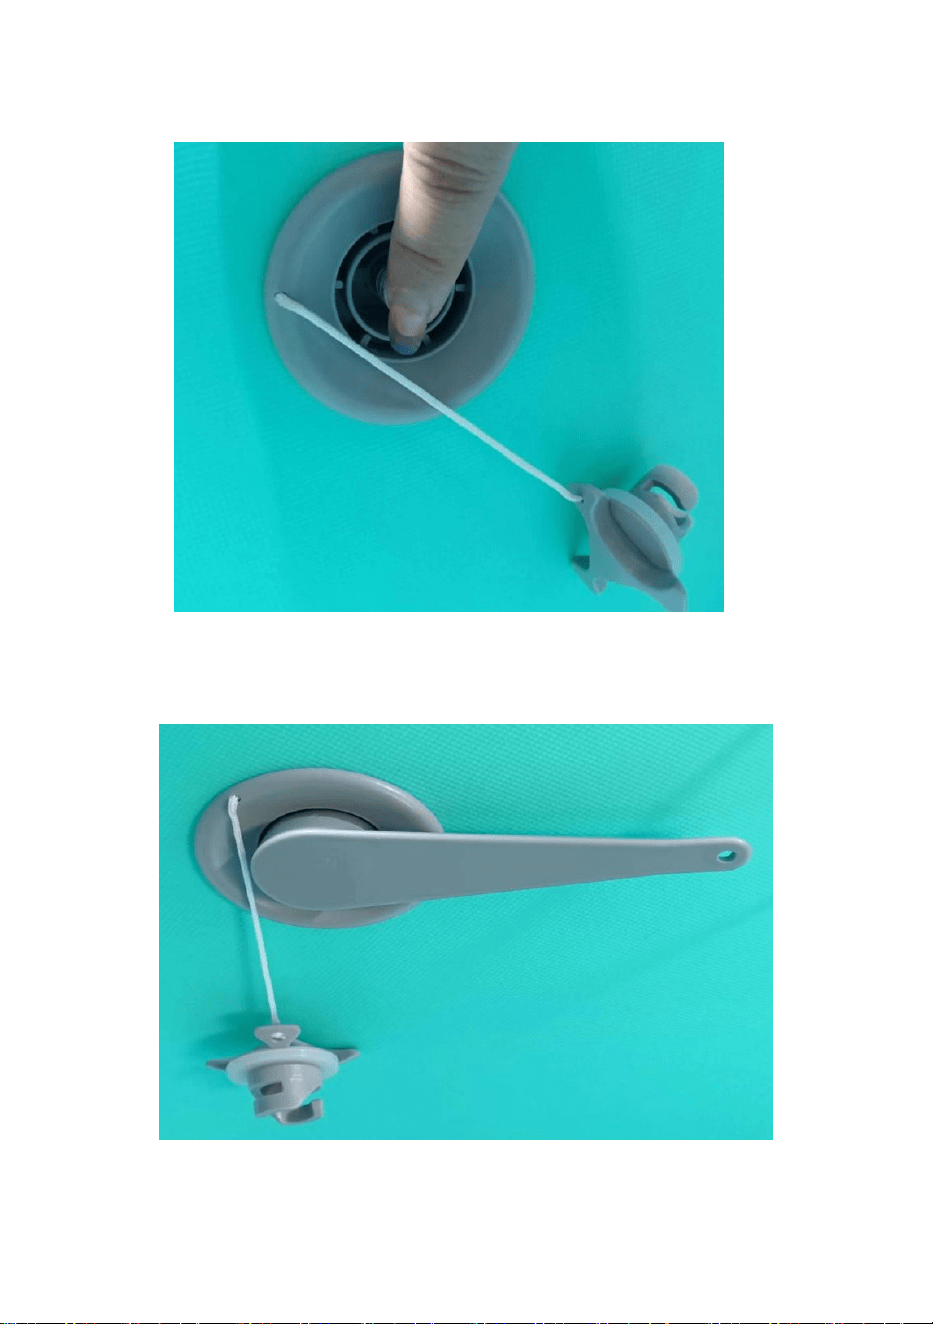
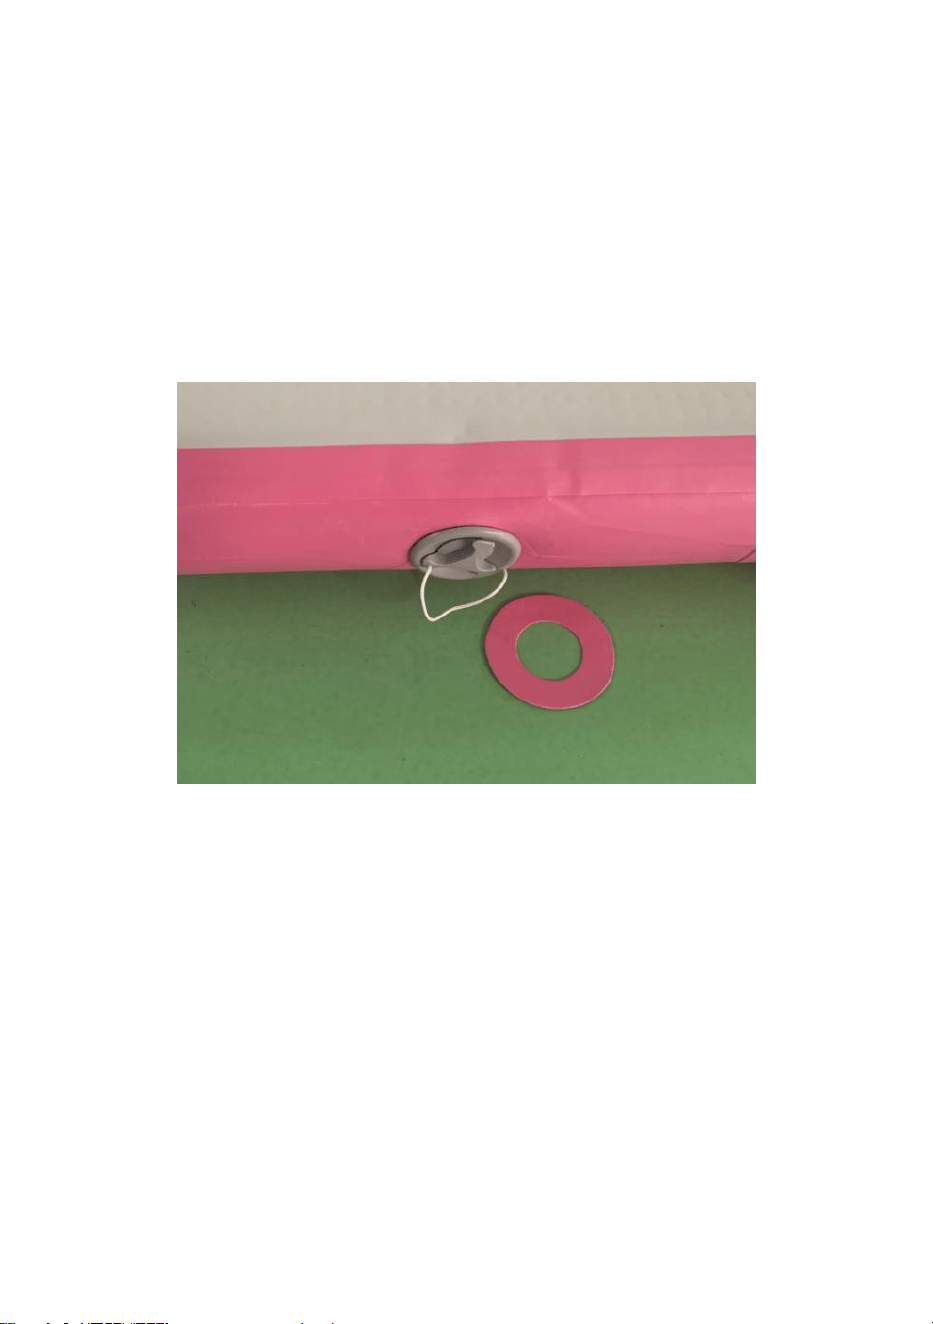
8.To avoid the leakage of the pressure relief valve for a long time,the valve
wrench is tightened clockwise using the valve wrench in the case of
loosening of the outer ring of the valve.
- 10 -
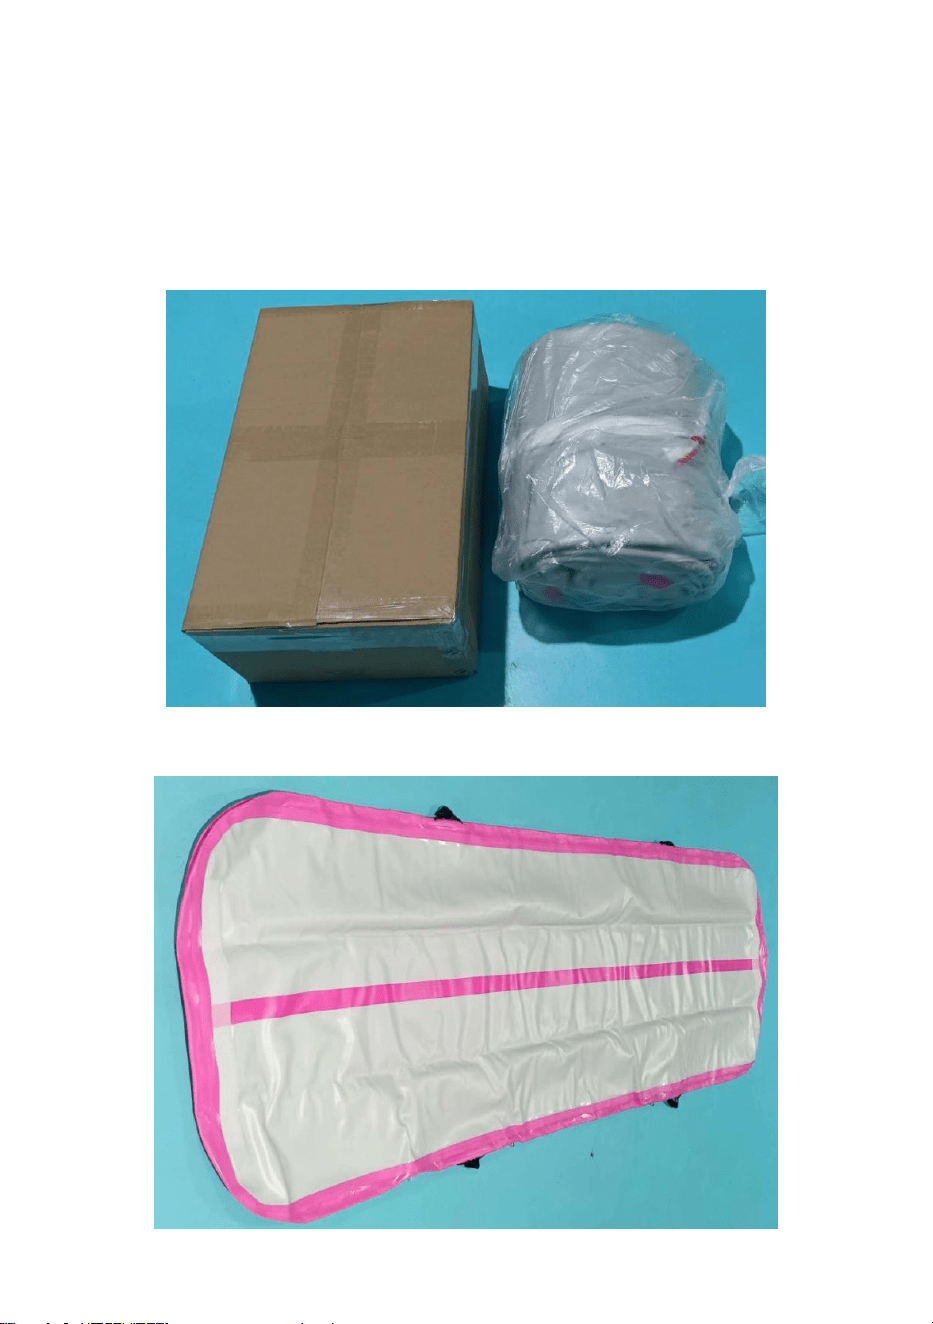
B: Rectangle (Product color is subject to actual configuration)
1、Make sure the packing is complete and takeout the inflatable from the
packing box.
2.Place the air cushion on the ground to open.
- 11 -
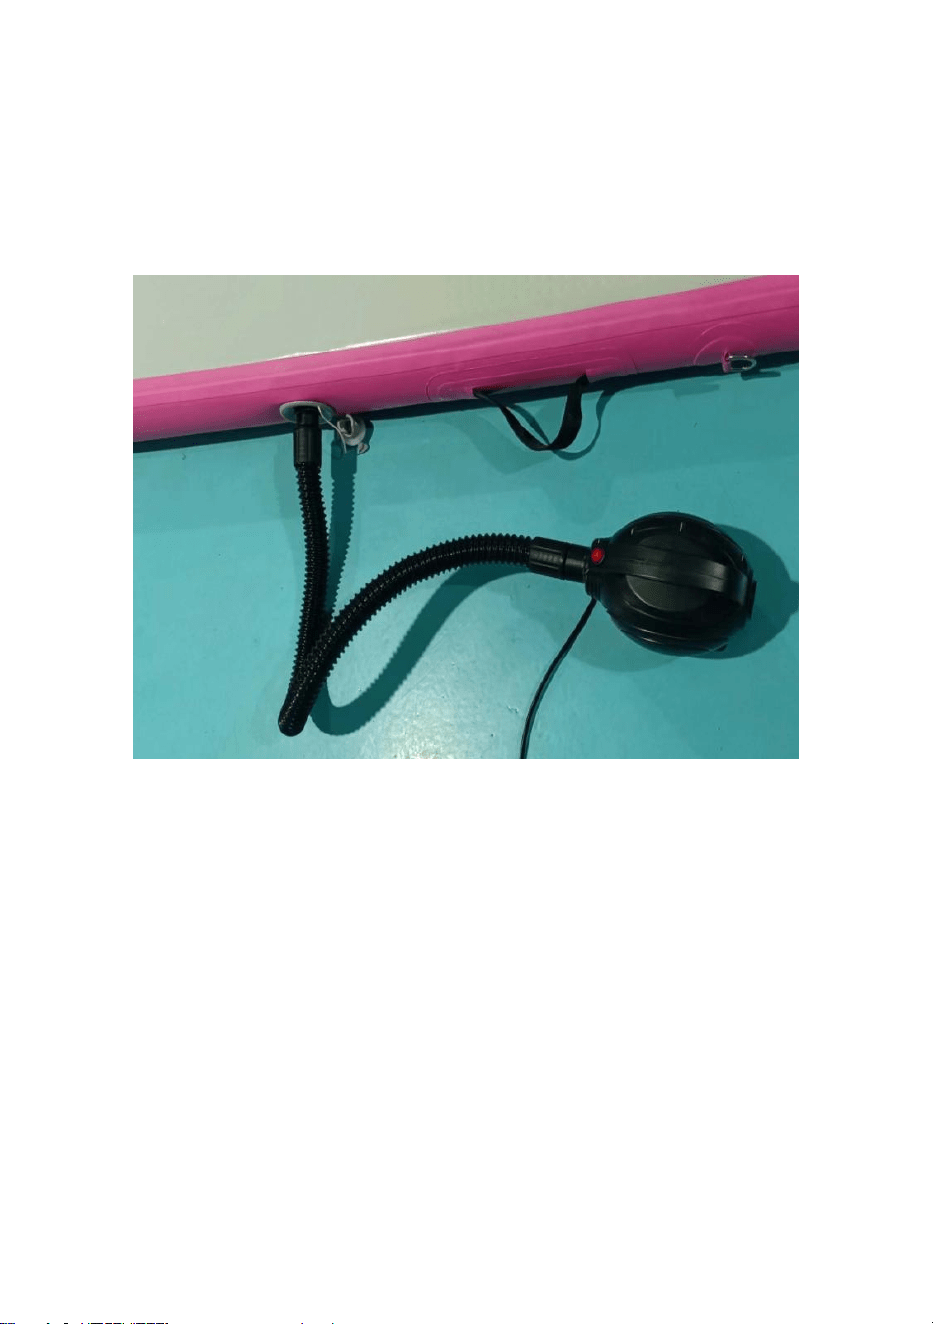
3.Turn the inflatable valve open against clockwise.
4.Air pipe and inflation valve connection.

- 12 -
5.Air pipe and air pump connection air pump plug.
Turn on the air pump and press the switch to start inflating.
6.Please turn off the switch when the air cushion is full of air.

- 13 -
7.Take out the inflatable tube.(When the valve does not pop up
automatically, please press it to close manually.
8.To avoid the leakage of the pressure relief valve for a long time,the valve
wrench is tightened clockwise using the valve wrench in the case of
loosening of the outer ring of the valve.

- 14 -
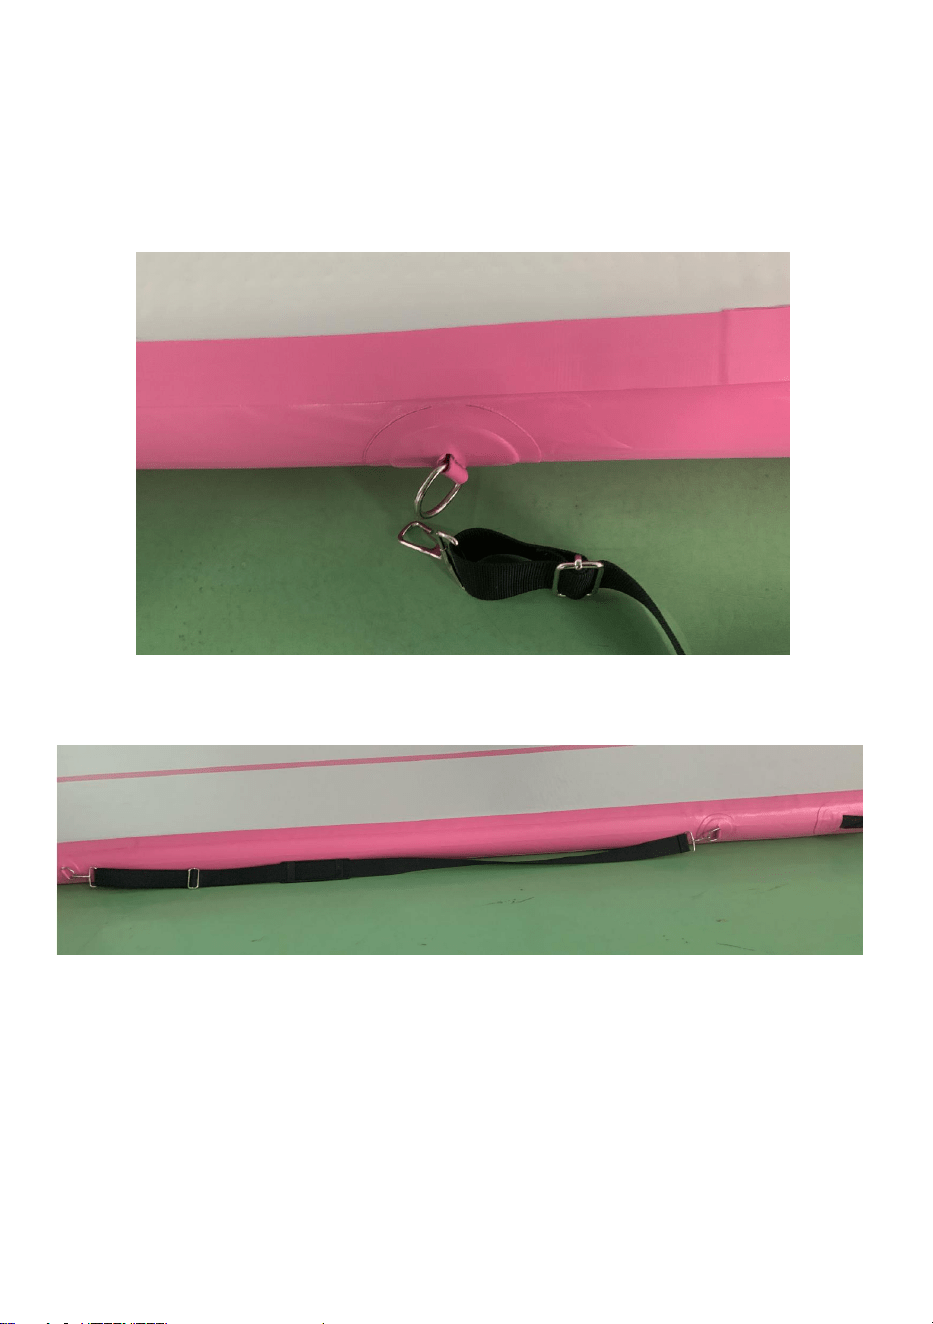
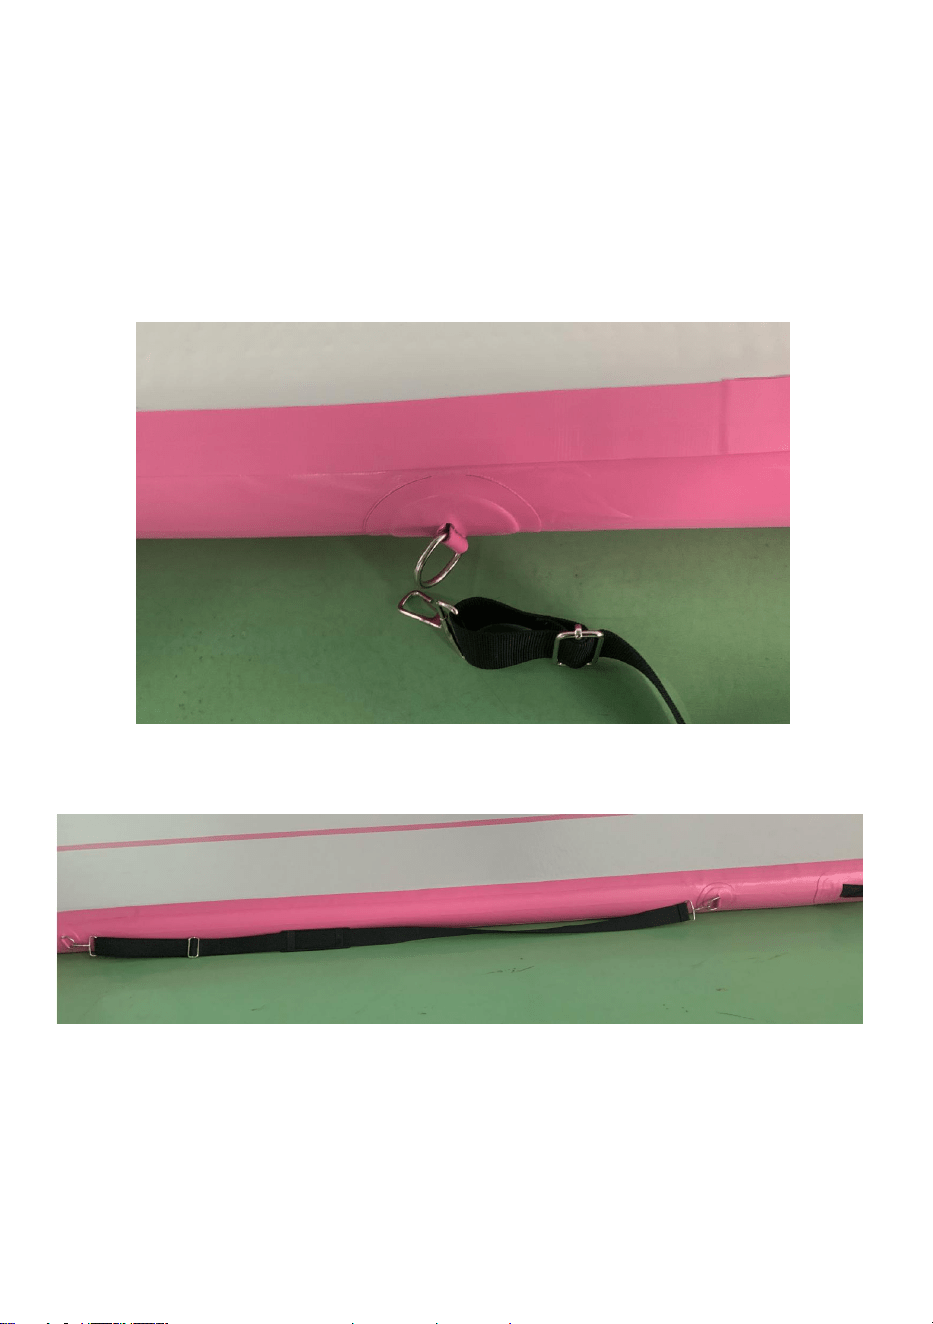
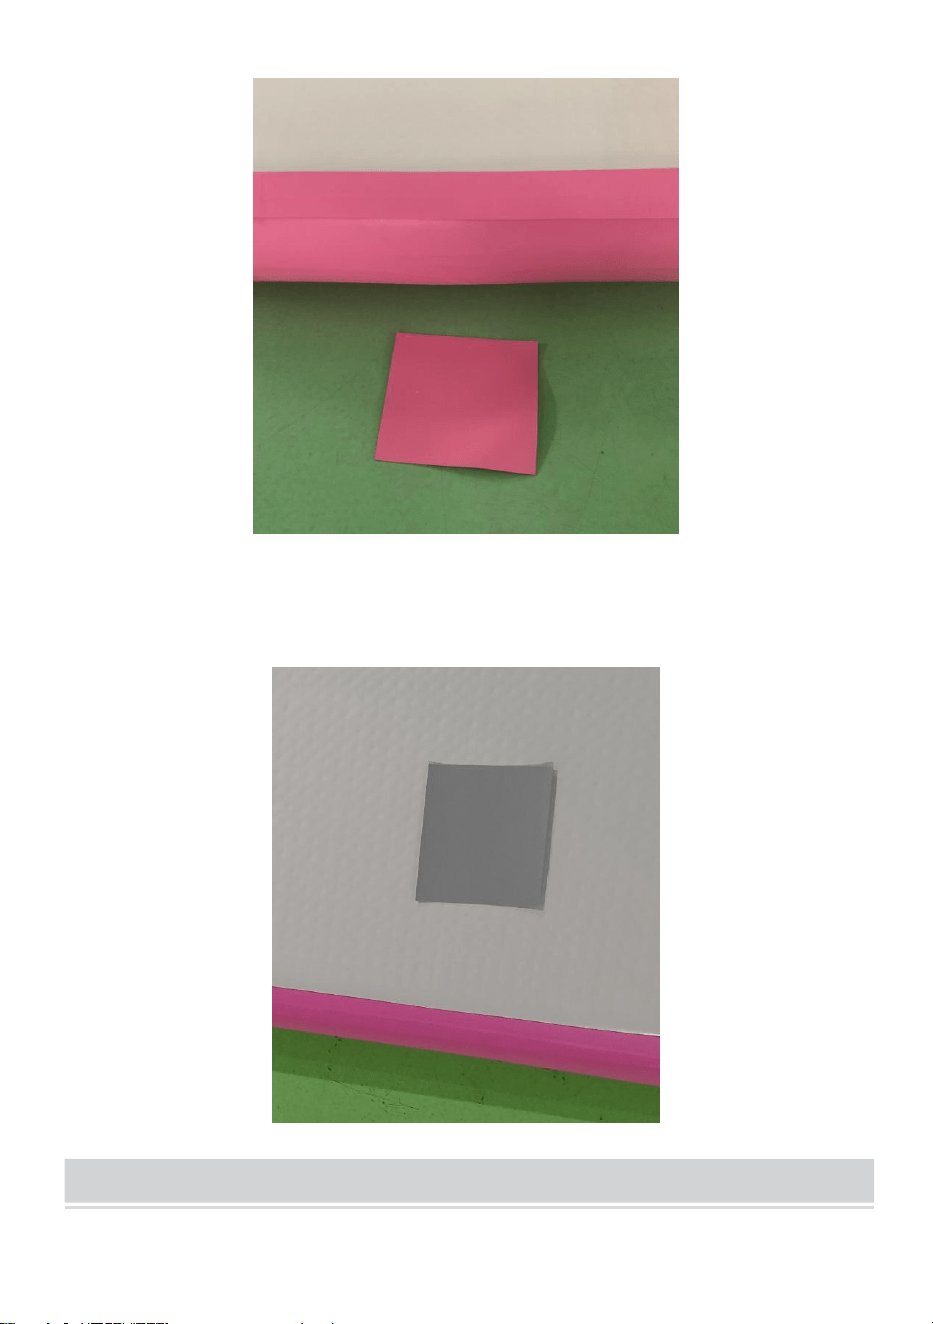
9.The shoulder strap is installed as shown in the picture and fastened with a
lock buckle.
The length can be adjusted according to personal usage habits.
- 15 -
PATCHING GUIDELINES
Tips:This product is equipped with repair materials (except glue). When air
leakage is caused by sharp objects during use, it can be repaired.
Because the product material is PVC, you need to purchase PVC glue to
repair the glue.
1、Before repairing, clean the area around the damage to ensure the surface
is dry.
2. Apply a thin layer of glue evenly on the surface of the repair material and
the surface around the damaged air cushion.
3. Stick the repair material and air cushion firmly. It is recommended to use
a hot hair dryer to heat it. After it is dry, press it with your hands for 2 minutes,
and then press it with an object for 40-60 minutes before use.
Equipped repair material usage location tips
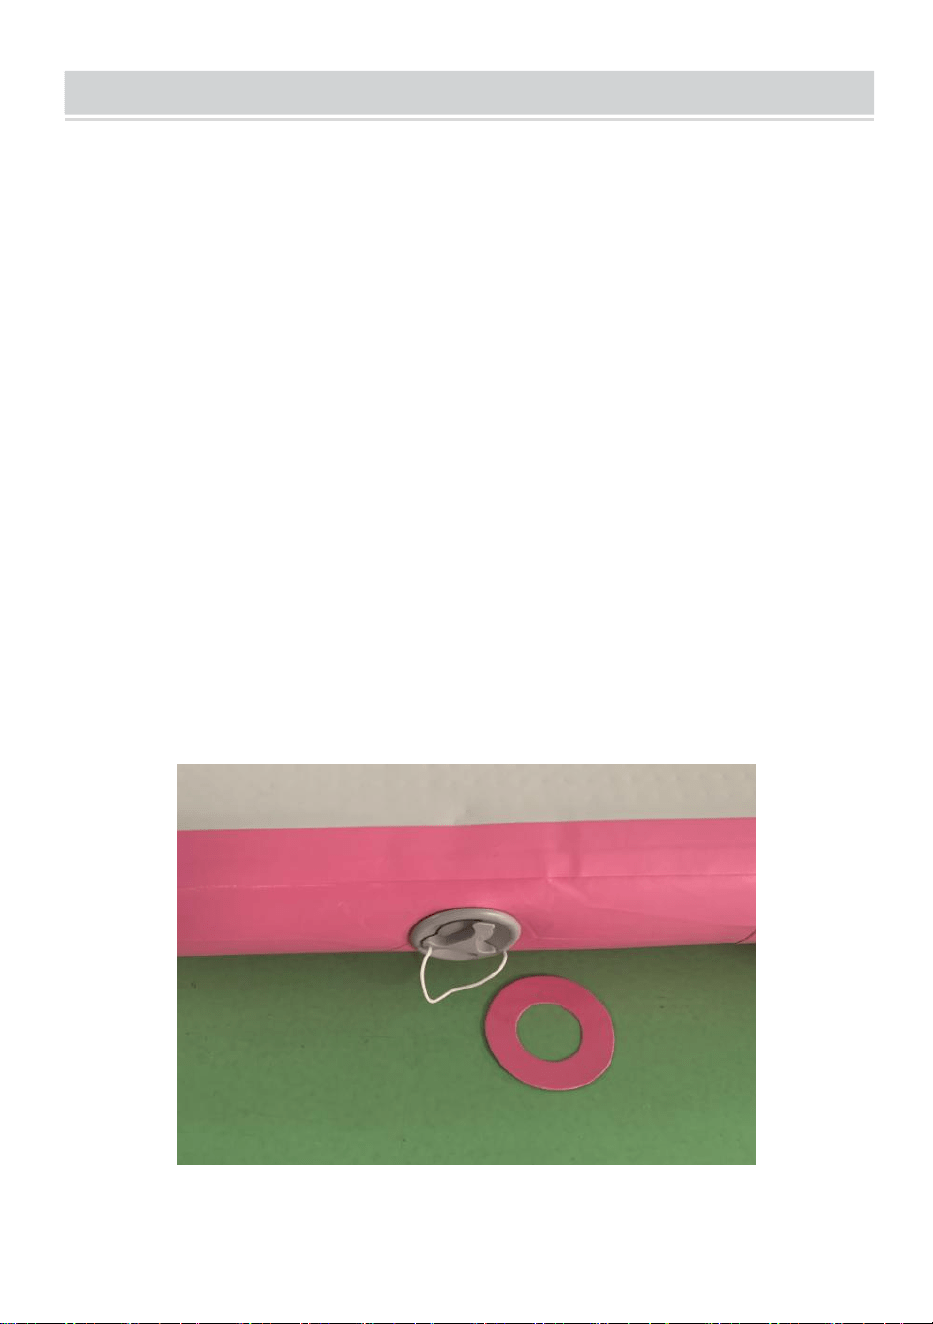
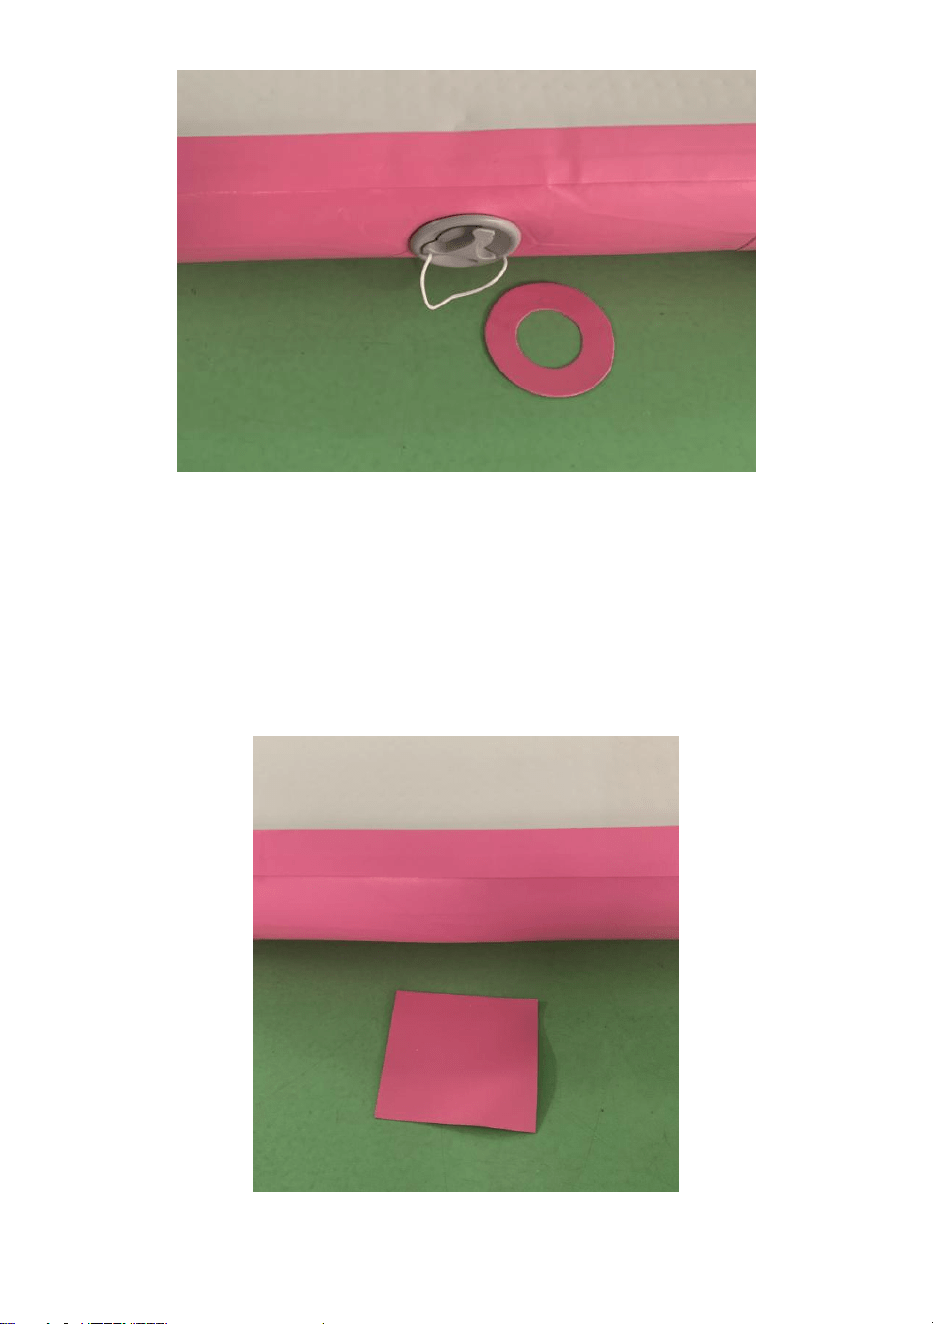
1.As shown in the picture, a ring-shaped repair material is configured. When
air leakage is found near the inflation port, the configured glue and repair
materials can be used to repair it.
- 16 -
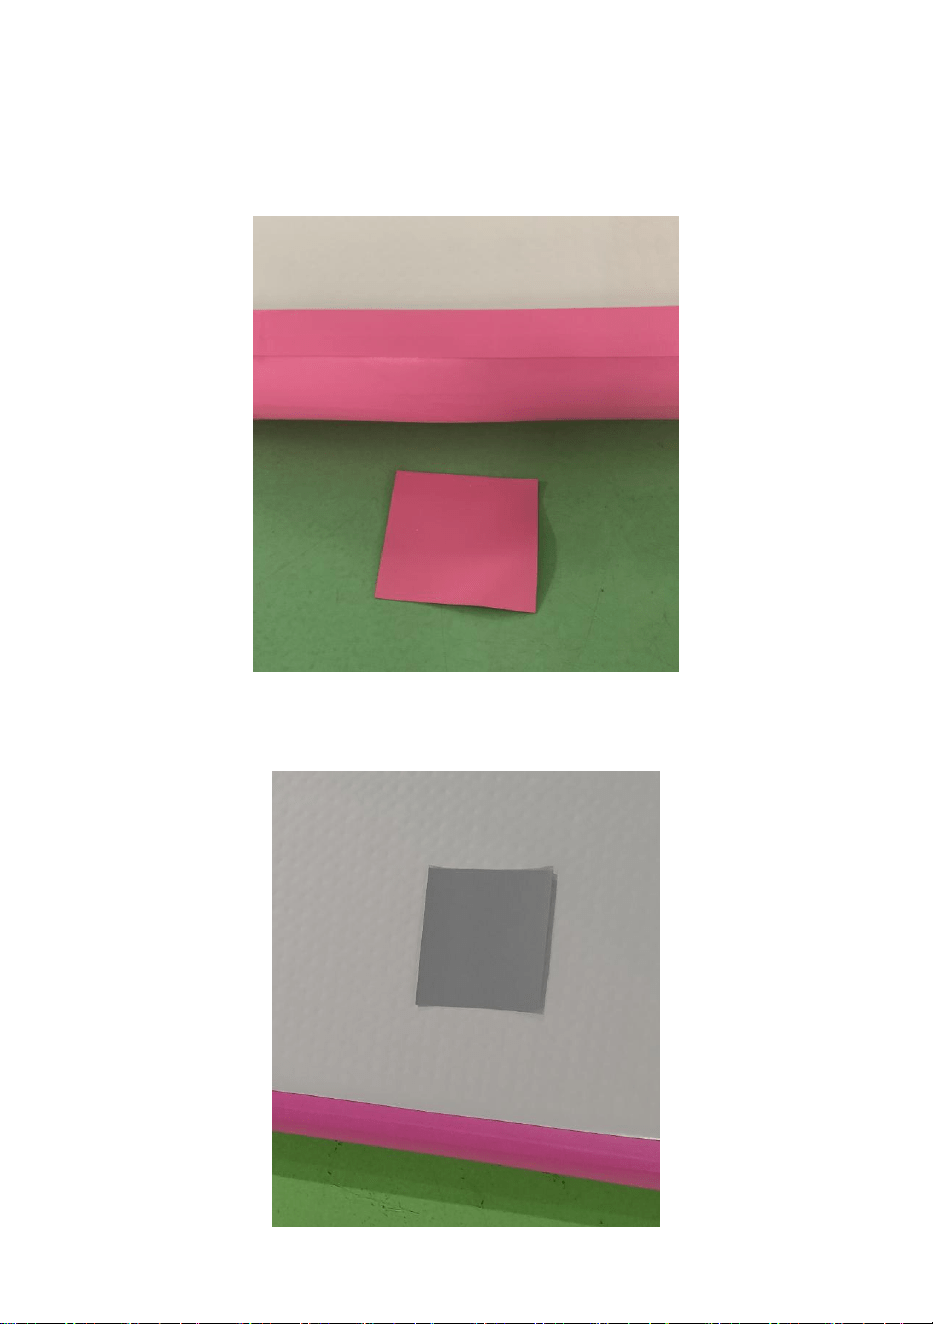
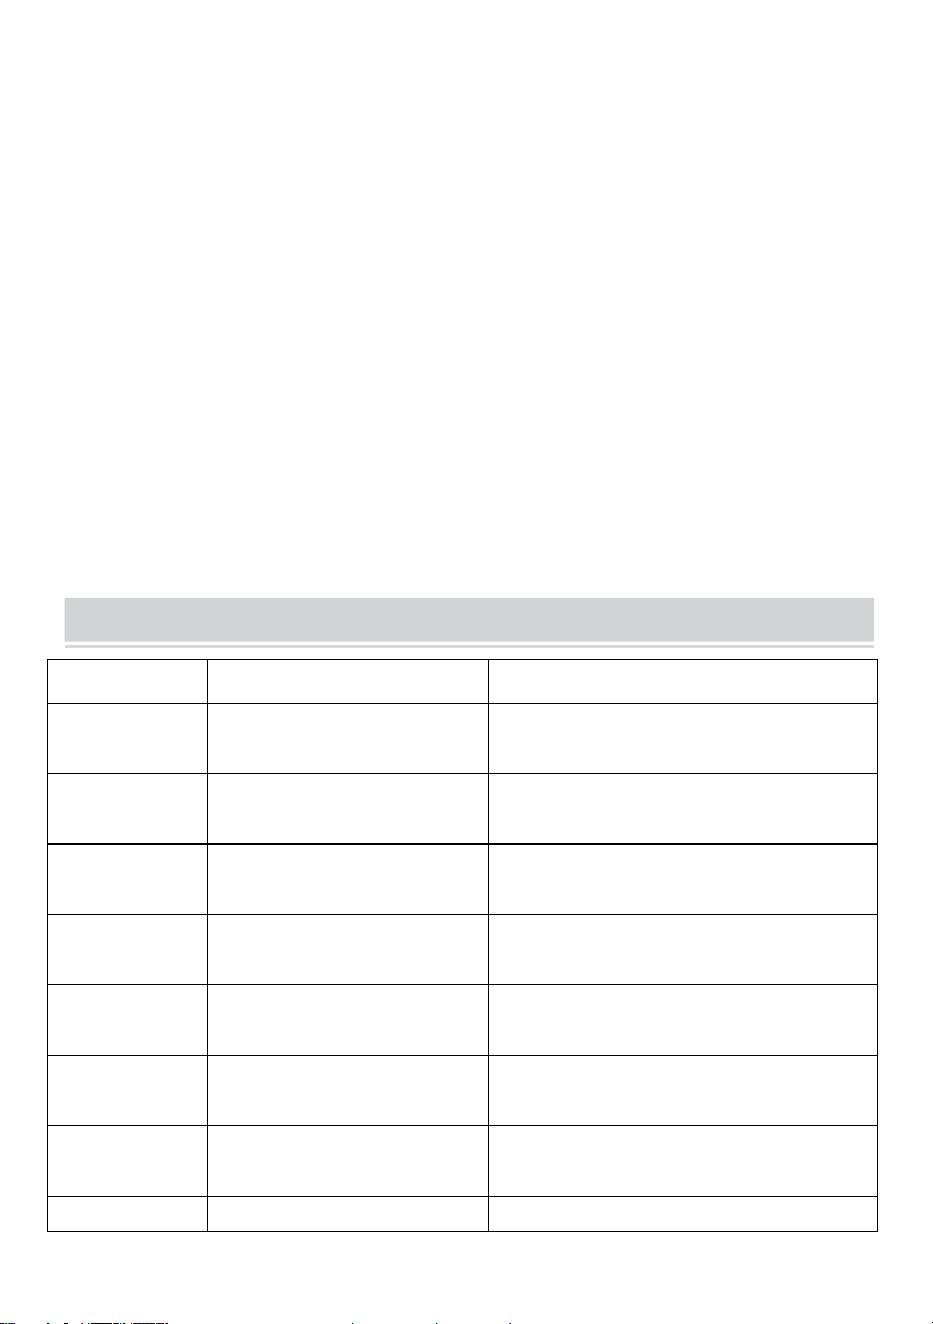
2.As shown in the picture, a square repair material is configured. When air
leakage is found around the perimeter, the configured glue and repair
materials can be used to repair it. (Different colors of edging are equipped
with different colors of repair materials)
3.When air leakage occurs above or at the bottom of the air cushion, please
use the provided gray square repair block and glue it together.

- 17 -
CLEANING AND STORAGE
1. Wipe with soft damp cloth.
2. Never use an abrasive cleanser or harsh pad.
3. Be sure to keep the product dry.
4. Please keep the product dry. Moisture can cause products to become moldy.
- 18 -
Address:Baoshanqu Shuangchenglu 803long 11hao 1602A-1609shi
Shanghai
Imported to USA: Sanven Technology Ltd. Suite 250, 9166 Anaheim
Place, Rancho Cucamonga, CA 91730
REP
UK
Pooledas Group Ltd
Unit 5 Albert Edward House, The Pavilions
Preston, United Kingdom
REP
EC
SHUNSHUN GmbH
Römeräcker 9 Z2021, 76351
Linkenheim-Hochstetten, Germany
Made In China


Technisch Ondersteuning en e-garantiecertificaat
www.vevor.com/support _ _ _ _
LUCHTTUIMELMAT
We continue to be committed to provide you tools with competitive price.
"Save Half", "Half Price" or any other similar expressions used by us only represents an
estimate of savings you might benefit from buying certain tools with us compared to the major
top brands and does not necessarily mean to cover all categories of tools offered by us. You
are kindly reminded to verify carefully when you are placing an order with us if you are
actually saving half in comparison with the top major brands.

- 1 -
De productkleur is afhankelijk van de daadwerkelijke
configuratie
Have product questions? Need technical support? Please feel free to
contact us:
Technical Support and E-Warranty Certificate
www. vevor. com/support
NEED HELP? CONTACT US!
AIR TUMBLING MAT

- 2 -
This is the original instruction, please read all manual instructions
carefully before operating. VEVOR reserves a clear interpretation of our
user manual. The appearance of the product shall be subject to the
product you received. Please forgive us that we won't inform you again
if there are any technology or software updates on our product.
IMPORTANT SAFEGUARDS
LET OP : Elke activiteit waarbij beweging, rotatie en hoogte betrokken zijn,
creëert de mogelijkheid van catastrofaal letsel, verlamming of zelfs de
dood. U aanvaardt het risico van ernstig letsel wanneer u deze apparatuur
gebruikt; deze apparatuur is alleen bedoeld voor gebruik door goed
opgeleide en gekwalificeerde deelnemers onder omstandigheden onder
toezicht. Ken uw imitaties voordat u ze gebruikt. Raadpleeg bij twijfel altijd
een leraar. Gekwalificeerde instructeur. Inspecteer altijd op losse
onderdelen of beschadigingen en test de stabiliteit vóór elk gebruik.
Gebruik matten alleen op een stevige ondergrond, omringd door geschikte
matten. Zorg ervoor dat de Het oppervlak van de mat is vóór gebruik droog
en in goede staat. Controleer altijd of de luchtdruk aan de minimale
vereisten voldoet. Laat de mat niet gedeeltelijk opgeblazen achter in een
ruimte waar deze zonder toezicht kan worden gebruikt. De mat kan tijdens
gebruik bewegen. Controleer altijd of de mat goed is geplaatst van het
product vóór gebruik. Controleer de druk regelmatig om er zeker van te zijn
dat het product goed is opgeblazen. Houd er rekening mee dat externe
temperatuurveranderingen de interne druk van het product zullen
veranderen mat.
LET OP : Deze apparatuur is niet bedoeld voor gebruik door personen
(inclusief kinderen) met verminderde fysieke, zintuiglijke of mentale
capaciteiten, of met een gebrek aan ervaring en kennis, tenzij zij onder
toezicht staan of instructies hebben gekregen over het gebruik van de
apparatuur door een persoon die verantwoordelijk is voor hun veiligheid.
LET OP : Kinderen moeten onder toezicht staan.
LET OP : Gooi alle plastic zakken zorgvuldig weg en houd ze uit de buurt
van kinderen en huisdieren.
LET OP : Het product moet op een vlakke ondergrond worden geplaatst.
SAFETY INSTRUCTIONS OF AIR PUMP
WAARSCHUWING: Lees alle veiligheidswaarschuwingen, instructies,
illustraties en specificaties die bij deze luchtpomp zijn geleverd. Het niet

- 3 -
opvolgen van alle onderstaande instructies kan leiden tot elektrische
schokken, brand en/of ernstig letsel.
Basisveiligheidsinformatie:
1. Dit product is uitsluitend bedoeld voor het oppompen.
2. Het is niet toegestaan om het product met de stroomkabel te trekken of
te slepen.
3. Houd bij het uittrekken van de stekker de stekker zelf vast; trek niet aan
de voedingskabel.
4. Knip de stekker niet zelf door en vervang deze niet, anders kunnen er
ernstige gevolgen optreden.
5. Bediening van het product is niet toegestaan in geval van schade aan
de stroomvoorziening
lijn of de schaal.
6. Het demonteren en demonteren van het product door leken is niet
toegestaan.
7. Mocht de luchtpomp in het water vallen, schakel dan vóór het
uitbaggeren de stroom uit en geef hem vervolgens ter controle en
onderhoud aan professionals.
luchtpomp niet aan met natte handen of terwijl u op een nat oppervlak
staat. Gebruik de luchtpomp altijd in een droge omgeving en steek de
stekker in een goed geaard stopcontact.
9. Brandgevaar: Gebruik de luchtpomp niet in de buurt van ontvlambare of
brandbare materialen. Houd de luchtpomp uit de buurt van hittebronnen of
vonken, zoals vlammen, sigaretten of elektrische apparaten.
10. Explosiegevaar: Gebruik de luchtpomp niet met gassen die
ontvlambaar, explosief of giftig zijn. Controleer altijd het
veiligheidsinformatieblad (SDS) van het gas voordat u het met de
luchtpomp gebruikt . Bovendien mag u de gespecificeerde druk niet
overschrijden. bereik voor de luchtpomp .

- 4 -
luchtpomp niet met gassen die metalen kunnen aantasten of chemische
ladingen kunnen uitoefenen. Controleer de compatibiliteit van het gas met
de materialen van de vijverbeluchting en de accessoires ervan. Gebruik
altijd beschermende handschoenen en een veiligheidsbril bij het hanteren
van corrosieve materialen.
12. Gebruik geen beschadigde stekker of stopcontact, aangezien dit een
elektrische schok of brand kan veroorzaken.
13. Als het netsnoer beschadigd is, moet het worden vervangen door de
fabrikant, zijn serviceagent of vergelijkbaar gekwalificeerde personen om
gevaar te voorkomen.
14. Dit apparaat kan worden gebruikt door kinderen vanaf 8 jaar en door
personen met verminderde lichamelijke, zintuiglijke of geestelijke
vermogens of gebrek aan ervaring en kennis, als zij onder toezicht staan of
instructies hebben gekregen over het veilige gebruik van het apparaat en
Begrijp de mogelijke gevaren. Kinderen mogen niet met het apparaat
spelen. Reiniging en gebruikersonderhoud mogen niet door kinderen
zonder toezicht worden uitgevoerd.
BEWAAR DEZE INSTRUCTIES
FCC INFORMATION OF AIR PUMP
LET OP: Wijzigingen of aanpassingen die niet uitdrukkelijk zijn
goedgekeurd door de partij die verantwoordelijk is voor naleving kunnen de
bevoegdheid van de gebruiker om de apparatuur te bedienen ongeldig
maken!
Dit apparaat voldoet aan deel 15 van de FCC-regels. Gebruik is
onderworpen aan de volgende twee voorwaarden:
1) Dit product kan schadelijke interferentie veroorzaken.
2)Dit product moet alle ontvangen interferentie accepteren, inclusief

- 5 -
interferentie die een ongewenste werking kan veroorzaken.
WAARSCHUWING: Wijzigingen of aanpassingen aan dit product die niet
uitdrukkelijk zijn goedgekeurd door de partij. Verantwoordelijk voor
naleving kan de bevoegdheid van de gebruiker om het product te bedienen
ongeldig maken.
Opmerking: Dit product is getest en voldoet aan de limieten voor een
digitaal apparaat van Klasse B overeenkomstig Deel 15 van de FCC-regels.
Deze limieten zijn bedoeld om redelijke bescherming te bieden tegen
schadelijke interferentie in een residentiële installatie.
Dit product genereert, gebruikt en kan radiofrequentie-energie uitstralen,
en als het niet wordt geïnstalleerd en gebruikt in overeenstemming met de
instructies, kan het schadelijke interferentie aan radiocommunicatie
veroorzaken. Er is echter geen garantie dat er geen interferentie zal
optreden in een bepaalde installatie. product schadelijke interferentie
veroorzaakt aan radio- of televisieontvangst, wat kan worden vastgesteld
door het product uit en weer in te schakelen, wordt de gebruiker
aangeraden te proberen de interferentie te corrigeren door een of meer
van de volgende maatregelen.
· Heroriënteer of verplaats de ontvangstantenne.
· Vergroot de afstand tussen het product en de ontvanger.
· Sluit het product aan op een stopcontact op een ander circuit dan dat
waarop de ontvanger is aangesloten.
· Raadpleeg de dealer of een ervaren radio-/tv-technicus voor hulp.
CORRECT DISPOSAL OF AIR PUMP
Dit product valt onder de bepalingen van de Europese Richtlijn
2012/19/EU. Het symbool met een doorgekruiste afvalbak
geeft aan dat het product in de Europese Unie gescheiden
moet worden ingezameld. Dit geldt voor het product en alle
- 6 -
accessoires die met dit symbool zijn gemarkeerd. Producten die als
zodanig zijn gemarkeerd, mogen niet bij het normale huisvuil worden
weggegooid, maar moeten worden ingeleverd bij een inzamelpunt voor
recycling van elektrische en elektronische apparaten.
PRODUCT PARAMETERS
MODEL
Maat /KLEUR
LUCHTPOMP
TT-M-40-24
40× Φ 24 inch / roze
AMERIKAANSE STEKKER
(AC110-120V 60H tot 600W)
TT-E-40-24
40×Φ24INCH/ROZE
EU-STEKKER (AC220-240V 50/60H z
600W)
TT-M-40-31.5
40× Φ 31,5 inch / groen
AMERIKAANSE STEKKER
(AC110-120V 60H tot 600W)
TT-E-40-31.5
40× Φ 31,5 inch / groen
EU-STEKKER (AC220-240V 50/60H z
600W)
TT-M-40-24-10
Pak : 10 ft +40×Φ24 inch/
ROZE inkt
AMERIKAANSE STEKKER
(AC110-120V 60H tot 600W)
TT-E-40-24-10
Pak : 10 ft +40×Φ24 inch/
ROZE inkt
EU-STEKKER (AC220-240V 50/60H z
600W)

- 7 -
TT-M-10-G
3 meter / Groen
AMERIKAANSE STEKKER
(AC110-120V 60H tot 600W)
TT-E-10-G
3 meter / Groen
EU-STEKKER (AC220-240V 50/60H z
600W)
TT-M-10-P
10ft /P- inkt
AMERIKAANSE STEKKER
(AC110-120V 60H tot 600W)
TT-E-10-P
10ft /P- inkt
EU-STEKKER (AC220-240V 50/60H z
600W)
TT-M-10-B
3 meter / Blauw
AMERIKAANSE STEKKER
(AC110-120V 60H tot 600W)
TT-E-10-B
3 meter / Blauw
EU-STEKKER (AC220-240V 50/60H z
600W)
TT-M-13-G
13ft / Groen
AMERIKAANSE STEKKER
(AC110-120V 60H tot 600W)
TT-E-13-G
13ft / Groen
EU-STEKKER (AC220-240V 50/60H z
600W)
TT-M-13-P
13ft /P- inkt
AMERIKAANSE STEKKER
(AC110-120V 60H tot 600W)
TT-E-13-P
13ft /P- inkt
EU-STEKKER (AC220-240V 50/60H z
600W)
TT-M-13-B
13ft / Blauw
AMERIKAANSE STEKKER
(AC110-120V 60H tot 600W)
TT-E-13-B
13ft / Blauw
EU-STEKKER (AC220-240V 50/60H z
600W)
TT-M-16-G
16ft / Groen
AMERIKAANSE STEKKER
(AC110-120V 60H tot 600W)
TT-E-16-G
16ft / Groen
EU-STEKKER (AC220-240V 50/60H z
600W)
TT-M-16-P
16ft /P- inkt
AMERIKAANSE STEKKER
(AC110-120V 60H tot 600W)
TT-E-16-P
16ft /P- inkt
EU-STEKKER (AC220-240V 50/60H z
600W)
TT-M-16-B
16ft / Blauw
AMERIKAANSE STEKKER
- 8 -
(AC110-120V 60H tot 600W)
TT-E-16-B
16ft / Blauw
EU-STEKKER (AC220-240V 50/60H z
600W)
TT-M-20-G
20ft / Groen
AMERIKAANSE STEKKER
(AC110-120V 60H tot 600W)
TT-E-20-G
20ft / Groen
EU-STEKKER (AC220-240V 50/60H z
600W)
TT-M-20-P
20ft /P- inkt
AMERIKAANSE STEKKER
(AC110-120V 60H tot 600W)
TT-E-20-P
20ft /P- inkt
EU-STEKKER (AC220-240V 50/60H z
600W)
TT-M-20-B
20ft / Blauw
AMERIKAANSE STEKKER
(AC110-120V 60H tot 600W)
TT-E-20-B
20ft / Blauw
EU-STEKKER (AC220-240V 50/60H z
600W)
INSTALLATION STEPS
A: Roller ( productkleur is afhankelijk van de daadwerkelijke configuratie )
1. Zorg ervoor dat de verpakking compleet is en haal het springkussen
uit de verpakking .
2. Plaats het luchtkussen op de grond om het te openen.
- 9 -
3.Draai het opblaasbare ventiel open tegen de klok in.
4. Aansluiting luchtleiding en opblaasventiel.
5. Luchtleiding en luchtpompaansluiting luchtpompstekker.
Zet de luchtpomp aan en druk op de schakelaar om het opblazen te
starten.
- 10 -
6. Schakel de schakelaar uit als het luchtkussen vol lucht is.
7. Haal de opblaasbare buis eruit. (Als de klep niet automatisch omhoog
komt, druk er dan op om deze handmatig te sluiten.

- 11 -
8. Om langdurig lekken van het overdrukventiel te voorkomen, wordt de
ventielsleutel met de klok mee vastgedraaid met behulp van de
ventielsleutel in het geval dat de buitenring van het ventiel losraakt.
B: Rechthoek _ ( Productkleur is afhankelijk van de daadwerkelijke
configuratie )

- 12 -
1. Zorg ervoor dat de verpakking compleet is en haal het springkussen uit
de verpakking .
2. Plaats het luchtkussen op de grond om het te openen.
3.Draai het opblaasbare ventiel open tegen de klok in.
- 13 -
4. Aansluiting luchtleiding en opblaasventiel.
5. Luchtleiding en luchtpompaansluiting luchtpompstekker.
- 14 -
Zet de luchtpomp aan en druk op de schakelaar om het opblazen te
starten.
6. Schakel de schakelaar uit als het luchtkussen vol lucht is.
- 15 -
7. Haal de opblaasbare buis eruit. (Als de klep niet automatisch omhoog
komt, druk er dan op om deze handmatig te sluiten.
8. Om langdurig lekken van het overdrukventiel te voorkomen, wordt de
ventielsleutel met de klok mee vastgedraaid met behulp van de
ventielsleutel in het geval dat de buitenring van het ventiel losraakt.
- 16 -
9. De schouderriem wordt geïnstalleerd zoals weergegeven in de afbeelding
en vastgemaakt met een slotgesp.
De lengte kan worden aangepast aan de persoonlijke gebruiksgewoonten .

- 17 -
PATCHING GUIDELINES
Tips: Dit product is uitgerust met reparatiematerialen (behalve lijm).Als
tijdens gebruik luchtlekkage wordt veroorzaakt door scherpe voorwerpen,
kan dit worden gerepareerd.
Omdat het productmateriaal PVC is, moet u PVC-lijm aanschaffen om de
lijm te repareren.
1. Maak vóór reparatie het gebied rond de schade schoon om er zeker van
te zijn dat het oppervlak droog is.
2. Breng een dunne laag lijm gelijkmatig aan op het oppervlak van het
reparatiemateriaal en het oppervlak rond het beschadigde luchtkussen.
3. Plak het reparatiemateriaal en het luchtkussen stevig vast. Het wordt
aanbevolen om een hete föhn te gebruiken om het te verwarmen. Nadat het
droog is, drukt u het gedurende 2 minuten met uw handen en drukt u het
vervolgens 40-60 minuten met een voorwerp vóór gebruik .
Uitgeruste locatietips voor het gebruik van reparatiemateriaal
1. Zoals op de afbeelding te zien is, is een ringvormig reparatiemateriaal
geconfigureerd. Wanneer er luchtlekkage wordt gevonden nabij de
opblaaspoort, kunnen de geconfigureerde lijm- en reparatiematerialen
worden gebruikt om het te repareren.
- 18 -
2. Zoals op de afbeelding te zien is, is een vierkant reparatiemateriaal
geconfigureerd. Wanneer er luchtlekkage rond de omtrek wordt gevonden,
kunnen de geconfigureerde lijm- en reparatiematerialen worden gebruikt om
het te repareren. (Verschillende kleuren randen zijn uitgerust met
verschillende kleuren reparatiematerialen )
3. Wanneer er luchtlekkage optreedt boven of aan de onderkant van het

- 19 -
luchtkussen, gebruik dan het meegeleverde grijze vierkante reparatieblok en
lijm dit aan elkaar.
CLEANING AND STORAGE
1. Veeg af met een zachte, vochtige doek.
2. Gebruik nooit een schurend reinigingsmiddel of een schuursponsje.
3. Zorg ervoor dat het product droog blijft.
4. Houd het product droog. Vocht kan ervoor zorgen dat producten gaan
schimmelen.

- 20 -

- 21 -
Adres: Baoshanqu Shuangchenglu 803long 11hao 1602A-1609shi
Shanghai
Geïmporteerd naar de VS: Sanven Technology Ltd. Suite 250, 9166
Anaheim Place, Rancho Cucamonga, CA 91730
REP
UK
Pooledas Group Ltd
Unit 5 Albert Edward House, The Pavilions
Preston, United Kingdom
REP
EC
SHUNSHUN GmbH
Römeräcker 9 Z2021, 76351
Linkenheim-Hochstetten, Germany
Gemaakt in China


Techniczny Certyfikat wsparcia i e-gwarancji
www.vevor.com/support _ _ _ _
MATA DO PRZEWRACANIA POWIETRZA
We continue to be committed to provide you tools with competitive price.
"Save Half", "Half Price" or any other similar expressions used by us only represents an
estimate of savings you might benefit from buying certain tools with us compared to the major
top brands and does not necessarily mean to cover all categories of tools offered by us. You
are kindly reminded to verify carefully when you are placing an order with us if you are
actually saving half in comparison with the top major brands.

- 1 -
Kolor produktu zależy od aktualnej konfiguracji
Have product questions? Need technical support? Please feel free to
contact us:
Technical Support and E-Warranty Certificate
www. vevor. com/support
NEED HELP? CONTACT US!
This is the original instruction, please read all manual instructions
carefully before operating. VEVOR reserves a clear interpretation of our
user manual. The appearance of the product shall be subject to the
product you received. Please forgive us that we won't inform you again
if there are any technology or software updates on our product.
AIR TUMBLING MAT

- 2 -
IMPORTANT SAFEGUARDS
UWAGA : Aktywność Anv obejmująca ruch, obrót i wysokość stwarza
możliwość katastrofalnych obrażeń, paraliżu, a nawet śmierci. Korzystając
z tego sprzętu, ponosisz ryzyko poważnych obrażeń; sprzęt ten jest
przeznaczony do użytku wyłącznie przez odpowiednio przeszkolonych i
wykwalifikowanych uczestników zgodnie z nadzorowanych warunkach.
Przed użyciem poznaj swoje imitacje. W razie wątpliwości zawsze
skonsultuj się z nauczycielem. Wykwalifikowany instruktor. Zawsze
sprawdzaj, czy nie ma luźnych połączeń lub uszkodzeń oraz sprawdzaj
stabilność przed każdym użyciem. Używaj mat wyłącznie na twardym
podłożu otoczonym odpowiednimi matami. Upewnij się, że Powierzchnia
maty jest sucha i w dobrym stanie przed użyciem. Zawsze sprawdź, czy
ciśnienie powietrza spełnia minimalne wymagania. Nie zostawiaj maty
częściowo napompowanej w miejscu, w którym może być używana bez
nadzoru. Mata może się poruszać podczas użytkowania. Zawsze
sprawdzaj, czy mata jest prawidłowo ułożona produktu przed użyciem.
Okresowo sprawdzaj ciśnienie, aby zapewnić prawidłowe napompowanie.
Należy pamiętać, że zmiany temperatury zewnętrznej wpływają na
ciśnienie wewnętrzne mata.
UWAGA : To urządzenie nie jest przeznaczone do użytku przez osoby (w
tym dzieci) o ograniczonych zdolnościach fizycznych, sensorycznych lub
umysłowych, bądź też nieposiadające doświadczenia i wiedzy, chyba że
znajdują się one pod nadzorem lub zostały poinstruowane w zakresie
użytkowania sprzętu przez osobę odpowiedzialną za ich bezpieczeństwo.
UWAGA : Dzieci powinny być nadzorowane.
UWAGA : Prosimy o ostrożne wyrzucanie wszystkich plastikowych toreb i
przechowywanie ich z dala od dzieci i zwierząt domowych.
UWAGA : Produkt należy ustawić na płaskiej powierzchni.
SAFETY INSTRUCTIONS OF AIR PUMP
OSTRZEŻENIE: Przeczytaj wszystkie ostrzeżenia dotyczące
bezpieczeństwa, instrukcje, ilustracje i specyfikacje dołączone do tej
pompy powietrza. Niezastosowanie się do wszystkich instrukcji
wymienionych poniżej może spowodować porażenie prądem, pożar i/lub
poważne obrażenia.
Podstawowe informacje dotyczące bezpieczeństwa:
1. Ten produkt służy wyłącznie do pompowania.

- 3 -
2. Ciągnięcie lub ciągnięcie produktu za przewód zasilający jest
niedozwolone.
3. Wyciągając wtyczkę, należy trzymać za wtyczkę; nie ciągnąć za
przewód zasilający.
4. Nie przecinaj ani nie wymieniaj wtyczki samodzielnie, w przeciwnym
razie mogą wystąpić poważne konsekwencje.
5. Eksploatacja produktu jest niedozwolona w przypadku uszkodzenia
zasilania
linia lub skorupa.
6. Niedopuszczalny jest demontaż i demontaż produktu przez osoby
niebędące laikami.
7. W przypadku wpadnięcia pompy powietrza do wody należy przed jej
wydobyciem odłączyć zasilanie i przekazać pompę profesjonalistom w celu
sprawdzenia i konserwacji.
8. Niebezpieczeństwo porażenia prądem elektrycznym: Nie dotykaj pompy
powietrza mokrymi rękami ani stojąc na mokrej powierzchni. Zawsze
używaj pompy w suchym środowisku i podłączaj ją do odpowiednio
uziemionego gniazdka.
9. Niebezpieczeństwo pożaru: Nie używaj pompy powietrza w pobliżu
materiałów łatwopalnych lub palnych. Trzymaj pompę powietrza z dala od
źródeł ciepła lub iskier, takich jak płomienie, papierosy lub urządzenia
elektryczne.
10. Niebezpieczeństwo wybuchu: Nie używaj pompy powietrza z gazami,
które są łatwopalne, wybuchowe lub trujące. Zawsze sprawdź kartę
charakterystyki (SDS) gazu przed użyciem go z pompą powietrza .
Ponadto nie przekraczaj podanego ciśnienia zakres pompy powietrza .
11. Niebezpieczeństwo korozji: Nie używaj pompy powietrza z gazami,
które mogą powodować korozję metali lub wywierać ładunki chemiczne.

- 4 -
Sprawdź kompatybilność gazu z materiałami napowietrzania stawu i jego
akcesoriami. Zawsze używaj rękawic i okularów ochronnych podczas
pracy z materiałami żrącymi.
12. Nie używaj uszkodzonej wtyczki lub gniazdka, gdyż może to
spowodować porażenie prądem lub pożar.
13. Jeżeli przewód zasilający jest uszkodzony, musi zostać wymieniony
przez producenta, jego przedstawiciela serwisowego lub osobę o
podobnych kwalifikacjach, aby uniknąć zagrożenia.
14. Niniejsze urządzenie może być obsługiwane przez dzieci w wieku od 8
lat i starsze oraz osoby o ograniczonych zdolnościach fizycznych,
sensorycznych lub umysłowych lub nieposiadających doświadczenia i
wiedzy, jeżeli znajdują się pod nadzorem lub zostały poinstruowane w
zakresie bezpiecznego użytkowania urządzenia oraz zrozumieć związane
z tym ryzyko. Dzieci nie powinny bawić się urządzeniem. Dzieci nie mogą
czyścić ani konserwować urządzenia bez nadzoru.
ZACHOWAJ TE INSTRUKCJE
FCC INFORMATION OF AIR PUMP
UWAGA: Zmiany lub modyfikacje, które nie zostały wyraźnie zatwierdzone
przez stronę odpowiedzialną za zgodność, mogą unieważnić uprawnienia
użytkownika do obsługi urządzenia!
To urządzenie jest zgodne z częścią 15 przepisów FCC. Działanie podlega
następującym dwóm warunkom:
1) Ten produkt może powodować szkodliwe zakłócenia.
2) Ten produkt musi akceptować wszelkie odbierane zakłócenia, w tym
zakłócenia, które mogą powodować niepożądane działanie.
OSTRZEŻENIE: Zmiany lub modyfikacje tego produktu, które nie zostały
wyraźnie zatwierdzone przez stronę. Osoba odpowiedzialna za zgodność

- 5 -
może unieważnić uprawnienia użytkownika do obsługi produktu.
Uwaga: ten produkt został przetestowany i stwierdzono, że spełnia
ograniczenia dla urządzeń cyfrowych klasy B zgodnie z częścią 15
przepisów FCC. Ograniczenia te mają na celu zapewnienie rozsądnej
ochrony przed szkodliwymi zakłóceniami w instalacjach domowych.
Ten produkt generuje, wykorzystuje i może emitować energię o
częstotliwości radiowej, a jeśli nie zostanie zainstalowany i nie będzie
używany zgodnie z instrukcją, może powodować szkodliwe zakłócenia w
komunikacji radiowej. Nie ma jednak gwarancji, że zakłócenia nie wystąpią
w konkretnej instalacji. Jeśli to produkt rzeczywiście powoduje szkodliwe
zakłócenia w odbiorze sygnału radiowego lub telewizyjnego, co można
sprawdzić wyłączając i włączając produkt, zachęca się użytkownika do
podjęcia próby skorygowania zakłóceń za pomocą jednego lub kilku z
poniższych sposobów.
· Zmień orientację lub położenie anteny odbiorczej.
· Zwiększ odległość pomiędzy produktem a odbiornikiem.
· Podłącz produkt do gniazdka w innym obwodzie niż ten, do którego
podłączony jest odbiornik.
· Skonsultuj się ze sprzedawcą lub doświadczonym technikiem
radiowo-telewizyjnym w celu uzyskania pomocy.
CORRECT DISPOSAL OF AIR PUMP
Ten produkt podlega przepisom Dyrektywy Europejskiej
2012/19/UE. Symbol przekreślonego kosza na śmieci oznacza,
że produkt wymaga selektywnej zbiórki śmieci na terenie Unii
Europejskiej. Dotyczy to produktu i wszystkich akcesoriów
oznaczonych tym symbolem. Produktów oznaczonych jako takie nie
można wyrzucać razem ze zwykłymi odpadami domowymi, lecz należy je
oddać do punktu zbiórki w celu recyklingu urządzeń elektrycznych i
- 6 -
elektronicznych.
PRODUCT PARAMETERS
MODEL
Rozmiar /KOLOR
POMPA POWIETRZA
TT-M-40-24
40× Φ 24 cale / różowy
WTYCZKA AMERYKAŃSKA
(AC110-120V 60H z 600W)
TT-E-40-24
40×Φ24 CALE/RÓŻOWY
WTYCZKA EU (AC220-240V 50/60H z
600W)
TT-M-40-31,5
40× Φ 31,5 cala / zielony
WTYCZKA AMERYKAŃSKA
(AC110-120V 60H z 600W)
TT-E-40-31,5
40× Φ 31,5 cala / zielony
WTYCZKA EU (AC220-240V 50/60H z
600W)
TT-M-40-24-10
Garnitur : 10 stóp + 40 × Φ24
cale / atrament RÓŻOWY
WTYCZKA AMERYKAŃSKA
(AC110-120V 60H z 600W)
TT-E-40-24-10
Garnitur : 10 stóp + 40 × Φ24
cale / atrament RÓŻOWY
WTYCZKA EU (AC220-240V 50/60H z
600W)
TT-M-10-G
10 stóp / zielony
WTYCZKA AMERYKAŃSKA
(AC110-120V 60H z 600W)
TT-E-10-G
10 stóp / zielony
WTYCZKA EU (AC220-240V 50/60H z

- 7 -
600W)
TT-M-10-P
Atrament 10 stóp / P
WTYCZKA AMERYKAŃSKA
(AC110-120V 60H z 600W)
TT-E-10-P
Atrament 10 stóp / P
WTYCZKA EU (AC220-240V 50/60H z
600W)
TT-M-10-B
10 stóp / niebieski
WTYCZKA AMERYKAŃSKA
(AC110-120V 60H z 600W)
TT-E-10-B
10 stóp / niebieski
WTYCZKA EU (AC220-240V 50/60H z
600W)
TT-M-13-G
13 stóp / zielony
WTYCZKA AMERYKAŃSKA
(AC110-120V 60H z 600W)
TT-E-13-G
13 stóp / zielony
WTYCZKA EU (AC220-240V 50/60H z
600W)
TT-M-13-P
Atrament 13 stóp / P
WTYCZKA AMERYKAŃSKA
(AC110-120V 60H z 600W)
TT-E-13-P
Atrament 13 stóp / P
WTYCZKA EU (AC220-240V 50/60H z
600W)
TT-M-13-B
13 stóp / niebieski
WTYCZKA AMERYKAŃSKA
(AC110-120V 60H z 600W)
TT-E-13-B
13 stóp / niebieski
WTYCZKA EU (AC220-240V 50/60H z
600W)
TT-M-16-G
16 stóp / zielony
WTYCZKA AMERYKAŃSKA
(AC110-120V 60H z 600W)
TT-E-16-G
16 stóp / zielony
WTYCZKA EU (AC220-240V 50/60H z
600W)
TT-M-16-P
Atrament 16 stóp / P
WTYCZKA AMERYKAŃSKA
(AC110-120V 60H z 600W)
TT-E-16-P
Atrament 16 stóp / P
WTYCZKA EU (AC220-240V 50/60H z
600W)
TT-M-16-B
16 stóp / niebieski
WTYCZKA AMERYKAŃSKA
(AC110-120V 60H z 600W)
TT-E-16-B
16 stóp / niebieski
WTYCZKA EU (AC220-240V 50/60H z
600W)
- 8 -
TT-M-20-G
20 stóp / zielony
WTYCZKA AMERYKAŃSKA
(AC110-120V 60H z 600W)
TT-E-20-G
20 stóp / zielony
WTYCZKA EU (AC220-240V 50/60H z
600W)
TT-M-20-P
Atrament 20 stóp /P
WTYCZKA AMERYKAŃSKA
(AC110-120V 60H z 600W)
TT-E-20-P
Atrament 20 stóp /P
WTYCZKA EU (AC220-240V 50/60H z
600W)
TT-M-20-B
20 stóp / niebieski
WTYCZKA AMERYKAŃSKA
(AC110-120V 60H z 600W)
TT-E-20-B
20 stóp / niebieski
WTYCZKA EU (AC220-240V 50/60H z
600W)
INSTALLATION STEPS
Odp.: wałek ( kolor produktu zależy od aktualnej konfiguracji )
1. Upewnij się, że opakowanie jest kompletne i wyjmij nadmuchiwany
element z opakowania .
2. Połóż poduszkę powietrzną na ziemi, aby ją otworzyć.

- 9 -
3. Otwórz nadmuchiwany zawór w kierunku przeciwnym do ruchu
wskazówek zegara.
4. Połączenie przewodu powietrznego i zaworu inflacyjnego.
5. Wtyczka pompy powietrza łącząca rurę powietrzną i pompę powietrza.
Włącz pompę powietrza i naciśnij przełącznik, aby rozpocząć

- 10 -
pompowanie.
6. Wyłącz przełącznik, gdy poduszka powietrzna jest pełna powietrza.
7. Wyjmij nadmuchiwaną rurkę. (Gdy zawór nie wyskoczy automatycznie,
naciśnij go, aby zamknąć ręcznie.
- 11 -
8. Aby uniknąć nieszczelności ciśnieniowego zaworu nadmiarowego przez
długi czas, klucz do zaworu dokręca się w kierunku zgodnym z ruchem
wskazówek zegara za pomocą klucza do zaworu w przypadku poluzowania
zewnętrznego pierścienia zaworu.
B: Prostokąt _ ( Kolor produktu zależy od aktualnej konfiguracji )

- 12 -
1. Upewnij się, że opakowanie jest kompletne i wyjmij nadmuchiwany
element z opakowania .
2. Połóż poduszkę powietrzną na ziemi, aby ją otworzyć.
3. Otwórz nadmuchiwany zawór w kierunku przeciwnym do ruchu

- 13 -
wskazówek zegara.
4. Połączenie przewodu powietrznego i zaworu inflacyjnego.
- 14 -
5. Wtyczka pompy powietrza łącząca rurę powietrzną i pompę powietrza.
Włącz pompę powietrza i naciśnij przełącznik, aby rozpocząć
pompowanie.
6. Wyłącz przełącznik, gdy poduszka powietrzna jest pełna powietrza.
- 15 -
7. Wyjmij nadmuchiwaną rurkę. (Gdy zawór nie wyskoczy automatycznie,
naciśnij go, aby zamknąć ręcznie.
8. Aby uniknąć nieszczelności ciśnieniowego zaworu nadmiarowego przez
długi czas, klucz do zaworu dokręca się w kierunku zgodnym z ruchem
wskazówek zegara za pomocą klucza do zaworu w przypadku poluzowania
zewnętrznego pierścienia zaworu.
- 16 -
9. Pasek na ramię zakłada się w sposób pokazany na rysunku i zapina za
pomocą klamry zamykającej.
Długość można dostosować do osobistych nawyków użytkowania .

- 17 -
PATCHING GUIDELINES
Wskazówki: Ten produkt jest wyposażony w materiały naprawcze (z
wyjątkiem kleju). Jeśli wyciek powietrza jest spowodowany ostrymi
przedmiotami podczas użytkowania, można go naprawić.
Ponieważ materiałem produktu jest PVC, musisz kupić klej do PVC, aby
naprawić klej.
1. Przed naprawą oczyść obszar wokół uszkodzenia, aby upewnić się, że
powierzchnia jest sucha.
2. Nałóż równomiernie cienką warstwę kleju na powierzchnię naprawianego
materiału oraz powierzchnię wokół uszkodzonej poduszki powietrznej.
3. Mocno przyklej materiał naprawczy i poduszkę powietrzną. Do
podgrzania zaleca się użycie gorącej suszarki do włosów. Po wyschnięciu
dociśnij dłońmi przez 2 minuty, a następnie przed użyciem dociśnij jakimś
przedmiotem przez 40-60 minut .
Wyposażone wskazówki dotyczące lokalizacji użycia materiałów
naprawczych
1. Jak pokazano na rysunku, skonfigurowany jest materiał naprawczy w
kształcie pierścienia. W przypadku wykrycia wycieku powietrza w pobliżu
portu napełniania, można go naprawić za pomocą skonfigurowanego kleju i
materiałów naprawczych.

- 18 -
2.Jak pokazano na rysunku, skonfigurowany jest kwadratowy materiał
naprawczy.W przypadku stwierdzenia wycieku powietrza na obwodzie,
można go naprawić za pomocą skonfigurowanego kleju i materiałów
naprawczych.(Różne kolory obrzeży są wyposażone w różne kolory
materiałów naprawczych )
3. Jeżeli wyciek powietrza nastąpi nad lub na dole poduszki powietrznej,

- 19 -
należy użyć dostarczonego szarego kwadratowego bloku naprawczego i
skleić go ze sobą.
CLEANING AND STORAGE
1. Wycierać miękką, wilgotną szmatką.
2. Nigdy nie używaj ściernych środków czyszczących ani szorstkich podkładek.
3. Pamiętaj, aby produkt był suchy.
4. Produkt powinien być suchy. Wilgoć może powodować pleśń.

- 20 -

- 21 -
Adres: Baoshanqu Shuangchenglu 803long 11hao 1602A-1609shi
Szanghaj
Import do USA: Sanven Technology Ltd. Suite 250, 9166 Anaheim Place,
Rancho Cucamonga, CA 91730
REP
UK
Pooledas Group Ltd
Unit 5 Albert Edward House, The Pavilions
Preston, United Kingdom
REP
EC
SHUNSHUN GmbH
Römeräcker 9 Z2021, 76351
Linkenheim-Hochstetten, Germany
Wyprodukowano w Chinach


Technisch Support- und E-Garantiezertifikat
www.vevor.com/support _ _ _ _
LUFTTAUMELMATTE
We continue to be committed to provide you tools with competitive price.
"Save Half", "Half Price" or any other similar expressions used by us only represents an
estimate of savings you might benefit from buying certain tools with us compared to the major
top brands and does not necessarily mean to cover all categories of tools offered by us. You
are kindly reminded to verify carefully when you are placing an order with us if you are
actually saving half in comparison with the top major brands.
- 1 -
Die Produktfarbe hängt von der tatsächlichen
Konfiguration ab
Have product questions? Need technical support? Please feel free to
contact us:
Technical Support and E-Warranty Certificate
www. vevor. com/support
NEED HELP? CONTACT US!
AIR TUMBLING MAT

- 2 -
This is the original instruction, please read all manual instructions
carefully before operating. VEVOR reserves a clear interpretation of our
user manual. The appearance of the product shall be subject to the
product you received. Please forgive us that we won't inform you again
if there are any technology or software updates on our product.
IMPORTANT SAFEGUARDS
VORSICHT : Jede Aktivität, die Bewegung, Rotation und Höhe beinhaltet,
kann zu katastrophalen Verletzungen, Lähmungen oder sogar zum Tod
führen. Sie gehen das Risiko schwerer Verletzungen ein, wenn Sie dieses
Gerät verwenden; dieses Gerät ist nur für die Verwendung durch
entsprechend geschulte und qualifizierte Teilnehmer gemäß Abschnitt 1.1
vorgesehen Beaufsichtigte Bedingungen. Informieren Sie sich vor der
Verwendung über Ihre Nachahmungen. Im Zweifelsfall wenden Sie sich
immer an einen Lehrer. Qualifizierter Ausbilder. Prüfen Sie vor jedem
Gebrauch immer auf lose Befestigungen oder Beschädigungen und testen
Sie die Stabilität. Verwenden Sie Matten nur auf festem Untergrund
umgeben von geeigneten Matten. Stellen Sie sicher, dass die Die
Oberfläche der Matte ist vor dem Gebrauch trocken und in gutem Zustand.
Überprüfen Sie immer, ob der Luftdruck den Mindestanforderungen
entspricht. Bitte lassen Sie die Matte nicht teilweise aufgeblasen in einem
Bereich, in dem sie unbeaufsichtigt verwendet werden kann. Die Matte
kann sich während des Gebrauchs bewegen. Überprüfen Sie immer, ob
die Matte richtig positioniert ist des Produkts vor der Verwendung.
Überprüfen Sie den Druck regelmäßig, um ein ordnungsgemäßes
Aufpumpen sicherzustellen. Beachten Sie, dass äußere
Temperaturänderungen den Innendruck des Produkts verändern Matte.
VORSICHT : Dieses Gerät ist nicht für die Verwendung durch Personen
(einschließlich Kinder) mit eingeschränkten physischen, sensorischen oder
geistigen Fähigkeiten oder mangelnder Erfahrung und Wissen bestimmt,
es sei denn, sie werden von einer dafür verantwortlichen Person
beaufsichtigt oder erhalten Anweisungen zur Verwendung des Geräts ihre
Sicherheit.
ACHTUNG : Kinder sollten beaufsichtigt werden.
ACHTUNG : Bitte entsorgen Sie alle Plastiktüten sorgfältig und halten Sie
sie von Kindern und Haustieren fern.
ACHTUNG : Das Produkt sollte auf einer ebenen Fläche platziert werden.
SAFETY INSTRUCTIONS OF AIR PUMP

- 3 -
WARNUNG: Lesen Sie alle Sicherheitswarnungen, Anweisungen,
Abbildungen und Spezifikationen, die dieser Luftpumpe beiliegen. Die
Nichtbeachtung aller unten aufgeführten Anweisungen kann zu
Stromschlägen, Bränden und/oder schweren Verletzungen führen.
Grundlegende Sicherheitsinformationen:
1. Dieses Produkt ist nur zum Aufpumpen bestimmt.
2. Das Ziehen oder Ziehen des Produkts an der Stromleitung ist nicht
gestattet.
3. Halten Sie beim Herausziehen des Steckers bitte den Stecker selbst
fest und ziehen Sie nicht am Netzkabel.
4. Schneiden und ersetzen Sie den Netzstecker nicht selbst. Andernfalls
kann es zu schwerwiegenden Folgen kommen.
5. Bei Schäden an der Stromversorgung ist der Betrieb des Produkts nicht
gestattet
Linie oder die Shell.
6. Eine Demontage und Demontage des Produkts durch Laien ist nicht
gestattet.
7. Falls die Luftpumpe ins Wasser fällt, unterbrechen Sie bitte die
Stromversorgung, bevor Sie sie ausbaggern. Anschließend sollte sie
einem Fachmann zur Überprüfung und Wartung übergeben werden.
8. Stromschlaggefahr: Berühren Sie die Luftpumpe nicht mit nassen
Händen oder wenn Sie auf einer nassen Oberfläche stehen. Verwenden
Sie die Luftpumpe immer in einer trockenen Umgebung und schließen Sie
sie an eine ordnungsgemäß geerdete Steckdose an.
9. Brandgefahr: Benutzen Sie die Luftpumpe nicht in der Nähe von
brennbaren oder brennbaren Materialien. Halten Sie die Luftpumpe von
Wärme- oder Funkenquellen wie Flammen, Zigaretten oder Elektrogeräten
fern.
10. Explosionsgefahr: Verwenden Sie die Luftpumpe nicht mit Gasen, die

- 4 -
brennbar, explosiv oder giftig sind. Überprüfen Sie immer das
Sicherheitsdatenblatt (SDB) des Gases, bevor Sie es mit der Luftpumpe
verwenden . Überschreiten Sie außerdem nicht den angegebenen Druck
Reichweite für die Luftpumpe .
Luftpumpe nicht mit Gasen, die Metalle angreifen oder chemische
Ladungen erzeugen können. Überprüfen Sie die Verträglichkeit des Gases
mit den Materialien der Teichbelüftung und deren Zubehör. Tragen Sie
beim Umgang mit korrosiven Materialien immer Schutzhandschuhe und
eine Schutzbrille.
12. Verwenden Sie keinen beschädigten Stecker oder eine beschädigte
Steckdose, da dies zu Stromschlägen oder Bränden führen kann.
13. Wenn das Netzkabel beschädigt ist, muss es vom Hersteller, seinem
Kundendienst oder ähnlich qualifizierten Personen ersetzt werden, um
Gefahren zu vermeiden.
14. Dieses Gerät kann von Kindern ab 8 Jahren und darüber sowie von
Personen mit eingeschränkten körperlichen, sensorischen oder geistigen
Fähigkeiten oder Mangel an Erfahrung und Wissen verwendet werden,
wenn sie beaufsichtigt oder in die sichere Verwendung des Geräts
eingewiesen werden verstehen Sie die damit verbundenen Gefahren.
Kinder dürfen nicht mit dem Gerät spielen. Reinigung und
Benutzerwartung dürfen nicht von Kindern ohne Aufsicht durchgeführt
werden.
ANLEITUNG AUFBEWAHREN
FCC INFORMATION OF AIR PUMP
VORSICHT: Änderungen oder Modifikationen, die nicht ausdrücklich von
der für die Einhaltung verantwortlichen Partei genehmigt wurden, können
zum Erlöschen der Berechtigung des Benutzers zum Betrieb des Geräts

- 5 -
führen!
Dieses Gerät entspricht Teil 15 der FCC-Bestimmungen. Der Betrieb
unterliegt den folgenden zwei Bedingungen:
1) Dieses Produkt kann schädliche Störungen verursachen.
2) Dieses Produkt muss alle empfangenen Störungen akzeptieren,
einschließlich Störungen, die zu unerwünschtem Betrieb führen können.
WARNUNG: Änderungen oder Modifikationen an diesem Produkt, die
nicht ausdrücklich von der Partei genehmigt wurden. Verantwortliche für
die Einhaltung können zum Erlöschen der Berechtigung des Benutzers
zum Betrieb des Produkts führen.
Hinweis: Dieses Produkt wurde getestet und entspricht den Grenzwerten
für ein digitales Gerät der Klasse B gemäß Teil 15 der FCC-Bestimmungen.
Diese Grenzwerte sollen einen angemessenen Schutz vor schädlichen
Störungen in einer Wohnanlage bieten.
Dieses Produkt erzeugt und verwendet Hochfrequenzenergie und kann
diese ausstrahlen. Wenn es nicht gemäß den Anweisungen installiert und
verwendet wird, kann es schädliche Störungen der Funkkommunikation
verursachen. Es gibt jedoch keine Garantie dafür, dass bei einer
bestimmten Installation keine Störungen auftreten. Wenn dies der Fall ist
Sollte das Produkt schädliche Störungen beim Radio- oder
Fernsehempfang verursachen, was durch Aus- und Einschalten des
Produkts festgestellt werden kann, wird dem Benutzer empfohlen, die
Störung durch eine oder mehrere der folgenden Maßnahmen zu beheben.
· Richten Sie die Empfangsantenne neu aus oder versetzen Sie sie.
· Erhöhen Sie den Abstand zwischen Produkt und Empfänger.
· Schließen Sie das Produkt an eine Steckdose an, die zu einem anderen
Stromkreis gehört als dem, an den der Empfänger angeschlossen ist.
· Wenden Sie sich für Hilfe an den Händler oder einen erfahrenen

- 6 -
Radio-/TV-Techniker.
CORRECT DISPOSAL OF AIR PUMP
Dieses Produkt unterliegt den Bestimmungen der
europäischen Richtlinie 2012/19/EU. Das Symbol mit der
durchgestrichenen Mülltonne auf Rädern weist darauf hin,
dass das Produkt in der Europäischen Union einer getrennten
Müllsammlung bedarf. Dies gilt für das Produkt und alle Zubehörteile, die
mit diesem Symbol gekennzeichnet sind. Als solche gekennzeichnete
Produkte dürfen nicht über den normalen Hausmüll entsorgt werden,
sondern müssen an einer Sammelstelle für das Recycling von Elektro- und
Elektronikgeräten abgegeben werden.
PRODUCT PARAMETERS
MODELL
Größe /FARBE
LUFTPUMPE
TT-M-40-24
40× Φ 24 Zoll / rosa
US-STECKER (AC110-120V 60H bei
600W)
TT-E-40-24
40×Φ24INCH/ROSA
EU-STECKER (AC220-240V 50/60H und
- 7 -
600W)
TT-M-40-31,5
40× Φ 31,5 Zoll / Grün
US-STECKER (AC110-120V 60H bei
600W)
TT-E-40-31,5
40× Φ 31,5 Zoll / Grün
EU-STECKER (AC220-240V 50/60H und
600W)
TT-M-40-24-10
Anzug : 10 Fuß + 40 X 24
Zoll/ P -Tinte
US-STECKER (AC110-120V 60H bei
600W)
TT-E-40-24-10
Anzug : 10 Fuß + 40 X 24
Zoll/ P -Tinte
EU-STECKER (AC220-240V 50/60H und
600W)
TT-M-10-G
10 Fuß / Grün
US-STECKER (AC110-120V 60H bei
600W)
TT-E-10-G
10 Fuß / Grün
EU-STECKER (AC220-240V 50/60H und
600W)
TT-M-10-P
10ft /P- Tinte
US-STECKER (AC110-120V 60H bei
600W)
TT-E-10-P
10ft /P- Tinte
EU-STECKER (AC220-240V 50/60H und
600W)
TT-M-10-B
10 Fuß / Blau
US-STECKER (AC110-120V 60H bei
600W)
TT-E-10-B
10 Fuß / Blau
EU-STECKER (AC220-240V 50/60H und
600W)
TT-M-13-G
13 Fuß / Grün
US-STECKER (AC110-120V 60H bei
600W)
TT-E-13-G
13 Fuß / Grün
EU-STECKER (AC220-240V 50/60H und
600W)
TT-M-13-P
13ft /P -Tinte
US-STECKER (AC110-120V 60H bei
600W)
TT-E-13-P
13ft /P -Tinte
EU-STECKER (AC220-240V 50/60H und
600W)
TT-M-13-B
13 Fuß / Blau
US-STECKER (AC110-120V 60H bei
600W)
TT-E-13-B
13 Fuß / Blau
EU-STECKER (AC220-240V 50/60H und
600W)
- 8 -
TT-M-16-G
16 Fuß / Grün
US-STECKER (AC110-120V 60H bei
600W)
TT-E-16-G
16 Fuß / Grün
EU-STECKER (AC220-240V 50/60H und
600W)
TT-M-16-P
16ft /P -Tinte
US-STECKER (AC110-120V 60H bei
600W)
TT-E-16-P
16ft /P -Tinte
EU-STECKER (AC220-240V 50/60H und
600W)
TT-M-16-B
16 Fuß / Blau
US-STECKER (AC110-120V 60H bei
600W)
TT-E-16-B
16 Fuß / Blau
EU-STECKER (AC220-240V 50/60H und
600W)
TT-M-20-G
20 Fuß / Grün
US-STECKER (AC110-120V 60H bei
600W)
TT-E-20-G
20 Fuß / Grün
EU-STECKER (AC220-240V 50/60H und
600W)
TT-M-20-P
20ft /P -Tinte
US-STECKER (AC110-120V 60H bei
600W)
TT-E-20-P
20ft /P -Tinte
EU-STECKER (AC220-240V 50/60H und
600W)
TT-M-20-B
20 Fuß / Blau
US-STECKER (AC110-120V 60H bei
600W)
TT-E-20-B
20 Fuß / Blau
EU-STECKER (AC220-240V 50/60H und
600W)
INSTALLATION STEPS
A: Roller ( Produktfarbe hängt von der tatsächlichen Konfiguration ab )
1. Stellen Sie sicher, dass die Verpackung vollständig ist, und nehmen
Sie das Schlauchboot aus der Verpackung .
- 9 -
2.Legen Sie das Luftkissen zum Öffnen auf den Boden.
3. Drehen Sie das aufblasbare Ventil gegen den Uhrzeigersinn auf.
4. Luftrohr- und Füllventilanschluss.
- 10 -
5.Luftrohr und Luftpumpenanschluss, Luftpumpenstecker.
Schalten Sie die Luftpumpe ein und drücken Sie den Schalter, um mit
dem Aufpumpen zu beginnen.
6.Bitte schalten Sie den Schalter aus, wenn das Luftkissen mit Luft
gefüllt ist.
- 11 -
7. Nehmen Sie den aufblasbaren Schlauch heraus. (Wenn das Ventil
nicht automatisch aufspringt, drücken Sie es bitte manuell, um es zu
schließen.
8.Um eine Undichtigkeit des Überdruckventils für längere Zeit zu vermeiden,
wird der Ventilschlüssel im Falle einer Lockerung des Außenrings des
Ventils mit dem Ventilschlüssel im Uhrzeigersinn festgezogen.
- 12 -
B: Rechteck _ ( Die Produktfarbe hängt von der tatsächlichen
Konfiguration ab .)
1. Stellen Sie sicher, dass die Verpackung vollständig ist, und nehmen
Sie das Schlauchboot aus der Verpackung .
2.Legen Sie das Luftkissen zum Öffnen auf den Boden.

- 13 -
3. Drehen Sie das aufblasbare Ventil gegen den Uhrzeigersinn auf.
4. Luftrohr- und Füllventilanschluss.
- 14 -
5.Luftrohr und Luftpumpenanschluss, Luftpumpenstecker.
Schalten Sie die Luftpumpe ein und drücken Sie den Schalter, um mit
dem Aufpumpen zu beginnen.
6.Bitte schalten Sie den Schalter aus, wenn das Luftkissen mit Luft gefüllt
ist.
- 15 -
7. Nehmen Sie den aufblasbaren Schlauch heraus. (Wenn das Ventil
nicht automatisch aufspringt, drücken Sie es bitte manuell, um es zu
schließen.
- 16 -
8.Um eine Undichtigkeit des Überdruckventils für längere Zeit zu vermeiden,
wird der Ventilschlüssel im Falle einer Lockerung des Außenrings des
Ventils mit dem Ventilschlüssel im Uhrzeigersinn festgezogen.
9. Der Schultergurt wird wie im Bild gezeigt angebracht und mit einer
Schlossschnalle befestigt.
Die Länge kann den persönlichen Nutzungsgewohnheiten angepasst
werden .

- 17 -
PATCHING GUIDELINES
Tipps: Dieses Produkt ist mit Reparaturmaterialien (außer Kleber)
ausgestattet. Wenn während des Gebrauchs durch scharfe Gegenstände
Luftlecks verursacht werden, kann es repariert werden.
Da das Produktmaterial PVC ist, müssen Sie PVC-Kleber kaufen, um den
Kleber zu reparieren.
1. Reinigen Sie vor der Reparatur den Bereich um den Schaden herum, um
sicherzustellen, dass die Oberfläche trocken ist.
2. Tragen Sie eine dünne Schicht Kleber gleichmäßig auf die Oberfläche des
Reparaturmaterials und die Oberfläche um das beschädigte Luftpolster auf.
3. Kleben Sie das Reparaturmaterial und das Luftkissen fest. Es wird
empfohlen, zum Erhitzen einen heißen Haartrockner zu verwenden.
Drücken Sie es nach dem Trocknen 2 Minuten lang mit den Händen und
- 18 -
drücken Sie es dann vor dem Gebrauch 40-60 Minuten lang mit einem
Gegenstand .
Tipps zum Einsatzort des ausgestatteten Reparaturmaterials
1. Wie im Bild gezeigt, ist ein ringförmiges Reparaturmaterial konfiguriert.
Wenn in der Nähe der Aufblasöffnung ein Luftleck festgestellt wird, können
der konfigurierte Kleber und die Reparaturmaterialien zur Reparatur
verwendet werden.
2. Wie in der Abbildung gezeigt, ist ein quadratisches Reparaturmaterial
konfiguriert. Wenn um den Umfang herum Luftlecks festgestellt werden,
können die konfigurierten Kleber- und Reparaturmaterialien zur Reparatur
verwendet werden. (Verschiedene Farben der Kanten sind mit
unterschiedlichen Farben von Reparaturmaterialien ausgestattet )
- 19 -
3.Wenn Luftlecks über oder an der Unterseite des Luftkissens auftreten,
verwenden Sie bitte den mitgelieferten grauen quadratischen
Reparaturblock und kleben Sie ihn zusammen.
CLEANING AND STORAGE
1. Mit einem weichen, feuchten Tuch abwischen.

- 20 -
2. Verwenden Sie niemals Scheuermittel oder scharfe Schwämme.
3. Achten Sie darauf, das Produkt trocken zu halten.
4. Bitte halten Sie das Produkt trocken. Feuchtigkeit kann dazu führen, dass
Produkte schimmeln.
- 21 -
Adresse: Baoshanqu Shuangchenglu 803long 11hao 1602A-1609shi
Shanghai
In die USA importiert: Sanven Technology Ltd. Suite 250, 9166 Anaheim
Place, Rancho Cucamonga, CA 91730
REP
UK
Pooledas Group Ltd
Unit 5 Albert Edward House, The Pavilions
Preston, United Kingdom
REP
EC
SHUNSHUN GmbH
Römeräcker 9 Z2021, 76351
Linkenheim-Hochstetten, Germany
In China hergestellt


Technique Assistance et certificat de garantie électronique
www.vevor.com/support _ _ _ _
TAPIS DE CULBUTAGE D'AIR
We continue to be committed to provide you tools with competitive price.
"Save Half", "Half Price" or any other similar expressions used by us only represents an
estimate of savings you might benefit from buying certain tools with us compared to the major
top brands and does not necessarily mean to cover all categories of tools offered by us. You
are kindly reminded to verify carefully when you are placing an order with us if you are
actually saving half in comparison with the top major brands.

- 1 -
La couleur du produit est soumise à la configuration réelle
Have product questions? Need technical support? Please feel free to
contact us:
Technical Support and E-Warranty Certificate
www. vevor. com/support
NEED HELP? CONTACT US!
This is the original instruction, please read all manual instructions
carefully before operating. VEVOR reserves a clear interpretation of our
user manual. The appearance of the product shall be subject to the
product you received. Please forgive us that we won't inform you again
if there are any technology or software updates on our product.
AIR TUMBLING MAT

- 2 -
IMPORTANT SAFEGUARDS
ATTENTION : Toute activité impliquant un mouvement, une rotation et une
hauteur crée la possibilité de blessures catastrophiques, de paralysie ou
même de mort. Vous assumez le risque de blessures graves lors de
l'utilisation de cet équipement ; cet équipement est destiné à être utilisé
uniquement par des participants correctement formés et qualifiés sous
conditions surveillées. Avant utilisation, connaissez vos imitations. En cas
de doute, consultez toujours un enseignant. Instructeur qualifié. Inspectez
toujours les raccords desserrés ou les dommages et testez la stabilité
avant chaque utilisation. Utilisez les tapis uniquement sur un sol ferme
entouré de tapis appropriés. Assurez-vous que La surface du tapis est
sèche et en bon état avant utilisation. Vérifiez toujours que la pression de
l'air répond aux exigences minimales. Veuillez ne pas laisser le tapis
partiellement gonflé dans une zone où il peut être utilisé sans surveillance.
Le tapis peut bouger pendant l'utilisation. Vérifiez toujours le bon
positionnement. du produit avant utilisation. Vérifiez périodiquement la
pression pour garantir un gonflage correct. Notez que les changements de
température externes modifieront la pression interne du produit. tapis.
ATTENTION : Cet équipement n'est pas destiné à être utilisé par des
personnes (y compris des enfants) ayant des capacités physiques,
sensorielles ou mentales réduites, ou un manque d'expérience et de
connaissances, à moins qu'elles n'aient été supervisées ou aient reçu des
instructions concernant l'utilisation de l'équipement par une personne
responsable de leur sécurité.
ATTENTION : Les enfants doivent être surveillés.
ATTENTION : Veuillez jeter soigneusement tous les sacs en plastique et
les garder hors de portée des enfants et des animaux domestiques.
ATTENTION : Le produit doit être posé sur une surface plane.
SAFETY INSTRUCTIONS OF AIR PUMP
AVERTISSEMENT : Lisez tous les avertissements de sécurité,
instructions, illustrations et spécifications fournis avec cette pompe à air.
Le non-respect de toutes les instructions énumérées ci-dessous peut
entraîner un choc électrique, un incendie et/ou des blessures graves.
Informations de sécurité de base :
1. Ce produit est destiné uniquement au pompage.
2. Il est interdit de tirer ou de traîner le produit avec la ligne électrique.

- 3 -
3. Lorsque vous retirez la fiche, veuillez la tenir elle-même ; ne tirez pas
sur la ligne électrique.
4. Ne coupez pas et ne remplacez pas la fiche d'alimentation par
vous-même, car cela pourrait entraîner de graves conséquences.
5. Le fonctionnement du produit n'est pas autorisé en cas de dommages à
l'alimentation
ligne ou la coquille.
6. Le démontage et le démontage du produit par des profanes ne sont pas
autorisés.
7. Si la pompe à air tombe dans l'eau, veuillez couper l'alimentation
électrique avant de la draguer. Ensuite, elle doit être remise à des
professionnels pour contrôle et entretien.
8. Risque de choc électrique : Ne touchez pas la pompe à air avec les
mains mouillées ou en vous tenant debout sur une surface mouillée.
Utilisez toujours la pompe à air dans un environnement sec et branchez-la
dans une prise correctement mise à la terre.
9. Risque d'incendie : n'utilisez pas la pompe à air à proximité de
matériaux inflammables ou combustibles. Gardez la pompe à air éloignée
des sources de chaleur ou d'étincelles, telles que des flammes, des
cigarettes ou des appareils électriques.
10. Risque d'explosion : N'utilisez pas la pompe à air avec des gaz
inflammables, explosifs ou toxiques. Vérifiez toujours la fiche de données
de sécurité (SDS) du gaz avant de l'utiliser avec la pompe à air . De plus,
ne dépassez pas la pression spécifiée. gamme pour la pompe à air .
11. Risque de corrosion : Ne pas utiliser la pompe à air avec des gaz
susceptibles de corroder les métaux ou d'exercer des charges chimiques.
Vérifier la compatibilité du gaz avec les matériaux de l'aération du bassin
et ses accessoires. Toujours utiliser des gants et des lunettes de

- 4 -
protection lors de la manipulation de matériaux corrosifs.
12. N'utilisez pas de fiche ou de prise endommagée, car cela pourrait
provoquer un choc électrique ou un incendie.
13. Si le cordon d'alimentation est endommagé, il doit être remplacé par le
fabricant, son agent de service ou des personnes de qualification similaire
afin d'éviter tout danger.
14. Cet appareil peut être utilisé par des enfants âgés de 8 ans et plus et
des personnes ayant des capacités physiques, sensorielles ou mentales
réduites ou un manque d'expérience et de connaissances s'ils ont reçu
une surveillance ou des instructions concernant l'utilisation de l'appareil de
manière sûre et comprendre les dangers encourus. Les enfants ne doivent
pas jouer avec l’appareil. Le nettoyage et l’entretien par l’utilisateur ne
doivent pas être effectués par des enfants sans surveillance.
CONSERVEZ CES INSTRUCTIONS
FCC INFORMATION OF AIR PUMP
ATTENTION : Les changements ou modifications non expressément
approuvés par la partie responsable de la conformité pourraient annuler le
droit de l'utilisateur à utiliser l'équipement !
Cet appareil est conforme à la partie 15 des règles FCC. Son
fonctionnement est soumis aux deux conditions suivantes :
1) Ce produit peut provoquer des interférences nuisibles.
2) Ce produit doit accepter toute interférence reçue, y compris les
interférences susceptibles de provoquer un fonctionnement indésirable.
AVERTISSEMENT : Tout changement ou modification apporté à ce
produit non expressément approuvé par la partie responsable. La
responsabilité de la conformité pourrait annuler l'autorité de l'utilisateur à
utiliser le produit.

- 5 -
Remarque : Ce produit a été testé et déclaré conforme aux limites d'un
appareil numérique de classe B conformément à la partie 15 des règles de
la FCC. Ces limites sont conçues pour fournir une protection raisonnable
contre les interférences nuisibles dans une installation résidentielle.
Ce produit génère, utilise et peut émettre de l'énergie radiofréquence et,
s'il n'est pas installé et utilisé conformément aux instructions, il peut
provoquer des interférences nuisibles aux communications radio.
Cependant, il n'y a aucune garantie que des interférences ne se produiront
pas dans une installation particulière. Si cela Si le produit provoque des
interférences nuisibles à la réception radio ou télévision, ce qui peut être
déterminé en éteignant et en allumant le produit, l'utilisateur est encouragé
à essayer de corriger les interférences en prenant une ou plusieurs des
mesures suivantes.
· Réorientez ou déplacez l'antenne de réception.
· Augmentez la distance entre le produit et le récepteur.
· Connectez le produit à une prise sur un circuit différent de celui auquel le
récepteur est connecté.
· Consultez le revendeur ou un technicien radio/TV expérimenté pour
obtenir de l'aide.
CORRECT DISPOSAL OF AIR PUMP
Ce produit est soumis aux dispositions de la directive
européenne 2012/19/UE. Le symbole représentant une
poubelle barrée indique que le produit nécessite une collecte
sélective des déchets dans l'Union européenne. Cela
s'applique au produit et à tous les accessoires marqués de ce symbole.
Les produits marqués comme tels ne peuvent pas être jetés avec les
ordures ménagères normales, mais doivent être déposés dans un point de
collecte pour le recyclage des appareils électriques et électroniques.
- 6 -
PRODUCT PARAMETERS
MODÈLE
Taille /COULEUR
POMPE À AIR
TT-M-40-24
40 × Φ 24 pouces / rose
PRISE AMÉRICAINE (AC110-120V 60H
z 600W)
TT-E-40-24
40 × Φ24 POUCES/ROSE
PRISE UE (AC220-240V 50/60H z
600W)
TT-M-40-31.5
40 × Φ 31,5 pouces / Vert
PRISE AMÉRICAINE (AC110-120V 60H
z 600W)
TT-E-40-31.5
40 × Φ 31,5 pouces / Vert
PRISE UE (AC220-240V 50/60H z
600W)
TT-M-40-24-10
Costume : 10 pieds + 40 × Φ
24 pouces/ encre P
PRISE AMÉRICAINE (AC110-120V 60H
z 600W)
TT-E-40-24-10
Costume : 10 pieds + 40 × Φ
24 pouces/ encre P
PRISE UE (AC220-240V 50/60H z
600W)
TT-M-10-G
10 pieds / Vert
PRISE AMÉRICAINE (AC110-120V 60H
z 600W)
TT-E-10-G
10 pieds / Vert
PRISE UE (AC220-240V 50/60H z
600W)

- 7 -
TT-M-10-P
Encre 10 pieds /P
PRISE AMÉRICAINE (AC110-120V 60H
z 600W)
TT-E-10-P
Encre 10 pieds /P
PRISE UE (AC220-240V 50/60H z
600W)
TT-M-10-B
10 pieds / Bleu
PRISE AMÉRICAINE (AC110-120V 60H
z 600W)
TT-E-10-B
10 pieds / Bleu
PRISE UE (AC220-240V 50/60H z
600W)
TT-M-13-G
13 pieds / Vert
PRISE AMÉRICAINE (AC110-120V 60H
z 600W)
TT-E-13-G
13 pieds / Vert
PRISE UE (AC220-240V 50/60H z
600W)
TT-M-13-P
Encre 13 pieds /P
PRISE AMÉRICAINE (AC110-120V 60H
z 600W)
TT-E-13-P
Encre 13 pieds /P
PRISE UE (AC220-240V 50/60H z
600W)
TT-M-13-B
13 pieds / Bleu
PRISE AMÉRICAINE (AC110-120V 60H
z 600W)
TT-E-13-B
13 pieds / Bleu
PRISE UE (AC220-240V 50/60H z
600W)
TT-M-16-G
16 pieds / Vert
PRISE AMÉRICAINE (AC110-120V 60H
z 600W)
TT-E-16-G
16 pieds / Vert
PRISE UE (AC220-240V 50/60H z
600W)
TT-M-16-P
Encre 16 pieds /P
PRISE AMÉRICAINE (AC110-120V 60H
z 600W)
TT-E-16-P
Encre 16 pieds /P
PRISE UE (AC220-240V 50/60H z
600W)
TT-M-16-B
16 pieds / Bleu
PRISE AMÉRICAINE (AC110-120V 60H
z 600W)
TT-E-16-B
16 pieds / Bleu
PRISE UE (AC220-240V 50/60H z
600W)
TT-M-20-G
20 pieds / Vert
PRISE AMÉRICAINE (AC110-120V 60H
- 8 -
z 600W)
TT-E-20-G
20 pieds / Vert
PRISE UE (AC220-240V 50/60H z
600W)
TT-M-20-P
Encre 20 pieds /P
PRISE AMÉRICAINE (AC110-120V 60H
z 600W)
TT-E-20-P
Encre 20 pieds /P
PRISE UE (AC220-240V 50/60H z
600W)
TT-M-20-B
20 pieds / Bleu
PRISE AMÉRICAINE (AC110-120V 60H
z 600W)
TT-E-20-B
20 pieds / Bleu
PRISE UE (AC220-240V 50/60H z
600W)
INSTALLATION STEPS
R : Rouleau ( la couleur du produit est soumise à la configuration réelle )
1. Assurez-vous que l'emballage est complet et sortez le gonflable de la
boîte d'emballage .
2. Placez le coussin d'air sur le sol pour l'ouvrir.
- 9 -
3. Tournez la valve gonflable dans le sens inverse des aiguilles d'une
montre.
4. Connexion du tuyau d'air et de la valve de gonflage.
5. Bouchon de pompe à air de connexion de tuyau d'air et de pompe à
air.
- 10 -
Allumez la pompe à air et appuyez sur l'interrupteur pour commencer à
gonfler.
6. Veuillez éteindre l'interrupteur lorsque le coussin d'air est plein d'air.
7. Retirez le tube gonflable. (Lorsque la valve ne s'ouvre pas
automatiquement, veuillez appuyer dessus pour la fermer manuellement.

- 11 -
8. Pour éviter les fuites de la soupape de surpression pendant une longue
période, la clé à soupape est serrée dans le sens des aiguilles d'une montre
à l'aide de la clé à soupape en cas de desserrage de la bague extérieure de
la soupape.
B : Rectangle _ ( La couleur du produit est soumise à la

- 12 -
configuration réelle )
1. Assurez-vous que l'emballage est complet et sortez le gonflable de la
boîte d'emballage .
2. Placez le coussin d'air sur le sol pour l'ouvrir.
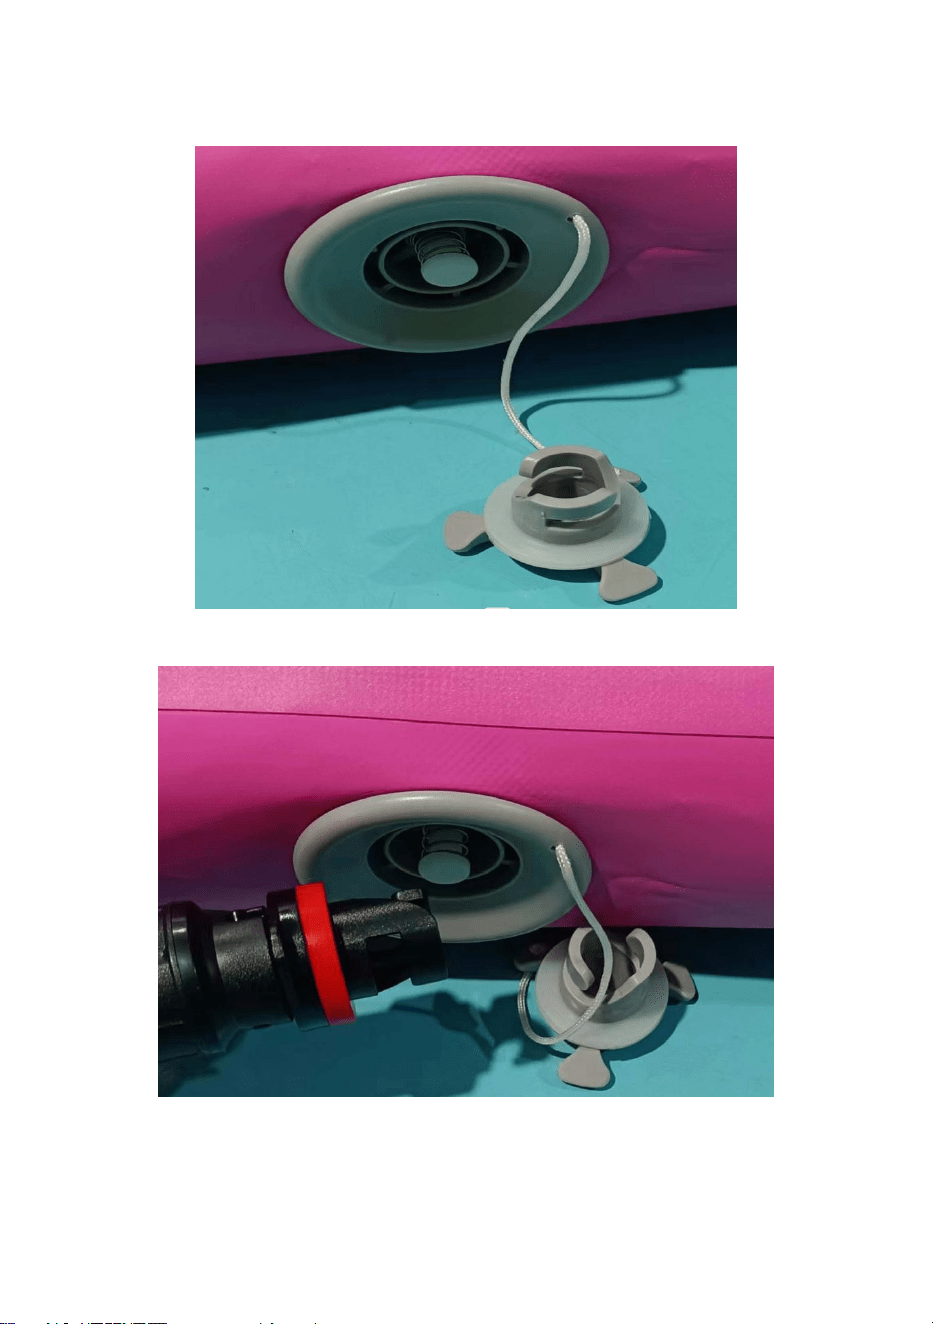
- 13 -
3. Tournez la valve gonflable dans le sens inverse des aiguilles d'une
montre.
4. Connexion du tuyau d'air et de la valve de gonflage.
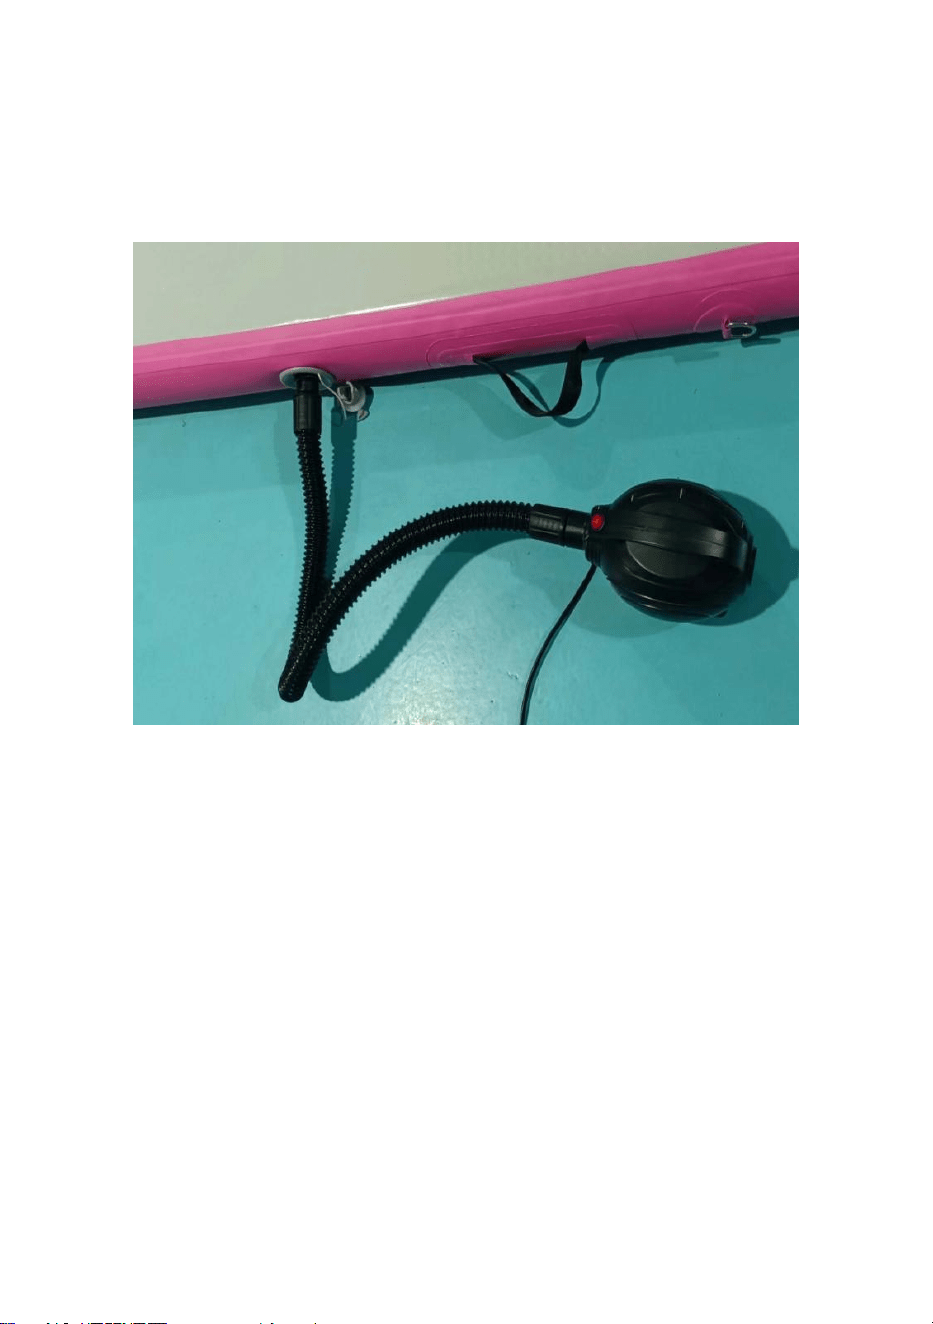
- 14 -
5. Bouchon de pompe à air de connexion de tuyau d'air et de pompe à
air.
Allumez la pompe à air et appuyez sur l'interrupteur pour commencer à
gonfler.
6. Veuillez éteindre l'interrupteur lorsque le coussin d'air est plein d'air.

- 15 -
7. Retirez le tube gonflable. (Lorsque la valve ne s'ouvre pas
automatiquement, veuillez appuyer dessus pour la fermer manuellement.
8. Pour éviter les fuites de la soupape de surpression pendant une longue

- 16 -
période, la clé à soupape est serrée dans le sens des aiguilles d'une montre
à l'aide de la clé à soupape en cas de desserrage de la bague extérieure de
la soupape.
9. La bandoulière est installée comme indiqué sur l'image et fixée avec une
boucle de verrouillage.
La longueur peut être ajustée en fonction des habitudes d'utilisation
personnelles .
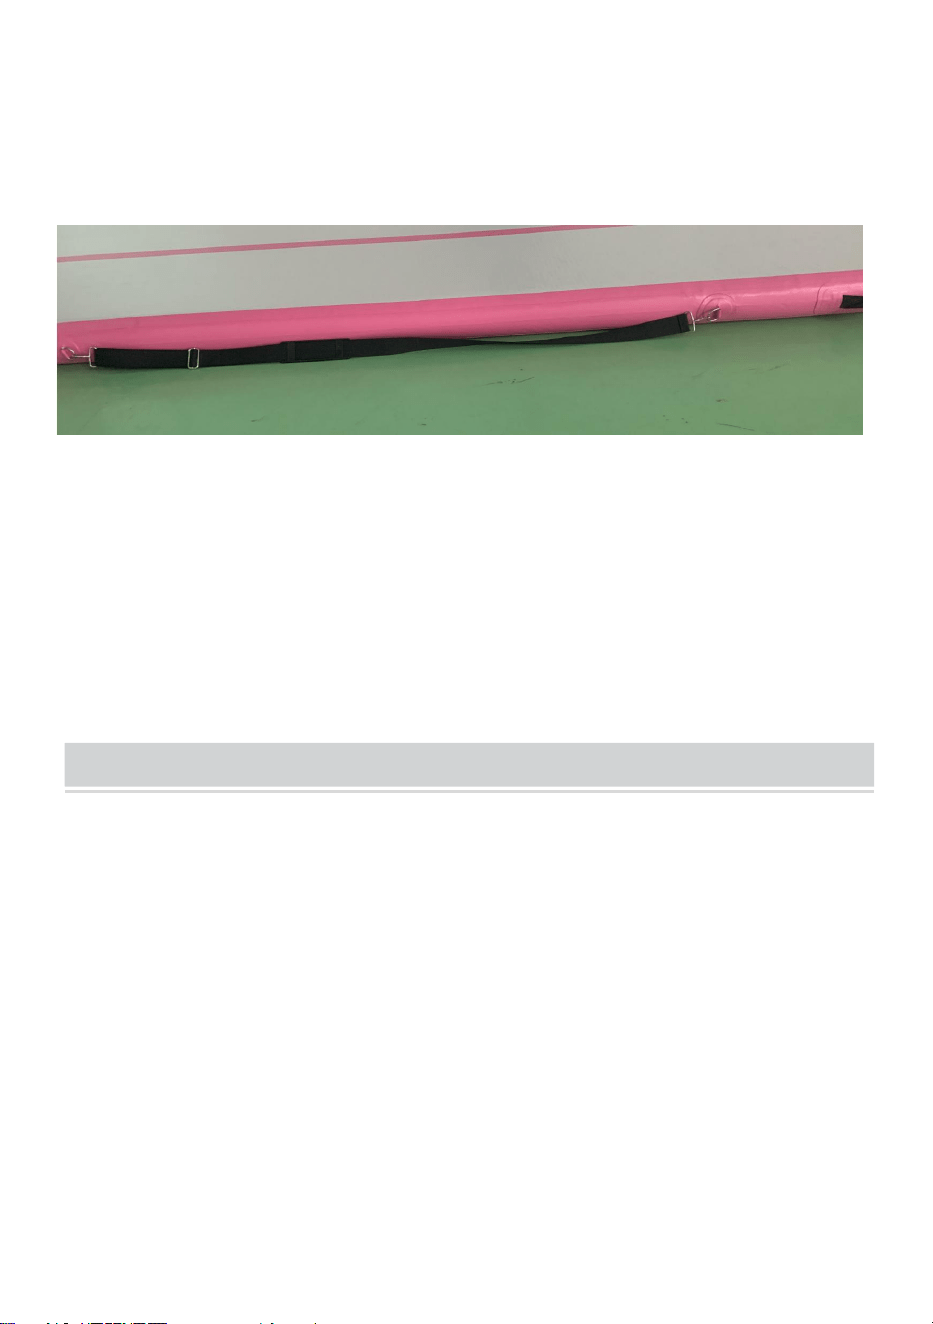
- 17 -
PATCHING GUIDELINES
Conseils: Ce produit est équipé de matériaux de réparation (à l'exception de
la colle).Lorsque la fuite d'air est causée par des objets pointus lors de
l'utilisation, elle peut être réparée.
Étant donné que le matériau du produit est du PVC, vous devez acheter de
la colle PVC pour réparer la colle.
1. Avant de réparer, nettoyez la zone autour des dommages pour vous
assurer que la surface est sèche.
2. Appliquez une fine couche de colle uniformément sur la surface du
matériau de réparation et sur la surface autour du coussin d'air endommagé.
3. Collez fermement le matériau de réparation et le coussin d'air. Il est
recommandé d'utiliser un sèche-cheveux chaud pour le chauffer. Une fois
sec, appuyez dessus avec vos mains pendant 2 minutes, puis appuyez
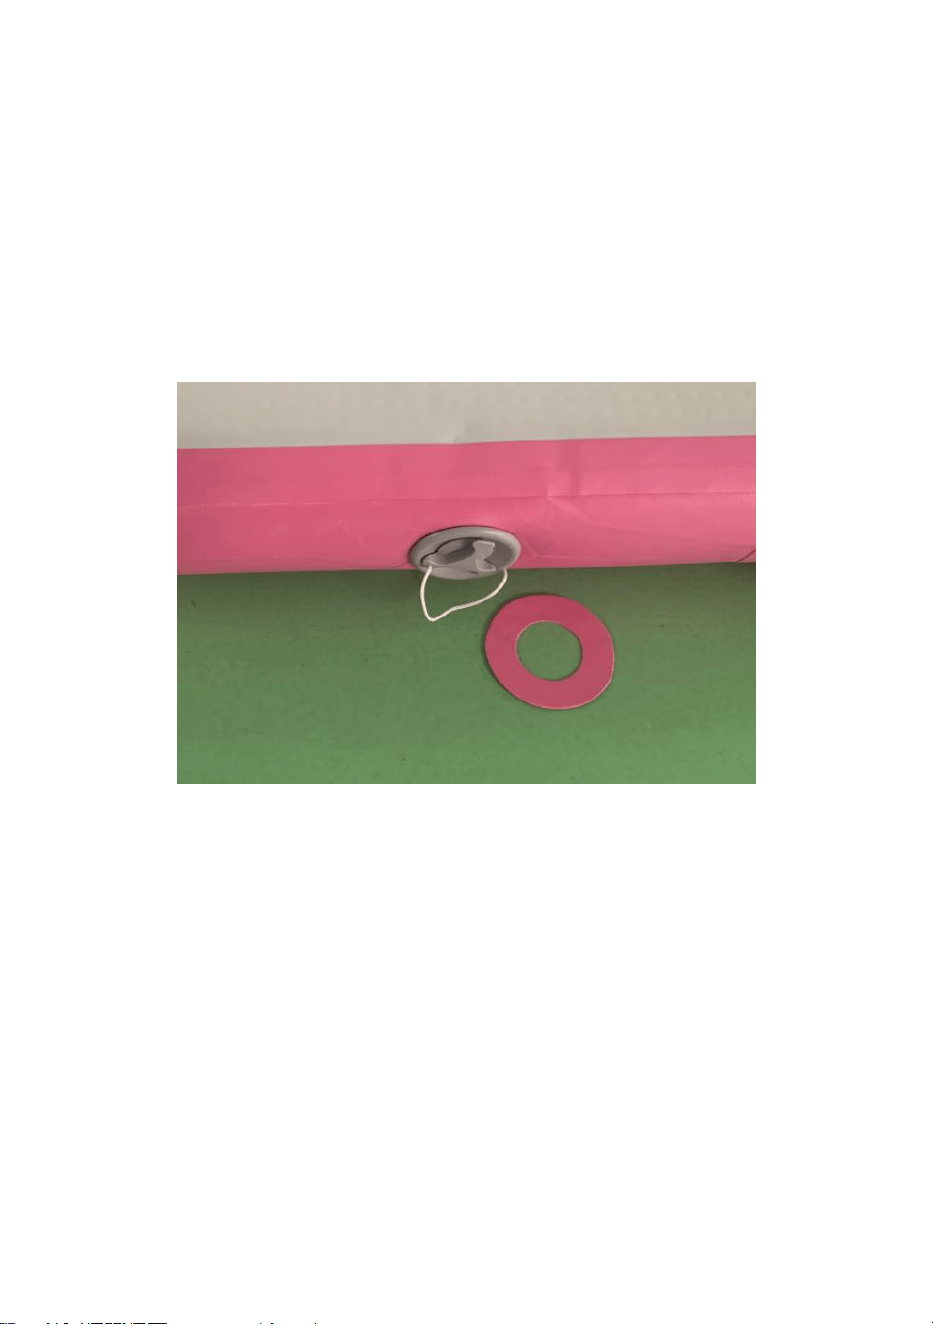
- 18 -
dessus avec un objet pendant 40 à 60 minutes avant utilisation. .
Conseils d'emplacement pour l'utilisation du matériel de réparation
équipé
1. Comme le montre l'image, un matériau de réparation en forme d'anneau
est configuré. Lorsqu'une fuite d'air est détectée près du port de gonflage, la
colle configurée et les matériaux de réparation peuvent être utilisés pour la
réparer.
2. Comme le montre l'image, un matériau de réparation carré est configuré.
Lorsqu'une fuite d'air est détectée autour du périmètre, la colle et les
matériaux de réparation configurés peuvent être utilisés pour la réparer.
(Différentes couleurs de bordure sont équipées de différentes couleurs de
matériaux de réparation. )
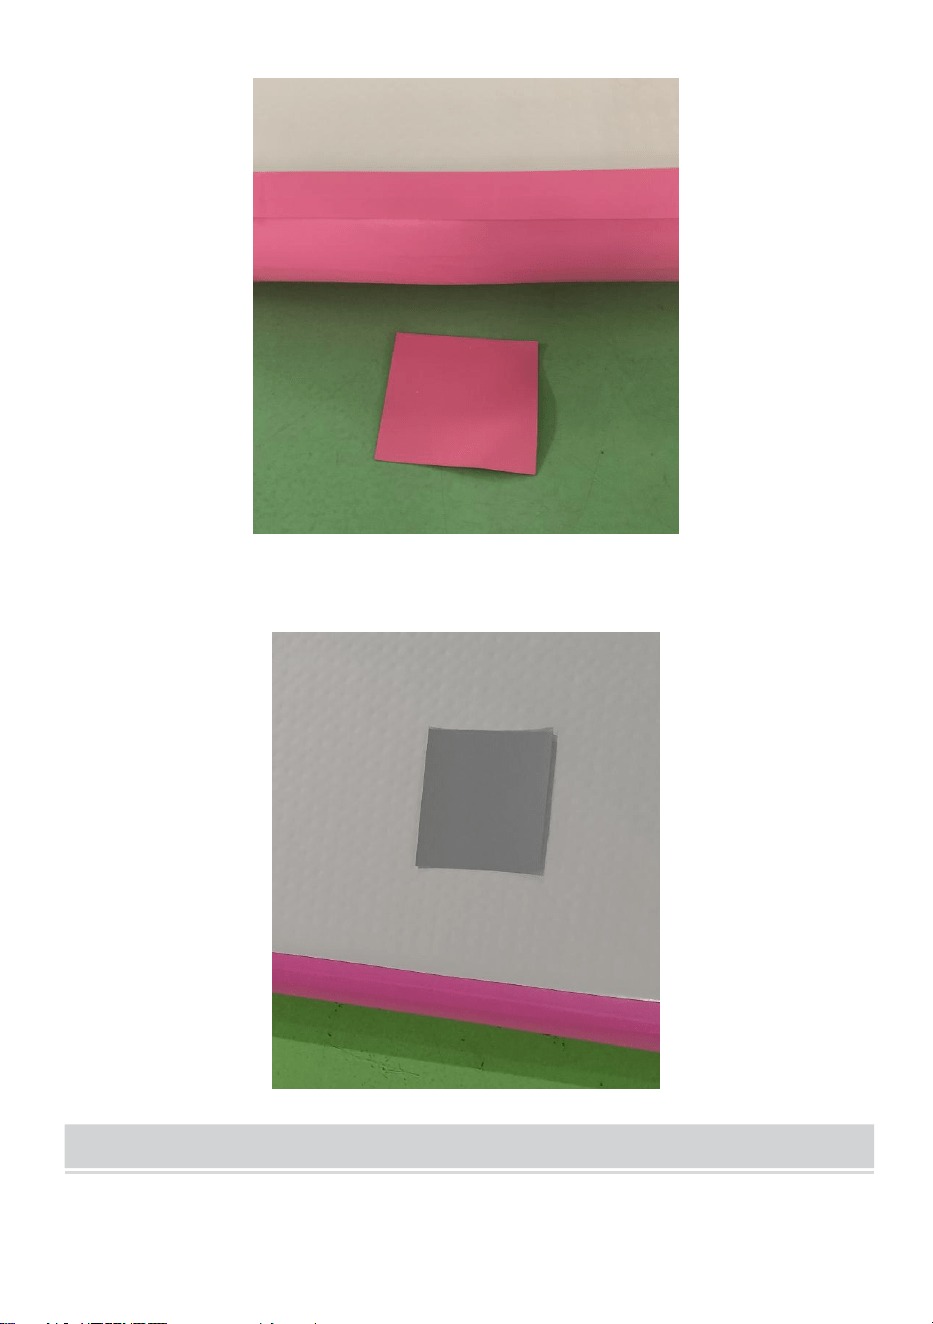
- 19 -
3. Lorsqu'une fuite d'air se produit au-dessus ou au bas du coussin d'air,
veuillez utiliser le bloc de réparation carré gris fourni et collez-le ensemble.
CLEANING AND STORAGE
1. Essuyer avec un chiffon doux et humide.
2. N'utilisez jamais de nettoyant abrasif ou de tampon agressif.

- 20 -
3. Assurez-vous de garder le produit au sec.
4. Veuillez garder le produit au sec. L'humidité peut provoquer la moisissure des
produits.
- 21 -
Adresse : Baoshanqu Shuangchenglu 803long 11hao 1602A-1609shi
Shanghai
Importé aux États-Unis : Sanven Technology Ltd. Suite 250, 9166
Anaheim Place, Rancho Cucamonga, CA 91730
REP
UK
Pooledas Group Ltd
Unit 5 Albert Edward House, The Pavilions
Preston, United Kingdom
REP
EC
SHUNSHUN GmbH
Römeräcker 9 Z2021, 76351
Linkenheim-Hochstetten, Germany
Fabriqué en Chine


Teknisk Support och e-garanticertifikat
www.vevor.com/support _ _ _ _
LUFTTUMLANDE MATTA
We continue to be committed to provide you tools with competitive price.
"Save Half", "Half Price" or any other similar expressions used by us only represents an
estimate of savings you might benefit from buying certain tools with us compared to the major
top brands and does not necessarily mean to cover all categories of tools offered by us. You
are kindly reminded to verify carefully when you are placing an order with us if you are
actually saving half in comparison with the top major brands.

- 1 -
Produktens färg är föremål för faktisk konfiguration
Have product questions? Need technical support? Please feel free to
contact us:
Technical Support and E-Warranty Certificate
www. vevor. com/support
NEED HELP? CONTACT US!
This is the original instruction, please read all manual instructions
carefully before operating. VEVOR reserves a clear interpretation of our
user manual. The appearance of the product shall be subject to the
product you received. Please forgive us that we won't inform you again
if there are any technology or software updates on our product.
AIR TUMBLING MAT

- 2 -
IMPORTANT SAFEGUARDS
FÖRSIKTIGHET : Anv-aktivitet som involverar rörelse, rotation och höjd
skapar risken för katastrofala skador, förlamning eller till och med dödsfall.
Du antar risken för allvarliga skador när du använder denna utrustning;
denna utrustning är endast avsedd att användas av korrekt utbildade och
kvalificerade deltagare under övervakade förhållanden. Innan du använder,
känna till dina imitationer. Om du är osäker, kontakta alltid en lärare.
Kvalificerad instruktör. Inspektera alltid för lösa beslag eller skador, och
testa stabiliteten före varje användning. Använd endast mattor på fast mark
omgiven av lämpliga mattor. Se till att mattans yta är torr och i gott skick
före användning. Kontrollera alltid att lufttrycket uppfyller minimikraven.
Lämna inte mattan delvis uppblåst i ett område där den kan användas utan
övervakning. Mattan kan röra sig under användning. Kontrollera alltid att
den är korrekt placerad av produkten före användning. Kontrollera trycket
regelbundet för att säkerställa korrekt uppblåsning. Observera att externa
temperaturförändringar kommer att ändra det inre trycket på matta.
FÖRSIKTIGHET : Denna utrustning är inte avsedd att användas av
personer (inklusive barn) med nedsatt fysisk, sensorisk eller mental
förmåga, eller bristande erfarenhet och kunskap, såvida de inte har fått
övervakning eller instruktioner angående användning av utrustningen av
en person som ansvarar för deras säkerhet.
VARNING : Barn bör övervakas.
VARNING : Kassera alla plastpåsar försiktigt och håll dem borta från barn
och husdjur.
VARNING : Produkten ska placeras på en plan yta.
SAFETY INSTRUCTIONS OF AIR PUMP
VARNING: Läs alla säkerhetsvarningar, instruktioner, illustrationer och
specifikationer som medföljer denna luftpump. Underlåtenhet att följa alla
instruktioner som anges nedan kan resultera i elektriska stötar, brand
och/eller allvarliga skador.
Grundläggande säkerhetsinformation:
1. Denna produkt är endast avsedd för upppumpning.
2. Det är inte tillåtet att dra eller dra produkten med elledningen.
3. När du drar ut kontakten, håll i själva kontakten, dra inte i nätkabeln.
4. Klipp och byt inte ut stickkontakten själv, annars kan det få allvarliga

- 3 -
konsekvenser.
5. Användning av produkten är inte tillåten i händelse av skada på
strömmen
lina eller skalet.
6. Demontering och demontering av produkten av lekmän är inte tillåtet.
7. Om luftpumpen faller i vatten, bryt strömförsörjningen innan du muddrar
ut den. Sedan ska den överlämnas till fackmän för kontroll och underhåll.
8. Risk för elektriska stötar: Rör inte luftpumpen med våta händer eller när
du står på en våt yta. Använd alltid luftpumpen i en torr miljö och anslut den
till ett ordentligt jordat uttag.
9. Brandrisk: Använd inte luftpumpen nära brandfarliga eller brännbara
material. Håll luftpumpen borta från värmekällor eller gnistor, såsom lågor,
cigaretter eller elektriska apparater.
10. Explosionsrisk: Använd inte luftpumpen med gaser som är brandfarliga,
explosiva eller giftiga. Kontrollera alltid säkerhetsdatabladet (SDS) för
gasen innan du använder den med luftpumpen. Dessutom , överskrid inte
det specificerade trycket intervall för luftpumpen .
11. Korrosionsrisk: Använd inte luftpumpen med gaser som kan korrodera
metaller eller utöva kemiska laddningar. Kontrollera gasens kompatibilitet
med materialen i dammluftningen och dess tillbehör. Använd alltid
skyddshandskar och skyddsglasögon vid hantering av frätande material.
12. Använd inte en skadad kontakt eller ett skadat uttag, eftersom det kan
orsaka elektriska stötar eller brand.
13. Om nätsladden är skadad måste den bytas ut av tillverkaren, dess
servicerepresentant eller liknande kvalificerade personer för att undvika
fara.
14. Denna apparat kan användas av barn från 8 år och uppåt och personer
med nedsatt fysisk, sensorisk eller mental förmåga eller bristande

- 4 -
erfarenhet och kunskap om de har fått övervakning eller instruktioner om
hur apparaten används på ett säkert sätt och förstå riskerna. Barn får inte
leka med apparaten. Rengöring och användarunderhåll får inte utföras av
barn utan uppsikt.
SPARA DESSA INSTRUKTIONER
FCC INFORMATION OF AIR PUMP
FÖRSIKTIGHET: Ändringar eller modifieringar som inte uttryckligen
godkänts av den part som ansvarar för efterlevnaden kan upphäva
användarens behörighet att använda utrustningen!
Denna enhet överensstämmer med del 15 av FCC-reglerna. Driften är
föremål för följande två villkor:
1) Denna produkt kan orsaka skadliga störningar.
2) Denna produkt måste acceptera alla mottagna störningar, inklusive
störningar som kan orsaka oönskad funktion.
VARNING: Ändringar eller modifieringar av denna produkt som inte
uttryckligen godkänts av parten. Ansvarig för efterlevnad kan upphäva
användarens behörighet att använda produkten.
Obs: Denna produkt har testats och befunnits överensstämma med
gränserna för en digital enhet av klass B i enlighet med del 15 av
FCC-reglerna. Dessa gränser är utformade för att ge rimligt skydd mot
skadlig störning i en bostadsinstallation.
Denna produkt genererar, använder och kan utstråla radiofrekvensenergi,
och om den inte installeras och används i enlighet med instruktionerna kan
den orsaka skadliga störningar på radiokommunikation. Det finns dock
ingen garanti för att störningar inte kommer att inträffa i en viss installation.
Om detta produkten orsakar skadliga störningar på radio- eller
tv-mottagning, vilket kan fastställas genom att stänga av och på produkten,
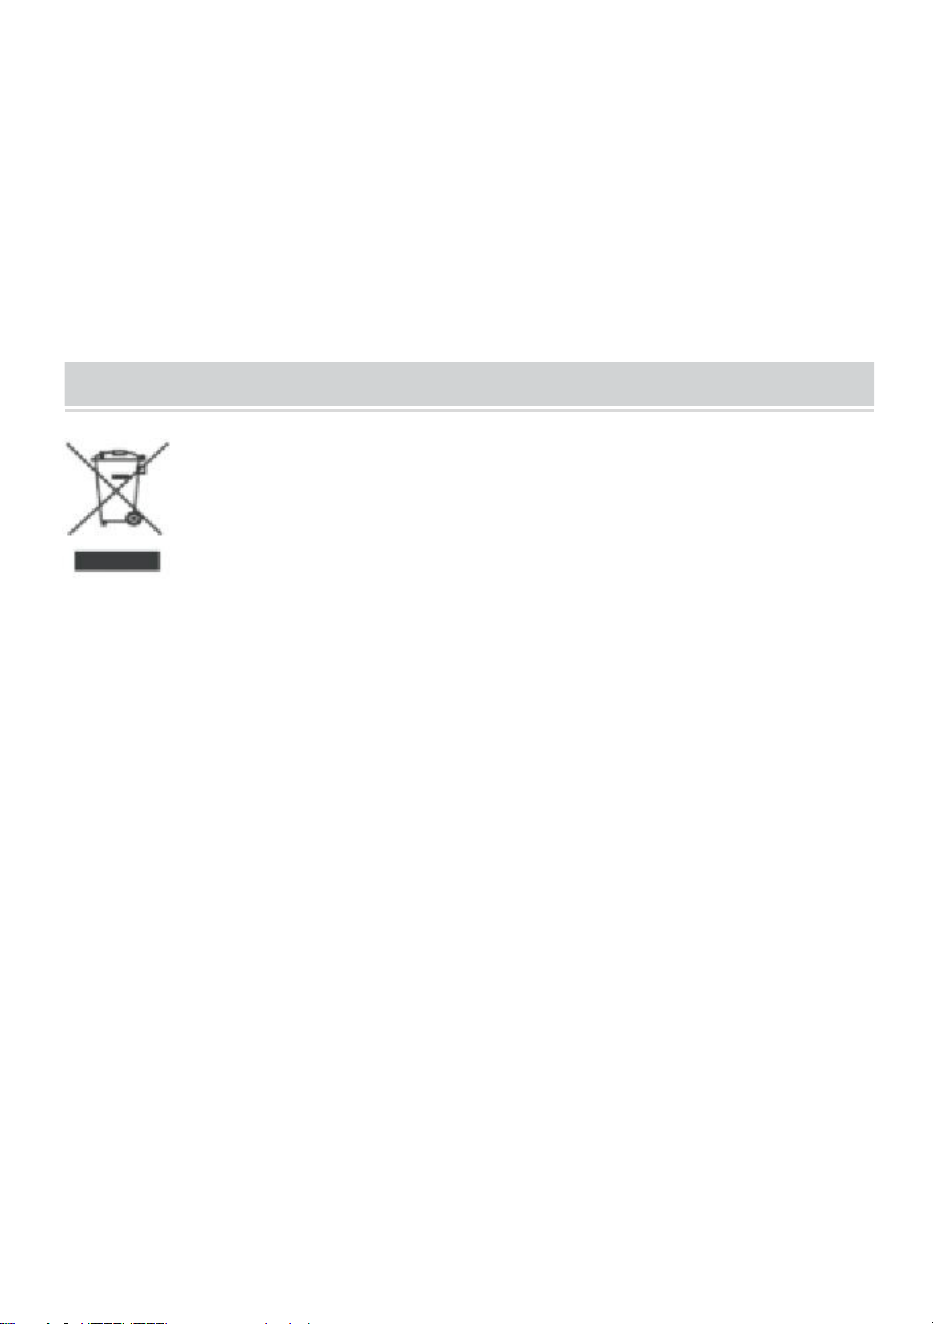
- 5 -
uppmanas användaren att försöka korrigera störningen med en eller flera
av följande åtgärder.
· Rikta om eller flytta mottagningsantennen.
· Öka avståndet mellan produkten och mottagaren.
· Anslut produkten till ett uttag på en annan krets än den som mottagaren
är ansluten till.
· Kontakta återförsäljaren eller en erfaren radio/TV-tekniker för hjälp.
CORRECT DISPOSAL OF AIR PUMP
Denna produkt omfattas av bestämmelserna i det europeiska
direktivet 2012/19/EU. Symbolen som visar en soptunna
korsad anger att produkten kräver separat sophämtning i
Europeiska Unionen. Detta gäller för produkten och alla
tillbehör märkta med denna symbol. Produkter märkta som sådana får inte
kasseras tillsammans med vanligt hushållsavfall, utan måste lämnas till en
insamlingsplats för återvinning av elektriska och elektroniska apparater.
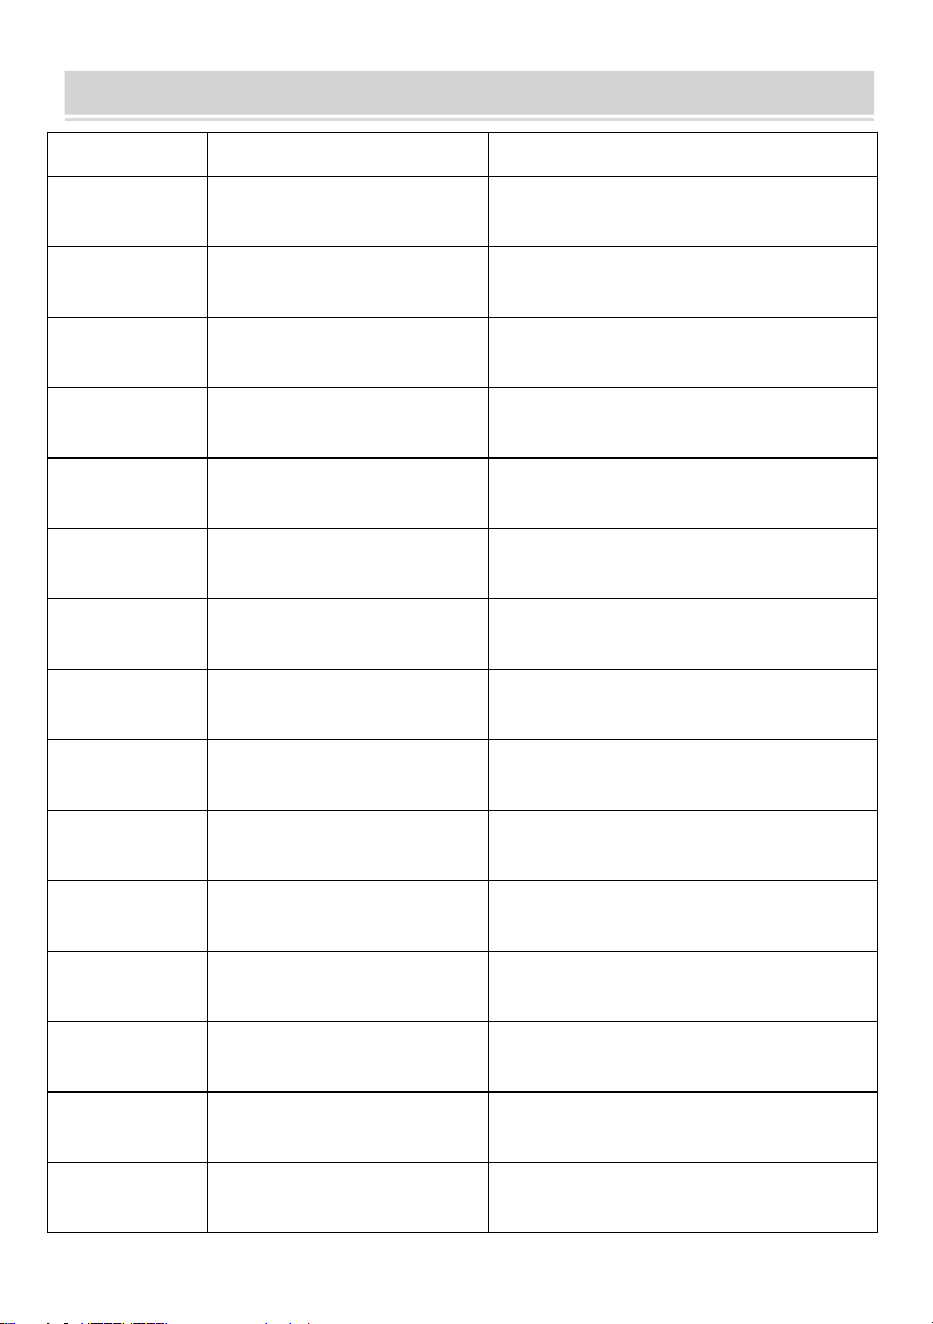
- 6 -
PRODUCT PARAMETERS
MODELL
Storlek /FÄRG
LUFT PUMP
TT-M-40-24
40× Φ 24 tum / rosa
USA-KONTAKT (AC110-120V 60H z
600W)
TT-E-40-24
40×Φ24TUM/ROSA
EU-KONTAKT (AC220-240V 50/60H z
600W)
TT-M-40-31,5
40× Φ 31,5 tum / grön
USA-KONTAKT (AC110-120V 60H z
600W)
TT-E-40-31.5
40× Φ 31,5 tum / grön
EU-KONTAKT (AC220-240V 50/60H z
600W)
TT-M-40-24-10
Kostym : 10 fot +40×Φ24
tum/ P bläck
USA-KONTAKT (AC110-120V 60H z
600W)
TT-E-40-24-10
Kostym : 10 fot +40×Φ24
tum/ P bläck
EU-KONTAKT (AC220-240V 50/60H z
600W)
TT-M-10-G
10 fot / grön
USA-KONTAKT (AC110-120V 60H z
600W)
TT-E-10-G
10 fot / grön
EU-KONTAKT (AC220-240V 50/60H z
600W)
TT-M-10-P
10 fot /P bläck
USA-KONTAKT (AC110-120V 60H z
600W)
TT-E-10-P
10 fot /P bläck
EU-KONTAKT (AC220-240V 50/60H z
600W)
TT-M-10-B
10 fot / blå
USA-KONTAKT (AC110-120V 60H z
600W)
TT-E-10-B
10 fot / blå
EU-KONTAKT (AC220-240V 50/60H z
600W)
TT-M-13-G
13 fot / grön
USA-KONTAKT (AC110-120V 60H z
600W)
TT-E-13-G
13 fot / grön
EU-KONTAKT (AC220-240V 50/60H z
600W)
TT-M-13-P
13 fot /P bläck
USA-KONTAKT (AC110-120V 60H z
600W)
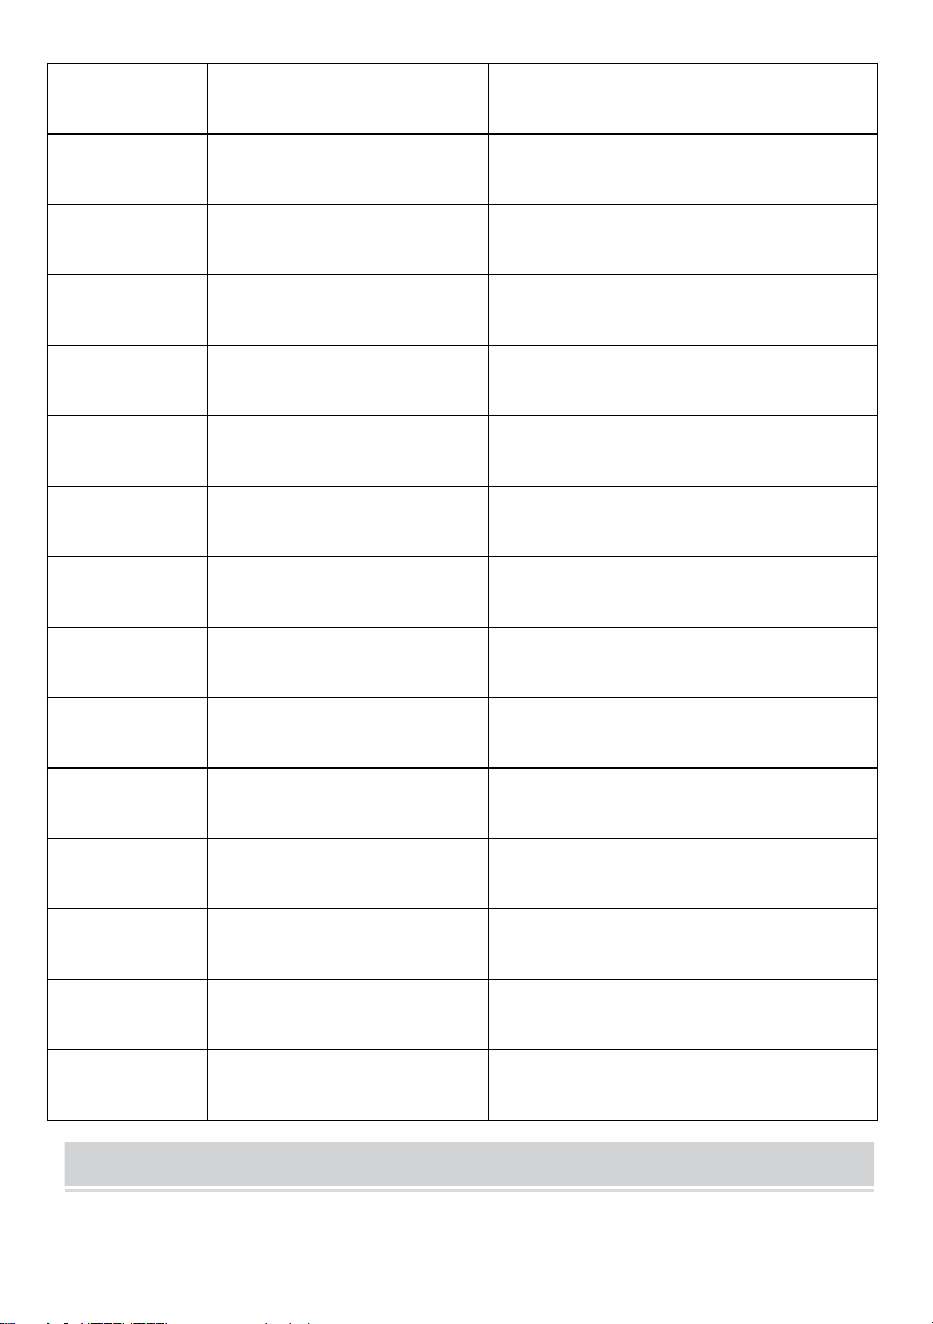
- 7 -
TT-E-13-P
13 fot /P bläck
EU-KONTAKT (AC220-240V 50/60H z
600W)
TT-M-13-B
13 fot / blå
USA-KONTAKT (AC110-120V 60H z
600W)
TT-E-13-B
13 fot / blå
EU-KONTAKT (AC220-240V 50/60H z
600W)
TT-M-16-G
16 fot / grön
USA-KONTAKT (AC110-120V 60H z
600W)
TT-E-16-G
16 fot / grön
EU-KONTAKT (AC220-240V 50/60H z
600W)
TT-M-16-P
16ft /P bläck
USA-KONTAKT (AC110-120V 60H z
600W)
TT-E-16-P
16ft /P bläck
EU-KONTAKT (AC220-240V 50/60H z
600W)
TT-M-16-B
16 fot / blå
USA-KONTAKT (AC110-120V 60H z
600W)
TT-E-16-B
16 fot / blå
EU-KONTAKT (AC220-240V 50/60H z
600W)
TT-M-20-G
20 fot / grön
USA-KONTAKT (AC110-120V 60H z
600W)
TT-E-20-G
20 fot / grön
EU-KONTAKT (AC220-240V 50/60H z
600W)
TT-M-20-P
20ft /P bläck
USA-KONTAKT (AC110-120V 60H z
600W)
TT-E-20-P
20ft /P bläck
EU-KONTAKT (AC220-240V 50/60H z
600W)
TT-M-20-B
20 fot / blå
USA-KONTAKT (AC110-120V 60H z
600W)
TT-E-20-B
20 fot / blå
EU-KONTAKT (AC220-240V 50/60H z
600W)
INSTALLATION STEPS
A: Roller ( produktens färg är föremål för faktisk konfiguration )
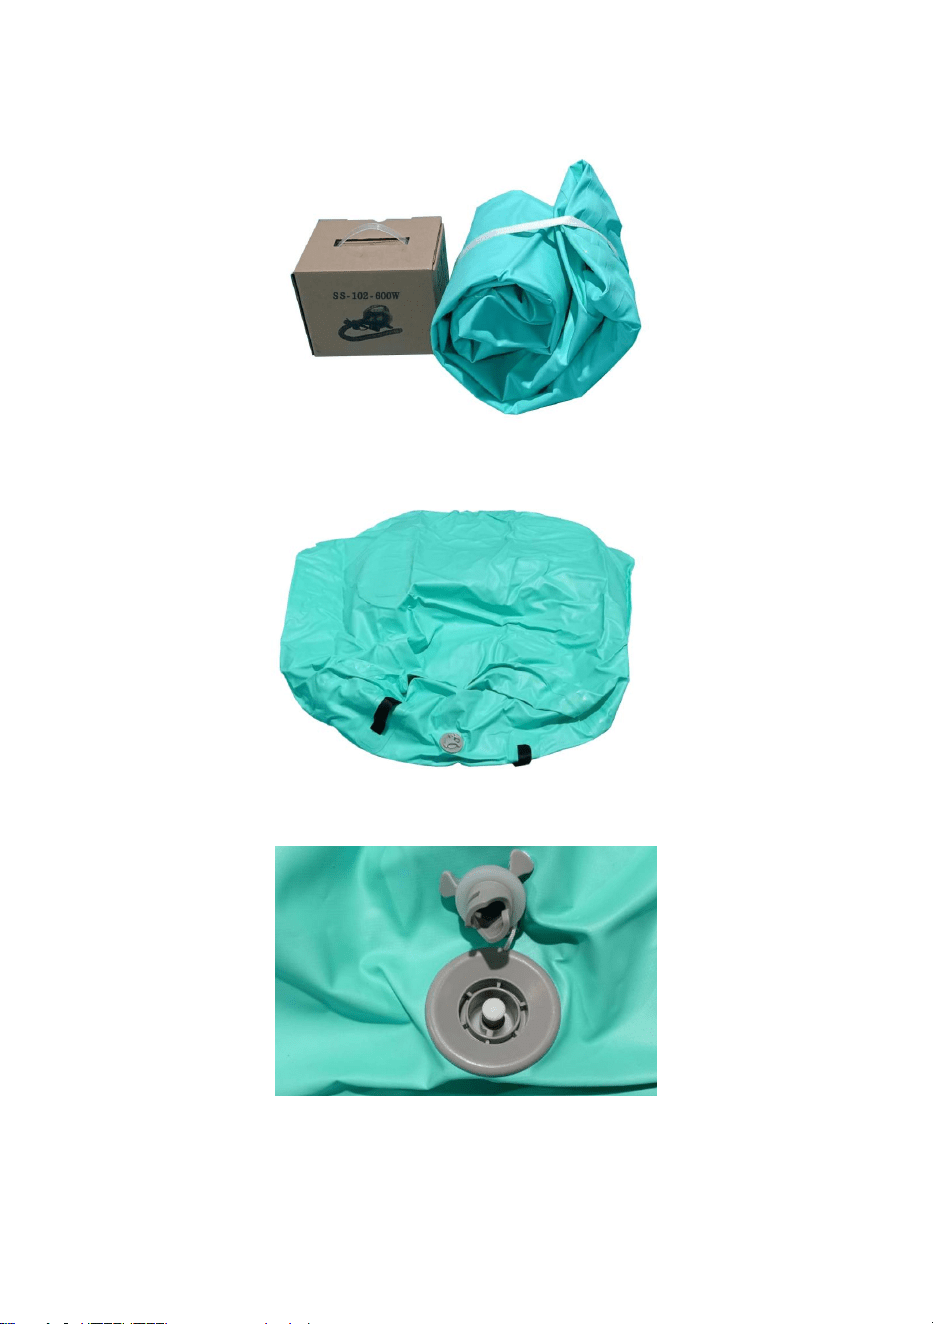
- 8 -
1. Se till att packningen är komplett och ta ut den uppblåsbara båten från
packboxen .
2. Placera luftkudden på marken för att öppna.
3. Vrid den uppblåsbara ventilen öppen moturs.
4.Anslutning av luftrör och uppblåsningsventil.
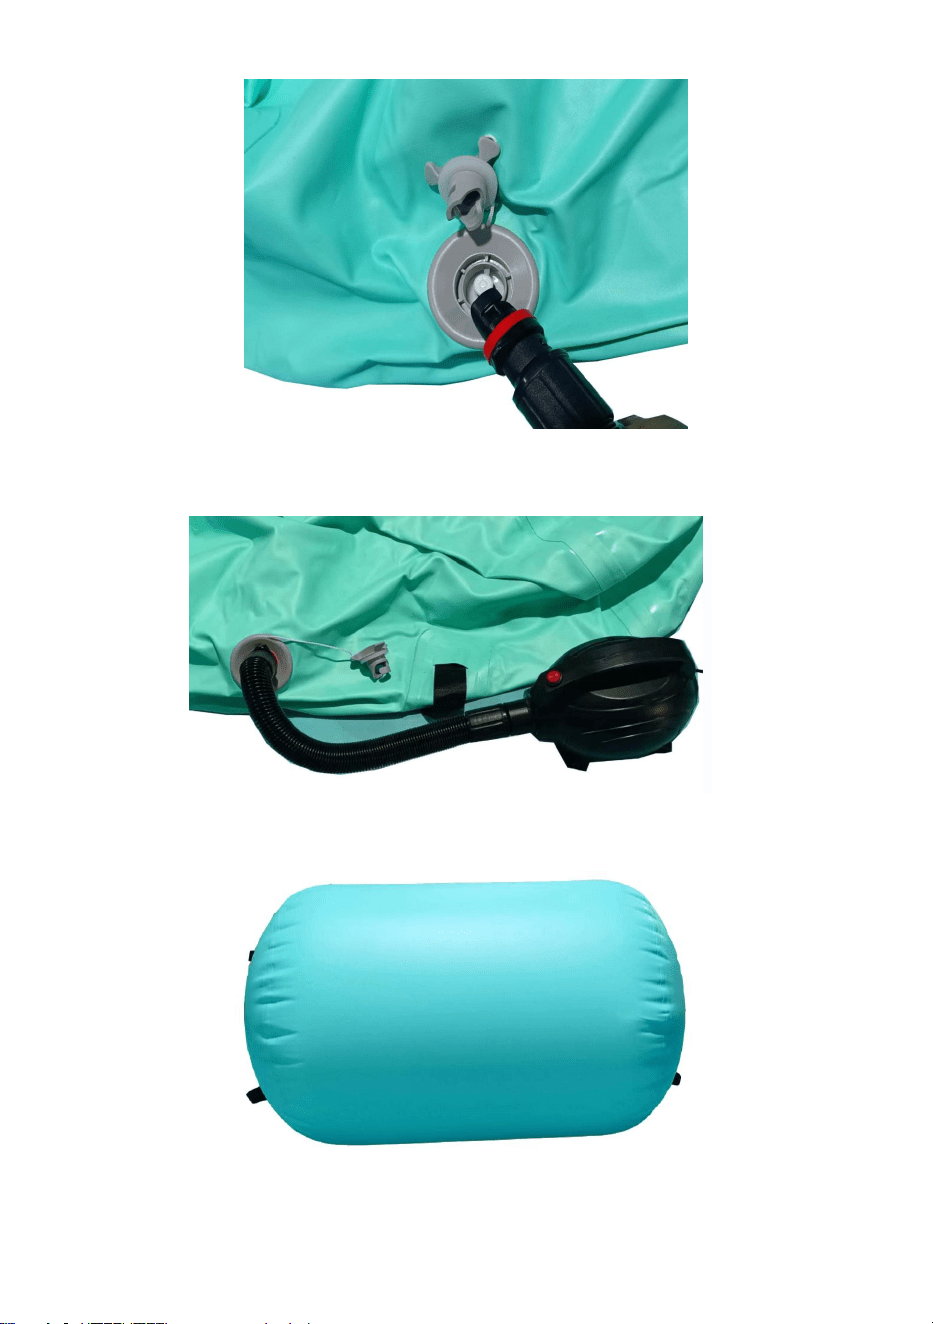
- 9 -
5.Anslutning av luftrör och luftpump luftpumpsplugg.
Slå på luftpumpen och tryck på strömbrytaren för att börja blåsa upp.
6. Stäng av strömbrytaren när luftkudden är full med luft.
7.Ta ut det uppblåsbara röret.(När ventilen inte dyker upp automatiskt,
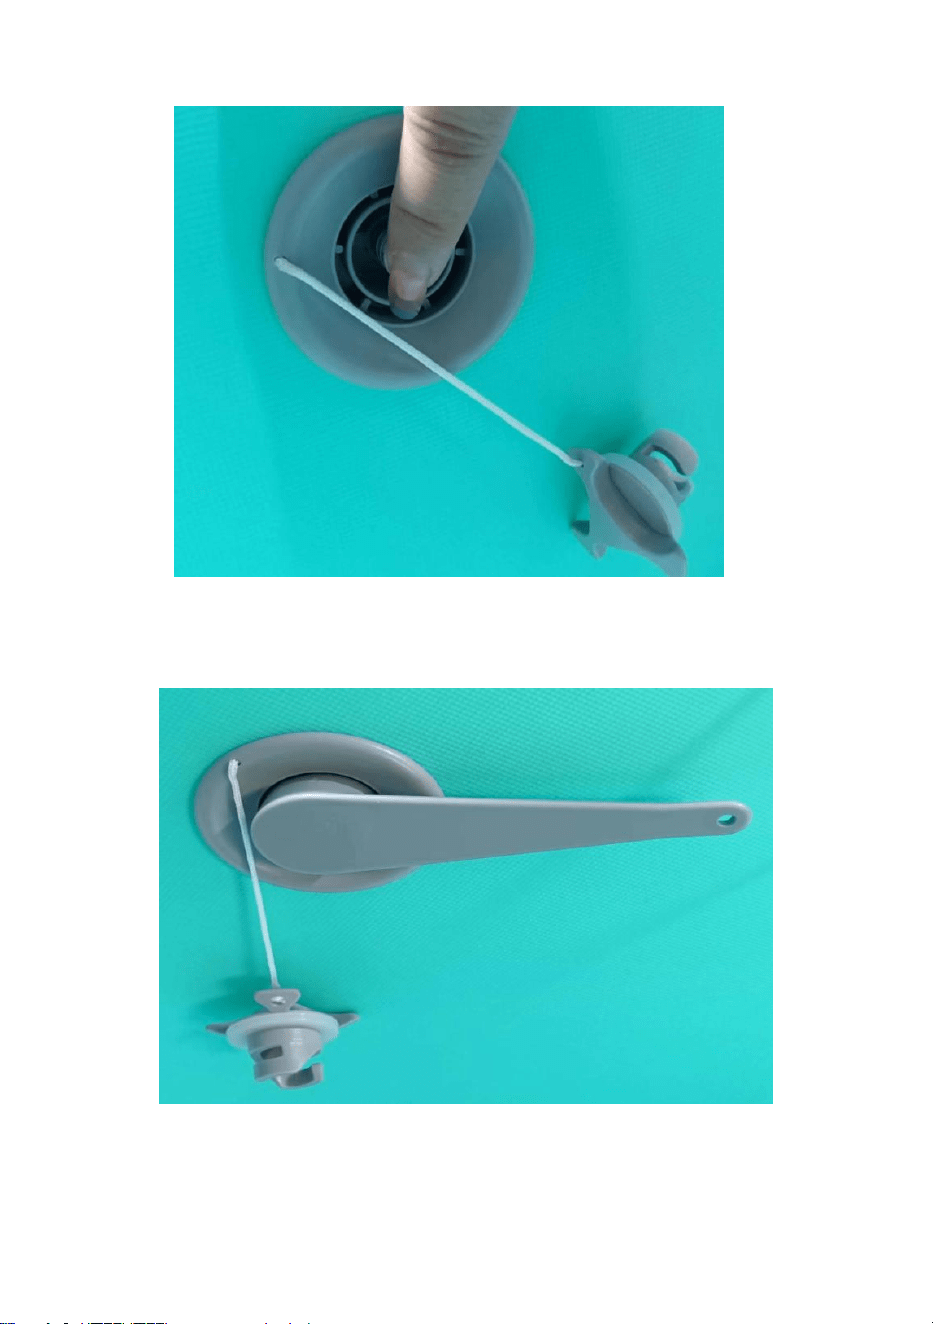
- 10 -
tryck på den för att stänga manuellt.
8.För att undvika läckage av övertrycksventilen under en längre tid, dras
ventilnyckeln åt medurs med ventilnyckeln vid lossning av ventilens yttre
ring.
B: Rektangel _ ( Produktens färg är föremål för faktisk konfiguration )

- 11 -
1. Se till att packningen är komplett och ta ut den uppblåsbara båten från
packboxen .
2. Placera luftkudden på marken för att öppna.
3. Vrid den uppblåsbara ventilen öppen moturs.

- 12 -
4.Anslutning av luftrör och uppblåsningsventil.
5.Anslutning av luftrör och luftpump luftpumpsplugg.
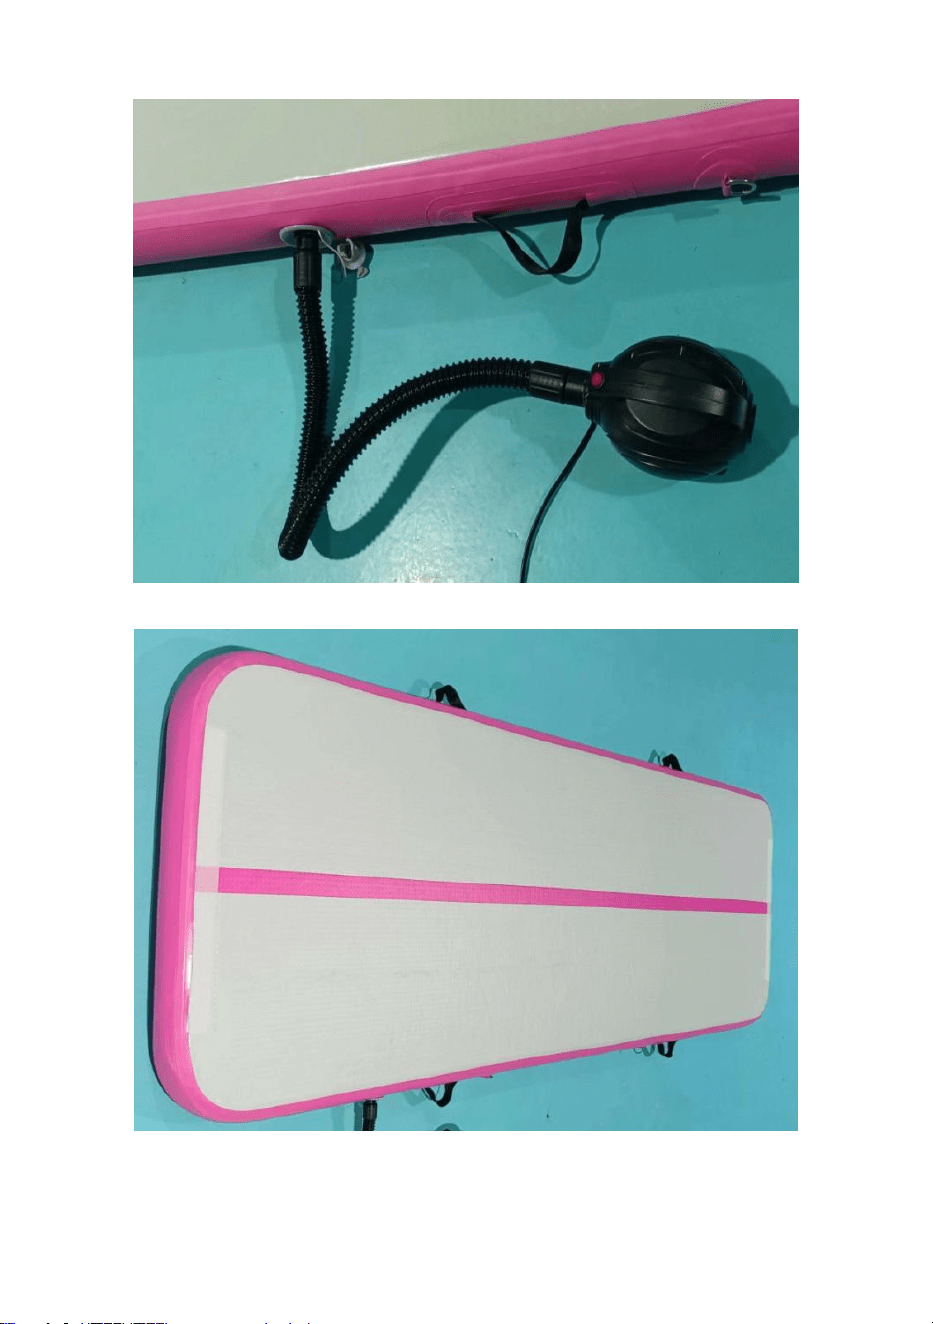
- 13 -
Slå på luftpumpen och tryck på strömbrytaren för att börja blåsa upp.
6. Stäng av strömbrytaren när luftkudden är full med luft.
7.Ta ut det uppblåsbara röret.(När ventilen inte dyker upp automatiskt,
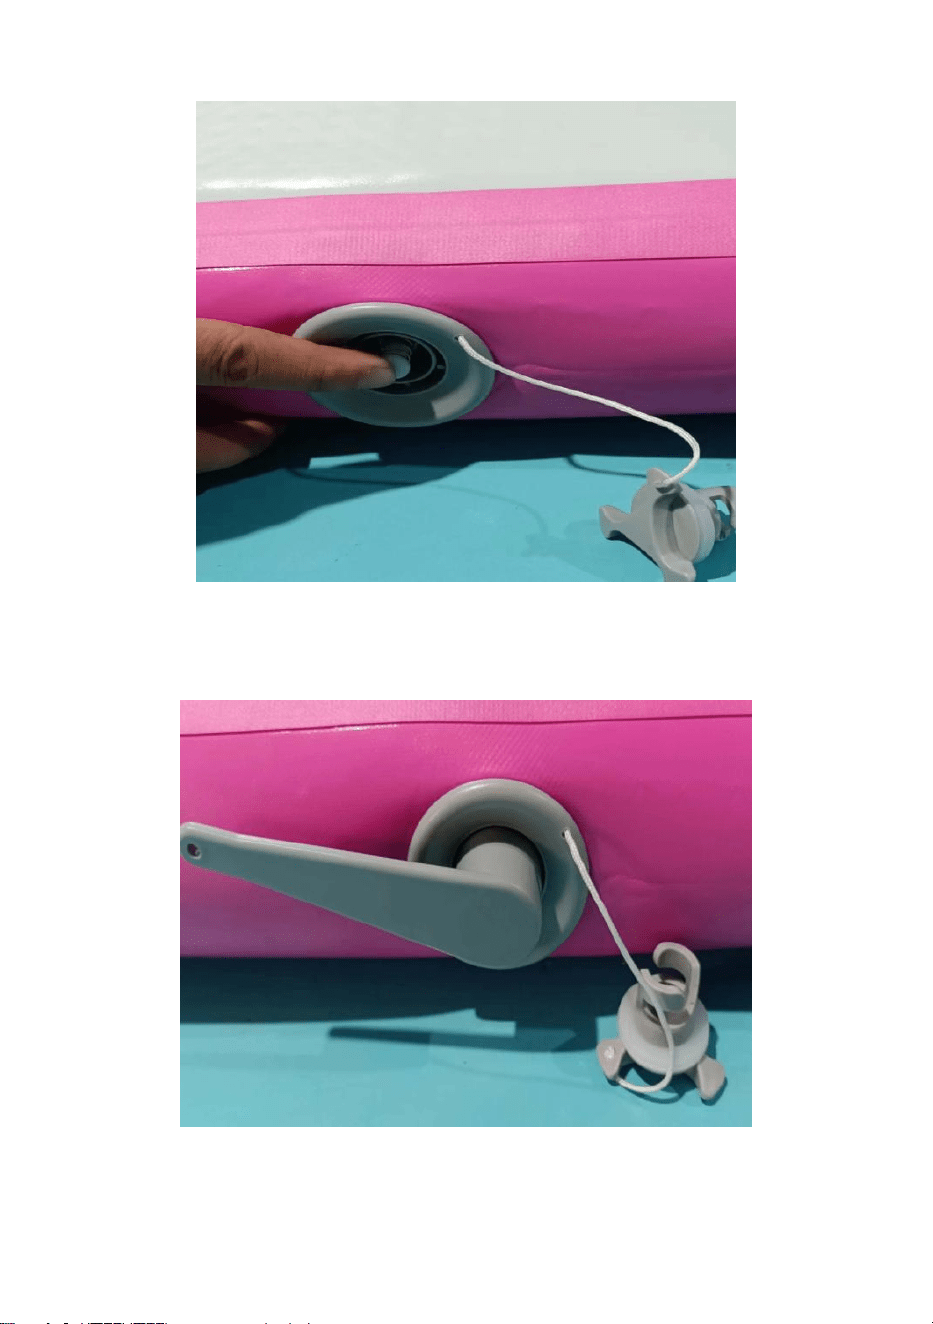
- 14 -
tryck på den för att stänga manuellt.
8.För att undvika läckage av övertrycksventilen under en längre tid, dras
ventilnyckeln åt medurs med ventilnyckeln vid lossning av ventilens yttre
ring.
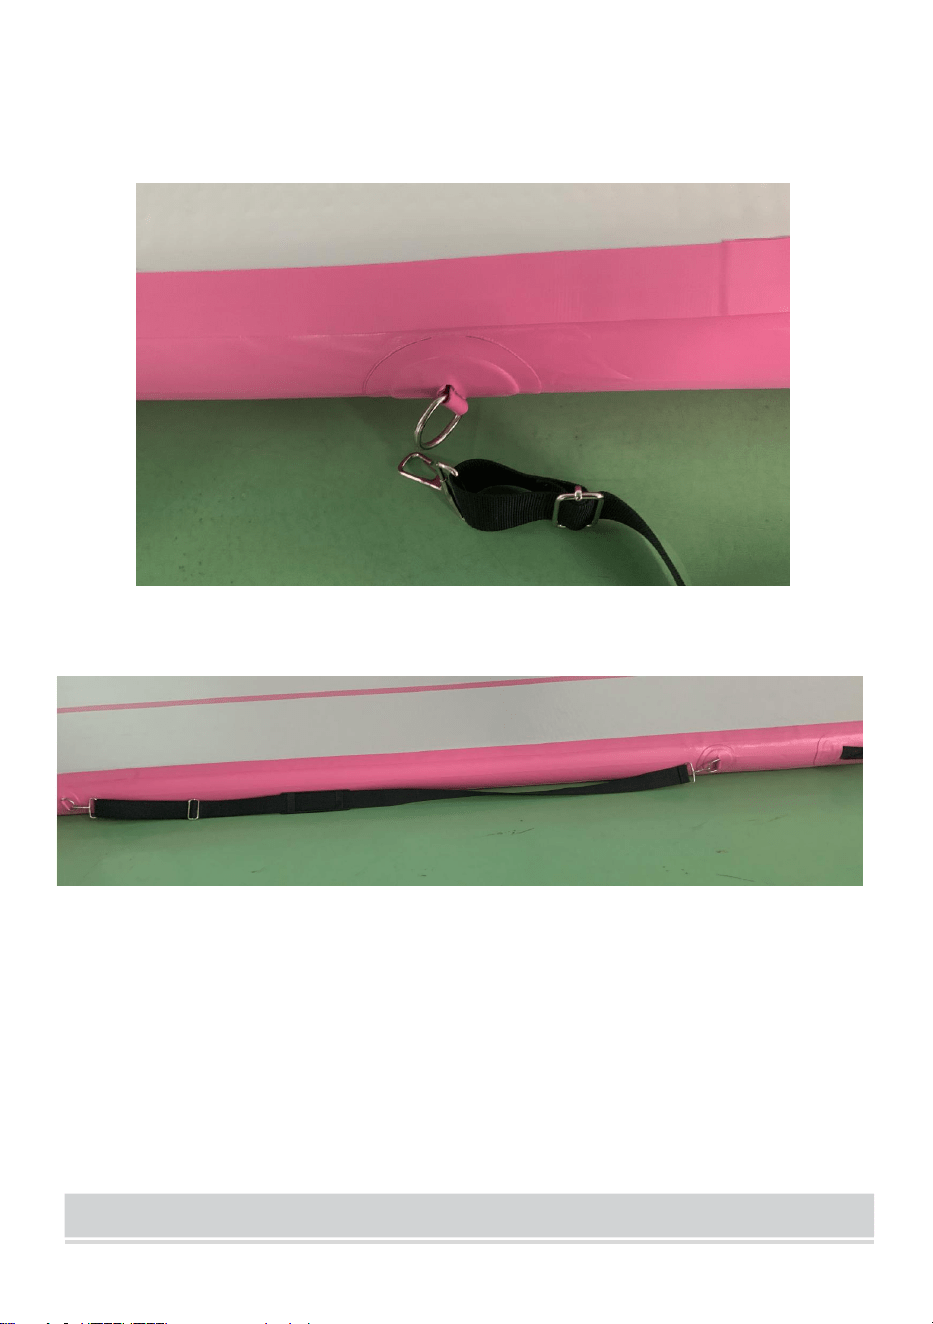
- 15 -
9. Axelremmen monteras som på bilden och fästs med låsspänne.
Längden kan justeras efter personliga bruksvanor .
PATCHING GUIDELINES
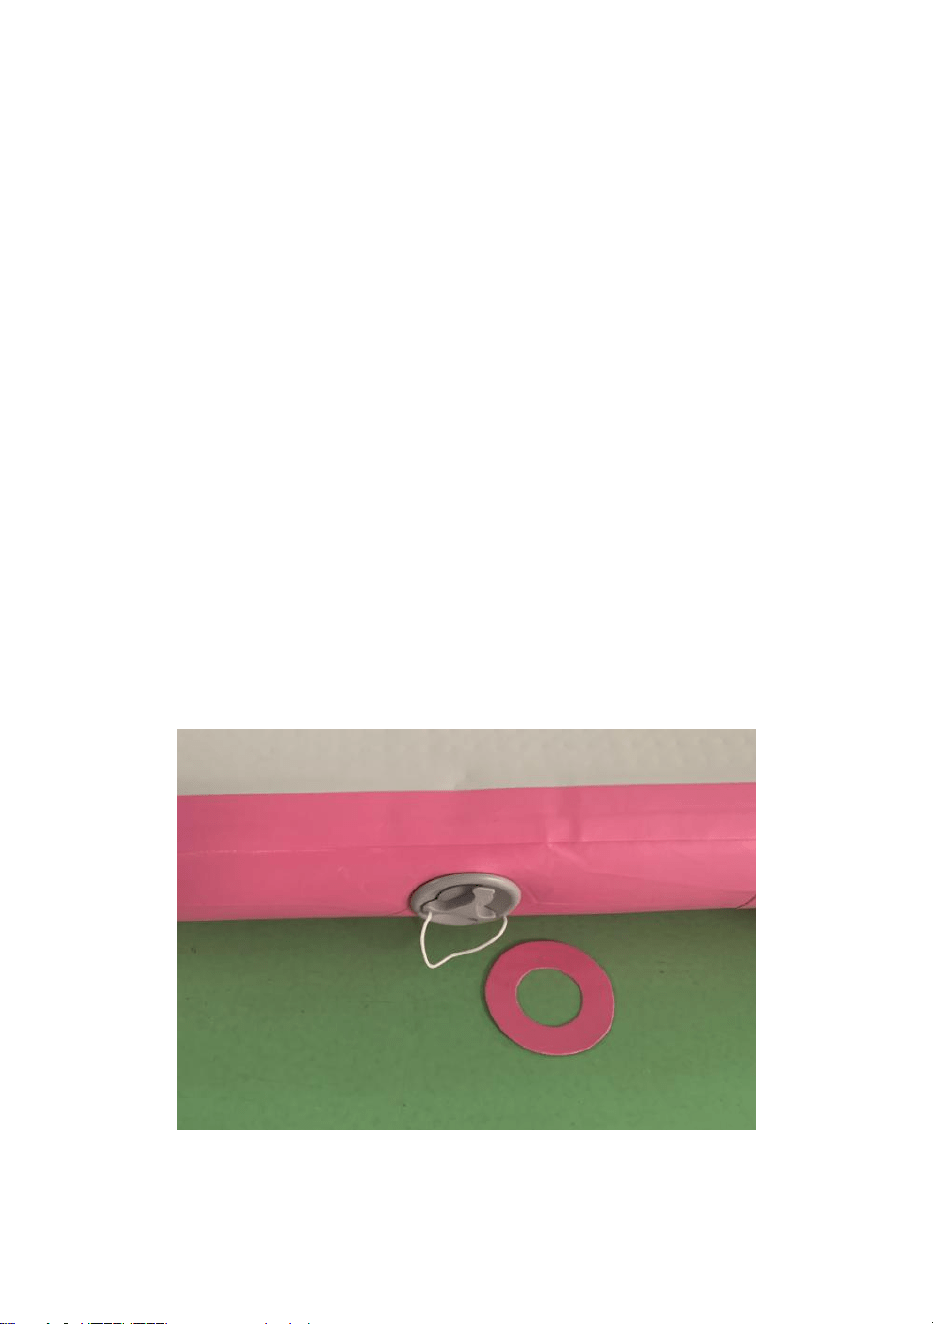
- 16 -
Tips: Denna produkt är utrustad med reparationsmaterial (förutom lim) När
luftläckage orsakas av vassa föremål under användning kan det repareras.
Eftersom produktmaterialet är PVC måste du köpa PVC-lim för att reparera
limmet.
1. Innan du reparerar, rengör området runt skadan för att säkerställa att ytan
är torr.
2. Applicera ett tunt lager lim jämnt på ytan av reparationsmaterialet och ytan
runt den skadade luftkudden.
3. Sätt fast reparationsmaterialet och luftkudden ordentligt. Det
rekommenderas att använda en varm hårtork för att värma det. När det har
torkat, tryck på det med händerna i 2 minuter och tryck sedan på det med ett
föremål i 40-60 minuter före användning .
Utrustade tips för placering av reparationsmaterial
1.Som visas på bilden är ett ringformat reparationsmaterial konfigurerat. När
luftläckage hittas nära uppblåsningsporten kan det konfigurerade limmet och
reparationsmaterialen användas för att reparera det.
2. Som visas på bilden är ett fyrkantigt reparationsmaterial konfigurerat. När
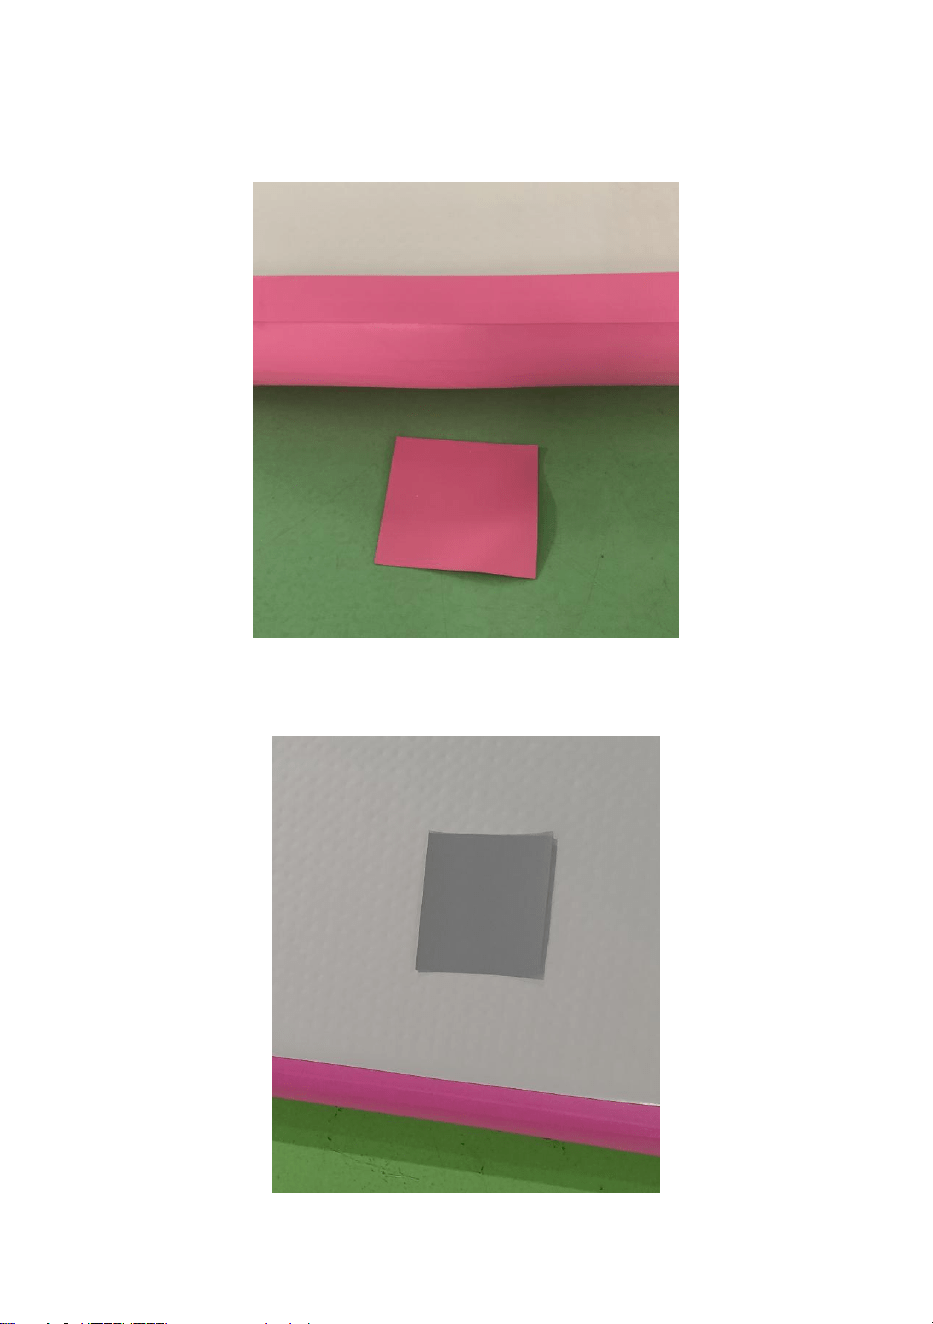
- 17 -
luftläckage hittas runt omkretsen kan det konfigurerade limmet och
reparationsmaterialen användas för att reparera det. (Olika färger på kanter
är utrustade med olika färger av reparationsmaterial )
3. När luftläckage uppstår ovanför eller i botten av luftkudden, använd det
medföljande gråa fyrkantiga reparationsblocket och limma ihop det.

- 18 -
CLEANING AND STORAGE
1. Torka av med en mjuk fuktig trasa.
2. Använd aldrig ett slipande rengöringsmedel eller en hård pad.
3. Se till att hålla produkten torr.
4. Håll produkten torr. Fukt kan göra att produkterna blir mögliga.

- 19 -
Adress: Baoshanqu Shuangchenglu 803long 11hao 1602A-1609shi
Shanghai
Importerad till USA: Sanven Technology Ltd. Suite 250, 9166 Anaheim
Place, Rancho Cucamonga, CA 91730
REP
UK
Pooledas Group Ltd
Unit 5 Albert Edward House, The Pavilions
Preston, United Kingdom
REP
EC
SHUNSHUN GmbH
Römeräcker 9 Z2021, 76351
Linkenheim-Hochstetten, Germany
Tillverkad i Kina


Técnico Certificado de soporte y garantía electrónica
www.vevor.com/support _ _ _ _
ESTERA DE CAÍDA DE AIRE
We continue to be committed to provide you tools with competitive price.
"Save Half", "Half Price" or any other similar expressions used by us only represents an
estimate of savings you might benefit from buying certain tools with us compared to the major
top brands and does not necessarily mean to cover all categories of tools offered by us. You
are kindly reminded to verify carefully when you are placing an order with us if you are
actually saving half in comparison with the top major brands.

- 1 -
El color del producto está sujeto a la configuración real.
Have product questions? Need technical support? Please feel free to
contact us:
Technical Support and E-Warranty Certificate
www. vevor. com/support
NEED HELP? CONTACT US!
This is the original instruction, please read all manual instructions
carefully before operating. VEVOR reserves a clear interpretation of our
user manual. The appearance of the product shall be subject to the
product you received. Please forgive us that we won't inform you again
if there are any technology or software updates on our product.
AIR TUMBLING MAT

- 2 -
IMPORTANT SAFEGUARDS
PRECAUCIÓN : Cualquier actividad que involucre movimiento, rotación y
altura crea la posibilidad de lesiones catastróficas, parálisis o incluso la
muerte. Usted asume el riesgo de sufrir lesiones graves al utilizar este
equipo; este equipo está diseñado para ser utilizado únicamente por
participantes debidamente capacitados y calificados bajo condiciones
supervisadas. Antes de usarlo, conozca sus imitaciones. En caso de duda,
consulte siempre a un maestro. Instructor calificado. Inspeccione siempre
si hay accesorios sueltos o daños, y pruebe la estabilidad antes de cada
uso. Use tapetes solo en terreno firme rodeado de tapetes apropiados.
Asegúrese de que La superficie del tapete está seca y en buenas
condiciones antes de su uso. Siempre verifique que la presión de aire
cumpla con los requisitos mínimos. No deje el tapete parcialmente inflado
en un área donde pueda usarse sin supervisión. El tapete puede moverse
durante el uso. Verifique siempre que esté en la posición adecuada del
producto antes de su uso. Compruebe la presión periódicamente para
garantizar un inflado adecuado. Tenga en cuenta que los cambios de
temperatura externa alterarán la presión interna del producto. estera.
PRECAUCIÓN : Este equipo no está diseñado para que lo utilicen
personas (incluidos niños) con capacidades físicas, sensoriales o
mentales reducidas, o con falta de experiencia y conocimiento, a menos
que hayan recibido supervisión o instrucciones sobre el uso del equipo por
parte de una persona responsable. su seguridad.
PRECAUCIÓN : Los niños deben ser supervisados.
PRECAUCIÓN : Deseche todas las bolsas de plástico con cuidado y
manténgalas alejadas de los niños y las mascotas.
PRECAUCIÓN : El producto debe colocarse sobre una superficie plana.
SAFETY INSTRUCTIONS OF AIR PUMP
ADVERTENCIA: Lea todas las advertencias de seguridad, instrucciones,
ilustraciones y especificaciones proporcionadas con esta bomba de aire.
No seguir todas las instrucciones enumeradas a continuación puede
provocar descargas eléctricas, incendios y/o lesiones graves.
Información básica de seguridad:
1. Este producto es sólo para inflar.
2. No se permite tirar o arrastrar el producto con el cable eléctrico.
3. Al desconectar el enchufe, sostenga el enchufe; no tire del cable de

- 3 -
alimentación.
4. No corte ni reemplace el enchufe usted mismo, ya que podría sufrir
graves consecuencias.
5. No se permite el funcionamiento del producto en caso de daños en la
fuente de alimentación.
línea o el caparazón.
6. No está permitido el desmontaje y desmontaje del producto por parte
de personas no profesionales.
7. En caso de que la bomba de aire caiga al agua, corte el suministro
eléctrico antes de dragarla y luego entreguela a profesionales para su
revisión y mantenimiento.
8. Peligro de descarga eléctrica: No toque la bomba de aire con las manos
mojadas o mientras esté parado sobre una superficie mojada. Utilice
siempre la bomba de aire en un ambiente seco y conéctela a un
tomacorriente con conexión a tierra adecuada.
9. Peligro de incendio: No utilice la bomba de aire cerca de materiales
inflamables o combustibles. Mantenga la bomba de aire alejada de fuentes
de calor o chispas, como llamas, cigarrillos o aparatos eléctricos.
10. Peligro de explosión: No use la bomba de aire con gases que sean
inflamables, explosivos o venenosos. Siempre verifique la hoja de datos
de seguridad (SDS) del gas antes de usarlo con la bomba de aire .
Además, no exceda la presión especificada. Rango para la bomba de
aire .
11. Peligro de corrosión: No utilice la bomba de aire con gases que
puedan corroer metales o ejercer cargas químicas. Verifique la
compatibilidad del gas con los materiales de la aireación del estanque y
sus accesorios. Utilice siempre guantes y gafas protectoras cuando
manipule materiales corrosivos.

- 4 -
12. No utilice un enchufe o toma de corriente dañado, ya que esto puede
provocar una descarga eléctrica o un incendio.
13. Si el cable de alimentación está dañado, debe ser reemplazado por el
fabricante, su agente de servicio o personas igualmente calificadas para
evitar riesgos.
14. Este aparato puede ser utilizado por niños a partir de 8 años y
personas con capacidades físicas, sensoriales o mentales reducidas o con
falta de experiencia y conocimiento si han recibido supervisión o
instrucciones sobre el uso del aparato de forma segura y comprender los
peligros involucrados. Los niños no deben jugar con el aparato. La
limpieza y el mantenimiento del usuario no deben ser realizados por niños
sin supervisión.
GUARDA ESTAS INSTRUCCIONES
FCC INFORMATION OF AIR PUMP
PRECAUCIÓN: ¡ Los cambios o modificaciones no aprobados
expresamente por la parte responsable del cumplimiento podrían anular la
autoridad del usuario para operar el equipo!
Este dispositivo cumple con la Parte 15 de las normas de la FCC. El
funcionamiento está sujeto a las dos condiciones siguientes:
1) Este producto puede causar interferencias perjudiciales.
2) Este producto debe aceptar cualquier interferencia recibida, incluidas
las interferencias que puedan causar un funcionamiento no deseado.
ADVERTENCIA: Los cambios o modificaciones a este producto que no
estén aprobados expresamente por la parte responsable del cumplimiento
podrían anular la autoridad del usuario para operar el producto.
Nota: Este producto ha sido probado y cumple con los límites para un
dispositivo digital Clase B de conformidad con la Parte 15 de las reglas de

- 5 -
la FCC. Estos límites están diseñados para brindar una protección
razonable contra interferencias dañinas en una instalación residencial.
Este producto genera, usa y puede irradiar energía de radiofrecuencia y, si
no se instala y usa de acuerdo con las instrucciones, puede causar
interferencias dañinas en las comunicaciones por radio. Sin embargo, no
hay garantía de que no se produzcan interferencias en una instalación en
particular. Si esto Si el producto causa interferencias dañinas en la
recepción de radio o televisión, lo cual se puede determinar apagando y
encendiendo el producto, se recomienda al usuario que intente corregir la
interferencia mediante una o más de las siguientes medidas.
· Reorientar o reubicar la antena receptora.
· Aumentar la distancia entre el producto y el receptor.
· Conecte el producto a una toma de corriente de un circuito diferente al
que está conectado el receptor.
· Consulte al distribuidor o a un técnico experimentado en radio/TV para
obtener ayuda.
CORRECT DISPOSAL OF AIR PUMP
Este producto está sujeto a las disposiciones de la Directiva
europea 2012/19/UE. El símbolo que muestra un contenedor
con ruedas tachado indica que el producto requiere recogida
selectiva de basura en la Unión Europea. Esto se aplica al
producto y a todos los accesorios marcados con este símbolo. Los
productos marcados como tales no podrán desecharse junto con la basura
doméstica normal, sino que deberán llevarse a un punto de recogida para
el reciclaje de aparatos eléctricos y electrónicos.
- 6 -
PRODUCT PARAMETERS
MODELO
Tamaño /COLOR
BOMBA DE AIRE
TT-M-40-24
40× Φ 24 pulgadas / rosa
ENCHUFE ESTADOUNIDENSE
(AC110-120V 60H z 600W)
TT-E-40-24
40×Φ24PULGADAS/ROSA
ENCHUFE EUROPEO (AC220-240V
50/60H z 600W)
TT-M-40-31.5
40× Φ 31,5 pulgadas / Verde
ENCHUFE ESTADOUNIDENSE
(AC110-120V 60H z 600W)
TT-E-40-31.5
40× Φ 31,5 pulgadas / Verde
ENCHUFE EUROPEO (AC220-240V
50/60H z 600W)
TT-M-40-24-10
Traje : 10 pies +40×Φ24
pulgadas/ tinta P
ENCHUFE ESTADOUNIDENSE
(AC110-120V 60H z 600W)
TT-E-40-24-10
Traje : 10 pies +40×Φ24
pulgadas/ tinta P
ENCHUFE EUROPEO (AC220-240V
50/60H z 600W)
TT-M-10-G
10 pies / Verde
ENCHUFE ESTADOUNIDENSE
(AC110-120V 60H z 600W)
TT-E-10-G
10 pies / Verde
ENCHUFE EUROPEO (AC220-240V
50/60H z 600W)
TT-M-10-P
Tinta de 10 pies /P
ENCHUFE ESTADOUNIDENSE
(AC110-120V 60H z 600W)
TT-E-10-P
Tinta de 10 pies /P
ENCHUFE EUROPEO (AC220-240V
50/60H z 600W)

- 7 -
TT-M-10-B
10 pies / Azul
ENCHUFE ESTADOUNIDENSE
(AC110-120V 60H z 600W)
TT-E-10-B
10 pies / Azul
ENCHUFE EUROPEO (AC220-240V
50/60H z 600W)
TT-M-13-G
13 pies / Verde
ENCHUFE ESTADOUNIDENSE
(AC110-120V 60H z 600W)
TT-E-13-G
13 pies / Verde
ENCHUFE EUROPEO (AC220-240V
50/60H z 600W)
TT-M-13-P
Tinta de 13 pies /P
ENCHUFE ESTADOUNIDENSE
(AC110-120V 60H z 600W)
TT-E-13-P
Tinta de 13 pies /P
ENCHUFE EUROPEO (AC220-240V
50/60H z 600W)
TT-M-13-B
13 pies / Azul
ENCHUFE ESTADOUNIDENSE
(AC110-120V 60H z 600W)
TT-E-13-B
13 pies / Azul
ENCHUFE EUROPEO (AC220-240V
50/60H z 600W)
TT-M-16-G
16 pies / Verde
ENCHUFE ESTADOUNIDENSE
(AC110-120V 60H z 600W)
TT-E-16-G
16 pies / Verde
ENCHUFE EUROPEO (AC220-240V
50/60H z 600W)
TT-M-16-P
Tinta de 16 pies /P
ENCHUFE ESTADOUNIDENSE
(AC110-120V 60H z 600W)
TT-E-16-P
Tinta de 16 pies /P
ENCHUFE EUROPEO (AC220-240V
50/60H z 600W)
TT-M-16-B
16 pies / Azul
ENCHUFE ESTADOUNIDENSE
(AC110-120V 60H z 600W)
TT-E-16-B
16 pies / Azul
ENCHUFE EUROPEO (AC220-240V
50/60H z 600W)
TT-M-20-G
20 pies / Verde
ENCHUFE ESTADOUNIDENSE
(AC110-120V 60H z 600W)
TT-E-20-G
20 pies / Verde
ENCHUFE EUROPEO (AC220-240V
50/60H z 600W)
TT-M-20-P
Tinta de 20 pies /P
ENCHUFE ESTADOUNIDENSE

- 8 -
(AC110-120V 60H z 600W)
TT-E-20-P
Tinta de 20 pies /P
ENCHUFE EUROPEO (AC220-240V
50/60H z 600W)
TT-M-20-B
20 pies / Azul
ENCHUFE ESTADOUNIDENSE
(AC110-120V 60H z 600W)
TT-E-20-B
20 pies / Azul
ENCHUFE EUROPEO (AC220-240V
50/60H z 600W)
INSTALLATION STEPS
R: Rodillo ( el color del producto está sujeto a la configuración real )
1. Asegúrese de que el embalaje esté completo y saque el inflable de la
caja de embalaje .
2.Coloque el cojín de aire en el suelo para abrirlo.
3. Gire la válvula inflable para abrirla en el sentido de las agujas del reloj.
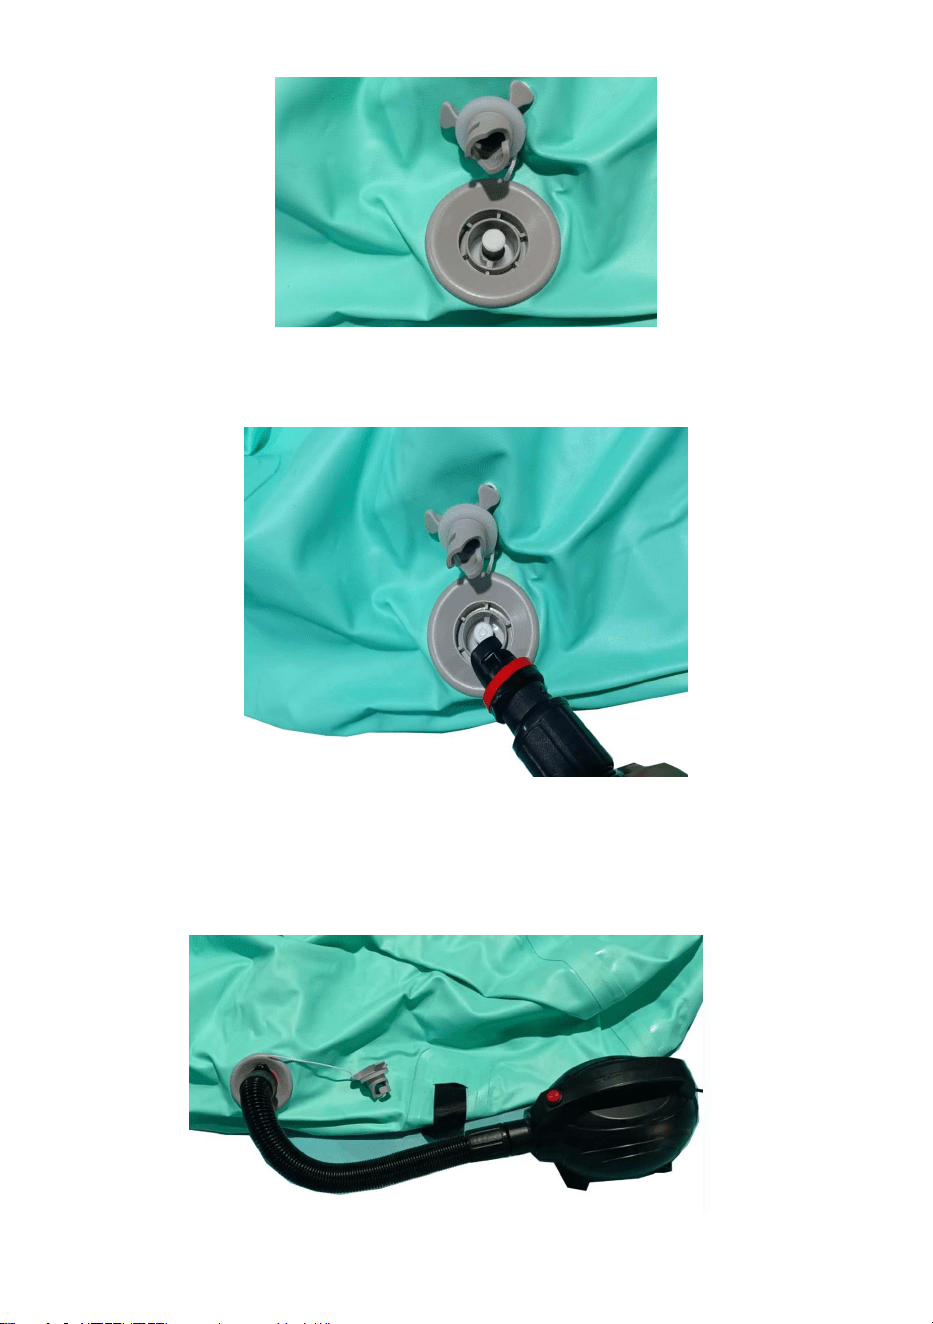
- 9 -
4. Conexión de tubería de aire y válvula de inflado.
5. Enchufe de la bomba de aire de conexión del tubo de aire y de la
bomba de aire.
Encienda la bomba de aire y presione el interruptor para comenzar a
inflar.
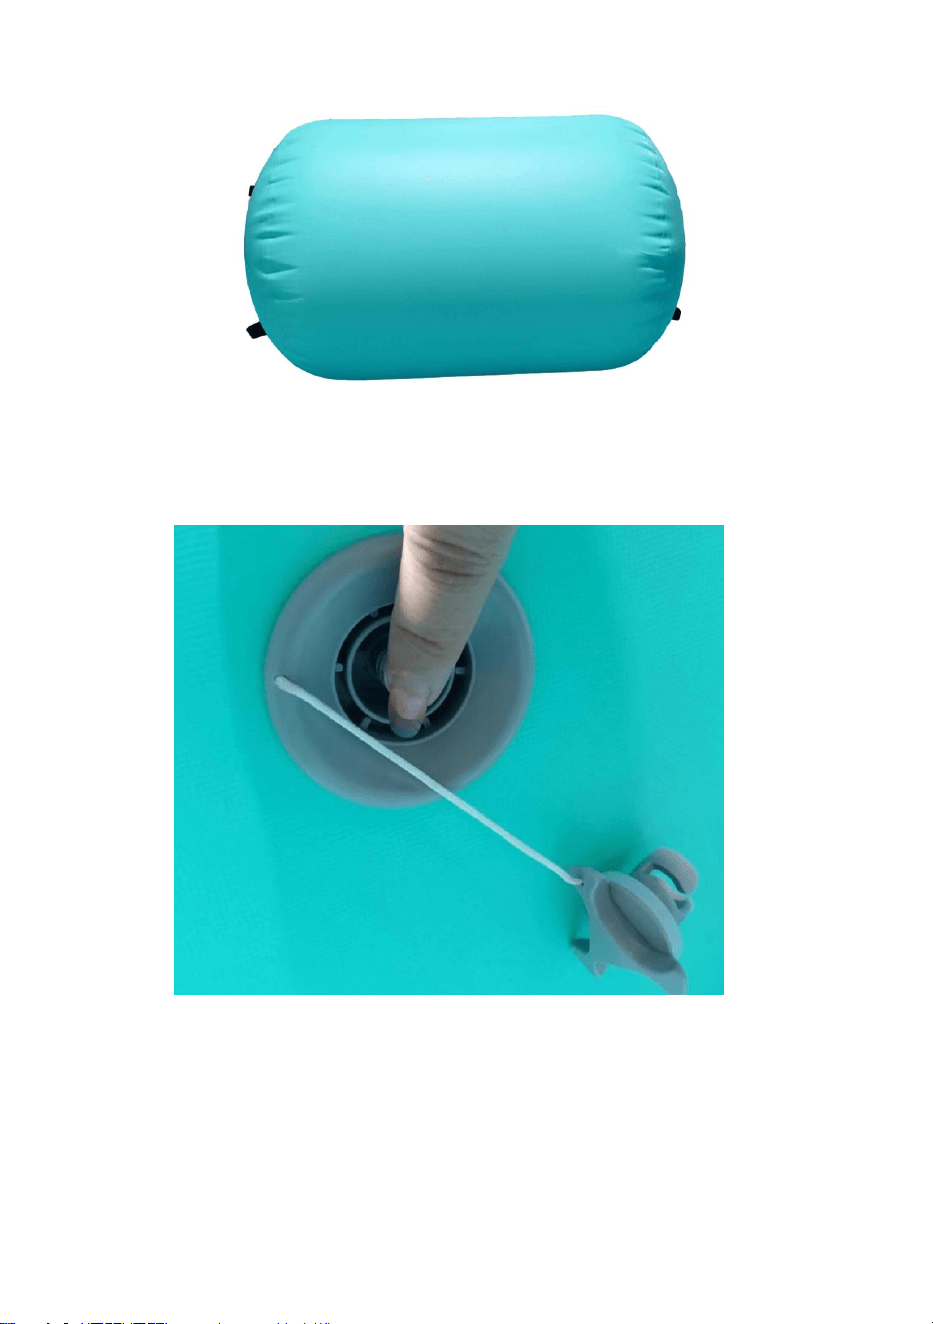
- 10 -
6. Apague el interruptor cuando el cojín de aire esté lleno de aire.
7. Saque el tubo inflable. (Cuando la válvula no se abre
automáticamente, presiónela para cerrarla manualmente.
8. Para evitar fugas de la válvula de alivio de presión durante mucho tiempo,
la llave de la válvula se aprieta en el sentido de las agujas del reloj usando
la llave de la válvula en el caso de que se afloje el anillo exterior de la
válvula.
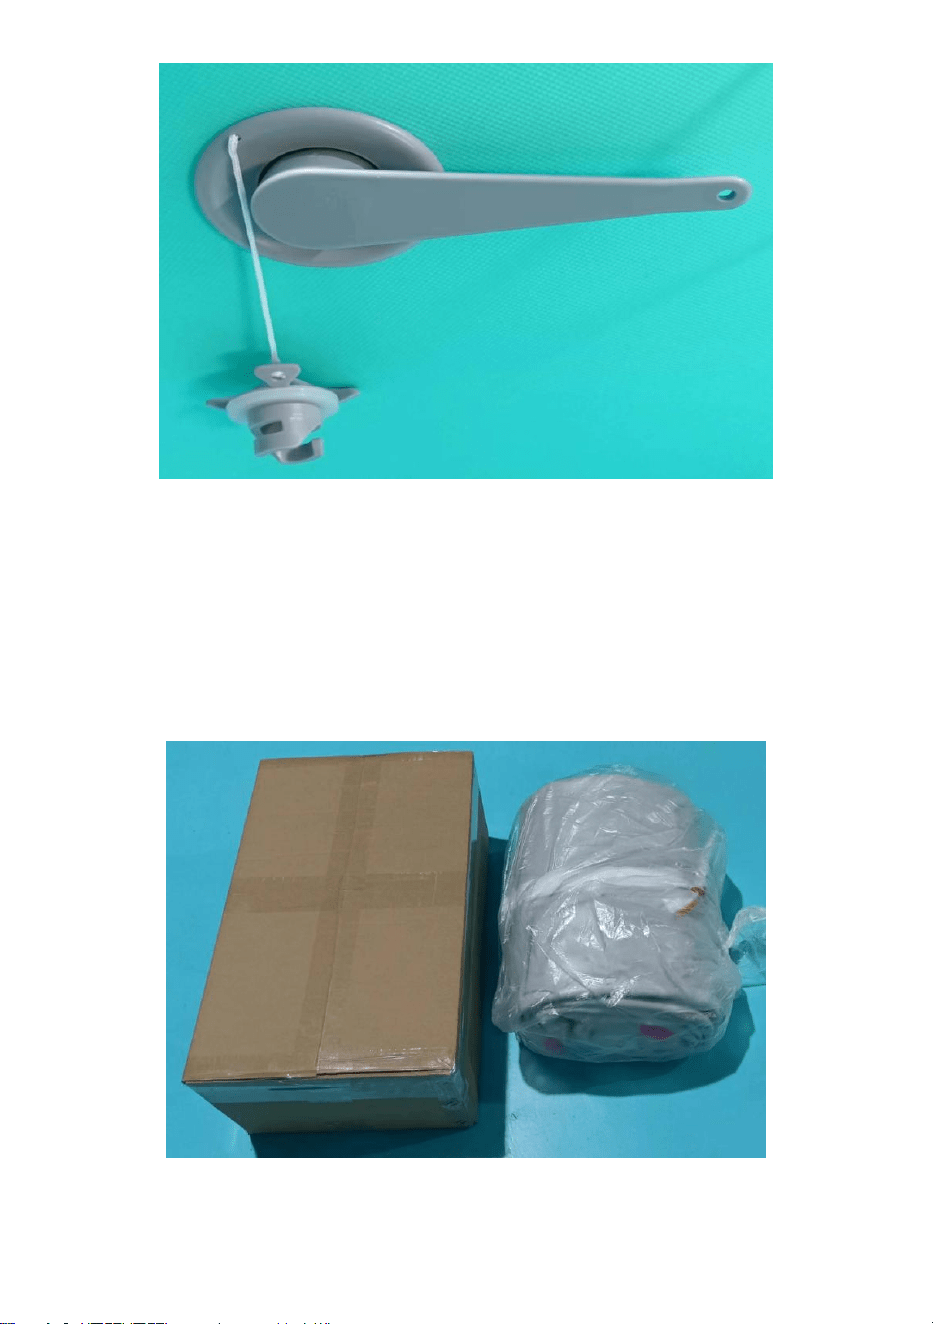
- 11 -
B: Rectángulo _ ( El color del producto está sujeto a la configuración
real )
1. Asegúrese de que el embalaje esté completo y saque el inflable de la
caja de embalaje .
2.Coloque el cojín de aire en el suelo para abrirlo.
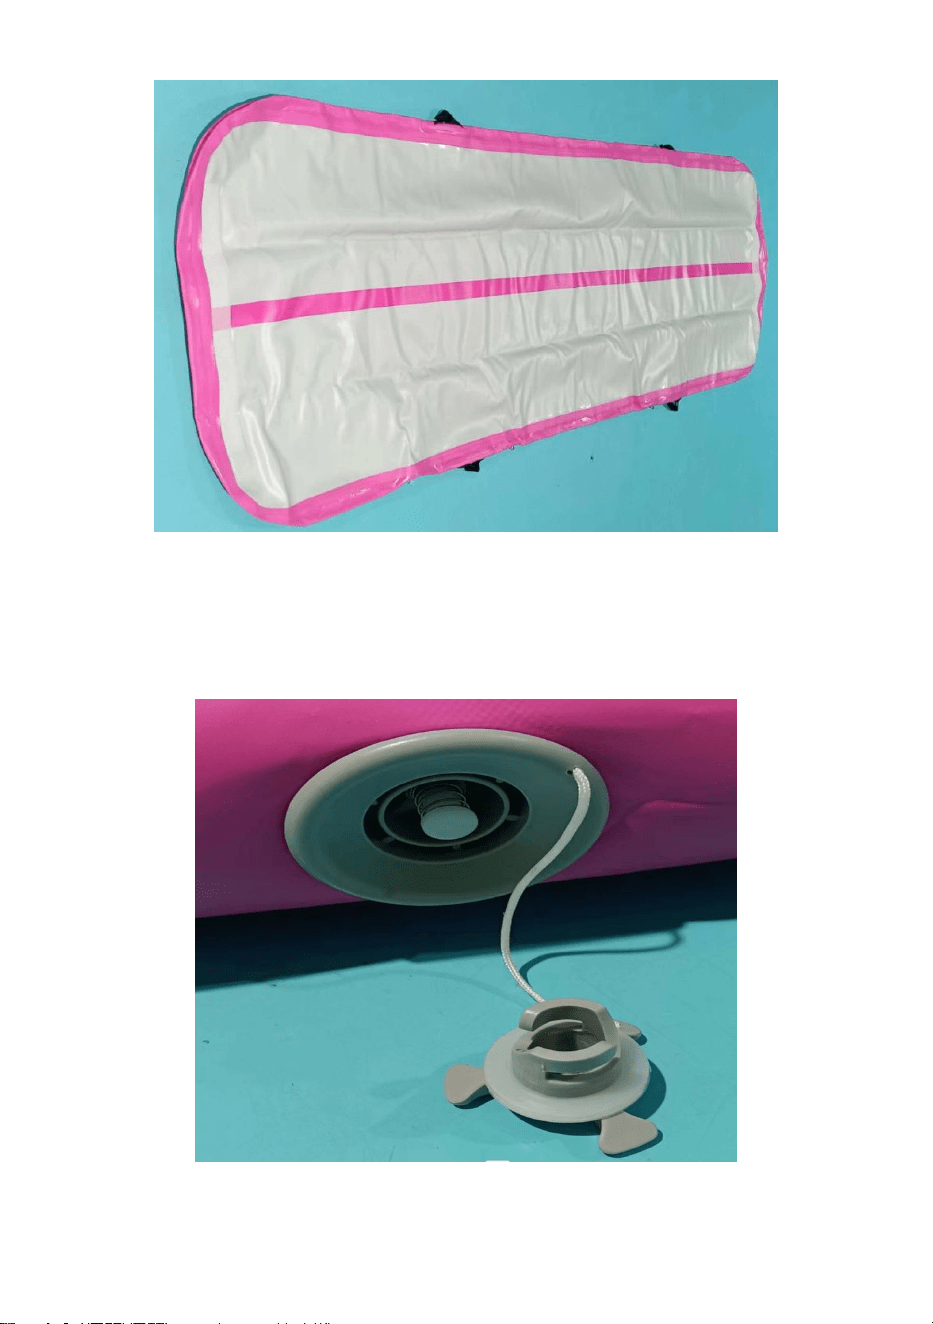
- 12 -
3. Gire la válvula inflable para abrirla en el sentido de las agujas del reloj.
4. Conexión de tubería de aire y válvula de inflado.
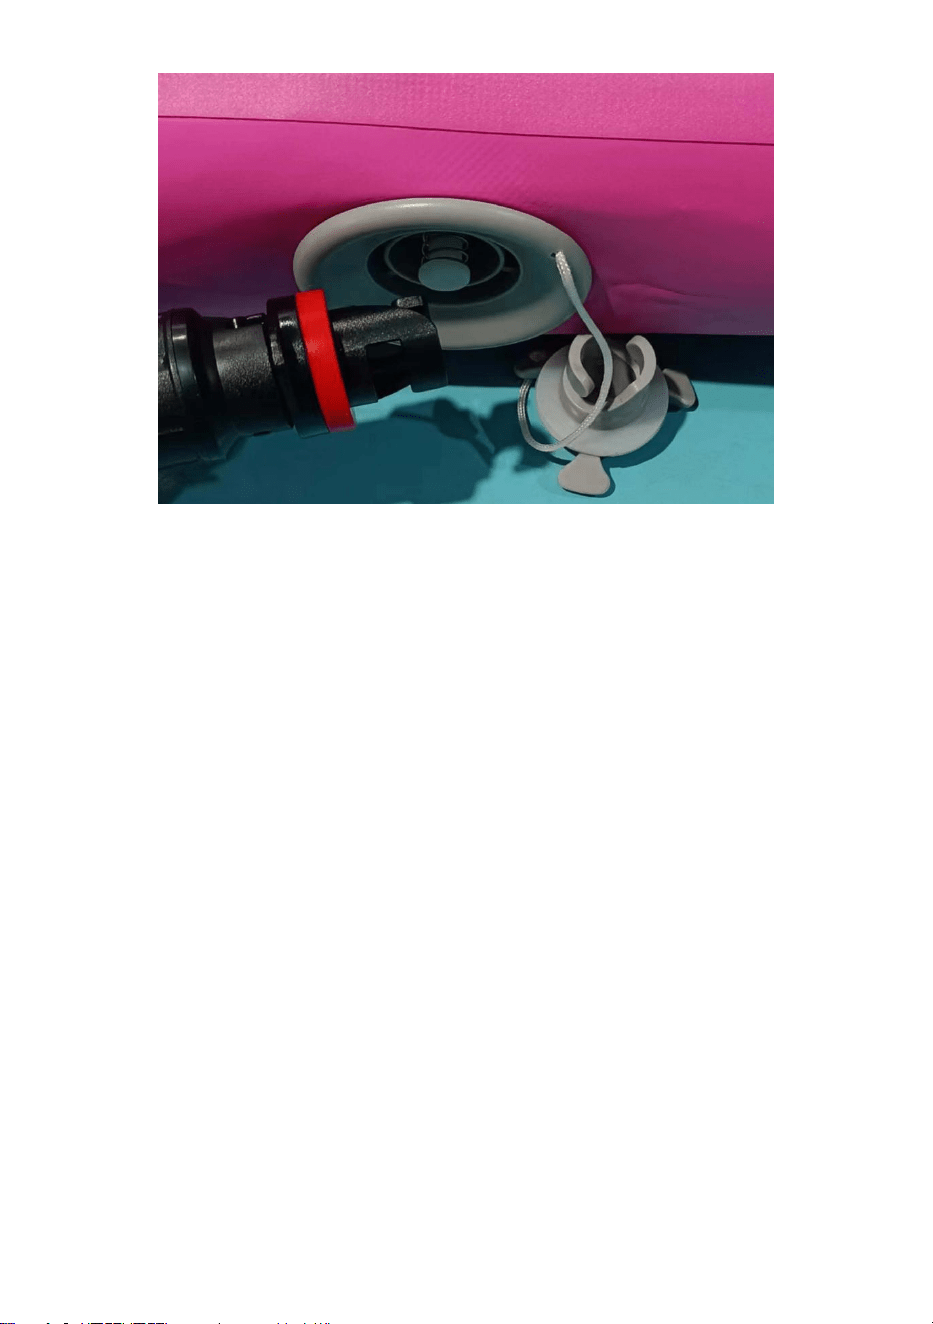
- 13 -
5. Enchufe de la bomba de aire de conexión del tubo de aire y de la
bomba de aire.
Encienda la bomba de aire y presione el interruptor para comenzar a
inflar.
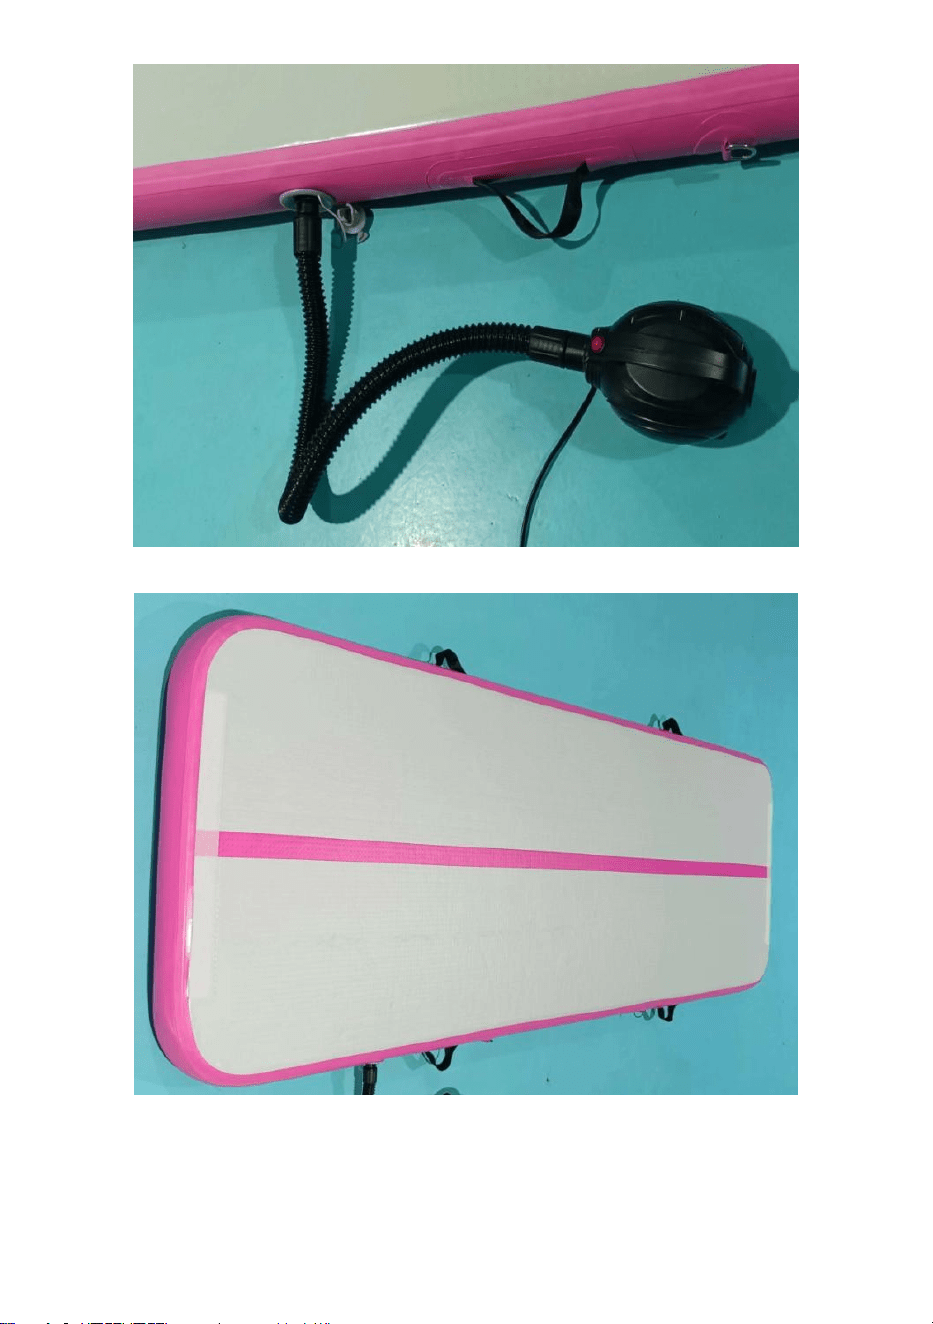
- 14 -
6. Apague el interruptor cuando el cojín de aire esté lleno de aire.
7. Saque el tubo inflable. (Cuando la válvula no se abre
automáticamente, presiónela para cerrarla manualmente.
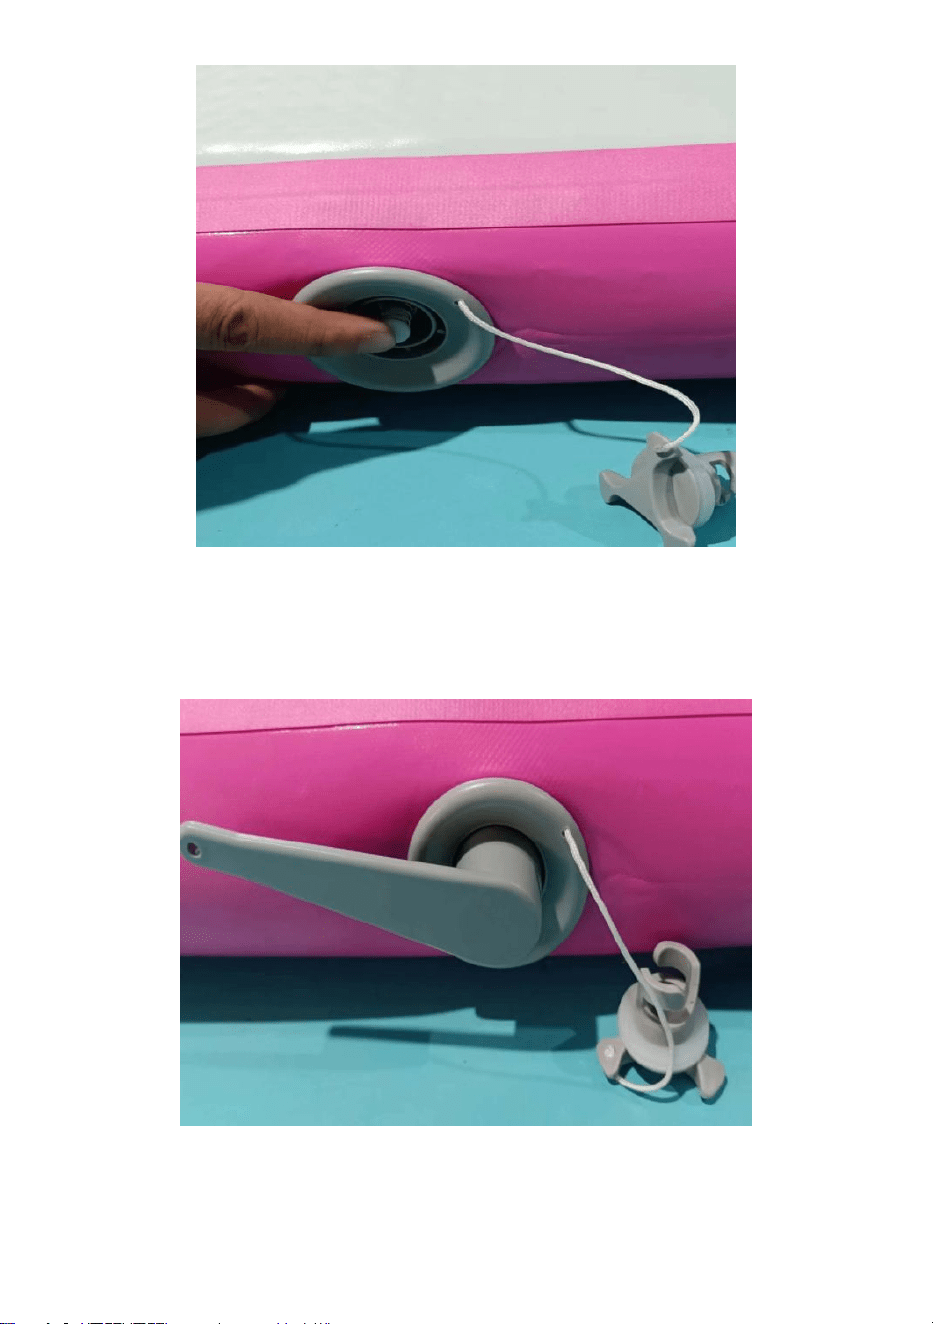
- 15 -
8. Para evitar fugas de la válvula de alivio de presión durante mucho tiempo,
la llave de la válvula se aprieta en el sentido de las agujas del reloj usando
la llave de la válvula en el caso de que se afloje el anillo exterior de la
válvula.
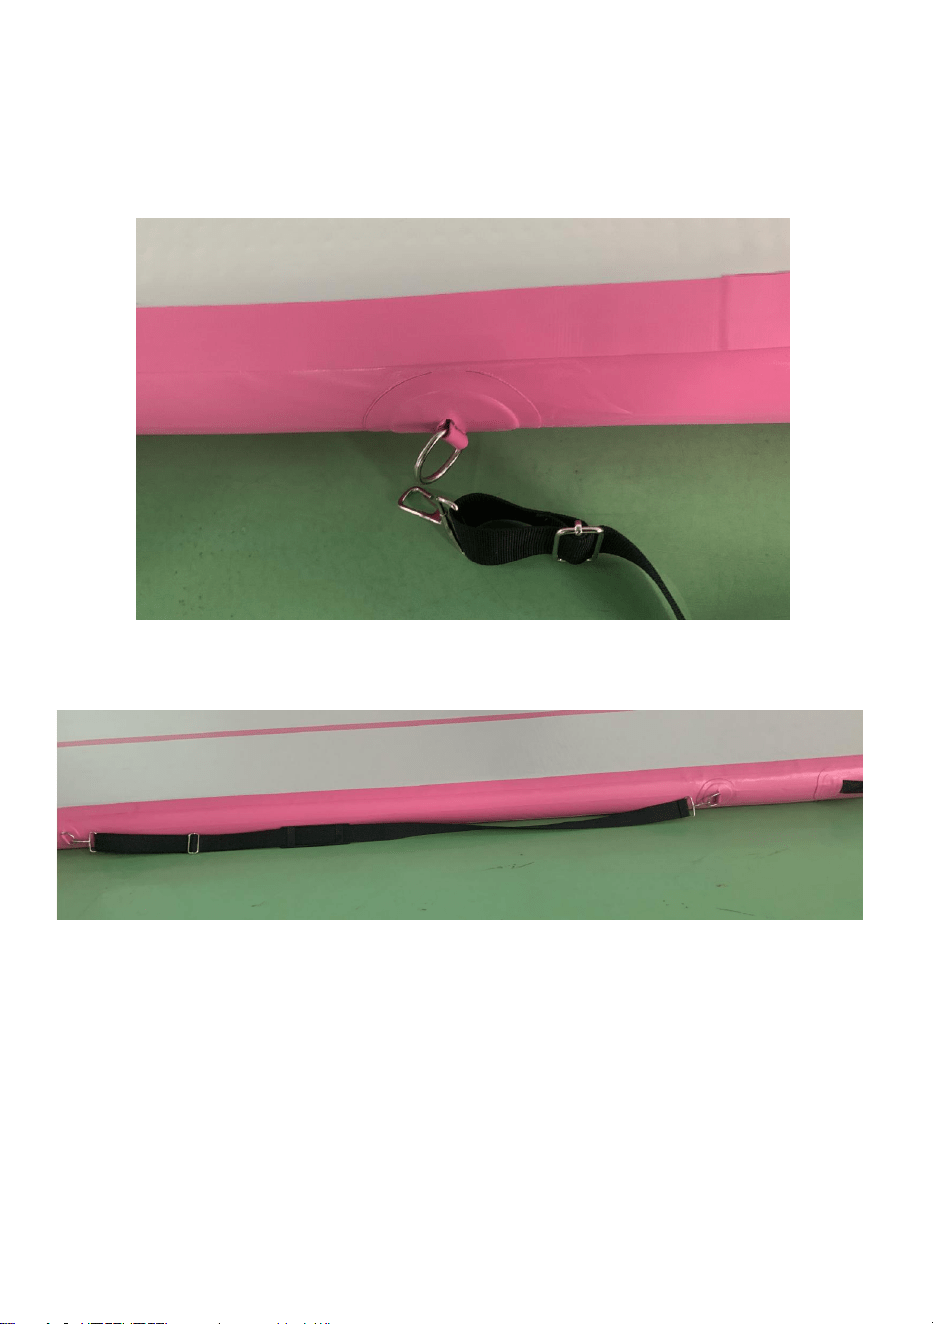
- 16 -
9. La correa para el hombro se instala como se muestra en la imagen y se
fija con una hebilla de bloqueo.
La longitud se puede ajustar según los hábitos de uso personales .

- 17 -
PATCHING GUIDELINES
Consejos: Este producto está equipado con materiales de reparación
(excepto pegamento). Cuando la fuga de aire es causada por objetos
afilados durante el uso, se puede reparar.
Debido a que el material del producto es PVC, debe comprar pegamento de
PVC para reparar el pegamento.
1. Antes de reparar, limpie el área alrededor del daño para asegurarse de
que la superficie esté seca.
2. Aplique una fina capa de pegamento uniformemente sobre la superficie
del material de reparación y la superficie alrededor del colchón de aire
dañado.
3. Pegue firmemente el material de reparación y el cojín de aire. Se
recomienda usar un secador de pelo caliente para calentarlo. Después de
que esté seco, presione con las manos durante 2 minutos y luego presione
con un objeto durante 40-60 minutos antes de usarlo. .
Consejos de ubicación para el uso de material de reparación
equipado
1. Como se muestra en la imagen, se configura un material de reparación
en forma de anillo. Cuando se encuentra una fuga de aire cerca del puerto
de inflado, se pueden usar el pegamento y los materiales de reparación
configurados para repararlo.
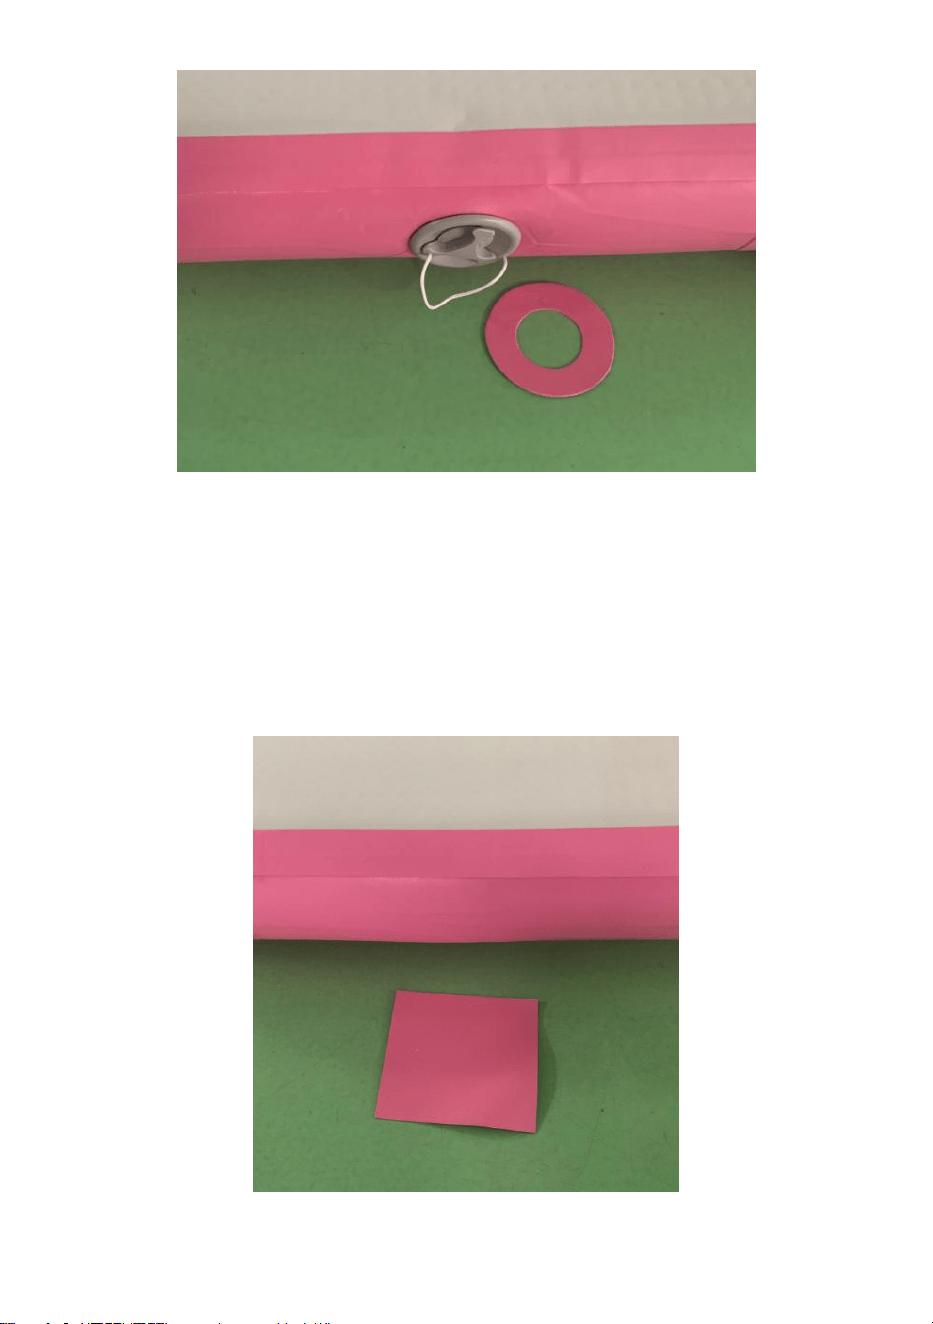
- 18 -
2. Como se muestra en la imagen, se configura un material de reparación
cuadrado. Cuando se encuentran fugas de aire alrededor del perímetro, se
pueden usar el pegamento y los materiales de reparación configurados para
repararlo. (Diferentes colores de bordes están equipados con diferentes
colores de materiales de reparación )
3. Cuando se produzca una fuga de aire encima o en la parte inferior del

- 19 -
colchón de aire, utilice el bloque de reparación cuadrado gris proporcionado
y péguelo.
CLEANING AND STORAGE
1. Limpiar con un paño suave y húmedo.
2. Nunca utilice un limpiador abrasivo o una almohadilla áspera.
3. Asegúrese de mantener el producto seco.
4. Mantenga el producto seco. La humedad puede provocar que los productos se
enmohezcan.

- 20 -
- 21 -
Dirección: Baoshanqu Shuangchenglu 803long 11hao 1602A-1609shi
Shanghai
Importado a EE. UU.: Sanven Technology Ltd. Suite 250, 9166 Anaheim
Place, Rancho Cucamonga, CA 91730
REP
UK
Pooledas Group Ltd
Unit 5 Albert Edward House, The Pavilions
Preston, United Kingdom
REP
EC
SHUNSHUN GmbH
Römeräcker 9 Z2021, 76351
Linkenheim-Hochstetten, Germany
Hecho en china


Tecnico Supporto e certificato di garanzia elettronica
www.vevor.com/support _ _ _ _
TAPPETINO ROTANTE AD ARIA
We continue to be committed to provide you tools with competitive price.
"Save Half", "Half Price" or any other similar expressions used by us only represents an
estimate of savings you might benefit from buying certain tools with us compared to the major
top brands and does not necessarily mean to cover all categories of tools offered by us. You
are kindly reminded to verify carefully when you are placing an order with us if you are
actually saving half in comparison with the top major brands.

- 1 -
Il colore del prodotto è soggetto alla configurazione
effettiva
Have product questions? Need technical support? Please feel free to
contact us:
Technical Support and E-Warranty Certificate
www. vevor. com/support
NEED HELP? CONTACT US!
AIR TUMBLING MAT

- 2 -
This is the original instruction, please read all manual instructions
carefully before operating. VEVOR reserves a clear interpretation of our
user manual. The appearance of the product shall be subject to the
product you received. Please forgive us that we won't inform you again
if there are any technology or software updates on our product.
IMPORTANT SAFEGUARDS
ATTENZIONE : qualsiasi attività che coinvolga movimento, rotazione e
altezza crea la possibilità di lesioni catastrofiche, paralisi o addirittura
morte. Si assume il rischio di lesioni gravi quando si utilizza questa
attrezzatura; questa attrezzatura è destinata all'uso solo da parte di
partecipanti adeguatamente addestrati e qualificati secondo condizioni
supervisionate. Prima dell'uso, conoscere le proprie imitazioni. In caso di
dubbio, consultare sempre un insegnante. Istruttore qualificato. Controllare
sempre eventuali accessori allentati o danni e testare la stabilità prima di
ogni utilizzo. Utilizzare i tappetini solo su un terreno solido circondato da
tappetini appropriati. Assicurarsi che La superficie del materassino è
asciutta e in buone condizioni prima dell'uso. Verificare sempre che la
pressione dell'aria soddisfi i requisiti minimi. Si prega di non lasciare il
materassino parzialmente gonfiato in un'area in cui può essere utilizzato
senza supervisione. Il materassino può muoversi durante l'uso. Controllare
sempre il corretto posizionamento del prodotto prima dell'uso. Controllare
periodicamente la pressione per garantire un corretto gonfiaggio. Tenere
presente che i cambiamenti della temperatura esterna alterano la
pressione interna del stuoia.
ATTENZIONE : questa attrezzatura non è destinata all'uso da parte di
persone (compresi i bambini) con capacità fisiche, sensoriali o mentali
ridotte, o con mancanza di esperienza e conoscenza, a meno che non
abbiano ricevuto supervisione o istruzioni relative all'uso dell'attrezzatura
da parte di una persona responsabile la loro sicurezza.
ATTENZIONE : i bambini devono essere sorvegliati.
ATTENZIONE : smaltire con cura tutti i sacchetti di plastica e tenerli
lontano dalla portata dei bambini e degli animali domestici.
ATTENZIONE : il prodotto deve essere posizionato su una superficie
piana.
SAFETY INSTRUCTIONS OF AIR PUMP
AVVERTENZA: leggere tutte le avvertenze di sicurezza, le istruzioni, le

- 3 -
illustrazioni e le specifiche fornite con questa pompa ad aria. La mancata
osservanza di tutte le istruzioni elencate di seguito può provocare scosse
elettriche, incendi e/o lesioni gravi.
Informazioni di sicurezza di base:
1. Questo prodotto serve solo per il pompaggio.
2. Non è consentito tirare o trascinare il prodotto con la linea elettrica.
3. Quando si stacca la spina, tenere la spina stessa; non tirare la linea di
alimentazione.
4. Non tagliare o sostituire da soli la spina di alimentazione, altrimenti si
potrebbero verificare gravi conseguenze.
5. Non è consentito il funzionamento del prodotto in caso di danni
all'alimentazione
linea o la shell.
6. Non è consentito lo smontaggio e lo smontaggio del prodotto da parte di
non addetti ai lavori.
7. Nel caso in cui la pompa dell'aria cada nell'acqua, interrompere
l'alimentazione prima di dragarla, quindi consegnarla a professionisti per il
controllo e la manutenzione.
8. Pericolo di scossa elettrica: non toccare la pompa dell'aria con le mani
bagnate o stando in piedi su una superficie bagnata. Utilizzare sempre la
pompa dell'aria in un ambiente asciutto e collegarla a una presa
adeguatamente messa a terra.
9. Pericolo di incendio: non utilizzare la pompa dell'aria vicino a materiali
infiammabili o combustibili. Tenere la pompa dell'aria lontana da fonti di
calore o scintille, come fiamme, sigarette o apparecchi elettrici.
10. Pericolo di esplosione: non utilizzare la pompa dell'aria con gas
infiammabili, esplosivi o velenosi. Controllare sempre la scheda dati di
sicurezza (SDS) del gas prima di utilizzarlo con la pompa dell'aria . Inoltre,
non superare la pressione specificata gamma per la pompa dell'aria .

- 4 -
11. Pericolo di corrosione: Non utilizzare la pompa dell'aria con gas che
possono corrodere i metalli o esercitare cariche chimiche. Verificare la
compatibilità del gas con i materiali di aerazione del laghetto e dei suoi
accessori. Utilizzare sempre guanti e occhiali protettivi quando si
maneggiano materiali corrosivi.
12. Non utilizzare una spina o una presa danneggiata, poiché ciò potrebbe
causare scosse elettriche o incendi.
13. Se il cavo di alimentazione è danneggiato, deve essere sostituito dal
produttore, dal suo agente di assistenza o da persone similmente
qualificate per evitare pericoli.
14. Questo apparecchio può essere utilizzato da bambini di età pari o
superiore a 8 anni e da persone con ridotte capacità fisiche, sensoriali o
mentali o con mancanza di esperienza e conoscenza se hanno ricevuto
supervisione o istruzioni relative all'uso dell'apparecchio in modo sicuro e
comprendere i rischi connessi. I bambini non devono giocare con
l'apparecchio. La pulizia e la manutenzione non devono essere effettuate
da bambini senza supervisione.
CONSERVA QUESTE ISTRUZIONI
FCC INFORMATION OF AIR PUMP
ATTENZIONE: cambiamenti o modifiche non espressamente approvati
dalla parte responsabile della conformità potrebbero invalidare il diritto
dell'utente a utilizzare l'apparecchiatura!
Questo dispositivo è conforme alla Parte 15 delle norme FCC. Il
funzionamento è soggetto alle due condizioni seguenti:
1) Questo prodotto può causare interferenze dannose.
2)Questo prodotto deve accettare qualsiasi interferenza ricevuta,
comprese le interferenze che potrebbero causare un funzionamento

- 5 -
indesiderato.
ATTENZIONE: cambiamenti o modifiche a questo prodotto non
espressamente approvati dalla parte responsabile della conformità
potrebbero annullare l'autorità dell'utente a utilizzare il prodotto.
Nota: questo prodotto è stato testato ed è risultato conforme ai limiti per un
dispositivo digitale di Classe B ai sensi della Parte 15 delle norme FCC.
Questi limiti sono progettati per fornire una protezione ragionevole contro
interferenze dannose in un'installazione residenziale.
Questo prodotto genera, utilizza e può irradiare energia in radiofrequenza
e, se non installato e utilizzato in conformità con le istruzioni, può causare
interferenze dannose alle comunicazioni radio. Tuttavia, non vi è alcuna
garanzia che non si verifichino interferenze in una particolare installazione.
In tal caso prodotto causa interferenze dannose alla ricezione radiofonica o
televisiva, che possono essere determinate spegnendo e accendendo il
prodotto, si consiglia all'utente di provare a correggere l'interferenza
adottando una o più delle seguenti misure.
· Riorientare o riposizionare l'antenna ricevente.
· Aumentare la distanza tra il prodotto e il ricevitore.
· Collegare il prodotto ad una presa su un circuito diverso da quello a cui è
collegato il ricevitore.
· Consultare il rivenditore o un tecnico radio/TV esperto per assistenza.
CORRECT DISPOSAL OF AIR PUMP
Questo prodotto è soggetto alle disposizioni della Direttiva
europea 2012/19/UE. Il simbolo che mostra un bidone della
spazzatura barrato indica che il prodotto richiede la raccolta
differenziata dei rifiuti nell'Unione Europea. Ciò si applica al
prodotto e a tutti gli accessori contrassegnati con questo simbolo. I prodotti
contrassegnati come tali non possono essere smaltiti con i normali rifiuti
- 6 -
domestici, ma devono essere portati in un punto di raccolta per il riciclaggio
di dispositivi elettrici ed elettronici.
PRODUCT PARAMETERS
MODELLO
Taglia /COLORE
POMPA D'ARIA
TT-M-40-24
40× Φ 24 pollici / rosa
SPINA AMERICANA (AC110-120V 60H
z 600W)
TT-E-40-24
40×Φ24 POLLICI/ROSA
SPINA UE (AC220-240V 50/60H z
600W)
TT-M-40-31.5
40× Φ 31,5 pollici / Verde
SPINA AMERICANA (AC110-120V 60H
z 600W)
TT-E-40-31.5
40× Φ 31,5 pollici / Verde
SPINA UE (AC220-240V 50/60H z
600W)
TT-M-40-24-10
Tuta : 10 piedi +40×Φ24
pollici/ inchiostro ROSA
SPINA AMERICANA (AC110-120V 60H
z 600W)
TT-E-40-24-10
Tuta : 10 piedi +40×Φ24
pollici/ inchiostro ROSA
SPINA UE (AC220-240V 50/60H z
600W)
TT-M-10-G
10 piedi / Verde
SPINA AMERICANA (AC110-120V 60H
z 600W)

- 7 -
TT-E-10-G
10 piedi / Verde
SPINA UE (AC220-240V 50/60H z
600W)
TT-M-10-P
Inchiostro da 10 piedi /P
SPINA AMERICANA (AC110-120V 60H
z 600W)
TT-E-10-P
Inchiostro da 10 piedi /P
SPINA UE (AC220-240V 50/60H z
600W)
TT-M-10-B
10 piedi / Blu
SPINA AMERICANA (AC110-120V 60H
z 600W)
TT-E-10-B
10 piedi / Blu
SPINA UE (AC220-240V 50/60H z
600W)
TT-M-13-G
13 piedi / Verde
SPINA AMERICANA (AC110-120V 60H
z 600W)
TT-E-13-G
13 piedi / Verde
SPINA UE (AC220-240V 50/60H z
600W)
TT-M-13-P
Inchiostro da 13 piedi /P
SPINA AMERICANA (AC110-120V 60H
z 600W)
TT-E-13-P
Inchiostro da 13 piedi /P
SPINA UE (AC220-240V 50/60H z
600W)
TT-M-13-B
13 piedi / Blu
SPINA AMERICANA (AC110-120V 60H
z 600W)
TT-E-13-B
13 piedi / Blu
SPINA UE (AC220-240V 50/60H z
600W)
TT-M-16-G
16 piedi / Verde
SPINA AMERICANA (AC110-120V 60H
z 600W)
TT-E-16-G
16 piedi / Verde
SPINA UE (AC220-240V 50/60H z
600W)
TT-M-16-P
Inchiostro da 16 piedi /P
SPINA AMERICANA (AC110-120V 60H
z 600W)
TT-E-16-P
Inchiostro da 16 piedi /P
SPINA UE (AC220-240V 50/60H z
600W)
TT-M-16-B
16 piedi / Blu
SPINA AMERICANA (AC110-120V 60H
z 600W)
TT-E-16-B
16 piedi / Blu
SPINA UE (AC220-240V 50/60H z
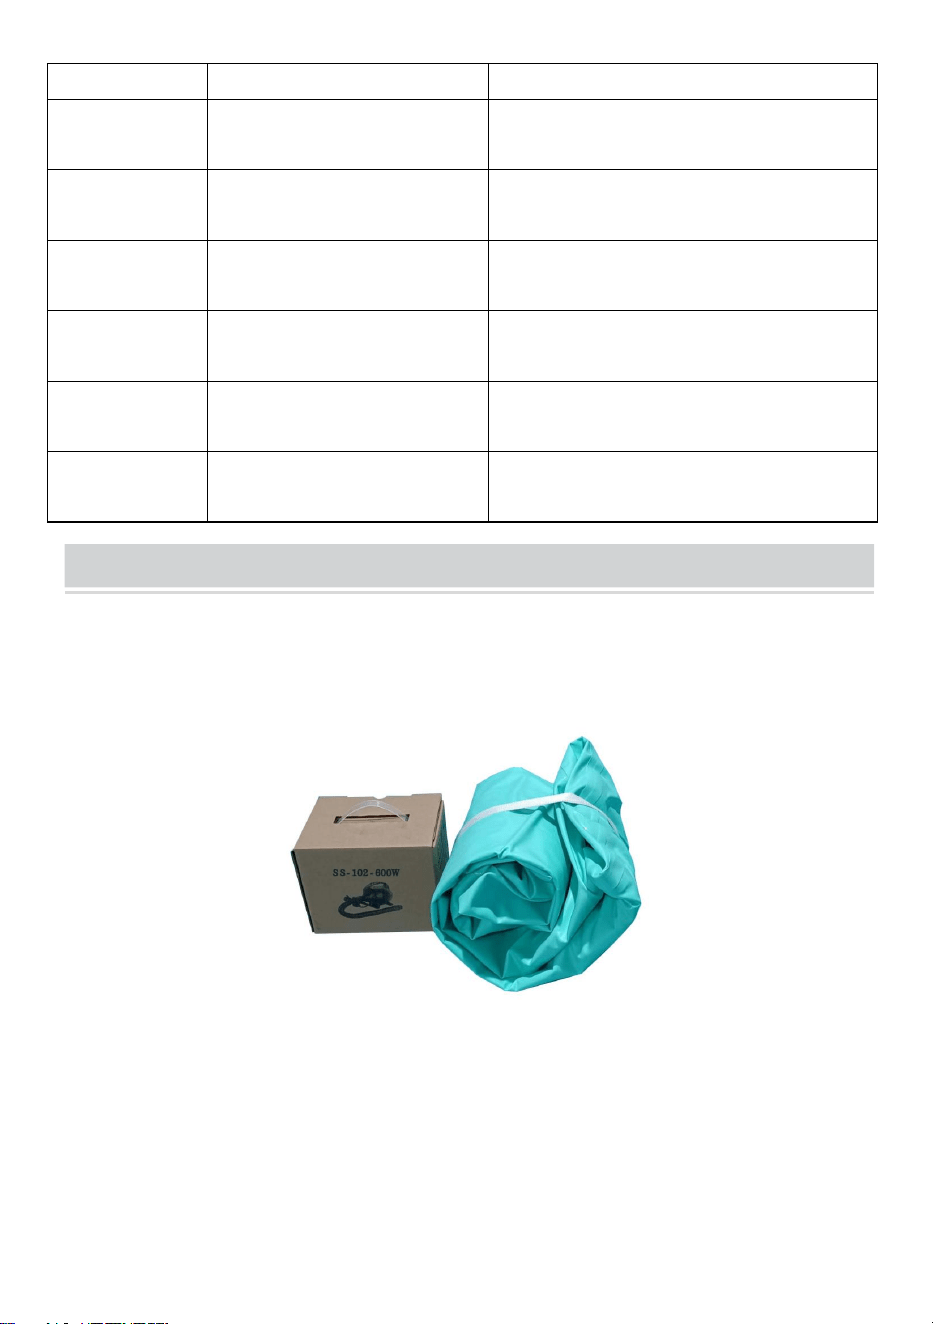
- 8 -
600W)
TT-M-20-G
20 piedi / Verde
SPINA AMERICANA (AC110-120V 60H
z 600W)
TT-E-20-G
20 piedi / Verde
SPINA UE (AC220-240V 50/60H z
600W)
TT-M-20-P
Inchiostro da 20 piedi /P
SPINA AMERICANA (AC110-120V 60H
z 600W)
TT-E-20-P
Inchiostro da 20 piedi /P
SPINA UE (AC220-240V 50/60H z
600W)
TT-M-20-B
20 piedi / Blu
SPINA AMERICANA (AC110-120V 60H
z 600W)
TT-E-20-B
20 piedi / Blu
SPINA UE (AC220-240V 50/60H z
600W)
INSTALLATION STEPS
A: Rullo ( il colore del prodotto è soggetto alla configurazione effettiva )
1. Assicurarsi che l'imballaggio sia completo ed estrarre il gonfiabile dalla
scatola di imballaggio .
2.Posizionare il cuscino d'aria a terra per aprirlo.

- 9 -
3. Ruotare la valvola gonfiabile in senso antiorario.
4. Collegamento del tubo dell'aria e della valvola di gonfiaggio.
5. Spina della pompa dell'aria per il collegamento del tubo dell'aria e
della pompa dell'aria.
Accendere la pompa dell'aria e premere l'interruttore per iniziare a
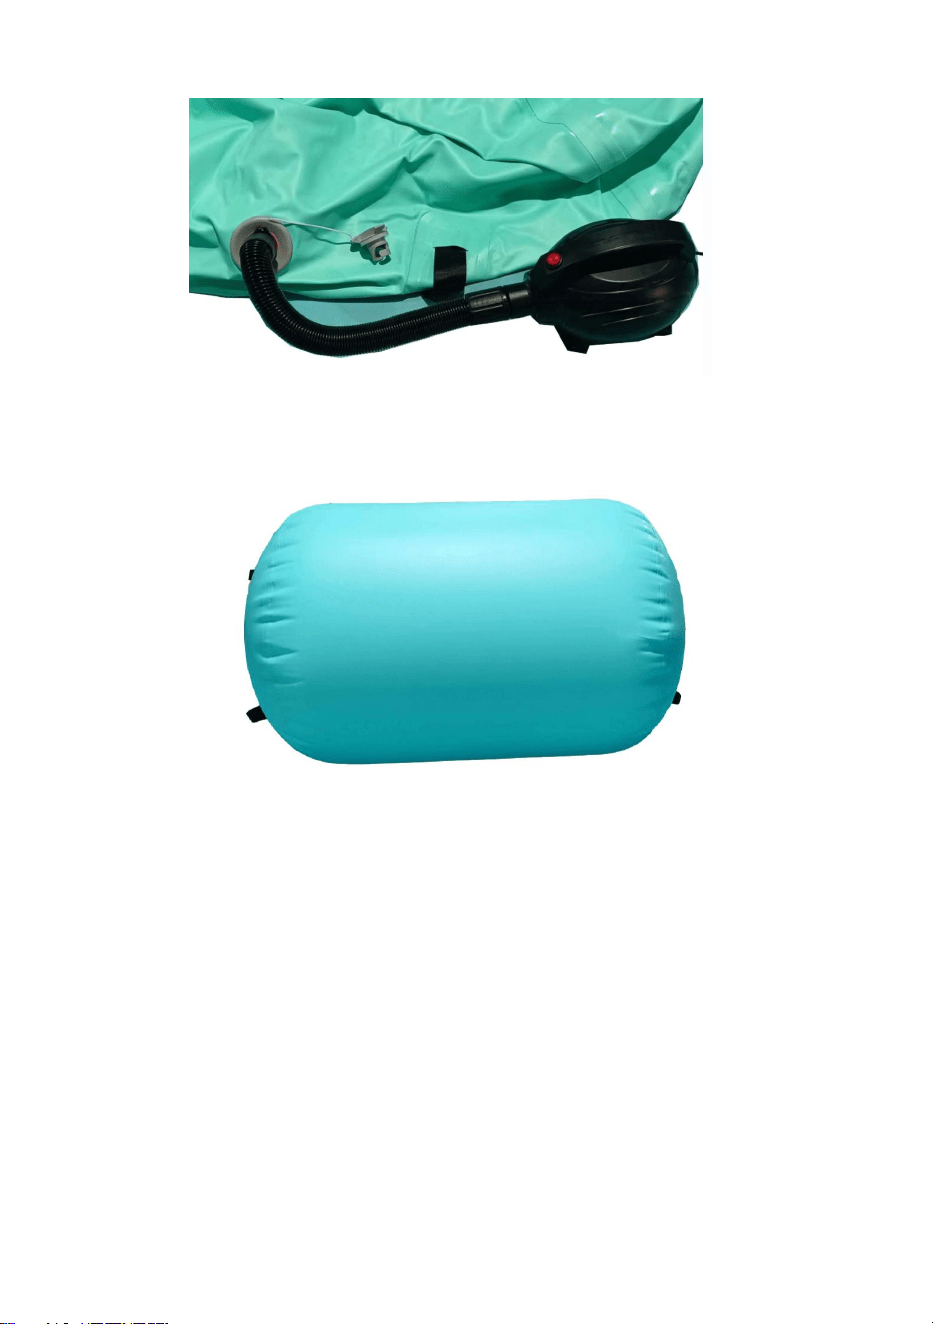
- 10 -
gonfiare.
6.Si prega di spegnere l'interruttore quando il cuscino d'aria è pieno
d'aria.
7. Estrarre il tubo gonfiabile. (Quando la valvola non si apre
automaticamente, premerla per chiuderla manualmente.
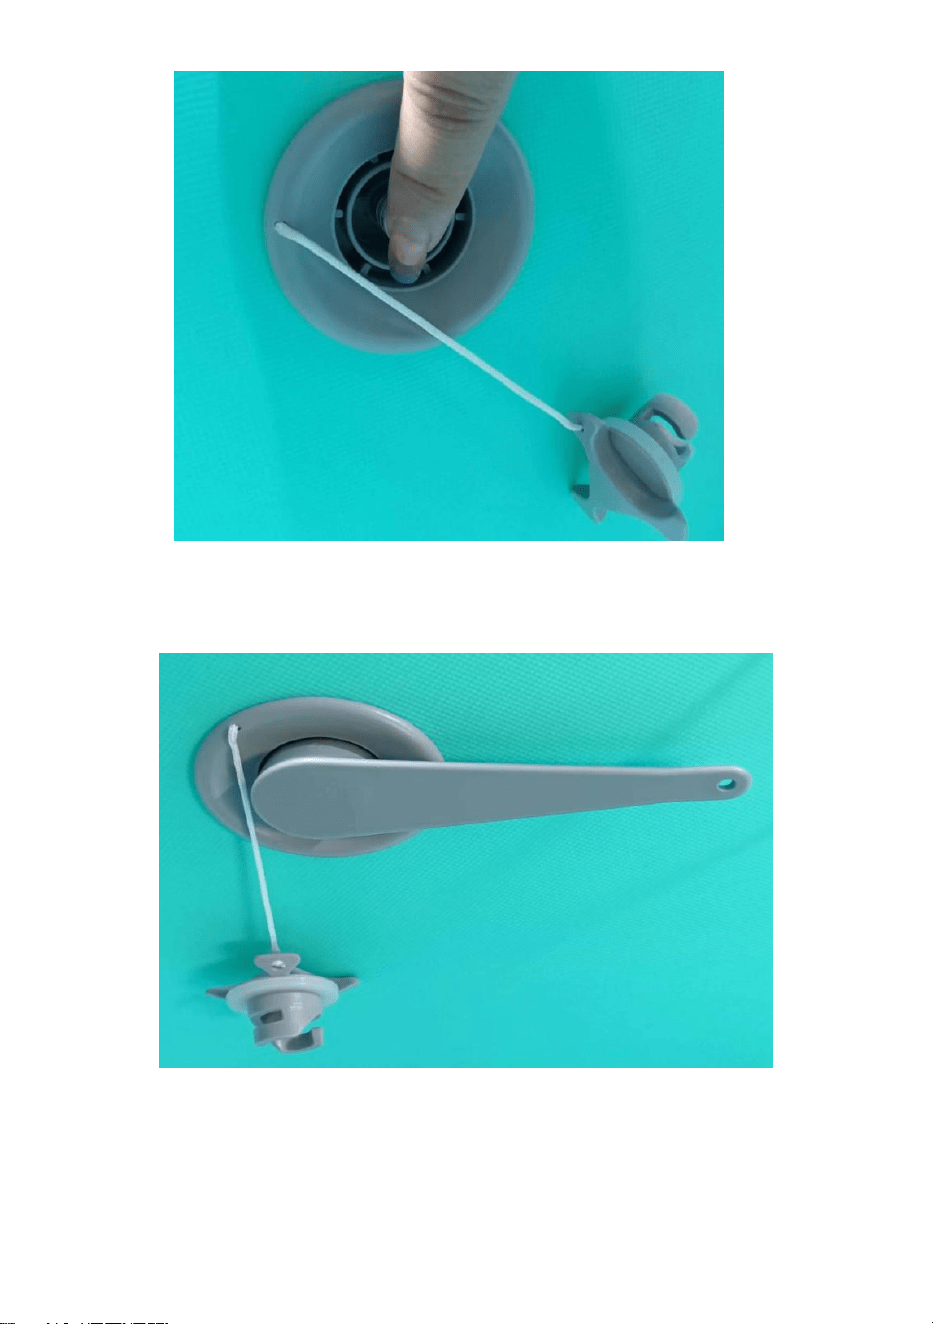
- 11 -
8. Per evitare perdite dalla valvola limitatrice di pressione per lungo tempo,
la chiave della valvola viene serrata in senso orario utilizzando la chiave
della valvola in caso di allentamento dell'anello esterno della valvola.
B: Rettangolo _ ( Il colore del prodotto è soggetto alla configurazione
effettiva )

- 12 -
1. Assicurarsi che l'imballaggio sia completo ed estrarre il gonfiabile dalla
scatola di imballaggio .
2.Posizionare il cuscino d'aria a terra per aprirlo.
3. Ruotare la valvola gonfiabile in senso antiorario.

- 13 -
4. Collegamento del tubo dell'aria e della valvola di gonfiaggio.
5. Spina della pompa dell'aria per il collegamento del tubo dell'aria e della
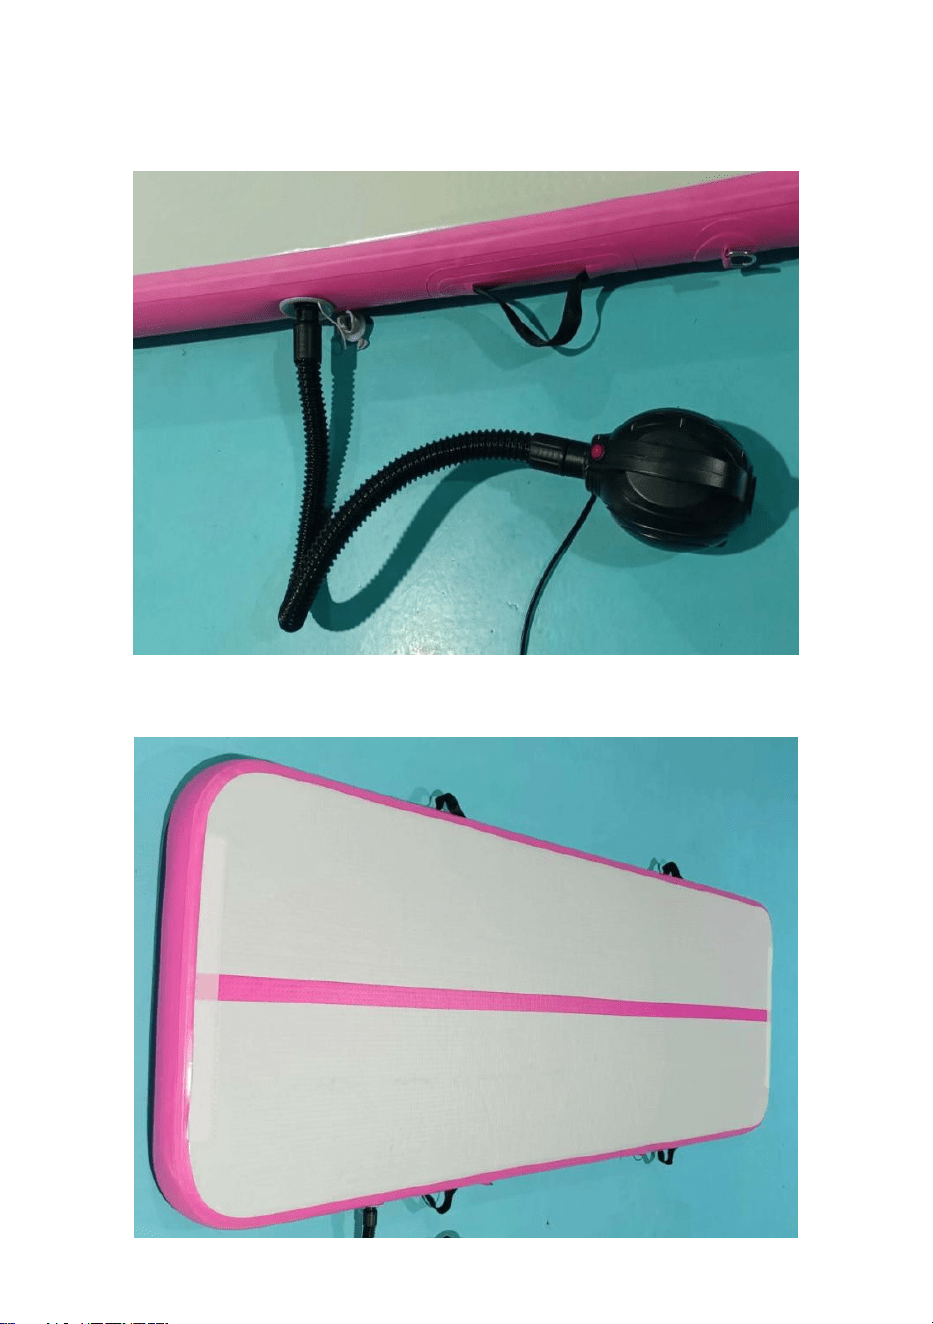
- 14 -
pompa dell'aria.
Accendere la pompa dell'aria e premere l'interruttore per iniziare a
gonfiare.
6.Si prega di spegnere l'interruttore quando il cuscino d'aria è pieno
d'aria.
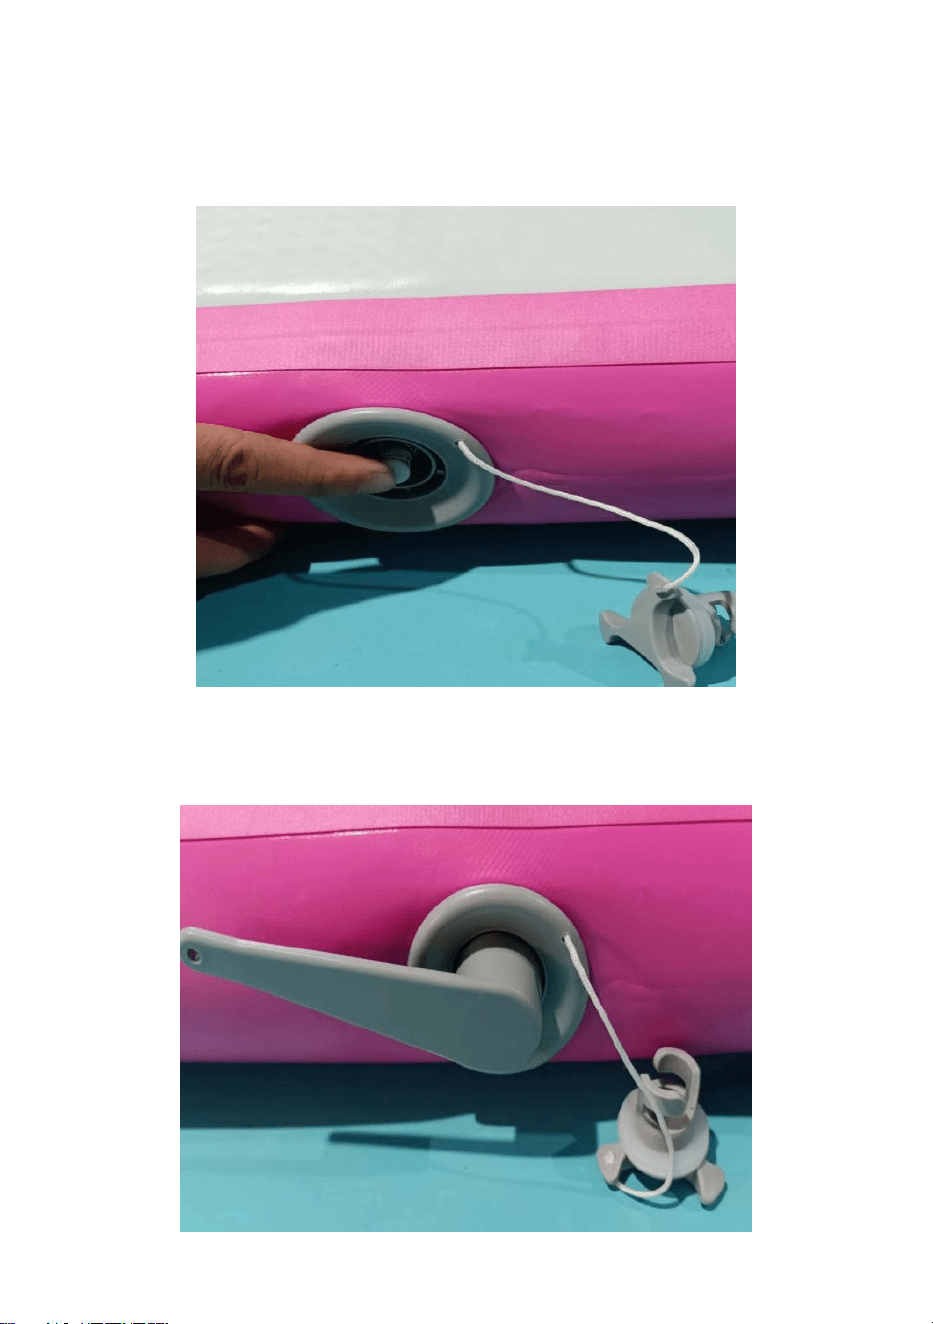
- 15 -
7. Estrarre il tubo gonfiabile. (Quando la valvola non si apre
automaticamente, premerla per chiuderla manualmente.
8. Per evitare perdite dalla valvola limitatrice di pressione per lungo tempo,
la chiave della valvola viene serrata in senso orario utilizzando la chiave
della valvola in caso di allentamento dell'anello esterno della valvola.

- 16 -
9. La tracolla è installata come mostrato nell'immagine e fissata con una
fibbia di bloccaggio.
La lunghezza può essere regolata in base alle abitudini di utilizzo personali .

- 17 -
PATCHING GUIDELINES
Suggerimenti: questo prodotto è dotato di materiali di riparazione (tranne la
colla).Se la perdita d'aria è causata da oggetti appuntiti durante l'uso, può
essere riparata.
Poiché il materiale del prodotto è il PVC, è necessario acquistare la colla per
PVC per ripararla.
1. Prima della riparazione, pulire l'area attorno al danno per garantire che la
superficie sia asciutta.
2. Applicare un sottile strato di colla in modo uniforme sulla superficie del
materiale di riparazione e sulla superficie attorno al cuscino d'aria
danneggiato.
3. Attaccare saldamente il materiale di riparazione e il cuscino d'aria. Si
consiglia di utilizzare un asciugacapelli caldo per riscaldarlo. Dopo che si è
asciugato, premerlo con le mani per 2 minuti, quindi premerlo con un
oggetto per 40-60 minuti prima dell'uso .
Suggerimenti sulla posizione di utilizzo del materiale di riparazione
attrezzato
1.Come mostrato nell'immagine, è configurato un materiale di riparazione a
forma di anello.Quando si rileva una perdita d'aria vicino alla porta di
gonfiaggio, è possibile utilizzare la colla configurata e i materiali di
riparazione per ripararla.
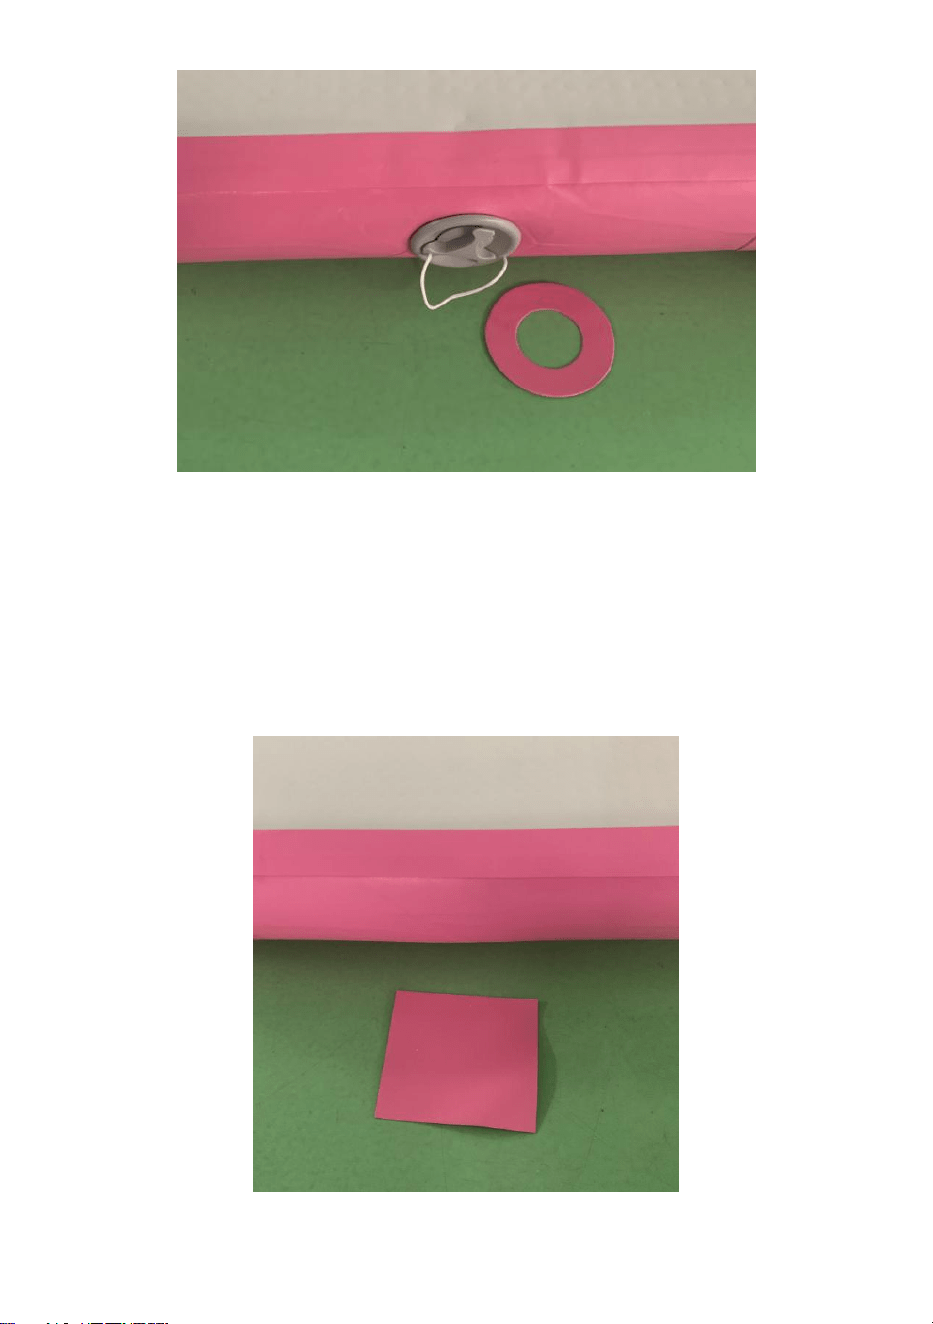
- 18 -
2.Come mostrato nell'immagine, è configurato un materiale di riparazione
quadrato. Quando si riscontra una perdita d'aria attorno al perimetro, è
possibile utilizzare la colla e i materiali di riparazione configurati per ripararlo.
(Diversi colori dei bordi sono dotati di diversi colori di materiali di
riparazione )
3.Quando si verificano perdite d'aria sopra o nella parte inferiore del cuscino

- 19 -
d'aria, utilizzare il blocco di riparazione quadrato grigio fornito e incollarlo
insieme.
CLEANING AND STORAGE
1. Pulisci con un panno morbido e umido.
2. Non utilizzare mai un detergente abrasivo o un tampone ruvido.
3. Assicurati di mantenere il prodotto asciutto.
4. Si prega di mantenere il prodotto asciutto. L'umidità può far ammuffire i prodotti.

- 20 -
Indirizzo: Baoshanqu Shuangchenglu 803long 11hao 1602A-1609shi
- 21 -
Shanghai
Importato negli Stati Uniti: Sanven Technology Ltd. Suite 250, 9166
Anaheim Place, Rancho Cucamonga, CA 91730
REP
UK
Pooledas Group Ltd
Unit 5 Albert Edward House, The Pavilions
Preston, United Kingdom
REP
EC
SHUNSHUN GmbH
Römeräcker 9 Z2021, 76351
Linkenheim-Hochstetten, Germany
Made in China