EnglishSENIXTOOLS.COM
2000W INVERTER GENERATOR
YAT USA INC. 10506 Bryton Corporate Center Dr, #500 Huntersville, NC 28078
For customer support, please call 1-800-261-3981 or email us at [email protected]
Instructions Manual
Model: GN4QL-M1
• SAFETY
• ASSEMBLY
• OPERATION
• MAINTENANCE
• WARRANTY
CAUTION: Before using this tool, please read this manual completely,
and follow all operating safety measures.
EN - 2
SENIXTOOLS.COM
SAFETY &
INTERNATIONAL
SYMBOLS
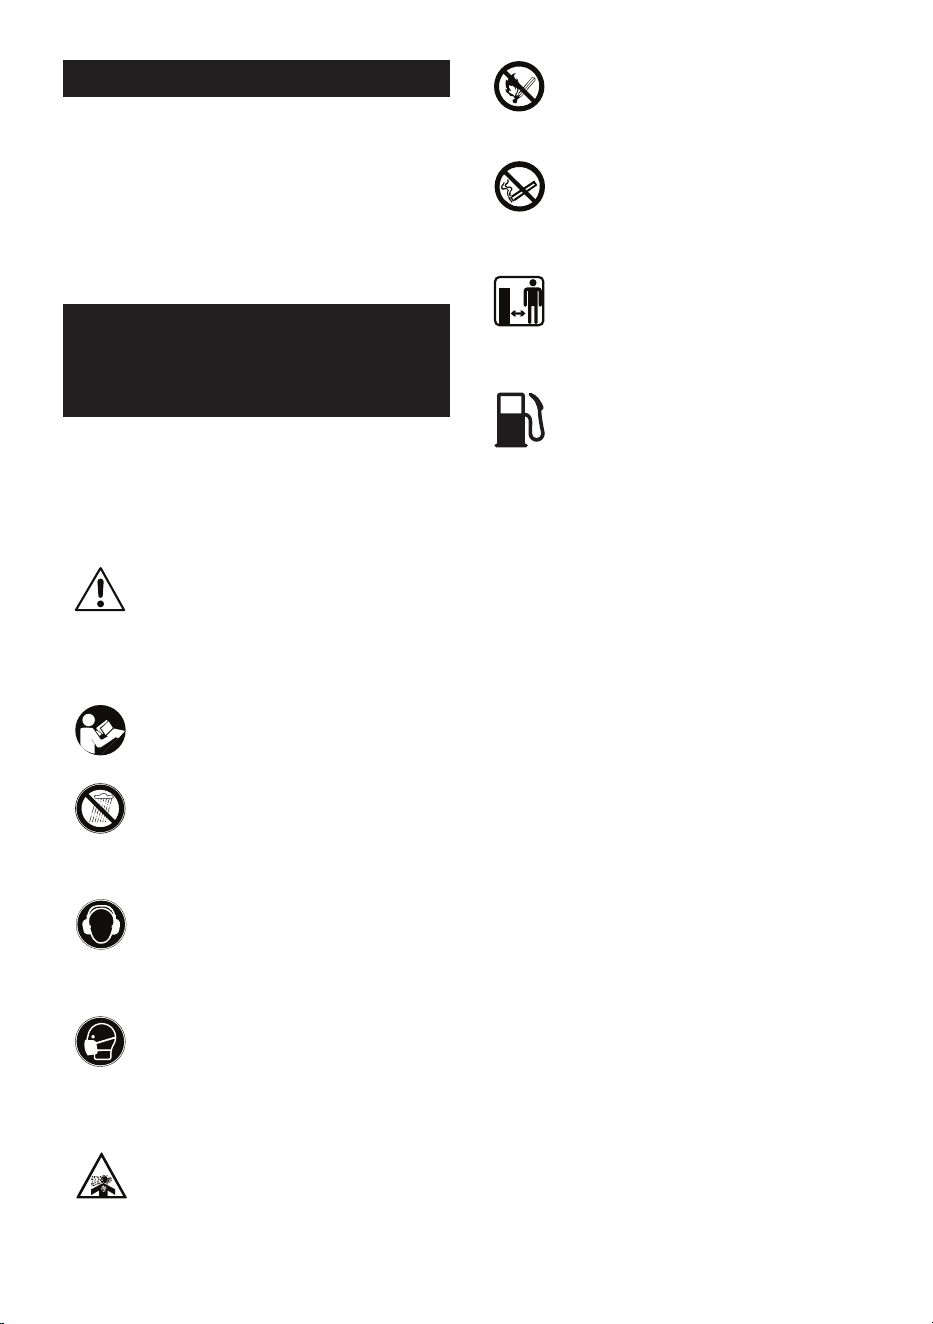
The following table depicts and describes
safety symbols that may appear on this
product. Read, understand and follow all
instructions on the machine before attempting
to assemble and operate.
This graphic accompanied by the
words WARNING, DANGER OR
CAUTION calls attention to an act
of a condition which can lead to
SERIOUS INJURY.
WARNING – To reduce the risk of
injury, user must read instruction
manual.
Do not use in rain or wet conditions.
Wear hearing protection.
Wear respiratory protection.
Risk if respiratory injury. Operate
engine OUTSIDE and far away from
windows, doors, and vents.
TABLE OF CONTENTS
SAFETY & INTERNATIONAL SYMBOLS ..............2
SAFETY INSTRUCTIONS .........................................3
KNOW YOUR UNIT .....................................................6
SPECIFICATIONS ....................................................... 7
ASSEMBLY ................................................................... 7
OPERATION ..................................................................9
MAINTENANCE .........................................................12
TROUBLESHOOTING ..............................................15
WARRANTY ................................................................ 16
Risk of FIRE while handling fuel.
Do not smoke while handling fuel.
Keep all bystanders away.
Always use clean, frensh, unleaded
fuel.

3 - EN
SENIXTOOLS.COM
SAFETY INSTRUCTIONS
GENERAL SAFETY
WARNINGS
WARNING!
Read all safety warnings, instructions,
illustrations and specications provided
with this inverter generator. Failure to follow
all instructions listed below may result in electric
shock, fire and/or serious injury.
Save all warnings and instructions for future
reference.
1. Work area safety
a. Keep work area clean and well lit. Cluttered
or dark areas invite accidents.
b. Do not operate Inverter Generator in
explosive atmospheres, such as in the
presence of flammable liquids, gases or
dust. Inverter Generator create sparks which
may ignite the dust or fumes.
c. Keep children and bystanders away
while operating an Inverter Generator.
Distractions can cause you to lose control.
2. Electrical safety
a. Inverter Generator plugs must match
the outlet. Never modify the plug in any
way. Do not use any adapter plugs with
earthed (grounded) Inverter Generator.
Unmodified plugs and matching outlets will
reduce risk of electric shock.
b. When operating an Inverter Generator
outdoors, use an extension cord suitable
for outdoor use. Use of a cord suitable for
outdoor use reduces the risk of electric shock.
c. If operating an inverter generator in
a damp location is unavoidable, use a
residual current device (RCD) protected
supply. Use of an RCD reduces the risk of
electric shock.
NOTE The term “residual current device (RCD)”
can be replaced by the term “ground fault circuit
interrupter (GFCI)” or “earth leakage circuit
breaker (ELCB)”.
3. Personal safety
a. Stay alert, watch what you are doing and
use common sense when operating an
inverter generator. Do not use an inverter
generator while you are tired or under the
influence of drugs, alcohol or medication.
A moment of inattention while operating
Inverter Generator may result in serious
personal injury.
b. Use personal protective equipment.
Always wear eye protection. Protective
equipment such as a dust mask, non-skid
safety shoes, hard hat or hearing protection
used for appropriate conditions will reduce
personal injuries.
c. Do not let familiarity gained from
frequent use of tools allow you to become
complacent and ignore tool safety
principles. A careless action can cause
severe injury within a fraction of a second.
4. Inverter generator use and care
a. Do not force the inverter generator. Use
the correct inverter generator for your
application. The correct inverter generator
will do the job better and safer at the rate for
which it was designed.
b. Do not use the inverter generator if the
switch does not turn it on and off. Any
inverter generator that cannot be controlled
with the switch is dangerous and must be
repaired.
c. Store idle Inverter Generator out of the
reach of children and do not allow persons
unfamiliar with the inverter generator or
these instructions to operate the inverter
generator. Inverter Generator are dangerous
in the hands of untrained users.
d. Maintain Inverter Generator and
accessories. Check for misalignment
or binding of moving parts, breakage of
parts and any other condition that may
affect the inverter generator’s operation.
If damaged, have the inverter generator
repaired before use. Many accidents
are caused by poorly maintained Inverter
Generator.
e. Use the inverter generator, accessories
and tool bits etc. in accordance with
these instructions, taking into account
the working conditions and the work to
be performed. Use of the inverter generator
for operations different from those intended
could result in a hazardous situation.
f. Keep handles and grasping surfaces
dry, clean and free from oil and grease.
Slippery handles and grasping surfaces do not
allow for safe handling and control of the tool
in unexpected situations.

EN - 4
SENIXTOOLS.COM
5. Service
a. Have your inverter generator serviced
by a qualified repair person using only
identical replacement parts. This will en-
sure that the safety of the inverter generator
is maintained.
SPECIFIC SAFETY
WARNINGS FOR
GENERATOR
a. Follow the maintenance and repair
instructions for this machine. Never carry
out any modifications of the machine.
Never change the preset rotary speed
or the engine and generator settings.
Information about maintenance and repair
is provided in this user manual.
b. Never touch the machine heedlessly. You
can burn yourself. Please note that the
engine, exhaust pipe and other surfaces
and lines can reach very high temperatures
while the generator is in operation.
c. Make sure that the air box of the
combustion engine is clear. Keep the air
box free of dust, dirt particles, gases and
fumes.
d. Do not operate the equipment with known
leaks in the engine’s fuel system.
e. Do not cover the generator during
operation.
f. Parts, especially exhaust system
components, get very hot during use. Stay
clear of hot parts.
g. Keep access doors on enclosures locked
during operation.
h. Keep the generator and surrounding area
clean at all times.
i. Always switch the generator off and let
it cool down before refueling it. Petrol is
easily flammable. Never smoke when you
are refueling the generator. Do not refuel
the generator if there is an open fire in the
vicinity!
j. Always use suitable aids such as funnels
and filler necks. Don’t spill any fuel on
the generator or its exhaust system.
There is a risk of ignition. When spills of
fuel or oil occur, they must be cleaned up
immediately.
k. Exhaust gases and fuel fumes are noxious.
Fuel fumes can ignite. Never use the
generator in environments where there is a
risk of explosion.
l. Never breathe in any fuel fumes, when
you are refueling the generator. Never
fill the tank in enclosed spaces, such as
basements or sheds. There is a risk of
poisoning and explosion!
m. Do not eat or drink, while you are refueling
the generator. If you have swallowed petrol
or oil, or if petrol or oil has got into your
eyes, then seek the advice of a doctor
immediately
n. Avoid skin contact with petrol.
o. Close the tank lid immediately after filling
the tank. Make sure that it is properly
closed.
p. Never use the generator without an air
filter. Never operate the generator if it is
not fully assembled or if housing parts are
missing or damaged.
q. Allow the generator to reach its operating
speed and to warm up briefly before
connecting consumer appliances. Unplug
consumer appliances first and allow the
generator to continue to run for a short
time, before switching it off.
r. If the plugged-in product operates
abnormally or unusually slow, immediately
stop using the generator as a power
source. Read and adhere to the instruction
manual of the product to make sure that it
can be safely and efficiently powered.
s. Only use a suitable means of transport
and lifting devices with sufficient weight
bearing capacity when transporting the
generator.
t. Secure the generator on transport vehicles
to prevent it from rolling, slipping, and
tilting.
RESIDUAL RISKS
Even if you are operating this generator in
accordance with the provisions, residual risks
will always still remain. The following dangers
can arise in connection with the structure and
design of product:
a. Fuel leakage when the tank is rusted
through or damaged.
b. Splash fuel/oil when refilling.
c. Extraordinary exhaust gases or noise if the
muffler is defect.

5 - EN
SENIXTOOLS.COM
INTENDED USE
This generator can be used as temporary
power supply to power on electrical appliances
such as Inverter Generator, lights or household
appliances if there is no mains electricity
available.
It can’t be used as a long-term power supply
or as the exclusive power source for buildings,
machines, and industrial facilities etc.,
especially not for medical devices for humans
or animals. This generator is for private use
only. It shall not be connected to any power
distributing devices or be used in enclosed
spaces!
EN - 6
SENIXTOOLS.COM
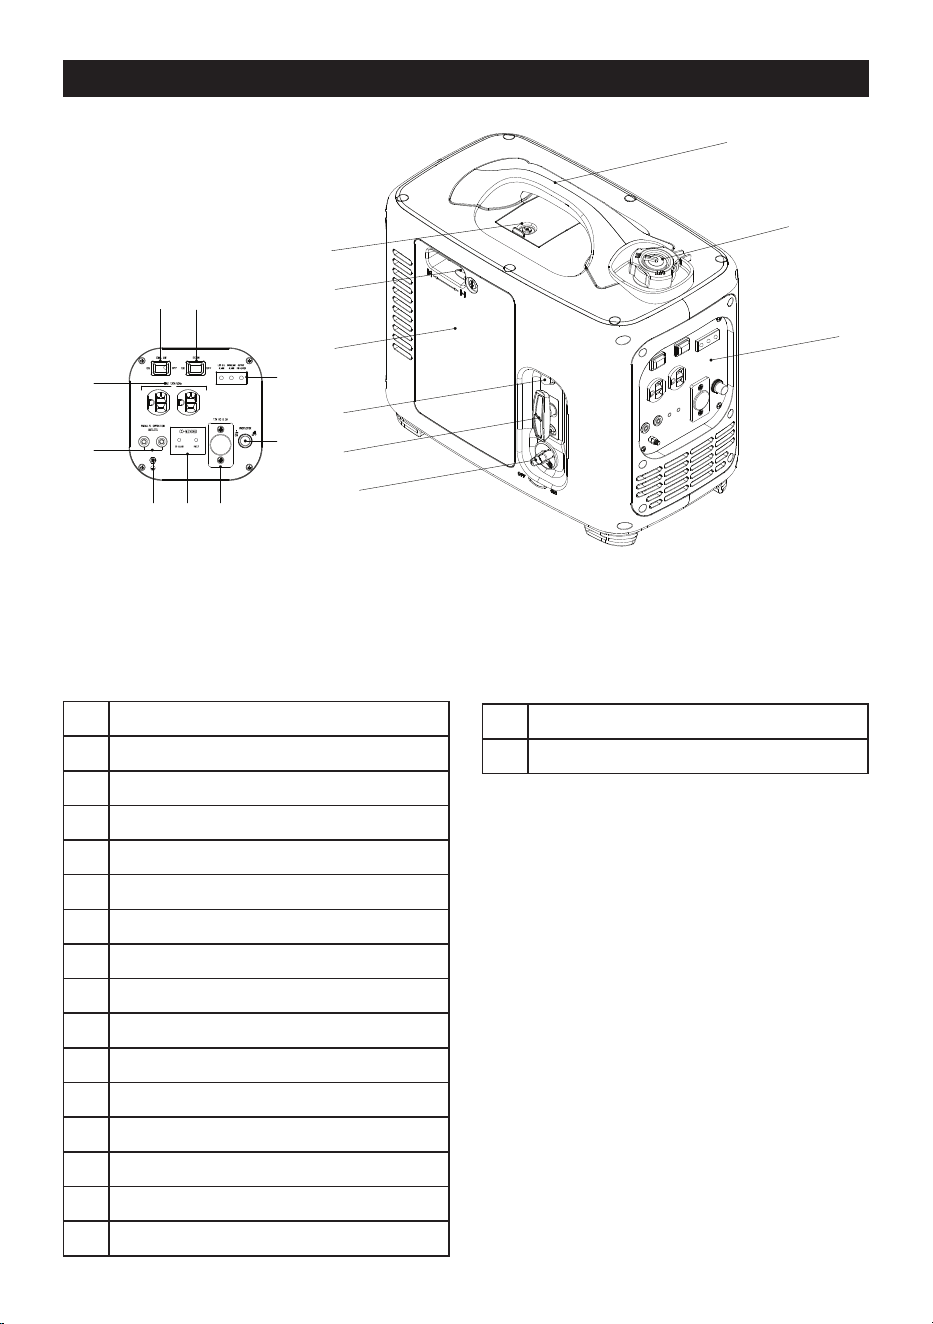
KNOW YOUR UNIT
1
2
3
4
5
6
7
8
9
1011
12
13
14
15
16
17
18
APPLICATIONS
Model: GN4QL-M1
As a generator,
Generating for normal use of electrical
appliances when no mains electricity available.
1 Spark Plug Access Cover
2 Handle
3 Fuel Cap with Air Relief Valve
4 Choke Switch
5 Air Filter Access Cover
6 Primer Bulb
7 Starter Handle
8 Fuel Switch
9 Function Panel
10 Economy Switch
11 Engine Switch
12 120V AC Receptacle
13 Parallel Kit Terminal
14 CO Detector
15 12V DC Receptacle
16 DC Breaker Reset Button
17 LED Indicators
18 Ground Terminal
7 - EN
SENIXTOOLS.COM
applied.
It is necessary to identify safety measures
to protect the operator that are based on
an estimation of exposure in the actual
conditions of use (taking account of all parts
of the operating cycle such as the times when
the product is switched o and when it is
running idle in addition to the loaded time).
ASSEMBLY
1. Unpack all parts and lay them on a flat,
stable surface:
2. Remove all packing materials and shipping
devices, if applicable.
3. The scope of delivery varies depending on
the country and purchased variant.
Model of GN4QL-M1
• Generator x1
• Oil can x1
• Spout of oil can x1
• Spark plug sleeve x1
• Wrench x2
• Instruction manual x1
4. If you find that parts are missing or show
damage do not use the product but contact
your dealer. Using an incomplete or
damaged product represents a hazard to
people and property.
5. Ensure that you have all the accessories
and tools needed for assembly and
operation. This also includes suitable
personal protective equipment.
WARNING!
This product is not delivered with fuel and oil.
Fill the oil tank and the fuel tank for the rst
use. It is essential to check the oil and fuel
level before every starts.
WARNING!
Wear protection equipments in case of injury
and always lay the product on a at and stable
surface through out operation. Follow all
instructions step-by-step and use the pictures
provided as a visual guide.
SPECIFICATIONS
TECHNOLOGY
The pure sine wave inverter provides a clean,
stable power supply, guaranteeing optimum
performance and a long service life for your
devices.
Model GN4QL-M1
Starting Watts 2,000W
Running Watts 1,600 W
Rated Output (AC) 120v 60Hz 13.33 A
Rated Output (DC) 12V / 8.3A
Engine Type Single cylinder, 4-stroke
Engine
Displacement
79 cc
Engine Speed 5000rpm
Engine Speed
(ECO)
3800-5500rpm
Cooling System Forced air cooled
Fuel Tank 1.05 Gallon
Fuel Type
87+ octane, stabiliz
-
er-treated Unleaded petrol
Oil Type SAE 10W-30/5W-30/30
Oil Tank Capacity 11.8 Oz
Run Time at Full
Load
3.5 h
Run Time at 25%
load
9.5 h
CO Detector Yes
Noise 65 dB
Machine Weight 39.7 lbs
The declared noise emission value(s) have
been measured in accordance with a standard
test method and may be used for comparing
the product with another and in a preliminary
assessment of exposure.
The emissions during actual use of the
inverter generator can dier from the declared
values depending on the ways in which the
product is used especially what kind of load is
EN - 8
SENIXTOOLS.COM
OIL FILLING
NOTE:
Fill engine oil and fuel separately. Never mix
engine oil with fuel. Engine oil has a signicant
inuence on engine performance and service
life..
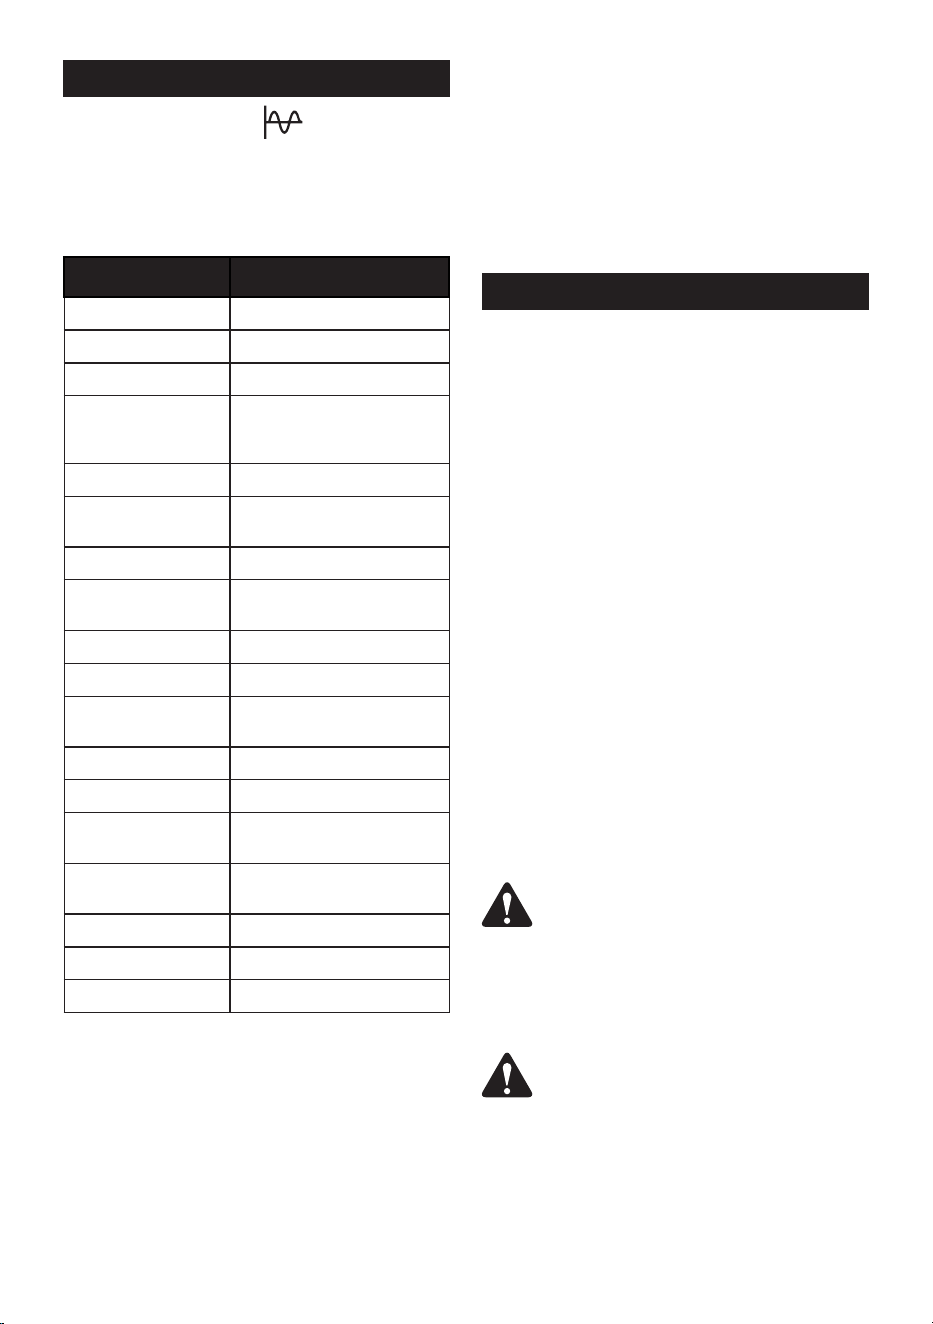
NOTE:
SAE 10W-30 is recommended for general
use. Other type shown may be used when the
average temperature in your area is within the
recommended rang.
0
0
-10
-20
20
40
60
80
30
20
10
100
40
30
5W-30 • 10W-30
Fig. 1
1. Place the product on a flat, stable surface.
Do not tilt the unit throughout the filling
process.
2. Loosen the retaining screw and detach the
access door.
Fig. 2
3. Unscrew and remove the engine oil tank
cap.
Fig. 3
4. Carefully fill the oil tank and allow the oil to
settle. Do not overfill. Use the dipstick on
the oil tank cap for checking oil level.
5. Wipe off any spilled oil thoroughly and
place the cap back onto the opening.
6. Reinstall the access door and tighten the
screw.
NOTE:
Do not run the engine even with too little oil.
Engine will shut o if engine oil level is too low.
Check the oil level before each use.
FUEL FILLING
WARNING!
Fill the fuel tank in a well-ventilated area away
from ignition sources. Fuel is combustible and
easily ignited. Never smoke while lling fuel.
If the engine is hot, shut it o and wait until it
completely cooled down before adding fuel.
NOTE:
Always use clean and fresh unleaded petrol.
Purchase fuel in quantities that can be used
within 30 days. Avoid getting dirt, dust or
water into the fuel tank. Fill fuel and engine oil
separately. Never mix fuel with engine oil.
1. Place the product on a flat, stable surface.
2. Unscrew and remove the fuel tank cap.
9 - EN
SENIXTOOLS.COM
fuel tank cap and prevent ventilation openings
from being blocked.
To turn on:
1. Check the oil and fuel level.
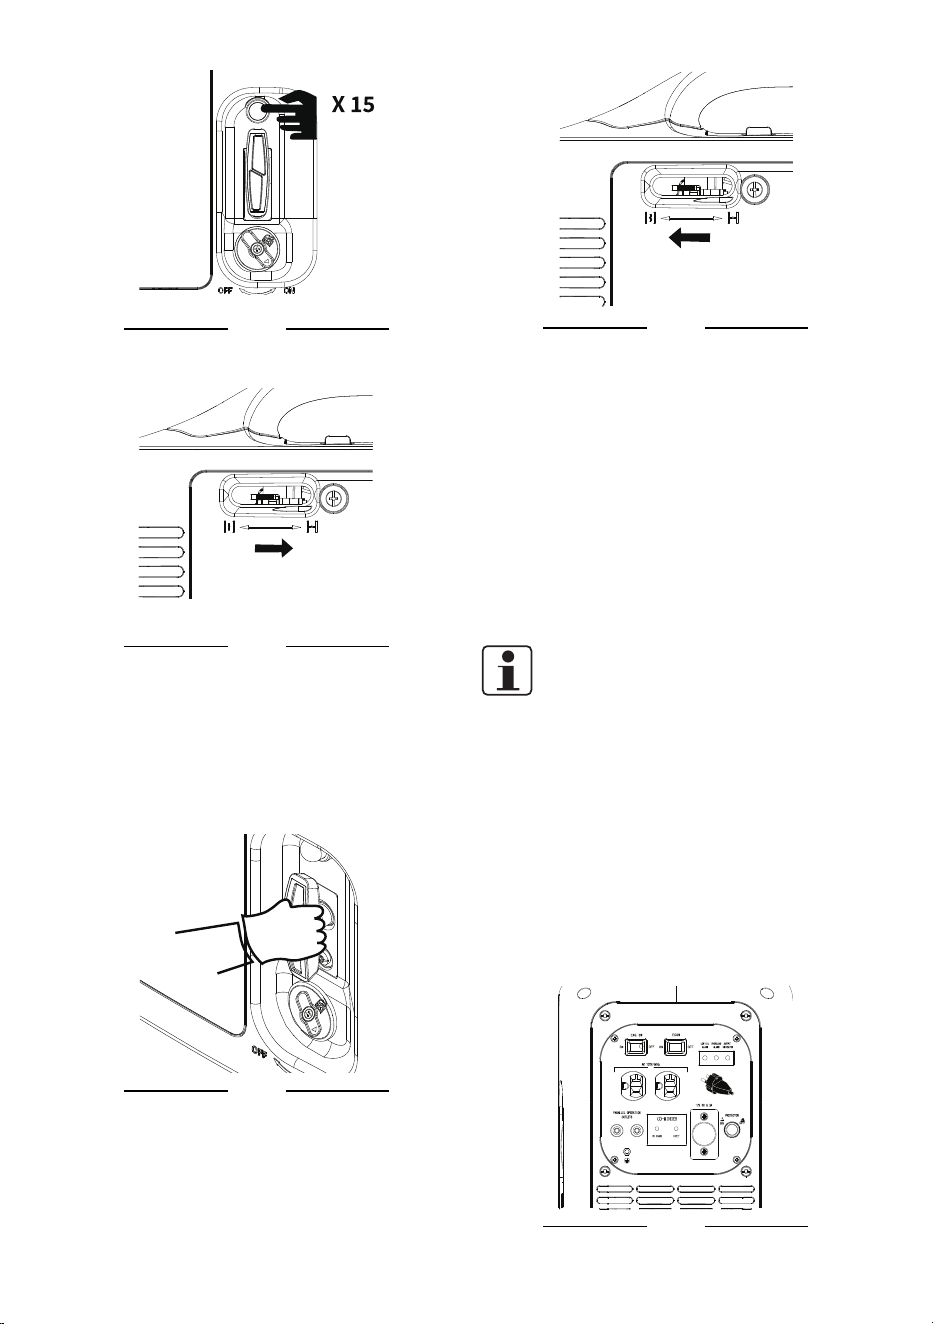
2. Set the air relief valve to “ON” position and
turn on the engine switch.
Fig.6
Fig.7
3. Set the fuel switch to “ON” position.
Fig.8
4. Press the Primer Bulb 15 times until it is
filled with fuel.
Fig. 4
3. Fill the fuel recommended by the
manufacturer into the fuel tank. Do not
overfill.
4. Leave a minimum 5 mm of space between
the top of the fuel and the inside edge of
the tank to allow for expansion.
5. Wipe off any spilled fuel with a soft cloth
and reattach the fuel tank cap.
6. Close the air relief valve by turning it to
“OFF” position.
Fig. 5
OPERATION
WARNING!
To prevent a possible re, keep the generator
at least 3 feet (1m) away from building
walls, vehicles, and other equipment during
operation. Do not place ammable objects
close to the engine or exhaust.
SWITCHING ON/OFF
WARNING!
Make sure that the electrical appliances are
unplugged and switched o and matches the
generator output voltage.Properly close the
EN - 10
SENIXTOOLS.COM
Fig.9
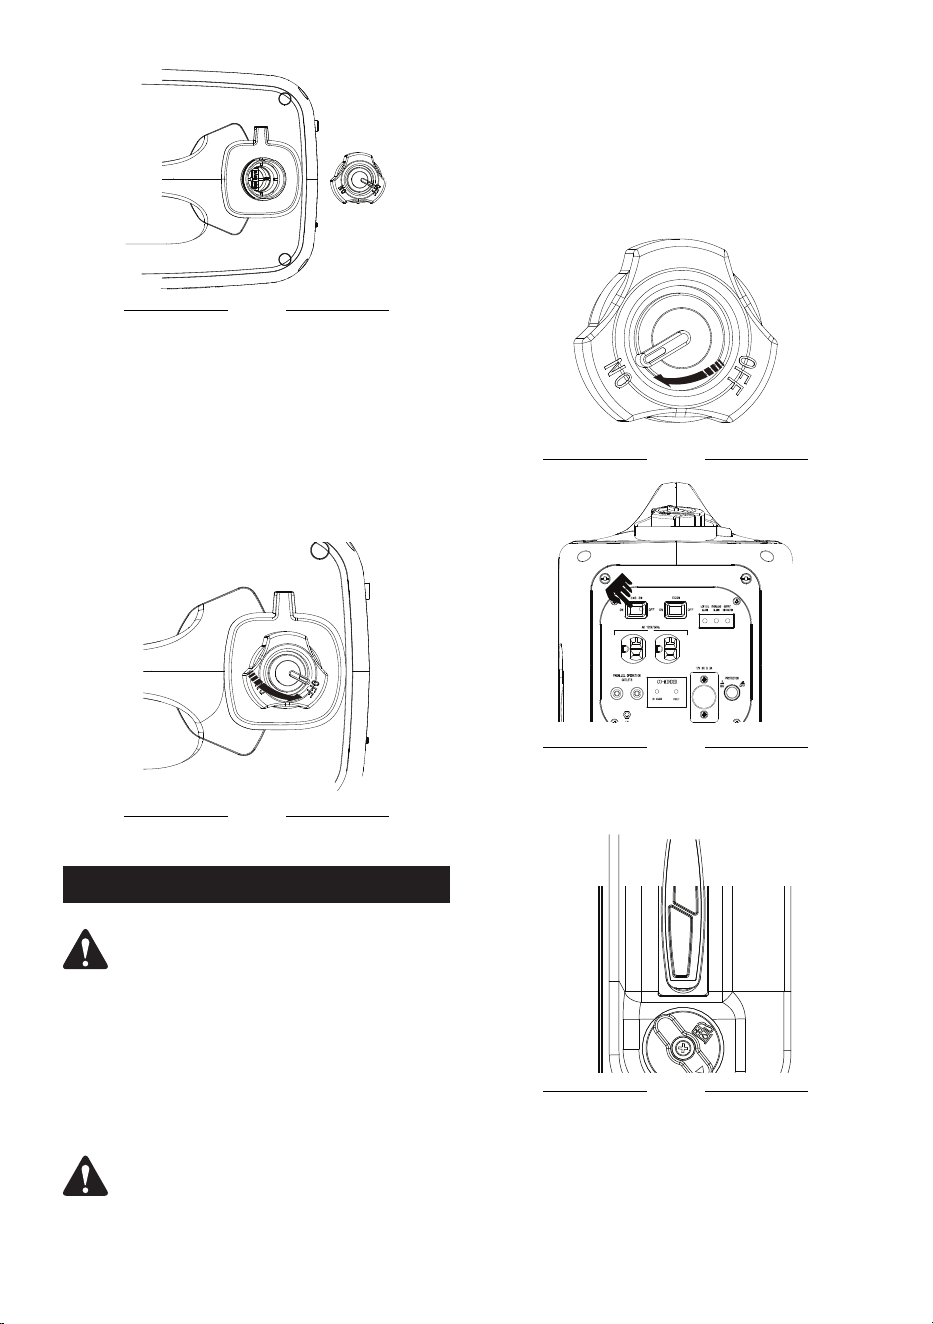
5. Shut off the choke switch by turning it to
the right side.
Fig.10
6. Firmly grip the starter handle and pull
it slowly for several times until you feel
resistance then pull it rapidly. Allow the
rope to return slowly and in a controlled
manner after each pull. Repeat until the
engine starts.
Fig.11
7. Shift the choke switch to the left side
immediately after engine starts.
.
Fig.12
8. Let the generator run idle for 10 seconds
to warm it up before connecting end
device(s).
To turn o:
1. Switch the end device(s) off and pull the
plug(s) from the output receptacle(s).
2. Let the generator run idle for three minutes.
3. Switch off the engine switch.
4. Let the generator cool down.
5. Turn the choke switch, fuel switch and air
relief valve to “OFF” position.
NOTE:
Let the engine idle for a few minutes rather
than shut it o directly. Never shut o with
load as this may damage the engine.
END DEVICE CONNECTING
Refer to “SPECIFICATION” to make sure
the device is suitable for connection to this
generator. If in doubt, consult a qualied
specialist.
This generator is designed with two 120V AC
receptacles and a 12V DC receptacle.
Fig.13
11 - EN
SENIXTOOLS.COM
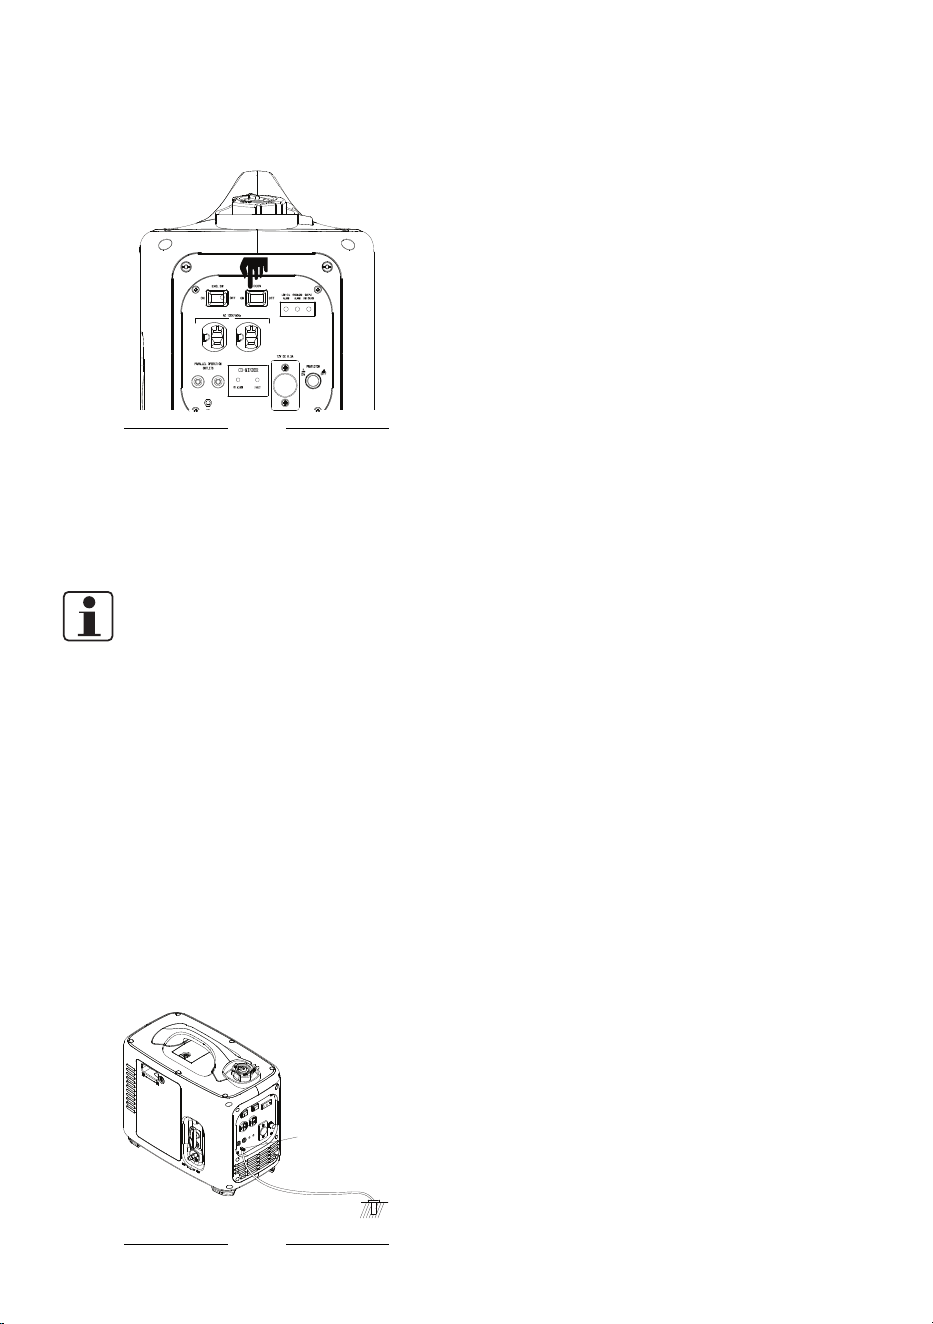
1. Switched off the end device(s) before
connect to the generator.
2. Turn off the economy switch when using
the 12V DC receptacle.
Fig.14
3. Connect the end device(s) to a proper
output receptacle on the generator.
4. Switch on and use the end device(s) as
usual.
5. Switch end device(s) off after use and pull
the plug(s) from the output receptacle(s).
NOTE:
When there is an excessive DC output from
receptacle, the protection device will cut it o
automatically. In this case, you do not need to
shut the generator o and restart, just press
the 12V DC breaker reset button to recover the
output.
GROUNDING
This device must always be grounded during
operation!
1. Clamp green-yellow earth wire (at least 1
metre long) between the hex nuts of the
grounding terminal.
2. Connect the free end with a well-earthed
piece of metal such as a ground spike!
Make a good electrical connection!
Grounding
screw
Ground
Fig. 15
PARALLEL KIT TERMINAL
It is intended to combine generators for
aording more output to end device(s). If one
generator can no longer meet the running
requirement of end device(s), a double power
output can be achieved by connecting another
in parallel using an external conductor.
ECO MODE
The engine run at a maximum speed with a
highest fuel consumption in normal use. When
shift to ECO mode, the engine speeds up as
load increases with reduced fuel consumption
rather than maintain a maxium speed. The
ECO mode is not applied to the 12V receptacle.
We recommend to turn o the ECO mode
before connecting to the 12V receptacle.
LED WARNING INDICATORS
Low Oil Indicator(Yellow)
Low oil indicator is designed to draw attention
to the oil level in case of engine failure. It
ashes and the engine stops automatically
when there is not enough oil for engine
running.
Output Indicator(Green)
We can judge the abnormality from this output
indicator. Lighting of it shows the well function
of the engine. If this indicator is o, please
notice that something wrong and need to be
checked.
Overload Indicator(Red)
The generator is shifted to the overload
protection state without any output when
this indicator is on or ashing and the output
indicator is o meanwhile. It means the
current loads in total is exceed the rated value
of this generator.
CO DETECTOR
When the generator is just started,
the CO Detector red light and FAULT
yellow light blinking at the same
time, indicating that the CO Detector
self-test function is normal. During
the operation of the generator, when
the CO Detector red light blinks, it
indicates that the CO concentration

EN - 12
SENIXTOOLS.COM
in the space where the generator is
exceeded. When the CO
Detector continues to exceed the
standard for 3 seconds, the CO
Detector will control the generator
to stop, so as to protect the user's
safety. After the shutdown, the CO
Detector red light will continue to
blink for about 5.5 minutes.
When the FAULT yellow light ashes
and stops, indicating that the CO
Detector is faulty.
OVERLOAD PROTECTION
NOTE:
When a large device rated close to the
generator’s capacity is started, the overload
light may come on for a few seconds.
The generator should only be loaded up to
its rated power. Otherwise, the generator
will be cut o automatically by the overload
protection when suering an excessive output
current. At that time, swicth the end device o
and unplug it to the generator.
If the end device is conrmed to be suitable,
but the overload protection does occur,
obeserve followings:
1. If the generator outputs from the AC
receptacle, restart the generator refer to
"SWITCHING ON/OFF" ;
2. If the generator outputs from the 12V DC
receptacle; press the DC breaker button to
resume the output.
WARNING!
Power reduction is necessary when the
generator is used in in high temperatures,
altitude and humidity.
MAINTENANCE
WARNING!
Shut o the generator and wait it to cool down
before perform any maintenance. Never take
any steps on a working unit.
WARNING!
Only perform maintenance mentioned in this
manual. All further works need to be carried
out by an authorized service center.
CHANGE OIL
1. Place the product on a flat, stable surface.
2. Cover the surface under the device with
non-flammable film or similar to prevent oil
from seeping into the ground.
3. Remove the air filter and oil filling access
cover and oil tank cap.
4. Use a suitable collection container to
collect waste oil from the oil tank opening.
5. Tilt the engine in the direction of the oil tank
opening and let the waste oil run into the
collection container. Ensure the oil in the
tank drain up completely.
6. Refill appropriate type of oil to the oil tank
according to “OIL FILLING”.
7. Refit the oil tank cap and the air filter and
oil filling access cover.
EMPTY THE FUEL TANK
Empty the fuel tank in advance if the generator
will be stored over 30 days to prevent fuel
deterioation.
1. Turn the air relief valve to “ON” position.
2. Unscrew and remove the fuel tank cap to
empty the fuel into a suitable container.
3. Screw the fuel tank cap onto the opening
and turn the air relief valve to “OFF”
position.
4. Wipe off the residual fuel around the
opening.
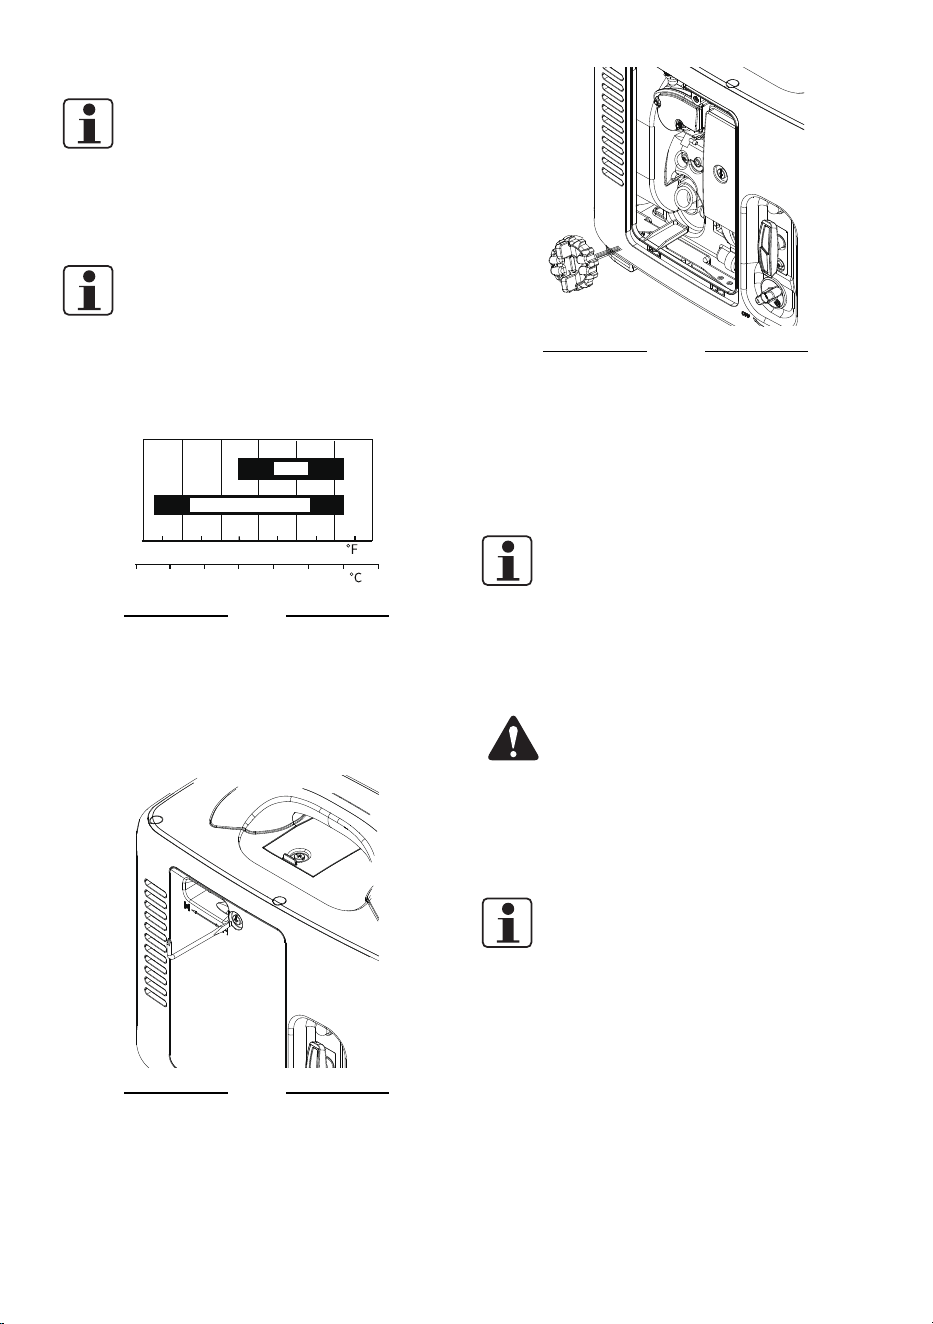
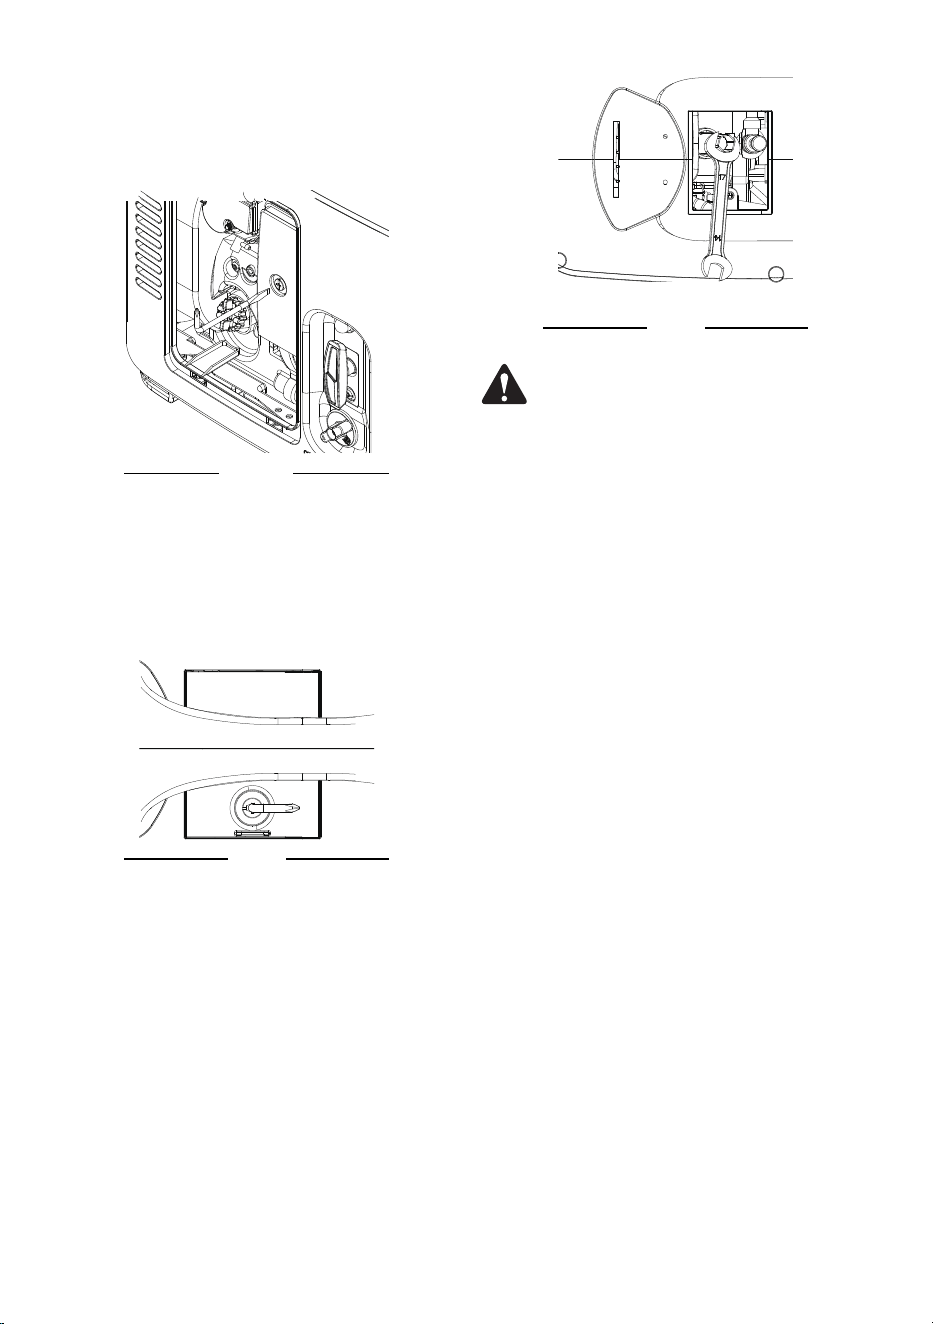
AIR FILTER MAINTENANCE
Dirty air lter blocks air from entering the
carburetor. In order to prevent carburetor
failure, please maintain the air lter regularly.
More frequent maintenance is required if the
generator is used in a particularly dirty area.
1. Loosen the retaining screw then remove
the access door.
2. Remove the air filter case and the foam.
3. Wash the foam throughtly and allow it to
13 - EN
SENIXTOOLS.COM
dry.
4. Attach the foam back and refit the air filter
case.
5. Reinstall the access door and tighten the
retaining screw.
Fig. 16
SPARK PLUG
MAINTENANCE
1. Unscrew the nut and open the spark plug
access cover on the top of the generator.
Fig. 17
2. Take the spark plug connector off with
fingers.
3. Insert a spark plug sleeve on spark plug for
easy loosening.
4. Turn the spark plug sleeve anticlockwise
by the provided wrench and take them out
carefully.
Fig. 18
WARNING!
Please prevent spark plug from dropping into
the housing.
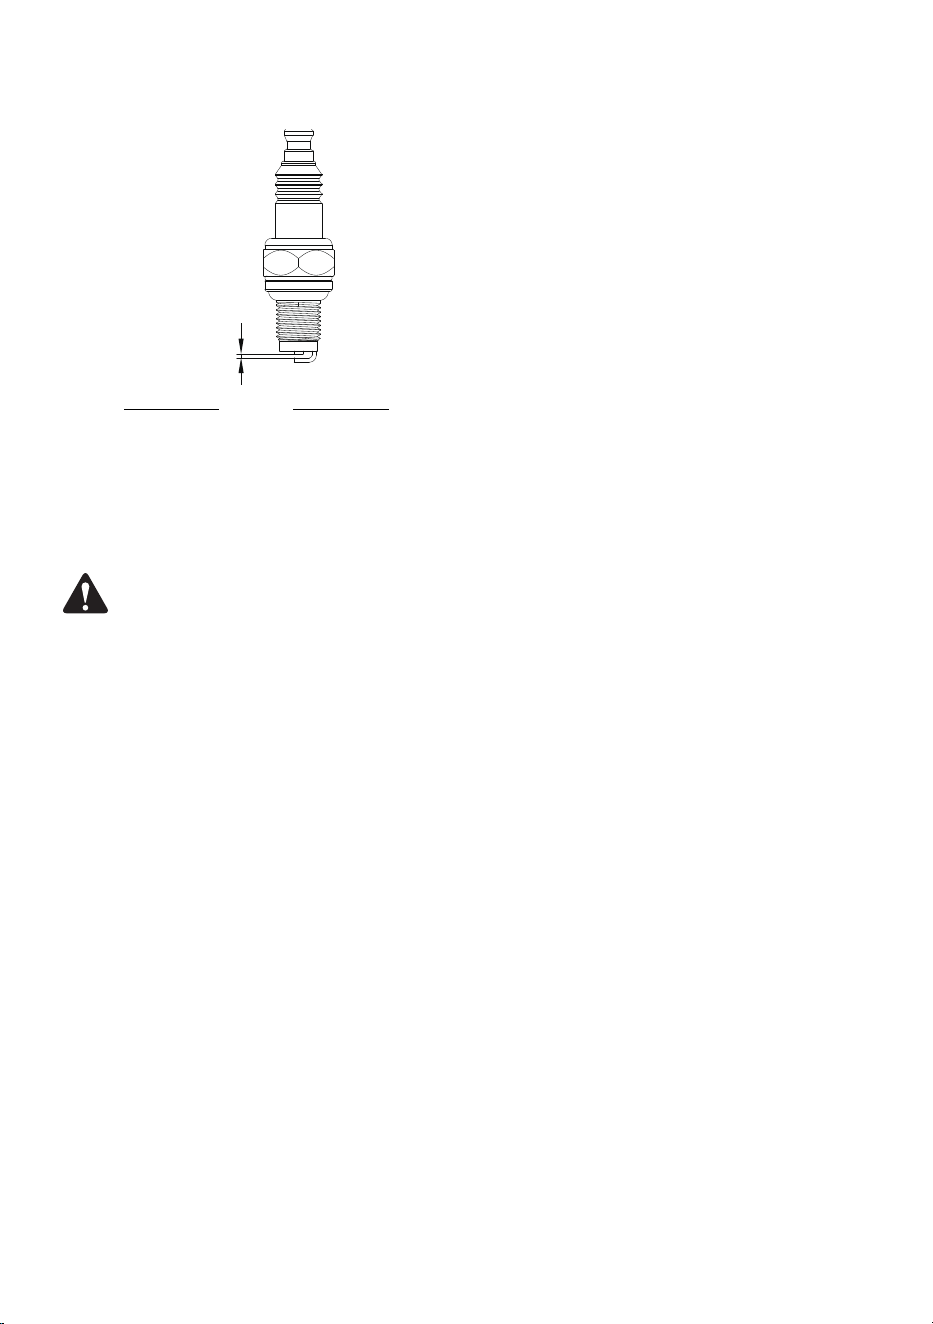
5. Check the spark plug for damage and wear.
6. Remove debris from the electrode with a
soft wired brush. Avoid heavy cleaning of
the electrode.
7. Dry the spark plug with a soft cloth if it is
wet from fuel.
EN - 14
SENIXTOOLS.COM
8. Check the spark plug gap. It should be 0.6
– 0.7 mm.
0.6-0.7
Fig. 19
9. Replace with a new spark plug if either the
electrode or the insulation is damaged.
10. When assembling the spark plug, first
insert the spark plug to the thread and then
screw lightly.
WARNING!
Do not over tighten the spark plug to avoid
damage! Tighten the spark plug properly.
A loose spark plug will cause the engine to
overheat. If overtightened, the threads in the
engine block will be damaged.
11. Plug the spark plug connector back to the
spark plug properly.
12. Close the spark plug access cover.
CLEANING
• Clean the product with a dry cloth. Use a
brush for areas that are hard to reach.
• In particular clean the air vents after every
use with a cloth and brush.
• Remove stubborn dirt with high pressure
air (max. 3 bar).
• Never immerse into water.
• Do not use chemical, alkaline, abrasive
or other aggressive detergents or
disinfectants to clean this product as they
might be harmful to its surfaces.
TRANSPORTATION
• Check all parts for binding. Tighten all loose
screws in case of loss. The absence of any
part may affect normal use of the product.
• Only carry the generator by its handle.
• Empty oil and fuel before a long-distance
transport to avoid leakage.
• Protect the product from any heavy
impacts and strong vibrations which may
occur during transportation in vehicles.
Always secure the generator to prevent
from rolling, slipping, and tilting during
transportation.
STORAGE
• Cleaning as described above.
• Make sure all covers are properly attached.
Dust enter will lead to a low working
efficiency.
• Cover the generator with the original
package or suitable enclosure to against
dust.
• Store the generator in a dark, dry, level,
well-ventilated area that is inaccessible to
children.
• Storage area should be away from ignition
sources, such as water heaters, clothes
dryers, and furnaces.
• The ideal storage temperature is
10°C~30°C.
• Empty the engine oil and fuel tank if it is
going to be stored for an extended period
(more than 30 days) or before storing it for
the winter.
DISPOSAL
Waste product should not be disposed of
with household waste. Please recycle where
facilities exist.
Check with your local authority or retailer
for recycling advice. Users should clean up
dust generated during operation to protect
environment.

15 - EN
SENIXTOOLS.COM
TROUBLESHOOTING
Suspected malfunctions are often due to causes that the users can x themselves. Therefore,
check the product using this section. In most cases the problem can be solved quickly.
PROBLEM POSSIBLE CAUSE SOLUTION
Engine does not
start
Not enough fuel in fuel tank Add fuel
Oil tank is empty Add oil
Engine switch not set to “I” Set engine switch to “I”
Air lter is dirty Clean air lter
Primer is not pressed Press the primer and restart
Carburettor is ooded with fuel Open the choke wait for drying
Spark plug connector loose Attach properly
Spark plug gap is incorrect
Set gap between electrodes at
0.6 – 0.7 mm
Spark plug is wet Dry spark plug
Spark plug is damaged Replace spark plug
Engine stops
Not enough fuel in fuel tank Add fuel
Oil tank is empty Add oil
Overload Eliminate overload
End device defect Remove the device
Air lter is dirty Clean air lter
Unusual noises Screws or nuts have become loose
Check screws and nuts for
tightness and tighten, if
necessary

EnglishSENIXTOOLS.COM
WARRANTY
SENIX TOOLS LIMITED WARRANTY
FOR THREE YEARS from the date of purchase, this product is warranted against defects in material or workmanship.
A defective product will be repaired or replaced free of charge. For further detail on warranty coverage and warranty
repair information, visit senixtools.com, call 1-800-261-3981, or email us at senix.service@yat.com
• This warranty does not cover part failure due to normal wear or tool abuse.
• This warranty does not apply to accessories or damage caused where repairs have been made or
attempted by others.
• This warranty does not cover the cost of transporting the product for warranty.
• The warranty is void if the product has been used for commercial, professional, or rental service purposes.
• The warranty applies to the original retail purchaser and is not transferable.
• Proof of purchase is required to obtain warranty coverage.
THIS WARRANTY IS GIVEN IN LIEU OF ALL OTHERS, INCLUDING THE IMPLIED WARRANTY OF
MERCHANTABILITY AND FITNESS FOR A PARTICULAR PURPOSE, AND EXCLUDES ALL INCIDENTAL OR
CONSEQUENTIAL DAMAGE.
Some states do not allow limitations on how long an implied warranty lasts or the exclusion or limitation of
incidental or consequential damages, so these limitations may not apply to you. This warranty gives you
specic legal rights and you may have other rights which vary in certain states or provinces.
NOTE: SENIX is not responsible for any injury caused by tampering and may prosecute warranty fraud to the fullest
extent permitted by law.
60-DAY MONEY-BACK GUARANTEE. If for any reason within 60 days from the date of original purchase you are
not completely satised with the performance of this SENIX product, you can return it with the original sales receipt
for a full refund.
Latin America: This warranty does not apply to products sold in Latin America. For products sold in Latin America,
see the country-specic warranty information contained in the packaging, call the retailer from which it was
purchased, or visit the website for warranty information.
Free warning label replacement: If your warning labels become illegible or are missing, call 1-800-261-3981 for
a free replacement.
REGISTER ONLINE - www.senixtools.com/pages/product-registration
Thank you for your purchase! Register your product now for:
Warranty Service: Registering your product will help you obtain more ecient warranty service in case of a problem
with your product.
Conrmation of Ownership: In case of an insurance loss, such as re, ood, or theft, your ownership registration
will serve as proof of purchase.
For your safety: Registering your product will allow us to contact you in the unlikely event a safety notication is
required under the Federal Consumer Safety Act.
YAT USA INC. 10506 Bryton Corporate Center Dr, #500 Huntersville, NC 28078
For customer support, please call 1-800-261-3981 or email us at senix.support@yatusa.com
WARRANTY