12/24
BC812

- 1 -
Overview
BQ14028 adopts low illumination at night, Sony dynamic CMOS sensor, external IR
Illuminator, you can obtain excellent observation results both day and night. The
novel structure patent design greatly improves the observation effect and
observation experience, and the built-in infrared color filter greatly improves the
observation effect of the equipment during the day, reduces the overexposure
under natural light during the day, and restores more realistically.
BQ14028 strengthens the waterproof design and reaches the protection level of
IP67. Using a single built-in rechargeable battery with a low power consumption
design, the continuous working time can reach more than 5 hours, meeting the
requirement of using without changing the battery all night. In addition, it has
advanced fast start-up performance, fast imaging in 3 seconds after booting, which
significantly improves the user's quick response ability. The high refresh rate design
enables the operator to obtain the ability to observe fast-moving targets. At the
same time, it is equipped with high-quality and high-performance objective lens,
making it safe and reliable without being afraid of strong light. When installed on a
tripod for long-distance night observation, the night observation distance can reach
300 meters.
BQ14028 is a rear clip-on model. The built-in WiFi module allows users to record
and share videos, and comes with a Type-C interface for external power supply and
data copying at the same time. It is mainly used in outdoor night shooting, hunting,
outdoor adventure, and can be clipped onto a sniper scope to complete night
hunting.
- 2 -
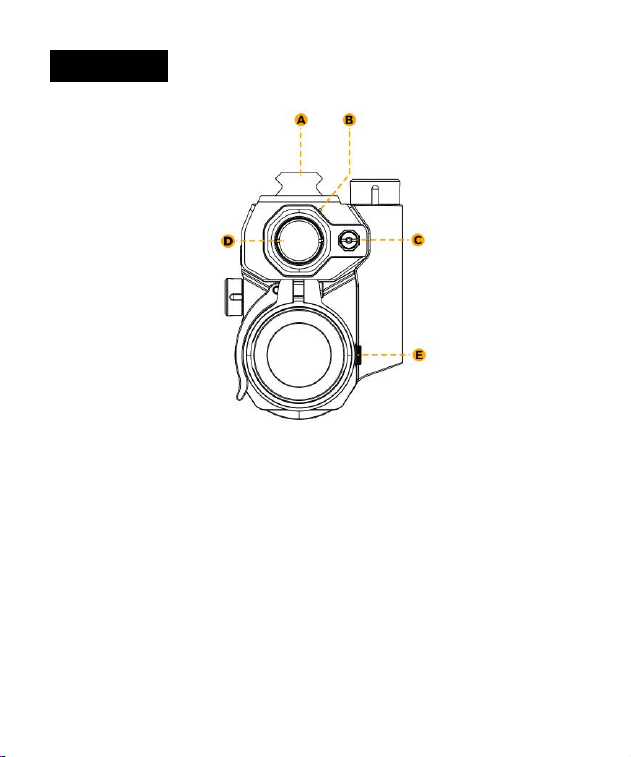
Interfaces
Front View
A. Picatinny rails, used for the installation of another IR flashlight
B. Photosensitive sensor, detects the brightness of external ambient light, and
automatically switches between day or night mode
C. Laser red dot for fast positioning of targets at close range
D. IR Illuminator for night observation and make the image clearer
E. Latch, which is used to reinforce the connection between the adapter and the
device
- 3 -
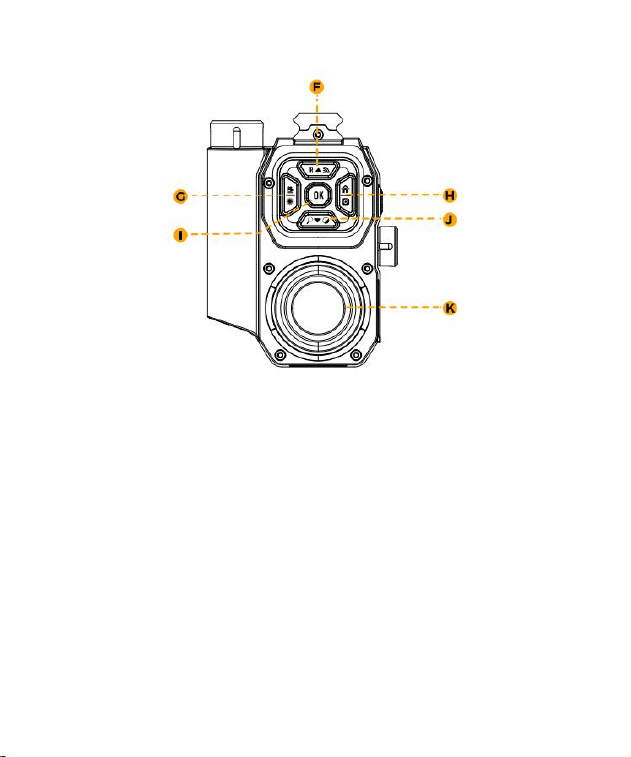
Back View
F. Upward / IR Illuminator / WiFi switch
G. Video/Laser red dot switch/Leftward
H. Menu/Photo/Rightward
I. OK button
J. Downward/Zoom(+) or Zoom (-)/ Black & White or Color mode Switch
K. Eyepiece lens

- 4 -
Left View
L. Power button, power on/off the scope
M. Eyepiece lens diopter adjustment ring
N. Objective lens focusing adjustment knob
O. TF card slot / HDMI interface/ Type-C power & data interface
- 5 -
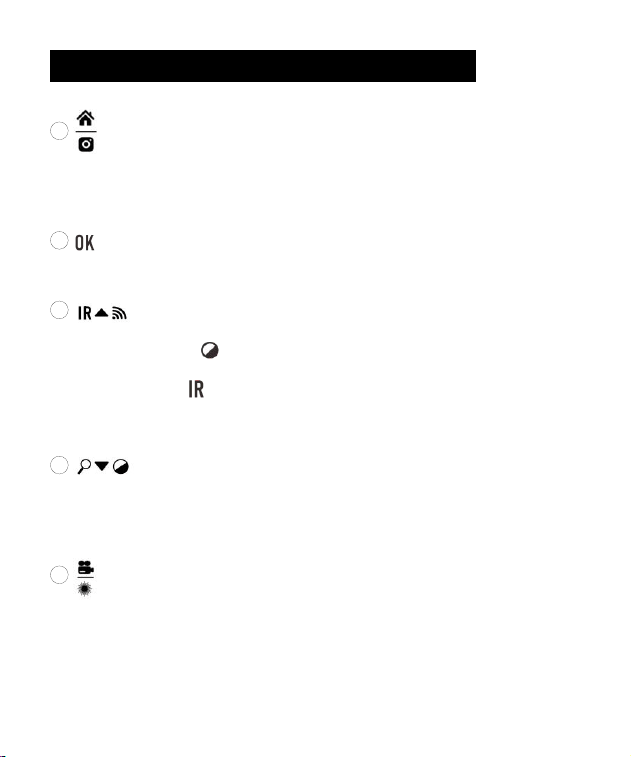
Instructions for Shortcut Button Operation
1
Button
Short press(<1s) to entry or exit the menu option, and long press (>1s) to take a
photo.
2
Button
Short press(<1s) to do item select.
3 Button
Firstly, long press the button (>1s) to switch to Black & White mode, then
short press(<1s) the button to adjust the IR Illuminator (IR1-3/Off) long press
(>1s) to turn on & off WiFi;
4
Button
Short press(<1s) to realize Zoom (+) or (-), long press (>1s) to switch to
Black & White or color mode;
5
Button
Press for a short time (<1s) to turn on or off the laser light, long press
(≥1s) to open the video recording function

- 6 -
Working Principle
The BQ14028 digital day & night vision scope collects external light through the
objective lens, and then converts the optical signal into electrical signal through the
digital CMOS sensor module. This signal is then transmitted to the CPU chipset for
processing in the format of MIPI signals. Finally, the electrical signal is transmitted
to the OLED screen, allowing users to view the image on the OLED screen on the
eyepiece.
The BQ14028 digital day & night vision scope features a powerful high brightness
dimmable IR Illuminator that can help to image object clearly and display them on
the OLED screen in low light and total darkness scenery. The OLED display screen
has high resolution and adjustable brightness. The image display adopts digital
zoom, allowing users to magnify the displayed image by 1x, 2x, 3x, 4x and 5x .
Installation Instructions
1. Preparation
Please take out the device, adapter, rubber shims from the box. And prepare a
riflescope (eyepiece diameter ≤ 48mm) and one 18650, 3. 7V battery.
- 7 -
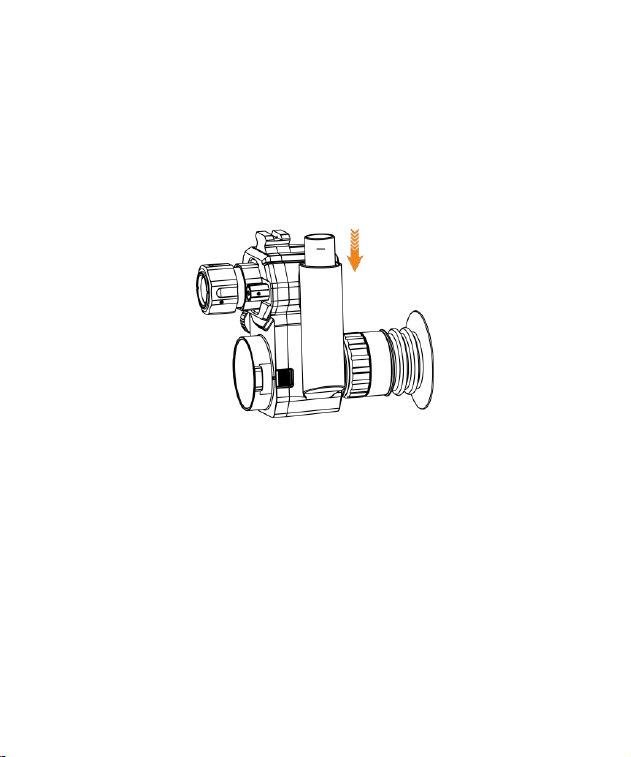
2. Battery Installation
(1) Rotate the battery cap counterclockwise and remove it;
(2) Place the battery into the battery compartment as shown. Note that the
positive electrode should be facing downwards;
(3) Put the battery cap back and tighten it.
3. Connect the adapter to the riflescope
(1) Release the retainer clip of the adapter and place the appropriate thickness
shim in the adapter, and the bulge edge of the shim is stuck with the edge of the
adapter;
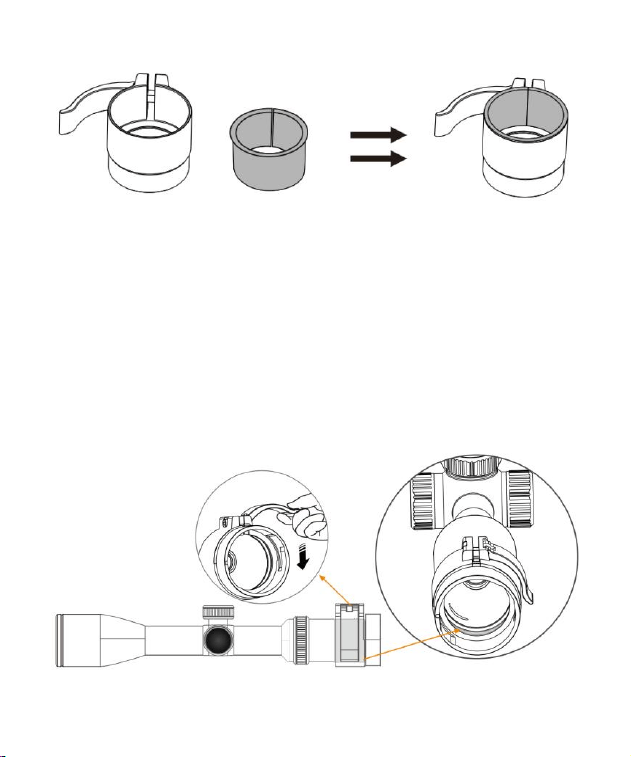
- 8 -
(2) Insert the eyepiece of the riflescope into the adapter, ensuring that the
edge of the eyepiece aligns with the edge of the shim inside the adapter. The
bulge on top of the adapter should be positioned facing directly upwards to
prevent any misalignment of the reticle once the night vision device is installed.
Finally, pull the retainer clip of the adapter downwards to secure the adapter
firmly to the riflescope.
- 9 -
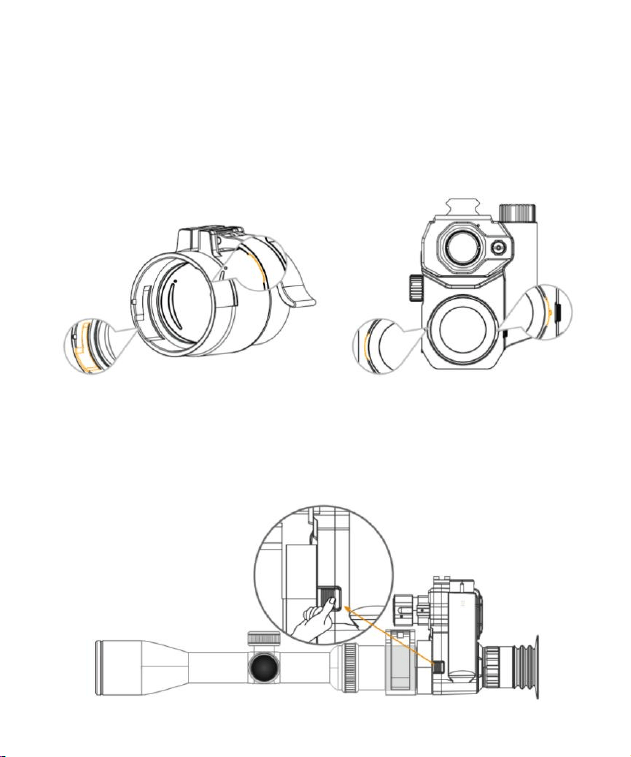
4. Connect the night vision scope to the riflescope
(1) Align the two bulge of the night vision scope with the two grooves in the
adapter, insert and rotate clockwise the scope, and after hearing a "click", the
installation is finished;
Note: How to separate?
Pull the latch backwards, and then rotate the night vision scope
counterclockwise, then remove the scope.
- 10 -
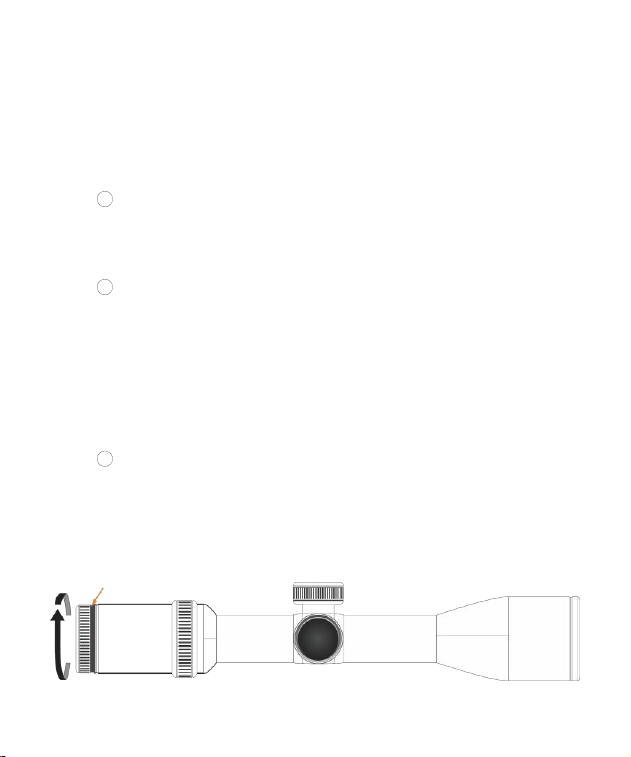
Focusing Adjustment
(2) Turn on the scope by long press the power button on the left side of the
scope and check the image quality. You may need to adjust the eyepiece and
objective lens to make the image clearer. Please follow the steps below:
1 If you can't see the electronic icons on the screen clearly, rotate the
diopter adjustment ring to suit your eyesight. If you can see them clearly,
please skip this step;
2 If you can't see the reticle of the riflescope clearly, please rotate the
objective focusing adjustment knob on the left side of the night vision scope
until you can see the reticle clearly, then the night vision scope has achieved
the best imaging results. At the same time, you still need to manually adjust
the focusing adjustment knob of your riflescope to get the best image
quality at different distances.
3
If you are still unable to see the image clearly after completing the
above steps. Please remove the riflescope out, make 1 circles
counterclockwise and pull out the edge of the eyepiece of your riflescope.
Then repeat the above steps to install and adjust again.

- 11 -
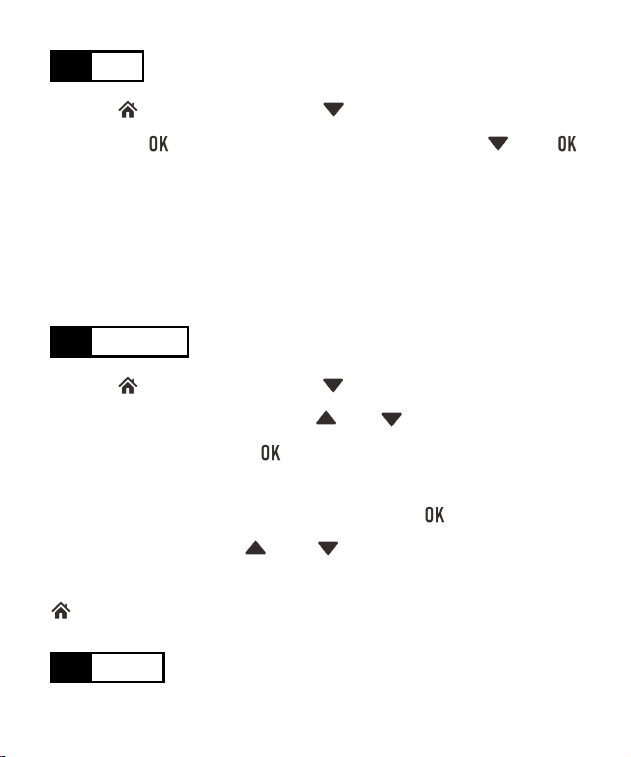
Menu Operation Instructions
1. Reticle Center Position Adjustment
Press the button, and press the button to select the "Reticle Center
Position Adjustment" option, long press the button (3s) and then pop up with
Reset/Save two options, select the "Reset" and adjust the XY coordinate position of
the center of the reticle. Press and to adjust the Y coordinate of the
center line. Press and to adjust the X coordinate of the center line. After
completion, press button to select the "Save". Choosing "Reset" can cancel all
the X/Y configuration and go back to default state.
Note: This feature is only available for certain batches of products.
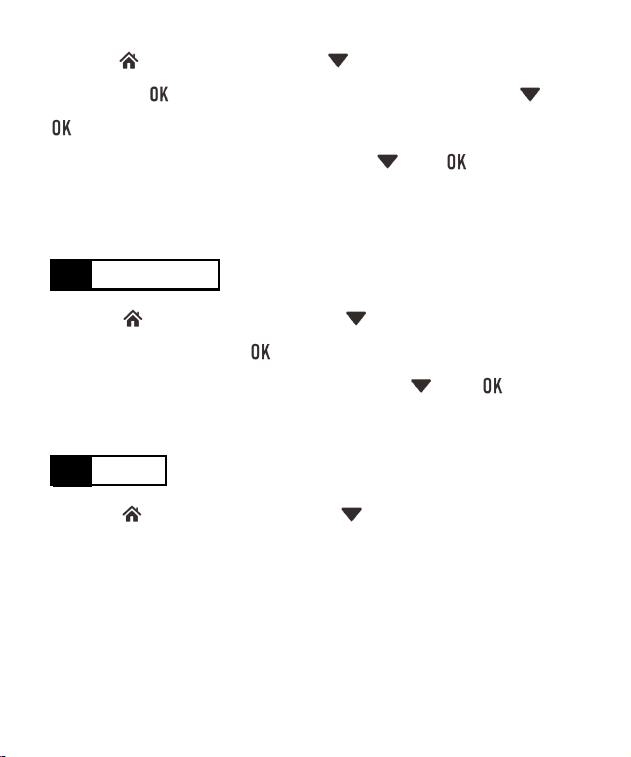
2. Language
Press the button firstly and press the button to select the option
"Language", and press the button to enter. Users can choose the option
according to actual needs. Include "Chinese/English/Spanish/Portuguese/French/
German/Italian/Polish/Turkish/Russian". After confirmation, the system can switch
to the corresponding language.
3. Picture in Picture
- 12 -
Press the button first and press the button to select the option "Picture
in Picture", and press the button to enter the "PIP" option, then pop up with
options such as "Off/2x/4x/6x". You can choose 2x/4x/6x magnification according
to the actual observation requirements, or turn off this function. This function is
turned off by default.
4. G Sensitivity
Press the button first and press the button to select the option "G
sensitivity", and press the button to enter the "G sensitivity" option, and then
pop up with three options such as "high/medium/low". Users can choose the
option according to actual needs.
5. Pitch Angle
Press the button first and press the button to select the option "Pitch
Angle", and press the button to enter the "Pitch Angle" option, and then pop
up the "off/on" option. Users can choose to turn the pitch angle on or off according
to the actual needs of the real-time display.
6. Default Color
- 13 -
Press the button first and press the button to select the option "Default
Color", and press the button to enter the sub-menu. Users can choose the
color according to actual needs.
7. LCD Brightness
Press the button first and press the button to select the "LCD
Brightness" option, and press the button to enter the sub-menu. Then adjust
the brightness on the pop-up sub-menu, including "1(Super Dark)", "2(Dark)",
"3(Normal)", "4(Bright)", and "5(Super Bright)".
8. IR Illuminator
Press the button first and press the button to select the "IR Illuminator"
option, and press the button to enter the sub-menu, the sub-menu will pop
up with "Off", "Auto" and other 3 levels of IR Illuminator intensity selection switch:
"IR1", "IR2", "IR3". Users can choose the color according to actual needs. To save
battery power, this switch is not saved by default and will be turned off after
restarting. When in Black & White mode, it can be adjusted and turned off by press
the button.
Note: The "Auto" option is related to the sensor. After choosing Auto option, the IR
Illuminator will be automatically on when the environment light is low and
automatically off when the environment light is bright.
- 14 -
9. Exposure
Press the button first and press the button to select the "Exposure"
option, and press the button to enter the sub-menu, then select "+2/3" or
"+1/3", "+0. 0", "-1/3"or other parameters on the pop-up sub-menu. After
confirmation, the system can realize the corresponding exposure compensation
intensity.
10. Automatic Recording
Press the button first and press the button to select the "Automatic
Recording" option, and press the button to enter the submenu, then select
"On" or "Off" on the sub-menu that pops up. After confirmation, the system will
automatically enter the recording mode to record the external scenery in real time.
11. Loop Recording
Press the button first and press the button to select the "Loop
Recording" option, and press the button to enter the sub-menu, then select
one of the options of "Off", "3 minutes", "5 minutes", "10 minutes" on the pop-up
sub-menu. After confirmation, the system will automatically enter the loop
recording mode to record the external scenery in real time and in a loop.

- 15 -
12. Playback
Press the button first and press the button to select the "Playback"
option, and then press the button to enter the album. Press , , ,
to select the file you want to check or delete, and short press the button.
Delete: short press button, then select "Delete Current" or "Delete All"
according to your needs. Then long press button(3s) to return to the album,
then long press button again to exit.
13. Audio Synchronization
Press the button first and press the button to select the "Audio
Synchronization" option, and press the button to enter the submenu, and
then press the and button to select "On" or "Off" on the pop-up
sub-menu for the voice recording.
14. Date Stamp
Press the button first and press the button to select the "Date Stamp"
option, and press the button to enter the sub-menu, then press the and
button to select "On" or "Off" on the pop-up sub-menu to select whether to
show the date label for videos and photos.
- 16 -
15. WiFi
Press the button first and press the button to select the "WiFi" option,
and press the button to enter the sub-menu, then press the and
button to select "On" or "Off" on the sub-menu. After confirmation, the system can
turn On or Off the WiFi.
Note: WiFi starts with "Ten Rings" and the default password is 12345678. You need
to download the corresponding "TenRings Shots" software from APP store, or scan
the QR code attached to this manual. The password can be changed on the APP.
16. Date/Time
Press the button first and press the button to select Date/Time option,
Cursor choice in the year position, press or button to adjust the year.
After the adjustment, press the button to jump to the month setting. Repeat
the above operations to complete the changes to the remaining items(month, day,
hour, minute, second). After the adjustment, press the button to jump to
date display format. Press or to select three display formats:
"YY/MM/DD", "MM/DD/YY", "DD/MM/YY". After confirmation, you can press the
button to exit.
17. Format
- 17 -
Press the button first and press the button to select "Format" option,
and press the button to enter the sub-menu, and then press the and
button to select "TF Card" on the pop-up sub-menu. After confirmation,
"Cancel" and "OK" options will pop up, press the and button again to
select "OK" option. Please choose carefully because the data cannot be recovered
after deletion!
18. Default Setting
Press the button first and press the button to select the "Default
Setting" option, and press the button to enter the sub-menu, and then select
"OK" or "Cancel" on the pop-up sub-menu, press the and button to
select OK option. Please operate carefully!
19. Version
Press the button first and press the button to select the "Version"
option, then software version information and serial number will be displayed on
the screen by pressing the button.

- 18 -
Warning
1. Do not look directly at the IR Illuminator in a short distance, otherwise it will
cause damage to the eyes!
2. The infrared light of this product will gather a lot of energy when it is on. It is
strictly prohibited to aim at combustible objects in close range, otherwise it
may cause fire. Please turn off the infrared light or go to sleep mode when it is
not in use!
3. This product needs to be adapted to an optical riflescope with focusing function,
otherwise it may not work!
4. Due to the design of optical path, some riflescopes may not be suitable for this
product!
5. Never look at the sun through this night vision device (or any other optical
instrument). lt may permanently damage your eyes and equipment!
6. Do not walk, run, or use any form of transportation (bicycle, motorcycle, car
etc. )when viewing through BQ14028. Doing so may prevent you from fully
understanding your surroundings, including any potential obstacles or other
hazards in your path!
Maintenance
When using the BQ14028 digital night vision device. please follow the following
recommendations, guidelines and precautions:
1. Keep the device away from any heating, direct sunlight, moisture, air
conditioning vents or other heating equipment.

- 19 -
2. Always store the device in a suitcase in a dry, well-ventilated space with a
temperature above +15'C (60°F) and below +48'C (118°F). Do not store near
heating equipment, in direct sunlight or high humidity (above 70%).
3. Clean the optical lens with camera lens cleaning products, and clean the outside
of the device with a clean soft cloth.
4. If the device is not used for more than a few weeks, please remove the battery.
5. Do not drop or shake the device in other ways. Although it has a rugged
shockproof design for outdoor use, the device contains complex digital circuitry
that can be damaged in extreme circumstances.
6. Do not open the device or attempt to repair the device in other ways.
7. Do not pour alcohol or any other liquid directly into the lens surface.
8. Do not use paper products (such as newspaper, textbook paper, etc) to clean
the surface of the lens and unit, because it may damage the coating.
9. Do not attempt to remove the eyepiece, as the OLED display may be damaged.
10. Do not place the device in direct sunlight or rain. The device is waterproof, but
not suitable for prolonged use which exposed to moisture and cannot be
immersed in water.
11. Wait at room temperature for at least 3 hours after the equipment is operated
at temperatures below zero degrees Celsius to avoid the accumulation of
condensed water on the internal surface of the lens and the consequent
atomization temperature difference due to extreme conditions.
Troubleshooting
1. The device does not turn on.

- 20 -
(1) Reinstall the battery and ensure that the polarity(+/- terminal) direction is
correct. Please refer to the silkscreen instructions on the battery installation
direction on the cover.
(2) Replace the battery.
(3) Clean the battery compartment, especially the contact points.
2. lmage Fuzzy
(1) Refocus by adjusting the objective lens focusing adjustment ring.
(2) Adjust the diopter setting by rotating the eyepiece as necessary until the
display icon is clear.
(3) Check the condition of the objective lens surface and eyepiece, and clean it
if necessary.
3. In low-light conditions, the image disappears or degrades in quality.
First make sure you are in night mode and activate infrared lighting, while
bright light sources (such as street lamps at night) may cause a decrease in
visibility or contrast. Keep the device away from the light source and the
visibility will be restored immediately.
4. Images viewed or recorded at night appear black and white.
This is a normal phenomenon and color cannot be reproduced in dim
conditions when infrared lighting is used as the primary source of light.
5. When taking photos or recording videos, it is prompted that"please insert TF
card".
(1) Check if the insertion method of the TF card is correct.
(2) Press the menu button and format the TF card.
6. When connecting the scope to the APP, it cannot be connected or is unstable.
When the battery of the device is too low, the connection to the APP will be
unstable. Please avoid connecting in a low battery state.
- 21 -
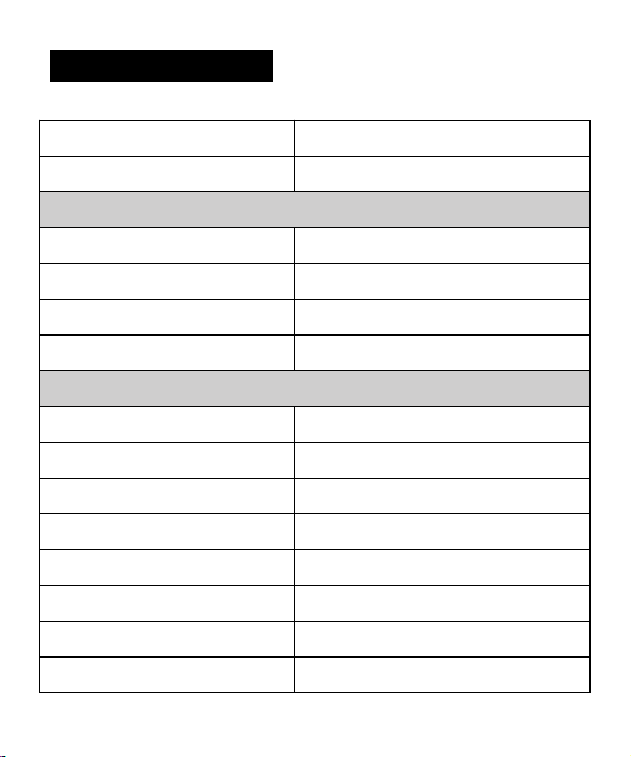
Technical Specifications
Product Model
BQ14028
Product Name
Digital Day & Night Vision scope
Sensor
Resolution(pixel)
1920×1080
Sensitivity(lux)
0. 001
Pixel Size(µm)
29
Frame Rate(fps)
60
Optics
Magnification(x)
2~10 (5x zoom)
Focal Length(mm)
16(fixed focus)
Objective Lens Size
Φ16
Field of View(H*V)
22°x16°
Operation Control
Manual focus
Entrance Pupil Diameter
6mm
Eye Relief
35mm/50mm
Focusing Angle Range(D)
-5~+5

- 22 -
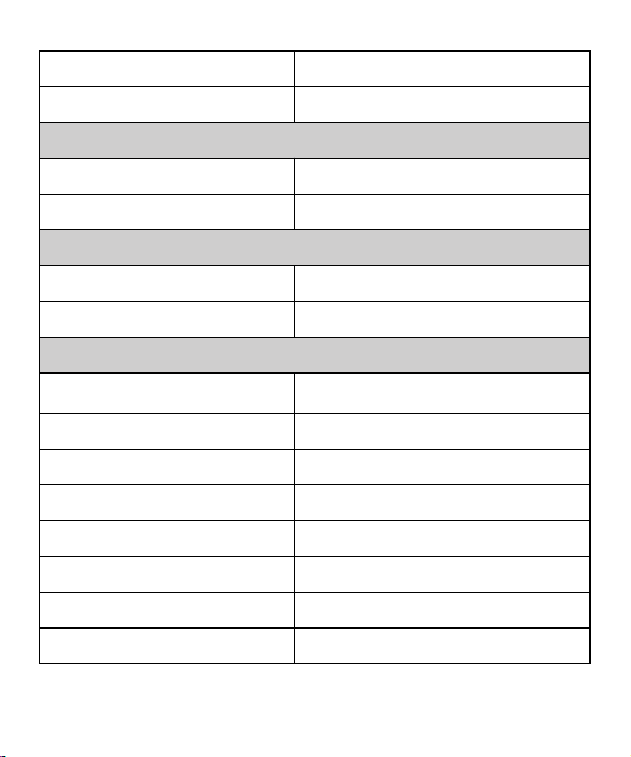
IR Illuminator
Installation
Built-in, support additional flashlight
Max. Power(W)
5
Illuminating Level
3 levels
Detection Range(m)
300
Wavelength(nm)
850/940
Power Supply
Power Supply Mode
18650 Li-ion battery
Output Voltage(V)
3. 7
Working Time with Battery(h)
≤8
External Power Supply
USB Type-C, 5V, 2A
Display
Type
OLED
Size
0. 39''
Resolution(pixel)
1024x768
Brightness
5 levels
System
Video Resolution(pixel)
1920x1080

- 23 -
Video Format
. MP4
Photo Resolution(pixel)
3072 x 1728
Photo Format
. JPG
Internal RAM
2Gb
Storage Type
TF Card (support 4G~128G)
Reticle Shape
6
Auto Recording
Yes
Loop Recording
Yes
Audio Recording
Yes
WiFi
Yes
APP
TenRings Shots
Exposure Compensation
Yes
Geomagnetism
3-axis Gyroscope
Picture-in-Picture
Yes
Playback
Yes
Pitch Angel
Yes
Language
Chinese/English/Spanish/Portugue-se/
French/German/Italian/Polish/Tu-rkish/
- 24 -
Russian
Mean Time Between Failures
>50000h
Interface
USB Type-C
Battery Charge and Data Transfer
HDMI output
Video Transmission
Connection Adapter
Size(mm)
48
Material
Aluminium Alloy
General
Dimensions (L*W*H)(mm)
143*82*113
Housing
Plastic & Aluminium Alloy
Body Color
Black
Net Weight(g)
330
Protection
IP67
Operating Temperature(℃)
-25~50
Storage Temperature(℃)
-30~75
Recoil Resistance(J)
6000

NIGHT VISION
1 YEAR LIMITED WARRANTY
BC807
BARSKA® Optics, as manufacturer, warrants this new precision optical product to
be free of original defects in materials and/or workmanship for the length of time
specified by this warranty. This warranty does not include damage caused by
abuse, improper handling, installation, maintenance, normal wear-and-tear,
unauthorized repairs or modifications and tampering in anyway.
This warranty applies only to products purchased within the United States,
excluding Alaska, the Hawaiian Islands and all U.S. territories in the Caribbean
and the Pacific.
In the event of a defect within 30 days, the consumer must return the defective unit
to the BARSKA dealer (the place of purchase) at his/her own expense.
Beyond 30 days, BARSKA products should be sent to the following address for
warranty repairs. Products must be packed carefully and sturdily to prevent
damage in transit, and returned freight prepaid to:
BARSKA® OPTICS
Repair Department
855 Towne Center Drive
Pomona, CA 91767
For additional and updated information
please visit our website at www.barska.com
Please email [email protected] or call 1-909-445-8168 (Press 3 for Customer
Service) for Return Merchandise Number (RMA#) before any returns.
NOTE: All merchandise received without a valid RMA # will be returned to shipper
at his/her own expense.
Please include all of the following when returning BARSKA products for service
and/or replacement:
1. Please write your complete details (Name, Address, Telephone #, E-mail
address, RMA#, etc.)
2. Purchase receipt or Proof of Purchase. (Original/Copy)
3. A brief explanation of the defect.
4. A check or money order for the warranty charge is required to cover inspection,
shipping, and handling.
*Please allow 6-8 weeks for delivery.
This product will either be replaced or repaired at the discretion of the warrantor.
If it's a discontinued item, we will replace the product with an equivalent product.
Should the repair not be covered by this warranty, an estimate will be sent for your
approval. Non-warranty repairs or refurbishing of your optical products are always
provided at a reasonable cost.
BARSKA® Optics shall not be liable for any consequential, incidental and/or
contingent damages whatsoever. We will not pay shipping, insurance or
transportation charges from you to us, or any import fees, duties and or taxes.
This warranty supersedes all previous BARSKA® Optics warranties.