
OWNERS
MANUEL

THANK YOU FOR CHOOSING A WILDERNESS SYSTEMS® KAYAK.
GET READY TO EXPLORE YOUR WORLD WITHOUT BOUNDARIES.
This is not just any kayak. It’s the right kayak. Attention to detail, performance, and quality have made
this the number one choice for enthusiasts year after year. Your premium kayak will provide you many
years of enjoyment. We hope you take advantage of all the adventure that awaits you.
This owner’s manual and additional information is available at confluenceoutdoor.com
CONTENTS
3 Kayak Anatomy
4 Outfitting
5 Rudder Installation
6 Seating Systems
16 Storage
17 Transportation
18 Care & Maintenance
19 Safety
20 Accessories
22 Limited Lifetime Warranty
23 Service & Support
3
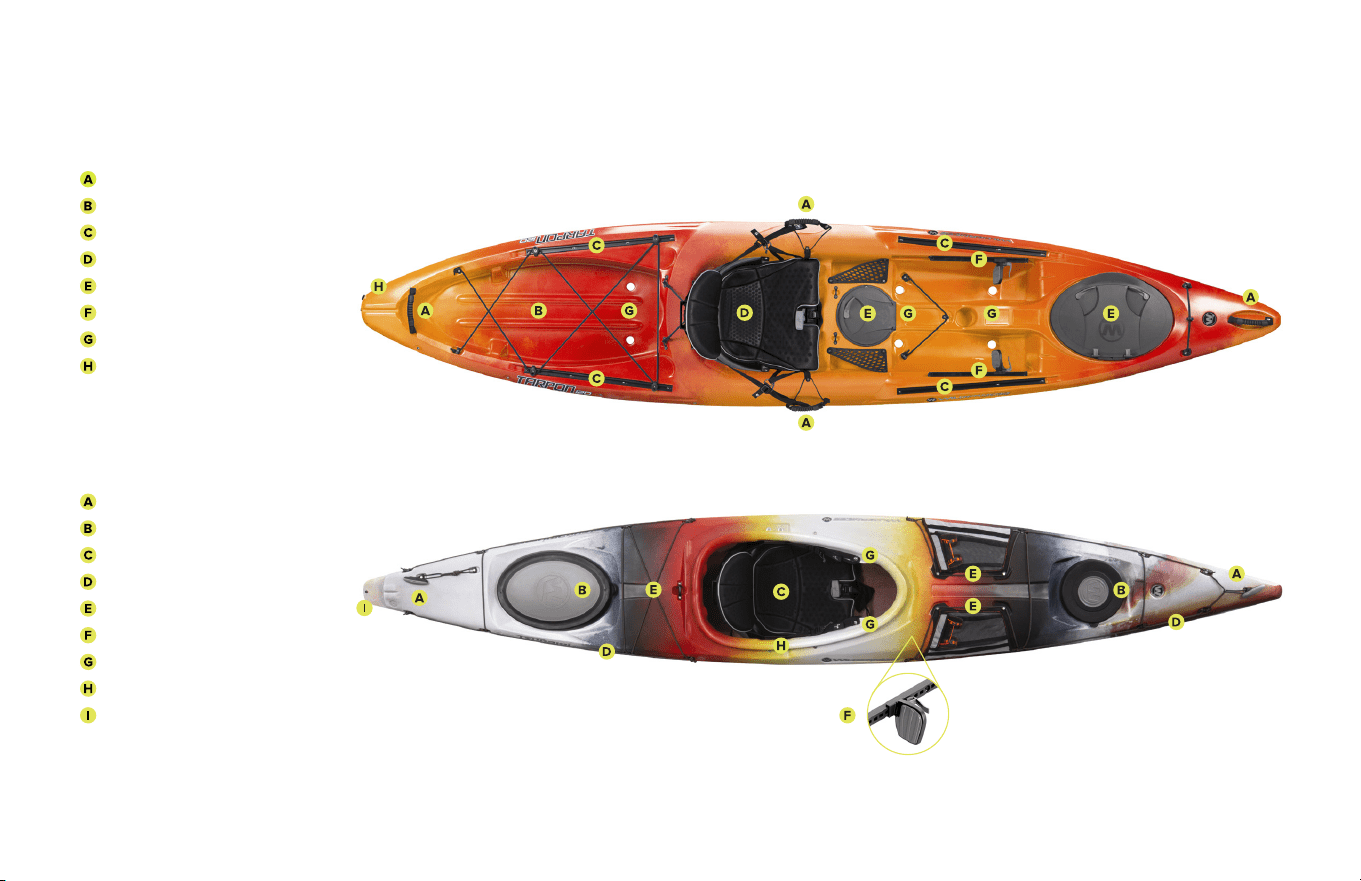
KAYAK ANATOMY
SIT ON TOP
Carry handle
Tankwell with bungee
SlideTrax
TM
accessory system*
Seating system
Cargo hatch
Footbraces
Self-bailing scupper tubes
Optional rudder location*
SIT INSIDE
Carry handles
Cargo hatches
Seating system
Safety lines
Bungee
Footbraces
Thighbraces
Cockpit coaming
Optional rudder location*
BOW
BOWSTERN
STERN
*Not available on all models
4
OUTFITTING
USING THE RUDDER SYSTEM
Some kayaks come with an optional factory rudder system included.
After market rudder systems are also available. Please contact
your local dealer for any questions regarding setup or installation,
or visit confluenceoutdoor.com for video instruction.
Once your rudder is installed, use the lift line (located on the right
side of the boat, towards the rear of the cockpit) to drop the rudder
into the water by pulling it forward.
To operate the rudder, use the footbrace pedals. To maintain a
straight position, both pedals should be even with each other. To
steer the kayak right, push the right pedal away from you. To steer
the kayak left, push the left pedal away from you. Allow the pedal
that is not in use to automatically move towards you when the other
pedal is being pushed.
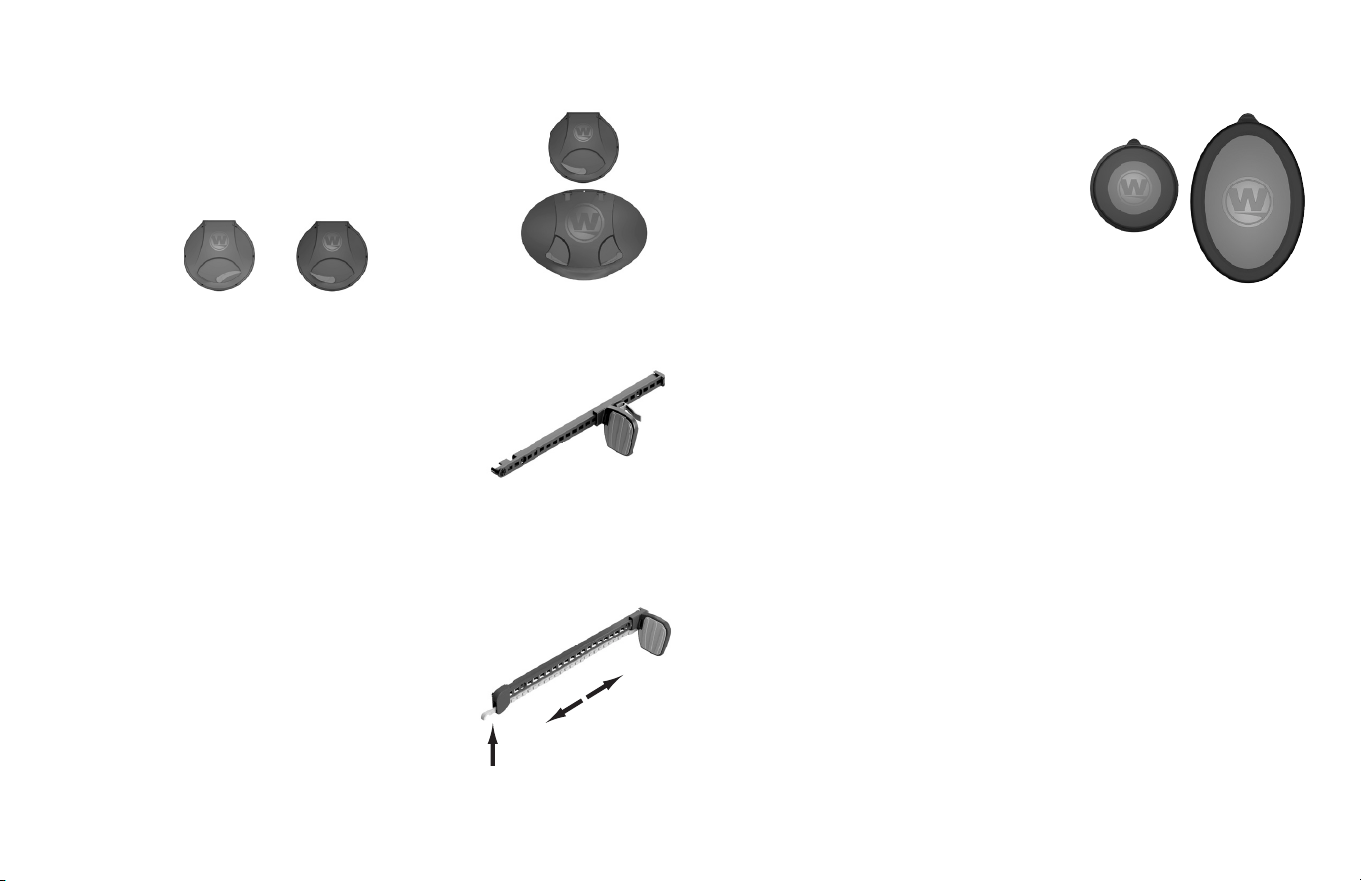
ORBIX HATCH COVERS
Lever-release open and close. Locked and
Unlocked icons are embossed on the hatch
for reference.
RUBBER DOME HATCHES
To remove the covers, find the tab and
peel o. To replace the cover, line up
ends first and then sides. Then hook it
under the hatch rim and press it on
firmly the entire way around. Sealed
bulkheads, if equipped, add flotation
and dry storage to the hatch area.
SLIDELOCK XL FOOTBRACES
The SlideLock Footbrace system is easy to
access from inside the boat. Find the black plastic
rod that is on the side of the cockpit extending from
the footbrace.Lift it up and slide forward or back so
your foot is resting comfortably on the footpeg and
there is a slight bend in your leg. Release the rod to
drop into position locking the footbrace.
KEEPERS XL FOOTBRACES
The adjustment lever is located on the backside
of the footpedal. To adjust, squeeze the lever
and slide the footpeg to the desired location.
Release the lever to lock it in place.
UNLOCKED LOCKED

5
RUDDER INSTALLATION
CONNECTING RUDDER CABLES
a. Insert the Rudder Swivels from the bottom of the holes
located on the aluminum wings of the blade assembly.
b. Next, snap a rubber washer over the exposed nipples that
are visible on the top side of the wings.
c. Thread the split rings through each of the small holes
located on the side of each nipple but above each rubber
washer. Once the rings are in place, the swivels should be
secured to the wings using the split rings
SECURE RUDDER TO KAYAK
a. Center rudder blade and then raise it so it flips over end of
kayak and settles into notch on deck. A variety of rudder
lock-downs are used to secure rudder to deck and these
should be put in place to secure rudder when transporting
on top of your vehicle.
b. Make sure to release lock-down before entering your kayak
to go paddling.
INSTALLING THE RUDDER
INSTALL THE RUDDER BRACKET
a. Remove the two filler screws on stern and set aside.
b. With the raised “stop” pin facing up, align the bracket with the
mounting holes in hull. Place ¼” lock washers (2 on each screw) over
¼-20 x 5/8” hex head screws and thread screws into mounting holes
using the 3/16” Allen head wrench provided with owners’ manual.
c. Start both screws before tightening either one completely.
Tighten each screw fully.
INSTALL THE RUDDER
a. Unwind the lift line coiled around the rudder.
b. Make sure the cord runs straight and true along the
starboard (right) side of the kayak when viewed from the stern.
c. Remove the ring pin from end of rudder post and insert
post into bracket.
d. Secure rudder in bracket by inserting ring pin in post
below bracket.
e. Test lift line cord by pulling on top or bottom run of cord to
raise or lower rudder. Learn which run raises and which run
lowers rudder.
6
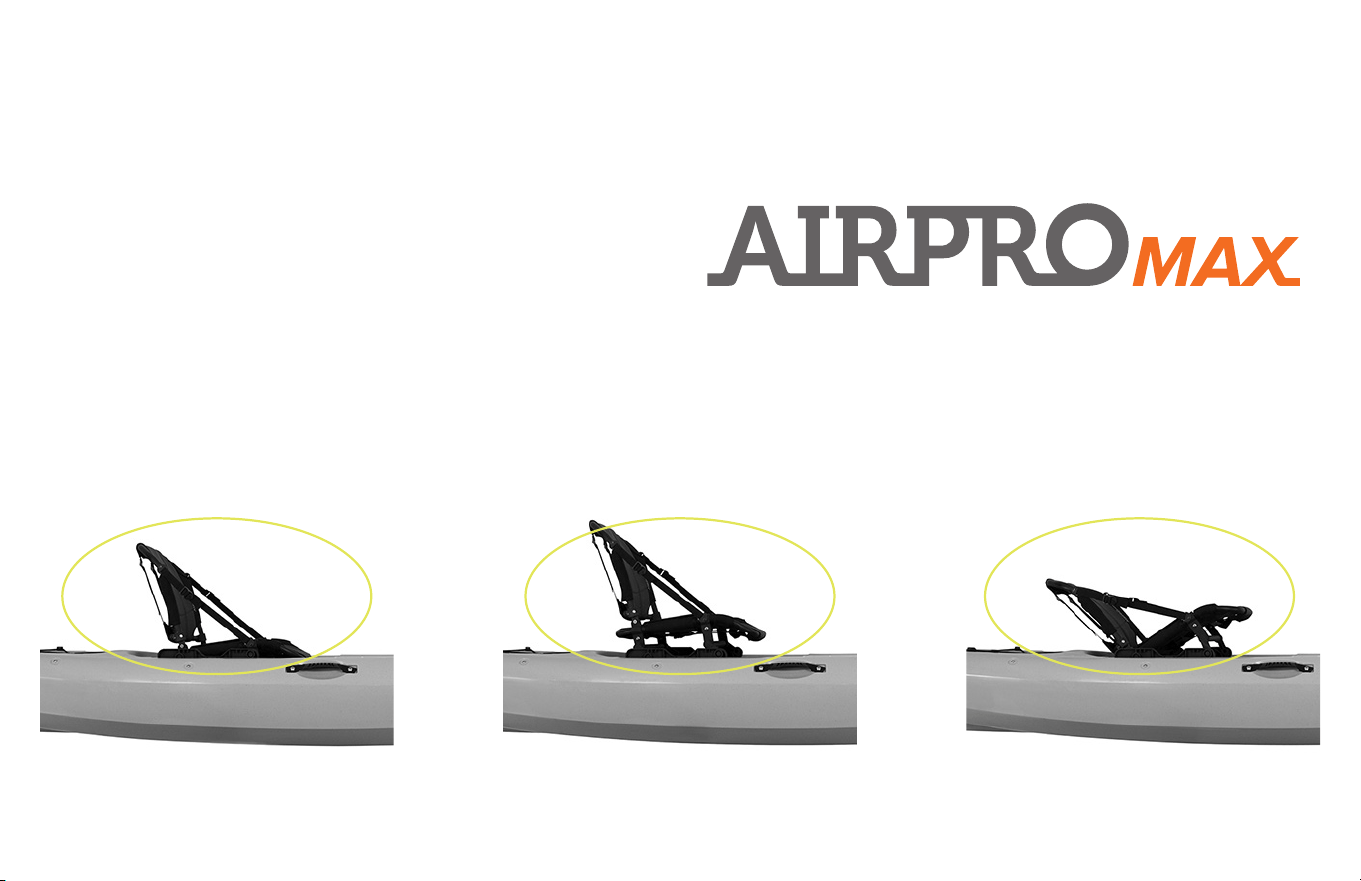
The Phase 3 AirPro MAX high/low seating system is poised to give kayak
anglers the competitive advantage they need to sight fish from the seat
of their kayak. The AirPro MAX preserves the popular innovations found
in most Phase 3 seats – adjustability, comfort features and high-quality
materials and patented design. The patented seat has a full forward/aft
trim range and three phase (high, low and recline) positioning without
any clipping or loosening of straps. Standing room remains ample and
the seat back can be folded and sat upon for even more height on the
water. The aluminum tube frame construction is highly durable with an
all-weather, breathable textile that aords both comfort and functionality.
The injection molded slide rails provide a platform for adding gear with
the ultimate accessibility.
PHASE 3
®
AIRPRO MAX SEATING SYSTEM
Recline PositionHigh PositionLow Position
7
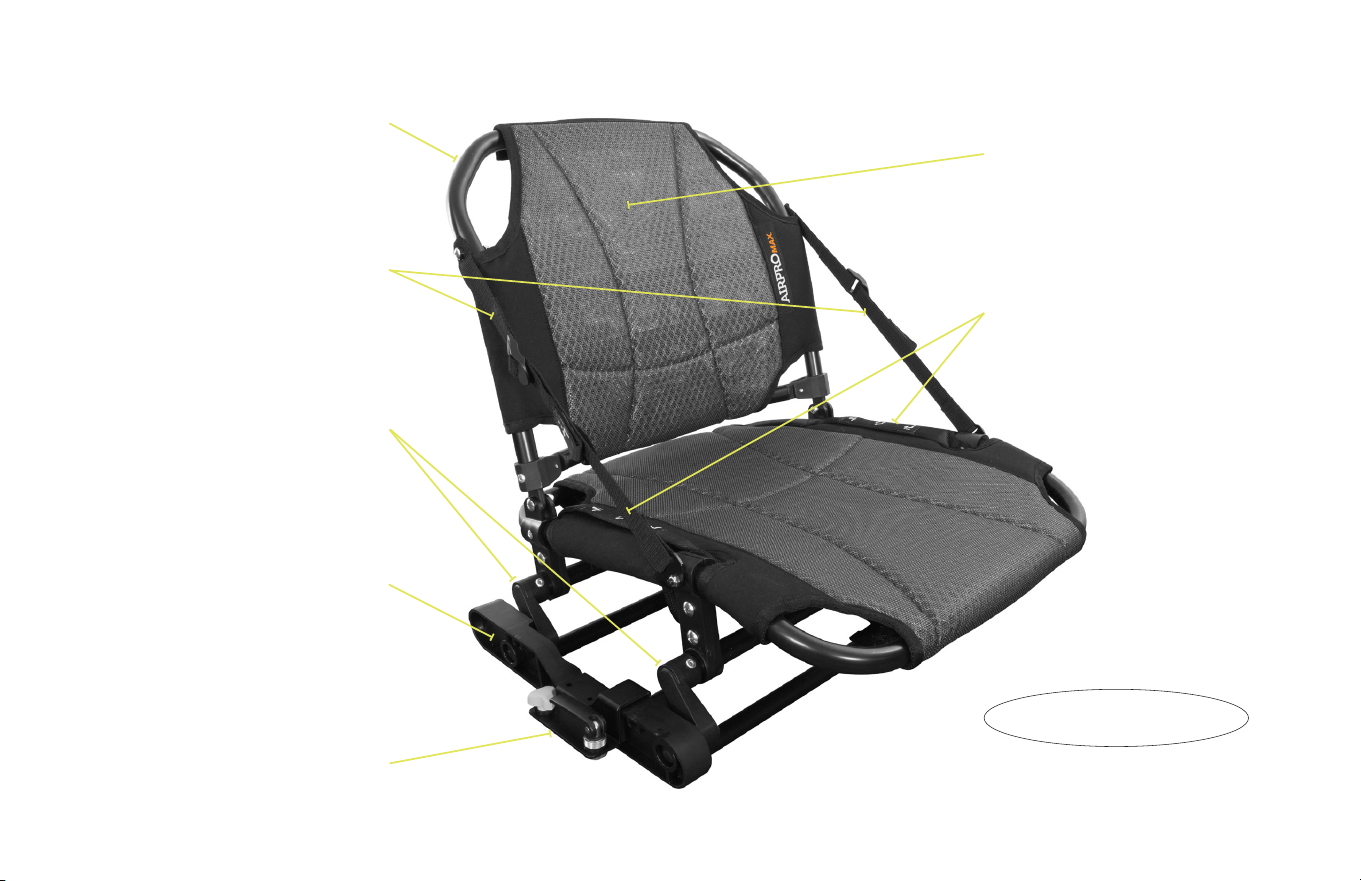
PHASE 3
®
AIRPRO MAX SEATING SYSTEM
Aluminum Tube Frame Premium all-weather, breathable
textile combining an open weave
fabric with a 3D mesh filler for the
ultimate in comfort.
Easy access grab handles allow
the seat to adjust quickly to low,
high or recline by unweighting the
seat and shifting.
Provisions have been made in the
slide rail to easily attach accessories.
Backrest straps allow for adjustments
of the seat back angle.
Adjustable hardware makes it easy to
slide the seat fore and aft.
Cam Rotational Pivots
HIGH POSITION
8
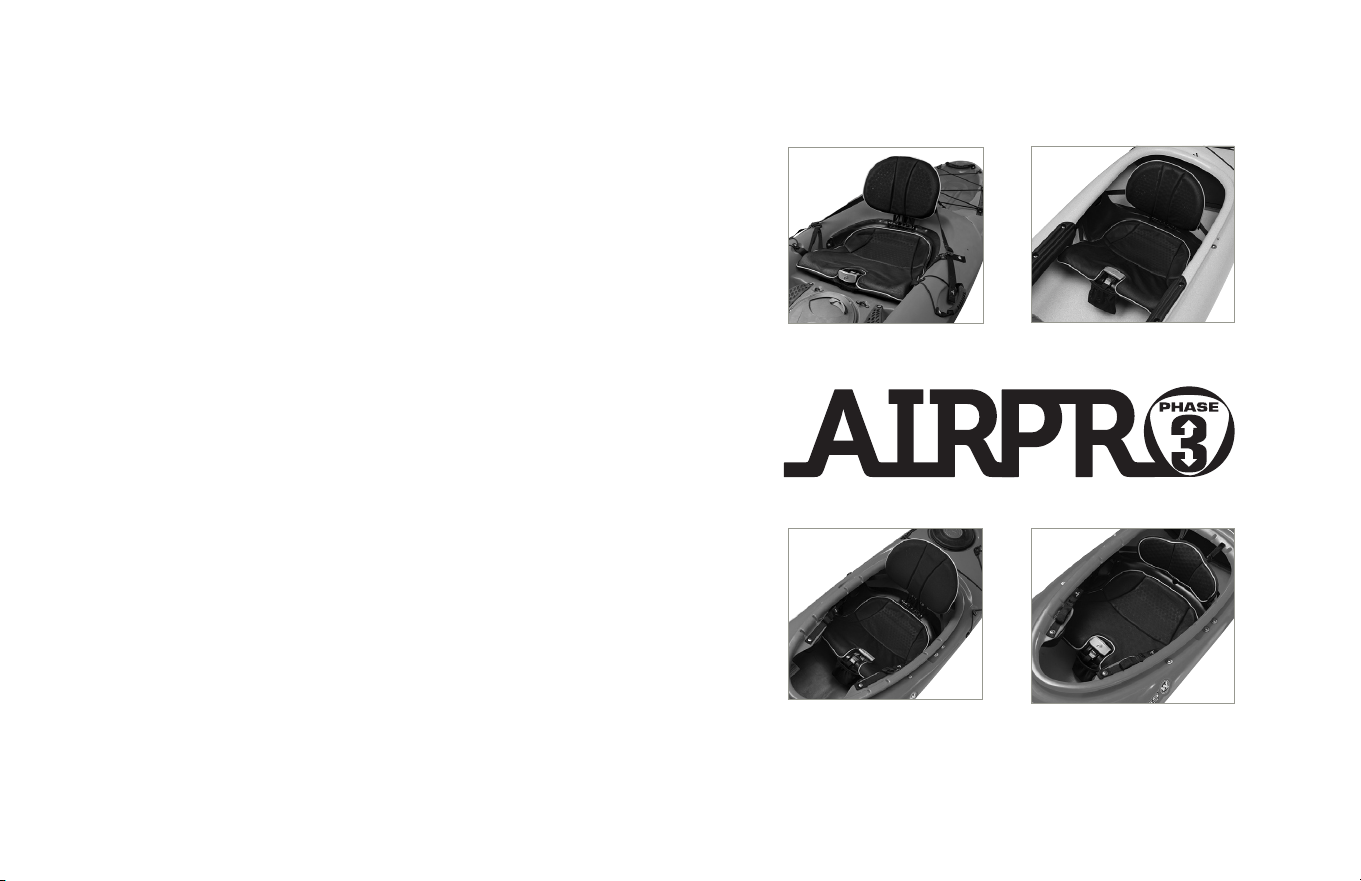
The patented Phase 3 seating system has become the industry leader
when it comes to an amazingly comfortable seat. And now it’s even better.
Ergonomic elements have been added to all aspects of the AirPro. The
contoured seat and seat backs have been designed with increased
comfort in mind. Multiple-sized holes in the special foam padding produce
varying densities to provide extra cushioning along the spine and under
the legs while comfortably supporting the sit bones. The flexible back rest
features a cutaway for spinal support and a dynamic structural design that
conforms to and moves with your back; the seat’s leg lifter area has a
softer edge and is contoured under your thighs. The AirPro also features
durable mesh fabric over perforated foam, greatly improving ventilation so
you and your seat breathe and dry out quickly.
Attention to ergonomic details is also evident in the controls that have
been carefully positioned to oer easier access to reach adjustment
points. Simple, highly visible icons easily identify the adjustment points
and their functions. A re-designed leg lifter has now become the central
control for adjusting both the seatback and leg lifter height. The leg
lifter uses a pulley style system that greatly reduces the eort needed
to position your legs for maximum comfort. With an easy pull on the web
strap the seat back is lowered causing less friction on the bungee cord
and preventing wear and tear. Located in front of the central controls is a
mesh bag that can be used for storage.
INTRODUCING PHASE 3 AIRPRO
PHASE 3
®
AIRPRO PHASE 3
®
AIRPRO SOT
PHASE 3
®
AIRPRO SEATING SYSTEM
PHASE 3
®
AIRPRO TOUR
PHASE 3
®
AIRPRO XP
9
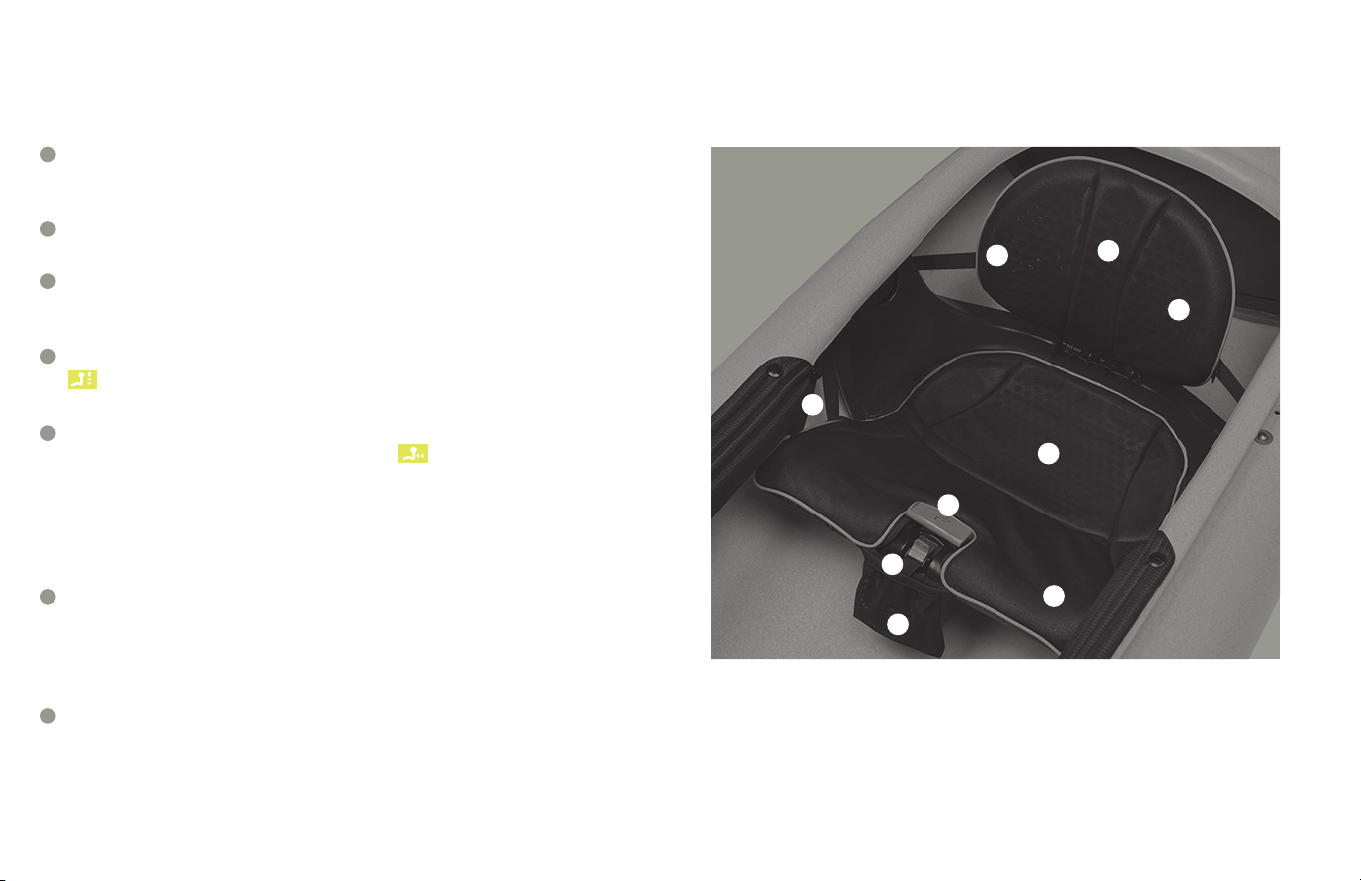
PHASE 3 AIRPRO – ASPIRE, PUNGO & PAMLICO
Position seat back for lumbar support while paddling or upper back
support while relaxing, the Phase 3 AirPro backrest will conform to
you providing all day comfort.
Large comfort holes allow ventilation for air flow while providing
cushioning to hard contact areas under the legs and along the spine.
Smaller holes on the backrest provide ventilation and increased
support to the oblique muscles while the holes in the seat pad
support the sit bones and provide drainage for water.
The backrest is lowered by pulling the strap loop with the
icon. Push the gray web cleat lever to release the strap and
raise the backrest.
The padded seat back adjusts forward and back with straps located
on either side of the paddler with the icon. These straps are
located next to the knee braces on Aspire and Pungo models or
behind the seat for Pamlico models. Tighten the backrest by pulling
forward on the strap or loosen it by pulling on the corded finger pull
loop. For good rotation while paddling it should not be too tight.
The leg lifter height is adjusted with the gray handle and
corresponding gray web cleat release levers; to raise the height of
the leg lifter gently shift one’s weight o of the leglifter while pulling
the gray handle. To lower the leglifter press both gray web cleat
levers simultaneously.
The mesh bag located in front of the central controls can be used
to store the leg lifter handle, seat height adjustment strap, a water
bottle or any other items you would like to keep in easy reach.
A
C
D
E
F
G
B
A
C
C
D
E
F
G
B
B
PHASE 3
®
AIRPRO SEATING SYSTEM
10
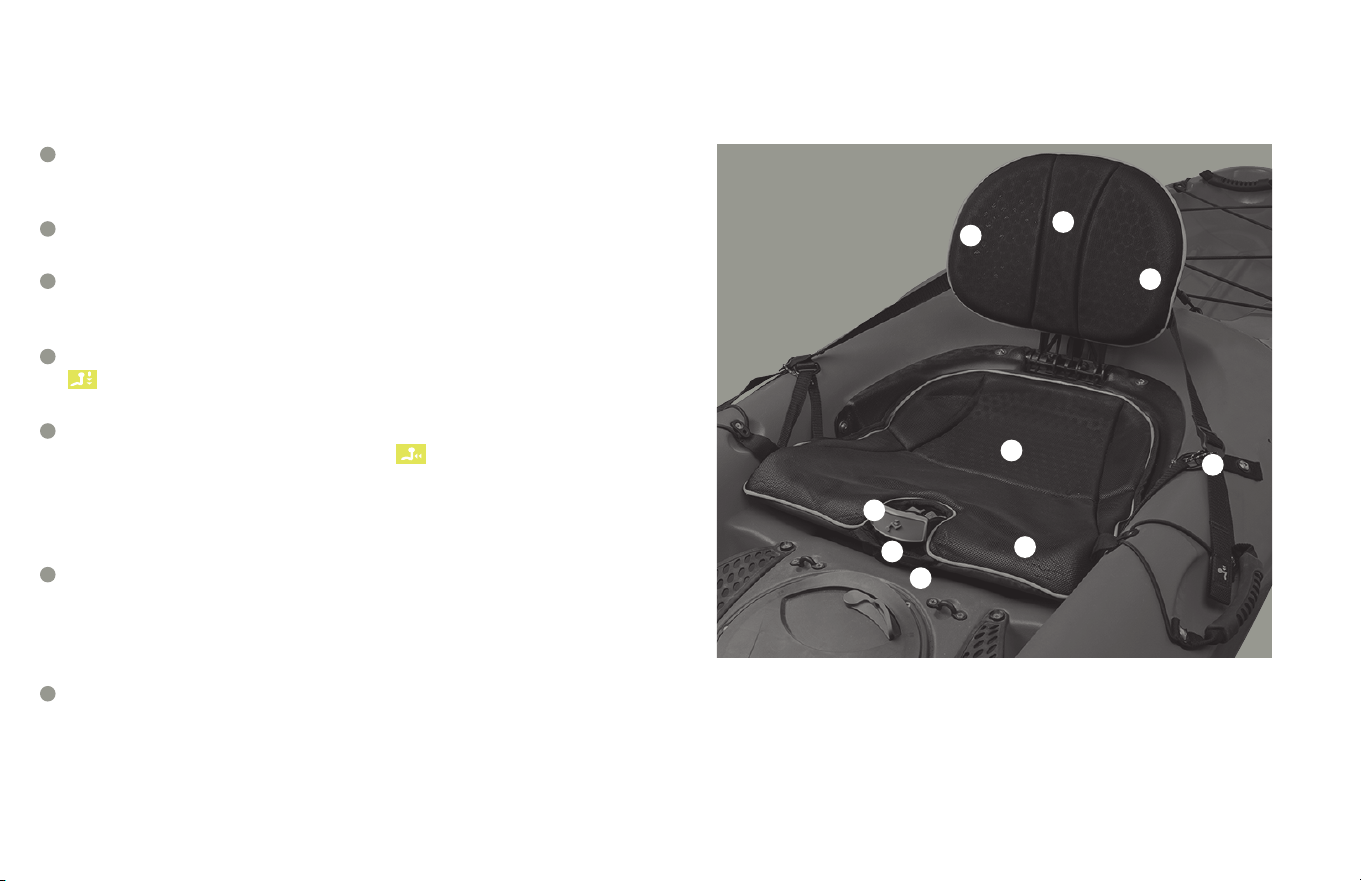
PHASE 3 AIRPRO SOT – TARPON
A
C
C
D
E
F
B
B
G
Position seat back for lumbar support while paddling or upper back
support while relaxing, the Phase 3 AirPro backrest will conform to
you providing all day comfort.
Large comfort holes allow ventilation for air flow while providing
cushioning to hard contact areas under the legs and along the spine.
Smaller holes on the backrest provide ventilation and increased
support to the oblique muscles while the holes in the seat pad
support the sit bones and provide drainage for water.
The backrest is lowered by pulling the strap loop with the
icon. Push the gray web cleat lever to release the strap and
raise the backrest.
The padded seat back adjusts forward and back with straps located
on either side of the paddler with the icon. These straps are
located near the hull on Tarpon models. Tighten the backrest by
pulling forward on the strap or loosen it by pulling on the corded
finger pull loop. For good rotation while paddling it should not be
too tight.
The leg lifter height is adjusted with the gray handle and
corresponding gray web cleat release levers; to raise the height of
the leg lifter gently shift one’s weight o of the leglifter while pulling
the gray handle. To lower the leglifter press both gray web cleat
levers simultaneously.
The mesh bag located in front of the central controls can be used
to store the leg lifter handle, seat height adjustment strap, a water
bottle or any other items you would like to keep in easy reach.
A
C
D
E
F
G
B
PHASE 3
®
AIRPRO SEATING SYSTEM
11
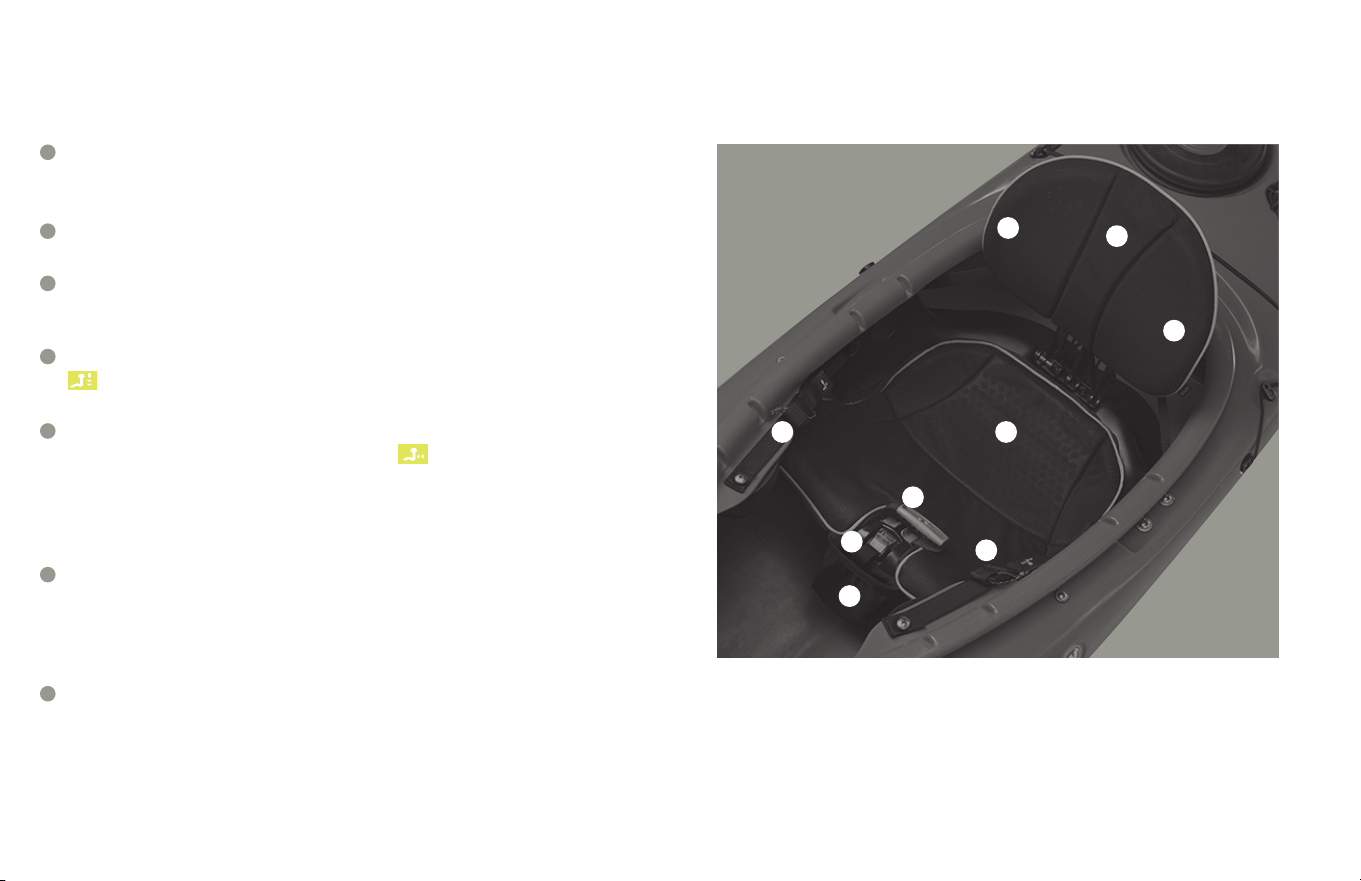
PHASE 3 AIRPRO TOUR – POLARIS & TSUNAMI*
C
C
D
E
F
G
B
A
B
Position seat back for lumbar support while paddling or upper back
support while relaxing, the Phase 3 AirPro backrest will conform to
you providing all day comfort.
Large comfort holes allow ventilation for air flow while providing
cushioning to hard contact areas under the legs and along the spine.
Smaller holes on the backrest provide ventilation and increased
support to the oblique muscles while the holes in the seat pad
support the sit bones and provide drainage for water.
The backrest is lowered by pulling the strap loop with the
icon. Push the gray web cleat lever to release the strap and
raise the backrest.
The padded seat back adjusts forward and back with straps located
on either side of the paddler with the icon. These straps are
located above the thighbraces on touring models. Tighten the
backrest by pulling forward on the strap or loosen it by pulling on
the corded finger pull loop. For good rotation while paddling it
should not be too tight.
The leg lifter height is adjusted with the gray handle and
corresponding gray web cleat release levers; to raise the height of
the leg lifter gently shift one’s weight o of the leglifter while pulling
the gray handle. To lower the leglifter press both gray web cleat
levers simultaneously.
The mesh bag located in front of the central controls can be used
to store the leg lifter handle, seat height adjustment strap, a water
bottle or any other items you would like to keep in easy reach.
A
C
D
E
F
G
B
*Available on Tsunami model sizes 125, 140 & 145
PHASE 3
®
AIRPRO SEATING SYSTEM
12
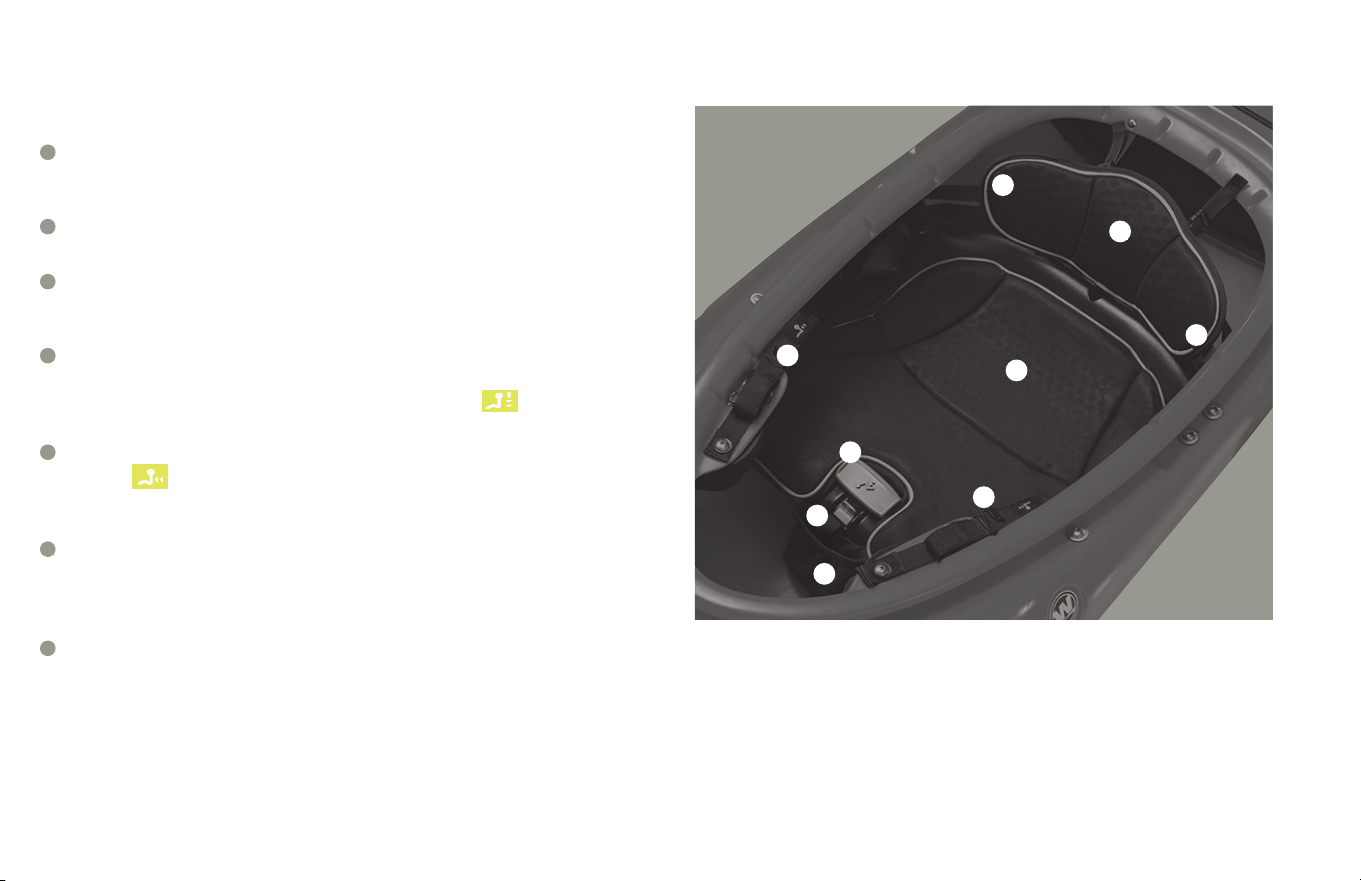
PHASE 3 AIRPRO XP – TEMPEST & TSUNAMI*
C
C
D
E
F
G
B
A
B
Position seat back for lumbar support while paddling or upper back
support while relaxing, the Phase 3 AirPro backrest will conform to you
providing all day comfort.
Large comfort holes allow ventilation for air flow while providing
cushioning to hard contact areas under the legs and along the spine.
Smaller holes on the backrest provide ventilation and increased support
to the oblique muscles while the holes in the seat pad support the sit
bones and provide drainage for water.
To adjust the height of the backband; tighten or loosen the two web
straps extending from the backband to the cockpit rim. Pull the web
loop strap located at the front of the seat with the icon to hold
the backband in place or press the gray web cleat lever to loosen.
To adjust the backstrap fit, tighten or loosen the two web loop straps
with the icon. The straps are anchored above the thigh braces.
Further adjustment can be achieved by using the web loop straps
located behind the backband.
The leg lifter height is adjusted with the gray handle and corresponding
gray web cleat release levers; to raise the height of the leg lifter gently
shift one’s weight o of the leglifter while pulling the gray handle. To
lower the leglifter press both gray web cleat levers simultaneously.
The mesh bag located in front of the central controls can be used to
store the leg lifter handle, backband height adjustment strap, a water
bottle or any other items you would like to keep in easy reach.
A
C
D
E
F
G
B
The adjustable thigh pads found on some touring and sea kayak models
are adjusted by removing the front screw and loosening the back screw.
Slide the thigh pad forward or back and in and out to find a comfortable
position. Replace the screws and tighten. A good position for the thigh pad
is a couple of inches in front of your kneecap or where it’s most comfortable.
*Available on Tsunami model sizes 165 & 175
PHASE 3
®
AIRPRO SEATING SYSTEM
13
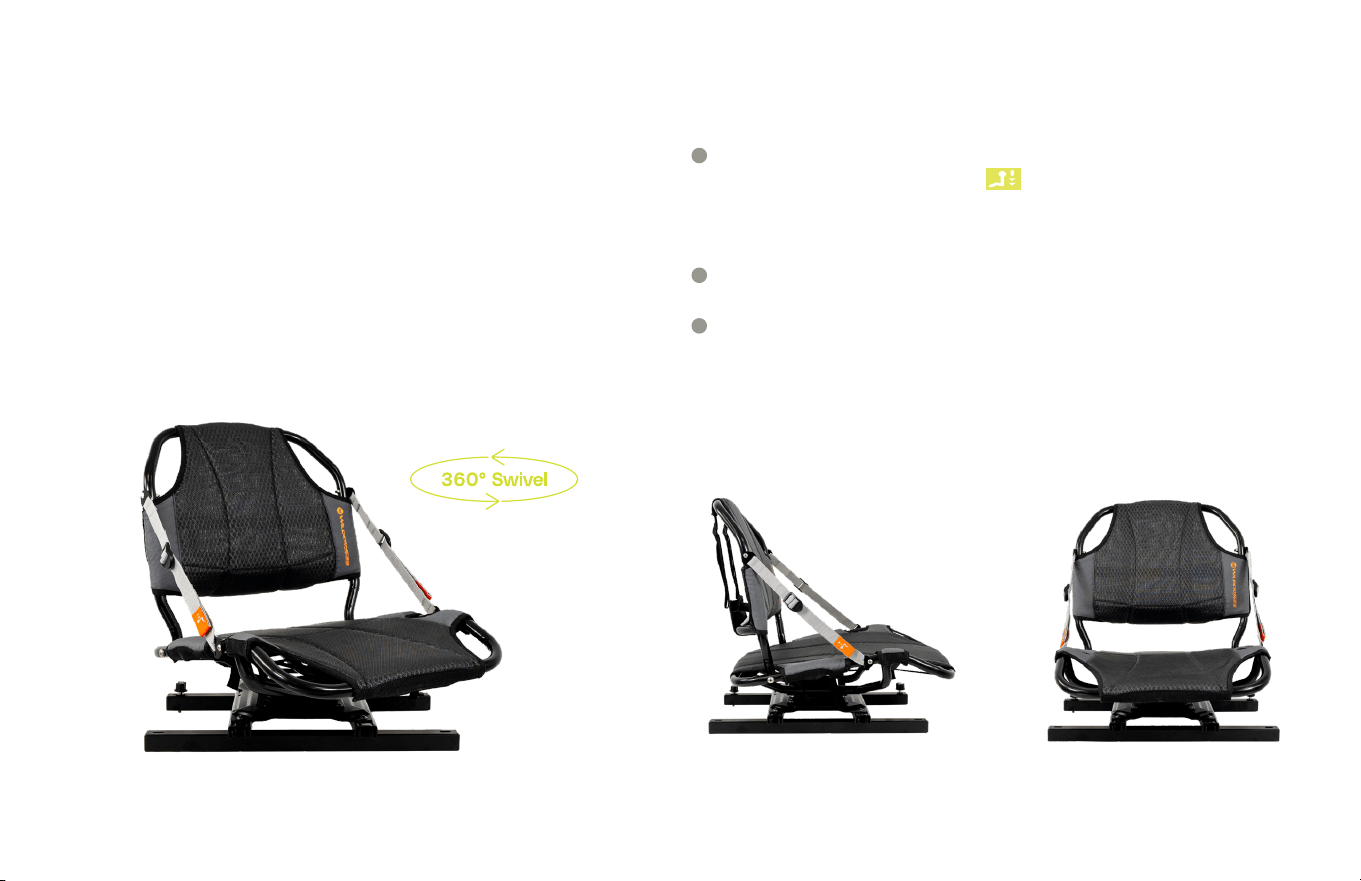
AIRPRO ACES SEAT
Front View
Side View
AIRPRO ACES - RECON 120 & RECON 120HD INSTRUCTIONS:
AirPro ACES seat provides easy:
Adjustability with the adjustable track seating, luxurious
Comfort with cushion and air flow, fine-tuned
Ergonomics with adjustable straps and option for additional lumbar
support, and 360 degree
Swivel allows continuous left and right movement enhancing fishing
eciency. Confidence, mobility and comfort come from the ease of
swiveling to get into the kayak, set up in any direction to fish, set the
hook and grab tackle stored in the rear tankwell.
The framed seat back adjusts forward and back with straps located
on either side of seat with the icon. Tighten the backrest by
pulling forward on the straps or loosen it by pulling on the tabs of
the plastic adjustment buckles. For a better paddling experience, it
should not be overly tight.
Adjust the seat forward or backwards by engaging the mechanical
lever underneath the center front of the seat.
To remove the seat from the boat, loosen the two studded knobs
and lift. To install the seat, align the two studded knobs back into the
seat mounting location and fully tighten the knobs.
A
C
B
14
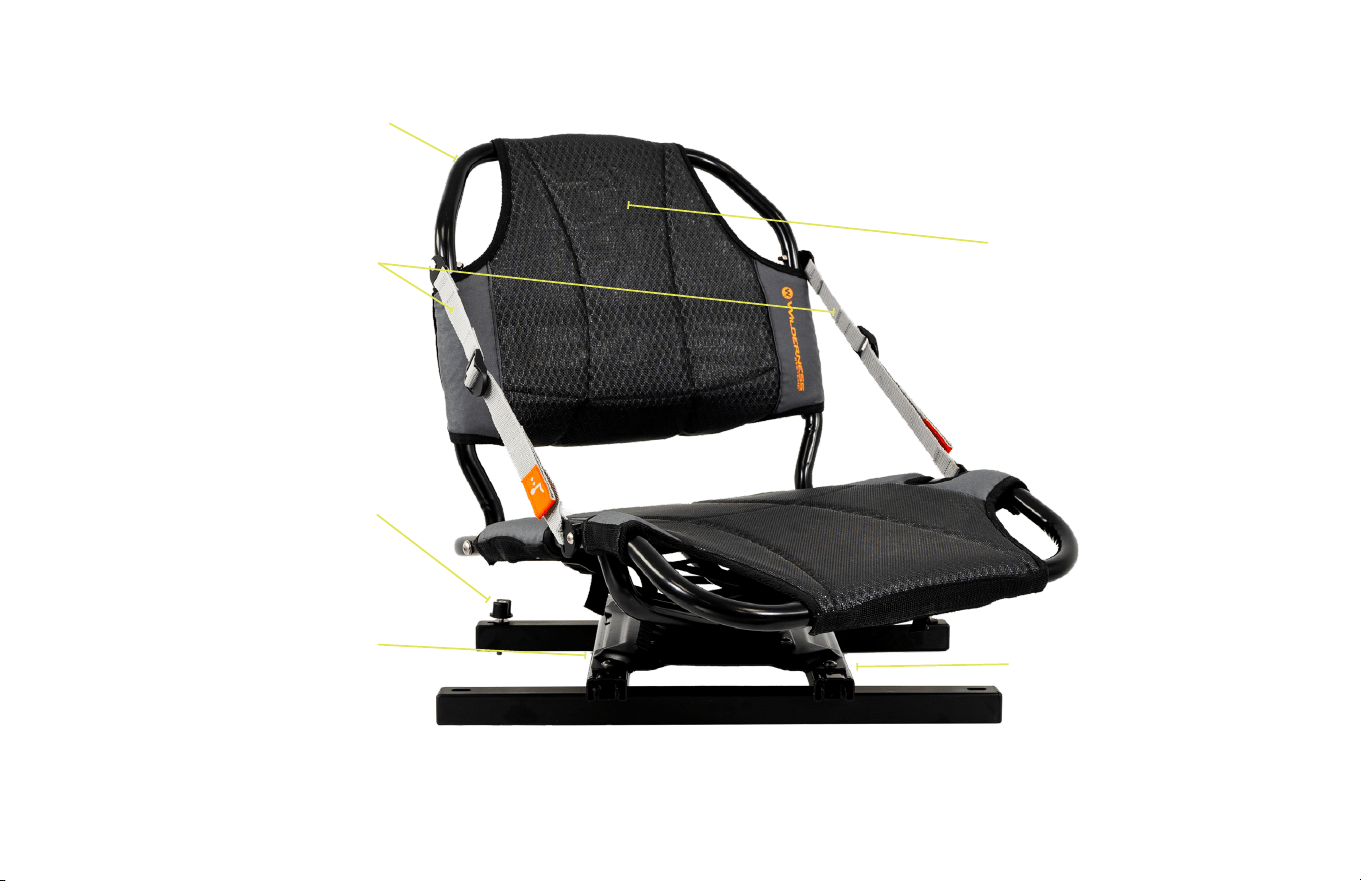
AIRPRO ACES SEAT
Aluminum Tube Frame
Premium all-weather, breathable
textile combining an open weave
fabric with 3D mesh filler for the
ultimate in comfort.
One handed mechanical lever
allows adjustment of the seat
forward and back for reach to
the pedals, optimal position for
paddling or to make room for
fishing
For 2024 and later models, the 360º
swivel allows left and right continuous
movement providing ease of entering and
exiting the kayak and 360 degree access
all the way around. Optional Shock Cord
Kit is provided that will recenter the swivel
seat when not in use.
Backrest straps allow for adjustments
of the seat back angle.
Quick install knob allows for ease
of install and removal as needed for
transport.
15
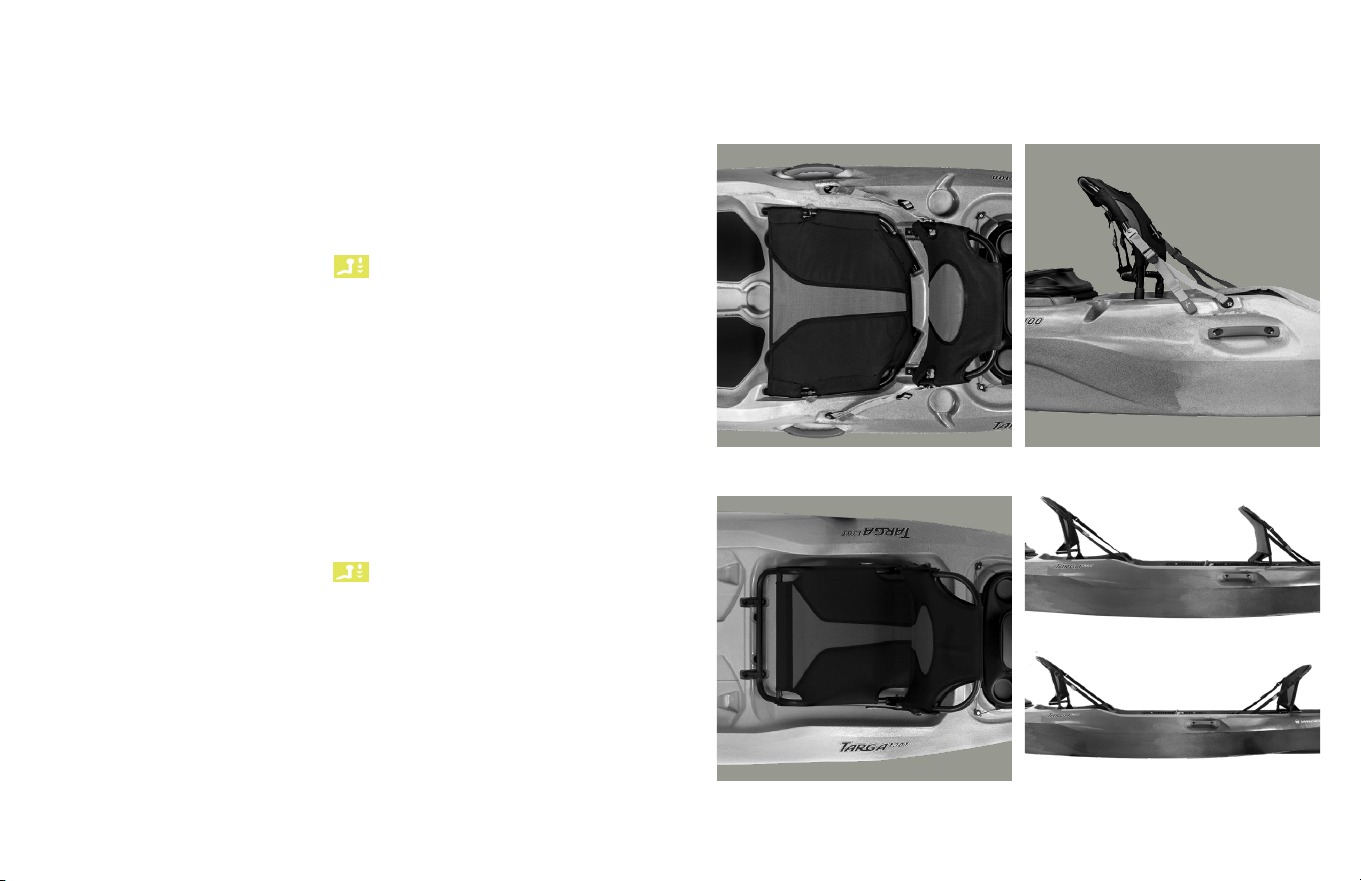
TARGA 100 - SEAT
TARGA 130T - SEAT
The new sling-style seat is made of a durable mesh that oers a
high level of breathability, making it comfortable and adjustable. It
keeps you cool and dry even during extended periods of use.
The framed seat back adjusts forward and back with straps located
on either side of seat with the icon. Tighten the backrest by
pulling forward on the straps or loosen it by pulling on the tabs of
the plastic adjustment buckles. For a better paddling experience, it
should not be overly tight.
The Targa Tandem unique design oers multiple seating
configurations tailored for your journey. Perfect for a comfortable
ride with plenty of options. It features three types of seating
configurations, depending on the experience you want to have -
standard tandem paddling, face-to-face paddling, and solo paddling.
The framed seat back adjusts forward and back with straps located
on either side of seat with the icon. Tighten the backrest by
pulling forward on the straps or loosen it by pulling on the tabs of
the plastic adjustment buckles. For a better paddling experience, it
should not be overly tight.
The tandem seats can be repositioned into multiple seating
configurations: Standard tandem, Face-to-Face tandem and Solo.
To reconfigure the seats, gently force the front seat bases out of the
retainer clips and reposition to the desired seating configurations
with the appropriate seat clips. Only the front tube of the seat is
engaged in the retaining clips. Ensure the seats are fully engaged
into the seat clips before paddling.
TARGA / TARGA TANDEM SEAT
Face-to-Face Seating Configuration
Standard Seat Configuration
*Not Shown - Solo Seat Configuration

16
SHORT TERM STORAGE
Be sure to empty the kayak of all water. The kayak may be
stored on its side or in a vertical position temporarily. Storage
in these positions for an extended period of time could cause
flattening or deformation in the side of the hull.
LONG TERM STORAGE
In addition to emptying all water out, you should clean the
kayak by rinsing with freshwater especially if the kayak has
been used in salt water or becomes muddy. Store out of
direct sunlight and indoors, if possible. UV exposure can
shorten the lifespan of any kayak and can degrade its
finish. Kayaks can be stored slung on their sides via web
straps, positioned 1/3 of the way along the hull (as shown).
Be sure to not leave straps or ropes tightly wound around
the hull for extended periods of time as it may cause
deformation.
Your kayak can also be stored hull up (as shown) on
parallel bars with weight supported evenly throughout its
length. For large cockpit (recreational) boats, position the
bars so that the cockpit coaming rests on the bars. For
smaller cockpit kayaks, position bars so that they contact
the deck between the cockpit and any hatches.
CAUTION:
Do not suspend your kayak by using the grab loops at either
end of the boat. This can cause the hull to distort over time.
STORAGE
17
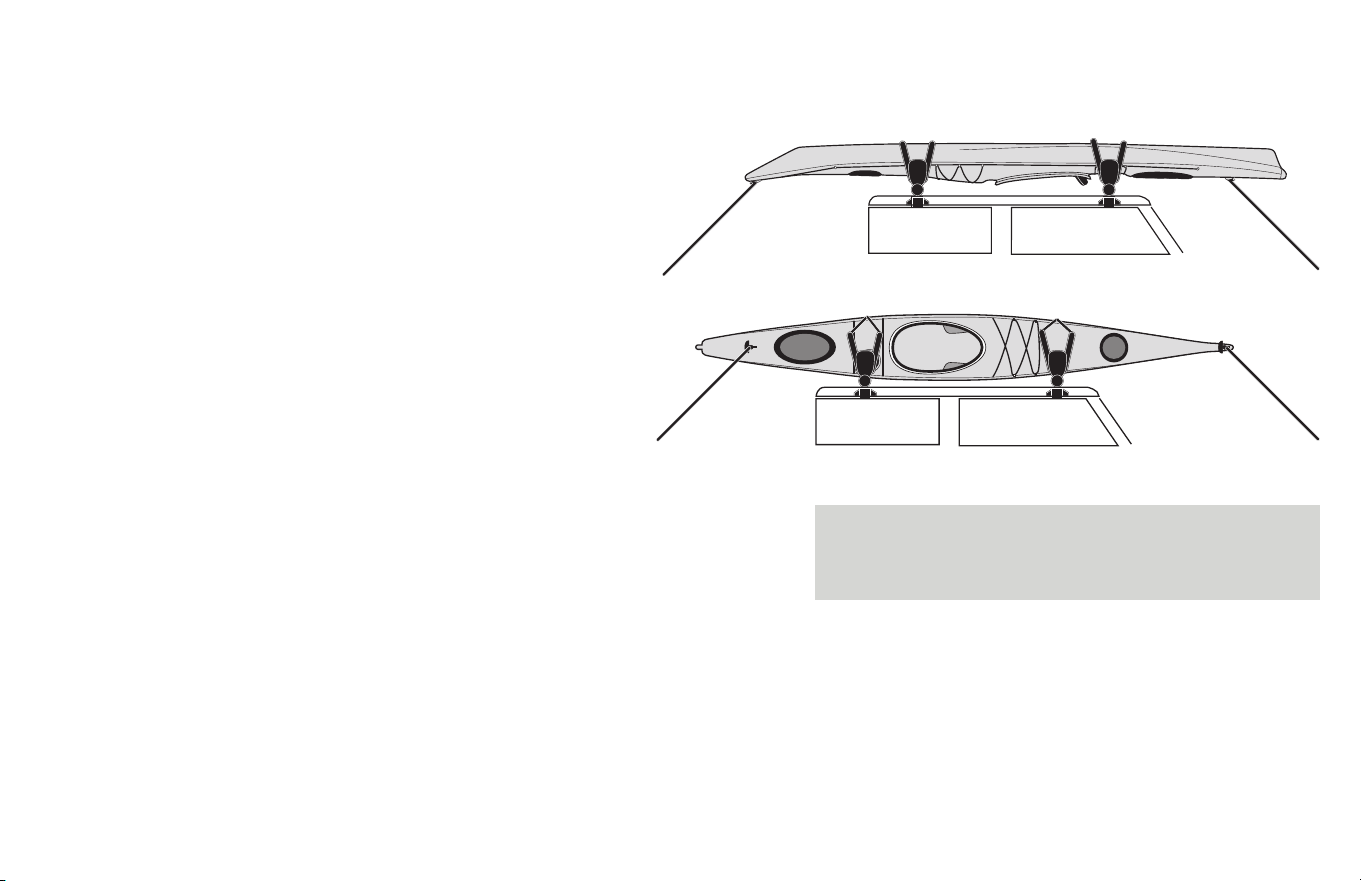
ROOF RACK
A kayak carrier, or “J cradle” for your vehicle is the best
method of transporting a kayak. It should be lashed down
at each crossbar, as well as at the bow and stern to each
end of the vehicle. Kayak cradles are recommended for
boats being transported “flat” to lessen chances of
deformation from being lashed too tightly to the bars.
Rotomolded kayaks can be transported on their edge or
upside down (hull up) safely using kayak stackers.
For Composite kayaks we recommend that they be
transported on their bottom using cradles to prevent
deformation. Be careful not to over tighten straps as this
could cause deformation in your boat.
USING FOAM BLOCK RACKS
Foam block racks can be used for transporting kayaks if
extreme caution is practiced in rigging the load. They
should be wide enough for adequate support. The boats
must be securely attached to the top of the vehicle through
the doors or windows and attached securely to both the
front and back of the vehicle. If these tie down points at the
front and back aren’t available on your vehicle, foam block
racks should NOT be used.
INCLEMENT WEATHER
If traveling when inclement weather is threatening, position the
kayak upside down if possible. A kayak heavy with water can
become dangerous. Use a portage cover to seal the cockpit if
an upside down position is not possible. Periodically check your
straps to ensure they have not stretched while wet.
ROTOMOLDED
ROTOMOLDED
CAUTION:
Always check your tie down rigging often as ropes and
straps may loosen in transport.
TRANSPORTATION

18
ROTOMOLDED KAYAK CARE
Our “roto” kayaks are made of high-density linear polyethylene,
which is virtually maintenance free. A minimal amount of care
in storage and transporting will help the kayak maintain a
like-new condition for many years.
Polyethylene will become more flexible in warm conditions
such as a hot, sunny day. It is possible for a kayak strapped
tightly to a roof rack to deform at the weight bearing points.
Use a padded rigid bar sport rack in addition to a kayak
J cradle or saddles to disperse the weight.
INFLATABLE KAYAK CARE
Your inflatable kayak is made of very durable materials.
However, like anything else, proper use and care will increase
the life of your kayak. Before storing your kayak, make sure it is
both CLEAN and DRY. You may clean your kayak with a mild
soap and water. NEVER use strong solvents to clean your kayak
as they will destroy the material.
Be sure to rinse your kayak with fresh water after every use in
salt water and allow it to dry thoroughly before storing. Use a
dry towel to wipe up all moisture. It should be deflated and kept
out of direct sunlight when stored. Avoid exposure to extreme
temperatures (hot or cold). If your boat is exposed to freezing
temperatures while storing, allow it to warm up before unfolding.
Do not store your kayak for an extended period fully inflated.
CLEANING
Usually, a quick rinse of fresh water is all that is necessary to keep
your hull clean and functioning in good order. This is very important
after paddling in salt water, especially if your boat is outfitted with
a rudder system or pedal drive. Be sure to thoroughly rinse the
rudder, rudder cables, and footbraces with fresh water to remove
salt residue. Additionally, rinse your seat system with fresh water.
Superficial scratches may occur, but can be removed or reduced
by use of a marine boat polish designed for polyethylene hulls.
Sanding or use of an abrasive rubbing compound is not
recommended.
To keep your kayak shining and minimize long-term degradation
caused by UV exposure, use an ultraviolet protectant such as 303
Protectant. 303 can also be used lightly on the top of the hatches
and on the seat outfitting and plastic buckles and straps, in
addition to the kayak itself. 303 is available at your local Wilderness
Systems dealer or online.
WARNING:
Avoid dragging kayak across the ground to prolong its life and
maintain its look and performance. Two people, utilizing the carrying
handles, is the best way to transport the boat. Alternately, you can
transport using a kayak cart, available at your dealer or online.
CARE & MAINTENANCE

19
Any person using kayaks built and/or sold by Wilderness Systems
is personally responsible for determining that their abilities are
equal or superior to the conditions encountered and exercising
proper judgment in choice of where and when to paddle.
Any person using Wilderness Systems kayaks assumes all risks and
takes complete responsibility for any and all damages, or injuries,
including death, which may result from use of or participation in
Wilderness Systems kayaks. Consult your physician prior to beginning
your paddlesport training.
DO:
• Wear a Coast Guard approved personal flotation device (PFD).
• Wear a helmet when paddling whitewater or in the ocean.
• Get paddlesports instruction from a licensed or certified instructor.
• Dress appropriately for weather conditions; cold water and/or
weather can result in hypothermia.
• Check your equipment prior to each use for signs of wear or failure.
• Scout unfamiliar waters. If necessary, paddle to shore and
carry your boat past uncertain areas.
• Stay aware of appropriate river water levels, tidal changes,
dangerous currents, and weather changes.
• Follow manufacturer’s recommendations for use and outfitting
of your kayak.
• Leave your paddling location and agenda with someone at
home before departing.
• Obtain certified first-aid and rescue training and carry first-aid
and rescue equipment.
DON’T:
• Never exceed your ability and assess how far and how long
you can paddle or swim.
• Never paddle alone.
• Never consume alcohol, drugs, or any other substance that may
aect your coordination, judgment, or ability when paddling.
• Never paddle in flood conditions.
• Never allow minors to use the boat without adult supervision.
• Avoid bracing yourself in the kayak in such a way that you
have to release any outfitting to escape.
• Do not impair entry or exit access to the kayak when installing
additional outfitting.
WARNING:
Kayaking can be hazardous with potential risk of serious injury
and even death.
SAFETY

20
EDUCATION / TRAINING
To help you learn about the logistics of a paddling trip and correct
paddling technique we strongly recommend a good beginner level
paddling course from a certified instructor.
PERSONAL GEAR
There are many items that you may wish to take with you on a paddling
trip. Your location, length of journey, group size, weather, etc. will all play
a part in this “essentials list.”
• Drinking water
• Snacks
• Extra clothes in a drybag
• Map or chart
• First-Aid
• Matches
• Sun protection
ESSENTIALS CHECKLIST:
PERSONAL FLOTATION DEVICE (PFD)
A USCG approved, comfortable and secure fitting PFD should
be worn at all times. Shorter PFDs are available that are ideal for
kayak paddling.
PADDLE
Choosing a paddle is almost as important as your choice of boat.
Blade shape, length, weight, and material all oer dierent
experiences. On longer trips, it is strongly recommended that you
have a spare paddle that can be easily stowed on your deck.
SAFETY EQUIPMENT
USCG regulations require an audible signal device (horn or
whistle) to be used in all watercraft. In addition, it is recommended
that all paddlers carry and know how to use a bilge pump, to
drain water from the kayak and a paddlefloat for a solo re-entry.
Be sure to secure training in the operation of a paddlefloat.
ACCESSORIES

21
OTHER ACCESSORIES:
There are a wide variety of accessories designed for your kayak
to enhance the performance and overall experience. Not all
accessories are available for all models.
SPRAYSKIRT
For longer trips or rougher conditions, a sprayskirt is worn by
the paddler to create a watertight seal, preventing the cockpit
from filling up with water.
DRY BAG
Ultra-light and water-resistant storage for an extra level of
protection and accessibility for gear.
A COMPLETE LINE OF OUR ACCESSORIES CAN BE
FOUND ONLINE AT CONFLUENCEOUTDOOR.COM
ACCESSORIES

22
required.
If service is required in a country that is not the country of
purchase, Consumer will comply with all applicable
export laws and regulations and be responsible for all
customs duties, value add tax (VAT), and other associated
taxes and charges. For international service, the
Wilderness Systems Distributor may repair or exchange
defective products and parts with comparable products
and parts that comply with local standards.
Wilderness Systems retains the right to satisfy warranty
via repair or replacement of products or of components
deemed defective. In addition, Wilderness Systems
reserves the right to replace original kayaks or
equipment with comparable current products.
LIMITATIONS AND EXCLUSIONS
This limited warranty does not apply to:
• Normal wear and tear and aging of product.
• Kayaks damaged by extreme weather or
environmental conditions.
• Kayaks damaged while in possession of a freight
carrier, a dealer, Consumer, or any party other than
Wilderness Systems.
• Kayaks damaged by accident, neglect, improper use
or handling.
• Kayaks that have been towed by power or sail boats.
• Kayaks designated as Prototypes.
• Kayaks sold as “demos” or in “as is” condition.
• Kayaks determined to have been used for any
activity other than an activity which is customary for
the product.
• Kayaks that have been structurally or dimensionally
altered or modified.
• Kayaks used for commercial or rental purposes.
TERMS AND CONDITIONS
For the original retail purchaser (“Consumer”), Wilderness
Systems kayaks provide a lifetime warranty against
material or manufacturing defects in the hull and deck.
Parts, accessories, and outfitting are warranted for a
period of one (1) year against material or manufacturing
defects from the date of purchase.
For Wilderness Systems kayaks sold as “2nd Quality” as
indicated on the Manufacturer’s Statement of Origin
(MSO), Wilderness Systems provides this limited warranty
for five (5) years for the hull and deck and one (1) year for
parts, accessories, and outfitting.
This limited warranty is only valid with the purchase of a
Wilderness Systems kayak from an Authorized Wilderness
Systems Dealer. This warranty is non-transferable.
HOW TO REGISTER YOUR BOAT
The warranty registration form should be completed
online at confluenceoutdoor.com within 30 days of
original purchase to be activated. It is suggested that
you keep your sales receipt should it be required in the
future for proof of purchase.
OBTAINING WARRANTY SERVICE
If you have a problem with your kayak and you suspect
that it may be due to defective materials or workmanship,
contact the nearest authorized Wilderness Systems
kayak dealer and arrange to have the problem inspected.
Consumer is responsible for delivery to, and pickup from,
the closest authorized dealer.
If the authorized Wilderness Systems dealer’s inspection
indicates a defect that is attributable to materials or
workmanship, reach out to your Wilderness Systems
dealer or online to repair or replace your Wilderness
Systems kayak free of charge at the company’s option.
Proof of purchase such as a sales receipt may be
This limited warranty excludes all other warranties,
expressed or implied, including implied warranties of
merchantability and fitness for a particular purpose, with
regard to Wilderness Systems Kayaks. Some state,
country, or provincial laws do not allow the exclusion of
certain implied warranties, so the above exclusion may
not apply to you.
This limited warranty excludes any incidental or
consequential damages or expenses resulting from any
defects. Wilderness Systems’s aggregate liability shall be
limited to an amount equal to Consumer’s original
purchase price paid for the defective product. Some
state, country, or provincial laws do not allow the
exclusion or limitation of incidental or consequential
damages, so the above exclusion may not apply to you.
To the extent any limitation or exclusion contained herein
is contrary to any country, state, or provincial law, such
limitation or exclusion shall be severable and all other
terms herein shall remain in full force and eect and are
valid and enforceable.
This warranty gives you specific legal rights and you may
also have other rights. For Consumers who are covered
by state, country or provincial consumer protection laws
or regulations, the benefits from this warranty are in
addition to all rights conveyed by such consumer
protection laws and regulations.
Helix Pedal Drive
Wilderness Systems’s Helix PD is elegible for a two year
warranty, which can be submitted for evaluation online.
LIMITED LIFETIME WARRANTY

23
FINDING YOUR SERIAL NUMBER
The serial number is located near the stern (rear) of the
boat, just below the line where the deck and side meet.
On most boats it is engraved in an indention on the
right side of the boat.
NOTICE: STATE REGULATIONS
Some states require that all kayaks be registered. To
register your kayak you will need your Manufacturer’s
Statement of Origin (MSO). This serves as the title to
your kayak and should have been provided when you
took delivery. If not, check with your retailer. If it has
been lost, have your dealer contact Wilderness
Systems and we will provide a replacement.
Note: Make sure the serial number on your MSO
matches that on your hull.
QUESTIONS?
Visit confluenceoutdoor.com to answer these and
many other commonly asked questions about our
kayaks and accessories:
How do I adjust the seat?
How do I move the footbraces for solo paddling?
How do I install the rudder?
How can I get replacement parts?
What other accessories are available for my kayak?
SERVICE AND SUPPORT
If you have a problem with your kayak that you believe
is covered under warranty, contact the nearest
authorized Wilderness Systems dealer. You can find a
listing of all dealers on our website.
If you have additional questions about your kayak or
accessories, please visit our online support webpage
at confluenceoutdoor.com for resources or to find
information on contacting a customer service
representative.
CONTACT US
Phone: 1-888-669-6960
Service and support hours are Monday through Friday
from 10 a.m. to 5:00 p.m. EST.
All warranties and part orders need to be handled
through an authorized dealer, we do not sell direct.
IMPORTANT INFORMATION
Boat Model:
Serial Number:
Date of Purchase:
Dealer Name:
SERVICE & SUPPORT

For additional resources, visit online at confluenceoutdoor.com
575 Mauldin Road, Suite 200
Greenville, SC 29607