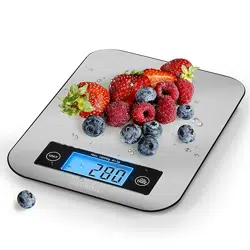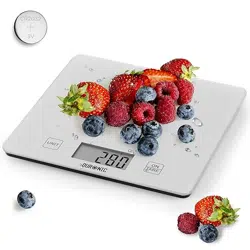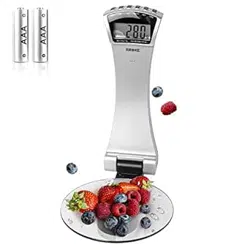
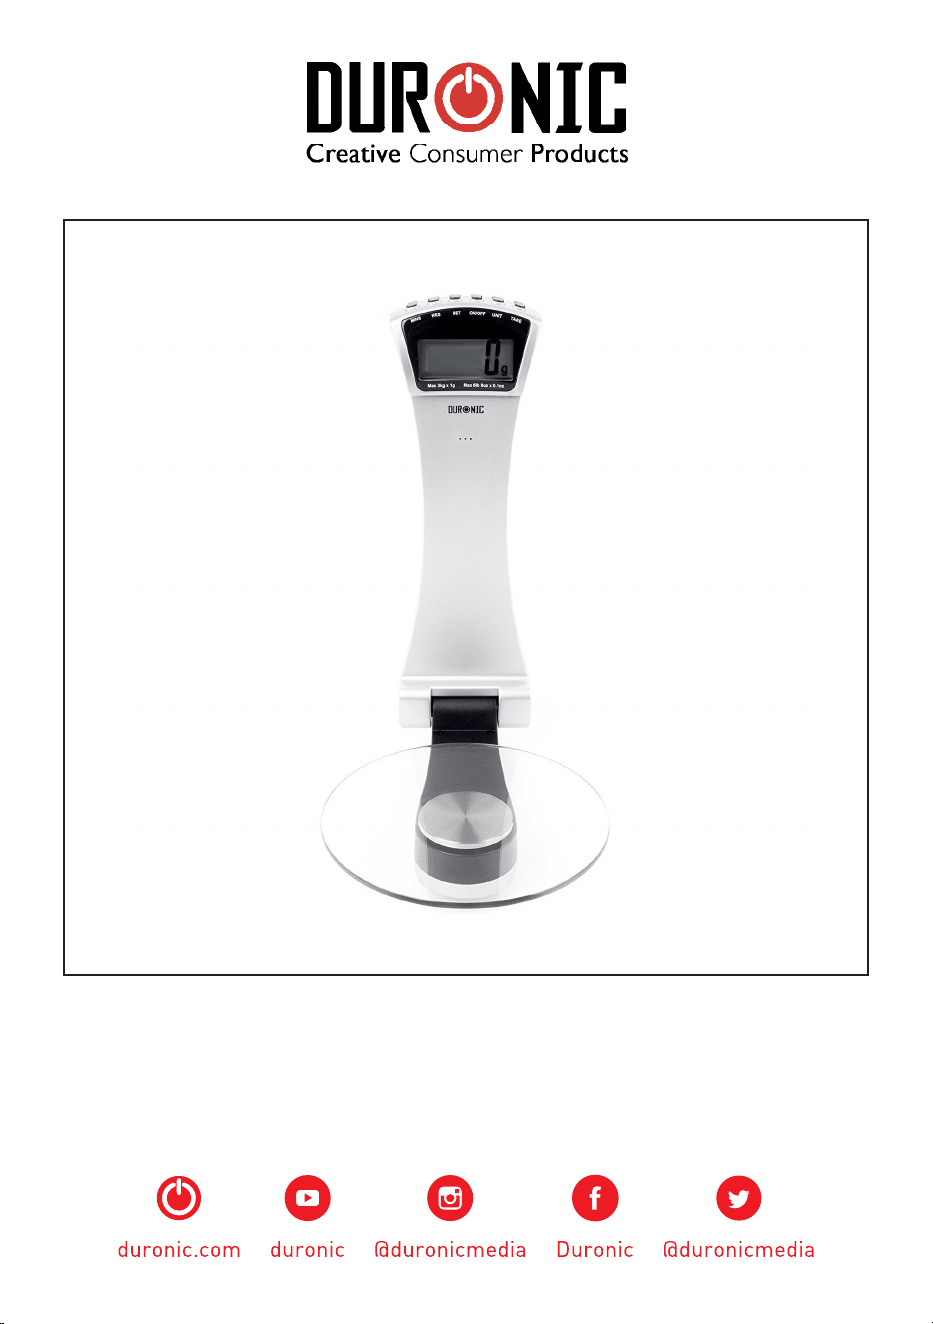
KS4000 - Kitchen Scale
PLEASE READ ALL THE INSTRUCTIONS BEFORE USE

2
3
English Manual
Manuel d’utilisation en Français
Gebrauchsanleitung auf Deutsch
Manual de Instrucciones en Español
Manuale D’istruzioni In Italiano
Instrukcja obsługi. Polski
Gebruikershandleiding in Nederlands
4
9
14
19
24
29
34
Contents
4
English Manual

5
Features and Specications
Model Batteries Minimum
Weight
Maximum
Weight
Units Graduation
KS4000 2 x AAA 5g 3kg / 6.6lb g / lb / oz 1g / 0.1oz
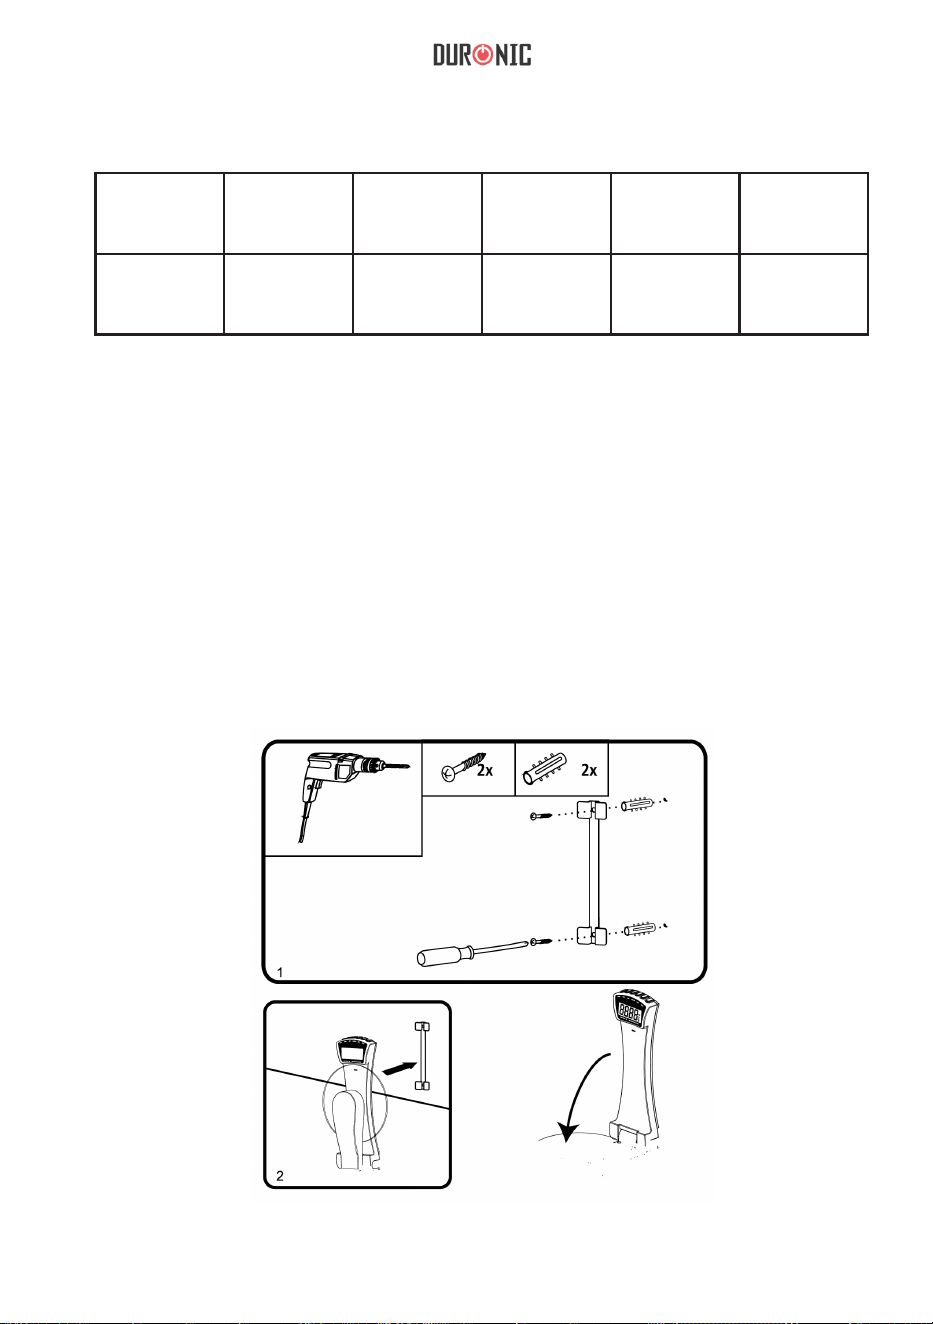
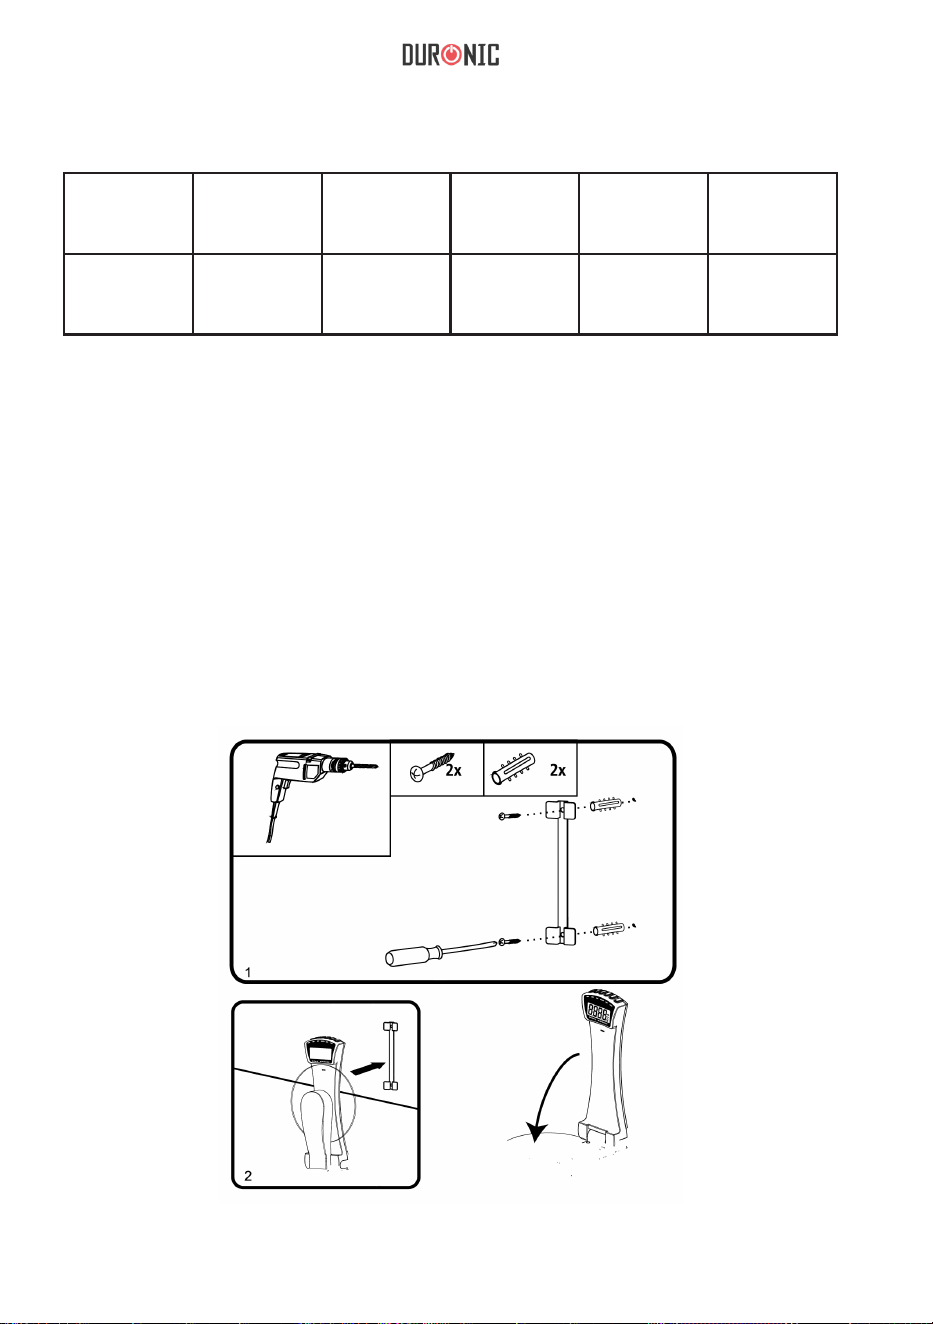
Installation
1. Make two holes in the wall, ensuring that they are the same distance to each other
as the mounting holes on the back of the mounting bar.
2. Insert 2 raw plugs into the wall
3. Place the mounting bar onto the wall over ensuring the holes align with each other.
4. Carefully x the bar to the wall using 2 screws.
5. Then x the scale onto the top of the mounting bar.
• ON/TARE button
• UNIT button
• TARE button
• SET button
• HRS button
• MINS button
• Weighing platform
• Clock and Timer

6
Batteries
Replacing the batteries
Remove the cover of the battery compartment on the back of the scale.
Take out the old batteries and and replace with 2 new ones, ensuring that they are
positioned according to the correct polarities +/-.
Fix the back cover back on top of the battery compartment.
When discarding of old unwanted batteries, it is important to follow local recycling
guidelines to ensure they are disposed of safely and responsibly.
Setting the Clock
When the batteries are inserted, the time will need to be reset. On the digital display it
will ash “TM” to show it is in Time Setting Mode.
To set the time:
1. Press the “HRS” button to select the hour gure.
2. Press the “MIN” button to select the minute gure.
3. Press the “SET” button once to conrm the time you have selected, and the “TM” will
stop ashing.
4. The display will only show in the Time Setting Mode for 20 seconds if there is no
operation.
Note: 24hr clock display format will be shown only when the grams (g) unit is selected.
12hr clock display format will be shown only when the pounds (lb) unit is selected.
Setting the Timer
1. Press the “SET” button to enter the Timer Mode, the display will then show “0:00”
and “TMR”.
2. Press and hold the “SET” button for 2 seconds to enter the Timer Set Mode and
‘TMR’ will ash.
3. Press the “HRS” button to adjust the hour gure.
4. Press the “MIN” button to adjust the minute gure.
5. Press the “SET” button once to conrm and ‘TMR’ will stop ashing. The time will
now begin counting down.
6. When the time counting has fnished, you will hear a beeping for 20
seconds. 7. Press “HRS” or “MIN” or “SET” to stop the alarm.
8. The scale will return to Clock Mode 40 seconds after the
alarm.
Using the Scale
To Weigh
1. Place your scale in an upright position.
2. Press the ON/OFF button to switch on the scale.
3. Wait until the screen display shows
“0.0”
4. Press UNIT button to select the desired unit.
7
5. Place the item you wish to weigh on the round glass platform.
6. The weight will be displayed.
7. The scales will return to Clock Mode automatically after 60 seconds of inactivity.
To Add and Weigh
To weight several different ingredients in the same bowl as each other, press the
TARE button between each ingredient to reset the scale.
Automatic Switch Off
The scale will automatically switch off after 60 seconds of no use.
Manual Switch Off
You can manually switch the scale off at any time by pressing the ON/OFF button.
Warning Indicators
Cleaning and Care
The scale is not waterproof, therefore should not be exposed to moisture or submerged
under water.
To clean the scale, use a slightly damp cloth to wipe over it. Do not use any chemical or
abrasive cleaning products to clean the scale.
If you plan to not use the scale for a long time, remove the batteries before storing
away.
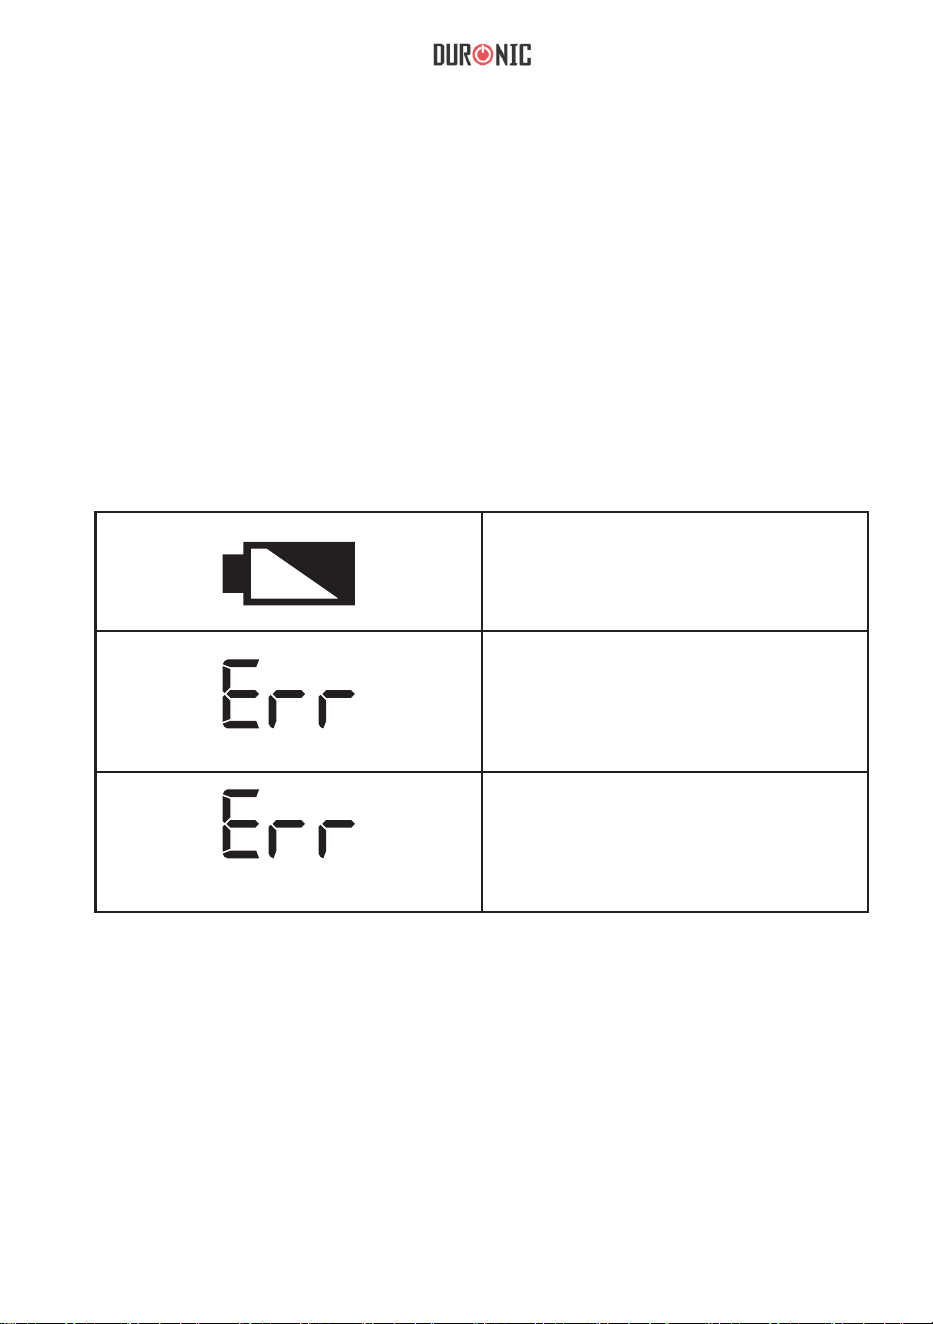
Low battery
This symbol gives advance warning
that the battery will run out soon. It’s
time to change the batteries.
Error
This means the weight is not stabi-
lised.
Check that the scale is level, press
TARE and start to weigh again.
Overload
This means that the maximum weight
limit has been exceeded. Remove
some ingredients to prevent damag-
ing the scale.
8
Warranty
1 Year Guarantee from Shine-Mart Ltd, Trademark owners of Duronic Products.
NOTE: THESE STATEMENTS DO NOT AFFECT YOUR STATUTORY RIGHTS AS A
CONSUMER
This product has been manufactured under the strictest or quality control procedures, and
using the highest quality of materials, to ensure excellent performance and reliability. It will
give very good and long lasting service, provided it is properly used and maintained. The
product is guaranteed for 1 years from the date of original purchase. If any defect arises due
to a faulty materials or poor workmanship, the faulty product must be returned to the original
place of purchase. Refund or replacement is at the discretion of that company.
Duronic Products are offered with a 1 year guarantee under the following conditions:
1. The product must be returned to the retailer with original proof of purchase.
2. The product must be installed and used in accordance with the instructions
contained in this operating manual.
3. It must be used only for domestic purposes.
4. It does not cover wear and tear, malicious damage, misuse, neglect,
inexpert repairs or consumable parts.
5. Shine-Mart Ltd has no responsibilities for accidental or consequential loss or damage.
6. Shine-Mart Ltd are not liable to carry out any type of servicing work,
under the guarantee
7. Valid in the UK only
This product is tted with CE:1363 plug and fuse
Imported by Shine-Mart Ltd, RM3 8SB
Information on waste Disposal for Consumers of
Electrical & Electronic Equipment.
This mark on a product and/or accompanying documents indicates that when it
is to be disposed of, it must be treated as Waste
Electrical & Electronic Equipment, (WEEE).
Any WEEE marked products must not be mixed with general household waste,
but kept separate for the treatment, recovery and recycling of the materials used.
For proper treatment, recovery and recycling; please take all WEEE marked
waste to your Local Authority Civic waste site,
where it will be accepted free of charge.
If customers dispose of Waste Electrical & Electronic Equipment correctly, they
will be helping to save valuable resources and preventing any potential negative
effects upon human health and the environment, of any hazardous materials that
the waste may contain.
9
Manuel d’utilisation en Français

10
Caractéristiques
Modèle
Batteries Poids
minimum
Poids
maximum
Unités
de poids
Graduation
KS4000 2 x AAA 5 g 3 kg / 6.6 lb g / lb / oz 1g / 0.1oz
Installation
1. Percez deux trous dans le mur en vous assurant qu’ils soient à la même distance
l’un de l’autre que les trous à l’arrière de la barre de montage.
2. Insérez deux chevilles dans le mur.
3. Placez la barre de montage sur le mur en vous assurant à nouveau que les trous
soient alignés les uns avec les autres.
4. Fixez la barre au mur à l’aide de deux vis.
5. Fixez la balance sur le dessus de la barre de montage.
• Bouton ON/OFF
• Bouton UNIT
• Bouton TARE
• Bouton SET
• Bouton HRS
• Bouton MINS
• Plateforme de pesée
• Horloge et minuteur

11
Batteries
REMPLACER LES PILES
Retirez le couvercle du compartiment à pile à l’arrière de la balance. Enlevez les
anciennes piles et remplacez-les avec deux nouvelles en vous assurant que les
pôles +/- soient correctement placés. Remettez le couvercle du compartiment à
pile en place.
Lorsque vous jetez de vieilles piles et batteries, il est important de suivre les règles
de recyclage locales afin qu’elles soient disposées en tout sécurité et
responsablement.
Programmer l’horloge
Lorsque les piles sont insérées, l’heure doit être reprogrammée. Sur l’écran digital,
l’indication « TM » clignotera pour signifier que le mode de programmation de
l’heure est activé.
Pour régler l’horloge :
1. Appuyez sur le bouton « HRS » pour sélectionner le chiffre de l’heure.
2. Appuyez sur le bouton « MIN » pour sélectionner le nombre des minutes.
3. Appuyez sur le bouton « SET » pour confirmer l’heure sélectionnée et l’indication
« TM » arrêtera de clignoter.
4. L’écran n’affichera le mode de programmation de l’heure que pendant 20
secondes si aucune opération n’est réalisée.
À noter : Le format 24H n’est affiché que lorsque l’unité de poids « grammes (g) »
est sélectionnée. Le format 12H n’est affiché que lorsque l’unité de poids « livres
(lb) » est sélectionnée.
Programmer le minuteur
1. Appuyez sur le bouton « SET » pour entrer le mode de minuterie, l’écran affichera
alors « 0:00 » et « TMR ».
2. Maintenez enfoncé le bouton « SET » pendant 2 secondes pour entrer le mode de
programmation de la minuterie et l’indication « TMR » commencera à clignoter.
3. Appuyez sur le bouton « HRS » pour sélectionner le chiffre de l’heure.
4. Appuyez sur le bouton « MIN » pour sélectionner le nombre des minutes.
5. Appuyez une fois sur le bouton « SET » pour confirmer et l’indication « TMR »
arrêtera de clignoter. Le minuteur comment alors à décompter le temps.
6. Une fois le compteur terminé, un signal sonore se fait entendre pendant 20
secondes.
7. Appuyez sur « HRS », « MIN » ou « SET » pour éteindre l’alarme.
8. La balance retombera sur le mode horloge 40 secondes après l’alarme.
Utiliser la balance
POUR PESER
1. Placez la balance en position verticale.
2. Appuyez sur le bouton « ON/OFF » pour allumer la balance.
3. Attendez que l’écran affiche « 0.0 ».
4. Appuyez sur le bouton « UNIT » pour sélectionner l’unité de poids désirée.
12
5. Placez l’élément que vous souhaitez peser sur la plateforme ronde en verre.
6. Le poids sera affiché.
7. La balance retournera sur le mode horloge automatiquement après 60 secondes
d’inactivité.
POUR AJOUTER DU POIDS ET LE PESER
Pour peser différents ingrédients dans le même contenant, appuyez sur le bouton
« TARE » entre chaque ingrédient pour remettre la balance à 0.
ARRÊT AUTOMATIQUE
La balance s’éteint automatiquement après 60 secondes sans être utilisée.
ARRÊT MANUEL
Vous pouvez éteindre manuellement la balance quand vous le souhaitez en appuyant
sur le bouton « ON/OFF ».
Indicateurs d’avertissement
Nettoyage et maintenance
La balance n’est pas résistante à l’eau et ne devrait donc pas être exposée à
l’humidité ou submergée sous l’eau.
Pour nettoyer la balance, utilisez un tissu légèrement humide. N’utilisez pas de
produits chimiques ou abrasifs pour la nettoyer.
Si vous n’avez pas l’intention d’utiliser la balance pendant un moment, retirez
les piles avant de la ranger.
Batterie faible
Ce symbole vous avertit que les
batteries seront bientôt faibles. Il est
temps de les changer.
Erreur
Cela signifie que le poids n’est pas
stabilisé.Vérifiez que la balance est
à niveau, appuyez sur « TARE » et
pesez à nouveau.
Surcharge
Cela signifie que la capacité
maximale a été dépassée. Retirez
quelques ingrédients pour ne pas
endommager la balance.
13
Garantie et service après-vente
1 an de garantie de la part de Shine-Mart Ltd, propriétaire de la marque Duronic.
NOTE : CES DÉCLARATIONS N’AFFECTENT EN RIEN VOTRE DROIT STATUTAIRE EN
TANT QUE CONSOMMATEUR
Ce produit a été produit en suivant les procédures de contrôle de qualité les plus strictes en
utilisant des matériaux de qualité pour assurer une excellente durabilité et performance.
Cette centrifugeuse vous offrira de longues années de service tant que vous utilisez
correctement cette machine et suivez les instructions de maintenance contenues dans ce
manuel. Ce produit est garanti pour 1 an à partir de la date originelle d’achat. Si ce produit
était endommagée en raison d’un problème électrique ou d’une fabrication imparfaite,
le produit défectueux peut être remplacé au vendeur à la discrétion de la marque sous
conditions:
1. Le produit doit être retourné avec la preuve originale d’achat.
2. Le produit doit être installé et utilisé en accord avec les instructions contenues
dans ce manuel d’utilisation.
3. Le produit doit être réservé à un usage privé.
4. La garantie ne protège pas contre les dommages dus à l’usure normale,
l’utilisation malveillante, la mauvaise utilisation, la négligence, les réparations
conduites par des non-experts ainsi que les pièces consommables.
5. Shine-Mart Ltd ne porte pas de responsabilité pour tout dommage ou perte
accidentel ou conséquent causé par ce produit.
6. Shine-Mart Ltd se dégage de toute responsabilité en matière de réparation
durant la période de garantie.
7. Valide dans toute l’Union Européenne.
Ce produit est fourni avec une prise européenne
et un fusible de 3 ampères.
Importé par Shine-Mart Ltd, RM3 8SB.
Ce symbole apparaît sur le produit et/ou les documents accompagnant ce
produit pour indiquer que pour procéder à la destruction de ce produit, celui-ci
doit être traité comme un déchet électrique et électronique (WEEE).
Les produits marqués WEEE ne doivent être mélangés avec les déchets
ménagers et doivent être séparés pour traitement et recyclage des composants.
An de traiter et recycler ce produit, veuillez déposer tous les composants
marqués WEEE au site de recyclage le plus proche où ce produit sera repris
gratuitement. Si les clients jettent les déchets électriques et électroniques
WEEE correctement, ce geste aidera la préservation de ressources précieuses
et prévient les potentiels effets négatifs que ces composants ou tout autre
composant dangereux ont sur la santé humaine et l’environnement.
Garantie
suivez nous
www.duronic.com @Duronic_FranceDuronic France@duronic_france
14
Gebrauchsanleitung auf Deutsch
15
Merkmale und Spezifikationen
Modell
Batterien Mindest-
gewicht
Maximales-
gewicht
Maßeinheit Einheit
KS4000 2 x AAA 5g 3kg / 6.6lb g / lb / oz 1g / 0.1oz
Installation
1. Boren Sie zwei Löcher in die Wand und achten Sie darauf, dass sie den
gleichen Abstand zueinander haben wie die Befestigungslöcher auf der Rückseite
der Montagestange.
2. Stecken Sie 2 Dübel in die Wand
3. Platzieren Sie die Montagestange an der Wand und achten Sie darauf, dass die
Löcher miteinander einstimmen.
4. Befestigen Sie die Stange vorsichtig mit 2 Schrauben an der Wand.
5. Befestigen Sie dann die Waage auf der Montagestange.
• EIN/TARE Taste
• UNIT Taste
• TARE Taste
• SET Taste
• HRS Taste
• MINS Taste
• Wiegeplatte
• Zeit und Timer

16
Batterien
Ersetzen der Batterien
Entfernen Sie die Abdeckung des Batteriefachs an der Unterseite der Waage.
Nehmen Sie die alten Batterien heraus und ersetzen Sie sie durch 2 neue.
Achten Sie dabei darauf, dass sie den richtigen Polaritäten +/- entsprechen.
Setzen Sie die hintere Abdeckung wieder auf am Batteriefach.
Beim Entsorgen alter Batterien ist es wichtig, die Recyclingrichtlinien zu
befolgen, um sicherzustellen, dass diese sicher und verantwortungsbewusst
entsorgt werden.
Uhr einstellen
Wenn die Batterien eingesetzt werden, muss die Zeit eingestellt werden. Auf der
Digitalanzeige wird „TM“ angezeigt, um anzuzeigen, dass die Waage sich im
Zeiteinstellungsmodus befindet.
So stellen Sie die Uhrzeit ein:
1. Drücken Sie die Taste „HRS“, um die Stunden auszuwählen.
2. Drücken Sie die Taste „MIN“, um die Minuten auszuwählen.
3. Drücken Sie einmal die Taste „SET“, um die von Ihnen gewählte Zeit zu
bestätigen.
4. Das Display wird im Zeiteinstellungsmodus nur 20 Sekunden lang angezeigt,
wenn keine Operation ausgeführt wird.
Hinweis: Das 24-Stunden Format wird nur angezeigt, wenn die Gramm (g) Einheit
ausgewählt ist. Das 12-Stunden Format wird nur angezeigt, wenn die Einheit Pfund
(lb) ausgewählt ist.
Timer einstellen
1. Drücken Sie die Taste „SET“. Auf dem Display wird „0:00“ und „TMR“
angezeigt.
2. Halten Sie die SET Taste 2 Sekunden lang gedrückt, um den Timer-Einstellmodus
aufzurufen, und TMR wird aktiviert.
3. Drücken Sie die Taste „HRS“, um die Stundenzahl auszuwählen.
4. Drücken Sie die Taste „MIN“, um die Minutenzahl auszuwählen.
5. Drücken Sie einmal die Taste "SET", um zu bestätigen.
6. Nach Ablauf der Zeitzählung hören Sie 20 Sekunden lang einen Piepton.
7. Drücken Sie „HRS“ oder „MIN“ oder „SET“, um den Alarm zu stoppen.
8. Die Waage kehrt 40 Sekunden nach dem Alarm in den Uhrmodus zurück.
Verwendung
Wiegen
1. Stellen Sie Ihre Waage aufrecht auf.
2. Drücken Sie die EIN / AUS-Taste, um die Waage einzuschalten.
3. Warten Sie, bis auf dem Bildschirm „0.0“ angezeigt wird.
4. Drücken Sie die UNIT-Taste, um die gewünschte Einheit auszuwählen

17
Tara-Funktion
Die Tara-Funktion erlaubt, in jedem Moment das Display der Waage auf Null
zurückzustellen und die Tara eines eventuellen Tellers oder mehr Wiegevorgänge,
ohne die bereits gewogenen Zutaten zu entfernen, auszuführen.
Automatische Abschaltfunktion
Die Waage schaltet sich nach 60 Sekunden automatisch aus.
Manuelles Ausschalten
Sie können die Waage jederzeit manuell ausschalten, indem Sie die Taste "ON /
OFF" drücken.
PROBLEME UND LÖSUNGEN
Reinigung und Pflege
Stellen Sie bitte sicher, dass sie auf einer trockenen, ebenen Oberfläche verwendet
wird.
Die Waage ist nicht wasserdicht und sollte daher keiner Feuchtigkeit ausgesetzt oder
unter Wasser getaucht werden.
Wenn Sie die Waage längere Zeit nicht benutzen, entfernen Sie die Batterien,
bevor Sie sie aufbewahren.
Niedriger Batteriestatus
Dieses Symbol warnt vorab, dass
die Batterie bald leer sein wird.
Error
Dies bedeutet, dass das Gewicht
nicht stabilisiert ist.
Überlast
Dies bedeutet, dass die maximale
Gewichtsgrenze überschritten
wurde.
5. Legen Sie den Gegenstand, den Sie wiegen möchten, auf die runde Glasplattform.
6. Das Gewicht wird angezeigt.
7. Die Waage kehrt nach 60 Sekunden Inaktivität automatisch in den Uhrmodus zurück.
18
Shine-Mart Ltd, der Markeninhaber von Duronic Produkten, bietet 1 Jahr Gewährleistung.
HINWEIS: DIESE BEDINGUNGEN BEEINFLUSSEN IHRE GESETZLICHE RECHTE ALS
VERBRAUCHER NICHT
Dieses Produkt wurde unter strengen Qualitätskontrollen produziert und aus hochwertigen
Materialien hergestellt, um ausgezeichnete Leistung und Zuverlässigkeit zu gewährleisten.
Sofern das Produkt korrekt benutzt und gewartet wird, kann eine langlebige Lebensdauer
erwartet werden.
Das Produkt hat eine Gewährleistung von einem Jahr ab Kaufdatum. Beim Auftreten eines
Schadens, der von fehlerhalten Materialien oder Verarbeitung verursacht wurde, sollte das
defekte Produkt an den ursprünglichen Verkäufer zurückgegeben werden. Die Erstattung
oder Umtausch erfolgt nach Vorschriften des Unternehmens.
Duronic Produkte haben 1 Jahr Gewährleistung unter folgenden Bedingungen:
1. Das Produkt muss mit dem Kaufnachweis zurückgegeben werden.
2. Das Produkt muss unter den Anweisungen und Anleitungen installiert und benutzt
worden sein.
3. Es muss ausschließlich für den Hausgebrauch genutzt worden sein.
4. Natürliche Abnutzung oder Verschleiß, böswillige Beschädigung, Missbrauch,
Vernachlässigung und unsachgemäße Reparaturen sind von der Gewährleistung
ausgeschlossen.
5. Shine-Mart Ltd übernimmt keine Verantwortung für zufällige oder Folgeschäden.
6. Shine-Mart Ltd ist nicht für Wartungsarbeiten zuständig. Diese fallen nicht unter die
Gewährleistung.
7. Gültig in der EU
Dieses Produkt ist mit tted CE geprüfte Typ-F
Euro Stecker/BS Stecker ausgestattet
Von Shine-Mart Ltd, RM3 8SB importiert
Information über Abfalllagerung für Verbraucher von elektronischen Geräten.
Dieses Zeichen auf dem Produkt und/oder auf mitgelieferte Dokumenten
zeigt, dass, wenn eine Entsorgung erfolgt, das Gerät an einer Elektro- und
Elektronikgeräte-Abfall-Sammelstelle (WEEE) abgegeben werden muss.
Um eine weitere Behandlung und Weiterverarbeitung der Materialien zu
gewährleisten dürfen diese WEEE-markierten Produkte nicht mit dem Hausmüll
vermischt werden.
Für die korrekte Behandlung, Aufbereitung und Wiederverwendung geben Sie
alle WEEE-markierten Produkte zur kommunalen Abfallbeseitigungsanlage.
Dort können Sie diese kostenlos abgeben.
Wenn die Beseitigung von Elektro-und Elektronik-Altgeräten korrekt
durchgeführt wird, tragen Sie zur Gewinnung von wertvollen Ressourcen
bei, sowie einer möglichen Vermeidung von negativen Auswirkungen auf
Gesundheit und Umwelt.
Gewährleistung
Folgen Sie Uns
19
Manual De Instrucciones En Español

20
Características y especificaciones
Modelo
Pilas Peso
mínimo
Peso
máximo
Unidad
de
medición
Graduación
KS4000 2 x AAA 5g 3kg / 6.6lb g / lb / oz 1g / 0.1oz
Instalación
1. Haga dos agujeros en la pared que estén a la misma distancia que los agujeros
de la parte posterior de la barra de montaje.
2. Inserte 2 tacos de plástico en la pared.
3. Instale la barra de montaje en la pared de manera que los agujeros coincidan.
4. Fije la barra en la pared con 2 tornillos.
5. A continuación, fije la balanza en la parte superior de la barra de montaje.
• Botón ON/TARA (encendido/tara)
• Botón UNIT (unidad)
• Botón TARE (tara)
• Botón SET (ajustes)
• Botón HRS (horas)
• Botón MINS (minutos)
• Plato de medición
• Reloj y tiempo

21
Pilas
Cambio de las pilas
Retire la tapa del compartimento de las pilas en la parte posterior de la báscula.
Saque las pilas gastadas y cámbielas por dos nuevas, asegurándose de que
estén colocadas según las polaridades correctas +/-.
Vuelva a colocar la tapa sobre el compartimento de las pilas.
Al desechar las pilas viejas no deseadas, por favor hágalo de una forma segura
y responsable.
Ajuste de la hora
Cuando las pilas se insertan, la hora tiene que reajustarse. En la pantalla digital
aparecerá «TM» para indicar que está en el modo ajuste de la hora.
Para ajustar la hora:
1.Presione el botón «HRS» para seleccionar la hora.
2. Presione el botón «MINS» para seleccionar los minutos.
3. Presione el botón «SET» una vez para confirmar la hora que ha seleccionado, y el
icono «TM» dejará de parpadear.
4. La pantalla sólo mostrará el modo ajuste de la hora durante 20 segundos si no se
realiza ninguna operación.
Nota: El formato de visualización del reloj de 24 horas sólo se mostrará cuando se
seleccione la unidad en gramos (g). El formato de visualización del reloj de 12 horas
se mostrará sólo cuando se seleccione la unidad en libras (lb).
Ajuste del temporizador
1. Presione el botón «SET» para entrar en el modo ajuste del temporizador, la
pantalla mostrará «0:00» y «TMR».
2. Mantenga presionado el botón «SET» durante 2 segundos para entrar en el modo
ajuste del temporizador y «TMR» aparecerá en pantalla.
3. Presione el botón «HRS» para ajustar la hora.
4. Presione el botón «MIN» para ajustar los minutos.
5. Presiona el botón «SET» una vez para confirmar y el botón «TMR» dejará de
parpadear. La cuenta atrás del temporizador se iniciará automaticamente.
6. Cuando la cuenta atrás haya terminado, oirá un pitido durante 20 segundos.
7. Presione «HRS», «MIN» o «SET» para detener la alarma.
8. La báscula volverá al modo ajuste del reloj 40 segundos después de que suene la
alarma.
Modo de uso
Cómo pesar con la báscula
1. Ponga su báscula en posición vertical.
2. Pulse el botón ON/OFF para encender la báscula.
3. Espere hasta que aparezca «0.0» en la pantalla.
4. Pulse el botón UNIT para elegir la unidad deseada.

22
5. Coloque lo que desea pesar en el plato de medición de vidrio.
6. Obtendrá el resultado.
7. La báscula volverá al modo ajuste de la hora automáticamente después de 60 segundos
de inactividad.
Añadir ingredientes y pesar
Para pesar varios ingredientes en el mismo recipiente, pulse el botón «TARE» cada
vez que añada un ingrediente nuevo para que así se reajuste la báscula.
Apagado automático
La báscula se apagará automáticamente después de 60 segundos de inactividad.
Apagado manual
Puede apagar la báscula tan solo pulsando el botón ON/OFF.
Símbolos de advertencia
Limpieza y mantenimiento
Esta báscula de cocina no es resistente al agua, por lo que no la sumerja en líquidos
ni la exponga a la humedad.
Para limpiarla, simplemente use un trapo húmedo. No use productos químicos
abrasivos que puedan dañar la unidad.
Si no va a usar la báscula durante un largo periodo de tiempo, saque las pilas.
Batería baja
Si aparece este icono, significa que
las pilas de su báscula se están
agotando y debe cambiarlas.
Error
Puede que el peso no se haya
detectado bien. Compruebe que la
báscula está nivelada, pulse el botón
«TARE» y vuelva a medir el peso.
Sobrecarga
También puede aparecerle esté icono
si añada más peso del máximo
requerido. Retire ingredientes para
evitar que la báscula se rompa.
23
Síguenos
NOTA: ESTAS DECLARACIONES NO AFECTAN SUS DERECHOS LEGALES COMO
CONSUMIDOR
Este producto ha sido fabricado bajo las más estrictas control de calidad y utilizando
materiales de
alta calidad para asegurar conabilidad y excelente funcionamiento. Le dará buen servicio y
una larga duración, siempre y cuando se utilice correctamente y sea bien mantenido.
El producto está garantizado por 1 año desde la fecha de compra original. Si surge
cualquier defecto debido a un error/defecto de fábrica o mano de obra, entonces el producto
debe ser devuelto al lugar original de compra. Reembolso o reemplazo es a discreción de la
compañía.
Productos Duronic se ofrecen con una garantía de 1 año bajo las siguientes condiciones:
1. El producto debe ser devuelto al vendedor con comprobante de compra original.
2. El producto debe instalarse y usarlo según las instrucciones
contenidas en este manual.
3. Este aparato es únicamente de uso doméstico.
4. No cubre desgaste, daños maliciosos, uso indebido, negligencia,
reparaciones inexpertas o partes consumibles.
5. Shine-Mart Ltd no será responsable por cualquier daño consecuente,
accidentes o pérdidas.
6. Shine-Mart Ltd no es responsable ah llevar a cabo cualquier tipo de
servicio, bajo la garantía.
7. Valido solamente dentro de la (EU).
Este producto esta equipado con enchufe/fusible Europeo
Importado por Shine-Mart Ltd, RM3 8SB
Información sobre la eliminación de residuos para los consumidores
de equipos eléctricos y eléctricos:
Esta marca en un producto y/o documentos adjuntos indica que cuando se va a
desechar, se debe tratar como equipos residuos eléctricos y electrónicos (RAEE)
Cualquier producto marcado (RAEE) no debe ser mezclado con la basura
doméstica, sino separado para el tratamiento, recuperación y reciclaje
de los materiales utilizados.
Para el tratamiento adecuado, recuperación y reciclaje; por favor, tome todos los
productos (RAEE) y llévelo al sitio de residuos de su
Autoridad Local, donde será aceptado de forma gratuita.
Si los clientes desechan los residuos eléctricos y electrónicos correctamente,
ayudar a ahorrar valiosos recursos y prevenir los efectos negativos sobre la salud
humana y el medio ambiente, de materiales peligrosos que pueden
contener los residuos
Garantía
24
Manuale D’istruzioni In Italiano

25
Features and Specications
Modello
Batterie
Peso min Peso max
Unità
Graduazione
KS4000 2 x AAA 5g 3kg / 6.6lb g / lb / oz 1g / 0.1oz
Installazione
1. Praticare due fori nel muro, accertandosi che siano alla stessa distanza tra loro
dei fori di montaggio sul retro della barra di montaggio.
2. Inserire 2 tasselli nella parete
3. Posizionare la barra di montaggio sulla parete assicurandosi che i fori siano
allineati tra loro.
4. Fissare con cura la barra al muro usando 2 viti.
5. Fissare la bilacia sulla parte superiore della barra di montaggio.
• Pulsante ON/TARE
• Pulsante UNIT
• Pulsante TARE
• Pulsante SET
• Pulsante HRS
• Pulsante MINS
• Piattaforma di pesatura
• Orologio e Timer

26
Batterie
Sostituzione della batteria
Rimuovere il coperchio del vano batterie sul retro della bilancia.
Estrarre le vecchie batterie e sostituirle con 2 nuove, assicurandosi che siano
posizionate correttamente.
Riposizionare il coperchio.
È importante seguire le linee guida di riciclaggio locali per assicurarsi che le
batterie vengano smaltite in modo sicuro e responsabile.
Impostare l'orologio
Quando vengono inserite le batterie, è necessario reimpostare l'ora. Sul display
digitale lampeggerà "TM" per mostrare che è in modalità di impostazione dell'ora.
Per impostare l'ora:
1. Premere il tasto “HRS” per selezionare l'ora.
2. Premere il tasto “MIN” per selezionare i minuti.
3. Premere una volta il pulsante “SET” per confermare l'ora selezionata.
4. Il display rimane nella modalità di impostazione dell'ora solo per 20 secondi se
non viene eseguita alcuna operazione.
Nota: il formato di visualizzazione dell'orologio a 24 ore verrà mostrato solo quando
è selezionata l'unità grammi (g). Il formato di visualizzazione dell'orologio a 12 ore
verrà mostrato solo quando è selezionata l'unità di libbre (lb).
Impostare il timer
1. Premere il pulsante “SET” per accedere alla modalità timer, il display
mostrerà quindi “0:00” e “TMR”.
2. Premere e tenere premuto il pulsante "SET" per 2 secondi per accedere alla
modalità di impostazione del timer e "TMR" lampeggerà.
3. Premere il tasto “HRS” per selezionare l'ora.
4. Premere il tasto “MIN” per impostare i minuti.
5. Premere una volta il pulsante "SET" per confermare e "TMR" smetterà
di lampeggiare.
6. Al termine del conteggio del tempo, si sentirà un segnale acustico per 20 secondi.
7. Premere “HRS” o “MIN” o “SET” per interrompere l'allarme.
8. La bilancia tornerà alla modalità orologio 40 secondi dopo la sveglia.
Utilizzo della bilancia
Pesare
1. Aprire il piatto della bilancia.
2. Premere il pulsante ON / OFF per accendere la bilancia.
3. Attendere fino a quando il display non mostra "0.0"
4. Premere il pulsante UNIT per selezionare l'unità desiderata.

27
Pesare
Per pesare diversi ingredienti nella stessa ciotola, premere il pulsante TARE prima di
aggiungere l'ingrediente che si vuole pesare.
Spegnimento automatico
La bilancia si spegne automaticamente dopo 60 secondi di inattività.
Spegnimento manuale
È possibile spegnere manualmente la bilancia in qualsiasi momento premendo il
pulsante ON / OFF.
Warning Indicators
Pulizia e manutenzione
La bilancia non deve essere esposta ad umidità o immersa nell'acqua.
Per pulire la bilancia, utilizzare un panno leggermente umido. Non utilizzare
detergenti chimici o abrasivi per pulire la bilancia.
Se si prevede di non utilizzare la bilancia per un lungo periodo, rimuovere le
batterie prima di riporla.
Livello batteria basso
Questo simbolo avvisa
anticipatamente che la batteria si
esaurirà presto.
Errore
Ciò significa che il peso non è stabile.
Verificare che la bilancia sia
posizionata correttamente premere
TARE e pesare.
Sovraccarico
Ciò significa che è stato superato il
limite di peso massimo. Rimuovere
alcuni ingredienti per evitare di
danneggiare la bilancia.
5. Posizionare l'oggetto che si desidera pesare sulla piattaforma di vetro.
6. Verrà visualizzato il peso.
7. Le bilance torneranno automaticamente alla modalità orologio dopo 60 secondi di
inattività.
28
Questo prodotto è garantito per una durata determinata con il distributore a partire dalla data
di acquisto contro ogni difetto derivante da difetti di fabbricazione o dei materiali. Questa
garanzia non copre difetti o danni derivanti da installazione impropria, uso improprio o usura
anomala del prodotto.
L’apparecchio deve essere restituito nella sua confezione originale e accompagnato dalla
ricevuta e deve essere stato utilizzato in modo corretto. È importante rispettare le istruzioni
per l’uso e le precauzioni di sicurezza indicate di seguito. Inoltre, non possiamo garantire
l’apparecchio se è stato modicato o riparato dall’acquirente o da terzi.
1 anno di garanzia da Shine-Mart Ltd, proprietari del marchio commerciale Duronic.
NOTA: QUESTE DICHIARAZIONI NON INFLUISCONO SUI DIRITTI LEGALI DEL
CONSUMATORE
Questo prodotto è stato realizzato con le rigorose procedure del controllo qualità, e
utilizzando materiali di altissima qualità, per garantire afdabilità e prestazioni eccellenti.
Vi regalerà un servizio ottimo e a lungo termine, purchè venga opportunamente usata e
mantenuta. Il prodotto è garantito per 1 anno dalla data di acquisto. Se sorge qualche
difetto a causa di materiali difettosi o scarsa manodopera, il prodotto difettoso dovrà essere
restituito al luogo originale di acquisto. Il rimborso o la sostituzione sono a discrezione
dell’azienda. I prodotti Duronic offrono 1 anno di garanzia alle seguenti condizioni:
1. Il prodotto deve essere restituito al rivenditore con la prova d’acquisto originale
2. Il prodotto deve essere installato e usato seguendo le istruzioni contenute nel manuale.
3. Il prodotto va utilizzato solo per scopi domestici. Non è da utilizzarsi per uso commerciale.
4. La garanzia non copre usura, danni volontari, abuso, negligenza, riparazioni
inesperte o consumo dei materiali.
5. Shine-Mart Ltd non è responsabile per Danni accidentali o consequenziali.
6. Shine-Mart Ltd non è tenuta a eseguire qualsiasi tipo di riparazione, ai sensi
della garanzia.
7. Termini validi in tutta l’unione europea *Ci riserviamo il diritto di modicare le sopracitate
condizioni Per parti di ricambio si prega di consultare il sito www.duronic.com
Corretto smaltimento del prodotto.
Qusto prodotto è inclusivo di spina certicata CE
importata da Shine-Mart Ltd, RM3 8SB
Questo segno su un prodotto o su documenti indica che quando deve essere
smaltito, deve essere trattato come i riuti elettrici ed elettronici (WEEE)
Tutti I prodotti marcati WEEE non devono essere buttati nei riuti domenistici
generici, ma separati per il trattamento, il recupero
e il riciclaggio dei materiali utilizzati.
Per un corretto trattamento, recupero e riciclaggio; si prega di portare tutti I
prodotti marcati WEEE al Vostro centro smaltimenti riuti autorizzato, dove
saranno accettati gratuitamente.
Se i consumatori sono propensi allo smaltimento corretto di riuti elettrici ed
elettronici, aiuteranno a salvare risorse importanti e a prevenire i potenziali
effetti negativi sulla salute umana e sull’ambiente di tutti i materiali pericolosi
che i riuti possono contenere.
Garanzia
Seguici
29
Instrukcja obsługi. Polski
30
Specyfikacja i Ogólna Charakterystyka
Model
Baterie Minimalne
obciążenie
Maksymalne
obciążenie
Jednostka
pomiaru
Skalowanie
KS4000 2 x AAA 5 g 3 kg / 6.6 lb g / lb / oz 1g / 0.1oz
Instalacja
1. Wywierć dwa otwory w ścianie upewniając się, że ich rozstaw jest zgodny z otworami
montażowymi na panelu montażowym wagi.
2. Umieść dwa wkręty w ścianie.
3. Umieść panel montażowy, ponownie upewniając się, że otwory montażowe pasują
do siebie.
4. Ostrożnie zamontuj panel montażowy za pomocą dwóch śrub.
5. Zamontuj wagę na panelu.
• Przycisk ON / TARE
• Przycisk UNIT (zmiana jednostki)
• Przycisk TARE (tarowanie)
• Przycisk SET (ustawienia)
• Przycisk HRS (godziny)
• Przycisk MINS (minuty)
• Platforma wagi
• Zegar i programator

31
Baterie
Wymiana Baterii
W celu wymienienia nowej baterii otwórz zabezpieczające wieczko na dole wagi.
Wymień stare baterie zgodnie z oznaczeniem polaryzacji. Gdy masz pewność,
że baterie zostały prawidłowo umieszczone zamknij pokrywę baterii.
Zużyte baterie zutylizuj zgodnie z lokalnym prawem obowiązującym w danym
kraju z zachowaniem przepisów o ochronie środowiska.
Ustawianie zegara
Po zainstalowaniu baterii czas zostanie zresetowany. Na wyświetlaczu zacznie
mrugać "TM" co daje znać, że urządzenie jest w trybie ustawiania czasu.
Aby ustawić czas:
1. Przyciśnij przycisk "HRS", aby wybrać godzinę.
2. Przyciśnij przycisk "MIN", aby ustawić minuty.
3. Przyciśnij przycisk "SET" jednokrotnie, aby potwierdzić ustawioną godzinę. "TM"
przestanie mrugać.
4. Urządzenie pozostanie w trybie ustawiania czasu przez 20 sek.
UWAGA: Czas zostanie wyświetlony w systemie 24-godzinnym, gdy wybierzesz
gramy (g) jako jednostkę wagi. Przy wybraniu funtów jako jednostki pomiaru (lb)
zegar będzie wyświetlany w trybie 12-godzinnym.
Ustawianie Programatora
1. Przyciśnij przyciśnij "SET", aby wejść w ustawienia programatora. Na wyświetlaczu
pojawi się "0:00" oraz "TMR".
2. Przyciśnij i przytrzymaj przycisk "SET" przez ok. 2 sekundy, aby wejść w tryb
ustawień programatora. Na wyświetlaczu zacznie mrugać "TMR".
3. Przyciśnij przycisk "HRS", aby określić godziny.
4. Przyciśnij przycisk "MIN" aby ustawić minuty.
5. Przyciśnij przycisk "SET" jednokrotnie, aby zatwierdzić ustawienia. "TMR"
przestanie mrugać. Rozpoczęto odliczanie czasu.
6. Kiedy ustawiony czas upłynie, usłyszysz sygnał dźwiękowy przez 20 sek.
7. Aby wyłączyć sygnał dźwiekowy przyciśnij "HRS", "MIN" lub "SET".
8. Waga powróci do systemy wyświetlania godziny po 40 sekundach od
wyłączenia alarmu.
Użytkowanie
Ważenie
1. Ustaw wagę w pozycji pionowej.
2. Naciśnij przycisk ON / OFF, aby włączyć wagę.
3. Poczekaj, aż na ekranie pojawi się „0.0”
4. Naciśnij przycisk UNIT, aby wybrać żądaną jednostkę.

32
5. Produkty, które chcesz zważyć umieść na szklanej platformie.
6. Wyświetlona zostanie waga.
7. Waga automatycznie powróci do trybu wyświetlania godziny po 60 sekundach
bezczynności.
Aby dodać wagę
TW celu zważenia kilku różnych składników w tej samej misce, przyciśnij przycisk
TARE pomiędzy dodawaniem kolejnych składników, aby zresetować odczyt.
Automatyczne wyłączanie
Waga automatycznie wyłączy się po 60 sekundach bezczynności.
Manualne wyłączanie wagi
Wagę w każdej chwili można wyłączyć manualnie przyciskając przycisk ON/OFF.
Znaki ostrzegawcze
Czyszczenie i Pielęgnacja
Waga nie jest wodoodporna, nie powinna być eksponowana na wilgoć lub zanurzana
w wodzie.
Aby wyczyścić wagę, używaj wilgotnej ściereczki, aby przetrzeć obudowę. Nie używaj
żadnych środków chemicznych lub ściernych do czyszczenia.
Jeżeli nie będziesz używał wagi przez dłuższy czas, wyciągnij baterie przed
odstawieniem do przechowywania.
Niski poziom baterii
Ten symbol ostrzega, że bateria
wkrótce się wyczerpie. Wymień
baterie
Błąd
Waga nie została ustabilizowana.
Sprawdź, czy waga znajduje się na
stabilnej powierzchni. Przyciśnij
TARE i ponownie zważ produkty.
Przeładowanie
Pojawienie się tego oznaczenia jest
znakiem przekroczenia maksymalnej
wagi urządzenia. Usuń cześć skł.,
aby zapobiec uszkodzeniu wagi.
33
Warunki Gwarancji
1 Rok Gwarancji rmy Shine-Mart LTD, marki handlowej Duronic Products.
UWAGA: ten dokument nie wpływa na twoje ustawowe prawo jako konsumenta.
Ten produkt został wykonany zgodnie z restrykcyjnymi normami kontroli i wykorzystuje
najwyższej jakości materiały dla uzyskania doskonałej wydajności i niezawodności.
Długotrwałość produktu zostaje osiągnięta przez właściwe użytkowanie i konserwację.
Gwarancja obejmuje 1 rok od daty zamówienia. Jeżeli jakikolwiek defekt powstanie ze
względu na wadliwość materiału lub niewłaściwe wykonanie to uszkodzony produkt musi
zostać dostarczony do miejsca, z którego został zamówiony. Zwrot pieniędzy lub wymiana
produktu jest w gestii rmy.
Duronic Products oferuje jeden rok gwarancji na podstawie poniższych warunków:
1. Produkt musi zostać zwrócony do sprzedawcy z oryginalnym dowodem zakupu.
2. Produkt był instalowany i użytkowany zgodnie z instrukcją obsługi.
3. Produkt użytkowany był wyłącznie w celach domowych.
4. Gwarancja nie obejmuje naturalnego zużycia się produktu, celowego uszkodzenia,
niewłaściwego użycia, zaniedbania, niewłaściwych napraw lub części
eksploatacyjnych.
5. Shine-Mart Ltd. nie ponosi odpowiedzialności za przypadkowe albo celowe zgubienie
produktu lub jego uszkodzenie.
6. Firma Shine-Mart Ltd nie jest zobowiązana do przeprowadzania jakichkolwiek prac
serwisowych w ramach gwarancji.
7. Obowiązuje na obszarze Unii Europejskiej.
Ten produkt jest wyposażony we wbudowaną wtyczkę typu Euro-Plug / BS z
certykatem CE importowaną przez Shine-Mart Ltd, RM3 8SB
Informacja o odpadach i utylizacja dla użytkowników sprzętu elektrycznego i
elektronicznego.
Usuwanie wyeksploatowanych urządzeń elektrycznych i elektronicznych (dotyczy
krajów Unii Europejskiej i innych krajów europejskich z wydzielonymi systemami
zbierania odpadów). Ten symbol na produkcie lub jego opakowaniu oznacza, że
produkt nie powinien być zaliczany do odpadów domowych. Należy go przekazać
do odpowiedniego punktu, który zajmuje się zbieraniem i recyklingiem urządzeń
elektrycznych i elektronicznych. Prawidłowe usunięcie produktu zapobiegnie
potencjalnym negatywnym konsekwencjom dla środowiska naturalnego i zdrowia
ludzkiego, których przyczyną mogłoby być niewłaściwe usuwanie produktu.
Recykling materiałów pomaga w zachowaniu surowców naturalnych.
Śledź Nas
34
Gebruikershandleiding in Nederlands

35
Eigenschappen en Specificaties
Model
Batterijen Minimum
Gewicht
Maximum
Gewicht
Gewichtsee
Nheden
Schaalver
Deling
KS4000 2 x AAA 5g 3kg / 6.6lb g / lb / oz 1g / 0.1oz
Installatie
1. Boor twee gaten in de muur, zorg dat ze even ver uit elkaar staan als de
bevestigingsgaten op de achterkant van de bevestigingsbalk.
2. Plaats 2 pluggen in de gaten in de muur.
3. Houd de bevestigingsbalk tegen de muur, zorg dat de gaten goed met elkaar zijn
uitgelijnd.
4. Bevestig de balk voorzichtig aan de muur met 2 schroeven.
5. Bevestig de weegschaal aan de bovenkant van de bevestigingsbalk.
• AAN/UIT knop
• UNIT knop
• TARE knop
• SET knop
• HRS knop
• MINS knop
• Weegplatform
• Klok en Kookwekker

36
Batterijen
Batterijen vervangen
Verwijder het deksel van het batterijvak aan de achterkant van de weegschaal.
Verwijder de oude batterijen en vervang deze met 2 nieuwe batterijen, zorg
ervoor dat de +/- polen correct geplaatst zijn.
Sluit het batterijvak.
Volg bij het verwijderen van batterijen de locale richtlijnen voor het veilig en
verantwoord behandelen en recyclen van oude batterijen.
Klok Instellen
De tijd moet opnieuw worden ingesteld als de batterijen in het apparaat worden
geplaatst. De digitale display zal “TM” weergeven om aan te duiden dat deze in
Tijdsinstellingsmodus is.
Om de tijd in te stellen:
1. Druk op de “HRS” knop om het uur in te stellen.
2. Druk op de "MIN" knop om minuten in te stellen.
3. Druk eenmalig op de "SET" knop om de geselecteerde tijd te bevestigen en “TM”
zal stoppen met knipperen.
4. De display zal voor slechts 20 seconden in Tijdsinstellingsmodus blijven als er
geen verdere invoer volgt.
Let op: 24 uurs tijdsweergave wordt alleen getoond als de gewichtseenheid
grammen (g) is geselecteerd. 12 uurs tijdsweergave wordt alleen getoond als de
gewichtseenheid ponden (lb) is geselecteerd.
Kookwekker Instellen
1. Druk op de "SET" knop om Kookwekker (Timer) Modus te activeren, de display
toont dan “0:00” en “TMR”.
2. Houd de "SET" knop 2 seconden ingedrukt om Kookwekker Modus te activeren en
'TMR' zal op het scherm knipperen.
3. Druk op de "HRS" knop om uren in te stellen.
4. Druk op de "MIN" knop om minuten in te stellen.
5. Druk eenmalig op de "SET" knop om de geselecteerde tijd te bevestigen en “TMR”
zal stoppen met knipperen. De kookwekker begint dan met aftellen.
6. Nadat de ingestelde tijd verstreken is zal de kookwekker zal 20 seconden lang
piepen.
7. Druk op "HRS" of "MIN" of "SET" om het alarm uit te schakelen.
8. De weegschaal schakelt 40 seconden nadat het alarm af is gegaan weer terug
naar Klok Modus.
Gebruik van de Weegschaal
Wegen
1. Zorg dat de weegschaal rechtop staat.
2. Druk op de aan/tare ("ON/TARE") knop om de weegschaal aan te zetten.
3. Wacht tot het scherm "0.0" aangeeft.
4. Druk op “UNIT” om de gewenste gewichtseenheid te selecteren.

37
5. Plaats het voorwerp dat u wilt wegen op het ronde glazen platform.
6. Het gewicht wordt weergegeven.
7. De weegschaal schakelt, na 60 seconden zonder verdere activiteit,
automatisch terug naar Klok Modus.
Toevoegen en wegen
Om meerdere ingrediënten in dezelfde kom te wegen kunt u na elk ingrediënt op de
“TARE” knop drukken om de weegschaal te resetten.
Automatisch Uitschakelen
De weegschaal schakelt na 60 seconden zonder gebruik automatisch uit.
Handmatig uitschakelen
De weegschaal kan op elk moment handmatig uitgeschakeld worden door op de
aan/uit ("ON/TARE") knop te drukken.
Waarschuwingen en Foutmelding
Schoonmaak en Onderhouden
De weegschaal is niet waterbestendig, stel het product bloot aan vocht en dompel het
niet onder in water of andere vloeistoffen.
Om de weegschaal schoon te maken kunt u deze afnemen met een licht vochtige
doek. Gebruik geen chemische schoonmaakproducten of schuurmiddelen om de
weegschaal schoon te maken.
Verwijder, in het geval dat u de weegschaal voor lange tijd niet zult gebruiken,
de batterijen voor het apparaat op te bergen.
Batterij bijna leeg
Dit symbool geeft van tevoren aan dat de
batterij binnenkort leeg zal zijn. Dit geeft
aan dat het tijd is dat de batterijen
verwisseld worden.
Fout
Dit geeft aan dat het gewicht niet
stabiel is. Zorg dat de weegschaal
waterpas staat, druk op “TARE” en
begin opnieuw met wegen.
Overbelast
Dit betekent dat het limiet voor
maximumgewicht is overschreden.
Verwijder het voorwerp of een deel van
de ingrediënten om schade aan de
weegschaal te voorkomen.
38
Garantie
1 Jaar Garantie van Shine-Mart Ltd Handelsmerk eigenaars van Duronic Producten. LET
OP: DEZE STELLINGEN HEBBEN GEEN INVLOED OP UW WETTELIJKE RECHTEN ALS
CONSUMENT
Dit product is vervaardigd onder de strengste kwaliteitscontrole procedures, met materialen
van de hoogste kwaliteit, om uitstekende werking en betrouwbaarheid te verzekeren. Het
zal zeer goed en langdurig dienstdoen, naar gelang het correct gebruikt en onderhouden
wordt. Het product heeft 1 jaar garantie van de originele aankoopdatum. Als een defect zich
toont vanwege een materiaal- of constructiefout, dient het defecte apparaat bij de originele
aankoop locatie geretourneerd te worden. Terugbetaling of vervanging is ter discretie van
dat bedrijf.
Duronic Producten worden aangeboden met een 1-jarige garantie onder de volgende
omstandigheden:
1. Het product dient naar de verkoper geretourneerd te worden met aankoopbewijs.
2. Het product dient geïnstalleerd en gebruikt te worden naar de instructies in deze
gebruikshandleiding.
3. Het product is alleen geschikt voor huishoudelijk gebruik.
4. De garantie dekt geen gebruiksschade, opzettelijke schade, verkeerd gebruik of
verwaarlozing.
5. Shine-Mart Ltd heeft geen verantwoordelijkheid voor accidentele schade of
verlies.
6. Shine-Mart Ltd is niet aansprakelijk voor onderhoud onder de garantie.
7. Alleen geldig in Nederland
Dit product is uitgerust met en CE:1363 stekker en zekering.
Geïmporteerd door Shine-Mart Ltd, RM3 8SB informatie over afvalverwerking voor
Afgedankte Elektrische en Elektronische Apparatuur (AEEA).
Dit teken geeft aan dat een product en/of bijbehorende documenten bij verwijdering, dienen te
worden behandeld als Afgedankte Elektrische en Elektronische Apparatuur (AEEA).
Alle AEEA gemarkeerde producten dienen niet te worden gemengd met algemeen
huishoudelijk afval, maar apart worden gehouden voor de behandeling, herwinning en
hergebruik van de gebruikte materialen.

39

40