
Another quality product fromAnother quality product from
EURO-PRO CORPORATION. 178 West Service Road, Champlain. New York 12919 Tel.: 1-800-798-7398
In Canada: 4400 Bois Franc, St. Laurent, Quebec H4S 1A7 Tel.: 1-514-842-8691
150
Model
Instruction Manual
Manual De Instrucciones
Manuel D'instruction
All manuals and user guides at all-guides.com
When using an electrical appliance, basic safety always be followed, including the
following:
Read all instructions before using this sewing machine.
1. An appliance should never be left unattended when plugged in.
2. Always unplug this appliance from the electric outlet immediately after using and
before cleaning.
1. Do not allow to be used as a toy. Close attention is necessary when this appliance is
used by or near children.
2. Use this appliance only for its intended use as described in this manual. Use only
attachments recommended by the manufacturer as contained in this manual.
3. Never operate this appliance if it has a damaged cord or plug, if it is not working
properly, if it has been dropped or damaged, or dropped into water. Return the
appliance to the nearest authorized dealer or service center for examination, repair,
electrical or mechanical adjustment.
4. Never operate the appliance with any air openings blocked. Keep ventilation
openings of the sewing machine from the accumulation of lint, dust, and loose cloth.
5. Keep fingers away from all moving parts. Special care is required around the sewing
machine needle.
6. Always use the proper needle plate. The wrong plate can cause the needle to break.
7. Do not use bent needles.
8. Do not pull or push fabric while stitching. It may deflect the needle causing it to break.
9. Switch the sewing machine off when making any adjustments in the needle area,
such as threading needle, changing needle, or threading bobbin, and the like.
10.Always unplug sewing machine from the electrical outlet when removing covers,
lubricating, or when making any other user servicing adjustments mentioned in the
instruction manual.
11.Never drop or insert any object into any opening.
12.Do not use outdoors.
13.Do not operate where aerosol spray products are being used or where oxygen is
being administered.
14.To disconnect, turn all controls to the off position, then remove plug from outlet.
15.Do not unplug by pulling on cord. To unplug, grasp the plug, not the cord.
This sewing machine is intended for household use only.
Danger
Warning
Save these instructions
- To reduce the risk of electric shock:
- To reduce the risk of burns, fire, electric shock, or injury to
persons:
Important safety instructions
GB
All manuals and user guides at all-guides.com
Medidas de seguridad importantes
Peligro
Advertencia
Conserve estas instrucciones
Al utilizar una máquina electrodoméstica, siempre se deben tomar ciertas precauciones
básicas, incluida la siguiente:
Lea todas las instrucciones antes de usar la máquina de coser.
1. No deje la máquina sin atender cuando está enchufada.
2. Siempre desenchufe la máquina inmediatamente de haber terminado de usarla y
antes de limpiarla.
1. No deje que se use para jugar. Tenga mucho cuidado cuando utiliza la máquina
cerca de los niños o cuando éstos la utilizan.
2. Use la máquina sólo para lo que se describe en este manual. Utilice únicamente los
accesorios recomendados por el fabricante, como aparecen en este manual.
3. No use la máquina, si el cable o el enchufe están dañados y si no funciona como
corresponde. No la use si se ha caído, dañado o caído al agua. Mándela a un
distribuidor o centro de servicio autorizado para que la examinen, reparen o hagan
los ajustes mecánicos o eléctricos.
4. Mantenga los dedos lejos de las piezas móviles. Tenga mucho cuidado alrededor de
la aguja de coser.
5. No use agujas torcidas.
6. No tire ni empuje la tela mientras cose. Puede desviar la aguja y romperla.
7. Apague la máquina ("STOP") cuando trabaja en la sección de la aguja: mientras la
enhebra, la cambia, enhebra la bobina, etc.
8. Nunca deje caer ni coloque ningún objeto en las aberturas.
9. No use la máquina en el exterior.
10.No use la máquina donde hay productos atomizados con aerosoles o donde se
administra oxígeno.
11.Para desenchufar, apague todos los controles ("STOP") y saque el enchufe del
tomacorriente.
12.No desenchufe la máquina tirando del cable. Para desenchufarla, tire del enchufe.
La máquina de coser es para uso doméstico únicamente.
- para reducir el peligro de choque eléctrico:
- para reducir el peligro de quemaduras, incendio, choque
eléctrico o lesiones:
Instrucciones de seguridad importantes
E
All manuals and user guides at all-guides.com
Lorsqu'on utilise un appareil électrique, certaines mesures de sécurité élémentaires
s'imposent pour réduire le risque de choc électrique, notamment:
Lire toutes les directives suivantes avant d'utiliser votre machine à coudre.
1. Un appareil électrique ne devrait jamais être laissé sans surveillance lorsqu'il est
branché.
2. Débranchez toujours l'appareil de la prise de courant immédiatement après vous en
être servi ou avant de le nettoyer.
1. Ne laissez pas les enfants utiliser la machine à coudre comme un jouet. Surveillez
attentivement lorsque l'appareil est utilisé par un enfant ou à proximité d'enfants.
2. N'utilisez pas votre appareil pour un autre usage que ceux décrits dans ce manuel.
N'employez que les accessoires recommandés par le fabricant dans ce manuel.
3. N'utilisez pas l'appareil si le cordon ou la prise ne sont pas en bon état, s'il ne
fonctionne pas correctement, s'il a fait une chute, ou s'il a été en contact avec l'eau.
Retournez-le chez le distributeur agréé ou au centre de service le plus proche pour
toute inspection, réparation ou réglage électrique ou mécanique.
4. Tenez les doigts loin des parties mobiles de l'appareil. Portez une attention
particulière autour de l'aiguille.
5. N'utilisez pas d'aiguille tordue.
6. Ne tirez pas sur le tissu vers l'avant ou vers l'arrière lorsque vous cousez. Ceci
pourrait faire dévier l'aiguille, qui pourrait se briser.
7. Mettez la machine à coudre hors tension (STOP) pour enfiler ou changer l'aiguille,
remplir la canette ou changer le pied presseur, ou pour toute autre manipulation
similaire.
8. N'échappez jamais d'objet à l'intérieur de l'appareil et n'essayez pas d'en insérer par
les ouvertures.
9. N'utilisez pas l'appareil à l'extérieur.
10.N'utilisez pas l'appareil en présence de vapeurs d'aérosols, ni dans un endroit où on
administre de l'oxygène.
11.Pour débrancher la machine, mettez-la hors tension (STOP), puis retirez- la fiche de
la prise.
12.Ne débranchez pas l'appareil en tirant sur son cordon, saisissez plutôt sa fiche.
Cette machine à coudre est conçue pour un usage domestique uniquement.
Avertissement
Conserver ces directives
- pour réduire le risque de brûlures, d'incendie, de
décharge électrique ou de blessures:
Recommandations importantes
F
All manuals and user guides at all-guides.com
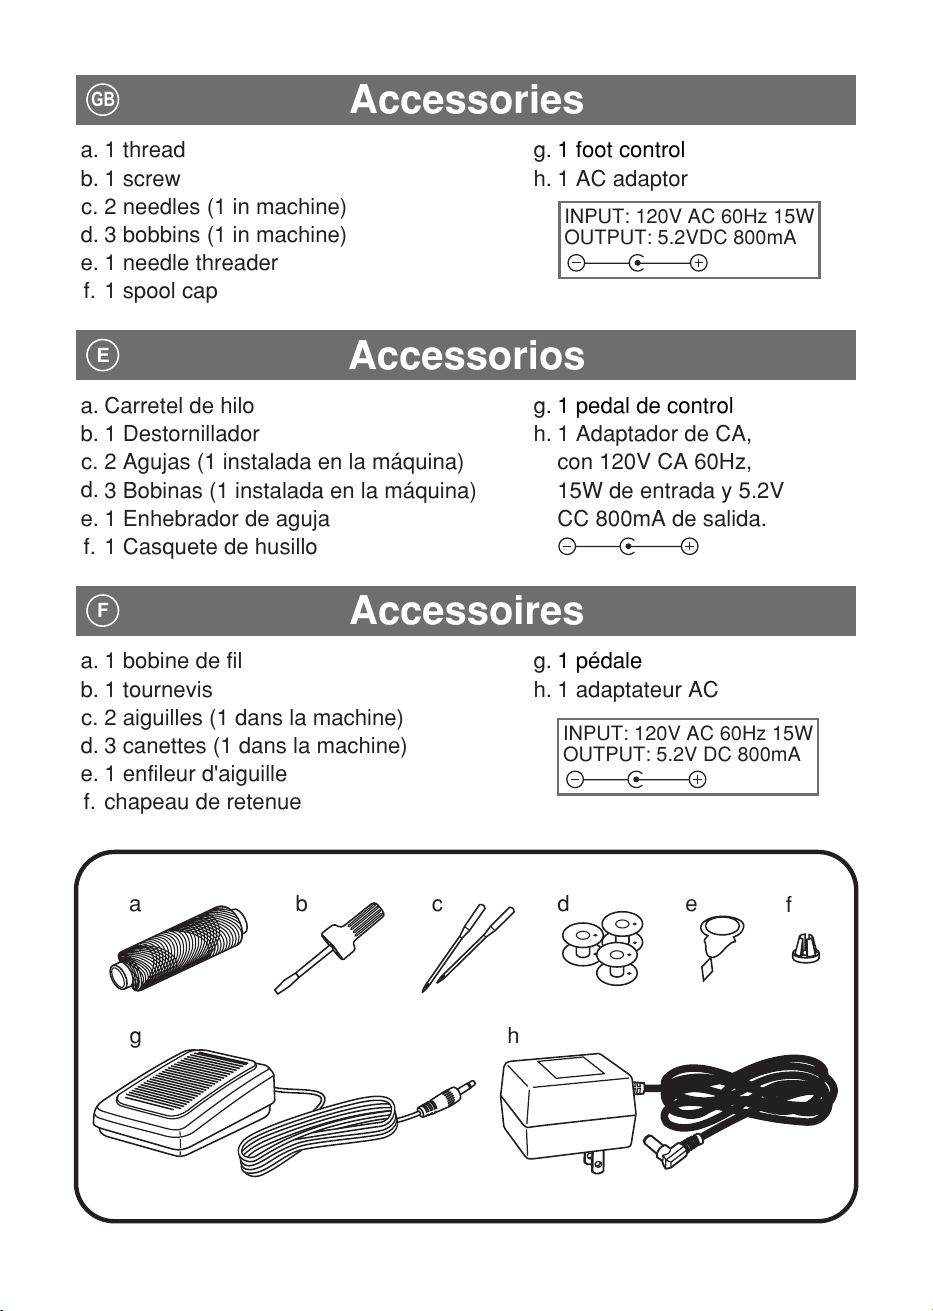
a.Carretel de hilo
b.1
c.
d.
e.
f.
g.
Destornillador
2 Agujas (1 instalada en la máquina)
3 Bobinas (1 instalada en la máquina)
1 Enhebrador de aguja
1 Casquete de husillo
h.1 Adaptador de CA,
con 120V CA 60Hz,
15W de entrada y 5.2V
CC 800mA de salida.
1 pedal de control
Accessories
a.1 thread
b.1 screw
c.2 needles (1 in machine)
d.
e.
f.
g.
h.1 AC adaptor
3 bobbins (1 in machine)
1 needle threader
1 spool cap
1 foot control
GB
INPUT: 120V AC 60Hz 15W
OUTPUT: 5.2VDC 800mA
Accessorios
E
Accessoires
a. 1 bobine de fil
b. 1 tournevis
c.
d.
e.
f.
g.
2 aiguilles (1 dans la machine)
3 canettes (1 dans la machine)
1 enfileur d'aiguille
chapeau de retenue
h. 1 adaptateur AC
1 pédale
INPUT: 120V AC 60Hz 15W
OUTPUT: 5.2V DC 800mA
F
g
ec db
a
f
h
All manuals and user guides at all-guides.com
List of contents
Principal parts of the machine . . . . . . . . . . . . . . . . . . . . . . . . . . . . . . . . . . . . . . 2
Inserting the bobbin . . . . . . . . . . . . . . . . . . . . . . . . . . . . . . . . . . . . . . . . . . . . . . 5
Threading the upper thread . . . . . . . . . . . . . . . . . . . . . . . . . . . . . . . . . . . . . . . . 6
Raising the bobbin thread . . . . . . . . . . . . . . . . . . . . . . . . . . . . . . . . . . . . . . . . . 7
Thread tension. . . . . . . . . . . . . . . . . . . . . . . . . . . . . . . . . . . . . . . . . . . . . . . . . . 7
Reverse sewing . . . . . . . . . . . . . . . . . . . . . . . . . . . . . . . . . . . . . . . . . . . . . . . . . 8
Stitch length control . . . . . . . . . . . . . . . . . . . . . . . . . . . . . . . . . . . . . . . . . . . . . . 8
Choose your pattern and start to sewing . . . . . . . . . . . . . . . . . . . . . . . . . . . . . . 9
Inserting and changing needle. . . . . . . . . . . . . . . . . . . . . . . . . . . . . . . . . . . . . 10
Maintenance . . . . . . . . . . . . . . . . . . . . . . . . . . . . . . . . . . . . . . . . . . . . . . . . . . 10
Trouble shooting guide . . . . . . . . . . . . . . . . . . . . . . . . . . . . . . . . . . . . . . . . . . 11
Stitch functions. . . . . . . . . . . . . . . . . . . . . . . . . . . . . . . . . . . . . . . . . . . . . . . . . 12
Connecting machine to power source . . . . . . . . . . . . . . . . . . . . . . . . . . . . . . . . 3
Winding the bobbin . . . . . . . . . . . . . . . . . . . . . . . . . . . . . . . . . . . . . . . . . . . . . . 4
GB
Índice
Partes más importantes de la máquina . . . . . . . . . . . . . . . . . . . . . . . . . . . . . . 13
Cómo conectar la máquina a la fuente de alimentación . . . . . . . . . . . . . . . . . 14
Devanado de la bobina . . . . . . . . . . . . . . . . . . . . . . . . . . . . . . . . . . . . . . . . . . 15
Cómo colocar la bobina . . . . . . . . . . . . . . . . . . . . . . . . . . . . . . . . . . . . . . . . . . 16
Cómo enhebrar el hilo superior . . . . . . . . . . . . . . . . . . . . . . . . . . . . . . . . . . . . 17
Cómo levantar el hilo de la bobina. . . . . . . . . . . . . . . . . . . . . . . . . . . . . . . . . . 18
Tensión del hilo . . . . . . . . . . . . . . . . . . . . . . . . . . . . . . . . . . . . . . . . . . . . . . . . 18
Cómo coser invirtiendo el sentido de la costura . . . . . . . . . . . . . . . . . . . . . . . 19
Control del largo de la puntada . . . . . . . . . . . . . . . . . . . . . . . . . . . . . . . . . . . . 19
Cómo seleccionar el tipo de puntada y empezar a coser . . . . . . . . . . . . . . . . 20
Cómo colocar y cambiar la aguja. . . . . . . . . . . . . . . . . . . . . . . . . . . . . . . . . . . 21
Mantenimiento . . . . . . . . . . . . . . . . . . . . . . . . . . . . . . . . . . . . . . . . . . . . . . . . . 21
Detección de fallas. . . . . . . . . . . . . . . . . . . . . . . . . . . . . . . . . . . . . . . . . . . . . . 22
E
All manuals and user guides at all-guides.com
Table des matières
Éléments de la machine à coudre . . . . . . . . . . . . . . . . . . . . . . . . . . . . . . . . . . 23
Insérer la canette . . . . . . . . . . . . . . . . . . . . . . . . . . . . . . . . . . . . . . . . . . . . . 26
Enfiler le fil d'aiguille . . . . . . . . . . . . . . . . . . . . . . . . . . . . . . . . . . . . . . . . . . . . 27
Sortir le fil de canette . . . . . . . . . . . . . . . . . . . . . . . . . . . . . . . . . . . . . . . . . . . 28
Tension du fil . . . . . . . . . . . . . . . . . . . . . . . . . . . . . . . . . . . . . . . . . . . . . . . . . . 28
Point arrière . . . . . . . . . . . . . . . . . . . . . . . . . . . . . . . . . . . . . . . . . . . . . . . . . . . 29
Longueur de point . . . . . . . . . . . . . . . . . . . . . . . . . . . . . . . . . . . . . . . . . . . . . . 29
Choisir son style de point et commencer à coudre . . . . . . . . . . . . . . . . . . . . . 30
Insérer et changer l'aiguille . . . . . . . . . . . . . . . . . . . . . . . . . . . . . . . . . . . . . . . 31
Entretien. . . . . . . . . . . . . . . . . . . . . . . . . . . . . . . . . . . . . . . . . . . . . . . . . . . . . . 31
Guide de diagnostic des pannes . . . . . . . . . . . . . . . . . . . . . . . . . . . . . . . . . . . 32
Brancher la machine à coudre. . . . . . . . . . . . . . . . . . . . . . . . . . . . . . . . . . . . . 24
Remplir la canette . . . . . . . . . . . . . . . . . . . . . . . . . . . . . . . . . . . . . . . . . . . . . . 25
F
All manuals and user guides at all-guides.com

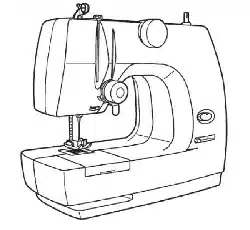
Principal parts of the machine
Upper thread guide
Take up lever
Bobbin winder
Pattern selector dial
Main switch
Stitch length/
Reverse lever
Tension dial
Tension
controlled plate
Presser foot
Bobbin
cover plate
Spool pin
Handwheel
Bobbin thread guide
Presser foot lever
Feed dog
2
AC adaptor
receptacle
Foot controller
connector
All manuals and user guides at all-guides.com
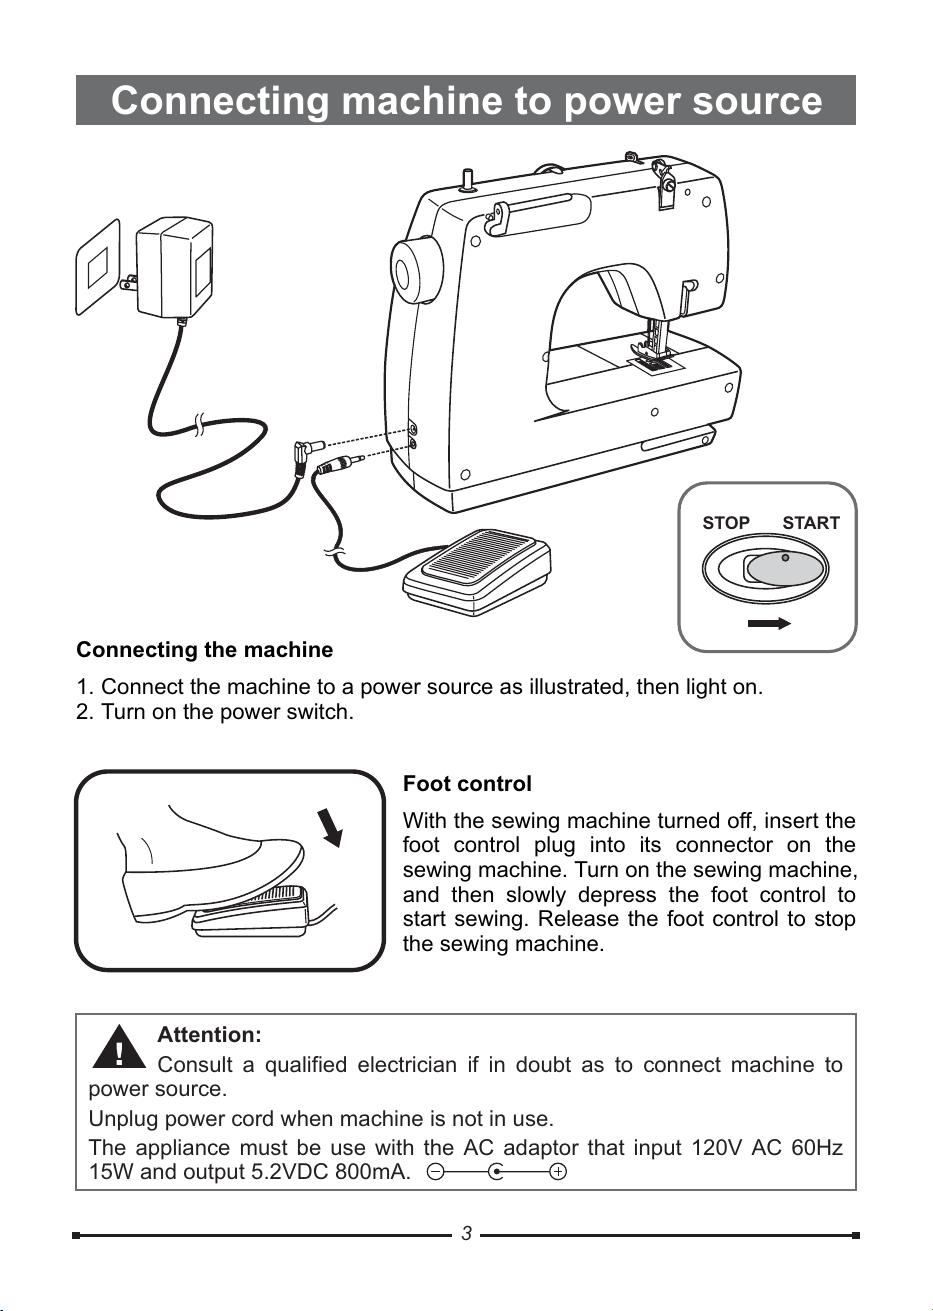
Connecting machine to power source
Attention:
Consult a qualified electrician if in doubt as to connect machine to
power source.
Unplug power cord when machine is not in use.
The appliance must be use with the AC adaptor that input 120V AC 60Hz
15W and output 5.2VDC 800mA.
STARTSTOP
Connecting the machine
1. Connect the machine to a power source as illustrated, then light on.
2. Turn on the power switch.
Foot control
With the sewing machine turned off, insert the
foot control plug into its connector on the
sewing machine. Turn on the sewing machine,
and then slowly depress the foot control to
start sewing. Release the foot control to stop
the sewing machine.
3
All manuals and user guides at all-guides.com
4
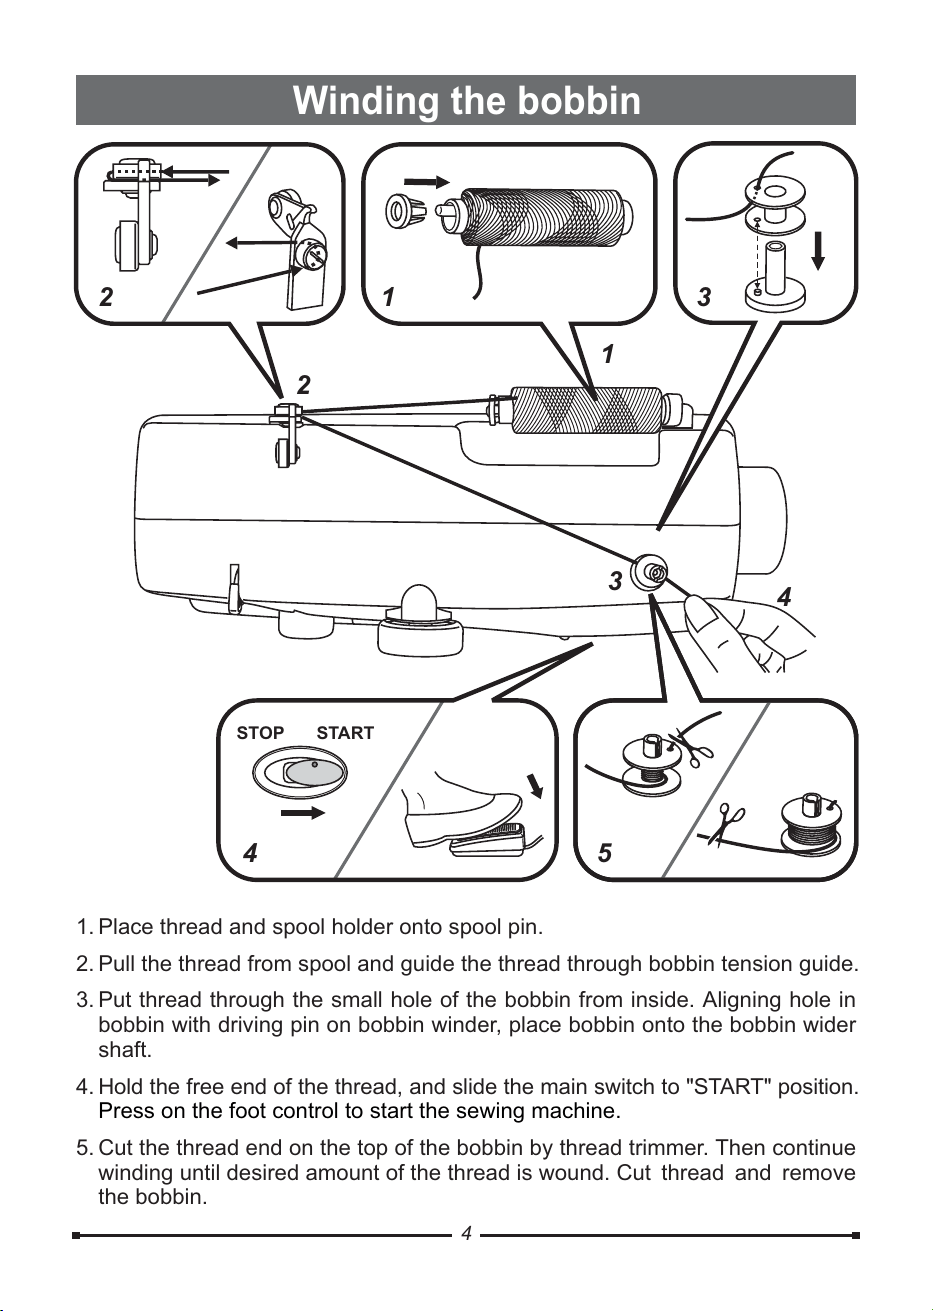
Winding the bobbin
1. Place thread and spool holder onto spool pin.
2. Pull the thread from spool and guide the thread through bobbin tension guide.
3. Put thread through the small hole of the bobbin from inside. Aligning hole in
bobbin with driving pin on bobbin winder, place bobbin onto the bobbin wider
shaft.
4. Hold the free end of the thread, and slide the main switch to "START" position.
5. Cut the thread end on the top of the bobbin by thread trimmer. Then continue
winding until desired amount of the thread is wound. Cut thread and remove
the bobbin.
Press on the foot control to start the sewing machine.
3
2
4
5
2
3
4
1
1
STARTSTOP
All manuals and user guides at all-guides.com
Inserting the bobbin
AB
B
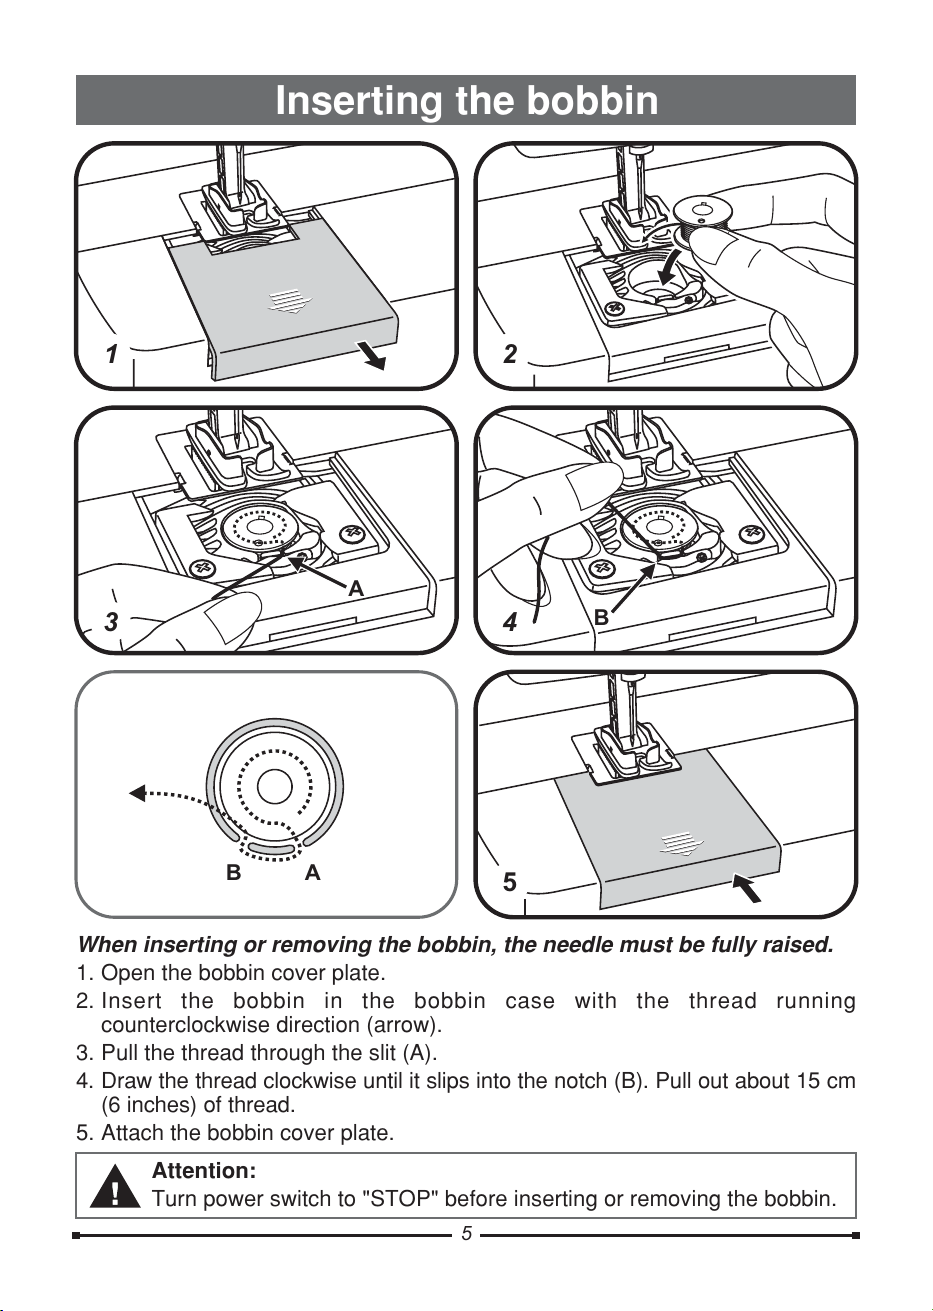
When inserting or removing the bobbin, the needle must be fully raised.
1. Open the bobbin cover plate.
2. Insert the bobbin in the bobbin case with the thread running
counterclockwise direction (arrow).
3. Pull the thread through the slit (A).
4. Draw the thread clockwise until it slips into the notch (B). Pull out about 15 cm
(6 inches) of thread.
5. Attach the bobbin cover plate.
Turn power switch to "STOP" before inserting or removing the bobbin.
Attention:
A
1
2
4
3
5
5
All manuals and user guides at all-guides.com
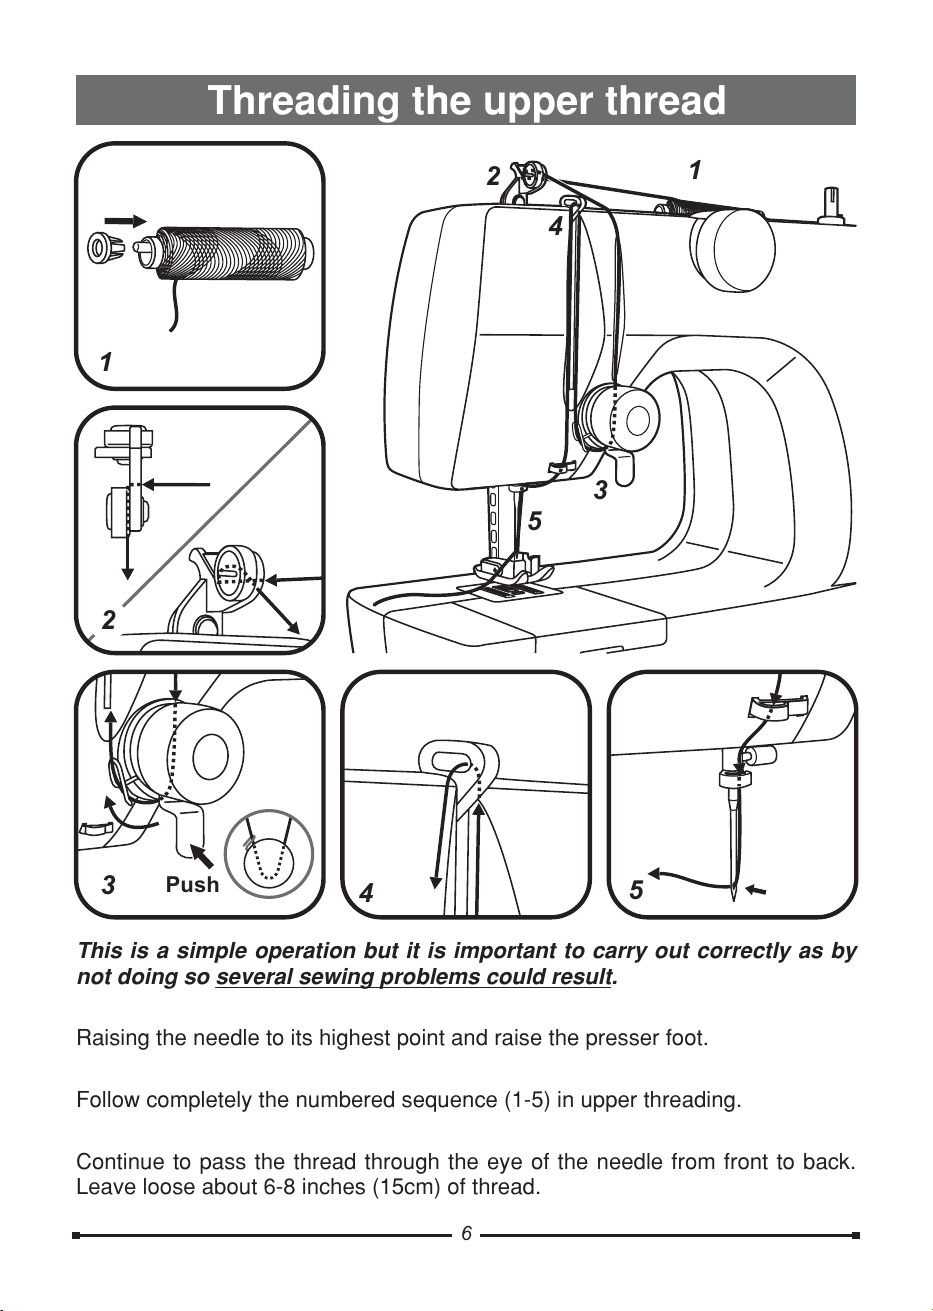
Threading the upper thread
This is a simple operation but it is important to carry out correctly as by
not doing so .several sewing problems could result
Raising the needle to its highest point and raise the presser foot.
Follow completely the numbered sequence (1-5) in upper threading.
Continue to pass the thread through the eye of the needle from front to back.
Leave loose about 6-8 inches (15cm) of thread.
6
4
2
3
5
1
1
2
3
4
5
Push
All manuals and user guides at all-guides.com
7
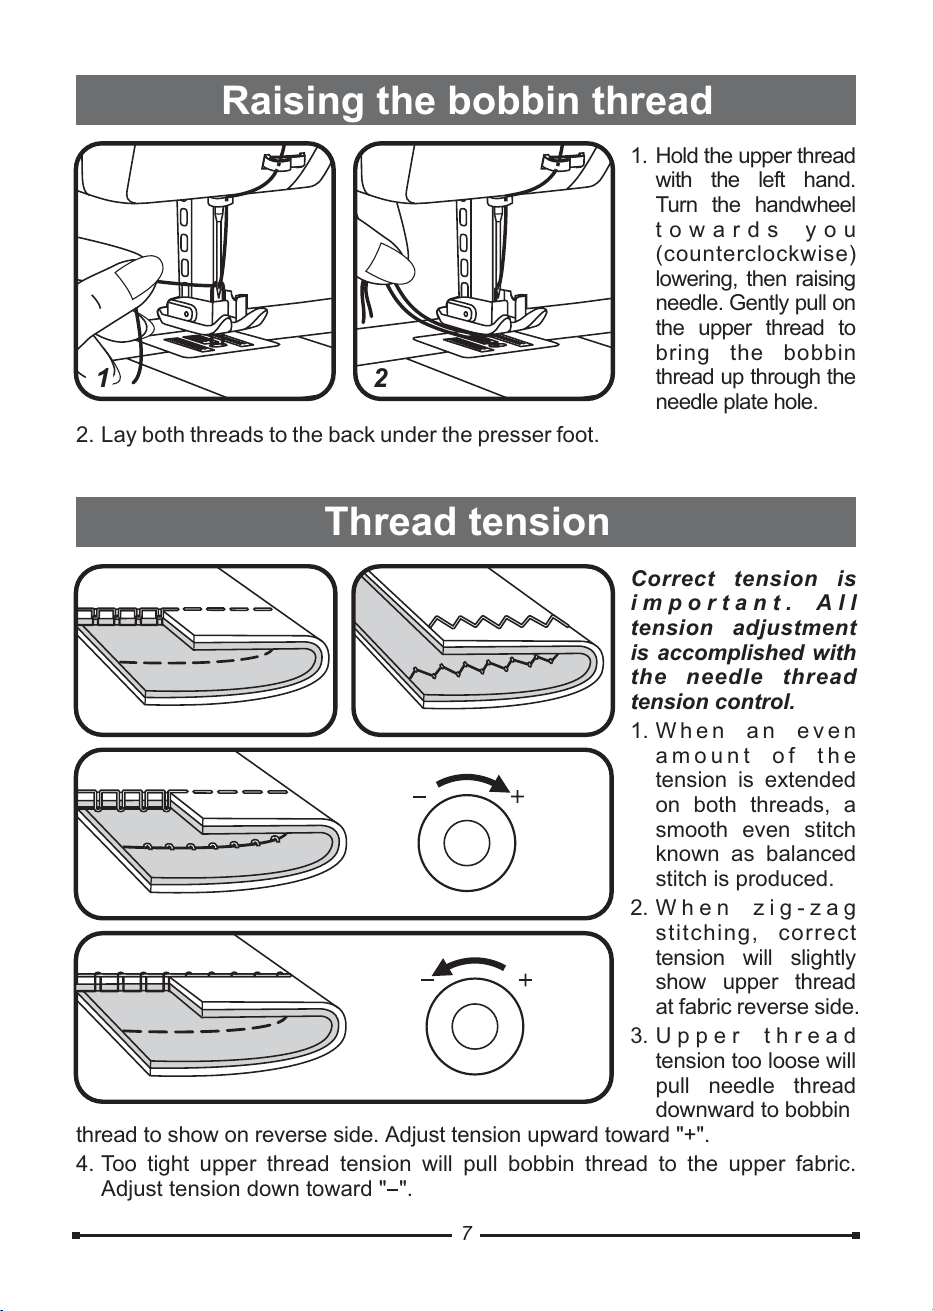
Raising the bobbin thread
1. Hold the upper thread
with the left hand.
Turn the handwheel
towards you
(counterclockwise)
lowering, then raising
needle. Gently pull on
the upper thread to
bring the bobbin
thread up through the
needle plate hole.
1
2
Thread tension
2. Lay both threads to the back under the presser foot.
Correct tension is
important. All
tension adjustment
is accomplished with
the needle thread
tension control.
1. When an even
amount of the
tension is extended
on both threads, a
smooth even stitch
known as balanced
stitch is produced.
2.When zig-zag
stitching, correct
tension will slightly
show upper thread
at fabric reverse side.
3.Upper thread
tension too loose will
pull needle thread
downward to bobbin
thread to show on reverse side. Adjust tension upward toward "+".
4. Too tight upper thread tension will pull bobbin thread to the upper fabric.
Adjust tension down toward " ".
All manuals and user guides at all-guides.com
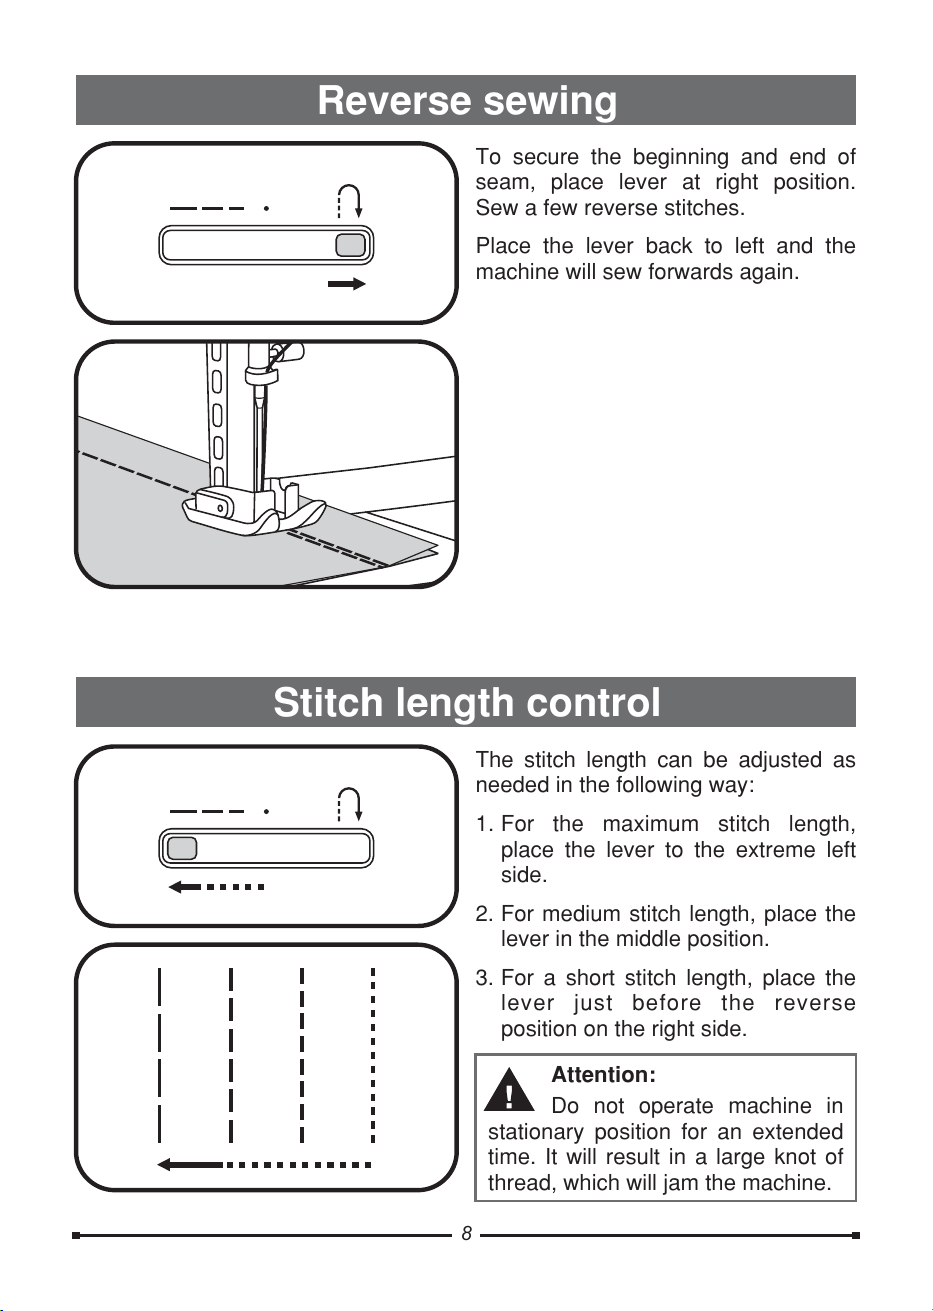
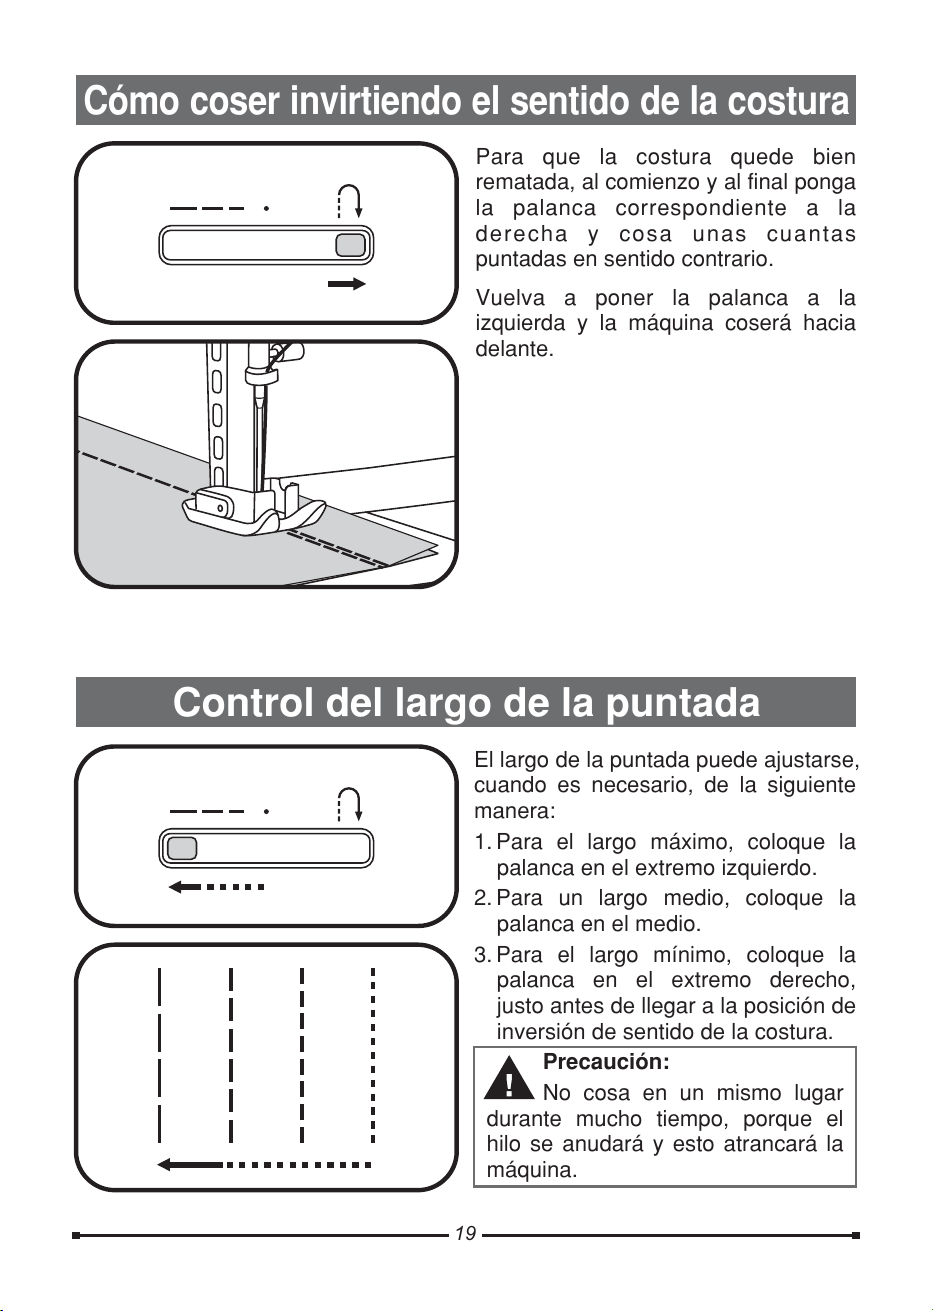
The stitch length can be adjusted as
needed in the following way:
1. For the maximum stitch length,
place the lever to the extreme left
side.
2. For medium stitch length, place the
lever in the middle position.
3. For a short stitch length, place the
lever just before the reverse
position on the right side.
Do not operate machine in
stationary position for an extended
time. It will result in a large knot of
thread, which will jam the machine.
Attention:
Reverse sewing
Stitch length control
To secure the beginning and end of
seam, place lever at right position.
Sew a few reverse stitches.
Place the lever back to left and the
machine will sew forwards again.
8
All manuals and user guides at all-guides.com
9
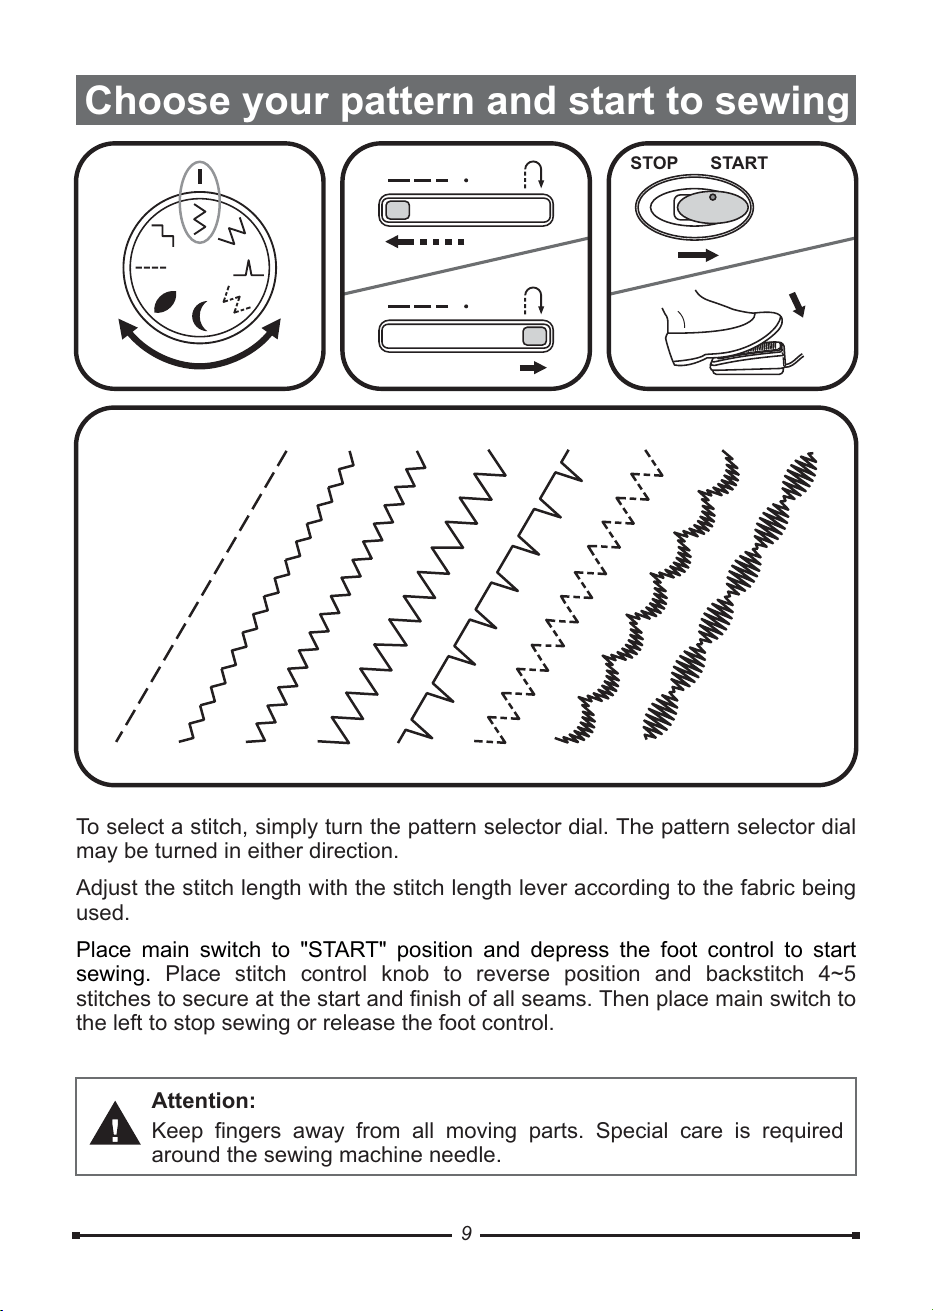
Choose your pattern and start to sewing
To select a stitch, simply turn the pattern selector dial. The pattern selector dial
may be turned in either direction.
Place stitch control knob to reverse position and backstitch 4~5
stitches to secure at the start and finish of all seams. Then place main switch to
the left to stop sewing or release the foot control.
Adjust the stitch length with the stitch length lever according to the fabric being
used.
Keep fingers away from all moving parts. Special care is required
around the sewing machine needle.
Attention:
Place main switch to "START" position and depress the foot control to start
sewing.
STOP START
All manuals and user guides at all-guides.com
Inserting and changing needle
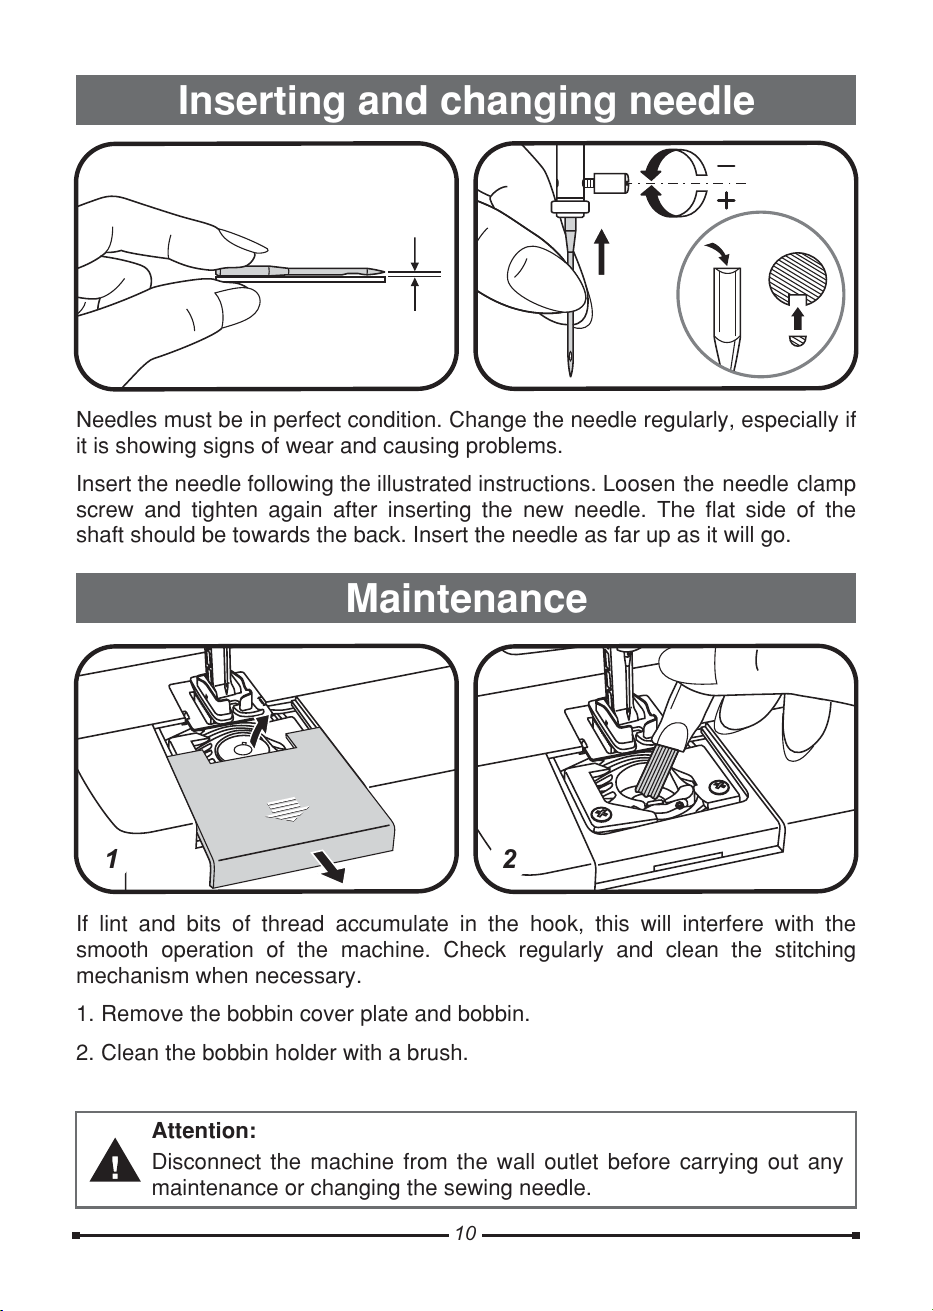
If lint and bits of thread accumulate in the hook, this will interfere with the
smooth operation of the machine. Check regularly and clean the stitching
mechanism when necessary.
1. Remove the bobbin cover plate and bobbin.
2. Clean the bobbin holder with a brush.
Disconnect the machine from the wall outlet before carrying out any
maintenance or changing the sewing needle.
Attention:
Maintenance
Needles must be in perfect condition. Change the needle regularly, especially if
it is showing signs of wear and causing problems.
Insert the needle following the illustrated instructions. Loosen the needle clamp
screw and tighten again after inserting the new needle. The flat side of the
shaft should be towards the back. Insert the needle as far up as it will go.
1
2
10
All manuals and user guides at all-guides.com
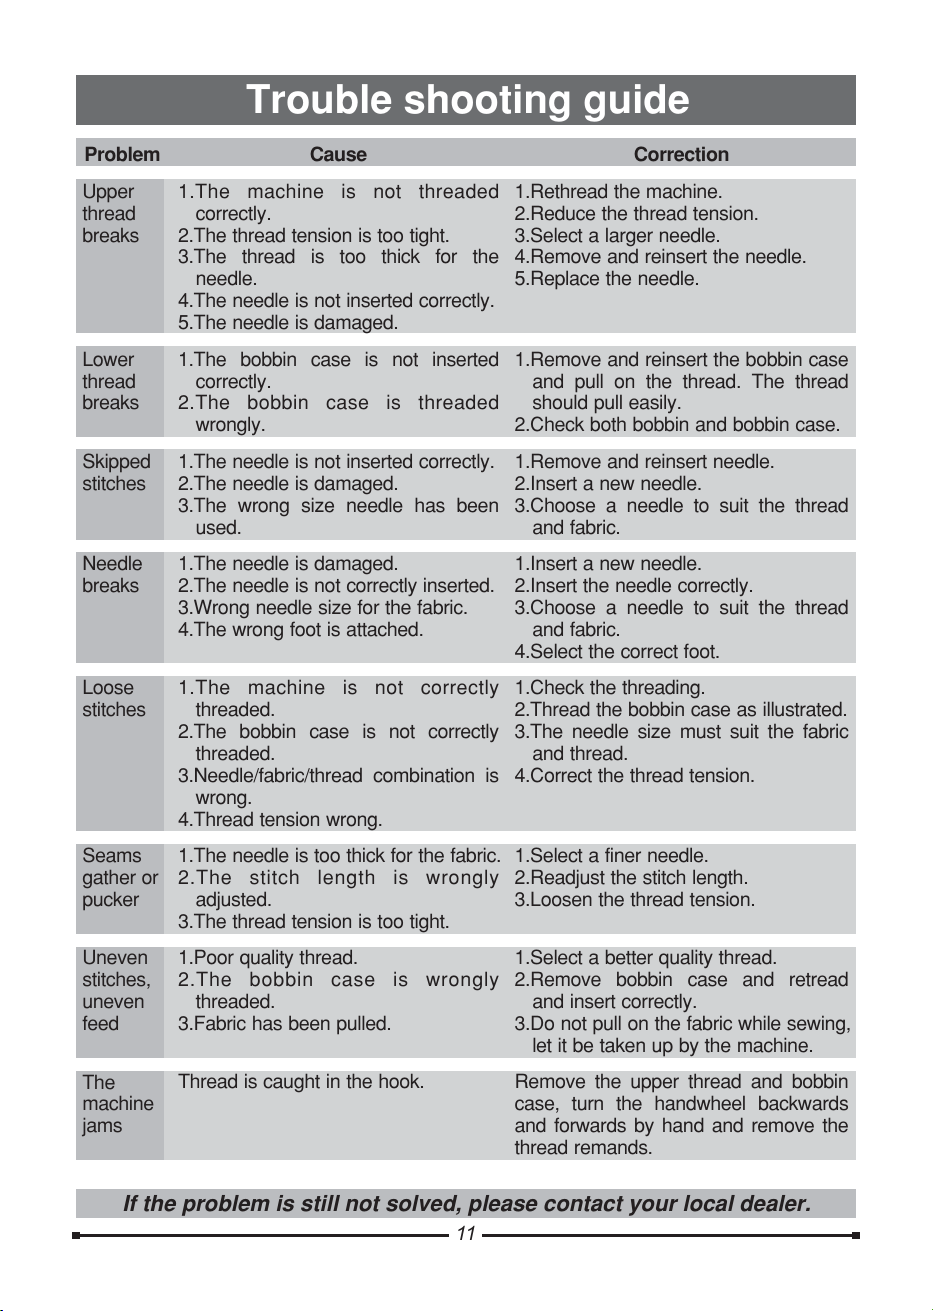
Trouble shooting guide
Problem Cause Correction
Upper
thread
breaks
Lower
thread
breaks
Skipped
stitches
Needle
breaks
Loose
stitches
Seams
gather or
pucker
Uneven
stitches,
uneven
feed
The
machine
jams
1.The machine is not threaded
correctly.
2.The thread tension is too tight.
3.The thread is too thick for the
needle.
4.The needle is not inserted correctly.
5.The needle is damaged.
1.The bobbin case is not inserted
correctly.
2.The bobbin case is threaded
wrongly.
1.The needle is not inserted correctly.
2.The needle is damaged.
3.The wrong size needle has been
used.
1.The needle is damaged.
2.The needle is not correctly inserted.
3.Wrong needle size for the fabric.
4.The wrong foot is attached.
1.The machine is not correctly
threaded.
2.The bobbin case is not correctly
threaded.
3.Needle/fabric/thread combination is
wrong.
4.Thread tension wrong.
1.The needle is too thick for the fabric.
2.The stitch length is wrongly
adjusted.
3.The thread tension is too tight.
1.Poor quality thread.
2.The bobbin case is wrongly
threaded.
3.Fabric has been pulled.
Thread is caught in the hook.
1.Rethread the machine.
2.Reduce the thread tension.
3.Select a larger needle.
4.Remove and reinsert the needle.
5.Replace the needle.
1.Remove and reinsert the bobbin case
and pull on the thread. The thread
should pull easily.
2.Check both bobbin and bobbin case.
1.Remove and reinsert needle.
2.Insert a new needle.
3.Choose a needle to suit the thread
and fabric.
1.Insert a new needle.
2.Insert the needle correctly.
3.Choose a needle to suit the thread
and fabric.
4.Select the correct foot.
1.Check the threading.
2.Thread the bobbin case as illustrated.
3.The needle size must suit the fabric
and thread.
4.Correct the thread tension.
1.Select a finer needle.
2.Readjust the stitch length.
3.Loosen the thread tension.
1.Select a better quality thread.
2.Remove bobbin case and retread
and insert correctly.
3.Do not pull on the fabric while sewing,
let it be taken up by the machine.
Remove the upper thread and bobbin
case, turn the handwheel backwards
and forwards by hand and remove the
thread remands.
If the problem is still not solved, please contact your local dealer.
11
All manuals and user guides at all-guides.com
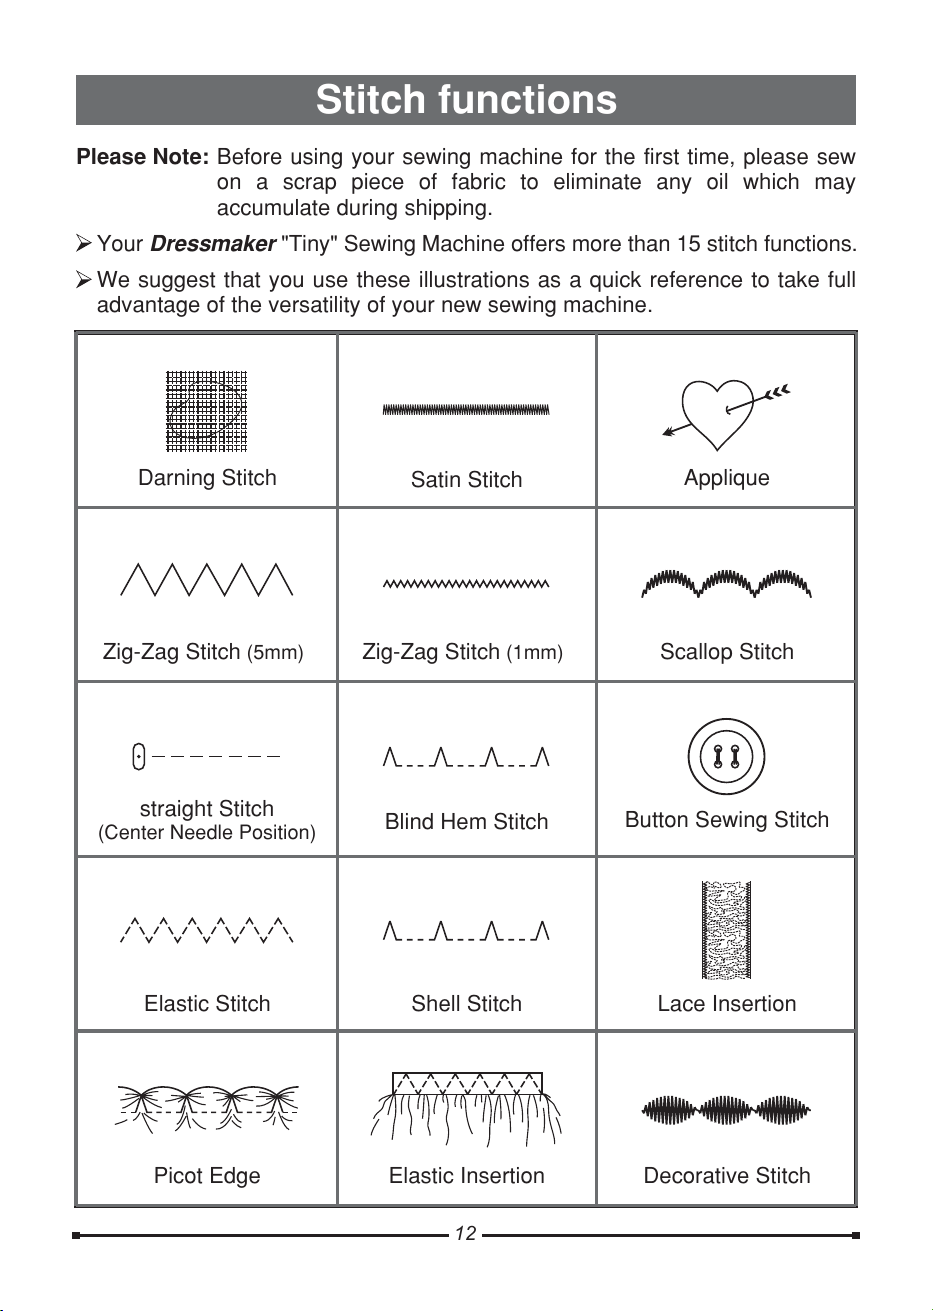
Stitch functions
Darning Stitch
Satin Stitch
Applique
Zig-Zag Stitch
(5mm) Zig-Zag Stitch (1mm) Scallop Stitch
straight Stitch
(Center Needle Position)
Button Sewing Stitch
Elastic Stitch Shell Stitch
Lace Insertion
Blind Hem Stitch
Please Note: Before using your sewing machine for the first time, please sew
on a scrap piece of fabric to eliminate any oil which may
accumulate during shipping.
Your "Tiny" Sewing Machine offers more than 15 stitch functions.
We suggest that you use these illustrations as a quick reference to take full
advantage of the versatility of your new sewing machine.
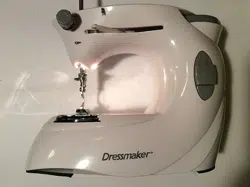
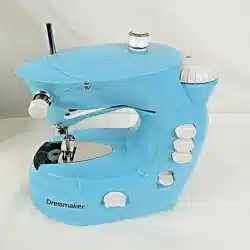
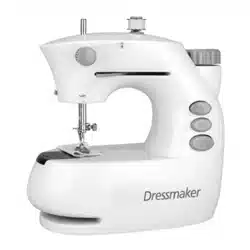
Dressmaker
Picot Edge Elastic Insertion
Decorative Stitch
12
All manuals and user guides at all-guides.com
Partes más importantes de la máquina
Guía del hilo superior
Palanca para levantar el hilo
Devanador
Selector de puntadas
Interruptor principal
Palanca de largo de
puntada/
inversión del sentido
de la costura
Regulador
de tensión
Placa de
tensión
controlada
Prensatelas
Tapa de la
bobina
Husillo
Volante
Enchufe para
adaptador de
CA
Guía del hilo de
la bobina
Palanca del
prensatelas
Placa de arrastre
13
Conectador para
el pedal de control
All manuals and user guides at all-guides.com
Encendido
(START)
Apagado
(STOP)
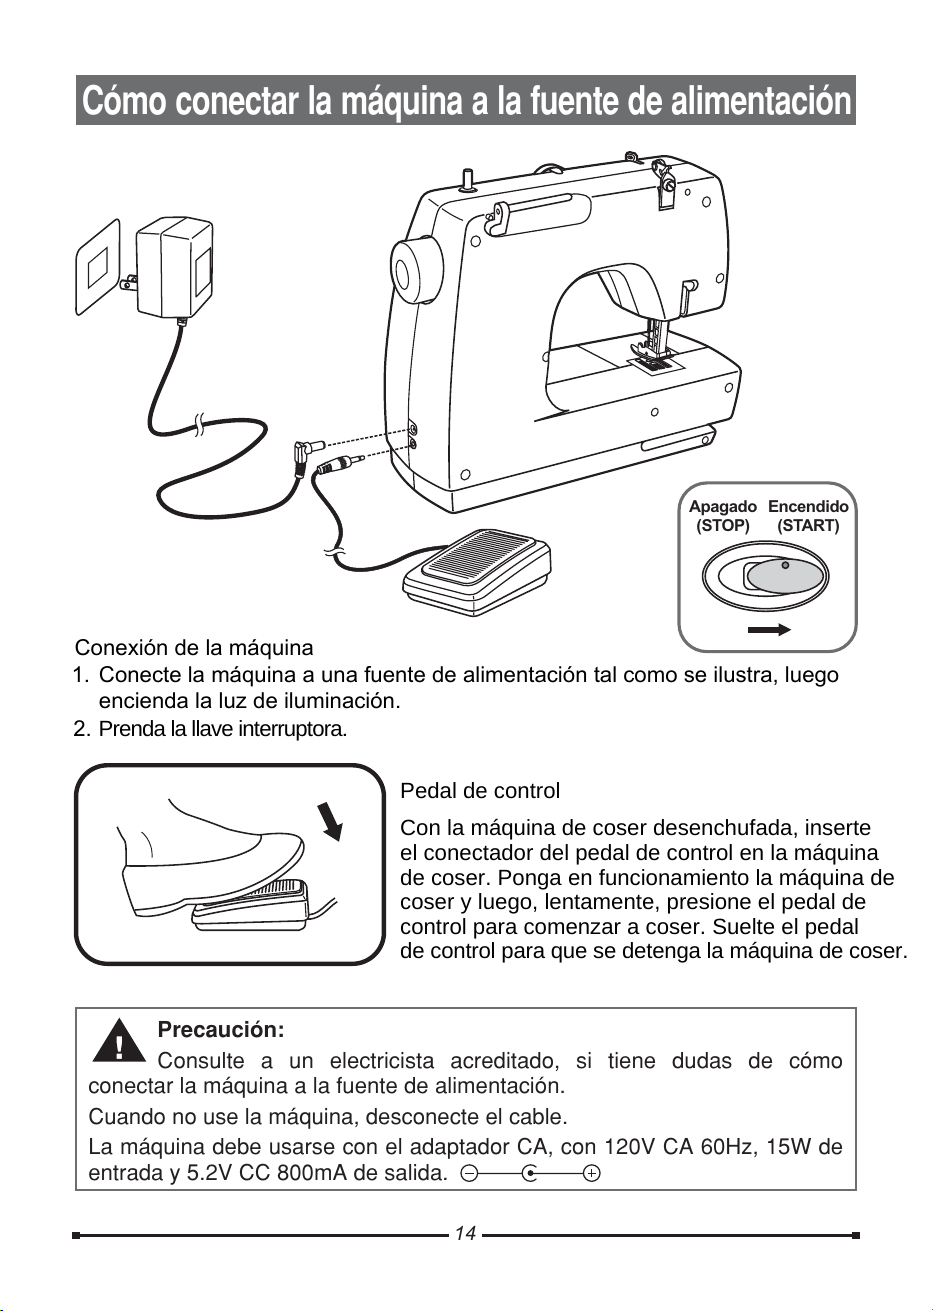
Cómoconectarlamáquinaalafuentedealimentación
Precaución:
Consulteaunelectricistaacreditado,sitienedudasdecómo
conectar la máquina a la fuente de alimentación.
Cuando no use la máquina, desconecte el cable.
LamáquinadebeusarseconeladaptadorCA,con120VCA60Hz,15Wde
entrada y 5.2V CC 800mA de salida.
2. Prenda la llave interruptora.
Pedal de control
Con la máquina de coser desenchufada, inserte
el conectador del pedal de control en la máquina
de coser. Ponga en funcionamiento la máquina de
coser y luego, lentamente, presione el pedal de
control para comenzar a coser. Suelte el pedal
de control para que se detenga la máquina de coser.
14
Conexión de la máquina
1.
Conecte la máquina a una fuente de alimentación tal como se ilustra, luego
encienda la luz de iluminación.
All manuals and user guides at all-guides.com
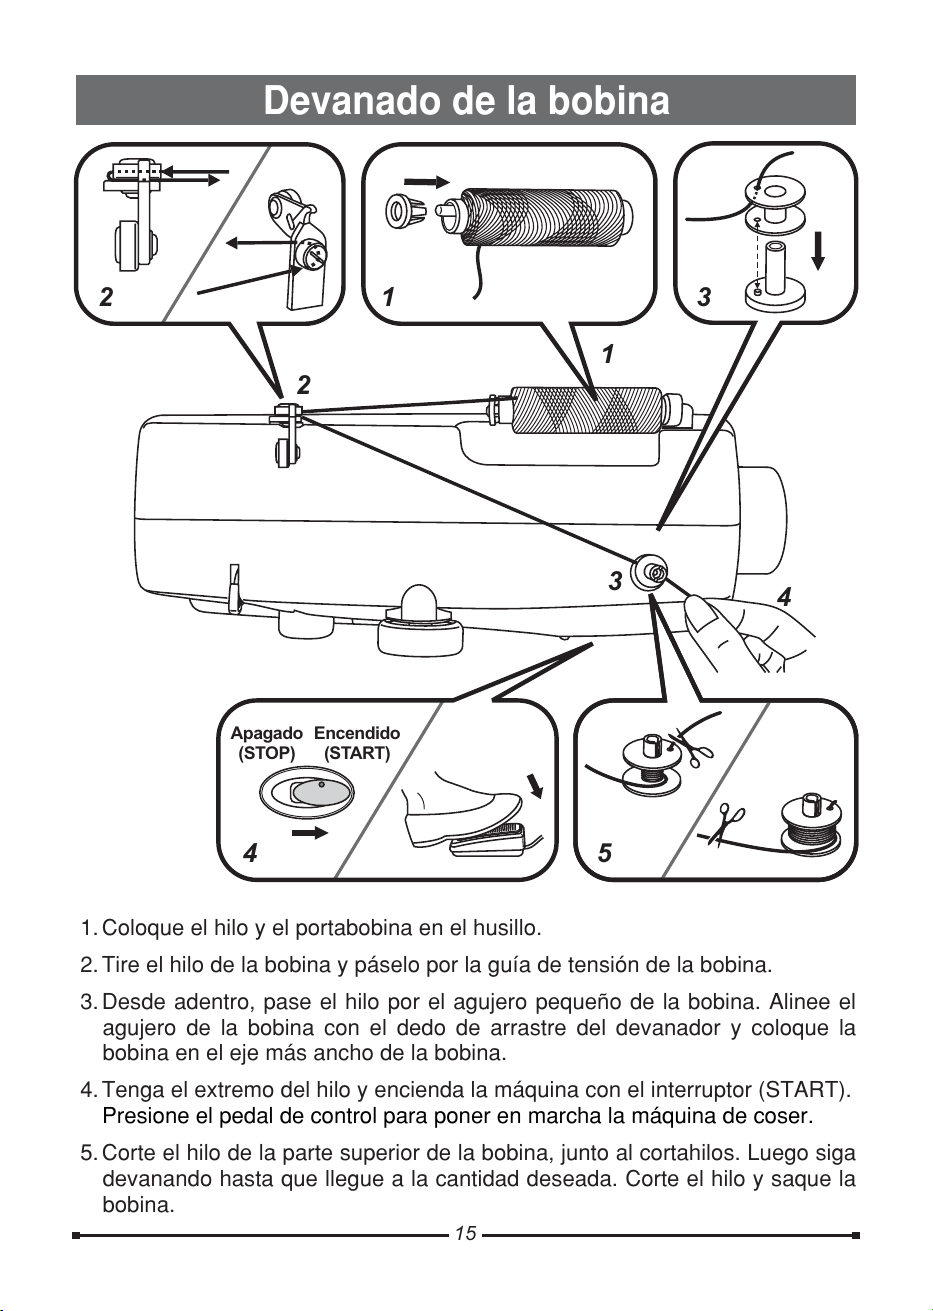
Devanado de la bobina
1.Coloque el hilo y el portabobina en el husillo.
2.Tire el hilo de la bobina y páselo por la guía de tensión de la bobina.
3.Desdeadentro,paseelhiloporelagujeropequeñodelabobina.Alineeel
agujerodelabobinaconeldedodearrastredeldevanadorycoloquela
bobina en el eje más ancho de la bobina.
4.Tenga el extremo del hilo y encienda la máquina con el interruptor (START).
5.Corte el hilo de la parte superior de la bobina, junto al cortahilos. Luego siga
devanando hasta que llegue a la cantidad deseada. Corte el hilo y saque la
bobina.
Presione el pedal de control para poner en marcha la máquina de coser..
Encendido
(START)
Apagado
(STOP)
15
3
2
4
5
2
3
4
1
1
All manuals and user guides at all-guides.com

Cómo colocar la bobina
AB
B
Para poner o sacar la bobina, la aguja debe estar levantada al máximo
1. Abra la tapa de la caja de la bobina.
2. Coloque la bobina en su caja y ponga el hilo hacia la izquierda (ver la flecha).
3. Tire el hilo por la hendidura (A).
4. Tire el hilo hacia la derecha hasta que entre en la muesca (B). Tírelo unos
15 cm (6 pulg.).
5. Vuelva a cerrar la tapa.
Apague la máquina (STOP) antes de sacar o poner la bobina.
Precaución:
A
1
2
4
3
5
16
All manuals and user guides at all-guides.com
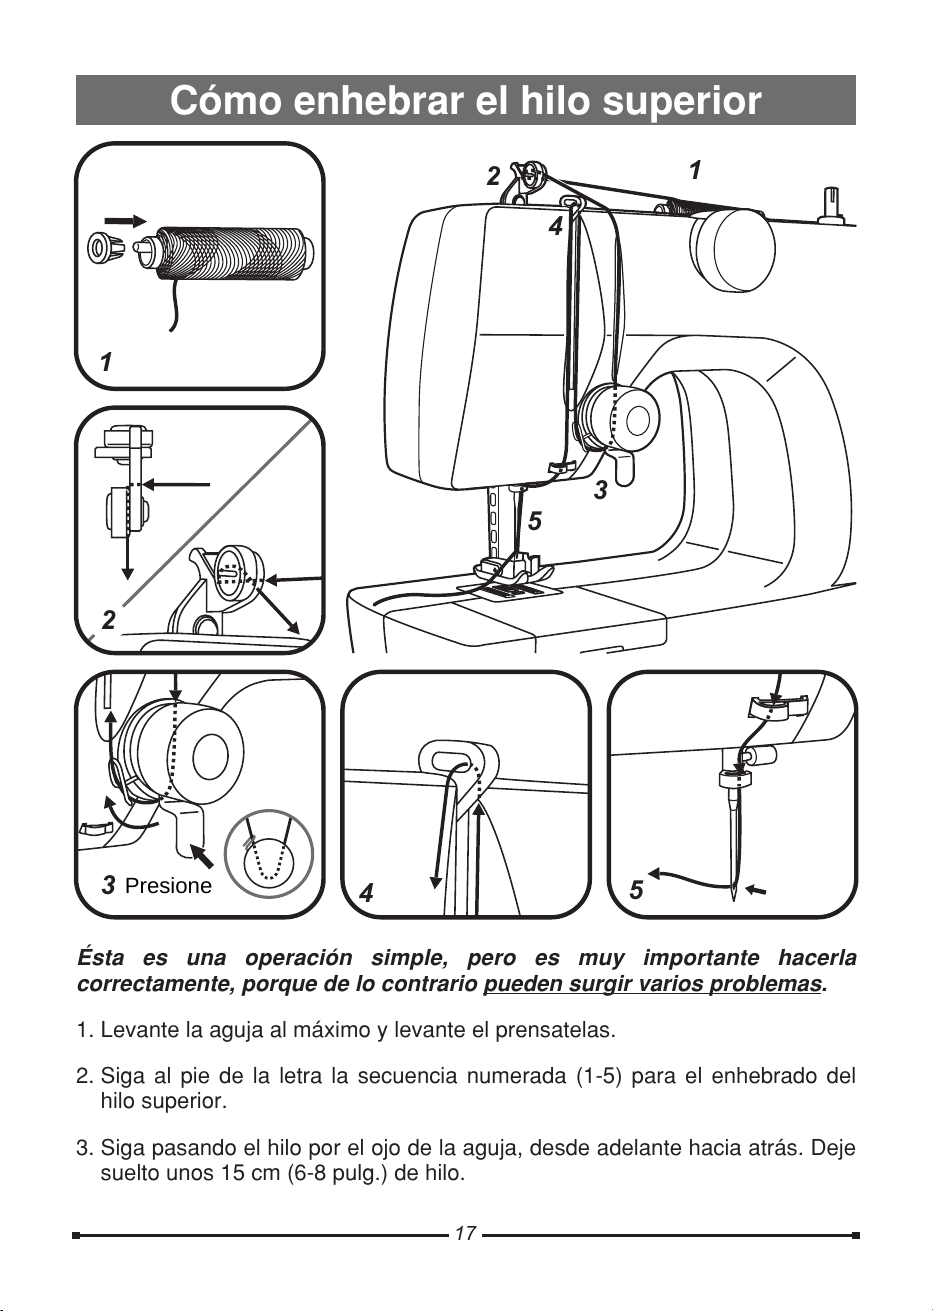
Cómo enhebrar el hilo superior
Ésta es una operación simple, pero es muy importante hacerla
correctamente, porque de lo contrario .pueden surgir varios problemas
1. Levante la aguja al máximo y levante el prensatelas.
2. Siga al pie de la letra la secuencia numerada (1-5) para el enhebrado del
hilo superior.
3. Siga pasando el hilo por el ojo de la aguja, desde adelante hacia atrás. Deje
suelto unos 15 cm (6-8 pulg.) de hilo.
17
4
2
3
5
1
1
2
3
4
5
Presione
All manuals and user guides at all-guides.com

Tensión del hilo
Cómo levantar el hilo de la bobina
18
1. Sostenga el hilo
superior con la mano
izquierda. Gire el
volante hacia usted
(hacia la izquierda)
para bajar; luego suba
la aguja. Suavemente
tire el hilo superior
para hacer pasar el
hilo de la bobina a
través del agujero de
la placa de la aguja.
1
2
Es importante que la
tensión del hilo sea la
correcta. Todos los
ajustes se hacen con
el regulador de
tensión.
1. Cuando los dos hilos
tienen una tensión
pareja, la puntada
será uniforme o, como
se dice, "equilibrada".
2. Cuando se cose en
zig-zag, la tensión
correcta es cuando
aparece ligeramente
el hilo superior cuando
se ve del revés de la
tela.
3.Si la tensión es
demasiado floja, el
hilo de la aguja tirará
hacia abajo, hacia el
hilo de la bobina, y
aparecerá del lado
del revés. Aumente la tensión, moviendo el regulador hacia "+".
4. Si la tensión es demasiado ajustada, el hilo de la aguja tirará el hilo de la bobina
hacia el lado derecho de la tela. Reduzca la tensión, moviendo el regulador hacia
"".
2. Estire los dos hilos hacia atrás por debajo del prensatelas.
All manuals and user guides at all-guides.com
El largo de la puntada puede ajustarse,
cuando es necesario, de la siguiente
manera:
1. Para el largo máximo, coloque la
palanca en el extremo izquierdo.
2. Para un largo medio, coloque la
palanca en el medio.
3. Para el largo mínimo, coloque la
palanca en el extremo derecho,
justo antes de llegar a la posición de
inversión de sentido de la costura.
No cosa en un mismo lugar
durante mucho tiempo, porque el
hilo se anudará y esto atrancará la
máquina.
Precaución:
Cómo coser invirtiendo el sentido de la costura
Control del largo de la puntada
Para que la costura quede bien
rematada, al comienzo y al final ponga
la palanca correspondiente a la
derecha y cosa unas cuantas
puntadas en sentido contrario.
Vuelva a poner la palanca a la
izquierda y la máquina coserá hacia
delante.
19
All manuals and user guides at all-guides.com
Apagado
(STOP)
Encendido
(START)
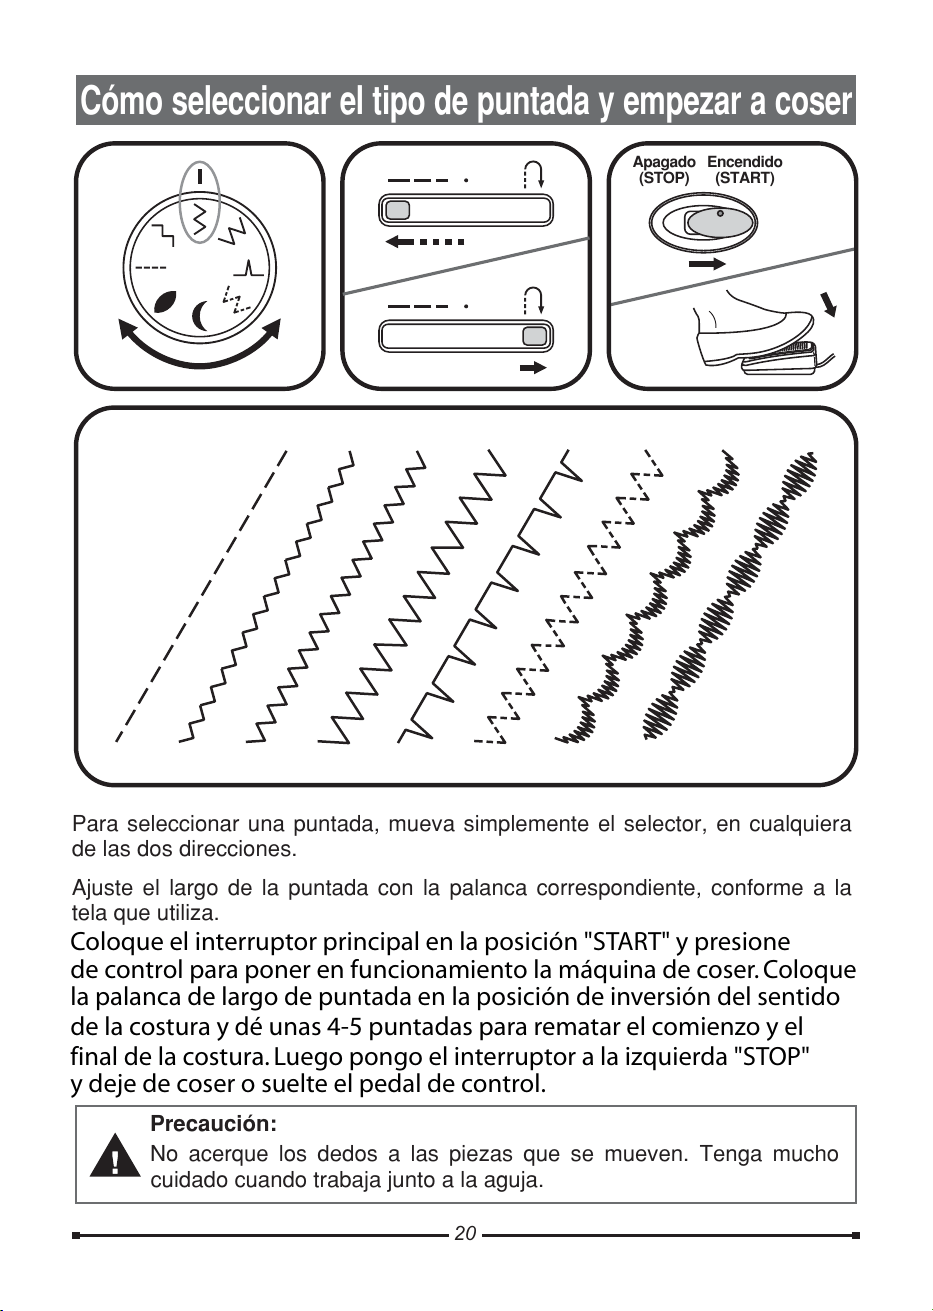
Cómo seleccionar el tipo de puntada y empezar a coser
20
Para seleccionar una puntada, mueva simplemente el selector, en cualquiera
de las dos direcciones.
Ajuste el largo de la puntada con la palanca correspondiente, conforme a la
tela que utiliza.
No acerque los dedos a las piezas que se mueven. Tenga mucho
cuidado cuando trabaja junto a la aguja.
Precaución:
Coloque el interruptor principal en la posición "START" y presione
de control para poner en funcionamiento la máquina de coser. Coloque
la palanca de largo de puntada en la posición de inversión del sentido
de la costura y dé unas 4-5 puntadas para rematar el comienzo y el
final de la costura. Luego pongo el interruptor a la izquierda "STOP"
y deje de coser o suelte el pedal de control.
All manuals and user guides at all-guides.com
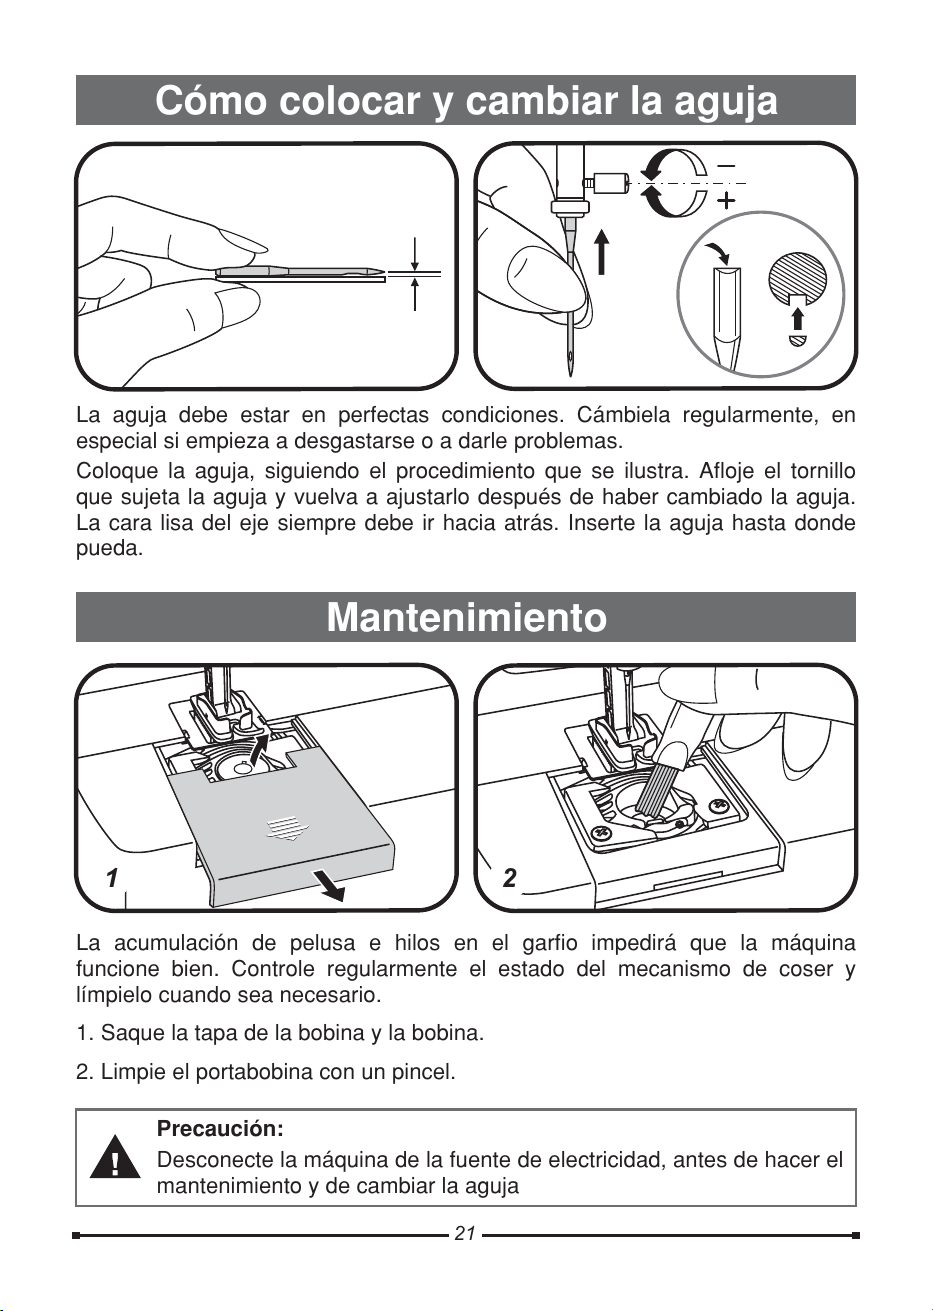
Cómo colocar y cambiar la aguja
La acumulación de pelusa e hilos en el garfio impedirá que la máquina
funcione bien. Controle regularmente el estado del mecanismo de coser y
límpielo cuando sea necesario.
1. Saque la tapa de la bobina y la bobina.
2. Limpie el portabobina con un pincel.
Desconecte la máquina de la fuente de electricidad, antes de hacer el
mantenimiento y de cambiar la aguja
Precaución:
Mantenimiento
La aguja debe estar en perfectas condiciones. Cámbiela regularmente, en
especial si empieza a desgastarse o a darle problemas.
Coloque la aguja, siguiendo el procedimiento que se ilustra. Afloje el tornillo
que sujeta la aguja y vuelva a ajustarlo después de haber cambiado la aguja.
La cara lisa del eje siempre debe ir hacia atrás. Inserte la aguja hasta donde
pueda.
1
2
21
All manuals and user guides at all-guides.com
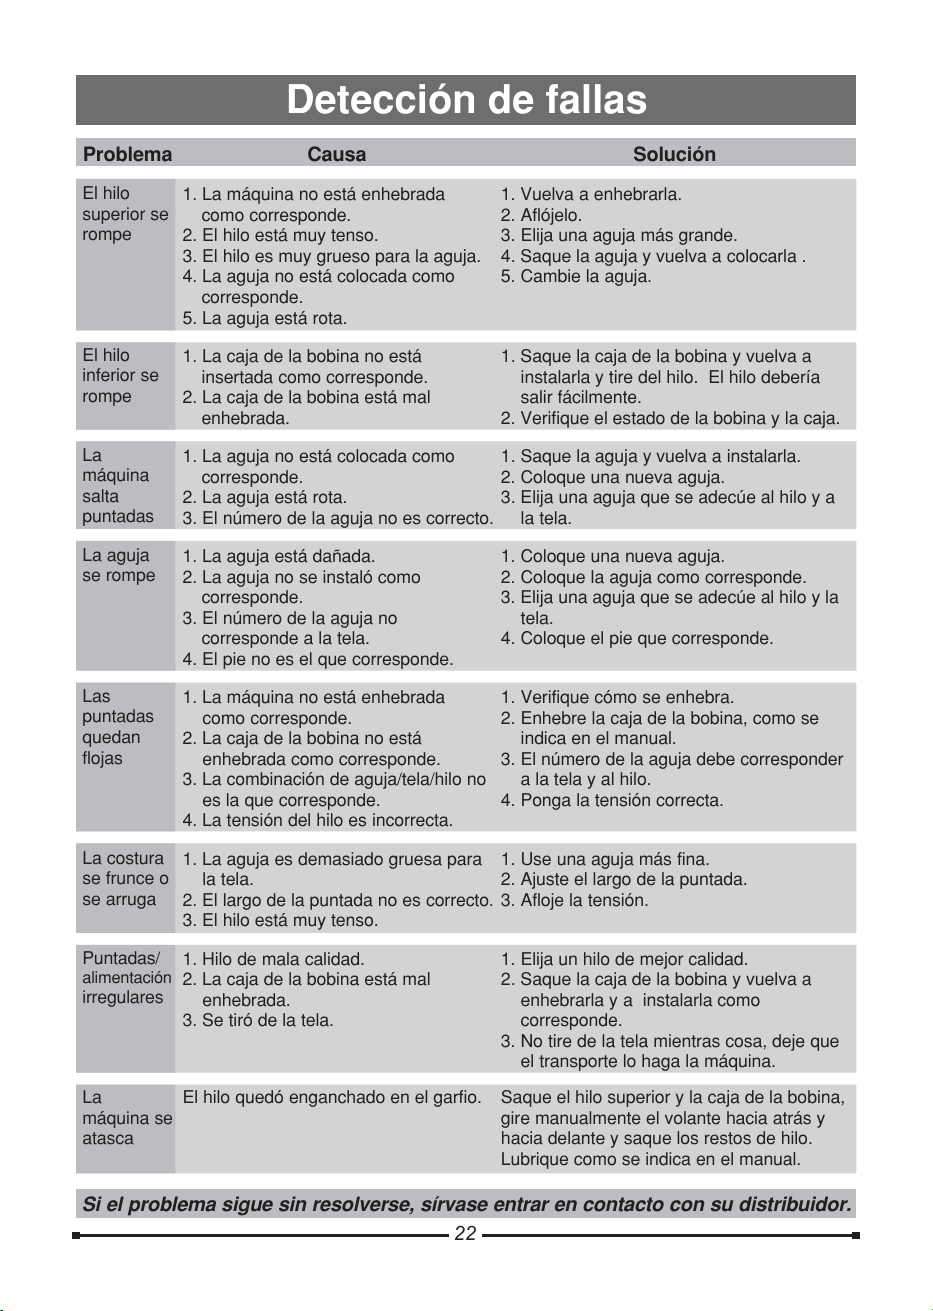
Problema Causa Solución
El hilo
superior se
rompe
El hilo
inferior se
rompe
La
máquina
salta
puntadas
La aguja
se rompe
Las
puntadas
quedan
flojas
La costura
se frunce o
se arruga
Puntadas/
irregulares
La
máquina se
atasca
1. La máquina no está enhebrada
como corresponde.
2. El hilo está muy tenso.
3. El hilo es muy grueso para la aguja.
4. La aguja no está colocada como
corresponde.
5. La aguja está rota.
1. La caja de la bobina no está
insertada como corresponde.
2. La caja de la bobina está mal
enhebrada.
1. La aguja no está colocada como
corresponde.
2. La aguja está rota.
3. El número de la aguja no es correcto.
1. La aguja está dañada.
2. La aguja no se instaló como
corresponde.
3. El número de la aguja no
corresponde a la tela.
4. El pie no es el que corresponde.
1. La máquina no está enhebrada
como corresponde.
2. La caja de la bobina no está
enhebrada como corresponde.
3. La combinación de aguja/tela/hilo no
es la que corresponde.
4. La tensión del hilo es incorrecta.
1. La aguja es demasiado gruesa para
la tela.
2. El largo de la puntada no es correcto.
3. El hilo está muy tenso.
1. Hilo de mala calidad.
2. La caja de la bobina está mal
enhebrada.
3. Se tiró de la tela.
El hilo quedó enganchado en el garfio.
1. Vuelva a enhebrarla.
2. Aflójelo.
3. Elija una aguja más grande.
4. Saque la aguja y vuelva a colocarla .
5. Cambie la aguja.
1. Saque la caja de la bobina y vuelva a
instalarla y tire del hilo. El hilo debería
salir fácilmente.
2. Verifique el estado de la bobina y la caja.
1. Saque la aguja y vuelva a instalarla.
2. Coloque una nueva aguja.
3. Elija una aguja que se adecúe al hilo y a
la tela.
1. Coloque una nueva aguja.
2. Coloque la aguja como corresponde.
3. Elija una aguja que se adecúe al hilo y la
tela.
4. Coloque el pie que corresponde.
1. Verifique cómo se enhebra.
2. Enhebre la caja de la bobina, como se
indica en el manual.
3. El número de la aguja debe corresponder
a la tela y al hilo.
4. Ponga la tensión correcta.
1. Use una aguja más fina.
2. Ajuste el largo de la puntada.
3. Afloje la tensión.
1. Elija un hilo de mejor calidad.
2. Saque la caja de la bobina y vuelva a
enhebrarla y a instalarla como
corresponde.
3. No tire de la tela mientras cosa, deje que
el transporte lo haga la máquina.
Saque el hilo superior y la caja de la bobina,
gire manualmente el volante hacia atrás y
hacia delante y saque los restos de hilo.
Lubrique como se indica en el manual.
alimentación
Detección de fallas
Si el problema sigue sin resolverse, sírvase entrar en contacto con su distribuidor.
22
All manuals and user guides at all-guides.com
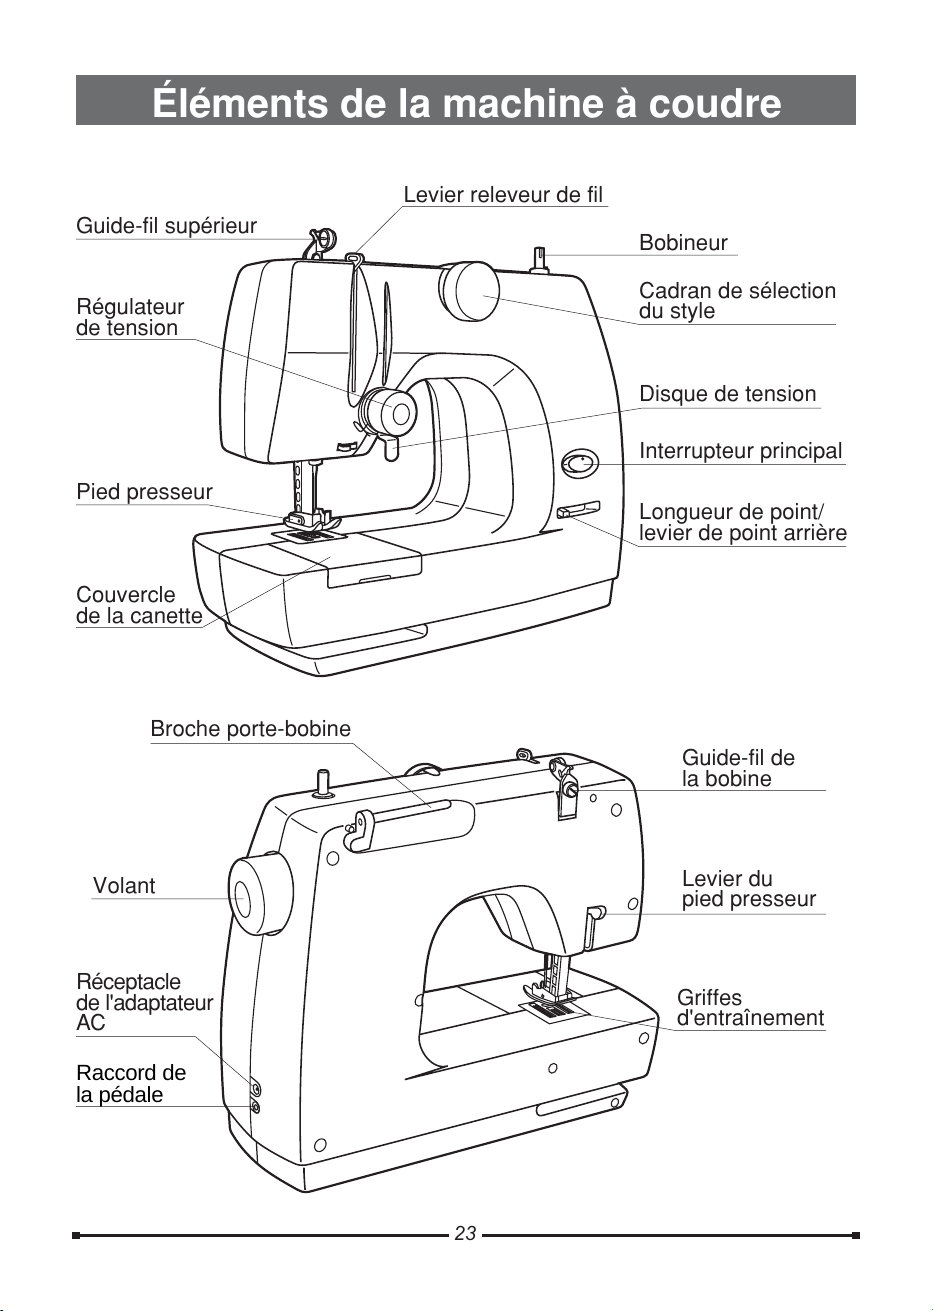
Éléments de la machine à coudre
Guide-fil supérieur
Levier releveur de fil
Bobineur
Cadran de sélection
du style
Interrupteur principal
Longueur de point/
levier de point arrière
Régulateur
de tension
Disque de tension
Pied presseur
Couvercle
de la canette
Broche porte-bobine
Volant
Réceptacle
de l'adaptateur
AC
Guide-fil de
la bobine
Levier du
pied presseur
Griffes
d'entraînement
23
Raccord de
la pédale
All manuals and user guides at all-guides.com
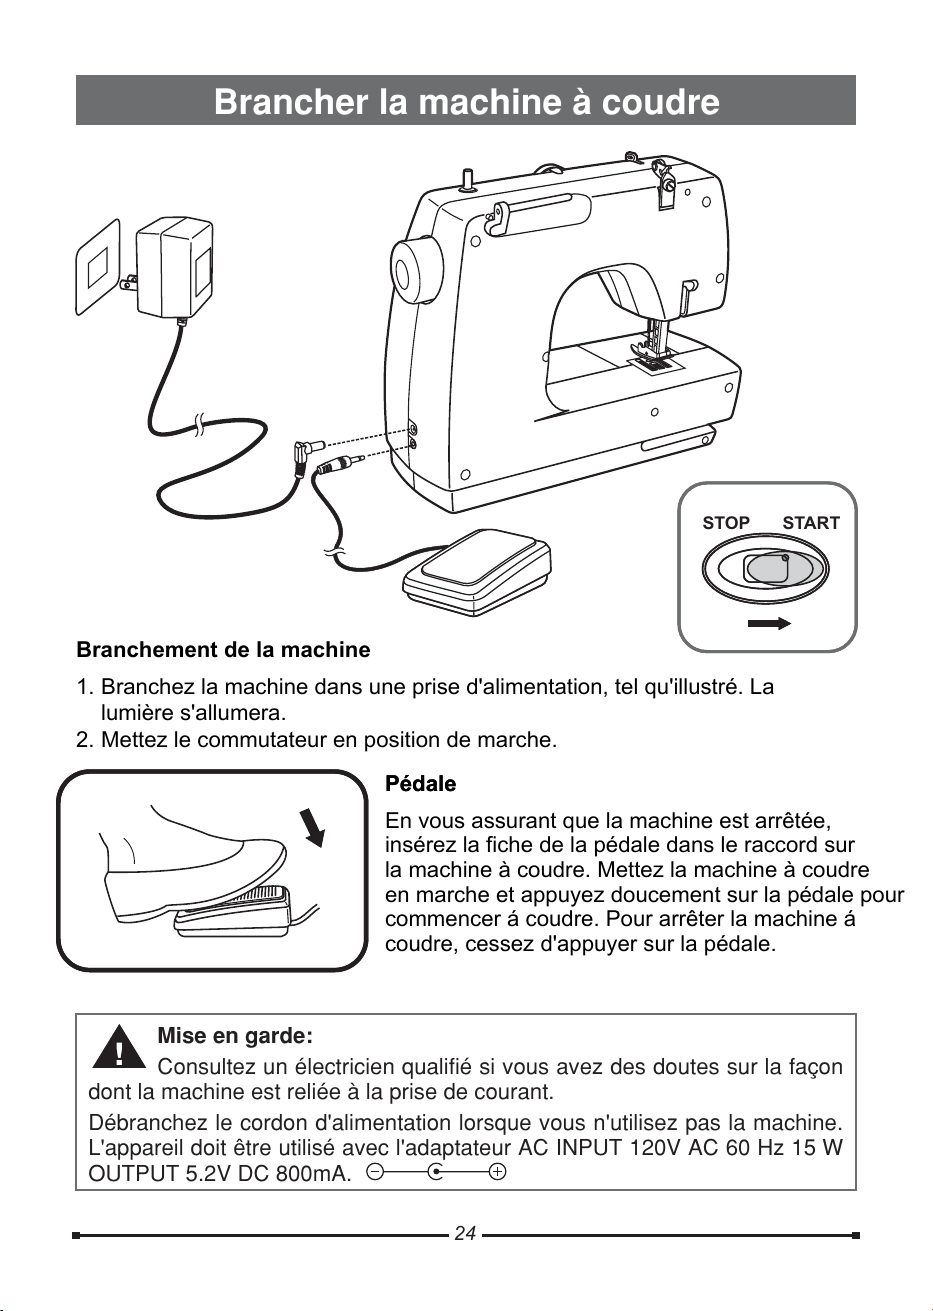
Brancher la machine à coudre
Mise en garde:
Consultez un électricien qualifié si vous avez des doutes sur la façon
dont la machine est reliée à la prise de courant.
Débranchez le cordon d'alimentation lorsque vous n'utilisez pas la machine.
L'appareil doit être utilisé avec l'adaptateur AC INPUT 120V AC 60 Hz 15 W
OUTPUT 5.2V DC 800mA.
STARTSTOP
24
Pédale
En vous assurant que la machine est arrêtée,
insérez la fiche de la pédale dans le raccord sur
la machine à coudre. Mettez la machine à coudre
en marche et appuyez doucement sur la pédale pour
commencer á coudre. Pour arrêter la machine á
coudre, cessez d'appuyer sur la pédale.
Branchement de la machine
1. Branchez la machine dans une prise d'alimentation, tel qu'illustré. La
lumière s'allumera.
2. Mettez le commutateur en position de marche.
Pédale
All manuals and user guides at all-guides.com

Remplir la canette
1. Placer la bobine de fil et le chapeau de retenue sur la broche porte-bobine.
2. Faites passer le fil de la bobine à travers le guide-fil et amenez-le jusqu'à la
canette.
3. Insérez le fil à travers le trou de la canette par l 'intérieur. Placer la bobine
sur l 'arbre du bobineur.
4. Tenir le bout du fil et mettre l'interrupteur à la position "marche" (START).
5. Coupez l 'excédent de fil avec un coupe-fil près du trou, ensuite continuez de
remplir la canette jusqu'à la quantité de fil désiré. Coupez le fil et retirez la
canette.
Appuyezzsur la pédale pour faire démarrer la machine áácoudre..
25
3
2
4
5
2
3
4
1
1
STARTSTOP
All manuals and user guides at all-guides.com
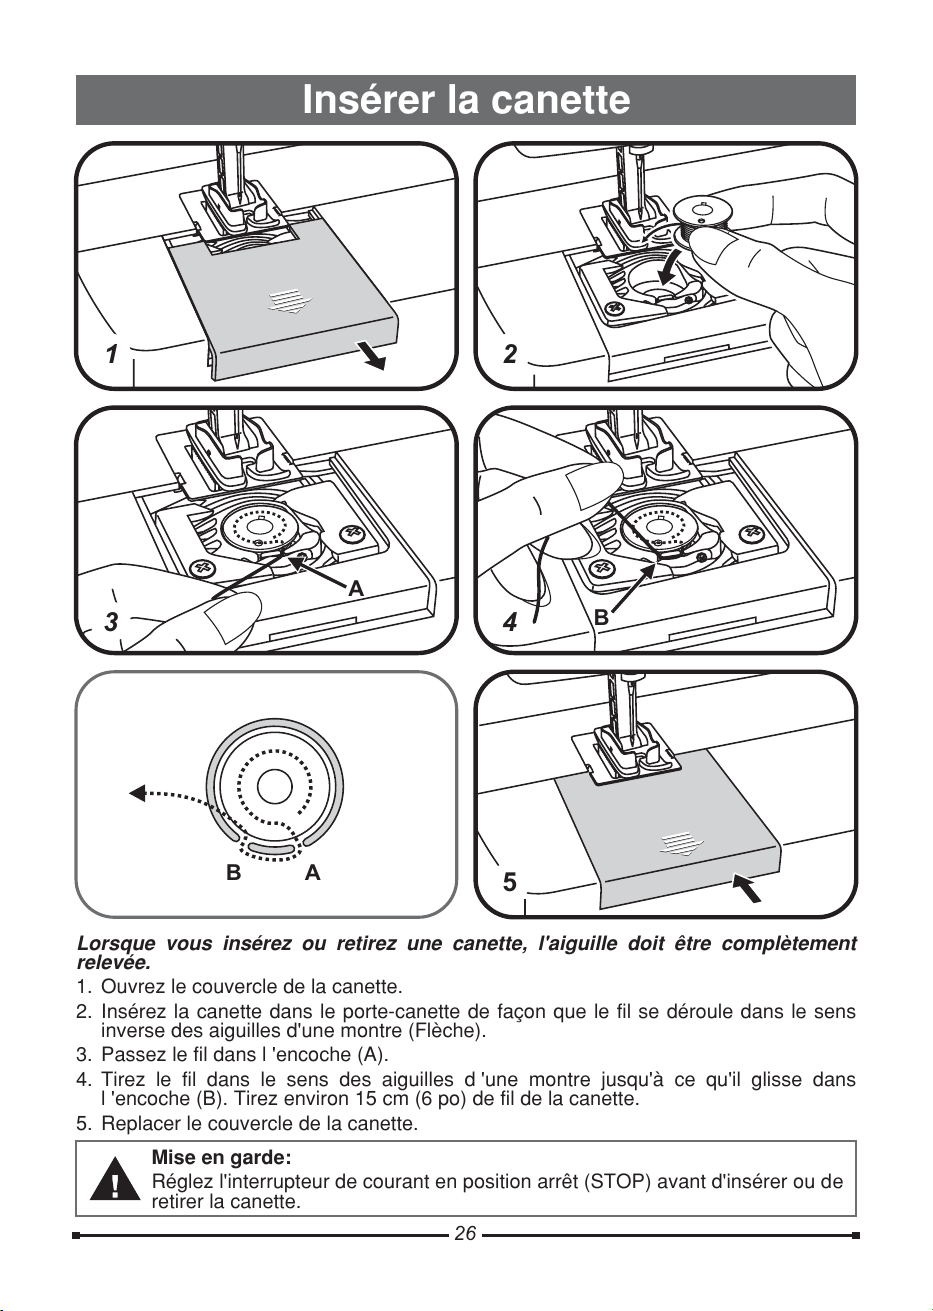
Insérer la canette
AB
B
Lorsque vous insérez ou retirez une canette, l'aiguille doit être complètement
relevée.
1. Ouvrez le couvercle de la canette.
2. Insérez la canette dans le porte-canette de façon que le fil se déroule dans le sens
inverse des aiguilles d'une montre (Flèche).
3. Passez le fil dans l 'encoche (A).
4. Tirez le fil dans le sens des aiguilles d 'une montre jusqu'à ce qu'il glisse dans
l 'encoche (B). Tirez environ 15 cm (6 po) de fil de la canette.
5. Replacer le couvercle de la canette.
Réglez l'interrupteur de courant en position arrêt (STOP) avant d'insérer ou de
retirer la canette.
Mise en garde:
A
1
2
4
3
5
26
All manuals and user guides at all-guides.com

Enfiler le fil d'aiguille
Cette opération est simple mais il est très important de l 'exécuter
correctement. .Sinon plusieurs problèmes peuvent survenir
1. Remontez la barre à aiguille à sa position la plus haute et relevez le pied
presseur.
2. Respectez rigoureusement les séquences numérotées (1-5) pour l'enfilage
supérieur.
3. Passez ensuite le fil dans le chas de l'aiguille de l'avant vers l'arrière.
Laissez dépasser le fil d'environ 15 cm (6-8 po) à l'arrière.
27
4
2
3
5
1
1
2
3
4
5
Appuyer
All manuals and user guides at all-guides.com

Tension du fil
Sortir le fil de canette au-dessus de la plaque
28
1. Tenez le fil d'aiguille
de la main gauche.
Tournez le volant vers
vous (dans le sens
inverse des aiguilles
d'une montre) jusqu'à
ce que l 'aiguille
descende puis
remonte à sa plus
haute position. Tirez
doucement sur le fil
1
2
d'aiguille pour faire sortir le fil de canette par le trou de la plaque à aiguille.
2. Ramenez les deux fils vers l'arrière, sous le pied presseur.
Une tension équilibrée
est importante. Utilisez
le régulateur de
tension pour tous les
ajustements de tension.
1. Pour une tension
équilibrée les fils
supérieur et inférieur
se croisent au centre
de la couture.
2. Lorsque vous utilisez
le point zigzag, la
tension normale
montrera légèrement
le fil supérieur sur
l 'envers du tissu.
3.Si la tension
supérieure est trop
lâche, le fil supérieur
apparaît sur l'envers
du tissu. Pour
augmenter la tension,
tournez le régulateur de tension vers le "+".
4. Si la tension supérieure est trop serrée, le fil inférieur apparaît sur le dessus du
tissu. Pour réduire la tension, tournez le régulateur de tension vers le "".
All manuals and user guides at all-guides.com

La longueur du point peut être ajustée
au besoin de la façon suivante:
- Pour obtenir une longueur de point
maximum, placez le levier
complètement du côté gauche.
- Pour obtenir une longueur de point
moyenne, placez le levier à la
position centre.
- Pour une longueur de point courte,
placez le levier juste avant la position
de point arrière, du côté droit.
Ne pas faire fonctionner la
machine en position stationnaire
longtemps. Cela e ntraînera la
formation d'un n'ud de fil qui
bloquerait la machine.
Mise en garde:
Point arrière
Longueur de point
Pour fermer ou renforcer le début et la
fin d'une couture, placez le levier à la
position de droite (point arrière).
Coudre quelques points arrière.
Placez le levier à la position de
gauche et la machine recommence à
coudre vers l'avant.
29
All manuals and user guides at all-guides.com
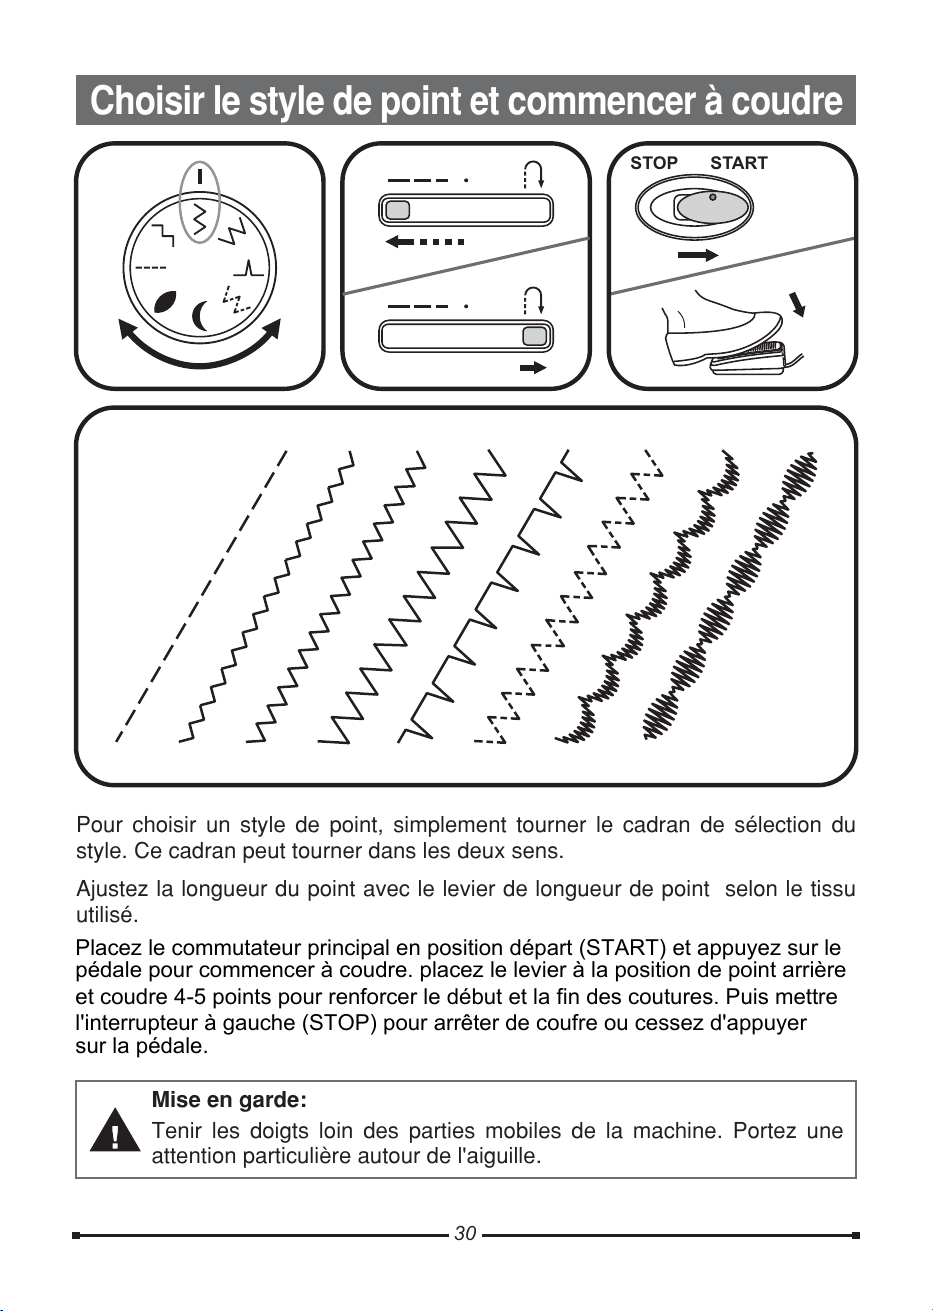
Choisirlestyledepointetcommenceràcoudre
Pourchoisirunstyledepoint,simplementtournerlecadrandesélectiondu
style. Ce cadran peut tourner dans les deux sens.
Ajustezlalongueurdupointaveclelevierdelongueurdepointselonletissu
utilisé.
Tenirlesdoigtsloindespartiesmobilesdelamachine.Portezune
attention particulière autour de l'aiguille.
Mise en garde:
P
30
STOP START
Placez le commutateur principal en position départ (START) et appuyez sur le
pédale pour commencer à coudre. placez le levier à la position de point arrière
et coudre 4-5 points pour renforcer le début et la fin des coutures. Puis mettre
l'interrupteur à gauche (STOP) pour arrêter de coufre ou cessez d'appuyer
sur la pédale.
All manuals and user guides at all-guides.com
Insérer et changer l'aiguille
Les aiguilles doivent être en parfait état. Remplacez l'aiguille régulièrement,
spécialement si elle présente des signes d'usure ou si elle cause des problèmes.
Insérez l'aiguille conformément aux illustrations. Desserrez la vis du serre-
aiguille et resserrez après avoir inséré une nouvelle aiguille. Le côté plat du
talon de l'aiguille doit être tourné vers l'arrière. Insérer l'aiguille aussi loin
qu'elle peut aller.
Si des résidus de tissu et des bouts de fil s 'accumulent dans le crochet, ceci
peut nuire au bon fonctionnement de la machine. Vérifiez régulièrement et
nettoyer le mécanisme de couture si nécessaire.
1. Retirez le couvercle de la canette et la canette
2. Nettoyer le porte-canette avec une brosse.
Débranchez toujours la machine de la prise de courant avant de faire
l'entretien ou de remplacer l'aiguille de la machine à coudre.
Mise en garde:
Entretien
1
2
31
All manuals and user guides at all-guides.com
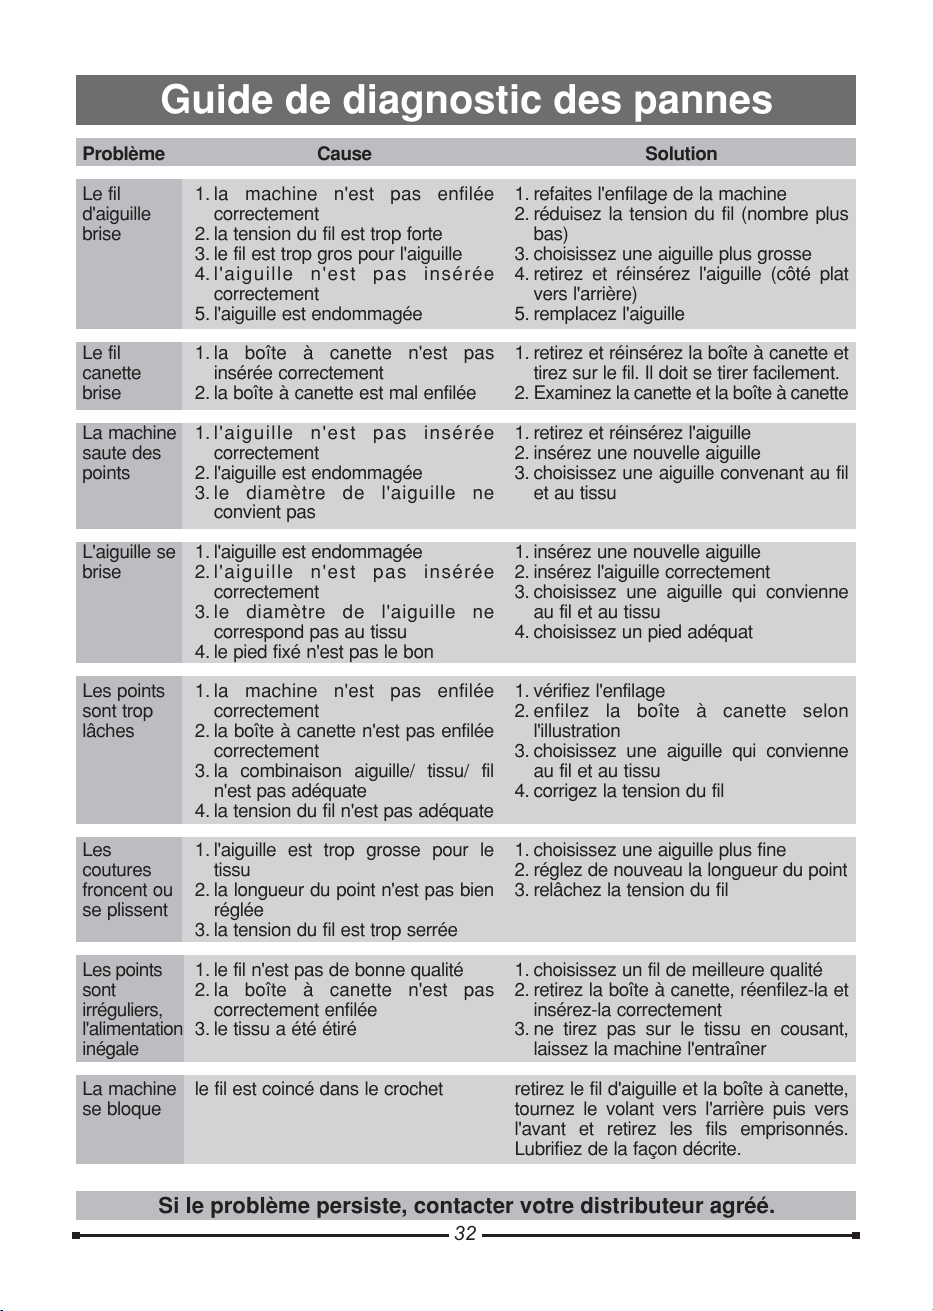
Guide de diagnostic des pannes
Si le problème persiste, contacter votre distributeur agréé.
32
Problème Cause Solution
Le fil
d'aiguille
brise
Le fil
canette
brise
La machine
saute des
points
L'aiguille se
brise
Les points
sont trop
lâches
Les
coutures
froncent ou
se plissent
Les points
sont
irréguliers,
l'alimentation
inégale
La machine
se bloque
1. la machine n'est pas enfilée
correctement
2. la tension du fil est trop forte
3. le fil est trop gros pour l'aiguille
4.l'aiguille n'est pas insérée
correctement
5. l'aiguille est endommagée
1. la boîte à canette n'est pas
insérée correctement
2. la boîte à canette est mal enfilée
1.l'aiguille n'est pas insérée
correctement
2. l'aiguille est endommagée
3. le diamètre de l'aiguille ne
convient pas
1. l'aiguille est endommagée
2.l'aiguille n'est pas insérée
correctement
3. le diamètre de l'aiguille ne
correspond pas au tissu
4. le pied fixé n'est pas le bon
1. la machine n'est pas enfilée
correctement
2. la boîte à canette n'est pas enfilée
correctement
3. la combinaison aiguille/ tissu/ fil
n'est pas adéquate
4. la tension du fil n'est pas adéquate
1. l'aiguille est trop grosse pour le
tissu
2. la longueur du point n'est pas bien
réglée
3. la tension du fil est trop serrée
1. le fil n'est pas de bonne qualité
2. la boîte à canette n'est pas
correctement enfilée
3. le tissu a été étiré
le fil est coincé dans le crochet
1. refaites l'enfilage de la machine
2. réduisez la tension du fil (nombre plus
bas)
3. choisissez une aiguille plus grosse
4. retirez et réinsérez l'aiguille (côté plat
vers l'arrière)
5. remplacez l'aiguille
1. retirez et réinsérez la boîte à canette et
tirez sur le fil. Il doit se tirer facilement.
2. Examinez la canette et la boîte à canette
1. retirez et réinsérez l'aiguille
2. insérez une nouvelle aiguille
3. choisissez une aiguille convenant au fil
et au tissu
1. insérez une nouvelle aiguille
2. insérez l'aiguille correctement
3. choisissez une aiguille qui convienne
au fil et au tissu
4. choisissez un pied adéquat
1. vérifiez l'enfilage
2. enfilez la boîte à canette selon
l'illustration
3. choisissez une aiguille qui convienne
au fil et au tissu
4. corrigez la tension du fil
1. choisissez une aiguille plus fine
2. réglez de nouveau la longueur du point
3. relâchez la tension du fil
1. choisissez un fil de meilleure qualité
2. retirez la boîte à canette, réenfilez-la et
insérez-la correctement
3. ne tirez pas sur le tissu en cousant,
laissez la machine l'entraîner
retirez le fil d'aiguille et la boîte à canette,
tournez le volant vers l'arrière puis vers
l'avant et retirez les fils emprisonnés.
Lubrifiez de la façon décrite.
All manuals and user guides at all-guides.com

021T1A0103( / / ) Nov/02
(T1)
All manuals and user guides at all-guides.com