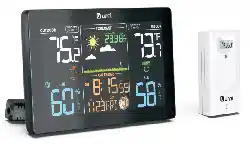
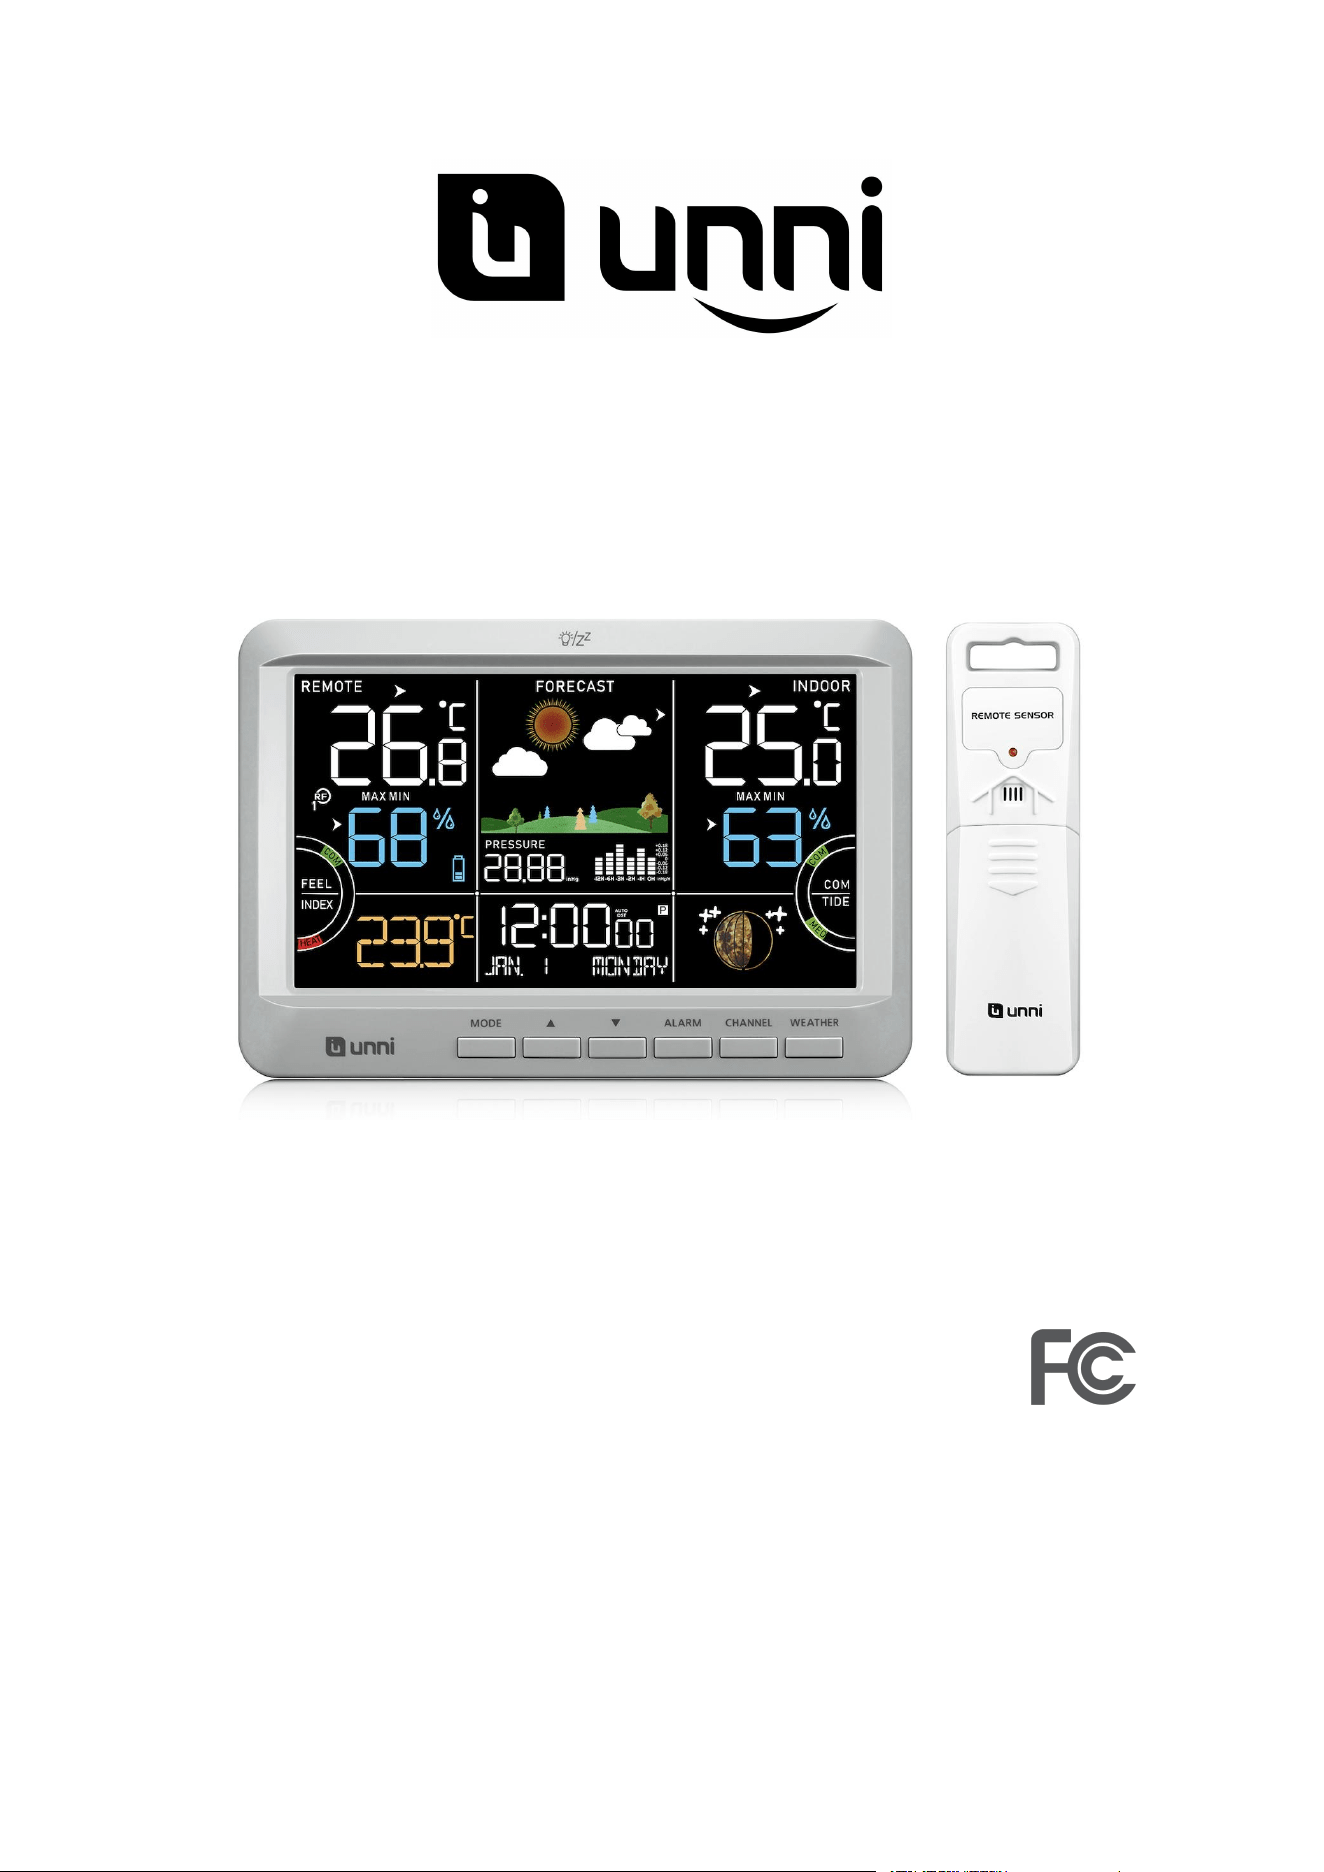
Digital Wireless Weather Station
OPERATING INSTRUCTION
Base unit: UN0512
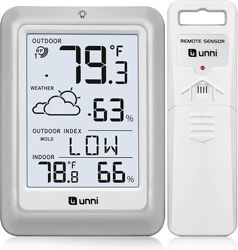
Wireless sensor: UN02
If you want to know about our features or support solutions, please let us know! We
really hope that owning an Unni Technology product is not only a practical
experience, but also a pleasure.
Please email us at: unni_technology@hotmail.com

3
Package included
• UN0512 weather station x 1
• UN02 wireless sensor x 1
• Switching adapter for base unit
• Operating instructions
Technical data
Base unit
Model: UN0512
Power consumption: 5.0V 200 mA
Power supply: 3 x (AA) / 1.5 V (not included)
Temperature measuring range: 14.2°F ~ 122°F
Temperature measuring accuracy: 32~104°F: +/-1.8°F, other +/-3.6°F
Humidity measuring range: 20 % to 95 % relative humidity
Humidity measuring accuracy: +/- 5 % with a measuring range of 40% to 80%, +/-8%
with measuring range of 20% to 39% and 81% to 95%
Temperature and humidity data detection and sending period: every 30 seconds
Barometric and weather data detection and sending period: every 1 hour
Wireless sensor
Model: UN02
Batteries: 2 x (AA) / 1.5 V (not included)
Temperature measuring range: - 50°F to 158°F
Temperature measuring accuracy: 32~104°F: +/-1.8°F, other +/-3.6°F
Protection type: IPX4: Protection against splash water from all directions
Transmission frequency: 433 MHz
Range: max. 328 ft (100 meters) (in open area)
Temperature and humidity data detection and sending period:
CH1: every 31 seconds; CH2: every 32 seconds; CH3: every 33 seconds

4
Switching adapter
Power supply: 120V~60Hz 7W
Output: 5.0V 200 mA
Note: With the continuous development and improvement of our products, the
design and technology may be changed.
Product functions
Weather station
• High-definition colour display
• 12- or 24-hour display
• Date, time and day of week display
• Alarm with snooze function
• Indoor temperature display in °C/°F
• Indoor and outdoor humidity display
• Outdoor temperature display in °C/°F with up to three wireless sensors at different
measurement sites (delivery includes one wireless sensor)
• Minimum/maximum display for temperature and humidity
• Humidity and temperature trend display
• Weather forecast symbols
• Moon phase display
• Comfort indicator
• Tide indicator
• Heat, Mold, Dew Point
• Fell Level
• Air pressure with past 12 hours data graph
• Low battery indicator
Wireless sensor
• Range of up to 328 ft (100 meters) (in open area)
• Low battery indicator
• Wall mounting bracket
• Loop for hanging
5
Warning:
Sensor waterproof rating is IPX4. But it is recommended that you cover it in the
shadow to protect it from long-term exposure to rain and sun, to make it more
accurate and give better performance.
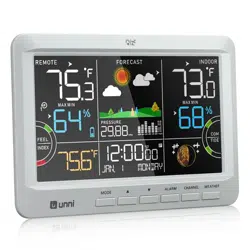
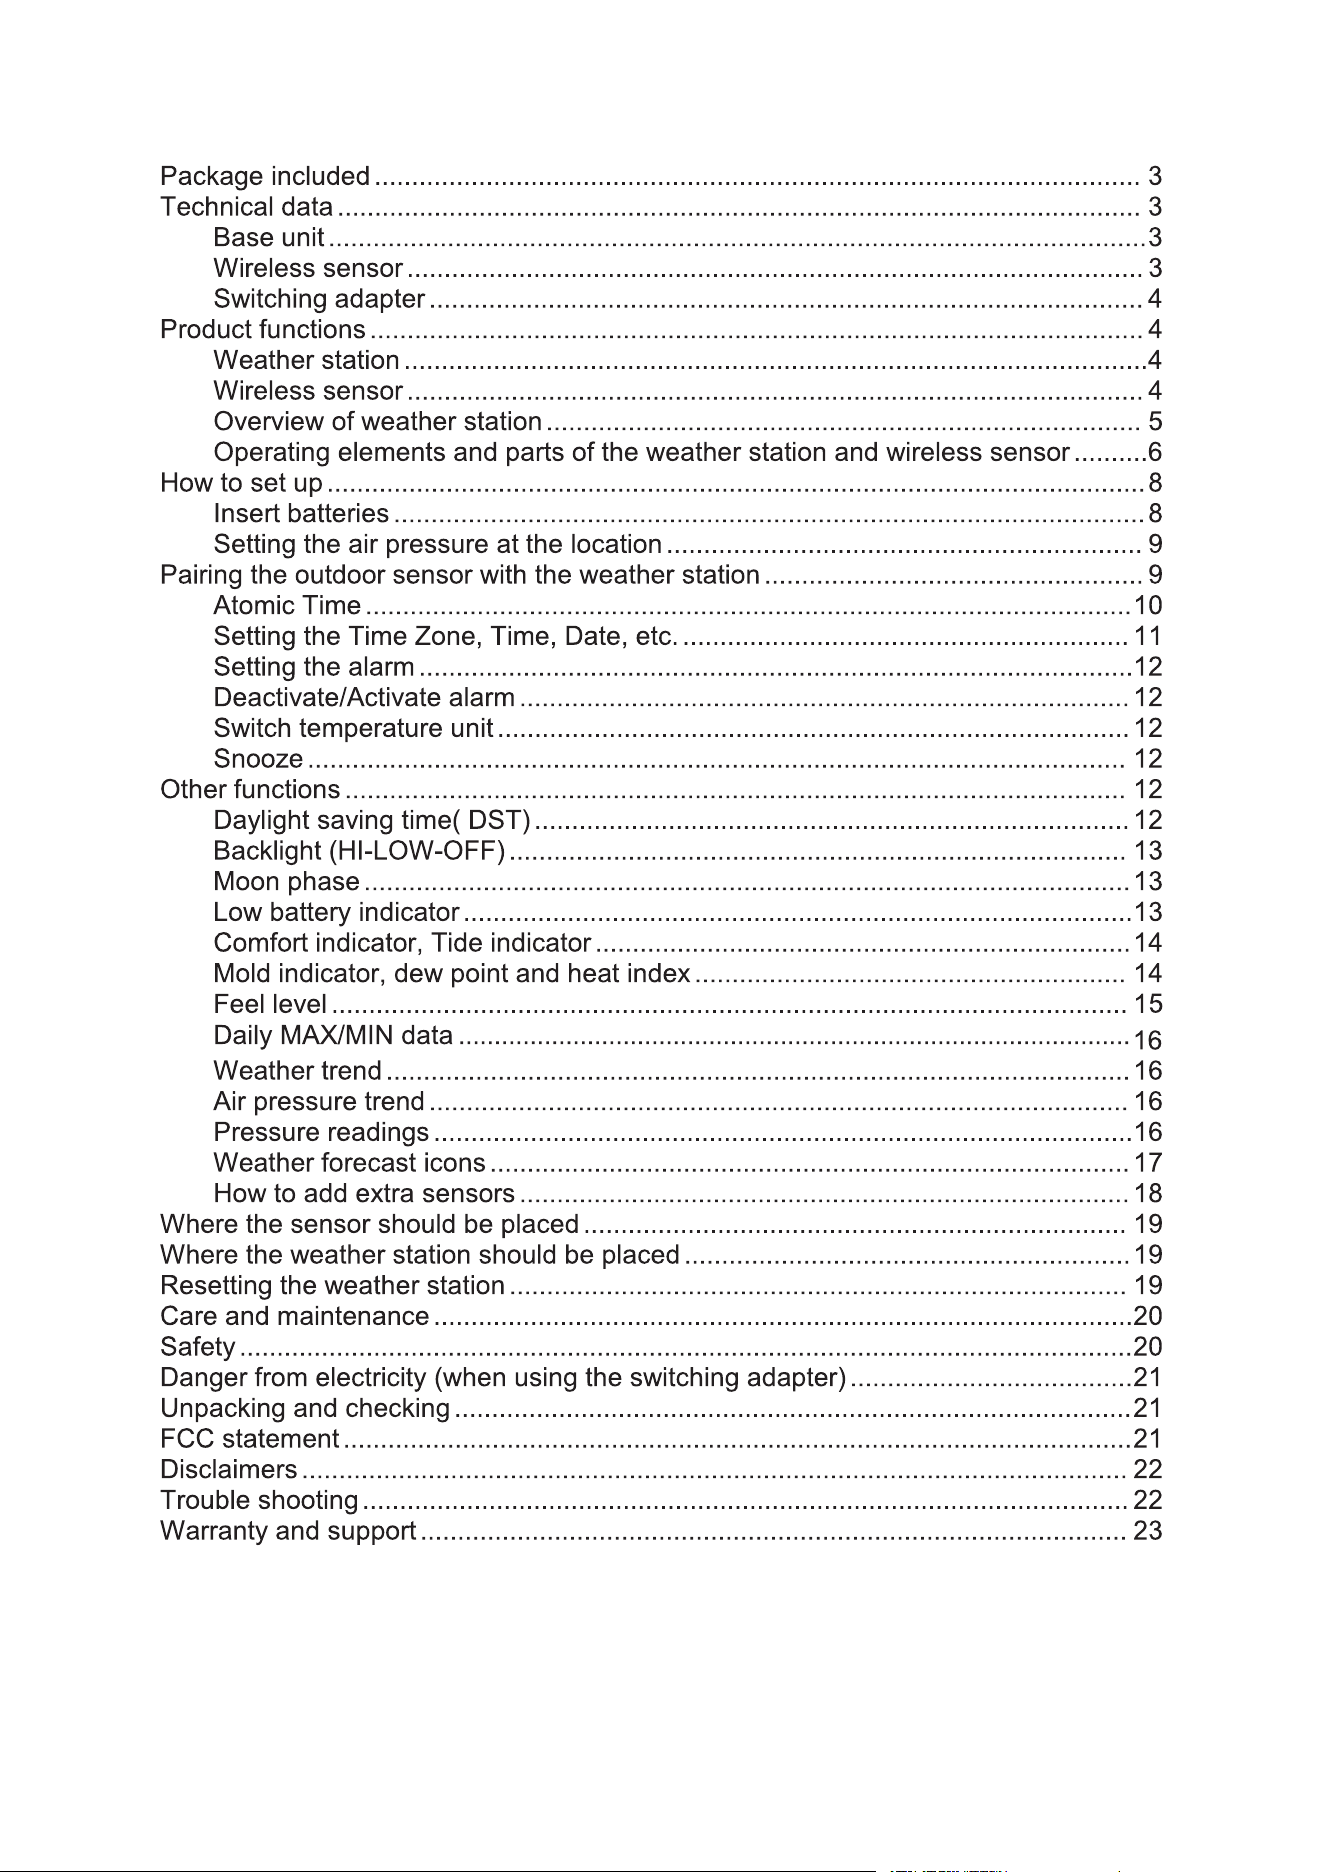
Overview of weather station
1. Current channel of outdoor sensor
2. Outdoor temperature / humidity
3. Outdoor temperature / humidity trend
4. Outdoor temperature unit in °C/°F
5. 12h Weather forecast / Pressure /
History data / Ice alert
6. Indoor temperature / humidity trend
7. Indoor temperature unit in °C/°F
8. Indoor temperature / humidity
9. Max/Min temperature / humidity
10. Comfort indicator
11. Tide
12. Moon phase
13. Time zone
14. Day of week
15. Atomic time / Daylight saving time
16. Month (M) / Date (D)
17. Heat / Dew / Mold Index
18. Index type
19. Feel level
6
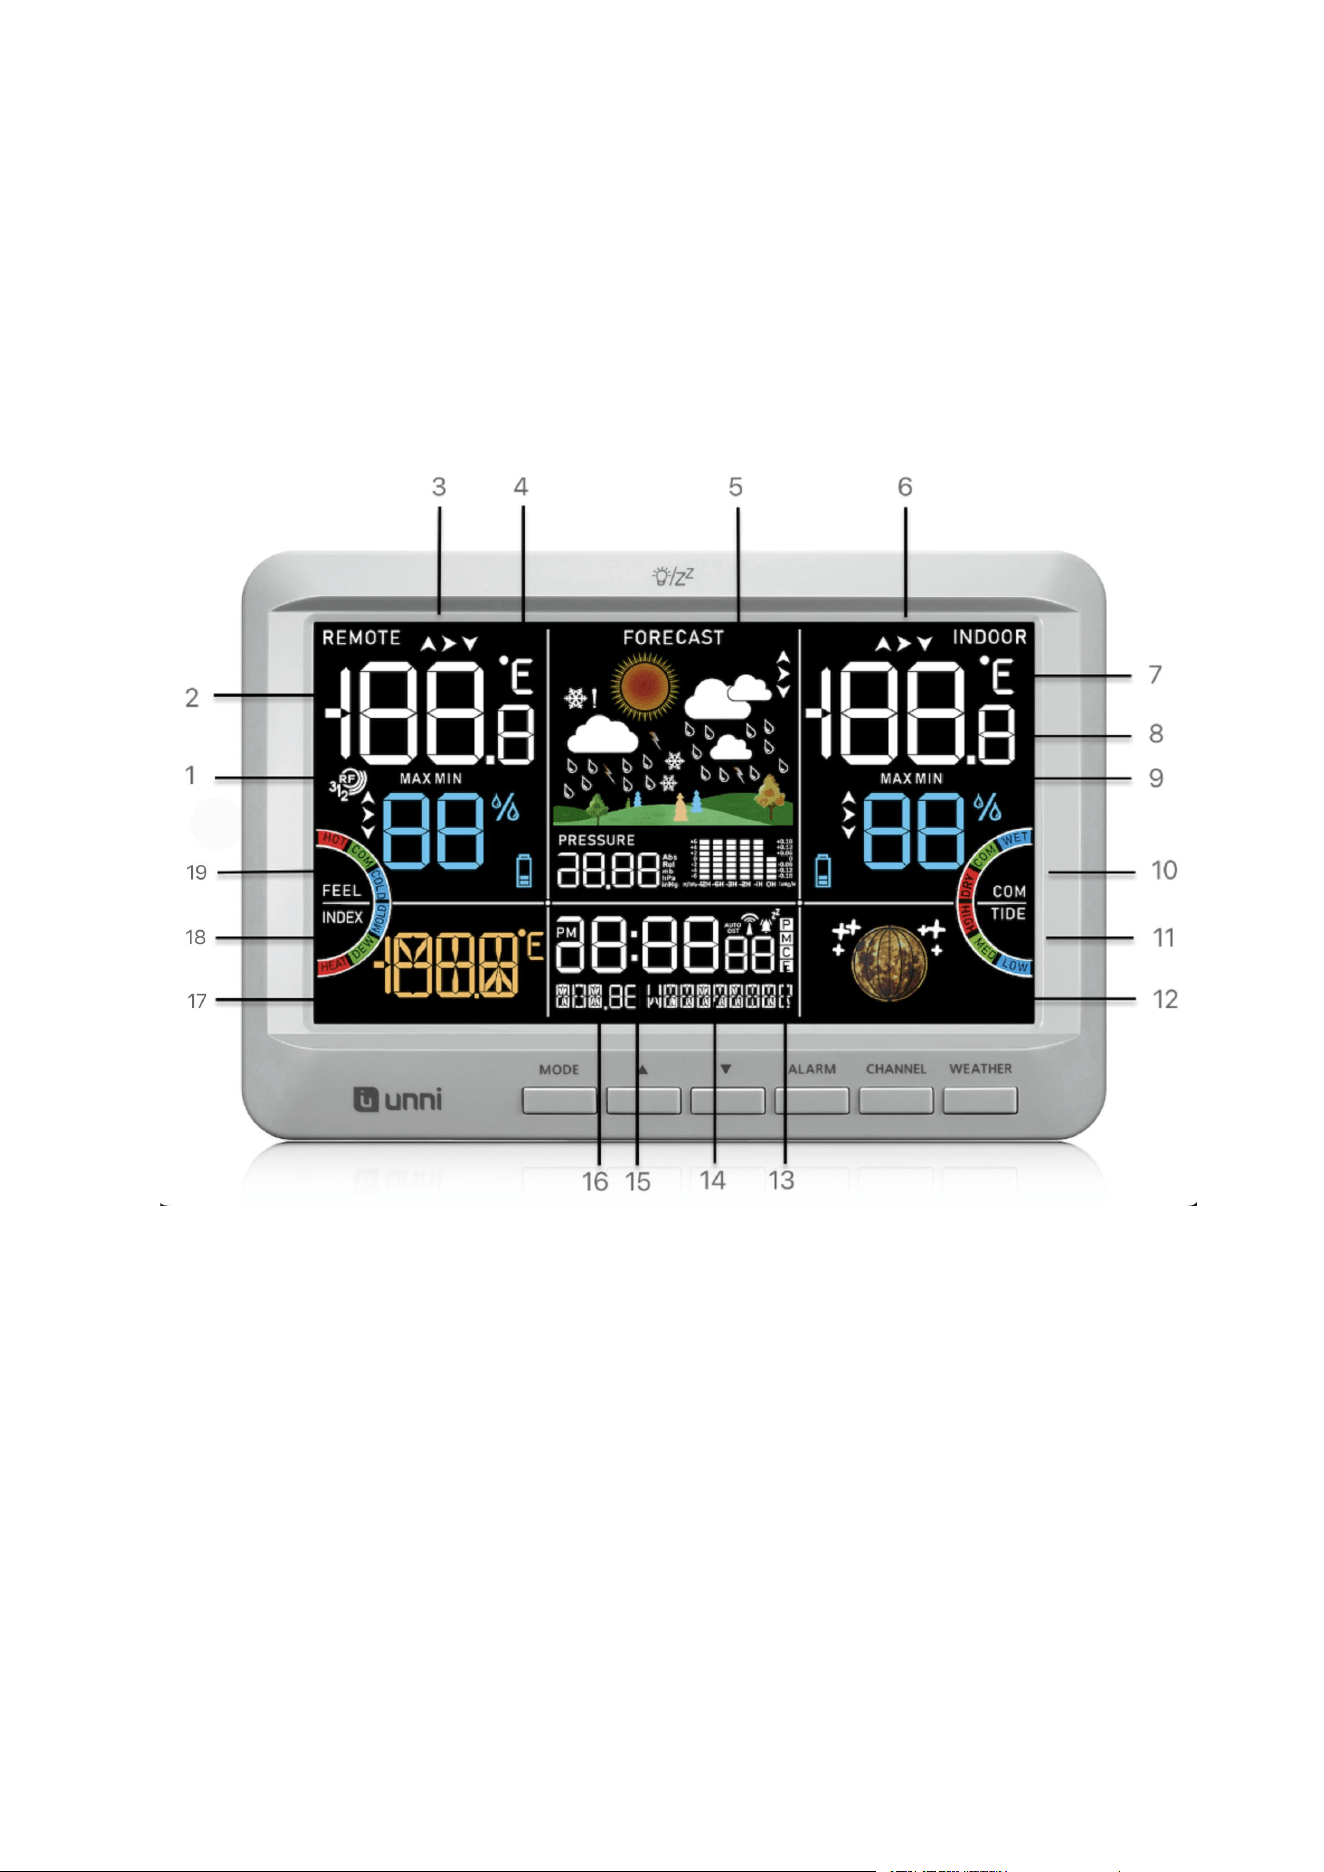
Operating elements and parts of the weather station and wireless
sensor
1
Operating buttons
Button MODE
* Activate settings mode
* Save changes to settings
7
Button ▲
* Set values (increase)
* Switch outdoor index
* Long press to activate / deactivate signal reception
Button ▼
* Set values (decrease)
* Display stored MAX and MIN values
* Long press to delete and re-record MAX and MIN values in 24 hours
Button ALARM
* Activate / Deactivate alarm
* Long press to activate alarm settings mode
Button CHANNEL
* Display weather data from various wireless sensors (channel 1.2.3)
* Long press to reconnect wireless sensor connection
Button Weather
* Switch temperature unit (°C / °F)
* Long press to activate air pressure settings mode
Button (SNOOZE/LIGHT)
* Illumination backlight
* Activate snooze function
2
Loop for hanging
3
Fold-out stand
4
Battery compartment
5
Adapter port

8
1
Red pilot light (Light up for 1 second only when transmitting data)
2
TX button: press to transmit wireless signal to main unit
3
Sliding switch 1 2 3: Set sensor number (transmission channel)
4
Battery compartment
5
Loop for hanging
Note:
If you are going to use the wireless sensor included in the package, there is no need
to change the transmission channel inside the outdoor sensor.
Changing the transmission channel is only necessary when you are going to add
additional wireless outdoor sensor. See “ How to add extra sensors “ on Page 18.
How to set up
Insert batteries (not included) and adaptor
1. Insert 2x AA batteries into your UN02 wireless sensor. Pay attention to the correct
polarity. While the sensor is transmitting, the red LED indicator will flash.
2. Use the ac adaptor to plug the weather station into a wall outlet.
(Note: When the weather station only uses batteries, the screen will turn off after
10s and you will need to press the button to activate it.)

9
Setting the air pressure at the location
As soon as the weather station has power from adapter or batteries, it will enter the
air pressure mode. You will see the air pressure unit starts to flash. Now you can set
the air pressure through ▲ or ▼ button. You can follow below steps.
1. The air pressure unit starts flashing, the default is inHg, you can use the ▲ or ▼
button to switch the inHg/Hpa system.
2. Long press the WEATHER button to confirm and enter the air pressure value
setting.
3. The air pressure value starts flashing. The default is 29.88 inHg which is the air
pressure of sea level. You can adjust it manually according to the data from the
local meteorological station, the air pressure range of our weather stations is
8.85~35.43 inHg. You can also keep the default data unchanged to make it adapt
automatically.
4. Press the WEATHER button to confirm and enter the weather symbol setting.
5.
The weather symbol starts flashing, the default is half sunny. It will automatically
adjust to the correct symbol. However, if you want to shorten the reception time
of the weather station, you can manually adjust it through ▲ and ▼ button.
6. Press the WEATHER button to save the setting and exit the air pressure mode.
7. To re-adjust, long press the WEATHER button till the air pressure unit start to
flash.
Pairing the outdoor sensor with the weather station
Once the weather station is turned on (plug in or installed batteries), it will start
receiving the pairing RF signals from the outdoor sensor with the same channel for 3
minutes. You can press the CHANNEL button on the base unit to match the correct
outdoor sensor.
Generally, the outdoor sensor will connect with the base unit automatically. If it fails,
please follow below steps to set:
• Ensure that the weather station is in the same channels with the outdoor sensor.

10
• Long press the CHANNEL button on the base unit to search signal from the
outdoor sensor.
• The sensor receiving icon will flash when searching for the signal.
• After the sensor is connected, the icon will become stable.
• Your weather station will search for the signal each 3 minutes every hour
automatically until it is connected.
Atomic Time
A) After 3 minutes reception of the signal from the remote sensor, the device will
begin to search for WWVB signal automatically to set the time and date. At this
time, the radio mast icon begins to flash, the icon is next to the digital
display of time, this process takes about 7 minutes.
B) The atomic time signal icon will flash while searching. The tower icon will be solid
when it has connected.
C) If fails, the device will automatically search for WWVB signals every 1 hour until
the signal is received.
D) After reception, this station will only search for the atomic signal after midnight.
E) Please be sure you have selected your time zone. When the Atomic time signal is
received, the station will set to the time zone selected.
F) The default time zone is PST Time, if you need to select the time zone that
matches your location, press and hold the ▲ button to exit from WWVB signal
search mode, then refer to Next chapter “
Setting the Time, Date, etc
” to set
the time zone and time.
Important:
Signal reception is normally better at night and when the weather is clear. In general,
the atomic signal takes 2-5 days to synchronize, so it’s necessary for the first
time using to set the time and date manually after power on.
F.Y.I:
Information: Radio station WWVB is located near Fort Collins, Colorado.

11
More information related to the WWVB signal, please refer to:
www.nistgov/pml/div688/grp40/wwvb.cfm.
The device will search for the WWVB signal at 1:00AM, 2:00AM, 3:00AM, 4:00AM
and 5:00AM every day to calibrate for any deviations of time automatically.
If your weather station does not receive the WWVB radio signal correctly, please
hang or place the weather station in a different location at your site. Please note that
devices such as computers, telephones, radios and televisions may cause
electromagnetic radiation which can interfere with the WWVB signal reception. Other
possible detriments to reception are: strong building insulation (metal building
materials), nearby mountains or atmospheric interference.
Setting the Time Zone, Time, Date, etc.
• Press and hold the MODE button for 3 seconds till the PST starts flashing, now you
are in the basic settings.
• To adjust the data through the ▲ and ▼ Button.
• Then press the MODE button to confirm and jump to the next setting.
Below are the setting orders:
1. TIME ZONE (PST—MST—CST—EST)
2. DST ON/OFF
3. ATOMIC (RCC) ON/OFF
4. YEAR
5. MONTH
6. DAY
7. 12/24H
8. HOUR
9. MINUTIES
NOTE:
If you have chosen ATOMIC OFF at the basic setting, please note that this weather
station will no longer receive atomic signals and you are also unable to select time
zone, until the factory settings are restored.
Note:
12
A. Weekday, moon phase and tide will be adjusted automatically when year, month
and date are set.
B. All setting can be skipped or ceased if no button is touched or pressed for 20s.
C. The setting process cannot be interrupted, otherwise you need to repeat this
process to modify any item.
Setting the alarm
There a alarm on the weather station.
1. Long press the ALARM button till the time starts flashing.
3. Set the desired hour for the alarm with the ▲ and ▼ buttons.
4. Press ALARM to store the setting and enter the minute setting.
5. Set the desired minute for the alarm with the ▲ and ▼ buttons.
6. Press ALARM to store the setting. Now the alarm is set.
Note: The default of the alarm is off.
Deactivate/Activate alarm
• Press and release the ALARM button to deactivate or activate the alarm.
• The alarm icon (bell) will show when it is activated.
Switch temperature unit
When Press the WEATHER button to switch the temperature unit: °C or °F.
Snooze
When the alarm sounds, press the (SNOOZE/LIGHT) button to pause the
alarm for 5 minutes.
• The snooze icon will flash.
• Press any button except (SNOOZE/LIGHT) to pause the alarm for 24 hours.
Other functions
Daylight saving time( DST)
13
The weather station will adapt to winter / summer time automatically when DST is
ON.
• Summer time: the second Sunday of March at 1:59 59’changes to 3:00 00’
• Winter time: the first Sunday of November at 1:59 59’changes to 1:00 00’
The default of DST is off. When the selection is ON, the AUTO DST symbol will
appear; when the DST period is entered, it will become DST.
Backlight (HI-LOW-OFF)
When the base unit is powered by adapter, the backlight is adjustable: HI-LOW-OFF.
You can press the (SNOOZE/LIGHT) button to adjust backlight.
Note: When the weather station is operated by batteries only, the backlight will turn
off after 10s and by pressing the (SNOOZE/LIGHT) button to activate it
again.
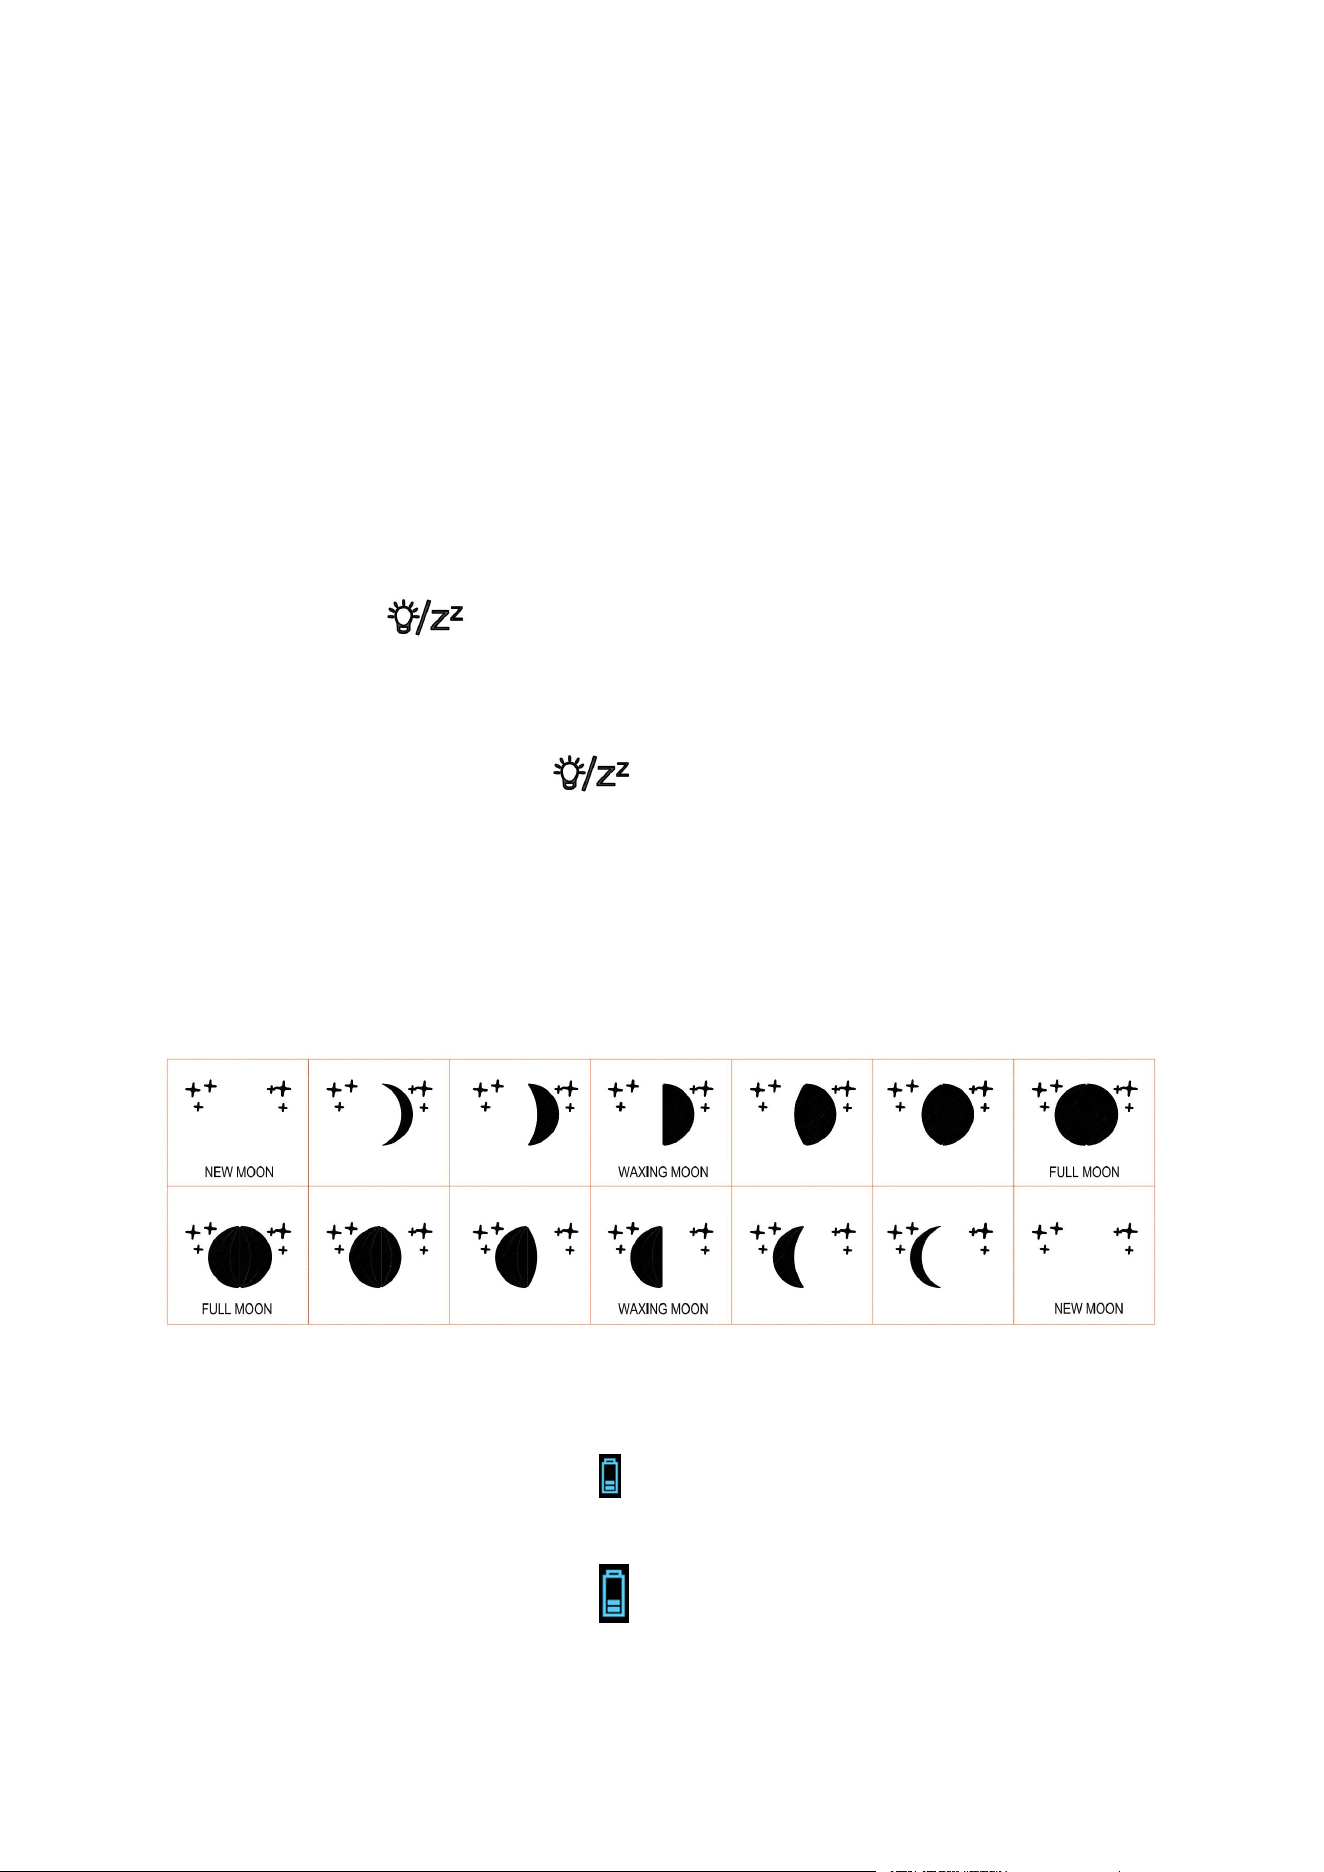
Moon phase
Moon phase will automatically update with the date.
Low battery indicator
• When there is a low battery symbol near Outdoor Humidity, you should replace
batteries of the wireless sensor.
• When there is a low battery symbol near Indoor Humidity, you should replace
batteries of the weather station.
14
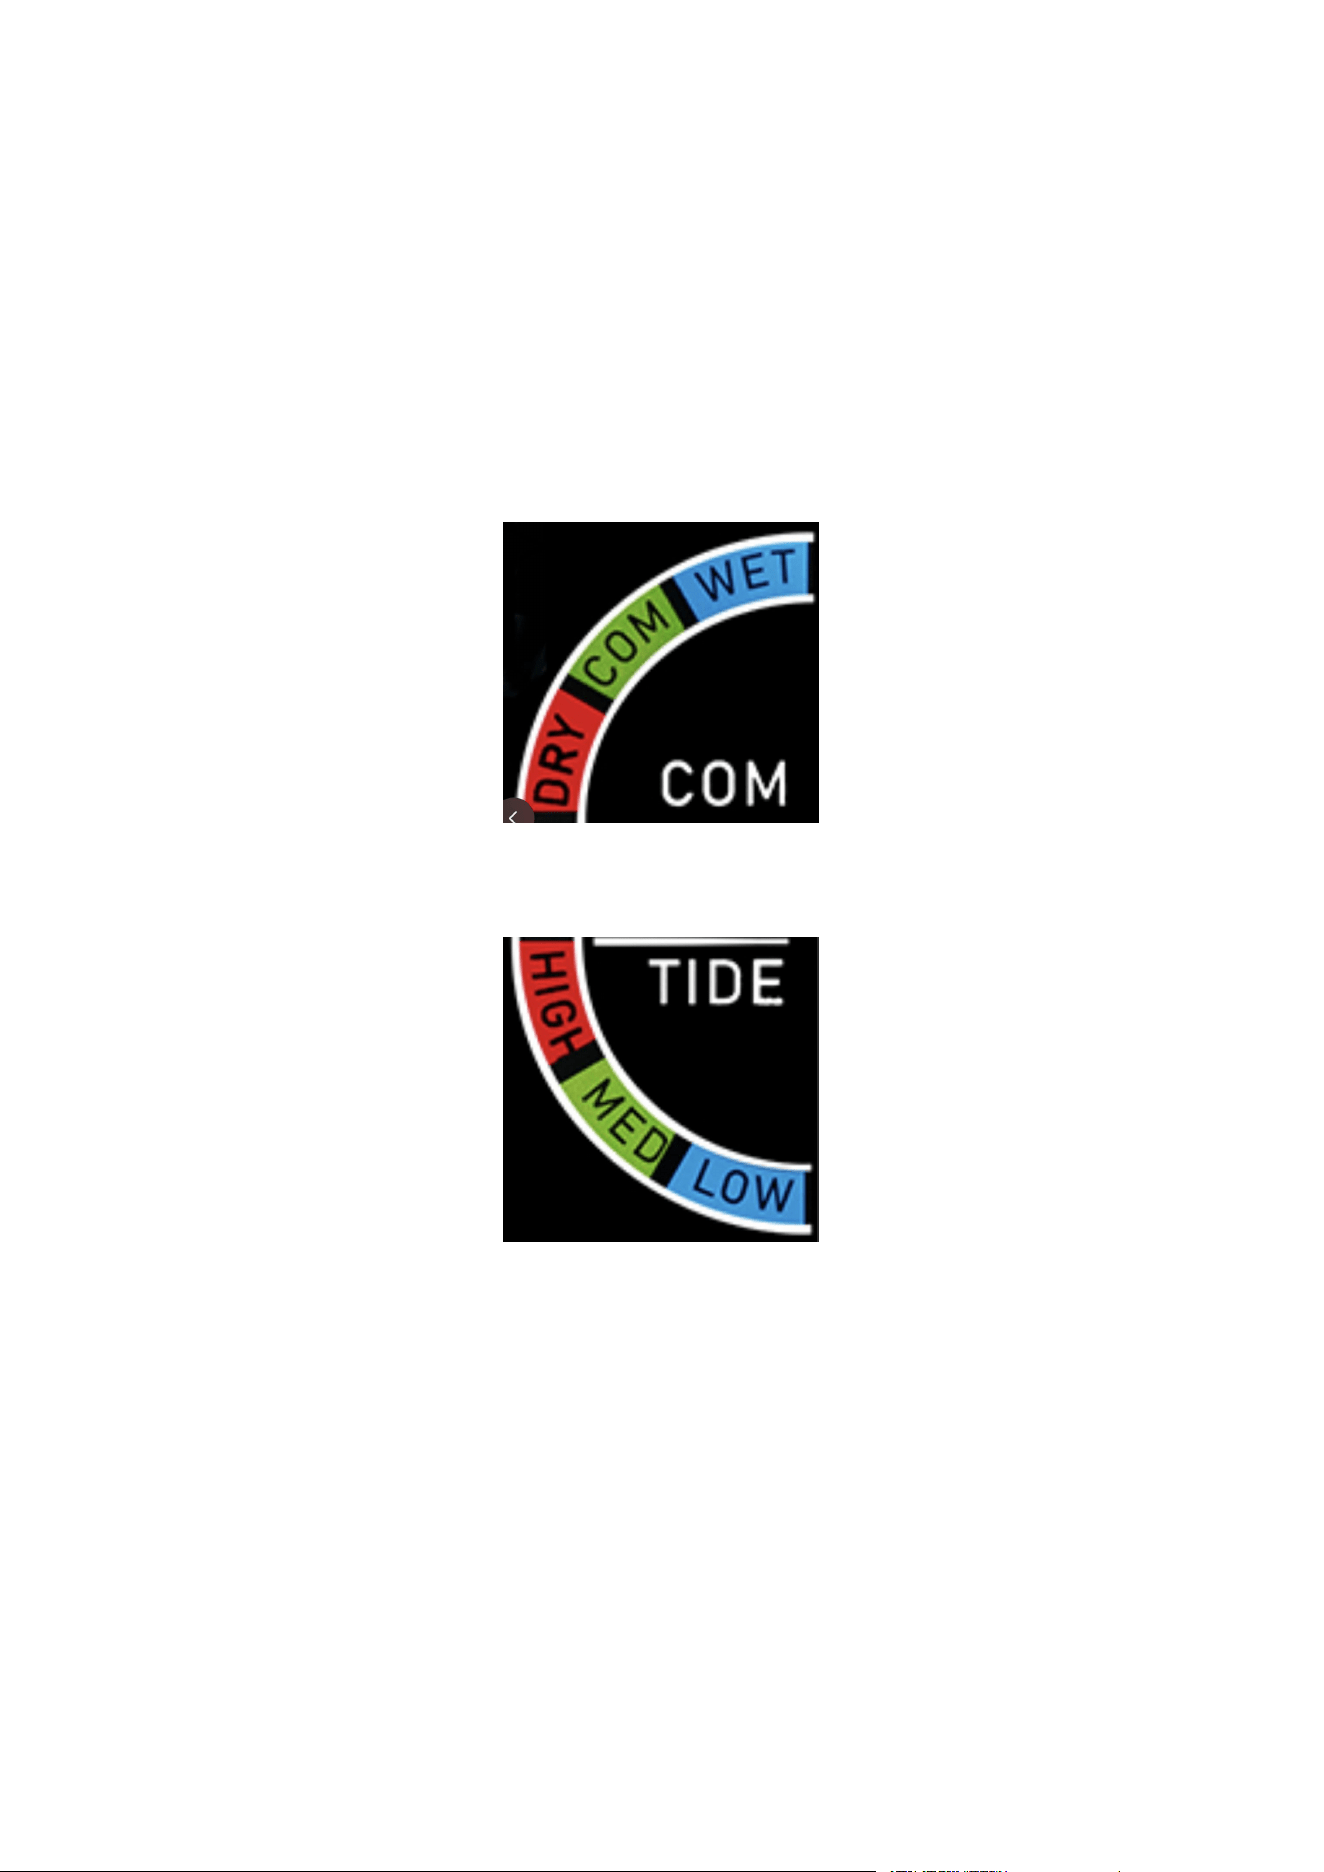
Comfort indicator
It depends on the indoor humidity, and indicates the comfort degree a person would
feel.
1. WET:> 70%
2. COM
:
40~70%
3. DRY:< 40%
Tide indicator
Tide will automatically update with the date.
Mold indicator, dew point and heat index
Press the ▲ button to display the data.
Note:
1.Heat index:
The Heat index consists of temperature and humidity, and display the perceived
temperature.
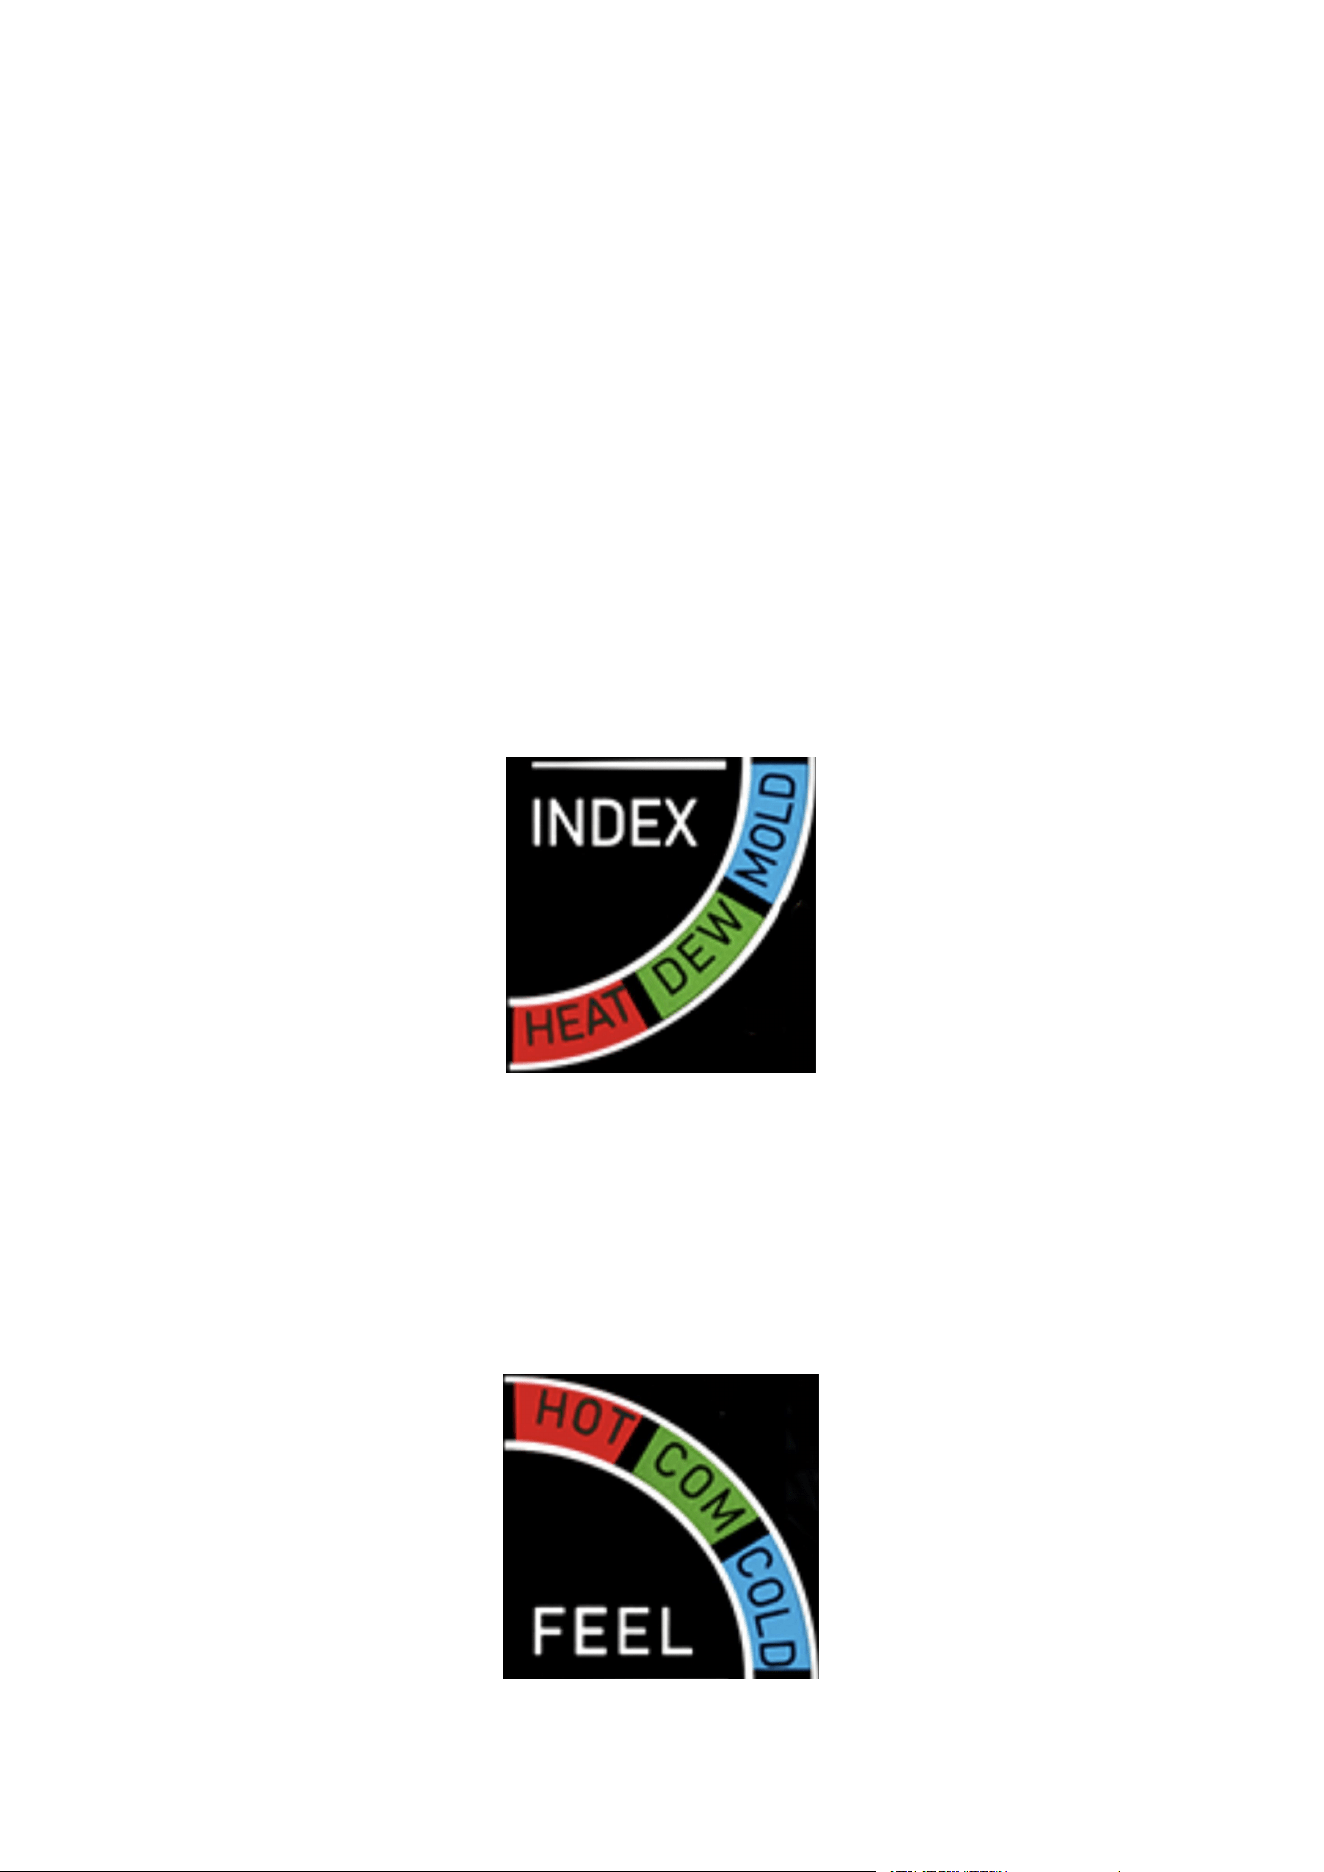
15
-- When the outdoor temperature is below 80°F, displays “current actual
temperature”.
-- When the outdoor temperature is over 80°F, the value will be calculated by
software.
-- When the outdoor temperature is over 158°F, displays “158°F”.
2. Dew point
The dew point is the temperature below which dew or mist from damp air.
-- If the dew point is below 32°F, “LL.L” will appear on the display.
-- If the dew point is higher than 140°F, “HH.H” will appear on the display.
3. Mold indicator
The mold consists of temperature and humidity.
-- The indicator shows the possibility of mold growth.
-- Possible indicators: 0, LOW, MED, HI
Feel level
The Feel level consists of outdoor temperature.
4. HOT:> 82.4°F (>28°C)
5. COM
:
64.4~82.4°F (18~28°C)
6. COLD:< 64.4°F (<18°C)
16
Daily MAX/MIN data
All MAX / MIN temperature/humidity records will reset automatically every 24h.
From normal display, press and release Button ▼ to view:
• press x 1: MAX-- indoor and outdoor temperature/ humidity records.
• press x 2: MIN-- indoor and outdoor temperature/ humidity records.
• press x 3: back to normal display.
Note: Press and hold Button ▼ to delete the highest and lowest temperature and
humidity values since starts.
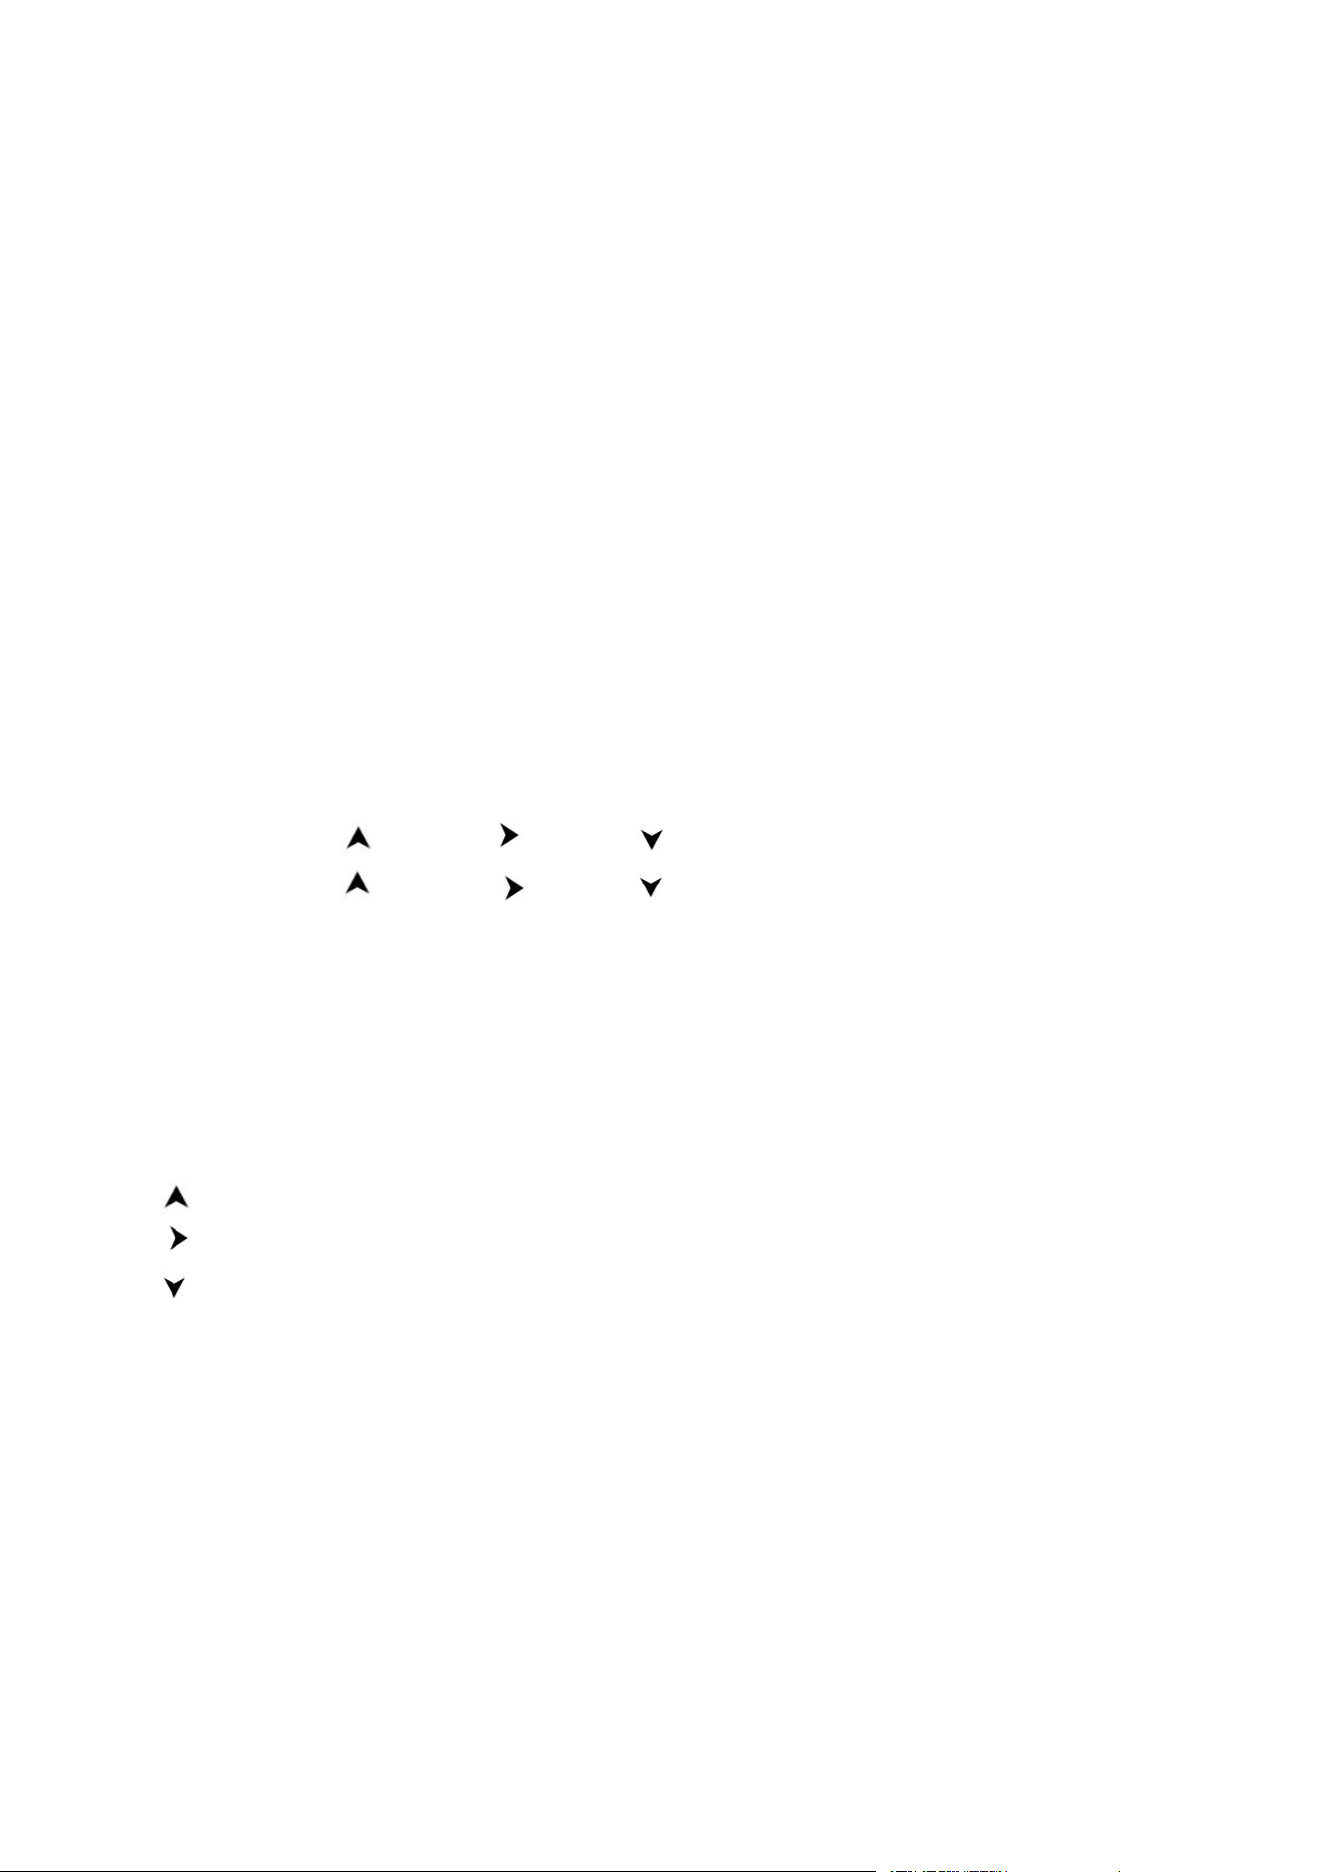
Weather trend
For the temperature and humidity values measured by the base unit and wireless
sensor, the trend is displayed by an arrow:
Trend rising constant falling
Temperature
Humidity
Air pressure trend
When the air pressure rises again, the symbol will be displayed continuously again.
The arrow shows the weather trend. If it points upwards or downwards, it means that
the weather rises or falls by more than 0.06 inHg (2 hPa) in an hour.
rising air pressure = weather rises
constant air pressure = weather stays the same
falling air pressure = weather falls
Pressure readings
History Graph:
• Read from left to right, your Pressure History Graph indicates the rise and fall in air
pressure over the past 12 hours.
• The numbers below represent the hour in which the reading was taken. The “0h” is
the current pressure level. “-3h” was the reading taken three hours ago, compared to
current pressure.

17
Your station provides Relative Barometric Pressure in:
• Your station will acclimate to the correct pressure without setting it yourself.
• You also have the option of setting the pressure number to match your local
reporting station by using the Air pressure mode (Press and hold the WEATHER
button)
• In the Air pressure mode you can also select the pressure unit of Inches of Mercury
(inHg default) or Hecto Pascal (hPa). Press the WEATHER button to choose.
Weather forecast icons
• The forecast icons are determined by your station's barometric pressure reading.
Please allow 7-10 days for calibration.
• 7 forecast icons use changing atmospheric pressure to predict weather conditions
for the next 12-hours.
• When Outdoor temperature is below 32˚F and the forecast shows RAIN or T-
STORM, the station will display SNOW icon.
Currently displayed symbol means the forecast for the next 12 hours. It may not
reflect the current state of the weather.
The accuracy of the weather forecast is around 75 %.
Temperature alarm - If the wireless sensor measures a temperature between
33.8 °F and 30.2°F, there is a risk of frost and a snowflake symbol will flash. If

18
the temperature falls below 30.2°F for an extended period of time, the snowflake
symbol will be constantly displayed.
Note: Even if the temp alarm is not displayed, when the temperature is around
freezing point, there is generally always a risk of frost and/or black ice. The outdoor
sensor can only measure the local temperature in the place where it is installed.
How to add extra sensors
The weather station comes with one wireless sensor. However, you can operate the
weather station with up to three wireless sensors. Additional wireless sensors are
available in our Amazon online shop.
Note:
1. You need to set different channels for the sensor (1-3). You can set it through pull
the stick on near the batteries.

19
2. Under the corresponding channel displayed on the base unit, press and hold the
CHANNEL button until the signal icon starts to flash to receive the signal from the
newly added sensor.
Where the sensor should be placed
1. Sensor can be hung/placed.
2. Better place it under the porch and eaves.
3. The maximum range of the sensor can reach 328ft in an open area.
4. Make sure that the sensor is vertical so that moisture can be drained correctly.
Note:
• Shielding building materials such as reinforced concrete reduce or prevent the
radio reception between the base station and wireless sensor.
• Devices such as televisions, cordless phones, computers and fluorescent tubes
can also interfere with the wireless reception.
• Do not place the base unit and wireless sensors directly on the floor. This restricts
the range.
• In low temperatures in winter the battery performance of the wireless sensors can
be significantly reduced. This reduces the transmitter range.
Where the weather station should be placed
• Pull out the stand and place on a flat surface.
• Or use the hanging holes on the back to mount on a wall.
• Choose a location 6 feet or more away from electronics such as cordless phones,
gaming systems, televisions, microwaves, routers, etc.
• Place within range of the outdoor sensors (328 ft, 100m open air).
• Obstacles such as walls, windows, stucco, concrete, and large metal objects can
reduce the range.
Resetting the weather station

20
If the base station appears to display incorrect values, you should reset the weather
station to the factory settings.
a. Take the batteries out of the outdoor sensor.
B. Shut off the main weather station (take out batteries or unplug the power cord).
c. Put batteries back in the outdoor sensor.
d. Power on the main weather station (put batteries in or plug the power cord).
e. Put them together within a couple feet for about 20 minutes for a strong
connection.
Care and maintenance
• Do not mix old and new batteries.
• Do not mix Alkaline, Standard, Lithium, or Rechargeable Batteries.
• Always purchase the correct size and grade of battery most suitable for intended
use.
• Replace all batteries of a set at the same time.
• Clean the battery contacts and also those of the device prior to battery installation.
• Ensure the batteries are installed with correct polarity (+ and -).
• Remove batteries from equipment when it is not used for an extended period of
time.
• Promptly remove expired batteries.
Safety
Read the following advice carefully and store these operating instructions in case
you want to reread something later. If you give the item to someone else, give them
these operating instructions as well.
• This device may be used by children over 8 years of age and over, as well as by
persons with reduced physical, sensory or mental abilities, or lack of experience and
/ or knowledge if they are supervised or instructed regarding the safe use of the
equipment and have understood the resulting hazards.
• Keep the device away from children under the age of 8.
• Cleaning and user maintenance may not be carried out by children unless they are
supervised.

21
• Children must be supervised to make sure that they do not play with the device.
• The device must not be immersed in water or other liquids. Electric shock hazard!
Do not use the device in areas where it may be wet, such as a sink.
Danger from electricity (when using the switching adapter)
• Connect the device to a properly installed power socket with a voltage that
corresponds to the Technical Data.
• Ensure that the socket is easily accessible, so that you can quickly remove the
switching adapter if necessary.
• Do not use the wireless weather station if the switching adapter or power cable is
damaged.
• Do not cover the switching adapter with curtains, newspapers, etc. and ensure that
it is sufficiently ventilated. The switching adapter can become hot.
• Uncoil the switching cable fully before connecting. Be careful not to damage the
cable with sharp edges or hot objects.
• Remove the switching adapter from the socket:
- before cleaning the wireless weather station,
- when a fault occurs during operation,
- during thunderstorms,
- always pull the switching adapter, not the cable.
• Do not modify the items or the power cable. Only allow repairs to be carried out by
a specialist workshop as improperly repaired devices endanger the user.
Unpacking and checking
1. Remove the device from the packaging, remove all protective films and keep the
packaging materials out of the reach of children.
2. Dispose of the materials separately according to type.
3. Check that all the items that should be included in the delivery are present and
whether the weather station displays any damage.
FCC statement

22
This device complies with Part 15 of the FCC Rules. Operation is subject to the
following two conditions: (1) This device may not cause harmful interference, and (2)
This device must accept any interference received, including interference that may
cause undesired operation
WARNING: Changes or modifications to this unit not expressly approved by the
party responsible for compliance could void the user’s authority to operate the
equipment.
NOTE: This equipment has been tested and found to comply with the limits for a
Class B digital device, pursuant to Part 15 of the FCC Rules. These limits are
designed to provide reasonable protection against harmful interference in a
residential installation.
This equipment generates uses and can radiate radio frequency energy and, if not
installed and used in accordance with the instructions, may cause harmful
interference to radio communications. However, there is no guarantee that
interference will not occur in a particular installation. If this equipment does cause
harmful interference to radio or television reception, which can be determined by
turning the equipment off and on, the user is encouraged to try to correct the
interference by one or more of the following measures:
• Reorient or relocate the receiving antenna.
• Increase the separation between the equipment and receiver.
• Connect the equipment into an outlet on a circuit different from that to which the
receiver is connected.
• Consult the dealer or an experienced radio / TV technician for help.
Disclaimers
Manufacturer reserves the right to change specifications of the product.
Manufacturer and supplier are not responsible for malfunction where interference
occurs.
Trouble shooting
23
Problem
Possible Solution
Outdoor temperature
is showing dashes
Dashes is generally an indication of wireless
interference.
Add sensor or replace
sensor batteries
a.Take the batteries out of the outdoor sensor.
B.Shut off the main weather station (take out batteries or
unplug the power cord).
c. Put batteries back in the outdoor sensor.
d. Power on the main weather station (put batteries in or
plug the power cord).
e. Put them together within a couple feet for about 20
minutes for a strong connection.
Atomic time is not correct
Check the time zone you have selected.
Weekday and moon
phase are not correct
Check the Year-Month-Date you have set.
Display screen is not
working
Check that the power adapter is plugged into the display
and an electrical outlet.
Accuracy of temperature
and humidity
1. When unpacking for the first time, the weather station
and sensor are sealed for a long time, and it takes 1-2
hours to balance with the current ambient temperature.
2. Keep away from heat
3. When comparing with other thermometers, it should
be
placed in the same position and allowed to stand for 1
hour. This is very important.
Inaccurate temperature
or humidity readings
To ensure accurate temperature/humidity measurement,
place device out of direct sunlight and away from any
heat sources or vents.
Warranty and support

24
UNNI Technology, Ltd. provides a 1-year warranty (from date of purchase) on this
product relating to manufacturing defects in materials & workmanship.
Before returning a product, please contact our friendly customer support with
questions: un[email protected]