
Technical Support and E-Warranty Certificate
www.vevor.com/support
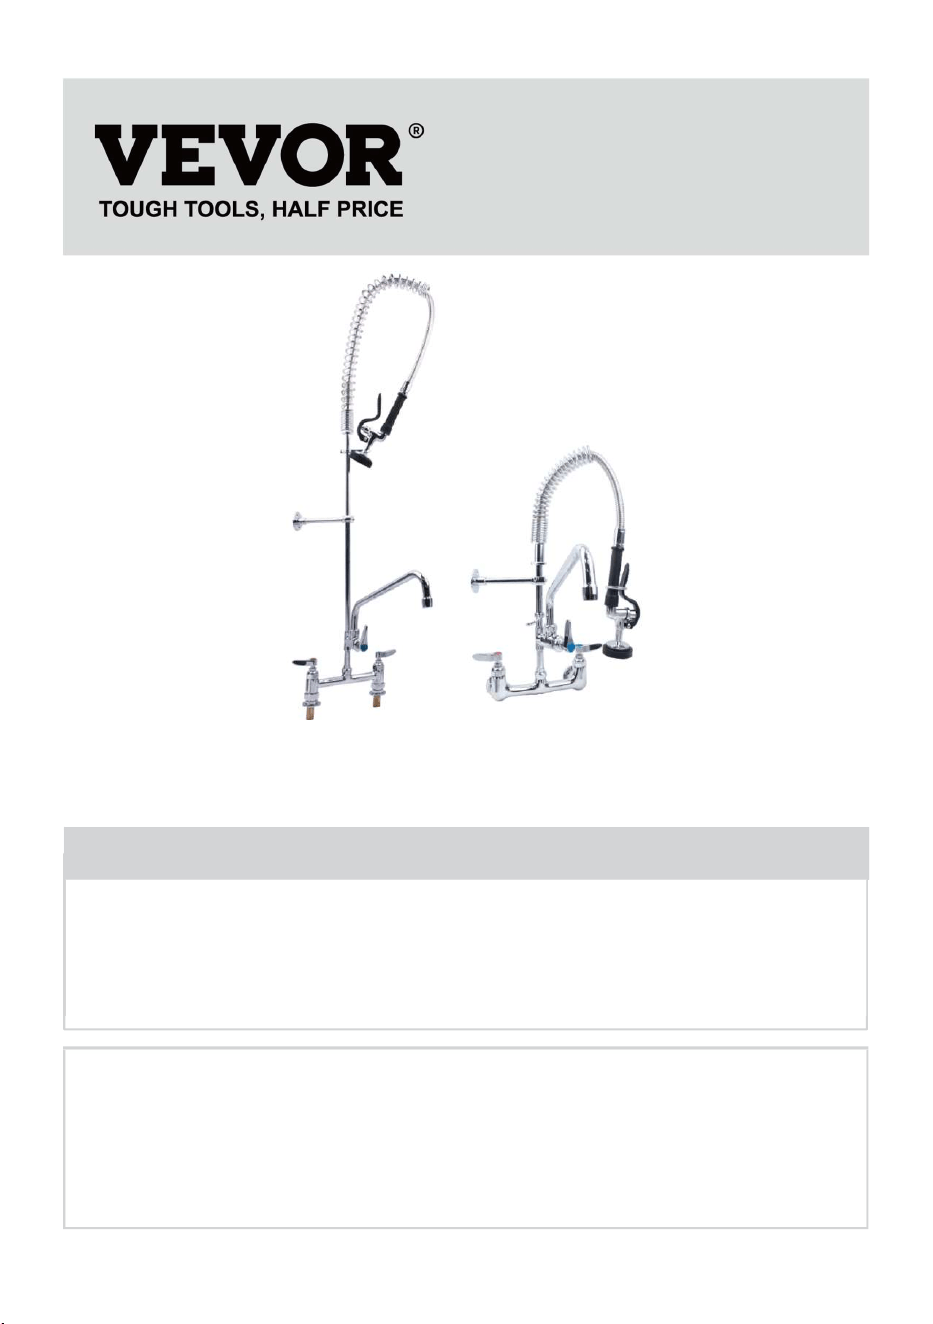
NSTALLATION INSTRUCTIONS
FOR PREFLUSH FAUCET
We continue to be committed to provide you tools with competitive price.
"Save Half", "Half Price" or any other similar expressions used by us only represents an
estimate of savings you might benefit from buying certain tools with us compared to the major
top brands and does not necessarily mean to cover all categories of tools offered by us. You
are kindly reminded to verify carefully when you are placing an order with us if you are
actually saving half in comparison with the top major brands.

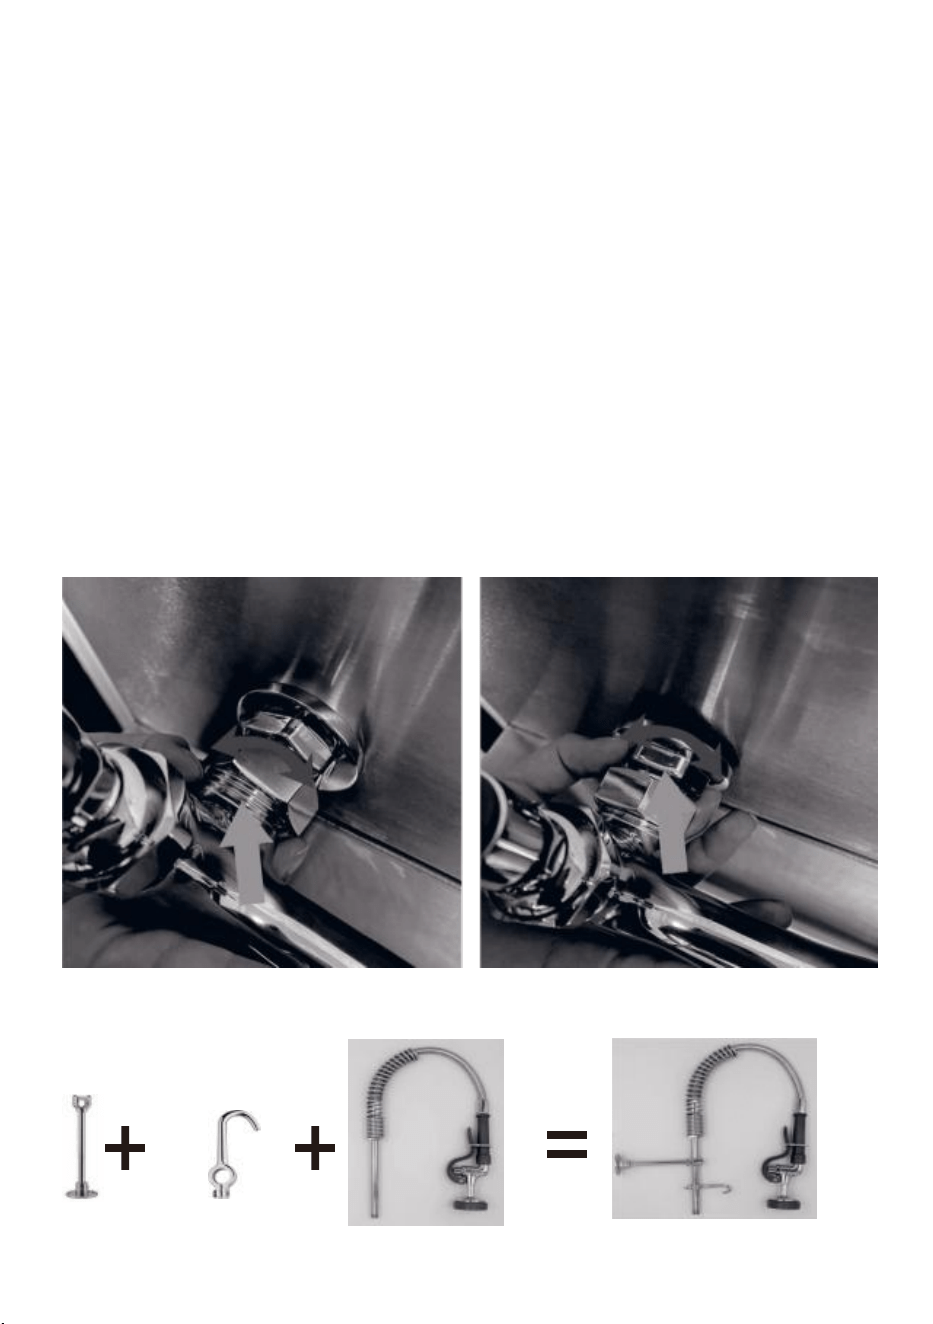
Note: The product is used to illustrate installation . Your product
may be different but the installation method is the sam
Have product questions? Need technical support? Please feel free to
contact us:
Technical Support and E-Warranty Certificate
www.vevor.com/support
NEED HELP? CONTACT US!
This is the original instruction, please read all manual instructions
carefully before operating. VEVOR reserves a clear interpretation of our
user manual. The appearance of the product shall be subject to the
product you received. Please forgive us that we won't inform you again if
there are any technology or software updates on our product.
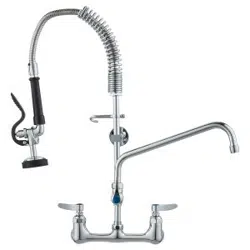
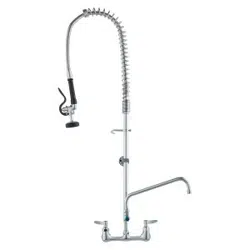
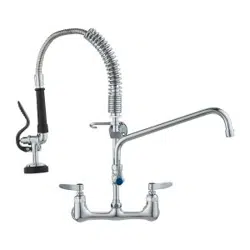
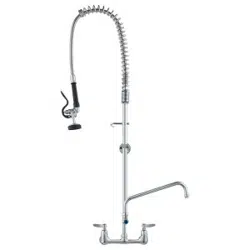
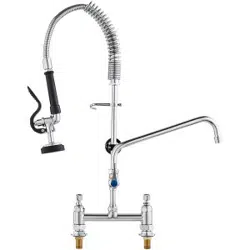
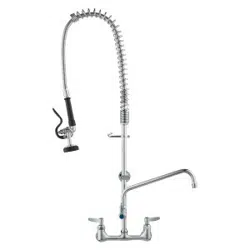
Preflush faucet
model
outlet area product size(mm) net weight(kgs)
5803A-12-21
/
21 inch 530*320*520
4.3
5803A-12-25
/
25 inch 530*320*600
4.2
5803A-12-36
/
36 inch 530*320*915
5.0
3803A-12-44
/
44 inch 530*320*1050
4.8
3803A-12-47
/
47 inch 530*320*1130
4.9
3804A-12-26
/
26 inch 530*320*690
4.3
3804A-12-44
/
44 inch 530*320*1080
4.8
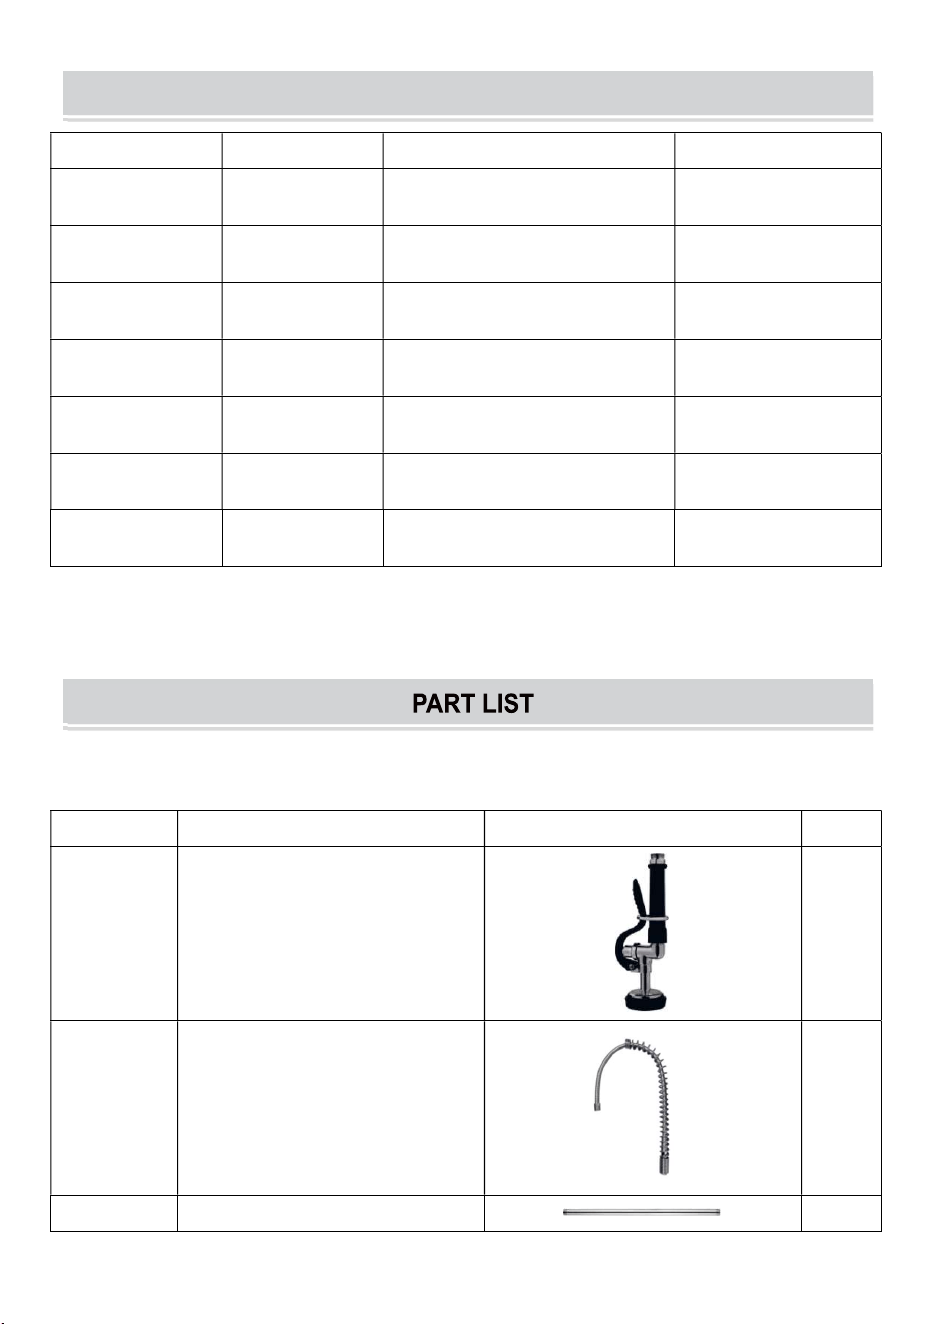
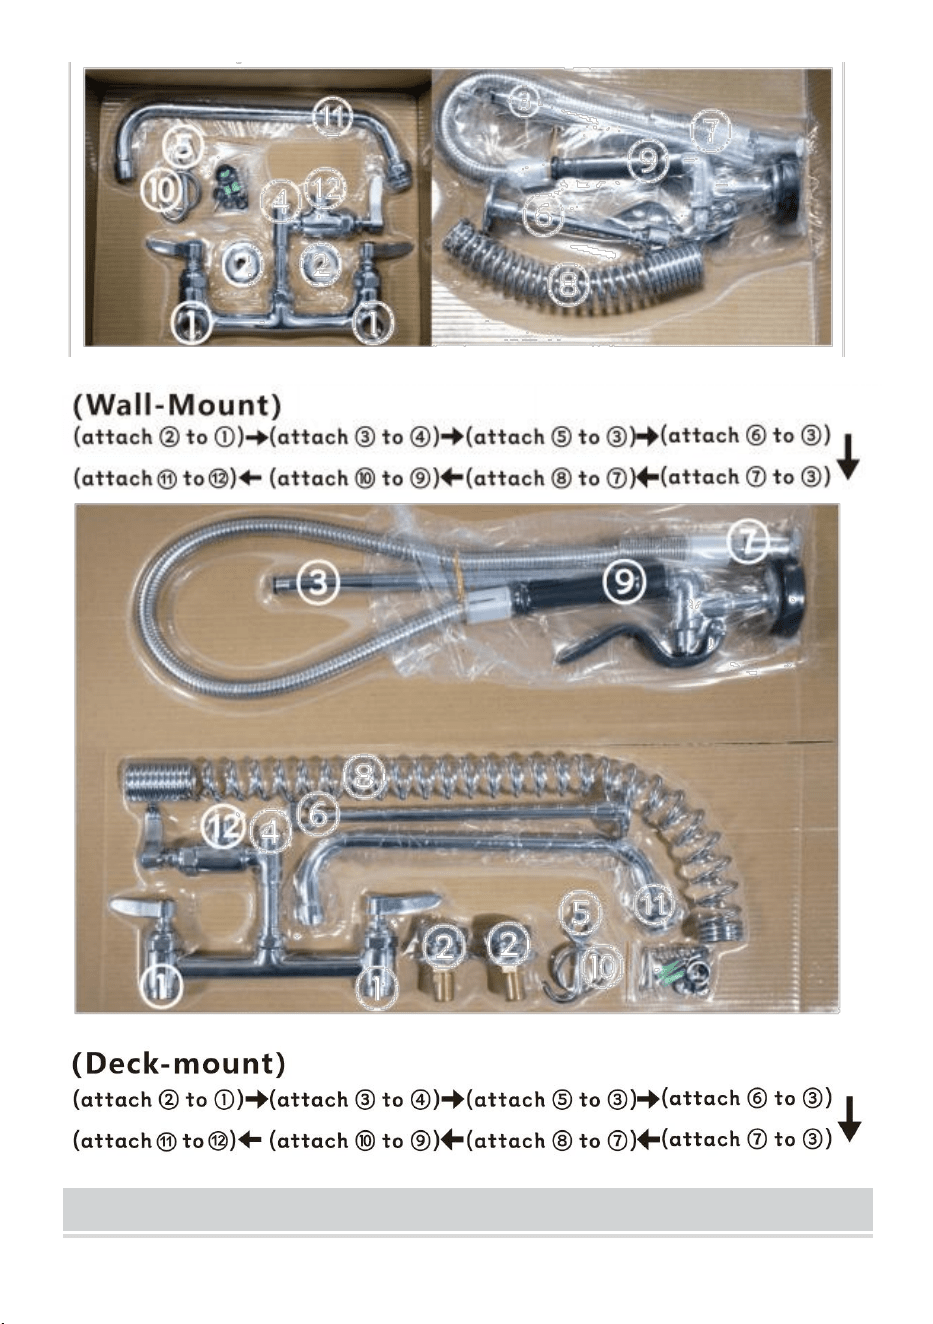
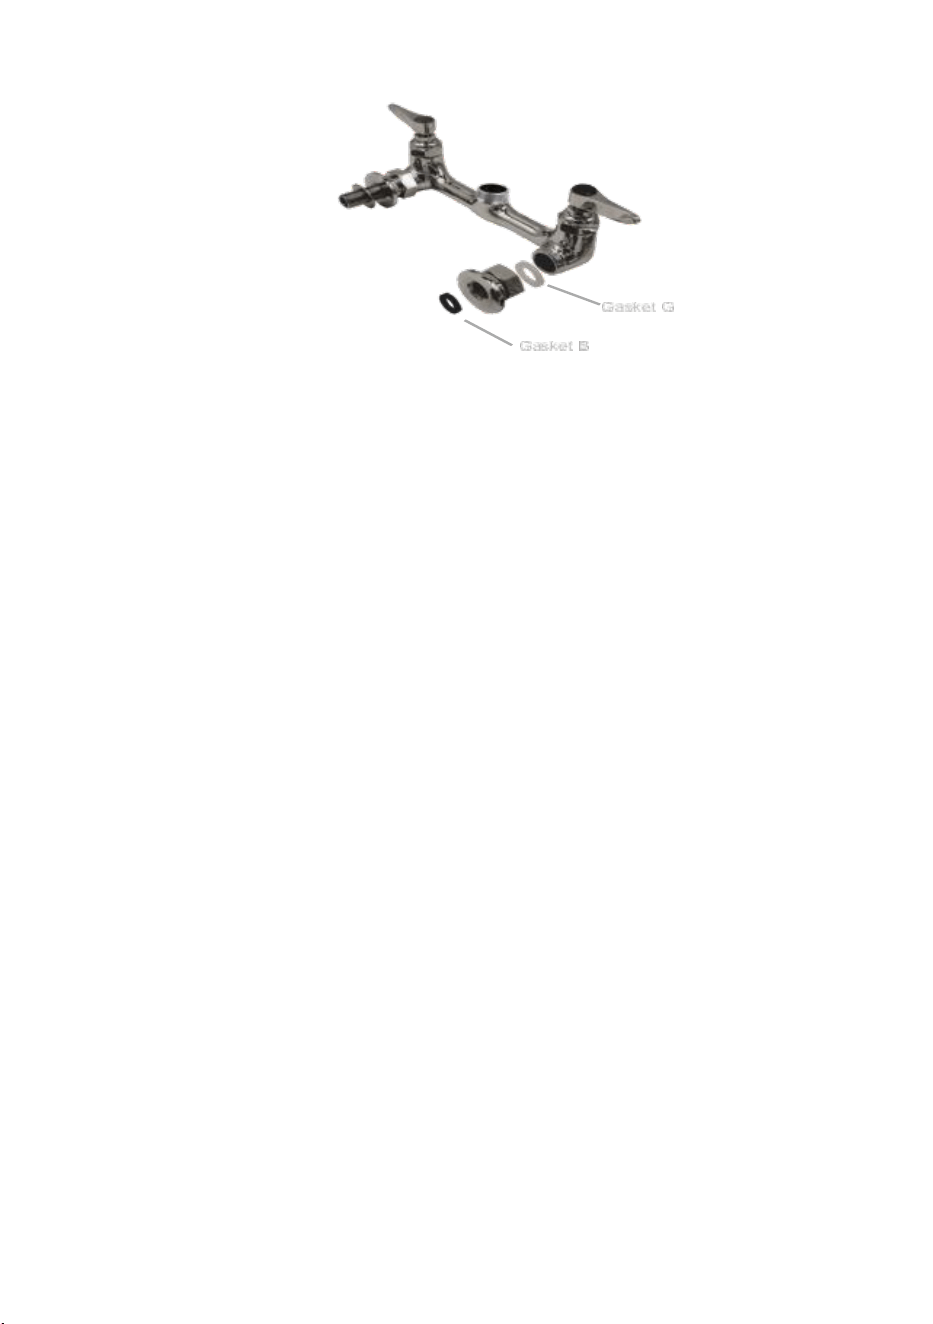
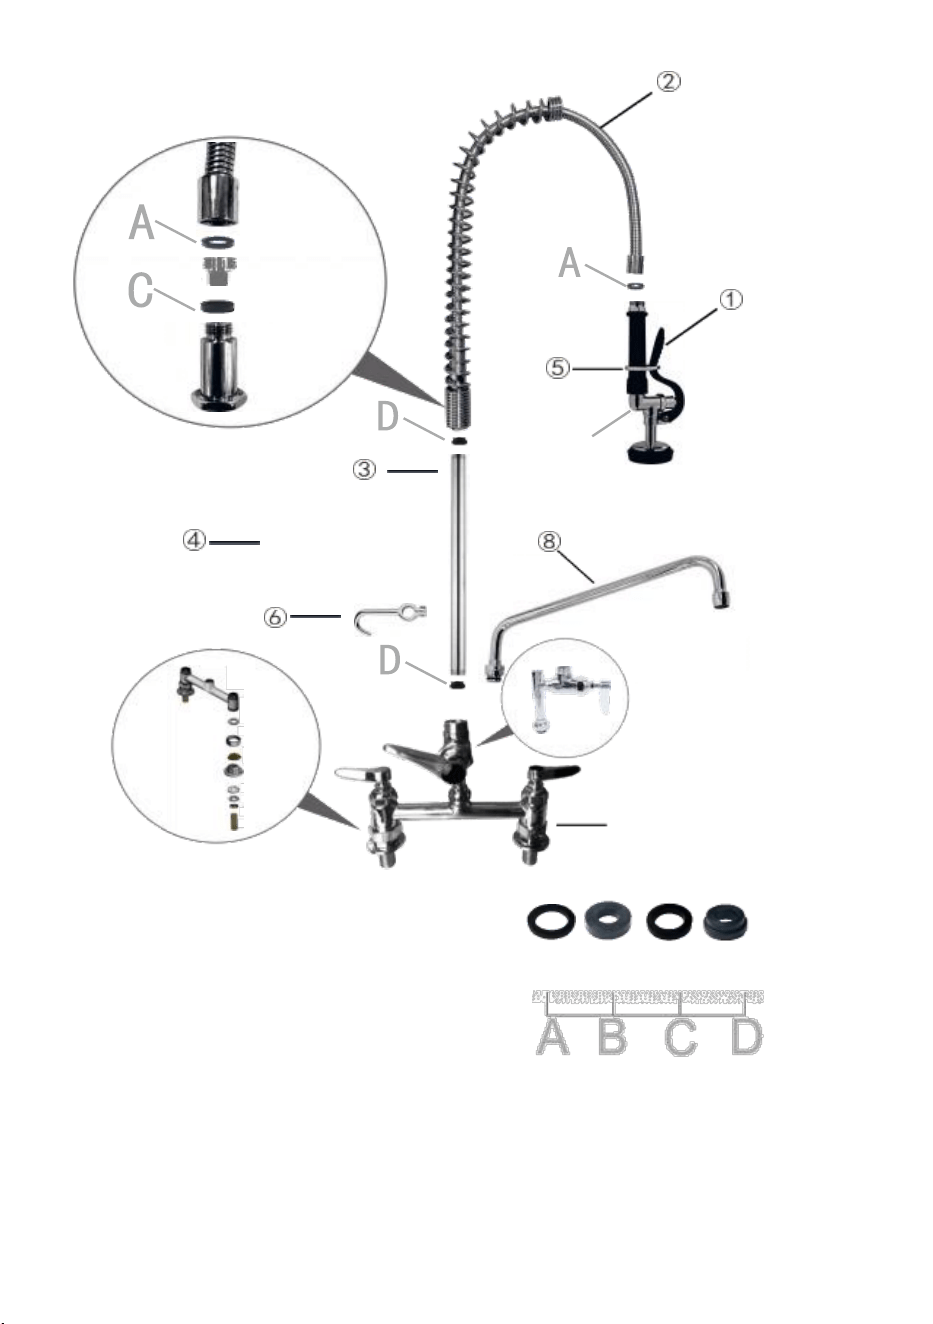
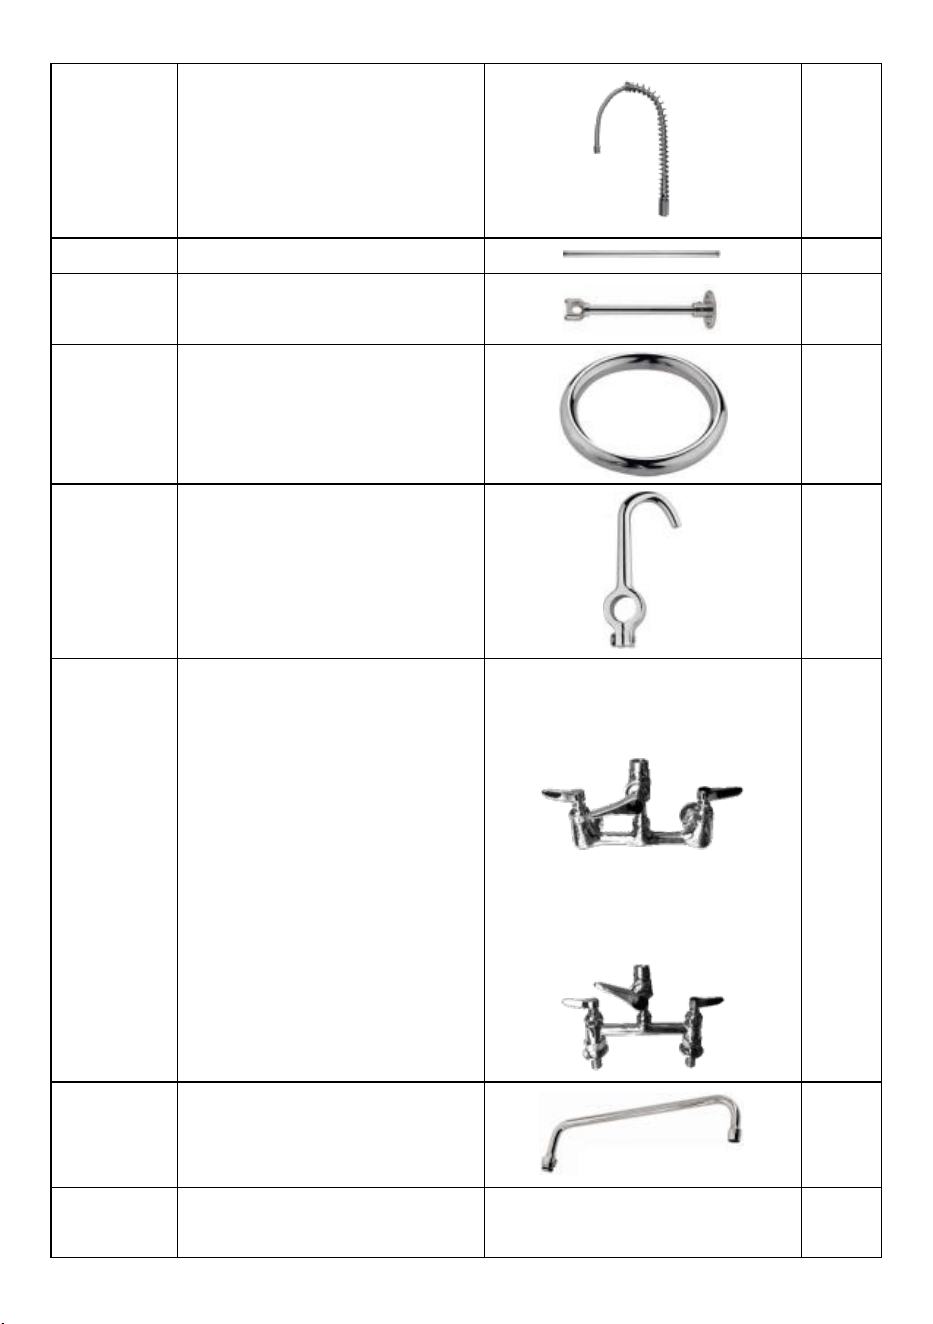
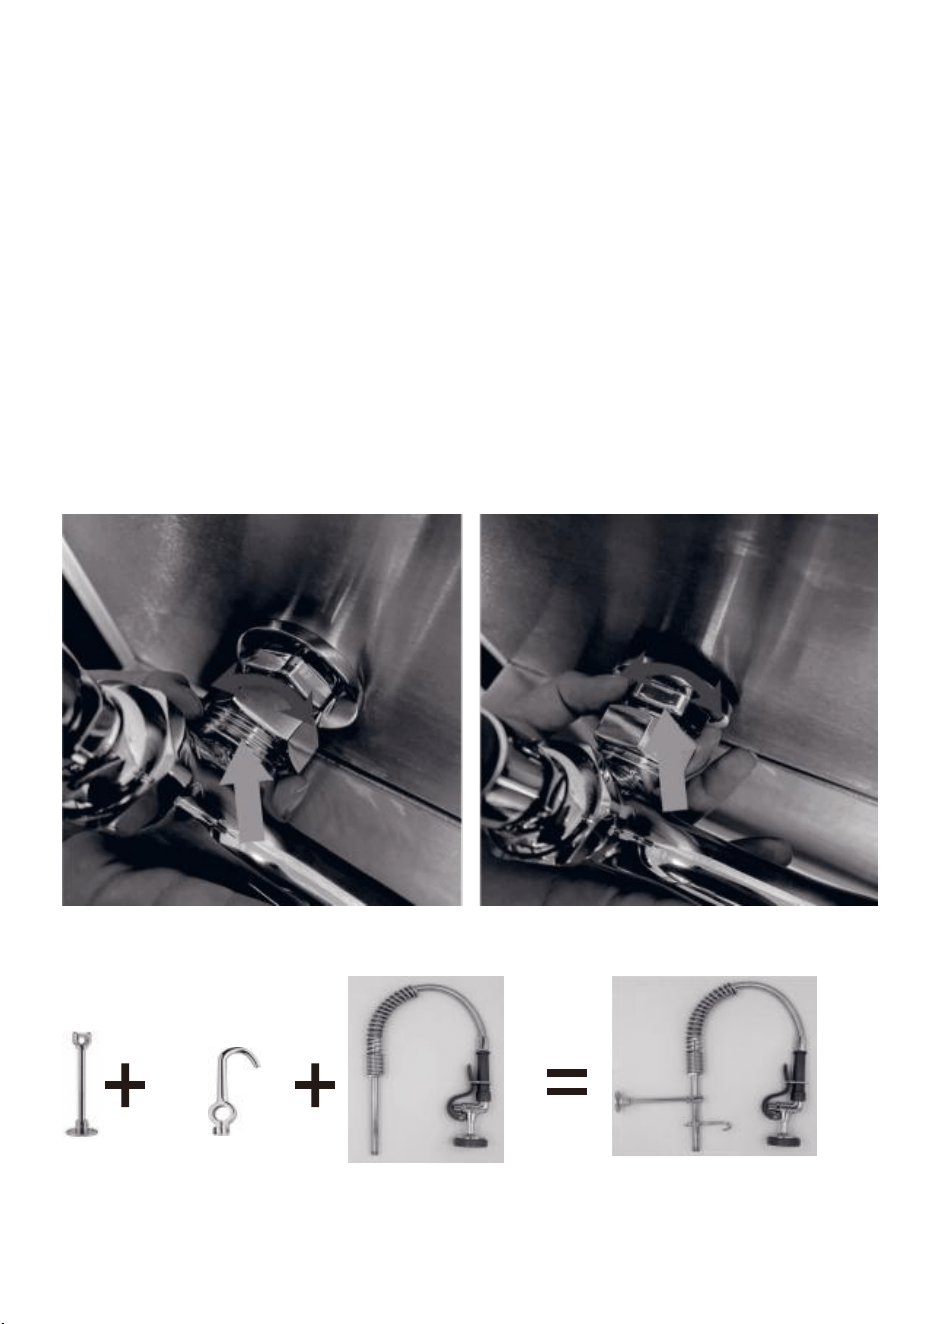
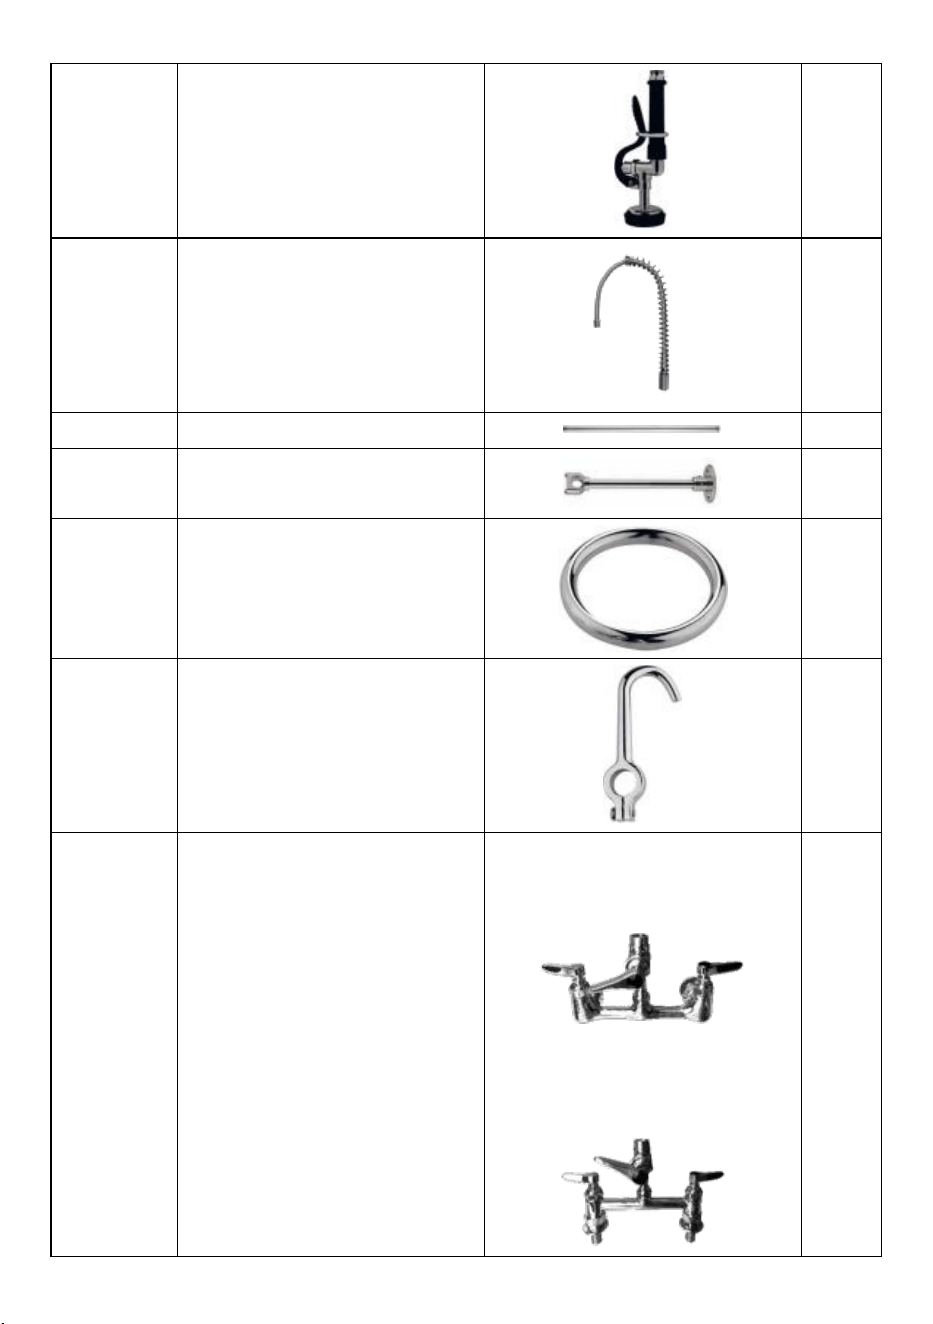
1.1 Wall-Mount / Deck-Mount Preflush faucet units parts list
No PART NAME PICTURE QTY
1 Spray Valve
1
2 Bent Pipe
1
3 Riser Pipe
1
P
ARAMETER LIST

4
Wall Bracket
1
5
Spray Valve Ring
1
6 Finger Body
1
7
Faucet Body
(Wall-Mount)
(Deck-mount)
1
8
Add-on Spout
1
9 Gasket Spare Parts 2
WARNING: Read and understand this manual before sembling,
installing, operating, or servicing this product. Failure to follow
these warnings and instructions can cause personal injury or
damage valuable property.
1. Mixing the hose with acid, alkali, oil, organic solvent, and
inflammable and explosive materials is strictly prohibited. The
Preflush faucet should not directly contact goods with sharp
edges.
2. When handling Preflush faucets, they should not be
dragged anywhere. Accidental damage to the Preflush faucet
should be prevented.
3. When storing Preflush faucets, they should not come
into contact with acids, alkalis, oils, organic solvents, or other
corrosive liquids or gases.
4. This product is not a toy. The Preflush faucet cannot be used as
a toy for children.
1.Please assemble the product in strict accordance with the instructions.
Incorrect assembly could be hazardous.
2.Please wear safety goggles and work gloves properly during assembly.
3. Do not assemble the product when tired or under the influence of alcohol,
drugs, or medication.
4.The product parameters are applied to the properly and completely
assembled product only.
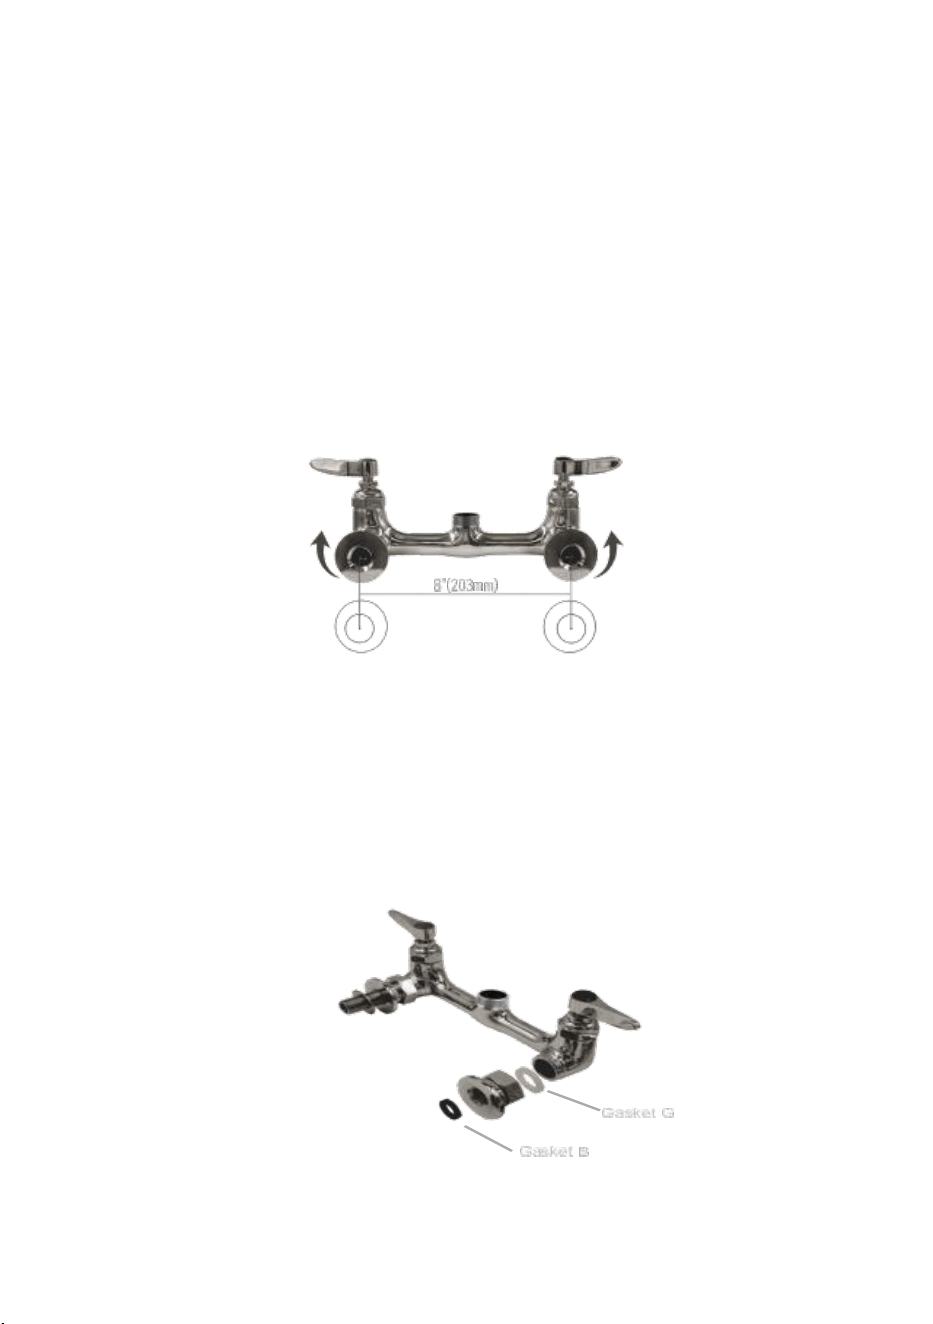
1.Exploded Drawing of Wall-Mount Preflush faucet Units.
A:21*15*3.2 B:17*8.4*4.5 C:16.5*11.1*3.1 D:15*12.8*9.5*5.5
Description:
ABCD is a seal that has been Preflush faucet on the product.

2. Exploded Drawing of Deck- Mount Preflush faucet Units
A:21*15*3.2 B:17*8.4*4.5 C:16.5*11.1*3.1 D:15*12.8*9.5*5.5
Description:
ABCD is a seal that has been Preflush faucet on the product.
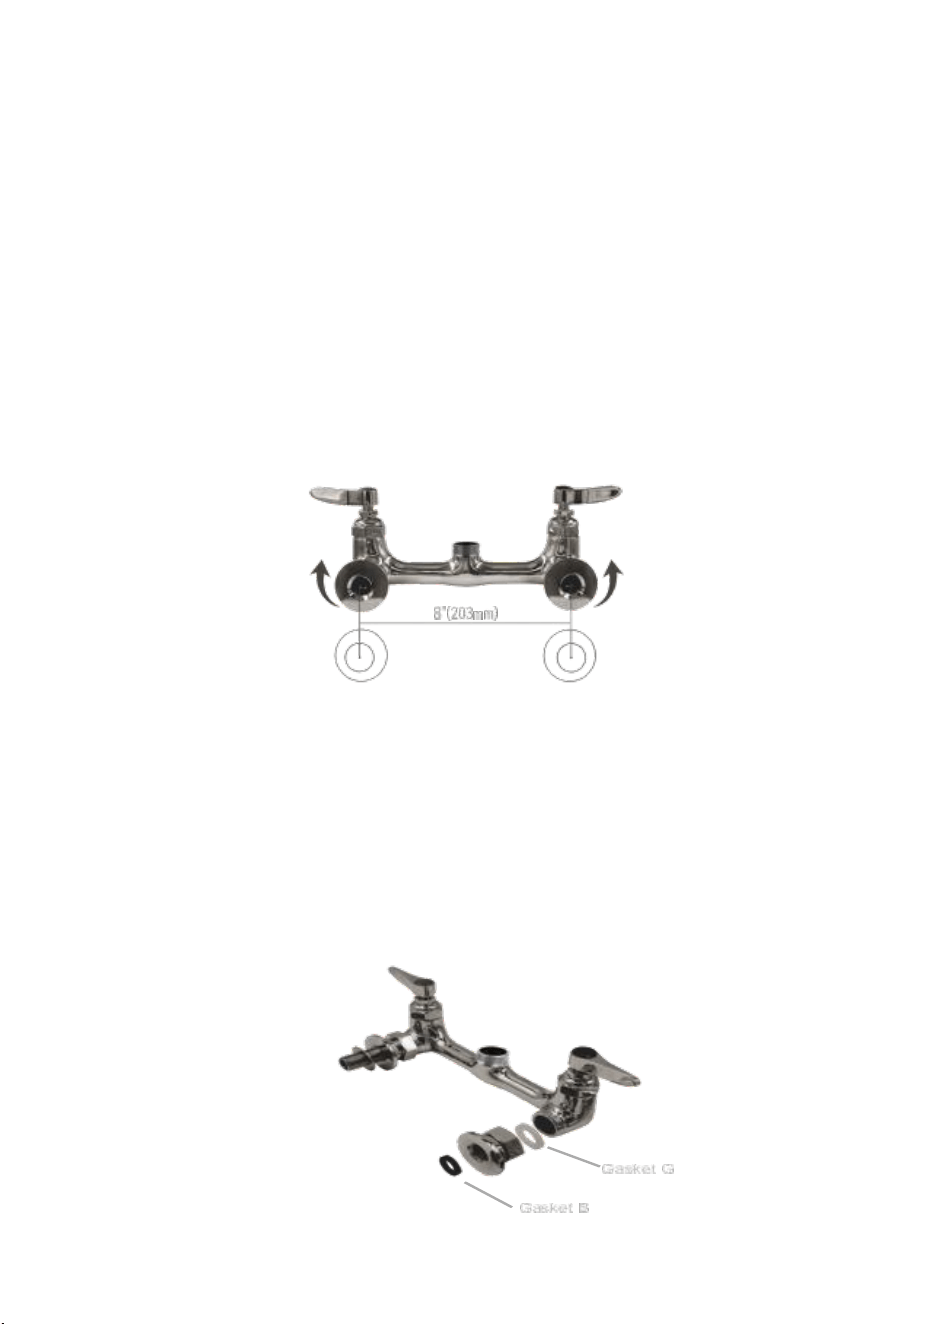
3. Installation procedure:
General Instructions
·Turn off the water supply of the main source
·Tighten all parts by hand before tightening with a wrench. Do not force
parts tighter.
·Handle the electroplated surface carefully; watch out that the surface is
not to be scratched by tools.
·All wall mount faucets have a G 1/2 (12 NPSM) female flanged inlet
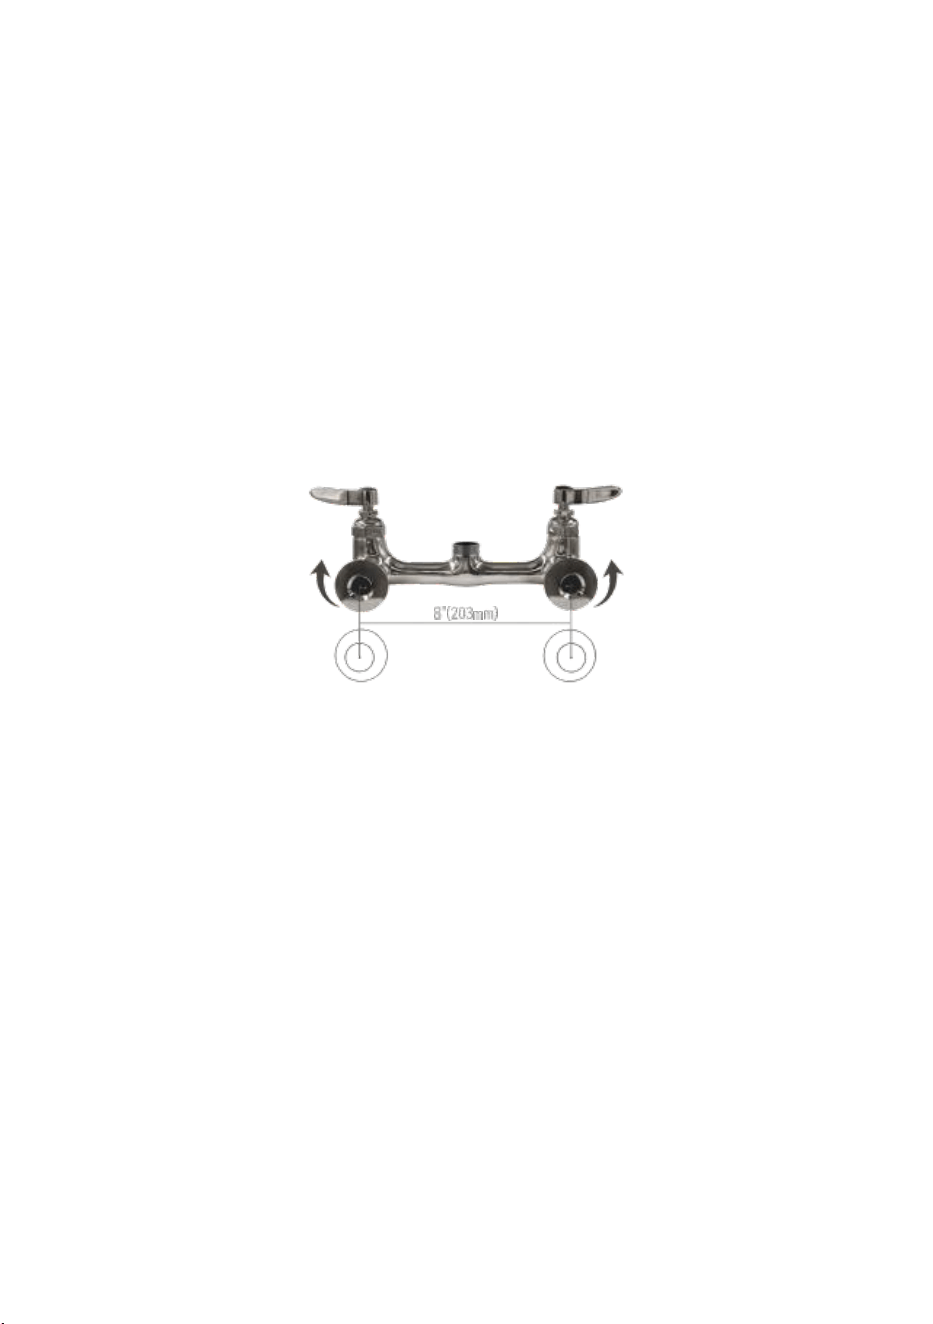
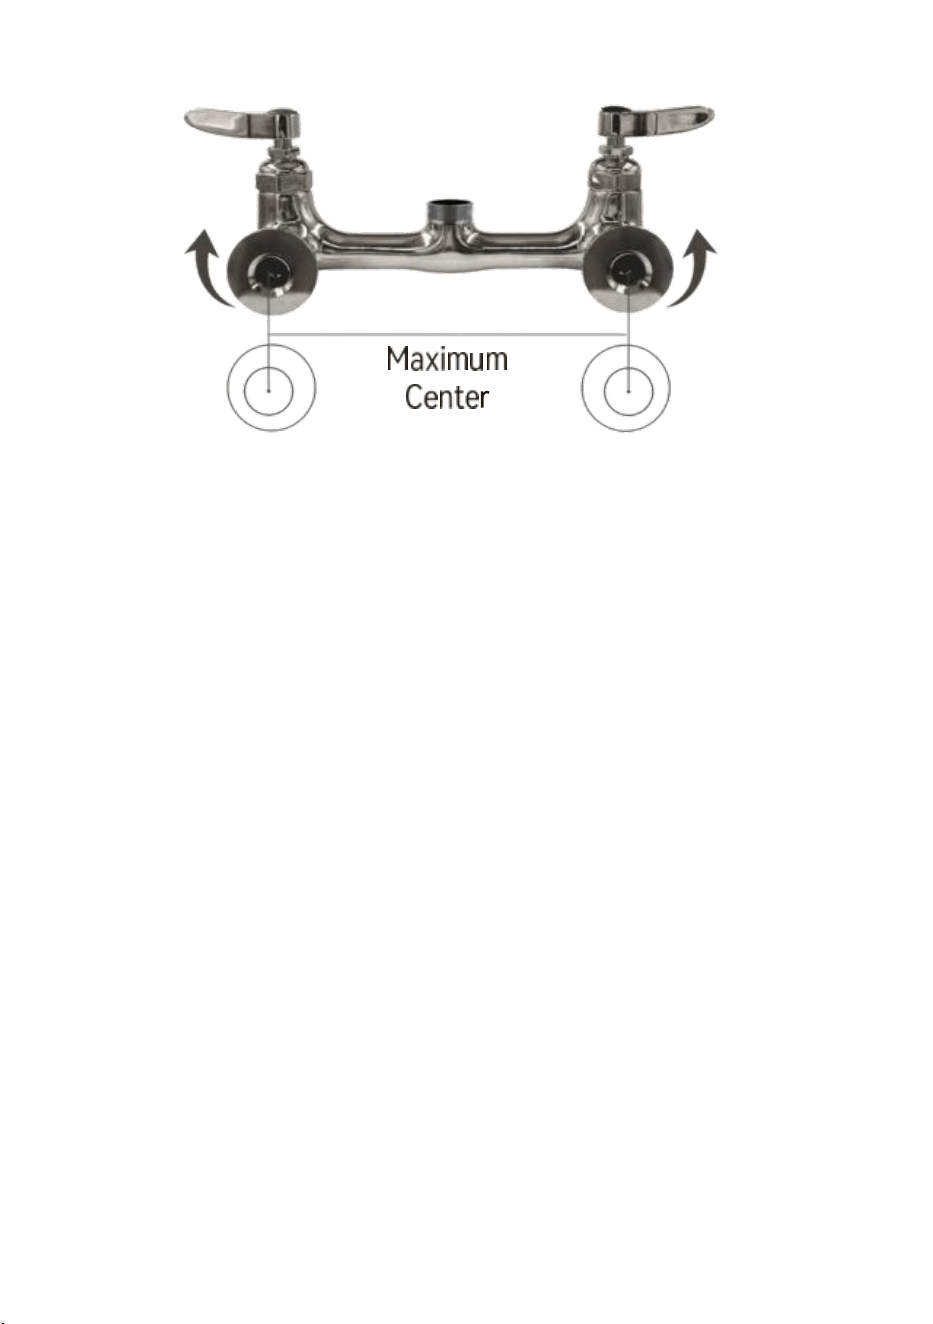
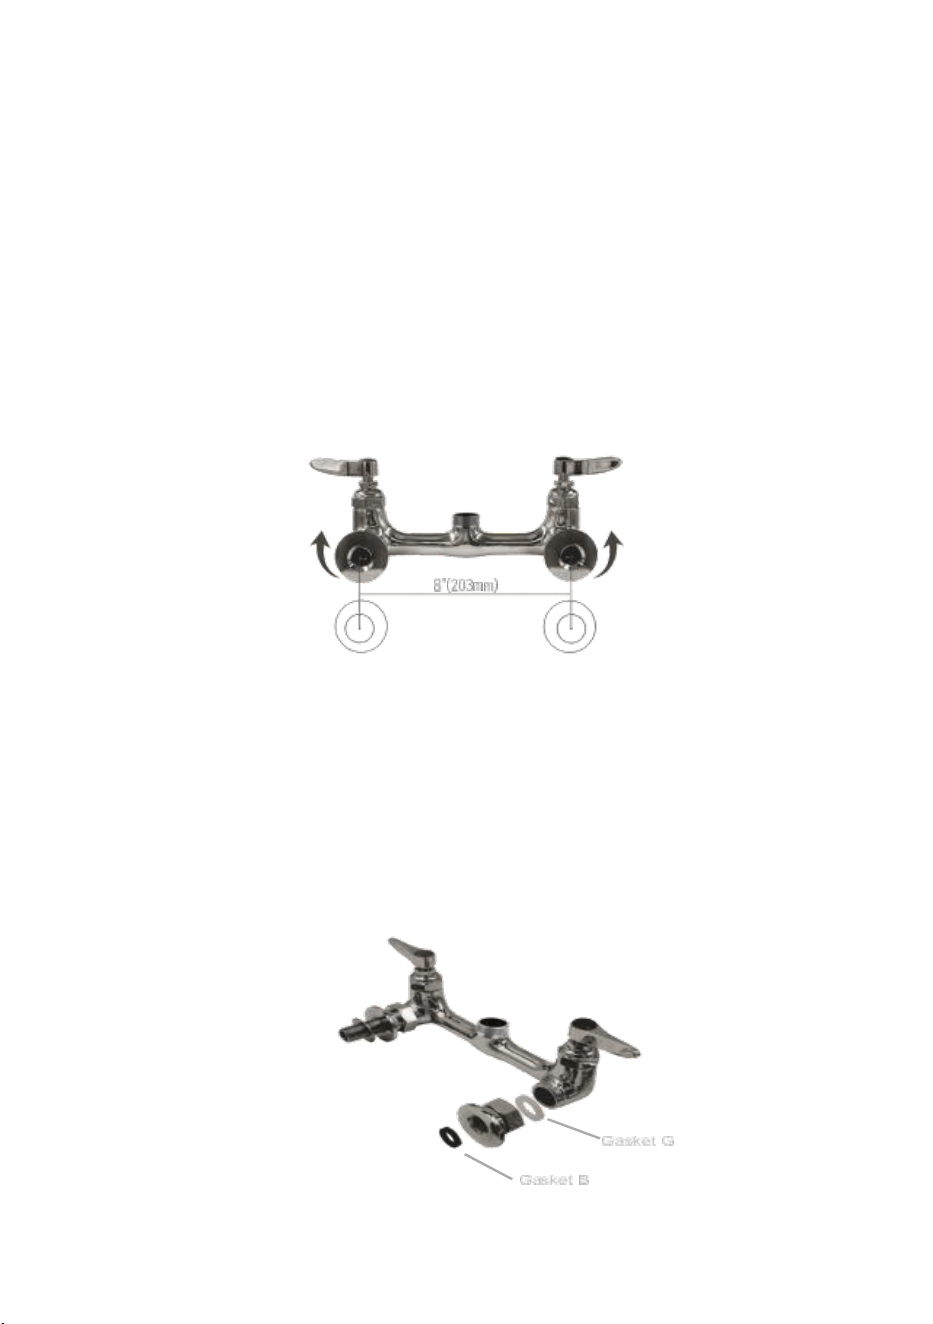
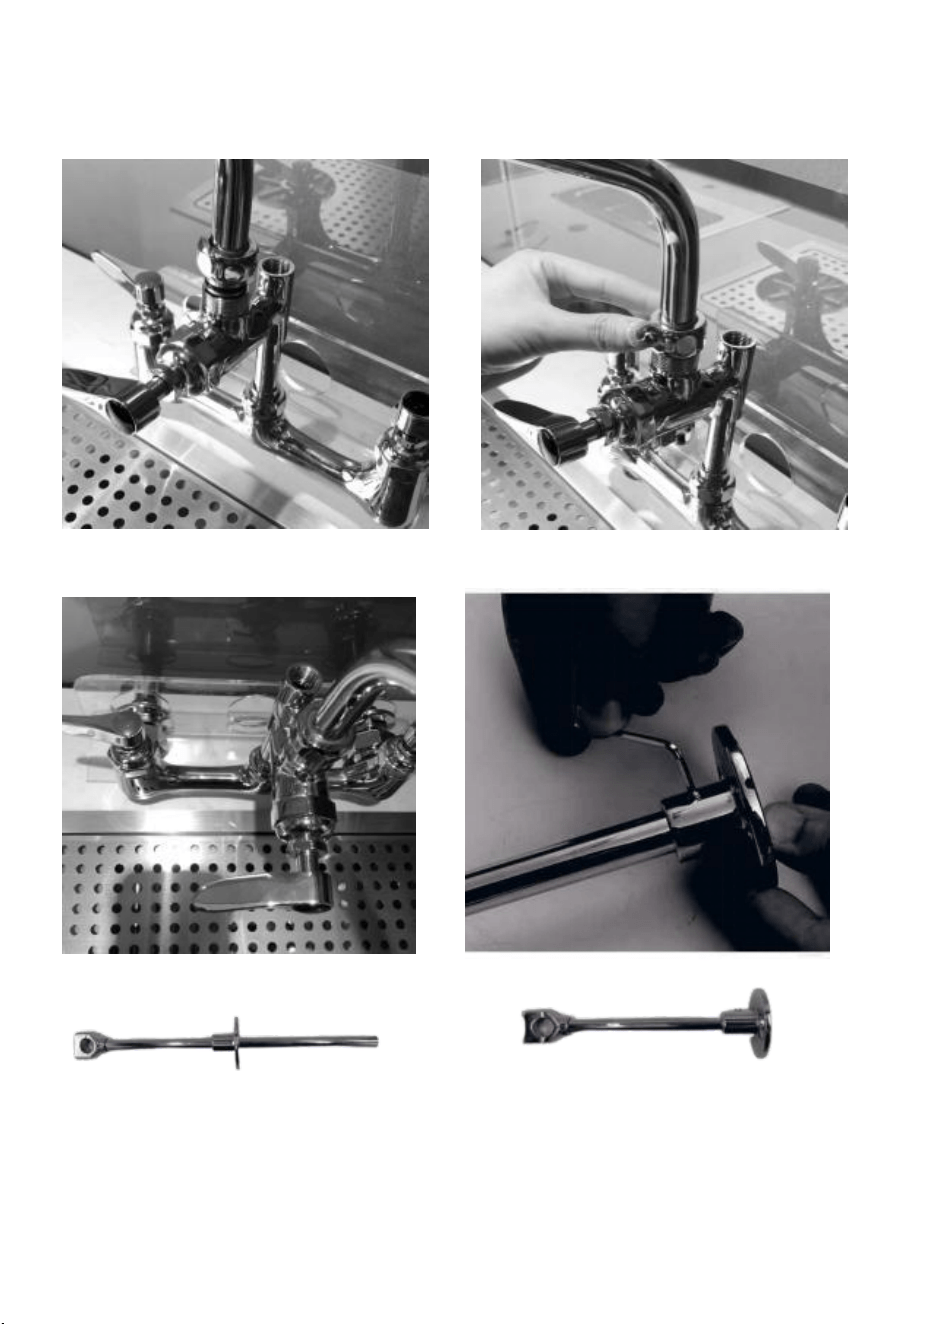
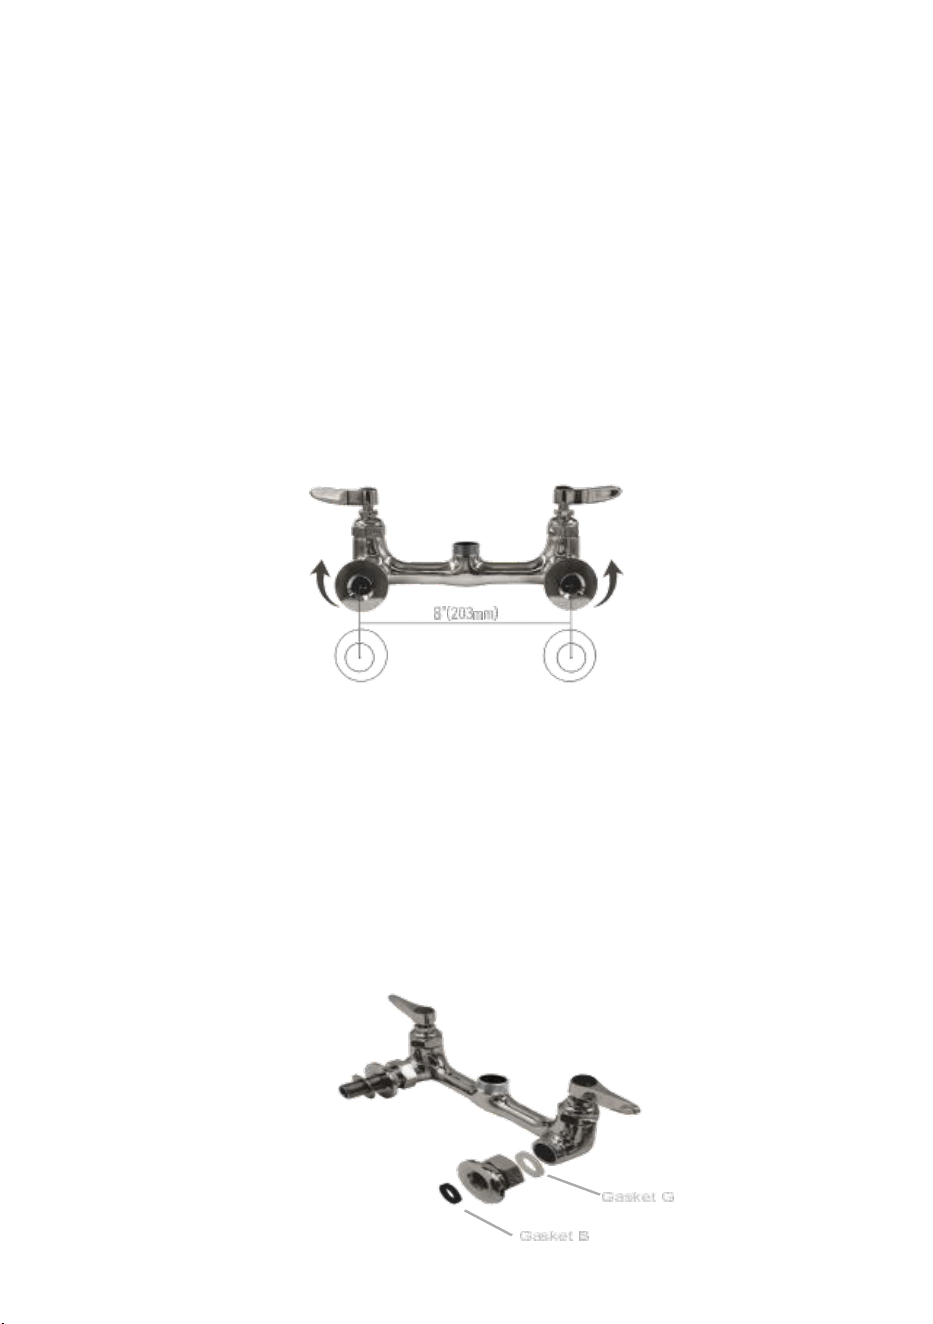
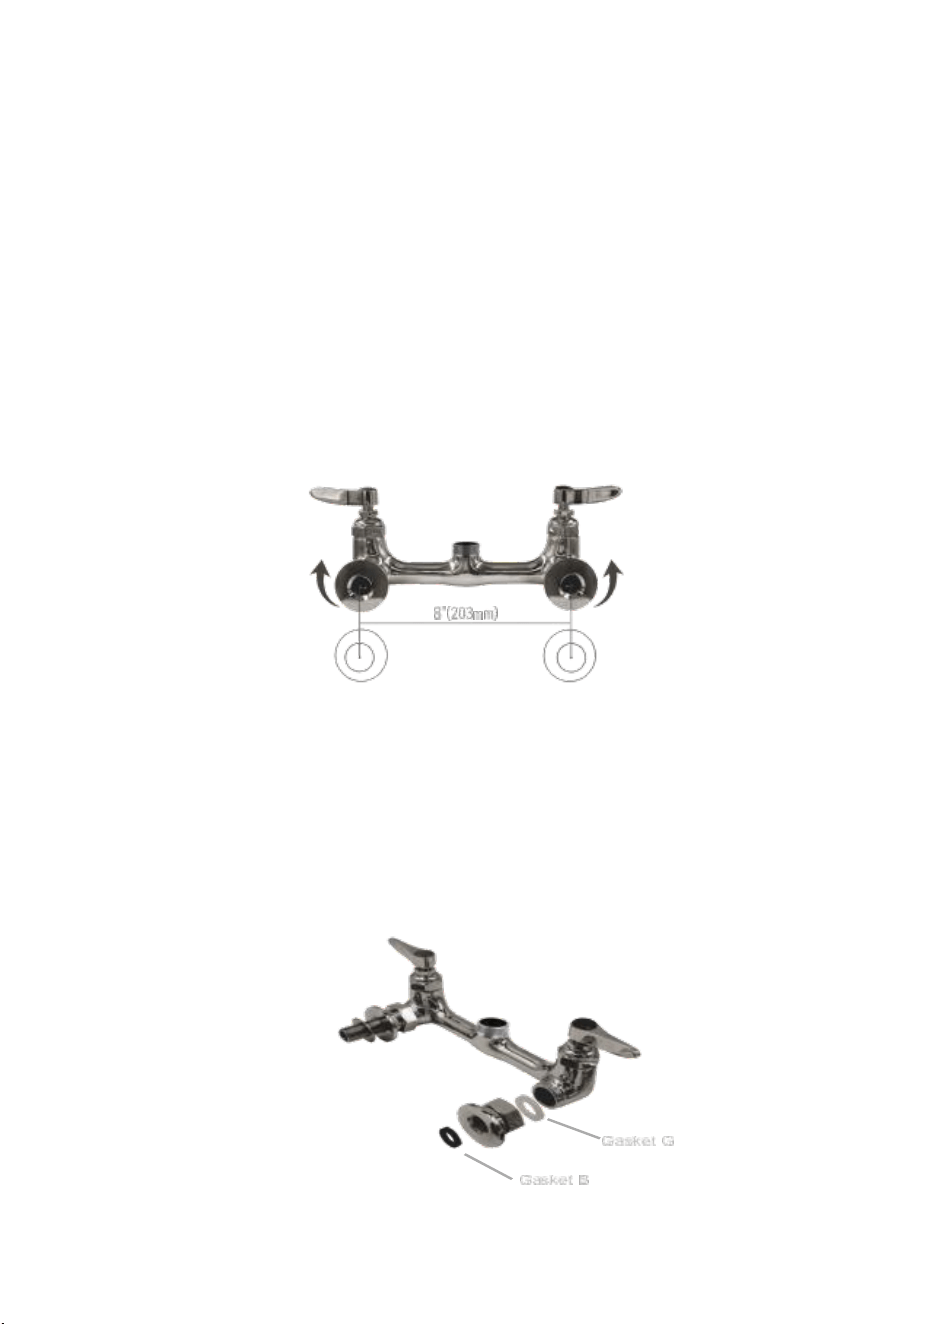
1. Faucet Body Assembly
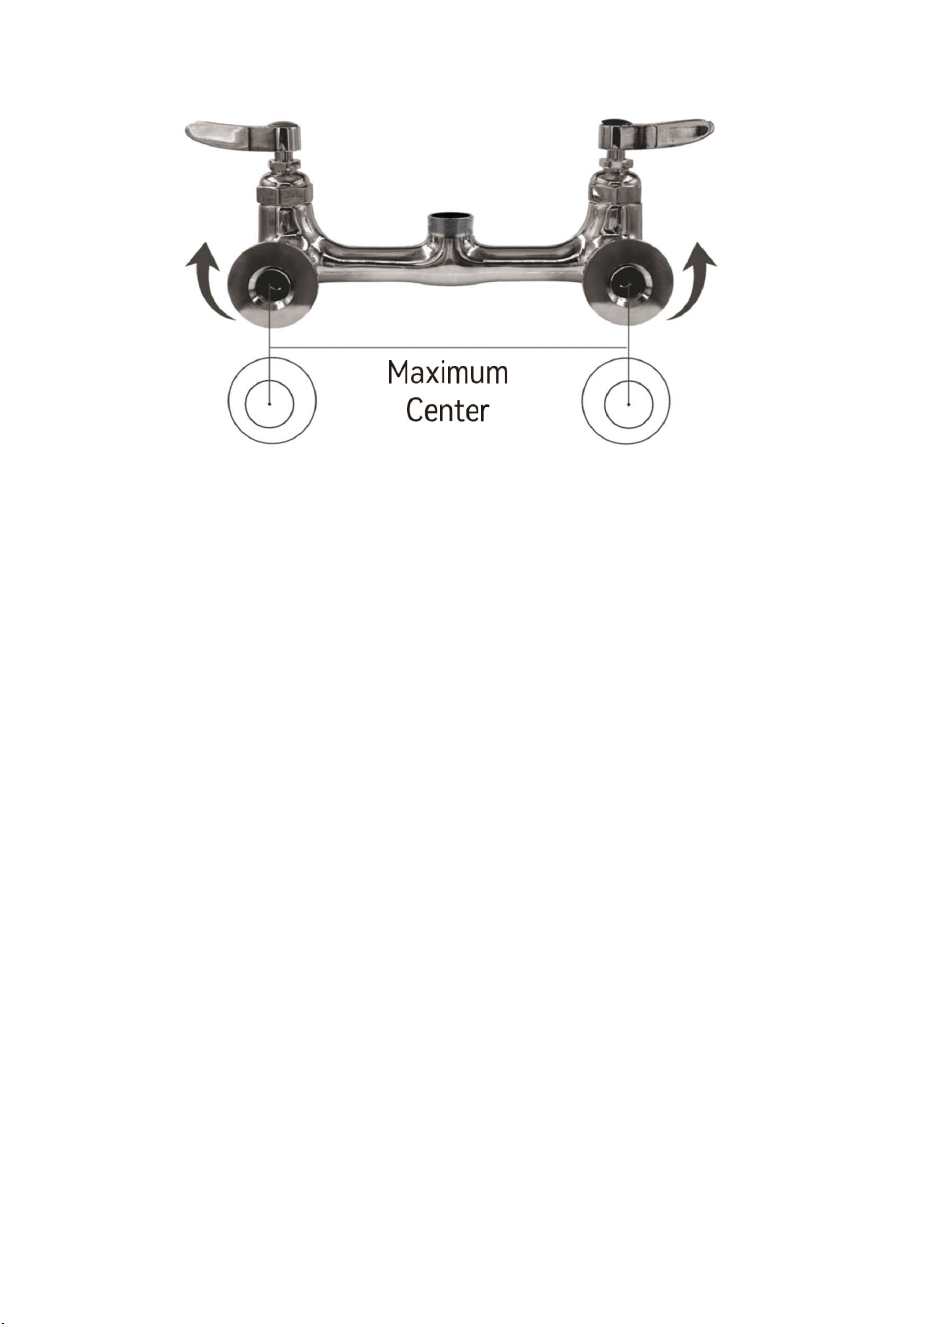
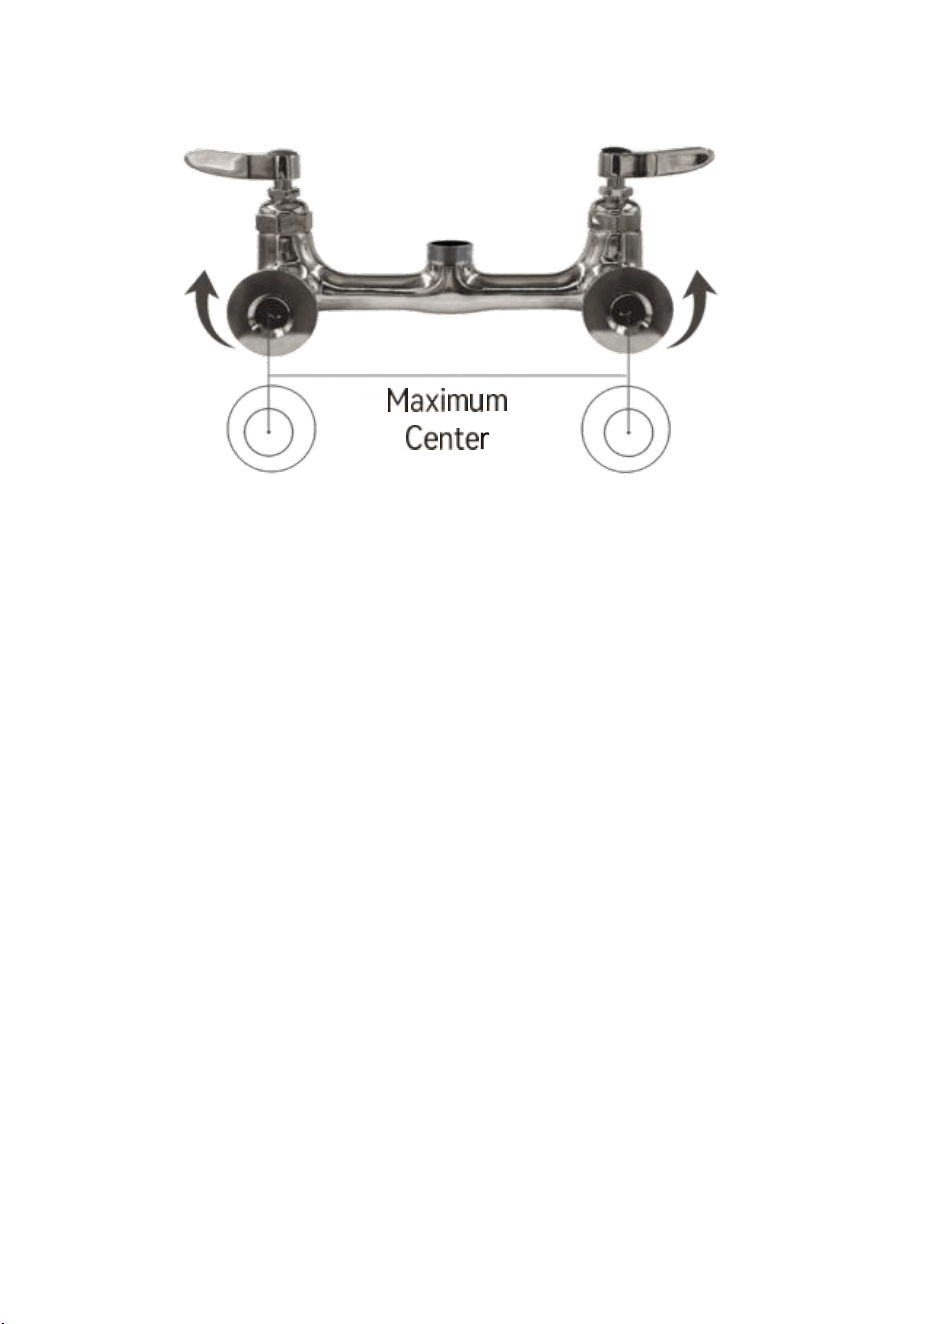
·The center distance can be adjusted between 8 (”203mm)
2. Install the faucet on a commercial sink
·Scale deposit from water may shut off water supply
·Drill two holes with a diameter of about 1" to 1-1/4" on the backsplash of
the water tank. and the distance between the two holes must be 8"
Note:
The installation method of the two products is the same, the picture is
the schematic diagram, and the product is subject to the physical
object
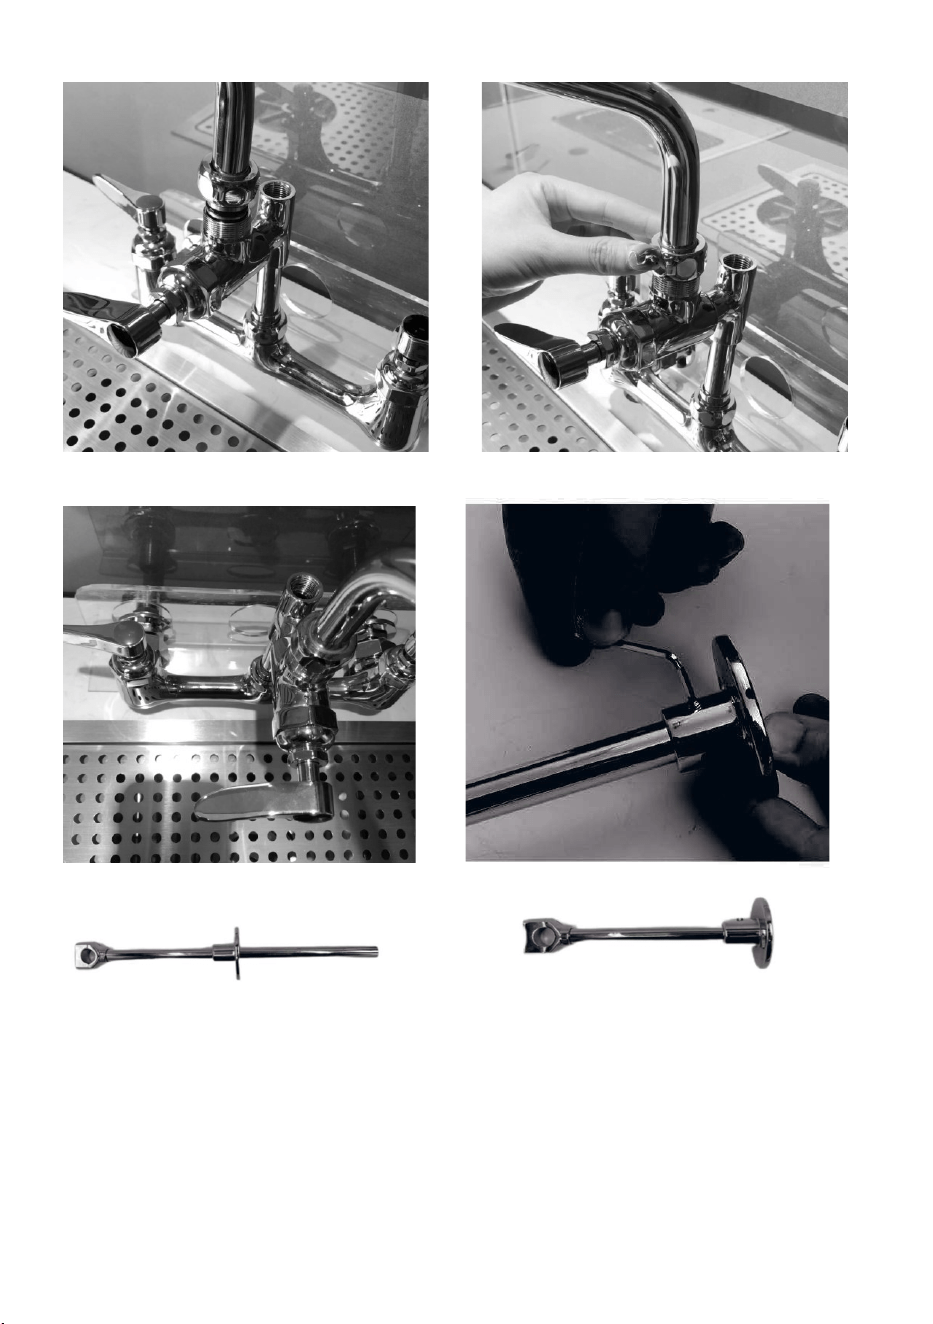
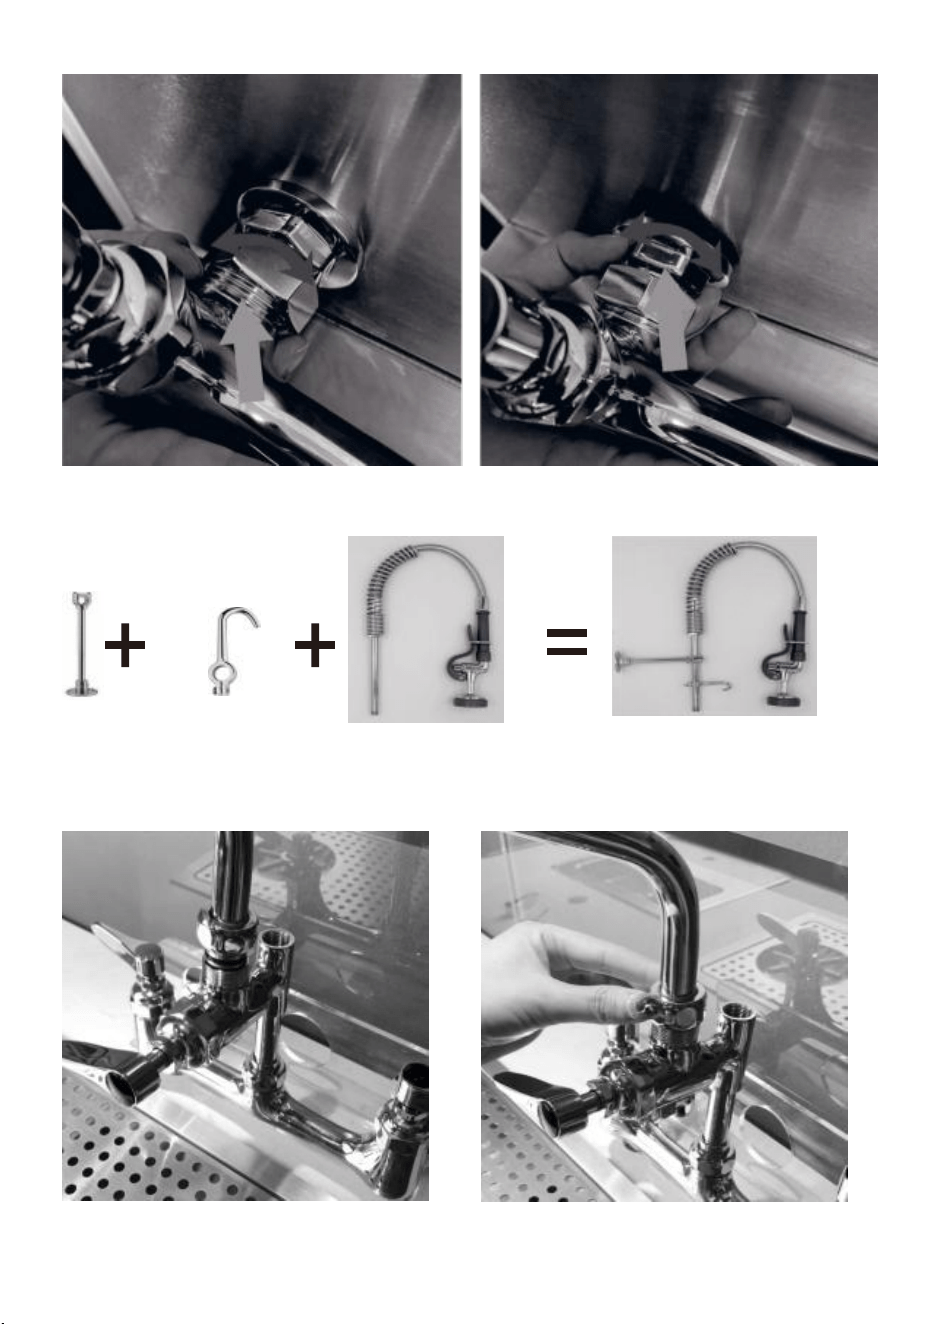
3.Assemble the wall-mounted faucet directly onto the wall faucet.
·Assemble the Female Eccentric Flanges with G 1 /2" Connector to the
water inlet
·Put the faucet body to the two Female Eccentric Flange.
If you find that the flange distance does not match the faucet body, you can
turn the two eccentric flanges to find the correct distance to assemble the
faucet body.
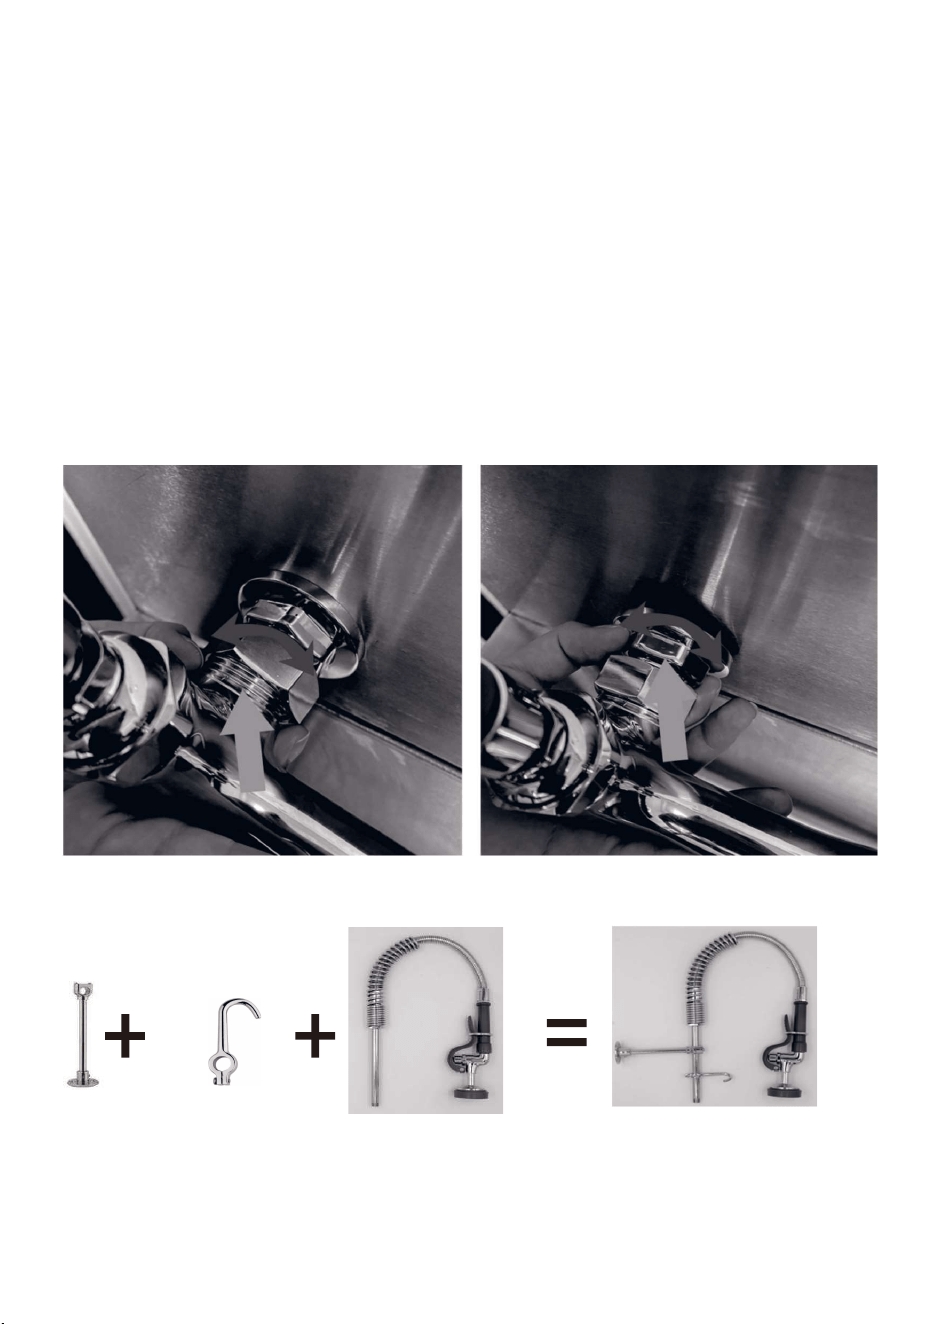
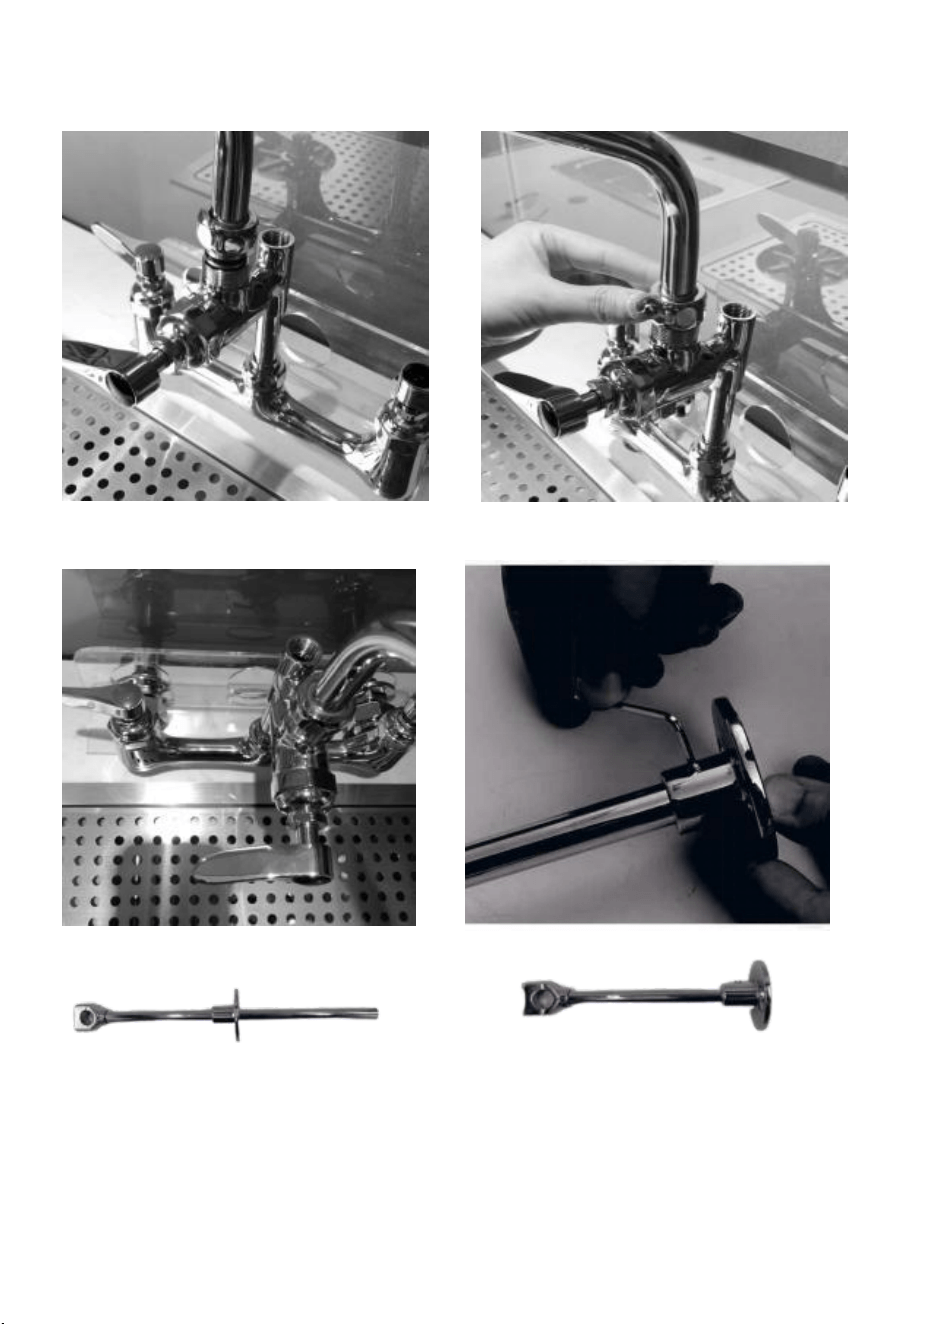
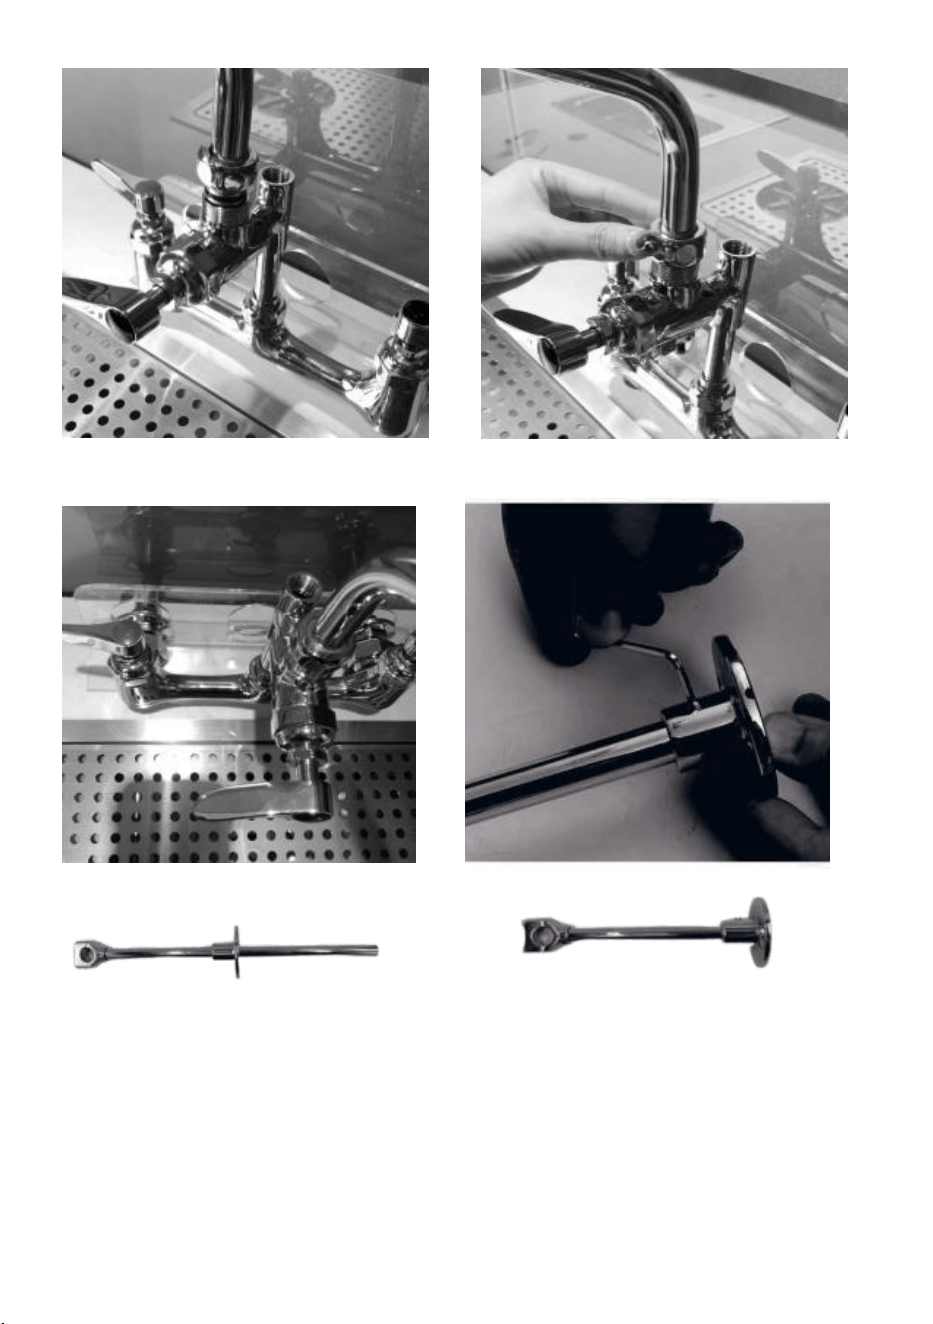
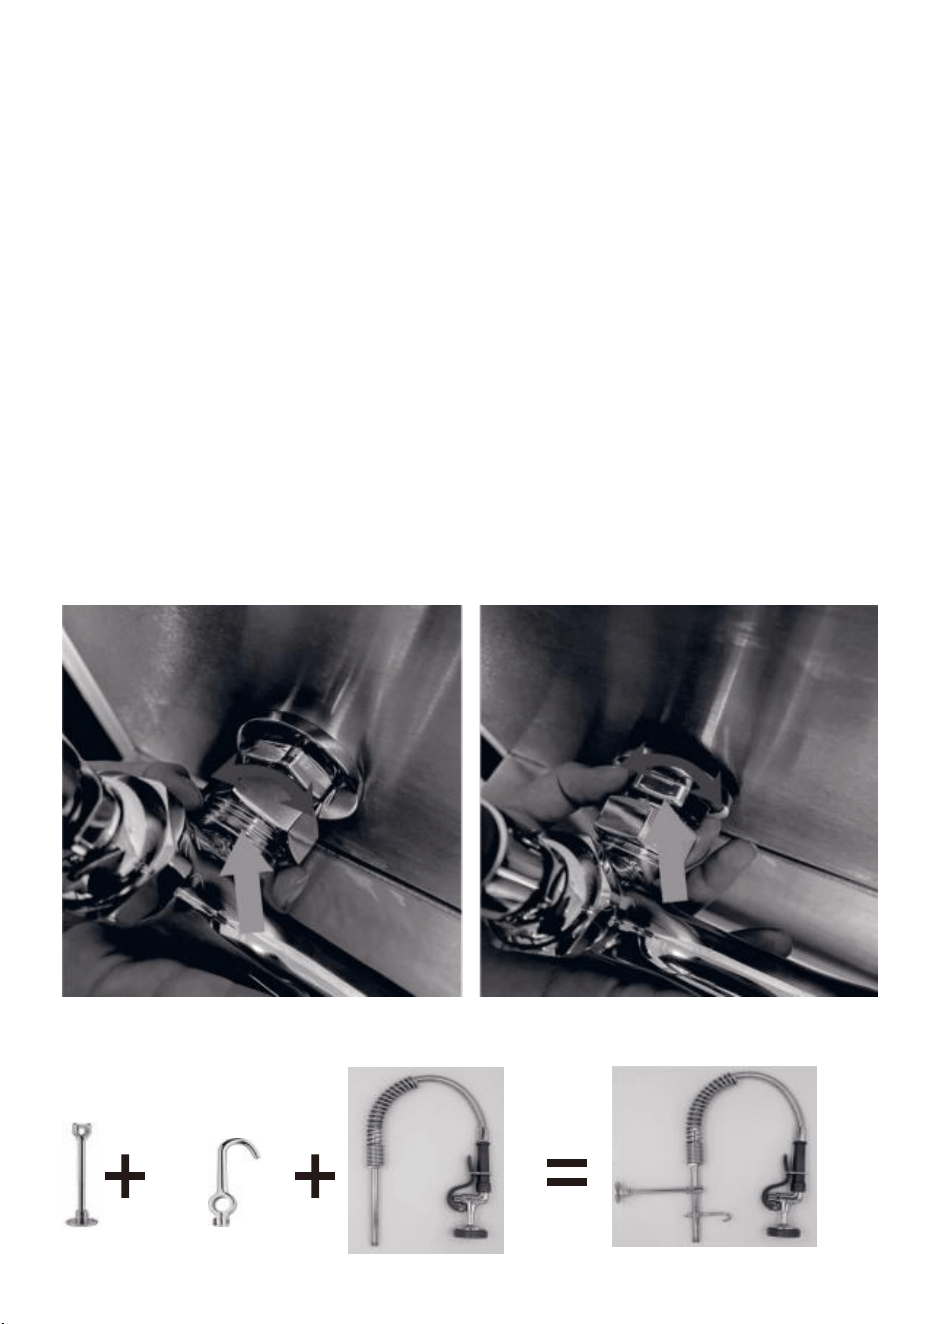
4. Preflush faucet part and add-on part assembly
5. Put the whole Preflush faucet part and the add-on part to the facet
body,connect 3" tube to Faucet Body,tighten the nut
6. Assemble the Add-on Spout to Add-on Faucet
7. Adjust the length of the Wall Bracket
A.Measure the length between the pipe and the wall
B.Loosen the screws at the end
C.Cut the pipe into what you need
D.Tighten the screw then assemble the end part to the wall
Adjustable
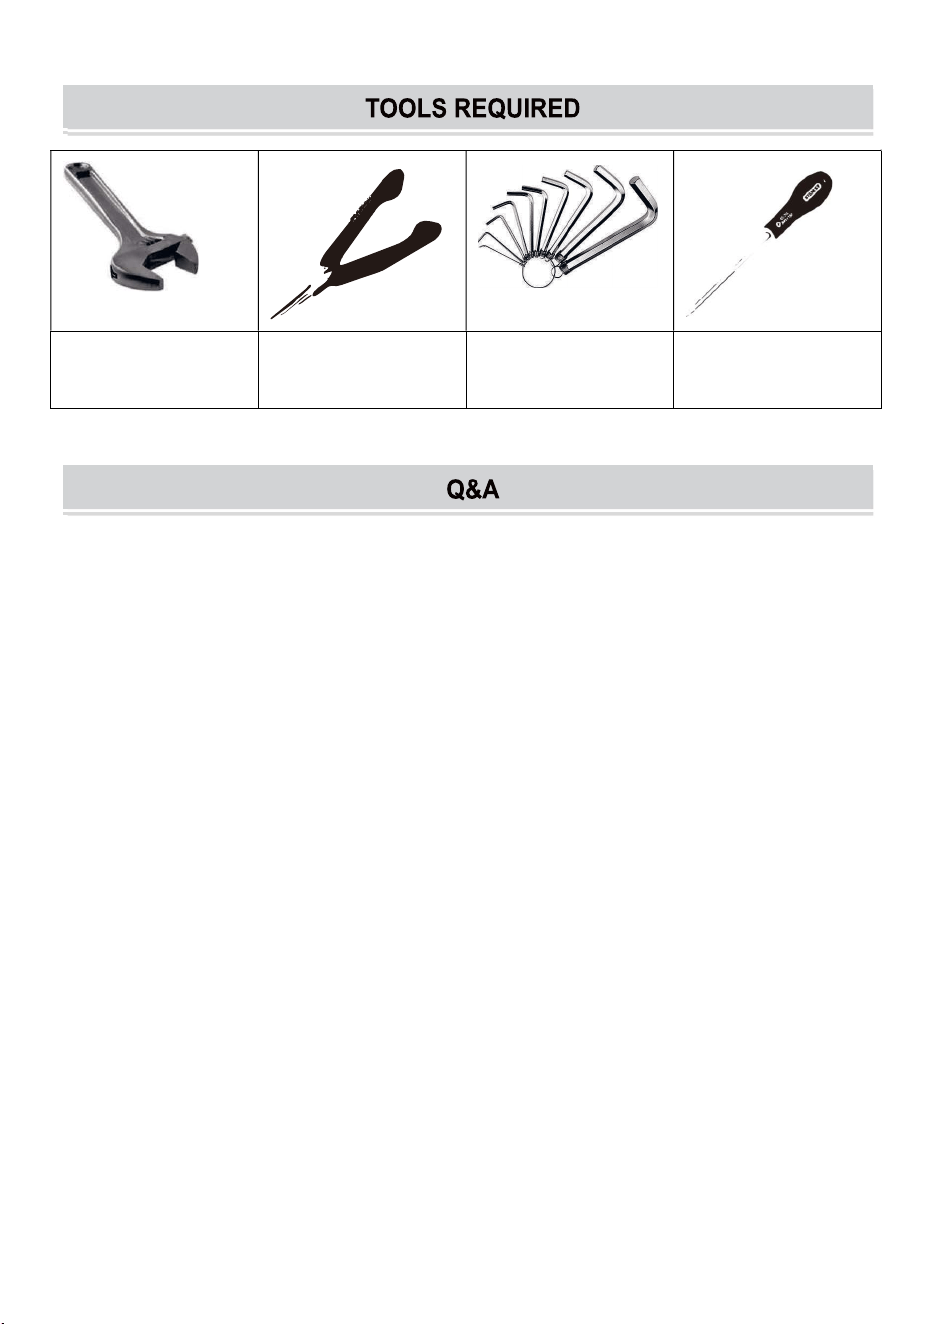
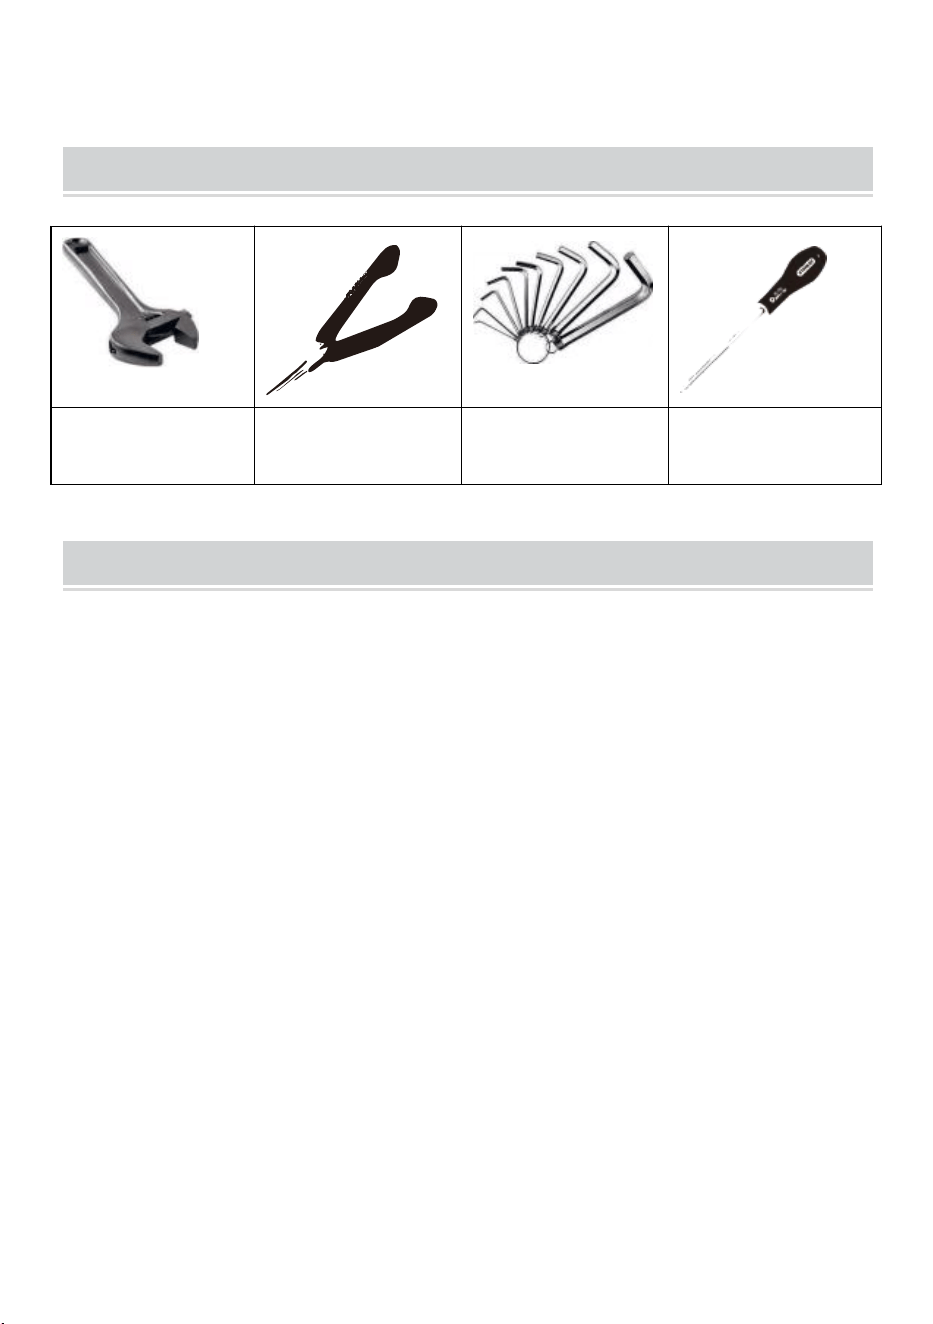
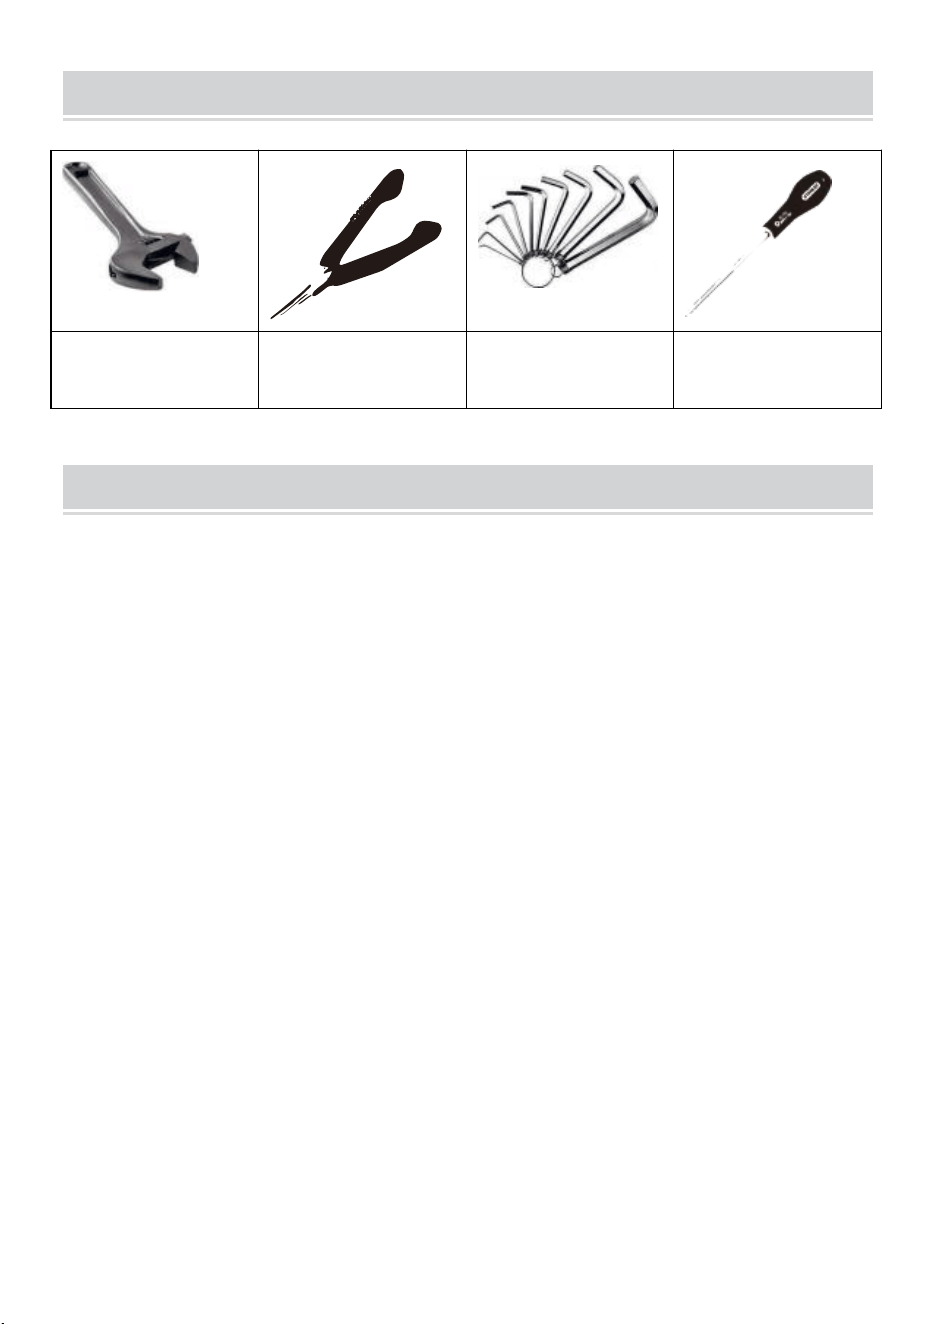
Wrench
Long Lose Pliers
Hexagona
Wrench
Cross
Screwdriver
1.Q:Why faucet leak?
A: One or more gaskets missed.Gaskets are broken or in correct.
(All the connectors where sealed with gaskets should not be screwed too
tight while installing, otherwise the gaskets will be damaged)
2.Q:How to do when leaking?
A: First of all, try to tight the connections where leaking. lf not work, pis
dis-assemble the leakage position and put the corresponding gasket into it,
or replace the broken gasket with a new one.
3. Q:Do you need water tape to install this faucet?
A: This commercial faucet is designed to use gaskets for seal, so the entire
faucet installation does not require the use of water tape,otherwise it may
leaks.
4. Q:center hole distance?
A: As 8" Adjustable Centers wall mount faucets, How to adjust the You can
adjust the center hole size by adjusting the female eccentric flange, As
shown below.
5. Q:How to get spare parts?
A: You can contact the dealer to purchase spare parts.
Address: Baoshanqu Shuangchenglu 803long 11hao 1602A-1609shi
Shanghai
Imported to USA: Sanven Technology Ltd, Suite 250, 9166 Anaheim
Place, Rancho Cucamonga, CA 91730
Made In China
SHUNSHUN GmbH
Römeräcker 9 Z2021, 76351
Linkenheim-Hochstetten, Germany
Pooledas Group Ltd
Unit 5 Albert Edward House, The
Pavilions Preston, United Kingdom

Technical Support and E-Warranty Certificate
www.vevor.com/support

Technisch Support- und E-Garantiezertifikat
www.vevor.com/support
NSTALLATIONSANLEITUNG
FÜR VORSPÜLHAHN
We continue to be committed to provide you tools with competitive price.
"Save Half", "Half Price" or any other similar expressions used by us only represents an
estimate of savings you might benefit from buying certain tools with us compared to the major
top brands and does not necessarily mean to cover all categories of tools offered by us. You
are kindly reminded to verify carefully when you are placing an order with us if you are
actually saving half in comparison with the top major brands.


Hinweis: Das Produkt dient zur Veranschaulichung der
Installation .Ihr Produkt kann anders sein , aber Die
Installationsmethode ist die gleiche
Have product questions? Need technical support? Please feel free to
contact us:
Technical Support and E-Warranty Certificate
www.vevor.com/support
NEED HELP? CONTACT US!
Preflush faucet
This is the original instruction, please read all manual instructions
carefully before operating. VEVOR reserves a clear interpretation of our
user manual. The appearance of the product shall be subject to the
product you received. Please forgive us that we won't inform you again if
there are any technology or software updates on our product.
PARAMETER LIST
Modell
Auslassbereich
Produktgröße (mm)
Nettogewicht
(kg)
5803A-12-21
/
einundzwanzig Zoll
530*320*520
4.3
5803A-12-25
/
25 Zoll 530*320*600
4.2
5803A-12-36
/
36 Zoll 530*320*915
5,0
3803A-12-44
/
44 Zoll 530*320*1050
4.8
3803A-12-47
/
47 Zoll 530*320*1130
4.9
3804A-12-26
/
26 Zoll 530*320*690
4.3
3804A-12-44
/
44 Zoll 530*320*1080
4.8
PART LIST
1.1 Teileliste für vorspülbare Wasserhahneinheiten zur
Wand-/Deckmontage
NEIN
TEILNAME
BILD
MEN
GE

1
Sprühventil
1
2
Gebogenes Rohr
1
3
Steigrohr
1
4
Wandhalterung
1
5
Sprühventilring
1
6
Fingerkörper
1
7
Wasserhahnkörper
( Wandhalterung )
( Deckmontage )
1

8
Zusatzauslauf
1
9
Ersatzteile für Dichtungen
2
SECURITY & WARNINGS
WARNUNG: Lesen und verstehen Sie dieses Handbuch, bevor Sie
dieses Produkt zusammenbauen , installieren, in Betrieb nehmen
oder warten. Die Nichtbeachtung dieser Warnungen und
Anweisungen kann zu Verletzungen oder Schäden an wertvollem
Eigentum führen.
1. Mischen Sie den Schlauch mit Säure, Alkali, Öl, organischem
Lösungsmittel und brennbarem Material Der Umgang mit
explosiven Stoffen ist strengstens untersagt. Der Vorspülhahn
sollte nicht direkt mit Gegenständen mit scharfen Kanten in
Berührung kommen.
2. Beim Umgang mit Vorspülarmaturen sollten diese nicht berührt
werden
irgendwohin geschleppt werden. Eine versehentliche
Beschädigung des Vorspülhahns sollte verhindert werden.
3. Bei der Lagerung von Vorspülarmaturen sollten diese nicht
beschädigt werden
in Kontakt mit Säuren, Laugen, Ölen, organischen Lösungsmitteln
oder anderen ätzenden Flüssigkeiten oder Gasen.
4. Dieses Produkt ist kein Spielzeug. Der Vorspülhahn darf nicht
als Spielzeug für Kinder verwendet werden.

ASSEMBLY PRECAUTIONS
1.Bitte montieren Sie das Produkt genau nach den Anweisungen. Eine
falsche Montage kann gefährlich sein.
2.Bitte tragen Sie bei der Montage ordnungsgemäß eine Schutzbrille und
Arbeitshandschuhe.
3. Montieren Sie das Produkt nicht, wenn Sie müde sind oder unter dem
Einfluss von Alkohol, Drogen oder Medikamenten stehen.
4. Die Produktparameter gelten nur für das ordnungsgemäß und
vollständig montierte Produkt.
PRODUCT ASSEMBLY
1.Explosionszeichnung der vorspülbaren Wasserhahneinheiten zur
Wandmontage.

A: 21*15*3,2 B: 17*8,4*4,5 C: 16,5*11,1*3,1 D: 15*12,8*9,5*5,5
Beschreibung:
ABCD ist ein Siegel, das am Produkt mit einem Preflush-Wasserhahn
versehen wurde.
2. Explosionszeichnung von an Deck montierten
Vorspül-Wasserhahneinheiten

A: 21*15*3,2 B: 17*8,4*4,5 C: 16,5*11,1*3,1 D: 15*12,8*9,5*5,5
Beschreibung:
ABCD ist ein Siegel, das am Produkt mit einem Preflush-Wasserhahn
versehen wurde.
3. Installationsvorgang:
INSTALLATION ADJUSTMENT
Allgemeine Anweisungen
· Schalten Sie die Wasserversorgung der Hauptquelle ab
· Ziehen Sie alle Teile von Hand fest, bevor Sie sie mit einem
Schraubenschlüssel festziehen. Ziehen Sie die Teile nicht mit Gewalt fest.
· Gehen Sie vorsichtig mit der galvanisierten Oberfläche um; achten Sie
darauf, dass die Oberfläche nicht durch Werkzeuge zerkratzt wird.
· Alle wandmontierten Wasserhähne verfügen über einen geflanschten
Einlass mit G 1/2 (12 NPSM)-Innengewinde
1. Zusammenbau des Wasserhahngehäuses
· Der Achsabstand kann zwischen 8 („203 mm) und
2. Installieren Sie den Wasserhahn an einem handelsüblichen
Waschbecken
· Kalkablagerungen im Wasser können die Wasserversorgung
unterbrechen
· Bohren Sie zwei Löcher mit einem Durchmesser von etwa 1 bis 1-1/4 Zoll
auf der Rückseite des Wassertanks . Der Abstand zwischen den beiden
Löchern muss 8 Zoll betragen .
Notiz:
Die Installationsmethode der beiden Produkte ist dieselbe, das Bild
ist das schematische Diagramm und das Produkt unterliegt dem
physischen Objekt
3. Montieren Sie den Wandhahn direkt am Wandhahn.
· Montieren Sie die exzentrischen Innenflansche mit G 1/2-Zoll-Anschluss
am Wassereinlass
· Setzen Sie den Wasserhahnkörper auf die beiden weiblichen
Exzenterflansche.
Wenn du finden Sollte der Flanschabstand nicht zum Armaturenkörper
passen, können Sie die beiden Exzenterflansche umdrehen finden den
richtigen Abstand zum Zusammenbau des Wasserhahnkörpers.
4. Vorspül - Armaturenteil und Anbauteil-Baugruppe
5. Setzen Sie das gesamte Teil des Vorspülhahns und das Zusatzteil auf
den Facettenkörper, schließen Sie das 3-Zoll-Rohr an den
Wasserhahnkörper an und ziehen Sie die Mutter fest
6. Montieren Sie den Zusatzauslauf am Zusatzhahn
7. Passen Sie die Länge der Wandhalterung an
A. Messen Sie die Länge zwischen Rohr und Wand
B. Lösen Sie die Schrauben am Ende
C. Schneiden Sie das Rohr auf die Länge zu, die Sie benötigen
D. Ziehen Sie die Schraube fest und montieren Sie dann das Endteil an der Wand
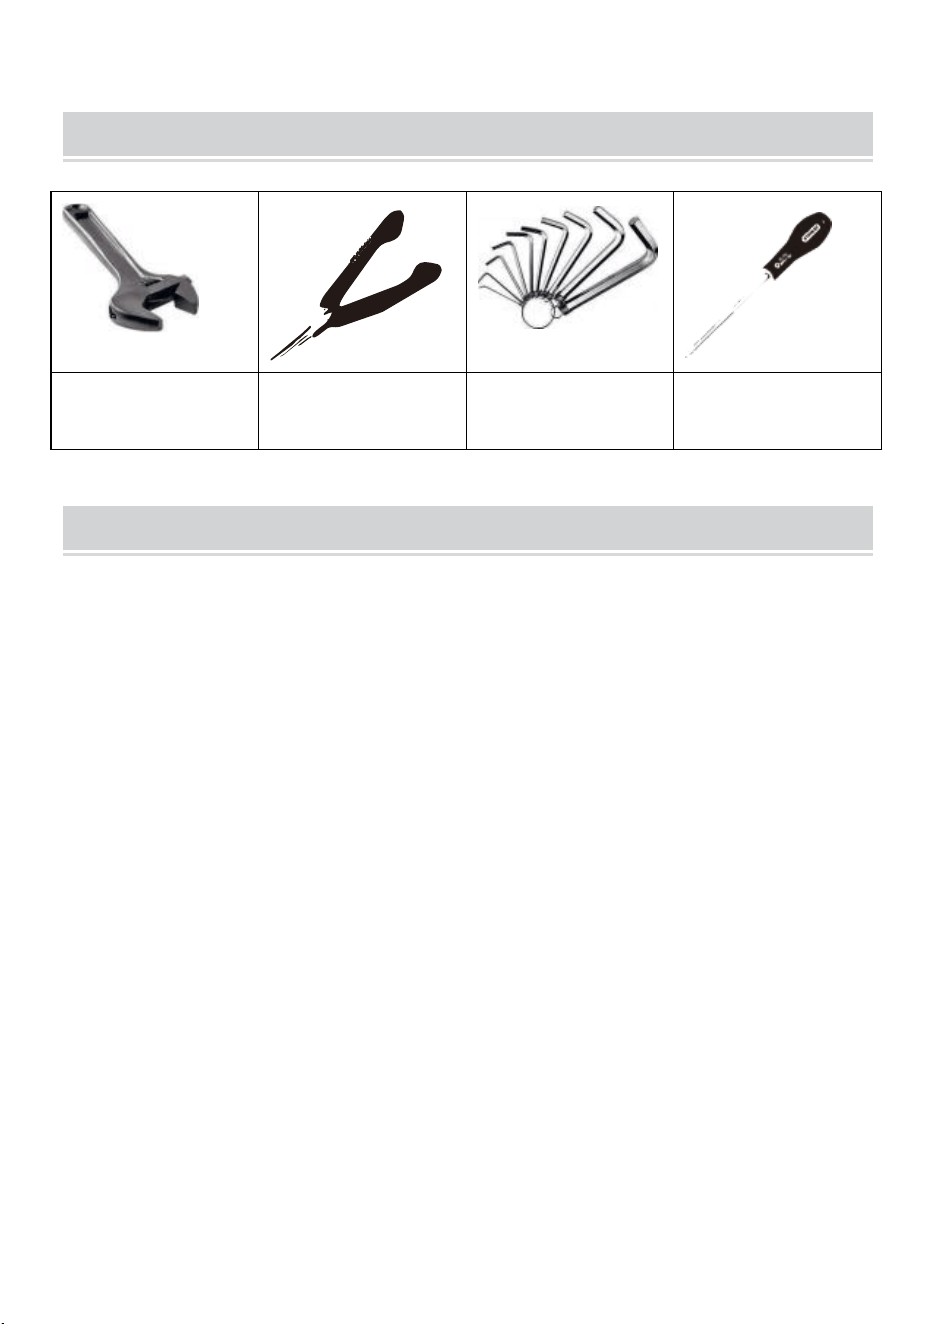
TOOLS REQUIRED
Rollgabelschlüs
sel
Lange Zange
Sechskantschlüs
sel
Kreuzschraubendre
her

Q&A
1. F: Warum leckt der Wasserhahn?
A: Eine oder mehrere Dichtungen fehlen. Die Dichtungen sind defekt oder
in Ordnung.
(Alle mit Dichtungen abgedichteten Anschlüsse dürfen bei der Montage
nicht zu fest angezogen werden, da sonst die Dichtungen beschädigt
werden.)
2. F: Was tun bei Undichtigkeiten?
A: Versuchen Sie zunächst, die Verbindungen an den undichten Stellen
abzudichten. Wenn dies nicht funktioniert, zerlegen Sie die Leckstelle und
setzen Sie die entsprechende Dichtung ein oder ersetzen Sie die defekte
Dichtung durch eine neue.
3. F: Benötigen Sie ein Wasserband, um diesen Wasserhahn zu
installieren?
A: Dieser handelsübliche Wasserhahn ist für die Verwendung von
Dichtungen zur Abdichtung konzipiert, so dass für die gesamte Installation
des Wasserhahns kein Klebeband erforderlich ist, da es sonst zu
Undichtigkeiten kommen kann.
4. F: Mittenlochabstand?
A: Bei 8"-Wasserhähnen mit verstellbarer Mitte zur Wandmontage: So
stellen Sie die Lochgröße in der Mitte ein, indem Sie den exzentrischen
Innenflansch anpassen , wie unten gezeigt.
5. F: Wie bekomme ich Ersatzteile?
A: Sie können den Händler kontaktieren, um Ersatzteile zu kaufen.
Adresse: Baoshanqu Shuangchenglu 803long 11hao 1602A-1609shi
Shanghai
In die USA importiert: Sanven Technology Ltd, Suite 250, 9166 Anaheim
Place, Rancho Cucamonga, CA 91730
REP
EC
SHUNSHUN GmbH
Römeräcker 9 Z2021, 76351
Linkenheim-Hochstetten, Germany
REP
UK
Pooledas Group Ltd
Unit 5 Albert Edward House, The
Pavilions Preston, United Kingdom
In China hergestellt


Technique Assistance et certificat de garantie électronique
www.vevor.com/support
INSTRUCTIONS D'INSTALLATION
POUR ROBINET DE PRÉCHASSE
We continue to be committed to provide you tools with competitive price.
"Save Half", "Half Price" or any other similar expressions used by us only represents an
estimate of savings you might benefit from buying certain tools with us compared to the major
top brands and does not necessarily mean to cover all categories of tools offered by us. You
are kindly reminded to verify carefully when you are placing an order with us if you are
actually saving half in comparison with the top major brands.


Remarque : le produit est utilisé pour illustrer l'installation .Votre
produit peut être di ff érent mais la méthode
d'installation est la même
Have product questions? Need technical support? Please feel free to
contact us:
Technical Support and E-Warranty Certificate
www.vevor.com/support
NEED HELP? CONTACT US!
Preflush faucet
This is the original instruction, please read all manual instructions
carefully before operating. VEVOR reserves a clear interpretation of our
user manual. The appearance of the product shall be subject to the
product you received. Please forgive us that we won't inform you again if
there are any technology or software updates on our product.
PARAMETER LIST
modèle
zone de
sortie
taille du produit (mm)
poids net (kg)
5803A-12-21
/
vingt-et-un pouce
530*320*520
4.3
5803A-12-25
/
25 pouce 530*320*600
4.2
5803A-12-36
/
36 pouce 530*320*915
5.0
3803A-12-44
/
44 pouce 530*320*1050
4.8
3803A-12-47
/
47 pouce 530*320*1130
4.9
3804A-12-26
/
26 pouce 530*320*690
4.3
3804A-12-44
/
44 pouce 530*320*1080
4.8
PART LIST
1.1 Liste des pièces des unités de robinetterie à pré-flush à montage
mural/sur pont
Non
NOM DE LA PIÈCE
IMAGE
QTÉ

1
Vanne de pulvérisation
1
2
Tuyau plié
1
3
Tube ascendant
1
4
Support mural
1
5
Anneau de valve de
pulvérisation
1
6
Corps de doigt
1
7
Corps du robinet
( Montage mural )
( Montage sur pont )
1

8
Bec supplémentaire
1
9
Pièces de rechange pour
joints
2
SECURITY & WARNINGS
AVERTISSEMENT : Lisez et comprenez ce manuel avant
d'assembler , d'installer, d'utiliser ou d'entretenir ce produit. Le
non-respect de ces avertissements et instructions peut provoquer
des blessures ou endommager des biens de valeur.
1. Mélanger le tuyau avec de l'acide, de l'alcali, de l'huile, un
solvant organique et des substances inflammables. et les
matériaux explosifs sont strictement interdits. Le robinet pré-
chasse ne doit pas entrer en contact direct avec des
marchandises avec des bords tranchants.
2. Lors de la manipulation des robinets à pré- chasse , ils ne
doivent pas être
traîné n'importe où. Il convient d'éviter tout dommage accidentel
au robinet de pré - chasse .
3. Lors du stockage des robinets de pré- chasse , ils ne doivent
pas venir
en contact avec des acides, des alcalis, des huiles, des solvants
organiques ou d'autres liquides ou gaz corrosifs.
4. Ce produit n'est pas un jouet. Le robinet pré- chasse ne peut
pas être utilisé comme un jouet pour les enfants.

ASSEMBLY PRECAUTIONS
1.Veuillez assembler le produit en stricte conformité avec les instructions.
Un assemblage incorrect pourrait être dangereux.
2. Veuillez porter correctement des lunettes de sécurité et des gants de
travail pendant l'assemblage.
3. N'assemblez pas le produit lorsque vous êtes fatigué ou sous l'influence
de l'alcool, de drogues ou de médicaments.
4. Les paramètres du produit sont appliqués uniquement au produit
correctement et complètement assemblé.
PRODUCT ASSEMBLY
1. Dessin éclaté des unités de robinetterie murale à pré-flush.

A : 21*15*3,2 B : 17*8,4*4,5 C : 16,5*11,1*3,1 D : 15*12,8*9,5*5,5
Description:
ABCD est un sceau qui a été pré-rincé sur le produit.
2. Vue éclatée des unités de robinetterie à pré-chasse à montage sur pont

A : 21*15*3,2 B : 17*8,4*4,5 C : 16,5*11,1*3,1 D : 15*12,8*9,5*5,5
Description:
ABCD est un sceau qui a été pré-rincé sur le produit.
3. Procédure d'installation :

INSTALLATION ADJUSTMENT
Instructions générales
· Coupez l'alimentation en eau de la source principale
· Serrez toutes les pièces à la main avant de les serrer avec une clé. Ne
forcez pas sur les pièces.
· Manipulez la surface galvanisée avec précaution ; veillez à ce que la
surface ne soit pas rayée par des outils.
· Tous les robinets muraux ont une entrée à bride femelle G 1/2 (12 NPSM)
1. Assemblage du corps du robinet
· L'entraxe peut être ajusté entre 8 (« 203 mm)
2. Installez le robinet sur un évier commercial
· Les dépôts de tartre provenant de l'eau peuvent couper l'alimentation en
eau.
· Percez deux trous d'un diamètre d'environ 1" à 1-1/4" sur le dos du
réservoir d' eau . et la distance entre les deux trous doit être de 8 "

Note:
La méthode d'installation des deux produits est la même, l'image est
le diagramme schématique et le produit est soumis à l'objet physique
3. Assemblez le robinet mural directement sur le robinet mural.
· Assemblez les brides excentriques femelles avec le connecteur G 1 /2" à
l'entrée d'eau.
· Placez le corps du robinet sur les deux brides excentriques femelles.
Si tu trouver que la distance entre les brides ne correspond pas au corps
du robinet, vous pouvez tourner les deux brides excentriques pour trouver
la bonne distance pour assembler le corps du robinet.
4. Pièce de robinet de pré- rinçage et assemblage de pièces
supplémentaires
5. Placez toute la partie du robinet pré - chassé et la partie supplémentaire
sur le corps à facettes, connectez le tube de 3" au corps du robinet, serrez
l'écrou.
6. Assemblez le bec supplémentaire au robinet supplémentaire
7. Ajustez la longueur du support mural
A. Mesurez la longueur entre le tuyau et le mur
B. Desserrez les vis à l'extrémité
C. Coupez le tuyau selon vos besoins.
D. Serrez la vis puis assemblez la partie d'extrémité au mur

TOOLS REQUIRED
Clé à molette
Pinces à perte
longue
Clé hexagonale
Tournevis
cruciforme
Q&A
1. Q : Pourquoi une fuite de robinet ?
R : Un ou plusieurs joints sont manquants. Les joints sont cassés ou
incorrects.
(Tous les connecteurs scellés avec des joints ne doivent pas être trop
serrés lors de l'installation, sinon les joints seront endommagés)
2. Q : Comment faire en cas de fuite ?
R : Tout d’abord, essayez de resserrer les connexions là où il y a une fuite.
Si cela ne fonctionne pas, démontez la position de fuite et placez-y le joint
correspondant, ou remplacez le joint cassé par un nouveau.
3. Q : Avez-vous besoin de ruban adhésif pour installer ce robinet ?
R : Ce robinet commercial est conçu pour utiliser des joints d’étanchéité,
de sorte que l’ensemble de l’installation du robinet ne nécessite pas
l’utilisation de ruban adhésif, sinon il pourrait fuir.
4. Q : distance du trou central ?
R : En tant que robinets muraux à centres réglables de 8 pouces, comment
régler la taille du trou central en ajustant la bride excentrique femelle ,
comme indiqué ci-dessous.

5. Q : Comment obtenir des pièces de rechange ?
R : Vous pouvez contacter le revendeur pour acheter des pièces de
rechange.
Adresse : Baoshanqu Shuangchenglu 803long 11hao 1602A-1609shi
Shanghai
Importé aux États-Unis : Sanven Technology Ltd, Suite 250, 9166
Anaheim Place, Rancho Cucamonga, CA 91730
REP
EC
SHUNSHUN GmbH
Römeräcker 9 Z2021, 76351
Linkenheim-Hochstetten, Germany
REP
UK
Pooledas Group Ltd
Unit 5 Albert Edward House, The
Pavilions Preston, United Kingdom
Fabriqué en Chine


Technisch Ondersteuning en e-garantiecertificaat
www.vevor.com/support
INSTALLATIE-INSTRUCTIES
VOOR VOORSPOELKRAAN
We continue to be committed to provide you tools with competitive price.
"Save Half", "Half Price" or any other similar expressions used by us only represents an
estimate of savings you might benefit from buying certain tools with us compared to the major
top brands and does not necessarily mean to cover all categories of tools offered by us. You
are kindly reminded to verify carefully when you are placing an order with us if you are
actually saving half in comparison with the top major brands.


Opmerking: het product wordt gebruikt om de installatie te
illustreren .Uw product kan anders zijn , maar de
installatiemethode is hetzelfde
Have product questions? Need technical support? Please feel free to
contact us:
Technical Support and E-Warranty Certificate
www.vevor.com/support
NEED HELP? CONTACT US!
Preflush faucet
This is the original instruction, please read all manual instructions
carefully before operating. VEVOR reserves a clear interpretation of our
user manual. The appearance of the product shall be subject to the
product you received. Please forgive us that we won't inform you again if
there are any technology or software updates on our product.
PARAMETER LIST
model
uitlaat
gebied
productgrootte (mm)
netto gewicht
(kg)
5803A-12-21
/
eenentwintig inch
530*320*520
4.3
5803A-12-25
/
25 inch 530*320*600
4.2
5803A-12-36
/
36 inch 530*320*915
5,0
3803A-12-44
/
44 inch 530*320*1050
4.8
3803A-12-47
/
47 inch 530*320*1130
4.9
3804A-12-26
/
26 inch 530*320*690
4.3
3804A-12-44
/
44 inch 530*320*1080
4.8
PART LIST
1.1 Onderdelenlijst voor wandmontage/dekmontage Voorspoelkraanunits
Nee
DEELNAAM
AFBEELDING
AAN
TAL

1
Sproeiklep
1
2
Gebogen pijp
1
3
Stijgpijp
1
4
Muurbeugel
1
5
Sproeiventielring
1
6
Vingerlichaam
1
7
Kraanlichaam
( Wandmontage )
( Dekmontage )
1

8
Extra uitloop
1
9
Reserveonderdelen voor
pakkingen
2
SECURITY & WARNINGS
WAARSCHUWING: Lees en begrijp deze handleiding voordat u dit
product monteert , installeert, bedient of onderhoudt. Het niet
opvolgen van deze waarschuwingen en instructies kan persoonlijk
letsel veroorzaken of waardevolle eigendommen beschadigen.
De slang mengen met zuur, alkali, olie, organisch oplosmiddel en
ontvlambaar en explosieve materialen is ten strengste verboden.
De voorspoelkraan mag niet rechtstreeks in contact komen met
goederen met scherpe randen.
2. Bij het hanteren van voorspoelkranen mag dit niet gebeuren
ergens heen gesleept. Onbedoelde schade aan de
voorspoelkraan moet worden voorkomen.
3. Bij het opbergen van voorspoelkranen mogen ze niet komen
in contact komen met zuren, logen, oliën, organische
oplosmiddelen of andere corrosieve vloeistoffen of gassen.
4. Dit product is geen speelgoed. De voorspoelkraan mag niet als
speelgoed voor kinderen worden gebruikt.
ASSEMBLY PRECAUTIONS
1. Monteer het product in strikte overeenstemming met de instructies. Een
onjuiste montage kan gevaarlijk zijn.

2. Draag tijdens de montage een veiligheidsbril en werkhandschoenen.
3. Monteer het product niet als u moe bent of onder invloed bent van
alcohol, drugs of medicijnen.
4. De productparameters worden alleen toegepast op het correct en
volledig gemonteerde product.
PRODUCT ASSEMBLY
1. Explosietekening van aan de muur gemonteerde
voorspoelkraaneenheden.

A: 21*15*3,2 B: 17*8,4*4,5 C: 16,5*11,1*3,1 D: 15*12,8*9,5*5,5
Beschrijving:
ABCD is een zegel dat als voorspoelkraan op het product is
aangebracht.
2. Explosietekening van op het dek gemonteerde voorspoelkranen
A: 21*15*3,2 B: 17*8,4*4,5 C: 16,5*11,1*3,1 D: 15*12,8*9,5*5,5
Beschrijving:
ABCD is een zegel dat als voorspoelkraan op het product is
aangebracht.
3. Installatieprocedure:

INSTALLATION ADJUSTMENT
Algemene instructies
· Schakel de watertoevoer van de hoofdbron uit
· Draai alle onderdelen met de hand vast voordat u ze met een sleutel
vastdraait. Forceer de onderdelen niet vaster.
· Ga voorzichtig om met het gegalvaniseerde oppervlak; zorg ervoor dat
het oppervlak niet door gereedschap wordt bekrast.
· Alle wandmontagekranen hebben een G 1/2 (12 NPSM) vrouwelijke
flensinlaat
1. Kraanbehuizing
· De hartafstand kan worden aangepast tussen 8 (“203 mm)
2. Installeer de kraan op een commerciële gootsteen
· Kalkaanslag uit water kan de watertoevoer afsluiten
· Boor twee gaten met een diameter van ongeveer 1" tot 1-1/4" op de
achterkant van het waterreservoir . De afstand tussen de twee gaten moet
8" zijn .
Opmerking:
De installatiemethode van de twee producten is hetzelfde, de
afbeelding is het schematische diagram en het product is onderhevig
aan het fysieke object
3. Monteer de wandkraan rechtstreeks op de wandkraan.
· Monteer de vrouwelijke excentrische flenzen met G 1/2" connector op de
waterinlaat
· Plaats het kraanlichaam op de twee vrouwelijke excentrische flens.
als jij vinden dat de flensafstand niet overeenkomt met het kraanlichaam,
kunt u de twee excentrische flenzen naar toe draaien vinden de juiste
afstand om het kraanlichaam te monteren.
4. Voorspoelkraanonderdeel en aanbouwonderdeel
5. Plaats het hele voorspoelkraangedeelte en het aanbouwgedeelte op het
facetlichaam, sluit de 3 "buis aan op het kraanlichaam en draai de moer
vast
6. Monteer de opzetuitloop op de opzetkraan
7. Pas de lengte van de muurbeugel aan
A.Meet de lengte tussen de buis en de muur
B. Draai de schroeven aan het uiteinde los
C. Snij de pijp in wat je nodig hebt
D. Draai de schroef vast en monteer het einddeel aan de muur
TOOLS REQUIRED
Verstelbare
sleutel
Lange verliezen
tangen
Zeshoekige
sleutel
Kruis
schroevendraaier
Q&A
1. Vraag: Waarom lekt de kraan?
A: Een of meer pakkingen ontbreken. Pakkingen zijn kapot of in orde.
(Alle connectoren die met pakkingen zijn afgedicht, mogen tijdens de
installatie niet te strak worden vastgeschroefd, anders worden de
pakkingen beschadigd)
2. Vraag: Hoe te doen bij lekken?
A: Probeer allereerst de lekkende verbindingen vast te draaien. Als dit niet
werkt, demonteer dan de lekkagepositie en plaats de bijbehorende pakking
erin, of vervang de kapotte pakking door een nieuwe.
3. Vraag: Heb je watertape nodig om deze kraan te installeren?
A: Deze commerciële kraan is ontworpen om pakkingen te gebruiken voor
afdichting, zodat voor de gehele kraaninstallatie geen watertape nodig is,
anders kan deze gaan lekken.
4. Vraag: afstand middengat?
A: Als 8" verstelbare centra wandmontagekranen, Hoe u de U kunt de
grootte van het middengat aanpassen door de vrouwelijke excentrische
flens aan te passen , zoals hieronder weergegeven.

5. Vraag: Hoe kan ik reserveonderdelen verkrijgen?
A: U kunt contact opnemen met de dealer om reserveonderdelen te kopen.

Adres: Baoshanqu Shuangchenglu 803long 11hao 1602A-1609shi
Shanghai
Geïmporteerd naar de VS: Sanven Technology Ltd, Suite 250, 9166
Anaheim Place, Rancho Cucamonga, CA 91730
REP
EC
SHUNSHUN GmbH
Römeräcker 9 Z2021, 76351
Linkenheim-Hochstetten, Germany
REP
UK
Pooledas Group Ltd
Unit 5 Albert Edward House, The
Pavilions Preston, United Kingdom
Gemaakt in China


Tecnico Supporto e certificato di garanzia elettronica
www.vevor.com/support
ISTRUZIONI PER L'INSTALLAZIONE
PER RUBINETTO PRELAVAGGIO
We continue to be committed to provide you tools with competitive price.
"Save Half", "Half Price" or any other similar expressions used by us only represents an
estimate of savings you might benefit from buying certain tools with us compared to the major
top brands and does not necessarily mean to cover all categories of tools offered by us. You
are kindly reminded to verify carefully when you are placing an order with us if you are
actually saving half in comparison with the top major brands.


Nota: il prodotto viene utilizzato per illustrare l'installazione .Il
tuo prodotto potrebbe essere diverso ma il metodo di
installazione è lo stesso
Have product questions? Need technical support? Please feel free to
contact us:
Technical Support and E-Warranty Certificate
www.vevor.com/support
NEED HELP? CONTACT US!
Preflush faucet

This is the original instruction, please read all manual instructions
carefully before operating. VEVOR reserves a clear interpretation of our
user manual. The appearance of the product shall be subject to the
product you received. Please forgive us that we won't inform you again if
there are any technology or software updates on our product.
PARAMETER LIST
modello
zona di
sbocco
dimensione del prodotto
(mm)
peso netto (kg)
5803A-12-21
/
ventuno pollice
530*320*520
4.3
5803A-12-25
/
25 pollice 530*320*600
4.2
5803A-12-36
/
36 pollice 530*320*915
5.0
3803A-12-44
/
44 pollice 530*320*1050
4.8
3803A-12-47
/
47 pollice 530*320*1130
4.9
3804A-12-26
/
26 pollice 530*320*690
4.3
3804A-12-44
/
44 pollice 530*320*1080
4.8
PART LIST
1.1 Elenco dei componenti dei rubinetti con prelavaggio con montaggio a
parete/su piano
NO
NOME DELLA PARTE
IMMAGINE
QUA
NTIT
À

1
Valvola di spruzzatura
1
2
Tubo piegato
1
3
Tubo montante
1
4
Supporto a parete
1
5
Anello della valvola di
spruzzatura
1
6
Corpo delle dita
1
7
Corpo del rubinetto
( Wall Mount )
( Montaggio su ponte )
1

8
Beccuccio aggiuntivo
1
9
Pezzi di ricambio per
guarnizioni
2
SECURITY & WARNINGS
AVVERTENZA: leggere e comprendere questo manuale prima di
assemblare , installare, utilizzare o sottoporre a manutenzione
questo prodotto. La mancata osservanza di queste avvertenze e
istruzioni può causare lesioni personali o danni a proprietà di
valore.
del tubo con acidi, alcali, olio, solventi organici e infiammabili e
materiali esplosivi è severamente proibito. Il rubinetto di
prelavaggio non deve entrare in contatto diretto con oggetti con
bordi taglienti.
2. Quando si maneggiano i rubinetti pre- risciacquo , non
dovrebbero esserlo
È necessario evitare danni accidentali al rubinetto di
prerisciacquo .
3. Quando si ripongono i rubinetti pre- risciacquo , non
dovrebbero venire
a contatto con acidi, alcali, oli, solventi organici o altri liquidi o
gas corrosivi.
4. Questo prodotto non è un giocattolo. Il rubinetto pre- risciacquo
non può essere utilizzato come giocattolo per bambini.

ASSEMBLY PRECAUTIONS
1.Si prega di assemblare il prodotto attenendosi scrupolosamente alle
istruzioni. Un assemblaggio errato potrebbe essere pericoloso.
2. Indossare correttamente occhiali protettivi e guanti da lavoro durante il
montaggio.
3. Non montare il prodotto quando si è stanchi o sotto l'influenza di alcol,
droghe o farmaci.
4. I parametri del prodotto si applicano solo al prodotto correttamente e
completamente assemblato.
PRODUCT ASSEMBLY
1. Disegno esploso delle unità di rubinetteria con prelavaggio per
montaggio a parete.

A: 21*15*3,2 B: 17*8,4*4,5 C: 16,5*11,1*3,1 D: 15*12,8*9,5*5,5
Descrizione:
ABCD è un sigillo che è stato utilizzato per il prelavaggio del
rubinetto sul prodotto.
2. Disegno esploso dei rubinetti con prelavaggio per montaggio su piano

A: 21*15*3,2 B: 17*8,4*4,5 C: 16,5*11,1*3,1 D: 15*12,8*9,5*5,5
Descrizione:
ABCD è un sigillo che è stato utilizzato per il prelavaggio del
rubinetto sul prodotto.
3. Procedura di installazione:

INSTALLATION ADJUSTMENT
Istruzioni generali
· Chiudere l'alimentazione idrica della fonte principale
· Stringere tutte le parti a mano prima di serrarle con una chiave. Non
forzare le parti.
· Maneggiare con cura la superficie elettrolitica; fare attenzione che la
superficie non venga graffiata da attrezzi.
· Tutti i rubinetti con montaggio a parete hanno un ingresso flangiato
femmina G 1/2 (12 NPSM).
1. Assemblaggio del corpo del rubinetto
· L'interasse può essere regolato tra 8 (”203mm)
2. Installa il rubinetto su un lavello commerciale
· I depositi di calcare derivanti dall'acqua potrebbero interrompere
l'erogazione dell'acqua
· Praticare due fori con un diametro compreso tra circa 1" e 1-1/4" sul lato
posteriore del serbatoio dell'acqua. E la distanza tra i due fori deve essere
di 8 "

Nota:
Il metodo di installazione dei due prodotti è lo stesso, l'immagine è un
diagramma schematico e il prodotto è soggetto all'oggetto fisico
3. Montare il rubinetto a parete direttamente sul rubinetto a parete.
· Montare le flange eccentriche femmina con connettore G 1 /2"
all'ingresso dell'acqua
· Posizionare il corpo del rubinetto sulle due flange eccentriche femmine.
Se tu Trovare Se la distanza della flangia non corrisponde al corpo del
rubinetto, è possibile ruotare le due flange eccentriche Trovare la distanza
corretta per montare il corpo del rubinetto.
4. Gruppo del rubinetto di prerisciacquo e della parte aggiuntiva
5. Posizionare l'intera parte del rubinetto di prerisciacquo e la parte

aggiuntiva sul corpo sfaccettato, collegare il tubo da 3" al corpo del
rubinetto, serrare il dado
6. Assemblare il beccuccio aggiuntivo al rubinetto aggiuntivo
7. Regolare la lunghezza della staffa da parete
A.Misurare la lunghezza tra il tubo e il muro
B.Allentare le viti all'estremità
C.Taglia il tubo in ciò che ti serve
D.Stringere la vite quindi montare la parte terminale al muro

TOOLS REQUIRED
Chiave
regolabile
Pinze a perdere
lungo
Chiave
esagonale
Cacciavite a
croce
Q&A
1. D: Perché il rubinetto perde?
R: Una o più guarnizioni mancanti Le guarnizioni sono rotte o non sono
corrette.
(Tutti i connettori sigillati con guarnizioni non devono essere avvitati troppo
stretti durante l'installazione, altrimenti le guarnizioni verranno
danneggiate)
2. Q:Come fare in caso di perdite?
R: Prima di tutto, provare a serrare le connessioni in cui si verificano
perdite. Se non funziona, smontare la posizione di perdita e inserire la
guarnizione corrispondente al suo interno, oppure sostituire la guarnizione
rotta con una nuova.
3. Q: Hai bisogno di nastro adesivo per installare questo rubinetto?
R: Questo rubinetto commerciale è progettato per utilizzare guarnizioni di
tenuta, quindi l'intera installazione del rubinetto non richiede l'uso di nastro
adesivo, altrimenti potrebbero verificarsi perdite.
4. Q:Distanza del foro centrale?
A: Come rubinetti con montaggio a parete con centri regolabili da 8", come
regolare È possibile regolare la dimensione del foro centrale regolando la
flangia eccentrica femmina , come mostrato di seguito.
5. Q: Come ottenere i pezzi di ricambio?
R: Puoi contattare il rivenditore per acquistare pezzi di ricambio.

Indirizzo: Baoshanqu Shuangchenglu 803long 11hao 1602A-1609shi
Shanghai
Importato negli Stati Uniti: Sanven Technology Ltd, Suite 250, 9166
Anaheim Place, Rancho Cucamonga, CA 91730
REP
EC
SHUNSHUN GmbH
Römeräcker 9 Z2021, 76351
Linkenheim-Hochstetten, Germany
REP
UK
Pooledas Group Ltd
Unit 5 Albert Edward House, The
Pavilions Preston, United Kingdom
Made in China


Techniczny Certyfikat wsparcia i e-gwarancji
www.vevor.com/support
INSTRUKCJA MONTAŻU
DO KRANU WSTĘPNEGO SPŁUKIWANIA
We continue to be committed to provide you tools with competitive price.
"Save Half", "Half Price" or any other similar expressions used by us only represents an
estimate of savings you might benefit from buying certain tools with us compared to the major
top brands and does not necessarily mean to cover all categories of tools offered by us. You
are kindly reminded to verify carefully when you are placing an order with us if you are
actually saving half in comparison with the top major brands.

Uwaga: Produkt służy do zilustrowania instalacji .Twój produkt
może być inny , ale metoda instalacji jest taka sama
Have product questions? Need technical support? Please feel free to
contact us:
Technical Support and E-Warranty Certificate
www.vevor.com/support
NEED HELP? CONTACT US!
This is the original instruction, please read all manual instructions
carefully before operating. VEVOR reserves a clear interpretation of our
user manual. The appearance of the product shall be subject to the
product you received. Please forgive us that we won't inform you again if
there are any technology or software updates on our product.
Preflush faucet

PARAMETER LIST
Model
obszar
wylotu
rozmiar produktu (mm)
masa netto (kg)
5803A-12-21
/
dwadzieścia jeden cal
530*320*520
4.3
5803A-12-25
/
25 cal 530*320*600
4.2
5803A-12-36
/
36 cal 530*320*915
5,0
3803A-12-44
/
44 cal 530*320*1050
4.8
3803A-12-47
/
47 cal 530*320*1130
4.9
3804A-12-26
/
26 cal 530*320*690
4.3
3804A-12-44
/
44 cal 530*320*1080
4.8
PART LIST
1.1 Lista części baterii do montażu naściennego/stojącego
NIE
CZĘŚCIOWE IMIĘ
ZDJĘCIE
ILO
ŚĆ
1
Zawór natryskowy
1
2
Wygięta rura
1
3
Rura pionowa
1
4
Wspornik ścienny
1
5
Pierścień zaworu
natryskowego
1
6
Ciało palca
1
7
Korpus kranu
( Mocowanie ścienne )
( montaż na pokładzie )
1
8
Dodatkowa wylewka
1
9
Części zamienne do
uszczelek
2

SECURITY & WARNINGS
OSTRZEŻENIE: Przeczytaj i zrozumiej niniejszą instrukcję przed
montażem , instalacją, obsługą lub serwisowaniem tego produktu.
Niezastosowanie się do tych ostrzeżeń i instrukcji może
spowodować obrażenia ciała lub uszkodzenie cennego mienia.
1. Mieszanie węża z kwasem, zasadą, olejem, rozpuszczalnikiem
organicznym i materiałem łatwopalnym i materiałów wybuchowych
jest surowo zabronione.Kran do spłukiwania wstępnego nie
powinien bezpośrednio stykać się z towarami o ostrych
krawędziach.
2. Podczas obsługi kranów do spłukiwania wstępnego nie powinno
tak być
należy zapobiegać przypadkowemu uszkodzeniu kranu
spłukiwania wstępnego .
3. Podczas przechowywania kranów ze spłuczką wstępną nie
powinny one przychodzić
w kontakcie z kwasami, zasadami, olejami, rozpuszczalnikami
organicznymi lub innymi żrącymi cieczami lub gazami.
4. Ten produkt nie jest zabawką. Kran do spłukiwania wstępnego
nie może być używany jako zabawka dla dzieci.
ASSEMBLY PRECAUTIONS
1. Prosimy o złożenie produktu ściśle według instrukcji. Nieprawidłowy
montaż może być niebezpieczny.
2. Podczas montażu należy nosić okulary ochronne i rękawice robocze.
3. Nie montuj produktu będąc zmęczonym lub pod wpływem alkoholu,

narkotyków lub leków.
4. Parametry produktu odnoszą się wyłącznie do produktu prawidłowo i
całkowicie zmontowanego.
PRODUCT ASSEMBLY
1. Rysunek rozłożony na części kranów do montażu ściennego ze
spłuczką wstępną.

Odp.: 21*15*3,2 B: 17*8,4*4,5 C: 16,5*11,1*3,1 D: 15*12,8*9,5*5,5
Opis:
ABCD to uszczelka, która została umieszczona na kranu Preflush na
produkcie.
2. Rysunek rozłożony na części baterii ze spłuczką wstępną do montażu
na blacie

Odp.: 21*15*3,2 B: 17*8,4*4,5 C: 16,5*11,1*3,1 D: 15*12,8*9,5*5,5
Opis:
ABCD to uszczelka, która została umieszczona na kranu Preflush na
produkcie.
3. Procedura instalacji:

INSTALLATION ADJUSTMENT
Ogólne instrukcje
· Zamknąć dopływ wody z głównego źródła
· Dokręcić wszystkie części ręcznie przed dokręceniem kluczem. Nie
dokręcać części na siłę.
· Ostrożnie obchodzić się z powierzchnią galwaniczną, uważając, aby nie
zarysować powierzchni narzędziami.
· Wszystkie baterie do montażu na ścianie mają wlot z kołnierzem żeńskim
G 1/2 (12 NPSM).
1. Zespół korpusu kranu
· Odległość od środka można regulować w zakresie 8 (”203 mm)
2. Zainstaluj kran na zlewie komercyjnym
· Osad kamienia z wody może odciąć dopływ wody
· Wywierć dwa otwory o średnicy od około 1" do 1-1/4" w tylnej części
zbiornika na wodę . Odległość pomiędzy dwoma otworami musi wynosić 8"
Notatka:
Metoda instalacji dwóch produktów jest taka sama, obraz jest
schematem, a produkt podlega obiektowi fizycznemu
3. Zamontuj baterię ścienną bezpośrednio na baterii ściennej.
· Zamontuj żeńskie kołnierze mimośrodowe ze złączem G 1/2" na wlocie
wody
· Umieść korpus kranu na dwóch żeńskich kołnierzach mimośrodowych.
Jeśli ty znajdować że odległość między kołnierzami nie jest dopasowana
do korpusu baterii, można obrócić oba kołnierze mimośrodowe znajdować
odpowiednią odległość do montażu korpusu baterii.
4. Montaż części kranu do spłukiwania wstępnego i części dodatkowej
5. Umieść całą część kranu do spłukiwania wstępnego i część dodatkową
na korpusie, podłącz 3-calową rurkę do korpusu kranu, dokręć nakrętkę

6. Zamontuj dodatkową wylewkę na dodatkowej baterii
7. Wyreguluj długość wspornika ściennego
A. Zmierz długość pomiędzy rurą a ścianą
B. Poluzuj śruby na koń cu
C. Przytnij rurę tak, jak potrzebujesz
D. Dokręć śrubę, a następnie przymocuj część końcową do ściany
TOOLS REQUIRED
Klucz nastawny
Długie szczypce
Klucz
sześciokątny
Śrubokręt
krzyżowy
Q&A
1. P: Dlaczego wyciek z kranu?
Odp.: Brak jednej lub więcej uszczelek. Uszczelki są uszkodzone lub są w
porządku.
(Wszystkie złącza uszczelnione uszczelkami nie powinny być dokręcone
zbyt mocno podczas montażu, w przeciwnym razie uszczelki ulegną
uszkodzeniu)
2. P: Jak postępować w przypadku wycieku?
Odp.: Przede wszystkim spróbuj dokręcić połączenia w miejscach
nieszczelności.Jeśli to nie pomoże, zdemontuj miejsce wycieku i włóż w
nie odpowiednią uszczelkę lub wymień uszkodzoną uszczelkę na nową.
3. P: Czy do zainstalowania tego kranu potrzebujesz taśmy wodnej?
Odp.: Ten komercyjny kran został zaprojektowany tak, aby można było
zastosować uszczelki do uszczelnienia, więc cała instalacja kranu nie
wymaga użycia taśmy wodnej, w przeciwnym razie może przeciekać.
4. P: odległość od środkowego otworu?
Odp.: Podobnie jak w przypadku kranów ściennych z regulowanym
środkiem 8 cali. Jak wyregulować Rozmiar otworu centralnego można
wyregulować, regulując żeński kołnierz mimośrodowy , jak pokazano

poniżej.
5. P: Jak zdobyć części zamienne?
Odp.: Możesz skontaktować się ze sprzedawcą w celu zakupu części
zamiennych.

Adres: Baoshanqu Shuangchenglu 803long 11hao 1602A-1609shi
Szanghaj
Import do USA: Sanven Technology Ltd, Suite 250, 9166 Anaheim Place,
Rancho Cucamonga, CA 91730
REP
EC
SHUNSHUN GmbH
Römeräcker 9 Z2021, 76351
Linkenheim-Hochstetten, Germany
REP
UK
Pooledas Group Ltd
Unit 5 Albert Edward House, The
Pavilions Preston, United Kingdom
Wyprodukowano w Chinach


Teknisk Support och e-garanticertifikat
www.vevor.com/support
NSTALLATIONSINSTRUKTIONER
FÖR PREFLUSH KRAN
We continue to be committed to provide you tools with competitive price.
"Save Half", "Half Price" or any other similar expressions used by us only represents an
estimate of savings you might benefit from buying certain tools with us compared to the major
top brands and does not necessarily mean to cover all categories of tools offered by us. You
are kindly reminded to verify carefully when you are placing an order with us if you are
actually saving half in comparison with the top major brands.


Obs: Produkten används för att illustrera installationen .Din
produkt kan vara annorlunda men
installationsmetoden är sa m
Have product questions? Need technical support? Please feel free to
contact us:
Technical Support and E-Warranty Certificate
www.vevor.com/support
NEED HELP? CONTACT US!
Preflush faucet
This is the original instruction, please read all manual instructions
carefully before operating. VEVOR reserves a clear interpretation of our
user manual. The appearance of the product shall be subject to the
product you received. Please forgive us that we won't inform you again if
there are any technology or software updates on our product.
PARAMETER LIST
modell
utloppsområde
produktstorlek (mm)
nettovikt (kg)
5803A-12-21
/
tjugoett tum
530*320*520
4.3
5803A-12-25
/
25 tum 530*320*600
4.2
5803A-12-36
/
36 tum 530*320*915
5.0
3803A-12-44
/
44 tum 530*320*1050
4.8
3803A-12-47
/
47 tum 530*320*1130
4.9
3804A-12-26
/
26 tum 530*320*690
4.3
3804A-12-44
/
44 tum 530*320*1080
4.8
PART LIST
1.1 Väggmonterad / däcksmonterad reservdelslista för förspolade
kranenheter
Nej
DELNAMN
BILD
ANT
AL

1
Sprayventil
1
2
Böjt rör
1
3
Stigrör
1
4
Väggfäste
1
5
Sprayventilring
1
6
Fingerkropp
1
7
Krankropp
( Väggfäste )
( Däckmonterad )
1

8
Tilläggspip
1
9
Packning reservdelar
2
SECURITY & WARNINGS
VARNING: Läs och förstå denna bruksanvisning innan du
monterar , installerar, använder eller servar denna produkt.
Underlåtenhet att följa dessa varningar och instruktioner kan
orsaka personskador eller skada värdefull egendom.
1. Blanda slangen med syra, alkali, olja, organiskt lösningsmedel
och antändning och explosiva material är strängt förbjudet. Pre
flush -kranen bör inte komma i direkt kontakt med varor med
vassa kanter.
2. Vid hantering av Pre- flush kranar bör de inte vara det
släpade var som helst. Oavsiktlig skada på Pre flush kranen bör
förhindras.
3. Vid förvaring av Pre flush kranar bör de inte komma
i kontakt med syror, alkalier, oljor, organiska lösningsmedel eller
andra frätande vätskor eller gaser.
4. Denna produkt är inte en leksak. Pre flush -kranen kan inte
användas som en leksak för barn.
ASSEMBLY PRECAUTIONS
1. Vänligen montera produkten i strikt enlighet med instruktionerna.
Felaktig montering kan vara farligt.
2. Använd skyddsglasögon och arbetshandskar ordentligt under

monteringen.
3. Montera inte produkten när du är trött eller påverkad av alkohol, droger
eller medicin.
4. Produktparametrarna tillämpas endast på den korrekt och
färdigmonterade produkten.
PRODUCT ASSEMBLY
1. Exploderad ritning av väggmonterade preflush kranenheter.
A: 21*15*3,2 B: 17*8,4*4,5 C: 16,5*11,1*3,1 D: 15*12,8*9,5*5,5
Beskrivning:
ABCD är en tätning som har varit Preflush-kran på produkten.
2. Sprängskiss över däckmonterade förspolade kranenheter

A: 21*15*3,2 B: 17*8,4*4,5 C: 16,5*11,1*3,1 D: 15*12,8*9,5*5,5
Beskrivning:
ABCD är en tätning som har varit Preflush-kran på produkten.
3. Installationsprocedur:

INSTALLATION ADJUSTMENT
Generella instruktioner
· Stäng av vattentillförseln till huvudkällan
· Dra åt alla delar för hand innan du drar åt med en skiftnyckel.Tvinga inte
åt delarna.
· Hantera den elektropläterade ytan försiktigt, se upp så att ytan inte repas
av verktyg.
· Alla väggmonterade kranar har ett G 1/2 (12 NPSM ) honflänsinlopp
1. Krankroppsmontering
· Mittavståndet kan justeras mellan 8 (”203 mm)
2. Installera kranen på en kommersiell diskho
· Avlagringar från vatten kan stänga av vattentillförseln
· Borra två hål med en diameter på ca 1" till 1-1/4" på baksidan av
vattentanken . och avståndet mellan de två hålen måste vara 8 "

Notera:
Installationsmetoden för de två produkterna är densamma, bilden är
det schematiska diagrammet och produkten är föremål för det fysiska
objektet
3. Montera den väggmonterade kranen direkt på väggkranen.
· Montera de excentriska honflänsarna med G 1 /2"-kontakten till
vatteninloppet
· Sätt på krankroppen på de två excentriska honflänsarna.
Om du hitta att flänsavståndet inte stämmer överens med krankroppen kan
du vända de två excentriska flänsarna till hitta rätt avstånd för att montera
krankroppen.
4. Förspolning av krandel och tilläggsdel
5. Sätt hela förspolningskrandelen och tilläggsdelen till facettkroppen,
anslut 3"-röret till krankroppen, dra åt muttern
6. Montera tilläggspipen till tilläggskranen
7. Justera längden på väggfästet
A. Mät längden mellan röret och väggen
B. Lossa skruvarna i änden
C. Skär röret i det du behöver
D. Dra åt skruven och montera sedan änddelen på väggen
TOOLS REQUIRED
Skiftnyckel
Long Lose tång
Sexkantnyckel
Kors
skruvmejsel
Q&A
1. F: Varför läcker kranen?
S: En eller flera packningar saknas. Packningarna är trasiga eller felaktiga.
(Alla kopplingar som är tätade med packningar ska inte skruvas för hårt vid
montering, annars skadas packningarna)
2. F: Hur gör man vid läckage?
S: Först och främst, försök att dra åt anslutningarna där det läcker. Om det
inte fungerar, ps demontera läckagepositionen och sätt in motsvarande
packning i den, eller byt ut den trasiga packningen mot en ny.
3. F: Behöver du vattentejp för att installera denna kran?
S: Denna kommersiella kran är designad för att använda packningar för
tätning, så hela kraninstallationen kräver inte användning av vattentejp,
annars kan den läcka.
4. F: mitthålsavstånd?
S: Som 8" justerbara centers väggmonterade kranar, hur man justerar Du
kan justera storleken på mitthålet genom att justera den excentriska
honflänsen, som visas nedan.

5. F: Hur får man reservdelar?
S: Du kan kontakta återförsäljaren för att köpa reservdelar.

Adress: Baoshanqu Shuangchenglu 803long 11hao 1602A-1609shi
Shanghai
Importerad till USA: Sanven Technology Ltd, Suite 250, 9166 Anaheim
Place, Rancho Cucamonga, CA 91730
REP
EC
SHUNSHUN GmbH
Römeräcker 9 Z2021, 76351
Linkenheim-Hochstetten, Germany
REP
UK
Pooledas Group Ltd
Unit 5 Albert Edward House, The
Pavilions Preston, United Kingdom
Tillverkad i Kina


Técnico Certificado de soporte y garantía electrónica
www.vevor.com/support
INSTRUCCIONES DE INSTALACIÓN
PARA GRIFO DE PRELAVADO
We continue to be committed to provide you tools with competitive price.
"Save Half", "Half Price" or any other similar expressions used by us only represents an
estimate of savings you might benefit from buying certain tools with us compared to the major
top brands and does not necessarily mean to cover all categories of tools offered by us. You
are kindly reminded to verify carefully when you are placing an order with us if you are
actually saving half in comparison with the top major brands.


Nota: El producto se utiliza para ilustrar la instalación. .Su
producto puede ser diferente pero El método de
instalación es el mismo .
Have product questions? Need technical support? Please feel free to
contact us:
Technical Support and E-Warranty Certificate
www.vevor.com/support
NEED HELP? CONTACT US!
Preflush faucet
This is the original instruction, please read all manual instructions
carefully before operating. VEVOR reserves a clear interpretation of our
user manual. The appearance of the product shall be subject to the
product you received. Please forgive us that we won't inform you again if
there are any technology or software updates on our product.
PARAMETER LIST
modelo
zona de
salida
Tamaño del producto
(mm)
peso neto (kg)
5803A-12-21
/
veintiuno pulgada
530*320*520
4.3
5803A-12-25
/
25 pulgada
530*320*600
4.2
5803A-12-36
/
36 pulgada
530*320*915
5.0
3803A-12-44
/
44 pulgada
530*320*1050
4.8
3803A-12-47
/
47 pulgada
530*320*1130
4.9
3804A-12-26
/
26 pulgada
530*320*690
4.3
3804A-12-44
/
44 pulgada
530*320*1080
4.8
PART LIST
1.1 Lista de piezas de las unidades de grifería con prelavado para montaje
en pared o en cubierta
No
NOMBRE DE LA PARTE
IMAGEN
CAN
TID
AD
1
Válvula de pulverización
1
2
Tubo doblado
1
3
Tubo ascendente
1
4
Soporte de pared
1
5
Anillo de válvula de
pulverización
1
6
cuerpo del dedo
1
7
Cuerpo del grifo
( Montaje en pared )
( Montaje en cubierta )
1

8
Boquilla adicional
1
9
Piezas de repuesto para
juntas
2
SECURITY & WARNINGS
ADVERTENCIA: Lea y comprenda este manual antes de
ensamblar , instalar, operar o dar servicio a este producto. El
incumplimiento de estas advertencias e instrucciones puede
causar lesiones personales o daños a propiedades valiosas.
1. Mezclar la manguera con ácido, álcali, aceite, solvente
orgánico e inflamable . y materiales explosivos está estrictamente
prohibido. El grifo de descarga previa no debe entrar en contacto
directo con productos con bordes afilados.
2. Al manipular grifos de descarga previa , no deben
Se debe evitar que se dañe accidentalmente el grifo de
predescarga .
3. Cuando guarde los grifos con predescarga , no deben salir
en contacto con ácidos, álcalis, aceites, disolventes orgánicos u
otros líquidos o gases corrosivos.
4. Este producto no es un juguete. El grifo de descarga previa no
se puede utilizar como juguete para niños.
ASSEMBLY PRECAUTIONS
1. Ensamble el producto estrictamente de acuerdo con las instrucciones.
El ensamblaje incorrecto podría ser peligroso.

2. Utilice gafas de seguridad y guantes de trabajo correctamente durante
el montaje.
3. No monte el producto cuando esté cansado o bajo la influencia de
alcohol, drogas o medicamentos.
4. Los parámetros del producto se aplican únicamente al producto
ensamblado de forma adecuada y completa.
PRODUCT ASSEMBLY
1.Dibujo despiezado de unidades de grifos con descarga previa de
montaje en pared.

A: 21*15*3,2 B: 17*8,4*4,5 C: 16,5*11,1*3,1 D: 15*12,8*9,5*5,5
Descripción:
ABCD es un sello que se ha colocado previamente en el grifo del
producto.
2. Dibujo despiezado de unidades de grifos de prelavado para montaje en
plataforma

A: 21*15*3,2 B: 17*8,4*4,5 C: 16,5*11,1*3,1 D: 15*12,8*9,5*5,5
Descripción:
ABCD es un sello que se ha colocado previamente en el grifo del
producto.
3. Procedimiento de instalación:

INSTALLATION ADJUSTMENT

Instrucciones generales
· Cerrar el suministro de agua de la fuente principal.
· Apriete todas las piezas a mano antes de apretarlas con una llave. No
fuerce las piezas para apretarlas más.
· Manipule la superficie galvanizada con cuidado, tenga cuidado de que la
superficie no se raye con herramientas.
· Todos los grifos de montaje en pared tienen una entrada con brida
hembra G 1/2 (12 NPSM)
1. Conjunto del cuerpo del grifo
· La distancia central se puede ajustar entre 8 (“203 mm)
2. Instale el grifo en un fregadero comercial.
· Los depósitos de sarro provenientes del agua pueden cortar el suministro
de agua.
· Taladre dos orificios con un diámetro de aproximadamente 1" a 1-1/4" en
el respaldo del tanque de agua y la distancia entre los dos orificios debe
ser de 8"
Nota:
El método de instalación de los dos productos es el mismo, la
imagen es el diagrama esquemático y el producto está sujeto al
objeto físico.
3. Monte el grifo de pared directamente en el grifo de pared.
· Montar las Bridas Excéntricas Hembra con Conector G 1 /2" a la entrada
de agua
· Coloque el cuerpo del grifo en las dos Bridas Excéntricas Hembra.
Si usted encontrar Si la distancia de la brida no coincide con el cuerpo del
grifo, puede girar las dos bridas excéntricas para encontrar la distancia
correcta para ensamblar el cuerpo del grifo.
4. Conjunto de pieza adicional y pieza de grifo de descarga previa

5. Coloque toda la parte del grifo de prelavado y la parte adicional en el
cuerpo de la faceta, conecte el tubo de 3" al cuerpo del grifo y apriete la
tuerca.
6. Ensamble la boquilla adicional al grifo adicional
7. Ajuste la longitud del soporte de pared.
A.Mida la longitud entre la tubería y la pared.
B.Afloje los tornillos al final.
C. Corta la tubería en lo que necesitas.

D.Apriete el tornillo y luego monte la parte final en la pared.
TOOLS REQUIRED
Llave ajustable
Alicates de
pérdida larga
Llave hexagonal
Destornillador
cruzado
Q&A
1. P: ¿Por qué el grifo tiene fugas?
R: Faltan una o más juntas. Las juntas están rotas o son correctas.
(Todos los conectores sellados con juntas no deben atornillarse
demasiado durante la instalación, de lo contrario las juntas se dañarán)
2. P: ¿Cómo hacerlo cuando hay una fuga?
R: En primer lugar, intente apretar las conexiones donde hay fugas. Si no
funciona, desmonte la posición de fuga y coloque la junta correspondiente
en ella, o reemplace la junta rota por una nueva.
3. P: ¿Necesita cinta de agua para instalar este grifo?
R: Este grifo comercial está diseñado para usar juntas como sello, por lo
que toda la instalación del grifo no requiere el uso de cinta de agua, de lo
contrario puede haber fugas.
4. P: ¿Distancia del orificio central?
R: Como grifos de montaje en pared con centros ajustables de 8", cómo
ajustarlo. Puede ajustar el tamaño del orificio central ajustando la brida
excéntrica hembra , como se muestra a continuación.

5. P: ¿Cómo conseguir repuestos?
R: Puede comunicarse con el distribuidor para comprar repuestos.

Dirección: Baoshanqu Shuangchenglu 803long 11hao 1602A-1609shi
Shanghai
Importado a EE. UU.: Sanven Technology Ltd, Suite 250, 9166 Anaheim
Place, Rancho Cucamonga, CA 91730
REP
EC
SHUNSHUN GmbH
Römeräcker 9 Z2021, 76351
Linkenheim-Hochstetten, Germany
REP
UK
Pooledas Group Ltd
Unit 5 Albert Edward House, The
Pavilions Preston, United Kingdom
Hecho en china