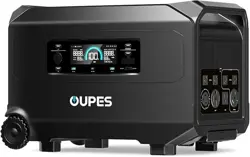
User Manual
1200W Portable Power Station
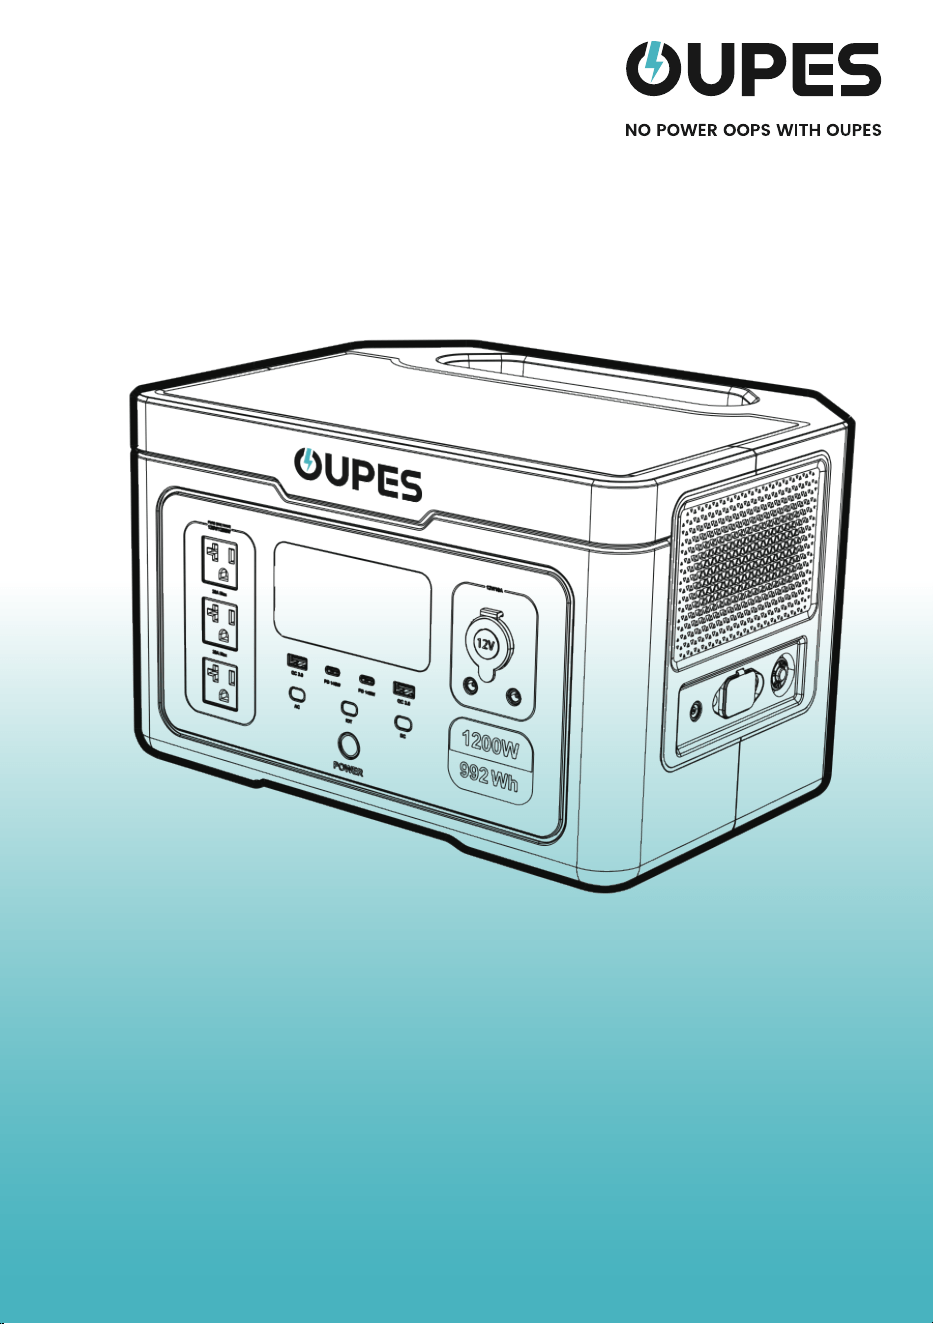
Exodus 1200


Contents
01
02-04
02
03
04
05-06
07-09
07-08
08
09
10-12
10
10
11
11-12
13-14
15
16
17
Product List
Product Description
Specifications
Function Description
LCD Screen
Instructions for Use
Recharge Methods
AC Charging
Solar Charging
Car Charging
Other Functions
Boost Mode
Frequency Switching
AC Input Overload Protection
EPS Mode
Error Code & Trouble Shooting
Storage and Maintenance
FAQ(Frequently Asked Question)
certification and Compliance

Before using this product, please read this user manual carefully to ensure that you
fully understand the product and can use it correctly. After reading this user manual,
please keep it in a safe place for future reference. Improper use of this product may
cause serious injury to yourself or others, or result in product damage and property
loss. By using this product, you are deemed to have understood, recognize and
accepted all the terms and contents of this document. The Company shall not be
responsible for any damages caused by the user's failure to use this product in
accordance with this user manual.
In accordance with laws and regulations, the Company reserves the right of final
interpretation of this document and all documents related to this product. This
document is subject to change, update, revision or termination without notice.
Please visit our website for the latest product information.
●The Company is not responsible for any damage caused by force injury (e.g. fire,
typhoon, flood, earthquake or negligence, abuse or use under other abnormal
circumstances by the customer).
●No compensation for losses caused by the use of non-standard connectors.
●The Company is not responsible for any damage caused by not following the
instructions in the operating instructions.
Disclaimer
01
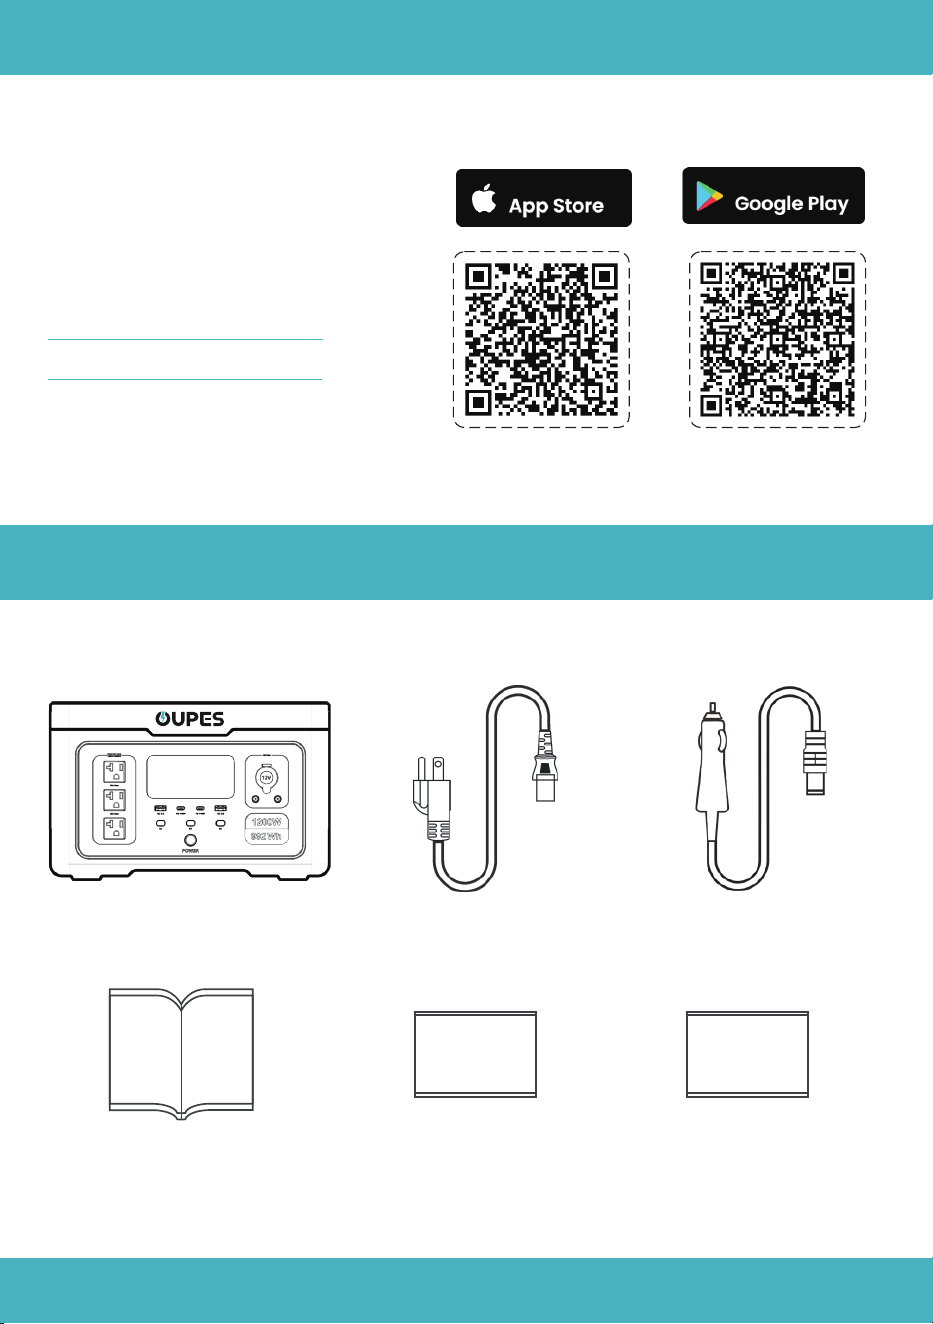
You can connect this product via
APP to view information, control the
device and personalize settings.
Scan the QR code to down-
load our Smart Control APP.
Power Station*1 AC Charging Cable*1 7909-Car Charging Cable*1
What's in the Box
APP
Available On
Available On
User Manual*1
Warranty Card*1 Brand Card*1

02
AC Output
DC 12V & Car
Lighter Output
USB-A Output
USB-C Output
Rated Voltage
Rated Power
Boost Mode Power
Peak Power
Rated Voltage
Rated Current
120Vac
1200W
1500W
3600W
Frequency 60Hz
12V
10A
5V/3A; 9V/2A; 12V/1.5A【18W Max】
5V/3A,9V/3A,15V/3A,20V/5A,28V/5A【140W Max】
AC Charge Input
PV Input
90~140Va.c 5A 50/60Hz 300W
12~29Vd.c MPPT: 16~26V 12A 240W Max
Car Charge Input 12~15.5V 8.5A Max
Product Description
Specifications
Output
IP Grade
Working Temperature
IP21
32℉~104℉(0℃~40℃)
Storage Temperature
-4℉~149℉ (-20℃~65℃)
Dimension
Net Weight
14.1*10.7*8.92in (359*271.4*226.7mm)
23.25lb(10.5kg)
Input
Rated Capacity
Rated Voltage
992Wh
32 Vdc
Battery Type
Battery
LiFePO4
03
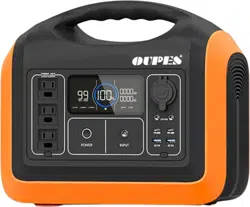
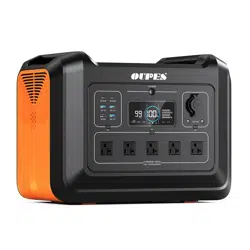
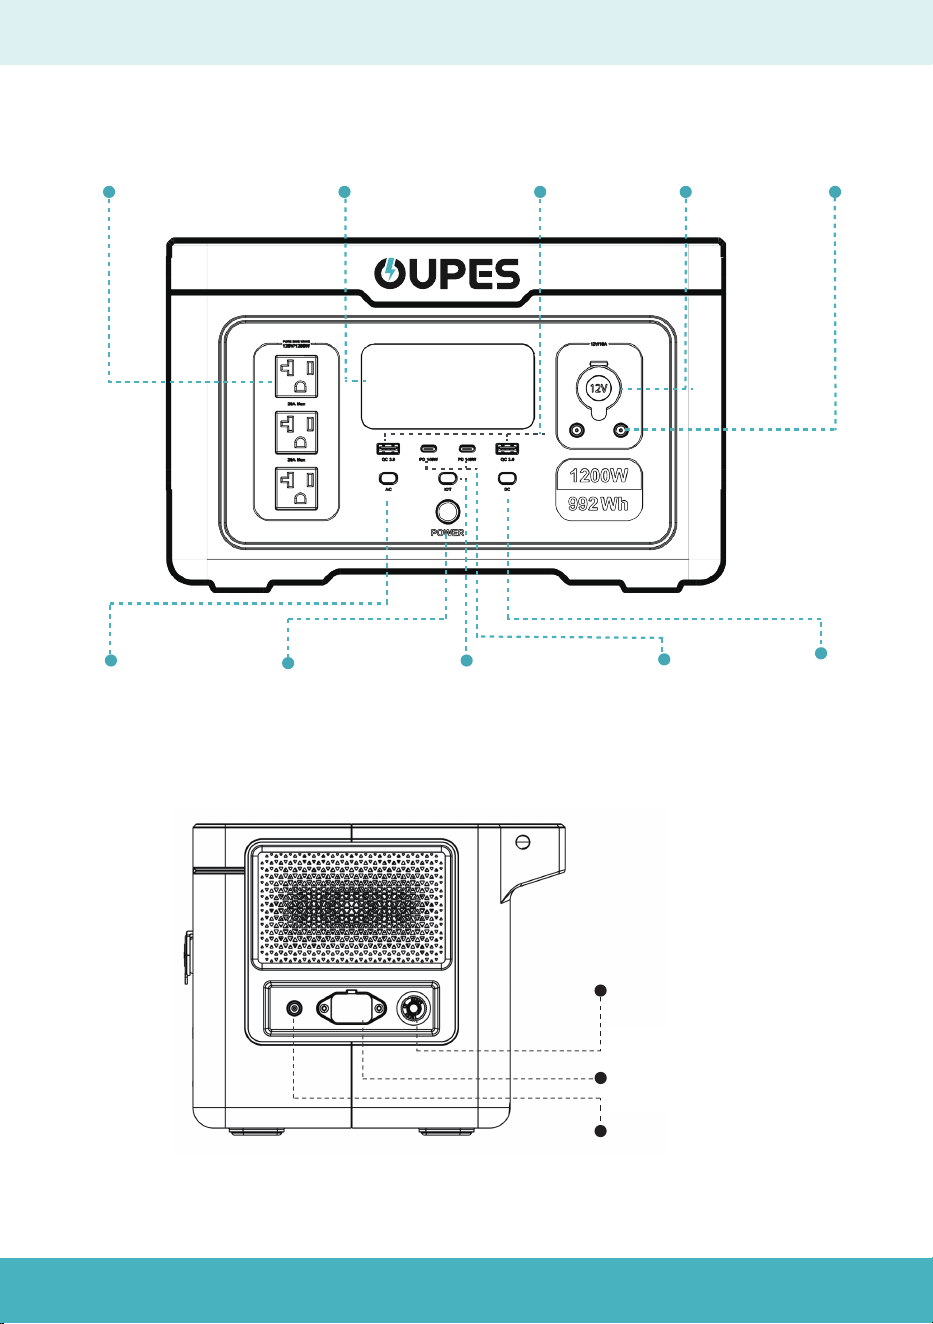
Function Description
Main Power
Button
USB-A
Output Port
LCD Screen
Car Charging
Output Port
DC 5521
Output Port
IOT button USB-C
Output Port
DC Output
Power Button
AC Output
Power Button
AC Output Port
AC Input Over
current Protection
AC Input Port
PV Input Port
04
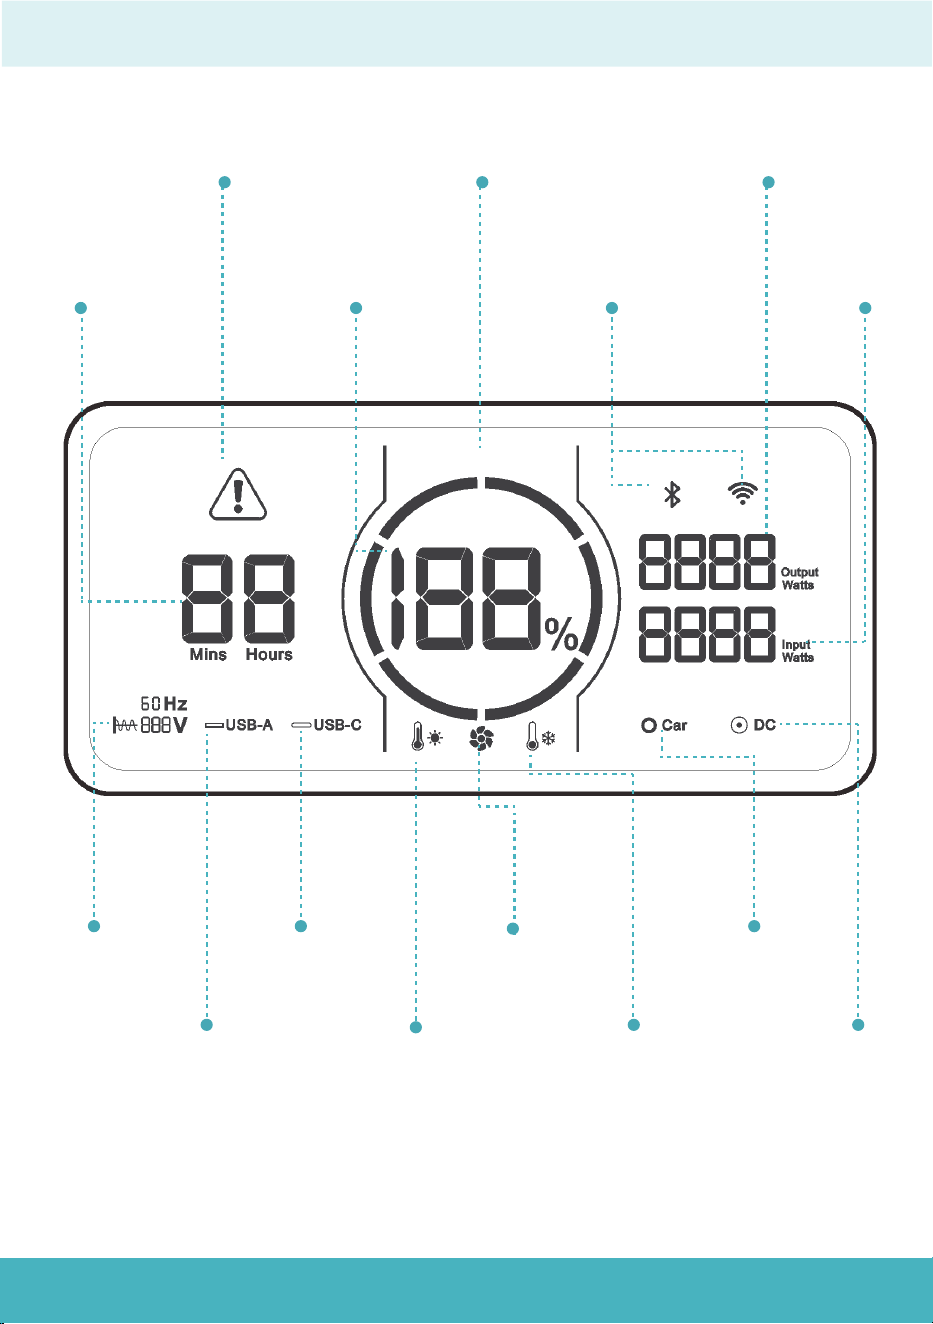
LCD Screen
Remaining
discharge
time display
Error
Warning
Battery
Capacity
Percentage
Battery Capacity
Circle
WiFi&
Bluetooth
Output Power
Display
Input Power
Display
AC Output
Indicator
USB-A
Indicator
USB-C
Indicator
High temperature
protection
Cooling Fan
Low temperature
protection
Car Charging
Port Indicator
DC 5521 port
status

05
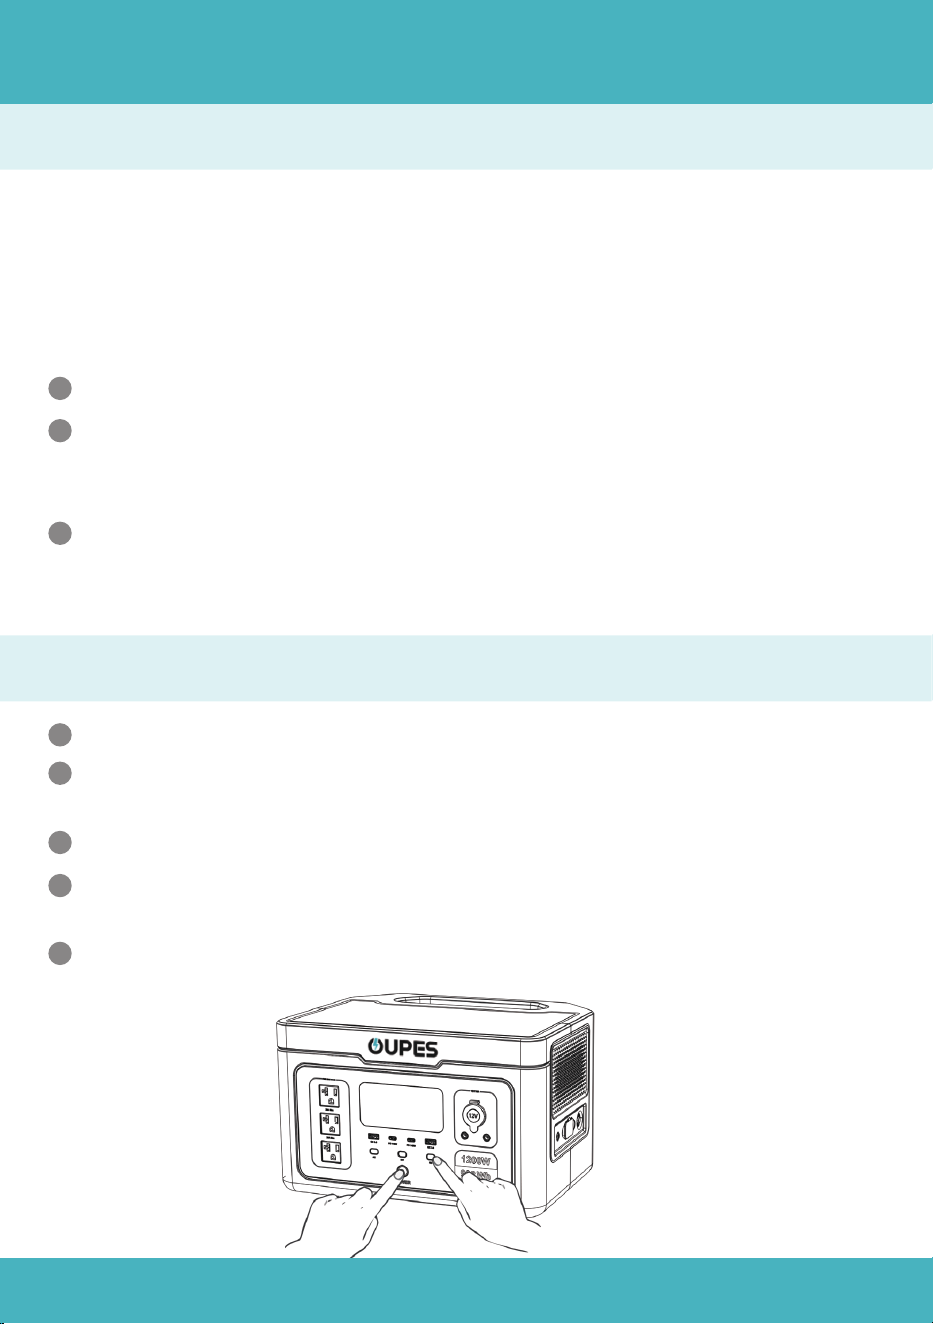
Instructions for use
Note:
Power On:
Power Off:
Main Power:
Main Power:
AC/DC Output Power:
Press and hold the main power button for 3 seconds.
1
The capacity circle and percentage will light up, confirming the screen is
functioning.
2
When the main power is on, press the button for the desired functional area.
Press and hold the main power button for 3 seconds.
Release the button when the screen displays "OFF" and LCD Screen will go out.
1
The corresponding icon on the LCD will light up, indicating the function is active.
2
1
2
AC/DC Output Power:
When the main power is on, press the button again for the desired functional area.
It is recommended to turn off DC and AC output power buttons before turning off
main power button.
Input port on the side of the product functions independently of the main power
button.
The corresponding icon on the LCD will go out, indicating the function is disabled.
1
2
1
2
The button light will light up and switch to a breathing mode.
3
The fan will start for a while and stop because of momentary power, indicating
the power is on.
4
06
LCD Screen
Battery Capacity Circle
Sleep Mode:
Automatic Shut Down:
When the main power is on, short press the main power button, the LCD
Screen will go out, while the power station is still functioning.
1
When the AC/DC output power button is on as well, it will switch to sleep mode
automatically within 5 minutes of inactivity and the LCD screen will automati-
cally go out.
2
When the main power is on, it will automatically shut down after 5 minutes
without operation.
1
When the AC/DC output power button is on as well, it will automatically shut
down after 6 hours without any load connected.
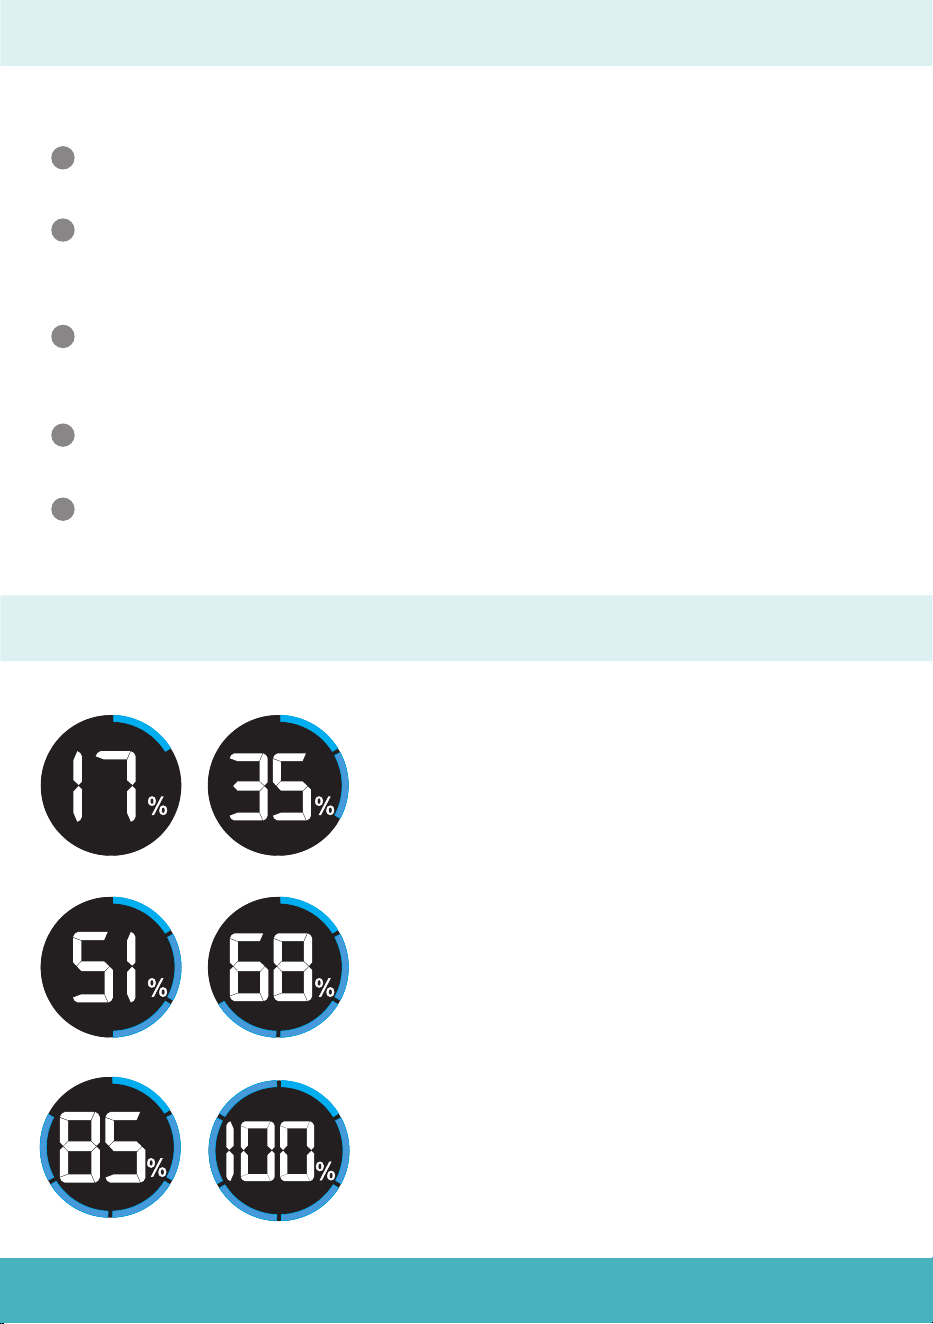
The battery capacity circle indicates the battery
remaining power and is equally divided into six
segments: 17%, 35%, 51%, 68%, 85%, and 100%.
Discharge:The capacity segments will go out
one by one and the rest luminous segments
indicate the remaining capacity.
Charge:The capacity circle will flash clockwise
and the real-time input power is displayed on
the right side of the screen.(Input Watts)
Fully Charged:The Battery Capacity Circle will
remain constant on and the fan icon will go out.
Reminder:Unplug when charging is complete.
2
When the power station is operated, the LCD Screen will light up again.
3

07
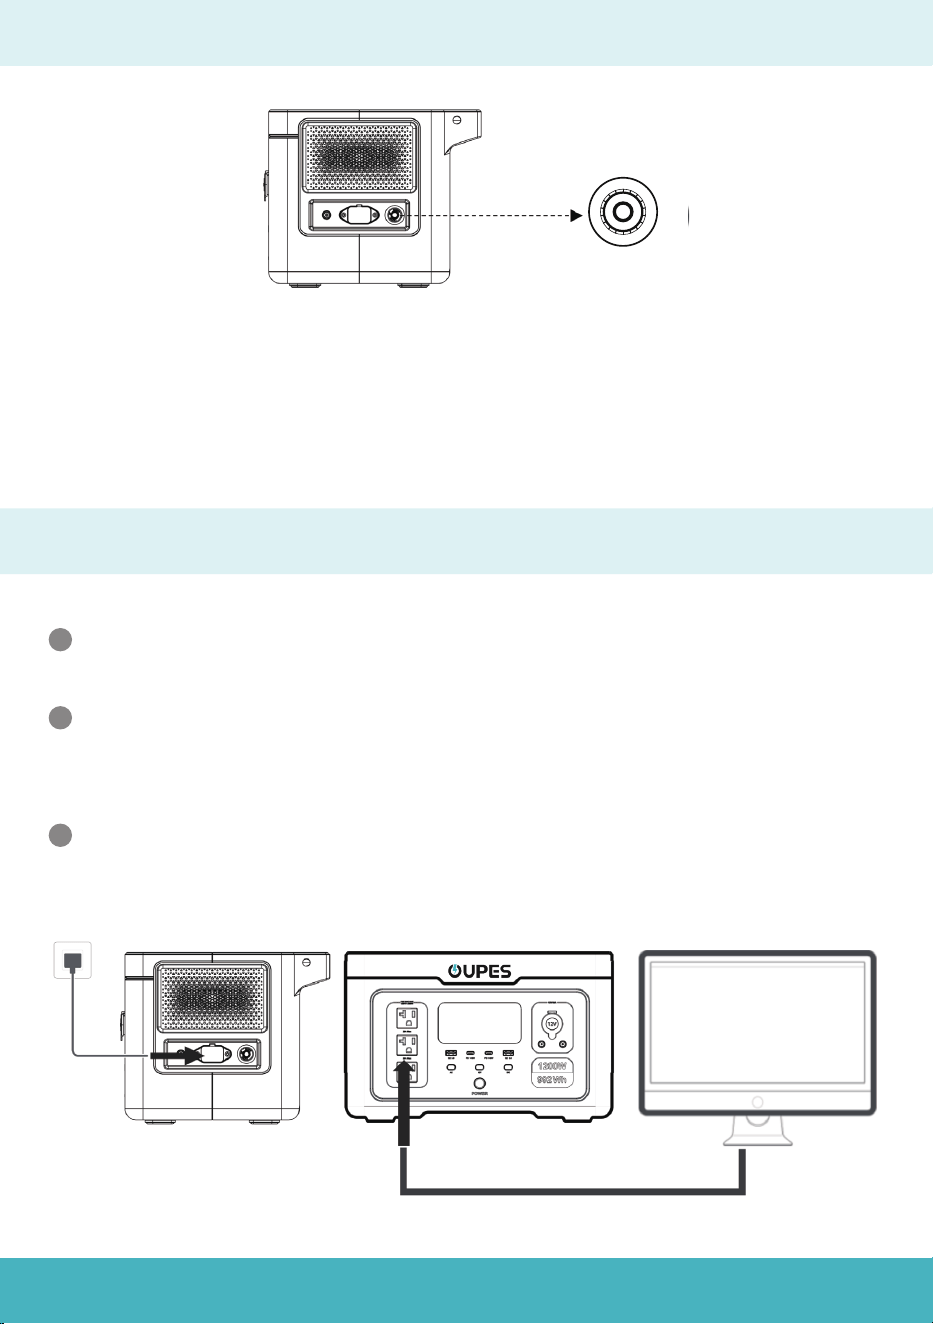
Recharge Methods
AC Charging
Switching Between Fast and Slow Charging
Use the AC charging cable to connect the Exodus 1200 as shown in the above
picture.
1
The input power will be displayed on the screen, showing that the device starts
charging.
2
The device supports up to 600W fast charging only when the battery capac-
ity is under 20%
3
Simultaneously press and hold the IOT button and DC button for 3-5 seconds,
till the word “SET” flashes on the screen.
1
Press IOT button to choose ”L” for 300W slow charging or “H” for 600W fast
charging. And slow charging is recommended for regular use.
2
Long press the main power to confirm, and the abbreviation”SUC” will
appear on the screen.
3
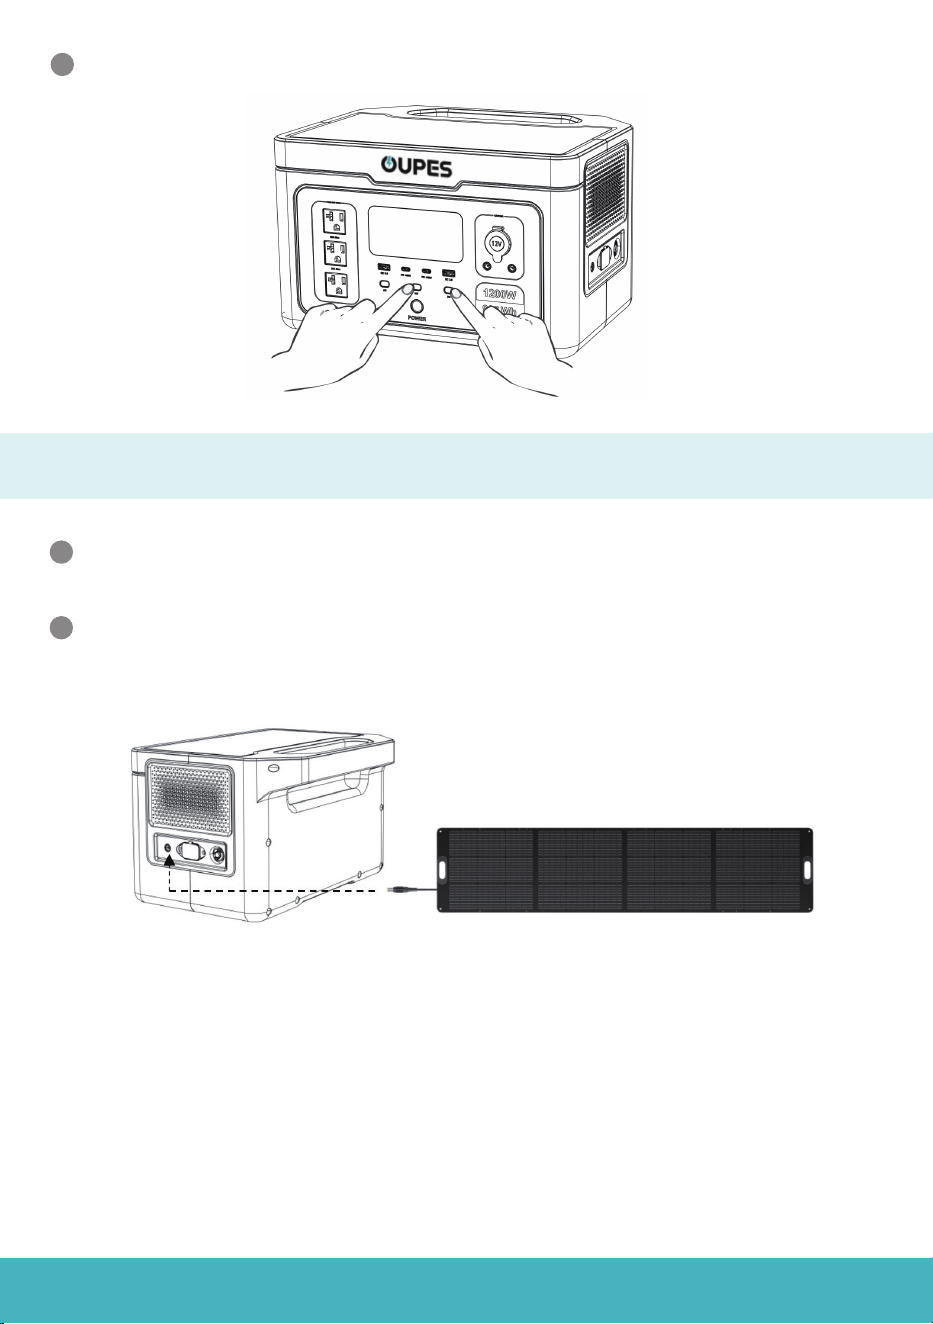
08
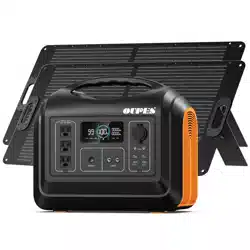
Solar Charging
Notice:
1. Makesurethatthesolarpanelispositionedataperpendicularangletothesun's
raysforthebestsolarenergyconversionefficiency.
2. Beforeconnectingthesolarpanel,confirmthattheopencircuitvoltageofthe
paneliswithin29VtopreventdamagetotheExodus1200.
Connect100Wor240Wsolarpanelchargingcabletothe7909chargingport
ontheExodus1200.OUPESprovides100Wand240Wsolarpanelsaswell.
1
Thecapacitycircleonthescreenwillstartrotating,andtheinputpowerwillbe
displayed,indicatingthatthedeviceischargingviasolarpower.
2
Long press the main power button to exit the setting mode.
4
09
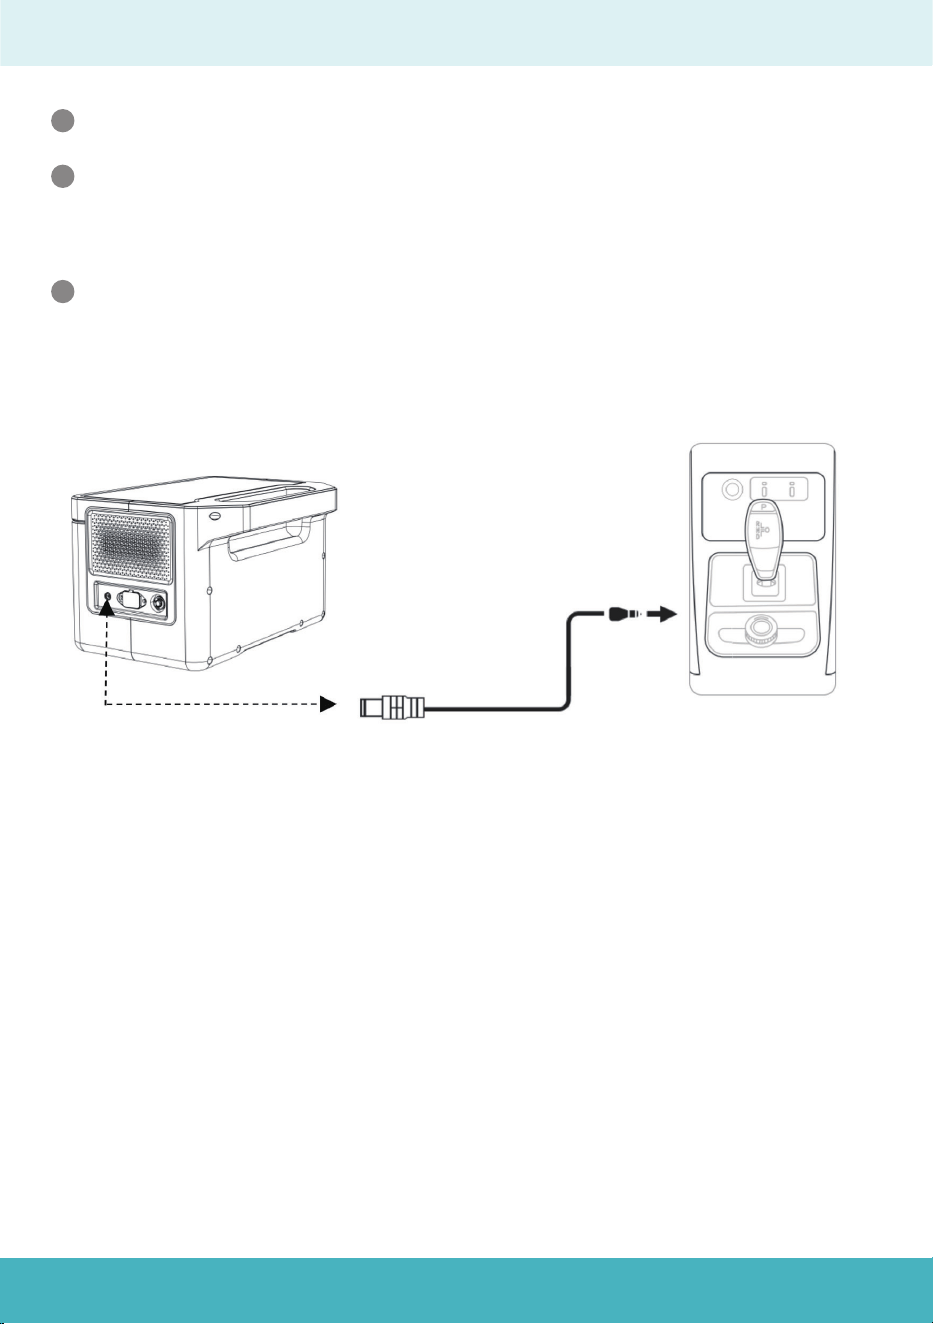
Car Charging
Thecarchargingportsupports15.5V/8.5Acarcharginginputelectricity.
1
Topreventyourcarbatteryfrompowerloss orbeingunabletostart,please
ensurethatthecarisstartedbeforeconnectingcarchargingcabletociga-
rettelighter.
Atthesametime,pleasecheckifthecarchargingportandthecigarette
lighterofthecarcharginginputcableareingoodconnection.Thecompany
shallnotbeheldresponsibleforanylosscausedbynon-compliancewiththe
standardoperation.
2
3
10
To prevent operational failures caused by overload protection, the power station
automatically activates Boost Mode when the total output power exceeds the
rated 1200W output power. This allows the Exodus 1200 to supply power to
high-power units (up to 1500W).
Other Functions
Frequency Switching
Notice:
Turn off the AC output power button.
1
Press DC output power button and main power button at the same time, till
the frequency sign flashes on the screen.
Press AC output power button to choose Frequency.
2
3
Boost Mode is automatically enabled when the power station is powered on.
1
Boost Mode is not available when the AC output is turned on and AC input is
charging at the same time. In this case, the power station is in the bypass
mode.
The boost mode is suitable for most electrical appliances such as heating
and motor-driven equipment, some appliances equipped with voltage
protection like precision instrument are not applicable to the boost mode.
2
3
Long press the main power to confirm, and the abbreviation ”SUC” will appear
on the screen.
4
Long press the main power button to exit the setting mode.
5
Boost Mode
11
EPS(Emergency Power Supply) Function
AC Input Overload Protection
If the AC input receives a continuous current that is greater than 15A, the protector
will blow. And the circuit will be cut off to protect the power station.
Please disconnect all the input connections for safety reason, and make sure the
input current is lower than 15A. Then press the Overload Protection button to
resume charging.
When powered on, the power station supports the EPS(Emergency Power
Supply) function.
1
Connect the power station to the power grid with AC charging cable, while use
the power station to charge your devices. In this case, AC power comes from
the power grid instead of battery itself.
If the power grid suddenly cuts off, the power battery will automatically take
over the charging process within 20ms.
2
3
P
R
E
S
S
O
T
R
E
S
E
T

12
Notice:
1. This is not a professional UPS function and does not support 0ms switching. Thus, do
not connect the Exodus 1200 to equipment requiring an uninterrupted power supply
such as data servers, work station and so on. The company bears no responsibility
for any device malfunction or date loss caused by personal improper operation.
2. It is recommended to charge only one device at a time when you would like to use
EPS function.
3. The total input and output power to the power station should lower than 1200W.
Otherwise, the power station will report an overload code and shut down in 1 minute.
EPS(Emergency Power Supply) Function
13
E000
Error
Code
Solution
Press the AC output power on/off
button for restore.
Error Code & Trouble Shooting
E004
Automatically recovers after
frequency returns to normal
E005
Need to manually press the AC
switch to restore
E011
Need to manually press the DC
switch to restore
E006
Automatically resumes after
temperature returns to normal
E001
The function icon indicates which
path is overloaded. Overload
protection requires manual
recovery. The UPS function is
overloaded at 1200W for 1 second.
E002
Battery capacity below 20%, load
≤300W, restart the corresponding
function button to restore the
function and charge in time.
E003
Need to manually press the AC
switch to restore
E010
Cause
AC output short circuit
protection
Abnormal AC input
frequency
High and low bus
voltage, over-current
Overload and short circuit
of the USB-A port
Inverter over-
temperature
Output overload
protection
AC Battery low voltage
protection
AC output over-voltage
and low voltage
protection
Cigarette lighter port
overload
Need to manually press the AC
switch to restore
Status
Flashing, no output
Flashing, no output
Flashing, no
output at all ports
Flashing, no output
at all ports
Flashing, no output
at all ports
The corresponding
function icon flashes
and the corresponding
port has no output.
Flashing, no output
at all ports
+
+
+
Flashing, no
output
Flashing, no output
+
+
+
+
+
14
Error
Code
Solution
E012
Need to manually press the DC
switch to restore
Error Code & Trouble Shooting
E013
Restart the corresponding function
button to restore the function after
protection and recharge in time
E016
E017
You need to manually press the
DC power button to restore
Need to manually press the main
power button to restore
Check BMS communication cable
E020
E021
Leave the device in place and
wait for the cell voltage to recover
automatically
E022
E023
Connect the AC charging cable
and charge until the voltage
returns to normal
Leave the device in place and
wait for the cell voltage to recover
automatically
E024
E025
Connect the AC charging cable
and charge until the voltage
returns to normal
E026
It will automatically return to
normal when the temperature
returns to normal.
E027
Need to manually press the AC
switch to restore
Cause
Overload and short
circuit of the USB-C
port
DC Discharge Battery
Low Voltage Protection
Over-voltage of the
inverter input battery
Hardware paranoia
anomaly
BMS communica-
tion failure
Battery cell high
voltage alarm
Battery cell low
voltage alarm
High total battery
voltage
Total battery voltage
too low
High temperature of
battery cell
system overload
Low temperature of
battery cell
It will automatically return to
normal when the temperature
returns to normal.
Status
E013 no output at all ports
E016 + Flashing
E017 Flashing
Flashing
E021 Flashing
E022 Flashing, all
outputs off
E023 Flashing, no
output shutdown
Flashing, all outputs off
Flashing, all outputs off
Flashing, no output
at all ports
+
+
AC icon flashing, AC
function off, DC output
normal, AC greater than
1500VA or AC+DC greater
than 1500W
Flashing, all outputs off

15
Storage and Maintenance
Please use a dry, soft, clean cloth or paper towel to gently wipe the product.
1
Please store the power station away from water resources, heat resources,
metal objects and chemical substances.
Store it in a dry, well-ventilated place at room temperature. The recommend-
ed storage temperature is -4℉-149℉ (-20℃-65℃).
2
3
Charge it to around 60% capacity and turn off the product before storing it.
4
For long-term storage, it is recommended to fully discharge and then fully
charge the battery(0%-100%) once every 3 months. And the warranty will be
invalid if the power station has not been charged or discharged in 6 months.
5

16
FAQ(Frequently Asked Question)
1. What type of battery does the product use?
The Exodus 1200 uses high-quality lithium iron phosphate (LiFePO4) batteries.
2. What equipment can be connected to the AC output port?
The AC output port has a rated power of 1200W and a peak power of 3600W, making
it suitable for most household appliances. However, it is recommended to confirm
the power requirements of your appliances and the total power consumption of all
connected devices is below the rated power.
3. How long can the product provide power to my appliance?
The LCD screen displays the estimated runtime based on the current power usage.
For devices with stable power consumption, the estimated runtime will be close to
the time shown on the screen.
4. Can this product be charged using a gasoline or diesel
generator?
Yes, it can be charged with a generator that has a built-in pure sine wave inverter.
The company will not be responsible for any product damage caused by using a
generator without this feature.
5. How can I tell if the product is charging?
When charging, the capacity circle on the LCD screen will rotate, and the input
power will be displayed.
6. Can this product be brought on board a plane?
No, this product cannot be brought on board a plane due to aviation regulations for
lithium-based batteries.
7. Is the actual output capacity of the product the same as
the capacity specified in the user manual?
The capacity shown in the user manual is the rated capacity of the battery pack.
Due to efficiency losses during charging and discharging, the actual output capacity
may be slightly lower than the rated capacity. Please note that in fast charge mode,
it is normal if the product does not charge to 100%.
17
Certification and Compliance
FCC Warning

https://oupes.com