
www.auna-multimedia.com
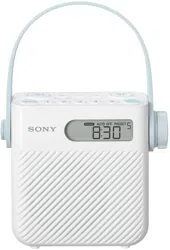
Splash
Duschradio
Shower Radio
Radio de douche
Radio para ducha
Radio da doccia
Doucheradio
10037795 10037796 10037797


3
DE
Technische Daten 4
Sicherheitshinweise 5
Geräteübersicht 8
Erste Schritte 10
CD Operation 11
USB 13
DAB-Radio/Bedienung 14
FM-Radio 17
Alarm- und Timereinstellung 19
BT-Bedienung 21
Spezielle Entsorgungshinweise für Verbraucher in Deutschland 22
Hinweise zur Entsorgung 24
Konformitätserklärung 24
INHALT
Sehr geehrter Kunde,
wir gratulieren Ihnen zum Erwerb Ihres Gerätes.
Lesen Sie die folgenden Hinweise sorgfältig
durch und befolgen Sie diese, um möglichen
Schäden vorzubeugen. Für Schäden, die durch
Missachtung der Hinweise und unsachgemäßen
Gebrauch entstehen, übernehmen wir keine
Haftung. Scannen Sie den QR-Code, um Zugri
auf die aktuellste Bedienungsanleitung und
weitere Informationen rund um das Produkt zu
erhalten.

4
DE
TECHNISCHE DATEN
Artikelnummer
10037795, 10037796, 10037797
Stromversorgung
Anschluss über Netzadapter
Akku
5 V⎓ (1 A)
Lithium-Ionen-Akku (2000mAh) (fest installiert)
CD-Player
CD-DA / CD-R / CD-RW / MP3 / WMA
US-Eingang
Wiedergabe von MP3 und WMA Datein
UKW-Radio
Frequenzbereich 87,5 MHz–108 MHz
Senderspeicher 20
DAB-Radio
Frequenzbereich 174 MHz–240 MHz
Senderspeicher 20
BT
Frequenzbereich 2402–2480 MHz
Sendeleistung -6.81dBm (EIRP)
RMS-Leistung
2 x 1W RMS

5
DE
SICHERHEITSHINWEISE
Erklärung der Symbole auf dem Gerät
CAUTION
RISK OF ELECTRIC SHOCK
DO NOT OPEN
WARNUNG: UM DIE GEFAHR EINES STROMSCHLAGS UND EINER
PERSONENVERLETZUNG ZU VERRINGERN, DAS GEHÄUSE NICHT ÖFFNEN. KEINE FÜR
DEN BENUTZER ZU WARTENDEN TEILE IM GERÄT. WENDEN SIE SICH IM FALLE EINER
REPARATUR NUR AN QUALIFIZIERTES PERSONAL.
Das Blitzsymbol mit dem Dreieck macht Sie auf gefährliche elektrische
Spannung in diesem Gerät aufmerksam, die hoch genug ist, um eine
Stromschlaggefahr darzustellen. Das Gehäuse nicht önen!
Das Ausrufezeichen mit dem Dreieck macht Sie darauf aufmerksam,
dass in der Dokumentation für das Gerät wichtige Bedienungs- und
Wartungshinweise enthalten sind.
Kinder ab 8 Jahren, psychisch, sensorisch und körperlich eingeschränkte
Menschen dürfen das Gerät nur benutzen, wenn sie vorher von einer für
sie verantwortlichen Aufsichtsperson ausführlich mit den Funktionen
und den Sicherheitsvorkehrungen vertraut gemacht wurden und die
damit verbundenen Risiken verstehen.
Falls das Netzkabel beschädigt ist, muss es vom Hersteller oder einem
autorisierten Fachbetrieb oder einer ähnlich qualizierten Person
ersetzt werden.
Schutz gegen Strahleneinwirkung
• Versuchen Sie nicht, das Gehäuse des Geräts auseinander zu bauen, da
die Strahleneinwirkung des Lasers schädlich für die Augen ist.
• Schalten Sie das Gerät sofort, wenn Flüssigkeiten oder feste
Gegenstände in das Geräteinnere gelangen sollten.
• Fassen Sie die Linse nicht an und stoßen Sie sie nicht, da Sie dadurch
die Linse beschädigen könnten, was dazu führen könnte, dass das Gerät
nicht mehr richtig funktioniert.
• Stecken Sie nichts in die Sicherheitsnut, da dadurch die Laserdiode
aktiviert wird, so lange das CD-Fach noch oen ist.
• Wenn Sie das Gerät für einen längeren Zeitraum nicht benutzen,
schalten Sie das Gerät aus. Ziehen Sie den Netzstecker aus der
Steckdose. Ziehen Sie den Netzstecker immer am Stecker selbst heraus.

6
DE
• Lesen, beachten und bewahren Sie diese Anweisungen auf. - Alle
Sicherheits- und Bedienungshinweise müssen vor der Verwendung
dieses Produkts gelesen und zum späteren Nachschlagen aufbewahrt
werden. Alle Warnhinweise auf dem Gerät und in den Anweisungen
müssen beachtet werden.
• Wird das Gerät nicht gemäß diesen Vorschriften installiert oder
verwendet, kann dies die Sicherheit des Produkts beeinträchtigen und
die Garantie ungültig machen.
• Verwenden Sie nur die in dieser Bedienungsanleitung aufgeführten
Netzteile für die Stromversorgung des Geräts. Verwenden Sie die
Netzteile nicht für andere Zwecke.
• Wenn der Netzstecker als Trennvorrichtung verwendet wird, muss die
Trennvorrichtung leicht bedienbar und zugänglich bleiben.
• Tauchen Sie das an die Steckdose angeschlossene Gerät nicht in
Wasser.
• Entfernen Sie keine Schrauben und önen Sie nicht das Gehäuse des
Produkts. Reparaturen am Produkt dürfen nur von kompetentem und
autorisiertem Personal durchgeführt werden. Benutzen Sie das Produkt
nicht, wenn Sie eine Beschädigung feststellen.
• Halten Sie das Produkt von direkter Sonneneinstrahlung und von
Wärmequellen wie Heizkörpern, Heizungen oder anderen Geräten, die
Wärme erzeugen, fern.
• Fernbedienung - Es besteht Explosionsgefahr, wenn die Batterie falsch
ersetzt wird (auf richtige Polarität achten). Ersetzen Sie sie nur durch
den gleichen oder einen gleichwertigen Typ. Die Batterie darf nicht
übermäßiger Hitze wie Sonnenschein, Feuer oder Ähnlichem ausgesetzt
werden. Wir weisen auf die Umweltaspekte der Batterieentsorgung hin.
• Warnung - BATTERIE NICHT Verschlucken, CHEMISCHE
VERBRENNUNGSGEFAHR - Die mit diesem Produkt gelieferte
Fernbedienung enthält eine Knopfzellenbatterie. Wenn die Batterie
verschluckt wird, kann sie innerhalb von nur 2 Stunden innere
Verbrennungen verursachen, die zum Tod führen können. Halten Sie
neue und gebrauchte Batterien von Kindern fern.
• Setzen Sie das Gerät keinen oenen Flammen aus, z. B. brennenden
Kerzen, die nicht auf oder in der Nähe des Geräts aufgestellt werden
dürfen.
• Die Belüftung sollte nicht durch Abdecken des Geräts oder der
Stromversorgung beeinträchtigt werden.
• Reinigen Sie das Gerät nur mit einem trockenen Tuch.
• Dieses Produkt ist für die Verwendung in gemäßigten Klimazonen
vorgesehen.
Hinweise zur Wasserdichtigkeit dieses Geräts
Die Spezikationen für die Wasserdichtigkeit dieses Produkts entsprechen
IPX4 gemäß IEC 60529 "Schutzgrade gegen das Eindringen von Wasser
(IP-Code)", der den Schutzgrad gegen das Eindringen von Wasser angibt.
Dieses Produkt kann nicht im Wasser verwendet werden.

Wenn das Gerät nicht ordnungsgemäß verwendet wird, kann Wasser in
das Gerät eindringen und zu Bränden, Stromschlägen oder Fehlfunktionen
führen. Beachten Sie die folgenden Sicherheitshinweise sorgfältig und
verwenden Sie das Gerät richtig.
IPX 4: Geschützt gegen Spritzwasser aus allen Richtungen.
Flüssigkeiten, für die die Spezikationen für die Wasserbeständigkeit
gelten
• Anwendbar: Süßwasser, Leitungswasser
• Nicht anwendbar: Andere Flüssigkeiten als die oben genannten (zum
Bespiel Seifenwasser, Waschmittelwasser, Wasser mit Badezusätzen,
Shampoo, heißes Quellwasser, Schwimmbadwasser, Meerwasser usw.)
Die Wasserbeständigkeit basiert auf Messungen, die unter den oben
beschriebenen Bedingungen durchgeführt wurden. Beachten Sie, dass
Fehlfunktionen, die durch Eintauchen in Wasser aufgrund von Missbrauch
durch den Kunden entstehen, nicht von der Garantie abgedeckt sind.
Erhalten der Wasserfestigkeit
Beachten Sie die folgenden Vorsichtsmaßnahmen, um eine
ordnungsgemäße Verwendung zu gewährleisten.
• Spritzen Sie kein Wasser mit Gewalt in die Schallaustrittsönungen.
Lassen Sie das Gerät nicht ins Wasser fallen, und verwenden Sie es
nicht unter Wasser.
• Lassen Sie dieses Gerät nicht in einer kalten Umgebung nass werden,
da das Wasser gefrieren kann. Um Fehlfunktionen zu vermeiden,
wischen Sie das Wasser nach dem Gebrauch unbedingt ab.
• Legen Sie das Gerät nicht ins Wasser und verwenden Sie es nicht an
einem feuchten Ort, z. B. in einem Badezimmer.
• Lassen Sie es nicht fallen und setzen Sie es keinen mechanischen
Stößen aus. Andernfalls kann das Gerät verformt oder beschädigt
werden, was zu einer Verschlechterung der Wasserbeständigkeit führt.
• Verwenden Sie ein weiches, trockenes Tuch, um Wasser, das
auf das Gerät gelangt ist, abzuwischen. Wenn Wasser in den
Lautsprecherausgangslöchern verbleibt, kann der Lautsprecher
dumpf oder gar nicht mehr hörbar werden. Halten Sie in diesem Fall
die Lautsprecherönungen nach unten und schütteln Sie das Gerät
mehrmals, um das Wasser herauszuholen.

8
DE
GERÄTEÜBERSICHT

9
DE
1 Standby-Taste
2 CD/BT: vorheriger Titel oder eingestellte Zeit verringern/ vorheriger
Sender
3 SOURCE – Quelle
4 CD/BT nächsten Titel überspringen TUNE+ Taste
5 Speicherplatz 1
6 SLEEP – Automatisches Ausschalten
7 Speicherplatz 2
8 MENU/INFO
9 CLOCK/ 3+ - Uhrzeiteinstellung/ Speicherplätze
10 PLAY MODE/ ALARM – Wiedergabemodus/ Alarm
11 ⏯ /SCAN -CD-/ BT-Modus: Wiedergabe/Pause; DAB-/FM-Modus:
Sendersuche
12 ⏹/ BT-Pair – CD-Modus: Stopp; BT-Modus: Gerät koppeln
13 LCD-Bildschirm
14 VOLUME/SNOOZE/ENTER – Lautstärkeregler (drehen)/ Eingabetaste
(drücken)
15 Tragegri
16 USB-Anschluss
17 Ladeanzeige
18 3,5 mm Kopfhöreranschluss
19 Typ-C-Anschluss
20 CD-Fach-Sicherung
21 CD-Fach

10
DE
ERSTE SCHRITTE
1. Verbinden Sie das im Lieferumfang enthaltene Typ-C-Kabel mit dem
Typ-C-Anschluss.
2. Schließen Sie das andere Ende des Typ-C-Kabels mit einem USB-
Netzadapter an eine Steckdose an. Sie können den Akku auch auaden,
indem Sie das Gerät mit dem USB-Anschluss eines Computers
verbinden. Die Ladeanzeige blinkt, während der Akku geladen wird.
3. Drücken Sie zum Einschalten des Geräts die Taste . Drücken Sie die
Taste zum Ausschalten des Geräts erneut.
Lassen Sie die Batterie vor dem ersten Einschalten mindestens 3 Stunden
lang laden.
4. Halten Sie die Taste zum Ausschalten des Geräts 3 Sekunden lang
gedrückt.
Lautstärkeeinstellung
Passen Sie die Lautstärke durch Drehen des Lautstärkereglers an.
11
DE
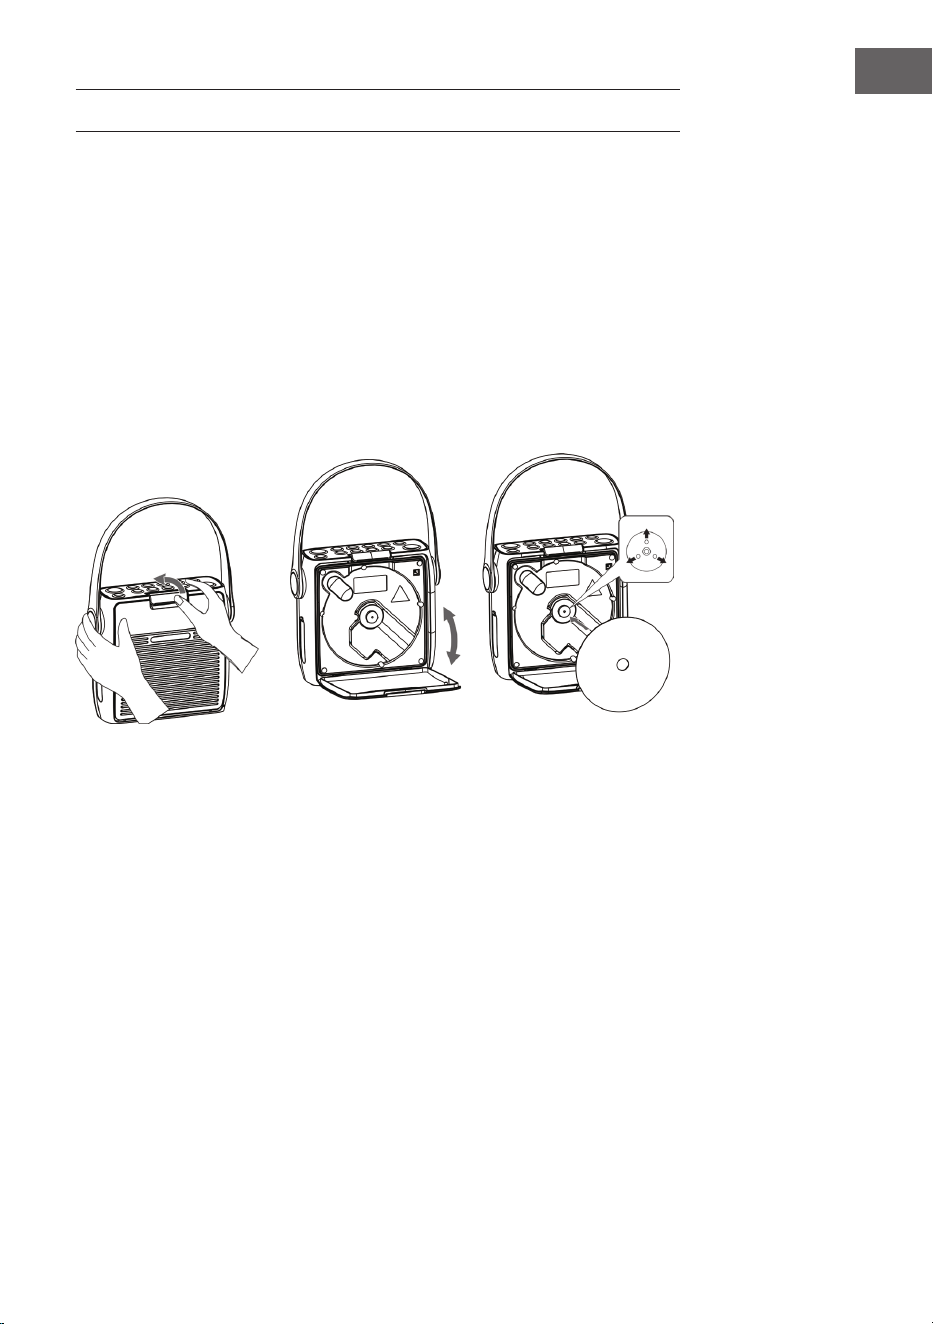
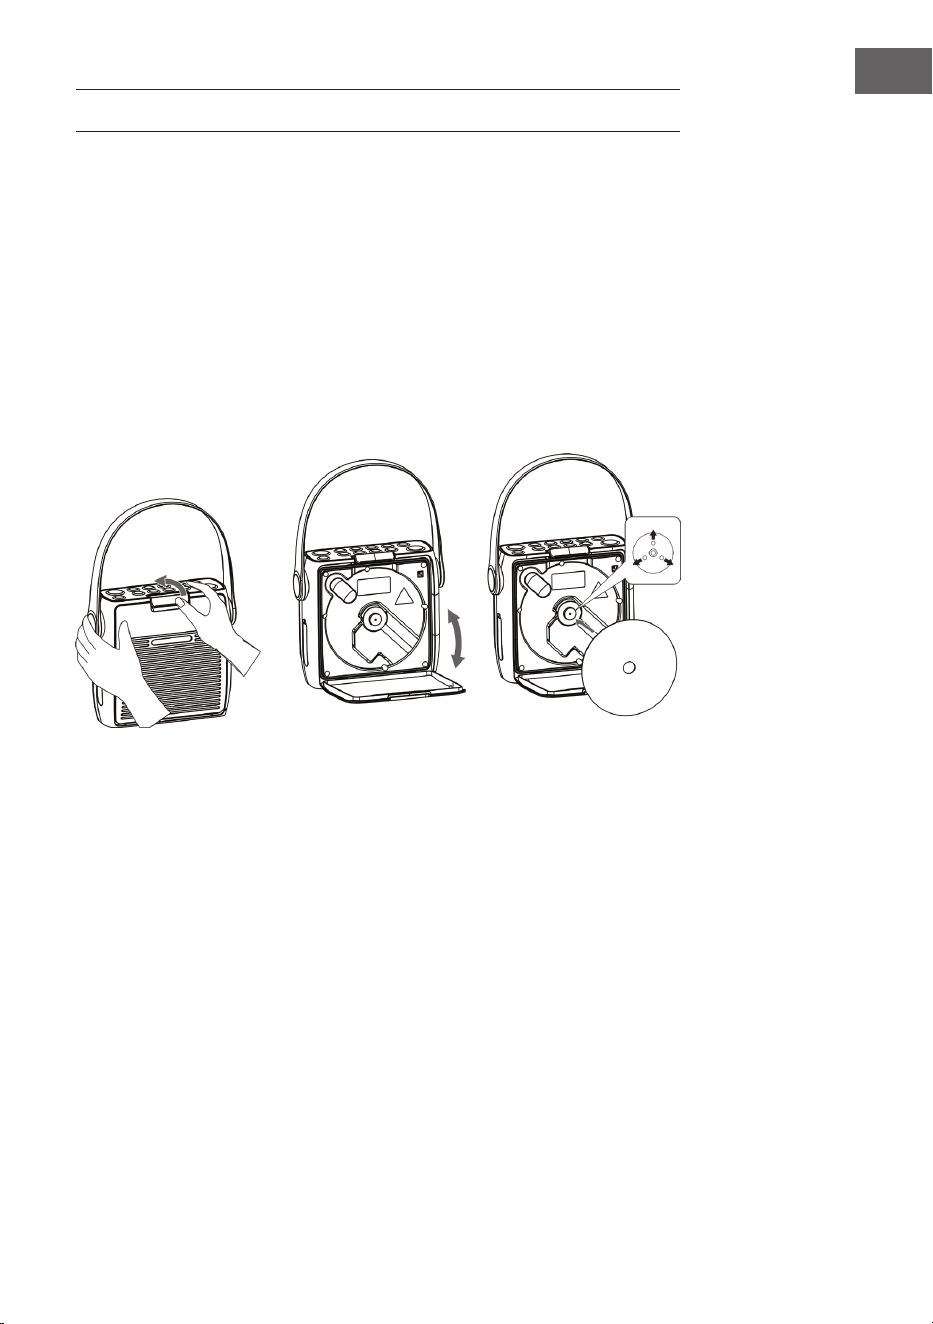
CD OPERATION
Drücken Sie mehrfach die Taste SOURCE, bis auf dem Bildschirm „CD“
angezeigt wird.
CD einlegen
1. Önen Sie die zunächst die CD-Fach-Sicherung und anschließend das
CD-Fach.
2. Legen Sie die CD mit der Beschriftung nach oben in das CD-Fach ein.
Achten Sie darauf, dass die CD auf die Mittelspindel gelegt wird.
3. Die CD wird gelesen. Auf dem Bildschirm wird „CD READING“
angezeigt. Nach einigen Sekunden wird die Gesamtanzahl der auf
der CD bendlichen Titel angezeigt und anschließend die gesamte
Wiedergabezeit.
4. Wenn keine CD eingelegt wird oder die eingelegte CD nicht gelesen
werden kann erscheint „NO DISC“ auf dem Bildschirm.
Wiedergabe pausierenk
1. Drücken Sie die Taste
⏯ , um die Wiedergabe zu pausieren.
2. Zum Fortsetzen der Wiedergabe drücken Sie die Taste ⏯ erneut.
Wiedergabe anhalten
Drücken Sie die Taste ⏹, um die Wiedergabe zu stoppen.
Titel überspringen
• Drücken Sie die Tasten ⏮ oder ⏭, um zurück zum Anfang eines Titels zu
springen, oder den vorherigen oder nächsten Titel anzuhören.

12
DE
• Drücken und halten Sie die Tasten ⏮ oder ⏭ , um schnell vor- oder
zurückzuspulen.
Wiedergabe wiederholen und Zufallswiedergabe
1. Drücken Sie während des Betriebsmodus die Taste PLAY MODE. Auf dem
Bildschirm wird
angezeigt. Der aktuelle CD-Titel wird in Dauerschleife
wiederholt.
2. Drücken Sie während des Betriebsmodus die Taste PLAY MODE
erneut. Auf dem Bildschirm wird angezeigt. Alle CD-Titel werden in
Dauerschleife wiederholt.
3. Wenn Sie die Taste PLAY MODE ein drittes Mal drücken, wird das
Symbol iauf dem Bildschirm angezeigt. Alle CD-Titel werden in
zufälliger Reihenfolge wiedergegeben. Drücken Sie die Tasten ⏮ oder ⏭,
um zum nächsten zufälligen Titel zu gelangen.
4. Wenn Sie die Taste PLAY MODE erneut drücken, wird die normale
Wiedergabe fortgesetzt.
Wiedergabeliste erstellen
Sie können 20 CD-Titel oder 99 MP3-Titel in beliebiger Reihenfolge
speichern. Die Wiedergabeliste kann im Stoppmodus erstellt werden.
1. Drücken Sie im Stoppmodus die Taste PLAY MODE, um die
Wiedergabeliste zu önen.
2. Wählen Sie mit den Tasten ⏮ oder ⏭ die Titel aus, welche Sie speichern
möchten.
3. Drücken Sie zum Bestätigen Ihrer Auswahl die Taste PLAY MODE.
4. Wiederholen Sie die Schritte 2 und 3, um weitere Titel in der
Wiedergabeliste zu speichern. Drücken Sie, sobald Sie alle gewünschten
Titel in der Wiedergabeliste gespeichert haben, die Taste
⏯, um die
Wiedergabe zu starten.
Gespeicherte Wiedergabeliste löschen
Drücken Sie zweimal die Taste ⏹, oder önen und schließen Sie das CD-
Fach einmal, um die gespeicherte Wiedergabeliste zu löschen.

13
DE
USB
1. An der Vorderseite des Geräts bendet sich ein USB-Anschluss. Drücken
Sie, sobald ein USB-Stick angeschlossen wurde, mehrfach die Taste
SOURCE, um den USB-Modus auszuwählen.
2. Auf dem Gerät wird automatisch die Anzahl der auf dem USB-Stick
bendlichen Titel angezeigt.
3. Alle Wiedergabetasten sind die gleichen wie im MP3-/CD-Modus..
Hinweise
• Das Gerät kann MP3-/WMA-Dateiformate ausschließlich im USB-
Betrieb wiedergeben.
• Wenn sich auf Ihrem USB-Stick MP3-/ WMA-Dateien benden, aber
auf dem Bildschirm „NO USB“ angezeigt wird, kann es sein, dass das
Format der Dateien nicht mit dem Gerät kompatibel ist (beispielsweise
mit DRM geschützte MP3-/WMA-Dateien).
• Dieses Gerät unterstützt USB-Versionen 1.1 und 2.0.
• Dieses Gerät unterstützt USB-Sticks mit bis zu 32 GB.
• Es kann vorkommen, dass nicht alle USB-Sticks und Speicherkarten mit
dem Gerät kompatibel sind. Dies weist nicht auf ein Problem des Geräts
hin.

14
DE
DAB-RADIO/BEDIENUNG
Vollständiger Sendersuchlauf
1. Drücken Sie, zum Aktivieren des automatischen Sendersuchlaufs, die
Taste SCAN und der Bildschirm wird „Scanning…“ (Suche) und einen
größer werdenden Balken anzeigen.
2. Alle gefundenen Sender werden automatisch eingespeichert. Zum
Erkunden der gefunden Sender drücken Sie die Tasten ⏮ oder ⏭.
Drücken Sie anschließend die Bestätigungstaste ENTER.
Manueller Sendersuchlauf
Zusätzlich zum automatischen Sendersuchlauf kann die Sendersuche auch
manuell durchgeführt werden.
1. Drücken Sie die Taste MENU der Fernbedienung, um das Menü
anzuzeigen.
2. Drücken Sie die Tasten ⏮ oder ⏭ , um den manuellen Sendersuchlauf
auszuwählen und drücken Sie zum Bestätigen die Taste ENTER.
3. Drücken Sie die Tasten ⏮ oder ⏭ zum Erkunden der DAB/DAB+-Sender,
die von 5A bis 13F nummeriert sind.
4. Nach der Auswahl der gewünschten Sendernummer, drücken Sie zum
Bestätigen die Taste ENTER. Der Bildschirm wird das Multiplex anzeigen.
5. Drücken Sie erneut die Taste MENU, um den ausgewählten Sender zu
der Senderliste hinzuzufügen.
DRC (Dynamikbereichskomprimierung)
1. Drücken Sie die Taste MENU, um das Menü anzuzeigen.
2. Drücken Sie zur Auswahl von „DRC“ die Tasten ⏮ oder ⏭ und drücken
Sie anschließend zum Bestätigen die Taste ENTER.
3. Drücken Sie zur Auswahl von „aus/hoch/niedrig“ die Tasten ⏮ oder ⏭.
4. Drücken Sie zum Bestätigen die Taste ENTER.
Sender löschen
Gegebenenfalls möchten Sie alle nicht verfügbaren Sender aus der
Senderliste löschen.
1. Drücken Sie während des DAB-Modus die Taste MENU, um das Menü
anzuzeigen.
2. Drücken Sie die Tasten ⏮ oder ⏭ , zur Auswahl von „Prune“ und drücken
Sie anschließend die Taste ENTER.
3. Drücken Sie zur Auswahl von „Ja“ die Tasten ⏮ oder ⏭ und drücken
Sie die Taste ENTER, um zu bestätigen, dass alle nicht verfügbaren
gespeicherten Sender gelöscht werden.
4. Sie können die Tasten ⏮ oder ⏭ auch drücken, um „Nein“ auszuwählen
und anschließend die ENTER-Taste zum Abbrechen der Einstellung
drücken.

15
DE
Softwareinformationen
1. Drücken Sie während des DAB-Modus die Taste MENU, um das Menü
anzuzeigen.
2. Drücken Sie die Tasten ⏮ oder ⏭ zur Auswahl von „System“ und drücken
Sie zum Bestätigen die Taste ENTER.
3. Drücken Sie die Taste ENTER der Fernbedienung, um die
Softwareversion anzeigen zu lassen.
4. Drücken Sie zum Verlassen der Anzeige die Taste MENU.
Sprachauswahl
Drücken Sie im DAB- oder FM-Modus die Taste MENU und wählen Sie mit
den Tasten ⏮ oder ⏭ „System“ aus. Drücken Sie zum Bestätigen ENTER.
Wählen Sie die gewünschte.
Auf Werkseinstellung zurücksetzen
Durch diese Funktion werden alle Einstellungen auf die Werkseinstellung
zurückgesetzt. Halten Sie die Taste MENU gedrückt und wählen Sie mit den
Tasten ⏮ oder ⏭ „System“ aus.
1. Wählen Sie mit den Tasten ⏮ oder ⏭ „Factory Reset“ (Werkseinstellung)
aus.
2. Bestätigen Sie durch Drücken der Taste ENTER.
Hinweis: Beim Zurücksetzen auf Werkseinstellung werden alle
gespeicherten FM-/DAB+-Sender gelöscht.
Sekundäre Dienste
Unter Umständen sehen Sie nach dem Namen des Senders ein „> “-Symbol,
welches anzeigt, dass für diesen Sender Sekundärdienste verfügbar
sind. Diese Sekundärdienste enthalten zusätzliche Dienste, die mit dem
Primärsender in Verbindung stehen. Die Sekundärdienste werden in der
Senderliste direkt hinter dem Primärsender eingefügt.
Um den sekundären Sender auszuwählen, drücken Sie die MENU-Taste,
wenn „>“ vor dem Sendernamen auf dem Bildschirm erscheint. Wenn der
Sekundärdienst endet, schaltet das Gerät automatisch zum Primärsender
zurück.
Sender speichern
Es können für einen schnellen Zugang bis zu 20 FM- und 20 FM-Sender
gespeichert werden.
Sender auf Speicherplatz 1 oder 2 speichern
1. Wählen Sie den Radiosender aus, welchen Sie speichern möchten.
2. Halten Sie die Taste
① oder ② 2 Sekunden lang gedrückt, bis auf dem
Bildschirm eine Nachricht angezeigt wird, welche den erfolgreichen
Speichervorgang bestätigt.

16
DE
Sender in der Speicherliste speichern
1. Wählen Sie den Radiosender aus, welchen Sie speichern möchten.
2. Halten Sie die Taste
③+ so lange gedrückt, bis die Speicherliste
angezeigt wird. Wählen Sie mit dem Drehregler einen gewünschten
Speicherplatz zwischen 3 und 20 aus. Bereits gespeicherte Sender
können überschrieben werden.
Gespeicherte Sender aufrufen
1. Drücken Sie, um Sender auf Speicherplatz 1 oder 2 zu hören die Tasten
①
oder ②.
2. Drücken Sie zum Aufrufen der anderen gespeicherten Sender zunächst
die Taste ③+, um die Senderliste zu önen. Wählen Sie mit dem
Drehregler den gewünschten Speicherplatz aus, und bestätigen Sie Ihre
Auswahl durch Drücken des Drehreglers.
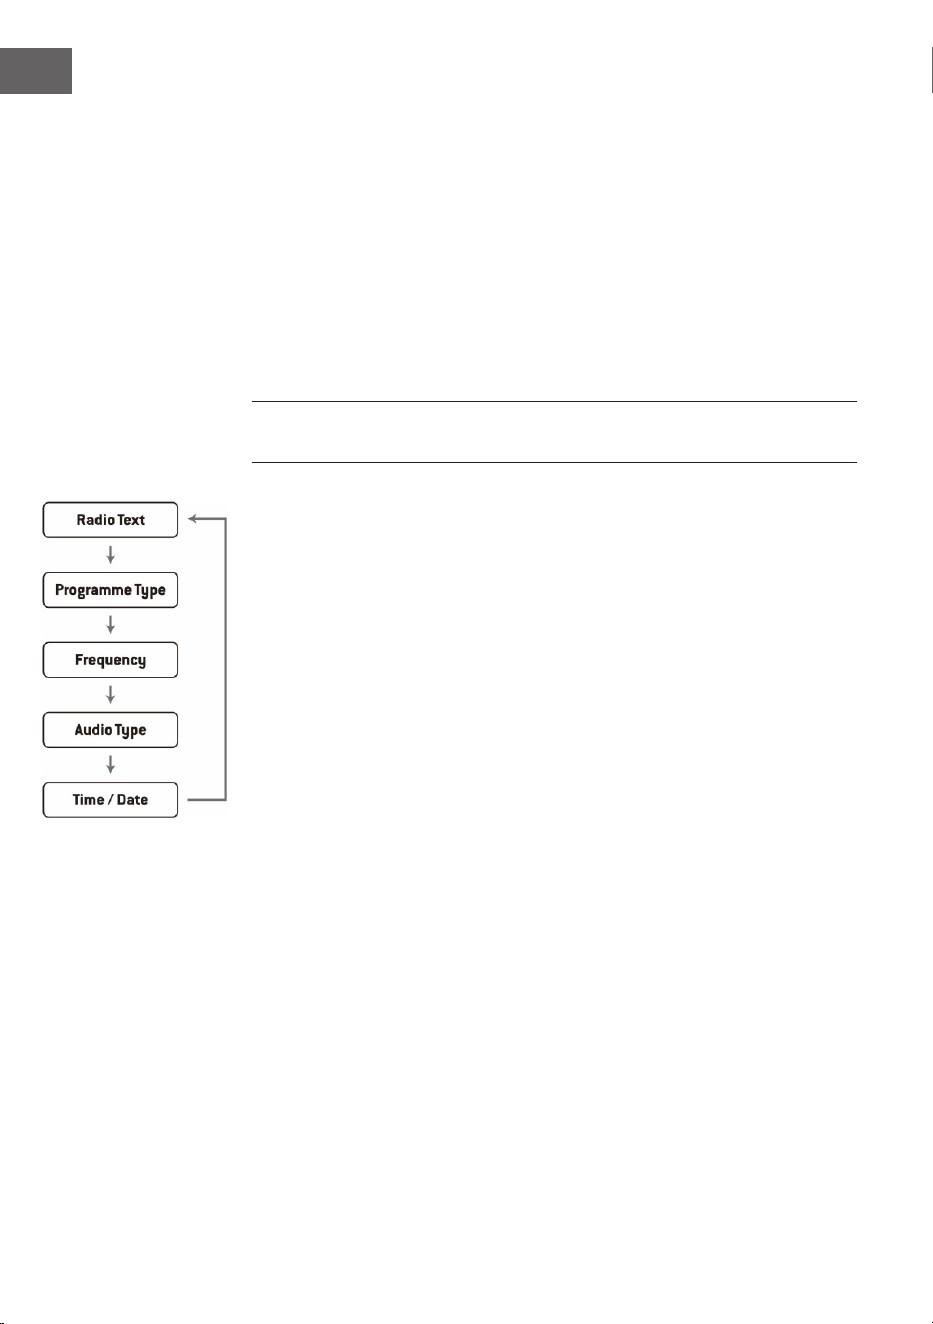
DAB-Anzeigemodi
Drücken Sie die Taste INFO der Fernbedienung. Auf dem Bildschirm werden
die verschiedenen Anzeigemodi angezeigt. Die Information wird jeweils am
unteren Bildschirmrand angezeigt.
Signalstärke
Auf dem Bildschirm wird ein Balken angezeigt, welcher die Signalstärke
anzeigt. Je stärker das Signal, desto länger der Balken von links nach rechts.
Programmart
Beschreibt Stil oder Genre des ausgestrahlten Programms.
Ensemble
Zeigt den Namen der Multiplex an, welche die Sender enthält, die Sie
hören. Eine Multiplex ist eine Sammlung von Radiosendern, welche
gebündelt auf einer Frequenz übertragen werden. Es gibt nationale und
lokale Multiplexen. Lokale Multiplexen enthalten Sender, welche für eine
Region spezisch sind.
Hinweis: DAB – im Unterscheid zu normalem Radio, werden bei DAB
mehrere Radiosender zusammen gruppiert und auf einer Frequenz
übertragen.
Frequenz
Zeigt die Frequenz des eingestellten Senders an, wie beispielsweise „11c
220.352 MHz“.

17
DE
Signalfehler
Zeigt die Signalfehlerrate an. Wenn die Zahl „0“ ist, bedeutet das, dass das
empfangene Signal fehlerfrei ist und eine starke Signalstärke hat.
Audio-Bit-Rate
Der Bildschirm zeigt die empfangene Audio Bit Rate an.
Zeit/ Datum
Zeigt die aktuelle Zeit und das Datum, welche vom Sender zur Verfügung
gestellt werden, an.
DLS (Dynamic Label Segment)
Beim dynamischen Labelsegment handelt es sich um eine Rolltextnachricht,
welche vom Sender in die Übertragung mit integriert werden kann. Diese
Nachricht enthält für gewöhnliche Informationen, wie beispielsweise
Sendungsdetails.
FM-RADIO
Drücken Sie mehrfach die Taste SOURCE, im in den FM-Modus zu wechseln.
Auf dem Bildschirm wird die Frequenz angezeigt.
Automatische Sendersuche
Drücken Sie so lange die Taste SCAN, bis das Radio beginnt, nach Sendern
zu suchen. Die ersten 20 Sender, die bei der Sendersuche gefunden werden,
werden in der Speicherliste gespeichert.
Manuelle Sendersuche
Drücken Sie mehrfach die Tasten ⏮ oder ⏭ , bis Sie die von Ihnen
gewünschte Frequenz erreicht haben
Sucheinstellungen
Dies ist eine Suchoption, die es Ihnen entweder ermöglicht alle Sender oder
nur Sender mit einem starken Signal zu suchen.
1. Drücken Sie die Taste MENU und drücken Sie anschließend die Tasten
oder , um „Scan Setting“ (Sucheinstellung) auszuwählen. Drücken Sie
zum Bestätigen die Taste ENTER.
2. Drücken Sie die Tasten ⏮ oder ⏭ um „All Stations“ (Alle Sender) oder
„Strong stations only“ (Nur Sender mit starkem Signal) auszuwählen.
Bestätigen Sie Ihre Auswahl mit der Taste ENTER.
Hinweis: Das Sternchen in der oberen rechten Ecke des Bildschirms zeigt
die aktuelle Auswahl an.
18
DE
Audioeinstellungen
Dieses Gerät wird automatisch zwischen Stereo- und Monomodus hin- und
her wechseln. Sie können dies umgehen, indem Sie den gewünschten
Modus manuell einstellen. Dies kann vor allem bei schlechtem Signal sehr
hilfreich sein.
1. Drücken Sie die Taste MENU und wählen Sie mit den Tasten ⏮ oder ⏭
„Audio setting“ (Audioeinstellungen) aus. Drücken Sie zum Bestätigen
die Taste ENTER.
2. Drücken Sie die Tasten ⏮ oder ⏭ , um „Stereo allowed“ (Stereo erlaubt)
oder „Forced mono“ (nur Mono) auszuwählen und bestätigen Sie Ihre
Auswahl mit der Taste ENTER.
Hinweis: Das Sternchen in der oberen rechten Ecke des Bildschirms zeigt
die aktuelle Auswahl an.
FM-Anzeigemodi
Wenn Sie die Taste INFO auf der Fernbedienung drücken, wird der
Bildschirm durch die folgenden Anzeigemodi wechseln.
• Radio Text: Wie bei DAB kann der Radiosender während der
Übertragung Programminformationen in Form eines Lauftextes
anzeigen lassen kann.
• Programmart: Hier wird der „Stil“ oder das „Genre“ des ausgestrahlten
Programms angezeigt.
• Frequenz: Die Frequenz des eingestellten Senders wird angezeigt, wie
beispielsweise „87.5 MHz“.
• Audioformat: Auf dem Bildschirm wird angezeigt, ob die Radiosender in
Mono oder Stereo empfangen werden.

19
DE
ALARM- UND TIMEREINSTELLUNG
Automatische Uhrzeiteinstellung
Die Uhrzeit kann automatisch aktualisiert werden, wenn Sie ein DAB+-
Signal an Ihrem aktuellen Standort empfangen.
Uhrzeiteinstellung
1. Drücken Sie die Taste CLOCK. Die Digitalanzeige blinkt auf dem
Bildschirm auf.
2. Drücken Sie zur Einstellung der aktuellen Jahreszahl die Tasten ⏮ oder
⏭ und drücken Sie anschließend zum Bestätigen die Taste CLOCK. Die
Monatsanzeige blinkt auf dem Bildschirm auf.
3. Drücken Sie zur Einstellung des aktuellen Monats die Tasten ⏮ oder
⏭ und drücken Sie anschließend zum Bestätigen die Taste CLOCK. Die
Tagesanzeige blinkt auf dem Bildschirm auf.
4. Drücken Sie zur Einstellung des aktuellen Tages die Tasten ⏮ oder ⏭ und
drücken Sie anschließend zum Bestätigen die Taste CLOCK. „12/24 H“
blinkt auf dem Bildschirm auf.
5. Drücken Sie zur Einstellung des gewünschten Stundenformats die Tasten
⏮ oder ⏭ und drücken Sie anschließend zum Bestätigen die Taste
CLOCK. Die Stundenanzeige blinkt auf dem Bildschirm auf.
6. Drücken Sie zur Einstellung der aktuellen Stunde die Tasten ⏮ oder
⏭ und drücken Sie anschließend zum Bestätigen die Taste CLOCK. Die
Minutenanzeige blinkt auf dem Bildschirm auf.
7. Drücken Sie zur Einstellung der aktuellen Minuten die Tasten ⏮ oder ⏭
und drücken Sie anschließend zum Bestätigen die Taste CLOCK.
Hinweis: Wenn kein DAB/DAB+-Signal verfügbar ist, kann die Uhrzeit auch
manuell eingestellt werden. Sobald ein DAB+-Signal empfangen wird, wird
die Uhrzeit automatisch aktualisiert.
Einstellung des Weckers
1. Drücken und halten Sie die Taste ALARM gedrückt, bis der Bildschirm
„On Timer“ anzeigt, und die digitalen Ziern zu blinken beginnen.
2. Drücken Sie die zum Anpassend der Stundenanzeige die Tasten⏮ oder
⏭ und drücken Sie anschließend zum Bestätigen die Taste ENTER. Die
Minutenanzeige wird dann auf dem Bildschirm zu blinken beginnen.
3. Drücken Sie die Tasten ⏮ oder ⏭ zum Einstellen der Minutenanzeige und
drücken Sie anschließend zum Bestätigen die Taste ENTER.
4. Wenn Sie die gewünschte Weckzeit mit den Tasten ⏮ oder ⏭ eingestellt
haben, wird der Bildschirm „O Timer“ anzeigen und die Stundenanzeige
wird zu blinken beginnen.

20
DE
5. Wählen Sie durch Drücken der Taste SOURCE den gewünschten Modus
aus (FM, USB, DAB oder CD-Modus) und drücken Sie zum Bestätigen die
Taste ENTER.
6. Drücken Sie zur Auswahl von „Timer On“ die Taste ALARM. Der Wecker
ist dann aktiv.
7. Im Standby-Modus wird das Symbol ◷ angezeigt, woraus hervorgeht,
dass der Wecker aktiviert wurde.
Täglichen Wecker deaktivieren
Deaktivieren Sie den aktuellen Wecker durch mehrfaches Drücken der Taste
ALARM. Das Symbol
◷ verschwindet vom Bildschirm.
Hinweise
1. Sollten Sie als Alarmquelle beispielsweise „CD“ ausgewählt haben und
es wurde aber keine CD eingelegt, wird die Alarmquelle automatisch zu
„DAB“ wechseln, sobald die Weckzeit erreicht ist.
2. Wenn Sie als Alarmquelle „FM“ ausgewählt haben, wird der zuletzt vor
dem Ausschalten gehörte FM-Sender als Weckton verwendet.
Schlummerfunktion
Drücken Sie die Taste ENTER, wenn der Alarm erklingt, um diesen zeitweise
zu pausieren. Durch jedes Drücken wird der Alarm wird dann für jeweils
9 Minuten in den Schlummerzustand versetzt, bevor er wieder erklingt.
Drücken Sie zum Deaktivieren des Alarms und der Schlummerfunktion
einmal die Taste
. Das Symbol für die Schlummerfunktion verschwindet
dann vom Bildschirm.
Automatisches Ausschalten des Geräts
Über die Taste SLEEP des Geräts kann eingestellt werden, dass das Gerät
sich nach einer bestimmten Zeit automatisch abschaltet. So können Sie
währen des Musikhörens einschlafen und das Gerät schaltet sich nach der
von Ihnen eingestellten Zeit automatisch aus und läuft nicht die ganze
Nacht durch.
1. Zur Auswahl der gewünschten Zeit, nach der das Gerät sich ausschalten
soll, drücken Sie mehrfach die Taste SLEEP, um zwischen folgenden
Optionen auszuwählen: 120 60 30 20 15 10 05 OFF.
2. Das automatische Ausschalten wurde nun aktiviert.
3. Durch Drücken der Taste SLEEP wird Ihnen die verbleibende Zeit bevor
das Gerät sich automatisch ausschaltet angezeigt.
4. Zum Abbrechen der Funktion, drücken Sie so lange die Taste SLEEP, bis
Sie Sleep o“ auswählen können.

21
DE
BT-BEDIENUNG
Das Gerät hat eine BT-Funktion und kann bis zu einer Entfernung von 8
Metern ein Signal empfangen.
Das Gerät mit einem externen BT-Gerät verbinden:
1. Schalten Sie das Gerät ein und wählen Sie den BT-Modus durch
mehrfaches Drücken der Taste SOURCE aus.
2. Wenn das Gerät mit keinem externen BT-Gerät verbunden ist, wird
mehrfach „BT PAIRING“ auf dem Bildschirm aufblinken.
3. Aktivieren Sie das externe BT-Gerät und wählen Sie den Suchmodus aus.
4. Splash wird in der BT-Geräteliste Ihres externen Geräts angezeigt
werden.
5. Wählen Sie Splash aus und geben Sie, falls notwendig, das Passwort
„0000“ ein.
6. Zum Deaktivieren der BT-Funktion, drücken Sie die Taste SOURCE, um in
einen anderen Modus zu wechseln oder deaktivieren Sie die Funktion auf
Ihrem externen BT-Gerät.
Hinweise:
• Wenn das Signal schwach ist, kann es sein, dass der BT-Empfänger
Ihres Geräts die Verbindung beendet. Das Gerät wird sich aber wieder
automatisch mit Ihrem externen BT-Gerät verbinden.
• Entfernen Sie Hindernisse zwischen externem Gerät und dem DAB-
Radio, damit Sie einen besseren Signalempfang haben.
• Dieses Gerät unterstützt A2DP (Advanced Audio Distribution Prole)
und AVRCP (Audio Video Remote Control Prole) Funktionen. Das Gerät
kann nicht mit mehreren BT-Geräten gleichzeitig verbunden werden.
• Es gibt keine Garantie für eine Kompatibilität des Geräts mit allen
anderen externen Geräten und Medienarten.
• Einige Mobiltelefone mit BT-Funktion trennen beim Empfangen oder
Tätigen von Anrufen automatisch die BT-Verbindung zum Gerät. Dies ist
kein Anzeichen für ein Problem des Geräts.

22
DE
SPEZIELLE ENTSORGUNGSHINWEISE FÜR
VERBRAUCHER IN DEUTSCHLAND
Entsorgen Sie Ihre Altgeräte fachgerecht. Dadurch wird gewährleistet,
dass die Altgeräte umweltgerecht verwertet und negative Auswirkungen
auf die Umwelt und menschliche Gesundheit vermieden werden. Bei der
Entsorgung sind folgende Regeln zu beachten:
• Jeder Verbraucher ist gesetzlich verpichtet, Elektro- und
Elektronikaltgeräte (Altgeräte) sowie Batterien und Akkus
getrennt vom Hausmüll zu entsorgen. Sie erkennen die
entsprechenden Altgeräte durch folgendes Symbol der
durchgestrichene Mülltonne (WEEE-Symbol).
• Sie haben Altbatterien und Altakkumulatoren, die nicht vom Altgerät
umschlossen sind, sowie Lampen, die zerstörungsfrei aus dem
Altgerät entnommen werden können, vor der Abgabe an einer
Entsorgungsstelle vom Altgerät zerstörungsfrei zu trennen.
• Bestimmte Lampen und Leuchtmittel fallen ebenso unter das Elektro-
und Elektronikgesetz und sind dementsprechend wie Altgeräte zu
behandeln. Ausgenommen sind Glühbirnen und Halogenlampen.
Entsorgen Sie Glühbirnen und Halogenlampen bitte über den Hausmüll,
sofern sie nicht das WEEE-Symbol tragen.
• Jeder Verbraucher ist für das Löschen von personenbezogenen Daten
auf dem Elektro- bzw. Elektronikgerät selbst verantwortlich.
Rücknahmepicht der Vertreiber
Vertreiber mit einer Verkaufsäche für Elektro- und Elektronikgeräte von
mindestens 400 Quadratmetern sowie Vertreiber von Lebensmitteln mit
einer Gesamtverkaufsäche von mindestens 800 Quadratmetern, die
mehrmals im Kalenderjahr oder dauerhaft Elektro- und Elektronikgeräte
anbieten und auf dem Markt bereitstellen, sind verpichtet,
1. bei der Abgabe eines neuen Elektro- oder Elektronikgerätes an einen
Endnutzer ein Altgerät des Endnutzers der gleichen Geräteart, das
im Wesentlichen die gleichen Funktionen wie das neue Gerät erfüllt,
am Ort der Abgabe oder in unmittelbarer Nähe hierzu unentgeltlich
zurückzunehmen und
2. auf Verlangen des Endnutzers Altgeräte, die in keiner äußeren
Abmessung größer als 25 Zentimeter sind, im Einzelhandelsgeschäft
oder in unmittelbarer Nähe hierzu unentgeltlich zurückzunehmen; die
Rücknahme darf nicht an den Kauf eines Elektro- oder Elektronikgerätes
geknüpft werden und ist auf drei Altgeräte pro Geräteart beschränkt.

23
DE
• Bei einem Vertrieb unter Verwendung von Fernkommunikationsmitteln
ist die unentgeltliche Abholung am Ort der Abgabe auf Elektro- und
Elektronikgeräte der Kategorien 1, 2 und 4 gemäß § 2 Abs. 1 ElektroG,
nämlich „Wärmeüberträger“, „Bildschirmgeräte“ (Oberäche von mehr
als 100 cm²) oder „Großgeräte“ (letztere mit mindestens einer äußeren
Abmessung über 50 Zentimeter) beschränkt. Für andere Elektro- und
Elektronikgeräte (Kategorien 3, 5, 6) ist eine Rückgabemöglichkeit in
zumutbarer Entfernung zum jeweiligen Endnutzer zu gewährleisten.
• Altgeräte dürfen kostenlos auf dem lokalen Wertstohof oder in
folgenden Sammelstellen in Ihrer Nähe abgegeben werden: www.take-
e-back.de
• Für Elektro- und Elektronikgeräte der Kategorien 1, 2 und 4 bieten
wir auch die Möglichkeit einer unentgeltlichen Abholung am Ort der
Abgabe. Beim Kauf eines Neugeräts haben Sie die Möglichkeit, eine
Altgerätabholung über die Webseite auszuwählen.
• Batterien können überall dort kostenfrei zurückgegeben werden, wo sie
verkauft werden (z. B. Super-, Bau-, Drogeriemarkt). Auch Wertsto- und
Recyclinghöfe nehmen Batterien zurück. Sie können Batterien auch per
Post an uns zurücksenden. Altbatterien in haushaltsüblichen Mengen
können Sie direkt bei uns von Montag bis Freitag zwischen 08:00 und
16:00 Uhr unter der folgenden Adresse unentgeltlich zurückgeben:
Chal-Tec Fulllment GmbH
Norddeutschlandstr. 3
47475 Kamp-Lintfort
• Wichtig zu beachten ist, dass Lithiumbatterien aus Sicherheitsgründen
vor der Rückgabe gegen Kurzschluss gesichert werden müssen (z. B.
durch Abkleben der Pole).
• Finden sich unter der durchgestrichenen Mülltonne auf der Batterie
zusätzlich die Zeichen Cd, Hg oder Pb ist das ein Hinweis darauf, dass
die Batterie gefährliche Schadstoe enthält. (»Cd« steht für Cadmium,
»Pb« für Blei und »Hg« für Quecksilber).
Hinweis zur Abfallvermeidung
Indem Sie die Lebensdauer Ihrer Altgeräte verlängern, tragen Sie dazu
bei, Ressourcen eizient zu nutzen und zusätzlichen Müll zu vermeiden.
Die Lebensdauer Ihrer Altgeräte können Sie verlängern, indem Sie defekte
Altgeräte reparieren lassen. Wenn sich Ihr Altgerät in gutem Zustand
bendet, könnten Sie es spenden, verschenken oder verkaufen.

24
DE
HINWEISE ZUR ENTSORGUNG
Wenn es in Ihrem Land eine gesetzliche Regelung
zur Entsorgung von elektrischen und elektronischen
Geräten gibt, weist dieses Symbol auf dem Produkt
oder auf der Verpackung darauf hin, dass dieses
Produkt nicht im Hausmüll entsorgt werden darf.
Stattdessen muss es zu einer Sammelstelle für
das Recycling von elektrischen und elektronischen
Geräten gebracht werden. Durch regelkonforme
Entsorgung schützen Sie die Umwelt und die
Gesundheit Ihrer Mitmenschen vor negativen
Konsequenzen. Informationen zum Recycling
und zur Entsorgung dieses Produkts, erhalten
Sie von Ihrer örtlichen Verwaltung oder Ihrem
Hausmüllentsorgungsdienst.
Dieses Produkt enthält Batterien. Wenn es in Ihrem
Land eine gesetzliche Regelung zur Entsorgung
von Batterien gibt, dürfen die Batterien nicht im
Hausmüll entsorgt werden. Informieren Sie sich
über die örtlichen Bestimmungen zur Entsorgung
von Batterien. Durch regelkonforme Entsorgung
schützen Sie die Umwelt und die Gesundheit Ihrer
Mitmenschen vor negativen Konsequenzen.
KONFORMITÄTSERKLÄRUNG
Hersteller:
Chal-Tec GmbH, Wallstraße 16, 10179 Berlin,
Deutschland.
Importeur für Großbritannien:
Berlin Brands Group UK Limited
PO Box 42
272 Kensington High Street
London, W8 6ND
United Kingdom
Hiermit erklärt Chal-Tec GmbH, dass der
Funkanlagentyp Splash der Richtlinie 2014/53/
EU entspricht. Der vollständige Text der EU-
Konformitätserklärung ist unter der folgenden
Internetadresse verfügbar: use.berlin/10037797

25
EN
Technical Data 26
Safety Instructions 27
Product Description 30
Getting started 32
CD Operation 33
USB operation 35
DAB+ Operation 36
FM Operation 39
Setting Alarms and Timers 41
BT Operation 43
Disposal Considerations 44
Declaration of Conformity 44
CONTENTS
Dear Customer,
Congratulations on purchasing this device.
Please read the following instructions carefully
and follow them to prevent possible damages.
We assume no liability for damage caused by
disregard of the instructions and improper use.
Scan the QR code to get access to the latest user
manual and more product information.

26
EN
TECHNICAL DATA
Item number
10037795, 10037796, 10037797
Power supply
Main unit DC
Built-in battery (DC)
5 V⎓ (1 A)
Lithium-ion rechargeable battery (2000mAh)
CD player
CD-DA / CD-R / CD-RW / MP3 / WMA
USB input
Playing MP3 and WMA les
FM radio
Tuning range 87.5 MHz–108 MHz
Presets 20
DAB radio
Tuning range 174 MHz–240 MHz
Presets 20
BT
Frequency range 2402–2480 MHz
Radio-frequency power -6.81dBm (EIRP)
RMS power
2 x 1W RMS
27
EN
SAFETY INSTRUCTIONS
Explanation of the symbols on the appliance
CAUTION
RISK OF ELECTRIC SHOCK
DO NOT OPEN
WARNING: TO REDUCE THE RISK OF ELECTRIC SHOCK; DO NOT REMOVE THE COVER
OR BACK. NO USER-SERVICEABLE PARTS INSIDE: REFER SERVICING TO QUALIFIED
PERSONNEL.
The lightning symbol is intended to alert you to the presence of
uninsulated, dangerous voltage within this product‘s enclosure that
might be of suicient magnitude to constitute a risk of electric shock.
Do not open the product case.
The exclamation symbol is intended to inform you that important
operating and maintenance instructions are included in the literature
accompanying this product.
Children over the age of 8 and persons with reduced physical,
sensory or mental capabilities or those with a lack of experience and
knowledge may only use the device if they are instructed on how to do
so by a person responsible for their safety, or if they are supervised and
understand the hazards associated with the use of the device.
If the mains cord is damaged, you must have it replaced by supplier, or
a service centre or similarly qualied persons in order to avoid a hazard.
On protection against laser energy exposure
• As the laser beam used in this compact disc player is harmful to the
eyes, do not attempt to disassemble the casing.
• Stop operation immediately if any liquid or solid object should fall into
the cabinet.
• Do not touch the lens or poke at it. If you do, you may damage the lens
and the player may not operate properly.
• Do not put anything in the safety slot. If you do, the laser diode will be
"ON" when the CD door is still open.
• If the unit is not to be used for a long period of time, make sure that the
power source is disconnected from the unit. Unplug the AC cord from
the wall outlet. Make it a practice to remove the AC cord by grasping
the main body and not by pulling the cord.
• This unit employs a laser. The use of controls or adjustment or
performance of procedures other than those specied here may result
in exposure to hazardous radiation.

28
EN
• Read, heed and retain these instructions – All the safety and operating
instructions should be read before this product is used and retained for
future reference. All warnings on the appliance and in the operating
instructions should be followed
• Failure to install or use the product in accordance with these
instructions may impair the safety of the product and invalid the
warranty.
• Use only power supply listed in these user manual/user instructions to
power the equipment and do not use the power supply for any other
purpose.
• The direct plug-in adapter is used as a disconnect device, the disconnect
device shall remain readily operable and accessible.
• Do not immerse the power-connected appliance in water.
• Do not remove screws from or open the product casing. Product repairs
are only to be carried out by competent and authorised personnel. Do
not use the product if any damage is noticed.
• Keep the product away direct sunlight and from heat sources such as
radiators, heaters or other appliances that produce heat.
• Remote Control - Danger of explosion if the battery is incorrectly
replaced (ensure correct polarity). Replace only with the same or
equivalent type. The battery shall not be exposed to excessive heat
such as sunshine, re or similar. Attention is drawn to the environmental
aspects of battery disposal.
• Warning – DO NOT INGEST BATTERY, CHEMICAL BURN HAZARD – The
remote control supplied with this product contains a coin/button cell
battery. If the battery is swallowed, it can cause internal burns in just 2
hours and can lead to death. Keep new and used batteries away from
children.
• Do not expose the product to naked ame sources, such lighted candles
which should not be placed on or near the product.
• Ventilation should not be impaired by covering the product or power
supply.
• Clean only with a dry cloth.
• This product is intended for use in moderate climates.
On waterproof performance of the this product
The water resistant specications of this product are equivalent to IPX4 in
IEC 60529 “Degrees of protection against ingress of water (IP Code)”, which
species the degree of protection provided against the entry of water. The
this product cannot be used in water.
Unless the unit is used correctly, water may get into the this product and
cause re, electrocution, or malfunctions. Note the following cautions
carefully and use the product correctly.
IPX4: Protected against water splashing from any direction.

29
EN
Liquids that the water resistant performance specications apply to:
• Applicable: fresh water, tap water
• Not applicable: liquids other than those above (examples: soapy water,
detergent water, water with bath agents, shampoo, hot spring water,
pool water, seawater, etc.)
The water resistant performance is based on measurements performed
under the conditions described above. Note that malfunctions resulting
from water immersion caused by customer misuse are not covered by the
warranty.
To maintain water resistant performance
Carefully note the precautions below to ensure proper use.
• Do not splash water forcibly into the sound output holes.
• Do not fall into the water, and do not use underwater.
• Do not allow the this product to remain wet in a cold environment, as
the water may freeze. To prevent malfunction, make sure to wipe o
any water after use.
• Do not place the this product in water or use it in a humid place such as
a bathroom.
• Do not drop expose it to mechanical shock. Doing so may deform or
damage the this product, resulting in deterioration of water resistance
performance.
• Use a soft dry cloth to wipe o any water that gets on the this product.
If water remains in the speaker output holes, the speaker may become
muled or completely inaudible. If this happens, position the Speaker
holes facing downward, and shake several times to get the water out.

30
EN
PRODUCT DESCRIPTION

31
EN
1 STANDBY button
2 CD/BT SKIP PREVIOUS/TUNE- button
3 SOURCE BUTTON
4 CD/BT SKIP NEXT/TUNE+ button
5 PRESET 1 button
6 SLEEP button
7 PRESET 2 button
8 MENU/INFO button
9 Clock set/ preset 3+ button
10 Play mode /alarm set buttoN
11 CD/BLUETOOTH PLAY/PAUSE/DAB/FM SCAN BUTTON
12 CD STOP button/ BT PAIR BUTTON
13 LCD display
14 Volume control knob /snooze/enter button
15 Carrying handle
16 USB jack
17 Charge indicator
18 3.5mm headphone jack
19 Type-C jack
20 CD door lock
21 CD door

32
EN
GETTING STARTED
1. Connect the Type-C cable to the Type-C port.
2. Connect the other end of the Type-C cable to a power outlet, using a
USB power adapter. You can also charge the battery by connecting
Type-C cable to a computer's USB port. The charging indicator shows the
battery charging.
3. Press the POWER button to turn on the unit. To turn o, Press the Power
button again.
Before you switch on for the rst time, charge the battery for at least
3hours.
4. Press and hold the POWER Button for 3 seconds or Power ‘o’.
Adjusting and muting the volume
Turn the Volume dial to increase or decrease the volume

33
EN
CD OPERATION
Press the SOURCE button repeatedly on the unit
Inserting a CD
While the Secpress the fuselage, to remove the CD door-lock lever, opening
the CD door, CD is set to the CD applied part with the printing aspect as
forward.
• Place an audio CD on the center spindle with its label side facing out.
• Please insert CD to the axis securely.
• Unit starts to read the disc, “CD READING” shows in display. After few
seconds, the total number of tracks show one second and then total
time of the CD will be shown on the LCD DISPLAY
• If there is no disc or the disc can’t be read, “NO DISC” will show on the
display.
To pause playback
1. Press the
⏯ button to pause the playback.
2. To resume playback, press the ⏯ button again.
To stop playback
Press the ⏹ button to stop playback.
Skipping to another track
• Press the ⏮ or ⏭ buttons to skip backwards to the beginning of the
track or previous track or skip forwards to the next track.

34
EN
• Press and hold the ⏮ or ⏭ buttons to perform fast forward/reverse
playback.
Repeat playback
1. During playback mode, press the PLAY MODE button
will show on
the display. The CD will play the current track repeatedly.
2. Press the PLAY MODE button twice, will show on the display. The CD
will play all tracks repeatedly.
3. Press the PLAY MODE button once more again, The indicator will
show on the display. All tracks will be played randomly. Press the ⏮ or ⏭
buttons to playback the next random track.
4. Press the PLAY MODE button once more again, the RANDOM function
will turn o.
Programme setting
User can program up to 20 tracks in CD mode or 99 tracks in MP3 in any
desired order. Program mode is activated while in STOP mode.
1. Press the PLAY MODE button to enter program mode.
2. Press the ⏮ or ⏭ buttons to select the track that you want to preset.
3. Press the PLAY MODE button to conrm the track.
4. Repeat steps 2-3 to program more tracks. Once it is completed, press
the button to start playback of the programmed tracks.
Programme cancel
To cancel the program, press the ⏹ button twice, or open the disk tray and
then close it again.

35
EN
USB OPERATION
1. There is an USB socket located at the front of the unit. When a USB
device is connected to the unit, press the SOURCE button select USB
mode.
2. The unit will automatically display the total number of tracks.
3. All playback features are the same as if you were playing an MP3 CD.
Notes
• The unit can only play MP3 le format in USB operation.
• If your USB device is loaded with MP3’s but the display keeps showing
"NO" on the display, the format of your USB device might not be
compatible with the unit.
• This unit supports USB versions 1.1 and 2.0.
• The unit can support USB devices with up to 32GB of memory.
• The unit may not be compatible with all USB devices and memory
cards, this is not an indication of a problem with the unit.

36
EN
DAB+ OPERATION
Full scan
1. To activate auto scan, press the SCAN button and the display will show
"Scanning …" and a progressing slide bar.
2. All the stations that have been found will be stored automatically. To
explore and listen to the found stations, press the or buttons to
select. Then press the ENTER button conrm into stations.
Manual Tuning
As well as the auto tune function, you can manually tune the receiver.
1. Press the MENU button to display the menu.
2. Press ⏮ or ⏭ buttons select 'select MANUAL TUNE' then press the ENTER
button to conrm.
3. Press the ⏮ or ⏭ buttons to cycle through the DAB+ channels, which are
numbered from 5A to 13F.
4. After your desired channel number is selected, press the ENTER button
to conrm. The display will show the multiplex. Press the MENU button
again to add selected channel to station list.
DRC (Dynamic compression)
1. Press the MENU button to display the menu.
2. Press the ⏮ or ⏭ buttons to select "DRC" and then press the ENTER
button to conrm DRC menu.
3. Press the ⏮ or ⏭ to select o / high / low.
4. Press the ENTER button to conrm.
Prune
You may remove all unavailable stations from the list
1. During DAB mode, press the MENU button to display the menu.
2. Press the ⏮ or ⏭ buttons to select "Prune" and then press the ENTER
button to conrm.
3. Press the ⏮ or ⏭ to select <Prune>, and then press the ENTER button to
delete the unavailable stations.
4. You can press the ⏮ or ⏭ to select <NO>, and then press the ENTER
button to cancel.
Software information
1. In DAB mode, press and hold the MENU button to display the menu.
2. Press the ⏮ or ⏭ buttons to select "SYSTEM" and then press the ENTER
button to conrm.
3. Press the ⏮ or ⏭ buttons to select "SW version".
4. Press the ENTER button to display the software version.

37
EN
5. Press the MENU button to exit.
Language selection
In DAB or FM mode press the menu button, select with the ⏮ or ⏭ buttons
or "SYSTEM" and press enter to conrm then select" language" and choose
the desired language from English/Danish/Dutch/French/German/Polish/
Italian/Spanish.
System reset
This setting will restore the factory default settings of the unit.
Press and hold the MENU button, press the ⏮ or ⏭ buttons select
“SYSTEM”.
1. Press the ⏮ or ⏭ buttons select “Factory Reset” menu.
2. Press the ENTER button to select Reset.
Note: After the system reset, all the tuned stations, FM/DAB+ preset
stations will be erased.
Secondary Devices
You may see a ">" symbol after the name of the station, this indicates that
there are secondary services available to that station. These secondary
services contain extra services that are related to the primary station. e.g. a
sports station may want to add extra commentaries. The secondary services
are inserted directly after the primary station in the station list.
To select the secondary station, press the MENU button when ">" appears in
the display before the station name. When the secondary service ends, the
unit will automatically switch back to the primary station.
Preset stations
You can store up to 20 DAB radio and 20 FM radio stations for quick access.
To quick-store a station to a preset button (1-2)
Tune to the DAB or FM radio station you want to store. Press and hold
one of the numbered Preset buttons (1-2) for two seconds until you see a
message to conrm that the preset has been stored.
To store a station to the preset list (3-20)
1. Tune to the DAB or FM radio station you want to store.
2. Hold the 3+ button to view the numerical list of stored presets, then turn
and press the Select dial to choose any Preset number between 3 and
20. You can overwrite existing presets.

38
EN
To recall a preset when listening to DAB radio or FM radio
1. To tune to Presets 1 to 2, press the corresponding numbered button on
the front panel.
2. To access presets 3 to 20 on the front panel press the 3+ button, turn the
Select dial right or left to scroll through the list of presets, then push and
release the Select dial to tune to the selected preset.
DAB Display modes
Press the INFO button, the display will switch through the following display
modes. The information of each display mode is displayed on the lower
segment of the display.
Signal strength
The display will show a slide bar to indicate the signal strength, the stronger
the signal, the longer the bar will be from left to right.
Programme type
This describes the "style" or "genre" of the programme that is being
broadcast.
Ensemble
This displays the name of the multiplex that contains the station you are
listening to. A multiplex is a collection of radio stations that are bundled
and transmitted on one frequency. There are national and local multiplexes.
Local ones contain stations that are specic to that area.
Note: DAB – unlike normal radio, groups together several radio stations and
transmits them on one frequency.
Frequency
This displays the frequency of the present station, such as "11C 220.352
MHz".
Signal Error
This displays a number showing the error rate. If the number is 0, it means
the signal received is error free and the signal strength is strong. If the error
rate is high, it is recommended to re-orient the aerial or re-position the unit.
Audio Bit Rate
The display will show the digital audio bit rate being received.

39
EN
Time / Date
This displays the current time and date provided automatically by the
broadcaster.
DLS (Dynamic Label Segment)
Dynamic label segment is a scrolling message that the broadcaster may
include with their transmissions. The message usually includes information,
such as program me details etc.
FM OPERATION
To switch the unit to FM mode, press the SOURCE button repeatedly to
select FM mode. The display will show the frequency.
Auto scan
Press the SCAN button until the tuner starts searching for a station. After
scanning the FM band, the rst 20 receivable stations will be stored in the
PRESETS.
Manual Scan
To search for FM stations manually, press the or ,buttons repeatedly
until your desired frequency is reached.
Scan setting
This is a scanning option to scan all stations, or just scan stations with a
strong signal.
1. Press the MENU button, then press the or buttons to select "Scan
setting". Press the ENTER button to conrm.
2. Press the or buttons to select "All stations" or "Strong stations
only". Press the ENTER button to conrm.
The asterisk shown at the top right of the display determines the currently
selected option.
Audio setting
This unit will automatically switch between stereo and mono mode, but
you can override this and switch this function manually. This can be helpful
when receiving poor signal reception.
1. Press the MENU button, then press the buttons to select “Audio setting”.
Press the ENTER button to conrm.
2. Press the buttons to select “Stereo allowed” or “Forced mono” and then
press the ENTER button to conrm.
40
EN
FM display modes
Press the INFO button on the remote control, the display will switch through
the display modes.
• Radio text: The broadcaster can include a scrolling text that displays
information about the current program.
• Programme type: This describes the "style" or "genre" of the programme
that is being broadcast.
• Frequency: This displays the frequency of the present station, such as
"87.50 MHz".
• Audio type:This displays if the station being received is in mono or
stereo.

41
EN
SETTING ALARMS AND TIMERS
Auto clock setting
The clock can be updated automatically if you can receive a DAB+ signal in
your location.
Clock setting
1. Press the CLOCK button .The data digits ash on the display.
2. Press the ⏮ or ⏭ buttons to adjust the year digits, and then press the
CLOCK button to conrm. The month digits will ash on the display.
3. Press the ⏮ or ⏭ buttons to adjust the month digits, and then press the
CLOCK button to conrm. The day digits will ash on the display.
4. Press the ⏮ or ⏭ buttons to adjust the day digits, and then press the
CLOCK button to conrm. The 12/24H digits will ash on the display.
5. Press the ⏮ or ⏭ buttons to adjust the 12H/24 digits, and then press the
CLOCK button to conrm. The hour digits will ash on the display.
6. Press the ⏮ or ⏭ buttons to adjust the hour digits, and then press the
CLOCK button to conrm. The minute digits will ash on the display.
7. Press the ⏮ or ⏭ buttons to adjust the minute digits. press the CLOCK
button to conrm the setting.
Note: If the unit cannot receive any DAB/DAB+ signal, you can set the clock
manually. Once the DAB+ signal is received, the time will be automatically
updated.
Setting the alarm
1. Press and hold the ALARM button display shows “On Timer”, and the
hour digits ash.
2. Press the ⏮ or ⏭ buttons to adjust the hour digits, and then press the
ENTER button to conrm. The minute digits will ash on the display.
3. Press the ⏮ or ⏭ buttons to adjust the minute digits, and then press the
ENTER button to conrm.
4. When the ⏮ or ⏭ On Timer Clock set is set, the display will show “O
Timer” and the hour digits will ash.
5. Press the buttons to select FM, USB, DAB or CD mode, then press the
ENTER button to conrm.
6. Press the ALARM button to select "Timer On", and the Timer is now set.
7. In standby mode, the icon
will show on the display to indicate the
Timer is On.
To cancel the alarm
Press the ALARM button select ALARM O mode. The
indicator will
disappear from the display.

42
EN
Notes
1. If “Wake to CD of USB ”is selected but a CD of USB is not inserted, the
alarm will default to the DAB automatically when the alarm wake time
is reached.
2. For ‘Wake to Radio”, the system will default to the last FM radio station
listened to before switching o.
Snooze function
Press the ENTER/SNOOZE Button to temporarily terminate the alarm mode.
The SNOOZE icon shows in display, the alarm will re-start again after 9
minutes on each press. To cancel the ENTER/SNOOZE mode, press the
button once, the ENTER/SNOOZE icon disappears from display.
Setting the sleep timer
Use the sleep timer to turn the unit o after a certain time in play mode. By
setting the sleep timer, you can fall asleep with music by knowing that your
unit will turn o by itself rather than playing all night.
1. To set the sleep timer press the SLEEP button repeatedly to select the
desired sleep timer as below:
120 60 30 20 15 10 05 OFF
2. The sleep timer is now set.
3. Press the SLEEP button to show the reminding time before the unit turn
o automatically.
4. To cancel the sleep timer, press the SLEEP button repeatedly to select
“Sleep OFF” .

43
EN
BT OPERATION
The unit has a Bluetooth function that can receive a signal within 8 meters
(without obstacles)
Pairing the unit with a Bluetooth device to listen to music:
1. Turn the unit on and press the SOURCE button select Bluetooth mode.
2. If the unit is not paired with any Bluetooth device, the display will ash
“BT PAIRING”
3. Activate your Bluetooth device and select the search mode.
4. “Splash” will appear on your Bluetooth device list.
5. Select “Splash” and enter “0000” for the password if necessary.
6. To disconnect the Bluetooth function, press the SOURCE button to
switch to another mode or disconnect the function from your Bluetooth
device.
Notes:
• If the signal strength is weak, your Bluetooth receiver may disconnect,
but it will re-enter pairing mode automatically.
• For a better signal reception, remove the obstacles between the unit
and the Bluetooth device.
• This unit supports A2DP (Advanced Audio Distribution Prole) and
AVRCP (Audio Video Remote Control Prole) functions. This can only be
paired with one Bluetooth device at one time.
• Compatibility with all devices and media types is not guaranteed.
• Some mobile phones with the Bluetooth function may connect and
disconnect as you make and end calls. This is not an indication of a
problem with your unit.

44
EN
DISPOSAL CONSIDERATIONS
If there is a legal regulation for the disposal of
electrical and electronic devices in your country,
this symbol on the product or on the packaging
indicates that this product must not be disposed of
with household waste. Instead, it must be taken to
a collection point for the recycling of electrical and
electronic equipment. By disposing of it in accordance
with the rules, you are protecting the environment and
the health of your fellow human beings from negative
consequences. For information about the recycling
and disposal of this product, please contact your local
authority or your household waste disposal service.
This product contains batteries. If there is a legal
regulation for the disposal of batteries in your country, the
batteries must not be disposed of with household waste.
Find out about local regulations for disposing of batteries.
By disposing of them in accordance with the rules, you are
protecting the environment and the health of your fellow
human beings from negative consequences.
DECLARATION OF CONFORMITY
Manufacturer:
Chal-Tec GmbH, Wallstrasse 16, 10179 Berlin,
Germany.
Importer for Great Britain:
Berlin Brands Group UK Limited
PO Box 42
272 Kensington High Street
London, W8 6ND
United Kingdom
Hereby, Chal-Tec GmbH declares that the radio
equipment type Splash is in compliance with Directive
2014/53/EU. The full text of the EU declaration of
conformity is available at the following internet address:
use.berlin/10037797
For Great Britain: Hereby, Chal-Tec GmbH declares that
the radio equipment type Splash is in compliance with
the relevant statutory requirements. The full text of the
declaration of conformity is available at the following
internet address: use.berlin/10037797

45
FR
Fiche technique 46
Consignes de sécurité 47
Aperçu de l'appareil 50
Premiers pas 52
Fonctionnement du CD 53
USB 55
Radio DAB/fonctionnement 56
Radio FM 59
Réglage de l'alarme et de la minuterie 61
Fonctionnement du BT 63
Informations sur le recyclage 64
SOMMAIRE
Cher client, chère cliente,
Toutes nos félicitations pour l’acquisition de
ce nouvel appareil. Lisez attentivement les
indications suivantes et suivez-les pour éviter
d'éventuels dommages. Nous ne saurions être
tenus pour responsables des dommages dus
au non-respect des consignes et à la mauvaise
utilisation de l’appareil. Scannez le QR-Code pour
obtenir la dernière version du mode d'emploi
ainsi que d'autres informations concernant le
produit

46
FR
FICHE TECHNIQUE
Numéro d'article
10037795, 10037796, 10037797
Alimentation
Connexion par adaptateur
secteur
Batterie
5 V⎓(1 A)
Batterie lithium-ion (2000mAh) (non amovible)
Lecteur CD
CD-DA / CD-R / CD-RW / MP3 / WMA
Entrée US
Lecture de chiers MP3 et WMA
Radio FM
Plage de fréquence 87,5 – 108 MHz
Mémorisation de station 20
Radio DAB
Plage de fréquence 174-240 MHz
Mémorisation de station 20
BT
Plage de fréquence 2402-2480 MHz
Puissance d'émission -6,81 dBm (PIRE)
Puissance RMS
2 x 1 W RMS

47
FR
CONSIGNES DE SÉCURITÉ
Explication des symboles sur l'appareil
ATTENTION
RISQUE DE CHOC ÉLECTRIQUE
NE PAS OUVRIR
MISE EN GARDE : POUR RÉDUIRE LE RISQUE DE CHOC ÉLECTRIQUE ET DE BLESSURE
CORPORELLE, N'OUVREZ PAS LE BOÎTIER. L'APPAREIL NE CONTIENT AUCUNE PIÈCE
RÉPARABLE PAR L'UTILISATEUR. EN CAS DE RÉPARATION, CONTACTER UNIQUEMENT
DU PERSONNEL QUALIFIÉ.
L'éclair avec la èche à l'intérieur d'un triangle est destiné à alerter
l'utilisateur de la présence de tension dangereuse non isolée à
l'intérieur du boîtier, d'une magnitude suisante pour constituer un
risque de choc électrique aux personnes. N'ouvrez pas le boîtier !
Le point d'exclamation dans un triangle est destiné à alerter
l'utilisateur de la présence d'importantes instructions d'utilisation et
d'entretien et de maintenance dans les documents qui accompagnent
ce produit.
Les enfants à partir de 8 ans et les personnes sourant de handicaps
mentaux, sensoriels et physiques ne peuvent utiliser l'appareil que s'ils
ont été parfaitement familiarisés avec les fonctions et les précautions
de sécurité par une personne responsable et s'ils comprennent les
risques associés.
Si le cordon d'alimentation est endommagé, il doit être remplacé par le
fabricant, un centre de service agréé ou une personne de qualication
similaire.
Protection contre l'exposition aux rayonnements
• N'essayez pas de démonter le boîtier de l'appareil car le rayonnement
du laser est dangereux pour les yeux.
• Éteignez immédiatement l'appareil si des liquides ou des objets solides
pénètrent à l'intérieur.
• Ne touchez pas ou ne heurtez pas la lentille, car cela pourrait
l'endommager et empêcher l'appareil de fonctionner correctement.
• N'insérez rien dans la rainure de sécurité, car cela activerait la diode
laser tant que le compartiment à CD est ouvert.
• Lorsque vous n''utilisez pas l'appareil pendant une longue période,
éteignez-le. Débranchez la che de la prise. Débranchez toujours le
câble secteur en tirant la che elle-même.

48
FR
• Lisez, suivez et conservez ces instructions - Toutes les instructions de
sécurité et d'utilisation doivent être lues avant d'utiliser ce produit et
conservées pour référence ultérieure. Tous les avertissements gurant
sur l'appareil et dans les instructions doivent être respectés.
• Le fait de ne pas installer ou utiliser l'appareil conformément à ces
instructions peut aecter la sécurité du produit et invalider la garantie.
• N'utilisez que les blocs d'alimentation énumérés dans ce manuel
d'instructions pour alimenter l'appareil. N'utilisez pas les blocs
d'alimentation à d'autres ns.
• Si la che secteur est utilisée comme dispositif de déconnexion, elle
doit rester facilement utilisable et accessible.
• Ne pas immerger dans l'eau l'appareil connecté à la prise.
• Ne retirez aucune vis et n'ouvrez pas le boîtier du produit. Les
réparations du produit ne doivent être eectuées que par du personnel
compétent et autorisé. N'utilisez pas le produit si vous constatez un
quelconque dommage.
• Conservez le produit à l'abri de la lumière directe du soleil et des
sources de chaleur telles que les radiateurs, les appareils de chauage
ou autres appareils produisant de la chaleur.
• Télécommande - Il existe un risque d'explosion si la pile n'est pas
remplacée correctement (veillez à respecter la polarité). Remplacez-la
uniquement par un type identique ou équivalent. La pile ne doit pas
être exposée à une chaleur excessive telle que le soleil, le feu ou autre.
Respectez les aspects environnementaux de la mise au rebut des piles.
• Mise en garde - NE PAS AVALER LA PILE, RISQUE DE BRÛLURE
CHIMIQUE - La télécommande fournie avec ce produit contient une
pile bouton. Si la pile bouton est avalée, elle peut provoquer de graves
brûlures internes et la mort en seulement 2 heures. Conservez les piles
neuves et usagées hors de portée des enfants.
• N'exposez pas l'appareil à des ammes nues, par exemple des bougies
allumées, qui ne doivent pas être placées sur ou près de l'appareil.
• N'entravez pas la ventilation en recouvrant l'appareil ou son
alimentation électrique.
• Nettoyez l'appareil avec un chion sec uniquement.
• Ce produit est destiné à être utilisé dans les climats tempérés.

49
FR
Remarques sur l'étanchéité de cet appareil
Les spécications d'étanchéité pour ce produit sont IPX4 basées sur la
norme IEC 60529 « Niveau de protection contre la pénétration de l'eau
(code IP) » qui indique le degré de protection contre la pénétration de l'eau.
Ce produit ne peut pas être utilisé dans l'eau.
Si l'appareil n'est pas utilisé correctement, de l'eau peut pénétrer
dans l'appareil et provoquer un incendie, un choc électrique ou un
dysfonctionnement. Respectez scrupuleusement les consignes de sécurité
suivantes et utilisez l'appareil correctement.
IPX 4 : protégé contre les éclaboussures d'eau provenant de toutes les
directions.
Liquides auxquels s'appliquent les spécications de résistance à l'eau
• Applicable : eau douce, eau du robinet
• Non applicable : Liquides autres que ceux mentionnés ci-dessus (par
exemple, eau savonneuse, eau détergente, eau avec additifs pour le
bain, shampooing, eau de source chaude, eau de piscine, eau de mer,
etc.)
La résistance à l'eau est basée sur des mesures eectuées dans les
conditions décrites ci-dessus. Notez que les dysfonctionnements causés
par une immersion dans l'eau due à une mauvaise utilisation par le client ne
sont pas couverts par la garantie.
Maintenir la résistance à l'eau
Respectez les précautions suivantes pour garantir une utilisation correcte.
• N'aspergez pas les ouvertures de sortie de son avec un jet puissant. Ne
laissez pas tomber l'appareil dans l'eau et ne l'utilisez pas sous l'eau.
• Ne laissez pas cet appareil prendre de l'eau dans un environnement
froid car l'eau pourrait geler. Pour éviter tout dysfonctionnement, veillez
à essuyer l'eau après utilisation.
• Ne placez pas l'appareil dans l'eau et ne l'utilisez pas dans un endroit
humide comme une salle de bains par exemple.
• Ne le faites pas tomber et ne le soumettez pas à des chocs mécaniques.
Sinon, l'appareil risque d'être déformé ou endommagé, ce qui
entraînera une détérioration de sa résistance à l'eau.
• Utilisez un chion doux et sec pour essuyer l'eau tombée sur l'appareil.
Si de l'eau reste dans les ouvertures de sortie de l'enceinte, le son
de celle-ci peut devenir terne ou inaudible. Dans ce cas, tenez les
ouvertures de l'enceinte vers le bas et secouez l'appareil plusieurs fois
pour faire sortir l'eau.

50
FR
APERÇU DE L'APPAREIL

51
FR
1 Touche de mise en veille
2 CD/BT: Titre précédent ou diminuer le réglage de l'heure / station
précédente
3 SOURCE
4 CD/BT sauter au titre suivant Touche TUNE+
5 Emplacement mémoire 1
6 SLEEP - Arrêt automatique
7 Emplacement mémoire 2
8 Menu/Info
9 CLOCK/ 3+ - Réglage de l'heure/ emplacements de mémoire
10 PLAY MODE/ ALARM - Mode de lecture/ Alarme
11 ⏯ /SCAN -Mode CD/ BT : lecture/pause ; mode DAB/FM : recherche de
station
12 ⏹/ Appairage BT - Mode CD : stop ; mode BT : appairage de l'appareil
13 Écran LCD
14 VOLUME/SNOOZE/ENTER - Contrôle du volume (tourner)/Touche
d'entrée (appuyer)
15 Poignée de transport
16 Port USB
17 Indicateur de charge
18 Prise casque 3,5 mm
19 Connecteur de type C
20 Verrouillage du compartiment CD
21 Compartiment CD

52
FR
PREMIERS PAS
1. Connectez le câble Type-C fourni au connecteur Type-C.
2. Connectez l'autre extrémité du câble de type C à une prise de courant
avec un adaptateur d'alimentation USB. Vous pouvez également charger
la batterie en connectant l'appareil au port USB d'un ordinateur. Le
témoin de charge clignote pendant la charge de la batterie.
3. Pour allumer l'appareil, appuyez sur la touche . Appuyez à nouveau sur
la touche pour éteindre l'appareil.
Laissez la batterie se charger pendant au moins 3 heures avant d'allumer
l'appareil pour la première fois.
4. Maintenez la touche 3 secondes pour éteindre l'appareil.
Réglage du volume
Ajustez le volume avec la commande de volume.
53
FR
FONCTIONNEMENT DU CD
Appuyez plusieurs fois sur la touche SOURCE jusqu'à ce que l'écran aiche
« CD ».
Insérer le CD
1. Ouvrez d'abord le fusible du compartiment CD, puis le compartiment CD.
2. Placez le CD avec la face imprimée vers le haut et la face brillante vers
le bas dans le compartiment CD. Assurez-vous que le CD est placé sur la
broche centrale.
3. Le CD est lu. L'écran aiche « CD READING ». Après quelques secondes,
le nombre total de pistes du CD s'aiche, puis la durée totale de lecture.
4. Si aucun CD n'est inséré ou si le CD inséré ne peut pas être lu, « NO DISC
» apparaît à l'écran.
Pour mettre en pause la lecture
1. Appuyez sur la touche
⏯pour mettre en pause la lecture.
2. Pour reprendre la lecture, appuyez à nouveau sur la touche ⏯.
Pour arrêter la lecture
Appuyez sur la touche ⏹ pour arrêter la lecture.
Pour sauter un titre
• Appuyez sur les touches ⏮ o ⏭ pour revenir au début d'un titre ou pour
écouter le titre précédent ou suivant.
• Appuyez sur les touches ⏮ o ⏭ et maintenez-les pour eectuer une
avance rapide ou un retour en arrière.

54
FR
Répétition des pistes et lecture aléatoire
1. Appuyez sur la touche PLAY MODE en mode de fonctionnement. L'écran
aiche
. La piste actuelle du CD est répétée en boucle.
2. Appuyez à nouveau sur la touche PLAY MODE en mode de
fonctionnement. L'écran aiche . Tous les titres du CD sont répétés en
boucle.
3. Si vous appuyez une troisième fois sur la touche PLAY MODE, l'icône
i apparaît à l'écran. Toutes les pistes du CD sont lues dans un ordre
aléatoire. Appuyez sur les touches ⏮ ou ⏭ pour accéder au titre aléatoire
précédent / suivant.
4. Appuyez à nouveau sur la touche PLAY MODE pour reprendre la lecture
normale.
Créer une liste de lecture
Vous pouvez stocker 20 pistes de CD ou 99 pistes de MP3 dans n'importe
quel ordre. La liste de lecture se créée en mode arrêt.
1. En mode arrêt, appuyez sur la touche PLAY MODE pour ouvrir la liste de
lecture.
2. Utilisez les touches ⏮ ou ⏭ pour sélectionner les titres que vous
souhaitez enregistrer.
3. Appuyez sur la touche PLAY MODE pour conrmer votre sélection.
4. Répétez les étapes 2 et 3 pour ajouter d'autres titres à la liste de lecture.
Une fois que vous avez enregistré tous vos titres, appuyez sur la touche
⏯ pour lire la liste programmée.
Pour eacer une liste de lecture programmée
Appuyez deux fois sur la touche ⏹ ou ouvrez et fermez une fois le
compartiment CD pour supprimer la liste de lecture enregistrée.

55
FR
USB
1. Un port USB se trouve à l'avant de l'appareil. Après avoir branché une clé
USB, appuyez plusieurs fois sur la touche SOURCE pour sélectionner le
mode USB.
2. L'appareil aiche automatiquement le nombre de titres sur la clé USB.
3. Toutes les touches de lecture sont les mêmes qu'en mode MP3/CD.
Remarques
• L'appareil peut lire les formats de chiers MP3/WMA en mode USB
uniquement.
• Si des chiers MP3/WMA se trouvent sur votre clé USB mais que
l'écran aiche « NO USB », il se peut que le format des chiers ne soit
pas compatible avec l'appareil (par exemple, des chiers MP3/WMA
protégés par DRM).
• Cet appareil prend en charge les versions USB 1.1 et 2.0.
• Cet appareil prend en charge les périphériques USB jusqu'à 32 Go.
• Il peut arriver que les clés USB et les cartes mémoire ne soient pas
toutes compatibles avec l'appareil. Cela n'indique pas un problème de
l'appareil.

56
FR
RADIO DAB/FONCTIONNEMENT
Recherche complète de stations
1. Pour activer la recherche automatique des stations, appuyez sur la
touche SCAN et l'écran aiche « Scanning...» (Recherche) et une barre
croissante.
2. Toutes les stations trouvées sont automatiquement sauvegardées. Pour
parcourir les stations trouvées, appuyez sur les touches ⏮ ou ⏭. Appuyez
ensuite sur la touche de conrmation ENTER.
Recherche manuelle des stations
En plus de la recherche automatique des stations, la recherche des stations
peut aussi se faire manuellement.
1. Appuyez sur la touche MENU de la télécommande pour aicher le menu.
2. Appuyez sur les touches ⏮ ou ⏭ pour sélectionner la recherche
manuelle des stations et appuyez sur la touche ENTER pour conrmer
3. Appuyez sur les touches ⏮ ou ⏭ pour parcourir les stations DAB/DAB+
numérotées de 5A à 13F.
4. Après avoir sélectionné le numéro de la station désirée, appuyez sur
ENTER pour conrmer. L'écran aiche le multiplex.
5. Appuyez à nouveau sur la touche MENU pour ajouter la station
sélectionnée à la liste des stations.
Compression de plage dynamique (DRC)
1. Appuyez sur la touche MENU pour aicher le menu.
2. Appuyez sur ⏮ ou ⏭ pour sélectionner « DRC » et appuyez sur ENTER
pour confirmer.
3. Appuyez sur les touches ⏮ ou ⏭pour sélectionner « o/haut/bas ».
4. Appuyez sur la touche ENTER pour conrmer.
Pour supprimer une station
Il se peut que vous souhaitiez supprimer toutes les stations non disponibles
de la liste des stations.
1. En mode DAB, appuyez sur la touche MENU pour aicher le menu.
2. Appuyez sur les touches ⏮ ou ⏭ pour sélectionner « Prune » et appuyez
sur ENTER pour confirmer.
3. Appuyez sur les touches ⏮ ou ⏭pour sélectionner « Oui » et appuyez sur
la touche ENTER pour conrmer que toutes les stations mémorisées non
disponibles seront supprimées.
4. Vous pouvez également appuyer sur les touches ⏮ ou ⏭ et sélectionner
« Non », puis appuyer sur la touche ENTER pour annuler le réglage.

57
FR
Informations sur les logiciels
1. En mode DAB, appuyez sur la touche MENU pour aicher le menu.
2. Appuyez sur ⏮ ou ⏭ pour sélectionner « System » et appuyez sur ENTER
pour conrmer.
3. Appuyez sur la touche ENTER de la télécommande pour aicher la
version du logiciel.
4. Pour quitter l'aichage, appuyez à nouveau sur la touche MENU.
Choix de la langue
En mode DAB ou FM, appuyez sur la touche MENU et sélectionnez « System
» avec les touches ⏮ ou ⏭. Appuyez sur la touche ENTER pour conrmer.
Choisissez votre langue.
Réinitialisation aux paramètres d'usine
Cette fonction réinitialise tous les paramètres aux valeurs par défaut.
Maintenez la touche MENU et sélectionnez « System » avec les touches ⏮
ou ⏭.
1. Utilisez les touches ⏮ ou ⏭ pour sélectionner « Factory Reset »
(réinitialisation aux paramètres d'usine).
2. Appuyez sur la touche ENTER pour conrmer.
Remarque : Lors de la réinitialisation des paramètres d'usine, toutes les
stations FM/DAB+ enregistrées sont supprimées.
Services secondaires
Dans certaines conditions, vous pouvez voir un symbole « > » après le nom
de la station, indiquant que des services secondaires sont disponibles
pour cette station. Ces services secondaires contiennent des services
supplémentaires qui sont liés à la station primaire. Les services secondaires
sont insérés dans la liste des stations directement après la station primaire.
Pour sélectionner la station secondaire, appuyez sur la touche MENU
lorsque « > » apparaît devant le nom de la station à l'écran. Lorsque le
service secondaire prend n, l'appareil revient automatiquement à la station
primaire.
Sauvegarder une station
Il est possible de mémoriser jusqu'à 20 stations de radio numériques et
20stations FM pour un accès rapide.
Pour sauvegarder une station à l'emplacement mémoire 1 ou 2
1. Sélectionnez la station que vous voulez sauvegarder.
2. Appuyez sur la touche
① ou ② et maintenez-la 2 secondes jusqu'à ce
qu'un message s'aiche à l'écran pour conrmer la réussite du processus
de sauvegarde.

58
FR
Sauvegarde des stations dans la liste de mémoire
1. Sélectionnez la station que vous voulez sauvegarder.
2. Maintenez la touche
③+ jusqu'à ce que la liste des mémoires s'aiche.
Utilisez la commande rotative pour sélectionner l'emplacement de
mémoire souhaité entre 3 et 20. Les stations déjà enregistrées peuvent
être écrasées.
Pour écouter une station mémorisée
1. Pour écouter les stations de l'emplacement mémoire 1 ou 2, appuyez sur
les touches
① ou ②.
2. Pour appeler les autres stations enregistrées, appuyez d'abord sur la
ouche ③+ pour ouvrir la liste des stations. Utilisez le bouton rotatif
pour sélectionner la station souhaitée et conrmez votre sélection en
appuyant sur le bouton rotatif.
Modes d'aichage DAB
Appuyez sur la touche INFO de la télécommande. L'écran présente les
diérents modes d'aichage. Les informations sont aichées en bas de
l'écran.
Force du signal
L'écran aiche une barre qui représente la force du signal Plus le signal est
fort, plus la barre est longue de la gauche vers la droite.
Type de programme
Décrit le style ou le genre de l'émission diusée.
Ensemble
Aiche le nom du multiplex contenant les stations que vous écoutez. Un
multiplex est un ensemble de stations de radio qui sont transmises de
manière groupée sur une même fréquence. Il existe des multiplex nationaux
et locaux. Les multiplex locaux contiennent des stations spéciques à une
région.
Remarque : DAB - contrairement à la radio normale, la DAB regroupe
plusieurs stations de radio et les transmet sur une seule fréquence.
Fréquence
Aiche la fréquence de la station réglée, telle que « 11c 220.352 MHz ».
Erreur de signal
Aiche le taux d'erreur du signal. Si le chire est « 0 », cela signie que le
signal reçu est exempt d'erreurs et a une forte intensité.

59
FR
Débit binaire audio
L'écran aiche le débit binaire audio numérique reçu.
Heure / Date
Aiche l'heure et la date actuelles fournies par la station.
DLS (Dynamic Label Segment)
Le segment d'étiquette dynamique est un message textuel délant qui
peut être intégré à la transmission par la station. Ce message contient des
informations ordinaires, telles que les détails sur l'émission.
RADIO FM
Appuyez plusieurs fois sur la touche SOURCE pour passer en mode FM.
L'écran aiche la fréquence.
Recherche automatique de stations
Appuyez sur la touche SCAN et maintenez-la jusqu'à ce que la radio
commence à rechercher des stations. Les 20 premières stations trouvées
lors de la recherche de stations sont enregistrées dans la liste de la
mémoire.
Recherche manuelle de stations
Appuyez sur les touches ⏮ ou ⏭ plusieurs fois jusqu'à ce que vous ayez
atteint la fréquence souhaitée
Paramètre de recherche
Il s'agit d'une option de recherche qui vous permet de rechercher soit toutes
les stations, soit uniquement les stations ayant un signal fort.
1. Appuyez sur la touche MENU, puis sur les touches ou pour
sélectionner « Scan Setting ». Appuyez sur la touche ENTER pour
conrmer.
2. Appuyez sur les touches ⏮ ou ⏭ pour sélectionner « All stations
» (Toutes les stations) ou « Strong stations only » (Stations fortes
uniquement). Appuyez sur la touche Entrée pour conrmer votre
sélection.
Remarque : l'astérisque dans le coin supérieur droit de l'écran indique la
sélection en cours.
Paramètres audio
Cet appareil passe automatiquement du mode stéréo au mode mono et
réciproquement. Vous pouvez contourner cela en réglant manuellement le
mode souhaité. Cela peut être très utile, surtout lorsque le signal est faible.
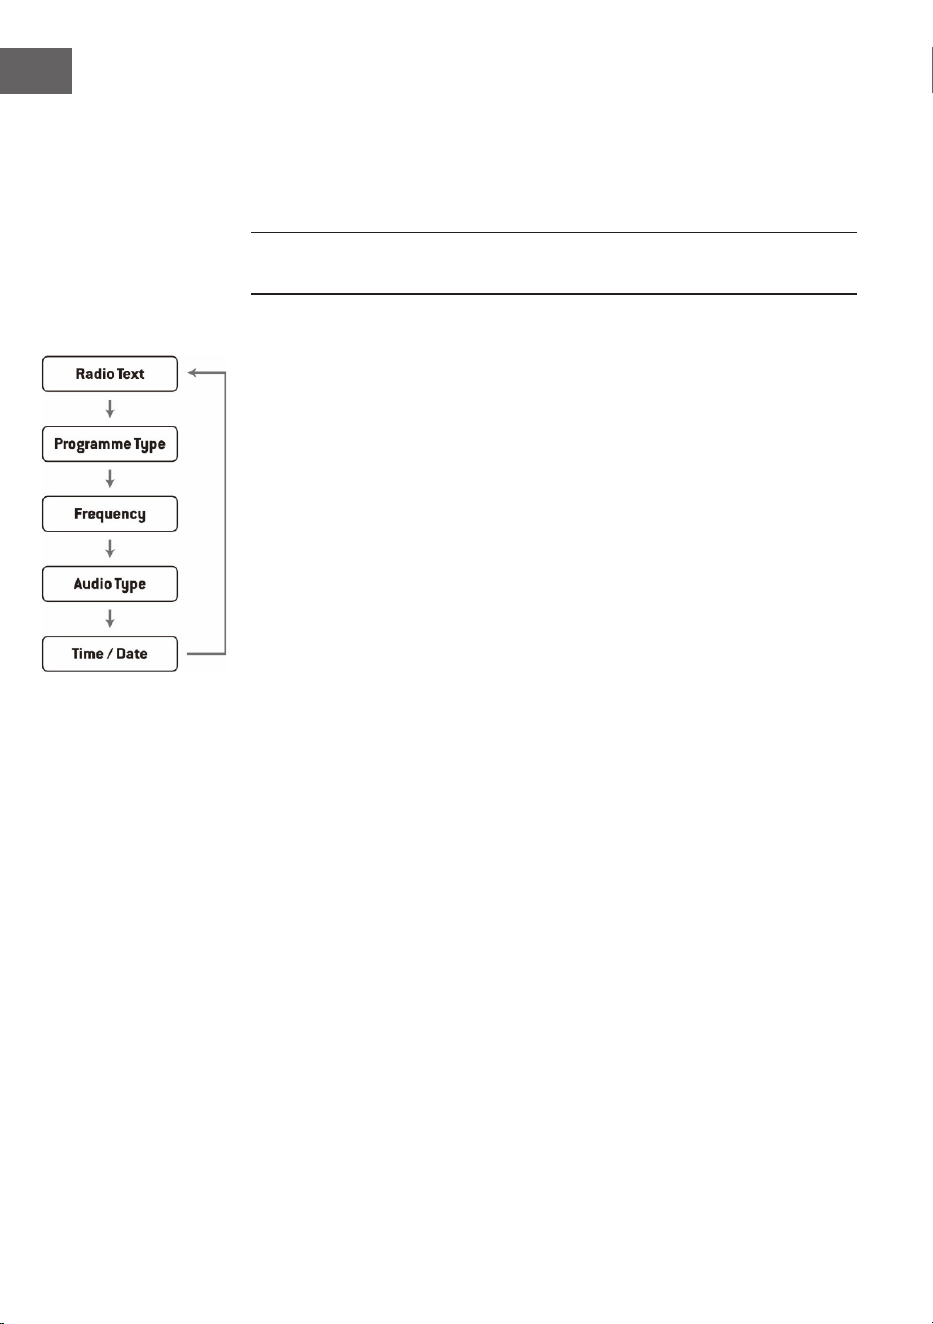
60
FR
1. Appuyez sur la touche MENU et utilisez les touches ⏮ ou ⏭ pour
sélectionner « Audio settings » (Réglage audio). Appuyez sur la touche
ENTER pour conrmer.
2. Appuyez sur les touches ⏮ ou ⏭ pour sélectionner « Stéréo autorisé » ou
« Mono forcé » et conrmez votre sélection avec la touche ENTER.
Remarque : l'astérisque dans le coin supérieur droit de l'écran indique la
sélection en cours.
Modes d'aichage FM
Lorsque vous appuyez sur la touche INFO de la télécommande, l'écran
passe par les modes d'aichage suivants.
• Texte radio : Comme pour la DAB, la station de radio peut aicher des
informations sur les programmes sous forme de texte délant pendant
la transmission.
• Type de programme : le « style » ou le « genre » du programme diusé
est aiché ici.
• Fréquence : Aiche la fréquence de la station réglée, par exemple « 87.5
MHz ».
• Format audio : L'écran indique si les stations de radio sont reçues en
mono ou en stéréo.

61
FR
RÉGLAGE DE L'ALARME ET DE LA MINUTERIE
Réglage automatique de l'heure
L'heure peut être mise à jour automatiquement lorsque vous recevez un
signal DAB+ à votre emplacement actuel.
Réglage de l'heure
1. Appuyez sur la touche CLOCK. L'aichage numérique clignote à l'écran.
2. Appuyez sur la touche ⏮ ou ⏭ pour régler l'année en cours, puis appuyez
sur la touche CLOCK pour conrmer. L'aichage du mois clignote à
l'écran.
3. Appuyez sur la touche ⏮ ou ⏭ pour régler le mois en cours, puis appuyez
sur la touche CLOCK pour conrmer. L'aichage du jour clignote à l'écran.
4. Appuyez sur la touche ⏮ ou ⏭ pour régler le jour en cours, puis appuyez
sur la touche CLOCK pour conrmer. « 12/24 H » clignote à l'écran.
5. Appuyez sur la touche ⏮ ou ⏭ pour régler le format de l'heure souhaité,
puis appuyez sur la touche CLOCK pour conrmer. L'aichage des heures
clignote à l'écran.
6. Appuyez sur la touche ⏮ ou ⏭ pour régler les heures puis appuyez sur la
touche CLOCK pour conrmer. L'aichage des minutes clignote à l'écran.
7. Appuyez sur la touche ⏮ ou ⏭ pour régler les minutes puis appuyez sur
la touche CLOCK pour conrmer.
REMARQUE : Si aucun signal DAB/DAB+ n'est disponible, l'heure peut
également être réglée manuellement. Dès qu'un signal DAB+ est reçu,
l'heure est automatiquement mise à jour.
Réglage du réveil
1. Appuyez sur la touche ALARM et maintenez-la jusqu'à ce que l'écran
aiche « On Timer » et que les chires numériques commencent à
clignoter.
2. Appuyez sur ⏮ ou ⏭ pour régler l'heure et appuyez sur ENTER pour
conrmer. L'aichage des minutes commence alors à clignoter à l'écran.
3. Appuyez sur la touche ⏮ ou ⏭ pour régler les minutes puis appuyez sur
la touche ENTER pour conrmer.
4. Lorsque vous avez réglé l'heure d'alarme souhaitée à l'aide des touches
⏮ ou ⏭, l'écran aiche « O Timer » et l'aichage des heures se met à
clignoter.
5. Sélectionnez le mode souhaité (mode FM, USB, DAB ou CD) en appuyant
sur la touche SOURCE et appuyez sur ENTER pour conrmer.
6. Appuyez sur la touche ALARM pour sélectionner « Timer On ». Le réveil
est alors actif.
7. En mode veille, le symbole
◷s' aiche, indiquant que le réveil a été
activé.

62
FR
Désactiver le réveil quotidien
Désactivez le réveil en cours en appuyant plusieurs fois sur la touche
ALARM. Le symbole
◷ disparaît de l'écran.
Remarques
1. Si, par exemple, vous avez sélectionné « CD » comme source d'alarme et
qu'aucun CD n'a été inséré, la source d'alarme passe automatiquement à
« DAB » dès que l'heure de l'alarme est atteinte.
2. Si vous avez sélectionné « FM » comme source de l'alarme, la dernière
station FM entendue avant l'arrêt est utilisée comme tonalité d'alarme.
Fonction arrêt automatique
Appuyez sur la touche ENTER lorsque l'alarme retentit pour l'interrompre
temporairement. Chaque pression sur la touche permet ensuite de mettre
l'alarme en veilleuse pendant 9 minutes avant qu'elle ne retentisse à
nouveau. Pour désactiver la fonction d'alarme et de répétition de réveil,
appuyez une fois sur la touche .
Le symbole de la fonction alarme à
répétition disparaît alors de l'écran.
Arrêt automatique de l'appareil
La touche SLEEP de l'appareil peut servir à régler l'appareil an qu'il
s'éteigne automatiquement après un certain temps. Ainsi, vous pouvez
vous endormir en écoutant de la musique et l'appareil s'éteindra
automatiquement après la durée réglée et ne fonctionnera pas toute la nuit.
1. Pour sélectionner la durée après laquelle l'appareil doit s'éteindre,
appuyez plusieurs fois sur la touche SLEEP pour choisir parmi les options
suivantes : 120 60 30 20 15 10 05 OFF.
2. L'arrêt automatique est maintenant activé.
3. Appuyez sur la touche SLEEP pour aicher le temps restant avant que
l'appareil ne s'éteigne automatiquement.
4. Pour annuler la fonction, appuyez sur la touche SLEEP jusqu'à ce que
vous puissiez sélectionner Sleep o.

63
FR
FONCTIONNEMENT DU BT
L'appareil dispose d'une fonction BT et peut recevoir un signal jusqu'à une
distance de 8 mètres.
Connectez l'appareil à un appareil BT externe :
1. Allumez l'appareil et sélectionnez le mode BT en appuyant plusieurs fois
sur la touche SOURCE.
2. Si l'appareil n'est pas connecté à un périphérique BT externe, « BT
PAIRING » clignote plusieurs fois à l'écran.
3. Activez l'appareil BT externe et sélectionnez le mode de recherche.
4. Splash sera aiché dans la liste des périphériques BT de votre
périphérique externe.
5. Sélectionnez Splash et, si nécessaire, saisissez le mot de passe « 0000 ».
6. Pour désactiver la fonction BT, appuyez sur la touche SOURCE pour
passer à un autre mode ou désactivez la fonction sur votre périphérique
BT externe.
Remarques :
• Si le signal est faible, le récepteur BT de votre appareil peut interrompre
la connexion. Cependant, l'appareil se reconnectera automatiquement à
votre périphérique BT externe.
• Retirez tout obstacle entre l'appareil externe et la radio DAB an
d'obtenir une meilleure réception du signal.
• Cet appareil prend en charge les fonctions A2DP (Advanced Audio
Distribution Prole) et AVRCP (Audio Video Remote Control Prole).
L'appareil ne peut pas se connecter à plusieurs appareils BT en même
temps.
• Il n'est pas garanti que l'appareil soit compatible avec tous les autres
appareils externes et types de médias.
• Certains téléphones mobiles dotés de la fonction BT déconnectent
automatiquement la connexion BT de l'appareil lors de la réception ou
de l'émission d'appels. Ceci n'indique pas un problème de l'appareil.

64
FR
CONSEILS POUR LE RECYCLAGE
S‘il existe une réglementation pour l‘élimination ou le
recyclage des appareils électriques et électroniques
dans votre pays, ce symbole sur le produit ou sur
l‘emballage indique que cet appareil ne doit pas
être jeté avec les ordures ménagères. Vous devez le
déposer dans un point de collecte pour le recyclage
des équipements électriques et électroniques.
La mise au rebut conforme aux règles protège
l‘environnement et la santé de vos semblables des
conséquences négatives. Pour plus d‘informations
sur le recyclage et l‘élimination de ce produit, veuillez
contacter votre autorité locale ou votre service de
recyclage des déchets ménagers.
Ce produit contient des piles. S‘il existe une
réglementation pour l‘élimination ou le recyclage
des piles dans votre pays, vous ne devez pas les
jeter avec les ordures ménagères. Renseignez-vous
sur les dispositions locales relatives à la collecte
des piles usagées. La mise au rebut conforme aux
règles protège l‘environnement et la santé de vos
semblables des conséquences négatives.
DÉCLARATION DE CONFORMITÉ
Fabricant :
Chal-Tec GmbH, Wallstraße 16, 10179 Berlin,
Allemagne.
Importateur pour la Grande Bretagne :
Berlin Brands Group UK Limited
PO Box 42
272 Kensington High Street
London, W8 6ND
United Kingdom
Le soussigné, Chal-Tec GmbH, déclare que
l’équipement radioélectrique du type Splash est
conforme à la directive 2014/53/UE. Le texte complet
de la déclaration UE de conformité est disponible à
l’adresse internet suivante : use.berlin/10037797
65
ES
Datos técnicos 66
Indicaciones de seguridad 67
Descripción general del aparato 70
Primeros pasos 72
Operación CD 10 73
USB 75
Radio DAB/operación 76
Radio FM 79
Conguración del temporizador y alarma 81
Funcionamiento BT 83
Indicaciones sobre la retirada del aparato 84
CONTENIDO
Estimado cliente:
Le felicitamos por la adquisición de este
producto. Lea atentamente el siguiente manual
y siga cuidadosamente las instrucciones de uso
con el n de evitar posibles daños. La empresa
no se hace responsable por los daños causados
por el incumplimiento de las instrucciones y el
uso indebido. Escanee el siguiente código QR
para acceder al último manual de usuario y a más
información sobre el producto.

66
ES
DATOS TÉCNICOS
Número del artículo
10037795, 10037796, 10037797
Suministro eléctrico
Conexión mediante adaptador
de red
Batería
5 V⎓ (1 A)
Batería de iones de litio (2000mAh) (instalada
permanentemente)
Reproductor de CD
CD-DA / CD-R / CD-RW / MP3 / WMA
Entrada US
Reproducción de archivos MP3 y WMA
Radio FM
Rango de frecuencia 87,5 MHz - 108 MHz
Memoria de emisoras 20
Radio DAB
Rango de frecuencia 174 Mhz - 240 Mhz
Memoria de emisoras 20
BT
Rango de frecuencia 2402-2480 MHz
Potencia de transmisión -6,81 dBm (EIRP)
Potencia RMS
2 x 1W RMS

67
ES
INDICACIONES DE SEGURIDAD
Explicación de los símbolos presentes en el aparato
ATTENCIÓN:
RIESGO DE DESCARGA ELÉCTRICA
NO ABRIR
ADVERTENCIA: PARA REDUCIR EL RIESGO DE UNA DESCARGA ELÉCTRICA Y DE
LESIONES PERSONALES, NO ABRIR LA CARCASA. NO EXISTE NINGUNA PIEZA QUE
EL USUARIO PUEDA REPARAR. EN CASO DE NECESITAR UNA REPARACIÓN, CONTACTE
SOLAMENTE CON PERSONAL CUALIFICADO.
El símbolo del rayo en un triángulo equilátero advierte al usuario
sobre la existencia de una tensión en el producto que puede ser de
la suciente magnitud como para representar un peligro de descarga
eléctrica. ¡No abrir la carcasa!
El signo de exclamación dentro de un triángulo equilátero advierte
al usuario de la existencia de indicaciones de funcionamiento y
mantenimiento importantes presentes en el manual adjunto con este
producto.
Los niños mayores de 8 años y las personas con discapacidad física,
sensorial o psíquica pueden utilizar el aparato si han sido previamente
instruidos por una persona responsable sobre el funcionamiento del
mismo y conocen las funciones, las indicaciones de seguridad y los
riesgos asociados.
Si el cable de alimentación está dañado, deberá ser sustituido por el
fabricante, una empresa autorizada o una persona cualicada.
Protección contra las radiaciones
• No intente desmontar la carcasa de la unidad, ya que la exposición a la
radiación láser es perjudicial para los ojos.
• Apague el aparato inmediatamente si entran líquidos u objetos sólidos
en el interior del aparato.
• No toque ni golpee la lente, ya que podría dañarla y hacer que la unidad
deje de funcionar correctamente.
• No introduzca nada en la ranura de seguridad, ya que esto activará el
diodo láser mientras el compartimento del CD esté abierto.
• Si no va a utilizar el aparato durante un largo periodo de tiempo,
apáguelo. Desconecte el enchufe de la toma de corriente. Extraiga
siempre el enchufe de la red por la propia clavija y nunca por el cable.

68
ES
• Lea, siga y conserve estas instrucciones - Todas las instrucciones
de seguridad y funcionamiento deben leerse antes de utilizar este
producto y conservarse para futuras consultas. Deben respetarse todas
las advertencias que aparecen en el aparato y en las instrucciones.
• Si no se instala o utiliza la unidad de acuerdo con estas instrucciones,
puede afectar a la seguridad del producto e invalidar la garantía.
• Utilice únicamente las fuentes de alimentación que guran en este
manual de instrucciones para alimentar la unidad. No utilice los cables
para otro n.
• Si se utiliza el enchufe de la red como dispositivo de desconexión, éste
debe ser fácilmente manejable y accesible.
• No sumerja el aparato conectado a la toma de corriente en agua.
• No retire ningún tornillo ni abra la carcasa del producto. Las
reparaciones del producto sólo pueden ser realizadas por personal
competente y autorizado. No utilice el producto si observa algún daño.
• Mantenga el producto alejado de la luz solar directa y de fuentes de
calor como radiadores, calefactores u otros aparatos que produzcan
calor.
• Mando a distancia - Existe riesgo de explosión si se sustituye la pila de
forma incorrecta (asegúrese de la polaridad correcta). Sustitúyalos sólo
por el mismo tipo o uno equivalente. La batería no debe ser expuesta
a un calor excesivo como el del sol, el fuego o similares. Llamamos su
atención sobre los aspectos medioambientales de la eliminación de las
pilas.
• Advertencia - NO TRAGUE LA PILA, PELIGRO DE QUEMADURA
QUÍMICA - El mando a distancia suministrado con este producto
contiene una pila de botón. Si se ingiere la pila, puede causar
quemaduras internas que pueden provocar la muerte en tan sólo 2
horas. Mantenga las pilas nuevas y usadas fuera del alcance de los
niños.
• No exponga el aparato a llamas desnudas, por ejemplo, velas
encendidas, que no deben colocarse sobre o cerca del aparato.
• La ventilación no debe verse afectada por de cubrir la unidad o la
fuente de alimentación.
• Limpie el aparato únicamente con un paño húmedo.
• Este producto está destinado a ser utilizado en climas templados.

69
ES
Notas sobre la impermeabilidad de esta unidad
Las especicaciones de impermeabilidad de este producto son IPX4 según
la norma IEC 60529 "Grados de protección contra la entrada de agua
(código IP)", que especica el grado de protección contra la entrada de
agua. Este producto no puede utilizarse en el agua.
Si el aparato no se utiliza correctamente, puede entrar agua en el aparato
y provocar un incendio, una descarga eléctrica o un mal funcionamiento.
Observe cuidadosamente las siguientes instrucciones de seguridad y utilice
el aparato correctamente.
IPX 4: Protegido contra las salpicaduras de agua desde todas las
direcciones.
Líquidos a los que se aplican las especicaciones de resistencia al agua
• Aplicable: agua dulce, agua del grifo
• No se aplica: Líquidos distintos de los mencionados anteriormente (por
ejemplo, agua jabonosa, agua con detergente, agua con aditivos para el
baño, champú, agua termal, agua de piscina, agua de mar, etc.)
La resistencia al agua se basa en las mediciones realizadas en las
condiciones descritas anteriormente. Tenga en cuenta que las averías
causadas por la inmersión en agua debido al mal uso por parte del cliente
no están cubiertas por la garantía.
Mantener la resistencia al agua
Observe las siguientes precauciones para garantizar un uso adecuado.
• No salpique el agua en las aberturas de salida del sonido. No deje caer
la unidad en el agua y no la utilice bajo el agua.
• No permita que esta unidad se humedezca en un ambiente frío, ya
que el agua podría congelarse. Para evitar fallos de funcionamiento,
asegúrese de limpiar el agua después de su uso.
• No coloque el aparato en el agua ni lo utilice en un lugar húmedo, por
ejemplo, en un cuarto de baño.
• No lo dejes caer ni lo sometas a golpes mecánicos. De lo contrario, la
unidad podría deformarse o dañarse, lo que provocaría un deterioro de
la resistencia al agua.
• Utilice un paño suave y seco para limpiar el agua que haya entrado en la
unidad. Si el agua permanece en los oricios de salida del altavoz, éste
puede volverse opaco o inaudible. En este caso, mantenga las aberturas
del altavoz hacia abajo y agite la unidad varias veces para que salga el
agua.
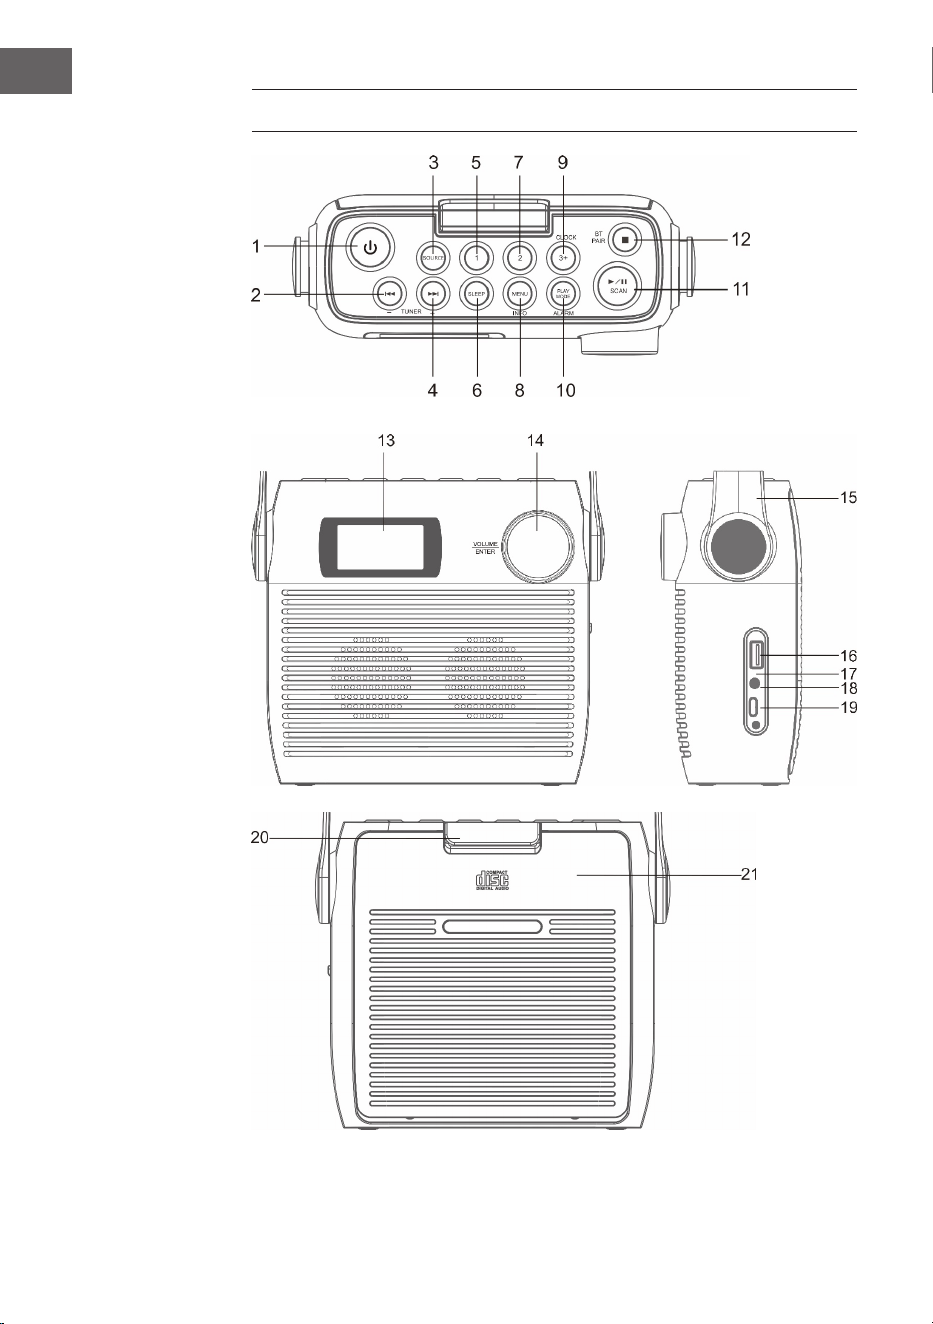
70
ES
DESCRIPCIÓN GENERAL DEL APARATO

71
ES
1 Botón de espera
2 CD/BT: Disminuir la pista anterior o jar la hora/estación anterior
3 SOURCE – fuente
4 CD/BT salta la pista siguiente Botón TUNE+
5 Posición de memoria 1
6 SLEEP - Apagado automático
7 Posición de memoria 2
8 MENU/INFO
9 CLOCK/ 3+ - Ajuste de la hora/ posiciones de memoria
10 MODO DE REPRODUCCIÓN/ ALARMA - Modo de juego/ Alarma
11 ⏯ /SCAN -Modo CD/ BT: reproducción/pausa; modo DAB/FM:
búsqueda de emisoras
12 ⏹/ Emparejar BT - Modo CD: parar; modo BT: emparejar dispositivo
13 Pantalla LCD
14 VOLUME/SNOOZE/ENTER - Control de volumen (girar)/Tecla Enter
(pulsar)
15 Asa de transporte
16 Conexión USB
17 Indicador de carga
18 Entrada de auriculares de 3,5 mm
19 Conector tipo C
20 Fusible del compartimento del CD
21 Compartimento de CD
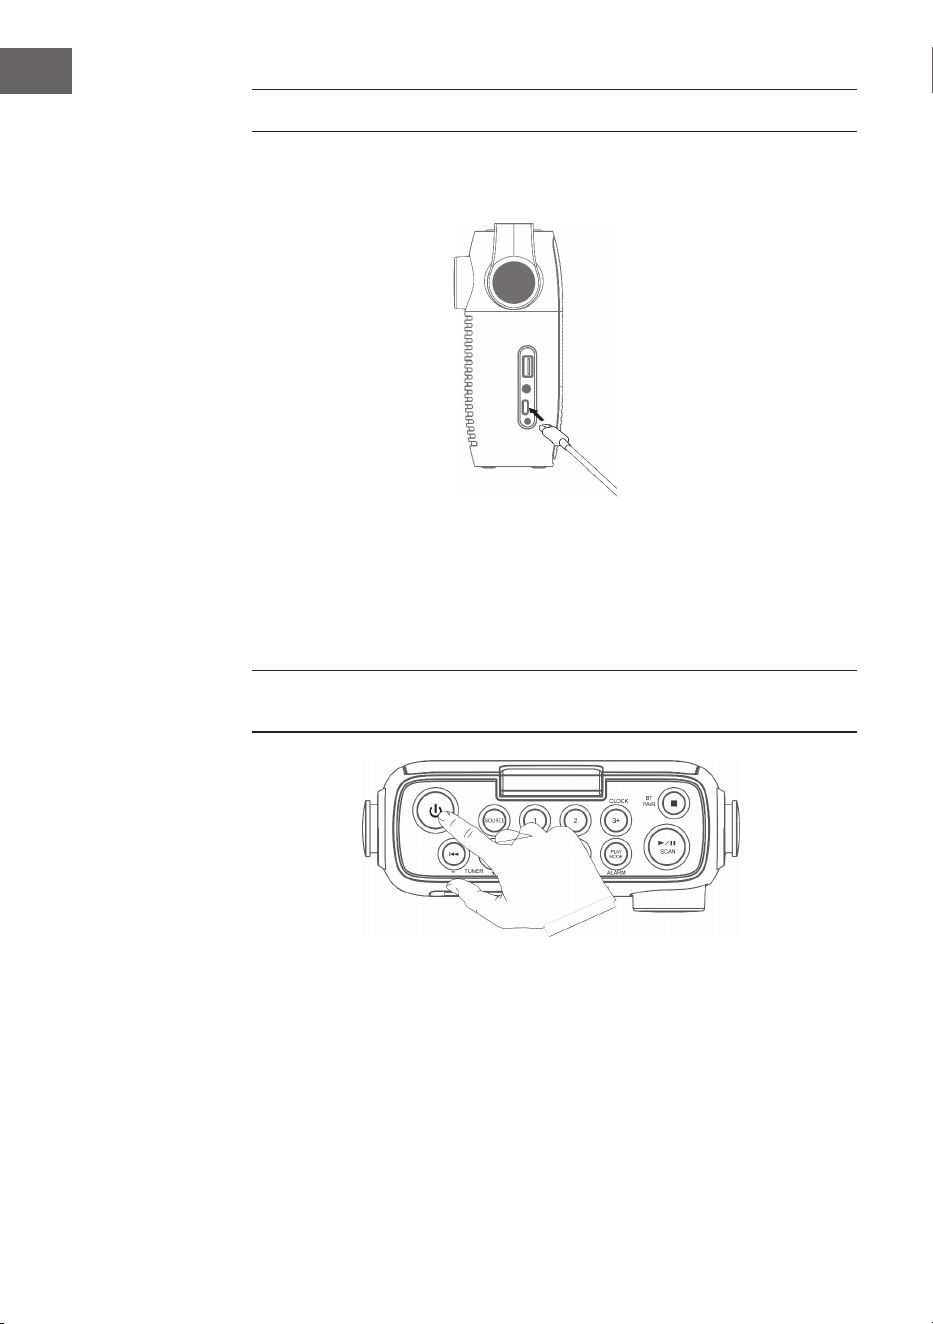
72
ES
PRIMEROS PASOS
1. Conecte el cable Type-C incluido en el volumen de suministro al
conector Type-C.
2. Conecta el otro extremo del cable Type-C a una toma de corriente
con un adaptador de corriente USB. También puedes cargar la batería
conectando la unidad al puerto USB de un ordenador. El indicador de
carga parpadea mientras la batería se está cargando.
3. Pulse el botón para encender la unidad Pulse el botón de encendido/
apagado para apagar el aparato.
Deja que la batería se cargue durante al menos 3 horas antes de encenderla
por primera vez.
4. Mantenga pulsado el botón durante 3 segundos para apagar la
unidad.
Ajuste del volumen
Ajuste el volumen girando el control de volumen.
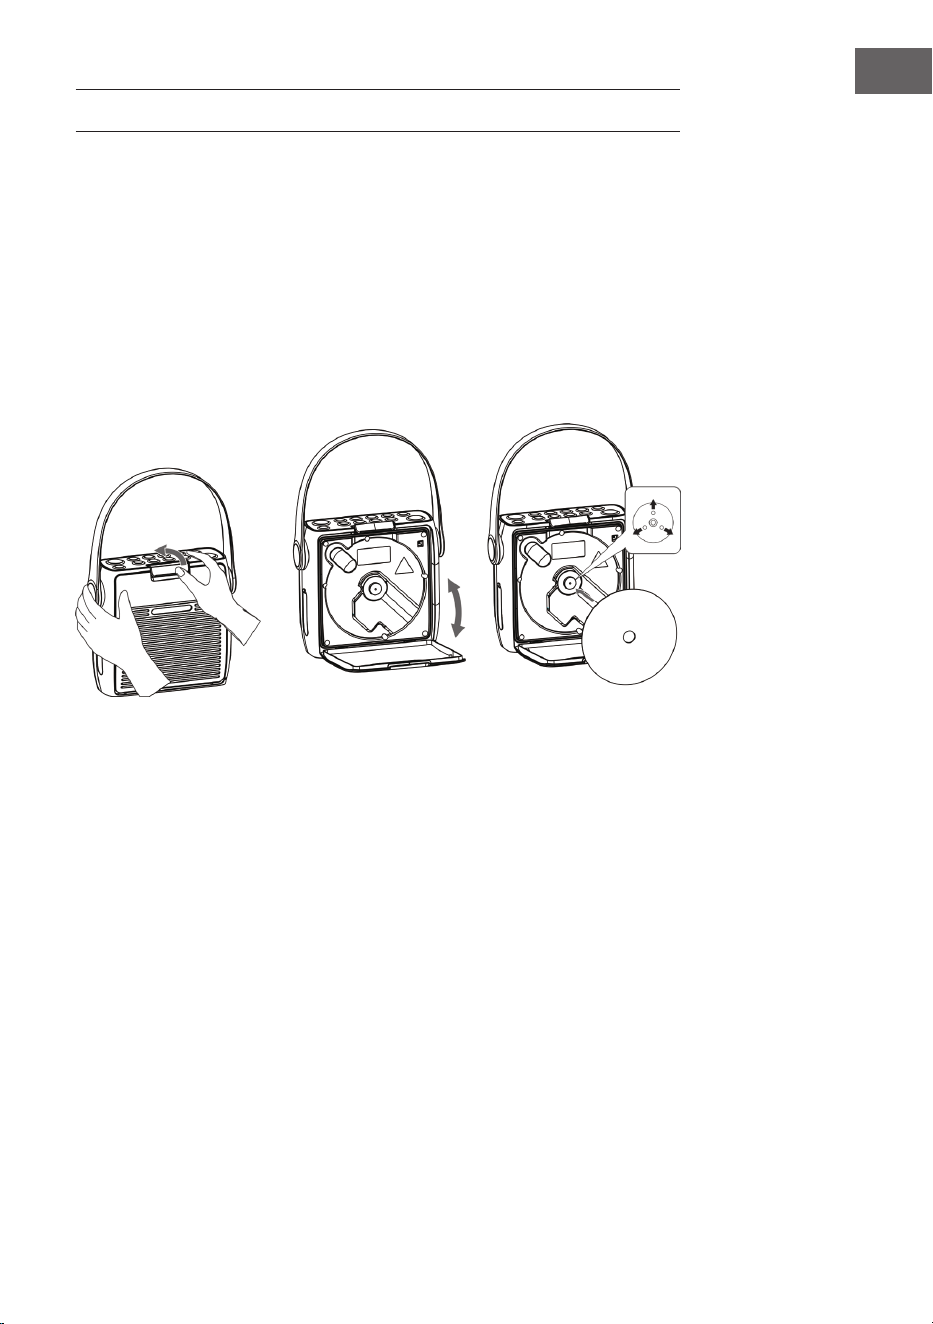
73
ES
OPERACIÓN CD 10
Pulse el botón SOURCE repetidamente hasta que aparezca "CD" en la
pantalla.
Insertar CD
1. Primero abra el fusible del compartimento del CD y luego el
compartimento del CD.
2. Introduzca un CD con la cara estampada hacia arriba dentro del
compartimento. Asegúrese de que el CD está colocado en el eje central.
3. Se lee el CD. La pantalla muestra "Lectura de CD". Después de unos
segundos, se muestra el número total de pistas del CD y, a continuación,
el tiempo total de reproducción.
4. Si no hay ningún CD insertado o no se puede leer el CD insertado,
aparece en la pantalla "NO DISC".
Pausar reproducción
1. Pulse este botón
⏯para iniciar o pausar la reproducción.
2. Pulse de nuevo la tecla ⏯para continuar con la reproducción.
Parar la reproducción
Pulse este botón ⏹ para detener la reproducción.
Saltar pista
• Pulse los botones ⏮ o ⏭ para volver al principio de una pista o para
escuchar la pista anterior o siguiente.
• Mantenga pulsados los botones ⏮ o ⏭ para avanzar o rebobinar.

74
ES
Repetir una pista y reproducción aleatoria
1. Pulse el botón PLAY MODE durante el modo de funcionamiento. En
pantalla aparece
. La pista actual del CD se repite en un bucle
continuo.
2. Pulse el botón PLAY MODE durante el modo de funcionamiento. En
pantalla aparece . Todas las pistas del CD se repite en un bucle
continuo.
3. Si pulsa el botón PLAY MODE por tercera vez, el icono i aparece en
la pantalla. Todas las pistas del CD se reproducen de manera aleatoria.
Pulse los botones ⏮ o ⏭ para pasar a la siguiente pista aleatoria.
4. Si vuelve a pulsar el botón PLAY MODE, se reanudará la reproducción
normal.
Crear lista de reproducción
Puedes almacenar 20 pistas de CD o 99 pistas de MP3 en cualquier orden.
La lista de reproducción se puede crear en modo de parada.
1. En el modo de parada, pulse el botón MODO DE REPRODUCCIÓN para
abrir la lista de reproducción.
2. Utilice los botones ⏮ o ⏭ para seleccionar los títulos que desea guardar.
3. Pulse la tecla Enter para conrmar su selección.
4. Repita los pasos 2 y 3 para almacenar más pistas en la lista de
reproducción. Cuando haya guardado todaslas pistas de la lista de
reproducción, pulsa el botón
⏯ para reproducirla.
Borrar mi lista de reproducción
Pulse el botón ⏹ dos veces o abra y cierre el compartimento del CD una vez
para borrar la lista de reproducción guardada.

75
ES
USB
1. Hay un puerto USB en la parte delantera de la unidad. Una vez
conectada la memoria USB, pulse repetidamente el botón SOURCE para
seleccionar el modo USB.
2. La unidad muestra automáticamente el número de títulos de la memoria
USB.
3. Todos los botones de reproducción son los mismos que en el modo
MP3/CD.
Notas
• La unidad puede reproducir formatos de archivo MP3/WMA sólo en
modo USB.
• Si hay archivos MP3/WMA en su memoria USB pero la pantalla muestra
"NO USB", es posible que el formato de los archivos no sea compatible
con la unidad (por ejemplo, archivos MP3/WMA protegidos con DRM).
• Esta unidad es compatible con la versión USB 1.1 y 2.0.
• El aparato es compatible con memorias USB de hasta 32 GB.
• Puede ocurrir que no todas las memorias USB y tarjetas de memoria
sean compatibles con la unidad. Esto es normal y no indica un
problema con la unidad.

76
ES
RADIO DAB/OPERACIÓN
Exploración completa de canales
1. Para activar la búsqueda automática de canales, pulse el botón SCAN y
la pantalla mostrará "Scanning..." (Búsqueda) y una barra creciente.
2. Todas las emisoras encontradas se almacenan automáticamente.
Para explorar las estaciones encontradas, pulse las teclas ⏮ o ⏭. A
continuación pulse la tecla ENTER.
Búsqueda manual de estaciones
Además de la búsqueda automática de canales, ésta también puede
realizarse manualmente.
1. Pulse el botón MENU del mando a distancia para mostrar el menú
principal.
2. Pulse las teclas ⏮ o ⏭ para seleccionar la búsqueda manual de canales
y pulse la tecla ENTER para conrmar
3. Pulse los botones ⏮ o ⏭ para explorar las emisoras DAB/DAB+
numeradas del 5A al 13F.
4. Después de seleccionar el número de canal deseado, pulse ENTER para
conrmar. La pantalla mostrará el múltiplex.
5. Pulse de nuevo el botón MENÚ para añadir el canal seleccionado a la
lista de canales.
Compresión de rango dinámico (DRC)
1. Pulse el botón MENU del mando a distancia para mostrar el menú
principal.
2. Pulse las teclas para seleccionar el valor de DRC ⏮ o ⏭, y para conrmar
pulse la tecla ENTER.
3. Pulse los botones ⏮ o ⏭ para seleccionar "o/alto/bajo" .
4. Finalmente, pulse la tecla ENTER para conrmar.
Borrar emisora
Es posible que desee eliminar todos los canales no disponibles de la lista
de canales.
1. Pulse el botón MENU del mando a distancia para mostrar el menú
principal.
2. Pulse las teclas para seleccionar ⏮ o ⏭, para seleccionar "Prune" y para
conrmar pulse la tecla ENTER.
3. Pulse las teclas ⏮ o ⏭para seleccionar "Sí" y pulse la tecla ENTER
para conrmar que se borrarán todos los canales almacenados no
disponibles.
4. También puede pulsar las teclas ⏮ o ⏭ para seleccionar "No" y luego
pulsar la tecla ENTER para cancelar el ajuste.

77
ES
Información sobre el software
1. Pulse el botón MENU del mando a distancia para mostrar el menú
principal.
2. Pulse las teclas para seleccionar "System"⏮o ⏭, y para conrmar pulse
la tecla ENTER.
3. Pulse la tecla ENTER del mando a distancia para mostrar la versión del
software.
4. Pulse el botón MENÚ para salir de la pantalla.
Selección de idiomas
En modo DAB o FM, pulse la tecla MENÚ y seleccione "Sistema" con las
teclas ⏮ o ⏭. Finalmente, pulse la tecla ENTER para conrmar. Seleccione la
hora deseada.
Restablecer los valores de fábrica
Esta función restablece todos los ajustes a los valores de fábrica. Mantenga
pulsada la tecla MENÚ y seleccione "Sistema" con las teclas ⏮ o⏭.
1. Utilice las teclas ⏮ o ⏭ para seleccionar "Restablecimiento de fábrica".
2. Pulse la tecla ENTER para conrmar su selección.
Nota: Al restablecer los ajustes de fábrica, se borran todas las emisoras FM/
DAB+ almacenadas.
Servicios secundarios
Puede ver un símbolo ">" después del nombre del canal, lo que indica
que hay servicios secundarios disponibles para ese canal. Estos servicios
secundarios son servicios adicionales relacionados con la emisora. Los
servicios secundarios se insertan en la lista de canales directamente
después del canal primario.
Para seleccionar el canal secundario, pulse la tecla MENU cuando aparezca
">" delante del nombre del canal en la pantalla. Cuando el servicio
secundario termina, la unidad vuelve a cambiar automáticamente a la
estación primaria.
Almacenamiento de una emisora
Se pueden almacenar hasta 20 emisoras de FM y 20 emisoras de FM para
un acceso rápido.
Guardar la emisora en la posición de memoria 1 o 2
1. Seleccione la emisora de radio que desea guardar.
2. Mantenga pulsado el botón
① o ② durante 2 segundos hasta que
aparezca un mensaje en la pantalla conrmando el proceso de guardado
con éxito.

78
ES
Guardar las emisoras en la lista de la memoria
1. Seleccione la emisora de radio que desea guardar.
2. Mantenga pulsada la tecla
③+ hasta que aparezca la lista de emisorias
guardadas. Utilice el mando giratorio para seleccionar una posición
de memoria deseada entre 3 y 20. Las emisoras ya guardadas pueden
sobrescribirse.
Acceder a las emisoras guardadas
1. Para escuchar las emisoras de la memoria 1 o 2, pulse las teclas
① o ②.
2. Para reproducir las demás emisoras guardadas, pulse primero la tecla
③+ para abrir la lista de emisoras. Seleccione con el mando giratorio la
posición deseada y conrme su elección pulsando el regulador.
Modos de visualización DAB
Pulse el botón DATE/TIME del mando a distancia. La pantalla muestra los
diferentes modos de visualización. La información aparece en la parte
inferior de la pantalla.
Fuerza de la señal
La pantalla muestra una barra que indica la intensidad de la señal. Cuanto
más fuerte sea la señal, más larga será la barra de izquierda a derecha.
Tipo de programa
Describe el estilo o el género del programa que se emite.
Conjunto
Muestra el nombre del múltiplex que contiene las emisoras que está
escuchando. Un múltiplex es un conjunto de emisoras de radio que
se transmiten agrupadas en una frecuencia. Hay multiplex nacionales
y locales. Los múltiplex locales contienen emisoras especícas de
determinadas zonas.
Nota: DAB - a diferencia de la radio normal, DAB agrupa varias emisoras de
radio y las transmite en una sola frecuencia.
Frecuencia
Muestra la frecuencia de la emisora jada, como "11c 220,352 MHz".
Error de señal
Muestra la tasa de error de la señal. Si el número es "0", signica que la
señal recibida está libre de errores y tiene una fuerte intensidad de señal.

79
ES
Tasa de bits de audio
La pantalla muestra la tasa de bits de audio digital.
Hora/fecha
Muestra la hora y la fecha actuales proporcionadas por el transmisor.
DLS (segmento dinámico de etiquetas)
El segmento de la etiqueta dinámica es un mensaje de texto desplazable
que el emisor puede integrar en la transmisión. Este mensaje contiene
información ordinaria, como los detalles de la emisora.
RADIO FM
Pulse el botón SOURCE para desplazarse entre el modo DAB y el FM. La
frecuencia se muestra en la pantalla.
Búsqueda automática de emisoras
Mantenga pulsado el botón SCAN hasta que la radio comience a buscar
emisoras. Las 20 primeras emisoras encontradas durante la búsqueda de
emisoras se almacenan en la lista de la memoria.
Búsqueda manual de emisoras
Pulse las teclas ⏮ o ⏭ varias veces hasta alcanzar la frecuencia deseada
Conguraciones de búsqueda
Esta es una opción de búsqueda que le permite buscar todas las emisoras o
sólo las que tienen una señal fuerte.
1. Pulse el botón MENÚ y, a continuación, pulse las teclas o para
seleccionar "Scan Setting" (conguración de la búsqueda. Finalmente,
pulse la tecla ENTER para conrmar.
2. Pulse las teclas ⏮ o ⏭ para seleccionar "All Stations" (Todas las
emisoras) o "Strong stations only" (Sólo emisoras fuertes). Pulse el botón
ENTER para conrmar su selección.
Nota: El asterisco en la esquina superior derecha de la pantalla indica la
selección actual.
Conguración de audio
Esta unidad cambiará automáticamente entre el modo estéreo y el mono.
Se puede evitar esto ajustando el modo deseado manualmente. Esto puede
ser muy útil, especialmente cuando la señal es pobre.

80
ES
1. Pulse el botón MENÚ y utilice los botones ⏮ o ⏭ para seleccionar
"Audio Setting" (Ajuste de audio). Finalmente, pulse la tecla ENTER para
conrmar.
2. Pulse las teclas ⏮ o ⏭ para seleccionar "Estéreo permitido" o "Mono
forzado" y conrme su selección con la tecla ENTER.
Nota: El asterisco en la esquina superior derecha de la pantalla indica la
selección actual.
Modos de visualización de FM
Al pulsar el botón INFO del mando a distancia, la pantalla pasará por los
siguientes modos de visualización.
• Texto de la radio: Al igual que en DAB, la emisora de radio puede
mostrar la información del programa en forma de texto desplazado
durante la transmisión.
• Tipo de programa: Aquí se muestra el "estilo" o "género" del programa
que se está emitiendo.
• Frecuencia: Se muestra la frecuencia de la emisora ajustada, como por
ejemplo "87,5 MHz".
• Formato de audio: La pantalla muestra si las emisoras de radio se
reciben en mono o en estéreo.

81
ES
CONFIGURACIÓN DEL TEMPORIZADOR Y
ALARMA
Ajuste automático de la hora
La hora puede actualizarse automáticamente cuando recibas una señal
DAB+ en tu ubicación actual.
Ajuste de la hora
1. Pulse la tecla CLOCK. El indicador digital parpadea en la pantalla.
2. Pulse los botones ⏮ o ⏭ para ajustar el año actual y luego pulse el botón
CLOCK para conrmar. El indicador digital parpadea en la pantalla.
3. Pulse los botones ⏮ o ⏭ para ajustar el mes actual y, a continuación,
pulse el botón CLOCK para conrmar. El indicador digital parpadea en
la pantalla.
4. Pulse los botones ⏮ o ⏭ para ajustar el día actual y, a continuación,
pulse el botón CLOCK para conrmar, "12/24H" parpadea en la pantalla.
5. Pulse los botones ⏮ o ⏭ para ajustar el formato de la hora y, a
continuación, pulse el botón CLOCK para conrmar. El indicador digital
parpadea en la pantalla.
6. Pulse los botones ⏮ o ⏭ para ajustar la hora actual y luego pulse el
botón CLOCK para conrmar. El indicador del minuto parpadea en la
pantalla.
7. Pulse los botones ⏮ o ⏭ para ajustar el minuto actual y, a continuación,
pulse el botón CLOCK para conrmar.
NOTA: Si no hay señal DAB/DAB+ disponible, la hora también se puede
ajustar manualmente. En cuanto se recibe una señal DAB+, la hora se
actualiza automáticamente.
Ajustar la alarma del reloj
1. Mantenga pulsado el botón ALARM hasta que la pantalla muestre "On
Timer" y los dígitos digitales empiecen a parpadear.
2. Pulse los botones⏮ o ⏭ para ajustar la visualización de la hora y luego
pulse el botón ENTER para conrmar. A continuación, el indicador de
minutos comenzará a parpadear en la pantalla.
3. Pulse los botones ⏮ o ⏭ para ajustar la visualización de los minutos y
luego pulse el botón ENTER para conrmar.
4. Cuando haya ajustado la hora de alarma deseada con los botones ⏮ o
⏭, aparecerá la pantalla "O timer" y el indicador de la hora empezará a
parpadear.
5. Seleccione el modo deseado (modo FM, USB, DAB o CD) pulsando el
botón SOURCE y pulse ENTER para conrmar.

82
ES
6. Pulse el botón ALARM para seleccionar "Timer on". El despertador se
activa.
7. En el modo Standby aparece el símbolo ◷, que indica que el
despertador se ha activado.
Desactivar el despertador diario
Desactive el despertador actual pulsando varias veces el botón ALARM. El
símbolo
◷ desaparece de la pantalla.
Notas
1. Si, por ejemplo, ha seleccionado "CD" como fuente de alarma y no se ha
insertado ningún CD, la fuente de alarma cambiará automáticamente a
"DAB" en cuanto se alcance la hora de la alarma.
2. Si ha seleccionado "FM" como fuente de alarma, se utilizará como tono
de alarma la última emisora FM escuchada antes de la desconexión.
Posponer la alarma
Pulse la tecla ENTER cuando suene la alarma para ponerla en pausa
temporalmente. Cada pulsación hará que la alarma se posponga durante 9
minutos seguidos antes de que vuelva a sonar. Para desactivar la alarma y
la función de repetición, pulse el botón una vez. El símbolo de la función de
repetición desaparece de la pantalla.
Apagado automático
El botón SLEEP del aparato puede utilizarse para que el aparato se
apague automáticamente después de un tiempo determinado. De este
modo, puedes dormirte mientras escuchas música y la unidad se apaga
automáticamente después de la hora que hayas establecido y no funciona
toda la noche.
1. Para seleccionar el tiempo deseado después del cual la unidad debe
apagarse, pulse el botón SLEEP repetidamente para elegir entre las
siguientes opciones: 120 60 30 20 15 10 05 OFF.
2. La desconexión automática se ha activado.
3. Pulse el botón SLEEP para visualizar el tiempo restante antes de que el
aparato se apague automáticamente.
4. Para cancelar la función, pulse el botón SLEEP hasta que pueda
seleccionar Sleep o.

83
ES
FUNCIONAMIENTO BT
La unidad tiene una función BT y puede recibir una señal hasta una distancia
de 8 metros.
Conecta la unidad a un dispositivo BT externo:
1. Encienda el aparato y seleccione el modo BT pulsando varias veces el
botón SOURCE.
2. Si la unidad no está conectada a un dispositivo BT externo, "BT PAIRING"
parpadeará en la pantalla varias veces.
3. Active su dispositivo BT y seleccione el modo de búsqueda.
4. Splash aparecerá en la lista de dispositivos BT de su dispositivo externo.
5. Seleccione Splash e introduzca, si fuera necesario, la contraseña "0000".
6. Para desactivar la función BT, pulse el botón SOURCE para cambiar de
modo o desactive la función en su dispositivo BT externo.
Notas:
• Si la señal es débil, el receptor BT de tu dispositivo puede interrumpir la
conexión. Sin embargo, la unidad se reconectará automáticamente a su
dispositivo BT externo.
• Retire cualquier obstáculo entre el dispositivo externo y la radio DAB
para tener una mejor recepción de la señal.
• Esta unidad soporta las funciones A2DP (Advanced Audio Distribution
Prole) y AVRCP (Audio Video Remote Control Prole). La unidad no
puede conectarse a varios dispositivos BT al mismo tiempo.
• No se garantiza que la unidad sea compatible con todos los demás
dispositivos externos y tipos de medios.
• Algunos teléfonos móviles con función BT desconectan
automáticamente la conexión BT con la unidad al recibir o realizar
llamadas. Esto no es una indicación de un problema con la unidad.

84
ES
RETIRADA DEL APARATO
Si en su país existe una disposición legal relativa a
la eliminación de aparatos eléctricos y electrónicos,
este símbolo estampado en el producto o en
el embalaje advierte que no debe eliminarse
como residuo doméstico. En lugar de ello, debe
depositarse en un punto de recogida de reciclaje
de aparatos eléctricos y electrónicos. Una gestión
adecuada de estos residuos previene consecuencias
potencialmente negativas para el medio ambiente
y la salud de las personas. Puede consultar más
información sobre el reciclaje y la eliminación de este
producto contactando con su administración local o
con su servicio de recogida de residuos.
Este producto contiene baterías. Si en su país existe
una disposición legal relativa a la eliminación de
baterías, estas no deben eliminarse como residuo
doméstico. Infórmese sobre la normativa vigente
relacionada con la eliminación de baterías. Una
gestión adecuada de estos residuos previene
consecuencias potencialmente negativas para el
medio ambiente y la salud de las personas.
DECLARACIÓN DE CONFORMIDAD
Fabricante:
Chal-Tec GmbH, Wallstraße 16, 10179 Berlín, Alemania.
Importador para Gran Bretaña:
Berlin Brands Group UK Limited
PO Box 42
272 Kensington High Street
London, W8 6ND
United Kingdom
Por la presente, Chal-Tec GmbH declara que el tipo
de equipo radioeléctrico Splash es conforme con
la Directiva 2014/53/UE. El texto completo de la
declaración UE de conformidad está disponible en la
dirección Internet siguiente: use.berlin/10037797
85
IT
Dati tecnici 86
Avvertenze di sicurezza 87
Descrizione del dispositivo 90
Primi passaggi 92
Modalità CD 93
USB 95
Radio DAB/Utilizzo 96
Radio FM 99
Impostazione sveglia e timer 101
Modalità BT 103
Smaltimento 104
Dichiarazione di conformità 104
INDICE
Gentile cliente,
la ringraziamo per l'acquisto del dispositivo. La
preghiamo di leggere attentamente le seguenti
istruzioni per l’uso e di seguirle per evitare
possibili danni. Non ci assumiamo alcuna
responsabilità per danni scaturiti da una mancata
osservanza delle avvertenze di sicurezza e da
un uso improprio del dispositivo. Scansionare
il codice QR seguente per accedere al manuale
d’uso più attuale e per ricevere informazioni sul
prodotto.

86
IT
DATI TECNICI
Numero articolo
10037795, 10037796, 10037797
Alimentazione
Connessione tramite adattatore
Batteria
5 V⎓ (1 A)
Batteria agli ioni di litio (2000mAh)
(installazione permanente)
Lettore CD
CD-DA/CD-R/CD-RW/MP3/WMA
Ingresso USB
Riproduzione di le MP3 e WMA
Radio FM
Gamma di frequenza 87,5-108 MHz
Memoria delle emittenti 20
Radio DAB
Gamma di frequenza 174-240 MHz
Memoria delle emittenti 20
BT
Gamma di frequenza 2402-2480 MHz
Potenza di trasmissione -6,81 dBm (EIRP)
Potenza RMS
2 x 1W RMS

87
IT
AVVERTENZE DI SICUREZZA
Spiegazione dei simboli sul dispositivo
ATTENZIONE
RISCHIO DI SCOSSE ELETTRICHE
NON APRIRE
AVVERTENZA: PER RIDURRE IL RISCHIO DI SCOSSE ELETTRICHE E LESIONI A PERSONE,
NON APRIRE L'ALLOGGIAMENTO. IL DISPOSITIVO NON CONTIENE COMPONENTI
CHE NECESSITANO DI MANUTENZIONE DA PARTE DELL'UTENTE. PER EVENTUALI
RIPARAZIONI, RIVOLGERSI ESCLUSIVAMENTE A PERSONALE QUALIFICATO.
Il simbolo del lampo all’interno del triangolo serve a indicare la
presenza di una tensione elettrica pericolosa all’interno del prodotto,
di potenza suiciente per rappresentare un pericolo di scossa elettrica
per persone. Non aprire l’alloggiamento!
Il punto esclamativo all’interno del triangolo serve a indicare la
presenza di importanti indicazioni relative a utilizzo e manutenzione
del dispositivo contenute nel manuale accluso al prodotto.
I bambini a partire da 8 anni e le persone con limitate capacità siche,
psichiche e sensoriali possono utilizzare il dispositivo solo se sono stati
istruiti da una persona responsabile della loro sicurezza sulle modalità
d'uso e sulle procedure di sicurezza e se comprendono i rischi associati.
Se il cavo di alimentazione è danneggiato, deve essere sostituito dal
produttore, da un'azienda tecnica autorizzata o da una persona con
qualica equivalente.
Protezione dall'esposizione alle radiazioni
• Non cercare di smontare l'alloggiamento del dispositivo, in quanto
l'esposizione alle radiazioni del laser può essere dannosa per gli occhi.
• Spegnere immediatamente il dispositivo se al suo interno sono niti
liquidi oppure oggetti duri.
• Non toccare la lente e non colpirla. Questo potrebbe danneggiarla,
provocando il malfunzionamento del dispositivo.
• Non inserire nulla nella scanalatura di sicurezza, visto che da essa viene
attivato il diodo laser, no a quando il vano per CD è ancora aperto.
• Spegnere il dispositivo se non viene utilizzato per lunghi periodi.
Staccare la spina dalla presa elettrica. Per staccare la spina, impugnarla
saldamente.

88
IT
• Leggere, seguire e conservare questo manuale. Tutte le avvertenze
di sicurezza e le informazioni sul funzionamento devono essere lette
prima di usare questo prodotto e conservate per future consultazioni. È
necessario rispettare tutte le avvertenze presenti sul dispositivo e nel
manuale.
• Se il dispositivo non viene installato e utilizzato nel rispetto delle
indicazioni, è possibile che venga compromessa la sua sicurezza e la
garanzia perde validità.
• Utilizzare solo gli alimentatori elencati in questo manuale di istruzioni
per alimentare il dispositivo. Non utilizzare gli alimentatori per altri
scopi.
• Se la spina di alimentazione viene utilizzata come dispositivo di
sezionamento, deve essere facilmente azionabile e accessibile.
• Non immergere in acqua il dispositivo collegato alla presa.
• Non rimuovere alcuna vite e non aprire l'alloggiamento del prodotto.
Le riparazioni del prodotto possono essere eettuate solo da personale
competente e autorizzato. Non utilizzare il prodotto se si nota un danno.
• Tenere il prodotto lontano dalla luce diretta del sole e da fonti di calore
come radiatori, stufe o altri dispositivi che generano calore.
• Telecomando - C'è il rischio di esplosione se la batteria viene sostituita
in modo errato (assicurarsi della corretta polarità). Sostituirle solo con
altre della stessa tipologia o equivalenti. La batteria non deve essere
esposta a calore eccessivo come sole, fuoco o simili. Quando si procede
allo smaltimento delle batterie, tenere in considerazioni gli aspetti
ecologici.
• Attenzione - NON INGERIRE LA BATTERIA, PERICOLO DI USTIONE
CHIMICA - Il telecomando fornito con questo prodotto contiene una
batteria a bottone. Se la batteria a bottone viene ingoiata, può causare
gravi ustioni interne e la morte in sole 2 ore. Tenere batterie nuove e
usate lontano dai bambini.
• Non esporre il dispositivo a amme libere, ad esempio candele accese,
che non devono essere collocate sopra o vicino al dispositivo.
• La ventilazione non deve essere ostacolata coprendo il dispositivo o
l'alimentazione.
• Pulire il dispositivo solo con un panno umido.
• Questo prodotto è destinato all'uso in climi temperati.

89
IT
Note sull'impermeabilità di questo dispositivo
Le speciche di impermeabilità di questo prodotto sono conformi a IPX4
secondo la norma IEC 60529 "Gradi di protezione contro l'ingresso di acqua
(codice IP)", che specica il grado di protezione contro la penetrazione di
acqua nel dispositivo. Questo prodotto non può essere usato in acqua.
Se il dispositivo non è usato correttamente, l'acqua può penetrare
all'interno e causare incendi, scosse elettriche o malfunzionamenti.
Rispettare attentamente le seguenti istruzioni di sicurezza e utilizzare
correttamente il dispositivo.
IPX 4: protetto contro gli spruzzi d'acqua da tutte le direzioni.
Liquidi a cui si applicano le speciche di resistenza all'acqua
• Applicabile: acqua dolce, acqua di rubinetto
• Non applicabile: liquidi diversi da quelli menzionati sopra (ad es.
acqua con sapone, acqua con detergente, acqua con additivi da bagno,
shampoo, acqua calda di sorgente, acqua di piscina, acqua di mare, ecc.)
La resistenza all'acqua si basa su misurazioni eettuate nelle condizioni
precedentemente descritte. Si noti che i malfunzionamenti dovuti
all'immersione in acqua a causa di un uso improprio da parte del cliente
non sono coperti dalla garanzia.
Mantenere la resistenza all'acqua
Rispettare le seguenti precauzioni per garantire un uso corretto.
• Non spruzzare con forza acqua nelle aperture di emissione del suono.
Non far cadere il dispositivo in acqua e non usarlo sott'acqua.
• Non lasciare che questo dispositivo si bagni in un ambiente freddo,
dato che l'acqua potrebbe congelarsi. Per evitare malfunzionamenti,
assicurarsi di rimuovere l'acqua dopo ogni uso.
• Non mettere il dispositivo in acqua e non utilizzarlo in un luogo umido,
ad esempio in un bagno.
• Non farlo cadere e non sottoporlo a urti meccanici. In caso contrario,
il dispositivo può essere deformato o danneggiato, con conseguente
peggioramento della resistenza all'acqua.
• Usare un panno morbido e asciutto per rimuovere l'acqua che si trova
sul dispositivo. Se l'acqua rimane nei fori di uscita dell'altoparlante,
il suono può risultare sordo o non essere udibile. In tal caso, tenere
le aperture degli altoparlanti verso il basso e scuotere il dispositivo
diverse volte per far uscire l'acqua.

90
IT
DESCRIZIONE DEL DISPOSITIVO

91
IT
1 Tasto standby
2 CD/BT: Traccia precedente o riduzione del tempo impostato/emittente
precedente
3 +SOURCE - Fonte
4 CD/BT: saltare la traccia successiva Tasto TUNE+
5 Posizione di salvataggio 1
6 SLEEP - Spegnimento automatico
7 Posizione di salvataggio 2
8 MENU/INFO
9 CLOCK/ 3+ - Impostazione dell'ora/Posizioni di salvataggio
10 PLAY MODE/ ALARM - Modalità di riproduzione/Sveglia
11 ⏯/SCAN - Modalità CD/BT: riproduzione/pausa; Modalità DAB/FM:
ricerca dell'emittente
12 ⏹/ Accoppiamento BT - Modalità CD: stop; Modalità BT: accoppiamento
dispositivo
13 Schermo LCD
14 VOLUME/SNOOZE/ENTER - Controllo del volume (girare)/Tasto di
inserimento (premere)
15 Impugnatura di trasporto
16 Connessione USB
17 Indicazione di carica
18 Connessione cuie da 3,5 mm
19 Connessione tipo C
20 Blocco del vano CD
21 Vano CD

92
IT
PRIMI PASSAGGI
1. Collegare il cavo di tipo C in dotazione alla connessione corrispondente.
2. Collegare l'altra estremità del cavo di tipo C a un adattatore USB che
viene poi inserito in una presa elettrica. È anche possibile caricare
la batteria collegando il dispositivo alla porta USB di un computer.
L'indicatore lampeggia mentre la batteria è in carica.
3. Premere per accendere il dispositivo. Premere di nuovo il tasto per
spegnere il dispositivo.
Lasciare caricare la batteria per almeno 3 ore prima di accendere il
dispositivo per la prima volta.
4. Tenere premuto il tasto per 3 secondi per spegnere il dispositivo.
Regolazione del volume
Regolare il volume con l'apposita manopola.
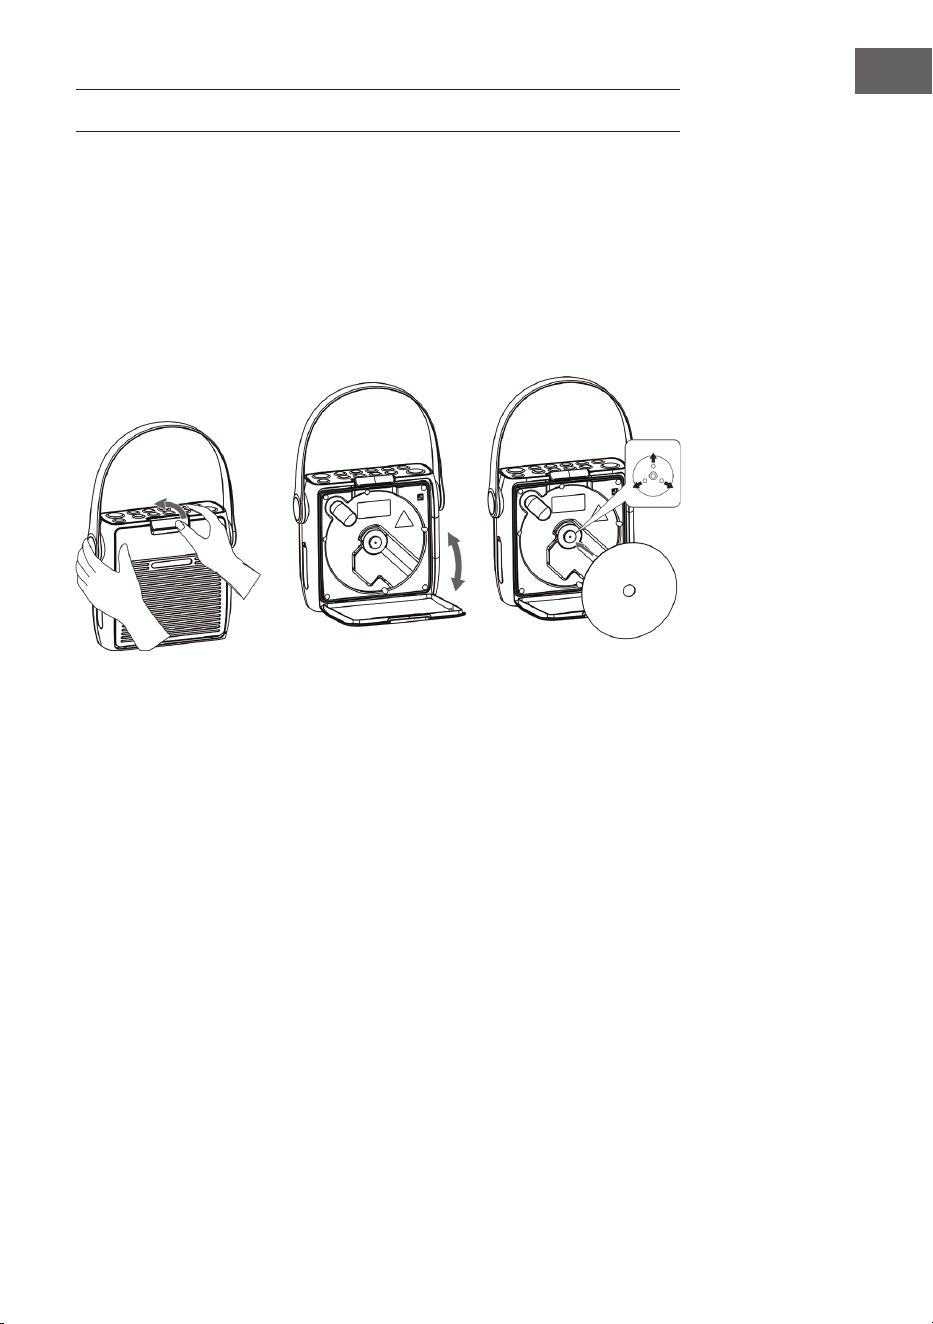
93
IT
MODALITÀ CD
Premere più volte SOURCE no a quando sullo schermo appare "CD“.
Inserire il CD
1. Aprire prima il blocco del vano CD e poi il vano.
2. Inserire il CD nel vano con il lato stampato verso l'alto. Assicurarsi che il
CD sia posizionato sul perno centrale.
3. Inizia la lettura del CD. Sullo schermo appare "CD READING". Dopo
alcuni secondi, viene visualizzato il numero totale di tracce sul CD e poi
la durata totale di riproduzione.
4. Se non viene inserito alcun CD o il CD inserito non può essere letto, sullo
schermo appare "NO DISC".
Mettere in pausa la riproduzione
1. Premere
⏯ per mettere in pausa la riproduzione.
2. Premere di nuovo ⏯ per procedere con la riproduzione.
Arrestare la riproduzione
Premere ⏹ per arrestare la riproduzione.
Saltare un titolo
• Premere i tasti ⏮ o ⏭ per tornare all'inizio di una traccia, per ascoltare la
traccia precedente o successiva.

94
IT
• Tenere premuto il tasto ⏮ o ⏭ per avanzare o tornare indietro
velocemente.
Ripetizione e riproduzione casuale
1. Premere il tasto PLAY MODE in modalità di funzionamento. Sullo
schermo appare
. La traccia corrente del CD viene ripetuta in loop.
2. Premere di nuovo il tasto PLAY MODE durante la modalità di
funzionamento. Sullo schermo appare . Tutte le tracce del CD
vengono ripetute in loop.
3. Se si preme il tasto PLAY MODE una terza volta, appare sullo schermo
il simbolo . Tutti i titoli del CD vengono riprodotti in ordine casuale.
Premere ⏮ o ⏭ per passare al brano casuale successivo.
4. Se si preme nuovamente il tasto PLAY MODE, riprende la riproduzione
normale.
Creare una playlist
È possibile memorizzare 20 tracce CD o 99 tracce MP3 in un ordine a
piacere. La playlist può essere creata in modalità stop.
1. In modalità stop, premere il tasto PLAY MODE per aprire la playlist.
2. Usare i tasti ⏮ o ⏭ per selezionare i titoli da salvare.
3. Premere PLAY MODE per confermare.
4. Ripetere i passaggi 2 e 3 per salvare altri titoli nella playlist. Quando
tutti i titoli sono stati salvati nella playlist, premere
⏯ per iniziare la
riproduzione.
Cancellare la playlist salvata
Premere due volte il tasto ⏹ o aprire e chiudere una volta il vano CD per
cancellare la playlist salvata.

95
IT
USB
1. Sul lato anteriore del dispositivo si trova una connessione USB. Una
volta collegata una chiavetta USB, premere ripetutamente il tasto
SOURCE per selezionare la modalità USB.
2. Il dispositivo mostra automaticamente il numero di titoli sulla chiavetta
USB.
3. Tutti i tasti di riproduzione sono gli stessi della modalità MP3/CD.
Note
• Il dispositivo può riprodurre i le MP3/WMA solo in modalità USB.
• Se ci sono dei le MP3/WMA sulla chiavetta USB, ma lo schermo
mostra "NO USB", il formato dei le potrebbe non essere compatibile
con il dispositivo (per esempio, le MP3/WMA protetti con DRM).
• Questo dispositivo supporta le versioni USB 1.1 e 2.0.
• Il dispositivo supporta chiavette USB no a 32 GB.
• Può succedere che non tutte le chiavette USB e le schede di memoria
siano compatibili con il dispositivo. Questo non indica un problema del
dispositivo.

96
IT
RADIO DAB/UTILIZZO
Ricerca emittenti completa
1. Per attivare la scansione automatica delle emittenti, premere il tasto
SCAN e lo schermo mostrerà "Scanning..." (Ricerca) e una barra
crescente.
2. Tutte le emittenti trovate vengono salvate automaticamente. Per
scorrere tra le emittenti trovate, premete i tasti ⏮ o ⏭. Premere poi il
tasto di conferma ENTER.
Ricerca manuale delle emittenti
Oltre alla ricerca automatica delle emittenti, è possibile eseguirla anche
manualmente.
1. Premere MENU sul telecomando per visualizzare il menu principale.
2. Premere i tasti ⏮ o ⏭ per selezionare la scansione manuale delle
emittenti e premere il tasto ENTER per confermare
3. Premere i tasti ⏮ o ⏭ per scorrere tra le emittenti DAB/DAB+ numerate
da 5A a 13F.
4. Dopo aver selezionato il numero dell'emittente desiderata, premere
ENTER per confermare. Lo schermo mostrerà il multiplex.
5. Premere nuovamente il tasto MENU per aggiungere l'emittente
selezionata alla lista.
DRC (compressione della gamma dinamica)
1. Premere MENU per visualizzare il menu principale.
2. Premere ⏮ o ⏭ per selezionare "DRC" e premere ENTER per
confermare.
3. Premere i tasti ⏮ o ⏭ per selezionare "spento/alto/basso".
4. Premere ENTER per confermare.
Cancellare le emittenti
Se si desidera cancellare dalla lista le emittenti non disponibile, seguire le
indicazioni successive.
1. Premere MENU in modalità DAB per visualizzare il menu principale.
2. Premere ⏮ o ⏭ per selezionare "Prune" e premere ENTER per
confermare.
3. Premere i tasti ⏮ o ⏭ per selezionare "Sì" e premere il tasto ENTER
per confermare la cancellazione di tutte le emittenti memorizzate non
disponibili.
4. È possibile anche utilizzare i tasti ⏮ o ⏭ per selezionare "No" e poi
premere il tasto ENTER per annullare l'impostazione.

97
IT
Informazioni sul software
1. Premere MENU in modalità DAB per visualizzare il menu principale.
2. Premere ⏮ o ⏭ per selezionare "System" e premere ENTER per
confermare.
3. Premere il tasto ENTER sul telecomando per visualizzare la versione del
software.
4. Premere MENU per abbandonare la schermata.
Selezione della lingua
In modalità DAB o FM, premere il tasto MENU e selezionare "System"
con i tasti ⏮ o ⏭. Premere ENTER per confermare. Selezionare la lingua
desiderata.
Resettare alle impostazioni di fabbrica
Questa funzione ripristina tutte le impostazioni ai valori di fabbrica. Tenere
premuto il tasto MENU e selezionare "System" con i tasti ⏮ o ⏭.
1. Usare i tasti ⏮ o ⏭ per selezionare "Factory Reset".
2. Premere ENTER per confermare.
Nota: quando si ripristinano le impostazioni di fabbrica, tutte le emittenti
FM/DAB+ memorizzate vengono cancellate.
Servizi secondari
In determinate condizioni, potrebbe comparire un simbolo ">" dopo il
nome dell'emittente, che indica la disponibilità di servizi secondari. Questi
contengono servizi aggiuntivi che sono collegati all'emittente primaria. I
servizi secondari sono inseriti nella lista delle emittenti direttamente dopo
la stazione primaria.
Per selezionare l'emittente secondaria, premere il tasto MENU quando ">"
appare davanti al nome della stazione sullo schermo. Quando il servizio
secondario termina, il dispositivo torna automaticamente all'emittente
primaria.
Salvare le emittenti
Per garantire un accesso rapido, è possibile salvare 20 emittenti digitali e
20 emittenti FM.
Salvare le emittenti nella posizione di memoria 1 o 2
1. Selezionare l'emittente da salvare.
2. Tenere premuto il tasto
① o ② per 2 secondi no a quando compare
un messaggio sullo schermo per confermare il successo del processo di
salvataggio.

98
IT
Salvare le emittenti nella lista
1. Selezionare l'emittente da salvare.
2. Tenere premuto il tasto
③+ nché non viene mostrata la lista di
salvataggio. Usare la manopola per selezionare una posizione di
salvataggio tra 3 e 20. Le emittenti che sono già state salvate possono
essere sovrascritte.
Accedere alle emittenti salvate
1. Per ascoltare le emittenti nella posizione di salvataggio 1 o 2, premere i
tasti
① o ②.
2. Per accedere alle altre emittenti salvate, premere prima il tasto ③+
per aprire la lista. Impostare l'emittente desiderata con la manopola e
premerla per confermare.
Modalità di visualizzazione DAB
Premere il tasto INFO sul telecomando. Lo schermo mostra le diverse
modalità di visualizzazione. Le informazioni vengono visualizzate nella parte
inferiore dello schermo.
Intensità del segnale
Lo schermo mostra una barra che indica l'intensità del segnale. Più intenso
è il segnale, più lunga sarà la barra da sinistra a destra.
Tipo di programma
Descrive lo stile o il genere del programma che viene trasmesso.
Ensemble
Mostra il nome del multiplex che contiene le emittenti in ascolto. Un
multiplex è un insieme di emittenti radio che vengono trasmesse in blocco
su una frequenza. Ci sono multiplex nazionali e locali. I multiplex locali
contengono emittenti speciche per una determinata zona geograca.
Nota: DAB - a dierenza della radio normale, DAB raggruppa diverse
emittenti radio e le trasmette su una frequenza.
Frequenza
Visualizza la frequenza dell'emittente impostata, ad esempio "11c 220.352
MHz".
Errore di segnale
Visualizza il tasso di errore del segnale. Se il numero è "0", signica che il
segnale ricevuto è senza errori e ha una forte intensità.

99
IT
Audio-Bit-Rate
Lo schermo mostra l'audio bit rate digitale che viene ricevuto.
Ora/Data
Indica l'ora e la data attuali fornite dall'emittente.
DLS (Dynamic Label Segment)
Il segmento dell'etichetta dinamica è un messaggio di testo scorrevole che
può essere integrato nella trasmissione dall'emittente. Questo messaggio
contiene informazioni ordinarie, come i dettagli del programma.
RADIO FM
Premere più volte SOURCE per passare in modalità FM. Sullo schermo
compare la frequenza.
Ricerca automatica delle emittenti
Tenere premuto il tasto SCAN nché la radio non inizia la ricerca
delle emittenti. Le prime 20 emittenti trovate durante la ricerca sono
memorizzate nella lista di salvataggio.
Ricerca manuale delle emittenti
Premete più volte ⏮ o ⏭ no a raggiungere la frequenza desiderata
Impostazioni di ricerca
Questa è un'opzione di ricerca che permette di cercare tutte le emittenti o
solo quelle con un segnale intenso.
1. Premere MENU e poi ⏮ o ⏭ per selezionare "Scan Setting" (impostazioni
di ricerca). Premere ENTER per confermare.
2. Premere i tasti ⏮ o ⏭ per selezionare "All Stations" (tutte le emittenti) o
"Strong stations only" (solo emittenti con segnale intenso). Confermare
la selezione con ENTER.
Nota: l'asterisco nell'angolo superiore destro dello schermo indica la
selezione attuale.
Impostazioni audio
Questo dispositivo passa automaticamente dalla modalità stereo a quella
mono e viceversa. È possibile aggirare questo problema impostando
manualmente la modalità desiderata. Questo può essere molto utile,
specialmente quando il segnale è debole.
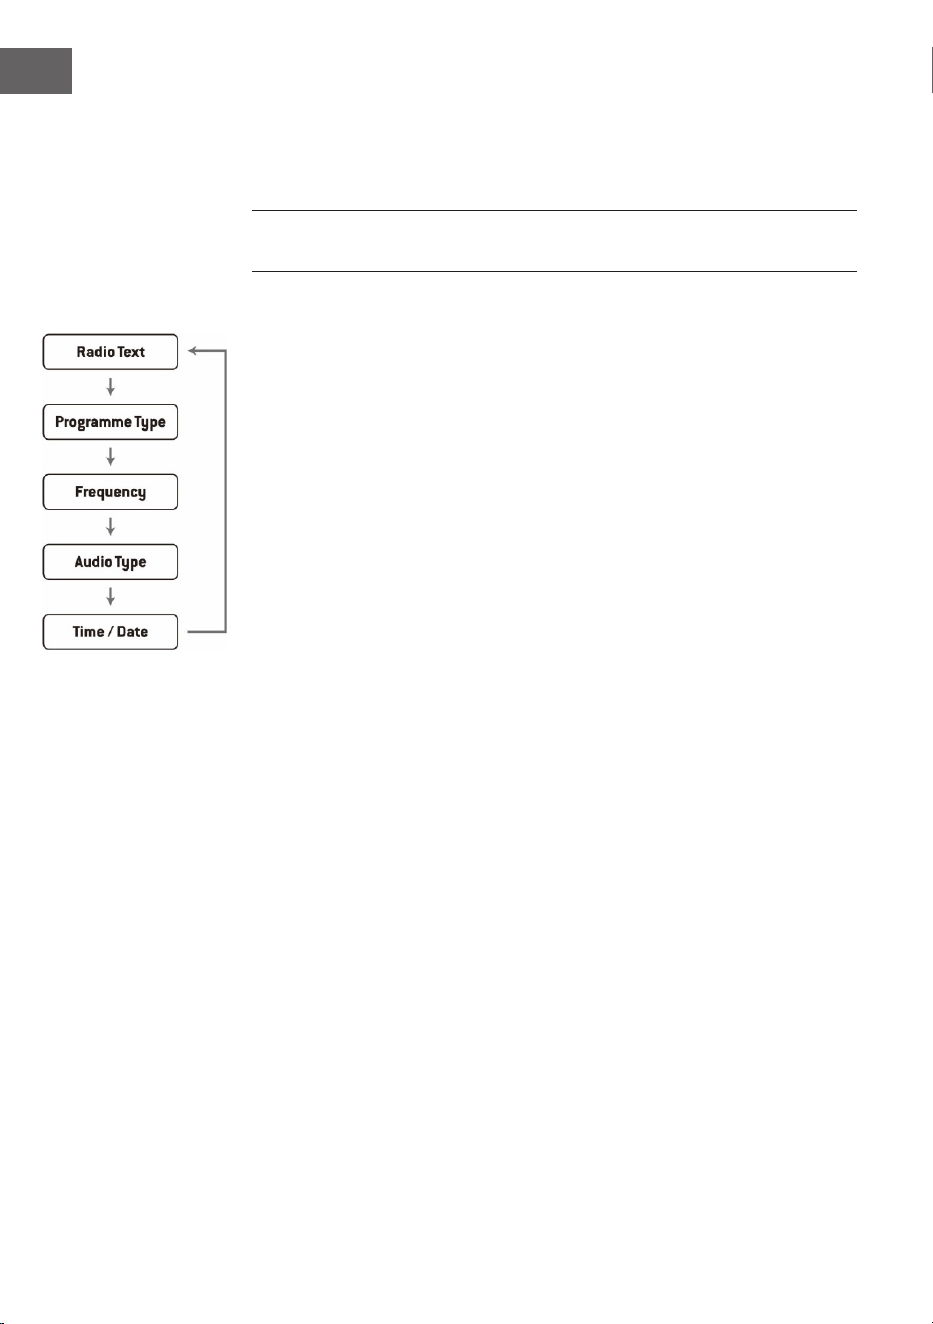
100
IT
1. Premere il tasto MENU e usare i tasti ⏮ o ⏭ per selezionare "Audio
setting" (impostazioni audio). Premere ENTER per confermare.
2. Premere ⏮ o ⏭ per selezionare "Stereo allowed" (stereo consentito) o
"Forced mono" (solo mono) e confermare la selezione con ENTER.
Nota: l'asterisco nell'angolo superiore destro dello schermo indica la
selezione attuale.
Modalità di visualizzazione FM
Quando si preme il tasto INFO sul telecomando, lo schermo scorre tra le
seguenti modalità di visualizzazione.
• Testo radio: come nella radio DAB, l'emittente può mostrare
informazioni sul programma sotto forma di testo scorrevole durante la
trasmissione.
• Tipo di programma: qui viene visualizzato lo "stile" o il "genere" del
programma in onda.
• Frequenza: viene mostrata la frequenza dell'emittente impostata, ad
esempio "87,5 MHz".
• Formato audio: lo schermo mostra se le emittenti radio vengono
ricevute in mono o in stereo.

101
IT
IMPOSTAZIONE SVEGLIA E TIMER
Impostazione dell'ora automatica
L'ora può essere aggiornata automaticamente quando si riceve un segnale
DAB+ nella località attuale.
Impostare l'ora
1. Premere il tasto CLOCK. L'indicazione digitale lampeggia sullo schermo.
2. Premere ⏮ o ⏭ per selezionare l'anno corrente e premere CLOCK per
confermare. L'indicazione del mese lampeggia sullo schermo.
3. Premere ⏮ o ⏭ per selezionare il mese corrente e premere CLOCK per
confermare. L'indicazione del giorno lampeggia sullo schermo.
4. Premere ⏮ o ⏭ per selezionare il giorno corrente e premere CLOCK per
confermare. "12/24 H" lampeggia sullo schermo.
5. Premere ⏮ o ⏭ per selezionare il formato orario desiderato e premere
CLOCK per confermare. L'indicazione delle ore lampeggia sullo schermo.
6. Premere ⏮ o ⏭ per selezionare l'ora corrente e premere CLOCK per
confermare. L'indicazione dei minuti lampeggia sullo schermo.
7. Premere ⏮ o ⏭ per selezionare i minuti attuali e premere CLOCK per
confermare.
Nota: se non è disponibile alcun segnale DAB/DAB+, l'ora può essere
impostata anche manualmente. Non appena si riceve un segnale DAB+,
l'ora viene aggiornata automaticamente.
Impostazione della sveglia
1. Tenere premuto il tasto ALARM nché lo schermo mostra "On Timer" e le
cifre digitali iniziano a lampeggiare.
2. Premere ⏮ o ⏭ per regolare l'ora e premere ENTER per confermare.
L'indicazione dei minuti inizierà quindi a lampeggiare sullo schermo.
3. Premere ⏮ o ⏭ per impostare i minuti e premere CLOCK per confermare.
4. Dopo aver impostato l'ora della sveglia desiderata con ⏮ o ⏭,
sullo schermo compare "O Timer" e l'indicazione dell'ora inizia a
lampeggiare.
5. Selezionare la modalità desiderata (modalità FM, USB, DAB o CD)
premendo il tasto SOURCE e premere ENTER per confermare.
6. Premere il tasto ALARM per selezionare "Timer On". La sveglia è attiva.
7. In modalità standby, viene mostrato il simbolo
◷ che indica che la
sveglia è stata attivata.
Disattivare la sveglia giornaliera
Disattivare la sveglia corrente premendo più volte il tasto ALARM. Il
simbolo
◷ scompare dallo schermo.

102
IT
Note
1. Se, per esempio, è stato selezionato "CD" come fonte audio della
sveglia e non è stato inserito alcun CD, la fonte della sveglia passerà
automaticamente a "DAB" non appena viene raggiunta l'ora impostata.
2. Se si sceglie "FM" come fonte audio della sveglia, verrà utilizzata l'ultima
emittente FM ascoltata prima dello spegnimento.
Funzione snooze
Premere il tasto ENTER quando suona la sveglia per metterla
temporaneamente in pausa. Ogni volta che si preme il tasto, si attiva uno
snooze di 9 minuti, dopodiché la sveglia torna a suonare. Per disattivare la
sveglia e la funzione snooze, premere una volta il tasto
. Il simbolo della
funzione snooze scompare dallo schermo.
Spegnimento automatico del dispositivo
Il tasto SLEEP può essere usato per impostare una durata per lo
spegnimento automatico del dispositivo. Così è possibile addormentarsi
ascoltando la musica senza che il dispositivo resti in funzione tutta la notte,
dato che si spegnerà automaticamente allo scadere del tempo impostato.
1. Per selezionare il tempo desiderato dopo il quale il dispositivo dovrebbe
spegnersi, premere ripetutamente SLEEP per scegliere tra le seguenti
opzioni: 120 60 30 20 15 10 05 OFF.
2. Lo spegnimento automatico è stato attivato.
3. Premere SLEEP per visualizzare il tempo rimanente prima dello
spegnimento automatico del dispositivo.
4. Per annullare la funzione, premere SLEEP no a selezionare "Sleep o".

103
IT
MODALITÀ BT
Il dispositivo è dotato di una funzione BT e può ricevere un segnale no a
una distanza di 8 metri.
Collegamento a un dispositivo BT esterno:
1. Accendere la radio e selezionare la modalità BT premendo più volte
SOURCE.
2. Se la radio non è collegata a un dispositivo BT esterno, "BT PAIRING"
lampeggerà più volte sullo schermo.
3. Attivare il dispositivo BT e selezionare la modalità di ricerca.
4. "Splash" comparirà nell'elenco dei dispositivi BT del dispositivo esterno.
5. Selezionare "Splash" e, se necessario, inserire la password "0000".
6. Per disattivare la funzione BT, premere SOURCE per passare a un'altra
modalità o disattivare la funzione sul dispositivo BT esterno.
Note:
• Se il segnale è debole, il ricevitore BT del dispositivo potrebbe
interrompere la connessione. Il dispositivo tornerà però a connettersi
automaticamente al dispositivo BT esterno.
• Rimuovere eventuali ostacoli tra il dispositivo esterno e la radio DAB in
modo da avere una migliore ricezione del segnale.
• Questo dispositivo supporta le funzioni A2DP (Advanced Audio
Distribution Prole) e AVRCP (Audio Video Remote Control Prole).
La radio non può essere collegata con diversi dispositivi BT
contemporaneamente.
• Non c'è garanzia che il dispositivo sia compatibile con tutti gli altri
dispositivi esterni e i tipi di media.
• Alcuni telefoni cellulari con funzione BT disconnettono
automaticamente la connessione BT con il dispositivo quando si
ricevono o eettuano chiamate. Questo non indica un problema del
dispositivo.

104
IT
SMALTIMENTO
Se nel proprio paese si applicano le
regolamentazioni inerenti lo smaltimento di
dispositivi elettrici ed elettronici, questo simbolo
sul prodotto o sulla confezione segnala che questi
prodotti non possono essere smaltiti con i riuti
normali e devono essere portati a un punto di
raccolta di dispositivi elettrici ed elettronici. Grazie
al corretto smaltimento dei vecchi dispositivi si
tutela il pianeta e la salute delle persone da possibili
conseguenze negative. Informazioni riguardanti
il riciclo e lo smaltimento di questi prodotti si
ottengono presso l’amministrazione locale oppure il
servizio di gestione dei riuti domestici.
Il prodotto contiene batterie. Se nel proprio
paese si applicano le regolamentazioni inerenti
lo smaltimento di batterie, non possono essere
smaltite con i normali riuti domestici. Preghiamo
di informarvi sulle regolamentazioni vigenti sullo
smaltimento delle batterie. Grazie al corretto
smaltimento dei vecchi dispositivi si tutela l’ambiente
e la salute delle persone da conseguenze negative.
DICHIARAZIONE DI CONFORMITÀ
Produttore:
Chal-Tec GmbH, Wallstraße 16, 10179 Berlino,
Germania.
Importatore per la Gran Bretagna:
Berlin Brands Group UK Limited
PO Box 42
272 Kensington High Street
London, W8 6ND
United Kingdom
Il fabbricante, Chal-Tec GmbH, dichiara che il tipo di
apparecchiatura radio Splash è conforme alla direttiva
2014/53/UE. Il testo completo della dichiarazione
di conformità UE è disponibile al seguente indirizzo
Internet: use.berlin/10037797

105
NL
Technische gegevens 106
Veiligheidsinstructies 107
Overzicht apparaat 110
Eerste stappen 112
CD handeling 113
USB 115
DAB-radio/bediening 116
FM radio 119
Alarm- en timerinstelling 121
BT bediening 123
Instructies voor afvoer 124
Conformiteitsverklaring 124
INHOUD
Geachte klant,
gefeliciteerd met de aanschaf van dit apparaat.
Lees de hierna volgende handleiding aandachtig
door en volg de instructies op om schade te
voorkomen. Voor schade veroorzaakt door het niet
in acht nemen van de instructies of door onjuist
gebruik nemen wij geen verantwoordelijkheid.
Scan de QR code voor toegang tot de meest
actuele gebruikershandleiding en voor meer
informatie rondom het artikel.

106
NL
TECHNISCHE GEGEVENS
Artikelnummer
10037795, 10037796, 10037797
Stroomvoorziening
Aansluiting via stroomstekker
Accu
5 V⎓ (1 A)
Lithium-ion accu (2000 mAh) (vast
geïnstalleerd)
CD-speler
CD-DA / CD-R / CD-RW / MP3 / WMA
USB-ingang
Weergave van MP3 en WMA bestanden
FM radio
Frequentiebereik 87,5 MHz–108 MHz
Zenderopslag 20
DAB radio
Frequentiebereik 174 MHz–240 MHz
Zenderopslag 20
BT
Frequentiebereik 2402–2480 MHz
Zendvermogen -6.81dBm (EIRP)
RMS vermogen
2 x 1W RMS
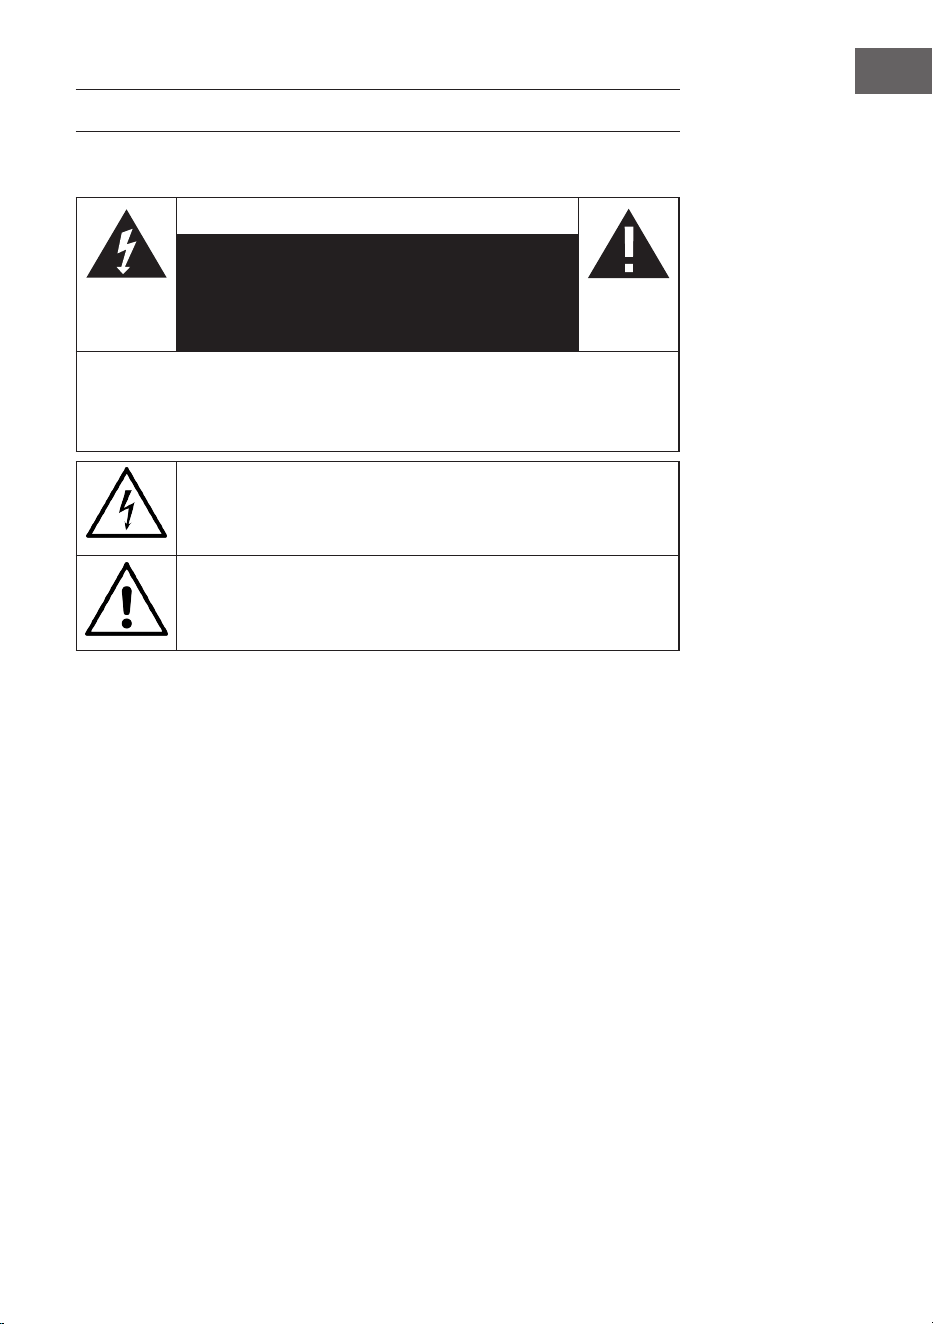
107
NL
VEILIGHEIDSINSTRUCTIES
Verklaring van de symbolen op het apparaat
CAUTION
RISK OF ELECTRIC SHOCK
NIET OPENEN
WAARSCHUWING: OPEN DE BEHUIZING NIET OM HET RISICO VAN ELEKTRISCHE
SCHOKKEN EN PERSOONLIJK LETSEL TE BEPERKEN. GEEN ONDERDELEN IN HET
TOESTEL DIE DOOR DE GEBRUIKER KUNNEN WORDEN GEREPAREERD. NEEM VOOR
REPARATIES CONTACT OP MET HIERVOOR GEKWALIFICEERD PERSONEEL.
De bliksemschicht met driehoek waarschuwt u voor de aanwezigheid
van gevaarlijke spanning in het toestel, die sterk genoeg kan zijn om
een risico van elektrische schokken te vormen. Open de behuizing niet!
Het uitroepteken met de driehoek is bedoeld om u te wijzen op de
aanwezigheid van belangrijke bediening- en onderhoudsinstructies
(service) in de documentatie die bij het apparaat is gevoegd.
Kinderen vanaf 8 jaar en personen met een beperkte lichamelijke,
sensorische en/of geestelijke gezondheid mogen het apparaat
alleen gebruiken wanneer ze van tevoren door een voor
hen verantwoordelijke persoon uitvoerig met de functies en
veiligheidsinstructies vertrouwd zijn gemaakt en de hieraan verbonden
risico's begrijpen.
Wanneer de stroomkabel of stekker beschadigd is moet die door
de fabrikant, een geautoriseerd vakbedrijf of een gelijkwaardig
gekwaliceerde persoon worden vervangen.
Bescherming tegen straling
• Probeer de behuizing van het toestel niet te demonteren, aangezien de
straling van de laser schadelijk is voor de ogen.
• Schakel het toestel onmiddellijk uit als er vloeistoen of vaste
voorwerpen in het inwendige van het toestel terechtkomen.
• Raak de lens niet aan en stoot er niet tegen, want dat kan de lens
beschadigen en ertoe leiden dat het toestel niet meer naar behoren
werkt.
• Steek niets in de veiligheidsgroef, want dat activeert de laserdiode
zolang het cd-vak nog open is.

108
NL
• Schakel het toestel uit als u het langere tijd niet zult gebruiken. Trek de
stekker uit het stopcontact. Trek de stekker altijd aan de stekker zelf
eruit.
• Deze aanwijzingen lezen, opvolgen en bewaren. - Alle veiligheids- en
bedieningsaanwijzingen moeten voor het gebruik van het product
gelezen en worden bewaard om later na te slaan. Alle waarschuwingen
op het apparaat en de aanwijzingen moeten worden opgevolgd.
• Wordt het apparaat niet volgens deze voorschriften geïnstalleerd of
gebruikt, dan kan dat de veiligheid van het product beïnvloeden en de
garantie ongeldig maken.
• Gebruik alleen in deze gebruiksaanwijzing opgevoerde adapters voor
de stroomverzorging van het apparaat. Gebruik de adapters niet voor
andere doeleinden.
• Wanneer de stekker als scheidingsinrichting van de stroom wordt
gebruikt, moet deze scheidingsinrichting gemakkelijk bedienbaar en
toegankelijk blijven.
• Dompel het aan het stopcontact verbonden apparaat niet in het water.
• Verwijder geen kleine schroefjes en open de behuizing van het product
niet. Reparaties van het product mogen enkel door bevoegd en
geautoriseerd personeel worden uitgevoerd. Gebruik het product niet
als u een beschadiging vaststelt.
• Houd het product op afstand van directe zonnestralen en
warmtebronnen zoals radiatoren, verwarmingen en andere apparaten
die warmte opwekken.
• Afstandsbediening - Er bestaat explosiegevaar als de batterij verkeerd
wordt ingezet (op de juiste polariteit letten). Vervang ze alleen
door hetzelfde of door een gelijkwaardig type. De batterij mag niet
blootgesteld worden aan overmatige hitte zoals zonlicht, vuur, e.d. Wij
wijzen op de milieuaspecten bij het weggooien van de batterij.
• Waarschuwing- BATTERIJ NIET inslikken, CHEMISCH
VERBRANDINGSGEVAAR - De met dit product meegeleverde
afstandsbediening bevat een knoopcelbatterij. Als de batterij wordt
ingeslikt, kan dit binnen 2 uur ernstige inwendige brandwonden
veroorzaken en de dood tot gevolg hebben. Houd nieuwe en gebruikte
batterijen uit de buurt van kinderen.
• Stel het apparaat niet aan open vlammen, bv. brandende kaarsen bloot
die niet of in de buurt van het apparaat neergezet mogen worden.
• De ventilatie mag niet alleen door afdekken van het apparaat of de
stroomvoorziening worden beïnvloed.
• Reinig het apparaat alleen met een droge doek.
• Dit product is bestemd voor het gebruik in gematigde klimatologische
zones.
Aanwijzing met betrekking tot de waterdichtheid van het apparaat
De specicaties voor de waterdichtheid van dit product beschermen
volgens IPx4 overeenkomstig IEC 60529 "beschermgraad tegen het
indringen van water (IP-code)", die de beschermingsgraad tegen het

109
NL
indringen van water aangeeft. Dit product kan niet in het water worden
gebruikt.
Als het apparaat niet volgens de voorschriften wordt gebruikt, kan
water in het apparaat binnendringen en tot branden, elektrische
schokken of foutieve functies leiden. Let zorgvuldig op de volgende
veiligheidsaanwijzingen en gebruik het apparaat op de juiste wijze.
IPX 4: beschermt tegen spattend water uit alle richtingen
Vloeistoen waarvoor de specicaties voor waterbestendigheid gelden
• Bruikbaar: zoet water, kraanwater
• Niet bruikbaar: andere vloeistoen dan de boven genoemde
(bijvoorbeeld zeepwater, wasmiddelwater, water met badextracten,
shampoo, heet bronwater, zwembadwater, zeewater, enz.)
De waterbestendigheid is gebaseerd op metingen die onder de boven
beschreven omstandigheden worden uitgevoerd. Let erop dat niet
werkende functies die door het onderdompelen in het water door het
misbruik van de klant niet onder de garantie vallen.
Behoud van de waterbestendigheid
Let u op de volgende voorzorgsmaatregelen om een volgens de
voorschriften gebruik te garanderen.
• Spat geen water met geweld in de openingen waar het geluid uit komt.
Laat het apparaat niet in het water vallen en gebruik het niet onder
water.
• Laat het apparaat niet in een koude omgeving nat worden, omdat het
water kan bevriezen. Om defecte functies te vermijden, wis het water na
gebruik in ieder geval af.
• Leg het apparaat niet in het water en gebruik het niet op een vochtige
plek, bijvoorbeeld in een badkamer.
• Laat het niet vallen en stelt het niet bloot aan mechanische stoten.
Anders kan het apparaat worden vervormd of beschadigd en dat leidt
tot een verslechtering van de waterbestendigheid.
• Gebruik een zachte, droge doek om water, dat op het apparaat terecht
is gekomen, weg te vegen. Als water in de gaatjes van de luidsprekers
zit, kan de luidspreker dof of helemaal niet meer hoorbaar worden.
Houd in dit geval de openingen van de luidsprekers naar beneden en
schudt het apparaat meermaals om het water eruit te halen.

110
NL
OVERZICHT APPARAAT

111
NL
1 Stand-by toets
2 CD/BT: vorige titel of ingestelde tijd verminderen / vorige zender
3 SOURCE – bron
4 CD/BT volgende titel overslaan TUNE+ toets
5 Geheugen 1
6 SLEEP - automatisch uitschakelen
7 Geheugen 2
8 Menu/ INFO
9 CLOCK/3+ - tijdinstelling/geheugens
10 PLAY MODE/ ALARM - weergavemodus/ alarm
11 ⏯ /SCAN -CD-/ BT-Modus: weergave/pauze;DAB-/FM-modus:
zenderzoeker
12 ⏹/ BT-Pair – CD-modus: stop;BT-modus: apparaat koppelen
13 LCD display
14 VOLUME/SNOOZE/ENTER – volumeregelaar (draaien)/entertoets
(drukken)
15 Draaggreep
16 USB aansluiting
17 Oplaadweergave
18 3,5 mm koptelefoonaansluiting
19 Typ-C-aansluiting
20 CD-vak beveiligingsklep
21 CD-vak

112
NL
EERSTE STAPPEN
1. Verbind de meegeleverde type-C kabel met de type-C aansluiting
2. Sluit het andere einde van de type-C kabel aan een met een USB-
netstekker aan een stopcontact aan. U kunt de accu ook opladen door
het apparaat met de USB-aansluiting van een computer te verbinden. De
oplaadindicator knippert, terwijl de accu wordt opgeladen.
3. Druk op om het apparaat aan te zetten. Druk opnieuw op de knop om
het apparaat uit te zetten.
Laat de accu bij de eerste keer aanzetten minimaal 3 uur lang opladen.
4. Houd de knop om het apparaat uit te zetten 3 seconden lang
ingedrukt.
Volume instellen
Pas het volume aan door te draaien aan de volumeknop.

113
NL
CD HANDELING
Druk meermaals op de toets SOURCE tot op het beeldscherm „CD“ wordt
weergegeven.
CD inleggen
1. Open vervolgens de cd-vak beveiligingsklep en aansluitend het cd-vak.
2. Leg de cd met het opschrift naar boven in het cd-vak. Let erop dat de cd
op de middenas wordt gelegd.
3. De cd wordt gelezen. Op het beeldscherm wordt „CD READING“
getoond. Na enkele seconden wordt het totale aantal titels van de cd
weergegeven en aansluitend de totale afspeeltijd.
4. Als er geen cd ingelegd kan worden of de ingelegde cd niet gelezen kan
worden, verschijnt „NO DISC“ op het beeldscherm.
Weergave pauzeren
1. Druk op de toets
⏯ om de weergave te pauzeren.
2. Om de weergave voort te zetten drukt u opnieuw op de toets ⏯.
Weergave stoppen
Druk op de toets ⏹, om de weergave te stoppen.
Titel overslaan
• Druk op de toetsen ⏮ of ⏭, om terug naar het begin van een titel te
springen of de vorige of volgende titel te beluisteren.
• Houd de toetsen⏮ of ⏭, ingedrukt om snel voor- of achteruit te spoelen.

114
NL
Weergave herhalen en random play
1. Drukt u tijdens de gebruiksmodus de toets PLAY MODE. Op het
beeldscherm wordt
weergegeven. De actuele cd-titel wordt
ononderbroken herhaald.
2. Drukt u tijdens de gebruiksmodus opnieuw de toets PLAY MODE.
Op het beeldscherm wordt weergegeven. Alle cd-titels worden
ononderbroken herhaald.
3. Als u de toets PLAY MODE voor de derde keer indrukt, wordt het
symbool op het beeldscherm weergegeven. Alle titels worden in een
willekeurige volgorde afgespeeld. Druk op de toetsen ⏮ of ⏭, om bij de
volgende toevallige titels te komen.
4. Als u opnieuw op de toets PLAY MODE drukt, wordt de normale
weergave voortgezet.
Afspeellijst maken
U kunt 20 cd-titels of 99 MP3-titels in gewenste volgorde opslaan. De
afspeellijst kan in de stopmodus worden gemaakt.
1. Drukt u in de stopmodus op de toets PLAY MODE om de afspeellijst te
openen.
2. Kiest u met de toetsen ⏮ of ⏭ de titels uit die u wilt opslaan.
3. Druk om uw keuze te bevestigen op de toets PLAY MODE.
4. Herhaal stap 2 en 3 om verdere titels in de afspeellijst op te slaan. Druk,
zodra u alle titels in de afspeellijst heeft opgeslagen, op de toets
⏯, om
de afspeellijst af te spelen.
Opgeslagen afspeellijst verwijderen
Drukt tweemaal op de toets ⏹, of open en sluit het cd-vak eenmaal om de
opgeslagen afspeellijst te verwijderen.

115
NL
USB
1. Aan de voorkant van het apparaat bevindt zich een USB-aansluiting.
Druk, zodra een USB-stick word aangesloten, meermaals op de toets
SOURCE, om de USB-modus uit te kiezen.
2. Op het apparaat wordt automatisch het aantal titels van de USB-stick
weergegeven.
3. Alle weergavetoetsen zijn dezelfde als in MP3-CD-modus.
Aanwijzingen
• Het apparaat kan MP3-/WMA bestanden uitsluitend in USB-gebruik
weergeven.
• Als zich op uw USB-stick MP3-/WMA bestanden bevinden, maar het
beeldscherm geeft „NO USB“ weer, dan kan het zo zijn dat het formaat
van de bestanden niet compatibel met het apparaat is (bijvoorbeeld
met DRM beschermde MP3-/WMA bestanden).
• Dit apparaat ondersteunt USB versies 1.1 en 2.0.
• Dit apparaat ondersteunt USB-sticks tot 32 GB.
• Het kan gebeuren dat niet alle USB-sticks en geheugenkaarten
compatibel met het apparaat zijn. Dit wijst niet op een probleem van
het apparaat.
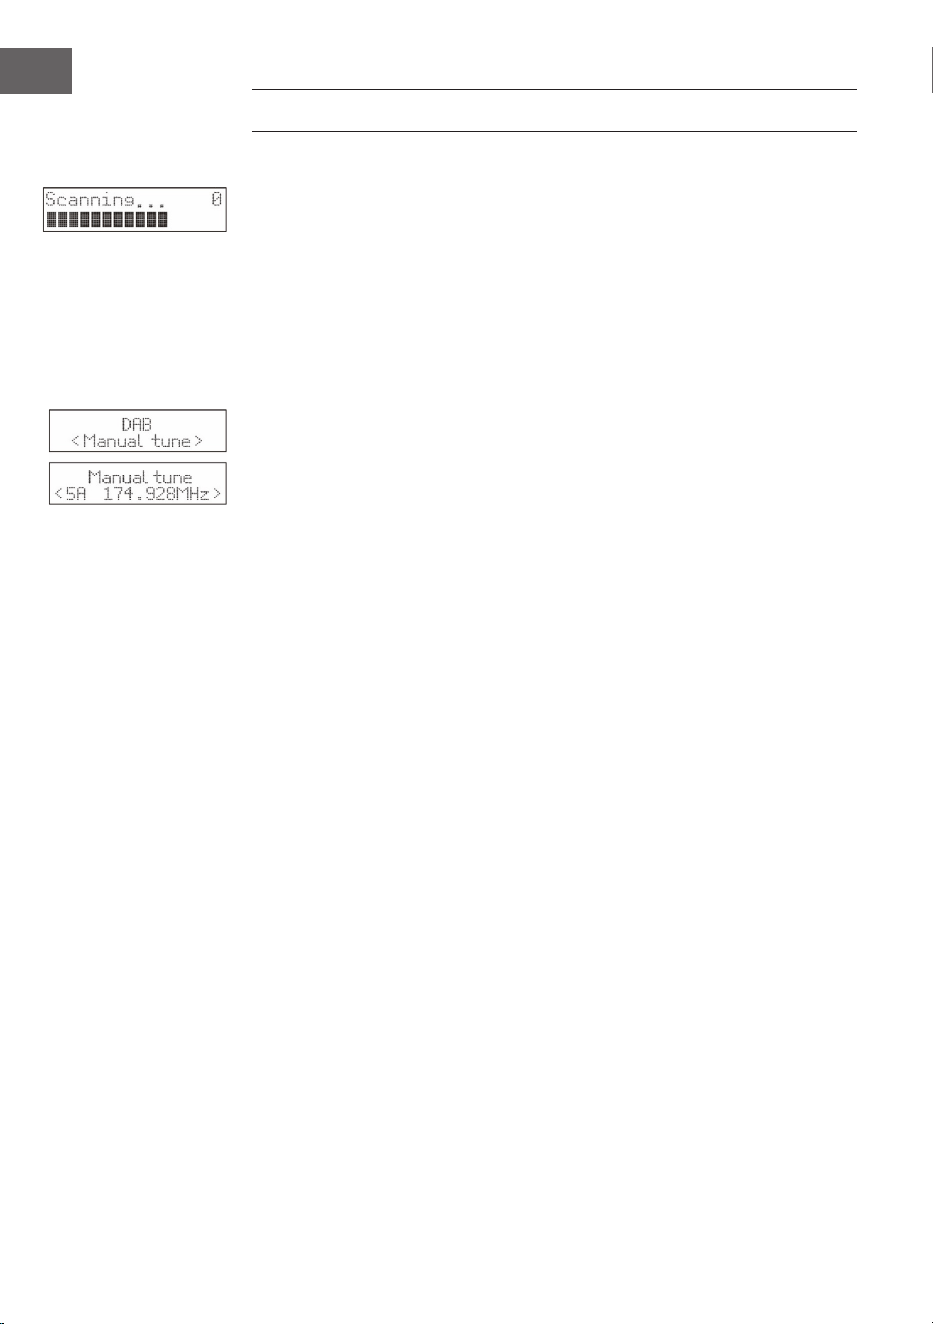
116
NL
DAB-RADIO/BEDIENING
Zenders zoeken
1. Om het automatisch zoeken naar radiozenders te activeren, drukt u op
de toets SCAN en het beeldscherm zal „Scanning…“ (zoeken) en een
groter wordende balk weergeven.
2. Alle gevonden zenders worden automatisch opgeslagen. Om de
gevonden zenders te verkennen drukt u op de toetsen ⏮ of ⏭. Druk
vervolgens de bevestigingstoets ENTER.
Handmatig zenders zoeken
Naast het automatisch zenders zoeken kan het zoeken naar zenders ook
handmatig worden uitgevoerd.
1. Druk op de MENU van de afstandsbediening om het menu weer te
geven.
2. Druk op de toetsen ⏮ of ⏭ , om de manuele zenderzoekopdracht te
kiezen en druk op te bevestigen de toets ENTER.
3. Druk op de toetsen ⏮ of ⏭ om de DAB/DAB+-zenders te verkennen die
van 5A tot 13F genummerd zijn.
4. Na de keuze uit de gewenste zendernummers op de toets ENTER
drukken om te bevestigen. Het beeldscherm zal de multiplex weergeven.
5. Houd de toets MENU nogmaals ingedrukt om de geselecteerde zender
aan de zenderlijst toe te voegen.
DRC (Dynamic Range Compression)
1. Druk op de MENU toets om het menu te openen.
2. Druk om „DRC“ te kiezen de toetsen ⏮ of ⏭ en druk vervolgens om te
bevestigen de toets ENTER.
3. Druk om te kiezen uit „uit/hoog/laag“ de toetsen ⏮ of ⏭.
4. Druk ter bevestiging op de toets ENTER.
Zender verwijderen
Eventueel kunt u alle niet-beschikbare zenders uit de zenderlijst wissen.
1. Druk in de DAB modus op de toets MENU om het menu te openen.
2. Druk op de toetsen ⏮ of ⏭ , om „Prune“ te kiezen en druk vervolgens op
de toets ENTER.
3. Druk voor de keuze van „Ja“ de toetsen ⏮ of ⏭ en druk de toets ENTER,
om te bevestigen dat alle niet beschikbare opgeslagen zenders worden
gewist.
4. U kunt de toetsen ⏮ of ⏭ ook indrukken om „Nee“ te kiezen en
vervolgens de toets ENTER voor het afbreken van de instelling
indrukken.
Software informatie

117
NL
1. Druk in de DAB modus op de toets MENU om het menu te openen.
2. Druk op de toetsen ⏮ of ⏭ om „System“ te kiezen en druk om te
bevestigen op de toets ENTER.
3. Druk op de toets ENTER van de afstandsbediening om de softwareversie
te laten weergeven.
4. Druk om de weergave af te breken op toets MENU.
Taalkeuze
Druk tijdens de DAB modus of FM-Modus de toets MENU en kies met
de toetsen ⏮ of ⏭ „System“ uit. Druk ter bevestiging op de toets ENTER.
Selecteer de gewenste.
Terugzetten naar fabrieksinstellingen
Door deze functie worden alle instellingen op de fabrieksinstelling
teruggezet. Houd de toets MENU ingedrukt en kies met de toetsen ⏮ of ⏭
„System“ uit.
1. Kies met de toetsen ⏮ of ⏭ „Factory Reset“ (fabrieksinstelling) uit.
2. Druk ter bevestiging op de toets ENTER.
Let op: Bij het terugzetten naar de fabrieksinstellingen, worden alle
opgeslagen FM-/DAB+ zenders gewist.
Secundaire diensten
Eventueel ziet u na de naam van de zender een „> “symbool dat weergeeft
dat voor deze zender secundaire diensten beschikbaar zijn. Deze secundaire
diensten bevatten extra diensten die met de primaire zender in verbinding
staan. De secundaire diensten worden in de zenderlijst direct achter de
primaire zender geplaatst.
Om de secundaire zenders uit te kiezen drukt u op de MENU-toets als „>“
voor de zendernaam op het beeldscherm verschijnt. Zodra de secundaire
dienst stopt, schakelt het apparaat automatisch terug naar de primaire
zender.
Zenders opslaan
Voor een snelle toegang kunnen tot 20 FM- en 20 DAB+ zenders worden
opgeslagen.
Zender op geheugenplaats 1 of 2 opslaan
1. Kies de radiozender uit die u wilt opslaan.
2. Houd de toets
① of ② 2 seconden lang ingedrukt tot op het
beeldscherm een bericht wordt weergegeven dat het succesvolle
opslagproces bevestigt.
Zender in de geheugenlijst opslaan
1. Kies de radiozender uit die u wilt opslaan.

118
NL
2. Houd de toets ③+ zo lang ingedrukt totdat de geheugenlijst wordt
weergegeven. Kies met de draaiknop een gewenste opslagplaats tussen
3 en 20 uit. Reeds opgeslagen zenders kunnen worden overschreven.
Opgeslagen zenders oproepen
1. Druk om een zender op opslagplaats 1 of 2 te beluisteren de toetsen
①
of ②.
2. Druk om andere opgeslagen zenders op te roepen eerst de toets ③+,
om de zenderlijst te openen. Kies met de draaiknop de gewenste
opslagplaats uit en bevestig uw keuze door op de draaiknop te drukken.
DAB weergavemodi
Druk op de toets INFO van de afstandsbediening Op het beeldscherm
worden de verschillende weergavemodi weergegeven. De informatie wordt
telkens op de onderste rand van het beeldscherm weergegeven.
Signaalsterkte
Op het beeldscherm wordt een balk getoond die de signaalsterkte
weergeeft. Hoe sterker het signaal des te langer de balk van links naar
rechts.
Soort programma
Beschrijft de stijl of het genre van het uitgezonden programma.
Ensemble
Toont de naam van de multiplex aan waarover de zender beschikt die
u beluistert. Een multiplex is een verzameling radiozenders die worden
gebundeld en op één frequentie worden uitgezonden. Er zijn nationale en
lokale multiplexen. Lokale multiplexen bevatten zenders die speciek op
een bepaalde streek zijn afgestemd.
Aanwijzing: DAB - in tegenstelling tot de normale radio worden bij
DAB meerdere radiozenders samen gegroepeerd en via een frequentie
uitgezonden.
Frequentie
Toont de frequentie van de ingestelde zender, bijvoorbeeld „11c 220.352
MHz“.

119
NL
Signaalsterkte
Toont signaalsterkte aan Als het getal „0“ is, betekent dit dat het
ontvangen signaal foutloos is en een sterke signaalsterkte heeft.
Audio-Bit-Rate
Het beeldscherm toont de ontvangen audio bitrate.
Tijd/datum
Geeft de actuele tijd en datum weer, die automatisch door de zender ter
beschikking wordt gesteld.
DLS (Dynamic Label Segment)
Bij een dynamic label segment gaat het om een doorlopende tekst die door
de zender met het uitzenden geïntegreerd kan worden. Deze tekst bevat in
de regel informatie zoals bijvoorbeeld zenderdetails.
FM RADIO
Druk meermaals op de toets SOURCE om naar de FM-modus over te
schakelen. Op het beeldscherm wordt de frequentie weergegeven.
Automatisch zenders zoeken
Druk zo lang op de toets SCAN totdat de radio naar zenders begint te
zoeken. De eerste 20 zenders die bij het zoeken naar zenders worden
gevonden, worden in de geheugenlijst opgeslagen.
Handmatig zenders zoeken
Druk meermaals op de toetsen ⏮ of ⏭, totdat u de gewenste frequentie
heeft bereikt.
Zoekinstellingen
Dit is een zoekoptie waarmee u kunt zoeken naar alle stations of alleen
naar stations met een sterk signaal.
1. Druk op de toets MENU en druk vervolgens op de toetsen of , om
„Scan Setting“ (zoekinstelling) te kiezen. Druk ter bevestiging op de
toets ENTER.
2. Druk op de toetsen ⏮ of ⏭ om „All Stations“ (alle zenders) of „Strong
stations only“ (alleen zenders met een sterk signaal) uit te kiezen.
Bevestig uw keuze met de toets ENTER.
Aanwijzing: het sterretje rechtsboven in het beeldscherm geeft de actuele
keuze weer.

120
NL
Audio-instellingen
Dit toestel schakelt automatisch tussen stereo en mono. U kunt dit omzeilen
door de gewenste modus handmatig in te stellen. Dit kan vooral heel nuttig
zijn wanneer het signaal slecht is.
1. Druk op de toets MENU en selecteer met de toetsen ⏮ of ⏭ „Audio
setting“ (audioinstellingen). Druk ter bevestiging op de toets ENTER.
2. Druk op CHANNEL +/- om 'Stereo toegestaan' of 'Alleen mono' te
selecteren en bevestig uw keuze met .
Aanwijzing: het sterretje rechtsboven in het beeldscherm geeft de actuele
keuze weer.
FM weergavemodi
Wanneer u op INFO drukt, zal het scherm tussen de volgende displaymodi
wisselen.
• Radio tekst: net als bij DAB kan het radiostation tijdens de uitzending
programma-informatie weergeven in de vorm van een doorlopende
tekst.
• Programmasoort: Dit geeft de 'stijl' of het 'genre' aan van het
programma dat wordt uitgezonden.
• Frequentie: De frequentie van de ingestelde zender wordt
weergegeven, bijvoorbeeld '87,5 MHz'.
• Audioformaat: Op het beeldscherm wordt weergegeven of de
radiozenders in mono of stereo worden ontvangen.

121
NL
ALARM- EN TIMERINSTELLING
Automatische tijdinstelling
De tijd kan automatisch geactualiseerd worden als u een DAB+ signaal op
uw actuele locatie ontvangt.
Tijdinstelling
1. Druk op de toets CLOCK. De digitale weergave knippert op het
beeldscherm
2. Druk om het actuele jaartal in te stellen de toetsen ⏮ of ⏭en druk
vervolgens ter bevestiging op de toets CLOCK. De maandweergave
knippert op het beeldscherm.
3. Druk om de actuele maand in te stellen de toetsen ⏮ of ⏭ en druk
vervolgens ter bevestiging op de toets CLOCK. De dagweergave
knippert op het beeldscherm.
4. Druk om de actuele dag in te stellen op de toetsen ⏮ of ⏭ en druk
vervolgens ter bevestiging op de toets CLOCK. „12/24 H“ knippert op het
beeldscherm.
5. Druk ter instelling van het gewenste urenformaat de toetsen ⏮ of ⏭
en druk vervolgens ter bevestiging op de toets CLOCK. De weergave van
het uur knippert op het beeldscherm.
6. Druk om het actuele uur in te stellen op de toetsen ⏮ of ⏭ en druk
vervolgens ter bevestiging op de toets CLOCK. De minutenweergave
knippert op het beeldscherm.
7. Druk om de actuele minuten in te stellen op de toetsen ⏮ of ⏭ en druk
vervolgens ter bevestiging op de toets CLOCK.
Aanwijzing: Wanneer geen DAB/DAB+ signaal beschikbaar is, kan de tijd
ook manueel worden ingesteld. Zodra een DAB+ signaal wordt ontvangen,
wordt de tijd automatisch geactualiseerd.
Instelling van de wekker
1. Druk en houd de toets ALARM ingedrukt tot het beeldscherm „On Timer“
weergeeft en de digitale getallen beginnen te knipperen.
2. Druk om de uren aan te passen op de toetsen ⏮ of ⏭ en druk
vervolgens ter bevestiging op de toets ENTER. De minutenweergave zal
dan op het beeldscherm beginnen te knipperen.
3. Druk de toetsen ⏮ of ⏭ voor het instellen van de minutenweergave en
druk vervolgens ter bevestiging op de toets ENTER.
4. Als u de gewenste wektijd met de toetsen ⏮ of ⏭ heeft ingesteld, zal het
beeldscherm „O Timer“ weergeven en de urenweergave zal beginnen
te knipperen.

122
NL
5. Kies door het drukken op de toets SOURCE de gewenste modus uit (FM,
USB, DAB of CD-modus) en druk ter bevestiging op de toets ENTER.
6. Druk om „Timer On“ te kiezen de toets ALARM. De wekker is dan actief.
7. In de standby modus wordt het symbool ◷ weergegeven, wat betekent
dat de wekker geactiveerd werd.
Dagelijkse wekker deactiveren.
Deactiveer de actuele wekker door meermaals op de toets ALARM te
drukken. Het symbool
◷ verdwijnt van het beeldscherm.
Belangrijke informatie
1. Mocht u als alarmbron bijvoorbeeld „CD“ hebben gekozen en er werd
geen cd ingelegd, dan zal de alarmbron automatisch naar „DAB“
overschakelen als de wektijd is bereikt.
2. Als u „FM“ als alarmbron heeft gekozen, dan zal de laatste voor het
uitschakelen beluisterde zender als wektoon worden gebruikt.
Snooze functie
Druk op de toets ENTER als het alarm afgaat om het tijdelijk te pauzeren.
Door elke keer drukken wordt het alarm telkens 9 minuten in de snooze
modus gezet voordat het weer afgaat. Druk om het alarm en de snooze
functie te deactiveren eenmaal de toets
. Het symbool voor de snooze
functie verdwijnt dan van het beeldscherm.
Automatisch uitschakelen van het apparaat.
Via de toets SLEEP van het apparaat kan worden ingesteld dat het apparaat
zich na een bepaalde tijd automatisch uitschakelt. Zo kunt u tijdens het
muziek luisteren in slaap vallen en het apparaat schakelt dan na de door u
ingestelde tijd automatisch uit en speelt niet de hele nacht door.
1. Om de gewenste tijd te kiezen waarna het apparaat zich automatisch
moet uitschakelen, drukt u meermaals op de toets SLEEP om tussen de
volgende opties te kiezen: 120 60 30 20 15 10 05 OFF.
2. Het automatisch uitschakelen wordt nu geactiveerd.
3. Door het drukken op de toets SLEEP wordt de verblijvende tijd
weergegeven totdat het apparaat zich automatisch uitschakelt.
4. Om de functie af te breken drukt u zo lang op de toets SLEEP totdat u
Sleep o“ kunt kiezen.

123
NL
BT BEDIENING
Het apparaat heeft een BT-functie en kan tot een afstand van 8 meter een
signaal ontvangen.
Het apparaat met een extern BT-apparaat verbinden:
1. schakel het apparaat in en kies de BT-modus door meermaals drukken
op de toets SOURCE.
2. Als het apparaat niet met een extern BT-apparaat is verbonden, zal
meermaals „BT PAIRING“ op het beeldscherm knipperen.
3. Activeer het externe BT-apparaat en kies de zoekmodus.
4. Splash wordt in de BT-apparatenlijst van uw externe apparaat
weergegeven.
5. Kies Splash uit en voer, indien noodzakelijk, het wachtwoord „0000“ in.
6. Om de BT-functie te deactiveren drukt u op de toets SOURCE om naar
een andere modus te schakelen of u deactiveert de functie op uw
externe BT-apparaat.
Aanwijzingen:
• Als het signaal zwak is, kan het zo zijn, dat de BT-ontvanger van uw
apparaat de verbinding beëindigt. Het apparaat zal zich echter weer
automatisch met uw externe BT-apparaat verbinden.
• Verwijder hindernissen tussen het externe BT-apparaat en de DAB-
radio, zodat u een beter signaalontvangst heeft.
• Dit apparaat ondersteunt 2DP (Advanced Audio Distribution Prole) en
AVRCP (Audio Video Remote Control Prole) functies. Het apparaat kan
niet met meerdere BT-apparaten gelijktijdig worden verbonden.
• Er geldt geen garantie voor een comptabiliteit van het apparaat met
alle andere externe apparaten en mediasoorten.
• Enkele mobiele telefoons met BT-functie verbreken bij het ontvangen
of het plegen van telefoontjes automatisch de BT-verbinding naar het
apparaat. Dit is geen teken voor een probleem van het apparaat.

124
NL
INSTRUCTIES VOOR AFVOER
Wanneer in uw land een wettelijke regeling geldt
voor het wegdoen van elektrische en elektronische
apparaten, wijst dit symbool op het product zelf of op
de verpakking erop dat het betreende product niet
met het huisvuil weggegooid mag worden. In plaats
daarvan dient het naar een centraal depot voor het
recyclen van elektrische en elektronische apparaten
te worden gebracht Door het afval volgens de
voorschriften weg te gooien beschermt u het milieu
en de gezondheid van uw medemensen tegen
negatieve consequenties. Informatie over recycling
en het afvoeren van dit artikel ontvangt u van uw
gemeente of van uw plaatselijke grondstoen- en
afvaldienst.
Dit artikel bevat batterijen. Wanneer in uw land
een wettelijke regeling is voor het afvoeren van
batterijen, mogen batterijen niet met het huisvuil
worden afgevoerd. Informeer naar de plaatselijke
regelgeving inzake de afvoer van batterijen. Door
apparatuur volgens de voorschriften af te voeren
beschermt u het milieu en de gezondheid van uw
medemensen tegen negatieve consequenties.
CONFORMITEITSVERKLARING
Fabrikant:
Chal-Tec GmbH, Wallstraße 16, 10179 Berlijn,
Duitsland.
Importeur voor Groot-Brittannië:
Berlin Brands Group UK Limited
PO Box 42
272 Kensington High Street
London, W8 6ND
United Kingdom
Hierbij verklaart Chal-Tec GmbH dat de
radioapparatuur Splash voldoet aan de richtlijn
2014/53/EU. De volledige tekst van de EU-
conformiteitsverklaring is beschikbaar via het
volgende internetadres: use.berlin/10037797