

About This Guide
About This Guide
This User Guide provides information for centrally managing VIGI devices via TP-Link VIGI app. Detailed
instructions on how to install the device can be found in the product’s Quick Start Guide.
Conventions
When using this guide, notice that:
■ Features available of VIGI devices may vary due to your region, device model, firmware version,
and app version. All images, steps, and descriptions in this guide are only examples and may not reflect
your actual experience.
■ The information in this document is subject to change without notice. Every effort has been made
in the preparation of this document to ensure accuracy of the contents, but all statements, information,
and recommendations in this document do not constitute the warranty of any kind, express or implied.
Users must take full responsibility for their application of any products.
■ This guide uses the specific formats to highlight special messages. The following table lists the
conventions that are used throughout this guide.
Underlined Indicates hyperlinks. You can click to redirect to a website or a specific section.
Bold
Indicates contents to be emphasized and texts on the web page, including the
menus, tabs, buttons and so on.
> The menu structures to show the path to load the corresponding page.
Caution
Reminds you to be cautious, and Ignoring this type of note might result in device
damage or data loss.
Note Indicates information that helps you make better use of your device.
More Information
■ The latest firmware can be found at Download Center at https://www.tp-link.com/support.
■ Product specifications can be found on the product page at https://www.tp-link.com.
■ For technical support, the latest version of the Quick Installation Guide, User Guide and other
information, please visit https://www.tp-link.com/support.
■ To ask questions, find answers, and communicate with TP-Link users or engineers, please visit
https://community.tp-link.com to join TP-Link Community.

Contents
About This Guide .............................................................................................................. II
Set Up Your VIGI Device ................................................................................................ 1
1. 1 Hardware Connection .................................................................................................................................. 2
1. 1. 1 For wired cameras and NVRs: ........................................................................................................................2
1. 1. 2 For Wi-Fi cameras: ...............................................................................................................................................2
1. 1. 3 For 4G cameras: ....................................................................................................................................................3
1. 1. 4 For solar panels: ....................................................................................................................................................3
1. 2 Add Your VIGI Device via the VIGI app ................................................................................................... 3
1. 2. 1 Add Device Locally ..............................................................................................................................................3
1. 2. 2 Add Device Remotely ......................................................................................................................................... 5
1. 3 Add Your VIGI Camera to NVR via the VIGI app.................................................................................. 8
Main Device Controls ...................................................................................................11
View Your Camera .........................................................................................................14
3. 1 Live View .........................................................................................................................................................15
3. 2 Notifications ...................................................................................................................................................16
3. 3 Device Control ..............................................................................................................................................17
Configure Solar Power Supply System .................................................................19
3. 1 Check Power Supply Statistics ..............................................................................................................20
3. 2 Custom Power Supply Time ....................................................................................................................21
3. 3 Restart Load Interface ...............................................................................................................................22
Configure Recording (Only for certain cameras) ...............................................23
4. 1 Format Micro SD Card ...............................................................................................................................24
4. 2 Configure Recording Schedule ..............................................................................................................24
Alarm and Detection .....................................................................................................26
5. 1 Alarm (Only for certain cameras) ...........................................................................................................27
5. 2 Human Detection .........................................................................................................................................27
5. 3 Vehicle Detection ........................................................................................................................................27
5. 4 Motion Detection .........................................................................................................................................28
5. 5 Camera Tampering .....................................................................................................................................28
5. 6 Line Crossing Detection ...........................................................................................................................29

5. 7 Intrusion Detection .....................................................................................................................................29
5. 8 Region Entering Detection .......................................................................................................................30
5. 9 Region Exiting Detection ..........................................................................................................................30
5. 10 Object Abandoned/Removal Detection ..............................................................................................31
Device Settings ...............................................................................................................32
6. 1 Device Information ......................................................................................................................................33
6. 2 Change Device Password ........................................................................................................................33
6. 3 Reboot Schedule .........................................................................................................................................34
6. 4 Device Sharing .............................................................................................................................................. 34
6. 5 Data Limit (For 4G cameras) ....................................................................................................................35
6. 6 Other Features .............................................................................................................................................. 35

2
Chapter 1 Set Up Your VIGI Device
1. 1 Hardware Connection
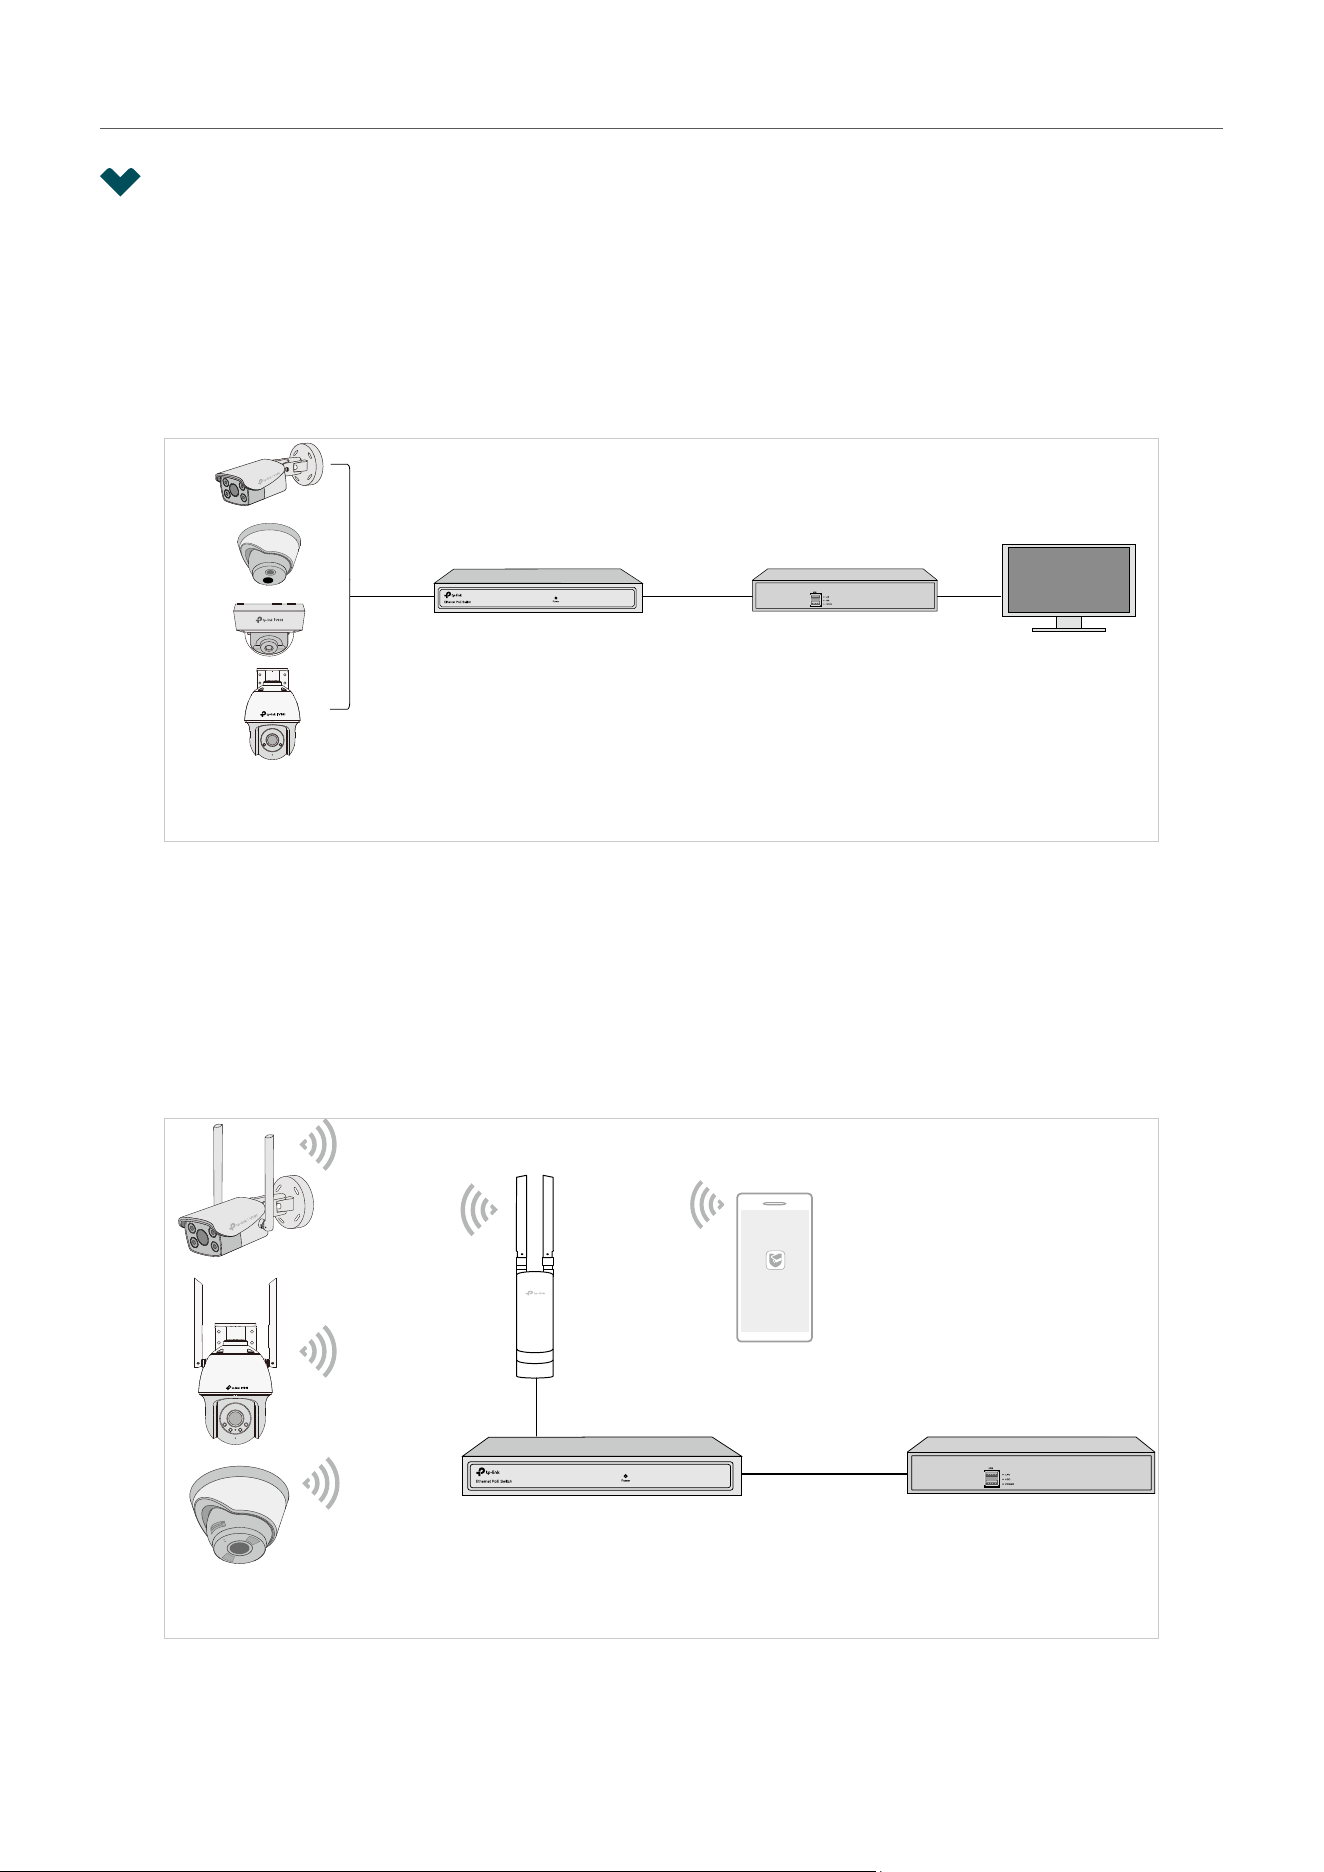
1. 1. 1 For wired cameras and NVRs:
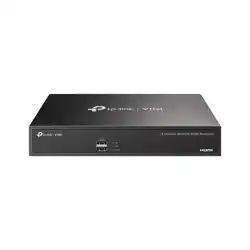
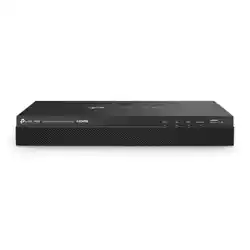
Connect the VIGI cameras and NVRs to the network according to the figure below.
Note: Here we use a VIGI NVR (Network Video Recorder) and a TP-Link Switch as examples.
Network Cameras
Network Device
(e.g., Switch or Router)
VIGI NVR
Monitor
1. 1. 2 For Wi-Fi cameras:
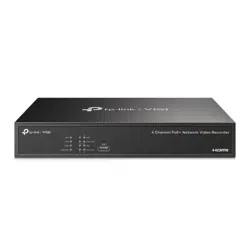
Here is a typical network topology. The camera works with an NVR for easier batch access and
management.
Note: Here we use a VIGI NVR (Network Video Recorder) and a TP-Link Switch as examples.
VIGI NVR
Access Point
Smartphone
Wi-Fi Cameras
VIGI
NVRNetwork Device
(e.g., Switch or Router)
3
Chapter 1 Set Up Your VIGI Device
1. 1. 3 For 4G cameras:
Here is a typical network topology for 4G network camera. You need insert a Nano SIM card into the
SIM card slot. If you want to manage the camera locally, you can connect the camera to your network
via an Ethernet cable.
4G Network Camera
Internet
VIGI
Base Station
Power
Adapter
Solar
Panel
or
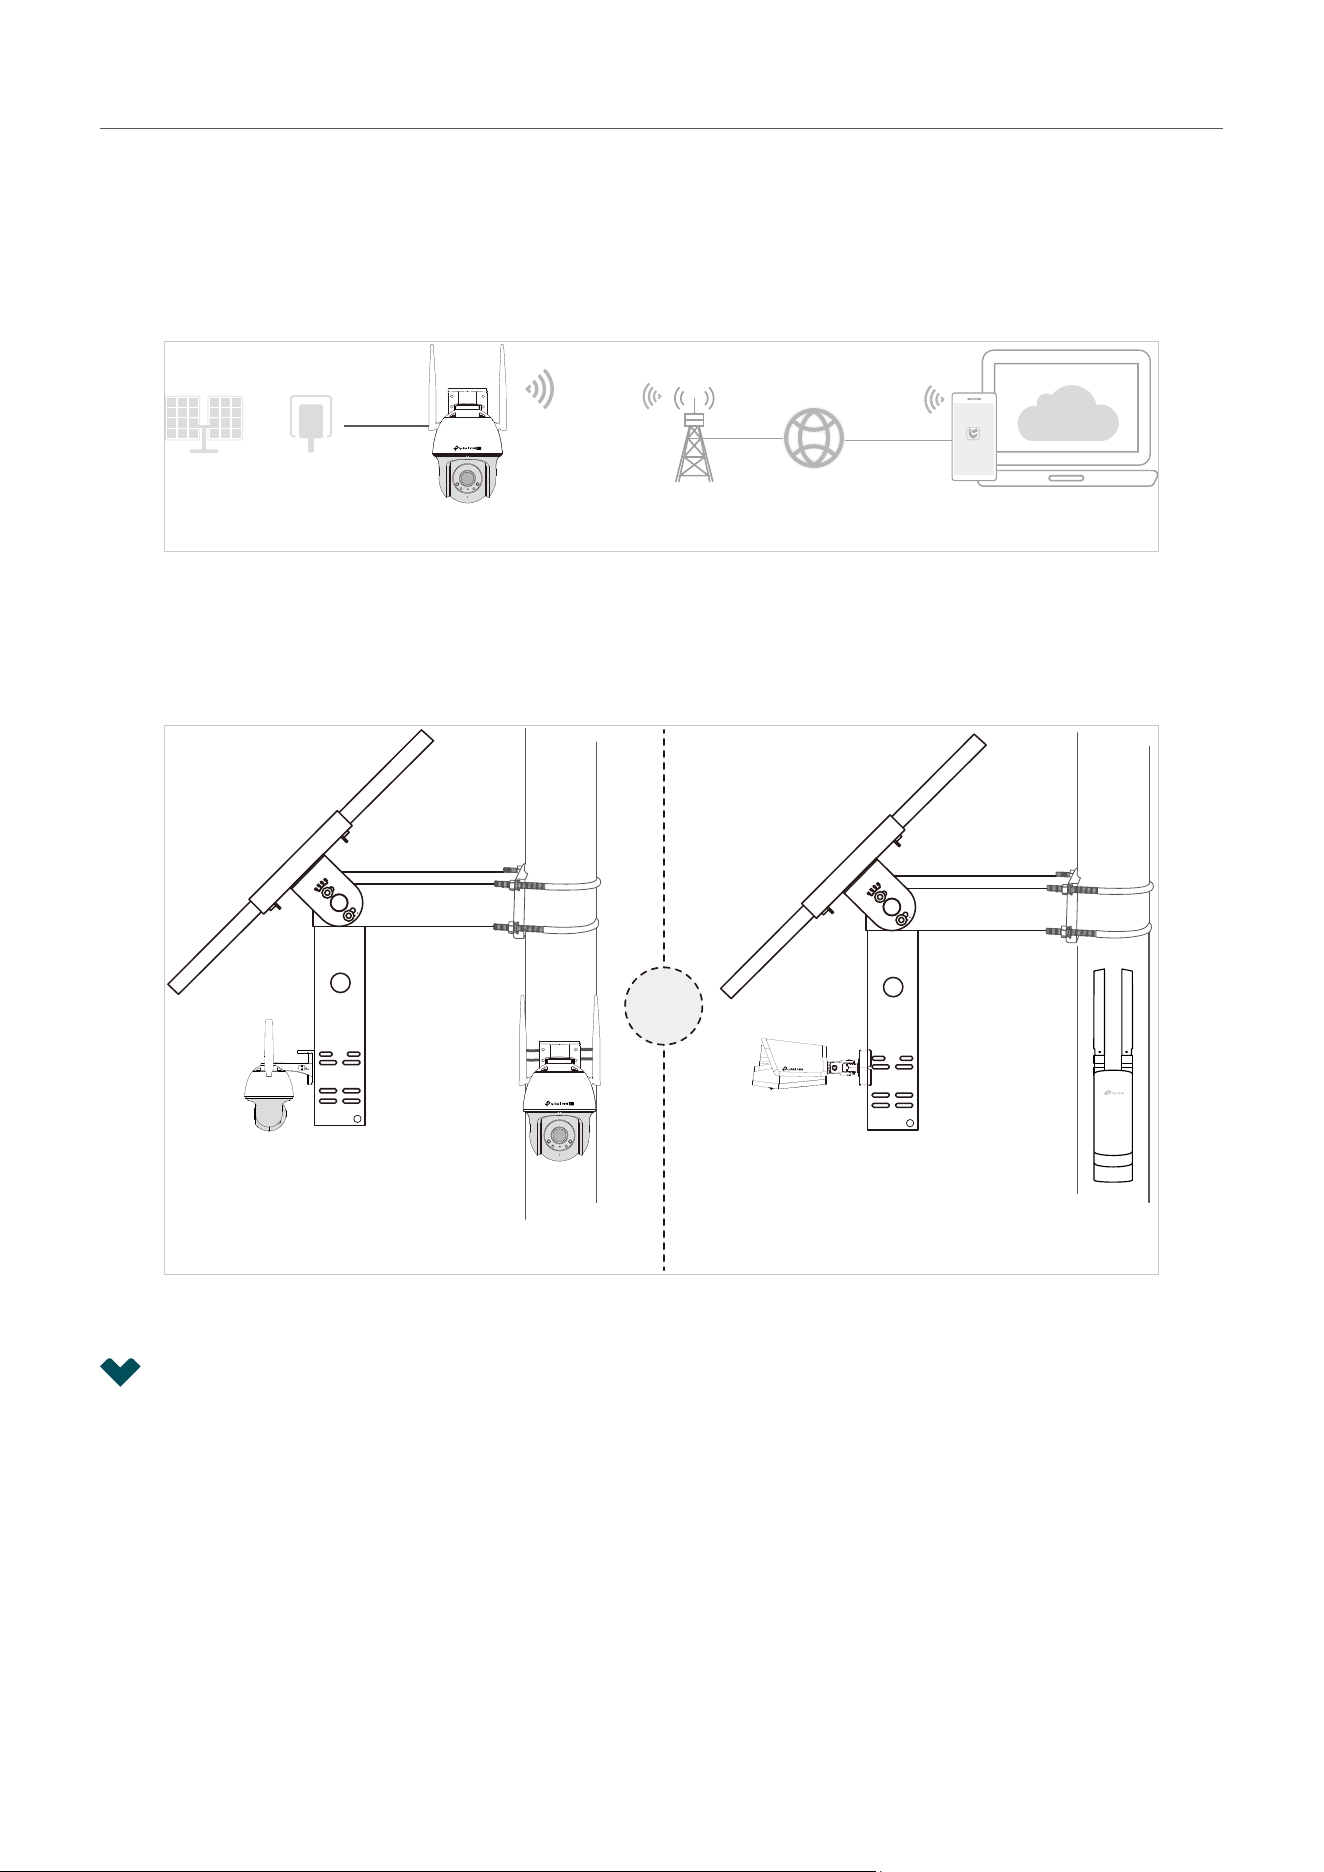
1. 1. 4 For solar panels:
Here is a typical network topology for the solar panel.
VIGI C540-4G
4G Network Camera
Network Devices
(such as wireless access
points, network bridges, etc.)
Or
1. 2 Add Your VIGI Device via the VIGI app
Note: More management methods such as using VIGI security manager and a web browser are
supported. For more instructions, see the Quick Start Guide included in the package.
The VIGI app is an application for mobile devices. With the VIGI app, you can remotely view live video,
manage VIGI devices, and get instant alerts.
1. 2. 1 Add Device Locally
To add your VIGI devices successfully, ensure that your VIGI devices are in the same subnet as your
phone. In this section we use a VIGI camera as an example.
4
Chapter 1 Set Up Your VIGI Device
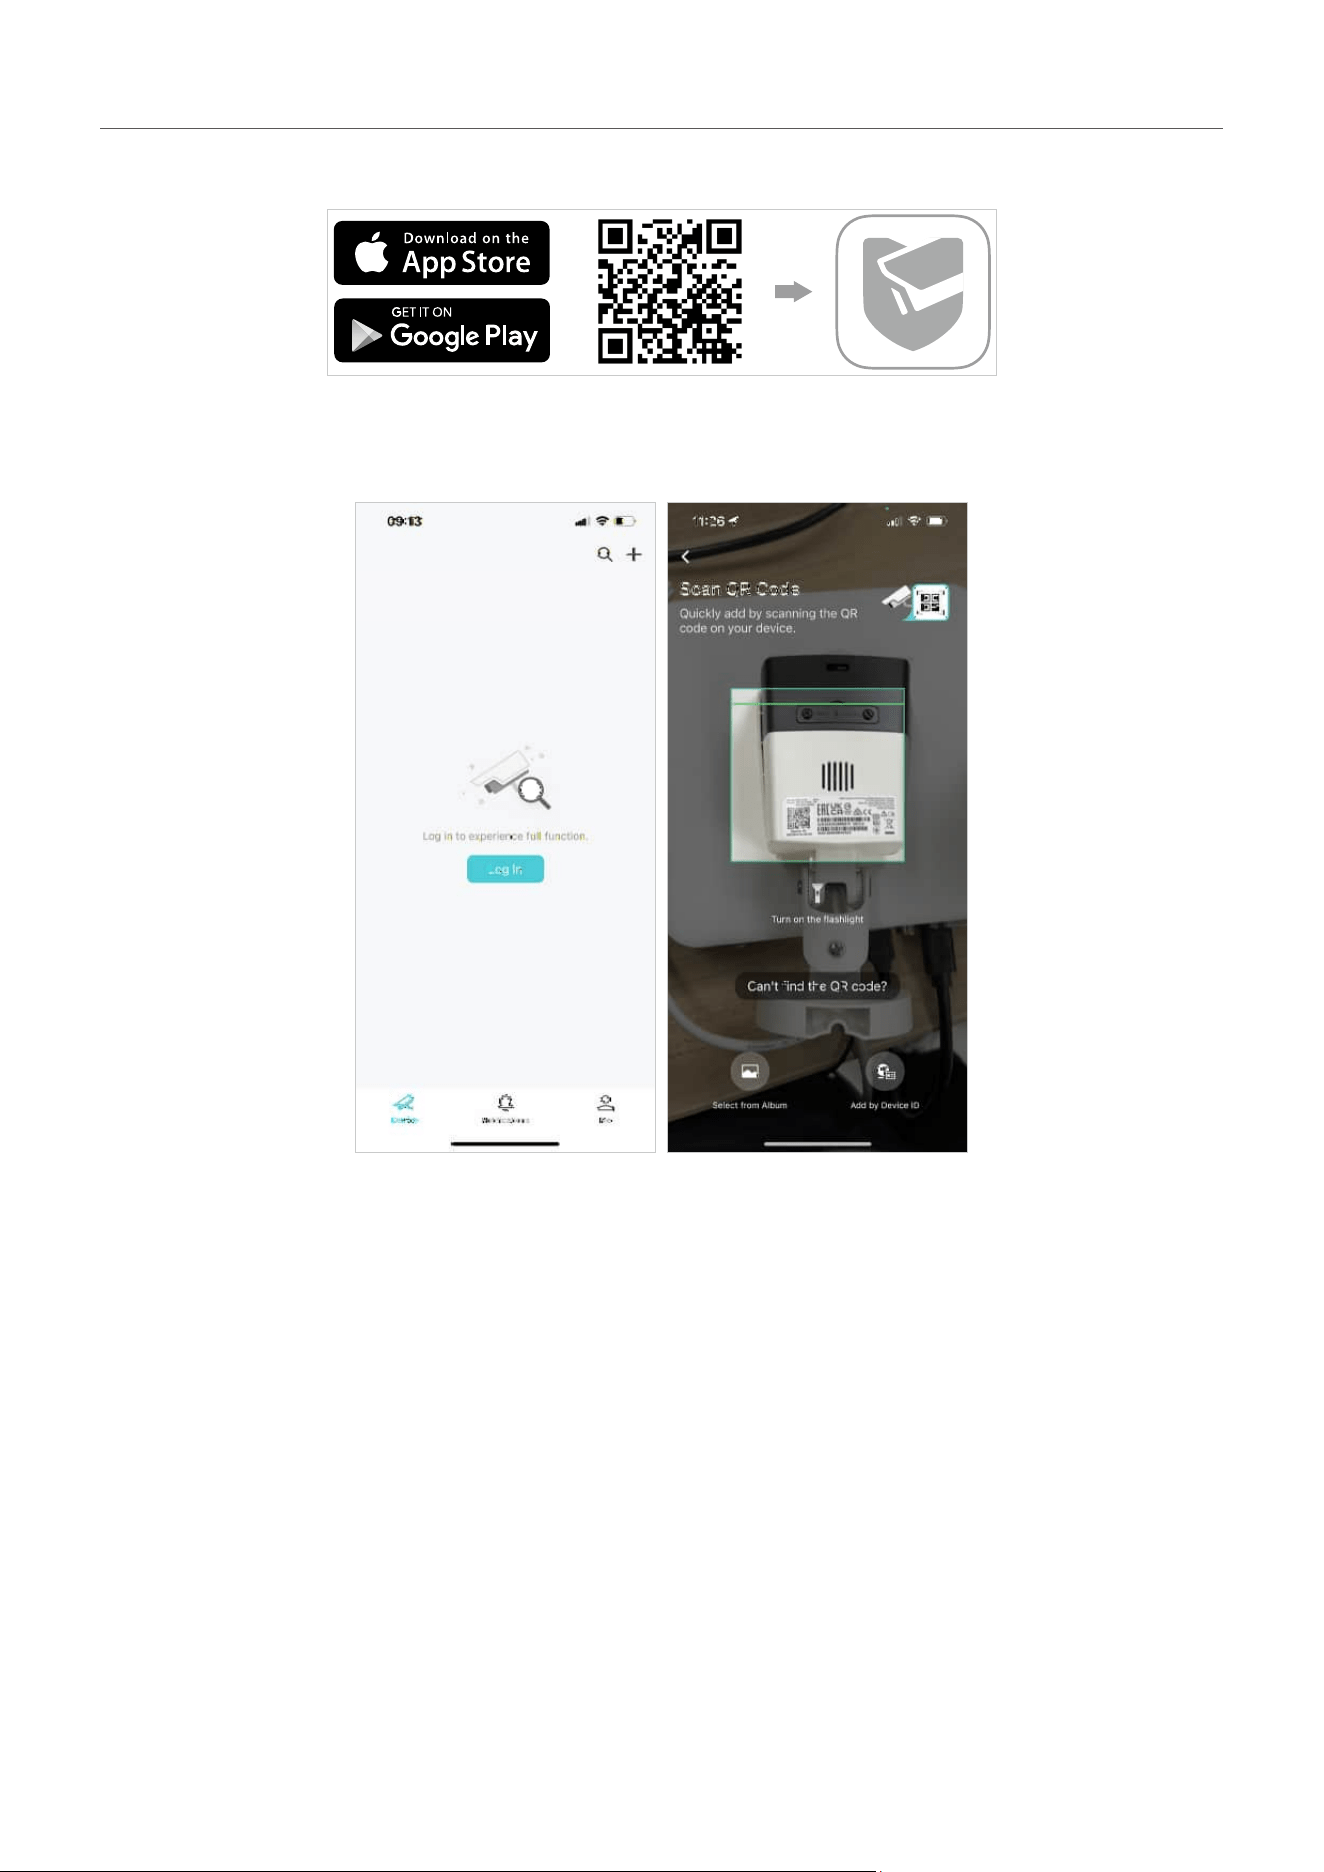
1. Download and install the VIGI app from the Apple App Store or Google Play.
2. Open the VIGI app, tap the + button on the top right and scan the QR code on your camera. You can
find the QR code printed on your product label of your camera.
5
Chapter 1 Set Up Your VIGI Device
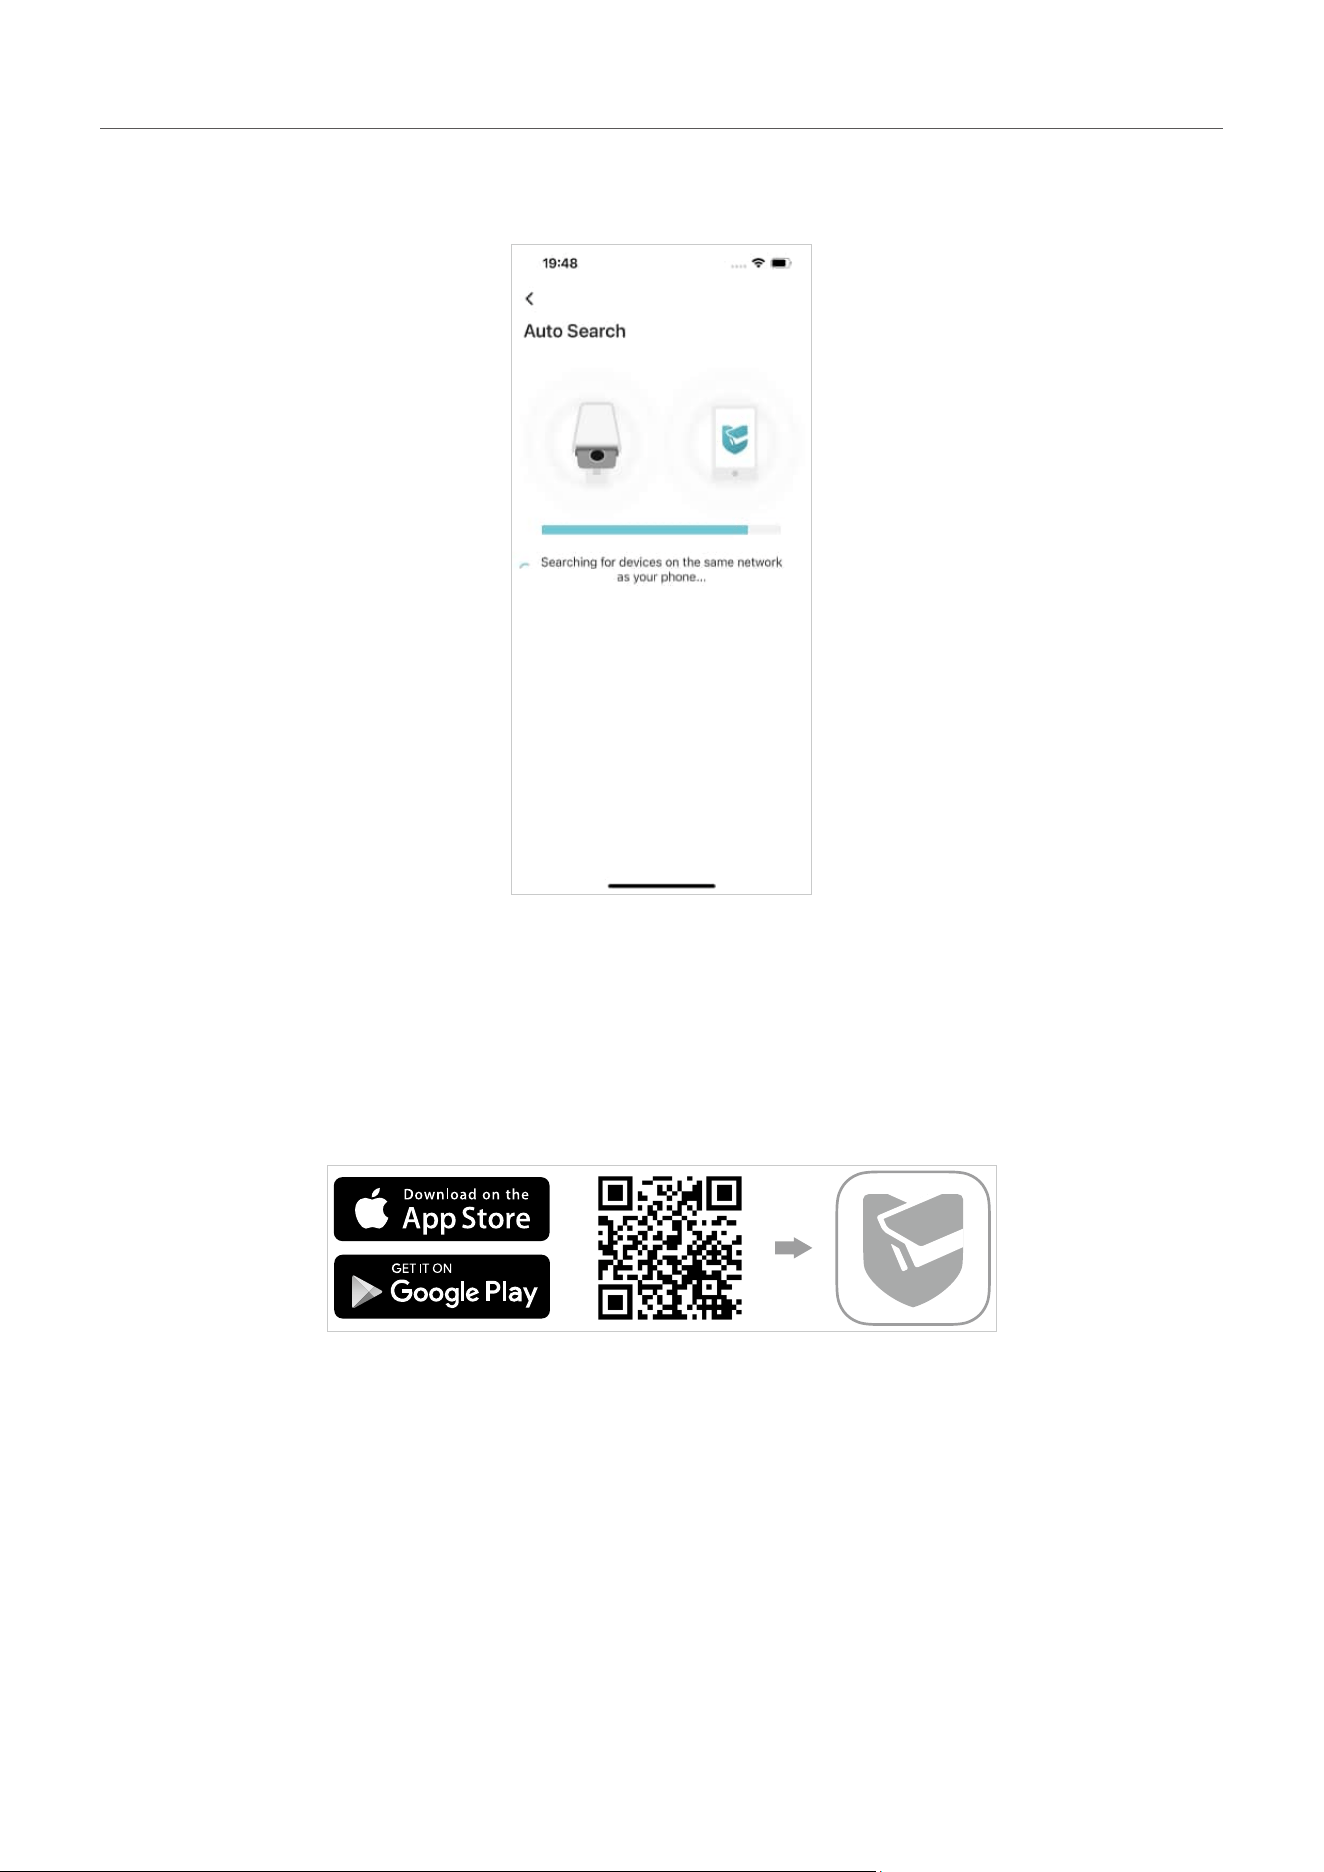
3. The system will auto search the cameras in the same network, select the desired cameras, and
follow the app insctructions to add your cameras.
1. 2. 2 Add Device Remotely
To add your VIGI devices successfully, ensure that your VIGI devices are connected to the internet. In
this section we use a VIGI camera as an example.
1. Download and install the VIGI app from the Apple App Store or Google Play.
6
Chapter 1 Set Up Your VIGI Device
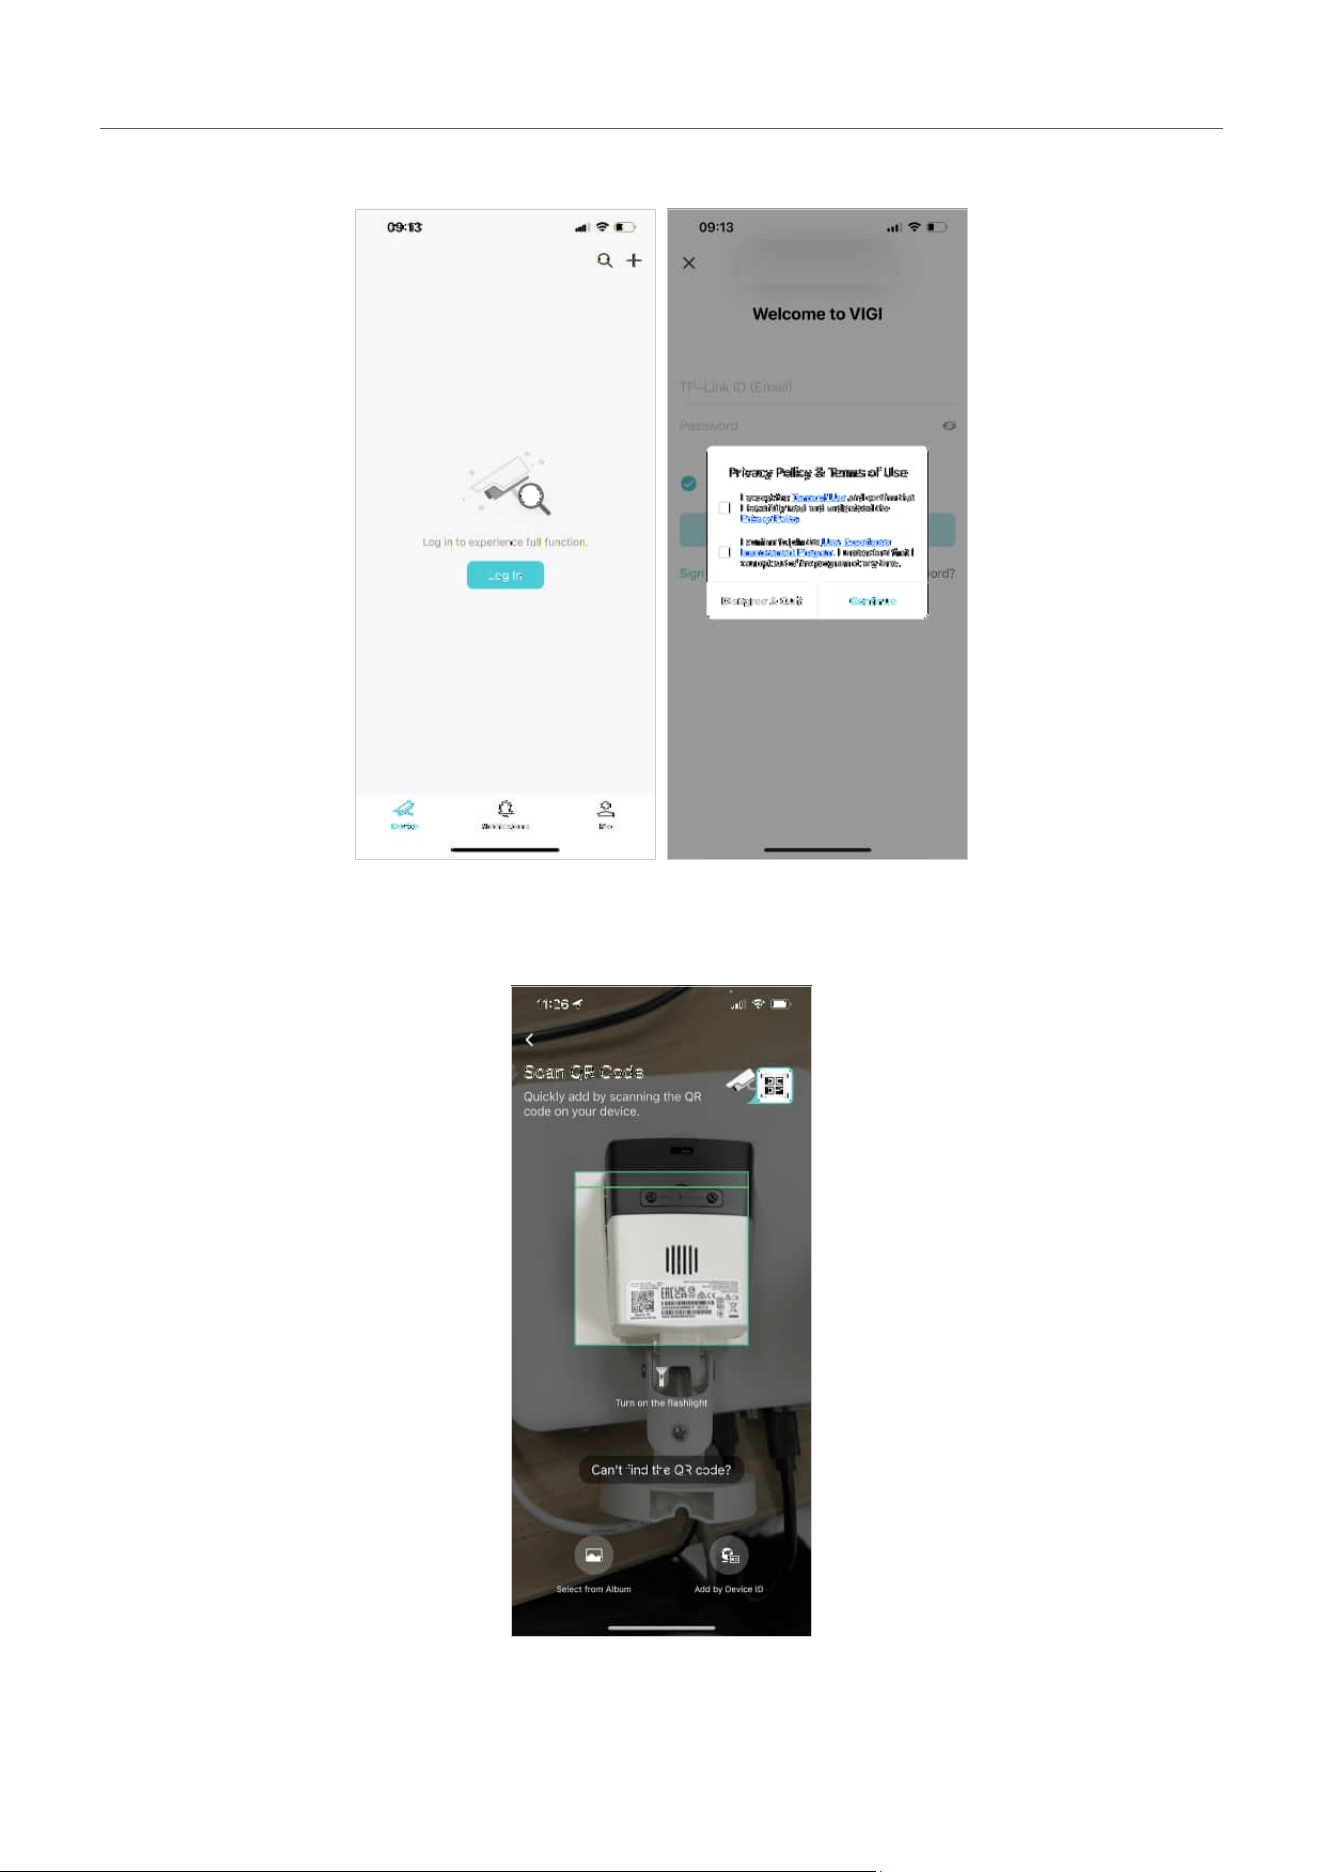
2. Open the VIGI app and log in with your TP-Link ID. If you don’t have an account, you can sign up first.
3. Tap the + button on the top right and scan the QR code on your camera. You can find the QR code
printed on your product label of your camera.
7
Chapter 1 Set Up Your VIGI Device
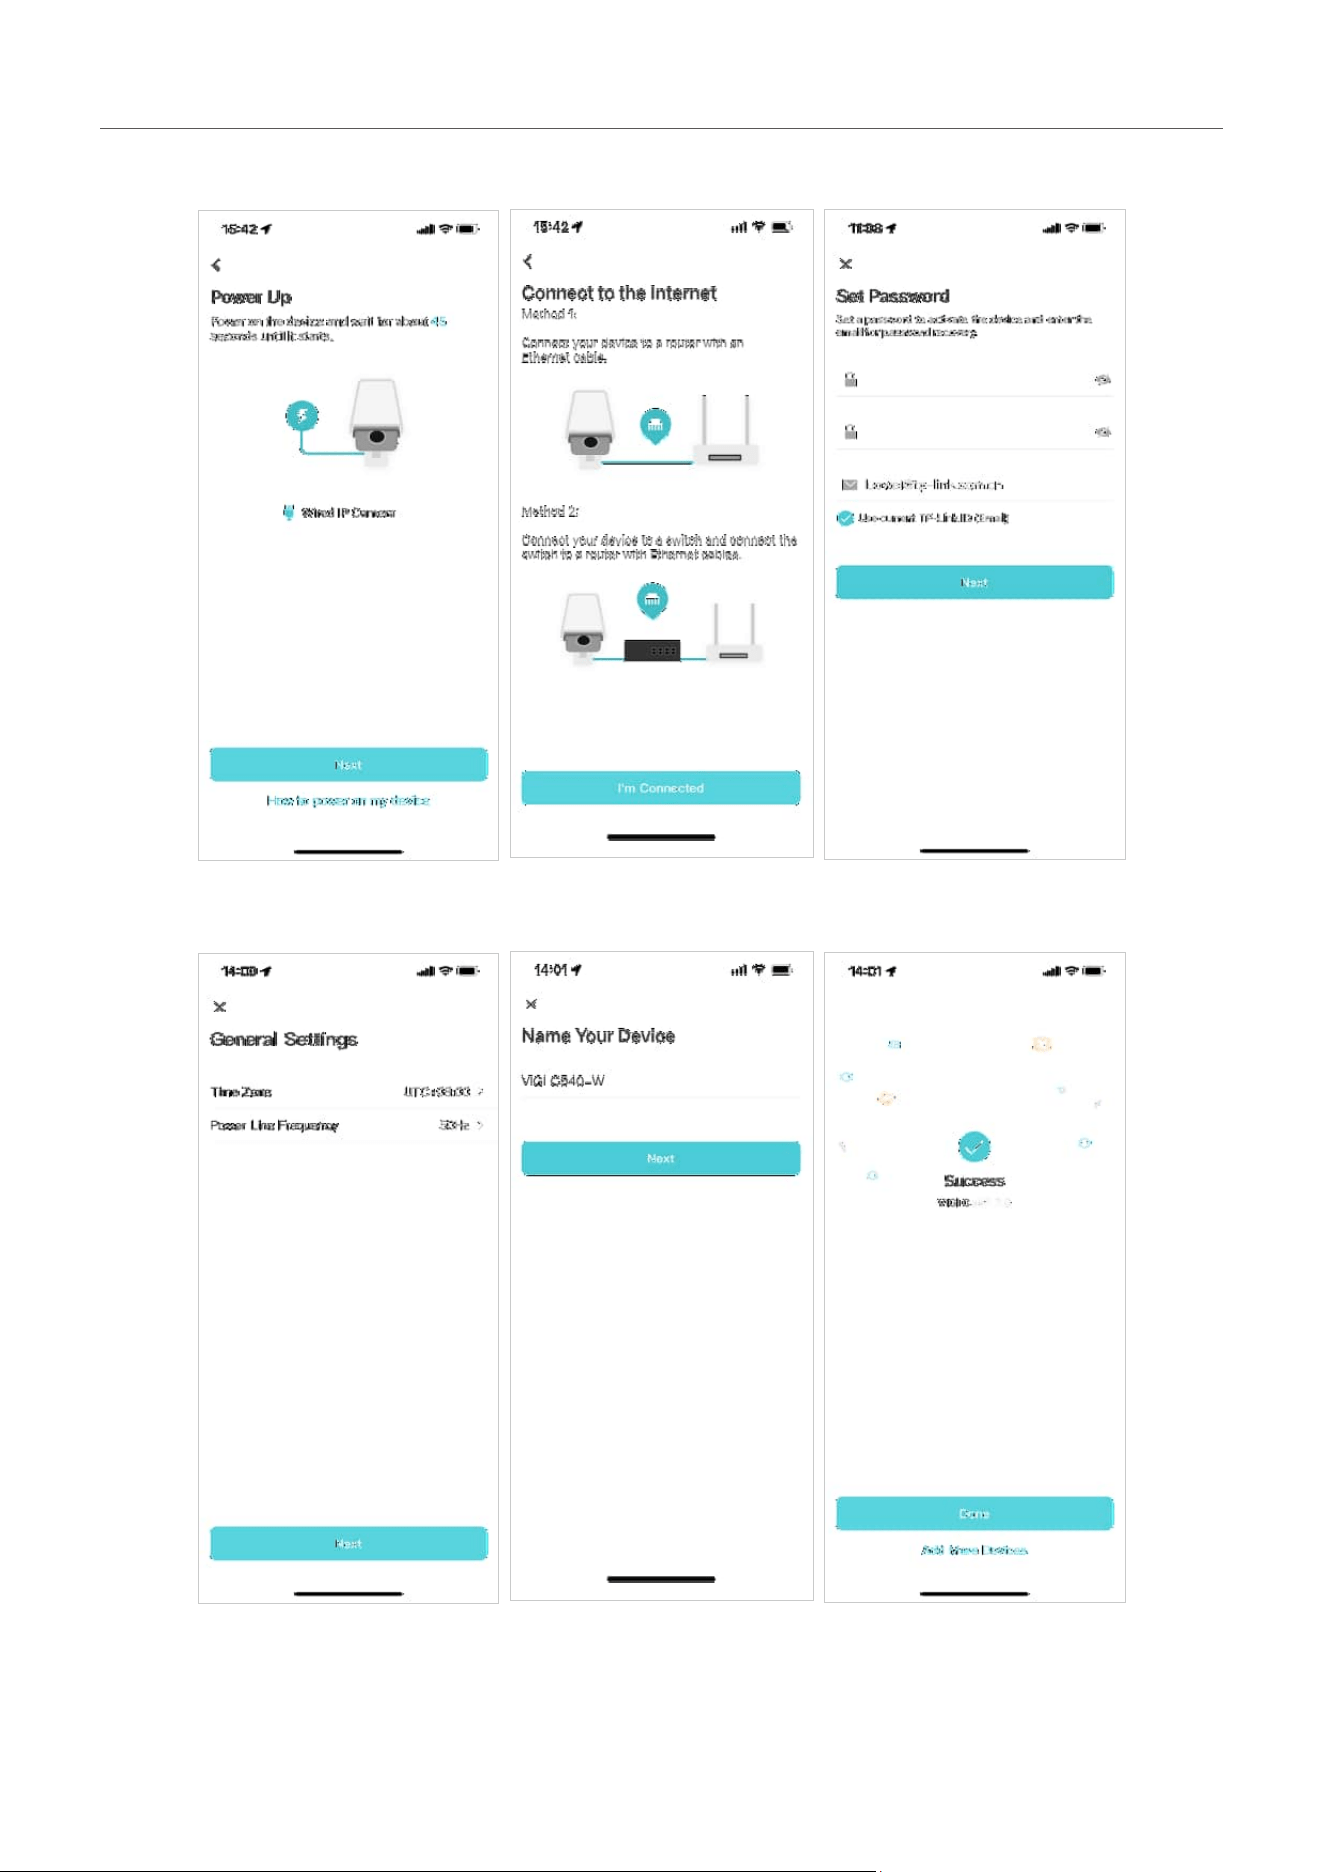
4. Follow the app instructions and set a device password to activate the device.
5. Set the time zone, and give a name to your device.
8
Chapter 1 Set Up Your VIGI Device
6. Tap Done to finish the setup, and now you can view and manage the camera.
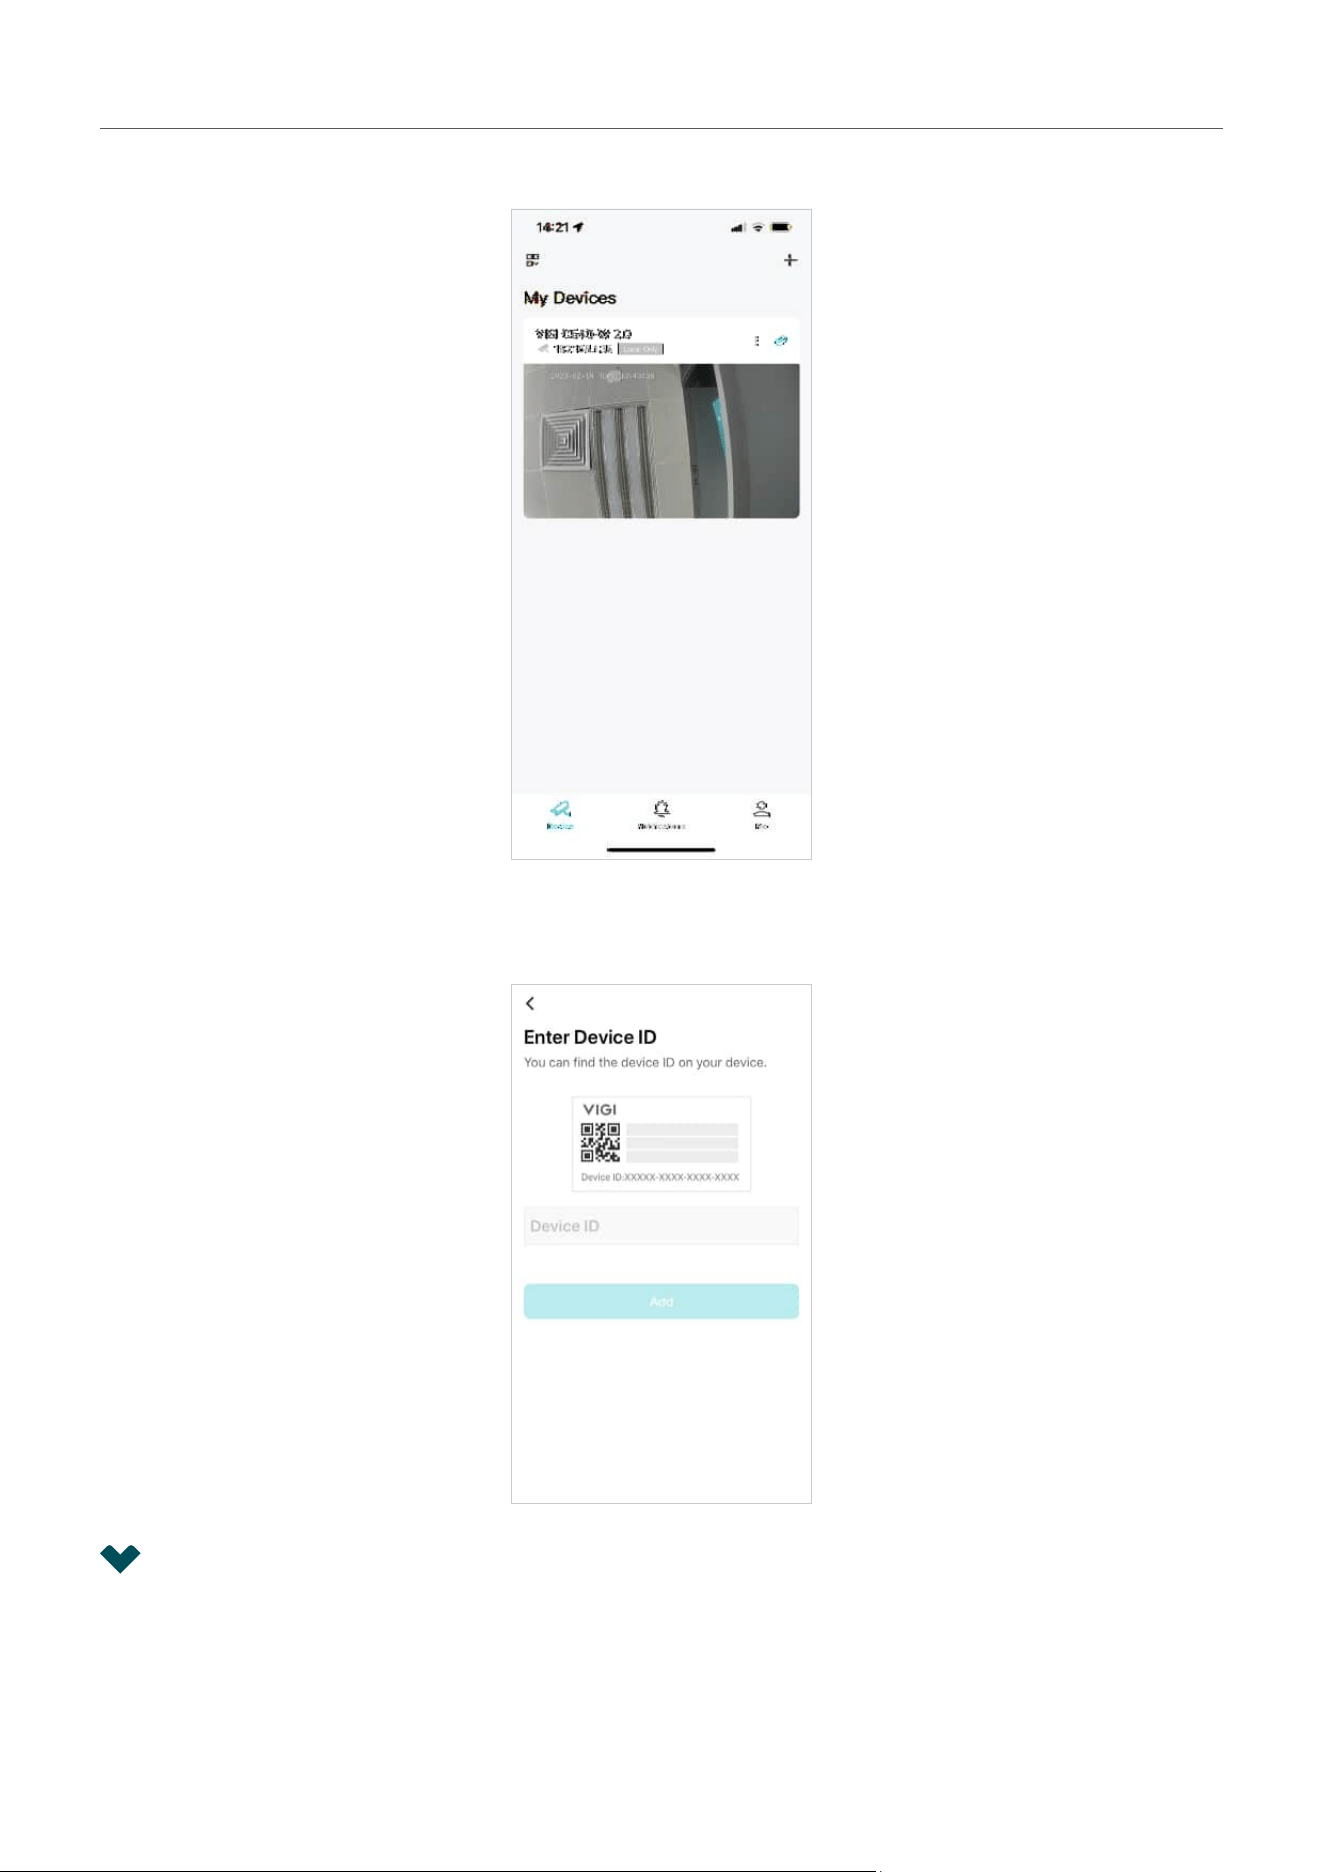
Note: Quickly add by entering the Device ID printed on your product label of your camera. Make sure
your camera has the internet connection.
1. 3 Add Your VIGI Camera to NVR via the VIGI app
After setting up the NVR using the VIGI app, you can quickly add you VIGI camera to the NVR using the
VIGI app too. Follow the steps below to add your VIGI cameras to the NVR:
9
Chapter 1 Set Up Your VIGI Device
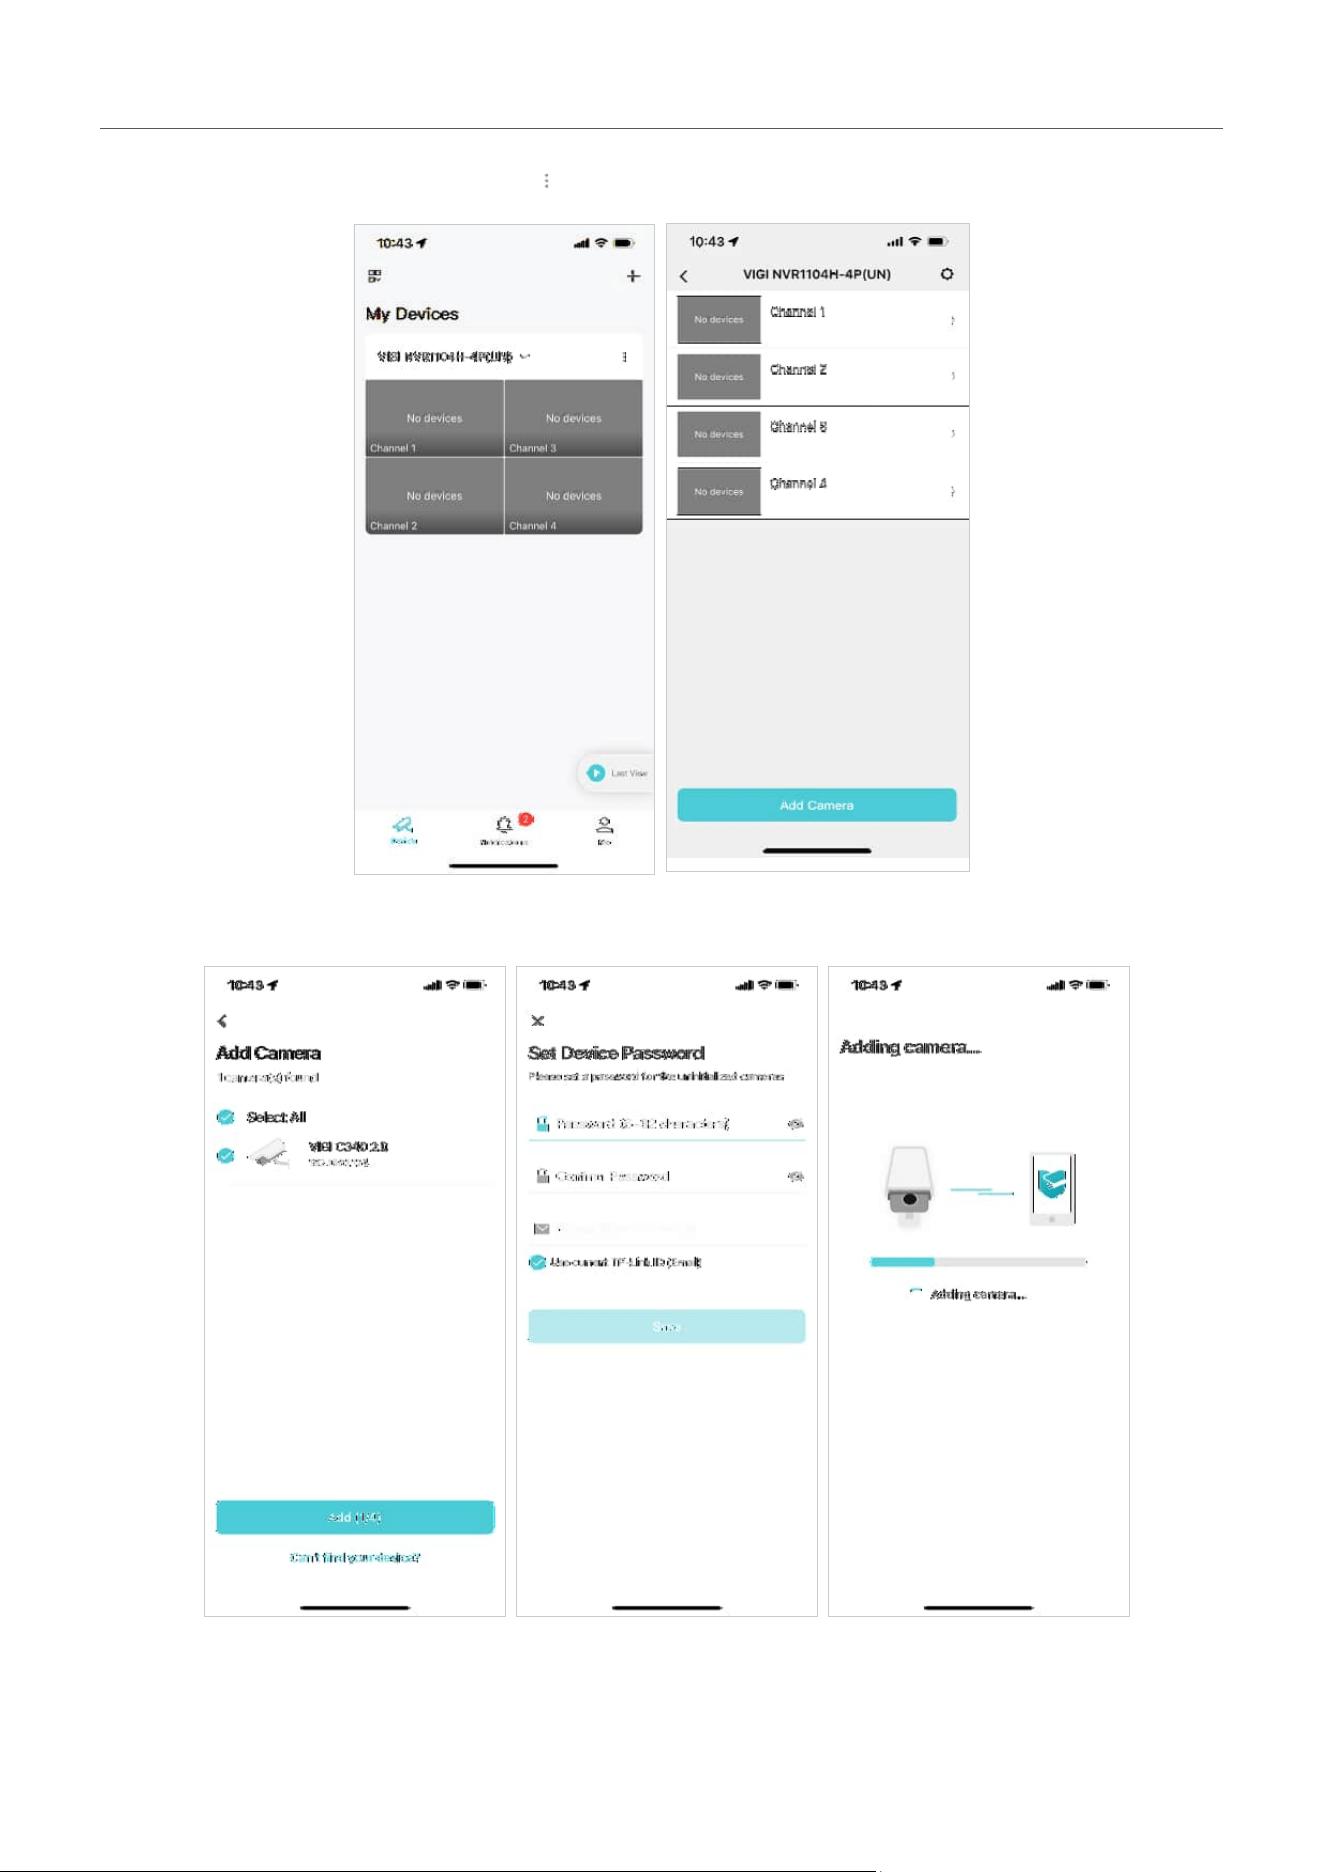
1. Go to the My Devices page, tap the icon.
2. Tap Add Camera, then follow the app instructions to add the camera.
10
Chapter 1 Set Up Your VIGI Device
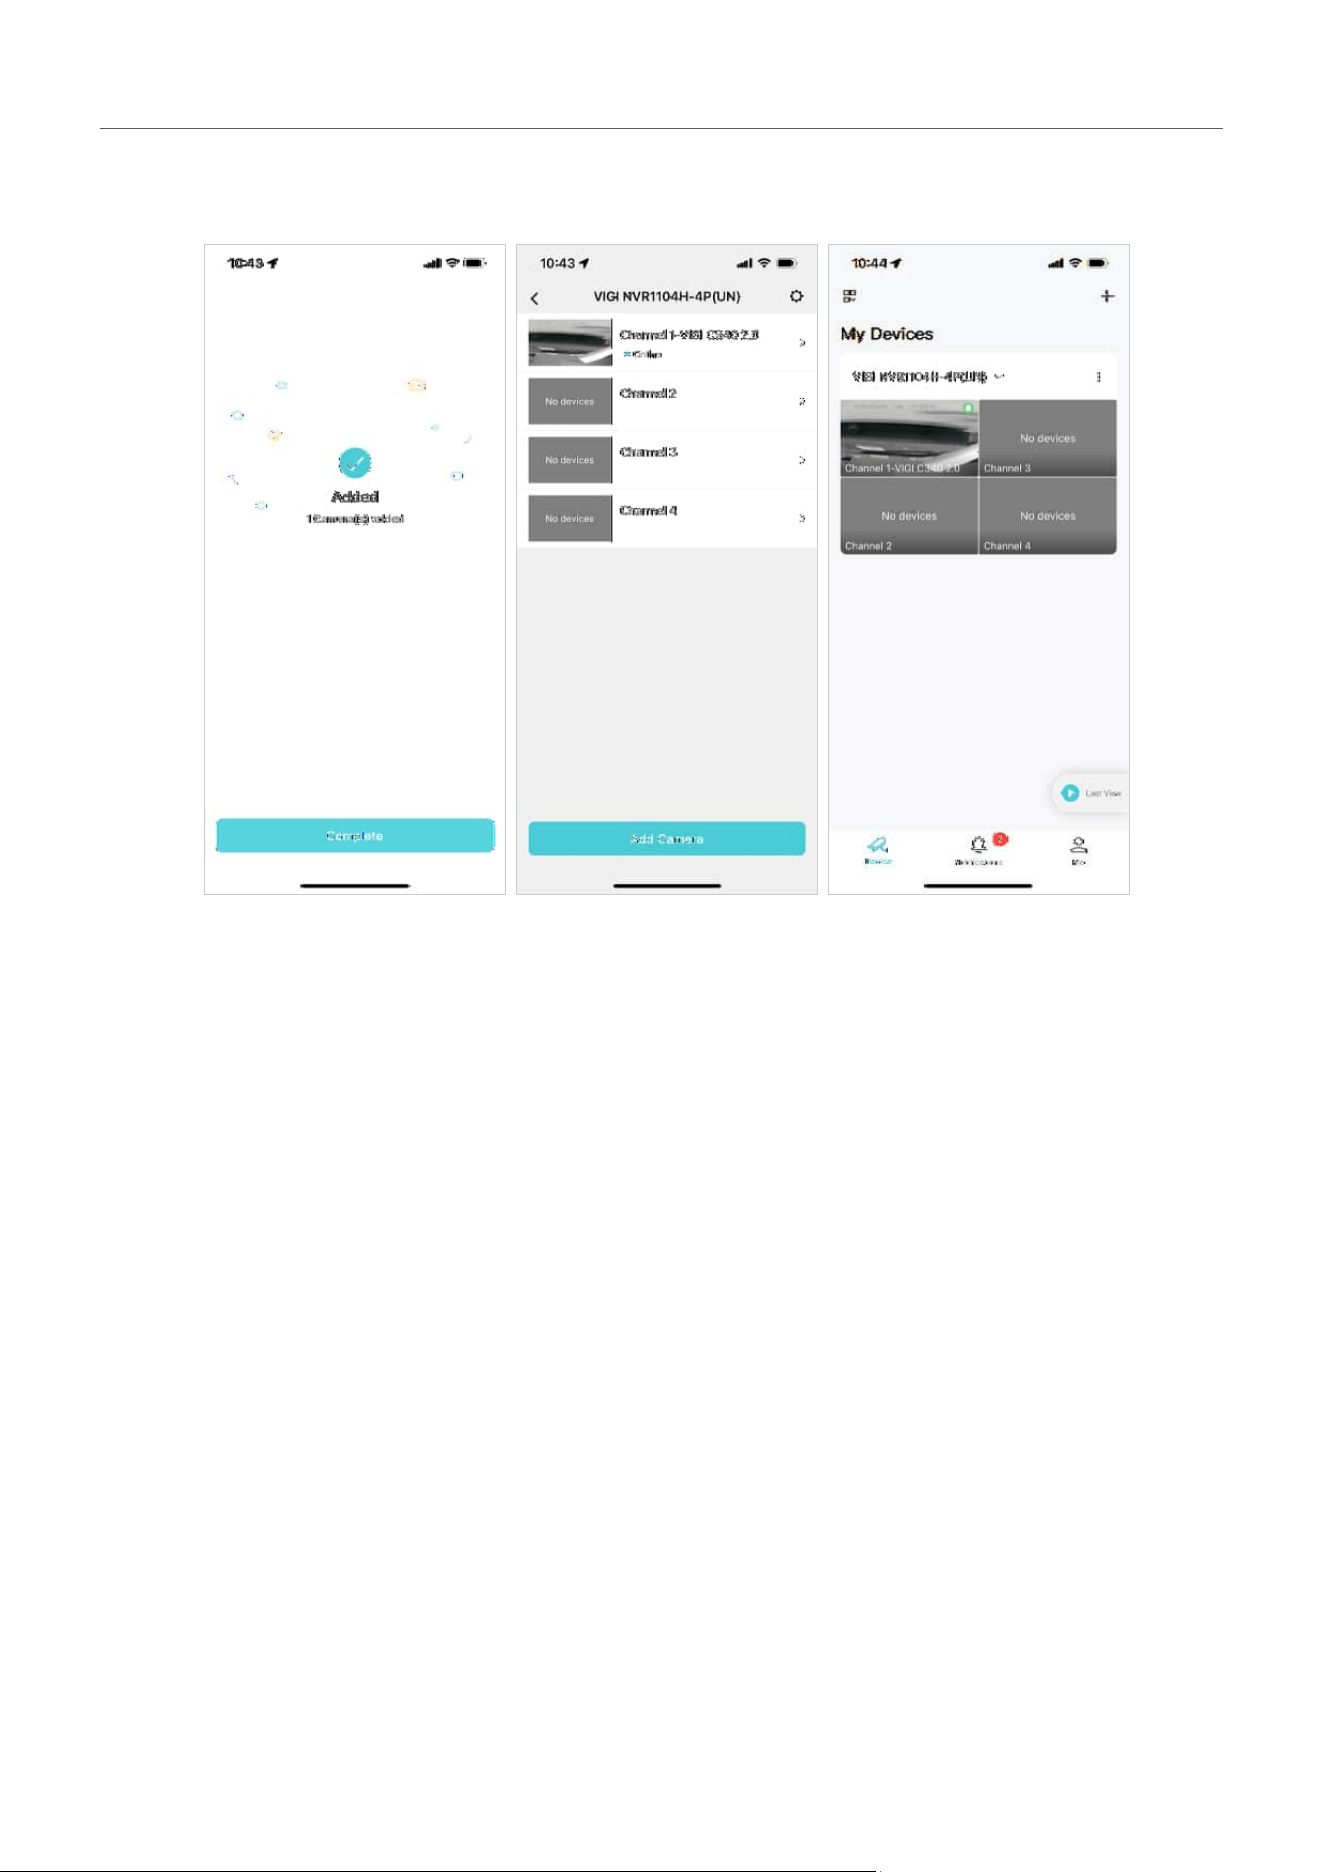
3. Tap Complete, then you can see that your camera has been added to the NVR, and you can view
live video on the NVR’s channel.

2
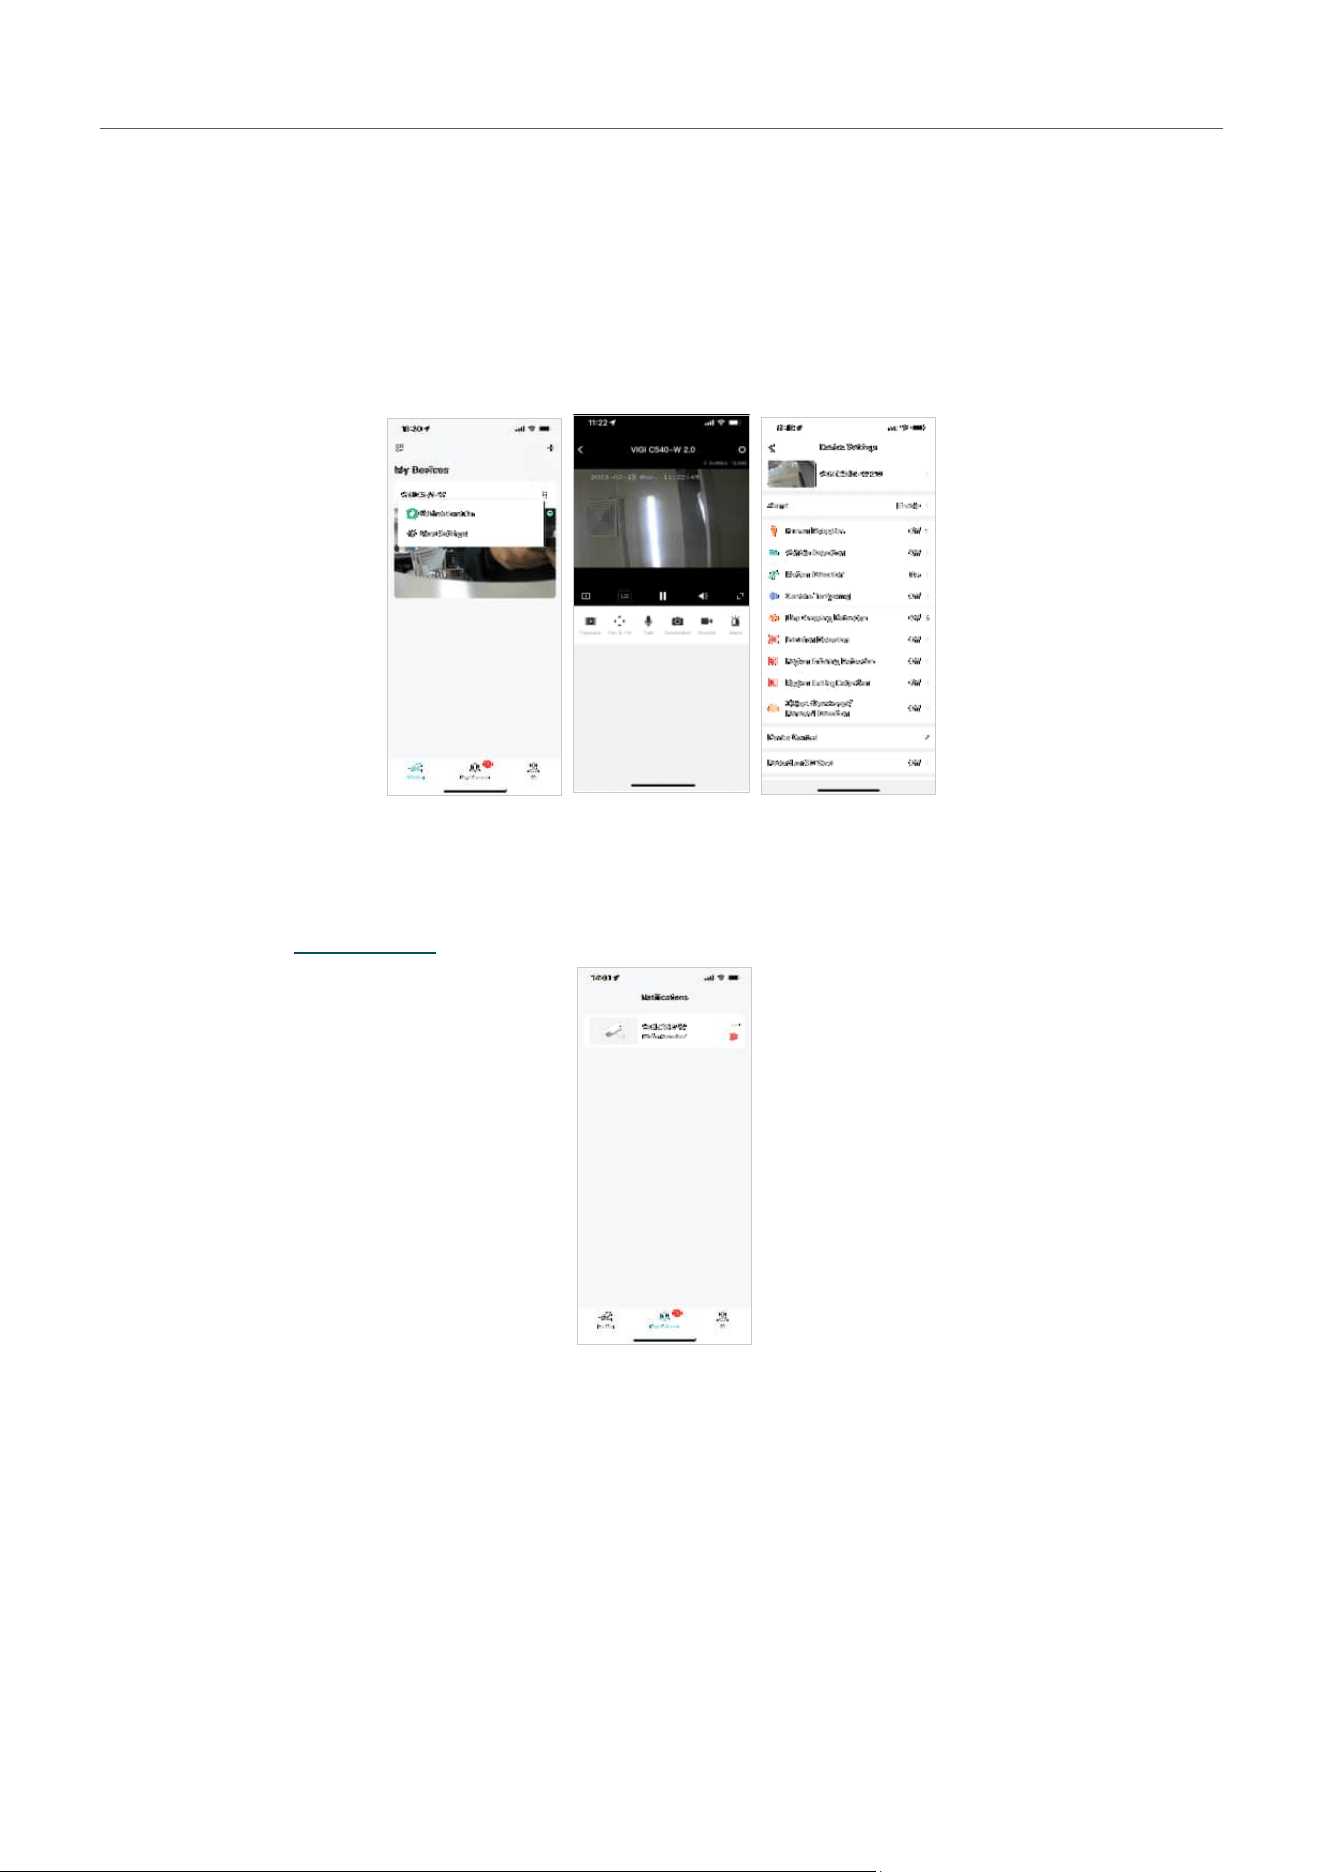
Main Device Controls
After you successfully set up your camera, you will see the home page of the VIGI app.
12
Chapter 2 Main Device Controls
Here you can view and manage all devices that you’ve added to VIGI. Tap your camera to enter the live
view page and further manage it.
■ Device
This page lists all your devices you’ve added and you can view them directly and manage them easily.
You can tap on the camera card enter the Live View page, tap the gear icon to enter the Device Settings
page.
■ Notifications
This page lists the notifications you receive when your camera detects an event. To set the notification
type, refer to the Notifications section.
13
Chapter 2 Main Device Controls
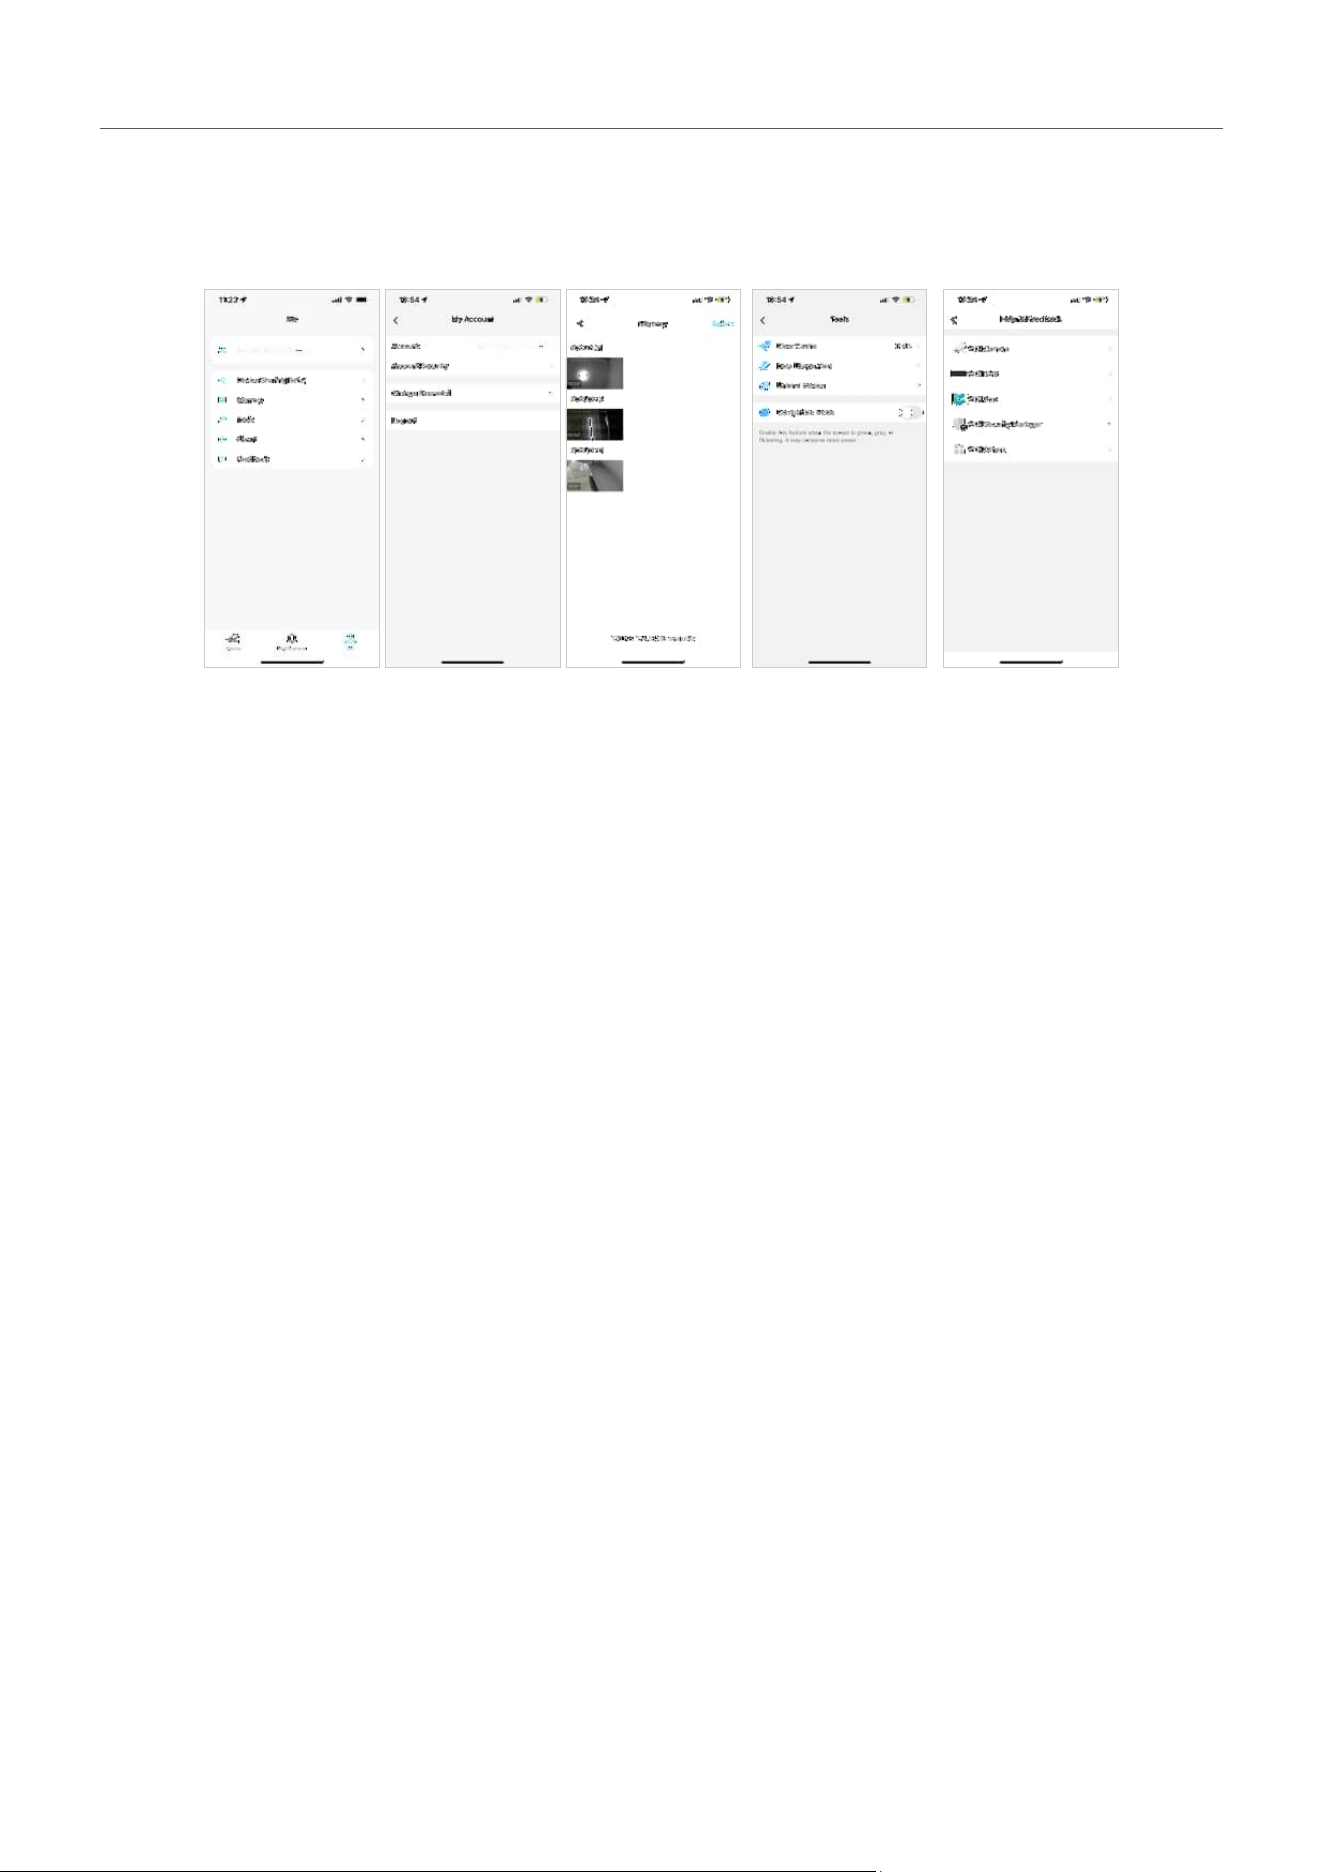
■ Me
On this page, you can change the account settings, check the memorable moments you saved, or find
the FAQs and other useful features.

15
Chapter 3 View Your Camera
3. 1 Live View
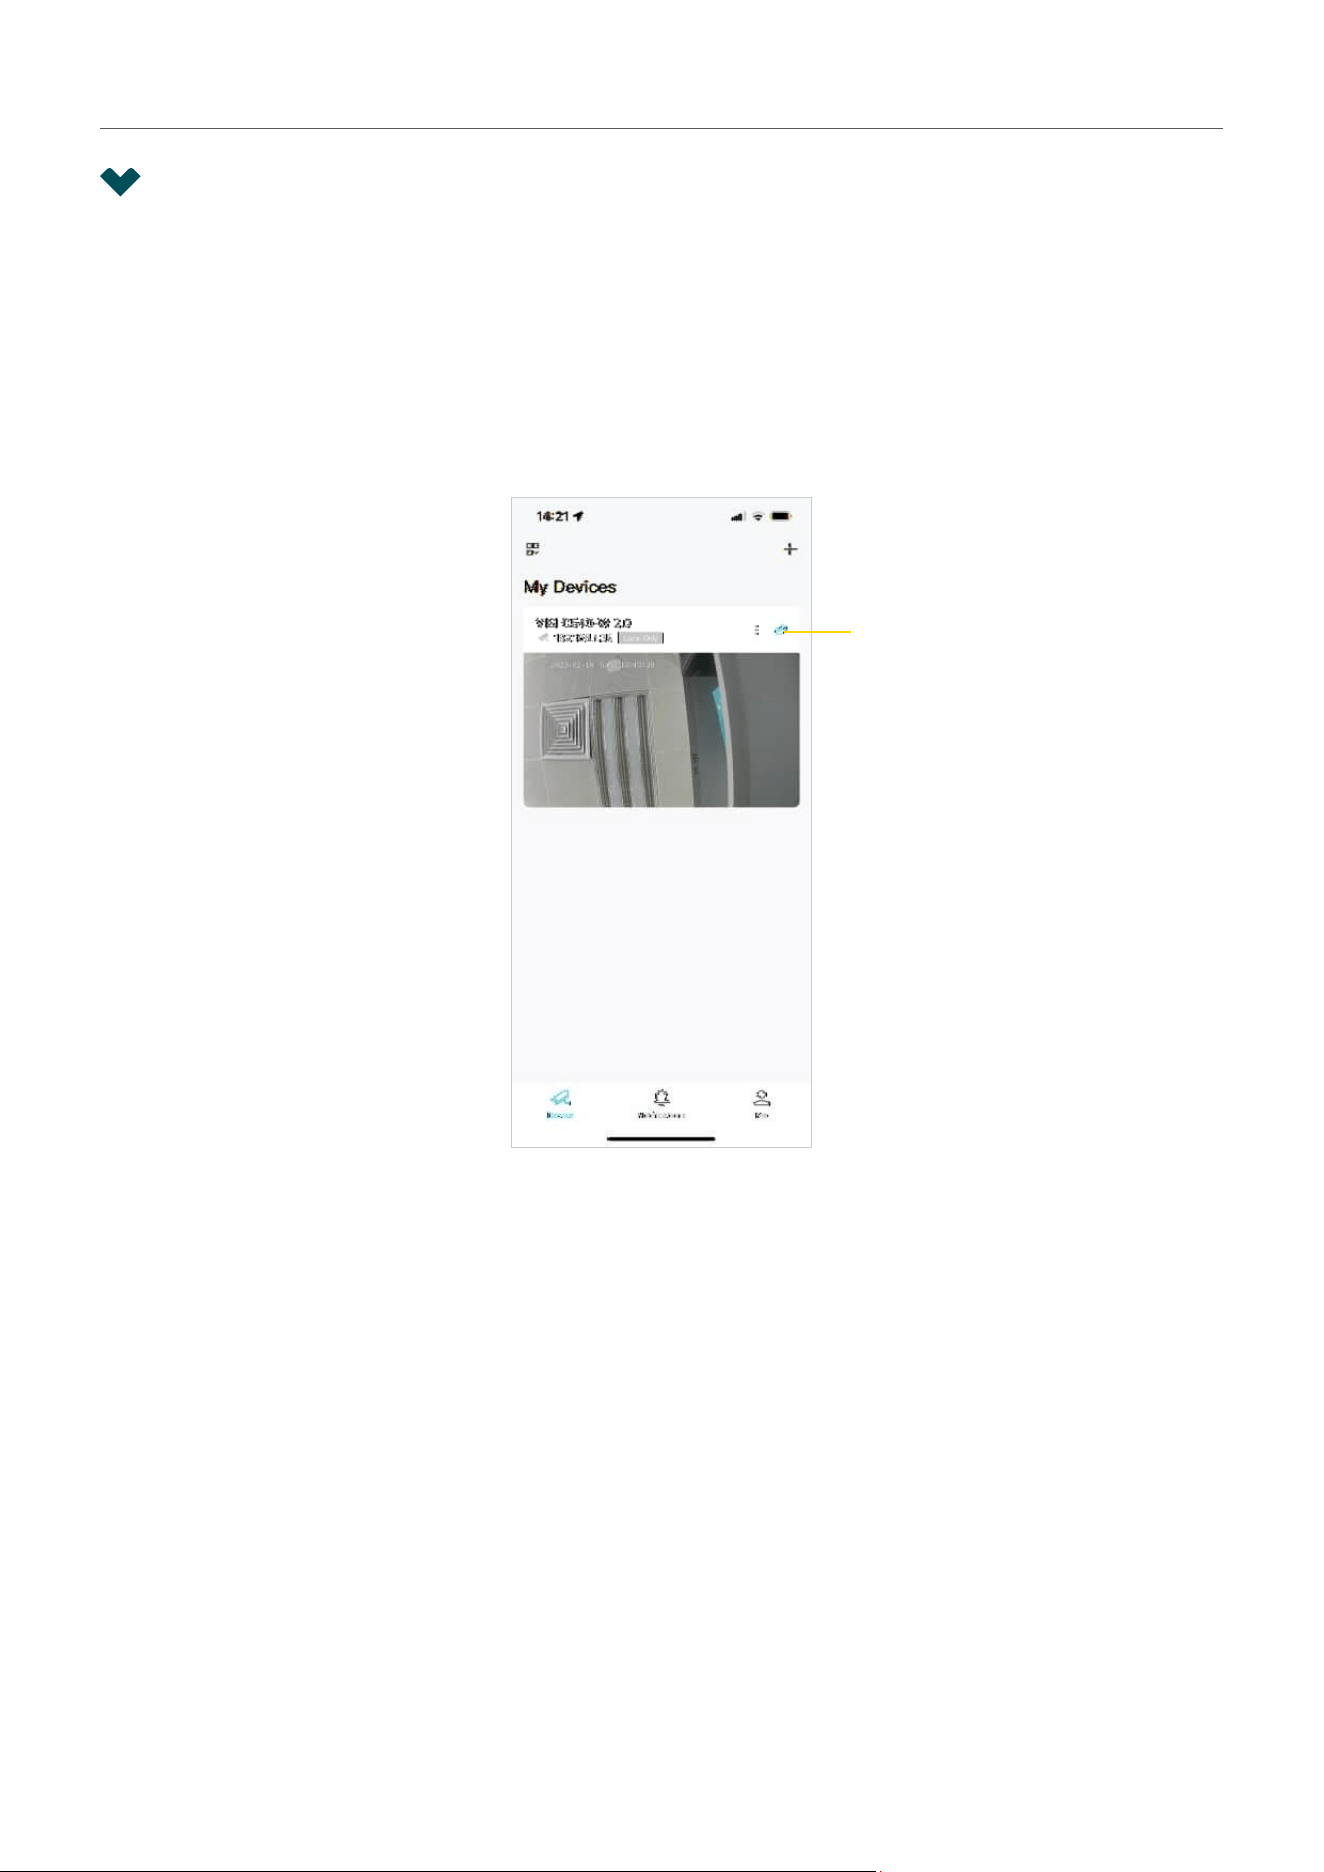
After you successfully add your camera, you will see your camera listed on the My Devices page. Bind it
to your TP-Link ID, and you can view and manage your camera from anywhere at any time with the VIGI
app.
■ Devices
This page lists all your devices you’ve added and you can view them directly and manage them easily.
You can tap on the camera card enter the Live View page.
Tap to bind to your TP-Link ID
16
Chapter 3 View Your Camera
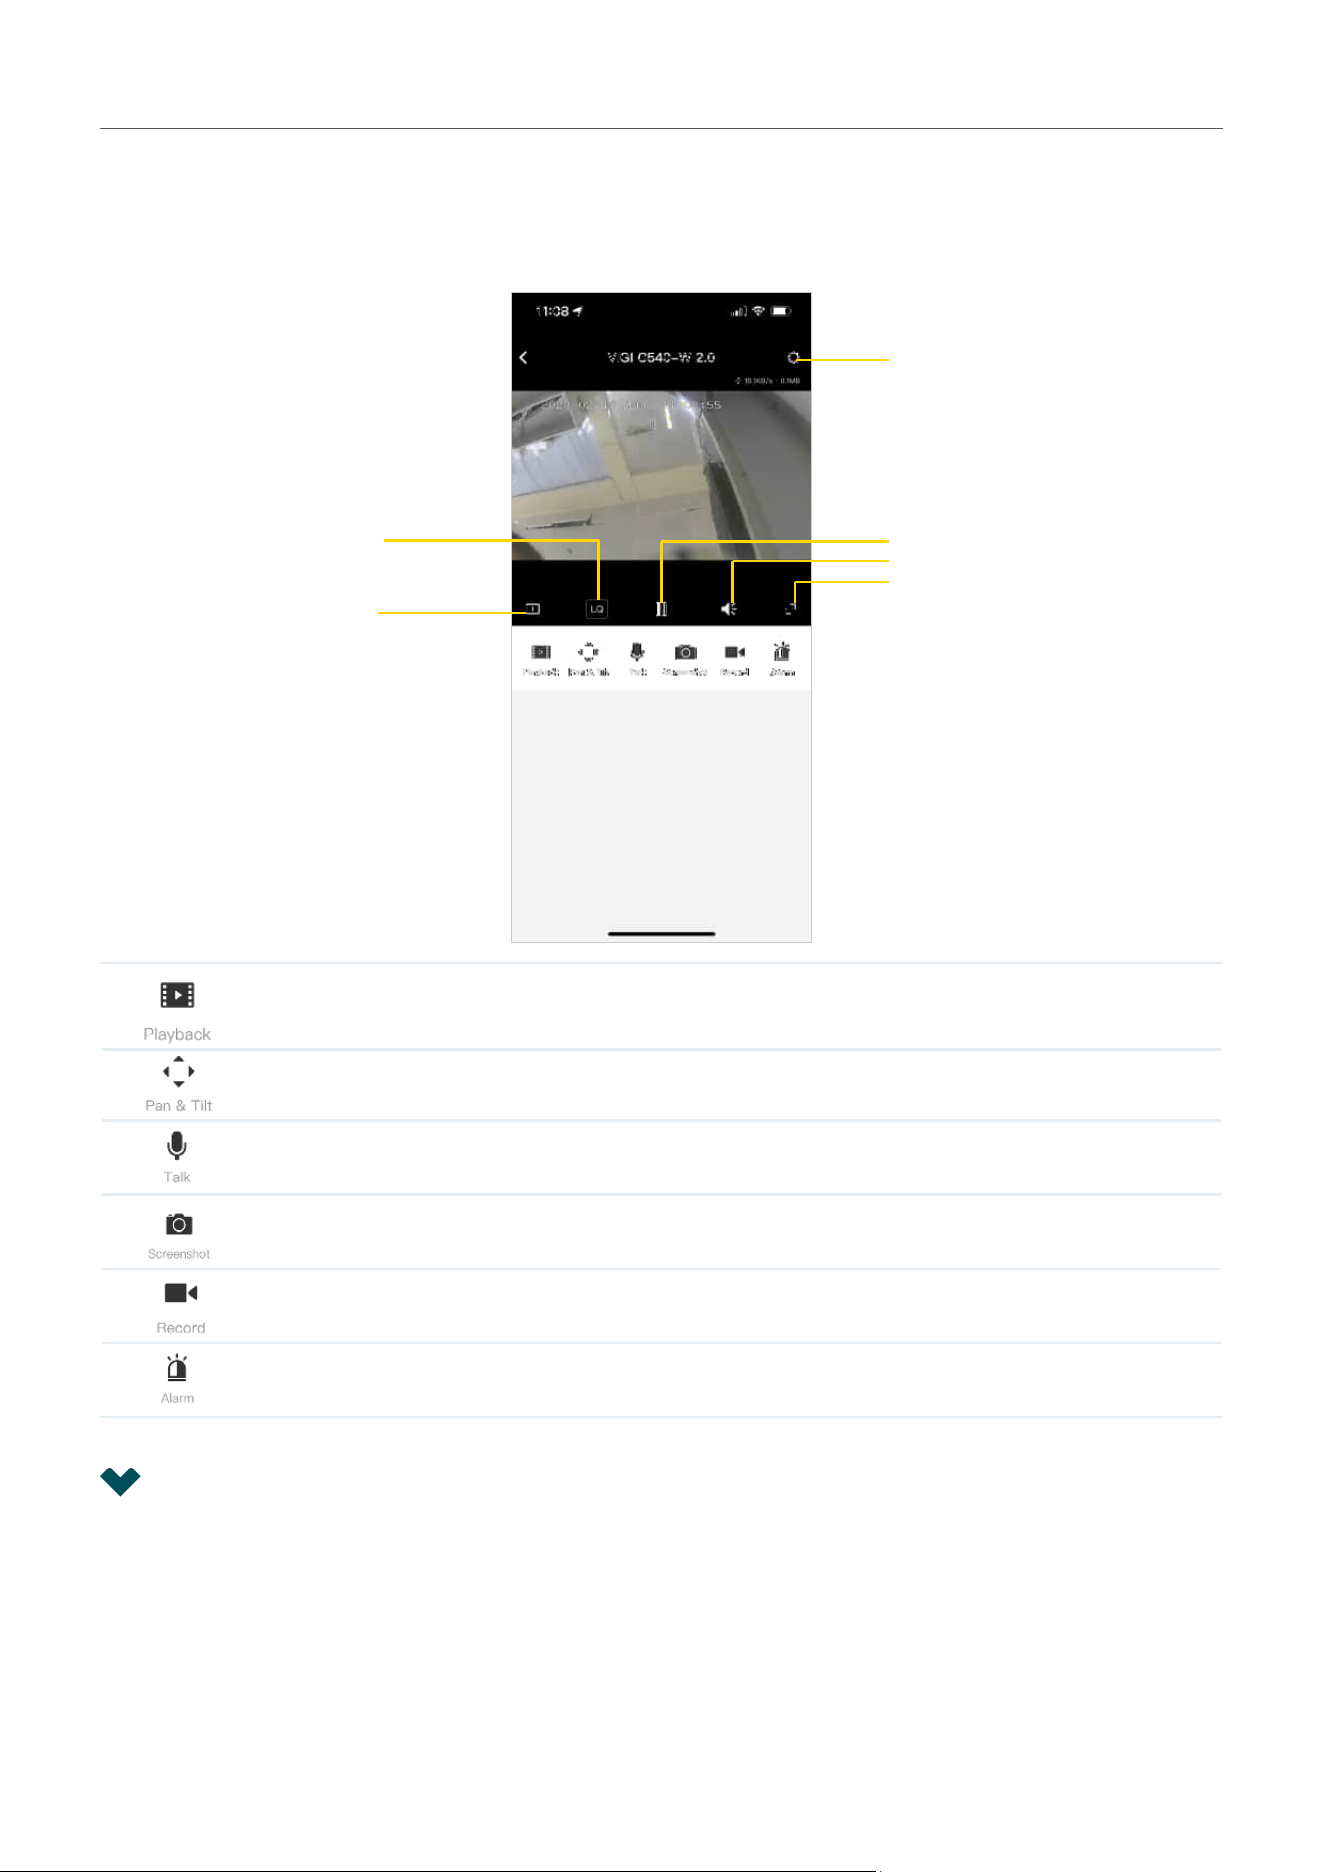
■ Live View
On the Live View page, you can keep an eye on what’s important to you real-time from anywhere with
the VIGI app.
Tap to play back the recordings.
(Only for Pan & Tilt cameras) Tap to control the pan & tilt of the camera.
(Only for certain cameras) Tap to talk (two-way audio).
Tap to capture screenshots.
Tap to start recording.
(Only for certain cameras) Click to adjust the volume of the speaker.
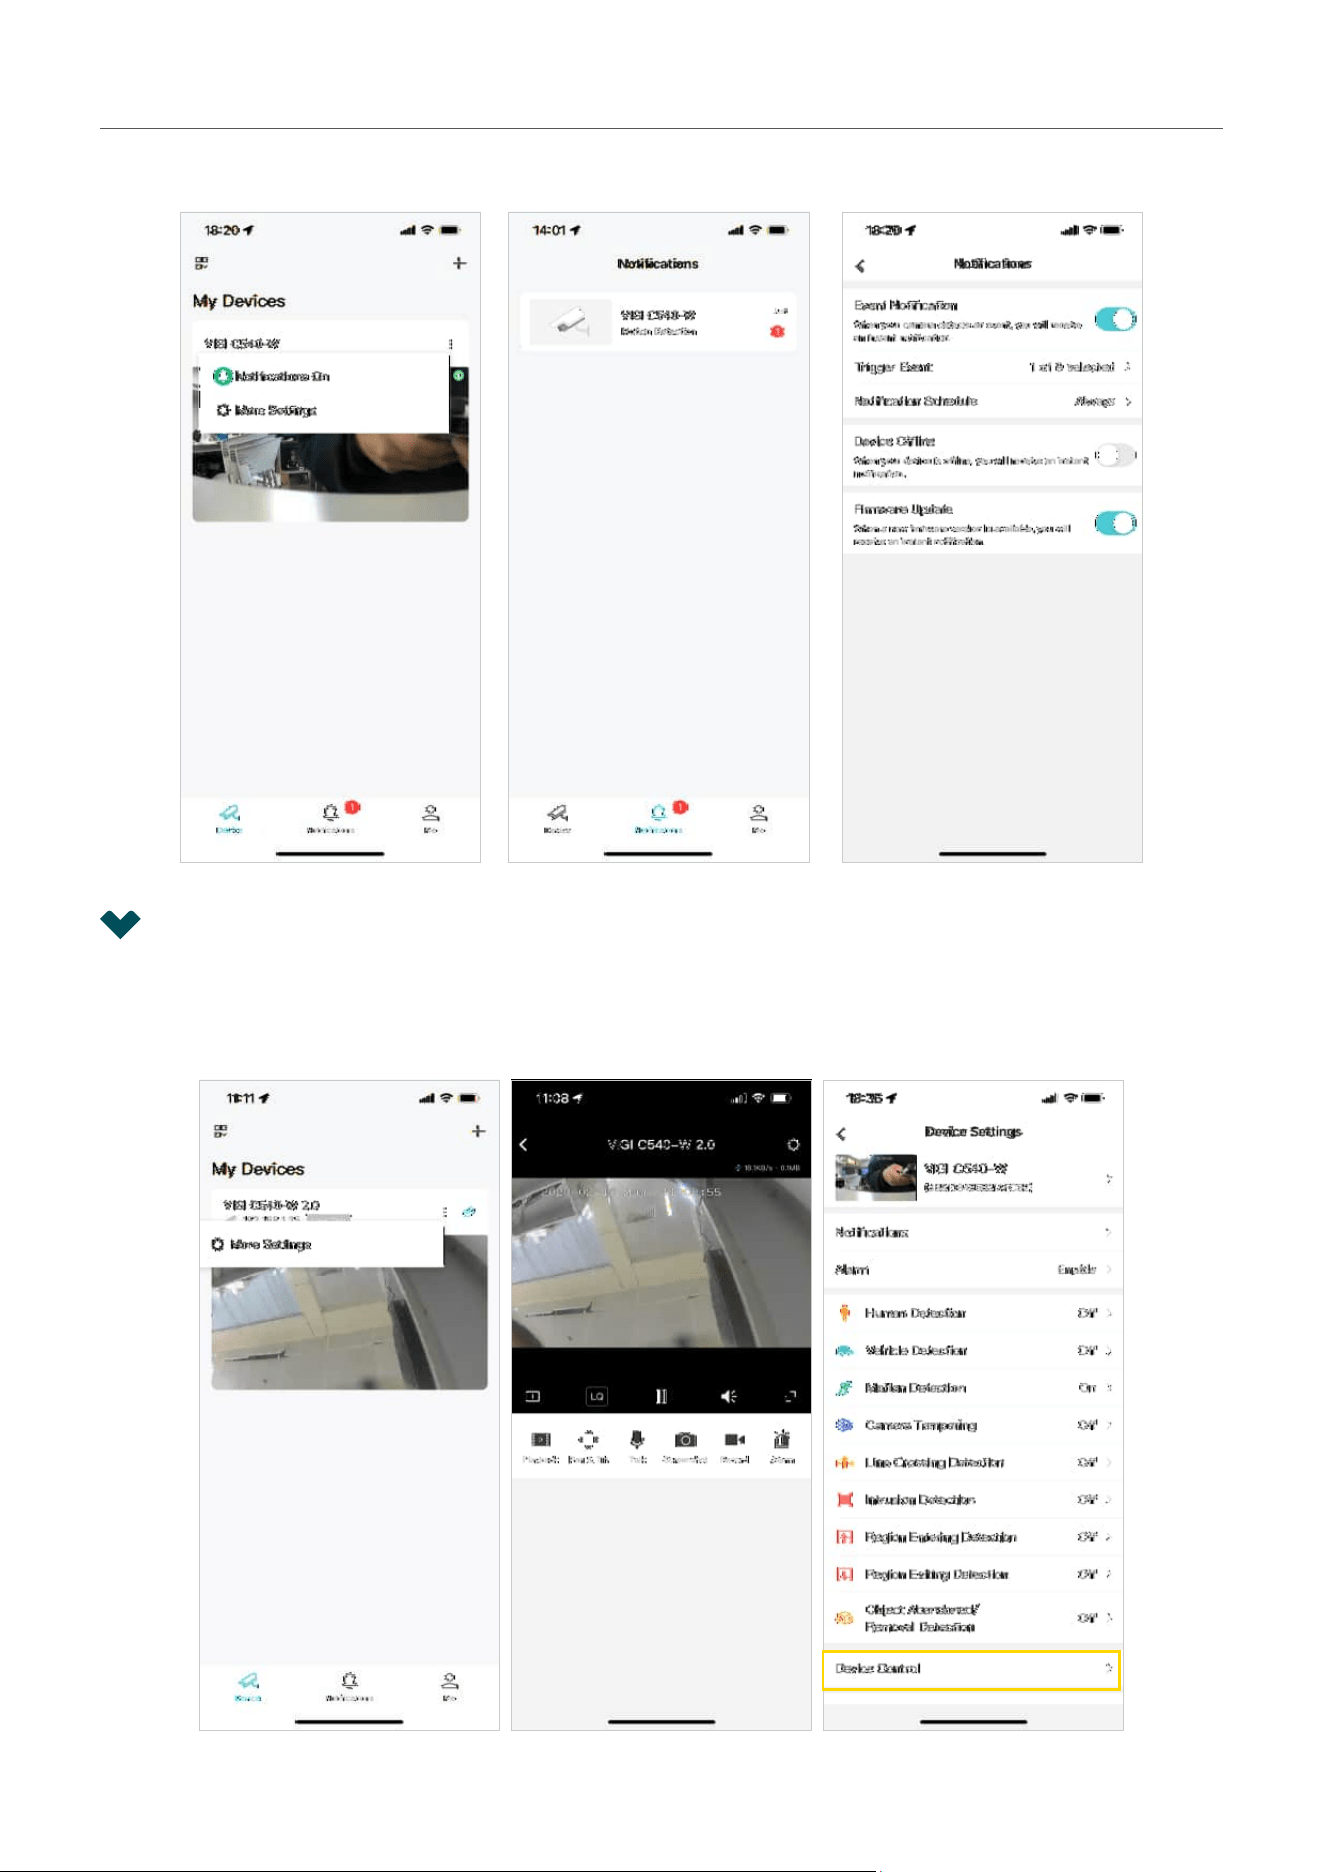
3. 2 Notifications
Get automatic notifications when your camera detects an event. Tap Notifications, you can check all
events here. To set the notification type, tap More Settings on the My Devices page or tap the gear icon
on the Live View page to enter the Device Settings page, then tap Notifications.
Camera Settings
Multi-Screen
View live videos from multiple
cameras at the same time
Video Quality
Play/Stop Live View
Camera Speaker
Full Screen
17
Chapter 3 View Your Camera
Note: Make sure you have turned on the detection and notification features to receive notifications.
3. 3 Device Control
You can adjust the live view display on the Device Control page. You can tap More Settings on the My
Devices page or tap the gear icon on the Live View page to enter the Device Settings page. On the
Device Control page, you can change the camera settings of your camera to meet various needs.
18
Chapter 3 View Your Camera
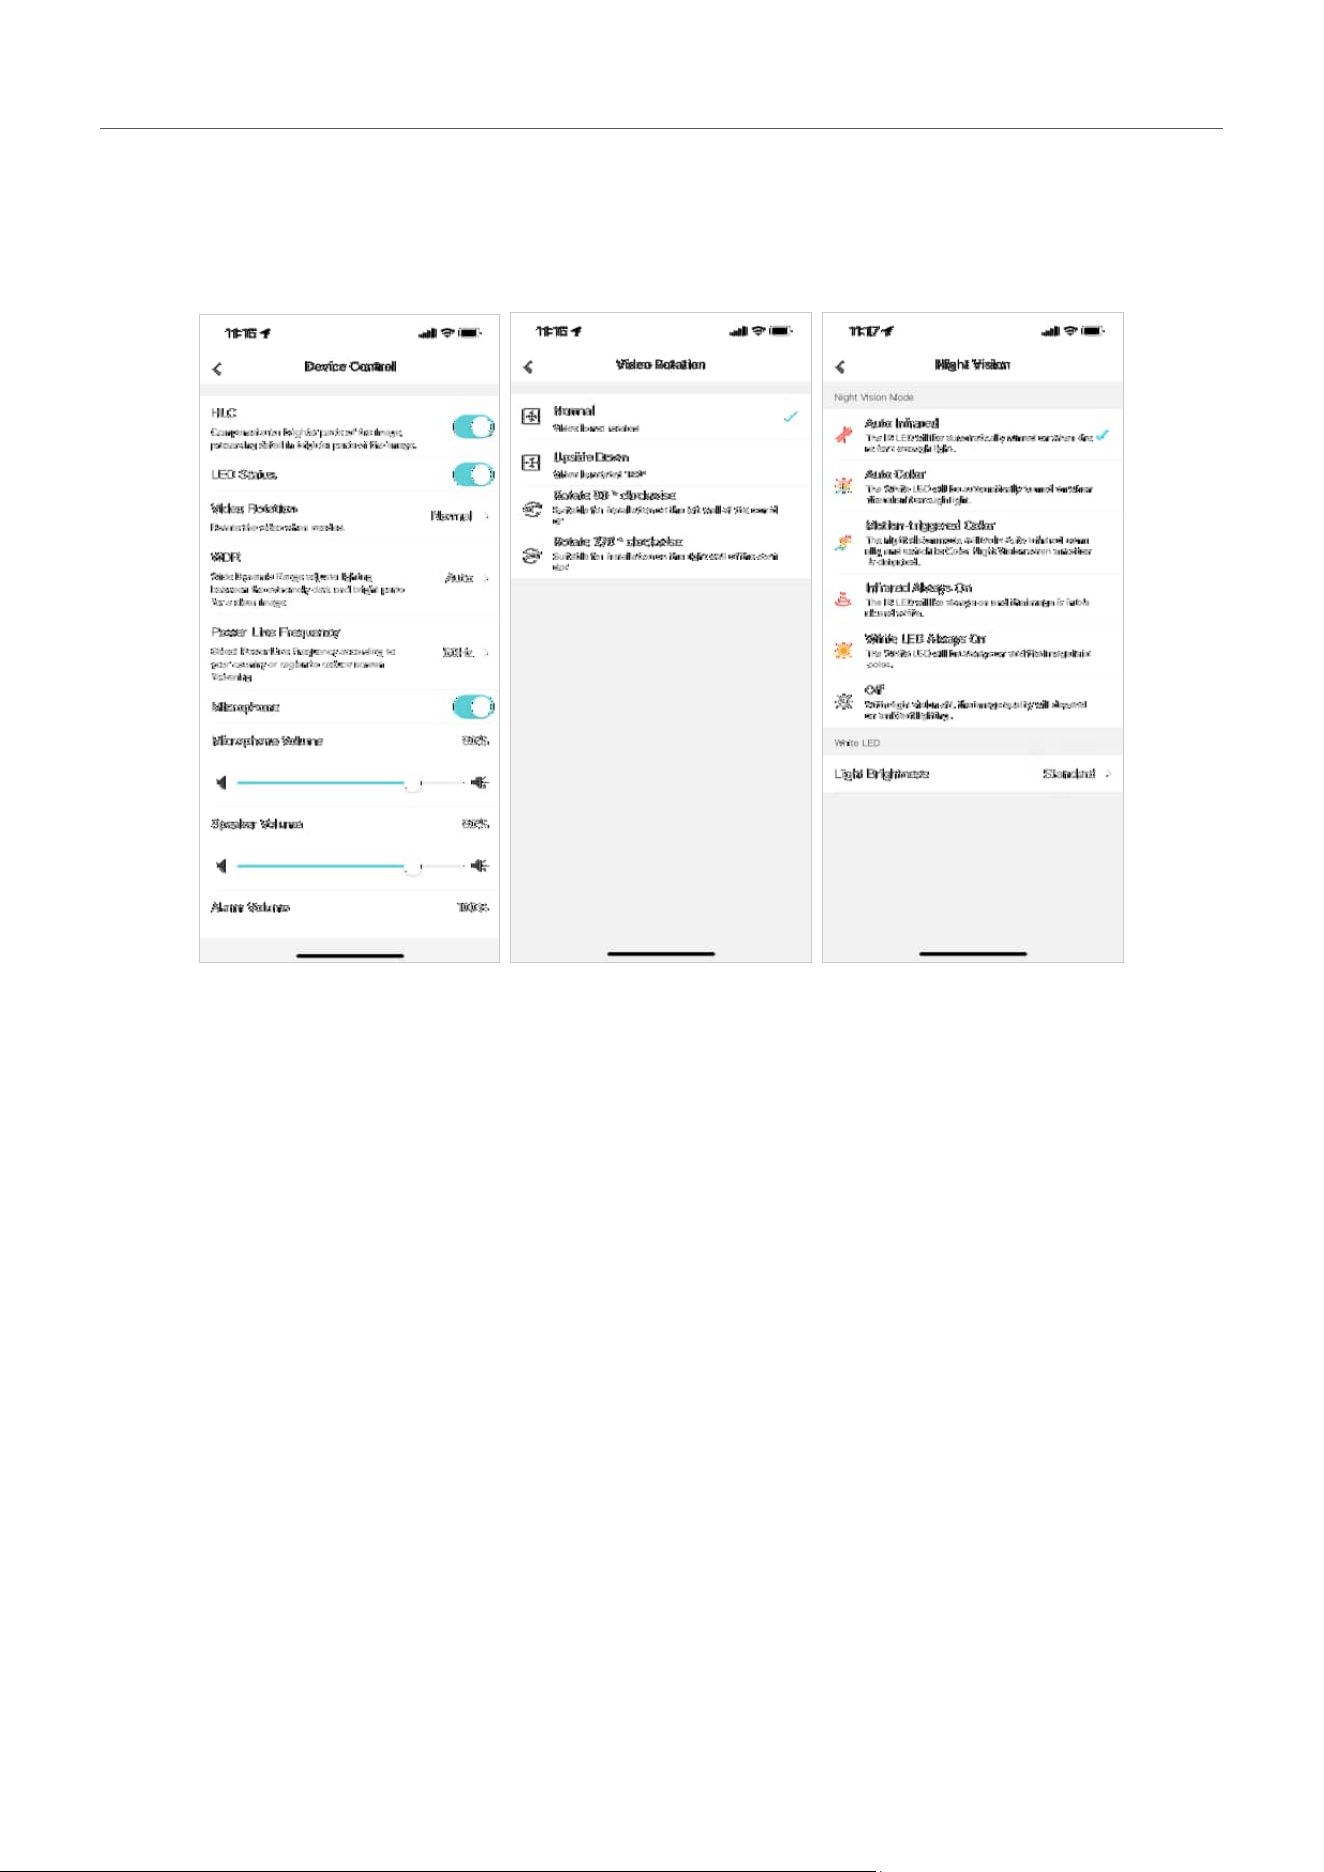
Follow the app instructions to configure the settings. You can enable HLC, set LED status, change
the video direction, configure WDR, disable the microphone or adjust the microphone volume (for
certain cameras), adjust the speaker/alarm volume (for certain cameras), set the night vision and light
brightness (for certain cameras).

3
Congure Solar Power Supply System
After setting up your VIGI solar power supply system, you can check the solar power supply statistics
and set the power supply time and restart the load interface via the VIGI app. This chapter includes the
following sections:
• Check Power Supply Statistics
• Custom Power Supply Time
• Restart Load Interface
20
Chapter 3 Configure Solar Power Supply System
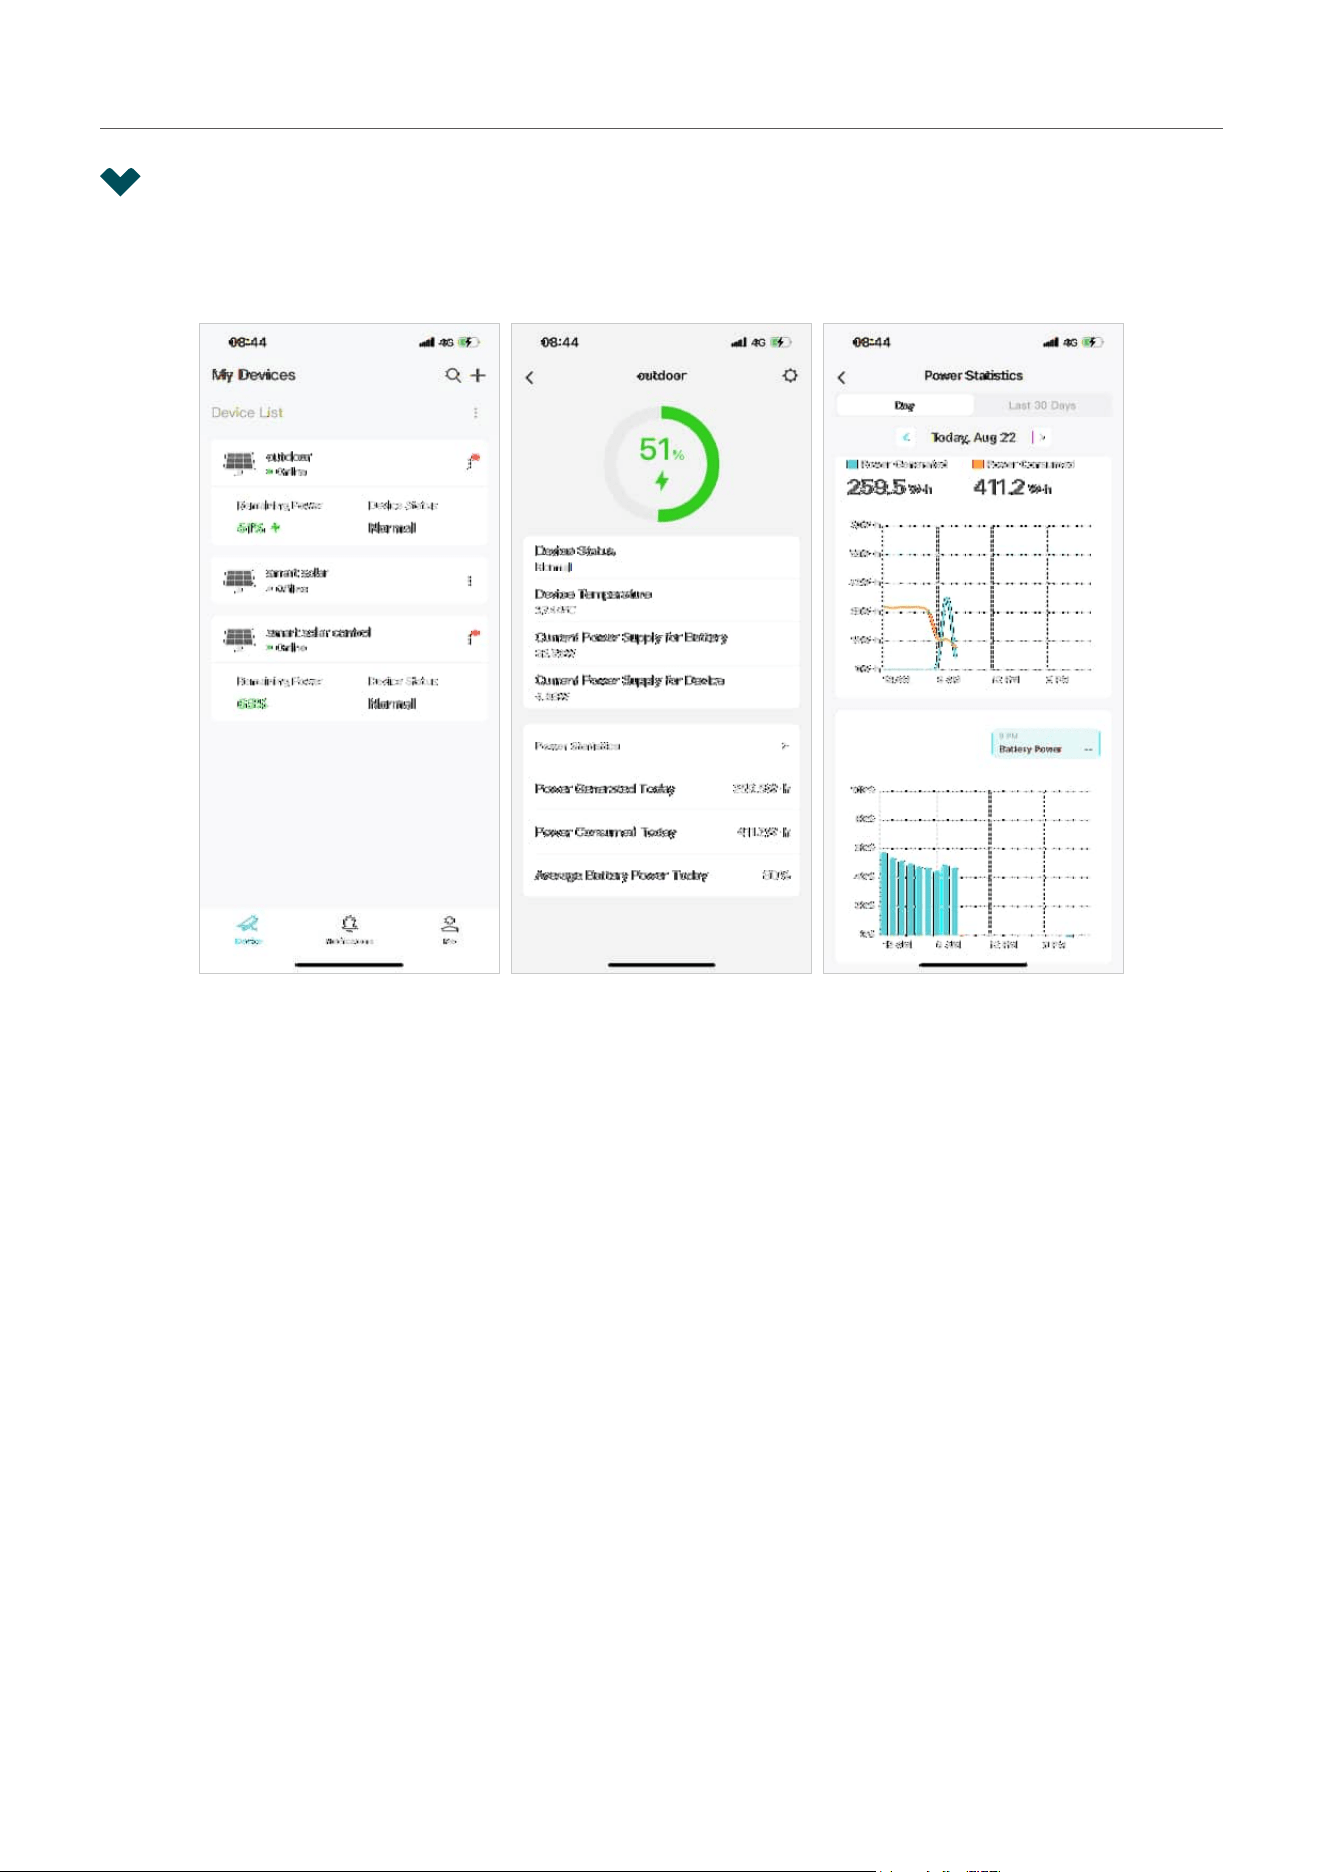
3. 1 Check Power Supply Statistics
Go to Devices, tap on the solar panel card to enter device page. Here you can check the device power
supply details. Tap Power Statistics to view more details.
21
Chapter 3 Configure Solar Power Supply System
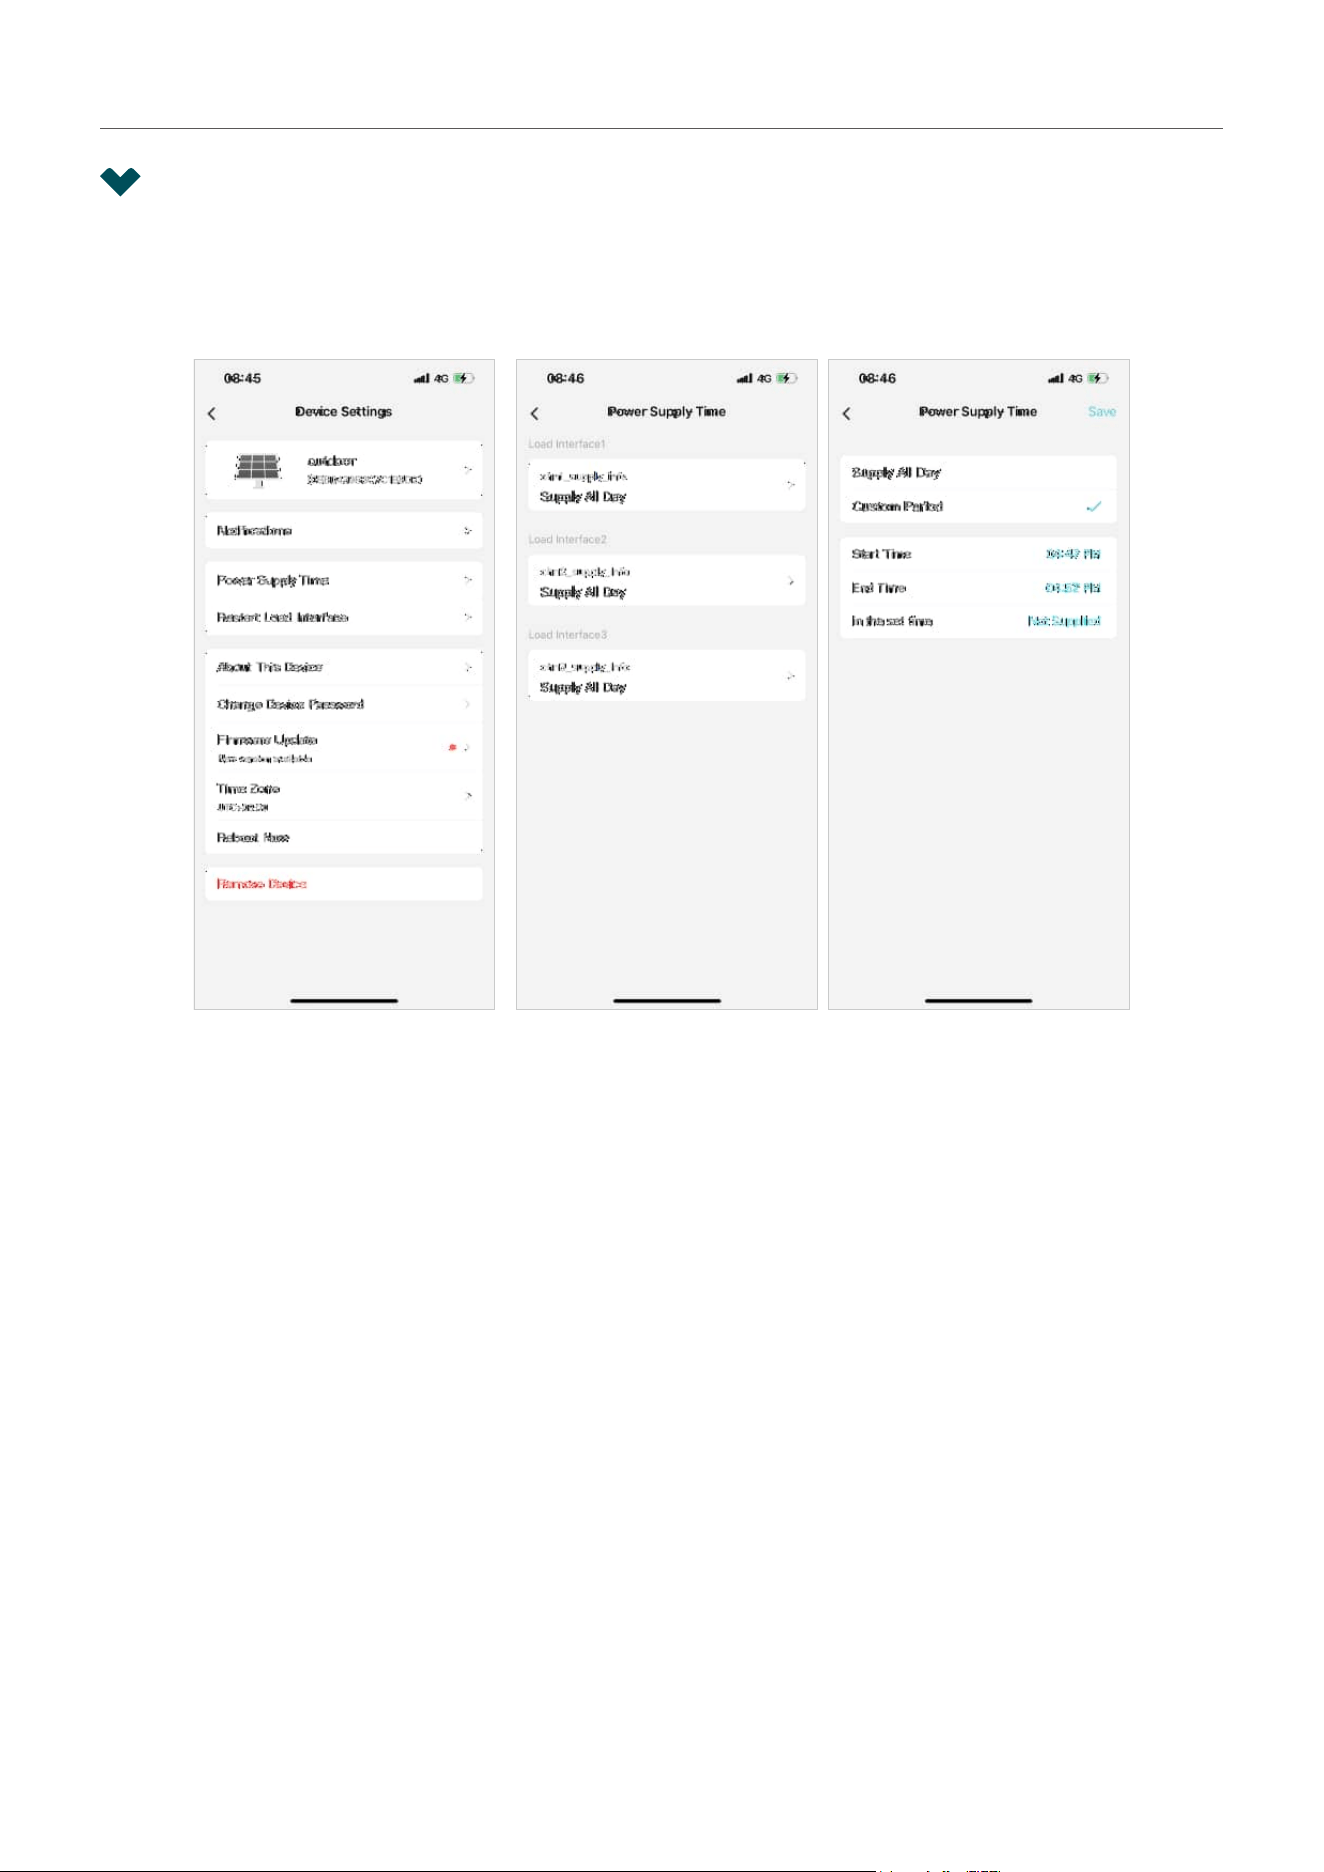
3. 2 Custom Power Supply Time
Go to Devices, tap on the solar panel card to enter device page, tap the gear icon to enter Device
Settings page. Here you can set when to supply power to the device for each load interface, all day or
the specific period.
22
Chapter 3 Configure Solar Power Supply System
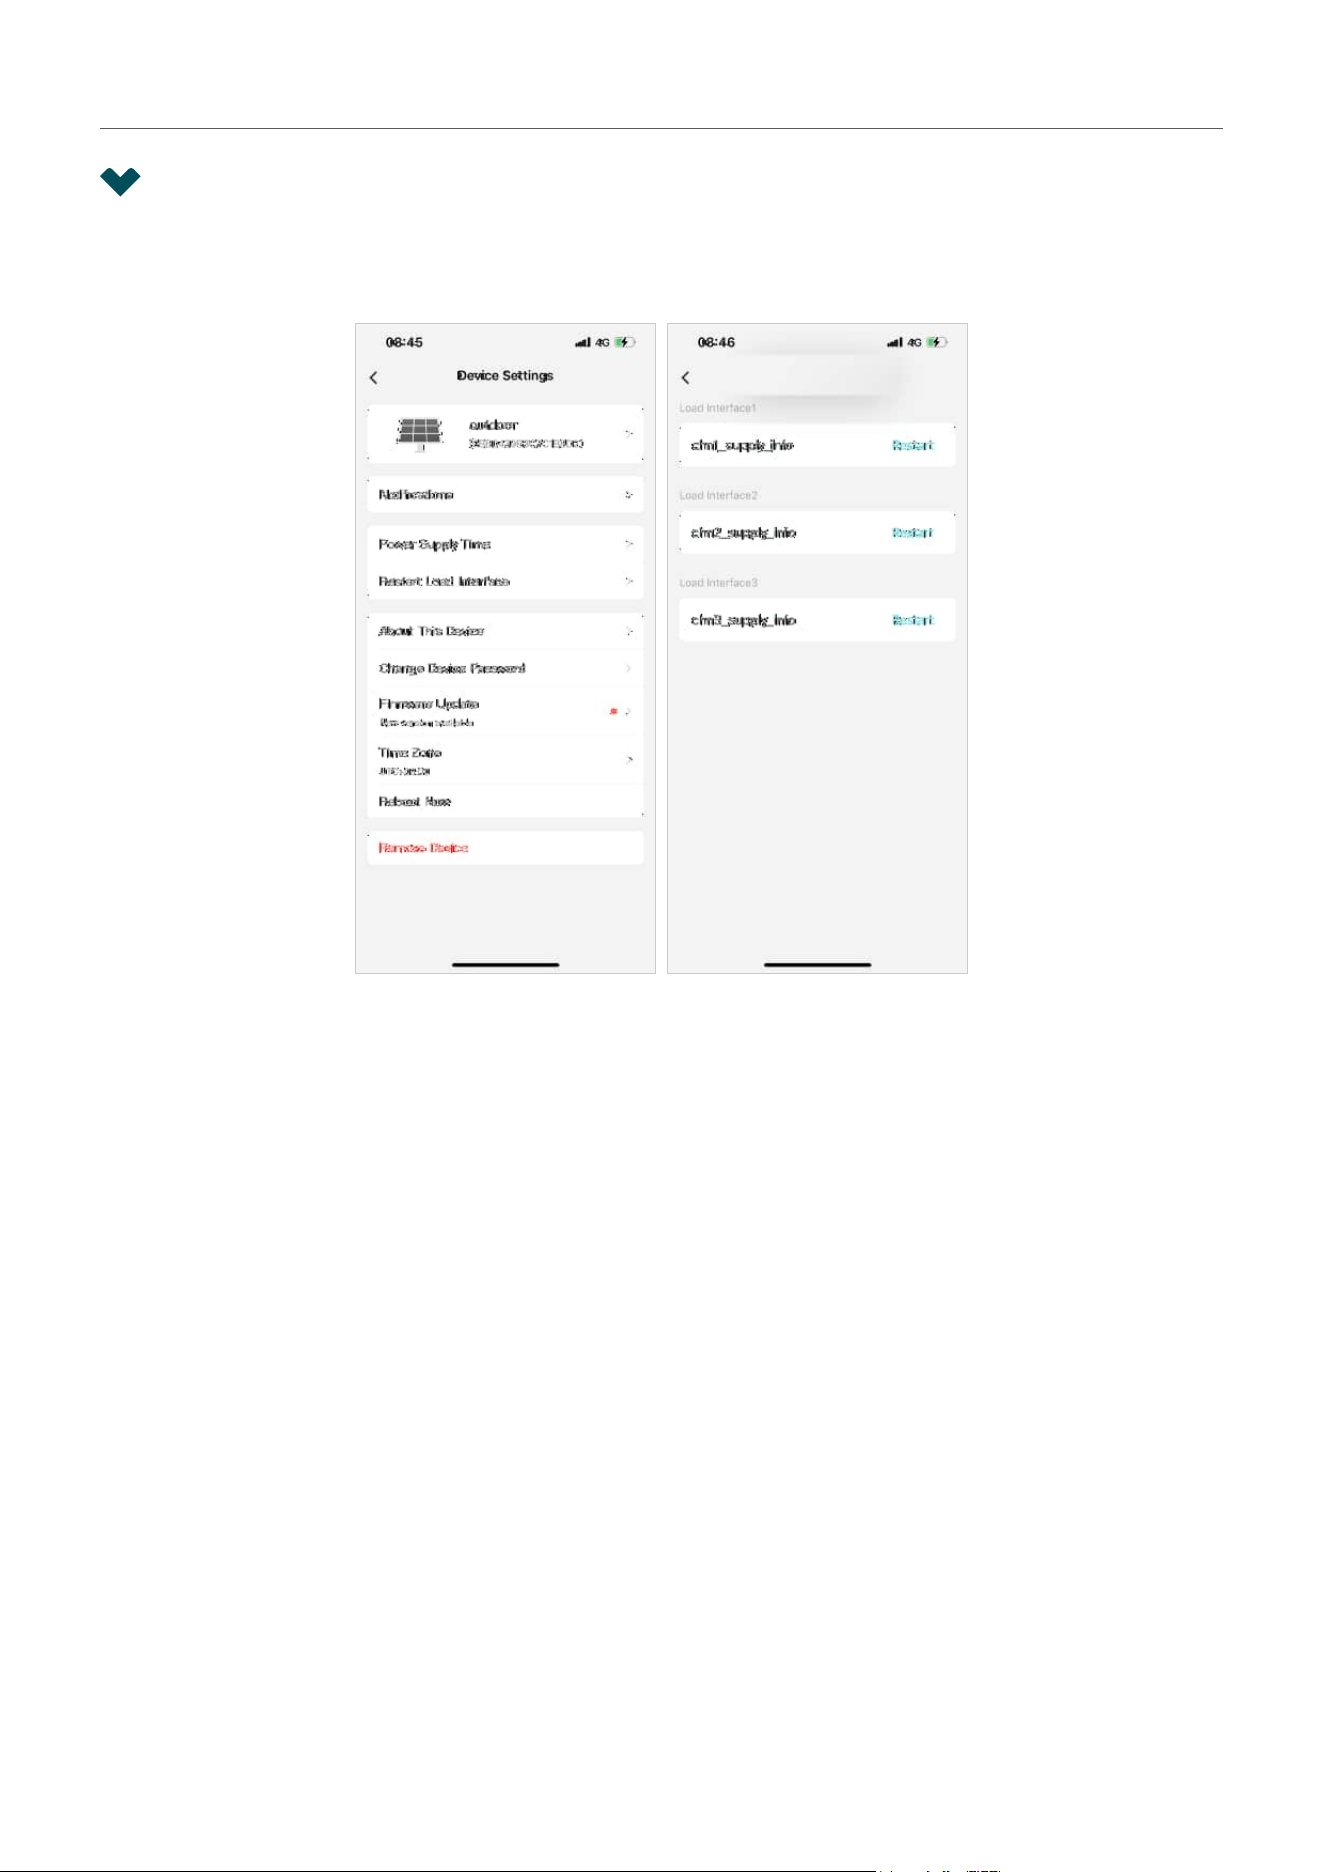
3. 3 Restart Load Interface
Go to Devices, tap on the solar panel card to enter device page, tap the gear icon to enter Device
Settings page. Here you can tap Restart to restart the desired load interface.

4
Congure Recording
(Only for certain
cameras)
VIGI cameras support both motion recordings and continuous recordings, and also customized
recording schedules. And recordings can be saved into a micro SD card. This chapter includes the
following sections:
• Format Micro SD Card
• Configure Recording Schedule
24
Chapter 4 Configure Recording (Only for certain cameras)
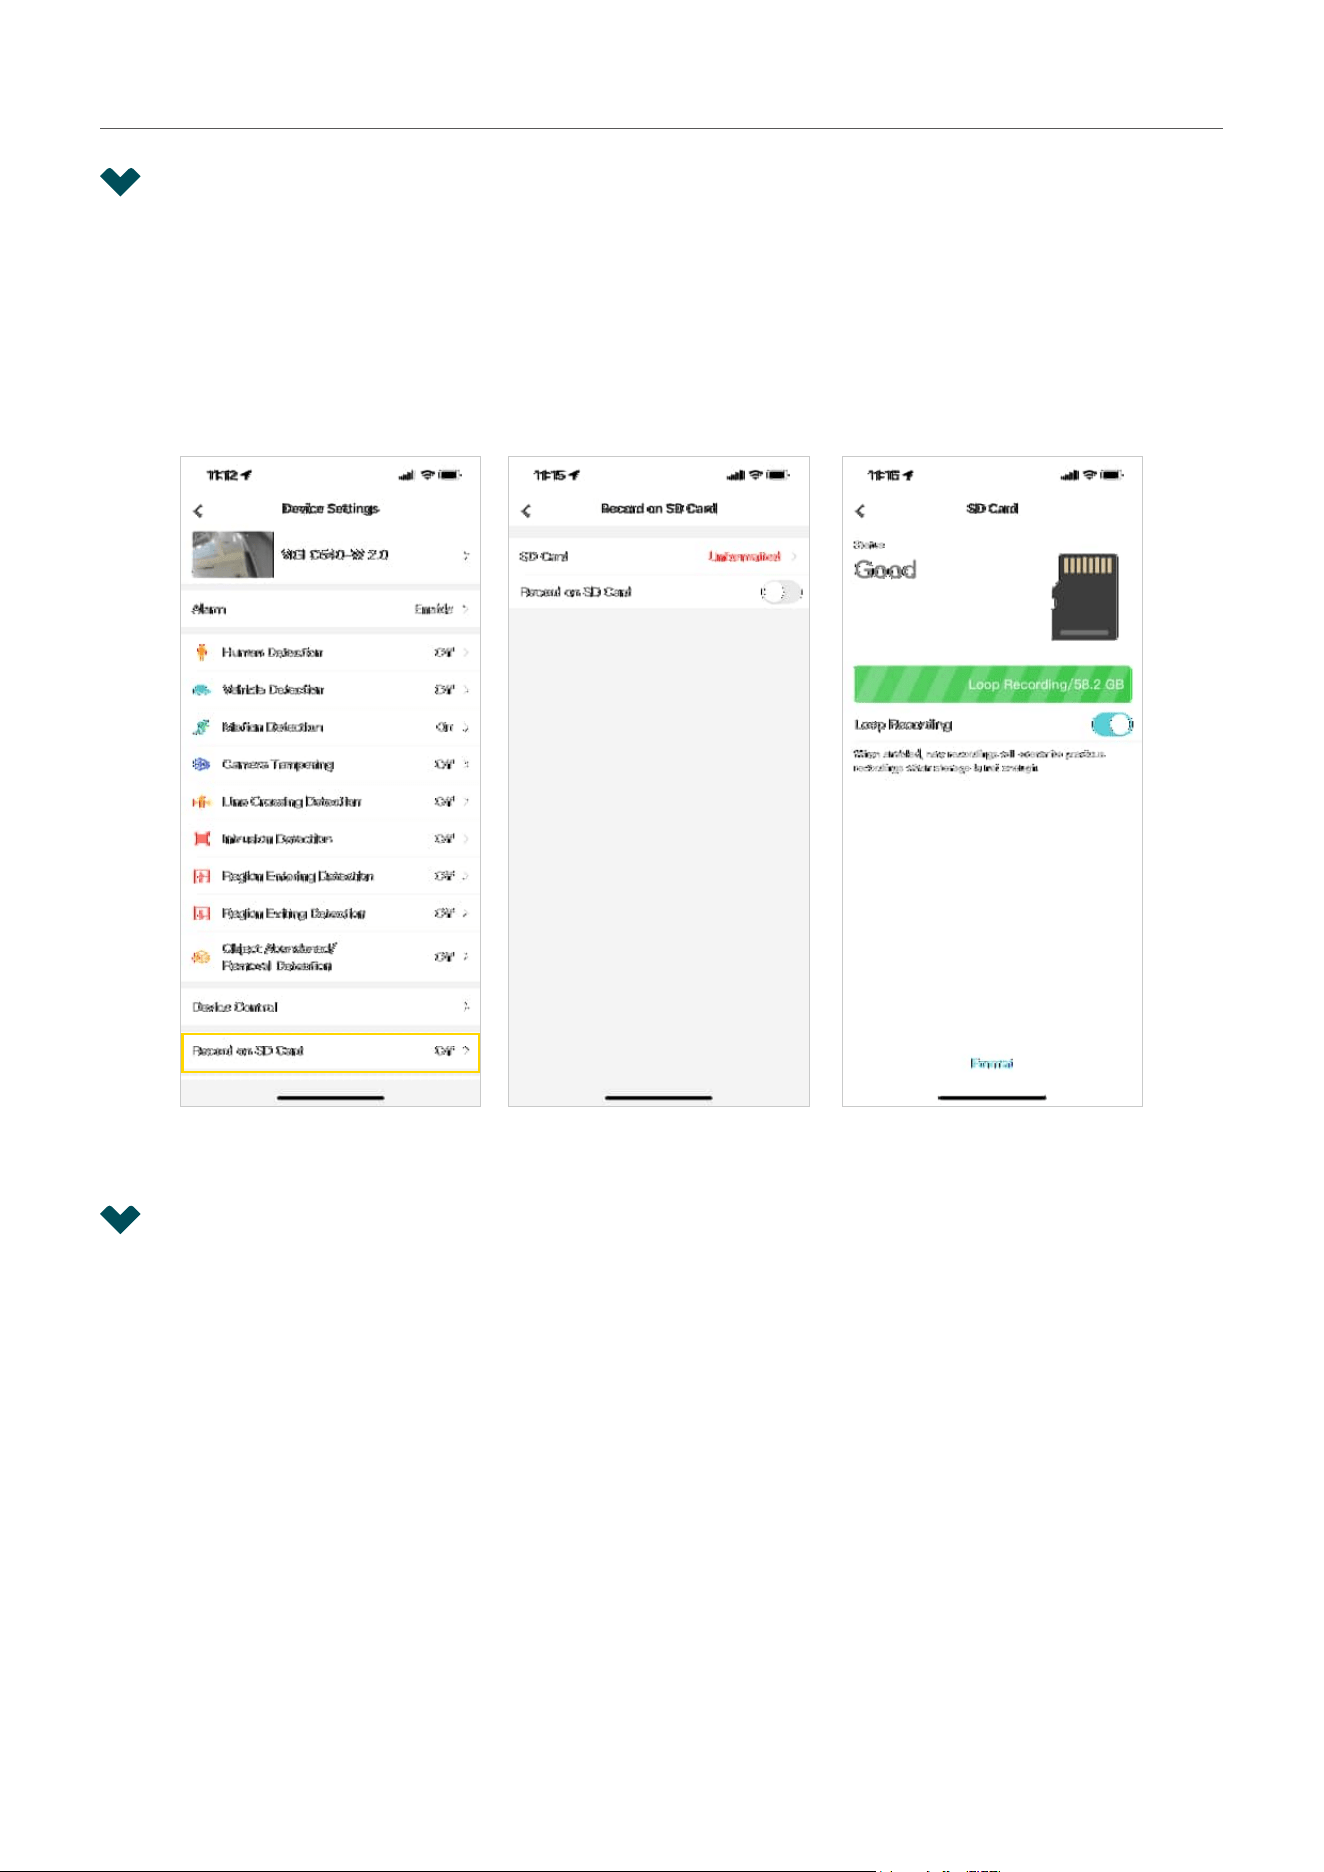
4. 1 Format Micro SD Card
To use the recording feature, you need to insert a micro SD card into the camera’s SD card slot and
follow the app instructions to format the card for recording.
You can tap More Settings on the My Devices page or tap the gear icon on the Live View page to enter
the Device Settings page. Tap Record on SD Card, tap Format to format the SD card. You can also
enable Loop Recording, then new recordings will overwrite previous recordings when storage is not
enough.
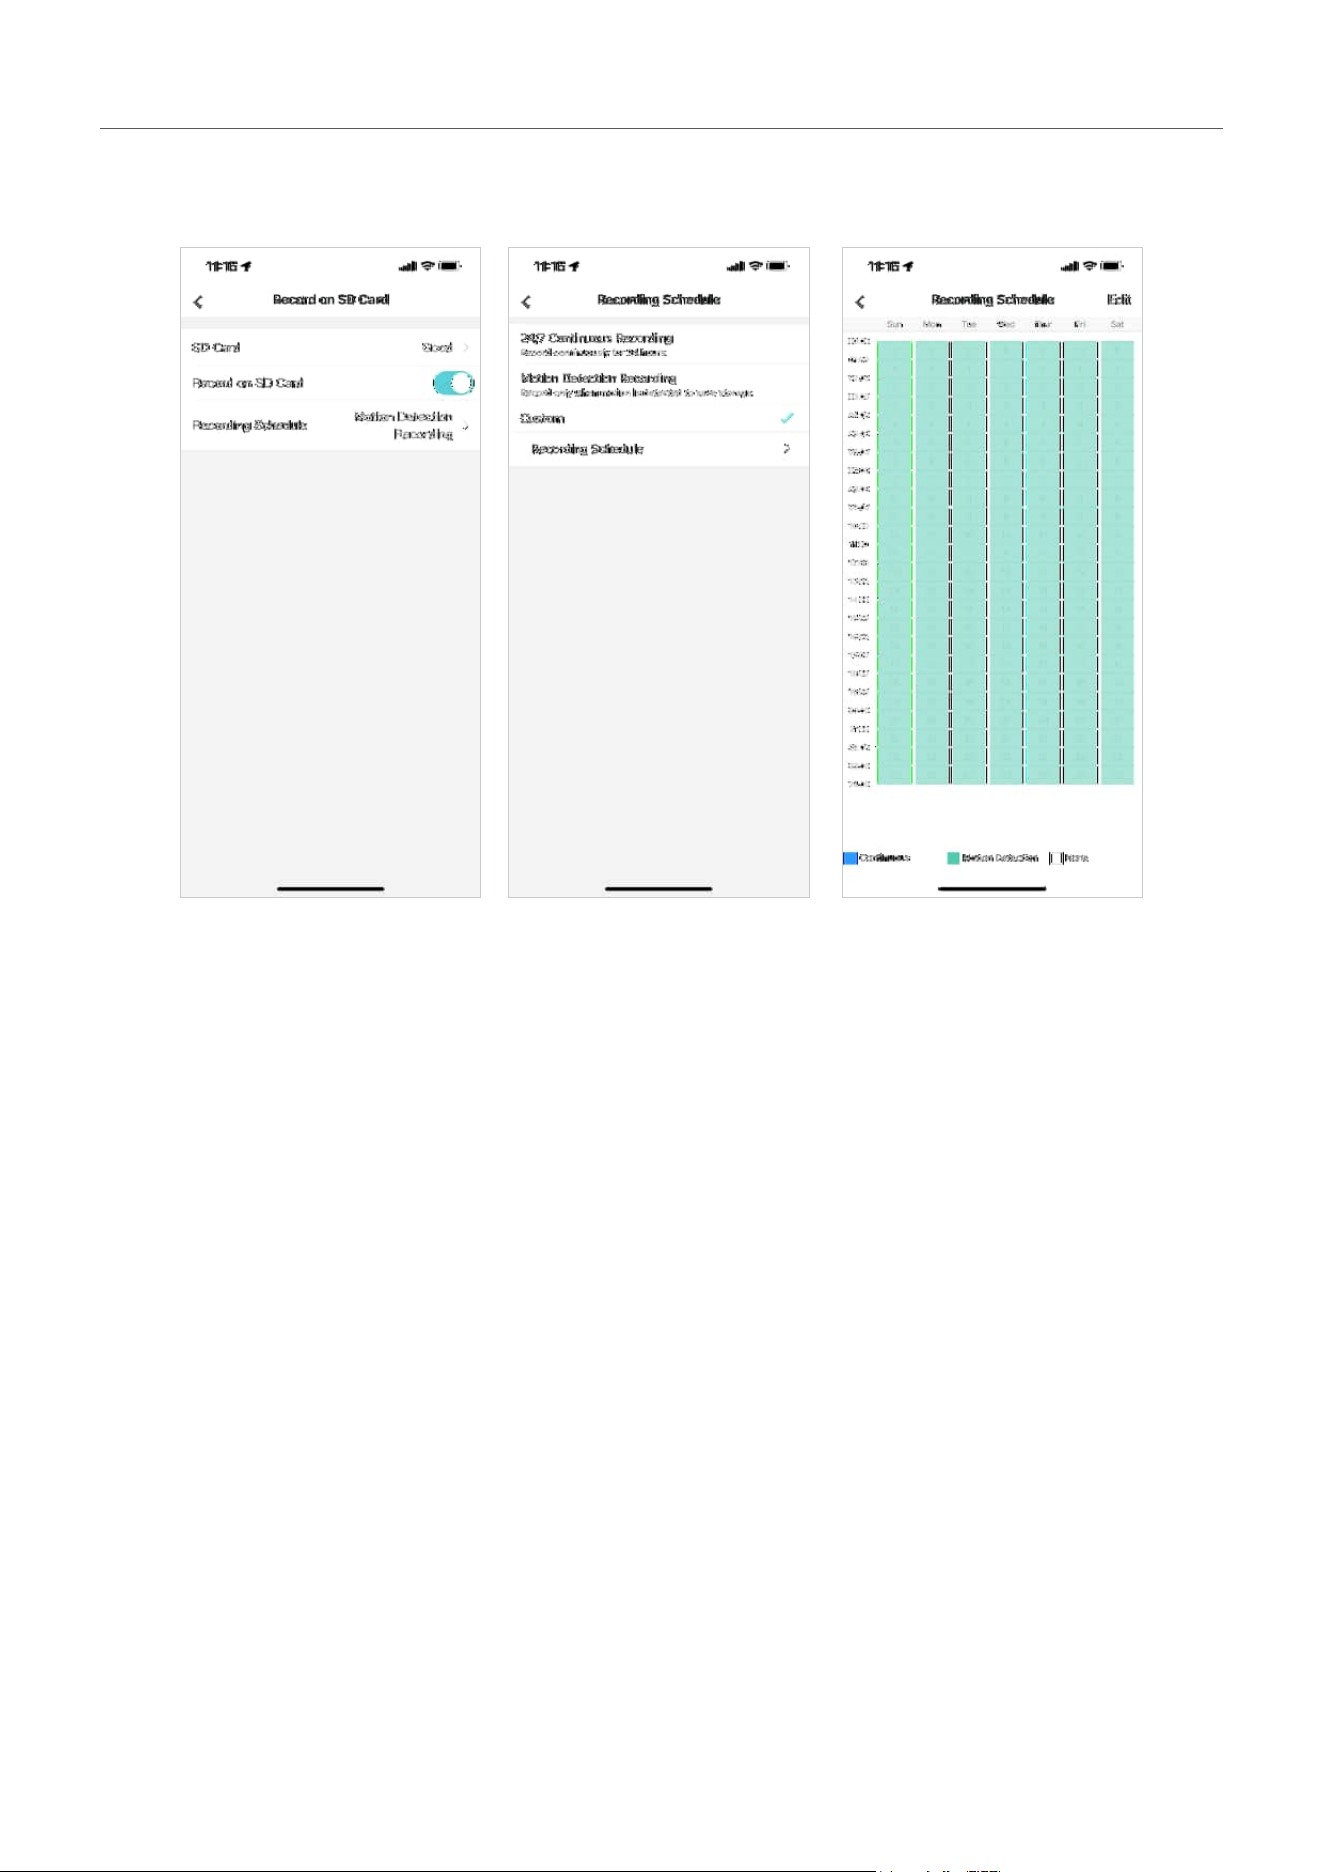
4. 2 Configure Recording Schedule
Recording schedule section provides convenience and flexibility for the daily monitoring of your
camera. You can choose to set motion recordings, continuous recordings, or customize the recording
schedule at a time. You can set different schedules for each day.
25
Chapter 4 Configure Recording (Only for certain cameras)
You can tap More Settings on the My Devices page or tap the gear icon on the Live View page to enter
the Device Settings page. Tap Record on SD Card, tap Record on Schedule.

5
Alarm and Detection
This chapter guides you on how to configure the event settings and alarm actions when your cameras
detect different types of events. This chapter includes the following sections:
• Alarm (Only for certain cameras)
• Human Detection
• Vehicle Detection
• Motion Detection
• Camera Tampering
• Line Crossing Detection
• Intrusion Detection
• Region Entering Detection
• Region Exiting Detection
• Object Abandoned/Removal Detection
27
Chapter 5 Alarm and Detection
5. 1 Alarm (Only for certain cameras)
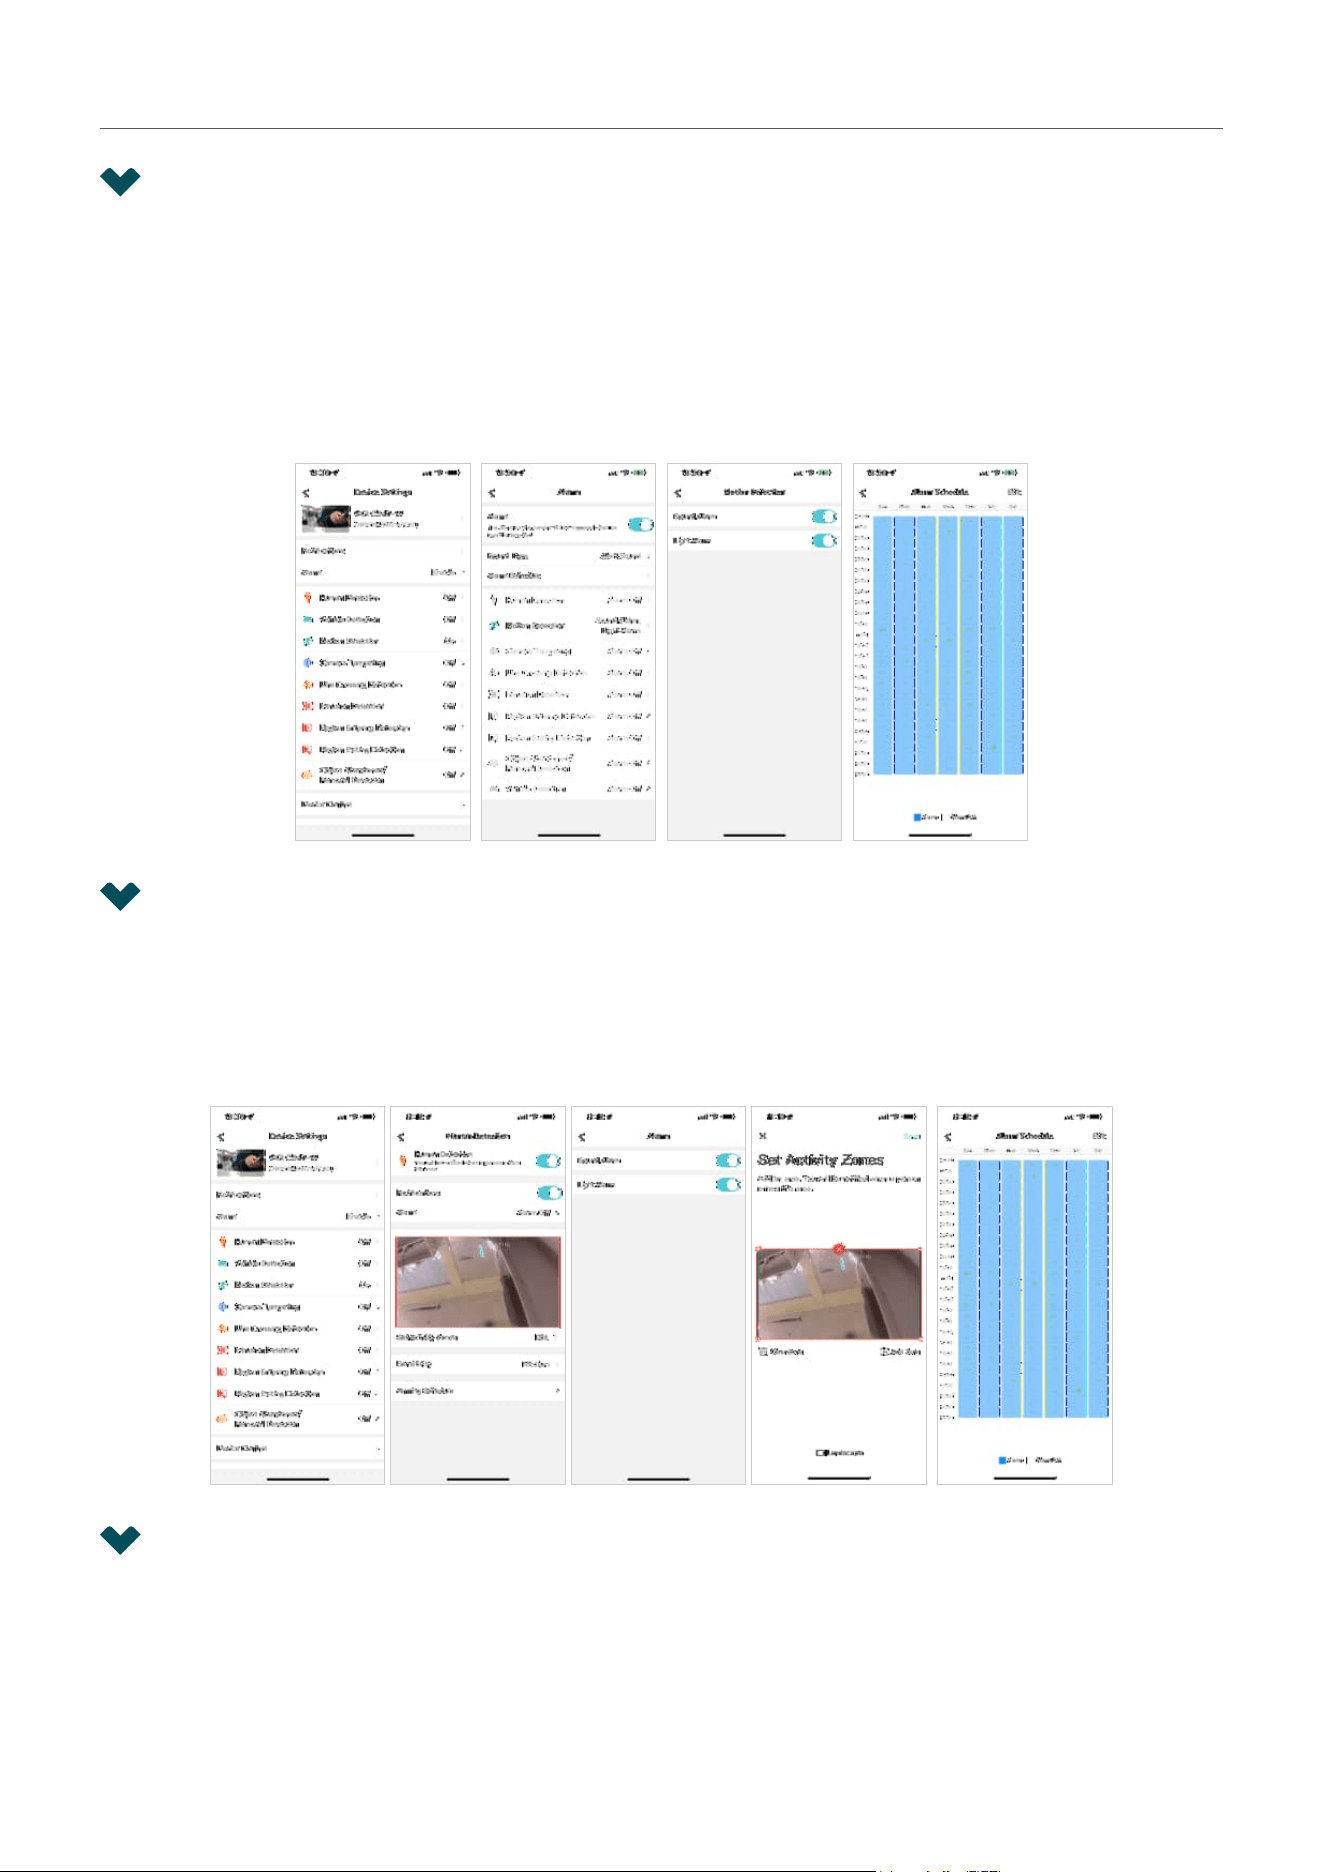
When Alarm is enabled, the VIGI app will alert you of activity that matters and sends notifications
straight to you when activities detected. You can customize the alarm type (sound alarm or light alarm),
alarm schedule as needed.
Tap More Settings on the My Devices page or tap the gear icon on the Live View page to enter the
Device Settings page. Tap Alarm, you can change the alarm settings of your camera to meet various
needs.
5. 2 Human Detection
Human detection triggers alarm actions when cameras detect persons are moving in the specified
areas. You can customize the area settings, select the triggered actions and set the alarm schedule.
Tap More Settings on the My Devices page or tap the gear icon on the Live View page to enter the
Device Settings page. Tap Human Detection to start detection settings.
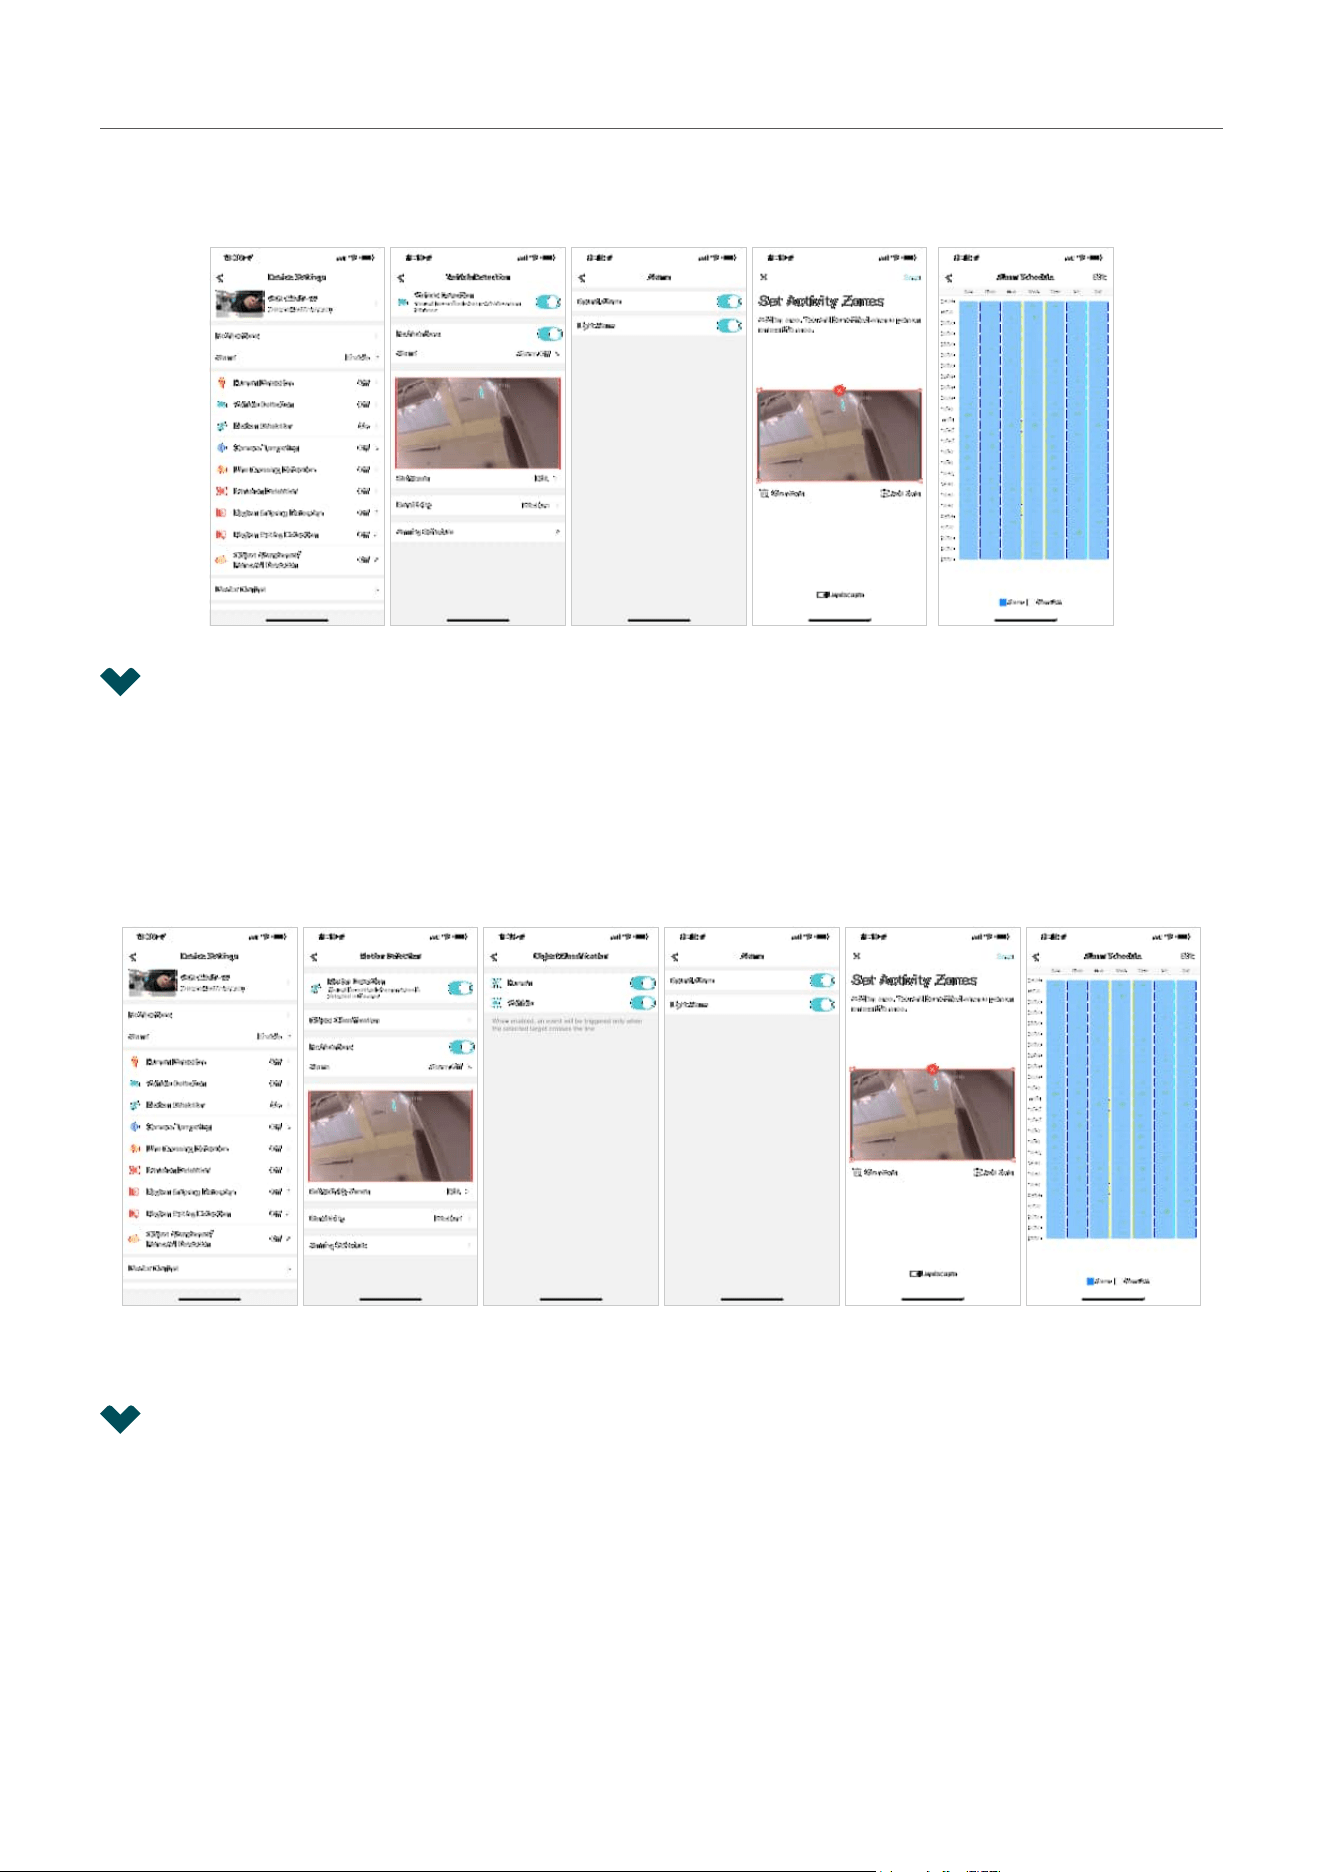
5. 3 Vehicle Detection
Vehicle detection triggers alarm actions when cameras detect vehicles are moving in the specified
areas. You can customize the area settings, select the triggered actions and set the alarm schedule.
28
Chapter 5 Alarm and Detection
Tap More Settings on the My Devices page or tap the gear icon on the Live View page to enter the
Device Settings page. Tap Vehicle Detection to start detection settings.
5. 4 Motion Detection
Motion detection allows cameras to detect the moving objects in the monitored area and triggers alarm
actions. You can customize the object classification, area settings, select the triggered actions and set
the alarm schedule.
Tap More Settings on the My Devices page or tap the gear icon on the Live View page to enter the
Device Settings page. Tap Motion Detection to start detection settings.
5. 5 Camera Tampering
Camera tampering triggers alarm actions when an area of camera’s lens is purposely blocked,
obstructed or vandalized. You can customize the video tampering settings, enable notifications, select
the triggered actions.
29
Chapter 5 Alarm and Detection
Tap More Settings on the My Devices page or tap the gear icon on the Live View page to enter the
Device Settings page. Tap Camera Tampering to start the settings.
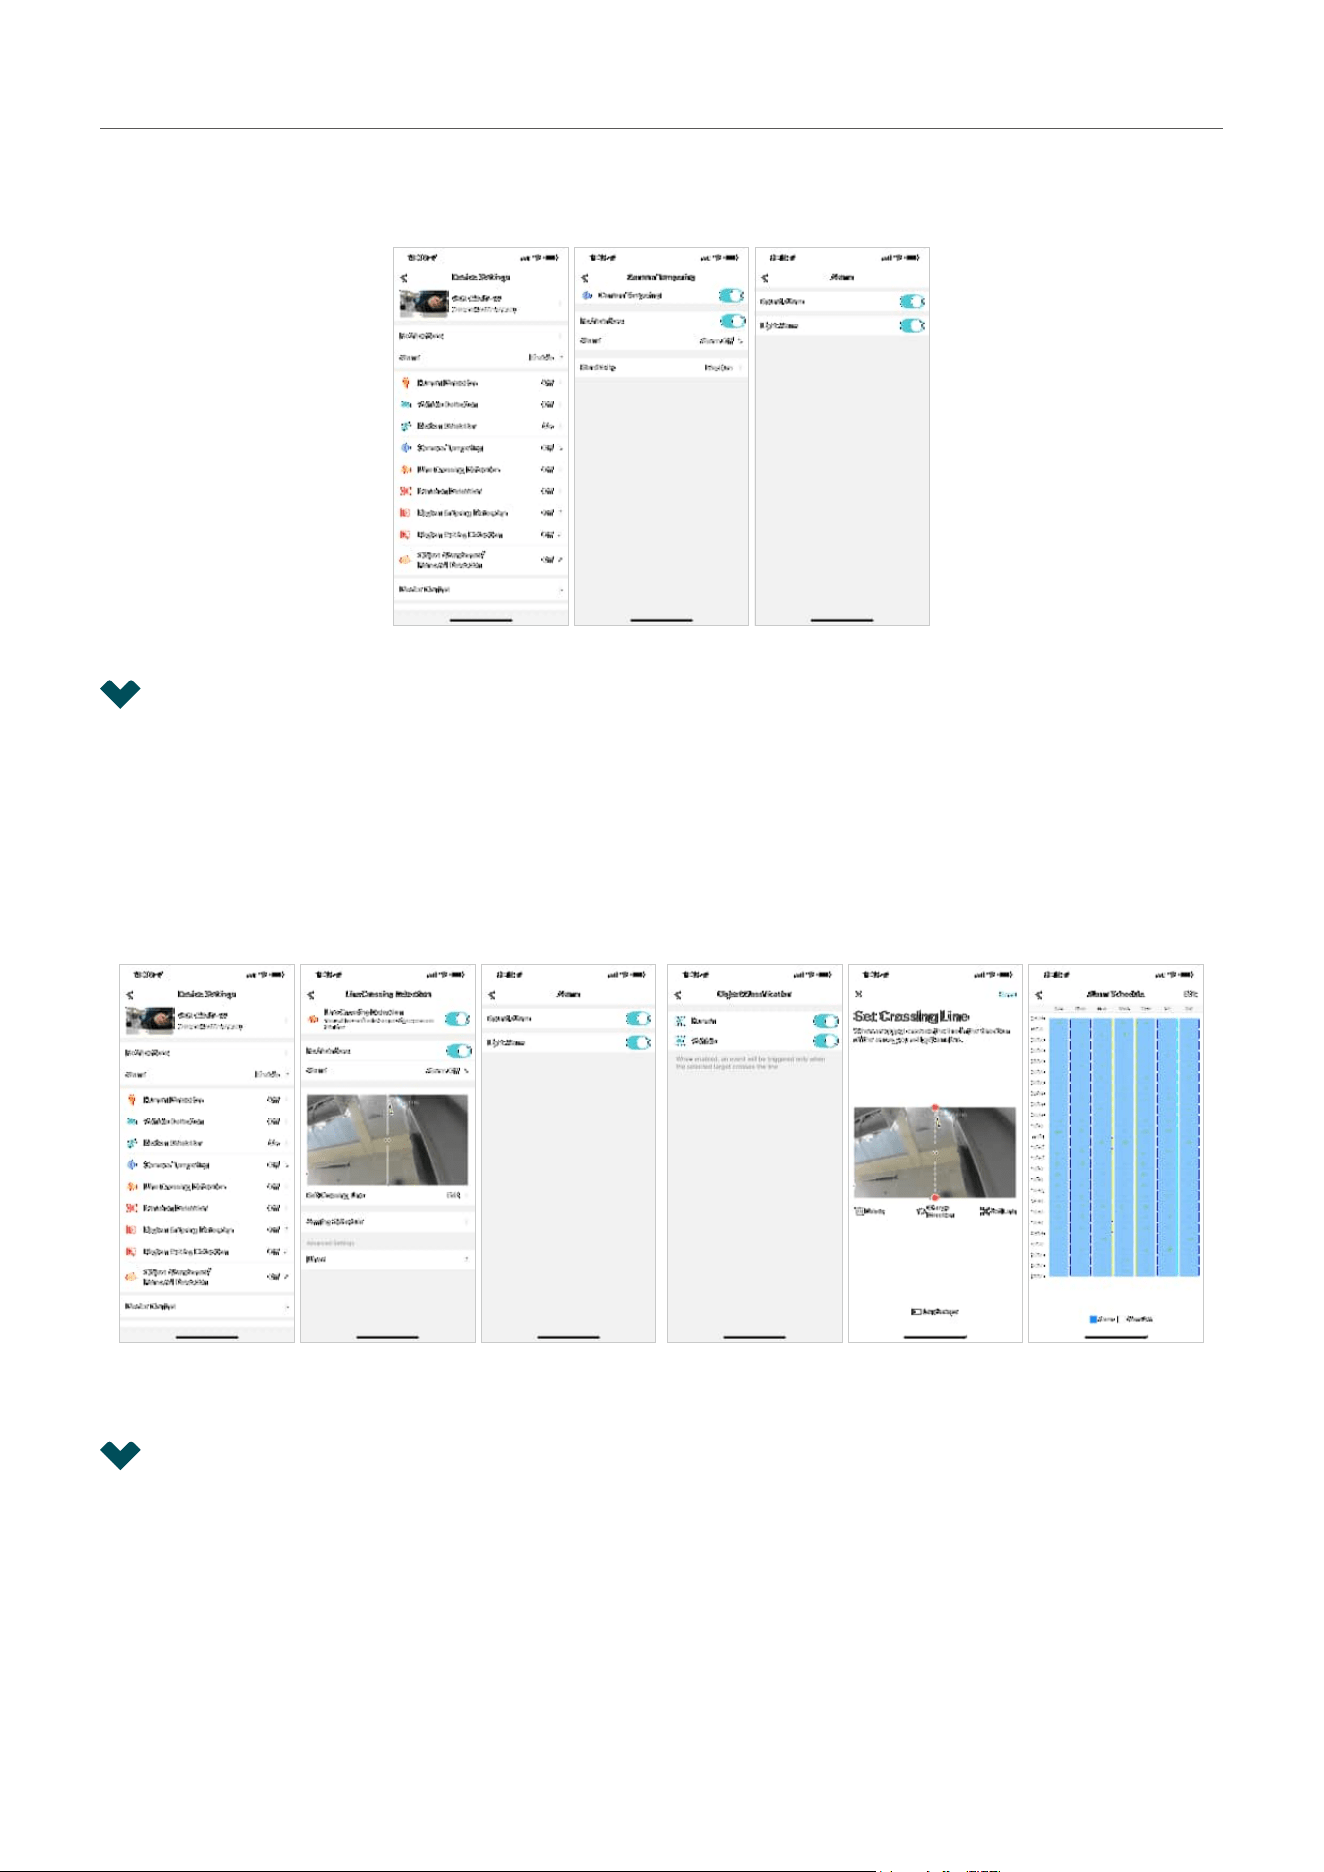
5. 6 Line Crossing Detection
Line crossing detection triggers alarm actions when cameras detect that moving objects cross a
customized virtual line. You can customize the object classification, the line crossing detection settings,
select the triggered actions and set the alarm schedule.
Tap More Settings on the My Devices page or tap the gear icon on the Live View page to enter the
Device Settings page. Tap Line Crossing Detection to start detection settings.
5. 7 Intrusion Detection
Intrusion detection triggers alarm actions when cameras detect an intrusion in the specified areas. You
can customize the intrusion detection settings, select the triggered actions and set the alarm schedule.

30
Chapter 5 Alarm and Detection
Tap More Settings on the My Devices page or tap the gear icon on the Live View page to enter the
Device Settings page. Tap Intrusion Detection to start detection settings. In the Advanced Settings
section, you can set the object classification, intrusion time, percentage and sensitivity.
5. 8 Region Entering Detection
Region entering detection triggers alarm actions when cameras detect moving objects enter the
specified regions. You can customize the region settings, select the triggered actions and set the alarm
schedule.
Tap More Settings on the My Devices page or tap the gear icon on the Live View page to enter the
Device Settings page. Tap Region Entering Detection to start detection settings. In the Advanced
Settings section, you can set the object classification and sensitivity.
5. 9 Region Exiting Detection
Region exiting detection triggers alarm actions when cameras detect moving objects exit the specified
regions. You can customize the region settings, select the triggered actions and set the alarm schedule.
31
Chapter 5 Alarm and Detection
Tap More Settings on the My Devices page or tap the gear icon on the Live View page to enter the
Device Settings page. Tap Region Exiting Detection to start detection settings. In the Advanced Settings
section, you can set the object classification and sensitivity.
5. 10 Object Abandoned/Removal Detection
Object abandoned/removal detection triggers alarm actions when cameras detect objects are left
behind or taken away in the specified areas. You can customize the area settings, select the triggered
actions and set the alarm schedule.
Tap More Settings on the My Devices page or tap the gear icon on the Live View page to enter the
Device Settings page. Tap Region Exiting Detection to start detection settings. In the Advanced Settings
section, you can set the object classification and sensitivity.

33
Chapter 6 Device Settings
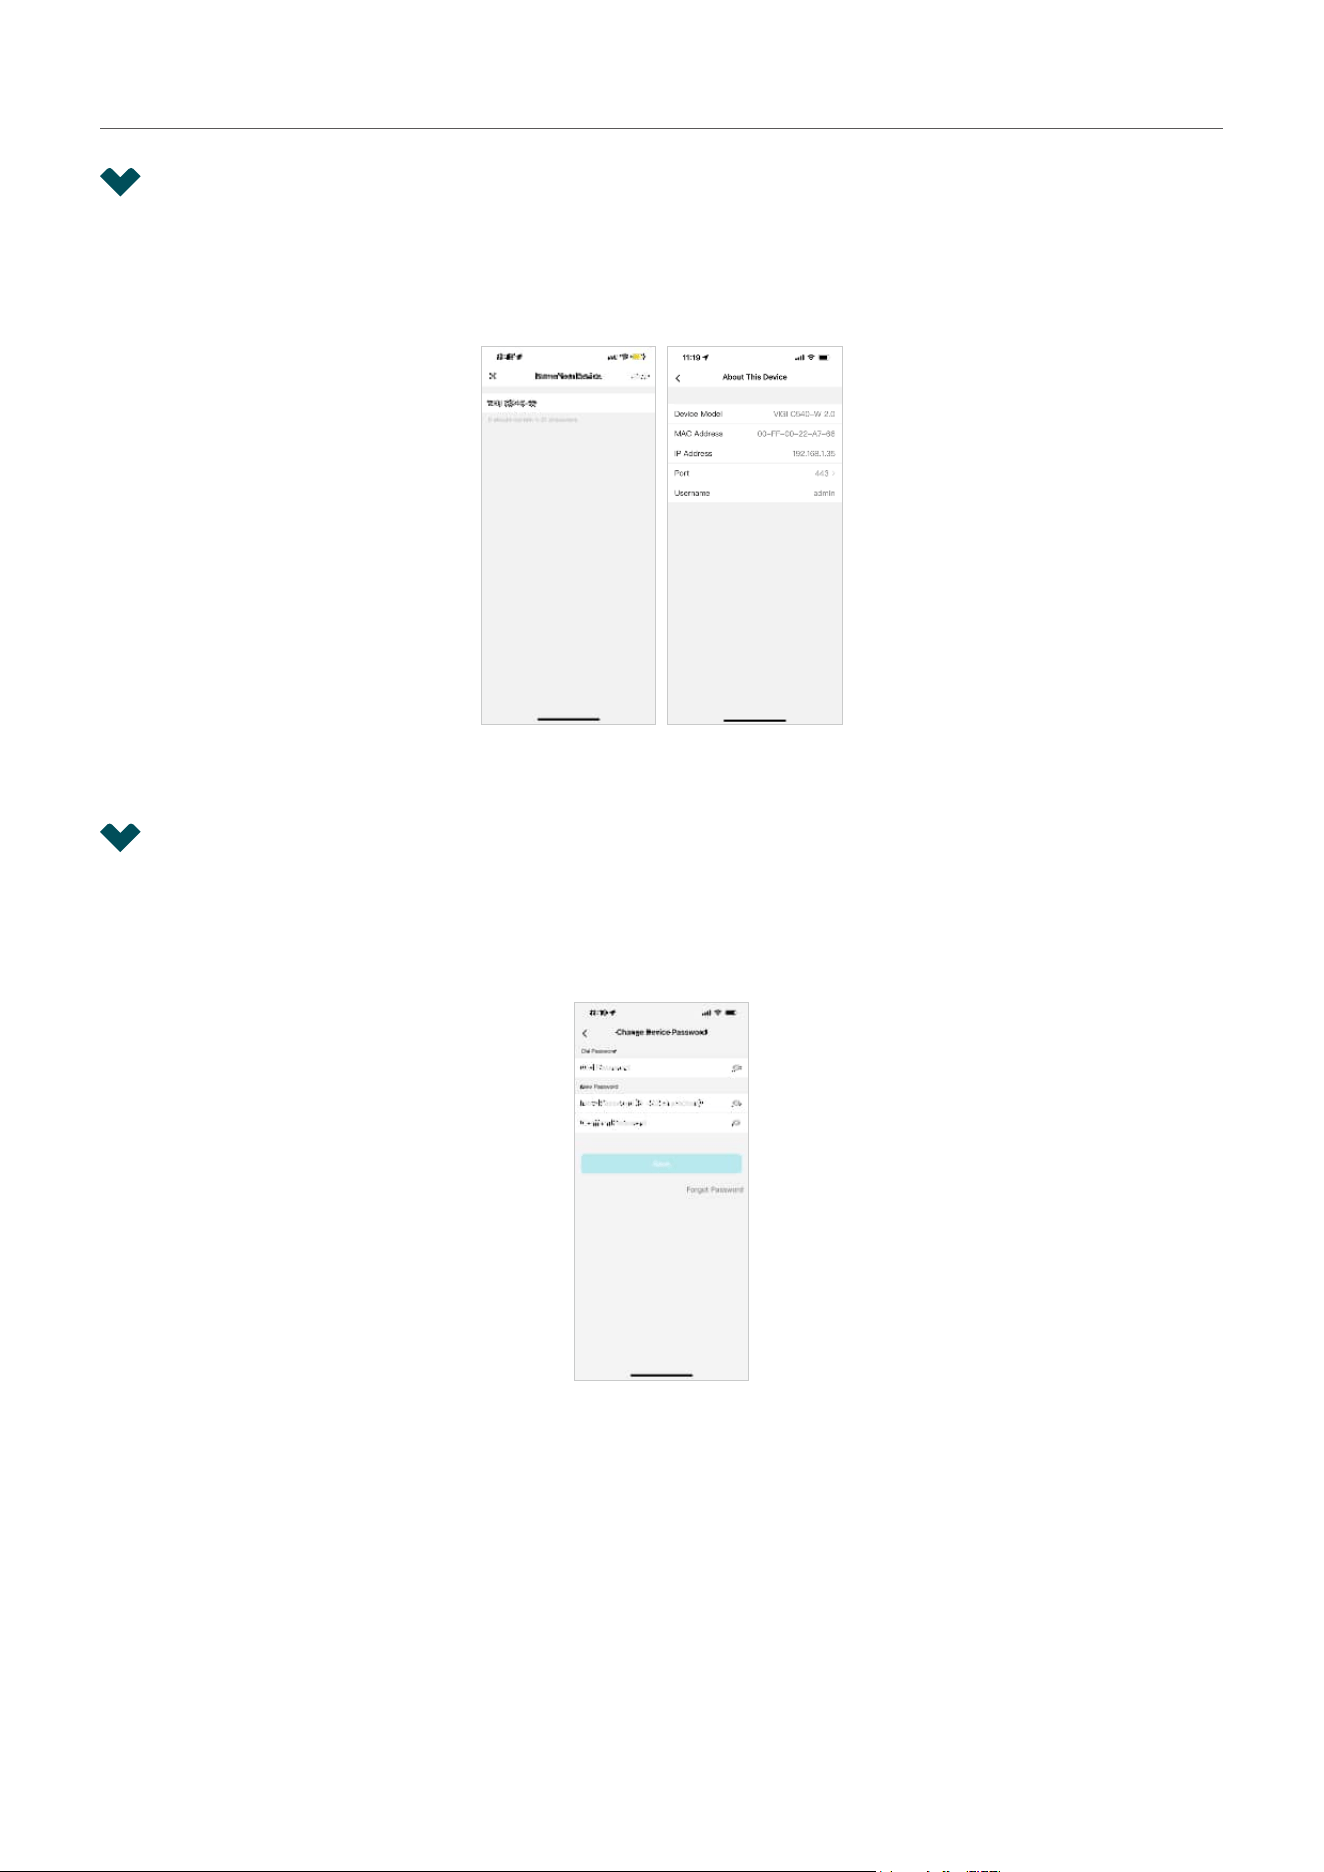
6. 1 Device Information
You can tap More Settings on the My Devices page or tap the gear icon on the Live View page to enter
the Device Settings page. Tap your device model to change its device name, tap About This Device to
view the device information including its username, IP address and MAC address.
6. 2 Change Device Password
You can tap More Settings on the My Devices page or tap the gear icon on the Live View page to enter
the Device Settings page. Tap Change Device Password to change the device password which will be
required when you log in to this device.
34
Chapter 6 Device Settings
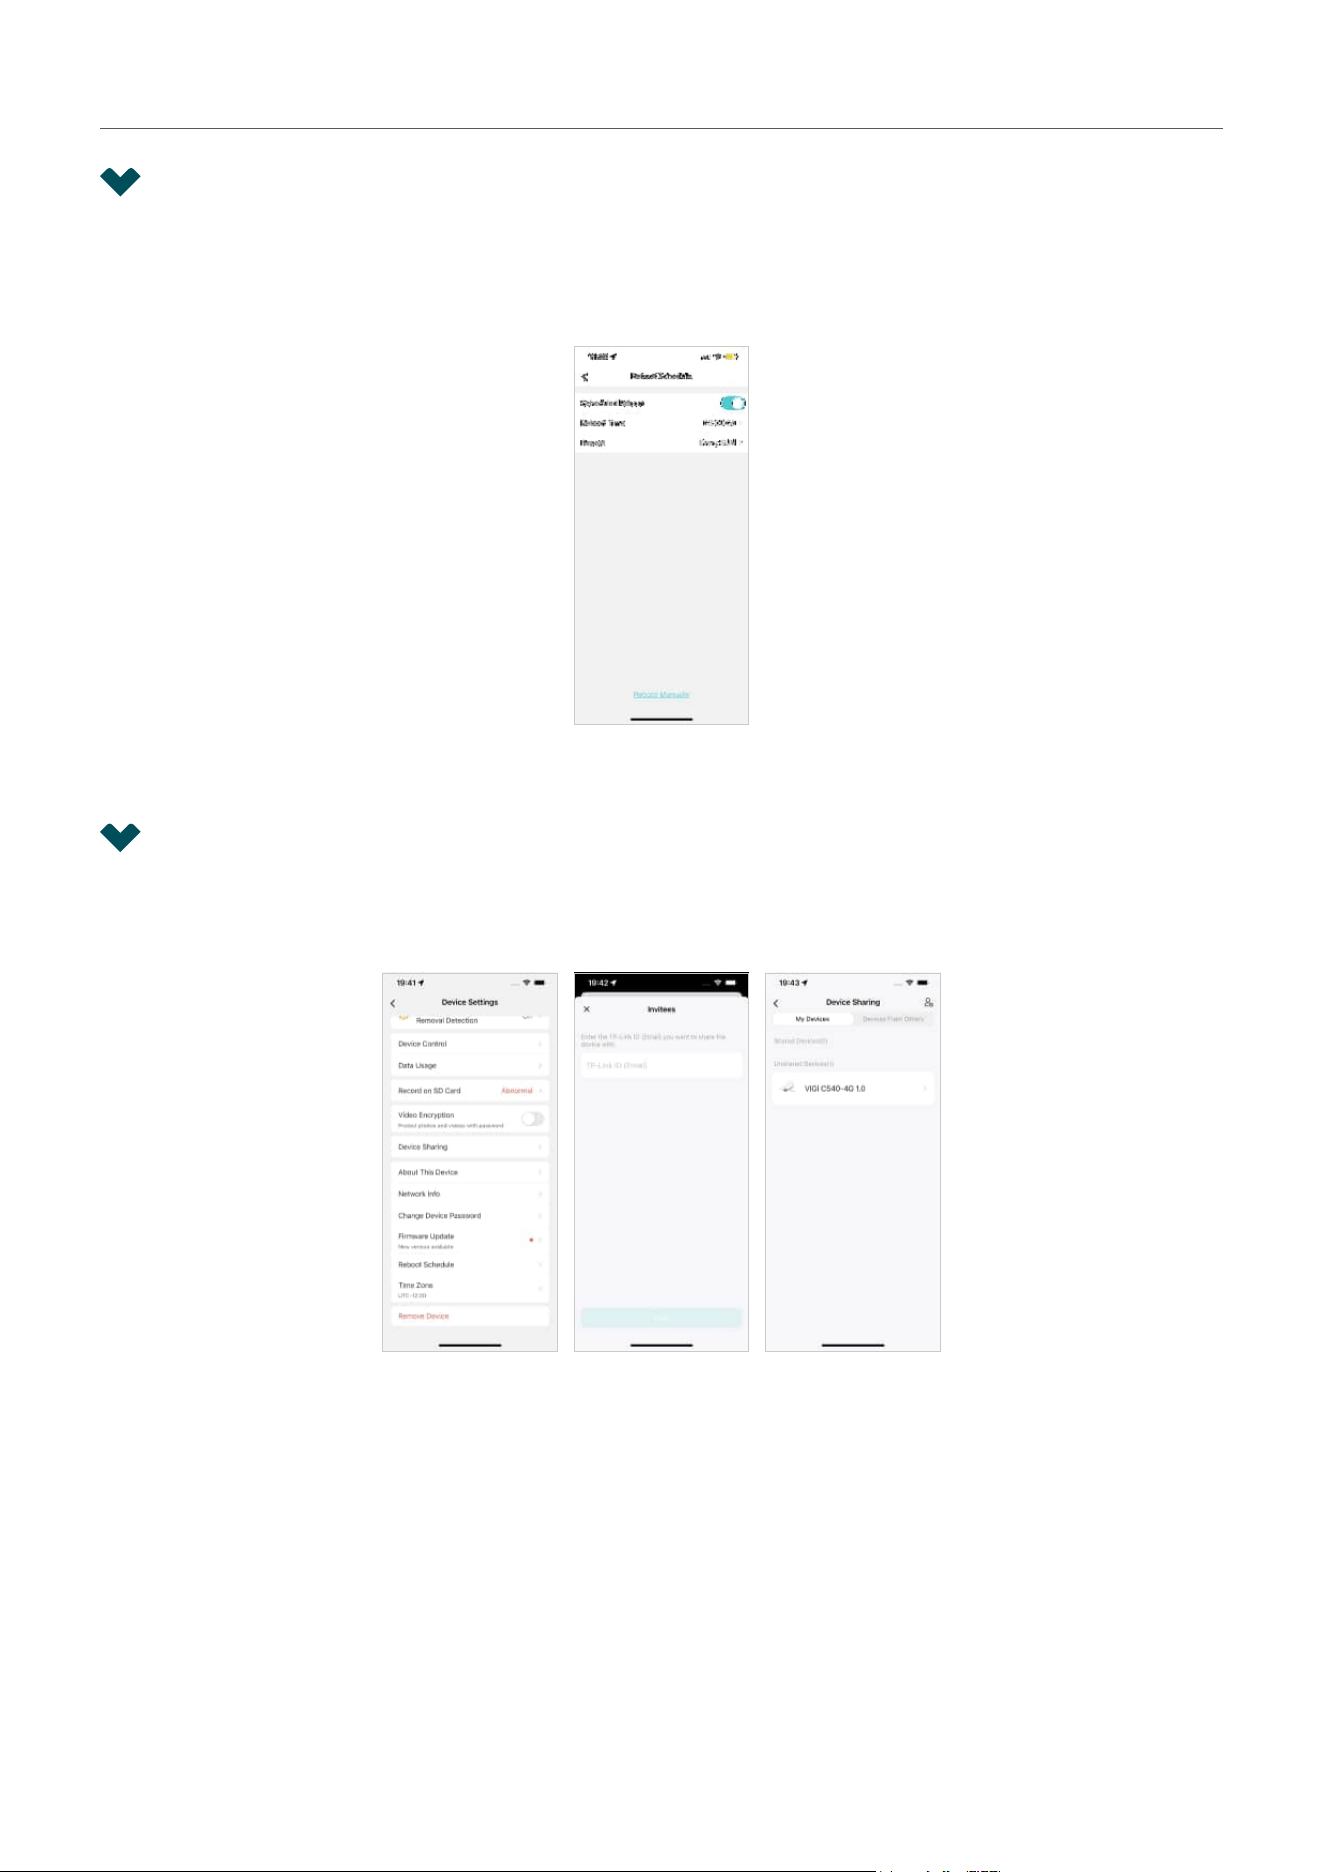
6. 3 Reboot Schedule
You can tap More Settings on the My Devices page or tap the gear icon on the Live View page to enter
the Device Settings page. Tap Reboot Schedule to reboot the device as needed. You can schedule the
reboot regularly or tap the Reboot Manually to reboot the device immediately.
6. 4 Device Sharing
You can tap More Settings on the My Devices page or tap the gear icon on the Live View page to enter
the Device Settings page. Tap Device Sharing to share your device with your family memebers.
35
Chapter 6 Device Settings
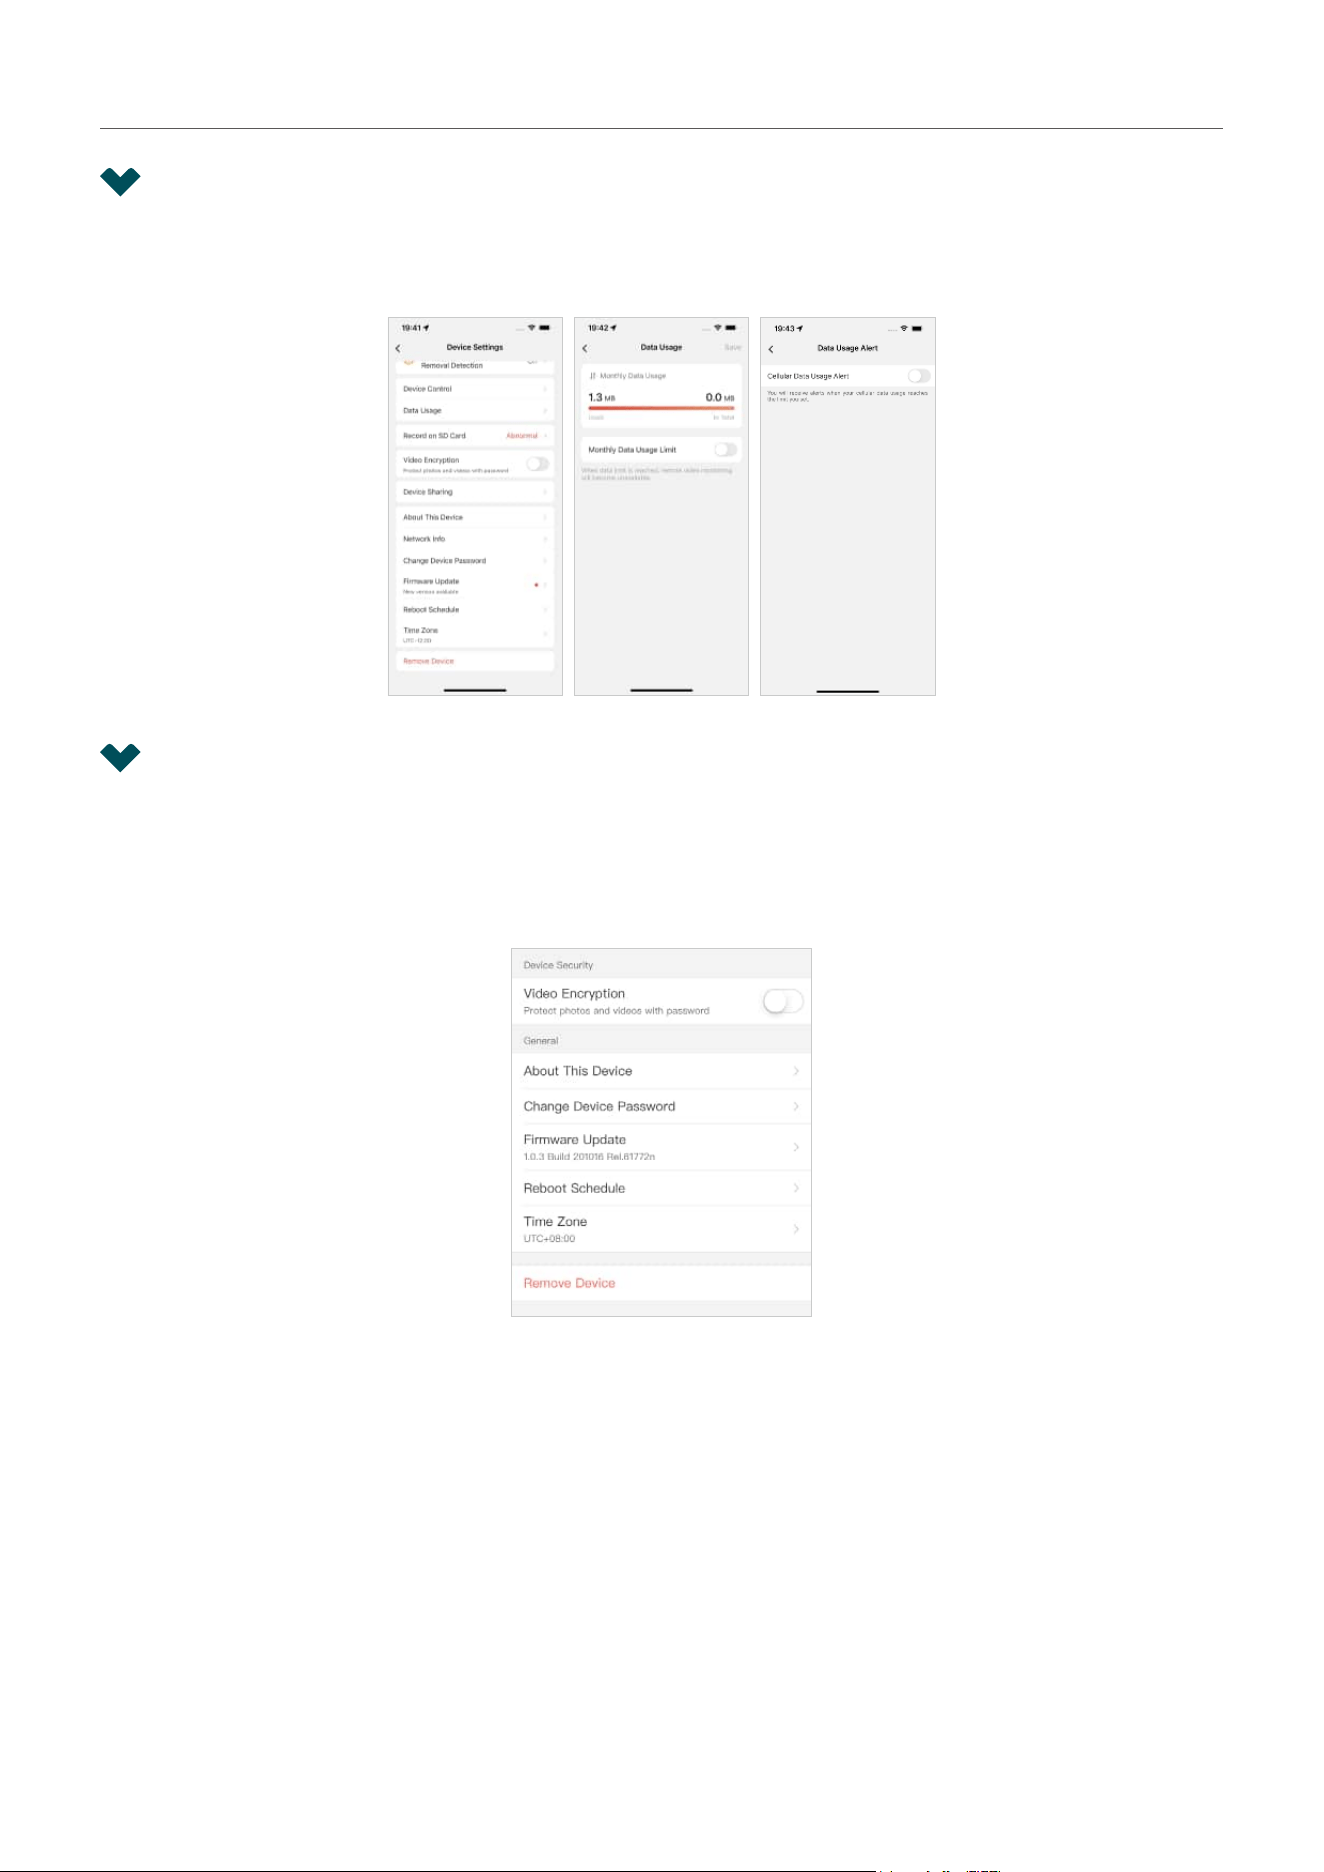
6. 5 Data Limit (For 4G cameras)
You can tap More Settings on the My Devices page or tap the gear icon on the Live View page to enter
the Device Settings page. Tap Data Usage to set the data limit and enable data usage alert.
6. 6 Other Features
You can tap More Settings on the My Devices page or tap the gear icon on the Live View page to
enter the Device Settings page. You can configure more device settings here, you can enable Video
Encryption to protect photos and videos with password, check firmware update for your device, set the
system time zone, and remove device from the network.