
Technical Support and E-Warranty Certificate www.vevor.com/support
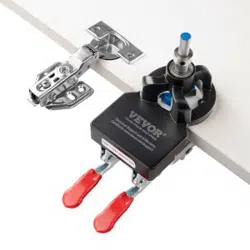
HINGE JIG
MODEL: SXRJL-2303
We continue to be committed to provide you tools with competitive price.
"Save Half", "Half Price" or any other similar expressions used by us only represents an
estimate of savings you might benefit from buying certain tools with us compared to the major
top brands and does not necessarily mean to cover all categories of tools offered by us. You
are kindly reminded to verify carefully when you are placing an order with us if you are
actually saving half in comparison with the top major brands.

1
MODEL: SXRJL-2303
Have product questions? Need technical support? Please feel free to
contact us:
Technical Support and E-Warranty Certificate
www.vevor.com/support
NEED HELP? CONTACT US!
This is the original instruction, please read all manual instructions
carefully before operating. VEVOR reserves a clear interpretation of our
user manual. The appearance of the product shall be subject to the
product you received. Please forgive us that we won't inform you again if
there are any technology or software updates on our product.
HINGE JIG

2
SAFETY INSTRUCTIONS
WARNING: Always follow basic safety precautions when using these devices.
These include:
1. This product contains small parts. If swallowed, it will pose a choking
hazard. Keep these small parts away from children !
2. Read, understand and follow your power tool manufacturer's instructions
for safety. Always wear safety glasses or eye shields before commencing
power tool operation. Always keep hands, face, hair, loose clothing, and body
at a safe distance from spindles and cutting tools. Always keep a firm grip on
tool handles when in operation. Always disconnect from power source
before adjusting power tools.
3. Do not operate the hinge tapper after fatigue or alcohol.
4. Please refer to the manual to install and use the jig.
5. Please always wear eye protection during use.
6. Keep hands and body clear of sharp edges and moving parts.
SAVE THESE INSTRUCTIONS
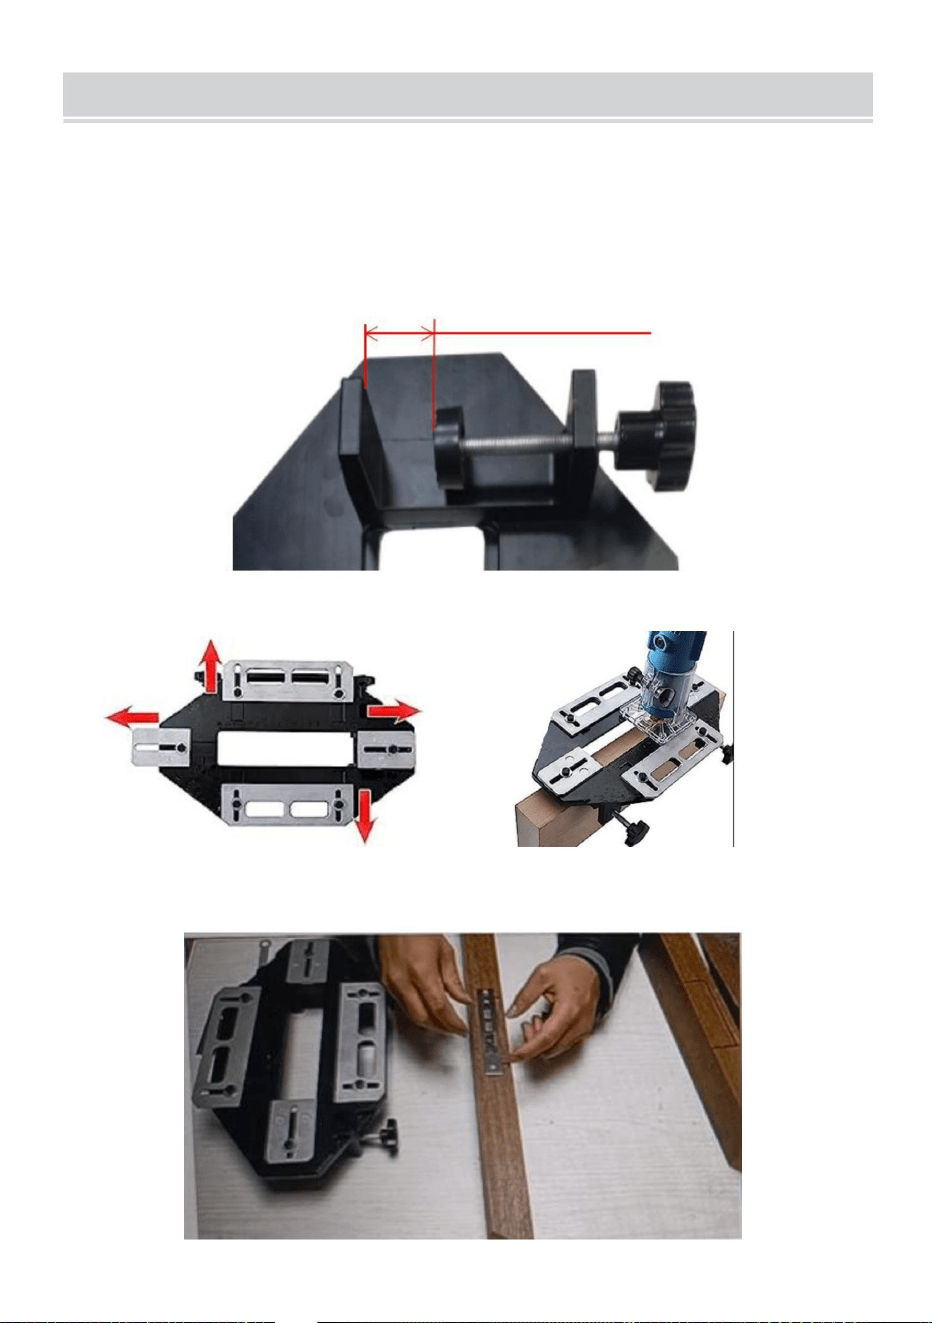
MODEL AND PARAMETERS
Model
SXRJL-2303
Type
Slot Positioning
Max. Clamping Thickness
60mm
Material
Aluminium Alloy
Color
Black
3
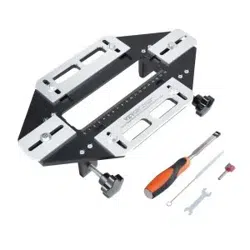
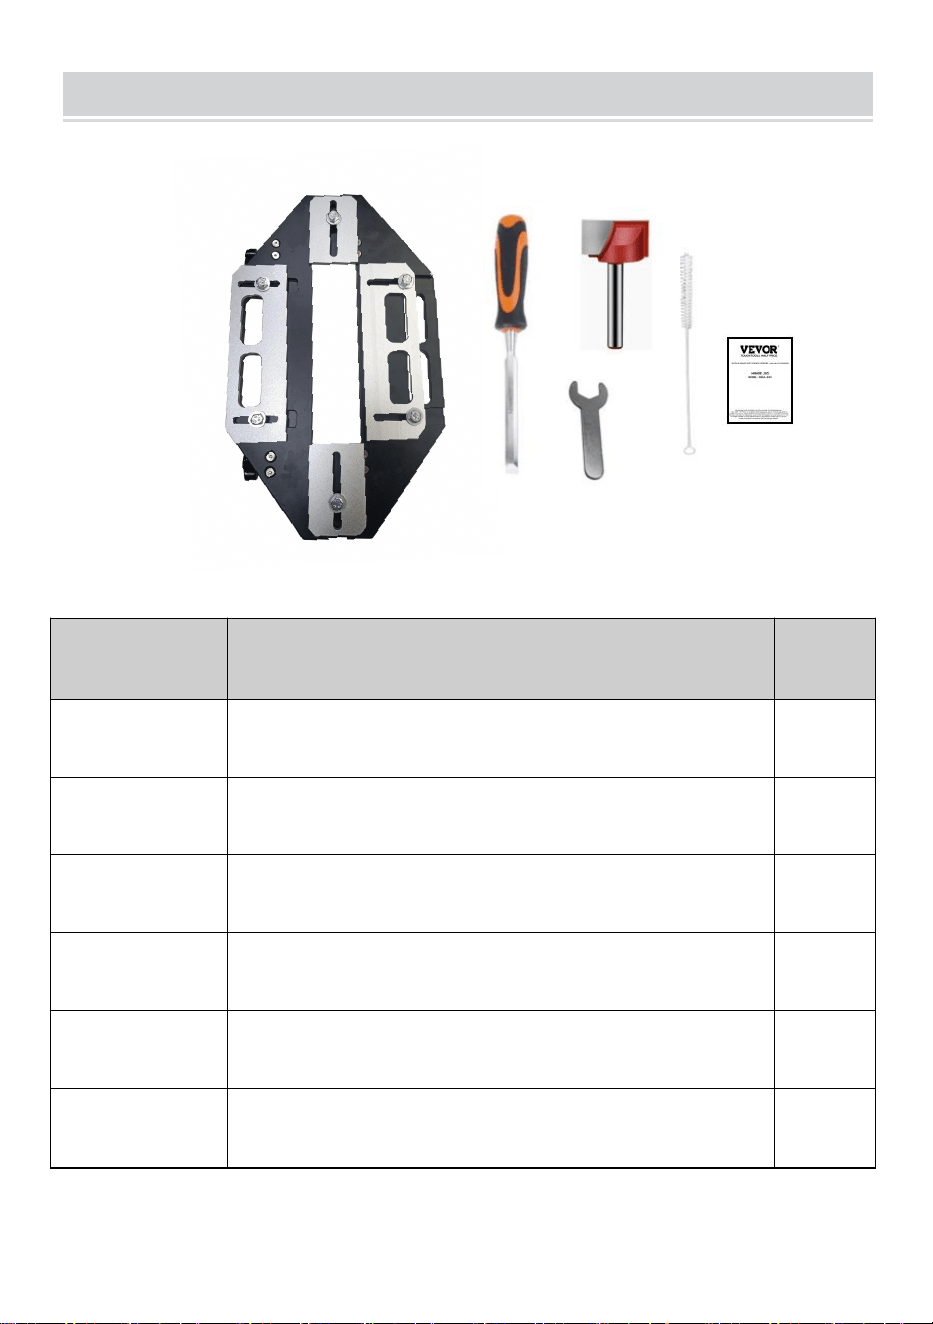
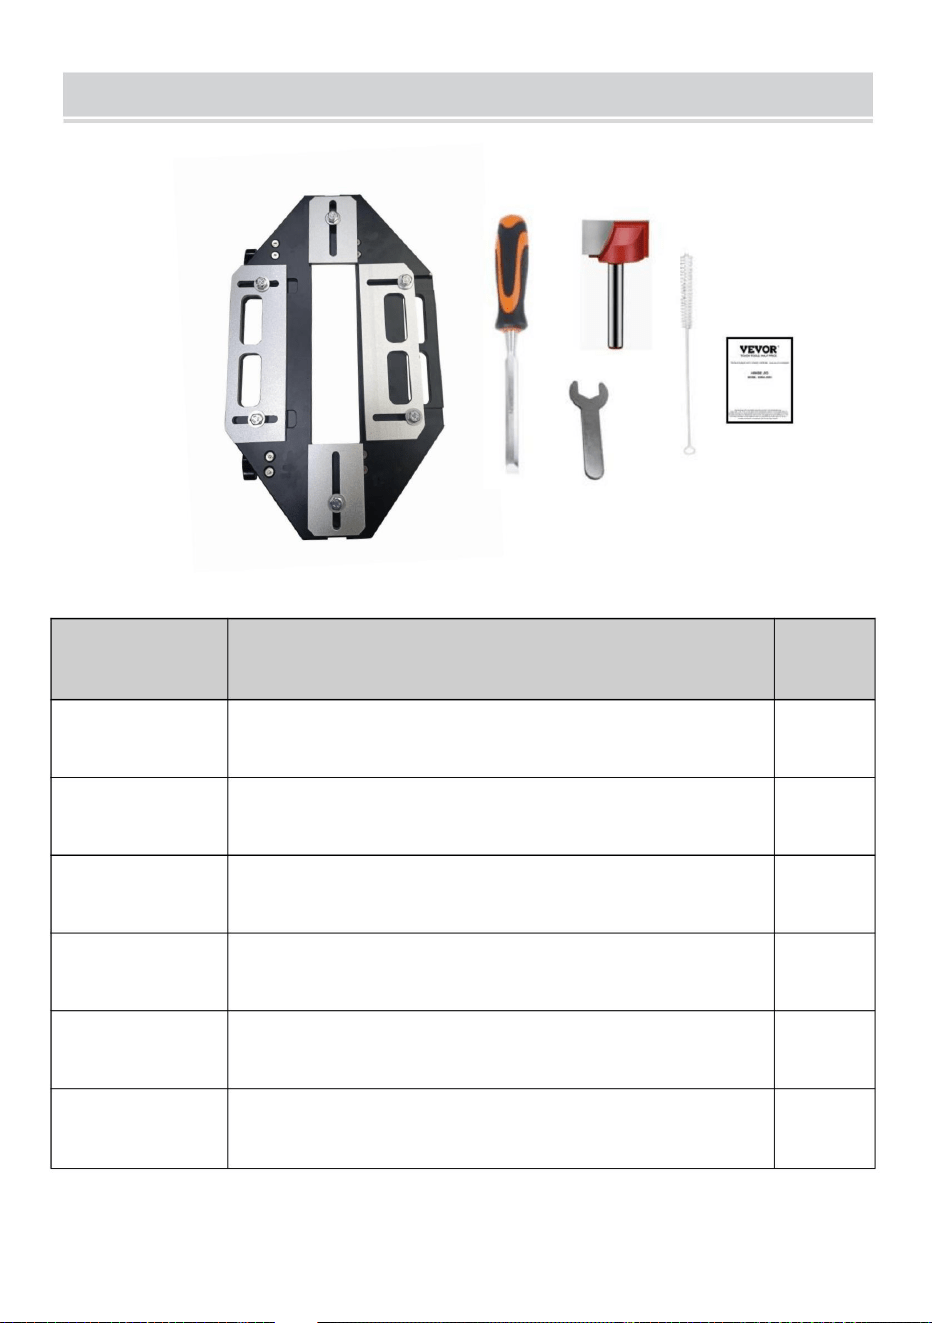
COMPONENTS
No.
Name
Qty
1
Main body
1
2
12mm Woodworking Chisel
1
3
Hairbrush
1
4
Side Cutter
1
5
Open-end Wrench
1
6
User Manual
1
1
2
3
4
5
6

4
OPERATION
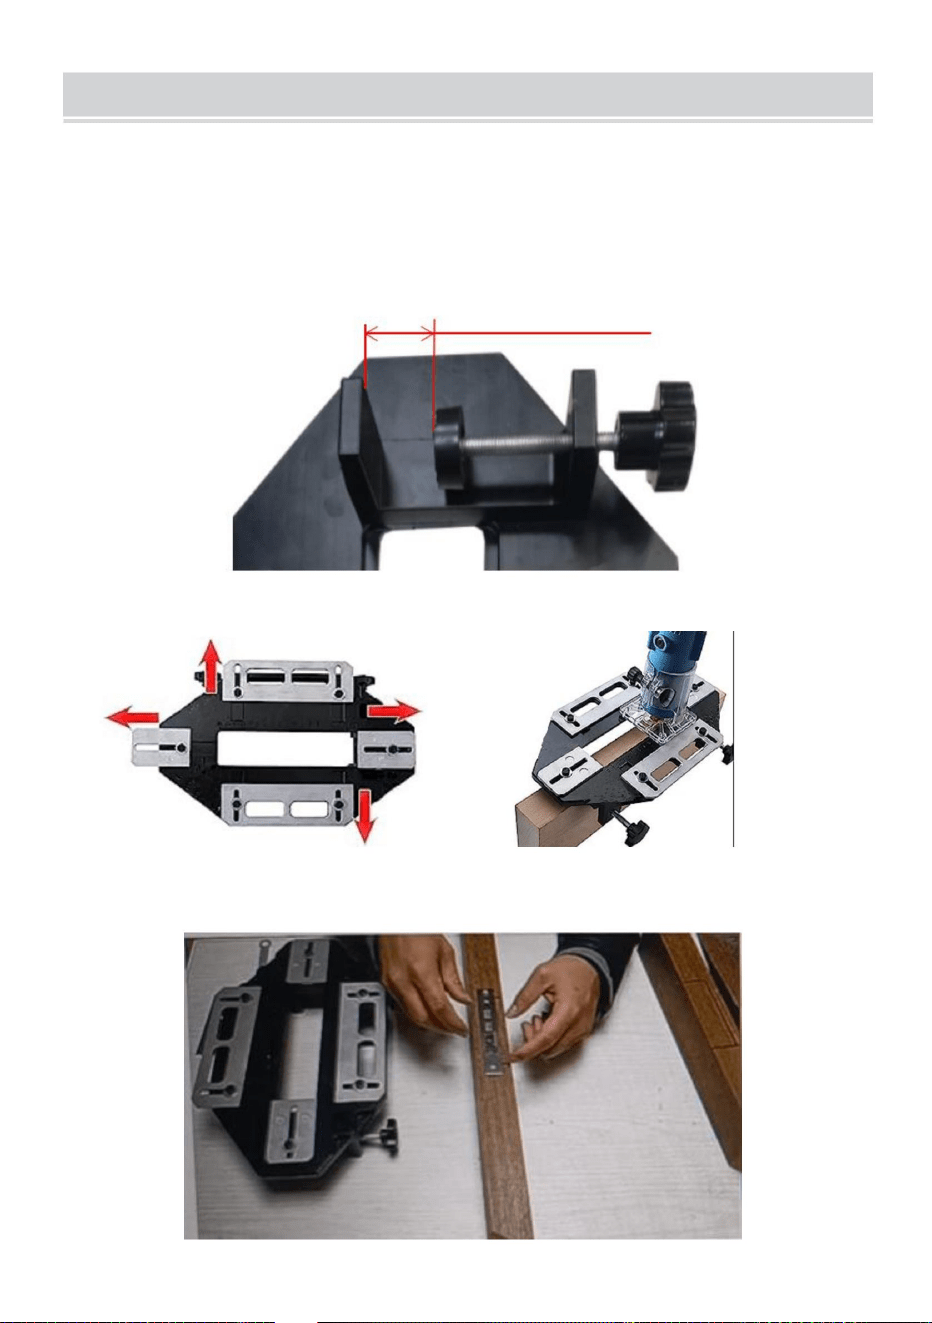
NOTE:
1.The tool needs to be used with the trimming machine.
2. After completion of slotting, all corners are rounded, you need to cut at
right angles before installation.
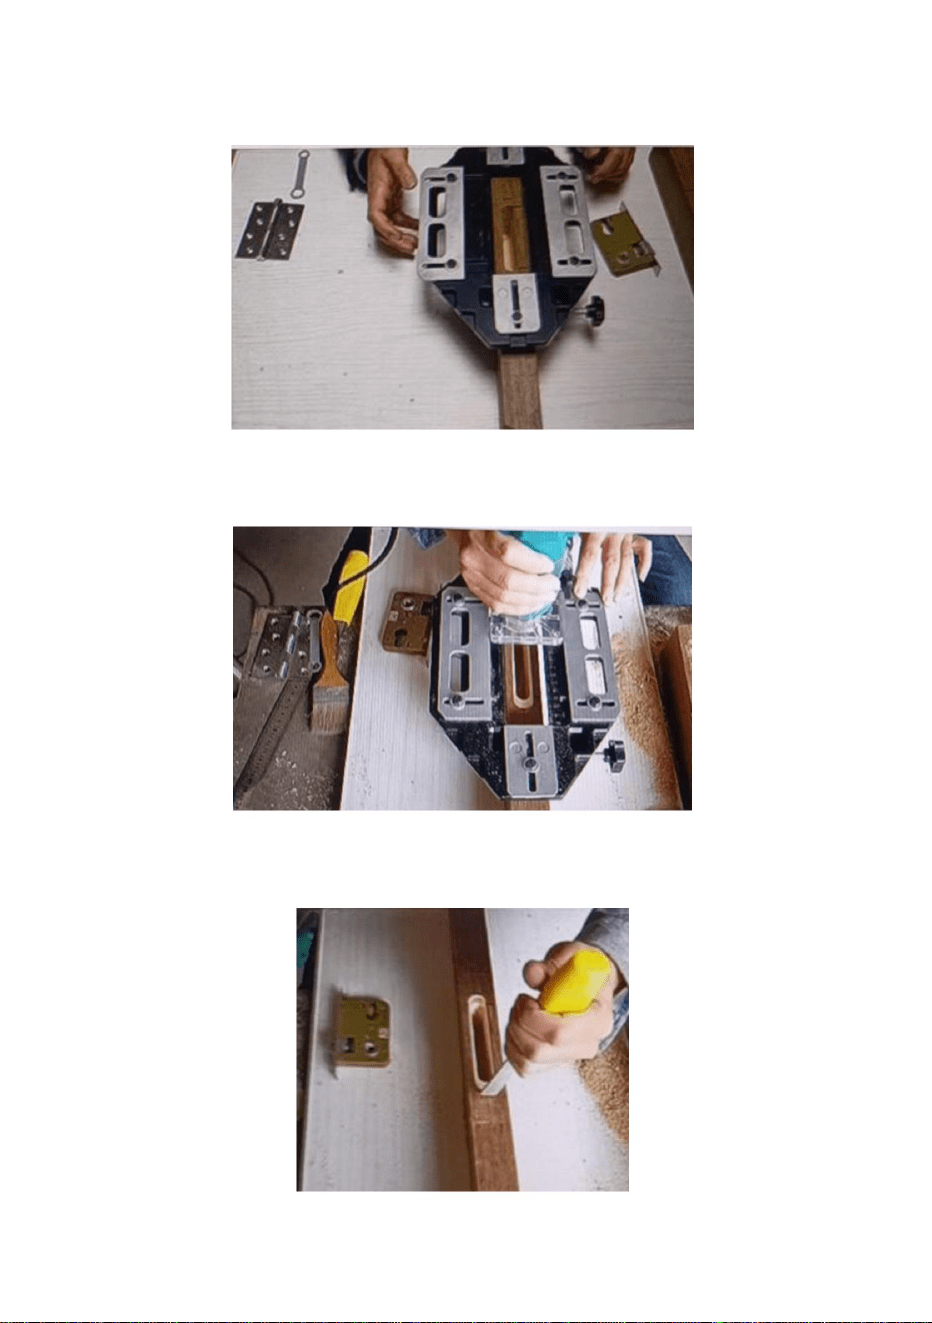
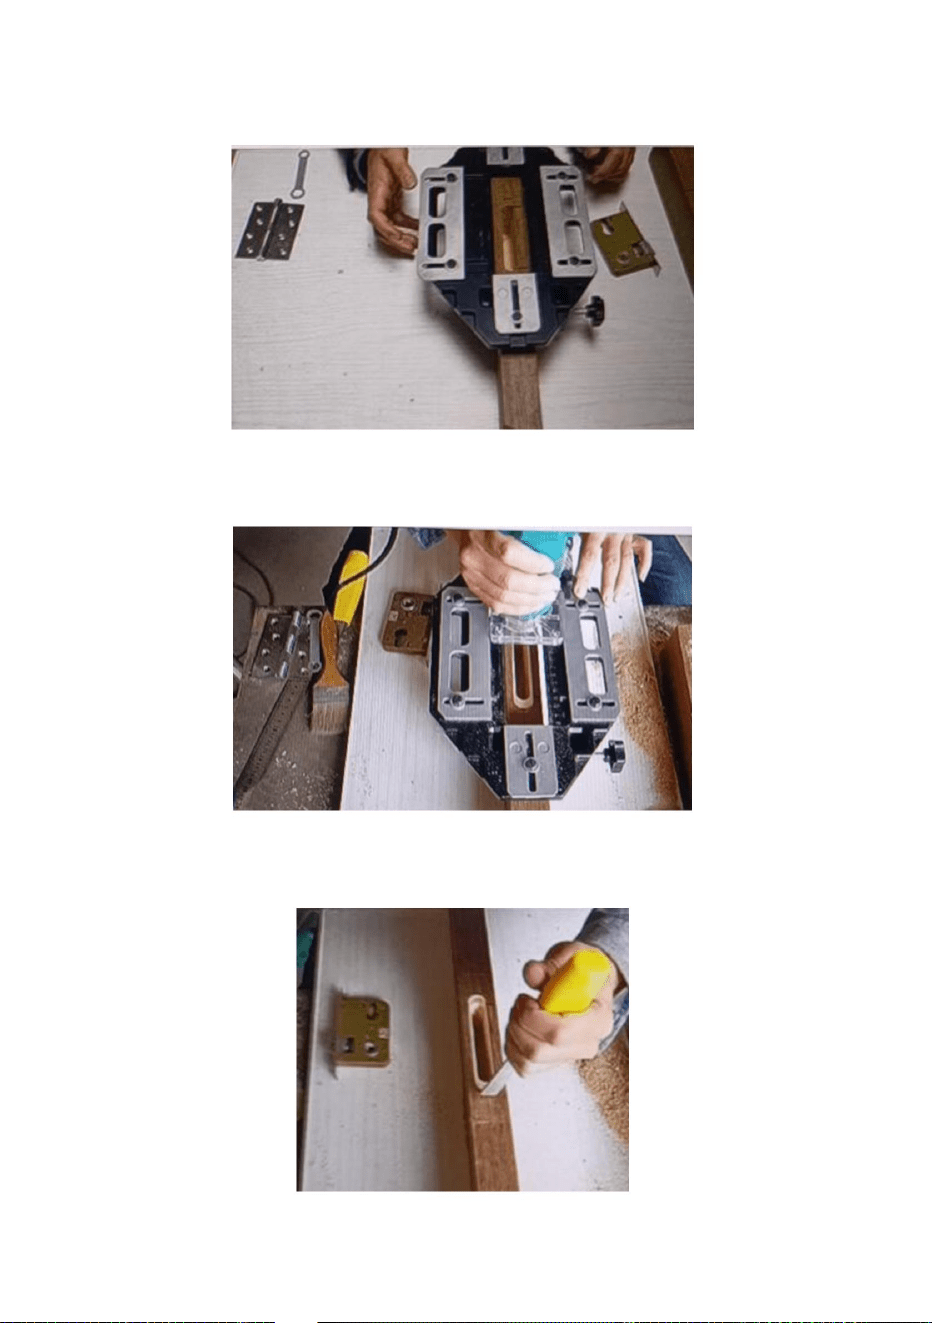
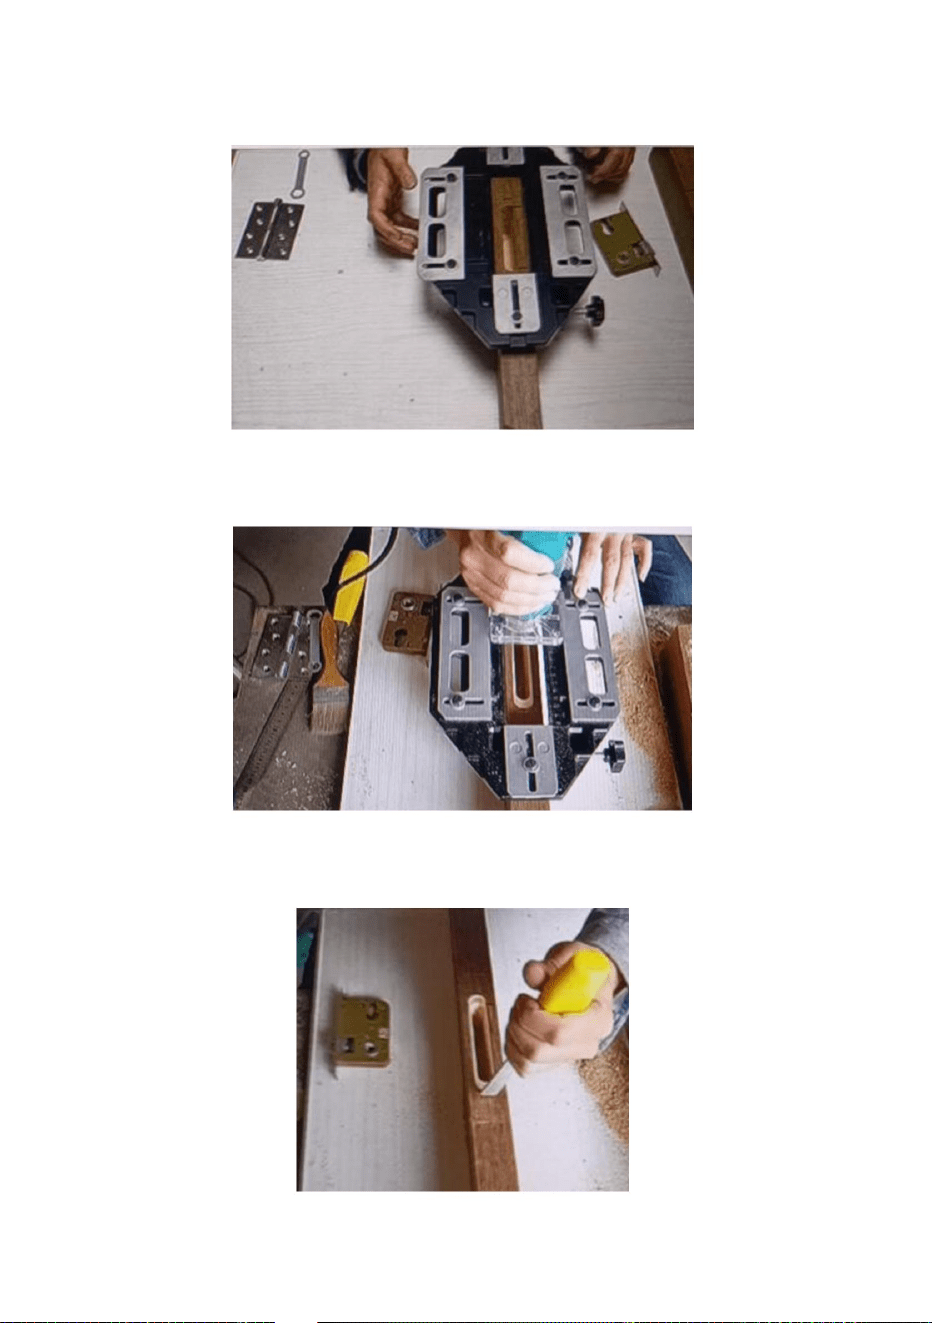
Install the lock body guide plate:
1. Mark the position of the lock body guide plate on the wooden door.
Max. Clamping Thickness:2.36in

5
2. Put the slotted retainer on the wooden door and fix it (Clamp by
tightening the black nuts.)
3. Using the wood router to slot.
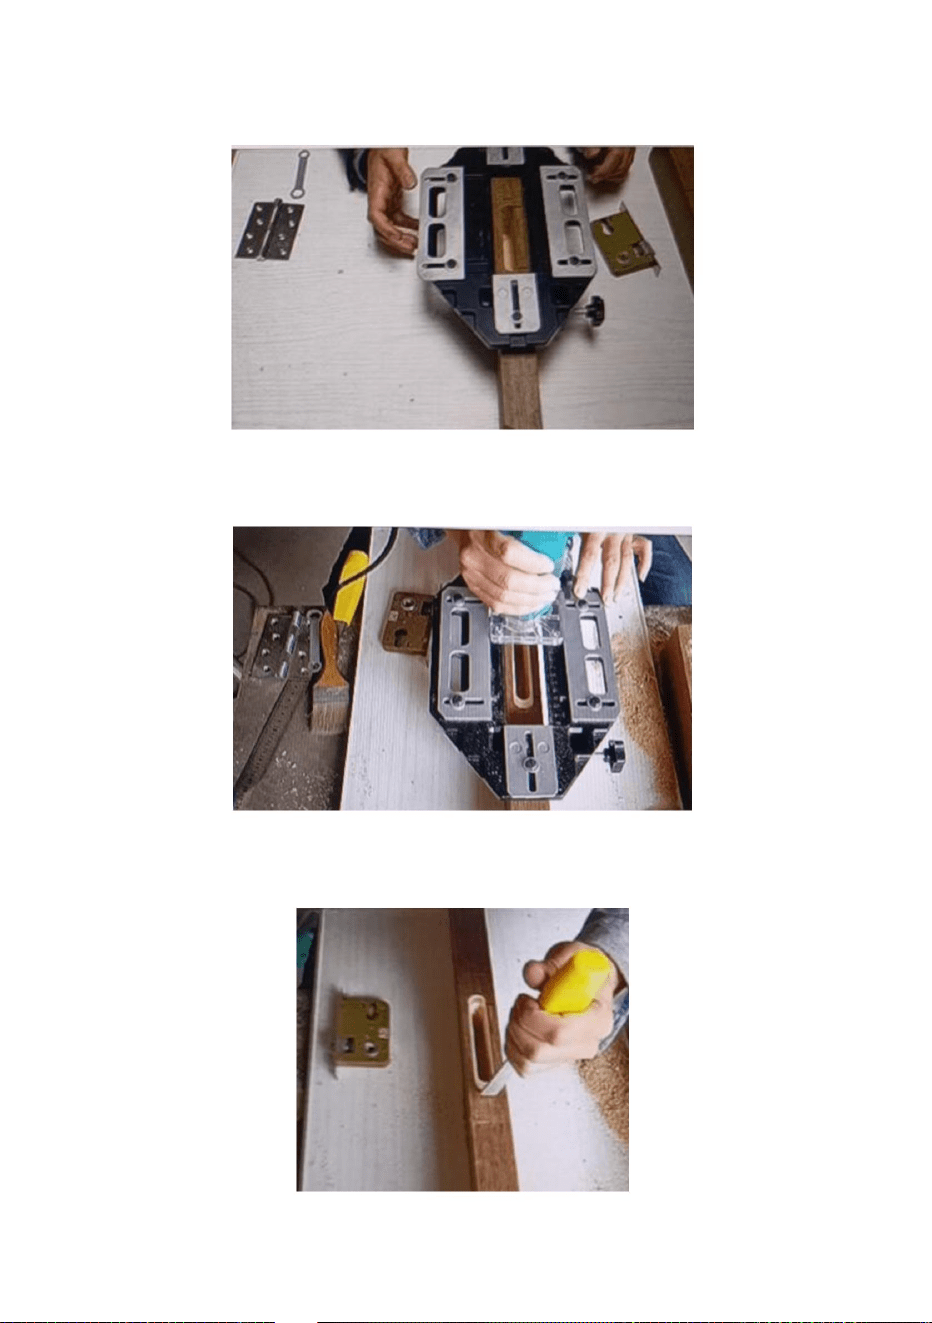
4. Use a chisel to chisel away the curved part to make the edge flat.
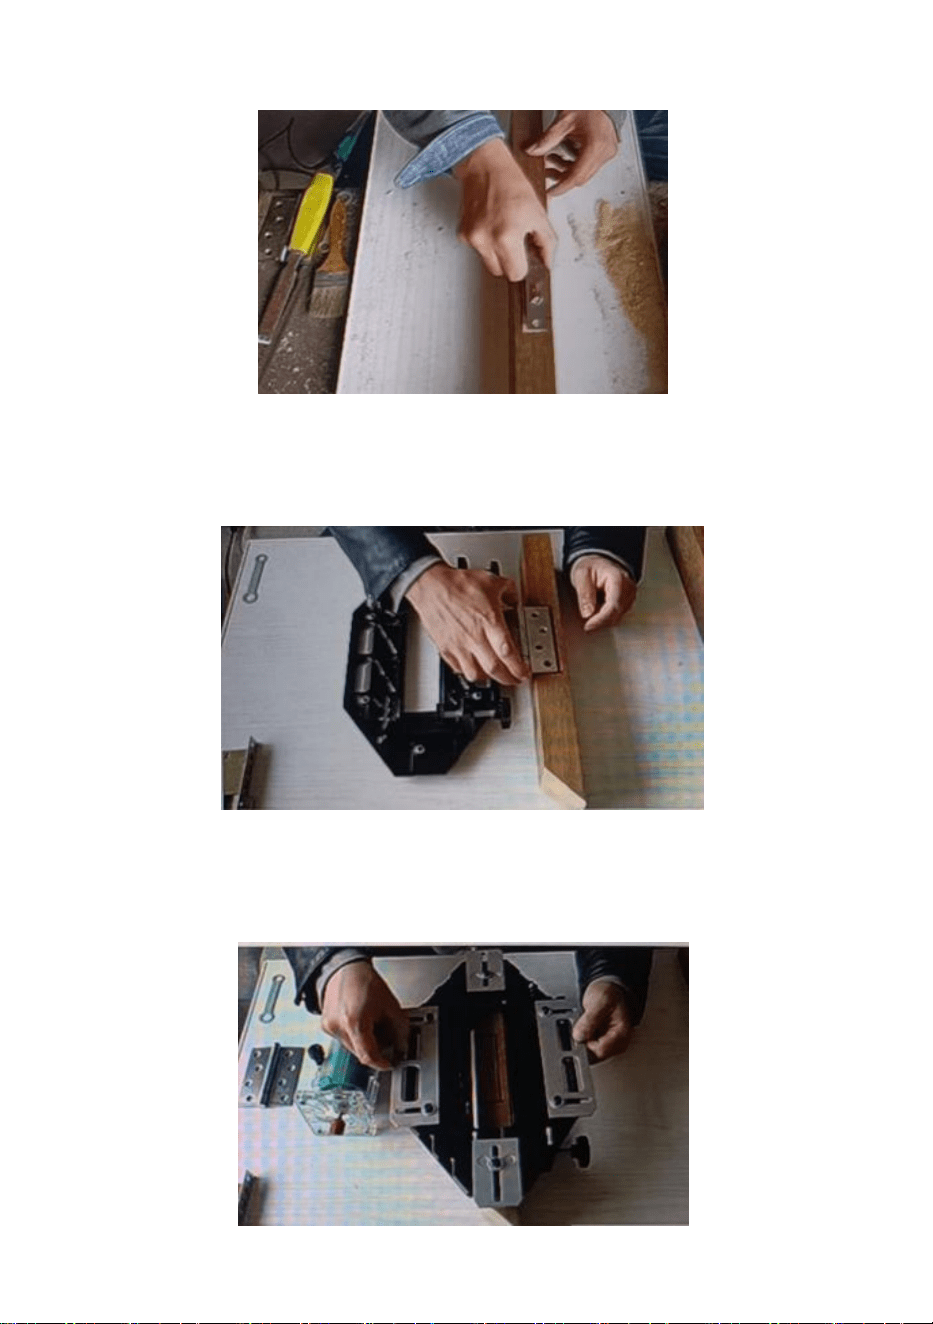
6
5.
Complete the slot and install the lock body guide plate.
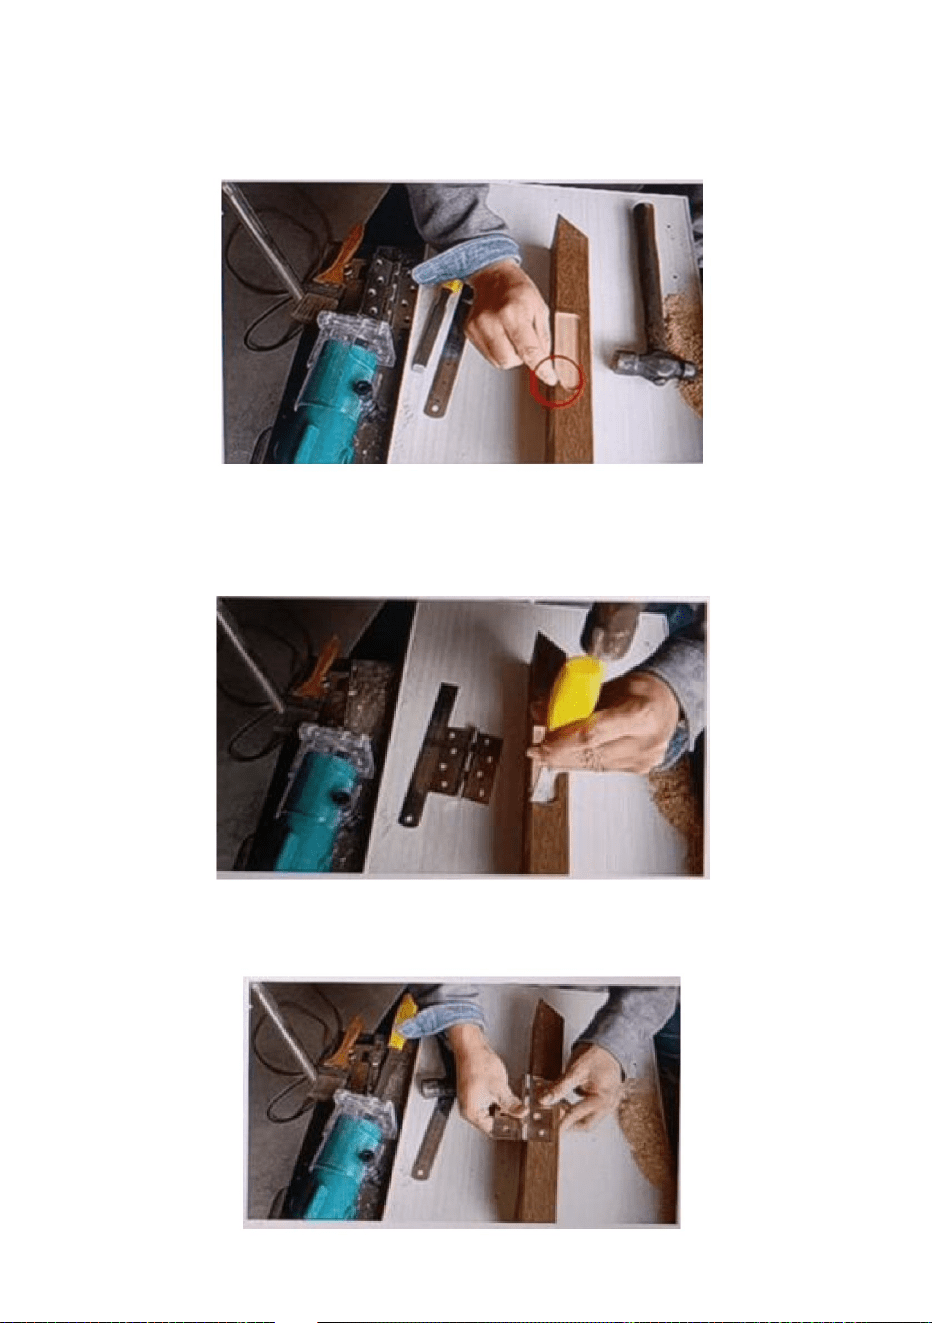
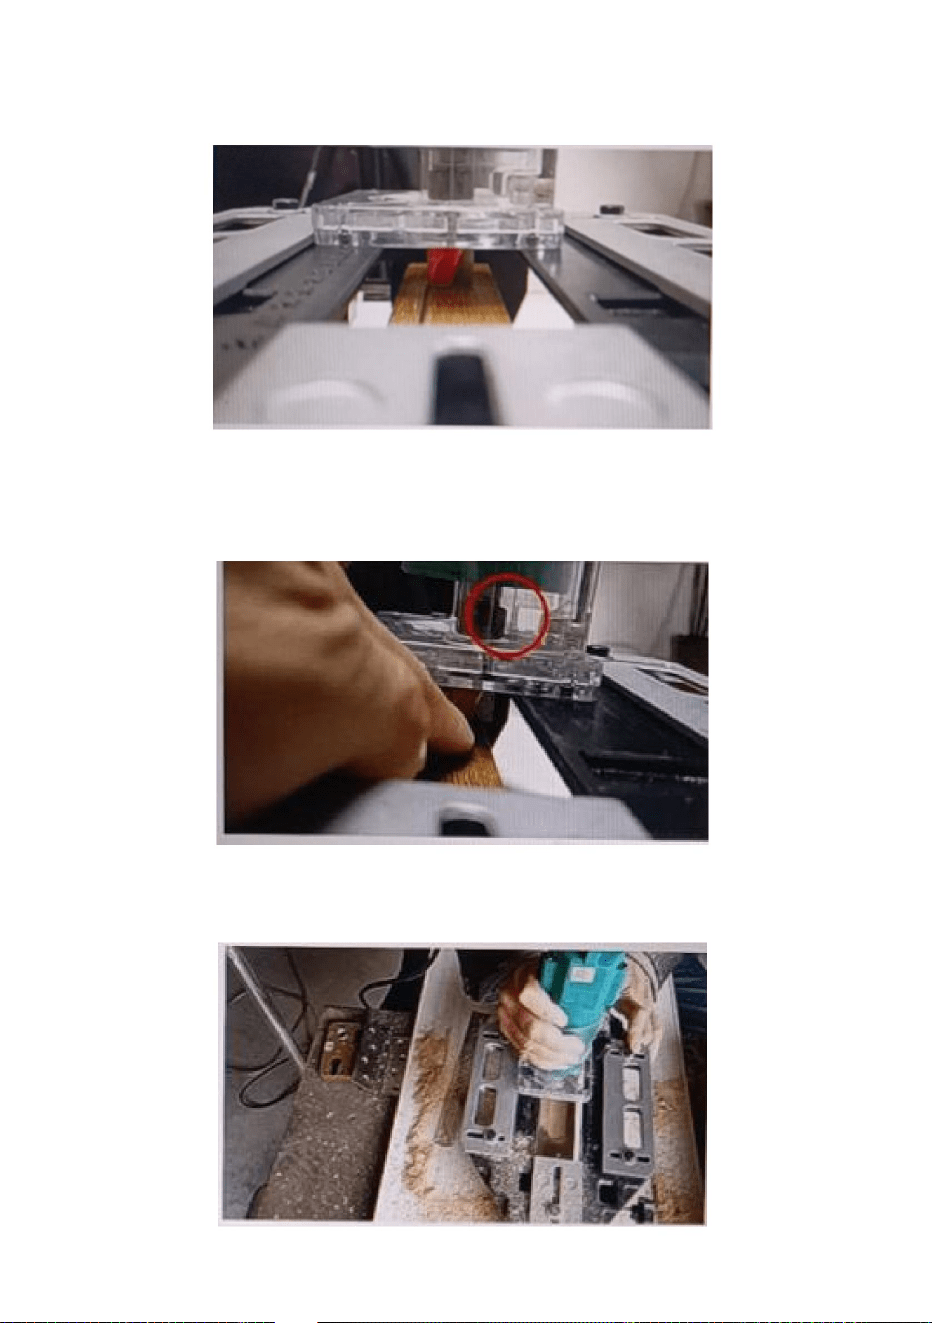
Install the hinge:
1. Mark the position of the hinge on the wooden door.
2. Put the slotted retainer on the wooden door and fix it (Clamp by
tightening the black nuts.)

7
3. Adjust the screws on the four sides to determine the working range of
the wood router.
4. Adjust the depth of the blade of the wood router, and set the blade to
extend beyond the edge of the door.
5. Slotting with the wooden router.

8
6. There is a certain chance that the edge of the door will be damaged
when grooving (The material of the wood and the work of the cutter head
may cause it), so don't hollow out all the wood at the edge.
7. Use a chisel to chisel off the curved and reserved sections, makina sure
the edges are flat.
8. Finish slotting and install the hinge.

9
MAINTENANCE
1. After each use, please install it in time and keep it properly to avoid
losing parts .
2. Clean the surface after each use .

Address: Shuangchenglu 803nong11hao1602A-1609shi, baoshanqu,
shanghai 200000 CN.
Imported to AUS: SIHAO PTY LTD, 1 ROKEVA STREETEASTWOOD
NSW 2122 Australia
Imported to USA: Sanven Technology Ltd., Suite 250, 9166 Anaheim
Place, Rancho Cucamonga, CA 91730
REP
EC
E-CrossStu GmbH
Mainzer Landstr.69, 60329 Frankfurt am Main.
REP
UK
YH CONSULTING LIMITED.
C/O YH Consulting Limited Office 147, Centurion House,
London Road, Staines-upon-Thames, Surrey, TW18 4AX


MODELLO: SXRJL-2303
DIMA PER CERNIERA
Supporto tecnico e certificato di garanzia elettronica www.vevor.com/support
Continuiamo a impegnarci per fornirvi strumenti a prezzi competitivi.
"Risparmia la metà", "Metà prezzo" o qualsiasi altra espressione simile da noi utilizzata rappresenta
solo una stima del risparmio che potresti ottenere acquistando determinati utensili con noi rispetto ai
principali marchi principali e non significa necessariamente coprire tutte le categorie di utensili da noi
offerti. Ti ricordiamo gentilmente di verificare attentamente quando effettui un ordine con noi se
stai effettivamente risparmiando la metà rispetto ai principali marchi principali.
Machine Translated by Google

HAI BISOGNO DI AIUTO? CONTATTACI!
MODELLO: SXRJL-2303
1
Questa è l'istruzione originale, si prega di leggere attentamente tutte le istruzioni del
manuale prima di utilizzare. VEVOR si riserva una chiara interpretazione del nostro manuale
utente. L'aspetto del prodotto sarà soggetto al prodotto ricevuto. Vi preghiamo di
perdonarci se non vi informeremo di nuovo se ci sono aggiornamenti tecnologici o software sul
nostro prodotto.
Hai domande sul prodotto? Hai bisogno di supporto tecnico? Non esitare a contattarci:
Supporto
tecnico e certificato di garanzia elettronica www.vevor.com/
support
DIMA PER CERNIERA
Machine Translated by Google

a distanza di sicurezza da mandrini e utensili da taglio. Mantenere sempre una presa salda su
per sicurezza. Indossare sempre occhiali di sicurezza o protezioni per gli occhi prima di iniziare
impugnature degli utensili quando sono in funzione. Scollegare sempre dalla fonte di alimentazione
prima di regolare gli utensili elettrici.
pericolo. Tenere queste piccole parti lontano dalla portata dei bambini!
funzionamento dell'utensile elettrico. Tenere sempre mani, viso, capelli, abiti larghi e corpo
2. Leggere, comprendere e seguire le istruzioni del produttore dell'utensile elettrico.
1. Questo prodotto contiene piccole parti. Se ingerito, può causare soffocamento.
3. Non azionare il maschiatore a cerniera dopo essersi stancati o aver assunto alcol.
4. Per installare e utilizzare il dispositivo, fare riferimento al manuale.
5. Indossare sempre protezioni per gli occhi durante l'uso.
6. Tenere mani e corpo lontani da spigoli vivi e parti in movimento.
Tipo
Spessore massimo di serraggio
Posizionamento dello slot
Lega di alluminio
Modello
Modello SXRJL-2303
Questi includono:
ATTENZIONE: seguire sempre le precauzioni di sicurezza fondamentali quando si utilizzano questi dispositivi.
Colore Nero
60mm
Materiale
MODELLO E PARAMETRI
ISTRUZIONI DI SICUREZZA
SALVA QUESTE ISTRUZIONI
2
Machine Translated by Google

Scalpello per lavorazione del legno da 12 mm
1
1
NO.
3
6
Quantità
Nome
Spazzola per capelli
Manuale d'uso
1
1
4
1
Corpo principale
Taglierina laterale
1
1
2
5
Chiave a forchetta
1
6
4
COMPONENTI
2
3
5
3
Machine Translated by Google

Installare la piastra guida del corpo della
serratura: 1. Segnare la posizione della piastra guida del corpo della serratura sulla porta in legno.
4
Spessore massimo di serraggio: 2,36 pollici
1. L'utensile deve essere utilizzato con la rifilatrice.
2. Dopo aver completato l'intaglio, tutti gli angoli sono arrotondati, è necessario tagliare
ad angolo retto prima dell'installazione.
NOTA:
OPERAZIONE
Machine Translated by Google
5
4. Utilizzare uno scalpello per asportare la parte curva e rendere piatto il bordo.
2. Posizionare il fermo scanalato sulla porta in legno e fissarlo (bloccare
serrando i dadi neri).
3. Utilizzo della fresatrice per legno per realizzare la scanalatura.
Machine Translated by Google

2. Posizionare il fermo scanalato sulla porta in legno e fissarlo
(bloccare serrando i dadi neri).
Installare la cerniera:
1. Segnare la posizione della cerniera sulla porta in legno.
5. Completare la fessura e installare la piastra guida del corpo della serratura.
6
Machine Translated by Google

7
5. Scanalatura con la fresatrice per legno.
3. Regolare le viti sui quattro lati per determinare l'intervallo di lavoro della fresatrice
per legno.
4. Regolare la profondità della lama della fresatrice per legno e impostarla in modo
che si estenda oltre il bordo della porta.
Machine Translated by Google

8
7. Utilizzare uno scalpello per rimuovere le sezioni curve e quelle rimaste,
assicurandosi che i bordi siano piatti.
6. C'è una certa possibilità che il bordo della porta venga danneggiato durante
la scanalatura (il materiale del legno e il lavoro della testa di fresatura potrebbero
causarlo), quindi non svuotare tutto il legno sul bordo.
8. Completare l'intaglio e installare la cerniera.
Machine Translated by Google

2. Pulire la superficie dopo ogni utilizzo.
1. Dopo ogni utilizzo, installarlo in tempo e conservarlo correttamente per evitare di
perdere parti.
MANUTENZIONE
9
Machine Translated by Google

CONSULENZA YH LIMITATA.
C/O YH Consulting Limited Ufficio 147, Centurion House,
Mainzer Landstr.69, 60329 Francoforte sul Meno.
E-CrossStu GmbH
Viale Europa, 101, 00186 Roma, Italia
Nuovo Galles del Sud 2122 Australia
Importato negli USA: Sanven Technology Ltd., Suite 250, 9166 Anaheim
Importato in AUS: SIHAO PTY LTD, 1 ROKEVA STREETEASTWOOD
Indirizzo: Shuangchenglu 803nong11hao1602A-1609shi, baoshanqu,
shanghai 200000 CN.
Luogo, Rancho Cucamonga, CA 91730
RAPPRESENTANZA DEL REGNO UNITO
Rappresentante della CE
Machine Translated by Google


MODEL: SXRJL-2303
„Oszczędź połowę”, „Połowa ceny” lub inne podobne wyrażenia używane przez nas stanowią
jedynie szacunkowe oszczędności, jakie możesz uzyskać, kupując u nas określone narzędzia w
porównaniu z głównymi markami i niekoniecznie oznaczają one objęcie wszystkich kategorii narzędzi
oferowanych przez nas. Uprzejmie przypominamy, aby dokładnie sprawdzić, czy składając u nas
zamówienie faktycznie oszczędzasz połowę w porównaniu z głównymi markami.
Nadal staramy się oferować Państwu narzędzia w konkurencyjnych cenach.
PRZYRZĄD DO ZAWIASU
Wsparcie techniczne i certyfikat gwarancji elektronicznej www.vevor.com/support
Machine Translated by Google

To jest oryginalna instrukcja, przed użyciem należy uważnie przeczytać wszystkie
instrukcje. VEVOR zastrzega sobie jasną interpretację naszej instrukcji obsługi. Wygląd produktu
będzie zależał od produktu, który otrzymałeś. Prosimy o wybaczenie, że nie poinformujemy
Cię ponownie, jeśli w naszym produkcie pojawią się jakiekolwiek aktualizacje technologiczne lub
oprogramowania.
Masz pytania dotyczące produktu? Potrzebujesz wsparcia technicznego? Skontaktuj się z
nami: Wsparcie
techniczne i certyfikat E-Gwarancji www.vevor.com/support
1
MODEL: SXRJL-2303
POTRZEBUJESZ POMOCY? SKONTAKTUJ SIĘ Z NAMI!
PRZYRZĄD DO ZAWIASU
Machine Translated by Google

obsługa elektronarzędzi. Zawsze trzymaj ręce, twarz, włosy, luźne ubranie i ciało
uchwyty narzędzi podczas pracy. Zawsze odłączaj od źródła zasilania
dla bezpieczeństwa. Zawsze zakładaj okulary ochronne lub osłony oczu przed rozpoczęciem
4. Zapoznaj się z instrukcją montażu i użytkowania przyrządu.
2. Przeczytaj, zrozum i postępuj zgodnie z instrukcjami producenta elektronarzędzi
w bezpiecznej odległości od wrzecion i narzędzi tnących. Zawsze trzymaj mocno
zagrożenie. Trzymaj te małe części z dala od dzieci!
1. Ten produkt zawiera małe części. W przypadku połknięcia może dojść do zadławienia.
3. Nie należy obsługiwać urządzenia do gwintowania zawiasów po zmęczeniu lub pod wpływem alkoholu.
6. Trzymaj ręce i ciało z dala od ostrych krawędzi i ruchomych części.
przed regulacją elektronarzędzi.
5. Podczas użytkowania należy zawsze nosić okulary ochronne.
2
Typ
Maksymalna grubość zacisku
Pozycjonowanie slotów
Kolor
Model
SXRJL-2303
Należą do nich:
OSTRZEŻENIE: Korzystając z tych urządzeń, należy zawsze przestrzegać podstawowych środków ostrożności.
Stop aluminium
Tworzywo
Czarny
60mm
ZAPISZ TE INSTRUKCJE
INSTRUKCJE BEZPIECZEŃSTWA
MODEL I PARAMETRY
Machine Translated by Google

2
Dłuto stolarskie 12mm
5
Klucz płaski
Korpus główny
Obcinak boczny
1
1
Instrukcja obsługi
Nazwa
Ilość
Szczotka do włosów
1
1
4
1
1
1
3
NIE.
6
1
6
4
SKŁADNIKI
2
5
3
3
Machine Translated by Google

Zamontuj prowadnicę korpusu zamka: 1.
Zaznacz położenie prowadnicy korpusu zamka na drewnianych drzwiach.
4
Maksymalna grubość zacisku: 2,36 cala
1. Narzędzie musi być używane z maszyną do przycinania.
2. Po wykonaniu rowków wszystkie rogi należy zaokrąglić, przed montażem należy
wykonać cięcie pod kątem prostym.
NOTATKA:
DZIAŁANIE
Machine Translated by Google

5
3. Wyfrezować rowki za pomocą frezarki do drewna.
2. Załóż zatrzask na drewniane drzwi i zamocuj go (zaciśnij, dokręcając
czarne nakrętki).
4. Za pomocą dłuta odkuj zakrzywioną część, aby krawędź była płaska.
Machine Translated by Google
2. Załóż zatrzask na drewniane drzwi i zamocuj go (zaciśnij, dokręcając
czarne nakrętki).
Montaż zawiasu: 1.
Zaznacz położenie zawiasu na drewnianych drzwiach.
5. Zakończyć wykonywanie otworu i zamontować prowadnicę korpusu zamka.
6
Machine Translated by Google

7
4. Dostosuj głębokość ostrza frezarki do drewna i ustaw je tak, aby wystawało poza krawędź
drzwi.
3. Wyreguluj śruby po czterech stronach, aby określić zakres roboczy frezarki do drewna.
5. Wycinanie rowków za pomocą frezarki do drewna.
Machine Translated by Google

8
7. Za pomocą dłuta odkuj zakrzywione i zarezerwowane sekcje, upewniając się, że krawędzie są
płaskie.
6. Istnieje pewne ryzyko, że krawędź drzwi zostanie uszkodzona podczas rowkowania (może to
być spowodowane materiałem drewna i pracą głowicy frezarskiej), dlatego nie należy wydrążać
całego drewna przy krawędzi.
8. Zakończ wykonywanie rowków i zamontuj zawias.
Machine Translated by Google

2. Wyczyść powierzchnię po każdym użyciu.
1. Po każdym użyciu należy zamontować urządzenie na czas i prawidłowo je przechowywać, aby
uniknąć zgubienia części.
KONSERWACJA
9
Machine Translated by Google

YH CONSULTING LIMITED.
C/O YH Consulting Limited Biuro 147, Centurion House,
Mainzer Landstr.69, 60329 Frankfurt nad Menem.
E-CrossStu GmbH
London Road, Staines-upon-Thames, Surrey, TW18 4AX
NSW 2122 Australia
Importowane do USA: Sanven Technology Ltd., Suite 250, 9166 Anaheim
Importowane do AUS: SIHAO PTY LTD, 1 ROKEVA STREETEASTWOOD
Adres: Shuangchenglu 803nong11hao1602A-1609shi, baoshanqu,
szanghaj 200000 CN.
Miejsce, Rancho Cucamonga, CA 91730
REP WIELKIEJ BRYTANII
Przedstawiciel UE
Machine Translated by Google


MODELL: SXRJL-2303
„Sparen Sie die Hälfte“, „Halber Preis“ oder andere ähnliche Ausdrücke, die wir verwenden, stellen nur eine
Schätzung der Ersparnis dar, die Sie beim Kauf bestimmter Werkzeuge bei uns im Vergleich zu den großen
Topmarken erzielen können, und decken nicht unbedingt alle von uns angebotenen Werkzeugkategorien ab. Wir
möchten Sie freundlich daran erinnern, bei Ihrer Bestellung bei uns sorgfältig zu prüfen, ob Sie im Vergleich
zu den großen Topmarken tatsächlich die Hälfte sparen.
Wir sind weiterhin bestrebt, Ihnen Werkzeuge zu wettbewerbsfähigen Preisen anzubieten.
SCHARNIERVORRICHTUNG
Technischer Support und E-Garantie-Zertifikat www.vevor.com/support
Machine Translated by Google

Brauchen Sie Hilfe? Kontaktieren Sie uns!
MODELL: SXRJL-2303
Dies ist die Originalanleitung. Bitte lesen Sie alle Anweisungen sorgfältig durch, bevor
Sie das Gerät in Betrieb nehmen. VEVOR behält sich eine klare Auslegung unserer
Bedienungsanleitung vor. Das Erscheinungsbild des Produkts richtet sich nach dem
Produkt, das Sie erhalten haben. Bitte verzeihen Sie uns, dass wir Sie nicht erneut informieren,
wenn es Technologie- oder Software-Updates für unser Produkt gibt.
Haben Sie Fragen zum Produkt? Benötigen Sie technischen Support? Bitte kontaktieren Sie
uns:
Technischer Support und E-Garantie-Zertifikat www.vevor.com/
support
SCHARNIERVORRICHTUNG
1
Machine Translated by Google

Halten Sie Hände, Gesicht, Haare, lose Kleidung und Körperteile stets
in sicherem Abstand zu Spindeln und Schneidwerkzeugen. Halten Sie immer fest
Werkzeuggriffe während des Betriebs. Trennen Sie immer von der Stromquelle
bevor Sie Elektrowerkzeuge einstellen.
2. Lesen, verstehen und befolgen Sie die Anweisungen Ihres Elektrowerkzeugherstellers
aus Sicherheitsgründen. Tragen Sie immer eine Schutzbrille oder einen Augenschutz, bevor Sie beginnen
Gefahr! Bewahren Sie diese Kleinteile außerhalb der Reichweite von Kindern auf!
1. Dieses Produkt enthält Kleinteile. Bei Verschlucken besteht Erstickungsgefahr.
5. Bitte tragen Sie während der Anwendung immer einen Augenschutz.
3. Betätigen Sie den Scharnierklopfer nicht nach Übermüdung oder unter Alkoholeinfluss.
6. Halten Sie Hände und Körper von scharfen Kanten und beweglichen Teilen fern.
4. Informationen zur Installation und Verwendung der Vorrichtung finden Sie im Handbuch.
2
Typ
Max. Klemmdicke
Positionierung der Steckplätze
60 mm
Modell
SXRJL-2303
Dazu gehören:
WARNUNG: Befolgen Sie bei der Verwendung dieser Geräte immer die grundlegenden Sicherheitsvorkehrungen.
Material
Farbe Schwarz
Aluminiumlegierung
BEWAHREN SIE DIESE ANWEISUNGEN AUF
SICHERHEITSHINWEISE
MODELL UND PARAMETER
Machine Translated by Google

Haarbürste
1
1
1
Hauptteil
Seitenschneider
12 mm Meißel für Holzbearbeitung
Maulschlüssel
2
3
NEIN.
5
6
1
1
1
1
4
Bedienungsanleitung
Name
Menge
1
5
4
KOMPONENTEN
3
6
2
3
Machine Translated by Google

Installieren Sie die Führungsplatte des
Schlosskörpers: 1. Markieren Sie die Position der Führungsplatte des Schlosskörpers auf der Holztür.
Max. Klemmdicke: 2,36 Zoll
1. Das Werkzeug muss mit der Trimmmaschine verwendet werden.
NOTIZ:
BETRIEB
2. Nachdem das Schlitzen abgeschlossen ist, sind alle Ecken abgerundet. Vor der Installation
müssen Sie im rechten Winkel schneiden.
4
Machine Translated by Google
3. Mit der Oberfräse Schlitze fräsen.
2. Schlitzhalter auf die Holztür aufstecken und fixieren (durch Festziehen der
schwarzen Muttern festklemmen).
4. Meißeln Sie den gebogenen Teil mit einem Meißel weg, um die Kante flach zu machen.
5
Machine Translated by Google

6
5. Vervollständigen Sie den Schlitz und montieren Sie die Führungsplatte des Schlosskörpers.
Scharnier montieren:
1. Markieren Sie die Position des Scharniers auf der Holztür.
2. Schlitzhalter auf die Holztür aufstecken und fixieren (durch Festziehen
der schwarzen Muttern festklemmen).
Machine Translated by Google

7
4. Passen Sie die Tiefe des Sägeblatts der Oberfräse an und stellen Sie das
Sägeblatt so ein, dass es über die Türkante hinausragt.
3. Stellen Sie die Schrauben an den vier Seiten ein, um den Arbeitsbereich der
Oberfräse zu bestimmen.
5. Schlitzen mit der Oberfräse.
Machine Translated by Google

8
7. Meißeln Sie die gebogenen und reservierten Abschnitte mit einem Meißel ab und stellen Sie sicher, dass die
Kanten flach sind.
6. Es besteht eine gewisse Gefahr, dass die Kante der Tür beim Nuten beschädigt wird (das Material des
Holzes und die Arbeit des Fräskopfes können dies verursachen), höhlen Sie daher nicht das gesamte Holz an der
Kante aus.
8. Beenden Sie das Schlitzen und montieren Sie das Scharnier.
Machine Translated by Google

2. Reinigen Sie die Oberfläche nach jedem Gebrauch.
1. Installieren Sie es nach jedem Gebrauch rechtzeitig und bewahren Sie es ordnungsgemäß auf, um den Verlust von
Teilen zu vermeiden.
WARTUNG
9
Machine Translated by Google

YH CONSULTING LIMITED.
London Road, Staines-upon-Thames, Surrey, TW18 4AX
Mainzer Landstr.69, 60329 Frankfurt am Main.
E-CrossStu GmbH
C/O YH Consulting Limited Office 147, Centurion House,
Nach AUS importiert: SIHAO PTY LTD, 1 ROKEVA STREETEASTWOOD
NSW 2122 Australien
Adresse: Shuangchenglu 803nong11hao1602A-1609shi, baoshanqu,
Shanghai 200000 CN.
Ort, Rancho Cucamonga, CA 91730
Importiert in die USA: Sanven Technology Ltd., Suite 250, 9166 Anaheim
UK REP
Vertreter der EG
Machine Translated by Google


MODÈLE:SXRJL2303
«Économisezlamoitié»,«Moitiéprix»outouteautreexpressionsimilaireutiliséeparnousnereprésente
qu'uneestimationdeséconomiesquevouspourriezréaliserenachetantcertainsoutilscheznousparrapport
auxgrandesmarquesetnecouvrepasnécessairementtouteslescatégoriesd'outilsquenousproposons.
Nousvousrappelonsdebienvouloirvérifiersoigneusementlorsquevouspassezunecommandechez
noussivouséconomisezréellementlamoitiéparrapportauxgrandesmarques.
Nouscontinuonsànousengageràvousfournirdesoutilsàdesprixcompétitifs.
GABARITDECHARNIÈRE
Assistancetechniqueetcertificatdegarantieélectroniquewww.vevor.com/support
Machine Translated by Google

Vousavezdesquestionssurnosproduits?Vousavezbesoind'assistancetechnique?
N'hésitezpas
ànouscontacter:Assistancetechniqueetcertificatdegarantie
électroniquewww.vevor.com/support
Ils'agitdelanoticed'utilisationd'origine.Veuillezlireattentivementtoutesles
instructionsdumanuelavantdel'utiliser.VEVORseréserveledroitd'interpréterclairement
notremanueld'utilisation.L'apparenceduproduitdépendduproduitquevousavez
reçu.Veuilleznousexcuser,nousnevousinformeronsplusencasdemiseàjourtechnologique
oulogicielledenotreproduit.
BESOIND'AIDE?CONTACTEZNOUS!
MODÈLE:SXRJL2303
GABARITDECHARNIÈRE
1
Machine Translated by Google

àunedistancesûredesbrochesetdesoutilsdecoupe.Gardeztoujoursuneprisefermesur
lespoignéesdel'outilpendantlefonctionnement.Débrancheztoujoursl'appareildelasourced'alimentation.
utilisationd'outilsélectriques.Gardeztoujourslesmains,levisage,lescheveux,lesvêtementsamplesetlecorps
avantderéglerlesoutilsélectriques.
2.Lisez,comprenezetsuivezlesinstructionsdufabricantdevotreoutilélectrique
pourdesraisonsdesécurité.Porteztoujoursdeslunettesdesécuritéoudeslunettesdeprotectionavantdecommencer
Danger.Gardezcespetitespièceshorsdeportéedesenfants!
1.Ceproduitcontientdepetitespièces.Encasd'ingestion,ilpeutprésenterunrisqued'étouffement.
3.N'utilisezpasletaraudàcharnièreaprèsavoirétéfatiguéousousl'effetdel'alcool.
5.Veuilleztoujoursporteruneprotectionpourlesyeuxpendantl'utilisation.
6.Gardezlesmainsetlecorpséloignésdesbordstranchantsetdespiècesmobiles.
4.Veuillezvousréféreraumanuelpourinstalleretutiliserlegabarit.
2
PositionnementdesfentesTaper
SXRJL2303
60mm
Ils’agitnotammentde:
Épaisseurdeserragemax.
Modèle
AVERTISSEMENT:Respecteztoujourslesprécautionsdesécuritédebaselorsquevousutilisezcesappareils.
Matériel
Noir
Alliaged'aluminium
Couleur
CONSERVEZCESINSTRUCTIONS
CONSIGNESDESÉCURITÉ
MODÈLEETPARAMÈTRES
Machine Translated by Google

Non.
3
5
6
1
1
1
1
1
Nom
Brosseàcheveux
4
Quantité
Manueld'utilisation
1
1
Corpsprincipal
Pincecoupantelatérale
Ciseauàboisde12mm
Cléàfourche
2
1
2
4
COMPOSANTS
6
3
5
3
Machine Translated by Google
Installerlaplaquedeguidageducorpsdeserrure:
1.Marquezlapositiondelaplaquedeguidageducorpsdeserruresurlaporteenbois.
Épaisseurdeserragemax.:2,36pouces
1.L'outildoitêtreutiliséaveclamachinedecoupe.
NOTE:
OPÉRATION
2.Unefoislerainurageterminé,touslescoinssontarrondis,vousdevezcouperà
angledroitavantl'installation.
4
Machine Translated by Google
5
4.Utilisezunciseaupourenleverlapartieincurvéeafinderendrelebordplat.
2.Placezlesupportfendusurlaporteenboisetfixezle(serrezenserrantles
écrousnoirs).
3.Utilisationdelatoupieàboispourréaliserlesrainures.
Machine Translated by Google

2.Placezlesupportfendusurlaporteenboisetfixezle(serrezen
serrantlesécrousnoirs).
Installerlacharnière:
1.Marquezlapositiondelacharnièresurlaporteenbois.
5.Complétezlafenteetinstallezlaplaquedeguidageducorpsdeserrure.
6
Machine Translated by Google

7
4.Ajustezlaprofondeurdelalamedelatoupieàboisetréglezlalamepourqu'elles'étende
audelàduborddelaporte.
3.Ajustezlesvissurlesquatrecôtéspourdéterminerlaplagedetravaildelatoupieàbois.
5.Rainurageavecladéfonceuseàbois.
Machine Translated by Google
8
7.Utilisezunciseaupourciselerlessectionscourbesetréservées,envousassurantqueles
bordssontplats.
6.Ilexisteuncertainrisquequeleborddelaportesoitendommagélorsdurainurage(le
matériauduboisetletravaildelatêtedecoupepeuventenêtrelacause),alorsnecreusez
pastoutleboissurlebord.
8.Terminezlerainurageetinstallezlacharnière.
Machine Translated by Google

2.Nettoyezlasurfaceaprèschaqueutilisation.
1.Aprèschaqueutilisation,veuillezl'installeràtempsetleconservercorrectementpouréviterde
perdredespièces.
ENTRETIEN
9
Machine Translated by Google

YHCONSULTINGLIMITÉE.
RoutedeLondres,StainesuponThames,Surrey,TW184AX
MainzerLandstr.69,60329FrancfortsurleMain.
ECrossStuGmbH
C/OYHConsultingLimitedBureau147,CenturionHouse,
ImportéenAustralie:SIHAOPTYLTD,1ROKEVASTREET,ASTWOOD
NSW2122Australie
Adresse:Shuangchenglu803nong11hao1602A1609shi,baoshanqu,shanghai
200000CN.
ImportéauxÉtatsUnis:SanvenTechnologyLtd.,Suite250,9166Anaheim
Lieu,RanchoCucamonga,CA91730
REPRÉSENTANTDELACE
REPRÉSENTANTDUROYAUMEUNI
Machine Translated by Google


MODEL: SXRJL-2303
"Save Half", "Half Price" of andere soortgelijke uitdrukkingen die wij gebruiken, geven alleen een schatting van de
besparingen die u kunt behalen door bepaalde gereedschappen bij ons te kopen in vergelijking met de grote topmerken
en betekent niet noodzakelijkerwijs dat alle categorieën gereedschappen die wij aanbieden, worden gedekt. Wij
herinneren u eraan om zorgvuldig te controleren of u daadwerkelijk de helft bespaart in vergelijking met de grote
topmerken wanneer u een bestelling bij ons plaatst.
Wij streven er voortdurend naar om u gereedschappen tegen concurrerende prijzen te leveren.
SCHARNIERJIG
Technische ondersteuning en e-garantiecertificaat www.vevor.com/support
Machine Translated by Google

HULP NODIG? NEEM CONTACT MET ONS OP!
MODEL: SXRJL-2303
1
Dit is de originele instructie, lees alle handleidingen zorgvuldig door voordat u het
product gebruikt. VEVOR behoudt zich een duidelijke interpretatie van onze gebruikershandleiding
voor. Het uiterlijk van het product is afhankelijk van het product dat u hebt ontvangen.
Vergeef ons dat we u niet opnieuw zullen informeren als er technologie- of software-updates
voor ons product zijn.
Heeft u vragen over het product? Heeft u technische ondersteuning nodig? Neem dan gerust
contact met
ons op: Technische ondersteuning en E-garantiecertificaat
www.vevor.com/support
SCHARNIERJIG
Machine Translated by Google

bediening van elektrisch gereedschap. Houd uw handen, gezicht, haar, losse kleding en lichaam altijd
gereedschapshandvatten tijdens gebruik. Koppel altijd los van de stroombron
voor de veiligheid. Draag altijd een veiligheidsbril of oogbescherming voordat u begint
voordat u elektrisch gereedschap afstelt.
2. Lees, begrijp en volg de instructies van de fabrikant van uw elektrisch gereedschap
op een veilige afstand van spindels en snijgereedschappen. Houd altijd een stevige grip op
Gevaar. Houd deze kleine onderdelen buiten bereik van kinderen!
1. Dit product bevat kleine onderdelen. Als het wordt ingeslikt, kan dit verstikkingsgevaar opleveren.
4. Raadpleeg de handleiding voor het installeren en gebruiken van de mal.
5. Draag altijd een oogbescherming tijdens gebruik.
6. Houd uw handen en lichaam uit de buurt van scherpe randen en bewegende onderdelen.
3. Gebruik de scharniertap niet na vermoeidheid of alcoholgebruik.
2
Type
Maximale klemdikte
Sleufpositionering
60mm
Hieronder vallen:
SXRJL-2303
Model
WAARSCHUWING: Volg altijd de basisveiligheidsmaatregelen bij het gebruik van deze apparaten.
Materiaal
Aluminiumlegering
ZwartKleur
BEWAAR DEZE INSTRUCTIES
VEILIGHEIDSINSTRUCTIES
MODEL EN PARAMETERS
Machine Translated by Google

1
Steeksleutel
1
3
Nee.
6 Gebruiksaanwijzing
Naam
Hoeveelheid
Haarborstel
1
1
4
1
Hoofdgedeelte
Zijsnijder
1
1
2
12mm houtbewerkingsbeitel
5
4
6
1
COMPONENTEN
2
5
3
3
Machine Translated by Google

Monteer de geleideplaat van het slothuis:
1. Markeer de positie van de geleideplaat van het slothuis op de houten deur.
4
Maximale klemdikte: 2,36 inch
OPMERKING:
2. Nadat het sleuvenwerk is voltooid, zijn alle hoeken afgerond. U moet ze voor de
installatie in een rechte hoek zagen.
1. Het gereedschap moet worden gebruikt met de trimmachine.
WERKING
Machine Translated by Google

5
4. Gebruik een beitel om het gebogen gedeelte weg te beitelen, zodat de rand vlak wordt.
2. Plaats de sleufhouder op de houten deur en bevestig deze (klem deze vast door de
zwarte moeren aan te draaien).
3. Gebruik de bovenfrees om sleuven te maken.
Machine Translated by Google

2. Plaats de sleufhouder op de houten deur en bevestig deze (klem deze vast
door de zwarte moeren aan te draaien).
Monteer het scharnier:
1. Markeer de positie van het scharnier op de houten deur.
5. Maak de sleuf af en monteer de geleideplaat van het slothuis.
6
Machine Translated by Google

7
5. Sleuven maken met de bovenfrees.
3. Stel de schroeven aan de vier zijden af om het werkbereik van de bovenfrees te
bepalen.
4. Pas de diepte van het zaagblad van de bovenfrees aan en zorg dat het
zaagblad voorbij de rand van de deur komt.
Machine Translated by Google

8
8. Maak het sleufwerk af en monteer het scharnier.
6. Er is een kans dat de rand van de deur beschadigd raakt bij het groeven (dit kan
komen door het materiaal van het hout en de werking van de freeskop). Hol daarom niet
het hele hout aan de rand uit.
7. Gebruik een beitel om de gebogen en gereserveerde delen weg te beitelen. Zorg ervoor
dat de randen vlak zijn.
Machine Translated by Google

2. Maak het oppervlak na elk gebruik schoon.
1. Installeer het product na elk gebruik op tijd en bewaar het goed om verlies van
onderdelen te voorkomen.
ONDERHOUD
9
Machine Translated by Google

YH CONSULTING LIMITED.
C/O YH Consulting Limited Kantoor 147, Centurion House,
Mainzer Landstr.69, 60329 Frankfurt am Main.
E-CrossStu GmbH
Londen Road, Staines-upon-Thames, Surrey, TW18 4AX
Geïmporteerd naar AUS: SIHAO PTY LTD, 1 ROKEVA STREETEASTWOOD
Geïmporteerd naar de VS: Sanven Technology Ltd., Suite 250, 9166 Anaheim
NSW 2122 Australië
Adres: Shuangchenglu 803nong11hao1602A-1609shi, baoshanqu, shanghai
200000 CN.
Plaats, Rancho Cucamonga, CA 91730
EC-REP
VK REP
Machine Translated by Google


MODELL: SXRJL-2303
GJÄRNSJIG
Teknisk support och e-garanticertifikat www.vevor.com/support
"Spara hälften", "halva priset" eller andra liknande uttryck som används av oss representerar
bara en uppskattning av besparingar du kan dra nytta av att köpa vissa verktyg hos oss jämfört med
de stora toppmärkena och betyder inte nödvändigtvis att täcka alla kategorier av verktyg som erbjuds
av oss. Du påminns vänligen om att noggrant kontrollera när du gör en beställning hos oss om
du faktiskt sparar hälften i jämförelse med de främsta stora varumärkena.
Vi fortsätter att vara engagerade i att ge dig verktyg till konkurrenskraftiga priser.
Machine Translated by Google
Detta är den ursprungliga instruktionen, läs alla instruktioner noggrant innan du
använder den. VEVOR reserverar sig för en tydlig tolkning av vår användarmanual. Utseendet
på produkten är beroende av den produkt du fått. Ursäkta oss att vi inte kommer att
informera dig igen om det finns någon teknik eller mjukvaruuppdateringar på vår produkt.
Har du produktfrågor? Behöver du teknisk support? Kontakta oss gärna: Teknisk support och
e-
garanticertifikat www.vevor.com/support
1
MODELL: SXRJL-2303
BEHÖVER HJÄLP? KONTAKTA OSS!
GJÄRNSJIG
Machine Translated by Google

för säkerheten. Bär alltid skyddsglasögon eller ögonskydd innan du börjar
på säkert avstånd från spindlar och skärverktyg. Håll alltid ett stadigt grepp om
verktygshandtag när de är i drift. Koppla alltid från strömkällan
4. Se manualen för att installera och använda jiggen.
2. Läs, förstå och följ din elverktygstillverkares instruktioner
drift av elverktyg. Håll alltid händer, ansikte, hår, löst sittande kläder och kropp
fara. Håll dessa små delar borta från barn!
1. Denna produkt innehåller små delar. Om den sväljs kommer den att utgöra en kvävning
innan du justerar elverktyg.
3. Använd inte gångjärnsskruven efter trötthet eller alkohol.
6. Håll händer och kropp borta från vassa kanter och rörliga delar.
5. Bär alltid ögonskydd vid användning.
Typ Slotspositionering
Max. Spänntjocklek
Färg
Dessa inkluderar:
SXRJL-2303
Modell
VARNING: Följ alltid grundläggande säkerhetsföreskrifter när du använder dessa enheter.
Material
Aluminiumlegering
Svart
60 mm
SPARA DESSA INSTRUKTIONER
SÄKERHETSINSTRUKTIONER
MODELL OCH PARAMETRAR
2
Machine Translated by Google
Huvuddel
Side Cutter
1
1
1
1
2
5
Öppen skiftnyckel
12 mm träbearbetningsmejsel
1
1
3
Inga.
Antal
6 Användarmanual
Namn
1
Hårborste
4
1
6
4
KOMPONENTER
3
2
5
3
Machine Translated by Google
Montera låskroppens styrplatta: 1.
Markera positionen för låskroppens styrplatta på trädörren.
4
Max. Spänntjocklek: 2,36 tum
1. Verktyget måste användas med trimningsmaskinen.
2. Efter slutförandet av spårningen är alla hörn rundade, du måste skära i
rät vinkel innan installation.
NOTERA:
DRIFT
Machine Translated by Google
3. Använd träöverfräsen till spåret.
2. Sätt den slitsade hållaren på trädörren och fixera den (Kläm fast genom
att dra åt de svarta muttrarna.)
4. Använd en mejsel för att mejsla bort den böjda delen för att göra kanten platt.
5
Machine Translated by Google

6
5. Komplettera spåret och installera låskroppens styrplatta.
2. Sätt den slitsade hållaren på trädörren och fixera den (Kläm fast
genom att dra åt de svarta muttrarna.)
Montera gångjärnet:
1. Markera gångjärnets position på trädörren.
Machine Translated by Google
5. Skåra med träöverfräsen.
3. Justera skruvarna på de fyra sidorna för att bestämma arbetsområdet för överfräsen.
4. Justera djupet på bladet på överfräsen och ställ in bladet så att det
sträcker sig utanför dörrens kant.
7
Machine Translated by Google

8. Slutför spårningen och montera gångjärnet.
6. Det finns en viss chans att dörrkanten skadas vid räffling (Trämaterialet och
skärhuvudets arbete kan orsaka det), så urholka inte allt trä i kanten.
7. Använd en mejsel för att mejsla av de böjda och reserverade sektionerna, se till
att kanterna är plana.
8
Machine Translated by Google

9
UNDERHÅLL
2. Rengör ytan efter varje användning.
1. Efter varje användning, vänligen installera den i tid och förvara den ordentligt för att
undvika att tappa delar.
Machine Translated by Google

UK REP
EC REP
NSW 2122 Australien
Importerad till USA: Sanven Technology Ltd., Suite 250, 9166 Anaheim
Importerad till AUS: SIHAO PTY LTD, 1 ROKEVA STREETEASTWOOD
Adress: Shuangchenglu 803nong11hao1602A-1609shi, baoshanqu,
shanghai 200000 CN.
Place, Rancho Cucamonga, CA 91730
YH CONSULTING LIMITED.
C/O YH Consulting Limited Office 147, Centurion House,
Mainzer Landstr.69, 60329 Frankfurt am Main.
E-CrossStu GmbH
London Road, Staines-upon-Thames, Surrey, TW18 4AX
Machine Translated by Google


MODELO:SXRJL2303
"Ahorrelamitad","mitaddeprecio"ocualquierotraexpresiónsimilarqueutilicemossolorepresenta
unaestimacióndelahorroquepodríaobteneralcomprarciertasherramientasconnosotrosencomparación
conlasprincipalesmarcasynonecesariamentesignificaquecubratodaslascategoríasdeherramientas
queofrecemos.Lerecordamosque,alrealizarunpedidoconnosotros,verifiquecuidadosamentesi
realmenteestáahorrandolamitadencomparaciónconlasprincipalesmarcas.
Seguimoscomprometidosabrindarleherramientasaprecioscompetitivos.
PLANTILLAPARABISAGRAS
Soportetécnicoycertificadodegarantíaelectrónicawww.vevor.com/support
Machine Translated by Google

¿NECESITAAYUDA?¡CONTÁCTENOS!
MODELO:SXRJL2303
1
Estassonlasinstruccionesoriginales,leaatentamentetodaslasinstruccionesdel
manualantesdeutilizarelproducto.VEVORsereservaunainterpretaciónclaradenuestro
manualdeusuario.Laaparienciadelproductoestarásujetaalproductoquerecibió.
Perdónenospornoinformarlenuevamentesihayactualizacionesdetecnologíaosoftwareen
nuestroproducto.
¿Tienepreguntassobreelproducto?¿Necesitaasistenciatécnica?Nodudeenponerseen
contactocon
nosotros:Asistenciatécnicaycertificadodegarantíaelectrónica
www.vevor.com/support
PLANTILLAPARABISAGRAS
Machine Translated by Google

Tipo
Grosormáximodesujeción
Posicionamientoderanuras
Material
Modelo
SXRJL2303
Estosincluyen:
ADVERTENCIA:Sigasiemprelasprecaucionesbásicasdeseguridadalutilizarestosdispositivos.
Aleacióndealuminio
Color Negro
60mm
2
Manejodeherramientaseléctricas.Mantengasiemprelasmanos,lacara,elcabello,laropasueltayelcuerpo
Mangosdeherramientascuandoestánenfuncionamiento.Desconectesiemprelaherramientadelafuentedealimentación.
Porseguridad.Utilicesiempregafasdeseguridadoprotectoresocularesantesdecomenzar.
3.Noutiliceelgolpeadordebisagrasdespuésdeestarcansadoobajolosefectosdelalcohol.
2.Lea,comprendaysigalasinstruccionesdelfabricantedesuherramientaeléctrica.
aunadistanciaseguradeloshusillosylasherramientasdecorte.Sujetesiemprefirmemente
Peligro.¡Mantengaestaspiezaspequeñasfueradelalcancedelosniños!
1.Esteproductocontienepiezaspequeñas.Siseingieren,puedenprovocarasfixia.
4.Consulteelmanualparainstalaryutilizarlaplantilla.
5.Utilicesiempreprotecciónparalosojosduranteeluso.
6.Mantengalasmanosyelcuerpoalejadosdebordesafiladosypiezasmóviles.
antesdeajustarherramientaseléctricas.
GUARDEESTASINSTRUCCIONES
INSTRUCCIONESDESEGURIDAD
MODELOYPARÁMETROS
Machine Translated by Google

3
4
6
1
COMPONENTES
2
5
3
1
Llavedebocaabierta
1
3
No.
6 Manualdeusuario
Nombre
Cantidad
Cepilloparaelpelo
1
1
4
1
Cuerpoprincipal
Cortadorlateral
1
1
2
Cincelparacarpinteríade12mm
5
Machine Translated by Google

Grosormáximodesujeción:2,36pulgadas
4
Instalelaplacaguíadelcuerpodelacerradura:1.
Marquelaposicióndelaplacaguíadelcuerpodelacerraduraenlapuertademadera.
1.Laherramientadebeutilizarseconlamáquinarecortadora.
2.Unavezfinalizadoelranurado,seredondeantodaslasesquinasyesnecesariocortarlas
enángulosrectosantesdelainstalación.
NOTA:
OPERACIÓN
Machine Translated by Google

3.Utilizandolafresadorademaderaparahacerranuras.
2.Coloqueelretenedorranuradoenlapuertademaderayfíjelo(sujeteapretando
lastuercasnegras).
4.Utiliceuncincelparacincelarlapartecurvaydejarelbordeplano.
5
Machine Translated by Google

6
5.Completelaranuraeinstalelaplacaguíadelcuerpodelacerradura.
Instalelabisagra:1.
Marquelaposicióndelabisagraenlapuertademadera.
2.Coloqueelretenedorranuradoenlapuertademaderayfíjelo(sujete
apretandolastuercasnegras).
Machine Translated by Google

5.Hacerranurasconlafresadorademadera.
3.Ajustelostornillosenloscuatroladosparadeterminarelrangodetrabajodelafresadora
demadera.
4.Ajustelaprofundidaddelahojadelafresadorademaderayconfigurelahojaparaquese
extiendamásalládelbordedelapuerta.
7
Machine Translated by Google

8
7.Utiliceuncincelparacincelarlasseccionescurvasyreservadas,asegurándosedequelos
bordesquedenplanos.
6.Existeunaciertaposibilidaddequeelbordedelapuertasedañealranurar(elmaterial
delamaderayeltrabajodelcabezaldecortepuedencausarlo),asíquenoahuequetodala
maderaenelborde.
8.Terminederanurareinstalelabisagra.
Machine Translated by Google

2.Limpielasuperficiedespuésdecadauso.
1.Despuésdecadauso,instáleloatiempoymanténgaloadecuadamenteparaevitar
perderpiezas.
MANTENIMIENTO
9
Machine Translated by Google

MainzerLandstr.69,60329FráncfortdelMeno.
C/OYHConsultingLimitedOficina147,CenturionHouse,
YHCONSULTINGLIMITADA.
ECrossStuGmbH
CarreteradeLondres,StainesuponThames,Surrey,TW184AX
NuevaGalesdelSur2122Australia
ImportadoaEE.UU.:SanvenTechnologyLtd.,Suite250,9166Anaheim
ImportadoaAustralia:SIHAOPTYLTD,1ROKEVASTREETEASTWOOD
Dirección:Shuangchenglu803nong11hao1602A1609shi,baoshanqu,
shanghai200000CN.
Lugar,RanchoCucamonga,CA91730
REPRESENTANTEDELREINOUNIDO
REPRESENTANTECE
Machine Translated by Google