Operation and Installation Manual
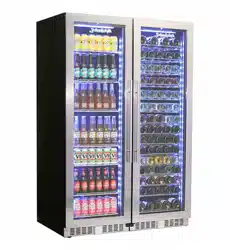
BD425 WINE AND BEVERAGE FRIDGE Range
Includes
BD425W / BD425B
BD425W-B / BD425B-B
BD425D / BD425D-B (Dual Zone)
BD425D-X & BD425D-BX (Dual Zone / Drawer)
This appliance is intended to be used in household and similar applications including use in commercial
settings. Such as staff kitchen areas in shops, offices and other working enviroments; by clients in hotels,
motels and other residential type enviroments, such as bed and breakfasts, catering and similar non-retail
applications.

1 | P a g e
Congratulations on the purchase of your new SCHMICK beveridge fridge.
Before using your new appliance, please read this manual thoroughly to ensure that you know how
to operate and install your new appliance safely and efficiently.
Warnings and general safety Instructions in this manual do not cover all possible conditions and
situations that may occur. It is your responsibility to use common sense, caution, and care when
installing, maintaining, and operating your appliance.
Because these following operating instructions cover various models, the features of your appliance
may differ slightly from those described in this manual, and as such not all warnings in this manual
will be applicable to your appliance.
WARRANTY – This unit comes with Australia wide 24 Month comprehensive warranty.
Full warranty statement can be found online at:
https://bar-fridges-australia.com.au/pages/warranty-statement
If you have any queries, please contact Bar Fridges Australia’s service department on
1300 376849 (Ext2) or email vicservice@bar-fridges-australia.com.au with your Fridge
Model details, your Serial Number, and Invoice Number ready for all warranty queries.
Or complete the online form, found at the link below:
https://www.bar-fridges-australia.com.au/making-a-warranty-claim.html
2 | P a g e
GENERAL SAFETY INSTRUCTIONS
READ CAREFULLY AND KEEP FOR FUTURE REFERENCE
Read this manual thoroughly before first use, even if you are familiar with this type of product.
The safety precautions enclosed herein reduce the risk of fire, electric shock and injury when
correctly adhered to. Keep this manual in a safe place for future reference. If applicable, pass
these instructions on to the next owner of the appliance.
Pay particular attention to messages that follow this safety alert symbol or the
words DANGER, WARNING or CAUTION. These words are used to alert you
to a potential hazard that can seriously injure you and others.
The instructions will tell you how to reduce the chance of injury and let you know
what can happen if the instructions are not followed.
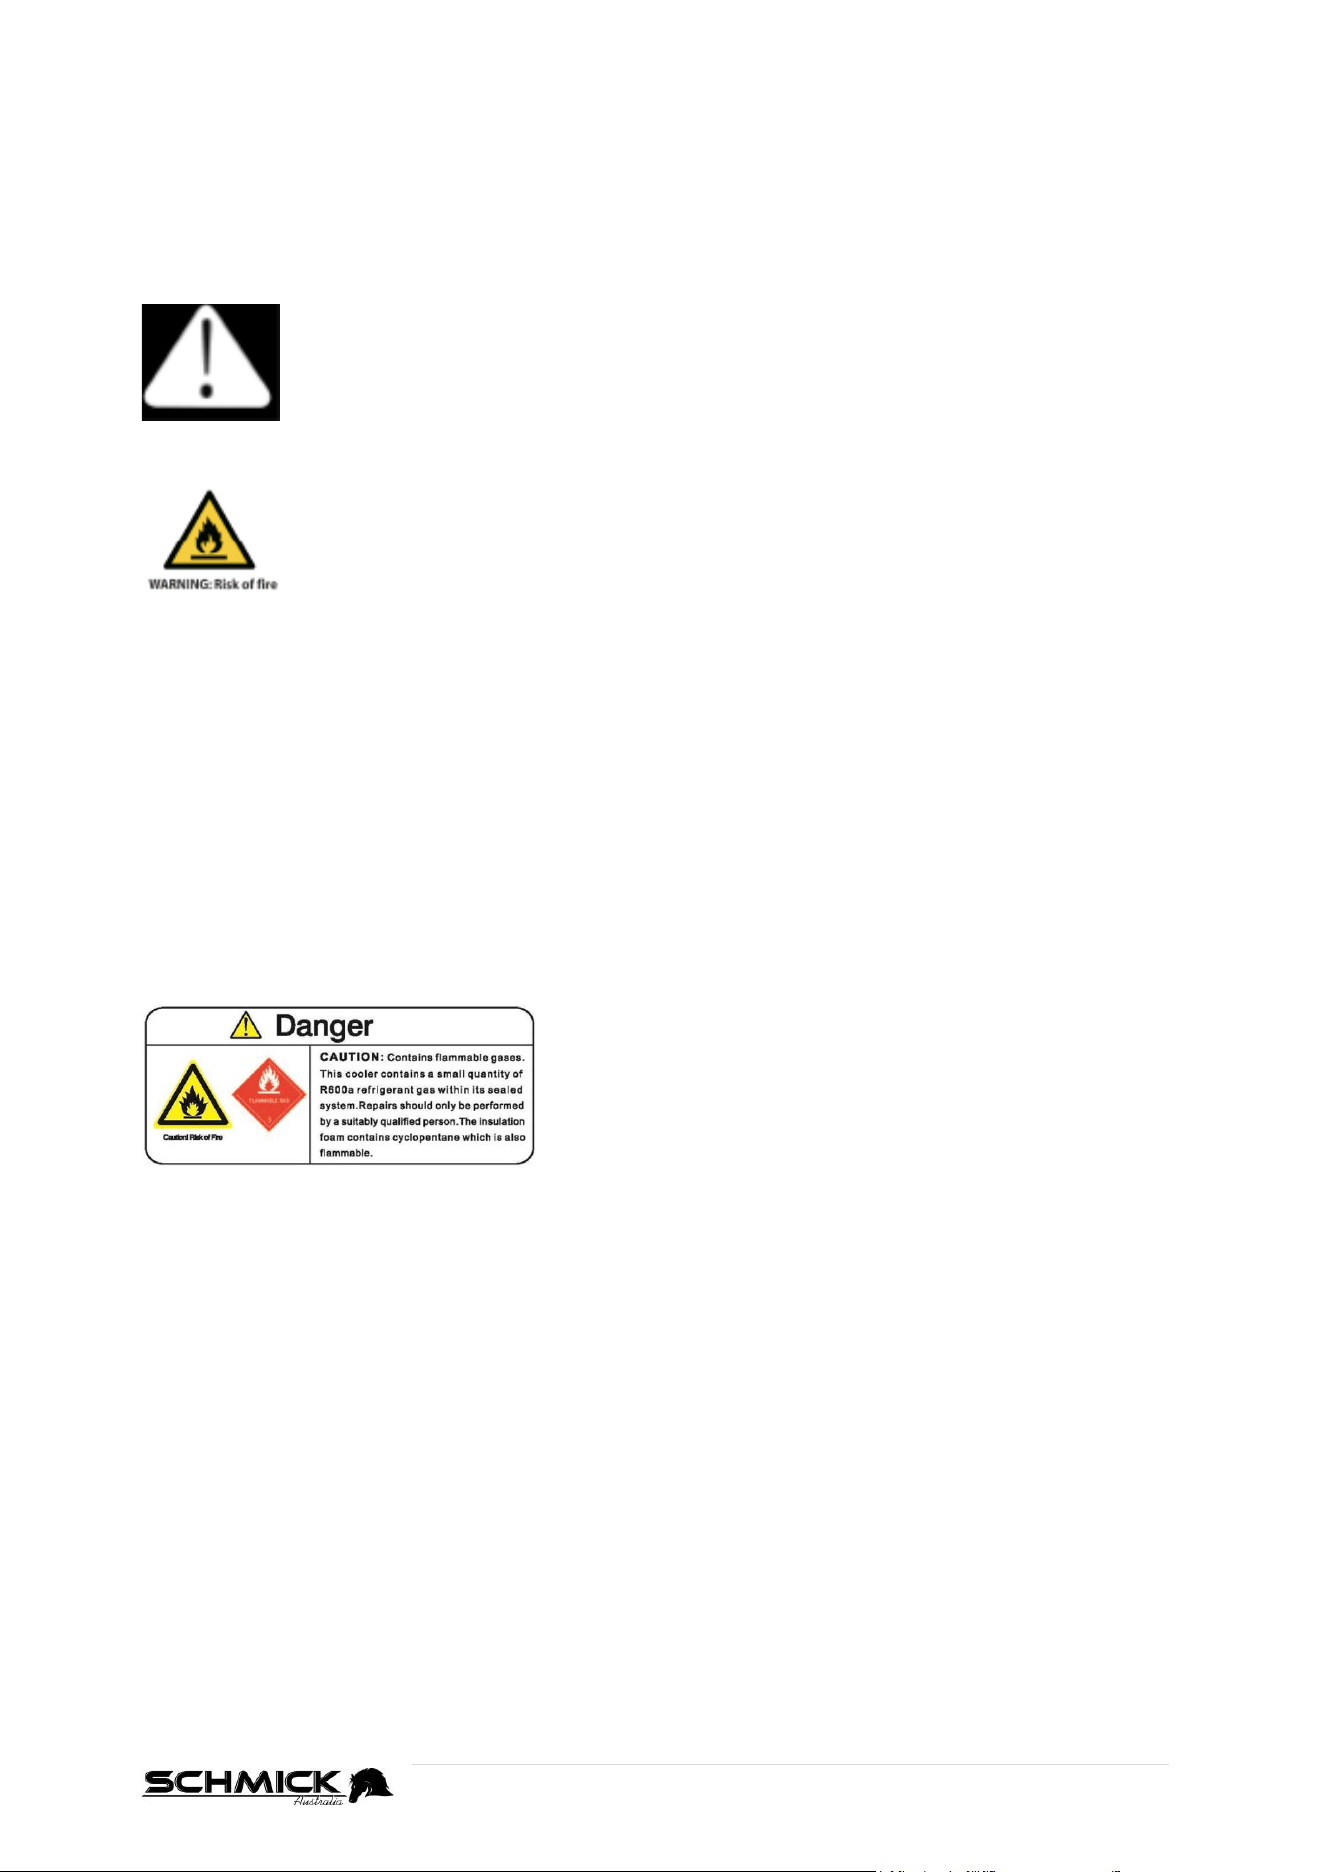
This symbol alerts you to take care as the appliance contains flammable
materials: isobutane as refrigerant and cyclopentane as insulation blowing gas.
While isobutane (R600a) is a gas with a high level of environmental
compatibility, it is nevertheless flammable.
Do not expose the appliance to high heat, sparks and open flames.
During transport and installation, ensure that none of the components of the
refrigerant circuit become damaged.
REFRIGERANT MATTERS
WARNING! Do not damage the refrigerant circuit!
Never use an appliance with a damaged refrigerant circuit!
If the refrigerant circuit becomes damaged, avoid proximity to open fires and all types of heat
and ignition sources. Thoroughly ventilate the room in which the appliance is located. The room
for installing the appliance must be at least 1m³ per 8g of refrigerant. The amount and type of
refrigerant in the appliance can be found in the Technical Specifications on the ‘Basic
Instructions Page’ and on the appliance rating plate.
It is hazardous for anyone other than an authorised
service person to service this appliance. In Queensland,
the authorised service person MUST hold a Gas Work
Authorisation for hydrocarbon refrigerants to carry out
servicing or repairs which involve the removal of covers
and the opening of refrigeration piping system.
RESPONSIBLE DISPOSAL
At the end of its working life, do not throw this appliance out with your household rubbish.
Electrical and electronic products contain substances that can have a detrimental effect on the
environment and human health if disposed of inappropriately. Observe any local regulations
regarding the disposal of electrical consumer goods and dispose of it appropriately for recycling
and recovery of the refrigerant and blowing agent. Contact your municipal authorities for advice
on recycling facilities in your area.
WARNING! This refrigeration appliance contains flammable refrigerants and insulation blowing
gases, which must be removed before disposal. Contact your municipal authorities for any codes
or regulations concerning the disposal of such materials.
DANGER! Risk of child entrapment: When discarding this or another refrigerator, make sure to
take off the door and leave the shelves/racks/drawers in place so that children cannot easily
climb in and get trapped inside.

3 | P a g e
ELECTRICAL SAFETY
VOLTAGE
Plug the appliance in a 220-240V, 50Hz, properly earthed power outlet, which must be in good
working order. Make sure your outlet voltage and circuit frequency correspond to the voltage
stated on the appliance rating label
FLUCTUATIONS
If voltage fluctuates in your area, especially Perth and WA which is more common, you are best
to invest in a voltage regulator, this can be purchased on our website, model AVS-1000.
POWER CONNECTION
Do not use an adaptor; do not use an extension cord. Plug the power plug directly into a
separate power point that cannot easily be turned off accidentally, and that is easily accessible
so you can switch it off when required.
POWER CORD
Do not kink or damage the power supply cord. Do not leave it exposed or dangling. Secure it
behind the appliance so no one steps on or places anything on the power supply cord or against
it. A squashed or damaged power plug may overheat and cause a fire.
DAMAGED CORD
Do not use a cord that shows cracks or abrasion damage along its length or at either end. Any
damage to the cord may cause a short circuit, fire and/or electric shock. If the power cord is
damaged, it must be replaced by the manufacturer or its service agent. To arrange a
replacement, please contact the service department on 1300 376849 (Ext2) or email
vicservice@bar-fridges-australia.com.au
DISCONNECTION
Never unplug the unit by pulling the cord. Always grip the plug firmly and pull straight out from
the power point.
ELECTRICAL WORK
If the installation of this appliance requires any electrical work (ie: if a new power point is
required), make sure it is carried out by a qualified electrician.
USAGE CONDITIONS AND RESTRICTIONS
INDOOR DOMESTIC AND/OR COMMERCIAL USE
This appliance is intended for indoor domestic use or industrial / commercial only.
INTENDED PURPOSE
Do not use this appliance for anything other than its intended purpose, and only use it as
described in this manual.
Do not attempt to alter or modify this appliance in any way.
USAGE RESTRICTIONS
This appliance is not intended for use by persons (including children) with reduced physical,
sensory or mental capabilities, or lack of experience and knowledge, unless they have been
given supervision or instruction concerning the use of the appliance by a person responsible for
their safety.
WARNING! Do not use any electrical appliances (such as ice cream makers) inside refrigeration
appliances, unless they are approved for this purpose, by the manufacturer.

4 | P a g e
USAGE CONDITIONS AND RESTRICTIONS (Con’t)
CHILDREN
Supervise children to ensure they do not play with the appliance.
Close supervision is necessary when any appliance is used by or near children.
Never allow children to operate, play with or crawl inside the appliance.
NO USE FOR LONG PERIODS
If the refrigerating appliance is left empty for long periods, switch off, defrost, clean, dry, and
leave the door open to prevent mould, condensation and/or odors developing within the
appliance.
IMPORTANT
Store wine in sealed bottles
Do not overload the cabinet – this will prevent air circulation and efficiency
Do not open the door unless necessary - Opening the door for long periods can cause a
significant increase of the temperature in the compartments of the appliance.
Do not cover the shelving with aluminum foil or any other materials that may prevent air
circulation

5 | P a g e
CLEANING AND MAINTENANCE
WARNING!
Do not use sharp objects or metal instruments to remove frost or clean the appliance.
Do not use mechanical devices or other means to accelerate the defrosting process.
Do not use hairdryers or any electrical heaters to accelerate the defrosting process.
Do not use high pressure water to clean the appliance.
Use a plastic scraper, if absolutely necessary.
DISCONNECT
Unplug the appliance before cleaning or servicing. Failure to do so can result in electric shock,
injury or death. Do not connect or disconnect the plug when your hands are wet.
FLAMES
Do not let open flames or ignition sources enter the appliance.
FLAMMABLE/EXPLOSIVE SUBSTANCES
Never clean this appliance with flammable fluids. Do not store or use volatile, flammable or
explosive substances such as aerosol cans with a flammable propellant in or close to this or any
other appliance. The fumes can create a fire hazard or explosion.
SOLVENTS
Clean the inside cabinet of fridge with a clean damp cloth, with neutral soap/detergent.
Avoid damage by never using abrasive or flammable cleaning products.
Do not use solvent based cleaning agents or abrasives on the interior as these may damage or
discolor the surfaces of the appliances.
DOOR SEAL
Use eucalyptus oil twice a year with clean cloth to wipe and clean the ‘door seal’.
STAINLESS STEEL
If you have purchased a stainless steel model, please see stainless steel care guide supplied
with purchase. Alternatively, find the guide here:
https://bar-fridges-australia.com.au/pages/stainless-steel-care-guide
CONDENSOR
Clean the condensor every 12 months with a vacuum cleaner and/or brush to eliminate any dust
accumulating. The condensor is located at rear/bottom section of unit so it may require a
technician to assist. In most cases in normal installations the build up of dust and particles will
be very minimal, but is recommended to prolong the life of your appliance.
SERVICE AND REPAIRS
Do not attempt to repair, modify or replace any part of the appliance unless specifically
recommended in this manual. Refer all other servicing to a qualified technician, or contact the
sales support line for advice on examination or repair of the appliance on 1300 376849 (Ext2),
or you can also email us vicservice@bar-fridges-australia.com.au
ITEMS STORAGED INSIDE THE CABINET
This appliance is intended to be used exclusively for the storage of wine or beverages.
It is 100% not recommended to store blood, biological or special pharmaceuticals in the
fridge.
Keep items/drinks at least 1-2cm away from walls to allow better air flow and to stop
drinks freezing over.
Warranty does not cover ‘contents’ in any circumstance

6 | P a g e
INSTALLATION BASICS
HEAVY
This appliance is heavy, take care when moving it. To avoid back or other injury, consider a two
person lift or mechanical aid when installing it. Failure to do so can result in back or other injury.
BUILT-IN DESIGN
This appliance can be ‘built into’ cabinetry, however, the appropriate clearance needs to be
provided on installation. See specifications found in this manual.
KEEP IT UPRIGHT
Do not tilt the fridge more than 45º from upright when moving it. Otherwise leave standing
upright for 24hours before switching on again.
HANDLE WITH CARE
Do not apply force to any part such as the condenser or door
Do not carry the fridge by carrying the door.
VENTILATION
Ensure proper ventilation by keeping any ventilation openings, in the appliance enclosure or in
the built-in structure, free and clear of obstructions. Ensure adequate air circulation around the
appliance to prevent overheating. Exact clearance measurements can be found further in this
manual.
POSITIONING
WARNING! When positioning the appliance, ensure the supply cord is not trapped or damaged.
WARNING! Do not locate multiple portable socket outlets or portable power supplies at the
rear of the appliance.
LEVEL
Install the appliance level in order to ensure proper operation. If necessary, adjust the levelling
legs at the bottom of the unit.
LOCATION
Install the appliance in an area that meets the following requirements:
Avoid area’s where the appliance would be exposed to direct sunlight, and/or sources of
heat, (stove, heater, radiator, etc.) – This will void your warranty
The ambient temperatures must correspond to the climate class (T) indicated on the rating
plate of the appliance: (ie: (T) Rated is 16°C to 43°C) (SEE TABLE BELOW)
The floor must be sturdy, level and strong enough to support the unit when fully loaded.
Avoid area’s where the appliance would be exposed to extreme cold ambient temperatures
or excessive moisture and high humidity (such as outdoors or exposed to wind, rain water
spray or drips).
Avoid positioning anywhere where water can penetrate ‘under’ or on ‘top’ of the fridge. It
could cause damage to the internal workings and is potentially dangerous.
Once into position: Allow at least 30minutes before turning the appliance “ON”.
AMBIENT ROOM TEMPERATURE
This appliance is designed to operate in ambient temperatures specified by its temperature class
marked on the rating plate.
Class
Symbol
Ambient Temperatures range(℃)
Extended Temperate
SN
﹢10 to﹢32
Temperate
N
﹢16 to﹢32
Subtropical
ST
﹢16 to﹢38
Tropical
T
﹢16 to﹢43
INSTALLATION TIP: Installing it in the coolest area of the room will save energy consumption
and running costs.

7 | P a g e
SUNLIGHT, HEAT SOURCES and EXTREME COLD
The fridge must not be exposed to direct sunlight.
Heat sources may increase electrical consumption.
Extreme cold ambient temperatures may also cause the unit not to perform properly.
POWER FAILURE
If the unit is unplugged, power is lost, or turned off, you must wait at least 3 to 5 minutes
before restarting the unit.
Most power failures are corrected within a few hours and should not affect the
temperature of your appliance if you minimize the number of times the door is opened.
If the power is going to be off for a long period of time, you need to take the proper steps
to protect your contents.
MOVING YOUR WINE / BEVERAGE FRIDGE
If you need to move your fridge after use, please follow these steps.
Remove all items.
Take out the loose items inside the Wine/Beverage fridge (such as shelf), or fix the loose
items with the foam.
Turn the adjustable leg up to the base to avoid damage.
Tape the door shut (We do not recommend packing tape, or cheap masking tape).
Be sure the appliance stays secure in the upright position during transportation. Also
protect outside of appliance with a blanket or similar items.
The importer is not responsible for damages or accidents arising from the misuse or
disregard of electrical laws relevant to the country where this product is used.
8 | P a g e
SETTING UP YOUR NEW BD425 (BASICS)
REMOVE PACKAGING
Unbox your unit, and remove all packaging materials, including the foam base, and any adhesive
films and/or tapes from the fridge.
Remove any/all protective films, to ensure the thermal dissipation from the appliance.
CHECK YOUR PARTS
Check the parts and accessories inside the packaging, against the components list (see below).
If you are missing any parts, please call 1300 376849 (Ext2), or you can also email us
vicservice@bar-fridges-australia.com.au
INSTALL INTO LOCATION
Once delivered and shifted into location, let the appliance stand upright for approximately
12 hours before connecting it to the power source, which helps to reduce the possibility of
a cooling-system malfunction from handling during transportation.
CLEAN BEFORE USE
Before use, please clean the inside cabinet of fridge with a clean damp cloth with a neutral
soap/detergent.
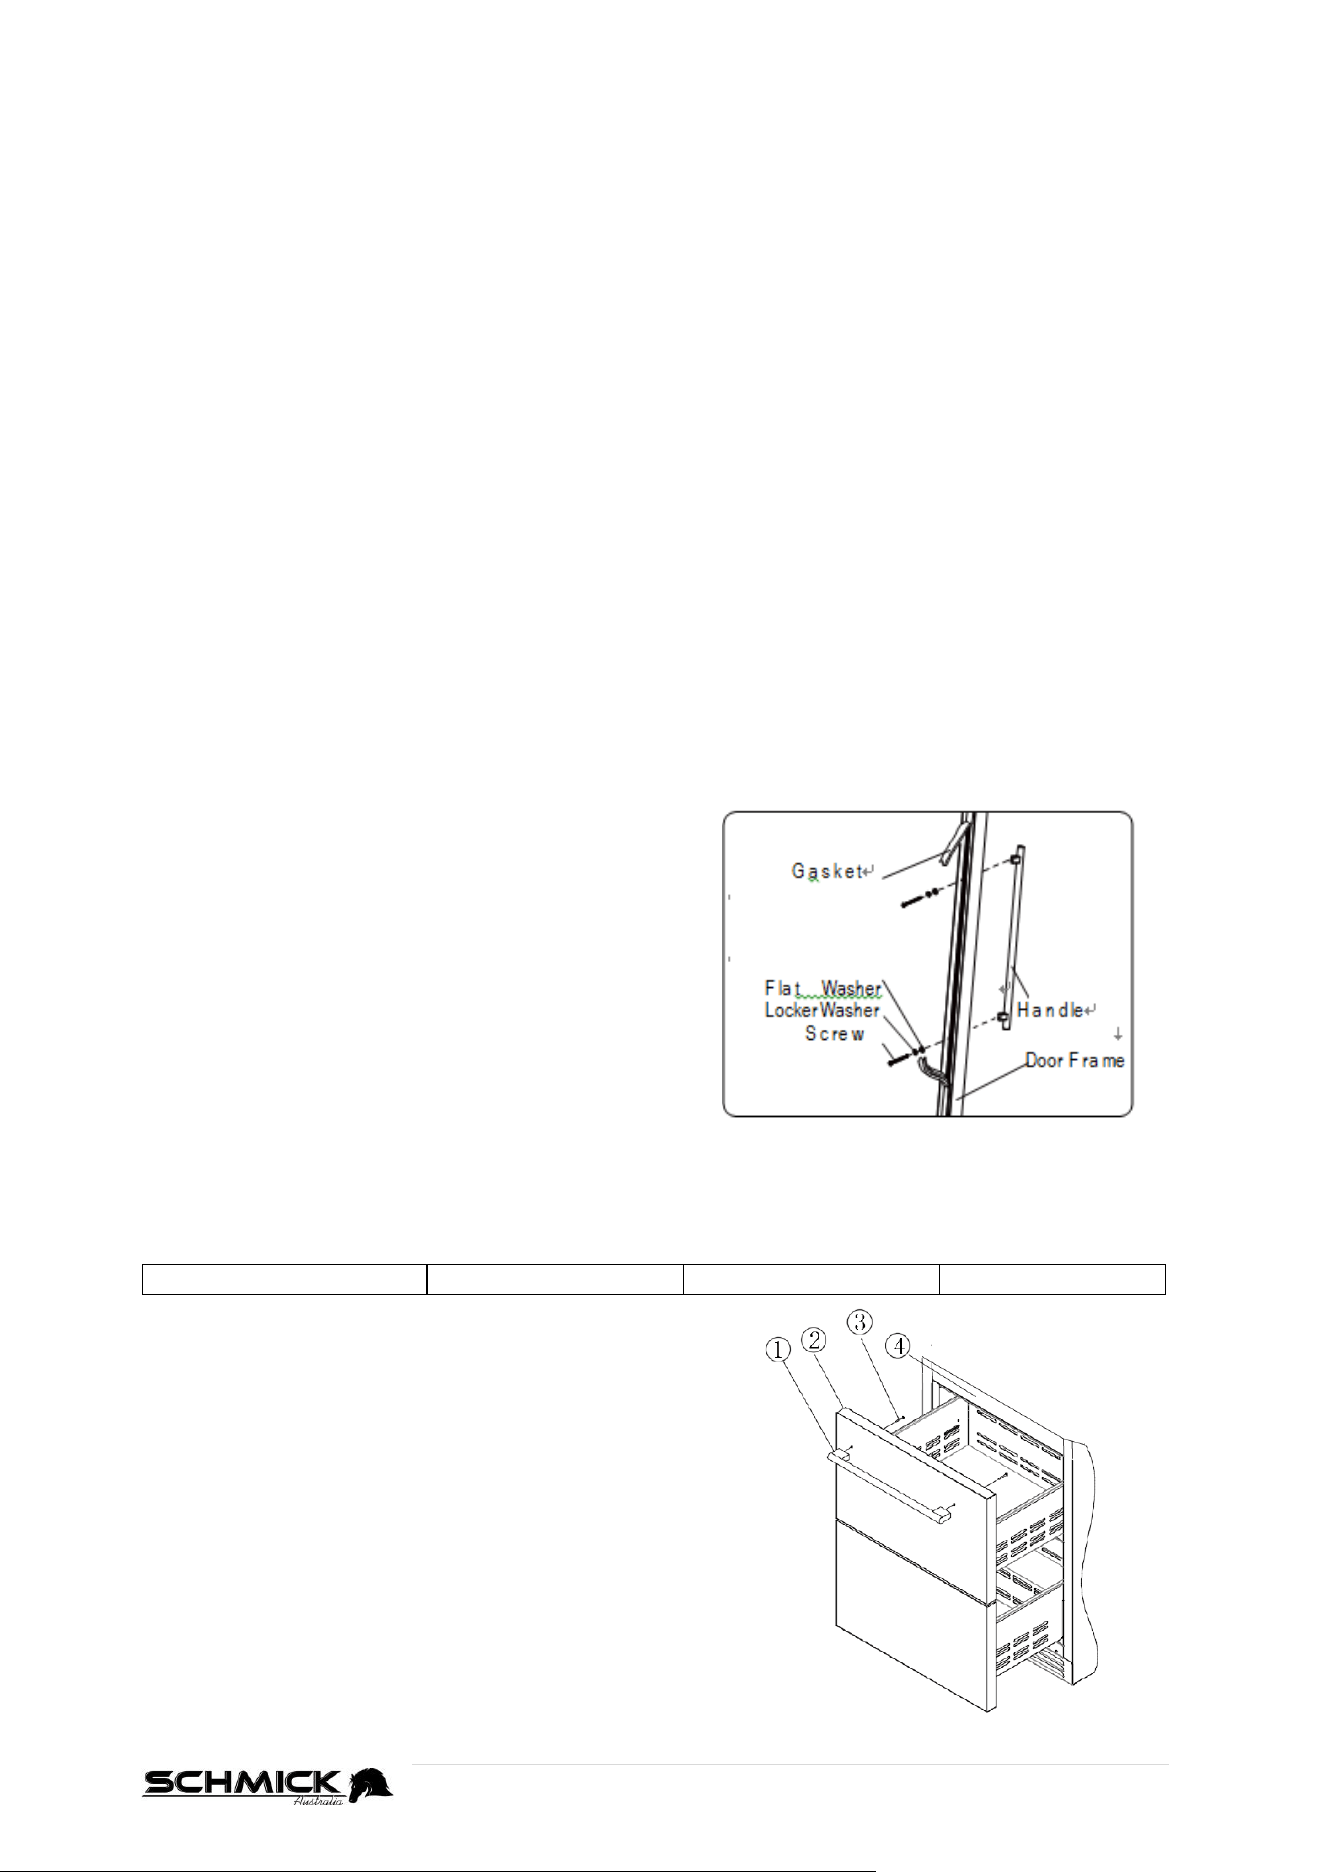
INSTALLATION OF DOOR HANDLE
Install the door handle provided with the appliance by following these steps:
Step 1
Remove the door seal at the inner side of the door
to expose the two screw holes, pinching as close as
possible to frame to lift out slowly
Step 2
Install the handle tightly with the screws and
washers provided.
Step 3
Tidy and restore the door seal.
INSTALLATION OF DRAWER HANDLE (BD425D-X and BD425D-BX ONLY)
1. Pull Handle
2. Drawer face
3. Screws
4. Fridge
Step 1
Take the handle and the screws from inside fridge
packaging.
Step 2
Align holes on the drawer and holes on the handles and
attach using the screws provided, tighten the screws
properly (do not overtighten).
9 | P a g e
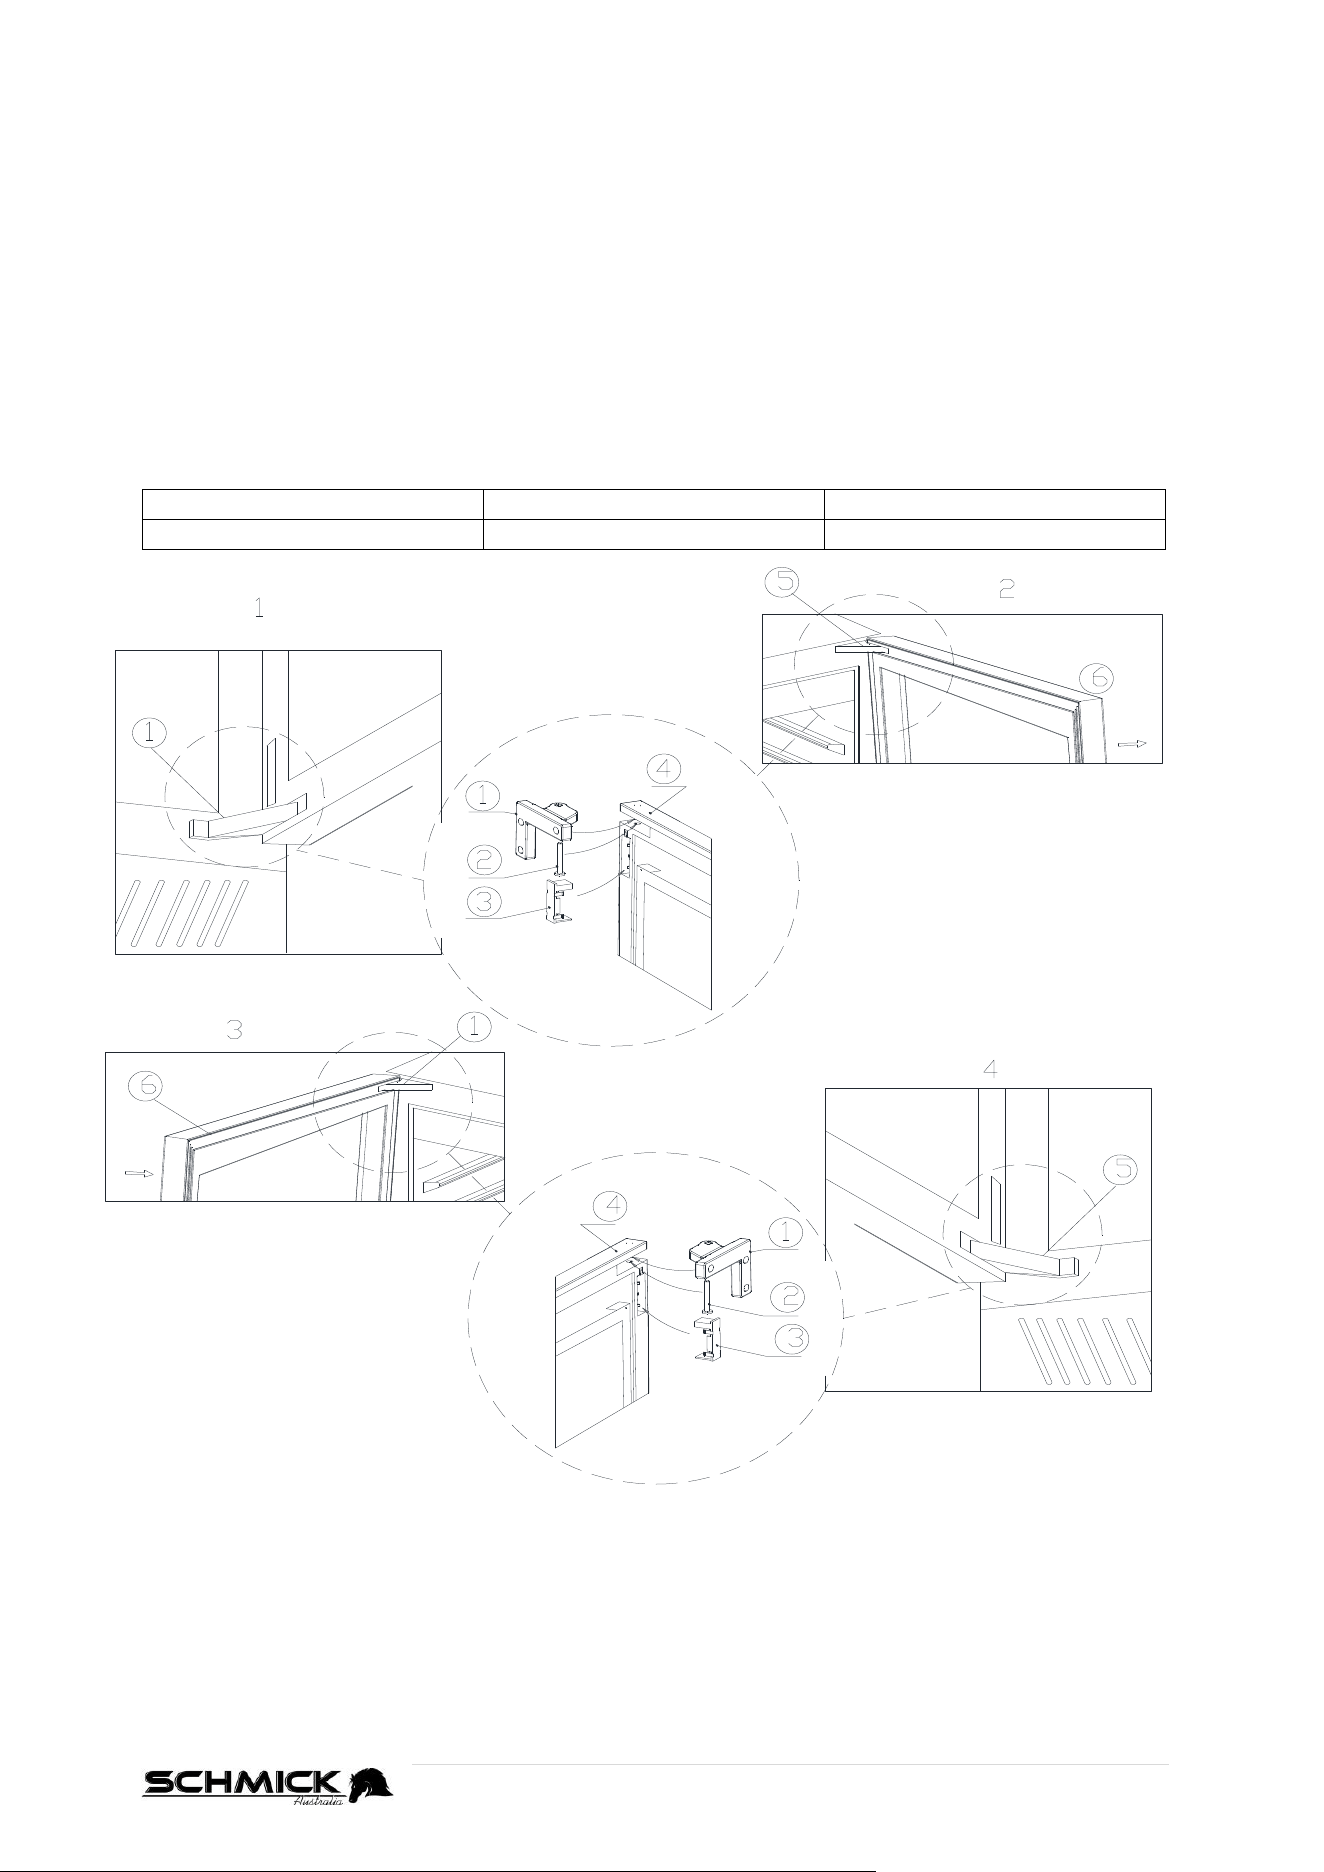
REVERSING THE DOOR HINGE
(RIGHT HINGE TO LEFT HINGE)
Directions and diagrams are based on a right hand hinged door, being swapped to a left hand hinged
unit. If swapping from left to right, simply mirror the instructions)
If you require the door swing to be changed, you can do this at home with some basic
tools, but we also recommend upto 2 other people to assist, as the door is very
heavy an awkward to manouver.
Steps below may vary, depending on if fridge is straight out of the box or has already been
installed. However, it is best to decide which side hinge is required, before installing into
place.
Please follow the below steps:
1. Upper Hinge Bracket
2. Hinge Pin
3. Hinge Cover
4. Upper Hinge
5. Lower Hinge bracket
6. Glass Door
STEP 1
As shown in Figure 1, use a flat-blade screwdriver to open the upper hinge cover ③ to see the
hinge shaft ②, and then use a flat-blade screwdriver to pry out the hinge pin (OR, in newer
models, use an allen key to unscrew the hinge pin) from the door and hinge bracket, and take
it out.
As shown in Figure 2, the installation method of the upper door hinge is much the same as the
lower hinge. Repeat the procedure to pry out the lower hinge pin.

10 | P a g e
REVERSING THE DOOR HINGE (Cont)
STEP 2
When the upper and lower hinge pins have been removed, grab a friend and carefully lift the
door Up and Off the fridge.
Place the door, glass side down, ideally onto an empty table with a blanket, to avoid marking
the door whilst you continue to work.
STEP 3
With the door removed, use an allen/hex key wrench to remove both the upper and lower door
hinge screws (3 each hinge), to remove the upper and lower door hinge brackets.
STEP 4 - Pay special attention to this:
Gently remove plugs on the opposite side of the fridge (ie: where you want the hinge to be).
You can now install the hinge brackets on your preferred side.
The right upper hinge is now positioned into the left lower hinge.
The right lower hinge is changed into the left upper hinge position. Make sure to secure
the hinge screws tightly
STEP 5
The glass door is also turned 180 degrees to install, with the lock hook and door alarm magnet
being removed and reinstalled to the opposite side (Top to Bottom / Bottom to Top)
See how to change the door alarm magnet and lock pieces on next page
STEP 6
Grab two (2) friends, and lift the door as shown in Figure 4 into place. Firstly insert the lower
hinge bracket into the corner fitting of the door, and gently align the mounting holes. Whilst
your 2 friends are still holding the door, insert the hinge pin into the hinge bracket to secure its
position. Make sure the lower pin is installed all the way. Then simply reinstall the hinge cover
and the installation of the lower part of the door is now completed.
STEP 7
Whilst you still have someone assisting you by holding the door, align the top of the door and
the hinge bracket as shown in Figure 3. When aligned correctly, tighten the screw-in pin with
an allen/hex key, until its level with the top of the door, to prevent the door from failing off.
Once screwed in carefully, reinstall the hinge pin cover, and the door swing change is now
finished.
STEP 8
With a friend, carefully lift the fridge off its back, and let rest at least 12 hours, before turning
the unit on.
11 | P a g e
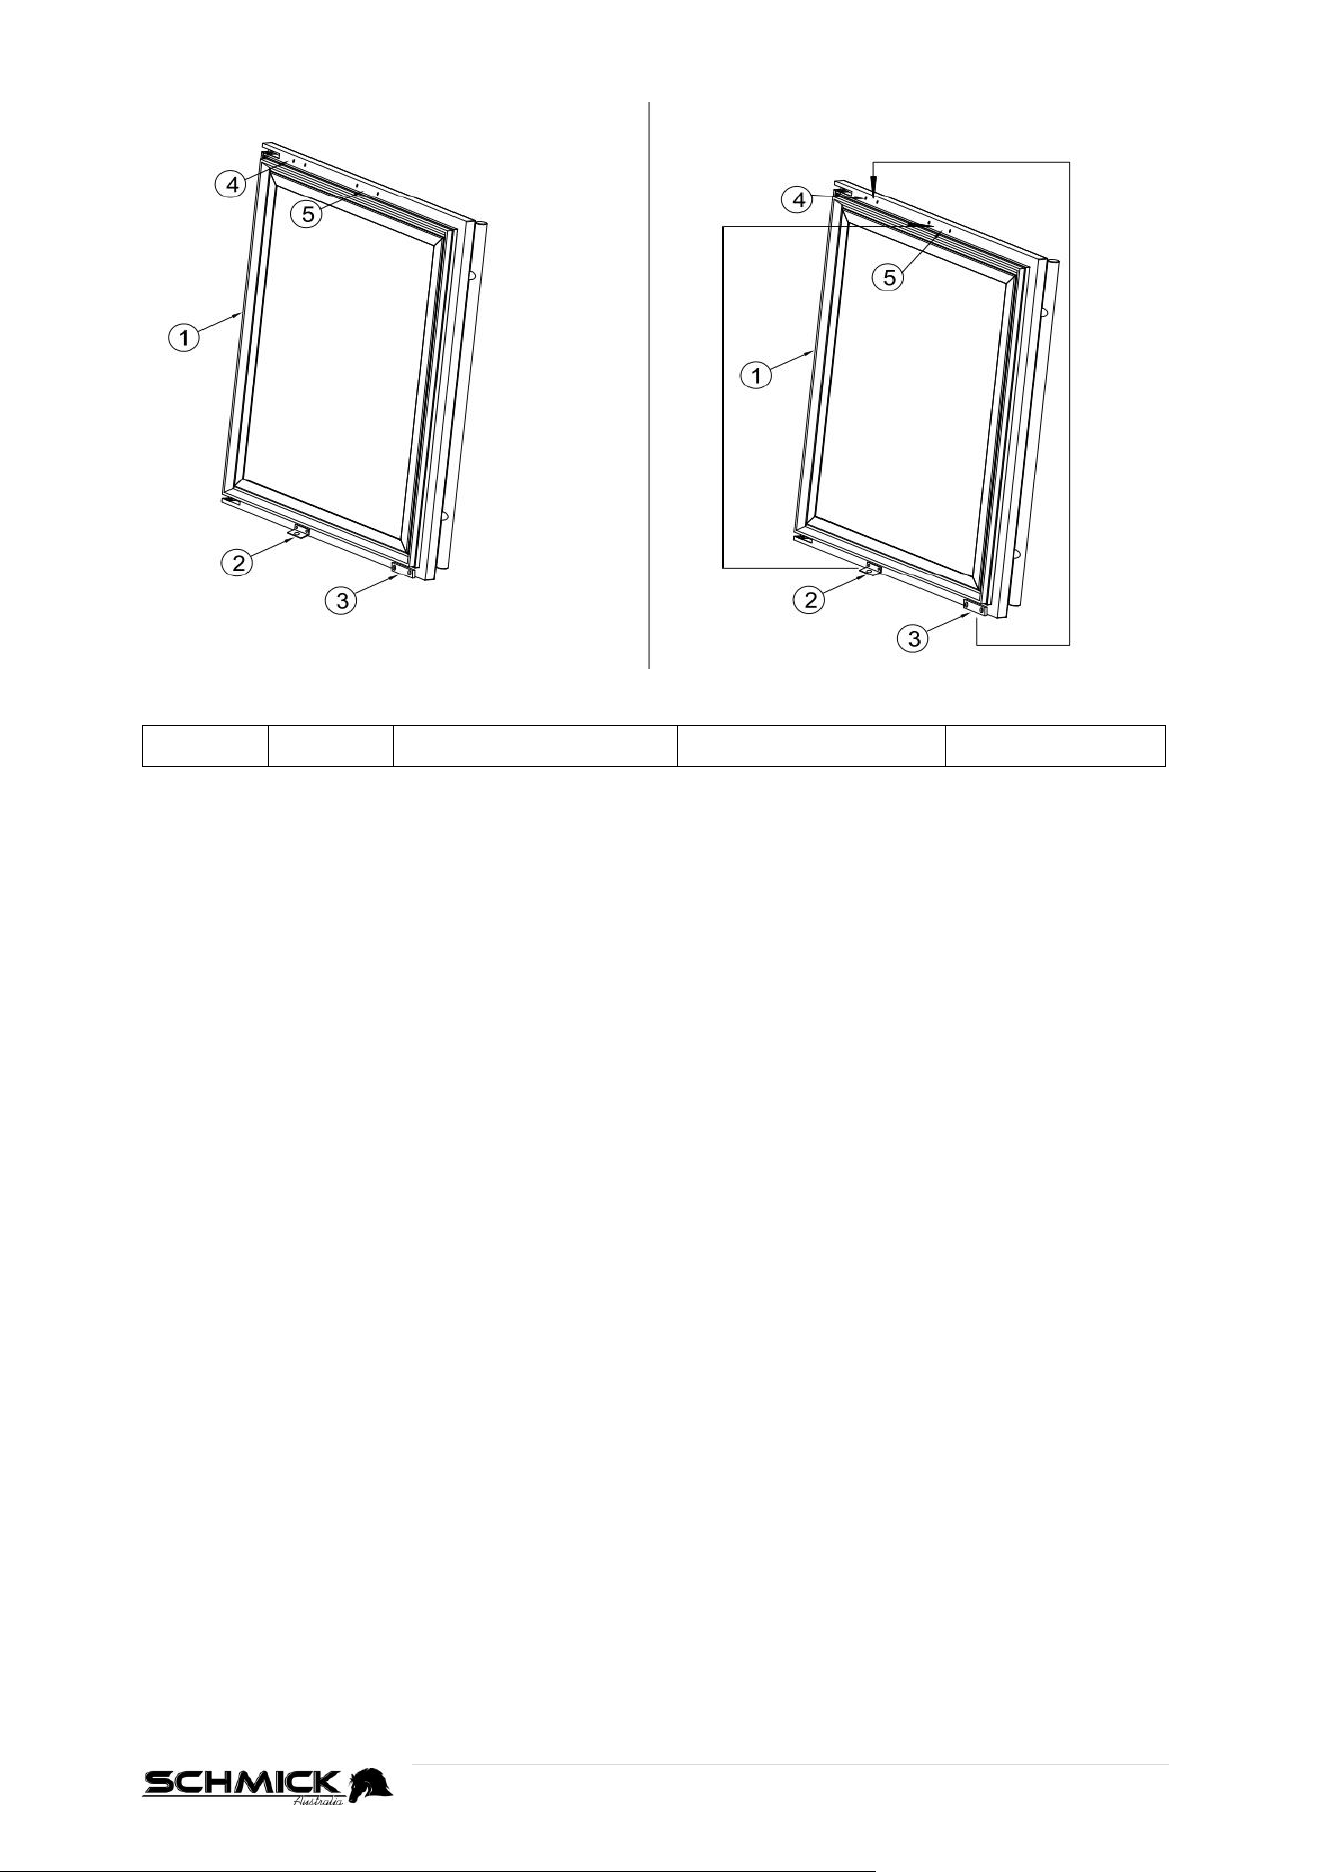
CHANGING THE DOOR ALARM PARTS AND DOOR LOCK
1. Door
2. Lock
3. Door alarm magnet
4. Magnet fix hole
5. Lock fix hole
STEP 1
After changing the door, first unscrew② lock and ③magnet like pic1;
STEP 2
Then fix the②lock to the position of ⑤ lock fix hole
STEP 3
Change the ③ magnet to position of ④ magnet fix hole
12 | P a g e
INSTALLATION OF YOUR BD425 WINE/BEVERAGE FRIDGE
Important information
This appliance is designed to be used in a free standing installation or built-in (fully recessed)
This appliance must be placed into position in accordance with these instructions.
The applicance must be installed on a smooth flat surface.
There is four (4) front and rear feet that can be adjusted (clockwise and anti-
clockwise) as required, to ensure the appliance is level and square.
Correct adjustment of the feet avoids excessive noise and vibration.
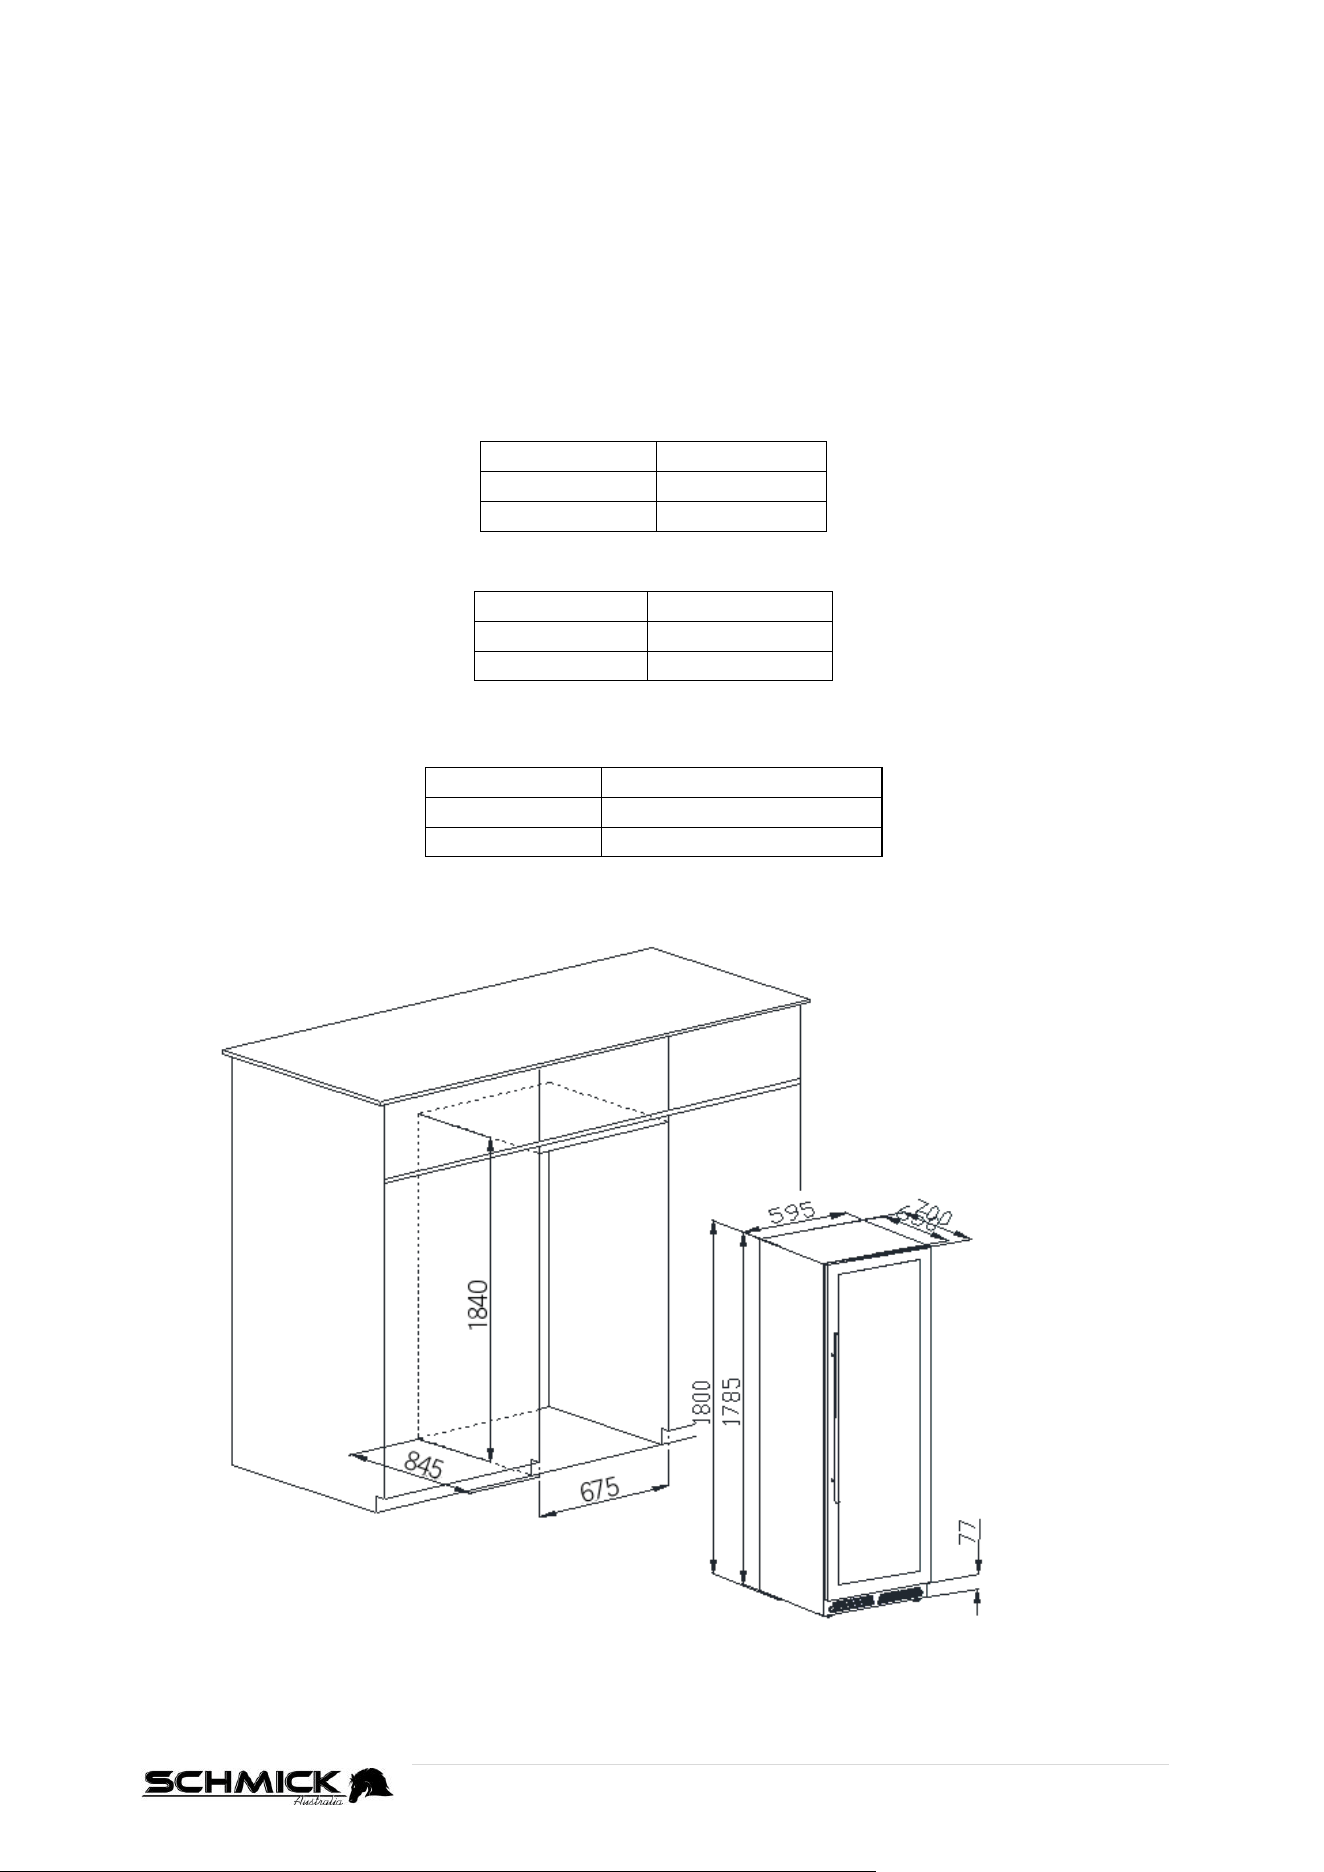
BD425 - FRIDGE MEASUREMENTS
Height
1800mm
Width
595mm
Depth
695mm
VENTILATION REQUIRED (minimum’s)
Top
40mm
Rear
150mm
Sides
40mm
CABINET SIZE REQUIREMENTS (if building-in to cabinetry)
(INTERNAL MEASUREMENTS)
Height
At Least 1840mm
Width
At Least 675mm
Depth
At Least 845mm
NOTE: To avoid any loss in performance, air suction channels must not be obstructed.

13 | P a g e
TEMPERATURE SETTINGS
Directions on how to change these default set temperatures can be found on the next 3 pages.
Make sure you study the correct operating instructions for your particular model.
FACTORY DEFAULT TEMPERATURE SETTINGS
BD425 - Single Zone models
Once connected to a power supply, the Fridge will take some time to reach its default preset
temperature of 12°C.
BD425 - Dual Zone models (Single Door)
Once connected to a power supply, the top compartment of your fridge will take some time to
reach its default preset temperature of 8°C.
The lower compartment of your fridge will take some time to reach its own default preset
temperature of 14°C.
BD425D-X Models (Half Door / 2x Drawer)
Once connected to a power supply, the top compartment of your fridge will take some time to
reach its default preset temperature of 12°C.
The lower compartment of your fridge will take some time to reach its own default preset
temperature of 6°C.
ALLOW UNIT TO REACH SET TEMPERATURE
Once the appliance has reached its set temperature (could be around 2-3hrs after powered up),
you can then place drinks inside.
TIP:
After changing the temperature setting, it will take some time before the fridge
reachs a balance across the whole compartment.
How long this takes will depend on the ambinent temperature, the amount of
drink/s stored inside, and how often the door is opened.

14 | P a g e
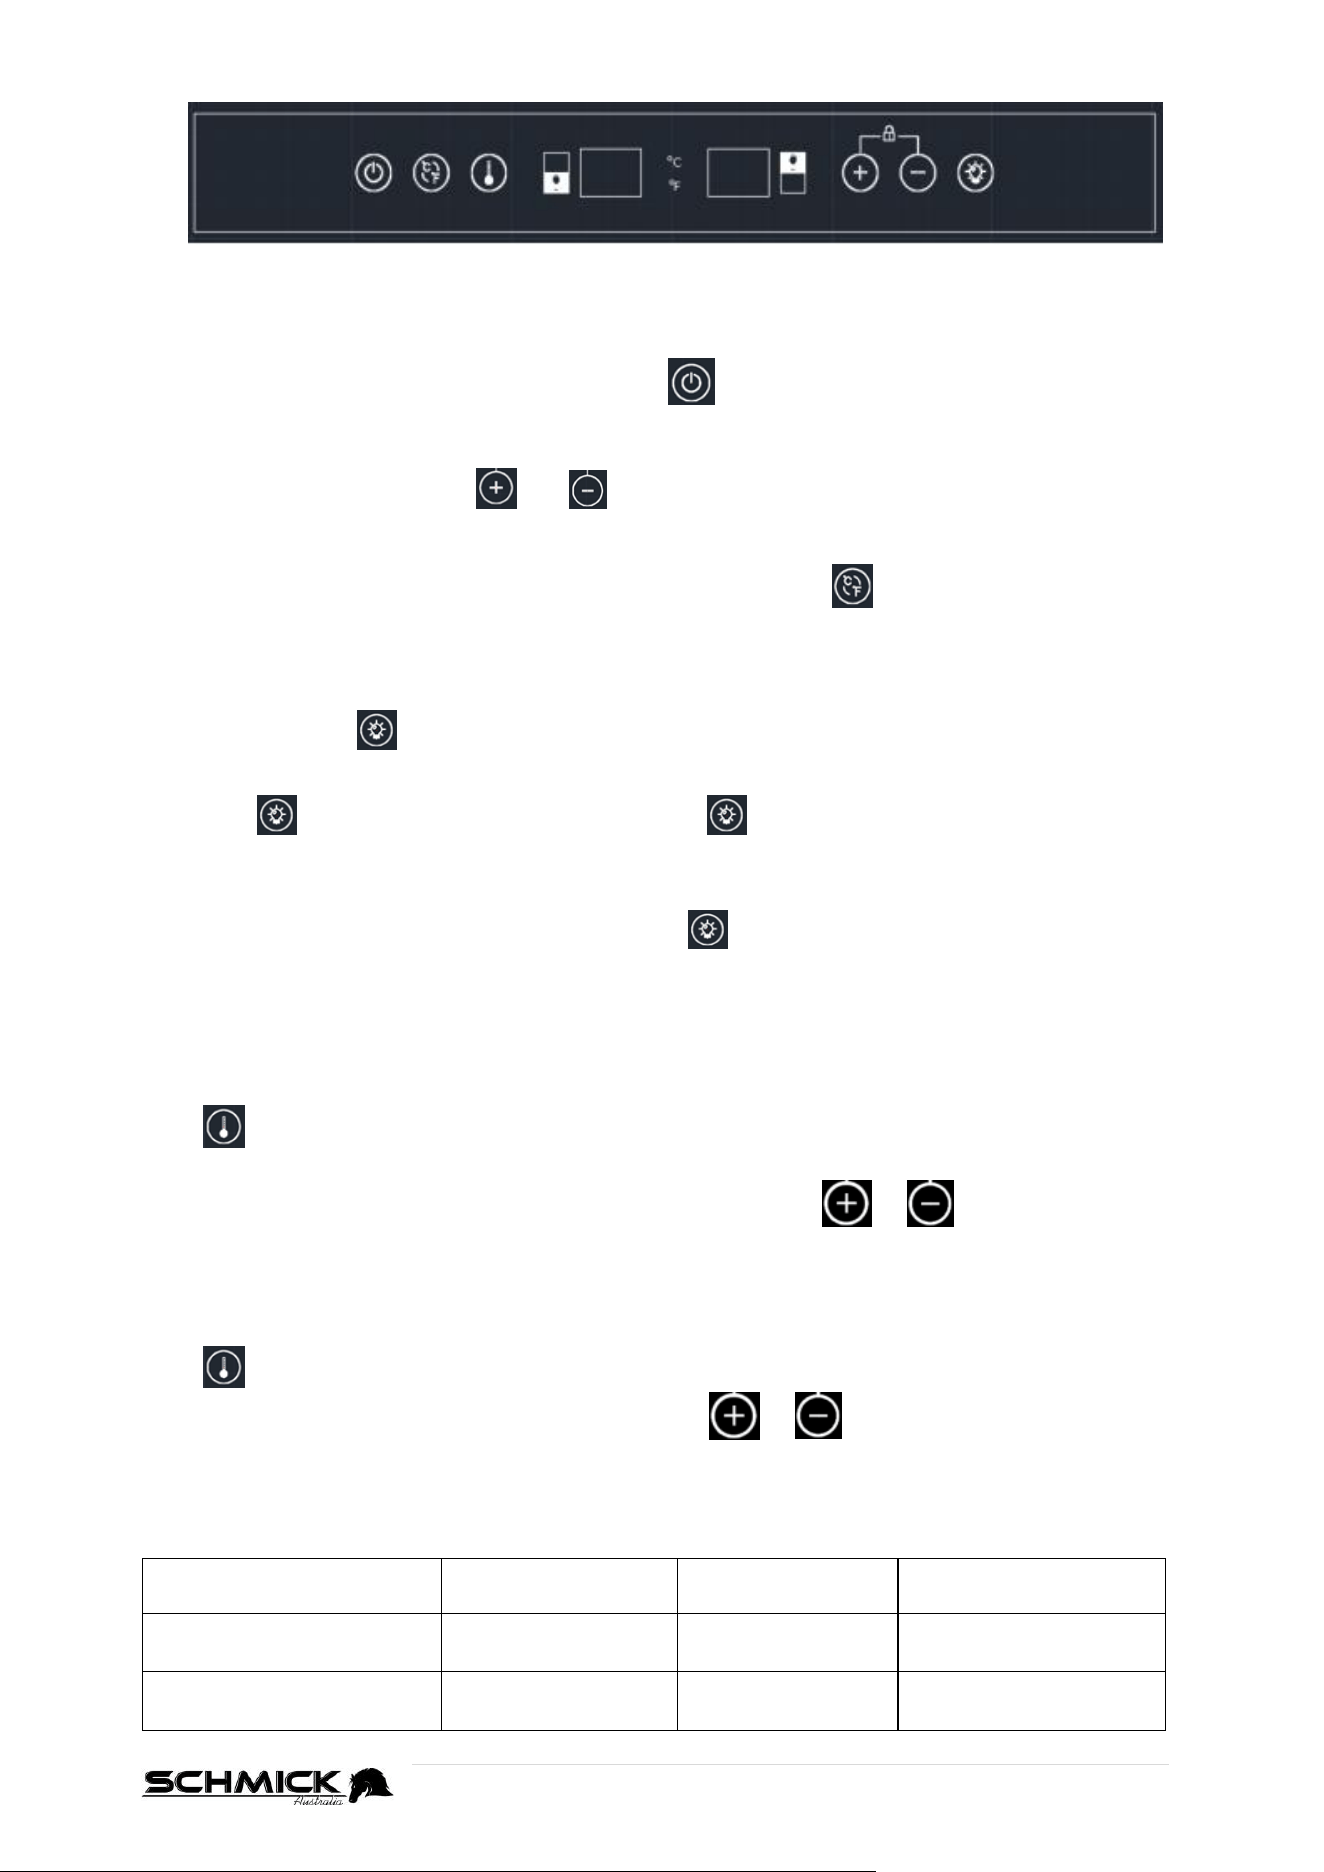
OPERATION AND TEMPERATURE CONTROL – SINGLE ZONE ONLY
There is one(1) central display window, with a 2-digit LED display . This can display the set
temperature or actual interior temperature.
Powering On/Off
To switch the unit ON or OFF, press and hold the Power switch for 3 seconds.
Keypad lock-out function
If there is no operation/use of the digital controller for 3 minutes, it will lock automatically.
Simply press and hold, both the and buttons for 3 seconds to unlock.
Celsius and Fahrenheit (℃/℉)
To switch between Celsius and Fahrenheit (℃/℉) settings, press the button to change the
temperature display between Celsius and Fahrenheit.
Lights
When the door is opened, the LED lighting will be switched on automatically.
Alternatively, Press to turn the LED lighting on or off.
Alternatively
, if you want the lights to ALWAYS be ON, open the fridge door (so lights are ON) and
press the button, so the lights turn OFF. Press again, so the lights turn ON.
The lights will now stay ON, even when the door is closed.
(To reverse this function, open the door, and press the to turn the lights off. You can then
close the door
Setting the Desired Temperature
Press before attempting to adjust the cabinet temperature. The LED window will then flash
and show the current set temperature. After 5 seconds, the LED window will show the current
internal temperature.
Adjust the temperature in 1℃ degree increments by pressing the or button/s until
desired temperature is reached.
Temperate range and default
Min Set Temp
Max Set Tamp
Factory Default
Temp
BD425
(Single Zone models)
1°C
18°C
12°C
NOTE: After the unit is unplugged, the system will return to factory default set temperature
15 | P a g e
OPERATION AND TEMPERATURE CONTROL – DUAL ZONE ONLY
There are 2 Display windows, each with a 2-digit LED display for each compartment. These can
display the set temperature or actual interior temperature.
Powering On/Off
To switch the unit ON or OFF, press and hold the Power switch for 3 seconds.
Keypad lock-out function
If there is no operation/use of the digital controller for 3 minutes, it will lock automatically.
Simply press and hold, both the and buttons for 3 seconds to unlock.
Celsius and Fahrenheit (℃/℉)
To switch between Celsius and Fahrenheit (℃/℉) settings, press the button to change the
temperature display between Celsius and Fahrenheit.
Lights
When the door is opened, the LED lighting will be switched on automatically.
Alternatively, Press to turn the LED lighting on or off.
Alternatively
, if you want the lights to ALWAYS be ON, open the fridge door (so lights are ON) and
press the button, so the lights turn OFF. Press again, so the lights turn ON.
The lights will now stay ON, even when the door is closed.
(To reverse this function, open the door, and press the to turn the lights off. You can then
close the door
Setting the Desired Temperature
Each zone can be set at different temperatures.
Top Compartment
Press before attempting to adjust the cabinet temperature. The LED window will then flash
and show the current set temperature of the Top Compartment.
Adjust the temperature in 1℃ degree increments by pressing the or button/s until
desired temperature is reached. After 5 seconds, the LED window will show the current internal
temperature.
Bottom Compartment
Press again, and the display with switch over to the bottom compartment. Again, adjust the
temperature in 1℃ degree increments by pressing the or button/s until desired
temperature is reached. After 5 seconds, the LED window will show the current internal
temperature.
Temperate range and defaults
Min Set
Temp
Max Set
Temp
Factroy Default
Temp
Top Compartment
5°C
12°C
8°C
Bottom
Compartment
12°C
20°C
14°C
NOTE: After the unit is unplugged, the system will return to factory default set temperature
16 | P a g e
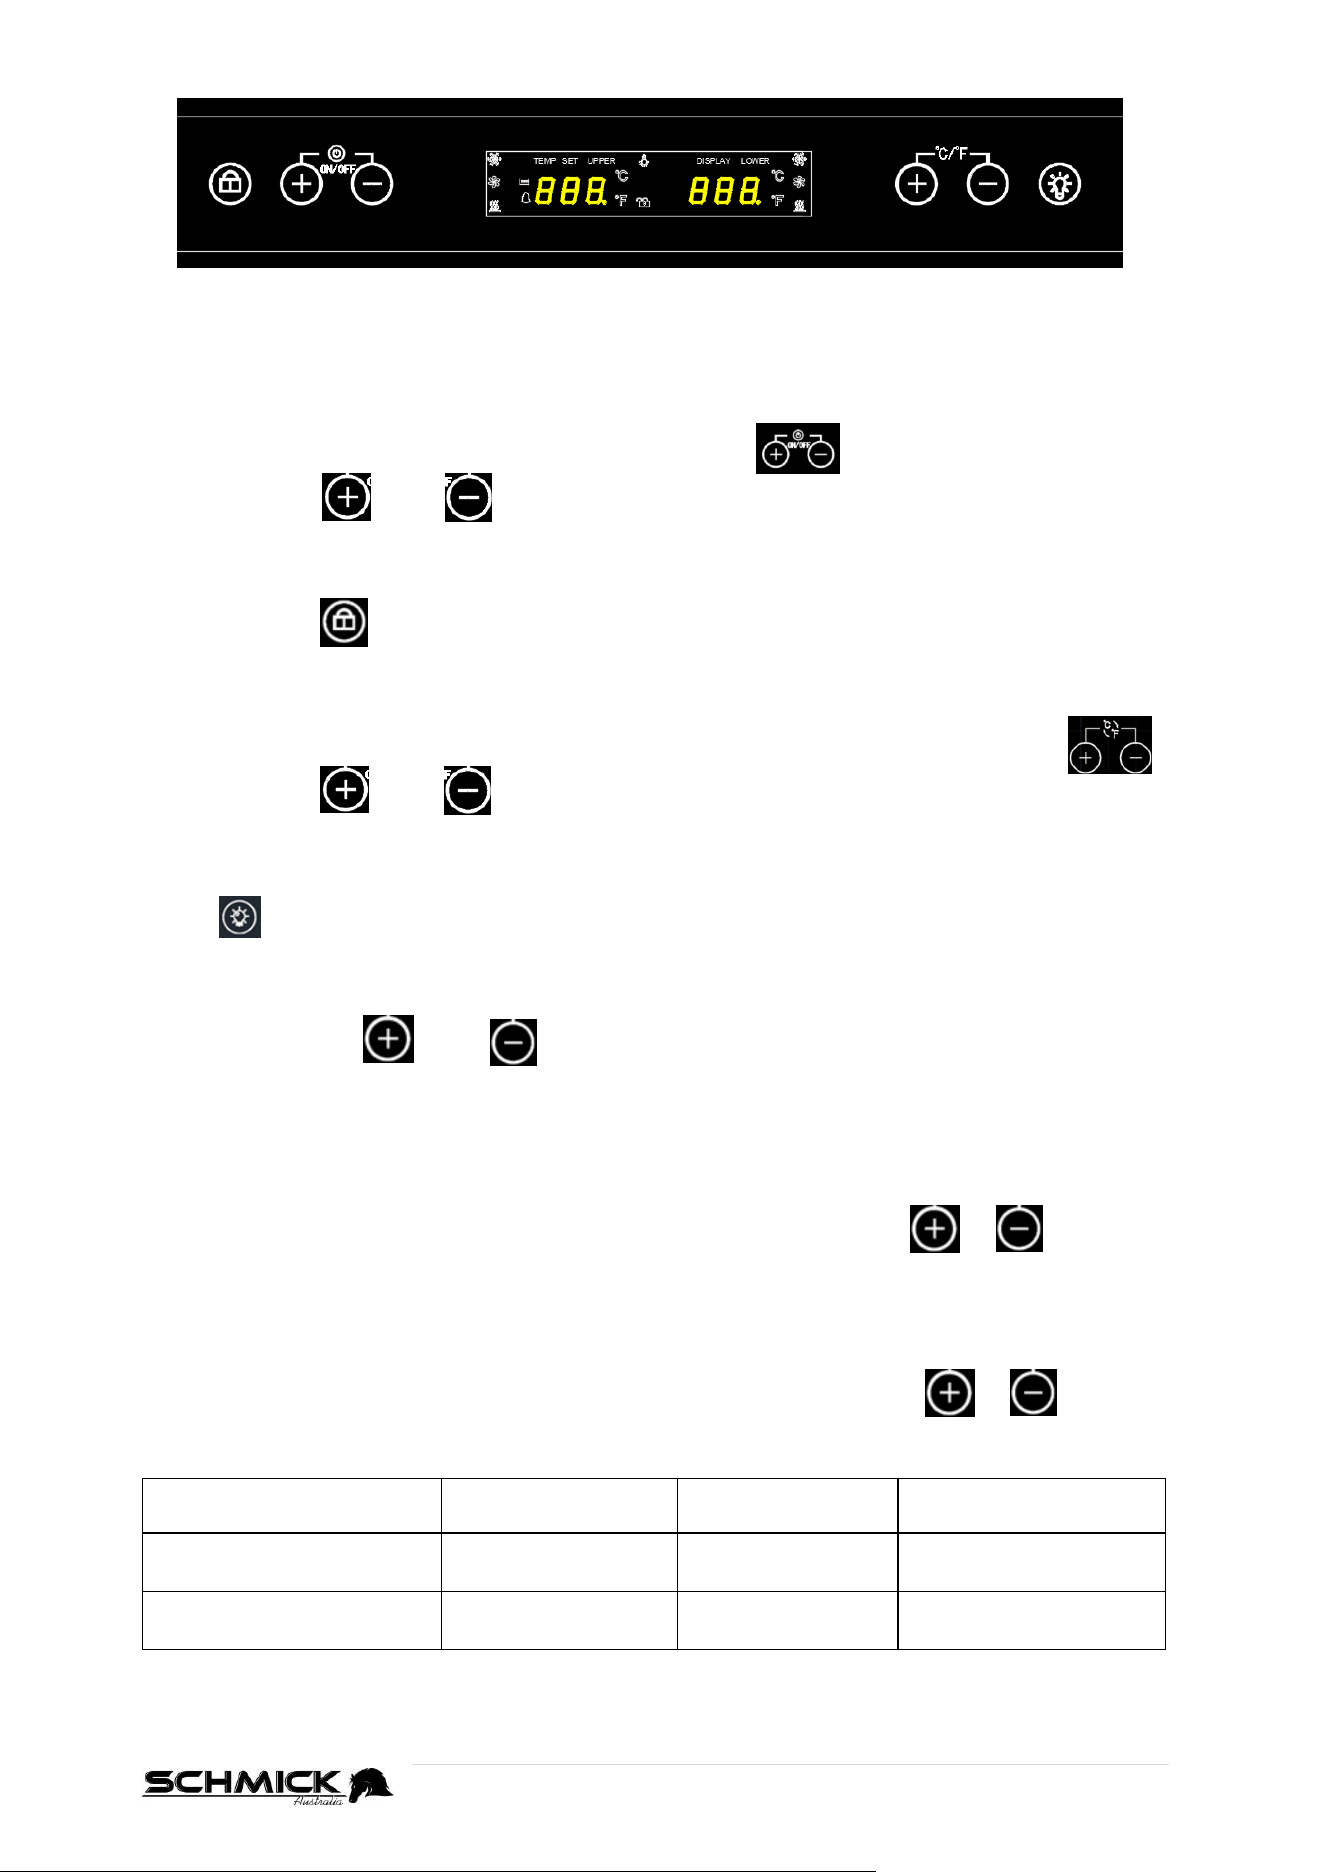
OPERATION AND TEMPERATURE CONTROL – X DRAWER MODELS
There are 2 Display windows, each with a 2-digit LED display for each compartment. These can
display the set temperature or actual interior temperature.
Powering On/Off
Power switch is on on left hand side of the control panel
Press and hold and together for 3 seconds to turn on or off the unit.
Keypad lock-out function
Press and hold for 2 seconds to unlock/lock the controls.
If there is no keypad operation after 15 seconds, the buttons will be locked again automatically.
Celsius and Fahrenheit (℃/℉)
To switch between Celsius and Fahrenheit (℃/℉) settings, use the right side controls.
Press and hold and together for 3 seconds to change the temperature display
between Celsius and Fahrenheit.
Lights
Press to turn the LED lighting on or off.
Setting the Desired Temperature
Each zone can be set at different temperatures.
Simply press either or buttons before attempting to adjust the cabinet
temperature. The LED window on the corresponding side will then flash and show the current set
temperature. After 5 seconds, the LED window revert to showing the current internal temperature.
Top Compartment
The LEFT LED window display, shows the temperature of upper/top compartment.
Adjust the temperature in 1℃ degree increments by pressing the left side or buttons
until desired temperature is reached.
Bottom Drawers
The RIGHT LED window display, shows the temperature of bottom drawers.
Adjust the temperature in 1℃ degree increments by pressing the right side or buttons
until desired temperature is reached.
Min Set Temp
Max Set
Temp
Factory Default
Temp
Top Compartment
5°C
20°C
12°C
Bottom Drawers
2°C
12°C
6°C
NOTE: After the unit is unplugged, the system will return to factory default set temperature
17 | P a g e
VERSATILE SHELVING
BD425 use’s heavy-duty chromed ball-bearing slide-out shelves.
This versatile shelving allows you to;
Adjust shelving height up or down
Swap flat beer shelving with special wine shelving, which has low-vibration rubber saddles
that “cradle” the bottles, stopping them from rolling on the shelves.
Slide-out shelving allows you to reach contents on the rear of the shelf easily.
Heavy-duty shelving to support a wide range of products.
HOW TO OPERATE THE PULL OUT SHELVES (WINE AND BEER)
Make sure the door is opened all the way, to prevent damaging a door seal/gasket, before
pulling the shelves out of their track.
For easy access to the storage content, you must pull the shelves approximately 1/3 out of
the track.
This unit was designed with a notch on each sides of the shelf tracks, to prevent bottles
from falling.
Avoid overcrowding the shelves, as this will reduce air flow, and therefore efficiency.
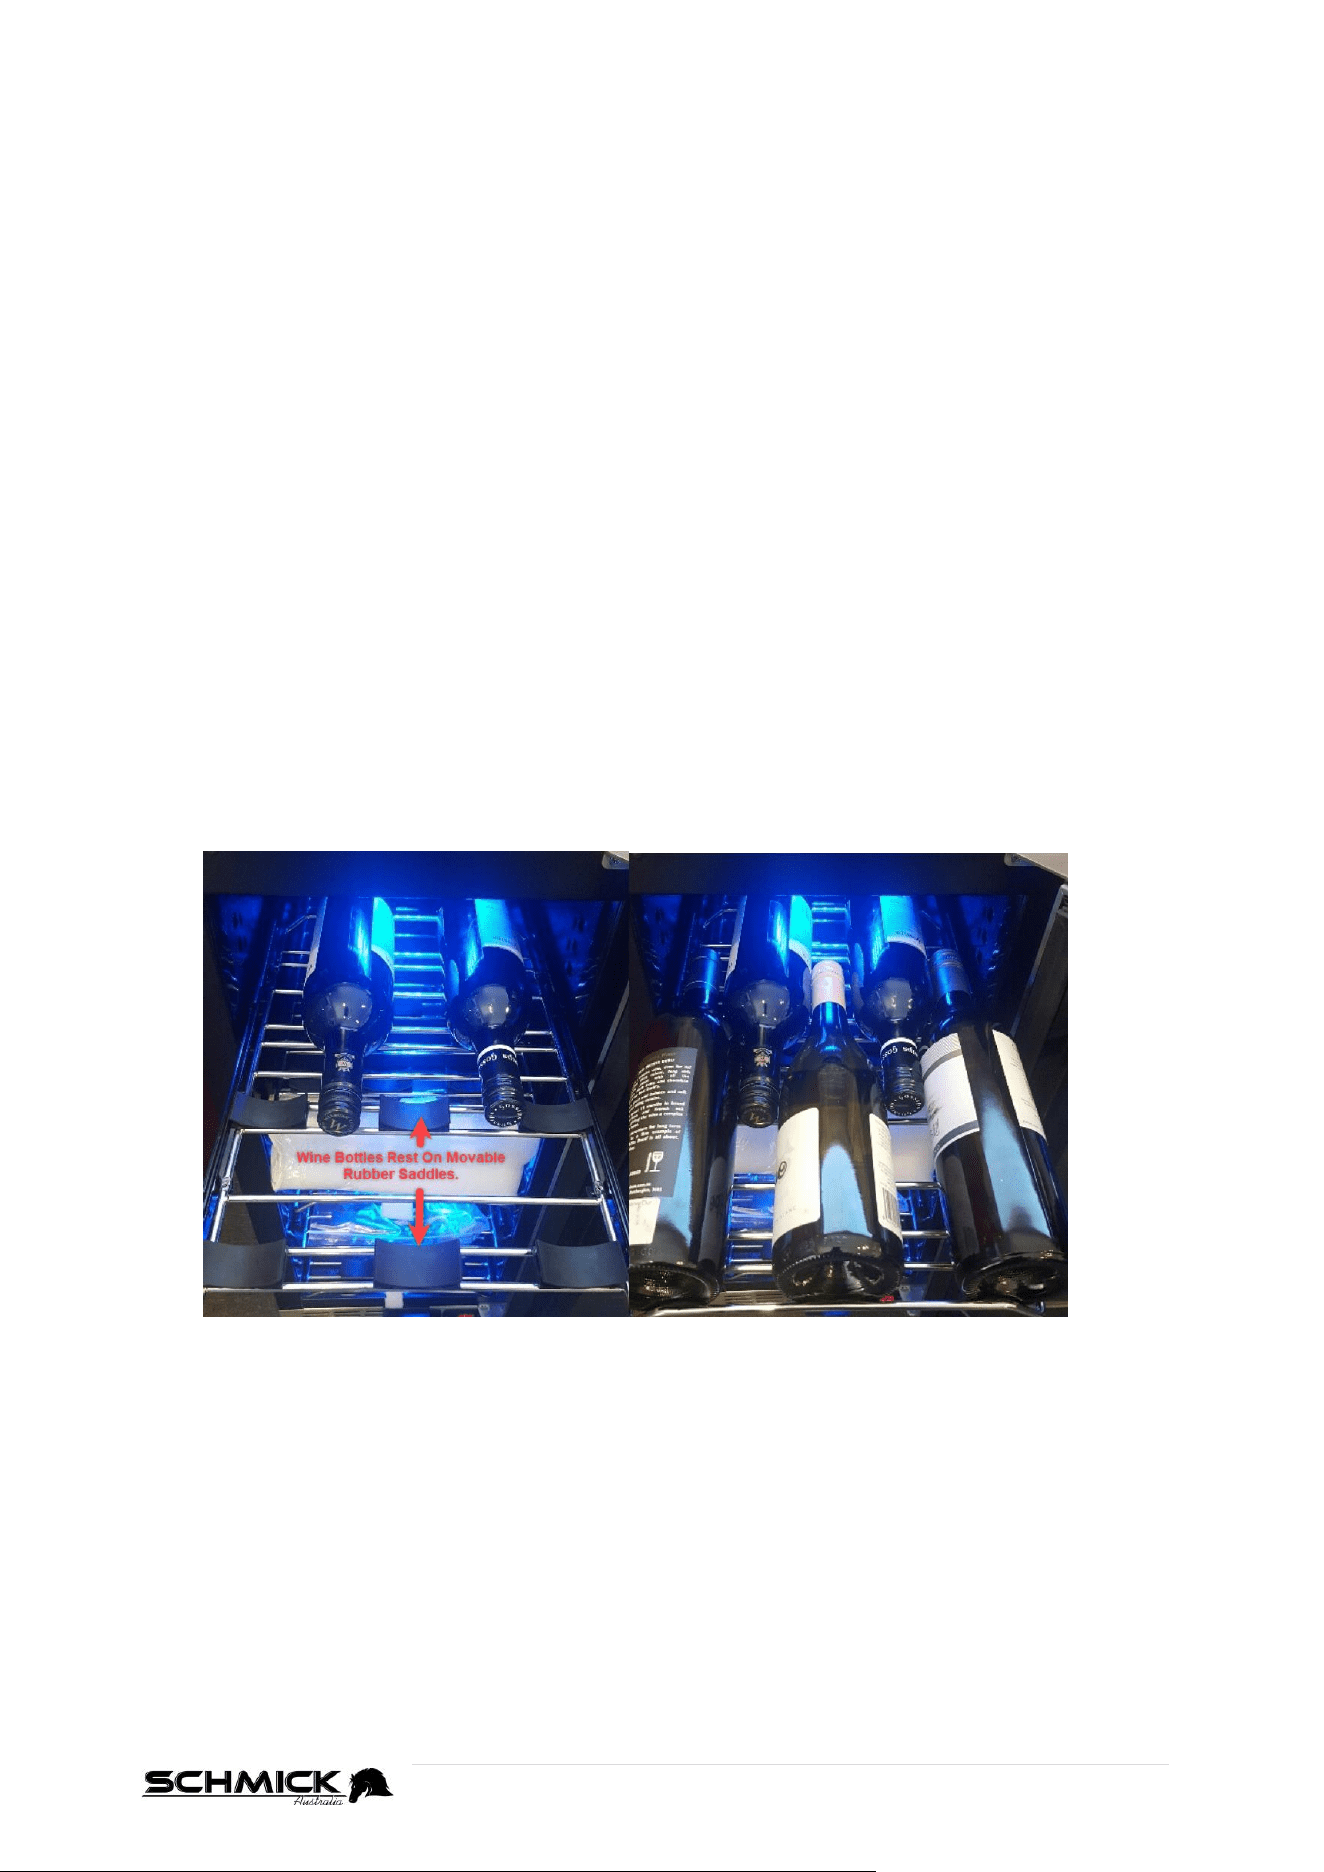
WINE SHELF SADDLES
The wine shelving has patented movable rubber saddles to rest wine bottles on. These allow
you to place the bottles in any position, so you do not have bottles touching each other and
clanking.

18 | P a g e
HOW TO ADJUST / CHANGE SHELF CONFIGURATION
TO REMOVE A SHELF
Shelving is unique with the beer and wine matching units, you can interchange beer for wine
and wine for beer. Please refer to the following directions to replace a shelf with a different
option.
First, slide the shelf out to the furthest point, ensuring the door is WIDE open.
You will notice 2x flippers located on either side of the shelf on the rail.
Position both hands on either side of the shelf so that your fingers can rest on both
flippers.
On the RIGHT-HAND side, push the flipper DOWN.
On the LEFT-HAND side, pull the flipper UP.
While holding the flippers like this, you can pull the shelf all the way out and remove it
from the fridge.
TIPS
Don’t be scared to pull hard, sometimes it seems tight.
Push and Pull the flippers like explained as tight as you can.
Make sure door is fully open at least 90°, or it’s hard to get fingers in right
position.
TO RE-INSERT A SHELF (AT SAME HEIGHT)
The support rail inside the fridge & silver bracket the shelf sits inside are both ‘C’ shaped.
Make sure both sides of the shelf sit inside this correctly.
You can use your finger to slide the silver bracket to the front of the support rail.
You must also make sure that the sides of the shelf sit inside the silver bracket.
Once the shelf is inside both the black railing & silver bracket, you can push the shelf into
the fridge, locking it into the railing.
19 | P a g e
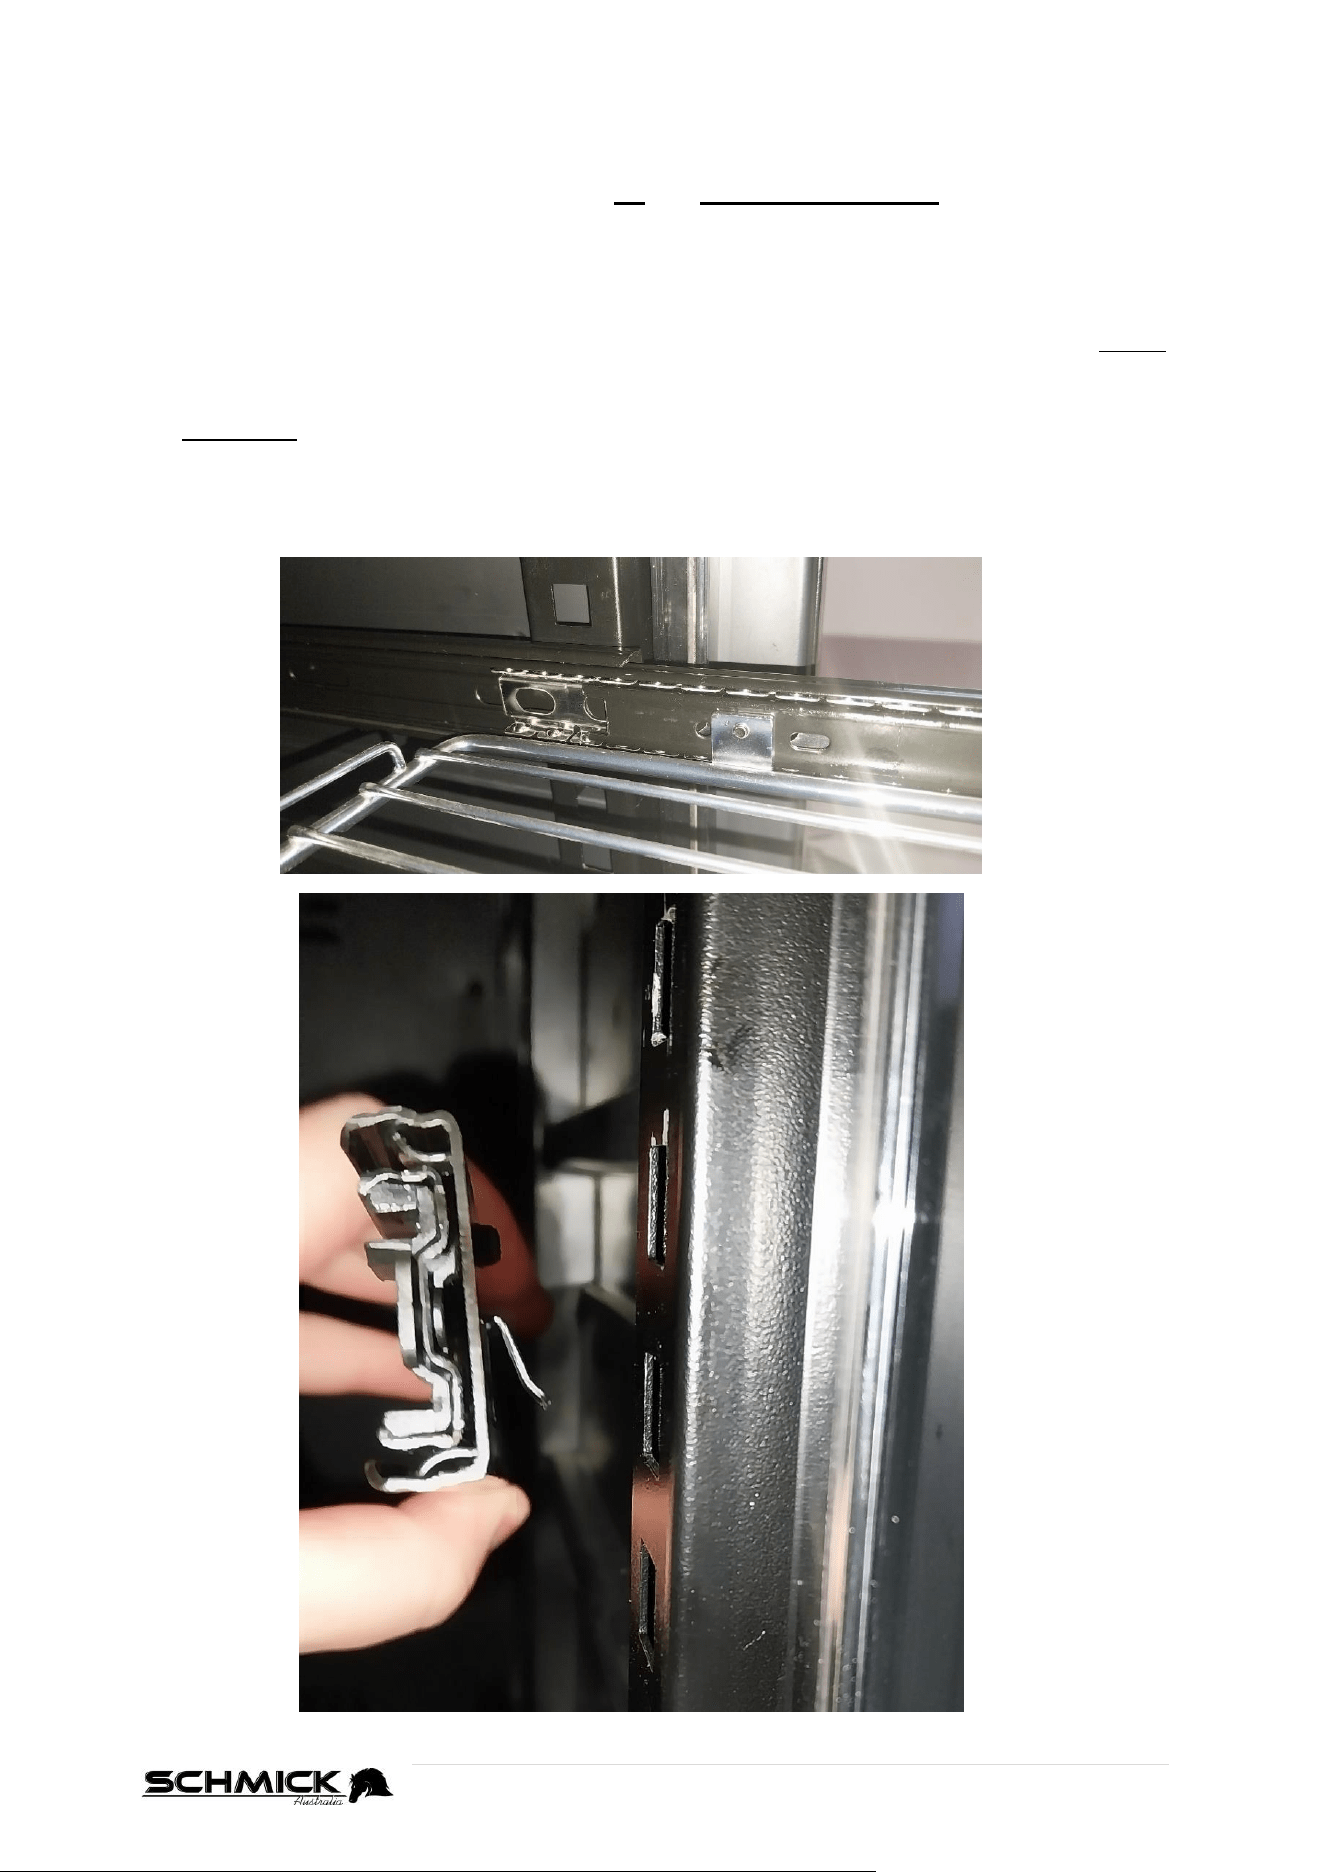
BD425 SHELF HEIGHT ADJUSTMENT
Shelf heights can be easily adjusted across all different models.
With the centre section of the shelving removed (by following steps above) - , grab the
front half of the support rail and pull it up and towards the middle of the fridge.
The clip/hook that holds the shelf in at the front faces down, as shown in the photo below.
Once the front of the rail is unhooked, simply pull the back half of the support rail towards
yourself and it will release from the fridge.
When placing the support rail back into the fridge, repeat the steps in reverse.
Place the support rail into the fridge and place the rear tooth/hook into your desired height
level.
Then, slide the front half of the support rail down, allowing the tooth/hook to sit in the
matching height slot.
Push down and outwards slightly, until you hear the support rail click/snap into place.
Make sure the shelving is at the same height level at all four slots to ensure the shelf is
level and supported correctly.
20 | P a g e
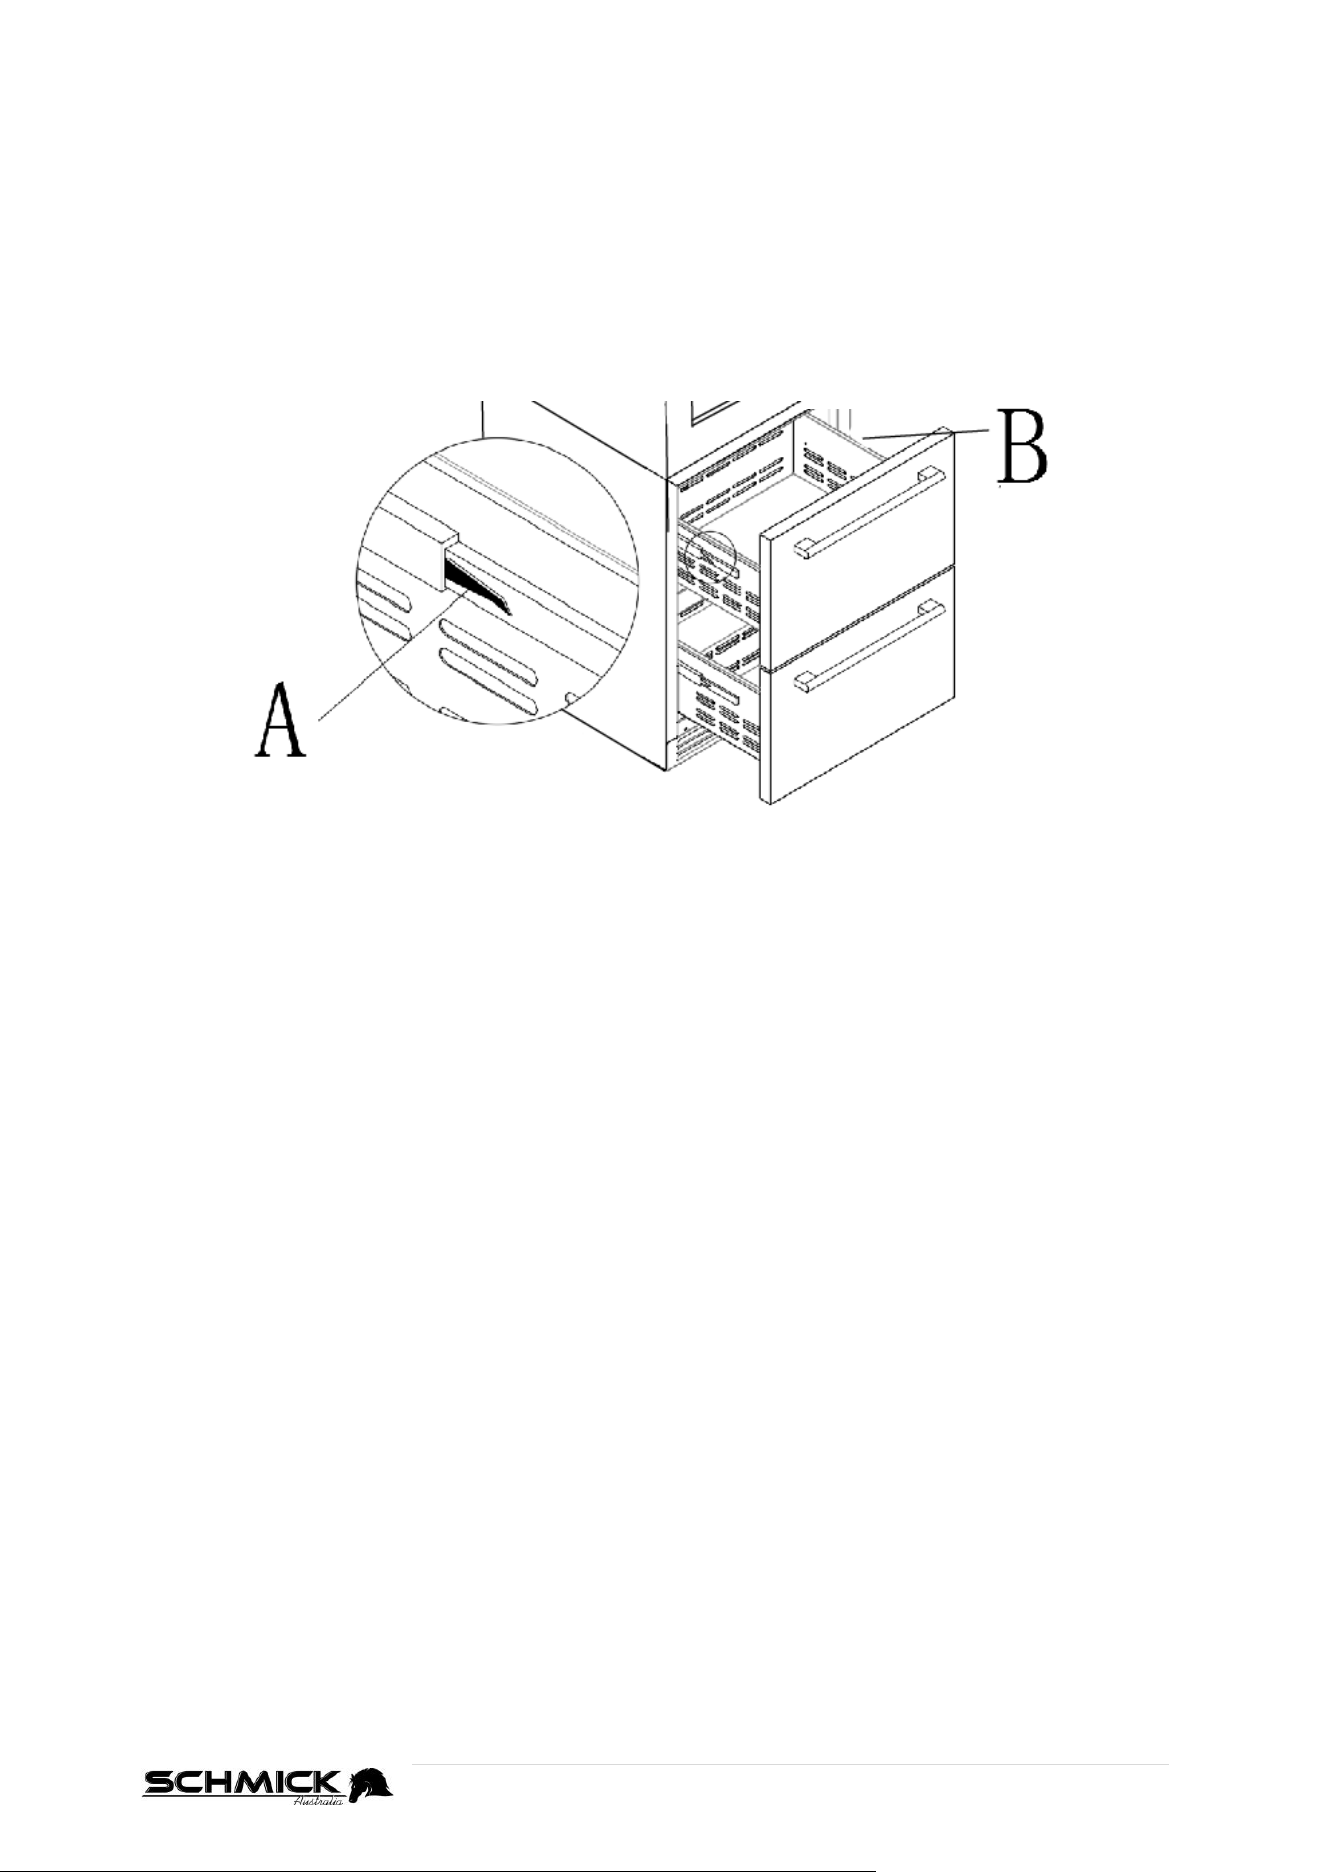
REMOVING THE DRAWERS (BD425D-X Models)
Pull the drawer out all the way, to the end of their rails.
Use one hand to press the right plastic notch downwards, as shown in Figure A.
At the same time lift the left plastic notch upwards with your other hand, as shown in
Figure B.
Hold both notches in these positions, and then proceed to pull the shelf out slowly.
LOCK & UNLOCK THE DOOR (OPTIONAL ON SOME MODELS)
Lock is an optional function. If your Wine/Beverage fridge has such function, a key
should be attached inside the packing of this Manual.
Insert the key into the lock and turn it counter-clockwise to unlock the door.
To lock it, please follow the reversed operation.
Please ensure to keep key in a safe place.
Figure A
Figure B
21 | P a g e
CHARCOAL FILTRATION SYSTEM
Your wine is a living object that breathes through the cork of its bottle. In order to preserve
the quality and taste of your fine wines, they must be stored at the ideal temperature and
ambient conditions.
This unit is equipped with an active charcoal filtration system to ensure air purity, cooling
efficiency, and to maintain an odor free cabinet for the storage of your fine wines.
The filter assembly is located at the rear panel inside your fridge.
Keep in mind that this filter must be changed every 12 months to ensure optimum conditions
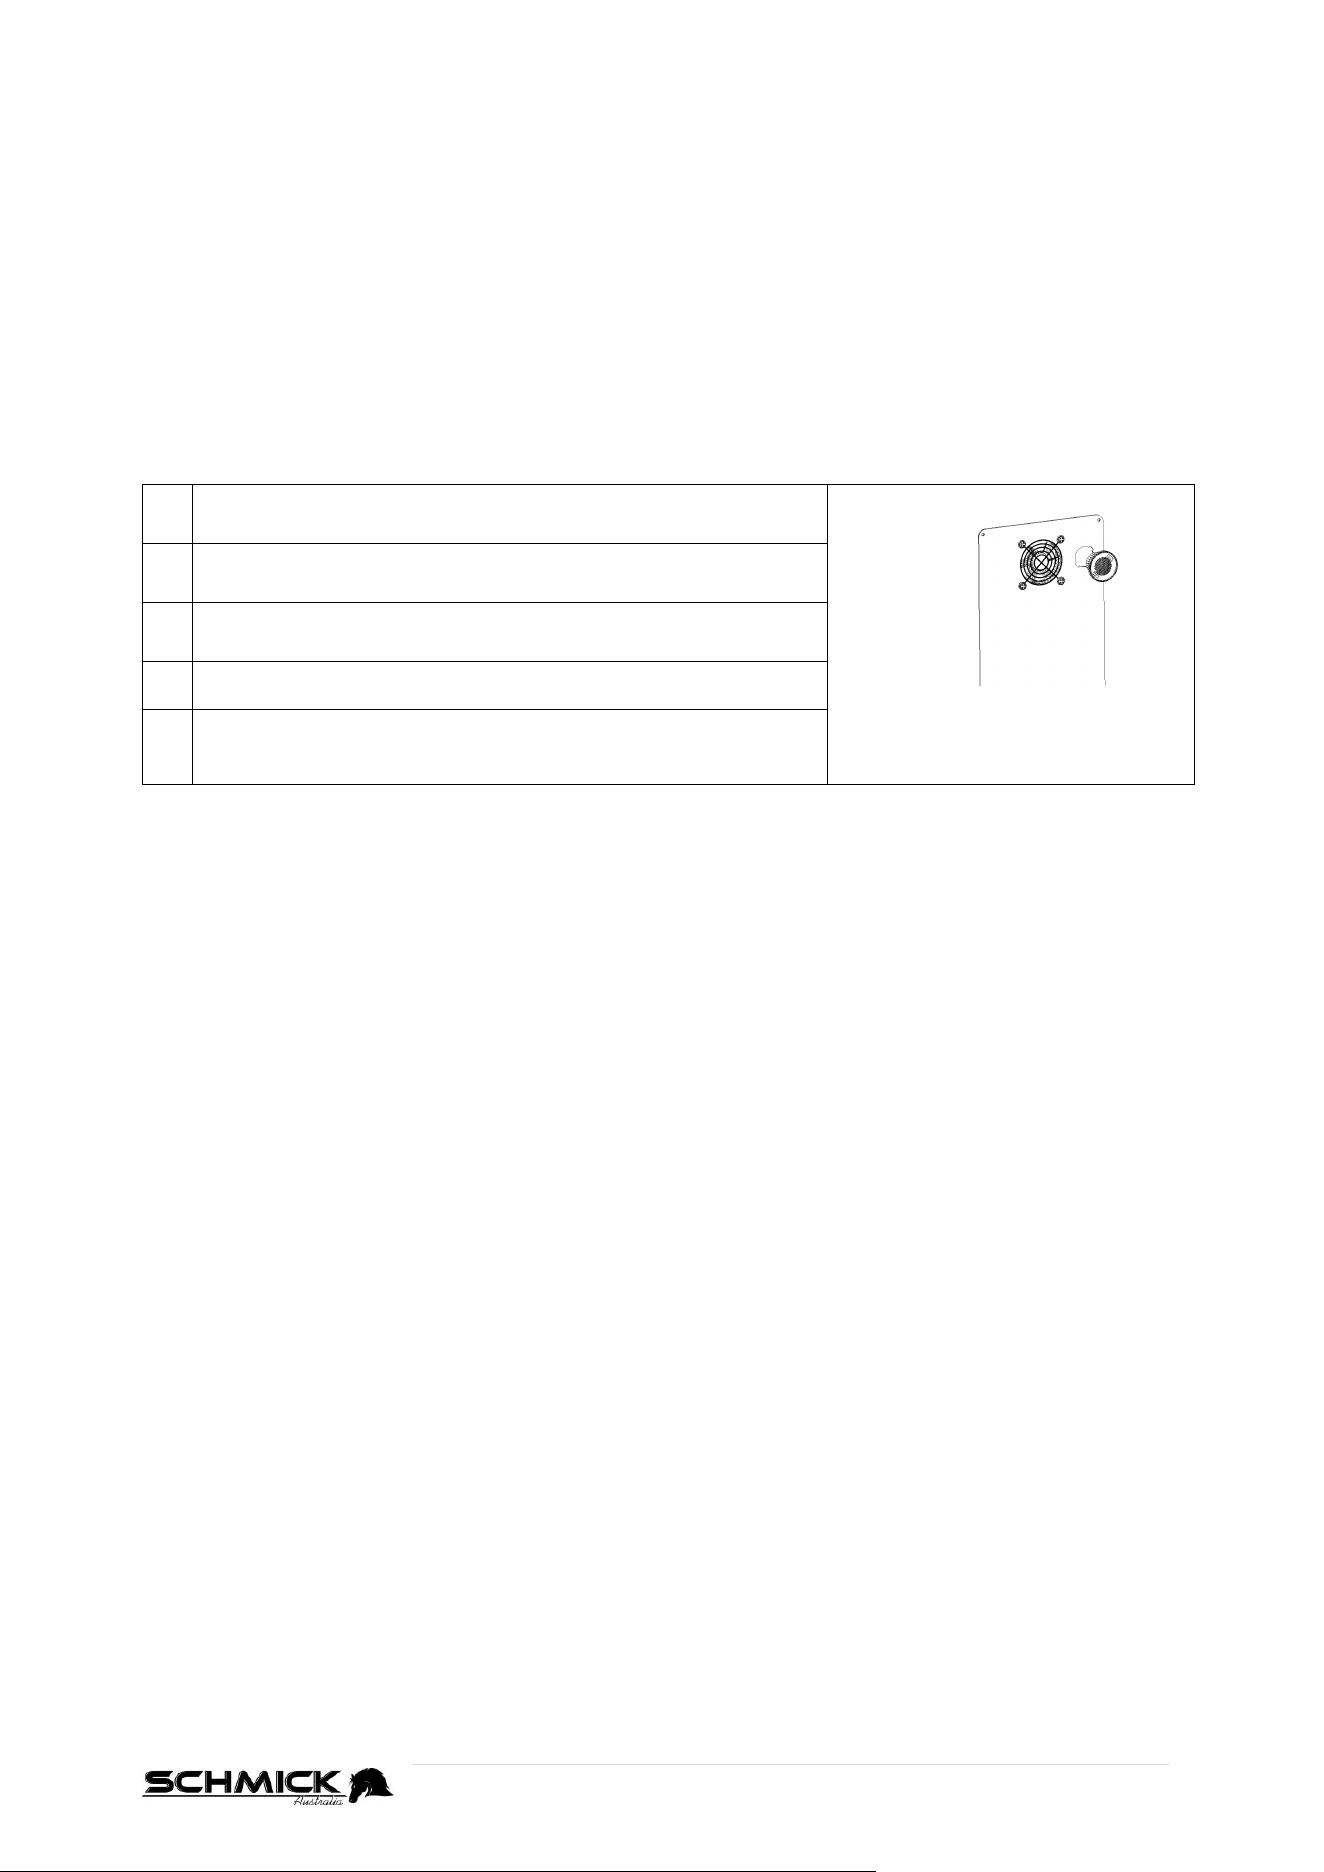
TO REPLACE YOUR CHARCOAL FILTER
(these can be purchased via www.bar-fridges-australia.com.au)
1
Remove the bottles of wine stored on the two (2) shelves
in front of the filter.
Turn Left to remove filter.
2
Remove the shelves and set aside to be replaced once
you have changed the filter
3
Hold the filter and turn it at 45 degrees in the
counterclockwise direction and then pull it out.
4
Remove the existing filter and replace it with a new one.
5
Put the new filter into the hole and then turn the filter at
45 degrees in clockwise direction.

22 | P a g e
PROBLEMS WITH YOUR BD425 WINE/BEVERAGE FRIDGE
TROUBLE SHOOTING / BASIC INFO
There are basic things you need to look and check before trying to initiate a technician call out
for warranty circumstances.
KNOWLEDGE BASE
This link to our Knowledge Base may be able to assist you with troubleshooting.
https://www.bar-fridges-australia.com.au/knowledgebase
NOISE
If your unit has become noisy, please check the following;
Can you ascertain exactly where the noise is coming from? It may be a loose screw or part
of the fridge that is now vibrating and is easy to fix.
Is the compressor / fridge level, a compressor not level will make a ‘clunking’ noise on start-
up and shut down.
Does the fan sound noisy? It may be as simple as needing slight adjustment or you may see
ice build up near the fan inside.
A slight sound may be heard when the liquid refrigerant circulates. This is normal.
A slight sound may be heard when defrosted water drops into the drip tray.
NOTE: The compressor and fans will run for longer periods if excessive quantities of food /
drink are stored or the ambient temperature is high.
NOT COOLING
All of a sudden unit has stopped cooling.
Have you got the controller set correctly? Or has it been altered or changed.
Is your door sealing properly, check all the way around door seal to make sure it is seating
correctly on fridge body, small gaps won’t affect cooling.
Check inner and rear fans are going
– If you can NOT see the individual blades stationary, the fans will be running
Does the compressor run? Make sure compressor is running. If it is running and still not
cooling and you have a warm fridge then there may be a gas problem and a technician will
be needed.
23 | P a g e
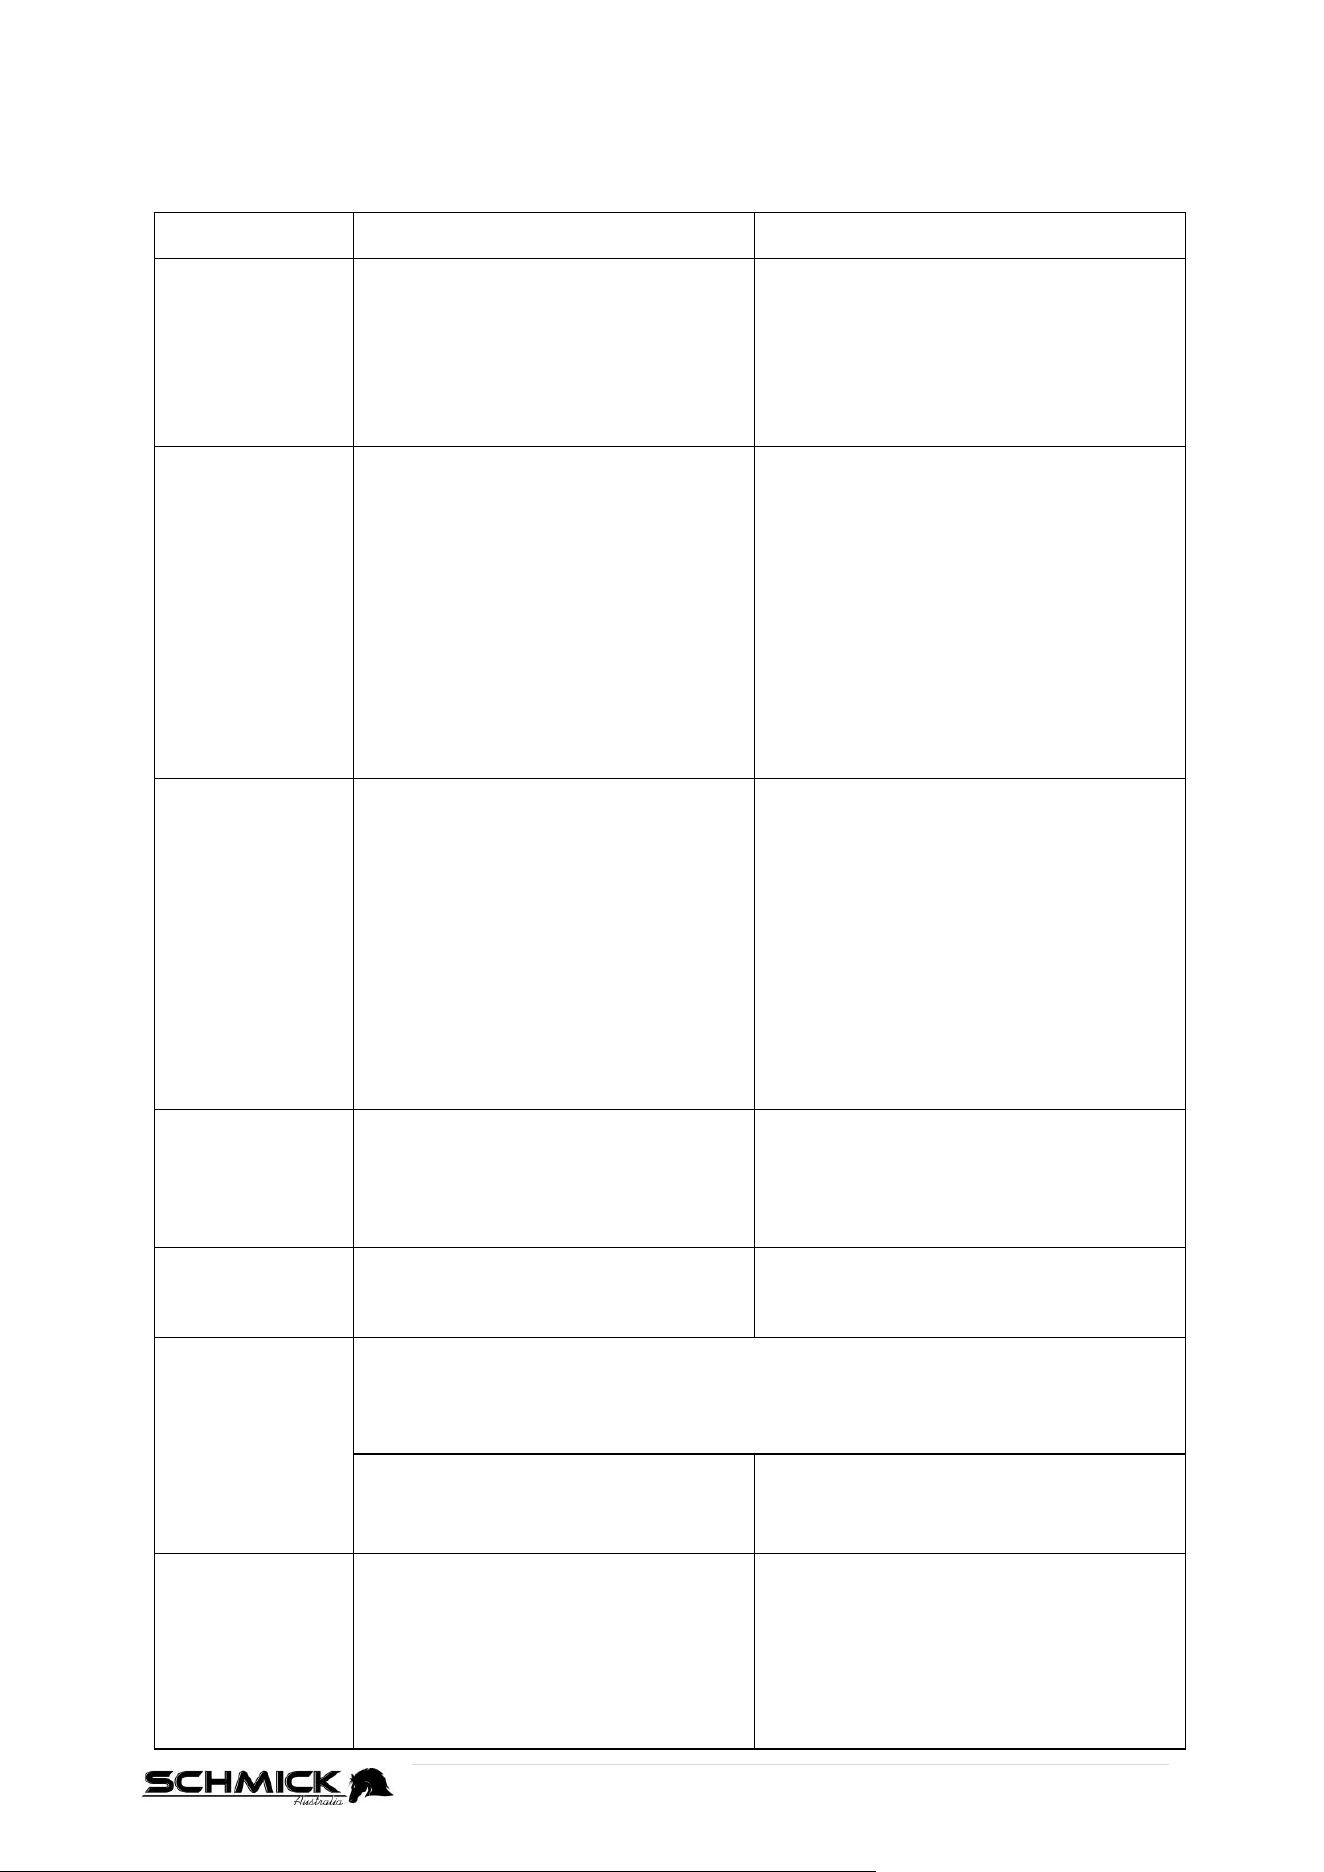
BD425 TROUBLESHOOTING GUIDE
You can solve many common Wine/Beverage fridge problems easily, saving you the cost of a
possible service call. If you can, try the following suggestions to see if you solve the problem
before calling.
PROBLEM
POSSIBLE CAUSE
REMEDY
Wine/Beverage
fridge does not
operate
No plugged in.
The appliance is turned off.
The circuit breaker tripped or a blown
fuse.
Connect the appliance.
Switch on the appliance.
Replace the broken fuse in your fuse box
or reset the breaker. Make sure the
outlet has sufficient amperage.
Wine/Beverage
fridge is not cold
enough
Check the temperature control
setting.
External environment may require a
higher setting.
The door is open too often.
The door is not closed completely.
The door seal does not seal properly.
Check the set temperature.
Set a lower temperature.
Do not open door or drawers more often
than necessary.
Close door or drawers properly.
Check the seal and clean or replace.
Clean the condenser when necessary.
Clear the obstructions and wipe off the
dust.
Turns on and off
frequently
The room temperature is hotter than
normal.
Overload of the cabinet
The door is open too often.
The door is not closed completely.
The temperature control is not set
correctly.
The door seal does not seal properly.
Put the appliance in a cooler place.
Leave the appliance to work for a while
until the set temperature has been
reached.
Do not open the appliance more often
than necessary.
Close the door or drawer properly.
Check the all door seals are clean, seal
correctly or replace it.
The light does
not work
Not plugged in.
The circuit breaker tripped or a blown
fuse.
The bulb has burned out.
The light button is “OFF”
Connect the appliance.
Switch on circuit breaker or replace fuse.
Switch on the light.
Vibrations
Check to sure that the Wine/Beverage
fridge is level.
Level the appliance with the
adjustable feet.
Too much noise
The rattling noise may come from the flow of the refrigerant, which is normal.
As each cycle ends, you may hear gurgling.
Contraction and expansion of the inside walls may cause popping and crackling
noises.
The Wine/Beverage fridge is not level.
Check to make sure that the refrigerator
is level, and that it is not in contact with
another appliance or furniture.
The door will not
close properly
The Wine/Beverage fridge.
The door was reversed and not
properly installed.
The door seal is dirty.
The shelves are out of position.
Level the appliance with the
adjustable feet.
Clean the door seals.
Check the racks, bins and refit correctly.
24 | P a g e
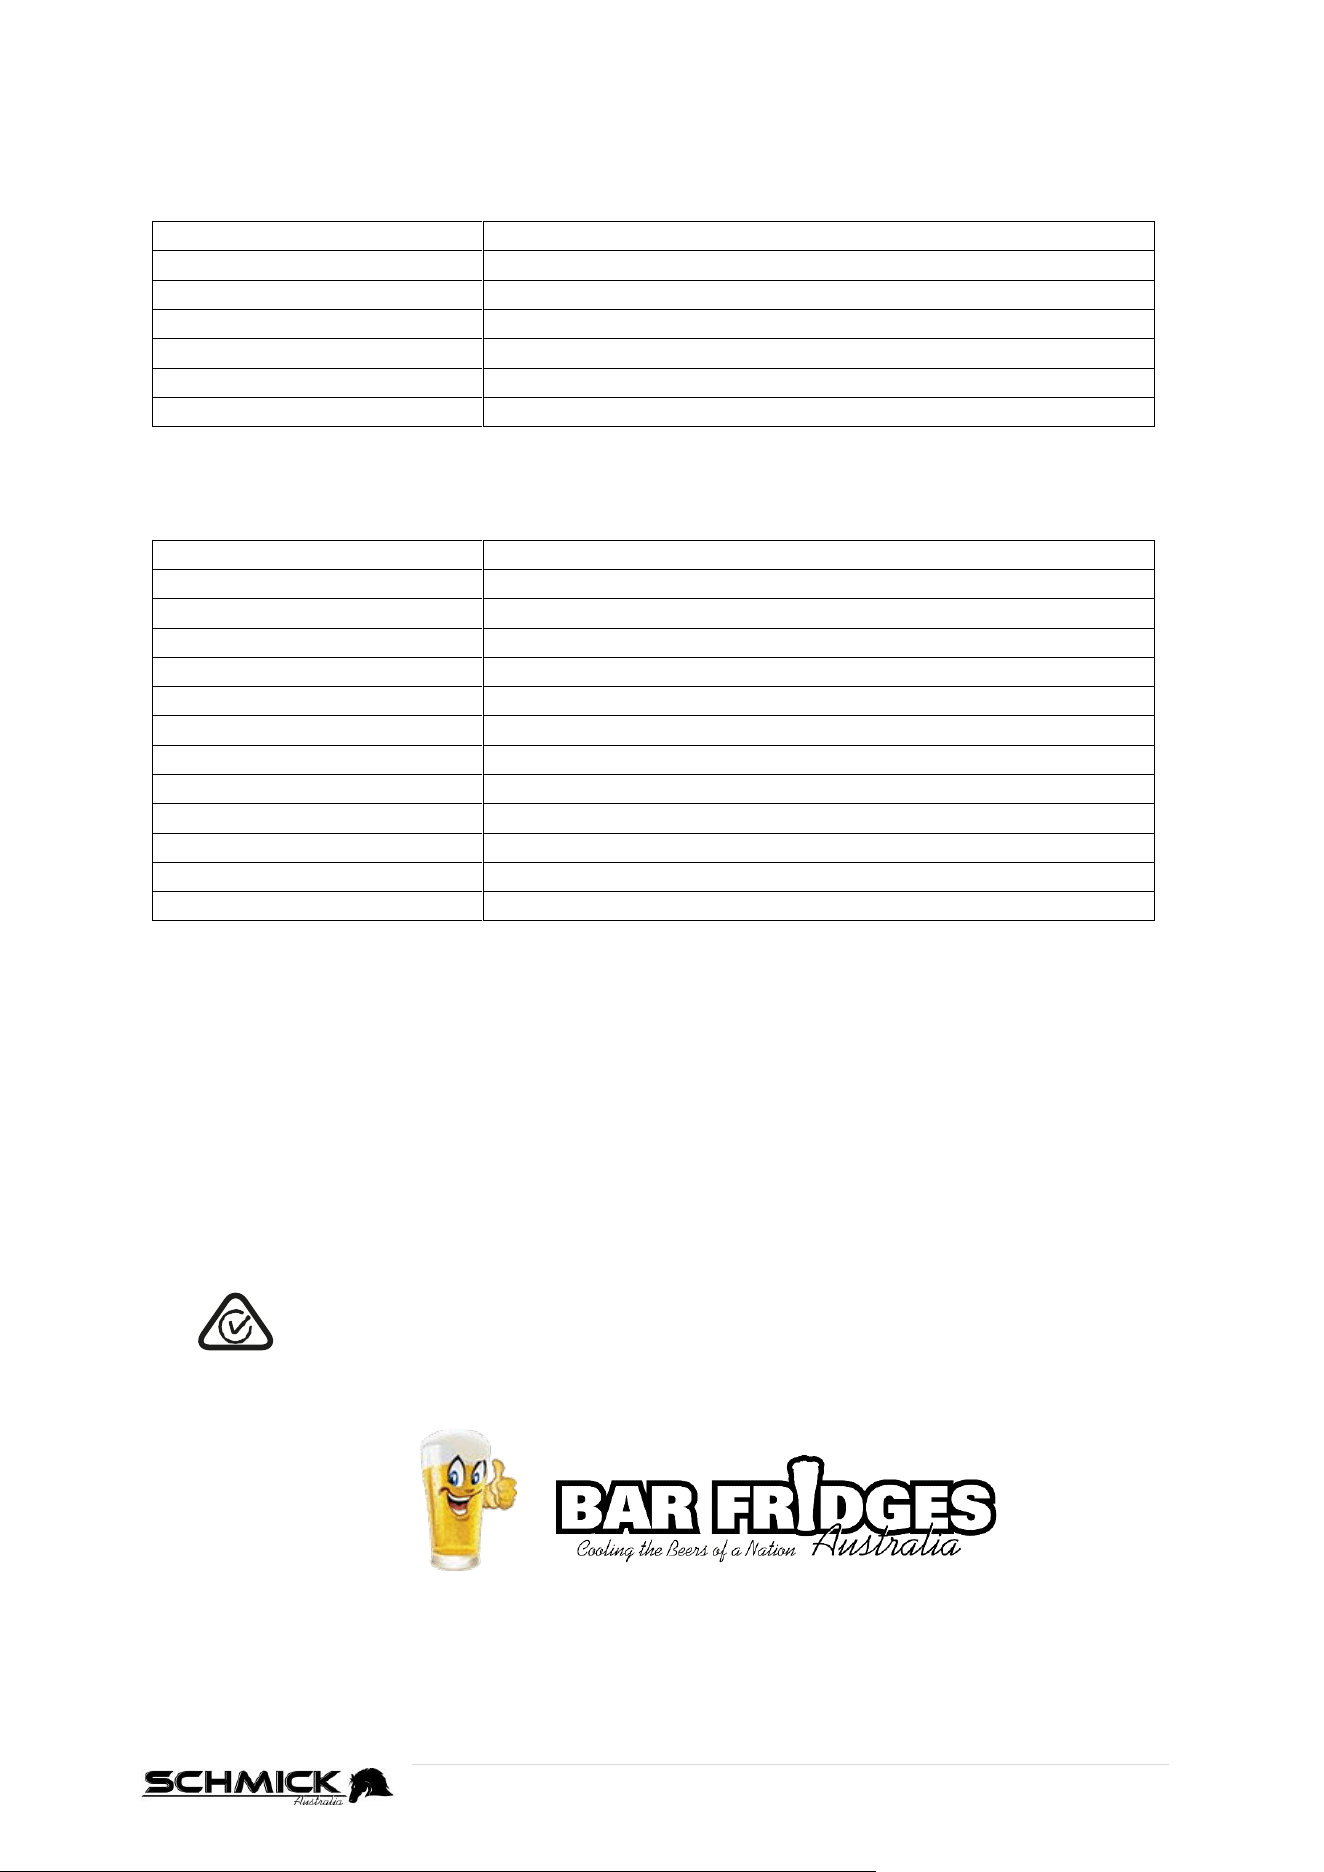
ERROR CODES
SINGLE ZONE MODELS
Error Code
Error
E1
Temp Sensor open circuit
E2
Temp Sensor short circuit
E3
Evaporator sensor open circuit
E4
Evaporator sensor short circuit
HH
Temp is too high (outside parameters)
LL
Temp is too low (outside parameters)
DUAL ZONE MODELS
Error Code
Error
E1
Upper Zone Temp Sensor open circuit
E2
Upper Zone Temp Sensor short circuit
E3
Upper Zone Evaporator sensor open circuit
E4
Upper Zone Evaporator sensor short circuit
E5
Lower Zone Temp Sensor open circuit
E6
Lower Zone Temp Sensor short circuit
E7
Lower Zone Evaporator sensor open circuit
E8
Lower Zone Evaporator sensor short circuit
HH on Left display
Once Upper zone temp is too high
LL on Left display
Once Upper zone temp is too low
HH on Right display
Once Bottom zone temp is too high
LL on Right display
Once Bottom zone temp is too low
COMPLIANCE
This product has been fully tested and meets all requirements as set out by electrical and
safety standards AS/NZS 60335.1 and AS/NZS 60335.2.24
All units have been MEPS tested and registered to ISO 23953-2 and F2020L01014 (2020)
The RCM Mark (Regulatory Compliance Mark) indicates that the product
complies with the relevant guidelines of the ACMA as well as corresponding
government requirements for the safety of electrical devices.