2
Table of Contents
Table of Contents .......................................................... 2
Safety Information ......................................................... 2
Warranty ......................................................................... 2
What is Covered ....................................................................... 2
What is Not Covered ................................................................. 2
Pre-Installation .............................................................. 3
Planning Installation ................................................................ 3
Tools Required ......................................................................... 3
Package Contents .................................................................... 3
Installation ..................................................................... 4
Maintenance .................................................................. 5
Care and Cleaning ........................................................ 5
Troubleshooting ............................................................ 5
Safety Information
WARNING: Your solar light may not function in temperatures
below -4ºF (-20ºC) or above 140ºF (60ºC).
CAUTION: Use a rechargeable battery only. Recycle or
dispose of batteries properly.
CAUTION: Do not open, short circuit, or mutilate batteries as
injury may occur.
Warranty
ONE YEAR LIMITED WARRANTY
WHAT IS COVERED
The manufacturer warrants this product to be free of defects in material and workmanship for a period of one (1) year from the date of purchase. This
warranty only applies to the original consumer purchaser and only to products used in normal use and service. The manufacturer’s only obligation
and your exclusive remedy, is the repair or replacement of the product at the manufacturer’s discretion, provided that the product has not been
damaged through misuse, abuse, accident, modification, alternation, neglect, or mishandling. Proof of purchase and evidence of manufacturer’s
date coding must accompany all warranty claims. Manufacturer’s date coding is printed and adhered to each product.
WHAT IS NOT COVERED
This warranty does not apply to products that are found to have been improperly installed, set-up, or used in any way not in accordance with the
instructions supplied with the product. This warranty does not apply to a failure of the product as a result of an accident, misuse, abuse, negligence,
alteration, or faulty installation. Batteries supplied with this product are not included in this warranty. This warranty shall not apply to the finish on
any portion of the product, such as surface and/or weathering, as this is considered normal wear and tear. The manufacturer does not warrant and
specially disclaims any warranty, whether express or implied, of fitness for a particular purpose, other than the warranty contained herein. This
warranty does not cover consequential or incidental loss or damage, including but not limited to any labor/expense costs involved in the
replacement or repair of the product.
Contact the Customer Service Team at 1-830-249-1200 or CustomerService@Creative-prc.us
.
3
Pre-Installation
PLANNING INSTALLATION
Ensure the mounting location for your solar light allows the solar panel to receive direct sunlight. Do not locate the product in shaded areas as this
will significantly reduce performance.
Position the solar light such that during evening hours the ambient light from other light sources does not affect the photosensor built into the solar
panel. High ambient light levels can cause the lamp to turn off during evening hours.
.
NOTE: The solar light is equipped with a photosensor that turns
the unit on at dusk and off at dawn. Ambient light can affect the
operation of the photosensor.
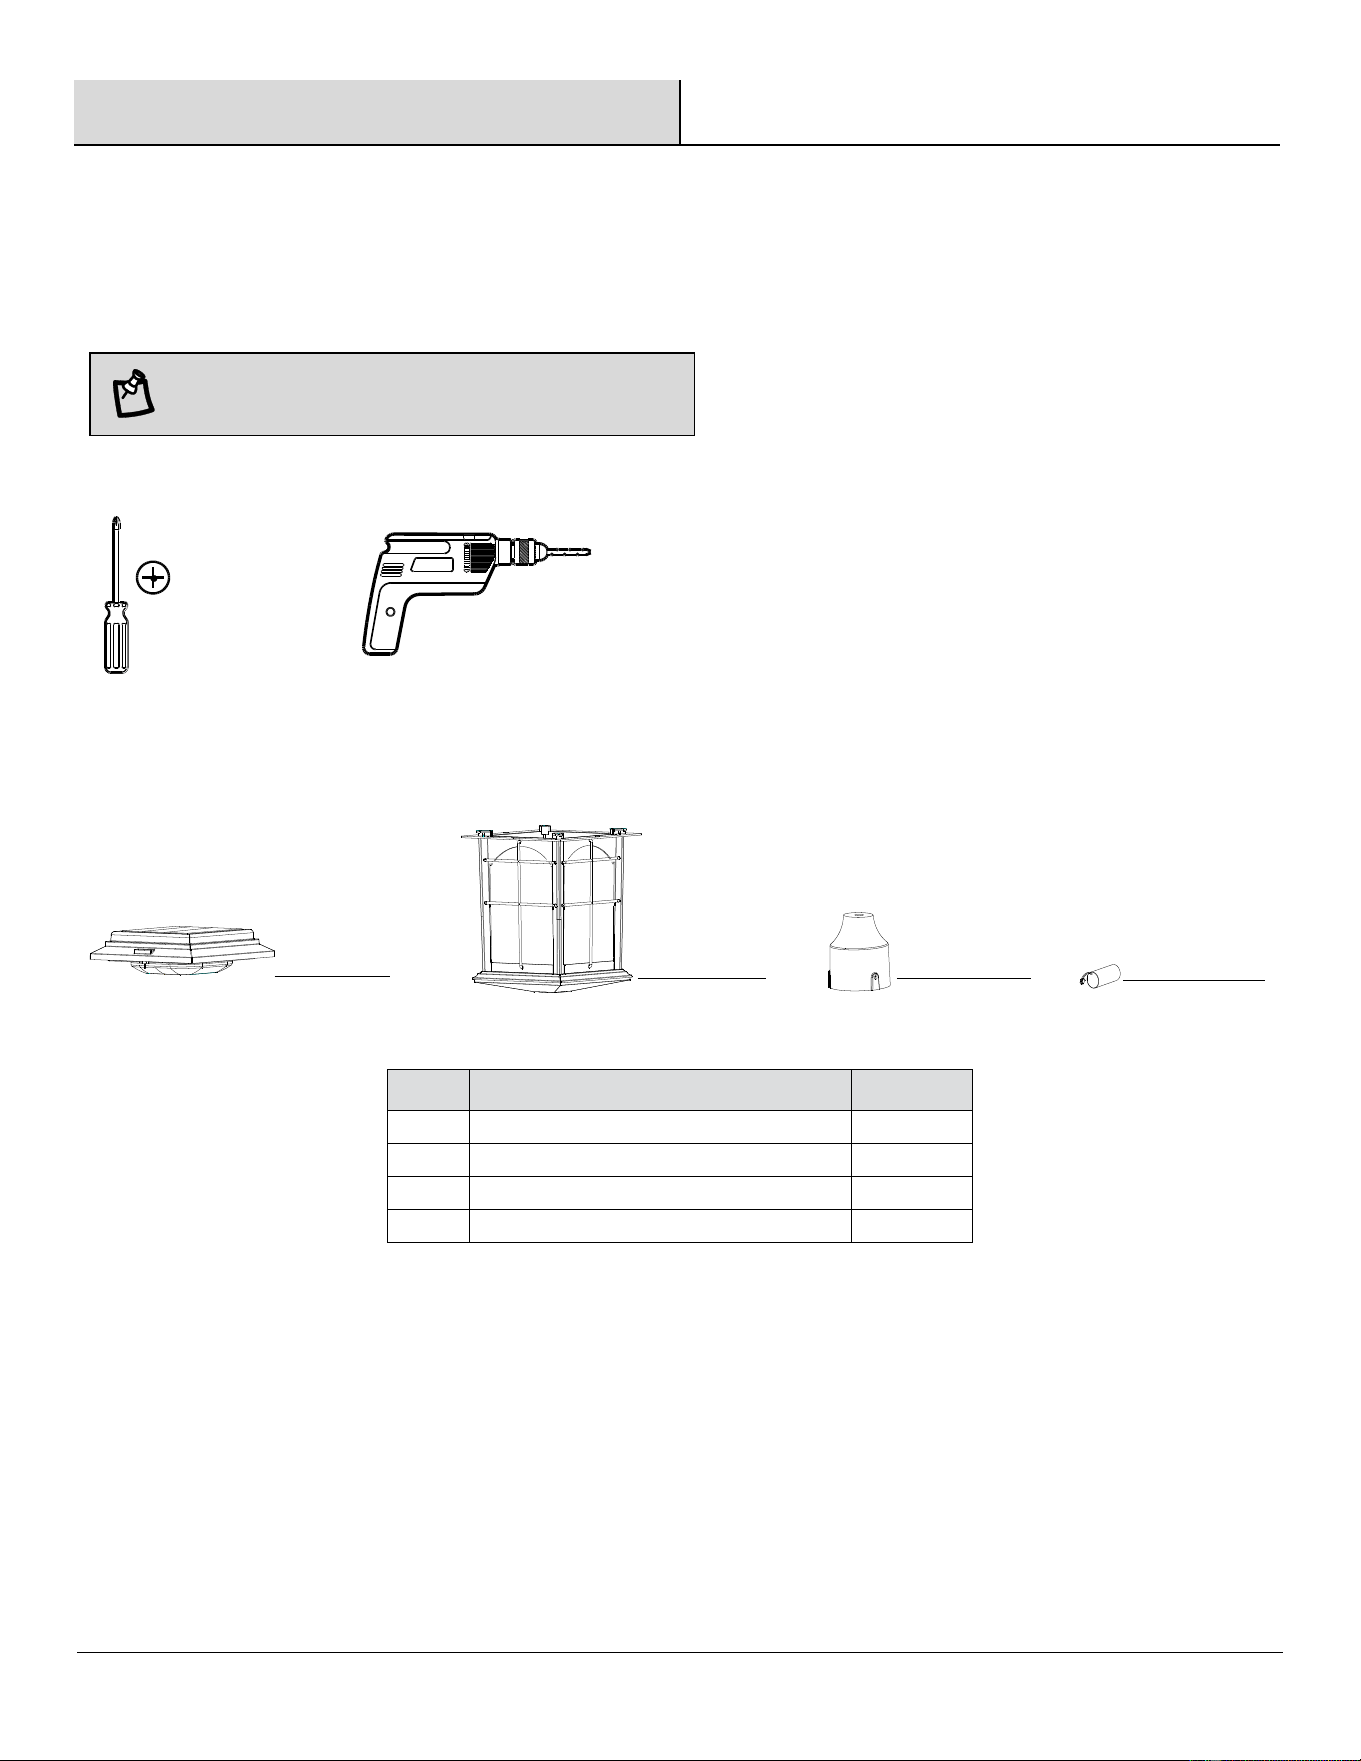
TOOLS REQUIRED
Phillips
screwdriver
Electric drill
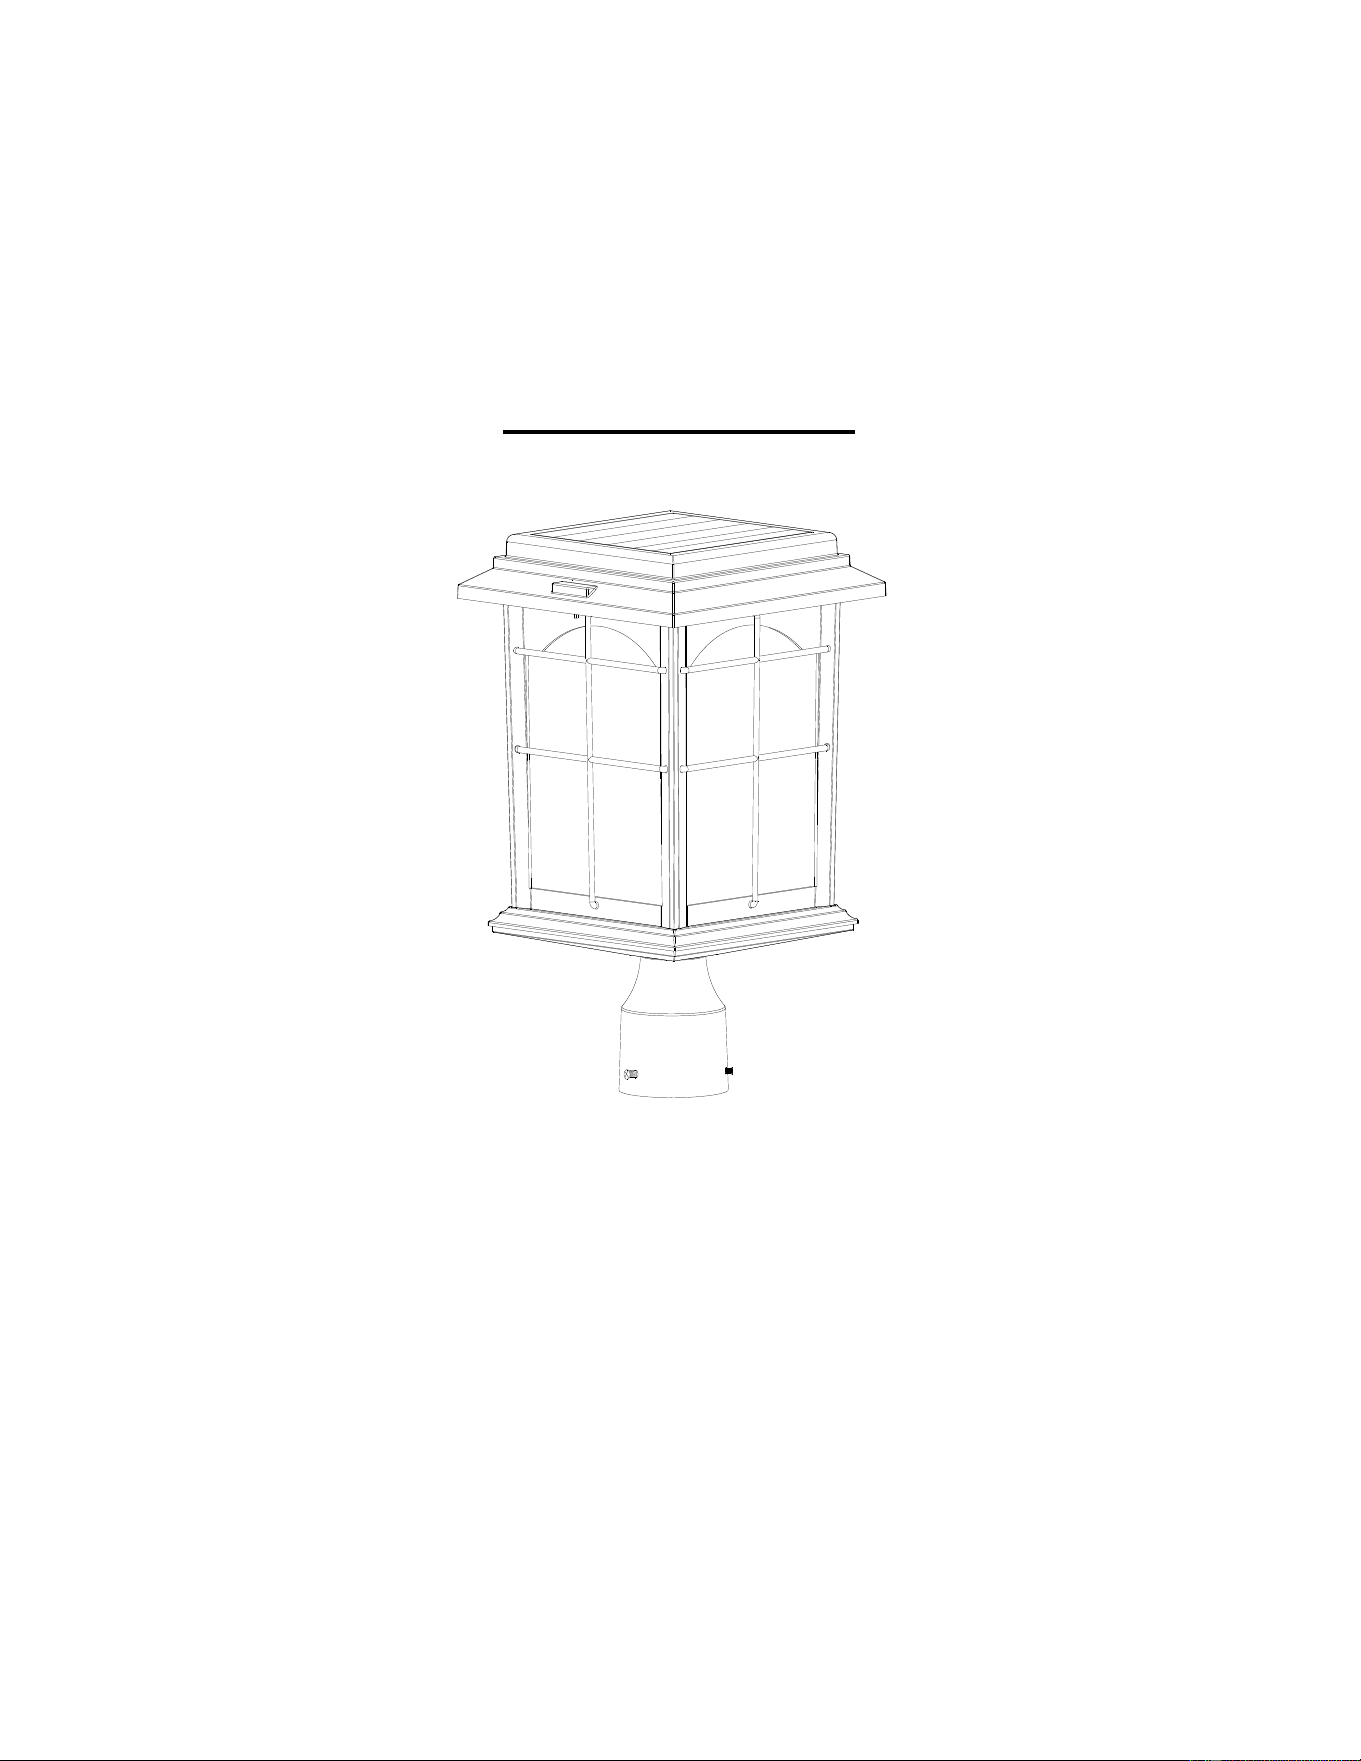
PACKAGE CONTENTS
C
D
A
B
Part
Description
Quantity
A
Top cap (Pre-assembled)
1
B
Lamp housing (Pre-assembled)
1
C
Mounting collar (Pre-assembled)
1
D
Battery pack (Pre-assembled)
1
4
Installation
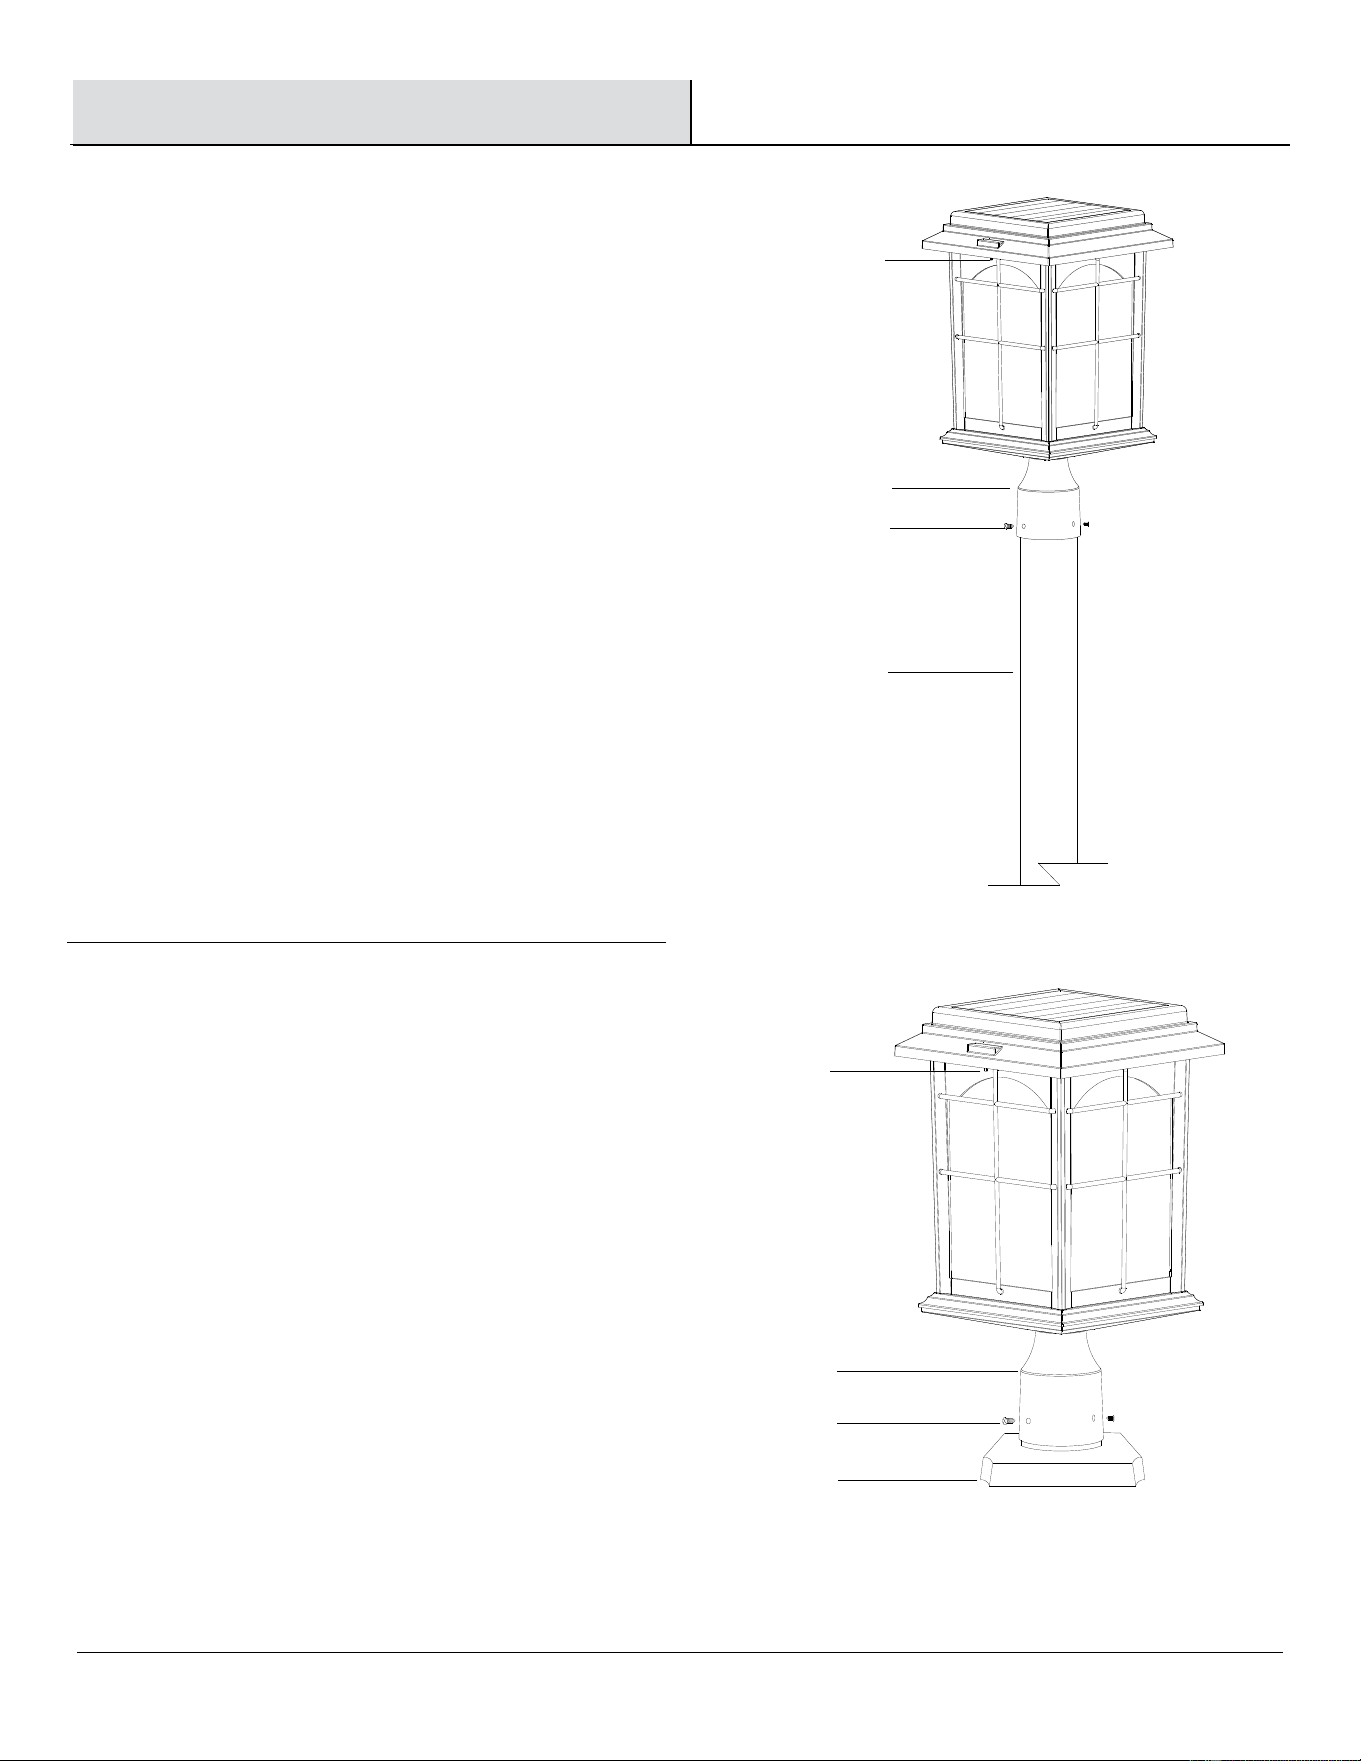
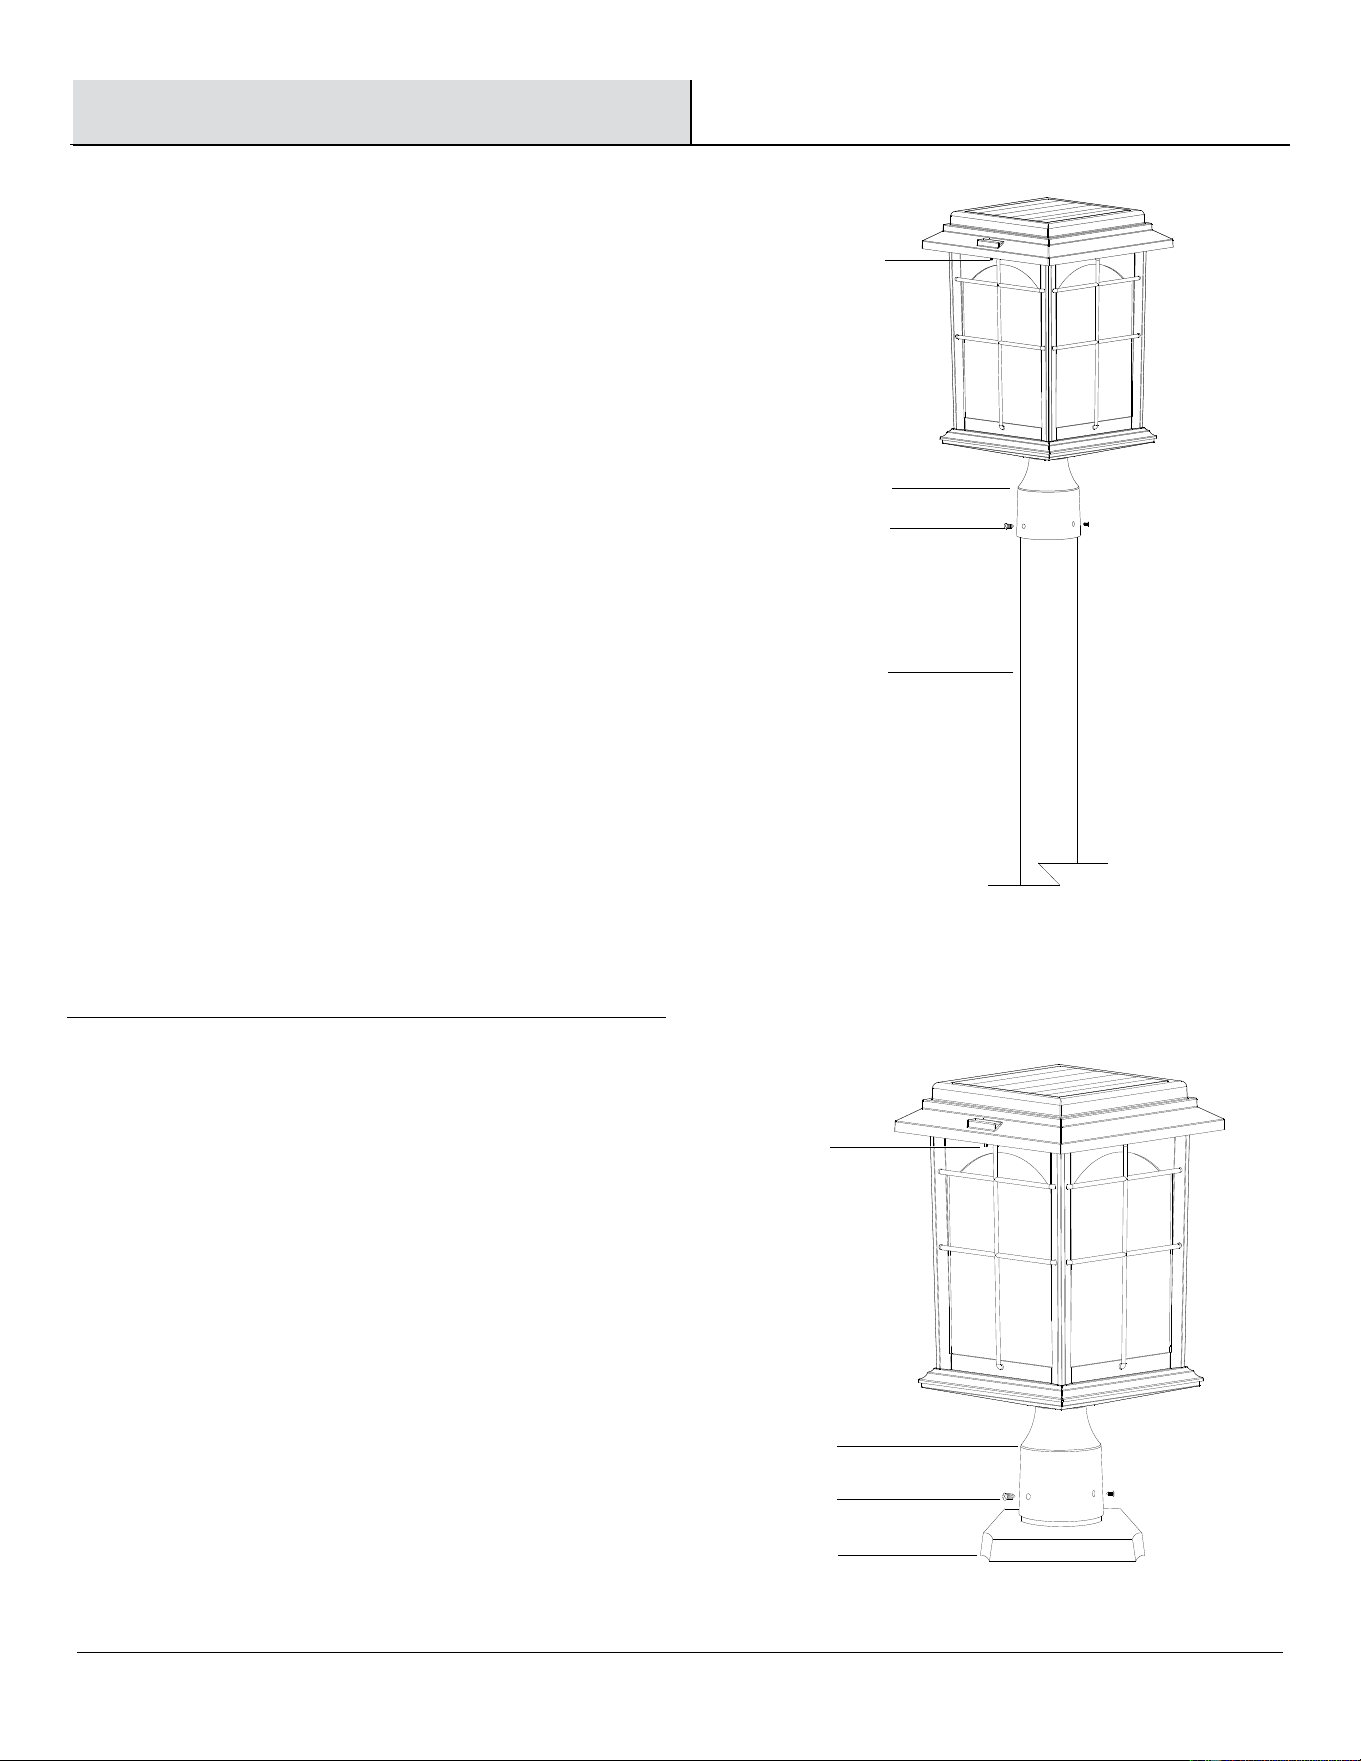
Option 1: Post mounting
□ Place the mounting collar (C) of the post lantern over the top
of the 3-inch diameter pole (J) (sold separately).
□ Tighten the three set screws (I) against the pole (J).
□ Alternative Securement: Remove the three set screws (I), and
mark holes locations with marker. Drill holes in the pole (J),
and secure the mounting collar (C) by screwing the three set
screws (I) into the holes drilled into the pole (J).
□ Set the AUTO/OFF switch (H) located on the bottom plate
under the top cap to the AUTO position, and allow it to charge
a full sunny day. The AUTO position automatically turns the
unit ON at dusk.
Option 2: Surface mounting
□ Place the mounting collar (C) of the post lantern onto the fixed
3-inch diameter pier base (K) (sold separately).
□ Tighten the three set screws (I) against the pier base (K).
□ Alternate Securement: Refer to Step 3 of the above Post
Mounting Instructions.
□ Set the AUTO/OFF switch (H) located on the bottom plate
under the top cap to the AUTO position, and allow it to charge
a full sunny day. The AUTO position automatically turns the
unit ON at dusk.
H
C
I
K
H
C
I
J
5
Maintenance
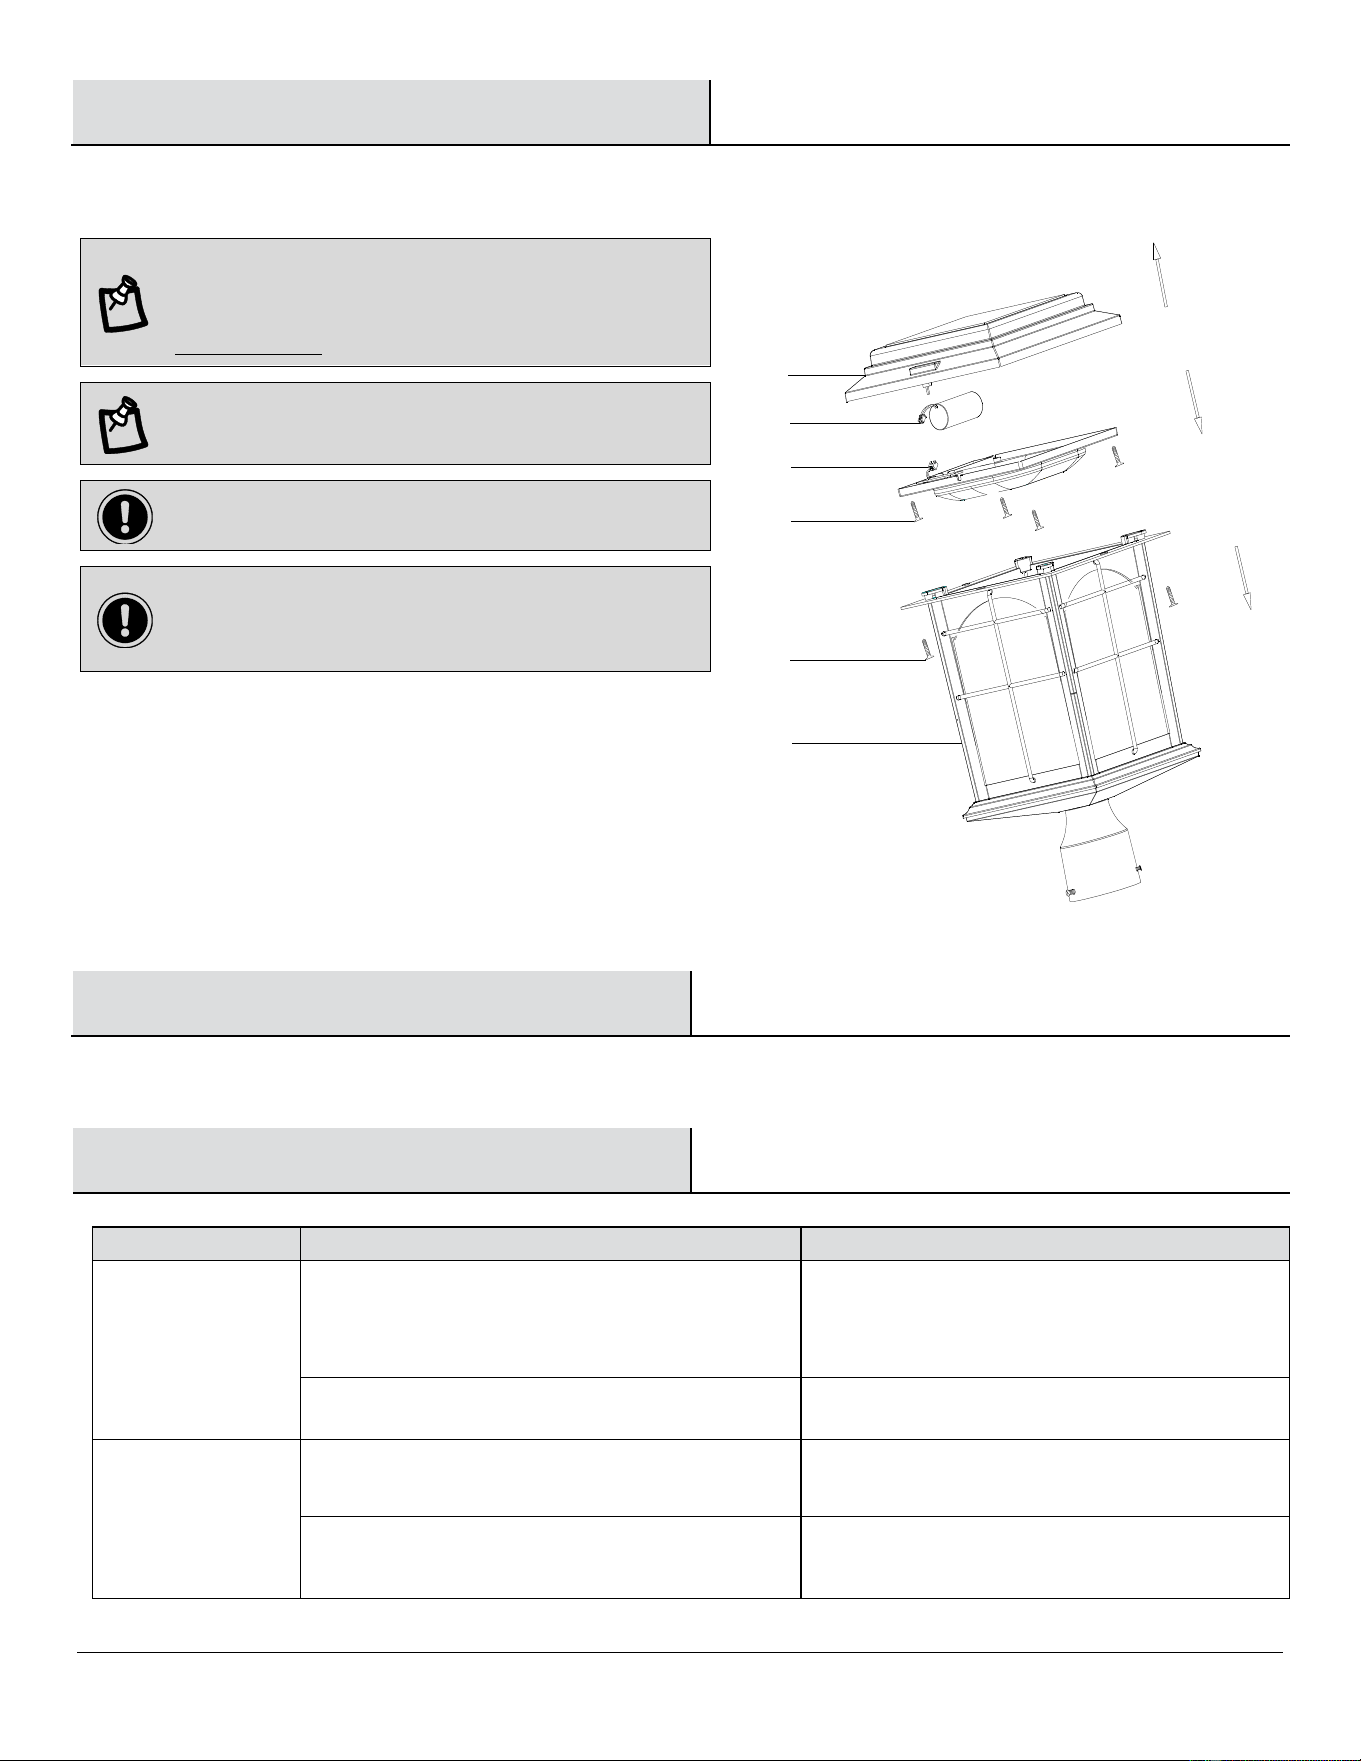
Replacing the battery
NOTE: Use one 26650 Lithium Phosphate, 3000mAh, 3.2V
rechargeable battery pack. For best performance, replace with a
Lithium Phosphate rechargeable battery pack every 18 months.
Replacement battery pack Model 46240-000RB is available at
NOTE: To reduce the risk of damage to the electrical connections,
exercise caution when separating the back plate (E) from the top cap
assembly (A).
IMPORTANT: Dispose of the battery in accordance with local, state,
and federal regulations.
IMPORTANT: When storing any solar product for an extended period
of time, remove the batteries. Storing any solar product without regular
recharge or removal of batteries could cause permanent damage to the
rechargeable batteries.
□ Loosen the two lock screws (G), remove the top cap assembly (A)
from the lamp housing (B).
□ Remove the back plate (E) from the top cap assembly (A) by
loosening the four lock screws (F).
□ Disconnect the wire connection of the battery lead (D) and remove
the old battery pack (D) from the battery compartment located on
the back plate (E). Replace with a new 26650 Lithium Phosphate,
3000mAh 3.2V rechargeable battery pack.
□ Replace the back plate (E) and the top cap assembly (A), with the
lock screws (F & G).
Care and Cleaning
□ The solar panel should be cleaned periodically with a damp cloth to help maintain optimum performance.
□ Do not use any cleaners with chemicals, solvents, or harsh abrasives.
Troubleshooting
Problem
Possible Cause
Solution
The nightly run time is
shorter.
The battery is not fully charged.
Ensure the solar light is located in an area where it can
receive the maximum amount of full, direct sunlight every
day. Keeping the solar panel clean is equally important to
ensure the maximum charging performance.
The battery is reaching the end of its useful life.
Replace the old battery with a Lithium Phosphate
rechargeable battery.
The solar light does
not turn on at night.
Your solar light is equipped with an AUTO/OFF switch on
the back plate of the top cap. This switch must be set to
AUTO prior to use.
Prior to use, check that the unit has been set to the AUTO
position and allowed to charge a full sunny day.
The solar light is installed close to other light sources,
which may keep the solar light from turning on at night
automatically.
Relocate the fixture or eliminate other light sources.
A
B
D
E
F
G
GUÍA DE USO Y MANTENIMIENTO
FAROL SOLAR DE POSTE
Tiene preguntas, problemas o faltan piezas? Antes de regresar a la tienda,
llame a Servicio al Cliente
de lunes a viernes de 8 a.m. y 6 p.m., hora local del Este
1-830-249-1200
CustomerService@Creative-prc.us
Conserva este manual para uso en el futuro
2
Tabla de contenido
Tabla de contenido ....................................................... 2
Información de seguridad ............................................ 2
Garantía .......................................................................... 2
Qué cubre la garantía ............................................................... 2
Qué no cubre la garantía ........................................................... 2
Preinstalación ................................................................ 3
Cómo planificar la instalación ................................................... 3
Herramientas necesarias .......................................................... 3
contenido del paquete .............................................................. 3
Instalación ..................................................................... 4
Mantenimiento ............................................................... 5
Mantenimiento y limpieza ............................................ 5
Solución de problemas ................................................ 5
Información de seguridad
ADVERTENCIA: Tu lámpara solar puede no funcionar a
temperaturas inferiores a -4 ºF (-20 ºC) o superiores a 140 ºF
(60 ºC)..
PRECAUCIÓN: Usa sólo una batería recargable. Recicla o
desecha las baterías adecuadamente.
PRECAUCIÓN: No hagas puente entre los bornes de la
batería ni las abras o modifiques, para evitar lesiones.
Garantía
GARANTÍA LIMITADA DE UN AÑO
QUÉ CUBRE LA GARANTÍA
El fabricante garantiza que este producto está libre de defectos materiales o de fabricación durante un (1) año a partir de la fecha original de
compra. Esta garantía es válida sólo para el comprador original y sólo cubre productos en uso y funciones normales. La única obligación y solución
exclusiva del fabricante, a criterio del mismo, será reparar o reemplazar el producto siempre y cuando el defecto no sea resultado de un mal uso,
abuso, accidente, modificaciones, alteración, negligencia o manejo indebido. Todas las reclamaciones por garantía deben estar acompañadas por
el comprobante de compra y evidencia del código de fecha del fabricante. El código de fecha del fabricante está impreso y adherido a cada
producto.
QUÉ NO CUBRE LA GARANTÍA
Esta garantía no cubre ningún producto instalado, configurado o usado incorrectamente sin seguir las instrucciones adjuntas al producto. Esta
garantía no cubre fallas del producto a consecuencia de un accidente, mal uso, abuso, negligencia, alteración o instalación defectuosa. Esta
garantía no cubre las baterías incluidas con este producto. Esta garantía no se aplica al acabado de ninguna parte del producto, como por ejemplo
el de la superficie, ni al deterioro por condiciones ambientales, ya que eso se considera un desgaste normal. El fabricante no garantiza y se exime
especialmente de cualquier garantía, expresa o implícita, de idoneidad para un fin en particular, distinto de la garantía indicada en el presente.
Esta garantía no cubre daños o pérdida directos o indirectos, incluidos cualquier costo de mano de obra o gastos relacionados con el reemplazo o
reparación del producto.
Póngase en contacto con el Equipo de Servicio al Cliente llamando al 1-830-249-1200 o CustomerServic[email protected].

3
Preinstalación
CÓMO PLANIFICAR LA INSTALACIÓN
Asegúrate de que el lugar de instalación de tu lámpara solar permita que el panel solar reciba luz solar directa. No coloques el producto en áreas
con sombra, ya que esto reducirá el rendimiento de forma significativa.
Coloca la lámpara solar de tal forma que durante las horas nocturnas la luz ambiental de otras fuentes de iluminación no afecte el fotosensor
incorporado en el panel solar. Los niveles altos de luz ambiental pueden causar que la lámpara se apague durante las horas nocturnas.
.
NOTA: La lámpara solar está equipada con un fotosensor que
enciende la unidad al atardecer y la apaga al amanecer. La luz
ambiental puede afectar el funcionamiento del fotosensor.
HERRAMIENTAS NECESARIAS
Destornillador
Phillips
Taladro eléctrico
CONTENIDO DEL PAQUETE
C
D
A
B
Pieza
Descripción
Cantidad
A
Tapa superior (preensamblada)
1
B
Carcasa de la lámpara (preensamblada)
1
C
Collarín de montaje (preensamblado)
1
D
Batería (preensamblada)
1
4
Instalación
Opción 1: Montaje en poste
□ Coloca el collarín de montaje (C) del farol de poste sobre la
parte superior del poste de 7.6 cm de diámetro (J) (se vende
por separado).
□ Aprieta los tres tornillos de fijación (I) contra el poste (J).
□ Fijación alternativa: Quita los tres tornillos de fijación (I) y
marca las ubicaciones de los orificios con un marcador.
Taladra orificios en el poste (J) y asegura el collarín de
montaje (C) atornillando los tres tornillos de fijación (I) en los
orificios taladrados en el poste (J).
□ Coloca el interruptor AUTO/OFF (AUTOMÁTICO/APAGADO)
(H), ubicado en la placa inferior debajo de la tapa superior, en
la posición de AUTO y déjalo que cargue durante todo un día
soleado. La posición de AUTO enciende automáticamente la
unidad al anochecer.
Opción 2: Instalación sobre superficie
□ Coloca el collarín de montaje (C) del farol de poste sobre el
pilar fijo de 7.6 cm de diámetro (K) (se vende por separado).
□ Aprieta los tres tornillos de fijación (I) contra el pilar (K).
□ Fijación alternativa: Consulta el paso 3 de las instrucciones
de montaje en poste.
□ Coloca el interruptor AUTO/OFF (AUTOMÁTICO/APAGADO)
(H), ubicado en la placa inferior debajo de la tapa superior, en
la posición de AUTO y déjalo que cargue durante todo un día
soleado. La posición de AUTO enciende automáticamente la
unidad al anochecer.
H
C
I
K
H
C
I
J

5
Mantenimiento
Cómo reemplazar la batería
NOTA: Usa una batería recargable 26650 de fosfato de litio, de 3000
mAh y 3.2 V. Para un mejor rendimiento, reemplaza con una batería
recargable de fosfato de litio cada 18 meses. El modelo 46240-000RB
de batería de reemplazo está disponible en www.creative-prc.us o
enviando un correo electrónico a [email protected].
NOTA: Para reducir el riesgo de daño a las conexiones eléctricas, ten
precaución al separar la placa posterior (E) del ensamblaje de la tapa
superior (A).
IMPORTANTE:Desecha la batería conforme con las regulaciones
locales, estatales y federales.
IMPORTANTE:Cuando almacenes cualquier producto solar durante
un largo período de tiempo, asegúrate de quitar las baterías.
Almacenar cualquier producto solar sin cargarlo regularmente o quitar
las baterías, puede dañar estas permanentemente..
□ Afloja los dos tornillos de seguridad (G), retira el ensamblaje de la
tapa superior (A) de la carcasa de la lámpara (B).
□ Retira la placa posterior (E) del ensamblaje de la tapa superior (A)
aflojando los cuatro tornillos de seguridad (F).
□ Desconecta la conexión de cable del terminal de la batería (D) y
quita la batería vieja (D) del compartimento de batería ubicado en
la placa posterior (E). Reemplaza con una batería recargable
26650 de fosfato de litio, de 3000 mAh y 3.2 V.
□ Vuelve a colocar la placa posterior (E) del ensamblaje de la tapa
superior (A) con los tornillos de seguridad (F & G).
Mantenimiento y limpieza
□ El panel solar debe limpiarse periódicamente con un paño húmedo para ayudar a mantener un rendimiento óptimo.
□ No uses limpiadores con químicos, solventes o productos abrasivos.
Solución de problemas
Problema
Causa posible
Solución
El tiempo de
funcionamiento nocturno
es menor.
La batería no está completamente cargada.
Asegúrate de que la luz solar se coloque en una zona donde
pueda recibir la cantidad máxima de luz solar directa y total
todos los días. Mantener el panel solar limpio es igualmente
importante para garantizar el rendimiento máximo de carga.
La batería está llegando al final de su vida útil.
Reemplaza la batería vieja por una batería recargable de
fosfato de litio.
La lámpara solar no se
enciende durante la
noche.
Tu lámpara solar está equipada con un interruptor AUTO/OFF
(AUTOMÁTICO/APAGADO) en la placa trasera de la tapa superior.
Este interruptor debe colocarse en AUTO antes de usarse.
Antes de usar, revisa que la unidad esté en la posición AUTO y
deja que se cargue durante todo un día soleado.
La lámpara solar está instalada próxima a otras fuentes de luz,
las cuales pueden evitar que la luz solar se encienda
automáticamente por la noche.
Ubica la lámpara en otro lugar o elimina las otras fuentes de
luz.
A
B
D
E
F
G