BlazeGrills.com
Blaze LTE PRO 32-Inch Grill
Premium LTE Series
PREMIUM LTE SERIES PRODUCT MANUAL
BLZ-4LTEPRO-LP/NG
SCAN TO REGISTER
22
26
23
25
Propane Connections
Local Codes
Natural Gas Connections
Fuel Conversions
Checking for Leaks
2
Blaze LTE PRO 32-Inch Grill Premium LTE Series
BlazeGrills.com
14
17
15
16
17
2
10–11
6
13
3
12
7
4–5
13
8–9
Unpacking Your Unit
Saftey Instructions
Specifications
Rating Plate Location
Blaze Introduction / Records
Electrical Safety
Exploded View and Replacement
General Safety and Installation Warnings
Gas Safety and Installation Warnings
Clearance to Combustibles
Unpacking Unit:
Your Blaze Series ppliance comes preassembled and
requires very little setup. We do recommend the use
of professional help during the installation of your unit
as improper installation may affect your warranty.
Product Inspection: A final inspection of your
product occurs at the factory to ensure a quality prod-
uct is packaged. Please re-check for possible ship-
ping damage immediately after unpacking your grill. If
the appliance is found to have some damage, contact
your dealer immediately as often the shipping carrier
will have a time frame to report damage. Remove all
packaging materials, labels and protective plastic film
before you start cooking, and please save the pack-
aging material if there is shipping damage. Keep all
packaging and document condition of appliance upon
arrival.
Caution: Do not leave the unit under the sun with
the protective film as it will make the film difficult to
remove and/or leave markings on the materials which
are not covered by the warranty. Never place your fin-
gers inside the observation openings in the grill grate
during removal or replacement of the grill grate and
never place your fingers inside the observation open-
ings in the grill at any time as injury could occur.
Burners: Check the burner tubes and remove any
obstructions that may be in the ports or holes. Using cold
water and a brush will be sufficient. Make sure all foreign
particles are removed from the burner before use. Make
sure the air shutter on the burners is slightly opened
(to about 1/8" for NG and 1/4" for LP). When finished,
ensure that the burners are aligned with the valve orifice
and seated in the bracket slot. This is accomplished by
first placing the burner tube shutter hole securely over
the valve orifice and ensuring the male post on the grill
chassis rests in the corresponding slot in the rear of the
burner. Failure to do so could result in a fire and injury.
Warranty
Grilling Techniques
Cleaning Your Grill
Cooking Temperatures
20–21
18
19
First-Time Operation
Installing the Appliance
Ventilation
Table of Contents:

A Special Message to Our
Customers:
Congratulations on your purchase of a Blaze product!
At Blaze, we pride ourselves on creating high-quality,
durable, and innovative outdoor cooking solutions that
inspire memorable experiences and exceed expectations.
Our passion for craftsmanship, performance, and outdoor
living drives everything we do.
This manual provides easy-to-follow instructions for
installing, operating, and maintaining your Blaze grill.
We recommend reading this manual carefully before
your first use to ensure safety, proper care, and optimal
performance. Your grill is designed and built with
meticulous attention to detail, using premium materials
and cutting-edge manufacturing processes, so you can
enjoy years of reliable, efficient, and satisfying outdoor
cooking.
We are committed to providing exceptional products
and unparalleled customer service. Your satisfaction
is our top priority, and we stand behind the quality and
workmanship of every Blaze product.
Thank you for choosing Blaze and welcome to our family
of passionate outdoor enthusiasts. We look forward to
being a part of your outdoor cooking adventures and
helping you create cherished memories with family and
friends.
Sincerely,
Blaze
MODEL #:
____________________________________________
SERIAL #:
____________________________________________
DATE OF PURCHASE:
____________________________________________
PLACE OF PURCHASE:
____________________________________________
TYPE OF GAS: NG _____ LP _____
To the Installer:
Please read these instructions carefully before
installation and give this manual to the owner.
To the Owner:
Keep this manual in a safe place for future
reference
Please Retain for Your
Records:
For your convenience, please record the following
information, which can be found on the data name
plate located on the left side panel of the grill, a
second label with the model number and serial
number is located under the right side of the drip
tray and the third is located on the box. Please refer
to this information when contacting Blaze or an
authorized service agent.
W
A
R
R
A
N
T
Y
N
I
N
E
T
Y
D
A
Y
90
W
A
R
R
A
N
T
Y
O
N
E
Y
E
A
R
1
W
A
R
R
A
N
T
Y
T
H
R
E
E
Y
E
A
R
3
W
A
R
R
A
N
T
Y
F
I
V
E
Y
E
A
R
5
L
I
F
E
T
I
M
E
W
A
R
R
A
N
T
Y
W
A
R
R
A
N
T
Y
N
I
N
E
T
Y
D
A
Y
90
W
A
R
R
A
N
T
Y
O
N
E
Y
E
A
R
1
W
A
R
R
A
N
T
Y
T
H
R
E
E
Y
E
A
R
3
W
A
R
R
A
N
T
Y
F
I
V
E
Y
E
A
R
5
L
I
F
E
T
I
M
E
W
A
R
R
A
N
T
Y
BLZ-4LTEPRO-LP/NG
3
Lifetime limited warranty. For complete warranty
information, product must be registered to validate the
warranty. Terms apply. See pg. 26 for all details.
Conforms to ANSI
Z21.58-2022/CSA
1.6-2022
Outdoor Cooking
4 Blaze LTE PRO 32-Inch Grill Premium LTE Series
BlazeGrills.com
WARNING
READ INSTRUCTIONS: Please read this
manual carefully and before using your
BLAZE Grill to ensure proper operation,
installation, servicing and to reduce the
risk of fire, burn hazard and/or other
injury. Improper installation and service or
maintenance may cause property damage,
injury, or death. Keep this manual handy and
do not operate without reading this manual.
IF YOU SMELL GAS: 1. Shut off gas to the
appliance. 2. Extinguish any open flame. 3.
If odor continues, immediately call your gas
supplier or your fire department.
EXPLOSION HAZARD: Do not store or
use gasoline or other flammable liquids or
vapor in the vicinity of this appliance. An
LP cylinder not connected for use shall not
be stored in the vicinity of this or any other
appliances. Do not attempt to heat unopened
containers on the appliance as pressure may
build up and cause the container to explode.
Never use charcoal or any other solid fuel in
the grill.
ONLY USE A QUALIFIED PROFESSIONAL
INSTALLER: Only a qualified professional
installer and service technician must perform
adjustments and service of the grill. Proper
location and proper use are essential to
insure safe and continued trouble-free
operation. Any non-approved alterations
made to the appliance will void the product’s
warranty.
HOT SURFACE: Do not touch while hot or
exposed to heated surface.
APPLIANCE INSTALLATION: This gas
appliance must be installed in accordance
with all local codes. In areas with no local
codes, the gas appliance must be installed
in accord with the National Fuel Gas Code
ANSI Z223.1 and storage and handling of
petroleum gases, ANSI/NFPA 58 or CSA
B149.1 natural gas and propane installation.
General Safety and Installation Warnings
IN MASSACHUSETTS: All gas products
must be installed using a “Massachusetts”
licensed plumber or gasfitter. A “T” handle
type manual gas valve must be installed in
the gas supply line to this appliance. This
applies to permanently installed natural
gas and propane installations but not for
20-pound propane tanks.
HANDLE WITH CARE: Use heat-resistant
gloves or tools to move it. Edges can be
sharp. Failure to use caution could result in
injury or cuts.
THIS UNIT IS FOR OUTDOOR USE ONLY: Do
not operate in a building, garage, or any other
enclosed areas. This could result in carbon
monoxide buildup which could result in injury
or death. Grills are not designed or intended
for installation near a window or vent that
goes into the house.
FIRE HAZARD: Have an ABC Fire
Extinguisher accessible at all times. Never
attempt to extinguish a grease fire with water
or other liquids. Never cook without the drip
pan in place. Never operate this appliance
while under the influence of alcohol or drugs.
CALIFORNIA PROPOSITION 65 WARNING:
This product can expose you to chemicals
including chromium (hexavalent compound),
which is [are] known to the State of California
to cause cancer [and] [or] [birth defects or other
reproductive harm. For more information go to
www.p65warnings.ca.gov
NOTE: The manufacturer cannot be held
responsible for damage or injury caused by
improper use of this appliance.
BLZ-4LTEPRO-LP/NG
5
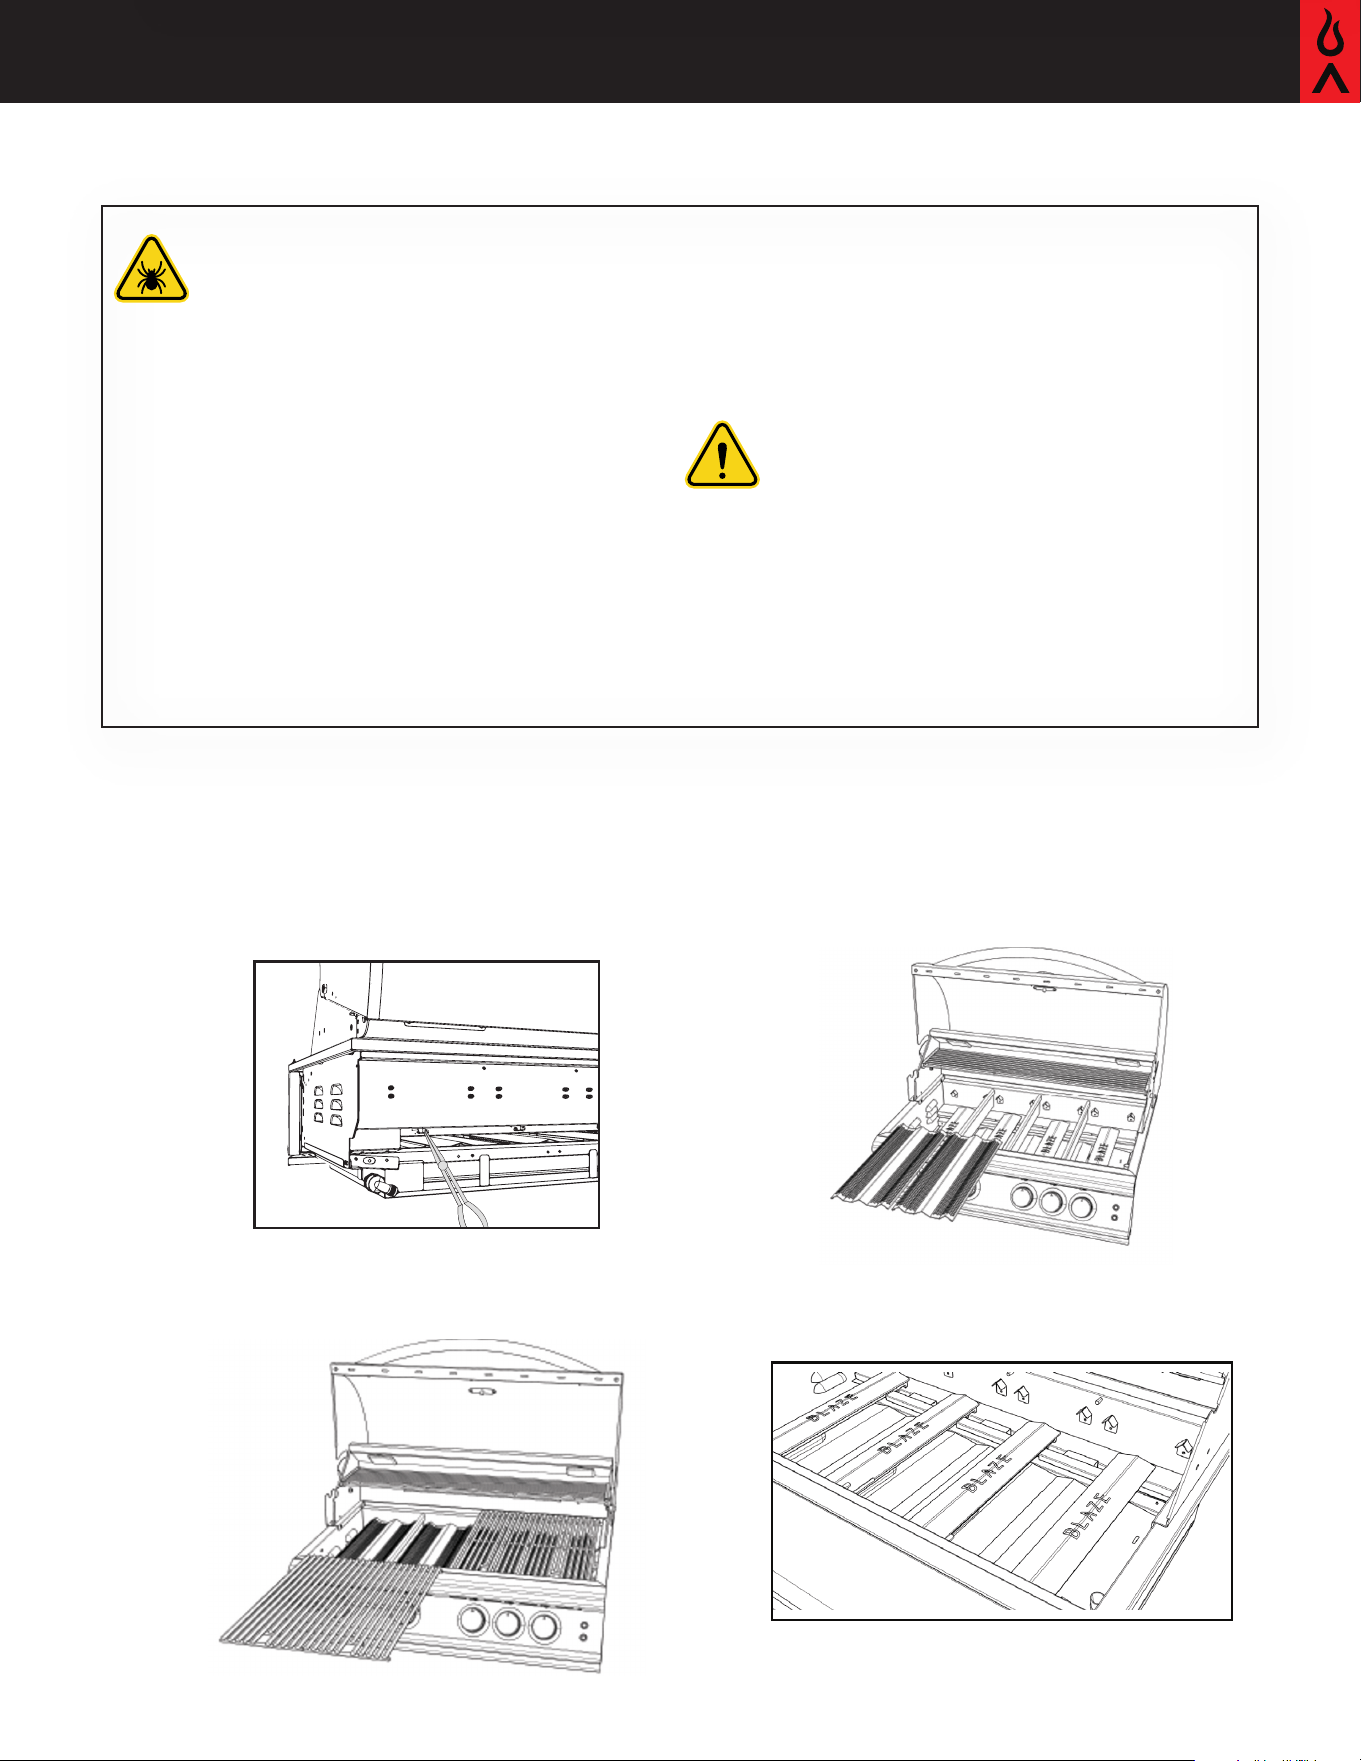
BURNER TUBES MUST BE INSPECTED
AND CLEANED BEFORE EACH USE: Spiders
and small insects occasionally make nests
in the burner tubes. These nests can lead to
a gas flow obstruction, which could result in
a fire around the burner tubes. This type of
fire is known as “flashback” and can cause
serious damage to your appliance and create
an unsafe condition for the user. Frequent
inspection and cleaning of the burner tubes
for any obstruction is necessary.
Flashbacks, also known as flash fires or
flare-ups, can occur in grills when fats and
juices from food drip onto the hot burners or
coals, causing a sudden burst of flames. It's
important to understand and heed warnings
related to flashbacks to ensure safe cooking.
BURNERS MUST BE ALIGNED: Blaze
products ship to you with pins/screws
locking our burners in place. For proper
operation, burners must be aligned with the
valve orifice and seated in the bracket slot.
This is accomplished by first placing the
burner tube shutter hole securely over the
valve orifice and ensuring the male post on
the grill chassis rests in the opening in the
rear of the burner. Failure to do so could
result in injury or death.
Flashback exhibits a characteristic “whooshing
jet like” sound. If this should occur, immediately
turn off your burners. Once cool to the touch
remove and clean them with soap, water and
a brush until all foreign objects are removed.
Once completely dry, re-install.
Step 1:
Remove five cotter pins from
the back of the grill using long
pliers.
Noted below is an LTE+ guide. These steps apply
LTE LTE2 LTE+ and LTE PRO
Step 3:
Remove flame tamers.
Step 2:
Open hood and remove grill
grates.
Step 4:
Visually inspect burners.
6 Blaze LTE PRO 32-Inch Grill Premium LTE Series
BlazeGrills.com
BTU output
14,000 BTU per burner (x4)
Back burner 10,000 BTU
Total BTU 66.000 BTU
Primary ignition
Push N’ Turn FlameThrower
Secondary ignition Flashtube
Cooking surface 29 1/2" x 18"
Total cooking area
warming rack
715 sq.in
184 sq.in
Flame tamer Stainless steel tri-baffle
Zone cooking 4 zones
Burner type
Cast stainless steel Burner
Rotisserie 1.12 LP/1.8 NG
Gas type
See rating place for size
and gas type. See pg 16
for conversion instructions
For outdoor use only: The manufacturer cannot be held
responsible for damage or injury caused by improper use.
Safe operation of the BLAZE Grill depends upon its proper
installation. Only a qualified professional installer and
service technician must perform adjustments and service
of the grill. Proper location and proper use is essential to
ensure safe and continued trouble-free operation. Any
non-approved alterations made to the appliance will void
the product’s warranty.
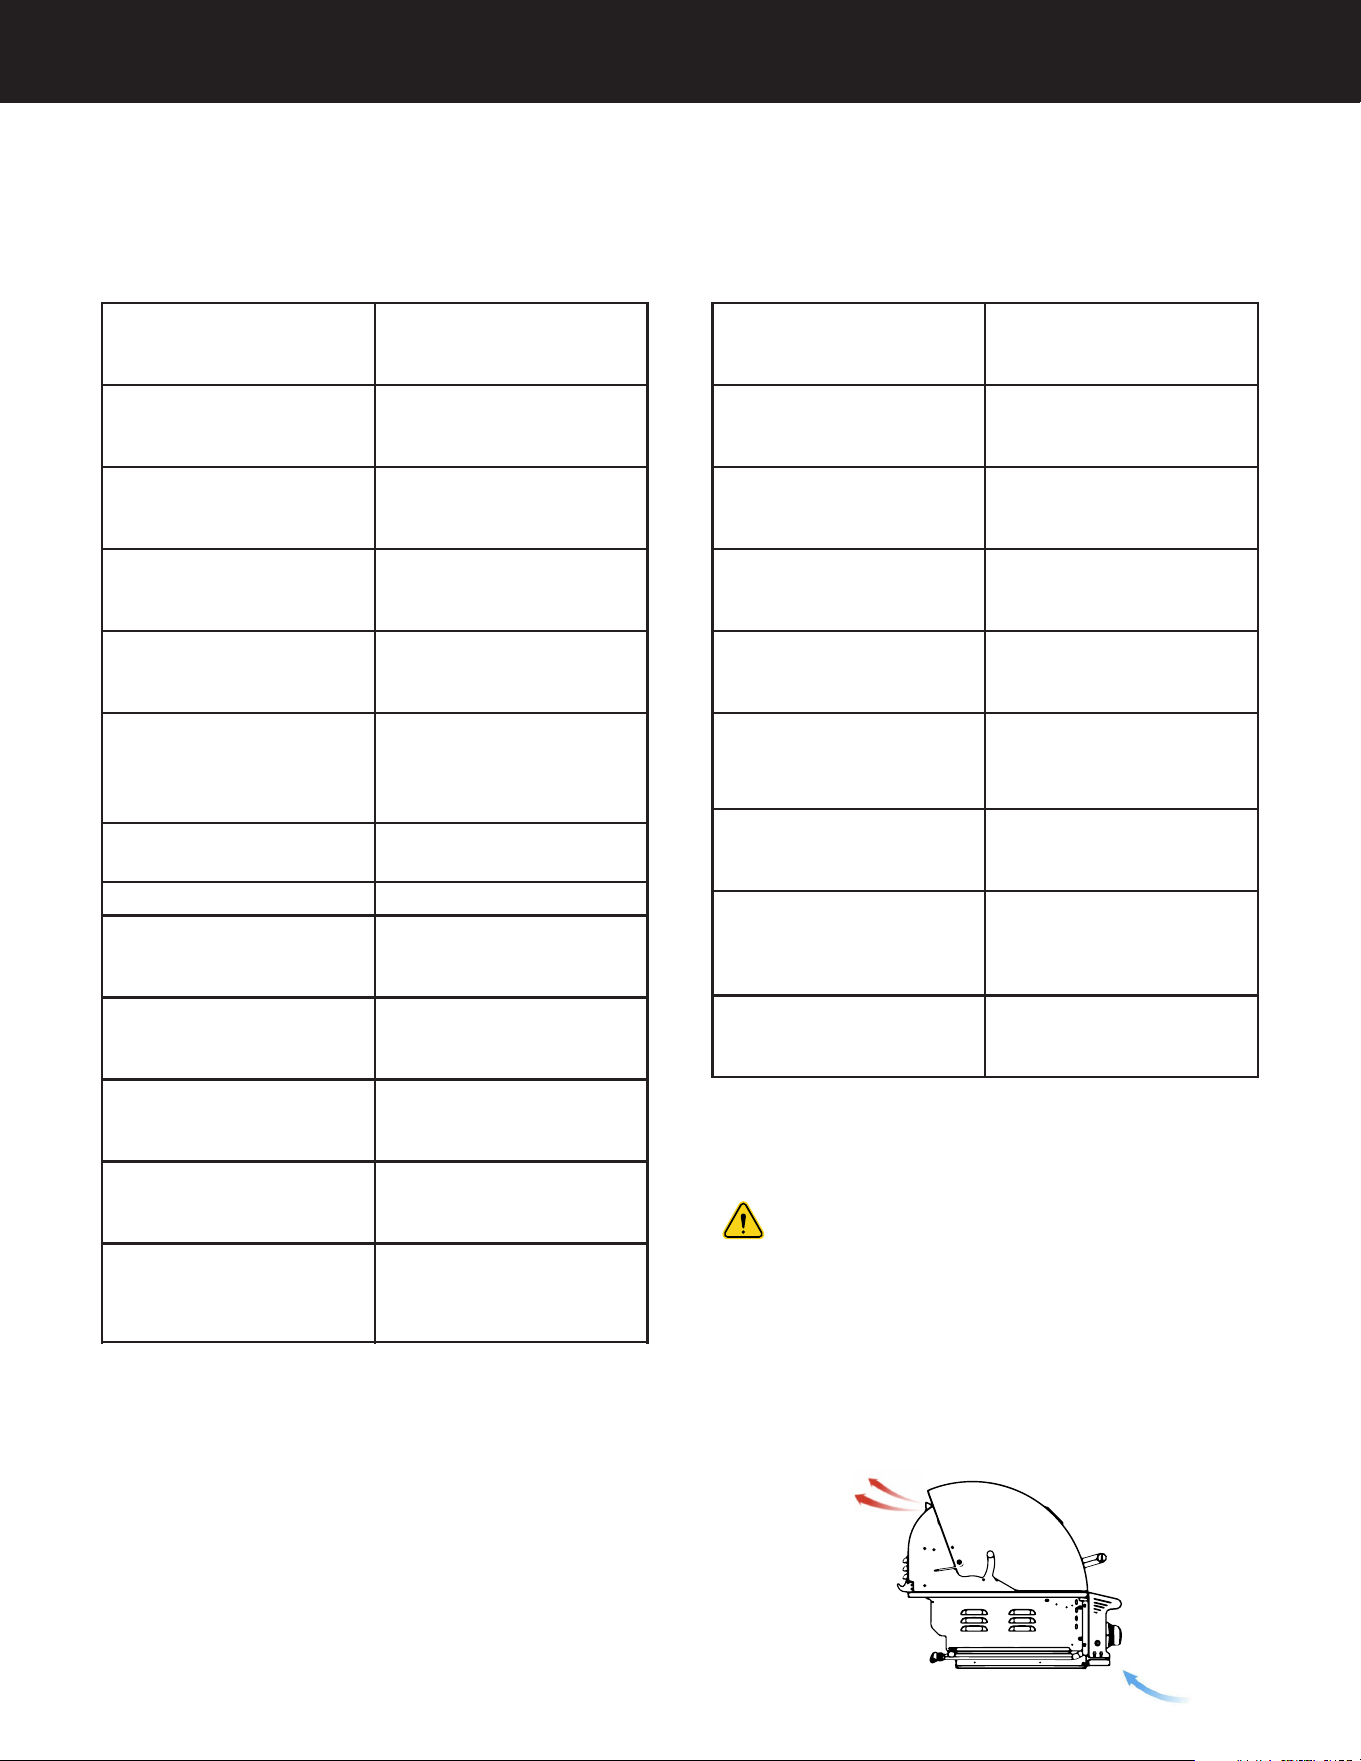
Dimensions:
Specifications:
Product dimensions 33” W x 27” D x 22 1/2” H
Cutout dimensions: 30 3/4” W x 21 1/4” D x 9
1/2” H
Overall width of cavity 30 3/4"
Overall depth of cavity 21 1/4"
Overall height of cavity 9 1/2"
Clearance to overhead
non-combustible
construction
72" with vent hood
Clearance to combustible
construction
18''
Clearance to non-
combustible
construction
3''
Overall hight when open 28"
Note: Outdoor cooking appliances require an AIR
GAP underneath, which allows for proper air flow and
combustion.
WHEN INSTALLING YOUR GRILL BE SURE
THAT AFTER THE CAVITY IS CUT THERE IS A 1''
AIRGAP CUT OUT OF THE FRONT FACE OF THE
COUNTERTOP BELOW THE CONTROL PANEL
TO ALLOW AIR FLOW.
BLZ-4LTEPRO-LP/NG
7
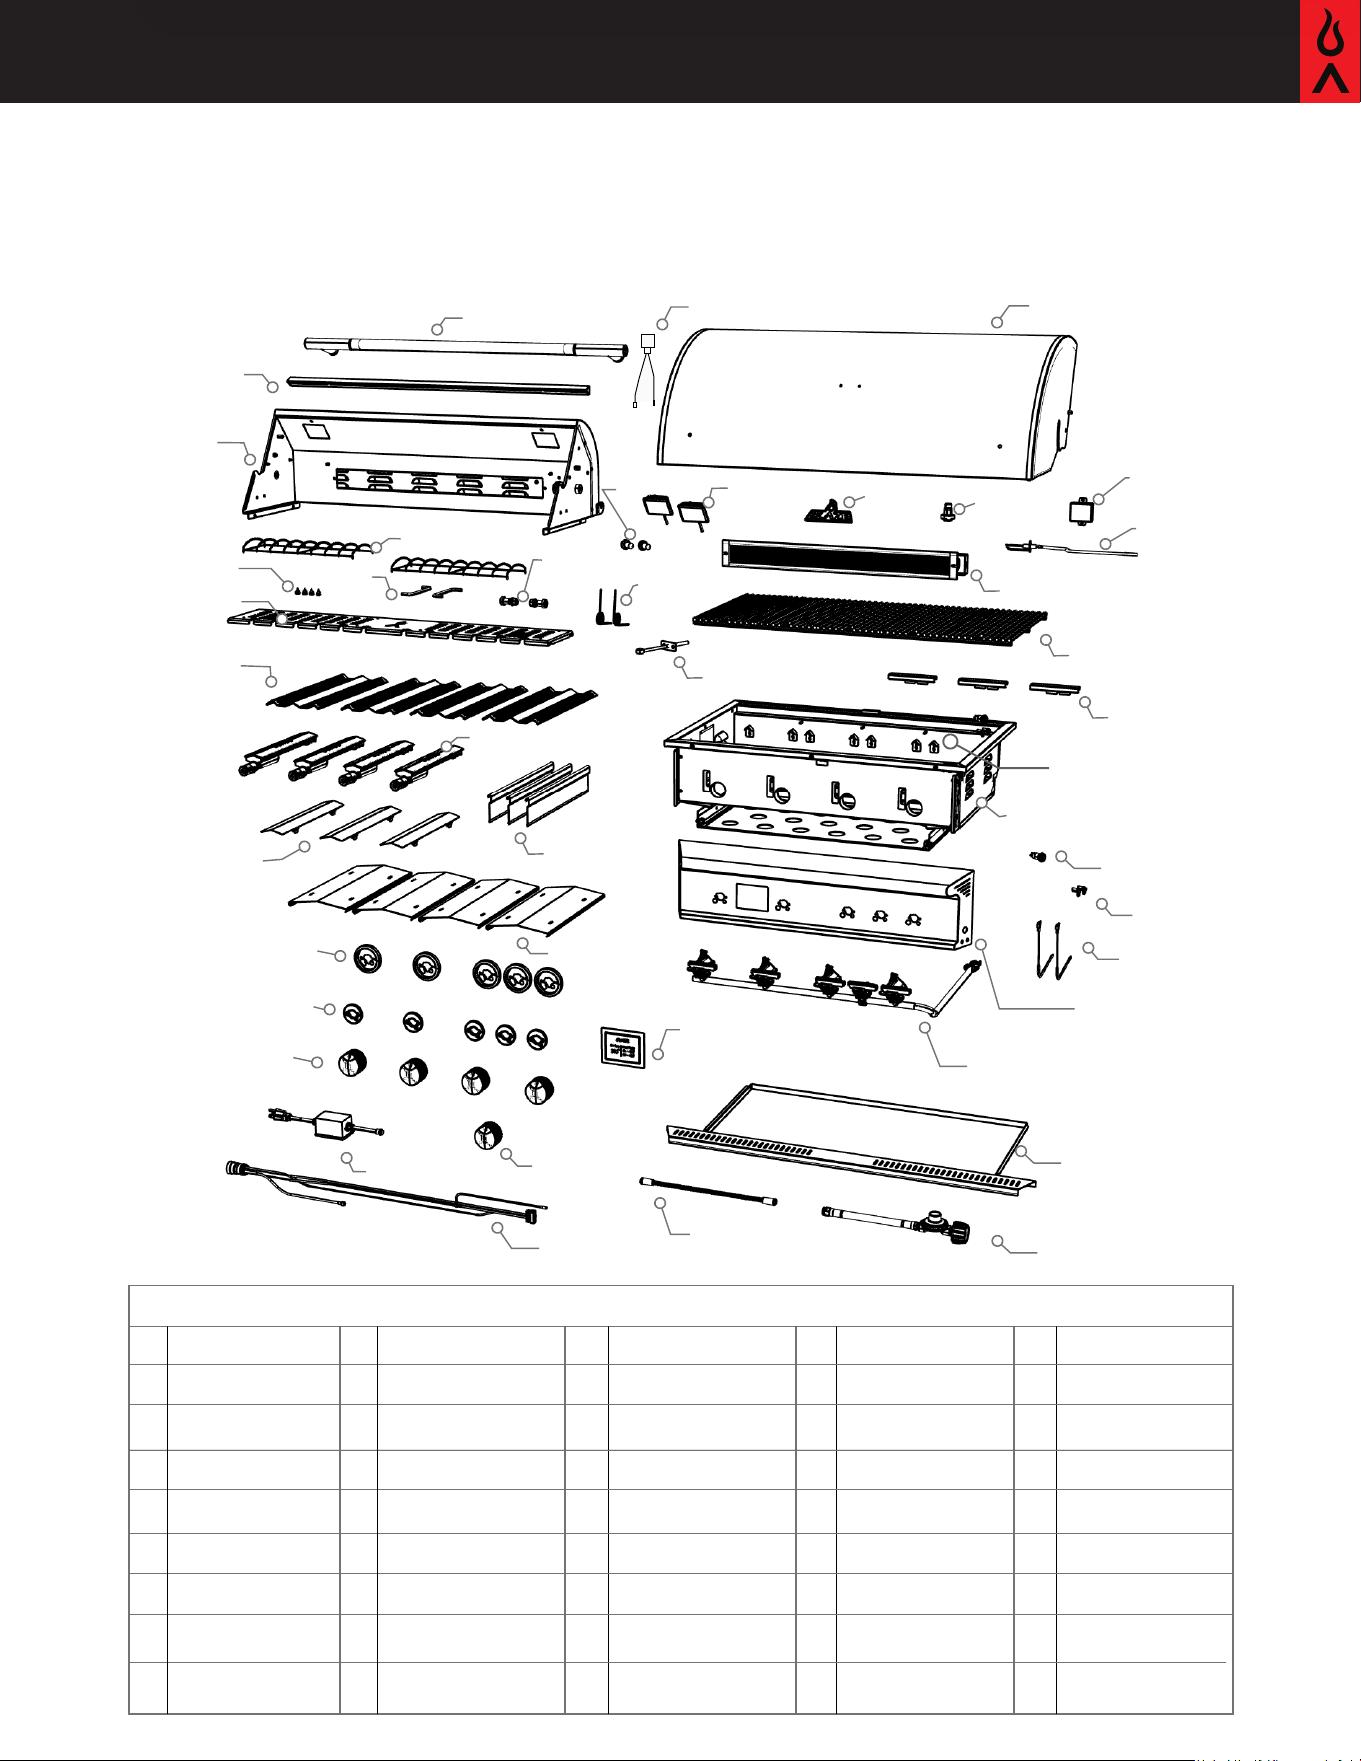
Exploded View and Replacement Parts
9. Cooking grids (5)
18. BLZ-4LTEPRO-004
17. BLZ-LTEPRO-002
16. BLZ-LTEPRO-001
15. BLZ-3PRO18-003
14.
BLZ-32-052
13. BLZ-4LTEPRO-003
12.
BLZ-LTE2-002
11. BLZ-32-044 20. BLZ-4LTEPRO-006
27. BLZ-LTEPRO-007
26. BLZ-LTEPRO-007R
25.
BLZ-3PRO-031
24. BLZ-4LTEPRO-008
23. BLZ-32-039
22. BLZ-LP-HOSE/REG
21. BLZ-4LTEPRO-005
29. BLZ-LTEPRO-008
31. BLZ-32-083
30. BLZ-32-084
28. BLZ-LTE3-001
19. BLZ-LTEPRO-00310. BLZ-LTE3-015
9. BLZ-LTE3-018
8. BLZ-LTE3-012
7. BLZ-4LTEPRO-011
6. BLZ-3PRO-045
5. BLZ-32-016
4. BLZ-LTE3-011
3.
BLZ-LTE3-016
2. BLZ-3PRO18-002
1. BLZ-4LTEPRO-001
31. Small
flavor bar (4)
28. LED (5)
13. Fire box
14. Heat
separator (3)
30. Large
flavor bar
Blaze Part Number: Reference Guide
4. Magnec
latch
22. Regulator
32. Main STS burner (4)
24. LED wire
15. Power
buon
20. Gas manifold
25. Transformer
29. Knob bezel (5)
27. Control
knob (4)
3. Logo
plate
23. Stainless steel
flexline
34. Warming rack
7. IR burner
5. IR igniter
cover
6. Igniter pin
and wire
2. Light
housing
21. Drip tray
42. Hood handle
1. Hood
33. Flame
tammer (4)
8. Hood
spring (2)
35. Hood
bumper (4)
18. Control panel
10. Thermocouple
11. Crossovers (3)
12. V - peg (16)
16. Jacks (2)
17. Probes (2)
19. Digital temp screen
26. Rear Burner
knob
36. Rails (2)
37. Racks(2)
38. Roller
pins(2)
39. Bulb
40. Upper fire
box
41. Wind
guard
32. BLZ-32-043
34. BLZ-4LTEPRO-007
36. BLZ-3PRO-082
35. BLZ-32-012W
33. BLZ-32-064
38. BLZ-32-048
40. BLZ-4LTEPRO-010
39. BLZ-3PRO-067
37. BLZ-LTEPRO-004
41. BLZ-4LTEPRO-009
43. BLZ-LTE3-010
42. BLZ-4LTEPRO-002
43. Magnec switch
controller box
BLZ-LTE3-018
8 Blaze LTE PRO 32-Inch Grill Premium LTE Series
BlazeGrills.com
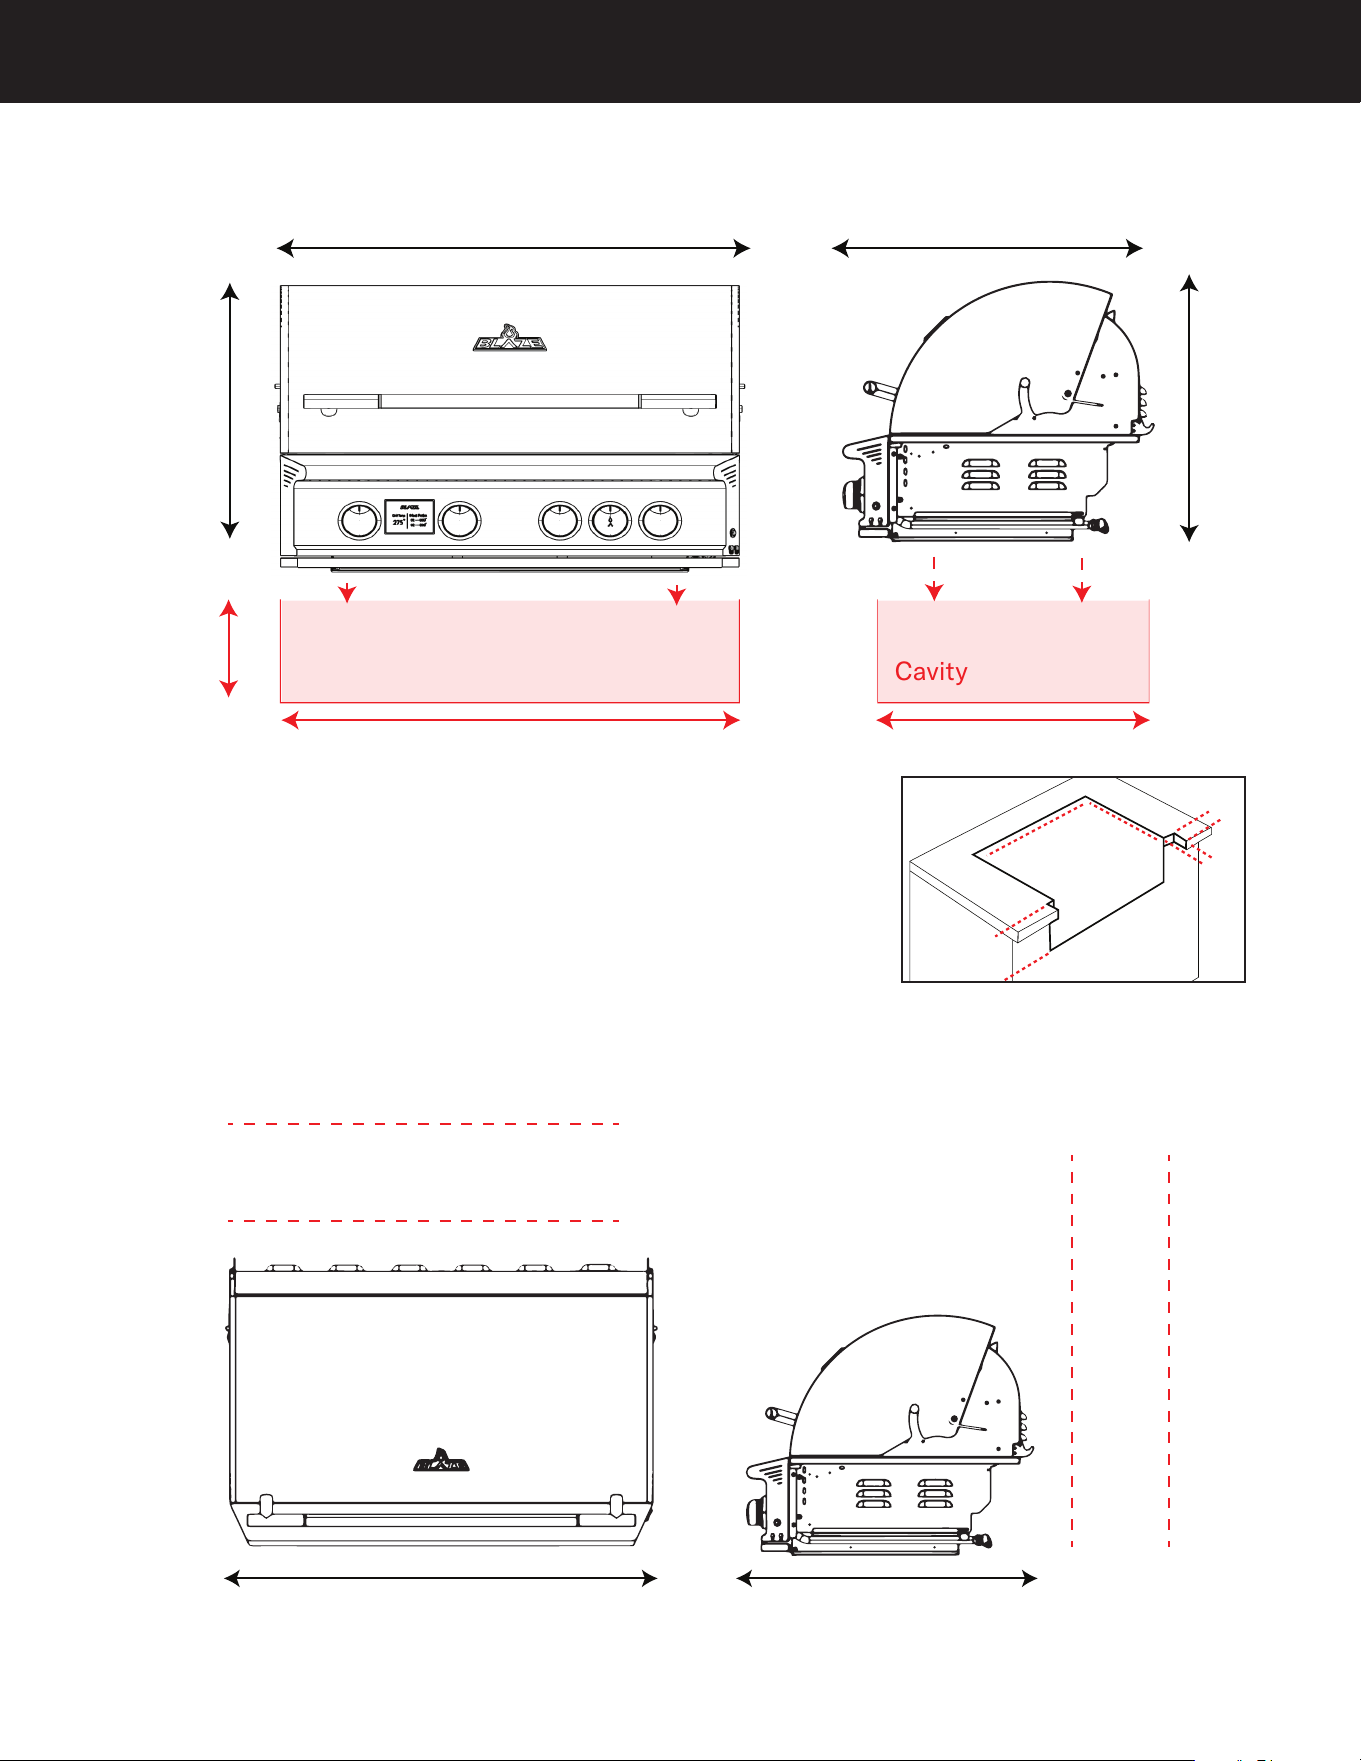
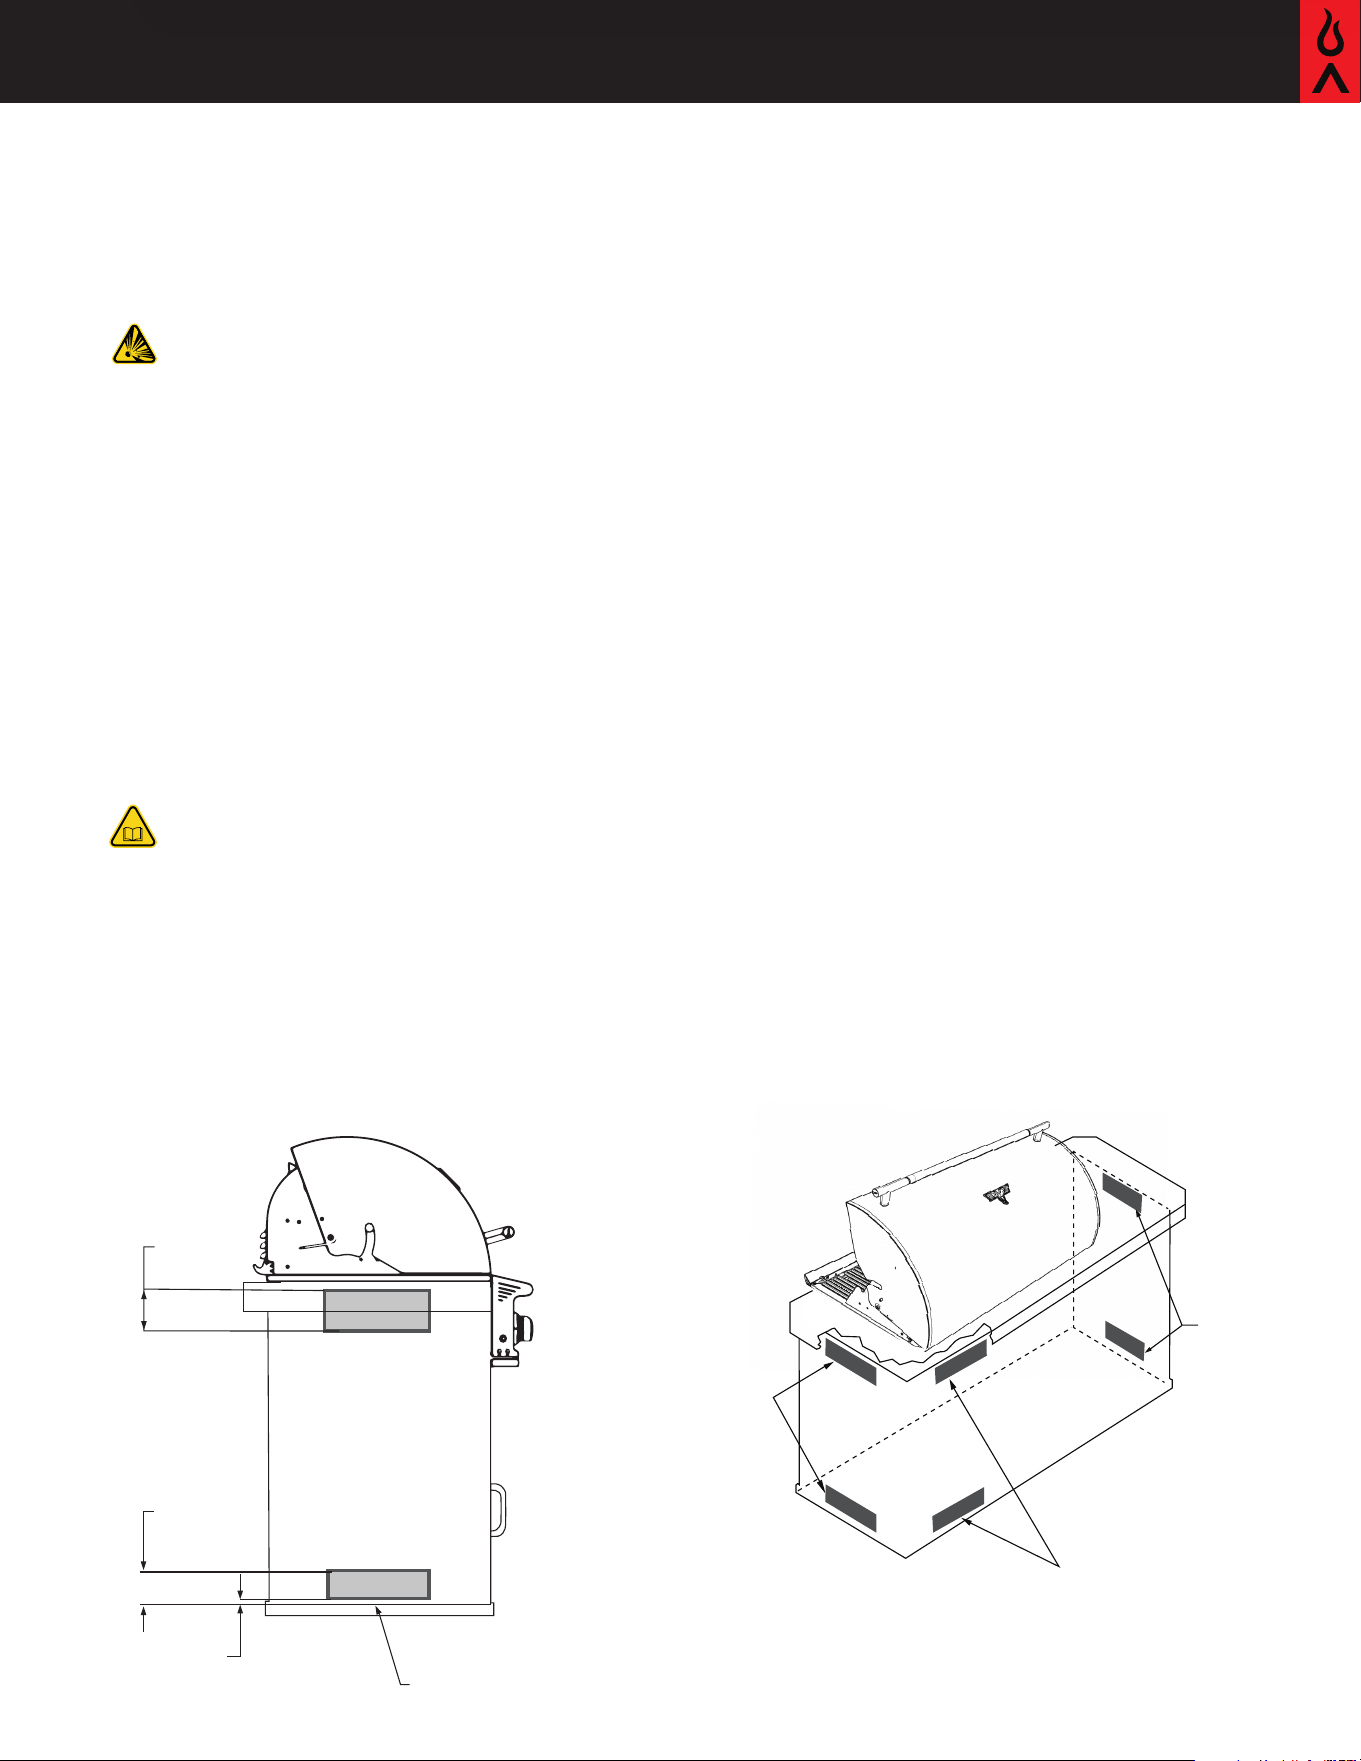
Distance to Rear Combustibles
Cavity Cutout Size
Cavity
27"
27"
33"
33"
22 1/2"
22 1/2"
9 1/2"
30 3/4"
Cavity
21 1/4"
3" 18"
Clearance to combustible construction
Clearance to non-combustible construction
3"
18"
Clearance to combustible construction
Clearance to non-combustible construction
Cavity
27"
27"
33"
33"
22 1/2"
22 1/2"
9 1/2"
30 3/4"
Cavity
21 1/4"
3" 18"
Clearance to combustible construction
Clearance to non-combustible construction
3"
18"
Clearance to combustible construction
Clearance to non-combustible construction
If the countertop of your outdoor kitchen extends beyond the edge
of the island, it will be necessary to make notches on the front
edges of the countertop to allow the appliance to fit perfectly
against the front edge of the countertop. The usual size of the
notch is 3/4" by 3/4", but Blaze recommends placing the product
in the cutout and marking the notch according to the desired width
and depth for a precise fit due to varying personal preferences.
3/4"
3/4"
30 3/4"
9 1/2"
21 1/4"
BLZ-4LTEPRO-LP/NG
9
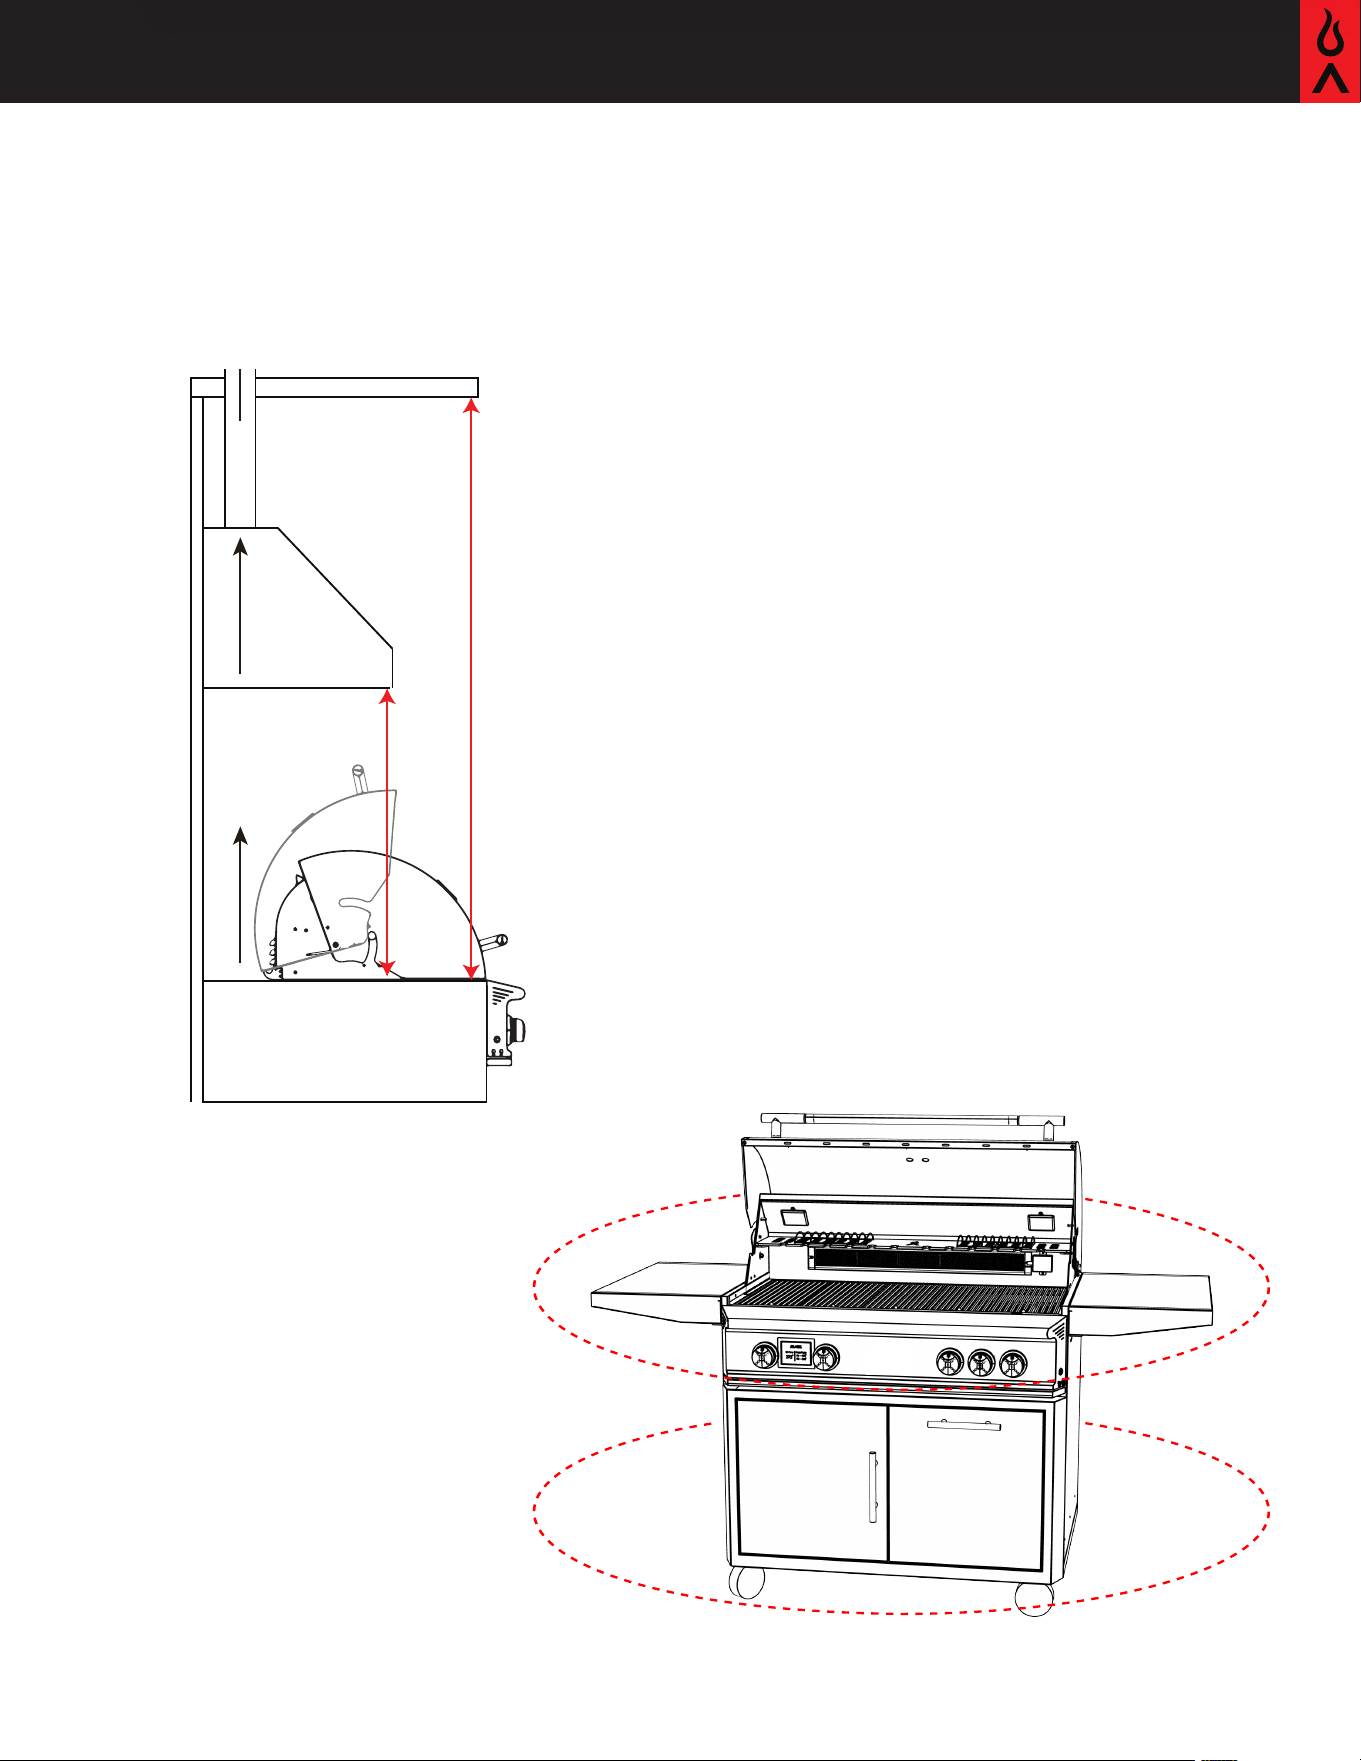
Distance to Overhead
18”
Clearance to combustible construction
18”
Clearance to combustible construction
18”
Clearance to combustible construction
36" Clearance to exhaust vent
60”
Clearance to non-combustible overhead construction
72 ''
18 " clearance to combustibles
This outdoor cooking gas appliance must not be installed
under overhead combustible construction.
When installing a Blaze Appliance under an Non-
Combustible overhead construction:
When installed under non-combustibles, the area above
the Blaze appliance must be covered with a UL-approved
vent hood. The vent hood must provide protection for the
overhead construction. The bottom of the exhaust fan
should be placed 36'' above the cooking surface.
It is imperative that a Blaze appliance is not installed
under combustible overhead construction.
When installed under overhead non-combustible
construction, a vent hood is still recommended. Gas
appliances produce a large amount of smoke. The covered
area should be properly ventilated.
When using a vent hood, the area above the cooking
surface of the oven must be covered with a vent hood
larger than the cooking area of the oven, and with a
minimum of 1000 CFM for proper outdoor application.

10 Blaze LTE PRO 32-Inch Grill Premium LTE Series
BlazeGrills.com
•
All gas appliances will get hot during use. Use
extreme caution when operating the appliance.
•
Do not touch hot surfaces. Always use the handle
to open or close the appliance.
•
Close supervision is necessary when this or any
appliance is used near children. Keep children away
from the appliance during operation and until the
appliance has cooled off.
•
Do not store any LP (liquid propane cylinder or
unconnected tank in the area of this appliance or
any other appliance. Never store an LP cylinder or
tank indoors, or within the reach of children.
•
Never test the appliance for gas leaks using a lighted
match or any other open flame; flame. See leak
testing procedures on pg. 17
• The use of accessories, regulators, or components
not recommended by the appliance manufacturer
may cause injuries and will void warranty.
• Never light the appliance with the hood closed. Be
certain that the burners are positioned and seated
over the gas valves and on the burner support.
• Never lean over the cooking surface when lighting
or operating the appliance.
•
Use cooking utensils with wood handles and
insulated oven mitts when operating the appliance.
• Do not store anything in the appliance. Make sure
food is not forgotten in the appliance; forgotten
items could melt or catch fire when the appliance
is turned on.
• To prevent injuries, do not use accessories that are
not recommended by the manufacturer.
•
Before cleaning the appliance, disconnect power
cord.
•
Never use the appliance in windy conditions. If
located in a consistently windy area (oceanfront,
mountaintop, etc.) a wind break will be required.
Winds blowing into or across the upper hood
vent or into hood can cause poor performance
and/or cause the control panel and knobs to get
dangerously hot.
Important Safety Instructions
•
Always open the appliance hood carefully, using only
the handle – the hood may be hot.
•
Children should not be left alone or unattended in
an area where any appliance is in use. They should
never be allowed to touch, sit or stand on any part
of the appliance.
•
Do not store items of interest to children in cabinets
above the appliance or in the appliance. Children
climbing on the appliance to reach these items could
be seriously injured.
•
Wear proper clothing when operating this appliance.
Loose-fitting or hanging garments should never be
worn while using the appliance.
• Do not leave the appliance unattended while in use.
•
Do not use water on grease fires! A violent steam
explosion may result. Instead, smother the fire with
a multi-purpose ABC extinguisher.
•
Location of appliance: Most importantly, this is
an outdoor appliance. Ensure your appliance is
positioned safely away from anything that can catch
fire. Under no circumstance is this appliance to be
used indoors. This includes garages or any other
enclosed area.
•
This outdoor cooking gas appliance is not approved to
be installed in or on any recreational vehicles or boats.
Blaze appliances are for single family/residential use
only.
•
When determining a suitable location, take into
account concerns such as exposure to wind,
proximity to traffic paths, and keeping any gas
supply lines as short as possible. Do not store
combustible materials, gasoline, or flammable liquids
or vapors around the appliance.
•
Please note since hot air rises above the Blaze
appliance while in operation, covered locations should
be avoided. Do not locate the Blaze appliance where
an overhang or awning may cover it.
•
DO NOT obstruct the flow of combustion and
ventilation air to this appliance.

BLZ-4LTEPRO-LP/NG
11
•
Locate outdoors only: As with any gas appliance,
harmful carbon monoxide is produced during the
combustion process that should not be allowed to
accumulate in a confined space.
•
Non-combustible enclosure: The Blaze grill must be
installed in a non-combustible enclosure only. The
determination of whether a location is combustible
or non-combustible construction is made by the local
fire marshal, building inspector, or the local safety
authority having jurisdiction.
•
Clearance from combustibles: Ensure your
appliance remains at a distance of at least 1'' from
sides and 18'' from back from any combustible
material such as wood, gyprock, paper and plants.
Do not store combustible materials, gasoline, or
flammable liquids or vapours around the appliance.
The outdoor kitchen structure itself should be
constructed completely out of non-combustible
materials. BlazeGrills offers an insulating jacket that
may be used to increase protection of surrounding
construction.
•
Adequate ventilation: Ensure there is adequate
ventilation for both the appliance, grill cart, and/
or island cavity. This is required not only for proper
combustion, but also to prevent gas build-up. While
the amount of venting required varies on a case-
by-case basis, consult with your local licensed
professional and local code for adequate venting
requirements. Keep the ventilation openings of the
enclosure free and clear from any debris.
•
Keep any electrical supply cords and fuel supply
hoses away from any heated surfaces and/or sharp,
aressive edges.
•
Firm level surface: Use your appliance only on a
firm, level surface. This appliance is not designed
for recreational vehicles, and should not be installed
on a boat or marine craft.
•
Protection from weather: Keep the appliance
protected from adverse weather, including rain
and winds. Wind, particularly coming into the rear
of the grill, can affect the exhaust from escaping
from the grill. This can back up the heat behind
the control panel potentially creating a gas leak,
damage to the product, and injury.
•
Maintenance access: When your appliance is
installed, you should be able to access the gas supply
line including the gas piping or hose, gas regulator,
gas cylinder, and any shut-off valves. Allow clear
access to the entire gas supply hose and regulator.
•
Partial enclosures: Many backyards have areas
that are partially closed off, such as balconies and
pergolas. In some cases, it is hard to decide whether
these partially enclosed areas should be classified
as indoor areas, particularly in terms of permanent
(non-closable) ventilation. Consult the AHJ (Authority
Having Jurisdiction) or local contractor of any
uncertainty. This outdoor cooking gas appliance
shall not be located in an indoor application.
•
Outdoor Appliance with Three Walls, No Roof: An
appliance is considered to be installed outdoors if it
is placed in an area with up to three walls but no roof
or overhead cover. The walls must be permanently
open, meaning they cannot be closed off by sliding
doors, garage doors, windows, or screens.
•
Outdoor Appliance with a Roof and Two Walls: An
appliance is also considered outdoors if it is installed
in a space with a roof and no more than two walls.
The walls can be either parallel or meet at a corner,
like in a breezeway. All openings in this space must
remain permanently open, and sliding doors, garage
doors, windows, or screens are not considered as
permanent openings.
• • Do not use under 0 degrees F.
12 Blaze LTE PRO 32-Inch Grill Premium LTE Series
BlazeGrills.com
Electrical Safety and Installation Warnings
Extension cords may be used if care is exercised in
their use. If an extension cord is used:
•
The marked electrical rating of the cord set or
extension cord should be at least as great as the
electrical rating of the appliance
•
The cord should be arranged so that it will not
touch hot surfaces, sharp edges or drape over the
countertop or tabletop (where it can be pulled or
tripped over unintentionally).
•
Outdoor extension cords should be used with
products suited for outdoor use. They are surface
marked with suffix letters "W" or "W-A" and with a tag
stating "Suitable for Use with Outdoor Appliances".
• To protect against electrical shock, the power cord
and plug should be kept dry and off of the ground.
Do not clean this product with water spray; do not
spray cleaners into the lamp socket area.
•
Gasoline, lighter fluid, or other flammable liquids
and vapors should never be stored in the area of
this appliance or any other appliance.
•
Before installation or service, disconnect the power
supply to the work area by removing the fuse,
"tripping" the circuit breaker, or unpluing the unit.
• NOTE: Use a 15-AMP Breaker with GFI protection.
•
Do not operate any appliance with a damaged
power cord or power plug, and do not operate
any appliance after the appliance malfunctions
or has been damaged in any manner. If this
should occur, return the appliance to the nearest
authorized service facility for examination, repair,
or adjustment.
• This appliance conforms to all uniform electrical
safety codes and electrical grounding regulations.
Install unit according to I.A.W. local codes or with
National Electrical Code ANSI/NFPA 70 or CSA
C22.1 in their absence.
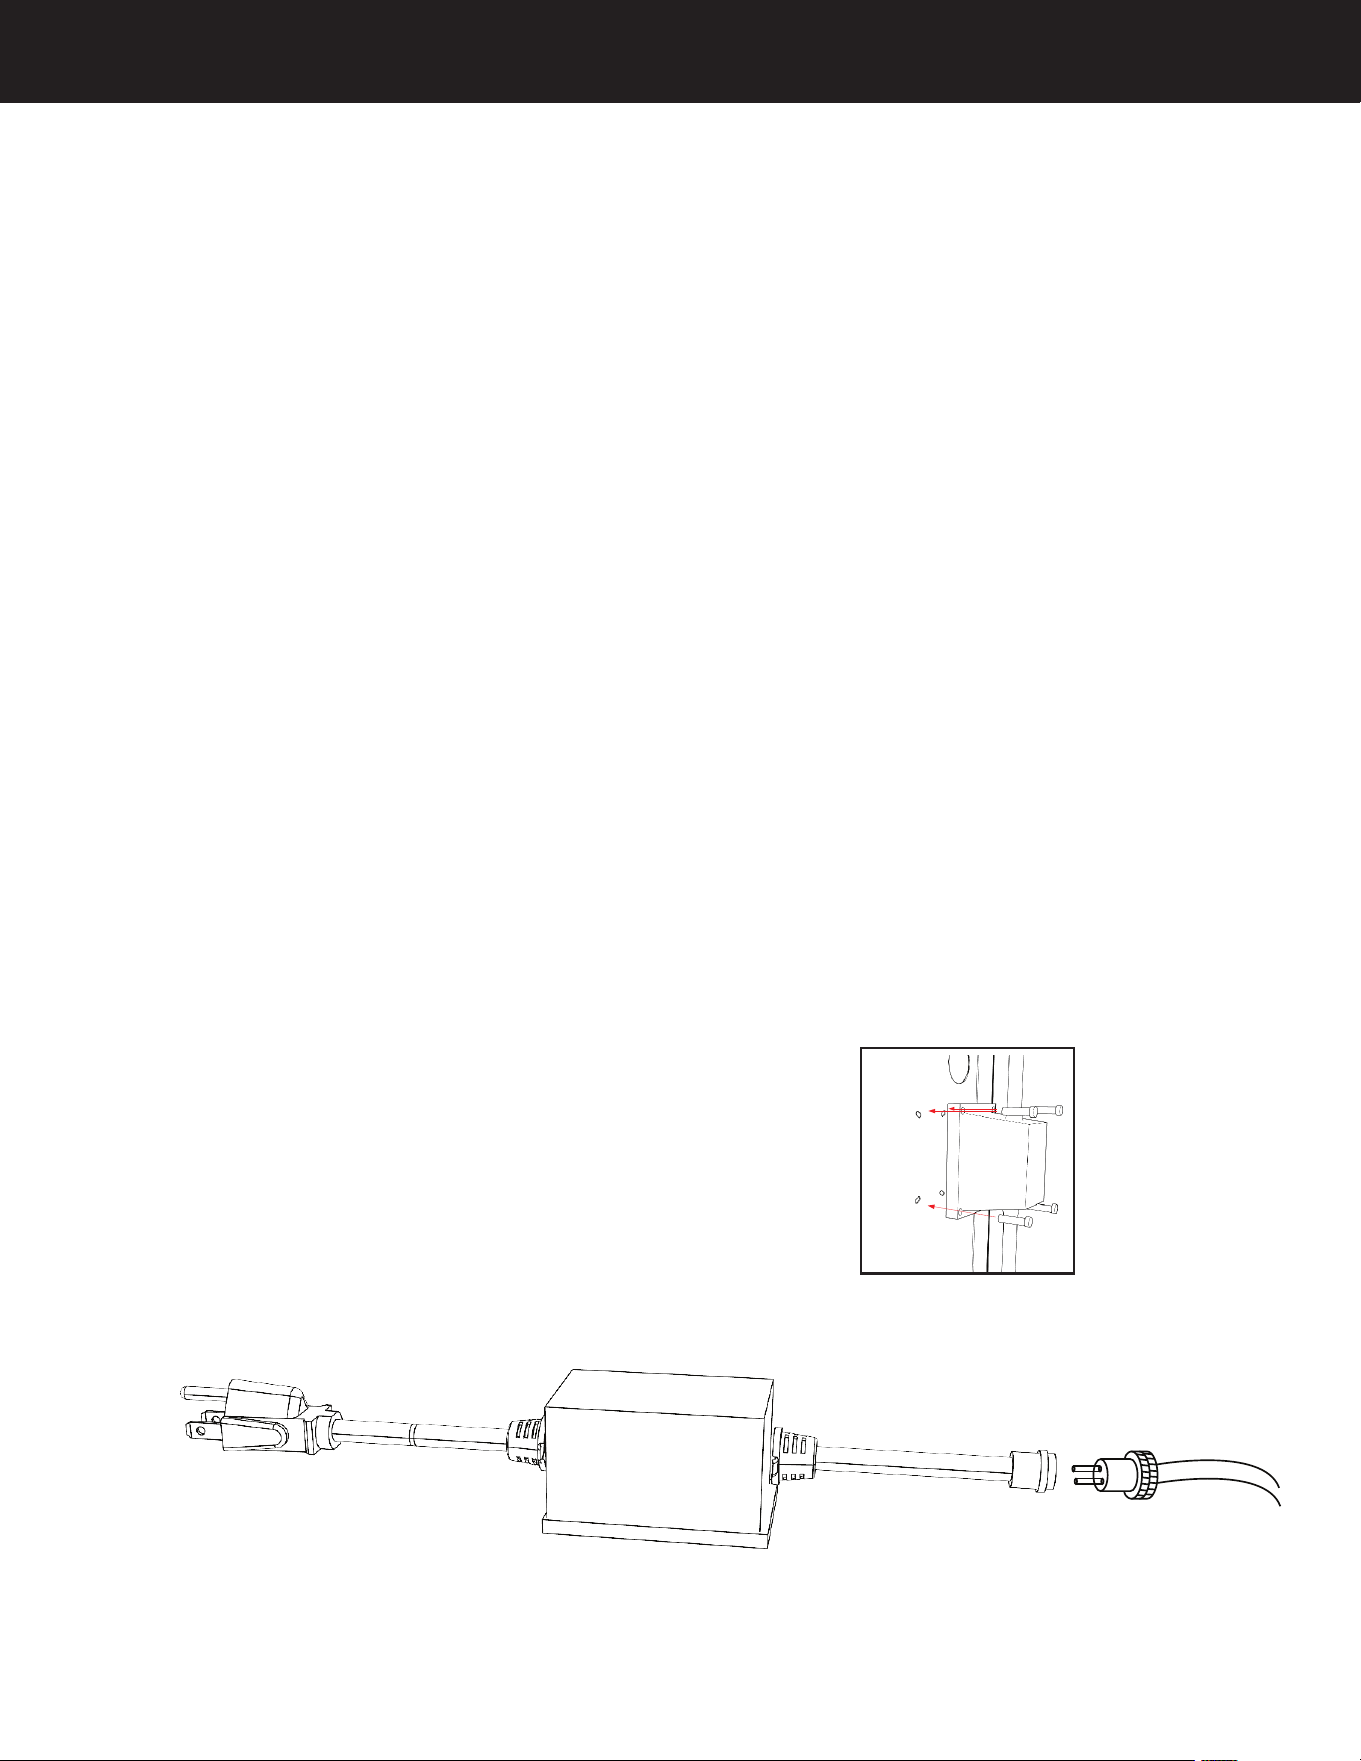
•
This grill uses a “Transformer” to provide power
to the LED lights and internal lights. This diagram
shows the connection to the transformer.
Before installing appliance into cart or built-in. Firmly
plug in the two-pronged LED wire into the transformer
and tighten the threaded wire nut.
Remember to mount your 15-amp outlet using the 4 holes
on the inside of the grill cart. If you are using a built-in,
mount the outlet to the back wall of the built-in housing.
15-AMP OUTLET BLAZE APPLIANCE
BLZ-4LTEPRO-LP/NG
13
Gas Safety:
All gas connections should be made by a professional
qualified technician and in accordance with local
codes and ordinances. The installation must conform
with local codes or, in the absence of local codes, with
either the national Fuel Gas Code, ANSI Z223.1/NFPA
54, or CAN/CGA-B149.1, Natural Gas Installation Code
or CAN/CGA-B149.2, propane Installation Code.
• Gas specifications: Be sure that the gas supplied to
the appliance conforms to the model you purchased.
A natural gas appliance requires natural gas to oper-
ate; an LP appliance requires liquid propane gas to
operate. Check the rating label on the left hand out-
side of the unit.
• Do not twist the gas supply hose.
•
Never connect the appliance to an unregulated gas
supply line. Appliances operated without a regulator are
unsafe and will not be serviced until installed properly
and safely. Unsafe operation without a gas regulator
will void the warranty of the appliance.
•
Appliances operated with (natural gas) NG must be
installed with the NG regulator supplied with the unit
and set to 4" water column pressure.
•
Appliances operated with (liquid propane) LP gas must
be installed with an LP regulator set to 11" water column
pressure.
•
NEVER CONNECT THE APPLIANCE TO AN
UNREGULATED GAS SUPPLY.
Gas Safety and Installation Warnings
WARNING: DO NOT SMOKE WHILE
PERFORMING THE LEAK TEST. Any open
flame will ignite the gas.
To prevent fire or explosion hazard, perform
leak test outdoors only.
Check to ensure that flexible hoses do not
have any cuts and wear that may affect the
safety before each use. Only the factory
supplied hose and regulator must be used.
Use only replacement regulator and hose
assemblies specified by Blaze.
WARNING: DO NOT USE A DENTED,
EXPIRED, OR RUSTED LP CYLINDER.
WARNING
ALWAYS CHECK FOR LEAKS AFTER
CHANGING THE LP CYLINDER. Finding
and/or fixing a gas leak is NOT a “DO-
IT YOURSELF” procedure – ONLY USE A
PROFESSIONAL.
NEVER USE THE APPLIANCE WITHOUT
FIRST LEAK TESTING THE GAS
CONNECTIONS INCLUDING ALL OF THE
VALVES, FITTINGS, LINES, ETC.
WARNING: DO NOT USE OPEN FLAME
TO CHECK FOR LEAKS. USE OF AN
OPEN FLAME COULD RESULT IN A FIRE,
EXPLOSION, AND BODILY HARM.
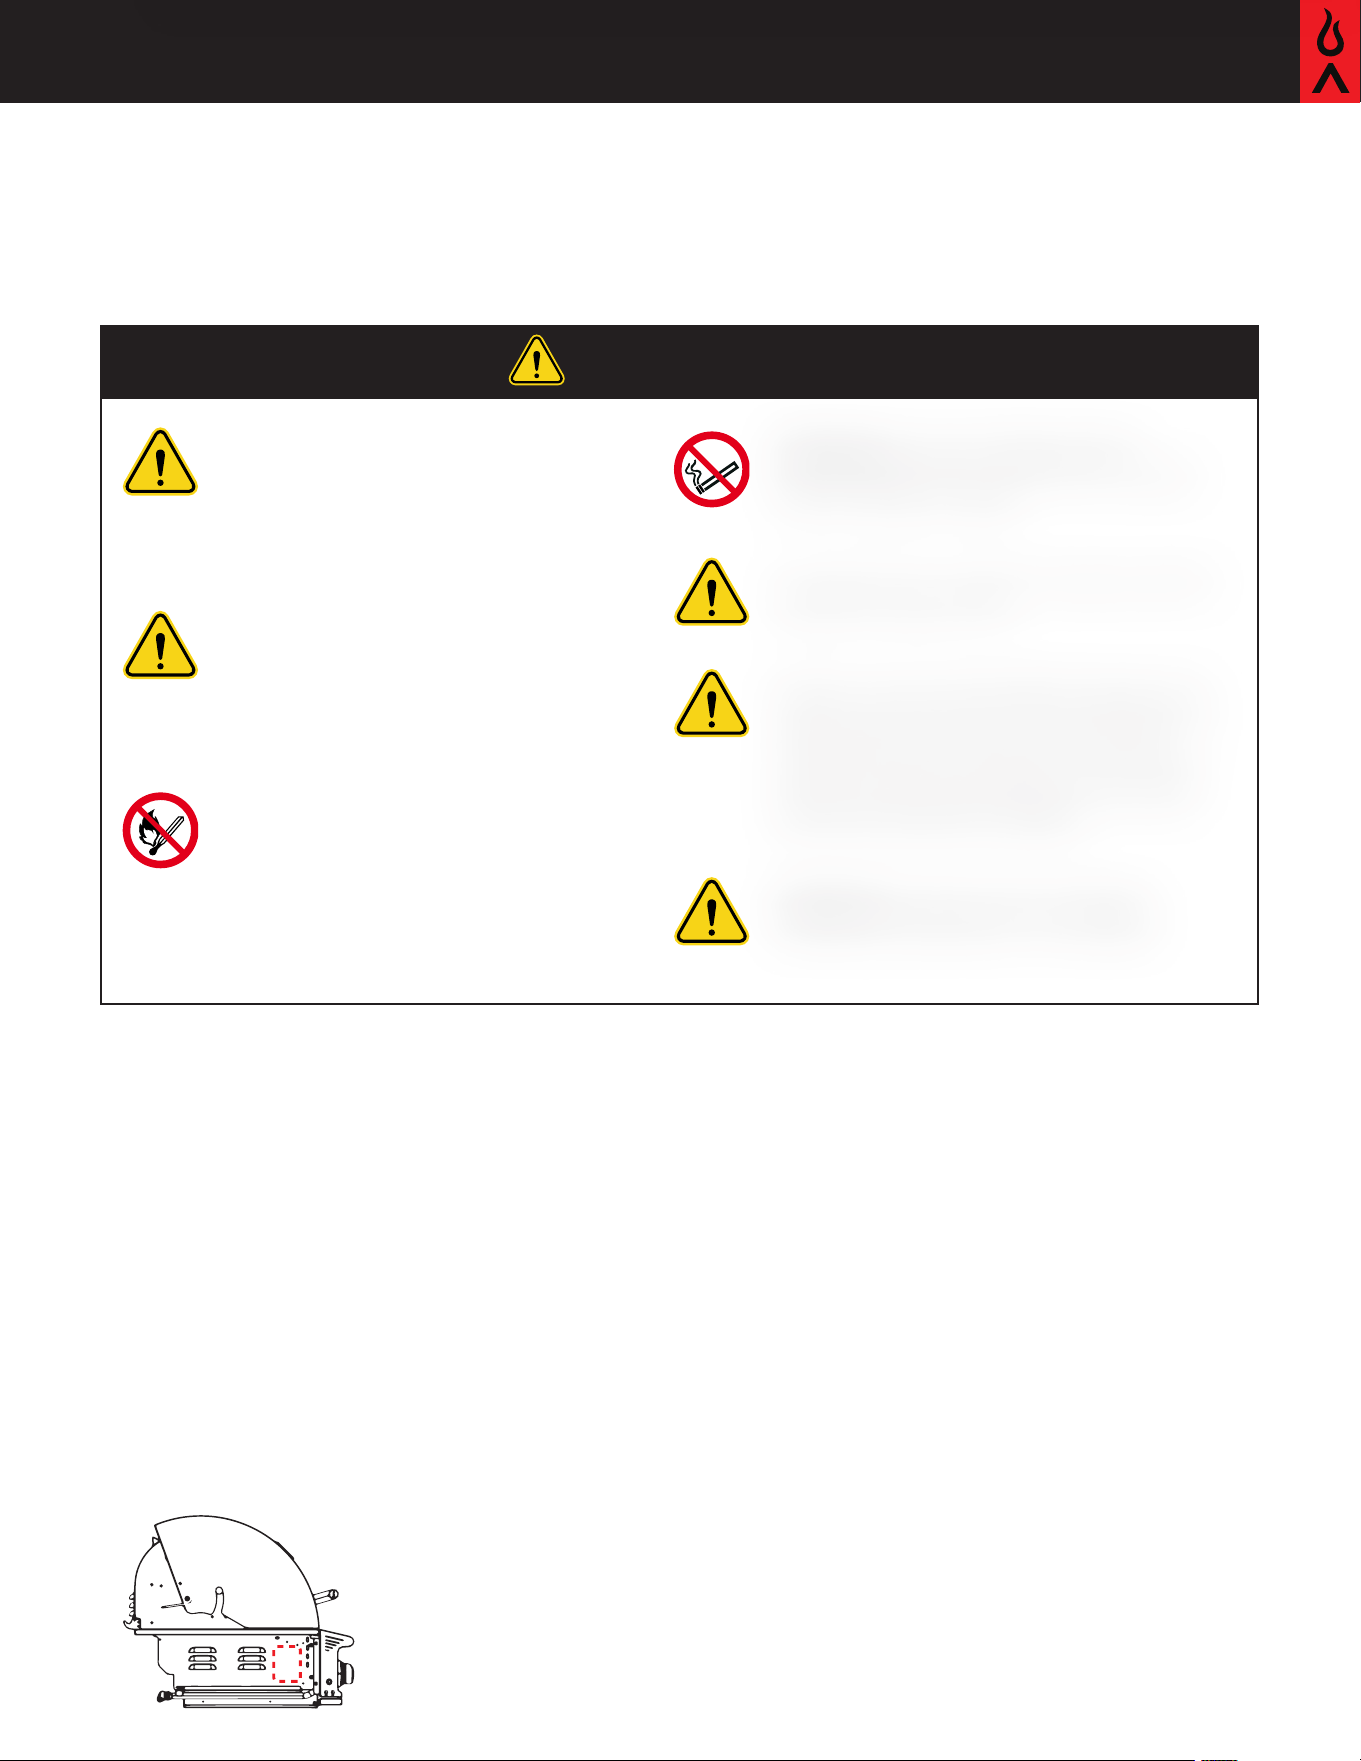
RATING
PLATE
LOCATION
14
Blaze LTE PRO 32-Inch Grill Premium LTE Series
BlazeGrills.com
Gas Connections
Procedure for LP Cylinder
Connection (20 lbs.):
All purging and refilling of LP cylinders must be performed
by qualified personnel in the LP gas industry.
Transporting and Storing LP Cylinders:
Transport only 1 cylinder at a time, ensuring the cylinder
is secured in an upright position with the control valve
turned off and the dust cap in place. Store cylinders
upright, outdoors — not in a building, garage, or any
other enclosed area — and out of the reach of children.
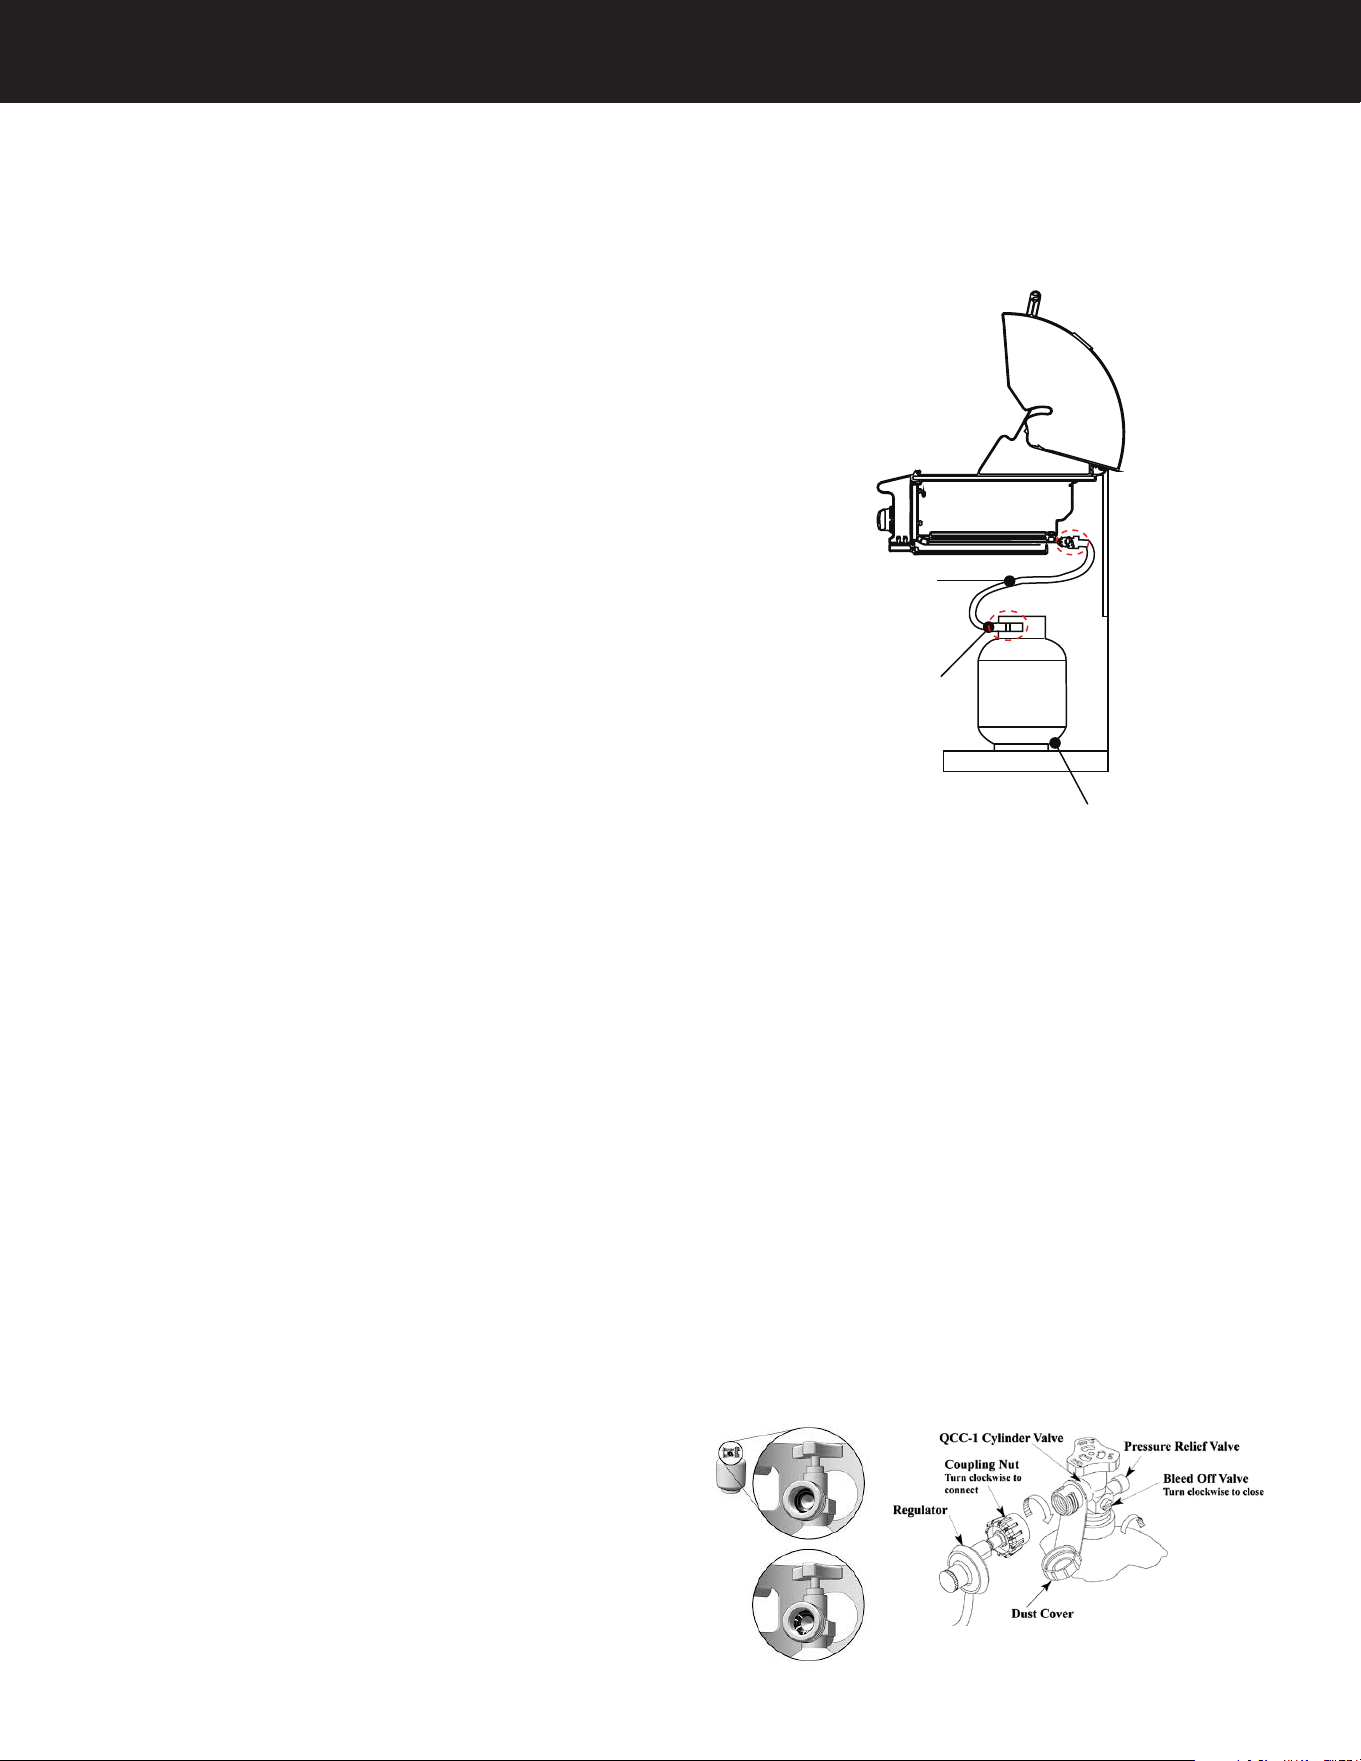
Connecting LP Cylinders:
Step 1: Slide the Blaze appliance halfway into the cart
or built-in then Install the factory-supplied hose and
regulator assembly as shown. Connect the 3/8” flare
end of the hose to the griddle coupling using a 3/8”
open wrench. Do not apply pipe sealant to the 3/8” flare
connection.
Step 2: Connect the regulator to the LP cylinder. Hand
tighten it, do not use a wrench. Check for leaks using
soapy water solution (see pg. 17).
Replacing LP Cylinder:
Step 1: To disconnect, turn the burner knobs to the OFF
position.
Step 2: Close the cylinder valve by turning the hand
wheel counterclockwise until it stops.
Step 3: Disconnect the regulator from the LP cylinder.
Step 4: Replace LP cylinder and connect regulator hose.
Check for leaks.
Note: An enclosure for LP gas cylinder must be vented
on the level of the cylinder valve and at floor level. The
effectiveness of the opening(s) for purposes of ventilation
shall be determined with the LP gas supply cylinder in
place (see pgs. 19–21).
WARNING: Do not place more than one cylinder in the
base cabinet enclosure at any time.
Install the factory-supplied hose and regulator
assembly as shown:
Note: pressure relief valve outlet should not point
toward the user when used.
The LP pressure regulator and hose supplied with this
unit must be used without alteration.
LP Gas Cylinder Seal Inspection For appliances using a
CGA 791 connection:
Inspect the Seal: The cylinder's elastomer face seal may
show visible damage or wear over time, which could cause
a leak even if the connection is tightened.
Check Before Every Use: Visually inspect the seal every
time the LP gas cylinder is replaced or refilled. Return
Damaged Cylinders: If you see cracks, pitting, or other
signs of deterioration (as shown in Figure 5), return the
cylinder unused to the seller.
LP Hose assembly
Factory Supplied
LP regulator
Type 1
Customer supplied
20lb (5 gallon) LP
cylinder
Factory Supplied
BLZ-4LTEPRO-LP/NG 15
Natural Gas Installation:
The installation must conform with local codes or, in the
absence of local codes, with either the National Fuel Gas
Code, ANSI Z223.1/NFPA 54, Natural Gas and Propane
Installation Code, CSA B149.1 or Propane Storage and
Handling Code, B149.2.
•
This gas appliance and its individual shutoff valve
must be disconnected from the gas supply piping
system during any pressure testing of that system
at the test pressures in excess of 1/2 psi (3.5 kPa).
•
This appliance must be isolated from the gas supply
piping system by closing its individual manual shutoff
valve during any pressure testing of the gas supply
piping system at test pressures equal to or less than
1/2 psi (3.5 kPa).
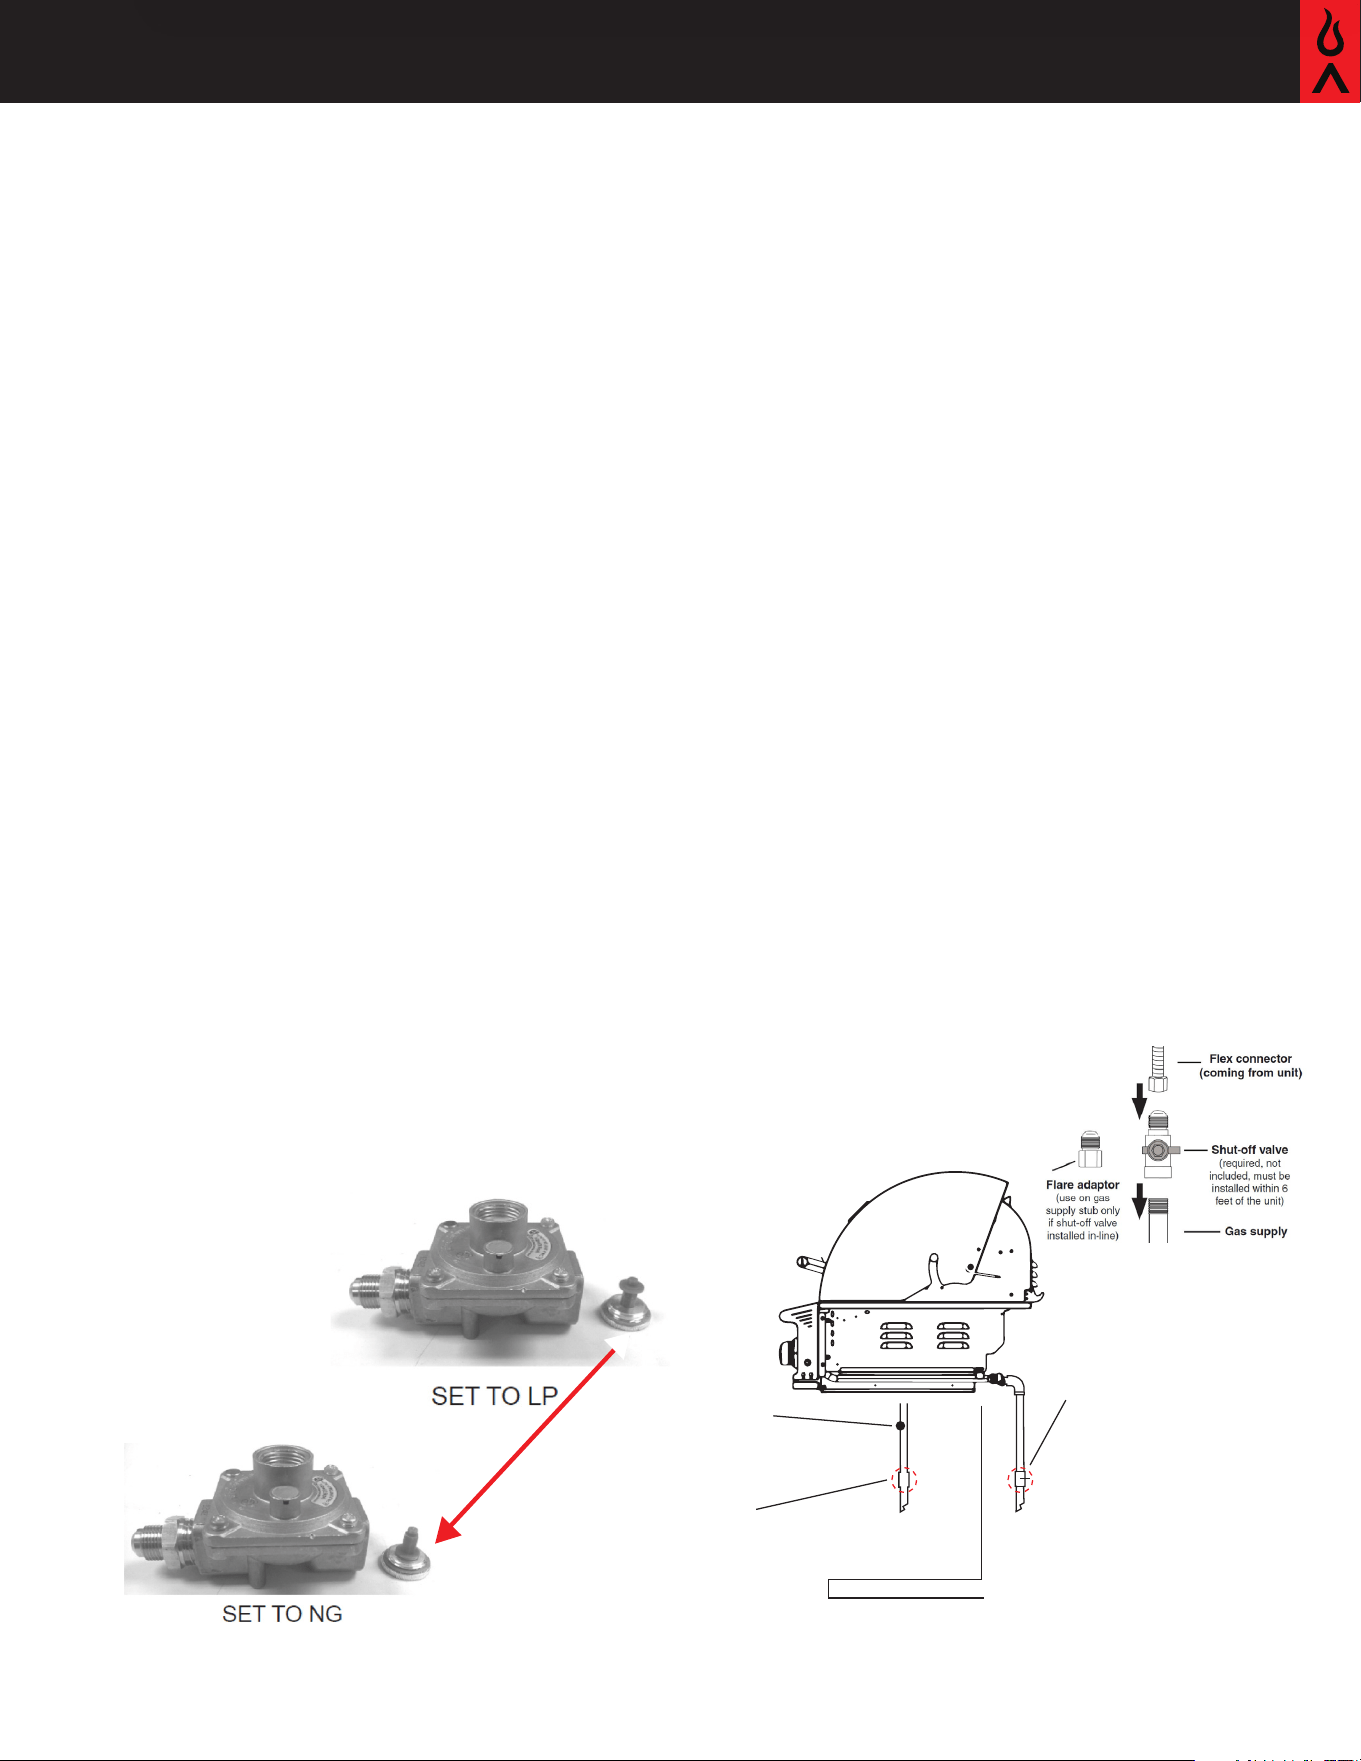
If the gas grill is factory built for natural gas:
The regulator supplied is set for '' water column (WC).
The regulator is convertible to 11'' wc (2.49 kPa) for
plumb-in system LP application. Do not use with a 20
lb. LP cylinder. Make sure that the regulator is set for
the correct gas type. To check, remove the brass hex
cap. You will find the conversion plastic pin attached
to the cap to the underside of the cap. If the disc (1/2''.
diameter) of the pin is close to the cap, then the regulator
is set for natural gas. If the disc is at the tip of the pin,
away from the brass cap, the regulator is set for system
LP application. To convert to natural gas, remove the
plastic conversion pin and invert and replace it back in
a manner such that the disc is close to the brass cap.
For both natural gas and LP, the maximum inlet pressure
is 14'' wc (3.5 kPa).
Natural Gas Connection:
•
Connect a suitable natural gas flex connector to the
grill regulator located on the rear right corner of the
appliance. It is recommended to use a flex connector
with a minimum of a 5/8” diameter or larger.
•
Seal all non-flared fittings with thread sealant or
Teflon tape. Make sure it is rated for gas appliances.
•
Ensure the flex connector is protected from sharp
edges, heat, aressive surfaces, and kinking.
•
Check the appliance controls to ensure all control
valves are in the full OFF position.
•
Turn on the main gas supply and check all connections
for leaks using soapy water (see pg. 17).
• The regulator used must be set for 4” WC and is for
use with Natural gas only.
•
Note: Most low-pressure regulators have a directional
arrow indicating the direction in which the gas must
travel. Ensure the arrow is pointing in the direction
of the appliance.
•
An installer-supplied gas shutoff valve must be
installed in an accessible place.
Regulator Set
at 4’’ WC
(natural gas)
Typical bottom
gas connection
Installer-supplied gas
shuto valve
(must be easily
accessible
installer-supplied
gas shuto valve
(must be easily
accessible)
Typical natural gas hook-up
caution: provide adequate ventilation holes in the
enclosure for safety purposes in the event of a gas
leak
16 Blaze LTE PRO 32-Inch Grill Premium LTE Series
BlazeGrills.com
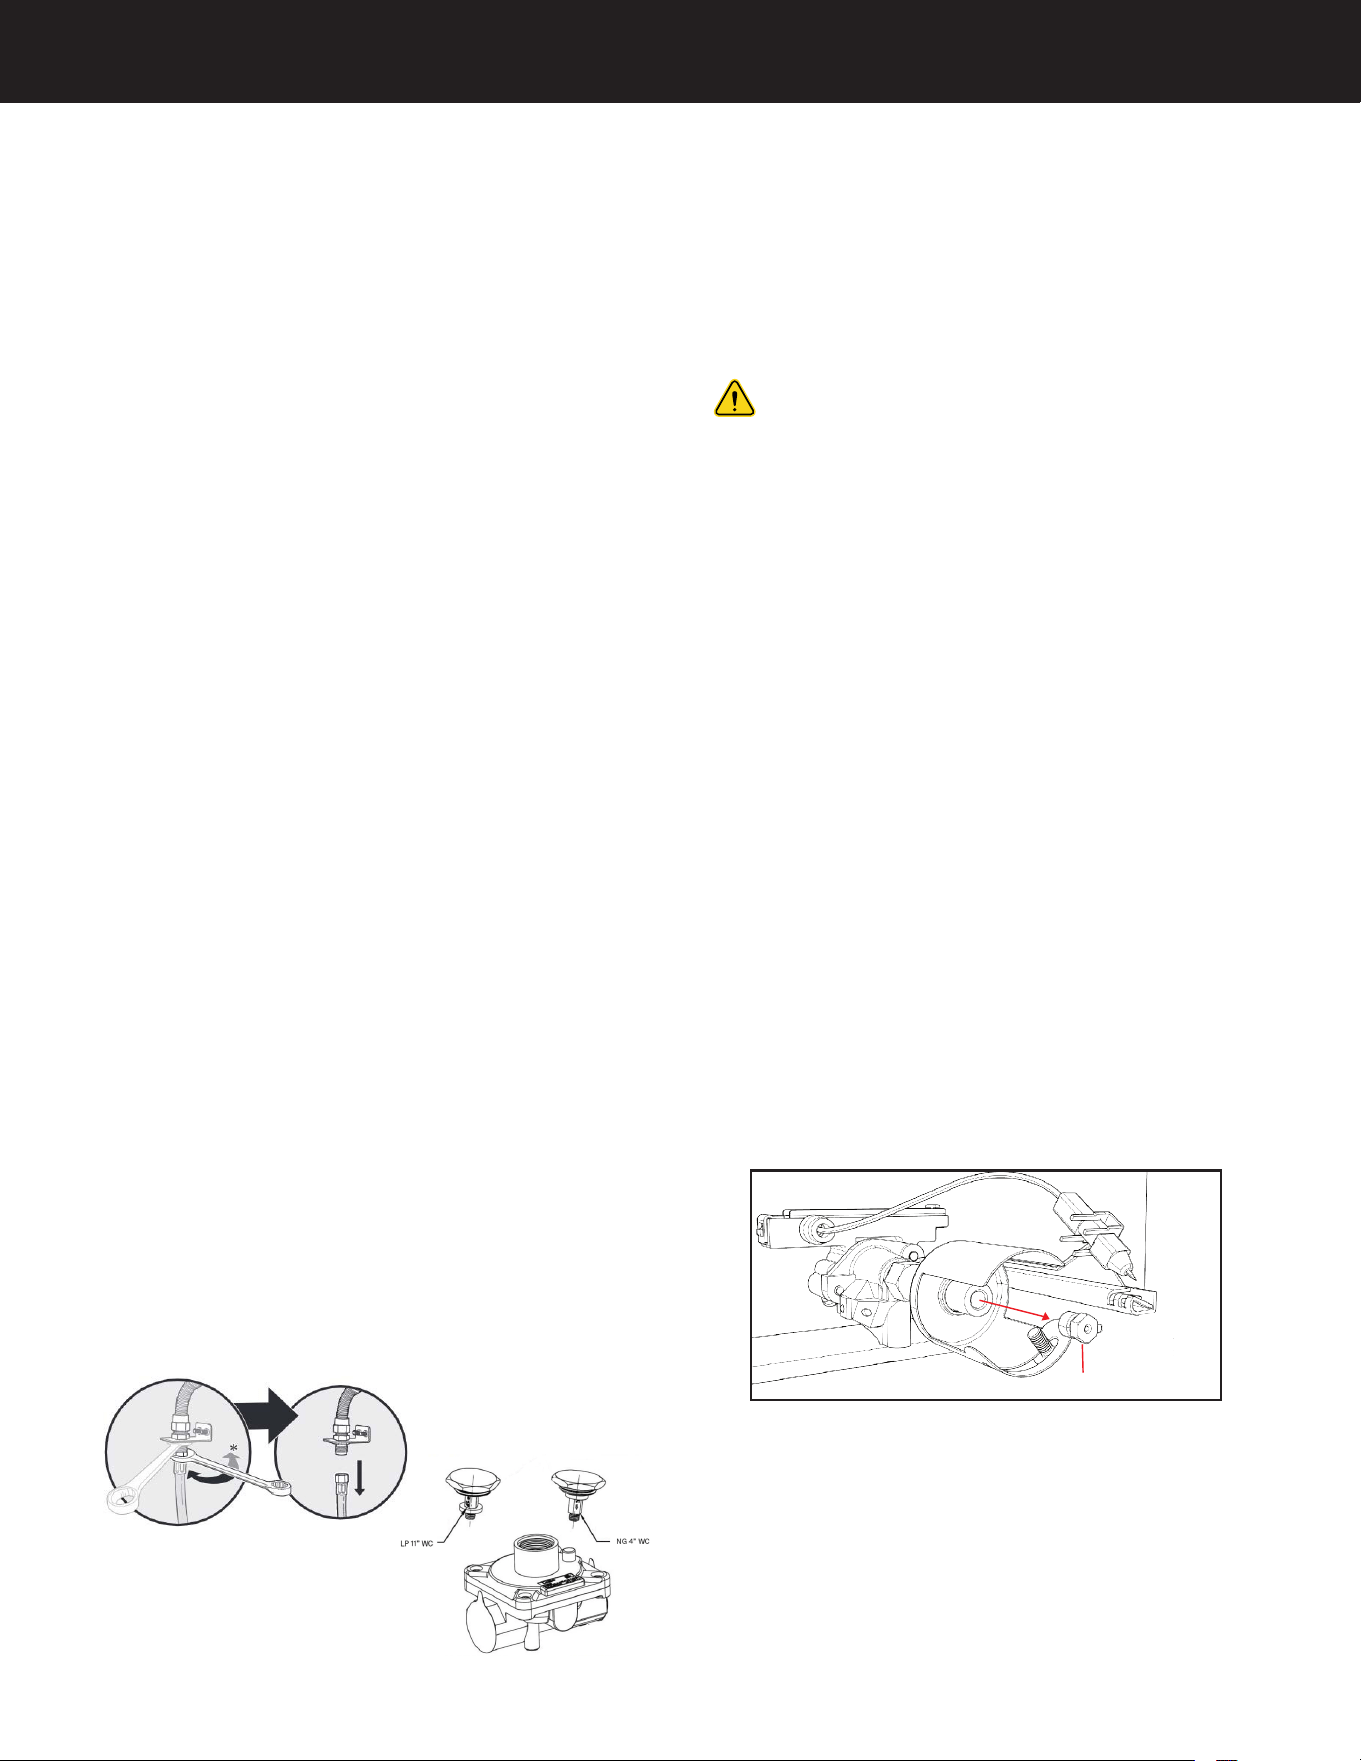
Convertible Gas Regulator (if
applicable):
Caution: This should only by performed by a licensed
gas professional. There is a tutorial video at blazegrills.
com to supplement the instructions below.
Currently all natural gas grills are supplied with a
regulator which is appropriate for use with natural gas
or low-pressure propane.
•
When converting to propane gas, the most common
propane canister used is a smaller sized portable
canister (typically 5 gallons or 20 pounds). The pre-
installed regulator will need to be converted to LP
gas (see below) and add a secondary low-pressure
hose and regulator with an outbound pressure set
to approximately 11'' of water column pressure. If an
individual is intending on using propane provided from
a larger tank permanently installed on location, the
regulator included with the appliance will only need to
be converted for use with LP fuel (see NG-LP regulator
conversion below). Please be aware that this included
regulator can only withstand an inbound pressure of .5
PSI or roughly 14'' WC pressure. Any higher pressure
on location will have to be further regulated before
connecting to the regulator on the appliance. Please
consult your local propane gas provider to confirm the
gas pressure on the supply line feeding the appliance.
• If converting to natural gas, a low-pressure regulator
with an outbound pressure set to 4'' WC pressure
must be used.
• With either setup, remember to always check for gas
leaks after the job is complete (see csee pg. 17).
Caution: This should only by performed by a
licensed gas professional.
Main Burners:
Step 1: Remove grill grates to expose the main burners
in the appliance. (See pg 5)
Step 2: On the top rear of each burner is a set of screws.
Remove screws (unless they were removed prior to
installation into an outdoor kitchen).
Step 3: To remove burner, pull burner upwards and slide
burner toward the rear of the appliance. Repeat for each
burner.
Step 4: Where the burner was previously located,
connecting to the main valve through the hole in the
basin should now be empty space.
Step 5: Inside the space you will find the end of the valve
(toward the front of appliance) with an orifice (brass
fitting) screwed into the end of the valve stem.
Step 6: Carefully remove the orifice with a 6mm socket
set and extension. (These are extremely fragile! When
unscrewing, be extremely gentle, you could easily break
the brass fitting and have to replace the valve).
Step 7: Once the old orifice is removed, replace it with the
new orifice, and repeat for all burners. When re-installing
the orifice, do not over tighten or you will strip the brass
fitting. Very little pressure is needed!!!
Step 8: Inspect burners for proper flame appearance.
The ideal flame appearance is to be primarily blue. A blue
flame indicates that the burner is operating efficiently.
Fuel Conversion
Remove Orifice
carefully
Fuel (Gas) Conversion
Instructions for Blaze Gas
BLZ-4LTEPRO-LP/NG
17
Local Codes:
• The self-contained LP system appliance is design
certified to be used with a standard 20 lb., 12 1/4"
diameter, 18" high cylinder with right handed con-
nection threads and this is the maximum size LP
tank to be used. The cylinder must be marked in
accordance with the latest U.S. Department of
Transportation specifications for LP gas cylinders.
(DOT. CFR49 or National Standards of Canada CAN/
CSA-B359 Cylinders, Spheres and Tubes for the
Transportation of Dangerous Goods) a propane tank
with an OPD) Overfill Prevention Device) must be
used at all times.
• If there are local codes that apply to outdoor burn-
ers, you will have to conform to them. Installation
must conform with local codes or, in the absence
of local codes, with Propane Installation Code, CSA
B149.1, or Propane Storage and Handling Code,
B149.2 as applicable.
• Installation in Canada must be in accordance with
the standard CAN/CGA- B149.2.
• A licensed gas professional or local gas company
representative must perform all gas connections.
• Ensure that the service supplying the appliance is
fitted with a shut-off valve conveniently positioned
near the appliance and giving ease of access.
• The appliance and its individual shut-off valve must
be disconnected from the gas supply piping system
during any pressure testing of that system.
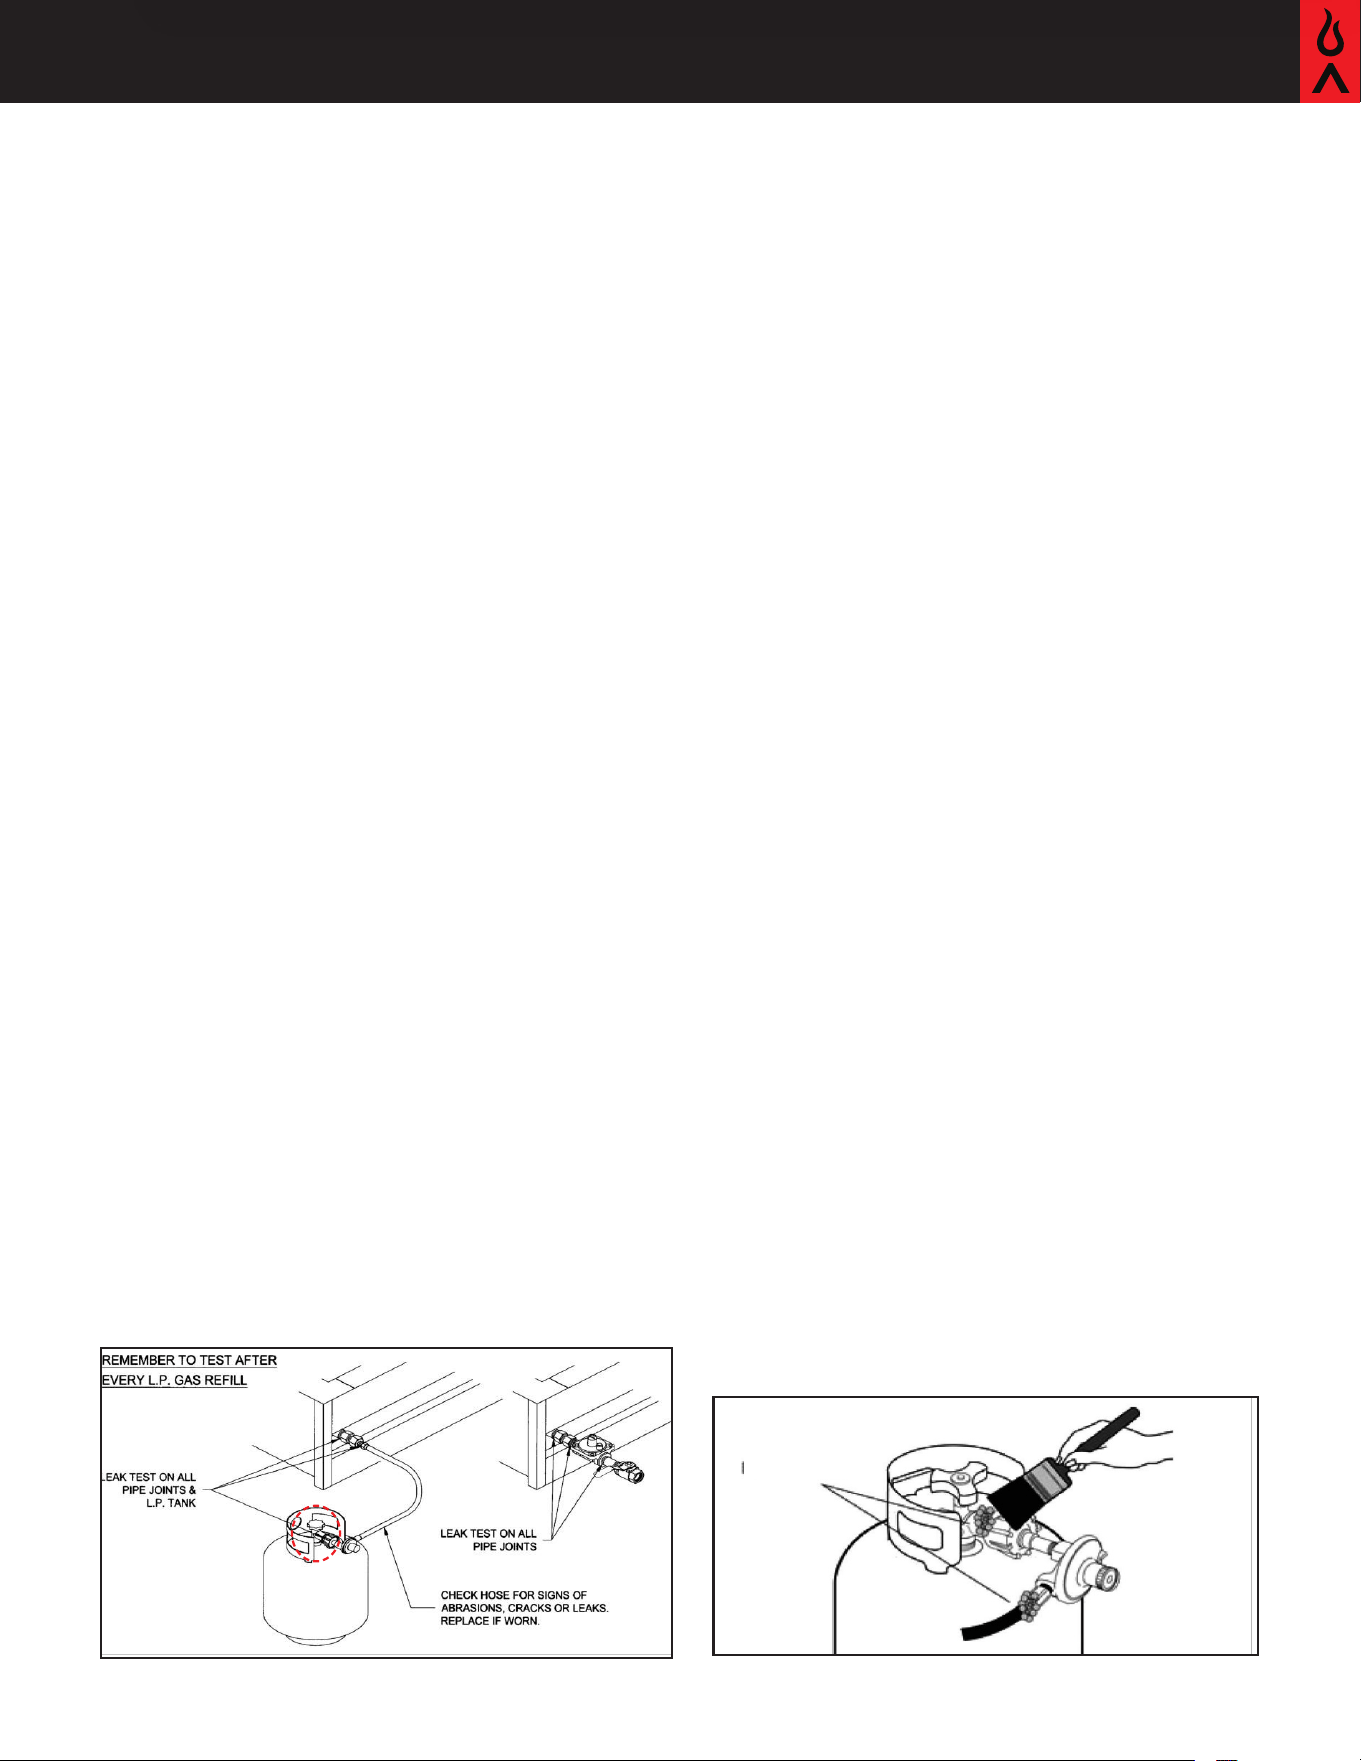
Checking for Gas Leaks:
• Perform a leak test before each use and when-
ever the gas cylinder is connected to the regulator
or whenever any part of the gas system is discon-
nected or replaced. As a safety precaution, remem-
ber to always leak test your appliance outdoors in a
well-ventilated area. Never smoke or permit sources
of ignition in the area while doing a leak test. Do not
use a flame, such as a lighted match to test for
leaks. Use a solution of soapy water.
• Prepare a leak testing solution of soapy water by
mixing in a spray bottle one part liquid soap to one
part water.
• Make sure all the control knobs are in the OFF posi-
tion and then turn on the gas.
• On natural gas systems, turn the main feed valve to
the appliance. On LP systems, turn the cylinder valve
knob counterclockwise one turn to open.
• Apply the leak-testing solution by spraying it on
joints of the gas delivery system. This includes all
valves, pipe connections, joints, lines, and every
point from the gas source to the burners.
• Blowing bubbles in the soap solution and/or there
is a faint gas smell (typically gas has an e smell)
indicates that a leak is present. Do not attempt to
ignite the appliance.
• Turn all control knobs back to the full OFF position.
•
All leaks must be corrected immediately: If you
are unable to stop a leak, turn all control knobs back
to the full OFF position, shut off the gas supply to
the appliance, and release pressure in the hose and
manifold by pushing in and turning any of the control
valves one quarter turn counterclockwise. On LP
systems, remove the cylinder from the appliance. Call
an authorized gas appliance service technician or
an LP gas dealer. Do not use the appliance until the
leak is corrected.
Bubbles = Leaks
18 Blaze LTE PRO 32-Inch Grill Premium LTE Series
BlazeGrills.com
Installing the Appliance in a BBQ Island
Safety Information and Install:
Two person lift: You will need a second person to
help you avoid damaging the appliance or your appliance
island.
Permit may be required: Check with city and fire
department for local building codes. A permit may be
required for outdoor kitchen construction.
Non-combustible material warning: Ensure all
clearances to combustibles are maintained. The island
must be made out of non-combustible material. In the
event it is combustible, the use of an insulation jacket
is REQUIRED.
Protection from weather: Keep the appliance
protected from adverse weather, including rain and
wind. Wind, particularly coming into the rear of the
appliance, can affect the exhaust from escaping
the appliance. This can back up the heat behind the
control panel potentially creating a gas leak, damage
to the product, and injury. A wind block behind the
appliance may be necessary.
Install Instructions:
Before installing an appliance in any island cutout,
make sure that the opening is not bier than the
outside frame of the appliance unit. The appliance
should rest on the lip of the frame. Pay careful atten-
tion to the location of the gas line. It should be routed
away from sources of heat, sharp edges, and ares-
sive surfaces and should make as few bends as possi-
ble. Ensure the gas line connection will be accessible
when appliance is installed. A safety shut-off valve is
required at this gas connection point. Before install-
ing the appliance into the island cut-out, the main
burner cotter pins may be removed for convenience of
service adjustments, and maintenance in the future.
These are accessible from the outside rear of the grill.
Ventilation openings in side walls shall not commu-
nicate directly with other enclosures of the outdoor
cooking gas appliance. If the outdoor kitchen coun-
tertop will overhang the face of the island, notching
out the two front countertop edges will be necessary
to allow the appliance to slide flush against the outer
front wall to the outdoor kitchen. Due to differing per-
sonal preferences the size of the notch-out, is recom-
mended to be done at the point of installation so that
the consumer can dictate their preference. Ensure
your island cavity is adequately vented. Number of
vents shown in diagram is for informational purposes
only. Consult your local licensed professional for ade-
quate requirements. Ensure your outdoor kitchen is
constructed out of non-combustible materials.
If your outdoor kitchen is constructed of
combustible materials, a Blaze insulated jacket is
REQUIRED.
If bbq island is not manufactured from
"non-combustible" material you must use a Blaze
insulated jacket for your grill.
Install Steps:
Step 1: Slide the appliance into the cut-out and then
attach the gas line.
Step 2: Be very careful not to kink the gas line when
lowering the appliance into the cut-out.
Step 3: Keep your fingers away from where the appliance
will be supported on counter. Your fingers could become
trapped and serious injury could occur.
Step 4: Check to make sure the appliance is level and
is supported around the entire outside edge. If the
appliance is not level or is unstable, use non-combustible
shims under the outside lip to stabilize it.
BLZ-4LTEPRO-LP/NG
19
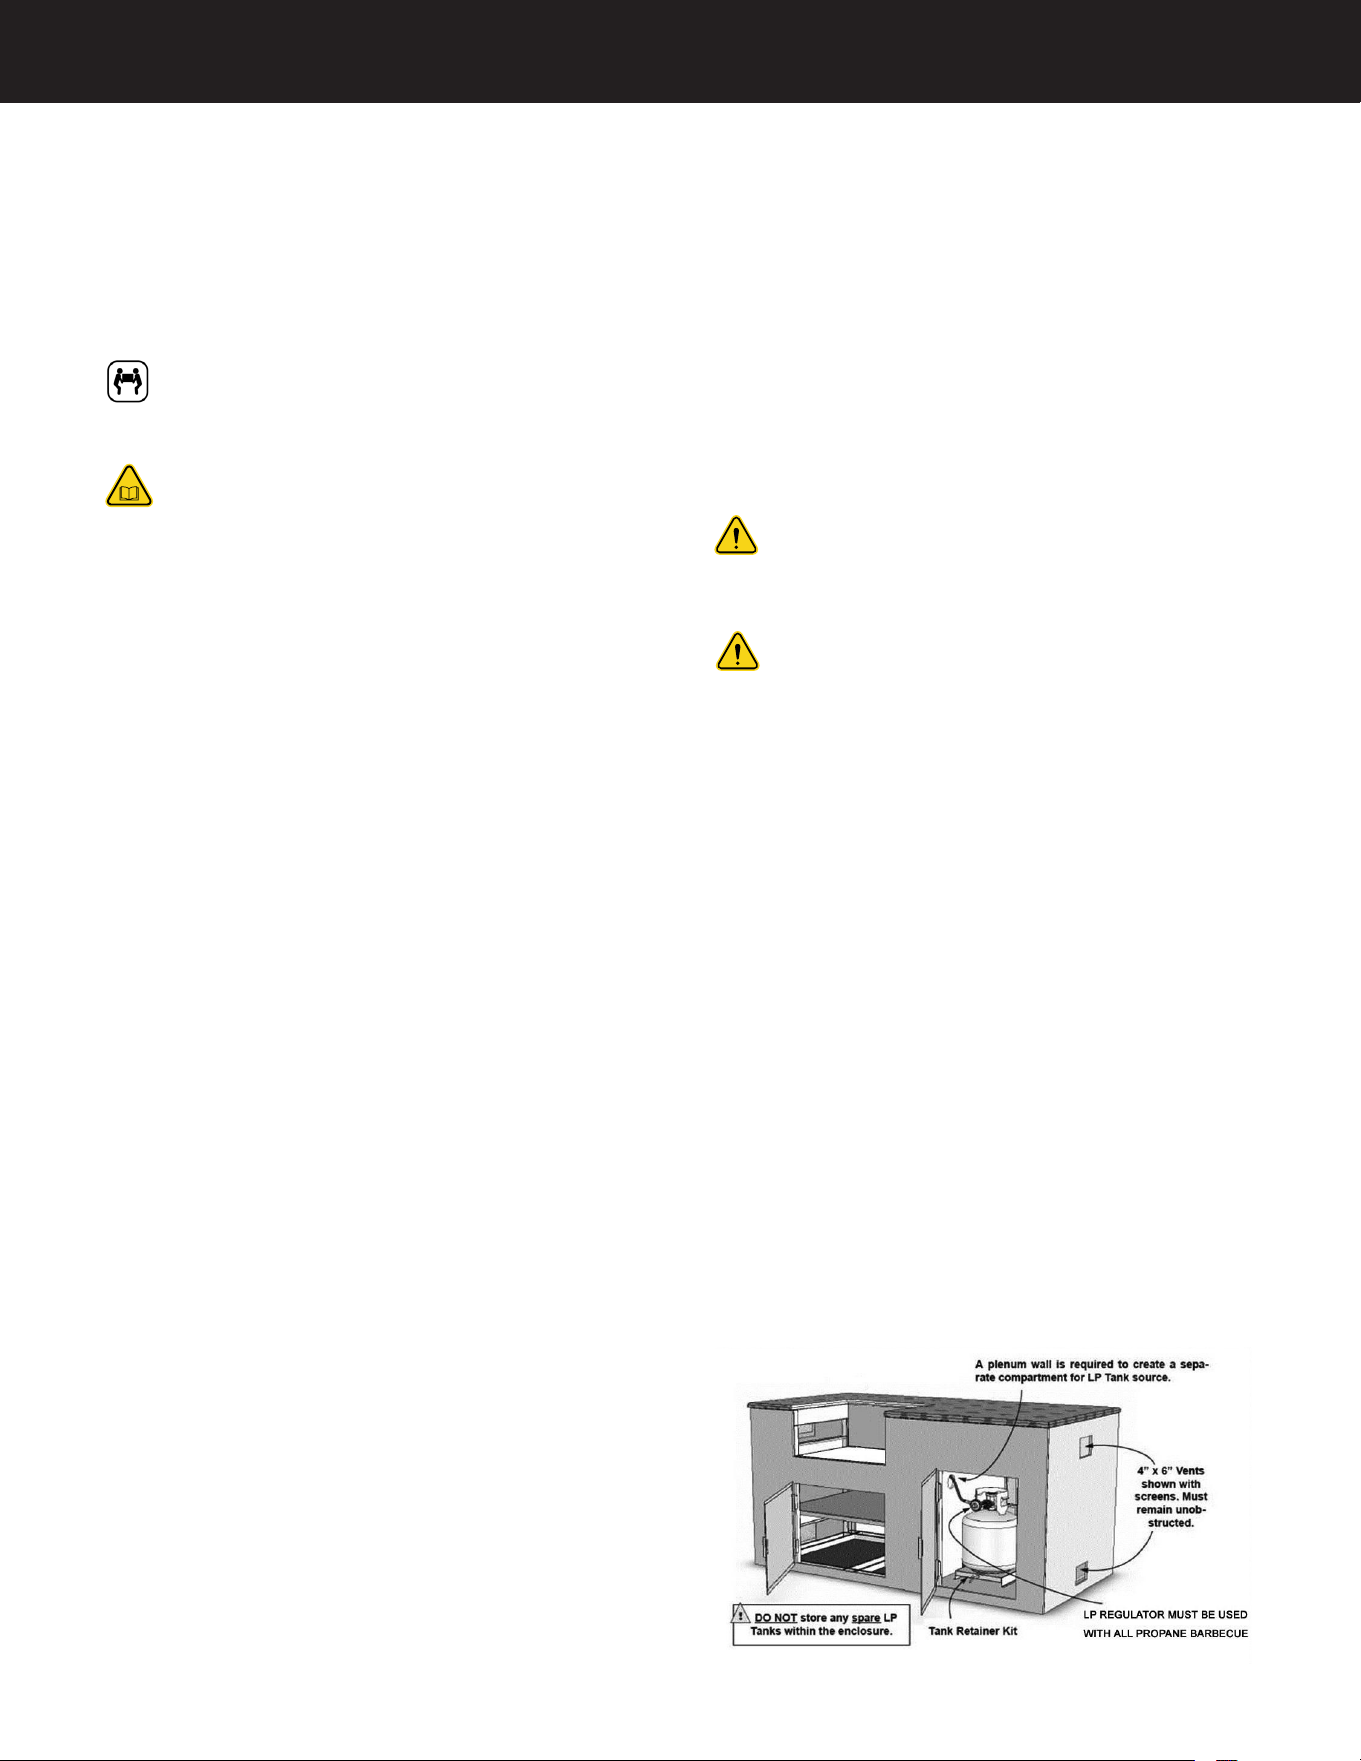
Outdoor Kitchen Ventilation
Failure to adequately vent your outdoor kitchen
cavity could result in an explosion or fire:
When building a gas appliance into an outdoor kitchen,
it is necessary to provide adequate ventilation for the
island cavity underneath. This is necessary for not only
proper combustion, but also to prevent a build-up of gas.
While the amount of venting required for your island will
vary due to the variety of differing local codes, inner
framework and design of an outdoor kitchen, the amount
of gas products installed and their locations, etc., all
built-in applications/ islands should be ventilated in
some way. Your local contractor and/or your local code
authority can determine adequate ventilation for each
installation. Stainless steel vent panels are available from
your dealer to cover the island venting. A Blaze insulating
jacket can be found through your local Blaze dealer.
The diagram below shows a variety of examples
of venting locations and configurations for an outdoor
kitchen. These are not the only possible options for
venting but instead simply some examples of the more
common configurations found. Notice the middle set
of vents being positioned lower on the island cavity
for LP gas. Lower vents are for LP and the higher vents
are for natural gas (examples only).
The following information is important to consider:
•
Must use non-combustible construction or
installed with an insulated jacket.
•
Should NOT be located under any overhead
combustible construction.
•
Upper and lower vents must be provided for
combustion air on both sides of island.
• Vents must remain unobstructed.
• Upper vents must be located 5 inches from the
top of the island to the bottom of the vent.
• Lower vents must be located within 1 inch from
the bottom of the island to the bottom of the first
vent opening and no more than 5 inches from the
bottom of the island to the top of the vent.
• Vents must meet ANSI standard codes.
•
Upper vents must have openings that have a total
free area of not less than 1 sq. in. per lb of stored
fuel capacity per vent and the lower vents must
have opening that have a total free area of not
less than 1/2 sq in per lb. of stored fuel capacity
per vents.
•
Vent opening must have minimum dimensions to
permit the entrance of a 1/8'' diameter rod.
LP/propane gas: LP gas is heavier than air and will
settle to the lowest levels of the outdoor kitchen.
vents
vents
vents
NG/natural gas: Natural gas is lighter than air and will
rise to the highest levels of the outdoor kitchen.
Upper vents
5 inches
maximium
Bottom of
Island
Lower Vents
5 inches
maximium
1 inch maximium
20 Blaze LTE PRO 32-Inch Grill Premium LTE Series
BlazeGrills.com
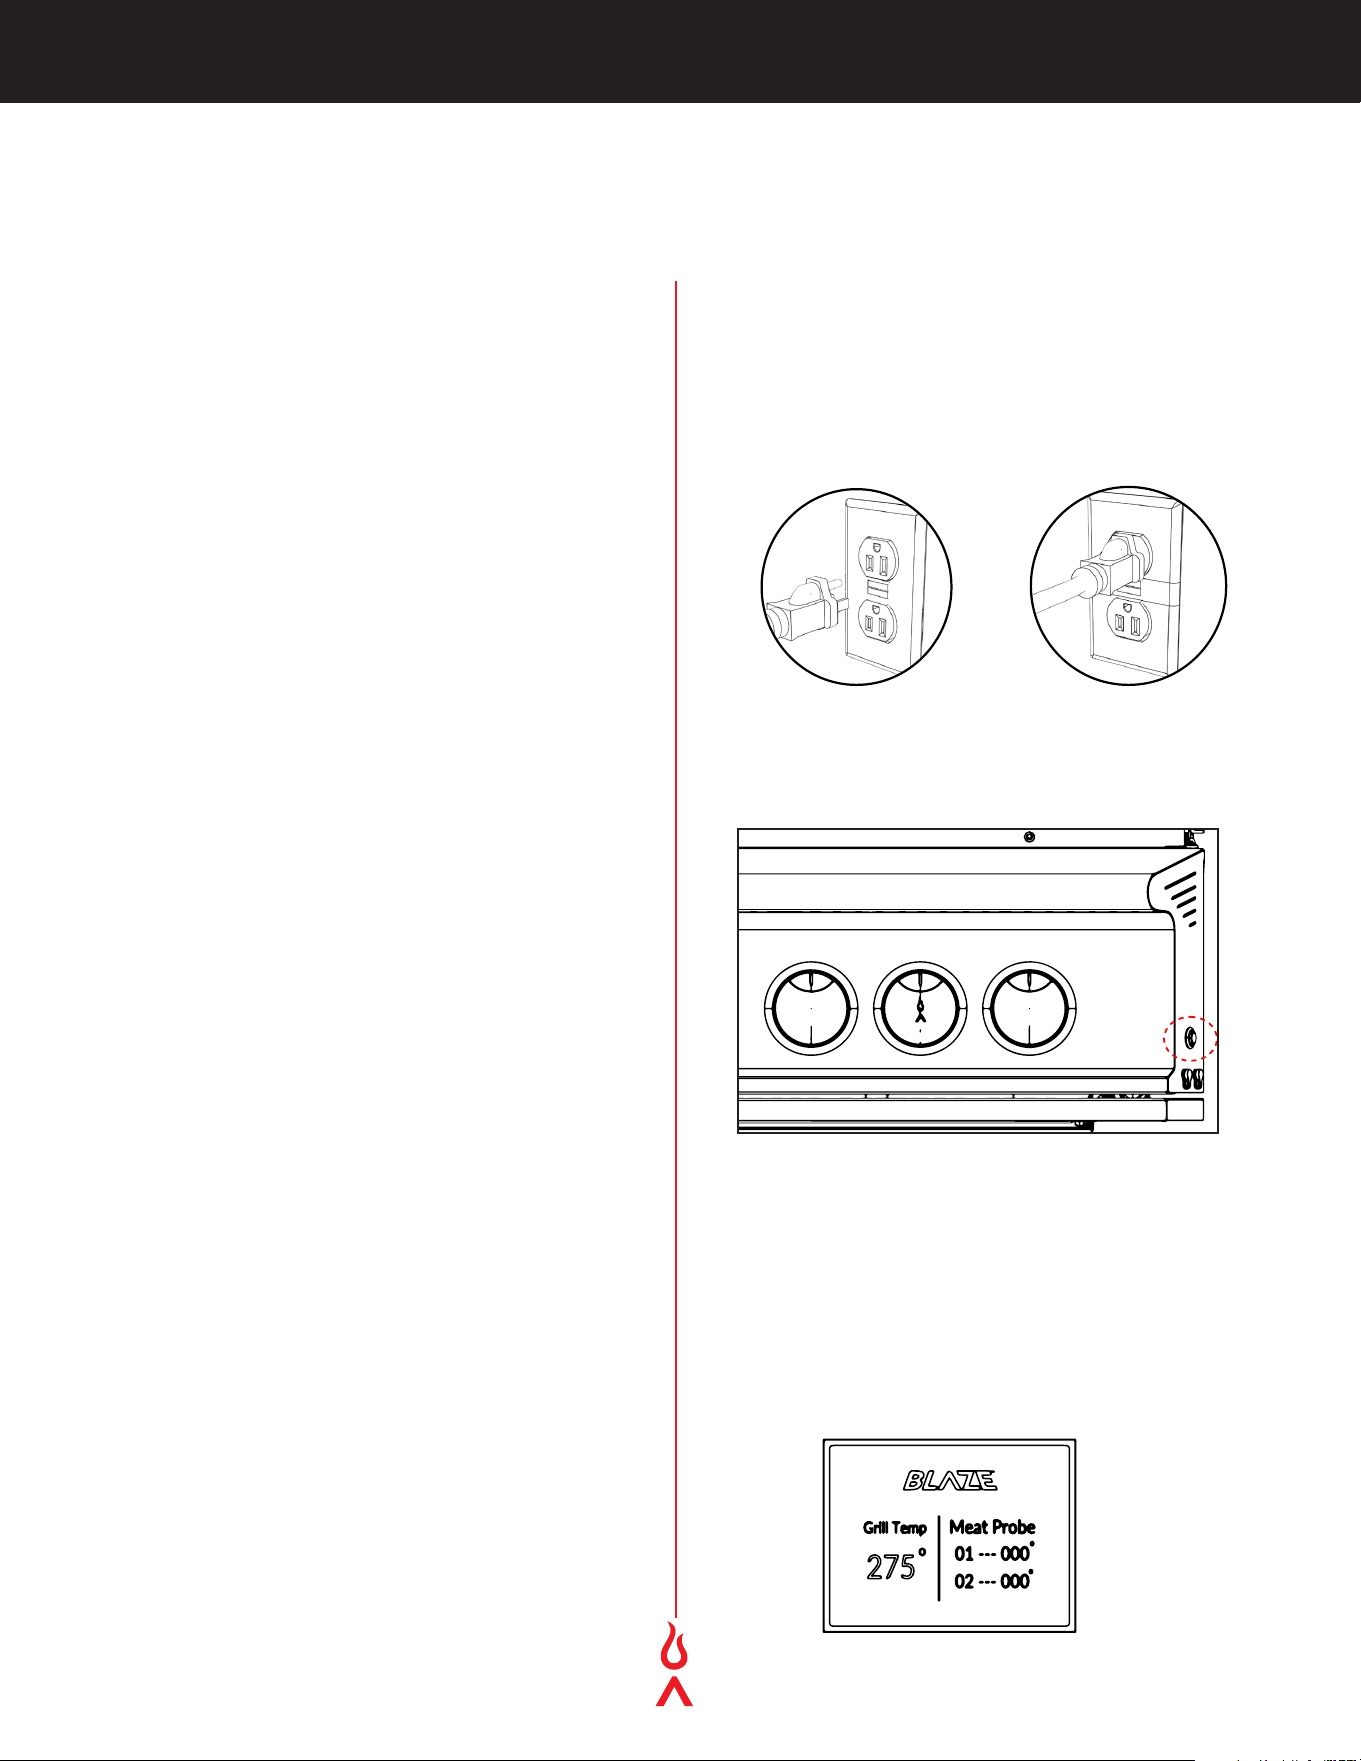
Powering the Grill and Using
Digital Screen:
Step 1: Make sure unit is plued into a 15-AMP breaker
with GFI protection. An extension cord may be used if
all requirements from pg. 12 are met.
Step 2: Press the button to the right lower side wall of
the control panel to power up. Button will turn "red"
when the main power is on. This will power the digital
screen and LED knobs (see below image).
Step 3: Using the digital screen. The digital screen is
used for accurate monitoring of the grill’s cooking tem-
perature and for monitoring probe temperature. In addi-
tion, your Blaze grill is equipped with two meat probes, for
monitoring those tasty steaks (connections are located
next the power button). The right side of the screen
is used for monitoring your meat probe temperatures.
Warning: Before lighting the burners inspect the gas
supply piping or hose. If there is evidence of cuts, wear,
or abrasion, it must be replaced prior to use. Always keep
your face and body as far away from the appliance as
possible when lighting. Always perfrom a gas leak test
before each use.
Caution: Never operate the appliance unattended. The
surface is extremely hot and someone could touch the
hot surface and get seriously burned. All gas appliances
should be attended at all times.
Prior to using your appliance, verify that all of the
following is correct:
• The burner tube is free of any debris or obstruction.
•
Installation of the proper gas type and regulator
settings.
• The proper gas connection is complete.
• Check for gas leaks.
• Minimum clearances are maintained.
• All packaging has been removed.
• All parts and components are properly in place.
•
An installer-supplied manual gas shut-off valve is fully
accessible.
•
LP hose is clean and inspected for cuts, wear, abrasion,
or leaks. Replace if necessary, with a suitable UL, ETL
or CSA Listed part with internally threaded connector.
First-Time Operation

BLZ-4LTEPRO-LP/NG 21
Lighting the Appliance:
Step 1: Open the hood.
Step 2: Use caution when lighting burners by standing
as far away from the burners as possible. Do not put
your hands, arms, head, or any body parts close to the
oven when lighting.
Step 3: To ignite burners, push the burner knob in and
slowly rotate counterclockwise to the high position. Gas
will only be released when pushed in to start.
Step 4: You will hear a loud click as the electronic lighter
produces a spark. Listen for the sound of the gas igniting
and look for a flame beneath the cooking grate. If the
burner does not light on the first try, repeat immediately.
Step 5: If the burner does not light in five seconds, turn
the burners off and wait five minutes with the hood
open until the gas clears before attempting to light it
again. Repeat the procedure or try the manual lighting
procedure below.
Step 6: If the burner does not light after several attempts,
immediately close all gas valves and consult the next
section manually lighting the main burners.
Step 7: Upon successful lighting, repeat the process on
the other burners you wish to light.
Step 8: To shut off the burners, rotate the knob and turn
to OFF. It is normal to hear a popping sound when the
burners are turned off.
Step 9: Close the valve at the gas supply.
Manual Burner Lighting:
Warning: A long match can be used, but it is recom-
mended to use a long lighter to perform match-light-
ing procedures. Serious burns can occur and lighters
can explode.
Step 1: Open the hood.
Step 2: If you have just attempted to light the burner,
allow five minutes for any accumulated gas to dissi-
pate. Use caution by standing as far away from the
burners as possible. Do not put your hands, arms,
head or any body parts close to the oven when lighting.
Step 3: Hold your open flame to the top of the tube
burners.
Step 4: Push in and turn the control knob to HIGH.
Step 5: If the burner does not light after five seconds,
turn the control knobs to the OFF position.
Step 6: Wait five minutes until the gas clears before
attempting to light it again.
Flame Adjustment:
Become familiar with the safety instructions at the front
of this manual. Do not smoke while lighting the appliance
or checking the gas supply connections.
•
Make sure that all gas connections are securely
tightened and have been leak-tested with a soapy
water solution - never with a flame!
•
Light the main burners and run them on the high
setting.
•
Inspect burners for proper flame appearance. The ideal
flame appearance is one that is mostly blue and not
lifting off of the burner surface. There is an air shutter
found at the end of the burner (close to the valve) which
can be either opened or closed to make adjustments to
the flame's appearance. To adjust, remove the burner
from the appliance and loosen the Phillips head screw
holding the air shutter to the burner. If the flame is
yellow, open the air shutter to make the flame bluer.
If the flame is lifting off of the burner surface, slightly
close the air shutter. Re-tighten the Phillips head
screw and re-install the burner to recheck the flame
appearance. Repeat if necessary.
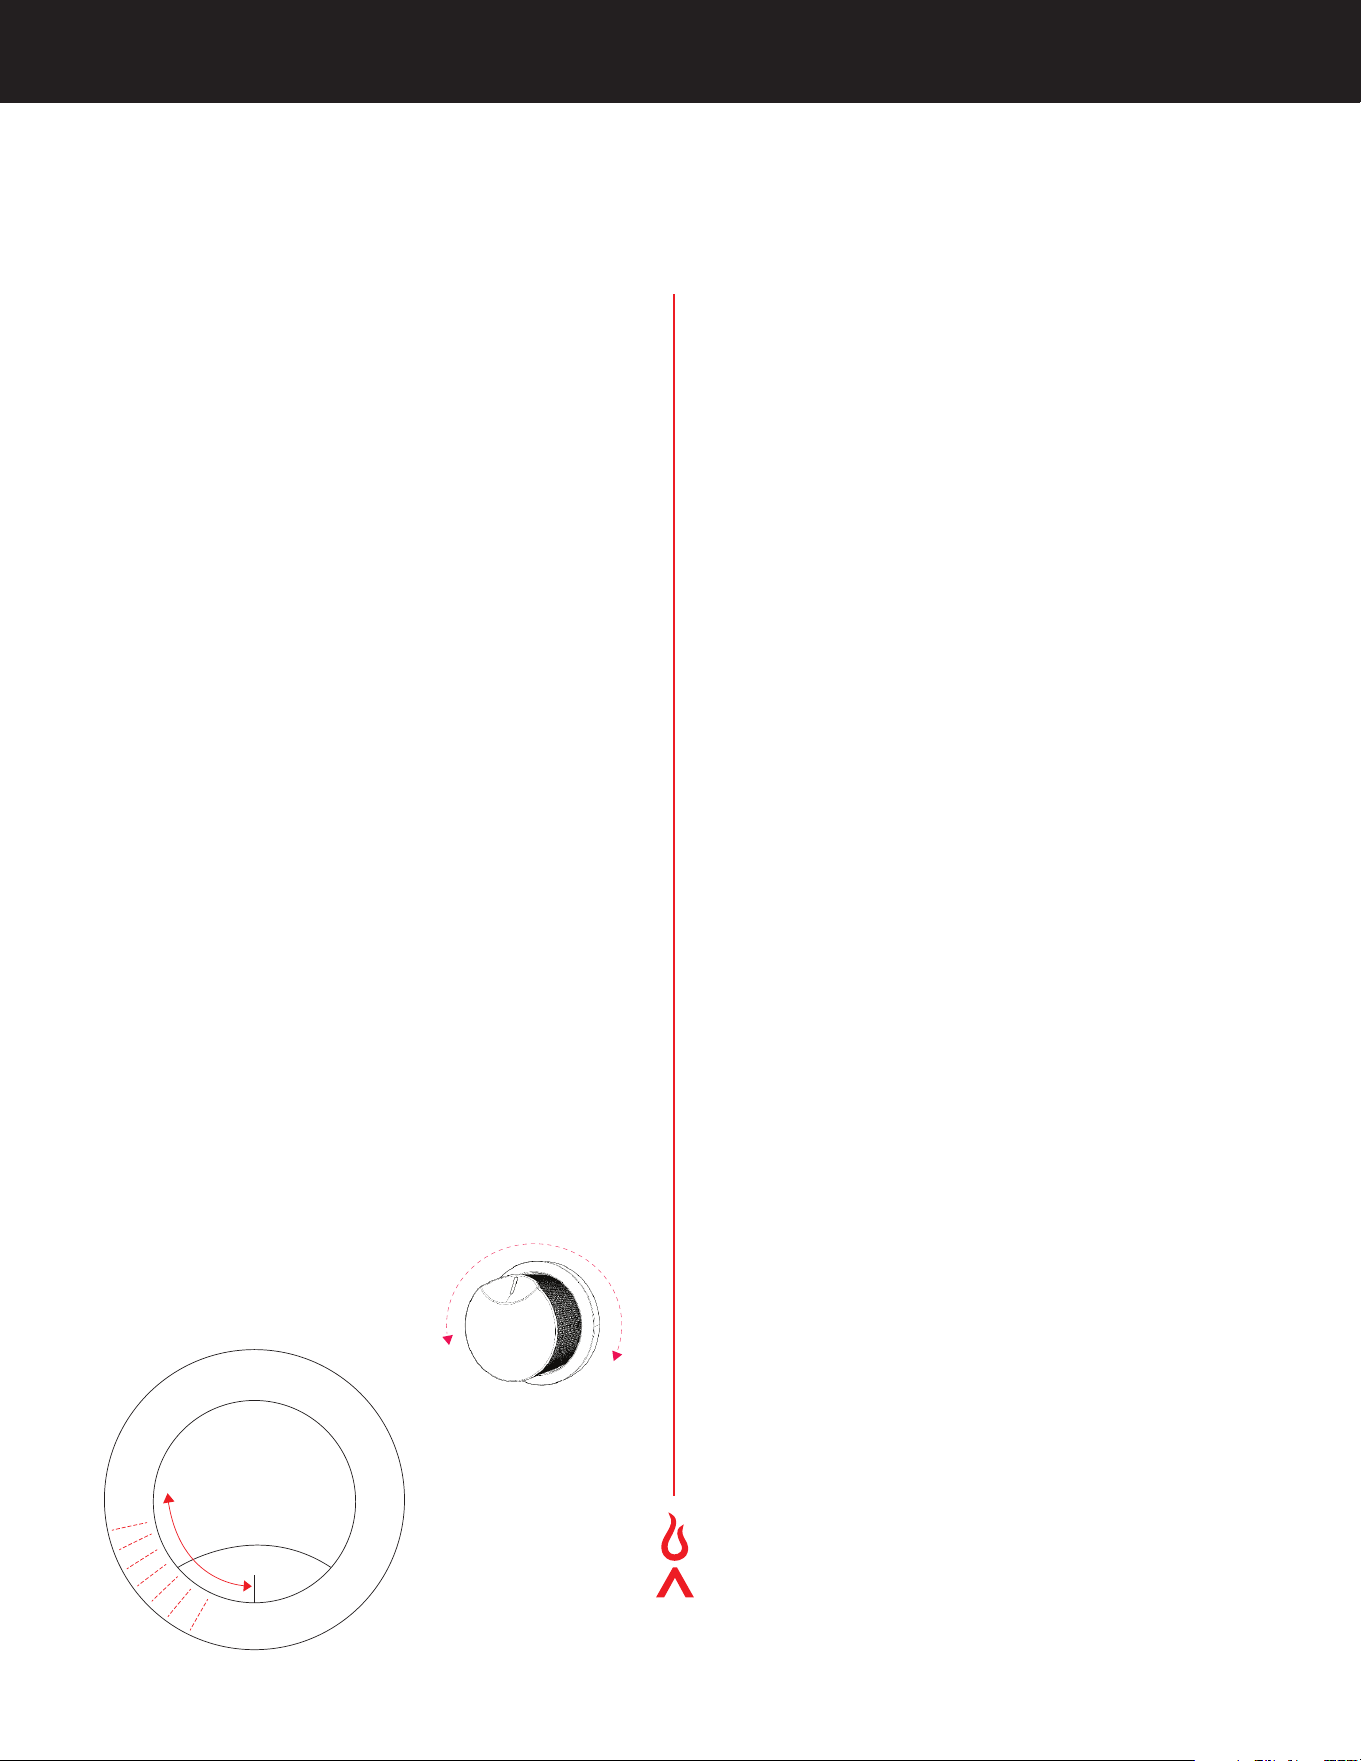
• Turn burners to low flame setting and test for proper
flame height. Flame should be stable and burning out
of each burner port without danger of going out in
the lowest setting. (To adjust the LOW flame setting
simply light the appliance on the LOW setting and
adjust the screw located under the knob on the front
of the valve using a flat head screwdriver as seen in
the diagram below.)
OFF
HI
LOW
Flame
adjustment
screw
22 Blaze LTE PRO 32-Inch Grill Premium LTE Series
BlazeGrills.com
Tips for Cooking Perfect Steaks
Season your steaks, then place them on one side of the grill,
turning on only two of the burners on the side that does not
have the steaks. Set the burners to low. Using your Blaze
meat probe, wait for the internal temperature to reach 110°F
for medium-rare or your desired temperature (medium 140°F,
well-done 160°F and above).
Take the steaks off the grill and place them to the side to
rest. Turn up the heat to high on the grill until the grill grates
are hot enough to quickly evaporate a few droplets of water.
Then place your steaks on the hot grates for 1 to 2 minutes
on each side. Remove the steaks, let them rest for a few
minutes, and then slice against the grain.
For more flavor, garlic herb butter can be added to the
steaks after they have been removed the first time. This
butter will smoke and add extra flavor. A Blaze smoker box
can be used to add a smoky flavor during the first portion of
the cooking process.
Ingredients:
Steaks (your choice of cut)
Salt
Black pepper
Optional: Additional seasonings (e.g., garlic powder, onion
powder, paprika)
Garlic herb butter (store-bought or homemade)
Water (for testing grill heat)
Optional: Wood chips (for use in Blaze smoker box)
Step 1. Season your steaks with salt, black pepper,
and any additional seasonings. Preheat the grill,
turning on only two burners on one side to low, and
leave the other side off.
Step 2. Place the steaks on the cooler side of the
grill. Use a Blaze meat probe to cook them to 110°F
for medium-rare, or your desired doneness (medium
140°F, well-done 160°F and above).
Step 3. Remove the steaks and let them rest. Turn
the grill to high and let the grates get hot enough to
evaporate water droplets.
Step 4. Sear the rested steaks on the hot grates for 1
to 2 minutes per side for a nice crust.
Step 5. Let the steaks rest briefly again. Optionally,
add garlic herb butter or use a Blaze smoker box with
wood chips during the initial cooking for extra flavor.
Use the left 2 burners to heat the grill without
directly cooking the steak. Once the steak has
reached its desired temperature, take it o to cool.
Then, turn the grill to high and sear the steaks.
BLZ-4LTEPRO-LP/NG 23
Grilling Techniques:
Direct Grilling: Place food directly over the heat source.
Best for quick-cooking items like burgers, steaks, and
vegetables.
Indirect Grilling: Use one side of the grill for cooking
while keeping the other side off. Best for larger cuts of
meat that need to cook slowly, like whole chickens or ribs.
Preparing the Food:
Marinades and Seasonings: Marinate meats and season
vegetables ahead of time for better flavor.
Cut and Prep: Ensure all foods are cut and prepped
appropriately for grilling.
Finishing Up:
Resting Meat: Let meat rest for a few minutes after
cooking to allow juices to redistribute.
Clean the Grill: After the grill has cooled slightly, brush
the grates to remove any remaining food particles.
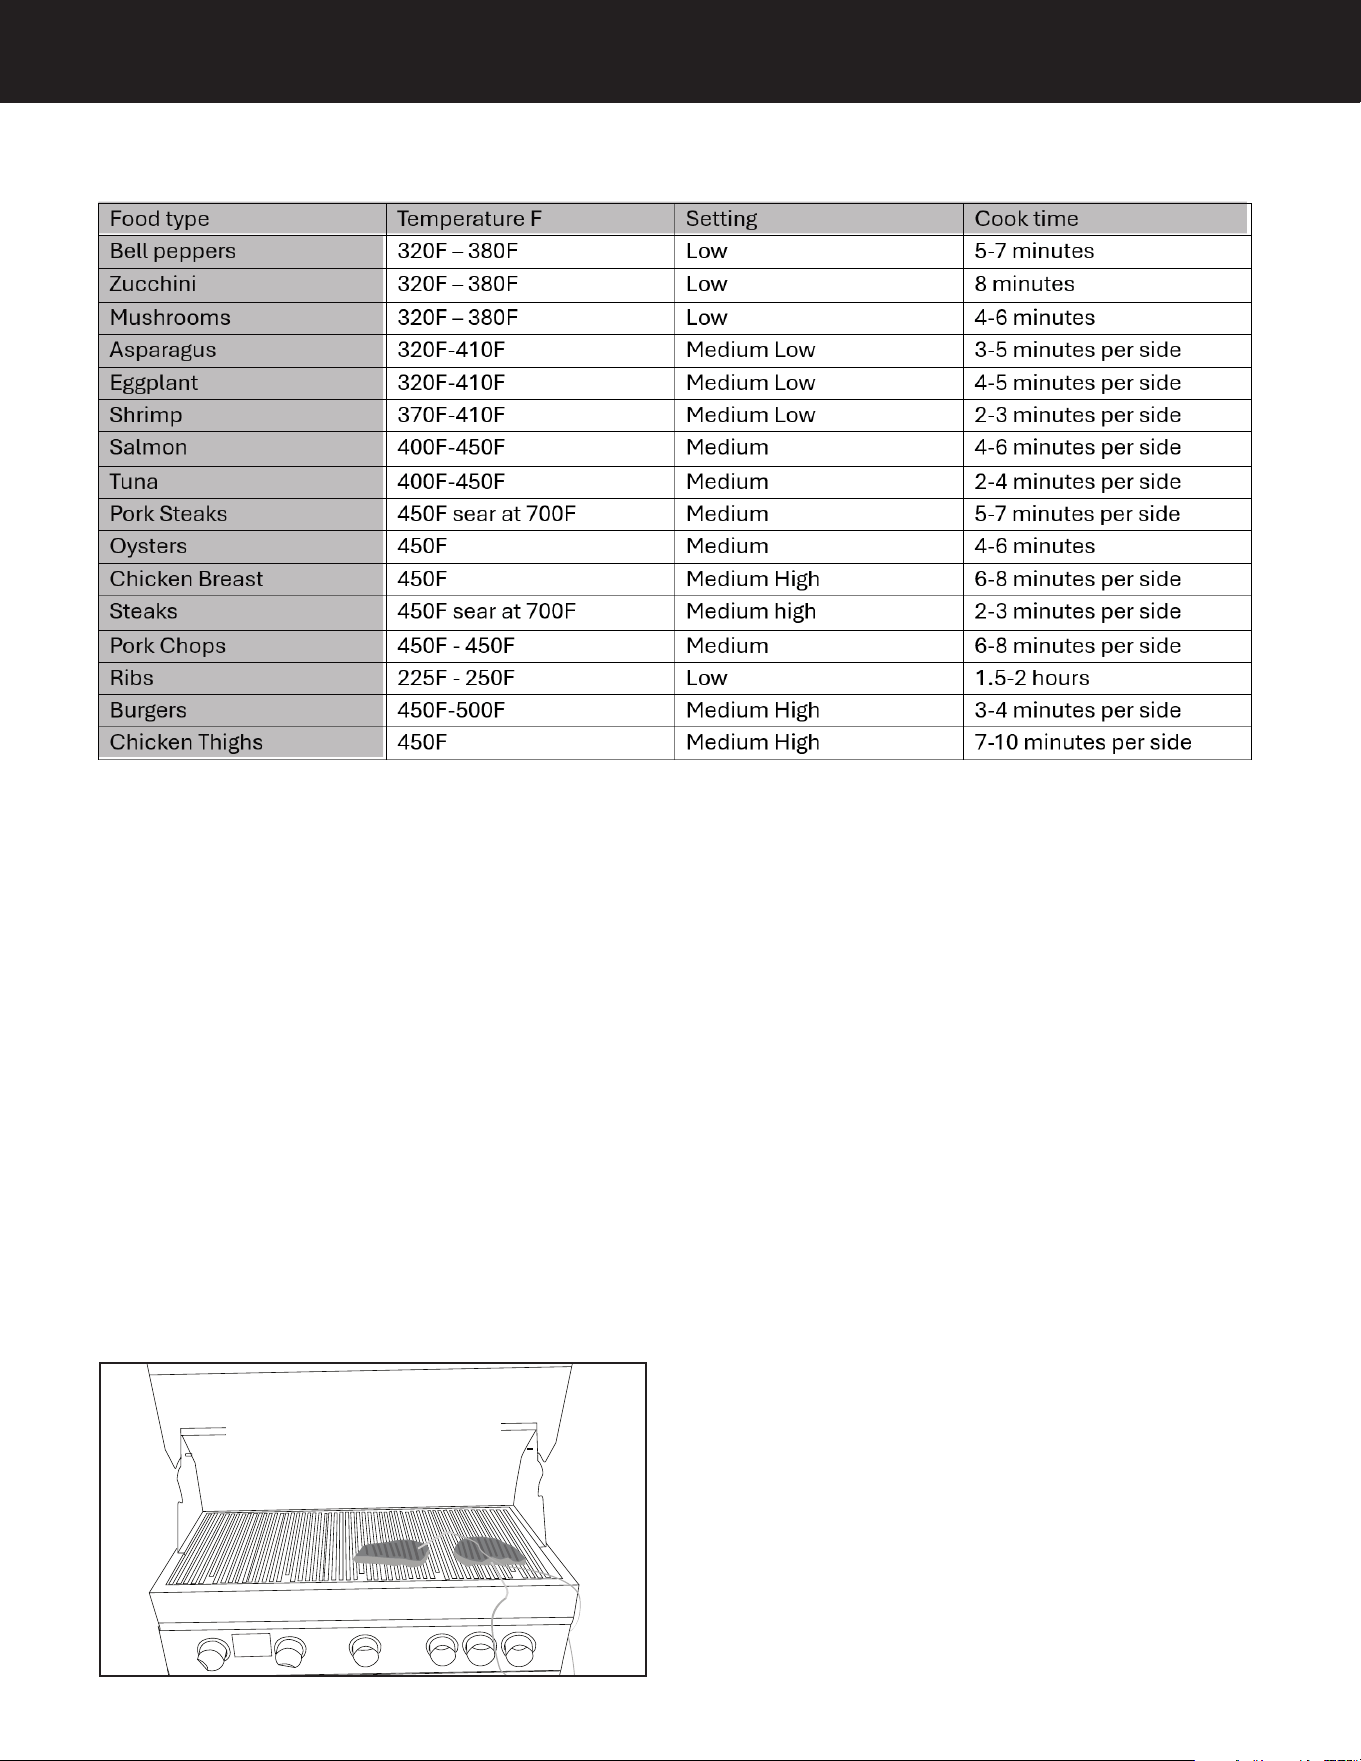
Cooking Times and
Temperatures:
Refer to the chart on the previous page for recommended
settings, temperatures, and internal cooking temperatures
for various foods.
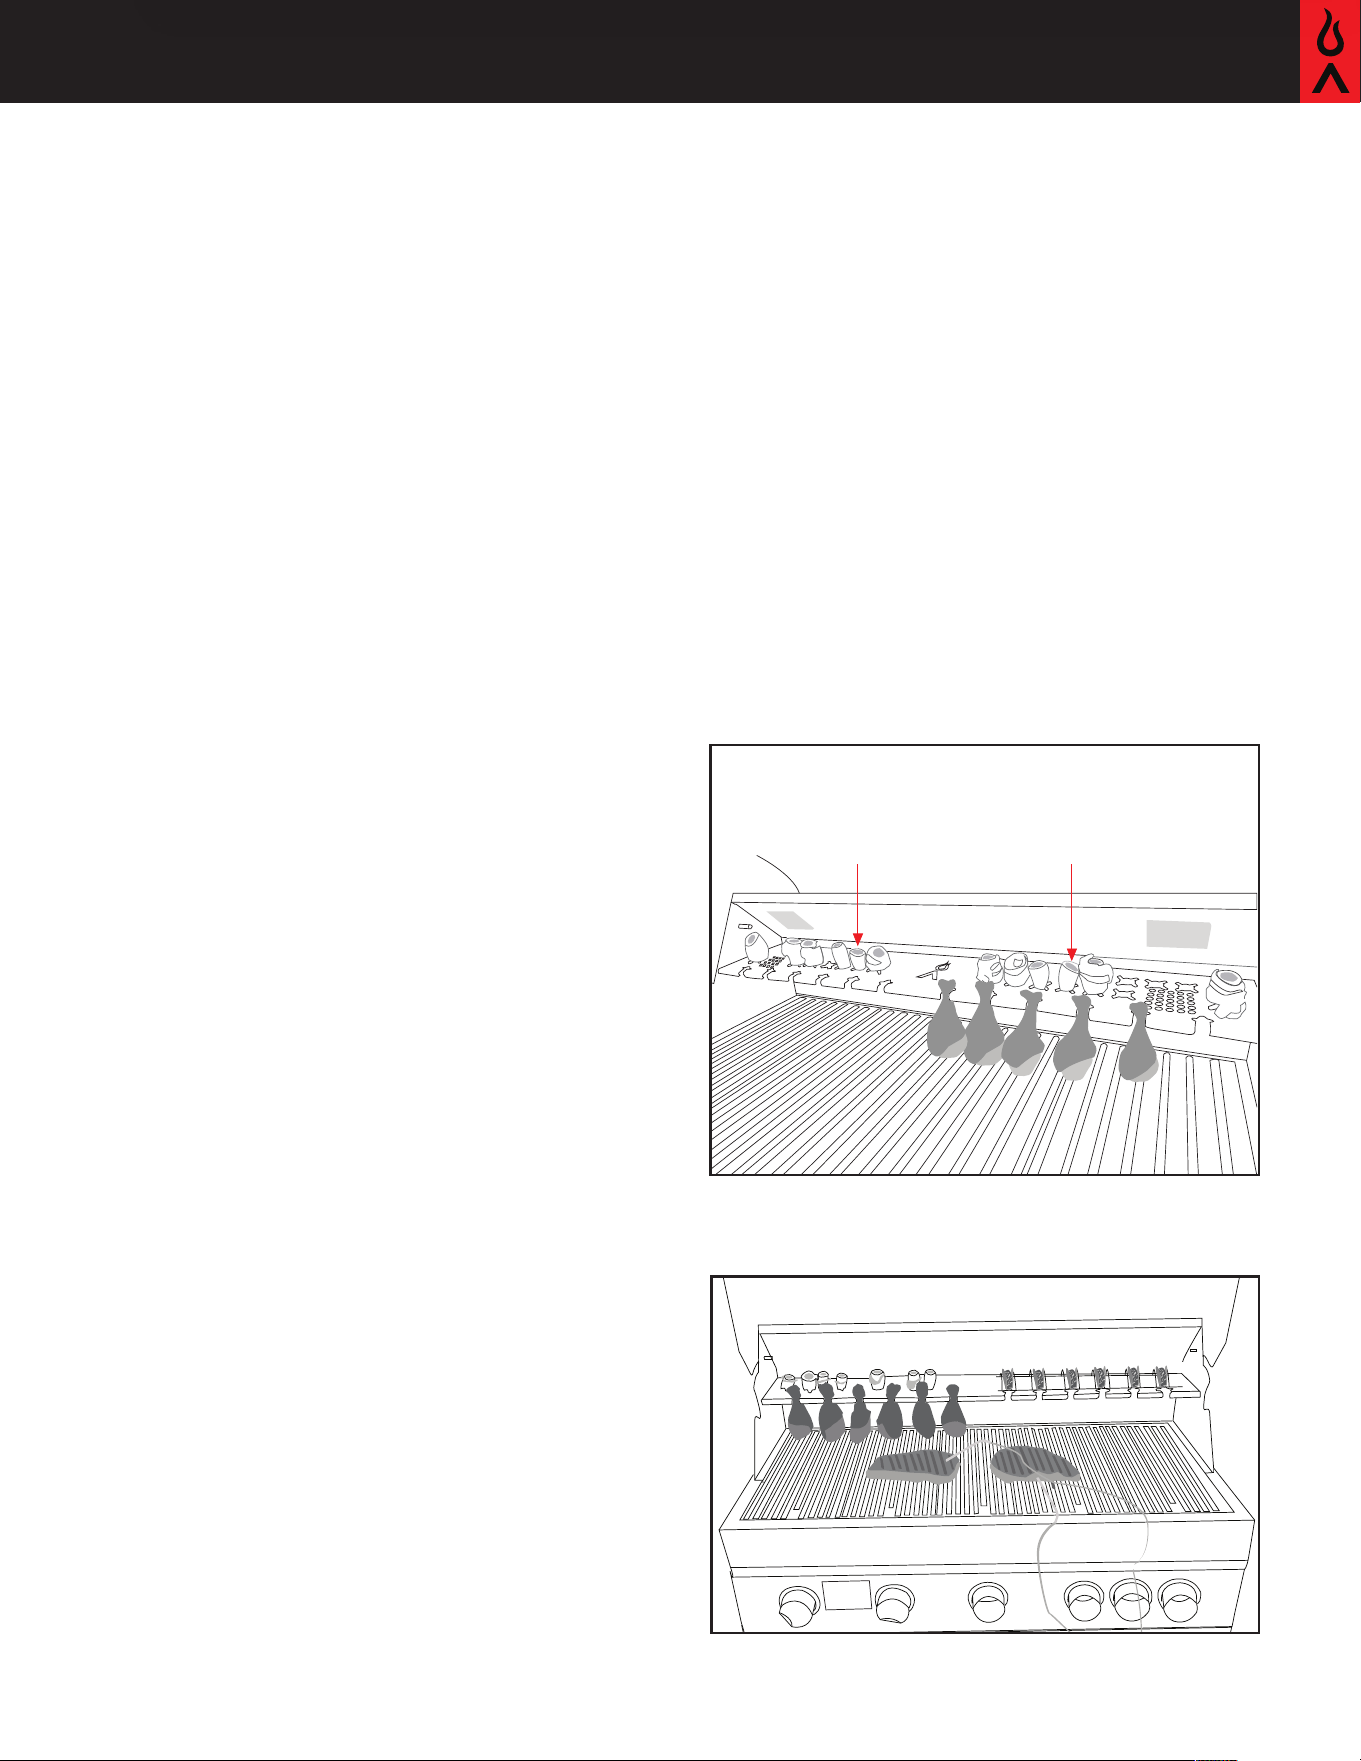
Blaze warming rack
The Blaze warming rack offers incredible versatility for
your grilling needs! When not in use, it conveniently stows
away on the top pegs above the warming rack. This rack
features holes that are perfect for standing peppers upright,
allowing them to be stuffed with your favorite ingredients.
You can also use these holes to cook stuffed mushrooms.
The notches on the rack are designed to hold chicken legs
securely, letting them hang and allowing the juices to flow down
into the meat, keeping it moist throughout the cooking process.
These same notches are ideal for cooking turkey legs—simply
place the rack in its upright storage position to accommodate
the turkey legs and cook them to perfection.
Proper Burn-Off Procedure for a
Gas Grill:
Remove and empty the drip pan if necessary. Clean it with
warm, soapy water if it has accumulated a lot of grease.
Step 1. Inspect the burner ports for blockages and clean them if
necessary. Use a paper clip or a grill brush to clear any cloed
holes.
Step 2. Inspect the gas hoses and connections for any signs
of wear or damage. Replace any damaged parts to prevent
gas leaks.
Step 3. Once the grill has cooled down, wipe down the exterior
with a damp cloth to remove any grease or dirt.
By following these steps, you ensure your grill remains clean,
safe, and ready for your next barbecue session.
Heavy-Duty Warming Rack: Built to Handle
Ribs, Wings, Stuffed Mushrooms, Jalapeño
Poppers, Tacos, Hotdog Buns, Fish, and
Everything You Can Toss Its Way!
24 Blaze LTE PRO 32-Inch Grill Premium LTE Series
BlazeGrills.com
Our Most Important Tips:
Always preheat your grill before cooking. Preheating
ensures that the grill reaches the desired temperature,
which helps in achieving even cooking and proper searing
of the food. It also helps to burn off any residual food
particles or grease from previous use, reducing the risk of
sticking and flare-ups. Preheat the grill for 10-15 minutes
with the lid closed before placing any food on the grates.
Using the Grill:
• Oil the grates: Use tongs and a paper towel
soaked in oil to grease the grates and prevent
sticking.
• Place food on the grill: arrange food on the grates,
leaving space between items for even cooking.
• Monitor temperature: use a meat thermometer to
check internal temperatures, and adjust burners
as needed.
• Flip and rotate: turn food occasionally for even
cooking. Use a spatula or tongs, not a fork, to
avoid piercing and losing juices.
Hood gauges are for approximate temperatures of the
oven; there is usually a 200-300 degree difference
between grill grates and hood gauge. The ambient
tempter also may affect the hood gauge accuracy.
How-to Guide:
Exterior Cleaning:
Before covering your grill* Wipe down the exterior
of the grill to remove any splatter or grease, always
scrubbing and polishing in the direction of the stain-
less-steel grain to avoid scratching the material. Do
not use harsh abrasives — instead, use a stainless
steel cleaner to treat the exterior surface for a pol-
ished look. To remove baked-on foods, use a fine-to-
medium-grit, non-metallic abrasive pad with a stain-
less-steel cleaner to avoid specks of grease collecting
in the grain (which will cause the appearance of rust).
Vinyl covers are the best way to protect appliances
from the elements. They can be purchased through
your local dealer or at BlazeGrills.com
• Always allow the surface to dry.
• Do NOT cover a damp or still-warm grill.
Cleaning the exterior of a stainless steel appliance
is important to maintain its appearance and prevent
rust and other damage. Here’s a step-by-step guide to
effectively clean your stainless steel appliance:
What's needed:
• Mild dish soap
• Warm water
• Soft cloths or sponges
• Stainless steel cleaner or polish
• Baking soda
• White vinegar (optional)
• Microfiber cloth
Steps to Clean the Exterior of a
Stainless Steel Grill:
Prepare cleaning solution: Mix a few drops of mild
dish soap with warm water in a bucket or container.
Wipe down the grill: Dip a soft cloth or sponge into
the soapy water and wring it out. Wipe down the exte-
rior surfaces of the grill, including the lid, sides, and
any other accessible parts. Make sure to follow the
grain of the stainless steel to avoid scratches.
Rinse: Rinse the cloth or sponge with clean water
and wipe down the grill to remove any soap residue.
Ensure all soap is removed, as it can leave streaks or
spots if left to dry.
Pre-heat on
medium
set to high as
needed for cooking
Gas appliance knobs are very sensitive to
changes in their position; a 1/8-inch turn can
result in a temperature change of
approximately 50 to 75 degrees.
700F
250F
Hi
Low
BLZ-4LTEPRO-LP/NG 25
Caution: Never flood a hot grill with cold water! This
causes grill warping and can cause the grill grate to
crack. Always wait until the grill is completely cool
before cleaning. After every use and when cool, you can
thoroughly wipe the grate with the grain using a rough
cloth to remove food particles and other cooking residue.
You may use a mixed solution of water and vinegar (2
tablespoons of vinegar per half gallon) and a Scotch-
Brite pad (working in the same direction as the stainless
steel grain) to remove the cooked-in food. Special grill
cleaners may also be commercially available in your
area which may be used to remove heavy soil build-up.
Thoroughly rinse the grill with room temperature water
after using any of these cleaners.
Dry the grill grate and coat it lightly with the cooking oil
of choice or apply a non-stick cooking spray. This will
prevent the grill from getting surface rust.
Cleaning Your Grill:
This appliance should be cleaned after every use.
1. Grill burners set to med/high: Scrape grill with a grill
brush.
2. Mix 50% vinegar/50% water and use a sponge
or paper towels to wipe down grill grates with the
solution.
3. Wet a cotton disposable rag with water, and pass
on the grill using tongs, be careful not to let the
steam burn you. Rag will steam and absorb any loose
Dry the grill: Use a clean, dry microfiber cloth to dry
the grill thoroughly. This helps to prevent water spots
and streaks.
Tough stains and grease: For tougher stains or
grease, uses sponge with Bar Keeper’s Friend. follow-
ing the grain of the stainless steel. Rinse with clean
water and dry with a microfiber cloth.
Alternatively, you can use a mixture of equal parts
white vinegar and water to clean stubborn spots.
Spray the solution onto the stains, let it sit for a few
minutes, then wipe clean with a cloth.
Polish (optional): If you want to add extra shine to
your grill you can use a stainless steel cleaner or pol-
ish. Apply according to the manufacturer’s instruc-
tions, usually by spraying or applying a small amount
remaining particles.
4. Lastly, turn burners off…and place 2-3 tablespoons
of peanut, vegetable, avocado, grapeseed or extra vir-
gin olive oil onto a disposable rag and spread with a
folded up paper towel until all exposed surface is cov-
ered with oil. The lingering heat from the grill cause
help the oil to hit a thinner viscosity. Take another
folder paper towel and with your tongs, wipe access
oil off the grill grates.
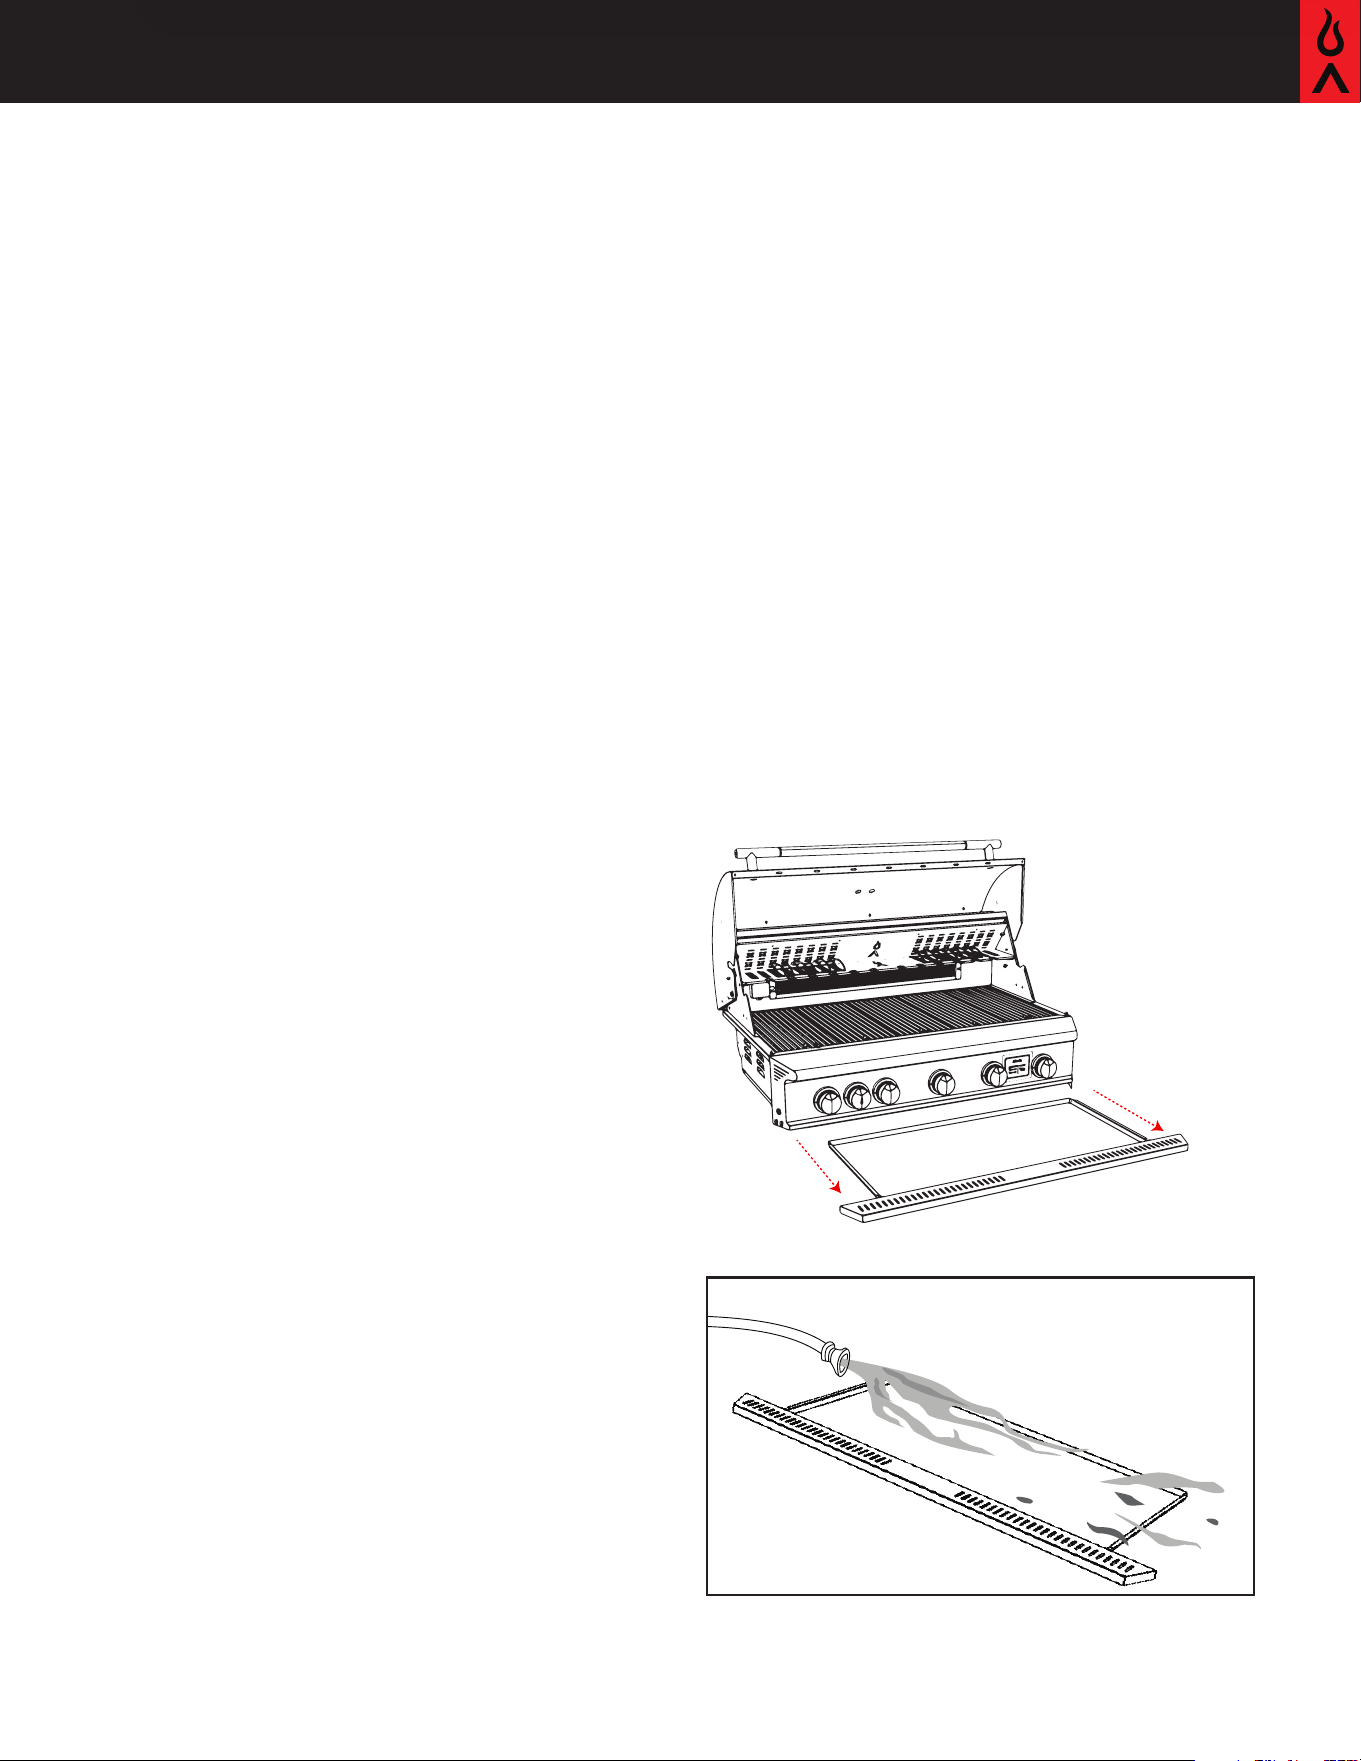
Drip Tray Cleaning:
After each use, it's crucial to clean the drip tray
promptly. Neglecting this step could lead to a poten-
tial fire hazard. Once the grill has cooled down com-
pletely, take out the tray from the front of the grill and
wash it using hot, soapy water. When placing the dried
drip tray back, ensure it fits securely into the grill
housing. If you opt for an oven-cleaning product, care-
fully adhere to the manufacturer's guidelines to pre-
vent any damage to the stainless steel.

26 Blaze LTE PRO 32-Inch Grill Premium LTE Series
BlazeGrills.com
Warranty
Warranty on Parts:
Stainless Steel Components: Blaze offers a lifetime
warranty on the stainless steel components, which
include the cooking grids, housing, and burners.
Lifetime Flame Stabilizers: Coverage is provided for
flame stabilizers as well stabilizers as well.
Blaze Gas appliances can be used in multi-user
applications, including but not limited to: apartment
complexes, hotels, condo complexes, fire stations,
police stations, multi-family dwellings, etc. The Blaze
Gas appliance warranty is not applicable when used in
a restaurant setting. For multi-user applications Blaze
Outdoor Products applies the following warranty:
If you have purchased a Blaze appliance you must register
your product within 30 days of purchase to validate
the warranty and maintain your original receipt to get
parts for the appliance. You may register your appliance
at www.blazegrills.com by selecting Support, and then
selecting Register your Product. You may also fill out
page 3 and mail to the address located at the bottom
of the form. The warranty is for original owners only at
the original site of delivery and cannot be transferred to
new owners. You must retain your sales slip or invoice.
The warranty is valid only for the original owner at the
original delivery site and is non-transferable. Retain your
sales slip or invoice. Blaze appliances are warrantied
for single-family/residential use only. It does not cover
labor, labor-related charges, or shipping & handling costs.
Repairs must be done by a qualified professional (Blaze
will not reimburse for diagnostic charges). Contact our
customer service at 1-866-976-9510 for assistance before
calling a service provider.
Installation, repair and maintenance work should be
performed by an authorized service technician. Work
by unqualified persons could be dangerous and will void
the warranty. All Natural and LP Gas appliances must
have a qualified installer complete the installation for
the warranty to be in effect. The incorrect installation
of the Blaze gas appliance will void the warranty. Please
call Blaze for more information on correct installation of
the gas appliance.
Blaze shall not be liable under this or any implied
warranty for incidental or consequential damages, and
Blaze's liability is limited to the purchase price of the
appliance only. This warranty gives you specific legal
rights, and you may also have other rights, which may
vary from state to state. This warranty is applicable in
the United States and Canada only.
Improper maintenance, high cooking temperatures,
excessive humidity, chlorine, fertilizers, lawn pesticides,
chemicals, and salt can affect the Stainless Steel
components and for these reasons, the warranties DO
NOT COVER DISCOLORATION, SURFACE RUST, OR
RUST, unless there is a loss of structural integrity/rust
through of the appliance components. This warranty
covers defects in material and workmanship.
Warranty Service & Replacement Parts:
To
obtain warranty service or replacement parts, contact
your authorized selling dealer or Blaze Grills directly.
Be prepared to provide the following information: the
purchaser's name, model number and serial number of the
appliance, date of purchase, and a detailed description
of the problem. Blaze Grills will not cover service calls
for correcting or installing problems. The owner is
responsible for proper installation, normal care and
maintenance, providing proof of purchase upon request,
and making the appliance accessible for service. In the
event of a warranty replacement, all costs associated
with removal, replacement, installation, and shipping
are the responsibility of the appliance owner. Some
states do not allow limitations on the duration of implied
warranties or the exclusion or limitation of consequential
damages. This warranty provides specific legal rights, and
you may have other rights that vary from state to state.
•Main Burners - Lifetime (Parts Only)
•Grill Grates - Lifetime (Parts Only)
• Body - Lifetime (Parts Only)
• Valves - Lifetime (Parts Only)
• Ignition - 1 Year (Parts Only)
• Lighting and Electrical - 1 year (Parts
Only)
Multi-user warranty
W
A
R
R
A
N
T
Y
N
I
N
E
T
Y
D
A
Y
90
W
A
R
R
A
N
T
Y
O
N
E
Y
E
A
R
1
W
A
R
R
A
N
T
Y
T
H
R
E
E
Y
E
A
R
3
W
A
R
R
A
N
T
Y
F
I
V
E
Y
E
A
R
5
L
I
F
E
T
I
M
E
W
A
R
R
A
N
T
Y
W
A
R
R
A
N
T
Y
N
I
N
E
T
Y
D
A
Y
90
W
A
R
R
A
N
T
Y
O
N
E
Y
E
A
R
1
W
A
R
R
A
N
T
Y
T
H
R
E
E
Y
E
A
R
3
W
A
R
R
A
N
T
Y
F
I
V
E
Y
E
A
R
5
L
I
F
E
T
I
M
E
W
A
R
R
A
N
T
Y
THREE (3) YEAR WARRANTY Stainless
steel housing, burners, stainless steel
rod cooking grids, brass valves, inner
liners and manifold assemblies.
NINETY (90) DAY WARRANTY All
other components, except burners, are
warrantied for 90 days. This warranty
replaces the lifetime warranty offered
with residential use when appliance is
used in multi-user settings.
W
A
R
R
A
N
T
Y
N
I
N
E
T
Y
D
A
Y
90
W
A
R
R
A
N
T
Y
O
N
E
Y
E
A
R
1
W
A
R
R
A
N
T
Y
T
H
R
E
E
Y
E
A
R
3
W
A
R
R
A
N
T
Y
F
I
V
E
Y
E
A
R
5
L
I
F
E
T
I
M
E
W
A
R
R
A
N
T
Y
W
A
R
R
A
N
T
Y
N
I
N
E
T
Y
D
A
Y
90
W
A
R
R
A
N
T
Y
O
N
E
Y
E
A
R
1
W
A
R
R
A
N
T
Y
T
H
R
E
E
Y
E
A
R
3
W
A
R
R
A
N
T
Y
F
I
V
E
Y
E
A
R
5
L
I
F
E
T
I
M
E
W
A
R
R
A
N
T
Y

BLZ-4LTEPRO-LP/NG 27
Please leave these
instructions with the
consumer.
Please read and retain
these instructions for
future reference and
before installation or
operation.
Contact Us:
Blaze
6620 Greenwell Springs Rd
Baton Rouge, LA 70805
Phone: 866-976-9510
customerservice@blazegrills.com
Contact Us:
@Blazegrills
@Blaze_Grills
@BlazeOutdoorProducts
Frequently Asked Questions:
Q: Where can I register my product?
Your Blaze product can be registered at blazegrills.
com/support/register-your-product/
Q: Can I still register if it has been over 30 days?
You can still register your products! Keep a copy of
your receipt or note your original purchase date for
future warranty claims.
Q: Where do I find parts that are not covered under
my warranty?
blazegrills.com/where-to-buy/
Q: What should I do if grill flames come through the
air gate or if it is not heating properly?
Immediately shut off gas, remove the grill plate, and
check burners for obstructions. Clean the burner
assembly and orifices and check gas pressure.
Q: Why is my grill not getting very hot when on high?
Check to make sure the gas line is not kinked, check gas
pressure, clean orifice, and clear out any insect nests.
Q: Why is my grill going out on low?
Grill may be in a windy location if so a wind guard may
be necessary, if not refer to page 21.
Blaze Rotisserie
BlazeGrills.com
ROTISSERIE PRODUCT MANUAL
Blaze Rotisserie
This manual is for LTE, LTE 2, LTE+ sizes 32" and 40"
BlazeGrills.com
Blaze Rotisserie
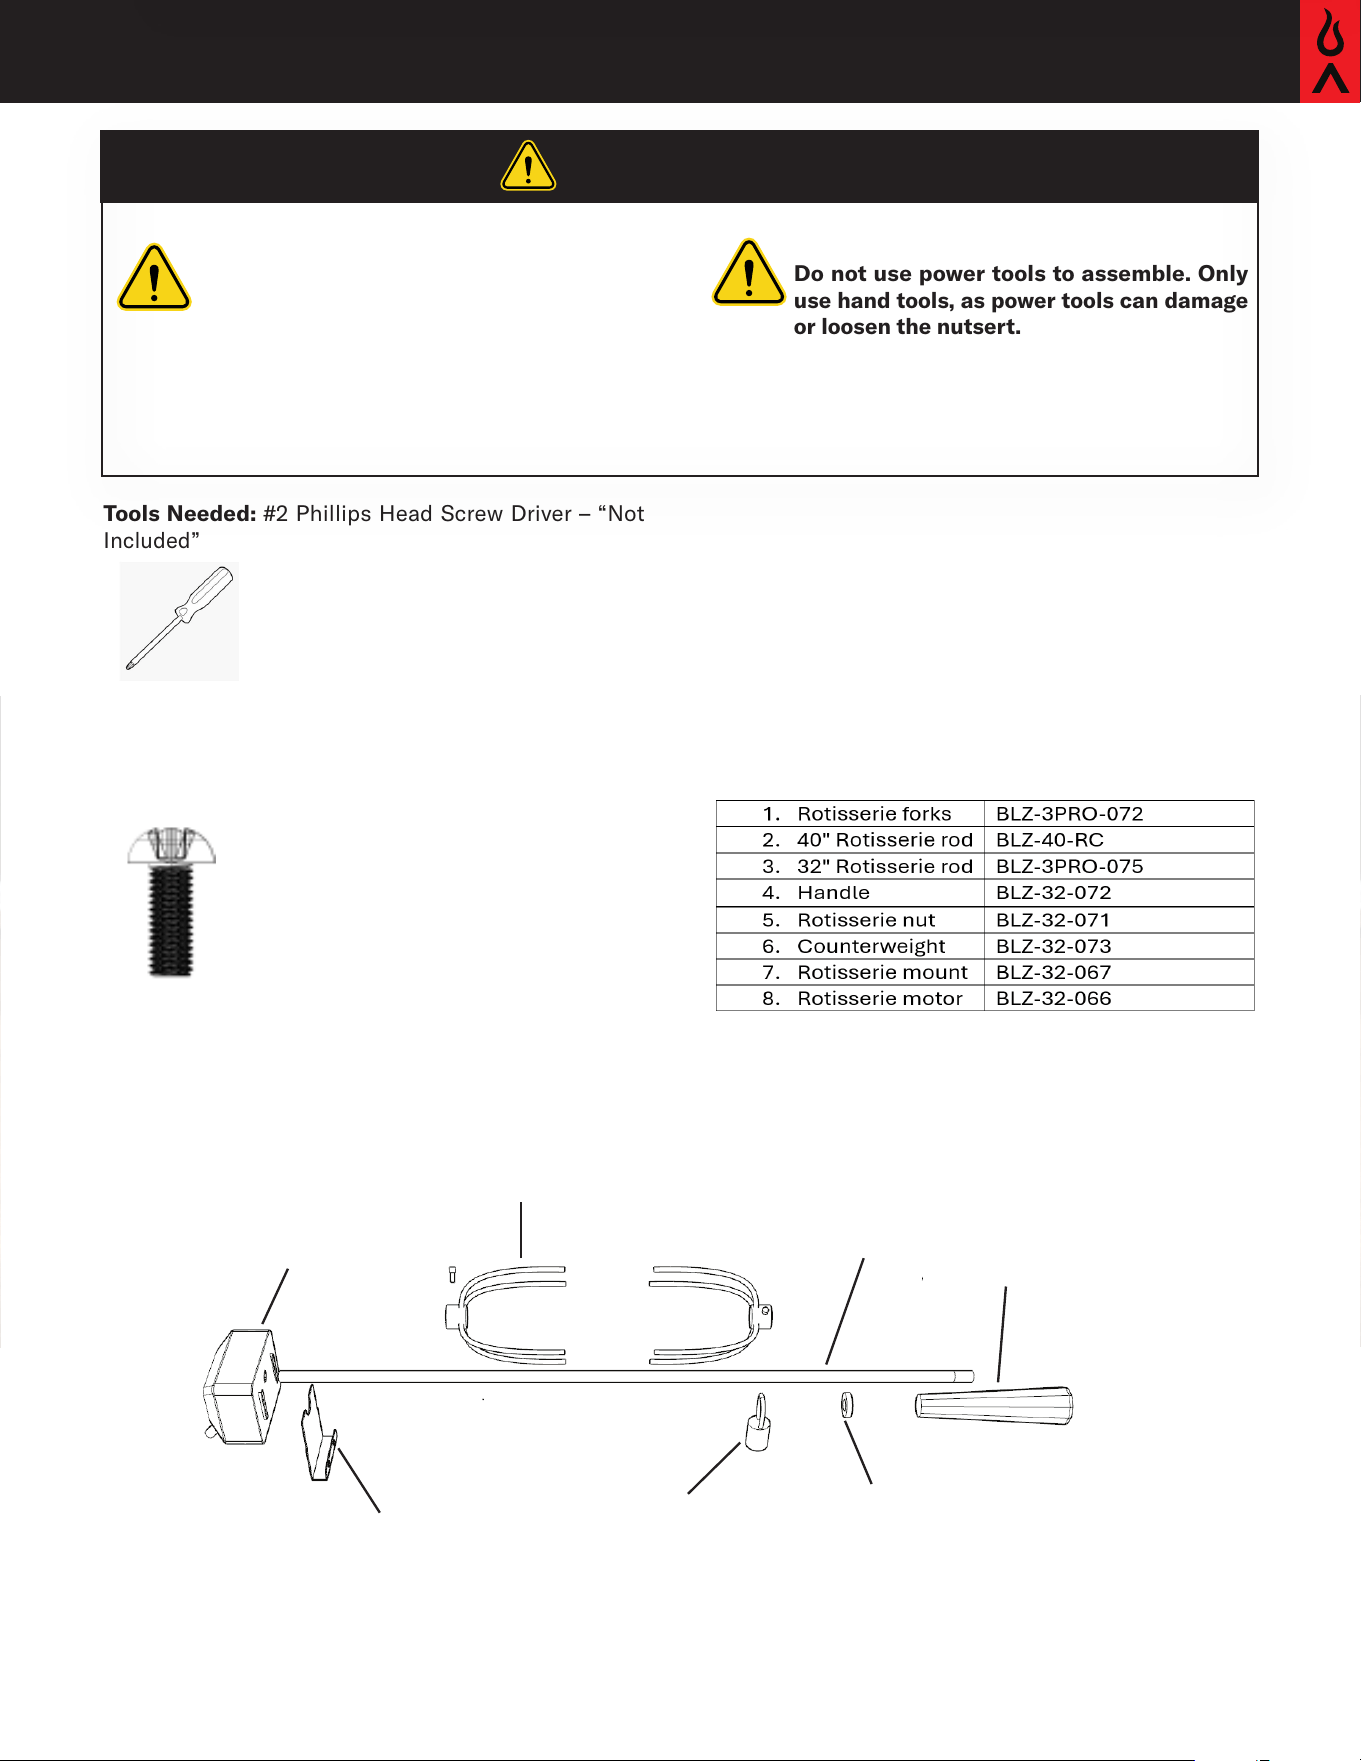
Do not use power tools to assemble. Only
use hand tools, as power tools can damage
or loosen the nutsert.
M5 x 12 mm M5 x 25 mm
Before getting started:
Unpack and lay out all of the included parts.
Tools Needed: #2 Phillips Head Screw Driver – “Not
Included”
Hardware needed "included"
If using a 32" grill, please note that the rotisserie rod
size will differ. The part number for the rotisserie rod
compatible with the 32" grill is BLZ-32-RC.
WARNING
CALIFORNIA PROPOSITION 65 WARNING:
This product can expose you to chemicals
including Chromium (hexavalent
compounds), which are known to the State
of California to cause cancer and birth
defects or other reproductive harm. For
more information go to: www.P65Warnings.
ca.gov
2.
3.
4.
5.
6.
7.
1.
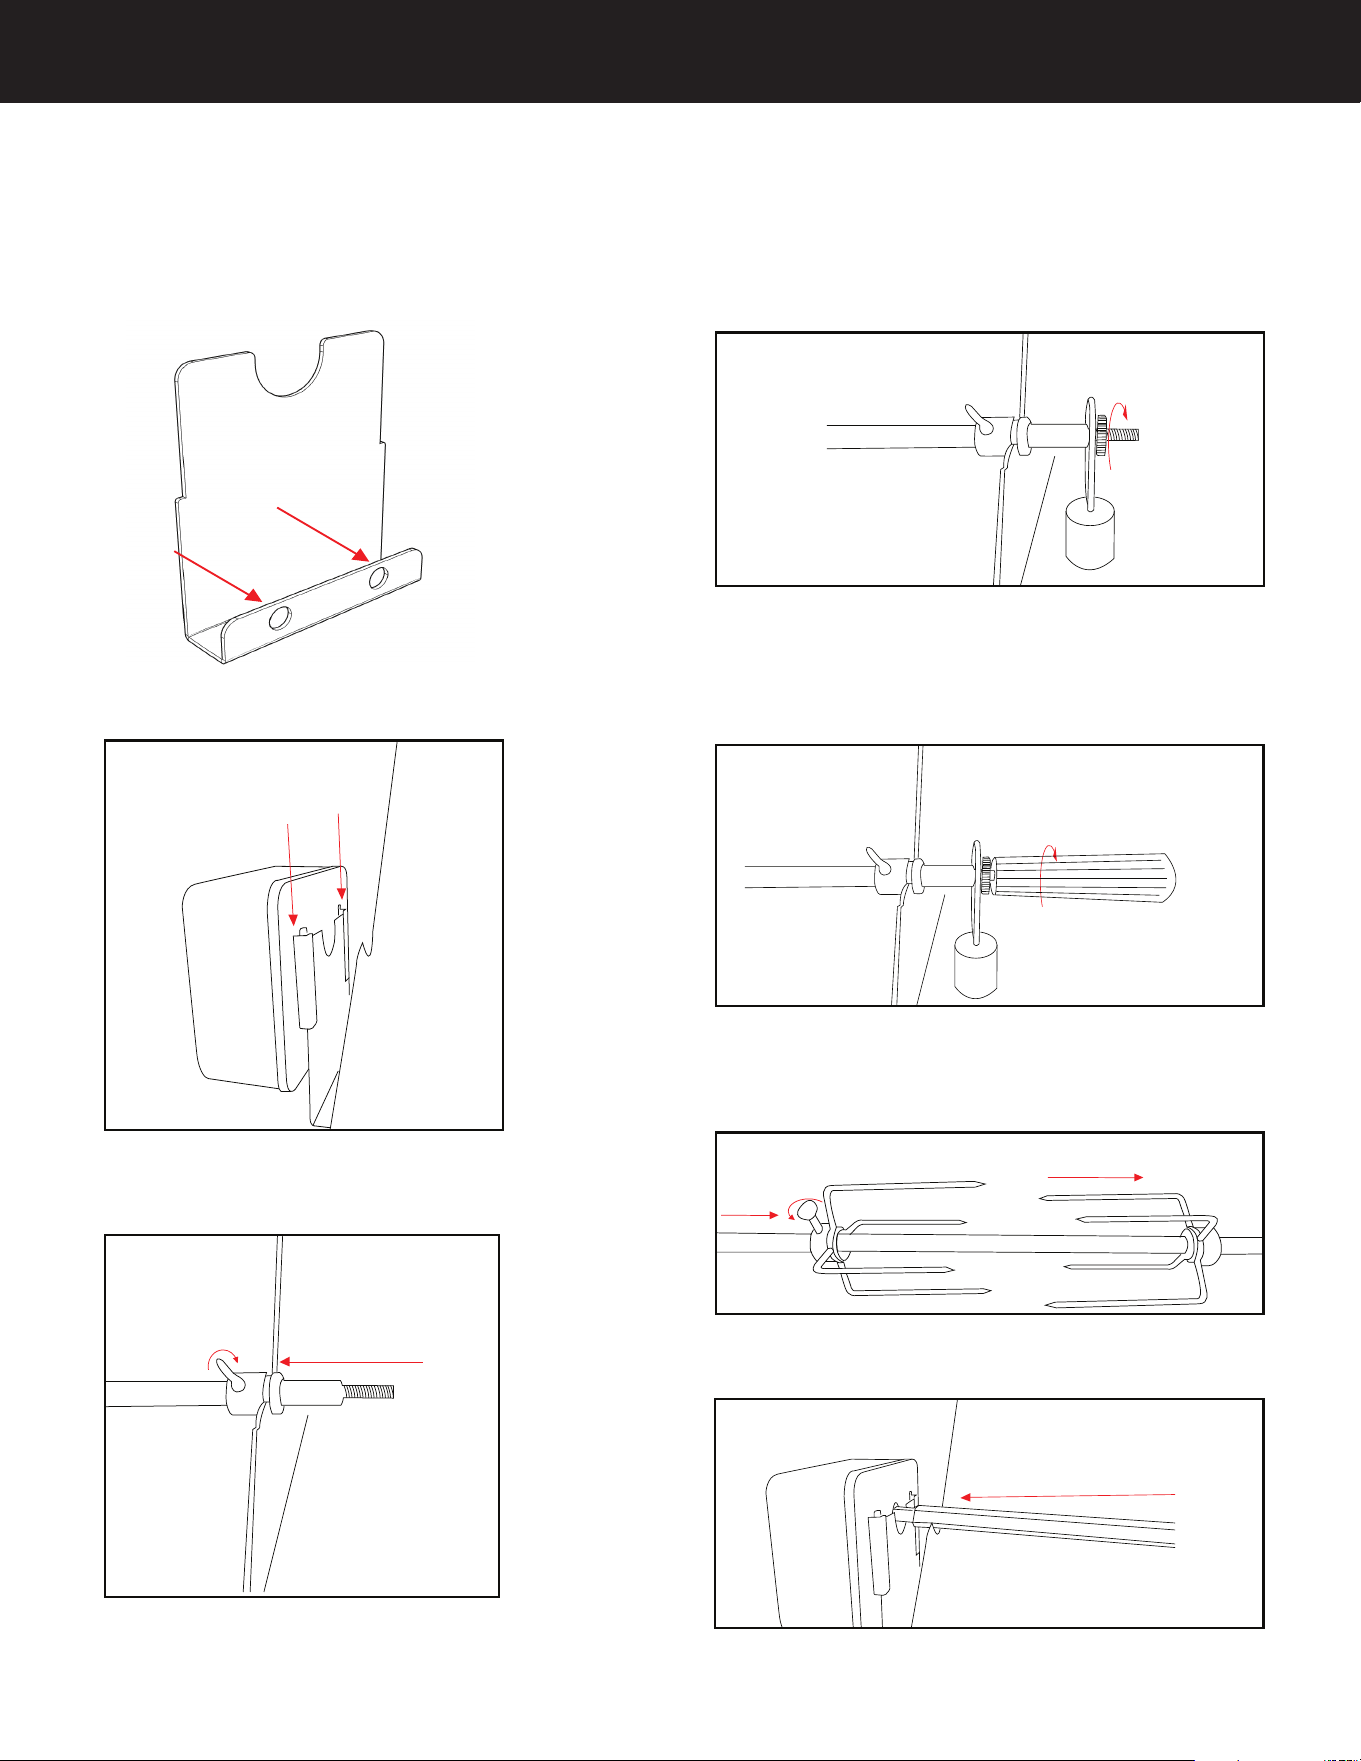
Blaze Rotisserie
BlazeGrills.com
STEP 1: Mount motor mount using 2 screws on
the side of the grill.
STEP 2: Slide motor onto motor mount.
STEP 3: Slide locking collar onto the rotisserie rod and
tighten the locking screw.
STEP 4:
Slide counterweight onto the rotisserie
rod. Screw knurled nut onto threaded end.
STEP 5: Screw handle onto the rotisserie rod.
STEP 6: Slide the rotisserie spikes onto the center of
the rod facing each other.
STEP 7: Slide rotisserie rod into the motor.
Insert two screws into
the mounting point on
the side of the grill.
Tighten collar screw to
prevent it from rotating.
Slide collar onto the ro-
tisserie and and place it
in the notch.
Put the knurled nut on
the treated rod in next.
pushing rotisserie motor
fully down onto its
mounting bracket
Put the handle on the
treated rod in next.
Turn locking
screw
Slide rotisserie spikes onto the
middle of the rotisserie rod
pushing rotisserie rod all
the way into the motor
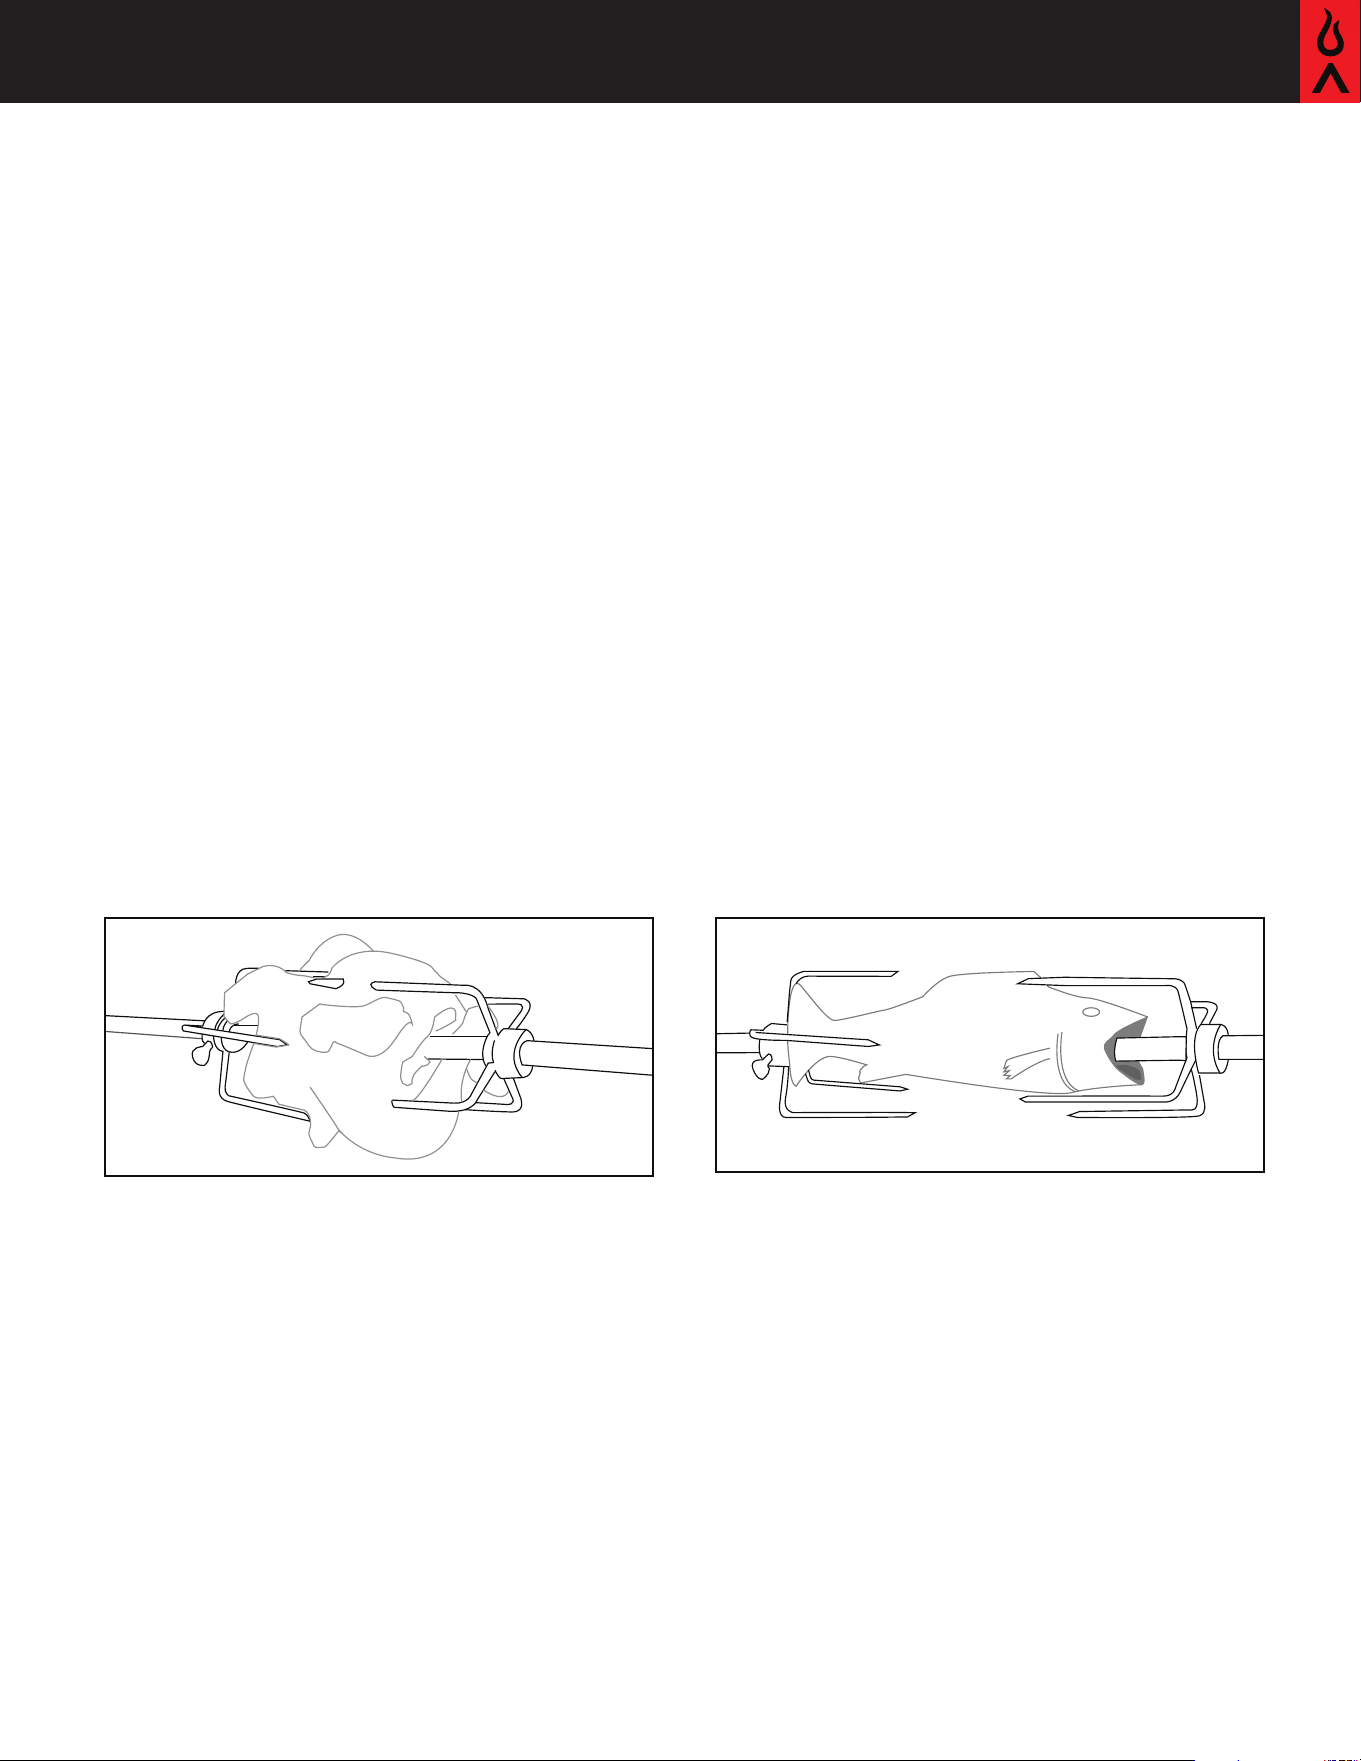
Classic Rotisserie Chicken
For a juicy, flavorful rotisserie chicken, pat a 4-5
pound chicken dry and rub it with olive oil, then
season with a mix of paprika, garlic powder,
onion powder, thyme, rosemary, oregano, cumin,
salt, and pepper. Stuff the cavity with lemon
halves, smashed garlic, and optional fresh
herbs.
Slide one rotisserie spike onto the spit,
positioning it away from the handle, and tighten
the locking screw. Next, slide the chicken onto
the spit and push the second set of spikes into
the chicken.
Place the chicken on the grill, identify the
heavier side, and adjust the counterweight to
the opposite side, then tighten the locking nut.
Cook at 375°F (190°C) for 1 to 1.5 hours, or until
the internal temperature reaches 165°F (74°C).
Let the chicken rest for 10-15 minutes before
carving to ensure juicy meat and crispy skin.
What is the counterbalance for?
The counterbalance is meant to be tightened
down in the opposite direction of the heavy
side. This is to ensure that the food rotates
easily without putting strain on the motor.
Rotisserie Fish
For a delicious rotisserie whole fish, start by
scaling the fish and scoring the sides to help
the seasoning penetrate. Leave the fins on for
a crispy snack. Pat the cleaned and gutted fish
(like trout, snapper, or sea bass) dry and rub it
with olive oil.
Season inside and out with salt, pepper,
and optional spices such as paprika or dried
oregano. Stuff the cavity with minced garlic,
lemon slices, and fresh herbs like parsley or
thyme. Slide the rotisserie spit through the fish
and secure it with rotisserie forks or skewers.
Preheat your rotisserie to medium heat (around
375°F or 190°C) and cook the fish for 20-30
minutes, or until the internal temperature
reaches 145°F (63°C) and the flesh flakes easily.
Let the fish rest for a few minutes before
transferring it to a serving platter. Garnish with
extra herbs and lemon wedges if desired. Enjoy
your flavorful, perfectly cooked rotisserie fish!
Pro Tip. Place the basting pan beneath the fish
and fill it with a mixture of butter, garlic, and
herbs. As the fish cooks, use a brush to baste
the garlic butter mixture onto the fish every 5
minutes. This technique helps keep the fish
moist and enhances its flavor with the aromatic
blend of garlic and herbs.