MINI ELECTRICCHAINSAW
USER MANUAL
Read Carefully Before Use
Keep for Future Reference

1
Safety Information
Warning!
·
ALWAYS observe all applicable local and national laws and regulations when using this tool.
· Use this tool ONLY for cutting wood. It should not be used playfully, carelessly, or for any
other purposes.
· DO NOT allow people unfamiliar with this tool or these instructions to operate it. Do not
let children or persons with compromised physical or mental capabilities use this tool. Keep
children, bystanders, and pets away while using this tool and store out of the reach of
children.
·
DO NOT use this tool while you are tired or under the influence of drugs,alcohol, or medication
·
Keep your work area clean and well lit.Cluttered or dark areas invite accidents.
· DO NOT operate this tool in areas filled with explosive or flammable gases, liquids, or
dust, as the heat might cause ignition and even explosion.
·
ALWAYS use with proper personal protective equipment such as a dust mask, a face
shield, a hard hat, goggles,work gloves,ear muffs, chainsaw chaps, and non-slip safety
shoes.
· ALWAYS use work gloves when handling the chain. Use only in well-ventilated places,
as the splinters,chips,and/or smoke may irritate your eyes,nose,throat,and/or skin and even
cause physical injury and/or health problems.
·
Be mindful of your wood during use. To avoid potential injury, make sure it is adequately
supported by a vise, sawhorse, or other equipment and will not fall directly onto the
ground when cut.
·
DO NOT wear loose clothing or jewelry while using this tool. Keep your hair and clothing
away from any moving parts.
· DO NOT overreach. Keep proper footing and balance at all times.
· DO NOT place other objects on this tool at any time.
· DO NOT leave this tool unattended during use.
· DO NOT get this tool wet or operate it with wet hands.
·
NEVER start this tool while the chain is in contact with any object. Hold it firmly during
use. Do not put it down before it has completely ceased operation.
· DO NOT operate this tool if it is dropped, damaged, or malfunctions. Repair or replace
damaged components before further use .Never replace any parts with non-identical ones.
·
ALWAYS remove the battery from this tool before any adjustment, cleaning, servicing, or
storage. Do not place the battery near any source of heat or explosion.
·
DO NOT touch this tool's chain or guide bar with any bare skin immediately after use, as
they may remain hot.

2
Specifications
Low voltage protection
15V
Guide Bar Length
6 in. / 4 in.(Configure according to the products you buy.)
Max. Chain Speed
19 ft./sec.
Max. Noise Level
65dB(A)
Net Weight
2.2Ib. (1kg)
3
Package List
1
Main Body
1
2
Guide plate
1
3
6 "chain or 4 "chain
2
4
Screwdriver, Wrench
1
The chain is configured according to the size you buy
Not Included but Necessary for Maintenance
· Chain Grinder or Round & Straight Files
·
Vise, Sawhorse,or Other Restraints
· Anti-Corrosive Oil
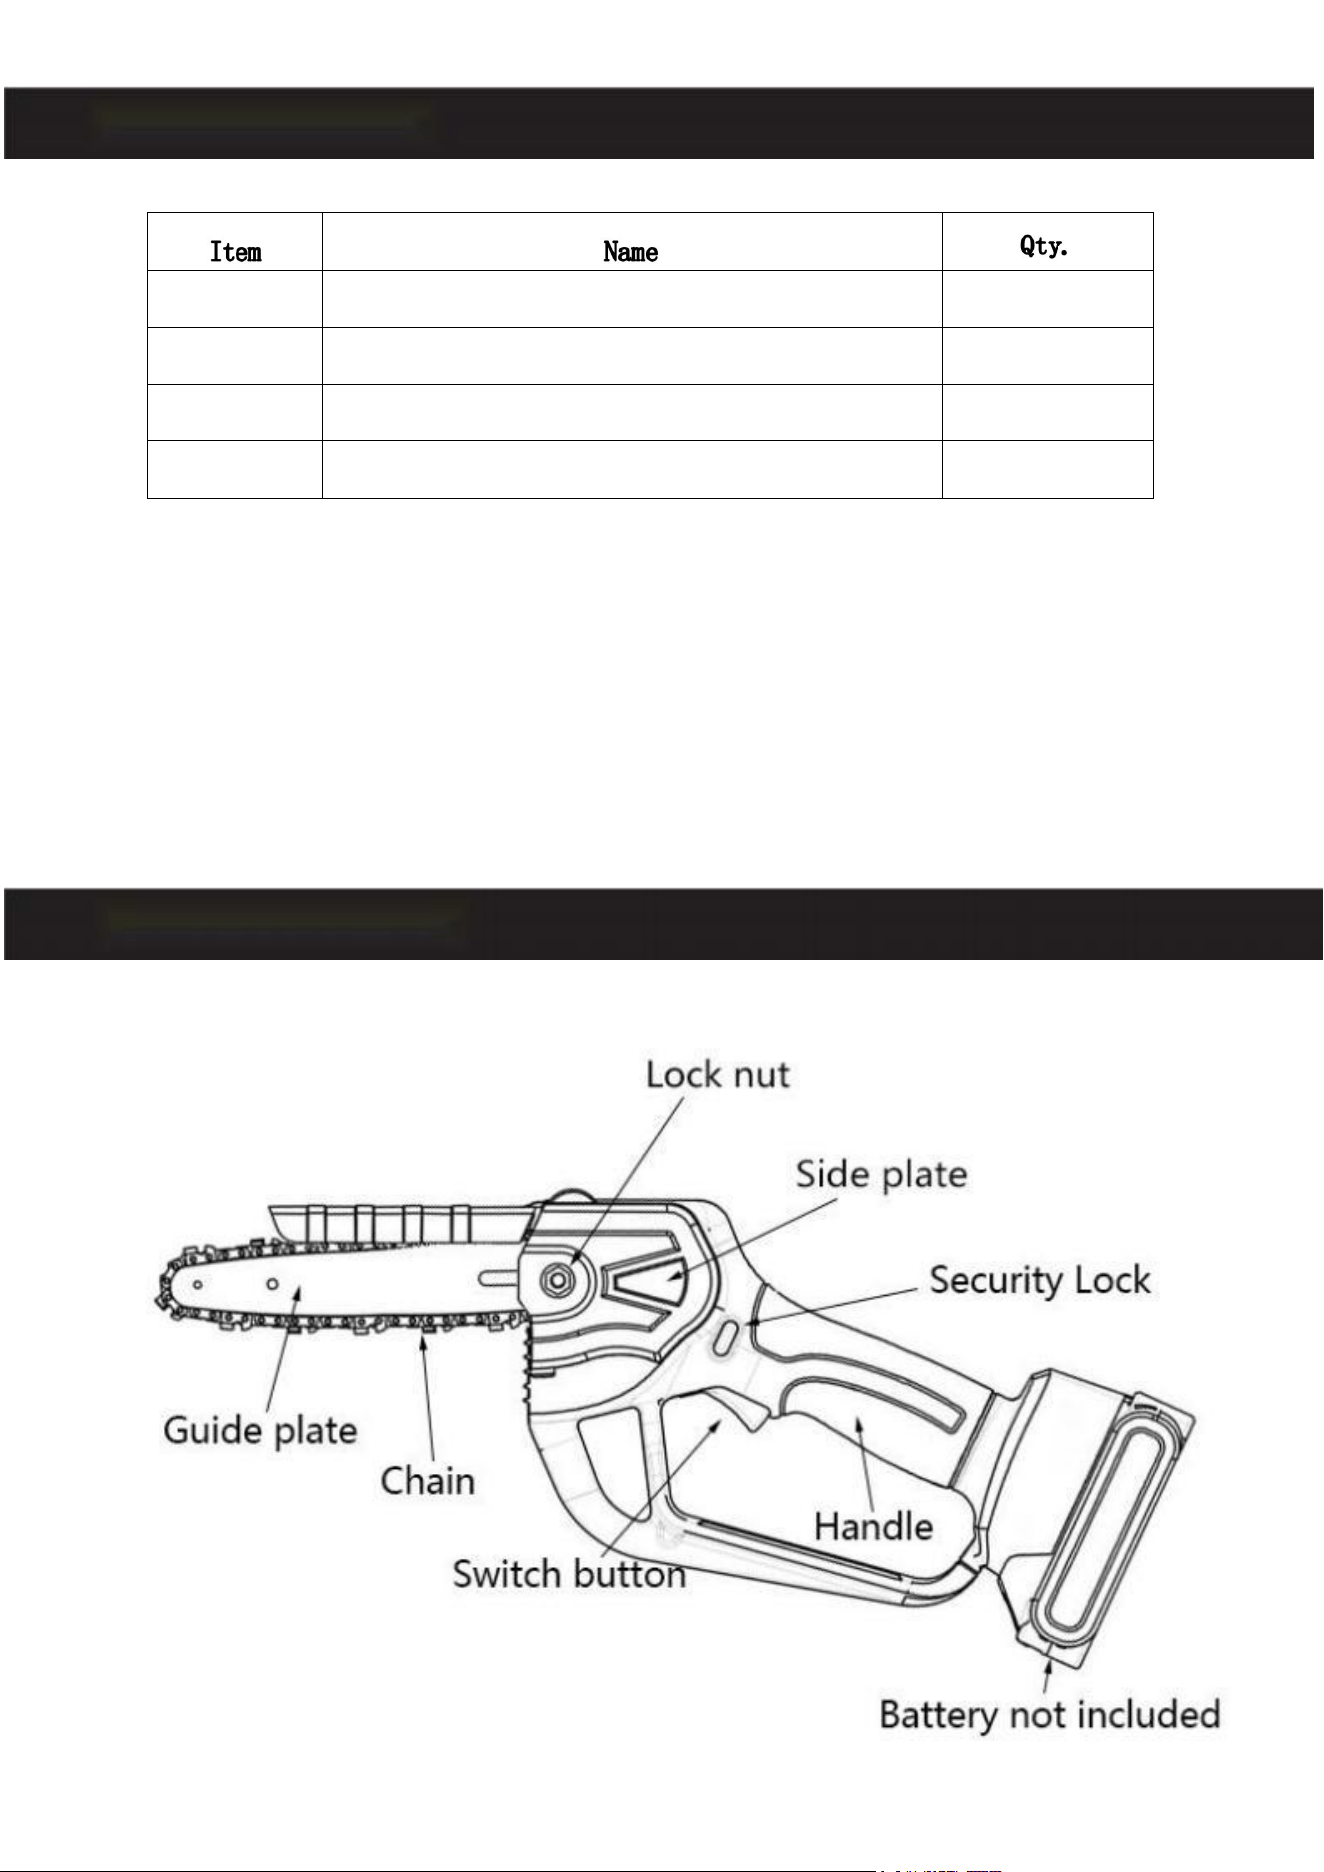
Product Diagram
4
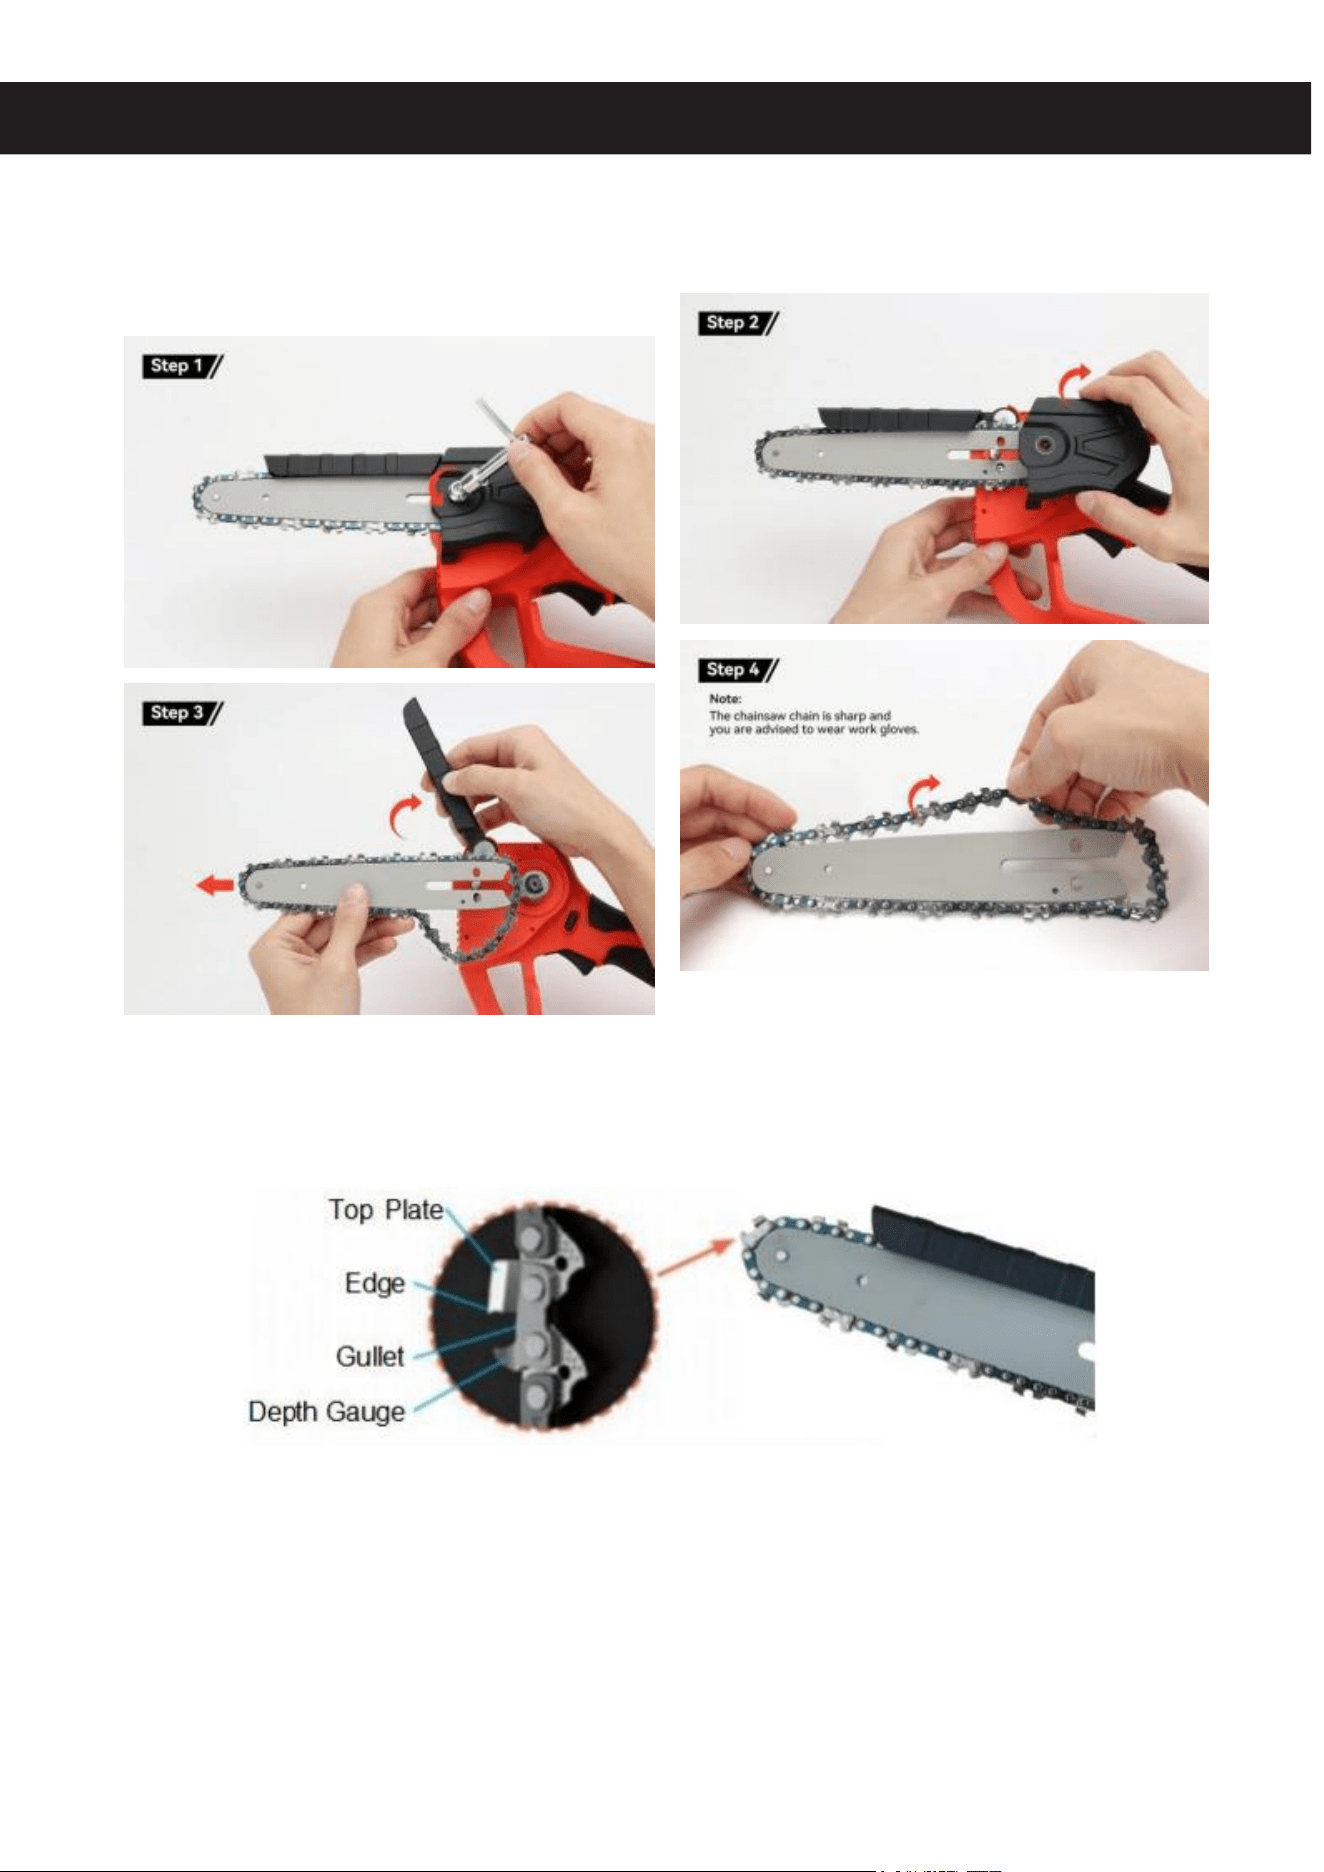
Assembly
The assembly method is the same for 4" and 6
Remove the lock nut from the side plate using the provided wrench. Disconnect this plate
from the tool.
Put on work gloves to protect your hands. Then, fit one of the provided chains into the groove
around the guide bar, making sure it's installed in the correct direction. As the chain goes from
top to bottom, the depth gauge should be ahead of the cutting edge.
Mount the chain and guide bar assembly onto the tool, fitting the chain around the toothed
wheel and securing the guide bar with the pre-installed lock bolt and pin.

5
Pull down to expose 1-3 guide teeth
If you find it hard to fix this assembly into place, adjust pin
position on its support bolt. Install the assembly again,
ensuring that the chain fits tightly to the guide bar and the
wheel.
Put the side plate back on the tool.
Replace the lock nut and retighten it with the
provided wrench.
Note: New chains are stretched at the beginning of use. Check and adjust the correct
tension periodically, as overly loose chains tend to break away from the guides, causing
rapid wear of the chain and guide plates.
6
Operation
1.Prepare the piece of wood to be cut, securing it in a vise, sawhorse, or other equipment to ensure
that it will not fall freely once cut. Don all personal protective equipment, including eye protection
and work gloves.
2.Firmly grasp the handle of the tool. Press the safety switch and the throttle simultaneously.
3.When cutting, you do not need to press the chainsaw hard, or cut back and forth like a traditional
hand saw, this operation may cause too much current to cause the chainsaw to stop working, you
just need to push the chain in the direction of cutting naturally.
4.As your cut nears completion, be especially careful to note the direction in which the wood is
loosening.
5.After use, release the safety switch and the throttle to stop the chainsaw. Press the lock button on
the battery pack while sliding it away from the base of the tool to remove it.
Maintenance
A dull chain will reduce the cutting efficacy of the chainsaw and increase the chance of
kickbacks. For best results, sharpen the chain teeth with a chain grinder or files (not included)
periodically as follows:
1.Unscrew the lock nut from the side plate with the provided wrench, disconnect the side plate
from the electric saw, and then take out the chain and guide rod.
2.Secure the chain and guide assembly in a vise or other equipment. Ensure that the assembly is
not damaged, that it is firmly fixed and that it will not move or fall during grinding.
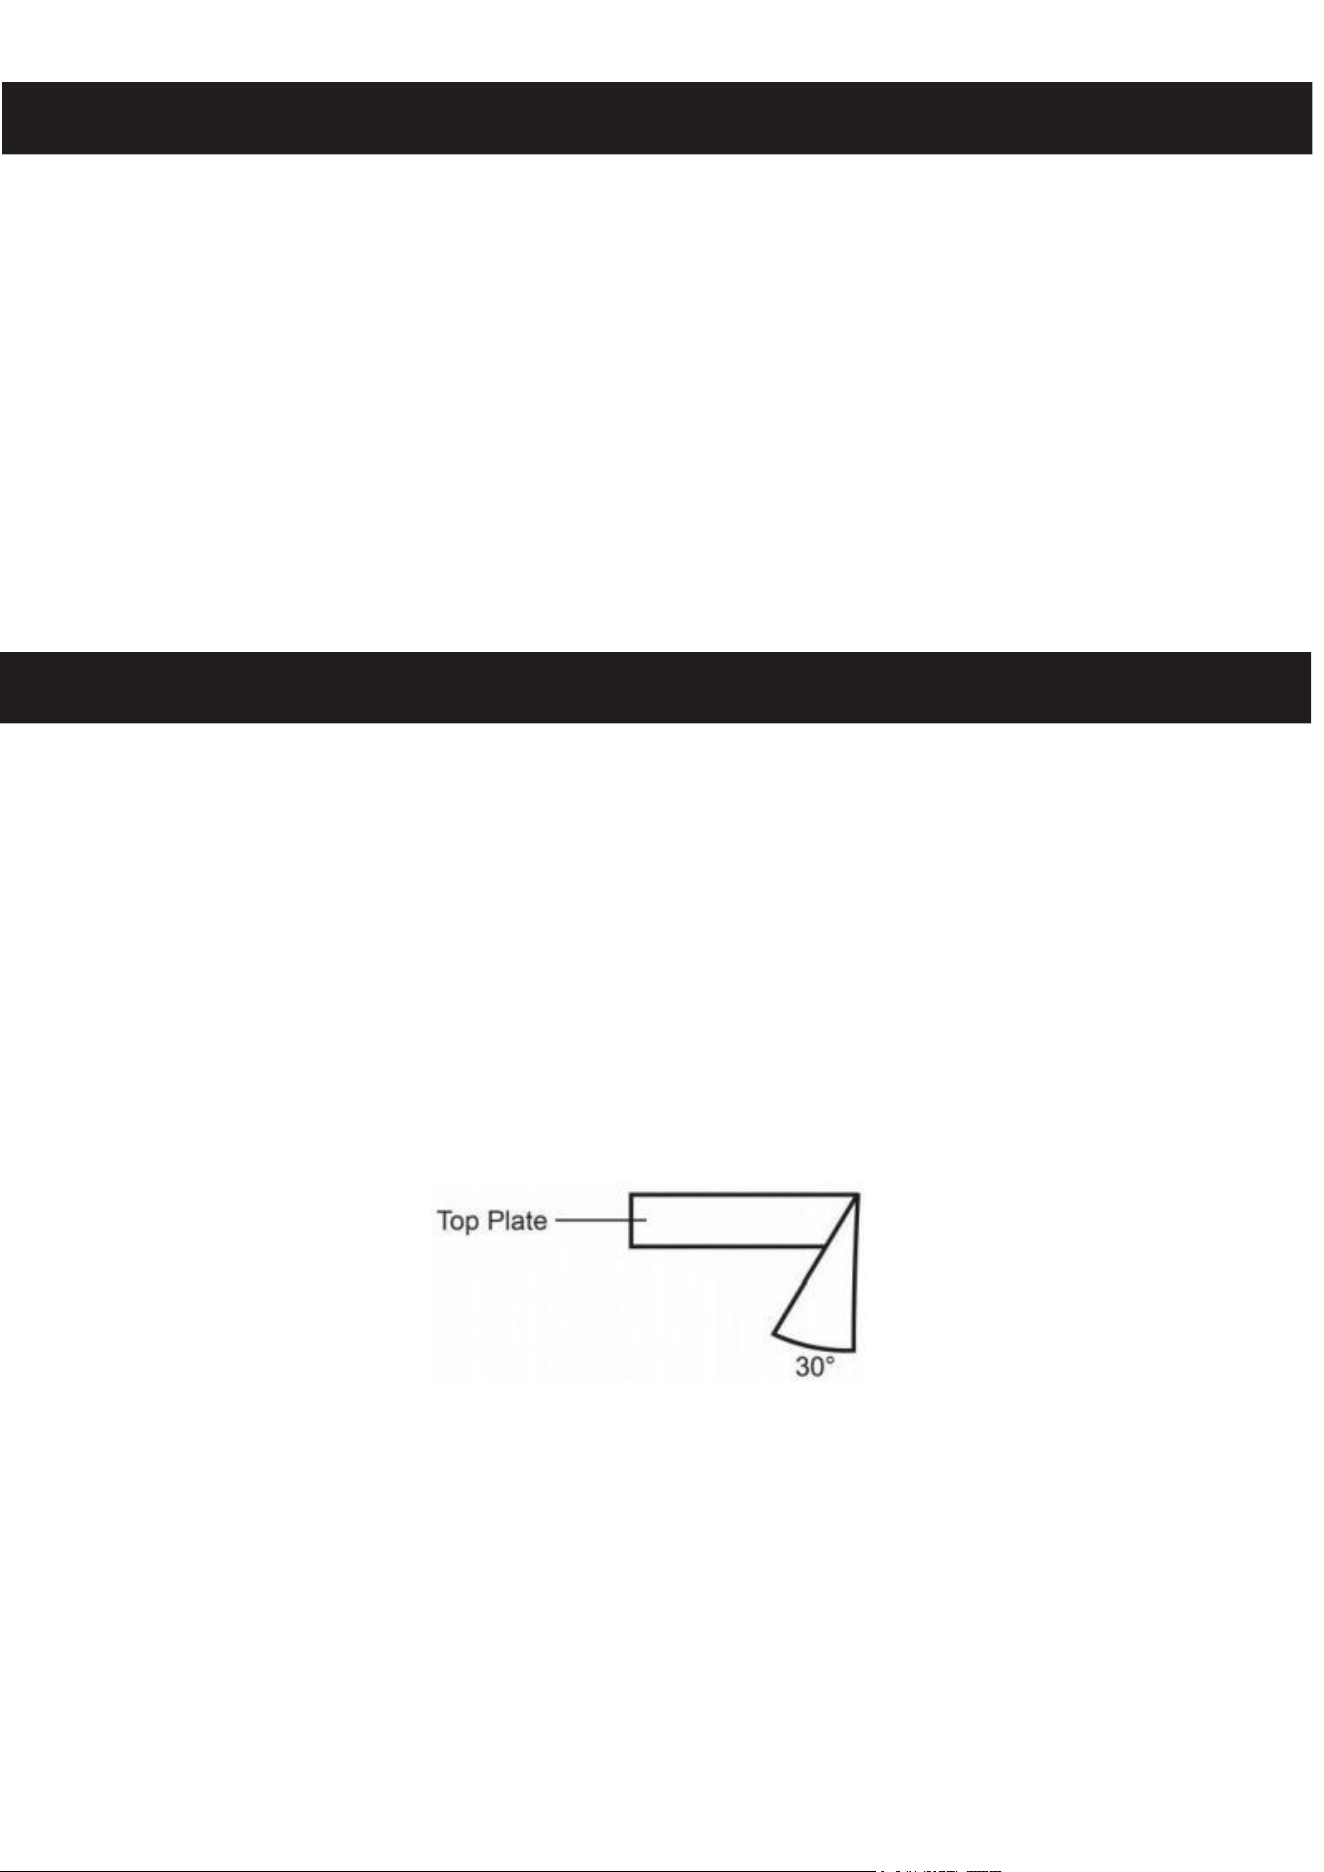
3.Mark the first tooth you sharpen with a felt-tip pen. Looking down from above, use a chain
grinder or round file to hone the cutting edge of its top plate to a sharp 30°angle. Take care
not to cut the links underneath the tooth.
4.If this process causes the top plate to become lower than its corresponding depth gauge,
use a straight file to reduce the height of the gauge until it is noticeably shorter than the top
plate.
5.File the other teeth in the same fashion until the first tooth is reached again.

7
Precautions for use
1.Install the chain according to the operation requirements and pull off the battery pack when
installing and removing the guide plate.
2.After installation, first start the machine with no load and observe the normal operation of the
machine.
3.According to the actual cutting situation, it is not recommended to cut too hard, first small and
then large.
4.After cutting a battery pack continuously, rest for a few minutes and wait for the machine motor to
cool before continuing to use.
5.When the battery voltage reaches 15v, the machine will stop running and the battery needs to be
replaced
6.Nonstandard operation will lead to machine failure.
Miscellaneous
· Check the parts of your chainsaw for any looseness,wear, or damage after use. Tighten, repair, or
replace any problematic parts before further use.
· Clear off any remaining wood chips,dust, or other dirt and debris on all external parts of the
chainsaw with a soft damp cloth, a soft dry brush, or compressed air.Do not use abrasive cleaners or
caustic chemicals.
· For best results,lubricate the guide bar, the chain, and the toothed wheel with high-quality anti-
corrosive oil (not included) between uses.
· If the chainsaw will not be used for an extended period of time, clean and lubricate it. Store in a cool
dry place inaccessible to children.
After-sales mailbox
If you encounter problems during use or have follow-up product
questions, you can contact us via the following email address and
we will get back to you as soon as possible!
Email: [email protected]