

SAVE THIS MANUAL FOR REFERENCE
Our Customer Service staff is ready to provide assistance.
In the case of a damaged or missing part, most replacement parts ship from our
facility.
For immediate help with assembly, or for additional product information, visit
www.YardForceUSA.com or email [email protected]
You will need this manual for safety
instructions, operating procedures, and Warranty.
The original sales receipt is required for warranty service.
YF22-3N1SPVSV-SC
22” 3-IN-1 SELF PROPELLED
LAWN MOWER
OPERATOR’S MANUAL


2
Hotline: 1-866-902-9690
YF22-3N1SPVS-SC Original Instructions
TABLE OF CONTENTS
Safety instructions ............................................................................................................................................ 3
Parts list ........................................................................................................................................................... 6
Intended use .................................................................................................................................................... 8
Assembly ......................................................................................................................................................... 9
Adjustment ..................................................................................................................................................... 14
Operation ....................................................................................................................................................... 15
Storing and maintenance ............................................................................................................................... 19
Trouble shooting .............................................................................................................................................24
Warranty ........................................................................................................................................................ 25
Federal Communications Commission
(FCC)
WARNING!
Any changes or modifications to this unit not expressly approved by the party responsible for compliance could void the user's
authority to operate the equipment.
Class B device:
NOTE: This equipment has been tested and found to comply with the limits for a Class B digital device, pursuant to part 15 of
the FCC Rules.
These limits are designed to provide reasonable protection against harmful interference in a residential installation.
This equipment generates, uses and can radiate radio frequency energy and, if not installed and used in accordance with the
instructions, may cause harmful interference to radio communications.
However, there is no guarantee that interference will not occur in a particular installation.
If this equipment does cause harmful interference to radio or television reception, which can be determined by turning the
equipment off and on, the user is encouraged to try to correct the int
erference by one or more of the following measures:
• Reorient or relocate the receiving antenna.
• Increase the separation between the equipment and receiver.
Connect the equipment into an outlet on a circuit different from that to which the receiver is connected.
Consult the dealer or an experienced radio/TV technician for help.
•
•

3
Hotline: 1-866-902-9690
SAFETY INSTRUCTIONS
IMPORTANT
Please read these instructions fully before assembling and operating.
DESCRIPTION OF SYMBOLS
WARNING: Some dust created by power sanding, sawing, grinding, drilling and other construction
activities contains chemicals known to the state of California to cause cancer, birth defects or other
reproductive harm. Some examples of these chemicals are:
• Lead from lead - based paints
• Crystalline silica from bricks and cement and other masonry products, and
• Arsenic and chromium from chemically - treated lumber.
Your risk from these exposures varies, depending on how often you do this type of work. To reduce your
exposure to these chemical: work in a well ventilated area, and work with approved safety equipment,
such as those dust masks that are specially designed to filter out microscopic particles. For more
information go to www.P65warnings.ca.gov.
Symbols are used in this manual to attract your attention to possible risks. The safety symbols and the
explanations which accompany them must be perfectly understood. The warnings themselves do not
prevent the risks and cannot be a substitute for proper methods of avoiding accidents.
WARNING SYMBOLS ON THE MACHINE
WARNING! To reduce the risk of injury, user must read instruction manual.
This symbol, before a safety comment, indicates a precaution, a warning or a danger. Ignoring
this warning can lead to an accident for yourself or for others. To limit the risk of injury, fire, or
electrocution always apply the recommendations indicated.
Do not open or remove safety shields while engine is running.
Keep bystanders away.
Look behind while backing.
Steep slope hazard.
Severing of toes or fingers – Rotary mower blade.
Thrown or flying objects – Whole body exposure.
Wear hearing protection.
Wear eye protection.
DANGER: KEEP HANDS AND FEET AWAY.
WARNING—GASOLINE IS FLAMMABLE
Allow the engine to cool at least two minutes before refueling.

4
Hotline: 1-866-902-9690
WARNING— CARBON MONOXIDE
Never run an engine indoors or in a poorly ventilated area. Engine exhaust contains carbon
monoxide, an odourless and deadly gas.
WARNING— HOT SURFACE
Engine parts, especially the muffler, become extremely hot during operation. Allow engine
and muffler to cool before touching.
SAFETY INSTRUCTIONS
TRAINING
1. Read the instructions carefully. Be familiar with the controls and the proper use of the equipment.
2. Never allow children or people unfamiliar with these instructions to use the lawnmower. Local
regulations can restrict the age of the operator.
3. Never mow while people, especially children, or pets are nearby.
4. Keep in mind that the operator or user is responsible for accidents or hazards occurring to other people
or their property.
5. Do not operate the machine while under the influence of alcohol or drugs.
6. Follow the manufacturer’s recommendation for wheel weights or counterweights.
7. Stop the machine and attachment(s) if anyone enters the area.
PREPARATION
1. While mowing, always wear substantial footwear and long trousers. Do not operate the equipment
when barefoot or wearing open sandals.
2. Thoroughly inspect the area where the equipment is to be used and remove all objects which can be
thrown by the machine.
3. Warning - gas is highly flammable.
- Store fuel in containers specifically designed for this purpose.
- Refuel outdoors only and do not smoke while refueling.
- Add fuel before starting the engine. Never remove the cap of the fuel tank or add gas while the
engine is running or when the engine is hot.
- If gas is spilled, do not attempt to start the engine but move the machine away from the area of
spillage and avoid creating any source of ignition until gas vapours have dissipated.
- Replace all fuel tank and container
caps securely.
4. Replace faulty mufflers.
5. Before using, always visually inspect to see that the blades, blade bolts and cutter assembly are not
worn or damaged. Replace worn or damaged blades and bolts in sets to preserve balance.
6. On multi-bladed machines, take care as rotating one blade can cause other blades to rotate.
OPERATION
1. Do not operate the engine in a confined space where dangerous carbon monoxide fumes can collect.
2. Mow only in daylight or in good artificial light.
3. Avoid operating the equipment in wet grass, where feasible.
4. Always be sure of your footing on slopes.
5. Walk, never run.
6. For wheeled rotary machines, mow across the face of slopes, never up and down.
7. Exercise extreme caution when changing direction on slopes.
8. Do not mow excessively steep slopes.
9. Use extreme caution when reversing or pulling the lawnmower towards you.
10. Stop the blade(s) if the lawnmower has to be tilted for transportation when crossing surfaces other than
grass, and when transporting the lawnmower to and from the area to be mowed.
11. Never operate the lawnmower with defective guards, or without safety devices, for example deflectors
and/or grass catchers, in place.
12. Do not change the engine governor settings or over speed the engine.
13. Disengage all blade and drive clutches before starting the engine.
14. Start the engine or switch on the motor carefully according to instructions and with feet well away from
SAFETY INSTRUCTIONS

5
Hotline: 1-866-902-9690
SAFETY INSTRUCTIONS
the blade(s).
15. Do not tilt the lawnmower when starting the engine or switching on the motor, except if the lawnmower
has to be tilted for starting. In this case, do not tilt it more than absolutely necessary and lift only the
part which is away from the operator.
16. Do not start the engine when standing in front of the discharge chute.
17. Do not put hands or feet near or under rotating parts. Keep clear of the discharge opening at all times.
18. Never pick up or carry a lawnmower while the engine is running.
19. Stop the engine and disconnect the spark plug wire, making sure that all moving parts have come to a
complete stop, and where a key is fitted remove the key:
- Before clearing blockages or unclogging chute.
- Before checking, cleaning or working on the lawnmower.
- After striking a foreign object. Inspect the lawnmower for damage and make repairs before
restarting and operating the lawnmower.
- If lawnmower starts to vibrate abnormally (check immediately).
20. Stop the engine and disconnect the spark plug wire, making sure that all moving parts have come to a
complete stop, and where a key is fitted remove the key:
- Whenever you leave the lawnmower.
- Before refueling.
21. Reduce the throttle setting during engine shut down and, if the engine is provided with a shut-off valve,
turn the fuel off at the conclusion of mowing.
22. Go slow when using a trailing seat.
23. Avoid holes, ruts, bumps, rocks, or other hidden hazards.
24. Do not direct discharge material toward anyone. Avoid discharging material against a wall or
obstruction. Material may ricochet back toward the operator. Stop the blade(s) when crossing gravel
surfaces.
25. Do not leave a running machine unattended. Always park on level ground, disengage the attachment,set
parking brake, and stop engine.
26. Do not mow in reverse unless absolutely necessary.
27. Tragic accidents can occur if the operator is not alert to the presence of children. Children are often
attracted to the machine and the mowing activity. Never assume that children will remain where you last
saw them.
28. Keep children out of the operating area and under the watchful care of a responsible adult other than
the operator.
29. Travel in the manufacturer recommended direction on slopes. Use caution while operating near drop-
offs.
30. Poor footing could cause a slip and fall accident.
31. Do not operate machine under any condition where traction, steering, or stability is in question. Tires
could slide even if the wheels are stopped.
32. Always keep the machine in gear when going down slopes. Do not coast downhill.
33. Avoid starting and stopping on slopes. Avoid making sudden changes in speed or direction. Make turns
slowly and gradually.
34. Use extra care while operating machine with a grass catcher or other attachment(s). They can affect the
stability of the machine.
35. Extinguish all cigarettes, cigars, pipes and other sources of ignition.
36. Do not store the machine or fuelcontainer, or refuel, where there is an open flame, spark, or pilot light
such as on a water heater or other appliance.
37. Use full width ramps for loading and unloading a machine for transport.
MAINTENANCE AND STORAGE
1. Keep all nuts, bolts and screws tight to be sure the equipment is in safe working condition.
2. Never store the equipment with gas in the tank inside a building where fumes can reach an open flame
or spark.
3. Allow the engine to cool before storing in any enclosure.
4. To reduce the fire hazard, keep the engine, muffler, battery compartment and gas storage area free of
grass, leaves, or excessive grease.
5. Check the grass catcher frequently for wear or deterioration.
6. Replace worn or damaged parts for safety.
7. If the fuel tank has to be drained, this should be done outdoors.

6
Hotline: 1-866-902-9690
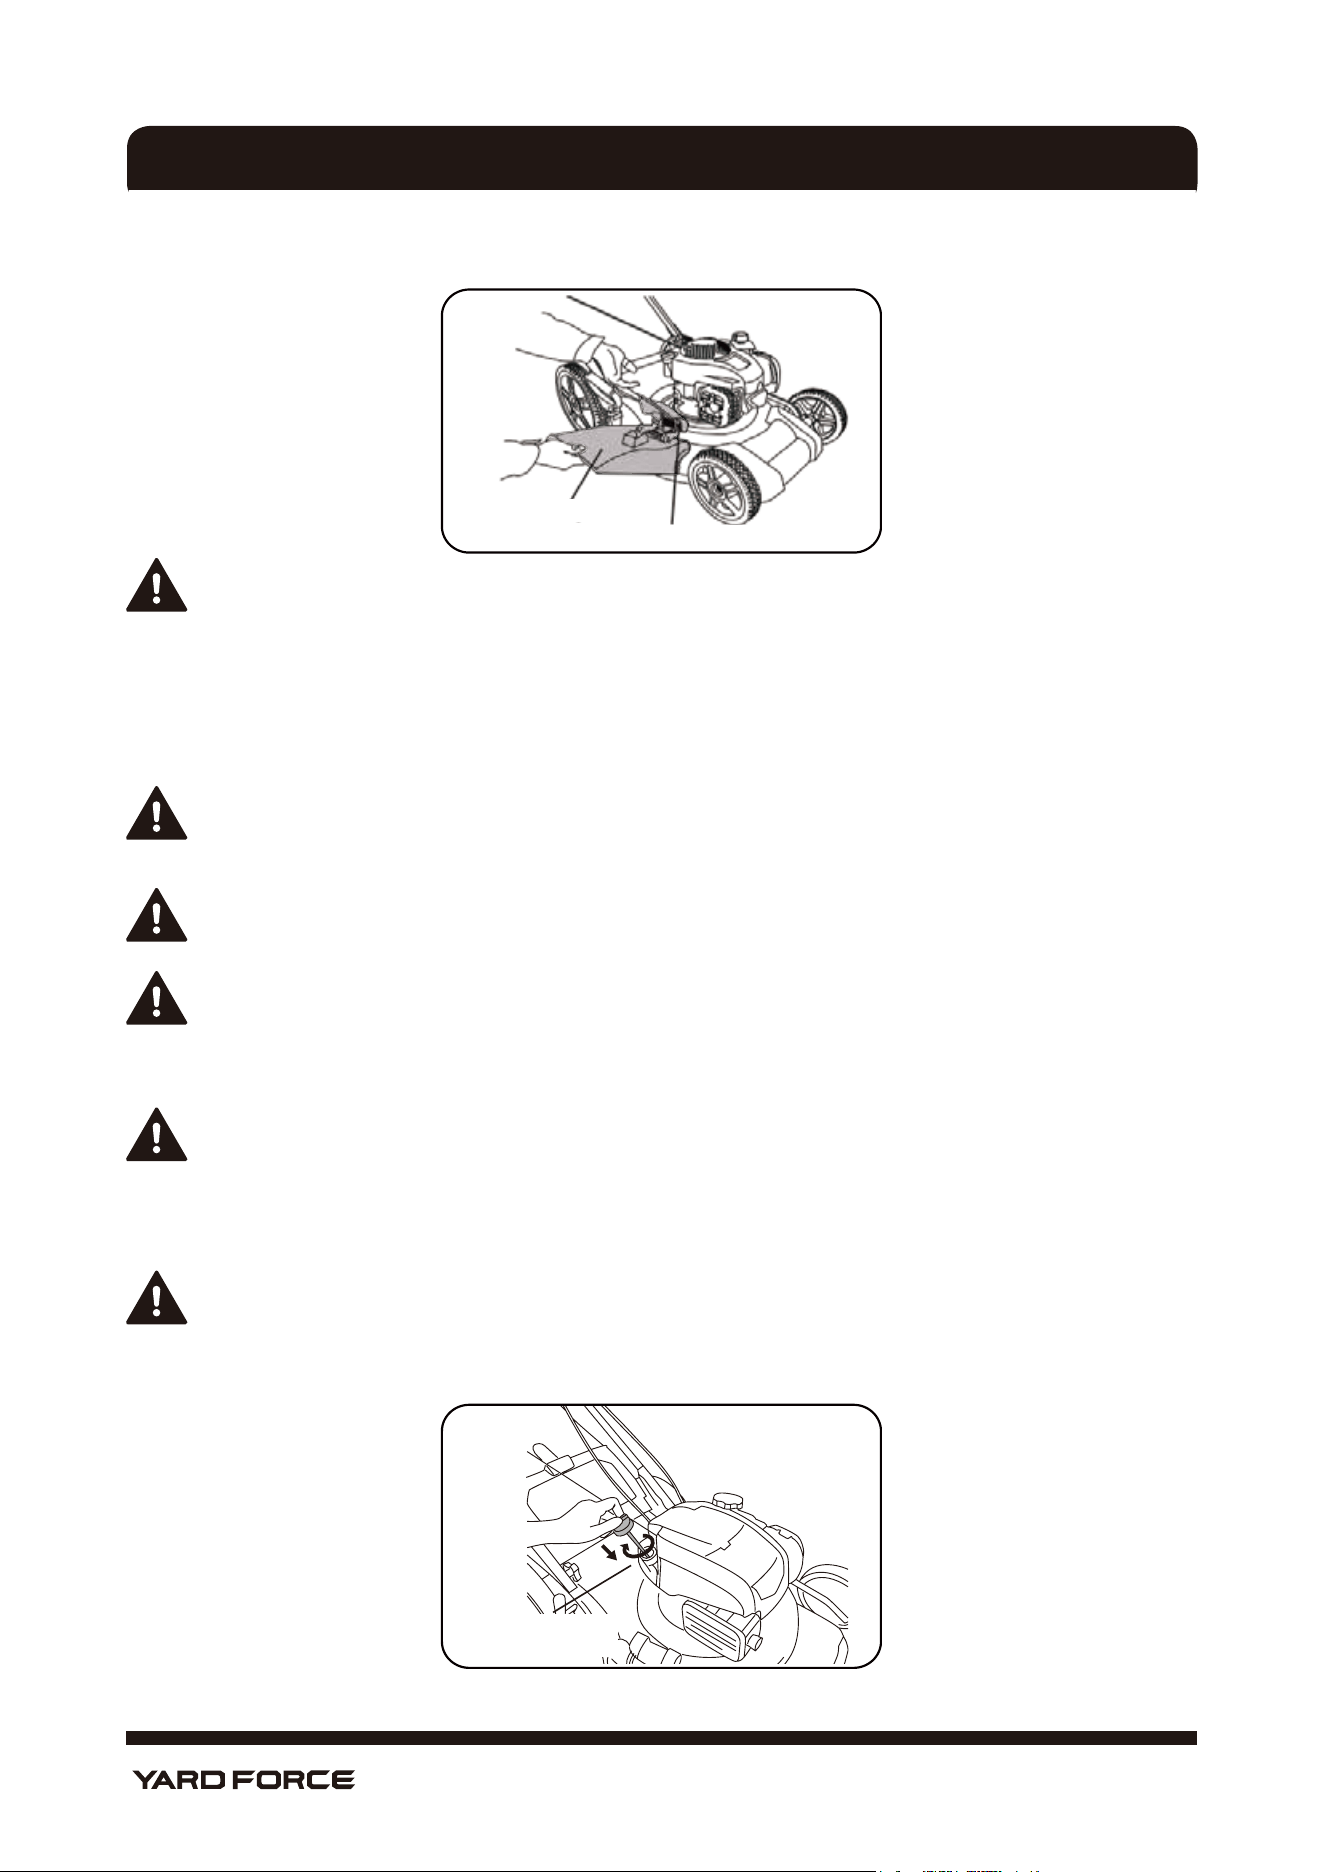
KNOW YOUR LAWN MOWER
PARTS LIST
Fig. 1
1
2
3
4
5
6
7
8
9
19
16
17
18
15
14
13
12
11
10
20
21

7
Hotline: 1-866-902-9690
1 Self-propelled control lever
2 Upper handle
3 Engine start handle
4 Rope guide
5 Grass bag
6
7 Height-adjusting handle
8 Rear wheel
9 Side discharge chute (removable)
10 Side discharge cover
11 Front wheel
12 Front bumper
13 Cutting deck
14 Spark plug cover
15 Engine oil cap
16 Fuel tank cap
17 Handle knob and bolt
18 Handle quick release lever
19 Cord clip
20 Lower handle
21 Engine On/Off control bar
PARTS LIST
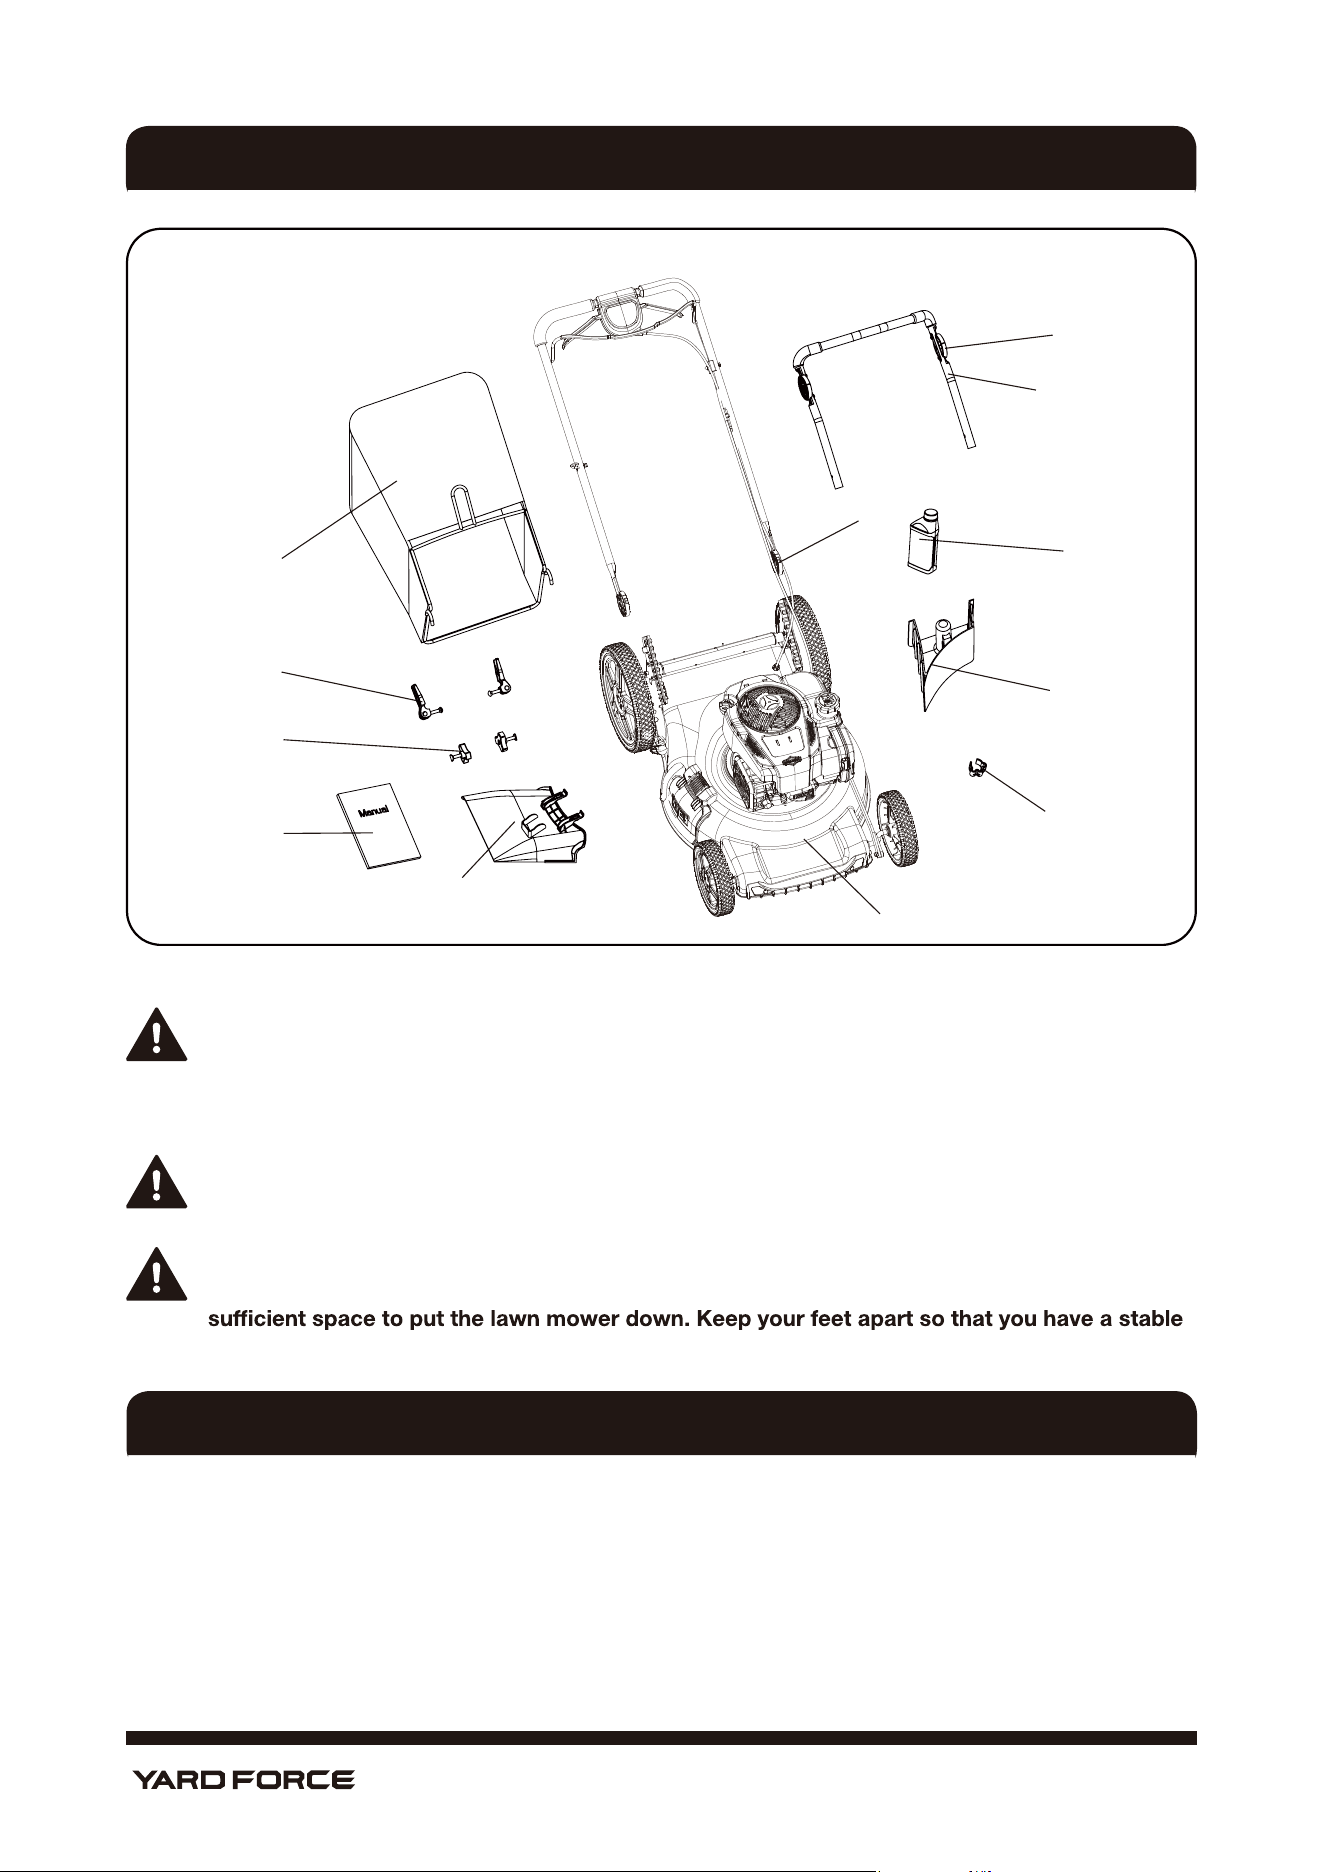
Carefully remove the lawn mower from its packaging and check that the following parts are included:
A. Grass bag with holder 1 pc
B. Handle quick release lever 2 sets
C. Handle Knob and Bolt 2 sets
D. Manual 1 pc
E. Side discharge chute 1 pc
F. Main mower deck (with upper handle) 1 pc
G. Cord clip 1 pc
H. Plastic mulching plug (inside the mower) 1 pc
I. Engine Oil (SAE 30 ) 1 pc
J.
K. Lower handle bar 1 pc
L.
PARTS LIST
8
Hotline: 1-866-902-9690
PARTS LIST
This gas-powered lawn mower has been designed for cutting residential lawn areas.
The machine is to be used only for its prescribed purpose. Any other use is deemed to be a case of misuse.
The user/operator and not the manufacturer will be liable for any damage or injuries of any kind caused as a
result of this.
Please note that our equipment has not been designed for use in commercial, trade or industrial applica-
tions. Our warranty will be voided if the machine is used in commercial, trade or industrial businesses or for
equivalent purposes.
INTENDED USE
Fig. 2
WARNING!
If any parts are damaged or missing, do not operate this lawn mower until the missing parts
are replaced.
Failure to heed this warning could result in serious personal injury.
NOTE:
Always recycle the packaging in accordance with local recycling programs.
WARNING!
This item requires a two-person lift to remove from the packaging. Make su re that you have
position, bend at the knees and keep your back straight.
A
B
C
H
I
K
G
D
E
L
F
J

9
Hotline: 1-866-902-9690
TECHNICAL SPECIFICATIONS
Engine type Single cylinder 4-stroke
Engine displacement 150 cc
Engine speed 3200±100 RPM
Cutting path 21” (53 cm)
Grass bag capacity 16 Gallon (60 L)
Height adjustments 1.25" - 3.75"(31-95 mm)
Front wheel diameter 8” (20 cm)
Rear wheel diameter 12” (30 cm)
Self-propelled speed up to 3 MPH
TECHNICAL SPECIFICATIONS
CAUTION! Read complete INSTRUCTION MANUAL before operating this machine.
IMPORTANT! THIS LAWN MOWER IS SHIPPED WITHOUT OIL OR GASOLINE IN THE ENGINE.
Your new lawn mower has been assembled at the factory with the exception of those parts left
disassembled for shipping purposes. All parts, such as nuts, washers, bolts, etc., necessary to complete the
assembly have been placed in the parts bag. To ensure safe and proper operation of your lawn mower, all
parts and hardware you assemble must be tightened securely. Use the correct tools as necessary to ensure
proper tightness.
TO REMOVE LAWN MOWER FROM CARTON
1. Remove loose parts included with mower.
2. Cut down two end corners of carton and lay end panel down flat.
3. Remove all packing materials .
4. Roll lawn mower out of carton and check carton thoroughly for additional loose parts.
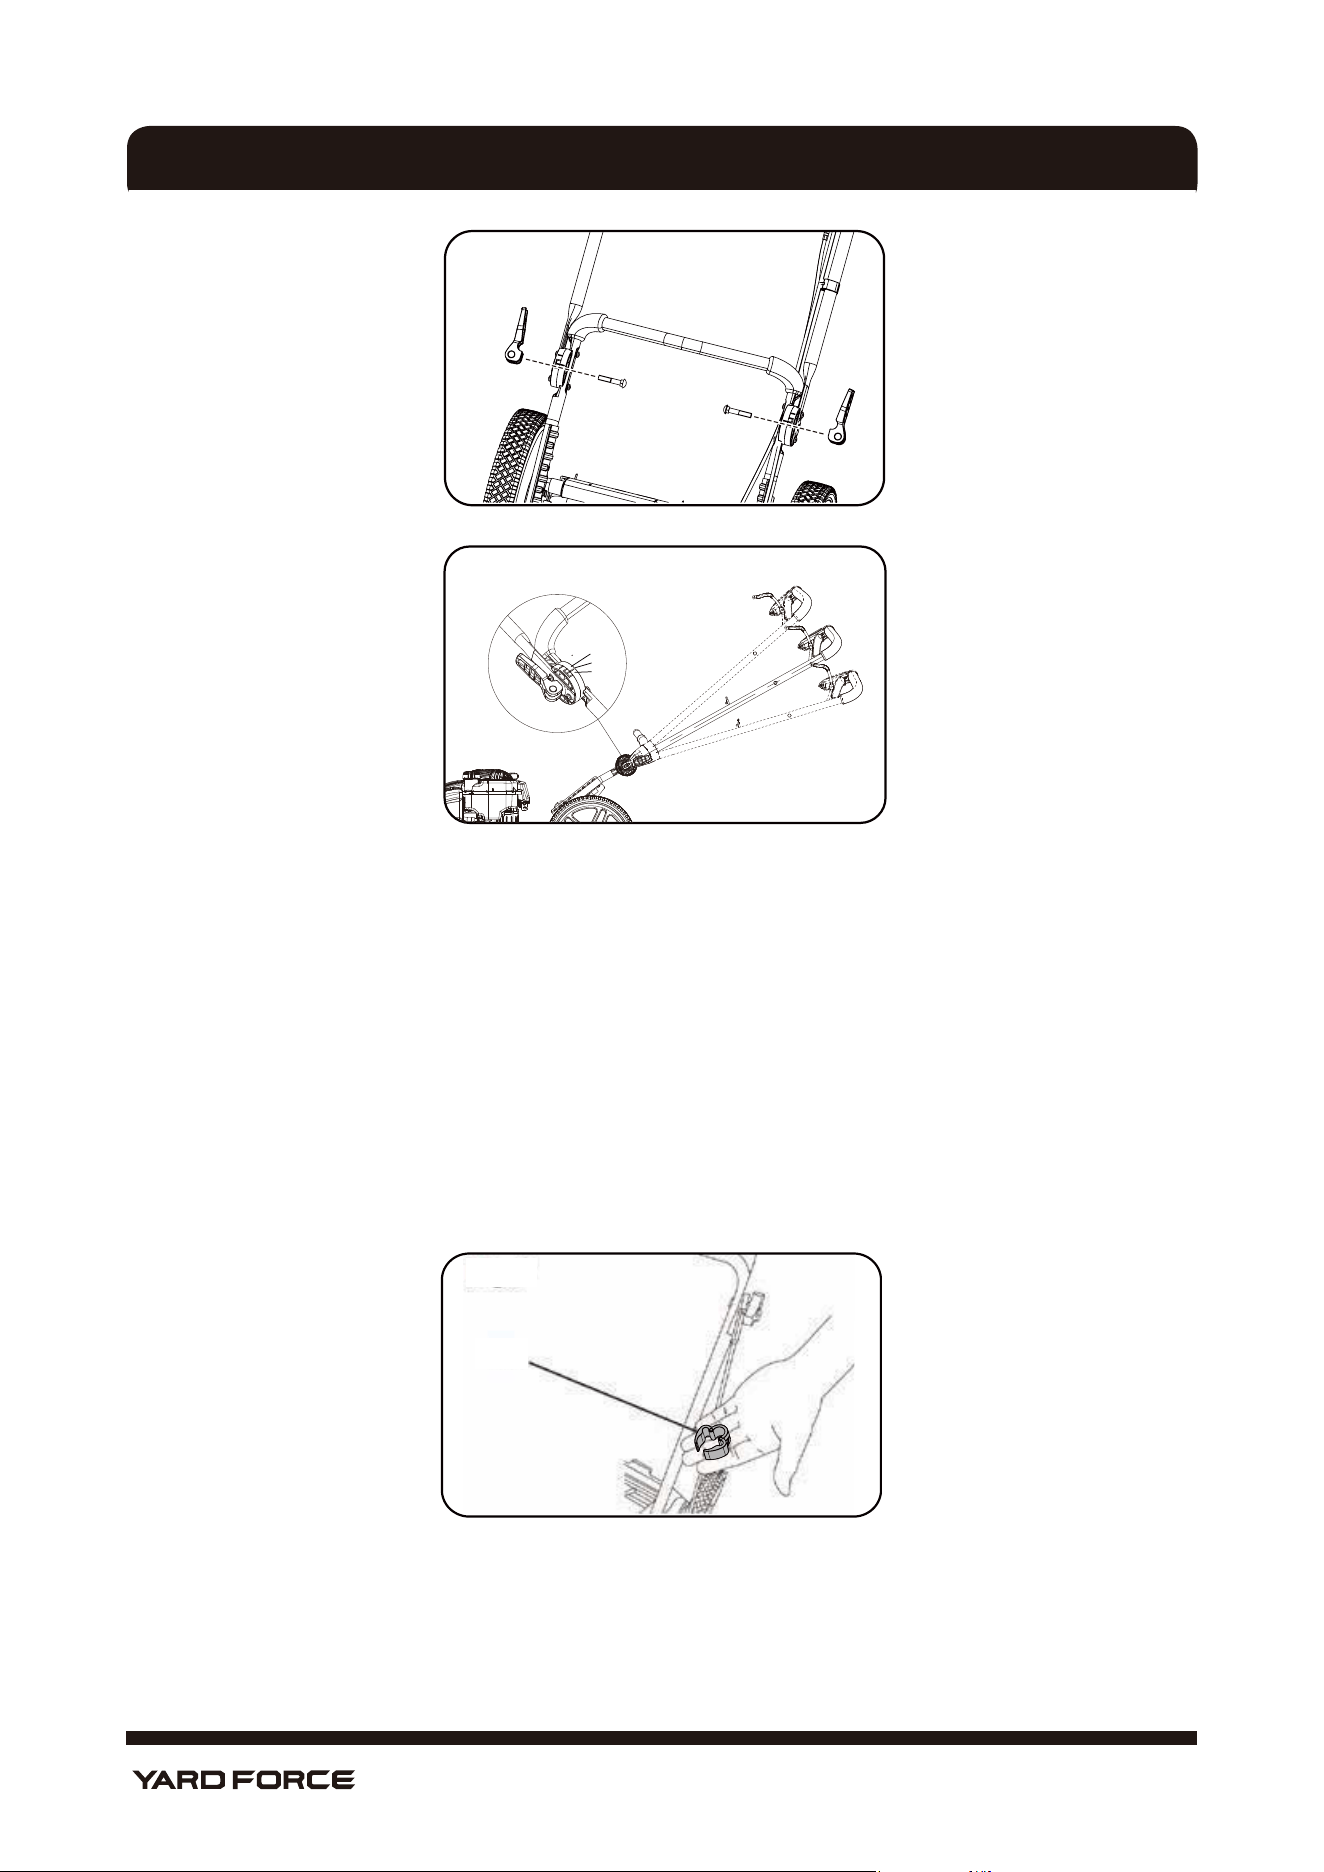
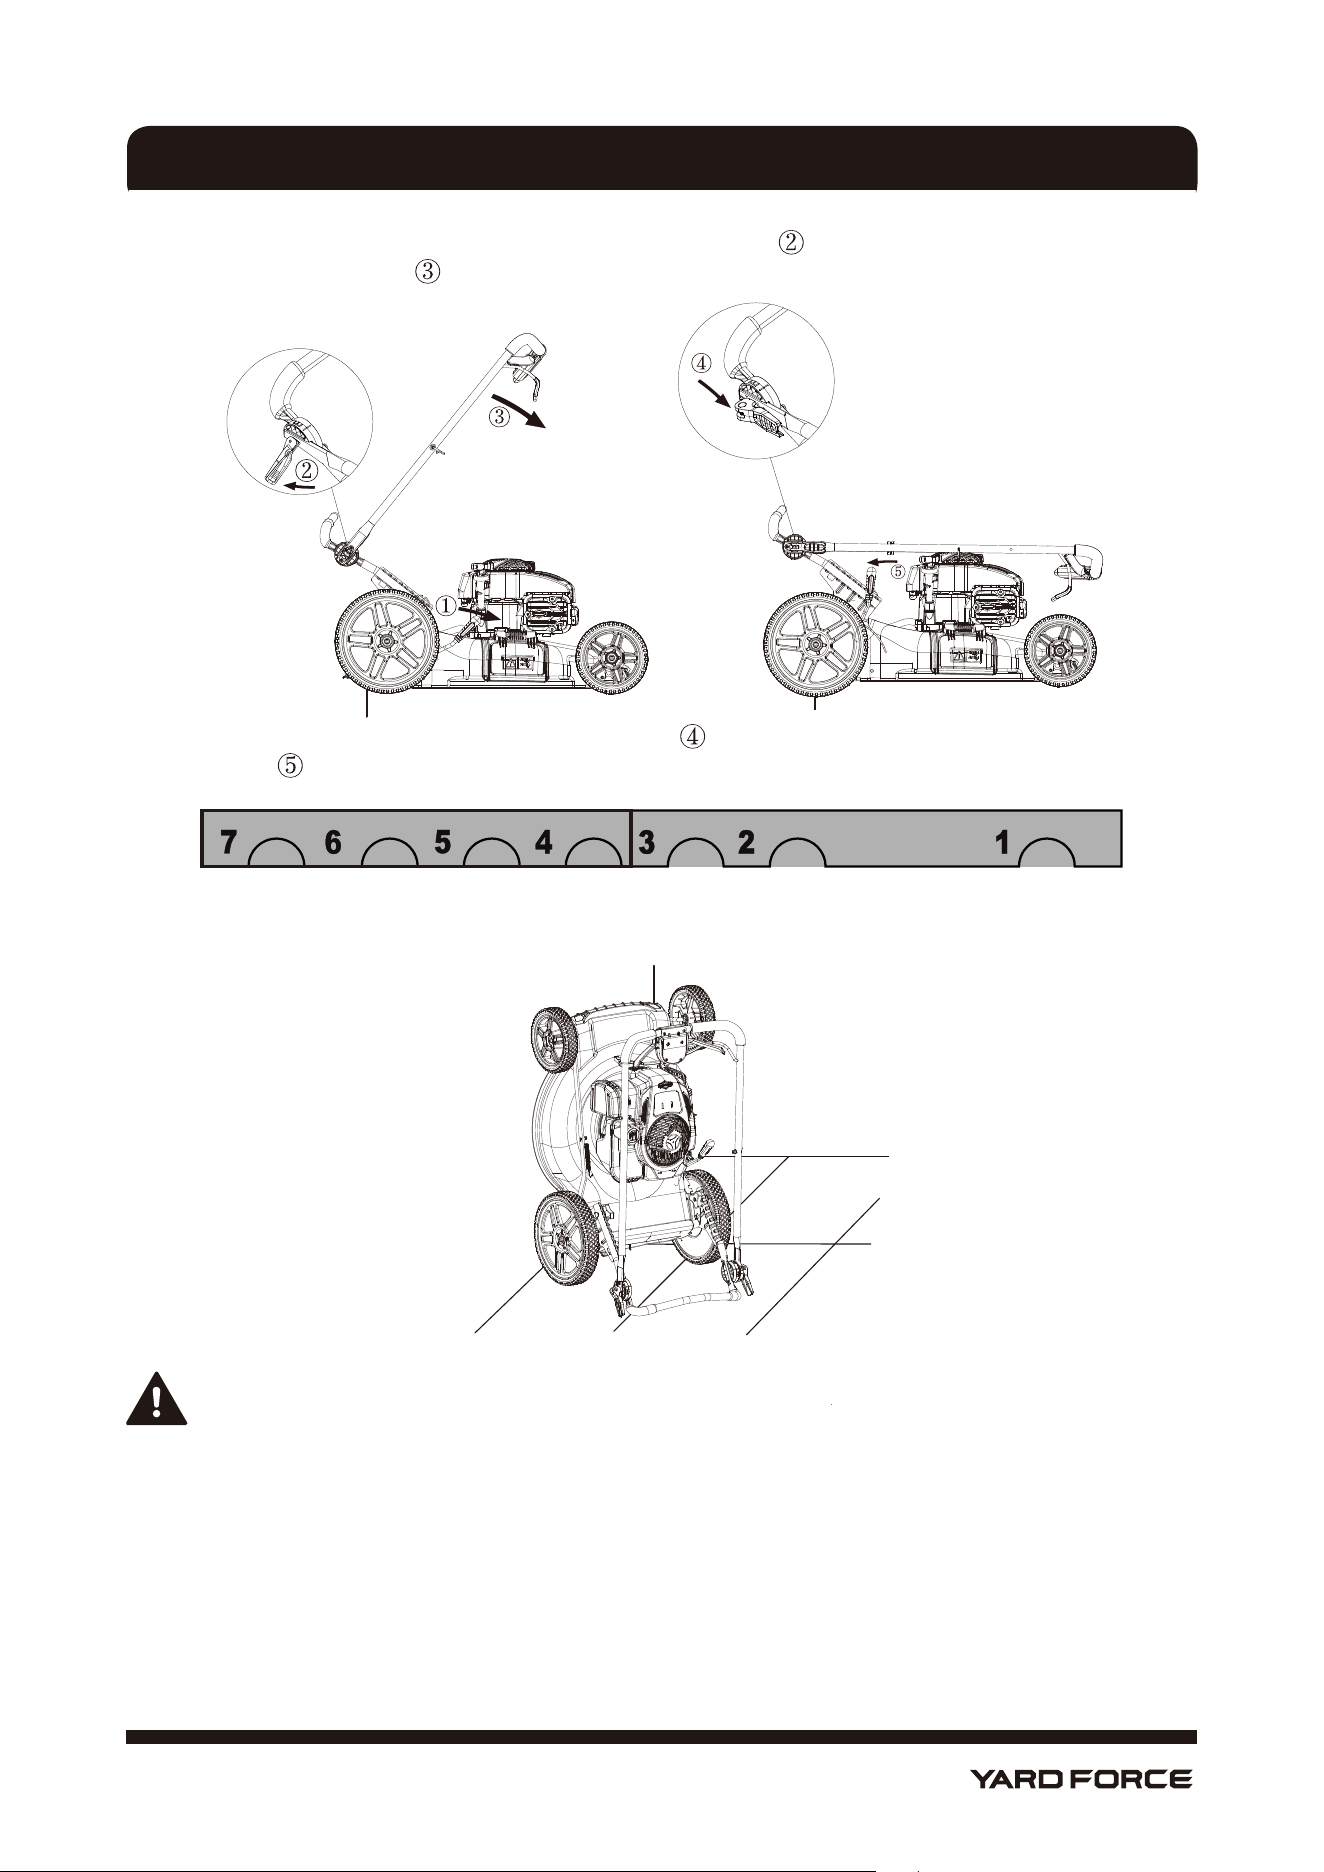
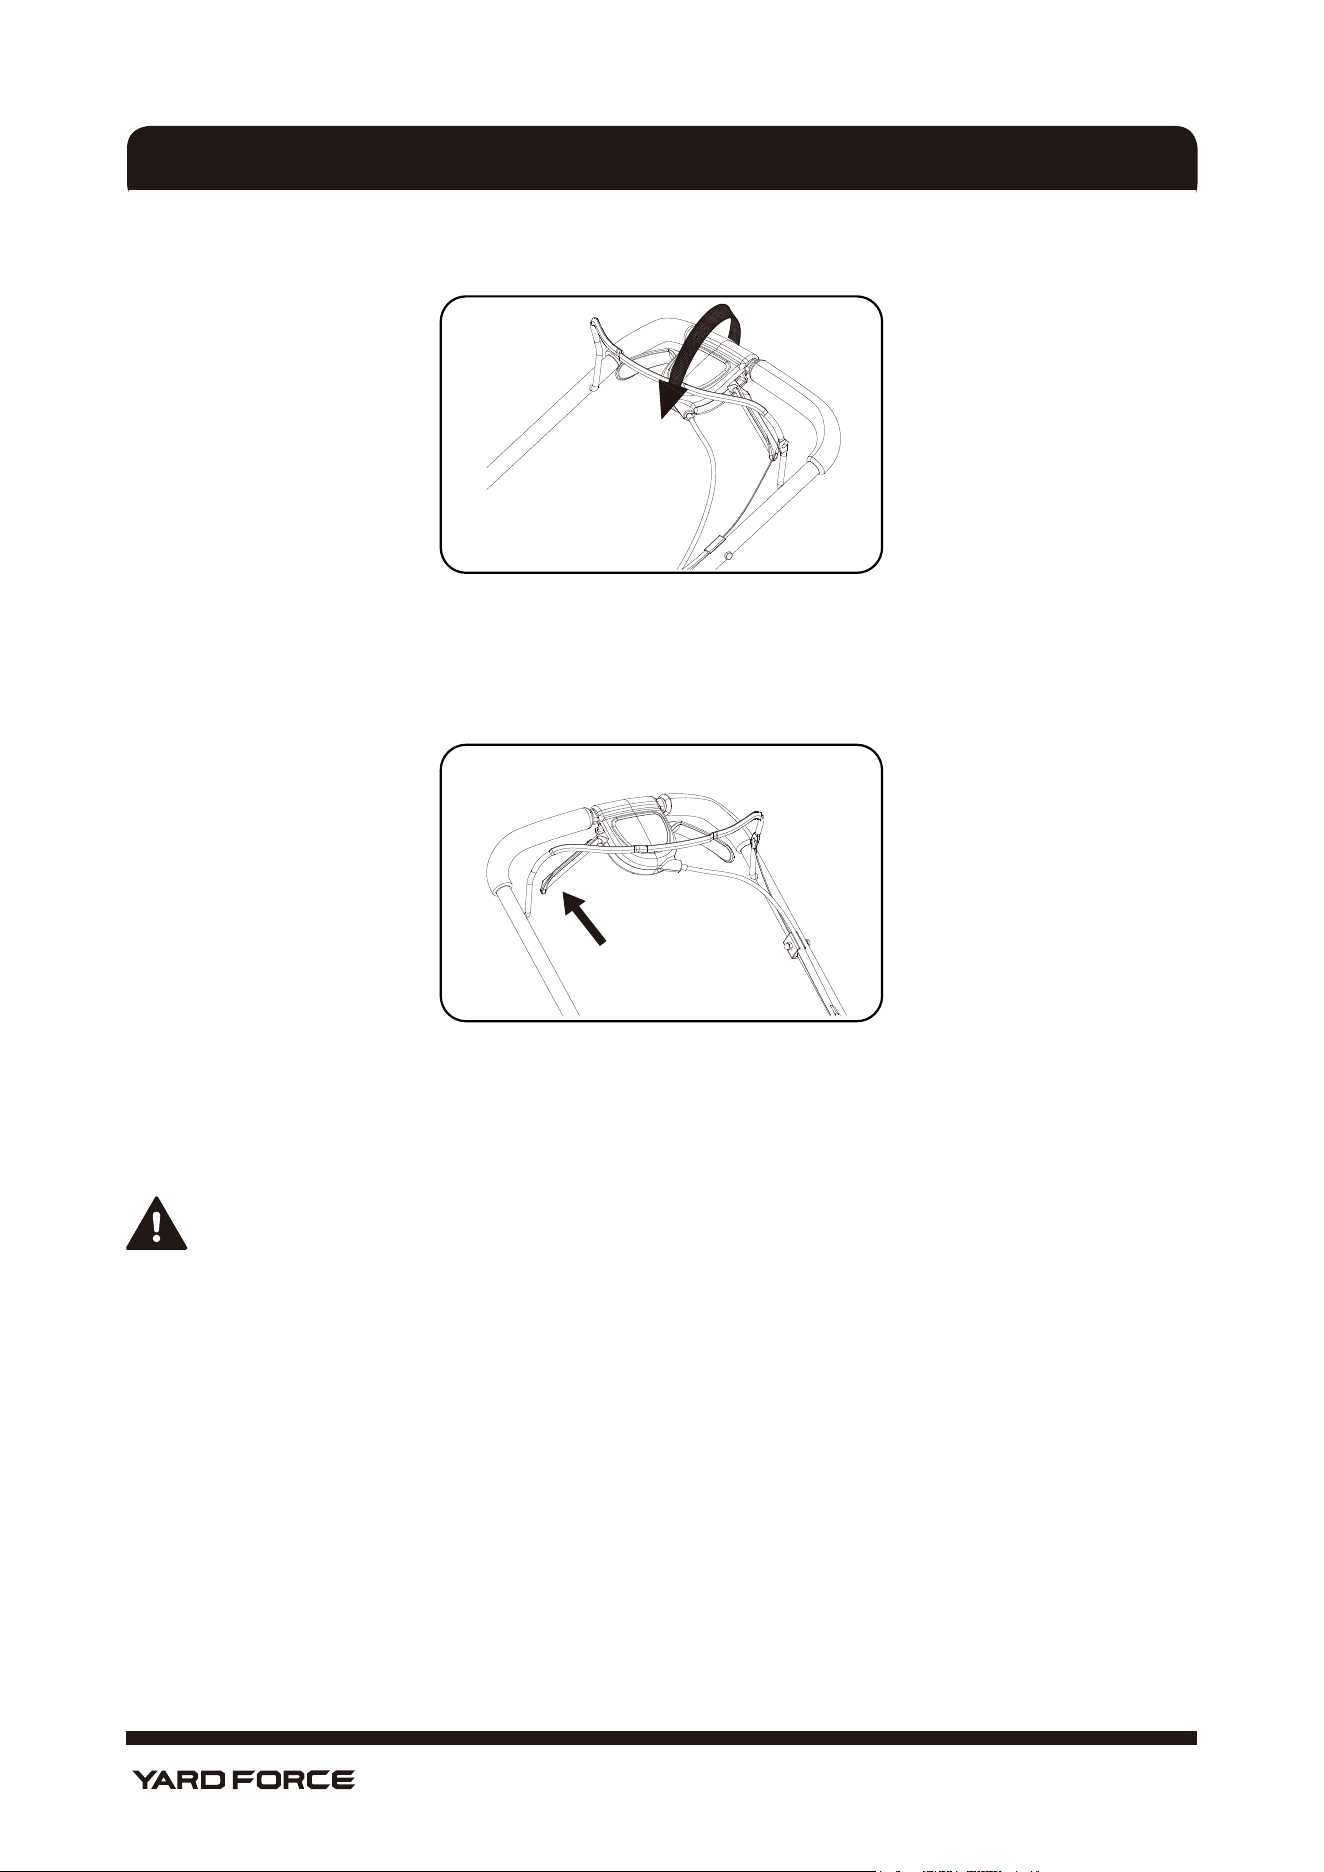
ASSEMBLING THE HANDLE
As shown in Figs. 3, 4 and 5
Arc head bolt
Fig. 3
Fixing knob
ASSEMBLY
10
Hotline: 1-866-902-9690
Fig. 4
IMPORTANT: Unfold handle carefully to avoid pinching or damaging the control cables. Control cables
must be routed above the lower handle during assembly. Please follow below steps to assemble.
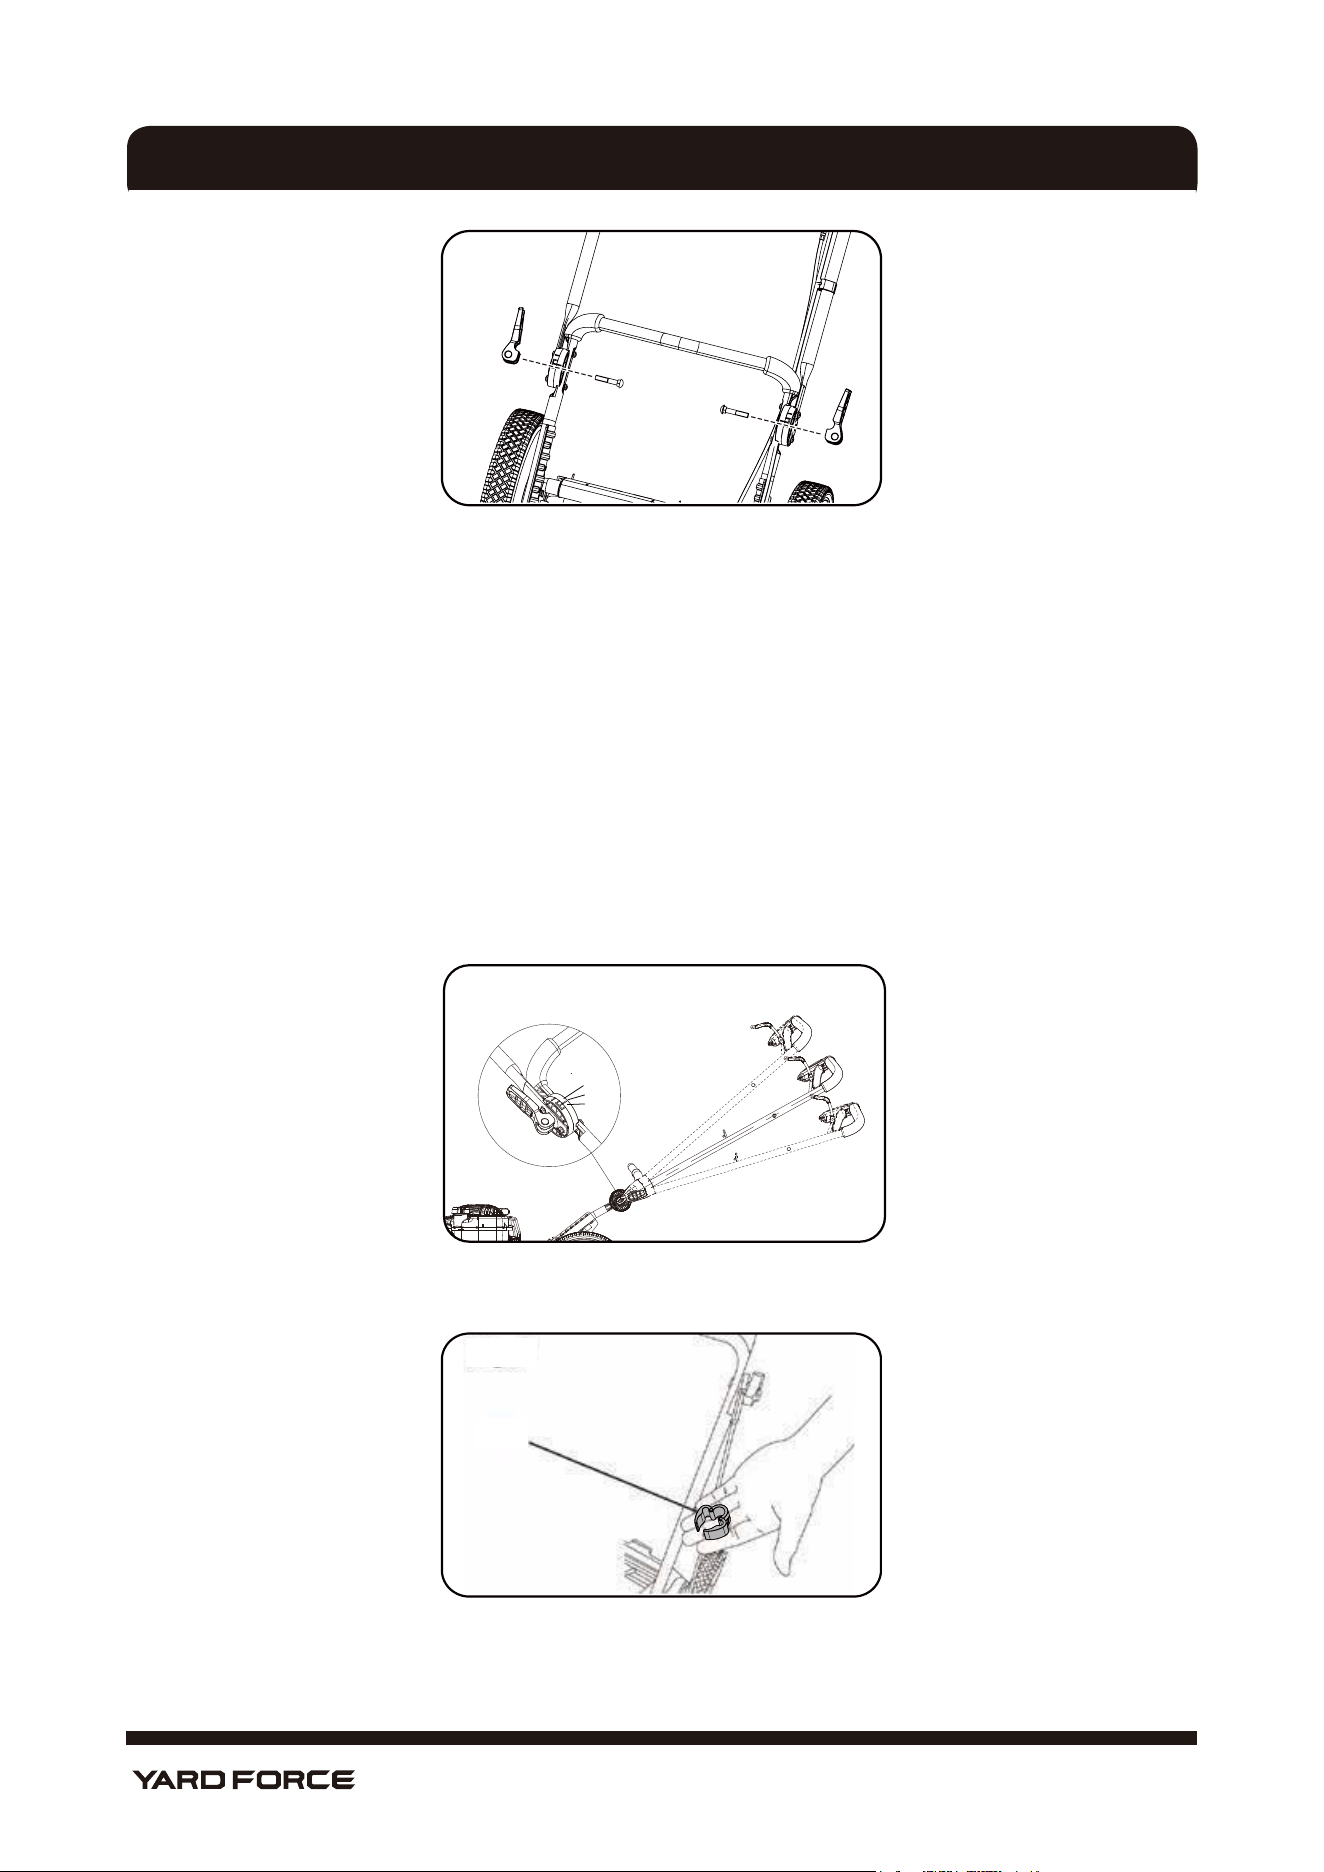
1. Insert the lower handle to the two side brackets. (See Fig.3)
2. Fasten the lower handle to the device by using two arc head bolts and two fixing knobs on each side.
Make sure the control cables are routed above the lower handle. (See Fig.4)
3. Insert the quick release lock bolt into the height adjust fixing blocks on the lower handle tube (1) and
upper handle fixing blocks (2). Screw the bolt in and clamp it to fix the lower handle.
4. The handle height can be adjusted at three positions (L, M and H) by rotating the height adjust fixing
block, make sure the arrows are aligned with same position of both height adjust fixing blocks, then you
can choose the handle height level you want.(See Fig.5)
5. Push up on the cam-lock handle knobs to lock the handle in place.
6. If needed, tighten the handle nut until the cam-lock handle knob locks the handle securely.
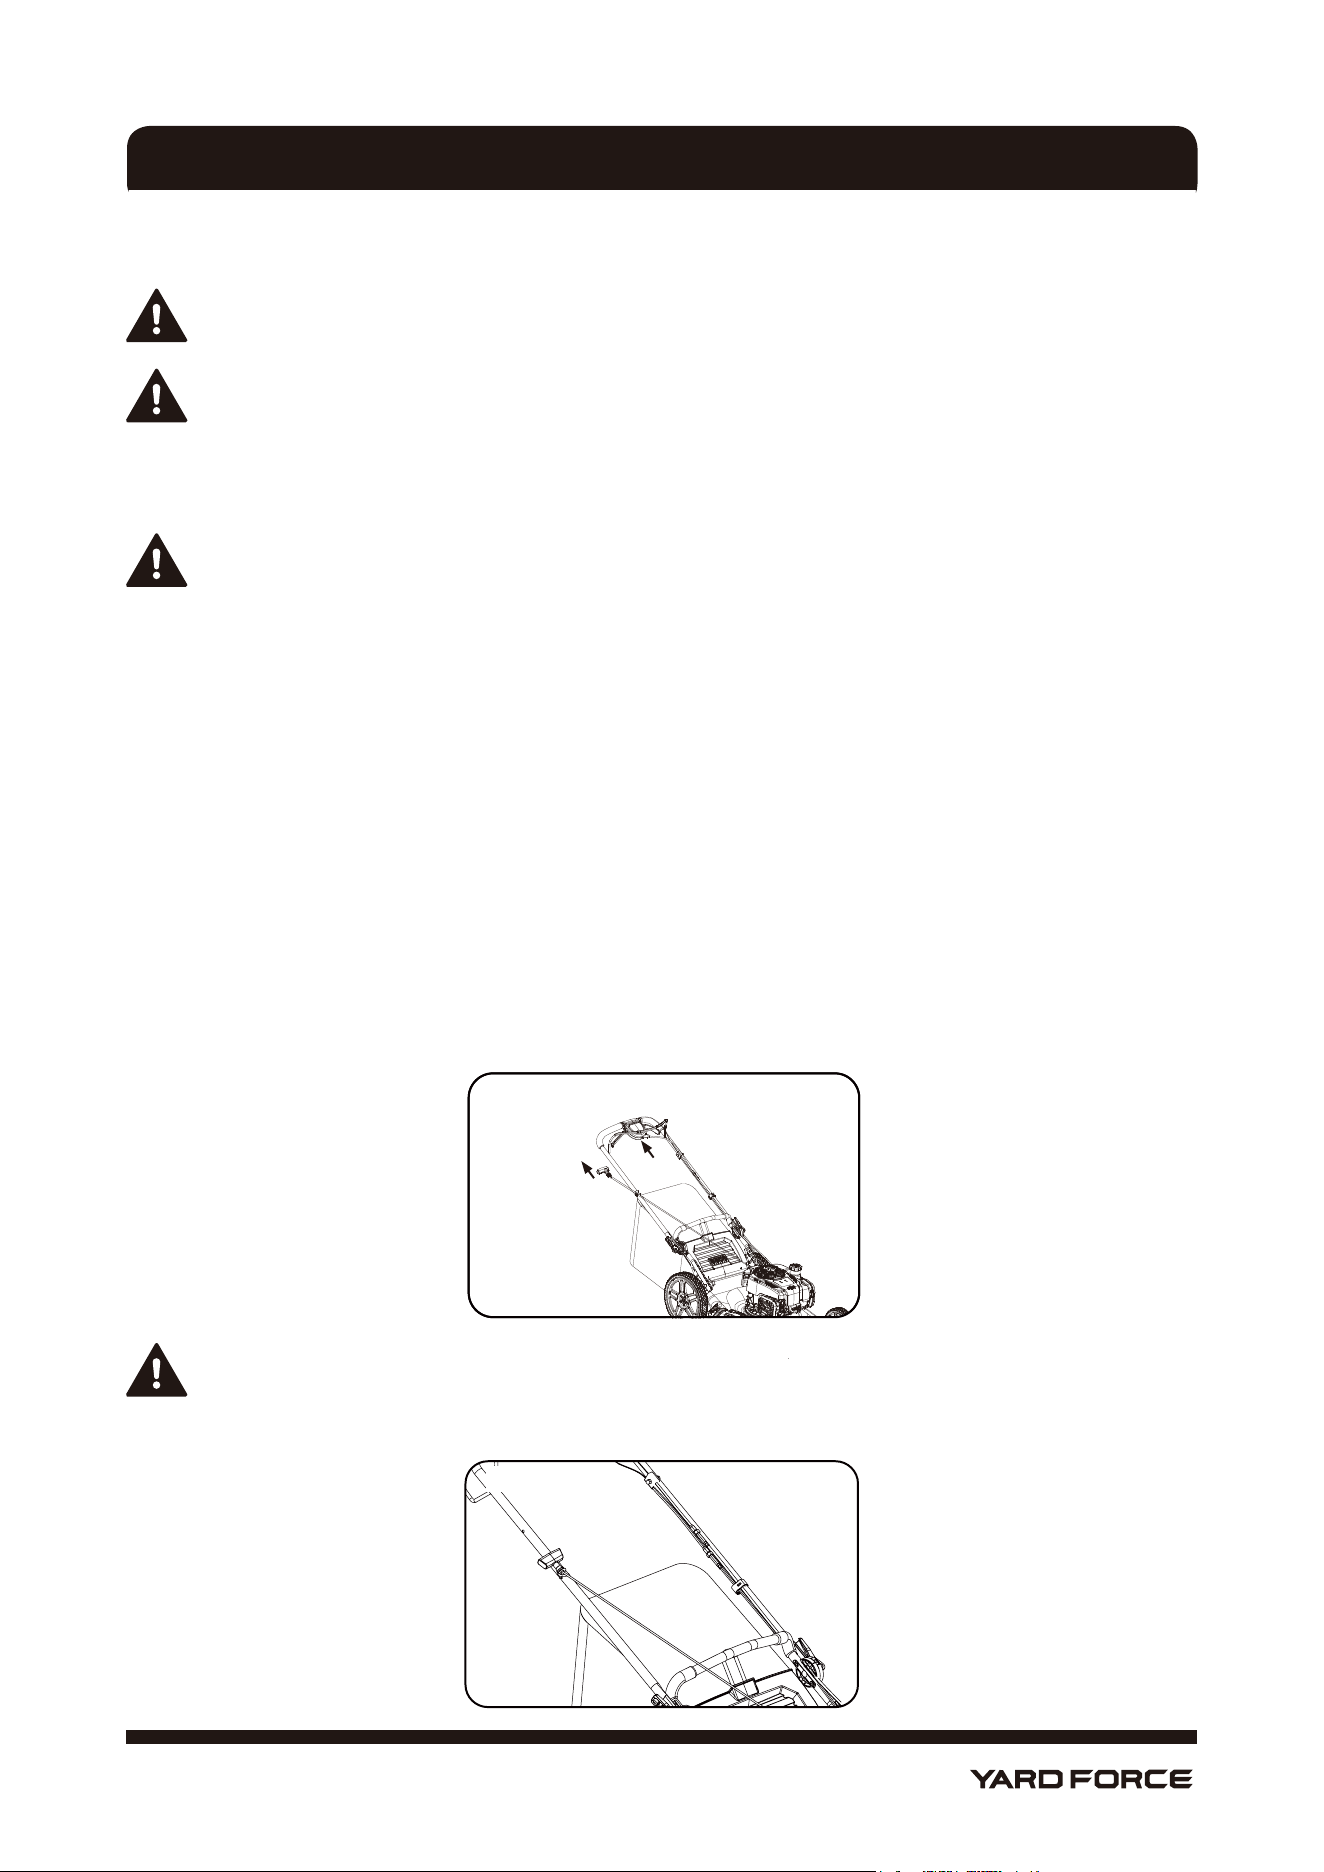
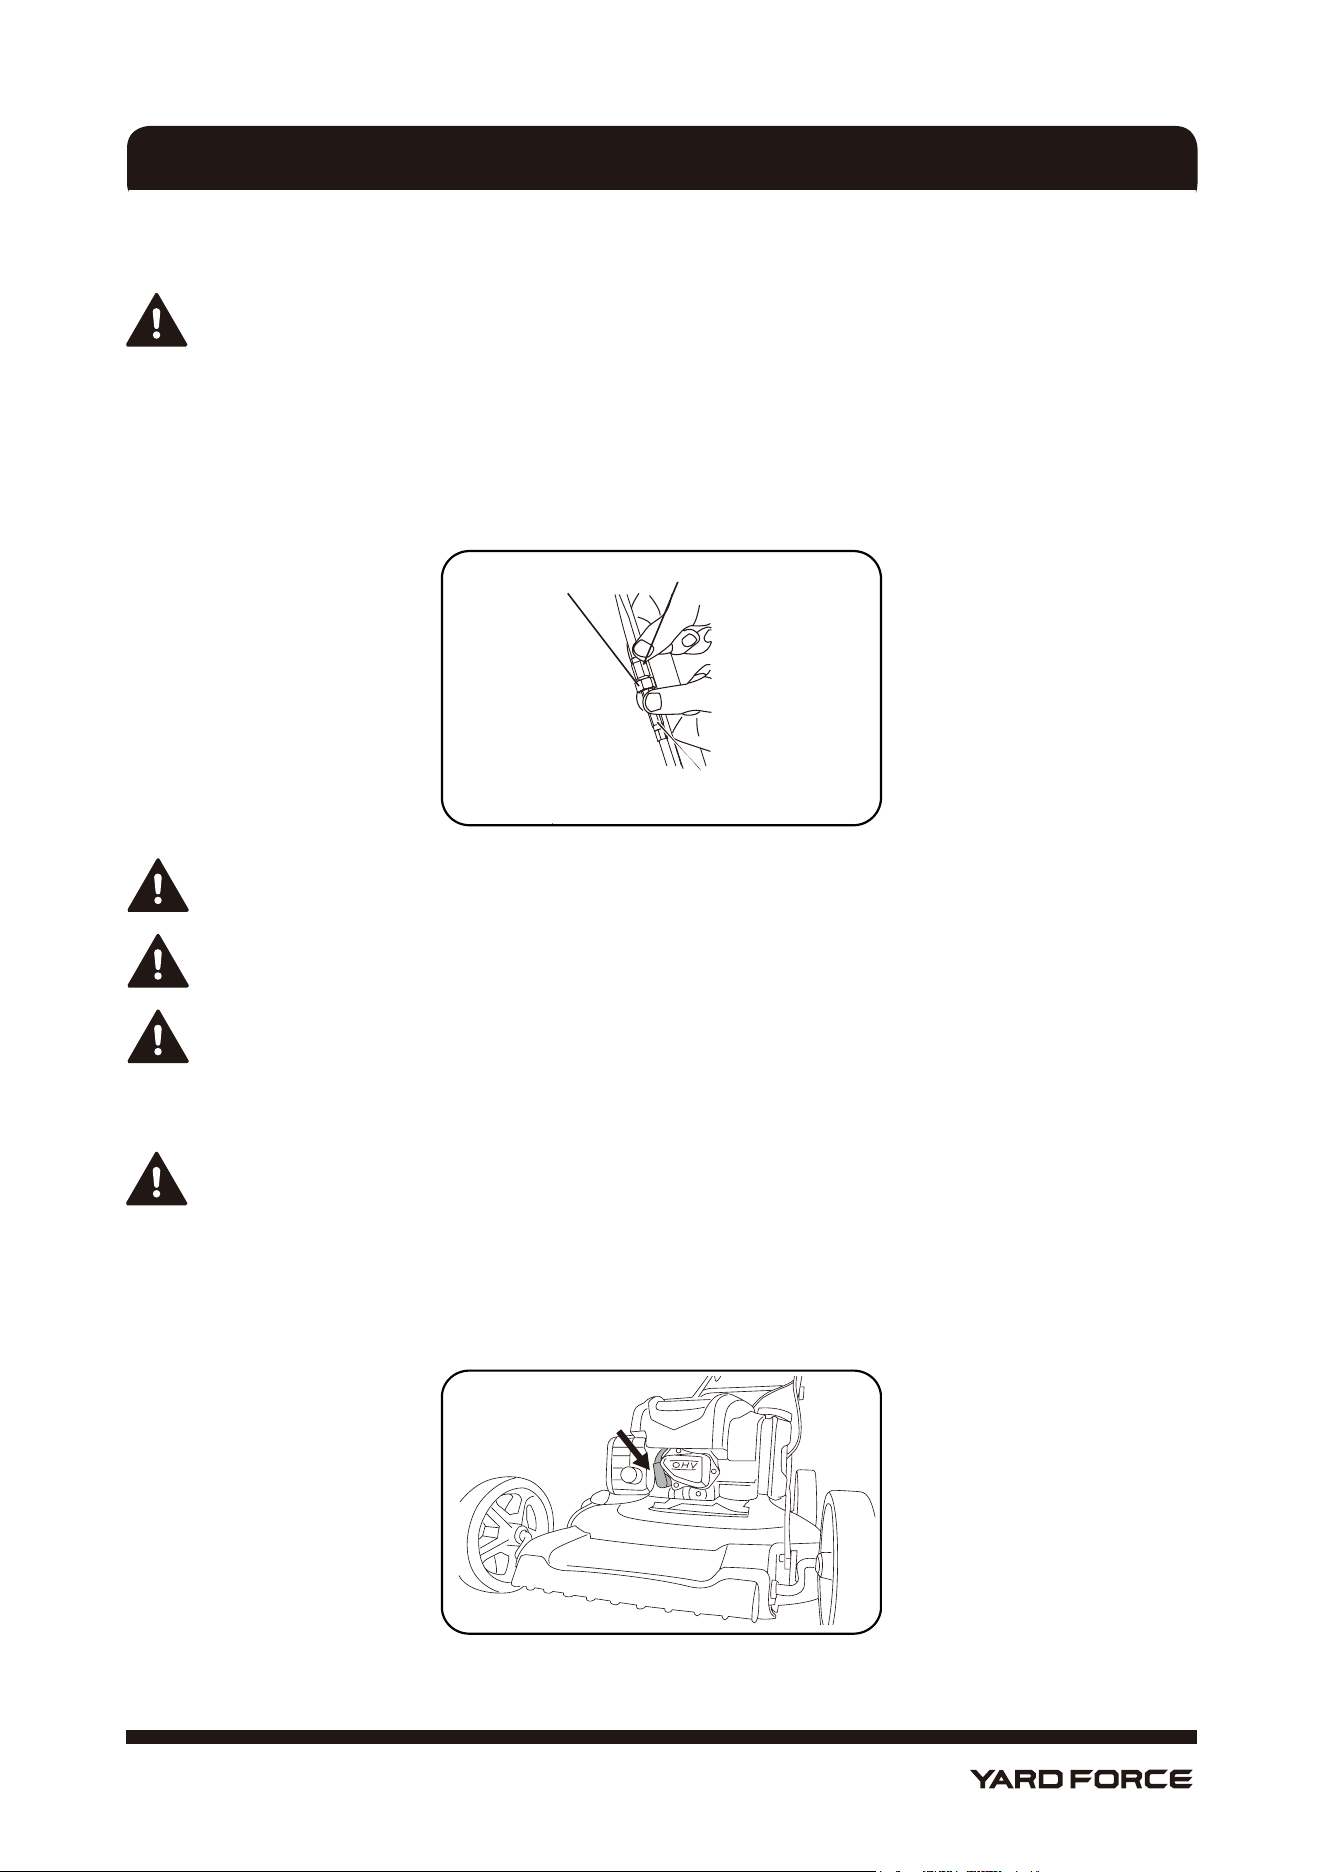
CLIP CONTROL CABLES TO THE HANDLE
As shown in Fig. 6
Fig. 6
Clip
Attach the control cables to the handle with the clip (supplied).
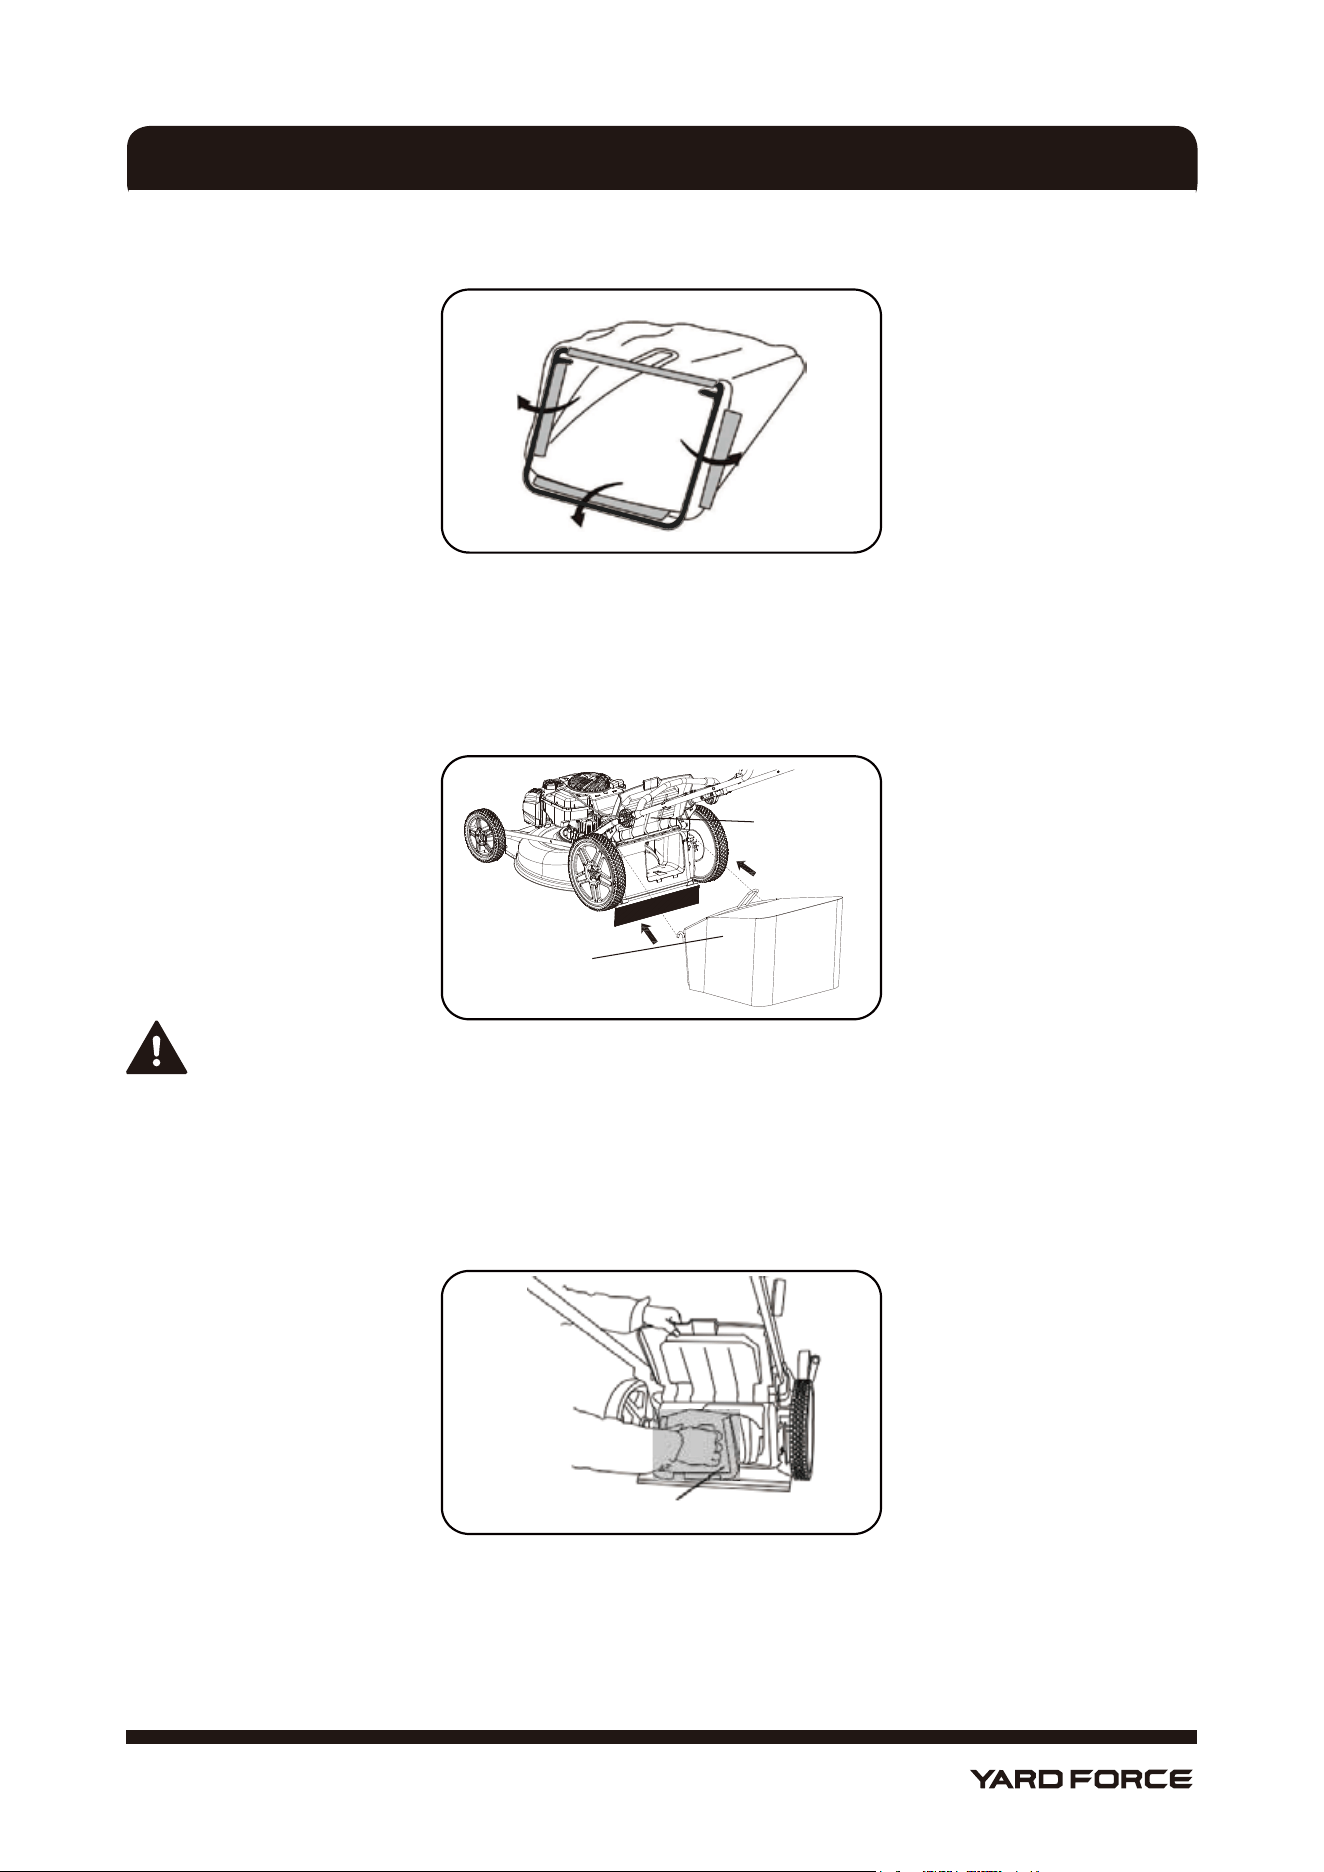
ASSEMBLING THE GRASS BAG
ASSEMBLY
Fig. 5
H
M
L
11
Hotline: 1-866-902-9690
As shown in Fig. 7
Fig. 7
1. The grass bag comes partially assembled. Make sure the frame handle is outside of the bag top.
2. Slip the vinyl bindings over the frame.
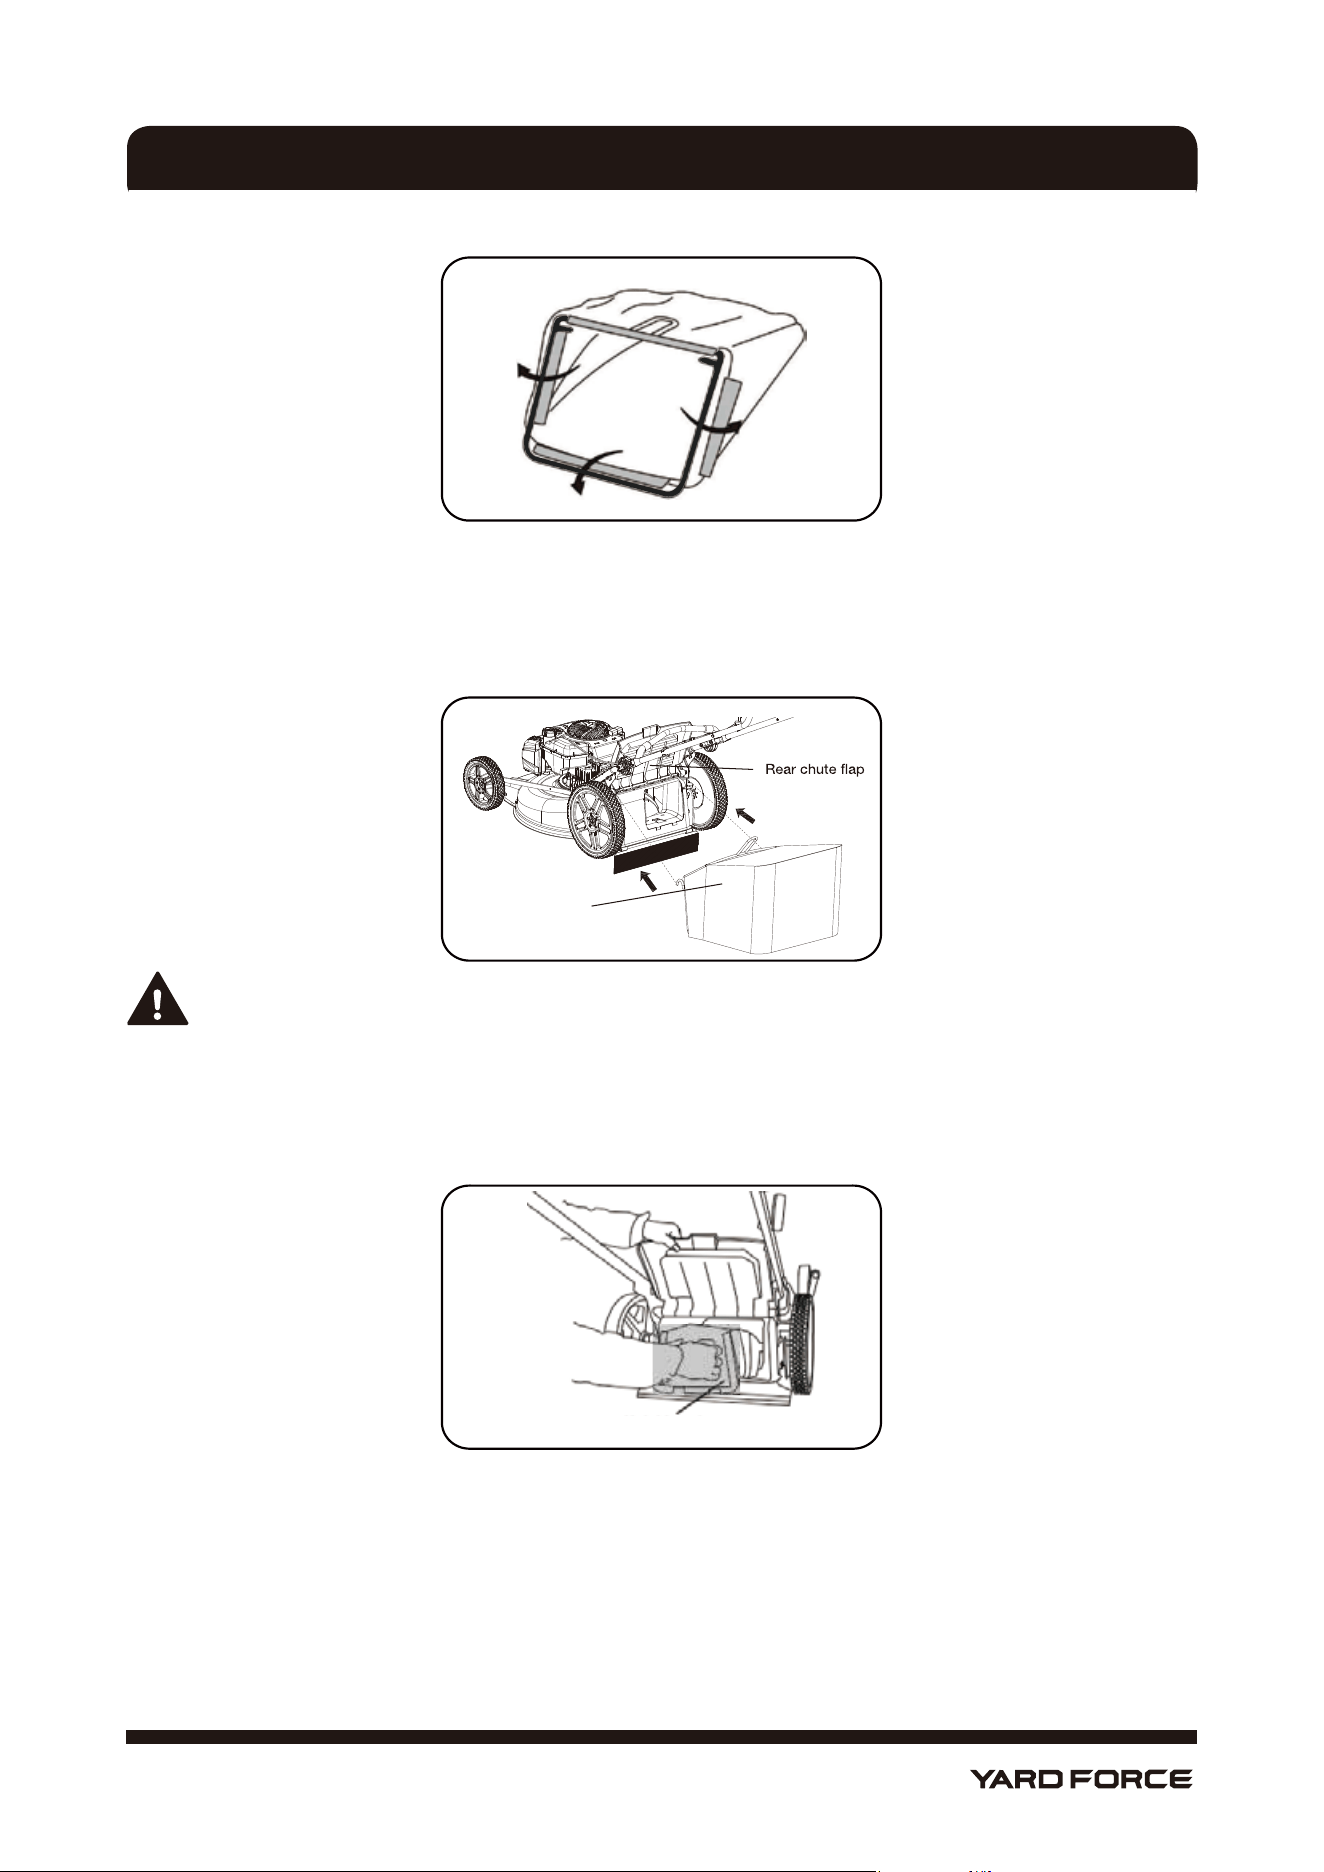
ATTACHING THE GRASS BAG TO THE MOWER
As shown in Fig. 8
Fig. 8
NOTE: Never install or remove the grass bag, mulching plug or side discharge chute while the
engine is running.
1. Lift the rear chute flap with one hand and hook in the grass bag, make sure the mulch plug be removed.
2. Release the rear chute flap to secure the grass bag in position.
INSTALLING THE MULCHING PLUG
As shown in Fig. 9
Fig. 9
Mulching plug
1. Remove the grass bag.
2. Push the plastic mulching plug into the discharge chute until it is locked in position.
3. Release the rear chute flap. It will close back to cover the mulching plug.
INSTALLLING THE SIDE DISCHARGE CHUTE
ASSEMBLY
Grass bag
12
Hotline: 1-866-902-9690
ASSEMBLY
As shown in Fig. 10
Fig. 10
Side discharge chute
Side discharge cover
NOTE: When changing to the side discharge, remove the grass bag and insert the mulching plug.
1. Lift the side discharge cover with one hand and hook in the side discharge chute with the other hand.
2. Release the side discharge cover to secure the chute in position.
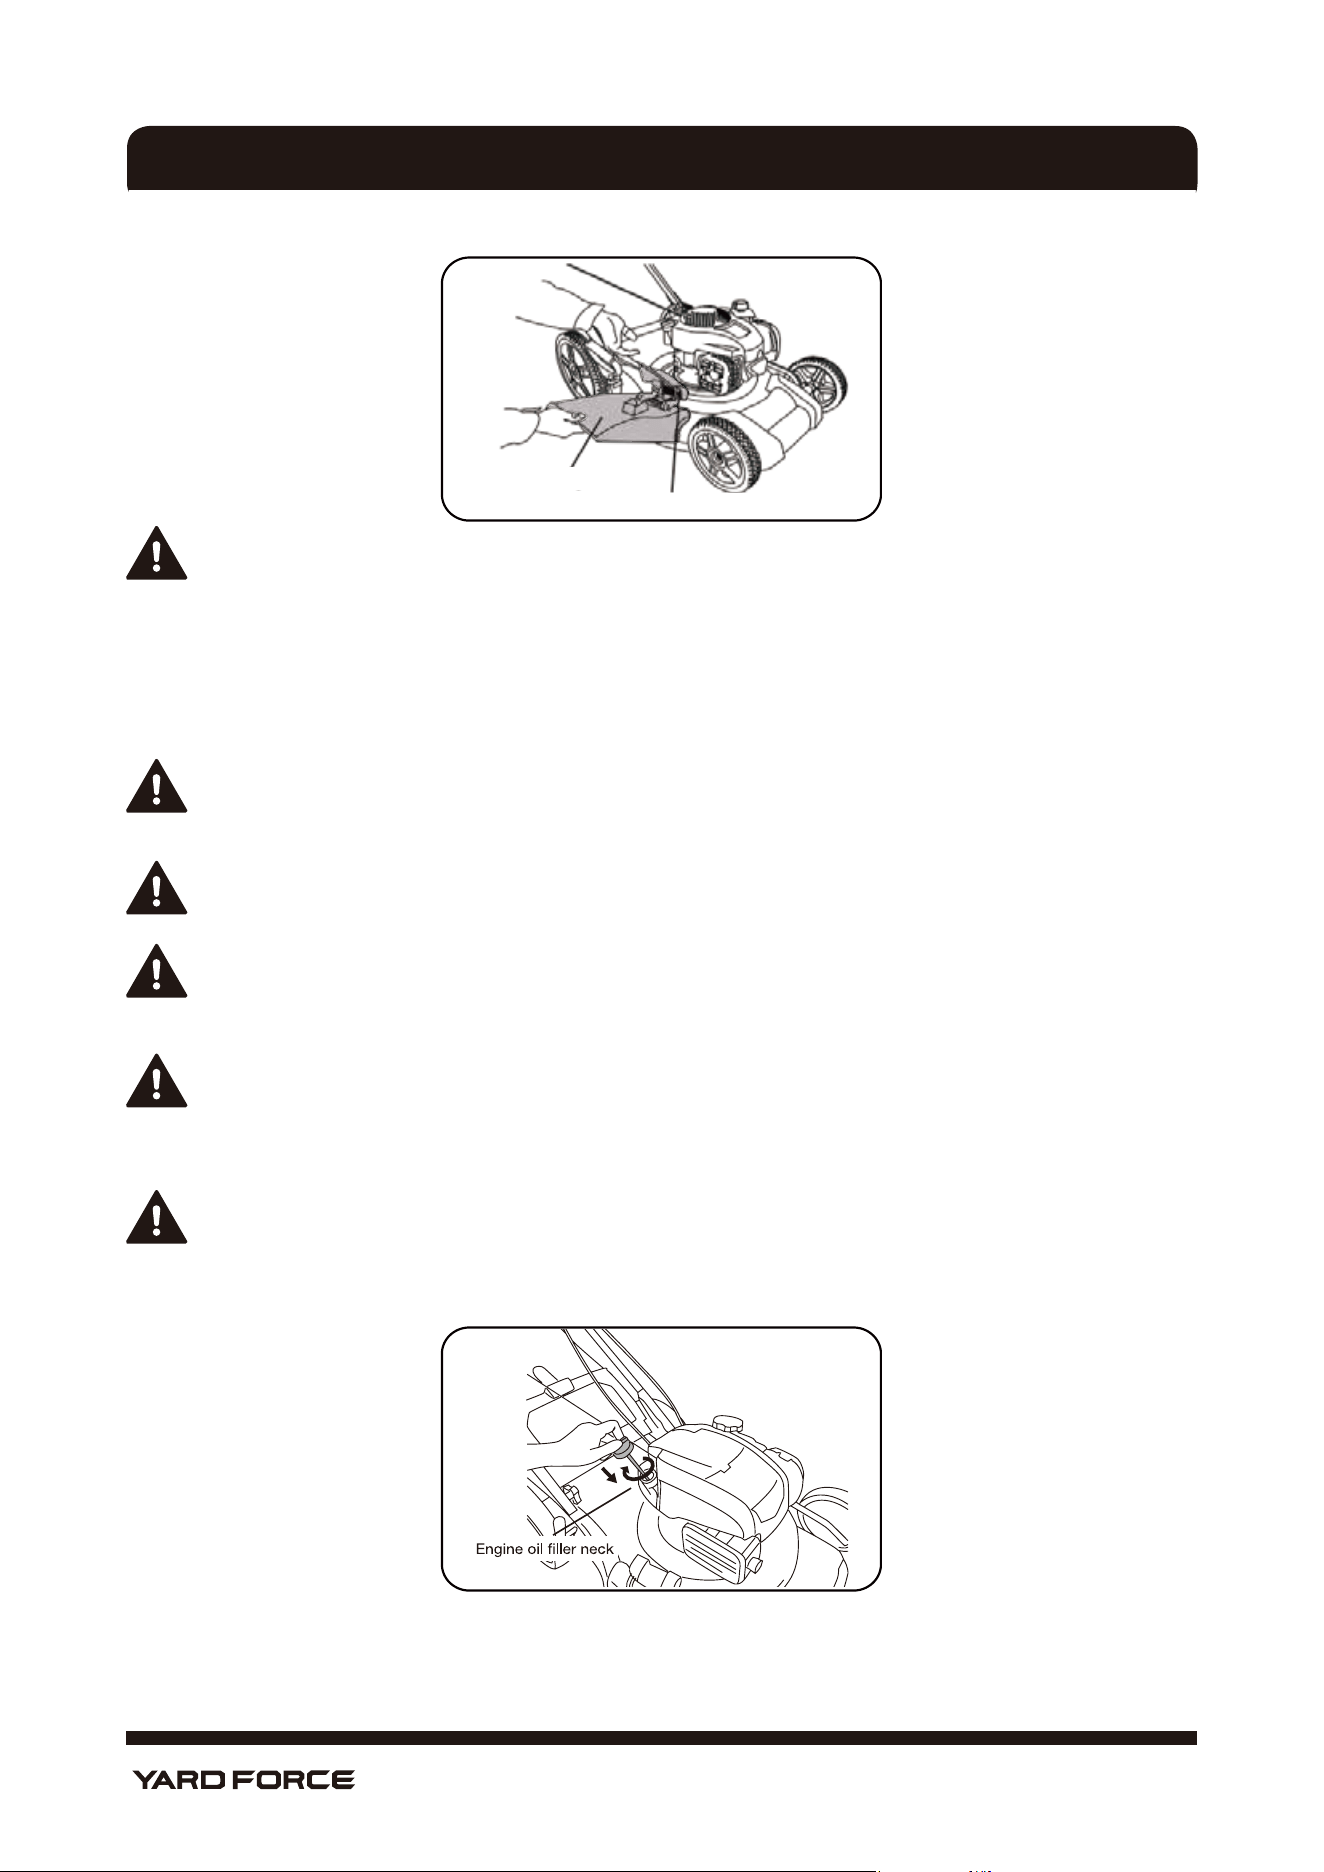
CHECKING AND FILLING ENGINE OIL
As shown in Figs. 11 to 12
CAUTION! The following procedures and adjustments must be performed before the engine
is started.
Do not attempt to make any of these adjustments while the engine is running.
CAUTION! To prevent engine damage, the engine is shipped without oil or gas.
The engine must be filled with the correct grade of oil and gas before starting the engine.
NOTE! Running the engine with a low oil level will cause engine damage. It is recommend that
high-detergent, premium-quality 4-stroke engine oil used. Using non-detergent oil can shorten the
engine’s service life, and using 2-stroke oil will damage the engine.
CAUTION! Always use high-quality detergent oil classified SAE30 oil (or equivalent, such as
SAE 5W-30, often called 4-stroke lawn mower oil).
Never use additives with recommended oil.
This engine is "Check and add" and never needs the oil to be drained and replaced.
NOTE: To check the engine oil level, stop engine and place the mower on a level surface.
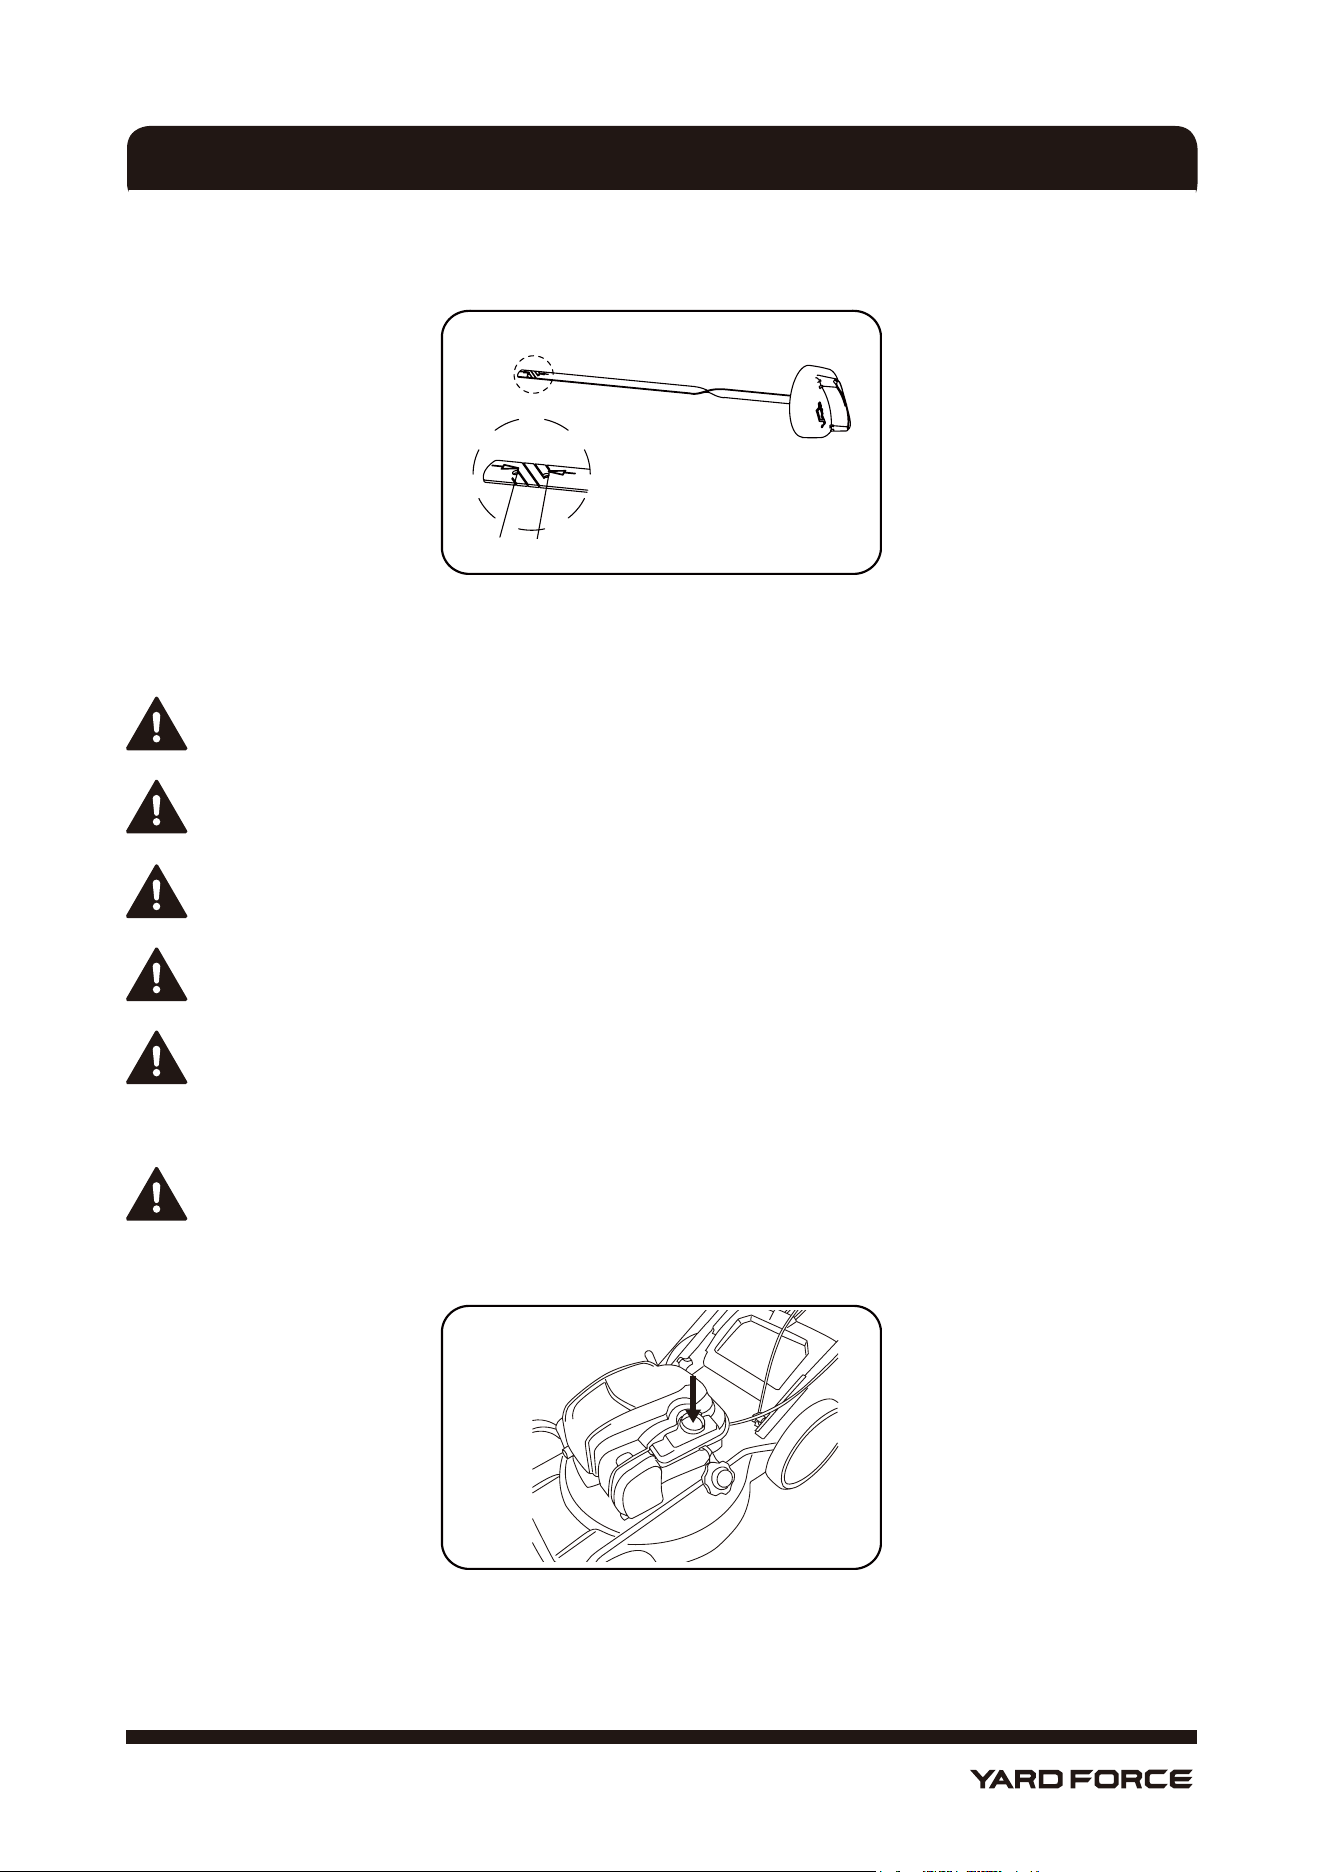
1. Remove the oil filler dipstick and wipe oil from it with a clean cloth (see Fig. 11).
Fig. 11
2. Insert the dipstick into the oil filler neck, twist it closed.
3. Remove the dipstick and check the oil level: the oil level must be between the Min. and Max. marks on
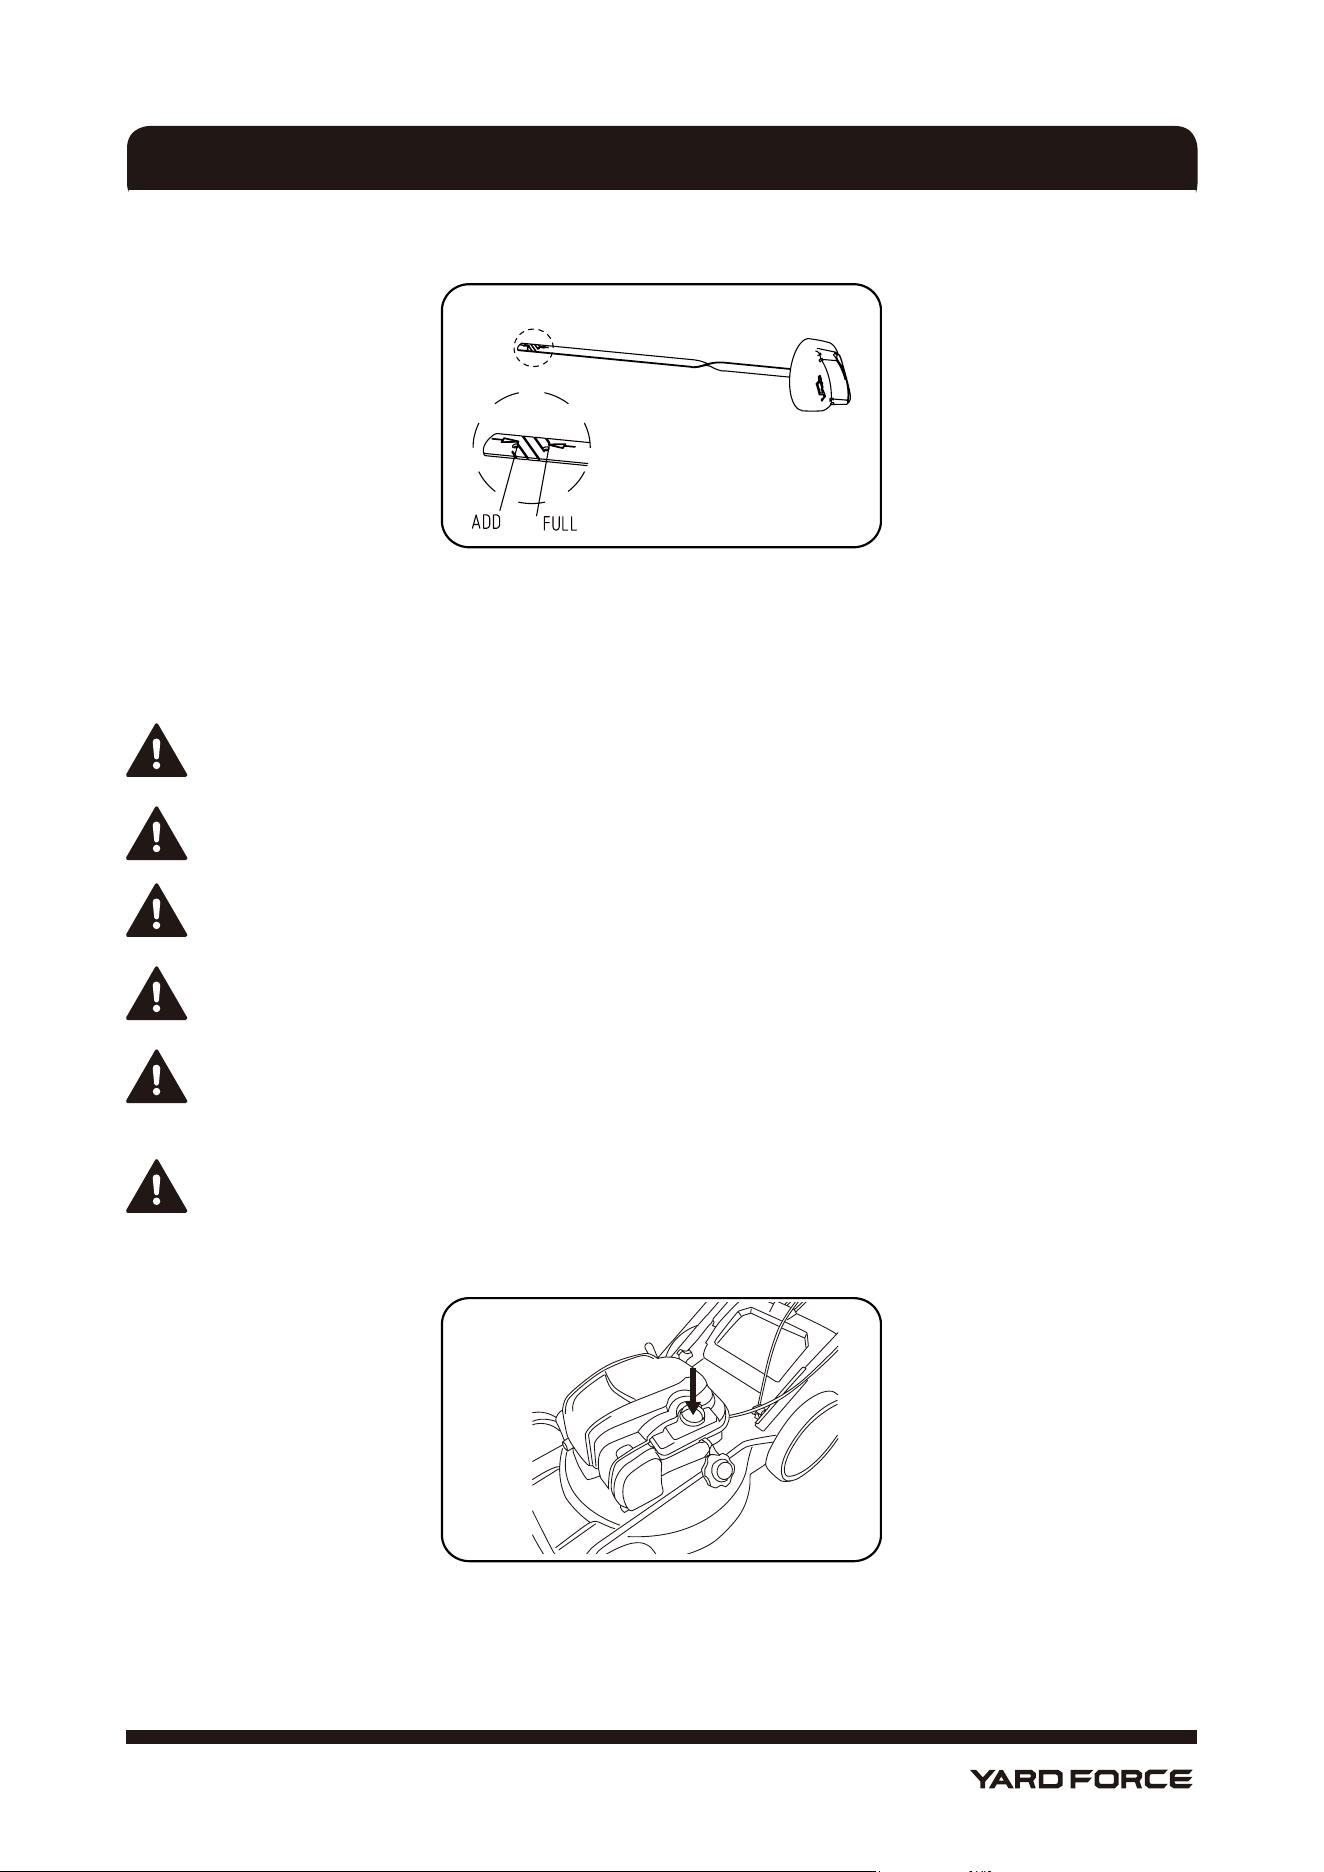
13
Hotline: 1-866-902-9690
the dipstick. If near the lower level, fill to upper lever with the recommended oil (SAE30 or equivalent). Do
not overfill. Wipe away any spilled oil (see Fig. 12).
Fig. 12
4. Attach oil filler dipstick and tighten by hand.
FILLING WITH ENGINE FUEL
As shown in Fig. 13
CAUTION! Always use clean, fresh unleaded gas. Purchase fuel in quantities that can be used
within 30 days. Never mix oil with gas.
CAUTION! Do not fill into the base of neck to allow for fuel expansion. Do not overfill the fuel tank.
CAUTION! WARNING! Gas is highly flammable and extreme caution must be taken when handling
or working with it. Keep out of reach of children.
CAUTION! To prevent engine damage the engine is shipped without oil or gas. The engine must be
filled with the correct grade of oil and gas before starting the engine.
WARNING! Refuel in a well-ventilated area with the engine stopped. Do not smoke or allow flame
or sparks in the area where the engine is refueled or where gas is stored. Avoid repeated or
prolonged contact with skin or inhalation of vapour.
WARNING! Gasoline with up to 10% ethanol (gasohol) is acceptable.
Do not use unapproved gasoline, such as E15 and E85.
1. Clean the area around the gas filler cap before removing the cap. Remove the warning tag if have, and
check the fuel level (see Fig. 13).
Fig. 13
2. Refill the tank if the fuel level is low.
3. Refuel carefully to avoid overfilling or spilling gas.
Do not ll above the bottom of the fuel tank neck.
4. Clean up any overflow or splashes of gas before starting the engine.
5. Tighten the filler cap after filling: finger tight only.
ASSEMBLY
14
Hotline: 1-866-902-9690
ADJUSTMENT
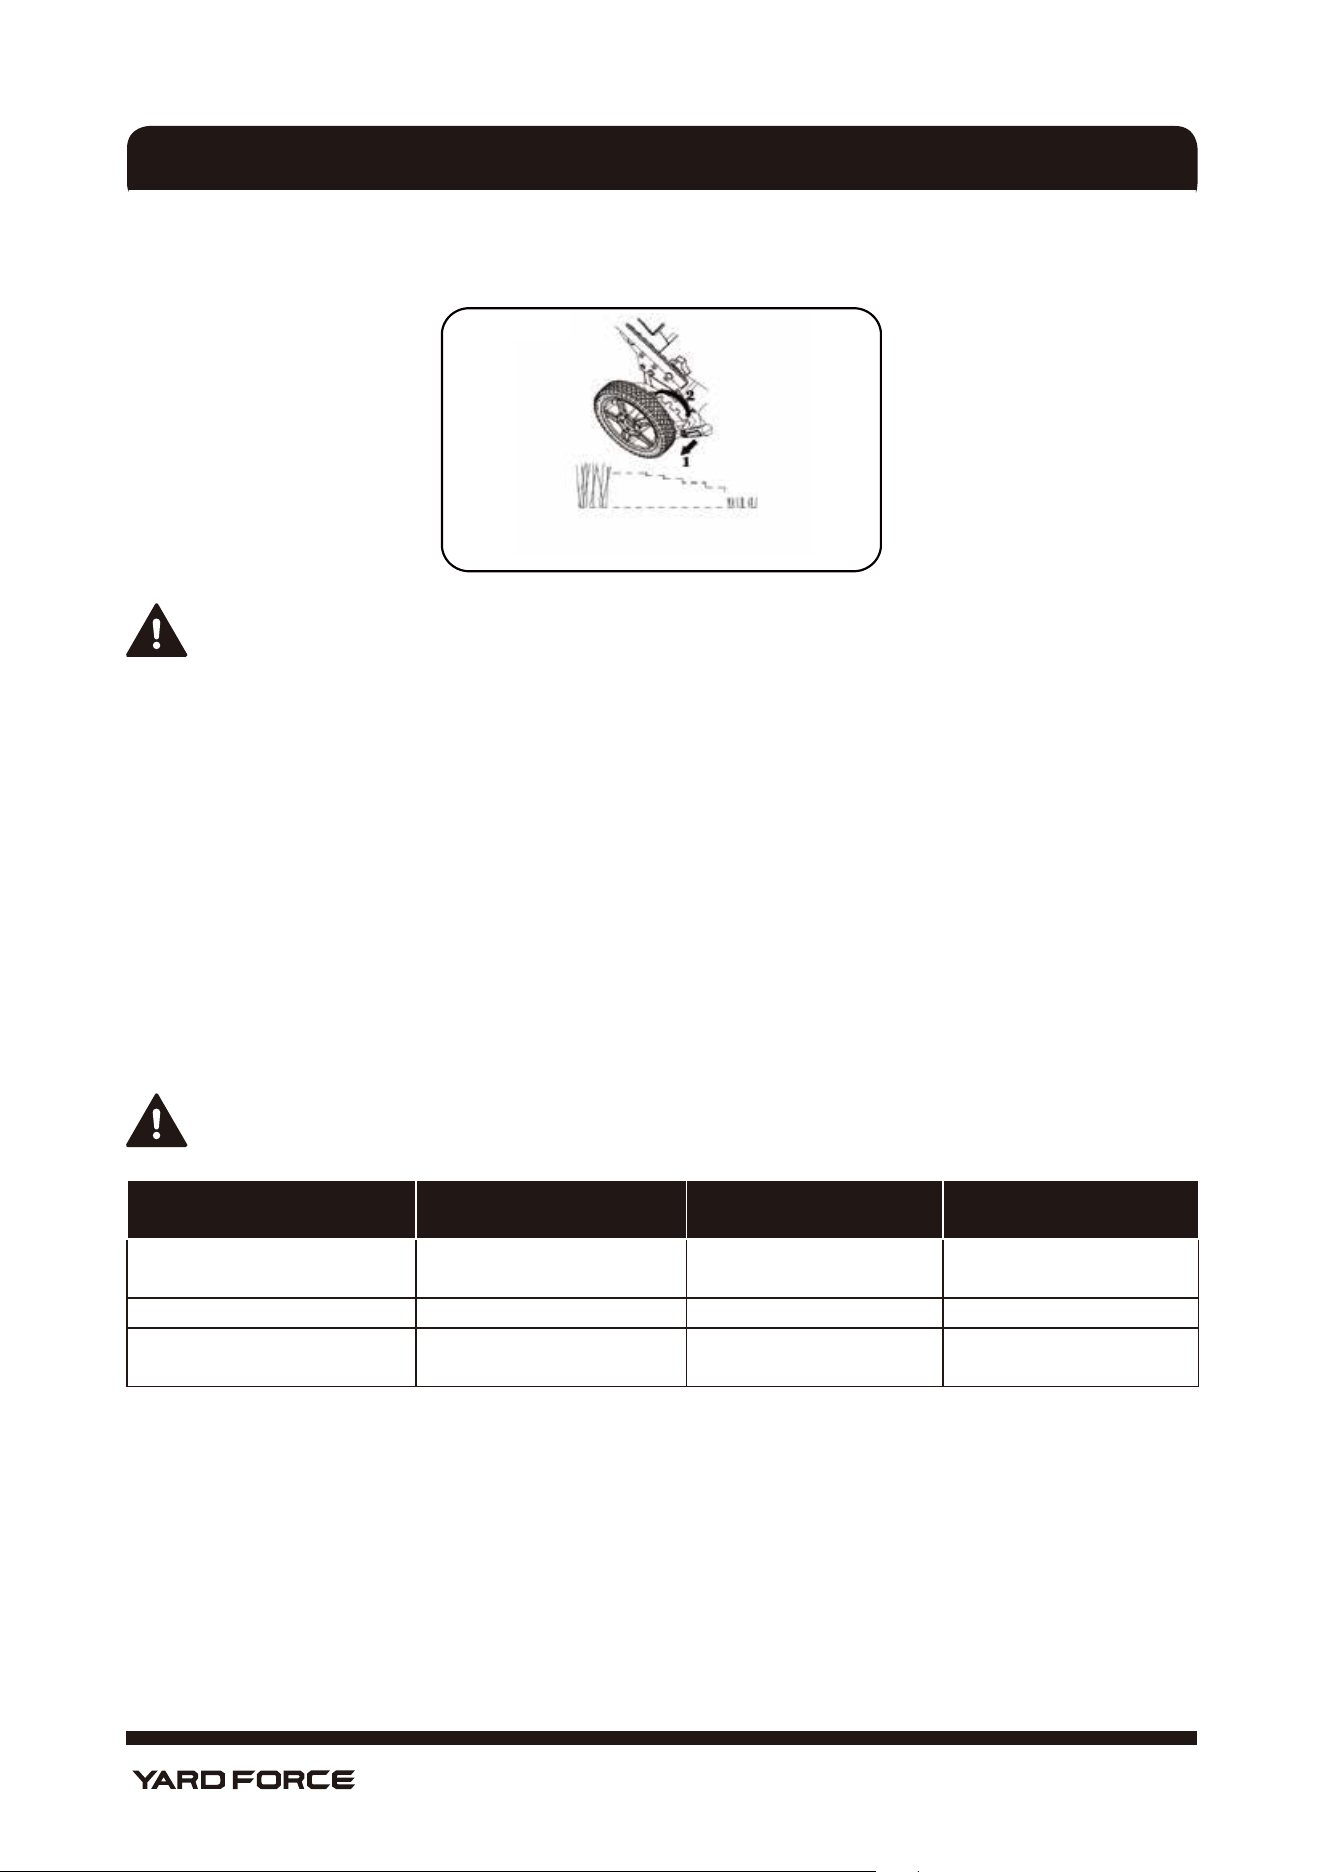
SETTING THE CUTTING HEIGHT
As shown in Fig. 14
3.75" (95 mm) 1.25" (31 mm)
Fig. 14
CAUTION! CAUTION! Adjust the cutting height only when the engine is not running.
NOTE: For shipping purposes the height adjustment position may not be adjusted to the cutting position.
Before operating the mower adjust cutting height to the normal cutting position.
The cutting height is centrally adjusted with height adjusting handle. Different cutting heights can be
selected.
Pull the height adjusting handle out and select the desired cutting height. The handle snaps into the desired
position.
From position 1 to position 7, the cutting heights range from 1.25" to 3.75" (31-95 mm).
SETTING REQUIRED FUNCTION
NOTE: This lawn mower has three functions. Change functions by changing the installed
accessories as shown in the following chart.
To convert mower Mulching Plug Grass Bag Side Discharge Chute
For rear bagging
×
√ ×
For mulching
√
×
×
For side discharging
√
×
√
“
√
”: installed “×”: removed
15
Hotline: 1-866-902-9690
OPERATION
START AND STOP THE ENGINE
WARNING: the blade begins to rotate as soon as the engine is started.
NOTE: Do not operate the lawn mower in enclosed or poorly-ventilated areas as the exhaust
gas contains toxic substances.
Keep hands, feet, hair and clothing away from the moving parts of the machine. The exhaust and
other parts of the machine will become hot during use.
Make sure that the blade is securely fastened before starting the engine.
NOTE: to start the engine, make sure that the spark plug cover is connected to the plug and the
machine is filled with sufficient oil and gas.
TO START THE ENGINE
NOTE: Due to protective coatings on the engine, a small amount of smoke may be present during the initial
use of the lawn mower. This is normal.
NOTE: NOTE: Your engine is equipped with an automatic choke system. No priming or choking is required
before starting.
1. The engine equipped with an automatic choke system. No priming or choking is required before starting
for your mower.
2. Stand behind the mower. Pull the Engine On/Off Control Bar toward upper handle with one hand and
place the other hand on the Engine Start Handle.
3. Pull the starter handle out until you feel a resistance and then start the engine with a sharp pull (see Fig.15).
Fig. 15
NOTE: If the engine fails to start after three pulls, repeat the process.
4. Once the engine is running, put the starter rope into the rope guide (see Fig. 16).
Fig. 16

16
Hotline: 1-866-902-9690
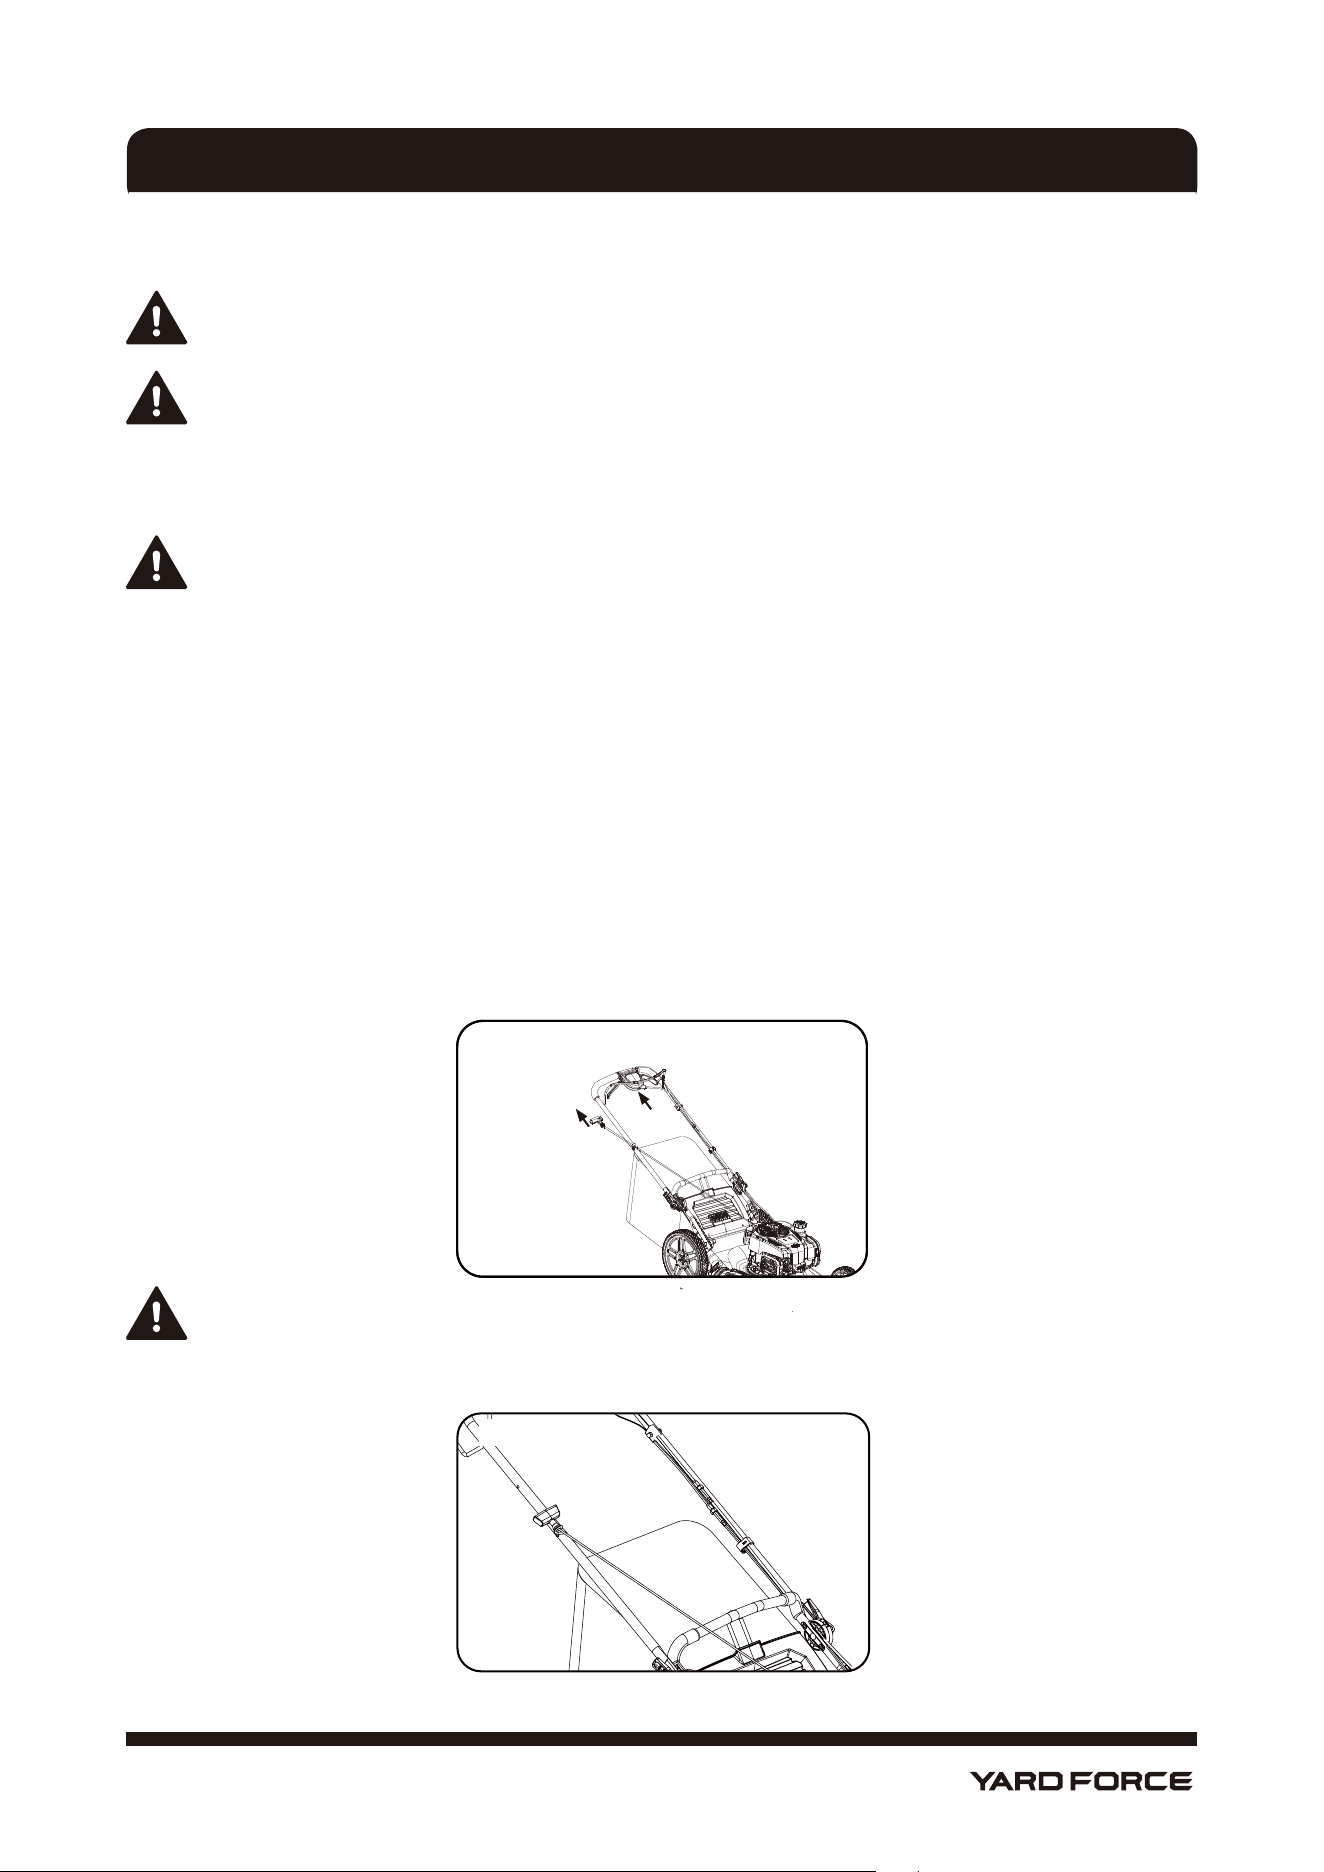
TO STOP THE ENGINE
As shown in Fig. 17
Fig. 17
Release the Engine On/Off Control Bar. It will return to its initial position and the engine will automatically
switch off.
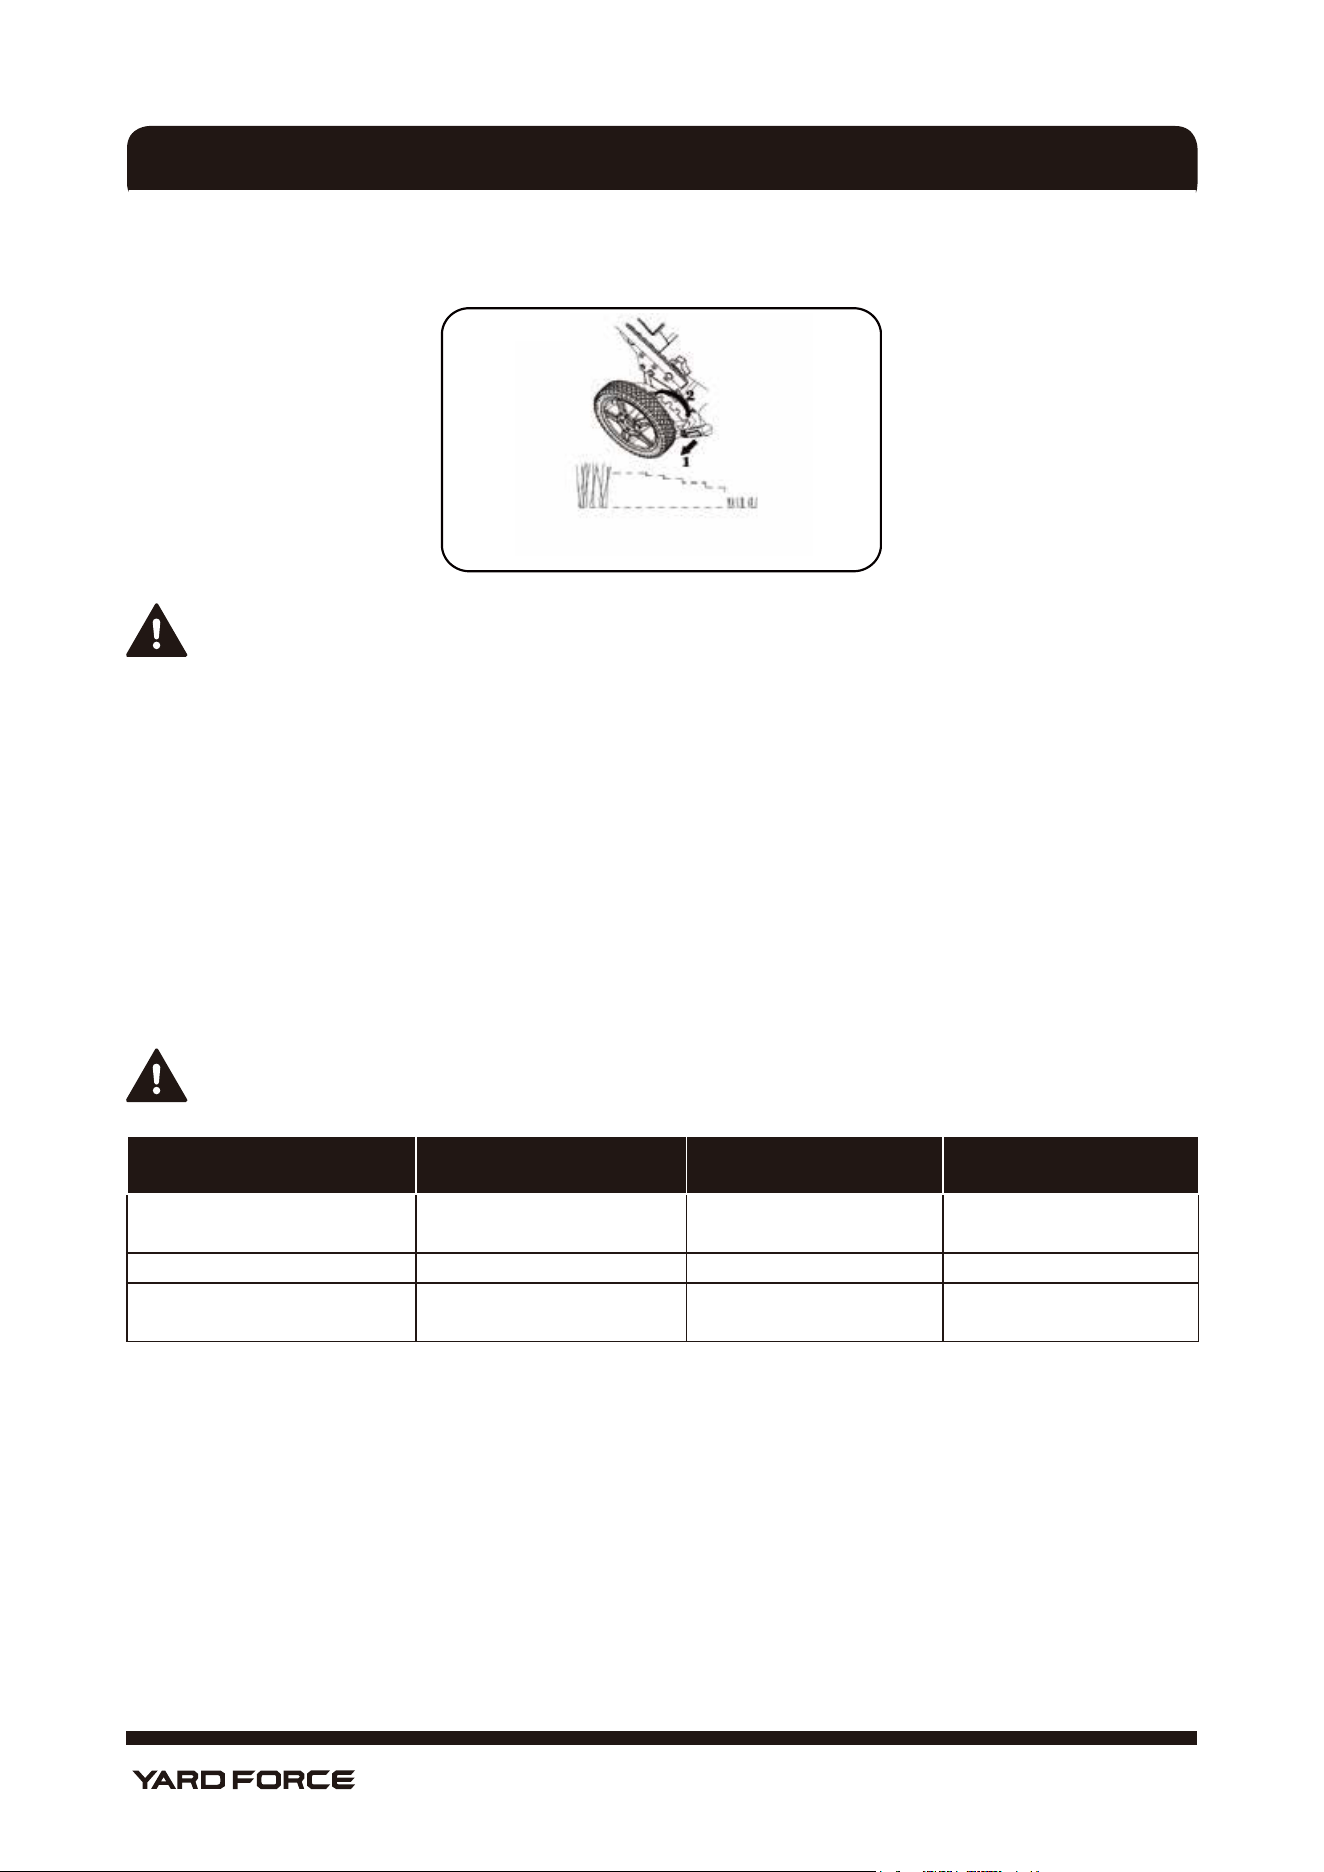
DRIVE CONTROL
As shown in Fig. 18
Fig. 18
1. Self-propelling is controlled by holding the engine on/off control bar down to the handle and squeeze the
self-propelled control lever to the handle.
2. To stop forwa
3. The self-propelled speed of the lawn mower can be adjusted by the self-propelling control lever. Squeeze
the self-propelled control lever to the handle, the walking speed will be at its fastest. Slow down the speed
by gradually releasing the self-propelled control lever.
rd motion without stopping the engine, release the self-propelled control lever while still
holding the engine on/off control bar down against the handle to continue mowing without self-propel
drive activated.
NOTE: After releasing the self-propelled control lever, if the mower will not roll backwards, push
the mower forward slightly to disengage the drive wheels.
OPERATION
17
Hotline: 1-866-902-9690
OPERATION
DRIVE ADJUSTMENT
Note:
The drive system consists of pulleys, a belt, and a cable linking the transmission to the drive
handle. As these components wear, adjustment may be needed. To adjust the drive linkage perform
thefollowing:
• Loosen the locking nut with a wrench (not supplied).
• Hold the upper bolt and turn the stop nut clockwise to shorten the cable, counterclockwise to lengthen
the cable.
• Start the mower to test the function of the drive control handle and tighten the locking nut once self-
propel can engage.
locking nut
stop nut
upper bolt
Note:
The cable must be loose with the self-propel drive bar in the released position; otherwise, the
machine may creep when the drive control handle is disengaged.
Note:
Self-propelled speed can change on slopes
Note: After releasing the drive control, if the mower will not roll backwards, push the mower forward
slightly to disengage the drive wheels.
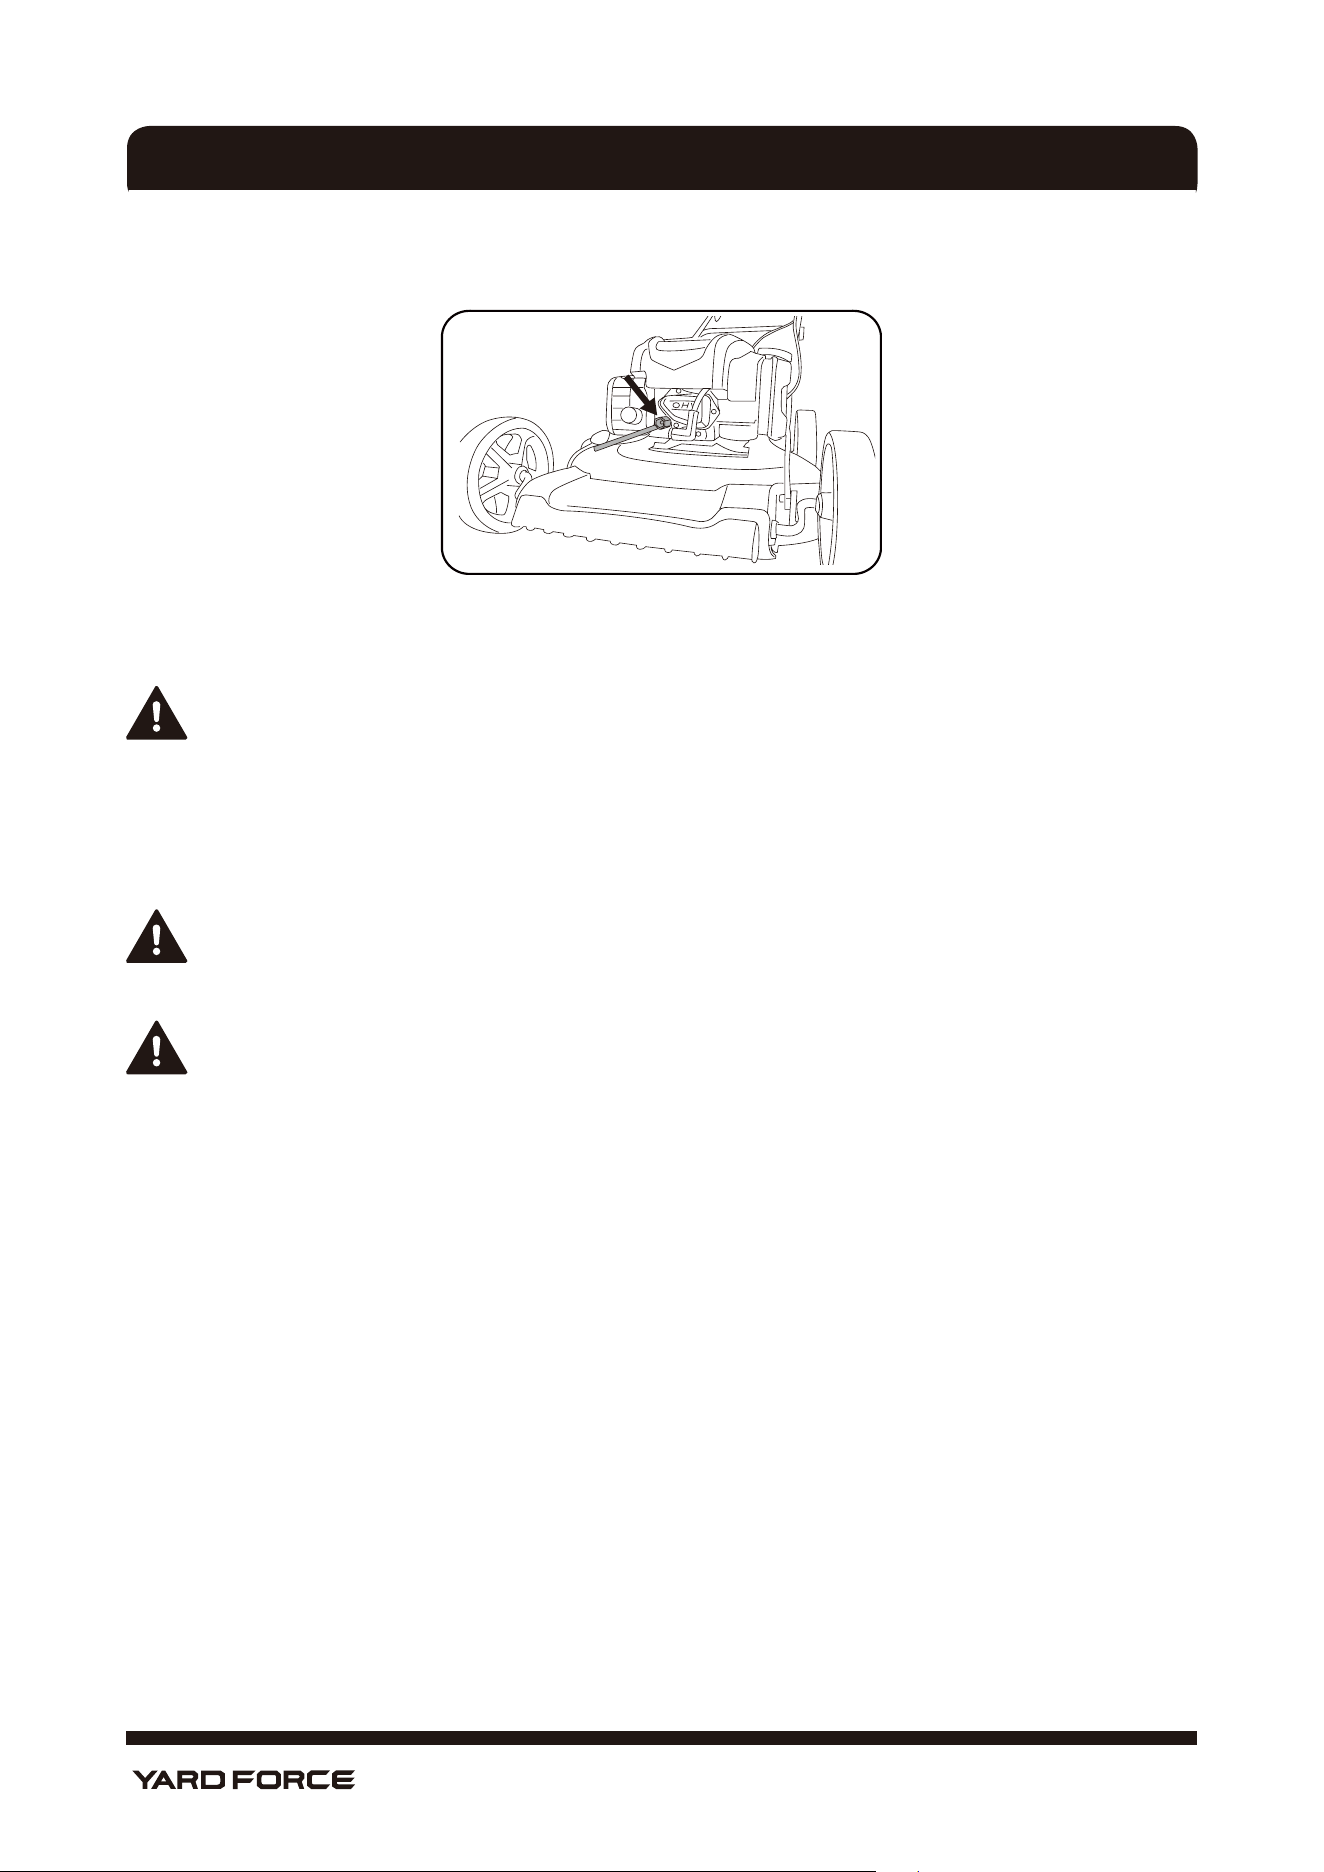
TO CLEAN A FLOODED ENGINE
NOTE: If the engine won’t start after you have pulled the engine start rope several times, the engine
may be flooded with excess fuel. Use following procedure to clear and start a flooded engine.
1. Release the Engine On/Off Control Bar to stop engine.
2. Remove the spark plug, dry it, and then re-install it.
(1) Remove the spark plug cover (see Fig. 19).
Fig. 19
18
Hotline: 1-866-902-9690
(2) Use a spark plug socket wrench (not supplied) to remove the spark plug (see Fig. 19-1).
Fig. 19-1
(3) After drying, tighten the spark plug.
NOTE: Install the spark plug carefully by hand to avoid cross-threading. After the plug is seated,
tighten it with the spark plug socket wrench to compress the washer.
3. Pull the Engine On/Off Control Bar toward upper handle.
4. Operate the starter as described above.
MOWING
WARNING: Always observe the strictest safety procedures when using the lawn mower.
Carefully read the safety instructions of this manual before using the lawn mower.
WARNING: Never open the rear chute flap when the grass bag has been detached (to be emptied)
and the engine is still running. The rotating blade can cause serious injuries!
1. Select your required height and function settings.
2. Start the engine and allow it run. See “To start the engine”.
3. Keep a firm grip on the upper handle with engine on/off control bar and self-propelled drive control bar
closed and walk along with it self-propelling to start mowing.
WORKING TIPS
1. Walk, never run with the mower, and be very careful when mowing uneven or rough ground.
2. Mow across slopes, never up and down.
3. Be careful when changing the direction of the mower on a slope.
4. Do not mow excessively steep slopes.
5. The best result will be achieved if the grass is dry. Wet grass will tend to clog the blade and the grass
collection system.
6. Grass grows at different rates at different time of the year. Never use the lowest cutting height for the
first cut of the season or in drought conditions.
7. Only about one third of the grass height should be cut.
8. Do not cut high or wet grass when mulching to ensure that the cut grass can be scattered effectively.
When you have been cutting for several minutes, please stop the mower and clean the blade and the
deck.
9. Do not remove grass debris in the mower casing or on the blade by hand or with your feet.
Instead, use suitable tools such as a brush or broom.
OPERATION

19
Hotline: 1-866-902-9690
OPERATION
EMPTYING THE GRASS BAG
As soon as grass clippings start to trail the lawn mower, it is time to empty the grass bag.
NOTE: Before taking off the grass bag, switch off the engine and wait until the blade has come
to a stop.
1. To take off the grass bag, use one hand to lift up rear chute flap and the other to grasp the grass bag
handle. The rear chute flap automatically falls down after removing the grass bag and closes off the rear
chute opening.
2. Empty the grass debris in the grass bag, and reinstall the grass bag.
NOTE: If any grass residue is caught in the discharge chute, clean it using a brush. Do not remove
grass debris in the mower casing or on the blade by hand or with your feet. Instead, use suitable
tools such as a brush or broom. To ensure that the cut grass can be collected into grass bag, the
discharge opening and inside the mower casing must be cleared of any blockage.
STORING AND MAINTENANCE
WARNING: Before performing any maintenance or cleaning work, switch off the engine and wait
until the blade has come to a stop.
CLEANING
GENERAL CLEANING
The lawn mower should be cleaned thoroughly every time after it has been used. Always clean your lawn
mower immediately after use.
Do not allow grass cuttings and other debris to become dry and hard on any of the mower surfaces.
Dried grass remnants and dirt may impair the mowing operation.
Check that the grass chute is free of any residual grass. Remove any such residue. Check the underside of
the lawn mower and the blade mount. When checking, tilt the lawn mower onto its left side (opposite the oil
filler neck).
NOTE: Before placing the lawn mower on its side, fully drain the fuel tank using a gas extraction
pump.
Do not tilt the lawn mower by more than 90 degrees.
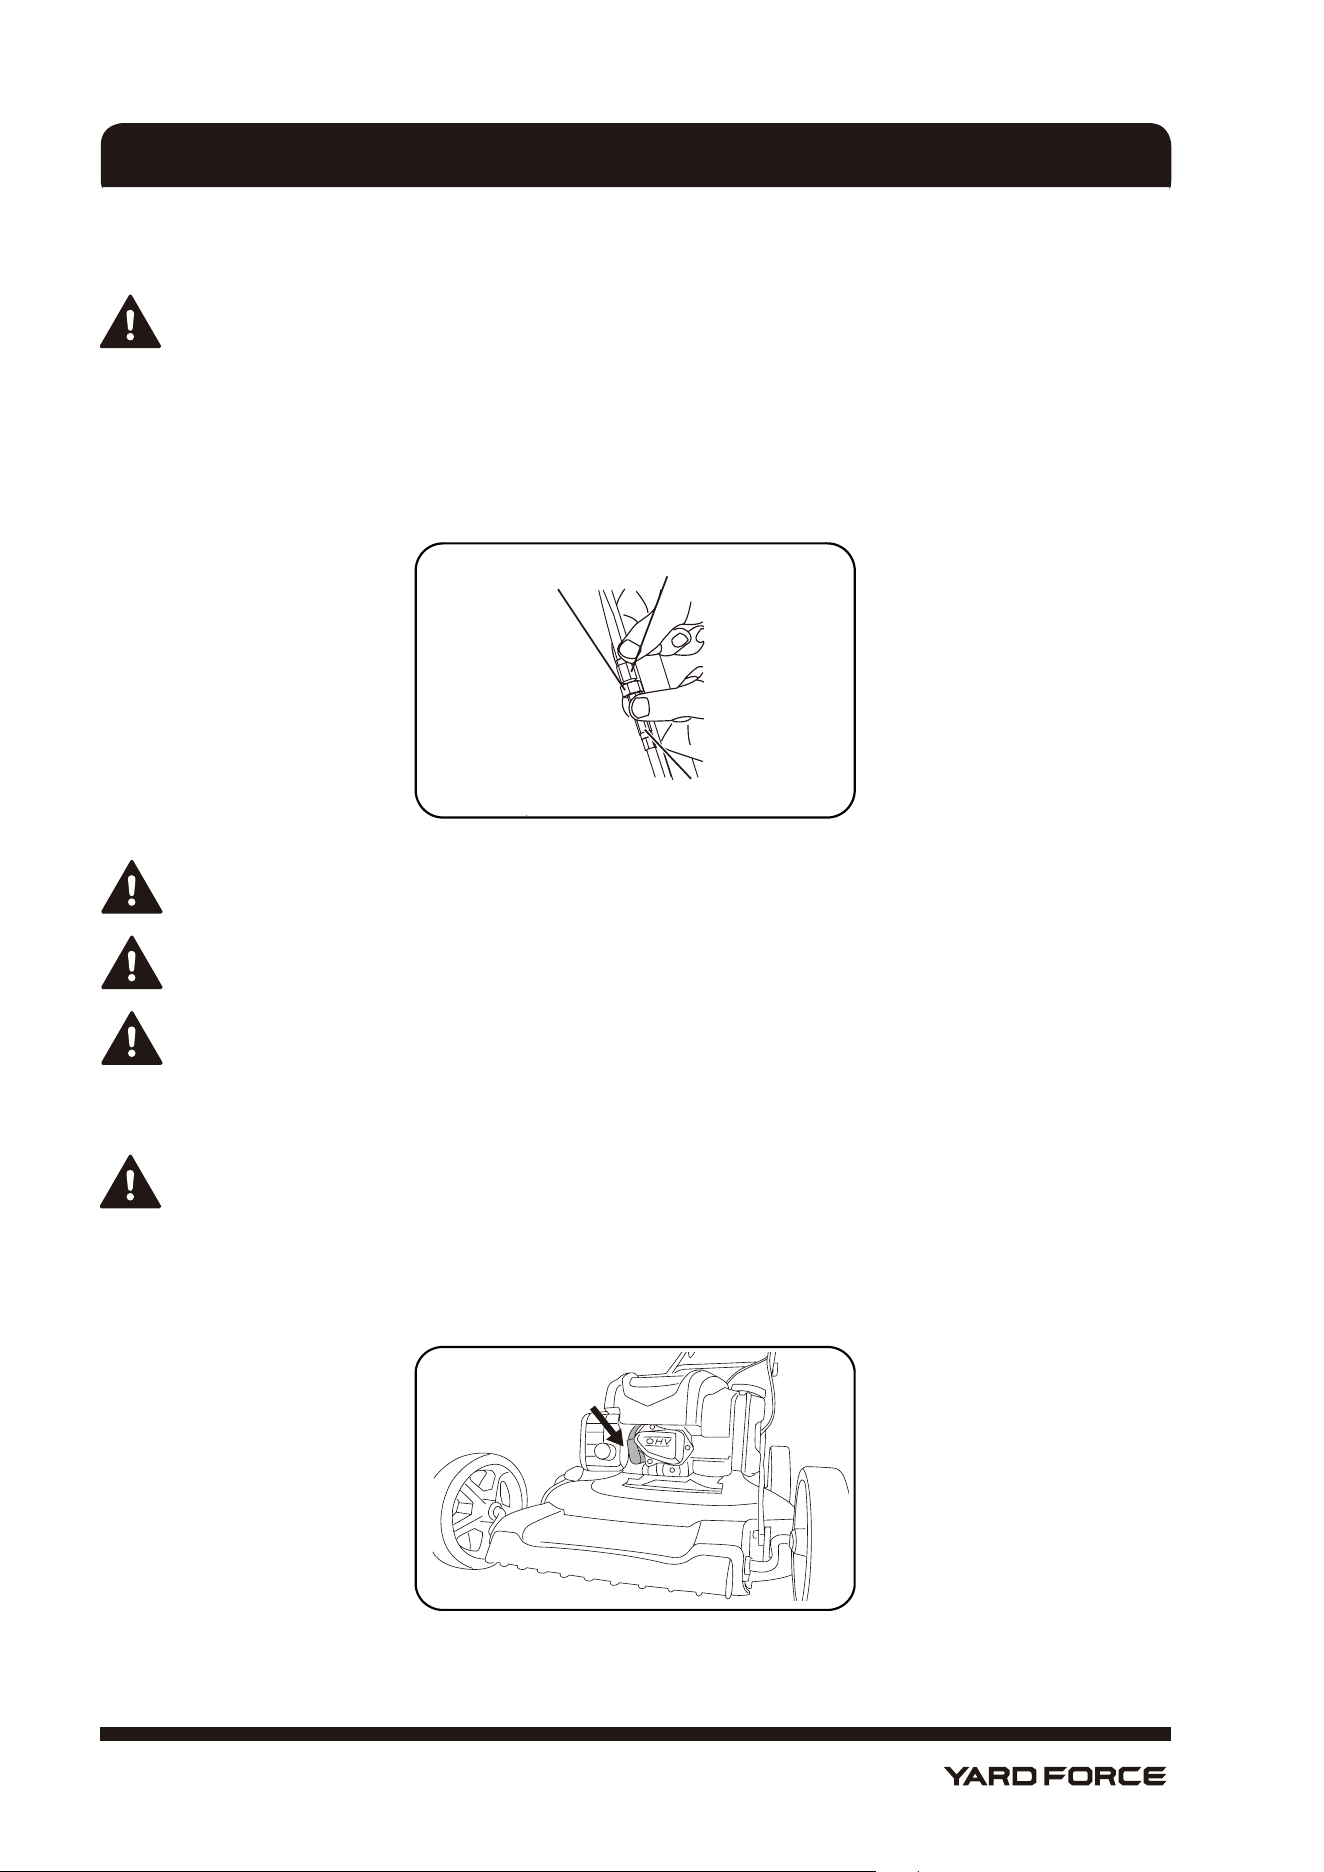
MAINTENANCE OF THE SPARK PLUG
As shown in Fig. 20
0.017"- 0.023"
Fig. 20
20
Hotline: 1-866-902-9690
1. Once the engine has cooled, pull off the spark cover with a twist.
2. Remove the spark plug using a spark plug wrench (not supplied).
3. Clean the spark plug with a wire brush (not supplied).
4. Using a feeler gauge, set the gap to 0.017"- 0.023" (0.432- 0.584 mm).
5. Install the spark plug carefully by hand to avoid cross-threading.
6. After the spark plug is seated, tighten with the spark plug wrench to compress the washer.
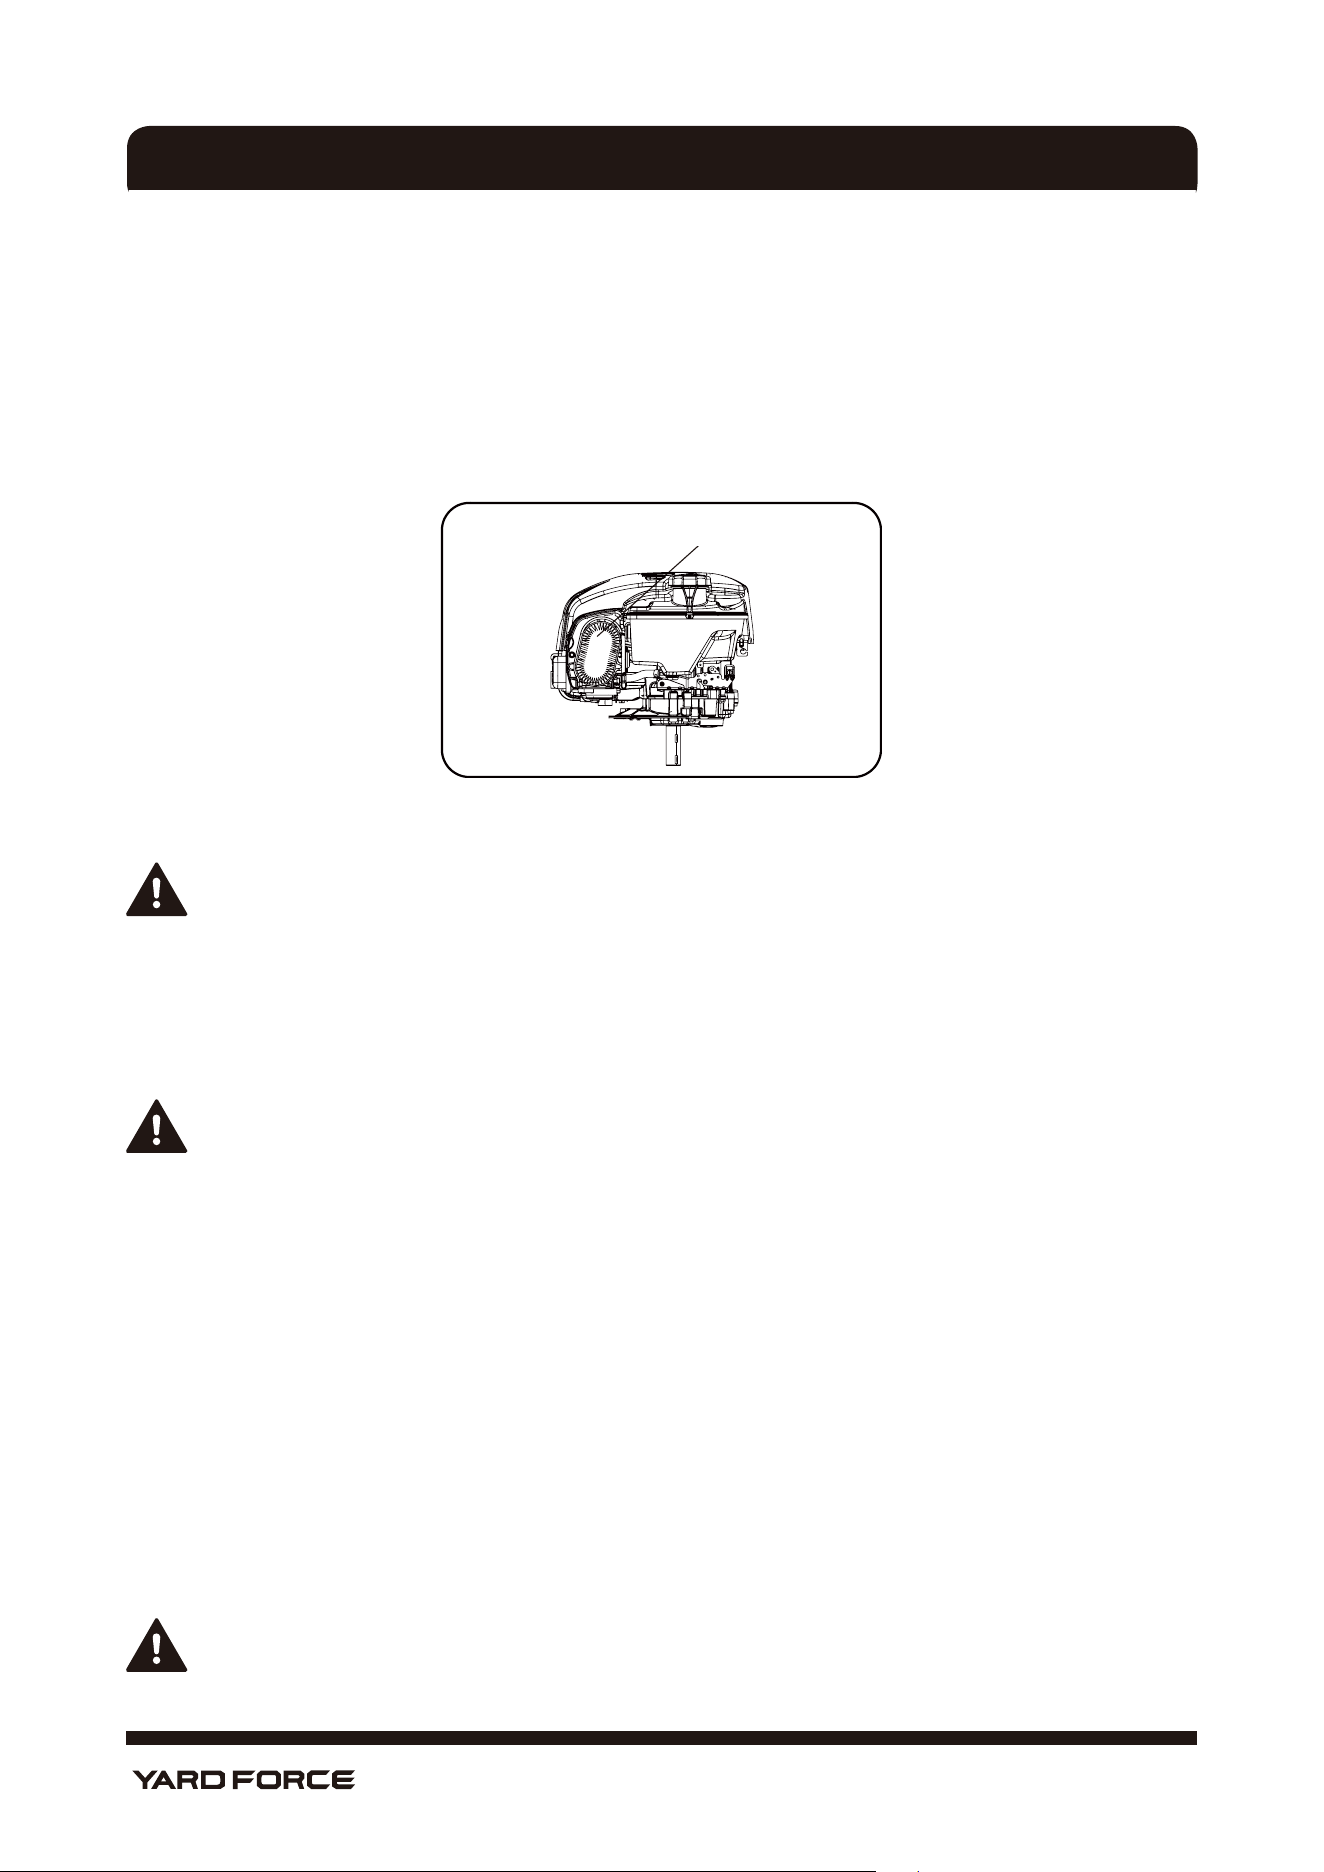
MAINTENANCE OF THE AIR FILTER
As shown in Fig. 21
Filter cartridge
Fig. 21
Soiled air filters reduce the engine output by restricting air to the carburetor. If the air contains a lot of dust,
the air filter should be checked more frequently.
WARNING! Never run the engine without the air filter element installed.
1. Press tabs at the top of the air filter cover and tilt away from the engine to remove the cover.
2. Remove the filter cartridge.
3. To loosen debris, gently tap the filter cartridge on a hard surface. If the filter cartridge is excessively dirty,
replace with a new one.
Note: Never clean the air filter cartridge with gas or inflammable solvents.
Clean the air filter cartridge only with compressed air or by tapping it.
4. Install the filter cartridge.
5. Close the cover and secure it properly by snapping tabs back into the correct slots at the top.
CHECK AND ADD THE ENGINE OIL
The Briggs & Stratton 625EXi engine on this lawn mower is made with a special feature Check & Add
TM
.
The oil never needs to be changed. Before each use check the oil level and add additional oil if the level is
not within the Min - Max levels.
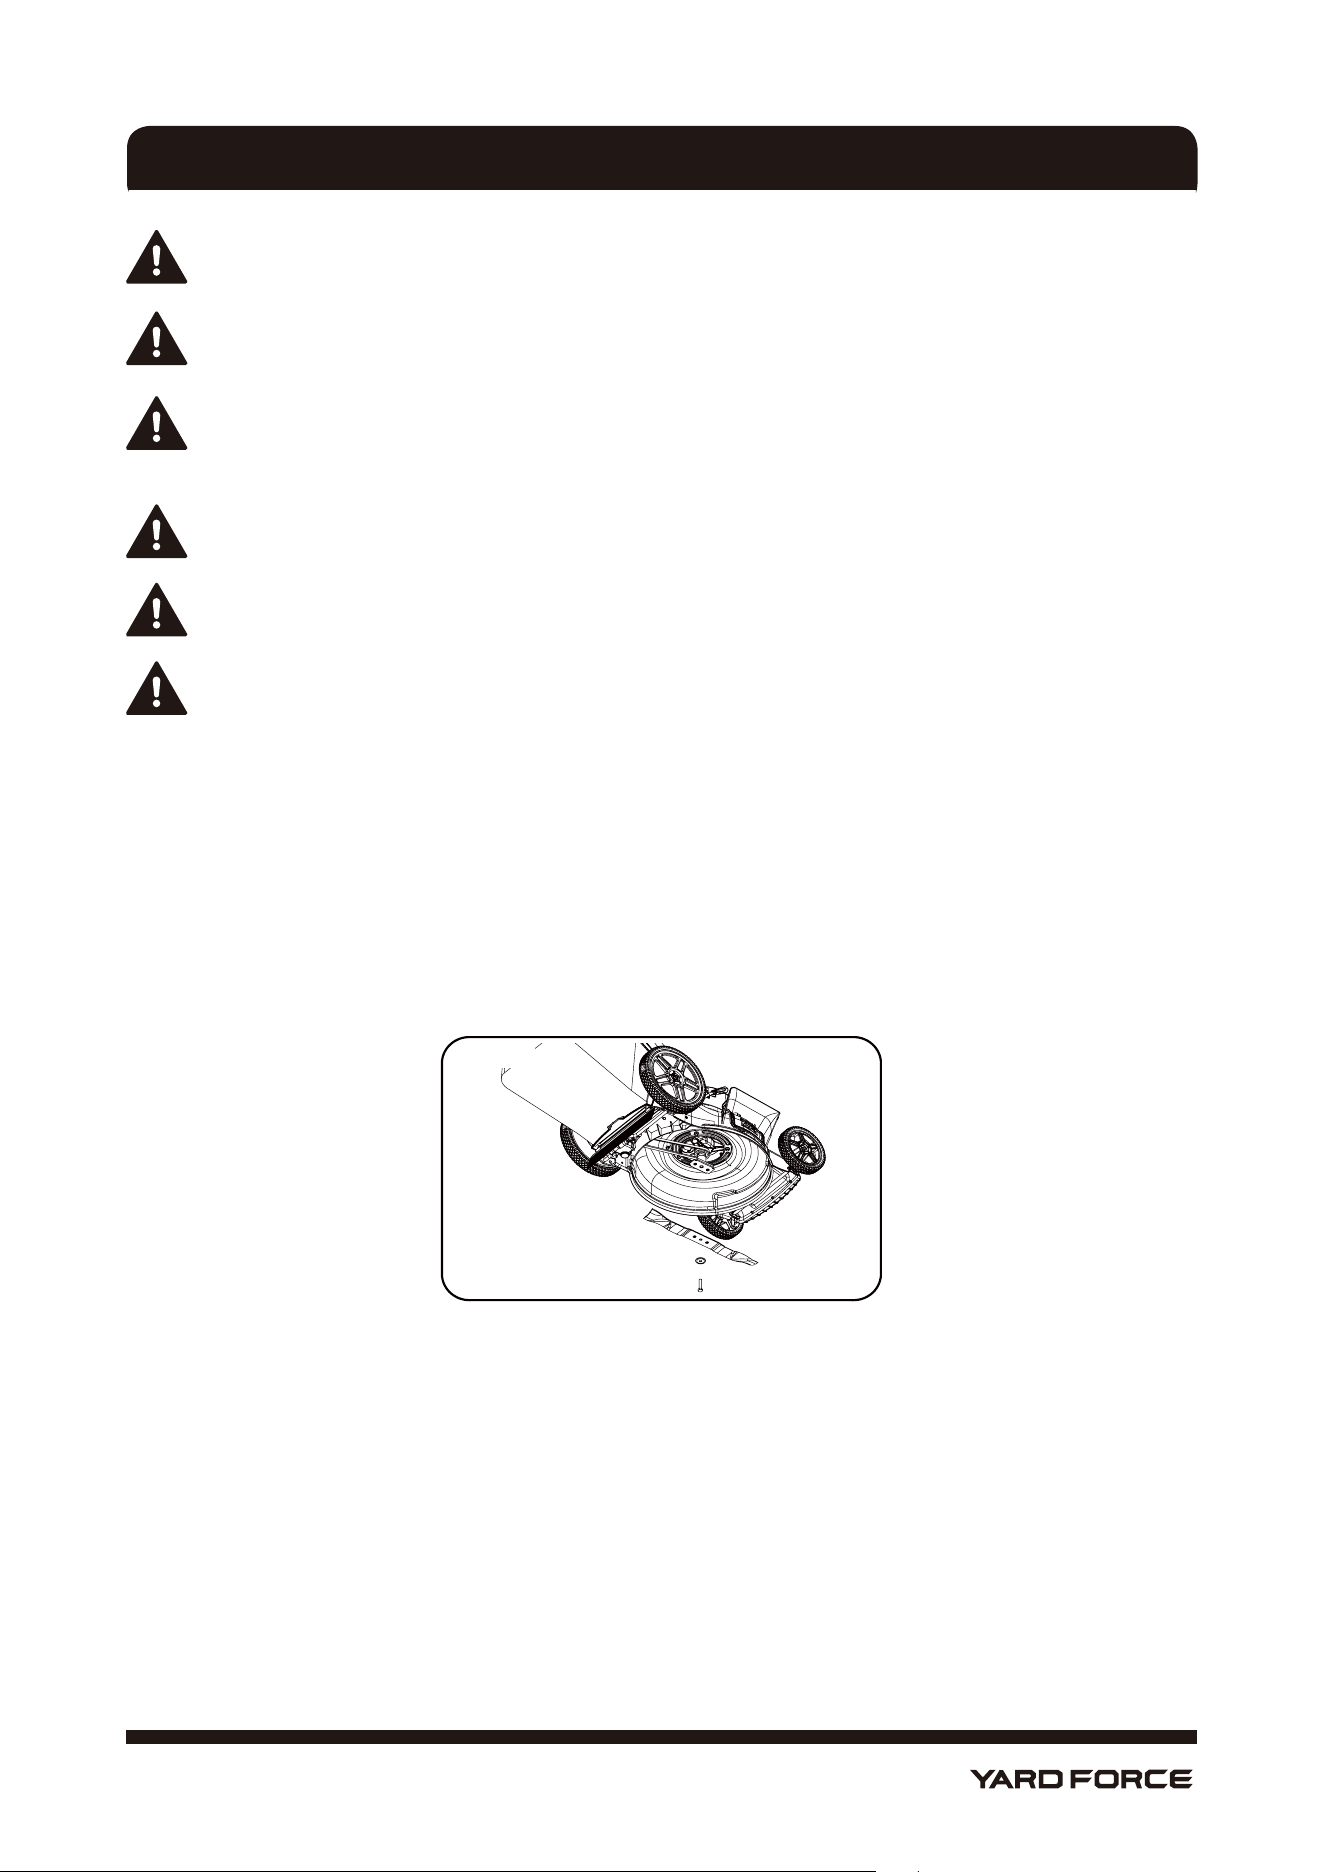
REPLACING THE BLADE
For safety reasons you should only ever have your blade sharpened, balanced and mounted by an
authorized service workshop. For optimum results, it is recommended that the blade be inspected once a
year.
WARNING! Before you remove the grass collection bag, stop the engine and wait until the blade
stops completely.
STORING AND MAINTENANCE
21
Hotline: 1-866-902-9690
STORING AND MAINTENANCE
WARNING! You will need garden gloves (not provided) and a wrench (not provided) to remove the
blade.
NOTE! Don’t invert the mower. Tip it slightly towards the oil filler pipe and reach under the deck.
WARNING! Always handle the blade with care; sharp edges could cause injury. USE GLOVES.
Replace your metal blade after 50 hours mowing or 2 years, whichever is sooner, regardless of
condition.
WARNING! If the blade is cracked or damaged, replace it with a new one.
WARNING! Don’t hold the blade by hand directly.
NOTE! Maintain the sharpness of the blade when cutting grass. If the blade has worn excessively
and become pitted and blunt, it should be replaced or sharpened. The sharpness of the blade will
affect the performance of the lawn mower.
For safety reasons we recommend that the blade only be changed by someone qualified and authorized to
do so.
Hold the blade and unscrew the blade bolt counter-clockwise using a wrench. Remove the washer and the
blade.
Fit a new blade or re-sharpen the blade. Place the blade on the two studs on the blade flange and then
replace the washer and bolts. Make sure the blade is correctly located, and then firmly tighten the bolt. Do
not over tighten. The side of blade with letters must face outside.
Fig. 22
STORING THE LAWN MOWER FOR SHORT PERIODS
The lawn mower can be stored for short periods of time (less than 15 days) without performing any storage
maintenance. Before placing the lawn mower into storage always do the following:
1. Allow the engine to fully cool.
2. Ensure the grass bag is empty.
3. Clean all debris from under the mower deck.
4. Store the lawn mower on a flat and level surface with the mower upright.
5. Store in a safe place which is not accessible by children or people who are not familiar with the lawn
mower's operation.
22
Hotline: 1-866-902-9690
STORING THE LAWN MOWER FOR EXTENDED PERIODS
If the lawn mower is to be placed into storage for more than 15 days, storage maintenance must be
performed on the lawn mower. If the following steps are not carried out, when you next operate the
lawnmower it may not start correctly and may need to be serviced.
CAUTION! Do not empty the gas tank in enclosed areas, near fire or when smoking. Gas fumes can
cause explosions and fire.
1. Empty the gas tank with a gas suction pump if available.
2. Start the engine and let it run until any remaining gas has been used up.
3. Clean the cooling fins of the cylinder and the housing.
4. Be sure to clean the entire machine to protect the paint.
5. Store the machine in a well-ventilated place.
MAINTENANCE SCHEDULE
Performing routine maintenance correctly on your lawn mower will ensure you get years of trouble-free use.
Please keep this manual safe for future reference.
It is recommended that the following maintenance schedule is adhered to. This will ensure the lawn mower
operates correctly and is safe to use.
12 hours of use 24 hours of use 36 hours of use
Air filter Clean Clean Clean
Spark plug Check Clean Clean
Engine oil Check Check and Add Check and Add
TRANSPORTING THE LAWN MOWER
Empty the gas tank. Always let the engine run until it has used up the remainder of gas in the tank.
Empty the engine oil from the warm engine. Remove the spark plug cover from the spark plug. Clean the
cooling fins of the cylinder and the housing. Use the original packaging to ship whenever possible.
VERTICAL STORAGE FEATURE INSTRUCTION
1. Ensure that the level of fuel in the fuel tank is no higher than what is recommended by the engine
manufacturer.
Note: If the fuel level in the fuel tank is too high, drain the fuel into an approved fuel container until it is at or
below the level recommended by the engine manufacturer.
2. Ensure that the cutting height setting is at or below position 3. If it is not, lower it.
STORING AND MAINTENANCE
23
Hotline: 1-866-902-9690
3. Disengage the cam-lock handle knob to ”unlocked” position
and fold down handle and lock handle
in the horizontal position
.
4. Lock the cam-lock handle knob for vertical storage , then adjust the cutting-height setting to position
4 or above
.
5. Tilt up and store. Make sure to position the mower so that the blade is facing a wall.
WARNING!
1. Storing the mower in the vertical position when there is too much fuel in the fuel tank may cause fuel to
leak from the fuel tank. Fuel is extremely ammable and explosive. A fire or explosion from fuel can burn
you and others.
2. Store the mower in the vertical position only when the level of fuel in the fuel tank is no higher than what
is recommended in this Operator’s Manual.
3. Do not store the mower in a position that is beyond the vertical (90°) position; Otherwise, fuel may
escape from the fuel tank.
4. Do not transport the mower in the vertical-stow position.
5. Do not attempt to start the mower in the vertical-stow position.
6. Do not attempt to store any machine with fuel and oil in the vertical-stow position that is not designed
for that purpose.
STORING AND MAINTENANCE

24
Hotline: 1-866-902-9690
TROUBLE SHOOTING
WARNING: Before performing any maintenance or cleaning work, switch off the engine and wait
until the blade has come to a stop.
Caution!
Improper repairs can result in the product functioning unsafely. This endangers yourself and your
environment.
Faults which cannot be rectified with the aid of following table may require service by an authorized Yard
Force or Briggs & Stratton repair center.
Please be aware that any improper repairs will also invalidate the warranty and additional costs may be
incurred.
Use only genuine spare parts. Only these spare parts are designed and suitable for this lawn mower. The
use of other spare parts not only voids the warranty, you can also endanger yourself and your environment.
Fault/malfunction Cause Remedy
Loud while running; machine
vibrates heavily.
Screws are loose.
Blade fasteners are loose. Blade is
unbalanced.
Tighten screws.
Tighten blade fasteners.
Replace blade.
Engine does not start.
Engine on/off control bar not pressed.
Spark plug is defective.
Fuel tank is empty.
Engine may be flooded.
Press start/stop lever.
Replace spark plug.
Refill with fuel.
Remove plug and dry.
Engine runs unsteadily.
Air filter is soiled.
Spark plug is soiled.
Clean the air filter.
Clean the spark plug.
Uneven mowing results.
Blade is blunt.
Cutting height is too low.
Sharpen the blade.
Set correct height.
Grass bag is not filled
sufficiently.
Blade is worn.
Grass bag is clogged.
Cutting height is not right.
The lawn/grass is wet. Discharge
channel/housing is blocked.
Underside of the mower deck is
clogged.
Replace the blade.
Empty the grass bag.
Correct the cutting height. Allow
the lawn to dry.
Clean the discharge channel/
housing.
Clean the underside of the mower
deck.

25
Hotline: 1-866-902-9690
WARRANTY
YARD FORCE TWO YEAR LIMITED WARRANTY
Product Warranty
Please keep your original purchase receipt in a safe place as proof of purchase. Warranty coverage for
that the product was purchased from an authorized retailer of Yard Force products. Warranty coverage
only applies to the original purchaser and is not transferable. Warranty coverage is only provided on
products purchased and used in the USA and Puerto Rico from authorized Yard Force retailers. Products
purchased or used outside of the USA and Puerto Rico are not covered by this warranty.
(2) Two-Year Warranty – Engine & Gearbox
The YF22-3N1SPVSV-SC has a 2-Year Limited Warranty from the date of purchase against manufacturer
defects for residential use only. Commercial use voids the warranty. This warranty does not cover acci-
dental damage, unreasonable use, normal wear and tear, neglect or non-compliance with the Operating,
Safety and Maintenance Instructions. All service, outside of normal maintenance as described in this
manual, must be done by an authorized service technician. Any unauthorized service or changes to the
this product must be manufacturer/or and authorized by Merotec Inc.
(90) Ninety-Day Warranty – Accessories
The accessories included with the YF22-3N1SPVSV-SC; like the blade, and other similar parts a re war-
ranted against manufacturer defects for residential use only for a period of 90 days from date of pur-
chase.
Warranty does not cover loss of use or other consequential damages arising from any of the above, nor
does it cover repairs made or attempted by unauthorized persons. This warranty is void if the product
is used for commercial, rental or industrial purposes. Certain parts, attachments and accessories are
subject to normal wear and tear and are excluded from the warranty.
Service and Warranty Claims Process
Contact the Yard Force Support Center toll-free at (866) 902-9690 Monday-Friday between 8:30 AM
and 5:00 PM Eastern Time for service and warranty support.
Yard Force USA Service Support agents can help you troubleshoot problems over the phone to get
you back up and running as quickly as possible. In the situation where service or warranty inspection is
needed, please follow these steps:
1. Contact Yard Force USA at (866) 902-9690 or support@merotecusa.com Monday-Friday between
8:30 AM and 5:00 PM Eastern Time.
2.
3. If service or a warranty evaluation is requested, Yard Force USA will provide an RGA number that
should be used in all communications with Yard Force USA and if necessary a list of local authorized
service centers to bring your lawn mower to for evaluation and repair.
4. All shipments to Yard Force USA must have an RGA number. Any shipment received that does not have
an RGA number clearly marked on the outside of the box will be refused.
5. All shipments must be sent pre-paid, Yard Force USA does not pay for any shipping costs for service
or warranty evaluation. Yard Force USA is not responsible for any packages that are lost by carrier. We
For more information or to ask questions, please call toll-free (866) 902-9690 or support@merotecusa.
com Monday-Friday between 8:30 AM and 5:00 PM Eastern Time.
SAVE THESE INSTRUCTIONS

YF22-3N1SPVSV-SC
CORTACESPED AUTOPROPULSORA
3 EN 1 DE 22”
MANUAL OPERATIVO
Nuestro personal de atención al cliente está a su disposición para ayudarle.
En caso de que se dañe o se pierda alguna pieza, la mayoría de repuestos se envían
desde nuestras instalaciones.
Para ayuda inmediata con el montaje, o para información adicional sobre el producto,
visite www.YardForceUSA.com o envíe un e-mail a [email protected]
Necesitará este manual para consultar las instrucciones de seguridad,
procedimientos operativos y la garantía.
Es necesario tener a la mano el recibo de compra original para el servicio de
garantía.
GUARDE ESTE MANUAL PARA CONSULTARLO
POSTERIORMENTE


2
Hotline: 1-866-902-9690
Instrucciones originales YF22-3N1SPVS-SC
ÍNDICE
Instrucciones de seguridad ............................................................................................................................. 3
Lista de las piezas ........................................................................................................................................... 6
Uso previsto .................................................................................................................................................... 8
............................................................................................................................. 9
Montaje .......................................................................................................................................................... 9
Ajuste ............................................................................................................................................................ 14
Operación ....................................................................................................................................................... 15
Almacenamiento y mantenimiento ............................................................................................................... 20
Resolución de problemas ..............................................................................................................................25
Garantía ........................................................................................................................................................ 26
Comisión Federal de Comunicaciones
(FCC)
¡ADVERTENCIA! Cualquier cambio o modicación a esta unidad no aprobado expresamente por el responsable
del cumplimiento podría anular la autoridad del usuario para operar el equipo.
Dispositivo clase B:
NOTA: Este equipo ha sido probado y cumple con con los límites para un dispositivo digital Clase B, de conformidad
con la parte 15 de las Reglas de la FCC.
Estos límites están diseñados para proporcionar una protección razonable contra interferencias dañinas en una
instalación residencial. Este equipo genera, utiliza y puede irradiar radiofrecuencia energía y, si no se instala y
utiliza de acuerdo con las instrucciones, puede causar interferencias perjudiciales radiocomunicaciones.
Sin embargo, no hay garantía de que no se produzcan interferencias en una instalación determinada.
Si este equipo causa interferencias dañinas a la radio o recepción de televisión, que se puede determinar girando el
equipo apagado y encendido, se recomienda al usuario que intente corregir la interferencia por una o más de las
siguientes medidas:
• Reorientar o reubicar la antena receptora.
• Aumentar la separación entre los equipos y receptor.
• Conecte el equipo a una toma de corriente de un circuito diferente desde aquel al que está conectado el receptor.
• Consulte al distribuidor o a un técnico experimentado en radio/TV por ayuda.

3
Hotline: 1-866-902-9690
INSTRUCCIONES DE SEGURIDAD
IMPORTANTE
Favor de leer estas instrucciones por completo antes de montar el aparato y de usarlo.
DESCRIPCIÓN DE LOS SÍMBOLOS
seguridad y las explicaciones que los acompañan deben comprenderse a la perfección. Las advertencias
en sí no evitan los riesgos y no pueden sustituir los métodos adecuados de evitar accidentes.
SÍMBOLOS DE ADVERTENCIA EN EL APARATO
¡ADVERTENCIA! Para reducir el riesgo de lesiones, el usuario debe leer el manual instructivo.
Este símbolo, cuando precede un comentario de seguridad, indica una precaución, una
advertencia o un peligro. Ignorar esta advertencia puede causar un accidente para usted o
para los demás. A fin de limitar el riesgo de lesión, incendio o electrocución, aplique siempre
las recomendaciones indicadas.
No abra ni retire los escudos de seguridad mientras el motor esté en funcionamiento.
Mantenga a las personas alejadas.
Mire hacia atrás cuando retroceda.
Peligro en pendientes pronunciadas.
Seccionamiento de dedos de los pies o de las manos - cuchilla rotativa de la podadora.
Objetos lanzados o voladores - exposición de todo el cuerpo.
Use protección en sus oídos.
Use protección en sus ojos.
PELIGRO: MANTENER MANOS Y PIES ALEJADOS.
ADVERTENCIA: LA GASOLINA ES INFLAMABLE
Deje que el motor se enfríe al menos durante dos minutos antes de volver a cargarlo con
gasolina.
ADVERTENCIA: MONÓXIDO DE CARBONO
Nunca encienda un motor en interiores o una área con poca ventilación. El escape del motor
contiene monóxido de carbono, un gas inodoro y mortal.
ADVERTENCIA: SUPERFICIE CALIENTE
Las piezas del motor, especialmente el silenciador, se calientan en extremo durante el
funcionamiento. Deje que el motor y el silenciador se enfríen antes de tocarlos.

4
Hotline: 1-866-902-9690
INSTRUCCIONES DE SEGURIDAD
CAPACITACIÓN
1. Lea las instrucciones atentamente. Familiarícese con los controles y el uso correcto del equipo.
2. Nunca permita que niños o personas que no estén familiarizadas con estas instrucciones usen la
podadora. Las normativas legales pueden restringir la edad del operador.
3. Nunca pode cuando haya personas, especialmente niños o mascotas, cerca.
4. No olvide que el operador o el usuario es responsable de los accidentes o riesgos que les ocurran a
otros o a su propiedad.
5. No opere la máquina si está bajo la influencia de alcohol o drogas.
6. Siga la recomendación del fabricante sobre los pesos y contrapesos de las llantas.
7. Detenga la máquina y los adjuntos si alguien entra en la zona.
PREPARACIÓN
1. Al podar, use siempre calzado robusto y pantalones largos. No opere el equipo con los pies descalzos
o con sandalias abiertas.
2. Inspeccione a conciencia la zona donde usará el equipo y retire todos los objetos que la máquina
podría lanzar.
3. Advertencia: la gasolina es altamente inflamable.
- Almacene la gasolina en contenedores especialmente diseñados para ello.
- Recargue el combustible en exteriores y no fume mientras lo haga.
- Agregue el combustible antes de encender el motor. Nunca retire la tapa del tanque de gasolina ni
agregue gasolina mientras el motor esté encendido o cuando el motor esté caliente.
- Si se derrama la gasolina, no intente encender el motor. Mueva la máquina lejos de la zona donde
se derramó y evite crear cualquier fuente de ignición hasta que los vapores de la gasolina se hayan
disipado.
- Vuelva a colocar el tanque de combustible y las tapas de forma segura.
4. Cambie y reponga los silenciadores defectuosos.
5. Antes de usar, siempre inspeccione visualmente para ver que las cuchillas, los pernos de las cuchillas
y el montaje de las cuchillas no estén dañados o desgastados. Cambie y reponga las cuchillas
desgastadas o dañadas y los pernos en conjunto para conservar el equilibrio.
6. En máquinas con múltiples cuchillas, tenga cuidado ya que una cuchilla rotativa puede causar que las
otras cuchillas giren también.
OPERACIÓN
1. No opere el motor en un espacio confinado donde se puedan acumular los peligrosos vapores de
monóxido de carbono.
2. Pode solo a la luz del día o con buena luz artificial.
3. Evite operar el equipo en pasto húmedo, siempre que sea posible.
4. Cuide siempre sus pasos en las pendientes.
5. Camine; no corra nunca.
6. Para máquinas rotativas con ruedas, pode transversalmente a la pendiente, no hacia arriba y hacia
abajo.
7. Tenga precaución extrema al cambiar de dirección en las pendientes.
8. No pode excesivamente las pendientes pronunciadas.
9. Tenga extrema precaución al retroceder o al jalar la podadora hacia usted.
10. Detenga las cuchillas si la podadora debe inclinarse para transportarla cuando cruce por superficies
que no sean pasto, y cuando transporte la podadora hacia y desde la zona que podará.
11. Nunca opere la podadora con protectores defectuosos o sin que los dispositivos de seguridad, por
ejemplo los deflectores o la bolsa recolectora de pasto, estén correctamente colocados en su lugar.
12. No cambie los ajustes del motor ni opere el motor con exceso de velocidad.
13. Desembrague todas las cuchillas y los embragues de impulsión antes de encender el motor.
14. Encienda el motor con cuidado siguiendo las instrucciones y con los pies bien alejados de las cuchillas.
15. No incline la podadora cuando encienda el motor, excepto si la podadora debe inclinarse para
encenderse. En cuyo caso, no la incline más de lo absolutamente necesario y levante solo la parte que
esté alejada del operador.
INSTRUCCIONES DE SEGURIDAD

5
Hotline: 1-866-902-9690
INSTRUCCIONES DE SEGURIDAD
16. No encienda el motor si está de pie frente al conducto de descarga.
17. No ponga las manos ni los pies cerca o debajo de las partes rotativas. En todo momento manténgase
alejado de la abertura de descarga.
18. No levante nunca la podadora mientras el motor esté funcionando.
19. Apague el motor y desconecte el cable de bujía, asegurándose de que todas las partes móviles se
hayan detenido por completo. Donde hay una llave, retírela:
- Antes de limpiar los bloqueos o de destapar el conducto.
- Antes de checar, limpiar o hacer cualquier trabajo en la podadora.
- Después de golpear algún objeto extraño. Inspeccione la podadora para ver si no tiene daños y
haga las reparaciones correspondientes antes de reiniciarla y de operarla.
- Si la podadora empieza a vibrar de manera anormal, verifíquela de inmediato.
20. Apague el motor y desconecte el cable de bujía, asegurándose de que todas las partes móviles se
hayan detenido por completo. Donde hay una llave, retírela:
- Cuando deje la podadora.
- Antes de volver a cargar combustible.
21. Reduzca la posición del acelerador durante el apagado del motor, y si el motor cuenta con una válvula
de cierre, apague el combustible cuando termine de podar.
22. Avance despacio si usa un asiento ajustable.
23. Evite hoyos, ranuras, baches, rocas u otros peligros escondidos.
24. No dirija el material de descarga hacia nadie. Evite descargar el material contra una pared u obstrucción.
El material podría rebotarle al operador. Detenga las cuchillas antes de cruzar por superficies de grava.
25. No deje inatendida la máquina encendida. Estacione siempre a nivel del piso, suelte el accesorio, ponga
el freno de estacionamiento y apague le motor.
26. No pode en reversa a menos que sea absolutamente necesario.
27. Pueden ocurrir accidentes trágicos si el operador no está alerta a la presencia de niños. Los niños
suelen sentirse atraídos a la máquina y la actividad de poda. Nunca suponga que los niños se quedarán
donde los vio por última vez.
28. Mantenga a los niños alejados de la zona de operación y bajo estricta supervisión por parte de un
adulto responsable que no sea quien esté podando.
29. Muévala en la dirección recomendada por el fabricante cuando pase por pendientes. Tenga precaución
cuando la opere cerca de algún barranco.
30. Un mal paso podría causar que se resbalara y se cayera.
31. No opere la máquina bajo ninguna condición donde esté en cuestión la tracción, la dirección o la
estabilidad. Las llantas podrían derrapar si las ruedas se detienen.
32. Mantenga siempre la máquina en marcha cuando baje por pendientes. No deje que la máquina se
impulse sola en pendientes hacia abajo.
33. Evite encender y apagar en pendiente. Evite hacer cambios repentinos de velocidad y de dirección. Dé
los giros lenta y gradualmente.
34. Sea extra cauto cuando opere la máquina con una bolsa recolectora de pasto u otros accesorios.
Podrían afectar la estabilidad de la máquina.
35. Apague todos los cigarrillos, puros, pipas y otras fuentes de ignición.
36. No almacene la máquina ni el contenedor de combustible donde haya llama abierta, chispas o una
llama piloto como la del calentador de agua u otro aparato.
37. Use rampas de ancho completo cuando cargue y descargue la máquina al transportarla.
MANTENIMIENTO Y ALMACENAMIENTO
1. Mantenga todas las tuercas, pernos y tornillos bien apretados para asegurarse de que el equipo esté
funcionando en buenas condiciones.
2. Nunca almacene el equipo con gasolina en el tanque dentro de un edificio donde los vapores puedan
llegar a una llama abierta o alguna chispa.
3. Deje que el motor se enfríe antes de almacenar en algún espacio cerrado.
4. Para reducir el riesgo de incendio, mantenga el motor, el silenciador del escape y el área de
almacenamiento de combustible, libres de pasto, hojas o grasa en exceso.
5. Cheque que las bolsas recolectoras de pasto no estén desgastadas o tengan algún deterioro.
6. Por seguridad, recambie las piezas desgastadas o dañadas.
7. Si debe drenar el tanque de combustible, hágalo en exteriores.

6
Hotline: 1-866-902-9690
CONOZCA SU PODADORA
LISTA DE LAS PIEZAS
Fig. 1
1
2
3
4
5
6
7
8
9
19
16
17
18
15
14
13
12
11
10
20
21

7
Hotline: 1-866-902-9690
1 Palanca de control de avance automático
2 Manubrio superior
3 Tirador de la cuerda de encendido del motor
4 Guía de la cuerda
5 Bolsa recolectora de pasto
6 Solapa del conducto trasero
7 Manubrio para ajuste de altura
8 Rueda trasera
9 Conducto de descarga lateral (extraíble)
10 Cubierta de descarga lateral
11 Rueda frontal
12 Parachoques frontal
13 Estación de corte
14 Cubierta de la bujía
15 Tapa del aceite de motor
16 Tapa del tanque de combustible
17 Perilla y perno del manubrio
18 Manejar palanca de liberación rápida
19 Abrazadera de cordón
20 Manubrio inferior
21 Barra de control de encendido y apagado del motor
LISTA DE LAS PIEZAS
Con cuidado saque la podadora de su embalaje y cheque que contenga las siguientes piezas:
A. Bolsa recolectora de paso con soporte 1 pieza
B. Manejar palanca de liberación rápida 2 sets
C. Perilla y perno del manubrio 2 sets
D. Manual 1 pieza
E. Conducto de descarga lateral 1 pieza
F. Estación principal de la podadora (con manubrio superior) 1 pieza
G. Abrazadera de cordón 1 pieza
H. Tapón acolchador plástico (dentro de la podadora) 1 pieza
I. Aceite de motor (SAE 30) 1 pieza
J.
K. Barra de manubrio inferior 1 pieza
L.
LISTA DE LAS PIEZAS
8
Hotline: 1-866-902-9690
LISTA DE LAS PIEZAS
Esta podadora de motor a gasolina se diseñó para cortar el paso en zonas residenciales.
uso. El usuario/operador, y no el fabricante, será el responsable de cualquier daño o lesiones de cualquier
tipo que sucedan como resultado de un mal uso.
Tenga en cuenta que nuestro equipo no fue diseñado para un uso en aplicaciones comerciales o indus-
equivalentes.
USO PREVISTO
¡ADVERTENCIA!
Si cualquiera de las piezas está dañada o perdida, no opere esta podadora hasta que las
haya reemplazado.
No seguir esta advertencia podría resultar en lesiones personales graves.
NOTA:
Recicle siempre el embalaje de acuerdo con los programas de reciclaje locales.
¡ADVERTENCIA!
Este artículo requiere que dos personas lo levanten para retirar el embalaje. Asegúrese de
del otro para una postura estable, doble sus rodillas y mantenga su espalda derecha.
Fig. 2
A
B
C
H
I
K
G
D
E
L
F
J

9
Hotline: 1-866-902-9690
ESPECIFICACIONES TÉCNICAS
Tipo de motor Cilindro único de 4 tiempos
Desplazamiento del motor 150 cc
Velocidad del motor 3200±100 RPM
Ancho del corte 21” (53 cm)
Capacidad de la bolsa recolectora de pasto 16 galones (60 l)
Ajustes de altura 1.25" - 3.75"(31-95 mm)
Diámetro de la rueda frontal 8” (20 cm)
Diámetro de la rueda trasera 12” (30 cm)
Velocidad de avance automático Hasta 3 millas por hora
ESPECIFICACIONES TÉCNICAS
¡PRECAUCIÓN! Lea el MANUAL INSTRUCTIVO completo antes de operar esta máquina.
¡IMPORTANTE! ESTA PODADORA SE ENTREGA SIN ACEITE NI GASOLINA EN EL MOTOR.
Su nueva podadora se ensambló en la fábrica con la excepción de las piezas que se dejaron desarmadas
para fines del envío. Todas las piezas, como tuercas, arandelas, pernos, etc., necesarias para terminar
el montaje están en la bolsa de las piezas. Con el fin de asegurar una operación segura y adecuada de
su podadora, todas las piezas y el hardware que usted monte deben apretarse correctamente. Use las
herramientas correctas según sea necesario para asegurar que todo quede apretado de forma adecuada.
PARA RETIRAR LA PODADORA DEL CARTÓN
1. Retire las piezas sueltas que se incluyen con la podadora.
2. Corte los dos extremos del cartón y coloque el panel final en el piso en plano.
3. Retire todos los materiales del embalaje.
4. Saque la podadora del cartón y verifique que no queden piezas sueltas adicionales en el cartón.
MONTAJE DEL MANUBRIO
Según se muestra en las fig. 3, 4 y 5
Fig. 3
MONTAJE
Perilla y perno del
manubrio
10
Hotline: 1-866-902-9690
Fig. 4
IMPORTANTE: Desboble el manubrio con cuidado para evitar pellizcar o dañar los cables de control.
Las segadoras que tienen la función de almacenamiento vertical tienen una estructura de mango diferente.
Siga los pasos a continuación para ensamblar.
1. Inserte la manija inferior en los dos soportes laterales (vea la figura 3).
2. Sujete la manija inferior al dispositivo usando dos pernos de cabeza de arco y dos perillas de fijación en
cada lado (vea la figura 4).
3. Inserte el perno de bloqueo de liberación rápida en los bloques de fijación de ajuste de altura en el tubo
de la manija inferior (1) y los bloques de fijación de la manija superior (2). Atornille el perno y fíjelo para
fijar el mango inferior.
4. La altura del mango se puede ajustar en tres posiciones (L, M y H) girando el bloque de fijación de
ajuste de altura, asegúrese de que la flecha esté alineada con la misma posición de ambos bloques de
fijación de ajuste de altura, luego puede elegir el nivel de altura del mango que desea. (Ver Fig.5)
5. Empuje hacia arriba las perillas de la manija de bloqueo de leva para bloquear la manija en su lugar.
6. Si es necesario, apriete la tuerca de la manija hasta que la perilla de la manija de bloqueo de leva
bloquee la manija de manera segura.
Fig. 5
H
M
L
ACOPLE LOS CABLES DE CONTROL AL MANUBRIO
Según se muestra en la fig. 6
Fig. 6
Clip
Acople los cables de control al manubrio con la abrazadera (provista).
MONTAJE
11
Hotline: 1-866-902-9690
MONTAJE EN LA BOLSA RECOLECTORA DE PASTO
Según se muestra en la fig. 7
Fig. 7
1. La bolsa recolectora de pasto ya estará medio montada. Asegúrese de que el marco del manubrio quede
por fuera de la parte superior de la bolsa.
2. Deslice las ataduras de vinilo por encima del marco.
ACOMPLAR LA BOLSA RECOLECTORA DE PASTO A LA PODADORA
Según se muestra en la fig. 8
Fig. 8
NOTA: Nunca instale ni retire la bolsa recolectora de pasto, el tapón acolchador o el conducto de
descarga lateral mientras el motor esté encendido.
1. Levante la solapa del conducto trasero con una mano y enchufe la bolsa recolectora de pasto,
asegúrese de que el tapón acolchador se retire.
2. Libere la solapa del conducto trasero para fijar la bolsa recolectora en su lugar.
INSTALAR EL TAPÓN ACOLCHADOR
As shown in Fig. 9
Fig. 9
1. Retire la bolsa recolectora de pasto.
2. Empuje el tapón acolchador de plástico en el conducto de descarga hasta que quede fijo en su lugar.
3. Suelte la solapa del conducto trasero. Se volverá a cerrar para cubrir el tapón acolchador.
MONTAJE
Solapa del
conducto trasero
Bolsa recolectora
de pasto
Tapón acolchador
12
Hotline: 1-866-902-9690
INSTALAR EL CONDUCTO DE DESCARGA LATERAL
Según se muestra en la fig. 10
Fig. 10
NOTA: Al cambiar a la descarga lateral, retire la bolsa recolectora de pasto e inserte el tapón
acolchador.
1. Levante la cubierta de descarga lateral con una mano y fije el conducto de descarga lateral con la otra.
2. Suelte la cubierta de descarga lateral para fijar el conducto en su lugar.
VERIFICAR Y LLENAR EL ACEITE DE MOTOR
Según se muestra en las fig. 11 y 12
¡PRECAUCIÓN! Los siguientes procedimientos y ajustes deben realizarse antes de encender el
motor.
No trate de hacer ninguno de estos ajustes mientras el motor esté encendido.
¡PRECAUCIÓN! Para evitar que el motor se dañe, el motor se entrega sin aceite ni gasolina.
El motor debe llenarse con la cantidad correcta de aceite y gasolina antes de encenderlo.
NOTA! Hacer funcionar el motor con un bajo nivel de aceite puede dañarlo. Se recomienda un
aceite de motor de cuatro tiempos de calidad superior con alta detergencia. Usar aceite sin
detergente puede acortar la vida útil del motor, y usar aceite de motor de dos tiempos daña el
motor.
¡PRECAUCIÓN! Use siempre aceite de motor de alta calidad clasificado como aceite SAE30 (o
equivalente, como SAE 5W-30, que suele llamarse aceite para podadora de 4 tiempos).
Nunca use aditivos con el aceite recomendado.
Este motor debe es "Check and Add", es decir que se debe checar y llenar, y nunca necesita que
el aceite se cambie.
NOTA: Para checar el nivel de aceite de motor, apague el motor y coloque la podadora sobre una
superficie nivelada.
1. Retire varilla del nivel de aceite y limpie el aceite con un paño limpio (vea Fig.11).
Fig. 11
2. Inserte la varilla de nivel de aceite en el cuello de llenado de aceite y atorníllela para cerrar.
MONTAJE
Conducto de descarga lateral
Cubierta de descarga lateral
Cuello para llenado
del aceite de motor
13
Hotline: 1-866-902-9690
3. Retire la varilla y verifique el nivel del aceite. El nivel debe estar entre las marcas mínimas y máximas de
la varilla. Si está cerca del nivel inferior, llene hasta el nivel superior con el aceite recomendado (SAE30 o
equivalente). No lo llene en exceso. Limpie cualquier derrame de aceite (vea Fig. 12).
Fig. 12
4. Acople la varilla del nivel de aceite y apriete a mano.
LLENAR DE COMBUSTIBLE
Según se muestra en la fig. 13
¡PRECAUCIÓN! Use siempre gasolina nueva y limpia sin plomo. Compre la gasolina en
cantidades que pueda usar en un plazo de 30 días. Nunca mezcle el aceite y la gasolina.
¡PRECAUCIÓN! No llene hasta base del cuello para dejar espacio para la expansión del
combustible. No llene el tanque de combustible en exceso.
¡PRECAUCIÓN! ¡ADVERTENCIA! La gasolina es altamente inflamable y se deben tomar extremas
precauciones al manejarla o trabajar con ella. Manténgase fuera del alcance de los niños.
¡PRECAUCIÓN! Para evitar que el motor se dañe, el motor se entrega sin aceite ni gasolina. El
motor debe llenarse con la cantidad correcta de aceite y gasolina antes de encenderlo.
¡ADVERTENCIA! Recargue el combustible en una zona bien ventilada con el motor apagado. No
fume ni permita presencia de llamas o chispas en la zona en donde esté recargando combustible
o donde almacena la gasolina. Evite contacto repetido o prolongado con la piel o inhalación de
vapores.
¡ADVERTENCIA! La gasolina con hasta 10% de etanol (gasohol) es aceptable.
No use gasolina no aprobada como la E15 o E85.
1. Limpie el área alrededor del tapón del tanque de llenado de gasolina antes de quitar el tapón. Retire la
etiqueta de advertencia y verifique el nivel del combustible (vea la Fig 13).
Fig. 13
2. Rellene el tanque si el nivel de combustible es bajo.
3. Recargue con cuidado de no llenar en exceso o derramar el combustible.
No llene por encima del fondo del cuello del tanque de combustible.
4. Limpie cualquier derrame o salpicadura de gasolina antes de encender el motor.
5. Apriete el tapón después del llenado, apretado únicamente con la fuerza de la mano.
MONTAJE
AGREGAR LLENO
14
Hotline: 1-866-902-9690
AJUSTE
AJUSTAR LA ALTURA DE CORTE
Según se muestra en la fig. 14
3.75" (95 mm) 1.25" (31 mm)
Fig. 14
¡PRECAUCIÓN! ¡PRECAUCIÓN! Ajuste la altura de corte solo cuando el motor no esté en
funcionamiento.
NOTA: Para fines de envío, la posición de ajuste de altura podría no estar ajustada a la posición de corte.
Antes de operar la podadora, ajuste la altura de corte a la posición normal de corte.
La altura de corte se ajusta centralmente con la manija de ajuste de altura de corte. Se pueden seleccionar
diferentes alturas de corte.
Jale la manija de ajuste hacia afuera y seleccione la altura de corte deseada. La manija se encaja en la
posición deseada.
De la posición 1 a la 7, las alturas de corte van desde 1.25" a 3.75" (31-95 mm).
AJUSTAR LA FUNCIÓN REQUERIDA
NOTA: Esta podadora tiene tres funciones. Modifique las funciones cambiando los accesorios
instalados como se muestra en la siguiente tabla.
Para convertir la
cortacesped
Tapón acolchador Bolsa del pasto
Conducto de descarga
lateral
Para la bolsa trasera
×
√ ×
Para acolchar
√
×
×
Para descarga lateral
√
×
√
“
√
”: instalado “×”: retirado
15
Hotline: 1-866-902-9690
OPERACIÓN
ENCENDER Y APAGAR EL MOTOR
ADVERTENCIA: la cuchilla comienza a rotar tan pronto se enciende el motor.
NOTA: No opere la podadora en áreas cerradas o mal ventiladas ya que el gas de escape contiene
sustancias tóxicas.
Mantenga manos, pies, cabello y ropa alejados de las partes móviles de la máquina. El escape y
otras piezas de la máquina se calientan durante el uso.
Asegúrese de que la cuchilla esté bien sujeta antes de encender el motor.
NOTA: al encender el motor, asegúrese de que la cubierta de la bujía esté conectada al enchufe y
que la máquina tenga suficiente aceite y gasolina.
PARA ENCENDER EL MOTOR
NOTA: Debido a los recubrimientos protectores del motor, puede observarse una pequeña cantidad de
humo al iniciar el uso de la podadora. Esto debe considerarse como normal.
NOTA: Su motor está equipado con un sistema cebador automático. No es necesario cebar ni
asfixiar el motor antes de encenderlo.
1. El motor está equipado con un sistema cebador automático. No es necesario cebar ni asfixiar el motor
antes de encender la podadora.
2. Póngase detrás de la podadora. Jale la barra de control de encendido y apagado del motor hacia el
manubrio superior con una mano y coloque la otra mano en el tirador de la cuerda de encendido del
motor.
3. Jale el tirador aproximadamente 4” a 6” hasta que sienta una resistencia y luego encienda el motor
jalando fuerte (vea la fig. 15).
Fig. 15
NOTA: Si el motor no se enciende tras jalar tres veces, repita el proceso.
4. Cuando el motor esté funcionando, ponga la cuerda del cebador en la guía de la cuerda (vea Fig. 16).
Fig. 16
16
Hotline: 1-866-902-9690
APAGAR EL MOTOR
Según se muestra en la fig. 17
Fig. 17
Suelte la barra de control de encendido y apagado del motor. Volverá a su posición inicial y el motor se
apagará automáticamente.
CONTROL DEL MECANISMO
Según se muestra en la fig. 18
Fig. 18
1. El autopropulsado se controla sosteniendo la barra de control de encendido y apagado del motor en al
manubrio y se empuja la barra autopropulsora hacia el manubrio.
2. Para detener el movimiento hacia adelante sin apagar el moto
3. La velocidad de avance automático de la cortadora de césped se puede ajustar mediante la palanca de
control de avance automático. Apriete la palanca de control de avance automático hacia el mango y la
velocidad de marcha será la más rápida. Reduzca la velocidad soltando gradualmente la palanca de control
de avance automático.
r, suelte la barra de control de mecanismo
autopropulsor al tiempo que sigue sosteniendo la barra de control de encendido y apagado del motor
contra el manubrio para seguir podando sin que esté activado el mecanismo autopropulsor.
NOTA: Tras soltar la barra autopropulsora, si la podadora no se mueve hacia atrás, empuje la
podadora ligeramente hacia adelante para soltar las ruedas.
OPERACIÓN
17
Hotline: 1-866-902-9690
OPERACIÓN
AJUSTE DE CONDUCCIÓN
Nota:
El sistema de transmisión consta de poleas, una correa, y un cable que une la transmisión al
variador resolver. A medida que estos componentes se desgastan, el ajuste puede ser necesario.
Para ajustar el varillaje de transmisión, realice el siguiente:
• Afloje la tuerca de bloqueo con una llave (no suministrado).
• Sostenga el perno superior y gire la tuerca de tope en el sentido de las agujas del reloj para acortar el
cable, en sentido antihorario para alargar el cable.
• Encienda la podadora para probar el funcionamiento de la unidad. manija de control y apriete la tuerca
de bloqueo una vez la autopropulsión puede activarse.
tuerca de bloqueo
tuerca de parada
perno superior
Nota:
El cable debe estar suelto con la autopropulsión. barra de transmisión en la posición liberada;
de lo contrario, el La máquina puede deslizarse cuando la palanca de control de está desconectado.
Nota: la velocidad autopropulsada puede cambiar en pendientes.
NOTA: Después de soltar el control de transmisión, si el cortacésped no ruede hacia atrás, empuje
la podadora hacia adelante ligeramente para desenganchar las ruedas motrices.
PARA LIMPIAR UN MOTOR INUNDADO
NOTA: Si el motor no se enciende después de jalar la cuerda varias veces, es posible que esté
inundado con un exceso de combustible. Siga el procedimiento a continuación para limpiar y
encender un motor inundado.
1. Suelte la barra de control de encendido y apagado del motor.
2. Retire la bujía, séquela y reinstálela.
(1) Retire la cubierta de la bujía (vea la Fig. 19).
Fig. 19

18
Hotline: 1-866-902-9690
(2) Use una llave tubular para bujía (no incluida) para retirar la bujía (vea la Fig. 19-1).
Fig. 19-1
(3) Tras secarla, vuelva a colocar la bujía.
NOTA: Instale la bujía con cuidado a mano para evitar dañar la rosca. Cuando la bujía esté
instalada, apriétela dando un 1/8 a 1/4 de giro con la llave tubular para bujía para comprimir la
arandela.
3. Jale la barra de control de encendido y apagado del motor hacia el manubrio superior.
4. Opere el cebador como se describe arriba.
PODAR
ADVERTENCIA: Observe siempre los procedimientos de seguridad más estrictos al usar la
podadora. Lea las instrucciones de seguridad de este manual en su totalidad antes de usar la
podadora.
ADVERTENCIA: Nunca abra la solapa del conducto trasero cuando la bolsa recolectora de pasto
se haya desamarrado (para vaciarse) o mientras el motor siga en funcionamiento. ¡La cuchilla
rotativa puede causar lesiones graves!
1. Seleccione sus ajustes de altura y de función.
2. Encienda el motor y deje que funcione.Vea “Para encender el motor”.
3. Sostenga firmemente el manubrio superior junto con la barra de control de encendido y apagado del
motor y la barra de control del mecanismo autopropulsor cerrados y camine junto con su mecanismo
autopropulsor para empezar a podar.
CONSEJOS DE TRABAJO
1. Camine, nunca corra con la podadora, y tenga mucho cuidado al podar en superficies disparejas o
accidentadas.
2. Pode transversalmente a la pendiente, no hacia arriba y hacia abajo.
3. Tenga cuidado al cambiar de dirección la podadora en una pendiente.
4. No pode excesivamente las pendientes pronunciadas.
5. Logrará mejores resultados si el pasto está seco. El pasto húmedo tiende a taponar la cuchilla y el
sistema de recolección de pasto.
6. El pasto crece a diferentes ritmos según la época del año. Nunca use la altura de corte menor para el
primer corte de la temporada o en condiciones de sequía.
7. Solo un tercio de la altura del pasto debe cortarse.
8. No corte pasto muy crecido o húmedo cuando esté acolchando para asegurar que el pasto cortado se
pueda dispersar eficazmente.
Cuando lleve varios minutos cortando, por favor detenga la podadora y limpie la cuchilla y la estación.
9. No retire los restos de pasto de la carcasa de la podadora o de la cuchilla con la mano ni con sus pies.
Use las herramientas adecuadas como una escoba o un cepillo.
OPERACIÓN

19
Hotline: 1-866-902-9690
VACIAR LA BOLSA RECOLECTORA DE PASTO
En cuanto los pedazos de pasto empiecen a rezagar la podadora, es hora de vaciar la bolsa de pasto.
NOTA: Antes de sacar la bolsa de pasto, apague el motor y espere hasta que la cuchilla se haya
detenido.
1. Para sacar la bolsa recolectora de pasto, use una mano para levantar la solapa del conducto trasero y
con la otra agarre la bolsa recolectora de paso. La solapa del conducto trasero cae automáticamente
después de retirar la bolsa de pasto y se cierra la apertura de la descarga trasera.
2. Vacíe la bolsa y reinstálela.
NOTA: Si queda algún residuo en el conducto de descarga, límpielo con un cepillo. No retire
los restos de pasto de la carcasa de la podadora o de la cuchilla con la mano ni con sus pies.
Use las herramientas adecuadas como una escoba o un cepillo. Para asegurar que el pasto se
pueda recolectar en la bolsa para el paso, la abertura de descarga y el interior de la carcasa de la
podadora deben estar libres de bloqueo.
OPERACIÓN
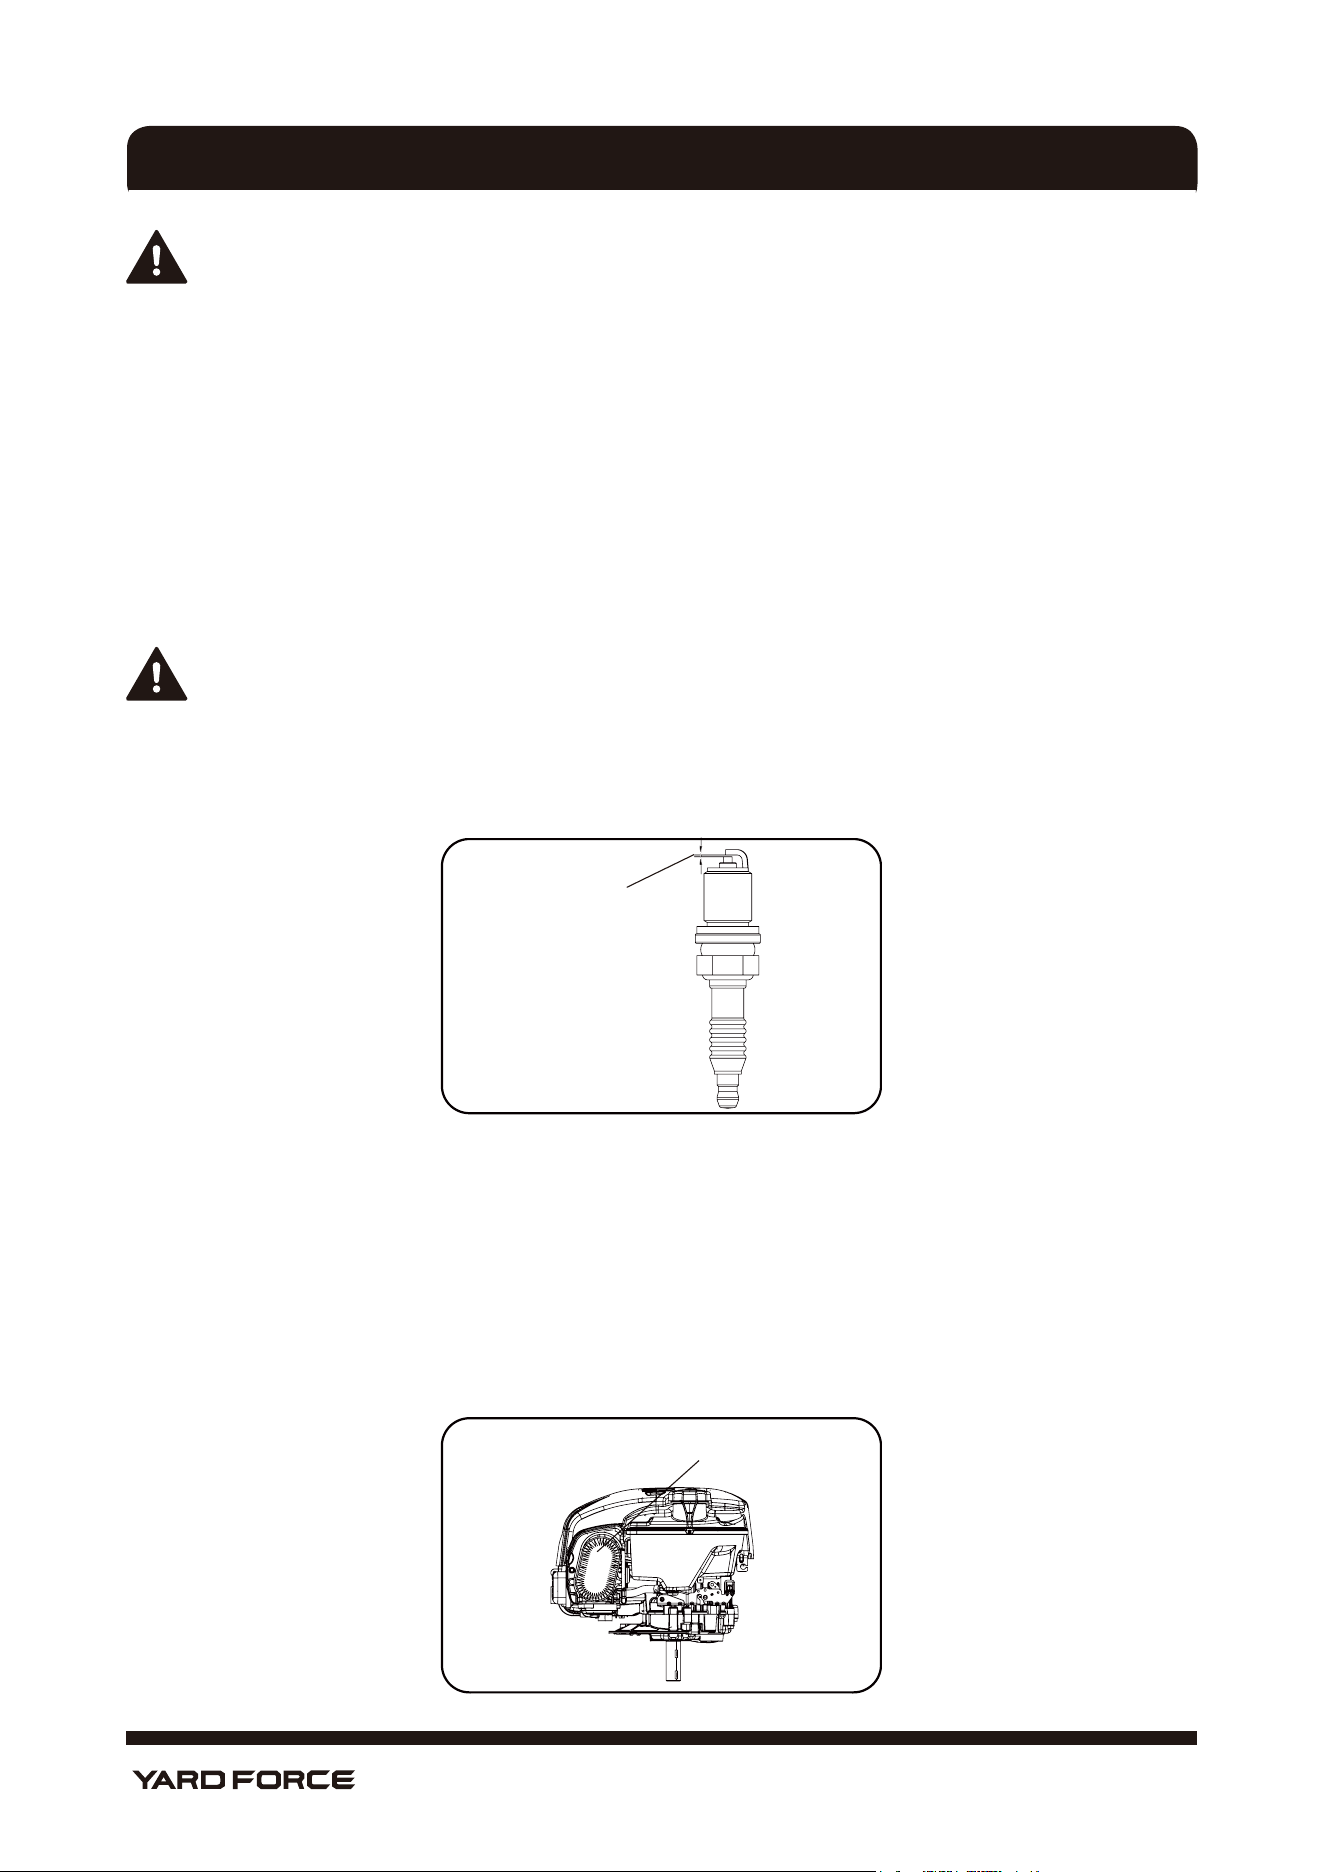
20
Hotline: 1-866-902-9690
ALMACENAMIENTO Y MANTENIMIENTO
ADVERTENCIA: Antes de realizar cualquier trabajo de mantenimiento o limpieza, apague el motor
y espere a que la cuchilla se haya detenido.
LIMPIEZA
LIMPIEZA GENERAL
La podadora debería limpiarse bien después de cada uso. Limpie siempre su podadora inmediatamente
tras cada uso.
No permita que los pedazos de pasto y otros escombros se sequen o se endurezcan sobre la superficie de
la podadora.
Los restos de pasto seco y tierra pueden interferir con la operación de la podadora.
Cheque que el conducto de pasto esté libre de cualquier resto de pasto. Si hay restos, quítelos. Cheque
la parte de abajo de la podadora y el montaje de las cuchillas. Al checar, incline la podadora hacia su lado
izquierdo (el opuesto al cuello de llenado de aceite).
NOTA: Antes de poner la podadora de lado, drene por completo el tanque de combustible usando
una bomba extractora de gasolina.
No incline la podadora más de 90 grados.
MANTENIMIENTO DE LA BUJÍA
Según se muestra en la fig. 20
0.017"- 0.023"
Fig. 20
1. Cuando el motor se haya enfriado, jale la cubierta de la bujía con un giro.
2. Retire la bujía con la ayuda de una llave tubular (no incluida).
3. Limpie la bujía con un cepillo metálico (no incluido).
4. Usando un calibrador de espesor, ajuste la distancia a 0.017- 0.023" (0.432- 0.584 mm).
5. Instale la bujía con cuidado a mano para evitar dañar la rosca.
6. Cuando la bujía esté instalada, apriétela con la llave tubular para bujía para comprimir la arandela.
MANTENIMIENTO DEL FILTRO DE AIRE
Según se muestra en la fig. 21
Cartucho de filtro
Fig. 21

21
Hotline: 1-866-902-9690
Los filtros de aire sucios reducen la salida del motor restringiendo el aire al carburador. Si el aire contiene
mucho polvo, el filtro de aire debe checarse con más frecuencia.
ADVERTENCIA! Nunca haga funcionar el motor sin que el elemento del filtro de aire esté instalado.
1. Pulse las pestañas superiores de la cubierta del filtro de aire e inclínelo lejos del motor para retirar la
tapa.
2. Retire el cartucho del filtro.
3. Para soltar los restos, dele suaves golpes al cartucho del filtro sobre una superficie dura. Si el cartucho
del filtro está excesivamente sucio, cámbielo por uno nuevo.
Nota: No limpie nunca el cartucho de aire con gasolina o solventes inflamables.
Limpie el cartucho del filtro de aire solo con aire comprimido o dándole golpecitos.
4. Instale el cartucho del filtro.
5. Cierre la tapa correctamente ajustando las pestañas de nuevo en sus ranuras en la parte de arriba.
CHEQUE Y AGREGUE EL ACEITE DE MOTOR
El motor de Briggs & Stratton 625EXi de esta podadora se diseñó con una función especial de Check &
Add
TM
, es decir checar y agregar. El aceite nunca debe cambiarse. Antes de cada uso, cheque el nivel del
aceite y agregue aceite adicional si el nivel no está entre los niveles mínimo y máximo.
CAMBIAR LA CUCHILLA
Por razones de seguridad, solo deberá afilar, balancear y montar la cuchilla en un taller de servicio
autorizado. Para resultados óptimos, se recomienda que la cuchilla se inspeccione una vez al año.
¡ADVERTENCIA! Antes de que retire la bolsa recolectora de pasto, detenga el motor y espere hasta
que la cuchilla pare por completo.
¡ADVERTENCIA! Necesitará guantes de jardinería (no incluidos) y una llave inglesa (no incluida)
para retirar la cuchilla.
NOTA! No voltee la podadora. Inclínela levemente hacia el lado de la pipa de llenado de aceite y
alcance bajo la estación.
¡ADVERTENCIA! Siempre maneje la cuchilla con cuidado; los extremos afilados puede causar
lesiones. USE GUANTES. Cambie su cuchilla de metal después de 50 horas de podado o de 2
años, lo que suceda antes, independientemente de su condición.
¡ADVERTENCIA! Si la cuchilla está agrietada o dañada, cámbiela por una nueva.
¡ADVERTENCIA! No sostenga la cuchilla directamente con sus manos.
NOTA! Mantenga el filo de la cuchilla al cortar el pasto. Si la cuchilla ya está excesivamente
desgastada y desafilada, debería cambiarla o afilarla. El filo de la cuchilla afectará el rendimiento de
la podadora.
ALMACENAMIENTO Y MANTENIMIENTO

22
Hotline: 1-866-902-9690
ALMACENAMIENTO Y MANTENIMIENTO
Por razones de seguridad, recomendamos que la cuchilla la cambie únicamente una persona cualificada y
autorizada para hacerlo.
Sostenga la cuchilla y desatornille el perno de la cuchilla en sentido contrario de las agujas del reloj
utilizando una llave inglesa. Retire la arandela y la cuchilla.
Ajuste una nueva cuchilla o afile la que tiene. Coloque la cuchilla sobre dos tacos en el borde de la cuchilla
y luego cambie la arandela y los pernos. Asegúrese de que la cuchilla quede correctamente colocada y
luego apriete firmemente el perno. No apriete en exceso. El lado de la hoja que tiene letras debe quedar
hacia afuera.
Fig. 22
ALMACENAR LA PODADORA POR PERIODOS BREVES
La podadora se puede almacenar por períodos breves de tiempo (menos de 15 días) sin necesidad de
realizar ningún mantenimiento de almacenamiento. Antes de guardar la podadora en el almacenamiento
siempre haga lo siguiente:
1. Deje que el motor se enfríe por completo.
2. Asegúrese de que la bolsa recolectora de pasto esté vacía.
3. Limpie los restos de debajo de la estación de la podadora.
4. Almacene la podadora sobre una superficie plana y nivelada con la podadora en posición vertical.
5. Almacene en un lugar seguro que no sea accesible para niños ni a personas que no están familiarizadas
con la operación
ALMACENAR LA PODADORA POR PERIODOS EXTENSOS
Si la podadora debe guardarse en almacenamiento por más de 15 días, deberá realizarse el mantenimiento
de almacenamiento. Si los siguientes pasos no se realizan, cuando vuelva a operar la podadora no iniciará
correctamente y tendrá que mandarla a reparar.
¡PRECAUCIÓN! No vacíe el tanque de gasolina en áreas de interiores, cerca del fuego o mientras
esté fumando. Los vapores de la gasolina pueden causar explosiones e incendios.
1. Vacíe el tanque de gasolina con una bomba extractora de gasolina si la tiene a la mano.
2. Encienda el motor y déjelo funcionar hasta que la gasolina remanente se haya consumido.
3. Limpie las aletas de enfriamiento del cilindro y la carcasa.
4. Asegúrese de limpiar toda la máquina para proteger la pintura.
5. Almacene de la máquina en un lugar bien ventilado.
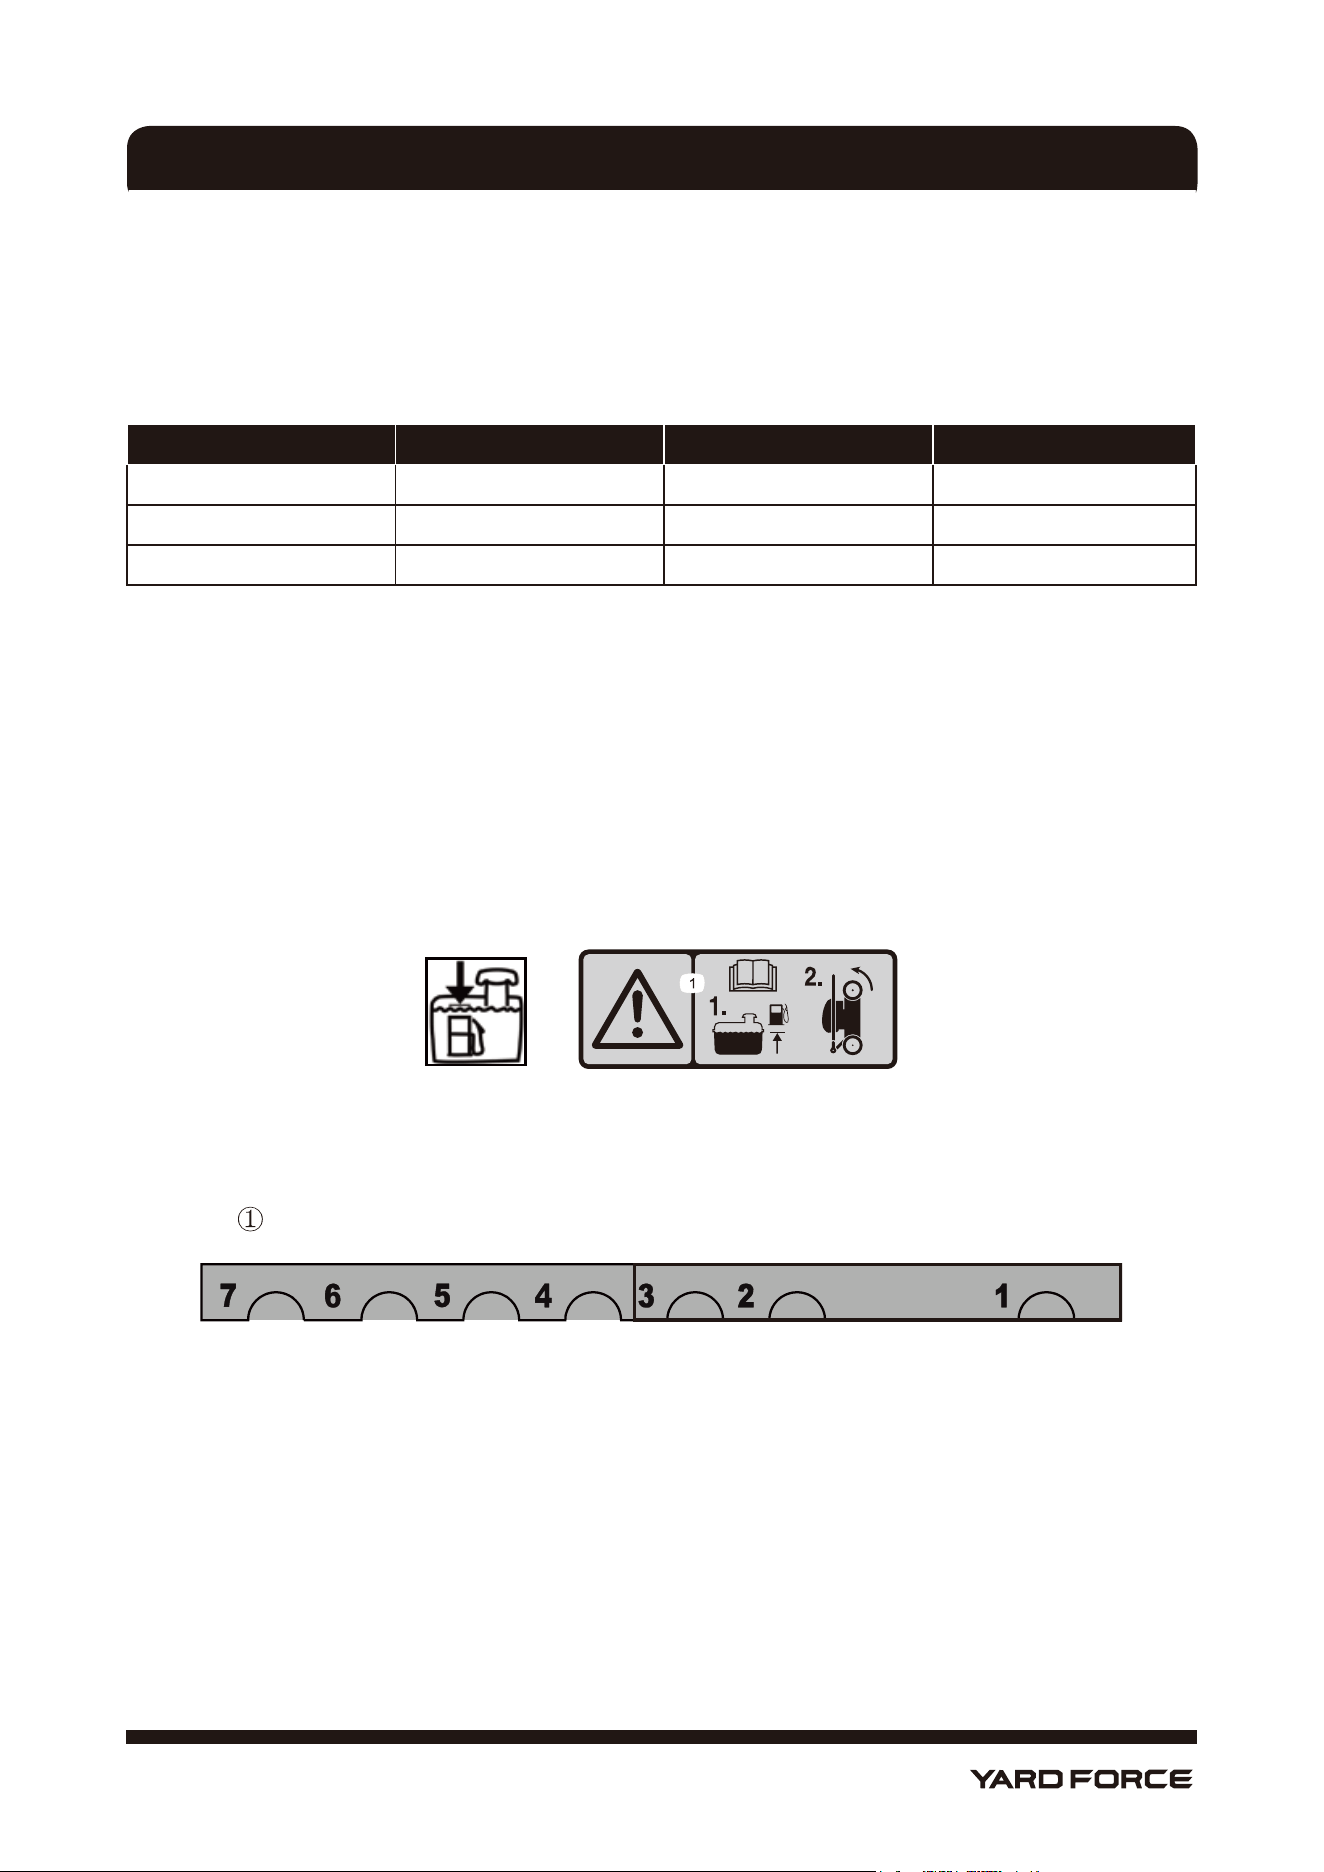
23
Hotline: 1-866-902-9690
PROGRAMA DE ALMACENAMIENTO
Realizar un mantenimiento rutinario correctamente a su podadora le asegurará años de uso sin problemas.
Por favor, guarde bien este manual para consultarlo en el futuro.
Se recomienda que se ciña al siguiente programa de mantenimiento. Esto asegurará que la podadora opere
correctamente y sea segura de usar.
12 horas de uso 24 horas de uso 36 horas de uso
Filtro de aire Limpio Limpio Limpio
Bujía Checar Limpio Limpio
Aceite de motor Checar Checar y agregar Checar y agregar
TRANSPORTAR LA PODADORA
Vacíe el tanque de gasolina. Siempre deje funcionar el motor hasta que se haya consumido la gasolina
remanente en el tanque.
Vacíe el aceite del motor del motor tibio. Retire la cubierta de la bujía. Limpie las aletas de enfriamiento del
cilindro y la carcasa. Use el embalaje original para envíos, siempre que sea posible.
INSTRUCCIONES DE CARACTERÍSTICAS DE ALMACENAMIENTO VERTICAL
1. Asegúrese de que el nivel de combustible en el tanque de combustible no sea superior al recomendado
por el motor fabricante.
Nota: Si el nivel de combustible en el tanque de combustible es demasiado alto, drene el combustible
en un recipiente de combustible aprobado hasta que esté en o por debajo del nivel recomendado por el
fabricante del motor.
2. Asegúrese de que el ajuste de la altura de corte esté en la posición 3 o por debajo de ella. Si no es así,
bájelo.
ALMACENAMIENTO Y MANTENIMIENTO
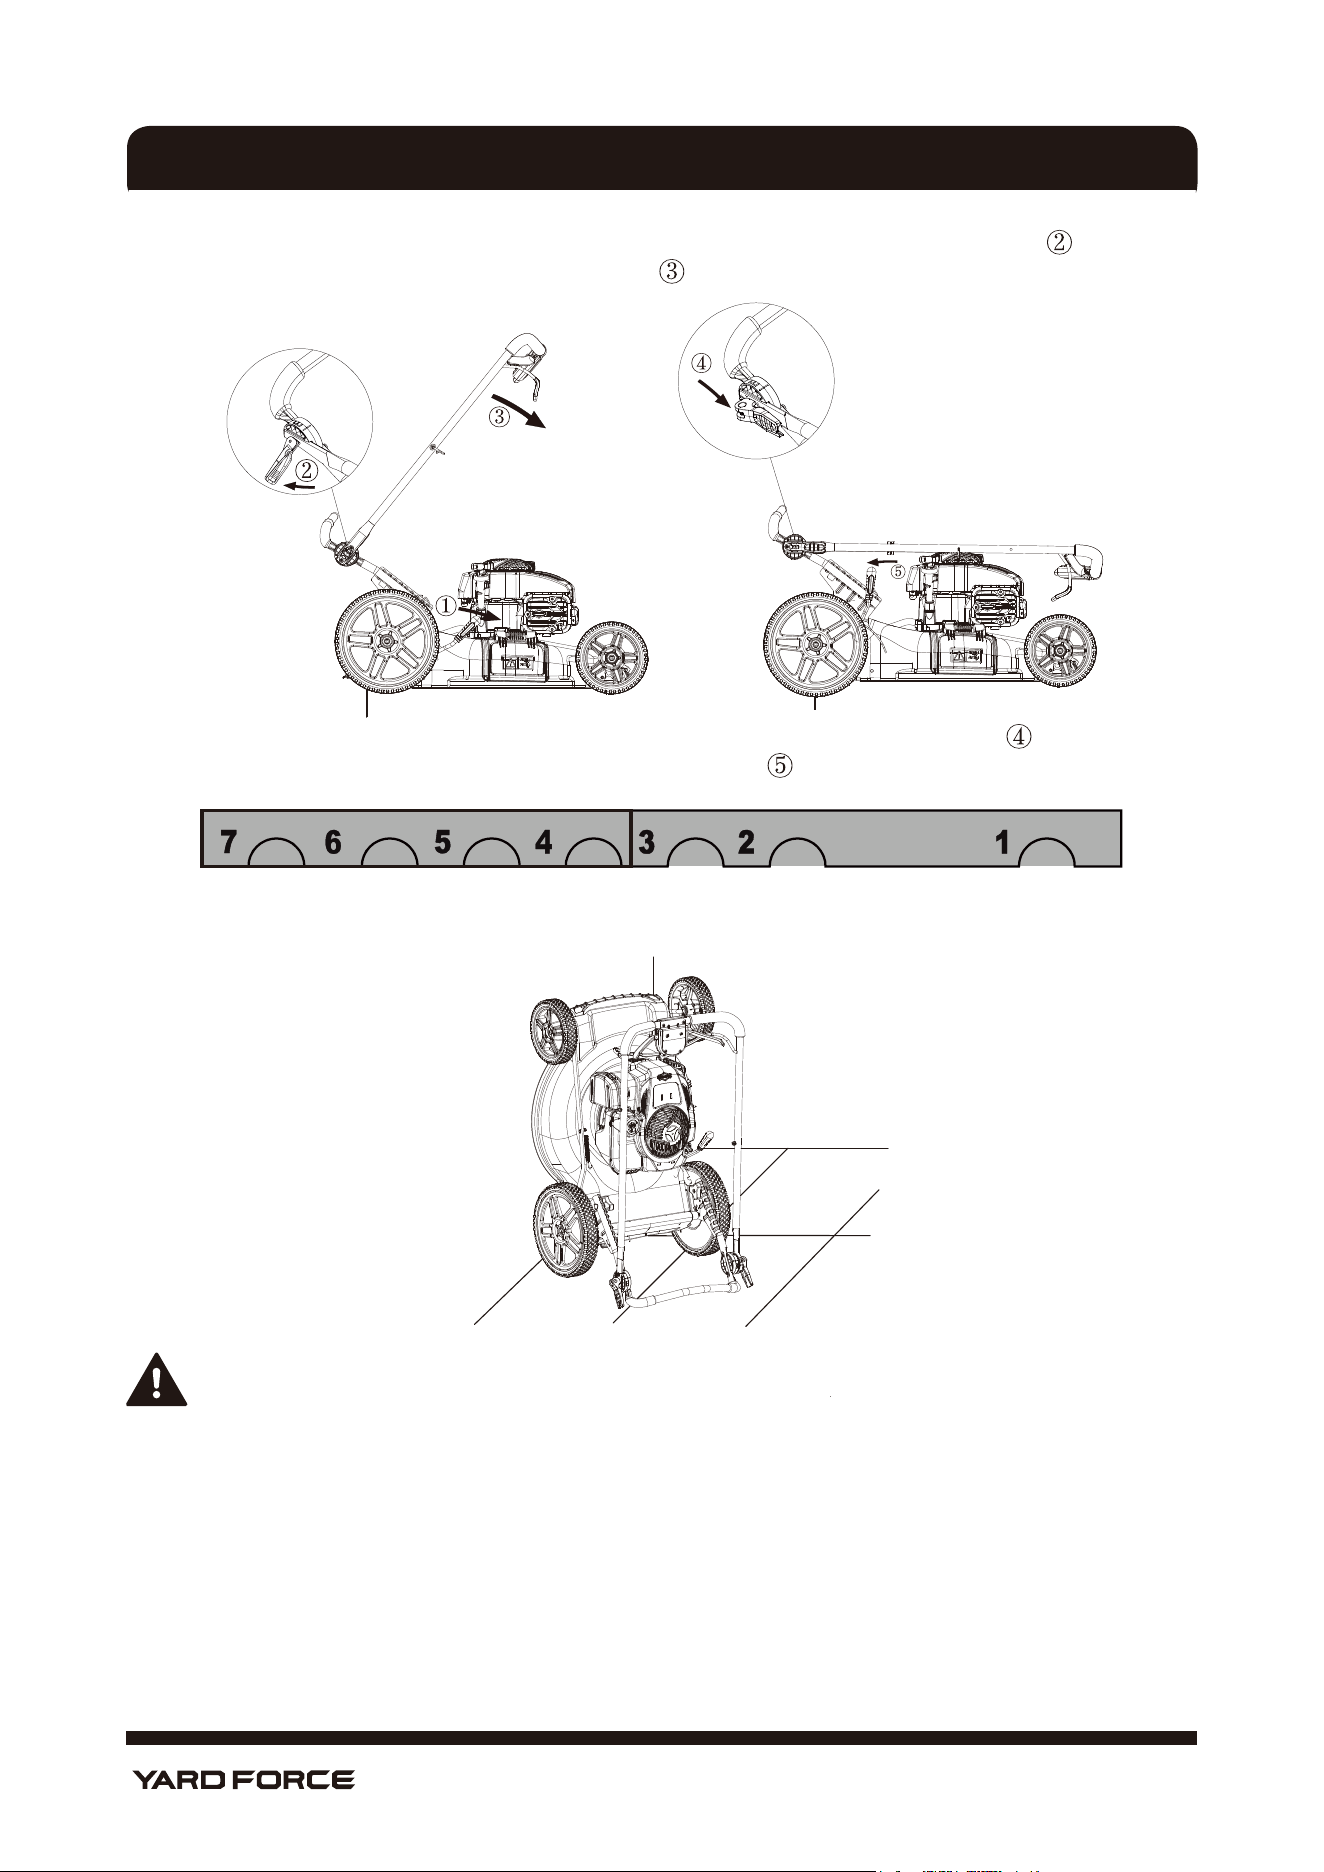
24
Hotline: 1-866-902-9690
3. Desenganche la perilla de la manija de bloqueo de leva a la posición "desbloqueada"
y pliegue la
manija y trabe la manija en la posición horizontal.
4. Bloquee la perilla de la manija de bloqueo de leva para almacenamiento vertical , luego ajuste la
configuración de la altura de corte a la posición 4 o superior
.
5. Incline hacia arriba y almacene. Asegúrese de colocar la podadora de modo que la cuchilla esté frente
a la pared.
ADVERTENCIA!
1. Almacenar la podadora en posición vertical cuando hay demasiado combustible en el tanque
de combustible puede hacer que el combustible se derrame. fuga del tanque de combustible. El
combustible es extremadamente inflamable y explosivo. Un incendio o una explosión de combustible
pueden arder usted y otros.
2. Guarde la podadora en posición vertical solo cuando el nivel de combustible en el tanque de
combustible no sea superior al se recomienda en este Manual del operador.
3. No almacene la podadora en una posición que esté
más allá de la posición vertical (90 °); De lo
contrario, el combustible escape del tanque de combustible.
4. No transporte la cortadora de césped en la posición de almacenamiento vertical.
5. No intente encender la podadora en la posición de almacenamiento vertical.
6. No intente almacenar ninguna máquina con combustible y aceite en la posición de almacenamiento
vertical que no esté diseñada para ese propósito.
ALMACENAMIENTO Y MANTENIMIENTO

25
Hotline: 1-866-902-9690
RESOLUCIÓN DE PROBLEMAS
ADVERTENCIA: Antes de realizar cualquier trabajo de mantenimiento o limpieza, apague el motor
y espere a que la cuchilla se haya detenido.
Precaución!
Las reparaciones inadecuadas pueden resultar en que el producto no funcione de manera segura.
Esto le pone en peligro usted y a su entorno.
Las fallas que no puedan rectificarse con ayuda de la siguiente tabla podrían requerir reparación por parte
de un centro de reparación autorizado de Yard Force o Briggs & Stratton.
Sepa que cualquier reparación inadecuada también invalidará la garantía y podría incurrir en costos
adicionales.
Use solo piezas de repuesto genuinas. Solo estas piezas de repuesto están diseñadas y son adecuadas
para esta podadora. El uso de otras piezas de repuesto no solo invalida la garantía, sino que puede ponerle
en peligro a usted y a su entorno.
Falla / mal funcionamiento Causa Solución
Muy ruidosa al funcionar; la
máquina vibra fuertemente.
Los tornillos están sueltos.
Los amarres de la cuchilla están
sueltos. La cuchilla no está
balanceada.
Apriete los tornillos.
Apriete los amarres de la cuchilla.
Cambie la cuchilla.
El motor no arranca.
La palanca de encendido/
apagado no está activada. La
bujía está defectuosa.
El tanque de combustible está vacío.
El motor podría estar inundado.
Active la palanca de encendido/
apagado.
Cambie la bujía.
Rellene con combustible.
Retire el enchufe y deje secar.
El motor tiene un
funcionamiento
inestable.
El filtro de aire está sucio. La bujía
está sucia.
Limpie el filtro de aire. Limpie la
bujía.
Resultados de poda
irregulares.
La cuchilla está desafilada.
La altura de corte es demasiado
baja.
Afile la cuchilla. Ajuste la altura
correcta.
La bolsa recolectora de pasto
no está suficientemente llena.
La cuchilla está desgastada.
La bolsa recolectora de pasto
está taponada.
La altura de corte no es la correcta.
El pasto está húmedo. El canal/
carcasa de descarga está
bloqueado. La parte inferior de
la estación de la podadora está
taponada.
Cambie la cuchilla.
Vacíe la bolsa recolectora de
pasto.
Corrija la altura de corte. Deje que
el pasto se seque.
Limpie el canal/carcasa de
descarga.
Limpie la parte inferior de la
estación de la podadora.

26
Hotline: 1-866-902-9690
GARANTÍA
GARANTÍA DE YARD FORCE LIMITADA A DOS AÑOS
Garantía del producto
Guarde su recibo de venta original en un lugar seguro como prueba de compra. La cobertura de la
comienza el día en que se compró el producto con un distribuidor autorizado de productos Yard
Force. La cobertura de la garantía aplica únicamente para el comprador original y no es transferible.
La cobertura de la garantía se proporciona únicamente para los productos comprados y usados en
los Estados Unidos y en Puerto Rico de distribuidores autorizados de Yard Force. Los productos
comprados o usados fuera de los Estados Unidos y Puerto Rico no están cubiertos por esta garantía.
Dos (2) años de garantía - Motor
La YF22-3N1SPVSV-SC tiene una garantía limitada de 2 años a partir de la fecha de compra ante
al fabricante por daño accidental, uso no razonable, desgaste por uso normal, negligencia o no
cumplimiento de las instrucciones de operación, seguridad y mantenimiento. Todo servicio, fuera del
mantenimiento normal descrito en este manual, deberá realizarse por un técnico de servicio autorizado.
la garantía. Todas las piezas y accesorios usadas en y con este producto deberán ser fabricados y
autorizados por Merotec. Inc.
Garantía de noventa (90) días - accesorios
Los accesorios incluidos con la YF22-3N1SPVSV-SC, como la cuchilla y otras piezas similares tienen
garantía ante el fabricante por defectos para uso residencial únicamente por un periodo de 90 días a
partir de la fecha de compra. La garantía no cubre la pérdida de uso u otros daños consecuentes de
nada de lo anterior, y tampoco cubre reparaciones hechas o tentativas de reparación realizadas por
o industriales. Ciertas piezas y accesorios están sujetos al desgaste normal y se excluyen de esta
garantía.
Proceso de servicio y reclamos de garantía
Para servicio y soporte con la garantía, póngase en contacto con el centro de soporte de Yard Force
llamando a la línea gratuita al (866) 902-9690 de lunes a viernes de 8:30 AM a 5:00 PM hora del este.
Los agentes de soporte de servicio de Yard Force USA pueden ayudarle a resolver los problemas por
teléfono para que pueda volver a usar su producto tan rápidamente como sea posible. En situaciones en
donde sea necesario reparación o inspección de la garantía, por favor siga de los siguientes pasos:
1. Contacte Yard Force USA al (866) 902-9690 o [email protected] de lunes a viernes de 8:30 AM
a 5:00 PM hora del este.
2.
3. Si se solicita un servicio o una evaluación de la garantía, Yard Force USA le proporcionará un número
RGA que deberá usar en todas las comunicaciones con Yard Force USA y, de ser necesario, una lista
de los centros de servicio autorizados locales donde podrá llevar su podadora para que la evalúen y
reparen.
4. Todos los envíos Yard Force USA deberán tener un número RGA. Cualquier envío recibido que no lleve
el número RGA marcado en la parte exterior de la caja será rechazado.
5. Todos los envíos deben ir prepagados, Yard Force USA no paga los costos de envío para servicio o
evaluación de garantía. Yard Force USA no se hace responsable de ningún paquete perdido por el
servicio de paquetería. Recomendamos que los envíos se hagan por un servicio de paquetería que
Para más información o si tiene alguna pregunta, llame sin costo al (866) 902-9690 o escriba a support@
merotecusa.com de lunes a viernes de 8:30 AM a 5:00 PM hora del este.
GUARDE ESTAS INSTRUCCIONES


www.YardForceUSA.com
Scan Code to connect with Yard Force Support
Need Help?
Please do not return the product to your place of purchase yet. We’re here to help and take care
of all your needs.
Contact our customer service department for help with:
• Product assembly or use
• Missing or damaged parts
• Troubleshooting
• Replacement parts and accessories
You can submit a support request by scanning the QR code on this page, or by visiting:
www.YardForceUSA.com/contact-support
Register your product today to maintain warranty coverage and stay up to date with
information on the use, care, maintenance and service of your product.
Register online today at :
www.yardforceusa.com/product-registration
Yard Force Power Equipment Inc.
Kennesaw, GA 30144
© 2025 Yard Force Power Equipment
Part Number: YF22-3N1SPVSV-SCMAN-B
2411