
Technical Support and E-Warranty Certificate www.vevor.com/support
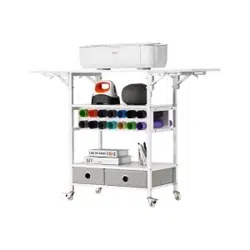
CRICUT TABLE
We continue to be committed to provide you tools with competitive price.
"Save Half", "Half Price" or any other similar expressions used by us only represents an
estimate of savings you might benefit from buying certain tools with us compared to the major top
brands and does not necessarily mean to cover all categories of tools offered by us. You are
kindly reminded to verify carefully when you are placing an order with us if you are actually saving
half in comparison with the top major brands.

- 1 -
(The picture is for reference only; please refer to the actual object)
NEED HELP? CONTACT US!
Have product questions? Need technical support? Please feel free to
contact us:
Technical Support and E-Warranty Certificate
www.vevor.com/support
This is the original instruction, please read all manual instructions
carefully before operating. VEVOR reserves a clear interpretation of our
user manual. The appearance of the product shall be subject to the
product you received. Please forgive us that we won't inform you again if
there are any technology or software updates on our product.
CRICUT TABLE
C240407S-01
- 2 -
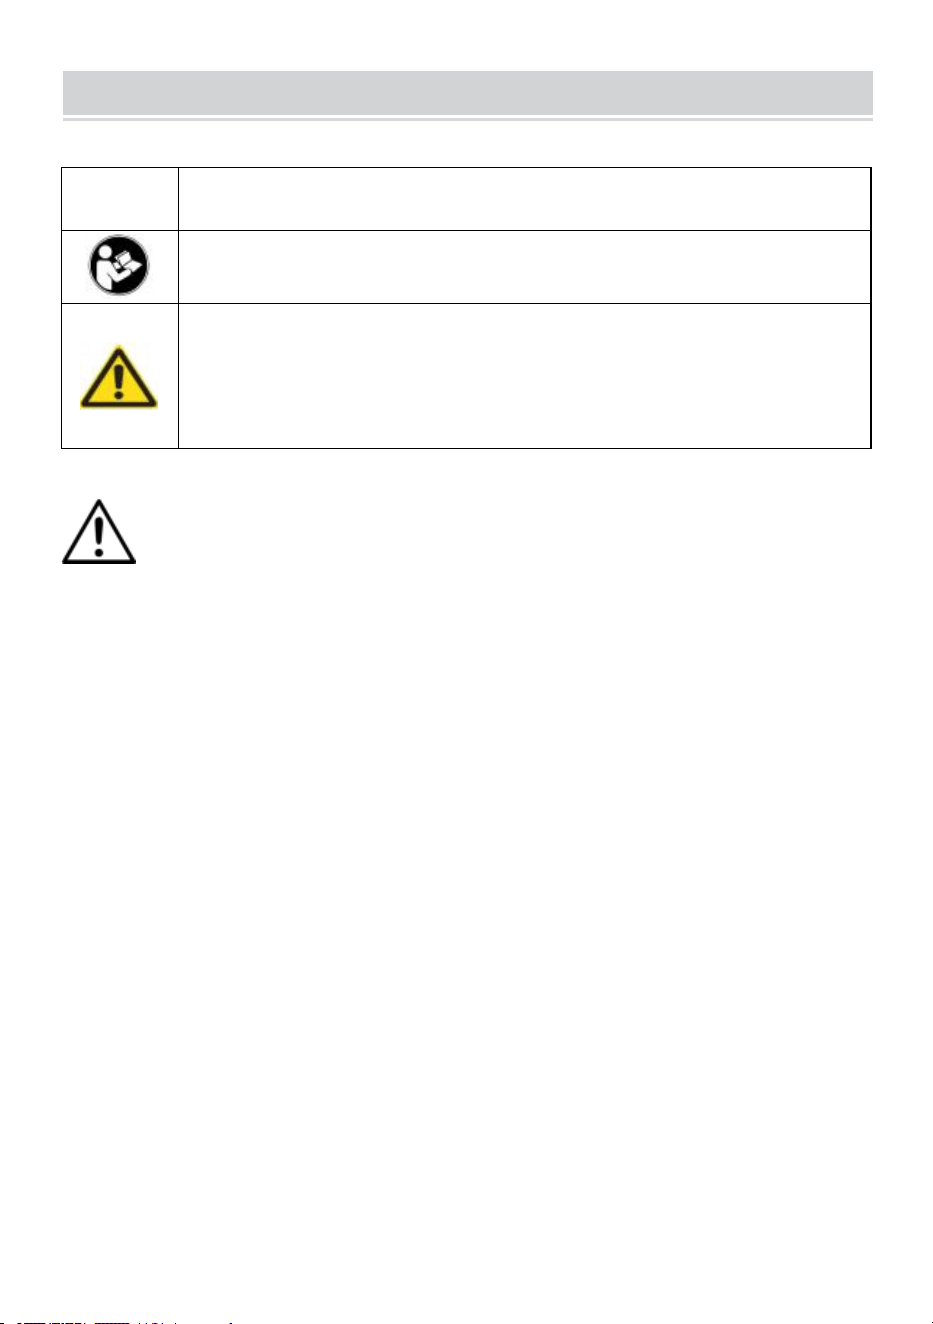
SAFETY INSTRUCTION AND PRECAUTIONS
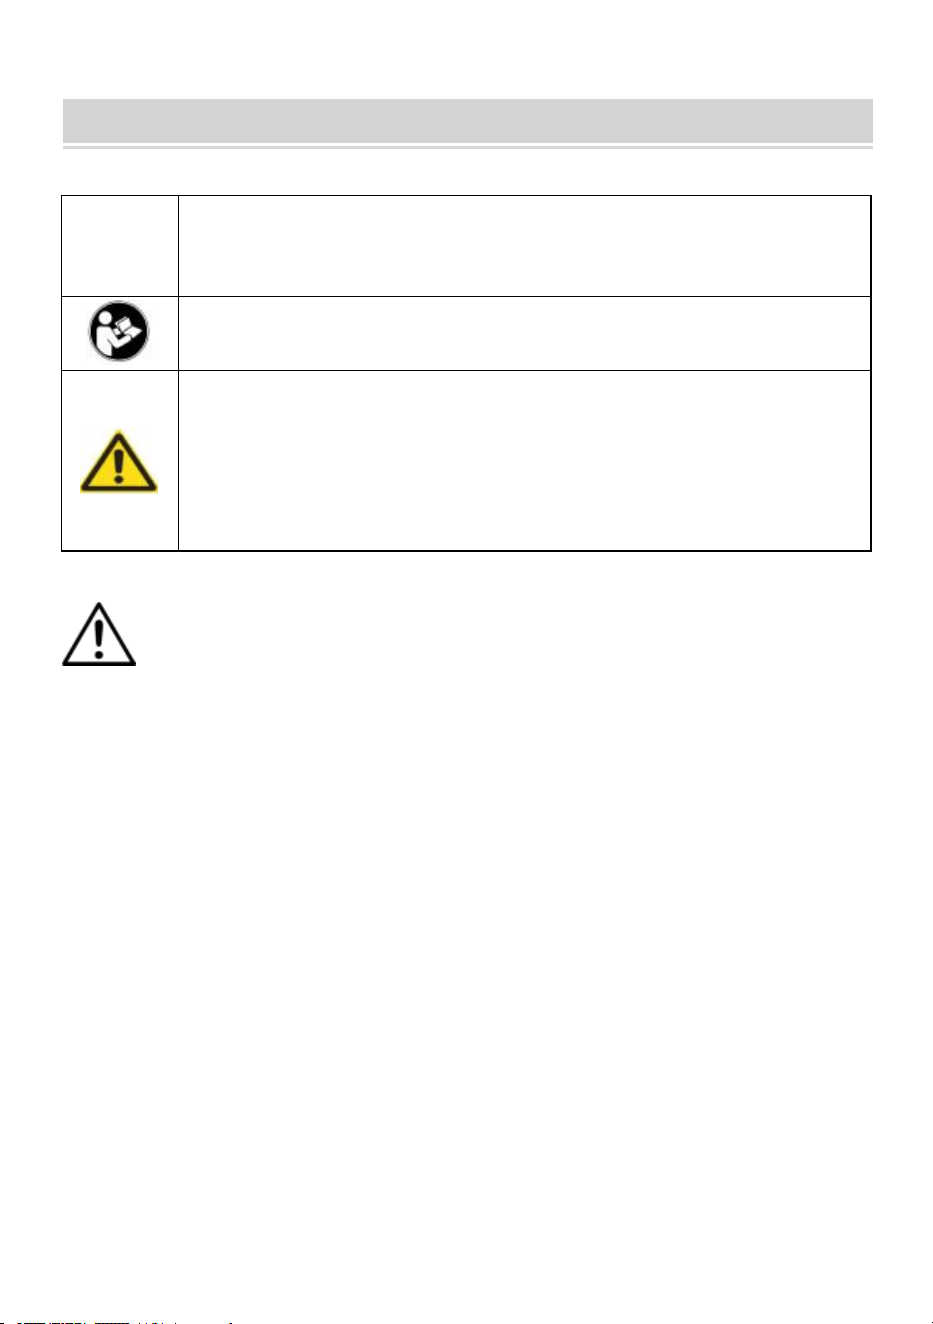
Symbol
Symbol Description
Warning: To reduce the risk of injury, the user must read the
instructions manual carefully.
This symbol, placed before a safety comment, indicates a kind of
precaution, warning, or danger. Ignoring this warning may lead to
an accident. To reduce the risk of injury, fire, or electrocution,
please always follow the recommendations shown below.
WARNING:To reduce the risk of injury, the user must read the
instructions manual carefully.
1.Do not attach or mount this product to a vehicle. This may cause
personal injury or product damage.
2.Do not stand or step on this product. You may fall which may cause
personal injury.
3.Keep the product on level surfaces. The product may become unstable
and tip if stored or moved on an unlevel surface, which may cause
personal injury or product damage
4.Do not exceed the maximum load capacity, including contents. Do not
exceed the maximum load capacity of each drawer. Do not exceed the
maximum load capacity of each tray.
5. Keep away from open flame. This product will ignite and burn if brought
into contact with an open flame.
6.Keep away from sharp points, blades and other items, so as not to
scratch the product.
SAVE THESE INSTRUCTIONS
- 3 -
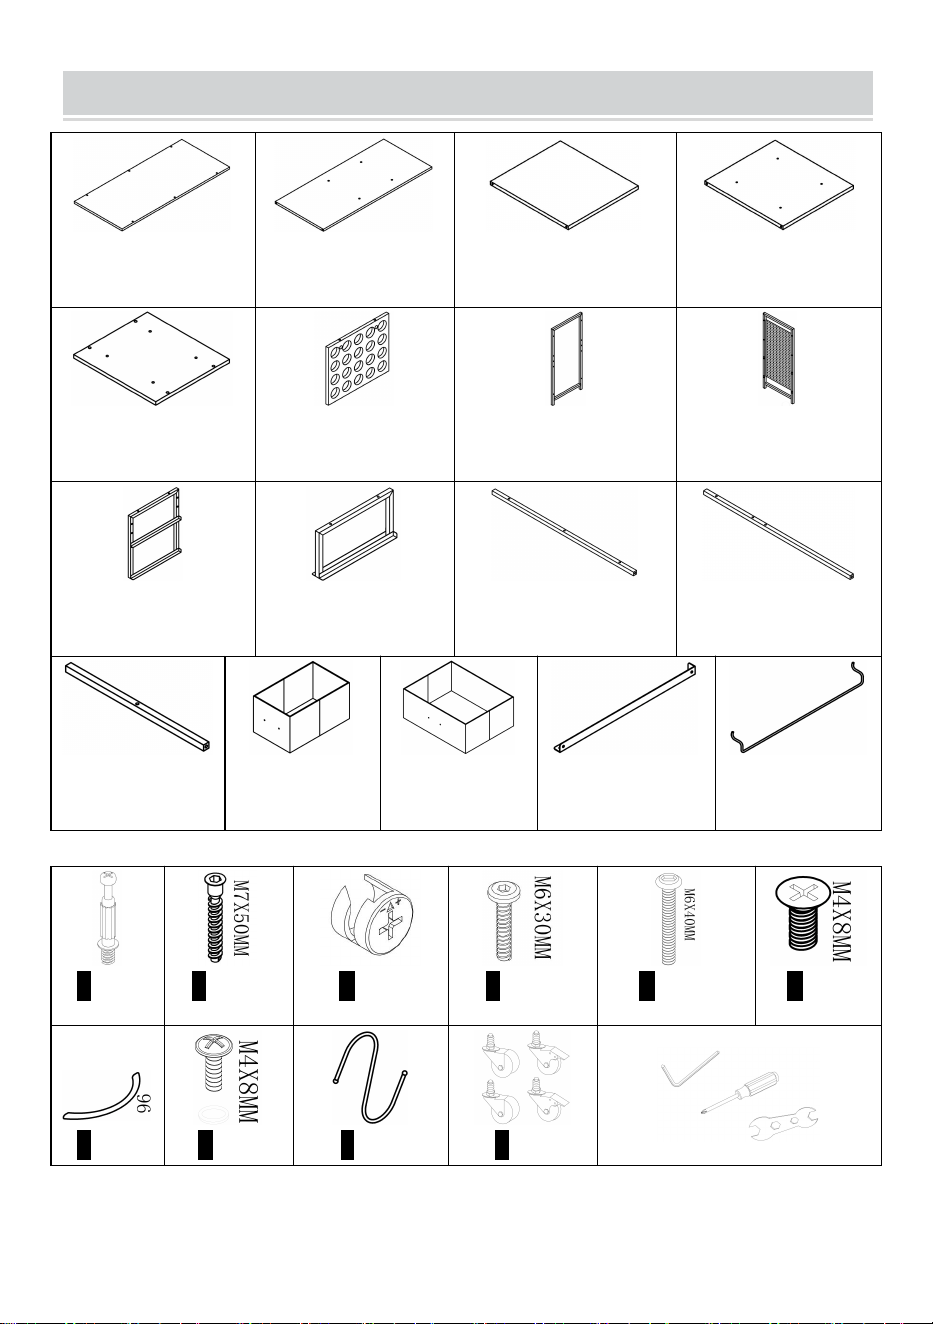
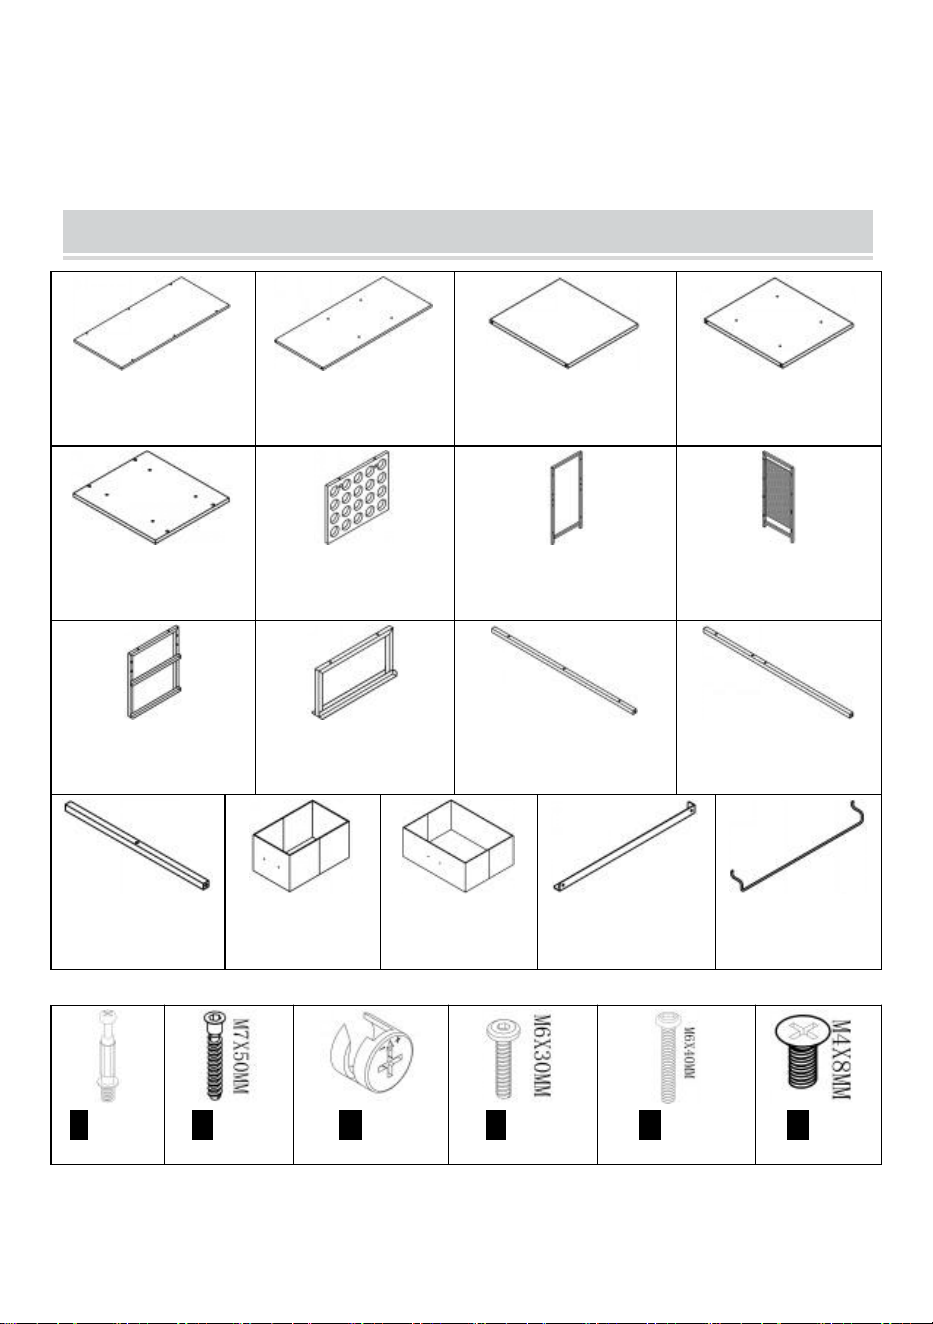
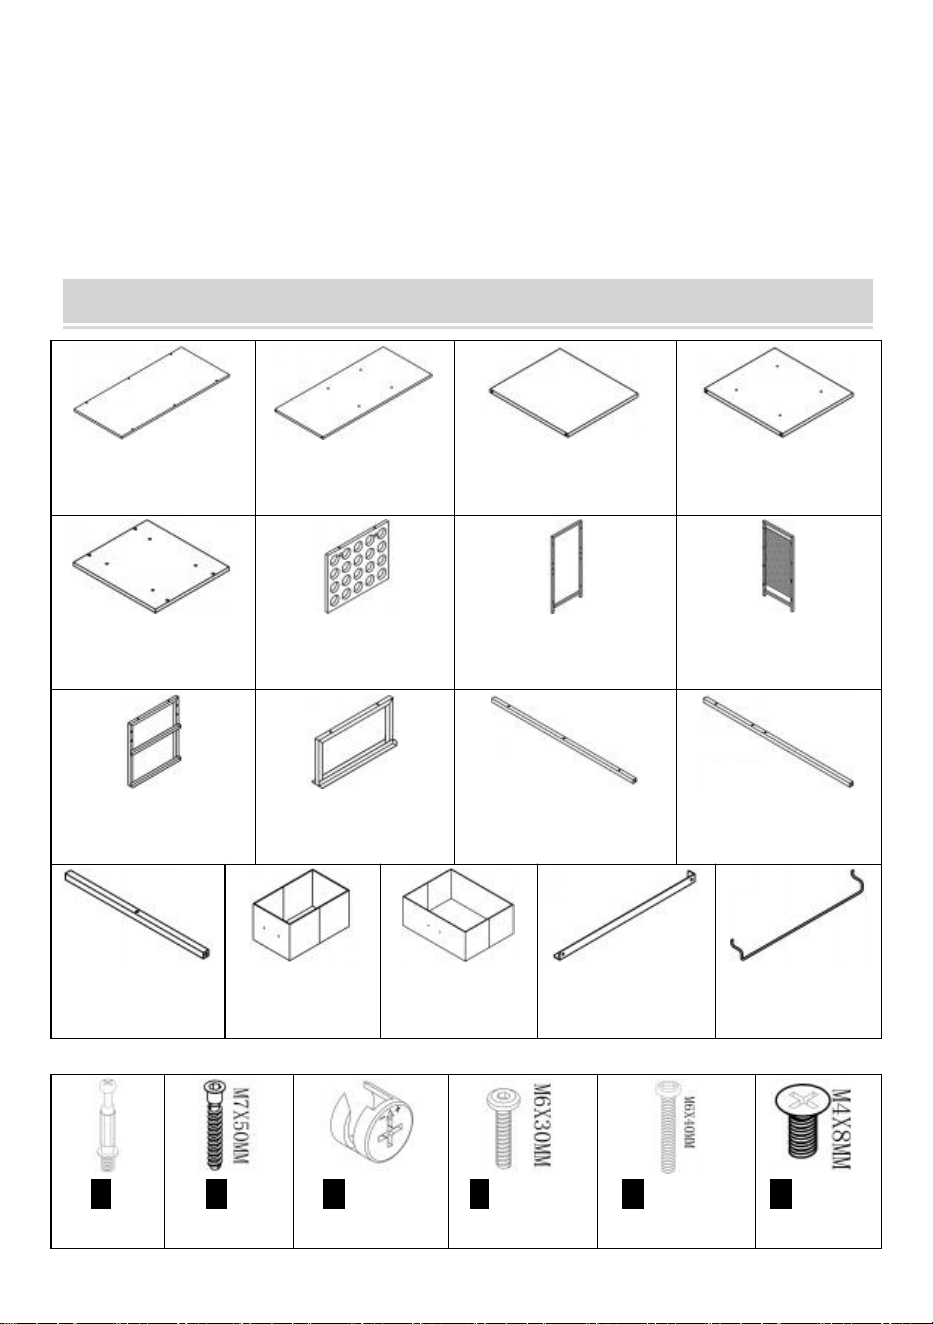
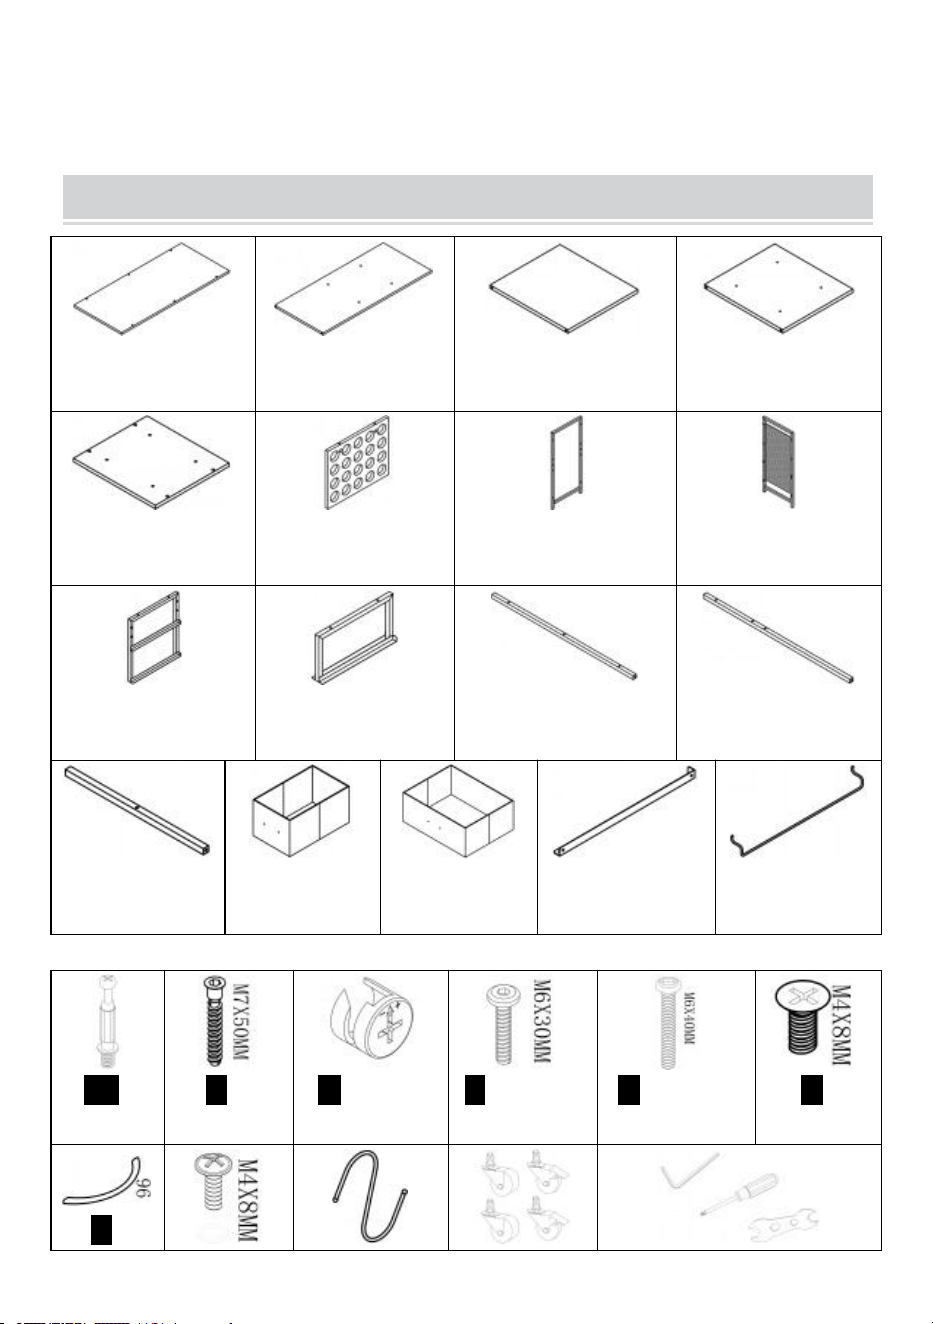
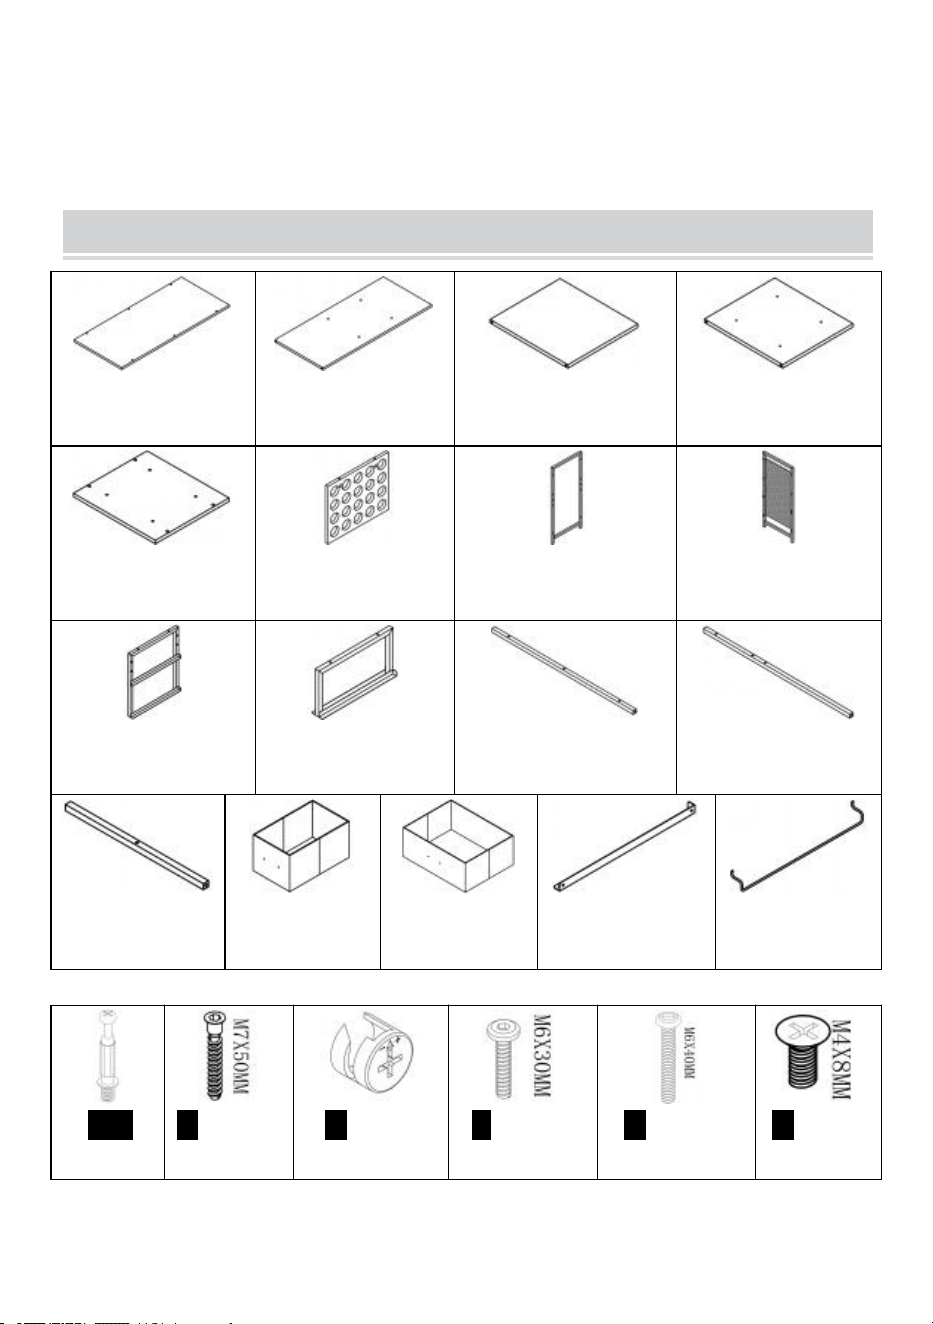
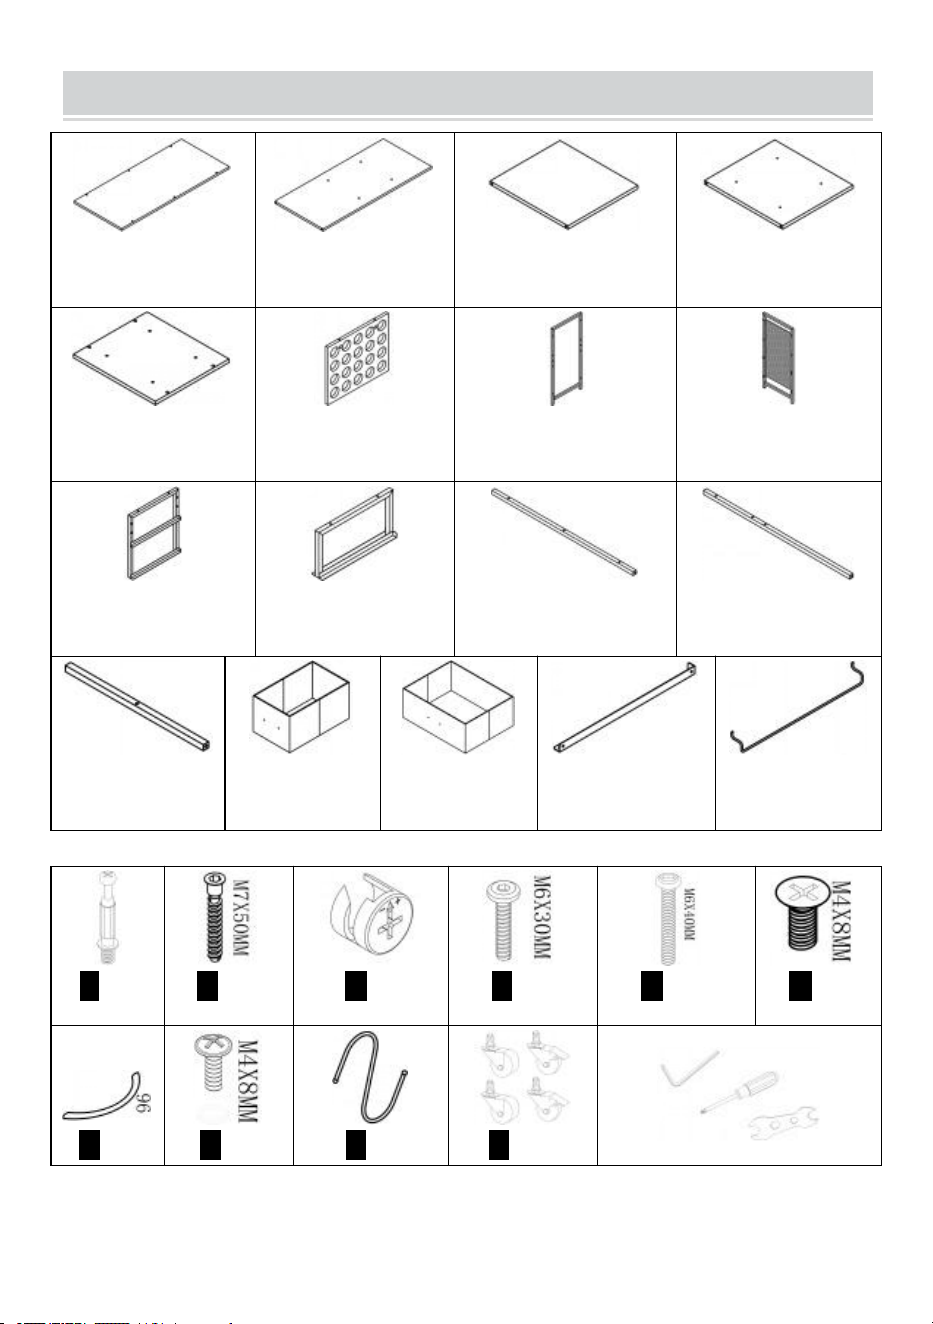
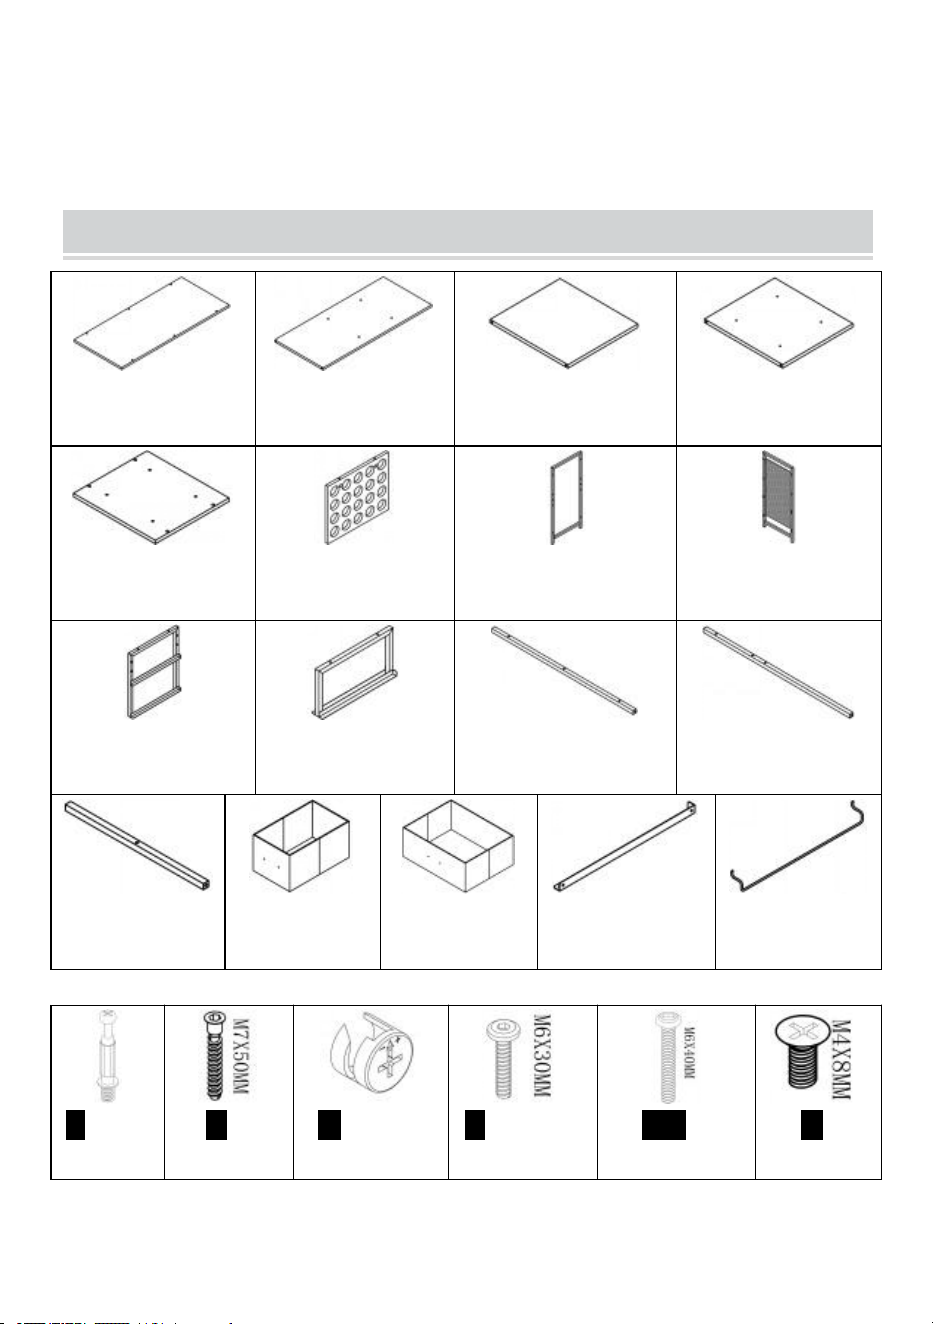
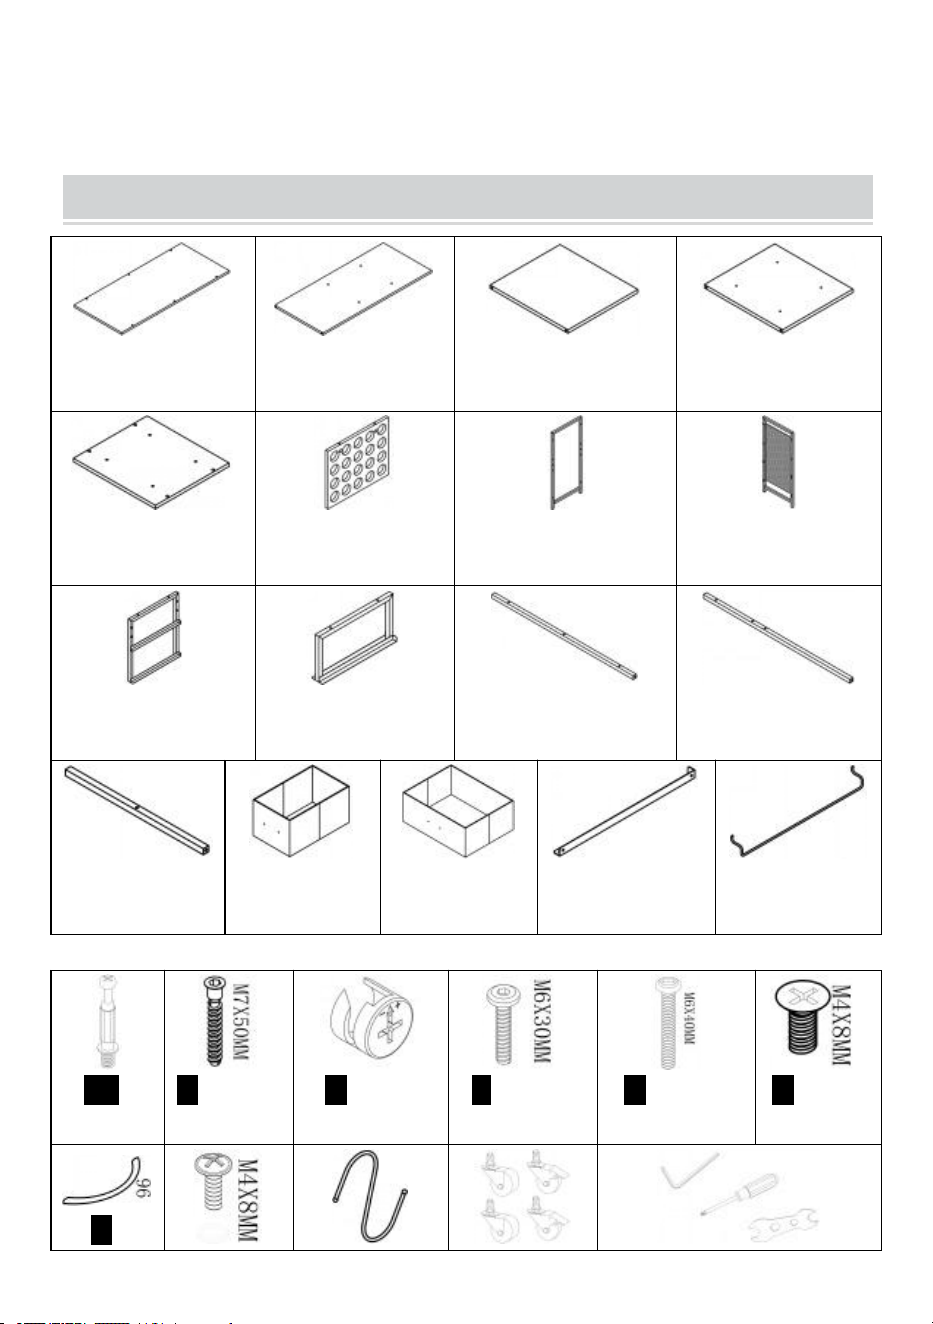
PART LIST
➊1pc
➋1pc
➌1pc
➍1pc
➎1pc
➏2pcs
➐1pc
➑1pc
➒1pc
➓1pc
⓫2pcs
⓬2pcs
⓭2pcs
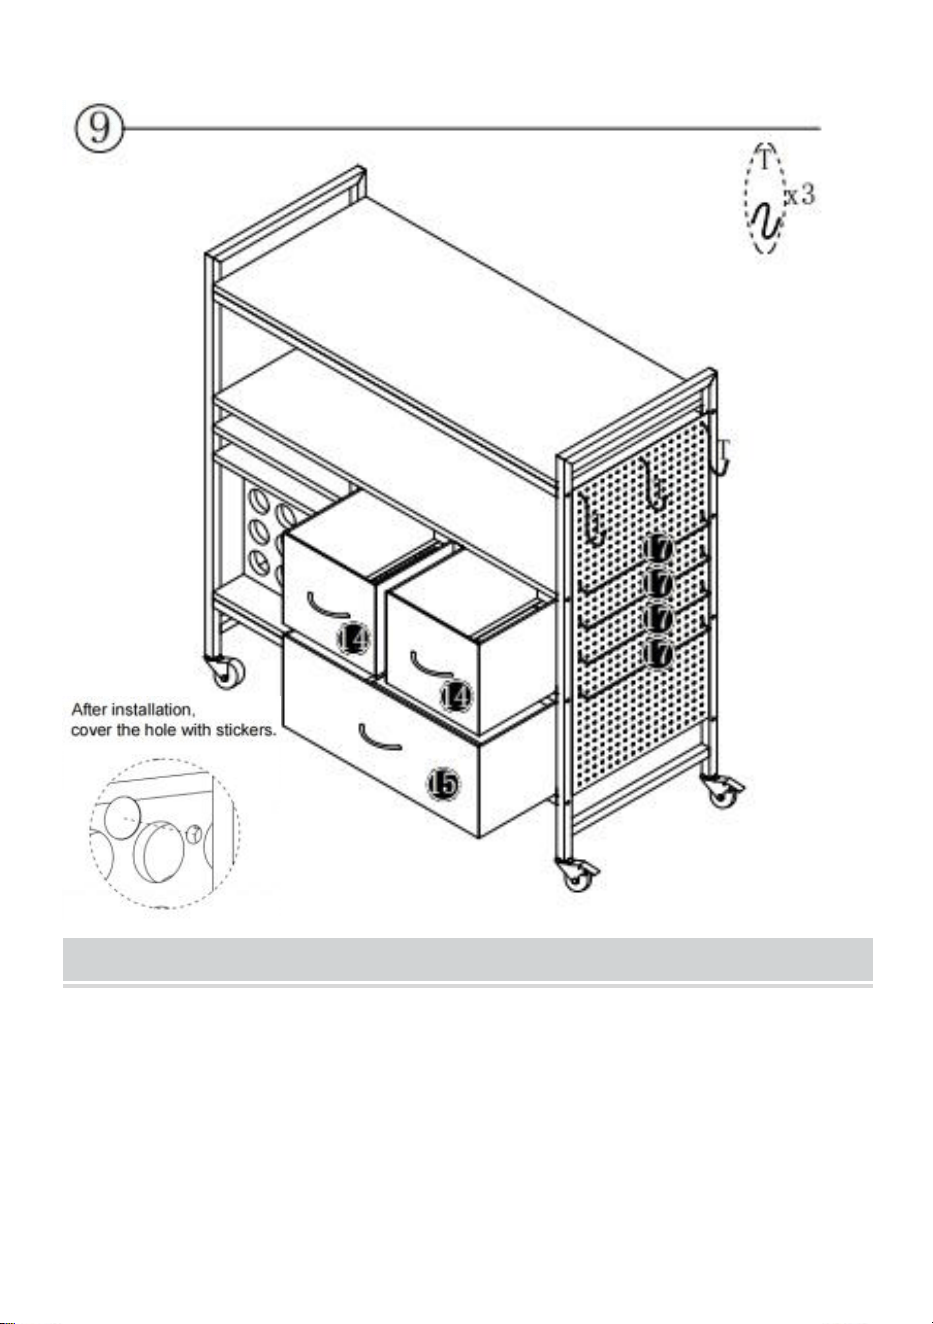
⓮2pcs
⓯1pc
⓰2pcs
⓱4pcs
A4pcs
B16pcs
C4pcs
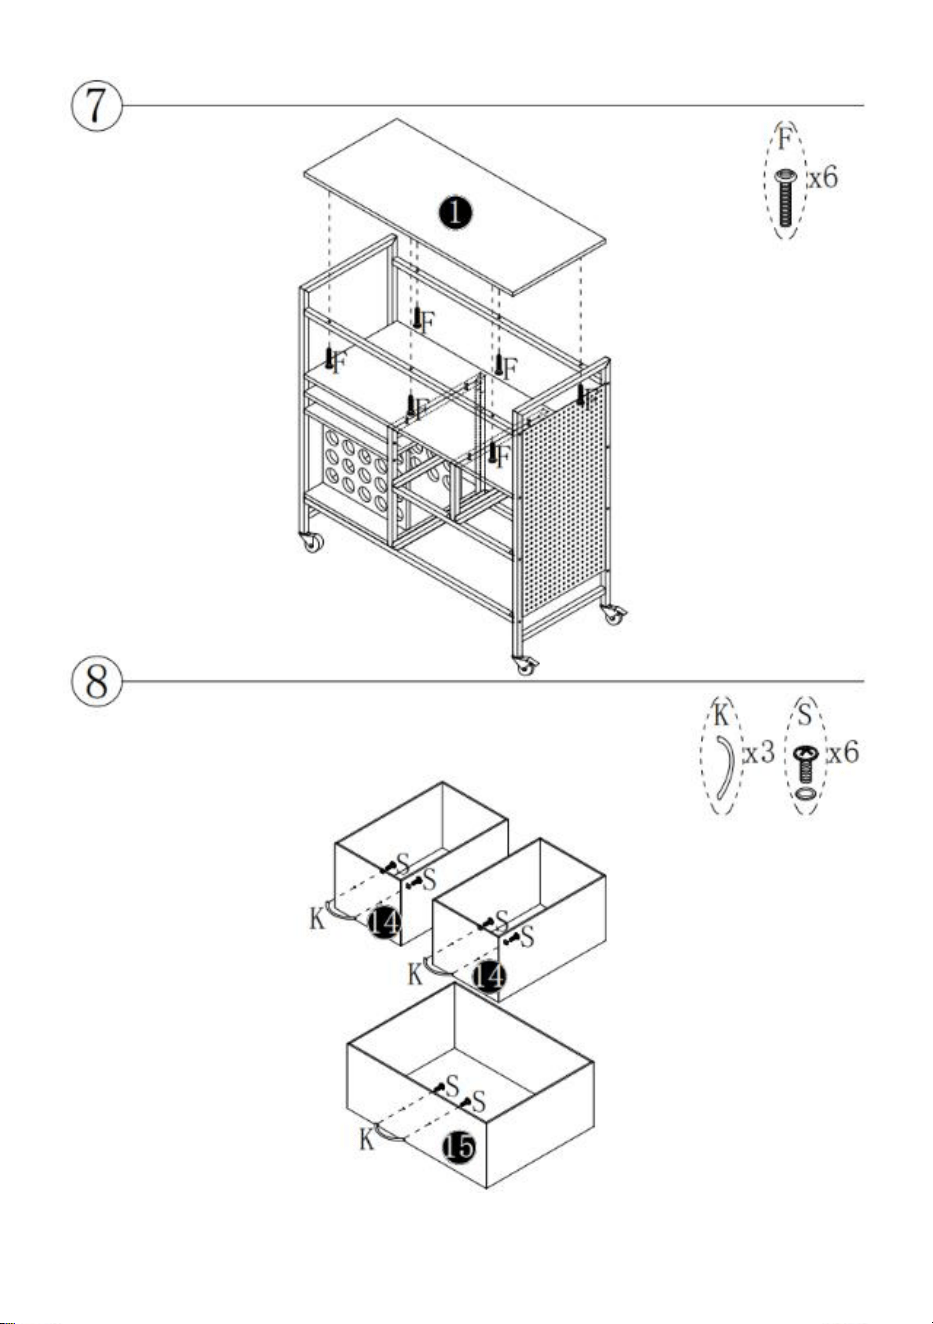
F14pcs
H16pcs
N4pcs
K3pcs
S6pcs
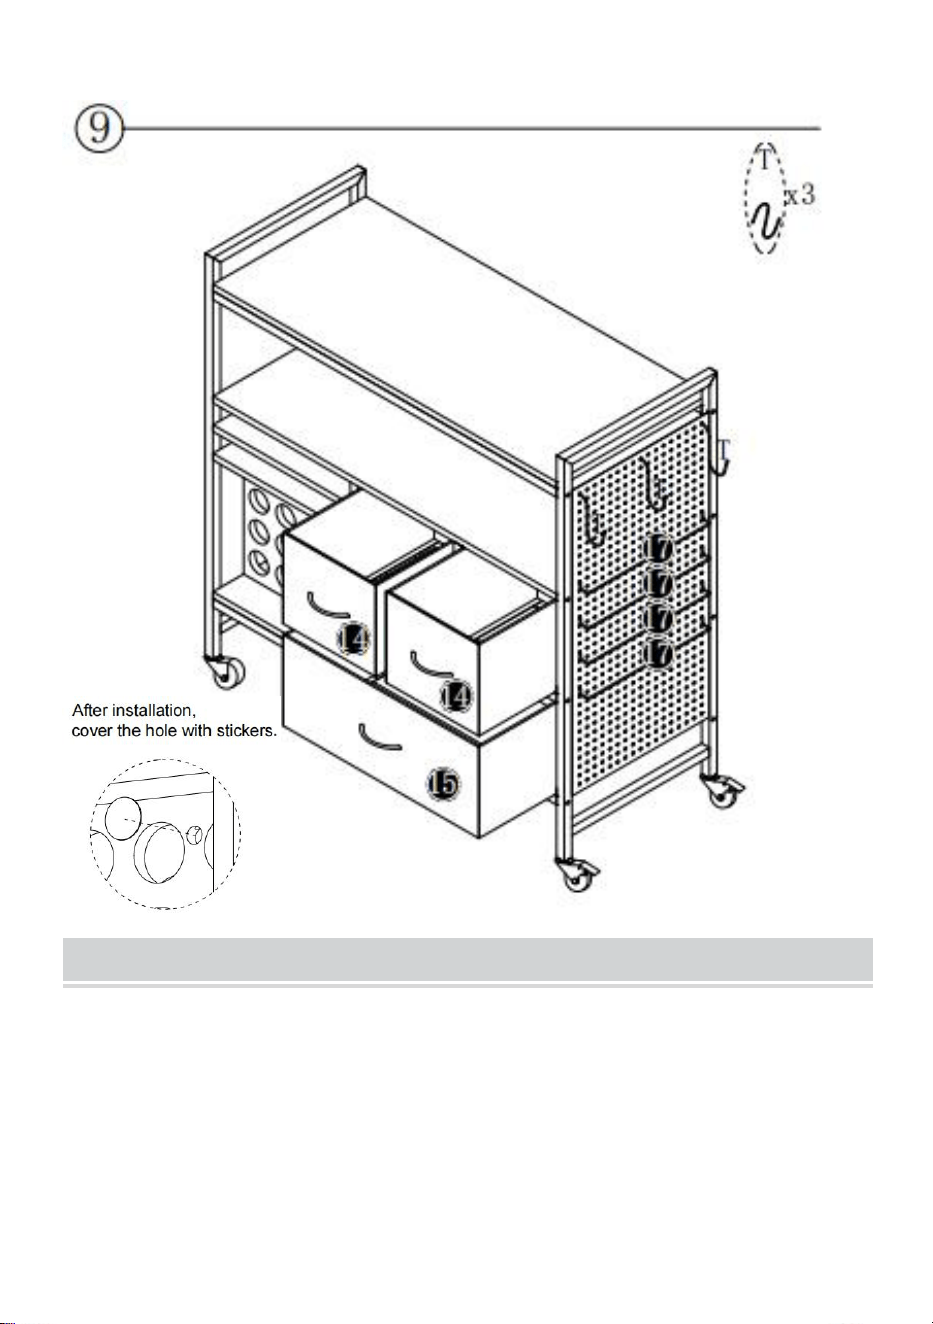
T3pcs
Y1set
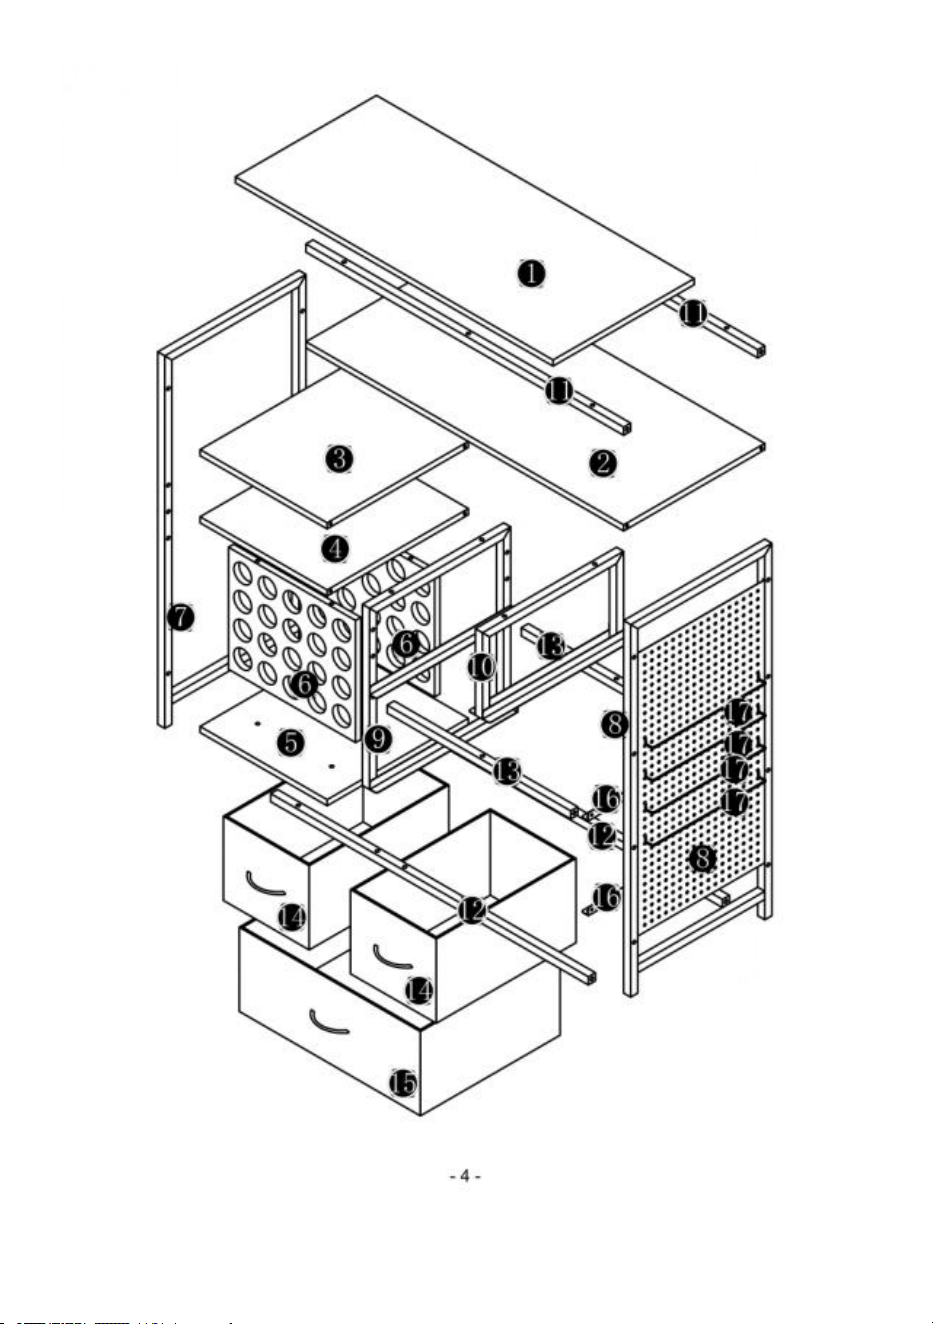
1.Please open all boxes to check the quantity and condition of accessories.
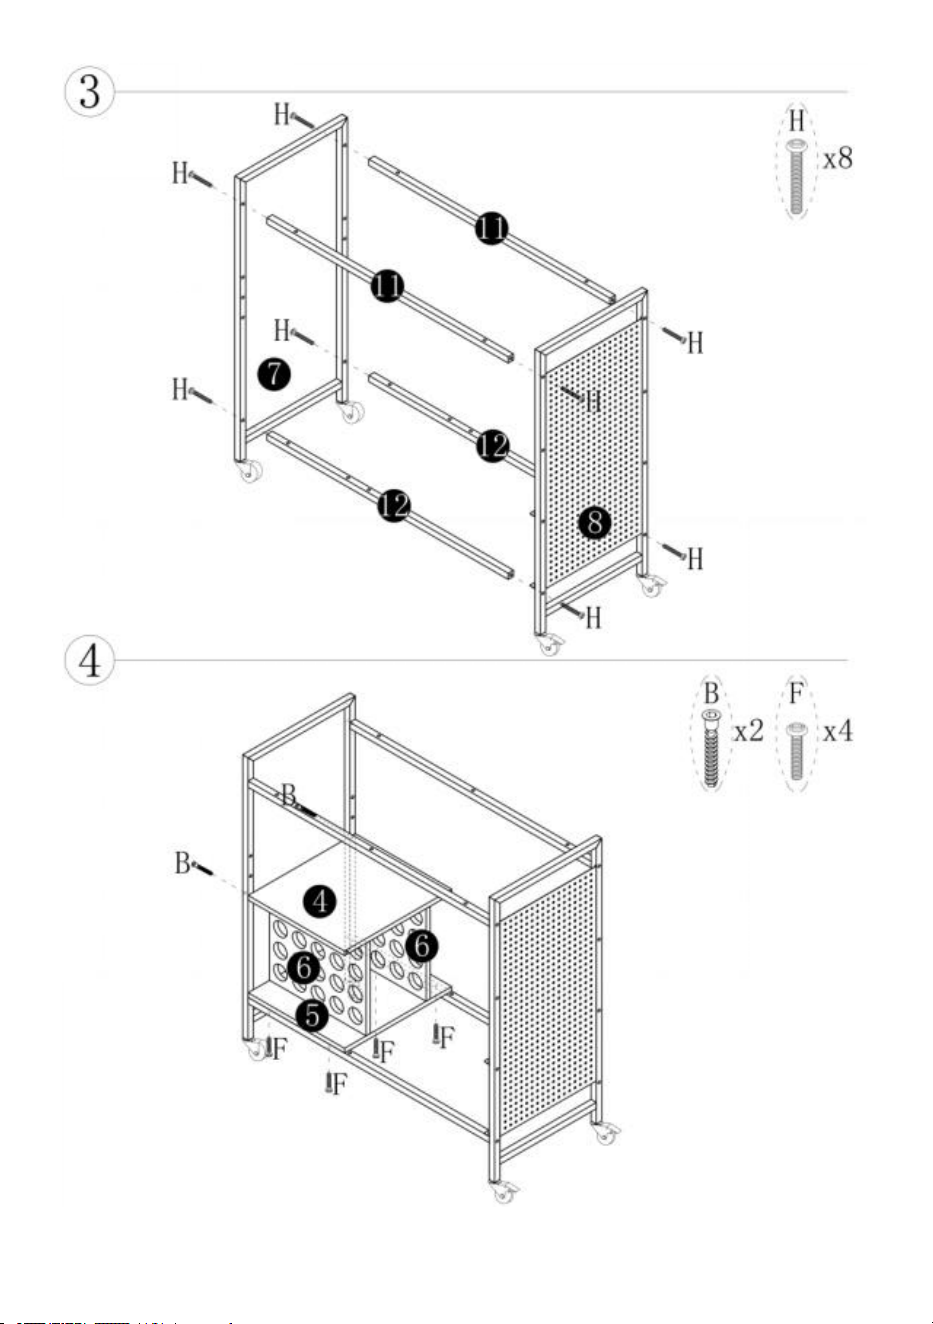
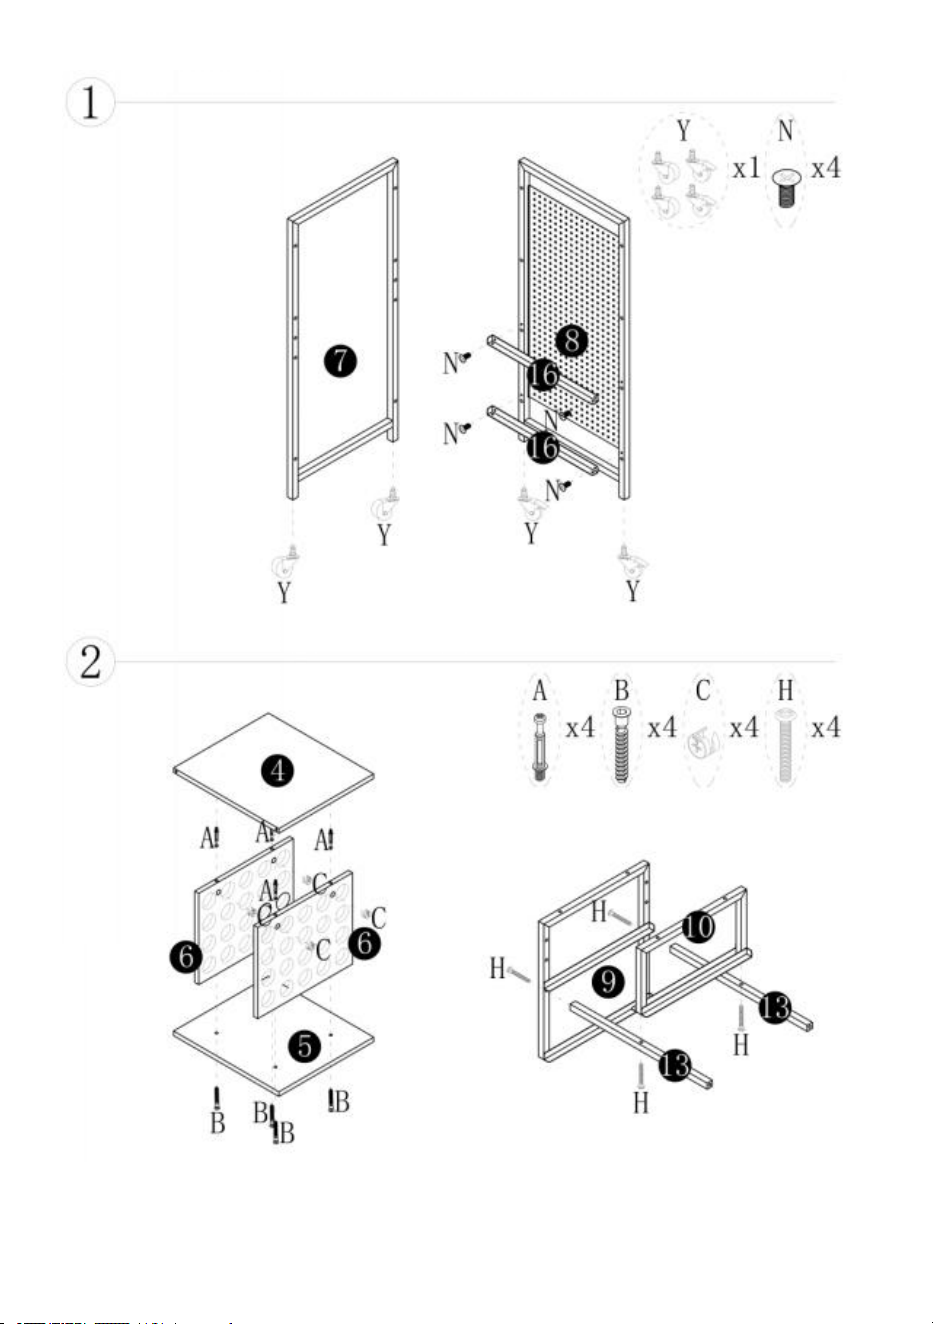
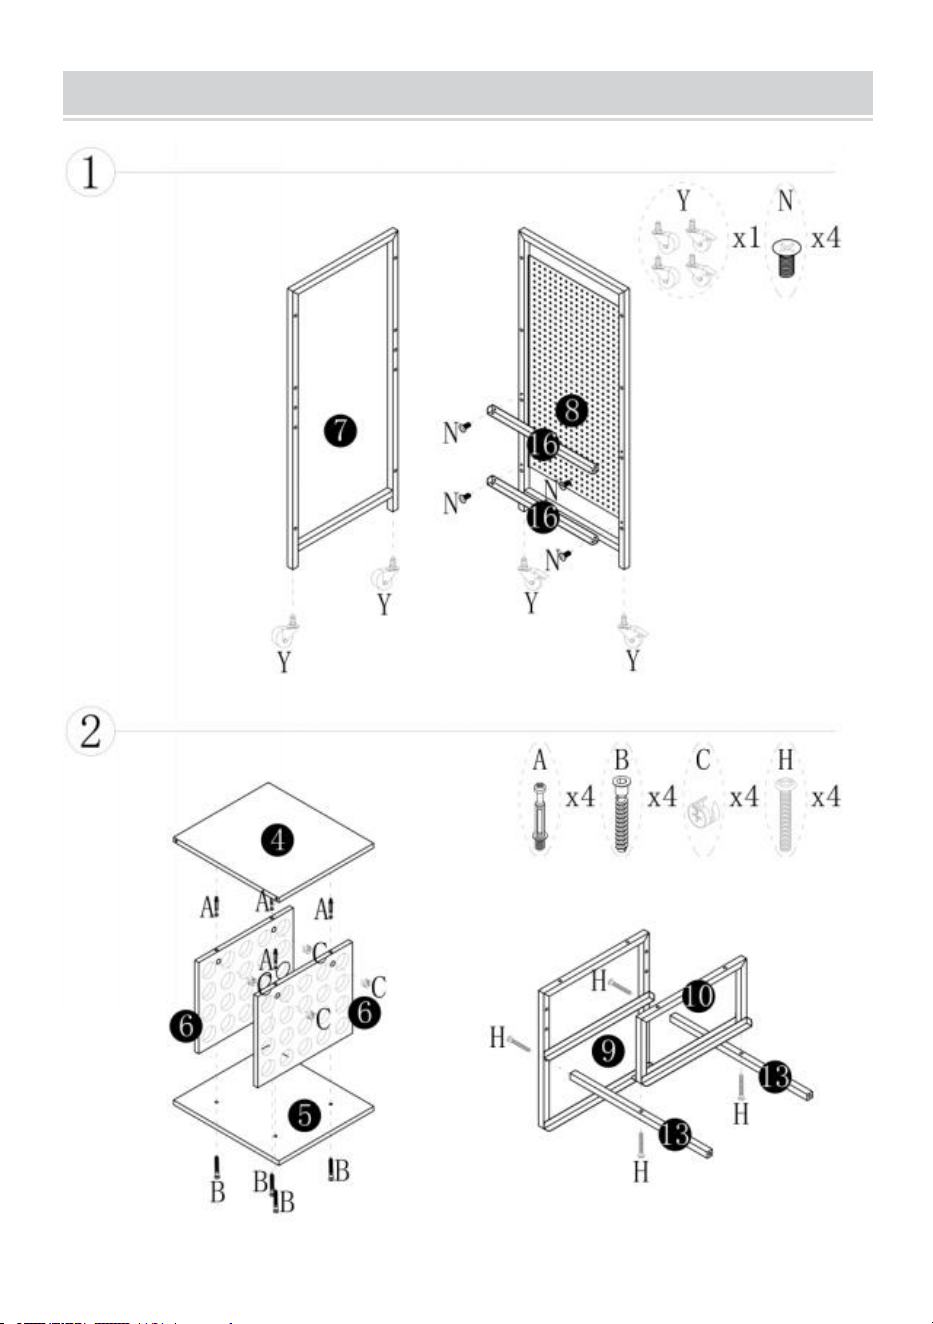
2.When installing, please align all the holes and do not tighten all the screws first.

- 4 -
- 5 -
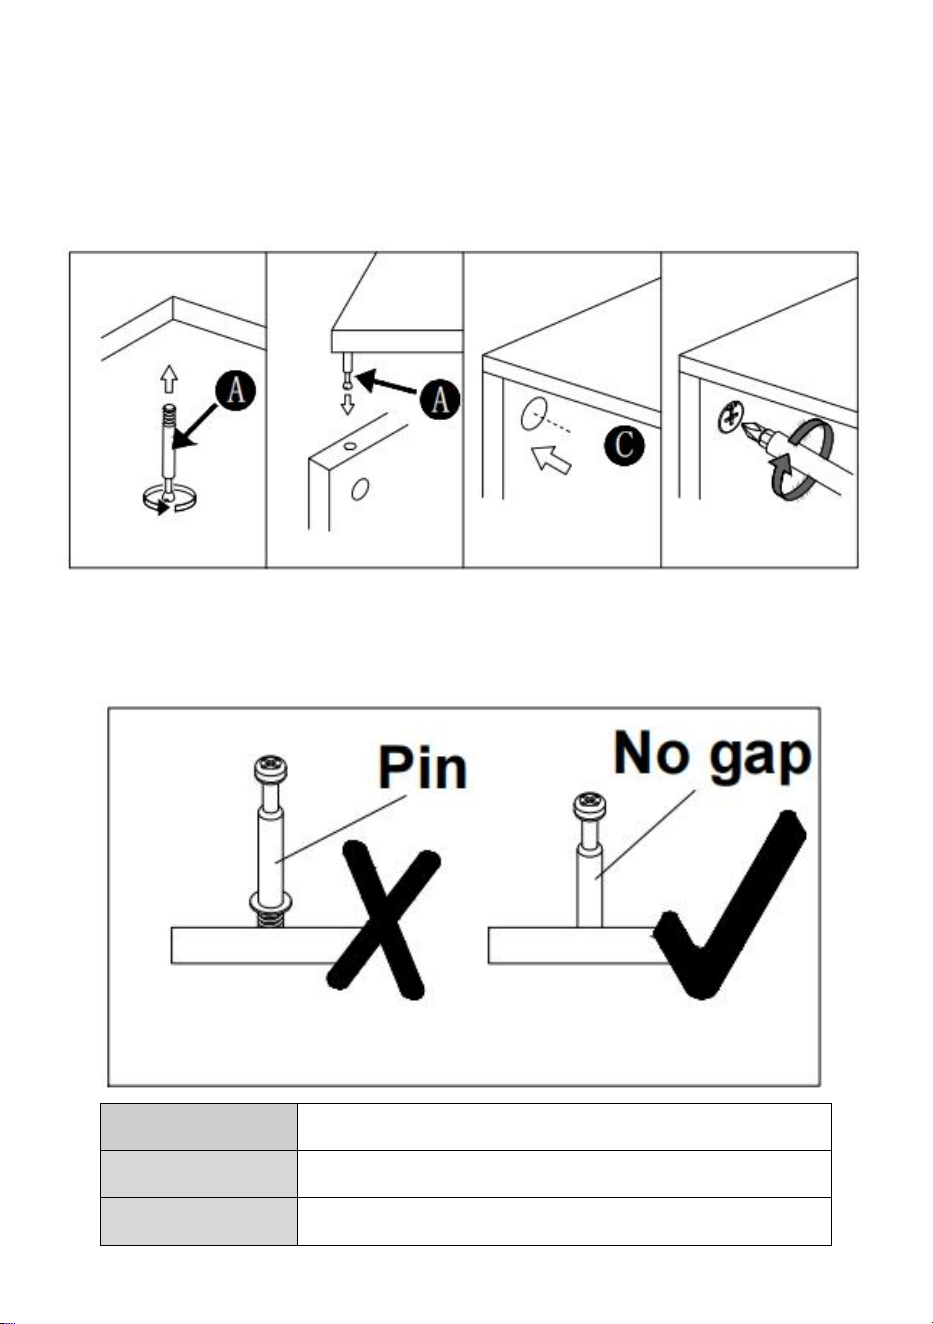
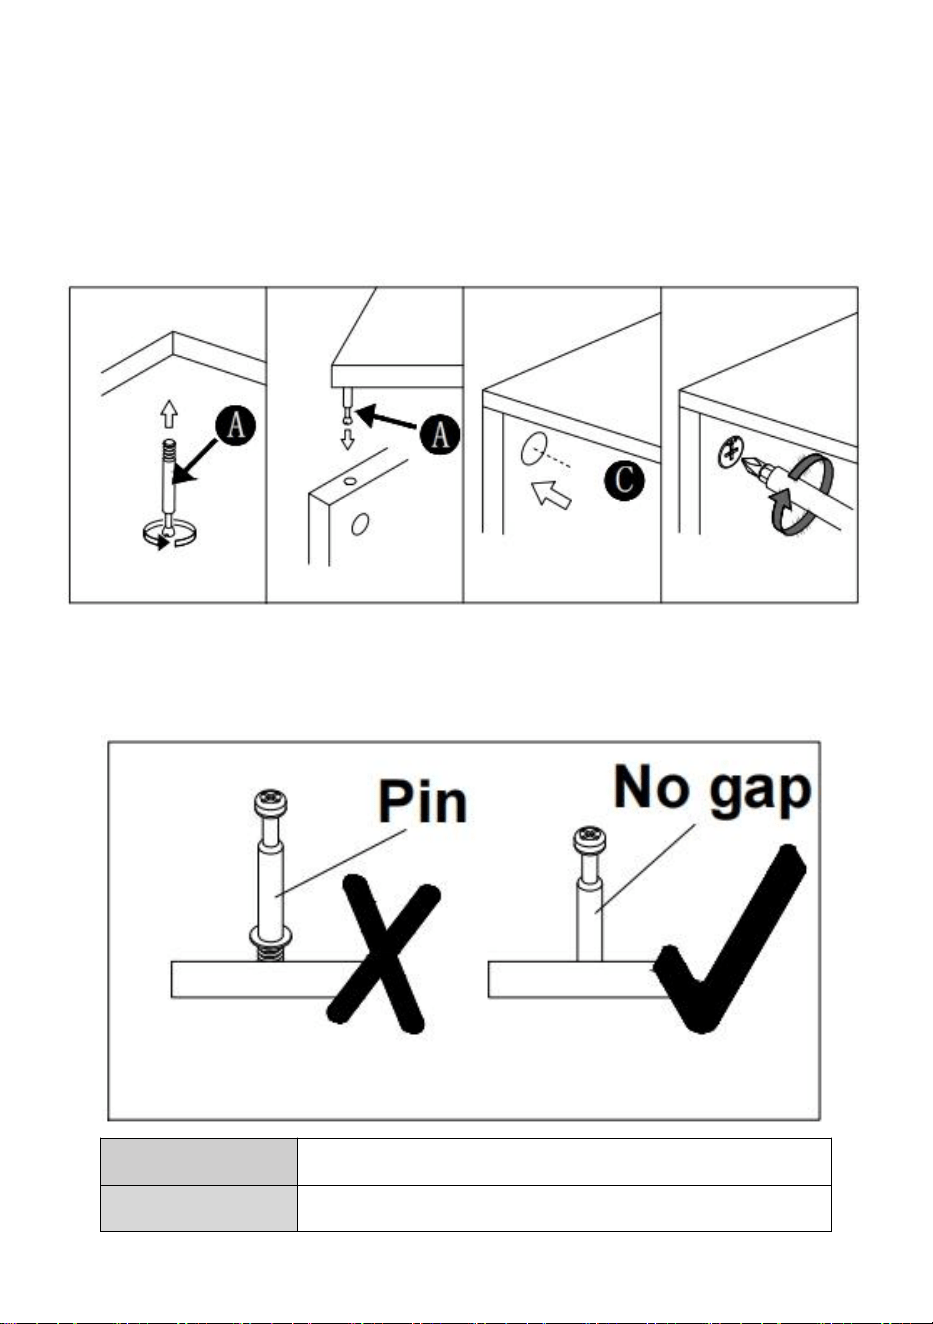
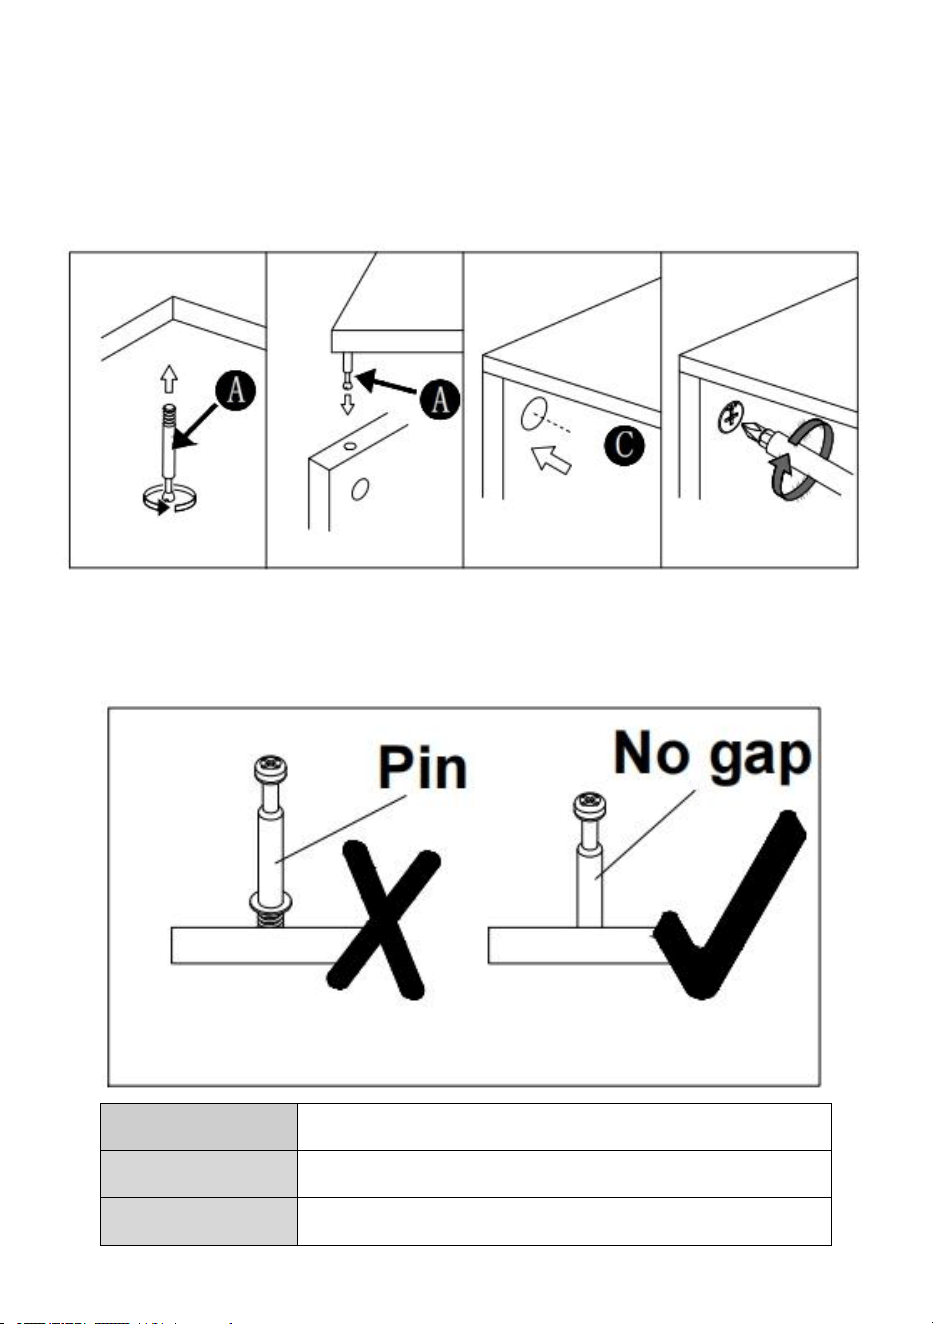
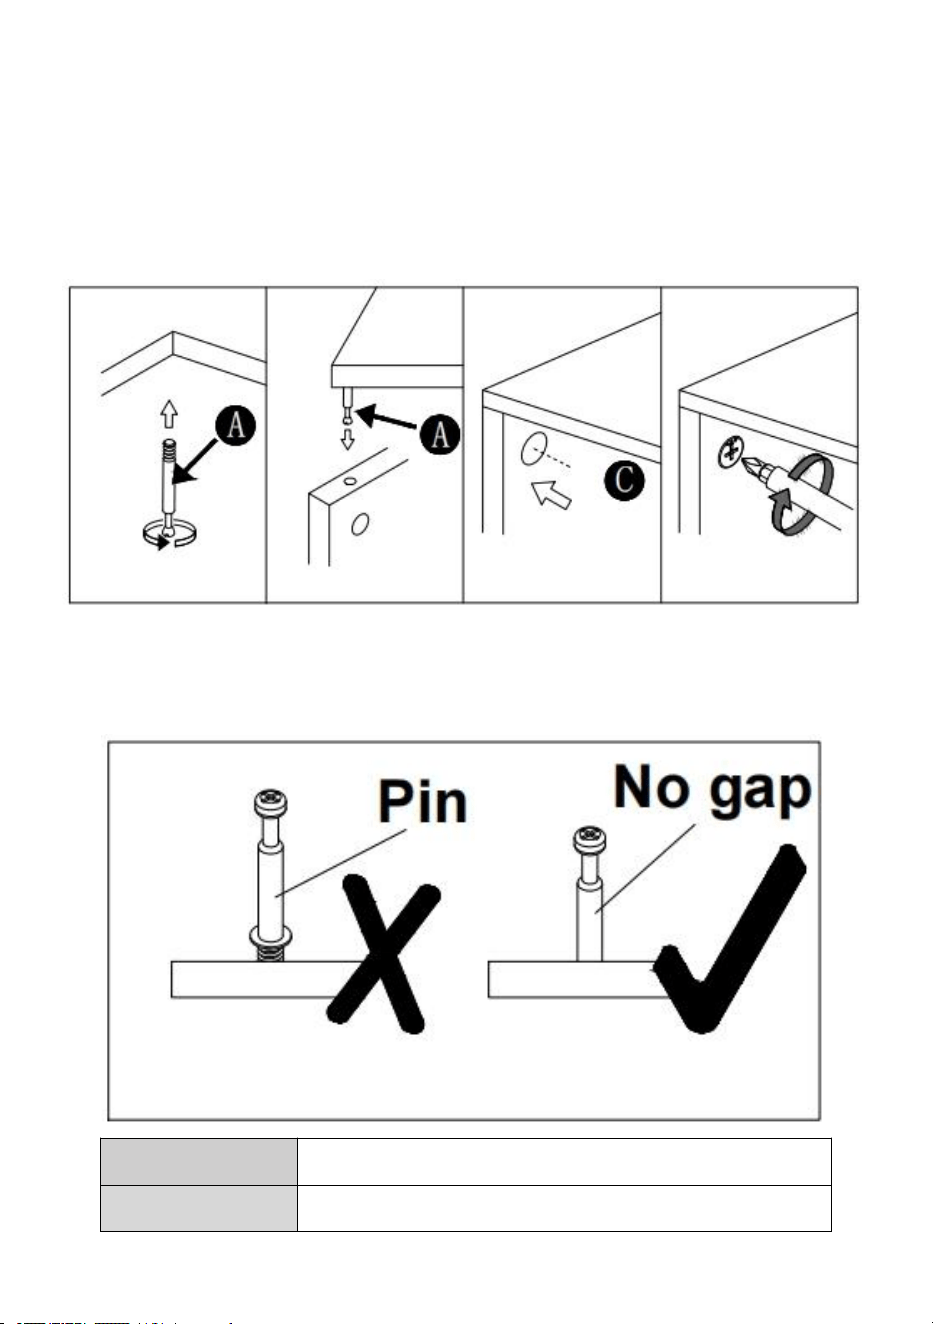
Installation of Cams and Pins
Screw the pin into the hole. To set the cams correctly, ensure that the arrow on the
cam is opening to the hole of the pin it is locking. Lock the cam by turning the cam
head with a screwdriver until it is tightened. Please do not use an electric
screwdriver to assemble the unit.
Read each step carefully before starting. It is very important that each step of
instruction is performed in the correct order. If these steps are not followed in
sequence, assembly difficulties will occur.
Model
C240407S-01
Maximum
110 lb/50 kg(Work area)
Wheels
Included(4pcs)

- 6 -
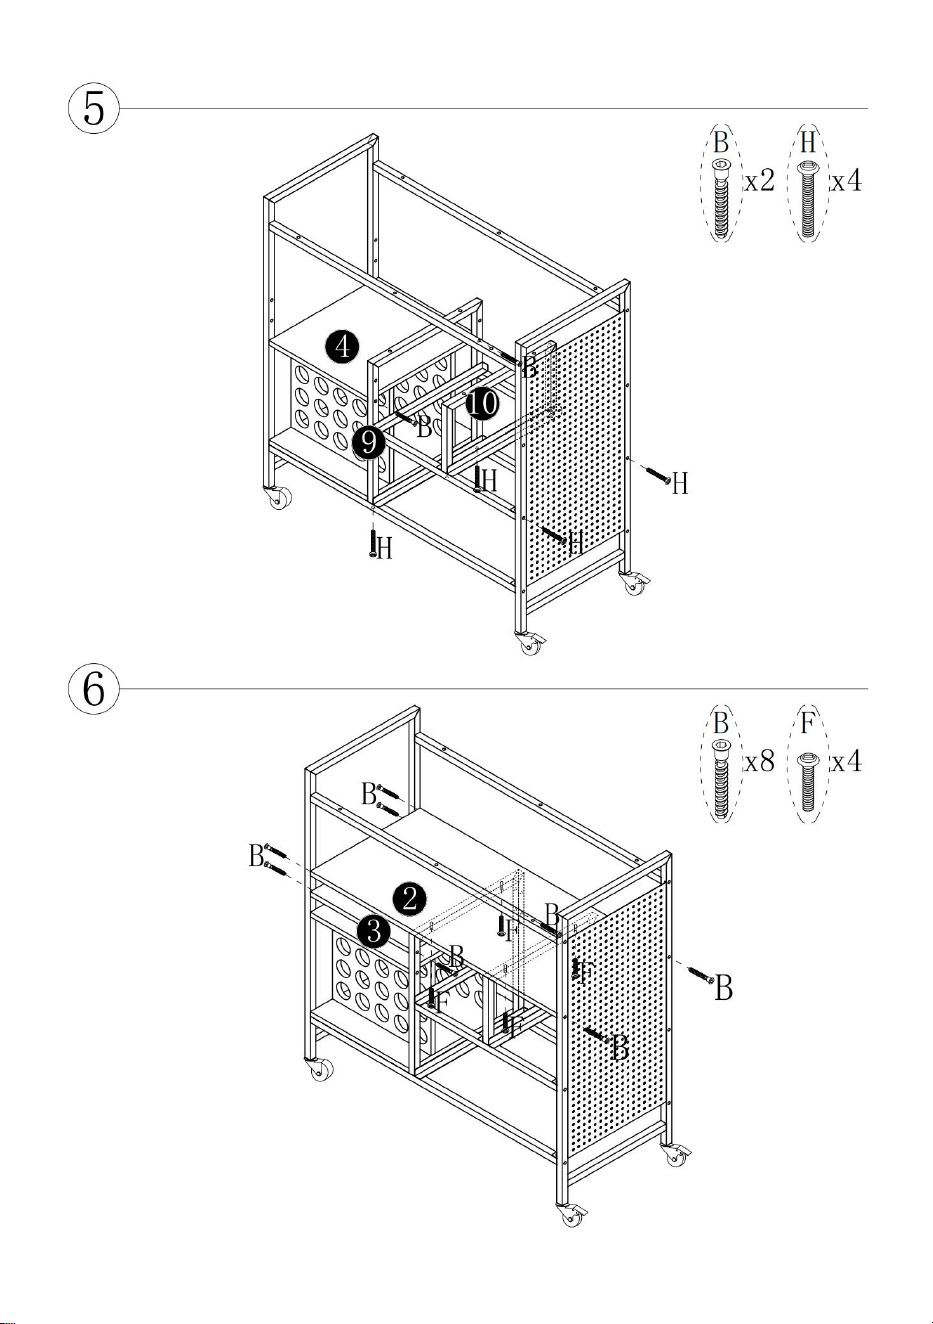
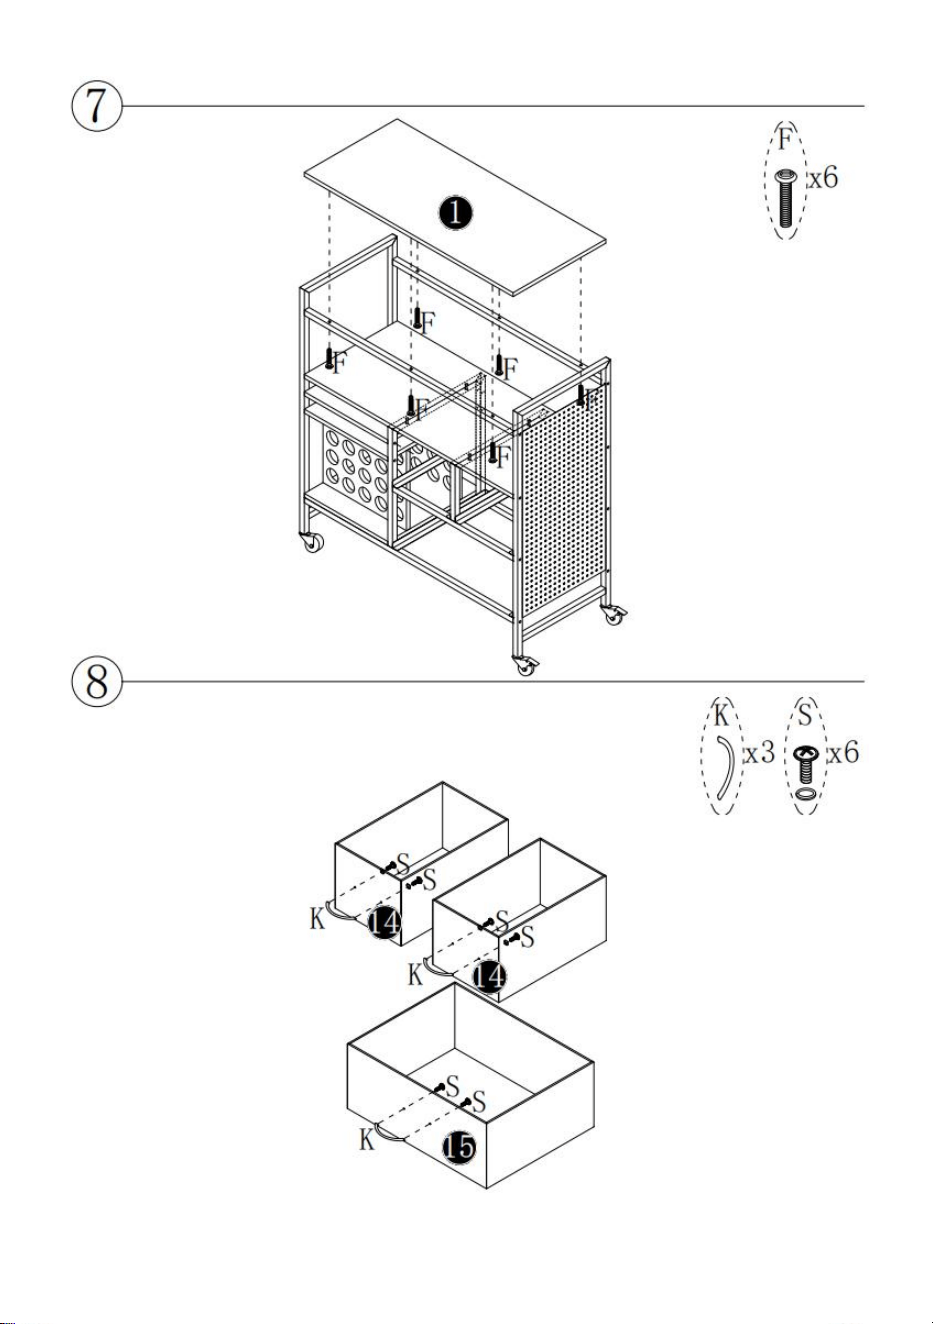
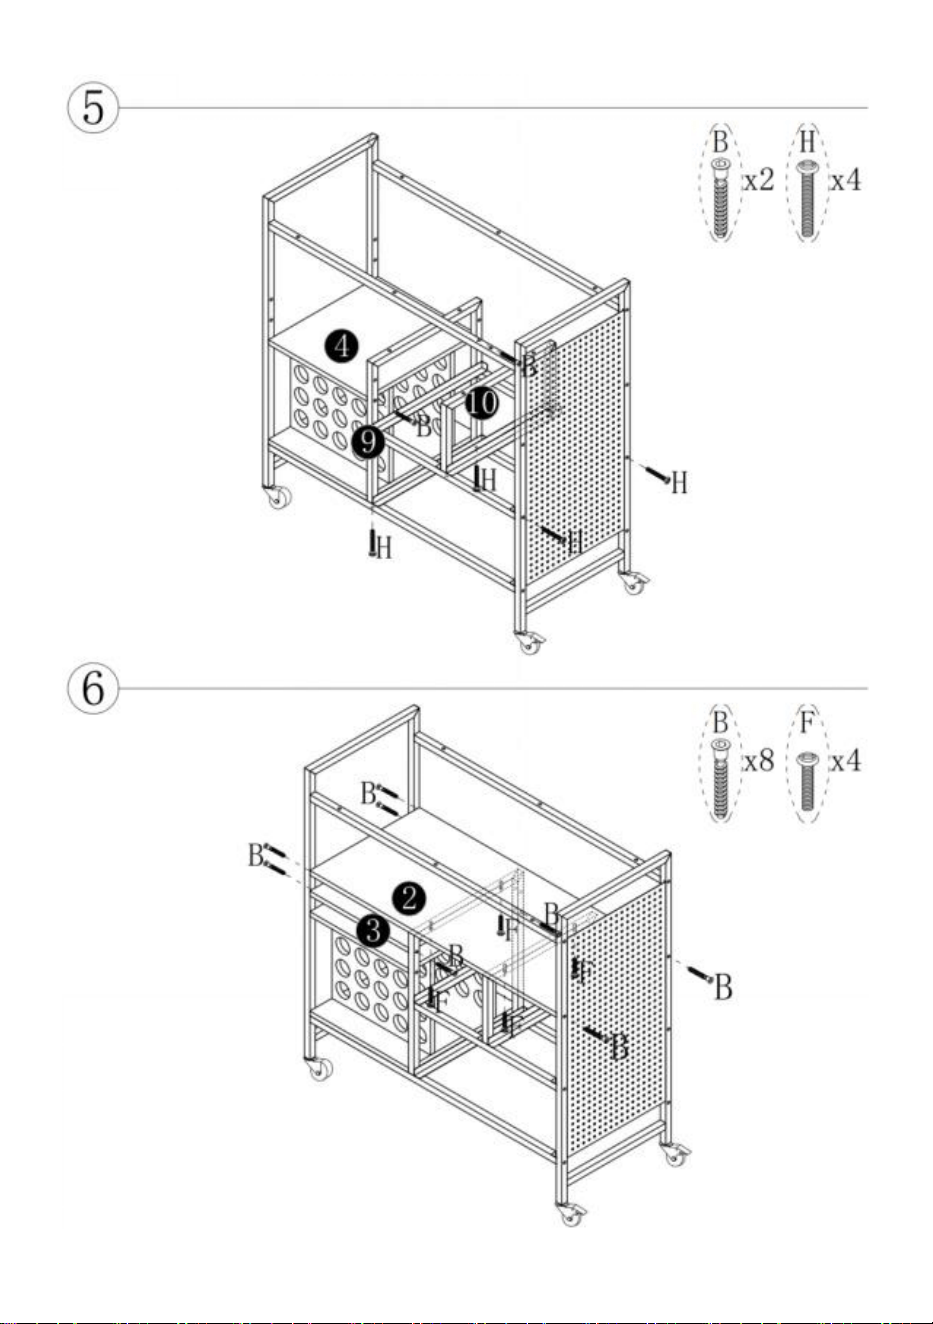
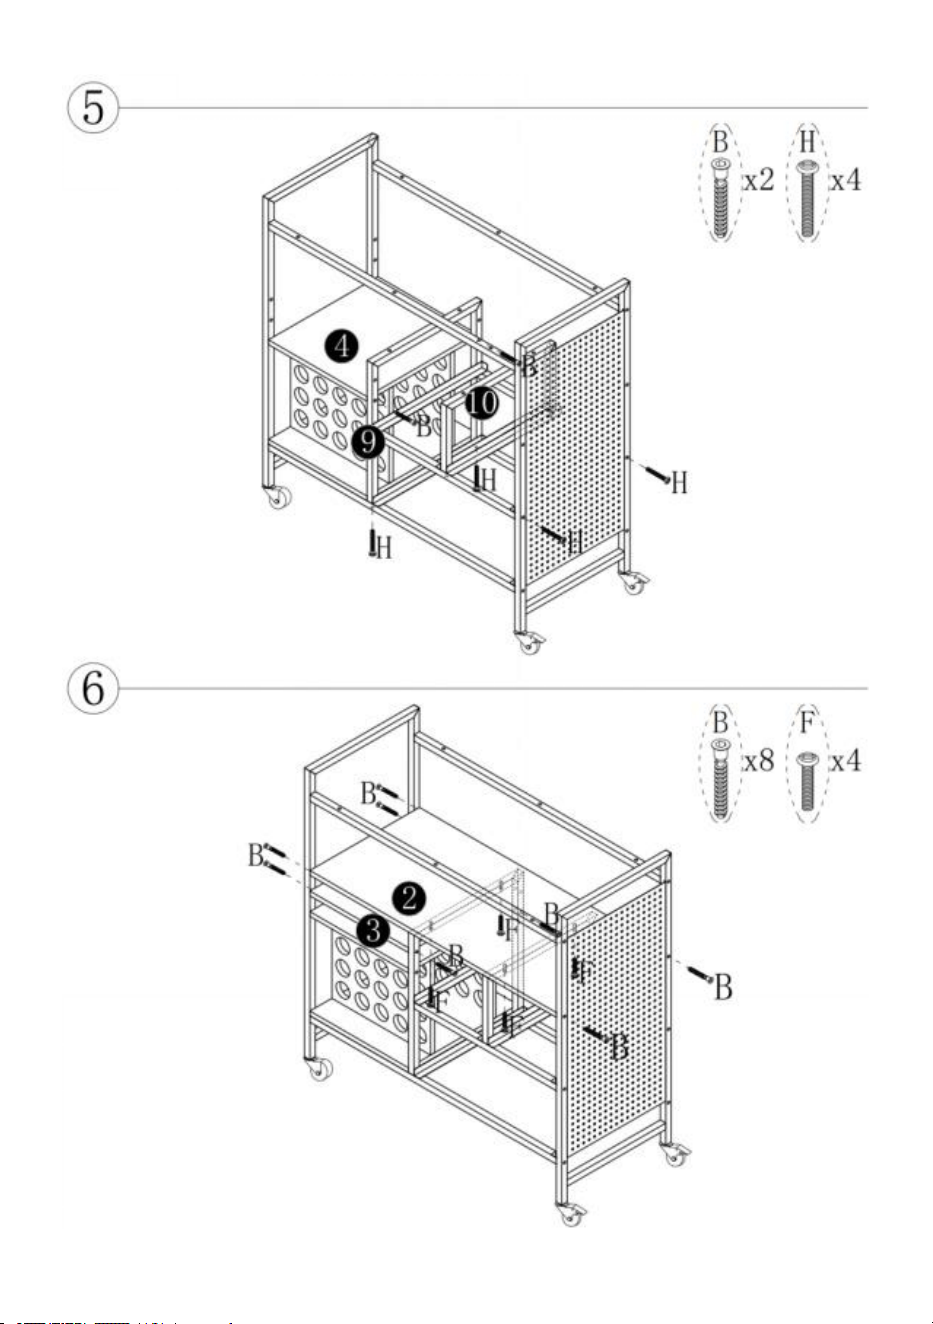
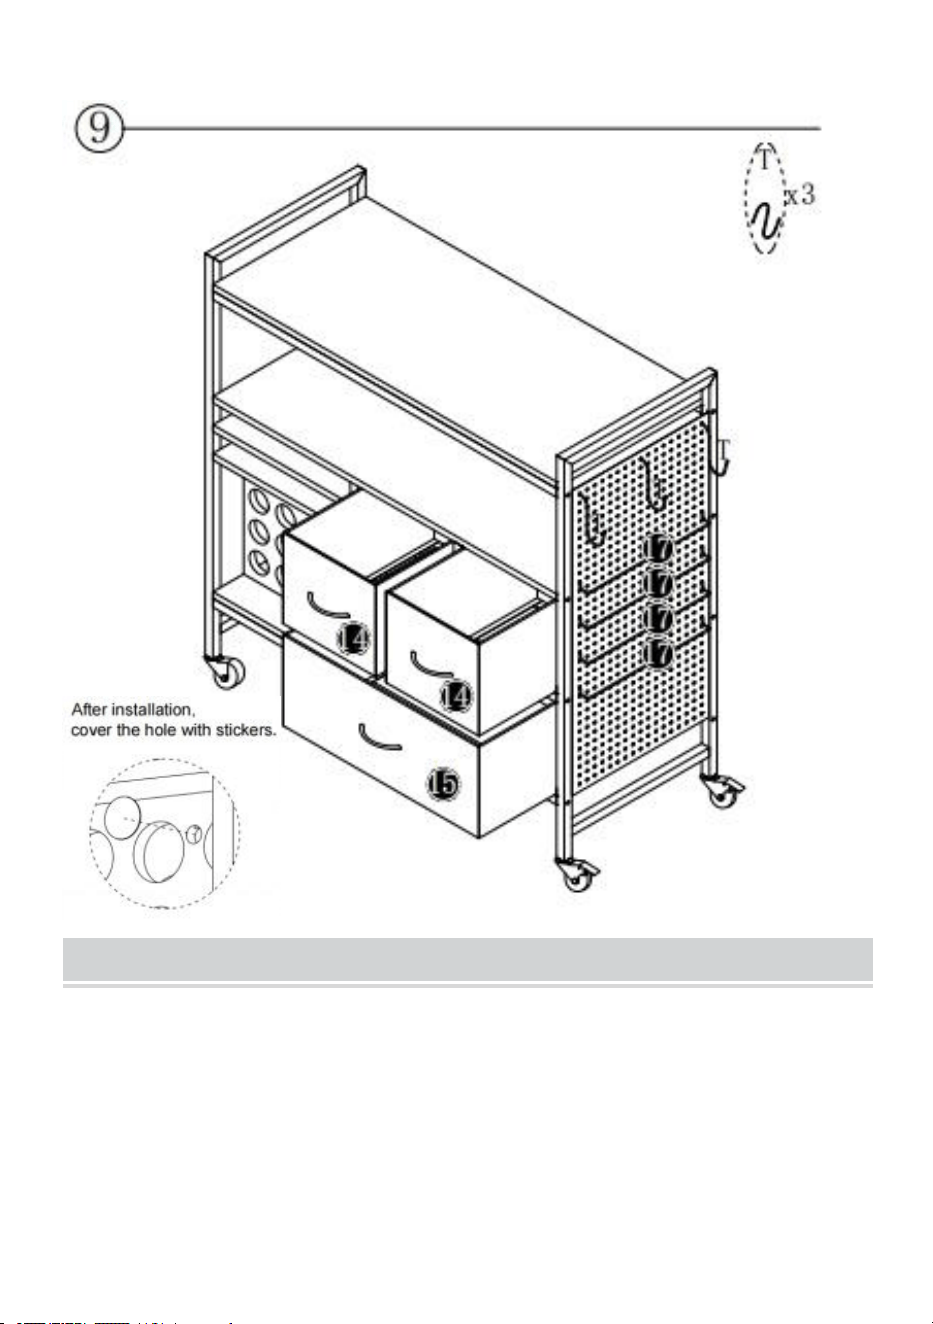
INSTALLATION STEPS

- 7 -
- 8 -
- 9 -
- 10 -
MAINTENANCE
1.Please try to avoid putting wet items on desktop.
2.If dirt and dust are found on the desk, please clean them in time.
3.Dust off regularly with a clean rag, and arrange items neatly on desktop.
4.Don't let it sit in the sun for too long.
5.Check the table regularly to prevent screws from loosening and falling
off.


Wsparcie techniczne i certyfikat gwarancji elektronicznej
www.vevor.com/support
STÓŁ CRICUT
Nadal staramy się oferować Państwu narzędzia w konkurencyjnych cenach.
„Oszczędź połowę”, „Połowa ceny” lub inne podobne wyrażenia używane przez nas stanowią
jedynie szacunkowe oszczędności, jakie możesz uzyskać, kupując u nas określone narzędzia w
porównaniu z głównymi markami i niekoniecznie oznaczają one objęcie wszystkich kategorii
narzędzi oferowanych przez nas. Uprzejmie przypominamy, aby dokładnie sprawdzić, czy
składając u nas zamówienie faktycznie oszczędzasz połowę w porównaniu z głównymi markami.

- 1 -
(Zdjęcie ma charakter poglądowy, proszę odnosić się do rzeczywistego obiektu)
POTRZEBUJESZ POMOCY? SKONTAKTUJ SIĘ Z NAMI!
Masz pytania dotyczące produktu? Potrzebujesz wsparcia
technicznego? Skontaktuj się z nami:
Wsparcie techniczne i certyfikat e-gwarancji
www.vevor.com/support
To jest oryginalna instrukcja, przed użyciem należy uważnie przeczytać
wszystkie instrukcje. VEVOR zastrzega sobie jasną interpretację naszej
instrukcji obsługi. Wygląd produktu będzie zależał od produktu, który
otrzymałeś. Prosimy o wybaczenie, że nie poinformujemy Cię ponownie,
jeśli w naszym produkcie pojawią się jakiekolwiek aktualizacje
CRICUT TABLE
C240407S-01
- 2 -
technologiczne lub oprogramowania.
SAFETY INSTRUCTION AND PRECAUTIONS
Symbol
Opis symbolu
Ostrzeżenie: Aby zminimalizować ryzyko obrażeń, użytkownik
powinien uważnie przeczytać instrukcję obsługi.
Ten symbol, umieszczony przed komentarzem dotyczącym
bezpieczeństwa, wskazuje na rodzaj ostrożności, ostrzeżenia lub
niebezpieczeństwa. Zignorowanie tego ostrzeżenia może
doprowadzić do wypadku. Aby zmniejszyć ryzyko obrażeń,
pożaru lub porażenia prądem, zawsze postępuj zgodnie z
poniższymi zaleceniami.
OSTRZEŻENIE: Aby zmniejszyć ryzyko obrażeń, użytkownik
musi uważnie przeczytać instrukcję obsługi.
1. Nie mocować ani nie montować tego produktu do pojazdu. Może to
spowodować obrażenia ciała lub uszkodzenie produktu.
2. Nie stawać ani nie stawać na tym produkcie. Można spaść, co może
spowodować obrażenia ciała.
3. Przechowuj produkt na równych powierzchniach. Produkt może stać się
niestabilny i przewrócić się, jeśli będzie przechowywany lub przenoszony
na nierównej powierzchni, co może spowodować obrażenia ciała lub
uszkodzenie produktu.
4. Nie przekraczaj maksymalnej ładowności, w tym zawartości. Nie
przekraczaj maksymalnej ładowności każdej szuflady. Nie przekraczaj
maksymalnej ładowności każdej tacy.
5. Trzymać z dala od otwartego ognia. produkt zapali się i będzie się palił,
jeśli zostanie wniesiony kontaktu z otwartym płomieniem.
6. Trzymać z dala od ostrych punktów, ostrzy i innych przedmiotów, aby nie
zarysować produktu .
- 3 -
ZAPISZ TE INSTRUKCJE
PART LIST
➊ 1 szt.
➋ 1 szt.
➌ 1 szt.
➍ 1 szt.
➎ 1 szt.
➏ 2 szt .
➐ 1 szt.
➑ 1 szt.
➒ 1 szt.
➓ 1 szt.
⓫ 2 szt .
⓬ 2 szt.
⓭ 2 szt.
⓮ 2 szt.
⓯ 1 szt.
⓰ 2 szt.
⓱ 4 szt.
4 sztuki
B 16szt
C 4szt
F 14szt
H 16szt
N 4szt

- 4 -
K 3szt
S 6szt
T 3 szt.
Y 1 zestaw
1. Otwórz wszystkie pudełka, aby sprawdzić ilość i stan akcesoriów.
2. Podczas montażu należy wyrównać wszystkie otwory i nie dokręcać najpierw
wszystkich śrub.

- 5 -

- 6 -
Montaż krzywek i sworzni
Wkręć sworzeń w otwór. Aby prawidłowo ustawić krzywki, upewnij się, że strzałka
na krzywce otwiera się na otwór sworznia, który blokuje. Zablokuj krzywkę,
obracając głowicę krzywki śrubokrętem, aż zostanie dokręcona. Nie używaj
wkrętaka elektrycznego do montażu urządzenia.
Przeczytaj uważnie każdy krok przed rozpoczęciem. Bardzo ważne jest, aby
każdy krok instrukcji był wykonywany we właściwej kolejności. Jeśli te kroki nie
zostaną wykonane w odpowiedniej kolejności, wystąpią trudności z montażem.
Model
C240407S-01
Maksymalne
110 funtów/ 5 0 kg (obszar roboczy)

- 7 -
Węgiel s
W zestawie (4 szt.)
INSTALLATION STEPS

- 8 -

- 9 -

- 10 -
- 11 -
- 12 -
MAINTENANCE
1. Staraj się nie kłaść mokrych przedmiotów na biurku.
2. Jeśli na biurku znajduje się brud i kurz , proszę Wyczyść je na czas.
3. Regularnie wycieraj kurz czystą szmatką i układaj przedmioty starannie
na biurku .
4. Nie pozostawiaj go na słońcu zbyt długo.
5. Regularnie sprawdzaj stół, aby zapobiec poluzowaniu się śrub i ich
wypadnięciu.

- 13 -
wyłączony.


Technischer Support und E-Garantie-Zertifikat www.vevor.com/support
CRICUT-TISCH
Wir sind weiterhin bestrebt, Ihnen Werkzeuge zu wettbewerbsfähigen Preisen anzubieten.
„Sparen Sie die Hälfte“, „Halber Preis“ oder ähnliche Ausdrücke stellen lediglich eine Schätzung
der Ersparnis dar, die Sie beim Kauf bestimmter Werkzeuge bei uns im Vergleich zu den großen
Top-Marken erzielen können, und decken nicht unbedingt alle von uns angebotenen
Werkzeugkategorien ab. Bitte prüfen Sie bei Ihrer Bestellung sorgfältig, ob Sie im Vergleich zu
den großen Top-Marken tatsächlich die Hälfte sparen.

- 1 -
(Das Bild dient nur als Referenz; bitte beziehen Sie sich auf das tatsächliche
Objekt.)
Brauchen Sie Hilfe? Kontaktieren Sie uns!
Haben Sie Fragen zu unseren Produkten? Benötigen Sie technische
Unterstützung? Kontaktieren Sie uns gerne:
Technischer Support und E-Garantie-Zertifikat
www.vevor.com/support
Dies ist die Originalanleitung. Bitte lesen Sie alle Anweisungen sorgfältig
durch, bevor Sie das Gerät in Betrieb nehmen. VEVOR behält sich das
Recht vor , die Bedienungsanleitung klar und deutlich zu interpretieren.
Das Aussehen des Produkts hängt vom gelieferten Produkt ab. Bitte
CRICUT TABLE
C240407S-01

- 2 -
haben Sie Verständnis dafür, dass wir Sie nicht erneut über Technologie-
oder Software-Updates informieren.
SAFETY INSTRUCTION AND PRECAUTIONS
Symbol
Symbol Beschreibung
Warnung:
Um das Verletzungsrisiko zu verringern, muss der
Benutzer die Bedienungsanleitung sorgfältig lesen.
Dieses Symbol vor einem Sicherheitshinweis weist auf eine
Vorsichtsmaßnahme, Warnung oder Gefahr hin. Das
Nichtbeachten dieser Warnung kann zu einem Unfall führen. Um
das Risiko von Verletzungen, Bränden oder Stromschlägen zu
verringern, befolgen Sie bitte stets die unten aufgeführten
Empfehlungen.
WARNUNG: Um das Verletzungsrisiko zu verringern, Der
Benutzer muss die Bedienungsanleitung sorgfältig lesen.
1. Befestigen oder montieren Sie dieses Produkt nicht an einem Fahrzeug.
Dies kann zu Verletzungen oder Produktschäden führen.
2. Stellen oder treten Sie nicht auf dieses Produkt. Sie könnten stürzen und
sich verletzen.
3. Stellen Sie das Produkt auf ebene Flächen. Das Produkt kann instabil
werden und kippen, wenn es auf einer unebenen Fläche gelagert oder
bewegt wird. Dies kann zu Verletzungen oder Produktschäden führen.
4. Überschreiten Sie nicht die maximale Tragfähigkeit (einschließlich
Inhalt). Überschreiten Sie nicht die maximale Tragfähigkeit jeder
Schublade. Überschreiten Sie nicht die maximale Tragfähigkeit jedes
Fachs.
5. Von offenem Feuer fernhalten. Das Produkt entzündet sich und brennt,
wenn es in Kontakt mit offenem Feuer.
- 3 -
6. Von scharfen Spitzen, Klingen und anderen Gegenstände, um das
Produkt nicht zu zerkratzen .
BEWAHREN SIE DIESE ANWEISUNGEN AUF
PART LIST
➊ 1 Stück
➋ 1 Stück
➌ 1 Stück
➍ 1 Stück
➎ 1 Stück
➏ 2 Stück
➐ 1 Stück
➑ 1 Stück
➒ 1 Stück
➓ 1 Stück
⓫ 2 Stück
⓬ 2 Stück
⓭ 2 Stück
⓮ 2 Stück
⓯ 1 Stück
⓰ 2 Stück
⓱ 4 Stück
A 4
Stück
B 16
Stück
C 4 Stück
F 14 Stück
H 16 Stück
N 4 Stück

- 4 -
K 3
Stück
S 6 Stück
T 3 Stück
Y 1 Satz
1. Bitte öffnen Sie alle Kartons, um die Menge und den Zustand des Zubehörs zu
überprüfen.
2. Richten Sie bei der Installation alle Löcher aus und ziehen Sie nicht zuerst alle
Schrauben fest.

- 5 -
- 6 -
Installation von Nocken und Stiften
Schrauben Sie den Stift in die Bohrung. Um die Nocken korrekt einzustellen,
achten Sie darauf, dass der Pfeil auf der Nocke zur Bohrung des Stifts zeigt, den
sie verriegelt. Verriegeln Sie die Nocke, indem Sie den Nockenkopf mit einem
Schraubendreher drehen, bis er fest sitzt. Bitte verwenden Sie zur Montage keinen
Akkuschrauber.
Lesen Sie jeden Schritt sorgfältig durch, bevor Sie beginnen. Es ist sehr wichtig,
dass jeder Schritt der Anleitung in der richtigen Reihenfolge ausgeführt wird.
Andernfalls treten Montageschwierigkeiten auf.
Modell
C240407S-01
Maximale
110 lb/ 5 0 kg (Arbeitsbereich)

- 7 -
Räder
Im Lieferumfang enthalten (4 Stück)
INSTALLATION STEPS

- 8 -
- 9 -
- 10 -

- 11 -

- 12 -
MAINTENANCE
1. Vermeiden Sie es, nasse Gegenstände auf den Schreibtisch zu legen.
2. Sollten Sie Schmutz und Staub auf dem Schreibtisch finden , reinigen
Sie sie rechtzeitig.
3. Stauben Sie regelmäßig mit einem sauberen Lappen ab und ordnen Sie
die Gegenstände ordentlich auf dem Schreibtisch an .
4. Lassen Sie es nicht zu lange in der Sonne liegen.

- 13 -
5. Überprüfen Sie den Tisch regelmäßig, um zu verhindern, dass sich
Schrauben lösen und fallen
aus.


Assistance technique et certificat de garantie électronique
www.vevor.com/support
TABLE CRICUT
Nous continuons à nous engager à vous fournir des outils à des prix compétitifs.
Les expressions « Moitié Économisez », « Moitié Prix » ou toute autre expression similaire que
nous utilisons ne représentent qu'une estimation des économies que vous pourriez réaliser en
achetant certains outils chez nous par rapport aux grandes marques et ne couvrent pas
nécessairement toutes les catégories d'outils que nous proposons. Nous vous invitons à vérifier
attentivement, lors de votre commande, que vous économisez réellement la moitié du prix par
rapport aux grandes marques.
- 1 -
(L'image est à titre indicatif uniquement ; veuillez vous référer à l'objet réel)
BESOIN D'AIDE ? CONTACTEZ-NOUS !
Des questions sur nos produits ? Besoin d'assistance technique ?
N'hésitez pas à nous contacter :
Assistance technique et certificat de garantie électronique
www.vevor.com/support
Ceci est le mode d'emploi d'origine. Veuillez lire attentivement toutes les
instructions du manuel avant utilisation. VEVOR se réserve le droit
d'interpréter clairement ce manuel d'utilisation. L'apparence du produit
dépend du produit que vous avez reçu. Veuillez nous excuser pour le
retard dans la publication de toute mise à jour technologique ou logicielle
CRICUT TABLE
C240407S-01

- 2 -
concernant notre produit.
SAFETY INSTRUCTION AND PRECAUTIONS
Symbol
e
Description du symbole
Avertissement :
Pour réduire le risque de blessure, l'utilisateur doit
lire attentivement le manuel d'instructions.
Ce symbole, placé devant une remarque de sécurité, indique une
précaution, un avertissement ou un danger. Ignorer cet
avertissement peut entraîner un accident. Pour réduire les
risques de blessure, d'incendie ou d'électrocution, veuillez
toujours suivre les recommandations ci-dessous.
AVERTISSEMENT : Pour réduire le risque de blessure, le
L'utilisateur doit lire attentivement le manuel d'instructions.
1. Ne pas fixer ni monter ce produit sur un véhicule. Cela pourrait entraîner
des blessures ou endommager le produit.
2. Ne pas monter ni marcher sur ce produit. Vous risqueriez de tomber et
de vous blesser.
3. Maintenez le produit sur une surface plane. Le produit peut devenir
instable et basculer s'il est stocké ou déplacé sur une surface instable, ce
qui peut entraîner des blessures ou des dommages.
4. Ne pas dépasser la capacité de charge maximale, contenu compris. Ne
pas dépasser la capacité de charge maximale de chaque tiroir. Ne pas
dépasser la capacité de charge maximale de chaque plateau.
5. Tenir à l'écart des flammes nues. Ceci le produit s'enflammera et brûlera
s'il est mis en contact contact avec une flamme nue.
6. Tenir à l'écart des pointes tranchantes, des lames et autres articles, afin
de ne pas rayer le produit .
- 3 -
CONSERVEZ CES INSTRUCTIONS
PART LIST
➊ 1 pièce
➋ 1 pièce
➌ 1 pièce
➍ 1 pièce
➎ 1 pièce
➏ 2 pièces
➐ 1 pièce
➑ 1 pièce
➒ 1 pièce
➓ 1 pièce
⓫ 2 pièces
⓬ 2 pièces
⓭ 2 pièces
⓮ 2 pièces
⓯ 1 pièce
⓰ 2 pièces
⓱ 4 pièces
Un 4
pièces
B 16
pièces
C 4 pièces
F 14 pièces
H 16 pièces
N 4
pièces
K 3

- 4 -
pièces
S 6 pièces
T 3 pièces
Y 1set
1. Veuillez ouvrir toutes les boîtes pour vérifier la quantité et l'état des accessoires.
2. Lors de l'installation, veuillez aligner tous les trous et ne serrez pas toutes les
vis en premier.

- 5 -

- 6 -
Installation de cames et de goupilles
Vissez la goupille dans le trou. Pour régler correctement les cames, assurez-vous
que la flèche de la came est orientée vers le trou de la goupille qu'elle verrouille.
Verrouillez la came en tournant la tête de came à l'aide d'un tournevis jusqu'à ce
qu'elle soit serrée. N'utilisez pas de tournevis électrique pour assembler l'appareil.
Lisez attentivement chaque étape avant de commencer. Il est essentiel de suivre
chaque étape des instructions dans le bon ordre. Si ces étapes ne sont pas
suivies dans l'ordre, des difficultés d'assemblage surviendront.
Modèle
C240407S-01
Charge
110 lb/ 5 0 kg (zone de travail)
Roues
Inclus (4 pièces)

- 7 -
INSTALLATION STEPS

- 8 -
- 9 -

- 10 -

- 11 -
MAINTENANCE
1. Veuillez éviter de mettre des objets mouillés sur le bureau.
2. Si vous trouvez de la saleté et de la poussière sur le bureau , veuillez
nettoyez-les à temps.
3. Dépoussiérez régulièrement avec un chiffon propre et rangez
soigneusement les objets sur le bureau .
4. Ne le laissez pas trop longtemps au soleil.

- 12 -
5. Vérifiez régulièrement la table pour éviter que les vis ne se desserrent et
ne tombent
désactivé.


Technische ondersteuning en e-garantiecertificaat www.vevor.com/support
CRICUT-TAFEL
Wij streven er voortdurend naar om u gereedschappen te leveren tegen concurrerende prijzen.
"Bespaar de helft", "halve prijs" of andere soortgelijke uitdrukkingen die wij gebruiken, geven
slechts een schatting van de besparingen die u kunt behalen door bepaalde gereedschappen bij
ons te kopen in vergelijking met de grote topmerken en betekenen niet per se dat alle
categorieën gereedschappen die wij aanbieden, hieronder vallen. Wij verzoeken u vriendelijk om
bij het plaatsen van een bestelling zorgvuldig te controleren of u daadwerkelijk de helft bespaart
in vergelijking met de grote topmerken.

- 1 -
(De afbeelding is alleen ter referentie; raadpleeg het daadwerkelijke object)
HULP NODIG? NEEM CONTACT MET ONS OP!
Heeft u vragen over het product? Heeft u technische ondersteuning
nodig? Neem dan gerust contact met ons op:
Technische ondersteuning en e-garantiecertificaat
www.vevor.com/support
Dit is de originele handleiding. Lees alle instructies zorgvuldig door
voordat u het product gebruikt. VEVOR behoudt zich het recht voor om de
gebruiksaanwijzing duidelijk te interpreteren. Het uiterlijk van het product
is afhankelijk van het product dat u hebt ontvangen. Neemt u het ons niet
kwalijk dat we u niet meer op de hoogte stellen van eventuele
CRICUT TABLE
C240407S-01

- 2 -
technologische of software-updates voor ons product.
SAFETY INSTRUCTION AND PRECAUTIONS
Symbo
ol
Symbool Beschrijving
Waarschuwing:
Om het risico op letsel te verminderen, moet de
gebruiker de gebruiksaanwijzing zorgvuldig lezen.
Dit symbool, geplaatst vóór een veiligheidsopmerking, duidt op
een voorzorgsmaatregel, waarschuwing of gevaar. Het negeren
van deze waarschuwing kan leiden tot een ongeval. Volg altijd de
onderstaande aanbevelingen om het risico op letsel, brand of
elektrocutie te verminderen.
WAARSCHUWING: Om het risico op letsel te verminderen, De
gebruiker moet de gebruiksaanwijzing zorgvuldig lezen.
1. Bevestig of monteer dit product niet aan een voertuig. Dit kan persoonlijk
letsel of schade aan het product veroorzaken.
2. Ga niet op dit product staan of stappen. U kunt vallen, wat kan leiden tot
persoonlijk letsel.
3. Plaats het product op een vlakke ondergrond. Het product kan onstabiel
worden en kantelen als het op een oneffen ondergrond wordt opgeslagen
of verplaatst, wat kan leiden tot persoonlijk letsel of schade aan het
product.
4. Overschrijd het maximale draagvermogen, inclusief inhoud, niet.
Overschrijd het maximale draagvermogen van elke lade niet. Overschrijd
het maximale draagvermogen van elke lade niet.
5. Verwijderd houden van open vuur. Dit product zal ontbranden en
verbranden als het in contact komt met contact met een open vlam.
6. Verwijderd houden van scherpe punten, messen en andere artikelen,
zodat het product niet bekrast wordt .
- 3 -
BEWAAR DEZE INSTRUCTIES
PART LIST
➊ 1 stuk
➋ 1 stuk
➌ 1 stuk
➍ 1 stuk
➎ 1 stuk
➏ 2 stuks
➐ 1 stuk
➑ 1 stuk
➒ 1 stuk
➓ 1 stuk
⓫ 2 stuks
⓬ 2 stuks
⓭ 2 stuks
⓮ 2 stuks
⓯ 1 stuk
⓰ 2 stuks
⓱ 4 stuks
Een
4-delige
B 16 stuks
C 4 stuks
F 14 stuks
H 16 stuks
N 4 stuks

- 4 -
K 3
stuks
S 6 stuks
T 3 stuks
Y 1set
1. Open alle dozen om het aantal en de staat van de accessoires te controleren.
2. Zorg ervoor dat bij de installatie alle gaten op één lijn liggen en draai nog niet
alle schroeven vast.

- 5 -

- 6 -
Installatie van nokken en pennen
Schroef de pen in het gat. Om de nokken correct te plaatsen, zorgt u ervoor dat de
pijl op de nok naar het gat van de pen wijst die deze blokkeert. Vergrendel de nok
door de nokkop met een schroevendraaier te draaien totdat deze vastzit. Gebruik
geen elektrische schroevendraaier om het apparaat te monteren.
Lees elke stap zorgvuldig door voordat u begint. Het is erg belangrijk dat elke stap
van de instructie in de juiste volgorde wordt uitgevoerd. Als deze stappen niet in de
juiste volgorde worden gevolgd, kunnen er montageproblemen ontstaan.
Model
C240407S-01
Maximale
110 lb/ 50 kg (werkgebied)
Wielen
Inbegrepen (4 stuks)

- 7 -
INSTALLATION STEPS

- 8 -

- 9 -

- 10 -

- 11 -
MAINTENANCE
1. Zorg ervoor dat er geen natte voorwerpen op het bureau liggen.
2. Als er vuil en stof op het bureau wordt aangetroffen , Maak ze op tijd
schoon.
3. Stof het regelmatig af met een schone doek en rangschik de items
netjes op het bureaublad .
4. Laat het niet te lang in de zon staan.

- 12 -
5. Controleer de tafel regelmatig om te voorkomen dat de schroeven
losraken en vallen.
uit.


Teknisk support och e-garanticertifikat www.vevor.com/support
CRICUT BORD
Vi fortsätter att vara engagerade i att ge dig verktyg till konkurrenskraftiga priser.
"Spara halva", "halva priset" eller andra liknande uttryck som används av oss representerar bara
en uppskattning av besparingar du kan dra nytta av att köpa vissa verktyg hos oss jämfört med
de stora toppmärkena och betyder inte nödvändigtvis att täcka alla kategorier av verktyg som
erbjuds av oss. Du påminns vänligen om att noggrant kontrollera när du gör en beställning hos
oss om du faktiskt sparar hälften i jämförelse med de främsta stora varumärkena.

- 1 -
(Bilden är endast för referens; vänligen hänvisa till det faktiska objektet)
BEHÖVER HJÄLP? KONTAKTA OSS!
Har du produktfrågor? Behöver du teknisk support? Kontakta oss
gärna:
Teknisk support och e-garanticertifikat
www.vevor.com/support
Detta är den ursprungliga instruktionen, läs alla instruktioner noggrant
innan du använder den. VEVOR reserverar sig för en tydlig tolkning av vår
användarmanual. Utseendet på produkten är beroende av den produkt du
fått. Ursäkta oss att vi inte kommer att informera dig igen om det finns
någon teknik eller mjukvaruuppdateringar på vår produkt.
CRICUT TABLE
C240407S-01
- 2 -
SAFETY INSTRUCTION AND PRECAUTIONS
Symbol
Symbol Beskrivning
Varning: För att minska risken för skada måste användaren läsa
bruksanvisningen noggrant.
Denna symbol, placerad före en säkerhetskommentar, indikerar
en slags försiktighetsåtgärd, varning eller fara. Att ignorera
denna varning kan leda till en olycka. För att minska risken för
skada, brand eller elstöt, följ alltid rekommendationerna nedan.
VARNING: För att minska risken för skador användaren måste
läsa bruksanvisningen noggrant.
1. Fäst eller montera inte denna produkt på ett fordon. Detta kan orsaka
personskador eller produktskador.
2. Stå eller trampa inte på denna produkt. Du kan falla vilket kan orsaka
personskada.
3.Håll produkten på jämna ytor. Produkten kan bli instabil och tippa om den
förvaras eller flyttas på en ojämn yta, vilket kan orsaka person- eller
produktskada
4. Överskrid inte den maximala lastkapaciteten, inklusive innehåll.
Överskrid inte den maximala lastkapaciteten för varje låda. Överskrid inte
den maximala lastkapaciteten för varje fack.
5 . Håll borta från öppen låga. Detta produkten kommer att antändas och
brinna om den förs in i den kontakt med öppen låga.
6. Håll dig borta från vassa spetsar, knivar och annat föremål, för att inte
repa produkten .
SPARA DESSA INSTRUKTIONER
- 3 -
PART LIST
➊ 1 st
➋ 1 st
➌ 1 st
➍ 1 st
➎ 1 st
➏ 2 st
➐ 1 st
➑ 1 st
➒ 1 st
➓ 1 st
⓫ 2 st
⓬ 2 st
⓭ 2 st
⓮ 2 st
⓯ 1 st
⓰ 2 st
⓱ 4 st
A 4 st
B 16st
C 4st
F 14st
H 16 st
N 4 st
K 3 st
S 6 st
T 3st
Y 1 set
1. Öppna alla rutor för att kontrollera tillbehörens kvantitet och skick.
2. Vid installation, vänligen rikta in alla hål och dra inte åt alla skruvar först.
- 4 -
- 5 -
Installation av kammar och stift
Skruva fast stiftet i hålet. För att ställa in kammarna korrekt, se till att pilen på
kammen öppnar sig mot hålet på stiftet som den låser. Lås kammen genom att
vrida kamhuvudet med en skruvmejsel tills det dras åt. Använd inte en elektrisk
skruvmejsel för att montera enheten.
Läs varje steg noggrant innan du börjar. Det är mycket viktigt att varje steg av
instruktionen utförs i rätt ordning. Om dessa steg inte följs i följd kommer
monteringssvårigheter att uppstå.
Modell
C240407S-01
Maximal
110 lb/ 5 0 kg (arbetsområde)
W häl s
Ingår (4st)

- 6 -
INSTALLATION STEPS
- 7 -

- 8 -

- 9 -

- 10 -
MAINTENANCE
1. Försök att undvika att lägga blöta föremål på skrivbordet.
2. Om smuts och damm hittas på skrivbordet , vänligen rengör dem i tid.
3 . Damma av regelbundet med en ren trasa och ordna föremålen snyggt
på skrivbordet .
4 .Låt den inte sitta i solen för länge.
5 .Kontrollera bordet regelbundet för att förhindra att skruvar lossnar och
faller

- 11 -
av.


Soporte técnico y certificado de garantía electrónica www.vevor.com/support
MESA CRICUT
Seguimos comprometidos a brindarle herramientas a precios competitivos.
"Ahorra la mitad", "Mitad de precio" o cualquier expresión similar que utilicemos solo representa
una estimación del ahorro que podría obtener al comprar ciertas herramientas con nosotros en
comparación con las principales marcas y no necesariamente abarca todas las categorías de
herramientas que ofrecemos. Le recordamos que, al realizar un pedido, verifique
cuidadosamente si realmente está ahorrando la mitad en comparación con las principales
marcas.

- 1 -
(La imagen es solo de referencia; consulte el objeto real)
¿NECESITAS AYUDA? ¡CONTÁCTANOS!
¿Tiene preguntas sobre el producto? ¿Necesita asistencia técnica? No
dude en contactarnos:
Soporte técnico y certificado de garantía electrónica
www.vevor.com/support
Estas son las instrucciones originales; lea atentamente todas las
instrucciones del manual antes de utilizarlo. VEVOR se reserva el
derecho de interpretar su manual de usuario. La apariencia del producto
dependerá del producto que haya recibido. Le rogamos que nos disculpe
si no le informamos de nuevo si hay actualizaciones tecnológicas o de
CRICUT TABLE
C240407S-01
- 2 -
software en nuestro producto.
SAFETY INSTRUCTION AND PRECAUTIONS
Símbol
o
Descripción del símbolo
Advertencia:
Para reducir el riesgo de lesiones, el usuario debe leer
atentamente el manual de instrucciones.
Este símbolo, colocado antes de una advertencia de seguridad,
indica precaución, advertencia o peligro. Ignorar esta
advertencia podría provocar un accidente. Para reducir el riesgo
de lesiones, incendios o electrocución, siga siempre las
recomendaciones que se indican a continuación.
ADVERTENCIA: Para reducir el riesgo de lesiones, El usuario
debe leer atentamente el manual de instrucciones.
1. No fije ni monte este producto en un vehículo. Esto podría causar
lesiones personales o daños al producto.
2. No se suba ni pise este producto. Podría caerse y causar lesiones
personales.
3. Mantenga el producto sobre superficies niveladas. El producto puede
desestabilizarse y volcarse si se almacena o se mueve sobre una
superficie desnivelada, lo que podría causar lesiones personales o daños
al producto.
4. No exceda la capacidad máxima de carga, incluido el contenido. No
exceda la capacidad máxima de carga de cada cajón. No exceda la
capacidad máxima de carga de cada bandeja.
5. Mantener alejado de las llamas abiertas. Esto El producto se encenderá
y arderá si se pone en contacto con una llama abierta.
6. Mantener alejado de puntas afiladas, cuchillas y otros artículos, para no
rayar el producto .
- 3 -
GUARDE ESTAS INSTRUCCIONES
PART LIST
➊ 1 pieza
➋ 1 pieza
➌ 1 pieza
➍ 1 pieza
➎ 1 pieza
➏ 2 piezas
➐ 1 pieza
➑ 1 pieza
➒ 1 pieza
➓ 1 pieza
⓫ 2 piezas
⓬ 2 piezas
⓭ 2 piezas
⓮ 2 piezas
⓯ 1 pieza
⓰ 2 piezas
⓱ 4 piezas
4 piezas
B 16
piezas
C 4 piezas
F 14 piezas
Alto 16
piezas
N 4
piezas

- 4 -
K 3
piezas
S 6 piezas
T 3 piezas
Y 1 juego
1. Abra todas las cajas para comprobar la cantidad y el estado de los accesorios.
2. Al instalar, alinee todos los orificios y no apriete todos los tornillos primero.

- 5 -
- 6 -
Instalación de levas y pasadores
Enrosque el pasador en el orificio. Para ajustar las levas correctamente,
asegúrese de que la flecha de la leva esté orientada hacia el orificio del pasador
que bloquea. Bloquee la leva girando la cabeza de la leva con un destornillador
hasta que esté apretada. No utilice un destornillador eléctrico para ensamblar la
unidad.
Lea cada paso detenidamente antes de comenzar. Es fundamental realizar cada
paso de las instrucciones en el orden correcto. Si no se siguen en secuencia,
podrían surgir dificultades de montaje.
Modelo
C240407S-01
Carga máxima
110 lb/ 50 kg (área de trabajo)

- 7 -
Ruedas
Incluido (4 piezas)
INSTALLATION STEPS
- 8 -

- 9 -

- 10 -

- 11 -

- 12 -
MAINTENANCE
1. Intente evitar colocar elementos húmedos sobre el escritorio.
2. Si encuentra suciedad y polvo en el escritorio , por favor Limpiarlos a
tiempo.
3. Quite el polvo periódicamente con un trapo limpio y coloque los
elementos de forma ordenada en el escritorio .
4. No lo dejes expuesto al sol durante mucho tiempo.

- 13 -
5. Revise la mesa periódicamente para evitar que los tornillos se aflojen y
se caigan.
apagado.


Supporto tecnico e certificato di garanzia elettronica www.vevor.com/support
TAVOLO CRICUT
Continuiamo a impegnarci per fornirvi strumenti a prezzi competitivi.
"Risparmia la metà", "Metà prezzo" o qualsiasi altra espressione simile da noi utilizzata
rappresenta solo una stima del risparmio che potresti ottenere acquistando determinati utensili
da noi rispetto ai principali marchi e non significa necessariamente coprire tutte le categorie di
utensili da noi offerte. Ti ricordiamo di verificare attentamente quando effettui un ordine con noi
se stai effettivamente risparmiando la metà rispetto ai principali marchi.

- 1 -
(L'immagine è solo a scopo illustrativo; fare riferimento all'oggetto reale)
HAI BISOGNO DI AIUTO? CONTATTACI!
Hai domande sui prodotti? Hai bisogno di supporto tecnico? Non
esitare a contattarci:
Supporto tecnico e certificato di garanzia elettronica
www.vevor.com/support
Queste sono le istruzioni originali, si prega di leggere attentamente tutte
le istruzioni del manuale prima di utilizzare il prodotto. VEVOR si riserva la
piena interpretazione del manuale utente. L'aspetto del prodotto
dipenderà dal prodotto ricevuto. Vi preghiamo di non informarvi
ulteriormente in caso di aggiornamenti tecnologici o software relativi al
CRICUT TABLE
C240407S-01

- 2 -
nostro prodotto.
SAFETY INSTRUCTION AND PRECAUTIONS
Simbol
o
Descrizione del simbolo
Attenzione:
per ridurre il rischio di lesioni, l'utente deve leggere
attentamente il manuale di istruzioni.
Questo simbolo, posto prima di un'avvertenza sulla sicurezza,
indica una sorta di precauzione, avvertimento o pericolo.
Ignorare questo avvertimento può causare un incidente. Per
ridurre il rischio di lesioni, incendi o folgorazione, seguire sempre
le raccomandazioni riportate di seguito.
ATTENZIONE: Per ridurre il rischio di lesioni, L'utente è tenuto a
leggere attentamente il manuale di istruzioni.
1. Non fissare o montare questo prodotto su un veicolo. Ciò potrebbe
causare lesioni personali o danni al prodotto.
2. Non salire o salire sul prodotto. Si potrebbe cadere e causare lesioni
personali.
3. Tenere il prodotto su superfici piane. Il prodotto potrebbe diventare
instabile e ribaltarsi se conservato o spostato su una superficie non piana,
con il rischio di lesioni personali o danni al prodotto stesso.
4. Non superare la capacità di carico massima, incluso il contenuto. Non
superare la capacità di carico massima di ciascun cassetto. Non superare
la capacità di carico massima di ciascun vassoio.
5. Tenere lontano da fiamme libere. Questo il prodotto si accenderà e
brucerà se portato in contatto con una fiamma libera.
6. Tenere lontano da punte affilate, lame e altri articoli, in modo da non
graffiare il prodotto .
- 3 -
CONSERVARE QUESTE ISTRUZIONI
PART LIST
➊ 1 pz
➋ 1 pz
➌ 1 pz
➍ 1 pz
➎ 1 pz
➏ 2 pezzi
➐ 1 pz
➑ 1 pz
➒ 1 pz
➓ 1 pz
⓫ 2 pezzi
⓬ 2 pezzi
⓭ 2 pezzi
⓮ 2 pezzi
⓯ 1 pz
⓰ 2 pezzi
⓱ 4 pezzi
Un 4
pezzi
B 16 pezzi
C 4 pezzi
F 14 pezzi
H 16 pezzi
N 4 pezzi
K 3

- 4 -
pezzi
S 6 pezzi
T 3 pezzi
Y 1 set
1. Aprire tutte le scatole per verificare la quantità e le condizioni degli accessori.
2. Durante l'installazione, allineare tutti i fori e non stringere prima tutte le viti.

- 5 -

- 6 -
Installazione di camme e perni
Avvitare il perno nel foro. Per impostare correttamente le camme, assicurarsi che
la freccia sulla camma si apra verso il foro del perno che si sta bloccando.
Bloccare la camma ruotando la testa della camma con un cacciavite fino a quando
non è ben serrata. Non utilizzare un cacciavite elettrico per assemblare l'unità.
Leggere attentamente ogni passaggio prima di iniziare. È fondamentale che ogni
passaggio delle istruzioni venga eseguito nell'ordine corretto. Se questi passaggi
non vengono seguiti in sequenza, si verificheranno difficoltà di montaggio.
Modello
C240407S-01
Carico massimo
110 libbre/ 50 kg (area di lavoro)
Ruote
Incluso (4 pezzi)
- 7 -
INSTALLATION STEPS

- 8 -

- 9 -

- 10 -
- 11 -
MAINTENANCE
1. Si prega di evitare di appoggiare oggetti bagnati sulla scrivania.
2. Se si riscontrano sporcizia e polvere sulla scrivania , si prega di pulirli in
tempo.
3. Spolverare regolarmente con uno straccio pulito e disporre
ordinatamente gli oggetti sulla scrivania .
4. Non lasciarlo al sole per troppo tempo.

- 12 -
5. Controllare regolarmente il tavolo per evitare che le viti si allentino e
cadano
spento.