
Technical Support and E-Warranty Certificate
www.vevor.com/support
DROP-IN DRAIN Installation Kit
MODEL:YGTJ-PVC-001 / YGTJ-SBS-001
We continue to be committed to provide you tools with competitive price.
"Save Half", "Half Price" or any other similar expressions used by us only
represents an estimate of savings you might benefit from buying certain tools
with us compared to the major top brands and does not necessarily mean to cover
all categories of tools offered by us. You are kindly reminded to verify carefully
when you are placing an order with us if you are actually Saving
Half in comparison with the top major brands.

- 1 -
MODEL: YGTJ-PVC-001 / YGTJ-SBS-001
NEED HELP? CONTACT US!
Have product questions? Need technical support? Please feel free to
contact us:
Technical Support and E-Warranty Certificate
www.vevor.com/support
This is the original instruction, please read all manual instructions
carefully before operating. VEVOR reserves a clear interpretation of our
user manual. The appearance of the product shall be subject to the
product you received. Please forgive us that we won't inform you again if
there are any technology or software updates on our product.
DROP-IN DRAIN
Installation Kit
- 2 -
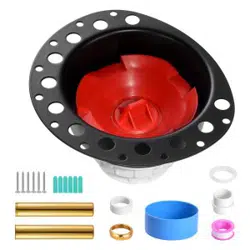
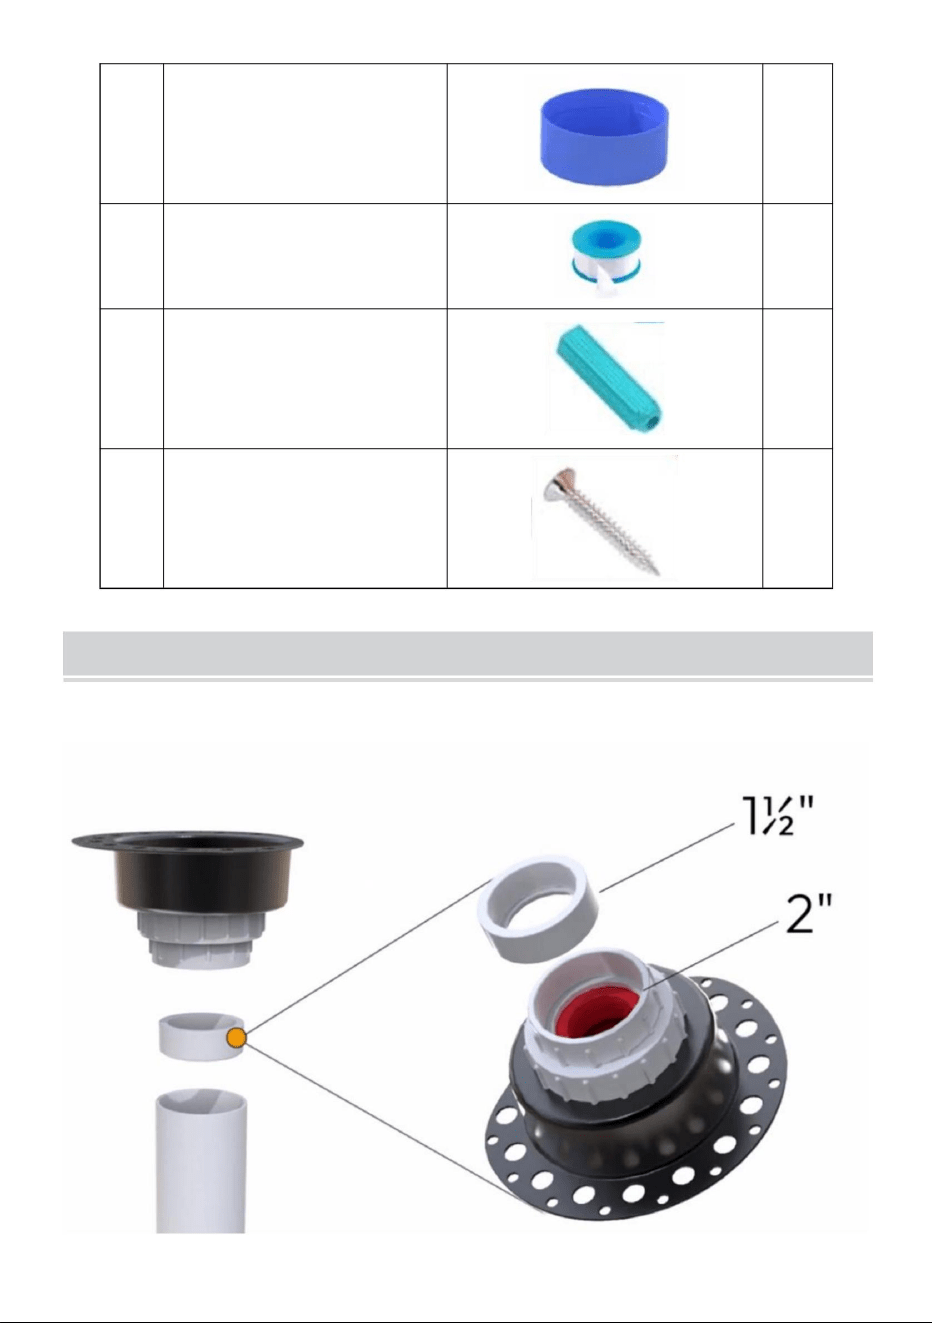
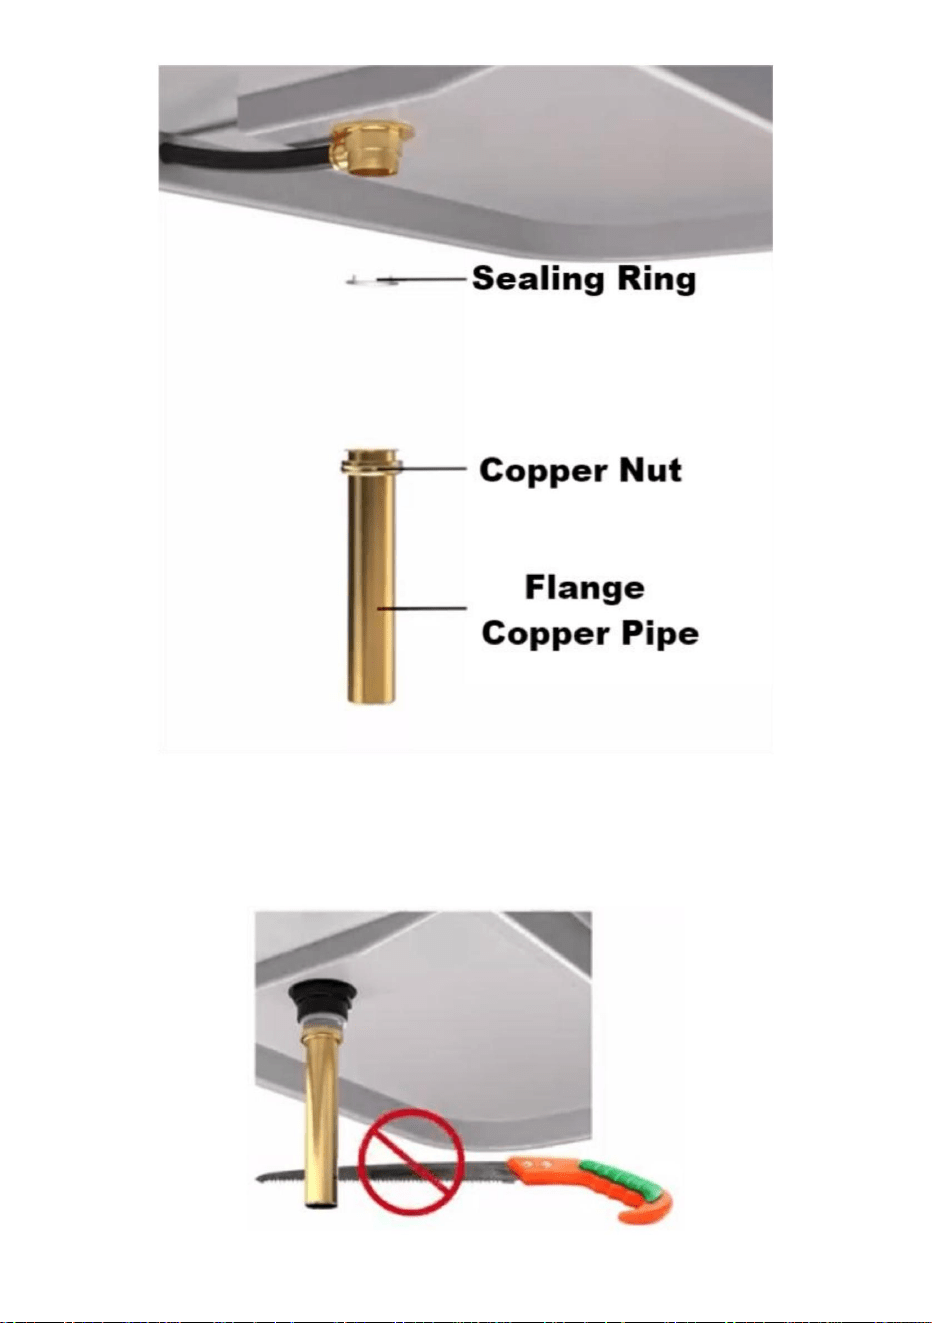
Part List
NO.
Name
Picture
QTY
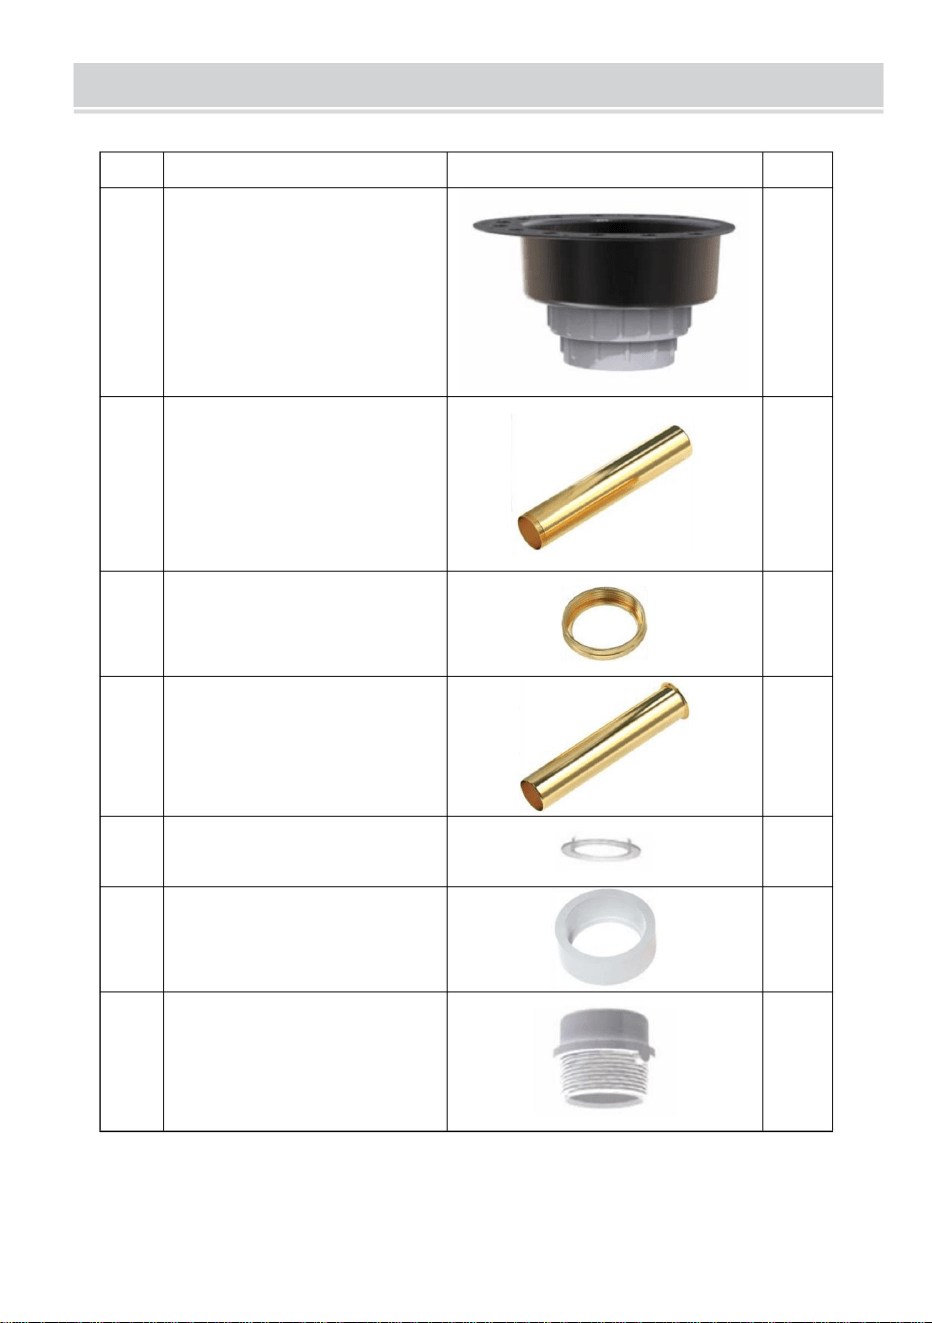
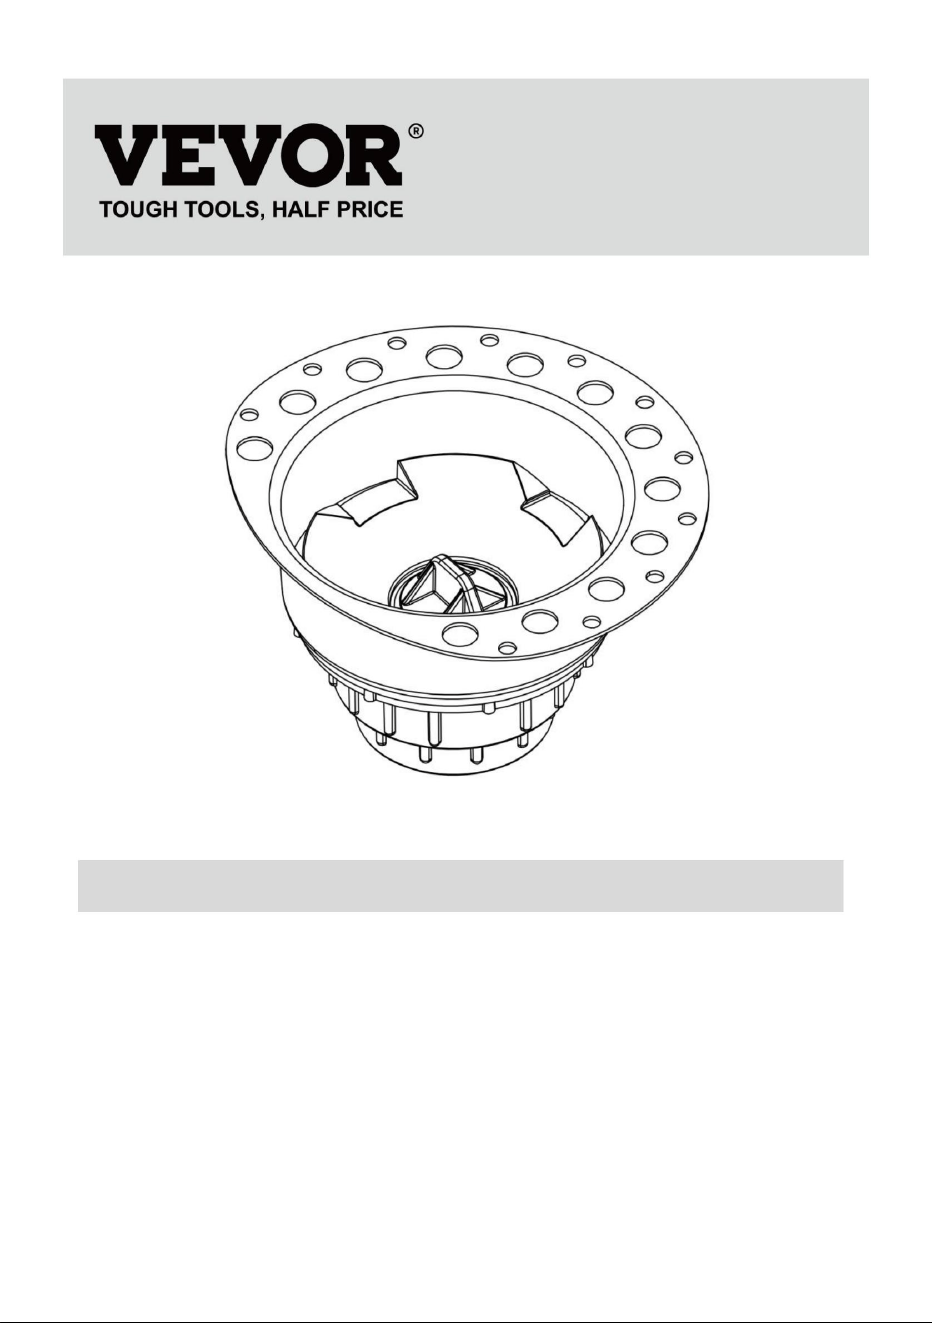
1
Drain Installation Kit
1
2
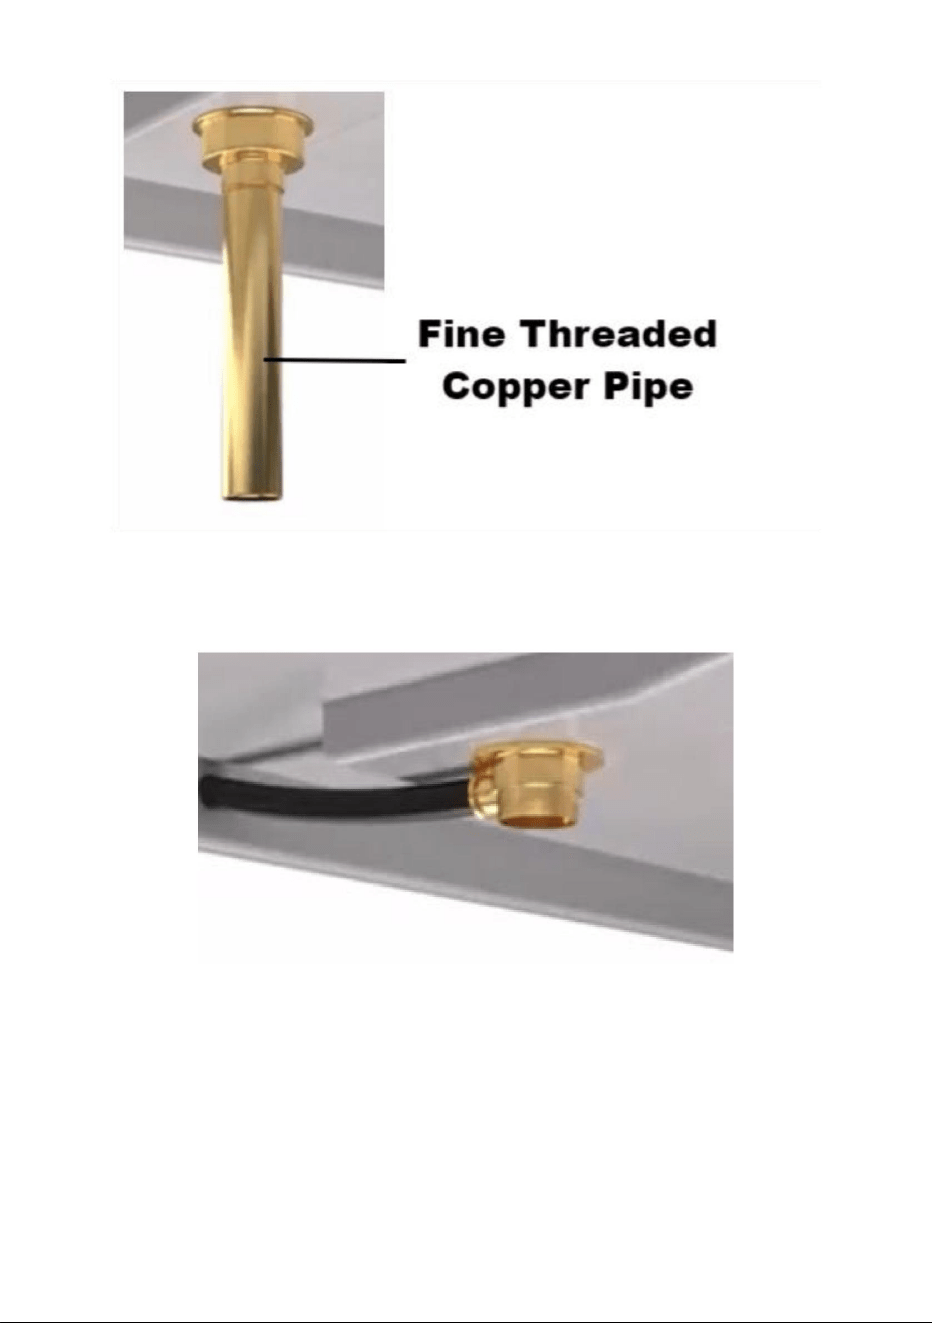
Fine threaded copper pipe
1
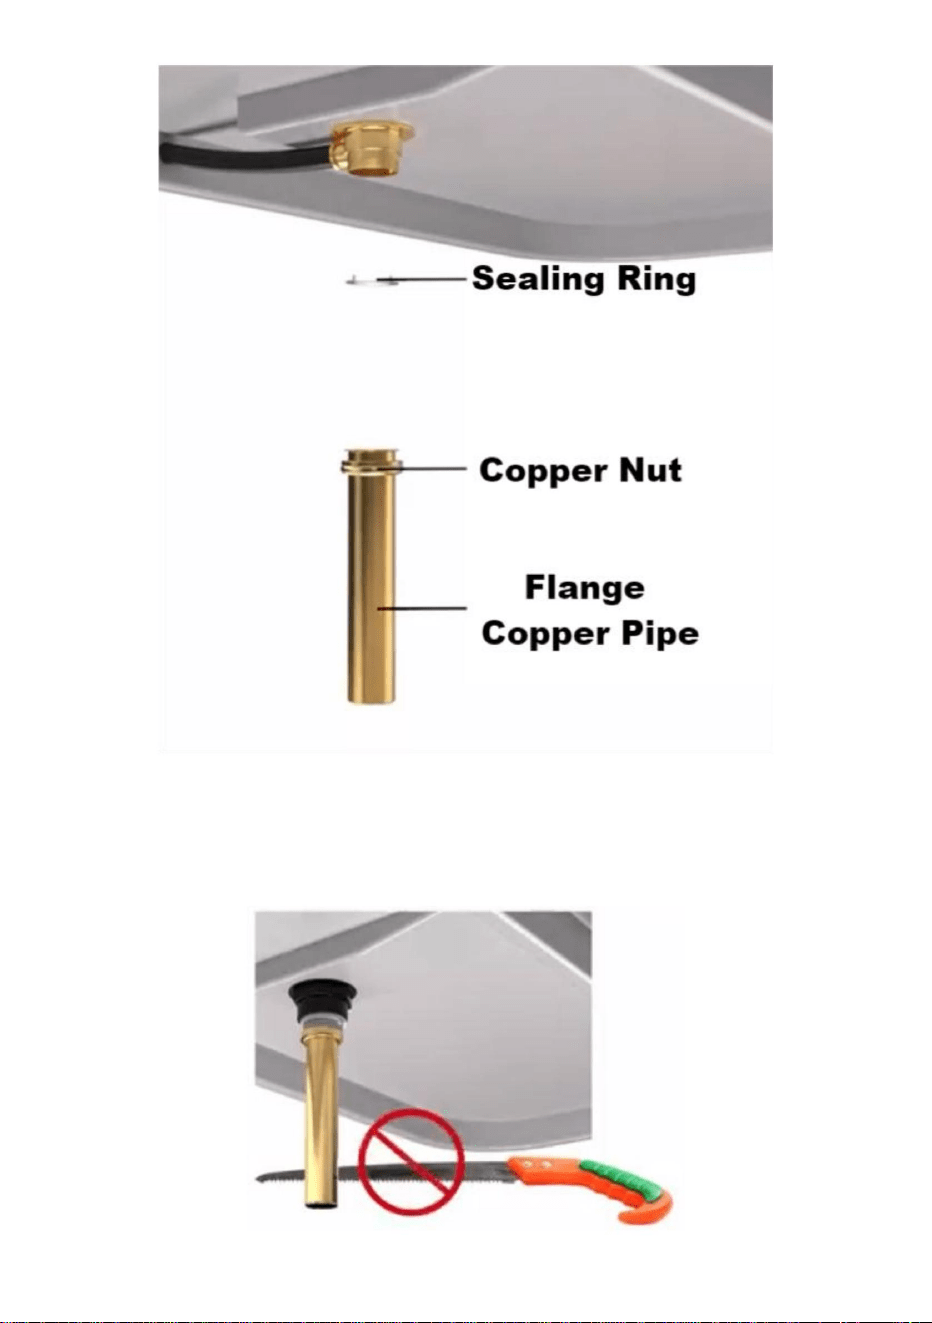
3
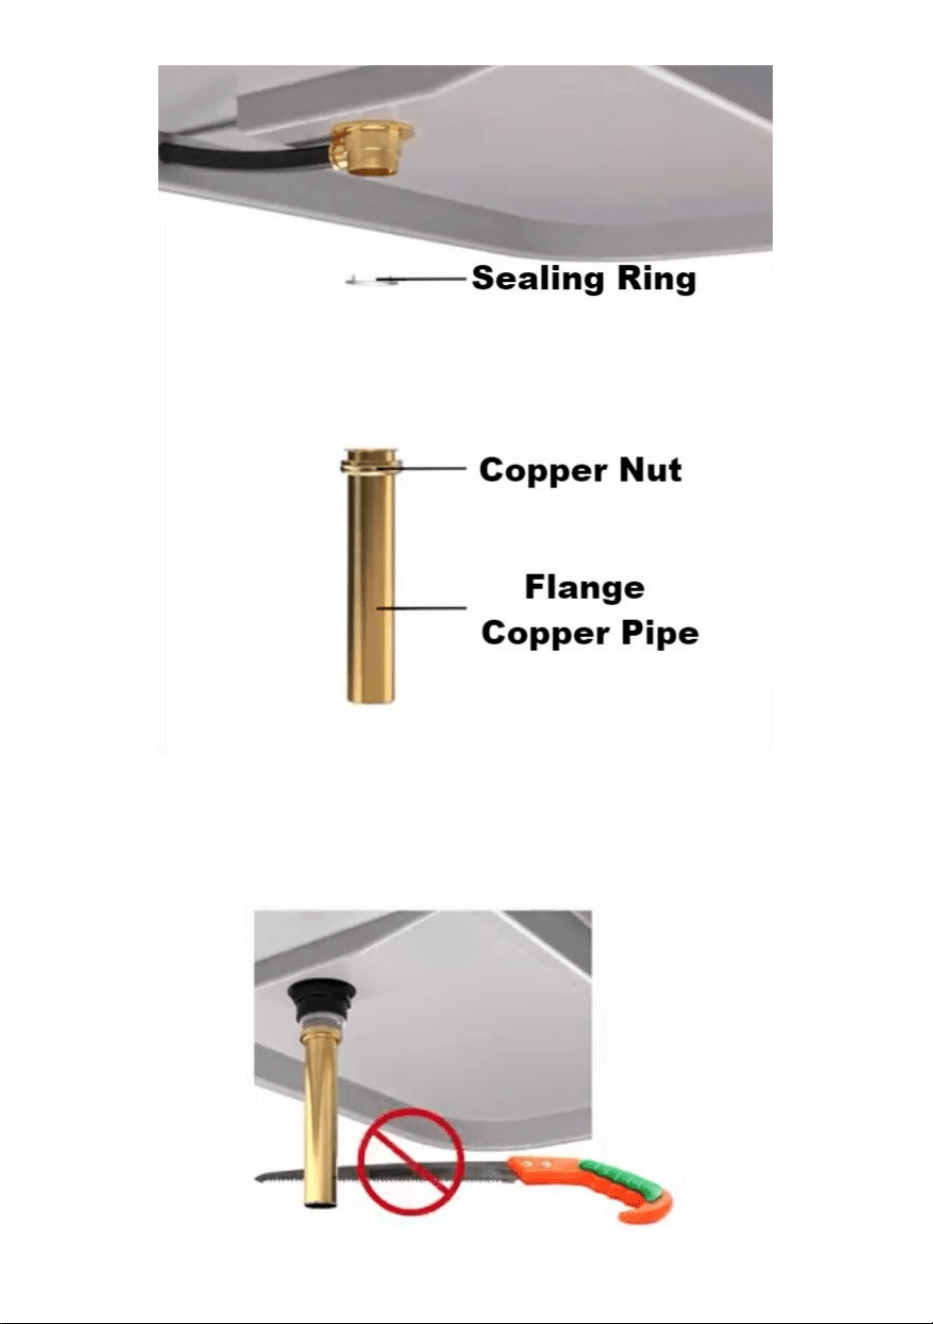
Copper nut
1
4
Flange copper pipe
1
5
Sealing ring
1
6
Drainage Adapter of Floor
1
7
Adopter of Tailpiece
1

- 3 -
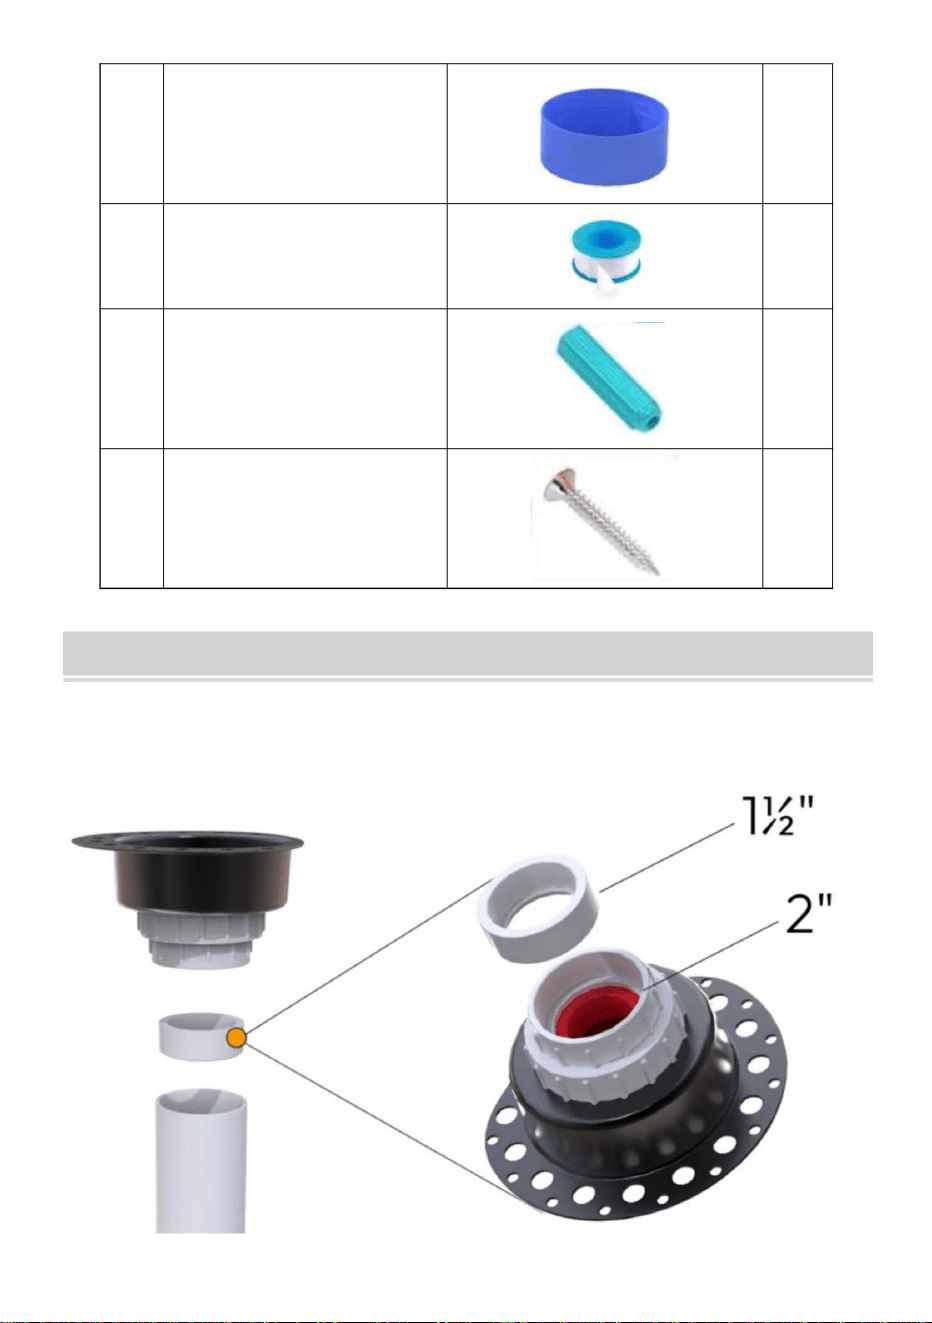
8
Protective Film Cover
1
9
Plumbers tape
1
10
Nylon Bolt Cap
6
11
Screw
6
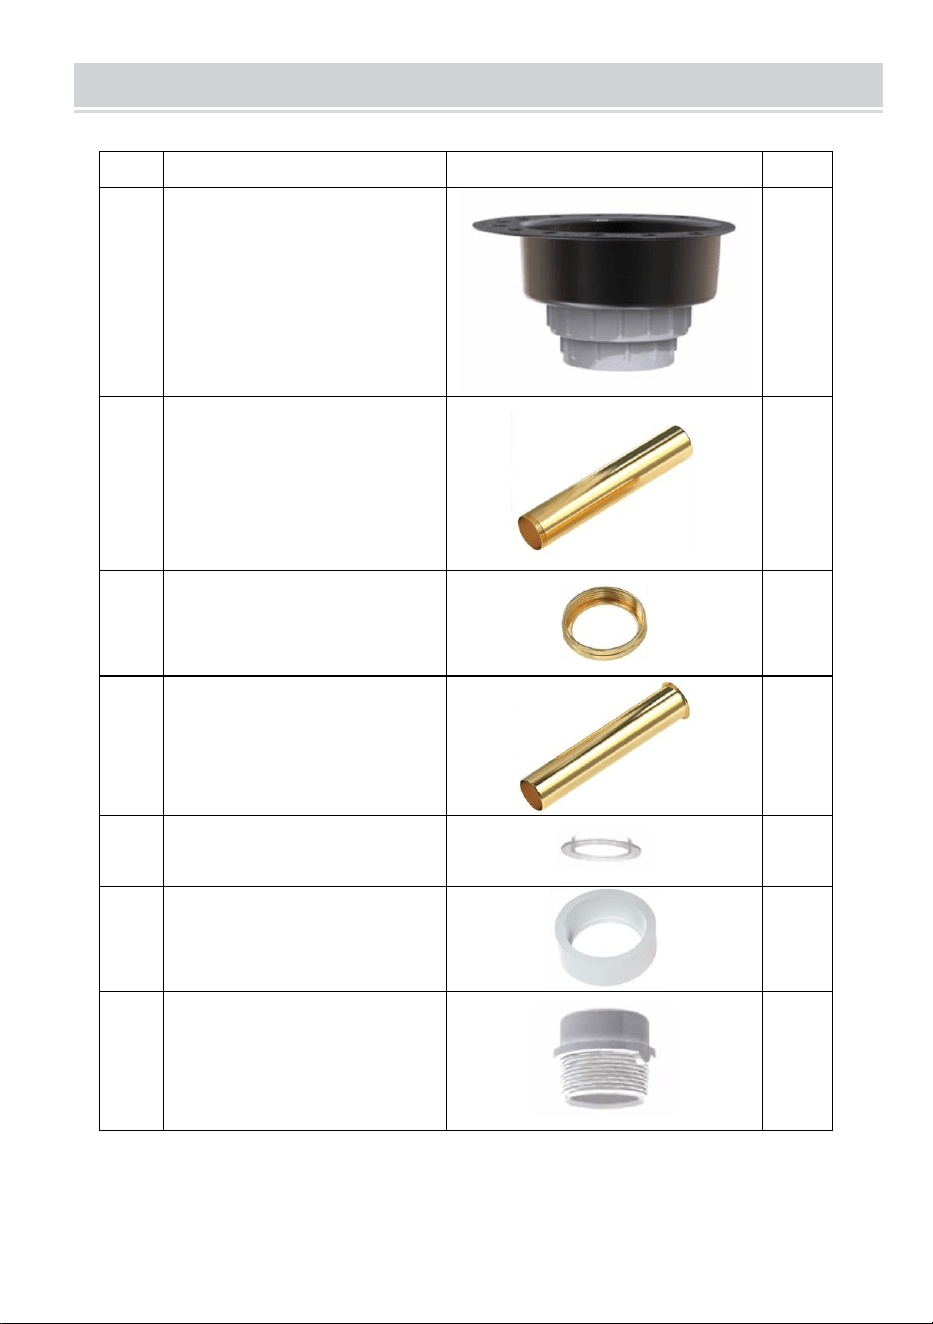
Installation kit
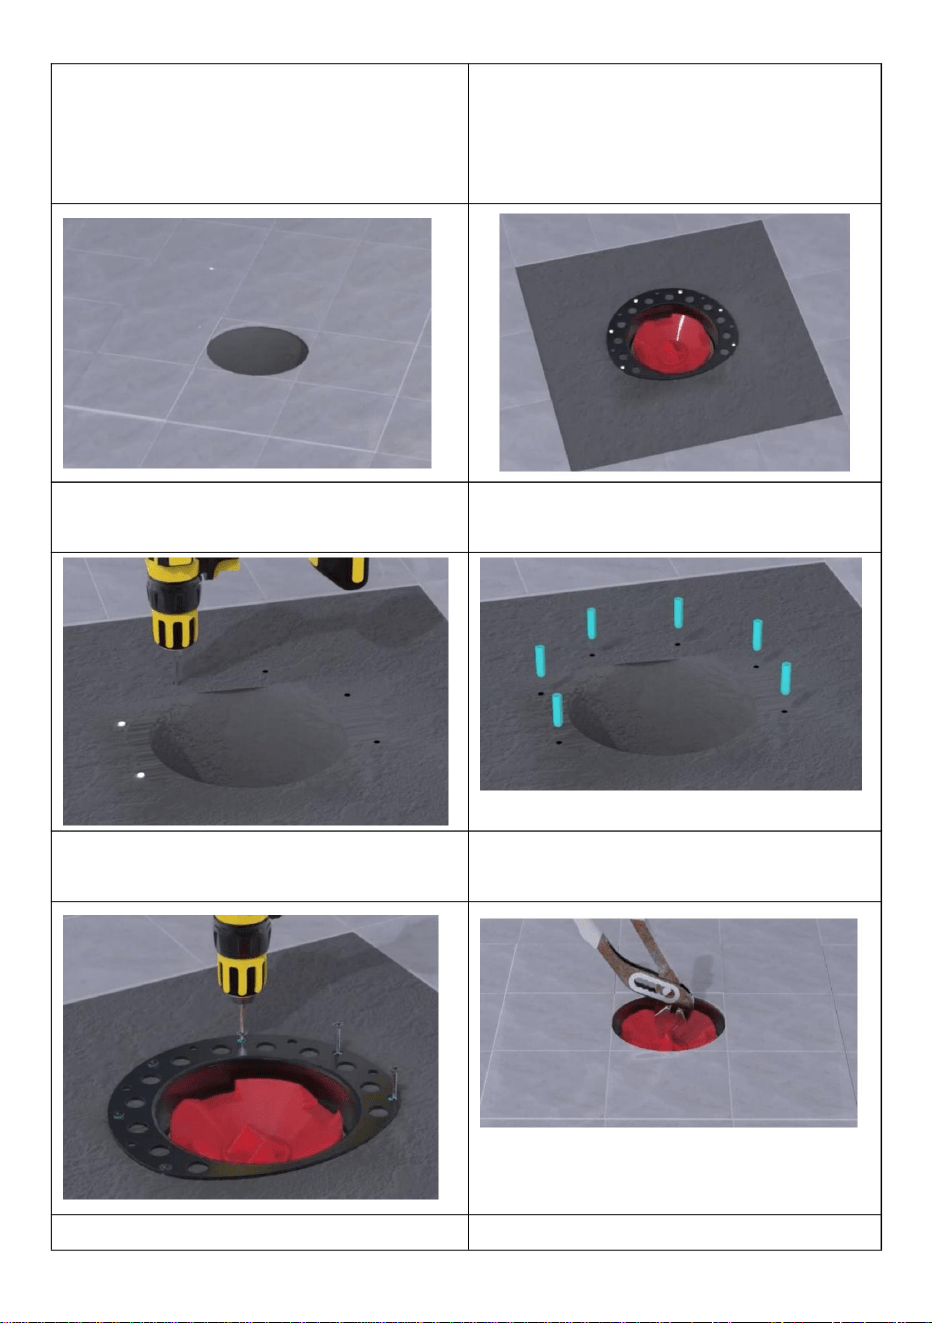
Connect to drainpipes:
- 4 -
Step 1:Cut 5 inch hole into sub-floor.
Step 2:Remove the surface layer
appropriately.Place components
and trace points.
Step 3:Drill holes.
Step 4:Put the Nylon Bolt Cap in the
hole.
Step 5:Tighten the screws.
Step 6:Fill the surface and remove
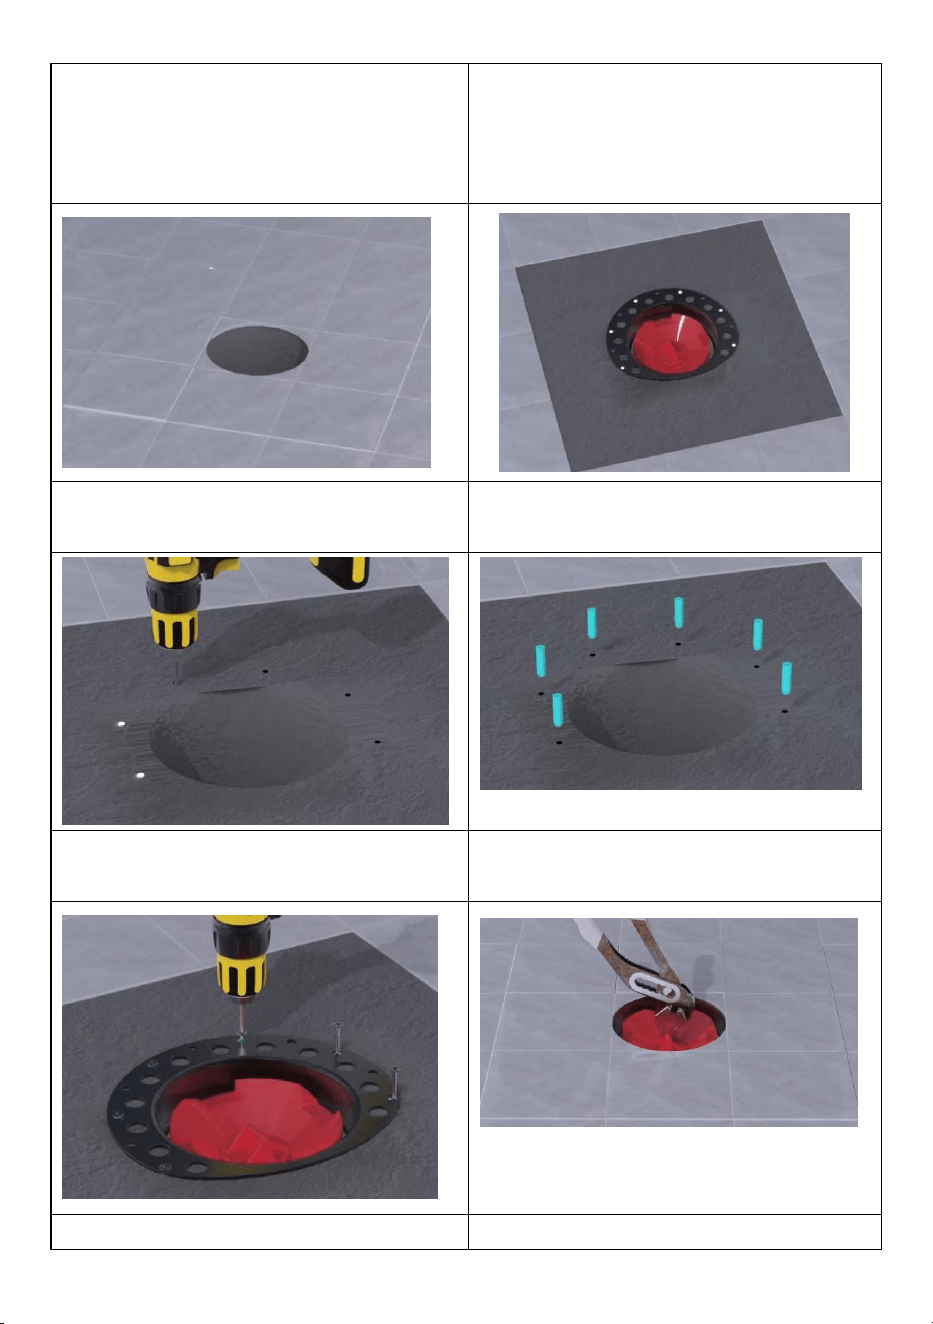
center tab.
Step 7:Put protective film cover on it
- 5 -
to avoid clogging from falling
impurities.
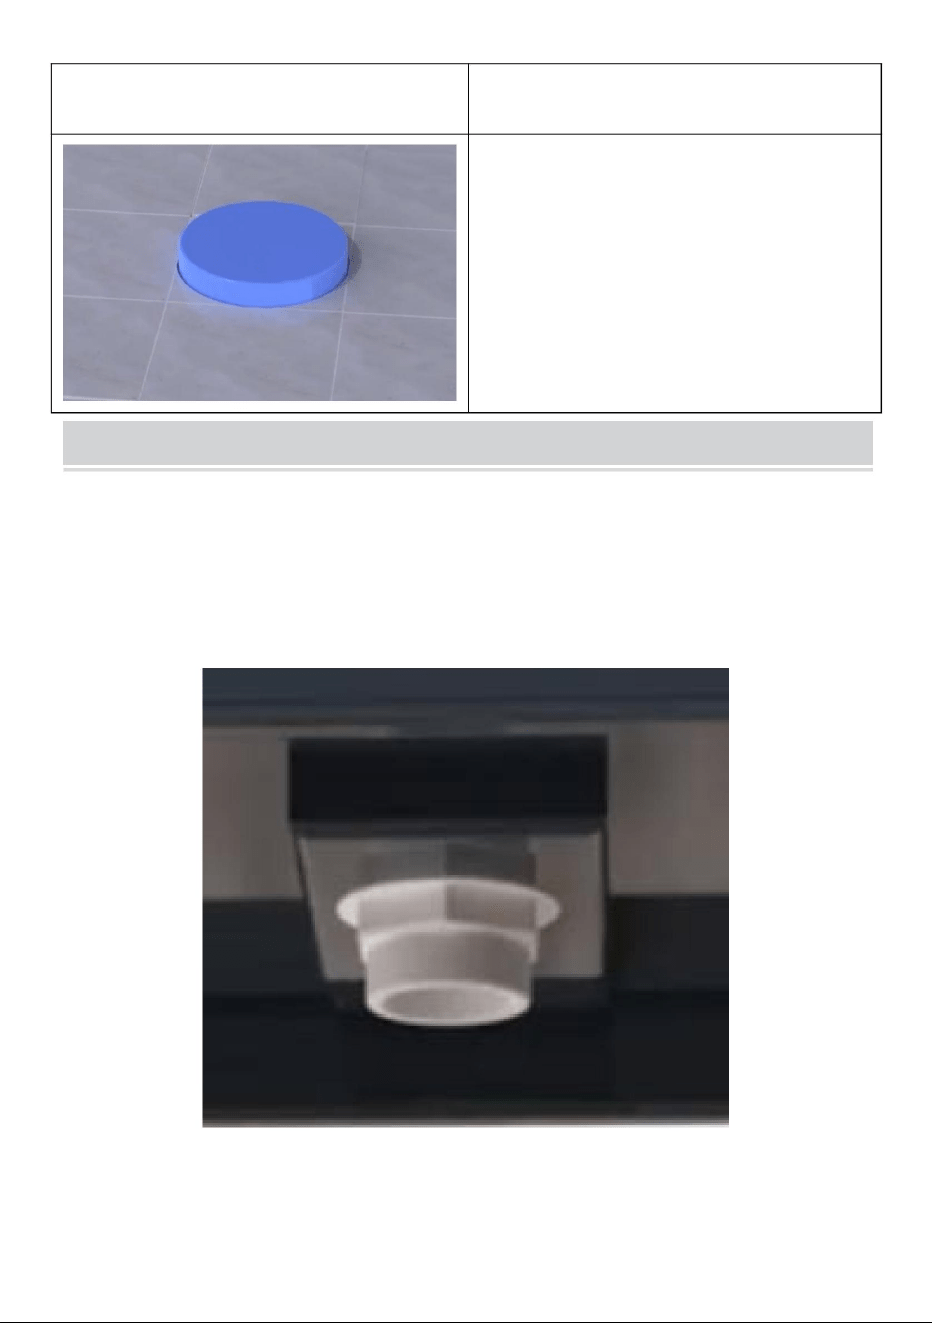
Bathtub connection
Notice:The component installation needs to be selected
according to the different bathtub drain.
The first form:

- 6 -
Second form:

- 7 -
The third form:
- 8 -
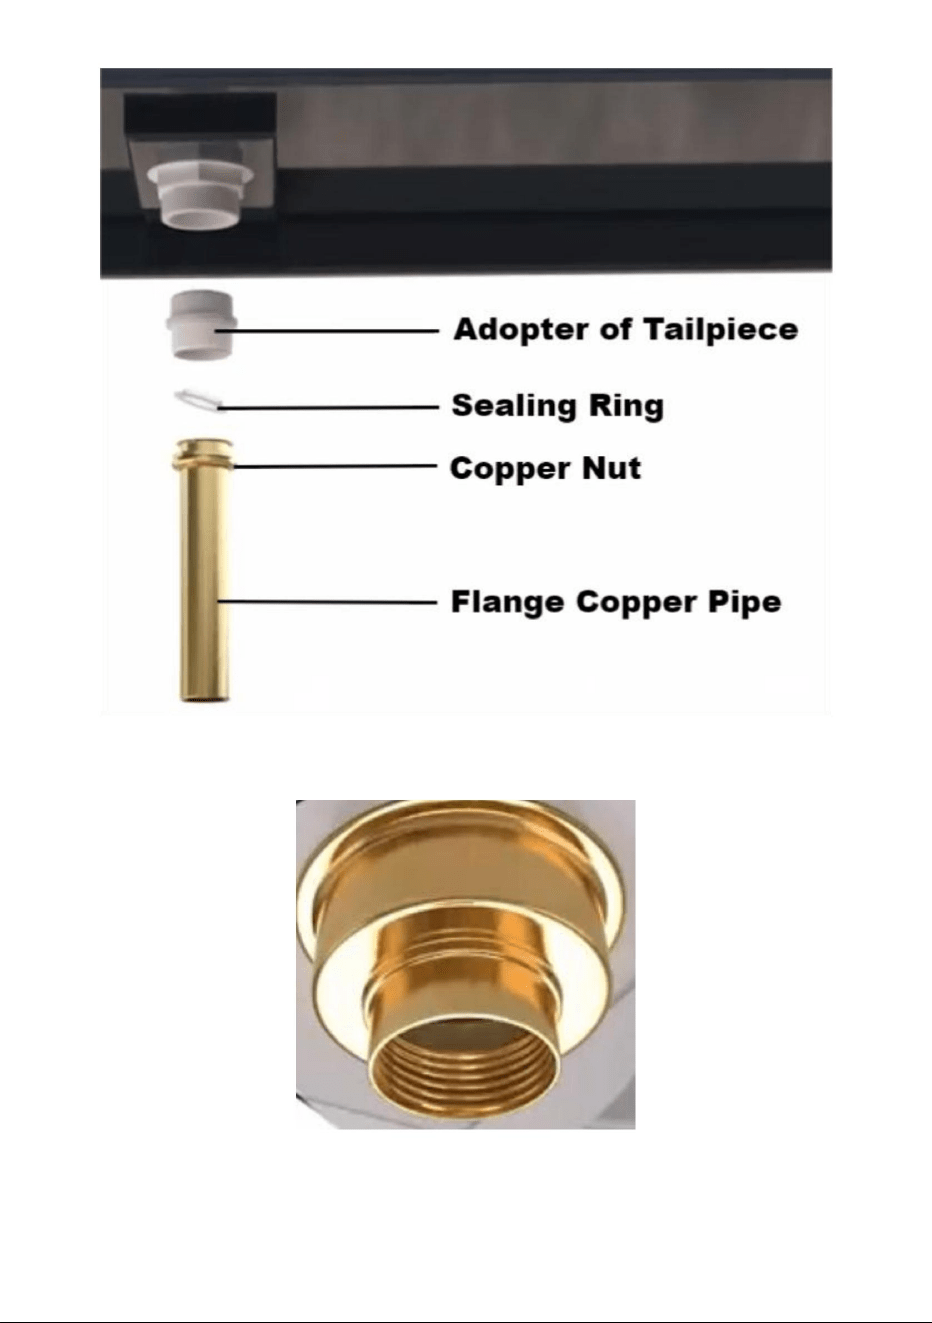
WARM NOTE :
Don't cut the supplied brass tailpieceDoing so may cause a leak.
- 9 -
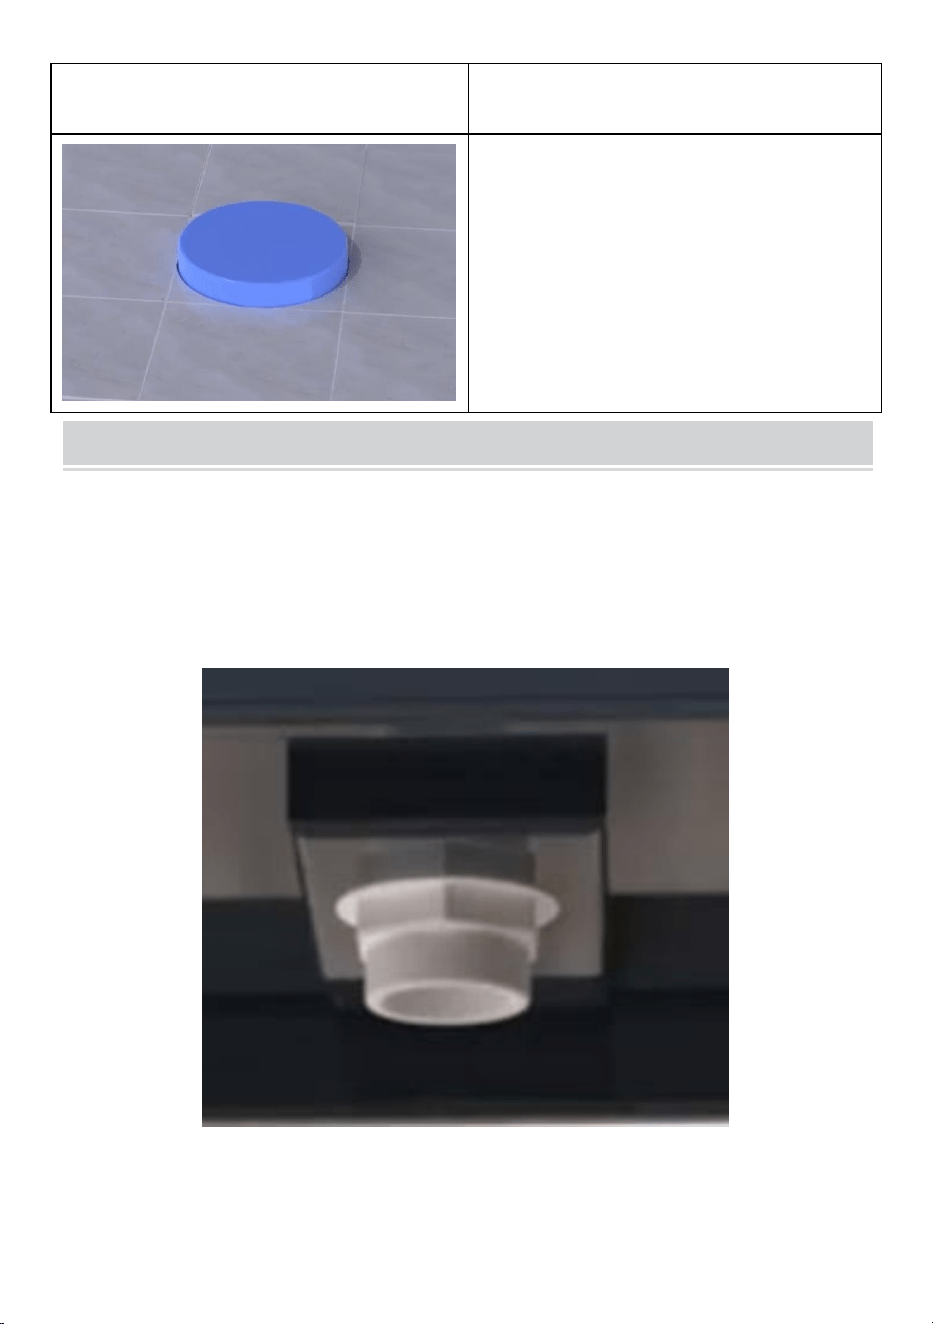
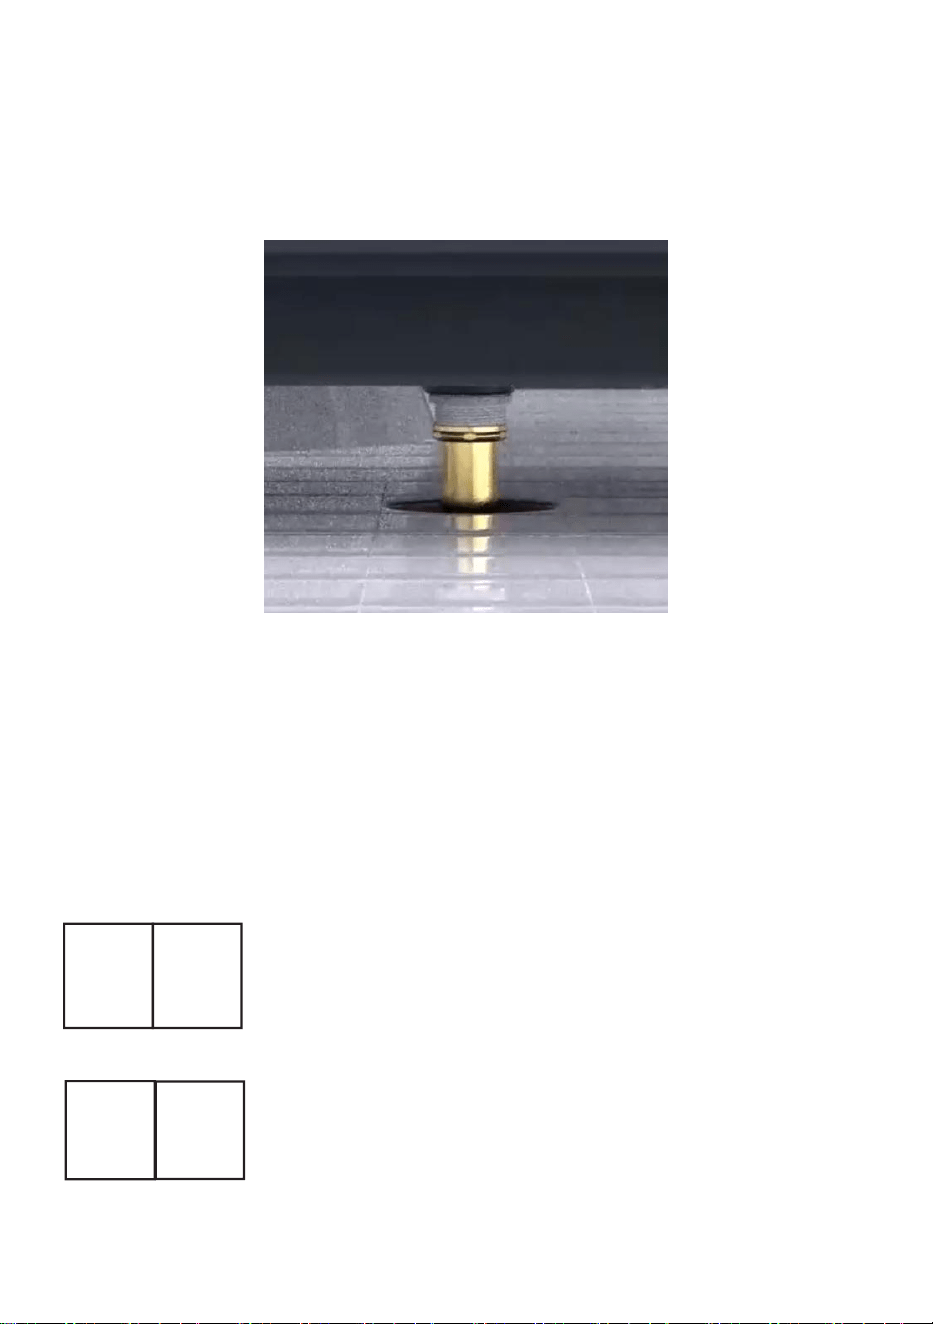
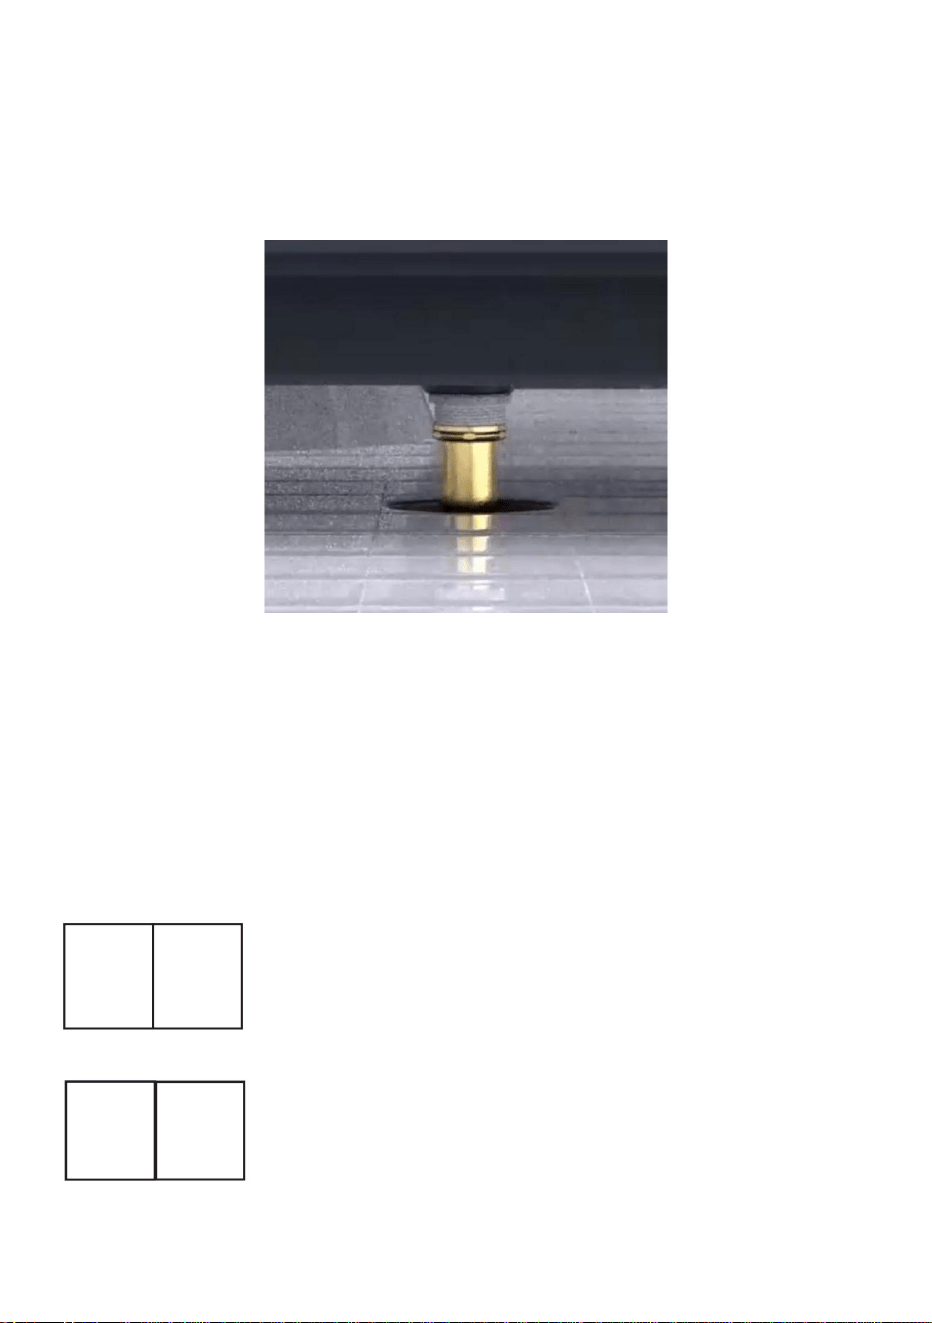
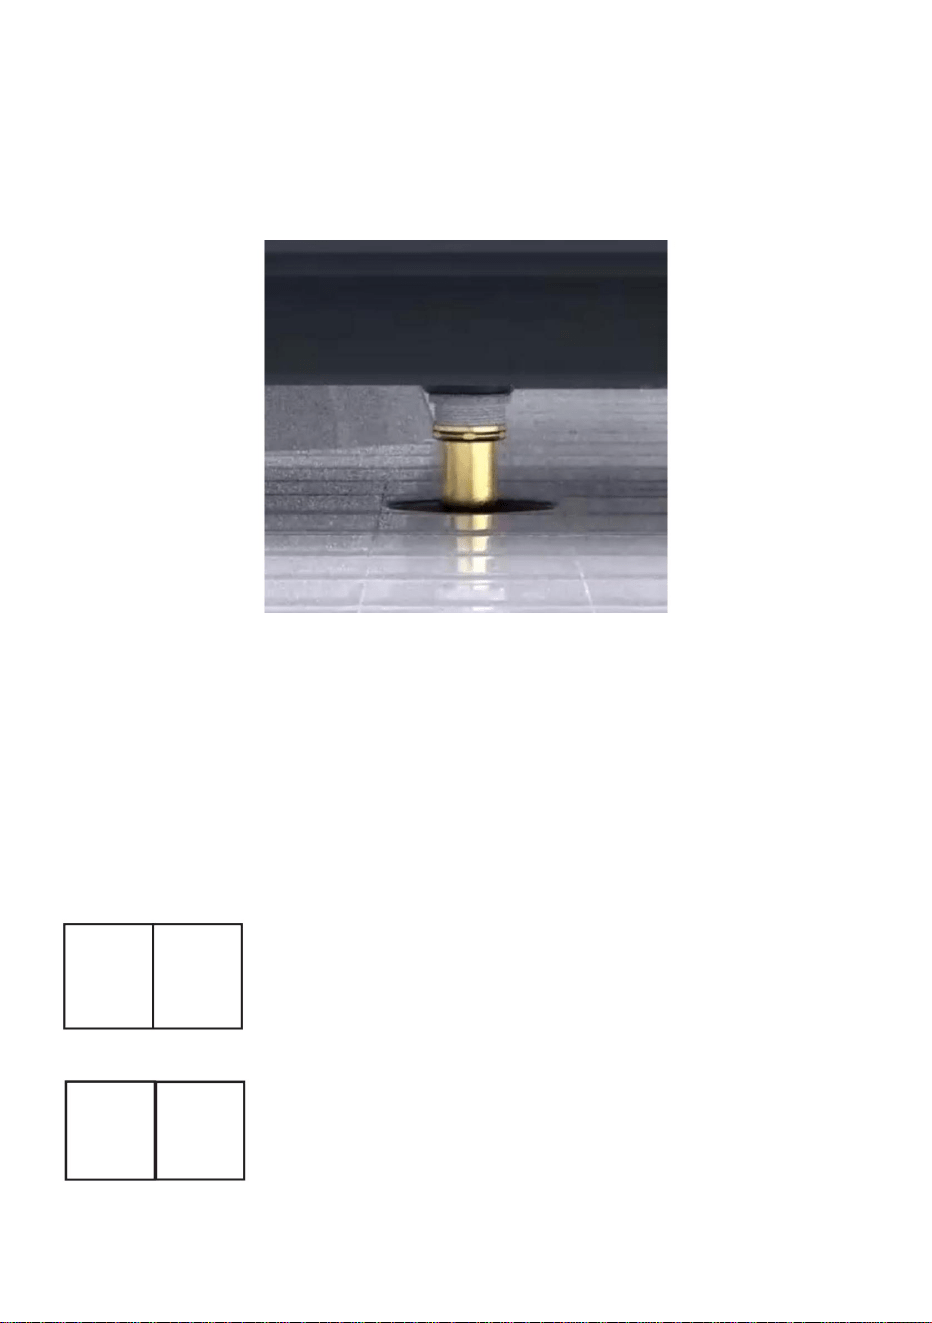
Final step:
Remove the protective film cover.Carefully lower the tub with installed brass
tailpiece into the red collar drainassembly Ensure tailpiece is fully
en-gaged with seal.
Manufacturer: Shanghaimuxinmuyeyouxiangongsi
Address: Shuangchenglu 803nong11hao1602A-1609shi, baoshanqu,
shanghai 200000 CN.
Imported to AUS: SIHAO PTY LTD. 1 ROKEVA STREETEASTWOOD
NSW 2122 Australia
Imported to USA: Sanven Technology Ltd. Suite 250, 9166 Anaheim
Place, Rancho Cucamonga, CA 91730
REP
UK
YH CONSULTING LIMITED.
C/O YH Consulting Limited Office 147,
Centurion House, London Road,
Staines-upon-Thames, Surrey, TW18 4AX
REP
EC
E-CrossStu GmbH
Mainzer Landstr.69,
60329 Frankfurt am Main.


MODEL: YGTJ-PVC-001 / YGTJ-SBS-001
„Oszczędź połowę”, „Połowa ceny” lub inne podobne wyrażenia używane przez
nas stanowią jedynie szacunkowe oszczędności, jakie możesz uzyskać, kupując u nas
określone narzędzia w porównaniu z głównymi markami i niekoniecznie oznaczają one
objęcie wszystkich kategorii narzędzi oferowanych przez nas. Uprzejmie przypominamy,
aby dokładnie sprawdzić, czy składając u nas zamówienie faktycznie
Wsparcie techniczne i certyfikat
Zestaw montażowy do odpływu
Nadal staramy się oferować Państwu narzędzia w konkurencyjnych
oszczędzasz połowę w porównaniu z głównymi markami.
cenach.
wpuszczanego
gwarancji
elektronicznej www.vevor.com/support

MODEL: YGTJ-PVC-001 / YGTJ-
To jest oryginalna instrukcja, przed użyciem należy uważnie przeczytać wszystkie
instrukcje. VEVOR zastrzega sobie jasną interpretację naszej instrukcji obsługi. Wygląd produktu
będzie zależał od produktu, który otrzymałeś. Prosimy o wybaczenie, że nie poinformujemy
Cię ponownie, jeśli w naszym produkcie pojawią się jakiekolwiek aktualizacje technologiczne lub
oprogramowania.
SBS-001
ODPŁYW
Zestaw
techniczne i certyfikat E-Gwarancji www.vevor.com/support
instalacyjny
WPUSZCZANY
POTRZEBUJESZ POMOCY? SKONTAKTUJ SIĘ Z NAMI!
Masz pytania dotyczące produktu? Potrzebujesz wsparcia technicznego? Skontaktuj się z nami:
Wsparcie
- 1 -

Pierścień
- 2 -
uszczelniający
Użytkownik końcówki
NIE.
2 Rura miedziana z cienkim gwintem
6 Adapter odpływowy podłogi
ZdjęcieNazwa
Zestaw do montażu
7
odpływów
1
ILOŚĆ
1
1
1
1
1
1
Nakrętka miedziana
Rura miedziana kołnierzowa
1
Lista
3
4
5
części

Podłącz do rur spustowych:
Taśma
Zestaw
- 3 -
instalacyjny
hydrauliczna
8
9
10
Pokrywa
Śruba
ochronna
11
1
1
6
Nylonowa nasadka na śrubę
6

Krok 4: Umieść nylonową zaślepkę na śrubie w
- 4 -
otworze.
Krok 1: Wytnij otwór o średnicy 5 cali w podłodze. Krok 2: Usuń warstwę wierzchnią w
Krok 3: Wywierć
Krok 7: Nałóż na niego folię ochronną
otwory.
odpowiedni
sposób. Umieść komponenty i punkty
śledzenia.
Krok 6: Wypełnij powierzchnię i usuń środkową
Krok 5: Dokręć śruby.
zakładkę.

aby uniknąć zatkania przez upadek
Podłączenie wanny
Uwaga: Należy wybrać instalację komponentu
w zależności od rodzaju odpływu wanny.
Pierwsza
- 5 -
forma:
zanieczyszczenia.

Druga
- 6 -
forma:

Trzecia
- 7 -
forma:

CIEPŁA
Nie przecinaj dołączonej mosiężnej końcówki. Może to spowodować wyciek.
UWAGA:
- 8 -

Zdejmij folię ochronną . Ostrożnie opuść wannę z zamontowanymi mosiężnymi elementami.
końcówka do czerwonego kołnierza odpływowego Upewnij się, że końcówka jest całkowicie
zabezpieczony
Producent: Shanghaimuxinmuyeyouxiangongsi
Adres: Shuangchenglu 803nong11hao1602A-1609shi, baoshanqu, szanghaj 200000
REP WIELKIEJ
Przedstawiciel UE
BRYTANII
CN.
pieczęcią.
Importowane do AUS: SIHAO PTY LTD. 1 ROKEVA STREETEASTWOOD
NSW 2122 Australia
Importowane do USA: Sanven Technology Ltd. Suite 250, 9166 Anaheim
Miejsce, Rancho Cucamonga, CA 91730
YH CONSULTING LIMITED.
C/O YH Consulting Limited Biuro 147, Centurion
House, London Road, Staines-upon-
Thames, Surrey, TW18 4AX
Ostatni
E-CrossStu GmbH
Mainzer Landstr.69,
60329 Frankfurt nad Menem.
krok:
- 9 -


Einbausatz für Drop-In-Abfluss
stellen nur eine Schätzung der Ersparnis dar, die Sie beim Kauf bestimmter Werkzeuge bei uns
im Vergleich zu den großen Topmarken erzielen können, und decken nicht unbedingt alle von uns
angebotenen Werkzeugkategorien ab. Wir möchten Sie freundlich daran erinnern, bei der
Bestellung bei uns sorgfältig zu prüfen, ob Sie im Vergleich zu den großen
Technischer Support und E-Garantie-
MODELL: YGTJ-PVC-001 / YGTJ-
Wir sind weiterhin bestrebt, Ihnen Werkzeuge zu wettbewerbsfähigen Preisen anzubieten.
„Sparen Sie die Hälfte“, „Halber Preis“ oder andere ähnliche Ausdrücke, die wir
Topmarken tatsächlich die Hälfte sparen.
verwenden,
SBS-001
Zertifikat
www.vevor.com/support

EINBAUABLAUF
- 1 -
Installationskit
Brauchen Sie Hilfe? Kontaktieren Sie uns!
Haben Sie Fragen zum Produkt? Benötigen Sie technischen Support? Bitte kontaktieren Sie
uns:
Technischer Support und E-Garantie-Zertifikat www.vevor.com/
MODELL: YGTJ-PVC-001 / YGTJ-
support
SBS-001
Dies ist die Originalanleitung. Bitte lesen Sie alle Anweisungen sorgfältig durch, bevor
Sie das Gerät in Betrieb nehmen. VEVOR behält sich eine klare Auslegung unserer
Bedienungsanleitung vor. Das Erscheinungsbild des Produkts richtet sich nach dem
Produkt, das Sie erhalten haben. Bitte verzeihen Sie uns, dass wir Sie nicht erneut informieren,
wenn es Technologie- oder Software-Updates für unser Produkt gibt.
Anwender des Saitenhalters
Dichtungsring
NEIN.
2 Kupferrohr mit
6 Drainageadapter des Bodens
Feingewinde
Bild
7
1
Menge
1
1
1
1
1
1
3
4
Kupfermutter
Flansch Kupferrohr
5
1
Name
Ablauf-
- 2 -
Installationsset
Stückliste
Einbausatz
1
1
6
An Abflussrohre
- 3 -
anschließen:
Klempnerband
Schutzfolie
6
8
9
10
11
Nylon-Schraubenkappe
Schrauben
Schritt 3: Löcher bohren.
Schritt 1: Schneiden Sie ein 5-Zoll-Loch in den Unterboden. Schritt 2: Entfernen Sie die
Schritt 4: Setzen Sie die Nylon-Schraubenkappe in
das
Schritt 5: Ziehen Sie die Schrauben fest.
Loch.
Oberflächenschicht
ordnungsgemäß. Platzieren Sie Komponenten und
Markierungspunkte.
Schritt 6: Füllen Sie die Oberfläche und entfernen Sie
die mittlere Lasche.
Schritt 7: Legen Sie eine Schutzfolie darauf
- 4 -

um Verstopfungen durch Herunterfallen zu vermeiden
Badewannenanschluss
Hinweis: Die Komponenteninstallation muss ausgewählt werden
je nach unterschiedlichem Badewannenabfluss.
Die erste
- 5 -
Form:
Verunreinigungen.

Zweite
- 6 -
Form:

Die dritte
- 7 -
Form:

WARMER HINWEIS:
Schneiden Sie den mitgelieferten Messing-Saitenhalter nicht ab. Dies könnte zu einem Leck führen.
- 8 -

Entfernen Sie die Schutzfolie . Senken Sie die Wanne mit dem eingebauten Messing vorsichtig ab.
in die rote Manschette des Ablaufrohrs einführen. Sicherstellen, dass das Ablaufrohr vollständig
mit Siegel
UK
Vertreter der EG
REP
verriegelt.
Hersteller: Shanghaimuxinmuyeyouxiangongsi
Adresse: Shuangchenglu 803nong11hao1602A-1609shi, baoshanqu, Shanghai
200000 CN.
Nach AUS importiert: SIHAO PTY LTD. 1 ROKEVA STREETEASTWOOD
NSW 2122 Australien
Importiert in die USA: Sanven Technology Ltd. Suite 250, 9166 Anaheim
Ort, Rancho Cucamonga, CA 91730
YH CONSULTING LIMITED.
Letzter
C/O YH Consulting Limited Office 147,
Centurion House, London Road,
Staines-upon-Thames, Surrey, TW18 4AX
E-CrossStu GmbH
Mainzer Landstr.69,
60329 Frankfurt am Main.
Schritt:
- 9 -


MODÈLE:YGTJPVC001/YGTJSBS001
«Économisezlamoitié»,«Moitiéprix»outouteautreexpressionsimilaireutiliséepar
nousnereprésentequ'uneestimationdeséconomiesquevouspourriezréaliserenachetant
certainsoutilscheznousparrapportauxgrandesmarquesetnecouvrepasnécessairementtoutes
lescatégoriesd'outilsquenousproposons.Nousvousrappelonsdebienvouloirvérifier
soigneusementlorsquevouspassezunecommandecheznoussivous
Assistancetechniqueetcertificatde
Kitd'installationdedrainà
Nouscontinuonsànousengageràvousfournirdesoutilsàdesprix
économisezréellementlamoitiéparrapportauxgrandesmarques.
compétitifs.
encastrer
garantie
électroniquewww.vevor.com/support

ànouscontacter:Assistancetechniqueetcertificatdegarantie
MODÈLE:YGTJPVC001/YGTJ
électroniquewww.vevor.com/support
SBS001
DRAINÀ
BESOIND'AIDE?CONTACTEZNOUS!
Vousavezdesquestionssurnosproduits?Vousavezbesoind'assistancetechnique?
N'hésitez
Ils'agitdelanoticed'utilisationd'origine.Veuillezlireattentivementtoutesles
instructionsdumanuelavantdel'utiliser.VEVORseréserveledroitd'interpréterclairement
notremanueld'utilisation.L'apparenceduproduitdépendduproduitquevousavez
reçu.Veuilleznousexcuser,nousnevousinformeronsplussidesmisesàjourtechnologiques
oulogiciellessontdisponiblessurnotreproduit.
pas
ENCASTRER
Kitd'installation
1

Adopteurde
2
cordier
NON.
2Tubesencuivreàfiletagefin
6Adaptateurdedrainagedusol
ImageNom
Kitd'installationde
7
drain
1
Qté
1
1
1
1
1
1
Écrouencuivre
Bridedetuyauencuivre
Bagued'étanchéité
1
Listedes
3
4
5
pièces
Raccorderauxtuyauxd'évacuation:
Rubande
Kit
3
d'installation
plomberie
8
9
10
Filmde
Vis
protection
11
1
1
6
Capuchondeboulonennylon
6

Étape4:placezlecapuchonduboulonennylondans
le
4
trou.
Étape1:Découpezuntroude5poucesdanslesousplancher.Étape2:Retirezlacouchedesurface
Étape3:Percezdes
Étape7:Placezlefilmprotecteurdessus
trous.
de
manièreappropriée.Placezlescomposantset
tracezlespoints.
Étape6:Remplissezlasurfaceetretirezlalanguette
Étape5:Serrezlesvis.
centrale.
pouréviterlecolmatagedûàlachute
Raccordementdelabaignoire
Remarque:l'installationducomposantdoitêtresélectionnée
selonlesdifférentsdrainsdebaignoire.
Lapremière
5
forme:
impuretés.
Deuxième
6
forme:
Latroisième
7
forme:

NOTECHALEUREUSE:
Necoupezpasleraccordenlaitonfourni.Celapourraitprovoquerunefuite.
8

Retirezlefilmprotecteur.Abaissezsoigneusementlabaignoireaveclelaiton
piècederaccordementdansl'assemblagededrainàcollierrougeAssurezvousquelapiècederaccordementest
engagéavecle
REPRÉSENTANTDUROYAUME
REPRÉSENTANTDELACE
UNI
sceau.
entièrement
installé
Fabricant:Shanghaimuxinmuyeyouxiangongsi
Adresse:Shuangchenglu803nong11hao1602A1609shi,baoshanqu,Shanghai
200000CN.
ImportéenAustralie:SIHAOPTYLTD.1ROKEVASTREETEASTWOOD
NSW2122Australie
ImportéauxÉtatsUnis:SanvenTechnologyLtd.Suite250,9166Anaheim
Lieu,RanchoCucamonga,CA91730
YHCONSULTINGLIMITÉE.
Étape
A/SYHConsultingLimitedBureau147,
CenturionHouse,LondonRoad,
StainesuponThames,Surrey,TW184AX
ECrossStuGmbH
MainzerLandstr.69,
60329FrancfortsurleMain.
finale:
9


DROP-IN DRAIN-installatiekit
Technische ondersteuning en e-
MODEL: YGTJ-PVC-001 / YGTJ-SBS-001
garantiecertificaat
www.vevor.com/support
"Save Half", "Half Price" of andere soortgelijke uitdrukkingen die wij gebruiken, geven alleen
een schatting van de besparingen die u kunt behalen door bepaalde gereedschappen bij ons te
kopen in vergelijking met de grote topmerken en betekent niet noodzakelijkerwijs dat alle categorieën
gereedschappen die wij aanbieden, worden gedekt. Wij herinneren u eraan om zorgvuldig te
controleren of u daadwerkelijk de helft bespaart in vergelijking met de grote
Wij streven er voortdurend naar om u gereedschappen tegen concurrerende prijzen te
topmerken wanneer u een bestelling bij ons plaatst.
leveren.
ons op: Technische ondersteuning en E-garantiecertificaat
MODEL: YGTJ-PVC-001 / YGTJ-
www.vevor.com/support
SBS-001
HULP NODIG? NEEM CONTACT MET ONS OP!
Heeft u vragen over het product? Heeft u technische ondersteuning nodig? Neem dan gerust
contact
Dit is de originele instructie, lees alle handleidingen zorgvuldig door voordat u het
product gebruikt. VEVOR behoudt zich een duidelijke interpretatie van onze gebruikershandleiding
voor. Het uiterlijk van het product is afhankelijk van het product dat u hebt ontvangen.
Vergeef ons dat we u niet opnieuw zullen informeren als er technologie- of software-updates
voor ons product zijn.
met
INLAATAFVOER
Installatiekit
- 1 -

Afvoer installatie kit
Hoeveelheid
Adopteur van Tailpiece
1
Koperen moer
Flens koperen buis
Naam
7
Afbeelding
2 Fijne schroefdraad koperen buis
NEE.
3
4
5
1
1
1
1
1
1
6 Afvoeradapter van vloer
1
Afdichtring
Onderdelenlijst
- 2 -

Installatiekit
Beschermfolie
Aansluiten op afvoerleidingen:
Schroef
hoes
1
1
6
8
9
10
Loodgieterstape
Nylon boutdop
11
6
- 3 -

Stap 4: Plaats de nylon boutdop in het gat.
Stap 1: Snijd een gat van 5 inch in de ondervloer. Stap 2: Verwijder de oppervlaktelaag op de
Stap 3: Boor
Stap 5: Draai de schroeven vast.
gaten.
juiste
manier. Plaats componenten en traceer
punten.
Stap 6: Vul het oppervlak en verwijder het
middelste lipje.
Stap 7: Plaats een beschermende folie eroverheen
- 4 -

om verstopping door vallen te voorkomen
Badkuip aansluiting
Let op: De componentinstallatie moet worden geselecteerd
afhankelijk van de verschillende badkuipafvoeren.
De eerste vorm:
onzuiverheden.
- 5 -

Tweede vorm:
- 6 -

De derde vorm:
- 7 -
WARM OPMERKING:
Knip het meegeleverde messing staartstuk niet door. Dit kan lekkage
- 8 -
veroorzaken.

Verwijder de beschermfolie . Laat de kuip met de gemonteerde messing onderdelen voorzichtig zakken.
staartstuk in de rode kraagafvoerconstructie Zorg ervoor dat het staartstuk volledig is
bezig met
Fabrikant: Shanghaimuxinmuyeyouxiangongsi
Adres: Shuangchenglu 803nong11hao1602A-1609shi, baoshanqu, shanghai 200000 CN.
zeehond.
Geïmporteerd naar AUS: SIHAO PTY LTD. 1 ROKEVA STREETEASTWOOD
NSW 2122 Australië
Geïmporteerd naar de VS: Sanven Technology Ltd. Suite 250, 9166 Anaheim
Plaats, Rancho Cucamonga, CA 91730
YH CONSULTING LIMITED.
C/O YH Consulting Limited Kantoor 147, Centurion
House, London Road, Staines-upon-
Thames, Surrey, TW18 4AX
E-CrossStu GmbH
Mainzer Landstr.69,
60329 Frankfurt am Main.
Laatste
VK
EC-
- 9 -
REP
REP
stap:


Kitdeinstalacióndedrenajeempotrable
"Ahorrelamitad","mitaddeprecio"ocualquierotraexpresiónsimilarqueutilicemos
solorepresentaunaestimacióndelahorroquepodríaobteneralcomprarciertas
herramientasconnosotrosencomparaciónconlasprincipalesmarcasynonecesariamente
significaquecubratodaslascategoríasdeherramientasqueofrecemos.Lerecordamos
que,alrealizarunpedidoconnosotros,verifiquecuidadosamentesi
Soportetécnicoycertificadode
MODELO:YGTJPVC001/YGTJ
Seguimoscomprometidosabrindarleherramientasaprecios
realmenteestáahorrandolamitadencomparaciónconlasprincipalesmarcas.
competitivos.
SBS001
garantía
electrónicawww.vevor.com/support

DRENAJEDE
Kitde
1
instalación
ENTRADA
¿NECESITASAYUDA?¡CONTÁCTANOS!
¿Tienepreguntassobreelproducto?¿Necesitaasistenciatécnica?Nodudeenponerseen
contactocon
nosotros:Asistenciatécnicaycertificadodegarantíaelectrónica
MODELO:YGTJPVC001/YGTJ
www.vevor.com/support
SBS001
Estassonlasinstruccionesoriginales,leaatentamentetodaslasinstruccionesdel
manualantesdeutilizarelproducto.VEVORsereservaunainterpretaciónclaradenuestro
manualdeusuario.Laaparienciadelproductoestarásujetaalproductoquerecibió.
Perdónenospornoinformarlenuevamentesihayactualizacionesdetecnologíaosoftwareen
nuestroproducto.

Anillode
AdoptantedeTailpiece
sellado
NO.
2Tubosdecobreconrosca
6Adaptadordedrenajedepiso
fina
Imagen
1
1
1
1
1
1
7 1
1
3
4
Tuercadecobre
Tubodecobreconbrida
5
CANTIDAD
Listade
Nombre
Kitdeinstalaciónde
2
drenaje
piezas

Kitdeinstalación
Cintade
Conectaralastuberíasde
3
desagüe:
fontanero
Cubiertadepelícula
Tornillo
protectora
1
1
6
8
9
10
Tapadepernodenailon
11
6

Paso3:Perforarlosagujeros.
Paso1:corteunorificiode5pulgadasenelcontrapiso.Paso2:retirelacapasuperficialde
Paso4:Coloquelatapadelpernodenailonenel
Paso5:Aprietelostornillos.
orificio.
manera
adecuada.Coloqueloscomponentesylos
puntosdeseguimiento.
Paso6:Rellenelasuperficieyretirelapestaña
central.
Paso7:Coloqueunapelículaprotectorasobreél.
4

Paraevitarobstruccionesporcaídas
Conexióndebañera
Aviso:Esnecesarioseleccionarlainstalacióndelcomponente
segúnlosdiferentesdesagüesdelabañera.
Laprimera
5
forma:
impurezas.

Segundaforma:
6

Laterceraforma:
7

NOTACALIENTE:
Nocorteelcordaldelatónsuministrado,yaquepodríaprovocaruna
8
fuga.
Engranadocon
NuevaGalesdelSur2122Australia
sello.
Retirelacubiertadepelículaprotectora.Bajeconcuidadolatinaconellatón
piezadecolaenelconjuntodedrenajedelcollarrojo.Asegúresedequelapiezadecolaesté
Fabricante:Shanghaimuxinmuyeyouxiangongsi
Dirección:Shuangchenglu803nong11hao1602A1609shi,baoshanqu,shanghai
200000CN.
ImportadoaAustralia:SIHAOPTYLTD.1ROKEVASTREETEASTWOOD
completamente
instalado.
ImportadoaEE.UU.:SanvenTechnologyLtd.Suite250,9166Anaheim
Lugar,RanchoCucamonga,CA91730
YHCONSULTINGLIMITADA.
C/OYHConsultingLimitedOficina147,
CenturionHouse,LondonRoad,
StainesuponThames,Surrey,TW184AX
ECrossStuGmbH
MainzerLandstr.69,
60329FráncfortdelMeno.
Paso
REPRESENTANTEDELREINO
REPRESENTANTECE
UNIDO
final:
9


Supporto tecnico e certificato di
Kit di installazione per scarico a
MODELLO:YGTJ-PVC-001 / YGTJ-SBS-001
caduta
garanzia
elettronica www.vevor.com/support
"Risparmia la metà", "Metà prezzo" o qualsiasi altra espressione simile da noi
utilizzata rappresenta solo una stima del risparmio che potresti ottenere acquistando
determinati utensili con noi rispetto ai principali marchi principali e non significa
necessariamente coprire tutte le categorie di utensili da noi offerti. Ti ricordiamo
gentilmente di verificare attentamente quando effettui un ordine con noi
Continuiamo a impegnarci per fornirvi strumenti a prezzi
se stai effettivamente risparmiando la metà rispetto ai principali marchi principali.
competitivi.

tecnico e certificato di garanzia elettronica www.vevor.com/
MODELLO: YGTJ-PVC-001 / YGTJ-
support
SBS-001
SCARICO A
HAI BISOGNO DI AIUTO? CONTATTACI!
Hai domande sul prodotto? Hai bisogno di supporto tecnico? Non esitare a contattarci:
Questa è l'istruzione originale, si prega di leggere attentamente tutte le istruzioni del
manuale prima di utilizzare. VEVOR si riserva una chiara interpretazione del nostro manuale
utente. L'aspetto del prodotto sarà soggetto al prodotto ricevuto. Vi preghiamo di
perdonarci se non vi informeremo di nuovo se ci sono aggiornamenti tecnologici o software sul
nostro prodotto.
Supporto
INCASSO
Kit di installazione
- 1 -

Nome
Kit di installazione dello scarico
6 Adattatore di drenaggio del pavimento
Immagine
7
Adottante del pezzo di coda
Quantità
1
Dado di rame
Flangia tubo rame
1
1
1
1
1
1
Anello di tenuta
1
2 Tubo di rame filettato fine
NO.
Elenco delle
3
4
5
parti
- 2 -

Nastro per
Kit di
Collegare ai tubi di scarico:
installazione
idraulici
8
9
10
Copertura in pellicola
Tappo per bullone in nylon
protettiva
11
1
1
6
Vite 6
- 3 -

Fase 4: Inserire il tappo del bullone in nylon
nel
- 4 -
foro.
Fase 1: tagliare un foro da 5 pollici nel sottopavimento. Fase 2: rimuovere lo strato
Fase 3: Praticare i
Fase 5: serrare le viti.
fori.
superficiale
in modo appropriato. Posizionare i
componenti e tracciare i punti.
Fase 6: Riempire la superficie e rimuovere la
linguetta
Fase 7: applicare la pellicola protettiva
centrale.

per evitare che l'intasamento cada
Collegamento vasca da bagno
Nota: è necessario selezionare l'installazione del componente
in base ai diversi scarichi della vasca.
La prima forma:
impurità.
- 5 -

Seconda
- 6 -
forma:

La terza
- 7 -
forma:
NOTA CALDA:
Non tagliare il terminale in ottone in dotazione. Ciò potrebbe causare perdite.
- 8 -
il pezzo di coda nel collare rosso gruppo di scarico Assicurarsi che il pezzo di coda sia
Nuovo Galles del Sud 2122 Australia
completamente
Rimuovere la pellicola protettiva. Abbassare con cautela la vasca con l'ottone
impegnato con la
Produttore: Shanghaimuxinmuyeyouxiangongsi
Indirizzo: Shuangchenglu 803nong11hao1602A-1609shi, baoshanqu, shanghai
200000 CN.
Importato in AUS: SIHAO PTY LTD. 1 ROKEVA STREETEASTWOOD
foca.
installato
Importato negli USA: Sanven Technology Ltd. Suite 250, 9166 Anaheim
Luogo, Rancho Cucamonga, CA
CONSULENZA YH LIMITATA.
91730
C/O YH Consulting Limited Ufficio 147,
Centurion House, London Road,
Staines-upon-Thames, Surrey, TW18 4AX
E-CrossStu GmbH
Mainzer Landstr.69,
60329 Francoforte sul Meno.
Fase
RAPPRESENTANZA DEL REGNO
Rappresentante della
- 9 -
CE
UNITO
finale: