INSTALLATION USER MANUAL
info@ vikiohome.com / www.vikiohome.com
Available Sizes: 30” 36
Model Name: RI50
”


VICTORY range hoods
Important Safety Instructions....................................................2
Electrical Requirements.............................................................4
Venting Requiremens.................................................................5
Calculating Duct System Length...............................................6
Specications..............................................................................6
Required Tools.............................................................................7
PartsSupplied..............................................................................7
Dimensions...................................................................................8
Preparation..................................................................................10
Rough-In......................................................................................11
Installation...................................................................................13
Installation of Filters..................................................................17
Venting Methods.........................................................................18
Range Hood Operations.............................................................19
Ex plosion Diagram.....................................................................20
Troubleshooting..........................................................................21
Maintenance................................................................................22
Control Panel Replacement.......................................................23
Wiring Diagram...........................................................................23
Circuit Board Replacement.......................................................24
Bulb Replacement......................................................................25
Clean and Replace the Grease Cup.........................................26
Warranty.......................................................................................27
Disclaimer....................................................................................28
Contact Us...................................................................................28
FAQ..............................................................................................29
PSD / VEGA / MAESTRO |
3
TABLE OF CONTENTS

| LUNA2
• Before beginning installation, please read and follow these important instructions for the safety
of your home and the people living in it.
• The instructions in this manual are intended for qualified installers and certified
service technicians.
Installation and electrical wiring must be completed by qualified professionals and in accordance
with applicable codes and standards.
• DO NOT attempt to install this appliance yourself. Injury could result from installing the unit due to
lack of appropriate electrical and technical background.
• The installer should leave these instructions with the consumer who should retain for local inspec-
tors’ use and for future reference.
• Due to the size and weight of VIKIO range hoods, two-person installation is highly recommended.
• Use care when handling the range hood, chimney cover, baffle filters, and any parts
or accessorie
s,
as sharp edges may lead to injury. Use of gloves during installation is highly recommended.
• The manufacturer will not be responsible for any damage to property or to persons caused by
incorrect installation, improper use of the appliance, or failure to heed the warnings listed.
• The manufacturer reserves the right to make changes to its products when considered necessary
and useful, without affecting the essential safety and operating characteristics.
• This appliance is designed for general ventilating use only. DO NOT use to exhaust
hazardous or
explosive materials and vapors.
WARNING: If the information in this manual is not followed exactly, a fire or explosion may result
• Sufficient air is needed for proper combustion and exhausting of gases through the
ducting installed
with range hoods to prevent back drafting.
• Before servicing or cleaning the unit, fully disconnect the hood from power to avoid risk of electric
shock and injury.
causing property damage, personal injury, or loss of life.
• The combustion air flow needed for safe operation of fuel-burning equipment may be
affected by
this unit's operation. Follow heating equipment guidelines and safety standards such as those
published by the National Fire Protection Association (NFPA), American Society of Heating,
Refrigeration and Air Conditioning Engineers (ASHRAE), and local code and government
authorities.
1
General Safety
IMPORTANT SAFETY INSTRUCTIONS
2

LUNA | 5
• Ducted range hoods MUST ALWAYS be vented to the outdoors or in some instances
converted
IMPORTANT SAFETY INSTRUCTIONS
to recirculate the air.
• Some existing installations may already have an external damper at the exit point of the home.
In this case,the damper in the transition piece of your hood needs to be removed,as these two
dampers work against each other and will reduce the performance of the hood.
• Please consult an HVAC or installation professional for advice to comply with local
regulations
and ensure appropriate ventilation.
• When cutting or drilling into a wall or ceiling, be careful not to damage electrical wiring
or other
hidden utilities.
• All electrical wiring must be properly installed, insulated, andgrounded. VIKIO range
hoods come
with a grounded 3-prong plug that must be plugged into a dedicated 15-
ampcircuit. Manipulating
the plug or cutting the electrical cord will void your warranty.
• Electrical installation must be in accordance with the National Electrical Code ANSI/ NPA70-latest edition
and/ or local codes.
• Old duct works hould be cleaned or replaced, ifnecessary, to avoid the possibility of a grease fire
or other hazard. Check all joints on duct work to ensure proper connection;
all joints should be
properly taped/secured.
• When a range hood ventilates air out of the room,the vented air must be replaced; this
is called
makeup air. If a makeup air system is needed, but not used, a hood may not
function as expected
due to negative air pressure.
• VIKIO does not currently provide makeup air units. Always consult applicable building
codes
regarding minimum and maximum airflow rates.Certain states mayr equire
additional items such
as makeup air for larger CFM range hoods.
• Keep the motor, fans, baffle channels, filters, tunnels, greasecups, and grease-laden
surface
sclean. Grease should not be allowed to accumulate inside or on the surface ofthe range hood;
clean surfaces frequently.
• After installation, use a stainless steel cleaning product or wipe to eliminate any residues from
• Take care when cleaning the range hood in spray form:never direct spray of water or
cleaners
onto the electrical wiring, motor, button panel, or light bulbs.
protective film after removal.
3

| LUNA4
IMPORTANT: Observe all governing codes and ordinances.
It is the customer’s responsibility:
• To contact a qualied electrician
• To assure that the electrical installation is adequate and in conformance with National
Electrical
Code, ANSI/NFPA 70 - latest edition*, or CSA Standards C22.1-94, Canadian Electrical Code, Part
1 and C22. 2 No. 0-M91 - latest edition** and all local codes and
ordinances.
If codes permit and a separate ground wire is used, it is recommended that a qualied electrician determine
that the ground path is adequate. A 120-Volt, 60 Hz, AC-only, fused electrical supply is required on a
separate 15-amp circuit.
DO NOT ground to a gas pipe.
Check with a qualied electrician if you are not sure that the range hood is properly grounded.
DO NOT have a fuse in the neutral or ground circuit.
IMPORTANT: Save this Installation Guide for electrical inspector’s use.
The range hood must be connected with copper wire/plug only.
The range hood should be connected directly to the fused disconnect (or circuit breaker) box through
exible armored or non-metallic sheathed copper cable.
A U.L. - or C.S.A. - listed strain relief must be provided at each end of the power supply cable.
Wire sizes (copper wire only) and connections must conform with the rating of the appliance as specied
on the model/serial rating label. Wire sizes must conform to the requirements of the National Electrical
Code ANSI/NFPA 70 - latest edition*, or CSA Standards C22.1-94, Canadian
Electrical Code Part 1 and C22. 2 No. 0-M91 - latest edition** and all local codes and ordinances. A U.L. -
or C.S.A. - listed conduit connector must be provided at each end of the power supply
cable (at the range hood and at the junction box).
ELECTRICAL REQUIREMENTS
• Duct system must terminate to the outside (roof or side wall).
•
•
DO NOT terminate the duct system in an attic or other enclosed area.
DO NOT use 4" (10.2 cm) laundry-type wall caps.
• Use metal/aluminum duct only. Rigid metal/aluminum vent is recommended.
• DO NOT use plastic duct.
• Always keep the duct clean to ensure proper airow.
• Calculate the following gures before installation:
1. Distance from the oor to the ceiling.
2. Distance from countertop/stove to range hood (recommend* 28" to 32").
3. Height of hood and duct cover.
2
2
General Safety
4

LUNA | 7
• It is recommended that the range hood be vented vertically through the roof through 6" or bigger
• A distance of 28" to 32" is recommended* between stove top and the bottom of range hood.
round metal/aluminum duct work.
• The size of the duct should be uniform.
• Use no more than three 90° elbows.
• DO NOT
• Make sure there is a minimum of 26" (66 cm) of straight duct between the elbowsif more than one
elbow is used.
install two elbows together.
• The length of duct system and number of elbows should be kept to a minimum to provide ecient
performance.
•
• The duct system must have a damper. If roof or wall cap has a damper, DO NOT use damper (if
supplied) on top of the range hood.
Use aluminum foil tape to seal all joints in the duct system.
• Use caulking to seal exterior wall or roof opening around the cap.
USE 6" ROUND ROOF OR RECTANGULAR WALL VENT CAP.
IMPORTANT:
• Use a rectangular to circular transition to connect range hood to ducting system.
• A minimum of a 6" round duct (standard for this range hood) must be used to maintain maximum
airow eciency.
• Always use rigid type metal/aluminum ducts if available to maximize airow when connecting to
provided duct.
• Please use Duct Run Calculation below to compute total available duct run when using elbows,
transitions and caps.
• ALWAYS, when possible, reduce the number or transitions and turns in the duct run.
If a reducer is used, install a long reducer instead of a pancake reducer.
Reducing the duct size will restrict airow and decrease eciency.
• If turns or transitions are required: Install as far away from opening and as far apart, between 2, as
possible.
• Minimum mount height between stove top to hood bottom should be no less than 26".
• It is important to install the hood at the proper mounting height. Hoods mounted too low could result
in heat damage and re hazard; while hoods mounted too high will be hard to reach
and will loose its
• Maximum mount height between stove top to hood bottom should be no higher than 34".
performance and eciency.
VENTING REQUIREMENTS
For the most ecient & quiet operation:
* Due to different ceiling height congurations, recommended height may not be applicable.
• Round - 6"
• If available,also refer to stove top manufacturer’s height clearance requirement sand recommended
hood mounting height above range.
(use Aluminimum foil tape to properly seal)
Minimum Duct Size:
5
To calculate the length of the duct system you require, subtract the equivalent feet for each“Duct
piece” (Table Below) used in the system from the “Recommendedmaximum run”(Table Below).
The longest duct run that is acceptable (if completely straight) is 50 feet. The number of duct pieces
(elbow, transition, etc.) installed in your duct run will determine the maximum length the duct run can be.
Please refer to the example below:
Duct Run Calculation:
Recommended maximum run
6" round duct 50 ft
Duct piece deduction
Each 90º elbow used 9 ft
Each 45º elbow used 5 ft
Each round to rectangle transition
used
7 ft
Side wall cap with damper 7 ft
Roof cap 7 ft
Duct Run Calcuation example:
One roof cap, two 90º elbows, and one 45º
elbow used:
7ft + 9ft + 9ft + 5ft = 30ft used.
The above duct pieces used are equivalent to 30ft
of a straight duct run. Subtract 30ft from the allowable
50ft. The remaining distance of 20ft is the longest that
the straight ducting (in addition to the vent pieces) can
be.
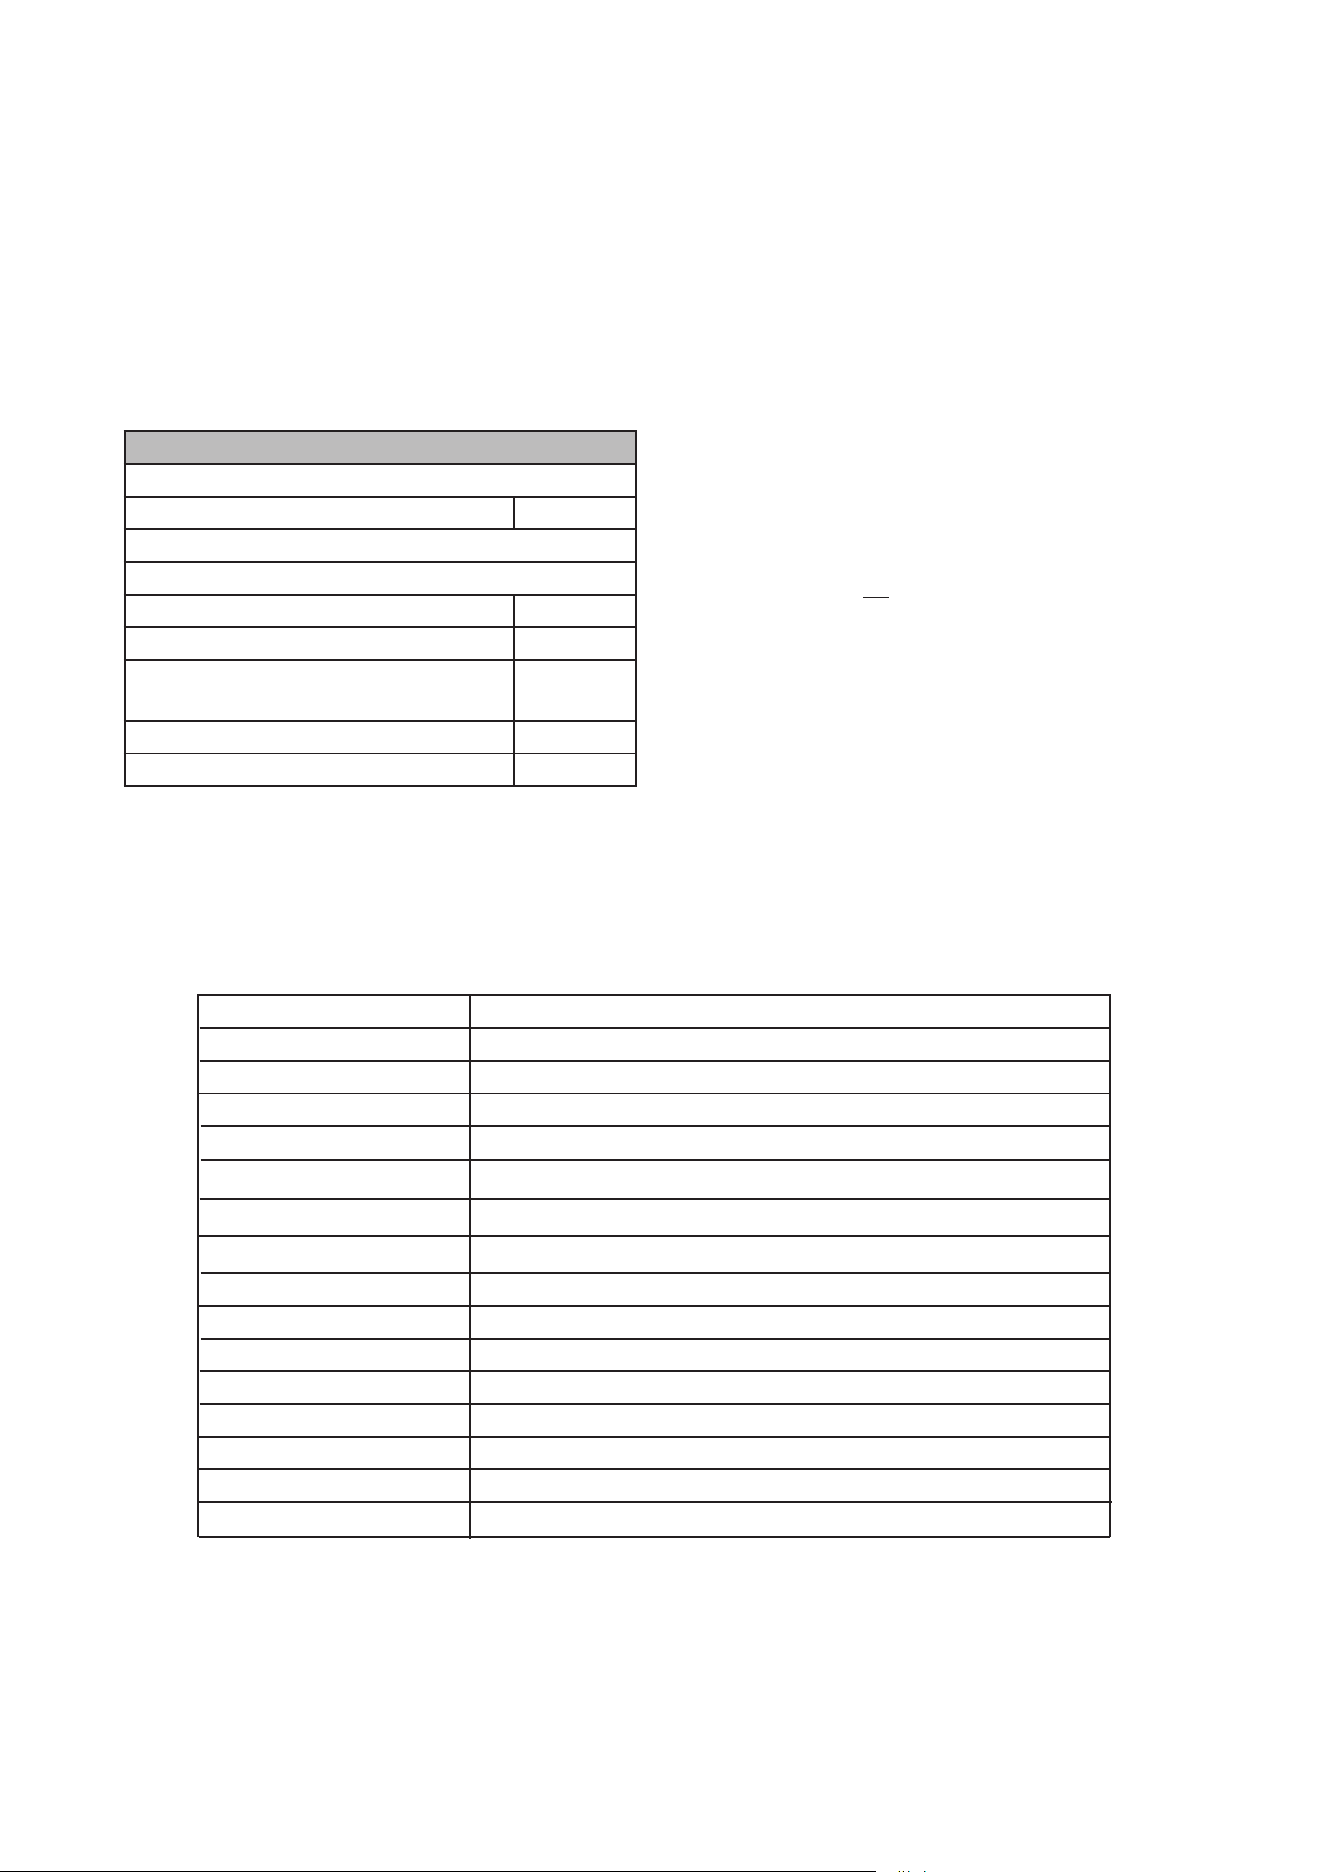
| LUNA6
Body Stainless Steel
Power Rating 120V/60Hz (USA & Canada standard)
General Input Power
218W + 12W for LED Lights
Motor Input Power 218W
Motor Revolution 1000 RPM (±10%) to 1900 RPM (±10%)
Levels Of Speed Control
3 Levels
Air Pressure 150 Pa (200 Pa Maximum)
Noise Level (Q/M/H)
1.0 Sone (40 dB) / 4.0 Sone (55 dB) / 6.5 Sone (60 dB)
Motor Type
Single Motor
Power Connection Type
Plug-in Wire (120V)
Control Type
Digital Display Panel
Filtration Type
Stainless Steel Bae Filters
Illumination
4 x 3W LED (4000K)
Venting Size
Top 6" Round
2 Year Parts Warranty
CALCULATING VENT SYSTEM LENGTH
SPECIFICATIONS
Warranty
Ampere
1.5A
6
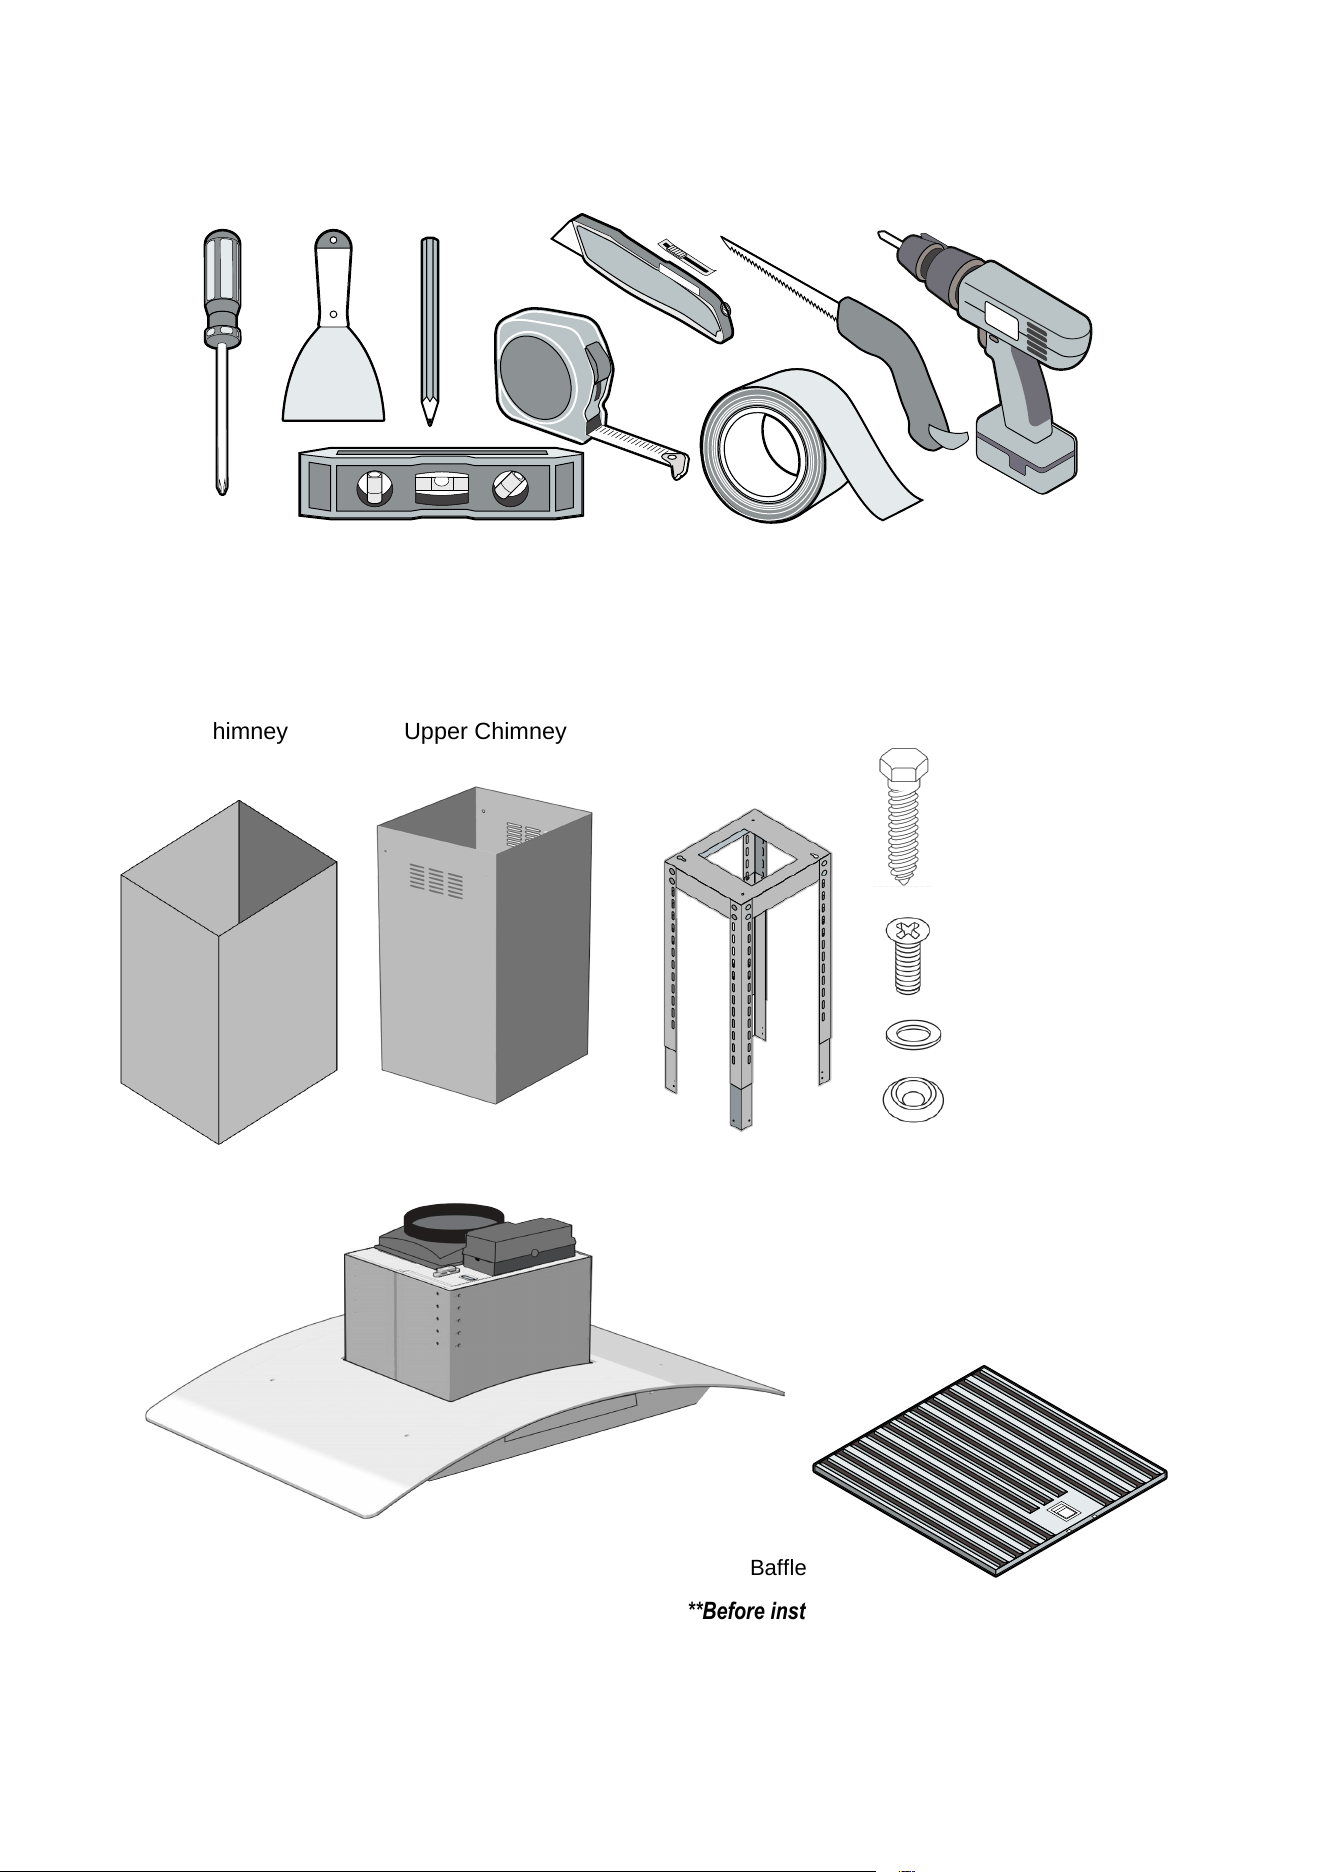
Putty
Knife
Pencil
Tape
Measure
Phillips
Screwdriver
Aluminum Tape
Power Drill
UtilityKnife
Drywall Knife
LUNA | 9
NOTE:
Where necessary, additional screws will be needed for installation and added support but is not
included. Please review contents before installation.
REQUIRED TOOLS
PARTS SUPPLIED
Level
Baffle Filters
Upper ChimneyLower Chimney
**Before installing, remove the protective white film**
QTY: 4PCS
(M6x60mm)
QTY: 10PCS
(M5x20mm)
Frame Support
(with extensions)
QTY: 8PCS
QTY: 2PCS
7
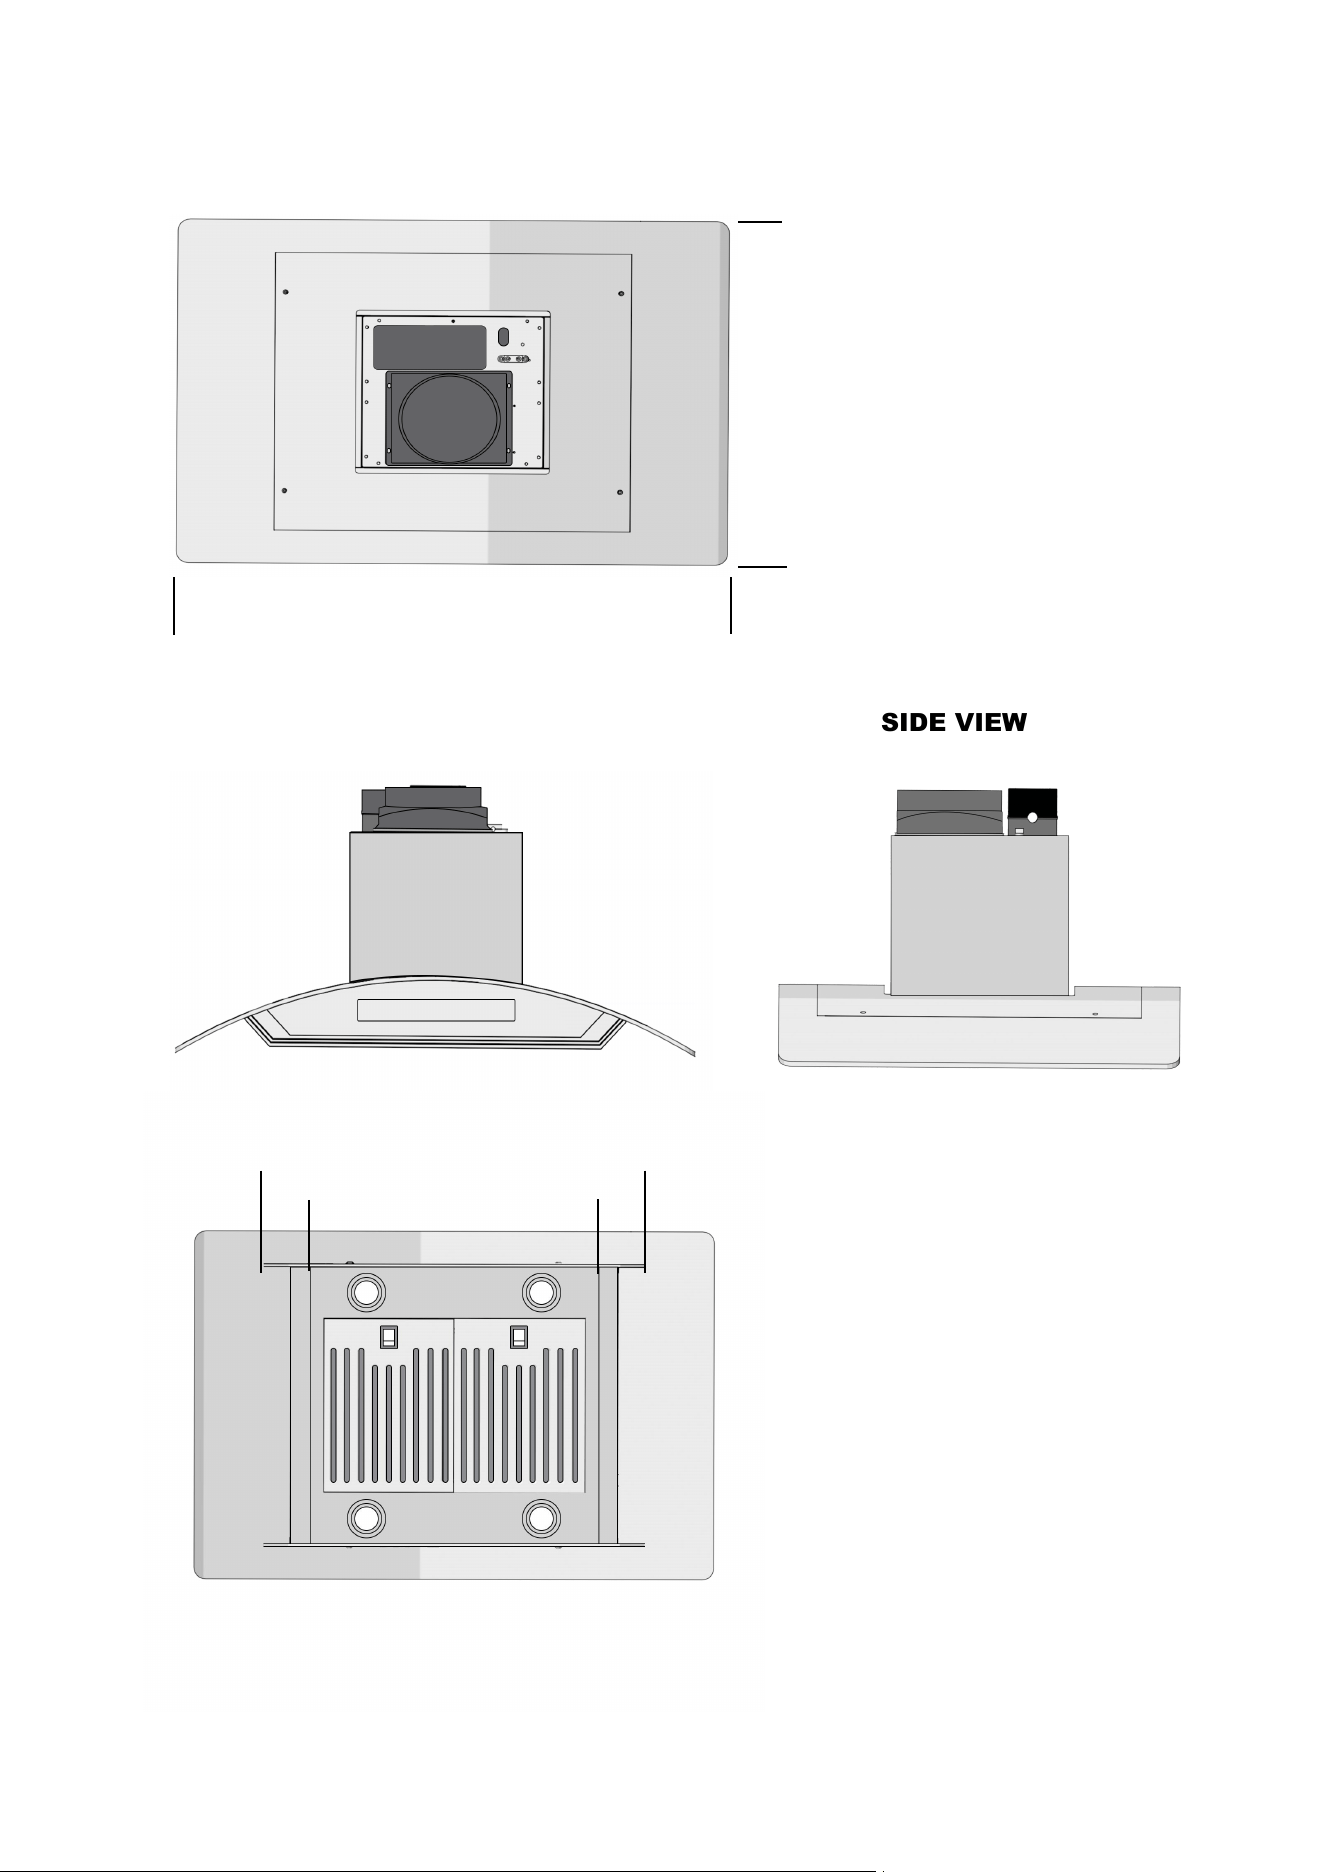
FRONT VIEW
SIDE VIEW
TOP VIEW
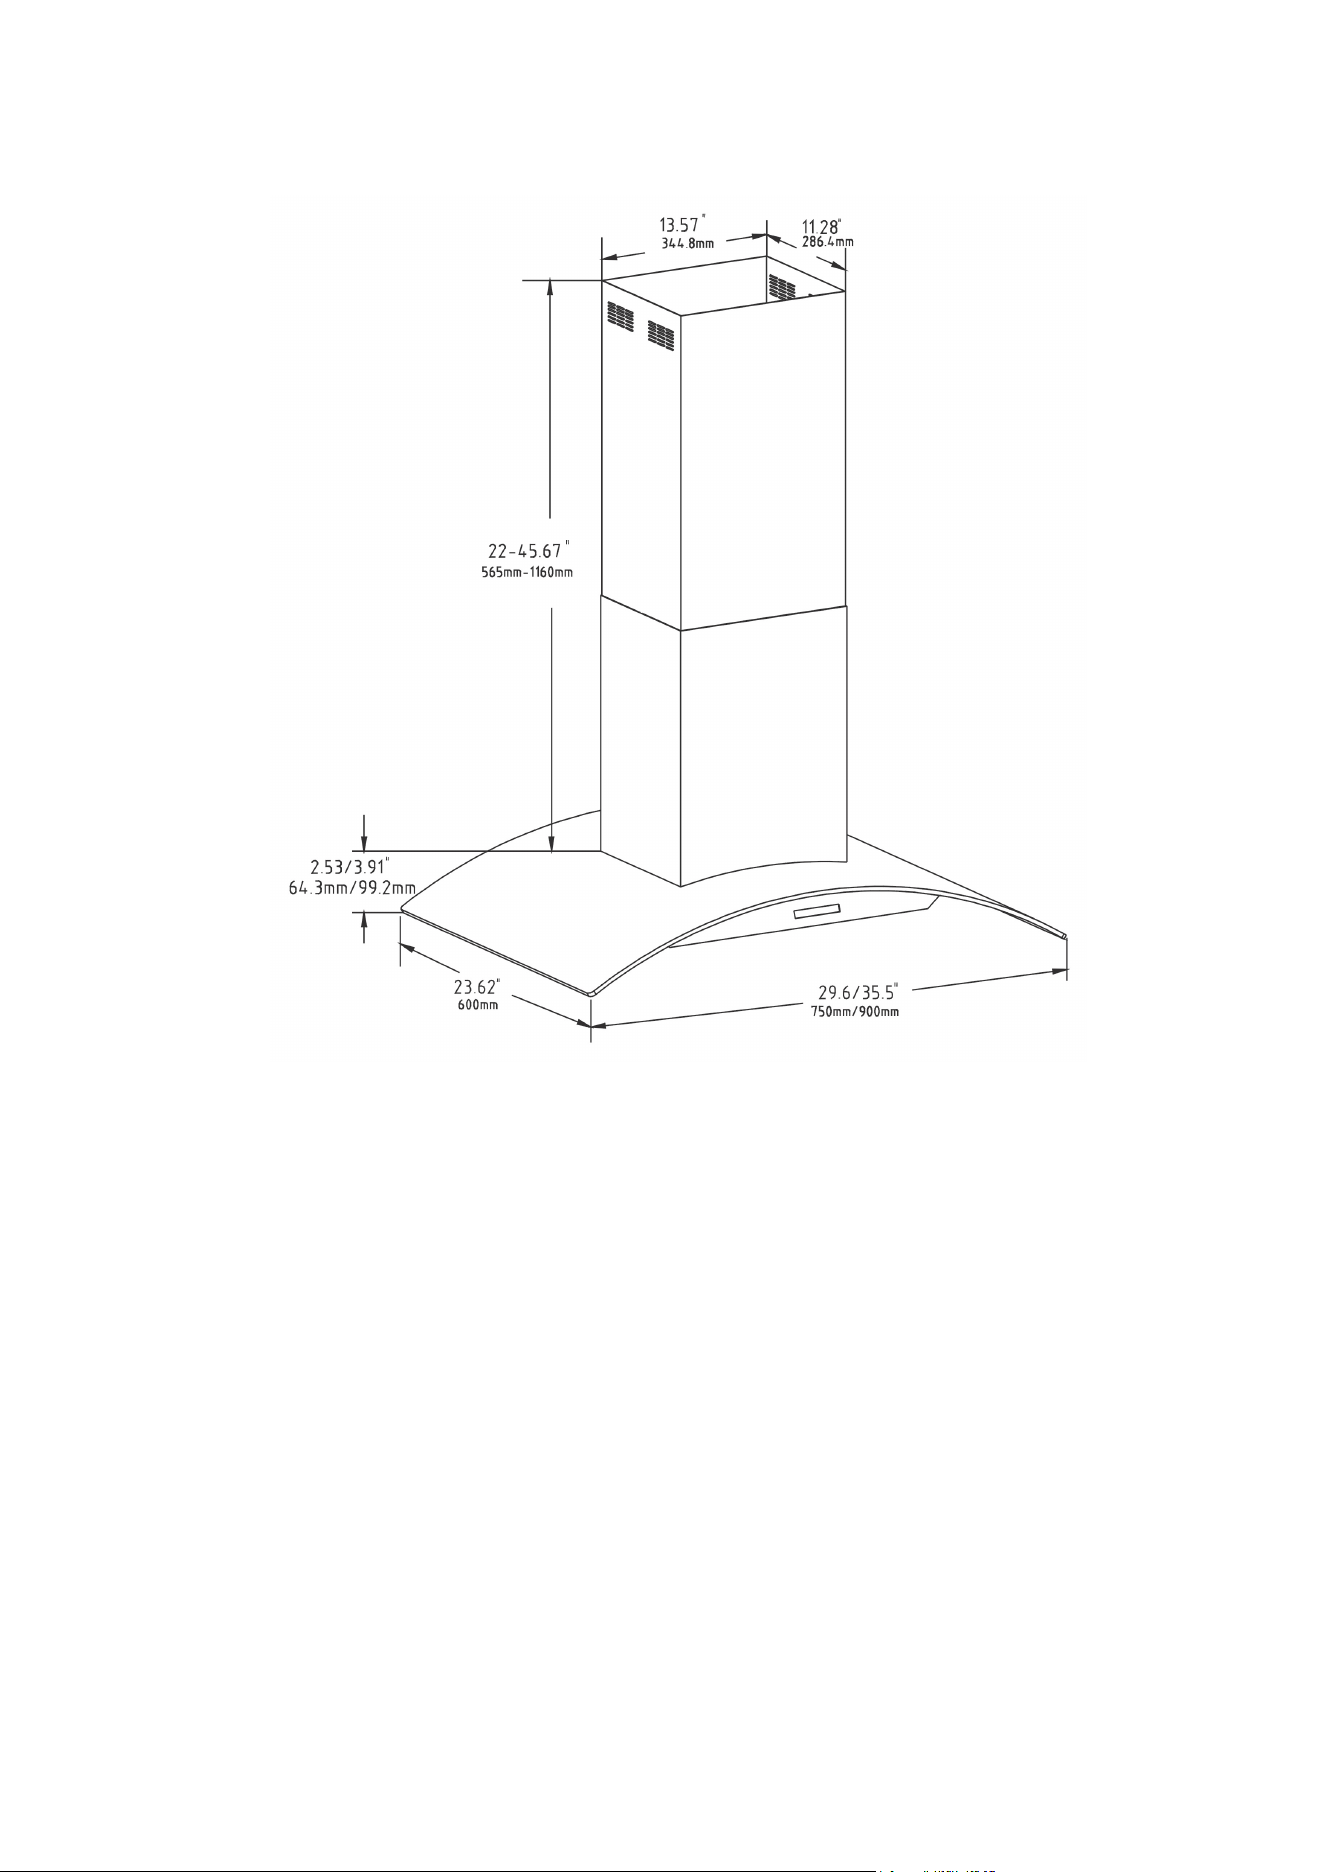
Available Glass Sizes: 29.6", 35.5"
VICTORY range hoods
| PSD / VEGA / MAESTRO
10
DIMENSIONS
23.62"
12.48"
8
10.35"
25.98"
19.53"
BOTTOM VIEW
VICTORY range hoods
| PSD / VEGA / MAESTRO
10
DIMENSIONS(Continued)
9
| LUNA10
Advanced Preparations:
• Be familiar with the controls of the range hood by reading through Range
Hood
Operations.
• Place the range hood on a at, stable surface. Connect the range hood to a
designated
standard
outlet (please refer the product label for the suitable voltage of this unit and turn on the range
hood. Verify all operations of the range hood by referring to Range Hood Operations. Place all
supplied parts and required hardware on a at, stable surface and verify the existence of all
supplied parts.
• Carefully remove the white or blue plastic protective coat from the range hood.
Preparations:
NOTE: To avoid damage to your hood, prevent debris from entering the vent opening.
• Decide the location of the venting pipe from the hood to the outside. Refer to Venting Methods.
• A straight, short vent run will allow the hood to perform more eciently.
•
• Try to avoid as many transitions, elbows, and long run as possible.
This may reduce the performance of the hood.
Using 45 degee elbows is better than using 90 degree elbows.
• IMPORTANT: Peel white plastic protective coat o the hood, if any.
• Use aluminum tape to seal joints between pipe sections.
THE HOOD MUST BE TESTED BEFORE INSTALLATION.
Vikio will not be responsible for additional labour costs related to reinstallation of the
hood due to transportation internal damage or wiring issues.
PREPARATION
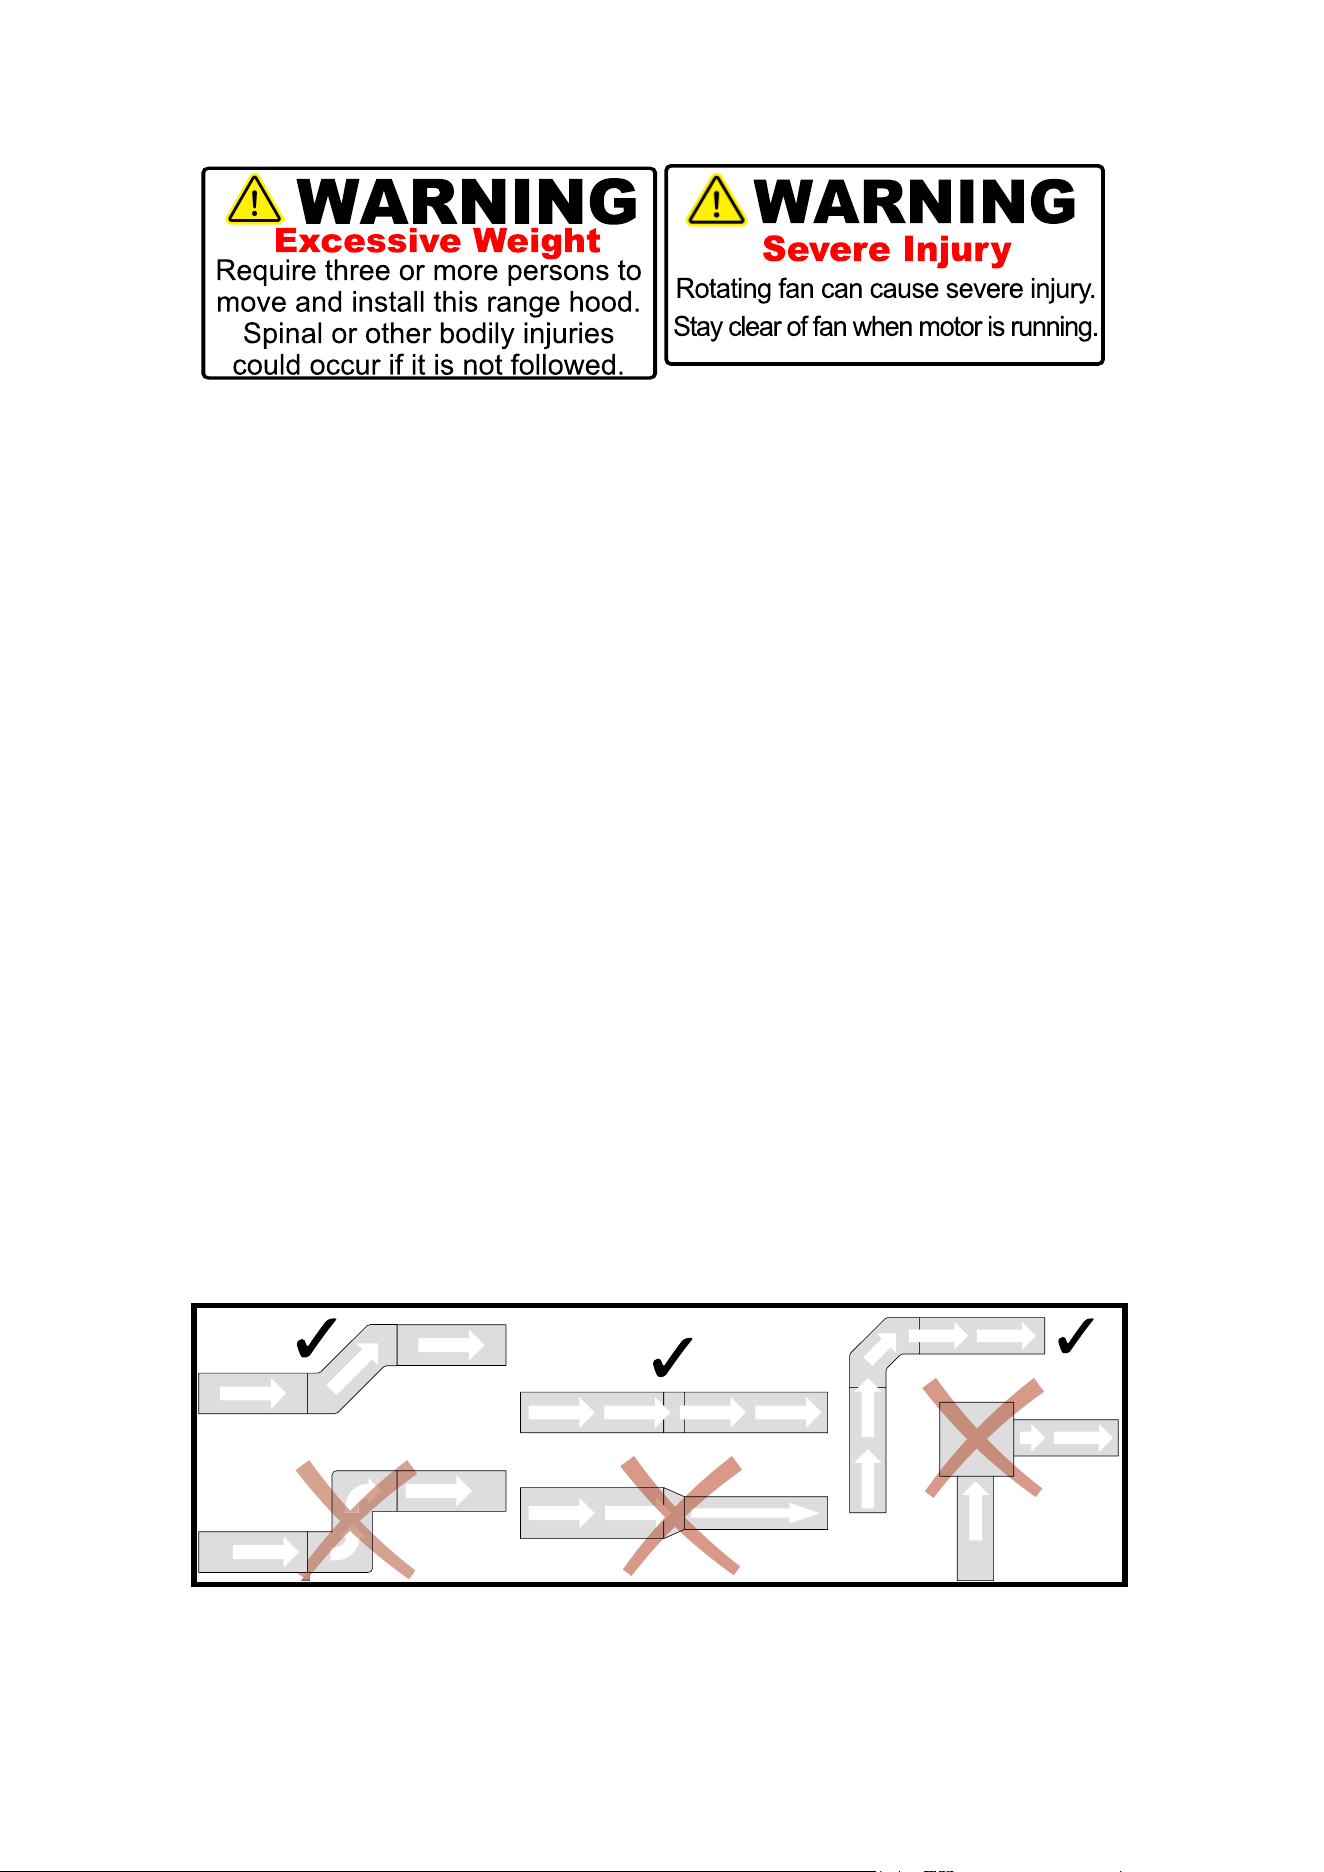
(a)
(b)
(c)
Areducer will reduce the CFM of the hood and increase the noise.c. DO NOT use
plenum boxes. Boxes create turbulence and make the hood inecient. Use a smooth
elbow to guide the air outdoors.
DO’S AND DON’TS FOR DUCT VENTING
a. Avoid the use of sharp elbows. Use 45 degrees instead, if possible.
b. DO NOT use REDUCERS. Keep the size of the duct the same, as per the manual.
10
VICTORY range hoods
| PSD / VEGA / MAESTRO
14
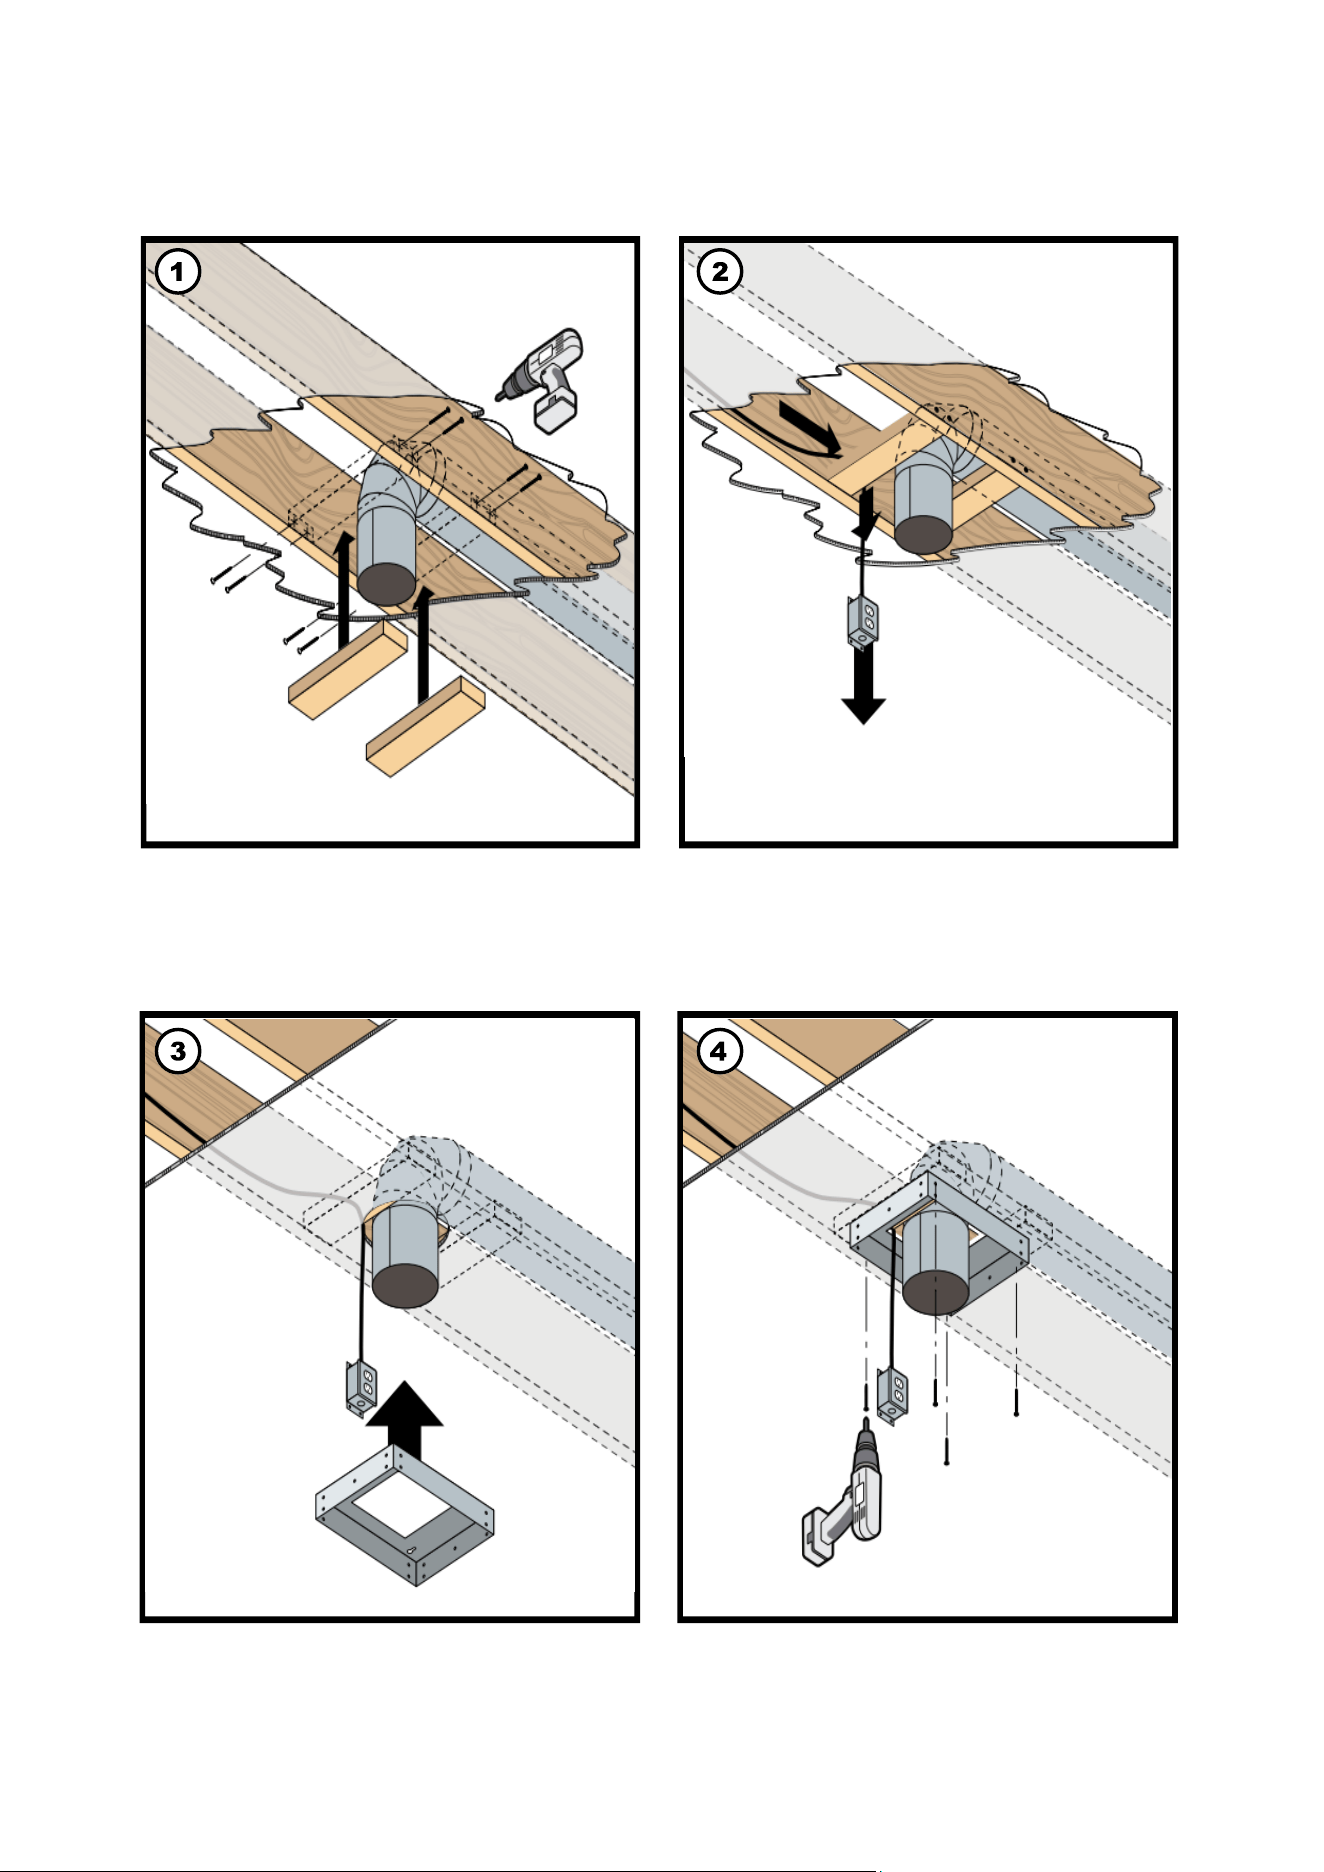
ROUGH
-
IN(Side Vent - Floor above)
Recommended to use this type of brace support when installing side wall vent system.
Cut two 2"x4" (or 2"x6") to the length of
the divide between joists.
Duct protruding
from ceiling should
be 5" minimum in
Use a shallow
electrical box
length.
(1) Measure the main frame of the range hood
support to the area planned for installation.
Screw two 2"x4"onto joists as shown
(woodscrews not included).
(2)Install an electrical outlet from the ceiling in
between the braces.Use 6"-Ø duct with elbow
connection for side vent.
(3) Thread the electrical outlet and duct through
themain frame of the range hood support.
(4) Screw the frame onto the drywall where the
wood braces are which will provide support.
11
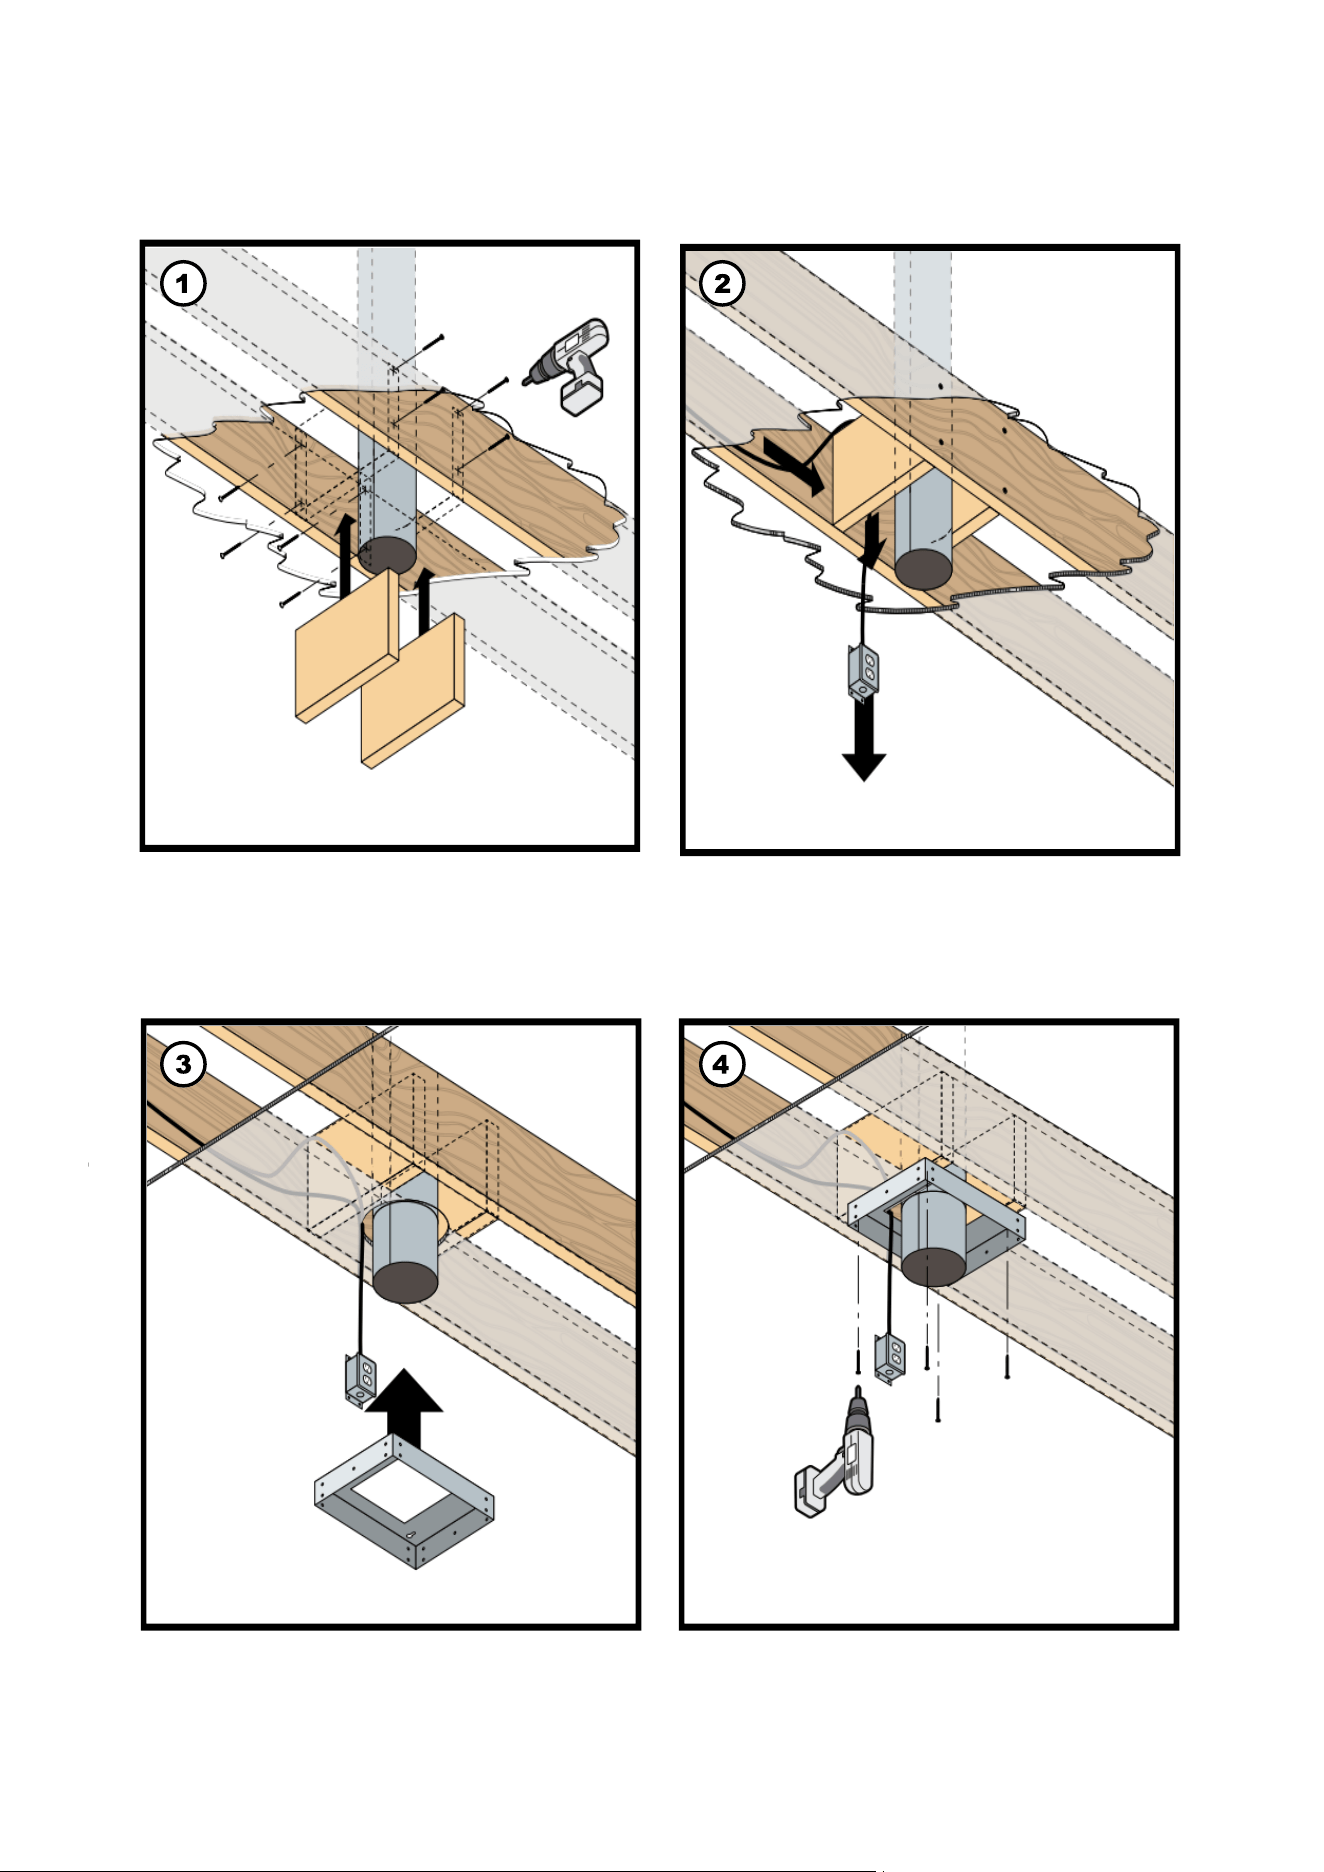
Recommended to use this type of brace support when installing roof vent system.
VICTORY range hoods
(3) Thread the electrical outlet and duct through
the main frame of the range hood support.
PSD ISLAND |
15
ROUGH
-
IN
(
Roof Vent - No oor above
)
(4) Screw the frame onto the drywall where the
wood braces are which will provide support.
Cut two 2"x10" to the length of the divide
between joists.
Use a shallow
electrical box
Duct protruding
from ceiling should
be 5" minimum in
length.
(1) Measure the main frame of the range hood
support to the area planned for installation.
Screw two 2"x10"onto joists as shown
(woodscrews not included).
(2)Install an electrical outlet from the ceiling in
between the braces. Use 6"-Ø duct for top vent.
12

VICTORY range hoods
6" Duct
Install the plastic aps ONLY if your wall or roof cap does not come
with backdraft dampers.
The adaptor can be used to protect the aps.
NOTE: DO NOT USE threaded drywall anchors to support thehood
when mounting the hood on sheetrock. Mounting the hood on wall
studs or lumbars is highly recommended.
GALAXY |
15
INSTALLATION
SAFETY WARNING: Risk of electrical shock. this range hood must be properly grounded.
Make sure this is done by qualied electrician in accordance with all applicable national and
local electrical codes. Before connecting wires, switch power o at service panel and lock
service panel to preduct power from being
switched on accidentally.
CAUTION: Make certain the range hood is secure before releasing!
For safety purpose, pre-drilled mounting holes are provided through the back
of the hood. For a more secure installation, use as many mounting holes as
needed to secure from the inside of hood.
13

VICTORY range hoods
PSD ISLAND |
19
INSTALLATION
(
Continued
)
corner bracket.
(6) Ensuring the extension arms with more holes
arepointed up, place each arm inside of each
(5)Determine the height needed for the support
eacharm.
extensions. Secure with screws with locking nut
(7)Fasten arm extensions to the brackets with
a
screw on each side of each bracket with
locking nut.
(8)Slip on the chimney sleeve over the arm
extensions while ensuring the power cord also
slips through the sleeves.
14
VICTORY range hoods
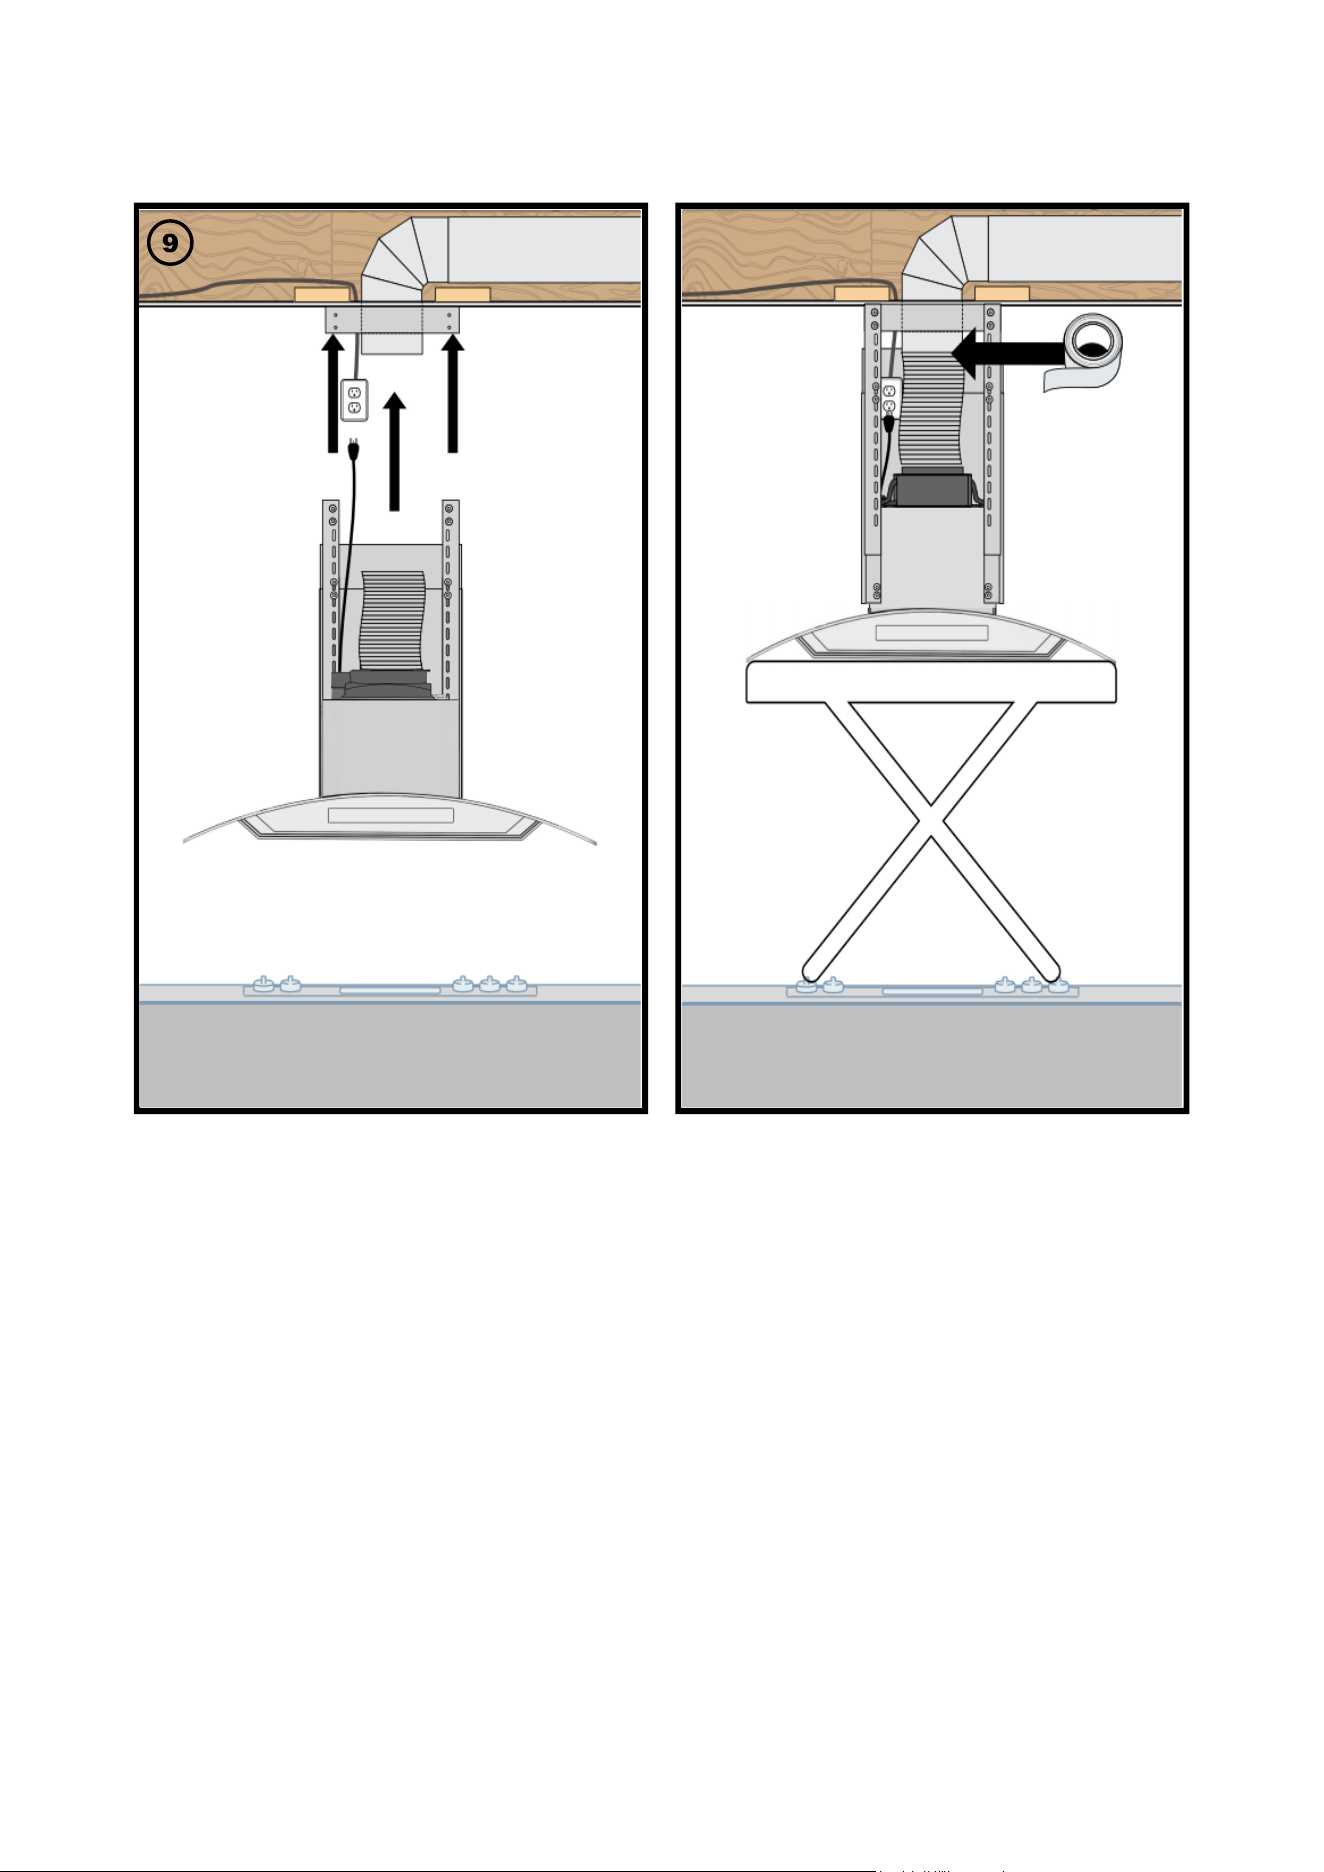
(9) Lift range hood and place arm extensions to the main frame attached tto the ceiling.
NOTE: Use a stable platform to rest the range hood and/or receive assistance to hold on range
hood.
Connect the ex duct from the range hood to the ducting in the ceiling. Use aluminum foil tape to
secure a proper seal.
| PSD ISLAND
18
INSTALLATION
(
Continued
)
15
VICTORY range hoods
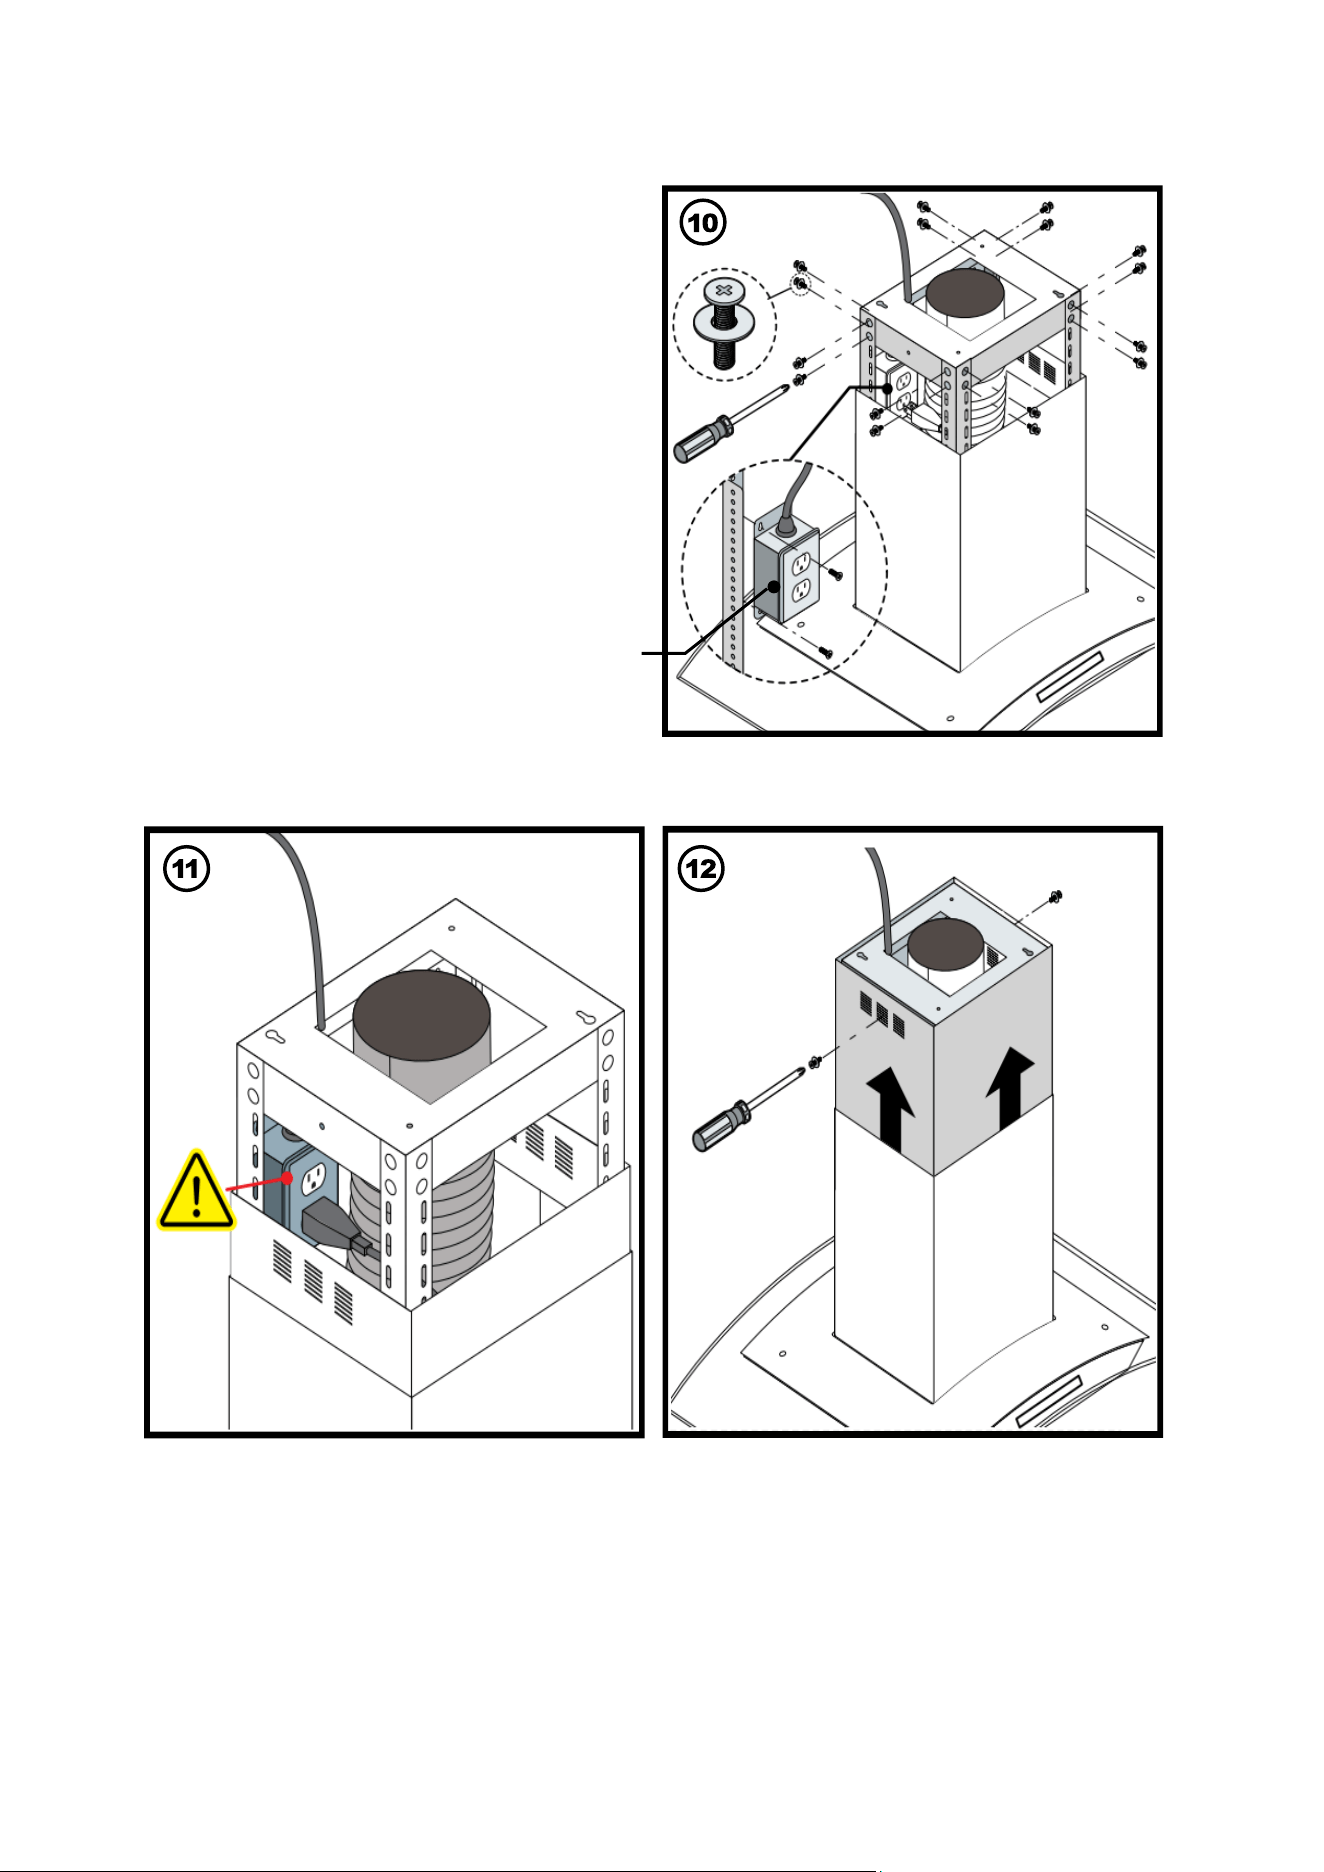
a couple of screws as shown here (screws not
(10)
Fasten arm extensions to the main frame
with a screw on each side of each bracket
with locking nut.
You may either install an electrical box in the
ceiling joist and plug in your power cord
through the ceilin(please refer to VENTING
METHOD page).
Or you may secure the electrical outlet
junction to the nearest arm extension using
included).
(11)Be alert of any electrical hazards before
plugging in to outlet. Check the fan motor
and
(12) Lift the inner sleeve of the chimney, and raise
to the main frame. Fasten screws to each of the
hole openings and ensure a secure t.
lights are functioning.
PSD ISLAND |
21
INSTALLATION
(
Continued
)
16
CAUTION: Make certain the range hood
is secure before releasing!
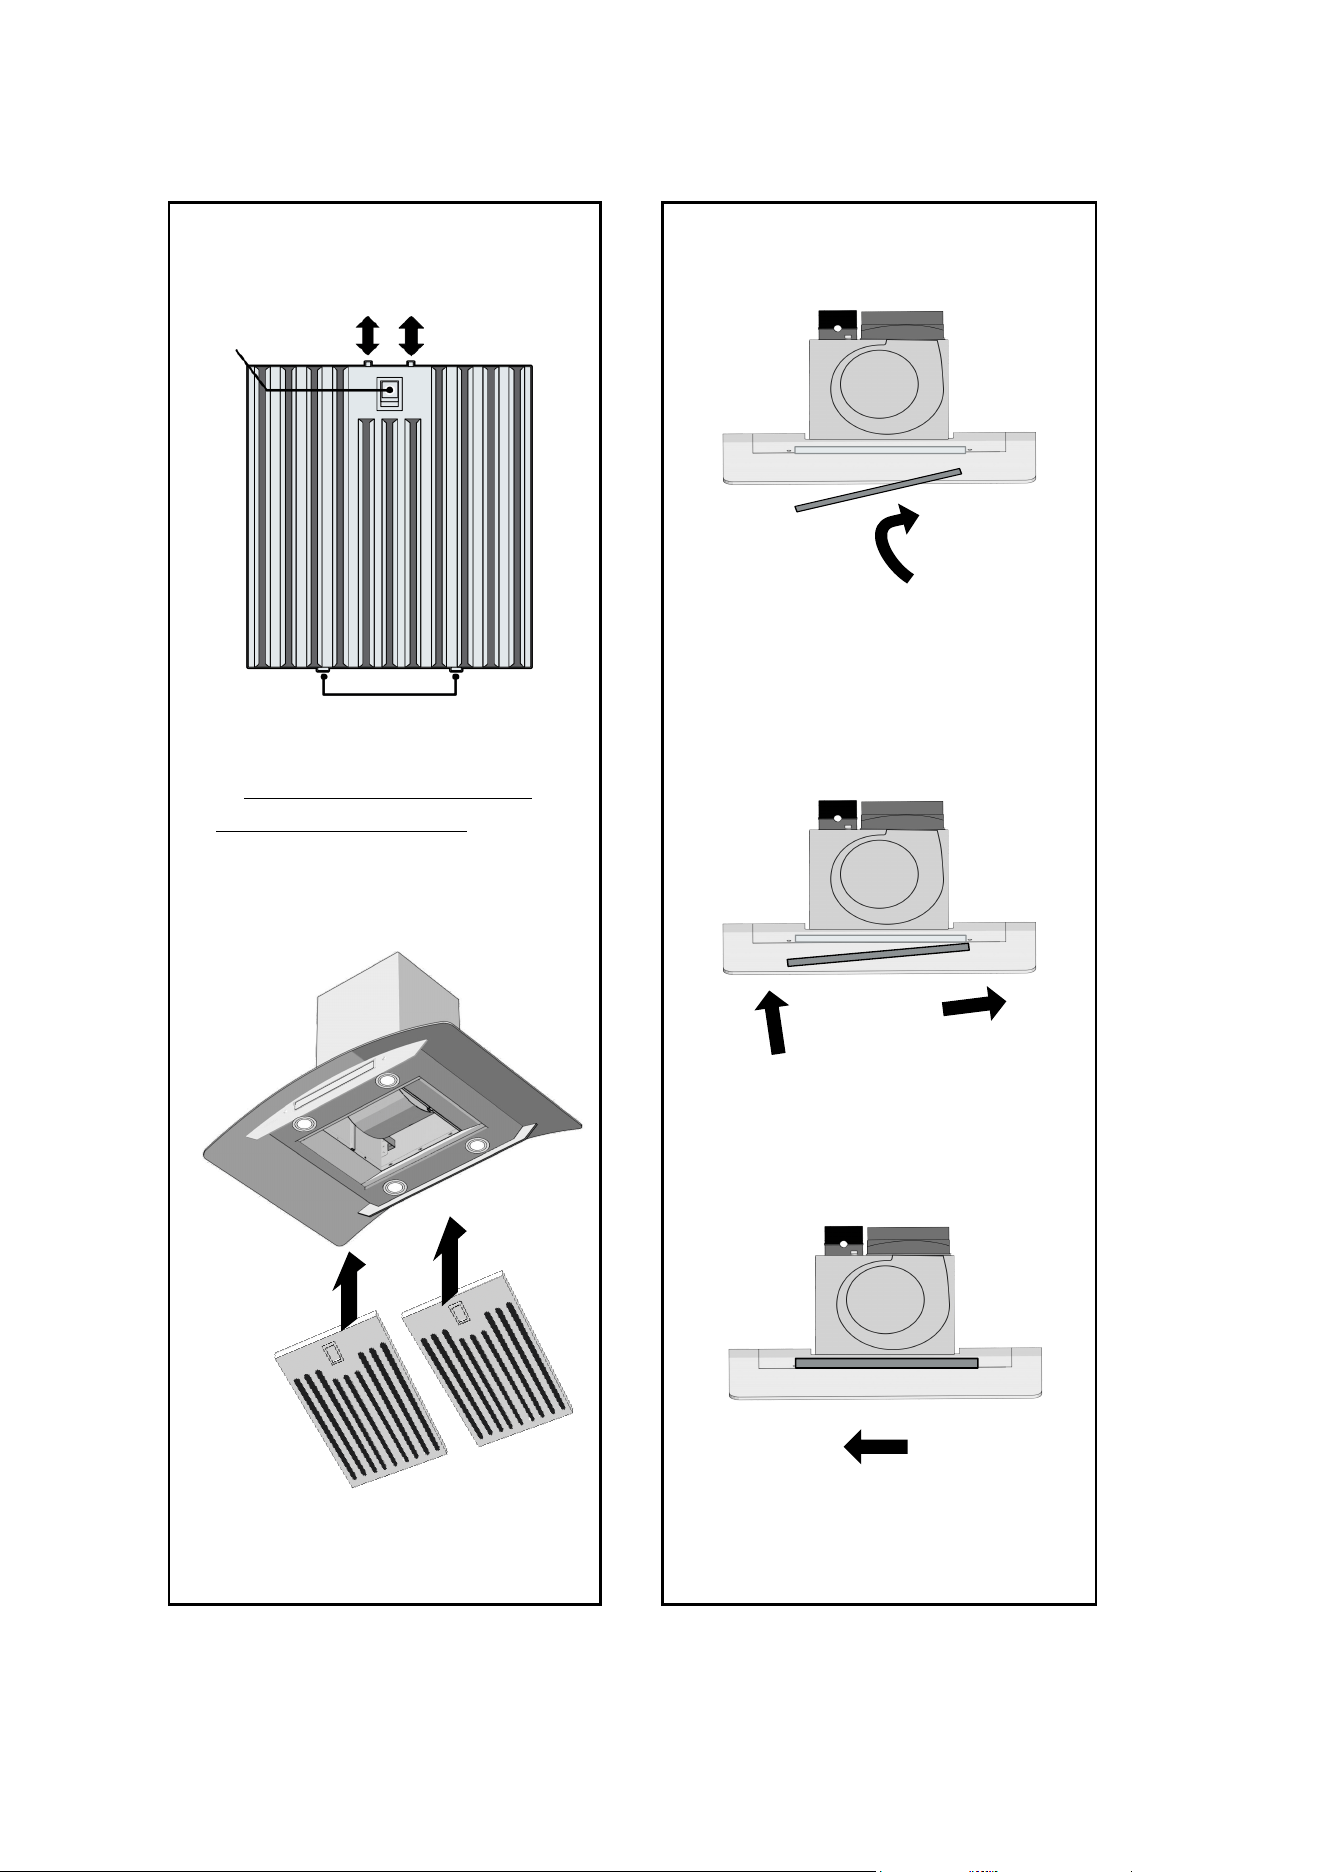
Retractable Tabs
BOTTOM VIEW
SIDE VIEW
| LUNA18
Angle lter and direct tab inserts toward
the aft slot of the range hood opening.
While continuing to install the flter, ensure
you depress the lever for the retractable
tabs to clear way for fush insertion.
INSTALLATION OF FILTERS
Tab Inserts
Lift Lever
***Before installing, remove
protective white lm***
Bae Filters
When lter sits ush within the opening,
release the lever to lock in place.
17
VICTORY range hoods
| PSD / VEGA / MAESTRO
20
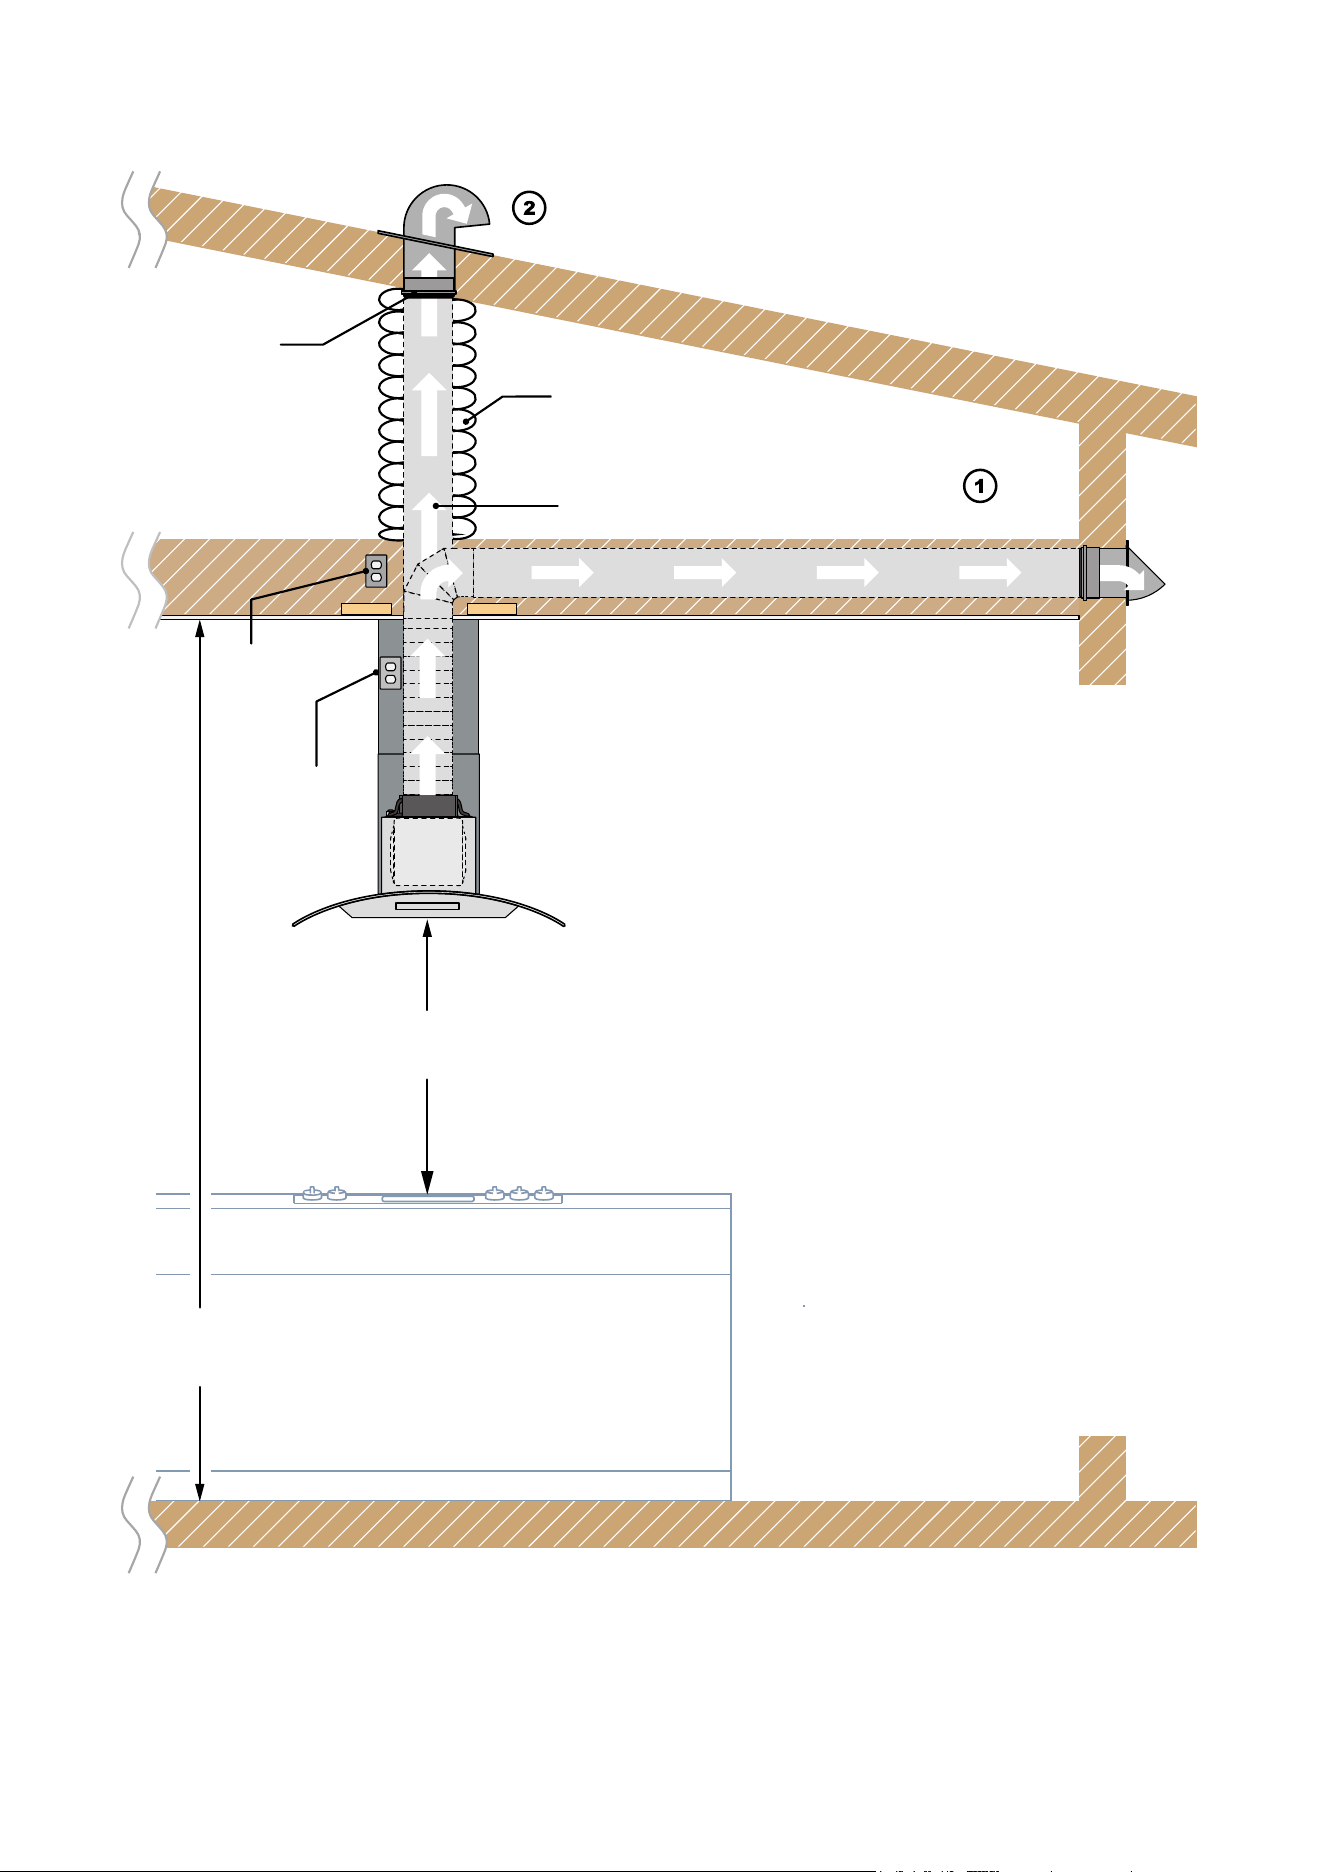
VENTING METHODS
Motor
Power
Outlet
120v
Alternate
location Outlet
120v
Backdraft
Damper
Wrap insulation
required for cold climates
6" Ø Duct
Standard
Wall Vent
Cap
Roof Vent Cap
Min: 26" Max: 34"
96"
*Max: 117"
• This range hood is factory set for
venting through the roof or wall.
• Duct work can terminate either
through the roof or wall. To vent
through a wall, a 90° elbow is
needed.
IMPORTANT:
• NEVER exhaust air or terminate
duct work into spaces between
walls, crawl spaces, ceiling, attics
or garages. All exhaust must be
vented to the outside.
• Use metal/aluminum duct work
only.
• Fasten all connections with sheet
metal screws and tape all joints
with certied Aluminum Tape.
• Use caulking to seal exterior wall
or roof opening around the cap.
• Colder climates require wrapping
insulation around the ducts and
optional blowers.
• The system must have a
Backdraft Damper.
18
Recommend 28" to 32"
| LUNA22
on the systerm, press Power
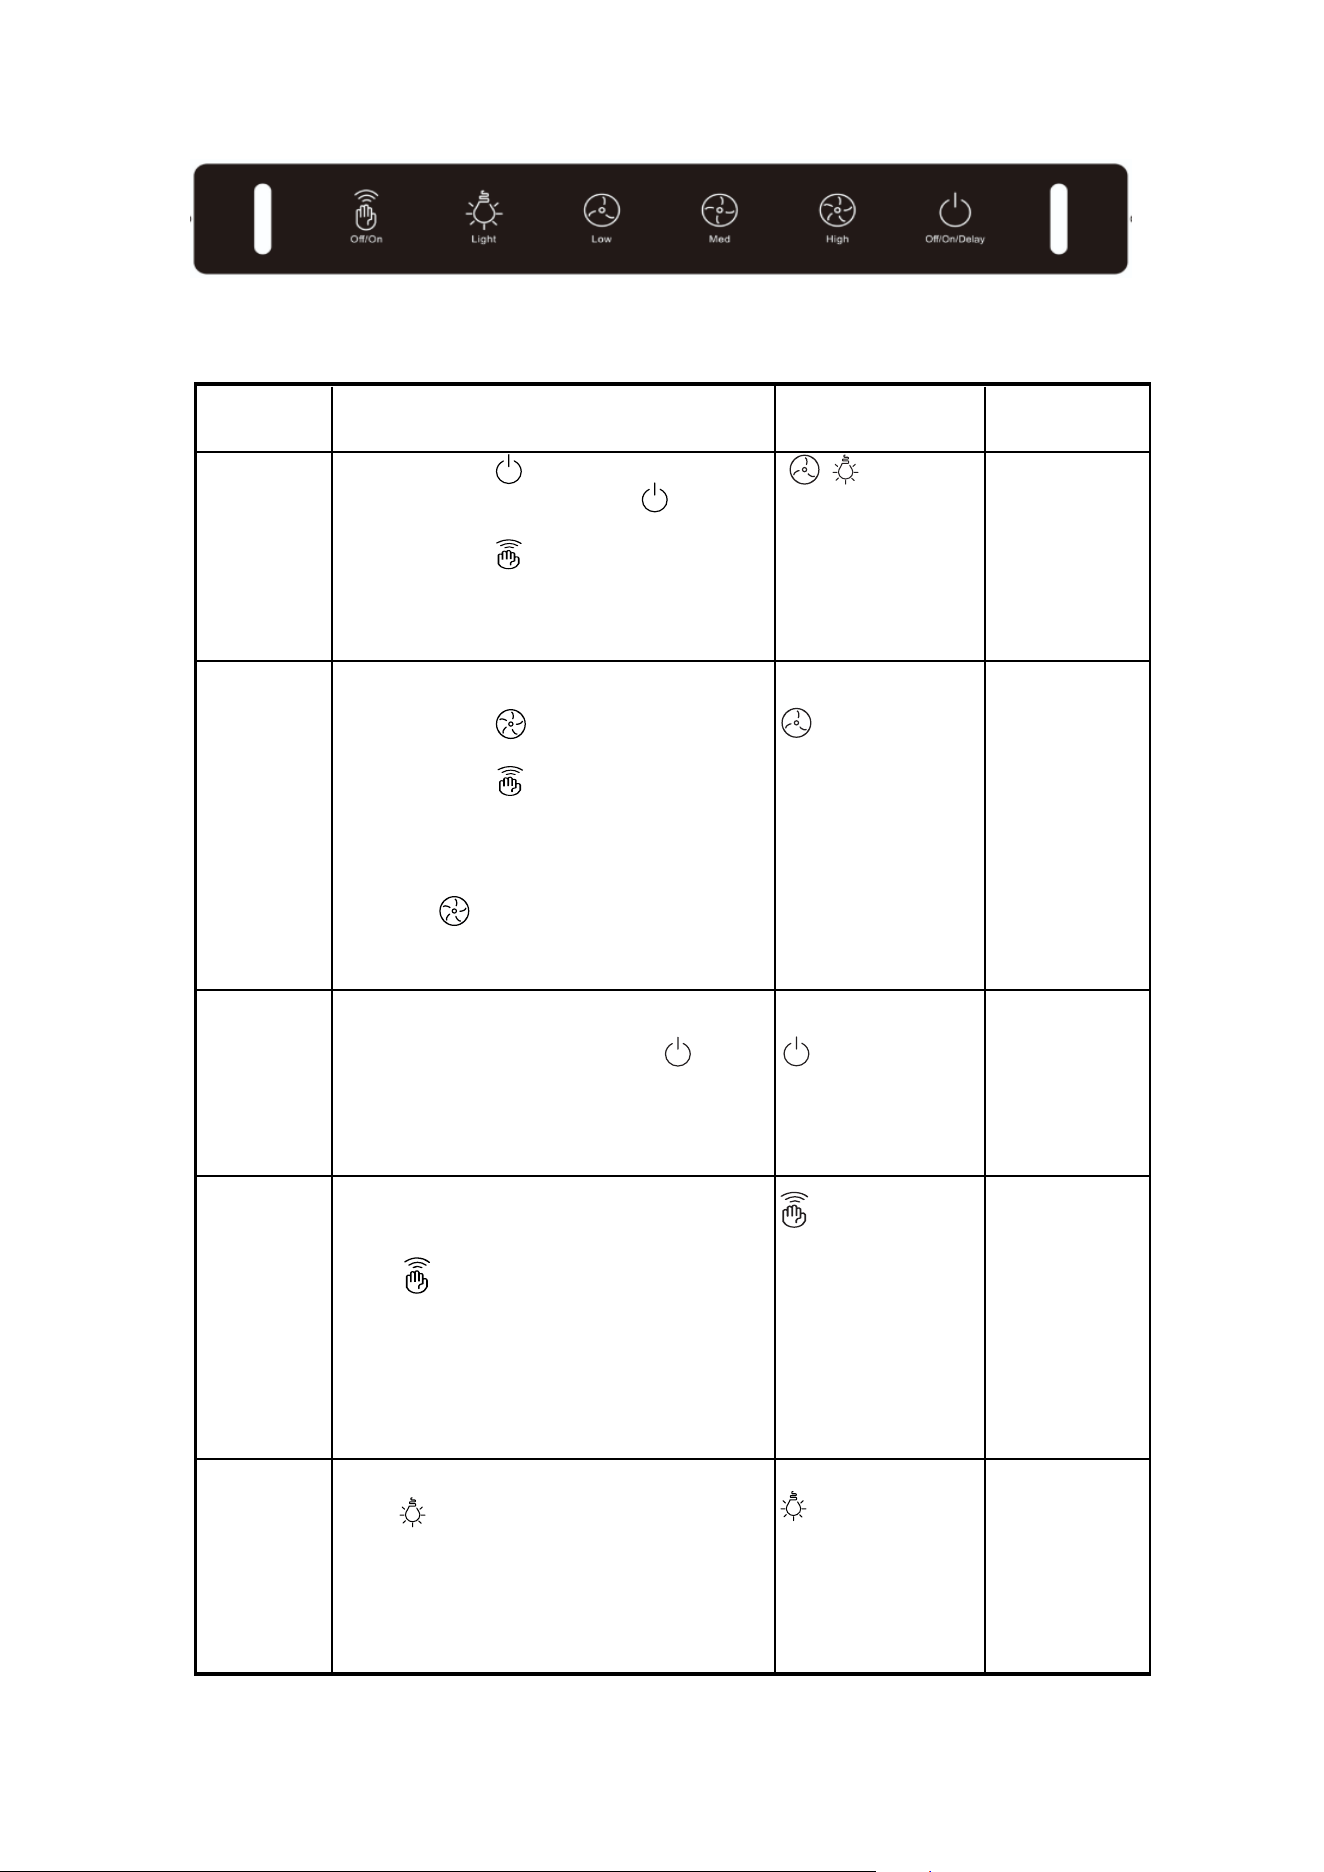
RANGE HOOD OPERATIONS (Digital Panel)
Method 1:
Press Power
FUNCTION
OPERATION
INDICATE
REMARK
button to turn
button once to turn off the systerm.
Method 2: In the Gesture on state, quickly
wave your hands(left or right) to
open the systerm.
Method 1:
ON/OFF
SPEED
Sensing points
Sensing points
Gesture Light Power/ DelaySpeed setting
Press Speed button to
choose
the speed.
Method 2: In the Gesture on state, from left
to right to increase the fan speed;
from right to left to reduce the fan
speed.
Method 3:
When the motor is running, press
Speed button to turn off the
current speed.
When the motor is running, press Power
DELAY
botton to activate the delay off timer function
(3 minutes).
LIGHT
Press Light button to turn on or off the
lighting function.
1.Switch factory
default is med
speed
2. Speed by
default remember
the last used
setting.
LED lights are
individually
controlled
Gesture by
default remember
the last used
setting.
.
Gesture by
default is turned
on.
When the switch is on/off,
the speed and light
buttons are on/off at the
same time.
If the indicator is on, it
indicates the current
speed. If the indicator is
off, it indicates that the
fan is off.
If the indicator blinks, the
delay off timer function
starts.
function is on;
-The indicator is dimmed,
it means the gesture
function is on normally
under the shutdown state;
-The indicator is all on, it
means the gesture
-The indicator is off, it
means the gesture
function is off.
-The indicator is on, it
means the light function
is on.
-The indicator is off, it
means the light function
is off.
GUESTURE
Press Guesture button to turn on or off
thegesture function.
19

LUNA | 25
EXPLOSION DIAGRAM
No. Description
Quantity
1
2
3
Power Cord
4
5
6
7
8
Glass Cover
9
Lower Chimney
Upper Chimney
Plastic box
Circuit Board
6" Round Duct Connector
10
12
13
14
Spuirrel Cage
Right Fan Blade
Motor
15
16
17
Rubber Gasket
18
6" Flexible Duct Tube
1
4
1
1
1
1
1
1
1
1
1
1
1
2
4
11
Hood Body
1
1
Capacaitor
Stainless Steel Baffle Filter
19
2
Chimney Mounting Bracket
Upper Support Frame Extension
Lower Support Frame Extension
Protective
Right Fan Blade
Grill
20
21
4
1
1
Control Panel
Light
22
2
20

| LUNA24
TROUBLESHOOTING
POSSIBLE CAUSE
ISSUE
weak
The blower or fan seems
A large amount of oil has
accumulated on the baffle filter.
.
Gesture invalid
SOLUTION
.
Check that there is power to the
The hand wave motion does not
pass through two sensor points or
the speed is too slow
The distance between the range
hood and the stove is too far.
The duct is clogged or if damper
unit(half-circular flapper) is not
installed correctly.
Use the wrong duct size.
Gesture function is not turned on.
.
The circuit board is malfunctioning
range hood.
Range hood is making a
rattling noise.
The motor is working, the
light is not on
The duct work connection is loose
The motor is loose.
.
The hood is not secured in place.
.
The light connector is not connected
The lights cannot be
turned off
The circuit or switch board is out of
order.
Light out of order
.
The circuit board is out of orderoff
Range hood does not
work.
.
Turn off the power and check that
all wires are properly connected.
Refer to your specific model's
installation instructions for proper
wiring.
Turn off the power and remove
the filter and check that all screws
are secure and tight around the
motor.
The ductwork connection to the
pipe is tight. Add duct tape if
necessary.
Check the installation of the hood.
Clean or replace the baffle filters.
Use the right duct- 3-1/4x10" or
6" round type.
Adjust the distance between the
range hood and the stove top
Clear the blockage of the duct.
Install the flapper correctly.
Turn on the Gesture function.
Please ensure that you move your
hand in a horizontal motion over
the sensing points, maintaining a
distance no closer than 5.9 inches
from the panel.
Contact the customer to replace
a new carcuit board.
The most common issue is that
the circuit breaker is off or the
fuse has blown.
Make sure the speed has been
selected at the controls.
Check whether the air outlet is
blocked by foreign matter or air
duct deformation, and the
If it is stuck, it will sound like motor
noise but it's really the damper.
damper is opened normally.
Check whether the LED
connector is connected
Contact customer service to
replace the lamp.
Contact customer service to eplace
the switch board or circuit board.
Contact customer service to
replace the circuit board
21

LUNA | 27
• Clean periodically with stainless steel cleaner and clean cotton cloth. Do not use corrosive or abrasive
detergent (e.g. Comet Power Scruv®, EZ-O® oven cleaner), or steel wool/scoring pads, which will
scratch and damage the stainless steel surface. For heavier oil use liquid degrease such as “Forumla
409®” or “Fantastic®” brand cleaner.
• After cleaning, you may use non abrasive stainless steel polish such as 3M
®
or ZEP
®
, to polish and
bu out the stainless luster and grain. Always scrub lightly, a with clean cotton cloth, and with
• If the hood looks splotchy (stainless steel hood), use a stainless steel cleaner to clean the surface of
the hood. Avoid getting cleaning solution onto or into the control panel. Follow
directions of the stainless
steel cleaner. CAUTION: Do not leave on too long as this may cause damage to the hood nish. Use a
soft towel to wipe o the cleaning solution, gently rub o any stubborn spots. Use a dry soft towel to dry
the hood.
the grain.
•
DO NOT allow deposits to accumulate or remain on the hood.
• DO NOT use ordinary steel wool or steel brushes. Small bits of steel may adhere to the surface and
cause rusting.
• DO NOT allow salt solutions, disinfectants, bleaches, or cleaning compounds to remain in
contact with
stainless steel for extended periods. Many of these compounds contain chemicals, which may be harmful.
Rinse with water after exposure and wipe dry with a clean cloth.
Cleaning Grease Filter:
• Filters should be cleaned after every 30 hours of use.
• Spray “Formula 409
®
” or equivalent
degreasing detergent and leave to soak if very dirty. Dry
the lters
and re-install before using the hood.
• Should lters wear out due to age and prolonged use, please contact Vikio Range Hoods to
order
replacement lters.
Replacing the light bulb:
• This range hood uses LED bulbs (please refer to the actual specication of the hood purchased):
USA/Canada: LED 3W 12V
Operations:
• Read and understand all instructions and warnings in this manual before operatingthe appliance.
Save these instructions for future reference.
•
• Always leave safety grills and lters in place. Without these components, operating blowers could
catch on to hair, ngers and loose clothing.
Never dispose cigarette ashes, ignitable substances or any foreign objects into blowers.
• Never leave cooking unattended. When frying, oil in the pan can easily overheat and
catch re.
The risk of self combustion is higher when the oil has been used several times.
• Never cook on “open” ames under the range hood. Check deep-fryers during use: Superheated oil
may be ammable.
•
• The saturation of greasy residue in the blower and lters may cause increased inammability.
Keep unit clean and free of grease and residue build-up at all times to prevent possible res.
SAFETY WARNING:
Never put your hand into area housing the fan while the fan is operating!
•
DO NOT operate blowers when flters are removed. Never disassemble parts to clean without
proper
instructions. Disassembly is recommended to be performed by qualifed personnel only.
• Filters must be cleaned periodically and free from accumulation of cooking residue.
Old and worn lters must be replaced immediately.
Read and understand all instructions and warnings in this manual before proceeding.
Cleaning Exterior surfaces:
MAINTENANCE
Replacing Filters:
22

LUNA | 27
1. Make sure the range hood is unplugged or turn OFF breaker.
2. Remove the glass cover.
3. Remove the screws holding the control panel.
4. Unplug the control panel, and replace with a new control panel.
5. Fix the screws of class cover.
Replacing Control Panel:
CONTROL PANEL REPLACEMENT
WIRING DIAGRAM (Digital Panel)
Plug to Outlet
White 110V
L
N
Yellow
Yellow
Capacitor
M
Black
White
AC-L
AC-N
MO-n
MO-1
(FAN1)
MO-2 (FAN2)
MO-3 (FAN3
White
Blue
Pink
)
LIGHTS
Scan for a button panel
installation tutorial video.
Never work on or clean the range hood while the power is on.
WARNING
Always unplug the unit or switch the electrical breaker to the off position.
Black 110V
LAMP-L
LAMP-N
Red
23
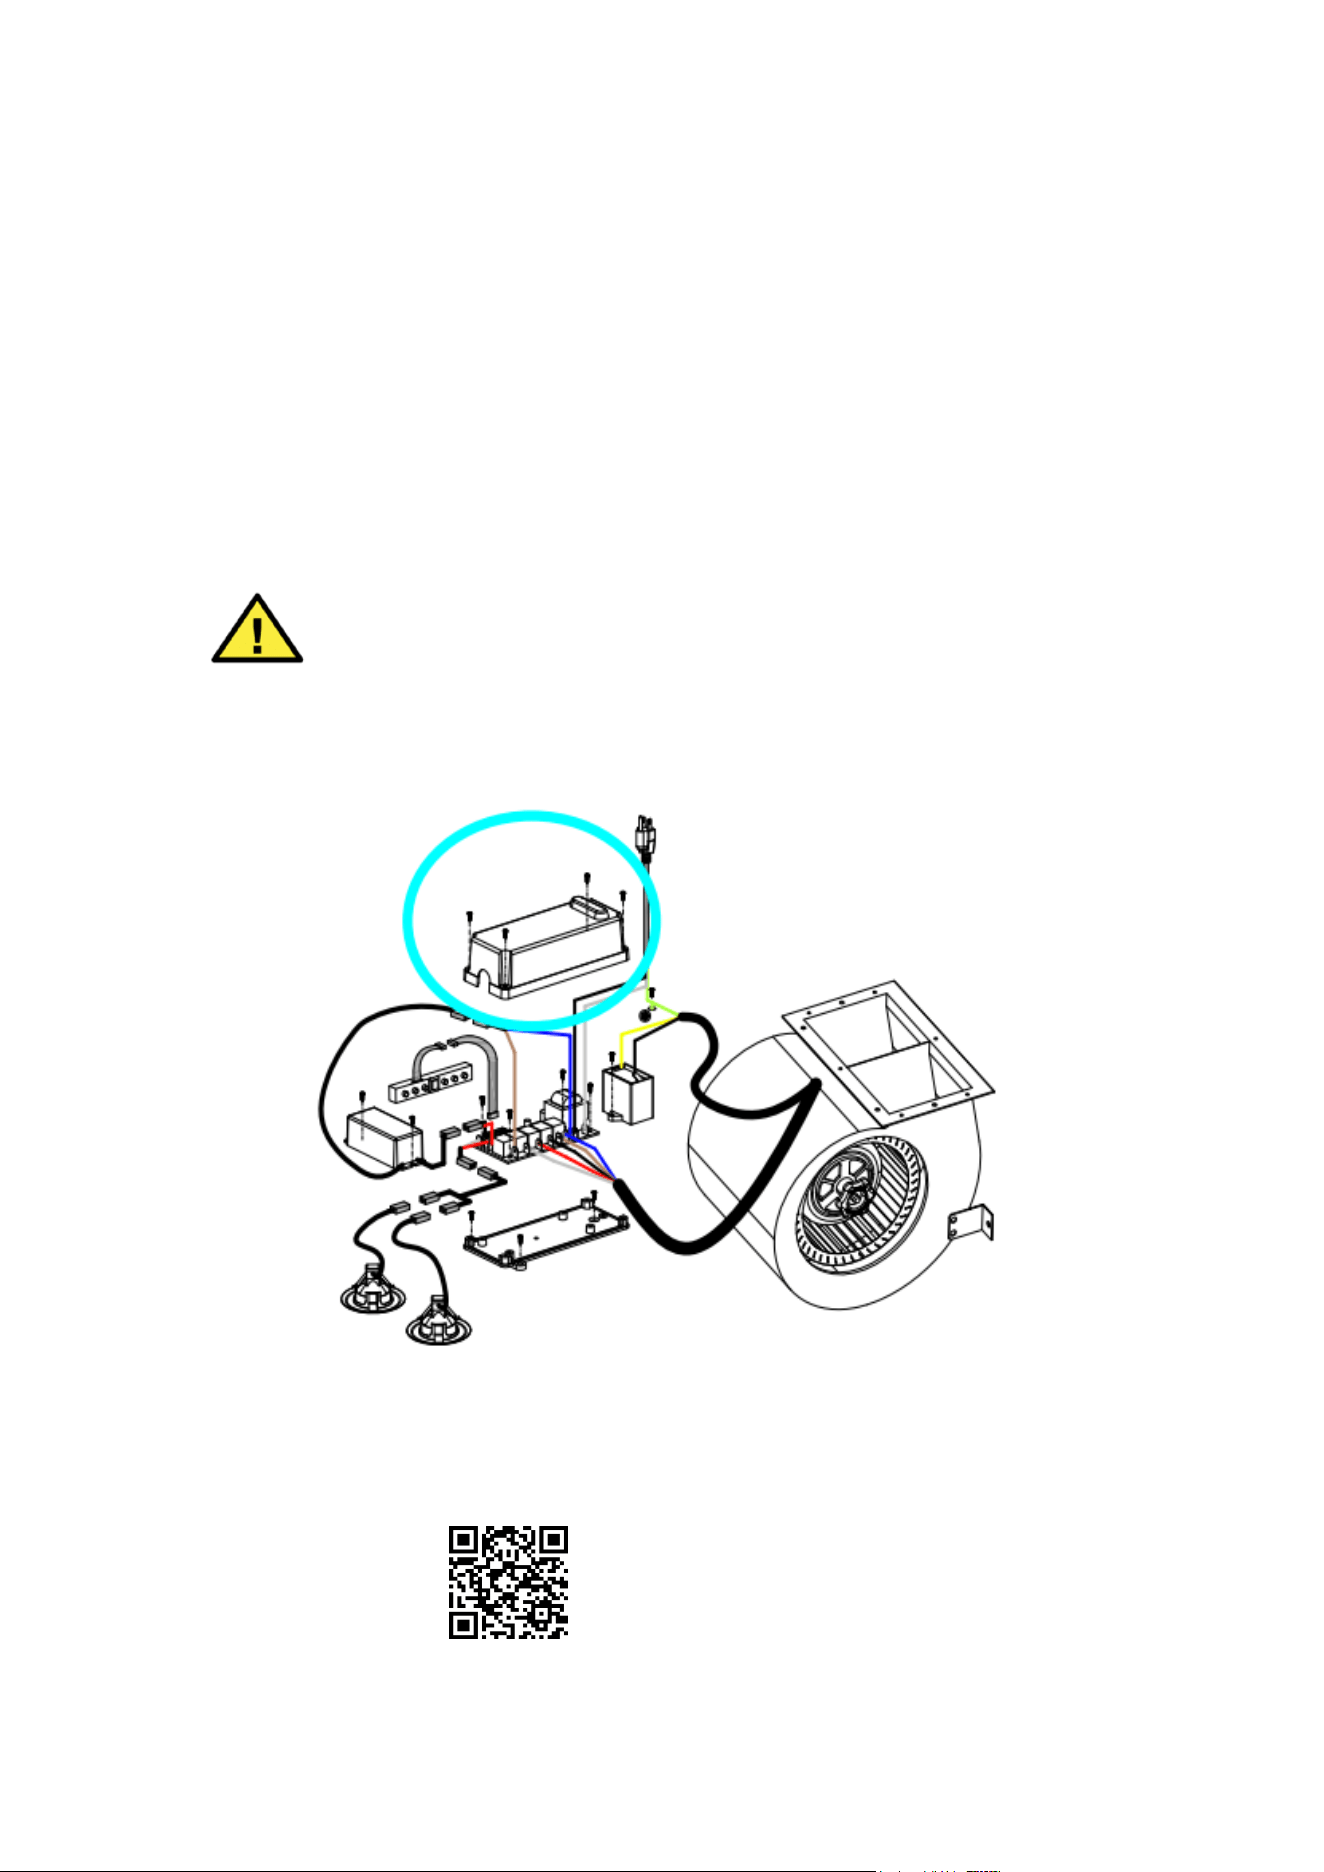
Replacing Circuit Board
CIRCUIT BOARD REPLACEMENT
:
1. Make sure the range hood is unplugged or turn OFF breaker.
2. Remove the Chimney.
3. Remove the screws on the circuit board box.
4. Take out the circuit board and unplug the wires connected to the circuit board one by
one.
5. Replace the circuit board, plug the wires one by one, and then secure the circuit board
with screws.
6. Put the wires back to the board box, fix the screws, cover the chimney.
WARNING
Never work on or clean the range hood while the power is on.
Always unplug the unit or switch the electrical breaker to the
off position.
Scan for a circuit board
installation tutorial video.
24
| LUNA26
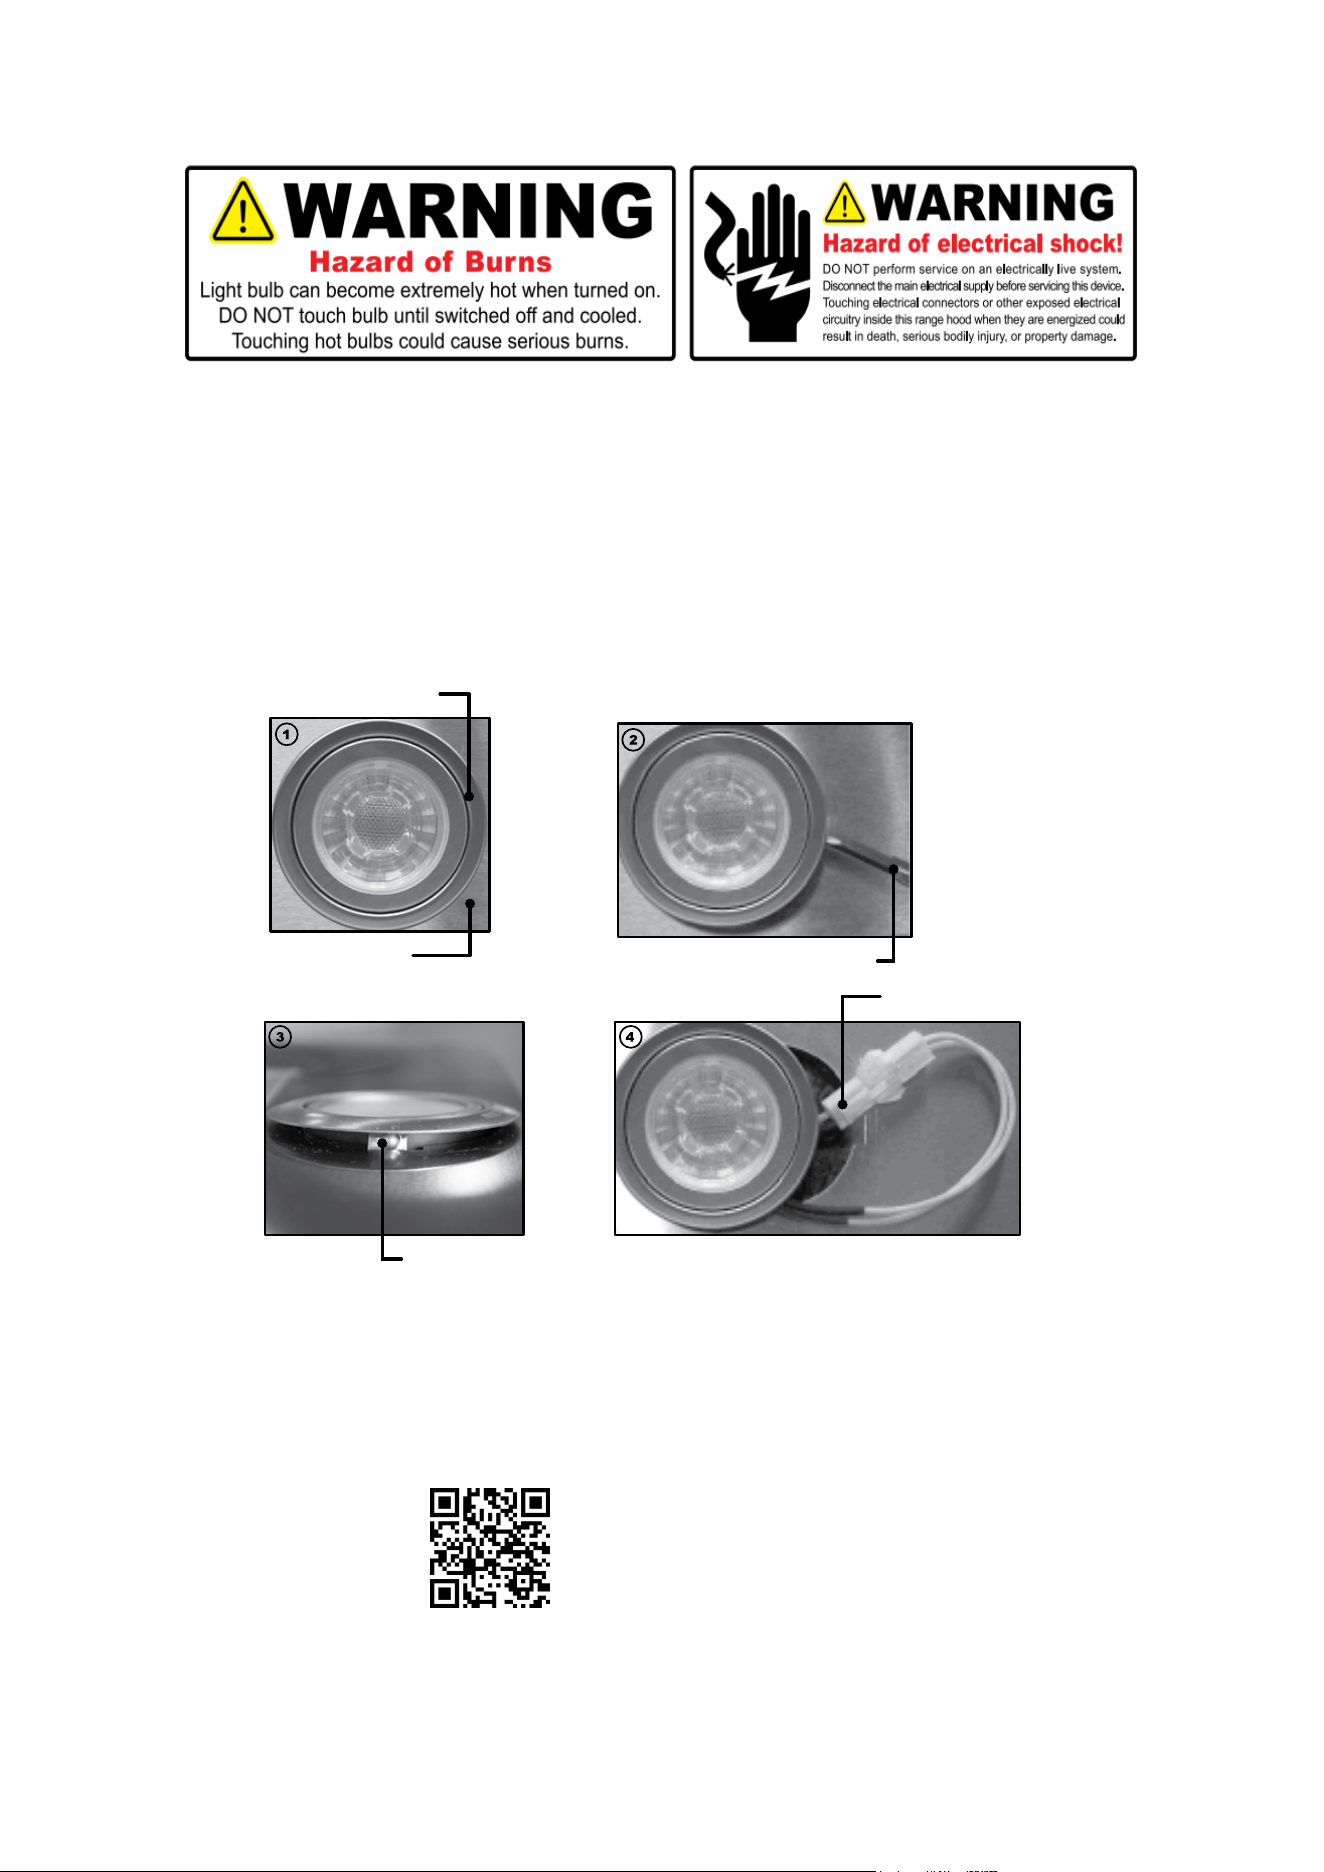
Replacing LED 3W Light Fixture:
1.Make sure the range hood is unplugged or turn OFF breaker and the lights are cool to
touch.
2.Place a fat-head screwdriver between light housing and hood body
3.Gently pry up the light housing and search for the metal clip
4.Apply force to the metal clip and pull out the light fxture
5.Disconnect the power cable and discard the old light fxture
6.Reverse the steps to install a new LED light fxture
BULB REPLACEMENT
7.Turn ON breaker and range hood to test for operation.
Why is my range hood white/blue?
This is a protective layer that is placed on all range hoods to prevent shipping
damage.
Light Housing
Power Plug
Hood Panel
Flat-head Screwdriver
Metal Clip
Scan for a light bulb
installation tutorial video.
25
WARNING
Never work on or clean the range hood while the power is on.
Always unplug the unit or switch the electrical breaker to the
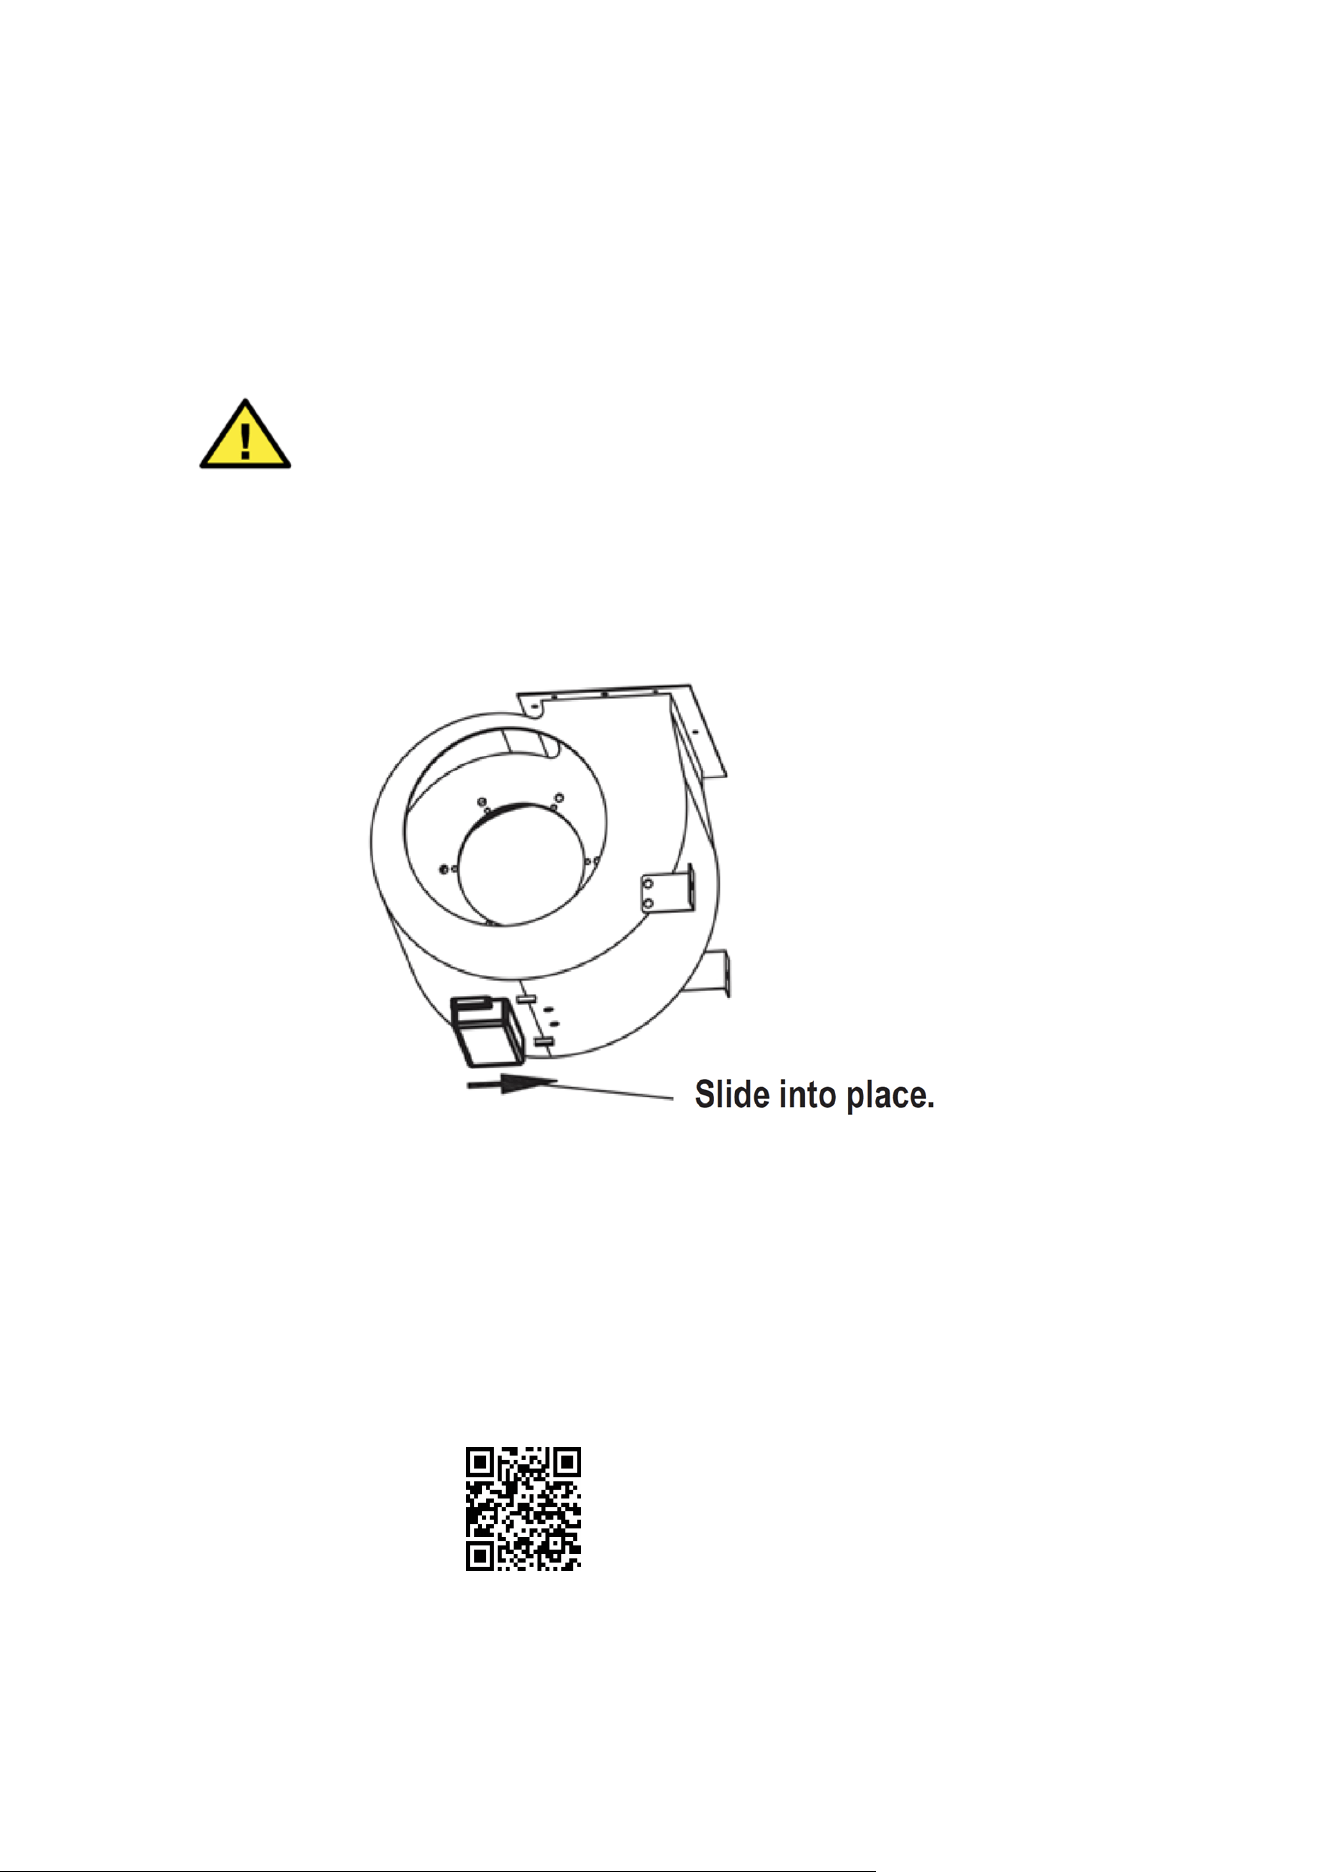
HOW TO CLEAN AND REPLACE THE GREASE CUP
off position.
Scan for a grease cup
A removable plastic grease cup is designed to catch excess grease at the bottom of the motor.
It’s recommended to remove it every 2–3 months, wash it, then re-install it.
To remove or install the grease cup, remove the baffe flters on your hood and slide the cup it
into brackets located at the bottom of the motor. See below.
installation tutorial video.
26

TO OBTAIN SERVICE UNDER WARRANTY:
You must present proof of original purchase date.
The information in this document is subject to change without notice, please contact Vi
kio
Please provide an original dated proof of purchase (sales receipt / invoice)
in order to obtain service under warranty.
Range Hoods for updated details.
LUNA | 29
WARRANTY
Two Y
ear Parts Warranty:
For two years from the date of original purchase, Vikio Range Hoods will provide free of charge, non-
consumable replacement parts or components that failed due to manufacturing defects.
Subject to the conditions and limitations set forth below, Vikio Range Hoods will replace any part of its
products that prove defective by reason of improper workmanship or materials.
Replacement parts or products will be provided by Vikio Range Hoods on an exchange basis, and will
be either new or refurbished to be functionally equivalent to new.
Who is Covered:
This warranty is extended to the original purchaser for products purchased for ordinary home use.
This Warranty Will Be Voided When:
Product is damaged through negligence, improper installation, accident, abuse, misuse, natural disaster,
insucient or excessive electrical supply, abnormal mechanical or environmental conditions or any
unauthorized disassembly, repair, modication, or failure to follow installation instructions. When product
is used commercially or other than its intended purpose. Damaged because of improper connection with
equipment of other manufacturers. Repaired or modied by anyone other than Vikio Range Hoods. This
limited warranty also does not apply to any product on which the original identication information has
been altered, obliterated or removed, has not been handled or packaged correctly or has been sold
as second-hand.
What is Not Covered:
Consumable parts such as light bulbs, metal and charcoal lters. The natural wear of nish, and wear due
to improper maintenance, use of corrosive and abrasive cleaning products, pads, and oven cleaner
products. Chips, dents or cracks due to abuse, misuse, freight damage, or improper installation. Damage of
product caused by accident, re, oods or acts of God. The manufacturer and/or distributor reseller is
not liable for, and does not cover under warranty, any loss of properties or any costs associated with
removing, servicing, installing, or determining the source of problems with this product.
This warranty is valid in Canada and the United States of America. It is non-transferable and applies
only to the original purchaser and does not extend to subsequent owners of this product.Any applicable
implied warranties, including the warranty of merchantability, are limited in duration to a period of express
warranty as provided herein beginning with the date of original purchase and, no warranties whether
expressed or implied, shall apply to this product thereafter.To obtain warranty service, you may contact
Vikio Range Hoods. Please conrm the terms of Vikio Range Hood’s policies prior to contacting us.
Typically, you must include product identication information, such as the model number/name with a
detailed description of the problem you are experiencing. You must also include proof of the date of
original purchase as evidence that the product is within the applicable warranty period, and that it is a
genuine range hood from Vikio Range Hoods.
27

| LUNA28
The information in this document is subject to change without notice, please contact Vi
ki
o Range Hoods for updated details.
CONTACT US
If you require assistance, please contact Vikio Range Hoods. Please have your order
number and model of the range hood ready.
You must have this information in order to receive a response to your request.
If you need replacement parts, we recommend using only genuine parts.
Our accessories and parts are engineered and designed specically for VIKIO range
hoods. Each part is rigorously tested assuring the utmost in durability and reliability,
providing a factory match, factory-installed appearance and functionality tailored to each
individual range hood model.
info@ vikiohome.com www.vikiohome.com
DISCLAIMER
Carefully inspect all items for damages before accepting delivery. Note any damages
on the freight bill or express receipt. request name and signature of the carrier’s agent
and keep a copy to support your claim. Upon acceptance of items, owner assumes
responsibility for its safe arrival. Report damages to the carrier and le a claim imme-
diately. Failure to do so may result in the denial of your claim. The carrier will furnish
you with necessary forms for ling a claim.
Damages on any returns or exchanges caused during transit are not covered under
our warranty (the customer must insure the return with the shipping company). If your
range hood is damaged in transit, please contact us within 14 days of receiving your
new order to report the damages. Vikio Range Hoods will, to the best of its ability, le
a damage claim and investigate the matter.
Please inspect contents of package(s) carefully upon receiving! We must be notied
of any damages and/or missing parts within fourteen (14) days upon your receipt of
the package(s). Claims will not be accepted after fourteen (14) days.
NOTE: Items are thoroughly tested and carefully packed in our facility before shipping.
Products must be returned in good working condition with ALL original parts and docu-
mentation packed in all original cartons, llers and shipping cartons. A restoc-king fee
of 10% will be charged for all approved return(s). Exchanges or returns will not be
accepted if the unit has been installed, and may be rejected if parts are missing.
Make sure to inspect the hood for damages and defects before installation.
Appearance aws of the hood found after installation and not aecting hood perfor-
mance are not covered under our warranty for returns or exchanges. Service visits
are notcovered under warranty and will carry a service charge.
28

FAQ
Can my hood be ductless?
How do I clean my filters and how often?
Your baffle filters should be washed with hot water and soap once per month or placed in a
dishwasher for cleaning. Make sure filters are completely dry before reinstalling.
No, It must be duct your range hood to the outside.
Is the width of my range hoods description, the actual size?
No — the actual width of the range hood will be slightly less than the generic description of the
range hood in order to better fit cabinet cutouts. For instance, a 30" (762 mm) range hood will
actually measure 29 1/2" (749 mm).
Why is my range hood white/blue?
This is a protective layer that is placed on all range hoods to prevent shipping damage.
29

| LUNA26
Why is my range hood white/blue?
This is a protective layer that is placed on all range hoods to prevent shipping
damage.
info@ vikiohome.com
www.vikiohome.com