Tumble Dryer / User Manual
EN
D3T7SSA
Thank you for choosing this product.
This User Manual contains important safety information and instructions on the
operation and maintenance of your appliance.
Please take the time to read this User Manual before using your appliance and keep
this book for future reference.
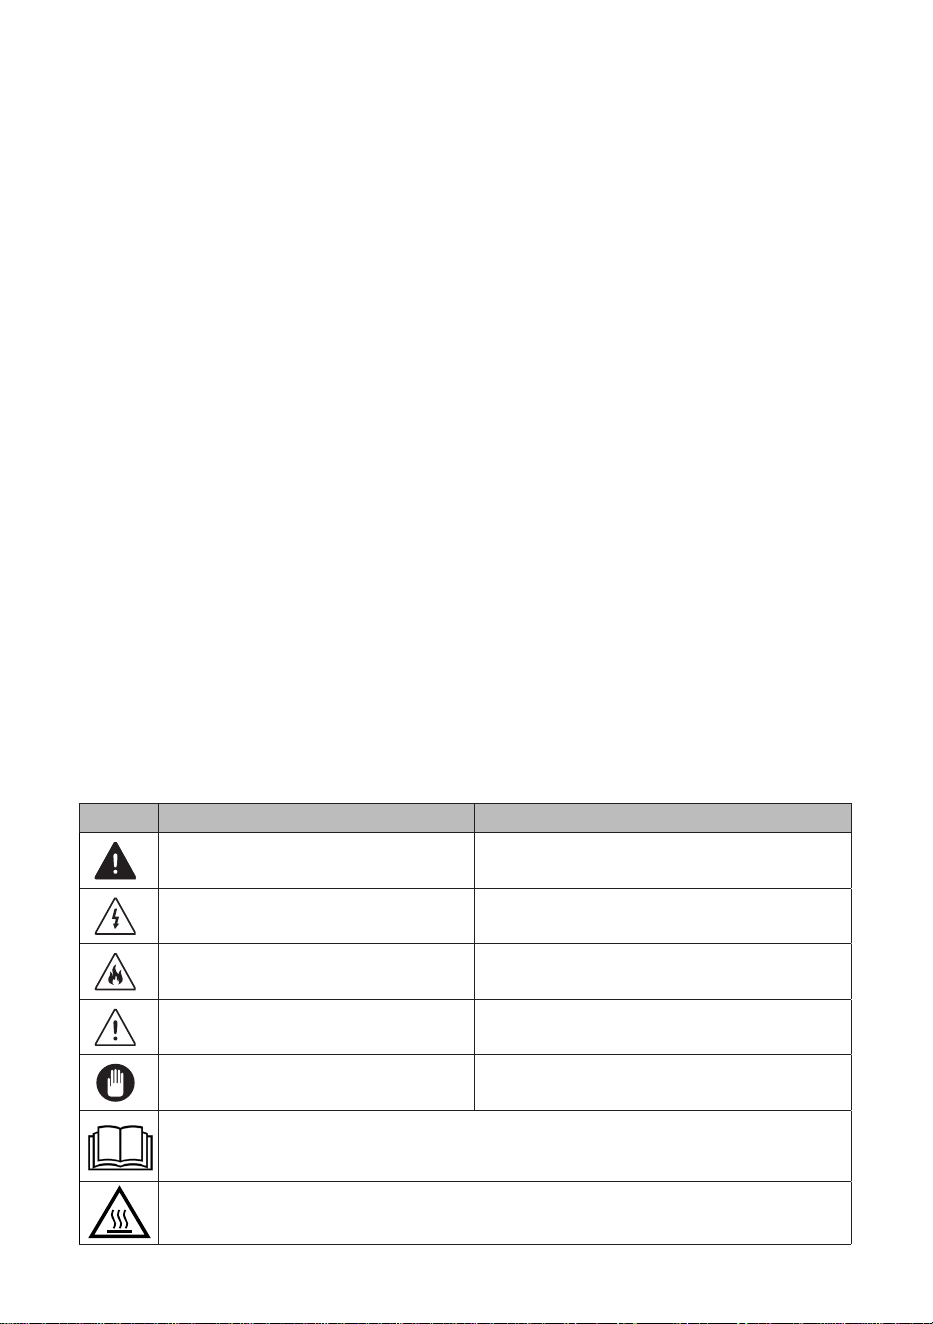
Icon Caption Description
WARNING Risk of serious injury or death
RISK OF ELECTRIC SHOCK Dangerous voltage
FIRE Risk of re
ATTENTION Risk of injury or material damage
IMPORTANT/NOTE Information on correct operation of the system
Read the instructions.
Hot surface

EN - III
CONTENTS
1. SAFETY INSTRUCTIONS ................................................................................. 3
1.1. Electrical Safety ............................................................................................... 3
1.2. Children's Safety ............................................................................................. 4
1.3. Product Safety ................................................................................................. 5
1.4. Correct Use ..................................................................................................... 6
1.5. Installing On Top Of a Washing Machine......................................................... 7
2. INSTALLATION .................................................................................................. 9
2.1. Removing the Safety Assembly ....................................................................... 9
2.2. Connection to Water Outlet (with optional drain hose) .................................... 9
2.2.1. Connecting the Water Discharge Hose ........................................................ 9
2.3. Adjusting the Feet .......................................................................................... 10
2.4. Electrical Connection ..................................................................................... 10
2.5. Under Counter Installation ............................................................................. 10
3. OVERVIEW ...................................................................................................... 10
4. PREPARING THE LAUNDRY .......................................................................... 11
4.1. Sorting the Laundry to be Dried..................................................................... 11
4.2. Preparing the Laundry to be Dried ................................................................ 12
4.3. Load Capacity................................................................................................ 12
5. USING THE TUMBLE DRYER ........................................................................ 13
5.1. Control Panel ................................................................................................. 13
5.1.1. Programme Selection Knob........................................................................ 13
5.1.2. Electronic Indicator and Additional Functions ............................................. 13
5.2. Programme Selection and Consumption Table ............................................. 14
5.2.1. Auxiliary Functions...................................................................................... 15
5.2.2. Starting the Programme ............................................................................. 16
5.2.3. Programme Progress ................................................................................ 17
6. CLEANING AND CARE ................................................................................... 19
6.1. Cleaning the Lint Filter................................................................................... 19
6.2. Emptying the Water Tank............................................................................... 19
6.3. Cleaning the Condenser ................................................................................ 20
6.4. Cleaning the Humidity Sensor ....................................................................... 20
6.5. Cleaning the Inner Surface of the Loading Door ........................................... 21
7. TECHNICAL SPECIFICATIONS ...................................................................... 22
8. TROUBLESHOOTING ..................................................................................... 23

EN - IV
9. AUTOMATIC FAULT WARNINGS AND WHAT TO DO ................................... 25
10. ENVIRONMENTAL PROTECTION AND PACKAGING INFORMATION ...... 26
10.1. Packaging Information ................................................................................. 26
11. DESCRIBING THE ENERGY LABEL AND SAVING ENERGY..................... 26
11.1. Energy Labelling .......................................................................................... 26
11.2. Energy Efficiency ......................................................................................... 26

EN - 1
PRIMARY CONSIDERATIONS
• This appliance can be used by children aged from
8 years and above and persons with reduced
physical, sensory or mental capabilities or lack
of experience and knowledge if they have been
given supervision or instruction concerning use of
the appliance in a safe way and understand the
hazards involved. Children must not play with the
appliance. Cleaning and user maintenance must not
be made by children without supervision.
• Children of less than 3 years should be kept away
unless continuously supervised.
• This tumble dryer is intended only for household
and indoor use. The warranty will be void in case of
commercial use.
• Use this product only for laundry with a label that
indicates it is suitable for drying.
• The manufacturer will not accept responsibility for
damages resulting from incorrect use or transport.
• Do not allow oor coverings to obstruct the
ventilation openings.
• Installation and repair of the machine should
only be made by an authorised repair agent.
The manufacturer cannot be held responsible for
damages resulting from un-authorised repairs.
WARNING: Never spray or pour water onto the
dryer to wash it! There is risk of electric shock!
• Leave at least 3 cm of space between the side and
rear walls of the product and above if you plan on
placing your appliance under a worktop.
• Assembly / disassembly for under-counter
installation if neccessary must be done by an
authorised service agent.

EN - 2
• Before installation, check the product for visible
damage. Never install or operate a damaged
product.
• Keep pets away from the dryer.
• Fabric softeners, or similar products, should
be used in accordance with the manufacturers
instructions.
• Remove all objects from pockets such as lighters
and matches.
• The appliance must not be installed behind a
lockable door, a sliding door or a door with a hinge
on the opposite side to that of the tumble dryer, if it
prevents the door from being fully opened.

EN - 3
1. SAFETY INSTRUCTIONS
This section contains safety instructions that will help
protect you from risk of personal injury or property
damage. Failure to follow these instructions will void
any warranty.
1.1. Electrical Safety
• The appliance must not be supplied through an
external switching device, such as a timer, or
connected to a circuit that is regularly switched on
and o by a utility.
• Do not touch the power plug with wet hands. Always
pull the plug to unplug the product, otherwise, there
will be risk of an electric shock.
• Connect the dryer to a grounded socket with fuse
protection. Have the earth connection installed by
a qualied electrician. Our company cannot be held
responsible for damages/losses resulting from using
the dryer without an earth connection as required
by local regulations.
• The voltage and the allowable fuse protection are
indicated on the type plate.(For the type plate,
please see Overview)
• Voltage and frequency values indicated on the
type plate must be equal to the mains voltage and
frequency value in your house.
• Unplug the dryer when it is not used for an
extended period, and before installation,
maintenance, cleaning and repair, otherwise, the
dryer may get damaged.
• The plug socket must be freely accessible at all
times after installation.

EN - 4
A damaged power cord/plug can cause re or
give you an electric shock. When damaged it must
be replaced, this should only be done by qualied
personnel.
To avoid the risk or re or electric shock, do not
use extension cords, multi sockets or adapters to
connect the dryer to mains power.
1.2. Children's Safety
• This appliance is not intended for use by persons
(including children) with reduced physical, sensory
or mental capabilities, or lack of experience
and knowledge, unless they have been given
supervision or instruction concerning use of the
appliance by a person responsible for their safety.
• This appliance can be used by children aged from
8 years and above and persons with reduced
physical, sensory or mental capabilities or lack
of experience and knowledge if they have been
given supervision or instruction concerning use of
the appliance in a safe way and understand the
hazards involved. Children must not play with the
appliance. Cleaning and user maintenance must not
be made by children without supervision.
• Do not leave children unattended near the machine.
• Children might lock themselves in the machine
resulting in risk of death.
• Do not allow children to touch the glass door during
operation. The surface becomes extremely hot and
may cause skin damage.
• Keep packaging material away from children.
• Poisoning and irritation may occur if detergent and
cleaning materials are consumed or come into
contact with the skin and eyes.

EN - 5
• Keep cleaning materials out of the reach of children
Electrical products are dangerous for children.
• Keep children away from the product while it is
running.
• To prevent children from interrupting the dryer cycle,
you can use the child lock to avoid any changes in
the running programme.
• Do not allow children to sit/climb on or climb inside
the product.
1.3. Product Safety
Due to risk of re, the following laundry items
and products should NEVER be dried in the dryer:
• Do not dry unwashed items in the tumble dryer.
• Items that have been soiled with substances such
as cooking oil, acetone, alcohol, petrol, kerosene,
spot removers, turpentine, waxes and wax
removers should be washed in hot water with an
extra amount of detergent before being dried in the
tumble dryer.
• Cleaning cloths and mats that have residues
of ammable cleaning agents or acetone, gas,
patrol, stain remover, turpentine, candle, wax, wax
remover or chemicals.
• Laundry that has residues of hair sprays, nail polish
remover and similar substances.
• Laundry on which industrial chemicals have been
used for cleaning (such as chemical cleaning).
• Laundry that has any kind of foam, sponge, rubber
or rubber-like parts or accessories. These include
latex foam sponge, shower caps, waterproof
fabrics, tted clothes and foam pillows.
• Items with lling and damaged items (pillows or
jackets). Foam protruding from these items might
catch re during the drying process.

EN - 6
• Operating the dryer in environments that contain
our or coal dust may cause explosion.
ATTENTION: Underwear that contains metal
reinforcements should not be put in the dryer. The
dryer may be damaged if metal reinforcements come
loose and break o during drying.
1.4. Correct Use
ATTENTION: Never stop a tumble dryer before
the end of the drying cycle unless all items are quickly
removed and spread out so that the heat is dissipated.
ATTENTION: Make sure that pets do not enter
the dryer. Check the inside of the dryer before
using it.
ATTENTION: Superheating of clothes inside of the
dryer can occur if you cancel the programme or in the
event of a power failure whilst the dryer is running.
This concentration of heat can cause self-combustion
so always activate the Refresh programme to cool
down or quickly remove all laundry from the dryer in
order to hang them up and dissipate the heat.
• Use the dryer only for household drying and to dry
fabrics with a label that indicates they are suitable
for drying. All other uses are out of the scope of
intended use and are prohibited.
• The warranty will be void in case of any commercial
use.
• This appliance is designed to be used inside
domestic residences only, and should be placed on
a straight and stable surface.
• Do not lean against or sit on the door of the dryer.
The dryer may tip over.
• To maintain a temperature that will not harm the
laundry (e.g. to prevent the laundry from catching

EN - 7
re), a cooling process starts after the heating
process. After this, the programme ends. At the
end of the programme, always remove the laundry
promptly.
ATTENTION: Never use the dryer without a lint
lter or with a damaged lint lter.
• Lint lters must be cleaned after each use as
indicated in Cleaning the Lint Filter.
• Lint lters must be dried after wet cleaning. Wet
lters might cause malfunction during the drying
process.
• Lint accumulation must not to be allowed around
the tumble dryer (not applicable for appliances
intended to be vented to the exterior of the building)
IMPORTANT: The clearance between the dryer
and the oor should not be reduced with objects such
as carpets, wood or panel, otherwise, sucient air
intake cannot be ensured for the machine.
• The maximum load capacity is 7 kilograms (dry
laundry).
• Do not install the dryer in rooms where there is risk
of freezing. Freezing temperatures negatively aect
the dryers performance.Condensation that freezes
in the pump and hose may cause damage.
1.5. Installing On Top Of a Washing Machine
ATTENTION: A washing machine cannot be placed
on the dryer. Pay attention to the warnings below
when installing the dryer on a washing machine.
ATTENTION: The dryer can only be placed on
washing machines that have same capacity and
above.
EN - 8
• To use the dryer on the washing machine, a xing
part must be used between the two products. The
xing part must be attached by an Authorised
Service Provider.
• When the dryer is placed on the washing machine,
the total weight of these products may reach almost
150 kilograms (when loaded). Place the products on
a solid oor that has a load bearing capacity!
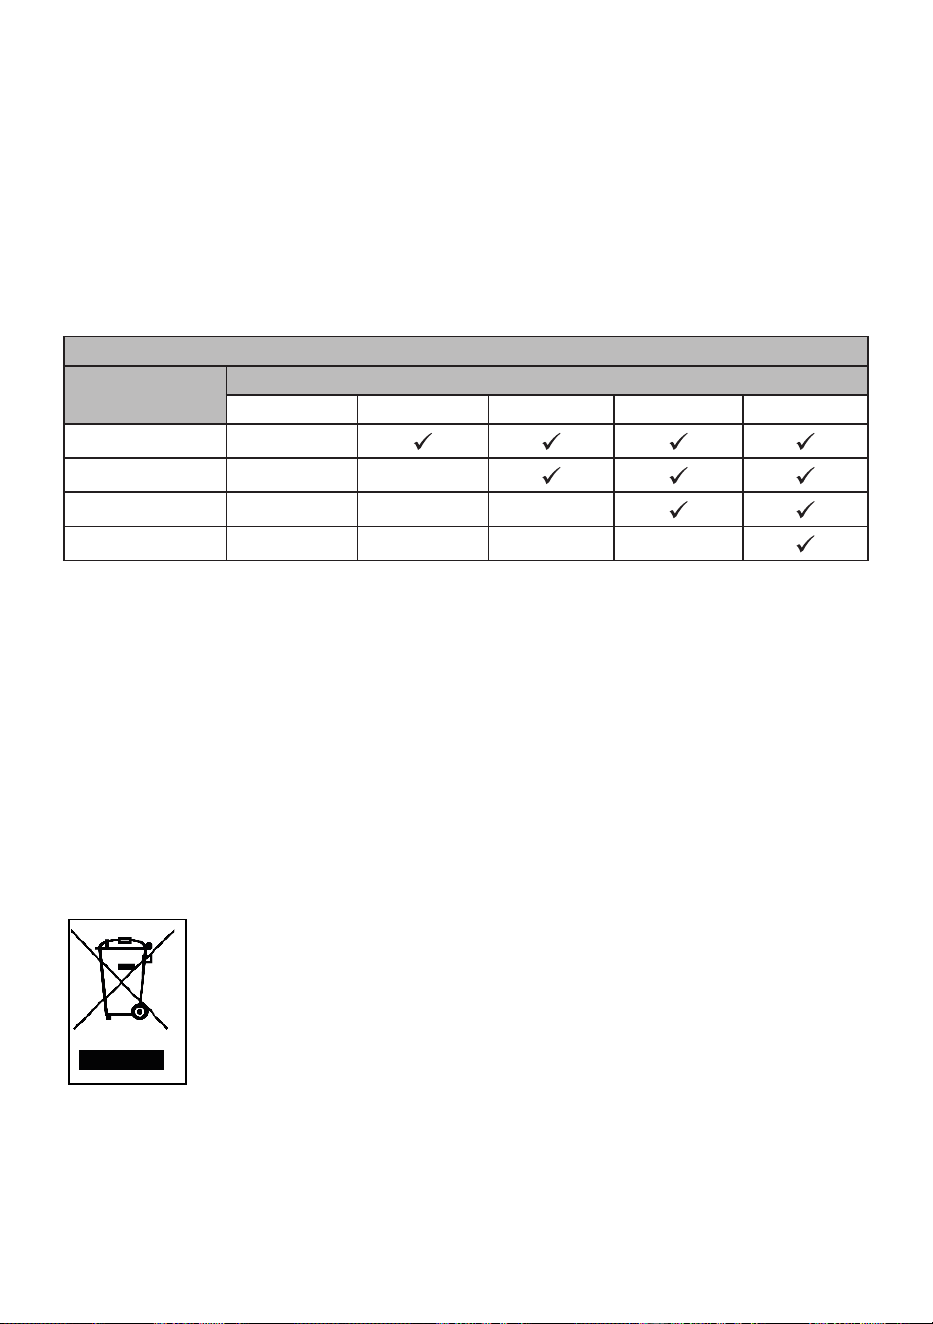
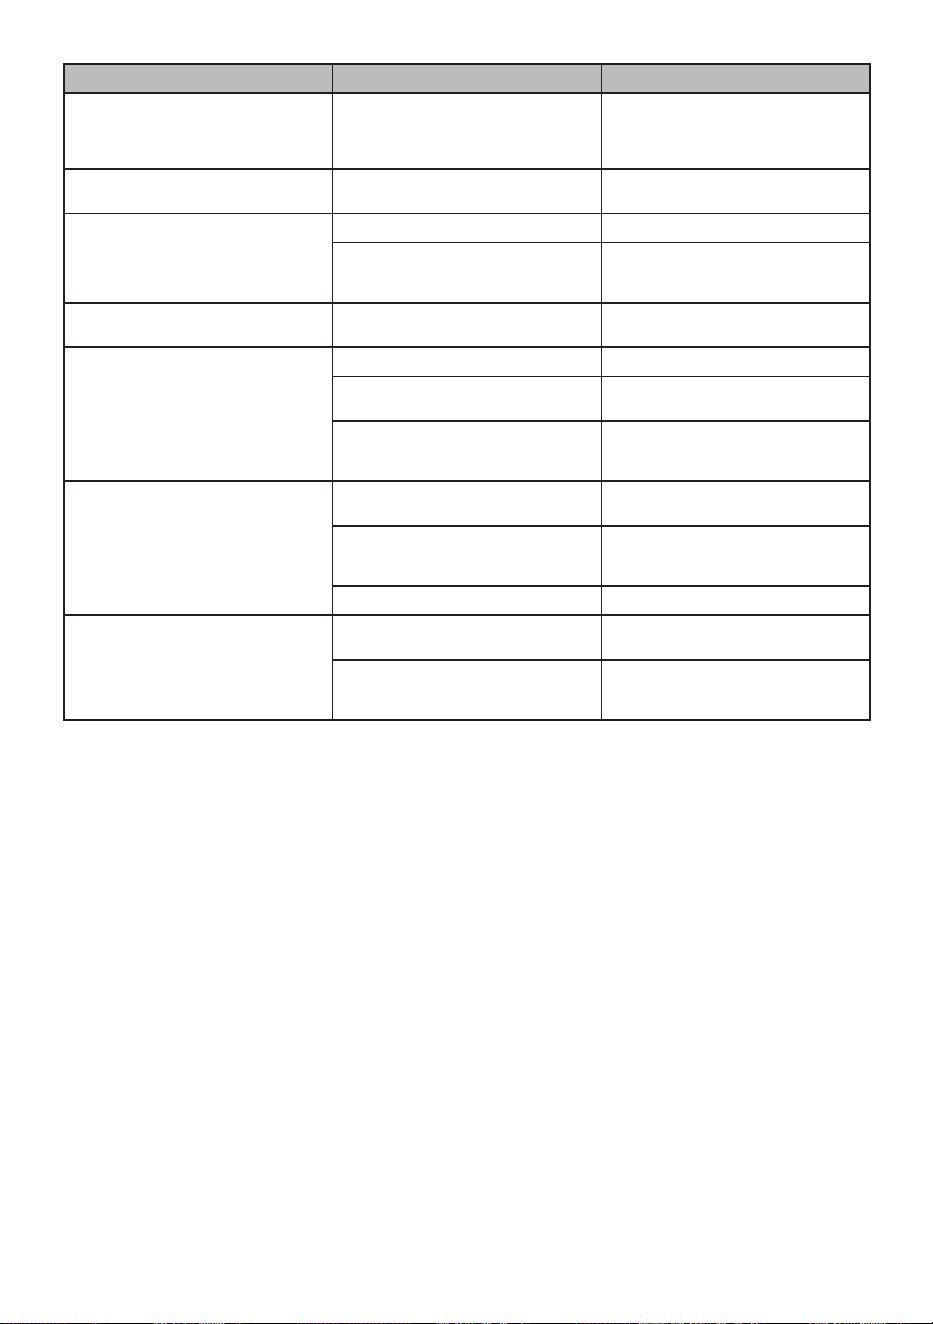
Appropriate Installation Table for Washing Machine and Tumble Dryer
Tumble Dryer
(Depth)
Washing Machine
37-41 cm 42-45 cm 46-49 cm 50-56 cm 57-63 cm
52,5 cm X
56 cm X X
61 cm X X X
64 cm X X X X
(For the depth information, please see 7. Technical Specications)
In order to put the dryer machine onto the washing
machine, a special stacking kit is required as an
optional extra. Please contact customer service to
acquire. The assembly instruction will be served
together with the stacking kit.
CE Declaration of conformity
We declare that our products meet the applicable European Directives, Decisions and
Regulations and the requirements listed in the standards referenced.
Disposing the Old Product
This product complies with EU WEEE Directive
(2012/19/EU). This product bears a classication symbol for waste electrical
and electronic equipment (WEEE).
This symbol, which is found on the product or information label, indicates
that this product must not be disposed together with other household waste
at the end of its service life. To prevent the potential harms of uncontrolled
waste disposal on the environment and human health, please keep this
product separate from other types of waste, and to prevent sustainable
reuse of material resources, make sure that it is recycled responsibly.
Contact your dealer or local authorities to get information on how and where you can take
the product for environmentally-safe recycling. This product cannot be mixed with other
commercial wastes for recycling.
EN - 9
2. INSTALLATION
• Before contacting the local Authorised
Service Provider for the installation
of the dryer, check the information in
the user manual to make sure that the
electrical installation and water outlet is
suitable. If they are not, call a qualied
electrician and a plumber to have the
necessary adjustments made.
• It is the customer’s responsibility to
prepare the dryer’s installation place, as
well as the electricity and waste water
installation. Before installation, check
the dryer for damage. If damaged, do
not have it installed. Damaged products
may endanger your health.
• Install the dryer on a stable and at
surface.
• Run the dryer in a dust-free
environment where the air ventilation
is good.
• The clearance between the dryer and
the oor should not be reduced with
objects such as carpets, wood or tape.
• Do not block the ventilation grills
found on the plinth of the tumble dryer.
• The appliance must not be installed
behind a lockable door, a sliding door
or a door with a hinge on the opposite
side of the tumble dryer, in such a
way that blocks the full opening of the
tumble dryer door.
• Once the dryer has been installed, the
connections must remain stable. When
installing the dryer, make sure that the
rear surface is not leaning on anything
(e.g. tap, socket).
• The operating temperature of the dryer
is +5°C to +35°C. If operated out of this
temperature range, the performance of
the dryer will be aected negatively and
the product will be damaged.
• Be careful when carrying the product
since it is heavy. Always wear safety
gloves.
• Always install the product should be
placed against a wall.
• The rear surface of the product should
be placed against the wall.
• When the product is placed on a stable
surface, use a water level to check if it
is fully stable. If not, adjust the feet until
it becomes steady. Repeat this process
every time you relocate the product.
• Do not place the dryer onto the power
cable.
2.1. Connection to Water Outlet (with
optional drain hose)
In products with a condenser unit, water
accumulates in the water tank during
the drying process. You must empty the
accumulated water after each drying
process. Instead of periodically emptying
the water tank, you can also use the water
drain hose provided with the product to
directly drain the water outside.
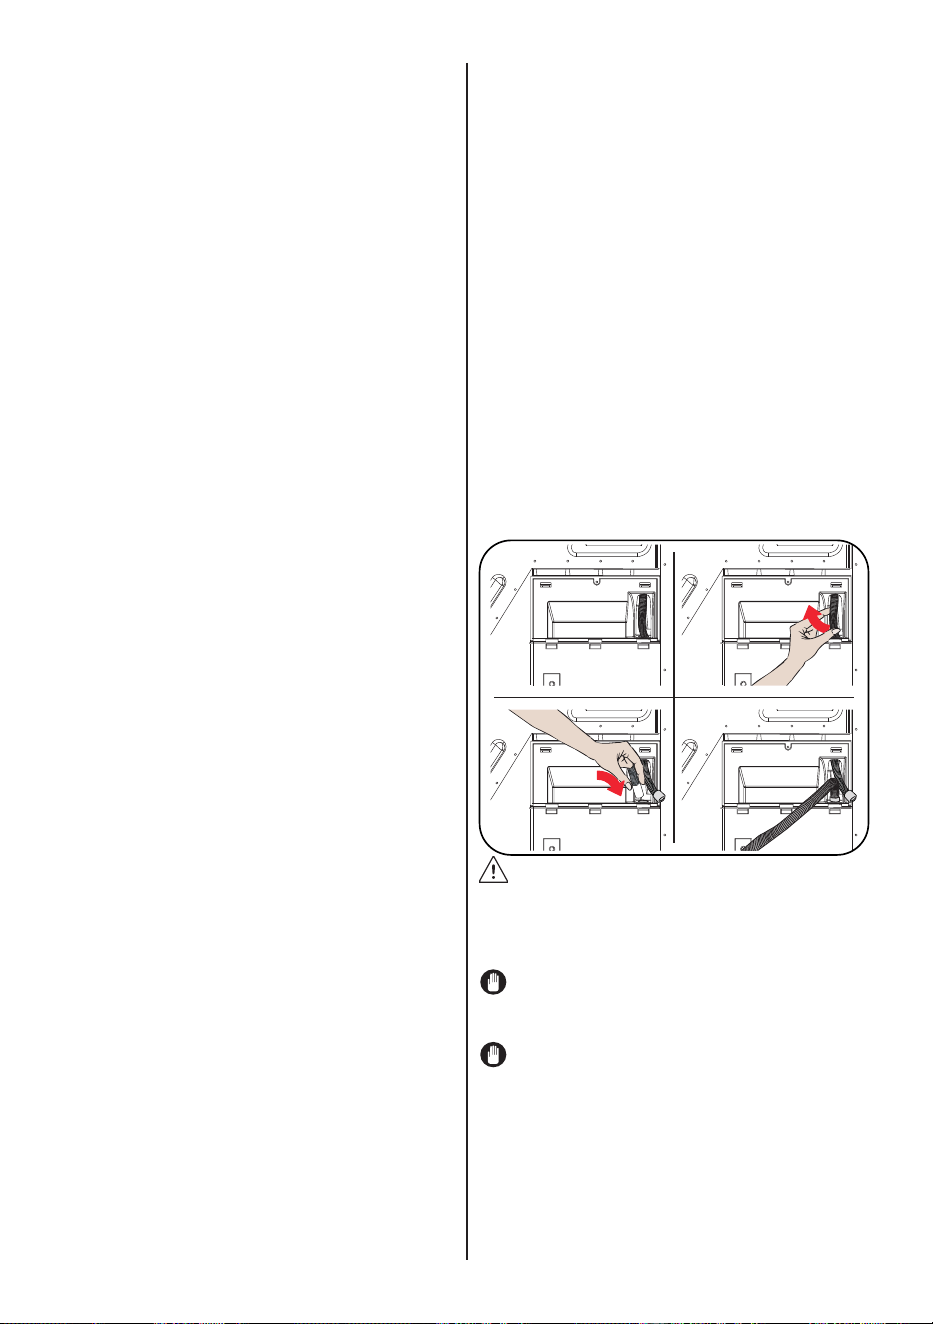
2.1.1. Connecting the Water Discharge
Hose
1. Pull and take out the end of the hose at the
back of the dryer. Do not use any tools to
take out the hose.
2. Fit one end of the water discharge hose,
which is provided with the product, to the slot
from which you have removed the hose.
3. Fix the other end of the water discharge hose
directly to the water outlet or sink.
ATTENTION: The hose must be
connected in a manner that it cannot be
displaced. If the hose comes out during
water discharge, there might be ooding in
your house.
IMPORTANT: The water discharge
house must be installed at a height of 80
cm maximum.
IMPORTANT: The water discharge
hose must not be bent between the outlet
and the product, folded or stepped over.
2
1
3

EN - 10
2.2. Adjusting the Feet
• For the dryer to work with less noise
and vibration, it must be stable and
balanced on its feet. Adjust the feed to
ensure that the product is balanced.
• Rotate the feet to the right and to the
left until the dryer is even and stable.
IMPORTANT: Never remove the
adjustable feet.
2.3. Electrical Connection
ATTENTION: There is risk of re and
electric shock.
• Your dryer is set to 220-240 V and 50
Hz.
• The mains cable of the dryer is
equipped with a special plug. This
plug must be connected to an earthed
socket protected by a fuse of 10
Amperes as indicated on the type plate.
The fuse current rating of the power
line where the outlet is connected must
also be 10 amperes. Consult a qualied
electrician if you do not have such an
outlet or fuse.
• Our company cannot be held
responsible for damages resulting from
usage without earthing.
IMPORTANT: Operating your machine
at low voltage values will shorten the
service life and decrease the performance
of your machine.
2.4. Under Counter Installation
• Leave at least 3 cm of space between
the side and rear walls of the product
and the underside of the worktop when
installing your product under a counter.
• Assembly / disassembly under the
counter if neccessary must be done by
authorized service.
3. OVERVIEW
1. Upper tray
2. Control panel
3. Loading door
4. Plinth opening slot
5. Plinth
6. Adjustable feet
7. Plinth cover
8. Type plate
9. Lint lter
10. Drawer Cover
11. Ventilation grills
1
2
3
4
5
6
7
8
9
10
11

EN - 11
4. PREPARING THE LAUNDRY
4.1. Sorting the Laundry to be Dried
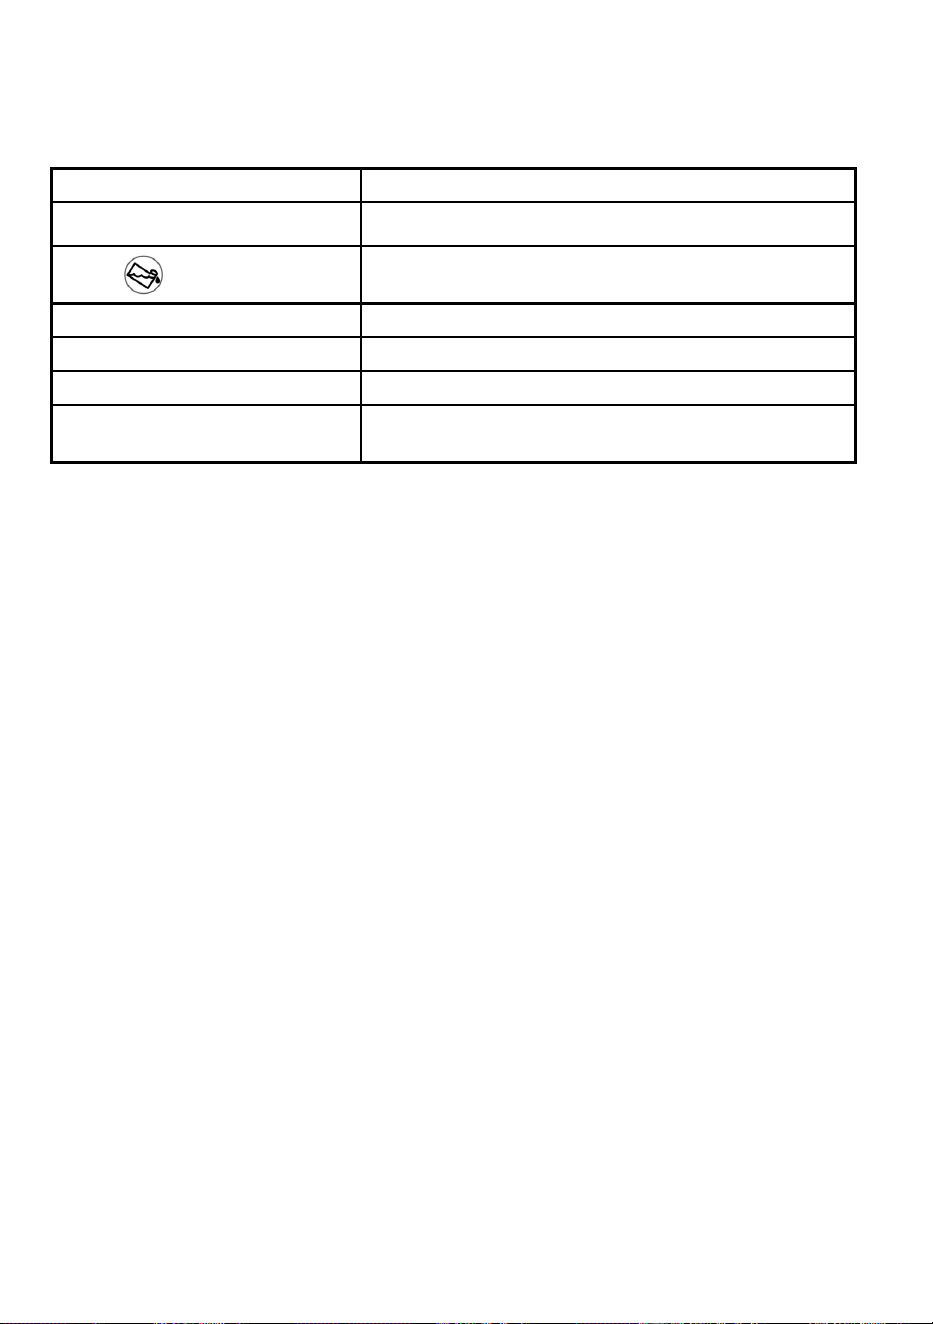
Follow the instructions on the labels of the laundry to be dried. Only dry items that have a
statement/symbol that indicates "they can be dried in a dryer".
• Do not operate the product with load amounts and laundry types other than those
given in 4.3. Load Capacity.
Suitable for drying in a
dryer
Does not need ironing
Sensitive/Delicate drying
Not suitable for drying in a
dryer
No drying
Do not dry-clean
At any temperature
At high temperatures
At medium temperatures At low temperatures Heatless Hang to dry
Spread to dry Hang wet to dry Spread in shadow to dry Suitable for dry cleaning
Do not dry thin, multi-layer or thick-layer fabrics together as they dry at dierent levels. For
this reason, dry clothes together that have the same structure and fabric type. This way,
you can get an even drying result. If you think that the laundry is still wet, you can select a
time programme for additional drying.
Please dry your big (like duvets) and small sizes of laundries seperately in order to not to
have a damp laundries.
EN - 12
4.3. Load Capacity
Follow the instructions in the "Programme
selection and consumption table". (See: 5.2
Programme selection and consumption
table). Do not load the product with more
laundry than the capacity values specied
in the table.
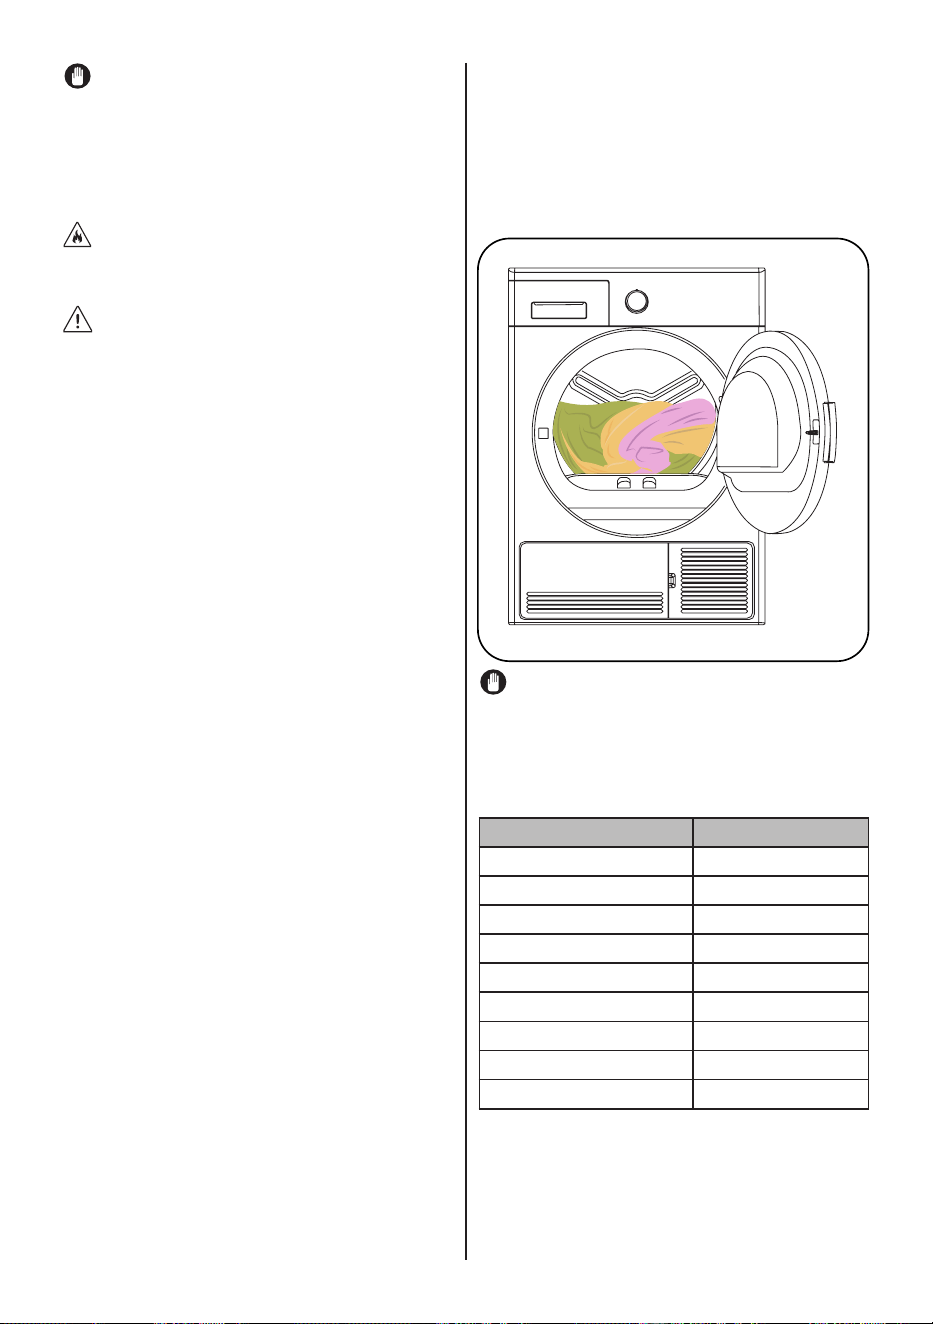
IMPORTANT: It is not recommended
to load the dryer with more laundry than
the amount shown in the gure. When
overloaded, the drying performance of
the dryer will decrease and the dryer and
laundry might be damaged.
Laundry Dry load weight (gr)
Bedsheet (double) 725
Pillowcase 240
Bath Towel 700
Hand Towel 225
Shirt 190
Cotton Shirt 200
Jean 650
Fabric - Gabardine Trousers 400
T-shirt 120
IMPORTANT: Delicate fabrics,
embroided fabrics, woolen/silk fabrics,
clothes made of delicate and expensive
fabrics, airtight clothes and tulle curtains
are not suitable for drying in the dryer.
4.2. Preparing the Laundry to be Dried
Risk of explosion and re!
Remove all objects from pockets such as
lighters and matches.
ATTENTION: The drum of the dryer and
the fabrics may get damaged.
• The clothes may have become
entangled during the washing process.
Separate them from each other before
placing them in the dryer.
• Remove all objects in the pockets of
the clothes and apply the following:
• Tie fabric belts, apron laces etc. to each
other or use a laundry bag.
• Lock the zips, clasps and fasteners, do
up the buttons of covers.
• To get the best drying result, sort the
laundry according to the textile type
and drying programme.
• Remove clips and similar metal parts
from the clothes.
• Woven goods such as t-shirts and knit
clothes generally shrink in the rst
drying. Use a protective programme.
• Do not over-dry synthetics. This will
cause creases.
• When washing the laundry to be dried,
adjust the amount of softener according
to the data from the manufacturer of the
washing machine.

EN - 13
5. USING THE TUMBLE DRYER
5.1. Control Panel
1. Programme Selection Knob
2. Electronic indicator and additional
functions
5.1.1. Programme Selection Knob
Use the programme selection knob to select
the desired drying programme
1
2
5.1.2. Electronic Indicator and Additional
Functions
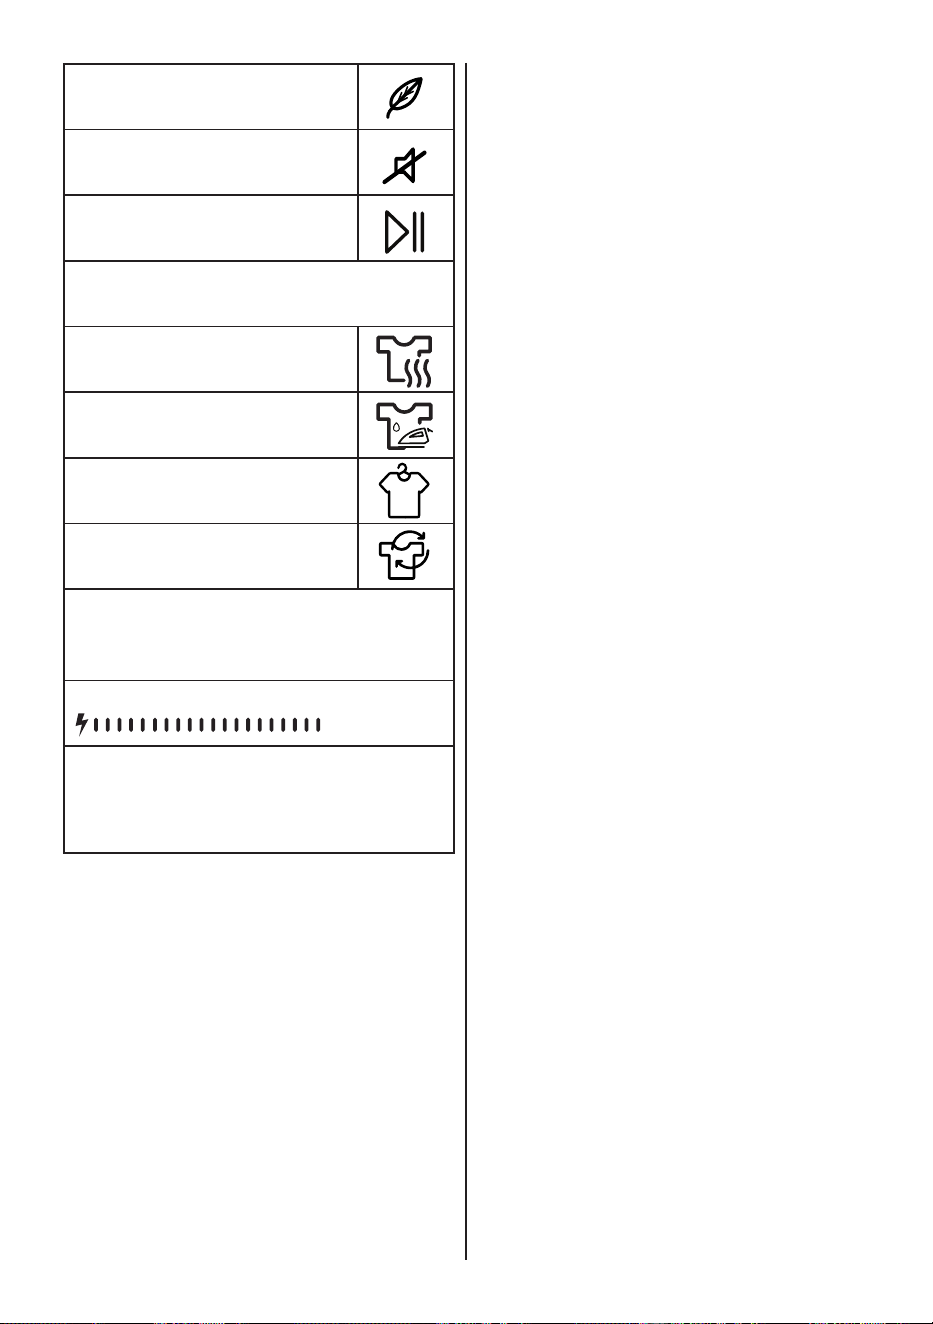
Display symbols:
Water tank warning indicator
Lint lter cleaning warning indicator
Heat exchanger cleaning warning
indicator
Extra Dry
Cupboard Dry
Iron Dry
Drying level 1
Drying level 2
Drying level 3
Drying level 4
Delay Timer
Anti-crease 60‘
Anti-crease 120‘
EN - 14
Delicate
Buzzer Cancel
Start and pause
Drying Step Display:
Drying
Iron dry
Cupboard dry
End
The electronic display shows the drying steps
throughout the program. Every time a program step
starts, the relevant drying step light turns on. Once
the drying step is complete, the relevant drying step
light turns o.
Energy Consumption Display
The energy consumption display shows the energy
consumption of the selected program. The bigger
the display, the more the energy consumption. The
energy consumption level increases or decreases
depending on the fabric type, duration of the selected
program, the drying level and the spinning speed.
EN - 15
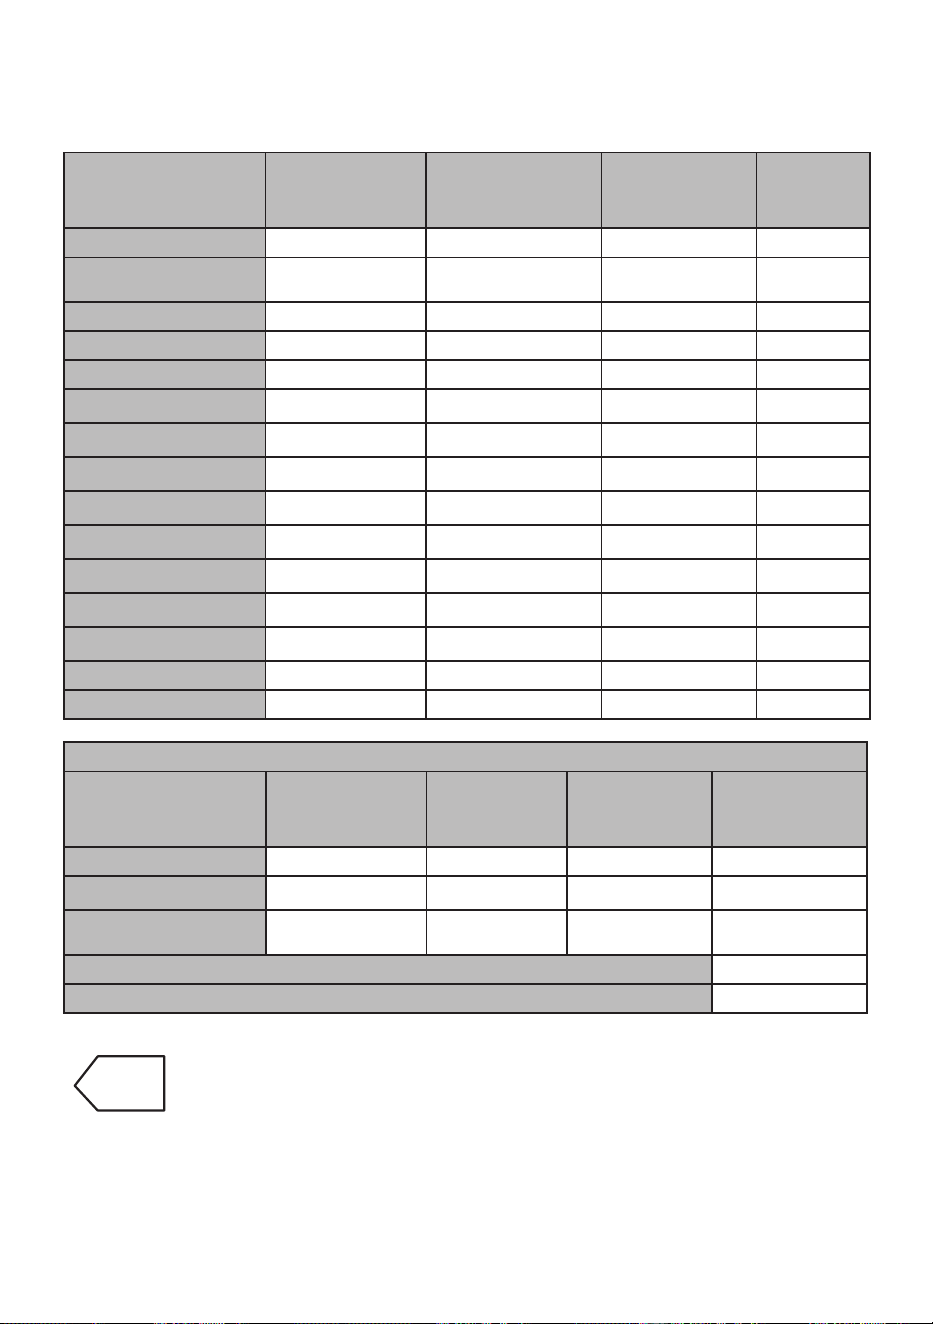
5.2. Programme Selection and Consumption Table
Press the Start/Pause button to start the programme. The Start/Pause LED that indicates
that the programme has started and the Drying LED will come on.
Programme Load (kg)
Washing
machine
spin speed
Approximate
amount of
remaining
humidity
Duration
(minutes)
Cottons + Cupboard Dry 7 1000 60% 125
Synthetics + Cupboard
Dry
3,5 800 40% 51
Delicate 2 600 50% 46
Mix 4 1000 60% 92
Towels 3 1000 60% 68
Hygiene 3 1000 60% 66
Drying Time - - - -
Baby Care 3 1000 60% 66
Jeans 4 1000 60% 91
Sport 4 800 40% 58
Outdoor 2 800 40% 42
Wool Refresh - - - -
Refresh - - - -
Express 29' 1 1200 50% 29
Shirts 12' 0,5 1200 50% 12
Energy consumption values
Programme Load (kg)
Washing
machine
spin speed
Approximate
amount of
remaining
humidity
Energy
consumption
values (kWh)
Cottons + Cupboard Dry 7 1000 60% 4,18
Cottons + Iron Dry
7 1000 60% 3.40
Synthetics + Cupboard
Dry
3,5 800 40% 1,42
Power consumption in the "o mode" P
O
(W) 0,5
Power consumption in the "on mode" P
L
(W) 1,0
The Cotton Cupboard Dry programme is the standard drying programme
that can be run with a full or half load and for which the information is
given on the label and product receipt. This programme is the most energy
ecient programme to dry normal wet cotton clothes.
*Energy labelling standard programme (SANS 61121:2015)
All values in the table were determined in accordance with the EN 61121:2013 standard.
Consumption values may vary from the values in the table depending on the fabric type,
spin speed, environment conditions and voltage values.

EN - 16
5.2.1. Auxiliary Functions
The table that summarises the options that can be selected in programmes is given below.
Option Description
Drying Target
Select the drying target suitable for your laundry to be dried.
Select Extra Dry for thick and multilayer laundry that takes time to dry. Select
Closet Dry for regular, single-layer laundry. Select Iron Dry for laundry that you
wish to leave damp, ready for ironing.
Drying Level
The dampness level obtained after drying can be increased by another 3 levels
in addition to the standard setting. This way, it is ensured that the laundry is drier.
Levels that can be selected apart from the standard setting (Level 1) 2 (low), 3
(medium), 4 (high). After selection, light of the relevant drying level turns on.
Delicate Drying* Delicate fabrics are dried in a longer time at low temperatures.
Delayed Start
You can delay the start of the program by selecting a time between 1 and 23
hours. You can press Start/Pause to activate the desired delay time. When this
time is up, the selected program will start automatically. During the delay time,
options compatible with the program can be activated/deactivated. If you long
press the Delayed Start button, the delay time will change continuously.
Cancel Audible Warning
The drying machine will give an audio warning when the buttons are pressed,
when the program selection knob is turned and when the program ends. To cancel
audio warnings, press and hold the “Anti-Crease Option” for 3 seconds. When you
press this button, you will hear an audible warning that indicates that the option
has been activated and the audible warnings stated will be cancelled.
Drying Time
If the program knob is turned to Time Drying, you can press the Time Drying option
button to select it and press Start/Pause to start the program.
Child Lock
There is a child lock option to avoid changes in the programme ow when keys are
pressed during the programme. To activate child lock feature user should press
“Options” and “Anticrease” buttons simultaneously for 3 sec. When the child lock
activated, all keys will be deactivated.Child lock is not automatically deactivated
at the end of the program. To deactivate child lock at end of the programme,
set the programme selection knob to “O” position. Then programme selection
knob to rst position. Child lock is still active. To deactivate the child lock , user
should press “Options” and “Anticrease” buttons simultaneously for 3 sec. When
activating/deactivating the child lock, “CL” will visualize on display for 2 sec and
then becomes o; and an audible warning will be heard. Warning: When the
product is running or the child lock is active, if you turn the programme selection
knob, you will hear an audible warning and “CL” will visualize on display for 2 sec
and then becomes o. If you turn the programme selection knob, you will hear an
audible warning. Even if you set the programme knob to another programme, the
previous programme will continue running. To select a new programme, you need
to deactivate the child lock and then set the programme selection knob.
Anti-crease*
If you do not open the door of the machine at the end of the program, the
anti-crease option will be active for 60 minutes. When the anti-crease option is
selected, anti-crease will be active for 120 minutes.
Spin Speed Selection
For the laundry to be dried, set the spin speed on the washing machine where you
washed the laundry. This way, it is ensured that the estimated drying time is more
accurately displayed.
*Options vary depending on model.
EN - 17
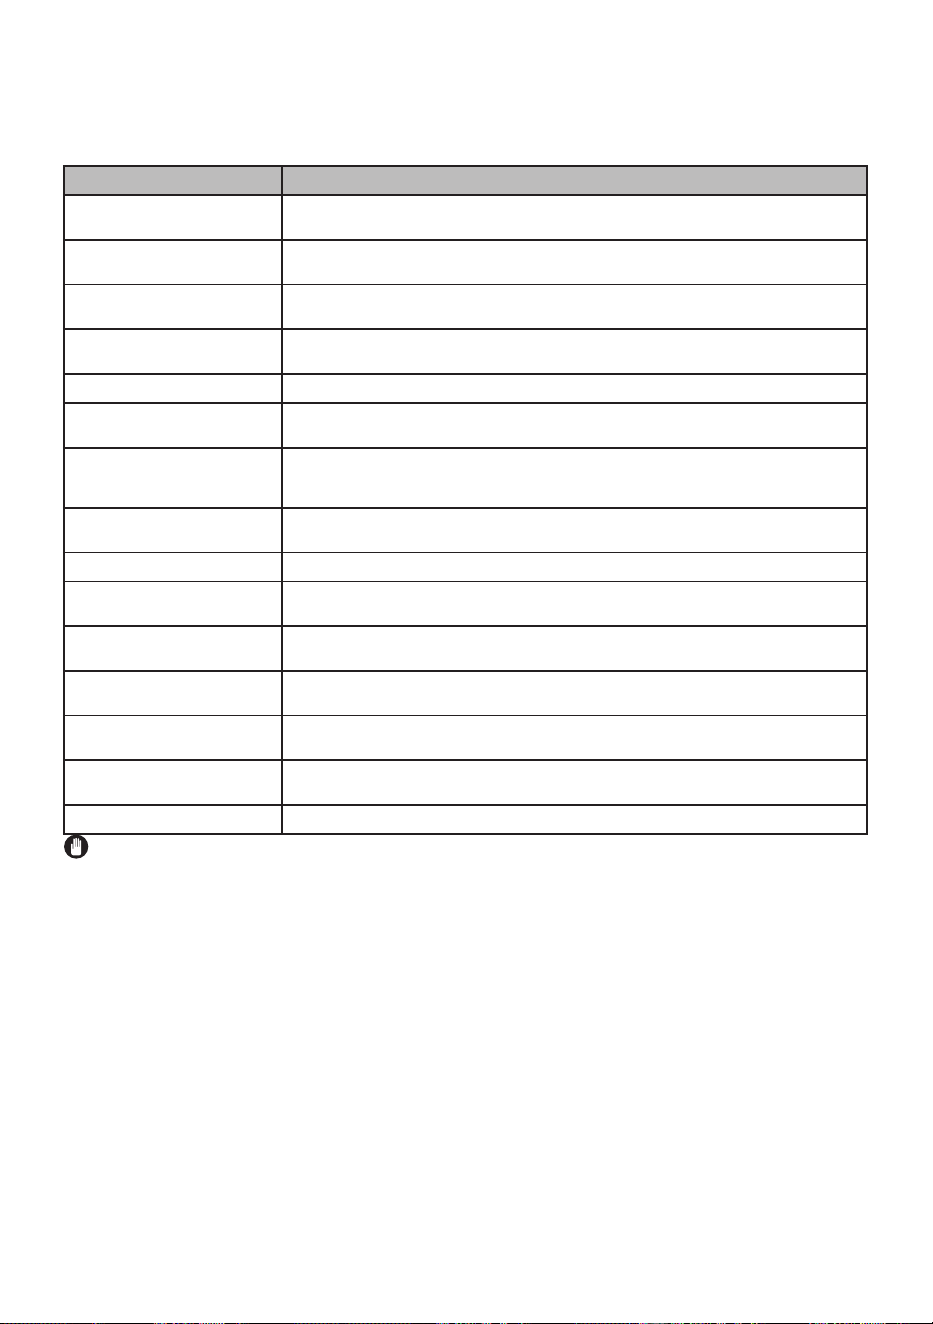
5.2.2. Starting the Programme
The Start/Pause LED will ash during programme selection.Press the Start/Pause button
to start the programme. The Start/Pause LED that indicates that the programme has
started and the drying LED will come on.
Programme Description
Cottons + Cupboard Dry
This programme dries cotton laundry including bedsheets, pillowcases, pyjamas,
underwear, tablecloths etc.
Synthetics + Cupboard Dry
This programme dries synthetics, such as shirts, t-shirts, blouses, at a lower
temperature compared to the cottons programme.
Delicate
This programme dries thin clothes like shirts, blouses and silk garments at a low
temperature to make them ready to wear.
Mix
This programme dries cotton-synthetic mixed garments that do not discolour to
make them ready to wear.
Towels This programme dries thick cotton laundry such as towels, bathrobe, etc.
Hygiene
"This programme is suitable for the fabrics which need
hygiene requirements."
Drying Time
To reach the required drying level at a low temperature, you can use the time
programmes of 10 min. to 150 min. Regardless of the drying level, the programme
stops at the desired time.
Baby Care
This programme provides hygienic drying for delicate infant clothes at a low
temperature.
Jeans This programme is used to dry jeans.
Sport
Sport program is used for synthetic sport laundries like shorts, t-shirts at low
temperature.
Outdoor
This programme is suitable for outdoor clothing, waterproof jackets, jackets with
inner insulation, etc.
Wool Refresh
Wool refresh helps wool textiles to remove excess water after washing by applying
low temperature and gentle movements of drum.
Refresh
This program provides ventillation for 10 minutes without applying hot air to help
freshen up your garments.
Express 29'
1 kg of cotton shirts spun at a high speed in the washing machine are dried in 29
minutes.
Shirts 12' 2 to 3 shirts are ready for to be ironed in 12 minutes.
IMPORTANT: Do not open the loading door while the programme is running. If you
have to open the door, do not keep it open for a long time.

EN - 18
5.2.3. Selection Stand By
After 15 minutes without user action in
selection mode, machine goes to energy-
saving mode due to decrease energy
consumption. No led activation on display.
When we changed the knob position in
energy-saving mode the jog dial led should
be x on in every knob change and nothing
is shown in display.
To restart the machine it will be necessary
to move selector to OFF and select again
the program.
5.2.4. Programme Progress
During the Programme
If you open the door when the programme
is running, the product will switch to standby
mode. Once the door has been closed,
press the Start/Pause key to resume the
programme.
Do not open the loading door when the
programme is running. If you have to open
the door, do not keep it open for a long
time.
Programme End
Once the programme is over, the warning
LEDs for Start/Pause, water tank level, lter
cleaning and condenser cleaning will turn
on. Additionally, an audible warning will be
given at the end of the programme. You can
remove the laundry to make the machine
ready for a new load.
IMPORTANT: Clean the lint lter after
every programme. Empty the water tank
after every programme.
IMPORTANT: If you do not take out the
laundry after the programme has ended, the
1-hour Anti Crease phase will automatically
be activated. This programme rotates the
drum at regular intervals to prevent creases.
5.3. Drum Light Information
• This product includes LED Drum Light.The
light works automatically when youopen
the door. And closes itself after awhile
automatically.
• It is not an adjustable option for user to
open or close it.
• Please do not try to replace or modify the
LED Light.
EN - 19
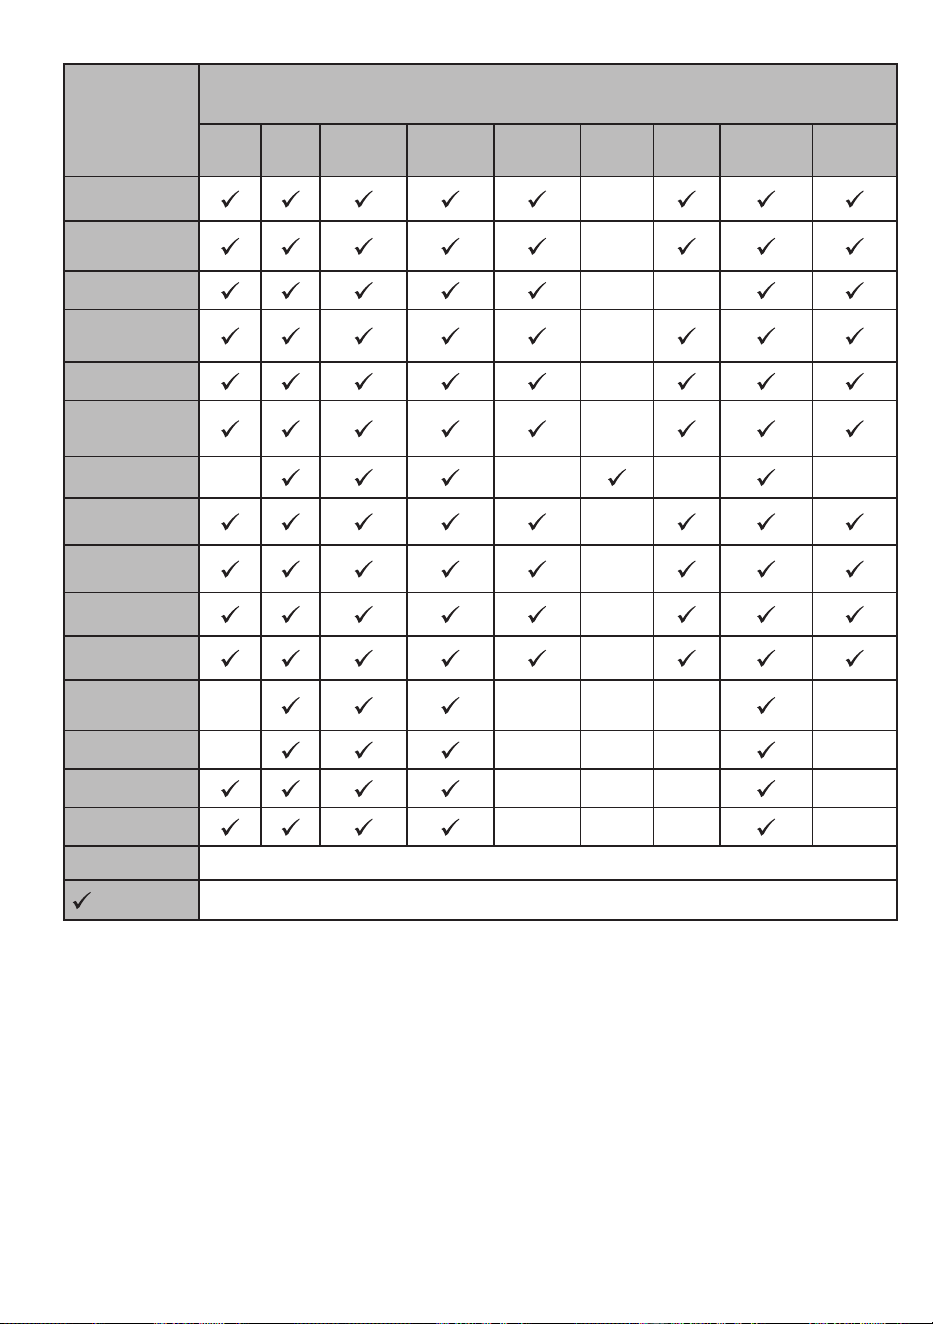
PROGRAMMES
OPTIONS
Drying
Target
Delay
Start
Buzzer
Cancel
Child Lock Delicate
Time
Drying
Drying
Level
Anticrease Spin
Cottons +
Cupboard Dry
X
Synthetics +
Cupboard Dry
X
Delicate X X
Mix X
Towels X
Hygiene X
Drying Time X X X X
Baby Care X
Jeans X
Sport X
Outdoor X
Wool Refresh X X X X X
Refresh X X X X X
Express 29' X X X X
Shirts 12' X X X X
X Not selectable
Selectable
EN - 20
6. CLEANING AND CARE
IMPORTANT: Do not use industrial
chemicals to clean your dryer. Do not use a
dryer that has been cleaned with industrial
chemicals.
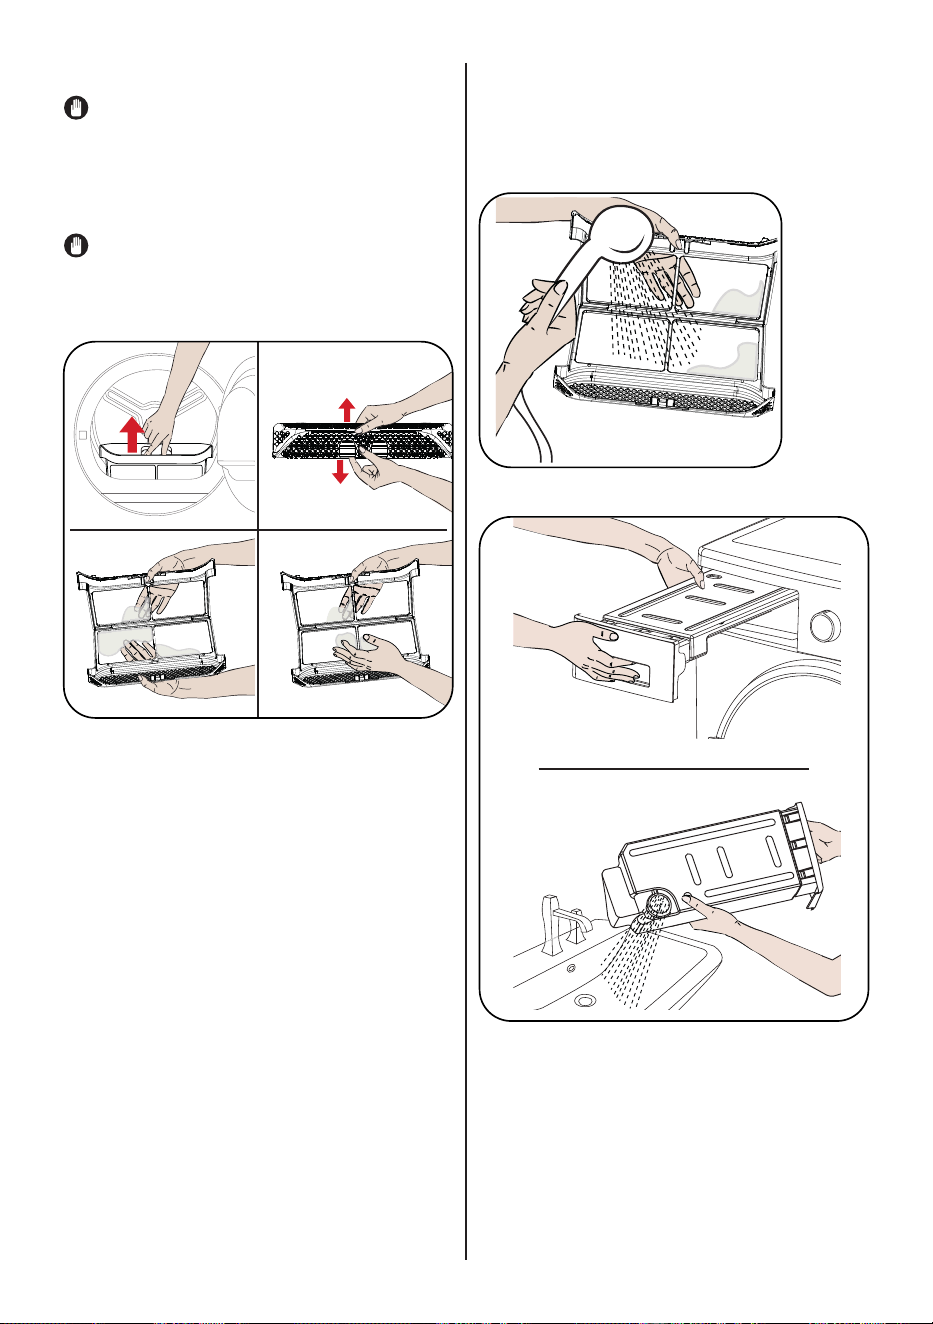
6.1. Cleaning the Lint Filter
IMPORTANT: DO NOT FORGET TO
CLEAN THE LINT FILTER AFTER EACH
USE.
To clean the lint lter:
1. Open the loading door.
2. Pull up the lint lter to remove it.
3. Use your hands or a soft cloth to clean
the lint.
4. Close and ret the lint lter.
1
2
3
4
After the dryer has been used for a certain
period of time, if you encounter a layer that
will cause obstruction on the lter surface,
wash the lter with warm water to clean the
layer. Dry the lter thoroughly before
reinstalling it again.
6.2. Emptying the Water Tank
1. Pull the drawer cover and carefully take
out the tank.
2. Empty the water in the tank.
3. If there is lint accumulated on the
discharge cap in the tank, clean it with
water.
4. Ret the water tank.
1
2
EN - 21
IMPORTANT: Never remove the water
tank when the programme is running. The
water condensed in the water tank is not
suitable for human consumption.
IMPORTANT: DO NOT FORGET TO
EMPTY THE WATER TANK AFTER EACH
USE.
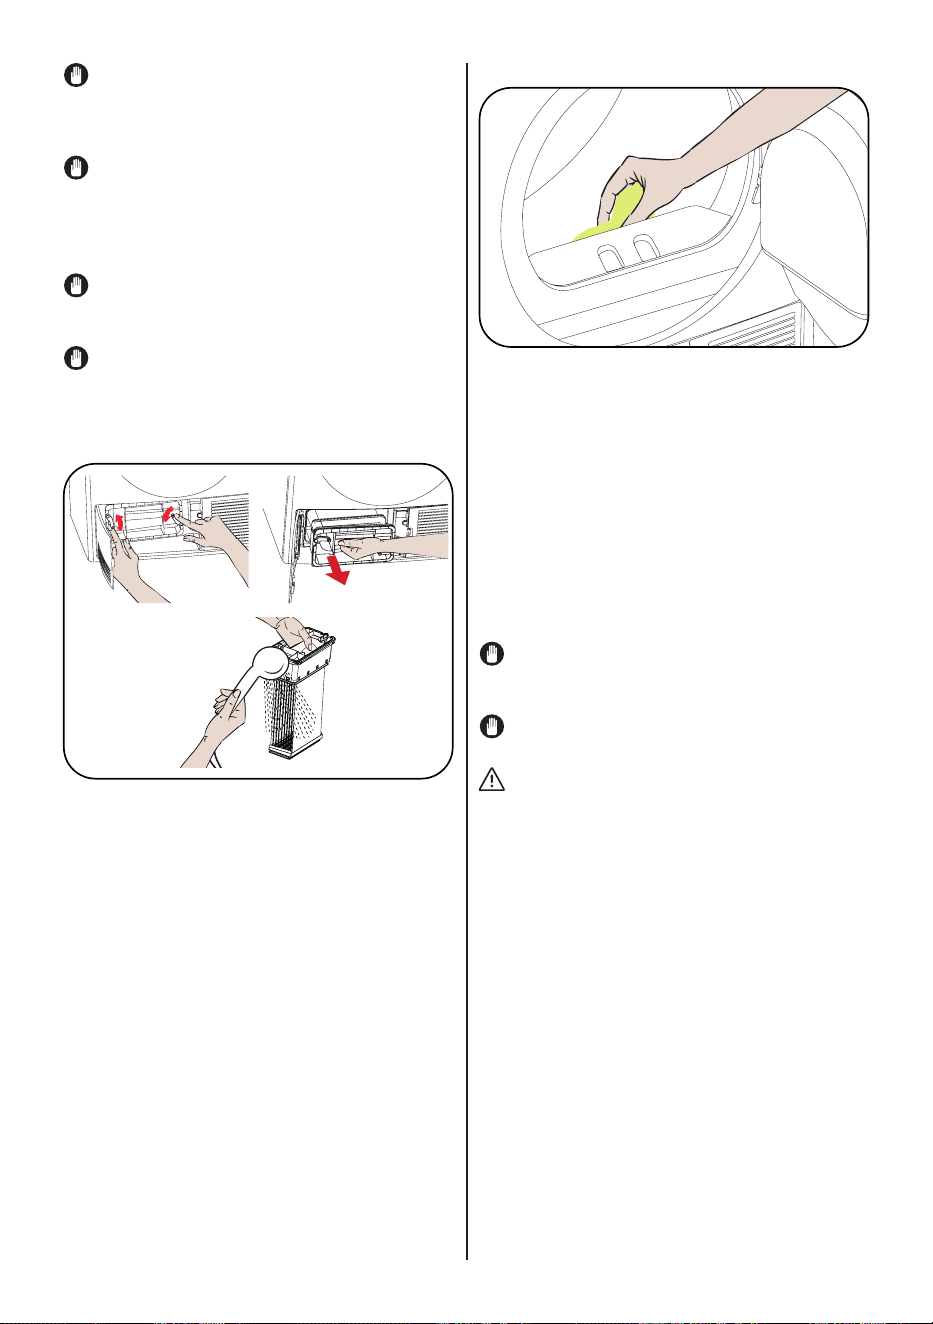
6.3. Cleaning the Condenser
IMPORTANT: Clean the condenser
when you see the warning “Condenser
Cleaning”.
IMPORTANT: EVEN IF THE
“CONDENSER CLEANING WARNING
LED” IS NOT ON: CLEAN THE
CONDENSER AFTER EVERY 30 DRYING
PROCESSES OR ONCE A MONTH.
If the drying process is completed, open the
loading door and wait for it to cool down.
1. Open the plinth and release the 2 cover
locks of the condenser.
2. Hold the condenser by the plastic part
and pull it out.
3. Clean it with a showerhead and wait for
the water to drain o.
4. Fully insert the condenser into its seat
and lock the 2 locks.
5. Close the plinth cover
1
2
3
6.4. Cleaning the Humidity Sensor
Inside the machine, there are humidity
sensors that detect whether the laundry is
dry or not.
To clean the sensors:
1. Open the loading door of the machine.
2. If the machine is still hot due to the drying
process, wait for it to cool down.
3. Using a soft cloth soaked in vinegar, wipe
the metal surfaces of the sensor and dry
them.
IMPORTANT: CLEAN THE METAL
SURFACES OF THE SENSOR 4 TIMES A
YEAR.
IMPORTANT: Do not use metal tools to
clean the metal surfaces of the sensor.
WARNING: Due to the risk or re and
explosion, do not use solution agents,
cleaning agents or similar products when
cleaning the sensors.
EN - 22
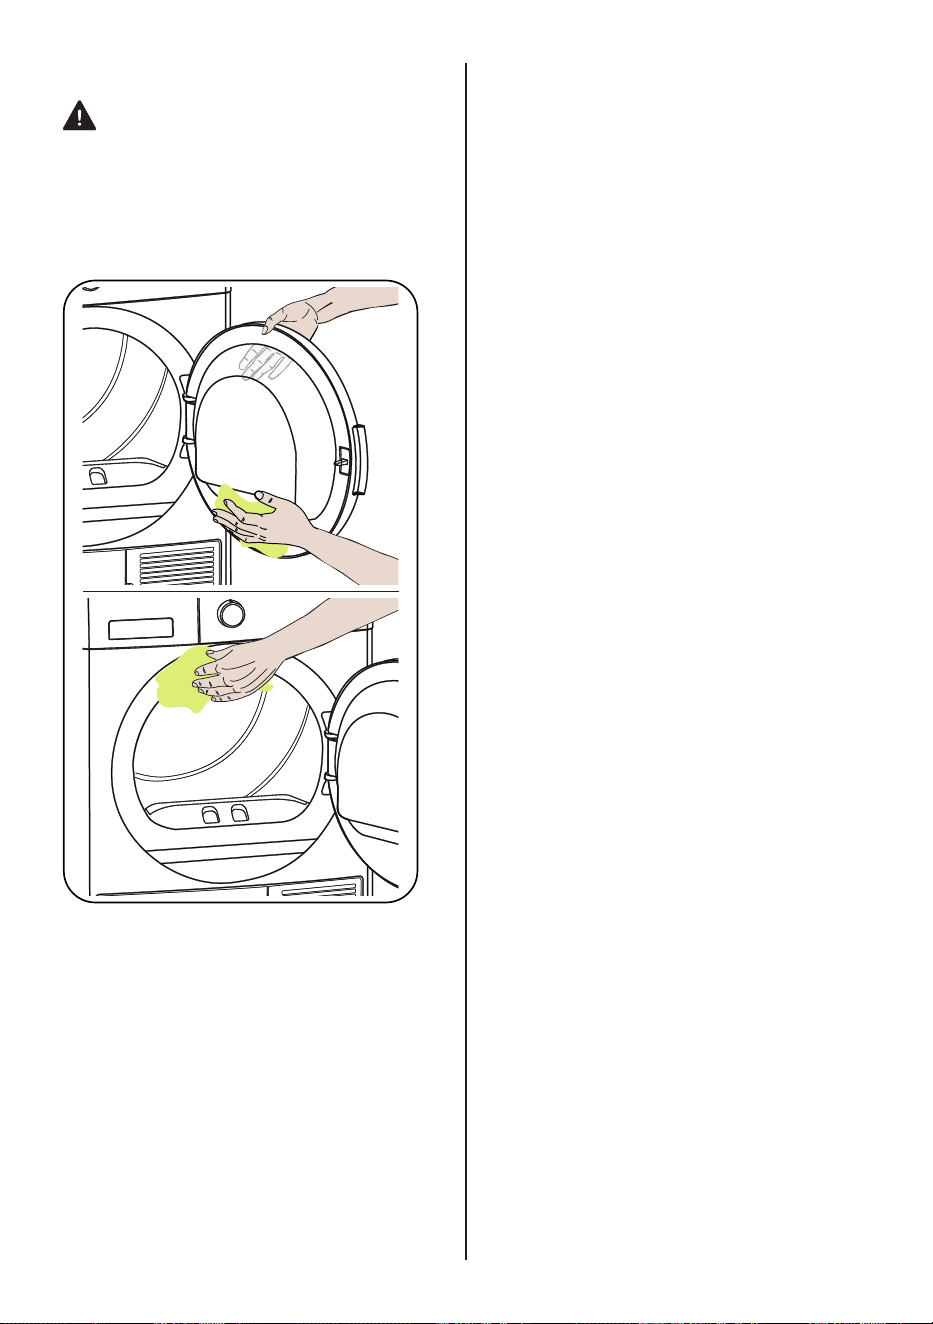
6.5. Cleaning the Inner Surface of the
Loading Door
IMPORTANT: DO NOT FORGET TO
CLEAN THE INNER SURFACE OF THE
LOADING DOOR AFTER EACH DRYING
PROCESS.
Open the loading door of the dryer and
clean all of the inner surfaces and the
gasket with a soft, damp cloth.
EN - 23
7. TECHNICAL SPECIFICATIONS
Brand SMEG
Model name D3T7SSA
Height Min: 845 mm / Max: 855 mm*
Width 596 mm
Depth 525 mm
Capacity (max.) 7 kg**
Net weight (with plastic door) 30,5 kg
Net weight (with glass door) 32,5 kg
Voltage
220-240 V
Power
2200 W
*Min. height: Height with the adjustable feet not used. Max. height: Height with the
adjustable feet extended to the maximum.
**Dry laundry weight before washing.
IMPORTANT: To improve the quality of the dryer, technical specications are subject to
change without prior notice.
IMPORTANT: The values declared have been obtained in a laboratory environment
according to the relevant standards. These values may change depending on the
environmental conditions and use of the dryer.

EN - 24
8. TROUBLESHOOTING
Your dryer is tted with systems that continuously perform checks during the drying
process to take the necessary measures and warn you in case of any malfunction.
WARNING: If the problem persists even if you have applied the steps in this section,
please contact the your dealer or an Authorised Service Provider. Never try to repair a
nonfunctional product.
PROBLEM REASON SOLUTION
The drying process takes a long
time.
The surface of the lint lter might be
clogged.
Wash the lter with lukewarm water.
The condenser might be clogged. Clean the condenser.
The ventilation grills in front of the
machine might be closed.
Open the doors/windows to prevent
the room temperature from rising
too much.
There might be a layer of limescale
on the humidity sensor.
Clean the humidity sensor.
The dryer might be overloaded with
laundry.
Do not overload the dryer.
The laundry might be insuciently
spun.
Select a higher spin speed on your
washing machine.
Laundry comes out damp at the end
of the drying process.
The laundry that comes out hot at the end of the drying process
generally feels more humid.
The programme used might not be
suitable for the type of laundry.
Check the care labels on the
laundry items, select a suitable
programme for the type of laundry
and additionally, use the time
programmes.
The surface of the lint lter might be
clogged.
Wash the lter with lukewarm water.
The condenser might be clogged. Clean the condenser.
The dryer might be overloaded with
laundry.
Do not overload the dryer.
The laundry might be insuciently
spun.
Select a higher spin speed on your
washing machine.
The dryer cannot be opened or the
programme cannot be started. The
dryer does not get activated when
adjusted.
The dryer might not be plugged in.
Make sure that the plug is tted in
the socket.
The loading door might be open.
Make sure that the loading door is
properly closed.
You might not have set a
programme or pressed the Start/
Pause key.
Make sure that the programme has
been set and the dryer is not in the
Standby (Pause) mode.
Child lock might be active. Deactivate the child lock.
The programme has been
interrupted for no reason.
The loading door might not be
closed properly.
Make sure that the loading door is
properly closed.
There might have been a power
failure.
Press the Start/Pause key to start
the programme.
The water tank might be full. Empty the water tank.
Clothes have shrunk, felted or
deteriorated.
The programme used might not be
suitable for the type of laundry.
Check the care labels on the
laundry items, select a suitable
programme for the type of laundry.
EN - 25
PROBLEM REASON SOLUTION
Water leaking from the loading door.
There might be lint accumulated on
the inner surfaces of the loading
door and on the surfaces of the
gasket of the loading door.
Clean the inner surfaces of the
loading door and the surfaces of the
gasket of the loading door.
The loading door opens on its own.
The loading door might not be
closed properly.
Push the loading door until you hear
the closing sound.
The water tank warning symbol is
on/ashing.
The water tank might be full. Empty the water tank.
The water discharge hose might
be bent.
If the product is connected directly
to the water outlet, check the water
discharge hose.
The condenser cleaning warning
symbol is on.
The condenser might be unclean. Clean the condenser.
The lter cleaning warning symbol
is on.
The lint lter might be unclean. Clean the lter.
The lter seat might be clogged
by lint.
Clean the lter seat.
There might be a layer that causes
obstruction on the surface of the
lint lter.
Wash the lter with lukewarm water.
The program can not be started and
the lter warning led is blinking
The lter seat might be clogged
by lint.
Clean the lter seat.
There might be a layer that causes
obstruction on the surface of the
lint lter.
Wash the lter with lukewarm water.
The condenser may not be placed. Replace the condenser.
The program can not be started and
both condenser and lter warning
leds are blinking
The condenser and lter may not
be placed.
Replace the lter and condenser.
The lter and condenser warning
leds are blinking even though the
lter and condenser are placed.
Call technical service.
EN - 26
9. AUTOMATIC FAULT WARNINGS AND WHAT TO DO
Your tumble dryer is equipped with a built-in fault detection system, indicated by a
combination of ashing operation lights. The most common failure codes are shown below.
ERROR CODE SOLUTION
E00 Contact the nearest authorised service agent.
E03 /
Empty the water tank, if problem does not solved,
contact the nearest authorised service agent.
E04 Contact the nearest authorised service agent.
E05 Contact the nearest authorised service agent.
E06 Contact the nearest authorised service agent.
E08
There may be voltage uctuation in mains.Wait until
voltage is appropriate for working range.
EN - 27
11. DESCRIBING THE ENERGY
LABEL AND SAVING ENERGY
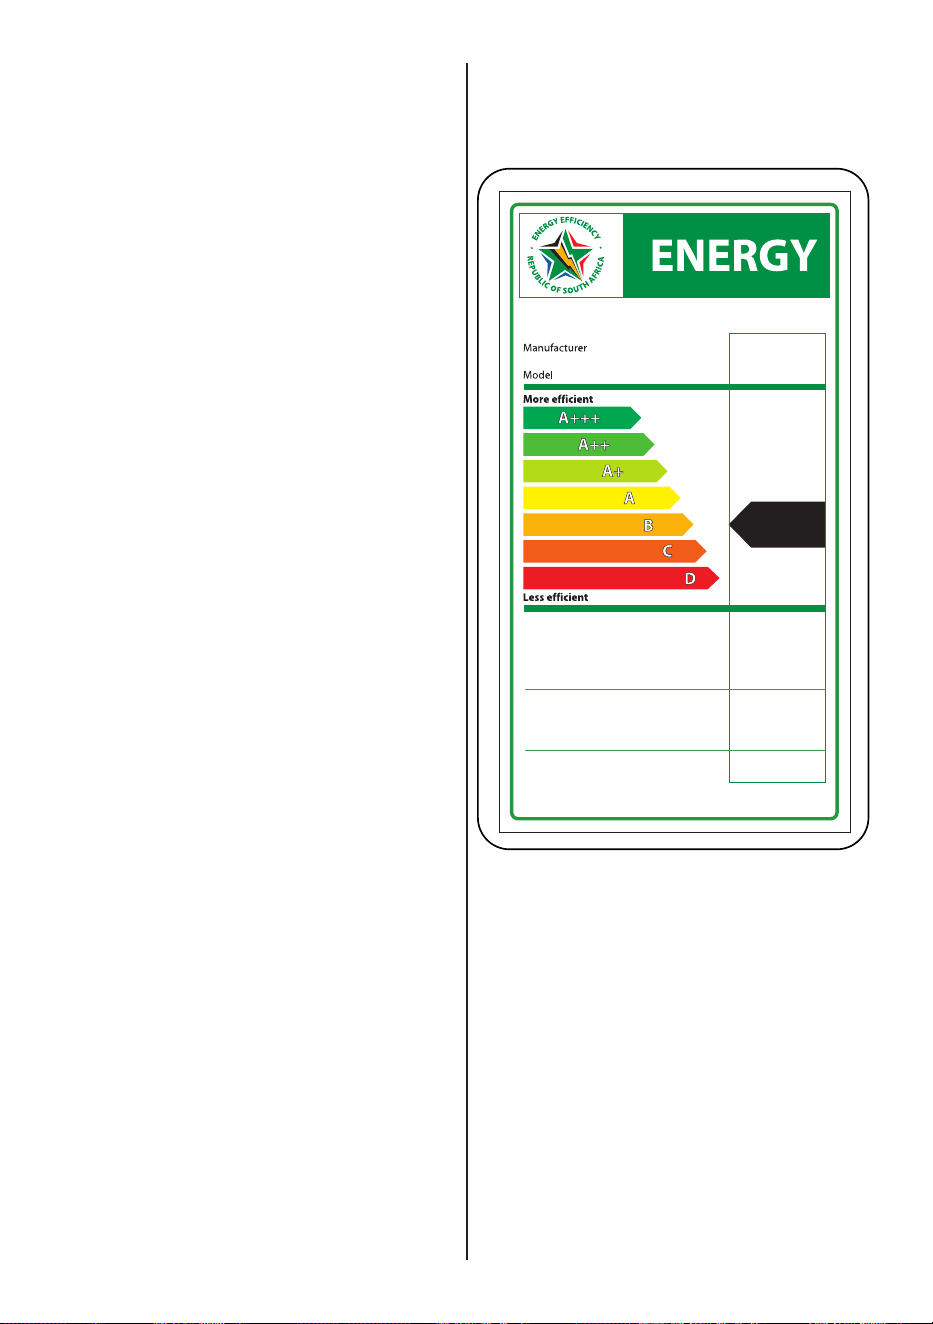
11.1. Energy Labelling
1. Trademark
2. Model
3. Energy Class
4. Energy Consumption
5. Dry Laundry Capacity
6. Machine Technology
7. Noise During Drying
3.11
7
65
Energy consumption, kWh/cycle
Noise (Optional)
(dB(A) re 1 pW)
Actual energy consumption will depend on
how the appliance is used
Capacity (cotton), kg
Condenser
Norm SANS 61121
Further information is contained in the product brochure.
Tumble
dryer
SMEG
D3T7SSA
B
10. ENVIRONMENTAL
PROTECTION AND PACKAGING
INFORMATION
10.1. Packaging Information
The packaging of this product is made
of recyclable materials. Do not dispose
of the packaging, waste together with
household or other waste. Instead, take it to
a packaging collection point dened by your
local authority.

EN - 28
11.2. Energy Eciency
• You should operate the dryer to full
capacity, but make sure that it is not
overloaded.
• When the laundry is being washed,
the spin speed should be at the
highest level possible. This will shorten
the drying time and reduce energy
consumption.
• Make sure that the same kinds of
laundry are dried together.
• Please follow the recommendations
in the user manual for programme
selection.
• For air circulation, leave an appropriate
clearance on the front and back sides
of the Dryer. Do not cover the grills on
the front side of the machine.
• Unless necessary, do not open the
door of the machine when drying. If you
have to open it, do not keep it open for
a long time.
• Do not add new (wet) laundry during
the drying process.
• Hairs and lint that detach from the
laundry and merge in the air are
collected by the "Lint Filters". Please
make sure that the lters are cleaned
before and after each use.
• For models with a condenser, make
sure that the condenser is cleaned at
least once a month or after each 30
uses.
• During the drying process, the
environment where the dryer is installed
must be well ventilated.
EN - 29
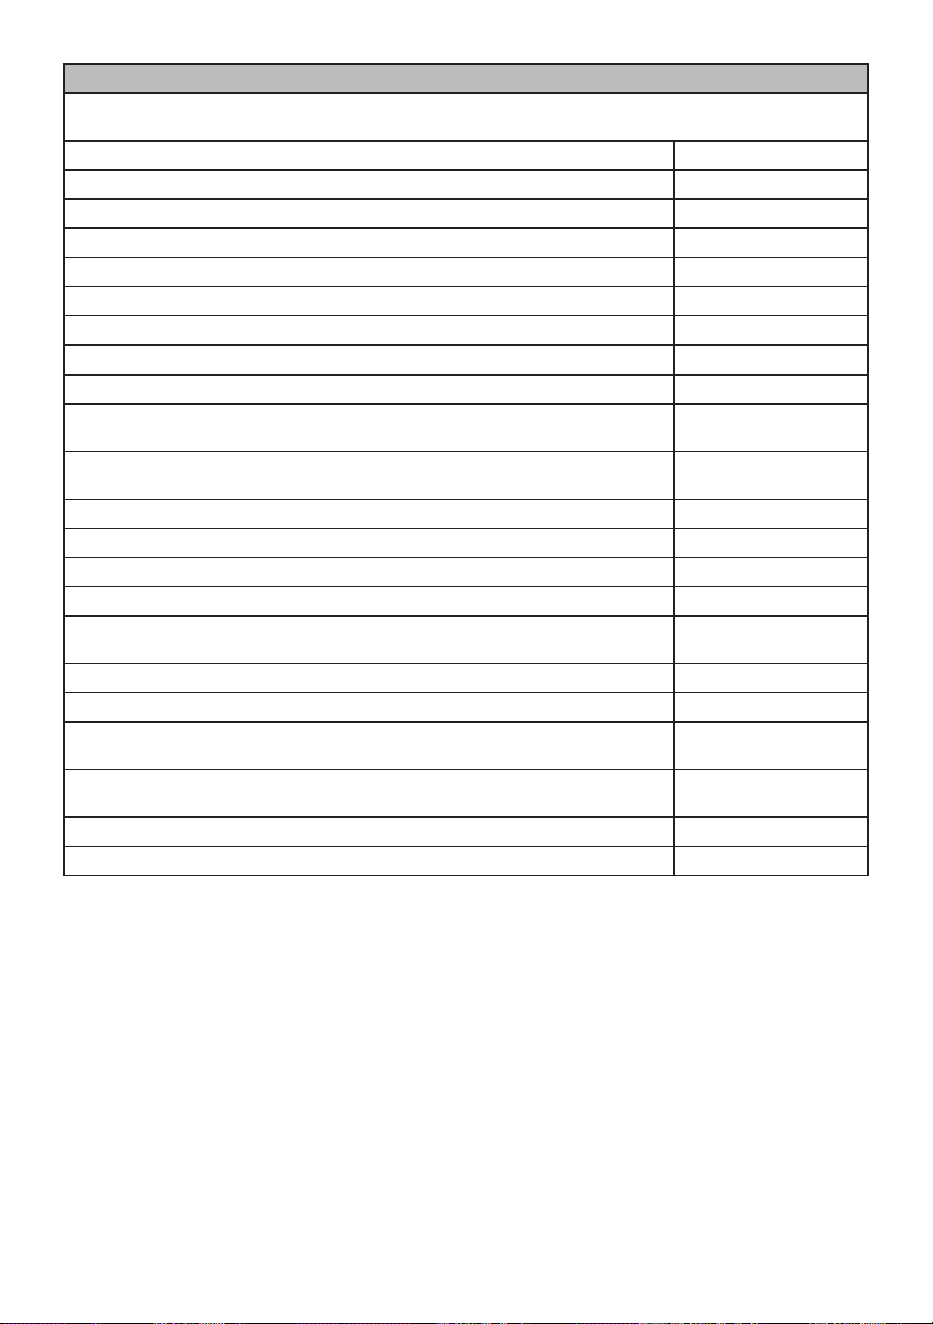
PRODUCT FICHE
Complying Commission Delegated Regulation (EU) No 392/2012
Supplier name or trademark SMEG
Model name D3T7SSA
Rated capacity (kg) 7
Type of Tumble Dryer Condenser
Energy eciency class
(1)
B
Annual Energy Consumption (kWh)
(2)
504
Automatic of Non-automatic Automatic
Energy Consumption of the standard cotton programme at full load (kWh) 4,18
Energy Consumption of the standard cotton programme at partial load (kWh) 2,31
Power consumption of the o-mode for the standard cotton programme at full load P
O
(W)
0,5
Power consumption of the left-on mode for the standard cotton programme at full load
P
L
(W)
1,0
The duration of the left mode on (min) n/a
Standard cotton programme
(3)
Programme time of the standard cotton programme at full load , T
dry
(min) 125
Programme time of the standard cotton programme at partial load , T
dry1/2
(min) 70
Weighted programme time of the standard cotton programme at full and partial load
(T
t
)
94
Condensation eciency class
(4)
B
Average condensation eciency of the standard cotton programme at full load C
dry
81%
Average condensation eciency of the standard cotton programme at partial load
C
dry1/2
81%
Weighted condensation eciency of the standard cotton programme at full load and
partial load C
t
81%
Sound power level for the standard cotton programme at full load
(5)
65
Built-in No
(1) Scale from A+++ (most ecient) to D (least ecient)
(2)Energyconsumption based on 160 drying cycles of the standard cotton programme
at full and partial load,and the consumption of the low-power modes. Actual energy
consumption per cycle will depend on how the appliance is used.
(3) “Cotton cupboard dry programme” used at full and partial load is the standard drying
programme to which the information in the label and the che relates, that this programme
is suitable for drying normal wet cotton laundry and that it is the most ecient programme
in terms of energyconsumption for cotton
(4) Scale from G (least ecient) to A (most ecient)
(5) Weighted average value - L wA expressed in dB(A) re 1 pW

52474975-230228-01