YETI
®
300/500/700
Please read all warnings, instructions and cautions carefully before
use to avoid personal injury, property damage or damage to your
Yeti 300/500/700, or any connected products. Goal Zero reserves the
right to update this document without prior notice. Please visit
www.goalzero.com to find the latest product information and the most
recent version of the User Guide.
INSTRUCTIONS PERTAINING TO RISK OF FIRE, ELECTRIC SHOCK, OR INJURY
TO PERSONS.
• WARNING - Your Yeti outputs the same potentially lethal AC power as a normal
household wall outlet. Please handle and use it carefully, as you would a normal
AC outlet on the wall.
• WARNING - Observe and carefully follow all connector ratings. There is a risk
of excessive heat, melting, fire, or electric shock from the use of accessories,
charging cords, or other electrical connections if the appropriate connector
ratings do not match the Yeti connector ratings. Consult your product manuals
for information about electrical connector ratings.
• WARNING - Ensure all connectors and accessories are tightly and securely
plugged in. Loose connections can lead to fire and other risks.
• WARNING - DO NOT allow the unit to be dropped, seriously jarred, punctured,
or otherwise damaged.
• WARNING - DO NOT use your Yeti if it is damaged or modified. Damaged
or modified batteries may exhibit unpredictable behavior resulting in fire,
explosion or risk of injury.
• WARNING - DO NOT allow foreign objects to enter into inputs, outputs or
ventilation holes.
• WARNING - DO NOT open your Yeti or tamper with or attempt to replace your
battery.
• WARNING - DO NOT allow children to use the Yeti.
• WARNING - To reduce the risk of damage to the electric plug and cord, pull the
plug rather than the cord when disconnecting and connectors or plugs.
• WARNING - DO NOT stack anything on top of this device while it is in storage
or in use.
IMPORTANT SAFETY INSTRUCTIONS
SAVE THESE INSTRUCTIONS
• WARNING - DO NOT charge, turn on or otherwise use your Yeti if it is
submerged or exposed to a significant amount of liquid, or if any liquid enters
the unit casing. If internal components get wet, your Yeti must be disposed of.
Failure to comply with these guidelines could cause serious damage, injury, or
death. In this case, isolate it in a fire safe location before disposal. Contact your
local fire department if you see any sparks or smell burning. Contact a local
fire department or a local battery recycling center for instructions on battery
disposal requirements in your area. More information about safely recycling
batteries can be found at: https://www.epa.gov/recycle/used-household-
batteries
• WARNING - DO NOT use your Yeti with life-saving medical equipment.
Take special care whenever using your device with medical equipment or
around medical equipment and ensure that the specified requirements of the
medical equipment are compatible with the device. Your Yeti is not a certified
Uninterruptable Power Supply and has not been tested to hospital-grade
standards or any standards specifically related to medical equipment.
• WARNING - DO NOT expose the Yeti to extreme temperatures (greater than
140 degrees F/60 degrees C or less than -4 degrees F/-20 degrees C).
• WARNING - Keep your unit in a dry, well-ventilated area when in use and do
not obstruct fan openings. Inadequate ventilation may cause damage to your
device.
• WARNING - DO NOT expose the unit to strong electrostatic or electromagnetic
conditions.
• WARNING - DO NOT put fingers or hands into the product.
• WARNING - Use of an attachment not recommended or sold by power pack
manufacturer may result in a risk of fire, electric shock, or injury to persons.
• WARNING - DO NOT operate the power pack with a damaged cord or plug, or a
damaged output cable.
• WARNING - When charging the internal battery, work in a well ventilated area
and do not restrict ventilation in any way.
What’s in the Box 2
How it Works 3
Get to Know Your Gear 4
Charging Your Power Station 5
i. Charging from Solar
ii. Charging from the Wall
Using Your Power Station 7
Display and Buttons 8
Storage and Maintenance 10
Technical Specifications 11
Frequently Asked Questions 12
Troubleshooting 13
Français 14
Table of Contents
For assistance with your device in the United States, visit our contact page at
www.goalzero.com/contact or call 1-888-794-6250. For assistance with your
device outside of the United States, contact the local distributor. If you do not have
contact information for the local distributor, contact us in the United States and we
will help connect you to the local representative.
2 3
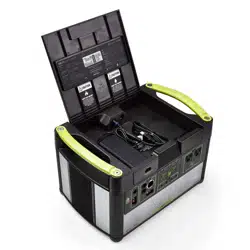
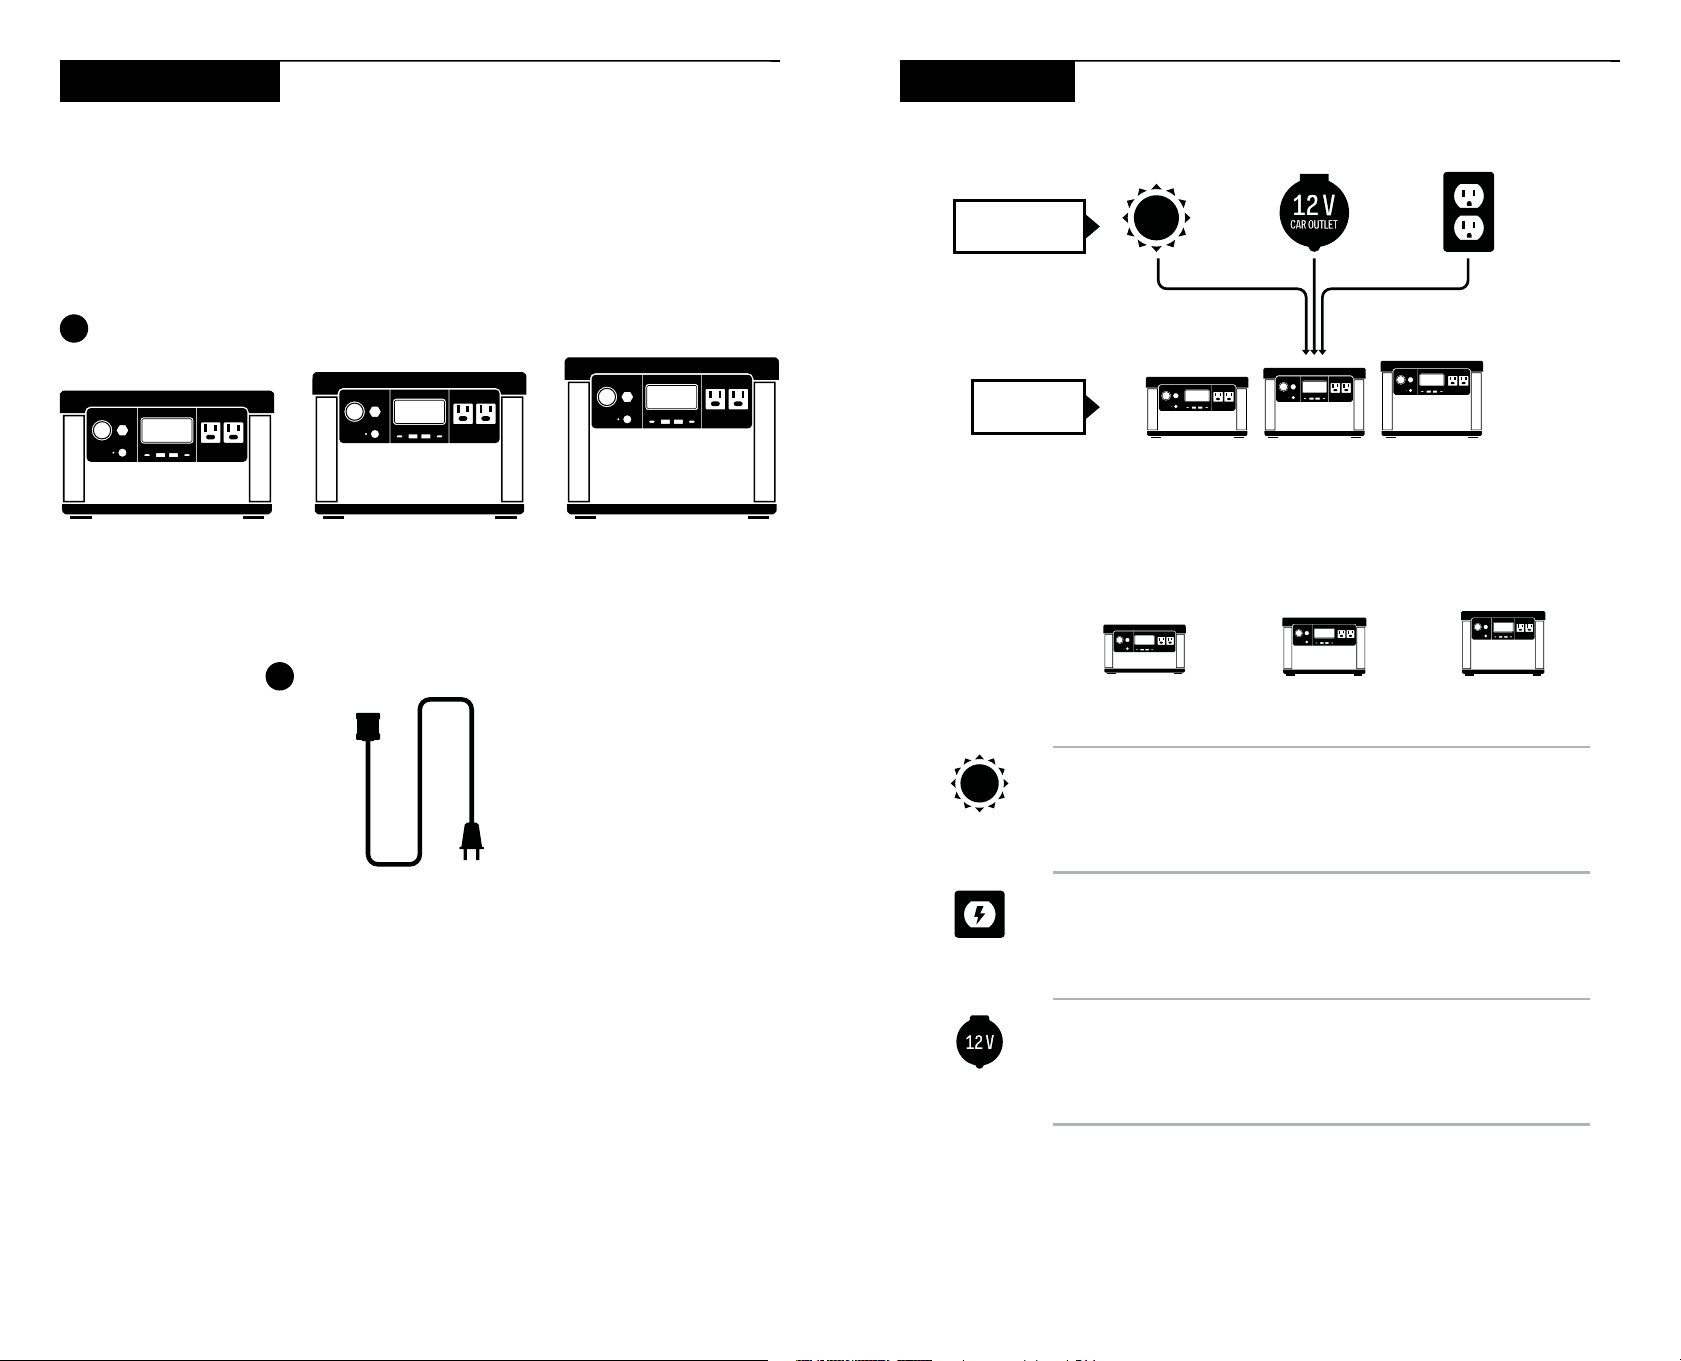
Yeti 300 Yeti 500 Yeti 700
1. Yeti 300/500/700
2. AC Power Cord
3. User Guide
2
1
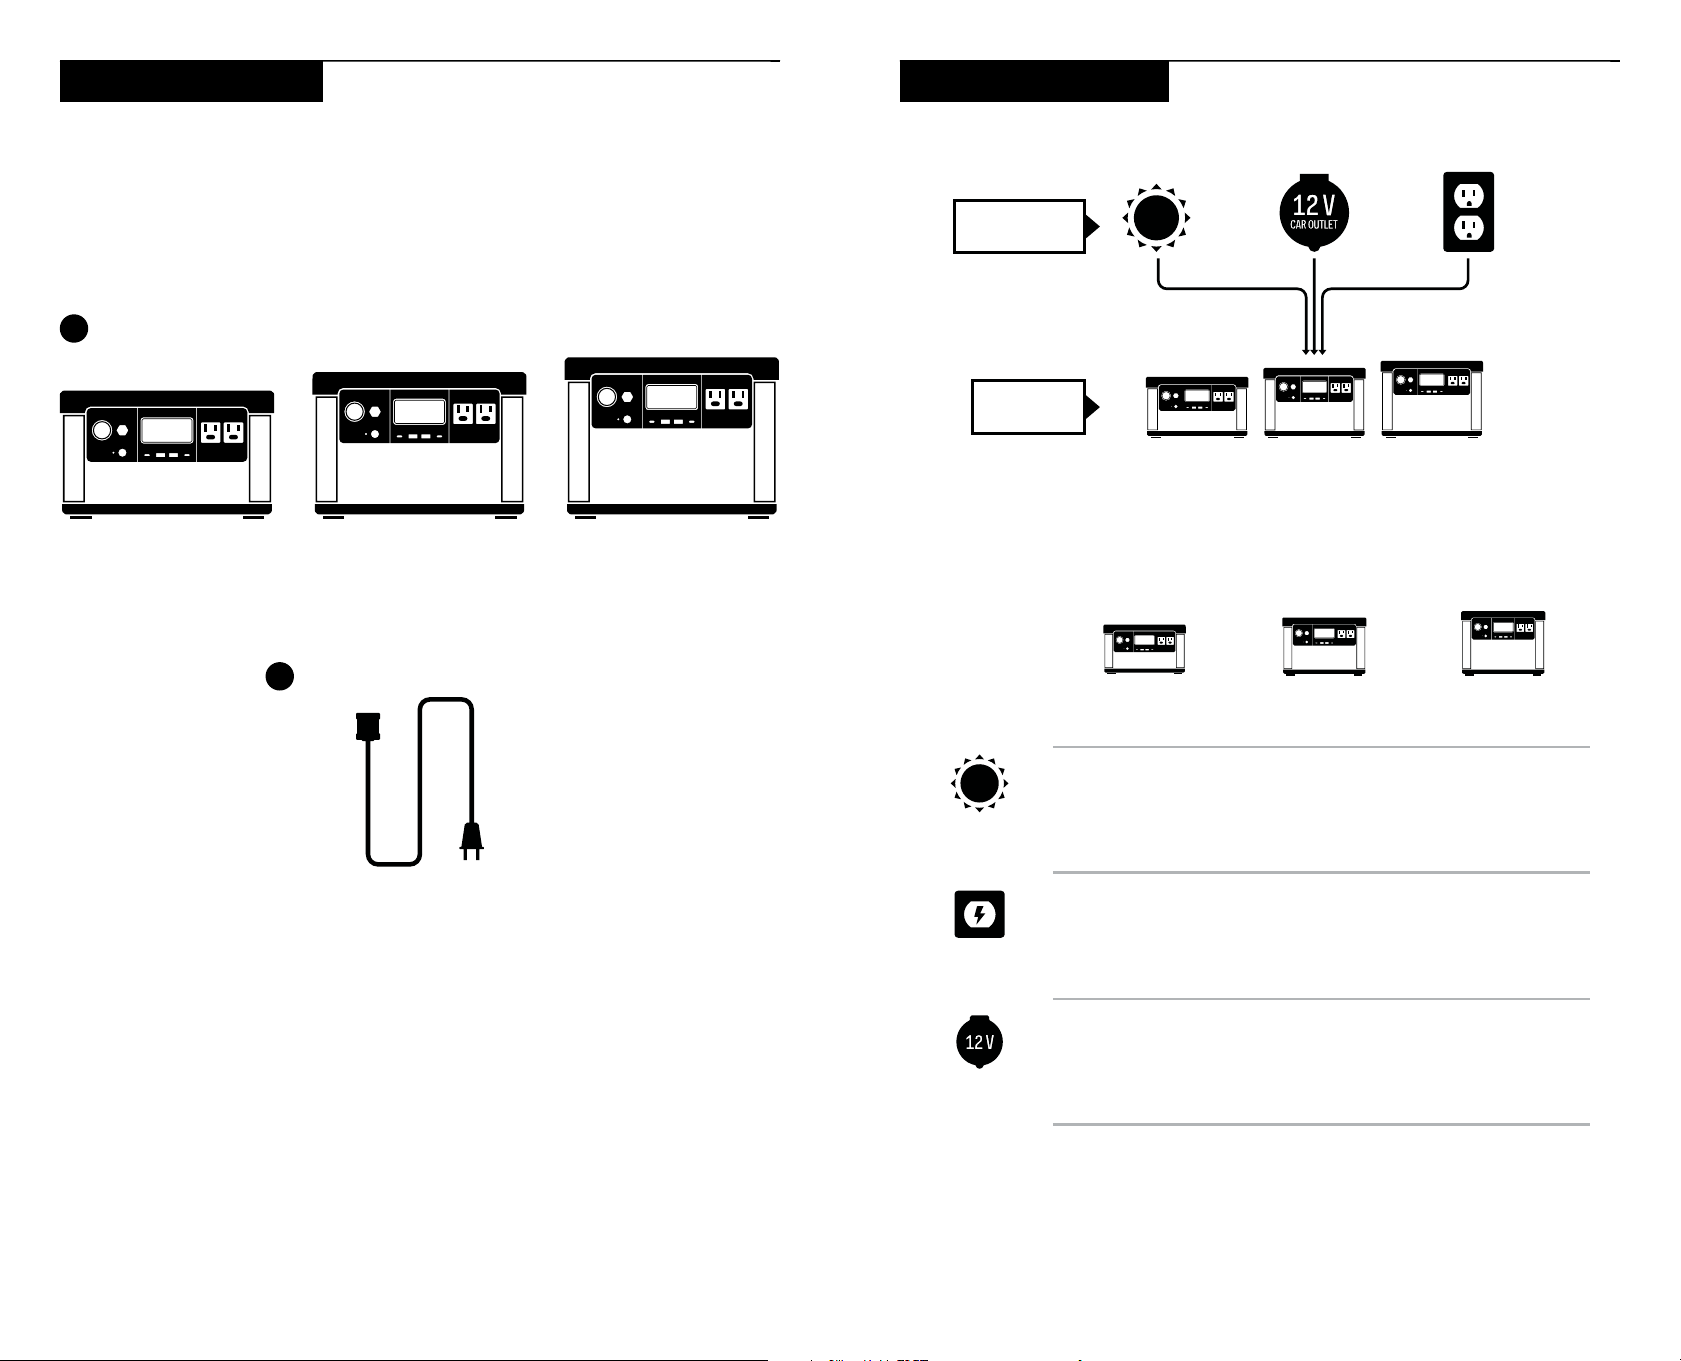
What’s in the Box How it Works
CHARGE IT
STORE IT
For individual product and device run times visit goalzero.com
<2
HOURS
(200 WATTS)
<3
HOURS
(200 WATTS)
<4
HOURS
(200 WATTS)
1
HOUR
1.5
HOURS
2
HOURS
3
HOURS
5
HOURS
7
HOURS
GOAL ZERO
YETI 300
GOAL ZERO
YETI 500
GOAL ZERO
YETI 700
12 V CAR
CHARGER
(10 A)
FAST
CHARGING
SOLAR
CHARGING
0-100%
4 5
Charging Your Power Station
When charging your Yeti, you will notice a battery segment blinking in the display.
This indicates the current charge status. Once your power station is fully charged,
all battery segments will be lit and remain solid. As long as there is more power
going into Yeti than is being pulled from the output ports, the display will also
indicate an estimated time until fully charged. This is an estimated time based
on the power input and output numbers at that time; it will gradually adjust to a
shorter or longer time as the average charge or discharge rates fluctuate. In the
upper left corner of the display, you can also see the number of watts being input.
Charging from Solar
IMPORTANT NOTE: When solar charging your power station, take note of the
voltages of the solar panels and do not exceed 30 V. Individual solar panels, or
solar panels chained in series in excess of 30 V cannot be used with the Goal
Zero Yeti and can cause serious damage to the unit. For help on chaining solar
panels, call our Customer Solutions Center at 888-794-6250.
Your Goal Zero Yeti has one 8mm charging port located on the left side of the
faceplate. It is designed to work with Goal Zero solar panels and is capable of
taking in 200 W of solar.
1. Place your solar panel where it will get as much direct sunlight as possible;
even partial shading will greatly reduce charging power.
2. Insert the blue-ringed plug from the panel into the input port on the Yeti. You will
know the Yeti is charging when the blue LED light next to the input port lights
up, and the battery segments in the LCD battery display are blinking. The Yeti is
fully charged when all battery segments stop blinking and remain solid.
3. Some Goal Zero panels are chainable to provide more power to your Yeti and
reduce solar charge times.
For more information about integrating your Yeti with solar, visit our website at
www.goalzero.com.
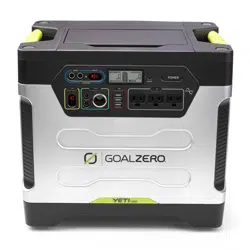
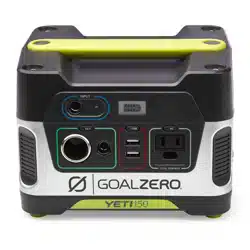
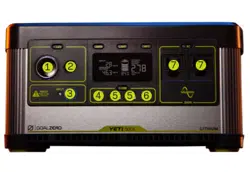
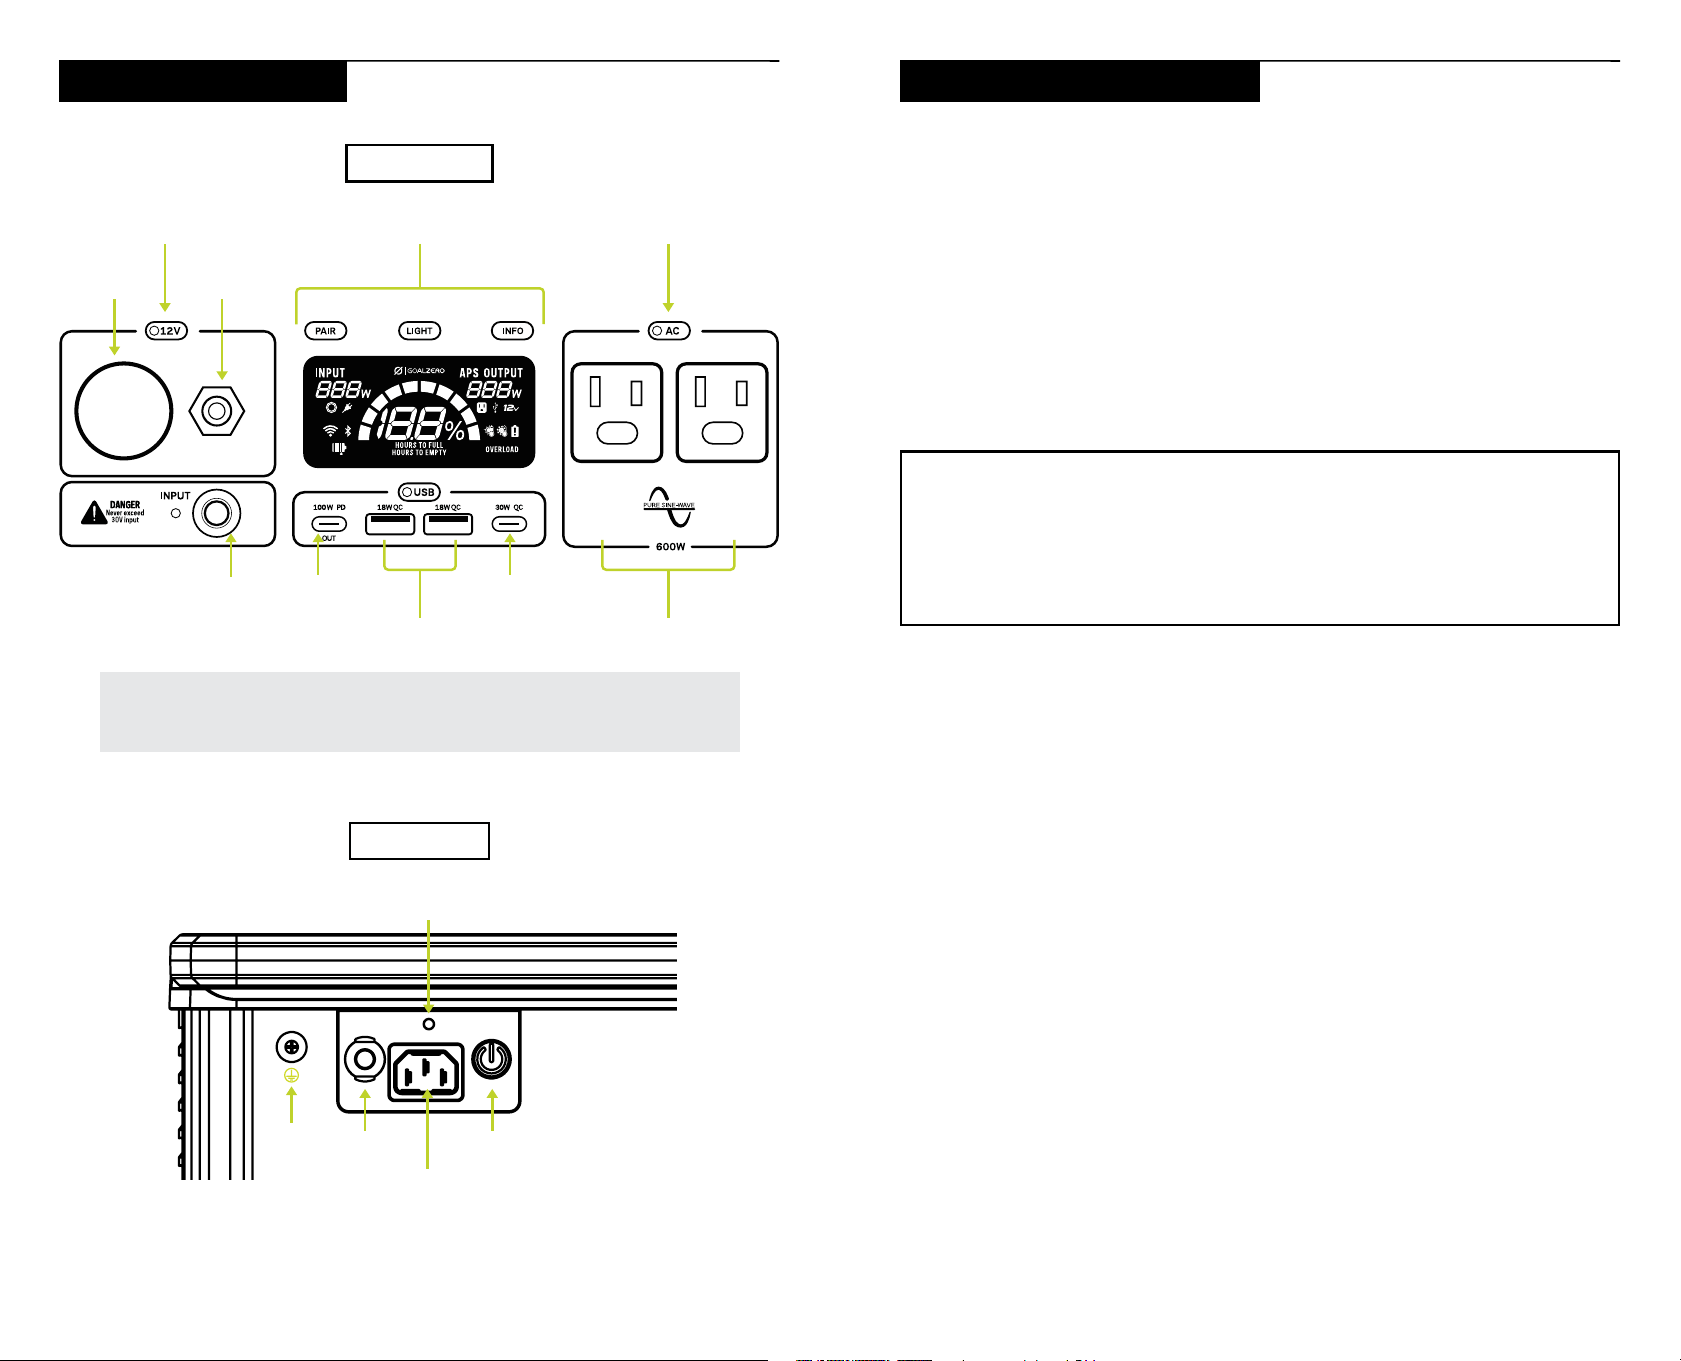
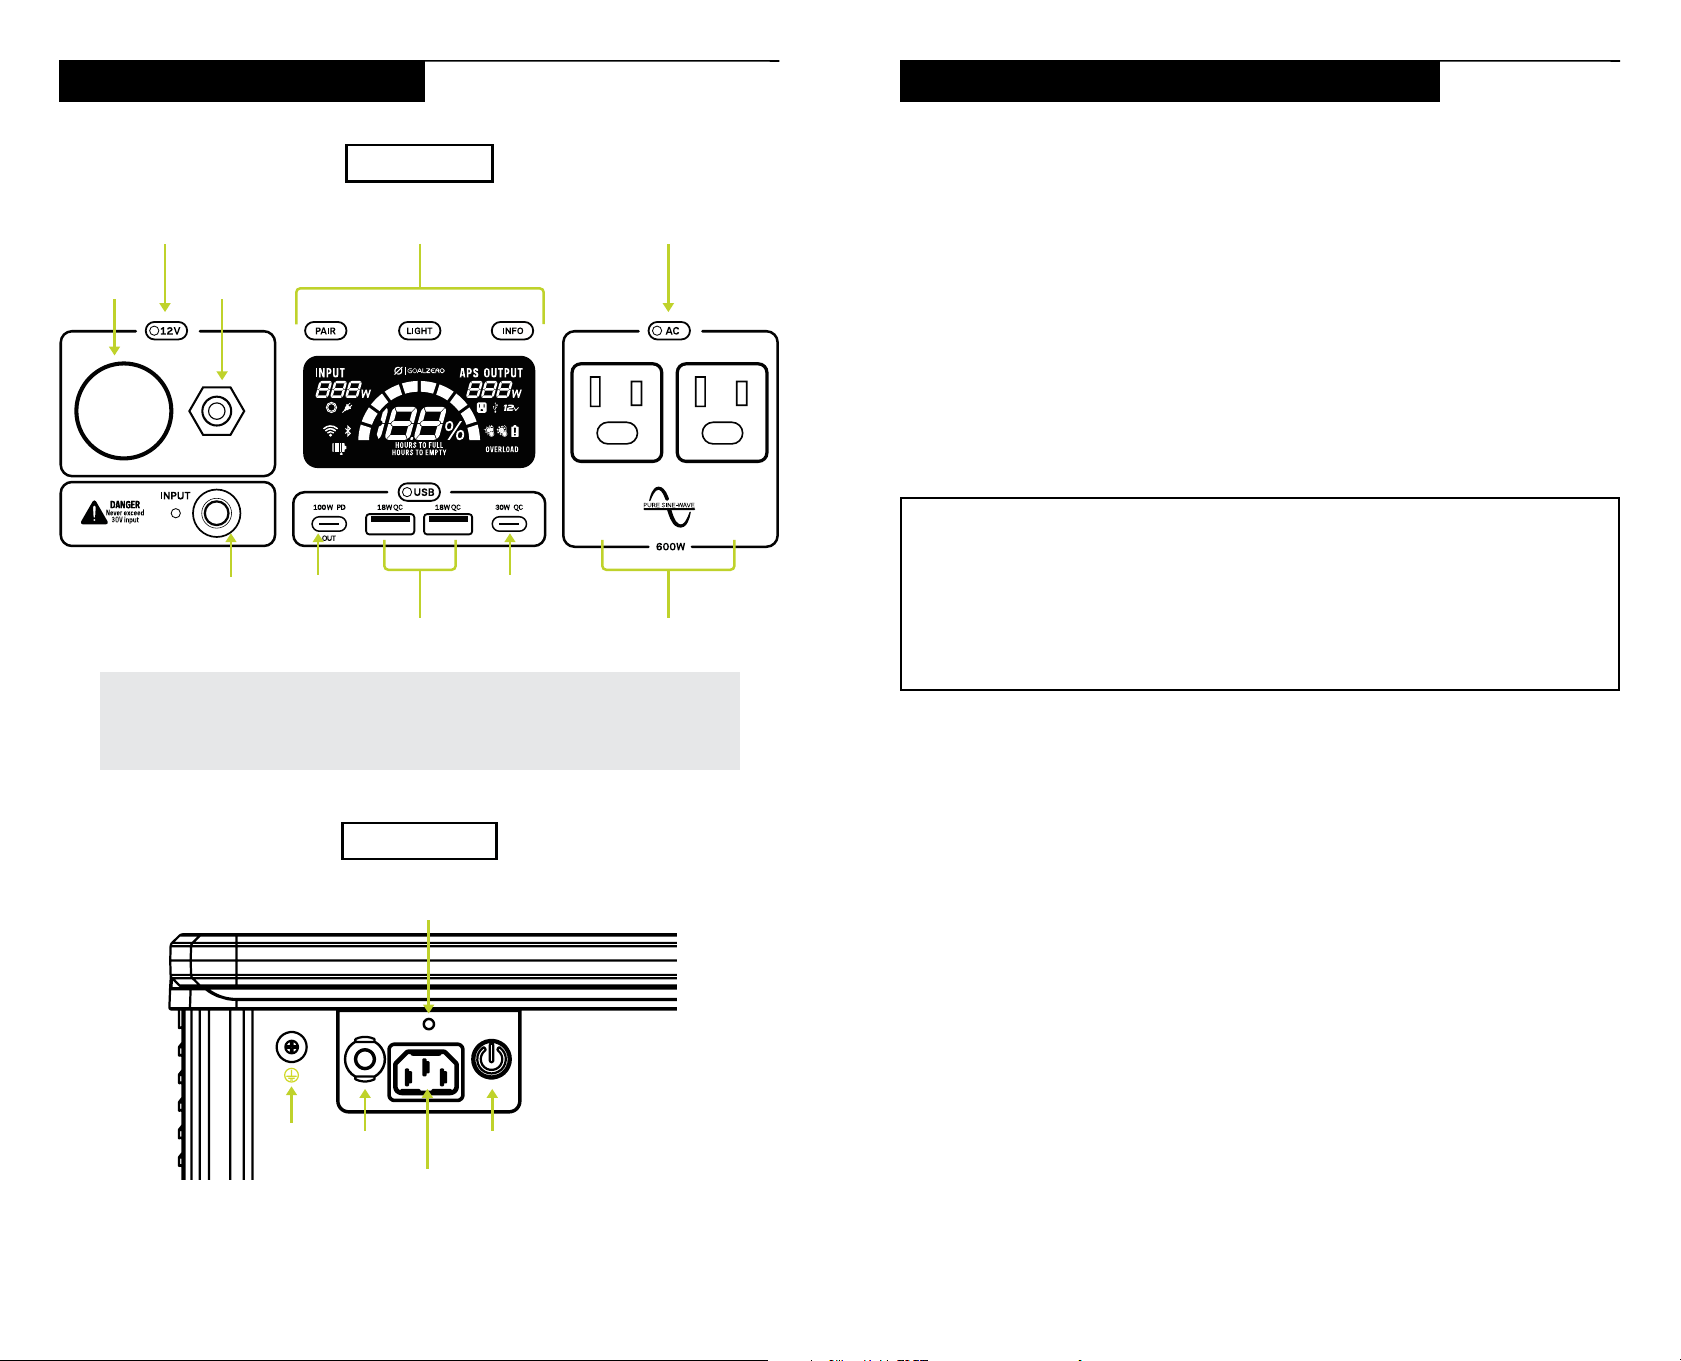
FRONT INTERFACE
BACK INTERFACE
Get To Know Your Gear
Lift the weather protection cover to use the ports.
NOTE: Turn individual ports on and off using the port activation buttons. Be sure to press the
buttons and turn off the ports when the power station is not in use to prevent excess battery drain.
12V Cig
Output
12V 6mm
Output
12V Port
Activation Button
AC Port
Activation Button
Interactive
Buttons and Screen
8mm Input USB-CUSB-C
AC Outputs x 2USB-A x 2
Power ButtonBreaker
AC Charge Port
Charge
Indicator LED
Ground
6 7
Charging from the Wall
Plug your Yeti into any wall outlet. You will know it is charging when the blue LED
light next to the input port turns on, and battery segments in the battery display
are blinking. The power station is fully charged when all battery segments stop
blinking and remain solid.
NOTE: For additional charging options such as car charging, visit
www.goalzero.com/shop/yeti-accessories.
Power Station Charge Rates
The Yeti 300/500/700 can be charged in either High or Low speed mode.
High Speed Mode: This mode charges your power station as quickly as possible.
You can see an estimate for how long charging will take in the app and on the power
station’s screen.
Low Speed Mode: This mode charges the power station in about 3 hours. Slower
charging keeps the unit cooler and quieter and maximizes battery life.
The unit will be set to Low mode when shipped from the factory. You can modify the
charging rate on the Yeti power station.
How to change the charging:
1. Press and hold the INFO button
2. While still holding the INFO button, press the AC button once to enter the input
limit selection.
3. Press the AC button a second time to switch between Low and High input
limits.
The Yeti 300 allows a max AC input of 420 W for fast charging. The slow charge
input is set to 140 W.
The Yeti 500 allows a max AC input of 500 W for fast charging. The slow charge
input is set to 240 W.
The Yeti 700 allows a max AC input of 500 W for fast charging. The slow charge
input is set to 340 W.
Using Your Power Station
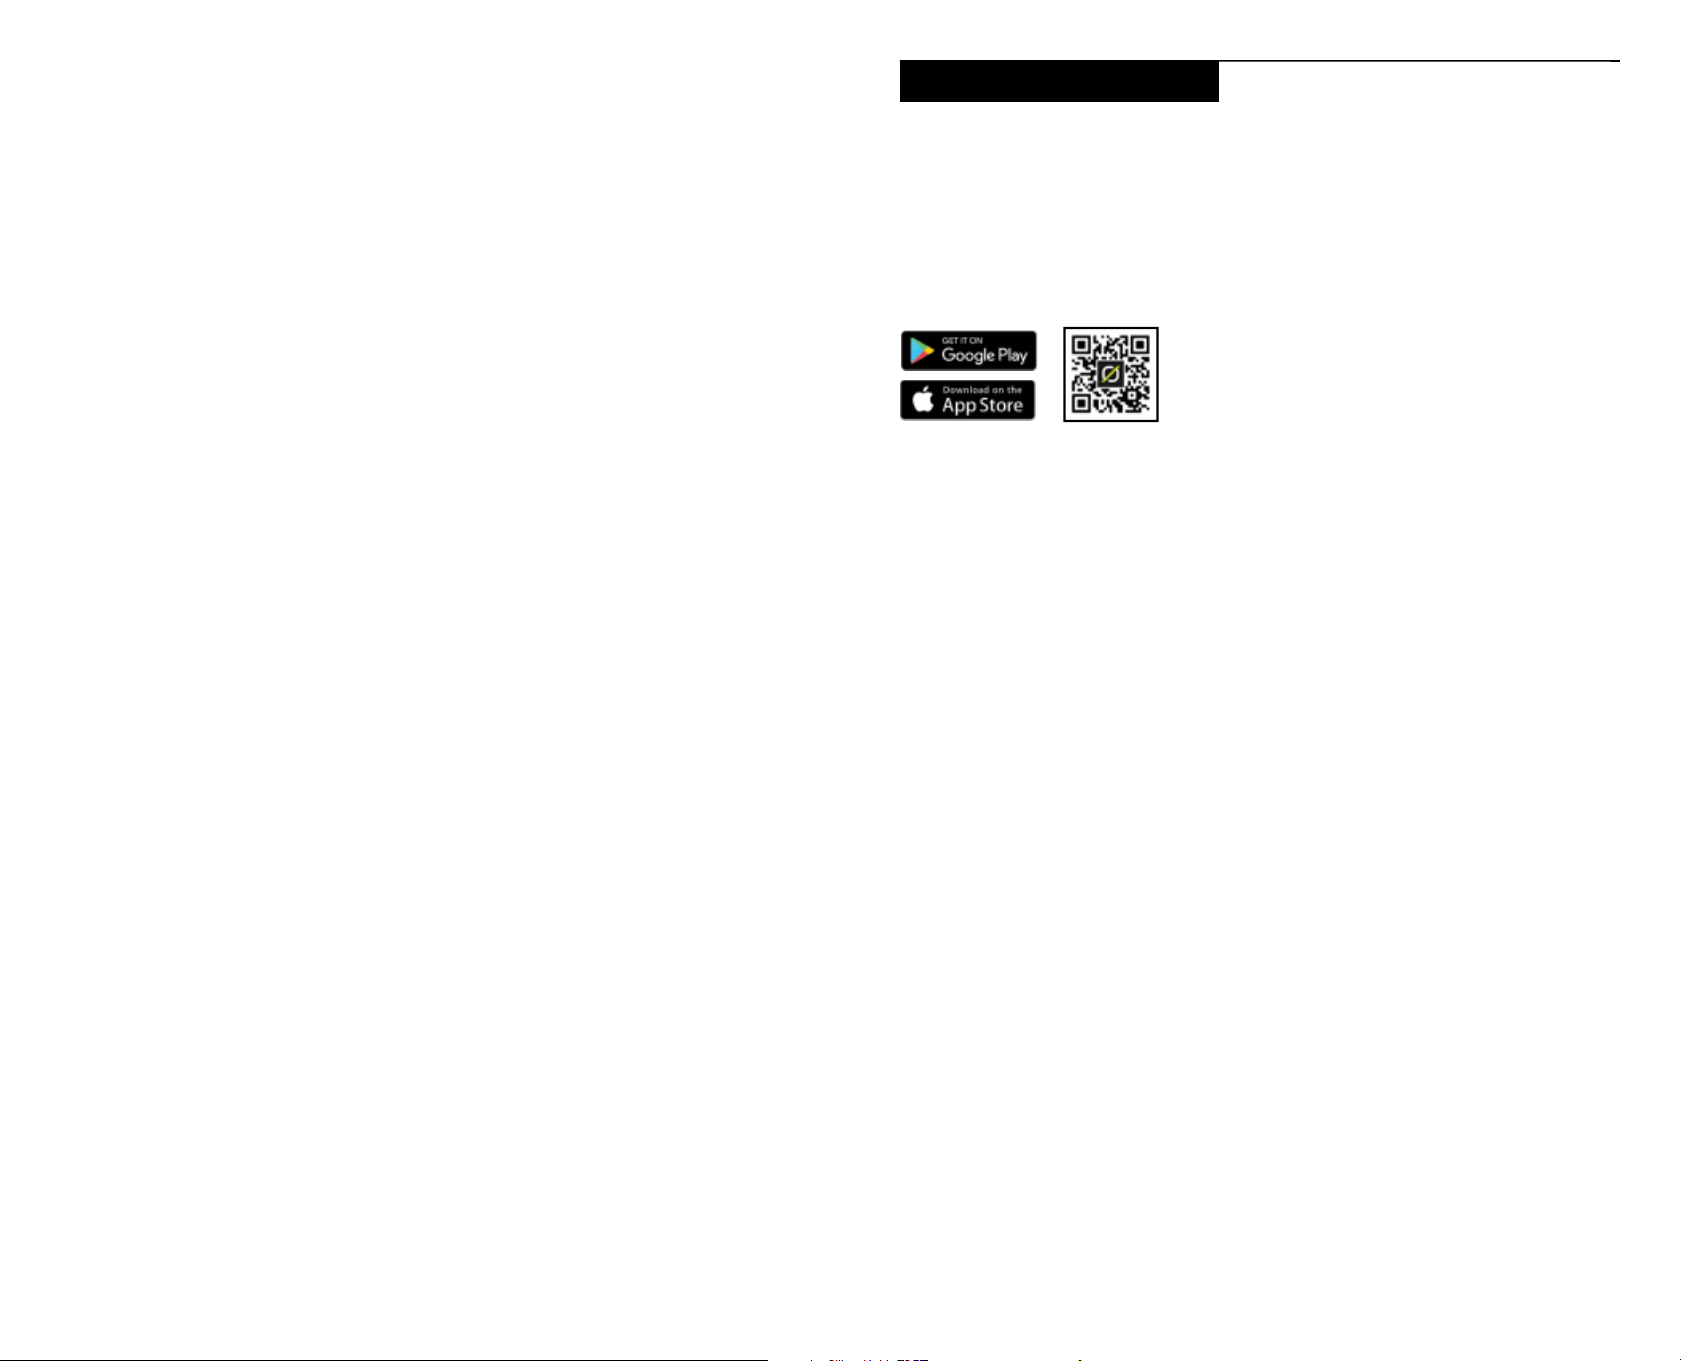
DOWNLOAD THE GOAL ZERO APP AND UPDATE YOUR DEVICE
The Goal Zero app makes it easy to control your Yeti, adjust settings, and monitor
your power usage. Download it from your app store, then follow the instructions in
the app to pair with Wi-Fi and set up your power station. The app will also prompt
you with any new firmware updates. Please make these updates before using your
device for optimal performance.
HOW TO USE YOUR YETI POWER STATION
1. Press and hold the power button on the back of the unit for 2 seconds until the
display turns on.
2. Press the button located above each port to power that specific port. When
not using certain ports, turn them off to conserve power.
3. You’ll know the port is turned on when the white LED light on the button is
illuminated.
4. Plug in your devices. The Yeti will not turn off automatically if a port is left
turned on, even when no load is present. This prevents shutdown when
intermittent or very low power loads are used.’
You can charge your Goal Zero Yeti and power devices simultaneously. If possible,
keep your Goal Zero Yeti plugged into a power source when not in use, or plug into
an AC power source every 12-18 months to keep battery fully charged.
Best-Use Strategy
When charging equipment with your Yeti, take note of the LCD Battery Display. If
you plug in devices that have a high power requirement, the charge level can drop
very quickly. When using the AC power output, the power station will be converting
the energy from the DC power of the battery to the AC power needed by your
device. Although your power station has a highly efficient inverter, there is still
some energy lost in the conversion and you may not get the full rated capacity of
the battery. If you’re experiencing shorter runtimes, you may want to check the
device’s power requirements.
Cold Weather Usage
Cold temperatures (below freezing) can impact the power station’s battery
capacity. We recommend keeping your Yeti power station in a temperature-
controlled environment for best performance.
8 9
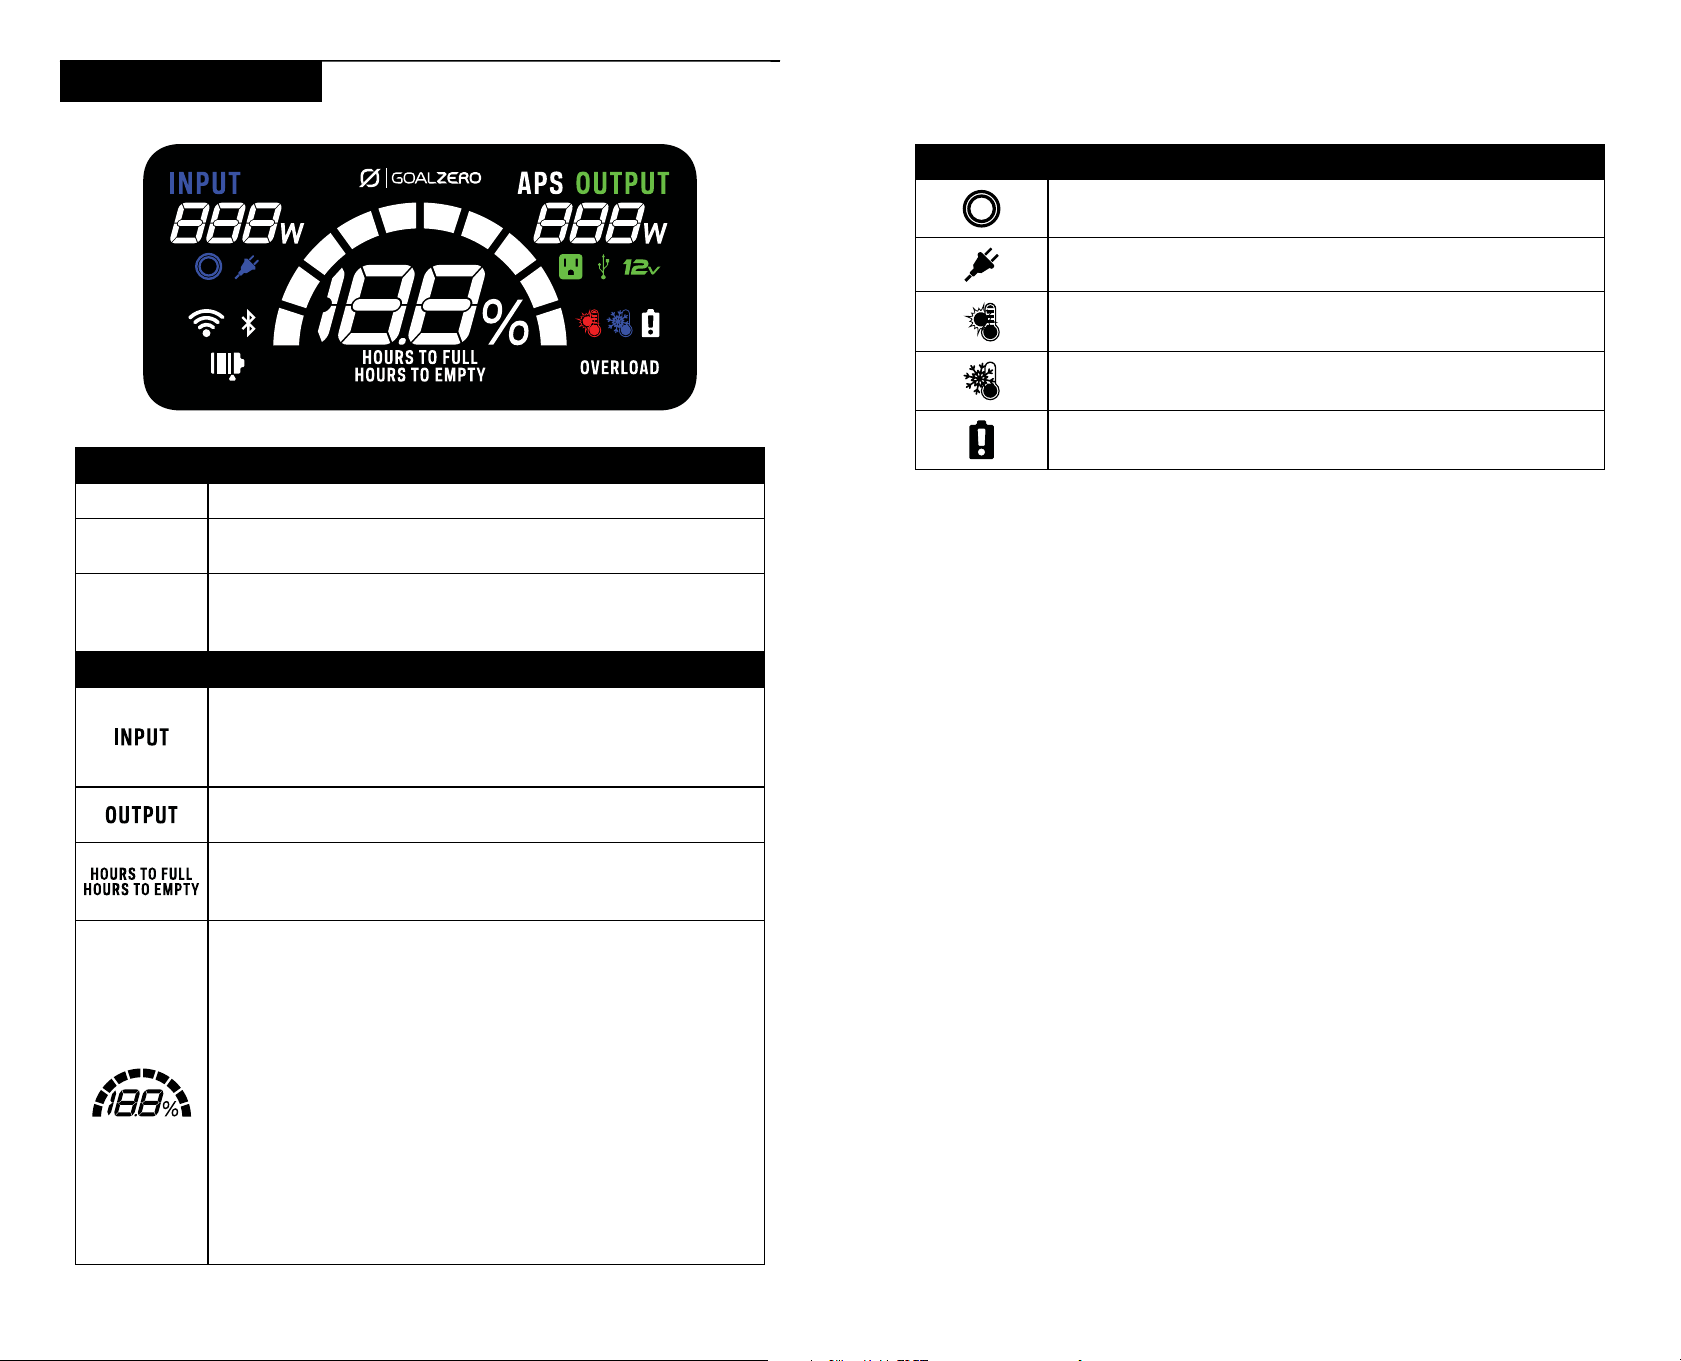
Display and Buttons
BUTTONS
LIGHT This button activates the display
PAIR
Press the PAIR button to connect your power station to the
Goal Zero app.
INFO
Press the INFO button to alternate between the battery state
of charge percentage and the Hours to Empty/Full on your
Yeti’s screen.
ICONS
Shows the amount of power (watts) going into the Yeti while
charging. If charging from solar, you’ll see the watts change
as you reposition the panels into/out of the sunlight, or if the
panels are shaded by other objects.
Shows the amount of power (watts) your devices are using while
plugged into the Yeti.
Shows the amount of time before your Yeti is completely
charged or empty, depending on if the net amount of power
going into the Yeti is positive or negative.
Shows 10 segments, approximating 10% per segment As
you use your power station, segments will disappear from the
display, indicating the remaining charge. When charging your
Yeti, you will notice a battery segment blinking. This indicates
the current charge status. Once your Yeti is fully charged, all
battery segments will be lit and remain solid. As long as there
is more power going into the Yeti than is being pulled from
the output ports, the display will also indicate an estimated
time until fully charged. This is an estimated time based on
the power input and output numbers at that time; it will adjust
to a shorter or longer time if the charge or discharge rates
fluctuate. Note that when you first plug in a power source,
whether it’s a solar panel or a wall charger, the Yeti may take a
minute to detect and adjust its charge circuitry before it starts
drawing power from the source.
ICONS (CONT.)
The power station is charging from the 8mm input port
The power station is charging from a wall outlet.
The power station is over the recommended operating
temperature.
The power station is under the recommended operating
temperature.
Icon will light up and remain on if the Battery Management
System is not detected or if the battery’s health is below 50%
AUTOMATIC POWER SWITCHING (APS)
The product will automatically enter the Automatic Power Switching (APS) mode
when you are inputting power into the AC input port and simultaneously outputting
through the AC output. Power will pass directly from the grid or AC power source to
the loads connected to the Yeti and bypass the inverter of the Yeti. If grid power is
interrupted, power will quickly switch to Yeti power.
The Yeti switches from grid to battery in under 20ms, but it does not support 0ms
switching. Some sensitive loads may be interrupted during the switch over. When
using your Yeti in APS mode, do not overload the AC output.
NOTE: If the AC output of your Yeti exceeds the 10A AC input breaker, the breaker
will trip and need to be reset after the load is reduced below the 10A limit.
GROUNDING INSTRUCTIONS
This product must be grounded. If it should malfunction or breakdown, grounding
provides a path of least resistance for electric current to reduce the risk of electric
shock. This product is equipped with a cord having an equipment grounding
conductor and a grounding plug. The plug must be plugged into an outlet that is
properly installed and grounded in accordance with all local codes ordinances. If
the unit is not connected to ground by the AC cord, it should be grounded with the
grounding connection that is included on the back of the power station.
WARNING – Improper connection of the equipment grounding conductor is able
to result in a risk of electric shock. Check with a qualified electrician if you are
in doubt as to whether the product is properly grounded. Do not modify the plug
provided with the product. If it will not fit the outlet, have a proper outlet installed
by a qualified electrician.
10 11
Storage and Maintenance
Store your power station in a climate-controlled, dry location. If you can’t keep your
power station plugged into a power source during storage, keep the power button
in the off state and charge the unit once every 12-18 months.
Failure to maintain your power station by following these steps can result in battery
damage which will void the product warranty.
* (0.5C discharge, climate controlled, 80% original capacity.)
NOTE: All DC outputs are regulated.
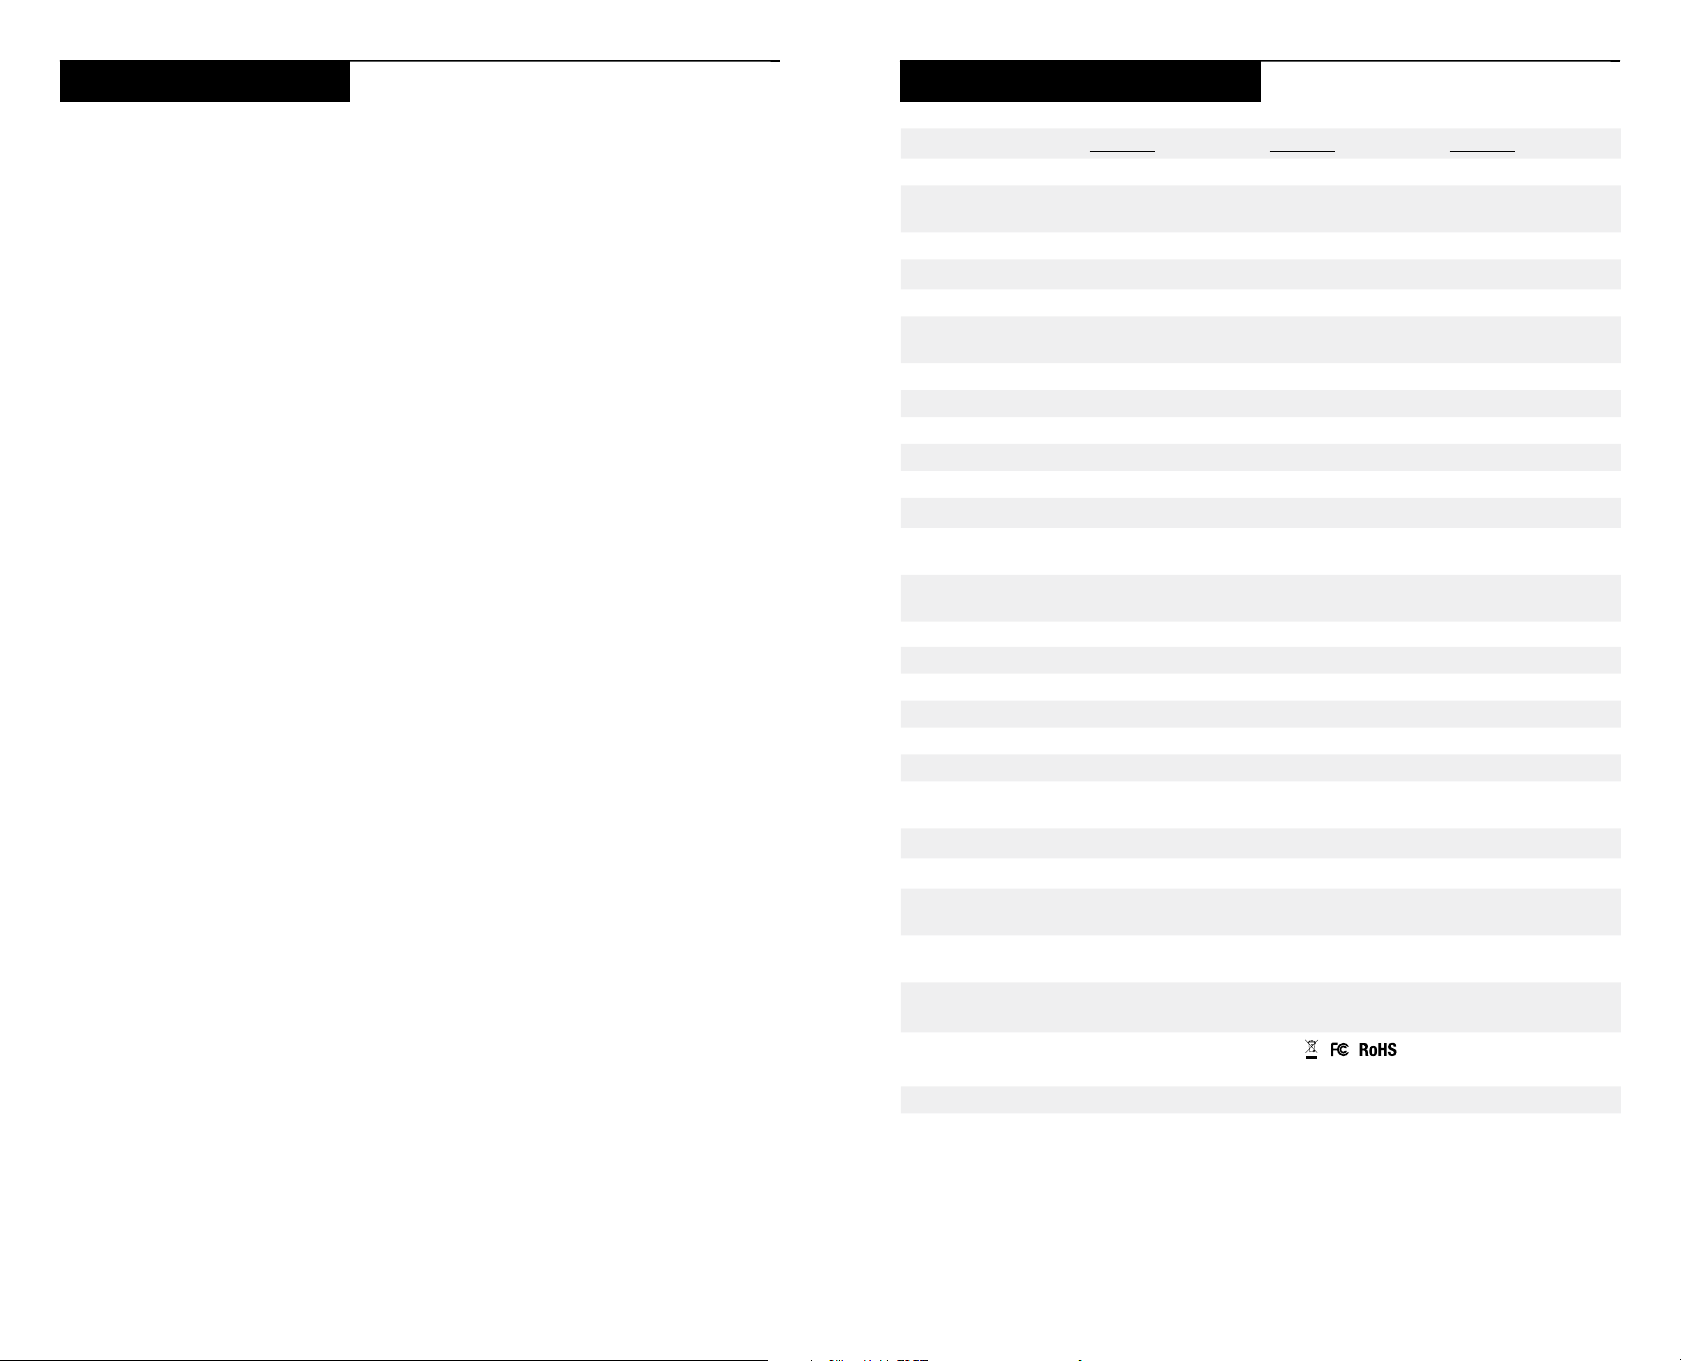
Yeti 300 Yeti 500 Yeti 700
Battery:
Cell Chemistry LiFePO
4
(Lithium Iron Phosphate)
Pack Capacity 296.96 Wh (25.6 V) 499.2 Wh (25.6 V) 677.376 Wh (25.6 V)
Lifecycles 4000* 4000* 4000*
Shelf-life Charge every 12-18 months (in “main power off” state)
Battery management
system
Yes Yes Yes
Ports:
Output
2x USB-A 18 W 18 W 18 W
1x USB-C 100 W 100 W 100 W
1x USB-C 30 W 30 W 30 W
1x 12V 6mm port 10 A 10 A 10 A
1x 12V Car Port 12 A 12 A 12 A
2x AC 350 W, 600W Surge 500 W, 1000 W Surge 600 W, 1000 W Surge
Combined output of 12 V ports cannot exceed 13.5 A
Input
AC Input 420 W max 500 W max 500 W max
8mm Solar 200 W max 200 W max 200 W max
General:
SKU 36900 (120V) 37000 (120V) 37100 (120V)
Chainable No No No
Weight (Yeti only) 14.1 lbs (6.4 kg) 16.7 lbs (7.6 kg) 20.9 lbs (9.5 kg)
Weight (In Box) 16.05 lbs (7.28 kg) 19.14 lbs (8.68 kg) 23.32 lbs (10.58 kg)
Dimensions (Yeti only) 11.32 x 7.72 x 6.78
in (28.76 x 19.6 x
17.22 cm)
11.32 x 7.72 x 7.8
in (28.76 x 19.6 x
19.82 cm)
11.32 x 7.72 x 8.55
in (28.76 x 19.6 x
21.72 cm)
Dimensions (In Box) 13.54 x 9.72 x 9.76
in (34.4 x 24.7 x
24.8 cm)
13.54 x 9.72 x
10.79 in (34.4 x 24.7
x 27.4 cm)
13.54 x 9.72 x
11.54 in (34.4 x 24.7
x 29.3 cm)
Operating Usage
Temp.
Charge: 32° to 104°F (0° to 40° C)
Discharge: -4° to 104°F (-20° to 40°C)
Certs
UL 2743, IEC 62368, UL/IEC 62133, UN 38.3
Limited Warranty 5 years** 5 years** 5 years**
Technical Specifications
** For warranty terms, conditions, and registration go to www.goalzero.com/warranty
To request a physical copy of the warranty call 1-888-794-6250.
For Patents, please see https://www.goalzero.com/pages/ip
This device complies with Industry Canada license-exempt RSS standard(s). Operation is subject
to the following two conditions: (1) this device may not cause interference, and (2) this device must
accept any interference, induding interference that may cause undesired operation of the device.
The device has been evaluated to meet general RF exposure requirement. To maintain-compliance
with RSS-102 — Radio Frequency (RF) Exposure guidelines, this equipment should be installed
and operated with a minimum distance of 20cm between the radiator and your body.
12 13
How do I reset my unit?
Press the Light and Info buttons at the same time and hold for 3 seconds to reset
the Yeti power station.
What type of battery is in my Yeti power station?
Your Goal Zero Yeti uses Lithium Iron Phosphate:
Lithium Iron Phosphate batteries can store and release a lot of energy in a short
period of time. The batteries in your Goal Zero Yeti are in a protective enclosure
with a sophisticated battery management and protection system controlling its
terminals to the outside world.
Can I take the Yeti power station on a plane?
No. It is not allowed on planes under FAA regulations. The Yeti 300, 500, and 700
have batteries that exceed the current FAA regulations for passenger air travel.
How do I know if my power station is charged?
To check the charge level of your Yeti, refer to the LCD Battery Display. When lit
up, you’ll see a battery outline with 10 segments, indicating the current charge
level. It is okay to use your Yeti even when it’s not fully charged.
Why is the light on the AC port activation button blinking?
A blinking light on the AC button indicates that at the current load, the AC
inverter will be shutting off soon. Recharge your power station as soon as
possible to continue powering your device. Once the AC inverter has shut off,
the Yeti will attempt to reset itself three times. After three attempts, the AC
inverter will remain off until you physically reset it by pushing the AC button or by
recharging the battery a small amount.
Why is the light on the port activation button red?
A red light on the 12 V, USB, and AC activation buttons indicate the port has
been shut off to protect your Yeti and the devices you have plugged in. Recharge
your Yeti as soon as possible to continue powering your devices.
Why doesn’t my hair dryer work with the power station?
Some appliances use more watts than your unit can output. The Yeti 300 allows
for 350 W of power. The Yeti 500 allows for 500 W of power and the Yeti 700
allows for 600 W. This means if your device is using more than 350-500 W for an
extended period of time, the Yeti’s inverter will shut off.
Frequently Asked Questions
If your devices are not recharging from your Yeti, follow these steps:
1. Ensure the Output Port has been turned on. The white LED light on the
power button should be lit up.
a. If any of the lights have turned red, this indicates a trip. Push the button
again to reset it. The light will turn white when it is successfully reset.
2. Check the Battery Display. If it is at 20% or below, charge your power
station.
3. Check the LCD Display for warning icons:
OVERLOAD: Power draw exceeds port’s maximum allowance. Indicated by
red light in the port’s button.
Battery requires attention. Contact customer support. 1-888-794-6250
4. If you are still experiencing trouble with your power station, please call our
Customer Solutions Center at 1-888-794-6250 or by email at support@
goalzero.com
Troubleshooting
14 15
Veuillez lire attentivement tous les avertissements, instructions et mises
en garde avant d’utiliser votre Yeti PRO4000, afin d’éviter des blessures,
des dégâts matériels ou des dommages à votre Yeti PRO4000 ou à tout
autre produit connexe. Goal Zero se réserve le droit de mettre à jour ce
document sans préavis. Veuillez consulter le site www.goalzero.com pour
les dernières informations sur le produit et la version la plus récente du
guide de l’utilisateur.
INSTRUCTIONS RELATIVES AU RISQUE D’INCENDIE, DE CHOC ÉLECTRIQUE
OU DE BLESSURE.
• AVERTISSEMENT – Votre Yeti émet le même courant alternatif
potentiellement mortel qu’une prise murale domestique normale. Veuillez le
manipuler et l’utiliser avec précaution, comme vous le feriez avec une prise
murale normale.
• AVERTISSEMENT – Observez et suivez attentivement toutes les
caractéristiques des connecteurs. Il y a un risque de chaleur excessive, de
fusion, d’incendie ou de choc électrique lors de l’utilisation d’accessoires, de
cordons de charge ou d’autres connexions électriques si les caractéristiques
des connecteurs ne correspondent pas à celles de la Yeti. Consultez les guides
de vos produits pour obtenir des informations sur les caractéristiques des
connecteurs électriques.
• AVERTISSEMENT – Vérifiez que tous les connecteurs et accessoires sont
bien branchés. Des connexions desserrées peuvent entraîner des incendies et
d’autres risques.
• AVERTISSEMENT – NE PAS laisser tomber l’appareil, le secouer brusquement,
le perforer ou l’endommager de quelque manière que ce soit.
• AVERTISSEMENT – NE PAS utiliser votre Yeti s’il est endommagé ou modifié.
Les piles endommagées ou modifiées peuvent avoir un fonctionnement
imprévisible et provoquer un incendie, une explosion ou un risque de blessure.
• AVERTISSEMENT – NE PAS laisser des objets étrangers pénétrer dans les
entrées, les sorties ou les trous de ventilation.
• ATTENTION – NE PAS ouvrir votre Yeti, le modifier et essayer de remplacer la
batterie.
• AVERTISSEMENT – NE PAS laisser les enfants utiliser la Yeti.
• AVERTISSEMENT – Pour réduire le risque d'endommager la fiche et le cordon
électriques, tirez sur la fiche plutôt que sur le cordon lorsque vous débranchez
des connecteurs ou des fiches.
• AVERTISSEMENT – NE PAS empiler quoi que ce soit sur cet appareil lorsqu’il
est stocké ou utilisé.
CONSIGNES DE SÉCURITÉ IMPORTANTES
CONSERVEZ CES INSTRUCTIONS
• AVERTISSEMENT – NE PAS charger, allumer ou utiliser votre Yeti s’il est
immergé ou exposé à une quantité importante de liquide, ou si du liquide
pénètre dans le boîtier de l’appareil. Si les composants internes sont mouillés,
votre Yeti doit être mis au rebut. Le non-respect de ces consignes peut
entraîner des dommages graves, des blessures ou la mort. Isolez l’appareil
dans un endroit sûr avant de le mettre au rebut. Contactez votre service
d’incendie local si vous voyez des étincelles ou si vous sentez une odeur de
brûlé. Contactez les services d’incendie locaux ou un centre de recyclage des
piles pour obtenir des instructions sur les exigences en matière d’élimination
des piles dans votre région. Pour plus d’informations sur le recyclage des
piles en toute sécurité, consultez le site: https://www.epa.gov/recycle/used-
household-batteries.
• AVERTISSEMENT – NE PAS utiliser votre Yeti avec des équipements médicaux
vitaux. Faites particulièrement attention lorsque vous utilisez votre appareil
avec des équipements médicaux ou à proximité d’équipements médicaux
et assurez-vous que les exigences spécifiées de l’équipement médical sont
compatibles avec l’appareil. Votre Yeti n’est pas une source d’alimentation
ininterrompue certifiée et n’a pas été testé selon des normes de qualité
hospitalière ou des normes particulières liées à l’équipement médical.
• AVERTISSEMENT – NE PAS exposer la Yeti à des températures extrêmes
(supérieures à 140 degrés F/60 degrés C ou inférieures à -4 degrés F/-20
degrés C).
• AVERTISSEMENT – Gardez votre appareil dans un endroit sec et bien ventilé
lorsqu’il est utilisé et n’obstruez pas les évents d’aération. Une ventilation
inadéquate peut endommager votre appareil.
• AVERTISSEMENT – NE PAS exposer l’appareil à des conditions
électrostatiques ou électromagnétiques fortes.
• AVERTISSEMENT –NE PAS insérer vos doigts ou vos mains dans le produit.
• AVERTISSEMENT – L'utilisation d'un accessoire non recommandé ou
non vendu par le fabricant du bloc d'alimentation peut entraîner un risque
d'incendie, de choc électrique ou de blessure.
• AVERTISSEMENT –NE PAS faire fonctionner la station d’alimentation avec un
cordon d’alimentation, une prise ou un câble de sortie endommagé.
• AVERTISSEMENT – Lors du chargement de la batterie interne, assurez-
vous que l’appareil fonctionne dans une zone bien ventilée et n’empêchez la
ventilation en aucune manière.
16 17
Yeti 300 Yeti 500 Yeti 700
1. Yeti 300/500/700
2. Cordon d’alimentation CA
3. Guide de l’utilisateur
2
1
Contenu de la boîte Comment ça marche
CHARGER
STOCKAGE
Pour connaître les durées de fonctionnement de chaque produit
etappareil, consultez goalzero.com
<2
HEURES
(200WATTS)
<3
HEURES
(200WATTS)
<4
HEURES
(200WATTS)
1
HEURE
1,5
HEURES
2
HEURES
3
HEURES
5
HEURES
7
HEURES
PANNEAU SOLAIRE
GOAL ZERO
YETI 300
PANNEAU SOLAIRE
GOAL ZERO
YETI 500
PANNEAU SOLAIRE
GOAL ZERO
YETI 700
12V CAR
CHARGEUR
(10 A)
CHARGEMENT
RAPIDE
CHARGEMENT
SOLAIRE
0-100%
18 19
INTERFACE AVANT
INTERFACE ARRIÈRE
Tout savoir sur votre matériel
Soulever le couvercle de protection contre les intempéries pour utiliser les ports.
REMARQUE: Activez et désactivez des ports individuels avec les boutons d'activation de port.
Pensez à appuyer sur les boutons et à éteindre les ports lorsque la station d’alimentation n'est pas
utilisée pour éviter une décharge excessive de la batterie.
Sortie 12
V Cig
Sortie 12V
6mm
Bouton d'activation
du port 12V
Bouton d'activation
du port CA
Boutons et écran
interactifs
Entrée 8mm USB-CUSB-C
Sorties CA x 2USB-A x 2
Bouton
d’alimentation
Disjoncteur
Port de charge CA
Indicateur de
charge à DEL
Masse
Chargement de votre station d’alimentation
Lors du chargement de votre Yeti, vous remarquerez un segment de batterie clignotant
sur l'écran. Ceci indique l'état de charge actuel. Une fois votre station d’alimentation
complètement chargée, tous les segments de la batterie seront allumés et resteront
allumés. Tant que la quantité d'énergie entrant dans le Yeti est supérieure à celle tirée
des ports de sortie, l'écran indiquera également un temps estimé jusqu'à ce qu'il soit
complètement chargé. Il s'agit d'une durée estimée basée sur les valeurs d'entrée et de
sortie de puissance à ce moment-là; il s'ajustera progressivement à une durée plus ou
moins longue à mesure que les taux moyens de charge ou de décharge évoluent. Dans
le coin supérieur gauche del’écran, vous pouvez également voir le nombre de watts en
cours de chargement.
Chargement à partir d’une source solaire
REMARQUE IMPORTANTE: Lorsque vous chargez votre station d’alimentation
à partir d’une source solaire, notez les tensions des panneaux solaires et ne
dépassez pas 30V. Les panneaux solaires, individuels ou en série au-delà de
30V ne peuvent pas être utilisés avec le Goal Zero Yeti et peuvent endommager
gravement l'appareil. Pour obtenir de l'aide sur le branchement des panneaux
solaires en série, appelez notre centre de solutions client au 888-794-6250.
Votre Goal Zero Yeti dispose d'un port de charge de 8mm situé sur le côté gauche de
la face avant. Il est conçu pour fonctionner avec les panneaux solaires Goal Zero et est
capable d’absorber 200W d’énergie solaire.
1. Placez votre panneau solaire là où il recevra autant de lumière directe du soleil
que possible; même une ombre partielle réduira considérablement la puissance
de charge.
2. Insérez la fiche à anneau bleu du panneau dans le port d'entrée du Yeti. Vous
savez que le Yeti est en charge lorsque le voyant à DEL bleu à côté du port
d'entrée s'allume et que les segments de batterie sur l'écran LCD de la batterie
clignotent. Le Yeti est complètement chargé lorsque tous les segments de la
batterie cessent de clignoter et restent fixes.
3. Certains panneaux Goal Zero peuvent être branchés en série pour fournir plus de
puissance à votre Yeti et réduire les temps de charge solaire.
Pour plus d'informations sur l'intégration de votre Yeti à l'énergie solaire, consultez
notre site Web à l'adresse www.goalzero.com.
20 21
Chargement à partir d’une prise d’alimentation murale
Branchez votre Yeti sur n’importe quelle prise murale. Vous savez qu’il est en charge
lorsque le voyant à DEL bleu à côté du port d'entrée s'allume et que les segments
de batterie sur l'écran LCD de la batterie clignotent. La station d’alimentation est
complètement chargée lorsque tous les segments de la batterie cessent de clignoter
et restent fixes.
REMARQUE: Retrouvez davantage d’options de recharge – par exemple, dans un
véhicule – consultez la page goalzero.com/shop/yeti-accessories.
Taux de charge de la station d’alimentation
La Yeti 300/500/700 peut être rechargée en mode haute ou basse vitesse.
Mode haute vitesse : Ce mode recharge la station d’alimentation aussi rapidement
que possible. Une estimation du temps de charge est affichée dans l’application et sur
l’écran de la station d’alimentation.
Mode basse vitesse : Ce mode recharge la station d’alimentation en 3 heures environ.
Une recharge plus lente garde l’appareil plus frais, plus silencieux et maximise la durée
de vie de la batterie.
L’appareil est réglé en mode basse vitesse lorsqu’il est expédié de l’usine. Le taux de
charge de la station d’alimentation Yeti peut être modifié.
Comment modifier le taux de charge :
1. Pressez et maintenez enfoncé le bouton INFO
2. En maintenant le bouton INFO enfoncé, appuyez sur le bouton AC (CA) pour
accéder à la sélection de limite d’entrée.
3. Appuyez une seconde fois sur le bouton AC (CA) pour basculer entre les limites
d’entrée Basse et Haute.
Pour la recharge rapide, la Yeti 300 permet une entrée CA maximale de 420 W.
L’entrée de recharge lente est réglée à 140 W.
Pour la recharge rapide, la Yeti 500 permet une entrée CA maximale de 500 W.
L’entrée de recharge lente est réglée à 240 W.
Pour la recharge rapide, la Yeti 700 permet une entrée CA maximale de 500 W.
L’entrée de recharge lente est réglée à 340 W.
Utiliser votre station d’alimentation
TÉLÉCHARGEZ L’APPLICATION GOAL ZERO ET METTEZ À JOUR VOTRE APPAREIL
L’application Goal Zero permet de contrôler facilement votre Yeti PRO4000, d’ajuster
les paramètres et de surveiller votre consommation d’énergie. Téléchargez-la depuis
votre boutique d’applications, puis suivez les instructions de l’application pour vous
jumeler avec le Wi-Fi et configurer votre station d’alimentation. L’application vous
informera également de toute nouvelle mise à jour du micrologiciel. Veuillez effectuer
ces mises à jour avant d’utiliser votre appareil pour des performances optimales.
COMMENT UTILISER VOTRE STATION D’ALIMENTATION YETI
1. Appuyez et maintenez enfoncé le bouton d'alimentation à l'arrière de l'appareil
pendant 2secondes jusqu'à ce que l'écran s'allume.
2. Appuyez sur le bouton situé au-dessus de chaque port pour alimenter ce port
spécifique. Lorsque vous n'utilisez pas certains ports, désactivez-les pour
économiser l'énergie.
3. Vous savez que le port est activé lorsque le voyant blanc à DEL du bouton est allumé.
4. Branchez vos appareils. Le Yeti s'éteindra automatiquement après 5minutes si
aucun port n'est activé. Tant qu’un port est activé, le Yeti reste allumé et vide la
batterie, même si rien n'est branché sur ce port.
Vous pouvez charger votre Goal Zero Yeti et alimenter plusieurs appareils
simultanément. Si possible, laissez votre Goal Zero Yeti branché à une source
d'alimentation lorsqu'il n'est pas utilisé, ou branchez-le à une source d'alimentation
secteur tous les 12 à 18mois pour garder la batterie complètement chargée.
Stratégie de meilleure utilisation
Lorsque vous chargez de l'équipement avec votre Yeti, surveillez l'écran LCD de la
batterie. Si vous branchez des appareils nécessitant beaucoup de puissance, le niveau
de charge peut chuter très rapidement. Lorsque vous utilisez la sortie d'alimentation
CA, la station d’alimentation convertit l'énergie de l'alimentation CC de la batterie
en puissance CA nécessaire à votre appareil. Bien que votre station d’alimentation
dispose d'un onduleur très efficace, il y a toujours une certaine perte d'énergie lors
de la conversion et vous risquez de ne pas obtenir la pleine capacité nominale de la
batterie. Si vous rencontrez des durées d'exécution plus courtes, vous souhaiterez
peut-être vérifier les besoins en énergie de l'appareil.
Utilisation par temps froid
Les températures froides (en dessous de zéro) peuvent avoir un impact sur la capacité
de la batterie de la station d’alimentation. Nous vous recommandons de conserver
votre station d’alimentation Yeti dans un environnement à température contrôlée pour
maximiser ses performances.

22 23
Affichage et boutons
BOUTONS
LIGHT Ce bouton active l’affichage
PAIR
Appuyez sur le bouton PAIR pour connecter votre station
d’alimentation à l'application Goal Zero.
INFO
Appuyez sur le bouton INFO pour afficher le pourcentage d’état
de charge de la batterie ou le temps de charge de Vide à Plein sur
l’écran de votre Yeti.
ICONS
Affiche la quantité de puissance (watts) entrant dans le Yeti
pendant le chargement. Si vous chargez depuis une source solaire,
les watts changent lorsque vous repositionnez les panneaux par
rapport à la lumière du soleil, ou si les panneaux sont ombragés par
d’autres objets.
Affiche la quantité de puissance (watts) que vos appareils utilisent
lorsqu’ils sont branchés au Yeti.
Affiche le temps nécessaire avant que votre Yeti soit complètement
chargé ou vide, selon que la quantité nette d'énergie entrant dans le
Yeti est positive ou négative.
Affiche 10 segments, d’environ 10 % par segment. Lorsque vous
utilisez votre station d’alimentation, les segments disparaissent de
l'écran, indiquant la charge restante. Lors du chargement de votre
Yeti, un segment de batterie clignote. Ceci indique l'état de charge
actuel. Une fois votre Yeti complètement chargé, tous les segments
de la batterie restent allumés et arrêtent de clignoter. Tant que la
quantité d'énergie entrant dans le Yeti est supérieure à celle tirée
des ports de sortie, l'écran indiquera également un temps estimé
jusqu'à ce qu'il soit complètement chargé. Il s'agit d'une durée
estimée basée sur les valeurs d'entrée et de sortie de puissance
à ce moment-là; il s'ajustera à une durée plus ou moins longue si
les taux de charge ou de décharge évoluent. Notez que lorsque
vous branchez pour la première fois une source d'alimentation, qu'il
s'agisse d'un panneau solaire ou d'une prise murale, le Yeti peut
prendre une minute pour détecter et ajuster ses circuits de charge
avant de commencer à tirer de l'énergie de la source.
ICÔNES (SUITE)
La station d’alimentation est en cours de charge depuis le port d'entrée
de 8mm
La station d’alimentation est en cours de charge depuis une prise murale.
La station d’alimentation dépasse la température de fonctionnement
recommandée.
La station d’alimentation est en dessous de la température de
fonctionnement recommandée.
Si le système de gestion de la batterie n'est pas détecté ou si l'état de la
batterie est inférieur à 50%, l'icône s'allume et reste allumée
COMMUTATION AUTOMATIQUE DE L’ALIMENTATION (CAA)
Le produit passe automatiquement en mode de commutation automatique de
l’alimentation (CDS) lorsque vous alimentez le port d’entrée CA et que vous utilisez
simultanément la sortie CA. Le courant passe directement du réseau ou de la source
d’alimentation CA aux charges connectées au Yeti et contourne l’onduleur de la
Yeti. Si l’alimentation du réseau est interrompue, le courant passera rapidement à
l’alimentation du Yeti.
Le Yeti passe du réseau à la batterie en moins de 20ms, mais ne supporte pas la
commutation à 0 ms. Certaines charges sensibles peuvent être interrompues pendant
la commutation. Lorsque vous utilisez votre Yeti en mode CAA, ne surchargez pas la
sortie CA.
REMARQUE: Si la sortie CA de votre Yeti dépasse le disjoncteur d'entrée CA de
10A, le disjoncteur se déclenche et doit être réinitialisé une fois la charge réduite en
dessous de la limite de 10A.
INSTRUCTIONS DE RACCORDEMENT À LA TERRE
Ce produit doit être raccordé à la terre. En cas de dysfonctionnement ou de panne, la mise
à la terre fournit un chemin de moindre résistance au courant électrique afin de réduire
le risque de choc électrique. Ce produit est équipé d'un cordon doté d'un conducteur de
mise à la terre et d'une fiche de mise à la terre. La fiche doit être branchée dans une prise
correctement installée et mise à la terre conformément à toutes les ordonnances des
codes locaux. Si l'unité n'est pas raccordée à la terre par le cordon secteur, elle doit l’être
avec la connexion de mise à la terre incluse à l'arrière de la station d’alimentation.
AVERTISSEMENT – Une mauvaise connexion du conducteur de mise à la terre
de l'équipement peut entraîner un risque de choc électrique. Vérifiez auprès
d'un électricien qualifié si vous avez des doutes quant à savoir si le produit est
correctement mis à la terre. Ne modifiez pas la fiche fournie avec le produit. S'il ne
rentre pas dans la prise, faites installer une prise appropriée par un électricien qualifié.
24 25
Stockage et entretien
Rangez votre station d’alimentation dans un endroit sec et climatisé. Si vous ne pouvez
pas garder votre station d’alimentation branchée à une source d’alimentation pendant
le rangement, gardez le bouton d’alimentation en positionéteinte et chargez l’appareil
une fois tous les 12 à 18 mois.
Si vous n’entretenez pas votre station d’alimentation en suivant ces étapes,
vousrisquez d’endommager la batterie, ce qui annulera la garantie du produit.
Cet appareil est conforme aux normes d'Industrie RSS non soumises à licence du Canada.
Son utilisation est soumise aux deux conditions ci-dessous: (1) cet appareil ne doit pas causer
d’interférence, et (2) cet appareil doit accepter toute interférence, y compris les interférences
susceptibles de provoquer un fonctionnement indésirable de l'appareil.
L'appareil a été évalué pour répondre aux exigences générales en matière d'exposition aux
radiofréquences. Pour rester conforme aux directives RSS-102 — Directives sur l'exposition aux
radiofréquences (RF), cet équipement doit être installé et utilisé avec une distance minimale de
20cm entre le radiateur et votre corps.
* (Décharge de 0,5 C, climat contrôlé, 80 % de la capacité originale.)
REMARQUE: Toutes les sorties CC sont régulées.
Yeti 300 Yeti 500 Yeti 700
Batterie:
Composition chimique
de la pile
LiFePO
4
(phosphate de fer lithium)
Capacité du bloc 296,96Wh (25,6V) 499,2Wh (25,6V) 677,376Wh (25,6V)
Durée de vie 4000* 4000* 4000*
Durée de conservation Recharger tous les 12 à 18 mois (en état d’arrêt principal)
Système de gestion
de batterie
Oui Oui Oui
Ports:
Sortie
2x USB-A 18 W 18 W 18 W
1x USB-C 100W 100W 100W
1x USB-C 30 W 30 W 30 W
1port 12V 6mm 10A 10A 10A
1x Port 12 V pour
voiture
12 A 12 A 12 A
2x CA 350W, surtension
600W
500W, surtension
1000W
600W, surtension
1000W
La sortie combinée des ports 12V ne peut pas dépasser 13.5A
Entrée
Entrée CA 420 W max 500 W max 500 W max
Solaire 8mm 200 W max 200 W max 200 W max
Général:
UGS 36900 (120V) 37000 (120V) 37100 (120V)
Capacité de
branchement en série
Non Non Non
Poids (Yeti uniquement)
6,4 kg 7,6 kg 9,5 kg
Poids (dans la boîte)
7,28 kg 8,68 kg 10,58 kg
Dimensions
(Yetiuniquement)
28,76 x 19,6 x
17,22 cm
28,76 x 19,6 x
19,82 cm
28,76 x 19,6 x
21,72 cm
Dimensions
(dans la boîte)
34,4 x 24,7 x 24,8
cm
34,4 x 24,7 x 27,4
cm
34,4 x 24,7 x 29,3
cm
Température de
fonctionnement.
Charge: 32° à 104°F (0° à 40°C)
Décharge: -4° à 104°F (-20° à 40 °C)
Certificats
UL 2743, CEI 62368, UL/CEI 62133, UN 38.3
Garantie limitée 5ans** 5ans** 5ans**
Caractéristiques techniques
** Pour les conditions de garantie et vous inscrire, consultez la page www.goalzero.com/warranty
Pour demander une copie physique de l'appel de garantie 1-888-794-6250.
Pour les brevets, veuillez consulter https://www.goalzero.com/pages/ip
26 27
Comment réinitialiser mon appareil?
Appuyez simultanément sur les boutons Light et Info et maintenez-les enfoncés
pendant 3secondes pour réinitialiser la station d’alimentation Yeti.
Quel type de batterie se trouve dans ma station d’alimentation Yeti?
Votre Goal Zero Yeti utilise du lithium fer phosphate:
Les batteries au lithium fer phosphate peuvent stocker et libérer beaucoup d’énergie
en peu de temps. Les batteries de votre Goal Zero Yeti se trouvent dans un boîtier de
protection doté d'un système sophistiqué de gestion et de protection des batteries
contrôlant ses bornes vers le monde extérieur.
Puis-je emmener la station d’alimentation Yeti dans un avion?
Non. elle n'est pas autorisée à bord des avions selon la réglementation de la FAA.
LesYetis 300, 500, et 700 disposent de batteries qui dépassent les réglementations
actuelles de la FAA pour le transport aérien de passagers.
Comment savoir si ma station d’alimentation est chargée?
Pour vérifier le niveau de charge de votre Yeti, consultez l'écran LCD de la batterie.
Lorsqu'il est allumé, un contour de batterie contenant 10 segments s’affiche, indiquant
le niveau de charge actuel. Il est possible d’utiliser votre Yeti même s’il n’est pas
complètement chargé.
Pourquoi le voyant du bouton d'activation du port CA clignote-t-il?
Un voyant clignotant sur le bouton CA indique qu'à l’état de charge actuel, l'onduleur
CA va bientôt s'éteindre. Rechargez votre station d’alimentation aussi vite que
possible pour continuer à alimenter votre appareil. Une fois l’onduleur CA arrêté, le Yeti
tente de se réinitialiser lui-même trois fois. Après trois tentatives, l'onduleur CA reste
éteint jusqu'à ce que vous le réinitialisiez physiquement en appuyant sur le bouton CA
ou en rechargeant légèrement sa batterie.
Pourquoi le voyant du bouton d'activation du port est-il rouge?
Un voyant rouge sur les boutons d'activation 12V, USB et CA indique que le port a été
désactivé pour protéger votre Yeti et les appareils que vous avez branchés. Rechargez
votre Yeti aussi vite que possible pour continuer à alimenter vos appareils.
Pourquoi mon sèche-cheveux ne fonctionne-t-il pas avec la station d’alimentation?
Certains appareils consomment plus de watts que ce que votre unité peut produire.
Le Yeti 300 permet une puissance de 350W. Le Yeti 500 permet une puissance
de 500W et le Yeti 700 permet une puissance de 600W. Cela signifie que si votre
appareil utilise plus de 350 à 500W pendant une période prolongée, l'onduleur du
Yetis'éteindra.
Foire aux questions
Si vos appareils ne se rechargent pas depuis votre Yeti, suivez ces étapes:
1. Assurez-vous que le port de sortie a été activé. Le voyant à DEL blanc sur le
bouton d'alimentation doit être allumé. Si l’un des voyants est devenu rouge, cela
indique un déclenchement. Appuyez à nouveau sur le bouton pour le réinitialiser.
Le voyant deviendra blanc une fois réinitialisé avec succès.
2. Contrôlez l’affichage de la batterie. S'il est à 20% ou moins, chargez votre
station d’alimentation.
3. Vérifiez que l'écran LCD n’affiche aucune icône d'avertissement:
SURCHARGE: La consommation électrique dépasse la capacité maximale du
port. Indiqué par un voyant rouge sur le bouton du port.
La batterie nécessite une attention particulière. Contactez le service à la
clientèle. 1888794-6250
4. Si vous rencontrez toujours des problèmes avec votre station d’alimentation,
veuillez contacter notre centre de solutions client par téléphone au
1-888-794-6250 ou par courriel à l’adresse support@goalzero.com
Dépannage

28 29

30
REV E
GOAL ZERO HEADQUARTERS
Draper, UT 84020
1-888-794-6250
Designed in the U.S.A.
Made in China
Goal Zero Yeti is a trademark of Goal Zero.
CAN ICES-3 (A) / NMB-3 (B) This Class B digital apparatus complies with Canadian
ICES-003. (Cet appareil numérique de la Classe B conforme à la norme NMB-003
du Canada). This device contains licence-exempt transmitter(s)/receiver(s) that
comply with Innovation, Science and Economic Development Canada’s licence-
exempt RSS(s). Operation is subject to the following two conditions: (1) This device
may not cause interference. (2) This device must accept any interference, including
interference that may cause undesired operation of the device. L’émetteur/
récepteur exempt de licence contenu dans le présent appareil est conforme aux
CNR d’Innovation, Sciences et Développement économique Canada applicables
aux appareils radio exempts de licence. L’exploitation est autorisée aux deux
conditions suivantes : (1) L’ appareil ne doit pas produire de brouillage; (2) L’
appareil doit accepter tout brouillage radioélectrique subi, même si le brouillage
est susceptible d’ en compromettre le fonctionnement. This equipment complies
with IC exposure limits set forth for an uncontrolled environment. This equipment
shall be installed and operated with minimum distance 10cm between the radiator
& body. Cet équipement est conforme aux limites d’exposition IC définies pour un
environnement non contrôlé. Cet équipement doit être installé et utilisé avec une
distance minimale de 10cm entre le radiateur et la carrosserie.
This equipment has been tested and found to comply with the limits for a Class
B digital device, pursuant to part 15 of the FCC Rules. These limits are designed
to provide reasonable protection against harmful interference in a residential
installation. This equipment generates, uses and can radiate radio frequency
energy and, if not installed and used in accordance with the instructions, may cause
harmful interference to radio communications. However, there is no guarantee that
interference will not occur in a particular installation. If this equipment does cause
harmful interference to radio or television reception, which can be determined
by turning the equipment off and on, the user is encouraged to try to correct the
interference by one or more of the following measures:
—Reorient or relocate the receiving antenna.
—Increase the separation between the equipment and receiver.
—Connect the equipment into an outlet on a circuit different from that to which the
receiver is connected.
—Consult the dealer or an experienced radio/TV technician for help.
This device complies with part 15 of the FCC Rules. Operation is subject to the
following two conditions: (1) This device may not cause harmful interference, and (2)
this device must accept any interference received, including interference that may
cause undesired operation.