FOR SUPPORT, VISIT ELEMENTELECTRONICS.COM/SUPPORT 1
USER
MANUAL
ESBAE21
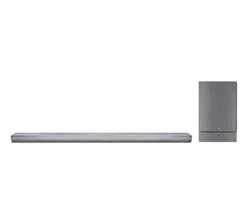
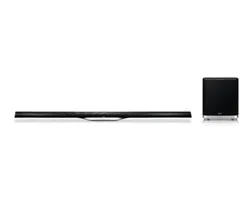
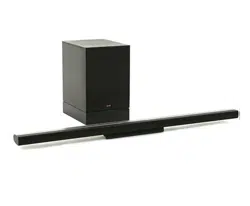
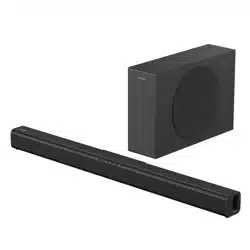
2.1 Sound Bar with
Wireless Subwoofer
USER MANUAL2
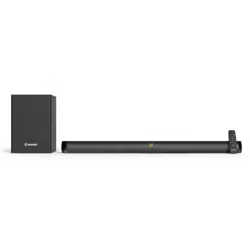
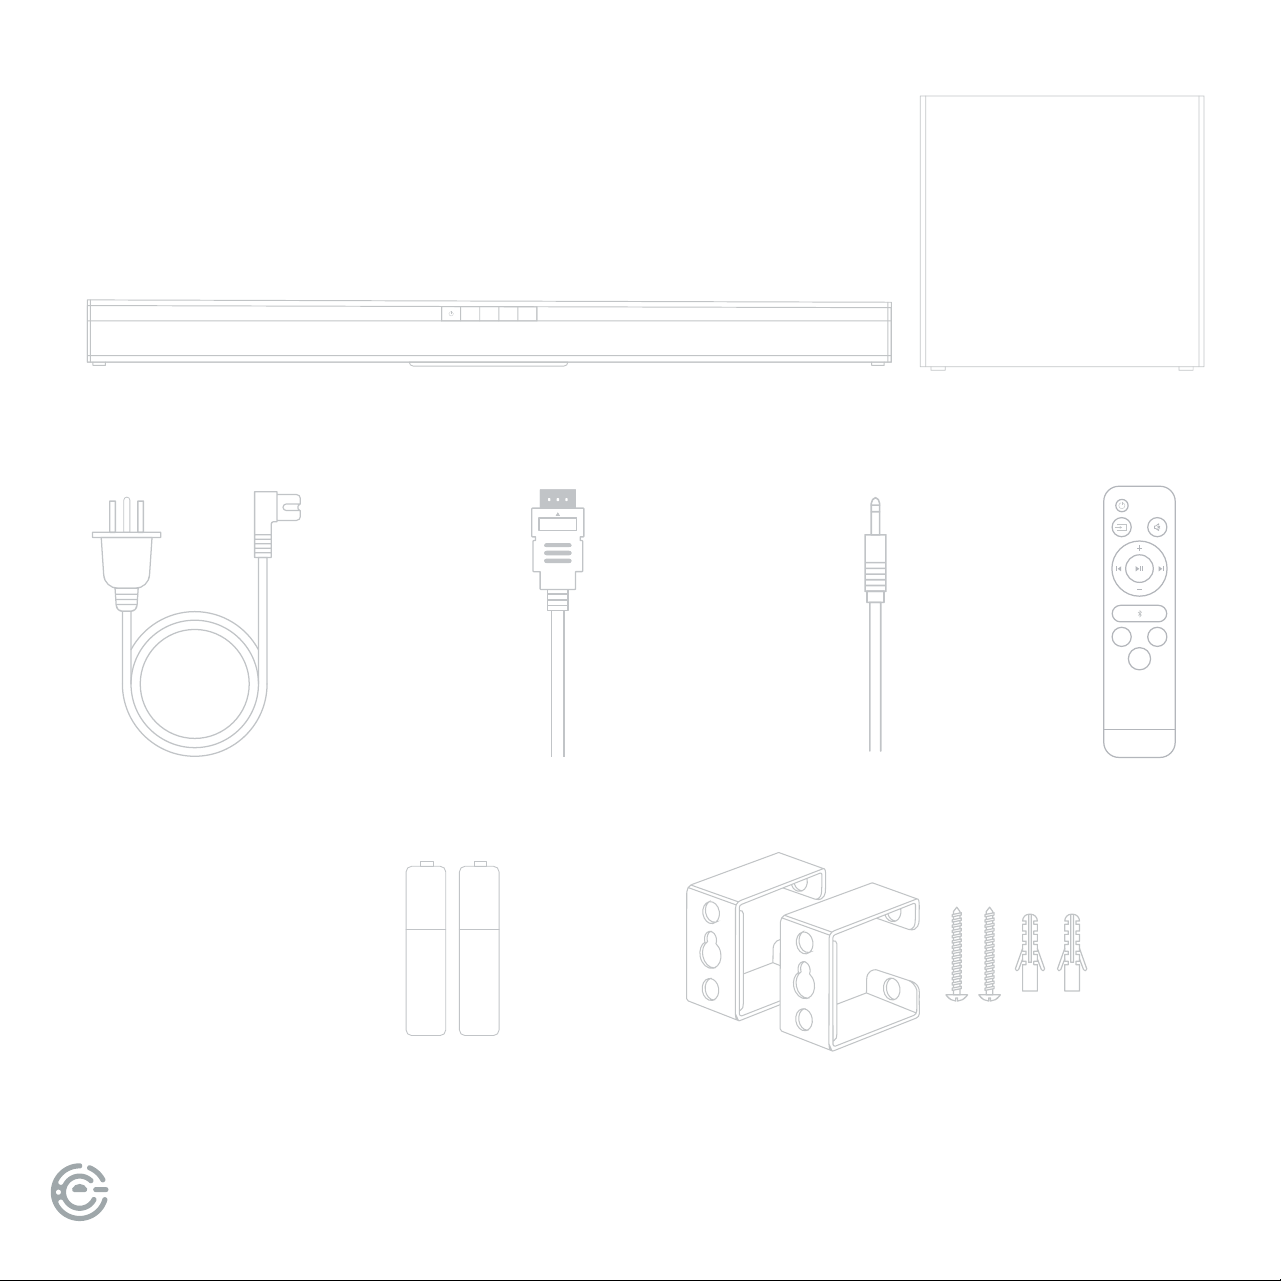
WHAT’S
INCLUDED
MUSIC
MOVIE
NEWS
Your new sound bar & subwoofer!
Power cord x 2
Remote
2 AAA
remote batteries
SOURCE EQ VOL
_
VOL
+
HDMI cable
Audio cable
Wall
mounting kit
+
_
+
_
+
_
+
_
FOR SUPPORT, VISIT ELEMENTELECTRONICS.COM/SUPPORT 3
FOR YOUR
ATTENTION
• Please read through this manual before making connections and operating your new sound bar.
Retain this manual for future reference.
• Do not open the cabinet of this unit; there are no user-serviceable parts inside.
Refer servicing to qualied personnel only.
• Switch o the unit when not in use. Switch o the unit and disconnect it from the AC power
supply when not in use for an extended period of time.
• Do not install the unit in a place exposed to heating sources or direct sunlight.
• Do not install the unit in a place exposed to moisture or rain.
• e sound bar should not be exposed to dripping or splashing, and objects lled with liquids
should not be placed on top of the unit.
• Install the unit on a horizontal, at and rm surface with good ventilation. Never block the vents
which will cause malfunction, resulting from overheating.
• Use a so and clean rag to clean the outside of the unit. Never clean it with chemicals or detergent.
• is book is only a guide for user’s operation, not a criterion for conguration.
• Only use attachments/accessories specied by the manufacturer.
• Where the main plug is used as the disconnect device, the disconnect device shall remain readily operable.
WARNING: e batteries shall not be exposed to excessive heat such as sunshine, re or the like.
CAUTION: Danger of explosion if battery is incorrectly replaced. Replace only with the same or equivalent type.
e lightning ash is intended to alert the user to the presence of dangerous voltage
within the product’s enclosure, and touching the internal components may result in a
risk of electric shock to persons.
e exclamatory mark is intended to alert the user to the presence of important
operating instructions.
To reduce the risk of electric shock or re, do not open the cover. Refer servicing
to qualied service personnel.
USER MANUAL4
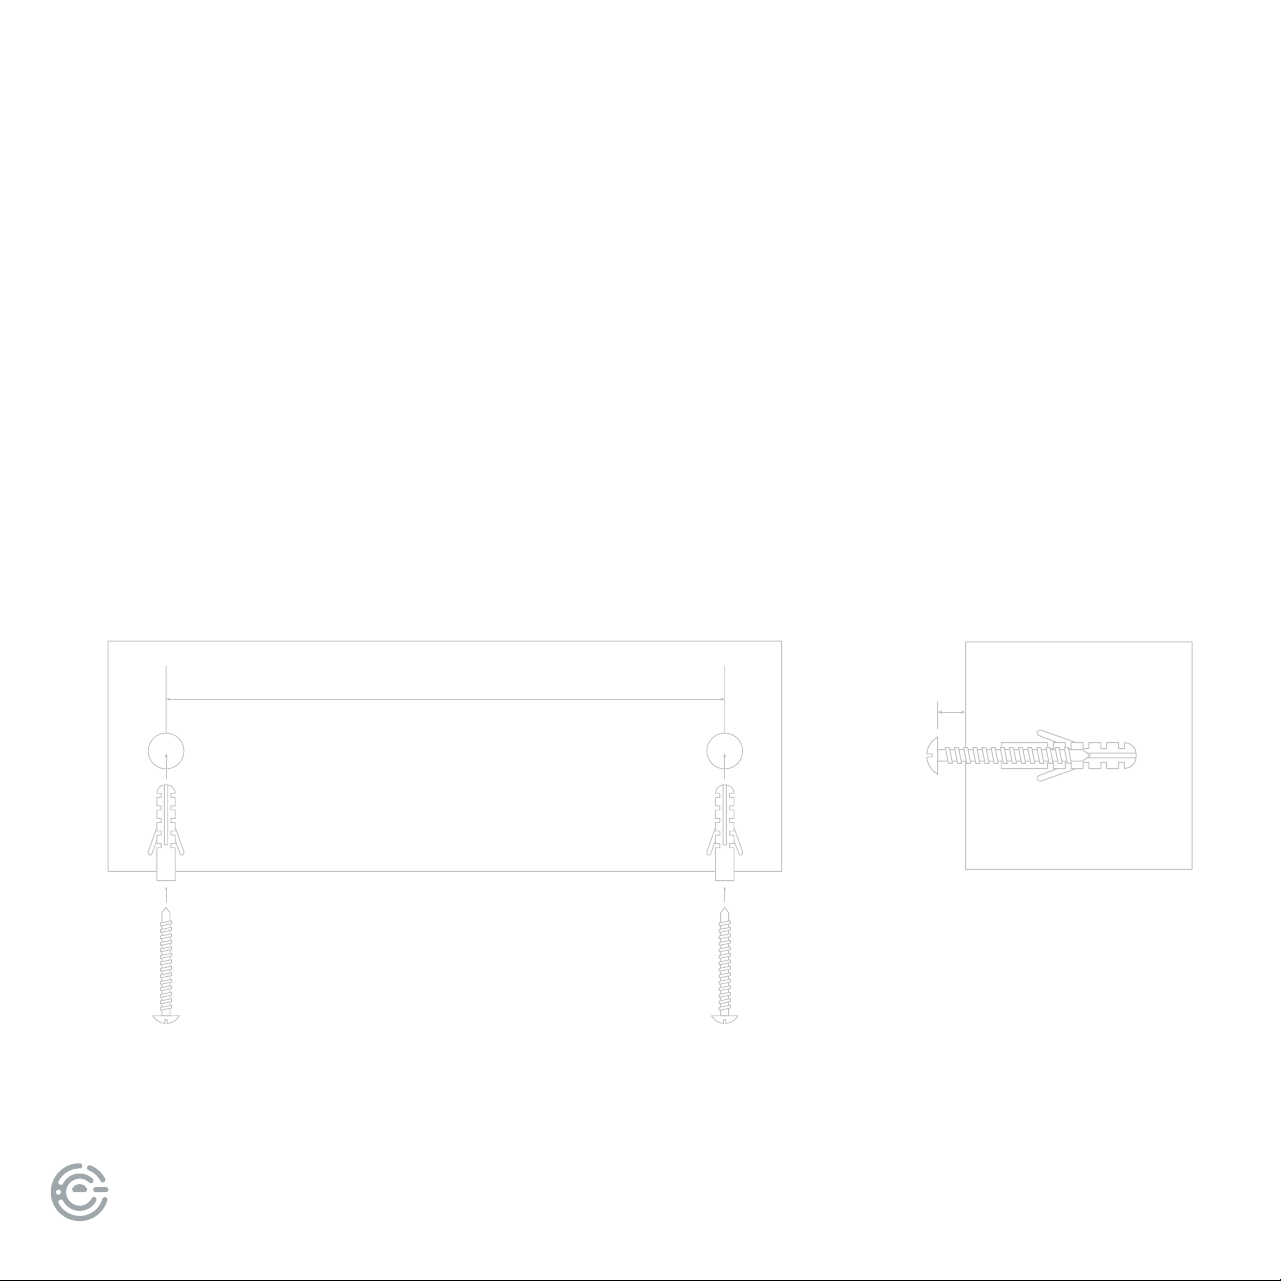
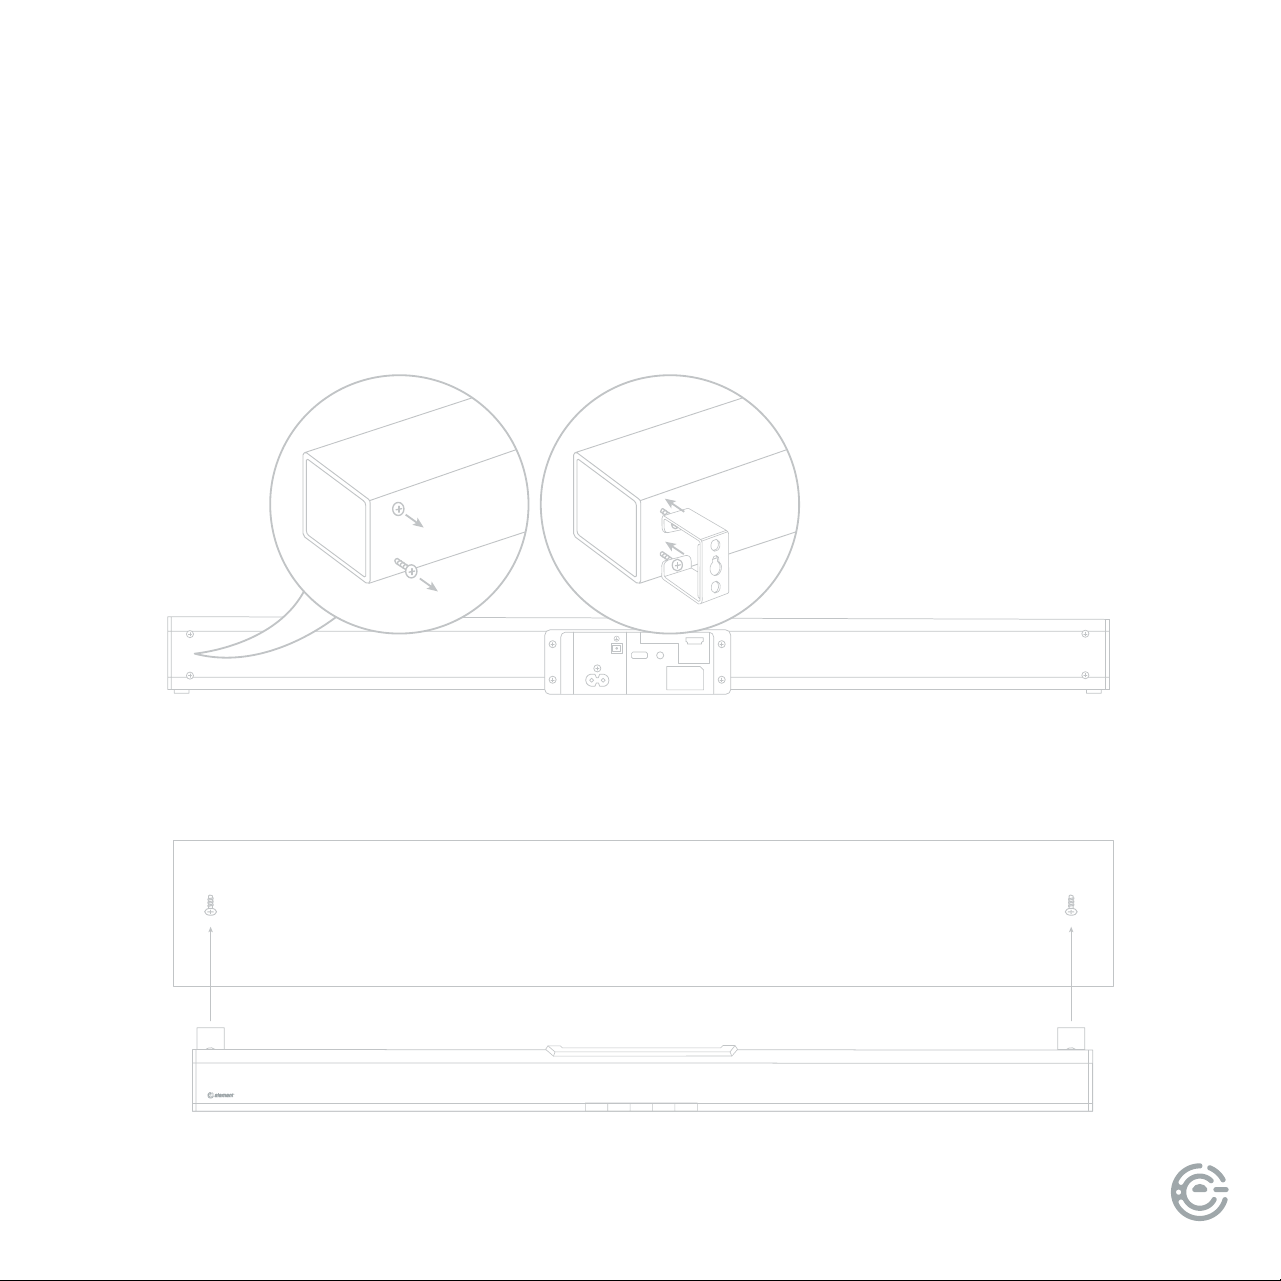
MOUNTING YOUR
SOUND BAR ON A WALL
In order to prevent injuries, the sound bar device must be fastened securely to
the wall in accordance with the below installation instructions.
SUGGESTED WALL MOUNTING HEIGHT: ≤ 59in
770mm
3mm
Leave 3mm distance between
the screw heads and the wall.
1. Drill two parallel holes into the wall (about 5.5-6 mm in diameter).
e distance between the holes should be 770mm
2. If needed, rmly x 1 dowel into each hole in the wall, insert screws
leaving 3mm clearance from wall.
FOR SUPPORT, VISIT ELEMENTELECTRONICS.COM/SUPPORT 5
4. Li unit onto wall, aligning the wall screws into the holes in the brackets and slot into place
MOUNTING YOUR
SOUND BAR ON A WALL
(continued)
AUX
HDMI ARC
USB
OPTICAL
AC-
3. Unscrew the four screws from the back of the Sound Bar, place brackets on each set of
holes and replace screws to hold brackets rmly in place
USER MANUAL6
SOURCE EQ VOL
_
VOL
+
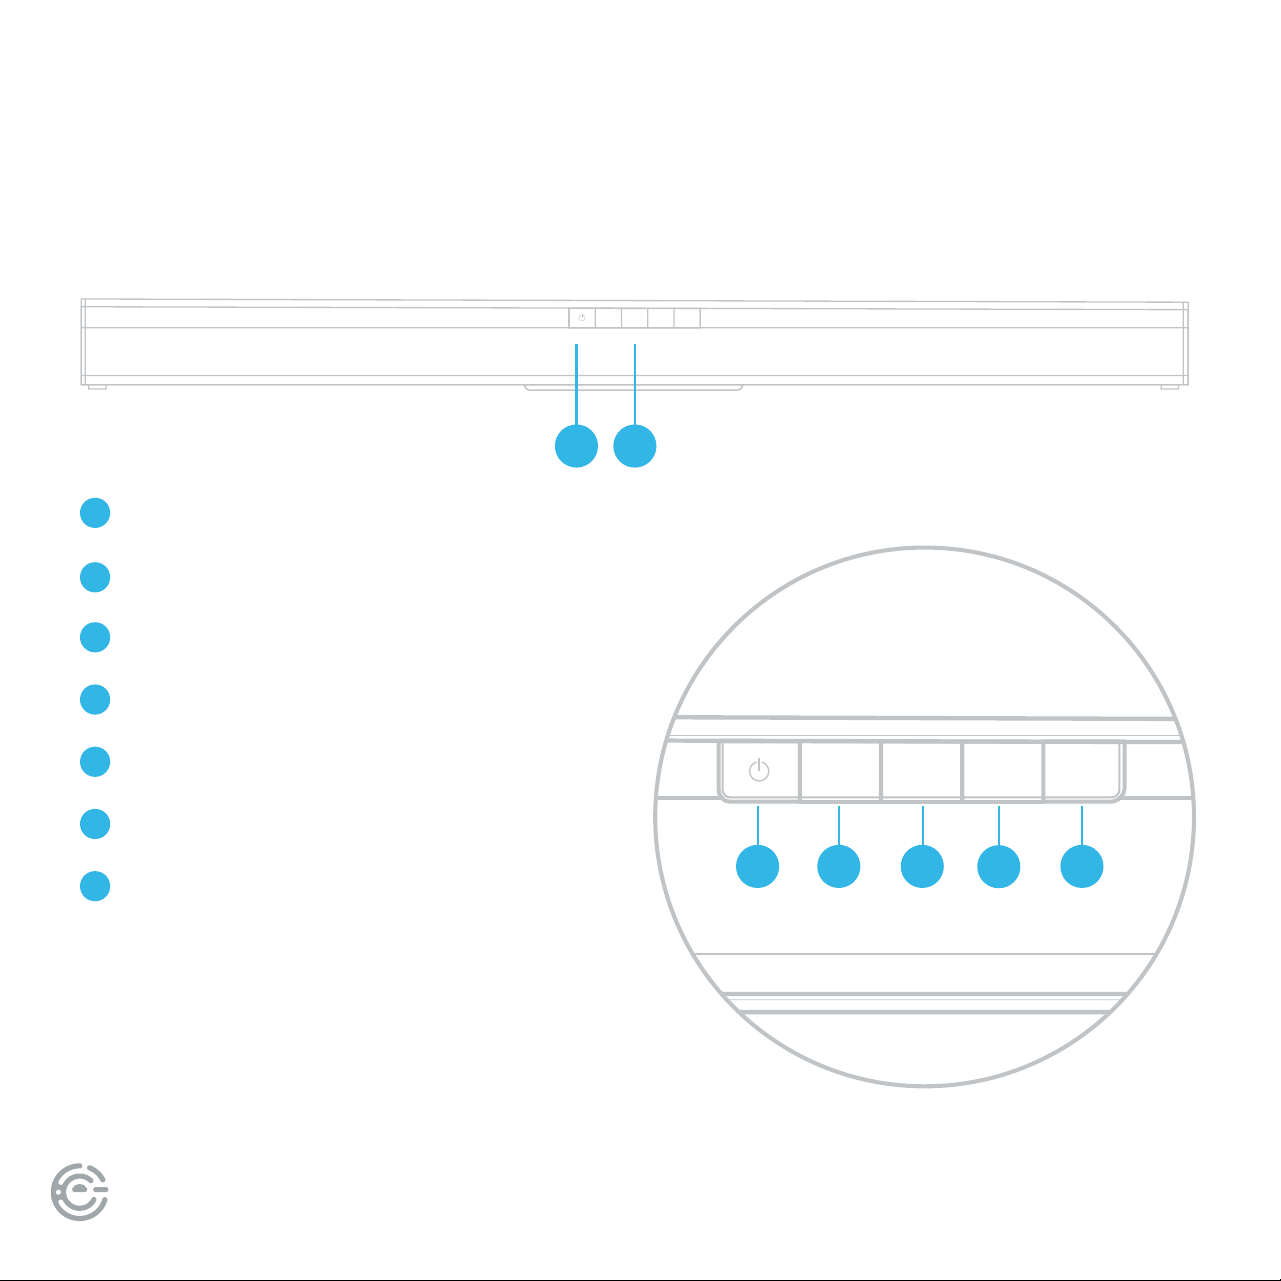
SOUND BAR
PANELS
SOURCE EQ VOL
_
VOL
+
1 2
3 4 7
6
5
Remote Control Sensor
LED Display
Power Turn sound bar on or o
Source Select input audio source
EQ Select the sound eect
Volume Down Turn down audio volume
Volume Up Turn up audio volume
1
2
3
4
5
6
7
Front
Front Controls

FOR SUPPORT, VISIT ELEMENTELECTRONICS.COM/SUPPORT 7
AUX
HDMI ARC
USB
OPTICAL
AC-
(continued)
SOUND BAR
PANELS
AUX
HDMI ARC
USB
OPTICAL
AC-
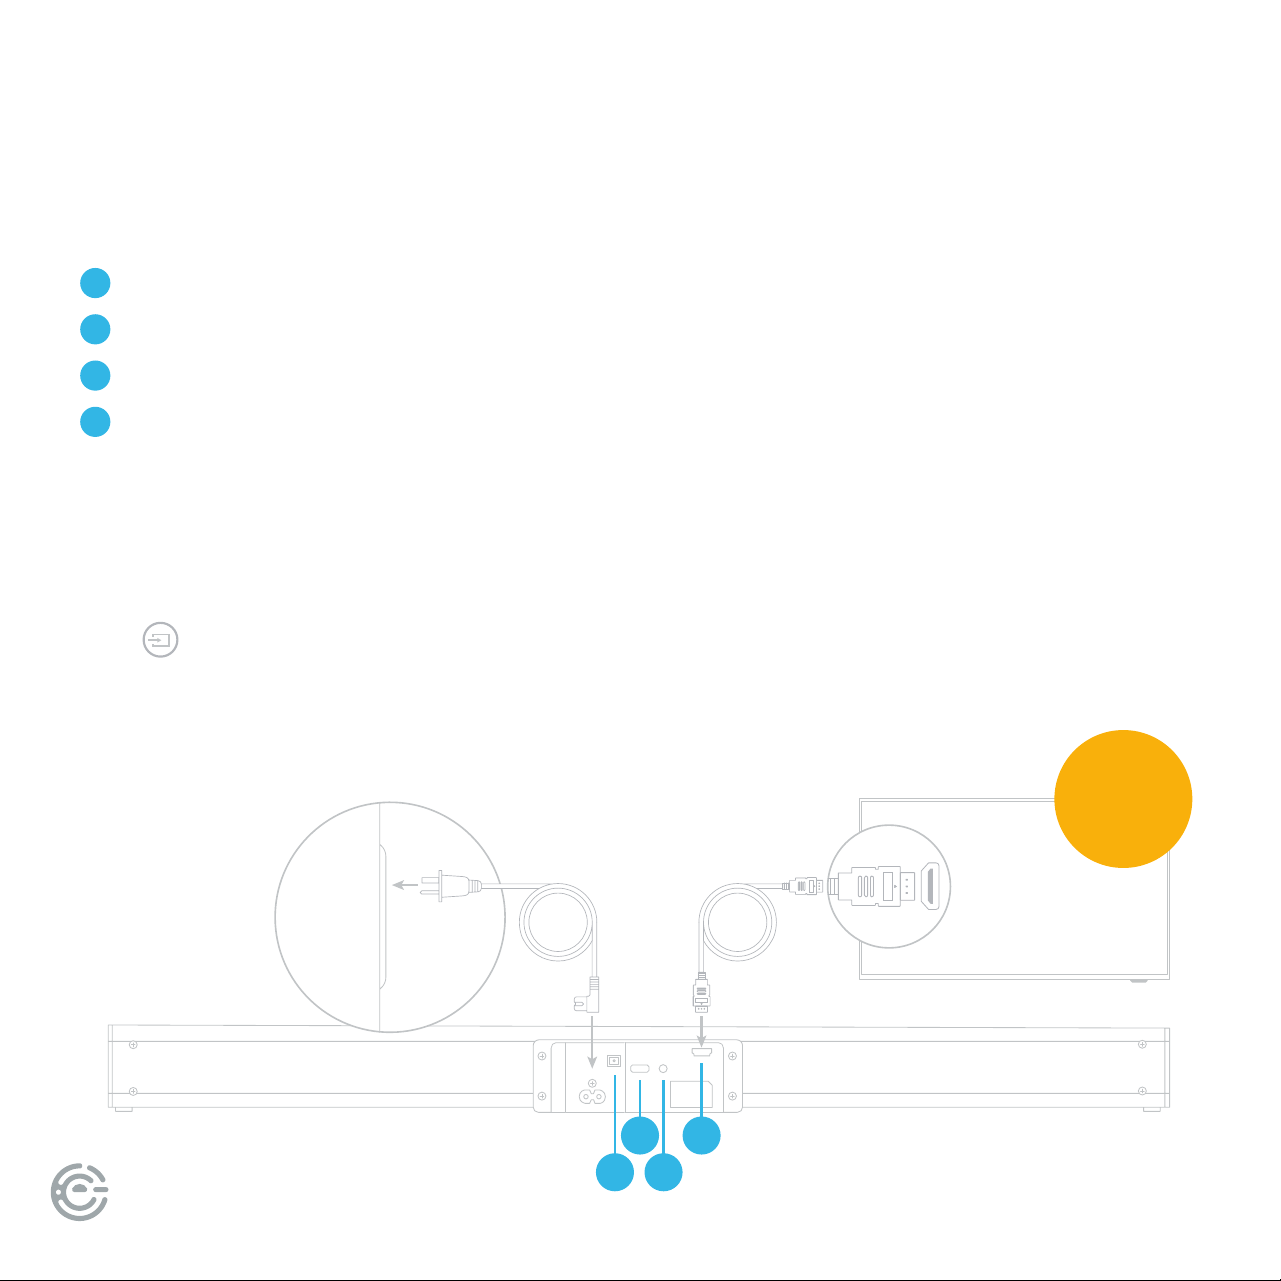
WALL BRACKET SCREWS
AC IN
OPTICAL
USB
HDMI (ARC)
AUX IN
8
9
10
11
12
13
8 8
10
9
11 12 13
Back
Back Connections
USER MANUAL8
AUX
HDMI ARC
USB
OPTICAL
AC-
CONNECT
TO YOUR TV
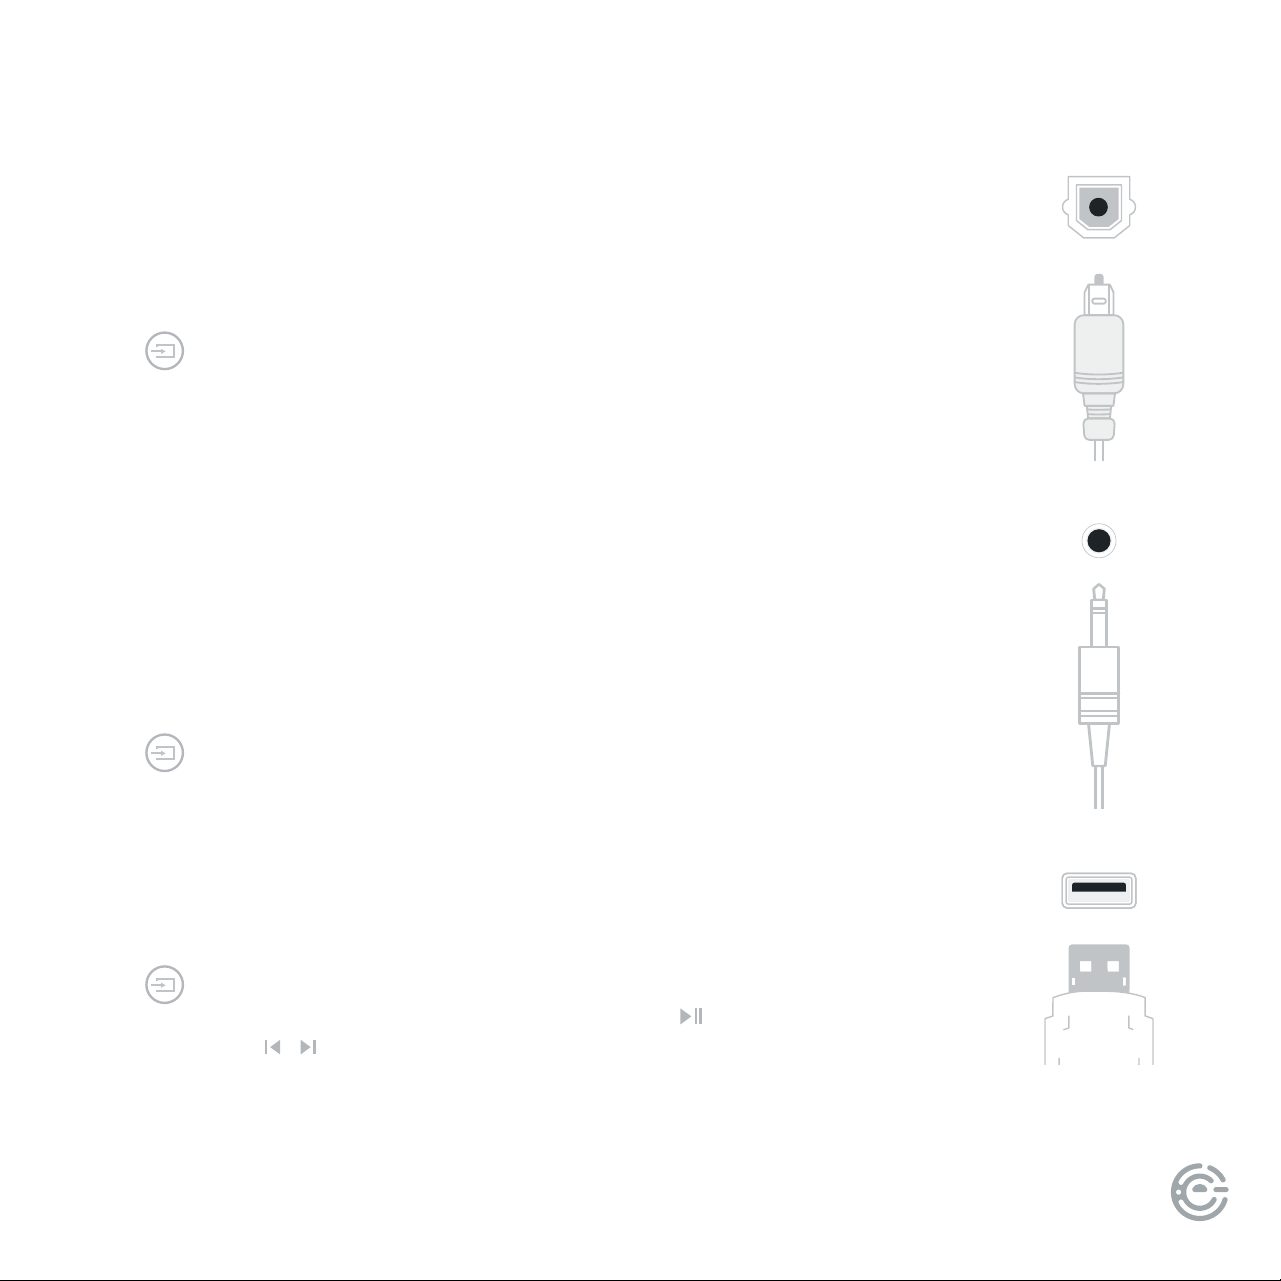
ere are 4 ways to connect your sound bar to the TV:
2 3
HDMI (ARC) Best Quality (cable included)
Optical Better Quality (cable not included)
AUX Good Quality (cable not included)
USB Good Quality (cable not included)
1
2
3
4
Ensure
HDMI CEC
is ON
ARC is an audio return channel function for digital audio which will give you the best
sound quality. Use the supplied ARC cable to connect to the HDMI ARC input of your
sound bar and the HDMI ARC output on your TV or other external device.
Press button on the remote control to select HDMI ARC mode.
e display will show ARC which means that HDMI ARC mode is selected.
Note: e external device audio output must be set to HDMI.
HDMI ARC (AUDIO RETURN CHANNEL)
14
MUSIC
MOVIE
NEWS
FOR SUPPORT, VISIT ELEMENTELECTRONICS.COM/SUPPORT 9
CONNECTIONS
Connect your sound bar to your TV or other external devices such as a CD, VCR, DVD
player, etc., by connecting an optical input cable (cable not included) to your sound
bar and the optical output of your external device.
Press button on the remote control to select optical input mode.
e display will show OPT which means that OPTICAL mode is selected.
Note: e external device audio output must be set to PCM.
Optical
is sound bar has an extra group of audio input terminals.
Connect your sound bar to your TV or other external devices such as a CD, VCR, DVD
player, etc. by connecting an AUX input cable (cable not included) to your sound bar
and the AUX output of your external device.
Press button on the remote control to select AUX input mode.
e display will show AUX which means that AUX mode is selected.
Connect a USB drive to your sound bar to play digital audio les.
Press button on the remote control to select USB mode and play should start
automatically. If play does not start automatically, press
. To skip to the previous/
next track, press / on the remote control. e display will show USB which means
that USB mode is selected.
AUX
USB
MUSIC
MOVIE
NEWS
MUSIC
MOVIE
NEWS
MUSIC
MOVIE
NEWS
MUSIC
MOVIE
NEWS
MUSIC
MOVIE
NEWS
MUSIC
MOVIE
NEWS
USER MANUAL10
CONNECTIONS
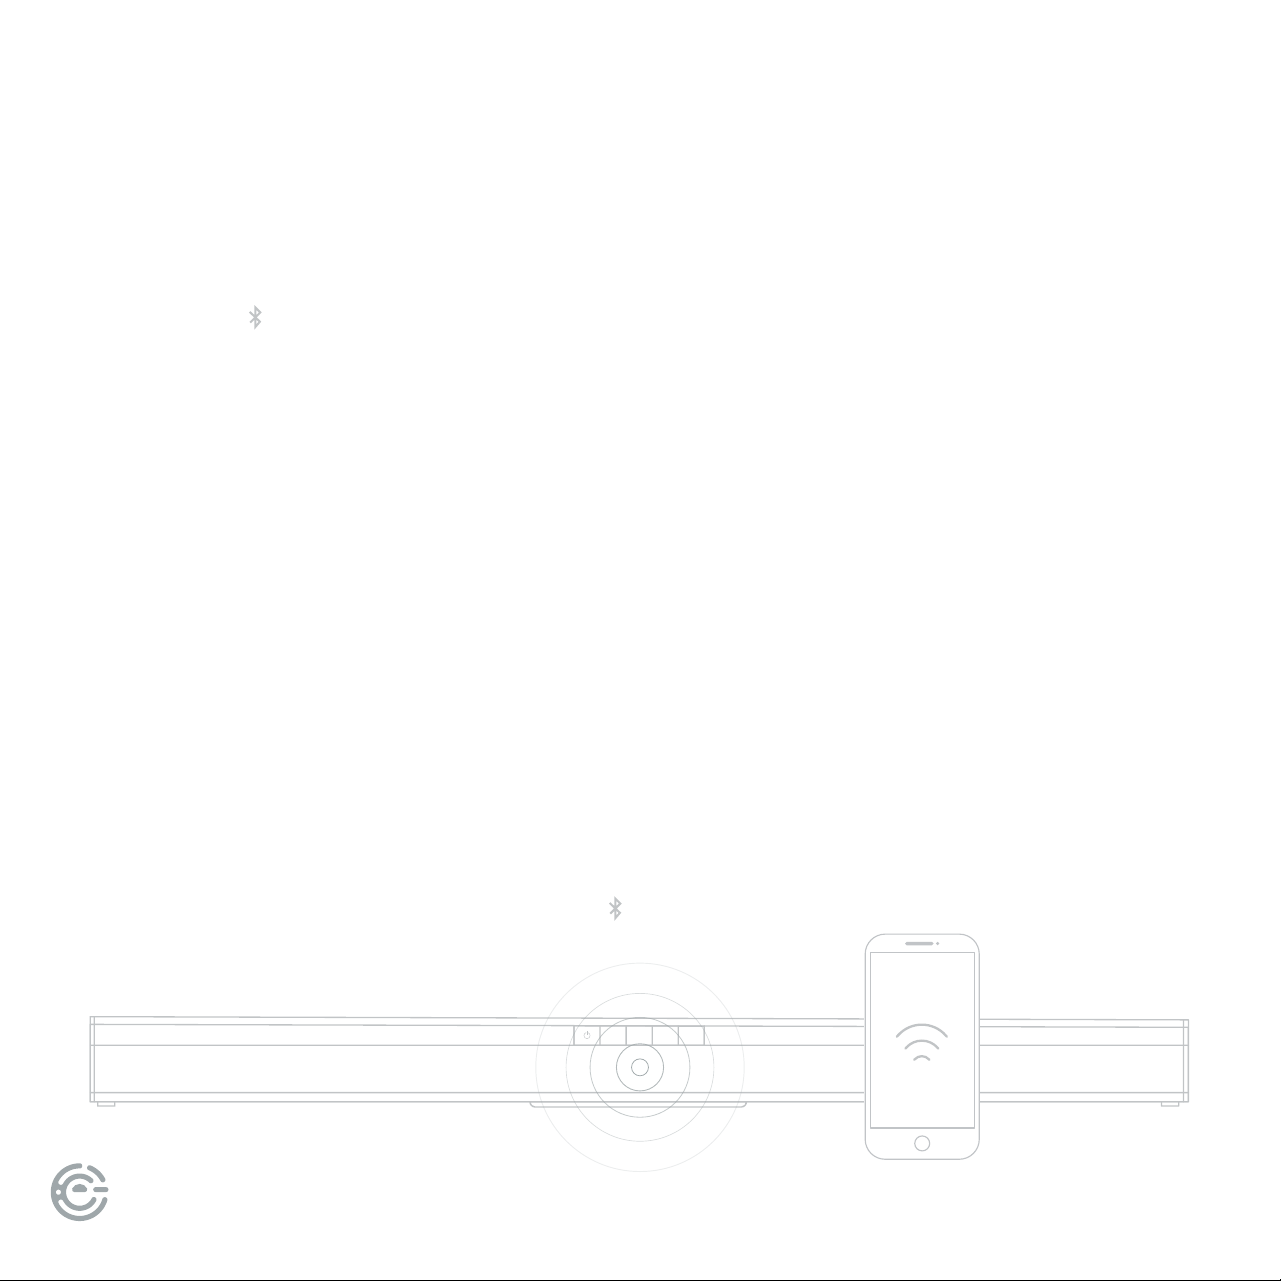
Press the POWER button on the remote control to power on the sound
bar, then press
MUSIC
MOVIE
NEWS
button on the remote control to switch to Bluetooth
mode. e display will show BT which means that BLUETOOTH
mode is selected.
If aer several seconds the display does not read BT, the sound bar is still
searching for a signal and you can follow these steps:
Pairing a device or connecting a paired device:
1. Press and hold the play/pause button on the remote control. Use your
smart device to search for the Bluetooth signal of the sound bar.
2. Select the sound bar on your list of Bluetooth connections.
3. e sound bar will then sync to play from your device.
When the display reads BT and a beep is heard, it means
you are connected successfully.
Disconnecting a device:
Press and hold the play/pause button on the remote control. When it
successfully disconnects the screen will show NO
MUSIC
MOVIE
NEWS
.
Bluetooth®
SOURCE EQ VOL
_
VOL
+
TIP: Bluetooth connection
range is 10 meters.
In Bluetooth mode,
[PLAY/PAUSE], [NEXT],
[PREVIOUS], [VOLUME+/-]
etc. are also active.
(continued)
FOR SUPPORT, VISIT ELEMENTELECTRONICS.COM/SUPPORT 11
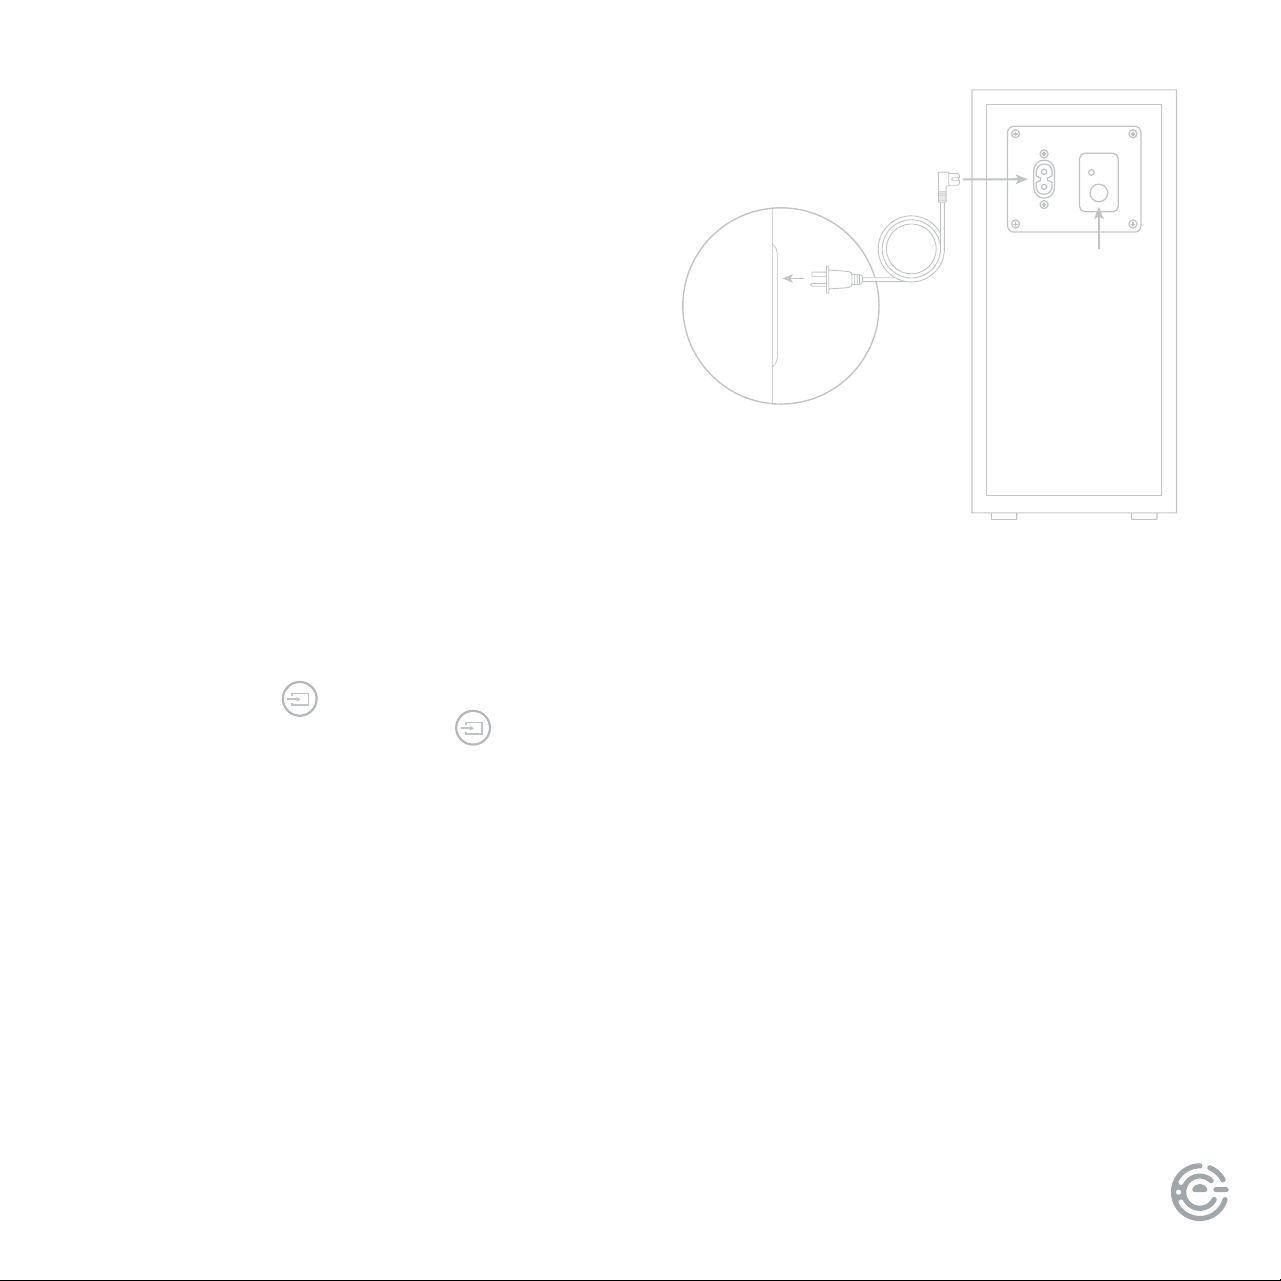
e subwoofer will receive the wireless audio signal
from the soundbar. e subwoofer and sound bar will
automatically connect when both units are plugged in
and turned on. When the light on the subwoofer is
BLINKING FAST, it is in pairing mode. When there is a CONSTANT LIGHT,
the subwoofer has connected and paired successfully. When the light is
BLINKING SLOW, the pairing has failed.
TIP: During the connection of the sound bar and subwoofer, users should not press and hold the PAIR
button on the subwoofer or it will cause it to disconnect.
Automatic Pairing of the
Subwoofer to the Soundbar
CONNECTIONS
(continued)
AC-
PAIR
PAIR
BUTTON
Press and hold the
MUSIC
MOVIE
NEWS
button on the sound bar to disconnect it. e indicator light on the subwoofer
will blink slowly. Press and hold the
MUSIC
MOVIE
NEWS
again and the sound bar will reconnect with the subwoofer, and
the light on the subwoofer will stay constant.
If the sound bar and subwoofer do not connect automatically you can follow these steps:
1. Press and hold the PAIR button on the rear of the subwoofer for a few secons. e subwoofer will enter
pairing mode and the light will blink quickly.
2. Press the POWER button on the sound bar or on the remote to turn the soundbar on.
3. Press and hold the SOURCE button on the sound bar for a few secons
4. If pairing was successful, the light will be constant. If the light is blinking, the connection has failed.
5. If unsuccessful, unplug the power cord from the subwoofer and wait 4 minures to reconnect.
Repeat steps 1-4.
USER MANUAL12
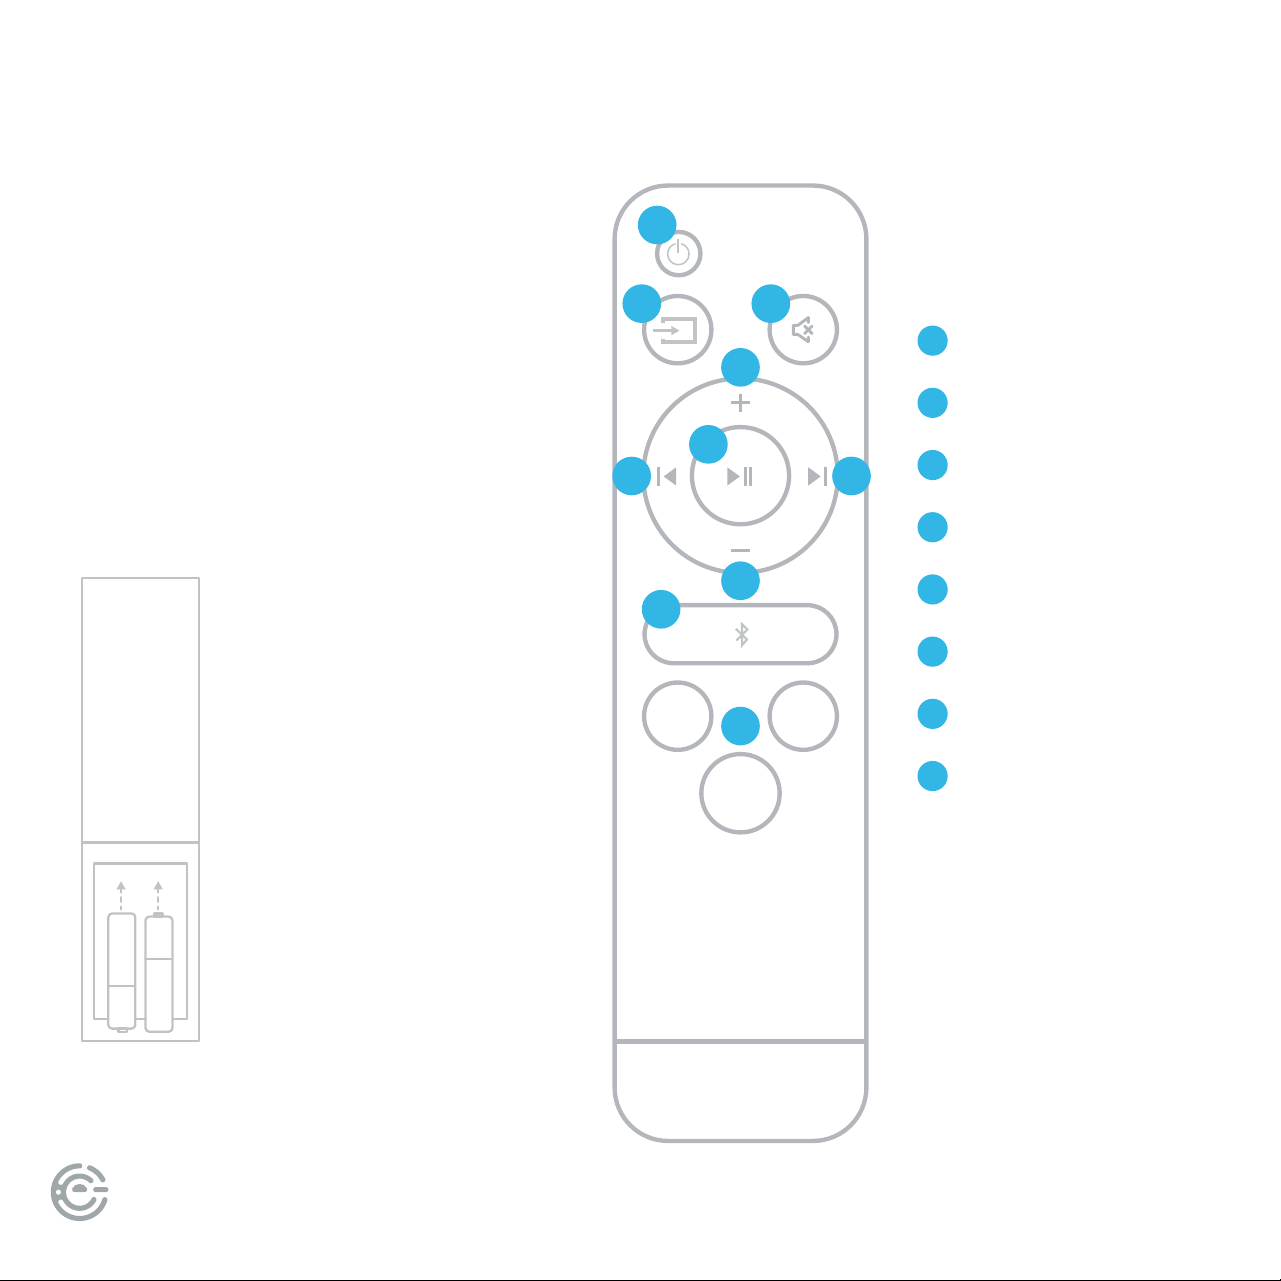
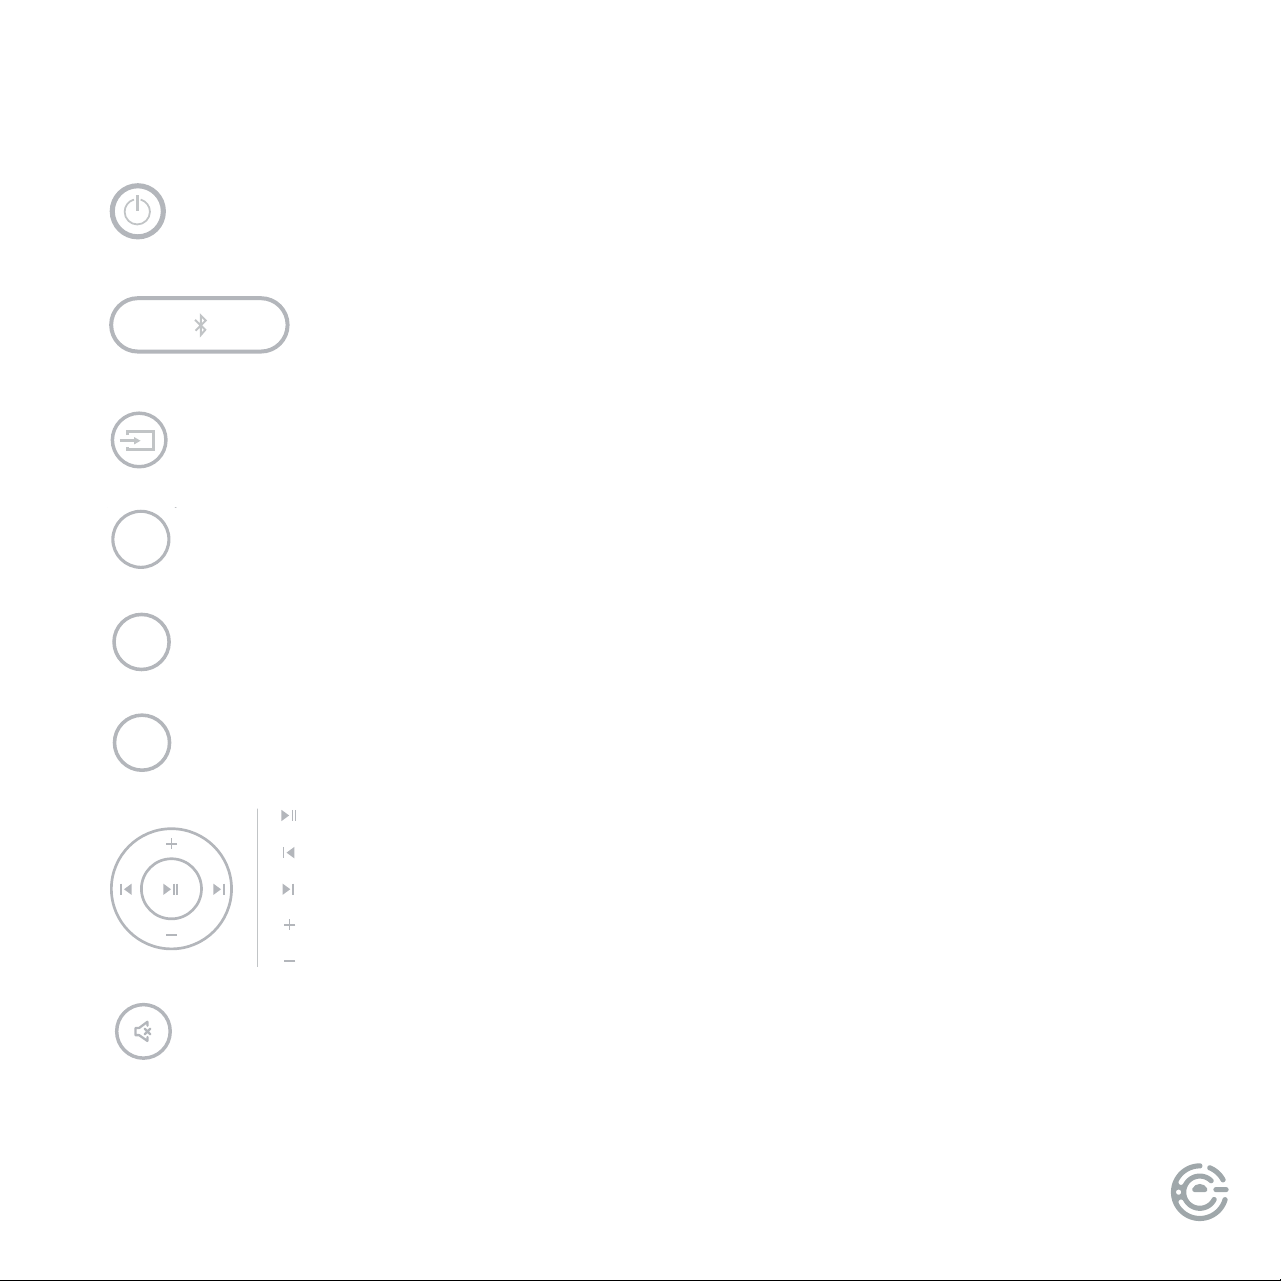
REMOTE
CONTROL
MUSIC
MOVIE
NEWS
1
2
3
3
6
8
6
4
5
7
Power
Source
Volume Up/Down
News/Music/Movie
Mute
Previous/Next
Play/Pause
Bluetooth
1
2
3
4
5
6
7
8
Insert the batteries into the remote control.
Point the remote control at the remote
sensor on the front panel. e remote
control works within a distance of about
6 meters from the sensor and within
an angle of about 30 degrees from
the le and right side.
Remote control operation
+
_
+
_
Remove the battery
compartment cover on
the back of the remote.
Load two AAA/1.5V batteries
into the battery compartment
making sure that the battery
has been inserted with the
correct polarities matching the
symbols +, - as indicated inside
the battery compartment.
Replace the cover.
Battery
installation
FOR SUPPORT, VISIT ELEMENTELECTRONICS.COM/SUPPORT 13
BASIC PLAYBACK
Press to switch on the unit. Press it again to put the unit in standby mode.
Press for AUX / HDMI ARC / OPTICAL / USB mode
Press to enter MOVIE mode.
Press to enter NEWS mode.
Press to enter MUSIC mode.
Press to temporarily switch o the sound. Press it again to switch it on.
Press to temporarily pause a playback. Press it again to resume the playback.
Press to return to the previous track.
Press to skip to the next track.
Press [VOLUME +] to turn up the volume.
Press [VOLUME -] to turn down the volume.
Press to switch to Bluetooth mode, hold down button
for 3 sec to disconnect Bluetooth mode.
MUSIC
MOVIE
NEWS
MUSIC
MOVIE
NEWS
MUSIC
MOVIE
NEWS
MUSIC
MOVIE
NEWS
MUSIC
MOVIE
NEWS
MUSIC
MOVIE
NEWS
MUSIC
MOVIE
NEWS
MUSIC
MOVIE
NEWS
MUSIC
MOVIE
NEWS
MUSIC
MOVIE
NEWS
MUSIC
MOVIE
NEWS
MUSIC
MOVIE
NEWS
MUSIC
MOVIE
NEWS
MUSIC
MOVIE
NEWS
MUSIC
MOVIE
NEWS

USER MANUAL14
TROUBLESHOOTING
Use the chart below to troubleshoot any issues you may be having. If you do not see your issue listed
below, or the troubleshooting guide does not solve your issue, please contact Element customer support.
SYMPTOM CAUSE REMEDY
No Power • AC power cord is not connected to a power supply
securely
• Check that the AC power cord is
connected securely
ere is no sound or
the sound is distorted
• e audio cables aren’t connected securely
• e volume is set to the minimum level
• e sound is switched o
• Connect the audio cables securely.
• Turn up the volume
• Press [MUTE] on the remote control
to switch on the sound
• Press [PLAY/PAUSE]
e remote control
does not function
• ere is no battery in the remote control
• e battery is out of charge
• e remote control isn’t pointed to the remote sensor
• e remote control is out of its operating area
• e unit is shut down
• Install two AAA/1.5V batteries in it
• Replace the battery with new one
• Make sure that the remote control is
pointed to the remote control sensor
• Make sure the remote control is within
the operating area
• Switch o the unit and disconnect it
from the AC outlet, then power on
the unit again
FOR SUPPORT, VISIT ELEMENTELECTRONICS.COM/SUPPORT 15
SOUND BAR
SPECIFICATIONS
SOUND BAR
POWER
SUPPLY
AC ~100-240V, 50/60Hz
RELATIVE
HUMIDITY
5% ~ 90%
FREQUENCY
RESPONSE
40Hz~200Hz
TEMPERATURE
14°F - 95°F
SOUNDBAR
MAX POWER
OUTPUT
SUBWOOFER
MAX POWER
OUTPUT
30W X 2 60W
WORKING ENVIRONMENT

USER MANUAL16
REFERENCES
Element TV Company, LP. bears no responsibility for data and/or
information that is compromised during a wireless transmission.
Frequency band
• is system uses the 2.4 GHz frequency band.
Certication
• is system conforms to the frequency restrictions and has received certication based on frequency laws.
us, a wireless permit is not Necessary.
• e actions below are punishable by law in some countries:
- Taking apart or modifying the unit.
- Removing specication indications.
Restrictions of use
• Wireless transmission and/or usage with all Bluetooth equipped devices is not guaranteed.
• All devices must conform to standards set by the Bluetooth SIG, Inc.
• Depending on the specications and settings of a device, it can fail to connect or some operations can be dierent.
• is system supports Bluetooth security features. But depending on the operating environment and/or settings,
this security is possibly not sucient. Transmit data wirelessly to this system with caution.
• is system cannot transmit data to a Bluetooth device.
Range of use
• Use this device at a maximum range of 8 m.
• e range can decrease depending on the environment, obstacles or interference.
Interference from other devices
• is system may not function properly and troubles such as noise and sound jumps may arise due to radio wave interference if this
unit is located too close to other Bluetooth devices or the devices that use the 2.4 GHz band.
• is system may not function properly if radio waves from a nearby broadcasting station, etc. is too strong.
Intended usage
• is system is for normal, general use only.
• Do not use this system near equipment or in an environment that is sensitive to radio frequency interference
(example: airports, hospitals, laboratories, etc.).

FOR SUPPORT, VISIT ELEMENTELECTRONICS.COM/SUPPORT 17
LICENSE
e Bluetooth
®
word mark and logos are registered trademarks owned by Bluetooth SIG,Inc. and any use of such marks by Element
TV Company, LP. is under license. Other trademarks and trade names are those of their respective Owners.
FCC STATEMENT
1. is device complies with Part 15 of the FCC Rules. Operation is subject to the following two conditions:
(1) is device may not cause harmful interference, and
(2) is device must accept any interference received, including interference that may cause undesired operation.
2. Changes or modications not expressly approved by the party responsible for compliance could void the user’s
authority to operate the equipment.
NOTE: is equipment has been tested and found to comply with the limits for a Class B digital device, pursuant to Part 15 of
the FCC Rules. ese limits are designed to provide reasonable protection against harmful interference in a residential installation.
is equipment generates uses and can radiate radio frequency energy and, if not installed and used in accordance with the
instructions, may cause harmful interference to radio communications. However, there is no guarantee that interference will not
occur in a particular installation. If this equipment does cause harmful interference to radio or television reception, which can be
determined by turning the equipment o and on, the user is encouraged to try to correct the interference by one or more of the
following measures:
• Reorient or relocate the receiving antenna.
• Increase the separation between the equipment and receiver.
• Connect the equipment into an outlet on a circuit dierent from that to which the receiver is connected.
• Consult the dealer or an experienced radio/TV technician for help.
RADIATION EXPOSURE STATEMENT
is equipment complies with FCC/IC radiation exposure limits set forth for an uncontrolled environment. is equipment should be
installed and operated with minimum distance 20cm between the radiator & your body.

USER MANUAL18
LET’S REGISTER
YOUR PRODUCT
It’s super easy, just head on over to
elementelectronics.com/register
www
BENEFITS OF REGISTERING YOUR PRODUCT:
Support
Get assistance
quickly by
pre-registering
your product.
News & Oers
Take advantage
of the latest news
and special oers
from Element.
Updates
Stay current
with important
product updates
and notications.
2 YEAR
WARRANTY
Warranty
Receive a
2-year limited
warranty with
product registration.*
*1-year manufacturer’s limited warranty with purchase, or 2-year limited warranty with product registration within 90 days of purchase. See warranty card for details.
FOR SUPPORT, VISIT ELEMENTELECTRONICS.COM/SUPPORT 19
WE’RE HERE
TO HELP
elementelectronics.com
1.888.842.3577
customerservice@elementelectronics.com
Find resources and get help for product setup, connecting devices,
technical issues, downloading manuals and more!
We’re available 24 hours a day, 7 days a week
Element oers environmentally responsible options to recycle your unwanted consumer electronics
device. More information can be found by visiting: www.elementelectronics.com/sustainability

Element, the Element Logo, and Bring it home are trademarks of Element Brand Holding, LLC. All other trademarks are the property of the respective
owner who has not sponsored, endorsed, or approved this product. ©2024, Element Brand Holding, LLC, All Rights Reserved.
Bring it home.
®