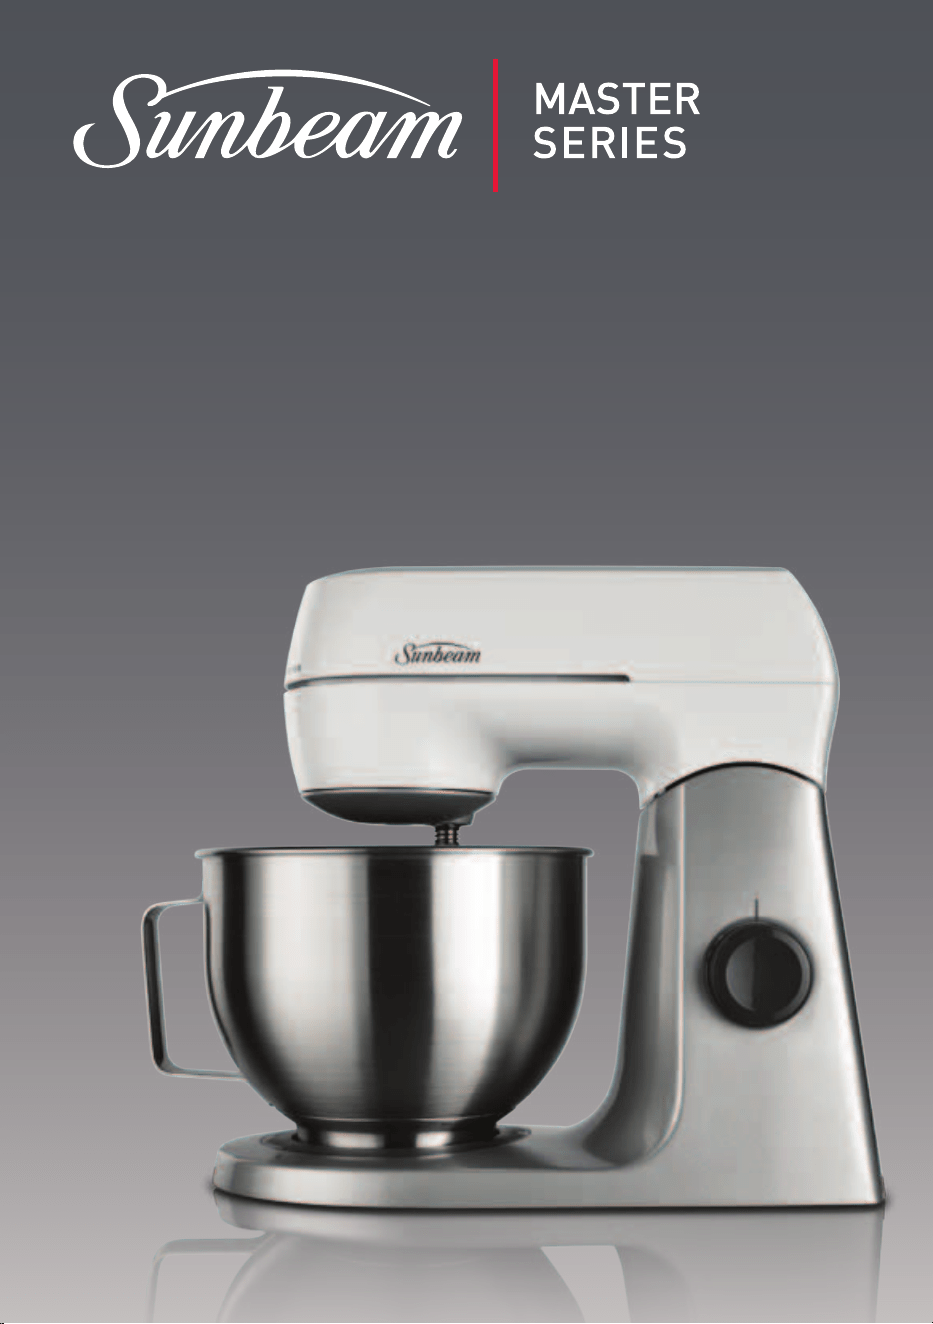
Planetary
Mixmaster
®
User Guide
Need help with your appliance?
Contact our customer service team
or visit our website for information
and tips on getting the most from
your appliance.
Australia | visit www.sunbeam.com.au
phone 1300 881 861
mail Units 5 & 6, 13 Lord Street,
Botany NSW 2019 Australia.
New Zealand | visit www.sunbeam.com.nz
phone 0800 786 232
mail Unit 3, Building D, 26 Vestey Drive,
Mt Wellington Auckland
New Zealand.
Sunbeam Corporation Limited | ABN 45 000 006 771
Sunbeam Corporation is a division of GUD Holdings Limited.
Sunbeam is a registered trademark.
Scrapemaster™ is a trademark of Sunbeam Corporation
Made in China to Sunbeam’s specification.
Due to minor changes in design or otherwise,
the product you buy may differ slightly from the one shown here.
Approved by the appropriate electrical regulatory authorities.
©Copyright Sunbeam 2013.
7/13
This Sunbeam product is covered by a
12 month replacement or repair warranty,
which is in addition to your rights under the
Australian Consumer Law (if your product
was purchased in Australia) or New Zealand
Consumer Guarantees Act (if your product
was purchased in New Zealand).
Upon receipt of your claim, Sunbeam will
seek to resolve your difficulties or, if the
product is defective, advise you on how to
obtain a replacement or refund.
To assist us in managing warranty claims,
we recommend you register your product
as soon as practicable after purchase by
creating a MySunbeam account on our
website and uploading a copy of your
original receipt.
In order to make a claim under our
warranty, you must have the original proof
of purchase documentation for the
product and present it when requested (if
not already uploaded to our website).
Should your product develop any defect
within 12 months of purchase because of
faulty materials or workmanship, we will
replace or repair it, at our discretion, free
of charge. A product presented for repair
may be replaced by a refurbished product
of the same type rather than being
repaired. Refurbished parts may be used
to repair the product.
Our replacement or repair warranty only
applies where a defect arises as a result
of faulty material or workmanship during
the warranty period. Your warranty does
not cover misuse or negligent handling
(including damage caused by failing to use
the product in accordance with this
instruction booklet), accidental damage,
or normal wear and tear.
Your warranty does not:
• cover freight or any other costs incurred
in making a claim, consumable items,
accessories that by their nature and
limited lifespan require periodic renewal
(such as filters and seals) or any
consequential loss or damage; or
• cover damage caused by:
- power surges, power dips, voltage
supply problems, or use of the product
on incorrect voltage;
Should you experience any
difficulties with your product
during the warranty period,
please contact our customer
service line for advice on 1300
881 861 in Australia, or 0800
786 232 in New Zealand.
Replacement
Guarantee
12
Month
- servicing or modification of the
product other than by Sunbeam or an
authorised Sunbeam service centre;
- use of the product with other
accessories, attachments, product
supplies, parts or devices that do not
conform to Sunbeam specifications; or
- exposure of the product to
abnormally corrosive conditions; or
• extend beyond 3 months if the product
is used in commercial, industrial,
educational or rental applications.
The benefits given to you by our
warranty are in addition to other rights
and remedies under law in relation to
the product.
In Australia our goods come with
guarantees that cannot be excluded
under the Australian Consumer Law. You
are entitled to a replacement or refund
for a major failure and for compensation
for any other foreseeable loss or
damage. You are also entitled to have the
goods repaired or replaced if the goods
fail to be of acceptable quality and the
failure does not amount to a major
failure.
Our goods also come with guarantees
that cannot be excluded under the New
Zealand Consumer Guarantees Act.
If your warranty claim is not accepted, we
will inform you and if requested to do so
by you, repair the product provided you
pay the usual charges for such repair.
You will also be responsible for all freight
and other costs.
Should your product require repair or
service after the warranty period, contact
your nearest Sunbeam service centre.
For a complete list of Sunbeam’s service
centres, visit our website or call our
customer service line for advice on 1300
881 861 in Australia, or 0800 786 232 in
New Zealand.
Australia
www.sunbeam.com.au
1300 881 861
Units 5 & 6,
13 Lord Street,
Botany NSW 2019
Australia
New Zealand
www.sunbeam.com.nz
0800 786 232
Unit 3, Building D,
26 Vestey Drive,
Mt Wellington
Auckland
New Zealand
MX7900W
MX7900R
MX7900B
RESTRICTED CONFIDENTIAL DOCUMENT
APPROVED:
DATE:
DESCRIPTION:
MX7900 IB
COLOURS:
SCALE 1:1
SUNBEAM
IB COVER ARTWORK
12-07-13
Unit 5&6,13 Lord St
Botany 2019,
NSW, AUSTRALIA
Ph: +61 2 9695 9999
CORPORATION LTD.
This drawing and all information shown hereon are the
exclusive property of Sunbeam Corporation Limited, and are
submitted only on a confidential basis. The recipient agrees
not to reproduce the drawing, to return it upon request, and
that no disclosure of the drawing or the information shown
hereon will be made to a third party without prior written
consent from the Sunbeam Corporation Limited.
2824-A-IB
Important instructions –
retain for future use.

Need help with your appliance?
Contact our customer service team
or visit our website for information
and tips on getting the most from
your appliance.
Australia | visit www.sunbeam.com.au
phone 1300 881 861
mail Units 5 & 6, 13 Lord Street,
Botany NSW 2019 Australia.
New Zealand | visit www.sunbeam.com.nz
phone 0800 786 232
mail Unit 3, Building D, 26 Vestey Drive,
Mt Wellington Auckland
New Zealand.
Sunbeam Corporation Limited | ABN 45 000 006 771
Sunbeam Corporation is a division of GUD Holdings Limited.
Sunbeam is a registered trademark.
StickMaster
®
is a trademark of Sunbeam Corporation
Made in China to Sunbeam’s specification.
Due to minor changes in design or otherwise,
the product you buy may differ slightly from the one shown here.
Approved by the appropriate electrical regulatory authorities.
©Copyright Sunbeam 2013.
2755A (07)
This Sunbeam product is covered by a
12 month replacement or repair warranty,
which is in addition to your rights under the
Australian Consumer Law (if your product
was purchased in Australia) or New Zealand
Consumer Guarantees Act (if your product
was purchased in New Zealand).
Upon receipt of your claim, Sunbeam will
seek to resolve your difficulties or, if the
product is defective, advise you on how to
obtain a replacement or refund.
To assist us in managing warranty claims,
we recommend you register your product
as soon as practicable after purchase by
creating a MySunbeam account on our
website and uploading a copy of your
original receipt.
In order to make a claim under our
warranty, you must have the original proof
of purchase documentation for the
product and present it when requested (if
not already uploaded to our website).
Should your product develop any defect
within 12 months of purchase because of
faulty materials or workmanship, we will
replace or repair it, at our discretion, free
of charge. A product presented for repair
may be replaced by a refurbished product
of the same type rather than being
repaired. Refurbished parts may be used
to repair the product.
Our replacement or repair warranty only
applies where a defect arises as a result
of faulty material or workmanship during
the warranty period. Your warranty does
not cover misuse or negligent handling
(including damage caused by failing to use
the product in accordance with this
instruction booklet), accidental damage,
or normal wear and tear.
Your warranty does not:
• cover freight or any other costs incurred
in making a claim, consumable items,
accessories that by their nature and
limited lifespan require periodic renewal
(such as filters and seals) or any
consequential loss or damage; or
• cover damage caused by:
- power surges, power dips, voltage
supply problems, or use of the product
on incorrect voltage;
Should you experience any
difficulties with your product
during the warranty period,
please contact our customer
service line for advice on 1300
881 861 in Australia, or 0800
786 232 in New Zealand.
Replacement
Guarantee
12
Month
- servicing or modification of the
product other than by Sunbeam or an
authorised Sunbeam service centre;
- use of the product with other
accessories, attachments, product
supplies, parts or devices that do not
conform to Sunbeam specifications; or
- exposure of the product to
abnormally corrosive conditions; or
• extend beyond 3 months if the product
is used in commercial, industrial,
educational or rental applications.
The benefits given to you by our
warranty are in addition to other rights
and remedies under law in relation to
the product.
In Australia our goods come with
guarantees that cannot be excluded
under the Australian Consumer Law. You
are entitled to a replacement or refund
for a major failure and for compensation
for any other foreseeable loss or
damage. You are also entitled to have the
goods repaired or replaced if the goods
fail to be of acceptable quality and the
failure does not amount to a major
failure.
Our goods also come with guarantees
that cannot be excluded under the New
Zealand Consumer Guarantees Act.
If your warranty claim is not accepted, we
will inform you and if requested to do so
by you, repair the product provided you
pay the usual charges for such repair.
You will also be responsible for all freight
and other costs.
Should your product require repair or
service after the warranty period, contact
your nearest Sunbeam service centre.
For a complete list of Sunbeam’s service
centres, visit our website or call our
customer service line for advice on 1300
881 861 in Australia, or 0800 786 232 in
New Zealand.
Australia
www.sunbeam.com.au
1300 881 861
Units 5 & 6,
13 Lord Street,
Botany NSW 2019
Australia
New Zealand
www.sunbeam.com.nz
0800 786 232
Unit 3, Building D,
26 Vestey Drive,
Mt Wellington
Auckland
New Zealand
SM7200
SM7400
RESTRICTED CONFIDENTIAL DOCUMENT
APPROVED:
DATE:
DESCRIPTION:
SM7200 & SM7400 IB
COLOURS:
SCALE 1:1
SUNBEAM
IB COVER ARTWORK
17-06-13
Unit 5&6,13 Lord St
Botany 2019,
NSW, AUSTRALIA
Ph: +61 2 9695 9999
CORPORATION LTD.
This drawing and all information shown hereon are the
exclusive property of Sunbeam Corporation Limited, and are
submitted only on a confidential basis. The recipient agrees
not to reproduce the drawing, to return it upon request, and
that no disclosure of the drawing or the information shown
hereon will be made to a third party without prior written
consent from the Sunbeam Corporation Limited.
2815-2819-A-IB
StickMaster
®
& StickMaster
®
Plus
User Guide
Important instructions –
retain for future use.
Contents
Sunbeam’s Safety Precautions 2
Features of your
Planetary Mixmaster
®
3
Using your Planetary Mixmaster
®
5
Safety Mechanisms 8
Mixing Guide 9
Oven Temperature Guide 10
Care and Cleaning 11
Troubleshooting Guide 12
Making a Successful Dough 13
Recipes 16

Need help with your appliance?
Contact our customer service team
or visit our website for information
and tips on getting the most from
your appliance.
Australia | visit www.sunbeam.com.au
phone 1300 881 861
mail Units 5 & 6, 13 Lord Street,
Botany NSW 2019 Australia.
New Zealand | visit www.sunbeam.com.nz
phone 0800 786 232
mail Unit 3, Building D, 26 Vestey Drive,
Mt Wellington Auckland
New Zealand.
Sunbeam Corporation Limited | ABN 45 000 006 771
Sunbeam Corporation is a division of GUD Holdings Limited.
Sunbeam is a registered trademark.
StickMaster
®
is a trademark of Sunbeam Corporation
Made in China to Sunbeam’s specification.
Due to minor changes in design or otherwise,
the product you buy may differ slightly from the one shown here.
Approved by the appropriate electrical regulatory authorities.
©Copyright Sunbeam 2013.
2755A (07)
This Sunbeam product is covered by a
12 month replacement or repair warranty,
which is in addition to your rights under the
Australian Consumer Law (if your product
was purchased in Australia) or New Zealand
Consumer Guarantees Act (if your product
was purchased in New Zealand).
Upon receipt of your claim, Sunbeam will
seek to resolve your difficulties or, if the
product is defective, advise you on how to
obtain a replacement or refund.
To assist us in managing warranty claims,
we recommend you register your product
as soon as practicable after purchase by
creating a MySunbeam account on our
website and uploading a copy of your
original receipt.
In order to make a claim under our
warranty, you must have the original proof
of purchase documentation for the
product and present it when requested (if
not already uploaded to our website).
Should your product develop any defect
within 12 months of purchase because of
faulty materials or workmanship, we will
replace or repair it, at our discretion, free
of charge. A product presented for repair
may be replaced by a refurbished product
of the same type rather than being
repaired. Refurbished parts may be used
to repair the product.
Our replacement or repair warranty only
applies where a defect arises as a result
of faulty material or workmanship during
the warranty period. Your warranty does
not cover misuse or negligent handling
(including damage caused by failing to use
the product in accordance with this
instruction booklet), accidental damage,
or normal wear and tear.
Your warranty does not:
• cover freight or any other costs incurred
in making a claim, consumable items,
accessories that by their nature and
limited lifespan require periodic renewal
(such as filters and seals) or any
consequential loss or damage; or
• cover damage caused by:
- power surges, power dips, voltage
supply problems, or use of the product
on incorrect voltage;
Should you experience any
difficulties with your product
during the warranty period,
please contact our customer
service line for advice on 1300
881 861 in Australia, or 0800
786 232 in New Zealand.
Replacement
Guarantee
12
Month
- servicing or modification of the
product other than by Sunbeam or an
authorised Sunbeam service centre;
- use of the product with other
accessories, attachments, product
supplies, parts or devices that do not
conform to Sunbeam specifications; or
- exposure of the product to
abnormally corrosive conditions; or
• extend beyond 3 months if the product
is used in commercial, industrial,
educational or rental applications.
The benefits given to you by our
warranty are in addition to other rights
and remedies under law in relation to
the product.
In Australia our goods come with
guarantees that cannot be excluded
under the Australian Consumer Law. You
are entitled to a replacement or refund
for a major failure and for compensation
for any other foreseeable loss or
damage. You are also entitled to have the
goods repaired or replaced if the goods
fail to be of acceptable quality and the
failure does not amount to a major
failure.
Our goods also come with guarantees
that cannot be excluded under the New
Zealand Consumer Guarantees Act.
If your warranty claim is not accepted, we
will inform you and if requested to do so
by you, repair the product provided you
pay the usual charges for such repair.
You will also be responsible for all freight
and other costs.
Should your product require repair or
service after the warranty period, contact
your nearest Sunbeam service centre.
For a complete list of Sunbeam’s service
centres, visit our website or call our
customer service line for advice on 1300
881 861 in Australia, or 0800 786 232 in
New Zealand.
Australia
www.sunbeam.com.au
1300 881 861
Units 5 & 6,
13 Lord Street,
Botany NSW 2019
Australia
New Zealand
www.sunbeam.com.nz
0800 786 232
Unit 3, Building D,
26 Vestey Drive,
Mt Wellington
Auckland
New Zealand
SM7200
SM7400
RESTRICTED CONFIDENTIAL DOCUMENT
APPROVED:
DATE:
DESCRIPTION:
SM7200 & SM7400 IB
COLOURS:
SCALE 1:1
SUNBEAM
IB COVER ARTWORK
17-06-13
Unit 5&6,13 Lord St
Botany 2019,
NSW, AUSTRALIA
Ph: +61 2 9695 9999
CORPORATION LTD.
This drawing and all information shown hereon are the
exclusive property of Sunbeam Corporation Limited, and are
submitted only on a confidential basis. The recipient agrees
not to reproduce the drawing, to return it upon request, and
that no disclosure of the drawing or the information shown
hereon will be made to a third party without prior written
consent from the Sunbeam Corporation Limited.
2815-2819-A-IB
StickMaster
®
& StickMaster
®
Plus
User Guide
Important instructions –
retain for future use.
2
Sunbeam’s Safety Precautions
Sunbeam are very safety conscious when designing
and manufacturing consumer products, but it is
essential that the product user also exercise care
when using an electrical appliance. Listed below are
precautions which are essential for the safe use of
an electrical appliance:
• Readcarefullyandsavealltheinstructions
providedwithanappliance.
•Alwaysturnthepoweroffatthepoweroutlet
beforeyouinsertorremoveaplug.Removeby
graspingtheplug-donotpullonthecord.
•Turnthepoweroffandremovetheplugwhenthe
applianceisnotinuseandbeforecleaning.
•Donotuseyourappliancewithanextensioncord
unlessthiscordhasbeencheckedandtestedby
aqualifiedtechnicianorserviceperson.
•Alwaysuseyourappliancefromapoweroutletof
thevoltage(A.C.only)markedontheappliance.
•Thisapplianceisnotintendedforusebyyoung
childrenorinfirmpersonsunlesstheyhavebeen
adequatelysupervisedbyaresponsibleadultto
ensurethattheycanusetheappliancesafely.
•Youngchildrenshouldbesupervisedtoensure
thattheydonotplaywiththeappliance.
•Neverleaveanapplianceunattendedwhilein
use.
•Donotuseanapplianceforanypurposeother
thanitsintendeduse.
•Donotplaceanapplianceonornearahotgas
flame,electricelementoronaheatedoven.
Donotplaceontopofanyotherappliance.
•Donotletthepowercordofanappliancehang
overtheedgeofatableorbenchtoportouchany
hotsurface.
•Donotoperateanyelectricalappliancewitha
damagedcordoraftertheappliancehasbeen
damagedinanymanner.Ifdamageissuspected,
returntheappliancetothenearestSunbeam
AppointedServiceCentreforexamination,repair
oradjustment.
•Foradditionalprotection,Sunbeamrecommend
theuseofaresidualcurrentdevice(RCD)
withatrippingcurrentnotexceeding30mAin
theelectricalcircuitsupplyingpowertoyour
appliances.
•Donotimmersetheapplianceinwaterorany
otherliquidunlessrecommended.
•Thisapplianceisintendedtobeusedin
householdandsimilarapplicationssuchas:staff
kitchenareasinshops,officesandotherworking
environments;farmhouses;byclientsinhotels,
motelsandotherresidentialtypeenvironments;
bedandbreakfasttypeenvironments.
Ifyouhaveanyconcernsregardingtheperformanceanduseofyourappliance,
pleasevisitwww.sunbeam.com.auorcontacttheSunbeamConsumerServiceLine.
Ensuretheabovesafetyprecautionsareunderstood.
SAFETYPRECAUTIONSFORYOURSUNBEAM
PLANETARYMIXMASTER
®
BENCHMIXER.
• NeverremoveScrapemaster
™
beater,whiskor
doughhookwhentheapplianceisinoperation.
•Ensurefingersarekeptwellawayfrommoving
Scrapemaster
™
beater,whiskordoughhook.
•Ensurethatthebowlissecuredandlockedonto
thebaseofthePlanetaryMixmaster
®
Bench
Mixerbeforecommencingmixing.
•Donotunlockorremovethemixingbowlfromthe
baseofthePlanetaryMixmaster
®
BenchMixer
whilstinuse.
•NevertiltbacktheheadofthePlanetary
Mixmaster
®
BenchMixerwhilsttheapplianceis
inoperation.
•Whenusingextremelyheavyloadstheappliance
shouldnotbeoperatedformorethan3minutes.
Thisdoesnotapplytotherecipesdetailedinthis
booklet.
•Ensurelonghairistiedbackandyoungchildren
arenotnearthebowl.

3
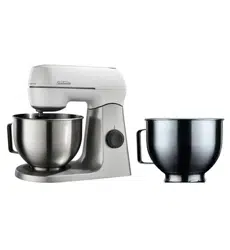
Features of your Planetary
Mixmaster
®
Bench Mixer
800W motor
Powerfulmotorachievesthoroughmixingresults.
Planetary mixing action
Enablesthemixingattachment(Scrapemaster
™
spatulabeater,whiskordoughhook)torotate
whilsttravellingaroundtheinsideofthebowl,
andreachallareasofthebowlensuring
ingredientsarecompletelymixed.
Stainless steel mixing bowl
The4.5Llitremixingbowlisidealformixing
largeorsmallquantitiesofingredients.
Itfeaturesahandleforeaseofuse.
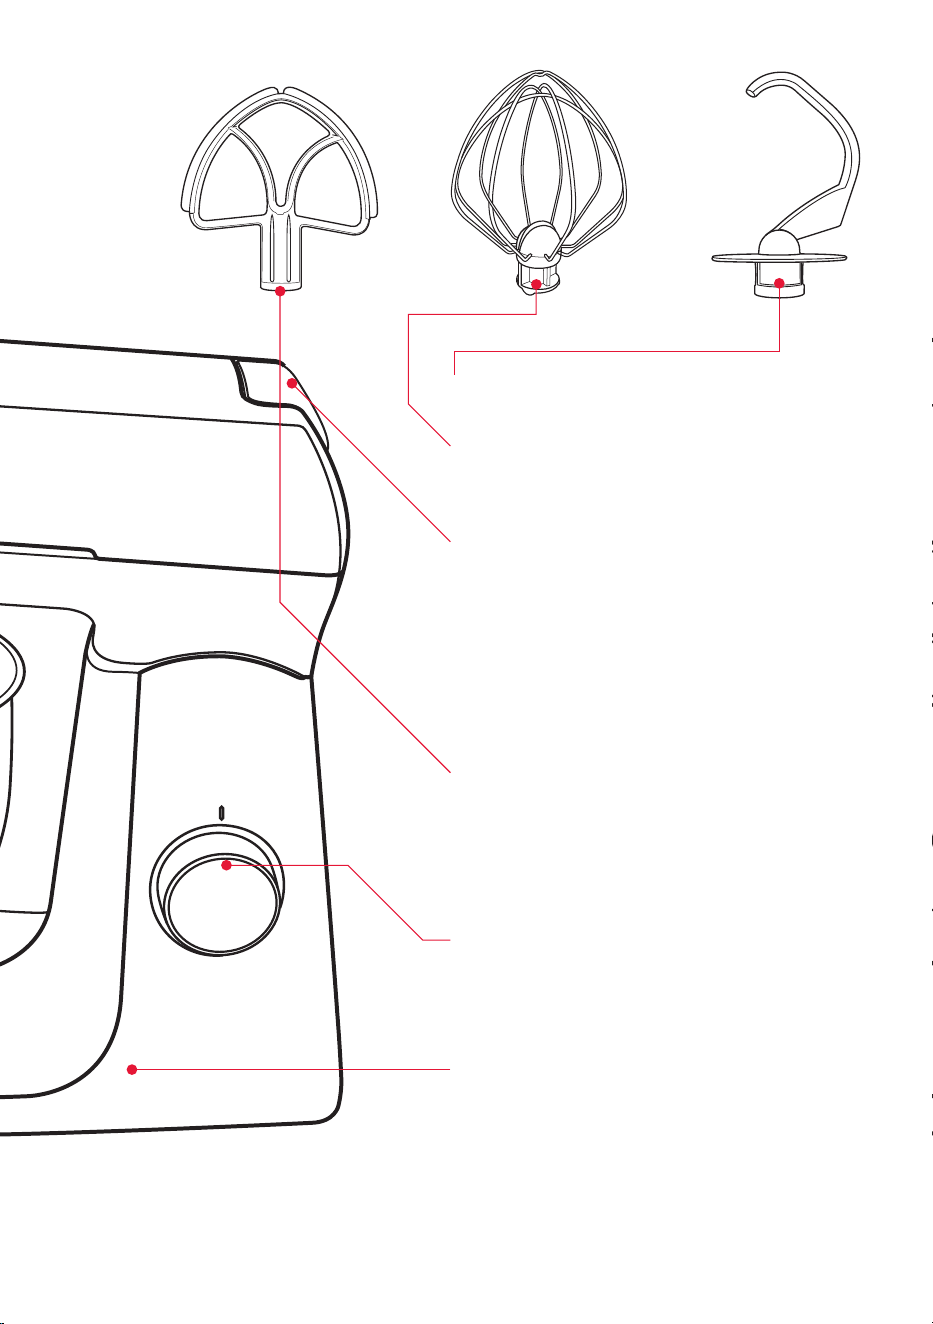
4
Die-cast alloy dough hook
Takesthehardworkoutofkneadingdoughand
otherheavymixtures.
Stainless steel whisk
Perfectforwhiskingcream,eggwhites,light
battersandpacketcakemixes.
Head release with in-built safety feature
Themixerheadcanbeeasilyreleasedandlifted
withonehand.Ittiltsupwardsandlockssecurely
intopositiontoalloweasyinsertionandremoval
ofthemixingbowlandattachments.Thein-built
safetyfeatureensuresthatthemixeronlystarts
whenthemixerheadistilteddownwardsand
securelylockedin.Liftingthemixerheadduring
themixingprocesswillautomaticallycutpowerto
themotor.
Scrapemaster™ spatula beater
Excelsatcombiningingredientsand
simultaneouslyscrapesthesidesandthe
bottomofthemixingbowl,virtuallyeliminating
hand-scrapingandbatterbuild-uponthe
blade.Superiorbowlclearancealsomakesthis
attachmentidealforsmallermixingquantities.
Speed control dial with 12 variable settings
Thecombinationof12electronicspeedsanda
powerfultorquecontrolmotorensuressuperior
mixingcontrolandmaintainsspeed,regardlessof
themixingload.
Die-cast metal body with sintered metal gears
Thedie-castmetalbodycombinedwithsintered
metalgearsdeliverquality,styleandsuperior
performance.
5
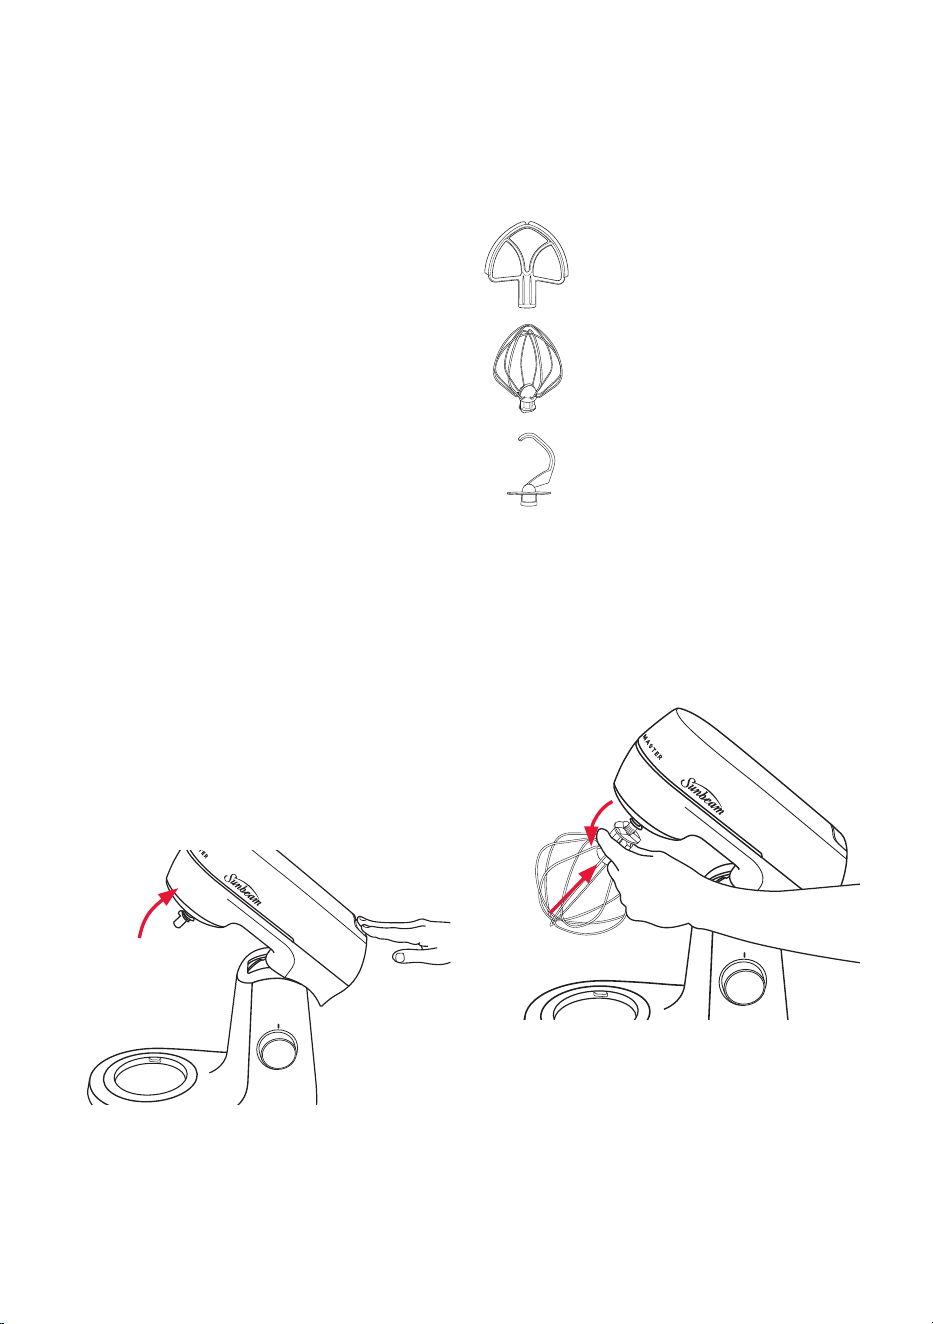
Before using your Planetary Mixmaster
®
Bench
Mixer
BeforeusingyourPlanetaryMixmaster
®
BenchMixerforthefirsttime,removeany
packagingmaterialandpromotionallabels
ortags.Pleasealsoremovetheplastic
plugpincoverbeforeusingthemixer.It
isrecommendedtowashthemixingbowl,
Scrapemaster
™
spatulabeater,whiskand
doughhookinwarmsoapywaterwithasoft
cloth.Rinseanddrythoroughly.
Set-up
BeforeassemblingyourPlanetaryMixmaster
®
BenchMixer,besurethepowercordis
unpluggedfromthepoweroutlet.Position
themixeronalevel,drysurfacesuchasa
benchtop.
1.Pressthe‘headrelease’button,locatedat
therearofthemixerhead.Thiswillrelease
themixerheadoutofitslockedposition.
Easethemixerheadbackwardsuntilit
locksintoitstiltposition(Fig.1).
2.Selectthedesiredattachmentdepending
onthemixingtasktobeperformed:
–Scrapemaster
™
spatulabeater
forsmalleramountsofmixture
orcreamingbutterandsugar
heavycakemixes.Alsogreat
forfoldingingredients
–Whiskforwhiskingcream,egg
whites,lightbattersandpacket
cakemixes.
–Doughhookforkneadingdough
andotherheavymixtures.
3.Attachtheselectedmixingattachment
ontothemixingshaft.Alignthegroove
inthetopoftheattachmentintothe
lockingpinonthemixingshaft.Pushthe
attachmentupwardsoverthelockingpin
andturnclockwiseuntilsecurelylockedin.
(Fig2).
Note:Besuretheattachmentislockedfirmly
inplace.
Using your Planetary Mixmaster
®
Bench Mixer
Figure1
Figure2
1.
2.
6
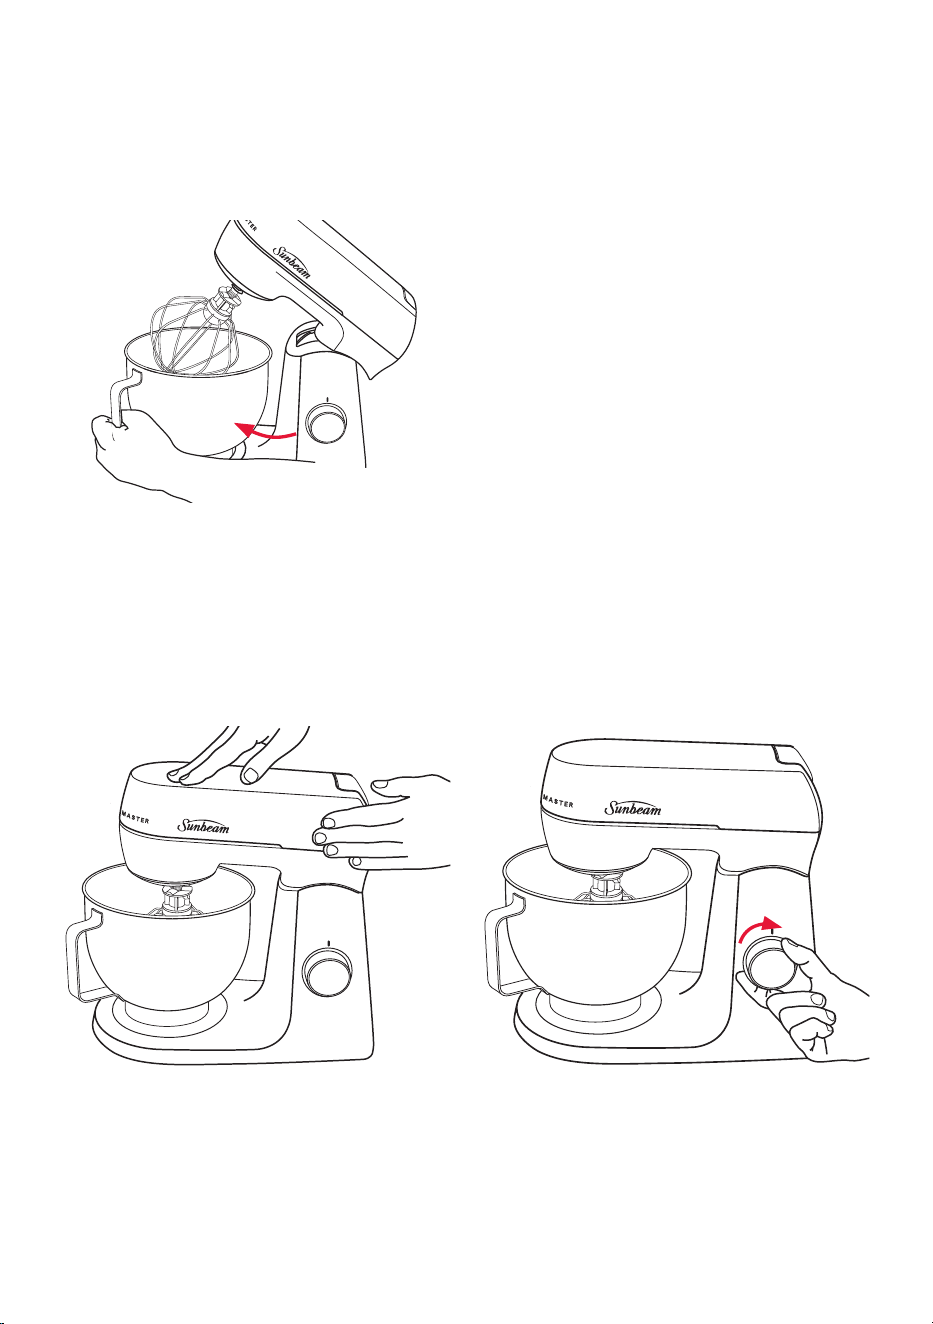
4.Placethebowlonthebasewiththehandle
facingyou.Thengentlyrotatethebowl
inaclockwisedirectionuntilitlocksinto
position(Fig3).Thebowlshouldfeelfirm
withnomovement.
5.Pressthe‘headrelease’buttontoun-lock
itfromitspositionandeasethemixer
headdown(Fig.4).
Using your Planetary Mixmaster
®
Bench Mixer
1. Positionthemixeronalevel,dry
surfacesuchasabenchtop.Ensurethe
mixingbowlisinplaceandthedesired
attachmentisinserted.
2. Plugthepowercordintoa230/240Volt
ACpoweroutlet.
3. Releasethemixerheadoutofitslocked
positionandeaseitbackwardsand
upwardsuntilitlocksintoitstiltposition.
Addingredientstothemixingbowl.
(Fig.1.page5)
Then,un-lockthemixerheadandlowerit
forwardintothemixingbowl.(Fig.4)
4. Turnthespeedcontroldialclockwiseto
commencemixing(Fig.5).Pleasereferto
themixingguideonpage9.
Using your Planetary Mixmaster
®
Bench Mixer continued
Figure4
Figure5
Figure3
7
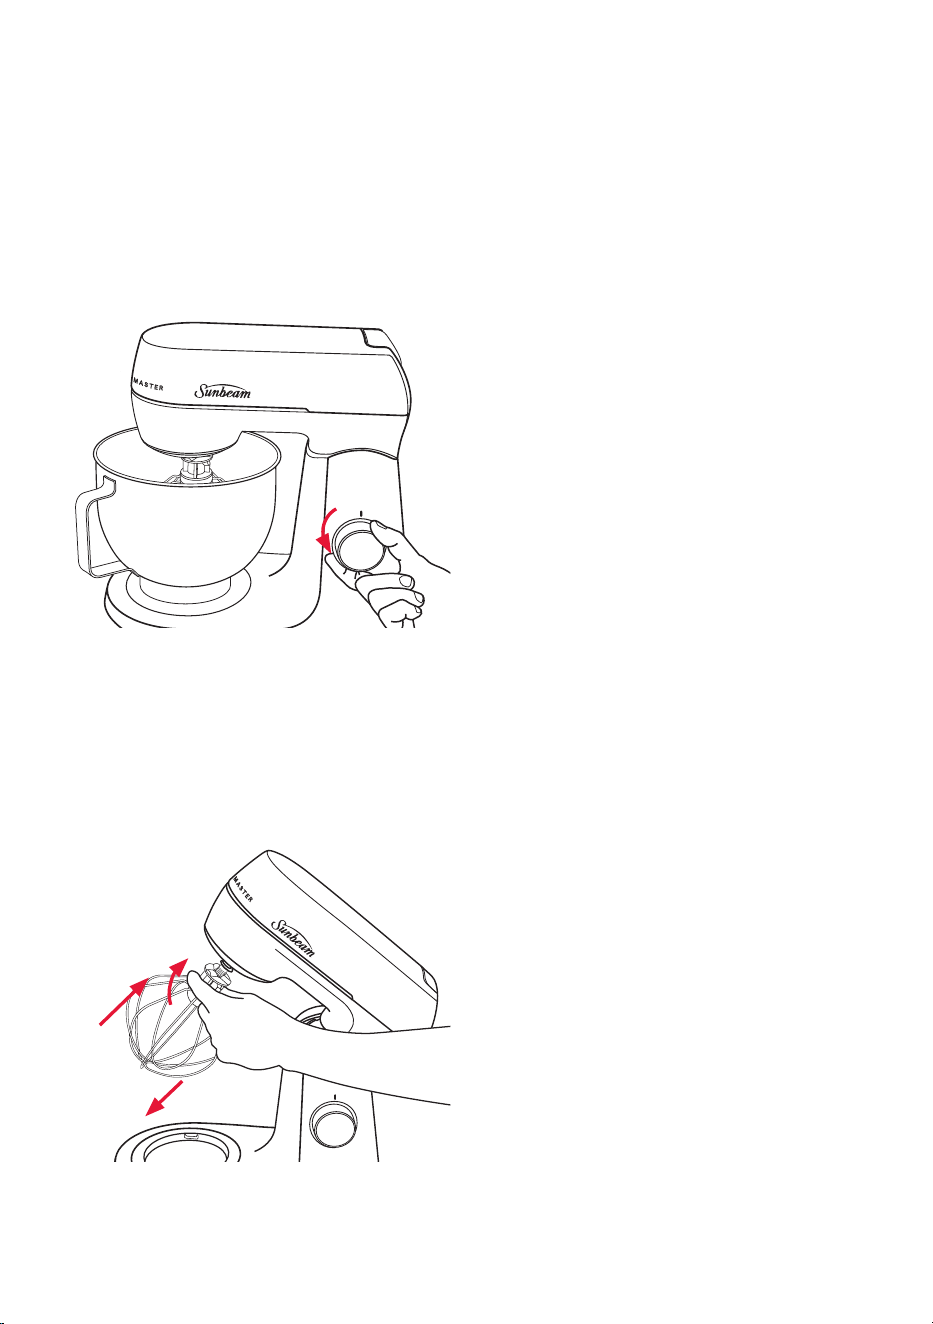
6.Whenmixingiscomplete,turnthespeed
controldialanti-clockwisetothe‘O’
position(Fig.6)andunplugthecordfrom
thepoweroutlet.
7.Pressthe‘headrelease’buttonandease
themixerheadbackuntilitislockedinto
thetiltbackposition
(seeFig1.page5).
8.Toremovetheparticularmixing
attachment,pushitupwards,turnitanti-
clockwise,thenpullitdownwards(Fig.7).
Using your Planetary Mixmaster
®
Bench Mixer continued
Figure6
Figure7
1.
2.
3.

8
Thermo cut-off – temperature overload
Themixerisequippedwithaself-resetting
safetydevicewhichsafeguardsagainst
overheatingthemotorwithexcessive
loads.Ifoverheatingoccurs,themixer
willautomaticallyactivatetheoverheating
protectiondeviceandswitchitselfoff.
Switchthemixeroffandunplugitfromthe
powerpoint.Releasethemixerheadandtilt
itbackuntilitislockedintothetiltback
position.Letthemixerrestfor30min.
Electronic protection cut-out
Ifthemixingloadistooheavyforthe
selectedspeedandpreventstheattachment
fromrotating,themixerwillcut-outto
preventdamagetotheunit.Unplugthemixer
andremovesomeofthemixturefromthe
bowl,workinginbatches.
Note:Whenusingextremelyheavyloadsthe
applianceshouldnotbeoperatedformore
than3minutes.Thisdoesnotapplytothe
recipesdetailedinthisbooklet.
Mixer head safety mechanism
Themixerheadmustbelockeddownorthe
motorwillnotoperate.Ifthemixerheadis
tiltedupwardsduringoperation,themixer
willautomaticallystop.Thisisasafety
mechanismtoavoidinjury.
Safety Mechanisms

9
SPEED SETTING RANGE MIXING TASK
LOW
1-4
FOLDING & KNEADING
Combiningorinitialmixingofingredients
Folding
Kneading–doughs(pastry,bread,scones,etc.)
MEDIUM
5-7
LIGHT MIXING
Kneading–heavydoughs
Beating–sugarandbutter,cakemixes
HIGH
8-10
CREAMING & BEATING
Whisking–lightbatters
Beating–heavybatters/icing
VERYHIGH
11-12
WHIPPING & AERATING
Whisking–eggwhites/cream
Pleasekeepinmindthatthevariousmixingtasksandrelatedspeeds,listedinthetable
below,mayvaryslightlyfromrecipetorecipe.Pleaserefertoitregularlyasyoudevelopyour
understandingofhowdifferentingredientsinteractwhenmixing.
Hints & Tips
Formostrecipes,itisbettertobegin
yourmixingonaslowerspeeduntilthe
ingredientsbegincombining,thenmoveto
theappropriatespeedrangefortheparticular
task.
Generally,thereisnotonesetspeedforan
entirerecipe.Youwillneedtochangethe
speedofthemixerdependingonwhatstage
oftherecipeyouareworkingon.Thisis
communicatedintherecipesection.
Whenmixinglargerquantitiesyoumay
needtoincreasethemixerspeedduetothe
amountofmixingrequiredandthelarger
loadonthemachine.
Whenbuildinguparecipethatrequires
theadditionofdryingredients,suchas
flour,slowthespeeddownwhilstthese
ingredientsarebeingaddedtoavoidasnow
stormeffect.Oncetheadditionalingredients
begincombiningthenslowlyincreasetothe
appropriatespeedfortheparticularmixing
task.
Mixing Guide

10
Oven Temperature Guide
DESCRIPTION OF
OVEN TEMPERATURES
Degrees Celcius °C Degrees Farenheit °F Gas Mark
VerySlow 120 250 ½
Slow 140-150 300 1-2
ModeratelySlow 160 325 3
Moderate 180 350 4
Moderatelyhot 200 400 6
Hot 220 425 8
VeryHot 240 475 9
Foryourinformation,thefollowingtemperaturesettingsareincludedasaguide.
Note: Ifusingfanforcedovensbesuretoturnthetemperaturedownby20°C.
Pleaserefertoyourovenmanufacturesinstructionguide
Alsocheckrecipesatthebackofthisbooklet.

11
BeforecleaningyourSunbeamPlanetary
Mixmaster
®
,ensurethatthepoweristurned
offatthepoweroutlet,thenremovetheplug.
WipeovertheoutsideareaofthePlanetary
Mixmaster
®
includingtheheadandbase,
withadampenedclothandpolishwithasoft
drycloth.
Wipeanyexcessfoodparticlesfromthe
powercord.
Sunbeamrecommendstowashthemixing
bowl,Scrapemaster
™
spatulabeater,whisk
anddoughhookinwarmsoapywaterand
wipedry–useabrushifnecessarytoremove
anystickyfoodparticles.
Allplasticcomponentsdeterioratethrough
prolongeddishwasheruse.However,parts
ofyourPlanetaryMixmaster
®
aretolerantto
dishwasheruse.Theseincludethestainless
steelmixingbowl,Scrapemaster
™
spatula
beater,whiskanddoughhook.
Note:Placeonlyonthetoprackofthe
dishwasher.
Stainless steel whisk
Afterwashingthestainlesssteelwhisk,the
outerwiremayhavemovedoutofposition
andbecomemisaligned(seeFigure8).
Pleasecliptheouterwirebackintoposition
(seeFigure9).
Maintenance Service
YourSunbeamPlanetaryMixmaster
®
should
beregularlychecked.Afterapproximately
fouryearsofdomesticuse,thegreasein
thegearcompartmentshouldbeexamined.
Wesuggestatthattimeyousendthemixer
toyournearestSunbeamApplianceService
Centretoensureefficient,correctservicing.
Storage
KeepyourSunbeamPlanetaryMixmaster®
BenchMixerinaconvenientpositiononyour
kitchenbenchreadyforuseatalltimes.
PlacetheScrapemaster
™
spatulabeater,
whiskanddoughhookinthemixingbowlas
storageoftheseattachmentsinadrawerwith
otherkitchenequipmentmaycausedamage.
Note:Neverwindthepowercordaroundthe
mixerafteruseasthewarmthfromthemotor
maycausedamagetothepowercord.For
addedconveniencetheunusedcordlength
caneasilybepushedintothebaseofthe
mixerforstorage.
Care and Cleaning
Figure8
Figure9

12
Troubleshooting Guide
Problem Possible Cause What to do
Motorwillnotstart. Motorisover-heated.
Mixerheadisnot
lockeddownproperly.
Unplugandallowmotortocool,(themixerhead
shouldbecooltotouch).
Movemixtureinmixingbowltothesideofthe
attachment,toallowtheattachmenttogoallthe
wayintothebowl.
Motorisover-heated. Useofahighspeed
foralongtime.
Mixturetooheavy.
Mixingquantitytoo
large.
Switchthemixeroffandunplugitfromthepower
point.Releasethemixerheadandtiltitbackuntil
itislockedintothetiltbackposition.Letthe
mixerrestfor30mintoallowthemotortocool.
Trymixinginbatchesanddonotoperateformore
than3minsasthismaycauseoverheating'
Mixerheaddoesnot
lockdownproperly.
Thickmixtureis
preventingthe
attachmentfrom
goingalltheway
downintothebowl.
Movemixtureinmixingbowltothesideofthe
attachment,toallowtheattachmenttogoallthe
wayintothebowl.
Attachmentis
hittingthebowl.
Attachmentisnot
insertedcorrectly.
Mixingbowlisnot
lockedintothebase
properly.
Removetheattachmentandtryinsertingagain.
Refertotheinstructionsinthisbookletifneeded.
Lockbowlintoposition.Refertotheinstructions
inthisbookletifneeded.
Mixerismovingon
thebenchtop.
Chosenspeedistoo
highforthemixture.
Mixturecaughtupin
theattachment.
Flourorspillson
benchtop.
Lowerthespeedormixinbatches.
Scrapedowntheattachmentandcontinuemixing.
Cleananddrybenchtopaswellasthemixerbase.

13
Making a Successful Dough
Measuring Ingredients
Carefulandcorrectmeasurementofall
ingredientsisessentialforrecipesuccess
(particularlywhenbaking).Australian
StandardMetriccupandspoonmeasuresare
usedinallrecipesinthebook.Allcupand
spoonmeasurementsshouldbelevel.
•Onemetrictablespoonisequalto20mls.
•Onemetricteaspoonisequalto5mls.
•Oneliquidcupmeasurementisequalto
250mls.
•Alleggsusedinourrecipesareextralarge
(59g)eggs,unlessotherwisespecified.
Thefollowingaresomehintsonmeasuring
ingredients.
When measuring wet ingredients, always
useameasuringjugorifmeasuringsmall
quantities,useastandardmetricmeasuring
spoon.Placethemeasuringjugonalevel
surfaceandcheckthemeasurementateye
level.
When measuring dry ingredients, alwaysusea
standardmetricmeasuringcuporstandard
metricmeasuringspoon.Shakegentlyto
ensuretherearenoairpocketsandlevelthe
surfacewithaknifeormetalspatula.Never
tapthecuponthebenchorpackinthe
ingredients(unlessspecified);thiswillgive
aninaccuratemeasurement.
Note:crushanylumps,particularlyin
bicarbonateofsodaorsugarbefore
measuring.
When measuring other ingredients, always
weighingramsusingmetricscales.To
ensureanaccuratereading,alwaysremember
to“tare”thescalesbacktozerowiththe
emptycontainerbeforeaddinganyfood.
Tips for substituting Ingredients
•Unsaltedbutterisbestforcakebaking,
howeveritcanbesubstitutedwithsalted
butterormargarineifnecessary.Margarine
mayslightlyalterthetextureofthefinal
result.
•Selfraisingflour=plainflour+baking
powder(1cupselfraisingflour=1cup
plainflour+2teaspoonsbakingpowder)
•1cupplainflour+1teaspoonbaking
powder=½cupplainflour+½cupself
raisingflour
•Whensubstitutingwheatflourwithgluten
freeflour,thebestresultsareusually
achievedinrecipesthathaveasmall
amountofflour.
•Commercialbakingpowderscancontain
wheatstarch.Ifyouareallergictowheat,
youcanmakeyouown.Bakingpowder
=1teaspoonbicarbonateofsoda+2
teaspoonscreamoftartar
•Icingsugarmixturecancontainwheat
starch(thispreventsitgoinglumpy).Ifyou
haveaglutenintolerance,pureicingsugar
canbeusedinstead.
•Sultanascanbesubstitutedwithequal
measureofanotherdriedfruit(bestifthey
arechoppedtosize).
•Goldensyrupcanbesubstitutedwithequal
measureoftreacleormolasses
•1cupbuttermilk=1cupfreshmilk+2
teaspoonsvinegarorlemonjuice.
•Milkcanbesubstitutedwithsoymilk.It
cansometimesalsobereplacedwithfruit
juiceactingastheliquidcomponent.
•7gdryyeast(1sachet)=15gcompressed
yeast

14
Making a Successful Dough continued
Preparing the dough
1.Insertdoughhook(refertopage6).Place
thedryingredientsintothebowlandlock
thebowlontothebase.
Note:Itisrecommendedthatnomorethan
500gofflourisusedinonebatch.
2.Turnthespeeddialtolowspeed(1-4),
andgraduallyaddtheliquidingredients
(includingthepre-preparedyeastmixture)
tothebowl.Whentheingredientsstart
toformaball,stopthemixerandusea
rubberorplasticspatulatoscrapedown
thesidesofthebowlifnecessary.
3.Kneadonlowspeed(1-4)(dependingon
theamountofdough)untilsmoothand
elastic;forabout5-8minutes.
4.Transferdoughtoalarge,wellgreased
mixingbowl.Coverthebowlwithalight
clothorplasticwrapandplaceitina
warm,draft-freeareauntilthedough
doublesinsize.
5.Plungefistintothecentreoftherisen
doughtopunchoutexcessair.Foldouter
edgesintothecentreandturndoughout
ontoalightlyflouredsurface.Cutand
shapedoughtoformbuns,rollsorfreeform
loavesandplaceonpreparedbakingtrays.
Alternatively,placedoughintoprepared
breadtins.Forpizzadough,itisnowready
toberolled,toppedandbaked.
6.Forthefinalrisingofthebreaddough,
covertheshapeddoughwithalightcloth
andplaceinawarm,draft-freeareauntil
doubledinsizeagain.Glazeandbake.
Tips
Toaddinteresttobreads.
•Brushdoughwithalittlemilkandsprinkle
loavesorbunswithpoppy,carawayor
sesameseedsbeforebaking.
•Sprinkleloaveswithshreddedcheese
duringthelastfewminutesofbaking.
•Drizzlecooled,sweettearingsorbuns
withicing,ordustwithicingsugarbefore
serving.
Glazes
Glazesmaybebrushedoverthedough
before,duringorafterbaking.
Forashinycrust,brushwithcreamor
evaporatedmilkbeforebaking;orwithwarm
sievedapricotjamafterbaking.
Foraglossycrust,brushwithbeatenegg
whitebeforebaking.
Foramattfinish,brushwithmeltedbutteror
margarineafterbaking.

Heading
15
Making a Successful Dough continued
Questions & Answers:
Q.Mymixtureseemsalittledryandcrumbly.
DoIneedtoaddmorewater?
A.Someflourtendstoabsorborwantmore
moisture/liquid,especiallyonwarmorhumid
days.Addmorewater,adropatatime,until
asmoothball/doughisreached.
Q.Iaddedtoomuchwaterandmydoughis
verysticky,whatcanIdo?
A.Ifthedoughissmoothwithoutlumps,
addalittleflouratatimeandkneadthe
doughuntilitissmooth,softtothetouch
andbouncesbackwhenpressedwiththetip
ofyourfinger.Doughshouldnotbestickyto
touch.
Q.Myyeastdidnotbubbleorfoam,why?
A.Theyeastmaybedeadorinactive,in
whichcaseyouwillneedtoreplaceit.This
occurswhentheliquidaddedorthestanding
positionwastoohotortoocold.Itcanalso
bebecausetheyeastisoutofdate.Ifthe
yeastdoesnotfoam,yourdoughwillnotrise.
Q.Mydoughdidnotrise,why?
A.Iftheyeastfermentedproperly,youmay
justneedtoplacethebowlinawarmer
position.Coveringthebowlwithplasticwrap,
andensuringtheareaisdraftfreemayhelp.
Inwinter,yourdoughwilltakelongertorise.

Heading
16
Recipes
Choc-Hazelnut Pancakes
Makes: 8-10
4cupsplainflour
3¾cupsbuttermilk
¾cupcastersugar
3eggs
Butter,forfrying
Hazelnutspreadandroastedhazelnuts,to
serve
1.Placetheflour,buttermilk,sugarandeggs
intheStainlessSteelMixingBowl.Using
thewhiskmixonlowspeed(1-4)until
combined.Increasetomediumspeed(5-7)
andmixuntilsmooth.
2.Meltbutterinalargefrypanovermedium
heat.Spoon¹/4cupofbatterintothepan
andcookuntilbubblesbegintoappearon
thesurface.Flippancakeandcookfora
minute.Repeatwithremainingbatter.
3.Servepancakeswithhazelnutspreadand
roastedhazelnuts.
Honey, Cranberry and Pistachio Nougat
Makes: approximately24pieces
2sheetsediblericepaper
2½cupscastersugar
½cuphoney
¹⁄
³
cupwater
500gliquidglucose
2eggwhites
1½cupspistachios,toasted
½cupdriedcranberries
1.Lightlygreasea20cmsquarecakepan.
Linebaseofthepanwith1sheetofrice
paper,trimmingtofit.
2.Combinesugar,honey,waterandglucose
inamediumsaucepan.Stirovermedium
heatuntilsugardissolves.Bringtoboil,
donotstirafterthispoint.Usingacandy
thermometercookuntilmixturereaches
140°C.Immediatelyremovefromheat.
3.PlaceeggwhitesintheStainlessSteel
MixingBowl.Usingthewhiskwhipegg
whitesonveryhighspeed(11-12)until
stiffpeaksform.Reducetomediumspeed
(5-7)andslowlyaddthesugarsyrupin
athin,steadystream.Onceallthesugar
syruphasbeenaddedcontinuebeatingfor
afurtherminute.Addthepistachiosand
cranberries.
4.Quicklyspoonintopreparedpan.Topwith
theremainingsheetofricepaperand
gentlypresstoflatten.
5.Setasidetocoolatroomtemperaturefor
6hoursoruntilset.Removefrompanand
cutintosmallsquarestoserve.
TIP:Aspoondippedinhotwaterwillhelp
spreadthenougat.

17
Recipes continued
Coconut Marshmallows
Makes: approximately16pieces
1cupcoldwater
¹⁄
³
cuppowderedgelatine
4cupscastersugar
2cupswater
2teaspoonslemonjuice
2cupsshreddedcoconut,lightlytoasted
1.Combinecoldwaterandgelatine.Set
aside.
2.Combinesugarandwaterinamedium
saucepanovermediumheat.Stir
constantlyuntilallsugarhasdissolved.
Bringtotheboil.Addgelatineandsimmer
uncoveredfor20minutes.Cooltoroom
temperature.
3.TransfersugarmixturetotheStainless
SteelMixingBowl.Addlemonjuice.
Usingthewhiskbeatonlowspeed(1-4)
graduallyincreasingtoveryhighspeed
(12)over15minutes.Mixtureshouldbe
verythickandholditsshape.
4.Rinsea20cmx30cmlamingtonpanwith
coldwater,donotdry.Spreadmarshmallow
mixtureintopan.Sprinklewithenough
coconuttocoverthesurface.Setasideto
coolatroomtemperaturefor3hoursor
untilset.Cutmarshmallowintosquares.
Tossincoconutbeforeserving.
Apple Tea Cake
Serves: 8-10
125gbutter,roomtemperature
½cupbrownsugar
1teaspoonvanillaextract
2eggs
1½cupsplainflour
¹⁄
³
cupmilk
2greenapples,peeled,cored,thinlysliced
2teaspoonsrawsugar
½teaspoongroundcinnamon
¼cupapricotjam,warmed
1.Preheatovento160°C.Greaseandlinea
22cmspringformcakepanwithbaking
paper.
2.Placebutter,sugarandvanillainthe
StainlessSteelMixingBowl.Usingthe
scraperbeatermixonmediumspeed(5-7)
untillightandcreamy.Addeggsmaking
suretobeatwellaftereachaddition.
3.Reducetolowspeed(1-4)andaddflour
andmilk,mixinguntilcombined.Pourinto
preparedpan.
4.Arrangeapplesovercakebatter.Sprinkle
withrawsugarandcinnamon.Bakefor
50minutes.Removefromoven,brush
withwarmjamandbakeforafurther
10minutesoruntilcookedwhentested.
Removefrompan.Placeonwirerackto
cool.

18
Recipes continued
Molten Dulce de Leche Cakes
DulcedeLecheisSouthAmericancaramel
thatcanbepurchasedinmostlarge
supermarkets.
Serves: 6
2eggyolks
1egg
1½cupsdulcedeleche*
¼cupplainflour
Vanillaice-cream,toserve
1.Preheatovento220ºC.Greaseandflour
6x1cupramekins.Placeonbakingtray.
2.PlaceeggyolksandeggintheStainless
SteelMixingBowl.Usingthewhiskwhip
onveryhighspeed(11-12)unitlightand
pale.
3.Reducetomediumspeed(5-7).Adddulce
delechewhiskinguntilcombined.
Foldthroughflour.
4.Dividemixtureevenlybetweenramekins.
Bakefor10-12minutesoruntilgoldenbut
jigglewhenshaken.Runknifearoundedge
oframekinandinvertontoplateorbowl.
Servewarmwithvanillaice-cream.
* Canbesubstitutedforcaramelcondensed
milk.
Pear and Chocolate Cake
Serves: 8-10
150gbutter,chopped
150gdarkchocolate,chopped
5eggs,separated
1cupcastersugar
¹⁄
³
cupcrèmefraiche
½cupalmondmeal
¾cupcocoapowder
400gcanpearsinsyrup,drained,rinsed
1.Preheatovento180ºC.Greaseandlinea
23cmspringformcakepanwithbaking
paper.
2.Placebutterandchocolateinalarge
heatproofbowloverasaucepanof
simmeringwater.Meltbutterandchocolate
untilsmooth.
3.PlaceeggswhitesintheStainlessSteel
MixingBowl.Usingthewhiskwhipegg
whitesonveryhighspeed(11-12)until
stiffpeaksform.Setaside.
4.PlaceeggyolksintheStainlessSteel
MixingBowl.Usingthewhiskwhipegg
yolksandsugaronveryhighspeed(11-12)
untillightandpale.
5.Reducetohighspeed(8-10)andslowly
addchocolatemixtureandcremefraiche.
Onlowspeed(1-4)siftoveralmond
mealandcocoapowder,mixuntiljust
combined.
6.Foldthrougheggwhitesinthreebatches.
Gentlypourintopreparedpan.Arrange
pearsovermixture.Bakefor40minutes
oruntilfirmandcookedwhentested.
Allowtocoolinpanfor10minutes.
Placeonwireracktocool.

19
Recipes continued
White Chocolate Layered Butter Cake
Serves: 8-10
185gbutter,roomtemperature
1¾cupscastersugar
1½teaspoonsvanillaextract
4eggs
1½cupsplainflour
¾cupself-risingflour
¾cupmilk
¾teaspoonbakingsoda
1.Preheatovento160°C.Greaseandlinea
23cmcakepanwithbakingpaper.
2.Placebutter,sugarandvanillainthe
StainlessSteelMixingBowl.Usingthe
scraperbeaterbeatonmediumspeed(5-7)
untillightandcreamy.Addeggsoneata
time,makingsuretobeatwellaftereach
addition.
3.Addflours,milkandbakingsoda.Mixon
lowspeed(1-2)untiljustcombined.
4.Pourintopreparedpan.Bakeforabout
1½hoursoruntilcookedwhentested.
Standinpanfor5minutes.Placeonwire
racktocool.
5.Whencool,splitcakehorizontallyinto3
evensizeddisks.Layerandcoverwith
whitechocolateganache.
White Chocolate Ganache
Makes: 2½cups
1cupthickenedcream
600gwhitechocolate,chopped
1.Bringcreamtoboilinamediumsaucepan
andimmediatelyremovefromheat.
2.Place chocolate in cream. Stir until smooth.
Coverandrefrigerate,stirringoccasionally
untilspreadableconsistency.

20
Recipes continued
Chocolate Chocoholic Cake
Serves: 10-12
185gbutter,roomtemperature
2¼cupscastersugar
1½cupswater
¼cupcocoapowder
¾teaspoonbakingsoda
2¼cupsself-risingflour
3eggs
1.Preheatovento180°C.Greaseandlinea
22cmcakepanwithbakingpaper.
2.Combinebutter,sugar,water,cocoaand
bakingsodainalargesaucepan.Stirover
mediumheatwithoutboilinguntilsugar
hasdissolvedandbutterismelted.Bring
toboilthenreduceheattolow.Simmer
uncoveredfor4minutes.Allowtocool.
3.Poursugarmixtureandflourintothe
StainlessSteelMixingBowl.Usingthe
scraperbeaterbeatonlowspeed(1-4)
untilcombined.
4.Increasetomediumspeed(5-7).Addeggs
oneatatime,makingsuretobeatwell
aftereachaddition.
5.Pourintopreparedpan.Bakeforabout1
houroruntilcookedwhentested.Standin
panfor5minutes.Placeonwirerackto
cool.Topwithrichfudgefrosting.
Rich Fudge Frosting
Makes: 2cups
180gbutter,chopped
1cupcastersugar
²⁄
³
cupwater
3cupsicingsugar
½cupcocoapowder
1.Combinebutter,sugarandwaterina
smallsaucepan.Stiroverlowheat,without
boiling,untilsugardissolves.
2.Placeicingsugarandcocoapowderinthe
StainlessSteelMixingBowl.Usingthe
scraperbeateronlowspeed(1-4)mixuntil
combined.Addbuttermixtureandmix
untilsmooth.
3.Coverandrefrigeratefor20minutesor
untilfrostingiscoolandthickens.Beat
withawoodenspoonuntilspreadable.

21
Recipes continued
Almond Meringue Cake
with Mascarpone Cream
Serves: 6-8
6eggwhites
1½cupscastersugar
½cupalmondmeal
250gtubmascarponecream
220gdarkchocolate,melted
1.Preheatovento160°C.Line3bakingtrays
withbakingpaperanddrawa20cmcircle
oneachpieceofbakingpaper.
2.PlaceeggwhitesintheStainlessSteel
MixingBowl.Usingthewhiskwhiponvery
highspeed(11-12)whilegraduallyadding
sugaruntilstiffpeaksform.Addalmond
mealmixinguntilwellcombined.
3.Dividemixtureintothreebatchesand
spreadevenlyovercirclesmarkedon
bakingpaper.Bakefor40minutesoruntil
crisp.Allowtocoolinoven.
4.PlacemascarponeintheStainlessSteel
MixingBowl.Usingthescraperbeatermix
onmediumspeed(5-7)mixuntilsmooth.
Graduallyaddmeltedchocolateandmix
untilwellcombined.
5.Sandwichmeringuestogetherwith
chocolatemascarponecream.Serve.
Sour Cream Lemon Cake
Serves: 10-12
250gbutter,roomtemperature
2½cupscastersugar
6eggs
1cupsourcream
¼cuplemonjuice
2tablespoonslemonzest
3cupsplainflour
½teaspoonbakingpowder
½teaspoonsalt
1.Preheatovento180°C.Greaseandlinea
24cmcakepanwithbakingpaper.
2.PlacebutterandsugarintheStainless
SteelMixingBowl.Usingthescraper
beatermixonmediumspeed(5-7)beat
untillightandcreamy.Addeggsoneata
time,makingsuretobeatwellaftereach
addition.
3.Reducetolowspeed(1-4)addsourcream,
lemonjuiceandzest.Siftoverflour,
bakingpowderandsalt.Gentlyfoldmixture
untilwellcombined.
4.Pourintopreparedpan.Bakefor1hour
and20minutesoruntilcookedwhen
tested.Allowcaketocoolinthepanfor
15minutes.Placeonwireracktocool.
5.Oncecakehascooled,coverwithlemon
buttercreamicing.

22
Recipes continued
Lemon Buttercream Icing
Makes: 2cups
250gbutter,roomtemperature
4cupsicingsugar
2tablespoonslemonjuice
2tablespoonslemonzest
½teaspoonsalt
1.Placebutterandicingsugarinthe
StainlessSteelMixingBowl.Usingthe
scraperbeatermixonmediumspeed(5-7)
graduallyincreasingtohighspeed(9-10).
Mixuntillightandfluffy.
2.Addlemonjuice,zestandsalt.Mixuntil
combined.
Sour Cherry Crumb Cake
Serves: 10-12
Topping:
80gbutter,chopped
¾cupplainflour
¼cupbrownsugar
¼cupcastersugar
¼teaspoongroundcinnamon
Cake:
160gbutter,roomtemperature
¾cupcastersugar
1teaspoonvanillaextract
2eggs
1½cupsplainflour
¼cupbuttermilk
1teaspoonbakingpowder
700gjarpoachedcherries,drained
1.Preheatovento180°C.Greaseandlinea
20cmsquareslicepanwithbakingpaper.
2.Topping:Inalargebowlcombinebutter,
flour,sugarsandcinnamon.Rubwith
fingersuntilachunkycrumbhasformed.
Setaside.
3.Cake:Placebutter,sugarandvanillain
theStainlessSteelMixingBowl.Usingthe
scraperbeateronmediumspeed(5-7)mix
untillightandcreamy.Addeggsoneata
time,makingsuretobeatwellaftereach
addition.
4.Reducetolowspeed(1-4).Addflour,
buttermilkandbakingpowder.Continueto
mixonlowspeed(1-4)untilcombined.
5.Pourintopreparedpan.Coverwith
cherries.Sprinkletoppingmixtureovertop
ofcake.Bakefor1houroruntilcooked
whentested.Placeonwireracktocool.
Tip:Toppingcanbedoneusingafood
processor.

23
Recipes continued
Flourless Orange Syrup Cake
Serves: 8-10
3smalloranges
3eggs
1cupcastersugar
3cupsalmondmeal
1teaspoonbakingpowder
Syrup:
²⁄
³
cupcastersugar
½cuporangejuice
1tablespoonorangezest
1.Preheatovento170°C.Greaseandlinea
22cmspringformcakepanwithbaking
paper.
2.Placeorangesinamediumsaucepan
andcoverwithwater.Placeovermedium
heatandbringtoasimmeruntiloranges
aretender,about30-40minutes.Drain
andallowtocool.Roughlychoporanges,
discardingtheseeds.
3.Usingafoodprocessorprocessoranges
untilsmooth.
4.PlaceeggsandsugarintheStainlessSteel
MixingBowl.Usingthewhiskwhiponhigh
speed(8-10)untileggsarepaleandhave
doubledinsize.
5.Reducetolowspeed(1-4),addremaining
ingredientstothebowl,andwhiskuntil
justcombined.
6.Pourintopreparedpan.Bakefor1hour
oruntilcookedwhentested.Placeonwire
racktocool.
7.Syrup:Placesugar,juiceandzestina
mediumsaucepanandbringtoasimmer.
Stirconstantlyuntilsugarhasdissolved
andthesyruphasthickened.Drizzleover
cake.Serve.
Lemon Melting Moments
Makes: 12approximately
250gbutter,roomtemperature
½cupicingsugar
1teaspoonvanillaextract
2cupsplainflour
½cupcustardpowder
2teaspoonslemonzest
Filling:
80gbutter,roomtemperature
1¼cupsicingsugar
1tablespoonlemonzest
2teaspoonslemonjuice
1.Preheatovento160°C.Greaseandline
2bakingtrayswithbakingpaper.
2.Placebutter,sugarandvanillainthe
StainlessSteelMixingBowl.Usingthe
scraperbeatermixonmediumspeed(5-7)
untillightandcreamy.
3.Reducetolowspeed(1-4),addremaining
ingredients,mixinguntilwellcombined.
4.Rollmixtureintotablespoonsizedballs.
Placeonpreparedtraysandgentlypress
downwithabackofafork.Bakefor15-20
minutesoruntilcooked.Placeonwirerack
tocool.
5.Filling:Placeallingredientsinthe
StainlessSteelMixingBowl.Usingthe
scraperbeateronhighspeed(8-10)mix
untillightandfluffy.
6.Oncethecookiesarefullycooledsandwich
togetherwithicing.Serve.

24
Recipes continued
Easy Chocolate Cookies
Makes: 30approximately
170gbutter,roomtemperature
1¼cupscastersugar
1egg
1½cupsplainflour
¾cupcocoapowder
1¼teaspoonsbakingpowder
250gdarkchocolatechips
1teaspoonsalt
1.Preheatovento180°C.Greaseandline
twobakingtrayswithbakingpaper.
2.PlacebutterandsugarintheStainless
SteelMixingBowl.Usingthescraper
beatermixonmediumspeed(5-7)until
lightandcreamy.Addeggandmixuntil
wellcombined.
3.Reducetolowspeed(1-4),addremaining
ingredients,mixinguntilwellcombined.
4.Reducetolowspeed(1-4)andmixuntil
ingredientsarewellcombined.Stirthrough
chocolatechipsandsalt.
5.Rollmixtureintotablespoonsizedballs.
Placeonpreparedtraysandgentlypress
down.Bakefor12-15minutesoruntil
cooked.Placeonwireracktocool.
White Chocolate Caramel Cookies
Makes: 30approximately
125gbutter,roomtemperature
½cupbrownsugar
1tablespoongoldensyrup
1tablespoonmilk
2cupsplainflour
2teaspoonsbakingpowder
250gwhitechocolatechips
1.Preheatovento180°C.Greaseandline
twobakingtrayswithbakingpaper.
2.PlacebutterandsugarintheStainless
SteelMixingBowl.Usingthescraper
beatermixonmediumspeed(5-7)until
lightandcreamy.Addgoldensyrupand
milkmixinguntilcombined.
3.Addremainingingredients.Reducetolow
speed(1-4)mixinguntilwellcombined.
4.Rollmixtureintotablespoonsizedballs.
Placeonpreparedtraysandgentlypress
downwiththebackofafork.Bakefor15
minutesoruntilcooked.Placeonwirerack
tocool.

25
Recipes continued
Golden Syrup Walnut Scrolls
Makes: 12each
100gbutter,chopped
2¼cupsself-risingflour
1tablespooncastersugar
²⁄
³
cupmilk
1egg
1cupwalnuts,chopped
½cupsliveredalmonds
¹⁄
³
cupbrownsugar
1teaspoongroundcinnamon
¼cupgoldensyrup
1.Preheatovento200°C.Lightlygreasea
19cmx29cmslicepan.
2.Placeflour,sugarandhalfofthebutterin
theStainlessSteelMixingBowl.Usingthe
scraperbeateronlowspeed(1-4)mixuntil
wellcombined.Addmilkandegg.
3.Usingthedoughhookkneadonlowspeed
(1-4)untilastickydoughhasformed.
4.Turndoughoutontoaflouredworksurface
androllintoa30x40cmrectangle.
5.Sprinklewithwalnuts,almonds,brown
sugarandcinnamon.Dotwithremaining
butter.Rolldoughtightlylengthwaysto
formalog.Trimendsandcutinto12
pieces.
6.Placecutsidedowninpreparedpan.
Bakefor25minutesoruntilcooked.
Placeonwireracktocool.Drizzlewith
goldensyrup.Serve.
Golden Syrup Walnut Scrolls
Serves: 6-8
200gpitteddates,chopped
¹⁄
³
cupboilingwater
1½teaspoonsbakingpowder
125gbutter,roomtemperature
1cupbrownsugar
2eggs
1½cupsplainflour
¼cupmilk
1.Preheatovento180°C.Greaseandlinea
20cmcakepanwithbakingpaper.
2.Placethedates,waterandbakingpowder
inasmallbowl.Setasidefor10minutes.
3.PlacebutterandsugarintheStainless
SteelMixingBowl.Usingthescraper
beateronmediumspeed(5-7)mixuntil
lightandcreamy.Addeggsoneata
time,makingsuretobeatwellaftereach
addition.
4.Addflour,milkanddatemixture.
Reducetolowspeed(1-4)mixinguntil
wellcombined.
5.Pourintopreparedpan.Bakefor40
minutesoruntilcookedwhentested.
Servewarmwithtoffeesauce.
Toffee Sauce
Makes: 2¼cups
200gbutter,chopped
1cupthickenedcream
1cupfirmlypackedbrownsugar
1.Placeallingredientsinasmallsaucepan.
Stirovermediumheatuntilmeltedand
combined.Simmerfor3minutes.Pour
overstickydatepudding.
TIP: Thissauceisalsogreatovervanilla
ice-cream.

26
Recipes continued
Cheese Biscuits
Makes: 40approximately
250gbutter,roomtemperature
1cupgratedparmesancheese
1cupgratedSwisscheese
4eggs
2½cupsplainflour
1teaspooncayennepepper
1tablespoonrocksalt
1.Preheatovento180°C.Greaseandline
twobakingtrayswithbakingpaper.
2.PlacebutterandcheesesintheStainless
SteelMixingBowl.Usingthescraper
beateronmediumspeed(5-7)mixuntil
wellcombined.Addeggsoneatatime,
makingsuretobeatwellaftereach
addition.
3.Reducetolowspeed(1-4).Addflour
andcayennepeppermixinguntilwell
combined.
4.Usearollingpin,rolloutdoughuntil
½cmthick.Usinga4cmcuttercutdough
andplaceontopreparedtrays.Sprinkle
withrocksalt.
5.Bakefor10minutesoruntilcooked.
Placeonwireracktocool.
Corn Fritters
Makes: 8approximately
500gfrozencornkernels,defrosted
2eggs
1redchilli,finelychopped
1redonion,finelychopped
¾cupplainflour
2tablespoonsfreshlychoppedcoriander
leaves
1teaspoonbakingsoda
Saltandfreshlygroundblackpepper,totaste
Butter,forcooking
1.PlaceallingredientsintheStainlessSteel
MixingBowl.Usingthescraperbeateron
lowspeed(1-4)mixuntiljustincorporated.
Seasontotastewithsaltandpepper.
2.Meltbutterinalargefrypanovermedium
heat.Add¼cupofbattertopanandcook
for2minutesoneachsideoruntilcooked.
Repeatwithremainingmixture.Servehot.

27
Recipes continued
Fetta and Spinach Scrolls
Makes: 12each
2cupsself-raisingflour
1tablespooncastersugar
50gbutter,chopped
¾cupmilk
1egg
250gfrozenspinach,thawed
1cuppizzacheese
100gfetacheese,crumbled
1.Preheatovento200°C.Lightlygreasea
19cmx29cmslicepan.
2.Placeflour,sugarandhalfofthebutterin
theStainlessSteelMixingBowl.Usingthe
scraperbeateronlowspeed(1-4)mixuntil
wellcombined.Addmilkandegg.
3.Usingthedoughhookkneadonlowspeed
(1-4)untilastickydoughhasformed.
4.Turndoughoutontoaclean,floured
worksurfaceandrollintoa30x40cm
rectangle.
5.Sprinklewithspinachandcheeses.
Dotwithremainingbutter.Rolldough
tightlylengthwaystoformalog.Trimends
andcutinto12pieces.
6.Placecutsidedownonpreparedpan.
Bakefor25minutesoruntilcookedwhen
tested.Placeonwireracktocool.
Cheesy Garlic Bread
Makes: 1loaf
1¼cupswarmwater
1tablespooncastersugar
2teaspoonsdryyeast
3½cupsplainflour
2tablespoonsoliveoil
1teaspoonsalt
3clovesgarlic,crushed
30gbutter,roomtemperature
1cupgratedcheddarcheese
½cupgratedparmesancheese
1.Lightlycoatabakingtraywithflour.
2.Inasmallbowlcombinewater,sugarand
yeast.Setasideuntilmixturebeginsto
foam.
3.Placeflour,oil,saltandyeastmixturein
theStainlessSteelMixingBowl.Usingthe
doughhookonlowspeed(1-2)kneadfor
5minutesoruntildoughissoftandsilky.
4.Addgarlic,butterandcheesestothe
doughandkneadonlowspeed(1-2)for
2minutes.
5.Rollintoalog.Placeonpreparedbaking
trayandcover.Placeinawarmareafor
40minutesoruntildoubledinsize.
6.Preheatovento180°C.Bakedoughfor30
minutesoruntilgoldenbrownandcooked
whentested.Placeonwireracktocool.

27
Recipes continued
Rosemary, Olive and Sea Salt
Focaccia Bread
Makes: 2loaves
1cupwarmwater
1tablespooncastersugar
2teaspoonsdryyeast
3½cupsplainflour
½cupoliveoil
2teaspoonssalt
¹⁄
³
cupkalamataolives
2tablespoonsfreshrosemaryleaves
1tablespoonseasalt
1.Inasmallbowlcombinewater,sugarand
yeast.Setasideuntilmixturebeginsto
foam.
2.Placeflour,halfoftheoliveoil,saltand
yeastmixtureintheStainlessSteelMixing
Bowl.Usingthedoughhookkneadonlow
speed(1-2)for2minutesoruntildough
formsaball.Continuetokneadfora
further8minutes.
3.Placedoughinalightlygreasedbowl,
cover.Placeinawarmareafor40minutes
oruntildoubledinsize.
4.Preheatovento180°C.Greaseandline
twobakingtrayswithbakingpaper.
5.Punchdowndough.Cutdoughinhalf.
Onalightlyflouredsurfacerolldoughinto
a20cmcircle.Placeonpreparedtrays.
6.Pressfingertipsintothedoughtoform
indents.Pouroverremainingoiland
scatterwitholives,rosemaryandseasalt.
Bakefor30minutesoruntilgoldenand
cookedwhentested.Servewarmorcold.
Basic Pizza Dough
Makes: 2largepizzas
1¼cupswarmwater
2teaspoonsdryyeast
1teaspooncastersugar
2cupsplainflour
2tablespoonsoliveoil
½teaspoonsalt
1.Combinethewater,yeastandsugarina
jug.Setasideuntilmixturebeginstofoam.
2.Placeflour,oil,saltandyeastmixturein
theStainlessSteelMixingBowl.Usingthe
doughhookkneadonlowspeed(1-2)for
2minutesormixtureformsaball.
Continuetokneadonlowspeed(1-2)for
afurther8minutes.
3.Placedoughinalightlygreasedbowl,
cover.Placeinawarmareafor40minutes
oruntildoubledinsize.
4.Punchdowndough.Cutdoughinhalf.
5.Takeonepieceofdoughandrollona
lightlyflouredsurfaceintoaroughround.
Placeonalightlygreasedpizzatrayand
stretchthedoughtofitthetray.Repeat
withremainingdough.Cover;allowto
standfor20-30minutes.Topasdesired.
TIP:ifyoupreferathickpizzacrust,usethis
doughquantitytomake1pizza.

28
Recipes continued
Supreme Pizza
Makes: 2largepizzas
1quantitybasicpizzadough
¼cuppizzasauce
2cupspizzacheese
¼cupchoppedfreshbasil
¼cuppittedkalamataolives
1smallredcapsicum,thinlysliced
½redonion,thinlysliced
100gbuttonmushrooms,thinlysliced
100gshavedham,torn
Saltandfreshlygroundblackpepper,totaste
1.Preparebasicpizzadoughaccordingto
recipe.
2.Preheatovento180°C.
3.Spreadpizzasauceoverbases.Sprinkle
withhalfofthecheese.Topwithremaining
ingredientsandsprinklewithremaining
cheese.
4.Cookpizzaforabout15minutesoruntil
basesaregoldenandcheesehasmelted.
Seasontotastewithsaltandpepper.
Serve.

Planetary
Mixmaster
®
User Guide
Need help with your appliance?
Contact our customer service team
or visit our website for information
and tips on getting the most from
your appliance.
Australia | visit www.sunbeam.com.au
phone 1300 881 861
mail Units 5 & 6, 13 Lord Street,
Botany NSW 2019 Australia.
New Zealand | visit www.sunbeam.com.nz
phone 0800 786 232
mail Unit 3, Building D, 26 Vestey Drive,
Mt Wellington Auckland
New Zealand.
Sunbeam Corporation Limited | ABN 45 000 006 771
Sunbeam Corporation is a division of GUD Holdings Limited.
Sunbeam is a registered trademark.
Scrapemaster™ is a trademark of Sunbeam Corporation
Made in China to Sunbeam’s specification.
Due to minor changes in design or otherwise,
the product you buy may differ slightly from the one shown here.
Approved by the appropriate electrical regulatory authorities.
©Copyright Sunbeam 2013.
7/13
This Sunbeam product is covered by a
12 month replacement or repair warranty,
which is in addition to your rights under the
Australian Consumer Law (if your product
was purchased in Australia) or New Zealand
Consumer Guarantees Act (if your product
was purchased in New Zealand).
Upon receipt of your claim, Sunbeam will
seek to resolve your difficulties or, if the
product is defective, advise you on how to
obtain a replacement or refund.
To assist us in managing warranty claims,
we recommend you register your product
as soon as practicable after purchase by
creating a MySunbeam account on our
website and uploading a copy of your
original receipt.
In order to make a claim under our
warranty, you must have the original proof
of purchase documentation for the
product and present it when requested (if
not already uploaded to our website).
Should your product develop any defect
within 12 months of purchase because of
faulty materials or workmanship, we will
replace or repair it, at our discretion, free
of charge. A product presented for repair
may be replaced by a refurbished product
of the same type rather than being
repaired. Refurbished parts may be used
to repair the product.
Our replacement or repair warranty only
applies where a defect arises as a result
of faulty material or workmanship during
the warranty period. Your warranty does
not cover misuse or negligent handling
(including damage caused by failing to use
the product in accordance with this
instruction booklet), accidental damage,
or normal wear and tear.
Your warranty does not:
• cover freight or any other costs incurred
in making a claim, consumable items,
accessories that by their nature and
limited lifespan require periodic renewal
(such as filters and seals) or any
consequential loss or damage; or
• cover damage caused by:
- power surges, power dips, voltage
supply problems, or use of the product
on incorrect voltage;
Should you experience any
difficulties with your product
during the warranty period,
please contact our customer
service line for advice on 1300
881 861 in Australia, or 0800
786 232 in New Zealand.
Replacement
Guarantee
12
Month
- servicing or modification of the
product other than by Sunbeam or an
authorised Sunbeam service centre;
- use of the product with other
accessories, attachments, product
supplies, parts or devices that do not
conform to Sunbeam specifications; or
- exposure of the product to
abnormally corrosive conditions; or
• extend beyond 3 months if the product
is used in commercial, industrial,
educational or rental applications.
The benefits given to you by our
warranty are in addition to other rights
and remedies under law in relation to
the product.
In Australia our goods come with
guarantees that cannot be excluded
under the Australian Consumer Law. You
are entitled to a replacement or refund
for a major failure and for compensation
for any other foreseeable loss or
damage. You are also entitled to have the
goods repaired or replaced if the goods
fail to be of acceptable quality and the
failure does not amount to a major
failure.
Our goods also come with guarantees
that cannot be excluded under the New
Zealand Consumer Guarantees Act.
If your warranty claim is not accepted, we
will inform you and if requested to do so
by you, repair the product provided you
pay the usual charges for such repair.
You will also be responsible for all freight
and other costs.
Should your product require repair or
service after the warranty period, contact
your nearest Sunbeam service centre.
For a complete list of Sunbeam’s service
centres, visit our website or call our
customer service line for advice on 1300
881 861 in Australia, or 0800 786 232 in
New Zealand.
Australia
www.sunbeam.com.au
1300 881 861
Units 5 & 6,
13 Lord Street,
Botany NSW 2019
Australia
New Zealand
www.sunbeam.com.nz
0800 786 232
Unit 3, Building D,
26 Vestey Drive,
Mt Wellington
Auckland
New Zealand
MX7900W
MX7900R
MX7900B
RESTRICTED CONFIDENTIAL DOCUMENT
APPROVED:
DATE:
DESCRIPTION:
MX7900 IB
COLOURS:
SCALE 1:1
SUNBEAM
IB COVER ARTWORK
12-07-13
Unit 5&6,13 Lord St
Botany 2019,
NSW, AUSTRALIA
Ph: +61 2 9695 9999
CORPORATION LTD.
This drawing and all information shown hereon are the
exclusive property of Sunbeam Corporation Limited, and are
submitted only on a confidential basis. The recipient agrees
not to reproduce the drawing, to return it upon request, and
that no disclosure of the drawing or the information shown
hereon will be made to a third party without prior written
consent from the Sunbeam Corporation Limited.
2824-A-IB
Important instructions –
retain for future use.