Mobile Data Terminal
About the Terminal
2. Select Restart.
Press and hold the Power button for approximately 8 seconds
until it restarts.
You may need to restart the terminal to correct conditions where
an application stops responding to the system or the terminal
seems to be locked up.
1. Press and hold the Power button until the options menu appears.
To restart the terminal if the touch panel display is unresponsive:
P400 Quick Start Guide
Introducing the Tera P400: An advanced rugged handheld
computer designed to deliver exceptional performance in
demanding environments. Powered by the AndroidTM 11
operating system and equipped with a Mediatek Octa-Core
processor, the P400 offers a seamless user experience.
One standout feature is the potent and easily replaceable
batter y, providing extended usage time and reducing downtime.
Moreover, the P400 boasts functionalities like barcode scanning,
NFC, and more. This broad spectrum of capabilities makes it an
ideal solution for applications spanning logistics, warehousing,
retail, and beyond.
This innovative device offers versatile input options, including
both numeric and alphabetic keypads, providing flexibility for
various use cases.
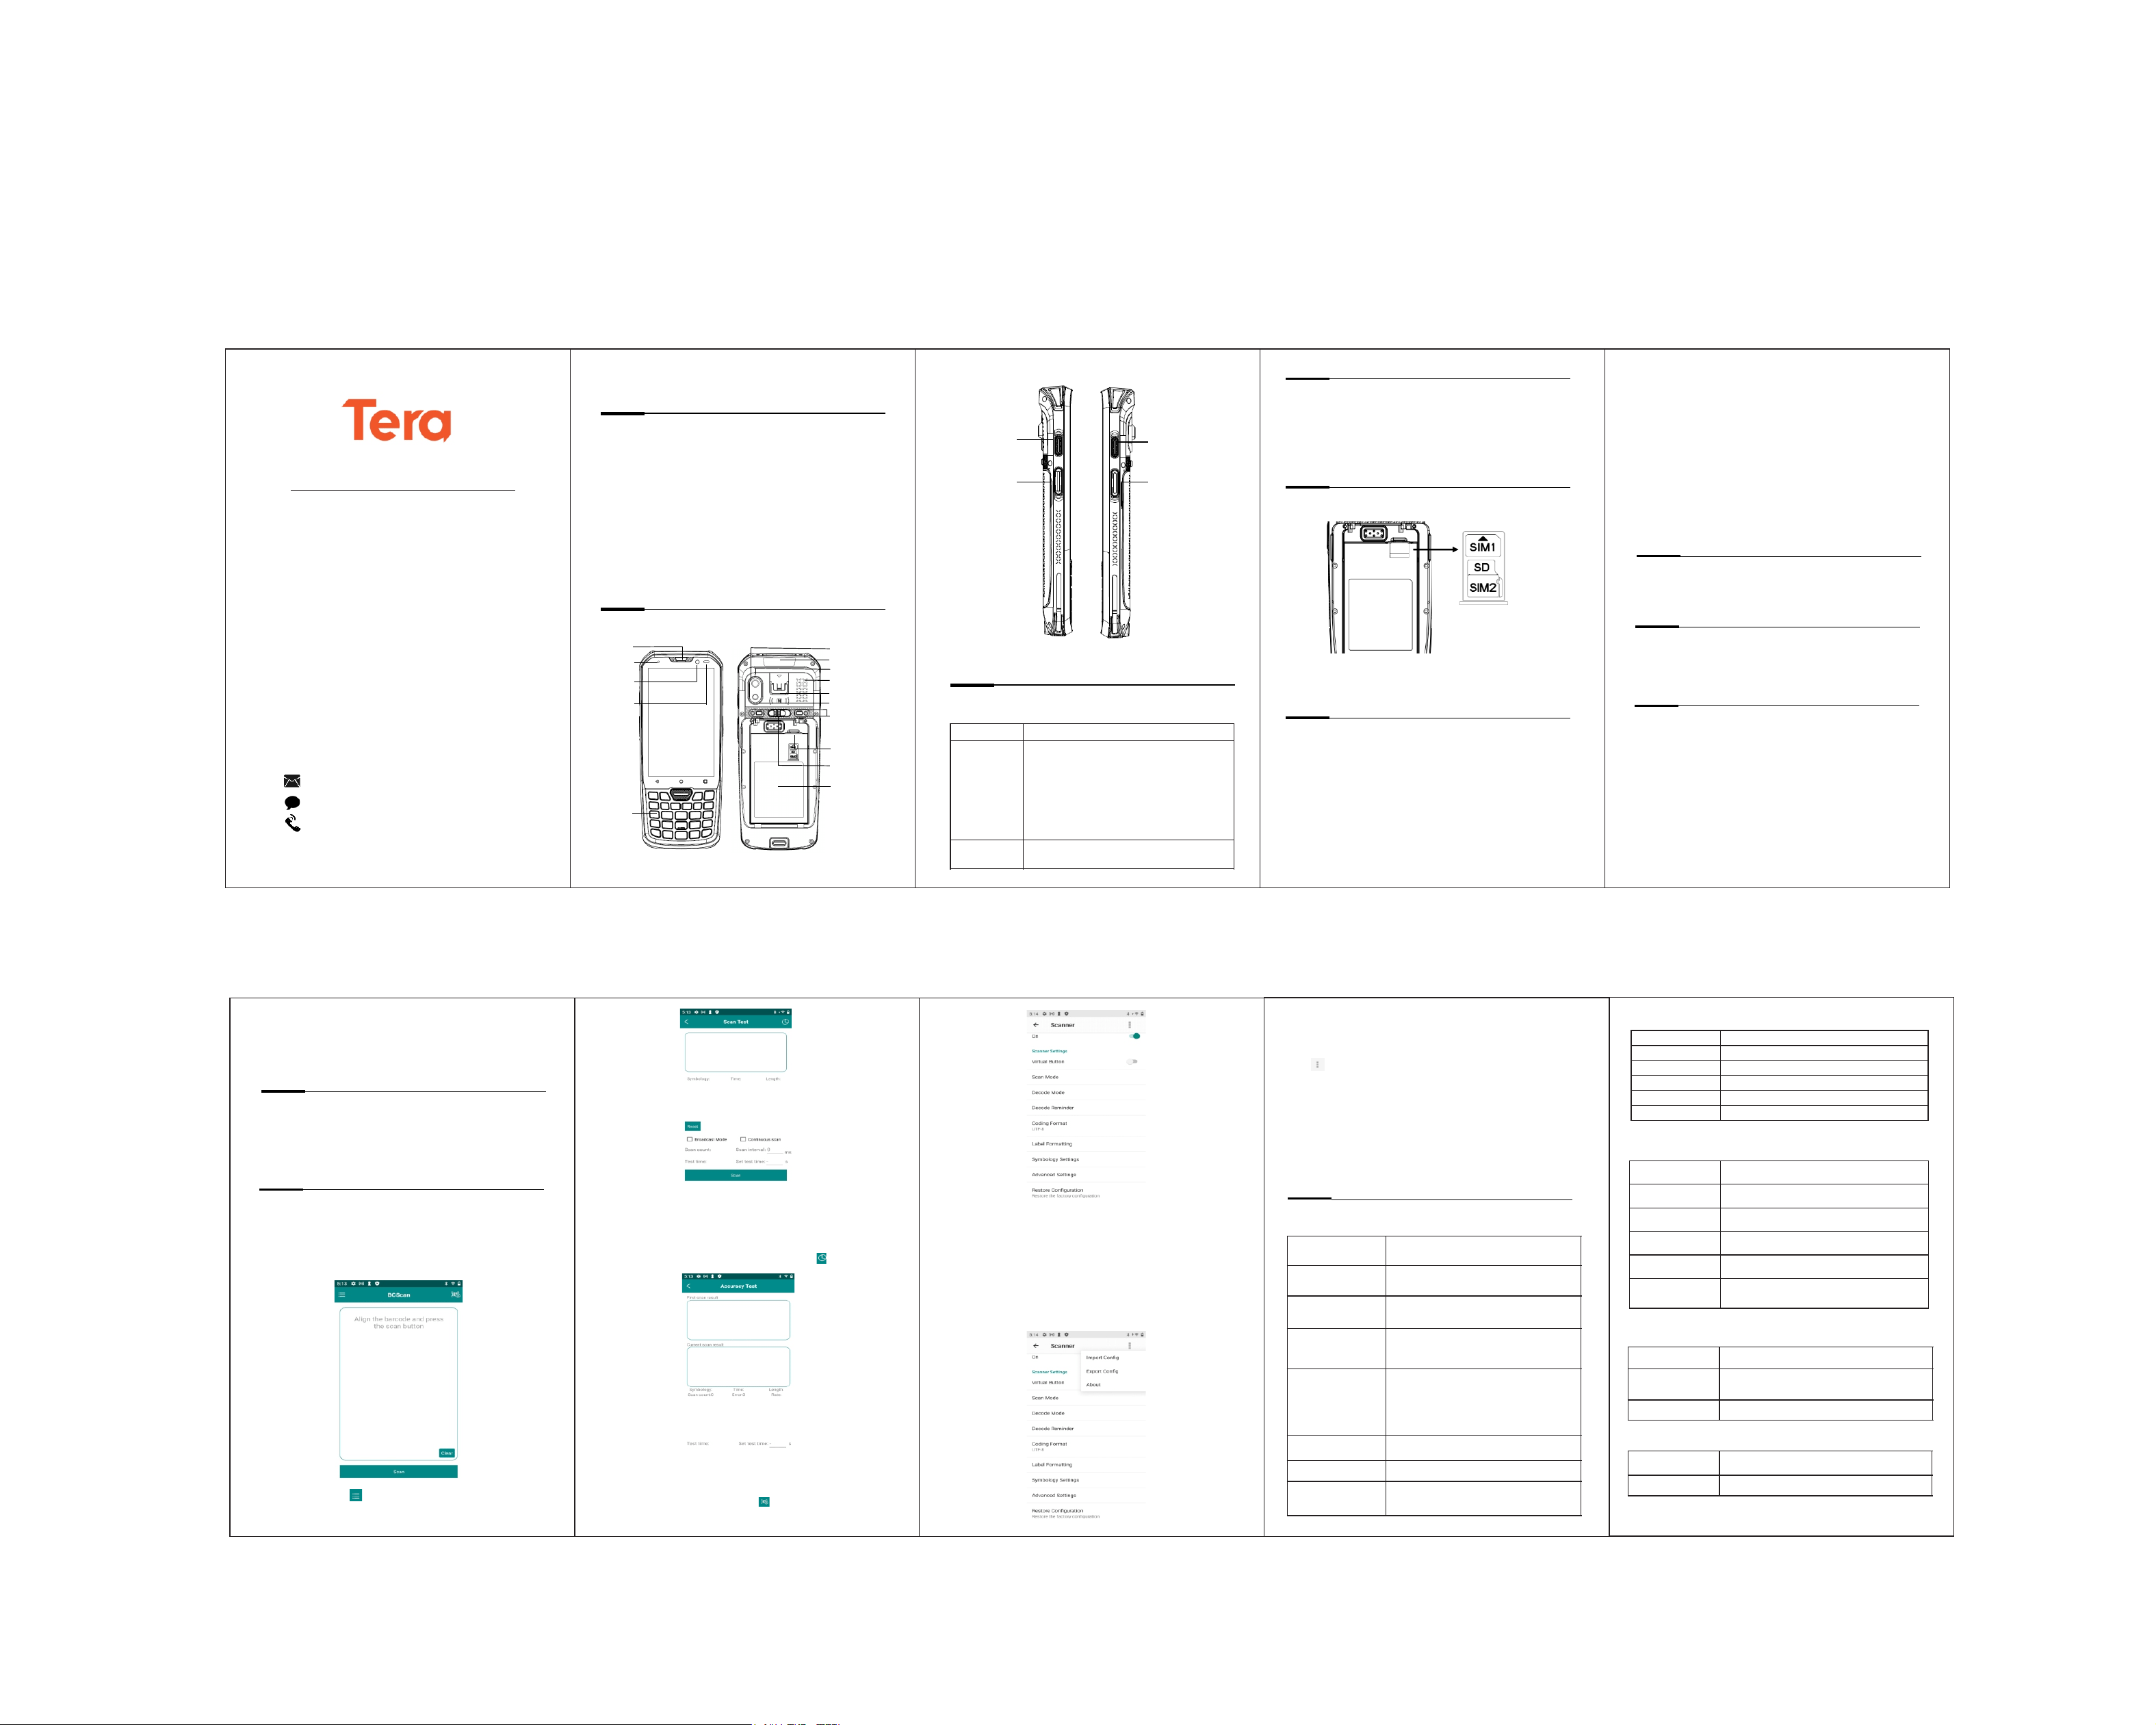
Install Micro SD and SIM cards
The positions of the card slots are indicated as follows:
Note: Always power off the terminal before attempting to install
or remove a card.
About the Battery
2. Expected Batter y Life: Under typical conditions, the battery
1. If you are storing the terminal for a few days (such as cover
the weekend), install a fully charged battery or connect the
terminal to a power source. If you are storing the terminal for a
longer period of time, remove and charge the battery. When the
batter y is done charging, store both the battery and the terminal
in a cool location. If you store the battery for several months,
recharge the battery periodically to keep it at peak performance.
The terminal uses a rechargeable Li-ion battery as its main power
source. Several factors determine the life of the battery, such as
screen brightness, screen timeout, network option, and extreme
temperature.
3. As lithium-ion batteries chemically age, the amount of charge
they can hold diminishes, resulting in shorter amounts of time
before a device needs to be recharged.
2. Tap Power off.
can retain up to 80% of its original capacity after approximately
300 complete charge cycles. A charge cycle involves the process
of both charging and discharging the battery as needed for
device usage.
1. Insert the charged battery pack into the battery
compar tment. The bottom of the battery must go in first.
Caution:Improper batter y replacement or incompatible device
usage may result in risk of burns,fire, explosion, or other hazard.
Dispose of lithium-ion batteries according to local regulations.
Risk of fire and burns if improperly handled. Do not open, crush,
heat or incinerate..
2. Press the battery down into the batter y compartment until the
batter y release latches snap into place.
3. Slide the batter y latch to the right. The batter y ejects slightly.
4. Remove the battery from the battery compartment.
4. For maximum batter y life, charge the battery at 20 °C (68°F) to
25°C (77°F) and store at 20°C (68°F) with a 30%-50% charge.
1. Press and hold the Power button until the options menu
appears.
3. Slide the batter y latch to the left.
You also have the option of using the original USB Type-A to USB
Type-C cable to charge the terminal from a host device, such as a
laptop or desktop computer. However, please ensure that the
connected host device can supply a minimum power output of
5V and 0.5A to the terminal.
Begin by connecting the USB cable to the power adapter, and
then connect it to the terminal.
This device comes with a USB Type-C port, and it is
recommended to charge the device using the provided original
USB cable and power adapter.
The terminal will start charging automatically, and the LED
Indicator will display the current charge status. If the LED
indicator is solid red, it means that the terminal is charging; if
the LED indicator is solid green, it indicates that the terminal is
fully charged.
The P400 supports the following mode of operation:
NFC technology provides the ability for short-range, wireless
data transfer between the P400 and NFC tags or other NFC
enabled devices placed in close proximity to the back of the
terminal.
NFC tag reader/writer mode: The terminal reads and/or writes
digital information from or to an NFC tag.
(Note: Avoid using third-party cables or adapters to charge the
terminal for optimal performance and safety.)
BCScan is a demonstration application designed to test scan
performance and manage the scan engine. Please be aware that
not all barcode symbologies are activated by default in the
BCScan app. If a barcode fails to scan, it is possible that the
correct symbology is not enabled.
Using the terminal while charging the battery increases the time
required to reach a full charge. If the mobile terminal is drawing
more current than supplied by the charging source, charging will
not take place.
To modify the scan profile or assess the scan engine's
performance, you must launch the BCScan application. Below is a
screenshot showcasing the application's primary interface.
In the Demo app, tap in the upper left corner of the screen to
obtain further information regarding each scan result.
The scan results will appear in the upper box and the related
information regarding the scanned barcode including symbology,
decoding time and message length will show up in the fields
underneath the box.
If you need to check scanning accuracy, please tap
if the scans are the same.
In this screen, you will find two text boxes where will show the
previous scan and the current scan so as for the user to identify
To set up the scan engine, please tap to access scanner settings
By default, the integrated scan engine is enabled for scanning. It
supports omni-directional barcode scanning, and an aiming beam is
provided to help assist with targeting barcodes.
If you need to enable or disable symbologies, DPM Mode, or OCR
Mode, please tap on the Symbology Settings option to access further
settings.
If you require data format modifications such as adding a prefix or
suffix, or removing characters, please tap on the Label Formatting
option to access additional settings.
If you have completed the setup process for a device and would like
to install the same configuration on another device, please follow
these steps:
• Tap , and choose the "Export Config" option
• Locate the exported file and transfer it to the desired device.
• Launch the BCScan app on the target device.
• Select the "Import Config" option to load the previously exported
file.
• Navigate to the scanner settings within the app.
Specifications
Mechanical
Terminal Features
Buttons and Description
Restart the terminal
Install the Battery
Remove the Battery
Charge the Terminal
About Near Field Communication (NFC)
About the BCScan Application.
The front, back and side view of the P400 are shown as follows:
System Architecture
Environmental
Connectivity
Data Collection
Need Support?
Issue with missing or damaged items?
info@tera-digital.com
https://www.tera-digital.com
+1(626)438-1404
Scan Engine Honeywell Scan Engine
NFC ISO 14443 Type A and B
WAN 2G/3G/4G
IEEE 802.11 ac/a/b/g/n/d/e/h/i/j/k/r/v/
w(2.4G/5G Dual band WIFI)
WLAN
Bluetooth Bluetooth 5.0, Bluetooth Low Energy (BLE)
Operating
Temperature
-20℃ to 50℃/-4°F to 122°F
Storage
Temperature
-40℃ to 70℃/-40°F to 158°F
Humidity
5%RH - 95%RH (Non-condensing)
Sealing
IP67, IEC sealing standard
Drop Test
Multiple drops to concrete at room
temperature from 1.8m / 5.9 ft.
Electrostatic
Discharge (ESD)
+/-15 kV air discharge, +/-8 kV direct
discharge
CPU Mediatek MT6762, 2.0 GHz Octa-core
Operating System Android 11
RAM 4GB
Interface USB Type-C
ROM 64GB
Storage Expansion Micro SD card (up to 256 GB )
Dimensions 160.5 x 67 x 17 mm / 6.3 x 2.6 x 0.67 in.
Weight 243 g / 8.57 oz. (battery included)
Display 4-inch 800(H)* 480(W) WVGA IPS
Physical Keyboard
26 keys, Side buttons: 2 SCAN buttons +
1 Power button+ 1 User-defined button
5100 mAh removable li-ion battery
Standby: over 300 hours
Continuous use: over 12 hours (depending
on user environment)
Charge time: 3 hours (with the original
adaptor and USB cable)
Battery
SIM Card Tray 2 slots for Nano SIM card, 1 slot for TF card
Audio 2 microphones, 1 speaker
Camera 5MP autofocus camera; f/2.2 aperture;
Flash LED
The P400 features a keypad comprising numeric keys and
functional keys.
Buttons Description
Power Button
Press and release the Power Button to turn
on/off the terminal screen.
Press and hold the button for approximately
3 seconds, and then release to view the
options menu.
. Power Off
. Restart
. Emergency
Scan Button
Press the right or left Scan Button or the one
on the keypad to trigger the scanner.
Receiver
Front
Camera
Indicator
Optical and
Proximity
Sensor
Rear Camera
Scan Engine
Loudspeaker
Flashlight
Expansion
Ports
SIM and TF
Card Slot
Battery
Compartment
Battery Cover
Latch
Microphone
Keyboard
Custom
Button
Left Scan
Button
Power Button
Right Scan
Button