JE2 - Slow Juicer

2

3
English Manual
Manuel d’utilisation en français
Gebrauchsanleitung auf Deutsch
Manual de Instrucciones en Español
Manuale D’istruzioni In Italiano
5
13
21
29
37
Contents
47 Instrukcja obsługi. Polski

4

5
English Manual
6
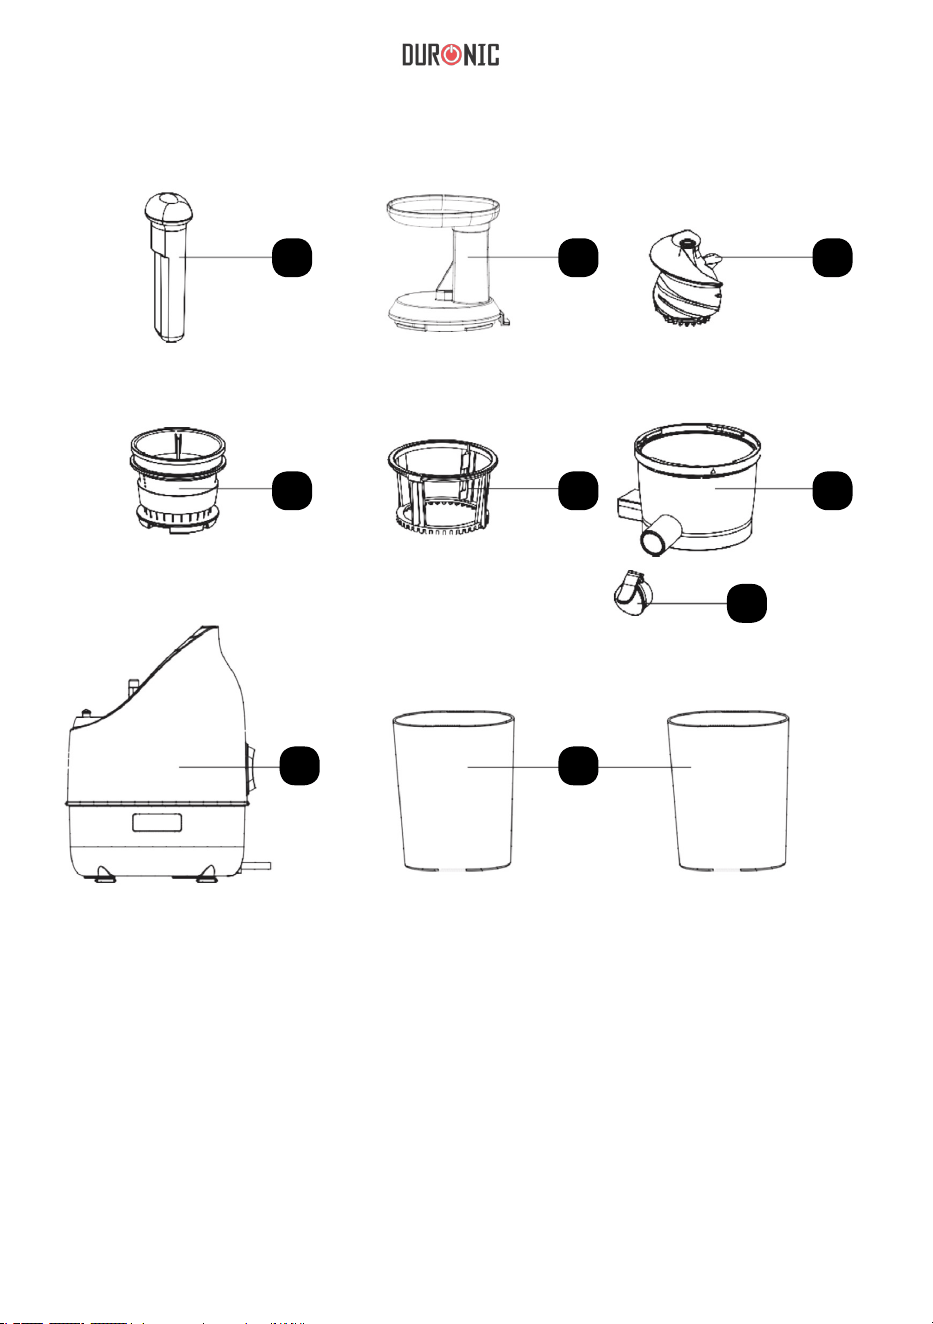
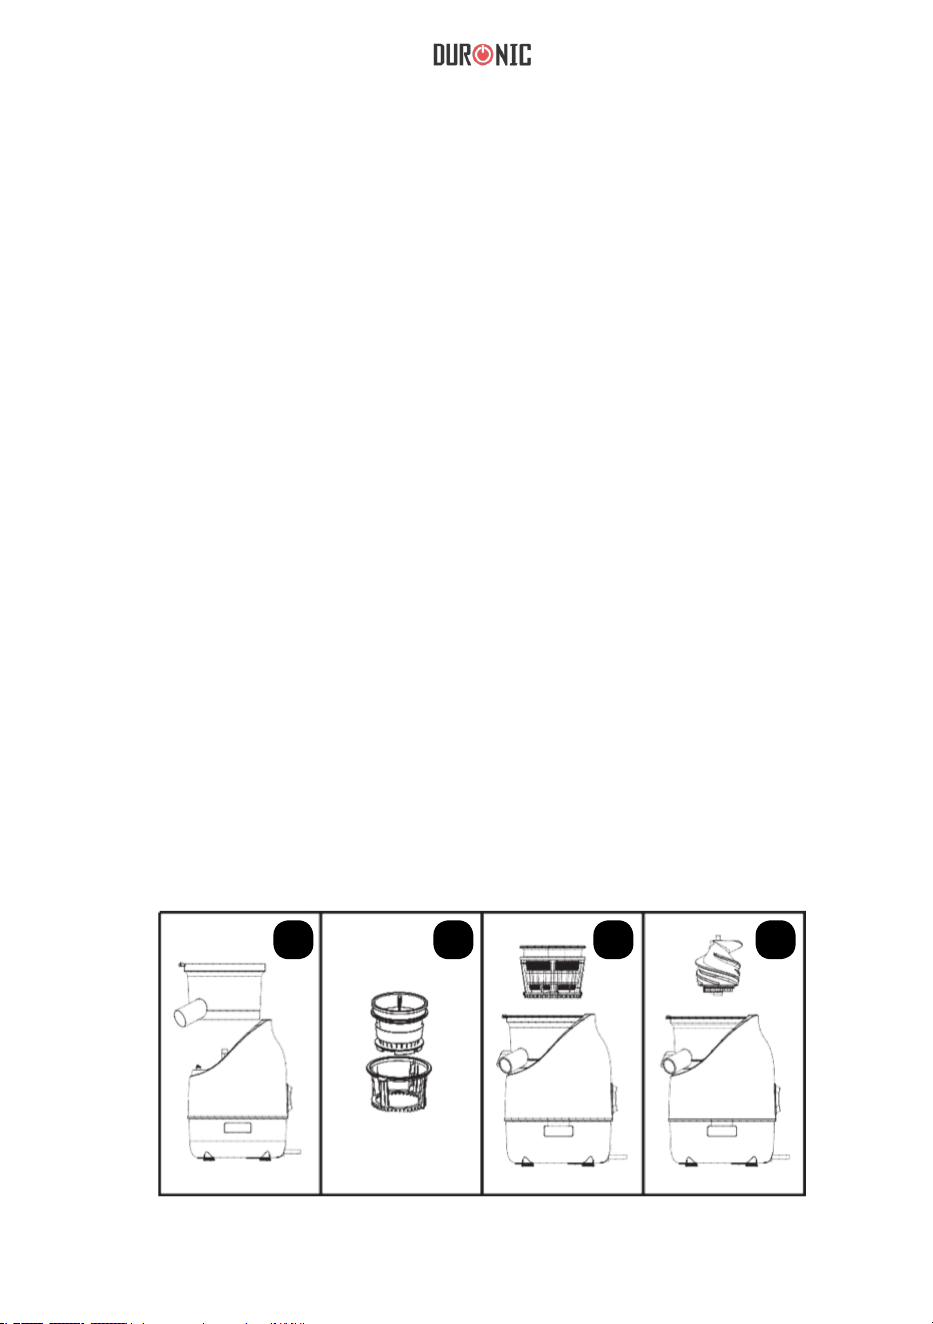
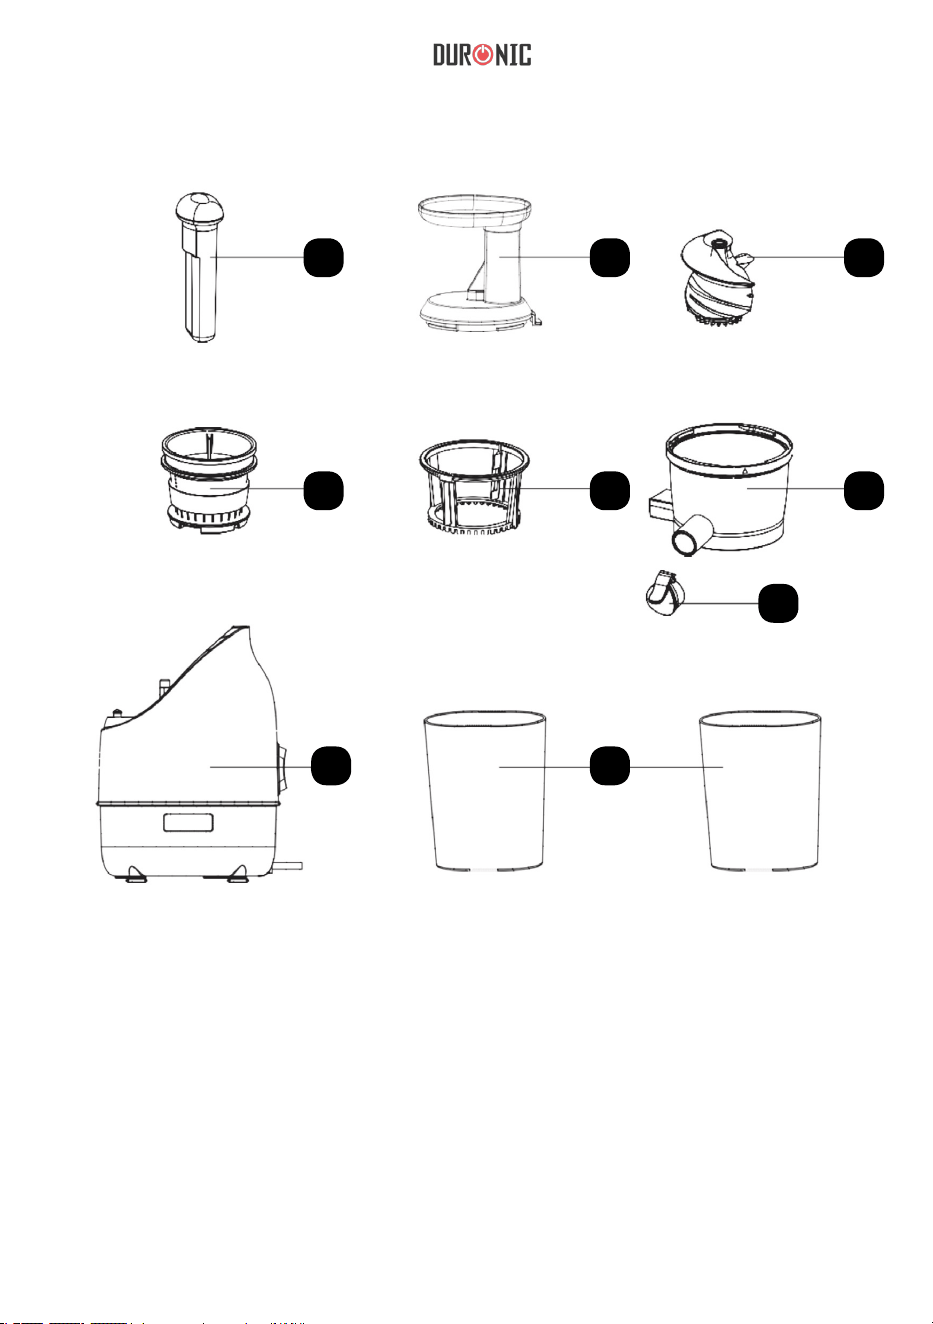
Parts & Assembly
1. Pusher
2. Feed in let
3. Rotor
4. Screening cylinder
5. Spinning brush
6. Juicing bowl
7. Juice-extracting spout
8. Juice/Pulp container
9. Juicer body
1 2 3
4 5 6
7
89
7
First use
I. Remove all packaging and check that all parts are included.
II. Wash all removable parts and accessories in warm water and dry them
thoroughly. To prevent electric shock and damage, do not immerse the
main machine in water.
III. Before assembling the machine, make sure that the plug has inserted into
the socket and that the switch at the back is in the ‘O’-Assembly.
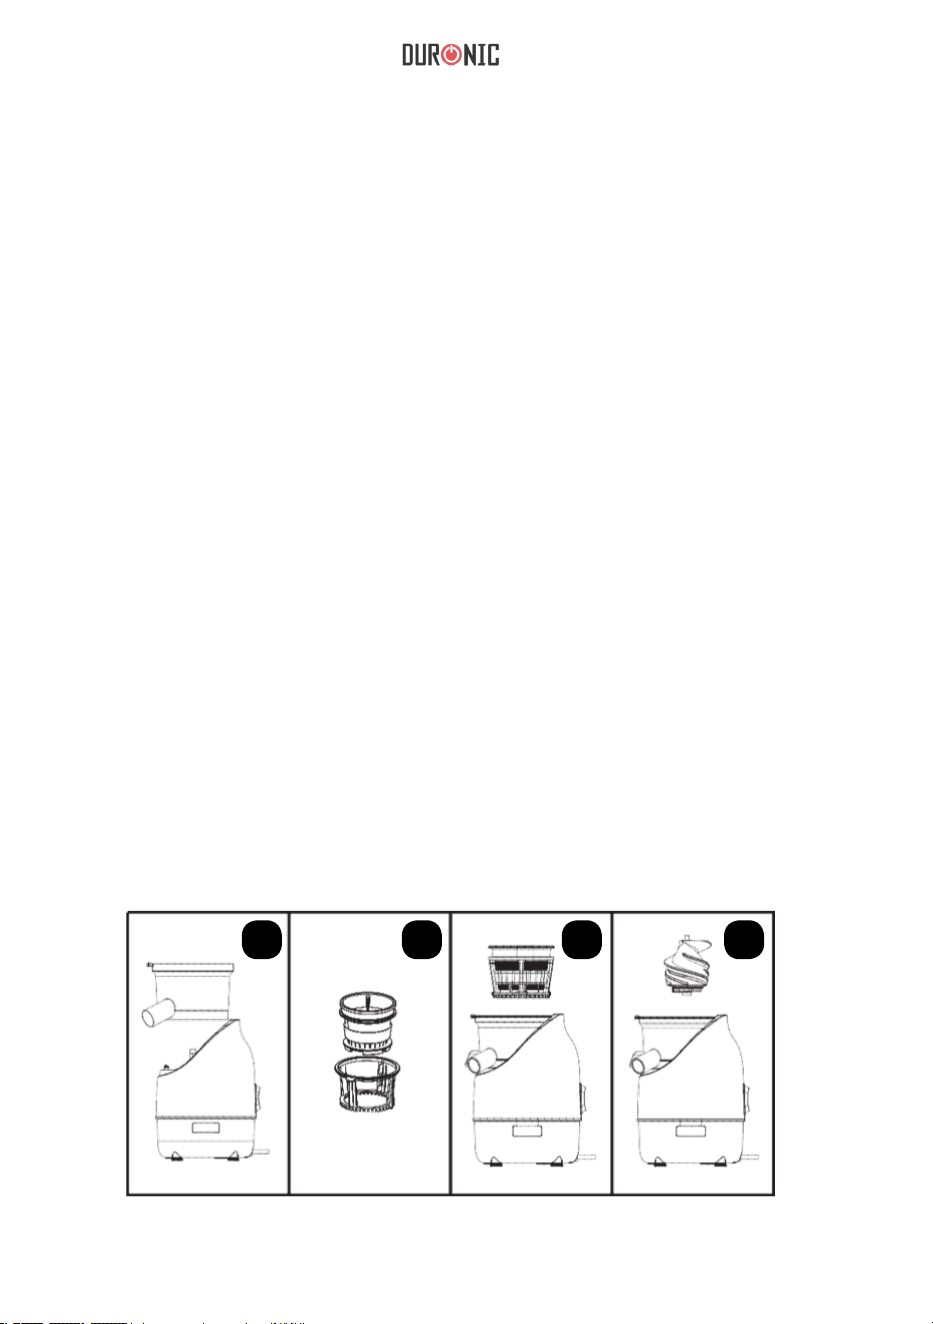
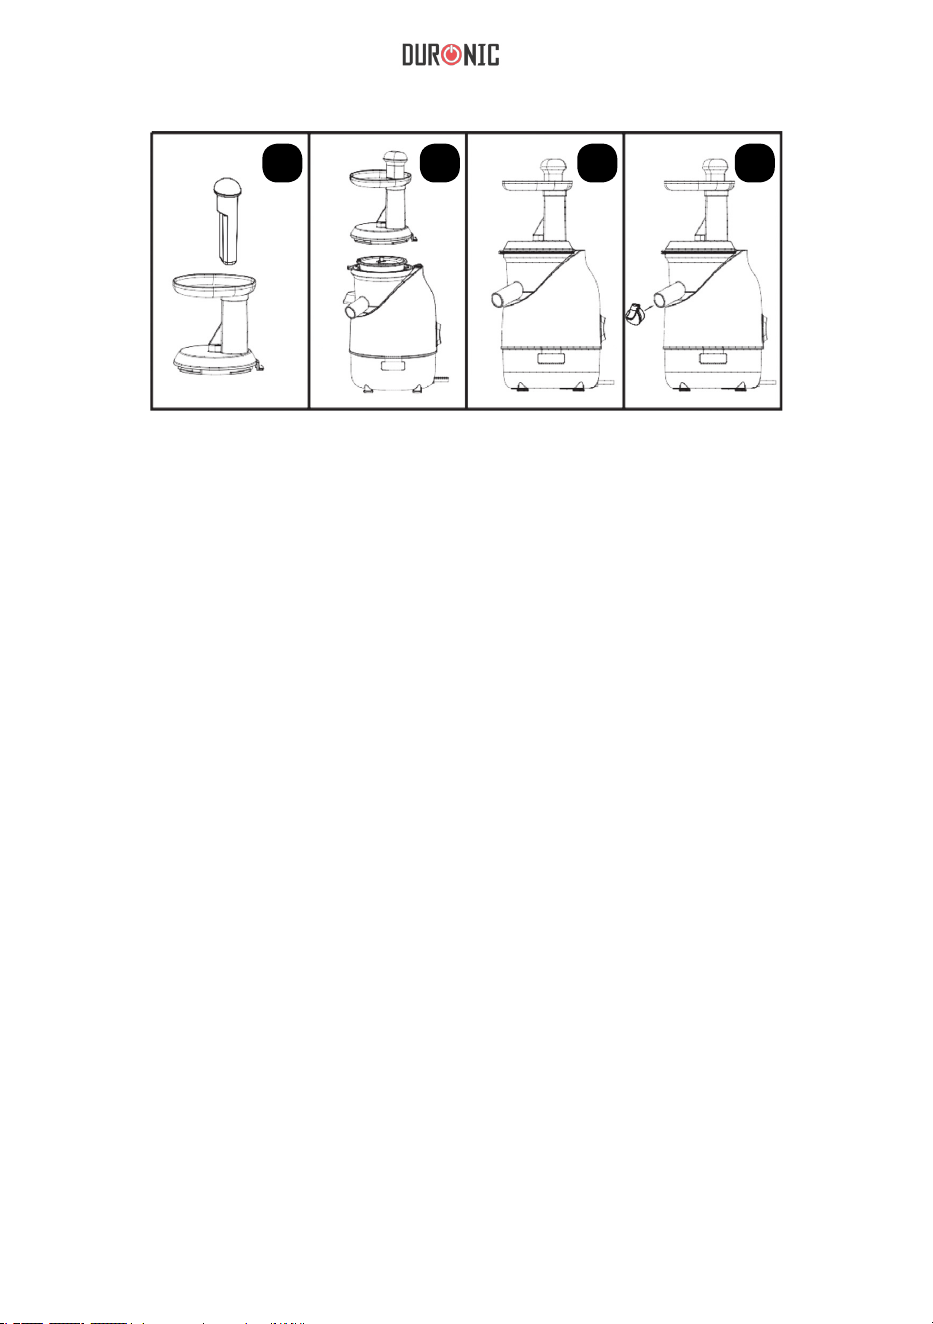
Make sure that all parts are installed correctly as follows:
1. Place the juicing bowl into the machine and make sure it cannot
move sideways (fig. 1)
2. Push the screening cylinder all the way into the spinning brush
locked into place (fig. 2
3. Align the spinning brush inside juicing bowl by matching the triangles
the top front (fig. 3
4. Push the rotor into the screening cylinder until it sits on the bottom
and only the little metal top sticks out of the cylinder (fig 4)
5. Insert the pusher into the feed inlet (fig 5)
6. Align the unlock-mark on feed inlet with the triangle on the juicing (fig 6)
7. A subtle rotation clockwise will close the cover (fig 7)
8. Attach the spout to the juicing bowl (fig 8)
1 2 3 4

8
Operation instruction
1. Once all parts are correctly installed, place the juice and pulp container
under the outlets of the juicing bowl and put the plug into the socket.
2. Prepare the fruit and vegetables:
A. Remove all non-edible parts: stones (e.g. cherry stone), cores (e.g.
of a pineapple), pits (of lemon and grapes) as well as solid skins
(e.g. from an orange).
B. If the ingredient is too large cut it into chunks.
C. Avoid fruits with little juice, rich in fibre, nuts, cocoa beans, as
they will cause damage to the machine.
3. Turn the machine into the ‘ON’-Position and insert ingredients into the feed
inlet. Move the pusher down slowly and evenly to extract the maximum
juice. In case food gets stuck in the feed inlet, stop the machine and empty
the channel of any pulp before continuing. If too many ingredients have
been inserted, push the ‘REV’-button and the rotor will operate in the
reversed direction to clear the excess food.
4. Empty the juice container and remove the pulp before it is filled u
completely to prevent overflowing, as well as after each cycle. Operatio
time should not exceed 20 minutes or 2-3 cycles, afterwards the machine
will need to cool down before the next use.
5 6 7 8

9
Product features:
1. Extracts the juice from fruits and vegetables, such as apple, carrots,
cucumber, celery, orange, and many more.
2. Separates the pulp from the juice, so both can be used for different
purposes.
3. Includes transparent accessories to view the process throughout.
4. Easy cleaning thanks to removable accessories.
5. Large containers for big batches of juice.
6. Easy to pour spout.
7. Adjustable juicing direction.
8. Juicing efficiency though low rate spinning prevents oxidization and keeps
the juice fresh and tasty.
9. DC motor drive, low output rotational speed;
10. Rated voltage: 220-240V; frequency: 50Hz; rated power: 220W;
5. Turn the machine off by selecting the ‘O’-Position at the back
of the machine.
6. After juicing, turn switch to the ‘O’-position. Wait until the motor stopped
spinning completely before removing any parts.
7. The product is not intended for a person with disability, or sense, or mental
disorder or those without relevant experience and knowledge (including
children).
8. This product has been designed for household use only and not suitable
for commercial purposes.
9. Do not leave the machine unattended whilst in use.
10. To prevent damage to the product do not insert hard foods, eg. fiber-rich
foods, eg. sugar cane, little-juice foods, such as banana food objects. If
foods get stuck use the pushing rod and not your hands to prevent injury
and damage.

10
Precautions:
Pay attention to the following whilst using the electric appliance:
1. Read the instruction carefully before use and keep them for future
reference.
2. Before use, ensure the local power voltage is consistent with the rated
voltage indicated on the product.
3. Before dismantle or installing any part of the product, disconnect it from
the power supply.
4. Before use, check the cable, plug and all loose parts for damage. Should
there be any damage or deformation, do not use the product. Contact the
customer service department for a repair or replacement.
5. To prevent damage or the cause of fire, do not use this product with a
timer.
6. To prevent the risk of electric shock and damage do not immerse the
machine in water. Use a soft cloth for cleaning.
7. Keep all your body parts as well as hard objects out of the feed inlet during
the operation. Do not use any other objects instead of the pushing rod to
push the food down. The contact with the rotor would cause injury and/or
damage. Use only original parts provided by manufacturer.
1. After use, unplug the machine and wait
until it has cooled off completely.
2. Clean all removable parts in warm,
soapy water. Clean the main body with
a soft wet cloth. Dry everything fully.
Cleaning and maintenance

11
Storage
1. The product should be kept away from children.
2. Store the product in a dry place away from direct irradiation
of ultraviolet light.
Problem Solution
Machine does not
turn on.
Check power plugs and that the
product is correctly assembled.
Failure to operate.
Make sure the parts have been
installed in the machine correctly.
Operation stopped
during use.
Too much food has been inserted;
remove some of it.
Food has not been prepared correctly,
e.g. not pitted, stoned, skinned; remove
any non-edible, hard parts of the food. If
the machine is blocked, use the reverse
function to clear it, remove all food and
pulp and clean the machine afterwards.
Noise occurs during
juicing.
Squeezing ingredients can cause noise,
which is normal condition. Do not use
frozen ingredients, all food must be
thawed before juicing.
Description of parts:
Product name: Slow Juicer
Product model: JE2
Rated voltage: 220-240V~
Frequency: 50/60Hz
Rated power: 200W
12
Warranty
1 Year Guarantee from Shine-Mart Ltd, Trademark owners of Duronic Products.
NOTE: THESE STATEMENTS DO NOT AFFECT YOUR STATUTORY RIGHTS AS A
CONSUMER
This product has been manufactured under the strictest or quality control procedures, and
using the highest quality of materials, to ensure excellent performance and reliability. It will
give very good and long lasting service, provided it is properly used and maintained. The
product is guaranteed for 1 years from the date of original purchase. If any defect arises due
to a faulty materials or poor workmanship, the faulty product must be returned to the original
place of purchase. Refund or replacement is at the discretion of that company.
Duronic Products are offered with a 1 year guarantee under the following conditions:
1. The product must be returned to the retailer with original proof of purchase.
2
. T
he product must be installed and used in accordance with the instruction
s
c
ontained in this operating manual.
3
. I
t must be used only for domestic purposes.
4. It does not cover wear and tear, malicious damage, misuse, neglect,
inexpert repairs or consumable parts.
5
. S
hine-Mart Ltd has no responsibilities for accidental or consequential loss or damage.
6
. S
hine-Mart Ltd are not liable to carry out any type of servicing work
,
u
nder the guarantee
7
. V
alid in the UK only
This product is tted with CE:1363 plug and fuse
Imported by Shine-Mart Ltd, RM3 8SB
Information on waste Disposal for Consumers of
Electrical & Electronic Equipment.
This mark on a product and/or accompanying documents indicates that when it
is to be disposed of, it must be treated as Waste
Electrical & Electronic Equipment, (WEEE).
Any WEEE marked products must not be mixed with general household waste,
but kept separate for the treatment, recovery and recycling of the materials used.
For proper treatment, recovery and recycling; please take all WEEE marked
waste to your Local Authority Civic waste site,
where it will be accepted free of charge.
If customers dispose of Waste Electrical & Electronic Equipment correctly, they
will be helping to save valuable resources and preventing any potential negative
effects upon human health and the environment, of any hazardous materials that
the waste may contain.

13
Manuel d’utilisation en français

14
Aperçu du produit
1 2 3
4 5 6
7
89
1.
Poussoir
2.
Entonnoir
3.
Coupleur
4.
Filtre
5.
Grattoir
6.
Anneau central
7.
Bec verseur
8.
Réservoir à pulpes/carafe
9.
Moteur

15
Première utilisation
1. Retirez l’emballage et vérifiez que tous les éléments sont bien inclus.
2. Nettoyez toutes les pièces démontables et accessoires puis séchez-les
convenablement. Pour éviter tout risque d’électrocution, n’immergez pas le
moteur dans l’eau.
3. Avant d’assembler l’appareil, assurez-vous que la prise soit bien insérée et
que l’interrupteur soit placé sur la position « O ».
Assurez-vous que tous les éléments soient bien insérés :
1. Placez l’anneau central sur le moteur et vérifiez qu’il soit bien verrouillé.
2. Placez le filtre dans le grattoir.
3. Alignez la flèche présente sur le grattoir avec la flèche présente sur le moteur.
4. Enfoncez le coupleur dans le grattoir jusqu’il soit bien enclenché.
5. Insérez le poussoir sur l’anneau central.
6. Verrouillez le poussoir sur l’anneau central.
7. Assurez-vous que le cadenas présent sur le poussoir s’aligne avec la flèche
présente sur l’anneau central.
8. Placez le réservoir à pulpes et la carafe devant les sorties correspondantes.
1 2 3 4

16
Instructions d’utilisation
1. Lorsque tous les éléments ont bien été insérés, placez le réservoir à pulpes et la
carafe devant les sorties correspondantes.
2. Préparez les fruits et légumes :
A. Retirez toutes les parties non comestibles (pépins, noyaux, etc), les
éventuelles tiges ainsi que les peaux solides.
B. Si les ingrédients sont trop larges, coupez-les en morceaux.
C. Evitez les fruits très secs, riches en fibres, les fruits à coques car leur
texture pourrait endommager l’appareil.
3. Allumez l’appareil à l’aide l’interrupteur puis insérez les ingrédients dans la chute.
Utilisez le poussoir en l’insérant soigneusement et lentement pour extraire un
maximum de jus. Si les ingrédients se bloquaient, retirez le couvercle et retirez ce
qui encombre la chute. Si une quantité importante d’ingrédients a été insérée,
utilisez la fonction « REV » pour enclencher la marche arrière. Le coupleur
commencera alors sa rotation dans le sens inverse.
4. Videz la carafe et le réservoir à pulpes avant qu’ils ne soient pleins. La durée de
fonctionnement ne devrait pas excéder les 20 minutes pour garantir la durabilité et
les performances de l’appareil.
5 6 7 8

17
Spécifications
1. Extraction de jus de fruits et légumes tels que des carottes, des pommes, des
concombres, du céleri, des oranges, etc.
2. Séparation de la chair du jus afin que chacun puisse être consommé
différemment.
3. Inclus un anneau transparent pour voir le processus d’extraction.
4. Nettoyage facilité grâce aux pièces démontables.
5. Large carafe pour un maximum de jus.
6. Bec verseur.
7. Marche arrière.
8. L’extraction de jus à rotation lente permet d’éviter l’oxydation des ingrédients
et garde le fruit frais.
9. Moteur DC, vitesse de rotation lente.
10. Tension nominale : 220-240V. Fréquence : 50 Hz. Puissance max : 220W.
5. Eteignez l’appareil en plaçant l’interrupteur sur la position « O ».
6. Patientez jusqu’à ce que l’appareil s’arrête complètement avant de le
démonter.
7. Ce produit n’est pas conçu pour être utilisé par une personne, y compris les
enfants, dont les capacités mentales, sensorielles ou physiques sont limitées ou
qui n’aurait pas reçu l’expérience nécessaire pour opérer l’appareil avec sécurité.
8. Ce produit a été conçu pour un usage domestique et non un usage
commercial.
9. Ne laissez pas l’appareil en fonctionnement sans supervision.
10. Pour éviter d’endommager l’appareil, n’insérez pas d’ingrédients solides, tels
que des ingrédients riches en fibres (des cannes à sucre par exemple), des
ingrédients très secs (des bananes par exemple) ou des objets solides. Si des
ingrédients venaient à rester coincé, utilisez le poussoir, n’insérez jamais vos
mains pour éviter toute blessure éventuelle.

18
Avertissements
Veuillez respecter les éléments suivants lorsque vous opérez un appareil
électrique :
1. Lisez les instructions d’utilisation attentivement et gardez-les pour d’éventuelles
références futures.
2. Avant d’utiliser l’appareil, assurez-vous que le courant utilisé par cet appareil
corresponde avec le courant utilisé par votre système électrique.
3. Avant d’assembler ou de démonter l’appareil, débranchez la prise de l’appareil.
4. Avant d’utiliser l’appareil, veuillez vérifier que l’alimentation ne soit pas
endommagée. Si l’alimentation ou un élément de cet appareil était endommagé,
veuillez contacter le service-client de la marque ou de votre revendeur.
5. Pour éviter tout dommage et tout risque d’incendie, n’utilisez pas cet appareil
pendant une période prolongée.
6. Pour éviter tout risque d’incendie ou d’électrocution, n’immergez pas l’appareil
dans l’eau. Utilisez un tissu doux pour nettoyer l’appareil.
7. Soyez attentif à ce qu’aucun objet solide ou qu’une partie de votre corps (y
compris les cheveux) n’entre pas en contact avec le coupleur. Tout contact avec le
coupleur pourrait provoquer des blessures ou endommager l’appareil. N’utilisez que
les accessoires originaux fournis par le fabricant.
1. Après utilisation, débranchez l’appareil et
laissez-le refroidir.
2. Nettoyez toutes les pièces démontables dans
de l’eau chaude savonneuse. Nettoyez le
moteur avec un tissu humide doux. Séchez tous
les éléments convenablement.
Nettoyage et maintenance

19
Stockage
1. Ce produit doit être gardé à l’abri des enfants.
2. Entreposez cet appareil dans un emplacement sec hors-de-portée des
rayons du soleil.
Problèmes Solutions
L’appareil ne
s’allume pas.
Vérifiez la prise d’alimentation et que
l’appareil a été assemblé correctement.
L’appareil ne fonctionne
pas.
Assurez-vous d’avoir inséré et verrouillé
tous les éléments correctement.
L’appareil s’arrête
en pleine
utilisation.
Une quantité importante d’ingrédients a
été insérée, veuillez en retirer une
partie.
Les ingrédients n’ont pas été préparés
correctement (les noyaux, les pépins et
autres parties solides n’ont pas été
retirés). Retirez ce qui bloque le
mécanisme et nettoyez la machine.
Un bruit se fait entendre
durant l’utilisation de
l’appareil.
Les fruits peuvent faire du bruit sous la
pression du coupleur, ce qui est normal.
N’utilisez pas d’ingrédients congelés,
tous les ingrédients insérés doivent être
décongelés avant d’être inséré.
Descriptions des éléments :
Nom du produit : Extracteur de jus
Modèle : JE2
Tension nominale : 220-240V~
Fréquence : 50/60Hz
Puissance nominale : 200W
20
Garantie et service après-vente
1 an de garantie de la part de Shine-Mart Ltd, propriétaire de la marque Duronic.
NOTE : CES DÉCLARATIONS N’AFFECTENT EN RIEN VOTRE DROIT STATUTAIRE EN
TANT QUE CONSOMMATEUR
Ce produit a été produit en suivant les procédures de contrôle de qualité les plus strictes en
utilisant des matériaux de qualité pour assurer durabilité et performance. Cet appareil vous
offrira de longues années de service tant que vous utilisez correctement cette machine et
suivez les instructions de maintenance contenues dans ce manuel. Ce produit est garantit
pour 1
an à partir de la date originelle d’achat. Si ce produit était endommagée en raison
d’un problème électrique ou d’une fabrication imparfaite, le produit défectueux peut être
remplacé ou réparé au vendeur à la discrétion du vendeur, du revendeur ou de la marque
sous conditions:
Ce symbole apparaît sur le produit et/ou les documents accompagnant ce produit
pour indiquer que le processus de destruction de ce produit doit être traité
conformément aux règles de gestion des déchets électriques et électroniques
(WEEE). Les produits marqués WEEE ne doivent pas être mélangés avec les
déchets ménagers et doivent être séparés pour procéder au traitement et
recyclage des composants. Afin de recycler ce produit, veuillez déposer tous les
composants marqués WEEE au site de recyclage le plus proche où ce produit
sera repris gratuitement. Ce geste a pour but d'aider la préservation des
ressources précieuses et prévient les potentiels effets négatifs que ces
composants ou tout autre composant dangereux ont sur la santé et
l’environnement.
Garantie
Suivez-nous sur
www.duronic.com @Duronic_FranceDuronic France@duronic_france
1. Le produit doit être retourné avec la preuve originale d’achat.
2. Le produit doit être installé et utilisé en accord avec les instructions contenues dans ce
manuel d’utilisation.
3.
Le produit doit être réservé à un usage domestique.
4. La garantie ne protège pas contre les dommages dus à l’usure normale, l’utilisation
malveillante de l'appareil, la mauvaise utilisation d'un élément, les réparations
conduites par des non-experts ainsi que les p
ièces consommables.
5. Shine-Mart Ltd ne porte pas de responsabilité pour tout dommage ou perte accidentel ou
conséquent causé par ce produit.
6. Shine-Mart Ltd se dégage de toute responsabilité en matière de réparation durant la
période de garantie.
7. Valide dans toute l’Union Européenne.
Ce produit est fourni avec une prise européenne
Importé par Shine-Mart Ltd, RM3 8SB.


22
Gebrauchsanleitung auf Deutsch
23
Bestandteile & Zusammensetzung
1. Stopfer
2. Deckel mit Einfüllöffnung
3. Press-Schraube
4. Sieb
5. Rotationsbürste
6. Verarbeitungsbehälter
7. Tülle
8. Saft- und
Fruchtfleischbehälter
9. Gehäuse
1 2 3
4 5 6
7
89

24
Vor der ersten Benutzung
I. Entfernen Sie jegliche Verpackung und stellen Sie sicher, dass alle Teile
vorhanden sind.
II. Waschen Sie alle abnehmbaren Teile mit warmen Wasser und trocknen
Sie sie gründlich ab. Halten Sie das Gehäuse nicht unter Wasser, um
einen Elektroschock und Schaden am Gerät zu verhindern.
III. Stellen Sie sicher, dass der Knopf auf der 'O'-Position steht, bevor Sie das
Gerät zusammensetzen.
Stellen Sie sicher, dass die Zusammensetzung korrekt wie folgt durchgeführt
wird:
1. Setzen Sie den Verarbeitungsbehälter auf das Gehäuse, und achten Sie
darauf, dass es sich nicht seitwärts bewegen kann (Abb. 1).
2. Drücken Sie das Sieb so weit wie möglich in die Rotationsbürste, bis es
einrastet (Abb. 2).
3. Setzen Sie die Rotationsbürste in den Verarbeitungsbehälter, in dem Sie die
beiden Dreiecke an deren oberer Vorderseite aneinander ausrichten (Abb. 3).
4. Drücken sie die Press-Schraube in das Sieb, bis es seinen Boden erreicht
und ausschließlich der kleine Metallstab aus dem Sieb herausragt (Abb. 4).
5. Setzen Sie den Stopfer in die Einfüllöffnung im Deckel (Abb. 5).
6. Richten Sie die 'Öffnen'-Markierung am Deckel dem Dreieck am Saftbehälter
aus (Abb.6).
7. Eine leichte Drehung mit dem Uhrzeigersinn wird den Deckel verschließen
(Abb 7).
8. Setzen Sie die Tülle auf (Abb. 8)
1 2 3 4

25
Bedienung
1. Sobald alle Teile korrekt eingesetzt wurden, platzieren Sie den Saft- und
Fruchtfleischbehälter unter den Ausgießern des Saftbehälters und stecken
Sie den Stecker in die Steckdose
2. Bereiten Sie Ihr Zutaten vor:
A. Entfernen Sie alle ungenießbaren Teile: Kerne, z.B. Kirsch-, Apfel-
und Zitronenkerne, Innenstücke wie in der Ananas, und harte
Schalen, wie von Orangen, etc.
B. Schneiden Sie große Früchte in Würfel.
C. Vermeiden Sie harte Zutaten, z.B. Nüsse und Kakaobohnen, sowie
faserreiche Zutaten, z.B. Zuckerrohr, und solche Zutaten mit wenig
Flüßigkeit, z.B. Bananen, da diese zu Schaden führen könnten.
3. Stellen Sie das Gerät an und geben Sie Ihre Zutaten durch die
Einfüllöffnung im Deckel. Drücken Sie den Stopfer langsam und
gleichmäßig herunter, um die maximale Menge an Saft zu extrahieren.
Sollte das Essen in der Maschine verstopfen, stellen Sie die Maschine aus
und entfernen Sie jegliches Essen aus dem Inneren, bevor Sie fortfahren.
Sollten zu viele Zutaten auf einmal eingegeben worden sein, stellen Sie
das Gerät in den Rückwärtsgang (REV), woraufhin die Press-Schraube
das verstopfte Essen lösen wird.
4. Leeren Sie den Saft- und Fruchtfleischbehälter bevor sie vollständig gefüllt
sind, sowie nach jedem Durchlauf, um ein Überlaufen zu verhindern. Die
5 6 7 8

26
Produkteigenschaften:
1. Dieses Gerät wurde für die Entsaftung von Obst und Gemüse hergestellt,
z.B. Äpfeln, Karotten, Gurken, Sellerie, Orangen.
2. Es trennt das Fruchtfleich vom Saft, sodass beides danach
weiterverwendet werden kann.
3. Es verfügt über transparentes Zubehör, womit der Verlauf stets
beobachtet werden kann.
4. Teile sind abnehmbar zur schnellen, einfachen Reinigung.
5. Durch den großräumigen Saft- und Fruchtfleischbehälter haben Sie die
Möglichkeit große Mengen an Saft herzustellen.
6. Dank der Tülle ist das Ausgießen kleckerfrei.
7. Die Drehrichtung ist einstellbar, um Verstopfungen leicht zu beheben.
8. Die effiziente, langsame Umdrehung verhindert ein Oxidieren des Saftes,
wodurch der Geschmack und die Frische der Zutaten erhalten bleibt..
9. Das Gerät verfügt über eine DC-Motoreinheit mit einer langsamen
Umdrehungsgeschwindigkeit
10. Die Spannung beträgt 220-240V, Frequenz 50Hz und die Leistung 220W
5. Stellen Sie das Gerät aus.
6. Warten Sie, bis der Motor komplett mit dem Rotieren aufgehört hat, bevor
Sie Teile entnehmen.
7. Dieses Gerät ist für die Verwendung von Personen geeignet (Kinder
eingeschlossen), die verminderte körperliche, sensorische oder geistige
Fähigkeiten haben oder nicht über ausreichende Erfahrung und
Kenntnisse verfügen, sofern sie von einer Person, die für Ihre Sicherheit
verantwortlich ist, Anweisungen für den Gebrauch des Geräts erhalten
haben oder von dieser beaufsichtigt werden.
8. Dieses Produkt ist ausschließlich für den Hausgebrauch vorgesehen und
nicht für kommerziellen Gebrauch.
9. Lassen Sie das Gerät während der Nutzung nicht unbeaufsichtigt.
10. Um einen Schaden zu vermeiden, verwenden Sie weder harte Zutaten,
z.B. Nüsse, noch faserreiche, z.B. Zuckerrohr, noch solche Zutaten mit
wenig Flüßigkeit, z.B. Bananen. Verwenden Sie weder Hände noch
Fremdobjekte um die Zutaten runterzudrücken, sondern ausschließlich
den mitgelieferten Stopfer.
Benutzung sollte 20 Minuten am Stück oder zwei bis drei Durchgänge
nicht überschreiten, woraufhin das Gerät vor der nächsten Benutzung
komplett abkühlen muss

27
Vorsichtsmaßnahmen
Beachten Sie folgendes während der Nutzung des Gerätes:
1. Lesen Sie die Gebrauchsanweisung vor der Benutzung sorgfältig durch
und heben Sie sie für spätere Bezugnahme auf.
2. Prüfen Sie, dass die Voltzahl auf dem Etikett der örtlichen Netzspannung
entspricht, bevor Sie das Gerät einstecken.
3. Bevor Sie Teile des Gerätes entnehmen oder einsetzen, entfernen Sie das
Gerät von der Steckdose.
4. Überprüfen Sie Kabel, Stecker und die abnehmbaren Teile vor der
Nutzung auf Defekte. Benutzen Sie das Gerät nicht, sollte etwas
beschädigt oder deformiert sein, sondern informieren Sie den Hersteller
unverzüglich. Entnehmen Sie keine Teile, die nicht zur Demontage
vorgesehen wurden.
5. Um Verletzungen und Schaden zu verhindern verwenden Sie keinen Timer
mit diesem Gerät.
6. Um Schaden und Elektroschock zu verhindern, halten Sie das Gerät nicht
unter Wasser. Verwenden Sie ein weiches Tuch zur Reinigung.
7. Halten Sie weder Hände noch Objekte während der Nutzung in die
Einfüllöffnung, da dies zu Verletzungen und/ oder Schäden am Gerät
führen kann. Um die Zutaten einzudrücken verwenden Sie keine anderen
Objekte außer dem hierzu vorgesehenen Stopfer. Der Kontakt zur Press-
Schraube würde Schaden verursachen. Verwenden Sie ausschließlich
originales Zubehör.
1. Entfernen Sie den Stecker nach der
Entsaftung und lassen Sie das Gerät
komplett abkühlen.
2. Waschen Sie alle entnehmbaren Teile
in warmem Seifenwasser und reinigen
Sie das Gehäuse mit einem weichen,
feuchten Tuch.
Reinigung und Instandhaltung

28
Bei Nichtgebrauch
1. Dieses Gerät sollte von Kindern entfernt aufbewahrt werden.
2. Lagern Sie das Gerät an einem trockenen Ort geschützt von UV-Licht.
Schwierigkeit
Lösung
Das Gerät nimmt den
Betrieb nicht auf
Überprüfen Sie, dass der Stecker korrekt
eingesteckt und die abnehmbaren Teile
korrekt montiert wurden.
Das Entsaften findet nicht
statt und es entsteht kein
Fruchtfleisch
Stellen Sie sicher, dass die abnehmbaren
Teile korrekt montiert wurden.
Das Gerät schaltet
sich während des
Betriebes aus.
Zu viele Zutaten wurden auf einmal in das Gerät
gegeben; entnehmen Sie einen Teil.
Die Zutaten wurden nicht vorbereitet, z.B. Kerne
und Schalen wurden nicht entfernt; entfernen Sie
alle ungenießbaren Teile der Zutaten.
Sollte das Gerät verstopft sein, halten Sie die REV-
Taste für 3-5 Sekunden gedrückt, um den Stau
aufzuheben. Entfernen Sie das Fruchtfleisch und
reinigen das Gerät anschließend.
Geräusche sind zu
vernehmen
Das Pressen der Zutaten kann zu Geräuschen
führen, dies ist normal. Sollten gefrorene Zutaten
verwendet worden, stellen Sie sicher, dass diese
aufgetaut sind. Lassen Sie diese gegebenfalls mit
Hilfe von warmem Wasser auftauen.
Beschreibung der Bestandteile:
Produktname: Langsam-Entsafter
Modell: JE2
Bemessungsspannung: 220-240V
Frequenz: 50/60Hz Rated
Nennleistung: 200W
29
Shine-Mart Ltd, der Markeninhaber von Duronic Produkten, bietet 1 Jahr Gewährleistung.
HINWEIS: DIESE BEDINGUNGEN BEEINFLUSSEN IHRE GESETZLICHE RECHTE ALS
VERBRAUCHER NICHT
Dieses Produkt wurde unter strengen Qualitätskontrollen produziert und aus hochwertigen
Materialien hergestellt, um ausgezeichnete Leistung und Zuverlässigkeit zu gewährleisten.
Sofern das Produkt korrekt benutzt und gewartet wird, kann eine langlebige Lebensdauer
erwartet werden.
Das Produkt hat eine Gewährleistung von einem Jahr ab Kaufdatum. Beim Auftreten eines
Schadens, der von fehlerhalten Materialien oder Verarbeitung verursacht wurde, sollte das
defekte Produkt an den ursprünglichen Verkäufer zurückgegeben werden. Die Erstattung
oder Umtausch erfolgt nach Vorschriften des Unternehmens.
Duronic Produkte haben 1 Jahr Gewährleistung unter folgenden Bedingungen:
1. Das Produkt muss mit dem Kaufnachweis zurückgegeben werden.
2.
Da
s Produkt muss unter den Anweisungen und Anleitungen installiert und benutz
t
w
orden sein.
3.
Es m
uss ausschließlich für den Hausgebrauch genutzt worden sein.
4.
Na
türliche Abnutzung oder Verschleiß, böswillige Beschädigung, Missbrauch
,
V
ernachlässigung und unsachgemäße Reparaturen sind von der Gewährleistun
g
a
usgeschlossen.
5.
Sh
ine-Mart Ltd übernimmt keine Verantwortung für zufällige oder Folgeschäden.
6. Shine-Mart Ltd ist nicht für Wartungsarbeiten zuständig. Diese fallen nicht unter die
Ge
währleistung.
7.
Gü
ltig in der EU
Dieses Produkt ist mit tted CE geprüfte Typ-F
Euro Stecker/BS Stecker ausgestattet
Von Shine-Mart Ltd, RM3 8SB importiert
Information über Abfalllagerung für Verbraucher von elektronischen Geräten.
Dieses Zeichen auf dem Produkt und/oder auf mitgelieferte Dokumenten
zeigt, dass, wenn eine Entsorgung erfolgt, das Gerät an einer Elektro- und
Elektronikgeräte-Abfall-Sammelstelle (WEEE) abgegeben werden muss.
Um eine weitere Behandlung und Weiterverarbeitung der Materialien zu
gewährleisten dürfen diese WEEE-markierten Produkte nicht mit dem Hausmüll
vermischt werden.
Für die korrekte Behandlung, Aufbereitung und Wiederverwendung geben Sie
alle WEEE-markierten Produkte zur kommunalen Abfallbeseitigungsanlage.
Dort können Sie diese kostenlos abgeben.
Wenn die Beseitigung von Elektro-und Elektronik-Altgeräten korrekt
durchgeführt wird, tragen Sie zur Gewinnung von wertvollen Ressourcen
bei, sowie einer möglichen Vermeidung von negativen Auswirkungen auf
Gesundheit und Umwelt.
Gewährleistung
Folgen Sie Uns

30
Manual De Instrucciones En Español

31
Descripción
1.
Empujador
2.
Tubo de entrada
3.
Tornillo de prensaje
4.
Filtro de zumo
5.
Cepillo giratorio
6.
Bol de zumo
7.
Boca de vertido antigoteo
8.
Recipiente de zumo/pulpa
9.
Motor
1 2 3
4 5 6
7
89
32
Antes del primer uso
I. Desembale el aparato y compruebe que todas las piezas estén incluidas.
II.
Lave todas las piezas desmontables y accesorios en agua tibia y
séquelos completamente. Para evitar descargas eléctricas y daños, no
sumerja el motor en agua.
III.
Antes de ensamblar la máquina, asegúrese de que el interruptor en la parte
trasera este en posición 'O' antes de conectar el enchufe a una tomacorriente.
Asegúrese de que todas las piezas estén instaladas correctamente.
1.
Coloque el bol de zumo en la máquina y asegúrese de que no
se pueda mover hacia los lados (fig. 1)
2.
Inserte el filtro de zumo dentro del cepillo giratorio (fig. 2)
3.
Luego, inserte dentro del bol de zumo asegurándose que estén
alineados los triángulos (fig. 3)
4.
El tornillo de prensaje vendría encima del filtro del zumo tal y
como indica en (fig. 4)
5.
Inserte el empujador en el tubo de entrada de alimentos (fig. 5)
6.
Alinee la marca de desbloqueo en la entrada de la alimentación con el triángulo
en el exprimidor (fig. 6)
7.
Un sutil giro hacia la derecha cerrara la tapa (fig. 7)
8.
Coloque la tapa de la boca de vertido antigoteo (fig. 8)
1 2 3 4

33
Instrucciones de Operación
1.
Una vez que todas las piezas estén correctamente montadas, coloque los
recipientes de zumo y pulpa en las salidas de vertido antigoteo y enchufe
la clavija a un tomacorriente.
2.
3.
Pulse el interruptor a posición ‘ON’ e inserte los alimentos por la abertura
y, si resulta necesario, hágalos descender utilizando el empujador. En el
caso de que los alimentos se atasquen, deténgase y retire los alimentos
dentro del tubo de entrada antes de reiniciar. Si esto no soluciona el
problema, utilice el botón ‘REV’ para que el tornillo de prensaje en
dirección inversa y eliminar exceso de alimentos.
4.
Vacíe los recipientes de zumo y pulpa antes de que se llene
completamente para prevenir un sobre flujo. El tiempo de operación no
debería exceder 20 minutos o 2-3 ciclos, después la máquina se tendrá
que enfriar antes del siguiente uso.
5 6 7 8
Prepare todos los ingredientes que se van a exprimir:
A. Es necesario quitar las partes como: extraer las pepitas duras
(cereza, durazno, aguacate, etc) pelar piel gruesa (cítricos, piña, melón,
etc) asimismo el corazón de la piña.
B. Corte aquellos alimentos que no pasen por la abertura.
C. Evite alimentos que tengan poco líquido, ricos en fibra, nueces,
granos de cocoa, etc ya que esto producirá daños al aparato.

34
Características del producto:
1.
Extrae el zumo de frutas y verduras como manzana, zanahoria,
pepino, apio, naranja y muchos más.
2.
Separa la pulpa del zumo, por lo tanto puede utilizarlo con
diferentes fines.
3.
Incluye accesorios transparentes para ver a todo el proceso.
4.
Limpieza fácil gracias a los accesorios extraíbles.
5.
Recipientes grandes para una mayor cantidad de zumo.
6.
Fácil de verter.
7.
Dirección del exprimidor ajustable.
8.
Eficiencia de extracción del zumo, sin embargo el sistema de rotación
baja previene la oxidación y mantiene el zumo fresco y sabroso.
9.
Motor DC, velocidad de rotación de la salida baja;
10.
Tensión nominal: 220-240 V; frecuencia: 50Hz; potencia nominal: 220 W;
5.
Apague la máquina poniendo el interruptor en posición ‘O'
detrás del aparato.
6.
Espere hasta que deje de girar completamente antes de quitar
cualquier pieza.
7.
Este aparato no está diseñado para ser utilizado por personas (incluyendo
los niños) cuyas capacidades físicas, sensoriales o mentales sean
reducidas o por personas con falta de experiencia.
8.
El aparato está diseñado exclusivamente para un uso doméstico y bajo
la vigilancia en el interior del hogar.
9.
No deje la máquina desatendida mientras esté en uso.
10.
Para evitar dañar el producto no introduzca alimentos duros, por
ejemplo, alimentos excesivamente fibrosos ejemplo, la caña de azúcar,
alimentos con poco liquido ejemplo, la banana. Si los alimentos se
atascan utilice el empujador y no sus manos para evitar lesiones y
daños.

35
Precauciones:
Preste atención a lo siguiente mientras utilice el aparato eléctrico:
1.
Lea las instrucciones cuidadosamente antes de usar y
consérvelas para referencia futura.
2.
Antes de usar el producto asegúrese que la tención coincida con la
tensión local.
3.
Antes de montar o desmontar algún accesorio asegúrese se
desconectar desde la tomacorriente.
4.
Antes de usar, verifique que el cable, enchufe y todos sus accesorios
estén en perfectas condiciones. En el caso de que existan averías,
póngase en contacto con Duronic para una reparación o reemplazo.
5.
Para evitar daños o causa de incendio, no use este producto con un
temporizador.
6.
Para evitar el riesgo de descarga eléctrica y/o daños NO sumerja la
máquina en el agua. Utilice un paño suave para limpiar.
7.
Mantenga todos los accesorios alejado de la entrada de alimentos, NO
utilice ningún otro accesorio aparte del empujador de Duronic. El contacto
con el tornillo de prensaje puede causar daños, únicamente utilice los
accesorios originales.
1.
Después del uso, desenchufe la
máquina y espere hasta que se haya
enfriado completamente.
2.
Limpie todas las piezas desmontables
en agua tibia y jabón. Limpie el cuerpo
principal con un paño suave y
húmedo. Secar todo completamente.
Limpieza y Mantenimiento

36
Almacenamiento
1.
El producto debe mantenerse alejado de los niños.
2.
Almacene el producto en un lugar seco fuera de la irradiación directa de
luz ultravioleta.
Problema Soluciones
No se pone en marcha
Verifique que el cable de alimentación esté
conectado correctamente en el tomacorriente
y detrás del aparato.
No funciona
Asegúrese de que todos los accesorios
estén montados correctamente.
El aparato se detiene
mientras esta en
funcionamiento
Demasiada comida ha sido
insertada; quite un poco de ello.
Tiene que asegurarse de que todos los
alimentos estén completamente
pelados, quitados las pepitas para evitar
atascos. Si la maquina se bloquea
utilice la función reversa para
desbloquear la entrada de alimentos.
Se produce un ruido al
momento de la
extracción del zumo.
Esto puede ocurrir al momento de empujar
los alimentos sobre el tubo de alimentación.
No use ingredientes congelados, toda la
comida debe ser descongelada.
Descripción:
Producto: Licuadora
Modelo: JE2
Voltaje: 220-240V~
Frecuencia: 50/60Hz
Potencia: 200W
37
Síguenos
NOTA: ESTAS DECLARACIONES NO AFECTAN SUS DERECHOS LEGALES COMO
CONSUMIDOR
Este producto ha sido fabricado bajo las más estrictas control de calidad y utilizando
materiales de
alta calidad para asegurar conabilidad y excelente funcionamiento. Le dará buen servici
o y
u
na larga duración, siempre y cuando se utilice correctamente y sea bien mantenido.
El producto está garantizado por 1 año desde la fecha de compra original. Si surge
cualquier defecto debido a un error/defecto de fábrica o mano de obra, entonces el producto
debe ser devuelto al lugar original de compra. Reembolso o reemplazo es a discreción de la
compañía.
Productos Duronic se ofrecen con una garantía de 1 año bajo las siguientes condiciones:
1
. E
l producto debe ser devuelto al vendedor con comprobante de compra original.
2. El producto debe instalarse y usarlo según las instrucciones
contenidas en este manual.
3
. E
ste aparato es únicamente de uso doméstico.
4
. N
o cubre desgaste, daños maliciosos, uso indebido, negligencia
,
reparaciones inexpertas o partes consumibles.
5
. S
hine-Mart Ltd no será responsable por cualquier daño consecuente
,
accidentes o pérdidas.
6
. S
hine-Mart Ltd no es responsable ah llevar a cabo cualquier tipo d
e
s
ervicio, bajo la garantía.
7
. V
alido solamente dentro de la (EU).
Este producto esta equipado con enchufe/fusible Europeo
Importado por Shine-Mart Ltd, RM3 8SB
Información sobre la eliminación de residuos para los consumidores
de equipos eléctricos y eléctricos:
Esta marca en un producto y/o documentos adjuntos indica que cuando se va a
desechar, se debe tratar como equipos residuos eléctricos y electrónicos (RAEE)
Cualquier producto marcado (RAEE) no debe ser mezclado con la basura
doméstica, sino separado para el tratamiento, recuperación y reciclaje
de los materiales utilizados.
Para el tratamiento adecuado, recuperación y reciclaje; por favor, tome todos los
productos (RAEE) y llévelo al sitio de residuos de su
Autoridad Local, donde será aceptado de forma gratuita.
Si los clientes desechan los residuos eléctricos y electrónicos correctamente,
ayudar a ahorrar valiosos recursos y prevenir los efectos negativos sobre la salud
humana y el medio ambiente, de materiales peligrosos que pueden
contener los residuos
Garantía


39
Manuale D’istruzioni In Italiano

40
Componenti del prodotto
1.
Pestello
2.
Condotto di
inserimento della
frutta
3.
Coclea
4.
Setaccio
5.
Raschietto
6.
Contenitore raccogli succo
7.
Beccuccio di erogazione
8.
Contenitore succo/scarti
9.
Unità motore
1 2 3
4 5 6
7
89

41
Primo utilizzo
I. Rimuovere l'imballaggio e controllare che tutte le parti siano incluse.
II.
Lavare tutte le parti smontabili e tutti accessori in con acqua calda e
asciugarle con cura. Per evitare scosse elettriche e danni, non
immergere l’unità principale in acqua o altri liquidi.
III.
Prima di assemblare la macchina, assicurarsi che la spina sia inserita
correttamente nella presa di corrente.
Assicurarsi che tutte le parti siano installate correttamente come segue:
1.
Posizionare il contenitore raccogli succo sull’unità principale e
assicurarsi che non si sposti lateralmente (fig. 1).
2.
Inserire il setaccio completamente all’interno del setaccio di
proiezione e bloccarlo in posizione. (fig. 2)
3.
Posizionare i setacci all’interno del contenitore raccogli succo
allinenado i triangoli sulla parte superiore. (fig. 3)
4.
Inserire la coclea all’interno sel setaccio fino a quando va ad
incastrasi con il meccanismo sul l’unità del prodotto. (fig. 4).
5.
Inserire il pestello nel condotto di inserimento della frutta (fig. 5).
6.
Posizionare il coperchio con il condotto di inserimento sopra l’unità,
allineando il simbolo del lucchetto (fig. 6).
7.
Una leggera rotazione in senso orario assicurerà il coperchio (fig. 7).
8.
Agganciare l'erogatore al contenitore raccogli succo. (fig. 8).
1 2 3 4
42
Istruzioni di funzionamento
1.
Una volta che tutte le parti sono installate correttamente, posizionare i
contenitori del succo e degli scarti sotto gli erogatori del contenitore del
succo e inserire la spina nella presa di corrente.
2.
Preparare la frutta e la verdura::
A.
Rimuovere tutte le parti non commestibili: noccioli (ad
es. noccioli di ciliegia), torsoli (ad es. di un ananas), semi (di
limone e uva), nonché bucce solide (ad esempio un'arancia).
B. Se l'ingrediente è troppo grande è consigliabile di tagliarlo in pezzi più piccoli.
Evitare frutti con poco succo, ricchi di fibra, noci, semi di cacao, in quanto
potrebbero causare danni all’apparecchio.
3.
Accendere l’apparecchio e inserire gli ingredienti nel condotto di
inserimento. Fare leggera pressione con il pestello al fine di far arrivare gli
ingredienti fino alla coclea e massimizzare la quantità di succo estratto. Nel
caso in cui gli ingredienti rimangano bloccati nel condotto di inserimento,
arrestare la macchina e svuotare il canale da qualsiasi intoppo prima di
continuare. Se sono stati inseriti troppi ingredienti, utilizzare il pulsante
'REV' e la coclea opererà in direzione inversa per liberare il condotto dagli
ingredienti in eccesso.
4.
Dopo ogni utilizzo, svuotare il contenitore del succo e rimuovere la polpa
in eccesso dal contenitore degli scarti per evitare traboccamenti. Il tempo
di utilizzo non deve superare i 20 minuti o 2-3 cicli al massimo; in seguito,
sarà necessario lasciar raffreddare l’apparecchio prima di utilizzarlo
nuovamente.
5 6 7 8

43
Caratteristiche del prodotto:
1.
Estrae il succo da frutta e verdura, come mele, carote, arance, kiwi,
melone e tanti altri.
2.
Separa la polpa dal succo, affinchè possano entrambi essere
riutilizzati per altri scopi.
3.
Le parti sono fabbricate in plastica trasparente per permettere di vedere il
processo di estrazione.
4.
Grazie agli accessori rimuovibili è semplice da pulire.
5.
Caraffa capiente.
6.
Beccuccio di erogazione rimuovibile.
7.
Funzione reverse per l’estrazione.
8.
Estrae succo in modo efficiente con un basso numero di giri per prevenire
l’ossidazione e mantenere il succo fresco e nutriente.
9.
Alimentazione del motore DC, velocità di rotazione a basso output;
10.
Tensione nominale: 220-240V; Frequenza: 50Hz; potenza: 220W;
5.
Spegnere l’apparecchio spostando il selettore su “O” (Off).
6.
Attendere che il motore si sia arrestato completamente prima di
rimuovere tutte le parti.
7.
Il prodotto non è inteso per l’utilizzo da parte di una persona con disabilità
sensoria o mentale o senza esperienza e conoscenza dell’apparecchio
(inclusi bambini).
8.
Questo prodotto è stato progettato esclusivamente per uso domestico e
non adatto per scopi commerciali.
9.
Non lasciare la macchina incustodita mentre in uso.
10.
Per evitare danni al prodotto non inserire alimenti duri, per esempio.
alimenti ricchi di fibra, ad es. zucchero di canna, alimenti con poco
succo. Se gli ingrendienti sono bloccati all’interno del condotto utilizzare
il pestello e non le proprie mani per evitare qualsiasi tipo di infortunio o
danno.

44
Informazioni di sicurezza:
Prestare attenzione alle seguenti precauzioni durante l'utilizzo l'apparecchio
elettrico:
1.
Leggere attentamente le presenti istruzioni prima dell'uso e
conservarle per riferimenti futuri.
2.
Prima dell'uso assicurarsi che il voltaggio delle prese di correnti sia
conforme con il voltaggio indicato sul prodotto.
3.
Prima di smontare o l'installazione di qualsiasi parte del prodotto,
scollegarlo dalla presa di corrente.
4.
Prima dell'uso, controllare che il cavo, la spina e tutte gli accessori non
siano danneggiati. In caso il prodotto risulti danneggiato in qualsiasi
maniera non utilizzarlo. Contattare il servizio clienti per una riparazione o
sostituzione.
5.
Per prevenire danni o possibili incendi tenere il prodotto lontano da
qualsiasi fonte di calore.
6.
Per prevenire il rischio di scosse elettriche e danni non immergere la
macchina in acqua o altri liquidi. Utilizzare un panno morbido per la
pulizia.
7.
Tenere qualsiasi parte del corpo così come qualsiasi oggetto lontano
dall’ingresso del condotto di inserimento quando l’apparecchio è in
funzione. Non utilizzare altri oggetti diversi dal pestello per spingere la
frutta verso la coclea. Fare attenzione in quanto il contatto con la coclea
potrebbe causare danni o infortuni. Utilizzare solo parti originali forniti dal
produttore.
1.
Dopo l'uso, scollegare l'apparecchio e
attendere che si sia raffreddato
completamente.
2.
Pulire tutte le parti removibili con
acqua tiepida e sapone. Pulire l’unità
principale con un panno umido.
Asciugare completamente il tutto.
Pulizia e manutenzione

45
Conservazione
1.
Il prodotto deve essere tenuto lontano dalla portata dei bambini.
2.
Conservare il prodotto in un luogo asciutto lontano da fonti
di calore o dalla diretta luce solare.
Problema Soluzione
L’apparecchio non si
accende.
Controllare le prese di corrente e
assicurarsi che il prodotto sia assemblato
correttamente
L’apparecchio non
esegue le normali
operazioni.
Assicurarsi che le parti siano state
installate correttamente.
L’apparecchio
interrompe
bruscamente
l’operazione eseguita
Sono stati inseriti troppi ingredienti;
Rimuovere gli ingredienti in eccesso.
Gli ingredienti non sono stati
adeguatamente preparati: non snocciolati o
la buccia non è stata rimossa. Rimuovere
qualsiasi parte non commestibile.
Se l’apparecchio risulta bloccato, utilizzare
la funzione reverse per liberare l’intoppo e
pulire la macchina prima di un nuovo
utilizzo.
Si udisce un rumore
durante la
spremitura
La spremitura della frutta può produrre un
lieve rumore in condizioni normali. Non
utilizzare ingredienti congelati, in quanto
potrebbero danneggiare l’apparecchio.
Descrizione delle parti:
Nome del prodotto: Estrattore di succo
Modello prodotto: JE2
Tensione nominale: 220-240V~
Frequenza: 50/60Hz
Potenza: 200W
46
Questo prodotto è garantito per una durata determinata con il distributore a partire dalla data
di acquisto contro ogni difetto derivante da difetti di fabbricazione o dei materiali. Questa
garanzia non copre difetti o danni derivanti da installazione impropria, uso improprio o usura
anomala del prodotto.
L’apparecchio deve essere restituito nella sua confezione originale e accompagnato dalla
ricevuta e deve essere stato utilizzato in modo corretto. È importante rispettare le istruzioni
per l’uso e le precauzioni di sicurezza indicate di seguito. Inoltre, non possiamo garantire
l’apparecchio se è stato modicato o riparato dall’acquirente o da terzi.
1 anno di garanzia da Shine-Mart Ltd, proprietari del marchio commerciale Duronic.
NOTA: QUESTE DICHIARAZIONI NON INFLUISCONO SUI DIRITTI LEGALI DEL
CONSUMATORE
Questo prodotto è stato realizzato con le rigorose procedure del controllo qualità, e
utilizzando materiali di altissima qualità, per garantire afdabilità e prestazioni eccellenti.
Vi regalerà un servizio ottimo e a lungo termine, purchè venga opportunamente usata e
mantenuta. Il prodotto è garantito per 1 anno dalla data di acquisto. Se sorge qualche
difetto a causa di materiali difettosi o scarsa manodopera, il prodotto difettoso dovrà essere
restituito al luogo originale di acquisto. Il rimborso o la sostituzione sono a discrezione
dell’azienda. I prodotti Duronic offrono 1 anno di garanzia alle seguenti condizioni:
1. Il prodotto deve essere restituito al rivenditore con la prova d’acquisto originale
2. Il prodotto deve essere installato e usato seguendo le istruzioni contenute nel manuale.
3. Il prodotto va utilizzato solo per scopi domestici. Non è da utilizzarsi per uso commerciale.
4. La garanzia non copre usura, danni volontari, abuso, negligenza, riparazioni
inesperte o consumo dei materiali.
5. Shine-Mart Ltd non è responsabile per Danni accidentali o consequenziali.
6. Shine-Mart Ltd non è tenuta a eseguire qualsiasi tipo di riparazione, ai sensi
della garanzia.
7. Termini validi in tutta l’unione europea *Ci riserviamo il diritto di modicare le sopracitate
condizioni Per parti di ricambio si prega di consultare il sito www.duronic.com
Corretto smaltimento del prodotto.
Qusto prodotto è inclusivo di spina certicata CE
importata da Shine-Mart Ltd, RM3 8SB
Questo segno su un prodotto o su documenti indica che quando deve essere
smaltito, deve essere trattato come i riuti elettrici ed elettronici (WEEE)
Tutti I prodotti marcati WEEE non devono essere buttati nei riuti domenistici
generici, ma separati per il trattamento, il recupero
e il riciclaggio dei materiali utilizzati.
Per un corretto trattamento, recupero e riciclaggio; si prega di portare tutti I
prodotti marcati WEEE al Vostro centro smaltimenti riuti autorizzato, dove
saranno accettati gratuitamente.
Se i consumatori sono propensi allo smaltimento corretto di riuti elettrici ed
elettronici, aiuteranno a salvare risorse importanti e a prevenire i potenziali
effetti negativi sulla salute umana e sull’ambiente di tutti i materiali pericolosi
che i riuti possono contenere.
Garanzia
Seguici

47
Instrukcja obsługi. Polski

48
Elementy i Montaż
1. Popychacz
2. Nakładka do owoców
3. Ślimak
4. Cylinder sitowy
5. Szczotka obrotowa
6. Pojemnik na sok
7. Zatyczka na lejek
8. Pojemnik na miąższ
9. Jednostka sterująca
1 2 3
4 5 6
7
89

49
Pierwsze użycie
I. Usuń wszystkie elementy pakunkowe i sprawdź, czy opakowanie zawiera
wszystkie elementy.
II. Umyj wszystkie usuwalne elementy w ciepłej wodzie i osusz. Nie zanurzaj
jednostki sterującej, aby zapobiec porażeniu prądem lub uszkodzeniu
urządzenia.
III. Przed montażem elementów i włożeniem wtyczki do gniazdka, upewnij się,
czy przełącznik jest w pozycji [O] - wyłączony.
Upewnij się, czy wszystkie elementy są prawidłowo zamontowane:
1. Umieść pojemnik na sok na jednostce sterującej i upewnij się, czy nie porusza
się na boki. (rys.1)
2. Wepchnij cylinder sitowy do obrotowej szczotki i zablokuj w miejscu. (rys. 2)
3. Umieść obrotową szczotkę w pojemniku na sok dopasowując pozycję
trójkątnych znaczników. (rys.3)
4. Umieść ślimak w cylindrze sitowym wpychając go do momentu aż znajdzie się
na dole elementu, a jedynie metalowy element cylindra będzie widoczny. (rys. 4)
5. Umieść popychacz w otworze wlotowym. (rys. 5)
6. Wyrównaj symbol blokady na otworze wlotowym z trójkątnym znacznikiem
sokowirówce. (rys. 6)
7. Przekręć pokrywkę zgodnie z ruchem wskazówek, aby ją zablokować. (rys. 7)
8. Nałóż zatyczkę na lejek. (rys. 8)
1 2 3 4

50
Instukcja Obsługi
1.
Kiedy wszystkie elementy są prawidłowo zamontowane, umieść
pojemnik na sok i miąższ lejkiem i podłącz urządzenie do zasilania.
2.
Przygotowanie warzyw i owoców:
B. Jeżeli składniki są zbyt duże, aby przejść przez otwór, pokrój je na
mniejsze kawałki.
C. Unikaj owoców z małą zawartością soku, bogatych w błonnik,
orzechów, ziaren kakaowca, ponieważ mogą uszkodzić urządzenie.
3.
Ustaw włącznik w pozycji [ON] i dodaj składniki do otworu wpustowego.
Przy pomocy popychacza delikatnie wprowadź składniki w światło otworu,
aby uzyskać więcej soku. Jeżeli składniki zablokują się w otworze, wyłącz
maszynę i opróżnij wlot z owoców i pulpy. Jeżeli zostało wprowadzonych
zbyt wiele składników, przyciśnij [REV], aby uruchomić bieg wsteczny..
4.
Opróżnij pojemnik na sok i miąższ, zanim będą przepełnione. W celu
przedłużenia żywotności urządzenia praca ciągła urządzenia nie powinna
przekraczać 20 min.
5 6 7 8
A.
Usuń wszystkie niejadalne elementy jak: pestki, skóra owoców,
gniazda nasienne itp.

51
Główna Charakterystyka:
1.
Pozyskiwanie soku z owoców i warzyw jak np. jabłka, marchewki,
ogórki, seler, pomarańcza i o wiele więcej.
2.
Odseparowywanie pulpy od soku, aby oba elementy mogły zostać
wykorzystane w różny sposób.
3.
Zawiera przezroczyste akcesoria, aby kontrolować proces wyciskania.
4.
Łatwy w utrzymaniu w czystości ze względu na zdejmowalne elementy.
5.
Duży otwór na owoce.
6.
Wygodny lejek.
7.
Dostosowywalny kierunek lania soku.
8.
Wydajność wyciskania dzięki przędzeniu o niskiej szybkości zapobiega
utlenianiu i utrzymuje świeży i smaczny sok.
9.
Niska prędkość obrotowa silnika;
10.
Napięcie: 220-240V; częstotliwość: 50Hz;
moc znamionowa: 220W;
5.
Wyłącz urządzenie ustawiając włącznik w pozycji [O].
6.
Zaczekaj aż praca silnika całkowicie ustanie, zanim przystąpisz do
rozmontowania elementów.
7.
Urządzenie nie zostało zaprojektowane do obsługi przez osoby o
ograniczonych zdolnościach fizycznych, sensorycznych i psychicznych lub
o nie wystarczającym doświadczeniu i wiedzy (w tym dzieci).
8.
Produkt został zaprojektowany wyłącznie do użytku w gospodarstwach
domowych, nie nadaje się do użytku przemysłowego.
9.
Nie zostawiaj uruchomionej maszyny bez nadzoru.
10.
Aby zapobiec uszkodzeniu urządzenia nie wkładaj produktów bogatych
w białko jak, trzcina cukrowa, pokarmy o małej zawartości soków, takie
jak banany. Jeśli produkty utknęły w świetle wlotu użyj popychacza, a nie
rak, aby zapobiec obrażeniom.

52
Środki Ostrożności
Zwróć uwagę na zastosowanie poniższych środków ostrożności podczas
użytkowania urządzenia:
1. Uważnie zapoznaj się z instrukcją obsługi i zachowaj ją do wglądu.
2. Przed użyciem upewnij się, czy napięcie domowej sieci elektrycznej jest zgodne
z napięciem tabliczki znamionowej.
3. Przed montażem lub demontażem poszczególnych elementów, odłącz
urządzenie od zasilania.
4. Przed użyciem sprawdź, czy przewód zasilający, wtyczka lub inne elementy
urządzenia nie są uszkodzone. W przypadku wystąpienia uszkodzeń nie używaj
urządzenia. Skontaktuj się z działem obsługi klienta w celu naprawy lub wymiany
urządzenia.
5. Aby zapobiec ryzyku pożaru nie używaj produktu z timerem.
6. Aby zapobiec ryzyku porażenia prądem i uszkodzenia urządzenie nie zanurzaj
do w wodzie. Czyść miękką ściereczką.
7. Podczas pracy urządzeni nie wkładaj żadnych twardych produktów lub części
swojego ciała (np. palców) do otworu wlotowego. Nie używaj innych obiektów niż
dołączony popychacz, aby nakierować produkty do wlotu. Kontakt ze ślimakiem
może spowodować uszkodzenie ciała lub urządzenia. Używaj jedynie oryginalnych
elementów dostarczonych przez producenta.
1. Po każdym użyciu odłącz urządzenie z gniazdka
elektrycznego i poczekaj aż urządzenie się
całkowicie ochłodzi.
2. Wyczyść wszystkie demontowane elementy w
ciepłej wodzie z detergentem. Jednostkę sterującą
wyczyść miękka, wilgotną ściereczką. Odczekaj do
całkowitego wyschnięcia.
Czyszczenie i pielęgnacja

53
Przechowywanie
1. Produkt powinien być przechowywany poza zasięgiem dzieci.
2. Przechowuj urządzenie w suchym miejscu z dala od światła ultrafioletowego.
Problem
Rozwiązanie
Urządzenie nie
włącza się
Sprawdź, czy wtyczka i elementy urządzenia
są prawidłowo zamontowane.
Nie działa
Upewnij się, czy wszystkie elementy są
prawidłowo zamontowane.
Zatrzymanie
podczas pracy
Zbyt duża ilość produktu - usuń część z
nich.
Składniki nie zostały prawidłowo
przygotowane np. nie usunięto pestek,
gniazd nasiennych, skórki; wszelkich
niejadalnych, twardych części. Jeżeli
urządzenie jest zablokowane, użyj funkcji
"REV", aby oczyścić wlot, usunąć produkty
i oczyścić maszynę.
Hałas w czasie
pracy
Proces produkcji soku może powodować
hałas i jest to zjawisko normalne. Nie używaj
mrożonych produktów, wszystkie składniki
muszą zostać rozmrożone przed
wyciskaniem.
Specyfikacja:
Rodzaj produktu:
Wyciskarka wolnoobrotowa
Model: JE2
Napięcie znamionowe: 220-240 V~
Częstotliwość: 50/60 Hz
Moc: 200 W
54
Warunki Gwarancji
1 Rok Gwarancji firmy Shine-Mart LTD, marki handlowej Duronic Products.
UWAGA: ten dokument nie wpływa na twoje ustawowe prawo jako konsumenta.
Ten produkt został wykonany zgodnie z restrykcyjnymi normami kontroli i wykorzystuje
najwyższej jakości materiały dla uzyskania doskonałej wydajności i niezawodności.
Długotrwałość produkty zostaje osiągnięta przez właściwe użytkowanie i konserwację.
Gwarancja obejmuje 1 rok od daty zamówienia. Jeżeli jakikolwiek defekt powstanie ze
względu na wadliwość materiału lub niewłaściwe wykonanie to uszkodzony produkt musi
zostać dostarczony do miejsca, z którego został zamówiony. Zwrot pieniędzy lub wymiana
produktu jest w
gestii firmy.
Duronic Products oferuje jeden rok gwarancji na podstawie poniższych warunków:
1. Produkt musi zostać zwrócony do sprzedawcy z oryginalnym dowodem zakupu.
2. Produkt był instalowany i użytkowany zgodnie z instrukcją obsługi.
3. Produkt użytkowany był wyłącznie w celach domowych.
4. Gwarancja nie obejmuje naturalnego zużycia się produktu, celowego uszkodzenia,
niewłaściwego użycia, zaniedbania, niewłaściwych napraw lub części eksploatacyjnych.
5. Shine-Mart Ltd. nie ponosi odpowiedzialności za przypadkowe albo celowe zgubienie
produktu lub jego uszkodzenie.
6. Firma Shine-Mart Ltd nie jest zobowiązana do przeprowadzania jakichkolwiek prac
serwisowych w ramach gwarancji.
7. Obowiązuje na obszarze Unii Europejskiej.
Ten produkt jest wyposażony we wbudowaną wtyczkę typu Euro-Plug / BS z
certyfikatem CE importowaną przez Shine-Mart Ltd, RM3 8SB
Informacja o odpadach i utylizacja dla użytkowników sprzętu elektrycznego i
elektronicznego.
Usuwanie wyeksploatowanych urządzeń elektrycznych i elektronicznych (dotyczy
krajów Unii Europejskiej i innych krajów europejskich z wydzielonymi systemami
zbierania odpadów). Ten symbol na produkcie lub jego opakowaniu oznacza, że
produkt nie powinien być zaliczany do odpadów domowych. Należy go przekazać
do odpowiedniego punktu, który zajmuje się zbieraniem i recyklingiem urządzeń
elektrycznych i elektronicznych. Prawidłowe usunięcie produktu zapobiegnie
potencjalnym negatywnym konsekwencjom dla środowiska naturalnego i zdrowia
ludzkiego, których przyczyną mogłoby być niewłaściwe usuwanie produktu.
Recykling materiałów pomaga w zachowaniu surowców naturalnych.
Śledź Nas