Auto switch function
When a source device is turned on, your switch
automatically detects and switches to that device’s
input. The automatic source detection is o by
default.
• You can turn the auto switch function on or back
o by pressing and holding the SELECT button
on your switch for three seconds while your
switch is turned o.
• All four LEDs on the front panel blink twice to
indicate that the auto switch function is turned
o.
• All four LEDs on the front panel turn on for two
seconds to indicate that the auto switch is turned
on.
Note: Some devices don’t output an on/o detection signal to
activate the auto switch function on your switch. If this causes
signal confusion, turn o the auto switch function.
USING YOUR SWITCH
1 Turn on your TV and source device.
2 To select a source device, press the SELECT
button repeatedly until the input LED lights for
the source device you want.
Front
OR
Press the number on your switch remote to select
the HDMI source.
3 Use your source device as usual to play video and
audio.
Note: You may leave the power on while not in use.
Input LEDs
The input LEDs, labeled 1-3 on your switch,
correspond to the INPUT ports 1 through 3. The
input LED for each turns red showing that the HDMI
source is connected.
Note: If the LED blinks, this is an error. Make sure that the
signal source is powered on. Or make sure that the HDMI
cable from the signal source is properly connected and
functioning correctly.
Before using your new product, please read these instructions to prevent any damage.
PACKAGE CONTENTS
• HDMI 3-port switch
• AC power adapter
• 6 ft. (1.83 m) USB-A to USB-C cable
• Remote
(with preinstalled battery)
• Double-sided tape (2)
• Quick Setup Guide
MOUNTING YOUR SWITCH (OPTIONAL)
You can mount your switch to a wall or secure it to a
at surface:
• Mount to a wall using two screws (not provided).
OR
• Secure to a at surface using the provided
double-sided tape to prevent sliding.
SETTING UP YOUR SWITCH
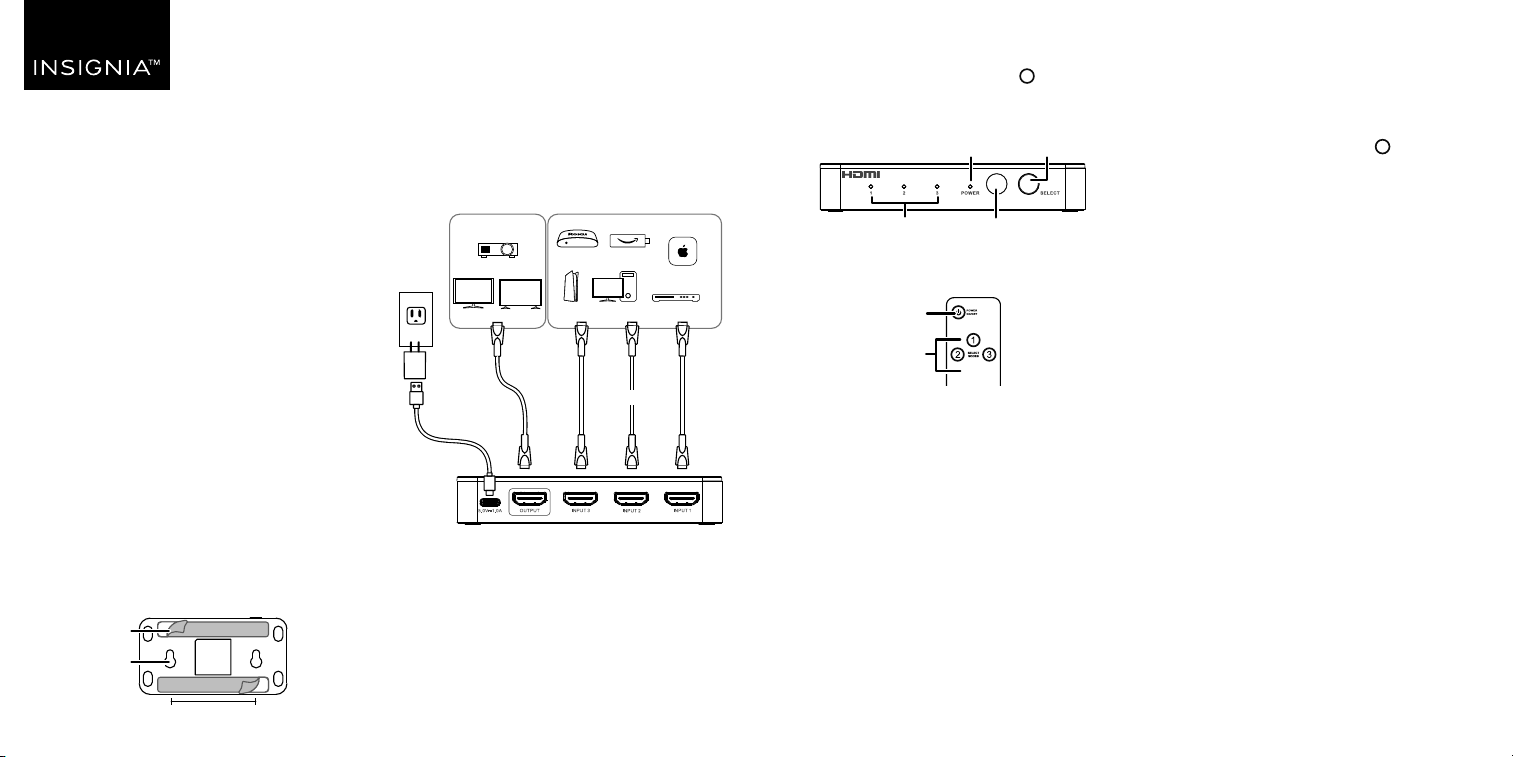
1 Connect HDMI cables (not included) from your
source devices to your switch’s INPUT ports.
2 Connect an HDMI cable from your TV, monitor, or
projector to your switch’s OUTPUT port.
3 Connect the USB-A to USB-C cable from your
switch’s 5V/1A (USB-C) port to the power adapter.
The power and input LEDs turn red to show that
they are connected.
Back
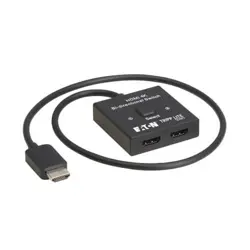
QUICK SETUP GUIDE
HDMI 3-Port
Switch
NS-AV20SWTCH / NS-AV20SWTCH-C
HDMI display
device
HDMI source device
Power
adapter
USB-A to
USB-C cable
Projector
Monitor
4K HDTV
Apple TV
Fire stickRoku
DVD/Blu-ray playerPC
PS5
HDMI
cable
HDMI cables
Power
Input
selectors
Screw mounts
Double-sided tape
Bottom
2-3/4 in. (70 mm)
Power LED
Select
button
Input LEDs IR sensor
V1 ENGLISH 25-0175
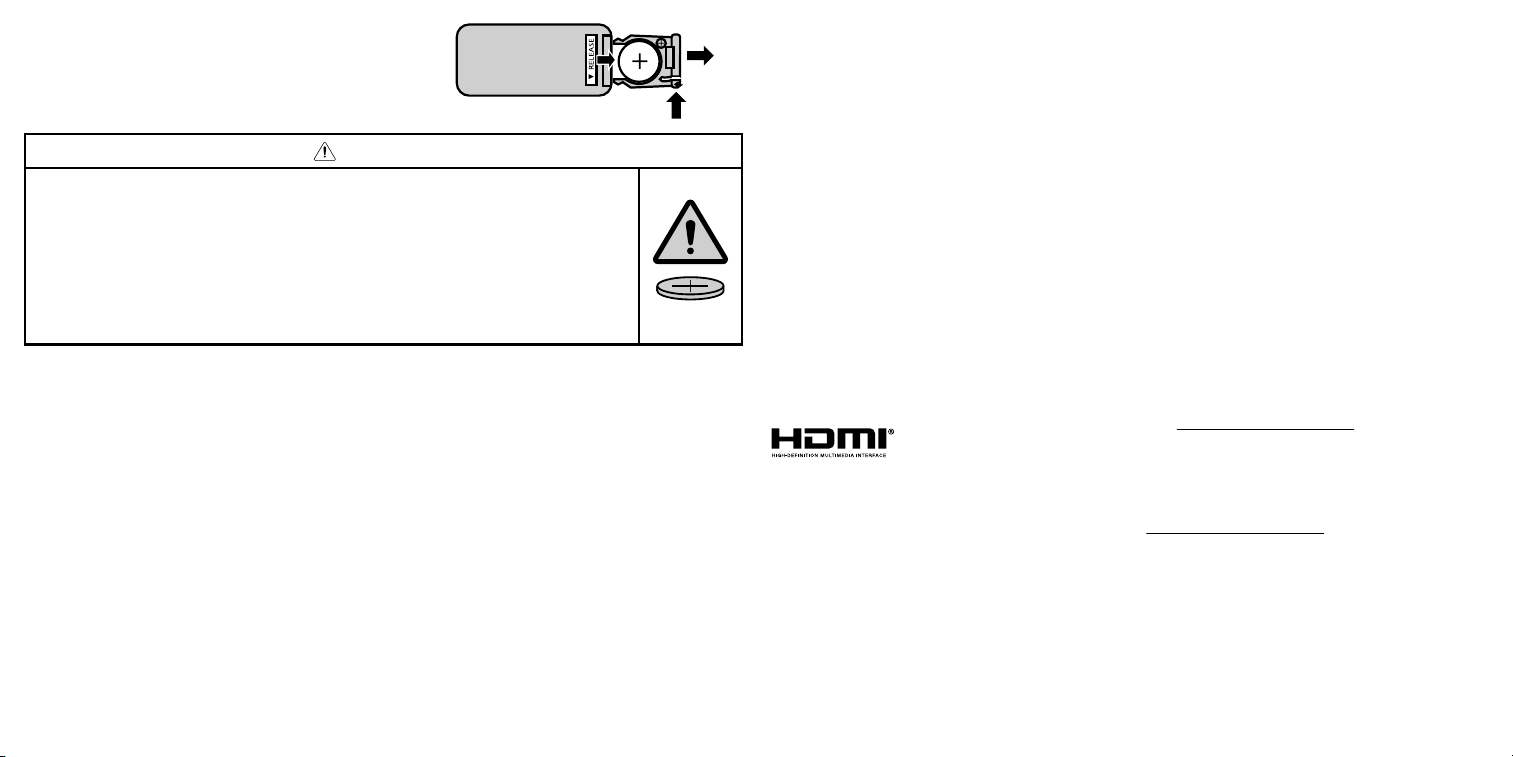
CHANGING THE REMOTE BATTERY
1 Push in the tab on the battery tray, then pull out the tray.
2 Remove the old battery. Insert a new CR2025 battery with
the + facing up, then slide the tray closed.
a) Remove and immediately recycle or dispose of used batteries and
keep away from children. Do NOT dispose of batteries in household
trash or incinerate.
b) Even used batteries may cause severe injury or death.
c) Call a local poison control center for treatment information.
d) Insert a 3V CR2025 non-rechargeable battery with the + facing up.
Non-rechargeable batteries are not to be recharged. Ensure the
batteries are installed correctly according to polarity (+ and -).
e) Do not force discharge, recharge, disassemble, heat above
50°C/122°F or incinerate. Doing so may result in injury due to
venting, leakage, or explosion resulting in chemical burns.
f) Remove and immediately recycle or dispose of batteries from
equipment not used for an extended period of time according to
local regulations.
g) Always completely secure the battery compartment. If the battery
compartment does not close securely, stop using the product,
remove the batteries, and keep them away from children.
SPECIFICATIONS
• Dimensions (L × W × H):
2.44 × 4.72 × 0.85 in. (6.2 × 12 × 2.15 cm)
• Weight: .37 lbs (0.167 kg)
• Input Port 1, 2, and 3:
HDMI receiver (Type-A 19-pin female)
• Output Port:
HDMI transmitter (Type-A 19-pin female)
• Video Amplier Bandwidth: 18Gbps
• Power Supply with USB-A Connector: DC 5V/1A
• Operation Pixel Frequency Range:
25MHz ~ 600MHz
• Frame Rate: Up to 4K @ 60Hz max.
• HDMI Standard: HDCP 2.2
• Video Signal: 12-bit deep full HD, 4K/2K video
• IR Remote: Manual
TROUBLESHOOTING
I don’t see a picture on the output display.
• Make sure that all cables are plugged in correctly.
• Make sure that the power adapter is connected and plugged in.
• Make sure that all devices (source and display) are plugged in and
turned on.
• Long HDMI cables may cause signal loss. Try a dierent, shorter
HDMI cable.
• Make sure that no cables are damaged or severed.
• Make sure that you have selected the correct input device.
There is a picture on the display but no sound.
• Make sure that the HDMI cable is well connected.
• Make sure that your source output is HDMI.
The display is not 4K.
• Make sure that your source device supports 4K resolution.
• Make sure that your HDMI cable supports 4K specication.
Notes:
• Manufacturer reserves the right to make changes in the hardware, packaging,
and any accompanying documentation without prior written notice.
The terms HDMI, HDMI High-Denition Multimedia Interface, HDMI Trade dress and
the HDMI Logos are trademarks or registered trademarks of HDMI Licensing
Administrator, Inc.
• NS-AV20SWTCH / NS-AV20SWTCH-C incorporates HDMI™ technology.
• Trademarks and brand names are the properties of their respective owners.
• INGESTION HAZARD: This product contains a button cell or coin battery.
• DEATH or serious injury can occur if ingested.
A swallowed button cell or coin battery can cause Internal Chemical
Burns in as little as 2 hours.
• KEEP new and used batteries OUT OF THE REACH OF CHILDREN.
• Seek immediate medical attention if a battery is suspected to be
swallowed or inserted inside any part of the body.
WARNING
LEGAL NOTICES
FCC Statement
1. FCC Caution - §15.21:
Changes or modications not expressly approved by the party responsible for
compliance could void the user’s authority to operate the equipment.
2. FCC Statement - §15.105(b):
This equipment has been tested and found to comply with the limits for a Class B
digital device, pursuant to part 15 of the FCC Rules. These limits are designed to
provide reasonable protection against harmful interference in a residential
installation. This equipment generates, uses, and can radiate radio frequency energy
and, if not installed and used in accordance with the instructions, may cause harmful
interference to radio communications. However, there is no guarantee that
interference will not occur in a particular installation. If this equipment does cause
harmful interference to radio or television reception, which can be determined by
turning the equipment o and on, the user is encouraged to try to correct the
interference by one or more of the following measures:
• Reorient or relocate the receiving antenna.
• Increase the separation between the equipment and receiver.
• Connect the equipment into an outlet on a circuit dierent from that to which the
receiver is connected.
• Consult the dealer or an experienced radio/TV technician for help.
ONE-YEAR LIMITED WARRANTY
Visit www.insigniaproducts.com for details.
CONTACT INSIGNIA:
For customer service, call
1-877-467-4289 (U.S. and Canada)
www.insigniaproducts.com
INSIGNIA is a trademark of Best Buy and its aliated companies.
Distributed by Best Buy Purchasing, LLC
7601 Penn Ave South, Richeld, MN 55423 U.S.A.
©2025 Best Buy. All rights reserved.
CR2025
Open
Push