LAUSANNE
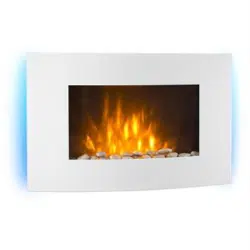
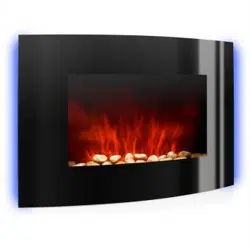
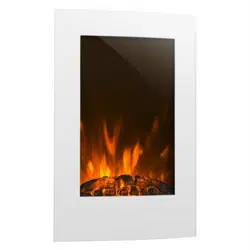
Elektrischer Kamin
Fireplace Heater
Cheminée électrique
Camino elettrico
Chimenea eléctrica
Elektrische haard
Hinweis: Das Gerät eignet sich nicht zur Nutzung als
primäre Heizquelle.
Note: The device is not suitable for use as a primary
heat source.
Remarque : l‘appareil ne convient pas en tant que
source principale de chauage.
Nota: il dispositivo non è idoneo ad essere utilizzato
come fonte di riscaldamento primaria.
Advertencia: el aparato no es apto para utilizar como
fuente de calefacción primaria.
Let op: het apparaat is niet geschikt voor gebruik als
primaire warmtebron.
www.klarstein.com
10012127 10031843


3
DE
English 19
Français 33
Italiano 47
Español 61
Nederlands 75
Sehr geehrter Kunde,
wir gratulieren Ihnen zum Erwerb Ihres Gerätes. Lesen Sie
die folgenden Hinweise sorgfältig durch und befolgen Sie
diese, um möglichen Schäden vorzubeugen. Für Schäden,
die durch Missachtung der Hinweise und unsachgemäßen
Gebrauch entstehen, übernehmen wir keine Haftung. Scannen
Sie den folgenden QR-Code, um Zugriff auf die aktuellste
Bedienungsanleitung und weitere Informationen rund um das
Produkt zu erhalten.
INHALTSVERZEICHNIS
Produktdatenblatt4
Sicherheitshinweise5
Installation6
Allgemeine Bedienung8
Display und Anzeigen9
Inbetriebnahme und Einstellungen10
Timer-Einstellungen11
Reinigung und Wartung14
Spezielle Entsorgungshinweise für Verbraucher in Deutschland15
Hinweise zur Entsorgung17
Hersteller & Importeur (UK)17
TECHNISCHE DATEN
Artikelnummer 10012127, 10031843
Stromversorgung 220-240 V ~ 50 Hz
Leistung 2000 W

4
DE
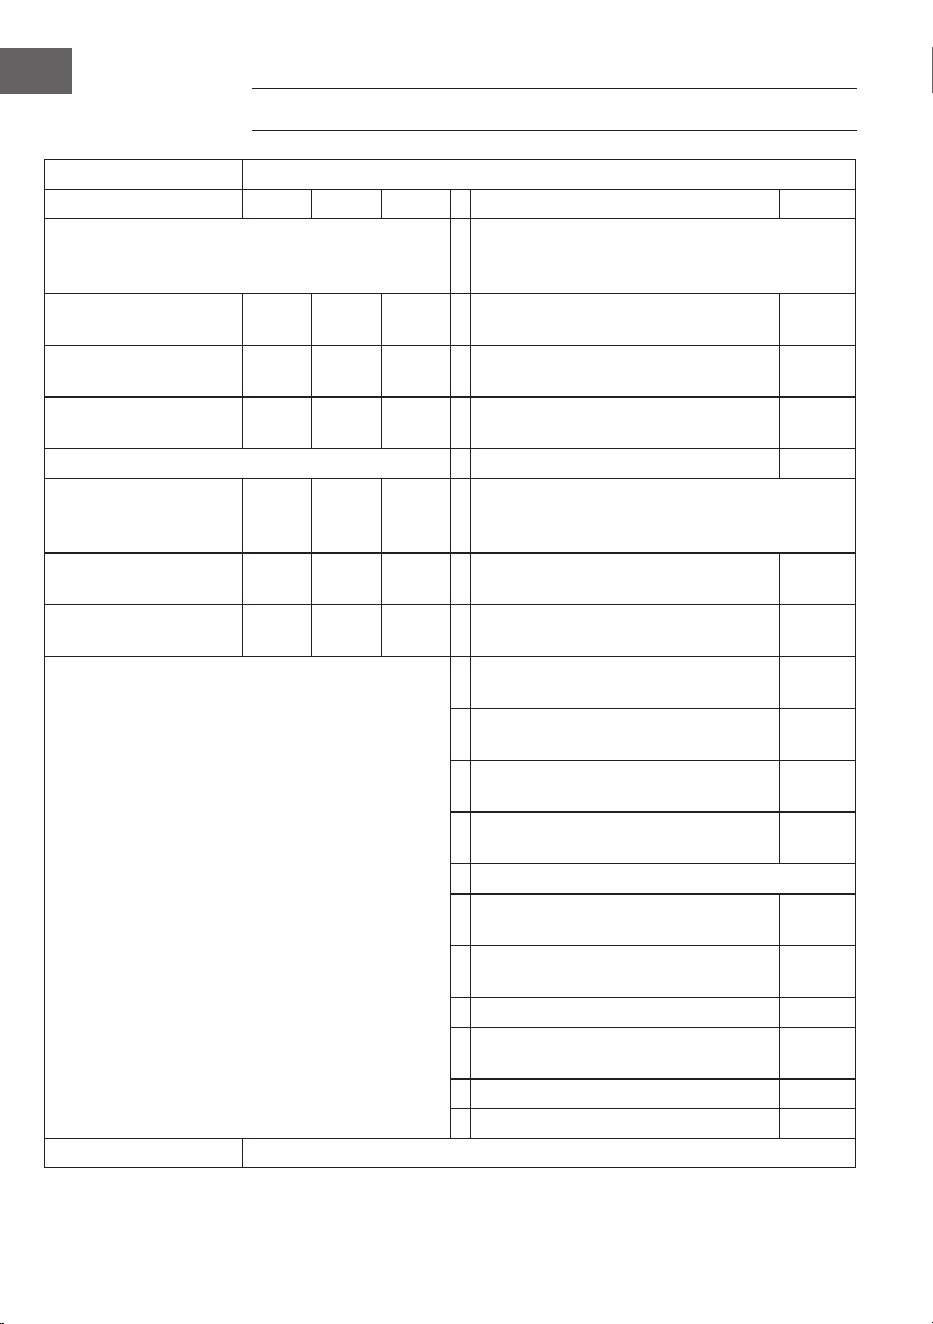
PRODUKTDATENBLATT
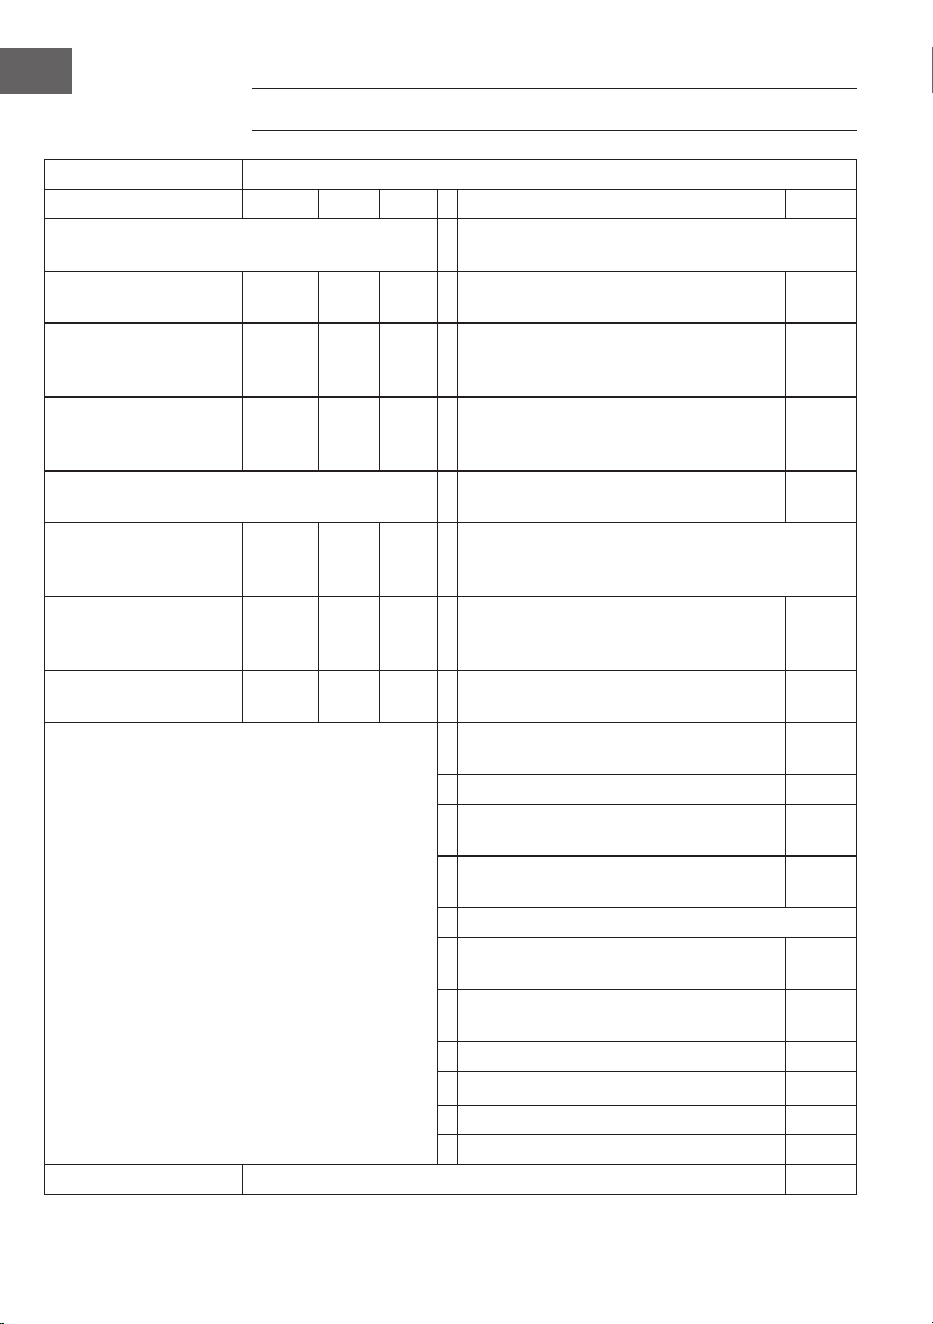
Modellkennung(en) 10012127, 10031843
Angabe Symbol Wert Einheit Angabe Einheit
Wärmeleistung Nur bei elektrischen Speicher-Einzelraumheizgeräten:
Art der Regelung der Wärmezufuhr
Nennwärmeleistung Pnom 2,0 kW Manuelle Regelung der Wärmezufuhr mit
integriertem Thermostat
k.A.
Mindestwärmeleistung
(Richtwert)
Pmin 1,0 kW Manuelle Regelung der Wärmezufuhr
mit Rückmeldung der Raum- und/oder
Außentemperatur
k.A.
Maximale kontinuierliche
Wärmeleistung
Pmax,c 2,0 kW Elektronische Regelung der Wärmezufuhr
mit Rückmeldung der Raum- und/oder
Außentemperatur
k.A.
Hilfsstromverbrauch
Wärmeabgabe mit Gebläseunterstützung k.A.
Bei Nennwärmeleistung
(Ventilator-Motor)
elmax 0,014 kW
Art der Wärmeleistung/Raumtemperaturkontrolle
Bei Mindestwärmeleistung
(Ventilator-Motor)
elmin 0,014 kW Einstuge Wärmeleistung, keine
Raumtemperaturkontrolle
nein
Im Bereitschaftszustand elSB 0,48 W Zwei oder mehr manuell einstellbare Stufen,
keine Raumtemperaturkontrolle
nein
Raumtemperaturkontrolle mit mechanischem
Thermostat
nein
Mit elektronischer Raumtemperaturkontrolle nein
Mit elektronischer Raumtemperaturkontrolle und
Tageszeitregelung
nein
Mit elektronischer Raumtemperaturkontrolle und
Wochentagsregelung
ja
Sonstige Regelungsoptionen
Raumtemperaturkontrolle mit Präsenzerkennung nein
Raumtemperaturkontrolle mit Erkennung offener
Fenster
nein
Mit Fernbedienungsoption nein
Mit adaptiver Regelung des Heizbeginns ja
Mit Betriebszeitbegrenzung nein
Mit Schwarzkugelsensor nein
Kontaktangaben Chal-Tec GmbH, Wallstraße 16, 10179, Berlin, Deutschland
5
DE
SICHERHEITSHINWEISE
• Kinder ab 8 Jahren, physisch und körperlich eingeschränkte Menschen dürfen
das Gerät nur benutzen, wenn sie vorher von einer für Sie verantwortlichen
Aufsichtsperson ausführlich mit den Funktionen und den Sicherheitsvorkehrungen
vertraut gemacht wurden.
• Achten Sie darauf, dass Kinder nicht mit dem Gerät spielen.
• Halten Sie Kinder unter 3 Jahren vom Gerät fern.
• Kinder zwischen 3 und 8 Jahren dürfen das Gerät nur benutzen, wenn sie vorher
von einer für Sie verantwortlichen Aufsichtsperson ausführlich mit den Funktionen
und den Sicherheitsvorkehrungen vertraut gemacht wurden. Kinder zwischen 3 und
8 Jahren dürfen das Gerät nicht einstecken, reinigen oder warten.
VORSICHT
Verbrennungsgefahr! Teile des Geräts können während dem Betrieb
sehr heiß werden. Achten Sie darauf, dass Kinder oder Versehrte dem
Gerät nicht zu nahe kommen.
• Falls das Netzkabel oder der Stecker beschädigt sind, müssen sie vom Hersteller,
einem autorisierten Fachbetrieb oder einer ähnlich quali zierten Person ersetzt
werden.
• Prüfen Sie vor der Benutzung die Spannung auf der Geräteplakette. Schließen Sie
das Gerät nur an Steckdosen an, die der Spannung des Geräts entsprechen.
• Schalten Sie das Gerät erst ein, wenn es ordnungsgemäß installiert wurde.
• Installieren Sie das Gerät nicht direkt unter einer Steckdose.
• Lassen Sie um das Gerät herum mindestens 1 Meter Platz zu Möbeln oder
brennbaren Gegenständen, beispielsweise Vorhängen. Stellen Sie keine
brennbaren oder explosiven Flüssigkeiten oder Stoffe in die Nähe des Geräts.
• Lassen Sie das Gerät nicht unbeaufsichtigt, solange es in Betrieb ist bzw. solange es
an den Stromkreis angeschlossen ist.
• Das Gerät ist nicht für den kommerziellen Gebrauch, sondern nur für Gebrauch im
Haushalt und in ähnlichen Umgebungen vorgesehen. Dazu zählen Küchen in Büros,
Bauernhöfen, Hotels, Motels und Einrichtungen, die Bed & Breakfast anbieten.
• Untersuchen Sie das Gerät regelmäßig auf Schäden. Benutzen Sie das Gerät nicht,
wenn es beschädigt ist.
• Reparaturen dürfen nur von Fachpersonal ausgeführt werden und sind erforderlich,
wenn das Gerät beschädigt wurde, Netzkabel oder Stecker beschädigt sind,
Flüssigkeiten darauf ausgelaufen oder Objekte darauf gefallen sind, wenn das
Gerät Nässe oder Feuchtigkeit ausgesetzt oder fallen gelassen wurde.
• Verlegen Sie das Netzkabel nicht unter Teppichen.
• Lassen Sie das Netzkabel nicht entlang scharfer Kanten oder heißer Ober ächen
verlaufen.

6
DE
• Um Überhitzung zu vermeiden, decken Sie das Gerät nicht ab und achten Sie
darauf, dass die Lüftungsschlitze nicht verdeckt sind.
• Tauchen Sie das Gerät niemals in Wasser oder andere Flüssigkeiten.
• Installieren Sie das Gerät nicht in Bädern oder in unmittelbarer Nähe zu Duschen
oder Schwimmbecken.
• Benutzen Sie das Gerät nicht im Freien.
• Fassen Sie das Gerät nicht mit nassen Händen an.
• Stellen Sie das gerät nicht auf oder in die Nähe heißer Oberächen.
• Ziehen Sie vor der Reinigung immer den Stecker aus der Steckdose und lassen Sie
das Gerät vollständig abkühlen.
• Benutzen Sie keine chemischen Reinigungsmittel.
• Benutzen Sie nur das mitgelieferte Zubehör, andernfalls kann das Gerät eine
Gefahr für den Benutzer darstellen oder kaputt gehen.
• Haben Sie das Gerät nicht an der frontblende hoch.
• Schließen Sie das Gerät nicht an externe Zeitschaltuhren oder ferngesteuerte
Steckdosen an.
Hinweis: Sofern Ihr Gerät nicht mit einem Sensor zur Messung und Kontrolle der
Raumtemperatur ausgestattet ist, installieren Sie das Gerät nicht in Räumen, in denen
sich Menschen benden, die das Gerät nicht selbstständig bedienen oder den Raum
selbstständig verlassen können.
INSTALLATION
Schalten Sie das Gerät nicht ein, bevor es ordnungsgemäß installiert wurde. Lesen Sie
sich die Anleitung vor der Installation sorgfältig durch und installieren Sie das Gerät erst,
wenn Sie alle Hinweise gelesen und verstanden haben.
Halten Sie sich insbesondere an die Maßangaben in der Installationsanleitung. Achten
Sie darauf, dass Sie bei der Installation keine Kabel beschädigen, die sich unter dem
Putz in der Wand benden. Seien Sie beim Bohren der Löcher sehr vorsichtig.
Hinweis: Dieses Gerät ist zur permanenten Befestigung an Wänden gedacht und
muss mindestens 30 cm über dem Boden angebracht werden. Die Halteklammern
müssen horizontal angebracht und das Kabel rechts hinter dem Kamin vorbeigeführt
werden.

7
DE
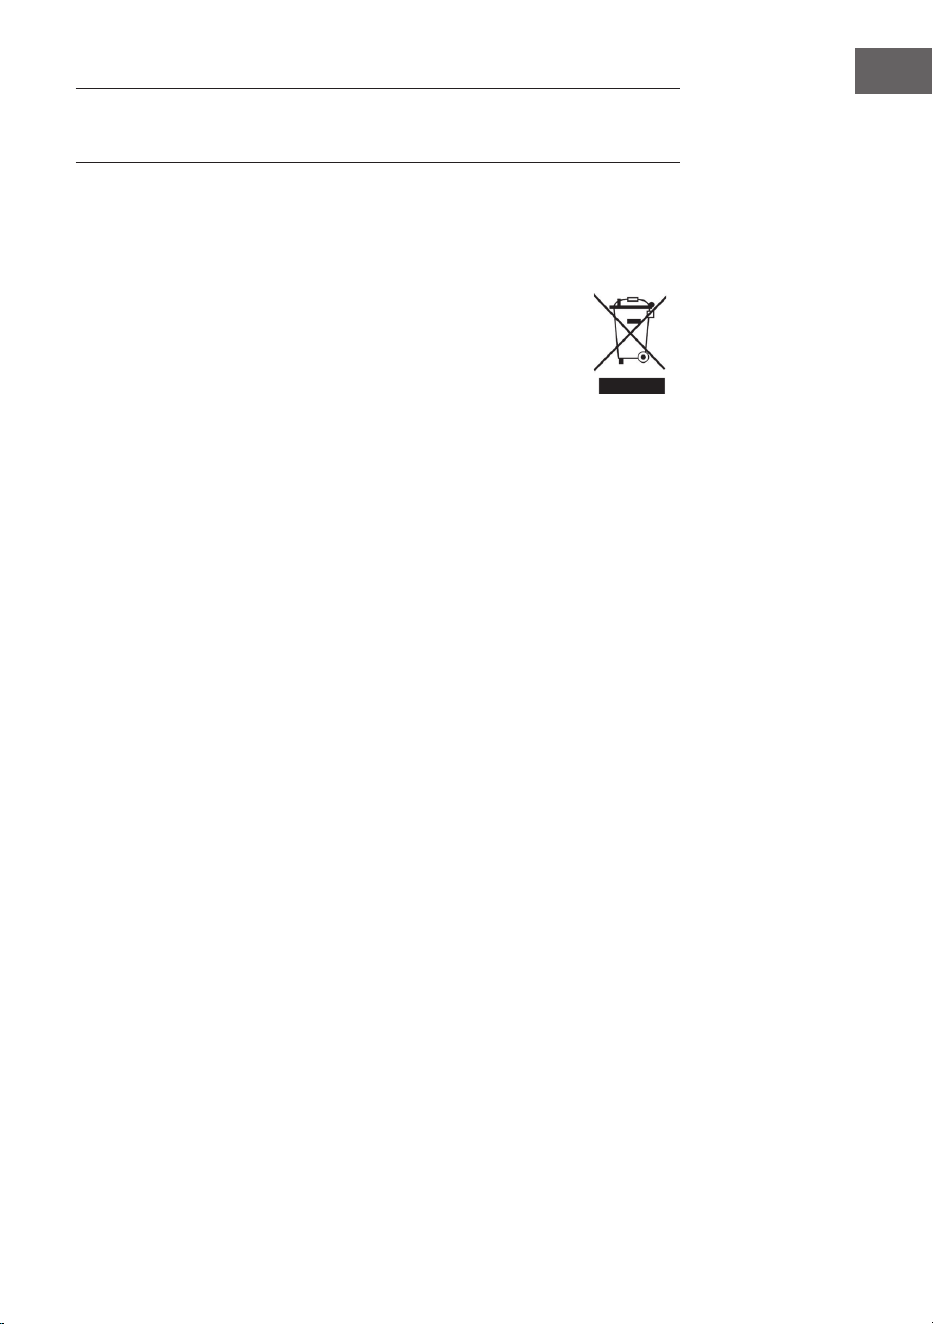
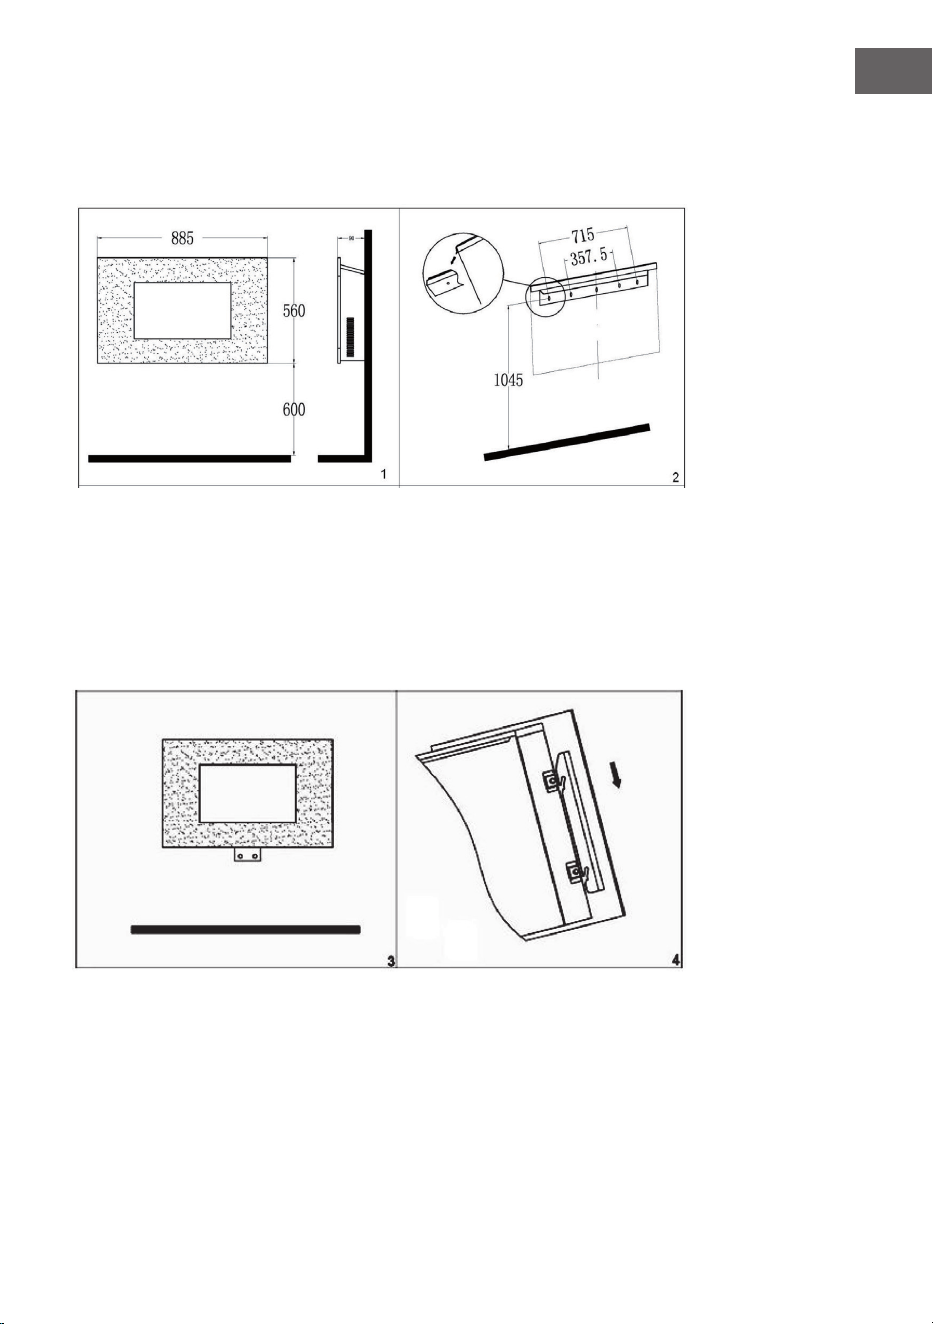
Damit Sie einen optimalen Blick auf den Kamin haben, empfehlen wir Ihnen den
Kamin auf einer Höhe von 60 cm anzubringen (siehe Bild 1). Befestigen Sie die obere
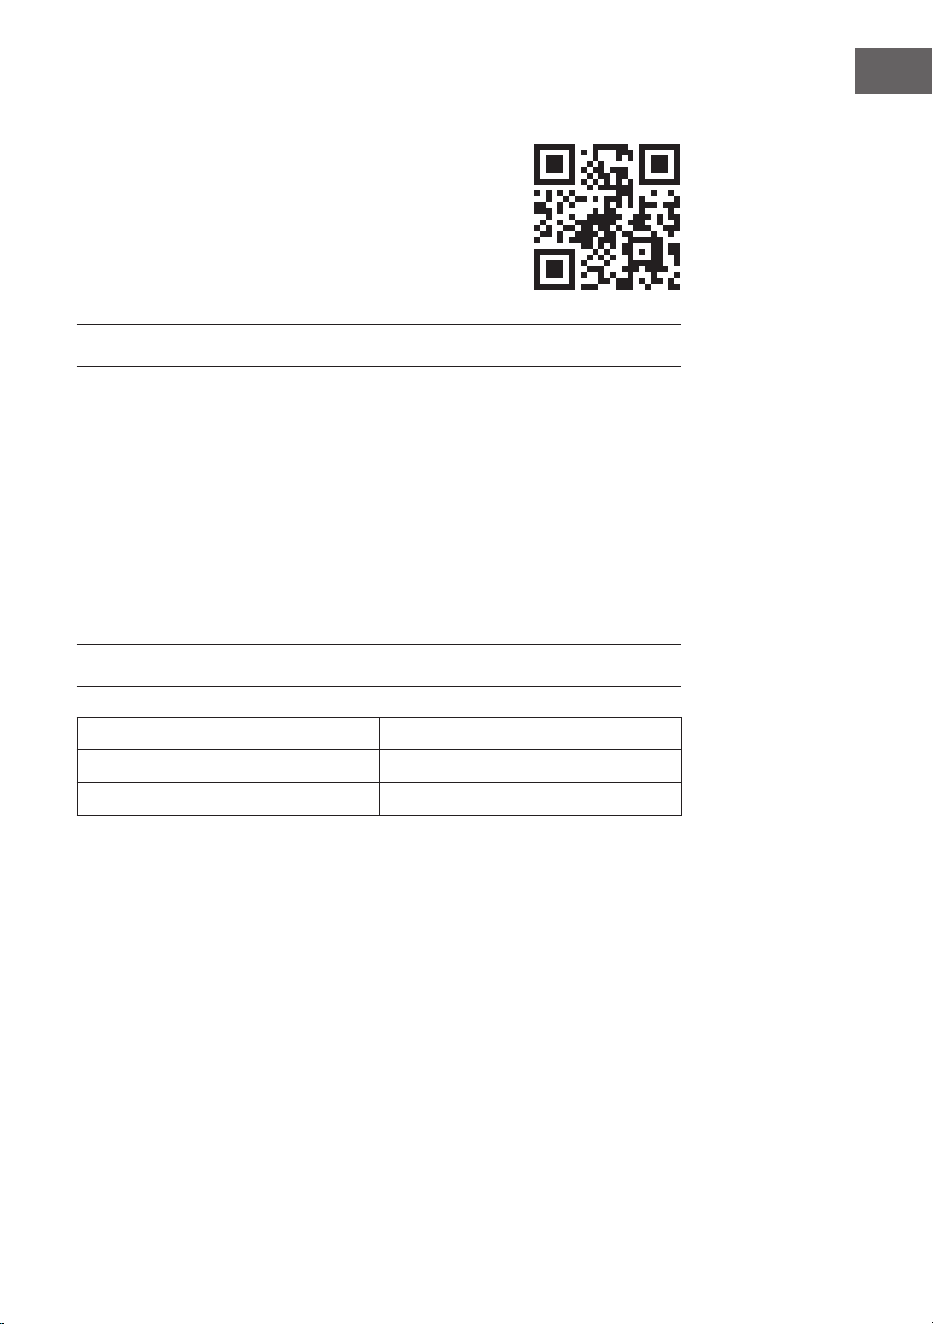
Halteklammer an der Wand. Die empfohlene Maße nden Sie in Bild 2. Um die
Bohrungen zu setzen verwenden Sie einen Bohrer der Größe 6.
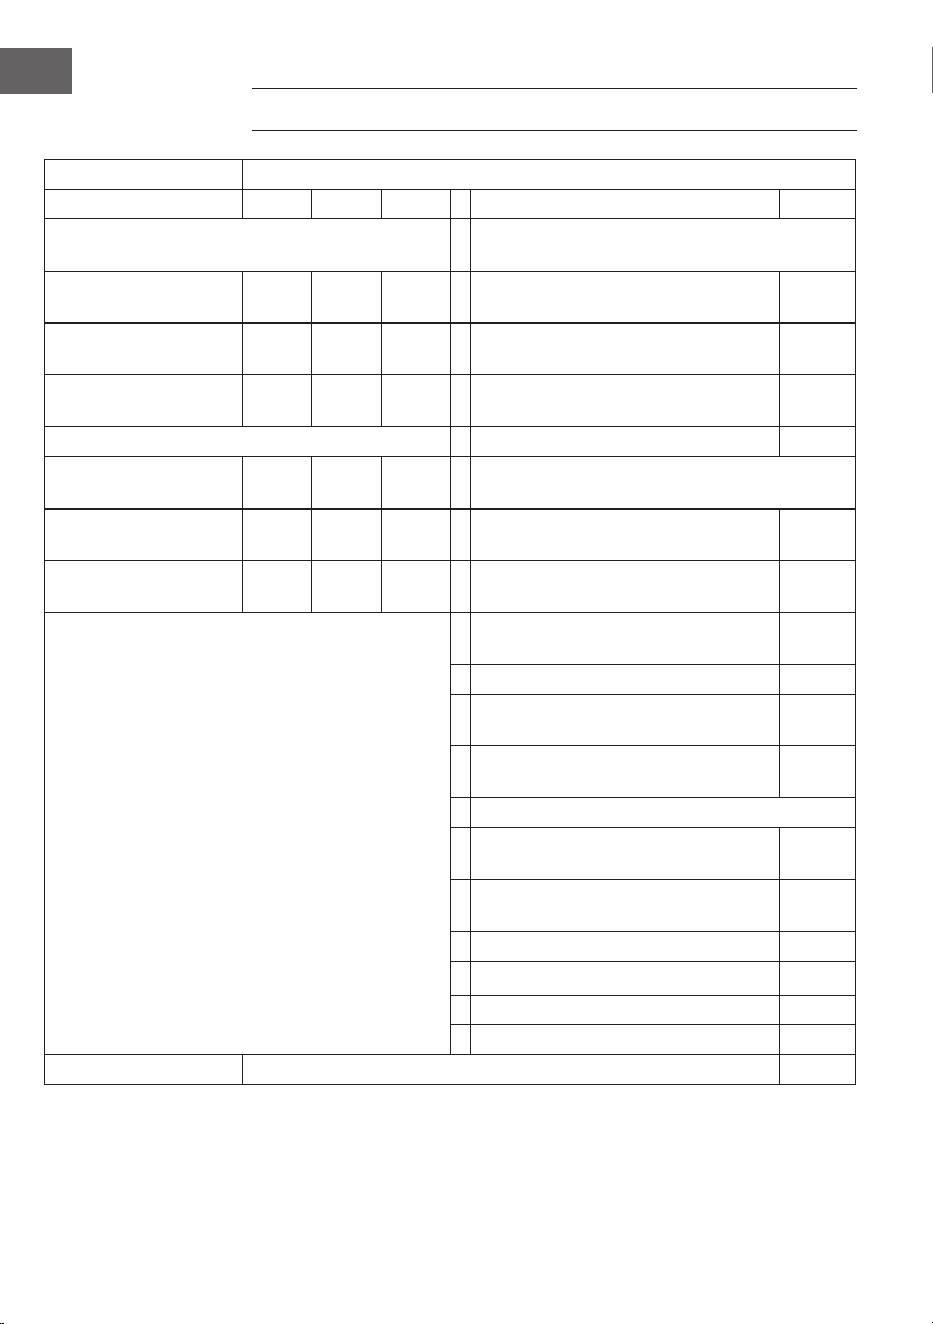
Befestigen Sie die untere Halteklammer am Gerät und markieren Sie die Positionen
der Bohrungen an der Wand, indem Sie das Gerät vorsichtig an die Wand halten(Es
werden zwei Personen dazu benötigt). Nehmen Sie das Gerät runter und machen
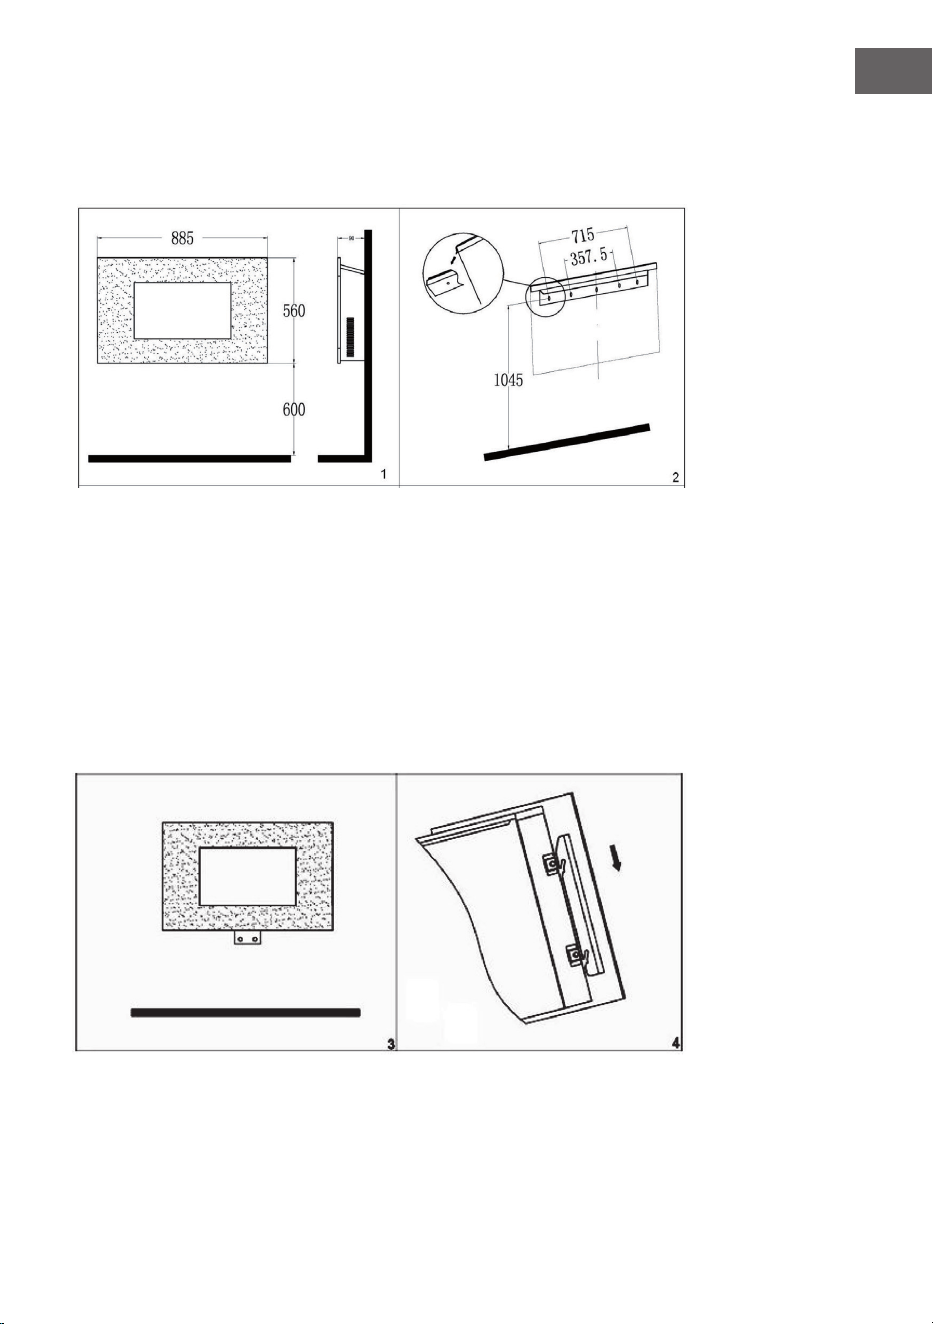
Sie die Bohrungen. Anschließend setzen Sie das Gerät auf die Obere Klammer und
Befestigen die unteren Klammer mit den Schrauben an der Wand, siehe Bild 3 und 4.
Ist der Kamin befestigt, können Sie die Steine aus Verpackung entnehmen und diese
entlang der Leuchteinheit in die gewünschte Position bringen.
8
DE
ALLGEMEINE BEDIENUNG
Hinweis: Sie können den Kamin entweder über die Tasten auf dem Kamin (oben
rechts) oder mit Hilfe der Fernbedienung steuern.
Manuelle Bedienung
• Stellen Sie den Standby-Kippschalter in die ON-Position um das Gerät
einsatzbereit zu machen. Sie hören einen Piepton.
• Drücken Sie die [O/I] Taste einmal um den Feuereffekt einzuschalten, eine
Indikator-LED leuchtet auf. Drücken Sie dieselbe Taste 3 Sekunden lang um die
Dimm-Funktion zu aktivieren, halten Sie die Taste gedrückt bis sie mit der Helligkeit
zufrieden sind.
• Drücken Sie die [POWER] Taste einmal, um die niedrige Heizstufe (1000W)
einzuschalten. Drücken Sie die [POWER] Taste zweimal, um die höchste Heizstufe
(2000W) einzuschalten. Drücken Sie die [POWER] Taste dreimal, um Heizung
auszuschalten.
• Um die Hintergrundfarbe (7 Farben verfügbar) einzustellen, drücken Sie Taste
[BACK LIGHT].
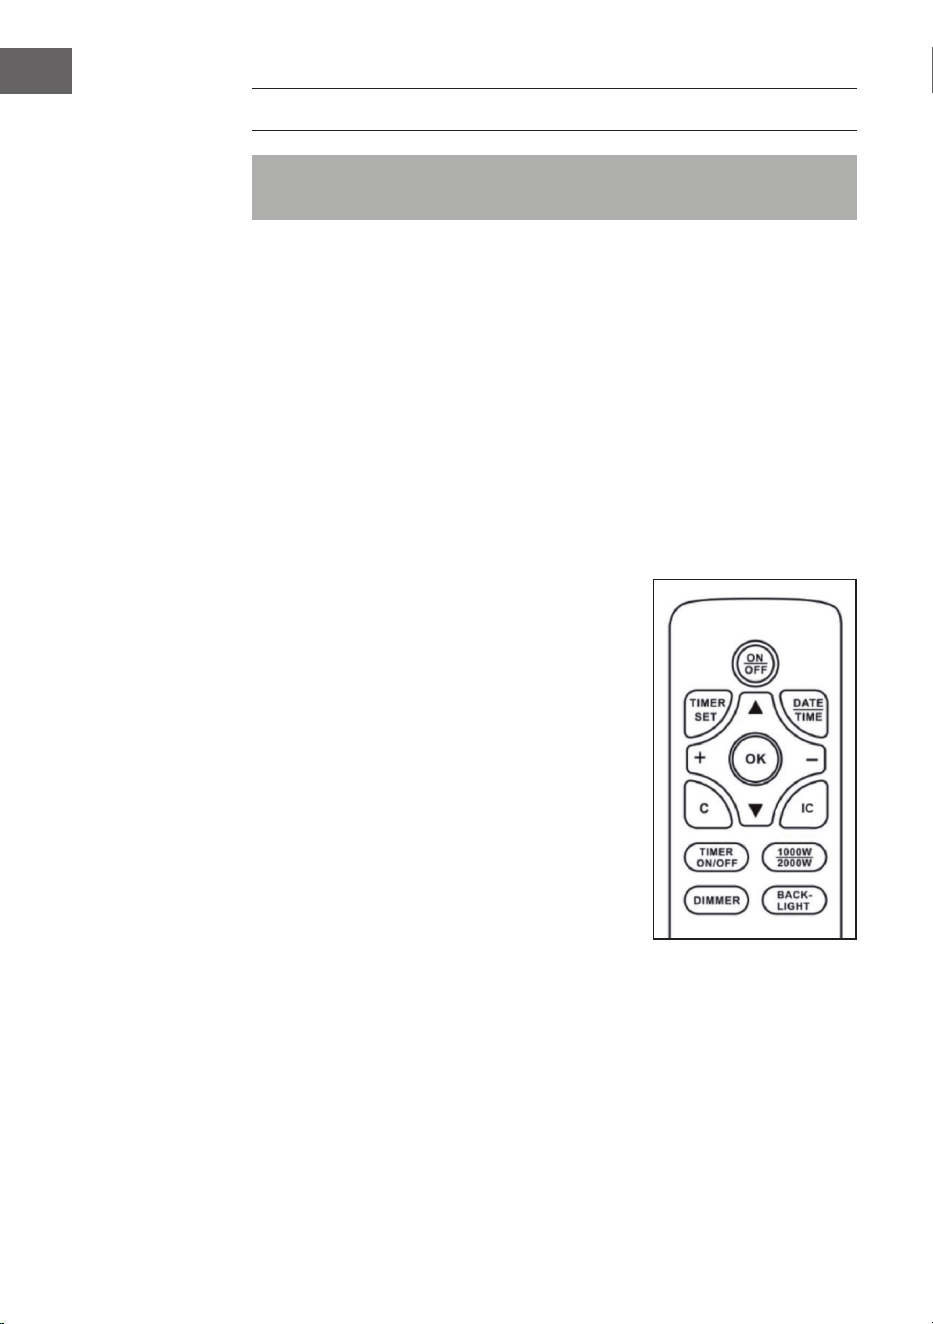
Bedienung mit der Fernbedienung
Damit die Fernbedienung funktiniert, muss der
Kippschalter auf ON stehen. Ein Piepton signalisiert,
dass das Gerät eingeschaltet ist.
Es dauert ein wenig, bis der Transmitter vom Receiver
am Gerät erkannt wird. Drücken Sie innerhalb von
2 Sekunden nicht mehrere Tasten, damit das Gerät
ordnungsgemäß funktioniert.

9
DE
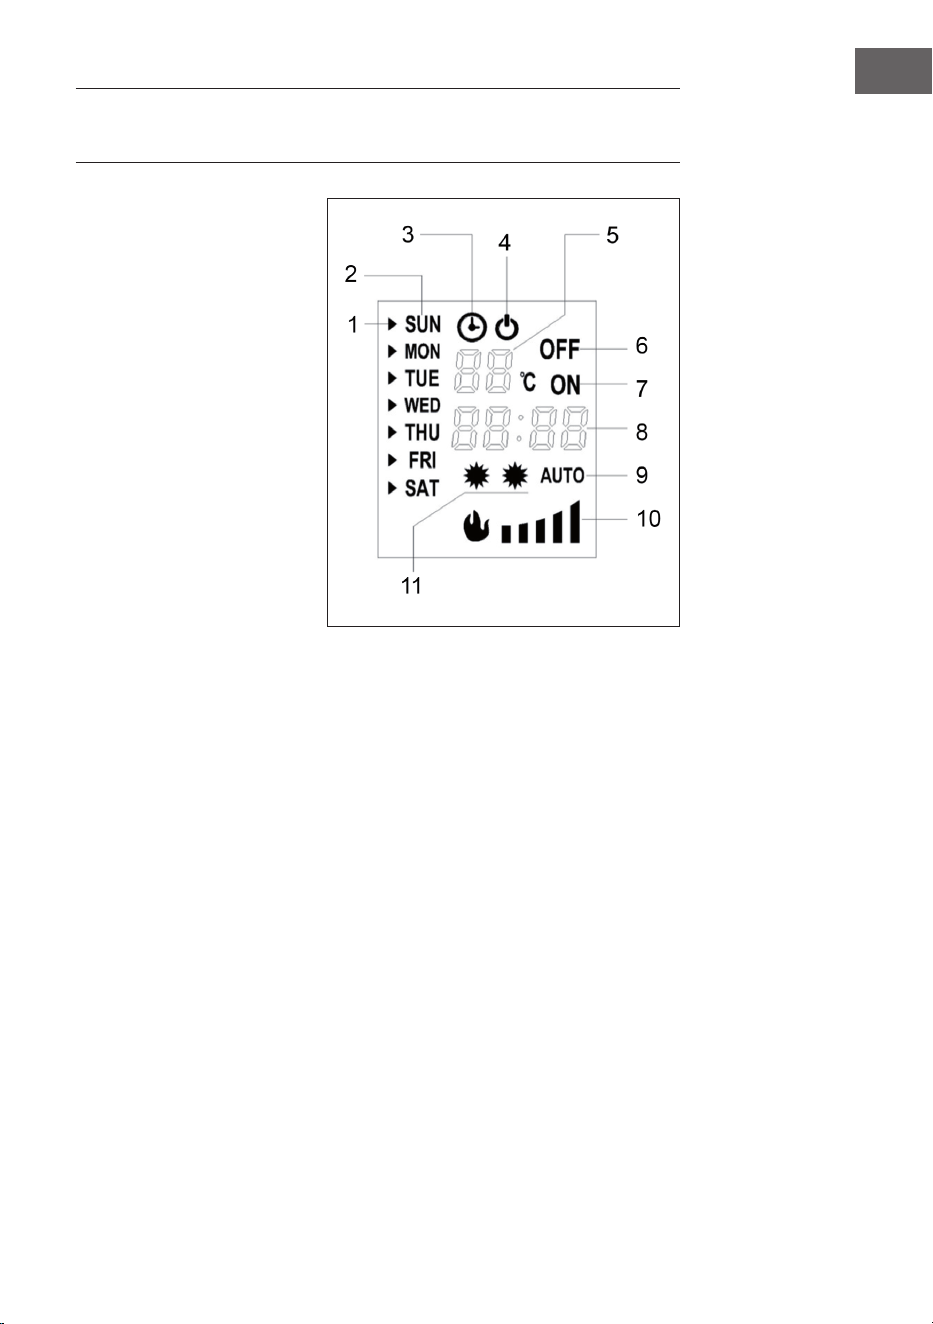
DISPLAY UND ANZEIGEN
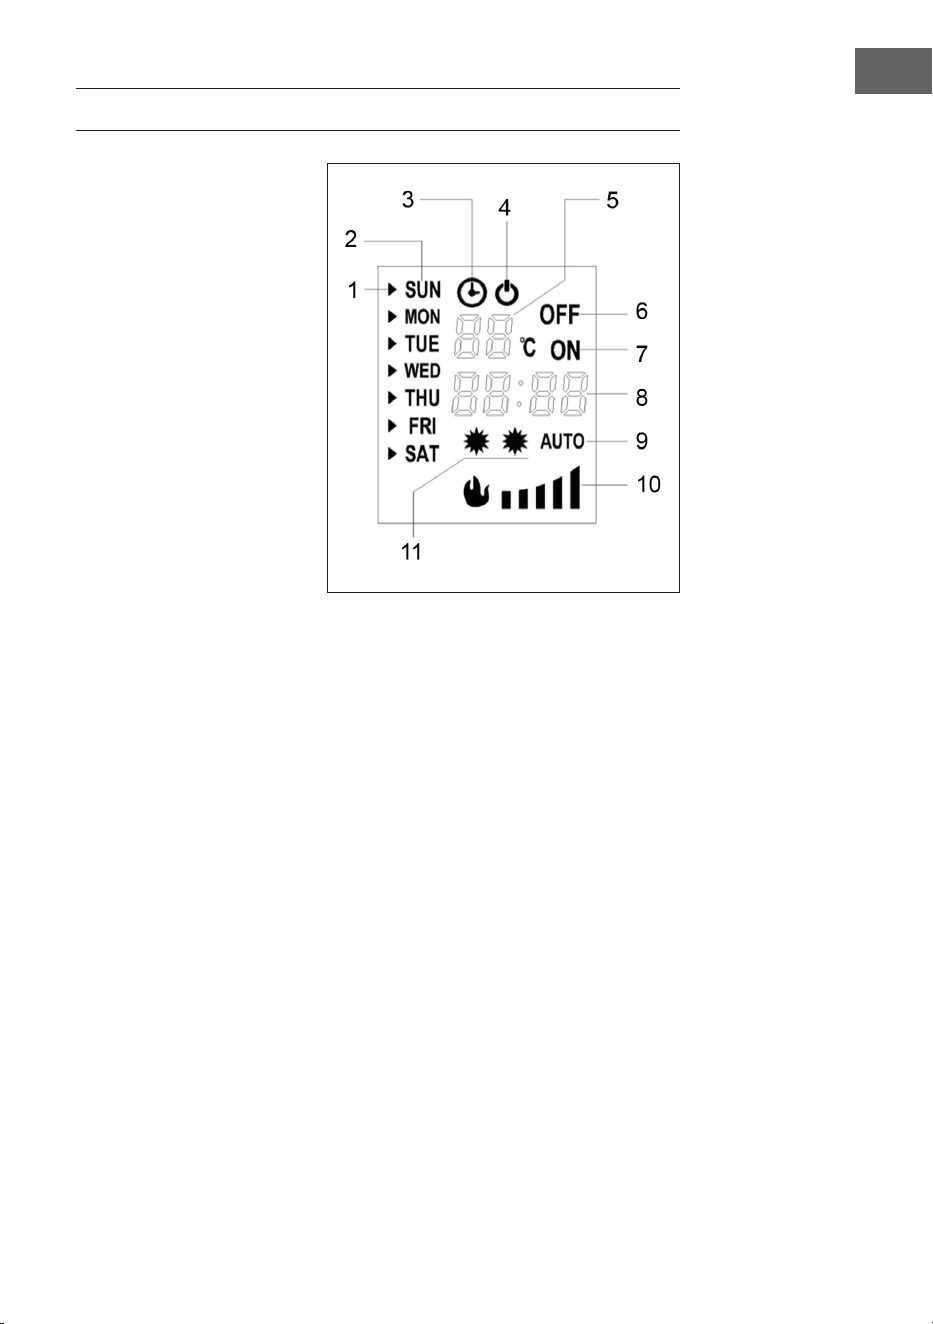
1 Pfeil
2 Wochentag
3 Timer
4 Standby
5 Temperaturanzeige und
Anzeige der Timer-
Einstellungsnummer
6 Timer aus
7 Timer an
8 Zeitanzeige
9 Automatische Heizkontrolle
10 Flammen-Helligkeit
11 Heizleistung
Temperaturanzeige und Anzeige der Timer-Einstellungsnummer (5)
Normalerweise zeigt das Display die raumtemperatur an. Während dem Einstellen der
Temperatur wird die eingestellte Temperatur angezeigt. Wenn Sie den Timer einstellen
wird hier die Einstellungsnummer angezeigt.
Zeitanzeige (8)
Normalerweise wird die aktuelle Zeit angezeigt. Während der Timer gestellt wird, wird
hier die eingestellte Timer-Zeit angezeigt.
10
DE
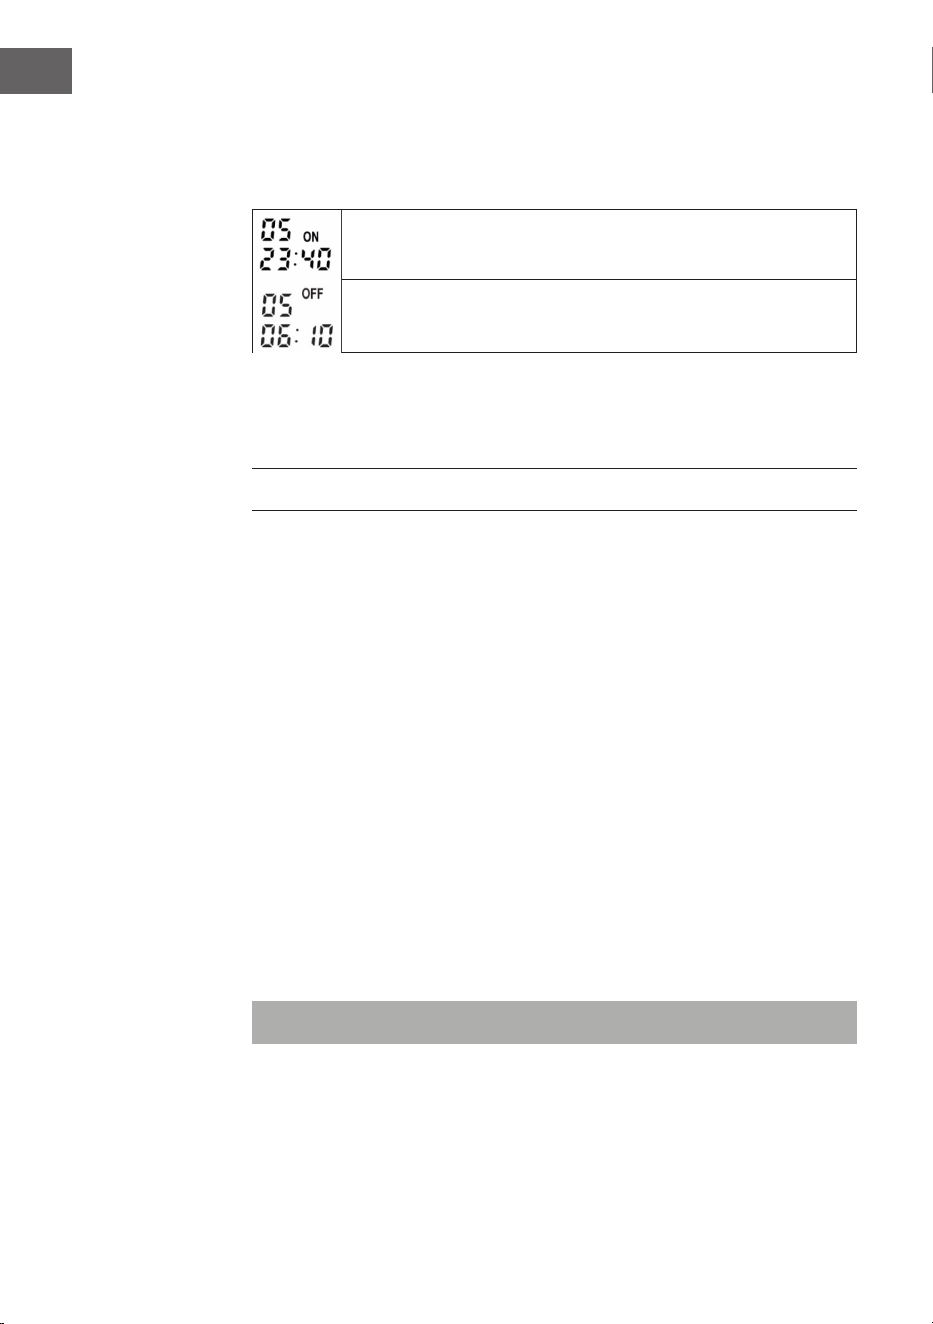
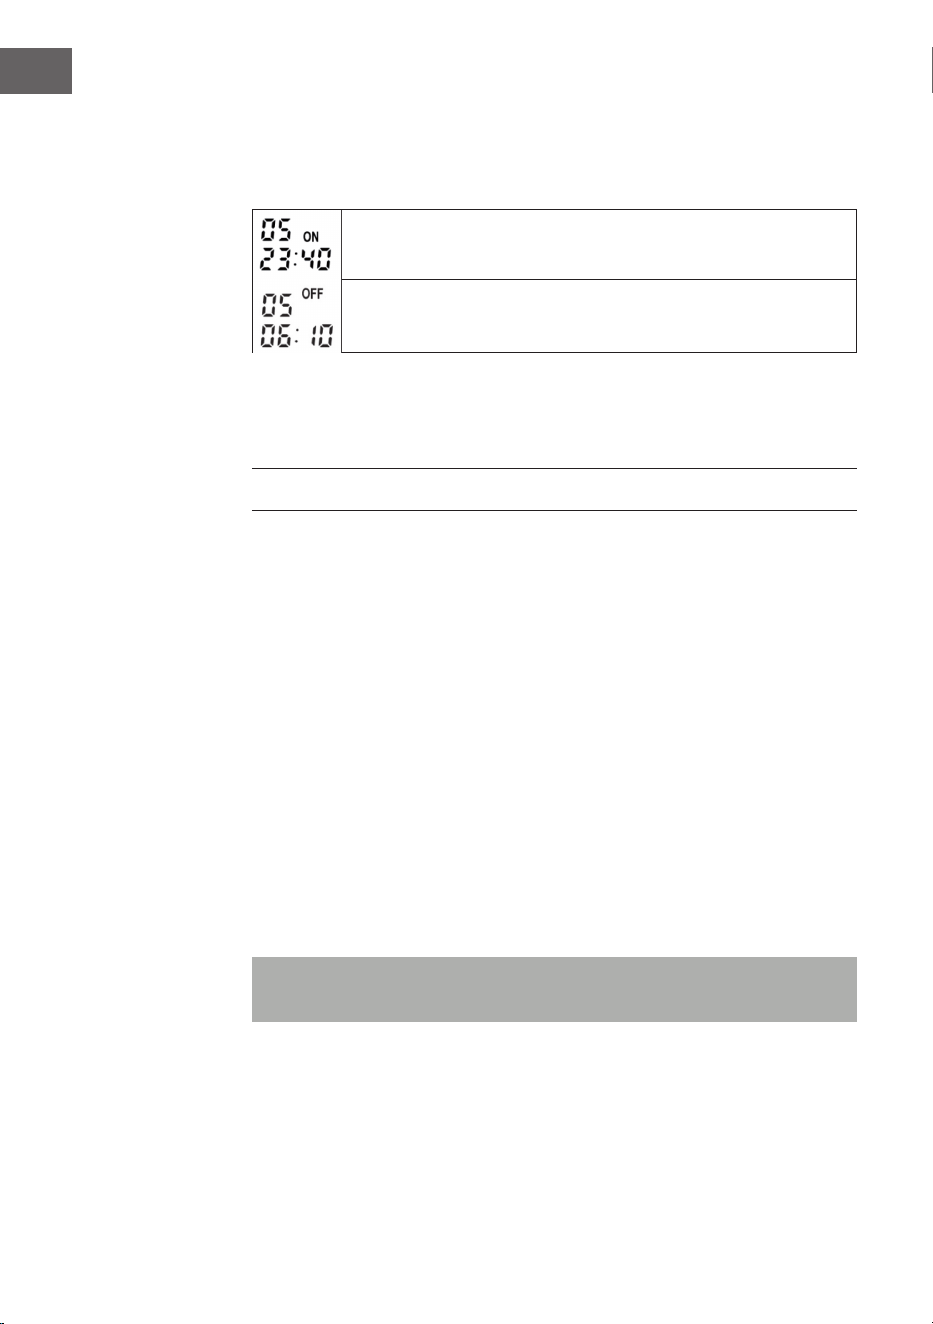
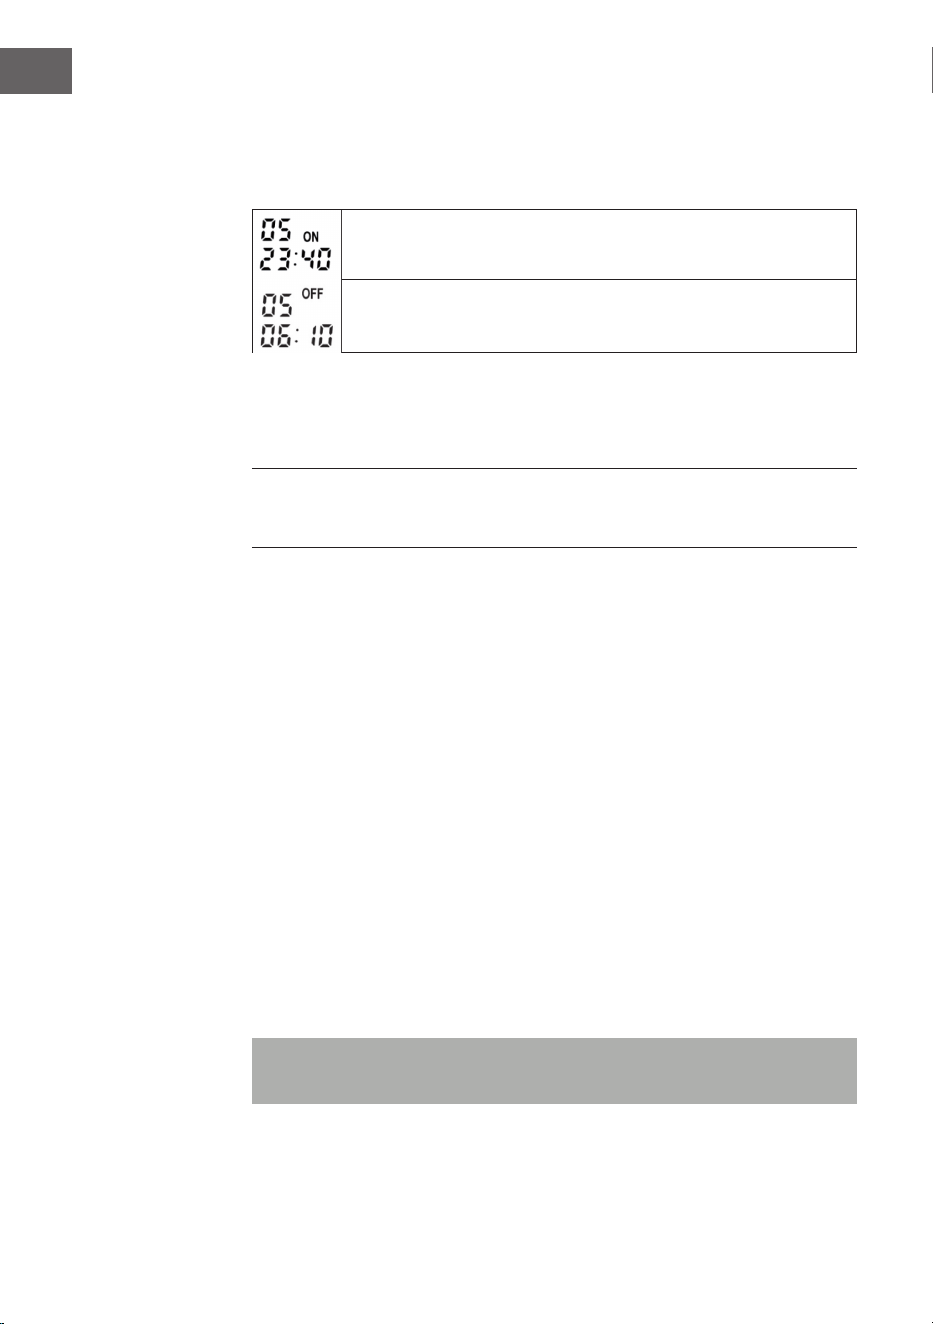
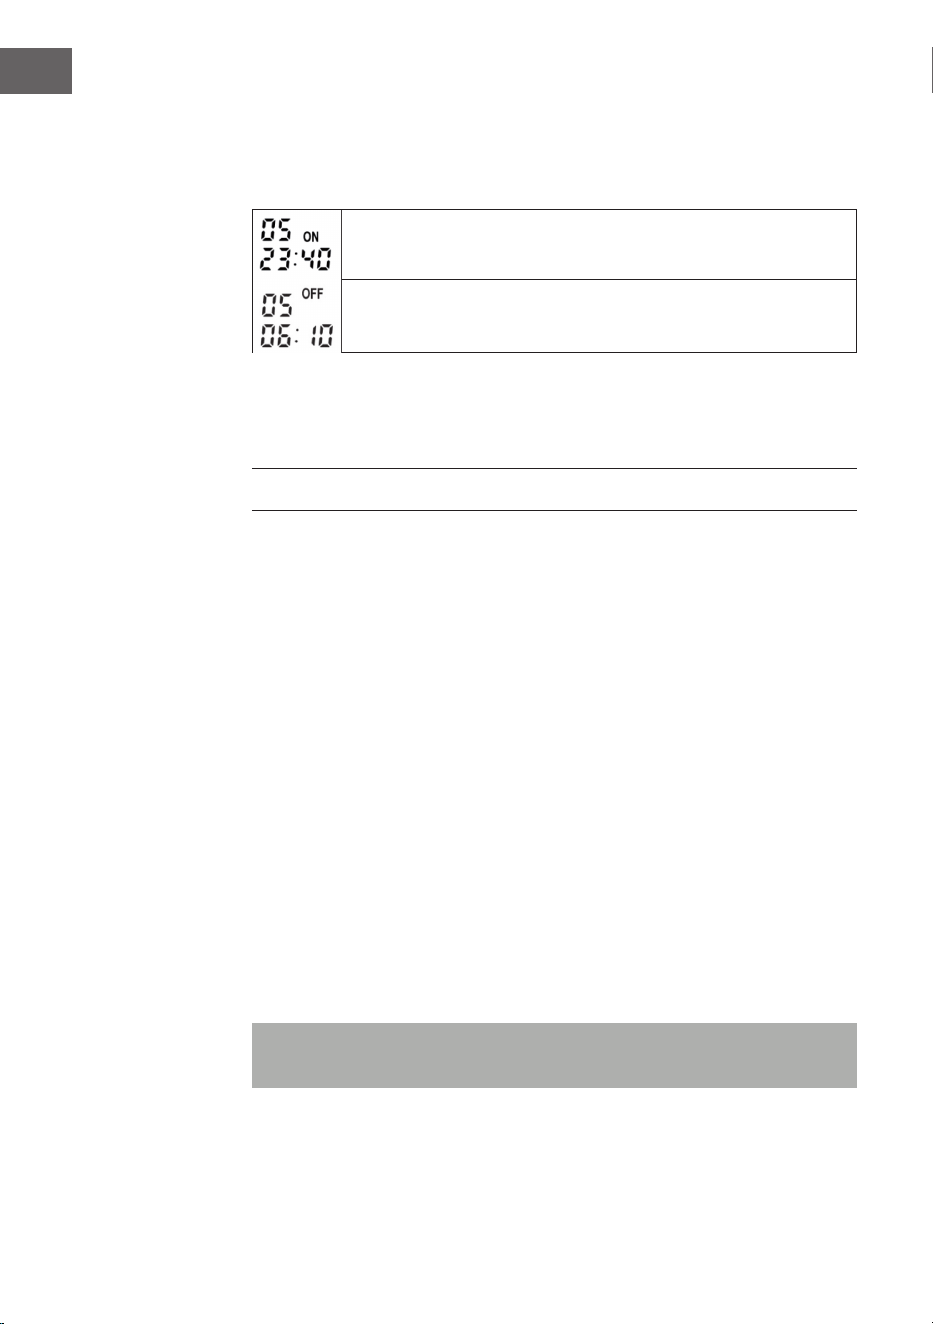
Ein- und Aus-Timer einstellen
Während sie den Timer einstellen, werden die einstellte Zeit und die Timer-
Einstellungsnummer im Display angezeigt.
Die Anzeige in diesem Beispiel zeigt die Startzeit von Einstellung5.
Die Anzeige in diesem Beispiel zeigt die Endzeit von Einstellung 5.
Flammen-Helligkeit
Die Flammen-Helligkeit kann in 5 Stufen angepasst werden und angezeigt werden.
INBETRIEBNAHME UND EINSTELLUNGEN
Gerät starten
1 Stecken Sie den Stecker in die Steckdose.
2 Legen Sie den EIN-Schalter um.
3 Drücken sie die [I/O] oder die [ON/OFF] Taste an der Fernbedienung, um das
Gerät zu starten.
4 Drücken Sie einmal auf die [1000W/2000W] Taste, um die niedrige heizleistung
(1000 W) zu aktivieren, drücken Sie die taste nochmal, um die hohe Heizleistung
(2000 W) zu aktivieren. Drücken Sie die Taste ein drittes Mal, um die Heizung
auszuschalten.
5 Drücken Sie mehrmals auf die [DIMMER] Taste, um die Helligkeit zu reduzieren.
6 Drücken Sie auf [BACK LIGHT], um eine von 7 Hintergrundfarben auszuwählen.
Adaptive Startsteuerfunktion
Drücken Sie auf die [IC] Taste auf der Fernbedienung, um die adaptive
Startsteuerfunktion zu starten. Wenn Sie diese Funktion aktivieren, passt das Gerät die
Heizstufe automatisch an, basierend auf der Raumtemperatur und der eingestellten
Temperatur. Wenn ein Timer eingestellt wurde, kann es sein, dass die Heizung vor dem
der eingestellten Startzeit gestartet wird.
Hinweis: Die Funktion funktioniert nur, wenn ein Wochen-Timer eingestellt ist.

11
DE
Datum und Zeit einstellen
1 Drücken Sie auf die [DATE/TIME] Taste und benutzen Sie die Tasten [ ] und [ ],
um das Datum einzustellen.
2 Drücken Sie erneut auf [DATE/TIME] und benutzen Sie die [+/-] Tasten, um die
Stunde einzustellen.
3 Drücken Sie erneut auf [DATE/TIME] und benutzen Sie die [+/-] Tasten, um die
Minute einzustellen.
4 Drücken Sie auf die [OK] Taste, um die Einstellungen zu speichern.
Temperatur einstellen
Die voreingestellte Temperatur beträgt 22°C. Drücken Sie auf die [+/-] Tasten, um eine
gewünschte Temperatur zwischen 15-30°C einzustellen.
TIMER-EINSTELLUNGEN
• Es gibt 10 verschiedene Timer-Einstellungen.
• Jede Einstellung verfügt über eine Einschalt-Zeit, eine Ausschalt-Zeit und eine
Temperatureinstellung.
• Die maximal einstellbare Zeit liegt bei 23 Stunden und 50 Minuten.
• Eine Einstellung kann für einen beliebigen Tag oder mehrere Tage programmiert
werden.
• Die eingestellte Zeit ist die Einschalt-Zeit. Falls die Ausschalt-Zeit am nächsten Tag ist
müssen Sie nur Ausschalt-Zeit einstellen.
Timer-Einstellung anzeigen
1 Drücken Sie auf die Taste [TIMER SET].
2 Benutzen Sie die [+/-] Tasten, um die Einschalt-Zeiten nacheinander durchzugehen.
3 Um die Ausschalt-Zeit anzuzeigen, drücken Sie auf die Taste [ ].
4 Benutzen Sie die [+/-] Tasten, um die Ausschalt-Zeiten nacheinander
durchzugehen.
5 Um die aktuelle Einstellung zu löschen, drücken Sie die Taste [C].
12
DE
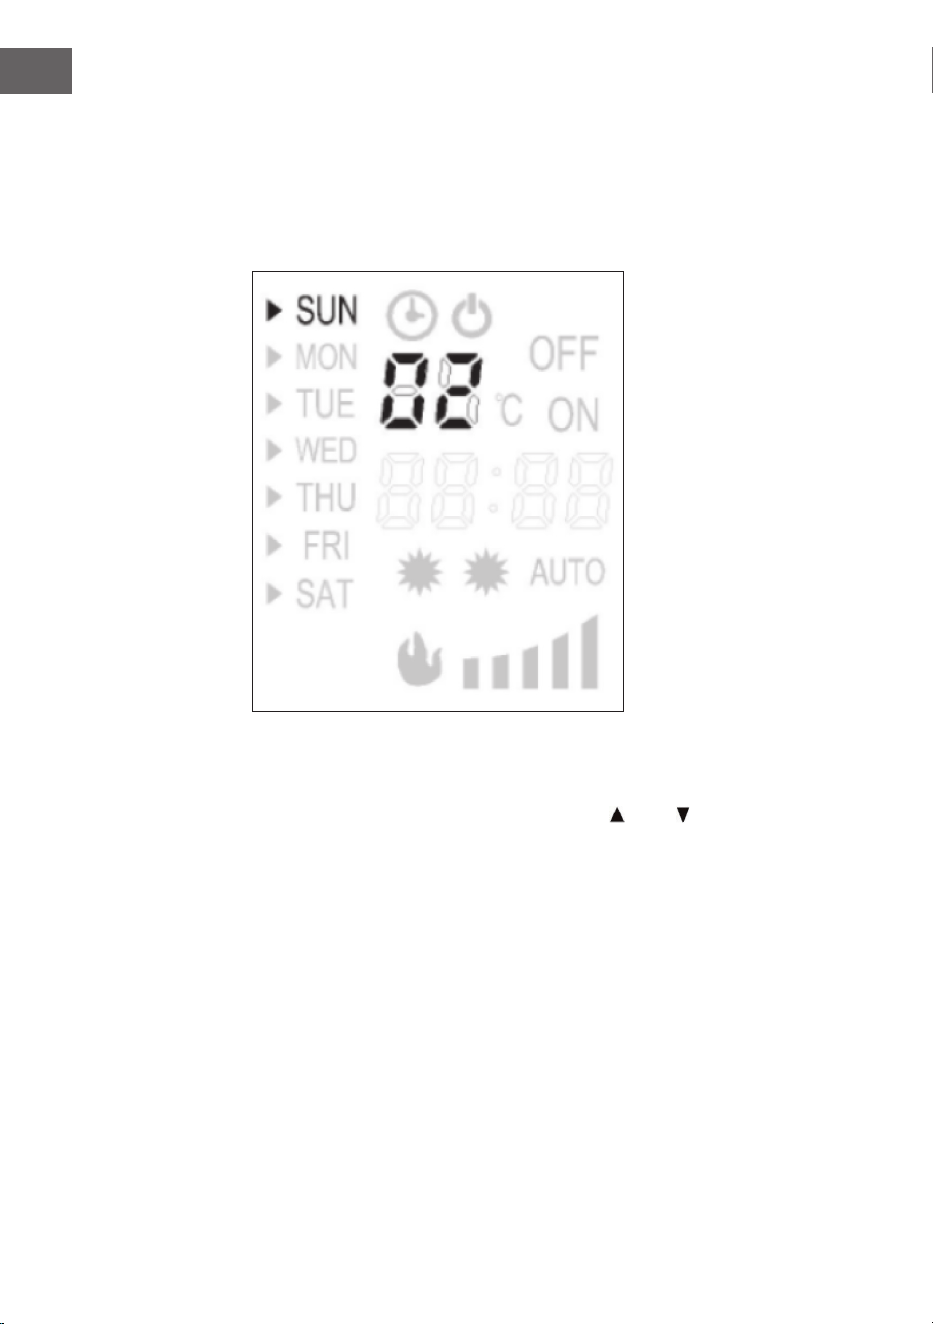
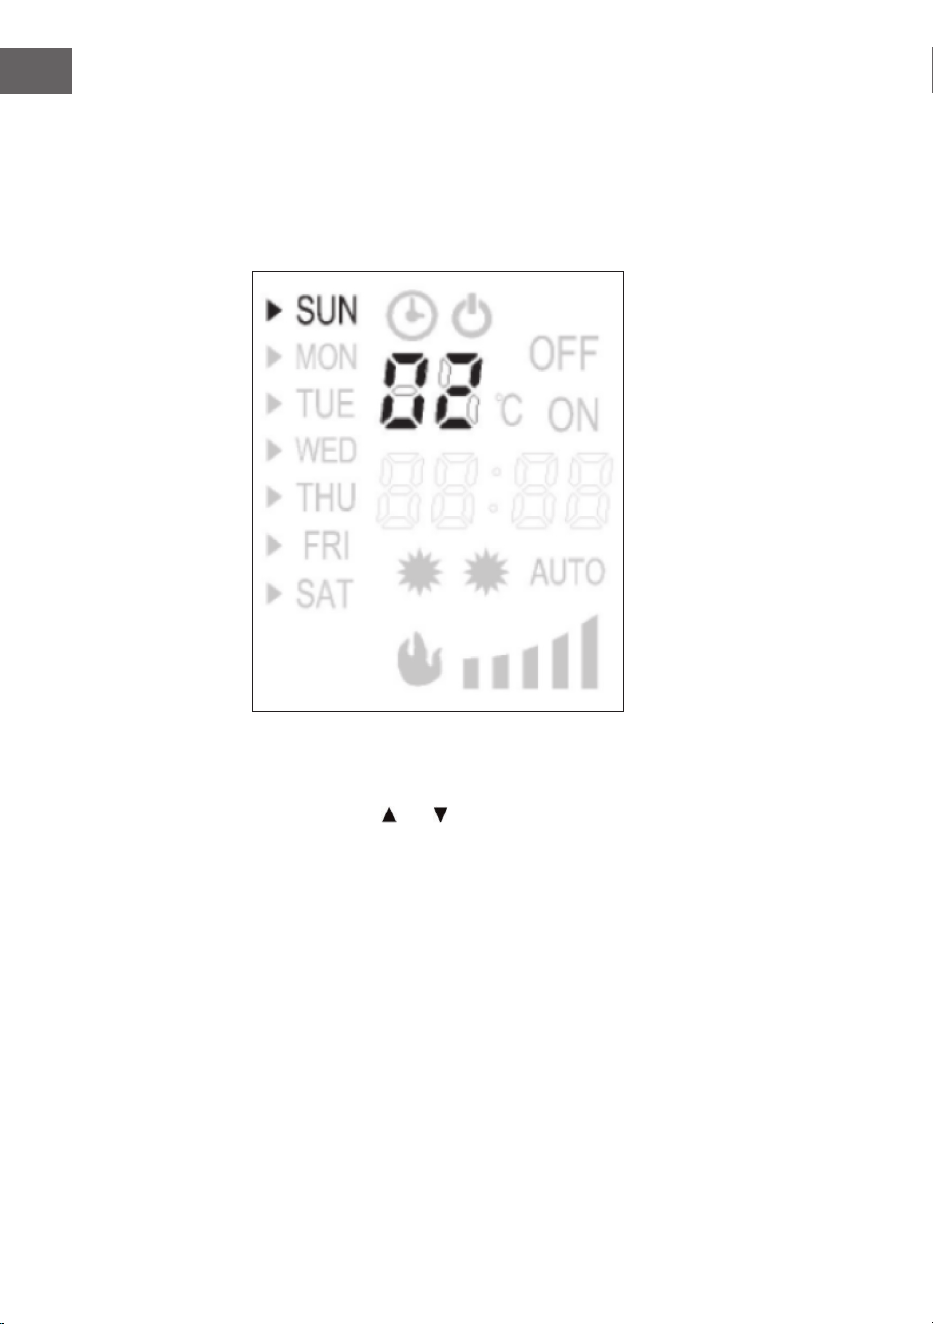
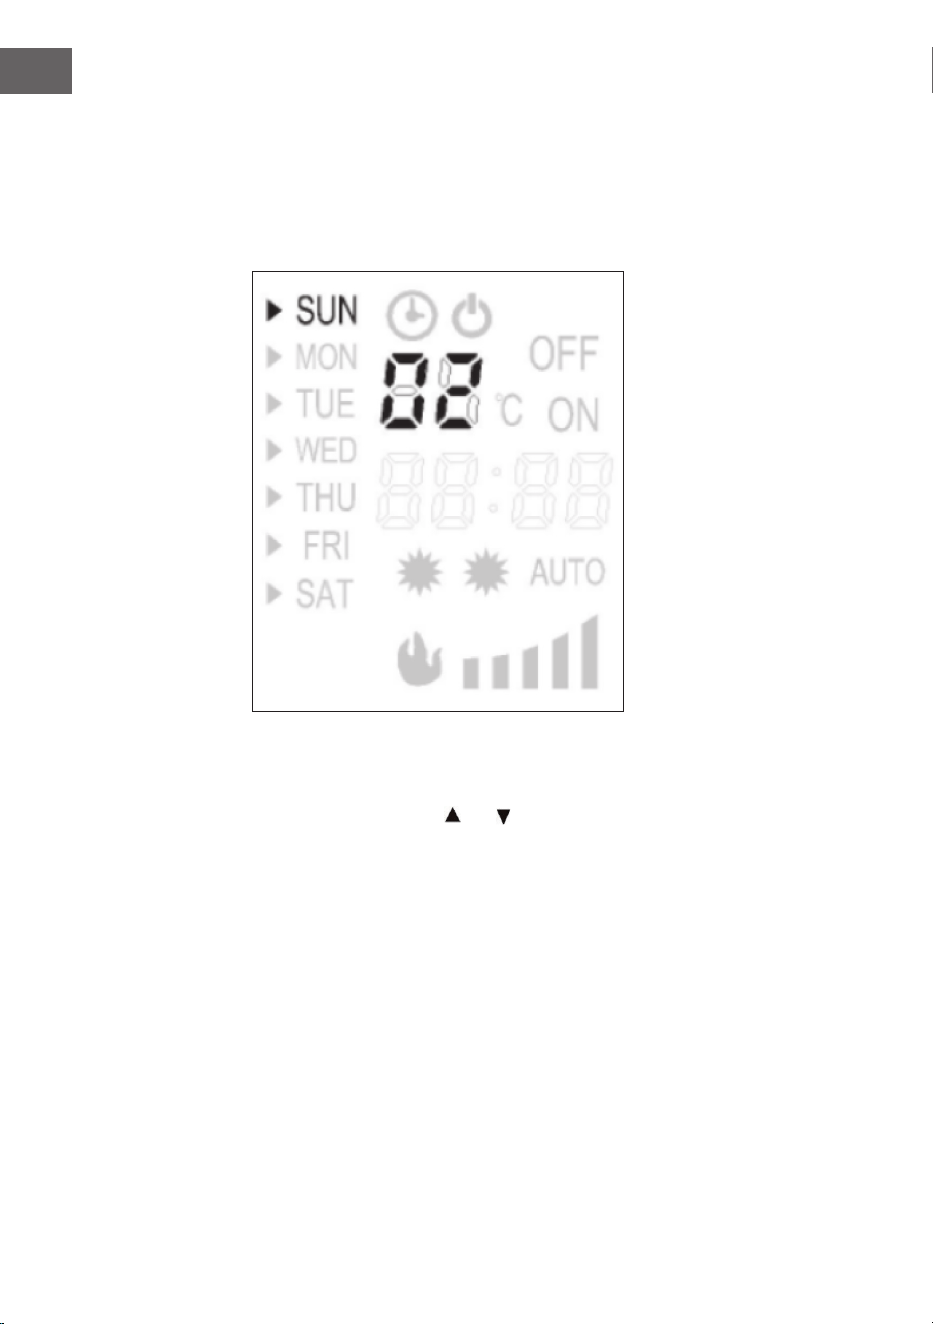
Timer-Einstellungen
(1) Einstellungsnummer auswählen
Drücken Sie auf die Taste [TIMER SET]. Die Timer-Einstellungsnummer blinkt im Display.
Benutzen Sie die [+/-] Taste, um eine andere Einstellungsnummer auszuwählen. Im
Beispiel wird die Einstellungsnummer [02] angezeigt.
(2) Wochentag(e) auswählen
Drücken Sie auf die Taste [TIMER SET] und der Pfeil auf der Linken Seite des
Displays beginnt zu blinken. Benutzen Sie die Taste [ ] oder [ ], um den Pfeil auf
den entsprechenden Wochentag zu bewegen. Drücken Sie dann auf [+], um den
Wochentag zu aktivieren oder drücken Sie auf [-], um den Wochentag zu deaktivieren,
bis alle Einstellungen vorgenommen wurden.
(3) Startzeit einstellen
1 Drücken Sie auf die Taste [TIMER SET], bis die Stundenanzeige blinkt.
2 Benutzen Sie die Tasten [+/-], um die Stunde einzustellen.
3 Drücken Sie auf die Taste [TIMER SET], bis die Minutenanzeige blinkt.
4 Benutzen Sie die Tasten [+/-], um die Minuten einzustellen.

13
DE
(4) Endzeit einstellen
1 Drücken Sie auf die Taste [TIMER SET], bis die Stundenanzeige blinkt.
2 Benutzen Sie die Tasten [+/-], um die Stunde einzustellen.
3 Drücken Sie auf die Taste [TIMER SET], bis die Minutenanzeige blinkt.
4 Benutzen Sie die Tasten [+/-], um die Minuten einzustellen.
(5) Temperatur einstellen
Drücken Sie auf die Taste [TIMER SET], bis die Temperaturanzeige blinkt. Benutzen Sie
die Tasten [+/-], um die Temperatur einzustellen. Mit [+] erhöhen Sie die Temperatur, mit
der Taste [-] verringern Sie die Temperatur.
Drücken Sie zum Schluss erneut auf [TIMER SET] und drücken Sie dann auf [OK], um
die Einstellungen zu speichern.
Wichtige Hinweise zum Timer
• Die Taste [TIMER ON/OFF] dient dazu den Timer ein- und auszuschalten.
• Falls der Strom kurzzeitig ausfällt oder der Stecker gezogen wird, werden die
Einstellungen beibehalten, allerdings müssen Datum und Zeit neu eingestellt
werden.
• Wenn der Wochen-Timer eingeschaltet ist, sollten Sie die Heizung ebenfalls
einschalten, andernfalls funktioniert nur der Flammeneffekt.
Überhitzungsschutz
Das Gerät ist mit einer Überhitzungsschutz ausgestattet, der ausgelöst wird, wenn das
Heizgerät überhitzt ist (z. B. durch versperrte Luftauslässe). Aus Sicherheitsgründen
wird der Kamin NICHT automatisch zurückgesetzt. Um den Überhitzungsschutz
zurückzusetzen, trennen Sie den Kamin vom Netz, und lassen ihn mindestens 15
Minuten lang abkühlen. Stecken Sie den Stecker wieder in die Steckdose und schalten
den Kamin wieder ein.
Fehlerbehebung
Problem Mögliche Ursache und Lösungsansatz
Der Ventilator funktioniert nicht. Überprüfen Sie Ihre Sicherungen.
Überprüfen Sie ob der
Überhitzungsschutz ausgelöst wurde.
Der Feuereffekt funktioniert nicht. Lassen Sie das Gerät von einem
qualizierten Elektriker prüfen.

14
DE
REINIGUNG UND WARTUNG
Ziehen Sie vor der Reinigung immer den Stecker aus der Steckdose und lassen Sie das
Gerät vollständig abkühlen. Reinigen Sie die Oberäche mit einem weichen, trockenen
Tuch. Benutzen Sie niemals Scheuermittel.
Hinweis: Reinigen Sie das Glas mit einem weichen Tuch. Benutzen Sie keinen
herkömmlichen Glasreiniger!
Dieses Produkt verwendet keine Standardbirne für den Flammeneffekt. Das Gerät
verwendet ein elektronisch gesteuertes LED-System. Dieses System darf NICHT vom
Benutzer nicht gewartet. Lassen Sie Reparaturen nur von einem qualizierten Elektriker
ausführen.
15
DE
SPEZIELLE ENTSORGUNGSHINWEISE FÜR
VERBRAUCHER IN DEUTSCHLAND
Entsorgen Sie Ihre Altgeräte fachgerecht. Dadurch wird gewährleistet, dass die
Altgeräte umweltgerecht verwertet und negative Auswirkungen auf die Umwelt und
menschliche Gesundheit vermieden werden. Bei der Entsorgung sind folgende Regeln
zu beachten:
• Jeder Verbraucher ist gesetzlich verpichtet, Elektro- und Elektro-
nikaltgeräte (Altgeräte) sowie Batterien und Akkus getrennt vom
Hausmüll zu entsorgen. Sie erkennen die entsprechenden Altgeräte
durch folgendes Symbol der durchgestrichene Mülltonne (WEEE
Symbol).
• Sie haben Altbatterien und Altakkumulatoren, die nicht vom Altgerät umschlossen
sind, sowie Lampen, die zerstörungsfrei aus dem Altgerät entnommen werden
können, vor der Abgabe an einer Entsorgungsstelle vom Altgerät zerstörungsfrei zu
trennen.
• Bestimmte Lampen und Leuchtmittel fallen ebenso unter das Elektro- und
Elektronikgesetz und sind dementsprechend wie Altgeräte zu behandeln.
Ausgenommen sind Glühbirnen und Halogenlampen. Entsorgen Sie Glühbirnen
und Halogenlampen bitte über den Hausmüll, sofern Sie nicht das WEEE Symbol
tragen.
• Jeder Verbraucher ist für das Löschen von personenbezogenen Daten auf dem
Elektro- bzw. Elektronikgerät selbst verantwortlich.
Rücknahmepicht der Vertreiber
Vertreiber mit einer Verkaufsäche für Elektro- und Elektronikgeräte von mindestens 400
Quadratmetern sowie Vertreiber von Lebensmitteln mit einer Gesamtverkaufäche von
mindestens 800 Quadratmetern, die mehrmals im Kalenderjahr oder dauerhaft Elektro-
und Elektronikgeräte anbieten und auf dem Markt bereitstellen, sind verpichtet,
1 bei der Abgabe eines neuen Elektro- oder Elektronikgerätes an einen Endnutzer ein
Altgerät des Endnutzers der gleichen Geräteart, das im Wesentlichen die gleichen
Funktionen wie das neue Gerät erfüllt, am Ort der Abgabe oder in unmittelbarer
Nähe hierzu unentgeltlich zurückzunehmen und
2 auf Verlangen des Endnutzers Altgeräte, die in keiner äußeren Abmessung größer
als 25 Zentimeter sind, im Einzelhandelsgeschäft oder in unmittelbarer Nähe hierzu
unentgeltlich zurückzunehmen; die Rücknahme darf nicht an den Kauf eines Elektro-
oder Elektronikgerätes geknüpft werden und ist auf drei Altgeräte pro Geräteart
beschränkt.

16
DE
• Bei einem Vertrieb unter Verwendung von Fernkommunikationsmitteln ist die
unentgeltliche Abholung am Ort der Abgabe auf Elektro- und Elektronikgeräte der
Kategorien 1, 2 und 4 gemäß § 2 Abs. 1 ElektroG, nämlich „Wärmeüberträger“,
„Bildschirmgeräte“ (Oberäche von mehr als 100 cm²) oder „Großgeräte“
(letztere mit mindestens einer äußeren Abmessung über 50Zentimeter)
beschränkt. Für andere Elektro- und Elektronikgeräte (Kategorien 3, 5, 6) ist eine
Rückgabemöglichkeit in zumutbarer Entfernung zum jeweiligen Endnutzer zu
gewährleisten.
• Altgeräte dürfen kostenlos auf dem lokalen Wertstoffhof oder in folgenden
Sammelstellen in Ihrer Nähe abgegeben werden:
www.take-e-back.de
• Für Elektro- und Elektronikgeräte der Kategorien 1, 2 und 4 an bieten wir auch die
Möglichkeit einer unentgeltlichen Abholung am Ort der Abgabe. Beim Kauf eines
Neugeräts haben sie die Möglichkeit eine Altgerätabholung über die Webseite
auszuwählen.
• Batterien können überall dort kostenfrei zurückgegeben werden, wo sie verkauft
werden (z. B. Super-, Bau-, Drogeriemarkt). Auch Wertstoff- und Recyclinghöfe
nehmen Batterien zurück. Sie können Batterien auch per Post an uns zurücksenden.
Altbatterien in haushaltsüblichen Mengen können Sie direkt bei uns von Montag bis
Freitag zwischen 08:00 und 16:00 Uhr unter der folgenden Adresse unentgeltlich
zurückgeben:
Chal-Tec Fulllment GmbH
Norddeutschlandstr. 3
47475 Kamp-Lintfort
• Wichtig zu beachten ist, dass Lithiumbatterien aus Sicherheitsgründen vor der
Rückgabe gegen Kurzschluss gesichert werden müssen (z. B. durch Abkleben der
Pole).
• Finden sich unter der durchgestrichenen Mülltonne auf der Batterie zusätzlich die
Zeichen Cd, Hg oder Pb ist das ein Hinweis darauf, dass die Batterie gefährliche
Schadstoffe enthält. (»Cd« steht für Cadmium, »Pb« für Blei und »Hg« für
Quecksilber).
Hinweis zur Abfallvermeidung
Indem Sie die Lebensdauer Ihrer Altgeräte verlängern, tragen Sie dazu bei, Ressourcen
efzient zu nutzen und zusätzlichen Müll zu vermeiden. Die Lebensdauer Ihrer Altgeräte
können Sie verlängern indem Sie defekte Altgeräte reparieren lassen. Wenn sich
Ihr Altgerät in gutem Zustand bendet, könnten Sie es spenden, verschenken oder
verkaufen.

17
DE
HINWEISE ZUR ENTSORGUNG
Wenn es in Ihrem Land eine gesetzliche Regelung zur
Entsorgung von elektrischen und elektronischen Geräten
gibt, weist dieses Symbol auf dem Produkt oder auf der
Verpackung darauf hin, dass dieses Produkt nicht im
Hausmüll entsorgt werden darf. Stattdessen muss es zu
einer Sammelstelle für das Recycling von elektrischen
und elektronischen Geräten gebracht werden. Durch
regelkonforme Entsorgung schützen Sie die Umwelt und die
Gesundheit Ihrer Mitmenschen vor negativen Konsequenzen.
Informationen zum Recycling und zur Entsorgung dieses
Produkts, erhalten Sie von Ihrer örtlichen Verwaltung oder
Ihrem Hausmüllentsorgungsdienst.
Dieses Produkt enthält Batterien. Wenn es in Ihrem Land
eine gesetzliche Regelung zur Entsorgung von Batterien
gibt, dürfen die Batterien nicht im Hausmüll entsorgt werden.
Informieren Sie sich über die örtlichen Bestimmungen zur
Entsorgung von Batterien. Durch regelkonforme Entsorgung
schützen Sie die Umwelt und die Gesundheit Ihrer
Mitmenschen vor negativen Konsequenzen.
HERSTELLER & IMPORTEUR (UK)
Hersteller:
Chal-Tec GmbH, Wallstraße 16, 10179 Berlin, Deutschland.
Importeur für Großbritannien:
Berlin Brands Group UK Limited
PO Box 42
272 Kensington High Street
London, W8 6ND
United Kingdom

19
EN
Dear Customer,
Congratulations on purchasing this device. Please read the
following instructions carefully and follow them to prevent
possible damages. We assume no liability for damage caused
by disregard of the instructions and improper use. Scan the QR
code to get access to the latest user manual and more product
information.
CONTENT
Product Data Sheet20
Safety Instructions21
Installation22
General Use24
Display and Indicators25
Operation and Settings26
Timer Settings27
Care and Cleaning30
Disposal Considerations31
Manufacturer & Importer (UK)31
TECHNICAL DATA
Item number 10012127, 10031843
Power supply 220-240 V ~ 50 Hz
Power 2000 W
20
EN
PRODUCT DATA SHEET
Model identier(s): 10012127, 10031843
Item Symbol Value Unit Item Unit
Heat output Type of heat input, for electric storage local space
heaters only
Nominal heat output Pnom 2.0 kW manual heat charge control, with integrated
thermostat
N/A
Minimum heat output
(indicative)
Pmin 1.0 kW manual heat charge control with room and/or
outdoor temperature feedback
N/A
Maximum continuous heat
output
Pmax,c 2.0 kW electronic heat charge control with room and/or
outdoor temperature feedback
N/A
Auxiliary electricity consumption
fan assisted heat output N/A
At nominal heat output
(fan motor)
elmax 0.014 kW
Type of heat output/room temperature control (select
one)
At minimum heat output
(fan motor)
elmin 0.014 kW single stage heat output and no room
temperature control
no
In standby mode elSB 0.48 W Two or more manual stages, no room
temperature control
no
with mechanic thermostat room temperature
control
no
with electronic room temperature control no
electronic room temperature control plus day
timer
no
electronic room temperature control plus week
timer
yes
Other control options (multiple selections possible)
room temperature control, with presence
detection
no
room temperature control, with open window
detection
no
with distance control option no
with adaptive start control yes
with working time limitation no
with black bulb sensor no
Contact details Chal-Tec GmbH, Wallstraße 16, 10179, Berlin, Germany

21
EN
SAFETY INSTRUCTIONS
• This appliance can be used by children aged from 8 years and above and persons
with reduced physical, sensory or mental capabilities or lack of experience and
knowledge if they have been given supervision or instruction concerning use of the
appliance in a safe way and understand the hazards involved.
• Children shall not play with the appliance. Cleaning and user maintenance shall not
be made by children without supervision.
• Children of less than 3 years should be kept away unless continuously supervised.
• Children aged from 3 years and less than 8 years shall only switch on/off the
appliance provided that it has been placed or installed in its intended normal
operating position and they have been given supervision or instruction concerning
use of the appliance in a safe way and understand the hazards involved. Children
aged from 3 years and less than 8 years shall not plug in, regulate and clean the
appliance or perform user maintenance.
CAUTION
Risk of burns! Some parts of this product can become very hot and
cause burns. Particular attention has to be given to be given where
children and vulnerable people are present.
• If the appliance or the supply cord is damaged, it must be repaired by
manufacturer, its service agent or quali ed person.
• This heater must be used on an AC supply only and the voltage marked on the
heater must correspond to the supply voltage.
• Do not switch the appliance on until it properly installed as described in this manual.
• The heater must not be located immediately below a socket outlet.
• Keep furniture, curtains and other ammable material at least 1 meter away from
the appliance. Never closed to curtains and other combustible material, otherwise
may cause risk
• Do not leave the appliance unattended during use.
• Do not leave the appliance unattended whilst connected to the mains supply.
• This appliance is intended for household use and should not be used for industrial
purposes.
• From time to time, check the cord for damage. Never use the appliance if the cord
or any part of the appliance shows signs of damage.
• Do not operate this appliance with a damaged plug or cord, after a malfunction or
after being dropped or damaged in any way.
• Repairs to electrical appliances should only be performed by a quali ed
electrician. Improper repairs may place the user at serious risk.
• Do not run the mains cable under carpets, rugs etc.
• Do not allow the mains cable to hang over sharp edges or come into contact with
hot surfaces.

22
EN
• In order to avoid overheating, do not cover or obstruct the heater in any way.
• Overheating will result if it is accidentally covered.
• Never immerse the product in water or any other liquids.
• Do not use this heater in the immediate surroundings of a bath, a shower or a
swimming pool.
• Do not use the appliance outdoors.
• Do not use if you have wet hands.
• Never use the appliance on or near hot surfaces.
• Before cleaning the appliance, ensure it is unplugged from the power and that it is
completely cooled.
• Do not clean the appliance with abrasive chemicals.
• Never use accessories that are not recommended or supplied by the manufacturer.
It could cause danger to the user or damage to the appliance.
• Do not lift the appliance by the front panel.
• In order to avoid a hazard due to inadvertent resetting of the thermal cutout, this
appliance must not be supplied through an external switching device, such as a
timer, or connected to a circuit that is regularly switched on and off by the utility.
Note: This heater is not equipped with a device to control the room temperature. Do
not use this heater in small rooms when they are occupied by persons not capable of
leaving the room on their own, unless constant supervision is provided.
INSTALLATION
• The re must not be used until it is securely fastened to the wall.
• Do not connect the appliance to the mains until properly xed to the wall and the
instructions are read fully.
• The minimum distances must be observed in the diagrams below.
• For installation of the appliance, care must be taken not to damage concealed
cables.
• Please be careful whilst drilling holes.
Note: This appliance is designed to be permanently xed to a wall at a minimum
height of 300 mm.The wall bracket must be tted horizontally and the cable routed to
the bottom right of the heater.
23
EN
A distance of 600 mm from bottom of heater to oor is recommended for optimum
viewing of fuel bed. See Fig.1 for recommend xing dimensions. For optimum viewing,
mark the top ve screws xing positions on wall in accordance with the recommend
xing dimensions (see Fig.2). Drill holes with a No. six drill bit.
Fix the wall bracket using that the plug and screws provided. Attach the lower xing
bracket the base of the re using the two small black screws supplied; ensure the bracket
is tted so that it is level with the back. Carefully lift the heater up ensuring that the top
rear ledge of heater engages with the wall bracket (see Fig.2 in circle) and is sitting
centrally. This process should be carried out by two people to avoid injury or damage.
Mark the lower xing bracket two xing hole positions on the wall-see Fig.3, remove the
heater. Drill the wall and insert the wall plugs. Ret the heater to the wall and fasten the
bottom xing bracket to the wall using the screws provided to permanently x the heater
in place. Unpack the pebbles from the bag and place them along the light unit in the
desired position.

24
EN
GENERAL USE
Note: The appliance can be operated either by the switches located on the top right
hand side of the re or by the supplied remote control.
Manual Operation
• This is done by operating the switches located at the top right hand side of the re
.The standby rocker switch must rst be switched on, the re will beep to indicate
that it is powered up.
• Press the O/I button once to turn on the appliance and re effect. A red indicator
light will show to indicate that the re is ON. Press the O/I button for 3 seconds this
will operate the dimmer mode, hold the button down until the desired brightness is
obtained.
• Press the POWER button once for the low heat setting 1000W; press twice for the
high heat setting 2000W; press three to switch off the heat setting.
• Press the BACK LIGHT button to adjust the colors of LED decoration, 7 colors
available.
Remote Operation
The standby rocker switch located at the top right hand
side of the re must rst be switched on; the re will
beep to indicate that it is powered up.
It takes a little time for the receiver to respond to the
transmitter. Do not press the buttons more than once
within two seconds for the re to operate normally.
25
EN
DISPLAY AND INDICATORS
1 Cursor
2 Date
3 Timer
4 Standby
5 Temperature display/
serial number display
6 Timer off
7 Timer on
8 Time display
9 Automatic control of heating
10 Flame brightness
11 Heat position
Temperature and serial number display (5)
Normally it displays the room temperature; while setting the temperature, the setting
temperature is displayed; When setting the timer, the serial number of the setting is
displayed.
Time display (8)
Normally it is display the current time; while setting the timer, the setting time is
displayed.
26
EN
Timer starting and timer shutdown
While setting the timer, the setting time is displayed, and the timer is used in combination
with serial number setting.
E.g. Means the starting time of setting 5 is 23:40.
E.g. means the shutdown time of setting 5 is 6:10.
Flame brightness
It displays the current brightness of the ame, which ranges from one to ve positions.
OPERATION AND SETTINGS
Boot steps
1 Connect the power.
2 Turn on the power switch.
3 Press the control switch or „ON/OFF“ key of the remote controller to start up
4 Press the 1000W/2000W button once for the low heat setting 1000W; press
twice for the high heat setting 2000W; press three to switch off the heat setting.
5 Press the DIMMER button to operate the dimmer mode, repeat pressing will raise
and lower the brightness.
6 Press the BACK LIGHT button to adjust the colors of LED decoration, 7 colors
available.
Adaptive start control function
Press „IC“ button on the remote controller to start or close the adaptive start control
function. When turned on this function, the replace can automatically change the
heating mode, and this is depend on the setting temperature and the room temperature.
When the timer is on, it is possible to start the heating ahead of the schedule.
Note: Adaptive start control function is only working when the week timer systerm is
power on.

27
EN
The date and time setting
1 Press „DATE TIME“ button, then press the „▲ “ or „ ▲“ key to select the date
2 Press „DATE TIME“ button again, then press the „+“ or „-“ to set the hour
3 Press „DATE TIME“ button again, then press the „+“ or „-“ to set the minute
4 Press „OK“ button to nish the setting.
Temperature setting
The default temperature setting is 22°C▲, press „+“ or „-“ on the remote controller to set
the temperature, which ranges is from 15°C to 30°C.
TIMER SETTINGS
• There are up to 10 kinds of timer setting.
• Each setting has its date, power-on time, shutdown time and temperature setting
• The max. time of each setting is 23 hours 50 minutes
• The setting date for each timer can be any day or more days of a week
• The setting date is the date of power-on time. If the shutdown time is on the second
day, it is unnecessary to set the date, you just set the shutdown time.
View the timer setting
1 Press the „TIME SET“ button
2 Press the „+“ or „-“ to check the power-on time by one by one.
3 For checking the shutdown time, press the „ “ button
4 Press the „+“ or „-“ to continue viewing
5 For deleting the current item of setting, press „C“ to delete this setting.
28
EN
Timer setting
(1) Select the settings
Press the „TIME SET“ button, and the serial number of setting starts blinking
Press the „+“ or „-“ to change the serial number of the setting. E.g., it is showing the
setting of No.2 .
(2) Select date
Press „TIME SET“ button once again, and the cursor on the left side of date starts
blinking Press the „ “ or “ ” keys to move the cursor to the corresponding date, press
the „+“ to add the corresponding date, or press „-“ to delete the date until you have
completed the selection of all dates
(3) Set the start time
1 Continue to press the „TIME SET“ button, the hour starts blinking
2 Press the „+“ or „-“ to adjust the hour
3 Continue to press the „TIME SET“ button, the minute starts blinking
4 Press the „+“ or „-“ to adjust minute
29
EN
(4) Set the shutdown time
1 Press the „TIME SET“ button, the display is off, and the hour starts blinking.
2 Press the „+“ or „-“ to adjust the hour.
3 Continue to press the „TIME SET“ button, the minute starts blinking.
4 Press the „+“ or „-“ to adjust minute.
(5) Set temperature
Then press the „TIME SET“ button, and the temperature setting starts blinking. Then
you can adjust the temperature by pressing „+“ or „-“. and “+” button will raise the
temperature, and the “-” will lower the temperature.
Press „TIME SET“ button to continue setting, and press „OK“ complete the setting.
Important Notes on Timer
• TIME ON/OFF is to control the timer opening and closing
• Note 1: Restart the machine after the power is cut off, the original setting is kept,
but the date and time must be reset.
• Note 2: When the week timer is power on, you should turn on the heating function,
or else when the machine is working again as the timer, there will be only the ame
effect working.
Safety Cut-Off
This appliance is tted with a safety cut-off which will operate if the re overheats (e.g.
due to blocked air vents). For safety reasons, the re will NOT automatically reset.
To reset the appliance, disconnect the appliance from the mains supply for at least 15
minutes. Reconnect to the mains supply and switch on the appliance.
Troubleshooting
Symptom Solution
No operation/no fan. Check fuse by replacement.
Check for safety cut-off operation.
No re effect light. Check the bulb by a qualied electrician.

30
EN
CARE AND CLEANING
Always disconnect from the mains supply before cleaning heater. For general cleaning
use a soft clean duster - never use harsh abrasive or cleaners.
Note: The glass viewing screen should be cleaned carefully with a soft cloth. DO
NOT use proprietary glass cleaners.
This product does not use a standard bulb for its ame effect. The appliance uses an
electronically controlled LED system to create the effect, therefor no parts need to be
replaced. There are no user-serviceable parts on this appliance. Under no circumstances
should the appliance be serviced be anyone other than a qualied electrician.

31
EN
DISPOSAL CONSIDERATIONS
If there is a legal regulation for the disposal of electrical
and electronic devices in your country, this symbol on the
product or on the packaging indicates that this product must
not be disposed of with household waste. Instead, it must be
taken to a collection point for the recycling of electrical and
electronic equipment. By disposing of it in accordance with
the rules, you are protecting the environment and the health of
your fellow human beings from negative consequences. For
information about the recycling and disposal of this product,
please contact your local authority or your household waste
disposal service.
This product contains batteries. If there is a legal regulation
for the disposal of batteries in your country, the batteries must
not be disposed of with household waste. Find out about local
regulations for disposing of batteries. By disposing of them in
accordance with the rules, you are protecting the environment
and the health of your fellow human beings from negative
consequences.
MANUFACTURER & IMPORTER (UK)
Manufacturer:
Chal-Tec GmbH, Wallstrasse 16, 10179 Berlin, Germany.
Importer for Great Britain:
Berlin Brands Group UK Limited
PO Box 42
272 Kensington High Street
London, W8 6ND
United Kingdom


33
ES
Estimado cliente:
Le felicitamos por la adquisición de este producto. Lea
atentamente el siguiente manual y siga cuidadosamente las
instrucciones de uso con el n de evitar posibles daños. La
empresa no se responsabiliza de los daños ocasionados por
un uso indebido del producto o por haber desatendido las
indicaciones de seguridad. Escanee el código QR para obtener
acceso al manual de usuario más reciente y otra información
sobre el producto:
ÍNDICE DE CONTENIDOS
Hoja de datos del producto34
Indicaciones de seguridad35
Instalación36
Conguración general38
Vista general del aparato y teclas de control39
Puesta en funcionamiento y conguraciones40
Conguraciones del temporizador41
Limpieza y cuidado44
Indicaciones sobre la retirada del aparato45
Fabricante e importador (Reino Unido)45
DATOS TÉCNICOS
Número de artículo
10012127, 10031843
Suministro eléctrico
220-240 V ~ 50 Hz
Potencia
2000 W
34
ES
HOJA DE DATOS DEL PRODUCTO
Denominación del modelo 10012127, 10031843
Dato Símbolo Valor Unidad Dato Unidad
Potencia térmica Solo con dispositivos de acumulación de calor
eléctricos para abastecimiento local: Tipo de regulación
del abastecimiento de calor
Potencia térmica nominal Pnom 2,0 kW manual heat charge control, with integrated
thermostat
n/a
Potencia térmica mínima
(valor orientativo)
Pmin 1,0 kW manual heat charge control with room and/or
outdoor temperature feedback
n/a
Potencia térmica continua
máxima
Pmax,c 2,0 kW electronic heat charge control with room and/or
outdoor temperature feedback
n/a
Consumo de corriente auxiliar
fan assisted heat output n/a
Con potencia térmica
nominal (Motor del
ventilador)
elmax 0,014 kW
Tipo de potencia térmica/control de temperatura
ambiente
Con potencia térmica mínima
(Motor del ventilador)
elmin 0,014 kW Potencia térmica de un solo nivel, sin control de
temperatura ambiente
no
En modo de espera elSB 0,48 W Dos o más niveles regulables manualmente, sin
control de temperatura ambiente
no
Control de temperatura ambiente con termostato
mecánico
no
Con control electrónico de temperatura
ambiente
no
Con control de temperatura ambiente y
regulación del momento del día
no
Con control de temperatura ambiente y
regulación del día de la semana
si
Otras opciones de regulación
Control de temperatura ambiente con detección
de presencia
no
Control de temperatura ambiente con detección
de ventanas abiertas
no
Con opción de control remoto no
Con regulación adaptable del comienzo de la
calefacción
si
Con limitación de tiempo de funcionamiento no
Con sensor de bulbo negro no
Información de contacto Chal-Tec GmbH, Wallstraße 16, 10179, Berlín (Alemania)

35
ES
INDICACIONES DE SEGURIDAD
• Los niños mayores de 8 años y las personas con discapacidad física o psíquica
pueden utilizar el aparato si han sido previamente instruidos por su tutor o
supervisor sobre el funcionamiento del mismo y conocen las funciones, así como
las indicaciones de seguridad.
• No permita que los niños jueguen con el aparato.
• Mantenga a los niños menores de 3 años alejados del aparato.
• Los niños entre 3 y 8 años solamente podrán utilizar el aparato si han sido
previamente instruidos por su tutor o supervisor sobre su uso y conocen las
indicaciones de seguridad. Los niños entre 3 y 8 años no podrán limpiar, instalar y
realizar labores de mantenimiento en el aparato.
ATENCIÓN
Riesgo de quemaduras. Algunas partes del aparato pueden alcanzar
temperaturas muy elevadas durante el funcionamiento. Asegúrese de
que nadie toque el aparato durante su funcionamiento.
• Si el cable de alimentación o el enchufe está dañado, deberá ser sustituido por el
fabricante, una empresa autorizada o una persona cuali cada.
• Antes de utilizar el aparato, compruebe la tensión en la placa técnica del mismo.
Conecte el aparato a tomas de corriente que se adecuen a la tensión del mismo.
• Solamente ponga en marcha el aparato si lo ha instalado correctamente.
• No instale el aparato directamente debajo de una toma de corriente.
• Mantenga alrededor del aparato un espacio de al menos 1 metro respecto a los
muebles y objetos in amables, como cortinas. No coloque cerca del aparato
líquidos o materiales in amables y explosivos.
• No deje el aparato sin supervisión si este se encuentra en marcha o conectado a la
toma de corriente.
• Este aparato no está indicado para un uso comercial, sino doméstico o para
entornos similares. Entre estos se encuentran o cinas, granjas, hoteles, moteles e
instalaciones que ofrecen servicio bed&breakfast.
• Compruebe el aparato regularmente para detectar posibles averías. No utilice el
aparato si está dañado.
• Las reparaciones deberán ser realizadas por personal autorizado y serán
necesarias si el aparato se ha visto dañado, si el cable de alimentación o el
enchufe están averiados, si se han vertido líquidos o se han dejado caer objetos
sobre el aparato, si el aparato se ha visto expuesto al agua o a la humedad o si el
propio aparato se ha dejado caer.
• No coloque el cable de alimentación debajo de alfombras.
• No deje que el cable quede colgando sobre cantos a lados o que entre en
contacto con super cies calientes.

36
ES
• Para evitar un sobrecalentamiento, no cubra el aparato ni obstruya las ranuras de
ventilación.
• No sumerja el aparato en agua ni en ningún otro líquido.
• No instale el aparato en los cuartos de baño o cerca de una ducha o piscina.
• Utilice el aparato únicamente en el interior.
• No toque el aparato con las manos mojadas.
• No utilice el aparato cerca de supercies calientes.
• Antes de limpiar el aparato, desconéctelo de la toma de corriente y deje que se
enfríe por completo.
• No utilice productos de limpieza químicos.
• Utilice exclusivamente los accesorios recomendados por el fabricante, ya que, de
lo contrario, podría suponer un riesgo para el usuario o provocar una avería en el
aparato.
• No levante el aparato por la pantalla delantera.
• No conecte el aparato a tomas de corriente manejadas por control remoto ni con
temporizador.
Atención: El aparato no está equipado con un sensor que mida y controle la
temperatura ambiente. Por ello, no utilice el aparato en estancias en las que se
encuentren personas que no puedan manejarlo por sí mismas o que no pueden
abandonar la estancia por sí mismas.
INSTALACIÓN
Solamente ponga en marcha el aparato si lo ha instalado correctamente. Lea
atentamente todas las indicaciones antes de instalar el aparato.
Respete todas las dimensiones indicadas en las instrucciones de instalación. Durante la
instalación, asegúrese de no dañar ningún cable que se encuentre enyesado detrás de
la pared. Tenga cuidado al taladrar los oricios.
Atención: El aparato se ha diseñado para montarse en una pared de forma
permanente a una altura mínima de 30 mm sobre el suelo. Los soportes deben estar
horizontales y el cable debe pasar recto por debajo del aparato
37
ES
Para que la chimenea tenga una apariencia óptima, le recomendamos montar el
aparato a 60 cm sobre el suelo (véase ilustración 1). Fije los soportes superiores a
la pared. Encontrará las dimensiones recomendadas en la ilustración 2. Taladre los
oricios con una broca del 6.
Fije los soportes inferiores en el aparato, alinee el aparato con cuidado y con la
ayuda de otra persona a la pared y marque ahí las posiciones de los oricios. Retire el
aparato y taladre los oricios. A continuación, je el aparato en los soportes superiores
y monte los soportes inferiores en la pared con la ayuda de los tornillos (véase
ilustraciones 3 y 4). Después de jar la chimenea, extraiga las pierdas decorativas del
embalaje y colóquelas en la posición deseada a lo largo de la fuente de iluminación.

38
ES
CONFIGURACIÓN GENERAL
Atención: Puede controlar el aparato a través de los botones situados en la parte
superior derecha de la chimenea o mediante el mando a distancia suministrado.
Manejo manual
• Coloque el interruptor Standby en posición ON para encender la chimenea.
Escuchará un pitido.
• Pulse una vez el botón [O/I] para activar el efecto de llamas. Se encenderá un
indicador LED. Pulse el mismo botón durante 3 segundos para activar el modo
atenuación. Mantenga el botón pulsado hasta conseguir la luz deseada.
• Pulse una vez el botón [POWER] para encender la calefacción de baja potencia
(1000 W). Pulse dos veces el botón [POWER] para encender la calefacción de
alta potencia (2000 W). Pulse una tercera vez el botón [POWER] para apagar la
calefacción.
• Para ajustar el color de fondo (7 colores disponibles), pulse el botón [BACK
LIGHT].
Mando a distancia
Antes de poder utilizar el mando a distancia, coloque
el interruptor en posición ON. Un pitido indica que el
aparato está encendido.
Se necesitará un tiempo hasta que el receptor del
aparato reconozca al emisor. No pulse ningún botón
en el intervalo de dos segundos para que el aparato
funcione correctamente.
39
ES
VISTA GENERAL DEL APARATO Y TECLAS DE
CONTROL
1 Flecha
2 Día de la semana
3 Temporizador
4 Standby
5 Indicador de temperatura
y números de ajuste del
temporizador
6 Temporizador apagado
7 Temporizador encendido
8 Hora
9 Control automático de
calefacción
10 Luminosidad de las llamas
11 Potencia de calefacción
Indicador de temperatura y números de ajuste del temporizador (5)
Normalmente, la pantalla muestra la temperatura ambiente. Al congurar la
temperatura, se muestra la temperatura congurada. Al congurar el temporizador, se
indican los números de ajuste del temporizador.
Hora (8)
Normalmente, se indica la hora actual. Al congurar el temporizador, se indica la hora
congurada del temporizador.
40
ES
Encender/Apagar el temporizador
Al congurar el temporizador, se indican en la pantalla la hora congurada y los
números de ajuste del temporizador.
En este ejemplo, se muestra la hora de inicio del ajuste 5.
En este ejemplo, se muestra la hora de nalización del ajuste 5.
Luminosidad de las llamas
La luminosidad de las llamas dispone de 5 niveles y su ajuste se indica en la pantalla.
PUESTA EN FUNCIONAMIENTO Y
CONFIGURACIONES
Poner el aparto en marcha
1 Introduzca el cable de alimentación en la toma de corriente.
2 Pulse el interruptor de encendido.
3 Pulse el botón [I/O] o [ON/OFF] en el mando a distancia para encender el
aparato.
4 Pulse una vez el botón [1000W/2000W] para encender la calefacción de baja
potencia (1000 W). Pulse otra vez el mismo botón para encender la calefacción
de alta potencia (2000 W). Vuelva a pulsar el mismo botón para apagar la
calefacción.
5 Pulse varias veces el botón [DIMMER] para ajustar el brillo.
6 Pulse el botón [BACK LIGHT] para elegir 1 de los 7 colores de fondo.
Función de inicio adaptable
Pulse el botón [IC] en el mando a distancia para iniciar la función de inicio adaptable.
Cuando esta función está activada, el aparato ajusta automáticamente la potencia de
calefacción basándose en la temperatura ambiente y en la temperatura congurada.
Si hay un temporizador congurado, es posible que la calefacción se inicie antes de la
hora congurada.
Atención: Esta función solo funciona cuando está congurado el temporizador
semanal.
41
ES
Congurar la fecha y hora
1 Pulse el botón [DATE/TIME] y utilice los botones [ ] y [ ] para ajustar la fecha.
2 Vuelva a pulsar el botón [DATE/TIME] y utilice los botones [+/-] para congurar la
hora.
3 Vuelva a pulsar el botón [DATE/TIME] y utilice los botones [+/-] para congurar
los minutos.
4 Pulse el botón [OK] para guardar la conguración.
Congurar la temperatura
La temperatura preestablecida es de 22 °C. Pulse los botones [+/-] para ajustar la
temperatura entre 15 y 30 °C.
CONFIGURACIONES DEL TEMPORIZADOR
• Hay 10 tipos de conguraciones de temporizador disponibles.
• Cada conguración cuenta con una hora de inicio, una hora de nalización y un
ajuste de temperatura.
• La hora máxima congurable es de 23 horas y 50 minutos.
• Se puede programar la conguración para un día en concreto o varios días.
• La hora congurada es la hora de inicio. Si la hora de nalización debe ser al día
siguiente, solamente debe congurar el temporizador de apagado.
Ver las conguraciones del temporizador
1 Pulse el botón [TIMER SET].
2 Utilice los botones [+/-] para pasar de una hora de inicio a otra.
3 Para visualizar la hora de nalización, pulse el botón [ ].
4 Utilice los botones [+/-] para pasar de una hora de nalización a otra.
5 Para eliminar la conguración actual, pulse el botón [C].

42
ES
Conguraciones del temporizador
(1) Elegir los números de ajuste
Pulse el botón [TIMER SET]. Los números de ajuste del temporizador parpadearán en
la pantalla. Utilice los botones [+/-] para elegir un número de ajuste. En el ejemplo, el
número de ajuste elegido es 2.
(2) Elegir el día de la semana
Pulse el botón [TIMER SET] y la echa de la parte izquierda de la pantalla empezará
a parpadear. Utilice los botones [ ] o [ ] para mover la echa al día de la semana
correspondiente. A continuación, pulse [+] para activar el día de la semana o pulse
el botón [-] para desactivar el día de la semana hasta haber completado todas las
conguraciones.
(3) Congurar la hora de inicio
1 Mantenga pulsado el botón [TIMER SET] hasta que empiecen a parpadear los
dígitos de la hora.
2 Utilice los botones [+/-] para congurar la hora.
3 Mantenga pulsado el botón [TIMER SET] hasta que empiecen a parpadear los
dígitos de los minutos.
4 Utilice los botones [+/-] para congurar los minutos.
43
ES
(4) Congurar la hora de nalización
1 Mantenga pulsado el botón [TIMER SET] hasta que empiecen a parpadear los
dígitos de la hora.
2 Utilice los botones [+/-] para congurar la hora.
3 Mantenga pulsado el botón [TIMER SET] hasta que empiecen a parpadear los
dígitos de los minutos.
4 Utilice los botones [+/-] para congurar los minutos.
(5) Congurar la temperatura
Mantenga pulsado el botón [TIMER SET] hasta que empiecen a parpadear los dígitos
de la temperatura. Utilice los botones [+/-] para congurar la temperatura. Con el
botón [+] aumenta la temperatura y con el botón [-] disminuye la temperatura.
Para nalizar, vuelva a pulsar el botón [TIMER SET] y a continuación, pulse [OK]
para guardar la conguración.
Indicaciones importantes sobre el temporizador
• Los botones [TIMER ON/OFF] sirven para activar/desactivar el temporizador.
• Si se produce un corte de electricidad o se desconecta el enchufe, las
conguraciones se mantendrán, pero se tendrá que ajustar la hora y la fecha.
• Cuando el temporizador semanal está encendido, se deberá activar la
calefacción, de lo contrario, solo funcionará el efecto de llamas.
Protección contra sobrecalentamiento
Este aparato está equipado con un sistema de protección contra soblecalentamiento que
se activa cuando la chimenea se sobrecalienta (p. ej. a causa de ranuras de ventilación
obstruidas). Por motivos de seguridad, el calefactor NO se reinicia automáticamente. Para
reiniciar el sistema de protección contra soblecalentamiento, desconecte el enchufe de la
toma de corriente y espere un mínimo de 15 minutos antes de volver a poner en marcha el
aparato. A continuación, conecte de nuevo el cable y encienda el aparato.
Detección y resolución de anomalías
Problema Posible causa y solución
El ventilador no funciona. Compruebe el fusible.
Compruebe si el sistema de protección
contra soblecalentamiento está activado.
El efecto de llamas no funciona. Contacte con electricista para que revise
la chimenea.

44
ES
LIMPIEZA Y CUIDADO
Antes de limpiar el aparato, desconéctelo de la toma de corriente y deje que se enfríe
por completo. Utilice un paño suave y seco para limpiar la parte superior. Nunca
emplee productos de limpieza.
Atención: Utilice un paño suave para limpiar el cristal. No utilice limpiacristales.
Este producto no utiliza bombillas estándar para el efecto de llamas. El aparato emplea
un sistema LED controlado de manera electrónica. NO existen piezas que puedan ser
reparadas por el usuario. Solamente un servicio técnico cualicado puede llevar a
cabo las reparaciones.
45
ES
INDICACIONES SOBRE LA RETIRADA DEL
APARATO
Si en su país existe una disposición legal relativa a la
eliminación de aparatos eléctricos y electrónicos, este
símbolo estampado en el producto o en el embalaje
advierte que no debe eliminarse como residuo doméstico.
En lugar de ello, debe depositarse en un punto de recogida
de reciclaje de aparatos eléctricos y electrónicos. Una
gestión adecuada de estos residuos previene consecuencias
potencialmente negativas para el medio ambiente y la salud
de las personas. Puede consultar más información sobre el
reciclaje y la eliminación de este producto contactando con
su administración local o con su servicio de recogida de
residuos.
Este producto contiene baterías. Si en su país existe una
disposición legal relativa a la eliminación de baterías, estas
no deben eliminarse como residuo doméstico. Infórmese
sobre la normativa vigente relacionada con la eliminación de
baterías. Una gestión adecuada de estos residuos previene
consecuencias potencialmente negativas para el medio
ambiente y la salud de las personas.
FABRICANTE E IMPORTADOR (REINO UNIDO)
Fabricante:
Chal-Tec GmbH, Wallstraße 16, 10179 Berlín, Alemania.
Importador para Gran Bretaña:
Berlin Brands Group UK Limited
PO Box 42
272 Kensington High Street
London, W8 6ND
United Kingdom


47
FR
Cher client,
Toutes nos félicitations pour l’acquisition de ce nouvel appareil.
Veuillez lire attentivement les instructions suivantes de branchement
et d’utilisation an d’éviter d’éventuels dommages. Le fabricant ne
saurait être tenu pour responsable des dommages dus au non-
respect des consignes de sécurité et à la mauvaise utilisation
de l’appareil. Scannez le QR-Code pour accéder à la dernière
version du mode d‘emploi et à d‘autres informations concernant
le produit:
SOMMAIRE
Fiche de données produit48
Consignes de sécurité49
Installation 50
Utilisation générale52
Écran et indications53
Mise en service et réglages54
Réglages de la minuterie55
Nettoyage et entretien58
Informations sur le recyclage59
Fabricant et importateur (UK)59
FICHE TECHNIQUE
Numéro d’article
10012127, 10031843
Alimentation électrique
220-240 V ~ 50 Hz
Puissance
2000 W
48
FR
FICHE DE DONNÉES PRODUIT
Référence (s) du produit 10012127, 10031843
Donnée Symbole Valeur Unité Donnée Unité
Puissance calorique Uniquement pour les radiateurs électriques à
accumulation : Type de régulation de l'apport de chaleur
Puissance calorique
nominale
Pnom 2,0 kW Régulation manuelle de l'apport de chaleur avec
thermostat intégré
Sans
objet
Puissance calorique
minimale (indicative)
Pmin 1,0 kW Régulation manuelle de l'apport de chaleur avec
indication de la température de la pièce et/ou de
l'extérieur
Sans
objet
Puissance maximale continue
de chauffage
Pmax,c 2,0 kW Régulation électronique de l'apport de chaleur
avec indication de la température de la pièce et/
ou de l'extérieur
Sans
objet
Consommation de courant auxiliaire
Apport de chaleur assisté par ventilateur Sans
objet
A puissance calorique
nominale (moteur de
ventilateur)
elmax 0,014 kW
Type de chauffage/contrôle de la température de la
pièce
A puissance calorique
minimale (moteur de
ventilateur)
elmin 0,014 kW Chauffage à une seule vitesse, pas de contrôle de
la température ambiante
non
En mode veille elSB 0,48 W Deux vitesses ou plus réglables manuellement, pas
de contrôle de la température ambiante
non
Contrôle de la température ambiante par
thermostat mécanique
non
Contrôle électronique de la température ambiante non
Contrôle électronique de la température ambiante
et régulation par jour
non
Contrôle électronique de la température ambiante
et régulation par semaine
oui
Autres options de régulation
Contrôle de la température ambiante avec
détection de présence
non
Contrôle de la température ambiante avec
détection de fenêtre ouverte
non
Avec option télécommande non
Avec contrôle du démarrage du chauffage oui
Avec limitation de la durée de fonctionnement non
Avec globe noir capteur de température non
Coordonnées de contact Chal-Tec GmbH, Wallstraße 16, 10179, Berlin, Allemagne

49
FR
CONSIGNES DE SÉCURITÉ
• Les enfants à partir de 8 ans ainsi que les personnes dont les capacités physiques,
mentales ou sensorielles sont réduites peuvent utiliser l’appareil à condition
d’avoir assimilé au préalable les consignes d’utilisation et de sécurité de l’appareil
transmises par une personne responsable de leur sécurité.
• Surveillez les enfants, ne les laissez pas jouer avec l‘appareil.
• Tenez les enfants de moins de 3 ans éloignés de l‘appareil.
• Les enfants entre 3 et 8 ans peuvent utiliser l‘appareil uniquement s‘ils ont assimilé
au préalable les consignes d’utilisation et de sécurité de l’appareil transmises par
une personne responsable de leur sécurité. Les enfants entre 3 et 8 ans ne sont pas
autorisés à brancher l‘appareil, à le nettoyer ou à l‘entretenir.
ATTENTION
Risque de brûlure ! certaines parties de l‘appareil peuvent être très
chaudes pendant le fonctionnement. Veillez à ce que les enfants ou les
handicapés n‘approchent pas trop de l‘appareil.
• Si le câble secteur ou la che sont endommagés, faites-les remplacer par le fabricant
un service professionnel agréé ou une personne de quali cation équivalente.
• Avant l’utilisation, véri ez la tension sur la plaque signalétique de l’appareil. Ne
branchez l’appareil que sur des prises de la tension correspondante.
• Allumez l‘appareil seulement une fois qu‘il a été correctement installé.
• N‘installez pas l‘appareil directement sous une prise de courant.
• Laissez autour de l‘appareil un espace de 1 mètre minimum avant les meubles
et autres objets in ammables tels que les rideaux. Ne placez aucun liquide
in ammable ou explosif ni des tissus à proximité de l‘appareil.
• Ne laissez pas l‘appareil sans surveillance, tant qu‘il est en service ou qu‘il est
branché sur le secteur.
• L’appareil n’est pas destiné à une utilisation commerciale mais au cadre domestique et
dans des conditions similaires. Cela comprend les cuisines de bureaux, les auberges,
hôtels, motels et installations proposant des services de type Bed & Breakfast.
• Contrôlez régulièrement le bon état de l‘appareil. n‘utilisez pas l‘appareil s‘il est endommagé.
• Les réparations ne doivent être effectuées que par des professionnels et sont
nécessaires lorsque l’appareil, le câble secteur ou la che ont été endommagés, si
des liquides ont coulé dessus, si des objets sont tombés dessus, si l’appareil a été
exposé à la pluie ou à l’humidité, s’il est tombé ou s’il ne fonctionne pas normalement.
• Ne faites pas passer le câble d‘alimentation sous un tapis.
• Ne faite spas pendre le câble d‘alimentation sur un rebord coupant ni passer sur
des surfaces chaudes.
• Pour éviter les surchauffes, ne recouvrez pas l‘appareil et veillez à ce que les fentes
d‘aération ne soient pas obstruées.
• Ne plongez jamais l’appareil dans l’eau ni dans d’autres liquides.
• N‘installez pas l‘appareil dans une salle de bains ou à proximité immédiate d‘une
douche ou d‘une piscine.
• N‘utilisez pas l‘appareil à l‘extérieur.

50
FR
• Ne touchez pas l‘appareil avec les mains mouillées.
• Ne placez pas l‘appareil sur ou à proximité d‘une surface chaude.
• Avant le nettoyage, débranchez toujours la che de la prise et laissez l‘appareil
refroidir complètement.
• N‘utilisez aucun produit de nettoyage chimique.
• Utilisez uniquement les accessoires fournis, faute de quoi l‘appareil pourrait
représenter un danger pour l‘utilisateur ou tomber en panne.
• Ne soulevez pas l‘appareil par le panneau avant.
• Ne branchez pas l‘appareil sur une prise de courant à démarrage différé ou
télécommandée.
Remarque : si votre appareil est équipé d‘un capteur de mesure et de contrôle de la
température ambiante, n‘installez pas l‘appareil dans les pièces o se trouvent des
personnes qui ne peuvent utiliser elles-mêmes l‘appareil ni quitter la pièce de leurs
propres moyens.
INSTALLATION
Ne branchez pas l‘appareil tant qu‘il n‘est pas complètement et correctement installé.
Avant l‘installation, lisez la notice consciencieusement et installez l‘appareil seulement
une fois que vous avez lu et compris tous les conseils.
Tenez-vous en scrupuleusement aux indications de mesures du guide d‘installation.
Veillez à n‘endommager aucun câble dans le plâtre du mur lors de l‘installation. Soyez
très prudent lorsque vous percez les trous.
Remarque : cet appareil est conçu pour être xé dénitivement au mur et doit être
installé à une hauteur minimale de 30 cm au-dessus du sol. Les pattes de support
doivent être montées horizontalement et le câble doit être passé derrière la cheminée
à droite.

51
FR
Pour que vous puissiez bien voir votre cheminée, nous vous conseillons de l‘installer à
60 cm de hauteur (voir schéma 1). Fixez les pattes de xation supérieures au mur. Vous
trouverez les mesures conseillées sur le schéma 2. Pour réaliser les perçages, utilisez un
foret de 6 mm.
Fixez les attes de xation inférieures sur l‘appareil et les emplacements des trous au mur
en maintenant l‘appareil avec précaution contre le mur (il est nécessaire d‘être à deux
pour cela). Reposez l‘appareil et percez les trous. Enn, posez l‘appareil sur les pattes
supérieures et xez les pattes inférieures au mur avec des vis, voir schémas 3 et 4. Une
fois la cheminée xée, vous pouvez prendre les pierres dans l‘emballage et les installer
dans la position de votre choix le long de l‘unité d‘éclairage.

52
FR
UTILISATION GÉNÉRALE
Remarque : vous pouvez piloter la cheminée soit avec les touches de la cheminée
elle-même (en haut à droite), soit par la télécommande.
Utilisation manuelle
• Placez le commutateur à bascule en position ON pour mettre l‘appareil en ordre de
marche. Vous pouvez entendre un bip.
• Appuyez une fois sur la touche [O/I] pour activer la simulation de ammes, un
témoin LED s‘allume. Appuyez sur la même touche pendant 3 secondes pour
activer la fonction dimm, maintenez la touche jusqu‘à ce que vous obteniez le
niveau de luminosité souhaité.
• Appuyez une fois sur la touche [POWER] pour allumer la puissance la plus basse
(1000W). Appuyez deux fois sur la touche [POWER], pour démarrer la plus forte
puissance de chauffage (2000W). Appuyez trois fois sur la touche [POWER] pour
éteindre le chauffage.
• Ur régler la couleur du rétroéclairage (7 couleurs au choix), appuyez sur la touche
[BACK LIGHT].
Utilisation par télécommande
Pour que la télécommande fonctionne, l‘interrupteur
à bascule doit se trouve sur ON. Un bip signale que
l‘appareil est allumé.
Le récepteur de l‘appareil a besoin d‘un peu de
temps pour reconnaître le transmetteur. N‘appuyez
plus sur aucune touche pendant 2 secondes pour que
l‘appareil fonctionne normalement.

53
FR
ÉCRAN ET INDICATIONS
1 èche
2 jour de la semaine
3 Minuterie
4 Veille
5 afchage de la température
et témoin du numéro choisi
6 Eteindre la minuterie
7 Minuterie allumée
8 Afchage de l‘heure
9 Contrôle automatique du
chauffage
10 Luminosité des ammes
11 Puissance calorique
Afchage de la température et témoin de numéro de réglage de la minuterie (5)
En principe, l‘écran indique la température ambiante. Pendant le réglage de la
température, c‘est la température réglée qui est afchée. Si vos réglez la minuterie, c‘est
alors le numéro de réglage qui est afché.
Afchage de l‘heure (8)
Par défaut, l‘heure actuelle est afchée. Lorsque vous réglez la minuterie, c‘est la durée
de la minuterie qui est afchée ici.
54
FR
Réglage de la minuterie de démarrage ou d‘arrêt
Lorsque vous réglez la minuterie, les durées réglées et le numéro de réglage de la
minuterie s‘afchent à l‘écran.
L'afchage de cet exemple indique l'heure de début du réglage 5.
L'afchage de cet exemple indique l'heure de n du réglage 5.
Luminosité des ammes
La luminosité des ammes est réglable en 5 niveaux et est afchée.
MISE EN SERVICE ET RÉGLAGES
Démarrage de l‘appareil
1 Branchez la che dans une prise.
2 Basculez l‘interrupteur sur ON.
3 Appuyez sur la touche [I/O] ou la touche [ON/OFF] de la télécommande pour
démarrer l‘appareil.
4 Appuyez une fois sur la touche [1000W/2000W] pour démarrer la plus faible
puissance de chauffage (1000 W), appuyez de nouveau sur la touche pour activer
la plus forte puissance (2000 W). Appuyez une troisième fois sur la touche pour
éteindre le chauffage.
5 Appuyez plusieurs fois sur la touche [DIMMER] pour réduire la luminosité.
6 Appuyez sur la touche [BACK LIGHT] pur choisir l‘une des 7 couleurs de
rétroéclairage disponibles.
Fonction de contrôle de démarrage adaptatif
Appuyez sur la touche [IC] de la télécommande pour démarrer la fonction de contrôle
de démarrage adaptatif. Lorsque vous activez cette fonction, l‘appareil ajuste la
puissance de chauffage automatique en se basant sur la température ambiante et la
température réglée. Si une minuterie a été programmée, il se peut que le chauffage
démarre avant l‘heure programmée.
Remarque : la fonction n‘est disponible que si vous avez programmé une minuterie
pour la semaine.

55
FR
Réglage de la date et de l‘heure
1 Appuyez sur la touche [DATE/TIME] et utilisez les touches échées [ ] ou [ ]pour
régler la date.
2 Appuyez de nouveau sur la touche [DATE/TIME et utilisez les touches [+/-] pour
régler les heures.
3 Appuyez de nouveau sur la touche [DATE/TIME] et utilisez les touches [+/-] pour
régler les minutes.
4 Appuyez sur la touche [OK] pour sauvegarder les réglages.
Réglage de la température
La température préréglée est de 22°C. Appuyez sur les touches [+/-] pour régler la
température de de votre choix entre 15-30°C.
RÉGLAGES DE LA MINUTERIE
• Il existe 10 réglages différents pour la minuterie.
• Chaque réglage possède une heure de début, une heure de n et une température.
• La durée maximale réglable est de 23 heures et 50 minutes.
• Vous pouvez programmer un réglage pour un jour donné ou plusieurs jours.
• L‘heure réglée est celle du début. Si l‘heure de n se trouve le jour suivant, vous
n‘avez besoin de régler que l‘heure de n.
Afchages des réglages de la minuterie
1 Appuyez sur la touche [TIMER SET].
2 Utilisez les touches [+/-] pour parcourir les unes après les autres les heures de
début.
3 Pour afcher les heures de n, appuyez sur la touche [ ].
4 Utilisez les touches [+/-] pour parcourir les unes après les autres les heures de n.
5 Pour effacer le réglage en cours, appuyez sur la touche [C].
56
FR
Réglages de la minuterie
(1) Choix du numéro de réglage
Appuyez sur la touche [TIMER SET]. Le numéro de réglage de la minuterie clignote à
l‘écran. Utilisez la touche [+/-] pour sélectionner un autre numéro de réglage. Dans
l‘exemple, le numéro de réglage [02] est afché.
(2) Choix du (des) jour(s) de la semaine
Appuyez sur la touche [TIMER SET] et la èche sur la gauche de l‘écran se met à
clignoter. Utilisez la touche [ ] ou [ ] pour déplacer la èche en face du jour de la
semaine choisi. Appuyez ensuite sur [+] pour activer le jour de la semaine ou appuyez
sur [-] pour désactiver le jour de la semaine, jusqu‘à avoir procédé à tous les réglages.
(3) Réglage de l‘heure de début
1 Appuyez sur la touche [TIMER SET] jusqu‘à ce que l‘afchage des heures clignote.
2 Utilisez les touches [+/-] pour régler les heures.
3 Appuyez sur la touche [TIMER SET] jusqu‘à ce que l‘afchage des minutes
clignote.
4 Utilisez les touches [+/-] pour régler les minutes.

57
FR
(4) Réglage de l‘heure de n
1 Appuyez sur la touche [TIMER SET] jusqu‘à ce que l‘afchage des heures clignote.
2 Utilisez les touches [+/-] pour régler les heures.
3 Appuyez sur la touche [TIMER SET] jusqu‘à ce que l‘afchage des minutes
clignote.
4 Utilisez les touches [+/-] pour régler les minutes.
(5) Réglage de la température
Appuyez sur la touche [TIMER SET] jusqu‘à ce que l‘afchage de la température
clignote. Utilisez les touches [+/-] po régler la température. Avec [+] vous augmentez la
température, avec la touche [-] vous la réduisez.
Terminez en appuyant de nouveau sur [TIMER SET] et appuyez ensuite sur [OK] pour
sauvegarder les réglages.
Conseils important pour la minuterie
• La touche [TIMER ON/OFF] sert à allumer et éteindre la minuterie.
• Si le courant est coupé momentanément ou que la ch est retirée, les réglages
seront conservés, toutefois vous devrez à nouveau régler la date et l‘heure.
• Lorsque la minuterie de la semaine est activée vous devez également allumer le
chauffage, faute de quoi seule la simulation de ammes fonctionnera.
Protection contre la surchauffe
L‘appareil est équipé d‘une protection contre la surchauffe qui se déclenche lorsque le
radiateur surchauffe (par ex en cas d‘aération bouchée). Pour des raisons de sécurité la
cheminée NE PEUT PAS se remettre en marche toute seule. Pour réinitialiser la protection
anti surchauffe, débranchez la cheminée du secteur, et laissez-la refroidir au moins 15
minutes. Rebranchez la che dans la prise et rallumez la cheminée.
Résolution des problèmes
Problème Cause possible et solution
Le ventilateur ne fonctionne pas. Contrôlez vos fusibles.
Vériez si la protection anti surchauffe
s'est déclenchée.
La simulation de ammes ne fonctionne
pas.
Faites contrôler l'appareil par un
spécialiste qualié.

58
FR
NETTOYAGE ET ENTRETIEN
Avant le nettoyage, débranchez la che de la prise et laissez l‘appareil refroidir
complètement. Nettoyez les surfaces externes avec un chiffon doux et sec. N‘utilisez
jamais de produit abrasif.
Remarque : nettoyez la vitre avec un chiffon humide. N‘utilisez jamais de nettoyant
courant pour vitres !
Ce produit n‘utilise pas de lampas standard pour la simulation de ammes. L‘appareil
utilise un système de LED piloté électroniquement. Ce système NE PEUT PAS être
entretenu par l‘utilisateur. Faites effectuer les réparations par un électricien qualié
uniquement.

59
FR
INFORMATIONS SUR LE RECYCLAGE
S‘il existe une réglementation pour l‘élimination ou le
recyclage des appareils électriques et électroniques dans
votre pays, ce symbole sur le produit ou sur l‘emballage
indique que cet appareil ne doit pas être jeté avec les
ordures ménagères. Vous devez le déposer dans un point
de collecte pour le recyclage des équipements électriques
et électroniques. La mise au rebut conforme aux règles
protège l‘environnement et la santé de vos semblables des
conséquences négatives. Pour plus d‘informations sur le
recyclage et l‘élimination de ce produit, veuillez contacter
votre autorité locale ou votre service de recyclage des
déchets ménagers.
Ce produit contient des piles. S‘il existe une réglementation
pour l‘élimination ou le recyclage des piles dans votre pays,
vous ne devez pas les jeter avec les ordures ménagères.
Renseignez-vous sur les dispositions locales relatives à la
collecte des piles usagées. La mise au rebut conforme aux
règles protège l‘environnement et la santé de vos semblables
des conséquences négatives.
FABRICANT ET IMPORTATEUR (UK)
Fabricant :
Chal-Tec GmbH, Wallstraße 16, 10179 Berlin, Allemagne.
Importateur pour la Grande Bretagne :
Berlin Brands Group UK Limited
PO Box 42
272 Kensington High Street
London, W8 6ND
United Kingdom


61
IT
Gentile cliente,
La ringraziamo per aver acquistato il dispositivo. La preghiamo
di leggere attentamente le seguenti istruzioni per l’uso e di
seguirle per evitare possibili danni tecnici. Non ci assumiamo
alcuna responsabilità per danni scaturiti da una mancata
osservazione delle avvertenze di sicurezza e da un uso
improprio del dispositivo. Scansionare il codice QR seguente,
per accedere al manuale d’uso più attuale e per ricevere
informazioni sul prodotto.
INDICE
Scheda informativa del prodotto62
Avvertenze di sicurezza63
Installazione64
Utilizzo generico66
Display e indicazioni67
Messa in funzione e impostazioni68
Impostazioni del timer69
Pulizia e manutenzione72
Avviso di smaltimento73
Produttore e importatore (UK)73
DATI TECNICI
Articolo numero
10012127, 10031843
Alimentazione
220-240 V ~ 50 Hz
Potenza
2000 W
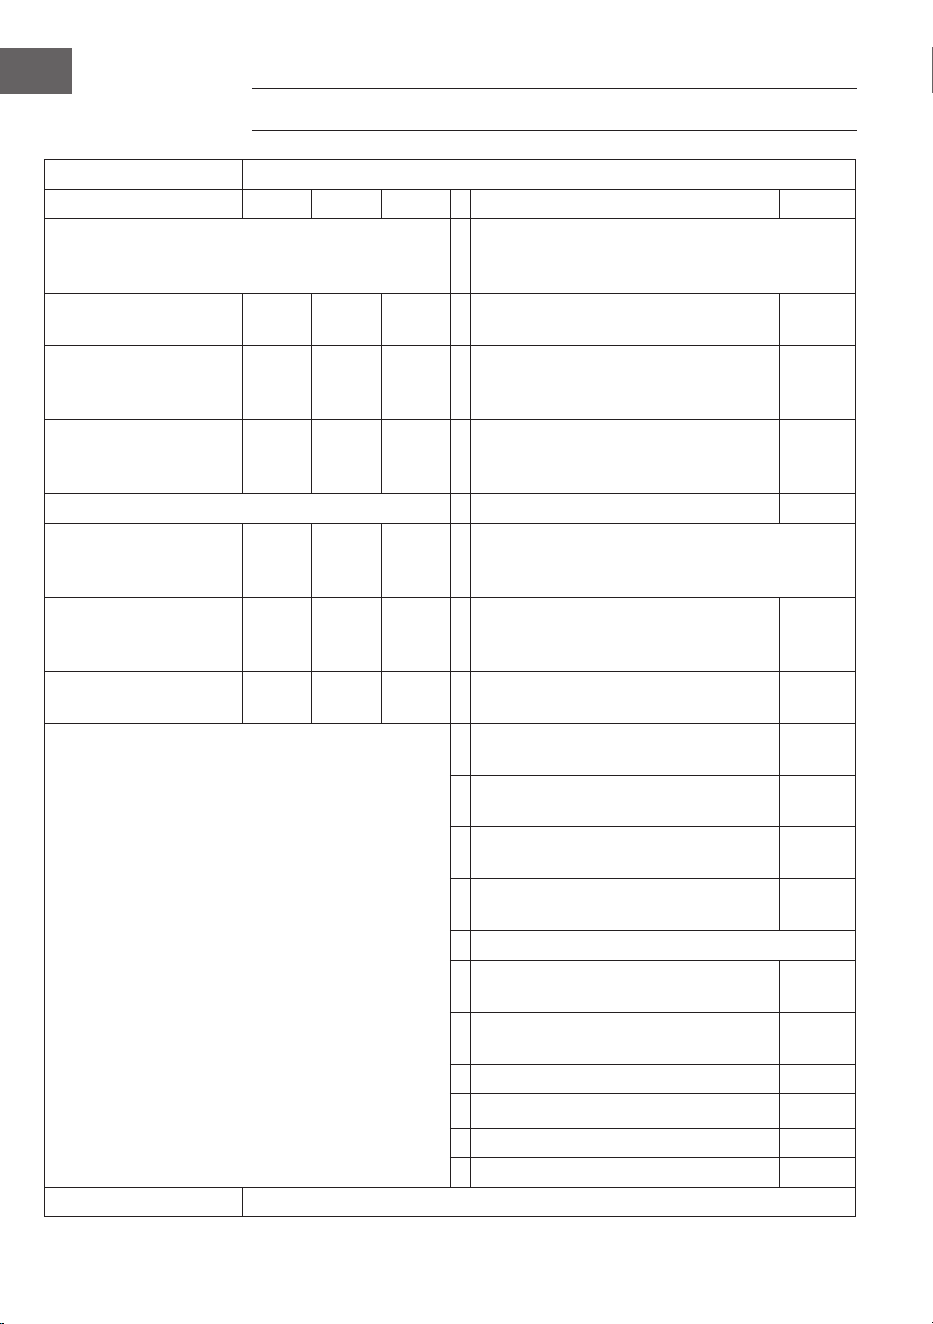
62
IT
SCHEDA INFORMATIVA DEL PRODOTTO
Identicazione del modello (i) 10012127, 10031843
Indicazione Simbolo Valore Unità Indicazione Unità
Potenza termica Solo per gli apparecchi per il riscaldamento d'ambiente
locale elettrici ad accumulo: Tipo di controllo
dell´apporto termico
Potenza termica nominale Pnom 2,0 kW Controllo manuale del carico termico con
termostato integrato
N.D.
Potenza termica minima
(valore indicativo)
Pmin 1,0 kW Controllo manuale del carico termico con
riscontro della temperatura ambiente e/o
esterna
N.D.
Potenza termica massima
continua
Pmax,c 2,0 kW Controllo elettronico del carico termico con
riscontro della temperatura ambiente e/o
esterna
N.D.
Consumo di elettricità ausiliaria
Potenza termica con supporto del ventilatore N.D.
Per la potenza termica
nominale (Motore del
ventilatore)
elmax 0,014 kW
Tipo di potenza termica / controllo della temperatura
ambiente
Per la potenza termica
minima (Motore del
ventilatore)
elmin 0,014 kW Potenza termica di un solo livello, senza
controllo della temperatura ambiente
no
In modalità di attesa elSB 0,48 W Due o più livelli impostabili manualmente, senza
controllo della temperatura ambiente
no
Con controllo della temperatura ambiente
tramite termostato meccanico
no
Con controllo elettronico della temperatura
ambiente
no
Controllo elettronico della temperatura
ambiente e timer giornaliero
no
Controllo elettronico della temperatura
ambiente e timer settimanale
si
Altre opzioni di controllo
Controllo della temperatura ambiente con
rilevamento di presenza
no
Controllo della temperatura ambiente con
rilevamento di nestre aperte
no
Con opzione telecomando no
Con controllo di avvio adattabile si
Con limitazione del tempo di funzionamento no
Con sensore lampada nero no
Informazioni di contatto Chal-Tec GmbH, Wallstraße 16, 10179, Berlino, Germania

63
IT
AVVERTENZE DI SICUREZZA
• Bambini a partire da 8 anni e persone con capacità siche o psichiche limitate
possono utilizzare il dispositivo solo dopo essere stati informati in modo esaustivo
riguardo alle funzioni e alle procedure di sicurezza da parte di una persona
responsabile del loro controllo.
• Assicurarsi che i bambini non giochino con il dispositivo.
• Tenere i bambini sotto a 3 anni lontano dal dispositivo.
• Bambini tra 3 e 8 anni possono utilizzare il dispositivo solo dopo essere stati
informati in modo esaustivo riguardo alle funzioni e alle procedure di sicurezza da
parte di una persona responsabile del loro controllo. Bambini tra 3 e 8 anni non
possono collegare il dispositivo, pulirlo o effettuare lavori di manutenzione.
ATTENZIONE
Pericolo di ustione! Alcune parti del dispositivo diventano estremamente
calde durante il funzionamento. Assicurarsi che bambini o invalidi non
si avvicinino eccessivamente al dispositivo.
• Se il cavo di alimentazione o la spina sono danneggiati, devono essere sostituiti dal
produttore, da un tecnico autorizzato o da una persona con quali ca equivalente.
• Prima dell’utilizzo, controllare la tensione sulla targhetta del dispositivo. Collegare
il dispositivo solo a prese di corrente con la medesima tensione del dispositivo.
• Accendere il dispositivo solo dopo aver effettuato un’installazione corretta.
• Non installare il dispositivo direttamente sotto a una presa di corrente.
• Lasciare almeno 1 metro di spazio tra il dispositivo e mobili o oggetti in ammabili,
come ad es. tende. Non posizionare liquidi o materiali esplosivi o in ammabili
nelle vicinanze del dispositivo.
• Non perdere di vista il dispositivo durante il funzionamento o se è ancora collegato
al circuito elettrico.
• Il dispositivo non è progettato per usi commerciali, ma solamente per l’uso in casa
o in ambienti simili. Di questi fanno parte uf ci, corti, hotel, motel e bed & breakfast.
• Controllare regolarmente se il dispositivo è danneggiato. Non utilizzare il
dispositivo se vi sono danni.
• Le riparazioni devono essere realizzate solo da personale tecnico e sono
necessarie se il dispositivo, il cavo di alimentazione o la spina sono stati
danneggiati, se oggetti o liquidi sono caduti sopra al dispositivo, se il dispositivo è
stato esposto a bagnato o umido o se è stato fatto cadere.
• Non far passare il cavo di alimentazione sotto a tappeti.
• Non far passare il cavo di alimentazione lungo bordi taglienti o su super ci
bollenti.

64
IT
• Per evitare il surriscaldamento, non coprire il dispositivo e assicurarsi che le prese
d’aria non siano bloccate.
• Non immergere mai il dispositivo in acqua o altri liquidi.
• Non installare il dispositivo in bagni o nelle immediate vicinanze di docce o
piscine.
• Non utilizzare il dispositivo all’aperto.
• Non toccare il dispositivo con le mani bagnate.
• Non posizionare il dispositivo sopra o vicino a superci bollenti.
• Prima di procedere alla pulizia, staccare la spina dalla presa di corrente e far
raffreddare completamente il dispositivo.
• Non utilizzare detergenti chimici.
• Utilizzare solo gli accessori inclusi in consegna, altrimenti il dispositivo potrebbe
rappresentare un pericolo per l’utente o rompersi.
• Non sollevare il dispositivo dal pannello frontale.
• Non collegare il dispositivo a timer esterni o a prese di corrente con comando a
distanza.
Avvertenza: se il vostro dispositivo non è dotato di sensore per misurare e controllare
la temperatura ambiente, non installarlo in stanze in cui si trovano persone che
non sono in grado di utilizzare autonomamente il dispositivo o che non sono nelle
condizioni di lasciare la stanza da sole.
INSTALLAZIONE
Non accendere il dispositivo prima di averlo installato in modo corretto. Leggere
attentamente il manuale prima dell’installazione e procedere ad installarlo solo dopo
aver letto e compreso tutte le avvertenze e le indicazioni.
Rispettare in modo particolare le indicazioni relative alle misure nel manuale di
installazione. Assicurarsi di non danneggiare i cavi che si trovano sotto all’intonaco
della parete durante l’installazione. Prestare molta attenzione quando si realizzano i
fori.
Avvertenza: questo dispositivo è progettato per il ssaggio a parete permanente
e deve essere montato ad almeno 30 cm sopra al pavimento. I morsetti di tenuta
devono essere montati in orizzontale e il cavo deve essere fatto passare a destra
dietro al camino.

65
IT
Per poter avere sempre sott’occhio il camino in modo ottimale, si consiglia di montarlo
ad un’altezza di 60 cm (v. immagine 1). Fissare alla parete il morsetto di tenuta
superiore. La misura suggerita si trova in immagine 2. Per realizzare i fori, utilizzare un
trapano della misura 6.
Fissare il morsetto di tenuta inferiore al dispositivo e segnare la posizione dei fori sulla
parete, tenendo con attenzione il dispositivo contro al muro (per questa procedura
sono necessarie due persone). Abbassare il dispositivo e realizzare i fori. In seguito,
posizionare il dispositivo sul morsetto superiore e ssare il morsetto inferiore alla parete
con le viti, v. immagini 3 e 4. Una volta ssato il camino, potete prendere le pietre
dall’imballaggio e posizionarle a piacere lungo l’unità luminosa.

66
IT
UTILIZZO GENERICO
Avvertenza: le funzioni del camino possono essere gestite sui tasti sul dispositivo (in
alto a destra) o tramite il telecomando.
Utilizzo manuale
• Posizionare l’interruttore-standby in posizione ON per rendere il dispositivo pronto
all’uso. Viene emesso un segnale acustico.
• Premere il tasto [O/I] una volta per attivare l’effetto amma e un indicatore LED si
accende. Premere lo stesso tasto per 3 secondi per attivare la funzione di gestione
dell’intensità luminosa e tenerlo premuto no al raggiungimento della luminosità
desiderata.
• Premere una volta il tasto [POWER] per attivare il livello di riscaldamento
minimo (1000W). Premere due volte il tasto [POWER] per attivare il livello di
riscaldamento massimo(2000W). Premere tre volte il tasto [POWER] per spegnere
il riscaldamento.
• Per impostare il colore di fondo (7 colori a disposizione), premere il tasto [BACK
LIGHT].
Utilizzo con il telecomando
Il telecomando funziona solo se l’interruttore è
posizionato su ON. Un segnale acustico indica che il
dispositivo è acceso.
Ci vuole un po‘ di tempo prima che il trasmettitore
del ricevitore sul dispositivo venga riconosciuto. Non
premere altri tasti entro 2 secondi, in modo che il
dispositivo funzioni in modo corretto.

67
IT
DISPLAY E INDICAZIONI
1 Freccia
2 Giorno della settimana
3 Timer
4 Standby
5 Indicazione della temperatura
e numero di impostazione del
timer
6 Timer spento
7 Timer acceso
8 Indicazione oraria
9 Controllo del riscaldamento
automatico
10 Luminosità delle amme
11 Potenza riscaldante
Indicazione della temperatura e numero di impostazione del timer (5)
Normalmente il display indica la temperatura ambiente. Mentre si regola la
temperatura, viene mostrata la temperatura impostata. Se viene impostato il timer, qui
viene mostrato il numero di impostazione del timer.
Indicazione oraria (8)
Normalmente viene indicata l’ora. Mentre si regola il timer, viene mostrato il tempo
impostato sul timer.
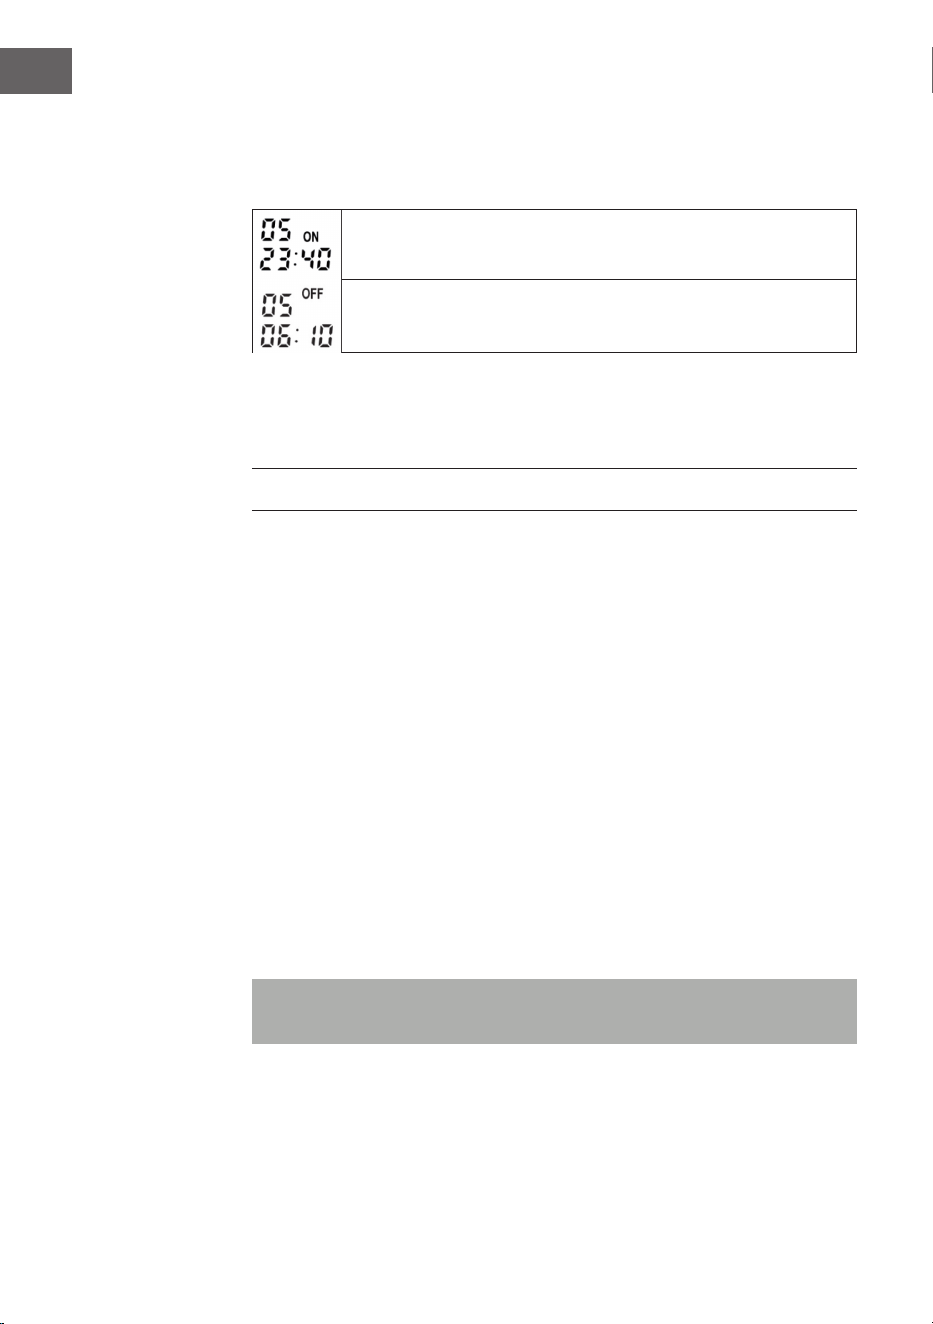
68
IT
Impostazione del timer di accensione e spegnimento
Mentre si regola il timer, vengono mostrati sul display tempo impostato e numero di
impostazione del timer.
L’indicazione in questo esempio indica il tempo di avvio
dell’impostazione 5.
L’indicazione in questo esempio indica il tempo di arresto
dell’impostazione 5.
Luminosità delle amme
La luminosità delle amme può essere regolata e mostrata in 5 livelli.
MESSA IN FUNZIONE E IMPOSTAZIONI
Attivare il dispositivo
1 Inserire la spina nella presa di corrente.
2 Attivare l’interruttore.
3 Premere [I/O] o [ON/OFF] sul telecomando per avviare il dispositivo.
4 Premere una volta il tasto [1000W/2000W] per attivare la potenza riscaldante
minima (1000 W) e premerlo una seconda volta per attivare la potenza
riscaldante massima (2000 W). Premere il tasto una terza volta per spegnere il
riscaldamento.
5 Premere più volte il tasto [DIMMER] per ridurre la luminosità.
6 Premere [BACK LIGHT] per selezionare uno dei 7 colori di fondo.
Funzione di avvio adattiva
Premere il tasto [IC] sul telecomando per attivare la funzione di avvio adattiva. Quando
si attiva tale funzione, il dispositivo regola automaticamente i livelli di riscaldamento
in base alla temperatura ambiente e alla temperatura impostata. Se viene impostato
il timer, è possibile che il riscaldamento venga attivato prima del tempo di avvio
impostato.
Avvertenza: la funzione può essere utilizzata solo se viene impostato un timer
settimanale.

69
IT
Impostare data e ora
1 Premere [DATE/TIME] e utilizzare i tasti [ ] e [ ] per impostare la data.
2 Premere di nuovo [DATE/TIME] e utilizzare i tasti [+/-] per impostare l’ora.
3 Premere di nuovo [DATE/TIME] e utilizzare i tasti [+/-] per impostare i minuti.
4 Premere il tasto [OK] per salvare le impostazioni.
Impostare la temperatura
La temperatura preimpostata è di 22 °C: premere i tasti [+/-] per impostare la
temperatura desiderata tra 15 e 30 °C.
IMPOSTAZIONI DEL TIMER
• Ci sono 10 diverse impostazioni del timer.
• Ogni impostazione è dotata di tempo di avvio, tempo di arresto e impostazione
della temperatura.
• Il tempo massimo impostabile è di 23 ore e 50 minuti.
• Un’impostazione può essere programmata per un giorno a scelta o per più giorni.
• Il tempo impostato è quello di avvio. Se il tempo di arresto è nel giorno successivo,
è necessario impostare solo il tempo di arresto.
Indicazione delle impostazioni del timer
1 Premere il tasto [TIMER SET].
2 Utilizzare i tasti [+/-] per scorrere in successione tra i tempi di avvio.
3 Per mostrare i tempi di spegnimento premere il tasto [ ].
4 Utilizzare i tasti [+/-] per scorrere in successione tra i tempi di arresto.
5 Per cancellare l’impostazione corrente, premere il tasto [C].
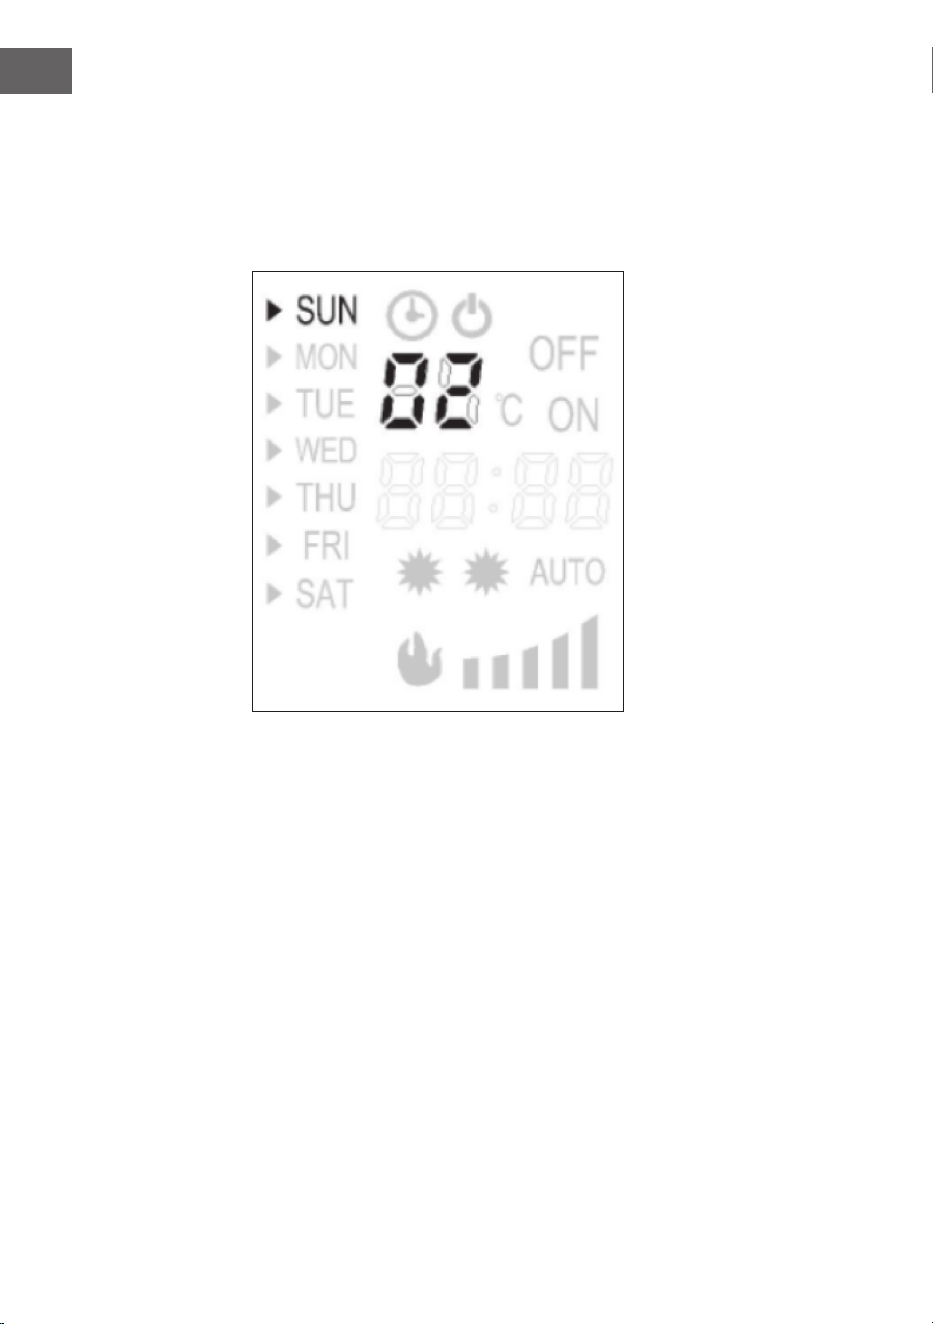
70
IT
Impostazioni del timer
(1) Selezionare il numero di impostazione
Premere il tasto [TIMER SET]. Il numero di impostazione del timer lampeggia sul display.
Utilizzare [+/-] per selezionare un altro numero di impostazione. Nell’esempio viene
indicato il numero di impostazione [02].
(2) Selezionare il/i giorno/i della settimana
Premere il tasto [TIMER SET] e la freccia sul lato sinistro del display comincia a
lampeggiare. Utilizzare [▲] o [▲] per spostare la freccia sul relativo giorno della
settimana. Premere poi [+] per attivare il giorno della settimana o premere [-] per
disattivare il girono della settimana, no a quando sono state selezionate tutte le
impostazioni.
(3) Impostare il tempo di avvio
1 Premere [TIMER SET] no a quando l’indicazione dell’ora lampeggia.
2 Utilizzare i tasti [+/-] per impostare le ore.
3 Premere [TIMER SET] no a quando l’indicazione dei minuti lampeggia.
4 Utilizzare i tasti [+/-] per impostare i minuti.
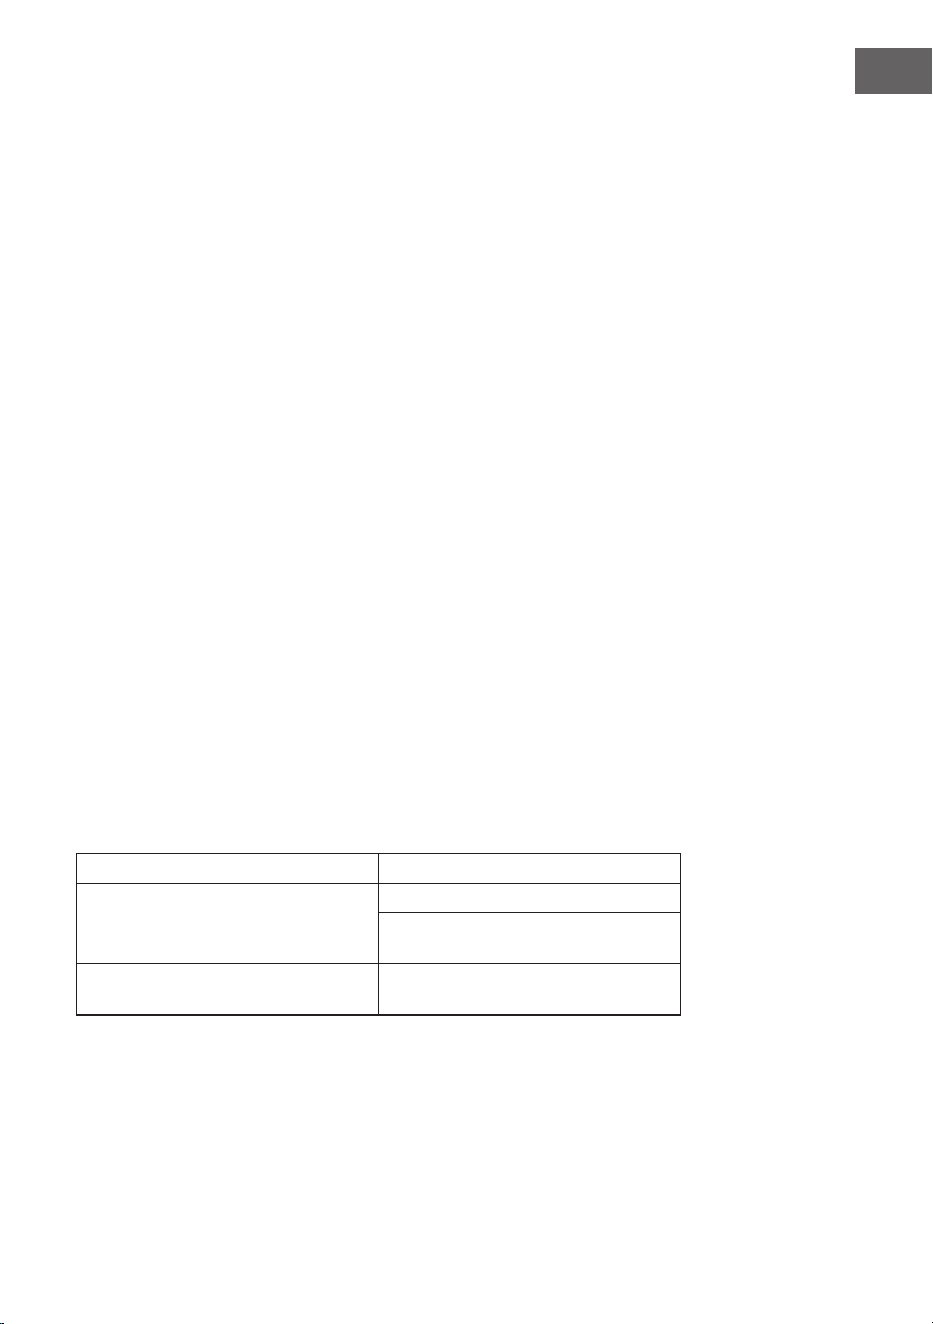
71
IT
(4) Impostare il tempo di arresto
1 Premere [TIMER SET] no a quando l’indicazione dell’ora lampeggia.
2 Utilizzare i tasti [+/-] per impostare le ore.
3 Premere [TIMER SET] no a quando l’indicazione dei minuti lampeggia.
4 Utilizzare i tasti [+/-] per impostare i minuti.
(5) Impostare la temperatura
Premere [TIMER SET] no a quando l’indicazione della temperatura lampeggia.
Utilizzare i tasti [+/-] per impostare la temperatura. Con [+] si aumenta la temperatura,
con [-] la si diminuisce.
Inne, premere di nuovo [TIMER SET] e poi [OK] per salvare le impostazioni.
Avvertenze importanti sul timer
• Il tasto [TIMER ON/OFF] serve ad accendere e spegnere il timer.
• Se dovesse mancare temporaneamente la corrente o se la spina viene scollegata,
le impostazioni vengono mantenute, ma è necessario impostare nuovamente ora e
data.
• Se il timer settimanale è attivo, è necessario attivare anche il riscaldamento,
altrimenti funziona solo l’effetto amma.
Protezione da surriscaldamento
Il dispositivo è dotato di protezione da surriscaldamento, che entra in funzione
quando il dispositivo è surriscaldato (ad es. a causa del bloccaggio degli sbocchi
d’aria). Per motivi di sicurezza, il camino NON viene resettato automaticamente. Per
resettare la protezione da surriscaldamento, scollegare il camino dalla rete elettrica e
lasciarlo raffreddare per almeno 15 minuti. Reinserire la spina nella presa di corrente e
accendere il camino.
Correzione degli errori
Problema Possibile causa e soluzioni
Il ventilatore non funziona. Controllare i fusibili.
Controllare se è entrata in funzione la
protezione da surriscaldamento.
L’effetto amma non funziona. Far controllare il dispositivo da un
elettricista qualicato.

72
IT
PULIZIA E MANUTENZIONE
Prima della pulizia, scollegare sempre la spina dalla presa di corrente e far raffreddare
completamente il dispositivo. Pulire le superci con un panno morbido e asciutto. Non
utilizzare mai prodotti abrasivi.
Avvertenza: pulire il vetro con un panno morbido. Non utilizzare comuni detergenti
per vetri!
Questo prodotto non utilizza lampadine standard per l’effetto amma. Viene utilizzato
un sistema LED a controllo elettronico. I lavori di manutenzione su di esso NON
possono essere realizzati dall’utente. Lasciare che un elettricista qualicato realizzi
eventuali riparazioni.

73
IT
AVVISO DI SMALTIMENTO
Se nel proprio paese si applicano le regolamentazioni
inerenti lo smaltimento di dispositivi elettrici ed elettronici,
questo simbolo sul prodotto o sulla confezione segnala che
questi prodotti non possono essere smaltiti con i riuti normali
e devono essere portati a un punto di raccolta di dispositivi
elettrici ed elettronici. Grazie al corretto smaltimento dei
vecchi dispositivi si tutela il pianeta e la salute delle persone
da possibili conseguenze negative. Informazioni riguardanti il
riciclo e lo smaltimento di questi prodotti si ottengono presso
l’amministrazione locale oppure il servizio di gestione dei
riuti domestici.
Il prodotto contiene batterie. Se nel proprio paese si
applicano le regolamentazioni inerenti lo smaltimento di
batterie, non possono essere smaltite con i normali riuti
domestici. Preghiamo di informarvi sulle regolamentazioni
vigenti sullo smaltimento delle batterie. Grazie al corretto
smaltimento dei vecchi dispositivi si tutela l’ambiente e la
salute delle persone da conseguenze negative.
PRODUTTORE E IMPORTATORE (UK)
Produttore:
Chal-Tec GmbH, Wallstraße 16, 10179 Berlino, Germania.
Importatore per la Gran Bretagna:
Berlin Brands Group UK Limited
PO Box 42
272 Kensington High Street
London, W8 6ND
United Kingdom


75
NL
Geachte klant,
gefeliciteerd met de aanschaf van dit apparaat. Lees de hierna
volgende handleiding aandachtig door en volg de instructies
op om schade te voorkomen. Voor schade veroorzaakt door
het niet in acht nemen van de instructies of door onjuist gebruik
nemen wij geen verantwoordelijkheid. Scan de QR code voor
toegang tot de meest actuele gebruikershandleiding en voor
meer informatie over het artikel.
INHOUDSOPGAVE
Technische gegevens75
Productinformatieblad76
Veiligheidsinstructies77
Installatie78
Algemene bediening80
Display en toelichting81
Ingebruikname en instellingen82
Timerinstellingen83
Reiniging en onderhoud86
Instructies voor afvoer87
Fabrikant & importeur (UK)87
TECHNISCHE GEGEVENS
Artikelnummer 10012127, 10031843
Stroomvoorziening 220-240 V ~ 50 Hz
Vermogen 2000 W

76
NL
PRODUCTINFORMATIEBLAD
Identicatie model(len) 10012127, 10031843
Specicatie Symbool Waarde Eenheid Specicatie Eenheid
Warmtevermogen Alleen voor individuele elektrische
accumulatiekachels: regulering van de warmtetoevoer
Nominaal warmtevermogen Pnom 2,0 kW Handmatige regeling van de warmtetoevoer
met ingebouwde thermostaat
k.A.
Minimaal warmtevermogen
(richtwaarde)
Pmin 1,0 kW Handmatige regeling van de warmtetoevoer
met terugmelding van de kamer- en/ of externe
temperatuur
k.A.
Maximaal continue
warmtevermogen
Pmax,c 2,0 kW Elektronische regeling van de warmtetoevoer
met terugmelding van de kamer- en/ of externe
temperatuur
k.A.
Hulpstroomverbruik
Warmteafgifte met ondersteuning van een
ventilator
k.A.
Bij nominaal
warmtevermogen
(ventilatormotor)
elmax 0,014 kW
Soort warmte / Kamertemperatuurcontrole
Bij minimaal
warmtevermogen
(ventilatormotor)
elmin 0,014 kW Enkele warmtestand, geen
kamertemperatuurcontrole
nee
In stand-by modus elSB 0,48 W Twee of meer handmatig in te stellen standen,
geen kamertemperatuurcontrole
nee
Controle kamertemperatuur met mechanische
thermostaat
nee
Met elektronische kamertemperatuurcontrole nee
Met elektronische kamertemperatuurcontrole en
tijdregulering
nee
Met elektronische kamertemperatuurcontrole en
weekdagregulering
ja
Overige regelopties
Kamertemperatuurcontrole met
aanwezigheidsherkenning
nee
Kamertemperatuurcontrole met open raam
detectie
nee
Met afstandsbediening nee
Met adaptieve regeling van het begin van de
verwarming
ja
Met bedrijfstijdbegrenzing nee
Met elektronische sensor nee
Contactgegevens Chal-Tec GmbH, Wallstraße 16, 10179 Berlijn, Duitsland

77
NL
VEILIGHEIDSINSTRUCTIES
• Kinderen vanaf 8 jaar en personen met een beperkte lichamelijke en/of geestelijke
gezondheid mogen het apparaat alleen gebruiken wanneer ze voorafgaand
door een voor hen verantwoordelijke persoon uitvoerig met de functies en
veiligheidsinstructies van het apparaat vertrouwd zijn gemaakt.
• Let erop dat kinderen niet met het apparaat spelen.
• Houdt kinderen onder de 3 jaar en huisdieren op afstand.
• Kinderen tussen 3 en 8 jaar mogen het apparaat alleen gebruiken wanneer ze van
tevoren door een voor hen verantwoordelijke persoon uitvoerig met de functies en
veiligheidsinstructies van het apparaat vertrouwd zijn gemaakt. Laat kinderen tussen
3 en 8 jaar het apparaat niet aansluiten, reinigen of onderhouden.
LET OP!
Gevaar voor brandwonden! Delen van het apparaat kunnen heel heet
worden tijdens het gebruik. Zorg ervoor dat kinderen of mindervaliden
niet te dicht bij het apparaat komen.
• Wanneer de stroomkabel of stekker beschadigd is, moet die door de fabrikant,
een geautoriseerd bedrijf of een gelijkwaardig gekwali ceerd persoon worden
vervangen.
• Controleer voor gebruik de spanning op het typeplaatje. Sluit het apparaat alleen
aan op stopcontacten waarvan de spanning overeenkomt.
• Zet het apparaat pas aan als het goed geïnstalleerd is.
• Installeer het apparaat niet direct onder een stopcontact.
• Laat rondom het apparaat ten minste 1 meter ruimte vrij tot meubels of brandbare
voorwerpen, zoals gordijnen. Plaats geen ontvlambare of explosieve (vloei)stoffen
in de buurt van het apparaat.
• Laat het apparaat niet onbeheerd achter terwijl het in werking is of op het
elektriciteitsnet is aangesloten.
• Het toestel is niet bestemd voor commercieel gebruik, maar voor gebruik in een
conventioneel huishouden en gelijkwaardige omgevingen. Hieronder vallen
keukens in kantoorgebouwen, boerderijen, hotels, motels en etablissementen die
Bed & Breakfast aanbieden.
• Controleer het toestel regelmatig op schade. Gebruik het apparaat niet wanneer
het beschadigd is.
• Reparaties mogen alleen door gekwali ceerd personeel worden uitgevoerd en
zijn noodzakelijk als het apparaat is beschadigd, als de stroomkabel of stekker is
beschadigd, als er vloeistof(fen) op zijn gelekt of voorwerpen op zijn gevallen, als
het apparaat is blootgesteld aan vocht of nattigheid of als het is gevallen.
• Leg de stroomkabel niet onder de vloerbedekking.
• Laat de stroomkabel niet langs scherpe randen of hete oppervlakken gaan.

78
NL
• Voorkom oververhitting door het apparaat niet af te dekken en let erop dat de
ventilatiesleuven niet bedekt zijn.
• Dompel het apparaat nooit in water of andere vloeistof(fen) onder.
• Installeer het apparaat niet in een badkamer of in de onmiddellijke nabijheid van
een douche of zwembad.
• Gebruik het apparaat niet buitenshuis.
• Raak het apparaat niet met natte handen aan.
• Plaats het apparaat niet op of in de buurt van oppervlaktes die heet worden.
• Neem voor het reinigen de stekker uit het stopcontact en laat het apparaat, indien
nodig, volledig afkoelen.
• Gebruik geen chemische reinigingsmiddelen.
• Gebruik alleen de meegeleverde accessoires, anders kan het apparaat gevaar
opleveren voor de gebruiker en/of kapot gaan.
• Til het apparaat niet op aan het voorpaneel.
• Sluit het apparaat niet op een externe timer of op een op afstand gestuurd
stopcontact aan.
Let op! Tenzij uw toestel is uitgerust met een sensor om de kamertemperatuur te meten
en te controleren, mag u het toestel niet installeren in ruimtes waar mensen zijn die het
toestel niet zelfstandig kunnen bedienen of de ruimte niet zelfstandig kunnen verlaten.
INSTALLATIE
Zet het apparaat pas aan als het goed geïnstalleerd is. Lees de handleiding voor de
installatie zorgvuldig door en installeer het apparaat pas, wanneer u alle instructies
gelezen en begrepen heeft.
Houdt u zich vooral aan de afmetingen zoals weergegeven in de montagehandleiding.
Let erop dat u bij de installatie geen kabels beschadigt die zich in de muur, onder het
pleisterwerk, bevinden. Wees heel voorzichtig bij het oren van de gaten.
Let op! Dit apparaat is bestemd voor een permanente bevestiging aan de muur en
moet minimaal 30 cm boven de vloer worden geplaatst. De bevestigingsklemmen
moeten horizontaal worden geplaatst en de kabel rechtsachter de haard lopen.
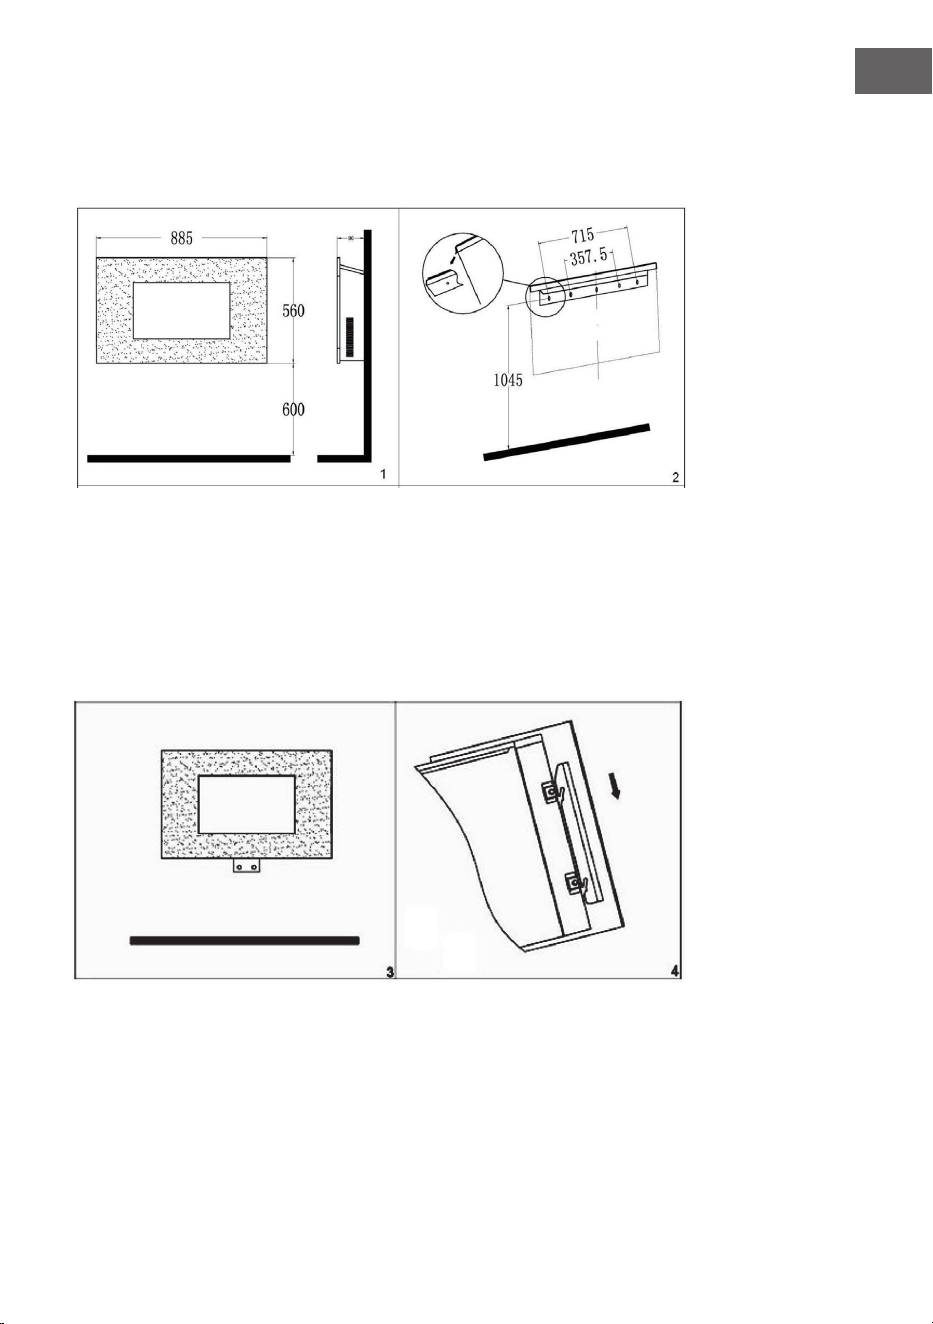
79
NL
Om een optimaal zicht op de haard te hebben, raden wij u aan de haard op een
hoogte van 60 cm te plaatsen (zie afbeelding 1). Bevestig de bovenste klemmen aan de
muur. De aanbevolen afmetingen vindt u in afbeelding 2. Om de boorgaten te maken
gebruikt u een formaat 6 boor.
Bevestig de onderste klemmen aan het apparaat en markeer de positie van de
boorgaten op de muur door het apparaat voorzichtig tegen de muur te houden
(hiervoor zijn twee personen nodig). Haal het apparaat weer weg en maak de
boorgaten. Aansluitend plaatst u het apparaat op de bovenste klemmen en bevestig de
onderste klemmen met de schroeven aan de wand, zie afbeeldingen 3 en 4. Wanneer
de haard bevestigd is, kunt u de stenen uit de verpakking nemen en deze langs de
lichtunit in de gewenste positie plaatsen.

80
NL
ALGEMENE BEDIENING
Tip! U kunt de haard met de knoppen (rechtsboven op de haard) bedienen of met de
afstandsbediening.
Handmatige bediening
• Zet de stand-by schakelaar op ON om het apparaat gebruiksklaar te maken. U
hoort een pieptoon.
• Druk op de [O/I] toets om het vuureffect in te schakelen, een indicatielampje gaat
branden. Druk diezelfde toets 3 seconden in om de dimmerfunctie te activeren,
houdt de toets ingedrukt tot u tevreden bent.
• Druk eenmaal op de [POWER] toets om de lage warmtestand (1000 W) in te
schakelen. Druk tweemaal op de [POWER] toets om de hoge warmtestand (2000
W) in te schakelen. Druk driemaal op de [POWER] toets om de verwarming uit te
schakelen.
• Om de achtergrondkleur (7 kleuren beschikbaar) in te stellen, drukt op de toets
[BACK LIGHT].
Gebruik per afstandsbediening
De afstandsbediening werkt alleen als de schakelaar
op ON staat. Een pieptoon geeft aan dat het toestel
ingeschakeld is.
Het duurt even voordat de zender door de ontvanger
op het apparaat wordt herkend. Druk binnen 2
seconden niet meer dan één knop in voor een goed
functioneren van het apparaat.

81
NL
DISPLAY EN TOELICHTING
1 Pijl
2 Weekdag
3 Timer
4 Stand-by
5 Temperatuurweergave
en weergave van de
timerinstelling
6 Timer uit
7 Timer aan
8 Tijd
9 Automatische warmtecontrole
10 Helderheid van de vlam
11 Verwarmend vermogen
Temperatuurweergave en weergave van de timerinstelling (5)
Normaal gesproken toont het display de kamertemperatuur. Tijdens het instellen van de
temperatuur wordt de ingestelde temperatuur weergegeven. Wanneer u de timer instelt,
wordt hier het instellingsnummer weergegeven.
Tijdweergave (8)
Normaal gesproken wordt de actuele tijd weergegeven. Terwijl de timer wordt
ingesteld, wordt hier de ingestelde timer tijd weergegeven.
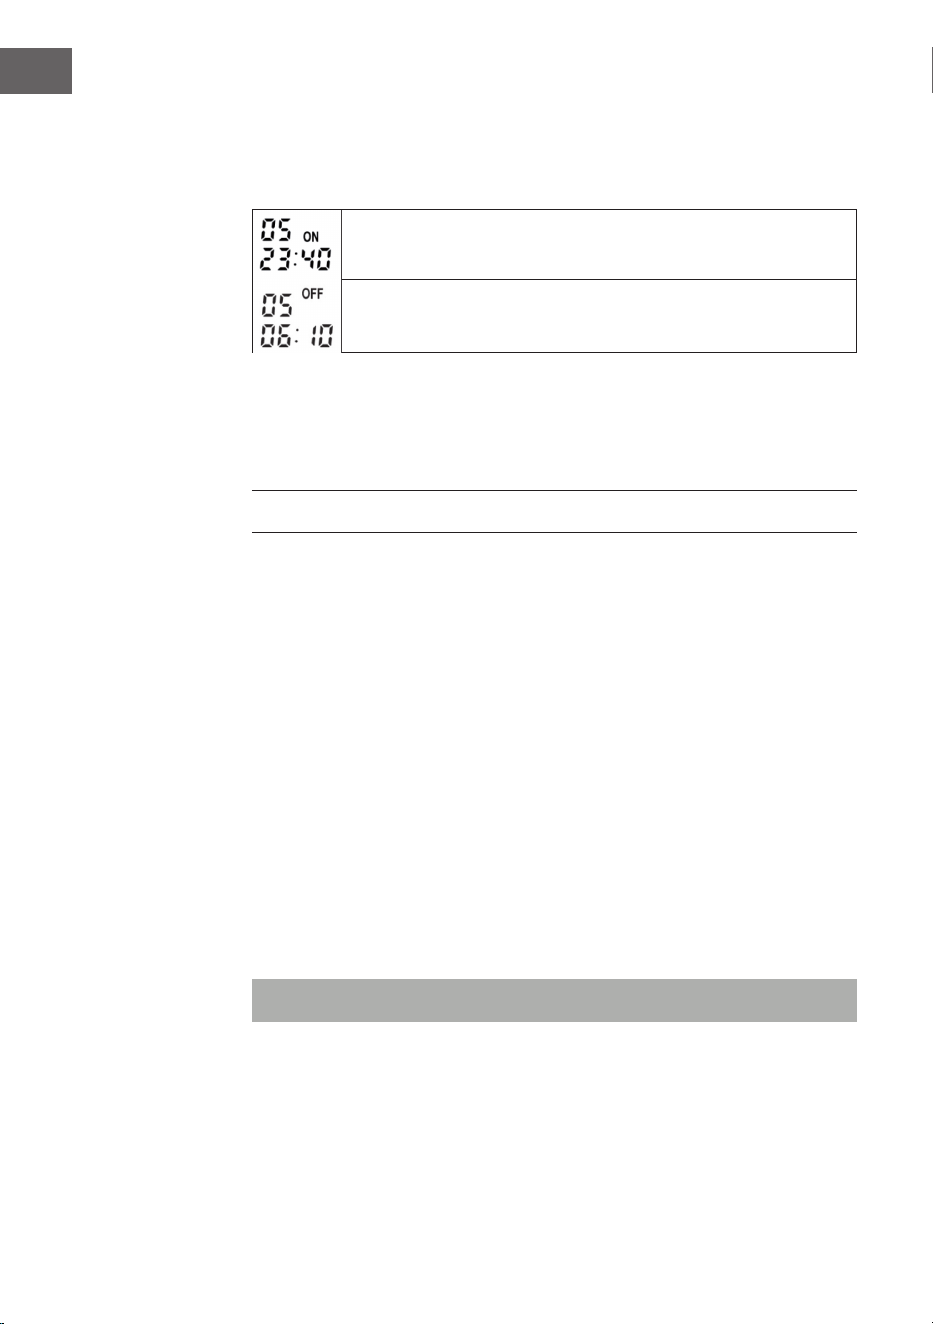
82
NL
In- en uitschakeltimer instellen
Tijdens het instellen van de timer worden de ingestelde tijd en het nummer van de
timerinstelling op het display weergegeven.
De weergave in dit voorbeeld toont de starttijd van instelling 5.
De weergave in dit voorbeeld toont de eindtijd van instelling 5.
Helderheid van de vlam
De helderheid van de vlam kan worden aangepast in 5 standen en weergegeven
worden.
INGEBRUIKNAME EN INSTELLINGEN
Apparaat opstarten.
1 Steek de stekker in het stopcontact.
2 Zet de AAN-schakelaar om.
3 Druk op de [I/O] of [ON/OFF] toets van de afstandsbediening om het toestel op
te starten.
4 Druk eenmaal op de [1000W/2000W] toets om geringe warmtestand (1000 W)
te activeren, druk nogmaals op deze toets om de hoge warmtestand (2000 W) te
activeren. Druk een derde maal op de toets om de verwarming uit te schakelen.
5 Druk meerdere malen op de [DIMMER] toets om de helderheid aan te passen.
6 Druk op [BACK LIGHT] om één van de 7 achtergrondkleuren te selecteren.
Aangepaste startfunctie
Druk op de [IC] toets op de afstandsbediening om de functie aangepaste startfunctie te
starten. Wanneer u deze functie activeert, past het toestel de warmtestand automatisch
aan op basis van de kamertemperatuur en de ingestelde temperatuur. Wanneer een
timer is ingesteld, kan de verwarming eerder beginnen dan de ingestelde starttijd.
Let op! De functie werkt alleen als er een weektimer ingesteld is.
83
NL
Datum en tijd instellen
1 Druk op de [DATE/TIME] toets en gebruik de toetsen [ ] en [ ] om de datum in
te stellen.
2 Druk opnieuw op de [DATE/TIME] toets en gebruik de [+/-] toetsen om de uren in
te stellen.
3 Druk opnieuw op de [DATE/TIME] toets en gebruik de [+/-] toetsen om de minuten
in te stellen.
4 Druk op de [OK] toets om de instellingen op te slaan.
Temperatuur instellen
De voorgeprogrammeerde temperatuur is 22°C. Druk op de [+/-] toetsen om de
gewenste temperatuur tussen 15-30 °C in te stellen.
TIMERINSTELLINGEN
• Er zijn 10 verschillende timer instellingen.
• Elke instelling heeft een inschakeltijd, een uitschakeltijd en een temperatuurinstelling.
• De maximaal in te stellen tijd ligt op 23 uur en 50 minuten.
• Een instelling kan voor een willekeurige dag of voor meerdere dagen worden
geprogrammeerd.
• De ingestelde tijd is de inschakeltijd. Wanneer de uitschakeltijd de volgende dag is,
hoeft u alleen de uitschakeltijd in te stellen.
Timerinstellingen weergeven
1 Druk op de [TIMER SET] toets.
2 Gebruik de [+/-] toetsen om door de inschakeltijden te bladeren.
3 Om de uitschakeltijd weer te geven drukt u op de [ ] toets.
4 Gebruik de [+/-] toetsen om door de uitschakeltijden te bladeren.
5 Om de actuele instelling te wissen, drukt u op de [C] toets.

84
NL
Timerinstellingen
(1) Instellingsnummer selecteren
Druk op de [TIMER SET] toets. Het nummer van de timerinstelling knippert op het
display. Gebruik de [+/-] toets om een ander instellingsnummer te kiezen. In het
voorbeeld wordt het instellingsnummer [02] weergegeven.
(2) Weekdag(en) selecteren
Druk op de [TIMER SET] toets en de pijl aan de linkerkant van het display begint te
knipperen. Gebruik de [ ] of [ ] toets om de pijl naar de betreffende dag van de week
te verplaatsen. Druk vervolgens op [+] om de weekdag te activeren of druk op [-] om de
weekdag te deactiveren totdat alle instellingen zijn uitgevoerd.
(3) Starttijd programmeren
1 Druk op de [TIMER SET] toets tot de urenweergave knippert.
2 Gebruik de [+/-] toetsen om de uren in te stellen.
3 Druk op de [TIMER SET] toets tot de minutenweergave knippert.
4 Gebruik de [+/-] toetsen om de minuten in te stellen.
85
NL
(4) Eindtijd instellen
1 Druk op de [TIMER SET] toets tot de urenweergave knippert.
2 Gebruik de [+/-] toetsen om de uren in te stellen.
3 Druk op de [TIMER SET] toets tot de minutenweergave knippert.
4 Gebruik de [+/-] toetsen om de minuten in te stellen.
(5) Temperatuur instellen
Druk op de [TIMER SET] toets tot de temperatuurweergave knippert. Gebruik de [+/-]
toetsen om de temperatuur in te stellen. Met [+] verhoogt u de temperatuur te verhogen,
met de [-] toets verlaagt u de temperatuur.
Druk ter afsluiting opnieuw op [TIMER SET]en vervolgens op [OK] om de instellingen
op te slaan.
Belangrijke informatie m.b.t. de timer
• De [TIMER ON/OFF] toets wordt gebruikt om de timer aan en uit te zetten.
• Als de stroom even uitvalt of de stekker uit het stopcontact wordt getrokken, blijven
de instellingen behouden, maar moeten datum en tijd opnieuw worden ingesteld.
• Als de weektimer ingeschakeld is, moet u ook de verwarming inschakelen, anders
functioneert alleen het vlammeneffect.
Oververhittingsbeveiliging
Het apparaat is voorzien van een oververhittingsbeveiliging die in werking treedt
wanneer de verwarming oververhit raakt (bijv. door geblokkeerde luchtuitlaten).
Om veiligheidsredenen wordt de haard NIET automatisch gereset. Om de
oververhittingsbeveiliging te resetten, neemt u de stekker uit het stopcontact en laat u het
toestel minstens 15 minuten afkoelen. Steek de stekker weer in het stopcontact en zet de
verwarming weer aan.
Probleemoplossingen
Probleem Mogelijke oorzaak en oplossing
De ventilator functioneert niet. Controleer de zekeringen.
Controleer of de
oververhittingsbeveiliging actief is.
Het vuureffect werkt niet. Laat het apparaat controleren door een
gekwaliceerde elektricien.

86
NL
REINIGING EN ONDERHOUD
Neem voor het reinigen de stekker uit het stopcontact en laat het apparaat, indien
nodig, volledig afkoelen. Reinig het oppervlak met een zachte, droge doek. Gebruik
nooit schuurmiddel.
Let op! Reinig het glas met een zachte doek. Gebruik geen conventionele
glasreiniger!
Dit apparaat gebruikt geen standaard lampenbollen voor het vlammeneffect. Het
apparaat maakt gebruik van een elektronisch gestuurd ledsysteem. Het systeem mag
NIET door de gebruiker worden onderhouden. Laat reparaties alleen uitvoeren door
een gekwaliceerde elektricien.
87
NL
INSTRUCTIES VOOR AFVOER
Wanneer in uw land een wettelijke regeling geldt voor het
afvoeren van elektrische en elektronische apparaten, wijst dit
symbool, op het product zelf of op de verpakking, erop dat
het betreffende product niet met het huisvuil afgevoerd mag
worden. In plaats daarvan dient het naar een centraal depot
voor het recyclen van elektrische en elektronische apparaten
te worden gebracht Door het afval volgens de voorschriften
weg te gooien beschermt u het milieu en de gezondheid van
uw medemensen tegen negatieve consequenties. Informatie
over recycling en het afvoeren van dit product ontvangt u
van uw gemeente of van uw plaatselijke grondstoffen- en
afvaldienst.
Dit artikel bevat batterijen. Wanneer in uw land een wettelijke
regeling is voor het afvoeren van batterijen, mogen batterijen
niet met het huisvuil worden afgevoerd. Informeer naar de
plaatselijke regelgeving inzake de afvoer van batterijen. Door
het afval volgens de voorschriften af te voeren beschermt
u het milieu en de gezondheid van uw medemensen tegen
negatieve consequenties.
FABRIKANT & IMPORTEUR (UK)
Fabrikant:
Chal-Tec GmbH, Wallstraße 16, 10179 Berlijn, Duitsland.
Importeur voor Groot-Brittannië:
Berlin Brands Group UK Limited
PO Box 42
272 Kensington High Street
London, W8 6ND
United Kingdom