OWNER'S MANUAL & OPERATION INSTRUCTION
9000 Starting Watts
7000 Running Watts
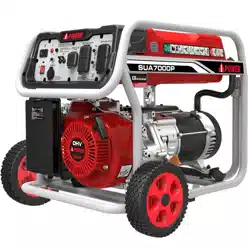
PORTABLE GENERATOR
This manual contains important information regarding safety,
operation, maintnance and storage of this product. Before use,
read carefully and understand all cautions, warnings, instructions
and product labels. Failure to do so could result in serious
personal injury and/or property damage.
SAVE THIS MANUAL
Visit Our Website at: http://www.a-ipower.com
Email Our Technical Support at: [email protected]
FOR TECHNICAL QUESTIONS, PLEASE CALL 1-855-888-3598
MODEL NUMBER
SUA9000E
A-iPower Corp.
1477 E. Cedar St., STE B
Ontario, CA 91761, U.S.A.
www.a-ipower.com
MADE IN CHINA
REV 7AA0700_A 08/2016
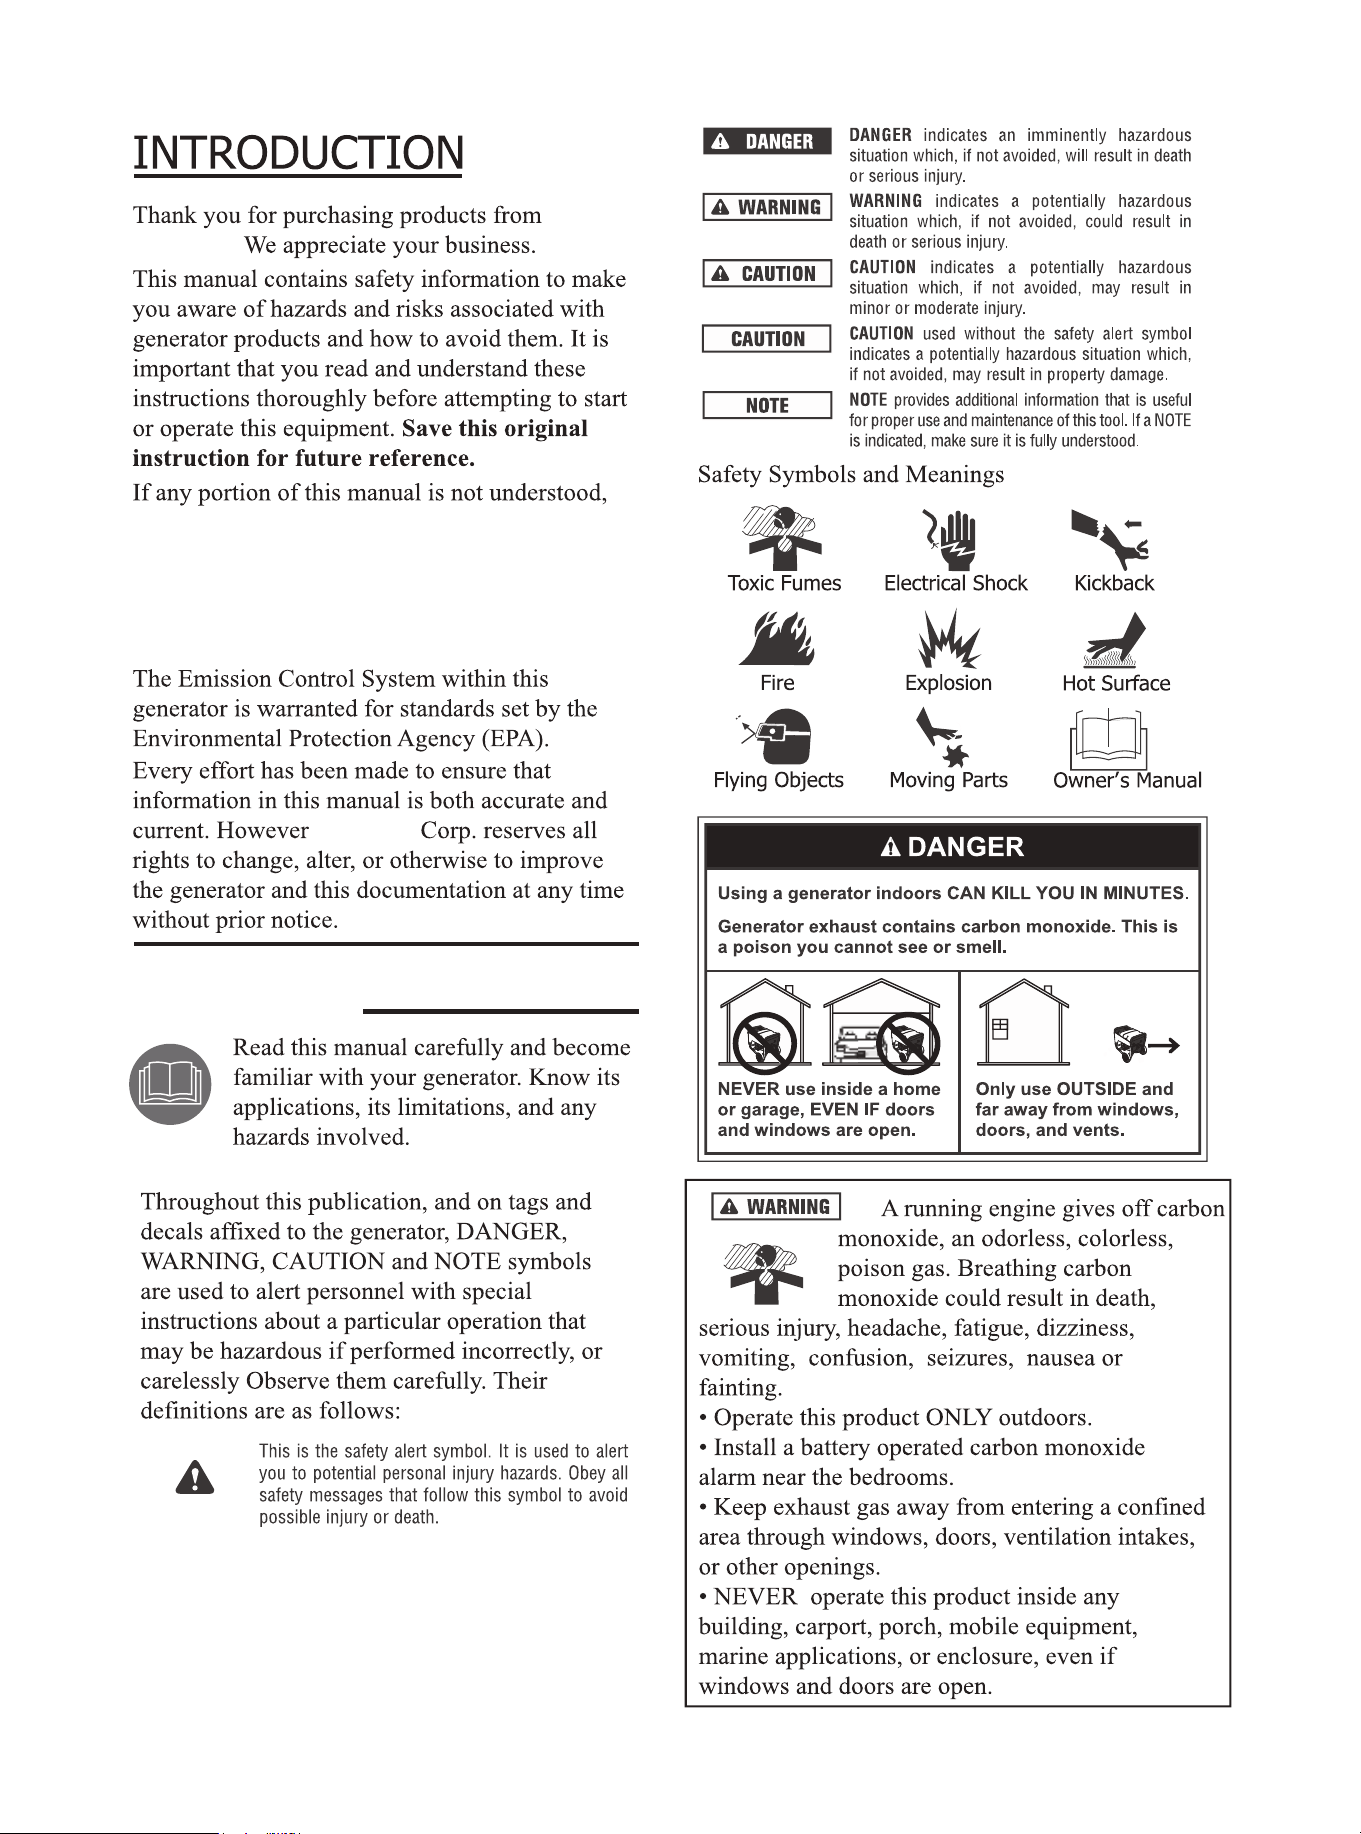
WARNING
The Engine Exhaust from this product contains chemicals known to the State of California to cause
cancer or birth defects and other reproductive harm.
3
3
6
7
9
10
12
6
6
9
9
9
10
4.4 Wattage Reference Guide
10
12
12
12
12
15
16
18
19
20
24
13
13
13
13
13
13
14
14
14
14
15
Parts list and Diagram
2
A-iPower.
A-iPower
Please call our Customer Service at 1-855-888-3598
for starting, operating and servicing procedures.
We also strongly recommend you to instruct any
other users who may operate the generator in an
emergency.
Failure to follow
instructions could result in serious injury or death.
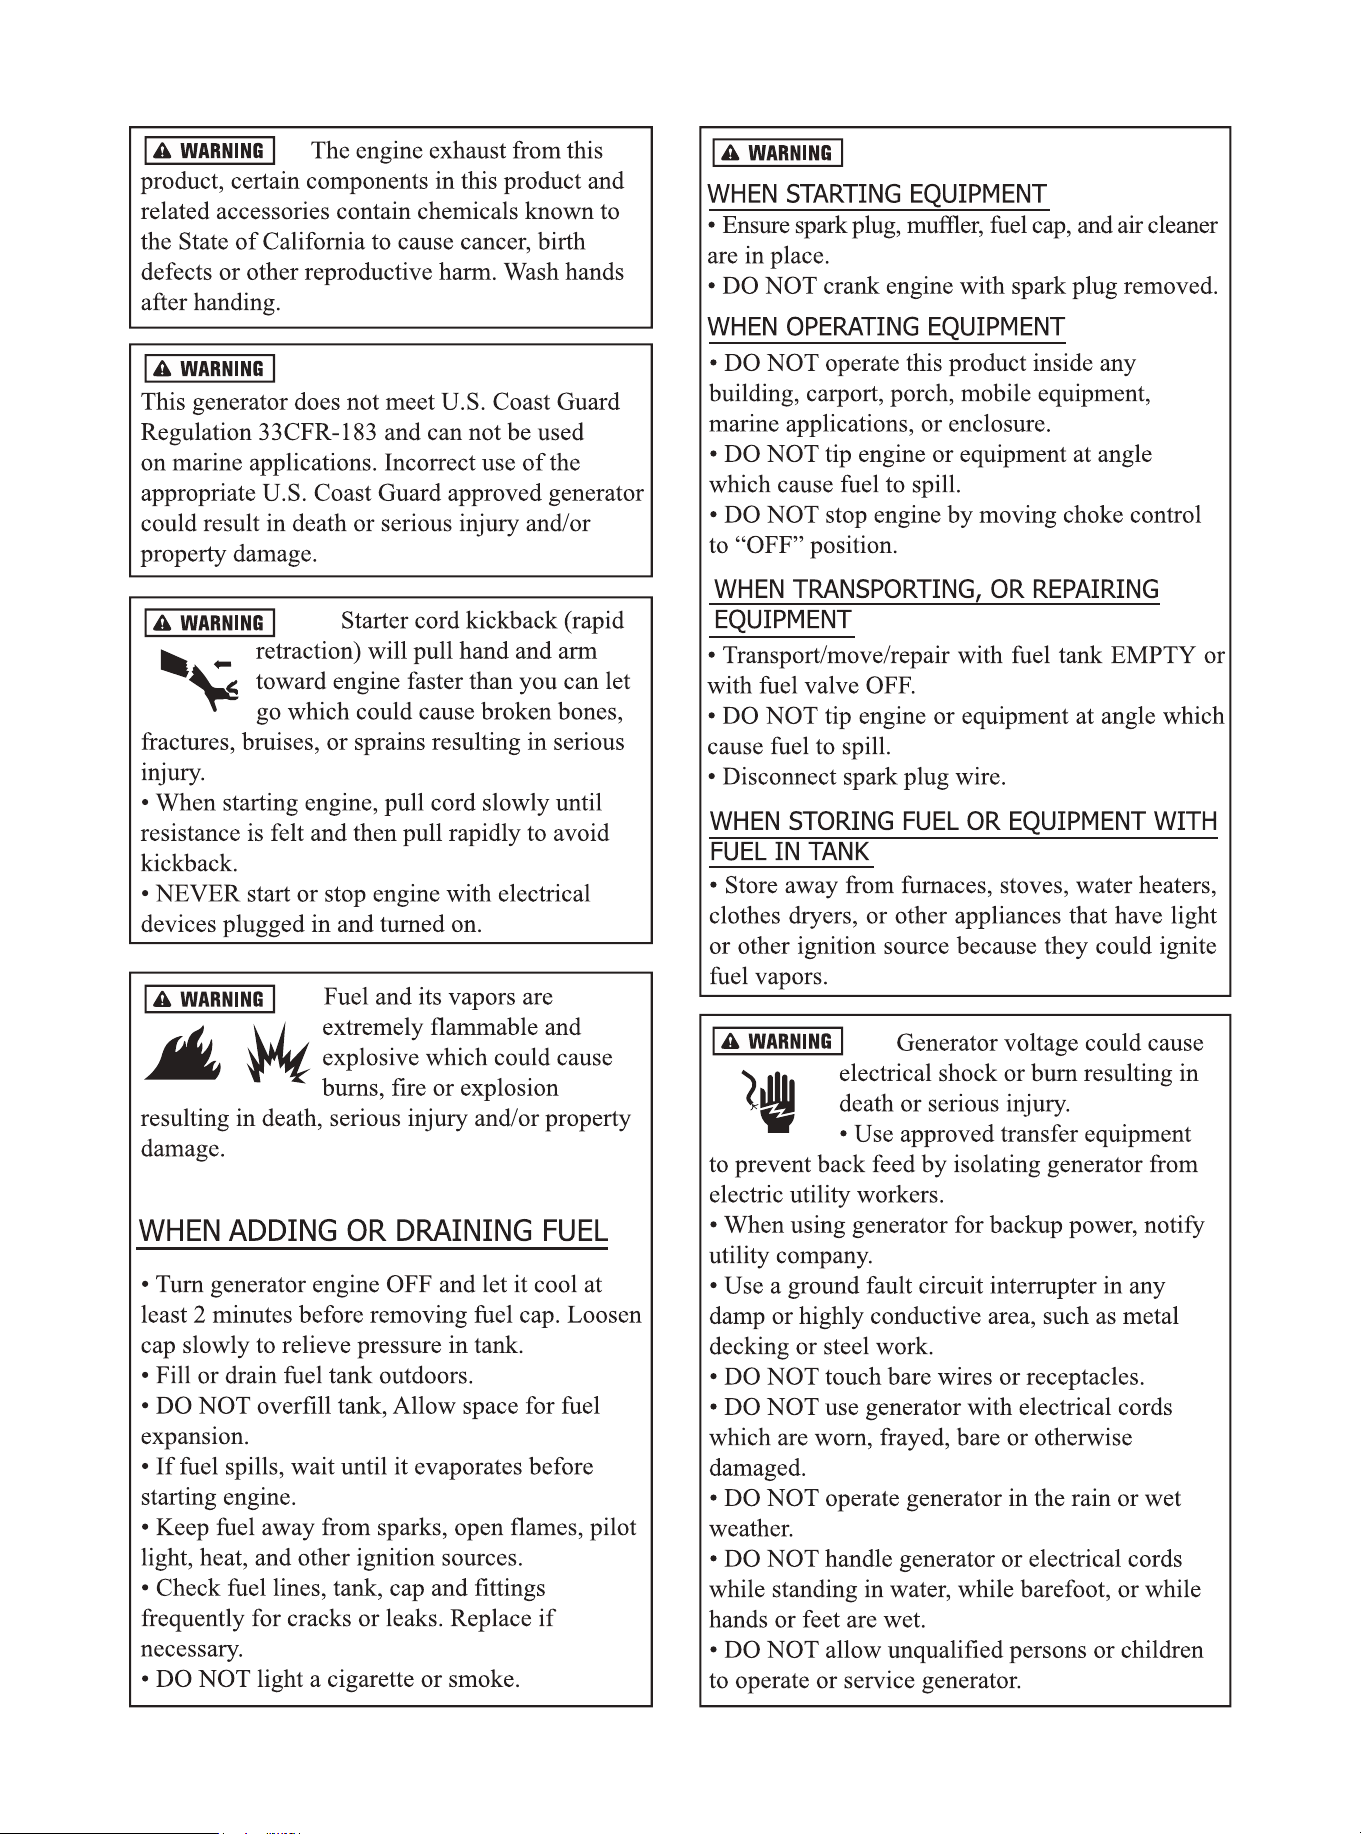
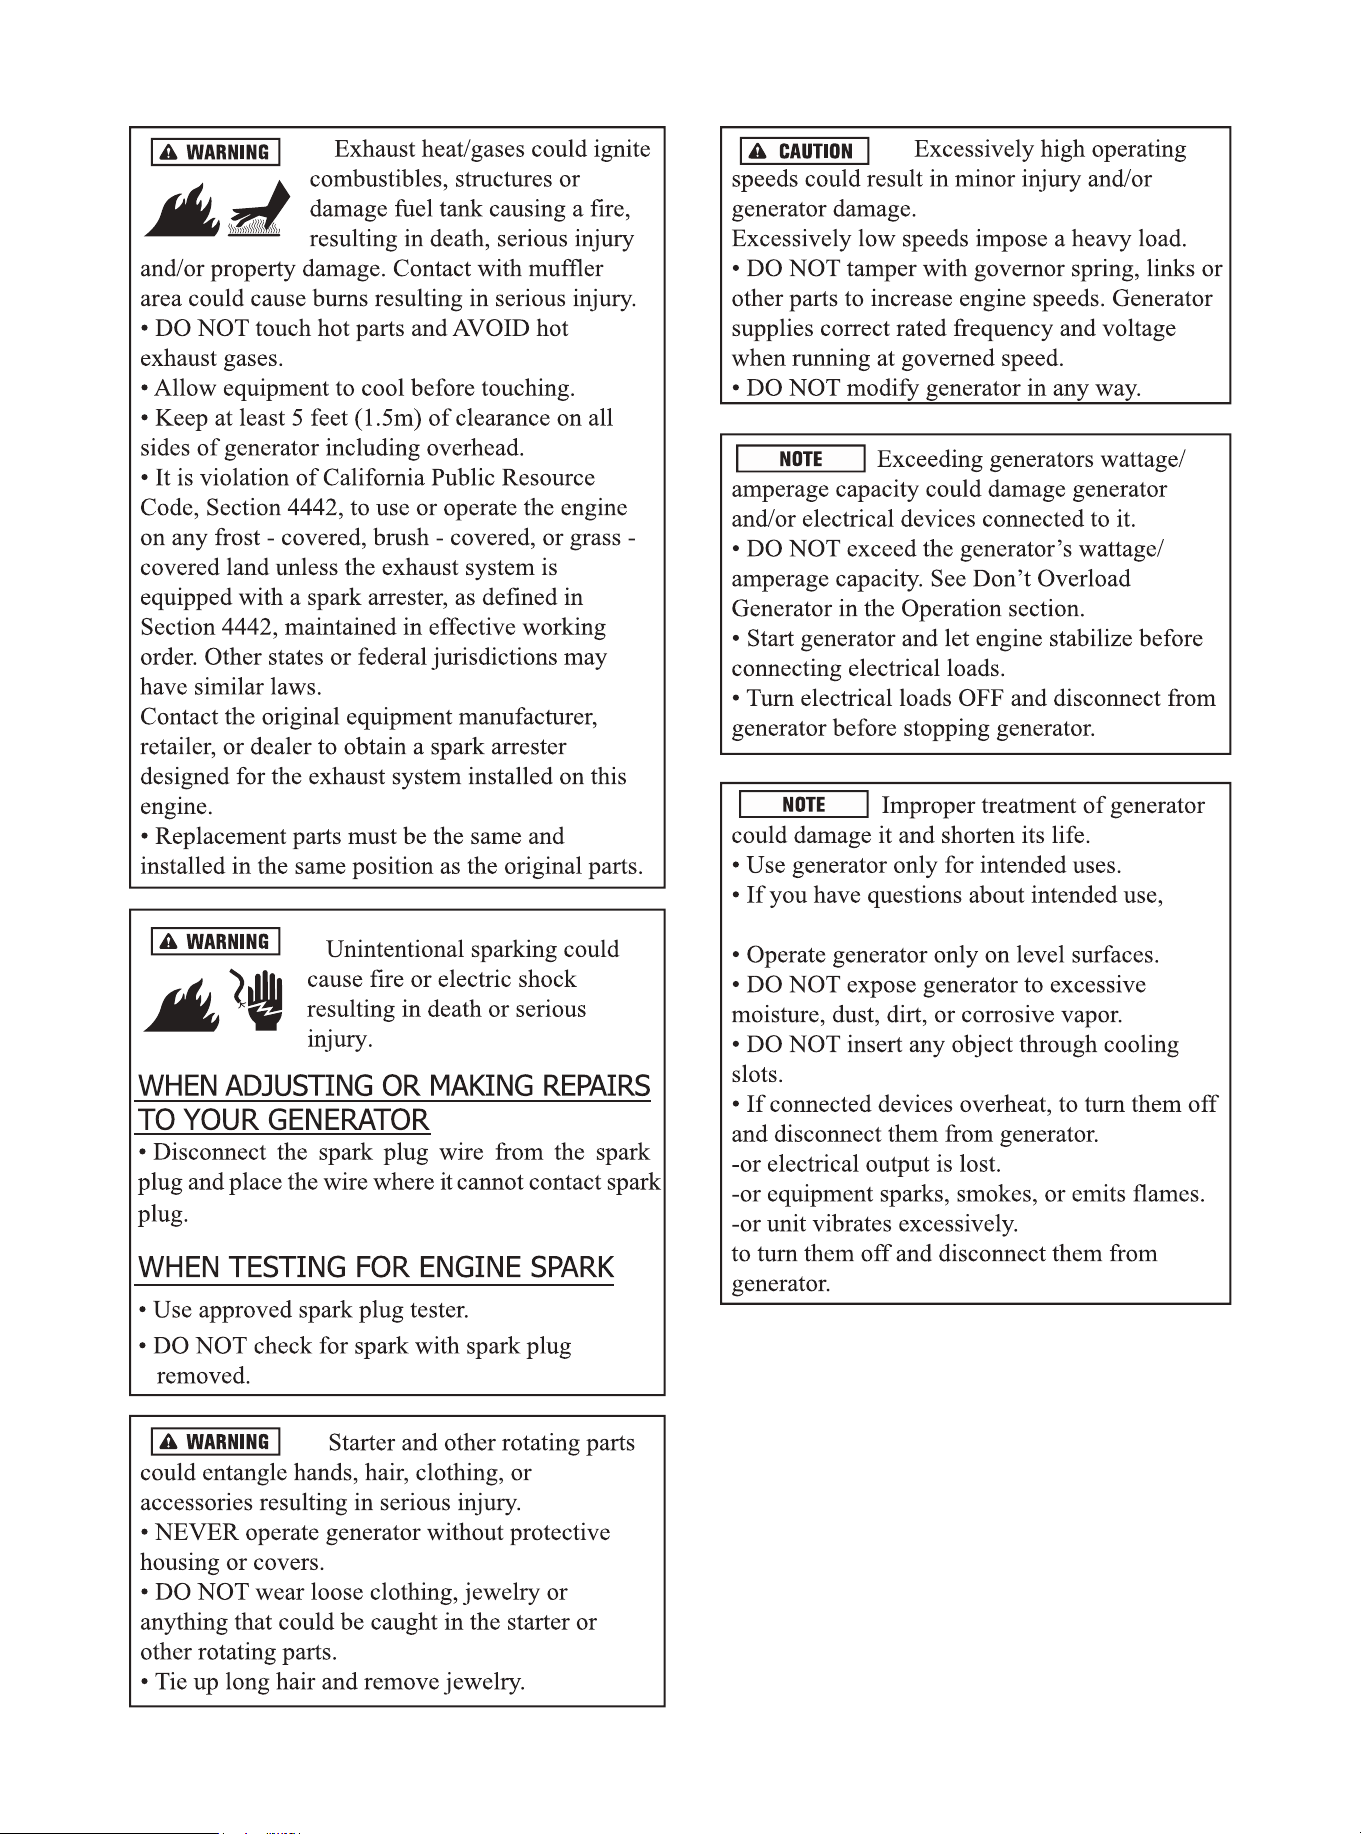
SECTION 1 SAFETY RULES
3
4
call our Customer Service at 1-855-888-3598.
please
5
SECTION 2 SET UP
INSTALL THE SUPPORT LEG
INSTALL THE WHEEL KIT
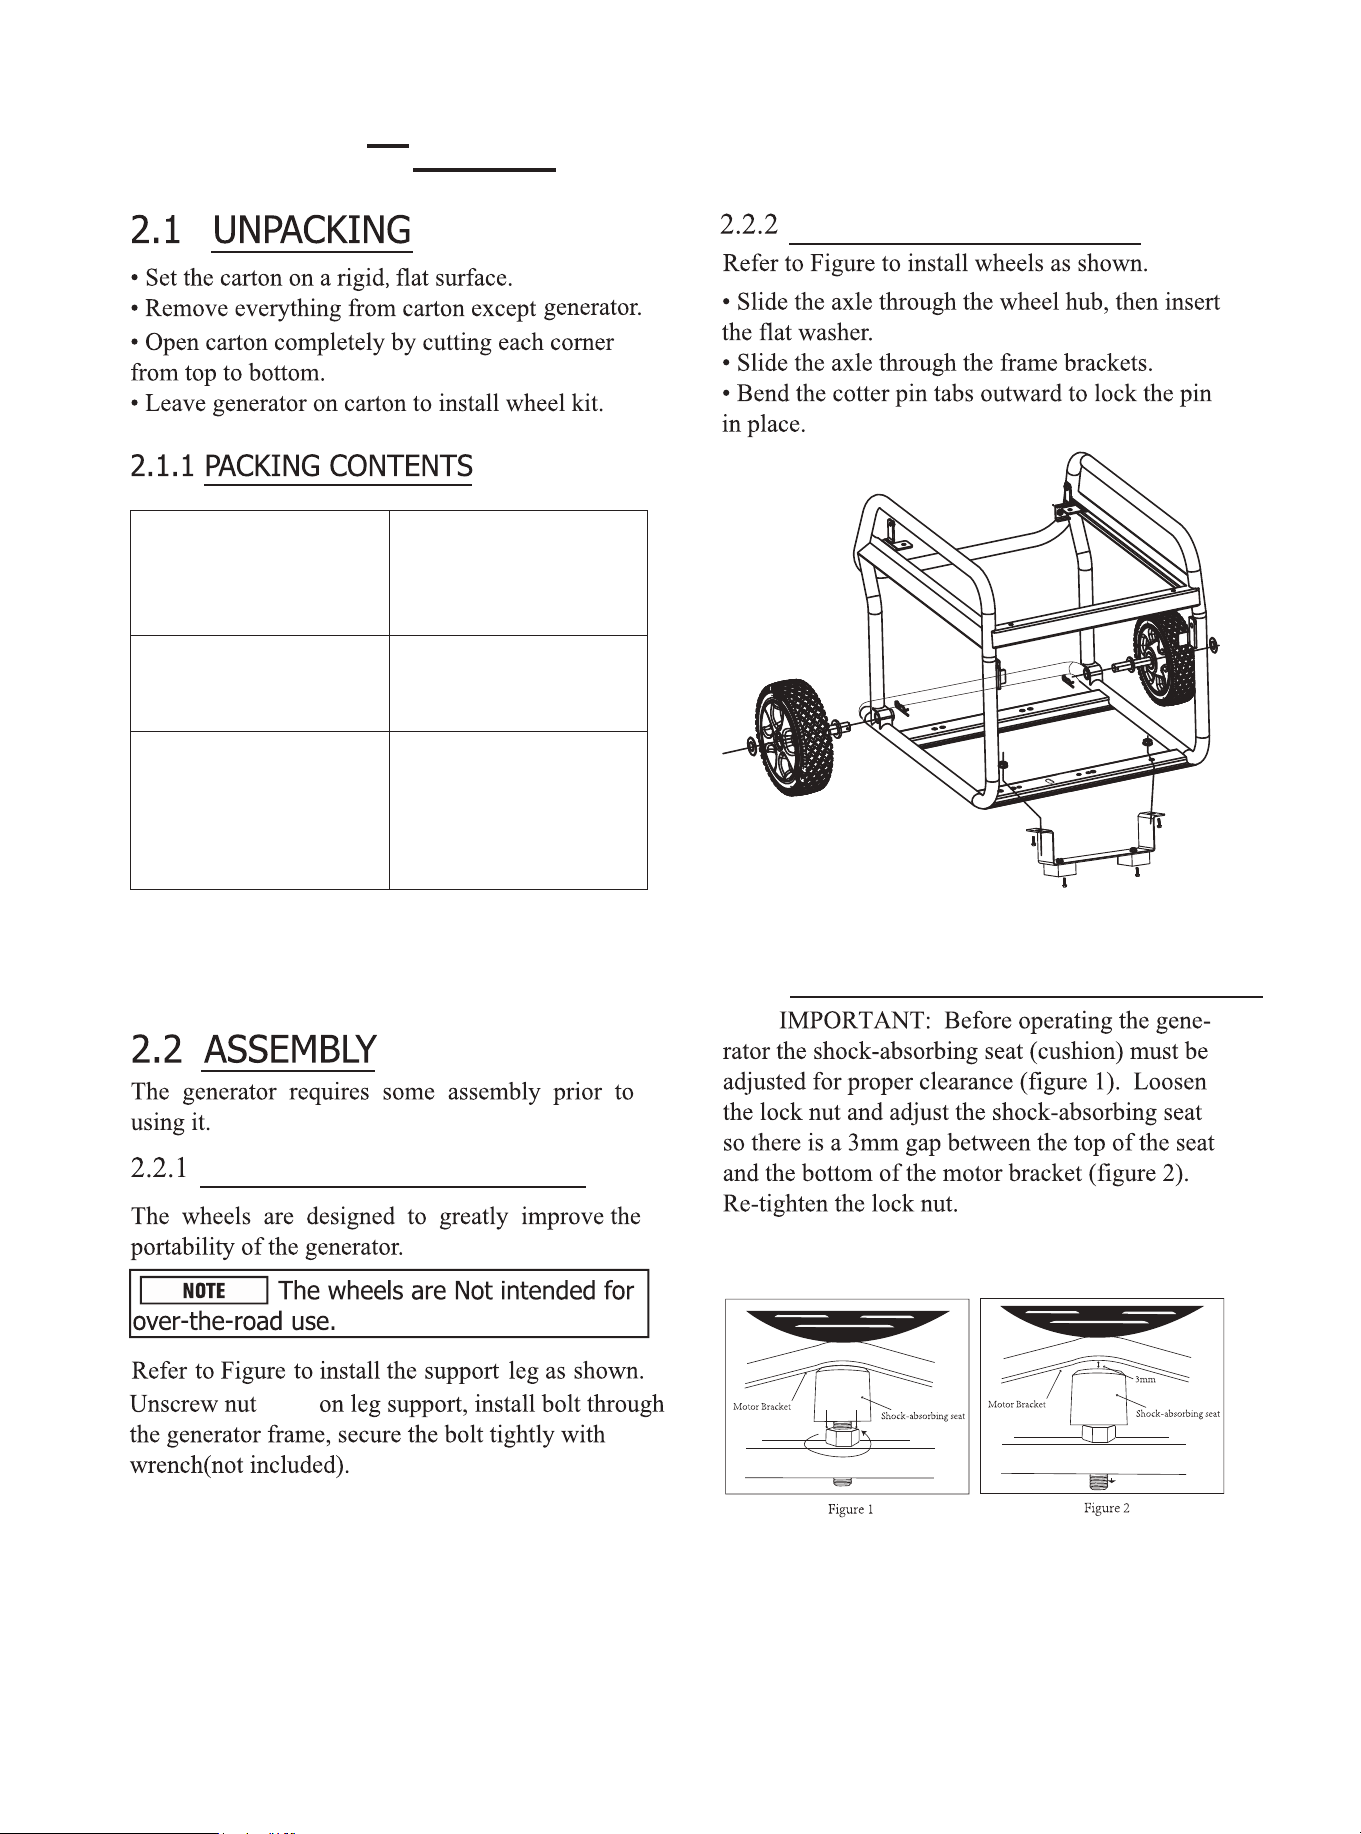
2.2.3 ADJUST SHOCK-ABSORBING SEAT
(M8)
6
2- 9.5 in wheel
2 -axle pin
2- pin
4- washer
1- support leg
2-flange bolt (M8x16)
2- nut (M8)
1- engine oil 1.0 Quart
1- DC charge cable
1- spark torch
1- extension bar
1- high altitude kit
Wheel kit
Support Leg
Other
The above mentioned parts are packed in one box.
Ensure you have all included items prior to assembly.
If items are damaged or missing, call 1-855-888-3598.
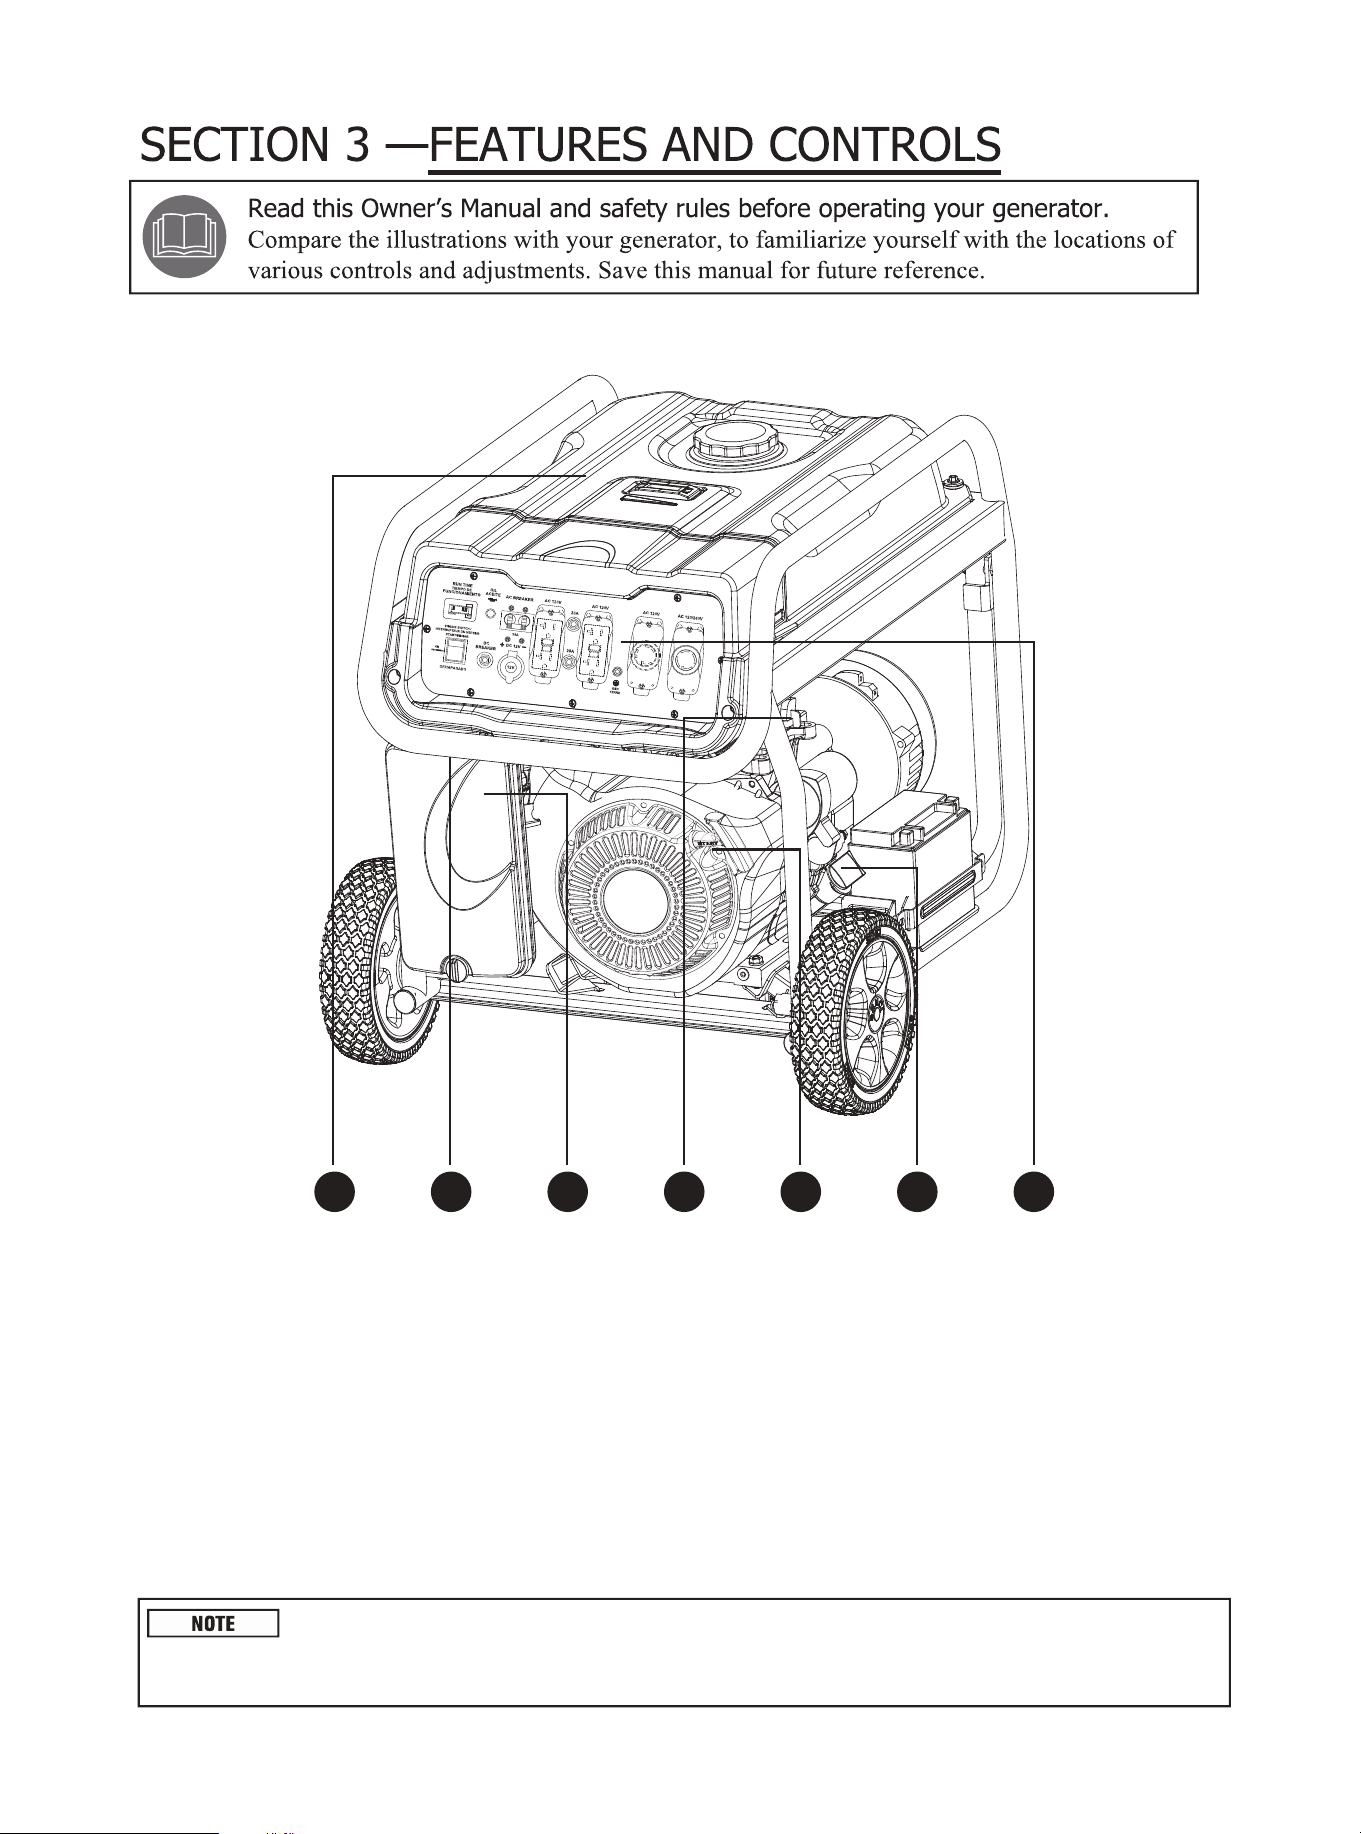
1. Fuel Tank - 7 gallon (25 L) capacity fuel tank.
2.
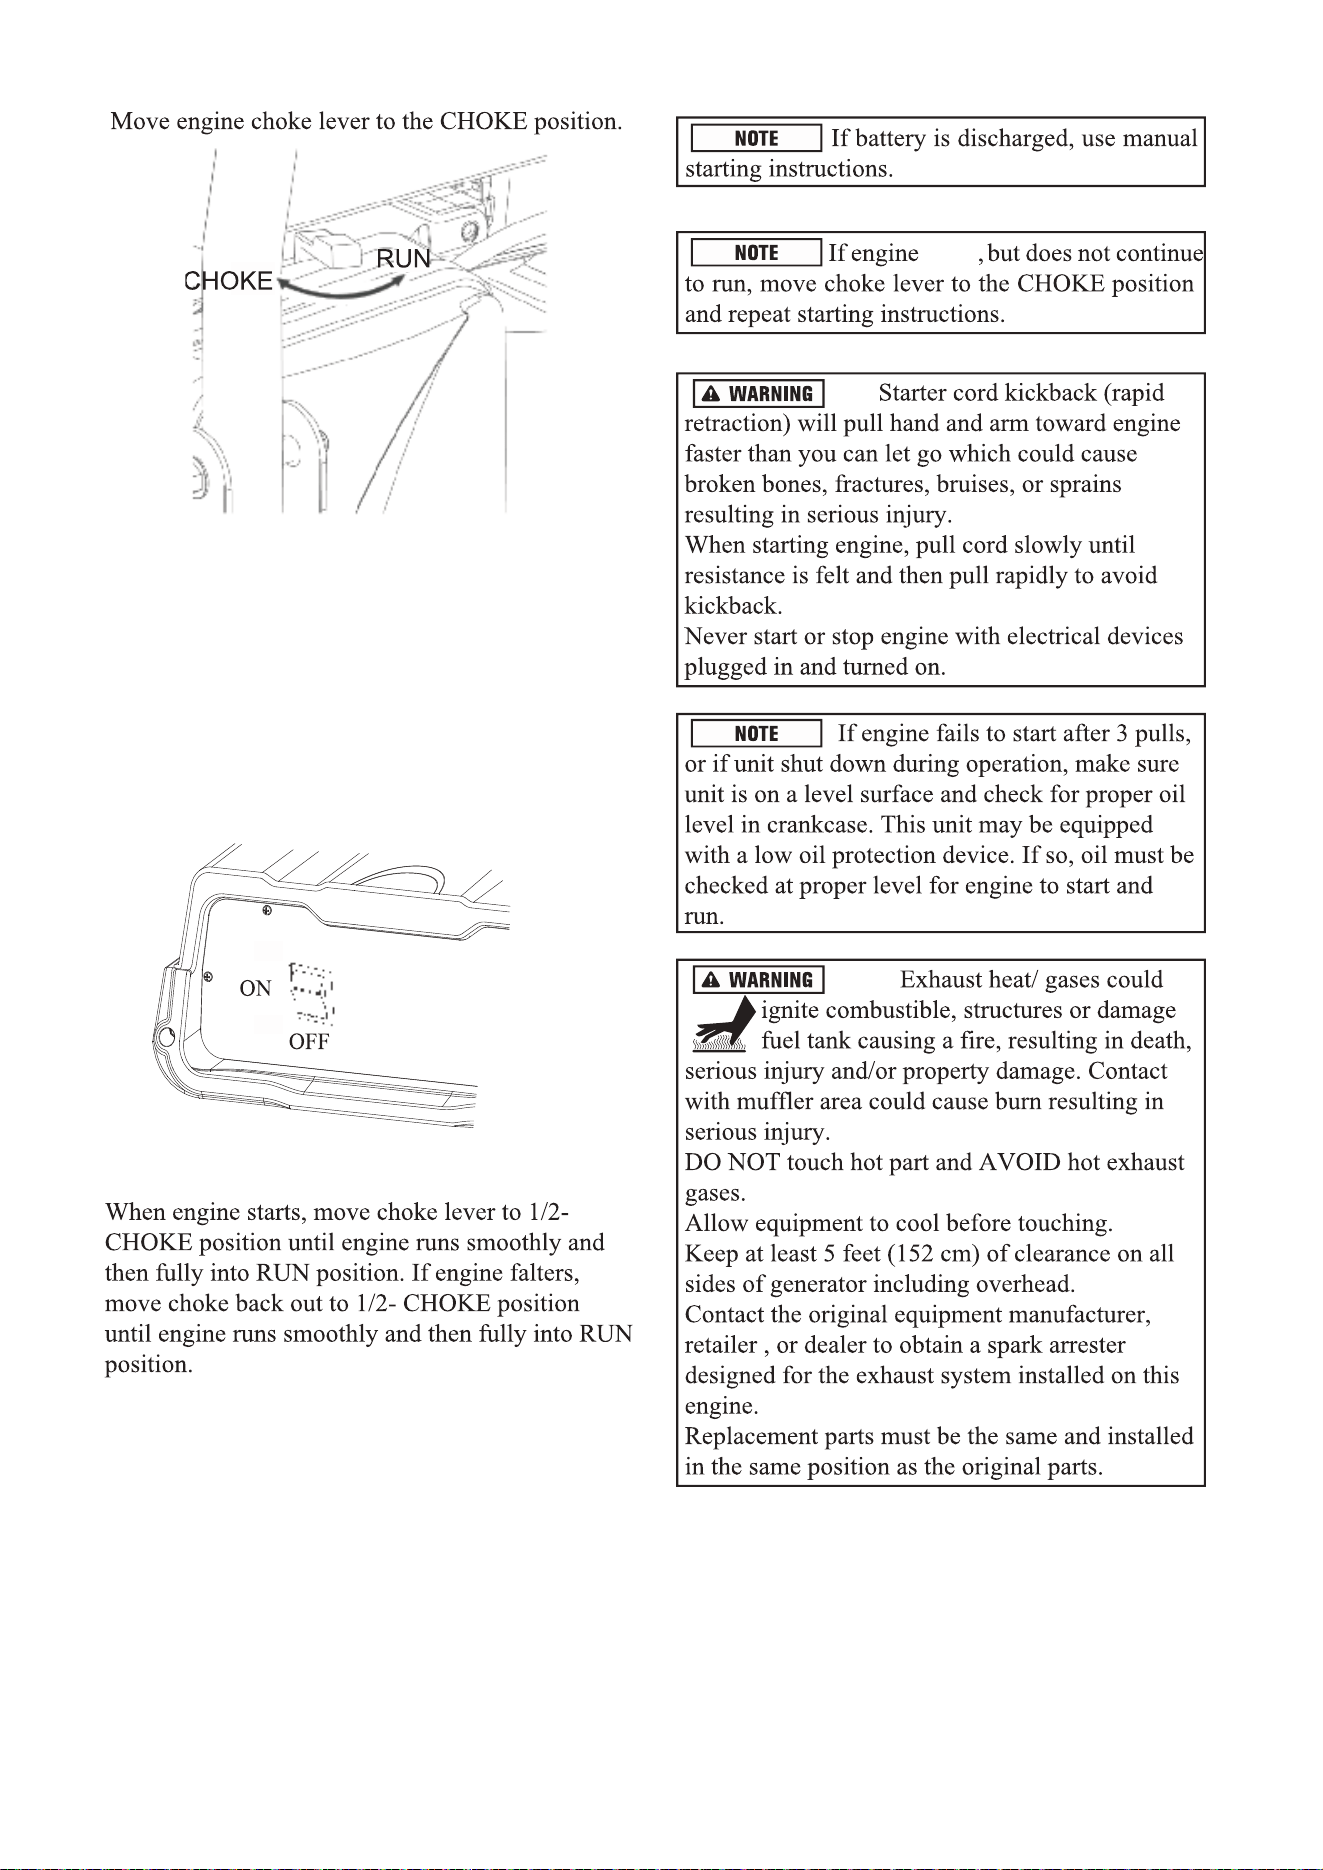
Choke Lever - Controls choke valve. Used when starting a cold engine.
4.
Fuel Valve - Used to turn fuel supply on and off to engine.
3.
Air Filter - Protects the engine by filtering dust and debris from the intake air.
5.
Recoil Starter - Used to manally start the engine.
6.
Oil Filler Cap - Check and fill engine oil level.
7.
Control Panel - See "Power Panel" section on Page 8.
1 2 3 4 5 6 7
GENERATOR
We are always working to improve our products. Therefore, final product may vary from
images shown. A-iPower reserves the right to change features, specifications without notice for further
improvements of products.
7
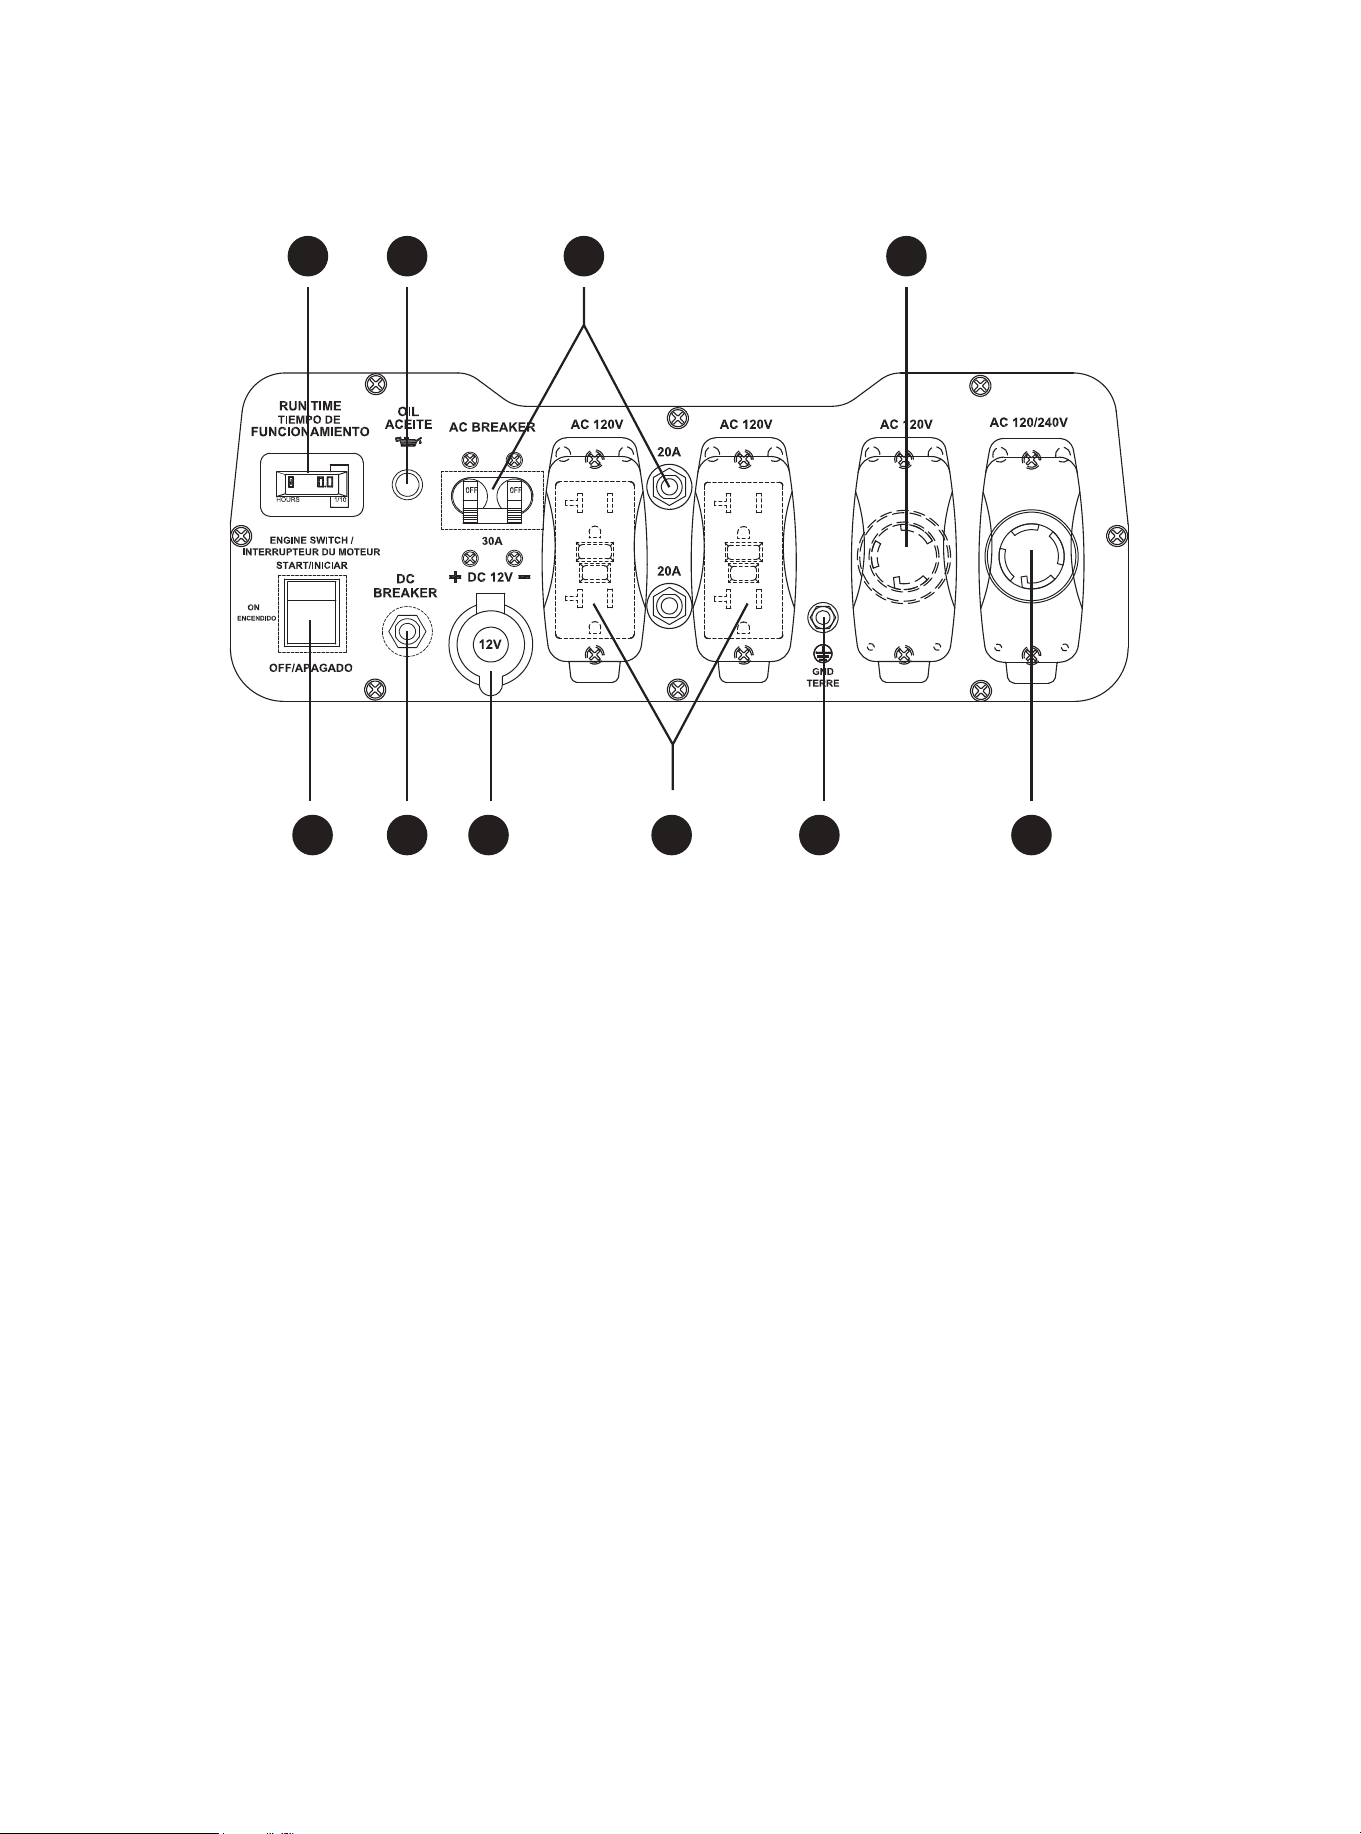
5. Engine Switch - Set this switch to ON before starting engine. Set switch to OFF to shut off engine.
1. Hour Meter - Monitor run time and schedule maintenance intervals
2. Low Oil Alarm - Alarm when low oil is detected
8. GFCI 120V 20A 5-20R - Used to supply electrical power for the operation of 120V AC, 20A,
single phase 60HZ electrical loads.
4. 120V AC 30A L5-30R - Used to supply electrical power for the operation of 120V AC, 20A,
single phase 60HZ electrical loads.
10. 120/240 VAC 30A L14-30R Twist-lock Receptacle - Used to supply electrical power for the
operation of 120V AC and/or 240VAC, 30A, single phase 60Hz electrical loads.
3. Circuit Breaker - The circuit breadker protects the generator against electrical overloads. The rating of
the breaker and the load it protects are marked near the breaker. Should any of the Circuit Breakers trip,
the generator will stop the electricity output. If this happens, unplug all loads from the generator. Allow
the generator to cool down. Then, press the tripped Circuit Breaker, restart the engine, and re-attach loads.
9. Ground Terminal - Prior to each use, set up the ground wire (not included) connection to the
Grounding Terminal to properly ground the Generator.
CONTROL PANEL
1 3
8
4
5 6
2
7 9 10
7. 12V DC OUTPUT – used for battery charging.
6. DC Circuit Breaker – protect DC output, turn off automatically if the current exceeds 8A.
8
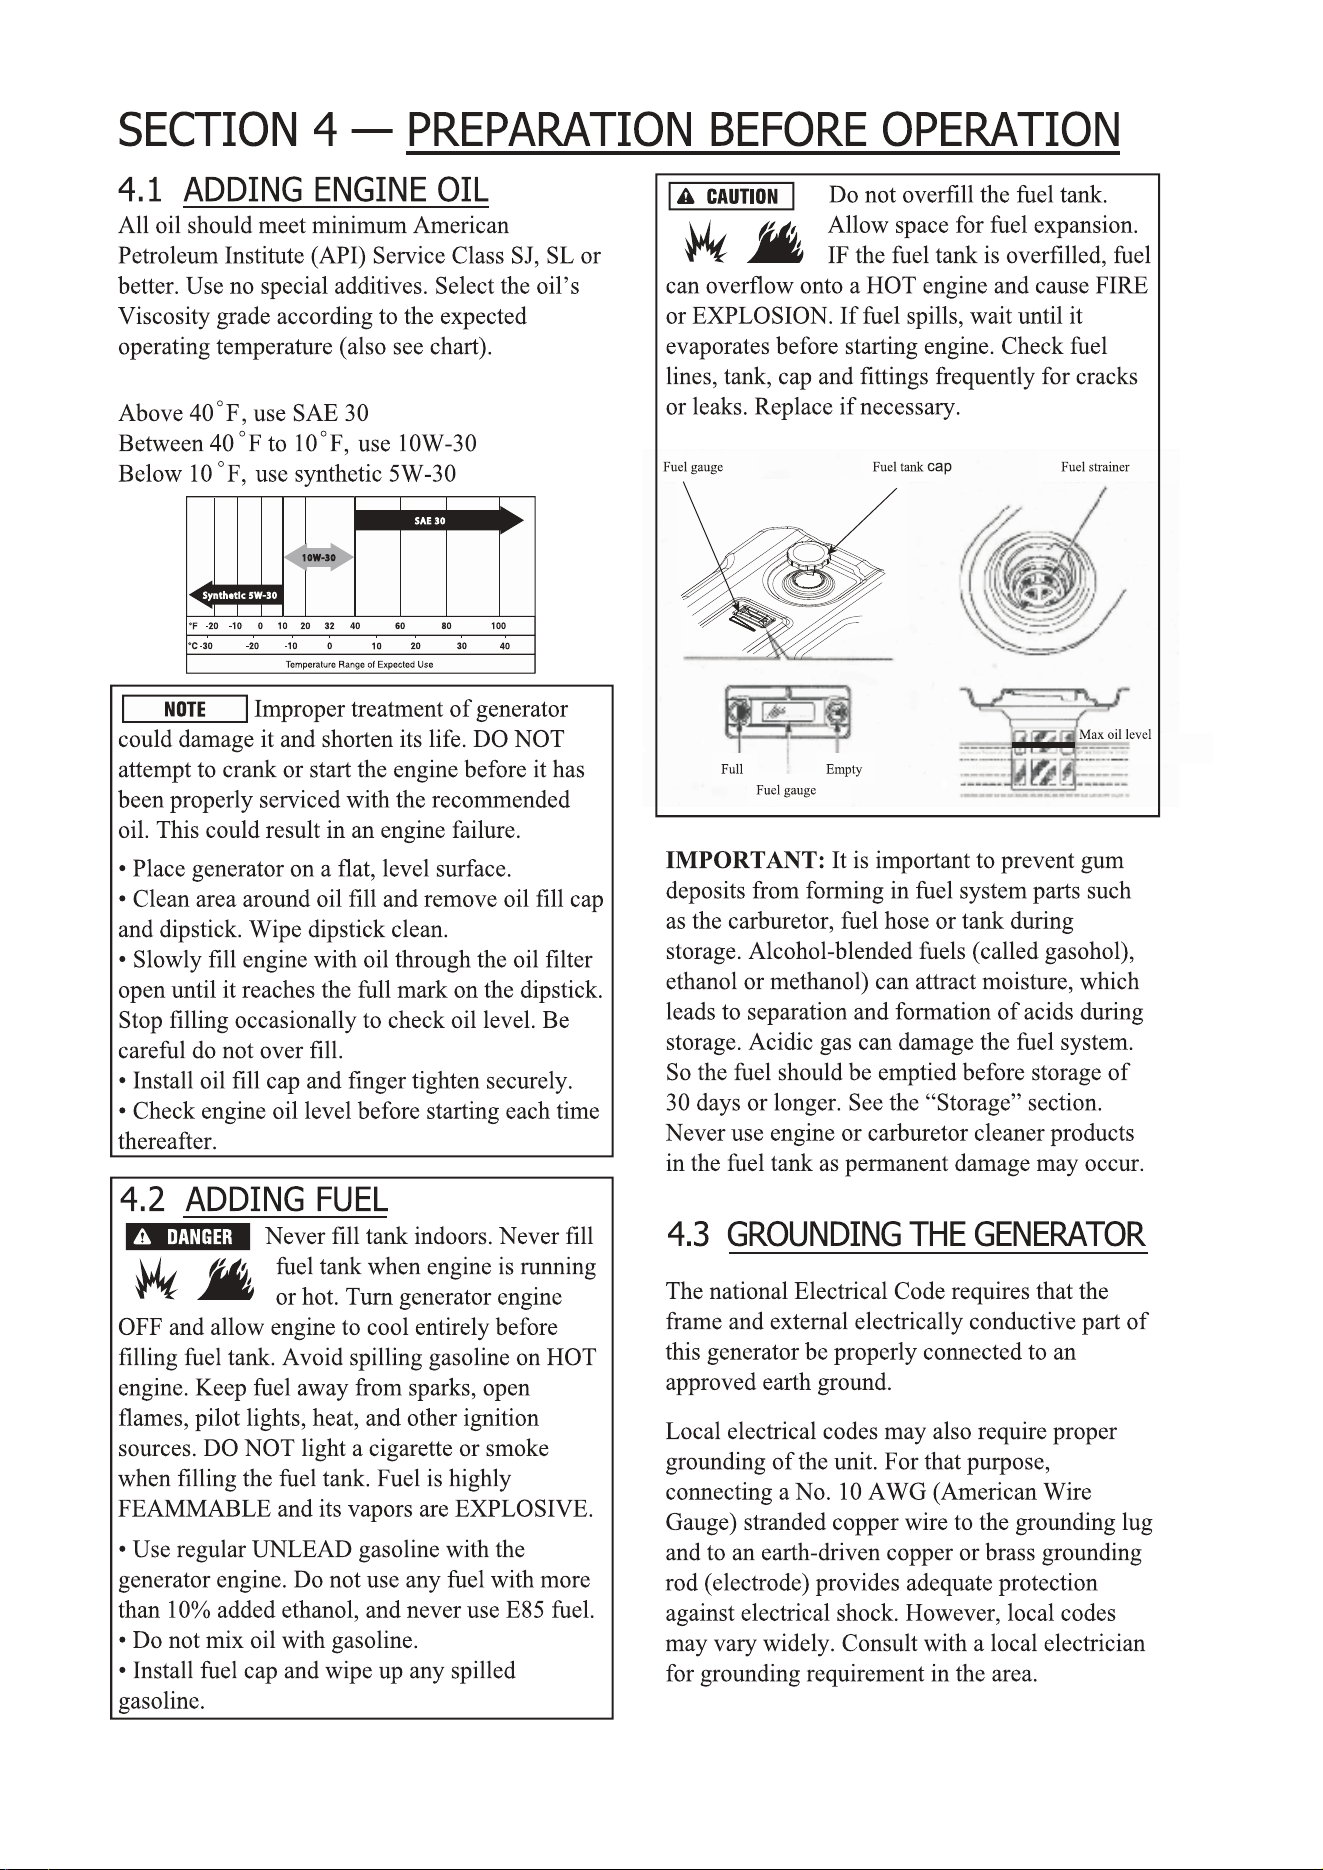
The SAE Viscosity Chart
9
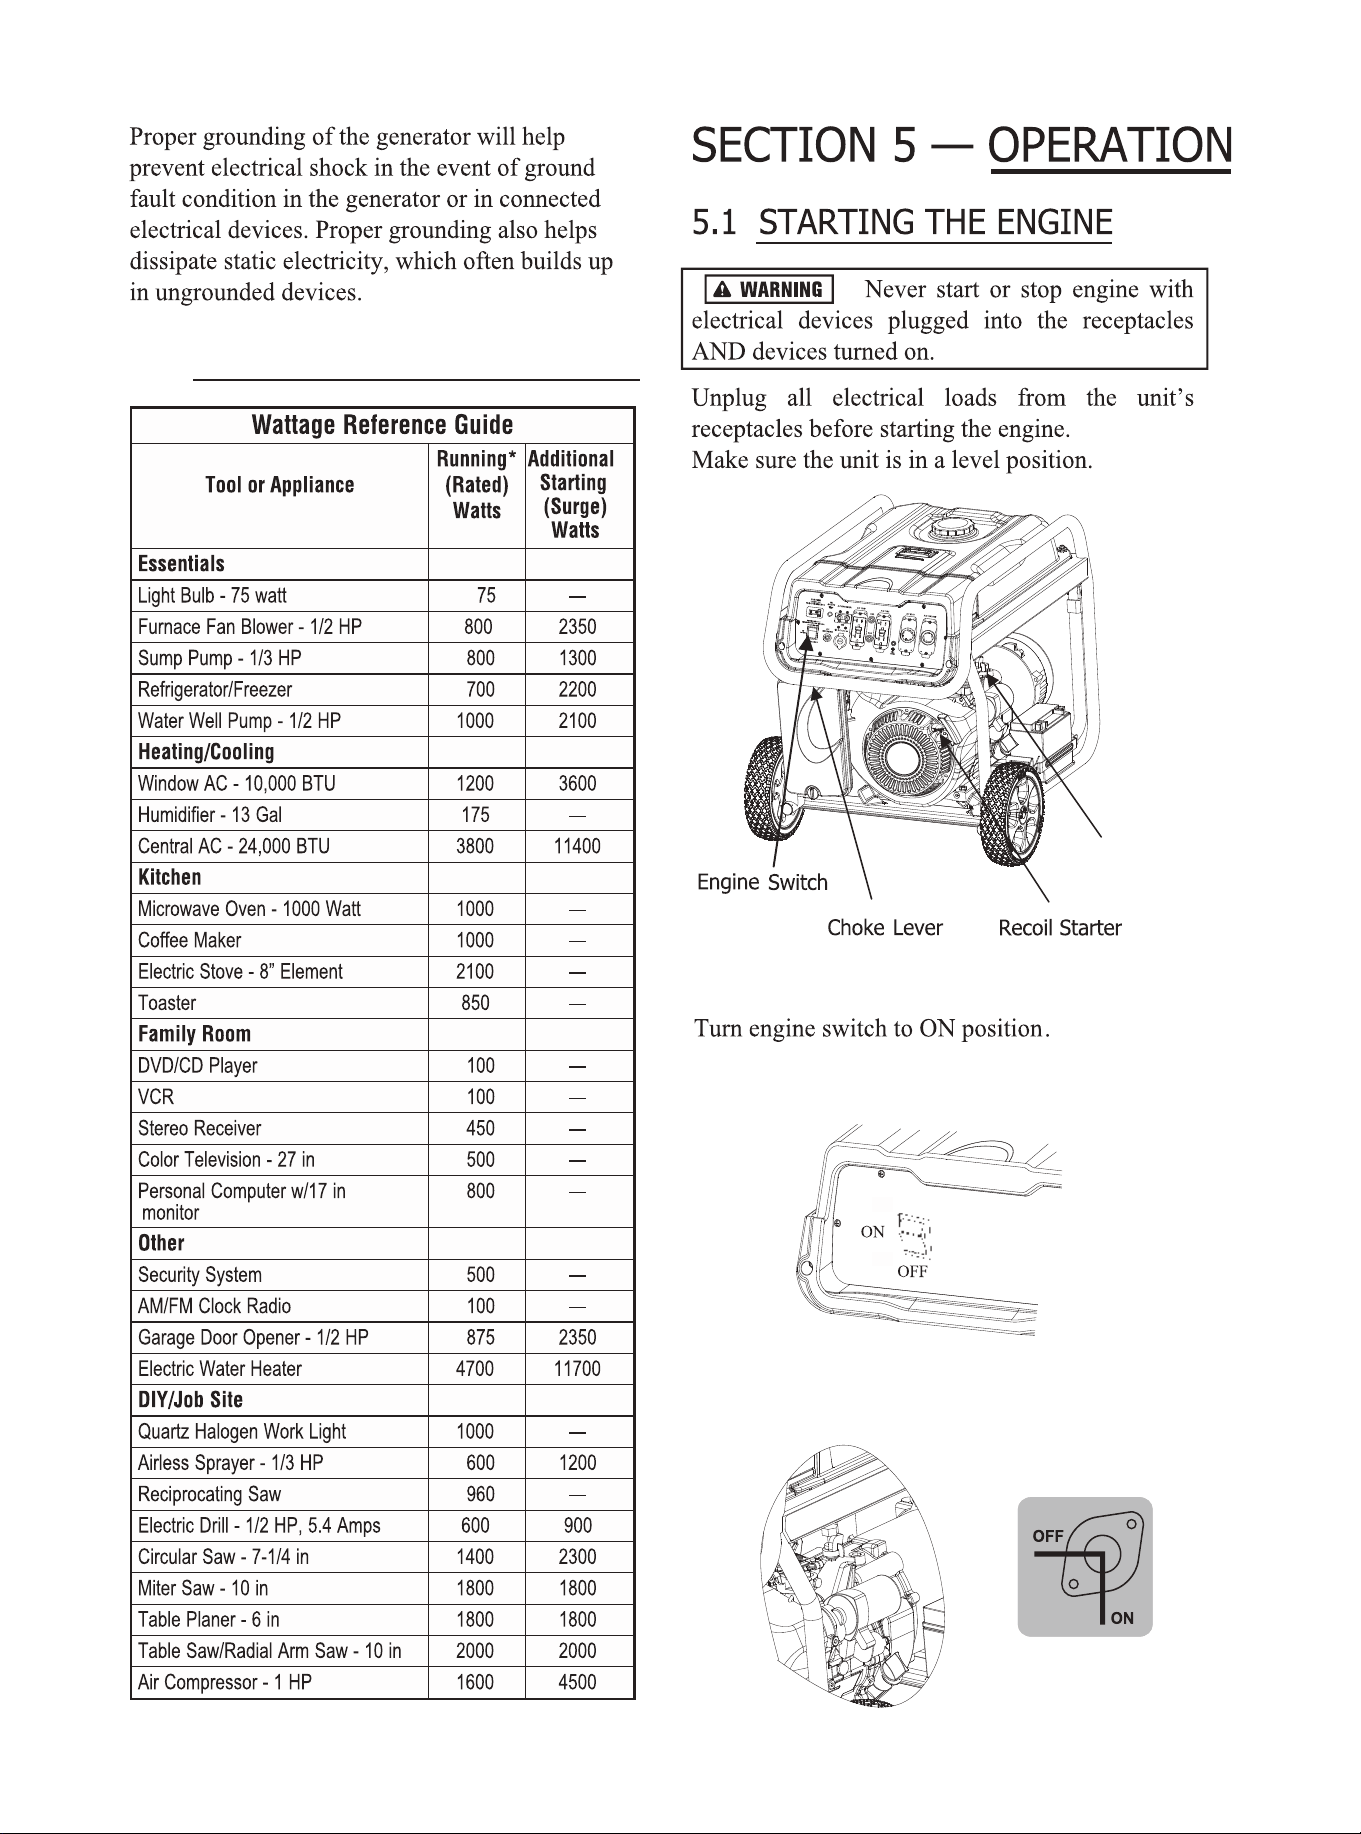
START
4.4 WATTAGE REFERENCE GUIDE
Fuel Valve
Turn Fuel Valve to ON position.
10
Push the switch to “START” position, hold in
start position until generator start.
Caution: to prolong the life of starter components,
DO NOT hold for more than 10 seconds. Pause
and retry as necessary. After generator starts,
release switch and it will return to the “ON”
position automatically.
START
starts
11
turn
DO NOT overload Generator Capacity
Volts x Amps = Watts
:
The “WATTAGE REFERENCE GUIDE”on Page 10
helps to determine how many items the generator can
operate at one time.
Engine
At high altitudes over 3,000 feet, the engine
carburetor and any other parts that control the
fuel-air ratio will be affected, which will decrease
performance, increase fuel consumption and
increase emission. Proper operation can be ensured
by installing an altitude kit by a qualified mechanic
when use at altitude higher than 3,000 feet. Refer to
the altitude kit and operation instruction (provided)
when needed.
HIGH ALTITUDE OPERATION
12
“MAINTENANCE”
section
13
If running this unit under dirty or dusty conditions,
or in extremely hot weather, to change the oil
more often.
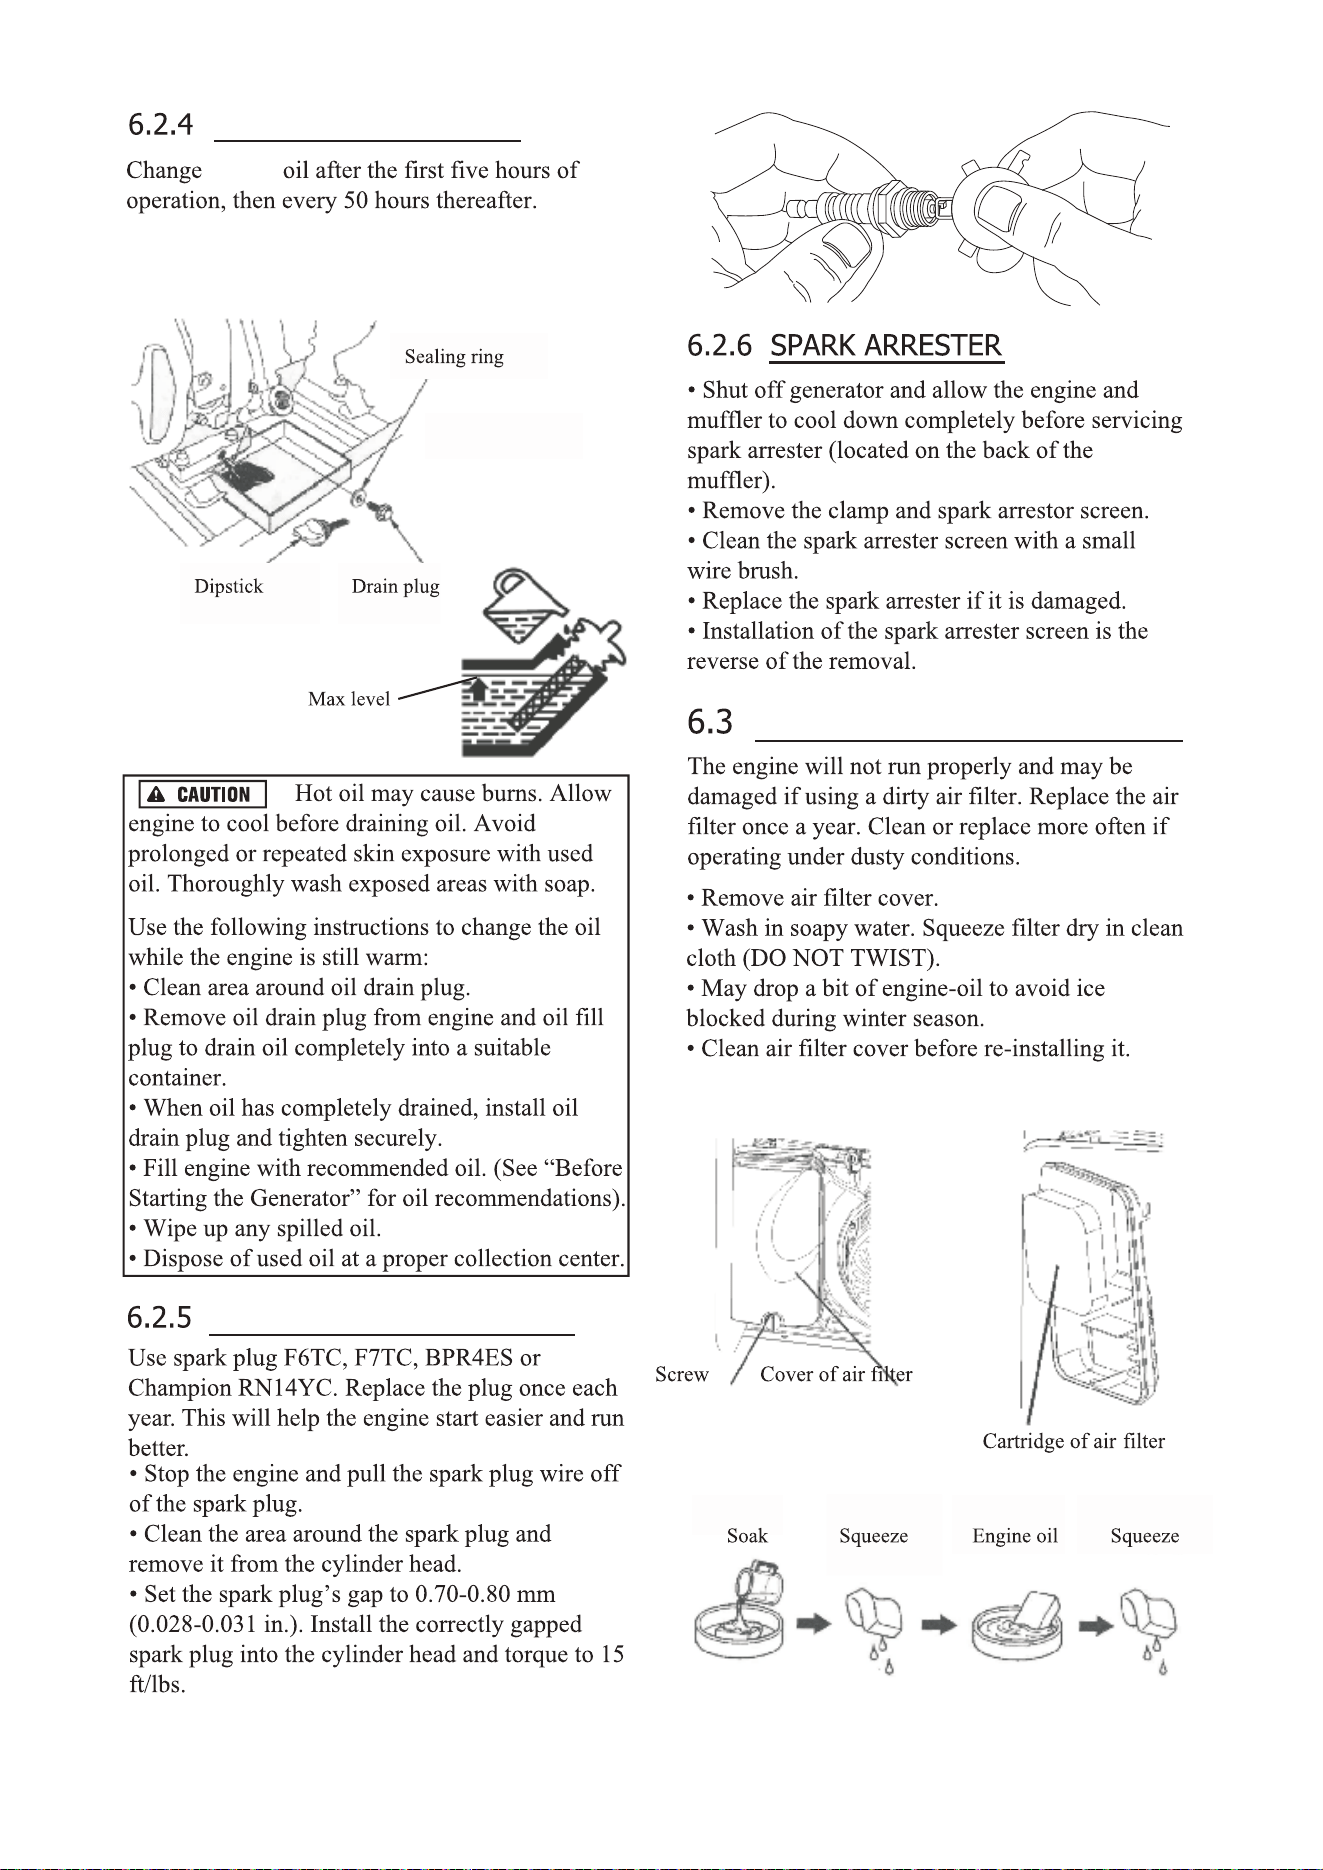
CHANGING ENGINE OIL
SPARK PLUG MAINTENANCE
AIR FILTER MAINTENANCE
engine
14
Valve Clearance
- Intake: 0.10-0.15mm(0.004-0.006 in)
- Exhaust: 0.15-0.20mm(0.006-0.008 in)
15
Problem Possible Causes Probable Solutions
Engine will not start FUEL RELATED:
1.
No fuel in tank or fuel valve is in “OFF” position.
3.
Choke not in START position, cold engine.
2.
Low quality, stale, dirty or deteriorated gasoline.
4.
Carburetor not primed.
5.
Dirty fuel passageways.
6.
Carburetor needle stuck.
Fuel can be smelled in the air.
7.
Too much fuel in chamber. This can be caused
by the carburetor needle sticking.
9.
Clogged Fuel Filter.
FUEL RELATED:
1.
Fill fuel tank with fresh 87+ octane unleaded
stabilizer-treated gasoline and turn fuel valve to
“ON” position.
Do not use gasoline with more than 10% ethanol
(E15, E20, E85, etc.).
3.
Move Choke to START position.
2.
4.
Pull on Starter Handle to prime.
5.
Clean out passageways using fuel additive.
Heavy deposits may require further cleaning.
6.
Gently tap side of carburetor float
chamber with screwdriver handle.
7.
Turn Choke to RUN position. Remove
spark plug and pull the start handle several
times to air out the chamber. Reinstall
spark plug and set Choke to START position.
9.
Replace Fuel Filter.
8.
Intake valve stuck open or closed.
8.
Call customer servise: 1-855-888-3598.
Drain fuel tank and carburetor; fill with fresh
fuel.
IGNITION (SPARK) RELATED:
1.
Spark plug cap not connected securely.
2. Spark
plug electrode wet or dirty.
3. Incorrect spark plug gap.
4. Spark plug cap broken.
5. Incorrect spark timing or faulty ignition system.
IGNITION (SPARK) RELATED:
1. Connect spark plug cap properly.
2. Clean spark plug.
3. Correct spark plug gap.
4. Replace spark plug cap.
5. Have qualified technician diagnose/
repair ignition system.
COMPRESSION RELATED:
1. Cylinder not lubricated.
Problem after long storage periods.
2. Loose or broken spark plug.
(Hissing noise will occur
when trying to start.)
3. Loose cylinder head or damaged head gasket.
(Hissing noise will occur when trying to start.)
4. Engine valves or tappets mis-adjusted or stuck.
ENGINE OIL RELATED:
1. Low engine oil.
2. Engine mounted on slope,
triggering low oil shutdown.
COMPRESSION RELATED:
1. Pour tablespoon of oil into spark plug
hole. Crank engine a few times
and try to start again.
2. Tighten spark plug.
If that does not work, replace spark plug.
If problem persists, may have head
gasket problem, see #3.
3. Tighten head.
If that does not remedy problem,
replace head gasket.
4. Have qualified technician adjust/
repair valves and tappets.
ENGINE OIL RELATED:
1. Fill engine oil to proper level.
Check engine oil before EVERY use.
2. Operate engine on level surface.
Check engine oil level.
Engine lacks power
Engine "hunts"
or falters
1. Carburetor is running too rich or too lean.
2. Clogged or dirty fuel filter.
1. Cylinder pressure is low.
1. Call Customer Service: 1-855-888-3598.
2. Clean or replace fuel filter.
1. Call Customer Service: 1-855-888-3598.
2. Dirty air filter. 2. Clean or replace fuel filter.
16

Problem Possible Causes Probable Solutions
Engine misfires 1. Spark plug cap loose.
2. Incorrect spark plug gap or
damaged spark plug.
3. Defective spark plug cap.
4. Old or low quality gasoline.
5. Incorrect compression.
1. Check wire connections.
2. Re-gap or replace spark plug.
3. Replace spark plug cap.
4. Use only fresh 87+ octane stabilizer-treated
unleaded gasoline.
Do not use gasoline with more than
10% ethanol (E15, E20, E85, etc.).
5. Diagnose and repair compression.
(Use Engine will not start:
COMPRESSION RELATED section.)
Engine stops
suddenly
1. Fuel tank empty or full of impure or low quality
gasoline.
2. Low oil shutdown.
3. Defective fuel tank cap creating vacuum,
preventing proper fuel flow.
4. Faulty magneto.
5. Disconnected or improperly
connected spark plug cap.
1. Fill fuel tank with fresh 87+ octane stabilizer-
treated unleaded gasoline.
Do not use gasoline with more than
10% ethanol (E15, E20, E85, etc.).
2. Fill engine oil to proper level.
Check engine oil before EVERY use.
3. Test/replace fuel tank cap.
4. Have qualified technician service magneto.
5. Secure spark plug cap.
Engine stops when
under heavy load
1. Dirty air filter
2. Engine running cold.
1. Clean or replace element.
2. Allow engine to warm up prior
to operating equipment.
Engine knocks 1. Old or low quality gasoline.
2. Engine overloaded.
3. Incorrect spark timing, deposit buildup,
worn engine, or other mechanical problems.
1. Fill fuel tank with fresh 87+ octane stabilizer-
treated unleaded gasoline.
Do not use gasoline with more than
10% ethanol (E15, E20, E85, etc.).
2. Do not exceed equipment’s load rating.
3. Have qualified technician diagnose
and service
Engine backfires 1. Impure or low quality gasoline.
2. Engine too cold.
3. Intake valve stuck or overheated engine.
4. Incorrect timing.
1. Fill fuel tank with fresh 87+ octane stabilizer-
treated unleaded gasoline.
Do not use gasoline with more than
10% ethanol (E15, E20, E85, etc.).
2. Use cold weather fuel and oil additives
to prevent backfiring.
3. Have qualified technician diagnose
and service engine.
4. Check engine timing.
Generator shuts down
during operation
No AC output
Generator gallops
Repeated circuit
breaker tripping
Generator cannot
supply enough power
or overheating
1. Out of fuel.
2. Low oil level.
1. Generator is overloaded.
2. Insufficient ventilation.
1. Cable not properly connected.
2. Circuit breaker is open.
3. Faulty brush assembly.
4. Faulty AVR.
5. Loose wiring.
6. Other.
1. Engine governor defective.
1. Overload.
2. Faulty cords or device.
1. Fill fuel tank.
2. Fill crankcase to the proper level. Place
generator on a flat, level surface.
1. Review load and adjust, see“xx”.
2. Check for air restriction. Move to a well
ventilated area.
1. Check all connections.
2. Reset circuit breaker.
3. Replace brush assembly.
4. Replace AVR.
5. Inspect and tighten wiring connections.
6. Contact Customer Service at 1-855-888-3598.
1. Contact Customer Service at 1-855-888-3598.
1. Review load and adjust. See“Wattage Reference
Guide” on Page 10.
2. Check for damaged, bare or frayed wires.
Replace defective device.
engine.
17
Model Number SUA9000E
Starting Watts 9000
Running Watts 7000
AC Load 120/240V
Frequency 60Hz
Running VAC Amperage 29.0A
Phase Single
IP Class 21
Power Factor 1.0
FOUR - 120V 20A NEMA 5-20R GFCI Outlet
ONE - 120V AC 30A L5-30R
ONE - 120/240V 30A NEMA L14-30R Outlet
Displacement 420cc / 14hp
Starting Method Electric
Cooling System Horizontal Single Cylinder 4 Stroke OHV
Fuel Tank Capacity 7Gl. (25L)
Engine Oil Capacity 1.0Qt. (1.0L)
Run time @ 50% Load (Hrs) 9.5 Hrs
Run time @ 100% Load (Hrs) 6.5 Hrs
Noise Level 76 dBA at 23ft (7m)
Receptacle
Engine
Generator
18
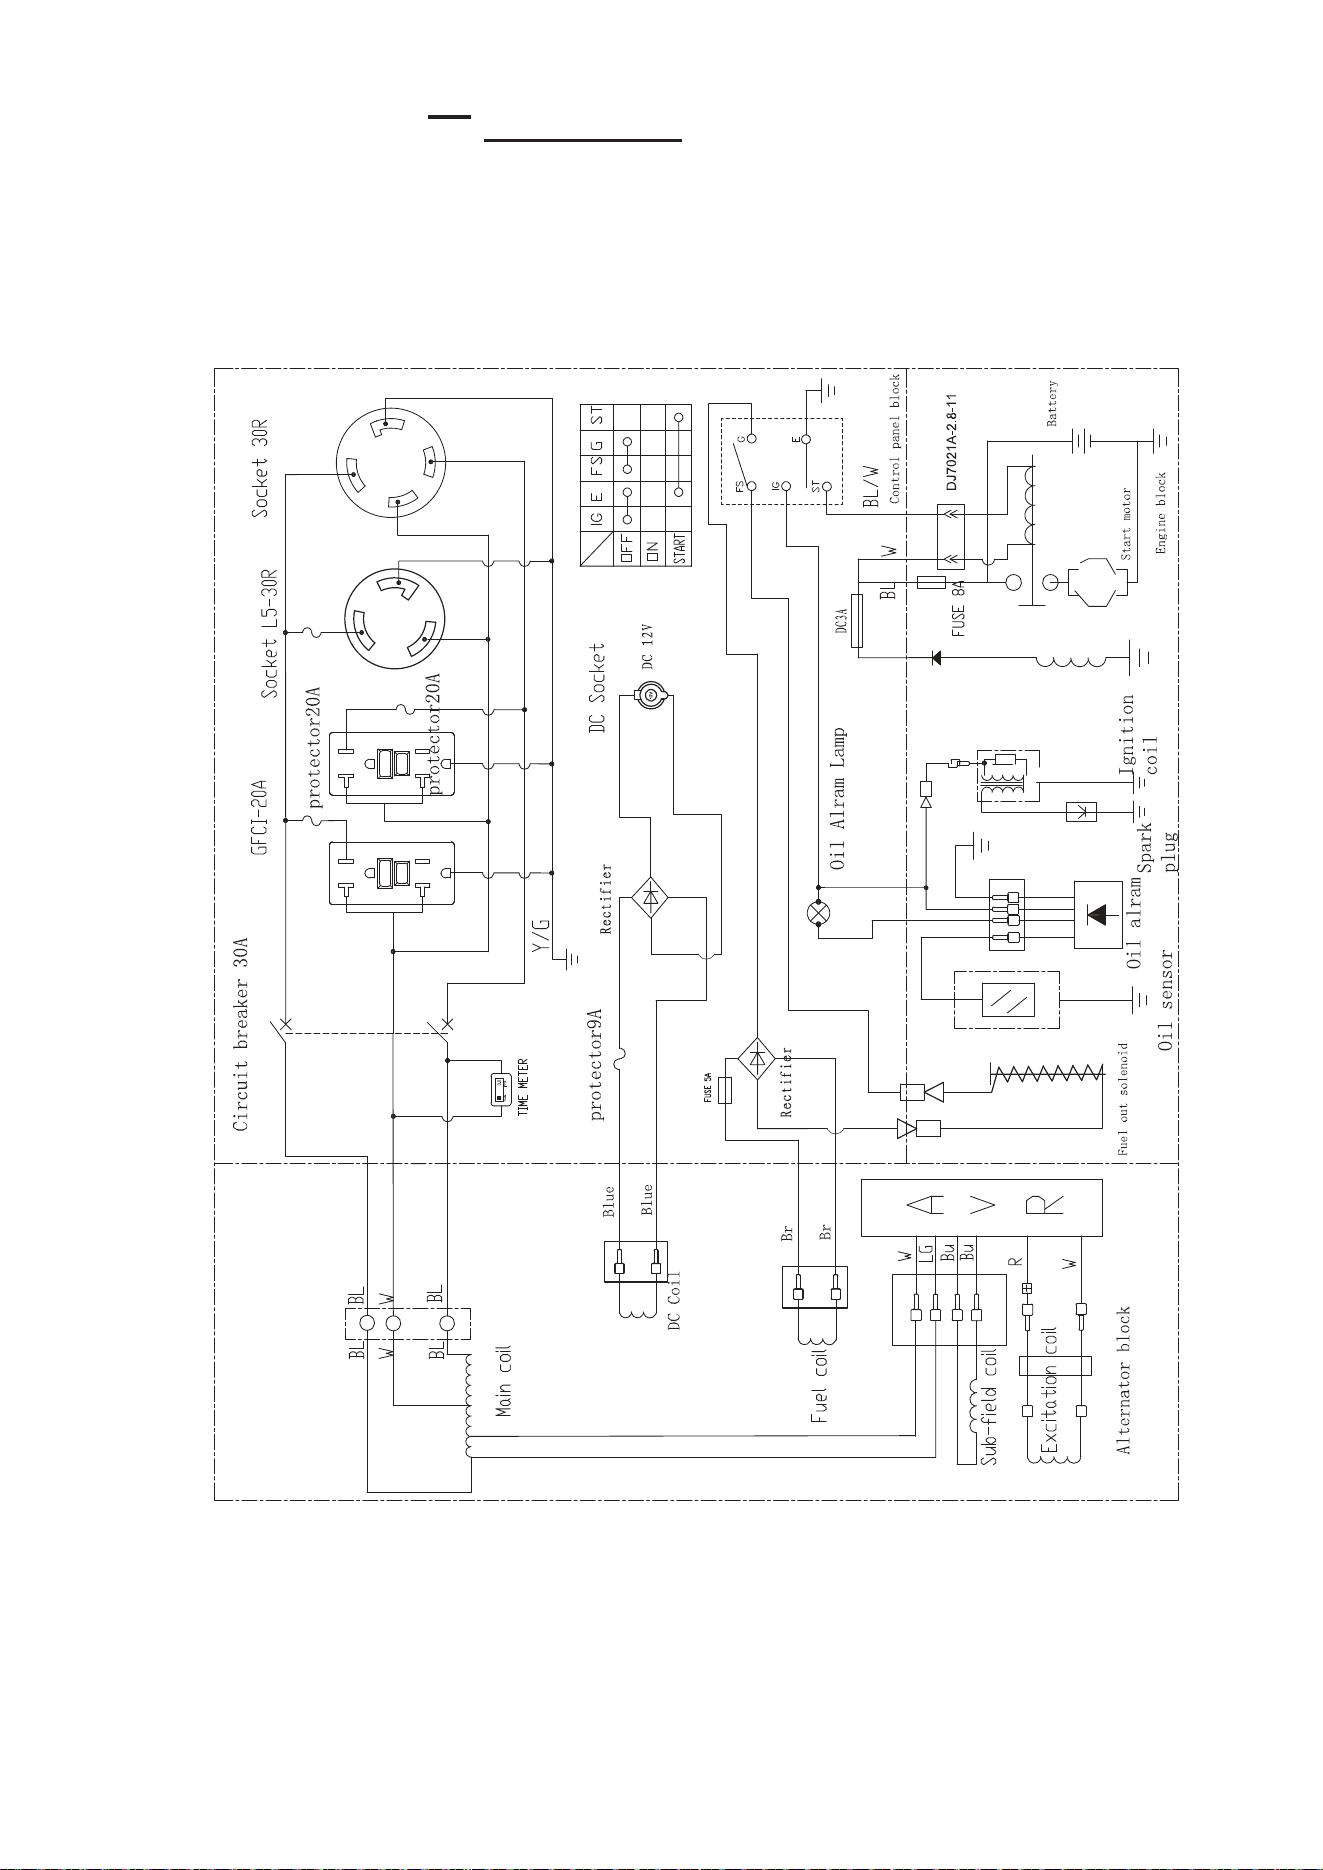
SECTION 10 DIAGRAM
SUA9000E
19

SECTION 11 PARTS LIST AND DIAGRAM
GENERAL PARTS LIST
Part
Discription QTY
Part
Discription QTY
1
Nut, Flange
4 32
Hexagon Blot
2
2
Nut, Flange
4 33
Bolt,Flange
4
3
Shock Absorbing Mount
4 34
Motor Bracket
1
4
Washer, Plain
4 35
Wiring Borad Assy
1
5
Wheel Assy
2 36
Bolt,Flange
5
6
Axle
2 37
Carbon Brush
1
7
Clip, Dowel Pin
1 38
AVR
1
8 Positive Charging Wire 1 39
Motor Cover, Rear
1
9 Negative Charging Wire 1 40
Washer, Plain
1
10
Bolt,Flange
9 41
Bolt,Flange
1
11 Battery Plate 1 42
Stator
1
12 Battery 1 43
Rotor
1
13
Ground Terminal
1 44
Bolt,Flange
1
14
Wave Spring
1 45
Bracket,Muffler
1
15
Nut, Flange
1 46
Muffler Assy
1
16
Bolt,Flange
4 47
Wahser, Muffler
1
17
Support Rubber
2 48
Hexagon Nut
2
18
Support Assy
1 49
Spring Washer
2
19
Bolt,Flange
2 50
Muffler Block
1
20
Nylon Nut
2 51
Wahser, Muffler
1
21
Handlebar Components
1 52
Control Pannel Assy
1
22
Handlebar Dowel Pin
2 53
Bolt,Flange
6
23
Handlebar Rubber Cover
2 54
Gasket,Fuel Tank
6
24
Handlebar Grip
1 55
Bolt,Flange
2
25
Gasoline Engine
1 56
Frame Components
1
26
Air Deflector,Down
1 57
Fuel Tank Assy
1
27
Bolt,Flange
3 58
Fuel Valve
1
28 Dust-Proof Rubber 2 59
Clamp
1
29
Nylon Nut
2 60
Clamp
2
30
Washer, Plain
2 61 Breather Tube 1
31
Motor Assy
1
20
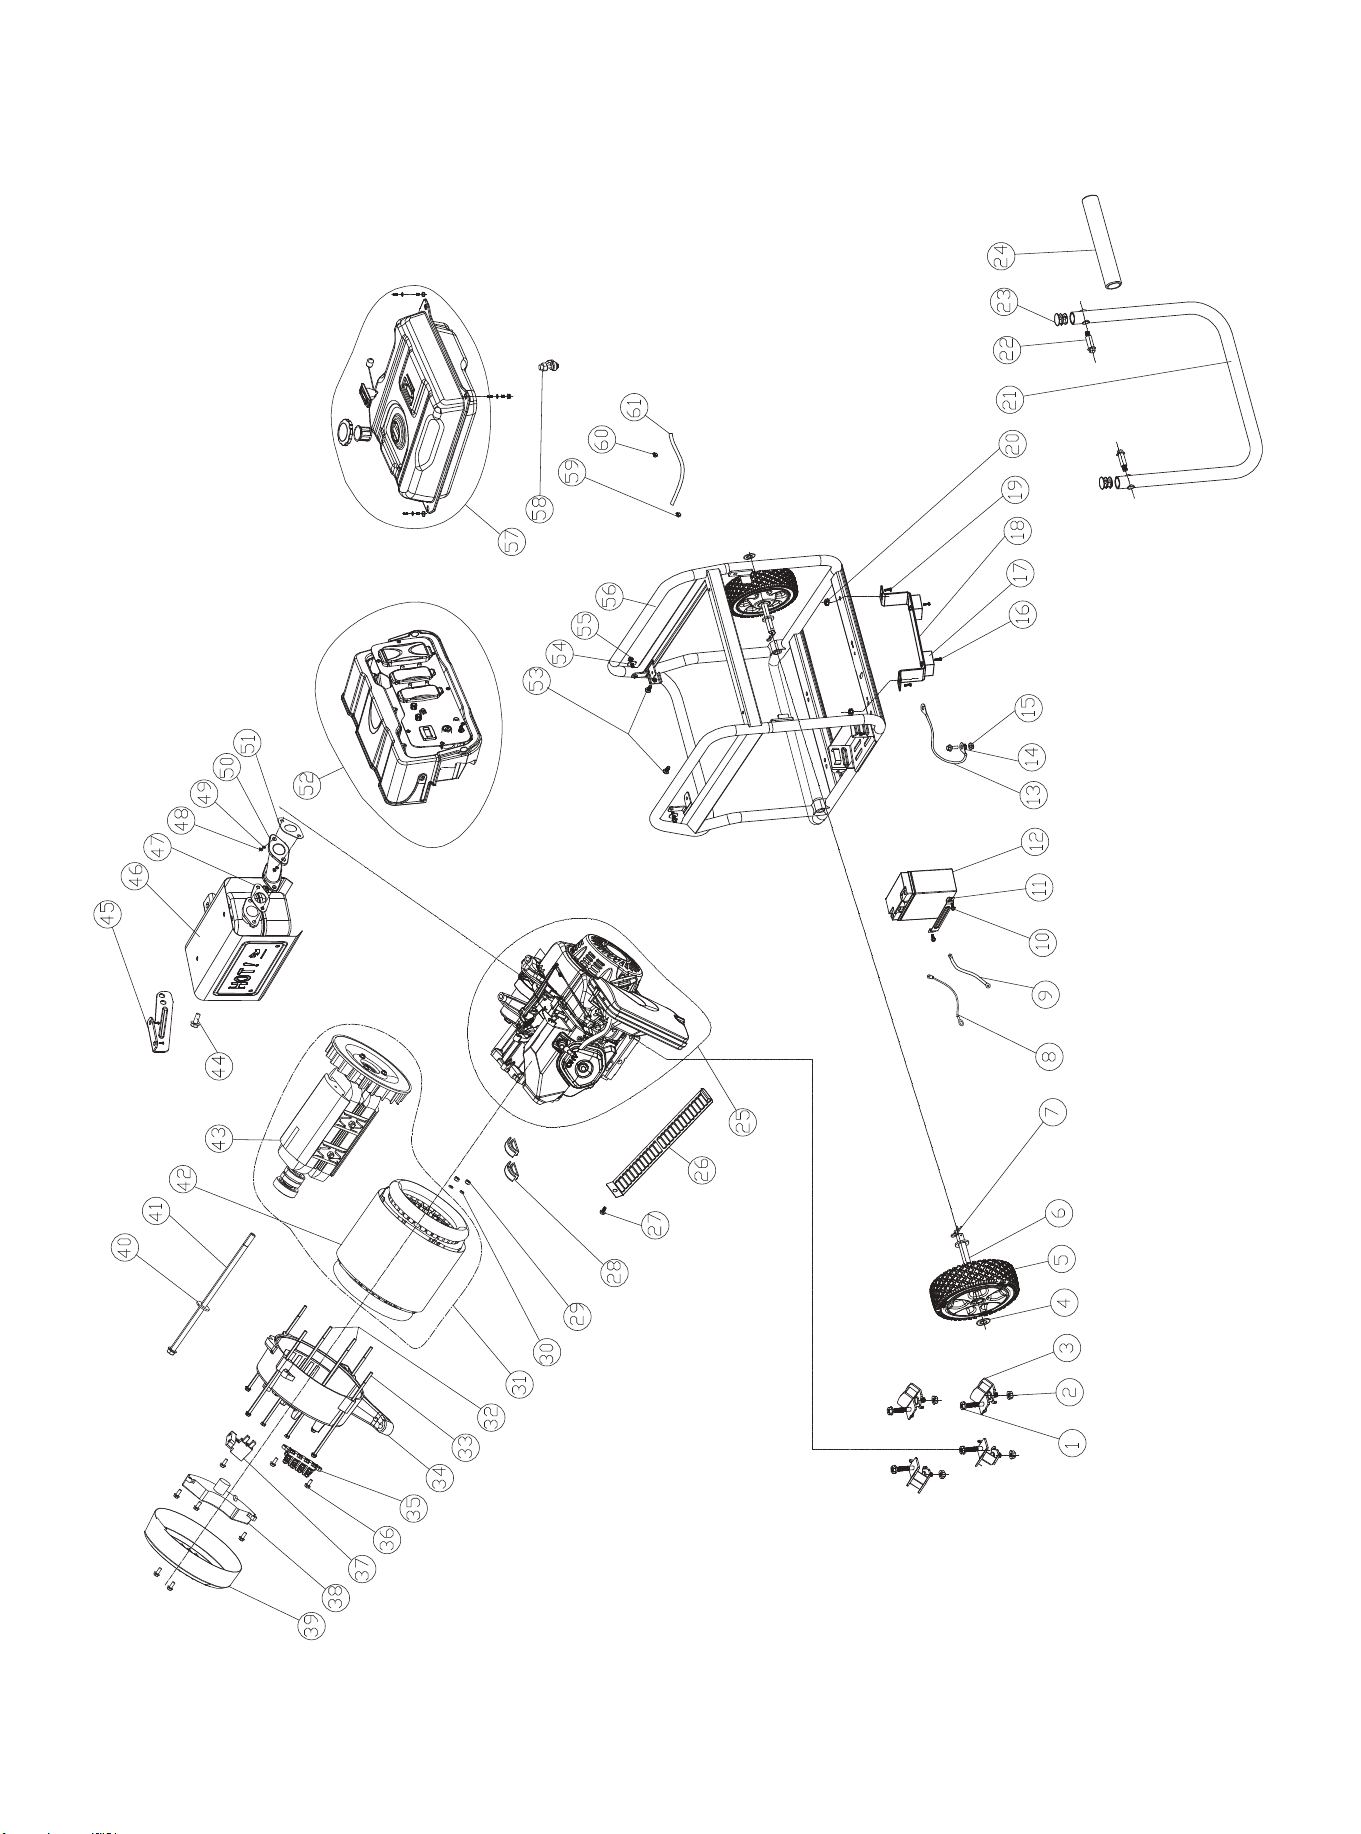
GENERAL DIAGRAM
21

ENGINE PARTS LIST
Part
Discription Qty
Part
Discription Qty
1
Bolt
1 46
Bearing
2
2
Cylinder Head Cover Assy
1 47
Crankshaft Assy
1
3
Exhaust Pipe
1 48
Gasket, Crankcase Cover
1
4
Gasket, Cylinder Cap
1 49
Dowel Pin
2
5
Bolt,Flange
12 50
Crankcase Cover Assy
1
6
Air Deflector
1 51
Bolt,Flange
7
7
Regulating Nut, Rockshaft
2 52
Oil Seal
2
8 Rockshaft 2 53
Bearing
1
9 Rocker Arm 2 54
Dipstick
1
10
Bolt, Rockshaft
2 55
Bolt,Flange
2
11 Rotor, Exhaust Valve 1 56
Engine Oil Sensor
1
12 Spring Retainer, Exhaust Valve 1 57
Gestket, Rod
1
13
Spring Retainer, Intake Valve
1 58
Oil Seal
1
14
Valve Spring
2 59
Clip,Dowel Pin
1
15
Oil Shield
1 60
Regulating Gear Assy
1
16
Spring Retainer, Exhaust Valve
2 61
Washer, Plain
1
17
Plate, Push Rod Guide
1 62
Cam Shaft Assy
1
18
Cylinder Head Assy
1 63
Balance Shaft
1
19
Bolt,Stud,Intake
2 64
Rubber Seat
1
20
Gasket, Intake Valve
1 65
Clamp
1
21
Connector, Carburetor
1 66
Oil Alarming
1
22
Gasket, Carburetor
1 67
Adjusting Rod
1
23
Carburetor Assy
1 68
Regulating Control Assy
1
24
Gasket, Air Cleaner
1 69
Regulating Rocker Rod
1
25
Nut,Flange
3 70
Adjusting Spring
1
26
Clamp
2 71
Reset Spring
1
27
Fuel Tube
0.44 72
Adjusting Arm
1
28 Protective Sleeve 1 73
Starting Motor Assy
1
29
Bracket,Air Cleaner
1 74
Wire Cover
1
30
Air Cleaner Assy
1 75 Bolt,Flange 2
31
Bolt,Flange
4 76
Wire Pressing Plate
1
32
Bolt,Stud,Exhaust
2 77
Aluminum Gesket
2
33
Sparking Plug
1 78
Drain Bolt
2
34
Gasket, Cylinder Head
1 79
Charge Coil
1
35
Dowel Pin
2 80
Bolt,Flange
2
36
Push Rod
2 81
Ignition Coil Assy
1
37
Valve Lifter
2 82
Bolt,Flange
2
38
Intake Valve
1 83
Flywheel Assy
1
39
Exhaust Valve
1 84
Cooling Fan
1
40
Ring Set, Piston
1 85
Starting Cup
1
41
Piston
1 86
Nut,Flange
1
42
Clip, Piston Pin
2 87
Starter Assy, Recoil
1
43
Piston Pin
1 88
Clamp
1
44
Connector Rod Assy
1 89
Clamp
1
45
Crankcase Assy
1
22
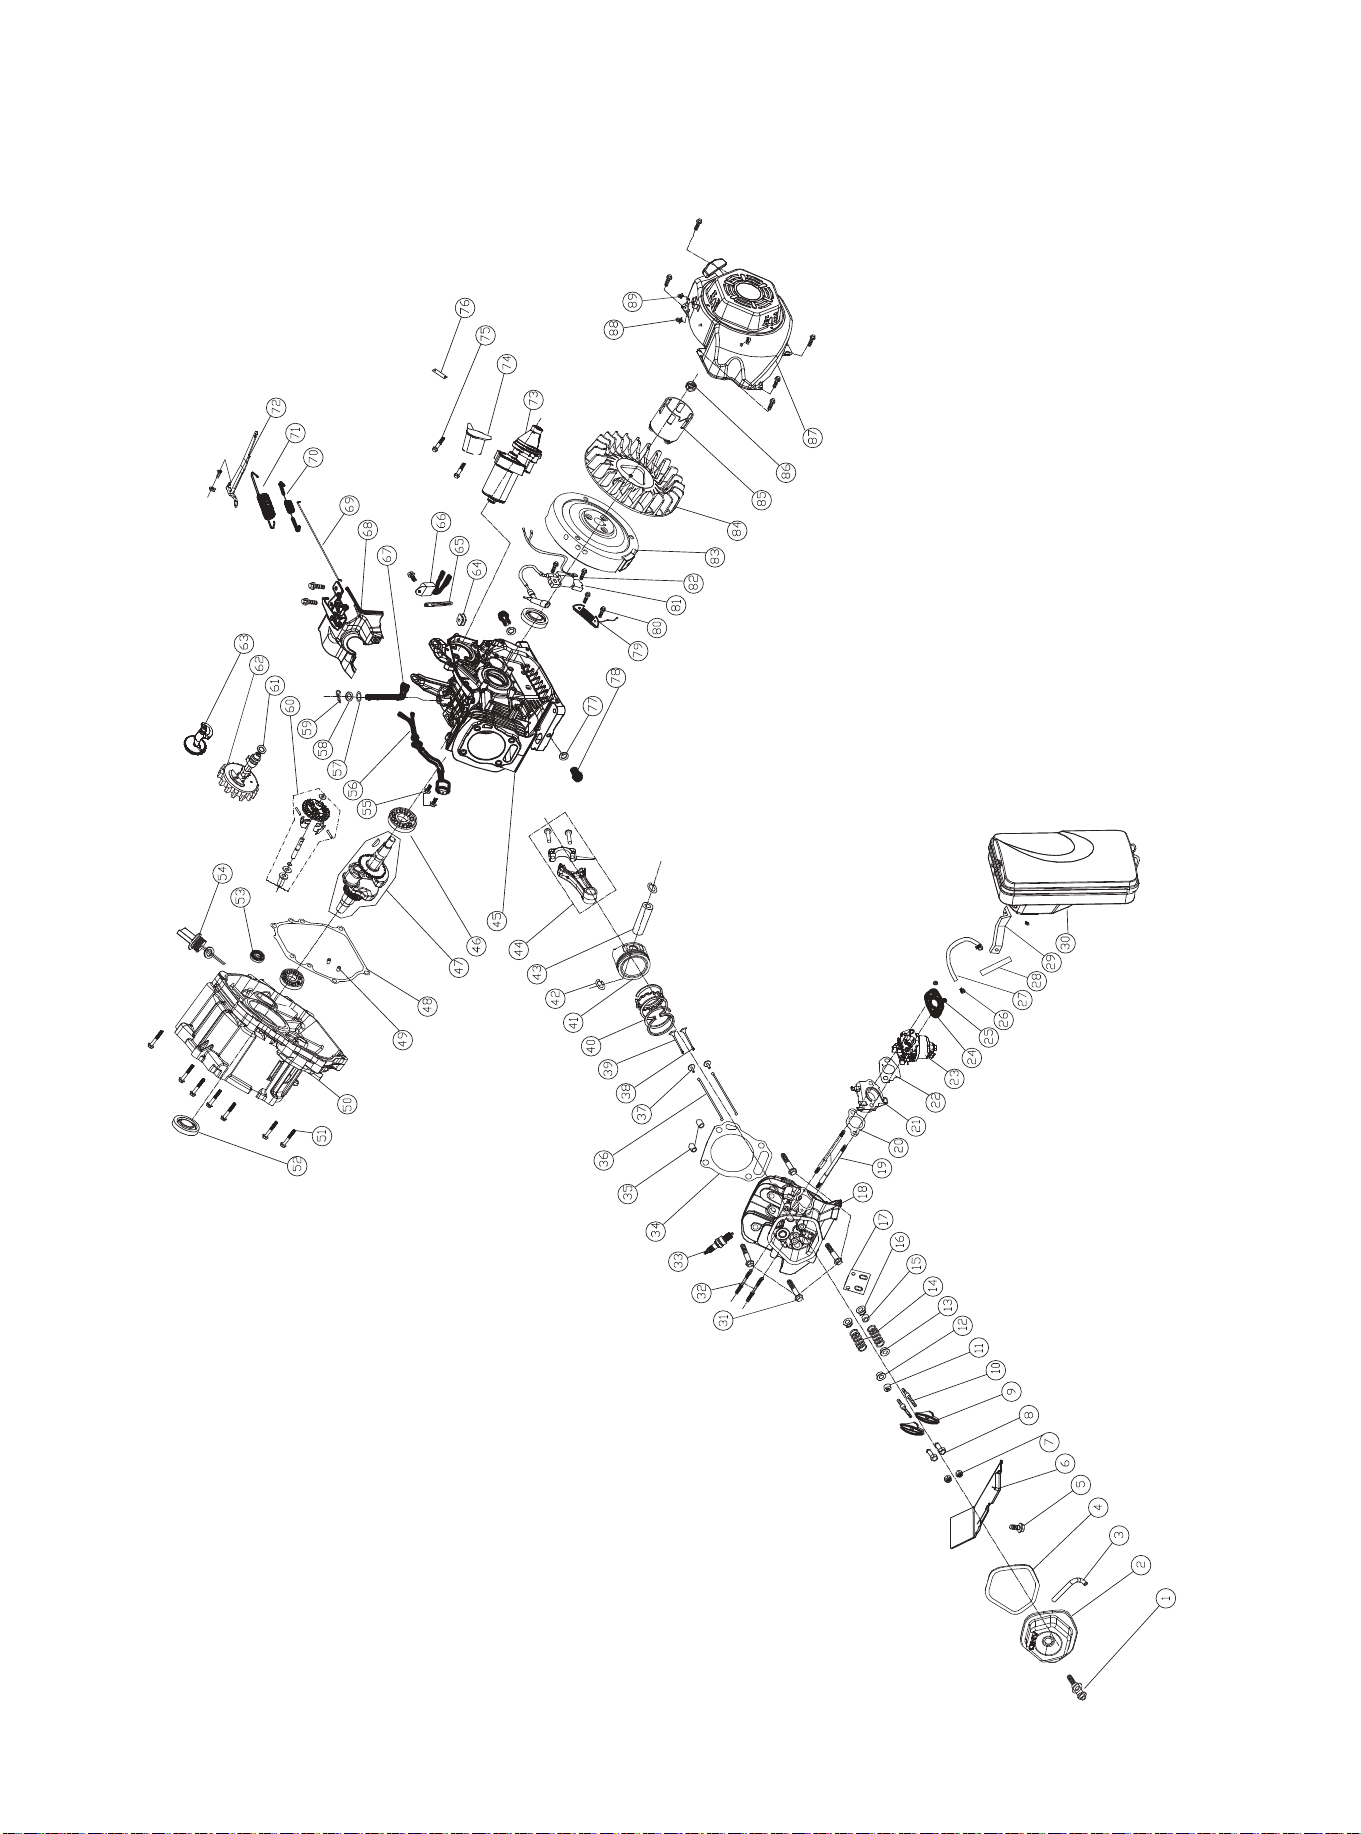
ENGINE DIAGRAM
23

2016 2017
12
24
25
A-iPower's only liability shall be the repair
or replacement of part(s) as stated above in
no event shall A-iPower be liable for any
incidental or consequential damages.
A-iPower
26

A-iPower Limited Warranty Policy
Thank You For Choosing A-iPower Generator!
Our Warranty
A-iPower will, at its position, free of charge, repair or replace any part(s) which, upon examination, inspection
and testing by A-iPower or an A-iPower authorized warranty service dealer that is defective in material or
workmanship or both. Transportation charges on product submitted for repair or replacement under this
warranty must be borne by purchaser. Retain your proof-of-purchase receipt. If you do not provide proof of the
initial purchase date, the manufacturer’s shipping date of the product will be used to determine the warranty
period starting. Customer is responsible for taking the unit to & from the “pre-approved” warranty center if
there is an issue with the unit that needs mechanical work.
Warranty Term
Any new A-iPower generator purchased for non-commercial use from an authorized A-iPower generator
dealer in the continental North America will be warranted against defects in material or workmanship for a
period of one years, from date of purchase, subject to exclusions noted herein. The warranty period begins on
the date of purchase by the first retail end-user, and continues for the period of warranty time. A-iPower
customer service will keep on supplying spare parts per request after warranty period with cost charge.
“Comsumer Use” means residential household using by a retail consumer. “Commercial Use” means all other
uses, including used for commercial, industrial or business or rental purposes. Once equipment has
experienced commercial use, it shall thereafter be considered as commercial use for purposes of this warranty.
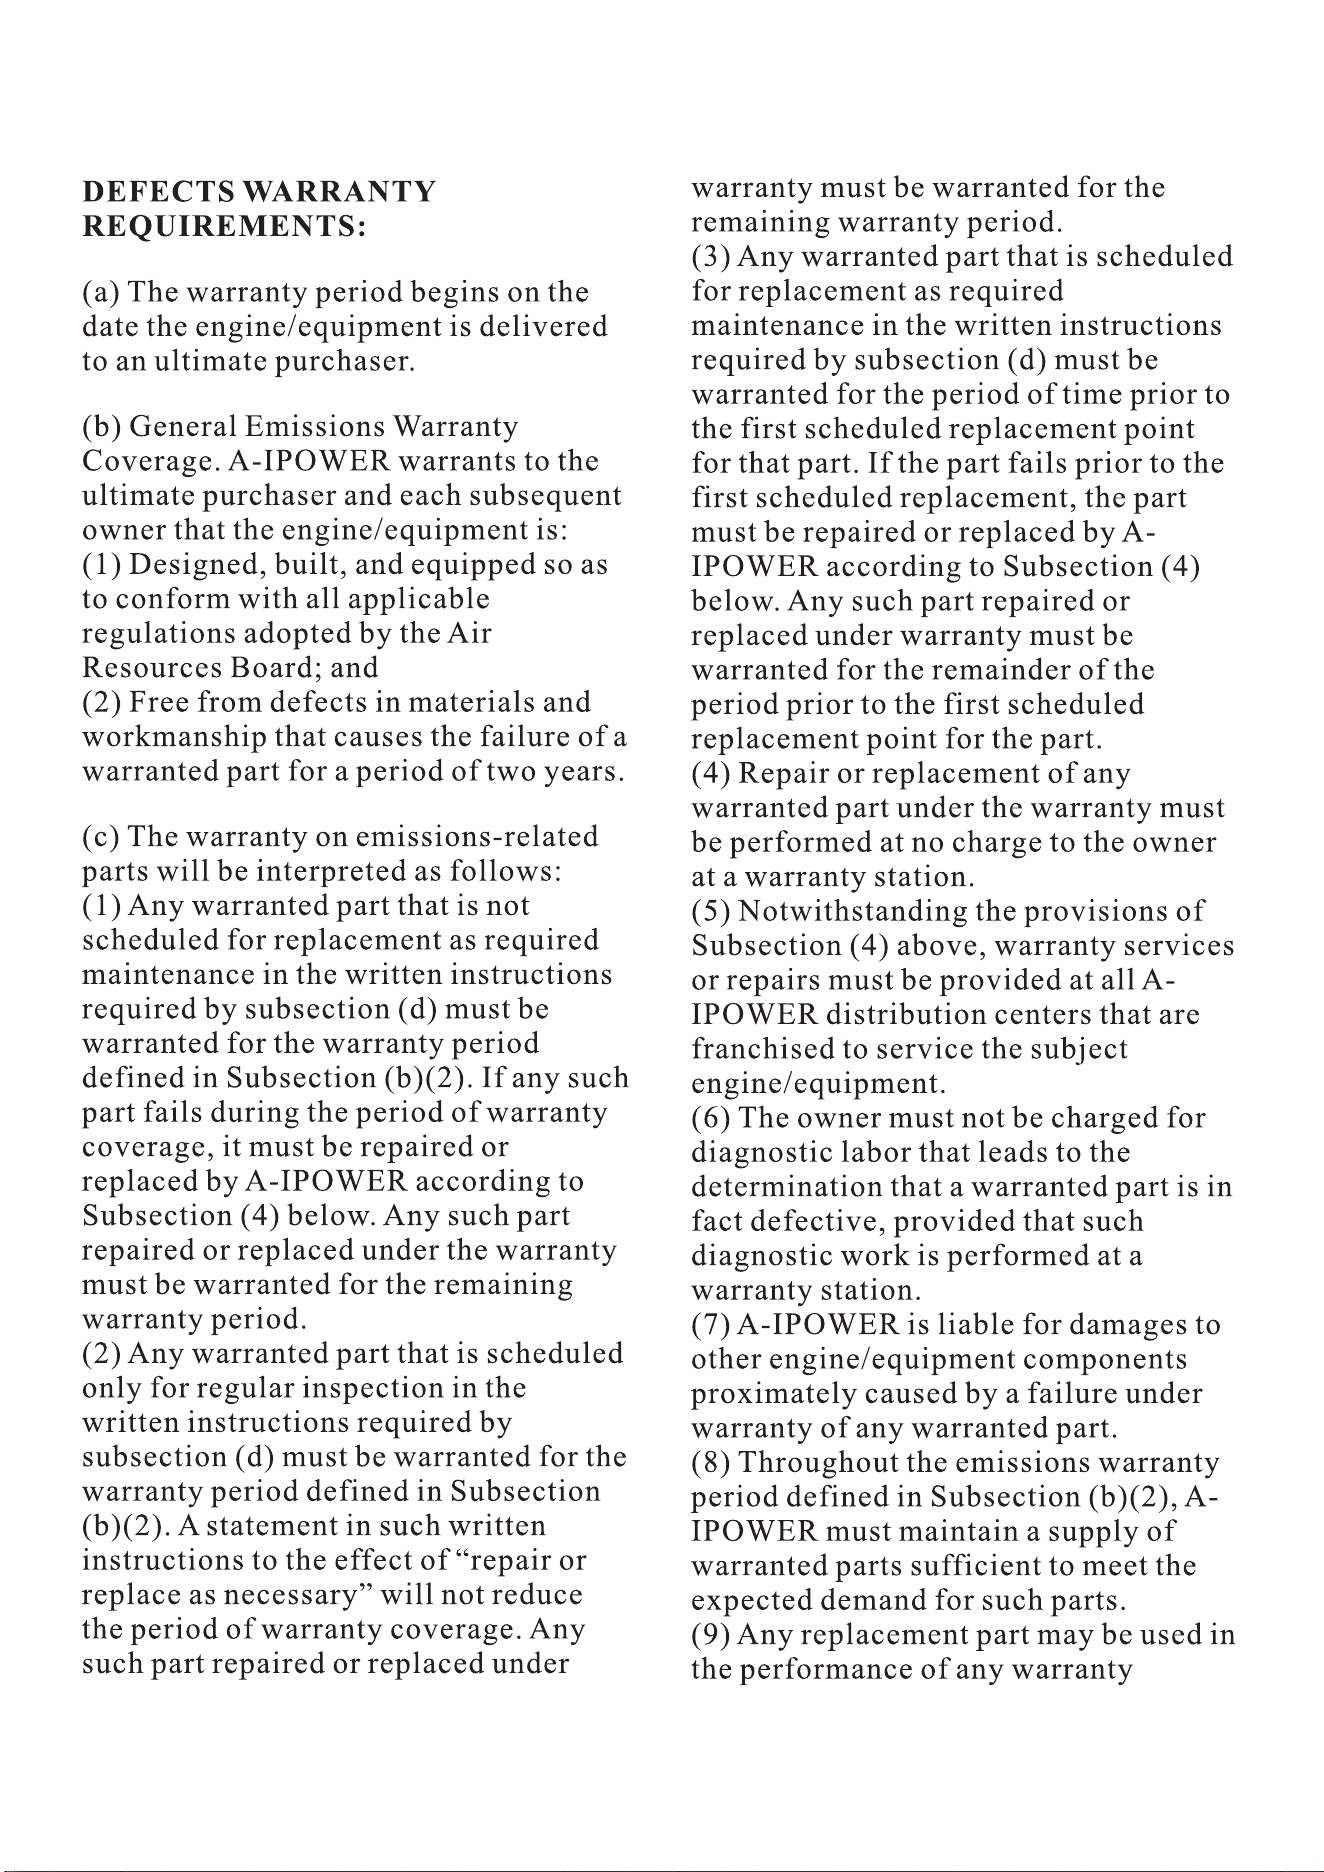
Warranty Exclusions
Most warranty repairs are handled routinely, but sometimes requests for warranty service may not be
appropriate. This warranty will not cover the following:
REGULAR WEARING: Outdoor Power Equipment, as with all mechanical devices, need periodic parts(s)
service and replacement to perform as designed. This warranty will not cover repair when normal use has
exhausted the lifetime of any part. INSTALLTION AND MAINTENANCE: This warranty does not cover the
generator or its parts what have been subjected to improper or unauthorized accident, over-speeding, improper
maintenance, repair or storage so as, in our judgment, to adversely affect its performance and reliability. This
warranty also does not cover regular maintenance and parts such as air filters, adjustments, fuel system
cleaning and obstruction (due to chemical, dirt, carbon lime, and so forth).
OTHER: This warranty excludes wearing parts such as oil seal, etc. or malfunction resulting from accidents,
abuse, modifications, alterations, or improper servicing or freezing or chemical deterioration; damaged related
to rodent and/or insect infestation. This warranty excludes used, reconditioned and demonstration equipment,
equipment used for prime power in place of utility power, equipment used in life support applications, and
failures due to acts of God and other force majeure events beyond the manufacturers control, such as collision,
theft, vandalism, riot or wars, nuclear holocaust, fire, freezing, lightning, earth-quake, windstorm, hail,
volcanic eruption, water or flood, tornado or hurricane.
How To Obtain Warranty Service
Please call our customer service number 1-855-888-3598, or email to support@a-ipower.com to contact our
support team at first in case of a service needed. Please prepare and provide the model number, serial number
and the proof of purchase while contacting us or mail a request to:
A-iPower Corp.
1477 E. Cedar St. STE B, Ontario, CA 91761, U.S.A.
27

855-888-3598,626-225-8930