MV7i
Smart Microphone and Interface
MV7i online user guide.
Version: 1.1 (2025-A)

Shure Incorporated
2/21
Table of Contents
MV7i Smart Microphone and Interface 3
Update Firmware 3
Important Safety Instructions for Passive Microphones 3
SAFETY PRECAUTIONS 3
General Description 4
Features 4
Recording Setups 5
Inputs and Outputs 6
Customization in MOTIV Mix 7
Global Tab 7
Mic Tab 7
Input Tab 8
Audio Output Modes 9
DSP Modes in MOTIV Mix 9
LED Touch Panel 10
Split LED Modes 10
Combined LED Modes 10
LED Behavior 10
Mounting Instructions 11
Troubleshooting 11
Firmware Update 13
Keep equipment connected during updates 13
System Requirements 13
System Requirements and Compatibility: Mac 14
System Requirements and Compatibility: Windows 14
System Requirements and Compatibility: iOS 14
System Requirements and Compatibility: Android 14
Additional Resources 14
Specifications 14
MV7i Yoke Assembly 17
Accessories 18
Furnished Accessories 19
Replacement Parts 19
Certifications 19
Information to the user 19
Environmental Regulatory Information 21
Shure Incorporated
3/21
MV7i
Smart Microphone and Interface
Update Firmware
For the best experience, keep the firmware on your device
up to date.
Important Safety Instructions for Passive Microphones
SAFETY PRECAUTIONS
Before using this product, please read and save the enclosed warnings and safety instructions.
WARNING:Ignoringthesewarningsmaycausesevereinjuryordeathasaresultofincorrectopera
tion.
If water or other foreign objects enter the inside of the device, fire or electric shock may result.
Do not attempt to modify this product. Doing so could result in personal injury and/or product failure.
CAUTION:Ignoringthesecautionsmaycausemoderateinjuryorpropertydamageasaresultofin
correct operation.
Never disassemble or modify the device, as failures may result.
Do not subject to extreme force and do not pull on the cable or failures may result.
Keep the microphone dry and avoid exposure to extreme temperatures and humidity.
High sound pressure
Hearing damage risk
To prevent possible hearing damage, do not listen at high volume levels for long periods.
WARNING
LISTENING TO AUDIO AT EXCESSIVE VOLUMES CAN CAUSE PERMANENT HEARING DAMAGE. USE AS LOW A VOL
UME AS POSSIBLE. Over exposure to excessive sound levels can damage your ears resulting in permanent noise-induced
hearing loss (NIHL). Please use the following guidelines established by the Occupational Safety Health Administration (OSHA)
on maximum time exposure to sound pressure levels before hearing damage occurs.
90 dB SPL
at 8 hours
95 dB SPL
at 4 hours
100 dB SPL
at 2 hours
105 dB SPL
at 1 hour
Shure Incorporated
4/21
•
•
•
•
•
•
◦
◦
◦
◦
◦
•
•
•
•
•
◦
◦
◦
•
•
110 dB SPL
at ½ hour
115 dB SPL
at 15 minutes
120 dB SPL
Avoid or damage may occur
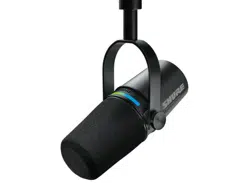
General Description
The Shure MV7i is a dynamic USB-C microphone with a built-in audio interface, engineered for seamless 2-channel audio
recordingorstreamingoncomputers,tablets,orsmartphones.ConnectanXLRmicrophoneoraninstrumentvia¼”directlyin
to the MV7i, then connect the MV7i via USB-C to the device of your choice, and effortlessly manage both channels using the
MOTIV Mix Desktop app or MOTIV Mobile app. Capture broadcast-quality sound on both channels and use cutting-edge DSP
features, including Voice Isolation Technology, Auto Level Mode with SmartGate , Real-time Denoiser, and Digital Popper
Stopper .
Encased in a sleek, all-metal design with an adjustable yoke, the MV7i streamlines your audio setup by delivering superior
sound quality with minimal cabling.
Features
First-of-its-kind microphone and interface in one for digital recording of 2 channels without the need for an external audio
interface.
Optimized frequency response for rich and natural vocal reproduction.
HighlydirectionaldynamicelementwithprovenVoiceIsolationTechnologythatseparatesyourvoicefromunwantedback
ground sounds.
ComboXLR&¼”Inputsupportsdualchannelrecording/streamingwithXLRmicrophonesorinstruments.Supportsmono
(XLR or TRS) and stereo (TRS) input.
Provides +60 dB of gain and 48 V of Phantom Power, suitable for any dynamic or condenser mic.
Advanced DSP features* to record broadcast quality audio in imperfect spaces, independently configurable with MOTIV
Mix Desktop app and MOTIV mobile apps:
Auto Level Mode with SmartGate : recalibrates mic gain in real-time based on distance, volume, and room dynamics
for consistent audio output. Intelligently prevents overlapping dialogues when recording with 2 channels.
Real-time Denoiser: reduces persistent ambient noise for clearer audio.
Digital Popper Stopper : eliminates harsh plosive sounds in real-time.
Adjustable Reverb: select from three types of reverb (Plate, Hall, Studio) with adjustable intensity.
Customizable tone and sound signature, gain control, EQ, compression and limiter for each channel.
Customizable dual-display LED Touch-to-Mute Panel: Configure LED color display into 3-color live metering, 1-color solid
or pulsing display with millions of hues to choose from. Instantly mute either the MV7i or the Input by touching the panel.
Up to 24 bit/48 kHz digital recording and streaming.
Mac and Windows Compatible: works with Mac, Windows, and select USB-C iOS and Android devices.
Zero-latency Monitoring: built-in 3.5 mm headphone jack for mixdown monitoring of both inputs.
Select your preferred recording output via MOTIV Apps
Mixdown Mode (Default): combines mic and mono input audio into one mono audio output.
Multi-Track Mode: renders two mono audio tracks. One for the mic and one for the input.
Stereo Mode: combines mic and stereo input audio into one stereo audio track. Preserves the stereo audio from the
Input and places mic input in both left and right channels.
Rugged, all-metal construction for outstanding reliability.
Adjustable integrated yoke for easy positioning on standard 5/8"-27 threaded stands or booms.
*AutoLevelModewithSmartGate,RealtimeDenoiserandDigitalPopperStopperwillbedisabledwhenMV7idetectsanin
strumentinputvia¼”.
™
™
™
™
Shure Incorporated
5/21
1.
2.
3.
4.
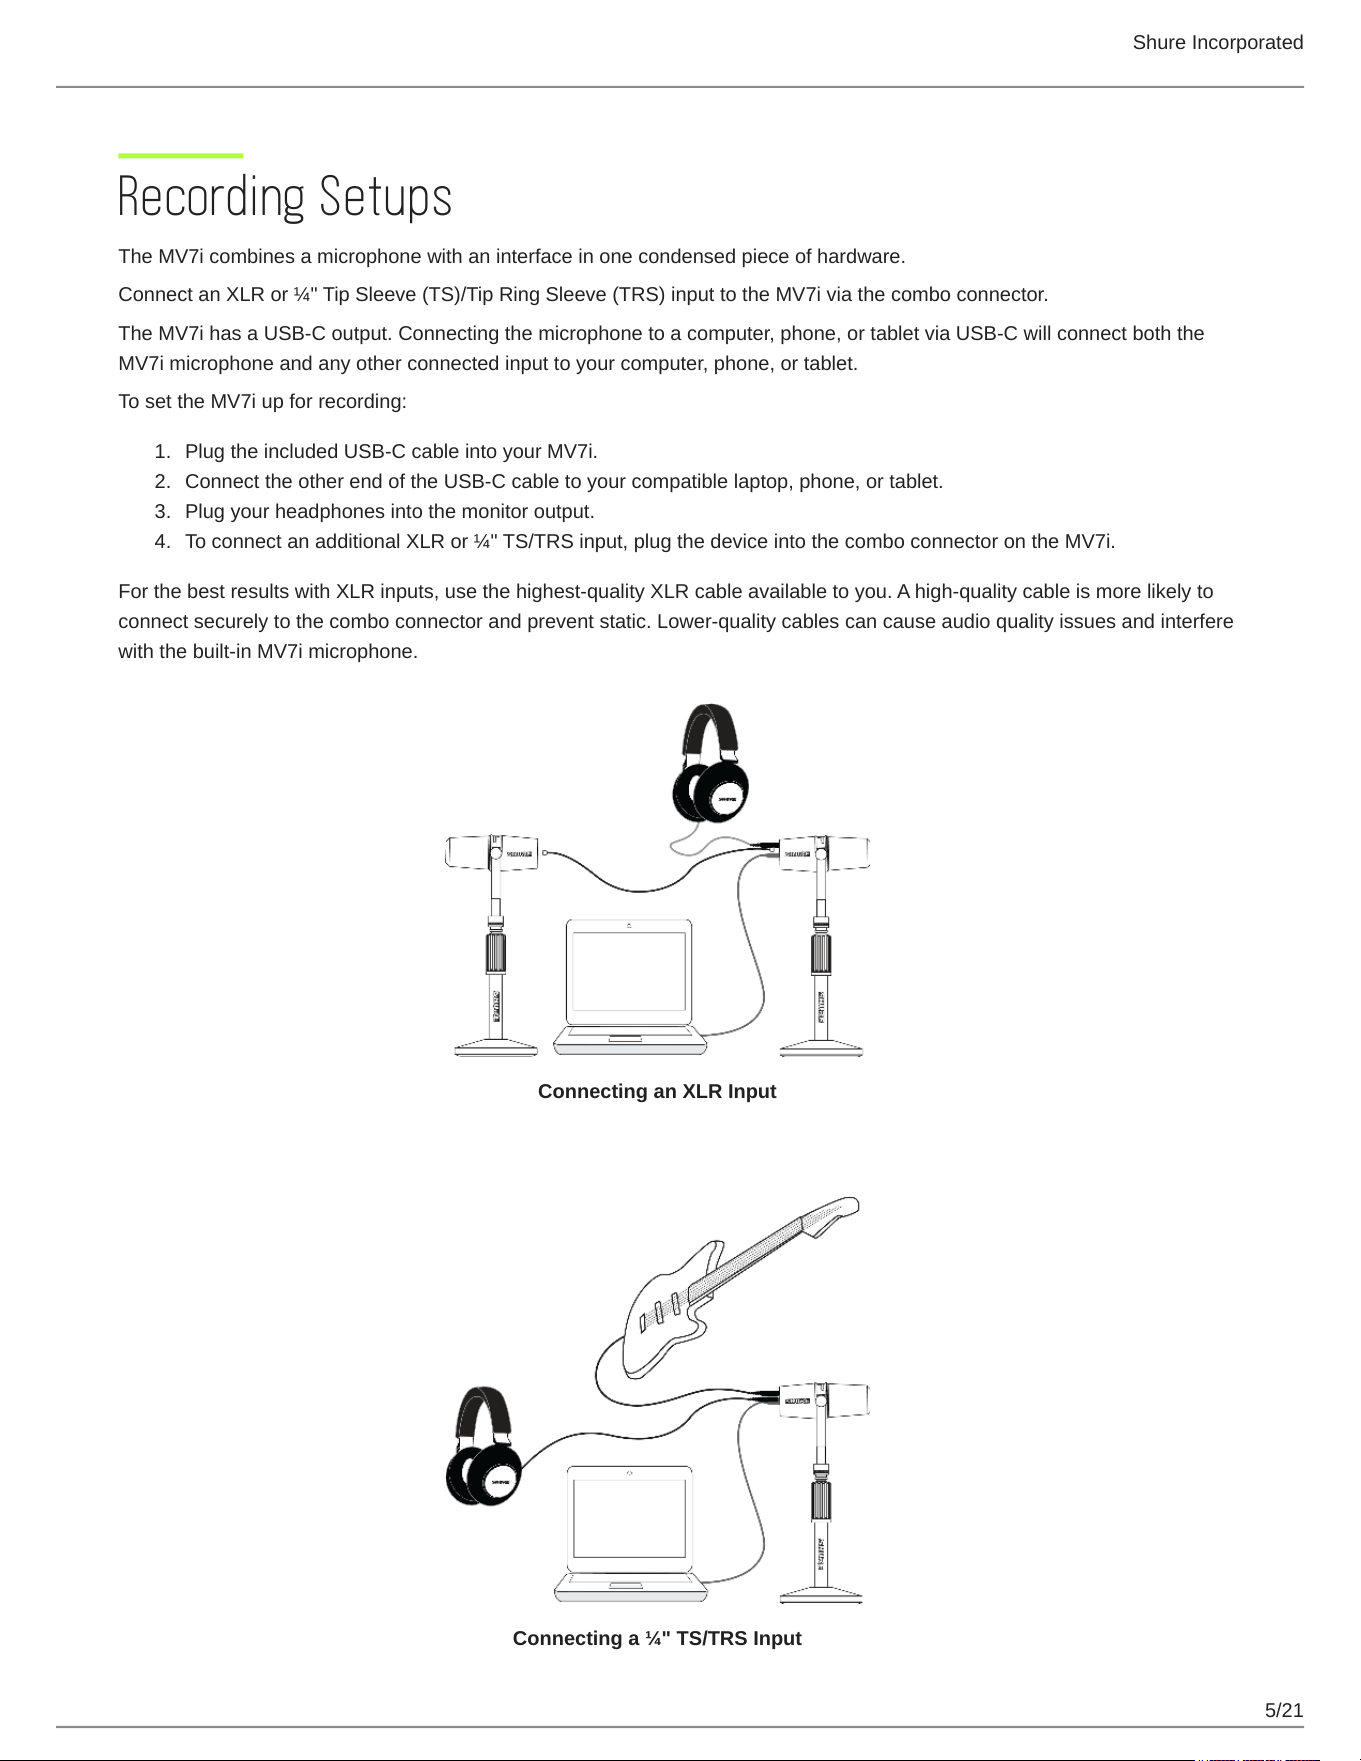
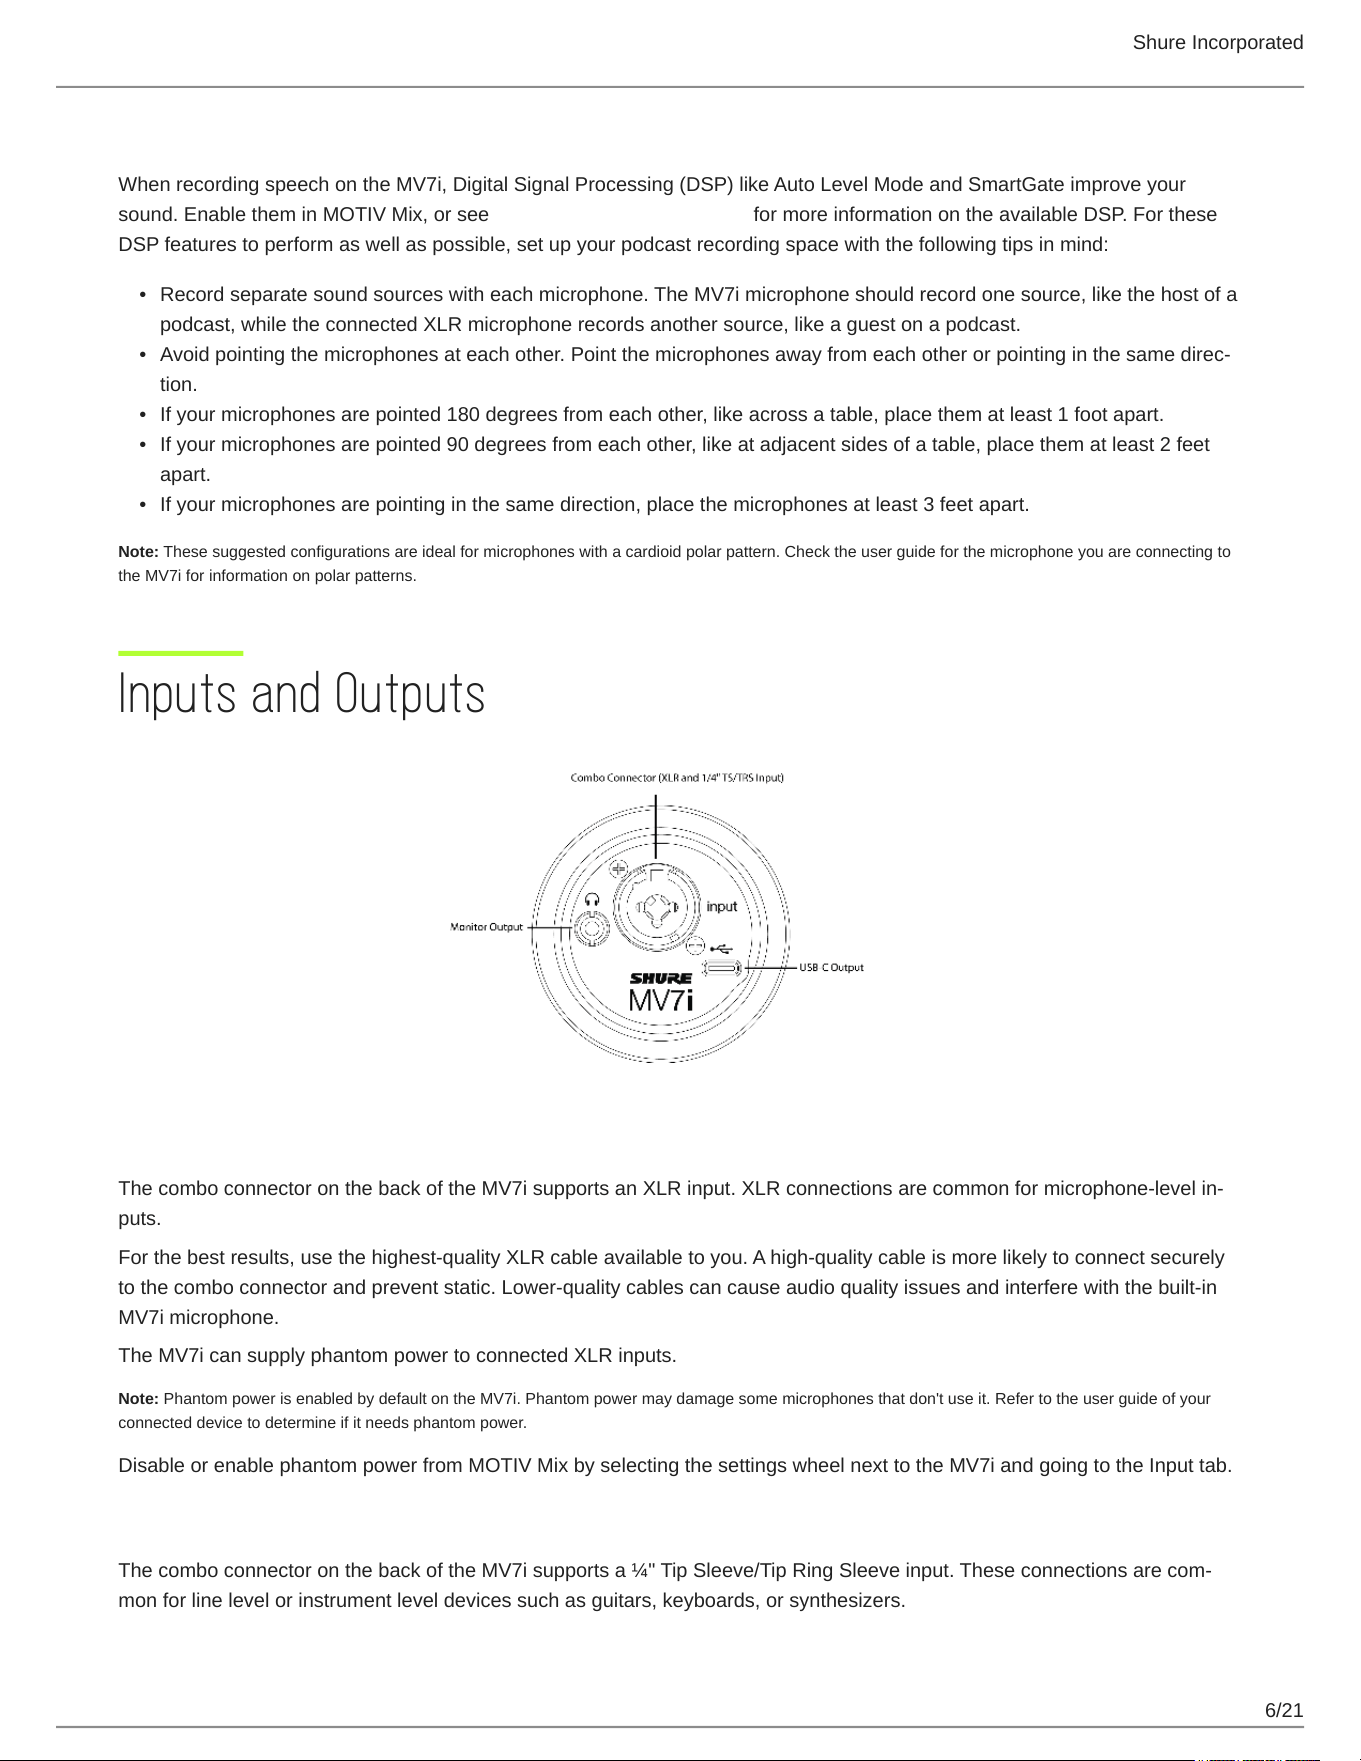
Recording Setups
The MV7i combines a microphone with an interface in one condensed piece of hardware.
Connect an XLR or ¼" Tip Sleeve (TS)/Tip Ring Sleeve (TRS) input to the MV7i via the combo connector.
The MV7i has a USB-C output. Connecting the microphone to a computer, phone, or tablet via USB-C will connect both the
MV7i microphone and any other connected input to your computer, phone, or tablet.
To set the MV7i up for recording:
Plug the included USB-C cable into your MV7i.
Connect the other end of the USB-C cable to your compatible laptop, phone, or tablet.
Plug your headphones into the monitor output.
To connect an additional XLR or ¼" TS/TRS input, plug the device into the combo connector on the MV7i.
For the best results with XLR inputs, use the highest-quality XLR cable available to you. A high-quality cable is more likely to
connect securely to the combo connector and prevent static. Lower-quality cables can cause audio quality issues and interfere
with the built-in MV7i microphone.
Connecting an XLR Input
Connecting a ¼" TS/TRS Input
Shure Incorporated
6/21
•
•
•
•
•
Tips for Recording A Podcast with 2 People
When recording speech on the MV7i, Digital Signal Processing (DSP) like Auto Level Mode and SmartGate improve your
sound. Enable them in MOTIV Mix, or see Customization in MOTIV Mix for more information on the available DSP. For these
DSP features to perform as well as possible, set up your podcast recording space with the following tips in mind:
Record separate sound sources with each microphone. The MV7i microphone should record one source, like the host of a
podcast, while the connected XLR microphone records another source, like a guest on a podcast.
Avoidpointingthemicrophonesateachother.Pointthemicrophonesawayfromeachotherorpointinginthesamedirec
tion.
If your microphones are pointed 180 degrees from each other, like across a table, place them at least 1 foot apart.
If your microphones are pointed 90 degrees from each other, like at adjacent sides of a table, place them at least 2 feet
apart.
If your microphones are pointing in the same direction, place the microphones at least 3 feet apart.
Note: These suggested configurations are ideal for microphones with a cardioid polar pattern. Check the user guide for the microphone you are connecting to
the MV7i for information on polar patterns.
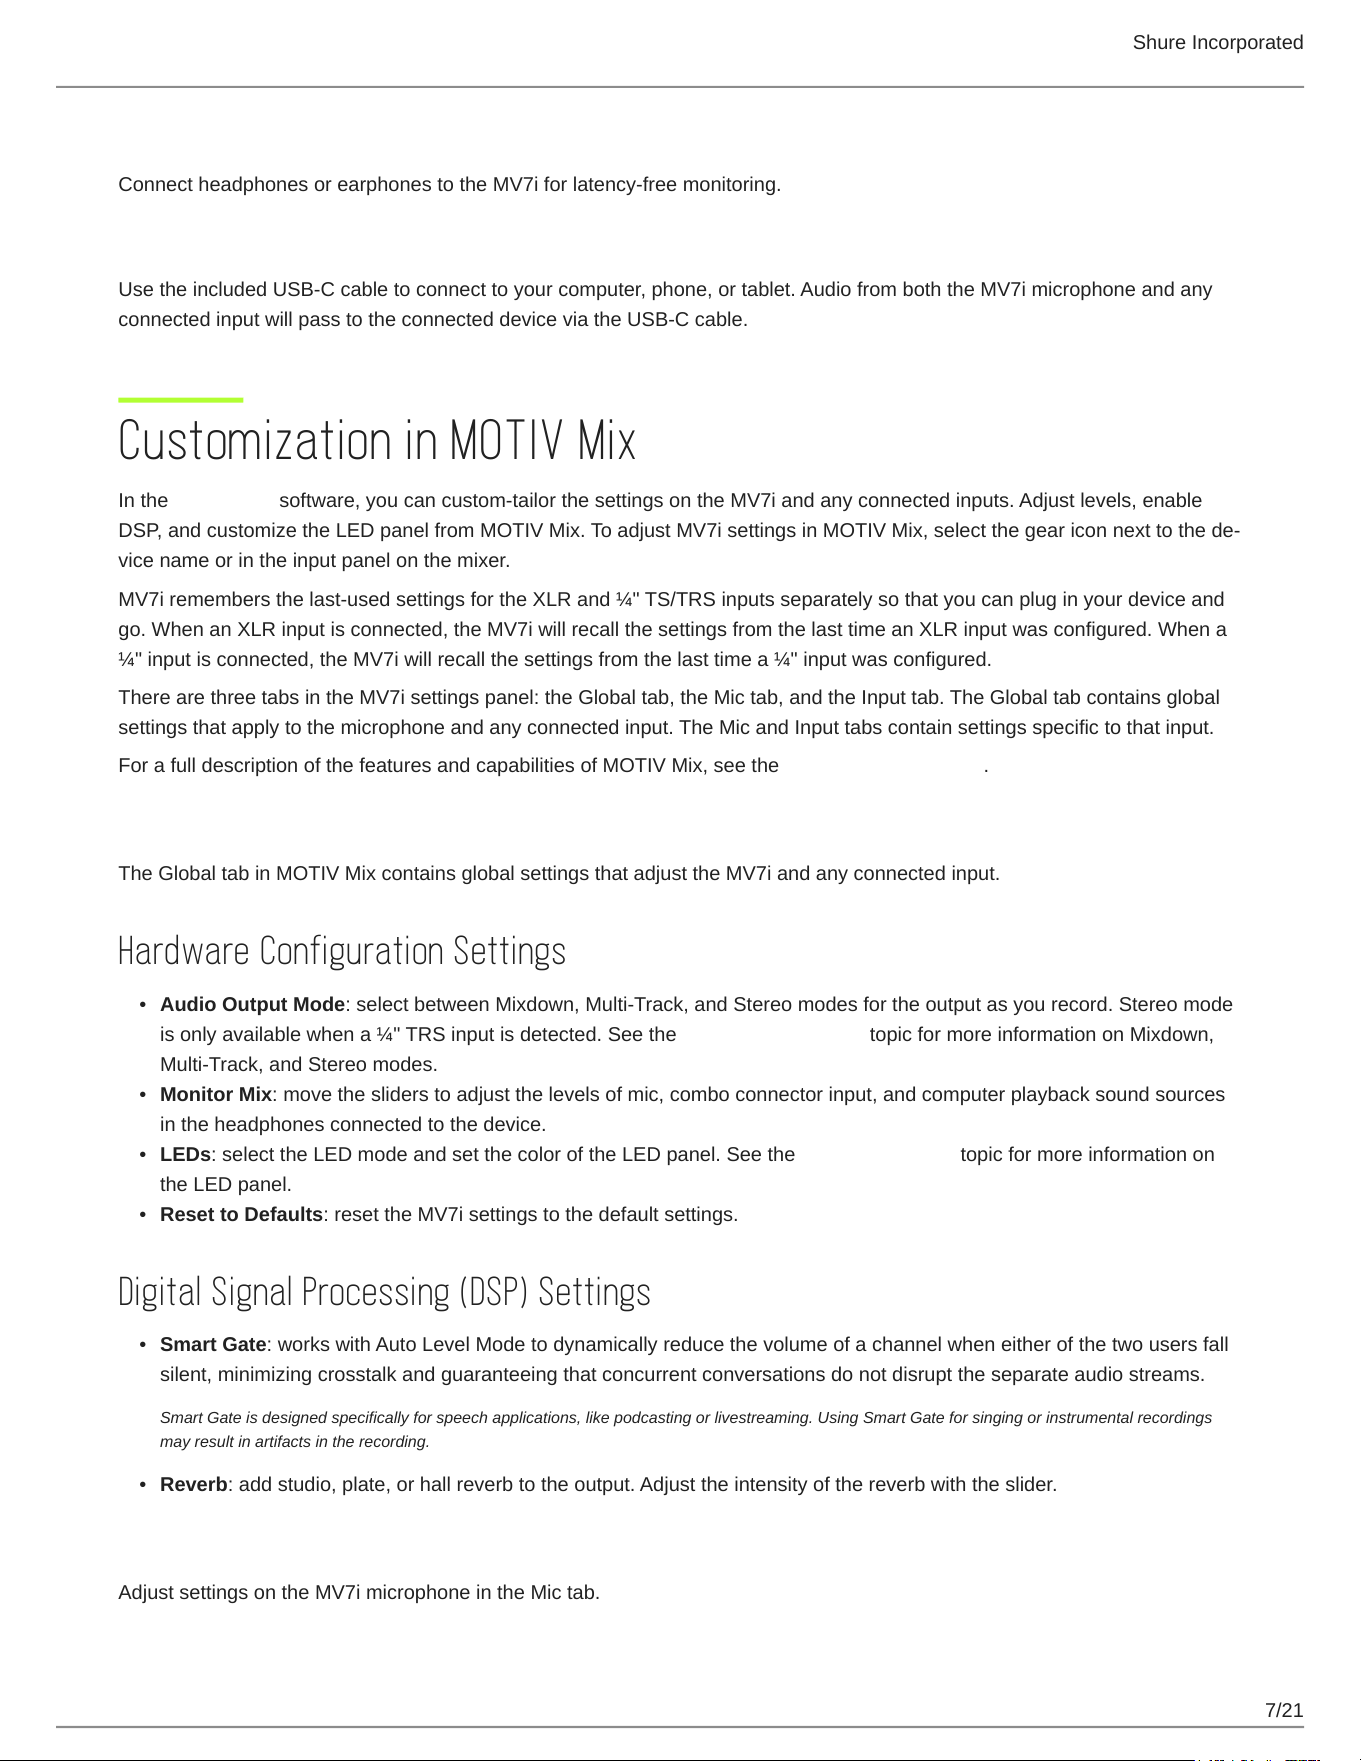
Inputs and Outputs
XLR Input
ThecomboconnectoronthebackoftheMV7isupportsanXLRinput.XLRconnectionsarecommonformicrophonelevelin
puts.
For the best results, use the highest-quality XLR cable available to you. A high-quality cable is more likely to connect securely
to the combo connector and prevent static. Lower-quality cables can cause audio quality issues and interfere with the built-in
MV7i microphone.
The MV7i can supply phantom power to connected XLR inputs.
Note: Phantom power is enabled by default on the MV7i. Phantom power may damage some microphones that don't use it. Refer to the user guide of your
connected device to determine if it needs phantom power.
Disable or enable phantom power from MOTIV Mix by selecting the settings wheel next to the MV7i and going to the Input tab.
¼" Tip Sleeve (TS)/Tip Ring Sleeve (TRS) Input
ThecomboconnectoronthebackoftheMV7isupportsa¼"TipSleeve/TipRingSleeveinput.Theseconnectionsarecom
mon for line level or instrument level devices such as guitars, keyboards, or synthesizers.
Shure Incorporated
7/21
•
•
•
•
•
•
3.5 mm Monitor Output
Connect headphones or earphones to the MV7i for latency-free monitoring.
USB-C Output
Use the included USB-C cable to connect to your computer, phone, or tablet. Audio from both the MV7i microphone and any
connected input will pass to the connected device via the USB-C cable.
Customization in MOTIV Mix
In the MOTIV Mix software, you can custom-tailor the settings on the MV7i and any connected inputs. Adjust levels, enable
DSP,andcustomizetheLEDpanelfromMOTIVMix.ToadjustMV7isettingsinMOTIVMix,selectthegeariconnexttothede
vice name or in the input panel on the mixer.
MV7i remembers the last-used settings for the XLR and ¼" TS/TRS inputs separately so that you can plug in your device and
go. When an XLR input is connected, the MV7i will recall the settings from the last time an XLR input was configured. When a
¼" input is connected, the MV7i will recall the settings from the last time a ¼" input was configured.
There are three tabs in the MV7i settings panel: the Global tab, the Mic tab, and the Input tab. The Global tab contains global
settings that apply to the microphone and any connected input. The Mic and Input tabs contain settings specific to that input.
For a full description of the features and capabilities of MOTIV Mix, see the MOTIV Mix user guide.
Global Tab
The Global tab in MOTIV Mix contains global settings that adjust the MV7i and any connected input.
Hardware Configuration Settings
Audio Output Mode: select between Mixdown, Multi-Track, and Stereo modes for the output as you record. Stereo mode
is only available when a ¼" TRS input is detected. See the
Audio Output Modes topic for more information on Mixdown,
Multi-Track, and Stereo modes.
Monitor Mix: move the sliders to adjust the levels of mic, combo connector input, and computer playback sound sources
in the headphones connected to the device.
LEDs: select the LED mode and set the color of the LED panel. See the LED Touch Panel topic for more information on
the LED panel.
Reset to Defaults: reset the MV7i settings to the default settings.
Digital Signal Processing (DSP) Settings
Smart Gate: works with Auto Level Mode to dynamically reduce the volume of a channel when either of the two users fall
silent, minimizing crosstalk and guaranteeing that concurrent conversations do not disrupt the separate audio streams.
Smart Gate is designed specifically for speech applications, like podcasting or livestreaming. Using Smart Gate for singing or instrumental recordings
may result in artifacts in the recording.
Reverb: add studio, plate, or hall reverb to the output. Adjust the intensity of the reverb with the slider.
Mic Tab
Adjust settings on the MV7i microphone in the Mic tab.
Shure Incorporated
8/21
•
•
•
•
•
•
•
•
•
•
•
•
•
•
•
•
Hardware Configuration Settings
Mute/Unmute: click to mute and unmute the MV7i microphone. The MV7i can also be muted or unmuted by touching the
LED panel anywhere in Combined LED modes or on one side in Split LED modes. See more about the touch-to-mute LED
panel feature in the
LED Touch Panel topic.
Mute lock: select the lock icon to lock the MV7i in a muted or unmuted state. When mute lock is on, the MV7i cannot be
muted or unmuted by touch and must be unlocked in MOTIV Mix to restore the touch-to-mute function.
Digital Signal Processing (DSP) settings
Autolevelmode,RealtimeDenoiser,andPopperStopperaredesignedforspeechapplications,likepodcastingorlivestreaming.Leavingthesefeaturesen
abled for singing or instrumental applications may result in artifacts in the recording.
Mode: select between Speech, Singing, or Instrument mode to automatically adjust the DSP features in MOTIV Mix to fit
your application. See more about the different modes in the
Modes in MOTIV Mix topic.
Gain: enable Auto-level mode for MOTIV Mix to automatically adjust your levels as you record. Disable Auto-level mode to
adjust gain manually via the slider. In manual mode, select the lock icon to lock your gain at the set level.
Compressor(availablewhenAutolevelmodeisturnedoff):selectlight,mediumorheavycompressiontoreducethedif
ferencebetweentheloudestandsoftestpartsofthesignal,makingtheoverallsoundlouderandmoreconsistentinvol
ume.
Limiter (available when Auto-level mode is turned off): enable or disable a limiter. Use a limiter to prevent distortion from
level peaks in your recording.
Tone: use the slider to adjust your tone between dark, natural, and bright.
Reverb: apply reverb to your output or to the monitor output on the MV7i. Adjust reverb parameters in the Global tab.
Real-time Denoiser: enable the Real-time Denoiser to help reduce unwanted noise.
Popper Stopper: enable the Popper Stopper DSP to detect and reduce plosives.
High-pass Filter: reduce unwanted low-frequency rumbling noise with a high pass filter at 75 Hz or 150 Hz.
Input Tab
The Input tab in MOTIV Mix hosts configurable settings for a connected XLR or ¼" TRS input.
Hardware Configuration settings
Mute/Unmute: click the button to mute and unmute the connected device. Select the lock icon to mute lock the input. In
this state, the connected device cannot be unmuted by touching the LED panel and must be unlocked in MOTIV Mixtore
storethetouchtomutefunction.TheconnecteddevicecanalsobemutedorunmutedbytouchingtheLEDpanelany
where in Combined LED modes or on side B in Split LED modes. See more about the touch-to-mute LED panel feature in
the
LED Touch Panel topic.
Input Type: select the input type that matches the device you're connecting to the MV7i. The MV7i supports XLR or ¼"
TS/TRS inputs.
XLR Phantom Power: enable phantom power if the connected XLR device requires it to operate. MV7i only supports
phantom power through the XLR input. Refer to your device's user guide to determine if it needs phantom power.
Digital Signal Processing (DSP) Settings
Autolevelmode,RealtimeDenoiser,andPopperStopperaredesignedforspeechapplications,likepodcastingorlivestreaming.Leavingthesefeaturesen
abled for singing or instrumental applications may result in artifacts in the recording.
Mode: select between Speech, Singing, or Instrument mode to automatically adjust the DSP features in MOTIV Mix to fit
your application. See more about the different modes in the
Modes in MOTIV Mix topic.
Gain: enable Auto-level mode for MOTIV Mix to automatically adjust your levels as you record. Disable Auto-level mode to
adjust gain manually via the slider. In manual mode, select the lock icon to lock your gain at the set level.
Shure Incorporated
9/21
•
•
•
•
•
•
•
•
•
•
•
Compressor(availablewhenAutolevelmodeisturnedoff):selectlight,mediumorheavycompressiontoreducethedif
ferencebetweentheloudestandsoftestpartsofthesignal,makingtheoverallsoundlouderandmoreconsistentinvol
ume.
Limiter (available when Auto-level mode is turned off): enable or disable a limiter. Use a limiter to prevent distortion from
level peaks in your recording.
Tone: use the slider to adjust your tone between dark, natural, and bright.
Reverb: apply reverb to your output or to the monitor output on the MV7i. Adjust reverb parameters in the Global tab.
Real-time Denoiser: enable the Real-time Denoiser DSP to help reduce unwanted noise.
Popper Stopper: enable the Popper Stopper DSP to detect and reduce plosives.
High-pass Filter: reduce unwanted low-frequency rumbling noise with a high pass filter at 75 Hz or 150 Hz.
WhenusingtheStereoaudiooutputmodewitha¼"input,onlytheGainandMutesettingsareavailable.Touseothersettingswitha¼"input,changetheau
dio output mode to Mixdown or Multi-Track in the Global tab.
Audio Output Modes
In MOTIV Mix, you can select between three audio output modes depending on your application: Mixdown, Multi-Track, and
Stereo. Select an output mode in the Global settings tab in MOTIV Mix. The default audio output mode is Mixdown mode.
Mixdown mode treats both the MV7i microphone and the connected input as mono inputs. These inputs are mixed together to
one mono mix output. If a stereo ¼" TRS cable is connected to the combo connector, the left channel is summed into the mono
channel. Mixdown mode is the default setting for the MV7i.
Multi-Track modesetstheMV7imicrophonetotheleftchannelandtheconnectedinputtotherightchannelofastereochan
nel in the recording. If a stereo TRS cable is connected to the combo connector, the left channel of the input is summed into
the right channel of the recording.
Stereo mode is available for setups that include a ¼" TRS connection. In Stereo mode, the MV7i microphone will route to left
and right outputs and the ¼" connection will route left audio to left outputs and right audio to right outputs. When using Stereo
mode while an XLR cable is connected to the combo connector, the output will be the same as Mixdown mode.
DSP Modes in MOTIV Mix
MOTIV Mixhasthreedigitalsignalprocessing(DSP)presetsdesignedtoenhanceanyapplication.Recordspeakersforpod
casts or livestreams with Speech mode, singers with Singing mode, and instruments with Instrument mode.
Each mode enables or disables DSP settings on the MV7i to fit your application. Presets are selected on a per-input basis. The
MV7irecallsandappliestheprevioussettingsoftheXLRand¼"TS/TRSseparatelywhenitisconnected.Anyselectedpre
sets will remain enabled when the MV7i is turned off or restarted.
Speech mode configures the MV7i and connected inputs to optimize the sound of speech for podcasts, streaming, and other
spoken applications. Speech mode enables the following features:
Auto-Level Mode
Real-time Denoiser
Popper Stopper
By default, Speech mode is enabled for the MV7i and connected XLR inputs.
Singing mode optimizes the MV7i and connected inputs for singing. Singing mode enables the following features:
Popper Stopper
Shure Incorporated
10/21
•
•
•
AutoLevelMode,RealtimeDenoiser,andSmartGateareturnedoffinSingingmode.Enablingthesefeaturesforsingingap
plications may result in audio artifacts in the recording.
Instrument modepreservestherawsoundofrecordedinstruments.AutoLevelMode,RealtimeDenoiser,andPopperStop
per are disabled in Instrument mode. Enabling these features when recording instruments may result in audio artifacts in the
recording. By default, Instrument mode is enabled for connected ¼" inputs.
LED Touch Panel
Configure and customize LED mode, color, and brightness in the MOTIV Mixapp.SelectbetweenSplitorCombinedliveme
tering, pulsing, or solid patterns and customize the color of the LED panel. By default, the MV7i is configured to Combined Live
Meter Color mode.
In Split modes, the LED panel is divided in half to display information about each input. Touching a side of the panel will mute
the input associated with that side.
In Combined modes, the entire LED panel displays information about both inputs collectively. Touching the panel anywhere will
mute both the MV7i microphone and the connected input.
When Mute Lock is enabled on the MV7i microphone or a connected input, that input will not mute or unmute when touching the LED touch panel. Instead, the
LED panel will flash red 3 times. Disable Mute Lock in MOTIV Mix to enable touch-to-mute capabilities.
Split LED Modes
SplitmodesdividetheLEDtouchpanelintotwosides.OnesiderepresentstheMV7imicrophoneandtheothersiderepre
sents the input connected to the combo XLR or ¼" connector.
When using the MV7i in a Split mode with another input connected to the combo connector on the MV7i:
Touch the MV7i microphone side to mute/unmute the microphone.
Touch the combo connector input side to mute/unmute a connected input.
Touch the center of the LED panel to mute/unmute all inputs.
Split mode can be set to Live Meter, Solid, or Pulsing modes.
In Split Live Meter Color Mode, each half of the LED panel displays the level of the associated input. The MV7i microphone
side displays levels for the built-in microphone, and the combo connector side shows the levels of the connected input.
In Split Solid Color Mode, set distinct solid colors for each side of the LED panel.
In Split Pulsing Color Mode, set custom pulsing colors for each side of the LED panel.
Combined LED Modes
CombinedmodesshowcollectiveinformationaboutboththeMV7imicrophoneandanyinputconnectedtothecomboconnec
tor across the entire LED touch panel. Touch the panel anywhere to mute both inputs.
Combined mode can be set to Live Meter, Solid, or Pulsing modes:
In Combined Live Meter Color Mode, the LED touch panel displays the total level from the MV7i and any connected inputs.
In Combined Solid Color Mode, the LED touch panel displays one solid color.
In Combined Pulsing Color Mode, the LED touch panel displays one pulsing color.
LED Behavior
When the MV7i is in Split mode, a status LED indicator may only show on the side of the associated input. One side of the LED
panel shows the status of the MV7i microphone. The other side shows the status the input connected to the combo connector.
Red, amber, and green ripples out from the center and back in: The MV7i is powering on via USB-C.
Shure Incorporated
11/21
Green center: The MV7i successfully connected to a computer, tablet, or phone via USB-C.
Amber flashing center: The MV7i failed to connect via USB-C. Unplug the microphone, make sure your computer or device is
awake, and then plug it back in. You may need to allow the microphone in your device settings.
Green, amber, and red ripples out from the center: A device has been connected to the combo connector on the MV7i.
Red, amber, and green ripples in from the edges: A device has disconnected from the combo connector on the MV7i.
White ripples out from the center: A device has been connected to the combo connector input on the MV7i with Phantom
Power enabled.
White ripples in from the edges:AdevicehasdisconnectedtothecomboconnectorontheMV7iwithPhantomPoweren
abled.
Red ripples from the center across the entire panel: The MV7i microphone and any connected combo connector input are
muted. Touch the panel to unmute, or unmute the microphone from your device.
Red ripples from the center on one side: The MV7i microphone or connected input associated with that side of the panel is
muted. Touch that side of the panel to unmute, or unmute the microphone or input from your device.
Red flashes 3 times when touched: The MV7i is mute locked and cannot be unmuted by touching the panel. Turn off Mute
Lock in MOTIV Mix.
Amber pulses slowly: The firmware on the MV7i is updating.
Keep the microphone connected while the firmware is updating.
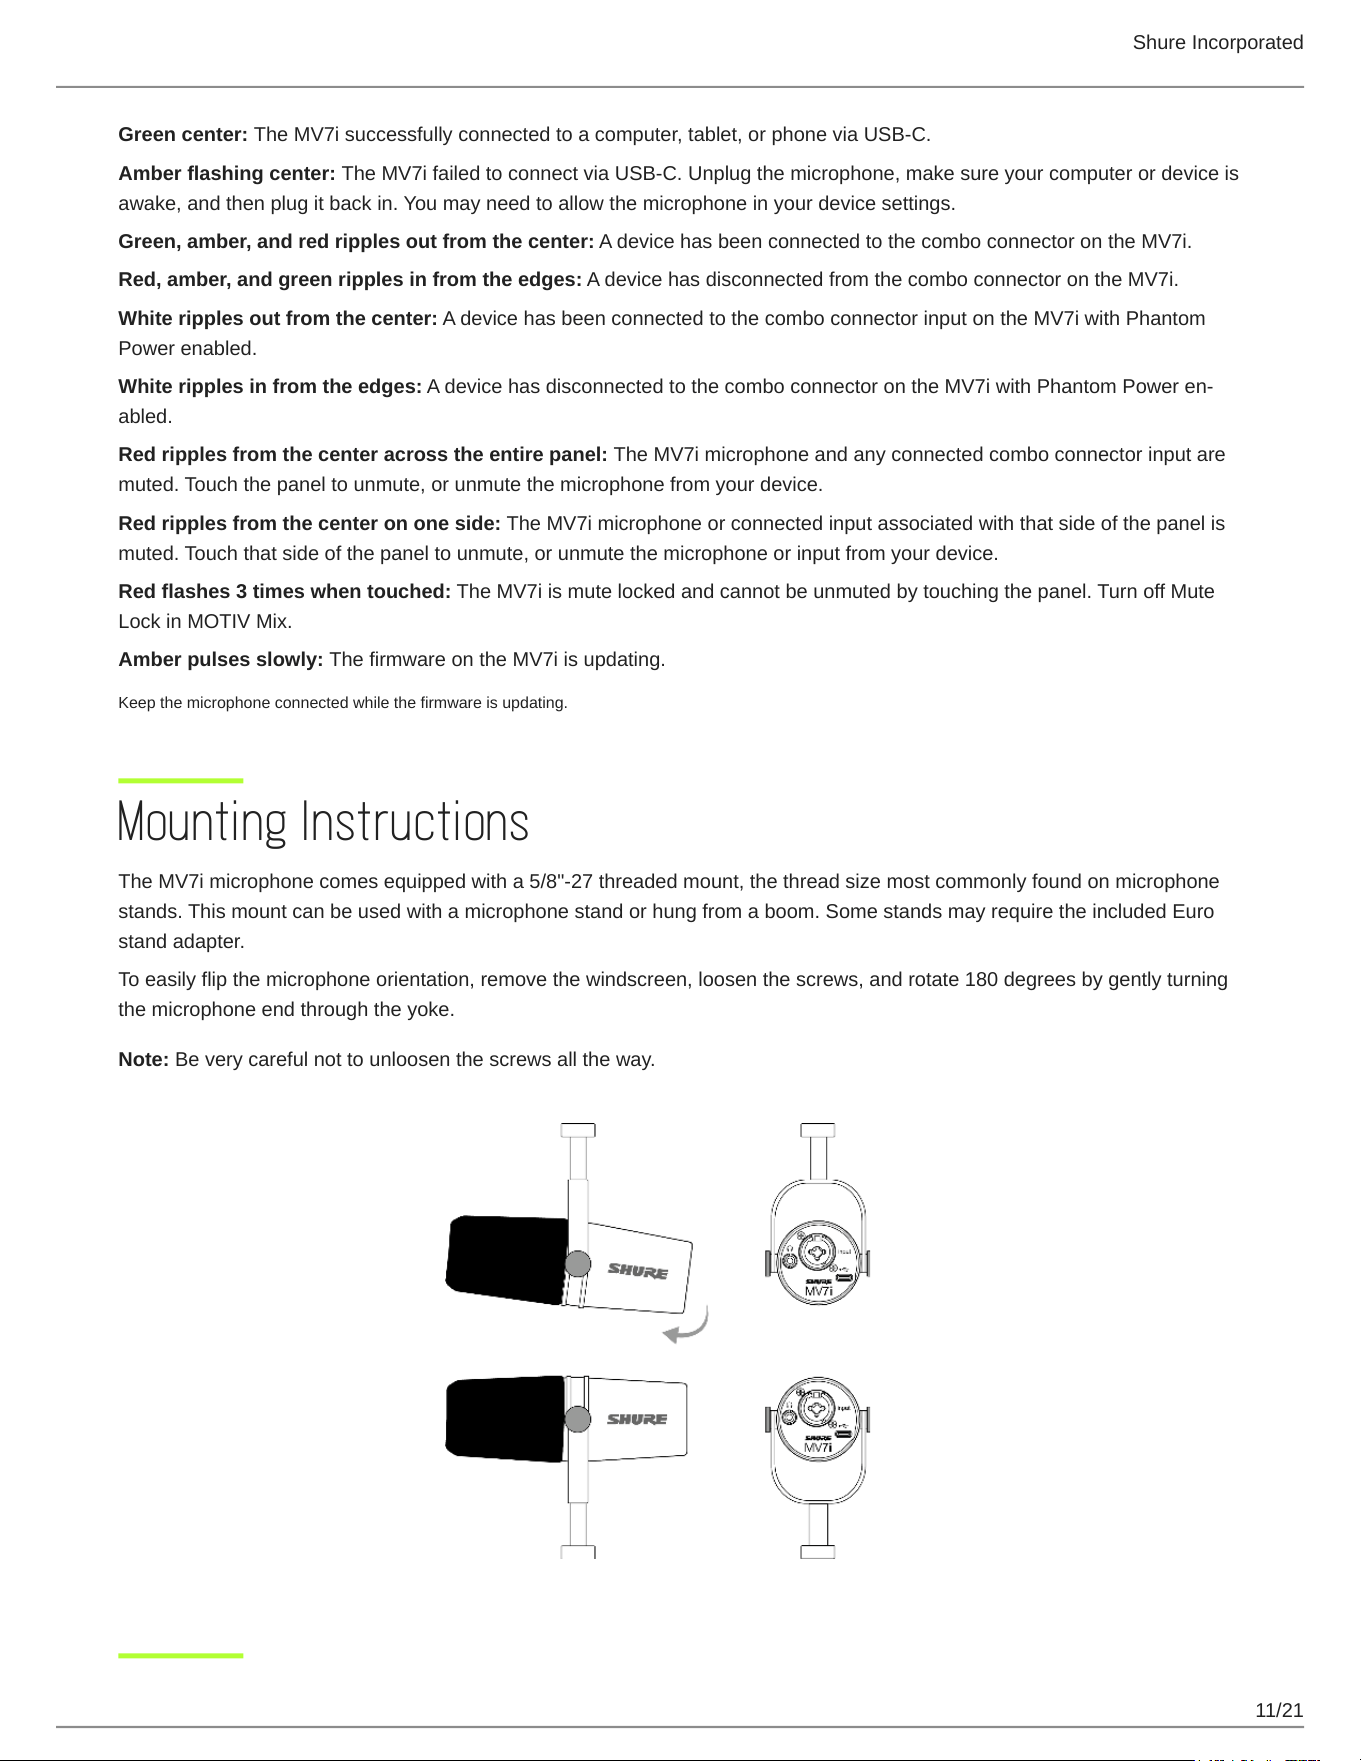
Mounting Instructions
The MV7i microphone comes equipped with a 5/8"-27 threaded mount, the thread size most commonly found on microphone
stands. This mount can be used with a microphone stand or hung from a boom. Some stands may require the included Euro
stand adapter.
To easily flip the microphone orientation, remove the windscreen, loosen the screws, and rotate 180 degrees by gently turning
the microphone end through the yoke.
Note: Be very careful not to unloosen the screws all the way.
Shure Incorporated
12/21
Troubleshooting
Issue Solution
Recording
has arti
facts or
sounds
strange
when
recording
singing or
an instru
ment
Check that the digital signal processing (DSP) settings for Auto Level Mode, Real-time Denoiser, Popper
Stopper, and Smart Gate on the MV7i are disabled in MOTIV Mix. These DSP modes are optimized for
speech applications and may affect the sound of singing or instrumental recordings.
Audio is
distorted in
Auto Level
Mode
Select Auto Level Mode to allow the software to control gain settings. Experiment with different microphone
placements. If distortion persists, consider using Manual mode to adjust your sound.
Audio is
distorted in
Manual
Mode
Audio distortion usually comes from overloading the microphone, which causes clipping. Lower your mic gain
for the best sound recording.
Audio
sounds
higher or
lower pitch
than nor
mal.
Your microphone and computer have a sample rate mismatch. To adjust your computer sample rate settings,
go to the
Shure FAQ topic for information on correcting sample rate mismatch.
Note: Windows update 10 v2004 (April 2020) solves this problem.
The MV7i
micro
phone is
muted, but
audio is
still pass
ing
through.
Low-quality XLR cables can cause this issue. Unplug any connected XLR input from the combo connector on
theMV7i,powercycletheMV7ibyunpluggingtheUSBCcableandpluggingitbackin,andconsiderup
grading or using a different XLR cable to connect an input to the combo connector.
Microphone
is plugged
in, but not
detected.
Unplug and reconnect the cable so that the app recognizes the microphone. You'll know that the connection
is made when the LED panel turns green after connecting and powering on.
You hear no
audio even
though the
desktop ap
plication is
displaying
the correct
Check the Monitor Mix blend. Move the Monitor Mix sliders up to hear the audio going into the mic and the
audio being played back at the same time.
Shure Incorporated
13/21
Issue Solution
micro
phone.
MV7i isn't
working
with Mi
crosoft
Teams on
Mac.
CheckwhatversionofMacOStheMacison.Currently,MicrosoftTeamsonMacOS15(Sequoia)hastrou
ble supporting any external microphones. To continue to pass audio in Teams calls with your MV7i, try these
workarounds:
Keep the Teams audio control panel open during your call.
Set both the input and the output in Teams to the MV7i. Connect headphones to the monitor output on the
MV7i to listen to your Teams call.
Microphone
has be
come de
tached
from the
yoke.
See the MV7i Yoke Assembly Topic for step by step instructions for re-assembling your yoke and assorted
washers. Correct washer assembly is crucial to ensure that your microphone is securely in place.
General
trou
bleshooting
Quit and re-start the app.
Reboot the computer, phone, or tablet.
Check for a firmware update in MOTIV Mix, MOTIV for iOS and Android, or MOTIV VideoforiOSandAn
droid.
Note: Contact Shure Service and Repair if you continue to experience any issues.
Firmware Update
Take advantage of additional features and design enhancements by updating the firmware in MOTIV Mix, MOTIV for iOS and
Android, or MOTIV Video for iOS and Android when prompted.
when a firmware update is available, the Firmware Update Available button will appear in the settings panel of your MV7i n
MOTIV Mix. Select the button to update your firmware.
Leave the MV7i plugged in until the firmware update is complete. The LED panel pulses amber while the firmware updates.
Contact Shure Service and Repair if you experience any issues.
Keep equipment connected during updates
KeepyourMOTIVdeviceconnectedtoyourcomputerormobiledevicewhenupdatingtoensurethattherearenoupdateis
sues.
System Requirements
Check the MOTIV Mix app or MOTIV mobile apps for the latest information on system requirements and compatibility.
Shure Incorporated
14/21
•
•
•
•
•
•
•
•
•
•
•
•
•
•
•
System Requirements and Compatibility: Mac
MacOS 12 and higher
Minimum 8 GB of RAM
Minimum 20% of hard disk space
System Requirements and Compatibility: Windows
Windows 10 and higher
Minimum 8 GB of RAM
Minimum 20% of hard disk space
System Requirements and Compatibility: iOS
iOS: iOS 16 and higher (USB-C devices only)
System Requirements and Compatibility: Android
Android 12.0 and higher
Android is a trademark of Google Inc.
Note: See the MOTIV Mix, MOTIV for iOS and Android, or MOTIV Video product pages for information on supported Android devices.
Additional Resources
Shure Knowledge Base FAQs
Training from the Shure Audio Institute
Microphone Techniques for Recording
Houses of Worship Systems Guide
Shure Performance & Production YouTube channel
Shure Creators YouTube channel
Download Shure Software
Software and firmware archive
Specifications
MV7i Microphone
Transducer Type
Dynamic (moving coil)
Polar Pattern
Unidirectional (Cardioid)
Shure Incorporated
15/21
Frequency Response
50Hzto16,000Hz
USB-C Maximum SPL
128dBSPL[2]
Sensitivity
(@ 1 kHz, open circuit voltage with USB-C connection)
-33 dBV/Pa [1][2]
Adjustable Gain Range
0to+36dB
Digital Noise Floor
20 Hz to 20 kHz, A-weighted
-118 dBFS (with Auto Level Mode and Real Time Denoiser enabled)
[1]1Pa=94dBSPL
[2] At Minimum Gain
Input (XLR or 1/4")
Supported Types
XLR and 1/4" Tip Sleeve (TS), ¼" Tip Ring Sleeve (TRS)
Input Impedance
XLR 5.8kΩ
¼" TRS 1MΩ
Adjustable Gain Range
Mixdown and Multi-track modes 0 to +60 dB
Stereo mode 0 to +40 dB
Maximum Input Level
XLR -14 dBV
¼" 7 dBV
Digital Noise Floor
XLR -118 dBFS (with Auto Level Mode and Real Time Denoiser enabled)
¼" -97 dBFS (at 10 dB gain)
Phantom Power
Yes (+48 V DC)
Shure Incorporated
16/21
System
On-Board DSP
AutoLevelModewithSmartGate,DigitalPopperStopper,RealtimeDenoiser,ToneSlider,Reverb,Com
pressor, Limiter, High-Pass Filter
USB Host Requirements
USB Audio Class 2 (UAC2), Powered through USB-C bus power (USB 2.0 or higher)
A/D Converter
24-bit, 48 kHz (16-bit, 44.1 kHz support for iOS)
Headphone Output
3.5mm(1/8″)
Connector Type
USB-C port
Mounting Type
5/8" - 27 thread mount
Housing
Diecast aluminum
Net Weight
567g(1.25lbs)
Dimensions
(when mic and yoke assembly are 90 degrees to one another, measured from surface to top of mic)
164 mm H x 207 mm L x 90 mm D
Cable
Includes one (1) 3m USB-C to USB-C cable
Software Compatibility
MOTIV Mix Desktop App, MOTIV Audio iOS and Android Apps
Bit Depth Sampling Rate
24 48 kHz
16* 44.1 kHz*
* iOS only
Shure Incorporated
17/21
Typical Frequency Response
Typical Polar Pattern
Overall Dimensions
MV7i Yoke Assembly
TheMV7iyokeallowsapodcastertobeflexiblewithmicplacement.Loosentheyokeknobsandyoucanadjustthemicro
phoneinavarietyangles.Ifthemicrophonebecomesdetachedfromtheyoke,thesearethestepstoputittogetherinthecor
rectordertoensurethatyourmicrophoneissecure.Eachsideusesonethingrayspringwasher,oneshinysilverbrasswash
er, two black plastic washers and the yoke and threaded yoke knob.
Shure Incorporated
18/21
1.
2.
◦
◦
◦
◦
3.
4.
5.
6.
7.
Start with the threaded knob flat side down on your tabletop.
Stack the washers on the threaded knob.
Place a black plastic washer on the knob.
Place one side of the yoke on next.
Then put the second black plastic washer on.
Place the flat silver washer and then the thin spring washer on the threaded knob.
Using your finger to hold the screw assembly in place, slide the MV7i onto the threaded screw and turn the
knob to keep washers in place.
Note: Be sure to keep this side on but loose so that you have room to easily move the yoke and assemble the washers
on the opposite side.
On the opposite yoke arm, place the washers into the side of the MV7i in reverse order. Thin spring washer >
Flat silver washer > Black plastic washer > Yoke arm
The yoke arm needs to be placed directly onto the stack of washers. To ensure that the washers are aligned,
put a pen through the yoke and washers to make sure that everything is properly centered. Leave pen in place.
Place the second black plastic washer onto the remaining threaded knob.
Remove the pen. Insert the threaded knob and black plastic washer into the stacked washers and tighten both
sides to ensure that your microphone is stable.
Shure Incorporated
19/21
•
•
•
•
1.
2.
Accessories
Furnished Accessories
3 meter USB-C to USB-C Cable 95C52640
Black Foam Windscreen AMV7+K
Replacement Parts
Black Windscreen AMV7+K
Black Replacement Grille 95B41550
Certifications
Information to the user
This equipment has been tested and found to comply with the limits for a Class B digital device, pursuant to part 15 of the FCC
Rules. This equipment generates, uses, and can radiate radio frequency energy and, if not installed and used in accordance
with the manufacturer's instruction manual, may cause interference with radio and television reception.
Notice: The FCC regulations provide that changes or modifications not expressly approved by Shure Incorporated could void
your authority to operate this equipment.
Theselimitsaredesignedtoprovidereasonableprotectionagainstharmfulinterferenceinaresidentialinstallation.Thisequip
mentgenerates,uses,andcanradiateradiofrequencyenergyand,ifnotinstalledandusedinaccordancewiththeinstruc
tions, may cause harmful interference to radio communications. However, there is no guarantee that interference will not occur
inaparticularinstallation.Ifthisequipmentdoescauseharmfulinterferencetoradioortelevisionreception,whichcanbede
termined by turning the equipment off and on, the user is encouraged to try to correct the interference by one or more of the
following measures:
Reorient or relocate the receiving antenna.
Increase the separation between the equipment and the receiver.
Connect the equipment to an outlet on a circuit different from that to which the receiver is connected.
Consult the dealer or an experienced radio/TV technician for help.
This device complies with part 15 of the FCC Rules. Operation is subject to the following two conditions:
This device may not cause harmful interference.
This device must accept any interference received, including interference that may cause undesired operation.
This Class B digital apparatus complies with Canadian ICES-003. Cet appareil numérique de la classe B est conforme à la
norme NMB-003 du Canada.
For information regarding responsible party and other matters relating to FCC compliance, please contact Shure Incorporated,
5800 W. Touhy Avenue, Niles, Illinois 60714-4608 U.S.A. shure.com/contact
Industry Canada ICES-003 Compliance Label: CAN ICES-3 (B)/NMB-3(B)
Shure Incorporated
20/21
Canada, ISED Notice
Notice: The Industry Canada regulations provide that changes or modifications not expressly approved by Shure Inc. could
void your authority to operate this equipment.
This microphone for use with any microphone stand with a 5/8" threaded adapter.
Note: Testingisbasedontheuseofsuppliedandrecommendedcabletypes.Theuseofotherthanshielded(screened)cabletypesmaydegradeEMCper
formance.
CE Notice
Hereby,ShureIncorporateddeclaresthatthisproductwithCEMarkinghasbeendeterminedtobeincompliancewithEuro
pean Union requirements.
The full text of the EU declaration of conformity is available at the following site:
https://www.shure.com/enEU/support/declara
tions-of-conformity.
UKCA Notice
Hereby,ShureIncorporateddeclaresthatthisproductwithUKCAMarkinghasbeendeterminedtobeincompliancewithUK
CA requirements.
The full text of the UK declaration of conformity is available at the following site:
https://www.shure.com/enGB/support/declara
tions-of-conformity.
This product meets the Essential Requirements of all relevant European directives and is eligible for CE marking.
Made for iPad (5th generation), iPad (6th generation, iPad (7th generation, iPad (8th generation), iPad Air 2, iPad Air 3, iPad
Mini4,iPadMini5,iPadPro9.7inch(1stgeneration),iPadPro(12.9inch)1stgeneration,iPadPro10.5inch2017(2ndgen
eration), iPad Pro 12.9-inch 2017 (2nd generation), iPhone 6s, iPhone 6s Plus, iPhone SE, iPhone 7, iPhone 7 Plus, iPhone 8,
iPhone 8 Plus, iPhone X, iPhone Xs, iPhone Xs Max, iPhone XR, iPhone 11, iPhone 11 Pro, iPhone 11 Pro Max, iPhone 12,
iPhone 12 Mini, iPhone 12 Pro, iPhone 12 Pro Max, iPhone SE 2, iPod Touch (7th generation).
iPad, iPhone, iPod and iPod touch are trademarks of Apple Inc., registered in the U.S. and other countries. iPad Air, iPad mini,
andLightningaretrademarksofAppleInc.Thetrademark“iPhone”isusedinJapanwithalicensefromAiphoneK.K.
Android Compatibility
This equipment is compatible with Android devices that support USB Audio Class 2.0 and USB-C connectivity. Not all Android
devices are compatible. Android is a trademark of Google Inc.
Recycling Information
Please consider the environment, electric products and packaging are part of regional recycling schemes and do not belong to
regular household waste.
Shure Incorporated
21/21
Environmental Regulatory Information
Waste Electrical and Electronic Equipment (WEEE) Directive
In the European Union and the United Kingdom, this label indicates that this product should not be disposed of with household
waste. It should be deposited at an appropriate facility to enable recovery and recycling.
Registration, Evaluation, Authorization of Chemicals (REACH) Directive
REACH (Registration, Evaluation, Authorization of Chemicals) is the European Union (EU) and the United Kingdom (UK)
chemical substances regulatory framework. Information on substances of very high concern contained in Shure products in a
concentration above 0.1% weight over weight (w/w) is available upon request.

