

Instruction Manual
Manual de instrucciones
Slim Espresso Maker 20 Bar Pressure
Cafetera Espresso Slim Presión 20 Bar
®
19390_19415_19416_19417_19418_19449_BTFL_Walmart_Slim Espresso_Maker_20 Bar_IM_R7.indd 119390_19415_19416_19417_19418_19449_BTFL_Walmart_Slim Espresso_Maker_20 Bar_IM_R7.indd 1 2023-12-19 9:25 AM2023-12-19 9:25 AM
The kitchen is my family’s happy
place. It’s where we cook and eat
and bake and laugh and share our
most beautiful moments together.
That’s what inspired the creation
of Beautiful, my new collection
of easy-to-use kitchenware that
you’ll want to keep out on your
kitchen counter. So whether
your kitchen has flour all over
the place from a kid's baking
session or you’re throwing an adult
dinner party, I hope every step will
be simple, delicious and beautiful!
www.beautifulbydrew.com
19390_19415_19416_19417_19418_19449_BTFL_Walmart_Slim Espresso_Maker_20 Bar_IM_R7.indd 219390_19415_19416_19417_19418_19449_BTFL_Walmart_Slim Espresso_Maker_20 Bar_IM_R7.indd 2 2023-12-19 9:25 AM2023-12-19 9:25 AM

Section 1: Safety
Important Safeguards ............................................ 6-7
Additional Important Safeguards ................................. 8-9
Notes on the Plug ................................................ 9
Notes on the Cord ............................................... 10
Plasticizer Warning .............................................. 10
Electric Power ................................................... 11
Section 2: Instructions
The Art of Extracting Espresso ................................... 14
Getting to Know Your 20 Bar Slim Espresso Maker ................. 15
Safety Warnings .................................................. 17
Before Using for the First Time ............................... 18-19
Pull the Perfect Espresso Shot ................................ 20-23
Dial In Single or Double Shot Volume ............................ 23
Texture Milk for Espresso Drinks .............................. 23-26
User Maintenance Instructions .................................... 27
Care & Cleaning Instructions ..................................... 27
Descalingcalin ................................................... 28
Storing Instructions ............................................. 29
Troubleshooting ............................................... 29-32
Espresso Recipes .............................................. 32-33
Warranty ......................................................... 34
Table of Contents
19390_19415_19416_19417_19418_19449_BTFL_Walmart_Slim Espresso_Maker_20 Bar_IM_R7.indd 319390_19415_19416_19417_19418_19449_BTFL_Walmart_Slim Espresso_Maker_20 Bar_IM_R7.indd 3 2023-12-19 9:25 AM2023-12-19 9:25 AM

Sección 1: Seguridad
Medidas importantes de seguridad ............................. 38-40
Medidas importantes de seguridad adicionales .................. 40-41
Notas sobre el enchufe .......................................... 42
Notas sobre el cable ............................................ 42
Advertencia sobre el acabado .................................... 43
Alimentación eléctrica ........................................... 43
Sección 2: Instrucciones
El arte de extraer el espresso ................................... 46
Conozca mejor su Cafetera Espresso Slim Presión 20 Bar ........ 47-48
Advertencias de seguridad ........................................ 49
Antes del primer uso ......................................... 50-51
Lograr un shot perfecto de espresso .......................... 52-55
Seleccionar el volumen de un shot simple o doble ................ 55
Texturizado de leche para espresso ........................... 56-58
Instrucciones de mantenimiento para el usuario .................. 59
Instrucciones de cuidado y limpieza ........................... 59-60
Descalcicación ............................................... 60-61
Instrucciones de almacenamiento .................................. 61
Solución de problemas ........................................ 62-65
Recetas de espresso ......................................... 65-66
Garantía ......................................................... 68
Índice
19390_19415_19416_19417_19418_19449_BTFL_Walmart_Slim Espresso_Maker_20 Bar_IM_R7.indd 419390_19415_19416_19417_19418_19449_BTFL_Walmart_Slim Espresso_Maker_20 Bar_IM_R7.indd 4 2023-12-19 9:25 AM2023-12-19 9:25 AM
Section 1
Safety
1
19390_19415_19416_19417_19418_19449_BTFL_Walmart_Slim Espresso_Maker_20 Bar_IM_R7.indd 519390_19415_19416_19417_19418_19449_BTFL_Walmart_Slim Espresso_Maker_20 Bar_IM_R7.indd 5 2023-12-19 9:25 AM2023-12-19 9:25 AM

6
IMPORTANT SAFEGUARDS
When using electrical appliances, basic safety precautions
should always be followed, including the following:
1. READ ALL INSTRUCTIONS.
2. Do not touch hot surfaces. Use handles or knobs.
Use oven mitts or potholders.
3. To protect against re, electrical shock and injury to
persons, do not immerse cord or plugs or appliance in
water or other liquid.
4. This appliance is not intended for use by persons
(including children) with reduced physical, sensory
or mental capabilities, or lack of experience and
knowledge, unless they have been given supervision or
instruction concerning use of the appliance by a person
responsible for their safety.
5. Close supervision is necessary when any appliance is
used by or near children.
6. Unplug from outlet when not in use and before cleaning.
7. Allow Espresso Maker to cool before putting on or
taking off parts, and before cleaning the appliance.
8. Do not operate any appliance with a damaged cord or
plug or after the appliance malfunctions, or has been
damaged in any manner. Return appliance to Customer
Service for examination, repair or adjustment.
19390_19415_19416_19417_19418_19449_BTFL_Walmart_Slim Espresso_Maker_20 Bar_IM_R7.indd 619390_19415_19416_19417_19418_19449_BTFL_Walmart_Slim Espresso_Maker_20 Bar_IM_R7.indd 6 2023-12-19 9:25 AM2023-12-19 9:25 AM

7
9. The use of accessory attachments not recommended by the
appliance manufacturer may cause re, electric shock or
injuries to persons.
10. Do not use outdoors.
11. Do not let cord hang over the edge of table or counter,
or touch hot surfaces.
12. Do not place on or near a hot gas or electric burner,
or in a heated oven.
13. If this appliance begins to malfunction during use,
press the POWER button; turn the function control to
STANDBY. Then immediately unplug the cord. Do not use
or attempt to repair the malfunctioning appliance.
14. Never use the appliance without water.
CAUTION: Relieve pressure through steam wand before
removing cup or lter basket.
15. Do not use this appliance for other than its intended
use.
16. Be certain lids are securely in place before operating
appliance.
17. Scalding may occur if the lids are removed during the
brewing cycle.
18. To disconnect, press the POWER button; turn the function
control to STANDBY. Then remove plug from wall outlet.
19. WARNING: To avoid the risk of injury, do not open the brew
chamber during the brew process.
19390_19415_19416_19417_19418_19449_BTFL_Walmart_Slim Espresso_Maker_20 Bar_IM_R7.indd 719390_19415_19416_19417_19418_19449_BTFL_Walmart_Slim Espresso_Maker_20 Bar_IM_R7.indd 7 2023-12-19 9:25 AM2023-12-19 9:25 AM

8
FOR HOUSEHOLD USE
ONLY
ADDITIONAL IMPORTANT
SAFEGUARDS
WARNING: This appliance generates heat and escaping steam
during use. Proper precautions must be taken to prevent the
risk of burns, res, or other injury to persons or damage
to property.
CAUTION: The Espresso Maker must be allowed to cool down
sufciently before adding more water to avoid splattering.
1. All users of this appliance must read and understand
this Instruction Manual before operating or cleaning
this appliance.
2. The cord to this appliance should be plugged into a 120
V AC electrical outlet only.
3. Use water only in this appliance! Do not put any other
liquids or food products in this appliance. Do not mix
or add anything to the water placed in this appliance,
except as instructed in the Descaling section of this
Instruction Manual.
4. DO NOT attempt to move an appliance containing hot
liquids. Allow appliance to cool completely before
moving.
19390_19415_19416_19417_19418_19449_BTFL_Walmart_Slim Espresso_Maker_20 Bar_IM_R7.indd 819390_19415_19416_19417_19418_19449_BTFL_Walmart_Slim Espresso_Maker_20 Bar_IM_R7.indd 8 2023-12-19 9:25 AM2023-12-19 9:25 AM

9
5. Keep appliance at least 4 inches away from walls or
other objects during operation.
6. Place the appliance on a surface that is resistant to
heat.
7. Prior to connecting or disconnecting plug from wall
outlet, press the POWER button; turn the function
control to STANDBY.
8. If this appliance falls or accidentally becomes
immersed in water or any other liquid, unplug it
immediately. Do not reach into the water! Do not use
this appliance after it has fallen into or has become
immersed in water. Contact Consumer Service for
examination and repair.
9. Always use fresh, cool water in your appliance. Warm
water or other liquids, except as described in the
descaling section, may cause damage to the Espresso
Maker.
SAVE THESE
INSTRUCTIONS
NOTES ON THE PLUG
This appliance has a polarized plug (one blade is wider
than the other). To reduce the risk of electric shock, this
plug will t in a polarized outlet only one way. If the
plug does not t fully into the outlet, reverse the plug.
19390_19415_19416_19417_19418_19449_BTFL_Walmart_Slim Espresso_Maker_20 Bar_IM_R7.indd 919390_19415_19416_19417_19418_19449_BTFL_Walmart_Slim Espresso_Maker_20 Bar_IM_R7.indd 9 2023-12-19 9:25 AM2023-12-19 9:25 AM

10
If it still does not t, contact a qualied electrician. Do
not modify the plug in any way.
NOTES ON THE CORD
a) A short power-supply cord (or detachable power-supply
cord) is to be provided to reduce risks resulting from
becoming entangled in or tripping over a longer cord.
b) Longer detachable power-supply cords or extension cords
are available and may be used if care is exercised in
their use.
c) If a long detachable power-supply cord or extension
cord is used:
1) The marked electrical rating of the detachable
power-supply cord or extension cord should be
at least as great as the electrical rating of the
appliance;
2) If the appliance is of the grounded type, the
extension cord should be a grounding- type 3-wire
cord; and
3) The longer cord should be arranged so that it will
not drape over the countertop or table top where it
can be pulled on by children or tripped over.
PLASTICIZER WARNING
CAUTION: To prevent Plasticizers from migrating to the
nish of the counter top or table top or other furniture,
place NON-PLASTIC coasters or place mats between the
19390_19415_19416_19417_19418_19449_BTFL_Walmart_Slim Espresso_Maker_20 Bar_IM_R7.indd 1019390_19415_19416_19417_19418_19449_BTFL_Walmart_Slim Espresso_Maker_20 Bar_IM_R7.indd 10 2023-12-19 9:25 AM2023-12-19 9:25 AM

11
appliance and the nish of the counter top or table top.
Failure to do so may cause the nish to darken; permanent
blemishes may occur, or stains can appear.
ELECTRIC POWER
If the electrical circuit is overloaded with other
appliances, your appliance may not operate properly.
It should be operated on a separate electrical circuit
from other appliances.
19390_19415_19416_19417_19418_19449_BTFL_Walmart_Slim Espresso_Maker_20 Bar_IM_R7.indd 1119390_19415_19416_19417_19418_19449_BTFL_Walmart_Slim Espresso_Maker_20 Bar_IM_R7.indd 11 2023-12-19 9:25 AM2023-12-19 9:25 AM

12
19390_19415_19416_19417_19418_19449_BTFL_Walmart_Slim Espresso_Maker_20 Bar_IM_R7.indd 1219390_19415_19416_19417_19418_19449_BTFL_Walmart_Slim Espresso_Maker_20 Bar_IM_R7.indd 12 2023-12-19 9:25 AM2023-12-19 9:25 AM

Section 2
Instructions
2
19390_19415_19416_19417_19418_19449_BTFL_Walmart_Slim Espresso_Maker_20 Bar_IM_R7.indd 1319390_19415_19416_19417_19418_19449_BTFL_Walmart_Slim Espresso_Maker_20 Bar_IM_R7.indd 13 2023-12-19 9:25 AM2023-12-19 9:25 AM

14
The art of extracting espresso
Consistency is key when it comes to a great shot of espresso. Optimal avor is
achieved as the brewing temperature is maintained. Grounds are pre-infused with
low, steady water pressure before extraction. Shot volumes are automatically
dispensed and can be adjusted to taste. The result is a perfectly balance,
rich and avorful espresso. The perfect espresso shot is all about achieving
a balance of acidity, sweetness and bitterness. Many factor play a major role:
temperature of the water: portalter, and serving cups are crucial. Filter
baskets and steam wand must be clean: coffee beans fresh and perfectly roasted.
The neness or coarseness of the grind, dose of ground coffee, and tamping
pressure should be consistent when experimenting to achieve your perfect pull.
19390_19415_19416_19417_19418_19449_BTFL_Walmart_Slim Espresso_Maker_20 Bar_IM_R7.indd 1419390_19415_19416_19417_19418_19449_BTFL_Walmart_Slim Espresso_Maker_20 Bar_IM_R7.indd 14 2023-12-19 9:25 AM2023-12-19 9:25 AM
15
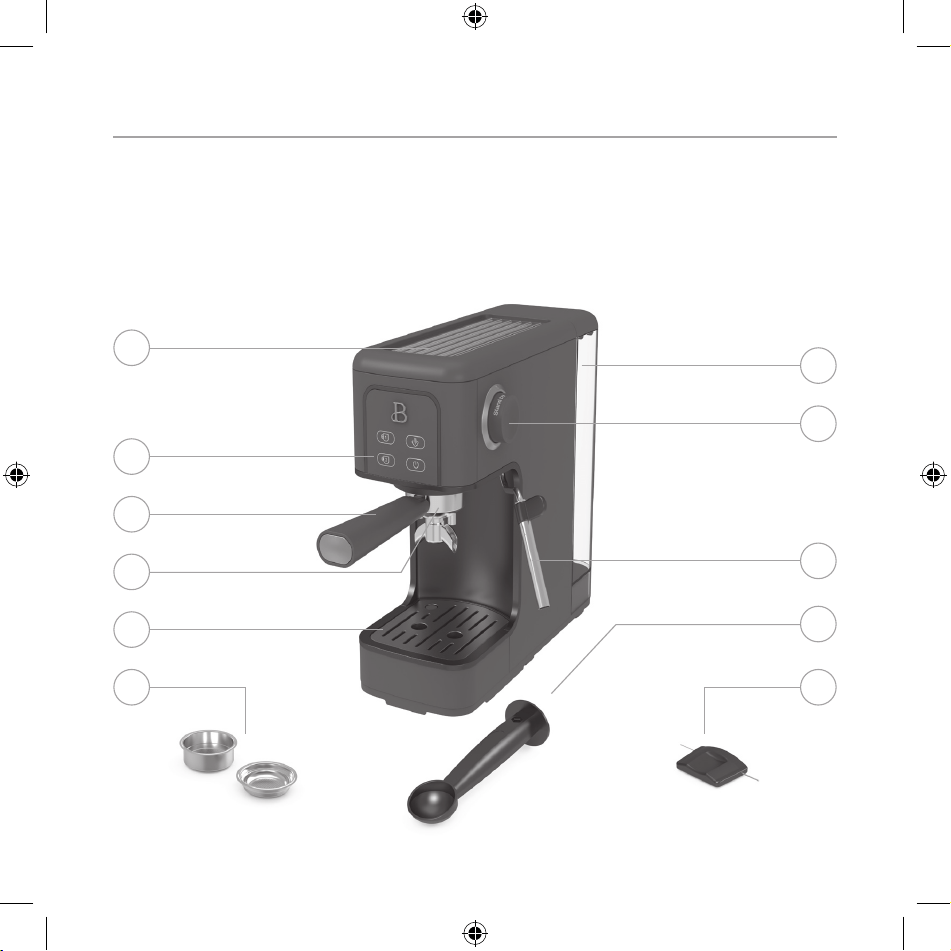
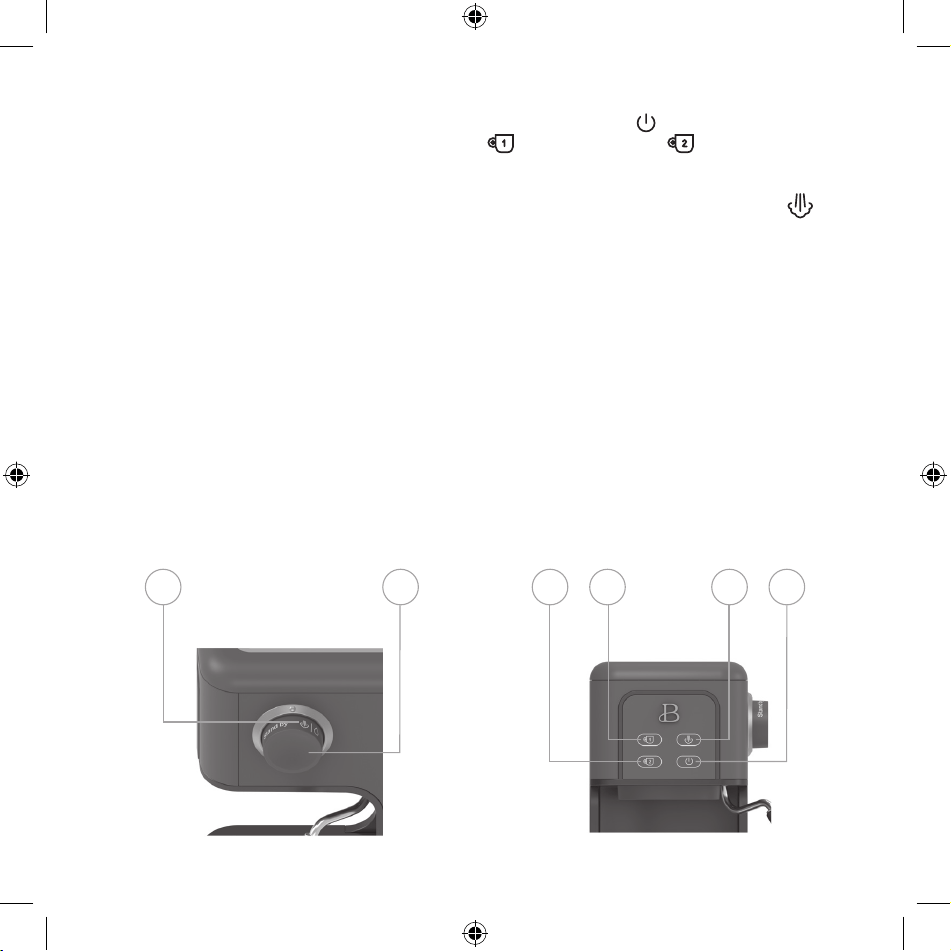
Getting to know your 20 Bar Slim Espresso Maker
Product may vary slightly from illustrations
1. Heated Warming Plate
2. 50 oz Removable Water Tank
3. Function Control Dial
4. Control Panel
5. Steam Wand with Silicone Tab
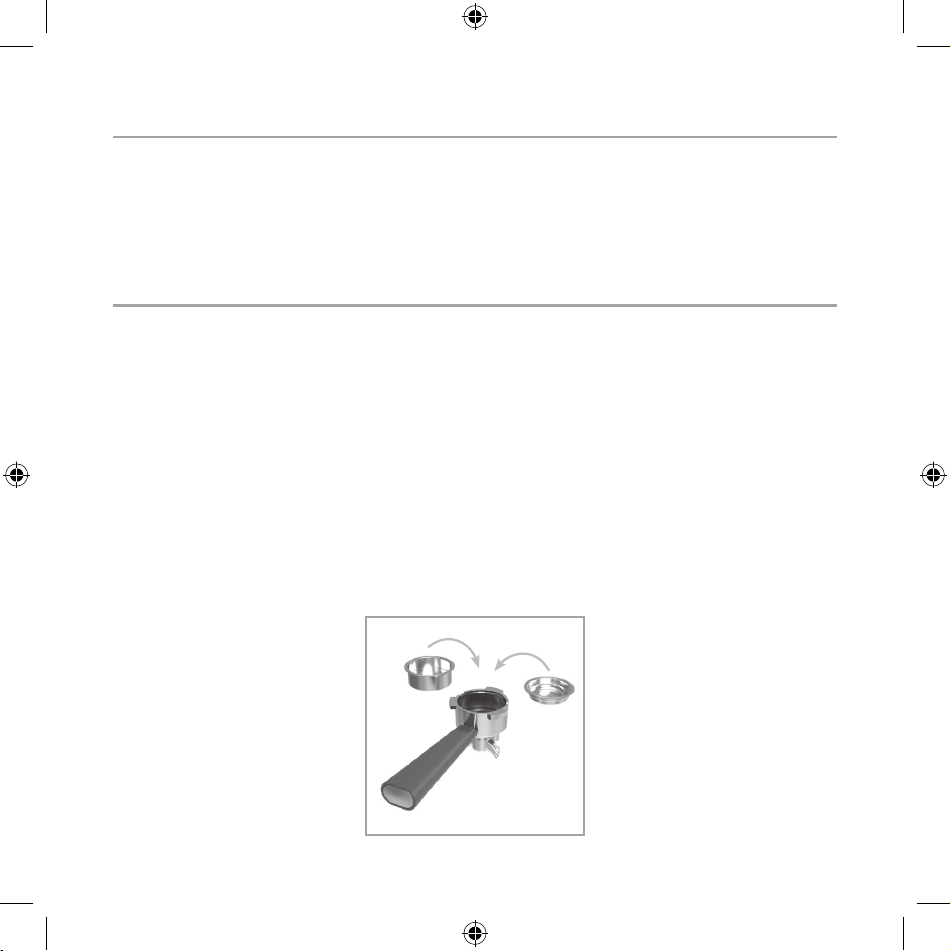
6. 2 Spouted Portalter
7. Brew Head
8. Removable Drip Tray with Full Indicator
9. 1 and 2 Cup Filter Baskets
10. 2-in-1 Coffee Tamper Spoon
11.Cleaning Pin
1
2
3
5
4
6
8
7
9
10
11
19390_19415_19416_19417_19418_19449_BTFL_Walmart_Slim Espresso_Maker_20 Bar_IM_R7.indd 1519390_19415_19416_19417_19418_19449_BTFL_Walmart_Slim Espresso_Maker_20 Bar_IM_R7.indd 15 2023-12-19 9:25 AM2023-12-19 9:25 AM
16
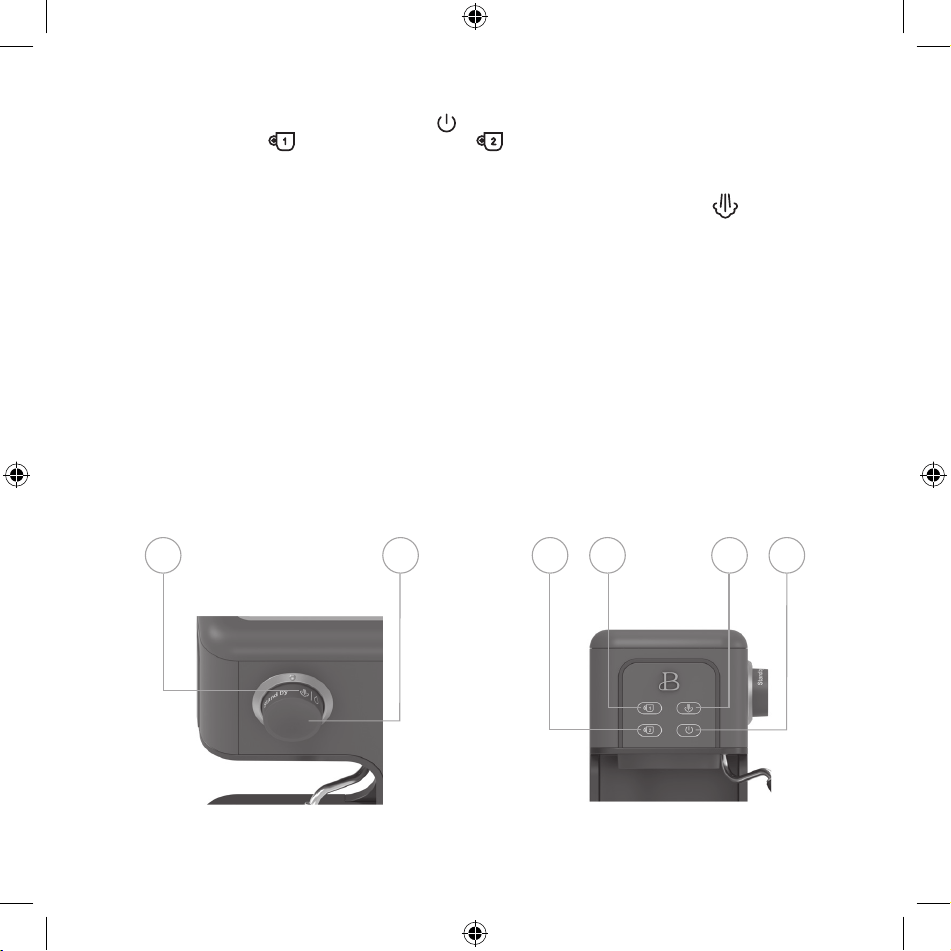
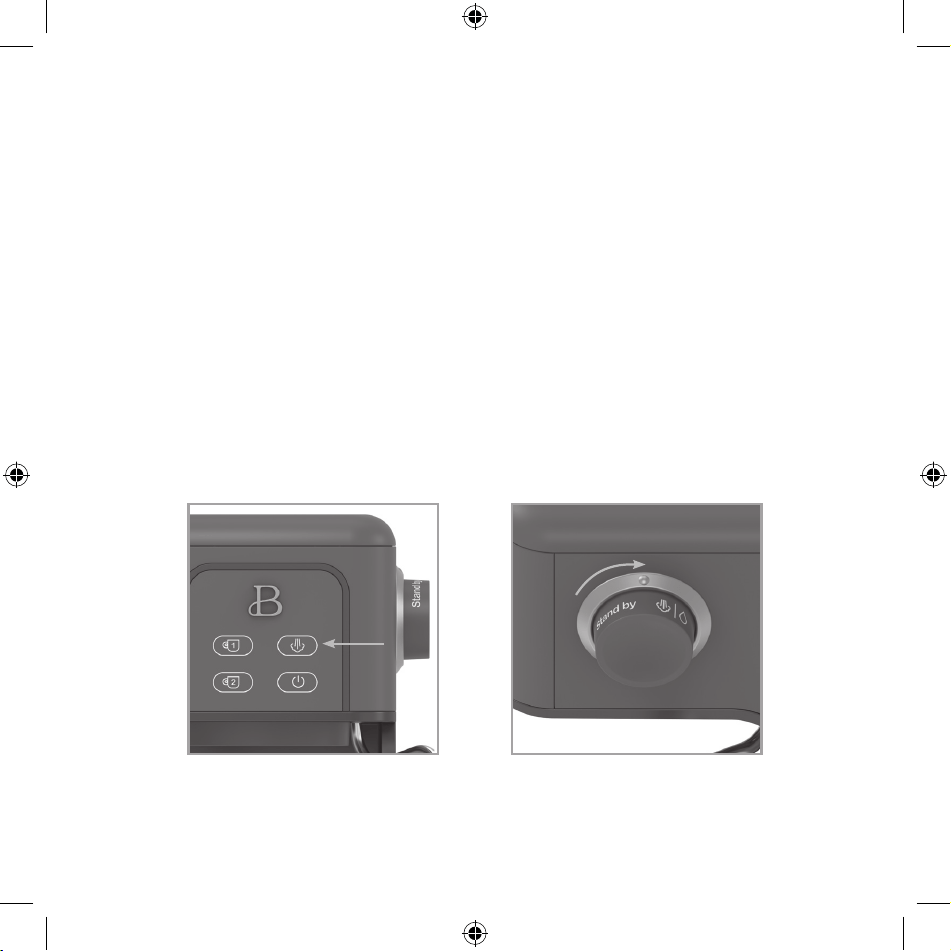
1. POWER BUTTON. Press the power ( ) button to turn the unit on. The
single shot ( ) and double shot ( ) buttons will begin to ash. When
the system is up to temperature, all 4 buttons on the control panel will
illuminate.
2. STEAM BUTTON. After espresso shots have been pulled, press (
) to
activate the heater to texturize milk. When pressed, the STEAM button
will ash. As temperature is achieved and steam is built, the button
will illuminate.
3. SINGLE SHOT PROGRAMMABLE BUTTON. Press once to initiate a 1.35 oz.
extraction. Press and hold the button for 3 seconds to adjust and to
dial in future single shot volume.
4. DOUBLE SHOT PROGRAMMABLE BUTTON. Press once to initiate a 2.7 oz.
extraction. Press and hold the button for 3 seconds to adjust and dial
in future double shot volume.
5. FUNCTION CONTROL DIAL. Once pressure is built and the STEAM button is
illuminated (stops ashing), turn the dial to activate the STEAM wand.
6. HOT WATER FUNCTION. Place a frothing pitcher under the steam wand. Turn
the function control dial to WATER. Allow water to ll the container.
Turn the function control dial to back to OFF position.
3 2 146 5
19390_19415_19416_19417_19418_19449_BTFL_Walmart_Slim Espresso_Maker_20 Bar_IM_R7.indd 1619390_19415_19416_19417_19418_19449_BTFL_Walmart_Slim Espresso_Maker_20 Bar_IM_R7.indd 16 2023-12-19 9:25 AM2023-12-19 9:25 AM
17
Safety Warnings
1. Proper precautions must be made to avoid burns from sprays of hot water
or steam.
2. Always use the silicone covers and tabs installed on both the steam wand
and the water dispenser to rotate and swing either wand to the perfect
position.
3. Avoid touching any hot surfaces on the machine or any metal parts of
the portalter, lter basket, water dispenser or steam wand while the
Espresso Maker is in use or after it has just been used to prepare hot
beverages.
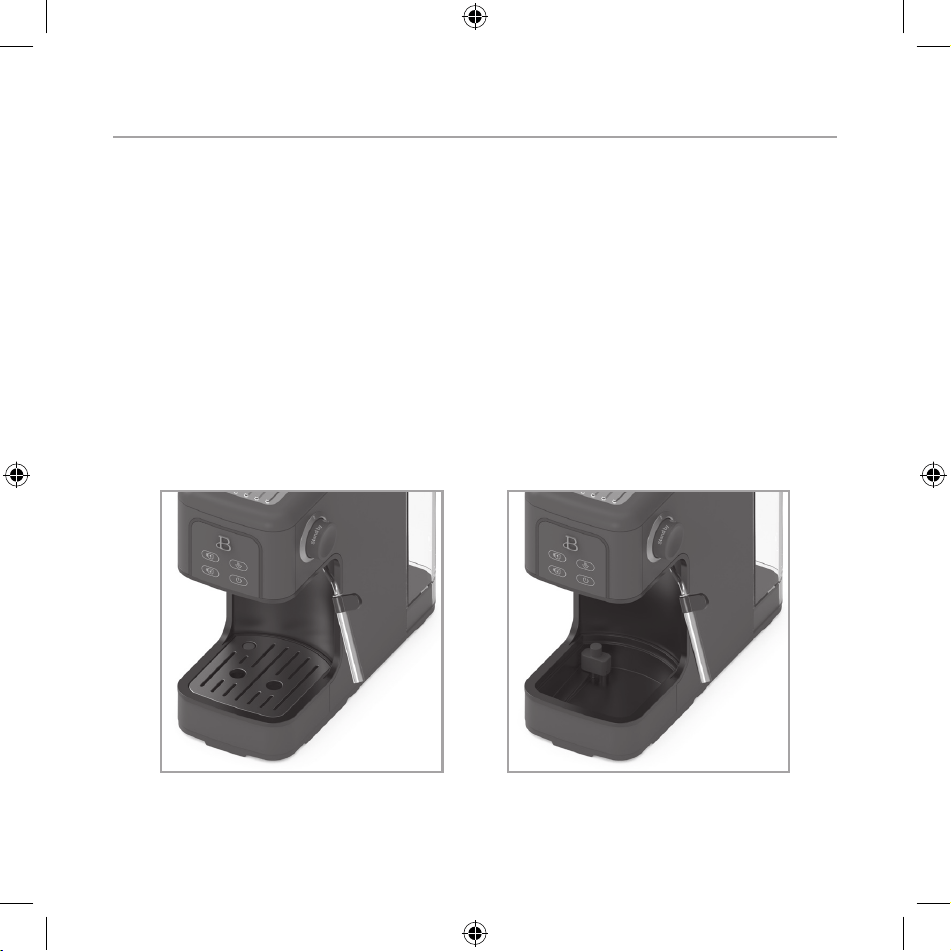
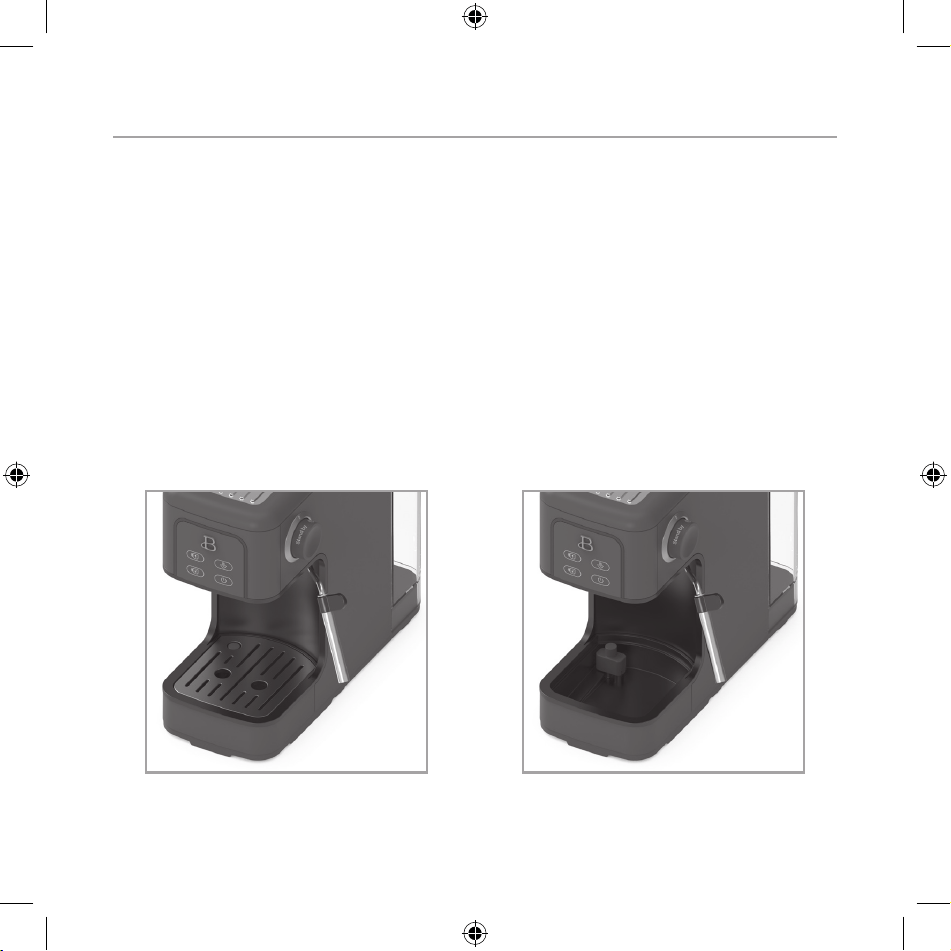
4. When too much water has accumulated in the drip tray, the red FULL
indicator will rise. (See Figure 1.) To avoid water spillage, lift the
drip plate off the tray. Slide the drip tray straight out to remove.
Empty water, wipe dry, and reassemble. (See Figure 2.)
Figure 2
Figure 1
19390_19415_19416_19417_19418_19449_BTFL_Walmart_Slim Espresso_Maker_20 Bar_IM_R7.indd 1719390_19415_19416_19417_19418_19449_BTFL_Walmart_Slim Espresso_Maker_20 Bar_IM_R7.indd 17 2023-12-19 9:25 AM2023-12-19 9:25 AM

18
Before Using for the First Time
1. Remove any packaging materials before use. Make sure the Espresso Maker
is unplugged.
2. Assemble the Drip Tray. Slide the drip tray in or out to remove for easy
cleaning.
3. Line the circular cutout of the FULL bar with the base of the unit; left
and right ends should t snugly in place. (See Figure 2.) Add the drip
plate.
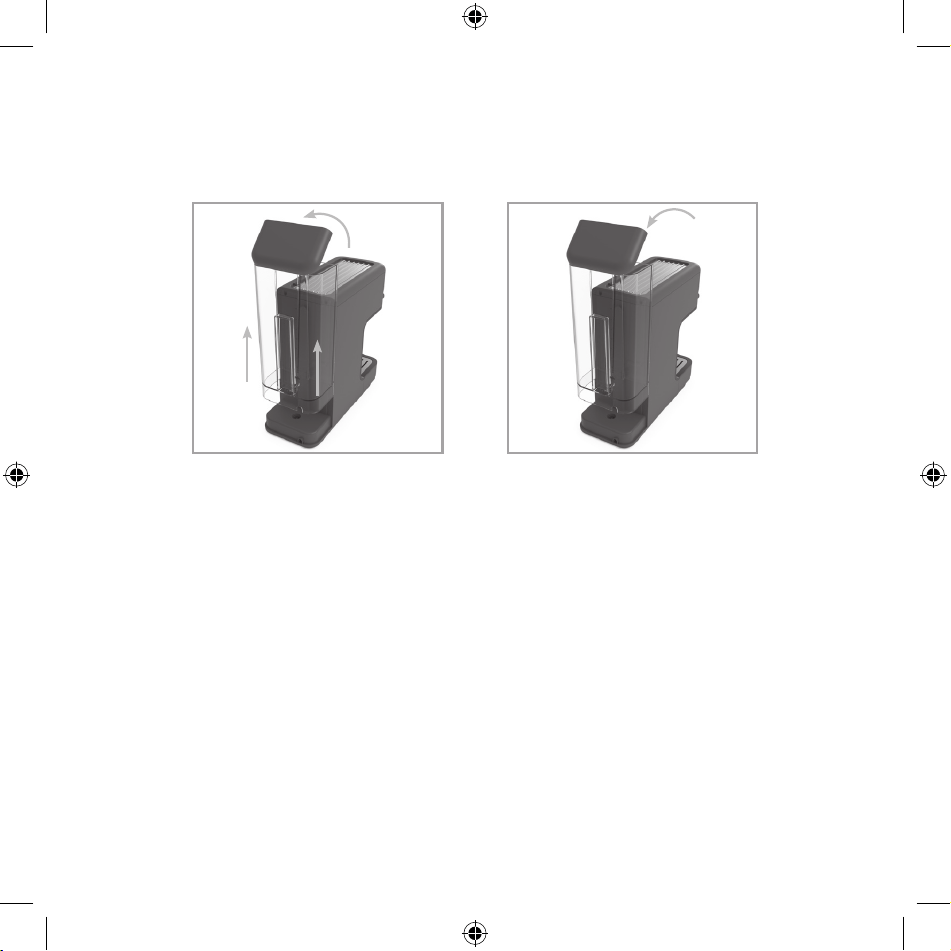
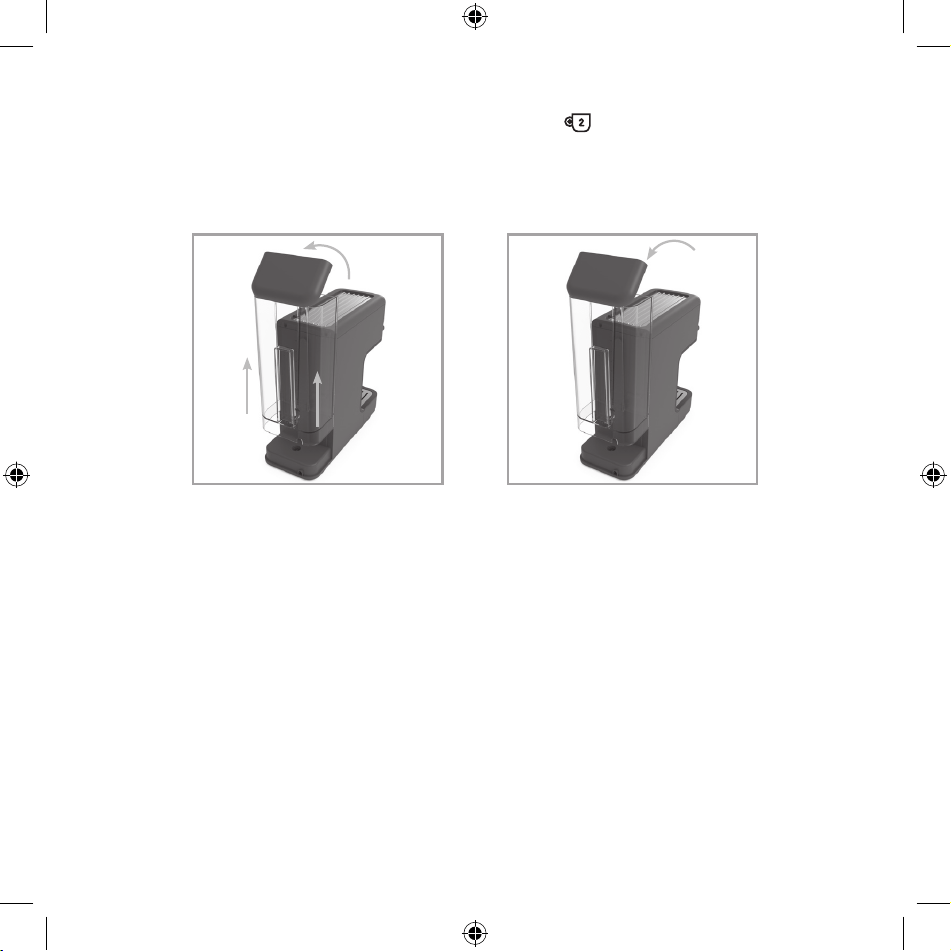
4. Fill the Water Tank. Lift open the lid of the water tank and ll with
cold water, or… grasp the water tank at the back of the Espresso Maker
and lift it up and off the unit. (See Figure 3.)
5. Fill the water tank with cold water to the MAX (1.5 liter) mark.
(See Figure 4.)
6. Slide the water tank back to its original position. Lift the lid to
close.
7. Pre-Clean and Prime the Pump. Place the Espresso Maker on a level
surface, within close proximity to a sink to discard water.
8. Place any empty (do not add coffee)1-cup or 2-cup lter basket into the
portalter. Insert and lock into the brew head following the detailed
description in the section: “Pulling the Perfect Espresso Shot.”
(See Figures 6 and 7.)
9. Center a wide-mouth spouted container or cup under the 2-spout
portalter. Place the steam wand’s tip into the frothing jug. Place an
empty container under the water dispenser.
10. Plug the unit into a 120V AC electrical outlet.
11. Press the power button to turn the unit on. The single shot (
) and
double shot ( ) buttons will begin to ash. When the system is up to
temperature, all 4 buttons on the control panel will illuminate.
12. Press the STEAM button. It will begin to ash until the temperature is
reached. Turn the function control dial to STEAM.
Hot steam will purge the line. After MAX 120 seconds, turn the function
control dial to STANDBY.
13. Press the double shot (
) button continually, emptying the hot water,
until the entire tank of water is purged through the system.
19390_19415_19416_19417_19418_19449_BTFL_Walmart_Slim Espresso_Maker_20 Bar_IM_R7.indd 1819390_19415_19416_19417_19418_19449_BTFL_Walmart_Slim Espresso_Maker_20 Bar_IM_R7.indd 18 2023-12-19 9:25 AM2023-12-19 9:25 AM
19
14. The pump is now primed, and the Espresso Maker is cleaned. You are
ready to pull the perfect espresso shot.
Figure 4
Figure 3
19390_19415_19416_19417_19418_19449_BTFL_Walmart_Slim Espresso_Maker_20 Bar_IM_R7.indd 1919390_19415_19416_19417_19418_19449_BTFL_Walmart_Slim Espresso_Maker_20 Bar_IM_R7.indd 19 2023-12-19 9:25 AM2023-12-19 9:25 AM

20
Pull the perfect espresso shot
The secret to a perfect espresso shot is all about achieving the perfect
balance of acidity, sweetness, and bitterness. Many factors play a major role:
temperature of the water; portalter, and serving cups is crucial, lter baskets
and steaming wand should be clean; coffee beans must be fresh and perfectly
roasted. The neness or coarseness of the grind, dose of ground coffee, and
tamping pressure should be consistent when experimenting to achieve your
perfect pull.
Operation
1. Place empty cappuccino shot cups onto the warming plate before the pull.
2. Run a blank shot to preheat the cup and portalter.
3. Plug the Espresso Maker into a 120V AC electrical outlet. All indicator
lights will be off, except for the POWER button will ash.
4. Fill the water tank with up to 1.5 liters of cold, preferably ltered
water, using the markings on the tank for reference. Close the lid.
IMPORTANT: Be sure to add enough water for shots plus the rst blank
shot.
NOTE: The water tank should always be lled past the MIN (5 oz.) mark.
Never ll the watertank past the MAX (1.5 liter) mark.
5. Insert either the 1 or 2 cup lter basket into the portalter.
(See Figure 5.)
Figure 5
19390_19415_19416_19417_19418_19449_BTFL_Walmart_Slim Espresso_Maker_20 Bar_IM_R7.indd 2019390_19415_19416_19417_19418_19449_BTFL_Walmart_Slim Espresso_Maker_20 Bar_IM_R7.indd 20 2023-12-19 9:25 AM2023-12-19 9:25 AM
21
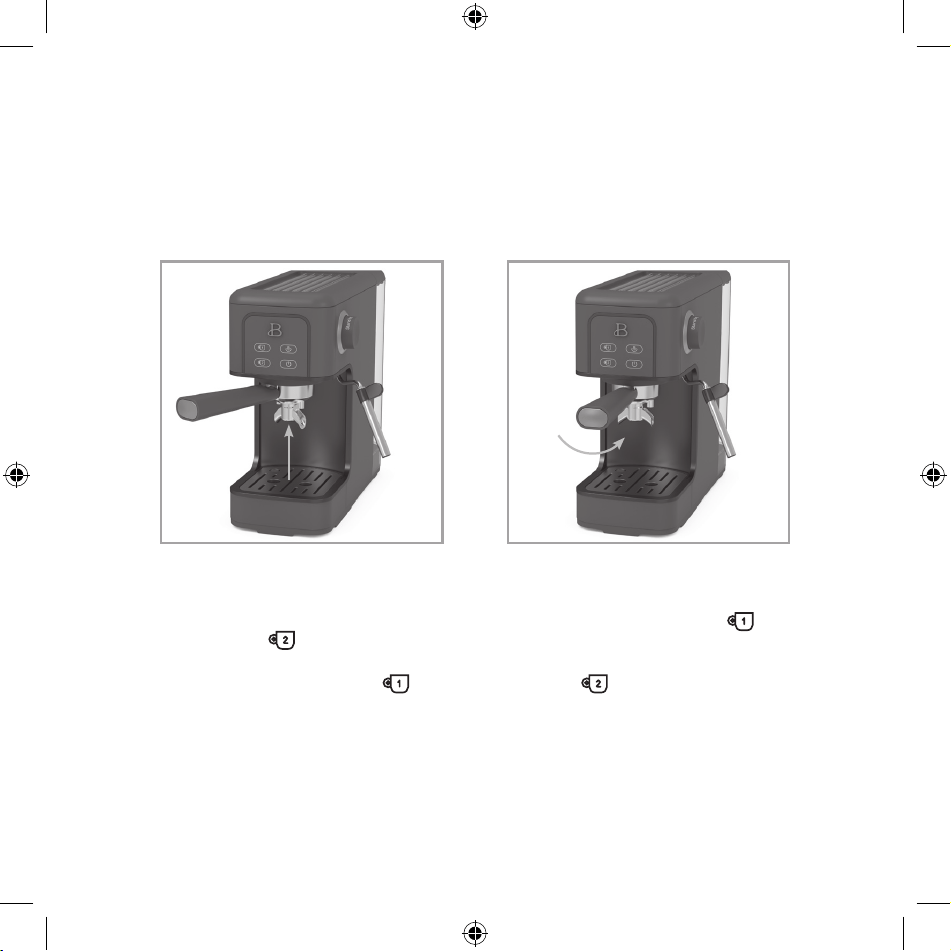
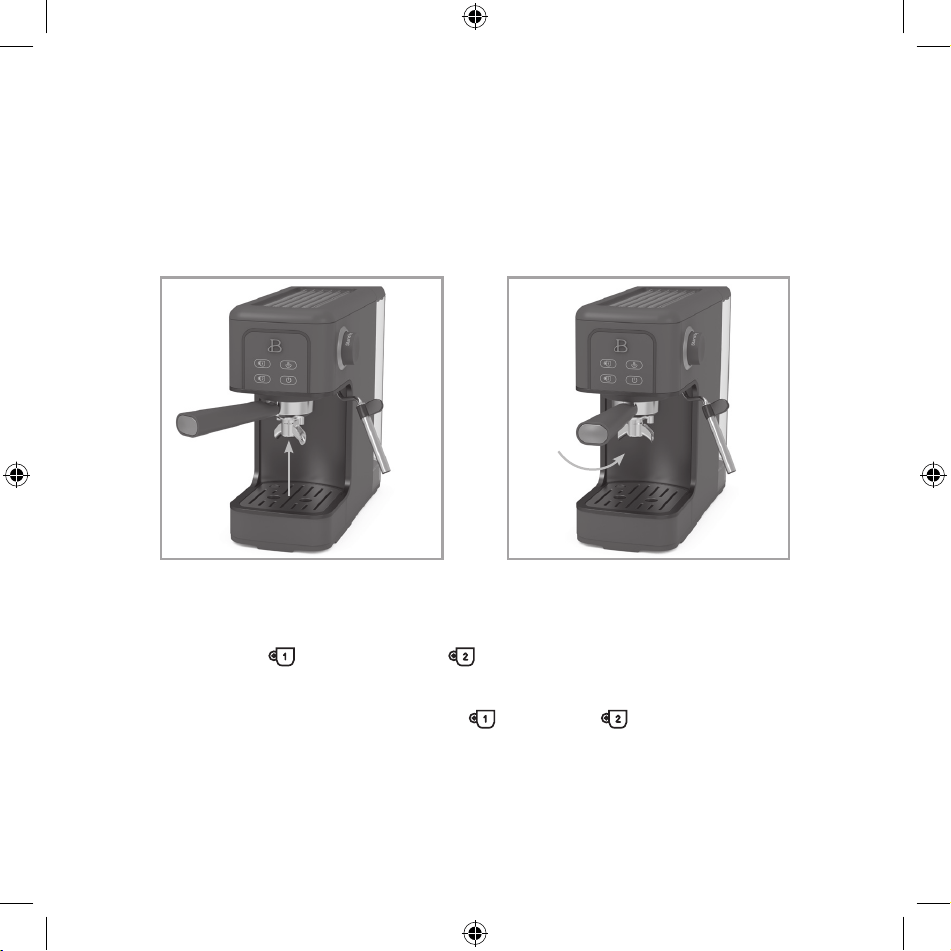
6. Align the portalter handle with the INSERT symbol on the brew head.
(See Figure 6.)
7. Turn handle counter-clockwise (to the right) until the portalter handle
is facing front and lined up with the LOCK. Make sure the portalter is
sealed and locked securely into the brew head. (See Figure 7.)
8. Center a wide spouted container or cup onto drip plate under the 2-spout
portalter.
9. Press the power button to turn the unit ON. The single shot (
) and
double shot (
) buttons will begin to ash. When the system is up to
temperature, all 4 buttons on the control panel will illuminate.
10. Press either the single (
) or double shot ( ) button to initiate
extraction. Both spouts will stream hot water (a blank shot) to warm the
espresso cup and portalter and then turn OFF.
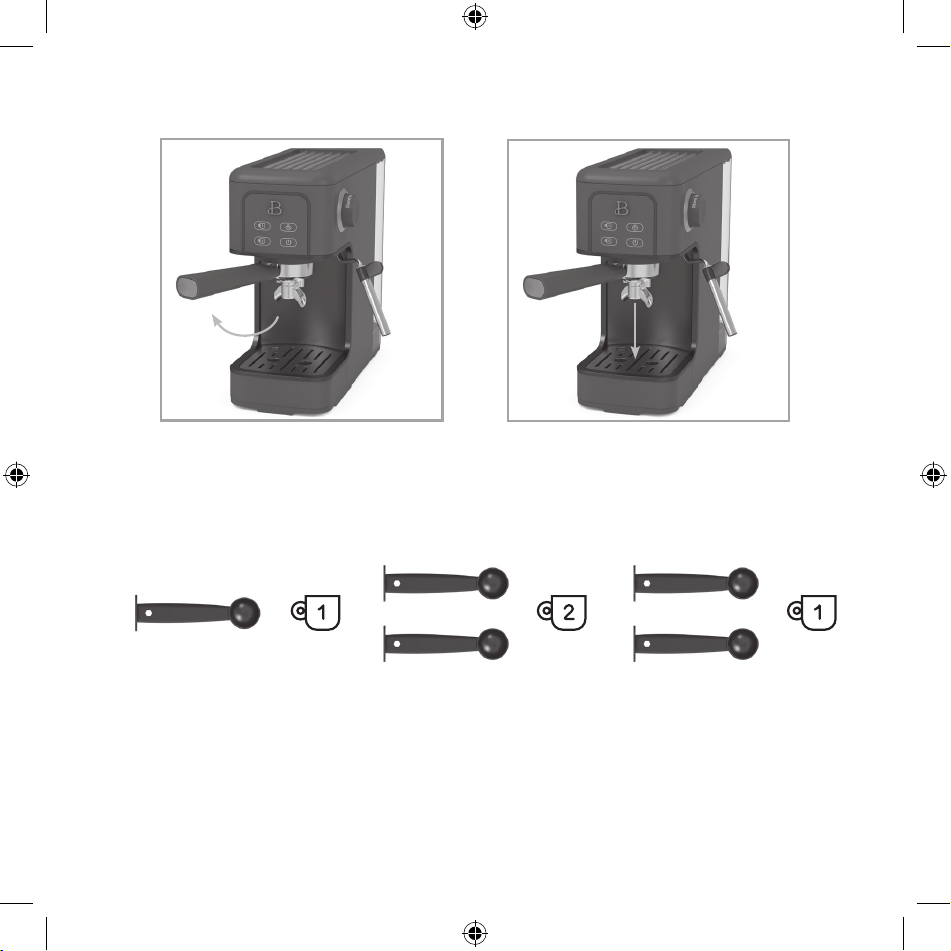
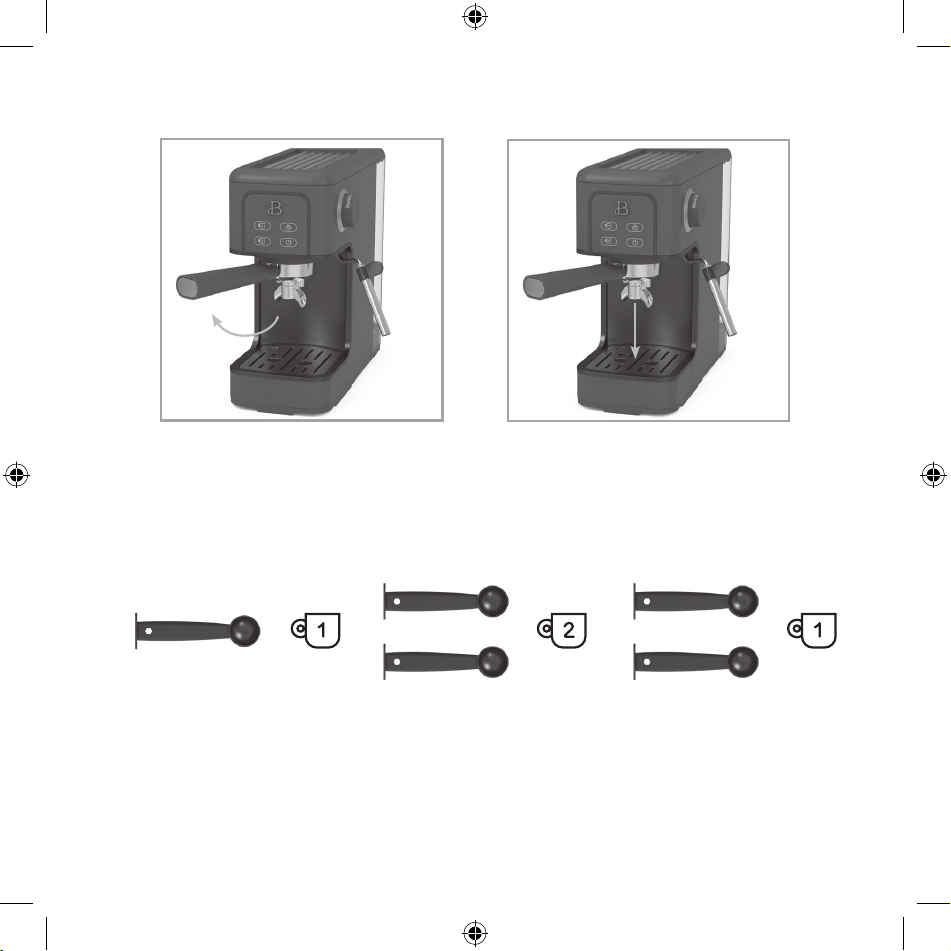
11. Remove the portalter from the brew head. Turn the handle clockwise (to
the left) to UNLOCK. The portalter will drop down from the brew head.
(See Figures 8 and 9.)
Figure 6
Figure 7
19390_19415_19416_19417_19418_19449_BTFL_Walmart_Slim Espresso_Maker_20 Bar_IM_R7.indd 2119390_19415_19416_19417_19418_19449_BTFL_Walmart_Slim Espresso_Maker_20 Bar_IM_R7.indd 21 2023-12-19 9:25 AM2023-12-19 9:25 AM
22
12. Use the 2-in-1 tamper spoon (and scale if desired) to dose ground
espresso coffee and add to the lter basket. Use the 1 cup lter basket
for a single espresso; the 2 cup lter for a double espresso or 2 single
espressos at the same time. (See Figure 10.)
13. Use the tamper spoon to gently press the coffee and pack it. Make sure
the tamper is perfectly dry as any wet spots will result in channeling.
Wipe any loose coffee grounds from the rim of the portalter to assure a
proper t into the brew head.
NOTE: When tamping for a double espresso, only tamp after the lter
basket has been lled. Tamping between measures may create a layer in
the coffee that may hinder extraction.
Figure 9
Figure 8
} }}
Figure 10
19390_19415_19416_19417_19418_19449_BTFL_Walmart_Slim Espresso_Maker_20 Bar_IM_R7.indd 2219390_19415_19416_19417_19418_19449_BTFL_Walmart_Slim Espresso_Maker_20 Bar_IM_R7.indd 22 2023-12-19 9:25 AM2023-12-19 9:25 AM

23
14. Align the portalter handle with the INSERT symbol on the brew head and
turn counterclockwise until it is sealed and securely locked.
(See Figures 6 and 7.)
15. Press either the single shot (
) or double shot ( ) button to
initiate extraction. Both spouts will stream thick, rich espresso. The
Espresso Machine is pre-set to deliver 1.35 oz. (single) to 2.7 oz.
(double) shots of espresso, before automatically turning OFF.
16. Remove the lter basket and discard used coffee puck.
CAUTION: To avoid scalding or burns, do not attempt to remove the
portalter handle during the brewing process, or when any button on the
control panel is ashing.
IMPORTANT! Keeping your Espresso Maker clean and thoroughly rinsed is
critical in pulling the perfect shot. Always run water through the brew
head and purge the steam wand after each use.
17. When the unit is turned ON if SINGLE, DOUBLE and STEAM lights ash, it
indicates that the knob is not in the STANDBY position. The knob needs
to be rotated to the STANDBY position and then the unit can be used.
18. If buttons ash during brewing it indicates that the water tank is empty
and needs to be lled. Press any button to return to standby mode once
the tank is lled.
Dial In Single or Double Shot Volume
1. The Espresso Maker consistently dials in the perfect brew water
temperature and measures the perfect volume for every shot.
2. To adjust volumes for future shots, press and hold the single or double
shot programmable button for 3 seconds to adjust and to dial in future
single or double shot volume.
EXAMPLE: to change the volume on the single shot – press and hold the
single shot for 3 seconds, water will begin to ow. Once you have the
desired amount, release the single shot button to stop water ow. The
new volume is now set, and can be re programmed at any time.
Texture Milk for Espresso Drinks
1. Transition to Steam.
IMPORTANT: Make sure the frothing jug is cold before texturing.
Refrigerate or run cold water into the jug before use.
19390_19415_19416_19417_19418_19449_BTFL_Walmart_Slim Espresso_Maker_20 Bar_IM_R7.indd 2319390_19415_19416_19417_19418_19449_BTFL_Walmart_Slim Espresso_Maker_20 Bar_IM_R7.indd 23 2023-12-19 9:25 AM2023-12-19 9:25 AM

24
CAUTION: After extracting espresso, the steam wand is hot. Always use
the silicone covers and tabs installed on the steam wand to rotate and
swing the wand into the perfect position.
2. Fill the stainless steel frothing jug no more than one-third (1/3) full
with fresh, cold milk (skim milk froths best) and place it next to the
Espresso Maker.
IMPORTANT: When texturing milk, the volume will double. Do not over-ll
the frothing jug.
3. Press the STEAM button. When pressed, the STEAM button will ash. As
temperature is achieved and steam is built, the button will illuminate
solid. (See Figure 11.)
4. Turn the function control dial to STEAM. Make sure the steam wand is
over the drip tray. Once steam is emitted from the wand (not water),
turn the function control dial to STANDBY. (See Figure 12.)
5. Quickly place the tip of the steam wand at the surface of the milk and
turn the function control dial to STEAM. Place the frothing pitcher
on an angle, and make sure the wand is approximately 1/3-inch from
either edge of the frothing pitcher. The steam wand should barely break
the milk’s surface to create ne micro-bubbles. Moving the wand in a
circular motion, texture the milk until the desired volume is reached.
When the milk temperature reaches between 140-150°F, it is ready, or
160°F for extra hot.
6. Turn the function control dial to STANDBY. Drop the pitcher down to
remove the steam wand.
7. Pour. After texturing, swirl the milk around for several seconds to
incorporate the milk at the bottom, with the micro-foam on top. Tap
the frothing pitcher on the counter until the milk appears shiny and
few bubbles remain. Pour textured milk as soon as possible. Swirl the
espresso slightly to break the surface tension of the cream. Slowly
introduce the micro-foam, integrating it with the espresso.
8. Wipe the steam wand with a wet kitchen towel and use the silicone tab to
swivel the wand back over the drip tray.
NOTE: To avoid milk build up on and inside and the outside of the steam
wand, ensure to purge the steam wand after every use. Make sure the
steam wand is over the drip tray and turn the function control dial to
STEAM – leave on for a few seconds and then turn.
19390_19415_19416_19417_19418_19449_BTFL_Walmart_Slim Espresso_Maker_20 Bar_IM_R7.indd 2419390_19415_19416_19417_19418_19449_BTFL_Walmart_Slim Espresso_Maker_20 Bar_IM_R7.indd 24 2023-12-19 9:25 AM2023-12-19 9:25 AM

25
9. Press the power button on the side of the unit to turn the espresso
machine on. The SINGLE and DOUBLE button indicator lights will ash,
and the STEAM indicator light will illuminate solid. When the unit is
nished preheating all 4 of the indicator lights will illuminate solid
in the standby mode.
10. Press either the SINGLE or DOUBLE button and the selected indicator
light will begin to ash, and the unit will begin to brew. After brewing
is complete the unit will return to the standby mode. While brewing,
only the selected button (either SINGLE OR DOUBLE), and the power button
will function.
11. To adjust the coffee volume press and hold either the SINGLE or DOUBLE
button for 3 seconds. The selected button indicator light will begin to
ash. Release the button once the desired volume is reached. The coffee
volume has now been adjusted and the unit will return to standby mode
(the max volume for the SINGLE shot is 100ml and 150ml for the DOUBLE
shot.
12. To reset the coffee volume to factory settings: During standby mode
press and hold both the SINGLE shot and DOUBLE shot buttons for 3
seconds, then the SINGLE and DOUBLE indicator lights will ash 5 times.
This indicates that the coffee volume has been reset and the unit will
then return to standby mode.
13. Press the STEAM button and the indicator light will begin to ash
indicating that the unit is preheating. Once the STEAM button indicator
light is solidly lit; this indicates that the unit is heated to the
correct temperature. Rotate the knob on the side of the unit tothe
steam position. The water pump will start working and the STEAM button
indicator light will ash. Rotate the knob back to the STANDBY position,
and the steam function will turn off and the STEAM indicator light will
stay solidly lit. To return to the standby mode press the STEAM button
again, and all four button indicators will become solidly lit.
14. The SINGLE and DOUBLE shot buttons will ash quickly if they are pressed
to brew coffee after frothing milk. To be able to brew coffee right
after frothing milk do the following:
15. Rotate the knob to the HOT WATER position. Place the steam wand over
the drip tray, into a cup or frothing pitcher. Hot water will start to
come out of the steam wand and the SINGLE indicator light will ash.
When the boiler has cooled down, and the temperature is low enough to
19390_19415_19416_19417_19418_19449_BTFL_Walmart_Slim Espresso_Maker_20 Bar_IM_R7.indd 2519390_19415_19416_19417_19418_19449_BTFL_Walmart_Slim Espresso_Maker_20 Bar_IM_R7.indd 25 2023-12-19 9:25 AM2023-12-19 9:25 AM
26
brew coffee, the water pump will stop working and the SINGLE, DOUBLE
and STEAM indicator lights will begin to ash. Rotate the knob to the
STANDBY position and the unit will return to the standby mode and you
will be able to brew coffee.
16. During standby mode rotate the knob to the HOT WATER position and both
the SINGLE and DOUBLE indicator lights will be solidly lit. Hot water
will begin to come out of the steam wand. Rotate the knob back to the
STANDBY position and the hot water will shut off and the unit will
return to standby mode.
17. If the knob is at the STEAM position before pressing the POWER switch
on, the SINGLE, DOUBLE, and STEAM indicator lights will ash until the
knob is rotated to the STANDBY position.
18. The steam function maximum working time is 2 minutes, and the hot water
function the maximum working time is 2 minute.
19. During standby mode the unit will automatically shut off after 5 minutes
if no function is pressed.
Figure 11
Figure 12
19390_19415_19416_19417_19418_19449_BTFL_Walmart_Slim Espresso_Maker_20 Bar_IM_R7.indd 2619390_19415_19416_19417_19418_19449_BTFL_Walmart_Slim Espresso_Maker_20 Bar_IM_R7.indd 26 2023-12-19 9:25 AM2023-12-19 9:25 AM

27
User Maintenance Instructions
This appliance requires little maintenance. It contains no user serviceable
parts. Do not try to repair it yourself. Any servicing requiring disassembly
other than cleaning must be performed by a qualied appliance repair technician.
Care & Cleaning Instructions
CAUTION: NEVER IMMERSE THE ESPRESSO MAKER IN WATER OR ANY OTHER LIQUID.
1. When espresso making is complete, press the POWER button; turn the
function control to STANDBY. Unplug the Espresso Maker from the
electrical outlet and allow to cool completely before cleaning.
CAUTION: The Espresso Maker creates hot water and steam under pressure.
To avoid burns on ngers or hands, always make sure the POWER light is
off. NEVER touch the lter basket holder or steam wand immediately after
brewing or steaming. Allow all parts to cool thoroughly before touching.
IMPORTANT: The portalter and lter basket should be emptied and rinsed
thoroughly with warm water after every use.
2. Clean the portalter and lter baskets. Grasp the portalter handle rmly
and turn clockwise (to the left) until the handle faces the UNLOCKED
position. The portalter will drop down and out of the unit. (See
Figures 8 and 9.)
3. Remove the lter basket and discard used coffee puck.
4. Rinse the portalter and lter baskets immediately after use to remove
residual coffee oils. If necessary, clean the lter basket with a
kitchen brush or soak in a cleaning solution for 20 minutes. Rinse and
dry thoroughly.
5. A cleaning pin has been supplied to ease in the care and cleaning of
your Espresso Maker. Use the smaller end of the cleaning pin to clear
holes in the base of the lter baskets and clean the steam wand.
6. Clean the steam wand and water dispenser. After frothing milk or
dispensing hot water, twist to remove the water dispenser tip and the
frothing tip from the steam wand and clean thoroughly.
7. Insert the cleaning pin’s larger wire into both the water dispenser’s and
steam wand’s outlet to clear. Rinse and screw the clean water reservoir
tip and frothing tip securely back into the wands.
19390_19415_19416_19417_19418_19449_BTFL_Walmart_Slim Espresso_Maker_20 Bar_IM_R7.indd 2719390_19415_19416_19417_19418_19449_BTFL_Walmart_Slim Espresso_Maker_20 Bar_IM_R7.indd 27 2023-12-19 9:25 AM2023-12-19 9:25 AM

28
8. Remove the drip plate, FULL bar, and slide the drip tray straight out.
Empty any collected water. Dry with a clean cloth and reassemble.
9. Wipe the outside of the Espresso Maker and brew head with a damp cloth.
WARNING: Never use solvents or any detergents that may scratch or damage
the surface of the machine.
10.Clean the stainless steel frothing jug, tamper, by hand.
11. No parts of the Espresso Maker should be cleaned in the dishwasher.
Descaling
Minerals and calcium found in hard-water areas can accumulate and affect the
operation of your machine. Depending on water conditions and frequency of use,
your Espresso Maker should be cleaned with distilled vinegar approximately
every 3 months to remove scale.
1. Before cleaning your Espresso Maker, make sure the function control dial
is in the STANDBY position and the appliance has been disconnected from
the wall outlet.
2. Fill the water tank with 1 part white vinegar to 3 parts cold water.
3. Attach empty portalter and any lter basket.
4. Plug the Espresso Maker into 120V AC electrical outlet.
5. Center a wide-mouth spouted container or cup under the 2-spout
portalter. Place the steam wand’s tip into the frothing jug. Place an
empty container under the water dispenser.
6. Press the POWER button. The single shot (
) and double shot ( )
buttons will beginto ash. When the system is up to temperature, all 4
buttons on the control panel will illuminate.
8. Turn the function control dial to STEAM. Allow the hot steam to purge
the line for at least 45 seconds.
9. Press the double shot (
) button, then empty the hot water, until the
entire tank of water is purged through the system.
10. In hard water environments, it is recommended to repeat this procedure.
11. After descaling, remove the water tank and rell with fresh, cold water.
Repeat steps 7 through 9 to thoroughly rinse the Espresso Maker.
19390_19415_19416_19417_19418_19449_BTFL_Walmart_Slim Espresso_Maker_20 Bar_IM_R7.indd 2819390_19415_19416_19417_19418_19449_BTFL_Walmart_Slim Espresso_Maker_20 Bar_IM_R7.indd 28 2023-12-19 9:25 AM2023-12-19 9:25 AM

29
WARNING: Never immerse power cord, plug or Espresso Machine in water
or any other liquid. The water tank should never be completely emptied
during descaling.
12. When the ow has stopped, press the POWER button. Make sure the all
indicator lights are OFF. Unplug the Espresso Maker from the wall outlet
when not in use.
13. Remove portalter, containers or cups and rinse with hot water for next
use.
Storing Instructions
1. Make sure unit is unplugged and fully cooled before storing.
WARNING: Never store Espresso Maker while it is hot or still plugged in.
2. Do not put any stress on cord where it enters unit, as this could cause
cord to fray and break.
3. Store the Espresso Maker in its box, in a clean, dry area.
Troubleshooting
PROBLEM POSIBLE CAUSE SOLUTION
Coffee runs
down the
side of the
portalter.
Portalter is not attached
correctly, or has not been
tightened sufciently.
Re-insert the portalter into
the brew head. Make sure the
handle is facing outward and is
rmly engaged on the brew head.
Coffee pod is not properly
tted in the lter basket.
Make sure that no part of the
coffee pod lter hangs over the
lip of the lter basket.
Edge of lter insert is not
free of coffee granules.
Clean around the top edge of
the lter and wipe the brew
head with a clean, damp cloth.
The brew head is dirty. Wipe brew head with a clean,
damp cloth.
Brew head rubber seal is
damaged or worn.
Contact Customer Service.
19390_19415_19416_19417_19418_19449_BTFL_Walmart_Slim Espresso_Maker_20 Bar_IM_R7.indd 2919390_19415_19416_19417_19418_19449_BTFL_Walmart_Slim Espresso_Maker_20 Bar_IM_R7.indd 29 2023-12-19 9:25 AM2023-12-19 9:25 AM

30
PROBLEM POSIBLE CAUSE SOLUTION
Espresso
is not
streaming.
No water in the water tank. Fill tank with water.
Water tank is incorrectly
assembled.
Press rmly down on the water
tank to make sure it is
correctly positioned.
Brewing lter may be
blocked.
See “Descaling” section of
this Instruction Manual.
The lter basket is blocked,
coffee grounds are too ne
or tamped down too hard.
Empty lter basket and rinse
under water to clean. Use the
cleaning pin to clear holes in
the base of the of the lter
basket. Wipe the brew head
with a cloth. Redose the lter
with a coarser coffee grind
and tamp with less pressure.
Espresso
does not
have any
or enough
cream.
Coffee is old or dry. Use freshly roasted and ground
coffee. Always store in an
airtight container.
Coffee not compacted rmly
enough.
Tamp coffee grounds with more
pressure.
Coffee grind is too coarse. Use a ner grind of pre-ground
coffee or grind the coffee
beans to a ner texture.
Dose is too small. Increase dose
Coffe is
too cold.
Cups, lter and lter hand
are cold.
Run a blank shot to pre-heat
cups,portalter and lter
baskets.
If making a cappuccino or
latte the milk may not be
heated enough.
Ensure that milk is heated
properly during texturing, but
DO NOT boil the milk.
19390_19415_19416_19417_19418_19449_BTFL_Walmart_Slim Espresso_Maker_20 Bar_IM_R7.indd 3019390_19415_19416_19417_19418_19449_BTFL_Walmart_Slim Espresso_Maker_20 Bar_IM_R7.indd 30 2023-12-19 9:25 AM2023-12-19 9:25 AM

31
PROBLEM POSIBLE CAUSE SOLUTION
No steam
from the
steam
nozzle.
Steam nozzle is blocked. See “Care & Cleaning
Instructions.”
Not enough
froth when
texturing.
Milk is not fresh. Begin again with fresh milk.
Milk temperature is too
warm.
Make sure that the milk is
well refrigerated before use.
Texturing jug is warm. Refrigerate or run cold water
into the jug before use.
Steam nozzle is blocked. See “Care & Cleaning
Instructions”.
Milk has been boiled. Tamp coffee grounds with more
pressure.
The milk is making large
bubbles rather than
microbubbles.
Use a ner grind of pre-ground
coffee or grind the coffee
beans to a ner texture.
Cups are
unevenly
lled.
Uneven tamping or
obstruction in the pouring
spouts.
Make sure coffee is tamped
evenly and check that both
pouring spouts on the
portalter are unobstructed.
See “Care & Cleaning
Instructions”.
Espresso
tastes
burnt.
Change the type of coffee
being used.
Experiment with various types
and brands of coffee beans.
Appliance has not been
rinsed after descaling.
Purge a full water tank
through the spresso Maker
before pulling another
espresso shot.
19390_19415_19416_19417_19418_19449_BTFL_Walmart_Slim Espresso_Maker_20 Bar_IM_R7.indd 3119390_19415_19416_19417_19418_19449_BTFL_Walmart_Slim Espresso_Maker_20 Bar_IM_R7.indd 31 2023-12-19 9:25 AM2023-12-19 9:25 AM

32
PROBLEM POSIBLE CAUSE SOLUTION
Pump makes
an unusually
loud noise.
Not enough water in the
tank, or the water tank is
empty.
Fill the water tank. The water
tank should always be lled
past the MIN (5 oz.) mark.
NEVER operate the Espresso
Maker with an empty water
tank.
Water tank is incorrectly
assembled.
Press rmly down on the water
tank to make sure it is
correctly positioned.
Machine does
not operate.
Portalter may be blocked. Remove portalter and clean
brewing head. See
“Care & Cleaning Instructions.”
Machine blocked by scale
buildup.
See “Descaling.”
Espresso Recipes
SHORT BLACK
A single shot of espresso topped with a stable layer of crema.
FLAT WHITE
A single shot of espresso topped with a steamed milk, 1/3 coffee and 2/3 steamed
milk.
YUAN YANG (COFFEE WITH TEA)
Yuan Yang is made by making strong black tea in a pot, stirring in evaporated or
sweetened condensed milk and coffee, then sweetening to taste.
1. 4 small black tea bags, paper and strings removed
2. 1 (14-oz) can sweetened condensed milk
3. 2 cups Americano Coffee (see recipe following)
Simmer tea and 1 cup water in a 2-qt. saucepan over medium heat for 3 minutes.
19390_19415_19416_19417_19418_19449_BTFL_Walmart_Slim Espresso_Maker_20 Bar_IM_R7.indd 3219390_19415_19416_19417_19418_19449_BTFL_Walmart_Slim Espresso_Maker_20 Bar_IM_R7.indd 32 2023-12-19 9:25 AM2023-12-19 9:25 AM

33
Squeeze out and discard tea bags. Stir in milk; boil. Cook, stirring, for 3
minutes. Stir in Americano coffee; pour into glasses.
AMERICANO OR LONG BLACK
A standard espresso shot diluted with hot water, served in a regular coffee cup
or mug. Add hot water before the espresso to maintain the delicate crema.
CAFÉ LATTÉ
A single shot espresso with steamed milk, typically served in a glass. The top
layer of microbubbles should be 10mm to seal the coffee.
CAPPUCCINO
Espresso with steamed milk, topped with creamy froth and a dusting of chocolate.
The resulting drink is approximately 2/3 milky coffee, 1/3 microbubbles.
CAFÉ MOCHA
Prepared similarly to a cappuccino but with the addition of drinking chocolate.
Stir chocolate into the espresso prior to adding the steamed milk and
microbubbles. Top with whipped cream.
MACCHIATO
Traditionally served as a short or long espresso with a dash of milk or a small
dollop of froth in the center of the crema.
ESPRESSO VODKA COCKTAIL
1. 1.5 oz. vodka
2. 1/2 oz. freshly squeezed lemon juice
3. 1/2 oz. simple syrup
4. 2 single espresso shots
5. Ice for serving
6. Lemon zest for garnish
Add vodka, lemon juice, simple syrup, espresso, and ice to a drink shaker. Shake
well. Pour into a chilled glass and serve over ice. Garnish with lemon zest.
19390_19415_19416_19417_19418_19449_BTFL_Walmart_Slim Espresso_Maker_20 Bar_IM_R7.indd 3319390_19415_19416_19417_19418_19449_BTFL_Walmart_Slim Espresso_Maker_20 Bar_IM_R7.indd 33 2023-12-19 9:25 AM2023-12-19 9:25 AM

Limited Two-Year Warranty
Sensio Inc. dba Made by Gather™
hereby warrants that for a period
of TWO YEARS from the date of
purchase, this product will be free
from mechanical defects in material
and workmanship, and for 90 days in
respect to non-mechanical parts. At
its sole discretion, Sensio Inc. dba
Made by Gather™ will either repair
or replace the product found to be
defective, or issue a refund on the
product during the warranty period.
The warranty is only valid for
the original retail purchaser from
the date of initial retail purchase
and is not transferable.
Keep the original sales receipt,
as proof of purchase isrequired
to obtain warranty validation.
Retail stores selling this product
do not have the right to alter,
modify, or in any way revise the
terms and conditions of the warranty.
Exclusions:
The warranty does not cover normal
wear of parts or damage resulting
from any of thefollowing: negligent
use of the product, use of improper
voltage or current, improper routine
maintenance, use contrary to the
operating instructions, disassembly,
repair, or alteration by anyone
other than qualied Sensio Inc.
dba Made by Gather™ personnel.
Also, the warranty does not cover
Acts of God such as re, oods,
hurricanes, or tornadoes.
Sensio Inc. dba Made by Gather™ shall
not be liable for any incidental or
consequential damages caused by the
breach of any express or implied
warranty. Apart from the extent
prohibited by applicable law, any
implied warranty of merchantability
or tness for a particular purpose
is limited in time to the duration
of the warranty. Some states,
provinces or jurisdictions do not
allow the exclusion or limitation
of incidental or consequential
damages, or limitations on how
long an implied warranty lasts,
and therefore, the above exclusions
or limitations may not apply to you.
The warranty covers specic legal
rights which may vary by state,
province and/or jurisdiction.
34
19390_19415_19416_19417_19418_19449_BTFL_Walmart_Slim Espresso_Maker_20 Bar_IM_R7.indd 3419390_19415_19416_19417_19418_19449_BTFL_Walmart_Slim Espresso_Maker_20 Bar_IM_R7.indd 34 2023-12-19 9:25 AM2023-12-19 9:25 AM

35
How To Obtain Warranty Service
You must contact Customer Service at
our toll-free number: 1-877-775-3564.
A Customer Service Representative
will attempt to resolve warranty
issues over thephone. If the
Customer Service Representative
is unable to resolve the problem,
you will be provided with a case
number and asked to return the
product to Sensio Inc. dba
Made by Gather™ Attach a tag to the
product that includes: your name,
address, daytime contact telephone
number, case number, and description
of the problem.
Also, include a copy of the original
sales receipt. Carefully package
the tagged product with the sales
receipt, and send it (with shipping
and insurance prepaid) to SENSIO
Inc.’s address. Sensio Inc.
dba Made by Gather™ shall bear
no responsibility or liability
for the returned product while
in transit to Sensio Inc.
dba Made by Gather™ Customer
Service Center.
®
19390_19415_19416_19417_19418_19449_BTFL_Walmart_Slim Espresso_Maker_20 Bar_IM_R7.indd 3519390_19415_19416_19417_19418_19449_BTFL_Walmart_Slim Espresso_Maker_20 Bar_IM_R7.indd 35 2023-12-19 9:25 AM2023-12-19 9:25 AM

36
How To Obtain Warranty Service
You must contact Customer Service at
our toll-free number: 1-877-775-3564.
A Customer Service Representative
will attempt to resolve warranty
issues over thephone. If the
Customer Service Representative
is unable to resolve the problem,
you will be provided with a case
number and asked to return the
product to Sensio Inc. dba
Made by Gather™ Attach a tag to the
product that includes: your name,
address, daytime contact telephone
number, case number, and description
of the problem.
Also, include a copy of the original
sales receipt. Carefully package
the tagged product with the sales
receipt, and send it (with shipping
and insurance prepaid) to SENSIO
Inc.’s address. Sensio Inc.
dba Made by Gather™ shall bear
no responsibility or liability
for the returned product while
in transit to Sensio Inc.
dba Made by Gather™ Customer
Service Center.
®
19390_19415_19416_19417_19418_19449_BTFL_Walmart_Slim Espresso_Maker_20 Bar_IM_R7.indd 3619390_19415_19416_19417_19418_19449_BTFL_Walmart_Slim Espresso_Maker_20 Bar_IM_R7.indd 36 2023-12-19 9:25 AM2023-12-19 9:25 AM

Sección 1
Seguridad
1
19390_19415_19416_19417_19418_19449_BTFL_Walmart_Slim Espresso_Maker_20 Bar_IM_R7.indd 3719390_19415_19416_19417_19418_19449_BTFL_Walmart_Slim Espresso_Maker_20 Bar_IM_R7.indd 37 2023-12-19 9:25 AM2023-12-19 9:25 AM

38
MEDIDAS IMPORTANTES
DE SEGURIDAD
Al utilizar electrodomésticos, se deben tomar siempre
precauciones de seguridad básicas, incluidas las
siguientes:
1. LEA TODAS LAS INSTRUCCIONES.
2. No toque supercies calientes. Use las asas o las
perillas. Use guantes de cocina o agarraderas.
3. Para protegerse contra incendios, descargas eléctricas
y lesiones a las personas, no sumerja el cable, los
enchufes o el aparato en agua u otro líquido.
4. Este aparato no está concebido para ser utilizado
por personas (incluidos niños) con capacidades
físicas, sensoriales o mentales reducidas; o con
falta de experiencia y conocimiento, a menos que
sean supervisados o reciban instrucciones relativas
al uso del aparato por una persona responsable de su
seguridad.
5. Es necesaria una estrecha supervisión cuando los niños
utilizan un aparato o si este se utiliza cerca de ellos.
6. Desconecte el aparato del tomacorriente cuando no esté
en uso y antes de limpiarlo.
7. Deje que la cafetera espresso se enfríe antes de poner
o quitar piezas y antes de limpiar el aparato.
8. No utilice un aparato con un cable o enchufe dañados,
19390_19415_19416_19417_19418_19449_BTFL_Walmart_Slim Espresso_Maker_20 Bar_IM_R7.indd 3819390_19415_19416_19417_19418_19449_BTFL_Walmart_Slim Espresso_Maker_20 Bar_IM_R7.indd 38 2023-12-19 9:25 AM2023-12-19 9:25 AM

39
después de una avería o si se dañó de cualquier manera.
Devuelva el aparato a servicio al cliente para su
examen, reparación o ajuste.
9. El uso de accesorios no recomendados por el fabricante
del aparato puede ocasionar incendios, descargas
eléctricas o lesiones.
NOTA: No intente reparar la unidad por su cuenta, esto
anulará la garantía.
10. No utilice en exteriores.
11. No deje que el cable cuelgue sobre el borde de una mesa
o una encimera, o toque supercies calientes.
12. No lo coloque sobre un hornillo eléctrico o a gas
caliente o cerca de uno, ni en un horno caliente.
13. Si este aparato comienza a funcionar mal durante el
uso, presione el botón de ENCENDIDO; gire el control
de función a STANDBY. Luego, desenchufe de inmediato
el cable. No use ni intente reparar el aparato si no
funciona correctamente.
14. Nunca use el aparato sin agua.
PRECAUCIÓN: Alivie la presión a través de la varilla de
vapor antes de quitar la taza o la canasta de ltro.
15. No utilice este aparato para otro uso que no sea el
indicado.
16. Asegúrese de que las tapas estén seguras en su lugar
antes de usar el aparato.
19390_19415_19416_19417_19418_19449_BTFL_Walmart_Slim Espresso_Maker_20 Bar_IM_R7.indd 3919390_19415_19416_19417_19418_19449_BTFL_Walmart_Slim Espresso_Maker_20 Bar_IM_R7.indd 39 2023-12-19 9:25 AM2023-12-19 9:25 AM

40
17. Pueden producirse quemaduras si se levantan las tapas
durante el ciclo de preparación.
18. Para desconectar, presione el botón de ENCENDIDO;
gire el control de función a STANDBY. Luego, quite el
enchufe del tomacorriente.
19. ADVERTENCIA: Para evitar el riesgo de lesión, no abra
la cámara de preparación mientras está preparando café.
SOLO PARA USO
DOMÉSTICO
MEDIDAS DE SEGURIDAD
IMPORTANTES
ADICIONALES
ADVERTENCIA: Este aparato genera calor y emite vapor
durante el uso. Se deben tomar las precauciones adecuadas
para prevenir el riesgo de quemaduras, incendios u otros
daños personales o materiales.
PRECAUCIÓN: Debe dejar que la cafetera espresso se
enfríe lo suciente antes de agregar más agua y evitar la
exposición al vapor.
1. Todos los usuarios de este aparato deben leer y
comprender el manual de instrucciones antes de utilizar
o limpiar el aparato.
19390_19415_19416_19417_19418_19449_BTFL_Walmart_Slim Espresso_Maker_20 Bar_IM_R7.indd 4019390_19415_19416_19417_19418_19449_BTFL_Walmart_Slim Espresso_Maker_20 Bar_IM_R7.indd 40 2023-12-19 9:25 AM2023-12-19 9:25 AM

41
2. El cable de este aparato debe conectarse solo a un
tomacorriente de 120V de CA.
3. ¡Use agua solamente con este aparato! No añada otros
líquidos o alimentos en el aparato. No mezcle ni
agregue nada al agua que añada al aparato, excepto
como se indica en las instrucciones en la sección de
Descalcicación de este Manual de instrucciones.
4. NO intente mover un aparato que contenga líquidos
calientes. Deje que el aparato se enfríe completamente
antes de moverlo.
5. Mantenga el aparato a al menos 4 pulgadas de las paredes
u otros objetos cuando está en funcionamiento.
6. Coloque el aparato sobre una supercie resistente al
calor.
7. Antes de conectar o desconectar el enchufe del
tomacorriente, presione el botón de ENCENDIDO; gire el
control de función a STANDBY.
8. Si este aparato cae o por accidente se sumerge en agua u
otro líquido, desenchúfelo inmediatamente. ¡No toque el
agua! No utilice este aparato si se cayó o se sumergió
en agua. Comuníquese con el Servicio al Cliente para su
revisión y reparación.
9. Use siempre agua potable y fresca en el aparato. Usar
agua tibia u otros líquidos, excepto como se describe
en la sección de descalcicación, puede dañar la
cafetera espresso.
19390_19415_19416_19417_19418_19449_BTFL_Walmart_Slim Espresso_Maker_20 Bar_IM_R7.indd 4119390_19415_19416_19417_19418_19449_BTFL_Walmart_Slim Espresso_Maker_20 Bar_IM_R7.indd 41 2023-12-19 9:25 AM2023-12-19 9:25 AM

42
GUAR DE ESTAS
INSTRUCCIONES
NOTAS SOBRE EL ENCHUFE
Este aparato posee un enchufe polarizado (una clavija es
más ancha que la otra). Para reducir el riesgo de descarga
eléctrica, este enchufe encajará en un tomacorriente
polarizado de una sola manera. Si el enchufe no entra
completamente en el tomacorriente, gire el enchufe.
Si aun así no encaja, contacte a un técnico electricista
calicado. No modique el enchufe de ninguna manera.
NOTAS SOBRE EL CABLE
a) Se debe brindar un cable de alimentación corto (o un
cable de alimentación desconectable) para reducir los
riesgos de enredarse o tropezarse con un cable largo.
b) Hay disponibles cables eléctricos desconectables
más largos o cables de extensión, y estos se pueden
utilizar si se tiene cuidado al usarlos.
c) Si se utiliza un cable eléctrico desconectable largo o
un cable de extensión:
1) La clasicación eléctrica marcada en el cable de
alimentación desconectable o cable de extensión
deberá ser al menos igual a la clasicación
eléctrica del aparato;
19390_19415_19416_19417_19418_19449_BTFL_Walmart_Slim Espresso_Maker_20 Bar_IM_R7.indd 4219390_19415_19416_19417_19418_19449_BTFL_Walmart_Slim Espresso_Maker_20 Bar_IM_R7.indd 42 2023-12-19 9:25 AM2023-12-19 9:25 AM

43
2) Si el aparato es del tipo con conexión a tierra, el
cable de extensión deberá ser un cable de 3 hilos con
conexión a tierra; y
3) El cable más largo debe colocarse de manera que
no cuelgue de una encimera o mesa de donde los niños
pudieran jalarlo o tropezar con él.
ADVERTENCIA SOBRE EL ACABADO
Para evitar que el acabado de la encimera o de la
mesa u otros muebles se dañe, coloque posavasos o
manteles individuales que NO SEAN DE PLÁSTICO entre el
electrodoméstico y el acabado de la encimera o de la mesa.
No hacerlo puede provocar el oscurecimiento del acabado,
generar desperfectos permanentes u ocasionar la aparición
de manchas.
ALIMENTACIÓN ELÉCTRICA
Si el circuito eléctrico está sobrecargado con otros
aparatos, este aparato podría no funcionar correctamente.
Debe utilizarse en un circuito eléctrico diferente al de
otros electrodomésticos.
19390_19415_19416_19417_19418_19449_BTFL_Walmart_Slim Espresso_Maker_20 Bar_IM_R7.indd 4319390_19415_19416_19417_19418_19449_BTFL_Walmart_Slim Espresso_Maker_20 Bar_IM_R7.indd 43 2023-12-19 9:25 AM2023-12-19 9:25 AM

44
19390_19415_19416_19417_19418_19449_BTFL_Walmart_Slim Espresso_Maker_20 Bar_IM_R7.indd 4419390_19415_19416_19417_19418_19449_BTFL_Walmart_Slim Espresso_Maker_20 Bar_IM_R7.indd 44 2023-12-19 9:25 AM2023-12-19 9:25 AM

Sección 2
Instrucciones
2
19390_19415_19416_19417_19418_19449_BTFL_Walmart_Slim Espresso_Maker_20 Bar_IM_R7.indd 4519390_19415_19416_19417_19418_19449_BTFL_Walmart_Slim Espresso_Maker_20 Bar_IM_R7.indd 45 2023-12-19 9:25 AM2023-12-19 9:25 AM

46
El arte de extraer espresso
La consistencia es la clave cuando se trata de un buen shot de espresso. El
sabor óptimo se logra a medida que se mantiene la temperatura de preparación.
El café molido se preinfusiona con presión baja de agua constante antes de la
extracción. Los volúmenes de shot se dispensan automáticamente y se pueden
ajustar al gusto. El resultado es un espresso perfectamente balanceado, rico
y sabroso. El shot perfecto de espresso se trata de alcanzar un equilibrio
de acidez, dulzor y amargor. Muchos factores tienen un rol importante: la
temperatura del agua, el portaltros y las tazas donde se sirve son cruciales.
Las canastas de ltro y la varilla de vapor deben estar limpias; los granos de
café frescos y perfectamente tostados. Si el molido es no o grueso, la dosis
de café molido y la presión de apisonado deben ser consistentes al experimentar
para lograr la perfección.
19390_19415_19416_19417_19418_19449_BTFL_Walmart_Slim Espresso_Maker_20 Bar_IM_R7.indd 4619390_19415_19416_19417_19418_19449_BTFL_Walmart_Slim Espresso_Maker_20 Bar_IM_R7.indd 46 2023-12-19 9:25 AM2023-12-19 9:25 AM

47
Conozca mejor suvCafetera Espresso Slim Presión 20 Bar
El producto puede diferir ligeramente del que aparece en las ilustraciones
1. Placa de calentamiento
2. Tanque de agua desmontable de 50 oz
3. Selector de control de función
4. Panel de control
5. Varilla de vapor y pestaña de
silicona
6. 2 portaltros con pico
7. Cabezal de preparación
8. Bandeja de goteo desmontable con
indicador de completo
9. Canastas de ltro de 1 y 2 tazas
10. Cuchara apisonadora de café 2 en 1
11. Pasador de limpieza
1
2
3
5
4
6
8
7
9
10
11
19390_19415_19416_19417_19418_19449_BTFL_Walmart_Slim Espresso_Maker_20 Bar_IM_R7.indd 4719390_19415_19416_19417_19418_19449_BTFL_Walmart_Slim Espresso_Maker_20 Bar_IM_R7.indd 47 2023-12-19 9:25 AM2023-12-19 9:25 AM
48
1. BOTÓN DE ENCENDIDO. Presione el botón de encendido ( ) para encender la
unidad. Los botones de shot simple ( ) y shot doble ( ) comenzarán a
parpadear. Cuando el sistema llegue a la temperatura, los 4 botones del
panel de control de iluminarán.
2. BOTÓN DE VAPOR. Después de preparar los shots de espresso, presione (
)
para activar el calentador a n de texturizar la leche. Al presionar, el
botón de VAPOR parpadeará. Conforme se alcance la temperatura y se acumule
vapor, el botón se iluminará.
3. BOTÓN PROGRAMABLE DE SHOT SIMPLE. Presione una vez para iniciar una
extracción de 1.35 oz. Mantenga presionado el botón por 3 segundos para
ajustar y seleccionar el volumen de shot simple futuro.
4. BOTÓN PROGRAMABLE DE SHOT DOBLE. Presione una vez para iniciar una
extracción de 2.7 oz. Mantenga presionado el botón por 3 segundos para
ajustar y seleccionar el volumen de shot doble futuro.
5. SELECTOR DE CONTROL DE FUNCIÓN. Una vez que la presión se acumule y el
botón de VAPOR se encienda (deje de parpadear), gire el selector para
activar la varilla de VAPOR.
6. FUNCIÓN DE AGUA CALIENTE. Coloque una jarra espumadora debajo de la
varilla de vapor. Gire el selector de control de función a AGUA. Deje
que el contenedores llene de agua. Gire el selector de control de
función a la posición APAGADO.
3 2 146 5
19390_19415_19416_19417_19418_19449_BTFL_Walmart_Slim Espresso_Maker_20 Bar_IM_R7.indd 4819390_19415_19416_19417_19418_19449_BTFL_Walmart_Slim Espresso_Maker_20 Bar_IM_R7.indd 48 2023-12-19 9:25 AM2023-12-19 9:25 AM
49
Advertencias de seguridad
1. Se deben tomar las precauciones adecuadas para evitar quemaduras por la
salpicadura del agua caliente o vapor.
2. Use siempre las cubiertas de silicona y las pestañas instaladas en
la varilla de vapor y el dispensador de agua para rotar y mover las
varillas a la posición ideal.
3. Evite tocar supercies calientes de la máquina o piezas de metal del
portaltros, la canasta de ltro, el dispensador de agua o la varilla
de vapor mientras está usando la cafetera espresso o apenas después de
usarla para preparar bebidas calientes.
4. Cuando se ha acumulado demasiada agua en la bandeja de goteo, se elevará
el indicador rojo de COMPLETO. (Ver Figura 1.) Para evitar derrames
de agua, levante la placa de goteo de la bandeja. Deslice la bandeja
de goteo hacia afuera para extraerla. Vacíe el agua, seque y vuelva a
ensamblar. (Ver Figura 2.).
Figura 2
Figura 1
19390_19415_19416_19417_19418_19449_BTFL_Walmart_Slim Espresso_Maker_20 Bar_IM_R7.indd 4919390_19415_19416_19417_19418_19449_BTFL_Walmart_Slim Espresso_Maker_20 Bar_IM_R7.indd 49 2023-12-19 9:25 AM2023-12-19 9:25 AM

50
Antes del primer uso
1. Retire todos los materiales de embalaje antes de usar. Asegúrese que la
cafetera esté desenchufada.
2. Ensamble la bandeja de goteo. Deslice la bandeja de goteo hacia adentro o
afuera para extraerla y limpiarla con facilidad.
3. Alinee el corte circular de la barra de COMPLETO con la base de la
unidad; los extremos izquierdo y derecho deben encajar bien en su lugar.
(Ver Figura 2.) Agregue la placa de goteo.
4. Llene el tanque de agua. Levante la tapa del tanque de agua y llénelo
con agua fría, o... tome el tanque de agua de la parte posterior de la
cafetera espresso y levántelo para sacarlo de la unidad. (Ver Figura 3.)
5. Gire el tanque de agua con agua fría a la marca MÁX. (1.5 litros).
(Ver Figura 4.)
6. Deslice el tanque de agua de regreso a su posición original. Levante la
tapa para cerrarla.
7. Lave previamente y cebe la bomba. Coloque la cafetera espresso sobre una
supercie nivelada, cerca de un lavabo para desechar el agua.
8. Coloque una canasta de ltro vacía (sin agregar café) de 1 taza o 2 tazas
en el portaltros. Inserte y trabe el cabezal de preparación siguiendo
la descripción detallada en la sección: “Lograr un shot perfecto de
espresso”. (Ver Figuras 6 y 7.)
9. Centre un contenedor de pico ancho o una taza debajo del portaltros de
2 picos. Coloque la punta de la varilla de vapor en la jarra espumadora.
Coloque un contenedor vacío debajo del dispensador de agua.
10. Enchufe la unidad en un tomacorriente de 120 V de CA.
11. Presione el botón de encendido para encender la unidad. Los botones de
shot simple (
) y shot doble ( ) comenzarán a parpadear. Cuando el
sistema llegue a la temperatura, los 4 botones del panel de control de
iluminarán.
12. Presione el botón de VAPOR. Comenzará a parpadear hasta que se alcance
la temperatura. Gire el selector de control de función a VAPOR. Vapor
caliente purgará la línea. Después de MÁX. 120 segundos, gire el
selector de control a STANDBY.
19390_19415_19416_19417_19418_19449_BTFL_Walmart_Slim Espresso_Maker_20 Bar_IM_R7.indd 5019390_19415_19416_19417_19418_19449_BTFL_Walmart_Slim Espresso_Maker_20 Bar_IM_R7.indd 50 2023-12-19 9:25 AM2023-12-19 9:25 AM
51
13. Mantenga presionado el botón de shot doble ( ), de modo que se vacíe el
agua caliente hasta que se purgue el tanque entero de agua del sistema.
14. La bomba está cebada y la cafetera espresso está limpia. Está listo
para lograr el shot perfecto de espresso.
Figure 4
Figure 3
19390_19415_19416_19417_19418_19449_BTFL_Walmart_Slim Espresso_Maker_20 Bar_IM_R7.indd 5119390_19415_19416_19417_19418_19449_BTFL_Walmart_Slim Espresso_Maker_20 Bar_IM_R7.indd 51 2023-12-19 9:25 AM2023-12-19 9:25 AM
52
Lograr el shot perfecto de espresso
El secreto para obtener un shot perfecto de espresso se trata de alcanzar
un equilibrio de acidez, dulzor y amargor. Muchos factores tienen un rol
importante: la temperatura del agua; el portaltros y las tazas son cruciales;
las canastas de ltro y la varilla de vapor deben estar limpias; los granos de
café deben ser frescos y estar tostados a la perfección. Si el molido es no o
grueso, la dosis de café molido y la presión de apisonado deben ser consistentes
al experimentar para lograr la perfección.
Funcionamiento
1. Coloque las tazas vacías de shots de cappuccino en la placa de
calentamiento antes de preparar.
2. Pase un shot vacío para precalentar la taza y el portaltros.
3. Enchufe la cafetera espresso en un tomacorriente de 120 V CA. Todas las
luces indicadores se apagarán, excepto el botón de ENCENDIDO, parpadeará.
4. Llene el tanque de agua con hasta 1.5 litros de agua fría, de preferencia
ltrada; use las marcas en el tanque como referencia. Cierre la tapa.
IMPORTANTE: Asegúrese de agregar suciente agua para shots más el primer
shot vacío.
NOTA: El tanque de agua siempre debe llenarse más de la marca MÍN. (5 oz).
Nunca llene el tanque de agua sobre la marca MÁX. (1.5 litros).
5. Inserte la canasta de ltro de 1 o 2 tazas en el portaltros. (Ver Figura 5.)
Figure 5
19390_19415_19416_19417_19418_19449_BTFL_Walmart_Slim Espresso_Maker_20 Bar_IM_R7.indd 5219390_19415_19416_19417_19418_19449_BTFL_Walmart_Slim Espresso_Maker_20 Bar_IM_R7.indd 52 2023-12-19 9:25 AM2023-12-19 9:25 AM
53
6. Alinee el asa del portaltros con el símbolo de INSERTAR en el cabezal
de preparación.(Ver Figura 6.)
7. Gire el asa en sentido antihorario (a la derecha) hasta que la manija
del portaltros esté orientada hacia el frente y alineada con el
BLOQUEO. Asegúrese de que el portaltros esté sellado y trabado de forma
segura en el cabezal de preparación. (Ver Figura 7.)
8. Centre un contenedor de pico ancho o una taza en la placa de goteo
debajo del portaltros de 2 picos.
9. Presione el botón de encendido para ENCENDER la unidad. Los botones de
shot simple (
) y shot doble ( ) comenzarán a parpadear. Cuando el
sistema llegue a la temperatura, los 4 botones del panel de control de
iluminarán.
10. Presione el botón de shot simple (
) o doble ( ) para iniciar la
extracción. Por ambos picos uirá agua caliente (un shot vacío) para
calentar la taza de espresso y el portaltros, y luego apáguela.
11. Quite el portaltros del cabezal de preparación. Gire el asa en sentido
horario (hacia la izquierda) hacia DESBLOQUEADO. El portaltros se
desenganchará del cabezal de preparación. (Ver Figuras 8 y 9.)
Figure 6
Figure 7
19390_19415_19416_19417_19418_19449_BTFL_Walmart_Slim Espresso_Maker_20 Bar_IM_R7.indd 5319390_19415_19416_19417_19418_19449_BTFL_Walmart_Slim Espresso_Maker_20 Bar_IM_R7.indd 53 2023-12-19 9:25 AM2023-12-19 9:25 AM
54
12. Use la cuchara apisonadora 2 en 1 (y una balanza si lo desea) para
dosicar el café espresso molido y viértalo en la canasta de ltro. Use
la canasta de ltro de 1 taza para un espresso simple; la 2 tazas para
un espresso doble o para preparar dos espressos simples al mismo tiempo.
(Ver Figura 10.)
13. Use la cuchara apisonadora para presionar con suavidad el café.
Asegúrese de que la apisonadora esté bien seca, ya que cualquier punto
húmedo abrirá canales. Quite el café molido suelto que quede en el
borde del portaltros para asegurarse que encaje bien en el cabezal de
preparación.
NOTA: Al apisonar para un espresso doble, hágalo solo después de llenar
} }}
Figure 10
Figure 9
Figure 8
19390_19415_19416_19417_19418_19449_BTFL_Walmart_Slim Espresso_Maker_20 Bar_IM_R7.indd 5419390_19415_19416_19417_19418_19449_BTFL_Walmart_Slim Espresso_Maker_20 Bar_IM_R7.indd 54 2023-12-19 9:25 AM2023-12-19 9:25 AM

55
la canasta de ltro. Apisonar entre medidas puede crear una capa en el
café que diculte la extracción.
14.Alinee el asa del portaltros con el símbolo de INSERTAR en el cabezal
de preparación y gírela en sentido antihorario hasta que esté sellado y
bien bloqueado. (Ver Figuras 6 y 7.)
15. Presione el botón de shot simple (
) o doble ( ) para iniciar la
extracción. Ambos picos producirán espresso sustancioso y espeso. La
máquina de espresso está preajustada para producir shots de espresso de
1.35 oz (simple) y 2.7 oz (doble) antes de APAGARSE automáticamente.
16. Quite la canasta de ltro y deseche el café usado.
PRECAUCIÓN: Para evitar quemarse, no intente quitar el asa del
portaltros durante el proceso de preparación, o cuando cualquier botón
del panel de control esté parpadeando.
¡IMPORTANTE! Es esencial mantener la cafetera espresso limpia y bien
enjuagada para lograr el shot perfecto. Siempre pase agua por el cabezal
de preparación y purgue la varilla de vapor después de cada uso.
17. Cuando la unidad está encendida, si las luces SINGLE, DOUBLE y STEAM
parpadean, indica que la perilla no está en la posición STANDBY. Es
necesario girar la perilla a la posición STANDBY y luego se podrá
utilizar la unidad.
18. Si los botones parpadean durante la preparación, el tanque de agua está
vacío y lo debe llenar. Presione cualquier botón para regresar al modo
de espera una vez que el tanque esté lleno.
Seleccionar el volumen de shot simple o doble
1. La cafetera espresso alista de manera consistente la temperatura perfecta
de agua para la preparación y mide el volumen perfecto para cada shot.
2. Para ajustar los volúmenes de shots futuros, mantenga presionado el botón
de shot simple o doble por 3 segundos para ajustar y seleccionar el
volumen de shot simple o doble futuro.
EJEMPLO: Para cambiar el volumen del shot simple, mantenga presionado
el shot simple por 3 segundos y el agua comenzará a uir. Una vez
que obtenga la calidad deseada, libere el botón de shot simple para
detener el ujo de agua. El nuevo volumen queda establecido y puede
reprogramarse en cualquier momento.
19390_19415_19416_19417_19418_19449_BTFL_Walmart_Slim Espresso_Maker_20 Bar_IM_R7.indd 5519390_19415_19416_19417_19418_19449_BTFL_Walmart_Slim Espresso_Maker_20 Bar_IM_R7.indd 55 2023-12-19 9:25 AM2023-12-19 9:25 AM

56
Texturizado de leche para espresso
1. Transición a vapor.
IMPORTANTE: Asegúrese de que la jarra espumadora esté fría antes de
texturizar. Refrigere o pase agua fría por la jarra antes de usarla.
PRECAUCIÓN: Después de extraer el espresso, la varilla de vapor estará
caliente. Use siempre las cubiertas de silicona y las pestañas instaladas
en la varilla de vapor para rotar y mover las varillas a la posición
ideal.
2. Llene la jarra espumadora de acero inoxidable con no más de un tercio
(1/3) de leche fría y fresca (la leche descremada crea más espuma) y
colóquela cerca de la cafetera espresso.
IMPORTANTE: Al texturizar leche, el volumen se duplicará. No llene en
exceso la jarra espumadora.
3. Presione el botón de VAPOR. Al presionar, el botón de VAPOR parpadeará.
Conforme se alcance la temperatura y se acumule vapor, el botón se
iluminará jo. (Ver Figura 11.)
4. Gire el selector de control de función a VAPOR. Verique que la varilla
de vapor esté sobre la bandeja de goteo. Una vez que se emita vapor de la
varilla (no agua), gire el selector de control de función a STANDBY. (Ver
Figura 12).5. Coloque rápido la punta de la varilla de vapor en la
supercie de la leche y gire el selector de control de función a VAPOR.
Coloque la jarra espumadora en ángulo y asegúrese de que la varilla esté
aproximadamente a 1/3 de pulgada de los bordes de la jarra espumadora.
La varilla de vapor debería apenas penetrar la supercie de la leche
para crear micro burbujas pequeñas. Moviendo la varilla en movimiento
circular, texturice la leche hasta alcanzar el volumen deseado. Cuando
la temperatura de la leche llegue a 140-150°F, está listo; o 160°F si
quiere más caliente.
6. Gire el selector de control de función a STANDBY. Baje la jarra para
quitar la varilla de vapor.
7. Vierta. Después de texturizar, revuelva la leche varios segundos para
incorporar la leche del fondo con la micro espuma de encima. Golpee
suave la jarra espumadora contra la encimera hasta que la leche parezca
brillosa y queden algunas burbujas. Vierta la leche texturizada lo antes
posible. Revuelva un poco el espresso para romper la tensión se la
supercie de la crema. Introduzca despacio la microespuma para integrarla
al espresso.
8. Limpie la varilla de vapor con una toalla de cocina húmeda y use la
19390_19415_19416_19417_19418_19449_BTFL_Walmart_Slim Espresso_Maker_20 Bar_IM_R7.indd 5619390_19415_19416_19417_19418_19449_BTFL_Walmart_Slim Espresso_Maker_20 Bar_IM_R7.indd 56 2023-12-19 9:25 AM2023-12-19 9:25 AM

57
pestaña de silicona para mover la varilla sobre la bandeja de goteo.NOTA:
Para evitar que se acumule leche sobre, dentro y fuera de la varilla
de vapor, asegúrese de purgar la varilla de vapor después de cada uso.
Asegúrese de que la varilla de vapor esté sobre la bandeja de goteo y
gire el selector de control de función a VAPOR; deje encendido varios
segundos y luego gire.
9. Presione el botón de encendido en el costado de la unidad para encender
la máquina de espresso. Las luces indicadoras de botón SIMPLE y DOBLE
parpadearán, y la luc indicadora de VAPOR se encenderá ja. Cuando
la unidad ya se haya precalentado, las 4 luces indicadoras quedarán
encendidas jas en modo de espera.
10. Presione el botón SIMPLE o DOBLE, la luz indicadora seleccionada
comenzará a parpadear y la unidad comenzará a preparar. Después de
completar la preparación, la unidad volverá al modo de espera. Mientras
se prepara, solo funcionarán los botones seleccionados (SIMPLE O DOBLE) y
el botón de encendido.
11. Para ajustar el volumen de café mantenga presionado el botón SIMPLE o
DOBLE por 3 segundos. La luz indicadora del botón seleccionado comenzará
a parpadear. Suelte el botón una vez alcanzado el volumen deseado. El
volumen de café se ha ajustado y la unidad regresará al modo de espera
(el volumen máximo para el shot SIMPLE es de 100ml y 150ml para el
shot DOBLE.
12. Para reiniciar el volumen de café a los ajustes de fábrica: En el modo
de espera, mantenga presionados los botones de shot SIMPLE y DOBLE por
3 segundos; luego las luces indicadores SIMPLE y DOBLE parpadearán 5
veces. Esto indica que el volumen de café se ha reiniciado y la unidad ha
regresado al modo de espera.
13. Presione el botón de VAPOR y la luz indicadora comenzará a parpadear
para indicar que la unidad se está precalentando. Una vez que la luz
indicadora del botón de VAPOR esté encendida ja, la unidad estará
calentada a la temperatura correcta. Gire la perilla en el lateral de la
unidad a la posición de vapor. La bomba de agua comenzará a funcionar y
la luz indicadora del el botón de VAPOR parpadeará. Vuelva a rotar la
perilla a la posición STANDBY, y la función de vapor se apagará y la luz
indicadora de VAPOR permanecerá encendida ja. Para regresar al modo de
espera, presione el botón de VAPOR de nuevo, y luego quedarán encendidos
jos los indicadores de los cuatro botones.
14. Los botones de shot SIMPLE y DOBLE parpadearán rápido si se los pulsa
19390_19415_19416_19417_19418_19449_BTFL_Walmart_Slim Espresso_Maker_20 Bar_IM_R7.indd 5719390_19415_19416_19417_19418_19449_BTFL_Walmart_Slim Espresso_Maker_20 Bar_IM_R7.indd 57 2023-12-19 9:25 AM2023-12-19 9:25 AM
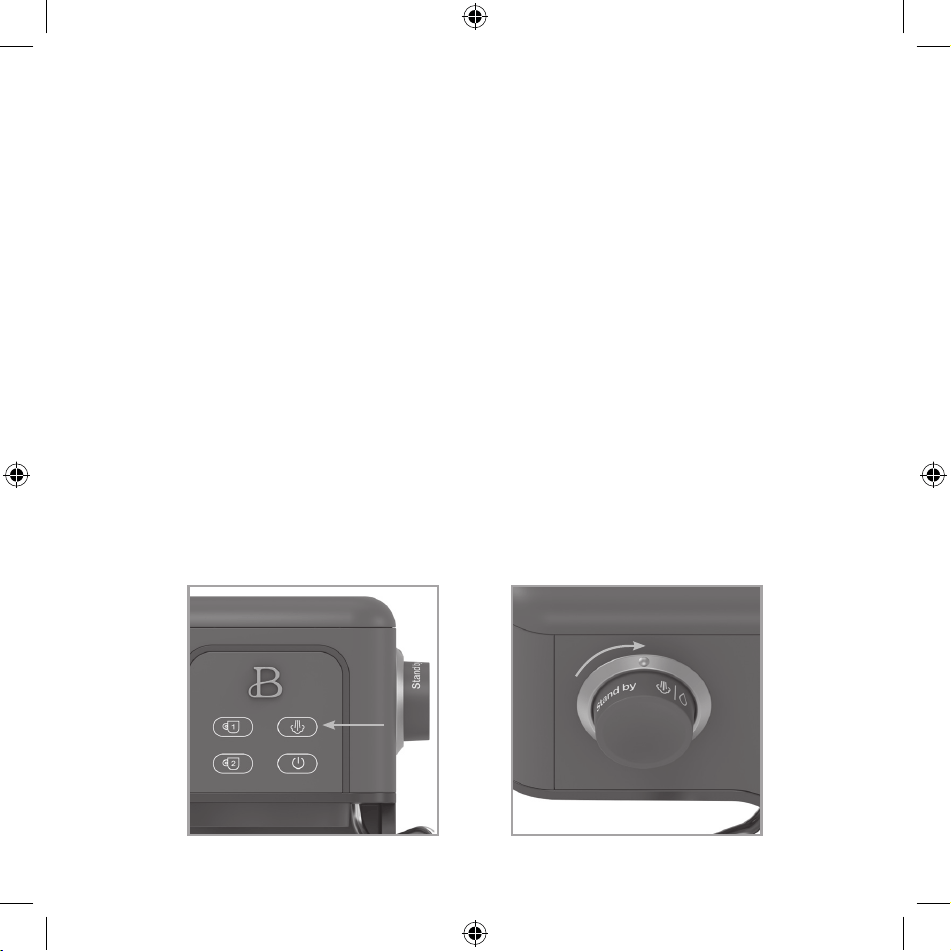
58
para preparar café después de espumar leche. Para poder preparar café
después de espumar leche, haga lo siguiente:
15. Gire la perilla a la posición AGUA CALIENTE. Coloque la varilla de vapor
sobre la bandeja de goteo, una taza o una jarra espumadora. Comenzará
a salir agua caliente por la varilla de vapor y la luz indicadora de
SIMPLE parpadeará. Cuando la caldera se haya enfriado, y la temperatura
sea sucientemente baja para preparar café, la bomba de agua dejará de
funcionar y las luces indicadoras de SIMPLE, DOBLE y VAPOR comenzarán a
parpadear. Rote la perilla a la posición STANDBY y la unidad regresará al
modo de espera: podrá preparar café.
16. En el modo de espera, gire la perilla a la posición de AGUA CALIENTE y
se encenderán jas las luces indicadoras SIMPLE y DOBLE. El agua caliente
comenzará a salir por la varilla de vapor. Gire la perilla de regreso a
la posición STANDBY; el agua caliente se cortará y la unidad regresará al
modo de espera.
17. Si la perilla está en la posición de VAPOR antes de presionar el BOTÓN
DE ENCENDIDO, las luces indicadoras de SIMPLE, DOBLE y VAPOR parpadearán
hasta que la perilla se gire a la posición STANDBY.
18. El tiempo máximo de funcionamiento de la función de vapor es de 2
minutos, y el de la función de agua caliente es de 2 minutos.
19. Durante el modo de espera, la unidad se apagará automáticamente después
de 5 minutos si no se presiona ninguna función.
Figure 11
Figure 12
19390_19415_19416_19417_19418_19449_BTFL_Walmart_Slim Espresso_Maker_20 Bar_IM_R7.indd 5819390_19415_19416_19417_19418_19449_BTFL_Walmart_Slim Espresso_Maker_20 Bar_IM_R7.indd 58 2023-12-19 9:25 AM2023-12-19 9:25 AM

59
Instrucciones de mantenimiento para el usuario
Este aparato requiere poco mantenimiento. No contiene piezas que el usuario
pueda reparar. No intente repararla por cuenta propia. Cualquier mantenimiento
que requiera desarmarlo, aparte de la limpieza, debe ser realizado por un
técnico calicado en reparación de electrodomésticos.
Instrucciones de limpieza y cuidado
PRECAUCIÓN: NUNCA SUMERJA LA CAFETERA ESPRESSO EN AGUA U OTRO LÍQUIDO.
1. Cuando se termina de preparar el espresso, presione el botón de
ENCENDIDO; gire el control de función a STANDBY. Desenchufe la cafetera
espresso del tomacorriente y deje que se enfríe completamente antes de
limpiarla.
PRECAUCIÓN: La cafetera espresso genera mucha agua caliente y vapor a
presión. Para evitar quemaduras en dedos y manos, siempre asegúrese
de que la luz indicadora de ENCENDIDO esté apagada. NUNCA toque el
soporte de la canasta de ltro o la varilla de vapor apenas termine de
preparar o vaporizar. Deje que todas las piezas se enfríen bien antes de
tocarlas.
IMPORTANTE: El portaltro y la canasta de ltro deben vaciarse y
enjuagarse bien con agua caliente después de cada uso.
2. Limpie el portaltros y las canastas de ltro. Tome el asa del
portaltros con rmeza y gire en sentido horario (a la izquierda) hasta
que el asa esté orientada hacia la posición DESBLOQUEADA. El portaltros
se desenganchará de la unidad. (Ver Figuras 8 y 9.)
3. Quite la canasta de ltro y deseche el café usado.
4. Enjuague el portaltros y las canastas de ltro de inmediato después
del uso para eliminar los aceites de café residuales. De ser necesario,
limpie la canasta de ltro con un cepillo de cocina o remójela en una
solución de limpieza por 20 minutos. Enjuague y seque por completo.
5. Se incluye un pasador de limpieza para facilitar el cuidado y limpieza
de su cafetera espresso. Use el extremo más pequeño del pin de limpieza
para limpiar los oricios en la base de las canastas de ltro y la
varilla de vapor.
6. Limpie la varilla de vapor y el dispensador de agua. Después de
espumar leche o dispensar agua caliente, gire para extraer la punta
19390_19415_19416_19417_19418_19449_BTFL_Walmart_Slim Espresso_Maker_20 Bar_IM_R7.indd 5919390_19415_19416_19417_19418_19449_BTFL_Walmart_Slim Espresso_Maker_20 Bar_IM_R7.indd 59 2023-12-19 9:25 AM2023-12-19 9:25 AM

60
del dispensador de agua y la punta espumadora de la varilla de vapor y
límpielos bien.
7. Inserte la parte larga del pasador de limpieza en las salidas del
dispensador de agua y de la varilla de vapor para limpiarlas. Enjuague y
enrosque la punta del depósito de agua limpia y la punta espumadora de
nuevo en la varilla.
8. Quite la placa de goteo, la barra de COMPLETO y deslice la bandeja de
goteo hacia afuera. Vacíe el agua acumulada. Seque con un paño limpio y
vuelva a ensamblar.
9. Limpie el exterior de la cafetera espresso y del cabezal de preparación
con un paño húmedo.
ADVERTENCIA: Nunca use solventes ni detergentes que puedan rayar o dañar
la supercie de la máquina.
10. Limpie la jarra espumadora de acero inoxidable a mano.
11. Ninguna pieza de la cafetera espresso debe limpiarse en el lavavajillas.
Descalcificación
Los minerales y la cal que se encuentran en las zonas de agua dura pueden
acumularse y afectar el funcionamiento de su máquina. Según las condiciones del
agua y la frecuencia de uso, su cafetera espresso debe limpiarse con vinagre
destilado para eliminar la cal aproximadamente cada 3 meses.
1. Antes de limpiar la cafetera espresso, asegúrese de que el selector
de control de función esté en posición STANDBY y el aparato esté
desconectado del tomacorriente.
2. Llene el tanque de agua con 1 parte de vinagre blanco y 3 partes de agua
fría.
3. Coloque el portaltros vacío con cualquier canasta de ltro.
4. Enchufe la cafetera espresso en un tomacorriente de 120 V CA.
5. Centre un contenedor de pico ancho o una taza debajo del portaltros de
2 picos. Coloque la punta de la varilla de vapor en la jarra espumadora.
Coloque un contenedor vacío debajo del dispensador de agua.
6. Presione el botón de ENCENDIDO. Los botones de shot simple (
) y
shot doble ( ) comenzarán a parpadear. Cuando el sistema llegue a la
19390_19415_19416_19417_19418_19449_BTFL_Walmart_Slim Espresso_Maker_20 Bar_IM_R7.indd 6019390_19415_19416_19417_19418_19449_BTFL_Walmart_Slim Espresso_Maker_20 Bar_IM_R7.indd 60 2023-12-19 9:25 AM2023-12-19 9:25 AM

61
temperatura, los 4 botones del panel de control de iluminarán.
8. Gire el selector de control de función a VAPOR. Permita que el vapor
caliente purgue la línea por al menos 45 segundos.
9. Mantenga presionado el botón de shot doble (
), de modo que se vacíe
el agua caliente, hasta que se purgue el tanque entero de agua del
sistema.
10. En ambientes de agua dura, se recomienda repetir este procedimiento.
11. Después de descalcicar, quite el tanque de agua y llénelo con agua fría
y fresca. Repita los pasos del 7 al 9 para enjuagar bien la cafetera
espresso.
ADVERTENCIA: Nunca sumerja el cable, el enchufe o la máquina de
espresso en agua u otros líquidos. El tanque de agua nunca debe estar
completamente vacío durante la descalcicación.
12. Cuando se haya detenido el ujo, presione el botón de ENCENDIDO.
Asegúrese de que todas las luces indicadoras estén APAGADAS. Desenchufe
la cafetera espresso del tomacorriente de pared cuando no lo use.
13. Quite el portaltros, los contenedores o tazas y enjuague con agua
caliente para el próximo uso.
Instrucciones de almacenamiento
1. Asegúrese de que la unidad esté desenchufada y completamente fría antes
de guardarla.
ADVERTENCIA: Nunca guarde la cafetera espresso mientras esté caliente o
enchufada.
2. No ejerza presión sobre el cable donde entra en la unidad, ya que esto
podría deshilacharlo y romperlo.
3. Guarde al cafetera espresso en su caja, en un lugar limpio y seco.
19390_19415_19416_19417_19418_19449_BTFL_Walmart_Slim Espresso_Maker_20 Bar_IM_R7.indd 6119390_19415_19416_19417_19418_19449_BTFL_Walmart_Slim Espresso_Maker_20 Bar_IM_R7.indd 61 2023-12-19 9:25 AM2023-12-19 9:25 AM

62
Solución de problemas
PROBLEMA CAUSA POSIBLE SOLUCIÓN
Se derrama
café por el
lado del
portaltros.
El portaltros no está bien
colocado o no se lo apretó lo
suciente.
Vuelva a insertar el portaltros
en el cabezal de preparación.
Asegúrese de que el asa esté
orientada hacia afuera y esté
conectada rmemente al cabezal
de preparación.
La cápsula de café no está
bien colocada en la canasta
de ltro.
Asegúrese de que ninguna parte
del ltro de cápsulas de café
cuelgue sobre el borde de la
canasta de ltro.
El borde del inserto del
ltro tiene granos de café.
Limpie el borde superior
del ltro y el cabezal de
preparación con un paño limpio
y húmedo.
El cabezal de preparación
está sucio.
Limpie el cabezal de preparación
con un paño húmedo y limpio.
El sello de goma del cabezal
de preparación está dañado o
desgastado.
Póngase en contacto con Servicio
al Cliente.
No sale el
espresso.
No hay agua en el tanque de
agua.
Llene el tanque de agua.
El tanque de agua no está
bien ensamblado.
Presione con rmeza hacia abajo
sobre el tanque de agua para
asegurarse de que esté bien
colocado.
El ltro de preparación puede
estar bloqueado.
Consulte la sección
“Descalcicación” en este Manual
de instrucciones.
19390_19415_19416_19417_19418_19449_BTFL_Walmart_Slim Espresso_Maker_20 Bar_IM_R7.indd 6219390_19415_19416_19417_19418_19449_BTFL_Walmart_Slim Espresso_Maker_20 Bar_IM_R7.indd 62 2023-12-19 9:25 AM2023-12-19 9:25 AM

63
PROBLEMA CAUSA POSIBLE SOLUCIÓN
No sale el
espresso.
La canasta de ltro está
bloqueada, los granos de
café son demasiado nos o se
los aplanó demasiado fuerte.
Vacíe la canasta de ltro
y enjuague con agua para
limpiarla. Use el pasador de
limpieza para limpiar los
oricios en la base de la
canasta de ltro. Limpie el
cabezal de limpieza con un
paño. Vuelva a llenar el ltro
con café molido más grueso y
apisone con menos presión.
El espresso
no tiene
nada de
crema o no
suciente.
El café está viejo o seco. Use café molido y tostado más
fresco. Siempre guárdelo en un
contenedor hermético.
El café no está bien
compactado.
Apisone el café molido con más
presión.
El café molido es muy
grueso.
Use un café premolido de
molido más no o muela los
granos de café a una textura
más na.
La cantidad es muy pequeña. Aumente la cantidad.
El café está
demasiado
frío.
Las copas, el ltro y el asa
del ltro están frías.
Pase un shot vacío para
precalentar la taza, el
portaltros y las canastas de
ltro.
Si va a preparar un
cappuccino o latte, la
leche podría no estar lo
sucientemente caliente
Asegúrese de que la leche se
caliente adecuadamente durante
el texturizado, pero NO hierva
la leche.
No sale
vapor de la
boquilla de
vapor.
La boquilla de vapor está
bloqueada.
Consulte “Instrucciones de
limpieza y cuidado”.
19390_19415_19416_19417_19418_19449_BTFL_Walmart_Slim Espresso_Maker_20 Bar_IM_R7.indd 6319390_19415_19416_19417_19418_19449_BTFL_Walmart_Slim Espresso_Maker_20 Bar_IM_R7.indd 63 2023-12-19 9:25 AM2023-12-19 9:25 AM

64
PROBLEMA CAUSA POSIBLE SOLUCIÓN
No se genera
suciente
espuma al
texturizar.
La leche no está fresca. Comience de nuevo con leche
fresca.
La temperatura de la leche
está muy alta.
Asegúrese de que la leche
esté bien refrigerada antes de
usarla.
La jarra de texturizado está
caliente.
Refrigere o pase agua fría por
la jarra antes de usarla.
La boquilla de vapor está
bloqueada.
Consulte “Instrucciones de
limpieza y cuidado”.
La leche se hirvió. Apisone el café molido con más
presión.
La leche está produciendo
burbujas grandes en lugar de
microburbujas.
Use un café premolido de
molido más no o muela los
granos de café a una textura
más na.
Las tazas
no están
llenadas
de manera
uniforme.
El apisonado no es uniforme
o hay una obstrucción en los
picos de vertido.
Asegúrese de que el café esté
apisonado de manera uniforme
y que ambos picos de vertido
del portaltros no tengan
obstrucciones. Consulte
“Instrucciones de limpieza y
cuidado”.
El espresso
sabe
quemado.
Cambie el tipo de café que
está usando.
Experimente con varios tipos y
marcas de granos de café.
No se enjuagó el aparato
después de descalcicar.
Purgue un tanque completo de
agua por la cafetera espresso
antes de hacer otro shot de
espresso.
19390_19415_19416_19417_19418_19449_BTFL_Walmart_Slim Espresso_Maker_20 Bar_IM_R7.indd 6419390_19415_19416_19417_19418_19449_BTFL_Walmart_Slim Espresso_Maker_20 Bar_IM_R7.indd 64 2023-12-19 9:25 AM2023-12-19 9:25 AM

65
PROBLEMA CAUSA POSIBLE SOLUCIÓN
La bomba
hace un
ruido
fuerte poco
habitual.
No hay suciente agua en el
tanque o el tanque de agua
está vacío.
Llene el tanque de agua. El
tanque de agua siempre debe
superar la marca MÍN. (5 oz).
NUNCA opere la cafetera
espresso con el tanque de agua
vacío.
El tanque de agua no está
bien ensamblado.
Presione con rmeza hacia
abajo sobre el tanque de agua
para asegurarse de que esté
bien colocado.
La máquina
no funciona.
El portaltros puede estar
bloqueado.
Quite el portaltros y limpie
el cabezal de preparación.
Consulte “Instrucciones de
limpieza y cuidado”.
La máquina está bloqueada
por acumulación de cal.
Consulte “Descalcicación”.
Recetas de espresso
NEGRO CORTO
Un shot simple de espresso cubierto con una capa estable de crema.
FLAT WHITE
Un shot simple de espresso cubierto con leche vaporizada, 1/3 café y 2/3 leche
vaporizada.
YUAN YANG (CAFÉ CON TÉ)
El Yuan Yang se hace con té negro fuerte, que debe preparar en una tetera, y
mezclando leche condensada evaporada o endulzada y café, y luego endulzar a
gusto.
1. 4 bolsas pequeñas de té negro, sin papel ni hilos
2. 1 lata de leche condensada endulzada (14 oz)
3. 2 tazas de café americano (consulte la receta a continuación)
19390_19415_19416_19417_19418_19449_BTFL_Walmart_Slim Espresso_Maker_20 Bar_IM_R7.indd 6519390_19415_19416_19417_19418_19449_BTFL_Walmart_Slim Espresso_Maker_20 Bar_IM_R7.indd 65 2023-12-19 9:25 AM2023-12-19 9:25 AM

66
Hierva té a fuego lento y 1 taza de agua en una olla de 2 cuartos de litro a fuego
medio por 3 minutos.
Estruje y deseche las bolsas de té. Mezcle la leche y hierva. Cocine,
revolviendo por 3 minutos. Agregue el café americano; vierta en vasos.
AMERICANO O NEGRO LARGO
Un shot de espresso estándar diluido con agua caliente, servido en una taza
común de café. Agregue agua caliente antes del espresso para mantener la crema
delicada.
CAFÉ LATTÉ
Un shot simple de espresso con leche vaporizada, servido en general en un vaso.
La capa superior de microburbujas debe ser de 10mm para sellar el café.
CAPPUCCINO
Espresso con leche espumada, cubierto con espuma cremosa y una espolvoreada
de chocolate. La bebida resultante es aproximadamente 2/3 café con leche, 1/3
microburbujas.
CAFÉ MOCHA
Se prepara de forma similar a un cappuccino pero se agrega chocolate para beber.
Vierta el chocolate al espresso antes de agregar la leche vaporizada y las
microburbujas. Cubra con crema batida.
MACCHIATO
Servido de forma tradicional como espresso corto o largo con un chorro de leche
o una cucharadita de espuma en el centro de la crema.
CÓCTEL DE ESPRESSO VODKA
1. 1.5 oz de vodka2. 1/2 oz de jugo de limón recién exprimido
3. 1/2 oz de jarabe simple
4. 2 shots simples de espresso
5. Hielo para servir
6. Cáscara de limón para decorar
Agregue vodka, jugo de limón, jarabe simple, espresso y hielo a una coctelera.
Agite bien. Vierta a un vaso frío sobre hielo. Decore con cáscara de limón.
19390_19415_19416_19417_19418_19449_BTFL_Walmart_Slim Espresso_Maker_20 Bar_IM_R7.indd 6619390_19415_19416_19417_19418_19449_BTFL_Walmart_Slim Espresso_Maker_20 Bar_IM_R7.indd 66 2023-12-19 9:25 AM2023-12-19 9:25 AM

67
19390_19415_19416_19417_19418_19449_BTFL_Walmart_Slim Espresso_Maker_20 Bar_IM_R7.indd 6719390_19415_19416_19417_19418_19449_BTFL_Walmart_Slim Espresso_Maker_20 Bar_IM_R7.indd 67 2023-12-19 9:25 AM2023-12-19 9:25 AM

Garantía limitada de dos años
Mediante la presente, Sensio Inc.
dba Made by Gather™. garantiza que,
durante el plazo de DOS AÑOS a partir
de la fecha de compra, este producto
no presentará defectos mecánicos en
el material ni en la mano de obra, y
durante 90 días, no los presentará en
las piezas no mecánicas. A su entera
discreción, Sensio Inc. dba Made by
Gather™ que resulte defectuoso, o
emitirá un reembolso por el producto
durante el plazo de garantía.
Esta garantía es válida únicamente
para el comprador minorista
original a partir de la fecha de
compra minorista inicial y no es
transferible. Conserve el recibo
de compra original, ya que se exige
una prueba de compra para obtener
la validación de la garantía. Las
tiendas minoristas no tienen derecho
a alterar, modicar ni corregir
de ninguna manera los términos y
condiciones de la garantía.
Exclusiones:
La garantía no cubre el desgaste
normal de las piezas ni el daño
ocasionado por cualquiera de las
siguientes causas: uso negligente
del producto, uso de un voltaje o
corriente incorrectos, mantenimiento
de rutina inadecuado, uso
contrario al de las instrucciones
de funcionamiento, desarmado,
reparación o alteración a cargo
de personas que no sean miembros
del personal calicado de Sensio
Inc. dba Made by Gather™ Asimismo,
la garantía no cubre actos de
la naturaleza, como incendios,
inundaciones, huracanes o tornados.
Sensio Inc. dba Made by Gather™
no asumirá responsabilidad por
daños incidentales o resultantes
ocasionados por la violación
de cualquier garantía expresa
o implícita. Salvo en la medida
en que lo prohíban las leyes
aplicables, cualquier garantía
implícita de comerciabilidad o
aptitud para un propósito particular
se limita temporalmente a la
duración de la garantía. Algunos
estados, provincias o jurisdicciones
no permiten la exclusión ni la
limitación de daños incidentales
o resultantes, o limitaciones
sobre la duración de una garantía
implícita y, por lo tanto, es posible
que las exclusiones o limitaciones
mencionadas no le correspondan.
La garantía cubre derechos legales
especícos que pueden variar de
un estado, una provincia o una
jurisdicción a otros.
68
19390_19415_19416_19417_19418_19449_BTFL_Walmart_Slim Espresso_Maker_20 Bar_IM_R7.indd 6819390_19415_19416_19417_19418_19449_BTFL_Walmart_Slim Espresso_Maker_20 Bar_IM_R7.indd 68 2023-12-19 9:25 AM2023-12-19 9:25 AM

69
Cómo obtener el servicio de garantía
Debe comunicarse con el Servicio
de atención al cliente a nuestro
número telefónico gratuito:
1-877-775-3564. Un representante
del Servicio de atención al cliente
intentará resolver los problemas
referidos a la garantía por
teléfono. Si este no puede resolver
el problema, le proporcionarán un
número de caso y le solicitarán que
devuelva el producto a Sensio Inc.
dba Made by Gather™ Adhiera una
etiqueta al producto que incluya:
su nombre, dirección, número
telefónico de contacto durante
el día, número de caso y descripción
del problema. Además, incluya una
copia del recibo de compra original.
Envuelva cuidadosamente el producto
etiquetado con el recibo de compra,
y envíelo (con el envío y el seguro
prepagados) a la dirección de
Sensio Inc. dba Made by Gather™.
Sensio Inc. dba Made by Gather™
no asumirá obligación ni
responsabilidad alguna por el
producto devuelto que esté en el
trayecto hacia el Centro de servicio
al cliente de Sensio Inc.
dba Made by Gather™
®
19390_19415_19416_19417_19418_19449_BTFL_Walmart_Slim Espresso_Maker_20 Bar_IM_R7.indd 6919390_19415_19416_19417_19418_19449_BTFL_Walmart_Slim Espresso_Maker_20 Bar_IM_R7.indd 69 2023-12-19 9:25 AM2023-12-19 9:25 AM

INSIDE back cover
19390_19415_19416_19417_19418_19449_BTFL_Walmart_Slim Espresso_Maker_20 Bar_IM_R7.indd 7019390_19415_19416_19417_19418_19449_BTFL_Walmart_Slim Espresso_Maker_20 Bar_IM_R7.indd 70 2023-12-19 9:25 AM2023-12-19 9:25 AM

INSIDE back cover
19390_19415_19416_19417_19418_19449_BTFL_Walmart_Slim Espresso_Maker_20 Bar_IM_R7.indd 7119390_19415_19416_19417_19418_19449_BTFL_Walmart_Slim Espresso_Maker_20 Bar_IM_R7.indd 71 2023-12-19 9:25 AM2023-12-19 9:25 AM

19390, 19415, 19416, 19417, 19418, 19449 R8
Sensio Inc.
dba Made by Gather™
New York, NY 10016/USA
www.beautifulbydrew.com
19390_19415_19416_19417_19418_19449_BTFL_Walmart_Slim Espresso_Maker_20 Bar_IM_R7.indd 7219390_19415_19416_19417_19418_19449_BTFL_Walmart_Slim Espresso_Maker_20 Bar_IM_R7.indd 72 2023-12-19 9:25 AM2023-12-19 9:25 AM


