T4S/T8S ToneMatch®
Mixer
Owner’s Guide
Guía del propietario
Notice d’utilisation
Bedienungsanleitung
Manuale di istruzioni
Gebruikershandleiding
取扱説明書
用户指南
使用者指南
كلاملا ليلد
2 - English
Important Safety Instructions
Please read and keep all safety and use instructions.
1. Read these instructions.
2. Keep these instructions.
3. Heed all warnings.
4. Follow all instructions.
5. Do not use this apparatus near water.
6. Clean only with a dry cloth.
7. Do not block any ventilation openings. Install in accordance with the
manufacturer’s instructions.
8. Protect the power cord from being walked on or pinched, particularly at plugs,
convenience receptacles, and the point where they exit from the apparatus.
9. Only use attachments/accessories specified by the manufacturer.
10. Use only with the cart, stand, tripod, bracket, or table specified by the
manufacturer or sold with the apparatus. When a cart is used, use
caution when moving the cart/apparatus combination to avoid injury
from tip-over.
11. Unplug this apparatus during lightning storms or when unused for long periods
of time.
12. Refer all servicing to qualified personnel. Servicing is required when the
apparatus has been damaged in any way such as power-supply cord or plug is
damaged, liquid has been spilled or objects have fallen into the apparatus, the
apparatus has been exposed to rain or moisture, does not operate normally, or
has been dropped.
WARNINGS/CAUTIONS:
This product contains magnetic material. Consult your physician on whether
this might aect you implantable medical device.
• This product is not intended for installation or use in indoor water facility areas
(including, without limitation, indoor pools, indoor water parks, hot tub rooms,
saunas, steam rooms and indoor skating rinks).
• To reduce the risk of fire or electrical shock, do NOT expose this product to rain,
liquids or moisture. Not applicable for products rated IPX4-9.
• Keep the product away from fire and heat sources. Do NOT place naked flame
sources, such as lighted candles, on or near the product.
• Do NOT make unauthorized alterations to this product.
• Do NOT use a power inverter with this product.
• Do NOT use in vehicles or boats.
• Use this product only with the power supply provided.
• Do NOT place or install the bracket or product near any heat sources, such as
fireplaces, radiators, heat registers or other apparatus (including amplifiers) that
produce heat.
• Do not use the ToneMatch® T4S/T8S mixer with a tripod/stand that is unstable.
The mixer is only designed for use on a ¼" screw (6 mm), and the tripod/stand
must be capable of supporting a device with a minimum weight of 1.9 kg (4.1 lbs)
and an overall size of 214 x 311 x 83 mm (8.4 x 12.25 x 3.25 inches). Using a tripod/
stand that is not designed to support the size and mass of the T4S/T8S mixer
may lead to an unstable and hazardous condition that could result in injury.
• Contains small parts which may be a choking hazard. Not suitable for
children under age 3.
NOTES:
• The speaker wire and interconnect cables included with this system are not
approved for in-wall installation. Please check your local building codes for the
correct type of wire and cable required for in-wall installation.
• Where the mains plug or an appliance coupler is used as the disconnect device,
the disconnect device shall remain readily operable.
• Due to ventilation requirements, Bose does not recommend placing the product
in a confined space such as in a wall cavity or in an enclosed cabinet.
Regulatory Information
This device complies with part 15 of the FCC Rules and with Industry Canada license-
exempt RSS standard(s). Operation is subject to the following two conditions: (1)
This device may not cause harmful interference, and (2) this device must accept any
interference received, including interference that may cause undesired operation.
This product conforms to all applicable EU directive requirements. The
complete Declaration of Conformity can be found at
www.Bose.com/compliance.
Information About Products That Generate Electrical Noise (FCC Compliance
Notice for US)
Note: This equipment has been tested and found to comply with the limits for a Class
A digital device, pursuant to part 15 of the FCC Rules. These limits are designed to
provide reasonable protection against harmful interference when the equipment is
operated in a commercial environment. This equipment generates, uses, and can
radiate radio frequency energy and, if not installed and used in accordance with
the instruction manual, may cause harmful interference to radio communications.
Operation of this equipment in a residential area is likely to cause harmful
interference in which case the user will be required to correct the interference at
one’s own expense.
Changes or modifications not expressly approved by Bose Corporation could void
the user’s authority to operate this equipment.
Shielded cables are required to maintain regulatory compliance.
This product complies with the Canadian ICES-003 Class A specifications.
CAN ICES-3(A)/NMB-3(A)
This product meets all EN55103-2 immunity requirements for E2 electromagnetic
environment.
Part Name
Toxic or Hazardous Substances and Elements
Names and Contents of Toxic or Hazardous Substances and Elements
PCBs
Metal parts
Plastic parts
Speakers
Cables
This table is prepared in accordance with the provisions of SJ/T 11364.
0: Indicates that said hazardous substance contained in all of the homogenous materials for this part
is below the limit requirement of GB/T 26572.
X: Indicates that said hazardous substance contained in at least one of the homogenous materials
used for this part is above the limit requirement of GB/T 26572.
Lead
(Pb)
Mercury
(Hg)
Cadmium
(Cd)
Hexavalent
(CR(VI))
Polybrominated
Biphenyl (PBB)
Polybrominated
diphenylether
(PBDE)
X
X
00
0
0
0
0
0
0
0
0
0
0
0
0
0
0
0
0
0
0
0
0
0
0
0
0
X
X
This symbol means the product must not be discarded as household
waste, and should be delivered to an appropriate collection facility for
recycling. Proper disposal and recycling helps protect natural resources,
human health, and the environment. For more information on disposal and
recycling of this product, contact your local municipality, disposal service,
or the shop where you bought this product.
Provided by DCE Safety
仅适用于海拔 2000m 以下地区安全使用
Only suitable for use at areas with altitude less than 2000 m.
For China:

Contents
English - 3
Introduction
Product Overview ................................................................................5
Product Features .............................................................................5
Unpacking .......................................................................................5
Control and Connection Panels
T4S ToneMatch® Mixer ............................................................................6
Control Panel .................................................................................6
Connection Panel .............................................................................7
T8S ToneMatch® Mixer ............................................................................8
Control Panel .................................................................................8
Connection Panel .............................................................................9
System Setup
Removing/Attaching the Cover ...................................................................10
Mounting Options ................................................................................11
Mounting the T4S/T8S on a Camera Tripod Stand ................................................11
Connecting the T4S via Digital Connection ........................................................12
Connecting the T4S/T8S via Analog Connection ...................................................13
Connecting the ToneMatch® Power Supply .........................................................14
Connecting the T4S/T8S to Your Computer ........................................................15
Connecting a Flash Drive to the T4S/T8S ..........................................................15
Operation
Reading the T4S/T8S Display ....................................................................16
Optimizing Input Gain and Output Volume .........................................................17
Using the Master Volume Control .................................................................18
Muting a Channel ............................................................................18
Muting Channel Eects .......................................................................18
Using the Rotary Selector ........................................................................19
Editing the Sound of a Channel ...................................................................20
Using the Pan/Aux Functions ..................................................................20
Using the Tuner ..............................................................................20
Selecting a ToneMatch® Preset. . . . . . . . . . . . . . . . . . . . . . . . . . . . . . . . . . . . . . . . . . . . . . . . . . . . . . . . . . . . . . . . . 22
Adjusting zEQ ...............................................................................22
Adjusting Para EQ ............................................................................23
Using Compressor/Gate Functions .............................................................23
Using Modulation Eects .....................................................................25
Adding Delays ...............................................................................26
Adding Reverb ...............................................................................26

Contents
4 - English
Using Global Functions ..........................................................................27
Selecting a Reverb Type ......................................................................27
Using the Prefs Utilities .......................................................................28
Loading and Saving Scenes ...................................................................30
Sharing a Scene ..............................................................................33
Bose Scenes ....................................................................................35
Factory Settings .............................................................................35
Singer/Songwriter ............................................................................36
DJ/Playback .................................................................................38
Full Band ................................................................................... 40
Factory Settings
Factory Settings ................................................................................42
Care & Maintenance
Troubleshooting .................................................................................43
Cleaning .......................................................................................46
Technical Information ............................................................................46
Additional Resources
Contact Information .............................................................................47
Importer Information .........................................................................47
Additional Information ...........................................................................47
Limited Warranty ............................................................................47

English - 5
Introduction
Product Overview
Take control of your music with T4S and T8S ToneMatch® mixers, compact 4 and 8 channel interfaces designed for performers.
Engineered with powerful DSP engines and intuitive user controls, they oer studio-quality EQ, dynamics and eects
processing. Sound great with integrated Bose® ToneMatch® processing and zEQ, especially when connected to a Bose L1 or F1
system for full end-to-end tonal control. Play confidently on stage with these rugged ToneMatch mixers using tactile controls,
easy-to-read LED displays and scene recall. ToneMatch mixers, the ultimate on-stage companions for performing artists.
Product Features
Powerful Audio Processing
• Updated, studio-quality eects with advanced digital
audio processing
• Eects include compressor, limiter, de-esser, noise gate,
chorus, flanger, phaser, tremolo, delay, and reverb
• Bose® ToneMatch® processing for natural-sounding vocals
and instruments
• zEQ focuses the sound of ToneMatch presets for eective
adjustments on the fly
• Independent ToneMatch, EQ, dynamics and eects per
channel
• Dedicated reverb for Aux sends, and a global shared
reverb for use across all channels
• Master output EQ helps compensate for venue acoustics
• Full end-to-end tonal optimization when used with Bose L1
and F1 systems
Seamless Live Control
• Tactile controls and indicators designed for live on-stage
use by musicians and DJs
• Fast-learning user interface
• Built-in tap tempo delay, chromatic tuner, and recallable scenes
• LED display and illuminated controls are easy to read and
use, even on dimly-lit stages
High-Density Connectivity
• Unprecedented connectivity and control in a small digital
stereo mixer
• Four (T4S) or eight (T8S) high-quality audio preamps with
XLR-combo jacks for microphones or instruments, and
switchable phantom power
• Two Aux inputs for additional sources two (T4S) or four
(T8S) Aux sends
• USB-A and -B for USB drive playback or PC/Mac interfacing
• ToneMatch outputs for digital audio and power (T4S only)
• Balanced ¼” TRS and XLR (T8S only) stereo outputs
• Independent headphone output
Convenient Gig-Ready Features
• Rugged enclosure with a protective magnetic cover to
protect controls and connectors
• Includes a ToneMatch cable for connecting to a Bose L1
Model II or L1 Model 1S system for digital audio and power
(T4S), or includes a universal power supply (T8S)
• Bottom insert allows you to use standard camera
mounting accessories to keep your ToneMatch mixer
within reach
T4S ToneMatch mixer and cover ToneMatch Cable
ToneMatch power supplyT8S ToneMatch mixer and cover
For a complete list of optional equipment and accessories, please visit www.Bose.com.
Unpacking
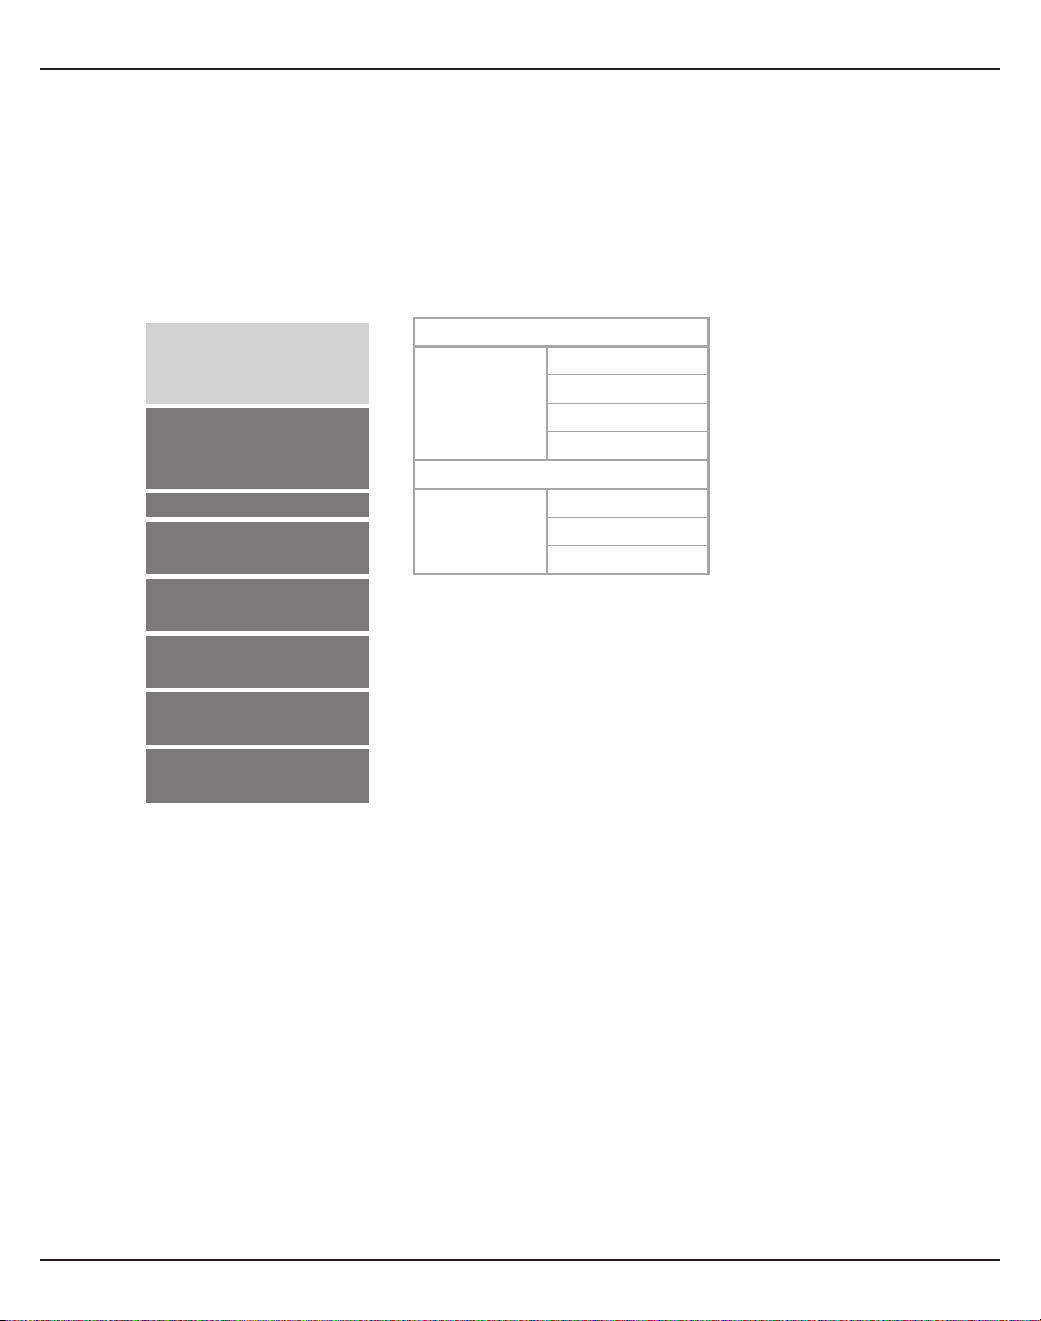
See the following table for what your mixer carton will include:
T4S
T8S

Control and Connection Panels
6 - English
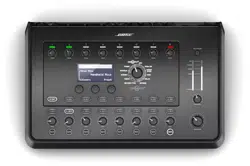
T4S ToneMatch® Mixer
Control Panel
Figure 1. T4S Control Panel
q INPUT SIGNAL/CLIP LEDs (1-4) – Displays the input signal status in color:
Green: Indicates the presence of an input signal
Red: Indicates input source clipping
w TRIM CONTROLS (1-4) – Adjusts the input sensitivity for the respective channel.
e DISPLAY – Provides function menus and system information.
r EDITING CONTROLS – These three rotary/push-button controls allow you to select or adjust items/values
appearing on the display.
t CH EDIT BUTTONS (1-4) – Selects the channel you want to modify.
y FX MUTE BUTTONS (1-4) – Bypasses the Mod, Delay, and Reverb eects on the selected channel.
u VOLUME CONTROLS (1-4) – Adjusts the volume level for the respective channel.
i MUTE BUTTONS (1-4) – Silences the audio output for the respective channel.
o MASTER VOLUME CONTROL – Adjusts the overall output level.
a HEADPHONE VOLUME CONTROL – Adjusts the volume level of the headphone output.
s ROTARY SELECTOR – Allows access to both global and channel-related parameters, which are adjusted
using the editing controls.
d PHANTOM POWER SWITCH – Applies +48V power to input channels 1-4. A red LED indicates that phantom
power is on.
f HEADPHONE JACK – For use with headphones only, with a minimum impedance of 24Ω.
q
w
i
u
y
t
r
e
d
s
a
o
f

English - 7
Control and Connection Panels
Figure 2. T4S Connection Panel
Connection Panel
q POWER SWITCH – Turns the mixer on or o.
w USB 2.0 TYPE-B – A USB interface that allows you to connect the mixer to your computer.
e USB 2.0 TYPE-A – A USB interface that allows you to stream audio from your flash drive.
r ANALOG L/R OUTPUT – Main analog output. Accepts ¼" TRS balanced or TS unbalanced cables.
t AUX OUTPUT – Two user-definable analog outputs. Can be configured for a pre-fader, post-EQ, and eects,
or post-fader output. Accepts ¼" TRS balanced cables.
y AUX IN – Analog input channels 5/6. Accepts ¼" TRS balanced or TS unbalanced cables for line-level
inputs. Can be used for stereo input signals.
u INPUTS 1-4 – Analog input channels 1-4. Accepts XLR balanced cables for microphones or ¼" TRS balanced
or TS unbalanced cables for high-impedance inputs, such as guitars.
i DIGITAL MAIN OUTPUT L – Connect digitally in stereo to two L1® Model 1S/II systems. Note: Only used in
stereo with Digital Main Output R.
o POWER PORT/DIGITAL MAIN OUTPUT R – A digital output used by the L1 Model 1S/II system. Delivers
power to the T4S mixer from the L1 Model 1S/II power stand. Can also deliver power from an AC outlet via
a ToneMatch power supply (not included with the T4S). Accepts the included ToneMatch® cable.
CAUTION: Although the ToneMatch port accepts a standard RJ-45 connector, do NOT connect the T4S
to a computer or phone network.
USB AUDIO
M
( )
MONO
q w e r t y
uio

Control and Connection Panels
8 - English
T8S ToneMatch® Mixer
Control Panel
Figure 3. T8S Control Panel
q INPUT SIGNAL/CLIP LEDs (1-8) – Displays the input signal status in color:
Green: Indicates the presence of an input signal
Red: Indicates input source clipping
w TRIM CONTROLS (1-8) – Adjusts the input sensitivity for the respective channel.
e DISPLAY – Provides function menus and system information.
r EDITING CONTROLS – These three rotary/push-button controls allow you to select or adjust items/values
appearing on the display.
t CH EDIT BUTTONS (1-8) – Selects the channel you want to modify.
y FX MUTE BUTTONS (1-8) – Bypasses the Mod, Delay, and Reverb eects on the selected channel.
u VOLUME CONTROLS (1-8) – Adjusts the volume level for the respective channel.
i MUTE BUTTONS (1-8) – Silences the audio output for the respective channel.
o MASTER VOLUME CONTROL – Adjusts the overall output level.
a HEADPHONE VOLUME CONTROL – Adjust the volume level of the headphone output.
s STEREO OUTPUT METER – Allows you to visually measure your output level.
d ROTARY SELECTOR – Allows access to both global and channel-related parameters, which are adjusted
using the editing controls.
f PHANTOM POWER SWITCH – Applies +48V power to input channels 1-8. A red LED indicates that phantom
power is on.
g HEADPHONE JACK – For use with headphones only, with a minimum impedance of 24Ω.
q
w
i
o
g
a
s
d
f
u
y
t
r
e

English - 9
Control and Connection Panels
Figure 4. T8S Connection Panel
Connection Panel
q POWER SWITCH – Turns the mixer on or o.
w USB 2.0 TYPE-B – A USB interface that allows you to connect the mixer to your computer.
e USB 2.0 TYPE-A – A USB interface that allows you to stream audio from your flash drive.
r ANALOG L/R OUTPUT – Main analog output. Accepts ¼" TRS balanced and TS unbalanced cables.
t AUX OUTPUT – Four user-definable analog outputs. Can be configured for a pre-fader, post-EQ, and
eects, or post-fader output. Accepts ¼" TRS balanced or TS unbalanced cables.
y AUX IN – Analog input channels 9/10. Accepts ¼" TRS balanced or TS unbalanced cables for line-level
inputs. Can be used for stereo input signals.
u INPUTS 1-8 – Analog input channels 1-8. Accepts XLR balanced cables for microphones or ¼" TRS balanced
or TS unbalanced cables for high-impedance inputs, such as guitars.
i XLR STEREO OUTPUT – Stereo analog output. Accepts XLR balanced cables for stereo output.
o DIGITAL POWER PORT – For use w/ ToneMatch power supply (see “Connecting the ToneMatch® Power
Supply” on page 14).
Note: The T8S is NOT designed to connect digitally to the L1® Model 1S/II.
CAUTION: Although the ToneMatch port accepts a standard RJ-45 connector, do NOT connect the T8S
to a computer or phone network.
M
( )
MAIN OUT
USB AUDIO
MONO
q w e r t y
uio

10 - English
System Setup
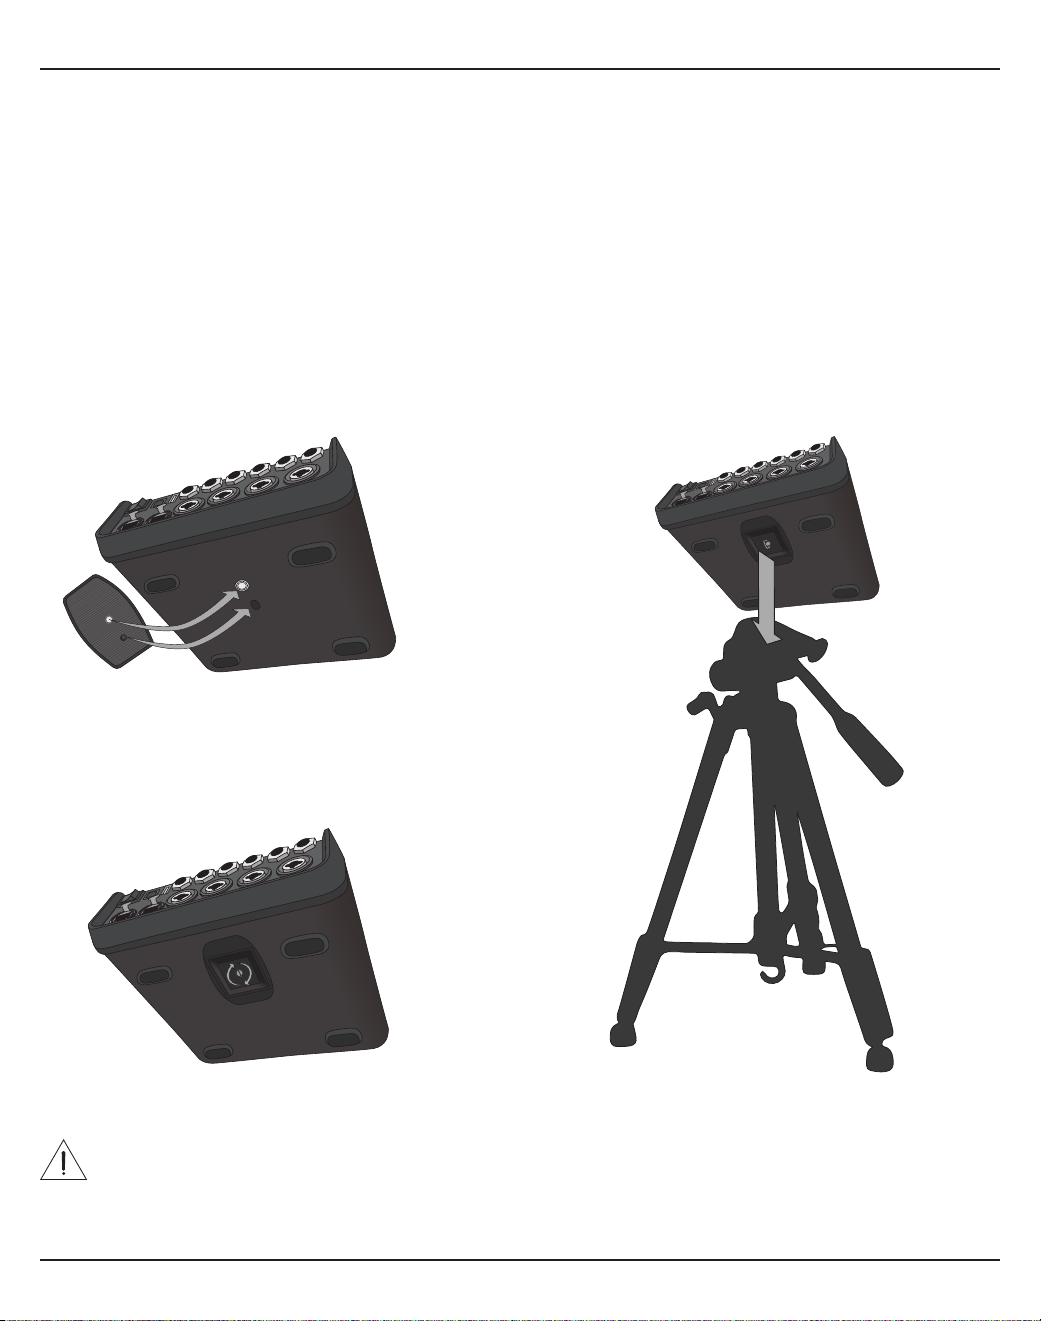
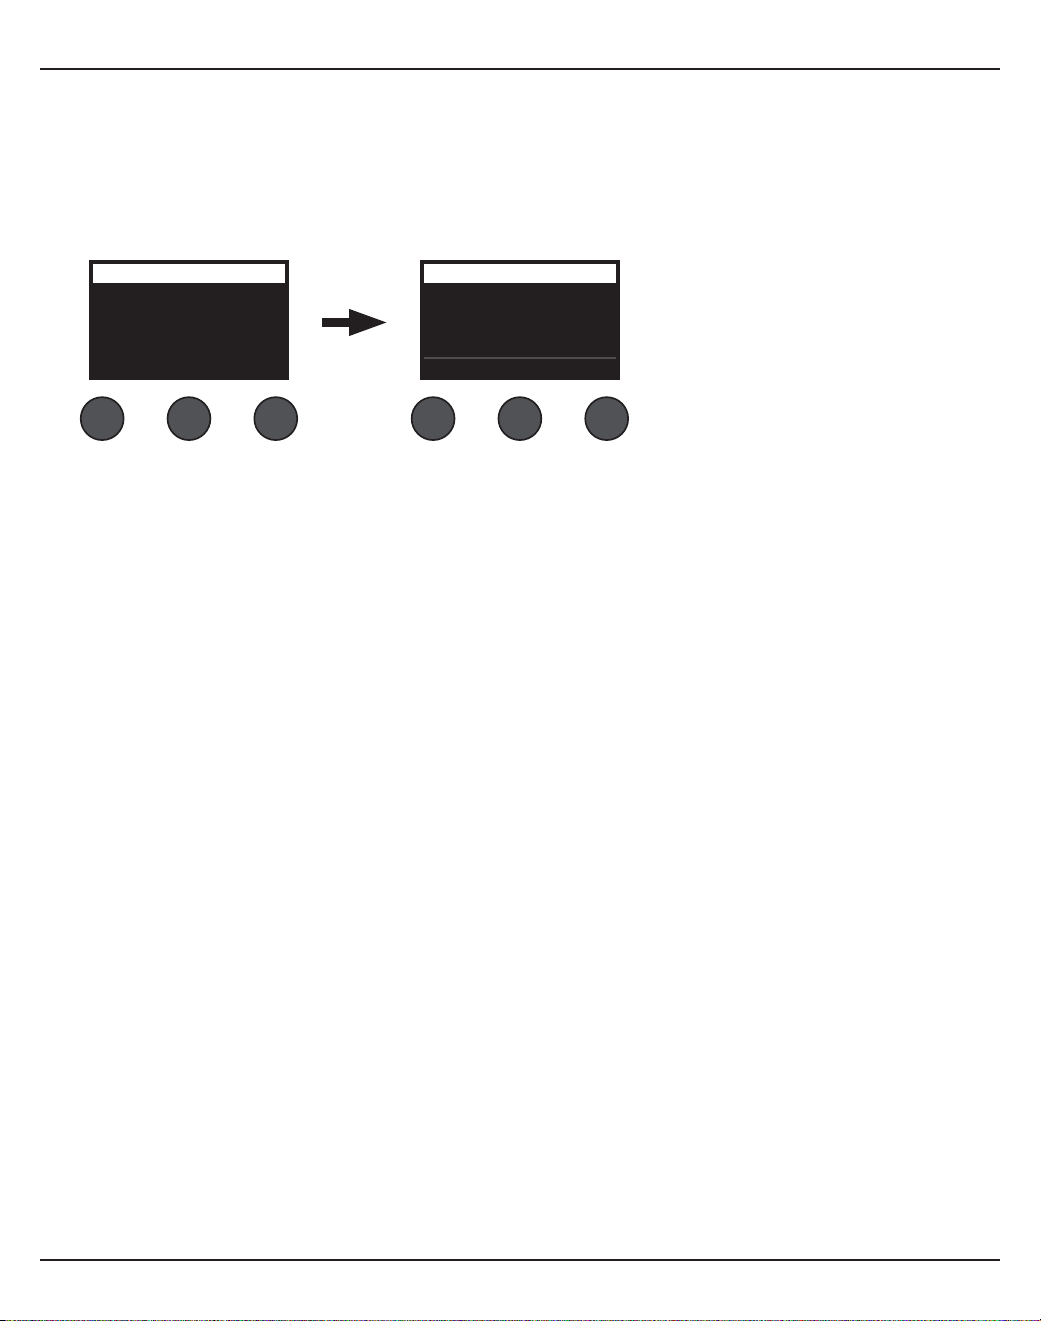
Removing/Attaching the Cover
The T4S/T8S ToneMatch® mixer comes out of the carton with a cover installed on the top panel. The cover is
designed to protect the control panel while transporting or storing the mixer.
To remove the cover:
1. Place thumbs on notches on front of cover and slide cover forward.
2. Grab cover by the back and lift to remove it.
To attach the cover:
1. Slide cover over the mixer, from back to front.
2. The magnetized cover will engage on its own and secure itself to the mixer.
Figure 5. Removing and attaching the cover
System Setup
English - 11
Figure 6. Securing bracket to T4S Figure 8. Mounting T4S to tripod stand using bracket
Figure 7. Bracket attached to T4S
Mounting Options
The T4S/T8S comes with a ¼" (6 mm) mounting screw insert. This enables it to be mounted onto a number
of available products that include a ¼" (6 mm) mounting screw, including a camera tripod stand.
Mounting the T4S/T8S on a Camera Tripod Stand
1. Extend the camera tripod legs and secure at desired height.
2. Remove the bracket from the top of the camera tripod stand and secure the bracket to the bottom of the
T4S/T8S with the screw. Make sure the small indentation on the T4S/T8S and the bump on the bracket
are aligned. See Figure 6.
3. Secure the bracket with the T4S/T8S back onto the camera tripod stand. See Figure 8.
WARNING: Do not use the ToneMatch® T4S/T8S mixer with a tripod/stand that is unstable. The mixer
is only designed for use on a ¼" screw (6 mm), and the tripod/stand must be capable of supporting
a device with a minimum weight of 1.9 kg (4.1 lbs) and an overall size of 214 x 311 x 83 mm (8.4 x 12.25
x 3.25 inches). Using a tripod/stand that is not designed to support the size and mass of the T4S/T8S
mixer may lead to an unstable and hazardous condition that could result in injury.
12 - English
System Setup
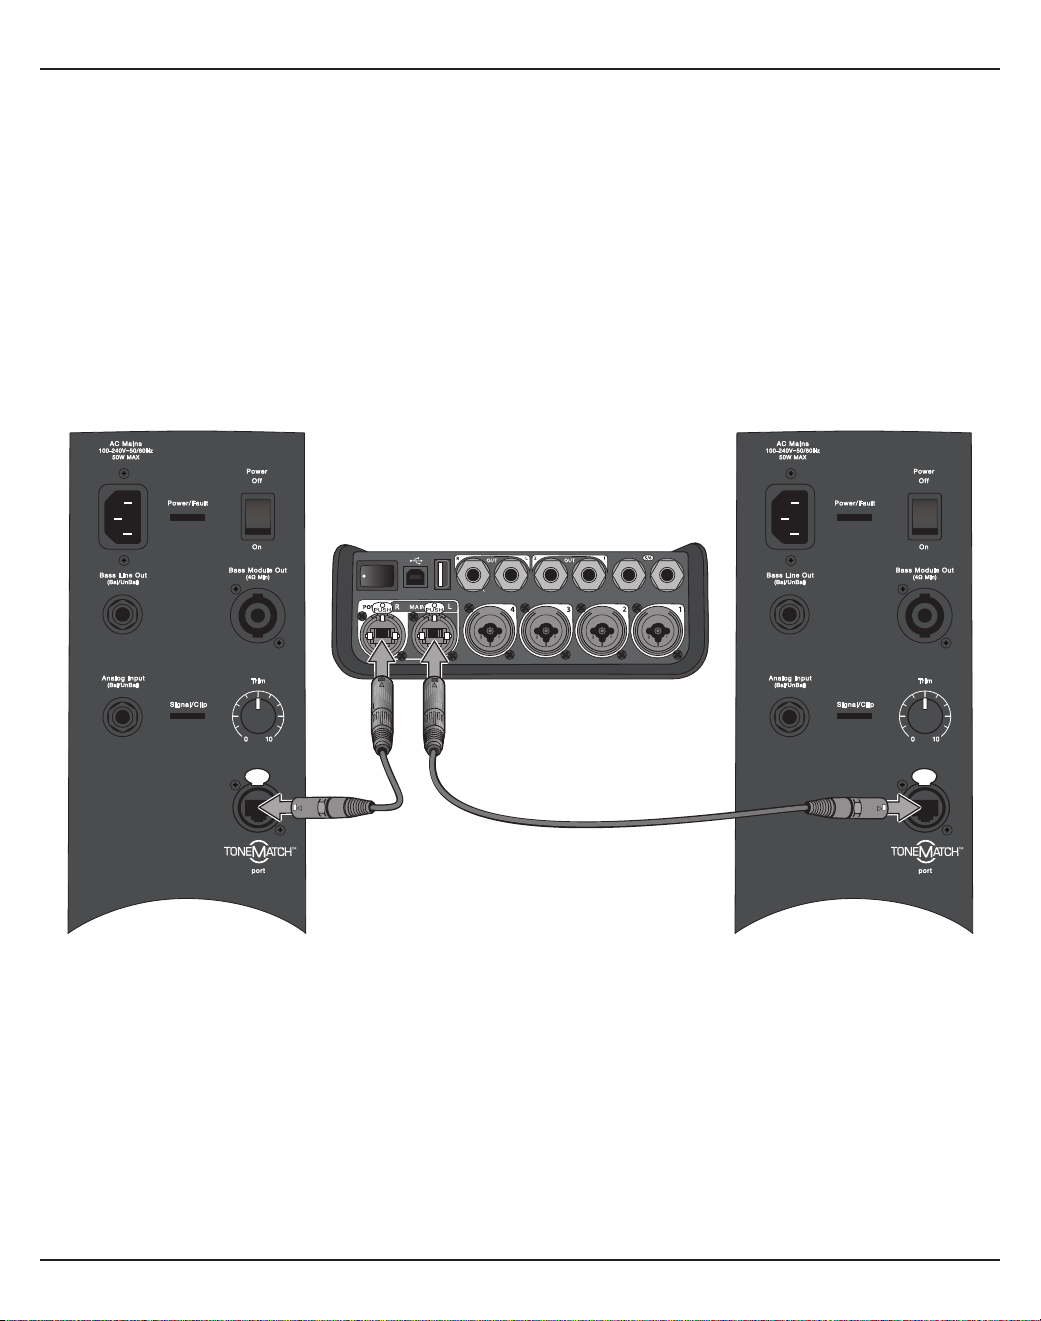
Connecting the T4S via Digital Connection
1. Make sure the L1 Model 1S/II and T4S are powered o and the T4S Master volume control is set to
minimum.
2. Plug one end of the ToneMatch® cable into the Power port/Digital Main Output R on the T4S. Plug the
other end of the ToneMatch cable into the ToneMatch port on the power stand.
Note: To connect the T4S to two L1 Model 1S/II power stands, connect a second power stand to the Digital
Main Output L port on the T4S using a ToneMatch cable.
3. Turn on the mixer and then turn on the L1 Model 1S/II power stand.
4. Connect your instruments and adjust levels. Refer to “Optimizing Input Gain and Output Volume” on
page17.
Figure 9. Two L1 model II systems connected to a T4S via digital connection
USB AUDIO
M
( )
MONO
Note: The T8S cannot be connected digitally and cannot be powered by the L1 Model 1S/II.
System Setup
English - 13
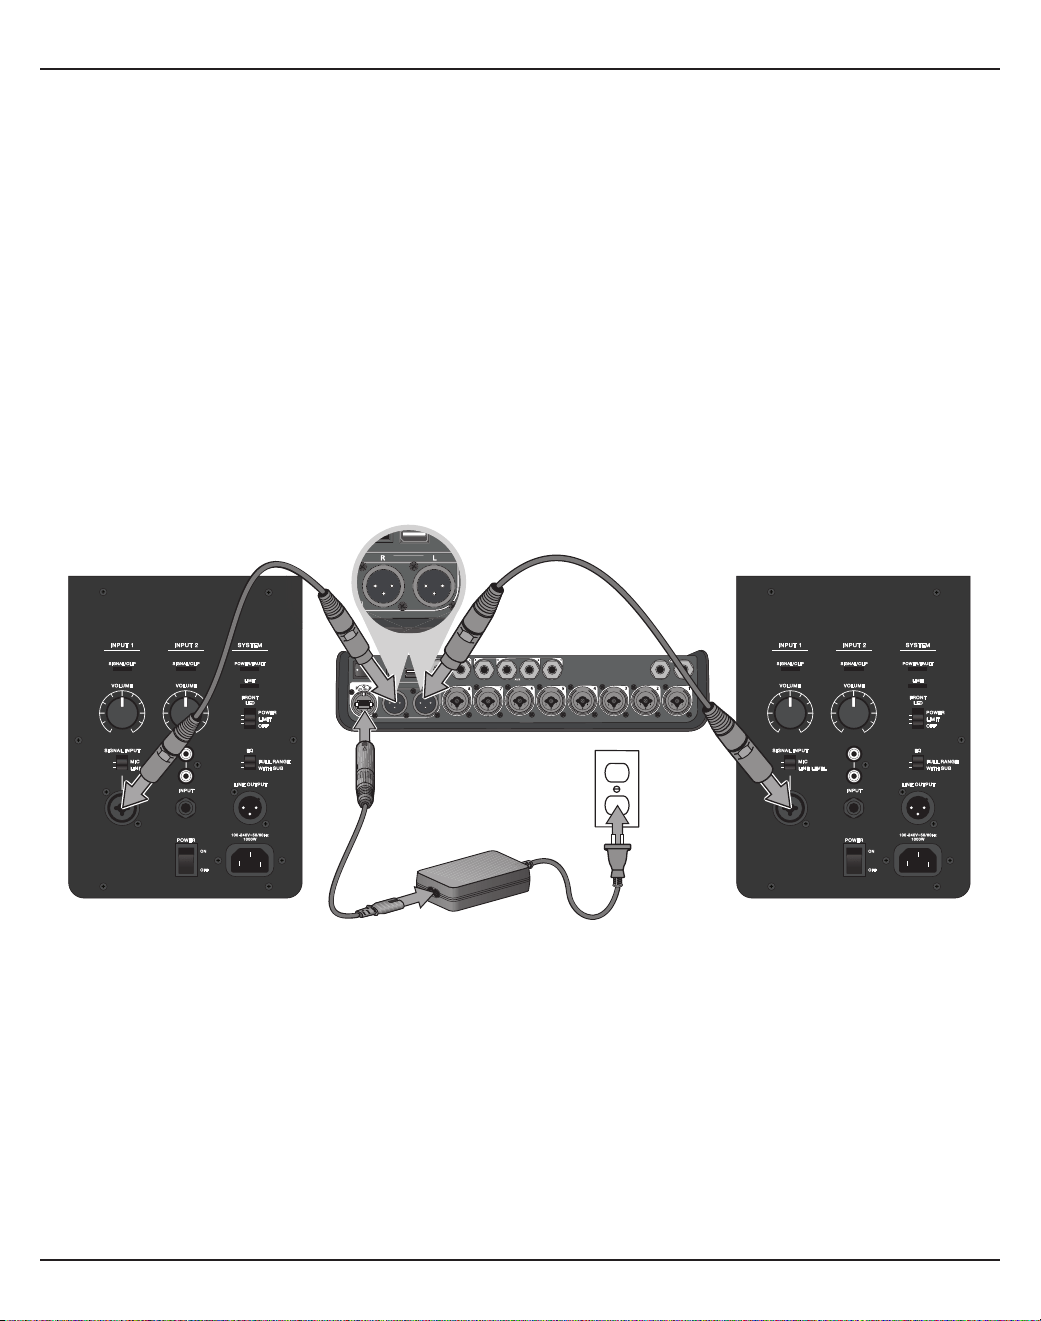
Connecting the T4S/T8S via Analog Connection
1. Make sure the device you are connecting to and the T4S/T8S are powered o and the T4S/T8S Master
volume control is set to minimum.
2. Using XLR balanced cables, connect one or two devices to the XLR Stereo Outputs of your T8S (see
Figure 10).
Note: The T4S/T8S can be connected to a device via the Analog R Output port using a ¼" TRS cable (sold
separately). Plug the other end of the TRS cable into the Analog Input port of the device. To connect the
T4S/T8S to two devices, connect a second device to the Analog L Output port on the T4S/T8S using a ¼"
TRS cable.
3. Connect a ToneMatch® power supply to the Power port of the T4S/T8S and plug it into a live AC outlet.
Refer to “Connecting the ToneMatch® Power Supply” on page14.
4. Turn on the T4S/T8S mixer and then turn on the device.
5. Connect your instruments and adjust levels. Refer to “Optimizing Input Gain and Output Volume” on
page17.
Figure 10. Two F1 systems connected to a T8S via analog connection
M
( )
MAIN OUT
USB AUDIO
MONO
(
M
US
B AUDI
O
( )
M
M
AIN
O
UT
()
M

14 - English
System Setup
Connecting the ToneMatch® Power Supply
The ToneMatch power supply provides power for the T4S/T8S mixer.
1. Plug the power supply cable into the T4S/T8S Power port.
2. Plug one end of the AC power cord into the power supply.
3. Plug the other end of the power cord into a live AC power outlet.
4. Switch the T4S/T8S power switch to the ON position.
Note: Power supply included with T8S is required for operation of the T8S. Power supply is not included with
the T4S and is not required for operation of the T4S.
Figure 11. Connecting T4S to power supply
System Setup
English - 15
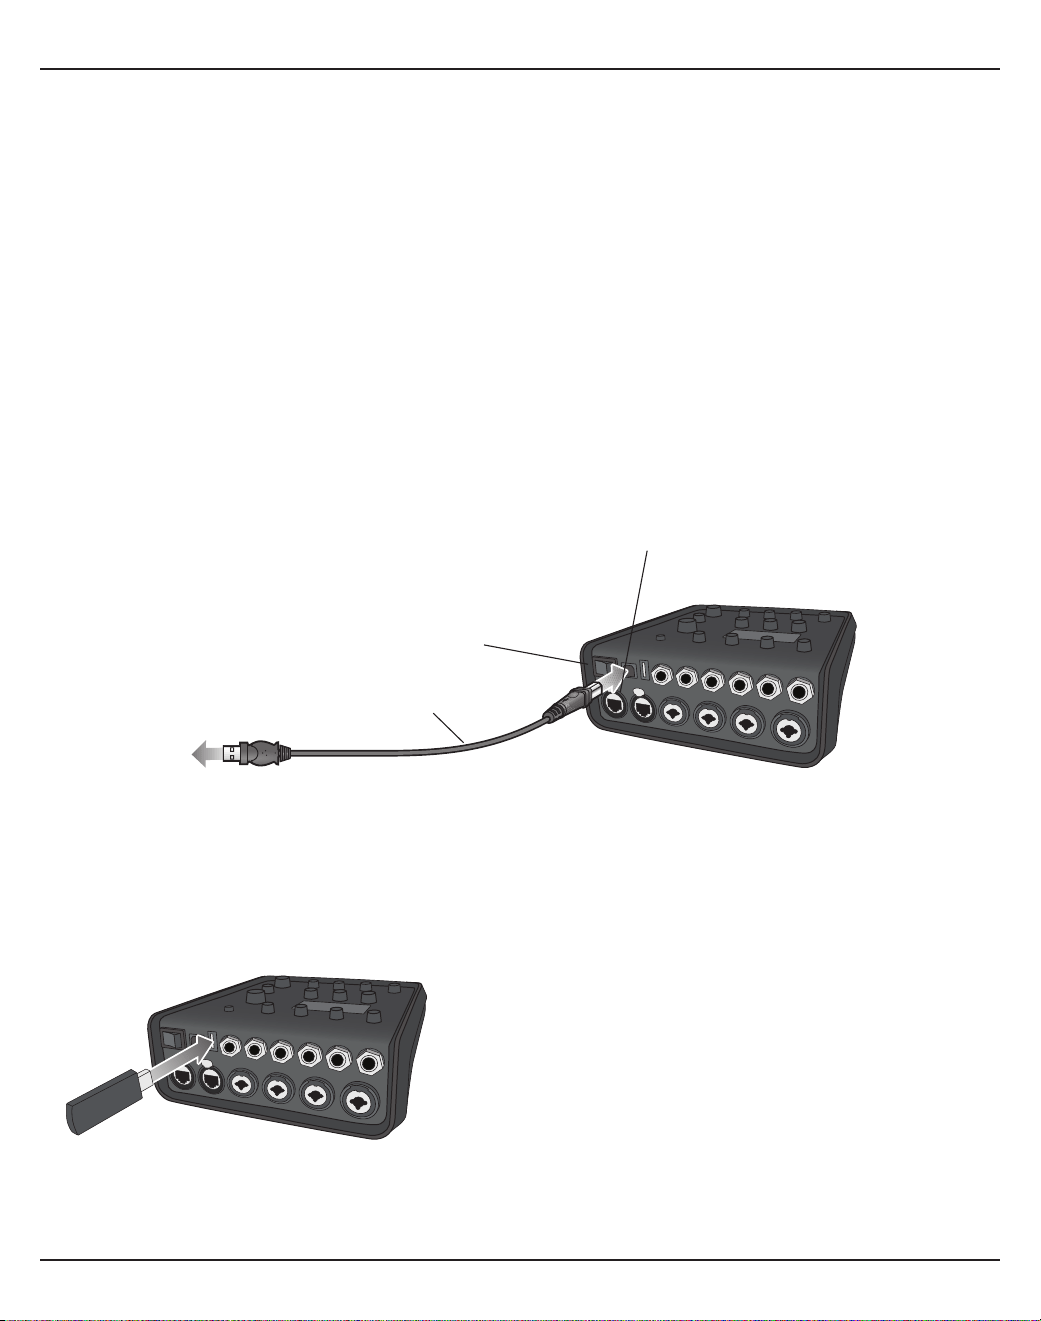
Connecting the T4S/T8S to Your Computer
The T4S/T8S provides a USB port for connecting it to a computer. This allows you to download performance
scenes to a computer or install system updates. Visit www.Bose.com/livesound for details on updating your
system.
When connected to a computer, you also can use the T4S/T8S as a general-purpose USB audio device for
recording/playback.
Note: The T4S/T8S operates at 48 kHz/24-bit. When using the T4S/T8S with recording software, you may
need to configure the software settings for 48 kHz/24-bit operation.
Note: Connecting the T4S/T8S to your computer requires a USB cable (Type A to Type B, not supplied).
1. Connect the mixer to a power source (ToneMatch® power supply for T4S/T8S or an L1 Model 1S/II for T4S only).
2. Plug one end of the USB cable into the mixer's USB 2.0 Type-B port (Figure 12).
3. Plug the other end of the USB cable into a USB port on your computer.
4. Turn on the mixer.
Figure 12. T4S-to-USB connection
ToneMatch port – To an L1 Model 1S/II
system or an ToneMatch power supply
Power switch
USB cable
(Type A to Type B)
To computer
USB port
Connecting a Flash Drive to the T4S/T8S
Plug in a USB 2.0/3.0 flash drive loaded with WAV/MP3 files into the USB 2.0 Type-A port to playback audio
tracks to your mixer.
Figure 13. Connecting a flash drive to the T4S

16 - English
Operation
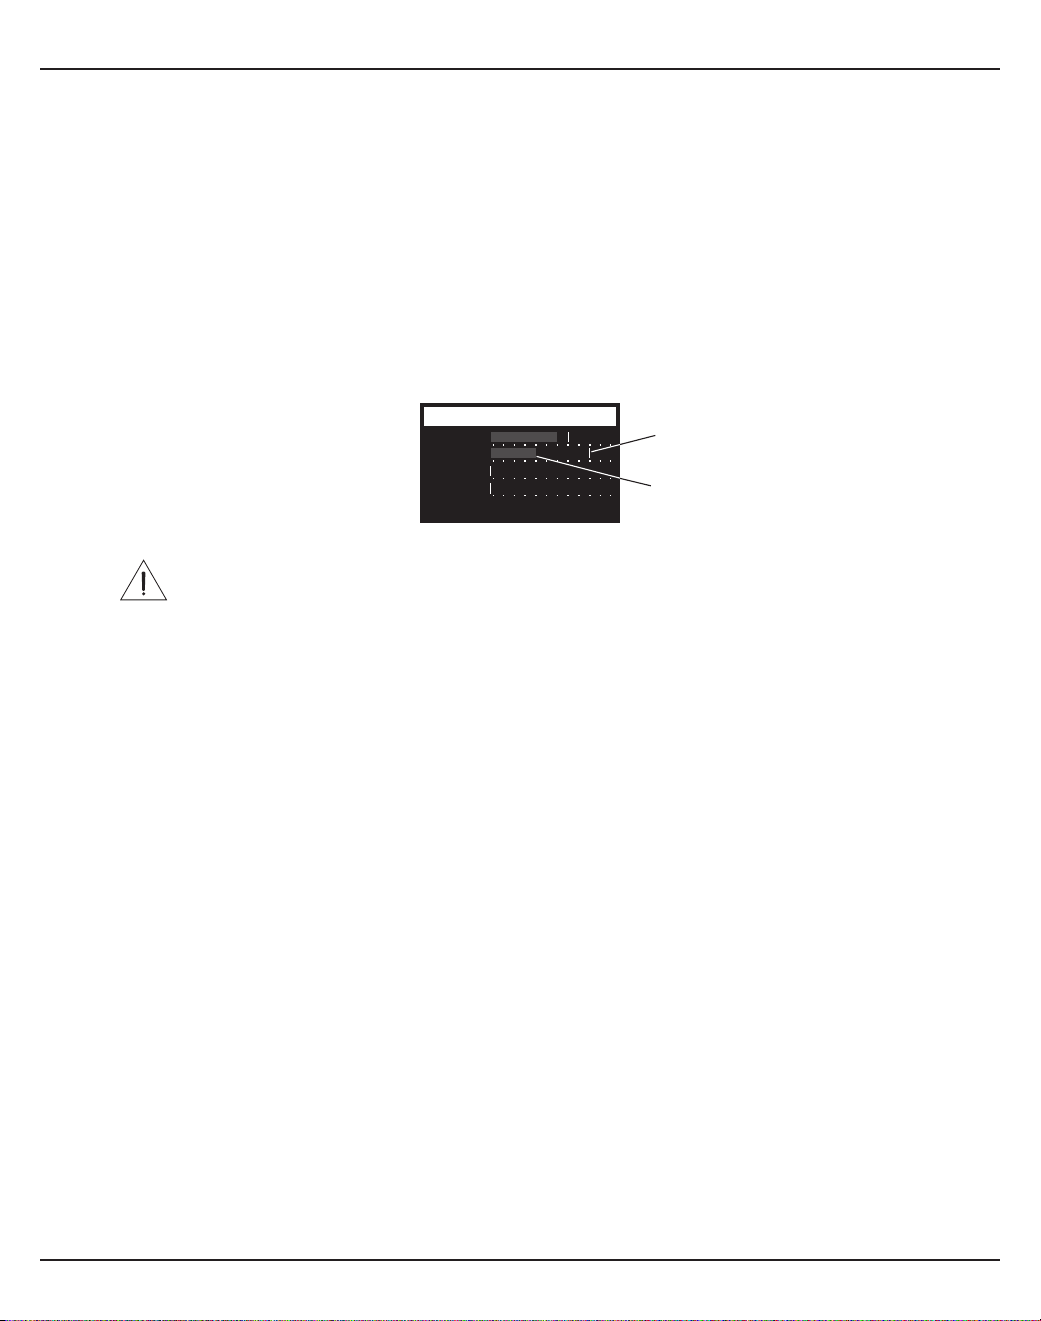
Reading the T4S/T8S Display
The display provides you with an interface for operating the mixer. Figure 14 shows a sample of display
information and the basic operating conventions. The content of the display depends on the rotary selector
position.
Figure 14. Sample display and operating conventions
Ch 1
Type Tim
eM
ix
Digital 250ms 30%
Delay
Fdbk.
All Channels
*Bose Scene 01
Load Shared Save
Scenes
Identifies the
selected channel
Indicates that pressing the control
toggles between parameters
Displays visual representation of
the value of the parameter
Identifies the function accessed by
the rotary selector
Parameter names and
their settings/values
Rotary/pushbutton
controls
This symbol indicates
that rotating the control
changes the setting.
Asterisk indicates that
the loaded scene was
modified
Indicates that pressing
the control activates the
function
Operation
English - 17
Optimizing Input Gain and Output Volume
Getting a quality volume level from your system relies on the combined adjustments of input channel gain,
master volume, and channel volume. Do the following for each channel used.
1. Make sure the Master volume, Trim, and channel volume controls are set to minimum.
2. Adjust input channel Trim.
A. If applicable, adjust the volume of your instrument/source to the desired level.
B. Play your instrument/source at a performance level.
C. Slowly turn the Trim control clockwise until the signal/clip indicator glows green. If the indicator
flashes red or glows steady red, turn the Trim control counterclockwise to decrease the level.
D. Use the input level meters (page 28) in the Prefs menu to check your input levels
CAUTION: If you are using a device that requires phantom power (+48V), such as a condenser
microphone, depress the Phantom power switch before adjusting the Trim control.
Note: The input level meter in the Prefs menu can be helpful when adjusting the input Trim level (see
page 28).
3. Set the Master volume control at the 12 o’clock position.
4. Slowly turn the channel volume control clockwise until the volume reaches the desired level.
Input LevelPreferences
Ch 3
Ch 1
Ch 2
Ch 4
Menu Aux InReset
Peak level indicator
Input level indicator

18 - English
Operation
Using the Master Volume Control
The Master volume control adjusts the overall output level of the T4S/T8S ToneMatch® output and analog
Master output. During normal operation, it is recommended to keep the Master control set at the 12 o’clock
position. Once you have set volume levels for all channels, you can adjust the Master volume up or down from
this position.
Muting a Channel
The Mute buttons silence the audio for the respective channel.
• To mute a channel, press the Mute button once. The Mute button glows white to indicate that the channel is
muted. “CH MUTE” will appear on the display for the respective channel.
• Press the Mute button again to unmute the channel. The Mute button dims to indicate that the channel is not
muted.
Muting Channel Eects
The FX Mute buttons mute only the Mod, Delay, and Reverb eects on the respective channel. Muting eects
does not bypass ToneMatch presets, zEQ, Para EQ, and Comp/Gate settings.
• To mute eects on a channel, press the FX Mute button once. The FX Mute button glows white to indicate
that the channel eects are muted. “FX MUTE” will appear on the display for the respective channel.
• Press the FX Mute button again to unmute the channel eects. The FX Mute button dims to indicate that the
channel eects are not muted.
Ch 1
Category
Utility
ToneMatch
CH MUTE
Flat
Preset
Ch 1
Category
Utility
ToneMatch
FX MUTE
Flat
Preset

Operation
English - 19
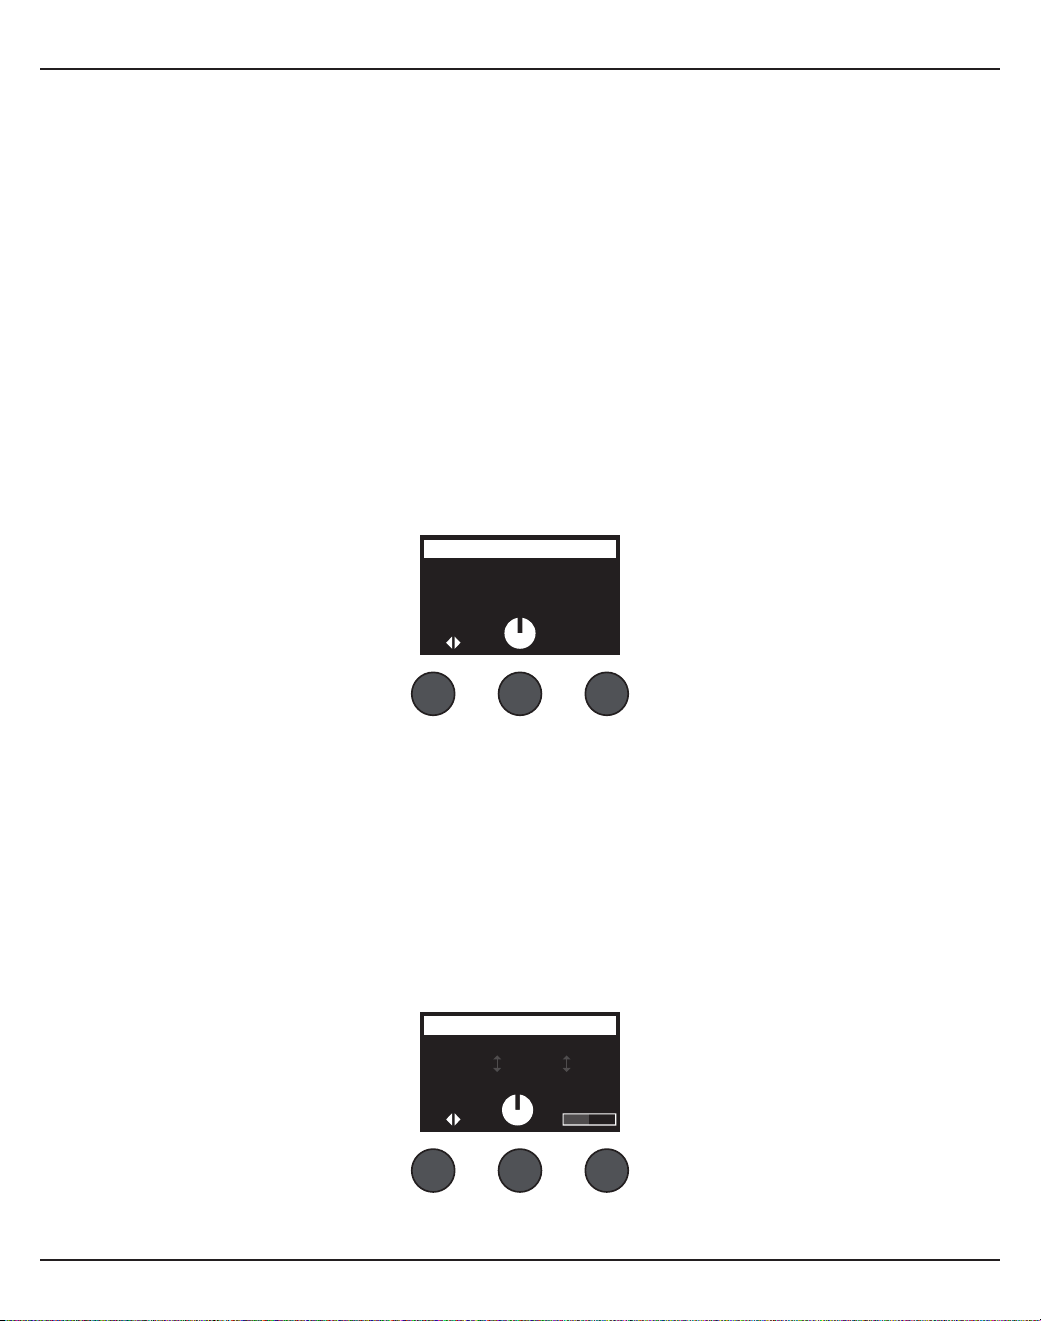
Using the Rotary Selector
The rotary selector provides access to the functions of the ToneMatch® mixer output. Figure 15 provides a
summary of the nine channel-related functions and the three global functions. The following pages describe
how to adjust each function.
Figure 15. Rotary selector
Channel Functions
q Pan/Aux – Provides access to pan, aux ins, and aux outs.
w Tuner – Provides tuning information for an instrument playing into the selected channel.
e ToneMatch – Provides access to proprietary ToneMatch presets designed for specific instruments and
microphones.
r zEQ – As part of the selected ToneMatch preset, zEQ provides controls to adjust low/mid/high frequencies
that are within the range of your instrument or microphone.
t Para EQ – Provides parametric EQ controls per channel.
y Comp/Gate – Provides access gate, compression, limiter, de-esser, and kick drum presets with adjustable
parameters.
u Mod – Provides access to several modulation eects such as chorus, flanger, phaser, and tremolo.
i Delay – Provides access to three types of delays and tap-tempo delay.
o Reverb – Applies reverb to a selected channel and can be sent to mains or aux.
Global Functions
a Reverb Type – Applies a selected type of reverb to all master output channels or aux sends.
s Prefs – Allows access to several system utilities.
d Scenes – Allows you to save and load performance scenes (a snapshot of the complete state of the unit).
e
o
y
d
r
a
u
q
t
s
i
w
20 - English
Operation
Editing the Sound of a Channel
The CH Edit functions allow access to settings that aect selected channels. The CH Edit functions are Pan/
Aux, Tuner, ToneMatch®, zEQ, Para EQ, Comp/Gate, Mod, Delay, and Reverb.
To edit a channel:
1. Press the CH Edit 1, 2, 3, 4, (T4S and T8S) 5, 6, 7, or 8 (T8S only) button. The selected channel will be
viewable in the upper-left corner of the display.
2. Select one of the CH Edit functions using the rotary selector.
3. Adjust the settings for that function using the following instructions.
Note: You can only edit one channel at a time. Pressing a CH Edit button enables editing for the selected
channel only.
Using the Pan/Aux Functions
Use the Pan/Aux function to route audio to either the master out L or R, control aux in, or aux send.
Using Pan
Use the Pan control to send each channel to its separate space in a stereo mix.
1. Press or rotate the left editor control and select Pan from the menu.
2. Rotate the Pan control to adjust the line output from L to R.
Aux Input 5/6 (9/10)
Use Aux Input 5/6 (9/10) to input a line-level stereo source, such as a mobile device.
1. Press or rotate the left control and select Aux In 5/6 from the menu.
2. Rotate the 5 Lvl or 6 Lvl control to adjust the signal level of either channel 5 or channel 6.
3. Press the 5 Lvl to switch to 5 Pan; press the 6 Lvl control to switch to 6 Pan. Rotate the Pan control to
adjust the pan from L to R.
Ch 1
Menu Pan
Pan
Pan
Ch 1
Menu 5 Pan 6 Lvl
Aux In 50%
Aux Input 5/6
6 Pan5 Lvl

Operation
English - 21
Routing Input Signals to the Aux Outputs
The Aux function allows you to route signals to two Aux outputs (T4S only) or four Aux outputs (T8S only)
for various signal processing, recording, and sound reinforcement applications. The signal level is adjustable
for each of the available Aux outputs:
Note: To mute the Aux output, press the Level control. Press it again to unmute.
1. Press or rotate the Menu control and select an Aux Send.
2. Rotate the Level control to adjust the signal level of the selected channel.
3. Rotate the Tap control to scroll through the tap menu and highlight the desired tap point.
A. Dry: After Preamp – The completely dry (no processing) signal is routed directly from the preamp
stage.
B. Pre: With EQ & Fx – The signal is routed from the preamp stage with applied processing.
C. Post: After Fader – The signal is routed after the Channel volume control with applied processing.
4. Press the Select control to select the tap point, or press the Cancel control to exit with no change. The
name of the currently selected tap point appears in bold type.
Ch 1
Menu Tap
Aux
1P
re
Level
50%
Aux 1 Output
Using the Tuner
An independent tuner is available on each input channel. The display indicates the note being played at the
bottom of the screen. As you tune, a pitch indicator appears on the display, showing you whether the note is
sharp or flat. Adjust the pitch of your instrument so the cursor aligns itself with the center of the screen.
Note: For silent tuning, press the Mute button for the applicable channel.
Use the Transpose feature to change the reference pitch up or down by two half steps. Or precisely dial in
your tuning using the reference pitch.
Ch 1
b#
A3
Tuner
Pitch indicator
22 - English
Operation
Ch 1
Category
Vocal Mics
ToneMatch
Handheld Mics
Preset
Handheld Mics
Headworn Mics
High Gain: Bright
High Gain: Normal
SelectCancel
Ch 1
Category
Utility
ToneMatch
Flat
Preset
Ch 1
Category
Vocal Mics
ToneMatch
Headworn Mics
Preset
Vocal Mics
Utility
Electric Guitars
Acoustic Guitars
Select Cancel
Rotate Press
PressRotate
Selecting a ToneMatch® Preset
The ToneMatch function allows you to select a ToneMatch preset for your instrument or microphone.
This proprietary technology optimizes system equalization to preserve the natural sound of your specific
instrument or microphone. They are organized into categories and independently selected for each channel.
1. Rotate the Category control to access the list of categories and highlight your choice.
2. Press the Select control to select your choice, or press the Cancel control to exit the list with no change.
3. If you pressed Select, rotate the Preset control to access the list of presets and highlight your choice.
4. Press the Select control to select your choice, or press the Cancel control to exit the list with no change.
Ch 1
Low Mid
Handheld Mics
High
0.0db 0.0db 0.0db
zEQ
Adjusting zEQ
The zEQ function is part of the ToneMatch preset technology. It allows you to adjust low/mid/high
frequencies that are within the range of your instrument or microphone.
To adjust zEQ, rotate the control under the corresponding frequency band.
Note: To bypass an individual frequency band, press the corresponding control. Press it again to activate.
Operation
English - 23
Adjusting Para EQ
The Para EQ function provides three parametric equalizations centered on a user-specified frequency within
the range of 50 Hz to 16 kHz.
Note: To bypass the Para EQ settings, press the Select control. Press it again to activate.
1. Press or rotate the Select control and select Para EQ band 1-3.
2. Rotate the Level control to adjust the boost/cut level from -15 dB to +15 dB.
3. Rotate the Freq control to adjust the center frequency from 50 Hz to 16 kHz.
4. Press the Freq control to switch to Width. Rotate the Width control to adjust the width of the bell curve
around the center frequency from 0.20 octave to 5.00 octave.
Ch 1
Select Level
B3
Freq
PEQ 1 -3.4dB 250.0Hz
Parametric EQ
Width
Using Compressor/Gate Functions
The Comp/Gate function provides access to gate, compression, limiter, de-esser and kick drum presets with
adjustable parameters.
Note: To bypass the Comp/Gate settings, press the Type control. Press it again to activate.
Note: Only one eect per channel.
1. Rotate the Type control to access the list of Comp/Gate eects and highlight your choice:
A. Compressor 1: Light – Compressor featuring a preset low-compression ratio with variable threshold
and gain parameters. Works well as a general-purpose compressor for most instruments and
microphones that require minimal level control.
B. Compressor 2: Medium – Compressor featuring a preset moderate compression ratio with variable
threshold and gain parameters. Works well with basses, guitars, keyboards, and vocals requiring
subtle level control.
C. Compressor 3: Heavy – Compressor featuring a preset high compression ratio with variable threshold
and gain parameters. Works well with loud instruments (like horns and drums), as well as strong
vocals that require more aggressive level control.
D. Limiter – Hard limiter featuring a preset ratio (∞:1) with variable threshold and gain parameters. Works
well with very loud instruments, such as drums, to prevent signal peaks from overloading the channel.
Ch 1
Type Thresh Speed
Gate -80.0dB 50%
Comp/Gate
Ramp

24 - English
Operation
Using the KickGate
The KickGate is a Bose® proprietary technology that allows you to raise the level of a kick drum channel while
eliminating the risk of feedback from the microphone. Two KickGate settings are available in the Comp/Gate
menu.
1. Connect the appropriate type of microphone.
2. Select an appropriate ToneMatch® preset.
3. Adjust the channel input Trim control until the hardest kick drum hits turn the input channel LED red, then
continue to adjust the control until the LED turns green. This optimizes your channel input Trim level.
4. Select Comp/Gate with the rotary selector.
5. Rotate the Type control to scroll down the list, highlight KickGate 1: Regular or KickGate 2: Fast, and
press Select. Choose KickGate 2 when using a double bass drum pedal.
6. While playing the kick drum, increase the volume to the desired performance level.
7. Play the kick drum at the softest level you intend to use in the performance and check that you can hear it.
8. While playing softly, increase the Thresh level until some of the kick drum hits get cut o. Then lower the
Thresh level by 3 dB.
9. While playing the kick drum normally, rotate the Tight control counter-clockwise to reduce the tightness
and add more “boom” to the sound. Tightness can be adjusted from 0% (slowest) to 100% (fastest).
E. De-Esser – Side-chained compressor featuring a preset compression ratio with variable threshold and
gain parameters. Designed to reduce sibilance on vocals.
F. Noise Gate – Noise gate with a fast preset attack time, variable threshold, and variable speed (release
time). Well-suited for eliminating unwanted noise from microphones and instruments.
G. KickGate 1: Regular – Gate featuring a preset attack time, and variable threshold and tightness
(release time) parameters. This is a Bose® proprietary technology designed specifically for kick drums.
This robust gate provides maximum gain before feedback, making your kick drum as loud as possible
through an PA system.
H. KickGate 2: Fast – Same as KickGate 1 but adjusted for faster tempos. Select this setting if you are
using a double bass drum pedal.
2. Press the Select control to select your choice, or press the Cancel control to exit the list with no change.
3. Compressor 1-3, Limiter, De-Esser: Rotate the Thresh control to adjust the input threshold (trigger) level
from –50 dB to 0 dB. Rotate the Gain control to adjust the gain from 0 dB to 30.0dB. The gain bar above
the control shows the amount of gain reduction. This display helps in setting the threshold.
Noise Gate: Rotate the Thresh control to adjust the input threshold (trigger) level from –90 dB to –30 dB.
Rotate the Speed control to set the gate closing speed to any value from 0% (fastest) to 100% (slowest).
Rotate the Ramp control to adjust the slope of the gate from 0% (horizontal) to 100% (vertical).
KickGate 1-2: Rotate the Thresh control to adjust the input threshold (trigger) level from –20dB to 0 dB.
Rotate the Tight control to adjust the tightness (how quickly the gate closes) from 0% (slowest) to 100%
(fastest).
Operation
English - 25
Using Modulation Eects
The Mod function allows you to apply modulation eects.
Note: To bypass the Mod settings, press the Type control. Press it again to activate.
1. Rotate the Type control to access the list of modulator types and highlight your choice:
A. Chorus 1: Brite – Wet, shimmering chorus that works well with acoustic instruments. Includes
adjustable mix, depth, and speed parameters.
B. Chorus 2: Warm – Similar to Chorus 1, but with a little less high frequencies. Includes adjustable mix,
depth, and speed parameters. Works well with electric guitars/basses.
C. Chorus 3: Dark – Similar to Chorus 2, but with less high frequencies for a darker tone. Includes
adjustable mix, depth, and speed parameters. Works well with electric guitars/basses.
D. Flanger 1: Tape – Tape-style flanger with no feedback. Includes adjustable mix, depth, and speed
parameters. Works well as an eect on electric guitars/basses.
E. Flanger 2: Feedback – Same as Flanger 1, but with preset Feedback eect.
F. Phaser 1: Stomp – Classic “stompbox”-style phaser. Features a preset wide sweep with variable speed
and feedback parameters. Works well as an eect on electric guitars/basses and keyboards.
G. Phaser 2: Rack – Classic “rack”-style phaser. Features a positive mix type with variable speed and
feedback parameters. Works well as an eect on electric guitars/basses and keyboards.
H. Phaser 3: Warm – Vintage-style phaser. Features a positive mix type with variable speed and
feedback parameters. Works well as an eect on electric guitars/basses and keyboards.
I. Phaser 4: Brite – Phaser with no bass. Features a positive mix type with variable speed and feedback
parameters. Works well as an eect on electric guitars and keyboards.
J. Tremolo – Vintage-style tremolo eect with variable speed and depth parameters. Works well as an
eect on guitars, keyboards, and harmonica.
2. Press the Select control to select your choice, or press the Cancel control to exit the list with no change.
3. Chorus 1-3, Flanger 1-2: Rotate the Mix control to adjust the desired mix of dry signal to wet signal
(modulator-processed). Rotate the Depth control to adjust how much the pitch varies from the original
input signal. Press the Depth control to access the Speed parameter. Rotate the Speed control to adjust
how quickly the pitch modulates.
Phaser 1-4: Rotate the Speed control to adjust how quickly the pitch modulates. Rotate the Fdbk. control
to adjust how much the modulation reverberates.
Tremolo: Rotate the Speed control to adjust how quickly the volume modulates. Rotate the Depth control
to adjust how much the volume varies from the original input signal.
Ch 1
Type Mix Depth
Chorus1 50% 50%
Modulator
Speed
26 - English
Operation
Ch 1
Type Tim
eM
ix
Digital 250ms 30%
Delay
Fdbk.
Adding Delays
The Delay function allows you to apply a digital-, analog-, or tape-style delay.
Note: To bypass the Delay settings, press the Type control. Press it again to activate.
1. Rotate the Type control to access the list of Delay types and highlight your choice.
A. Digital Delay – Straight digital delay eect where the repeats remain uncolored. Features adjustable
mix, time, and feedback parameters. Works well with guitars, drums, and vocals.
B. Analog Delay – Classic analog delay eect where the repeats continuously deteriorate. Features
adjustable mix, time, and feedback parameters. Works well with guitars, drums, and vocals.
C. Tape Delay – Vintage-style tape delay eect where the repeats deteriorate even more than Analog
Delay. Well-suited for guitars, horns, harmonica, and vocals.
2. Press the Select control to select your choice, or press the Cancel control to exit the list with no change.
3. Rotate the Time control to adjust the amount of the delay time in 5 ms increments. Press the Time control
to tap your desired delay tempo.
4. Rotate the Mix control to set the desired mix of dry signal (0%) to wet signal (100%).
5. Press the Mix control to access the Fdbk. setting. Rotate the Fdbk. control to adjust the amount of delay
feedback.
Adding Reverb
The Reverb function applies a user-adjustable amount of reverb to the selected channel. To select the type of
reverb, see “Selecting a Reverb Type” on page 27.
Note: To mute the Reverb eects, press the Mix control. Press it again to unmute.
1. Press or rotate the Menu control and select which output to send the reverb too.
2. Rotate the Mix control to adjust the desired mix of dry signal (0%) to wet signal (100%).
3. Rotate the Bright control to equalize the high frequencies of reverb applied to the selected channel.
Ch 1
Mix Bright
50% 50%
Reverb
Menu
Main
Operation
English - 27
Using Global Functions
The Global functions allow access to settings that aect the overall operation of the mixer and all of its
channels.
Selecting a Reverb Type
The Reverb Type function allows you to select the type of reverb that is applied to all input channels. The
decay time (Time) and balance (Bal) are adjustable. Balance controls the ratio of early-to-late reflections.
Note: To mute the Reverb, press the Type control. Press it again to unmute.
1. Select Reverb Type with the rotary selector.
2. Press or rotate the Menu control and select which output to send the reverb too. You can send a dierent
reverb type to either the Main or Aux sends.
3. Rotate the Type control to display the list of reverbs:
A. Plate – Creates the ambiance of a typical studio plate reverb. Features adjustable time and balance
(ratio of early/later reflections) parameters.
B. Small – Creates the ambiance of a small-sized space. Features adjustable time and balance (ratio of
early/later reflections) parameters.
C. Medium – Creates the ambiance of a medium-sized space. Features adjustable time and balance
(ratio of early/later reflections) parameters.
D. Large – Creates the ambiance of a large-sized space. Features adjustable time and balance (ratio of
early/later reflections) parameters.
E. Cavern – Creates the ambiance of an extremely large space. Features adjustable time and balance
(ratio of early/later reflections) parameters. A unique and interesting reverb eect.
4. Rotate the Type control to scroll through the reverb list and highlight the desired reverb type.
5. Press the Type control to select.
6. Rotating the Time control controls the decay time of the selected reverb model from its minimum decay
time to its maximum decay time. At 0%, the decay time will be at minimum and will simulate the smallest
room size available to the currently selected reverb type. At 100%, the decay time will be at maximum
and will simulate the largest room size available to the currently selected reverb type. Each reverb type
has their own usable range of decay times that work best for the selected model type. The Reverb
Decay parameter allows you to adjust the reverb time between the specific ranges that work best for the
selected reverb model type.
7. Press the Time control to switch to Bal. Rotate the Bal. control to adjust the early-to-late reflection ratio
(0% = all early reflections, 100% = all late reflections).
All Channels
Menu Type Bal.
Main Medium 50%
Reverb Type
Time
28 - English
Operation
Using the Prefs Utilities
The Prefs function allows access to several system utilities.
1. Select Prefs with the rotary selector.
2. Rotate the Menu control to scroll through the list and highlight the desired utility. Press the Select control
to display the utility:
• Status – Displays the eects assigned to input channels (viewable only).
• Input Level – Displays input level meters with peak signal indicators for all input channels. Press the
Reset control to reset all peak signal indicators. This display is helpful in setting the channel input trim
level (see “Optimizing Input Gain and Output Volume” on page 17). Press the Aux In control to monitor
the level of the auxiliary inputs (For the T8S only, press the Ch 5-8 control to monitor the level of
Inputs5-8).
• Output Level – Displays output level meters for all outputs: Main L, Main R, USB L, and USB R. Press the
Aux control to monitor the level of the auxiliary outputs.
Output Level Preferences
USB L
Main L
Main R
USB R
Menu Rese
tA
ux
Status
Ch 1 Mod
Mod
Mod Dly
Cm
pR
ev
Rev
Rev
CmpCh 2
Ch 3
Ch 4
Menu
Preferences
Cmp = Compressor/Gate
Mod = Modulation
Dly = Delay
Rev = Reverb
Input LevelPreferences
Ch 3
Ch 1
Ch 2
Ch 4
Menu Aux InReset
Peak level indicator
Input level indicator

Operation
English - 29
• Master Out EQ – The Master Out EQ is a 6-band graphic equalizer put on the master mix output. With
the middle control, select the frequency range you want to boost or attenuate and use the Level control
to adjust the level +/–18dB.
• USB B to PC – Allows you to send a selected source to your computer through USB left and right
output channels. The source choices are Ch1-4 (Ch5-8 for T8S only), Aux In, Master, or Aux Out 1-2
(AuxOut 3-4 for T8S only).
• USB B from PC – Allows you to send USB left and right channels from your computer to a selected
mixer destination (None, Aux In, or Master).
• USB A-Playback – Attach a USB Type-A flash drive to play any WAV/MP3 files stored to the flash drive.
Using the menu, select the folder that contains the WAV/MP3 files; select the file you want to play and
adjust the level by rotating the Level control.
+18
+12
+6
0
-6
-12
-18
125HzMenu
Master EQ Preferences
Level
1. Rotate the Left/Right control to highlight a source.
2. Press the Select control to select the source, or press the Cancel
control to exit with no change.
3. Rotate Menu to return to the Prefs menu list.
Left : Master
Right : Master
LeftMenu
USB to PC Preferences
Right
Left : Master
Right : Master
LeftMenu
USB from PC Preferences
Right
1. Rotate the Left/Right control to highlight a destination.
2. Press the Select control to select the source, or press the Cancel
control to exit with no change.
3. Rotate the Menu control to return to the Prefs menu list.
Tomorrow Is Too late.wav
Sarah.wav
Mistakes for Love.mp3
Sun Behind the Clouds.wav
Hey God Maker. mp3
LevelSelectMenu
30 - English
Operation
• Versions – Displays revision levels of DSP Firmware.
• ToneMatch – Displays the list of ToneMatch preset banks stored in the T4S/T8S. Refer to
www.Bose.com/livesound for the latest preset banks.
• L1 Power Stand – When connected to an L1® Model 1S/II power stand, Connected appears on the
screen.
Versions
T4S v1.0.0
Menu
Preferences
C: Ovation Guitars
B: Audix Mics.
A: Taylor Guitars
Menu
ToneMatchPreferences
Connected
Menu
L1 Stand Preferences
Loading and Saving Scenes
A scene is a snapshot of the state of the T4S/T8S ToneMatch® mixer.
• A scene remembers all ToneMatch mixer settings, and the status of the Mute, FXMute, and CH Edit buttons.
• A scene does not remember channel trim, channel volume levels, Master volume level, headphone level or
the Phantom power switch position.
All Channels
Singer/Songwriter
Load Shared Save
Scenes

Operation
English - 31
The T4S/T8S includes three types of scenes:
• (5) Bose scenes: Read-only factory-preset scenes. You cannot edit and overwrite them.
• (10) User Scenes: User-definable scenes for saving and recalling all your favorite settings. You can update
these scenes by overwriting them as many times as you want.
• (1) Shared Scene: A user-definable scene for saving settings you want to share with other T4S/T8S
ToneMatch® mixer users. This scene can be uploaded to a computer using the L1® updater software available
at www.Bose.com/livesound.
To load a scene:
1. Select Scenes with the rotary selector.
2. Rotate the Load control to scroll through the scenes list and highlight the desired scene name. The name
of the currently loaded scene appears in bold type.
3. Press the Select control to select the scene, or press the Cancel control to exit the list and leave the
setting unchanged.
Note: The display returns to the Scenes screen if you do not press the Select or Cancel control within
10seconds. No change is made and the currently loaded scene appears on the screen.
4. If you pressed Select, the question “Are you sure?” is displayed. Press the Yes control to load the scene, or
press the No control to exit and leave the scene setting unchanged.
Note: The display returns to the Scenes screen if you do not press the Yes or No control within 10 seconds. No
change is made and the currently loaded scene appears on the screen.
To save a scene:
1. Select Scenes with the rotary selector. The currently loaded scene is displayed.
2. Rotate the Save control to highlight the scene you wish to save. Press Select, or press Cancel to exit the
list.
All Channels
Singer/Songwriter
Load Shared Save
Scenes
Note: The display returns to the Scenes screen if you do not press
the Select or Cancel control within 10 seconds. No change occurs,
and the currently loaded scene appears on the screen.
My Scene 01
My Scene 02
My Scene 03
Cancel Select

32 - English
Operation
3. If you pressed Select, use the Rename screen to edit the scene name, or press Save to use the name as
displayed and go to Step 4.
To change the scene name before saving:
You can use the following editing options to change the scene name. After changing the name, press the Save
control and go to Step 4.
• Select and change characters: While the Rename screen is displayed, rotate the Cursor control to highlight
the character or character position you want to change. Then rotate the Select control to change the
character.
• Use the character map: While the Rename screen is displayed, rotate the Cursor control to highlight the
character you want to change. Then press the Select control to view the character map. Rotate the Select
control to move the cursor left or right. Rotate the Up/Dn control to move the cursor up or down. When the
character you want is highlighted, press Select to write that character in the selected position.
• Use clear, insert, and delete functions: While the Rename screen is displayed, rotate the Cursor control to
position the cursor. Then press the Cursor control for a menu of special editing functions. Rotate the Select
control to highlight the function you want. Then press the Select control to perform the function.
Clear Character – Removes the character highlighted by the cursor and leaves
a blank space.
Clear All – Clears the entire line of text.
Clear to End – Clears all text to the right of the cursor including the
highlighted character.
Insert – Inserts a blank space to the left of the highlighted character.
Delete – Removes the character and space highlighted by the cursor.
Rename
J
rstuvwxyzABCDEFGHI
123456789, ;/\()|+-
KLMNOPQRSTU VWXYZ0
abcdefgh jklmnopqi
Cancel Up/Dn Select
Scenes
Clear To End
Insert
Clear All
Clear Character
Delete
CancelSelect
Rename
M yScene 01
CursorSave Select
Scenes

Operation
English - 33
4. When the question “Are You Sure?” is displayed, press the Yes control to save the scene, or press the No
control to exit without saving the scene.
Sharing a Scene
If you create a scene that you would like to share with another T4S/T8S ToneMatch® mixer user, you can
save that scene as a Shared Scene by saving it to the [To Shared Scene] slot. Using the L1® updater, you can
upload the Shared Scene to your computer and then transfer the file to the computer of another T4S/T8S
user. The other T4S/T8S user can download the scene to their T4S/T8S using the L1 updater. The L1 updater
is available at www.Bose.com/livesound.
To save a Shared Scene:
1. Load the scene that you want to share (see “To load a scene” on page 31).
2. Press the Save control to access the list of scenes.
3. Rotate the Select control to scroll through the scene list and highlight [To Shared Scene]. Press Select or
press Cancel to exit the list.
4. If you pressed Select, use the Rename screen to edit the scene name (see “To change the scene name
before saving” on page 32) or go to Step 5 if you want to use the existing name.
Are You Sure?
YesNo
Note: The display returns to the Scenes screen if you do not press the Select
or Cancel control within 10 seconds. No change occurs, and the currently
loaded scene appears on the screen.
[To Shared Scene]
My Scene 10
My Scene 09
Cancel Select
Rename
M yScene 07
CursorSave Select
Scenes
34 - English
Operation
5. Press the Save control to store the scene as a Shared Scene.
6. When the question “Are you sure?” is displayed, press the Yes control to save the scene, or press the No
control to exit without saving the scene as a Shared Scene.
Note: The display returns to the Scenes screen if you do not press the Yes or No control within 10 seconds. No
change occurs, and the currently loaded scene appears on the screen.
7. Press the Shared control to confirm the scene saved as a Shared Scene.
Note: The T4S/T8S provides only one storage location for a Shared Scene. Saving a scene as a Shared Scene
always overwrites the previously saved Shared Scene.
Please visit www.Bose.com/livesound for details on using the L1® updater application for downloading and
uploading scenes to and from your computer.
All Channels
Singer/Songwriter
Load Shared Save
Scenes All Channels
My Scene 07
Current Shared Scene:
Back
Scenes
Press
Operation
English - 35
Bose Scenes
The five Bose scenes are provided as examples for you to use as a starting point. After loading a Bose scene,
you can modify the settings and then save the settings as a My Scene or Shared Scene.
Factory Settings
This scene restores the mixer to the settings it had when it left the factory. Loading this scene erases any
changes you previously made to the currently loaded scene.
CH 1-4 (T4S/T8S) CH 5-8 (T8S)
ToneMatch
Active
Utility
Flat
zEQ
Bypass
Low Mid High
0 dB 0 dB 0 dB
Para EQ Bypass
Comp/Gate
Bypass
Chorus1
Mod
Bypass
Chorus1
Delay
Bypass
Digital
Reverb
Bypass
Digital
Aux
Mute
Pre: With EQ & Fx
Global Settings
Preferences
Active screen Status
USB to PC Left/Right:Master
USB from PC Left/Right:Master
Master Out Post Master Volume
Reverb Type
Type Medium
Time 50%
Bal 50%
Note: For a list of the factory settings for all eects, see “Factory Settings” on page 42.

36 - English
Operation
Singer/Songwriter
This scene is designed for a singer/songwriter playing keyboard or guitar and sometimes accompanied by an
MP3 track.
Figure 16. Example setup for Singer/Songwriter
Operation
English - 37
Microphone Guitar Keyboard Bass Aux In
CH 1 CH 2 CH 3 CH 4 5/6
ToneMatch
Active Active Active Active
N/A
Vocal Mics Acoustic Guitar Keyboards Basses
Handheld Mics Steel String w/
piezo
General Keys Active Bass 1
zEQ
Active Active Active Active
N/ALow Mid High Low Mid High Low Mid High Low Mid High
0 dB 0 dB 0 dB 0 dB 0 dB 0 dB 0 dB 0 dB 0 dB 0 dB 0 dB 0 dB
Para EQ Bypass Bypass Bypass Bypass N /A
Comp/
Gate
Bypass Bypass Bypass Bypass
N/A
Comp2 Comp2 Comp2 Comp2
Mod
Bypass Bypass Bypass Bypass
N/A
Chorus1 Chorus1 Chorus3 Chorus1
Delay
Bypass Bypass Bypass Bypass
N/A
Digital Digital Digital Digital
Reverb
Active Active Bypass Bypass
N/A
Medium (Global) Medium (Global) Medium (Global) Medium (Global)
Pan/Aux
Center Center Center Center Aux In
Aux 1-2 50% Aux 1-2 50% Aux 1-2 50% Aux 1-2 50% 5 Lvl 6 Lvl
Pre: With EQ & Fx Pre: With EQ & Fx Pre: With EQ & Fx Pre: With EQ & Fx 50% 50%
Singer/Songwriter scene channel settings
Global Settings
Preferences
Active screen Status
USB to PC Left/Right:Master
USB from PC Left/Right:Master
Master Out Post Master Volume
Reverb Type
Type Medium
Time 50%
Bal 50%
38 - English
Operation
DJ/Playback
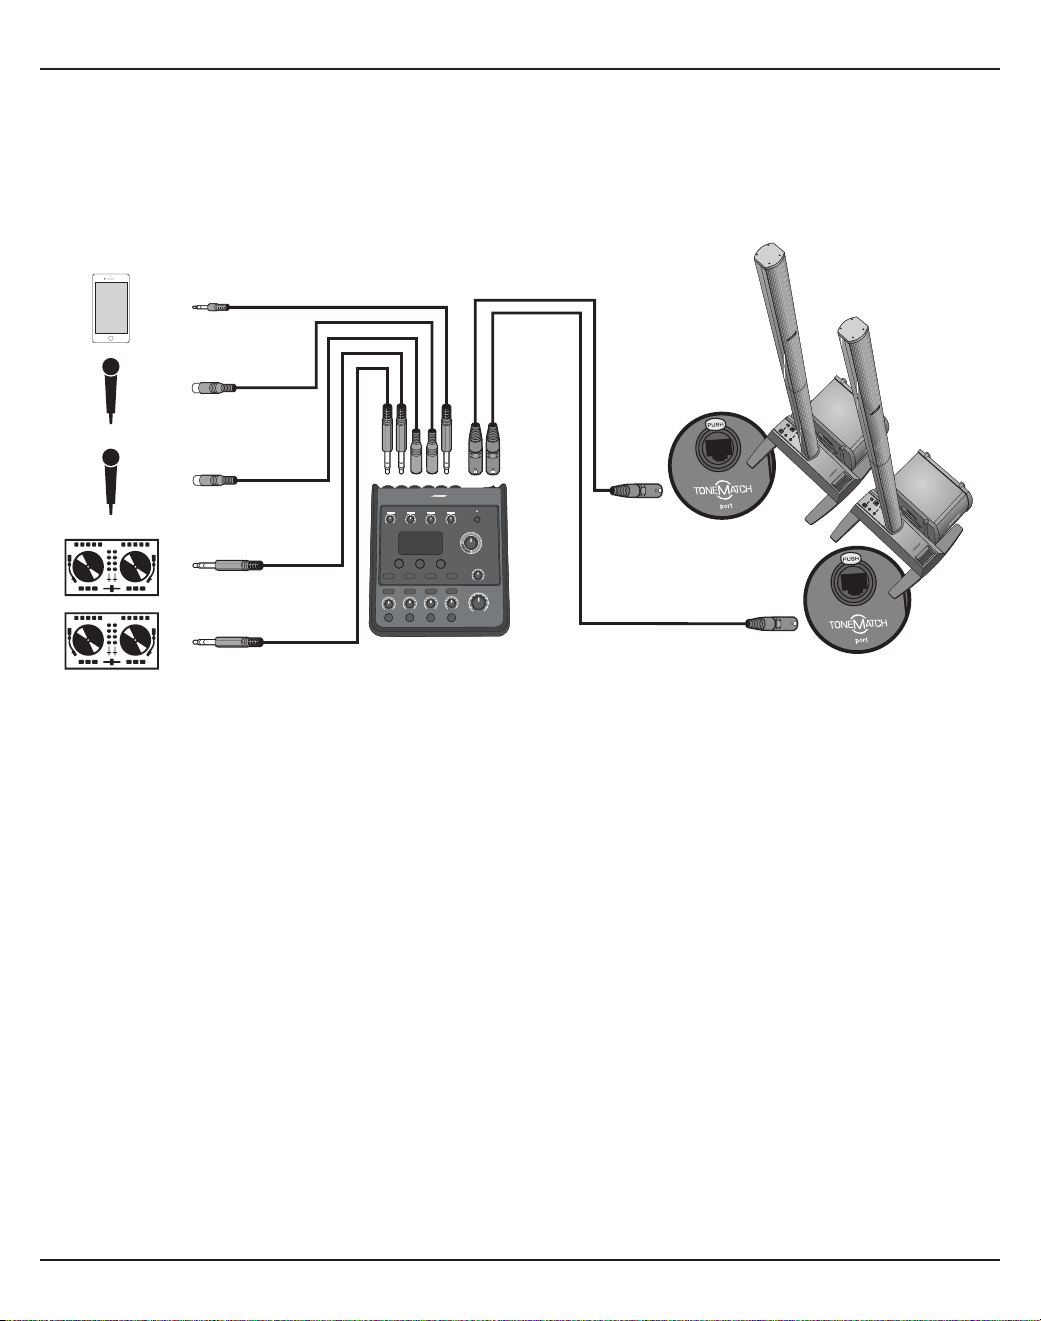
The DJ/Playback scene is designed for a DJ event or any audio playback need. This setup uses two
microphones and either a mobile device, mixer, or laptop computer.
Figure 17. Example setup for stereo DJ/Playback
Operation
English - 39
DJ/Playback scene channel settings
Global Settings
Preferences
Active screen Status
USB to PC Left/Right:Master
USB from PC Left/Right:Master
Master Out Post Master Volume
Reverb Type
Type Medium
Time 50%
Bal 50%
Source 1 Left Source 1 Right Microphone Microphone Aux In
CH 1 CH 2 CH 3 CH 4 5/6
ToneMatch
Active Active Active Active
N/A
DJ/Playback DJ/Playback Vocal Mics Vocal Mics
Flat, zEQ Controls Flat, zEQ Controls Handheld Mics Handheld Mics
zEQ
Active Active Active Active
N/ALow Mid High Low Mid High Low Mid High Low Mid High
0 dB 0 dB 0 dB 0 dB 0 dB 0 dB 0 dB 0 dB 0 dB 0 dB 0 dB 0 dB
Para EQ Bypass Bypass Bypass Bypass N/A
Comp/
Gate
Bypass Bypass Bypass Bypass
N/A
Limit Limit Comp2 Comp2
Mod
Bypass Bypass Bypass Bypass
N/A
Chorus1 Chorus1 Chorus3 Chorus1
Delay
Bypass Bypass Bypass Bypass
N/A
Digital Digital Digital Digital
Reverb
Bypass Bypass Bypass Bypass
N/A
Medium (Global) Medium (Global) Medium (Global) Medium (Global)
Pan/Aux
Left Right Center Center Aux In
Aux 1-2 50% Aux 1-2 50% Aux 1-2 50% Aux 1-2 50% 5 Lvl 6 Lvl
Pre: With EQ & Fx Pre: With EQ & Fx Pre: With EQ & Fx Pre: With EQ & Fx 50% 50%

40 - English
Operation
Full Band
This scene is set up for a drum kit, bass guitar, electric guitar, vocals, and MP3 player.
Figure 18. Example setup for Drums and Bass
SYSTEMINPUT 2INPUT 1
VOLUME VOLUME
FRONT
LED
POWER
LIMIT
OFF
FULL RANGE
WITH SUB
EQ
MIC
LINE LEVEL
SIGNAL INPUT
INPUT
POWER
ON
OFF
100-240V~50/60Hz
1000W
LINE OUTPUT
SIGNAL/CLIP SIGNAL/CLIP POWER/FAULT
LIMIT
SYSTEM
INPUT 2INPUT 1
LINE OUTPUT LINE OUTPUT
LINE INPUT
POWER/FAULT
LIMIT
SIGNAL/CLIP
LINE INPUT
NORM
REV
THRU
HPF
POLARITY
LINE
OUTPUT EQ
POWER
LIMIT
OFF
FRONT
LED
Operation
English - 41
Full Band scene channel settings
Global Settings
Preferences
Active screen Status
USB to PC Left/Right:Master
USB from PC Left/Right:Master
Master Out Post Master Volume
Reverb Type
Type Medium
Time 50%
Bal 50%
Kick Drum Overhead Overhead Bass Guitar Microphone Microphone Microphone Aux In
CH 1 CH 2 CH 3 CH 4 CH 5 CH 6 CH 7 CH 8 9/10
ToneMatch
Active Active Active Active Active Active Active Active
N/A
Percussion Percussion Percussion Basses Electric Guitars Vocal Mics Vocal Mics Vocal Mics
Kick, General General Overhead General Overhead Active Bass 1 Mic'd Amp w/
SM57
Handheld Mics Handheld Mics Handheld Mics
zEQ
Active Active Active Active Active Active Active Active
N/A
L M H L M H L M H L M H L M H L M H L M H L M H
0
dB
0
dB
0
dB
0
dB
0
dB
0
dB
0
dB
0
dB
0
dB
0
dB
0
dB
0
dB
0
dB
0
dB
0
dB
0
dB
0
dB
0
dB
0
dB
0
dB
0
dB
0
dB
0
dB
0
dB
Para EQ Bypass Bypass Bypass Bypass Bypass Bypass Bypass Bypass N /A
Comp/Gate
Active Bypass Bypass Active Bypass Bypass Bypass Bypass
N/A
Kick 1 Comp2 Comp2 Comp2 Comp2 Gate Gate Gate
Mod
Bypass Bypass Bypass Bypass Active Bypass Bypass Bypass
N/A
Chorus1 Chorus1 Chorus1 Chorus1 Chorus 1 Chorus 1 Chorus 1 Chorus 1
Delay
Bypass Bypass Bypass Bypass Bypass Bypass Bypass Bypass
N/A
Digital Digital Digital Digital Digital Digital Digital Digital
Reverb
Bypass Bypass Bypass Bypass Bypass Active Active Active
N/A
Medium (Global) Medium (Global) Medium (Global) Medium (Global) Medium (Global) Medium (Global) Medium (Global) Medium (Global)
Pan/Aux
Center Center Center Center Center Center Center Center Aux In
Aux 1-4 50% Aux 1-4 50% Aux 1-4 50% Aux 1-4 50% Aux 1-4 50% Aux 1-4 50% Aux 1-4 50% Aux 1-4 50% 9 Lvl 10 Lvl
Dry: After Preamp Dry: After Preamp Dry: After Preamp Dry: After Preamp Dry: After Preamp Dry: After Preamp Dry: After Preamp Dry: After Preamp 50% 50%
Factory Settings
42 - English
Factory Settings
This section describes the settings in the T4S/T8S mixer when it left the factory. To restore your
T4S/T8S at any time to these factory settings, load the Bose Factory Settings scene.
Comp/Gate Factory Settings
Type Thresh Gain
Compressor 1: Light –16.0 dB 3.0 dB
Compressor 2: Medium –16.0 dB 5.0 dB
Compressor 3: Heavy –16.0 dB 8.0 dB
Limiter –10.0 dB 0 dB
De-Esser –10.0 dB 0 dB
Thresh Speed
Noise Gate –70.0 dB 50%
Thresh Tight
KickGate1: Regular –20.0 dB 100%
KickGate2: Fast –20.0 dB 100%
Modulator Factory Settings
Type Thresh Gain Speed
Chorus 1: Brite 50% 50% 0.50 Hz
Chorus 2: Warm 70% 100% 0.15 Hz
Chorus 3: Dark 25% 25% 3.0 Hz
Flanger 1: Tape 50% 50% 1.00 Hz
Flanger 2: Feedback 50% 100% 2.00 Hz
Speed Feedback
Phaser 1: Stomp 0.50 Hz 0%
Phaser 1: Rack 0.50 Hz –75%
Phaser 1: Warm 1.00 Hz –26%
Phaser 1: Bright 0.50 Hz –76%
Speed Depth
Tremolo 5.00 Hz 50%
Delay Factory Settings
Type Mix Time Feedback
Digital 30% 150 ms 30%
Analog 30% 275 ms 20%
Tape 30% 350 ms 30%
Reverb Type Factory Settings
Type Bal. Time Time Range
Plate 50% 20% 0-4.6 s
Small 50% 15% 0-0.8 s
Medium 50% 25% 0-1.9 s
Large 50% 50% 0-3.5 s
Cavern 50% 100% 0-7.0 s

English - 43
Care and Maintenance
Troubleshooting
If you experience problems while using this product, try the following solutions. If you still cannot solve the
problem, seek online help at www.Bose.com/livesound. If you cannot find answers to your questions there,
please call the Bose Product and Technical Support Team directly at (877) 335-2673.
Problem What to do
T4S/T8S is plugged
in, power switch is on,
but no power.
• Make sure you have power at the AC outlet. Try operating a lamp or other
equipment from the same AC outlet or test the outlet using an AC outlet tester.
If using the T4S with an L1® Model II or 1S system:
• Make sure the ToneMatch® cable is properly connected to the mixer and the L1
power stand.
• Verify that the power cord plug is fully inserted into the power stand and the AC
(mains) outlet.
• Make sure the L1 power stand is turned on and the power LED is blue.
T4S/T8S is on, but
there is no sound.
• Make sure the Master volume control is turned up.
• Verify that the input channel(s) you want to hear is not muted.
• Check that the Volume control is turned up for the channel you want to hear.
• Make sure the appropriate input channel Trim control has been turned up enough
so that the LED is green (indicating that there is a strong input signal).
• Check the Prefs (Preference) Input and Output level meters to confirm that there
is a signal at both the input and output stages.
• Make sure volume control is turned up on your input source (instrument).
• Connect your input source (instrument) to the mixer using a dierent cable.
• Plug your input source (instrument) directly into the L1 power stand or a dierent
amplifier to make sure the source is working.
• Turn the mixer o and wait 30 seconds. Then turn mixer on again.
If using the T4S with an L1 Model II or 1S system:
• Turn o the power stand, re-seat the ToneMatch cable plug in the ToneMatch
port, and turn on the power stand again.
• If available, try a dierent ToneMatch cable. If another ToneMatch cable is not
available, try a standard ethernet cable.
• Connect the T4S/T8S Master output to the Analog Input on the power stand
using a ¼" phone plug cable. Turn up the power stand Trim control, and verify
that you hear sound.
• Make sure power LED on power stand is blue. If LED is red, please call the Bose
Product and Technical Support Team directly at (877) 335-2673.
44 - English
Care and Maintenance
Problem What to do
Poor quality sound from a
microphone or instrument
connected to the T4S/T8S.
• Make sure there is no unwanted zEQ or Para EQ equalization applied.
• Verify that you have selected an appropriate ToneMatch® mixer preset
for your microphone/instrument. If you do not want to use a ToneMatch
mixer preset, make sure ToneMatch is set to Flat.
• Make sure there are no unwanted eects (Comp/Gate, Mod, Delay,
Reverb) on your input channel. Check the Status in the Prefs menu for
any currently active eects.
• Check that the T4S/T8S input Trim is adjusted properly for your
microphone/instrument. The signal LED should be green; if the LED is
red, lower the Trim level until it is green.
• Try a dierent microphone or instrument cable.
• Check the cable connecting your microphone or instrument to the T4S/
T8S mixer. Make sure the cable plug is fully inserted into the microphone/
instrument output connector and the T4S/T8S input connector.
• Check the settings (if any) on your microphone or instrument.
• Check the batteries (if any) in your instrument or microphone.
Not hearing any eects. • Check that you pressed the correct CH Edit button.
• Make sure the FX Mute button is not pressed for the channel in question.
T4S/T8S not responding to
control knobs.
• Turn o the mixer. Wait 30 seconds and turn mixer on again.
Master volume control has no
eect.
• Verify that the Master output is configured for Post Master Volume
operation in the Prefs menu under Master Out.
With nothing plugged into the
T4S/T8S input connectors, a
slight hum or buzz is heard
from the L1® system.
• Plug the T4S/T8S and the L1 power stand into the same AC (mains) outlet.
• Using an AC outlet tester, test the AC outlet that the T4S/T8S and/or the
L1 power stand is plugged into for reversed or open (hot, neutral, and/or
ground) contacts.
• If using an extension cord, make sure that the cord is also tested as
above.
Too much (or not enough)
bass, mid-range, or high
frequencies.
• Make sure there is no unwanted zEQ or Para EQ equalization applied.
• Verify that you have selected an appropriate ToneMatch mixer preset
for your microphone/instrument. If you do not want to use a ToneMatch
mixer preset, make sure ToneMatch is set to Flat in the Utility category.
Poor-sounding playback of a
stereo recording using a CD
player, MP3 player, or other
such device.
• Connect the left channel of the device to Aux input 5 and the right
channel to Aux input 6 (or 9/10 for T8S). Aux inputs 5/6 (or 9/10) are
designed for line-level inputs.
• Disable any extended bass or EQ features when using CD or mobile
device.
• If you are using recording software on a computer, check the software
requirements. You may need to configure the software settings for
48kHz/24-bit operation.

English - 45
Care and Maintenance
Problem What to do
Microphone is encountering
feedback.
• Orient the microphone so that it is not pointing directly at its respective
loudspeaker.
• Try a dierent microphone.
• Try a dierent position for the L1 system and/or vocalist on stage.
• Increase the distance from the L1 system to the microphone.
• Reduce the HIGH frequencies by adjusting the zEQ on the microphone
channel.
• Try notching out a particular frequency that could be causing the
feedback by adjusting the Para EQ on the microphone channel.
• Temporarily bypass any audio eects used (Mod, Delay, Reverb) to see if
they might be contributing to the feed-back problem.
Aux output does not sound
right.
• Check if the Aux output is configured for the desired tap point for each
input channel. Refer to “Routing Input Signals to the Aux Output” on
page 21.
• Verify that each input assigns the desired signal level to the Aux output.
Unable to send T4S/T8S
audio to a computer through
a USB connection.
• Check that the USB cable is properly connected to the mixer and
computer.
• Try a dierent USB cable.
• Make sure the mixer is turned on.
• Verify that the desired mixer input channels are assigned to the left and
right USB output channels. See “USB to PC” in the Prefs menu.
• Make sure that the Trim level of the respective input channel is turned up
enough so that the green LED is on, indicating that there is a strong input
signal.
• Check the Input and Output level meters under the Prefs menu to confirm
that there is a signal at both the input and output stages.
• Verify that your computer USB input is working by connecting another
USB-compatible audio device.
• If you are using recording software on a computer, check the software
requirements. You may need to configure the software settings for
48kHz/24-bit operation.
T4S/T8S is not responding to
flash drive.
• To determine if there is an issue with your flash drive, connect a dierent
brand flash drive
46 - English
Care and Maintenance
Problem What to do
Unable to send audio from a
computer to the T4S/T8S via
USB connection.
• Check that the USB cable is properly connected to the mixer and
computer.
• Try a dierent USB cable.
• Make sure mixer is turned on.
• Verify the computer is playing and that the audio setting is not disabled
in your computer.
• Check that the USB signal is assigned to the desired mixer inputs. See
“PC to USB” in the Prefs menu.
• Verify that the mixer input channels assigned to the incoming USB signal
are not muted and their volume controls are turned up.
• Make sure that the appropriate input channel Trim control is turned up
enough so that the green LED is on (indicating that there is a strong
input signal).
• Check the Input and Output level meters under the Prefs menu to confirm
that there is a signal at both the input and output stages.
• Verify that your computer USB output is working by connecting another
USB-compatible audio device.
• If you are using recording software on a computer, check the software
requirements. You may need to configure the software settings for
48kHz/24-bit operation.
Cleaning
• You may clean the product enclosure using only a soft dry cloth.
• Do not use any solvents, chemicals, or cleaning solutions containing alcohol, ammonia, or abrasives.
• Do not use any sprays near the product or allow liquids to spill into any openings.
Technical Information
Mechanical
T4S T8S
Dimensions (L x W x H) 8.4" x 7.25" x 3.25"
(214 mm x 184 mm x 83 mm)
8.4" x 12.25" x 3.25"
(214 mm x 311 mm x 83 mm)
Weight 2.1 lbs (1.0 kg) 4.1 lbs (1.9 kg)
Electrical
A/D and D/A Conversion 24 bits
Sampling Rate 48 kHz
USB 2.0 or higher, Type-A to Type-B cable, Type-A port and Type-B port
PC Requirements Microsoft Windows 7 or higher; Mac OS 10.5 or higher

English - 47
Additional Information
Additional Information
Refer to the owner’s guide (online at www.Bose.com) for more information about your product (including
accessories and replacement parts). To request a printed copy, use the phone numbers provided.
Limited Warranty
Your product is covered by a limited warranty. Visit www.pro.Bose.com for warranty details.
The warranty information provided with this product does not apply in Australia and New Zealand. See our
website at www.bose.com/au/warranty or www.bose.com/nz/warranty for details of the Australian and New
Zealand warranty.
Date of Manufacture
The eighth digit in the serial number indicates the year of manufacture; “6” is 2006 or 2016.
Americas
(USA, Canada, Mexico, Central America, South
America)
Bose Corporation
Framingham, MA 01701 USA
Corporate Center: 508-879-7330
Americas Professional Systems,
Technical Support: 800-994-2673
Australia
Bose Pty Limited
Unit 3/2 Holker Street
Newington NSW Australia
61 2 8737 9999
Belgium
Bose N.V. / S.A
Limesweg 2, 03700
Tongeren, Belgium
012-390800
China
Bose Electronics (Shanghai) Co Ltd
25F, L’Avenue
99 Xianxia Road
Shanghai, P.R.C. 200051 China
86 21 6010 3800
France
Bose S.A.S
26-28 avenue de Winchester
78100 St. Germain en Laye, France
01-30-61-63-63
Germany
Bose GmbH
Max-Planck Strasse 36D 61381
Friedrichsdorf, Deutschland
06172-7104-0
Hong Kong
Bose Limited
Suites 2101-2105, Tower One, Times Square
1 Matheson Street, Causeway Bay, Hong Kong
852 2123 9000
India
Bose Corporation India Private Limited
Salcon Aurum, 3rd Floor
Plot No. 4, Jasola District Centre
New Delhi – 110025, India
91 11 43080200
Italy
Bose SpA
Centro Leoni A – Via G. Spadolini
5 20122 Milano, Italy
39-02-36704500
Japan
Bose Kabushiki Kaisha
Sumitomo Fudosan Shibuya Garden Tower 5F
16-17, Nanpeidai-cho
Shibuya-Ku, Tokyo, 150-0036, Japan
TEL 81-3-5489-0955
www.bose.co.jp
The Netherlands
Bose BV
Nijverheidstraat 8 1135 GE
Edam, Nederland
0299-390139
United Kingdom
Bose Ltd
1 Ambley Green, Gillingham Business Park
KENT ME8 0NJ
Gillingham, England
0870-741-4500
Importer Information
European Union
Bose Products B.V., Gorslaan 60, 1441 RG
Purmerend, The Netherlands
China
Bose Electronics (Shanghai) Company
Limited, Part C, Plan 9, No. 353 North Riying
Road, China (Shanghai) Pilot Free Trade Zone
Taiwan
Bose Taiwan Branch, 9F-A1, No. 10, Section 3,
Minsheng East Road, Taipei City 104, Taiwan
Tel: +886-2-2514 7676
Mexico
Bose de México, S. de R.L. de C.V., Paseo de
las Palmas 405-204, Lomas de Chapultepec,
11000 México, D.F.
Tel: +5255 (5202) 3545
See website for other countries
Contact Information
Visit us on the web at www.Bose.com.
2 - Español Latinoamérica
Instrucciones importantes de seguridad
Lea y conserve todas las instrucciones de uso y
seguridad.
1. Lea estas instrucciones.
2. Guarde estas instrucciones.
3. Preste atención a las advertencias.
4. Siga todas las instrucciones.
5. No use este aparato cerca del agua.
6. Límpielo solamente con un paño seco.
7. No obstruya ninguna abertura de ventilación. Realice la instalación conforme a las
instrucciones del fabricante.
8. Proteja el cable de alimentación para que nadie lo pise o lo perfore, especialmente en
enchufes, receptáculos de tomas múltiples y en el punto donde salen del dispositivo.
9. Use solamente los accesorios especificados por el fabricante.
10. Use solamente con el carro, el soporte de piso, el trípode, el soporte o la mesa
especificados por el fabricante o vendidos con el dispositivo. Cuando se usa un
carro, tenga precaución al moverlo con el dispositivo para evitar lesiones por
tropiezos.
11. Desenchufe este aparato durante tormentas eléctricas o cuando no lo utilice durante
períodos prolongados.
12. Derive todas las tareas de mantenimiento a personal calificado. Se requieren tareas
de mantenimiento si el aparato se daña de alguna manera; por ejemplo, si se daña el
enchufe o el cable de alimentación, si se derrama líquido o si caen objetos dentro del
aparato, si se expone el aparato a la lluvia o la humedad, si no funciona normalmente o
si se ha caído.
ADVERTENCIAS/PRECAUCIONES:
Este producto contiene materiales magnéticos. Consulte con su médico si esto podría
llegar a afectar un dispositivo médico implantado.
• Este producto no está diseñado para ser instalado ni utilizado en zonas de instalaciones
acuáticas en interiores (incluidos, entre otros, piscinas techadas, parques acuáticos
techados, jacuzzis, saunas, salas de vapor y pistas de patinaje techadas).
• Para reducir el riesgo de incendio o descarga eléctrica, NO exponga este producto a la
lluvia, líquidos o humedad. No aplicable para productos con clasificación IPX4-9.
• Mantenga el producto lejos del fuego y de fuentes de calor. NO coloque encima ni cerca
del producto fuentes de llamas expuestas, como velas encendidas.
• NO realice alteraciones no autorizadas a este producto.
• NO use un convertidor de corriente con este producto.
• NO lo use en vehículos o embarcaciones.
• Use este producto únicamente con la fuente de alimentación suministrada.
• NO instale ni coloque el soporte ni el producto cerca de fuentes de calor, como chimeneas,
radiadores, rejillas de calefacción u otros aparatos (incluidos amplificadores) que
produzcan calor.
• No utilice el mezclador T4S/T8S ToneMatch® con un trípode o soporte que sea inestable.
El mezclador solo está diseñado para su uso en un tornillo de ¼” (6 mm), y el trípode
o soporte debe ser capaz de soportar un dispositivo con un peso mínimo de 1.9 kg (4.1
lb) y un tamaño total de 214 x 311 x 83 mm (8.4 x 12.25 x 3.25 pulgadas). Es posible que
el uso de un trípode o soporte que no esté diseñado para soportar el tamaño y el peso
del mezclador T4S/T8S provoque una condición inestable y peligrosa que podría causar
lesiones.
• Contiene piezas pequeñas que pueden provocar asfixia. No recomendable para
niños menores de 3 años.
NOTAS:
• El cable del altavoz y los cables de interconexión que se incluyen con este sistema
no están aprobados para instalaciones en pared. Compruebe los códigos locales de
edificación para verificar cuáles son los tipos correctos de alambre y cable requeridos para
instalaciones en pared.
• Si se utiliza la clavija de conexión de red eléctrica o un acoplador del artefacto como el
dispositivo de desconexión, el dispositivo de desconexión deberá permanecer listo para
funcionar.
• Debido a los requisitos de ventilación, Bose no recomienda colocar el producto en
espacios reducidos, como una cavidad de pared o un gabinete cerrado.
Información regulatoria
Este dispositivo cumple con la parte 15 de las reglas de la FCC y con las normas RSS sin
licencia de la industria canadiense. El funcionamiento está sujeto a las siguientes dos
condiciones: (1) este dispositivo no debe provocar interferencias dañinas y (2) este dispositivo
debe aceptar cualquier interferencia recibida, incluida la interferencia que puede causar un
funcionamiento no deseado.
Este producto cumple con todos los requisitos correspondientes de la Directiva de la
UE. La Declaración de conformidad completa puede encontrarse en
www.Bose.com/compliance.
Información acerca de productos que generan ruido eléctrico (aviso de cumplimiento de la
FCC para EE.UU.)
Nota: Este equipo ha sido sometido a pruebas y se ha comprobado que cumple con los límites
de un dispositivo digital Clase A, de acuerdo con la Parte 15 de las reglas de la FCC. Estos
límites están diseñados para proporcionar una protección razonable contra interferencias
perjudiciales cuando el equipo se utiliza en un entorno comercial. Este equipo genera, usa y
puede irradiar energía de radiofrecuencia y, si no se instala y se usa conforme a lo indicado en
el manual de instrucciones, podría causar una interferencia perjudicial a las comunicaciones
de radio. El funcionamiento de este equipo en un área residencial podría llegar a provocar
interferencias perjudiciales, en cuyo caso el usuario deberá corregir dichas interferencias por
cuenta propia.
Los cambios o las modificaciones no aprobados expresamente por Bose Corporation podrían
invalidar la autoridad del usuario para operar el equipo.
Se requieren cables aislados para mantener el cumplimiento de las reglamentaciones.
Este producto cumple con las especificaciones Clase A de la normativa canadiense ICES-003.
CAN ICES-3(A)/NMB-3(A)
Este producto cumple con todos los requisitos de inmunidad de EN55103-2 para un entorno
electromagnético E2.
Part Name
Toxic or Hazardous Substances and Elements
Names and Contents of Toxic or Hazardous Substances and Elements
PCBs
Metal parts
Plastic parts
Speakers
Cables
This table is prepared in accordance with the provisions of SJ/T 11364.
0: Indicates that said hazardous substance contained in all of the homogenous materials for this part
is below the limit requirement of GB/T 26572.
X: Indicates that said hazardous substance contained in at least one of the homogenous materials
used for this part is above the limit requirement of GB/T 26572.
Lead
(Pb)
Mercury
(Hg)
Cadmium
(Cd)
Hexavalent
(CR(VI))
Polybrominated
Biphenyl (PBB)
Polybrominated
diphenylether
(PBDE)
X
X
00
0
0
0
0
0
0
0
0
0
0
0
0
0
0
0
0
0
0
0
0
0
0
0
0
X
X
Este símbolo significa que el producto no debe desecharse como residuo
doméstico y debe enviarse a una planta para tratamiento de residuos apropiada
para su reciclado. Una eliminación y un reciclado adecuados ayudan a proteger
los recursos naturales, la salud humana y el medioambiente. Para obtener más
información acerca de la eliminación y el reciclado de este producto, comuníquese
con su municipalidad local, un centro de servicios de desecho o la tienda donde
compró este producto.
Proporcionado por DCE Safety

Contenido
Español Latinoamérica - 3
Introducción
Descripción general del producto ........................................................................ 5
Características del producto ......................................................................... 5
Desempaque .......................................................................................... 5
Paneles de control y conexión
Mezclador T4S ToneMatch® .............................................................................. 6
Panel de control .................................................................................... 6
Panel de conexión .................................................................................. 7
Mezclador T8S ToneMatch® .............................................................................. 8
Panel de control .................................................................................... 8
Panel de conexión .................................................................................. 9
Configuración del sistema
Quitar y colocar la cubierta .............................................................................10
Opciones de montaje ...................................................................................11
Montaje del T4S/T8S en un trípode de cámara ......................................................... 11
Conexión del T4S mediante conexión digital ..............................................................12
Conexión del T4S/T8S mediante conexión analógica ......................................................13
Conexión de la fuente de alimentación ToneMatch® ........................................................14
Conexión del T4S/T8S a su computadora .................................................................15
Conexión de una unidad flash al T4S/T8S .................................................................15
Operación
Lectura de pantalla de T4S/T8S .........................................................................16
Optimización de la ganancia de entrada y del volumen de salida ............................................17
Uso del control de volumen maestro .....................................................................18
Silenciar un canal ...................................................................................18
Silenciar los efectos del canal ........................................................................18
Uso del selector rotatorio ...............................................................................19
Edición del sonido de un canal .........................................................................20
Uso de las funciones de Pan/Aux ....................................................................20
Uso del afinador ...................................................................................20
Selección de una preselección ToneMatch® ........................................................... 22
Ajuste de zEQ .....................................................................................22
Ajuste del ecualizador paramétrico .................................................................. 23
Uso de las funciones de compresor/compuerta .......................................................23
Uso de los efectos de modulación ...................................................................25
Adición de retardos (delays) ........................................................................26
Adición de reverberación ...........................................................................26

Contenido
4 - Español Latinoamérica
Uso de las funciones globales .......................................................................... 27
Selección de un tipo de reverberación ............................................................... 27
Uso de las utilidades de Pref. ........................................................................ 28
Carga y almacenamiento de escenas .................................................................30
Compartir una escena ..............................................................................33
Escenas Bose .........................................................................................35
Configuración de fábrica ........................................................................... 35
Cantante/compositor ..............................................................................36
DJ/reproducción ................................................................................... 38
Banda completa ...................................................................................40
Configuración de fábrica
Configuración de fábrica ...............................................................................42
Cuidado y mantenimiento
Solución de problemas ................................................................................43
Limpieza .............................................................................................46
Información técnica ...................................................................................46
Recursos Adicionales
Información de contacto ...............................................................................47
Información del importador .........................................................................47
Información adicional .................................................................................. 47
Garantía limitada ..................................................................................47

Español Latinoamérica - 5
Introducción
Descripción general del producto
Tome el control de su música con los mezcladores T4S y T8S ToneMatch®: interfaces compactas de 4 y 8 canales pensadas para intérpretes.
Diseñados con poderosos motores DSP y controles de usuario intuitivos, ofrecen un ecualizador con calidad de estudio y procesamiento
de dinámica y efectos. Suene genial con el procesamiento y el zEQ integrados de Bose® ToneMatch®, especialmente cuando se conecte
a un sistema de sonido Bose L1 o F1 para un control tonal integral y completo. Toque con confianza en el escenario con estos robustos
mezcladores mediante controles táctiles, pantallas LED fáciles de leer y memoria de escena. Mezcladores ToneMatch®: los mejores
compañeros de escena para intérpretes.
Características del producto
Procesamiento poderoso de audio
• Efectos actualizados y de calidad de estudio con
procesamiento de audio digital avanzado
• Los efectos incluyen compresor, limitador, de-esser, compuerta
de ruido, chorus, flanger, phaser, tremolo, retraso (delay) y
reverberación
• Procesamiento Bose® ToneMatch® para voces e instrumentos
con sonido natural
• El zEQ enfoca el sonido de las preselecciones ToneMatch para
ajustes eficaces sobre la marcha
• ToneMatch, ecualizador, dinámica y efectos independientes
por canal
• Reverberación dedicada para envíos auxiliares y reverberación
global compartida para usar en todos los canales
• El ecualizador de salida maestro ayuda a compensar la acústica
del lugar
• Optimización tonal integral y completa cuando se usa con los
sistemas de sonido Bose L1 y F1
Control en vivo continuo
• Controles e indicadores táctiles diseñados para que músicos y
DJ los usen en vivo en el escenario
• Interfaz del usuario fácil de aprender
• Retraso tap tempo, afinador cromático y escenas memorizables
incorporados
• Pantalla LED y controles iluminados que son fáciles de leer y
usar, incluso en escenarios con poca luz
Conectividad de alta densidad
• Conectividad y control sin precedentes en un pequeño
mezclador estéreo digital
• Cuatro (T4S) u ocho (T8S) preamplificadores de audio de alta
calidad con conectores combinados XLR para micrófonos o
instrumentos y alimentación phantom conmutable
• Dos entradas auxiliares para fuentes adicionales y dos (T4S) o
cuatro (T8S) envíos auxiliares
• USB-A y -B para reproducción de unidades USB o interfaz PC/Mac
• Salidas ToneMatch para audio digital y alimentación
(únicamente T4S)
• Salidas estéreo TRS y XLR de ¼” (6 mm) balanceadas
(únicamente T8S)
• Salida de audífonos independiente
Características convenientes para conciertos
• Carcasa resistente con una cubierta magnética para proteger
los controles y conectores
• Incluye un cable ToneMatch para conectar a un sistema Bose L1
Model II o L1 Model 1S para audio digital y alimentación (T4S),
o incluye una fuente de alimentación universal (T8S)
• La inserción inferior le permite utilizar accesorios estándar de
montaje de cámara para mantener su mezclador ToneMatch al
alcance de la mano
Mezclador T4S ToneMatch y cubierta Cable ToneMatch
Fuente de alimentación
ToneMatch
Mezclador T8S ToneMatch y cubierta
Para obtener una lista completa de los accesorios y los dispositivos opcionales, visite www.Bose.com.
Desempaque
Lea la siguiente tabla para ver lo que incluye la caja de su mezclador:
T4S
T8S

Paneles de control y conexión
6 - Español Latinoamérica
Mezclador T4S ToneMatch®
Panel de control
Figura 1. Panel de control de T4S
q LED DE SEÑAL DE ENTRADA/CLIPEO (1-4): Muestra el estado de la señal de entrada en color:
Verde: Indica la presencia de una señal de entrada
Rojo: Indica el clipeo de la fuente de entrada
w CONTROLES DE RECORTE (1-4): Ajusta la sensibilidad de entrada para el canal correspondiente.
e PANTALLA: Proporciona menús de funciones e información del sistema.
r CONTROLES DE EDICIÓN: Estos tres controles rotativos/interruptores que se giran o presionan le permiten
seleccionar o ajustar los elementos o valores que aparecen en la pantalla.
t BOTONES DE EDICIÓN DE CANALES (1-4): Selecciona el canal que desee modificar.
y BOTONES DE SILENCIAMIENTO DE EFECTOS (1-4): Pone en bypass los efectos de modulación, retraso y
reverberación en el canal seleccionado.
u CONTROLES DE VOLUMEN (1-4): Ajusta el nivel de volumen del canal respectivo.
i BOTONES DE SILENCIO (1-4): Silencia la salida de audio del canal respectivo.
o CONTROL DE VOLUMEN MAESTRO: Ajusta el nivel de salida general.
a CONTROL DE VOLUMEN DE LOS AUDÍFONOS: Ajusta el nivel de volumen de la salida de los audífonos.
s SELECTOR GIRATORIO: Permite acceder tanto a parámetros globales como de canal, que se ajustan mediante los
controles de edición.
d INTERRUPTOR DE ALIMENTACIÓN PHANTOM: Aplica alimentación de +48 V a los canales de entrada 1-4. Un LED
rojo indica que la alimentación phantom está encendida.
f CONECTOR DE AUDÍFONOS: Para uso con audífonos solamente, con una impedancia
q
w
i
u
y
t
r
e
d
s
a
o
f

Español Latinoamérica - 7
Paneles de control y conexión
Figura 2. Panel de conexión de T4S
Panel de conexión
q INTERRUPTOR DE ALIMENTACIÓN: Enciende o apaga el mezclador.
w USB 2.0 TIPO B: Una interfaz USB que le permite conectar el mezclador a su computadora.
e USB 2.0 TIPO A: Una interfaz USB que le permite reproducir audio desde su unidad flash.
r SALIDA L/R ANALÓGICA: Salida analógica principal. Acepta cables TRS balanceados o TS no balanceados
de 1/4” (6 mm).
t SALIDA DE AUDIO: Dos salidas analógicas definibles por el usuario. Puede configurarse para una salida pre-
fader, post-EQ, de efectos o post-fader. Acepta cables TRS balanceados de 1/4” (6 mm).
y ENTRADA AUXILIAR: Canales de entrada analógica 5/6. Acepta cables TRS balanceados o TS no
balanceados de 1/4” (6 mm) para entradas a nivel de línea. Puede utilizarse para señales de entrada estéreo.
u ENTRADAS 1-4: Canales de entrada analógica 1-4. Acepta cables XLR balanceados para micrófonos o cables
TRS balanceados o TS no balanceados de 1/4” (6 mm) para entradas de alta impedancia, como guitarras.
i SALIDA PRINCIPAL DIGITAL L: Se conecta digitalmente en estéreo a dos sistemas L1® Model 1S/II.
Nota: Solamente se utiliza en estéreo con salida principal digital R.
o PUERTO DE ALIMENTACIÓN/SALIDA PRINCIPAL DIGITAL R: Salida digital que usa el sistema L1® Model 1S/II.
Proporciona alimentación al mezclador T4S desde el soporte de alimentación L1 Model 1S/II. También puede
suministrar alimentación desde una toma de CA a
través de una fuente de alimentación ToneMatch (no incluida
con el T4S). Acepta el cable ToneMatch® incluido.
PRECAUCIÓN: Aunque el puerto ToneMatch acepta un conector RJ-45 estándar, NO conecte el T4S a una
computadora o red telefónica.
USB AUDIO
M
( )
MONO
q w e r t y
uio

Paneles de control y conexión
8 - Español Latinoamérica
Mezclador T8S ToneMatch®
Panel de control
Figura 3. Panel de control de T8S
q LED DE SEÑAL DE ENTRADA/CLIPEO (1-8): Muestra el estado de la señal de entrada en color:
Verde: Indica la presencia de una señal de entrada
Rojo: Indica el clipeo de la fuente de entrada
w CONTROLES DE RECORTE (1-8): Ajusta la sensibilidad de entrada para el canal correspondiente.
e PANTALLA: Proporciona menús de funciones e información del sistema.
r CONTROLES DE EDICIÓN: Estos tres controles rotativos/interruptores que se giran o presionan le permiten
seleccionar o ajustar los elementos o valores que aparecen en la pantalla.
t BOTONES DE EDICIÓN DE CANALES (1-8): Selecciona el canal que desee modificar.
y BOTONES DE SILENCIAMIENTO DE EFECTOS (1-8): Pone en bypass los efectos de modulación, retaraso y
reverberación en el canal seleccionado.
u CONTROLES DE VOLUMEN (1-8): Ajusta el nivel de volumen del canal respectivo.
i BOTONES DE SILENCIO (1-8): Silencia la salida de audio del canal respectivo.
o CONTROL DE VOLUMEN MAESTRO: Ajusta el nivel de salida general.
a
CONTROL DE VOLUMEN DE LOS AUDÍFONOS: Ajusta el nivel de volumen de la salida de los audífonos.
s MEDIDOR DE SALIDA ESTÉREO: Permite controlar visualmente el nivel de salida.
d SELECTOR GIRATORIO: Permite acceder tanto a parámetros globales como de canal, que se ajustan mediante los
controles de edición.
f INTERRUPTOR DE ALIMENTACIÓN PHANTOM: Aplica alimentación de +48 V a los canales de entrada 1-8. Un LED
rojo indica que la alimentación phantom está encendida.
g CONECTOR DE AUDÍFONOS: Para uso con audífonos solamente, con una impedancia mínima de 24 Ω.
q
w
i
o
g
a
s
d
f
u
y
t
r
e
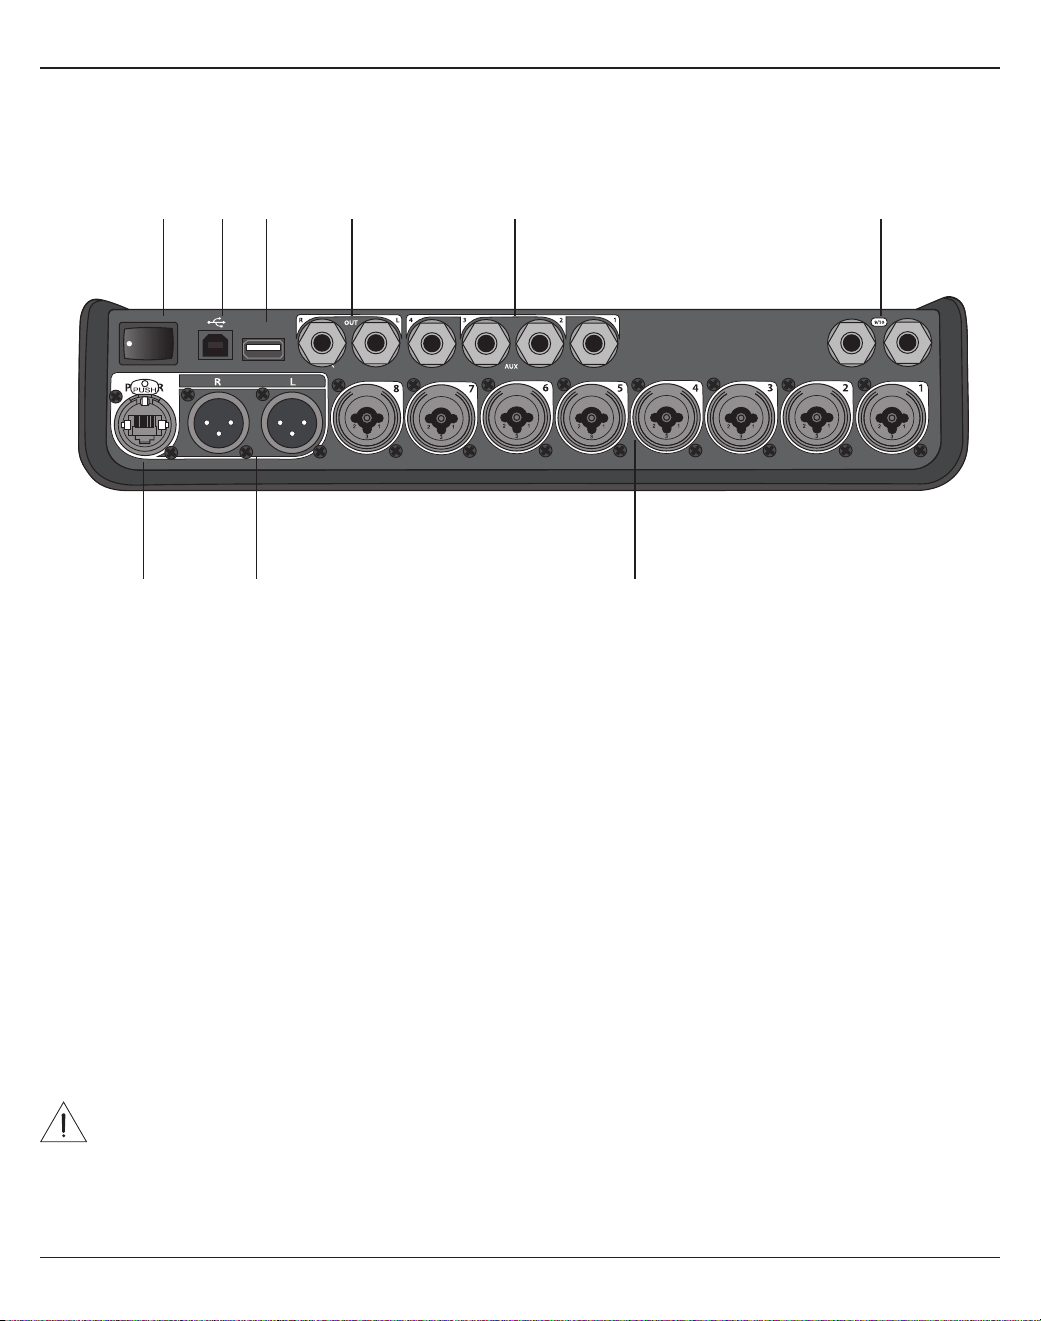
Español Latinoamérica - 9
Paneles de control y conexión
Figura 4. Panel de conexión de T8S
Panel de conexión
q INTERRUPTOR DE ALIMENTACIÓN: Enciende o apaga el mezclador.
w USB 2.0 TIPO B: Una interfaz USB que le permite conectar el mezclador a su computadora.
e USB 2.0 TIPO A: Una interfaz USB que le permite reproducir audio desde su unidad flash.
r SALIDA L/R ANALÓGICA: Salida analógica principal. Acepta cables TRS balanceados y TS no balanceados
de 1/4” (6 mm).
t SALIDA DE AUDIO: Cuatro salidas analógicas definibles por el usuario. Puede configurarse para una salida pre-
fader, post-EQ, de efectos o post-fader. Acepta cables TRS balanceados o TS no balanceados de 1/4” (6 mm).
y ENTRADA AUXILIAR – Canales de entrada analógica 9/10. Acepta cables TRS balanceados o TS no balanceados
de ¼” (6 mm) para entradas a nivel de línea. Puede utilizarse para señales de entrada estéreo.
u ENTRADAS 1-8: Canales de entrada analógica 1-8. Acepta cables XLR balanceados para micrófonos o cables TRS
balanceados o TS no balanceados de 1/4” (6 mm) para entradas de alta impedancia, como guitarras.
i SALIDA ESTÉREO XLR: Salida analógica estéreo. Acepta cables XLR balanceados para salida estéreo.
o PUERTO DE ALIMENTACIÓN DIGITAL: Para usar con la fuente de alimentación ToneMatch (consulte “Conexión de
la fuente de alimentación ToneMatch®” en la página 14).
Nota: El T8S NO está diseñado para conectarse digitalmente al L1® Model 1S/II.
PRECAUCIÓN: Aunque el puerto ToneMatch acepta un conector RJ-45 estándar, NO conecte el T8S a una
computadora o red telefónica.
M
( )
MAIN OUT
USB AUDIO
MONO
q w e r t y
uio

10 - Español Latinoamérica
Configuración del sistema
Quitar y colocar la cubierta
El mezclador T4S/T8S ToneMatch® se entrega de fábrica con una cubierta instalada en el panel superior. La cubierta
está diseñada para proteger el panel de control mientras se transporta o almacena el mezclador.
Para quitar la cubierta:
1. Coloque los pulgares en las ranuras de la parte frontal de la cubierta y deslice la cubierta hacia delante.
2. Agarre la cubierta por la parte posterior y levántela para retirarla.
Para colocar la cubierta:
1. Deslice la cubierta sobre el mezclador, de atrás hacia delante.
2. La cubierta magnetizada se enganchará por sí sola y se asegurará al mezclador.
Figura 5. Quitar y colocar la cubierta

Configuración del sistema
Español Latinoamérica - 11
Figura 6. Fijación del soporte al T4S
Figura 8. Montaje del T4S en el trípode mediante el uso de soporte
Figura 7. Soporte fijado al T4S
Opciones de montaje
El T4S/T8S viene con una inserción de tornillo de montaje de ¼” (6 mm). Esto permite que pueda montarse en
trípodes y soportes que incluyan un tornillo de montaje de ¼” (6 mm), incluido un trípode de cámara.
Montaje del T4S/T8S en un trípode de cámara
1. Extienda las patas del trípode de cámara y asegúrelas a la altura deseada.
2. Retire el soporte de la parte superior del trípode de cámara y fije el soporte a la parte de abajo del T4S/T8S con el
tornillo. Asegúrese de que la pequeña hendidura en el T4S/T8S y el relieve en el soporte estén alineados. Vea la Figura 6.
3. Fije el soporte con el T4S/T8S incorporado en el trípode de cámara. Vea la Figura 8.
ADVERTENCIA: No utilice el mezclador T4S/T8S ToneMatch® con un trípode o soporte que sea inestable. El
mezclador solo está diseñado para su uso en un tornillo de ¼” (6 mm), y el trípode o soporte debe ser capaz de
soportar un dispositivo con un peso mínimo de 1.9 kg (4.1 lb) y un tamaño total de 214 x 311 x 83 mm (8.4 x 12.25
x 3.25 pulgadas). Es posible que el uso de un trípode o soporte que no esté diseñado para soportar el tamaño y
el peso del mezclador T4S/T8S provoque una condición inestable y peligrosa que podría causar lesiones.
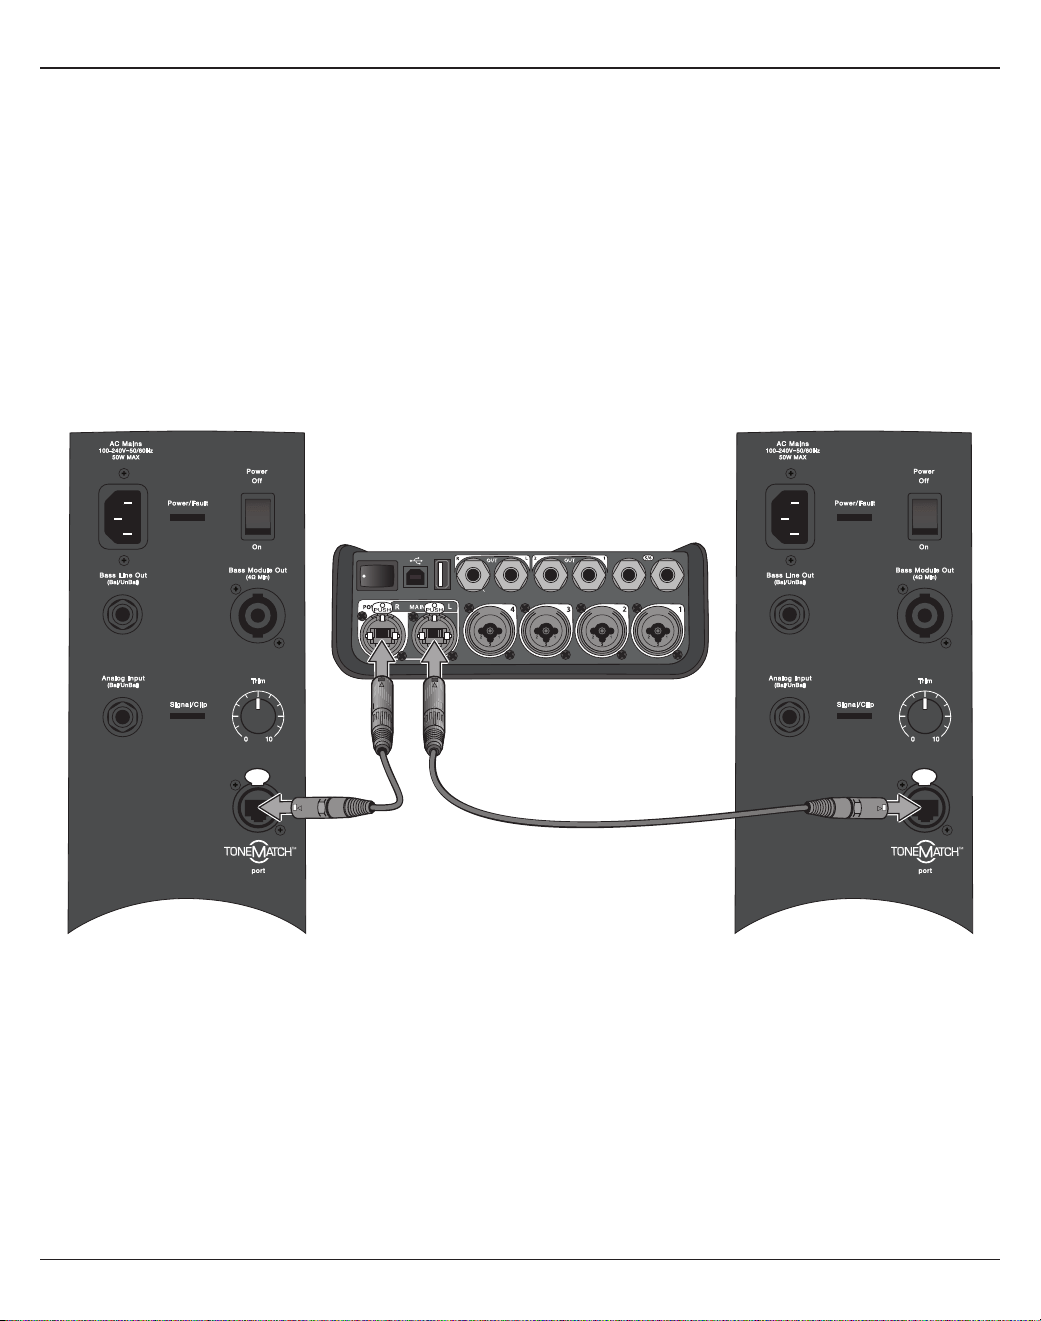
12 - Español Latinoamérica
Configuración del sistema
Conectar el T4S mediante conexión digital
1. Asegúrese de que el L1 Model 1S/II y el T4S estén apagados y que el control de volumen maestro del T4S esté al
mínimo.
2. Enchufe un extremo del cable ToneMatch® en el puerto de alimentación/la salida principal digital R del T4S.
Enchufe el otro extremo del cable ToneMatch en el puerto ToneMatch del soporte de alimentación.
Nota: Para conectar el T4S a dos soportes de alimentación L1 Model 1S/II, conecte un segundo soporte de
alimentación al puerto de salida principal digital L del T4S mediante un cable ToneMatch.
3. Encienda el mezclador y, a continuación, encienda el soporte de alimentación de L1 Model 1S/II.
4. Conecte sus instrumentos y ajuste los niveles. Consulte “Optimización de la ganancia de entrada y el volumen de
salida” en la página17.
Figura 9. Dos sistemas L1 Model II conectados a un T4S mediante conexión digital
USB AUDIO
M
( )
MONO
Nota: El T8S no se puede conectar digitalmente y el L1 Model 1S/II no puede alimentarlo.

Configuración del sistema
Español Latinoamérica - 13
Conexión del T4S/T8S mediante conexión analógica
1. Asegúrese de que el dispositivo al que se está conectando y el T4S/T8S estén apagados y que el control de
volumen maestro del T4S/T8S esté al mínimo.
2. Mediante cables balanceados XLR, conecte uno o dos dispositivos a las salidas estéreo XLR de su T8S (Vea la
Figura 10).
Nota: El T4S/T8S se puede conectar a un dispositivo a través del puerto de salida analógica R mediante un cable
TRS de ¼” (6 mm) (se vende por separado). Enchufe el otro extremo del cable TRS en el puerto de entrada
analógica del dispositivo. Para conectar el T4S/T8S a dos dispositivos, conecte un segundo dispositivo al puerto
de salida analógica L del T4S/T8S mediante un cable TRS de ¼” (6 mm).
3. Conecte una fuente de alimentación ToneMatch® al puerto de alimentación del T4S/T8S y conéctelo a una toma
de CA. Consulte “Conexión de la fuente de alimentación ToneMatch®” en la página 14.
4. Encienda el mezclador T4S/T8S y luego encienda el dispositivo.
5. Conecte sus instrumentos y ajuste los niveles. Consulte “Optimización de la ganancia de entrada y el volumen de
salida” en la página17.
Figura 10. Dos sistemas F1 conectados a un T8S mediante conexión analógica
M
( )
MAIN OUT
USB AUDIO
MONO
(
M
US
B AUDI
O
( )
M
M
AIN
O
UT
()
M

14 - Español Latinoamérica
Configuración del sistema
Conexión de la fuente de alimentación ToneMatch®
La fuente de alimentación ToneMatch proporciona alimentación para el mezclador T4S/T8S.
1. Enchufe el cable de alimentación en el puerto de alimentación T4S/T8S.
2. Enchufe un extremo del cable de alimentación de CA en la fuente de alimentación.
3. Enchufe el otro extremo del cable de alimentación en una toma de alimentación de CA activa.
4. Coloque el interruptor de encendido del T4S/T8S en la posición ON (Encendido).
Nota: Para el funcionamiento del T8S se necesita la fuente de alimentación suministrada con el T8S. La fuente de
alimentación no se incluye con el T4S y no es necesaria para el funcionamiento del T4S.
Figura 11. Conexión del T4S a la fuente de alimentación

Configuración del sistema
Español Latinoamérica - 15
Conexión del T4S/T8S a su computadora
El T4S/T8S tiene un puerto USB para conectarlo a una computadora. Esto le permite descargar escenas de
actuaciones a una computadora o instalar actualizaciones del sistema. Visite www.Bose.com/livesound para obtener
detalles sobre la actualización del sistema.
Cuando se conecta a una computadora, también puede utilizar el T4S/T8S como un dispositivo de audio USB de
propósito general para grabar/reproducir.
Nota: El T4S/T8S opera a 48 kHz/24-bit. Cuando utilice el T4S/T8S con un software de grabación, es posible que
necesite configurar los ajustes del software para el funcionamiento a 48 kHz/24-bit.
Nota: Para conectar el T4S/T8S a la computadora se requiere un cable USB (tipo A a tipo B, no suministrado).
1. Conecte el mezclador a una fuente de alimentación (fuente de alimentación ToneMatch® para T4S/T8S o un L1 Model 1S/
II para T4S solamente).
2. Enchufe un extremo del cable USB en el puerto USB 2.0 tipo B del mezclador (Figura 12).
3. Conecte el otro extremo del cable USB a un puerto USB de su computadora.
4. Encienda el mezclador.
Figura 12. Conexión de T4S a USB
Puerto ToneMatch: A un sistema L1 Model 1S/II
o a una fuente de alimentación ToneMatch
Interruptor de encendido
Cable USB
(tipo A a tipo B)
Al puerto USB de
la computadora
Conexión de una unidad flash al T4S/T8S
Conecte una unidad flash USB 2.0/3.0 cargada con archivos WAV/MP3 en el puerto USB 2.0 tipo A para reproducir
pistas de audio en su mezclador.
Figura 13. Conexión de una unidad flash al T4S

16 - Español Latinoamérica
Operación
Lectura de pantalla de T4S/T8S
En esta pantalla se ofrece una interfaz para operar el mezclador. En la figura 14, se muestra un ejemplo de la
información en pantalla y lel menú de operación. El contenido de la pantalla depende de la posición del selector
rotatorio.
Figura 14. Pantalla de ejemplo y funcionamiento básico.
Ch 1
Type Tim
eM
ix
Digital 250ms 30%
Delay
Fdbk.
All Channels
*Bose Scene 01
Load Shared Save
Scenes
Identifica el canal
seleccionado
Indica que se puede elegir el parámetro
presionando el control
Se muestra una representación visual
del valor del parámetro
Identifica la función a la que accedió el
selector rotatorio
Nombres de parámetro y sus
configuraciones/valores
Controles del botón/
rotatorios
Con este símbolo se indica
que la configuración cambia
cuando se rota el control.
Con un asterisco se indica
que la escena cargada se
modificó
Indica que se activa la
función con la presión
del control
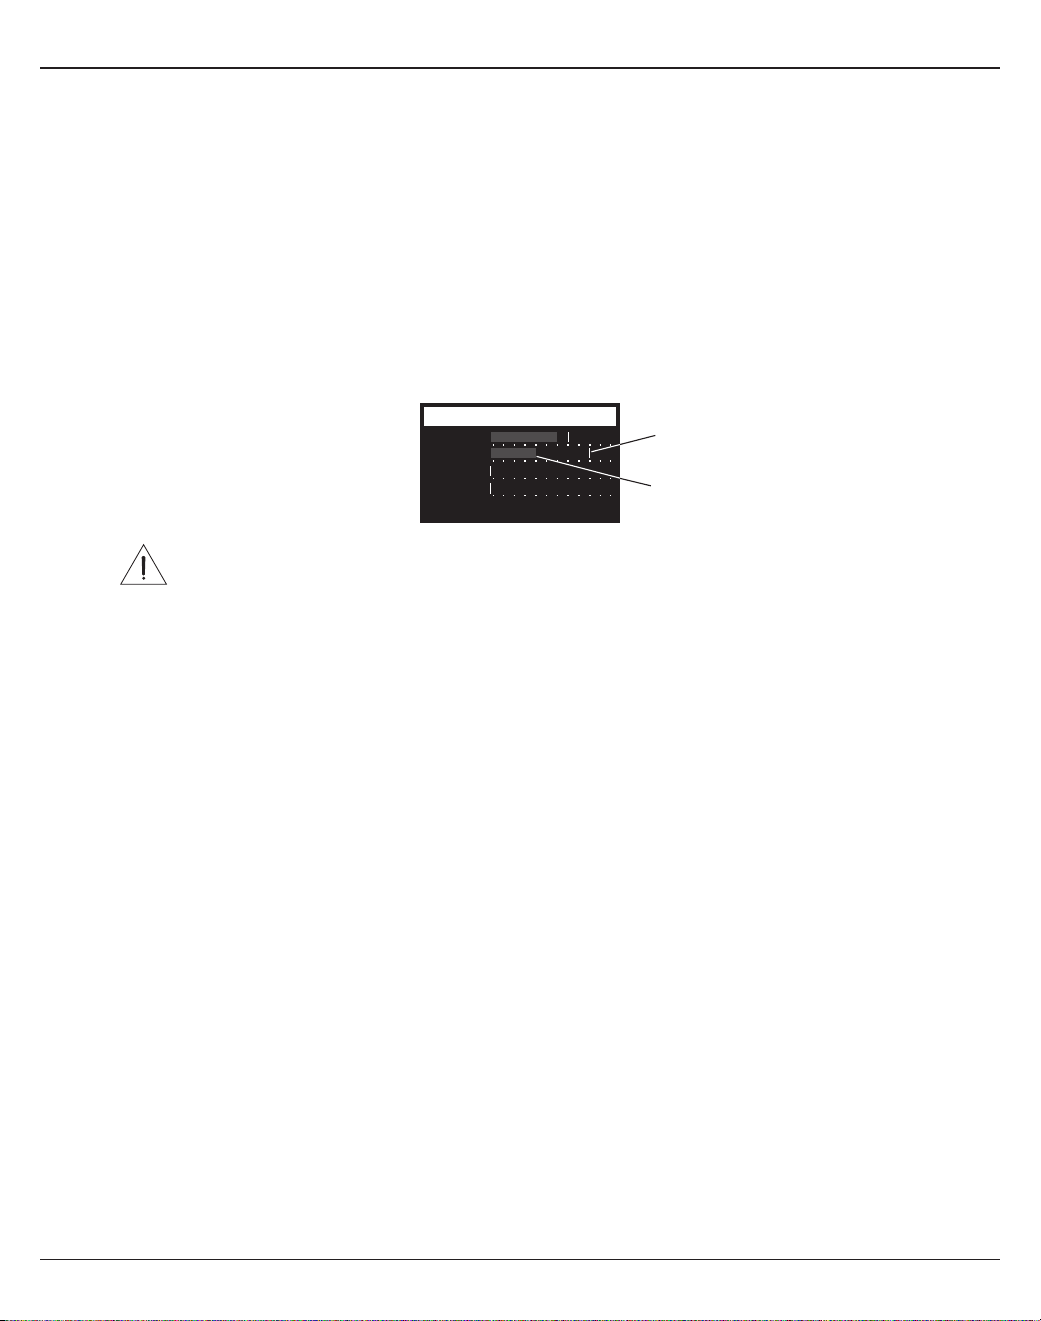
Operación
Español Latinoamérica - 17
Optimización de la ganancia de entrada y el volumen de salida
Obtener un nivel de volumen de calidad del sistema depende de los ajustes combinados de la ganancia del canal de
entrada, el volumen maestro y el volumen del canal. Realice las siguientes acciones en cada canal utilizado.
1. Asegúrese de que los controles de volumen Maestro, Recorte (Trim) y volumen del canal estén en el mínimo.
2. Ajuste el Recorte del canal de entrada.
A. Si corresponde, ajuste el volumen del instrumento o la fuente al el nivel deseado.
B. Toque el instrumento o reproduzca el sonido de la fuente al nivel de una presentación.
C. Gire lentamente el control de Recorte hacia la derecha hasta que el indicador de señal/clipeo esté en
verde. Si el indicador parpadea en rojo o se ilumina en rojo permanente, gire el control de Recorte hacia la
izquierda para disminuir el nivel.
D. Utilice los medidores de nivel de entrada (página 28) en el menú Pref. para revisar los niveles de entrada
PRECAUCIÓN: Si utiliza un dispositivo para el cual se necesita una alimentación phantom (+48 V),
como un micrófono de condensador, oprima el interruptor de alimentación Phantom antes de ajustar
el control de Recorte.
Nota: El medidor de nivel de entrada del menú Pref. puede ser útil cuando se ajusta el nivel de entrada de
Recorte (consulte la página 28).
3. Establezca el volumen Maestro en la posición de las 12 en punto.
4. Gire lentamente el control de volumen del canal hacia la derecha hasta alcanzar el nivel deseado.
Input LevelPreferences
Ch 3
Ch 1
Ch 2
Ch 4
Menu Aux InReset
Indicador de nivel pico
Indicador de nivel de entrada

18 - Español Latinoamérica
Operación
Uso del control de volumen maestro
Con el control de volumen Maestro se ajusta el nivel de entrada general de la salida de T4S/T8S ToneMatch® y la
salida analógica maestra. Durante una operación normal, se recomienda mantener el control Maestro en la posición
de las 12 en punto. Después de fijar los niveles de volumen de todos los canales, puede subir o bajar el volumen
master desde esta posición.
Silenciar un canal
Con los botones de Silencio (Mute) se silencia el audio del canal respectivo.
• Para silenciar un canal, presione el botón de Silencio una vez. El botón de Silencio se ilumina en blanco para indicar
que se silenció el canal. Aparecerá "CANAL EN SILENCIO" (CH MUTE) en la pantalla del canal respectivo.
• Vuelva a presionar el botón de Silencio para activar el sonido del canal. El botón de Silencio se atenúa para indicar
que el canal dejó de estar en silencio.
Silenciar los efectos del canal
Con los botones de Silenciamiento de efectos (FX Mute) se silencian solo los efectos de modulación, retardo y
reverberación del canal respectivo. Con el silenciamiento de los efectos no se ponen en bypass las configuraciones
de preselecciones ToneMatch, zEQ, ecualizador paramétrico y compresor/compuerta.
• Para silenciar los efectos de un canal, presione el botón de Silenciamiento de efectos una vez. El botón
de Silenciamiento de efectos se ilumina en blanco para indicar que se silenciaron los efectos. Aparecerá
"SILENCIAMIENTO DE EFECTOS (FX MUTE) en la pantalla del canal respectivo.
• Vuelva a presionar el botón de Silenciamiento de efectos para activar el sonido de los efectos del canal. El botón
de Silenciamiento de efectos se atenúa para indicar que los efectos del canal dejaron de estar en silencio.
Ch 1
Category
Utility
ToneMatch
CH MUTE
Flat
Preset
Ch 1
Category
Utility
ToneMatch
FX MUTE
Flat
Preset

Operación
Español Latinoamérica - 19
Uso del selector rotatorio
Con el selector rotatorio se accede a las funciones de la salida del mezclador ToneMatch®. En la figura 15, se muestra
un resumen de las 9 funciones relacionadas con el canal y las 3 funciones globales. En las siguientes páginas se
describe la forma de ajuste de cada función.
Figura 15. Selector rotatorio
Funciones del canal
q Pan/Aux: proporciona acceso al control panorámico y a las entradas y salidas auxiliares.
w Afinador: proporciona la afinación de la señal de un instrumento en el canal seleccionado.
e ToneMatch: proporciona acceso a las preselecciones exclusivas de ToneMatch diseñadas para instrumentos y
micrófonos específicos.
r zEQ: como parte de la preselección ToneMatch elegida, zEQ proporciona controles para ajustar las frecuencias
bajas/medias/altas dentro del rango del instrumento o micrófono.
t Ecualizador paramétrico: proporciona controles de ecualizador paramétrico por canal.
y Compresor/compuerta: proporciona acceso a las preselecciones de compuerta, compresión, limitador, de-esser y
bombos con parámetros ajustables.
u Mod.: proporciona acceso a varios efectos de modulación, tales como chorus, flanger, phaser y tremolo.
i Retardo: proporciona acceso a 3 tipos de retardos y retraso tap tempo.
o Reverberación: aplica reverberación a un canal seleccionado y se puede enviar a los canales principales o a los
auxiliares.
Funciones globales
a Tipo de reverberación: aplica un tipo seleccionado de reverberación a todos los canales de salida maestras o
envíos auxiliares.
s Pref.: permite el acceso a varias utilidades del sistema.
d Escenas: permite guardar y cargar escenas de actuaciones (una instantánea del estado completo de la unidad).
e
o
y
d
r
a
u
q
t
s
i
w

20 - Español Latinoamérica
Operación
Edición del sonido de un canal
Las funciones de edición de canal (CH Edit) permiten acceder a la configuración de los canales seleccionados. Las
funciones de edición de canal son Pan/Aux, ToneMatch®, zEQ, ecualizador paramétrico, compresor/compuerta, mod.,
retardo y reverberación.
Para editar un canal:
1. Presione los botones Edición de Canal 1, 2, 3, 4, (T4S y T8S) 5, 6, 7 u 8 (solo T8S). El canal seleccionado será
visible en la esquina superior izquierda de la pantalla.
2. Seleccione una de las funciones de Edición de Canal con el selector rotatorio.
3. Ajuste la configuración de tal función con las siguientes instrucciones.
Nota: Solo puede editar un canal a la vez. Si presiona un botón Edición de Canal, se activa la edición del canal
seleccionado solamente.
Uso de las funciones de Pan/Aux
Utilice la función Pan/Aux para enrutar el audio a la salida maestra izquierda (L) o derecha (R), la entrada auxiliar de
control o el envío auxiliar.
Uso del control panorámico (Pan)
Utilice el control panorámico para enviar cada canal a su espacio independiente en una mezcla estéreo.
1. Presione o rote el control izquierdo del editor y seleccione el control panorámico (Pan) en el menú.
2. Gire el control panorámico para ajustar la salida de línea de izquierda (L) a derecha (R).
Entrada auxiliar 5/6 (9/10)
Utilice la entrada auxiliar 5/6 (9/10) para ingresar una fuente estéreo de nivel de línea, como un dispositivo móvil.
1. Presione o gire el control izquierdo y seleccione la entrada auxiliar 5/6 en el menú.
2. Gire el control Nivel 5 o Nivel 6 para ajustar el nivel de señal del canal 5 o 6.
3. Presione Nivel 5 para cambiar al Pan 5; presione el control Nivel 6 para cambiar al Pan 6. Gire el controlm
panorámico para ajustarlo panel de izquierda (L) a derecha (R).
Ch 1
Menu Pan
Pan
Pan
Ch 1
Menu 5 Pan 6 Lvl
Aux In 50%
Aux Input 5/6
6 Pan5 Lvl
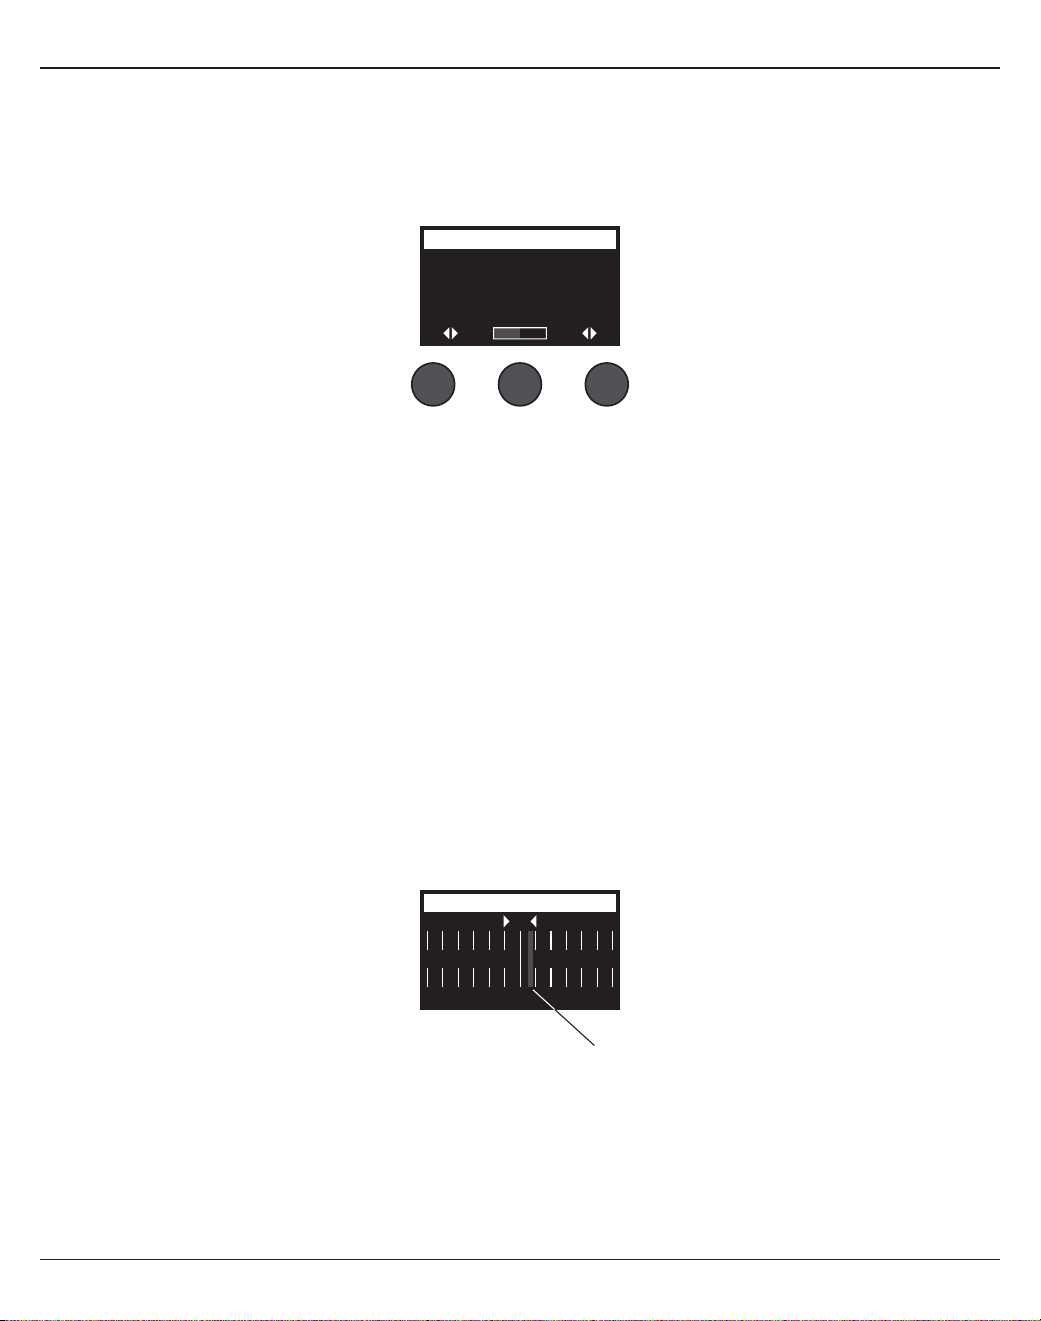
Operación
Español Latinoamérica - 21
Enrutamiento de las señales de entrada a las salidas auxiliares
La función auxiliar permite enrutar las señales a dos salidas auxiliares (solo T4S) o cuatro salidas auxiliares (solo T8S)
para diversas aplicaciones de procesamiento, grabación y refuerzo de sonido. El nivel de señal es ajustable para cada
salida auxiliar disponible:
Nota: Para silenciar la salida auxiliar, presione el control de Nivel. Vuelva a presionarlo para activar el sonido.
1. Presione o gire el control de Menú y seleccione un envío auxiliar.
2. Gire el control de Nivel para ajustar el nivel de señal del canal seleccionado.
3. Gire el control de Toque (Tap) para revisar el menú de toque y destacar el punto de toque deseado.
A. Sin procesamiento: Después de la preamplificación: la señal completamente seca (sin procesamiento) se
envía directamente desde la etapa de preamplificación.
B. Previo: Con ecualización y efectos: la señal se envía desde la etapa de preamplificación con el
procesamiento aplicado.
C. Posterior: Después de fader: la señal se envía después del control de volumen del canal con el
procesamiento aplicado.
4. Presione el control Seleccionar para seleccionar el punto de toque o el control Cancelar para salir sin hacer
cambios. El nombre del punto de toque seleccionado actualmente aparece en negrita.
Ch 1
Menu Tap
Aux
1P
re
Level
50%
Aux 1 Output
Uso del afinador
Un afinador independiente está disponible en cada canal de entrada. En la parte inferior de la pantalla, se muestra la
nota que se está tocando. A medida que realiza ajustes, aparece un indicador de tono en la pantalla para mostrar si
la nota es sostenida o bemol. Ajuste el tono del instrumento para que el cursor se alinee con el centro de la pantalla.
Nota: Para una afinación silenciosa, presione el botón de Silencio para el canal aplicable.
Utilice la función de transposición para subir o bajar el tono de referencia en dos semitonos o ingrese la afinación
deseada mediante el tono de referencia.
Ch 1
b#
A3
Tuner
Indicador de tono
22 - Español Latinoamérica
Operación
Ch 1
Category
Vocal Mics
ToneMatch
Handheld Mics
Preset
Handheld Mics
Headworn Mics
High Gain: Bright
High Gain: Normal
SelectCancel
Ch 1
Category
Utility
ToneMatch
Flat
Preset
Ch 1
Category
Vocal Mics
ToneMatch
Headworn Mics
Preset
Vocal Mics
Utility
Electric Guitars
Acoustic Guitars
Select Cancel
Girar
Presionar
Presionar
Girar
Selección de una preselección ToneMatch®
La función ToneMatch le permite seleccionar una preselección ToneMatch para el instrumento o micrófono. Con esta
tecnología exclusiva es posible optimizar la ecualización del sistema para conservar el sonido natural del instrumento
o micrófono específicos. Se organizan en categorías y se seleccionan de manera independiente para cada canal.
1. Gire el control de Categoría para acceder a la lista de categorías y resaltar su elección.
2. Presione el control Seleccionar para elegir su opción o presione el control Cancelar para salir de la lista sin hacer
cambios.
3. Si presionó Seleccionar, gire el control de Preselección para acceder a la lista de preselecciones y resaltar su
elección.
4. Presione el control Seleccionar para elegir su opción o presione el control Cancelar para salir de la lista sin
hacer cambios.
Ch 1
Low Mid
Handheld Mics
High
0.0db 0.0db 0.0db
zEQ
Ajuste de zEQ
La función de zEQ es parte de la tecnología de preselección ToneMatch. Le permite ajustar las frecuencias bajas/
medias/altas dentro del rango del instrumento o micrófono.
Para ajustar zEQ, gire el control en la banda de frecuencia correspondiente.
Nota: Para poner en bypass una banda de frecuencia individual, presione el control correspondiente. Vuelva a presionarlo
para activarla.
Operación
Español Latinoamérica - 23
Ajuste del ecualizador paramétrico
La función del ecualizador paramétrico ofrece 3 ecualizaciones paramétricas que se centran en una frecuencia de
usuario específico dentro del rango de 50 Hz y 16 kHz.
Nota: Para poner en bypass la configuración del ecualizador paramétrico, presione el control Seleccionar. Vuelva a
presionarlo para activarla.
1. Presione o gire el control Seleccionar y seleccione la banda del ecualizador paramétrico 1 a 3.
2. Gire el control de Nivel para ajustar el nivel de aumento/corte de -15 dB a +15 dB.
3. Gire el control de Frec. para ajustar la frecuencia central de 50 Hz a 16 kHz.
4. Presione el control de Frec. para cambiar a ancho. Gire el control Ancho para ajustar el ancho de la curva de
campana alrededor de la frecuencia central de 0.20 octavas a 5.00 octavas.
Ch 1
Select Level
B3
Freq
PEQ 1 -3.4dB 250.0Hz
Parametric EQ
Width
Uso de las funciones de compresor/compuerta
La función de compresor/compuerta proporciona acceso a las preselecciones de compuerta, compresión, limitador,
de-esser y bombos con parámetros ajustables.
Nota: Para poner en bypass la configuración de compresor/compuerta, presione el control de Tipo. Vuelva a presionarlo
para activarla.
Nota: Solo se permite un efecto por canal.
1. Gire el control de Tipo para acceder a la lista de efectos de compresor/compuerta y resaltar su elección:
A. Compresor 1: Suave: compresor con un ratio fijo de compresión baja con parámetros variables de umbral
y ganancia. Funciona bien como compresor de propósito general en la mayoría de los instrumentos y
micrófonos en los que se necesita un control mínimo.
B. Compresor 2: Medio: compresor con un ratio fijo de compresión moderada con parámetros variables de
umbral y ganancia. Funciona bien con bajos, guitarras, teclados y voces en los que se necesita un control
sutil.
C. Compresor 3: Extremo: compresor con un ratio fijo de compresión alta con parámetros variables de umbral
y ganancia. Funciona bien con instrumentos ruidosos (como trompetas y tambores), al igual que con voces
en los que se requiere un control más agresivo.
D. Limitador: limitador potente con un ratio fijo (∞:1) con parámetros variables de umbral y ganancia. Funciona bien
con instrumentos muy ruidosos, como tambores, para prevenir picos de señal por una sobrecarga del canal.
Ch 1
Type Thresh Speed
Gate -80.0dB 50%
Comp/Gate
Ramp

24 - Español Latinoamérica
Operación
Uso de KickGate
KickGate es una tecnología exclusiva de Bose® que le permite elevar el nivel de canal de un bombo y eliminar el
riesgo de retroalimentación del micrófono. Existen dos configuraciones de KickGate disponibles en el menú de
compresor/compuerta.
1. Conecte el tipo adecuado de micrófono.
2. Elija una preselección ToneMatch® apropiada.
3. Ajuste el control de Recorte de entrada de canal hasta que el bombo más intenso cambie el LED de canal de
entrada a rojo y luego ajuste el control hasta que el LED cambie a verde. Esto optimiza el nivel de recorte de
entrada de canal.
4. Seleccione Compresor/compuerta con el selector rotatorio.
5. Gire el control de Tipo para desplazarse hacia abajo en la lista y seleccione KickGate 1: Regular o KickGate 2:
Rápido y presione Seleccionar. Elija KickGate 2 cuando utilice un bombo con doble pedal.
6. Mientras toca el bombo, aumente el volumen hasta el nivel de presentación deseado.
7. Toque el bombo en el nivel más suave que tiene pensado usar en la presentación y compruebe que puede
escucharlo.
8. Mientras toca de manera suave, aumente el nivel de Umbral hasta que algunos de los golpes al bombo se
interrumpan. Disminuya el nivel de Umbral en 3 dB.
9. Mientras toca el bombo de manera normal, gire el control de Tensión hacia la izquierda para reducir la tensión y
agregar más “potencia” al sonido. La tensión se puede ajustar de 0 % (más lento) a 100 % (más rápido).
E. De-Esser: compresor tipo "side chain" con un ratio fijo de compresión con parámetros variables de umbral y
ganancia. Diseñado para reducir los sonidos sibilantes de las voces.
F. Compuerta de ruido: compuerta de ruido con un tiempo rápido de ataque, con un umbral y una velocidad
variables (release). Ideal para eliminar el sonido no deseado de micrófonos e instrumentos.
G. KickGate 1: Regular: compuerta con ataque fijo, además de parámetros variables de umbral y tensión
(release). Esta es una tecnología exclusiva de Bose® que se diseñó específicamente para bombos. Es una
compuerta que proporciona una ganancia máxima antes del punto de retroalimentación, lo cual permite que
los bombos suenen lo más fuerte posible en el sistema de PA.
H. KickGate 2: Rápido: es lo mismo que KickGate 1, pero se ajusta a tempos más rápidos. Seleccione esta
configuración si utiliza un bombo con doble pedal.
2. Presione el control Seleccionar para elegir su opción o presione el control Cancelar para salir de la lista sin hacer
cambios.
3. Compresor 1-3, limitador, de-Esser: Gire el control de Umbral para ajustar el nivel del umbral de entrada (trigger)
de -50 dB a 0 dB. Gire el control de Ganancia para ajustar la ganancia de 0 dB a 30.0 dB. En la barra de ganancia
que se encuentra sobre el control, se muestra la cantidad de reducción de ganancia. Esta pantalla ayuda a
configurar el umbral.
Compuerta de ruido: Gire el control de Umbral para ajustar el nivel del umbral de entrada (trigger) de -90 dB a
-30 dB. Gire el control de Velocidad para establecer la velocidad de cierre de la compuerta en cualquier valor
de 0 % (más rápido) a 100 % (más lento). Gire el control de Rampa para ajustar el grado de la compuerta de 0 %
(horizontal) a 100 % (vertical).
KickGate 1-2: Gire el control de Umbral para ajustar el nivel del umbral de entrada (trigger) de -20 dB a 0 dB. Gire
el control de Tensión para ajustar la tensión (qué tan rápido se cierra la compuerta) de 0 % (más lento) a 100 %
(más rápido).
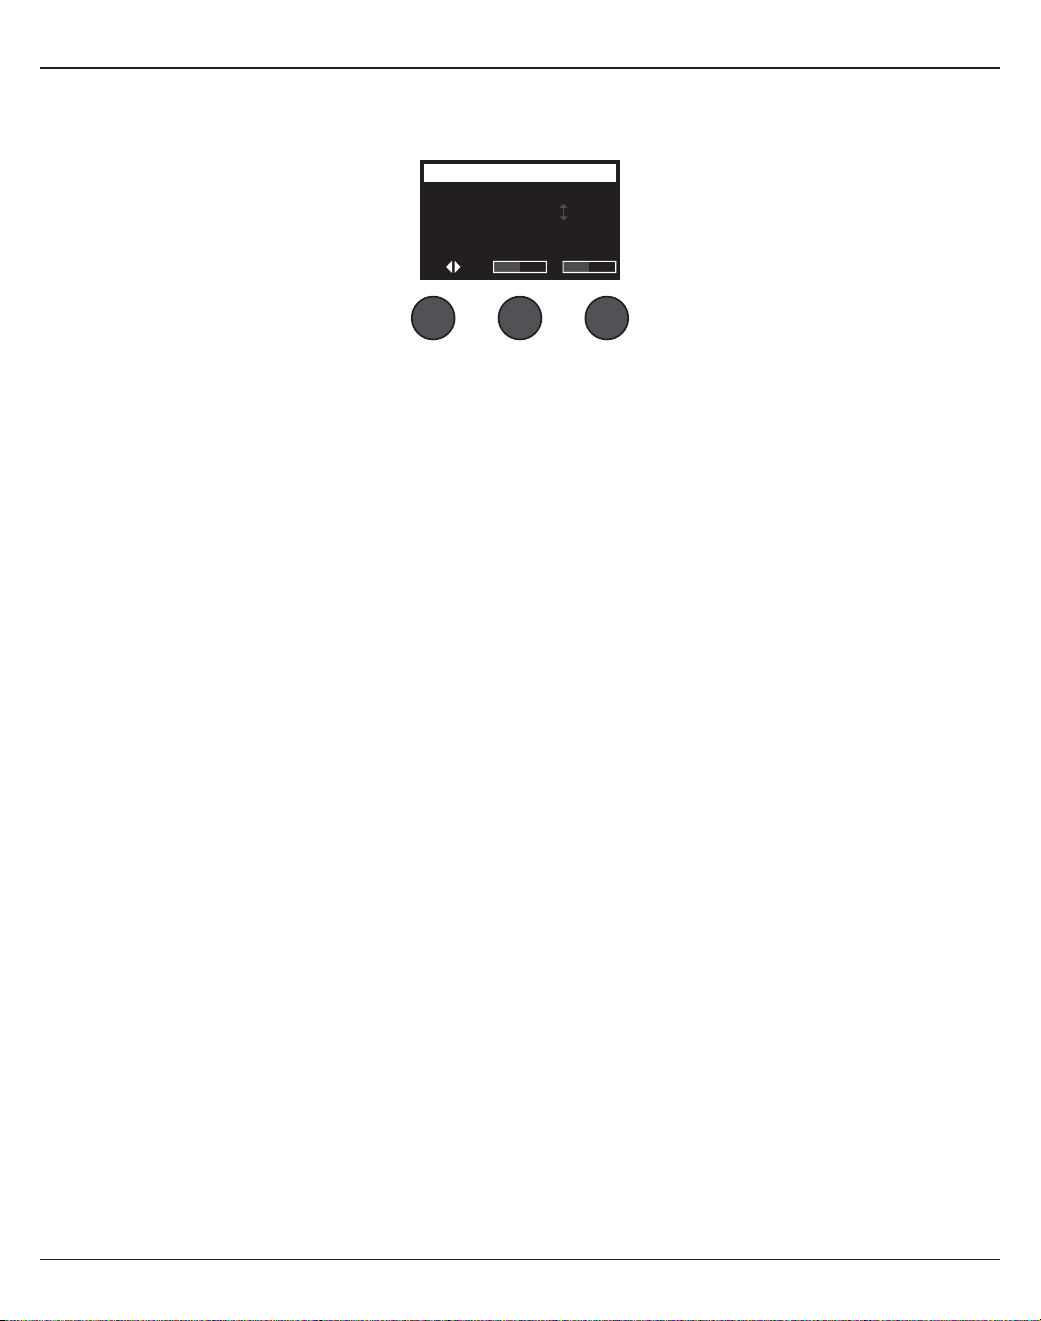
Operación
Español Latinoamérica - 25
Uso de los efectos de modulación
La función de modulación le permite aplicar efectos de modulación.
Nota: Para poner en bypass la configuración de modulación, presione el control de Tipo. Vuelva a presionarlo para
activarla.
1. Gire el control de Tipo para acceder a la lista de tipos de modulador y resaltar su elección:
A. Chorus 1: Brillante: coro de altas frecuencias que funciona bien con instrumentos acústicos. Se incluyen
parámetros ajustables de mezcla, profundidad y velocidad.
B. Chorus 2: Cálido: similar a Chorus 1, pero con frecuencias un poco menos altas. Se incluyen parámetros
ajustables de mezcla, profundidad y velocidad. Funciona bien con bajos y guitarras eléctricos.
C. Chorus 3: Oscuro: similar a Chorus 2, pero con frecuencias menos altas para un tono más oscuro. Se incluyen
parámetros ajustables de mezcla, profundidad y velocidad. Funciona bien con bajos y guitarras eléctricos.
D. Flanger 1: Cinta: flanger con estilo de cinta sin retroalimentación. Se incluyen parámetros ajustables de
mezcla, profundidad y velocidad. Funciona bien como efecto en bajos y guitarras eléctricos.
E. Flanger 2: Retroalimentación: similar a Flanger 1, pero con un efecto de retroalimentación.
F. Phaser 1: Pedal: phaser con el estilo clásico de un “pedal de efectos”. Con una amplia extensión de
preselección y parámetros variables de velocidad y retroalimentación. Funciona bien como efecto en bajos y
guitarras eléctricos, al igual que en teclados.
G. Phaser 2: Rack: phaser con el estilo clásico de “rack”. Con un tipo de mezcla positivo y parámetros variables
de velocidad y retroalimentación. Funciona bien como efecto en bajos y guitarras eléctricos, al igual que en
teclados.
H. Phaser 3: Cálido: phaser con estilo retro. Con un tipo de mezcla positivo y parámetros variables de velocidad y
retroalimentación. Funciona bien como efecto en bajos y guitarras eléctricos, al igual que en teclados.
I. Phaser 4: Brillante: phaser sin graves. Con un tipo de mezcla positivo y parámetros variables de velocidad y
retroalimentación. Funciona bien como efecto en guitarras eléctricas y teclados.
J. Tremolo: efecto tremolo con estilo retro y parámetros variables de velocidad y profundidad. Funciona bien
como efecto en guitarras, teclados y armónicas.
2. Presione el control Seleccionar para elegir su opción o presione el control Cancelar para salir de la lista sin hacer
cambios.
3. Chorus 1-3, Flanger 1-2: Gire el control de Mezcla para ajustar la mezcla deseada de señal sin procesamiento a
señal con procesamiento (procesada con modulación). Gire el control de Profundidad para ajustar el nivel de
variación del tono a partir de la señal original de entrada. Presione el control de Profundidad para acceder al
parámetro de Velocidad. Gire el control de Velocidad para ajustar la rapidez con la que se modula el tono.
Phaser 1-4: Gire el control de Velocidad para ajustar la rapidez con la que se modula el tono. Gire el control de
Retroalimentación para ajustar el nivel de reverberación de la modulación.
Tremolo: Gire el control de Velocidad para ajustar la rapidez con la que se modula el volumen. Gire el control de
Profundidad para ajustar el nivel de variación del volumen a partir de la señal original de entrada.
Ch 1
Type Mix Depth
Chorus1 50% 50%
Modulator
Speed
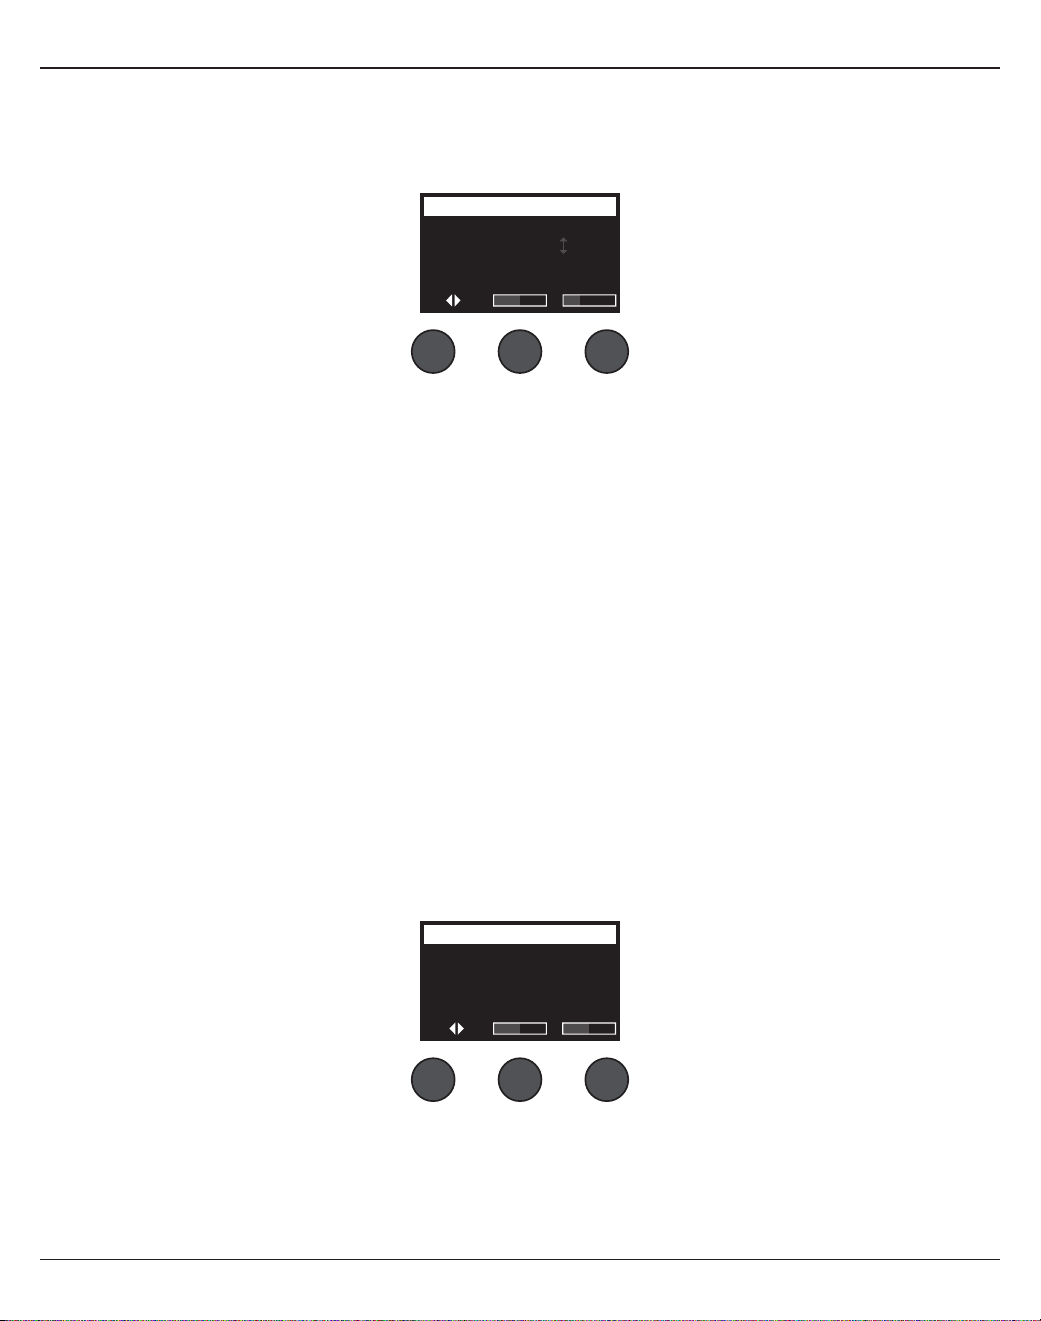
26 - Español Latinoamérica
Operación
Ch 1
Type Tim
eM
ix
Digital 250ms 30%
Delay
Fdbk.
Adición de retardos (delays)
La función de retardo permite aplicar un retardo con estilo digital, analógico o de cinta.
Nota: Para poner en bypass la configuración de retardo, presione el control de Tipo. Vuelva a presionarlo para
activarla.
1. Gire el control de Tipo para acceder a la lista de tipos de retardo y resaltar su elección.
A. Retardo digital: efecto de retardo digital directo en el que las repeticiones se mantienen sin alteraciones. Con
parámetros ajustables de mezcla, tiempo y retroalimentación. Funciona bien con guitarras, tambores y voces.
B. Retardo analógico: efecto de retardo analógico clásico en el que las repeticiones se deterioran constantemente. Con
parámetros ajustables de mezcla, tiempo y retroalimentación. Funciona bien con guitarras, tambores y voces.
C. Retardo de cinta: efecto de retardo de cinta con estilo retro en el que las repeticiones se deterioran aún más que en
el retardo analógico. Ideal para guitarras, trompetas, armónicas y voces.
2. Presione el control Seleccionar para elegir su opción o presione el control Cancelar para salir de la lista sin hacer cambios.
3. Gire el control de Tiempo para ajustar la cantidad de tiempo de retardo en incrementos de 5 ms. Presione el control de
Tiempo para fijar tocando (tap) el tempo de retardo deseado.
4. Gire el control de Mezcla para establecer la mezcla deseada de señal sin procesamiento (0 %) a señal con procesamiento
(100 %).
5. Presione el control de Mezcla para acceder a la configuración de Retroalimentación. Gire el control de Retroalimentación
para ajustar el nivel de retroalimentación de retardo.
Adición de reverberación
La función de reverberación permite aplicar una cantidad de reverberación que el usuario puede ajustar en el canal
seleccionado. Para seleccionar este tipo de reverberación, consulte “Selección de un tipo de reverberación” en la página 27.
Nota: Para silenciar los efectos de reverberación, presione el control de Mezcla. Vuelva a presionarlo para activar el sonido.
1. Presione o gire el control de Menú y seleccione la salida de la reverberación.
2. Gire el control de Mezcla para ajustar la mezcla deseada de señal sin procesamiento (0 %) a señal con
procesamiento (100 %).
3. Gire el control de Brillo para ecualizar las altas frecuencias de reverberación aplicadas en el canal seleccionado.
Ch 1
Mix Bright
50% 50%
Reverb
Menu
Main
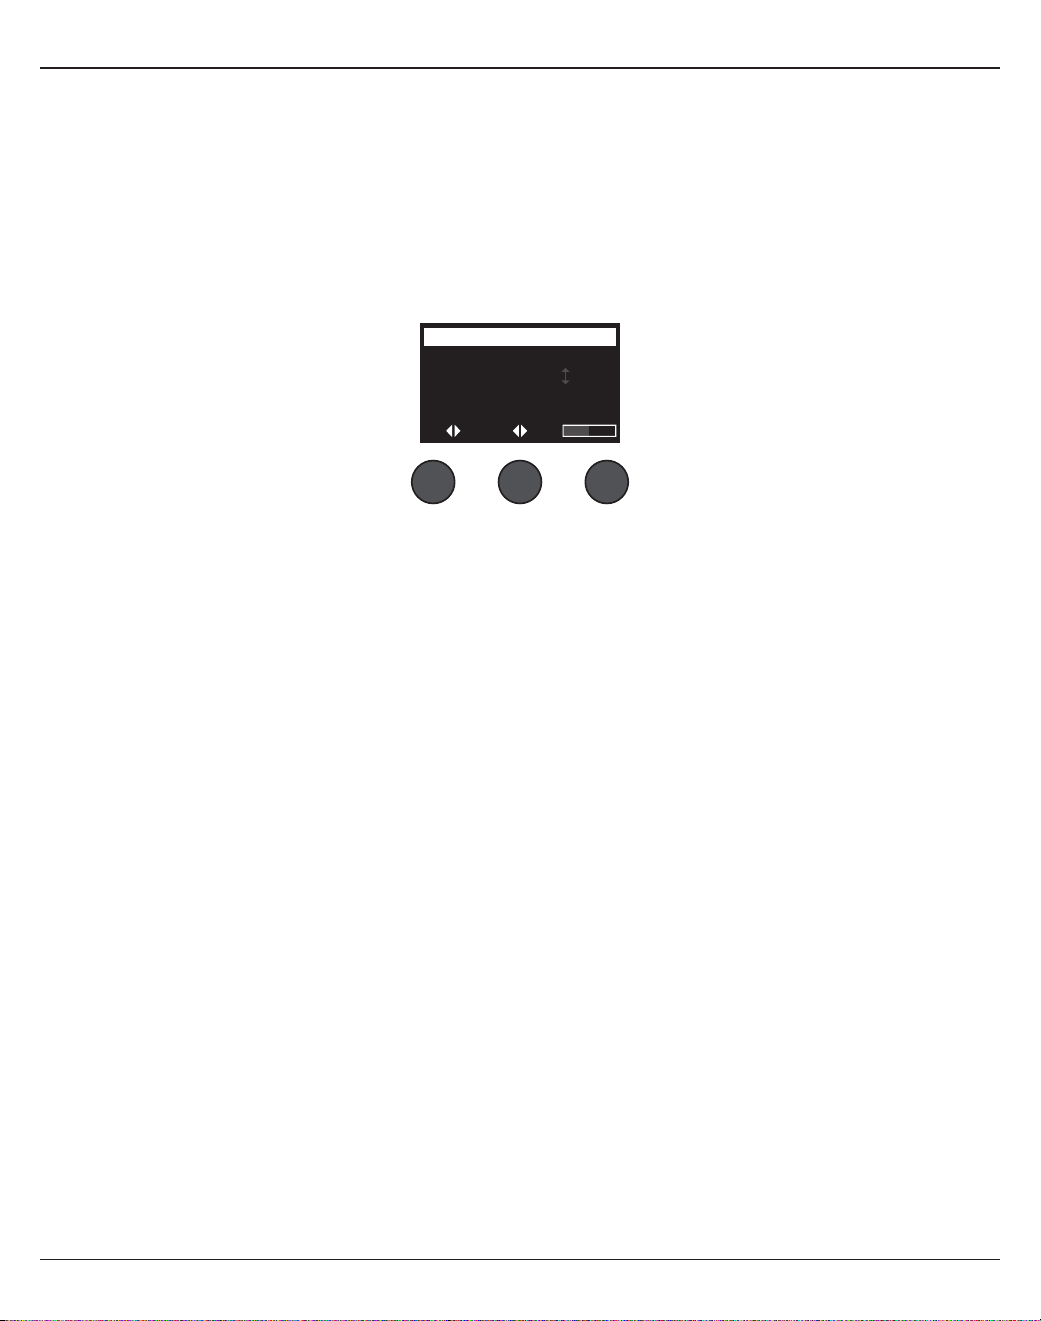
Operación
Español Latinoamérica - 27
Uso de las funciones globales
Las funciones Globales permiten acceder a configuraciones que afectan el funcionamiento general del mezclador y
todos sus canales.
Selección de un tipo de reverberación
La función de tipo de reverberación permite seleccionar el tipo de reverberación que se aplica a los canales de
entrada. El tiempo de decaimiento (decay time) y el balance (bal) son ajustables. Con el balance se controla el índice
de reflexiones tempranas y tardías.
Nota: Para silenciar la reverberación, presione el control de Tipo. Vuelva a presionarlo para activar el sonido.
1. Seleccione Tipo de reverberación con el selector rotatorio.
2. Presione o gire el control de Menú y seleccione la salida de la reverberación. Puede enviar un tipo de
reverberación diferente a un envío principal o auxiliar.
3. Gire el control de Tipo para ver la lista de reverberaciones:
A. Plate: crea el ambiente de una reverberación de lámina típica de estudio. Con parámetros ajustables de
tiempo y balance (índice de reflexiones tempranas/tardías).
B. Pequeño: crea el ambiente de un espacio pequeño. Con parámetros ajustables de tiempo y balance (índice
de reflexiones tempranas/tardías).
C. Medio: crea el ambiente de un espacio mediano. Con parámetros ajustables de tiempo y balance (índice de
reflexiones tempranas/tardías).
D. Grande: crea el ambiente de un espacio grande. Con parámetros ajustables de tiempo y balance (índice de
reflexiones tempranas/tardías).
E. Caverna: crea el ambiente de un espacio extremadamente grande. Con parámetros ajustables de tiempo y
balance (índice de reflexiones tempranas/tardías). Un efecto de reverberación único e interesante.
4. Gire el control de Tipo para revisar el menú de reverberación y destacar el punto de reverberación deseado.
5. Presione el control de Tipo para realizar la selección.
6. Gire el control de Tiempo para manejar el tiempo de decaimiento del modelo de reverberación seleccionado
desde el mínimo hasta el máximo. En un 0 %, el tiempo de decaimiento estará en el mínimo y se simulará el
tamaño de sala más pequeño que esté disponible para el tipo de reverberación seleccionado actualmente. En
un 100%, el tiempo de decaimiento estará en el máximo y se simulará el tamaño de sala más grande que esté
disponible para el tipo de reverberación seleccionado actualmente. Cada tipo de reverb posee un rango de
tiempos de decaimiento, que funciona mejor según el tipo de modelo seleccionado. El parámetro de decaimiento
de reverberación le permite ajustar el tiempo de reverberación entre los rangos específicos que funcionan mejor
según el tipo de modelo de reverberación seleccionado.
7. Presione el control de Tiempo para cambiar a Bal. Gire el control de Bal. para ajustar el índice de reflexión
temprana y tardía (0 % = todas las reflexiones tempranas, 100 % = todas las reflexiones tardías).
All Channels
Menu Type Bal.
Main Medium 50%
Reverb Type
Time
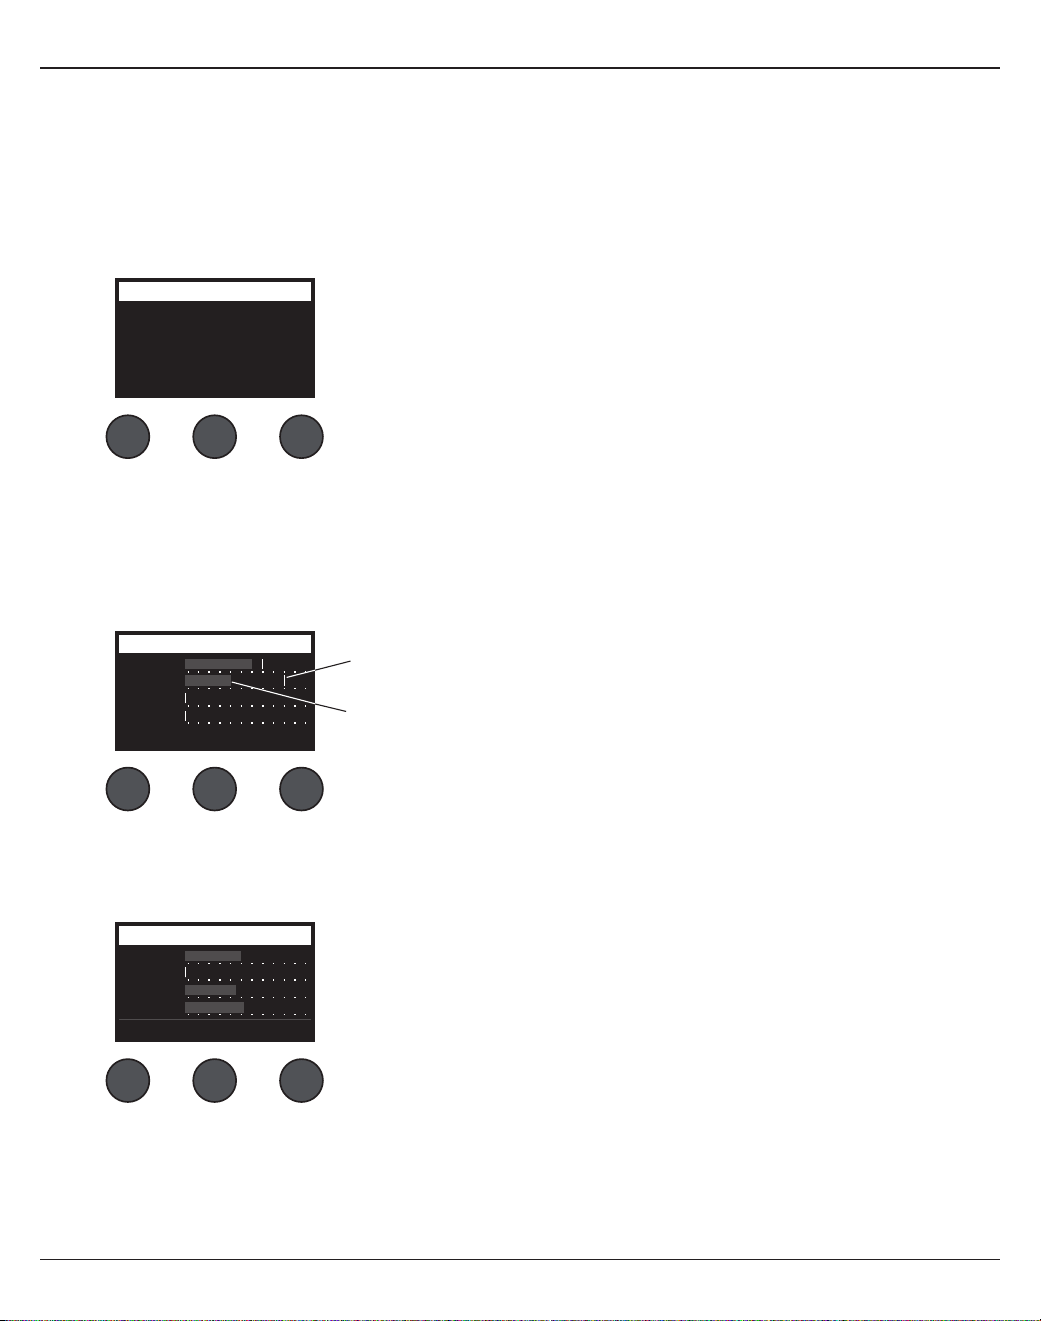
28 - Español Latinoamérica
Operación
Uso de las utilidades de Pref.
La función de Pref. permite el acceso a varias utilidades del sistema.
1. Seleccione Pref. con el selector rotatorio.
2. Gire el control de Menú para revisar la lista y destacar la utilidad deseada. Presione el control Seleccionar para
ver la utilidad:
• Estado: se muestran los efectos asignados a los canales de entrada (solo visibles).
• Nivel de entrada: se muestran los medidores de nivel de entrada con indicadores de señal pico de todos los
canales de entrada. Presione el control Restablecer para restaurar a cero todos los indicadores de señal pico.
Esta pantalla es útil cuando se configura el nivel de recorte de entrada de canal (consulte “Optimización de
la ganancia de entrada y el volumen de salida” en la página 17). Presione el control de Entrada auxiliar para
supervisar el nivel de las entradas auxiliares (solo para T8S, presione el control de canal 5-8 para supervisar el
nivel de entradas 5-8).
• Nivel de salida: se muestran los medidores de nivel de salida de todas las salidas: Izquierda principal, derecha
principal, USB izquierdo, USB derecho. Presione el control auxiliar para supervisar el nivel de las salidas
auxiliares.
Output Level Preferences
USB L
Main L
Main R
USB R
Menu Rese
tA
ux
Status
Ch 1 Mod
Mod
Mod Dly
Cm
pR
ev
Rev
Rev
CmpCh 2
Ch 3
Ch 4
Menu
Preferences
Cmp = compresor/compuerta
Mod = modulación
Dly = retardo
Rev = reverberación
Input LevelPreferences
Ch 3
Ch 1
Ch 2
Ch 4
Menu Aux InReset
Indicador de nivel pico
Indicador de nivel de entrada
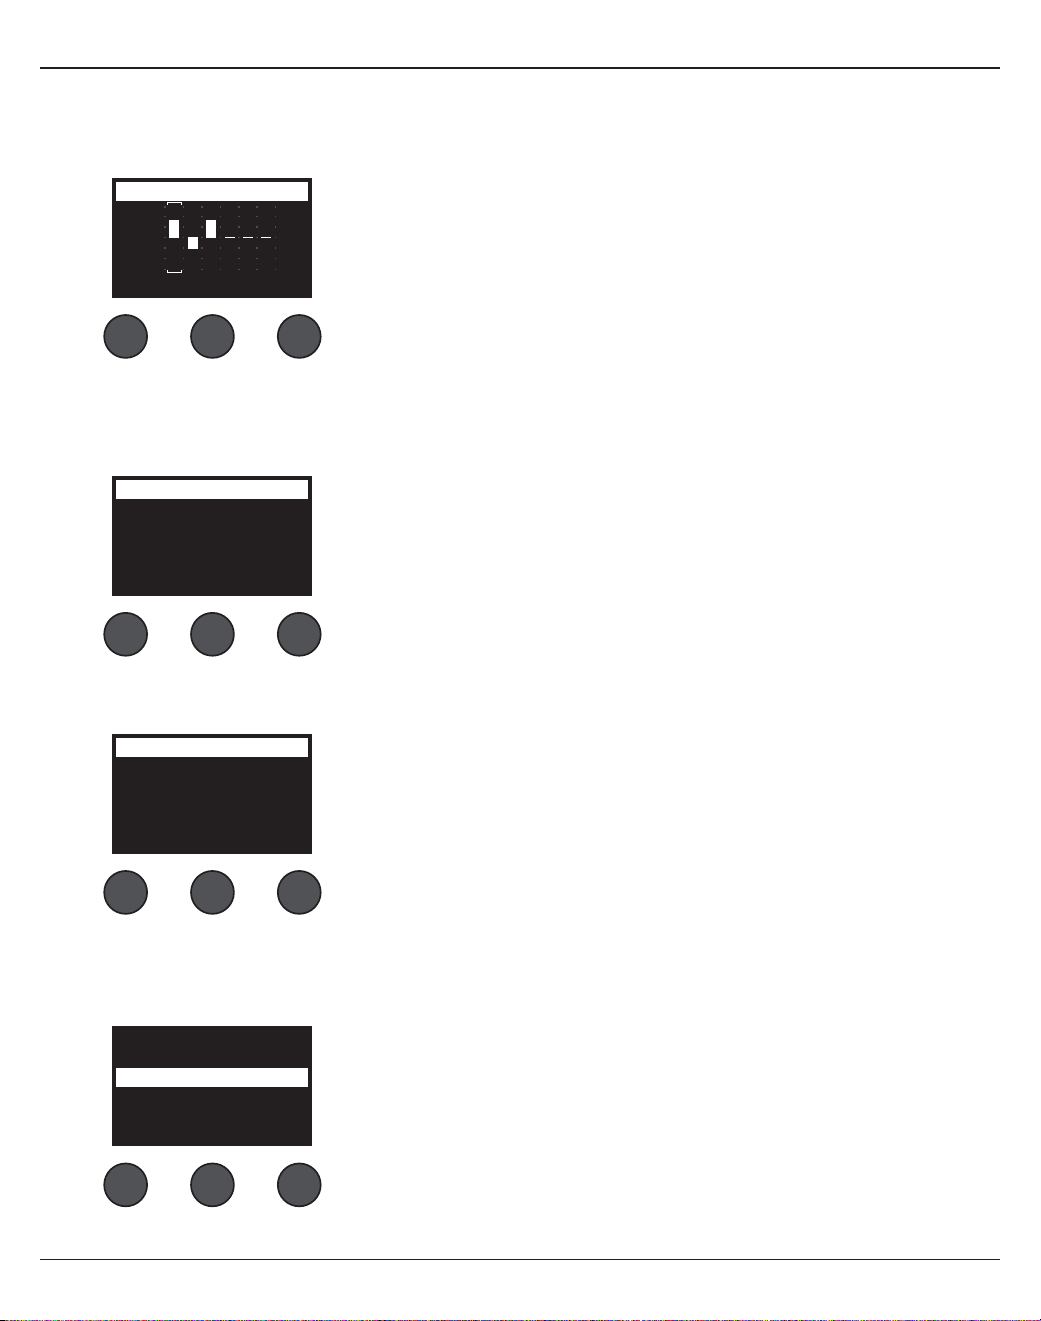
Operación
Español Latinoamérica - 29
• Ecualizador de salida maestro: ecualizador gráfico de 6 bandas que se encuentra en la salida de mezcla
maestra. Con el control medio, seleccione el rango de frecuencia que desea aumentar o atenuar y utilice el
control de Nivel para ajustar el nivel +/–18 dB.
• USB B a PC: permite enviar una fuente seleccionada a la computadora mediante los canales USB de salida
izquierdo y derecho. Las opciones de fuente son: canales 1-4 (canales 5-8 solo en T8S), entrada auxiliar,
maestra o salidas auxiliares 1-2 (salidas auxiliares 3-4 solo en T8S).
• USB B desde PC: permite enviar canales USB izquierdo y derecho desde la computadora hasta un destino del
mezclador seleccionado (ninguno, entrada auxiliar o maestra).
• Reproducción USB A: conecte una unidad flash USB de tipo A para reproducir archivos WAV/MP3
almacenados en la unidad flash. En el menú, seleccione la carpeta con los archivos WAV/MP3, elija el archivo
que desea reproducir y ajuste el nivel mediante la rotación del control de Nivel.
+18
+12
+6
0
-6
-12
-18
125HzMenu
Master EQ Preferences
Level
1. Gire el control Izquierdo/derecho para resaltar una fuente.
2. Presione el control Seleccionar para seleccionar la fuente o el control
Cancelar para salir sin hacer cambios.
3. Gire el control de Menú para volver a la lista de menú Pref.
Left : Master
Right : Master
LeftMenu
USB to PC Preferences
Right
Left : Master
Right : Master
LeftMenu
USB from PC Preferences
Right
1. Gire el control Izquierdo/derecho para resaltar un destino.
2. Presione el control Seleccionar para seleccionar la fuente o el control
Cancelar para salir sin hacer cambios.
3. Gire el control de Menú para volver a la lista de menú Pref.
Tomorrow Is Too late.wav
Sarah.wav
Mistakes for Love.mp3
Sun Behind the Clouds.wav
Hey God Maker. mp3
LevelSelectMenu

30 - Español Latinoamérica
Operación
• Versiones: se muestra la versión del firmware DSP.
• ToneMatch: se muestra la lista de bancos de preselección ToneMatch que se encuentran en T4S/T8S. Consulte
www.Bose.com/livesound para ver los bancos de preselección más recientes.
• Soporte de alimentación L1: cuando se conecta a un soporte de alimentación L1® Model 1S/II, aparece
Conectado en la pantalla.
Versions
T4S v1.0.0
Menu
Preferences
C: Ovation Guitars
B: Audix Mics.
A: Taylor Guitars
Menu
ToneMatchPreferences
Connected
Menu
L1 Stand Preferences
Carga y almacenamiento de escenas
Una escena es una instantánea del estado del mezclador T4S/T8S ToneMatch®.
• En una escena se conservan todos los ajustes del mezclador ToneMatch, además del estado de los botones
Silenciar, Silenciamiento de efectos y Edición de Canal
• En una escena no se conservan el recorte de canal, los niveles de volumen del canal, el nivel de volumen maestro, el
nivel de los audífonos ni la posición del interruptor de alimentación phantom.
All Channels
Singer/Songwriter
Load Shared Save
Scenes
Operación
Español Latinoamérica - 31
En T4S/T8S se incluyen tres tipos de escenas:
• (5) escenas Bose: Escenas de preselección de fábrica y solo lectura. No se pueden editar ni sobrescribir.
• (10) escenas de usuario: El usuario define estas escenas para guardar y recuperar todos los ajustes favoritos. Para
actualizar estas escenas, puede sobrescribirlas tantas veces como desee.
• (1) escena compartida: El usuario define esta escena para almacenar los ajustes que desea compartir con otros
usuarios de mezcladores T4S/T8S ToneMatch®. Esta escena se puede cargar a una computadora mediante el
software de actualización L1® disponible en www.Bose.com/livesound.
Para cargar una escena:
1. Seleccione Escenas con el selector rotatorio.
2. Gire el control Cargar para revisar la lista de escenas y destacar el nombre de escena deseado. El nombre de la
escena cargada actualmente aparece en negrita.
3. Presione el control Seleccionar para elegir la escena o presione el control Cancelar para salir de la lista sin hacer
cambios en la configuración.
Nota: La pantalla vuelve a mostrar las escenas si no presiona el control Seleccionar o Cancelar dentro de los 10
segundos. No se realiza ningún cambio y aparece la escena cargada actualmente en la pantalla.
4. Si presiona Seleccionar, aparece la pregunta “¿Está seguro?”. Presione el control Sí para cargar la escena o
presione el control No para salir sin hacer cambios en la configuración de la escena.
Nota: La pantalla vuelve a mostrar las escenas si no presiona el control Sí o No dentro de los 10 segundos. No se
realiza ningún cambio y aparece la escena cargada actualmente en la pantalla.
Para guardar una escena:
1. Seleccione Escenas con el selector rotatorio. Se muestra la escena cargada actualmente.
2. Gire el control Guardar para destacar la escena que desea guardar. Presione Seleccionar o Cancelar para salir de
la lista.
All Channels
Singer/Songwriter
Load Shared Save
Scenes
Nota: La pantalla vuelve a mostrar las escenas si no presiona el control
Seleccionar o Cancelar dentro de los 10 segundos. No se produce
ningún cambio y aparece la escena cargada actualmente en la pantalla.
My Scene 01
My Scene 02
My Scene 03
Cancel Select
32 - Español Latinoamérica
Operación
3. Si presiona Seleccionar, utilice la pantalla Renombrar para editar el nombre de la escena o Guardar para usar el
nombre que se muestra en pantalla y siga con el paso 4.
Para cambiar el nombre de la escena antes de guardar:
Puede utilizar las siguientes opciones de edición para cambiar el nombre de la escena. Después de cambiar el
nombre, presione el control Guardar y siga con el paso 4.
• Seleccione y cambie los caracteres: En la pantalla Renombrar, gire el control Cursor para destacar el carácter o la
posición del carácter que desea cambiar. Luego gire el control Seleccionar para cambiar el carácter.
• Use el mapa de caracteres: En la pantalla Renombrar, gire el control Cursor para destacar el carácter que desea
cambiar. Luego presione el control Seleccionar para ver el mapa de caracteres. Gire el control Seleccionar para
mover el cursor hacia la izquierda o derecha. Gire el control Arriba/abajo para mover el cursor hacia arriba o abajo.
Cuando se destaca el carácter deseado, presione Seleccionar para escribir tal carácter en la posición seleccionada.
• Utilice las funciones borrar, insertar y eliminar: En la pantalla Renombrar, gire el control Cursor para ubicar
el cursor. Luego presione el control Cursor para ver un menú de funciones de edición especial. Gire el control
Seleccionar para destacar la función que desee. Luego presione el control Seleccionar para realizar la función.
Borrar carácter: elimina el carácter destacado con el cursor y deja un espacio en
blanco.
Borrar todo: borra la línea de texto completa.
Borrar hasta el final: borra todo el texto al lado derecho del cursor, incluido el
carácter destacado.
Insertar: inserta un espacio en blanco al lado izquierdo del carácter destacado.
Eliminar: elimina el carácter y el espacio destacado con el cursor.
Rename
J
rstuvwxyzABCDEFGHI
123456789, ;/\()|+-
KLMNOPQRSTU VWXYZ0
abcdefgh jklmnopqi
Cancel Up/Dn Select
Scenes
Clear To End
Insert
Clear All
Clear Character
Delete
CancelSelect
Rename
M yScene 01
CursorSave Select
Scenes

Operación
Español Latinoamérica - 33
4. Cuando se muestra la pregunta “¿Está seguro?”, presione el control Sí para guardar la escena o No para salir sin
guardarla.
Compartir una escena
Si crea una escena que desea compartir con otro usuario del mezclador T4S/T8S ToneMatch®, puede guardarla
como una escena compartida en el espacio [Escena compartida]. Con el actualizador L1®, puede cargar la escena
compartida en la computadora y luego transferir el archivo a la computadora de otro usuario del T4S/T8S. El
otro usuario del T4S/T8S puede descargar la escena en el T4S/T8S con el actualizador L1. El actualizador L1 está
disponible en www.Bose.com/livesound.
Para guardar una escena compartida:
1. Cargue la escena que desea compartir (consulte “Para cargar una escena” en la página 31).
2. Presione el control Guardar para acceder a la lista de escenas.
3. Gire el control Seleccionar para revisar la lista de escenas y destacar [Escena compartida]. Presione Seleccionar
o Cancelar para salir de la lista.
4. Si presiona Seleccionar, utilice la pantalla Renombrar para editar el nombre de la escena (consulte “Para cambiar
el nombre de la escena antes de guardar” en la página 32) o vaya al paso 5 si desea usar el nombre existente.
Are You Sure?
YesNo
Nota: La pantalla vuelve a mostrar las escenas si no presiona el control
Seleccionar o Cancelar dentro de los 10 segundos. No se produce ningún cambio
y aparece la escena cargada actualmente en la pantalla.
[To Shared Scene]
My Scene 10
My Scene 09
Cancel Select
Rename
M yScene 07
CursorSave Select
Scenes
34 - Español Latinoamérica
Operación
5. Presione el control Guardar para almacenar la escena como escena compartida.
6. Cuando se muestra la pregunta “¿Está seguro?”, presione el control Sí para guardar la escena o No para salir sin
guardarla como escena compartida.
Nota: La pantalla vuelve a mostrar las escenas si no presiona el control Sí o No dentro de los 10 segundos. No se
produce ningún cambio y aparece la escena cargada actualmente en la pantalla.
7. Presione el control Compartida para confirmar la escena como escena compartida.
Nota: El T4S/T8S solo proporciona una ubicación de almacenamiento para una escena compartida. Si se guarda una
escena como escena compartida, se sobrescribirá la escena compartida anteriormente en todos los casos.
Visite www.Bose.com/livesound para obtener detalles sobre el uso de la aplicación del actualizador L1® para
descargar y actualizar escenas en y desde la computadora.
All Channels
Singer/Songwriter
Load Shared Save
Scenes All Channels
My Scene 07
Current Shared Scene:
Back
Scenes
Presionar
Operación
Español Latinoamérica - 35
Escenas Bose
Las cinco escenas Bose se ofrecen como ejemplos para que las utilice como punto de partida. Después de cargar
una escena Bose, puede modificar la configuración y guardarla como Mi escena o Escena compartida.
Configuración de fábrica
Con esta escena se restaura el mezclador con las configuraciones de fábrica. Si se carga esta escena, se borran todos
los cambios que se realizaron con anterioridad en la escena cargada actualmente.
CANALES 1-4 (T4S/T8S)
CANALES 5-8 (T8S)
ToneMatch
Activo
Utilidad
Plano
zEQ
Bypass
Bajo Medio Alto
0 dB 0 dB 0 dB
Ecualizador
paramétrico
Bypass
Compresor/
compuerta
Bypass
Chorus1
Modulación
Bypass
Chorus1
Retraso
Bypass
Digital
Reverberación
Bypass
Digital
Auxiliar
Mute (Silenciar)
Previo: Con ecualización y
efectos
Configuración global
Preferencias
Pantalla activa Estado
USB a PC Izquierdo/derecho:
maestro
USB desde PC Izquierdo/derecho:
maestro
Salida master Volumen post maestro
Tipo de reverberación
Tipo Mediano
Tiempo 50 %
Bal 50 %
Nota: Para ver una lista de configuración de fábrica de todos los efectos, consulte “Configuración de fábrica” en la
página 42.

36 - Español Latinoamérica
Operación
Cantante/compositor
Esta escena se diseñó para un cantante/compositor que toca un teclado o una guitarra y que a veces se acompaña
con una pista MP3.
Figura 16. Configuración de ejemplo para un cantante/compositor
Operación
Español Latinoamérica - 37
Micrófono Guitarra Teclado Bajo Entrada auxiliar
CANAL 1 CANAL 2 CANAL 3 CANAL 4 5/6
ToneMatch
Activo Activo Activo Activo
No aplica
Micrófonos vocales Guitarra acústica Teclados Bajos
Micrófonos de mano Cuerdas de acero con
piezo
Teclas generales Bajo activo 1
zEQ
Activo Activo Activo Activo
No aplica
Bajo
Medio
Alto Bajo Medio Alto Bajo Medio Alto Bajo Medio Alto
0 dB
0 dB 0 dB
0 dB 0 dB 0 dB 0 dB 0 dB 0 dB 0 dB 0 dB 0 dB
Ecualizador
paramétrico
Bypass Bypass Bypass Bypass
No aplica
Compresor/
compuerta
Bypass Bypass Bypass Bypass
No aplica
Comp2 Comp2 Comp2 Comp2
Modulación
Bypass Bypass Bypass Bypass
No aplica
Chorus1 Chorus1 Chorus3 Chorus1
Retraso
Bypass Bypass Bypass Bypass
No aplica
Digital Digital Digital Digital
Reverberación
Activo Activo Bypass Bypass
No aplica
Medio (global) Medio (global) Medio (global) Medio (global)
Pan/Aux
Centro Centro Centro Centro Entrada auxiliar
Auxiliares 1-2 50 % Auxiliares 1-2 50 % Auxiliares 1-2 50 % Auxiliares 1-2 50 %
Nivel
5
Nivel
6
Previo: Con ecualización
y efectos
Previo: Con
ecualización y efectos
Previo: Con
ecualización y efectos
Previo: Con
ecualización y efectos
50
%
50 %
Configuración de canal de escena de cantante/compositor
Configuración global
Preferencias
Pantalla activa Estado
USB a PC Izquierdo/derecho: maestro
USB desde PC Izquierdo/derecho: maestro
Salida maestra Volumen principal posterior
Tipo de reverberación
Tipo Mediano
Tiempo 50 %
Bal 50 %

38 - Español Latinoamérica
Operación
DJ/reproducción
La escena de DJ/reproducción se diseñó para un evento de DJ o cualquier necesidad de reproducción de audio. En
esta configuración se utilizan dos micrófonos y un dispositivo móvil, un mezclador o una computadora portátil.
Figura 17. Configuración de ejemplo de DJ/reproducción estéreo
Operación
Español Latinoamérica - 39
Configuración de canal de escena de DJ/reproducción
Configuración global
Preferencias
Pantalla activa Estado
USB a PC Izquierdo/derecho: maestro
USB desde PC Izquierdo/derecho: maestro
Salida maestra Volumen principal posterior
Tipo de reverberación
Tipo Mediano
Tiempo 50 %
Bal 50 %
Fuente 1 izquierda Fuente 1 derecha Micrófono Micrófono Entrada
auxiliar
CANAL 1 CANAL 2 CANAL 3 CANAL 4 5/6
ToneMatch
Activo Activo Activo Activo
No aplica
DJ/reproducción DJ/reproducción Micrófonos vocales Micrófonos vocales
Controles zEQ planos Controles zEQ planos Micrófonos de mano Micrófonos de mano
zEQ
Activo Activo Activo Activo
No aplicaBajo Medio Alto Bajo Medio Alto Bajo Medio Alto Bajo Medio Alto
0 dB 0 dB 0 dB 0 dB 0 dB 0 dB 0 dB 0 dB 0 dB 0 dB 0 dB 0 dB
Ecualizador
paramétrico
Bypass Bypass Bypass Bypass
No aplica
Compresor/
compuerta
Bypass Bypass Bypass Bypass
No aplica
Límite Límite Comp2 Comp2
Modulación
Bypass Bypass Bypass Bypass
No aplica
Chorus1 Chorus1 Chorus3 Chorus1
Retraso
Bypass Bypass Bypass Bypass
No aplica
Digital Digital Digital Digital
Reverberación
Bypass Bypass Bypass Bypass
No aplica
Medio (global) Medio (global) Medio (global) Medio (global)
Pan/Aux
Izquierdo Derecho Centro Centro Entrada
auxiliar
Auxiliares 1-2 50 % Auxiliares 1-2 50 % Auxiliares 1-2 50 % Auxiliares 1-2 50 % Nivel
5
Nivel
6
Previo: Con
ecualización y efectos
Previo: Con
ecualización y efectos
Previo: Con
ecualización y efectos
Previo: Con
ecualización y efectos
50 % 50 %

40 - Español Latinoamérica
Operación
Banda completa
Esta escena se configuró para una batería, un bajo, una guitarra eléctrica, voces y un reproductor de MP3.
Figura 18. Configuración de ejemplo de batería y bajo
SYSTEMINPUT 2INPUT 1
VOLUME VOLUME
FRONT
LED
POWER
LIMIT
OFF
FULL RANGE
WITH SUB
EQ
MIC
LINE LEVEL
SIGNAL INPUT
INPUT
POWER
ON
OFF
100-240V~50/60Hz
1000W
LINE OUTPUT
SIGNAL/CLIP SIGNAL/CLIP POWER/FAULT
LIMIT
SYSTEM
INPUT 2INPUT 1
LINE OUTPUT LINE OUTPUT
LINE INPUT
POWER/FAULT
LIMIT
SIGNAL/CLIP
LINE INPUT
NORM
REV
THRU
HPF
POLARITY
LINE
OUTPUT EQ
POWER
LIMIT
OFF
FRONT
LED
Operación
Español Latinoamérica - 41
Configuración de canal de escena de banda completa
Configuración global
Preferencias
Pantalla activa Estado
USB a PC Izquierdo/derecho: maestro
USB desde PC Izquierdo/derecho: maestro
Salida maestra Volumen principal posterior
Tipo de reverberación
Tipo Mediano
Tiempo 50 %
Bal 50 %
Bombo Sobrecarga Sobrecarga Bajo Guitarra Micrófono Micrófono Micrófono Entrada auxiliar
CANAL 1 CANAL 2 CANAL 3 CANAL 4 CANAL 5 CANAL 6 CANAL 7 CANAL 8 9/10
ToneMatch
Activo Activo Activo Activo Activo Activo Activo Activo
No aplica
Percusión Percusión Percusión Bajos Guitarras eléctricas Micrófonos vocales Micrófonos vocales Micrófonos vocales
Bombo, General Overheads, general Overheads, general Bajo activo 1 Amplificador de
micrófono con
SM57
Micrófonos de mano Micrófonos de
mano
Micrófonos de
mano
zEQ
Activo Activo Activo Activo Activo Activo Activo Activo
No aplica
L M H L M H L M H L M H L M H L M H L M H L M H
0
dB
0
dB
0
dB
0
dB
0
dB
0
dB
0
dB
0
dB
0
dB
0
dB
0
dB
0
dB
0
dB
0
dB
0
dB
0
dB
0
dB
0
dB
0
dB
0
dB
0
dB
0
dB
0
dB
0
dB
Ecualizador
paramétrico
Bypass Bypass Bypass Bypass Bypass Bypass Bypass Bypass
No aplica
Compresor/
compuerta
Activo Bypass Bypass Activo Bypass Bypass Bypass Bypass
No aplica
Kick 1 Comp2 Comp2 Comp2 Comp2 Compuerta Compuerta Compuerta
Modulación
Bypass Bypass Bypass Bypass Activo Bypass Bypass Bypass
No aplica
Chorus1 Chorus1 Chorus1 Chorus1 Chorus 1 Chorus 1 Chorus 1 Chorus 1
Retraso
Bypass Bypass Bypass Bypass Bypass Bypass Bypass Bypass
No aplica
Digital Digital Digital Digital Digital Digital Digital Digital
Reverberación
Bypass Bypass Bypass Bypass Bypass Activo Activo Activo
No aplica
Medio (global) Medio (global) Medio (global) Medio (global) Medio (global) Medio (global) Medio (global) Medio (global)
Pan/Aux
Centro Centro Centro Centro Centro Centro Centro Centro Entrada auxiliar
Auxiliares
1-4
50 % Auxiliares
1-4
50 % Auxiliares
1-4
50 % Auxiliares
1-4
50 % Auxiliares
1-4
50 % Auxiliares
1-4
50 % Auxiliares
1-4
50 % Auxiliares
1-4
50 % Nivel 9 Nivel 10
Sin procesamiento:
Después de la
preamplificación
Sin procesamiento:
Después de la
preamplificación
Sin procesamiento:
Después de la
preamplificación
Sin procesamiento:
Después de la
preamplificación
Sin procesamiento:
Después de la
preamplificación
Sin procesamiento:
Después de la
preamplificación
Sin procesamiento:
Después de la
preamplificación
Sin procesamiento:
Después de la
preamplificación
50 % 50 %
Configuración de fábrica
42 - Español Latinoamérica
Configuración de fábrica
En esta sección, se describe la configuración de fábrica del T4S/T8S. Para restablecer el T4S/T8S con esta
configuración de fábrica en cualquier momento, cargue la escena de configuración de fábrica Bose.
Configuración de fábrica del compresor/compuerta
Tipo Umbral Ganancia
Compresor 1: Suave -16.0 dB 3.0 dB
Compresor 2: Medio -16.0 dB 5.0 dB
Compresor 3: Extremo -16.0 dB 8.0 dB
Limitador -10.0 dB 0 dB
De-Esser -10.0 dB 0 dB
Umbral Velocidad
Compuerta de ruido -70.0 dB 50 %
Umbral Ajustado
KickGate1: Regular -20.0 dB 100 %
KickGate2: Rápido -20.0 dB 100 %
Configuración de fábrica del modulador
Tipo Umbral Ganancia Velocidad
Chorus 1: Brillante 50 % 50 % 0.50 Hz
Chorus 2: Cálido 70 % 100 % 0.15 Hz
Chorus 3: Oscuro 25 % 25 % 3.0 Hz
Flanger 1: Cinta 50 % 50 % 1.00 Hz
Flanger 2:
Retroalimentación
50 % 100 % 2.00 Hz
Velocidad Retroalimentación
Phaser 1: Pedal 0.50 Hz 0 %
Phaser 1: Rack 0.50 Hz -75 %
Phaser 1: Cálido 1.00 Hz -26 %
Phaser 1: Brillante 0.50 Hz -76 %
Velocidad Profundidad
Tremolo 5.00 Hz 50 %
Configuración del fábrica de retraso
Tipo Mezcla Tiempo Retroalimentación
Digital 30 % 150 ms 30 %
Análogo 30 % 275 ms 20 %
Cinta 30 % 350 ms 30 %
Configuración de fábrica de la reverberación
Tipo Bal. Tiempo Rango de
tiempo
Plate 50 % 20 % 0-4.6 s
Pequeño 50 % 15 % 0-0.8 s
Mediano 50 % 25 % 0-1.9 s
Grande 50 % 50 % 0-3.5 s
Caverna 50 % 100 % 0-7.0 s

Español Latinoamérica - 43
Cuidado y mantenimiento
Solución de problemas
Si experimenta algún problema mientras utiliza este producto, pruebe las soluciones que se muestran a continuación.
Si todavía no puede solucionar el problema, busque ayuda en línea en www.Bose.com/livesound. Si no puede
encontrar respuesta a sus preguntas ahí, llame al equipo de asistencia técnica y de producto de Bose directamente al
(877) 335-2673.
Problema Qué hacer
El T4S/T8S está
conectado, el
interruptor de
encendido está
activado, pero no hay
energía.
• Asegúrese de que la toma de CA reciba alimentación. Pruebe conectar y utilizar una
lámpara u otro dispositivo en la misma toma de CA, o bien examine la toma con un
aparato para comprobar la salida de CA.
Si se utiliza el T4S con un sistema L1® Model II o 1S:
• Asegúrese de que el cable ToneMatch® se haya conectado adecuadamente al
mezclador y el soporte de alimentación L1.
• Verifique que el enchufe del cable de alimentación se haya insertado completamente
en el soporte de alimentación y la toma de CA (red eléctrica).
• Asegúrese de que el soporte de alimentación L1 esté encendido y el LED de encendido
esté en azul.
El T4S/T8S está
encendido, pero no hay
sonido.
• Asegúrese de que el control de volumen maestro se haya subido.
• Verifique que los canales de entrada que desea escuchar no estén en silencio.
• Compruebe que el control de volumen se haya subido en el canal que desea escuchar.
• Asegúrese de que el control de recorte de canal de entrada adecuado se haya subido
lo suficiente para que el LED esté en verde (lo cual indica que existe una señal de
entrada potente).
• Revise los medidores de entrada y salida de Pref. (preferencia) para confirmar que
existe una señal tanto en la etapa de salida como de entrada.
• Asegúrese de que el control de volumen de la fuente de entrada (instrumento) esté
encendido.
• Conecte la fuente de entrada (instrumento) al mezclador con un cable diferente.
• Conecte la fuente de entrada (instrumento) directamente en el soporte de
alimentación L1 o un amplificador diferente para asegurarse de que la fuente esté en
funcionamiento.
• Apague el mezclador y espere 30 segundos. Vuelva a encender el mezclador.
Si se utiliza el T4S con un sistema L1 Model II o 1S:
• Apague el soporte de alimentación, vuelva a colocar el enchufe del cable ToneMatch
en el puerto ToneMatch y encienda el soporte de alimentación nuevamente.
• Si es posible, intente con un cable ToneMatch diferente. Si no dispone de otro cable
ToneMatch, intente con un cable Ethernet estándar.
• Conecte la salida maestra del T4S/T8S a la entrada analógica del soporte de
alimentación con un cable telefónico de 6.35 mm (¼"). Suba el control de recorte del
soporte de alimentación y compruebe que existe sonido.
• Asegúrese de que el LED de encendido del soporte de alimentación esté en azul.
Si el LED está en rojo, llame al equipo de asistencia técnica y de producto de Bose
directamente al (877) 335-2673.

44 - Español Latinoamérica
Cuidado y mantenimiento
Problema Qué hacer
Mala calidad de sonido de
un micrófono o instrumento
conectado al T4S/T8S.
• Asegúrese de que no se haya aplicado una ecualización no deseada de zEQ o
un ecualizador paramétrico.
• Compruebe haber seleccionado una preselección adecuada del mezclador
ToneMatch® para el micrófono/instrumento. Si no desea usar una preselección
del mezclador ToneMatch, asegúrese de que la configuración de ToneMatch
sea plana.
• Asegúrese de que no existan efectos no deseados (compresor/compuerta,
modulación, retraso, reverberación) en el canal de entrada. Revise el estado
del menú de Pref. para ver los efectos activos actualmente.
• Verifique que el recorte de entrada del T4S/T8S se haya ajustado
correctamente en el micrófono/instrumento. La señal LED debería ser verde.
Si el LED está en rojo, disminuya el nivel de recorte hasta que esté en verde.
• Pruebe un cable de instrumento o micrófono diferente.
• Compruebe que el cable del micrófono o instrumento esté conectado al
mezclador T4S/T8S. Asegúrese de que el enchufe del cable se haya insertado
en el conector de salida del micrófono/instrumento y el conector de salida del
T4S/T8S.
• Verifique la configuración (si existe) del micrófono o instrumento.
• Verifique las baterías (si existen) del instrumento o micrófono.
No se escucha ningún efecto. • Revise que haya presionado el botón de Edición de Canal correcto.
• Asegúrese de que el botón de Silenciamiento de efectos no se haya
presionado en el canal en cuestión.
El T4S/T8S no responde a las
perillas de control.
• Apague el mezclador. Espere 30 segundos y vuelva a encender el mezclador.
No hay efecto en el control de
volumen maestro.
• Verifique que la salida maestra se haya configurado en un funcionamiento de
volumen post maestro en el menú Pref. en la salida maestra.
Si no se enchufa nada en los
conectores de entrada del T4S/
T8S, se escucha un ruido o
zumbido en el sistema L1®.
• Conecte el T4S/T8S y el soporte de alimentación L1 en la misma toma de CA
(red eléctrica).
• Use un aparato para comprobar la salida de CA de la toma a la que está
conectado el T4S/T8S o el soporte de alimentación L1 y revise si hay
contactos invertidos o abiertos (vivo, neutro o a tierra).
• Si se utiliza un cable de extensión, asegúrese de probar el cable como se
indicó anteriormente.
Nivel demasiado alto (o no
suficiente) de frecuencias altas,
de rango medio o graves.
• Asegúrese de que no se haya aplicado una ecualización no deseada de zEQ o
un ecualizador paramétrico.
• Compruebe haber seleccionado una preselección adecuada del mezclador
ToneMatch para el micrófono/instrumento. Si no desea usar una preselección
del mezclador ToneMatch, asegúrese de que la configuración de ToneMatch
sea plana en la categoría de utilidades.

Español Latinoamérica - 45
Cuidado y mantenimiento
Problema Qué hacer
Reproducción de sonido de
baja calidad de una grabación
estéreo con un reproductor
de CD, MP3 u otro dispositivo
similar.
• Conecte el canal izquierdo del dispositivo a la entrada auxiliar 5 y el canal
derecho a la entrada auxiliar 6 (o 9/10 para T8S). Las entradas 5/6 (o 9/10) se
diseñaron para entradas de nivel de línea.
• Desactive las funciones extendidas de ecualización o graves cuando utilice un
reproductor de CD o dispositivo móvil.
• Si utiliza un software de grabación en una computadora, revise los requisitos
de software. Es posible que deba ajustar la configuración de software en la
operación 48 kHz/24 bits.
El micrófono recibe
retroalimentación.
• Oriente el micrófono de modo que no apunte directamente al altavoz
respectivo.
• Pruebe utilizar otro micrófono.
• Pruebe cambiar la ubicación del sistema L1 o del vocalista en el escenario.
• Aumente la distancia entre el sistema L1 y el micrófono.
• Reduzca las frecuencias ALTAS mediante el ajuste de zEQ en el canal de
micrófono.
• Intente cortar una frecuencia en particular que probablemente esté causando
la retroalimentación mediante el ajuste del ecualizador paramétrico en el canal
del micrófono.
• Ponga en bypass temporalmente los efectos de audio utilizados (modulación,
retraso, reverberación) para ver si pudieran estar contribuyendo al problema
de retroalimentación.
La salida auxiliar no suena bien. • Compruebe que la salida auxiliar se haya configurado en el punto de toque
deseado en cada canal de entrada. Consulte “Enrutamiento de las señales de
entrada a las salidas auxiliares” en la página 21.
• Verifique que cada entrada asigne el nivel de señal deseado a la salida auxiliar.
No es posible enviar audio del
T4S/T8S a una computadora
mediante una conexión USB.
• Compruebe que el cable USB se haya conectado correctamente al mezclador
y la computadora.
• Pruebe otro cable USB.
• Asegúrese de que el mezclador esté encendido.
• Verifique que los canales de entrada deseados del mezclador se hayan
asignado a los canales de salida USB izquierdo y derecho. Vea la opción “USB
a PC” en el menú de Pref.
• Asegúrese de que el nivel de recorte del canal de entrada respectivo se haya
subido lo suficiente para que el LED verde esté encendido, lo cual indica que
existe una señal de entrada potente.
• Verifique los medidores de nivel de entrada y salida en el menú de Pref. para
confirmar que existe una señal en las etapas de entrada y salida.
• Para comprobar que la entrada USB de la computadora esté funcionando,
conecte otro dispositivo de audio compatible con USB.
• Si utiliza un software de grabación en una computadora, revise los requisitos
de software. Es posible que deba ajustar la configuración de software en la
operación 48 kHz/24 bits.
El T4S/T8S no responde a la
unidad flash.
• Para determinar si existe un problema con la unidad flash, conecte una unidad
flash de otra marca.
46 - Español Latinoamérica
Cuidado y mantenimiento
Problema Qué hacer
No es posible enviar audio desde
una computadora al T4S/T8S
mediante una conexión USB.
• Compruebe que el cable USB se haya conectado correctamente al mezclador
y la computadora.
• Pruebe otro cable USB.
• Asegúrese de que el mezclador esté encendido.
• Compruebe que la computadora esté en modo de reproducción y que la
configuración de audio no se haya desactivado.
• Verifique que la señal USB se haya asignado a las entradas deseadas del
mezclador. Vea la opción “PC a USB” en el menú de Pref.
• Compruebe que los canales de entrada del mezclador asignados a la señal
USB entrante no estén en silencio y que los controles de volumen se hayan
subido.
• Asegúrese de que el control de recorte de canal de entrada adecuado se haya
subido lo suficiente para que el LED esté en verde (lo cual indica que existe
una señal de entrada potente).
• Verifique los medidores de nivel de entrada y salida en el menú de Pref. para
confirmar que existe una señal en las etapas de entrada y salida.
• Para comprobar que la salida USB de la computadora esté funcionando,
conecte otro dispositivo de audio compatible con USB.
• Si utiliza un software de grabación en una computadora, revise los requisitos
de software. Es posible que deba ajustar la configuración de software en la
operación 48 kHz/24 bits.
Limpieza
• Puede limpiar la carcasa del producto utilizando únicamente un paño suave y seco.
• No utilice solventes, productos químicos ni soluciones de limpieza que contengan alcohol, amoníaco o abrasivos.
• No utilice aerosoles cerca del producto ni permita que se viertan líquidos en las aberturas.
Información técnica
Mecánica
T4S T8S
Dimensiones (La. x An. x Al.) 8.4" x 7.25" x 3.25"
(214 mm x 184 mm x 83 mm)
8.4" x 12.25" x 3.25"
(214 mm x 311 mm x 83 mm)
Peso 1.0 kg (2.1 lb) 1.9 kg (4.1 lb)
Eléctrica
Conversión A/D y D/A 24 bits
Frecuencia de muestreo 48 kHz
USB 2.0 o superior, cable de tipo A a tipo B, puerto de tipo A a puerto de tipo B
Requisitos de la computadora Microsoft Windows 7 o posterior; Mac OS 10.5 o posterior

Español Latinoamérica - 47
Información adicional
Información adicional
Consulte la Guía del propietario (en línea en www.Bose.com) para obtener más información acerca del producto
(incluidos los accesorios y repuestos). Para solicitar una copia impresa, use los teléfonos suministrados.
Garantía limitada
El producto está cubierto con una garantía limitada. Visite www.pro.Bose.com para ver detalles de la garantía.
La información de la garantía de este producto no se aplica a Australia ni a Nueva Zelanda. Visite nuestro sitio web
en www.bose.com/au/warranty o www.bose.com/nz/warranty para ver detalles de la garantía en Australia y Nueva
Zelanda.
Fecha de fabricación
El octavo dígito del número de serie indica el año de fabricación; p. ej., "6" es 2006 o 2016.
Américas
(EE.UU., Canadá, México, Centroamérica y Sud-
américa)
Bose Corporation
Framingham, MA 01701, EE.UU.
Centro corporativo: 508-879-7330
Americas Professional Systems,
Soporte técnico: 800-994-2673
Australia
Bose Pty Limited
Unit 3/2 Holker Street
Newington NSW, Australia
61 2 8737 9999
Bélgica
Bose N.V. / S.A
Limesweg 2, 03700
Tongeren, Bélgica
012-390800
China
Bose Electronics (Shanghái) Co Ltd
25F, L’Avenue
99 Xianxia Road
Shanghái, P.R.C. 200051, China
86 21 6010 3800
Francia
Bose S.A.S
26-28 Avenue de Winchester
78100 St. Germain en Laye, Francia
01-30-61-63-63
Alemania
Bose GmbH
Max-Planck Strasse 36D 61381
Friedrichsdorf, Alemania
06172-7104-0
Hong Kong
Bose Limited
Suites 2101-2105, Tower One, Times Square
1 Matheson Street, Causeway Bay, Hong Kong
852 2123 9000
India
Bose Corporation India Private Limited
Salcon Aurum, 3rd Floor
Plot No. 4, Jasola District Centre
Nueva Delhi – 110025, India
91 11 43080200
Italia
Bose SpA
Centro Leoni A – Via G. Spadolini
5 20122 Milano, Italia
39-02-36704500
Japón
Bose Kabushiki Kaisha
Sumitomo Fudosan Shibuya Garden Tower 5F
16-17, Nanpeidai-cho
Shibuya-Ku, Tokio, 150-0036, Japón
TEL 81-3-5489-0955
www.bose.co.jp
Países Bajos
Bose BV
Nijverheidstraat 8 1135 GE
Edam, Países Bajos
0299-390139
Reino Unido
Bose Ltd
1 Ambley Green, Gillingham Business Park
KENT ME8 0NJ
Gillingham, Inglaterra
0870-741-4500
Información de firma
importadora
Unión Europea
Bose Products B.V., Gorslaan 60, 1441 RG
Purmerend, Países Bajos
China
Bose Electronics (Shanghai) Company Limited,
Part C, Plan 9, N.° 353 North Riying Road, China
(Shanghai) Pilot Free Trade Zone
Taiwán
Bose Taiwan Branch, 9F-A1, No.10, Section 3,
Minsheng East Road, Taipei City 104, Taiwán
Tel.: +886-2-2514 7676
México
Bose de México, S. de R.L. de C.V. Paseo de las
Palmas 405-204, Lomas de Chapultepec, 11000
México, D.F.
Tel.: +5255 (5202) 3545
Visite el sitio web para consultar por otros países
Información de contacto
Visite nuestra página web en www.Bose.com.

2 - Français
Instructions importantes relatives à la sécurité
Merci de lire et de conserver le manuel d’instruction et
de respecter les consignes de sécurité.
1. Veuillez lire ces consignes.
2. Veuillez conserver ces consignes.
3. Respectez tous les avertissements.
4. Suivez toutes les consignes.
5. N’utilisez pas cet appareil à proximité d’eau ou de toute autre source d’humidité.
6. Utilisez uniquement un chion sec pour le nettoyage.
7. Ne bloquez jamais les orifices d’aération. Suivez les instructions du fabricant pour
l’installation.
8. Protégez le cordon d’alimentation contre les risques de piétinement ou de pincement,
notamment au niveau des fiches, des prises de courant et des branchements à l’appareil.
9. Utilisez uniquement les accessoires spécifiés par le fabricant.
10. Utilisez uniquement le chariot, le support, le trépied, l’équerre ou la table
spécifié(e) par le fabricant ou vendu(e) avec l’appareil. Si vous utilisez un
chariot, faites attention à ne pas faire basculer l’ensemble chariot/appareil.
11. Débranchez cet appareil pendant les orages ou au cours des longues périodes de
non-utilisation.
12. Confiez toute réparation à du personnel qualifié. Une réparation est nécessaire lorsque
l’appareil a été endommagé de quelque façon que ce soit (endommagement du cordon
d’alimentation ou de la fiche électrique, renversement d’un liquide ou de tout objet sur
l’appareil, exposition de l’appareil à la pluie ou à l’humidité, mauvais fonctionnement,
chute de l’appareil, etc.).
AVERTISSEMENTS/PRÉCAUTIONS:
Ce produit contient des composants magnétiques. Consultez votre médecin afin de
savoir si ces composants peuvent avoir une incidence sur un dispositif médical
implanté.
• Ce produit n’est pas destiné à être monté ou utilisé dans des installations humides en
intérieur (par exemple piscine intérieure, parc aquatique intérieur, baignoire à remous,
sauna, hammam, patinoire intérieure, etc.).
• Pour limiter les risques d’incendie ou d’électrocution, n’exposez PAS cet appareil à la pluie,
à toutes formes de liquides ou à l’humidité. Ne s’applique pas aux produits dont l’indice de
protection est IPX4-9.
• Tenez le produit à l’écart du feu et des sources de chaleur. Ne placez JAMAIS d’objets
enflammés, tels que des bougies allumées, sur l’appareil ou à proximité.
• Veillez à NE PAS eectuer de modifications non autorisées sur ce produit.
• Veillez à NE PAS utiliser un convertisseur continu-alternatif avec ce produit.
• Veillez à NE PAS utiliser cet appareil dans des véhicules ou des bateaux.
• Utilisez ce produit uniquement avec l’adaptateur d’alimentation fourni.
• N’INSTALLEZ PAS le support ou le produit à proximité d’une source de chaleur, telle
qu’une cheminée, un radiateur, une arrivée d’air chaud ou tout autre appareil (notamment
des amplificateurs) produisant de la chaleur.
• N’utilisez PAS le mixeur ToneMatch® T4S/T8S sur un trépied/socle instable. Seule une vis
de 6mm peut être utilisée pour fixer ce mixeur. Par ailleurs, le trépied/socle doit pouvoir
supporter un appareil d’un poids minimum de 1,9kg et de dimensions hors tout de
214x311x83mm. L’utilisation d’un trépied incompatible avec les dimensions et le poids
du mixeur T4S/T8S n’assurera pas une stabilité susante, ce qui peut être dangereux et
provoquer des blessures.
• Certaines petites pièces présentent un risque de suocation. Ne pas laisser à la
portée des enfants de moins de 3 ans.
REMARQUES:
• Les câbles d’enceintes et d’interconnexion fournis avec cet appareil ne sont pas
compatibles avec une installation encastrée. Consultez la réglementation locale pour
connaître le type de câblage requis pour une installation encastrée.
• Lorsque l’alimentation de secteur ou la prise multiple est utilisée comme dispositif de
débranchement de l’appareil, le dispositif de débranchement doit rester facilement
accessible.
• Pour assurer une ventilation correcte, Bose déconseille de placer ce produit dans un
espace confiné tel qu’une cavité murale ou un placard fermé.
Informations réglementaires
Cet appareil est conforme à la partie15 de la réglementation de la FCC et au(x) standard(s)
RSS exempté(s) de licence d’Industrie Canada. Son fonctionnement repose sur les deux
conditions suivantes: (1) cet appareil ne doit pas provoquer d’interférences et (2) cet
appareil doit tolérer les interférences externes, y compris celles qui peuvent provoquer un
fonctionnement anormal.
Ce produit est conforme à toutes les directives de l’Union européenne qui s’y
appliquent. L’attestation complète de conformité est disponible à l’adresse
www.Bose.com/compliance.
Informations sur les produits générateurs de bruit électrique (Déclaration de conformité
FCC pour les États-Unis)
Remarque: Ce matériel a fait l’objet de tests prouvant sa conformité aux limites imposées
aux appareils numériques de classeA, conformément à la partie 15 des réglementations de la
FCC. Ces limites sont conçues pour orir une protection raisonnable contre les interférences
nuisibles lorsque l’appareil est utilisé en environnement commercial. Cet appareil génère,
utilise et est susceptible d’émettre de l’énergie à certaines fréquences radio. À ce titre, s’il
n’est pas installé ou utilisé conformément aux instructions, il est susceptible de perturber les
communications radio. L’utilisation de cet équipement dans une zone résidentielle risque de
provoquer des interférences nuisibles, auquel cas l’utilisateur devra remédier au problème à
ses propres frais.
Toute modification non autorisée expressément par Bose Corporation est susceptible
d’annuler le droit de l’utilisateur à utiliser cet appareil.
Des câbles blindés doivent être utilisés pour assurer le respect des réglementations.
Ce produit est conforme aux spécifications de la réglementation ICES-003 classeA du
Canada.
CAN ICES-3(A)/NMB-3(A)
Ce produit répond aux critères d’immunité de la normeEN55103-2 pour les environnements
électromagnétiques classésE2.
Part Name
Toxic or Hazardous Substances and Elements
Names and Contents of Toxic or Hazardous Substances and Elements
PCBs
Metal parts
Plastic parts
Speakers
Cables
This table is prepared in accordance with the provisions of SJ/T 11364.
0: Indicates that said hazardous substance contained in all of the homogenous materials for this part
is below the limit requirement of GB/T 26572.
X: Indicates that said hazardous substance contained in at least one of the homogenous materials
used for this part is above the limit requirement of GB/T 26572.
Lead
(Pb)
Mercury
(Hg)
Cadmium
(Cd)
Hexavalent
(CR(VI))
Polybrominated
Biphenyl (PBB)
Polybrominated
diphenylether
(PBDE)
X
X
00
0
0
0
0
0
0
0
0
0
0
0
0
0
0
0
0
0
0
0
0
0
0
0
0
X
X
Ce symbole signifie que le produit ne doit pas être jeté avec les déchets ménagers,
mais doit être déposé dans un centre de collecte approprié pour recyclage.
La mise au rebut adéquate et le recyclage permettent de protéger les ressources
naturelles, la santé humaine et l’environnement. Pour plus d’informations sur
l’élimination et le recyclage de ce produit, contactez votre mairie, votre service
d’enlèvement des ordures ou le magasin où vous avez acheté ce produit.
Fourni par DCE Safety

Sommaire
Français - 3
Introduction
Présentation du produit ................................................................................. 5
Caractéristiques du produit .......................................................................... 5
Déballage ............................................................................................. 5
Panneaux de commande et de connexion
Mixeur ToneMatch® T4S ................................................................................. 6
Panneau de commande ............................................................................. 6
Panneau de connexion .............................................................................. 7
Mixeur ToneMatch® T8S ................................................................................. 8
Panneau de commande ............................................................................. 8
Panneau de connexion .............................................................................. 9
Configuration du système
Retrait/mise en place du couvercle .......................................................................10
Options de montage. . . . . . . . . . . . . . . . . . . . . . . . . . . . . . . . . . . . . . . . . . . . . . . . . . . . . . . . . . . . . . . . . . . . . . . . . . . . . . . . . . . . 11
Montage du T4S/T8S sur un trépied d’appareil photo ..................................................11
Connexion du T4S en numérique ........................................................................12
Connexion du T4S/T8S en analogique ....................................................................13
Connexion de l’alimentation secteur ToneMatch® ..........................................................14
Connexion du T4S/T8S à votre ordinateur ................................................................15
Connexion d’une cléUSB au T4S/T8S ....................................................................15
Utilisation
Lecture de l’acheur du T4S/T8S .......................................................................16
Optimisation du gain d’entrée et du volume de sortie ......................................................17
Utilisation du réglage de volume général (Master) .........................................................18
Coupure du son sur un canal .........................................................................18
Coupure des eets sur les canaux ....................................................................18
Utilisation du sélecteur rotatif ...........................................................................19
Modification du son d’un canal .........................................................................20
Utilisation des fonctions Pan/Aux ....................................................................20
Utilisation de l’accordeur ...........................................................................20
Sélection d’une présélection ToneMatch® ............................................................. 22
Réglage de la fonction zEQ .........................................................................22
Réglage de la fonction Para EQ ..................................................................... 23
Utilisation des fonctions Compressor/Gate ........................................................... 23
Utilisation des eets de modulation ................................................................. 25
Ajout de délai .....................................................................................26
Ajout de réverbération .............................................................................26

Sommaire
4 - Français
Utilisation des fonctions globales ....................................................................... 27
Sélection d’un type de réverbération ................................................................. 27
Utilisation des utilitaires du menu Prefs ..............................................................28
Chargement et enregistrement de configurations de sessions («Scenes») ..............................30
Partage d’une «Scene» ............................................................................33
Fichiers de «Scenes» Bose ............................................................................35
Configuration par défaut ...........................................................................35
Singer/Songwriter .................................................................................36
DJ/Playback .......................................................................................38
Full Band .........................................................................................40
Configuration par défaut
Configuration par défaut ...............................................................................42
Entretien et maintenance
Résolution des problèmes ..............................................................................43
Nettoyage ............................................................................................46
Caractéristiques techniques ............................................................................46
Ressources supplémentaires
Pour nous contacter ...................................................................................47
Informations importateur ...........................................................................47
Informations supplémentaires ..........................................................................47
Garantie limitée .................................................................................... 47

Français - 5
Introduction
Présentation
Prenez le contrôle de votre musique grâce aux mixeurs ToneMatch® T4S et T8S : des interfaces compactes 4 et 8 canaux, conçues
pour les musiciens et chanteurs. Dotés de puissants moteurs DSP et de réglages intuitifs, ils orent des capacités d’égalisation ainsi
que des traitements dynamiques et des eets dignes d’un studio. Le traitement Bose® ToneMatch® et la fonction zEQ intégrés sont
synonymes d’un son de grande qualité, en particulier si vous reliez le mixeur à un système Bose L1 ou F1: vous bénéficiez alors d’un
contrôle tonal de bout en bout! Dotés de commandes tactiles, d’un écranLCD très lisible et d’une fonction de mémorisation des
scènes, les mixeurs ToneMatch sont des appareils ultra-robustes qui vous procureront toute la confiance nécessaire pour vous donner
à fond sur scène. Les mixeurs ToneMatch sont des partenaires de choix pour les véritables performeurs.
Caractéristiques
Traitement audio ultra-performant
• Nouveaux eets dignes d’un studio, avec traitement audio
numérique avancé
• Les eets disponibles sont les suivants: compresseur, limiteur,
déesseur, noise gate, chœur, flanger, phaser, trémolo, délai et
réverbération
• Traitement Bose® ToneMatch® assurant un son naturel sur les
voix comme sur les instruments
• La fonction zEQ permet d’aner le son des préréglages
ToneMatch, pour eectuer des ajustements ecaces à la volée
• Réglage indépendant par canal des paramètres ToneMatch,
d’égalisation, de traitement dynamique et d’eets
• Réverbération dédiée sur les départsAux et réverbération
globale répartie sur tous les canaux
• L’égalisation de sortie principale assure une adaptation
optimale à l’acoustique du local
• Optimisation tonale complète de bout en bout en cas
d’utilisation avec les systèmes Bose L1 ou F1
Utilisation intuitive sur scène
• Commandes tactiles et indicateurs destinés aux musiciens et
DJ se produisant sur scène
• Interface utilisateur rapide à maîtriser
• Délai au tempo par pression sur une touche (Tap Tempo),
accordeur chromatique et scènes mémorisables intégrés
• L’écranLED et les commandes rétro-éclairéessont faciles à lire
et utiliser, y compris sur des scènes sombres
Connectivité haute densité
• Une connectivité et un niveau de contrôle sans précédent sur
un mixeur numérique stéréo aussi compact
• Quatre (T4S) ou huit (T8S) préamplis orant un son de
grande qualité dotés de connecteursCombo (XLR/jack) pour
microphones ou instruments et d’une alimentation fantôme
commutable
• 2 entrées Aux pour sources de signal supplémentaires 2 (T4S)
ou 4 (T8S) départsAux
• Ports USB typeA et typeB pour la lecture de clésUSB ou
l’interface avec un PC/Mac
• Sorties ToneMatch transportant le signal audionumérique et la
tension d’alimentation (T4S uniquement)
• Sorties symétriques stéréo sur jack TRS¼” et XLR
(T8S uniquement)
• Sortie casque indépendante
Fonctions ultra-pratiques en concert
• Boîtier robuste avec capot de protection aimanté assurant la
protection des commandes et des connecteurs
• Câble ToneMatch fourni pour la connexion à un système
BoseL1 modèle II ou à un système L1 modèle1S transportant
le signal audionumérique et la tension d’alimentation (T4S), ou
alimentation électrique universelle fournie (T8S)
• Un insert fileté sur le fond du boîtier permet d’utiliser des
supports pour appareil photo afin de garder votre mixeur
ToneMatch à portée de main
Mixeur T4S ToneMatch et capot de protection Câble ToneMatch
Alimentation secteur
ToneMatch
Mixeur T8S ToneMatch et capot de protection
Pour une liste complète des accessoires en option, veuillez vous référer au site www.Bose.com.
Déballage
Reportez-vous au tableau suivant pour connaître le contenu de l’emballage du mixeur:
T4S
T8S

Panneaux de commande et de connexion
6 - Français
Mixeur ToneMatch® T4S
Panneau de commande
Figure1. Panneau de commande T4S
q INDICATEURS DE PRÉSENCE DE SIGNAL D’ENTRÉE/ÉCRÊTAGE (1-4) – leur couleur indique l’état du signal d’entrée:
Vert: Indique la présence d’un signal d’entrée
Rouge: Indique l’écrêtage de la source d’entrée
w RÉGLAGES DE GAIN (TRIM) (1-4) – Réglage de la sensibilité d’entrée pour chaque canal.
e AFFICHEUR – Accès aux menus des fonctions et aux informations système.
r COMMANDES – Ces trois boutons-poussoirs rotatifs permettent de sélectionner ou d’ajuster les éléments/valeurs
achés.
t BOUTONS CH EDIT (1-4) – Sélection du canal que vous souhaitez modifier.
y BOUTONS FX MUTE (1-4) – Coupure des eets Mod (modulation), Delay (délai) et Reverb (réverbération) pour
chaque canal.
u RÉGLAGES DE VOLUME (1-4) – Réglage du volume pour chaque canal.
i BOUTONS MUTE (1-4) – Coupure de la sortie audio pour chaque canal.
o RÉGLAGE DE VOLUME GLOBAL (MASTER) – Réglage du niveau de sortie général.
a RÉGLAGE DE VOLUME CASQUE – Réglage du volume de la sortie casque.
s SÉLECTEUR ROTATIF – Accès aux paramètres globaux et propres à chaque canal, qui sont ensuite réglés à l’aide
des autres commandes.
d INTERRUPTEUR MARCHE/ARRÊT FANTÔME – Activation d’une tension fantôme de +48V sur les connecteurs
d’entrée1 à 4. Une diode rouge indique que l’alimentation fantôme est activée.
f PRISE CASQUE – Pour les casques uniquement, d’une impédance minimale de 24Ω.
q
w
i
u
y
t
r
e
d
s
a
o
f

Français - 7
Panneaux de commande et de connexion
Figure2. Panneau de connexion T4S
Panneau de connexion
q INTERRUPTEUR MARCHE/ARRÊT – Mise en marche/Arrêt du mixeur.
w USB 2.0 TYPEB – Interface USB permettant de connecter le mixeur à votre ordinateur.
e USB 2.0 TYPEA – Interface USB permettant la lecture de fichiers audio depuis votre cléUSB.
r SORTIE L/R ANALOGIQUE – Sortie analogique principale. Chaque connecteur accepte des câbles TRS ¼" (symétriques)
ou TS (asymétriques).
t SORTIE AUXILIAIRE – Deux sorties analogiques paramétrables par l’utilisateur. Se configurent avant fader, après
égalisation et eets ou après post-fader. Chaque connecteur accepte des câbles TRS ¼" symétriques.
y ENTRÉE AUXILIAIRE – Canaux d’entrée analogiques 5/6. Chaque connecteur accepte des câbles TRS ¼" (symétriques)
ou TS (asymétriques) pour des entrées au niveau ligne. Peuvent être utilisés pour les signaux d’entrée stéréo.
u ENTRÉES1-4 – Canaux d’entrée analogiques1 à 4. Reçoit des câblesXLR symétriques pour microphones ou des câbles
TRS ¼" (symétriques) ou TS (asymétriques) pour des sources d’entrée haute impédance, par exemple des guitares.
i SORTIE NUMÉRIQUE PRINCIPALE L – Pour connexion numérique en stéréo à deux systèmes L1® modèle 1S/II.
Remarque: S’utilise exclusivement en stéréo avec la sortie numérique principale R.
o PORT D’ALIMENTATION/SORTIE NUMÉRIQUE PRINCIPALE R – Une sortie numérique utilisée par le système L1 modèle
1S/II. Alimente le mixeur T4S à partir du socle amplificateur du système L1 modèle 1S/II. Peut également alimenter le
mixeur à partir de l’alimentation secteur ToneMatch branchée à une prise secteur (non fournie avec le T4S). Reçoit le
câble ToneMatch® fourni.
ATTENTION: Bien que le port ToneMatch utilise un connecteur RJ-45 standard, NE connectez JAMAIS le T4S à
un réseau informatique ou téléphonique.
USB AUDIO
M
( )
MONO
q w e r t y
uio

Panneaux de commande et de connexion
8 - Français
Mixeur ToneMatch® T8S
Panneau de commande
Figure3. Panneau de commande T8S
q INDICATEURS DE PRÉSENCE DE SIGNAL D’ENTRÉE/ÉCRÊTAGE (1-8) – leur couleur indique l’état du signal
d’entrée:
Vert: Indique la présence d’un signal d’entrée
Rouge: Indique l’écrêtage de la source d’entrée
w RÉGLAGES DE GAIN (TRIM) (1-8) – Réglage de la sensibilité d’entrée pour chaque canal.
e AFFICHEUR – Accès aux menus des fonctions et aux informations système.
r COMMANDES – Ces trois boutons-poussoirs rotatifs permettent de sélectionner ou d’ajuster les éléments/valeurs
achés.
t BOUTONS CH EDIT (1-8) – Sélection du canal que vous souhaitez modifier.
y BOUTONS FX MUTE (1-8) – Coupure des eets Mod (modulation), Delay (délai) et Reverb (réverbération) pour
chaque canal.
u RÉGLAGES DE VOLUME (1-8) – Réglage du volume pour chaque canal.
i BOUTONS MUTE (1-8) – Coupure de la sortie audio pour chaque canal.
o RÉGLAGE DE VOLUME GLOBAL (MASTER) – Réglage du niveau de sortie général.
a RÉGLAGE DE VOLUME CASQUE – Réglage du volume de la sortie casque.
s INDICATEUR DE NIVEAU DE SORTIE STÉRÉO – Permet de mesurer et de visualiser le niveau de sortie.
d SÉLECTEUR ROTATIF – Accès aux paramètres globaux et propres à chaque canal, qui sont ensuite réglés à l’aide
des autres commandes.
f INTERRUPTEUR MARCHE/ARRÊT FANTÔME – Envoi d’une tension d’alimentation fantôme +48V sur les
connecteurs d’entrée1 à 8. Une diode rouge indique que l’alimentation fantôme est activée.
g PRISE CASQUE SUR JACK – Pour les casques uniquement, d’une impédance minimale de 24Ω.
q
w
i
o
g
a
s
d
f
u
y
t
r
e
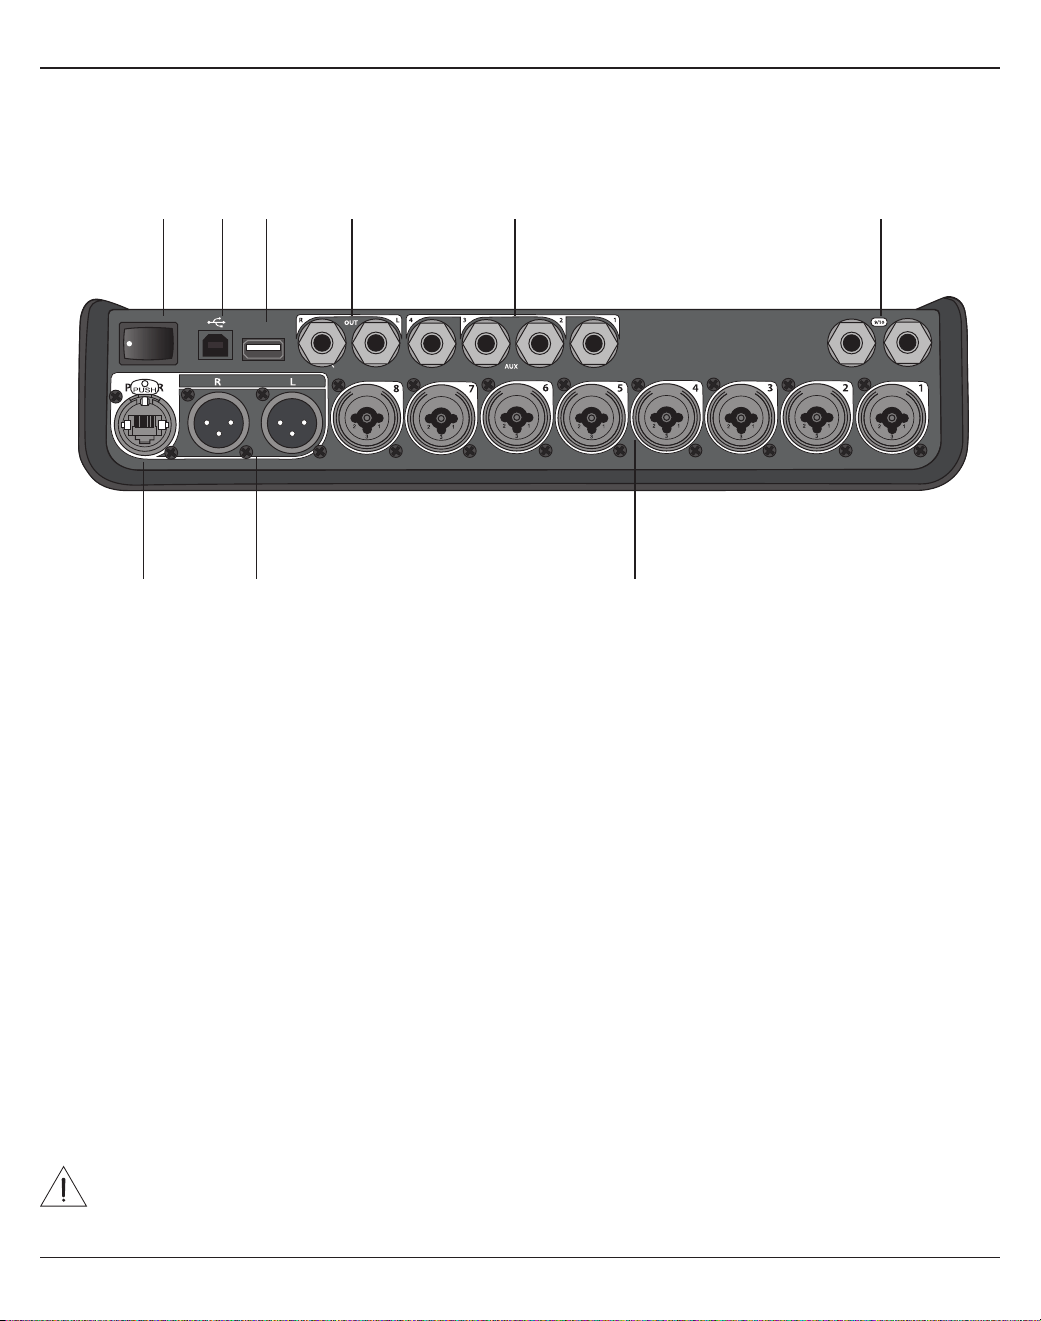
Français - 9
Panneaux de commande et de connexion
Figure4. Panneau de connexion T8S
Panneau de connexion
q INTERRUPTEUR MARCHE/ARRÊT – Mise en marche/Arrêt du mixeur.
w USB 2.0 TYPEB – Interface USB permettant de connecter le mixeur à votre ordinateur.
e USB 2.0 TYPEA – Interface USB permettant la lecture de fichiers audio depuis votre cléUSB.
r SORTIE L/R ANALOGIQUE – Sortie analogique principale. Chaque connecteur accepte des câbles TRS ¼" TRS
(symétriques) ou TS (asymétriques).
t SORTIE AUXILIAIRE – Quatre sorties analogiques paramétrables par l’utilisateur. Se configurent avant fader, après
égalisation et eets ou après post-fader. Chaque connecteur accepte des câbles TRS ¼" (symétriques) ou TS
(asymétriques).
y ENTRÉE AUXILIAIRE – Canaux d’entrée analogiques 9/10. Chaque connecteur accepte des câbles TRS ¼"
(symétriques) ou TS (asymétriques) pour des entrées au niveau ligne. Peuvent être utilisés pour les signaux
d’entrée stéréo.
u ENTRÉES 1-8 – Canaux d’entrée analogiques1 à 8. Reçoit des câblesXLR symétriques pour microphones ou des
câbles TRS ¼" (symétriques) ou TS (asymétriques) pour des sources d’entrée haute impédance, par exemple des
guitares.
i SORTIE ANALOGIQUE XLR – Sortie analogique stéréo. Reçoit des câblesXLR symétriques pour sortie stéréo.
o PORT D’ALIMENTATION NUMÉRIQUE – Pour une utilisation avec l’alimentation secteur ToneMatch
(voir«Connexion de l’alimentation secteur ToneMatch®» à la page14).
Remarque: Le T8S N’EST PAS PRÉVU pour une connexion numérique au système L1® modèle 1S/II.
ATTENTION: Bien que le port ToneMatch utilise un connecteur RJ-45 standard, NE connectez JAMAIS le T4S à
un réseau informatique ou téléphonique.
M
( )
MAIN OUT
USB AUDIO
MONO
q w e r t y
uio

10 - Français
Configuration du système
Retrait/mise en place du couvercle
Le mixeur T1 ToneMatch® T4S/T8S est livré d’origine avec un capot placé sur son panneau supérieur. Ce capot est
destiné à protéger le panneau de commande lorsque le mixeur est transporté ou rangé.
Pour retirer le capot:
1. Placez vos pouces sur les encoches situées à l’avant du capot et poussez-le.
2. Saisissez ensuite le capot par l’arrière et soulevez-le pour l’extraire.
Pour remettre le capot en place:
1. Faites glisser le capot sur le mixeur de l’arrière vers l’avant.
2. Le capot magnétique s’enclenchera tout seul sur le mixeur.
Figure5. Retrait et mise en place du capot

Configuration du système
Français - 11
Figure6. Fixation de la semelle au T4S Figure8. Montage du T4S sur un trépied à l’aide d’une semelle
Figure7. Semelle vissée au T4S
Options de montage
Le mixeur T4S/T8S est équipé d’un insert fileté de diamètre 6mm (1/4"). Cela permet de le fixer sur un certain
nombre de supports dotés d’une vis de montage de 6mm (1/4"), y compris un trépied pour appareil photo.
Montage du T4S/T8S sur un trépied d’appareil photo
1. Sortez les pieds du trépied et fixez-les à la hauteur souhaitée.
2. Retirez la semelle située sur la partie supérieure du trépied d’appareil photo et fixez-la à la partie inférieure du
T4S/T8S à l’aide de la vis. Veillez à bien emboîter la petite saillie de la semelle dans l’encoche du T4S/T8S.
Voir Figure6.
3. Refixez au trépied la semelle à présent vissée au T4S/T8S. Voir Figure8.
AVERTISSEMENT: N’utilisez PAS le mixeur ToneMatch® T4S/T8S sur un trépied/socle instable. Seule une vis
de 6mm peut être utilisée pour fixer ce mixeur. Par ailleurs, le trépied/socle doit pouvoir supporter un appareil
d’un poids minimum de 1,9kg et de dimensions hors tout de 214x311x83mm. L’utilisation d’un trépied
incompatible avec les dimensions et le poids du mixeur T4S/T8S n’assurera pas une stabilité susante, ce qui
peut être dangereux et provoquer des blessures.

12 - Français
Configuration du système
Connexion du T4S en numérique
1. Assurez-vous que le système L1 modèle 1S/II et le T4S sont hors tension et que le réglage du niveau de sortie
général (MASTER) du T4S est réglé au minimum.
2. Branchez une extrémité du câble ToneMatch® sur le port d’alimentation/ sortie numérique principale R du T4S.
Branchez l’autre extrémité du câble ToneMatch au port ToneMatch du socle amplificateur.
Remarque: Pour connecter le T4S à deux socles amplificateurs L1 modèle 1S/II, connectez un second socle
amplificateur au connecteur de la sortie numérique principale L du T4S à l’aide d’un câble ToneMatch.
3. Mettez successivement le mixeur, puis le socle amplificateur L1 modèle 1S/II sous tension.
4. Connectez vos instruments et réglez les niveaux. Référez-vous à «Optimisation du gain d’entrée et du volume de
sortie» en page17.
Figure9. Deux systèmes L1 modèle II connectés à un T4S en numérique
USB AUDIO
M
( )
MONO
Remarque: Le T8S ne peut pas être connecté en numérique et ne peut pas être alimenté par le système L1
modèle1S/II.

Configuration du système
Français - 13
Connexion du T4S/T8S en analogique
1. Assurez-vous que l’appareil que vous connectez au T4S/T8S est hors tension et que le réglage du niveau de
sortie général (MASTER) du T4S/T8S est réglé au minimum.
2. À l’aide de câblesXLR symétriques, connectez un ou deux appareils aux sorties stéréos XLR du T8S
(voir Figure10).
Remarque: Le T4S/T8S peut être connecté à un appareil via le connecteur la sortie analogique R à l’aide d’un
câble TRS ¼" (vendu séparément). Branchez l’autre extrémité du câble TRS au connecteur d’entrée analogique
de l’appareil. Pour connecter le T4S/T8S à deux appareils, branchez un second appareil au connecteur de sortie
analogique L du T4S/T8S à l’aide d’un câble TRS ¼".
3. Branchez l’alimentation secteur ToneMatch® au port d’alimentation du T4S/T8S, puis reliez-la à une prise secteur
sous tension. Reportez-vous à la rubrique: «Connexion de l’alimentation secteur ToneMatch®» à la page14.
4. Mettez sous tension le mixeur T4S/T8S, puis l’appareil.
5. Connectez vos instruments et réglez les niveaux. Référez-vous à «Optimisation du gain d’entrée et du volume de
sortie» en page17.
Figure10. Deux systèmes F1 connectés à un T8S en analogique
M
( )
MAIN OUT
USB AUDIO
MONO
(
M
US
B AUDI
O
( )
M
M
AIN
O
UT
()
M
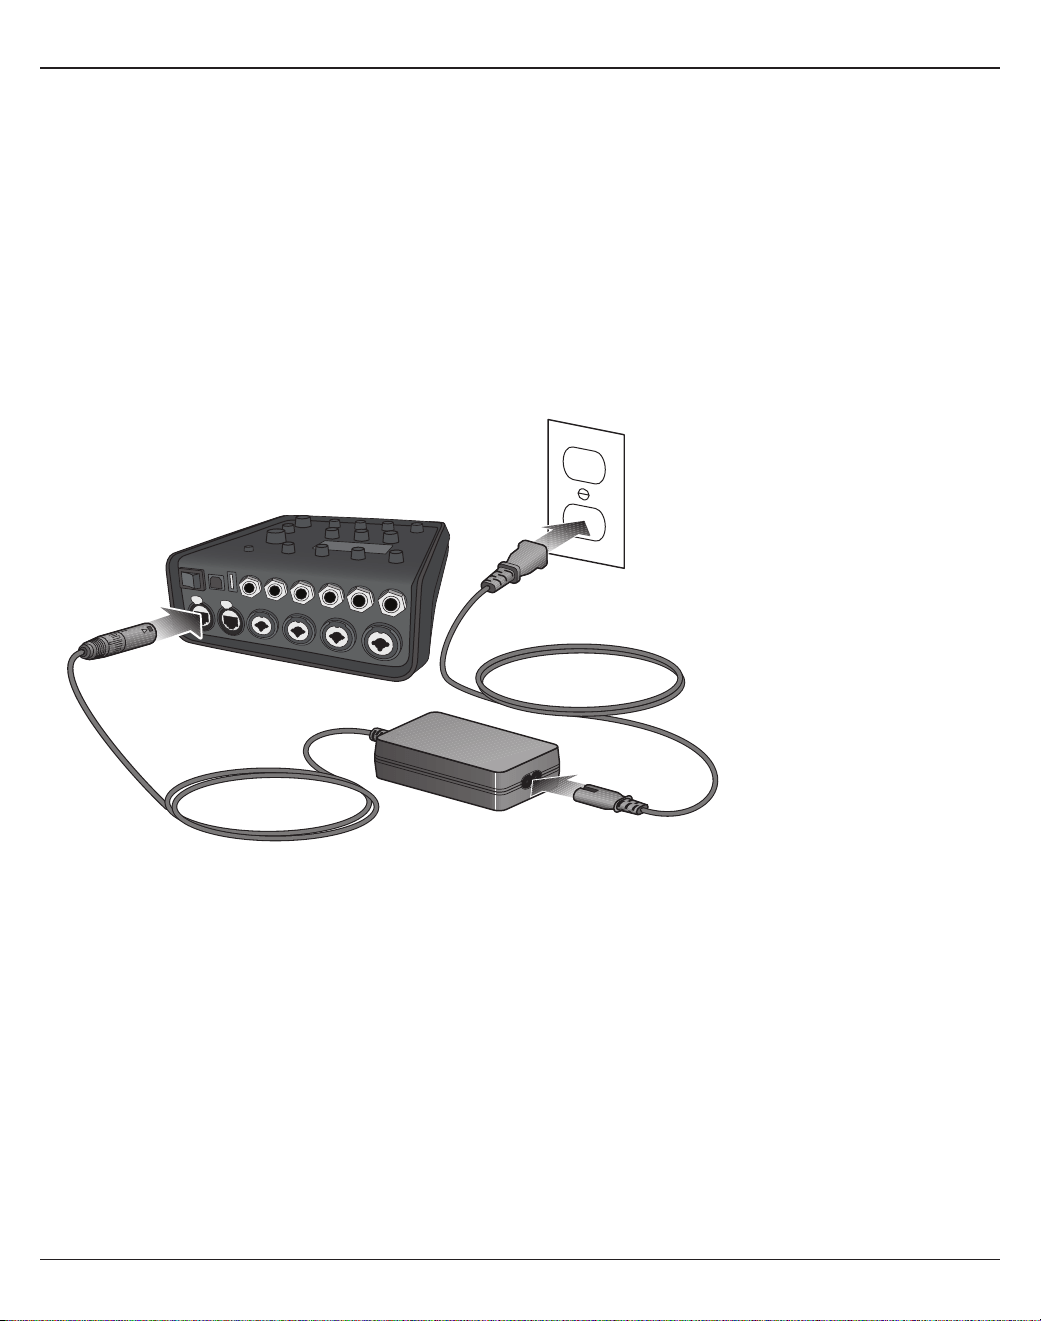
14 - Français
Configuration du système
Connexion de l’alimentation secteur ToneMatch®
L’alimentation secteur ToneMatch alimente en électricité le mixeur T4S/T8S.
1. Branchez le câble de l’alimentation électrique au port d’alimentation du T4S/T8S.
2. Branchez une extrémité du cordon d’alimentation secteur à l’alimentation secteur.
3. Branchez l’autre extrémité du cordon à une prise secteur sous tension.
4. Mettez le commutateur secteur du T4S/T8S en position ON.
Remarque: Lalimentation fournie avec le T8S est nécessaire à son fonctionnement. L’alimentation n’est pas fournie
avec le T4S et n’est pas nécessaire à son fonctionnement.
Figure11. Connexion du T4S à l’alimentation

Configuration du système
Français - 15
Connexion du T4S/T8S à votre ordinateur
Le port USB du T4S/T8S permet d’eectuer une connexion à un ordinateur, afin de transférer sur l’ordinateur
des fichiers de configuration de session ou d’installer des mises à jour du système. Pour obtenir des informations
concernant les mises à jour, visitez la page www.Bose.com/livesound.
Lorsque le T4S/T8S est connecté à un ordinateur, il est également possible de l’utiliser comme périphérique audio
standard (interface USB) pour l’enregistrement/la lecture.
Remarque: Le T4S/T8S travaille en 48kHz/24bits. Pour utiliser le T4S/T8S avec un logiciel d’enregistrement, il peut
être nécessaire de paramétrer le logiciel pour fonctionner en 48kHz/24bits.
Remarque: Pour connecter le T1 à un ordinateur, utilisez un câble USB typeA à typeB (non fourni).
1. Branchez le mixeur à une source d’alimentation (alimentation secteur ToneMatch® pour T4S/T8S ou un système
L1modèle 1S/II pour le T4S uniquement).
2. Branchez une extrémité du câble sur le port USB 2.0 typeB (Figure12).
3. Connectez l'autre extrémité à un port USB de l'ordinateur.
4. Mettez sous tension le mixeur.
Figure12. Connexion T4S vers USB
Port ToneMatch – Vers un système L1 modèle
1S/II ou une alimentation électrique ToneMatch
Interrupteur
marche/arrêt
Câble USB
(typeA à typeB)
Vers le port USB
de l’ordinateur
Connexion d’une cléUSB au T4S/T8S
Branchez une cléUSB 2.0/3.0 contenant des fichiers au format WAV/MP3 au port USB 2.0 typeA pour lire des
contenus audio sur votre mixeur.
Figure13. Connexion d’une cléUSB au T4S
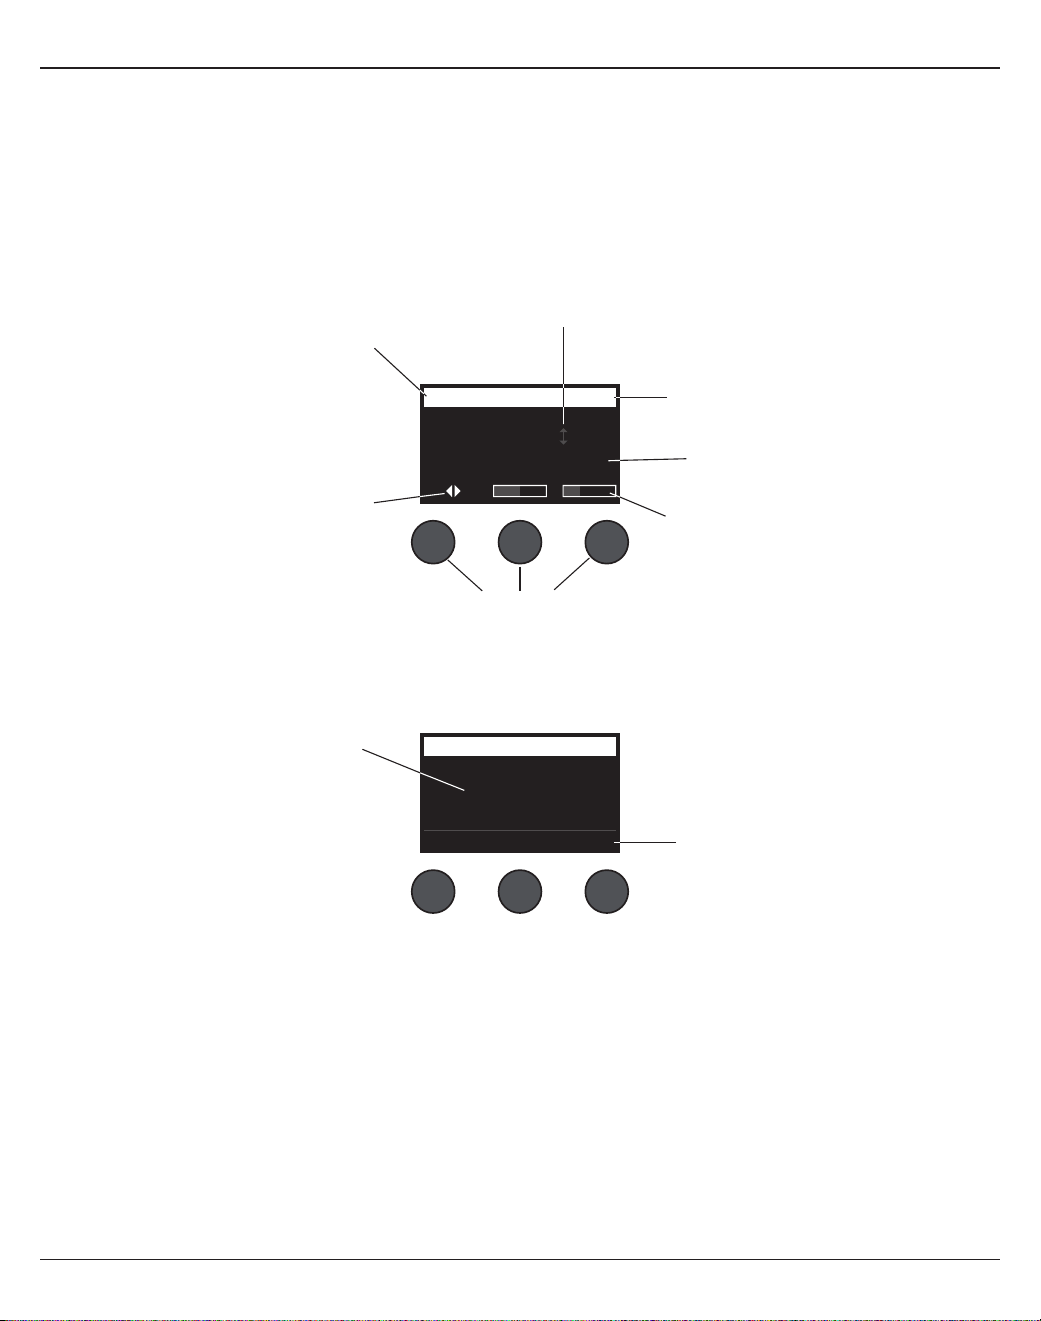
16 - Français
Utilisation
Lecture de l’acheur du T4S/T8S
L’acheur visualise l’interface vous permettant d’utiliser le mixeur. La Figure14 illustre un exemple des informations
apparaissant sur l’acheur, ainsi que les conventions de fonctionnement de base. Le contenu de l’acheur dépend
de la position des sélecteurs rotatifs.
Figure14. Exemple du contenu de l’acheur et
conventions d’utilisation
Ch 1
Type Tim
eM
ix
Digital 250ms 30%
Delay
Fdbk.
All Channels
*Bose Scene 01
Load Shared Save
Scenes
Identifie le canal
sélectionné.
Indique qu’appuyer sur le sélecteur rotatif
fait passer d’un paramètre à un autre.
Représentation visuelle de la valeur
du paramètre
Identifie la fonction accessible à l’aide
du sélecteur rotatif.
Noms et valeurs des
paramètres
Boutons-poussoirs
rotatifs
Ce symbole indique que
tourner le potentiomètre
modifie la valeur.
L’astérisque indique que la
configuration de «Scene»
chargée a été modifiée.
Indique la fonction activée
par pression du contrôle.
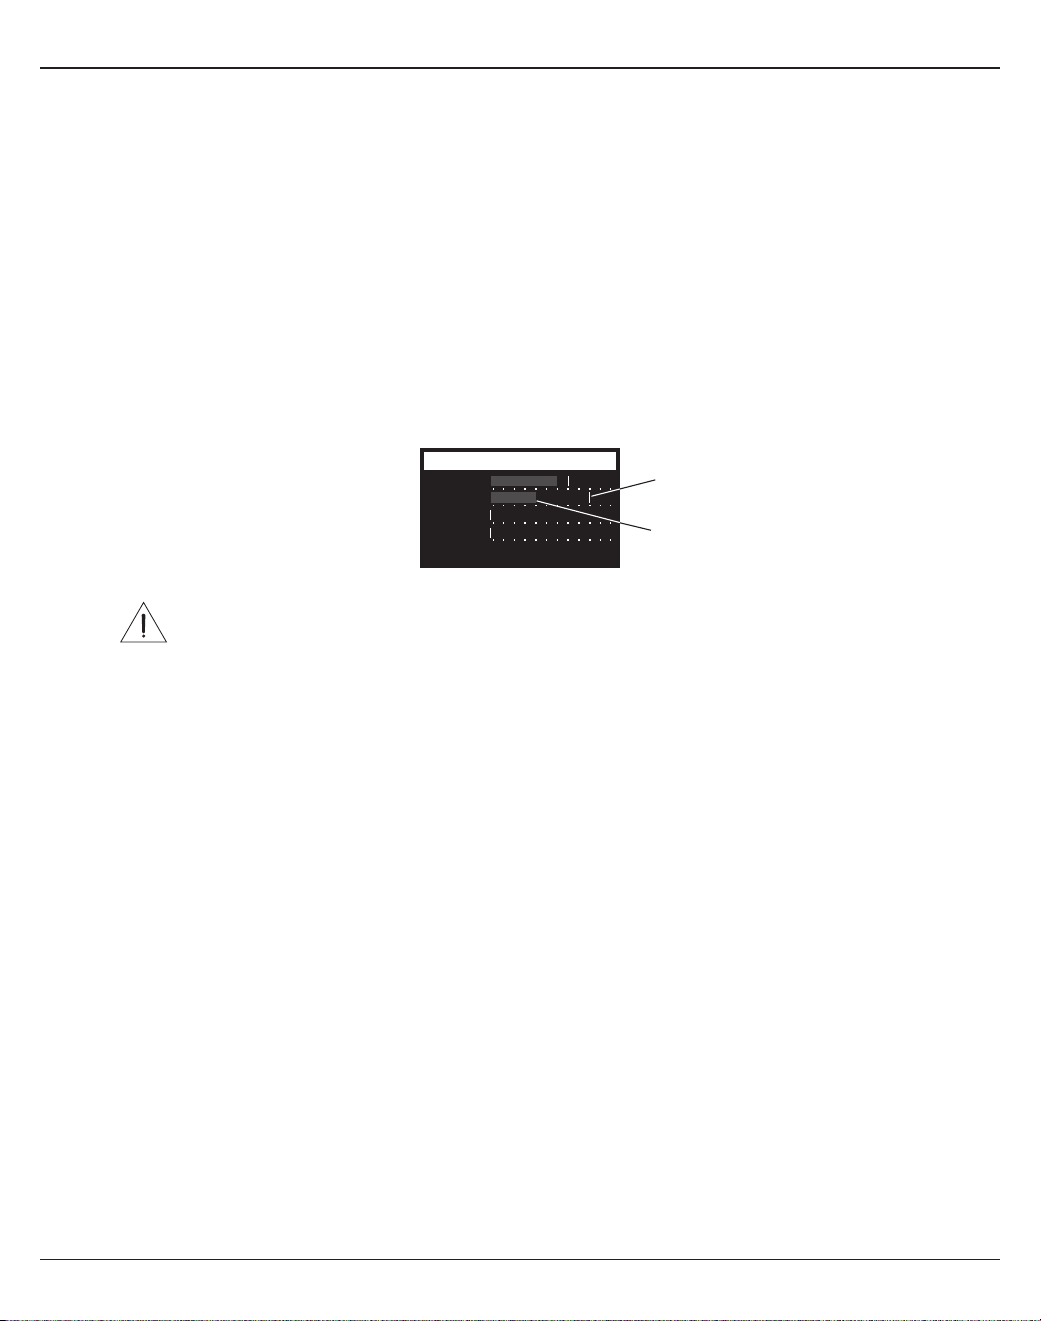
Utilisation
Français - 17
Optimisation du gain d’entrée et du volume de sortie
Pour que le volume ne soit pas seulement une question de quantité mais aussi de qualité, il est nécessaire de
combiner les réglages de sensibilité d’entrée, de volume principal et de volume sur chaque canal. Suivez la procédure
ci-dessous pour chaque canal utilisé.
1. Vérifiez que le volume général (Master), la sensibilité d’entrée (Trim) et les volumes des canaux sont réglés à leur
valeur minimale.
2. Réglez la sensibilité d’entrée (Trim).
A. Si nécessaire, réglez le volume de votre instrument ou de la source audio au niveau désiré.
B. Jouez de l’instrument ou mettez la source en lecture à un niveau normal pour votre application.
C. Tournez doucement le potentiomètre Trim dans le sens horaire jusqu’à ce que l’indicateur Signal/Clip
s’allume en vert. Si l’indicateur passe au rouge, même clignotant, tournez le potentiomètre Trim dans le sens
anti-horaire pour réduire le niveau.
D. Utilisez les vu-mètres d’entrée ( page28) dans le menu Prefs pour vérifier les niveaux d’entrée
ATTENTION: Si vous utilisez une source demandant une alimentation fantôme (+48V), par exemple
un microphone statique, appuyez sur la touche Phantom avant de régler le potentiomètre de Trim.
Remarque: L’indicateur de niveau disponible dans le menu Prefs peut être précieux lors du réglage du
niveau de Trim d’entrée (voir page 28).
3. Réglez le potentiomètre de volume Master à midi.
4. Tournez lentement le potentiomètre de volume du canal jusqu’à ce que le volume atteigne le niveau désiré.
Input LevelPreferences
Ch 3
Ch 1
Ch 2
Ch 4
Menu Aux InReset
Indicateur de crêtes
Indicateur de niveau d’entrée

18 - Français
Utilisation
Utilisation du réglage de volume général (Master)
Le réglage de volume Master agit sur le niveau de sortie global du mixeur T4S/T8S sur la sortie ToneMatch® et sur
la sortie analogique Master. En temps normal, il est recommandé de laisser le potentiomètre Master en position
médiane (midi). Après avoir réglé les niveaux de sortie de tous les canaux, vous pourrez ajuster le potentiomètre
Master à partir de cette position, vers le haut ou vers le bas.
Coupure du son sur un canal
Les boutons Mute coupent le son sur le canal correspondant.
• Pour couper le son sur un canal, appuyez sur le bouton Mute. Le bouton Mute devient blanc pour indiquer que le
canal est coupé. La mention «CH MUTE» apparaît sur l’acheur pour le canal correspondant.
• Pour rétablir le son sur ce canal, appuyez à nouveau sur le bouton Mute. Le bouton Mute s’éteint pour indiquer que
le son n’est plus coupé sur ce canal.
Coupure des eets sur les canaux
Les boutons FX Mute suppriment les eets Mod (modulation), Delay (délai) et Reverb (réverbération) pour le canal
correspondant. Cette coupure des eets ne modifie pas les présélections ToneMatch ni les paramètres zEQ, Para EQ
et Comp/Gate.
• Pour couper les eets sur un canal, appuyez sur le bouton FX Mute. Le bouton FX Mute devient blanc pour indiquer
que le canal est coupé. La mention «FX MUTE» apparaît sur l’acheur pour le canal correspondant.
• Pour rétablir les eets sur ce canal, appuyez à nouveau sur le bouton FX Mute. Le bouton FX Mute s’éteint pour
indiquer que les eets ne sont plus coupés sur ce canal.
Ch 1
Category
Utility
ToneMatch
CH MUTE
Flat
Preset
Ch 1
Category
Utility
ToneMatch
FX MUTE
Flat
Preset

Utilisation
Français - 19
Utilisation du sélecteur rotatif
Le sélecteur rotatif permet d’accéder aux fonctions et traitements de la sortie ToneMatch® du mixeur. La Figure15
illustre les 9fonctions/traitements relatifs aux canaux et les 3fonctions globales. Les pages suivantes expliquent
comment ajuster chaque fonction.
Figure15. Sélecteur rotatif
Fonctions/traitements relatifs aux canaux
q Pan/Aux – Permet d’accéder aux panoramiques et aux départs/retours auxiliaires.
w Tuner – Visualise les informations concernant l’accord de l’instrument joué sur le canal sélectionné.
e ToneMatch – Permet d’accéder aux présélections ToneMatch exclusives, conçues pour des instruments et des
microphones spécifiques.
r zEQ – Dans le cadre de la présélection ToneMatch choisie, la fonction zEQ permet d’ajuster les fréquences graves,
médium et aiguës du son de votre instrument ou microphone.
t Para EQ – Permet d’accéder aux réglages de l’égaliseur paramétrique par voie.
y Comp/Gate – Permet d’accéder aux paramètres de noise gate, de compression, de limiteur, de dé-esseur, et des
présélections de grosse caisse possédant des paramètres réglables.
u Mod – Permet d’accéder à plusieurs eets de modulation, comme le chorus, le flanger, phasing et le trémolo.
i Delay – Permet d’accéder à trois types de délais et de délais tap-tempo.
o Reverb – Applique une réverbération au canal sélectionné, sur les généraux ou le départ auxiliaire.
Fonctions/traitements globaux
a Reverb Type – Permet de choisir le type de réverbération utilisé sur les canaux de sortie Master ou les départs
auxiliaires.
s Prefs – Permet d’accéder à divers utilitaires système.
d Scenes – Permet d’enregistrer et de charger des configurations de session, ou «Scenes» (ensemble des
paramètres actuels de l’appareil).
e
o
y
d
r
a
u
q
t
s
i
w

20 - Français
Utilisation
Modification du son d’un canal
Les fonctions CH Edit permettent d’accéder aux paramètres qui aectent le canal sélectionné. Les fonctions CH Edit
sont les suivantes: Pan/Aux, Tuner, ToneMatch®, zEQ, Para EQ, Comp/Gate, Mod, Delay et Reverb.
Pour modifier un canal :
1. Appuyez sur la touche CH Edit 1, 2, 3, 4, (T4S et T8S) 5, 6, 7 ou 8 (T8S uniquement). Le canal sélectionné
apparaît alors en haut à gauche de l’acheur.
2. Sélectionnez l’une des fonctions CH Edit à l’aide du sélecteur rotatif.
3. Réglez les paramètres de cette fonction en suivant les instructions ci-dessous.
Remarque: Il n’est possible de modifier qu’un seul canal à la fois. Appuyer sur une touche CH Edit n’active l’édition
que sur le canal sélectionné.
Utilisation des fonctions Pan/Aux
La fonction Pan/Aux permet d’assigner les signaux audio aux sorties principales L/R, de contrôler le niveau de
l’entrée, ou celui du départ auxiliaire.
Utilisation du Pan
Le panoramique sert à placer le signal de la voie à l’endroit désiré dans l’image stéréo.
1. Appuyez sur le potentiomètre de gauche (ou tournez-le) puis sélectionnez Pan dans le menu.
2. Tournez alors le potentiomètre Pan pour placer le son dans l’image stéréo (signal de sortie au niveau ligne).
Entrée Aux 5/6 (9/10)
L’entrée Aux 5/6 (9/10) accepte une source de signal stéréo au niveau ligne, un appareil mobile par exemple.
1. Appuyez sur le potentiomètre de gauche (ou tournez-le) puis sélectionnez Aux In 5/6 dans le menu.
2. Tournez le potentiomètre 5 Lvl ou 6 Lvl pour doser le signal du canal 5 ou du canal 6.
3. Appuyez sur le potentiomètre 5 Lvl pour passer à 5 Pan; appuyez sur 6 Lvl pour passer à 6 Pan. Tournez le
potentiomètre Pan pour régler le panoramique (position dans l"image gauche/droite).
Ch 1
Menu Pan
Pan
Pan
Ch 1
Menu 5 Pan 6 Lvl
Aux In 50%
Aux Input 5/6
6 Pan5 Lvl
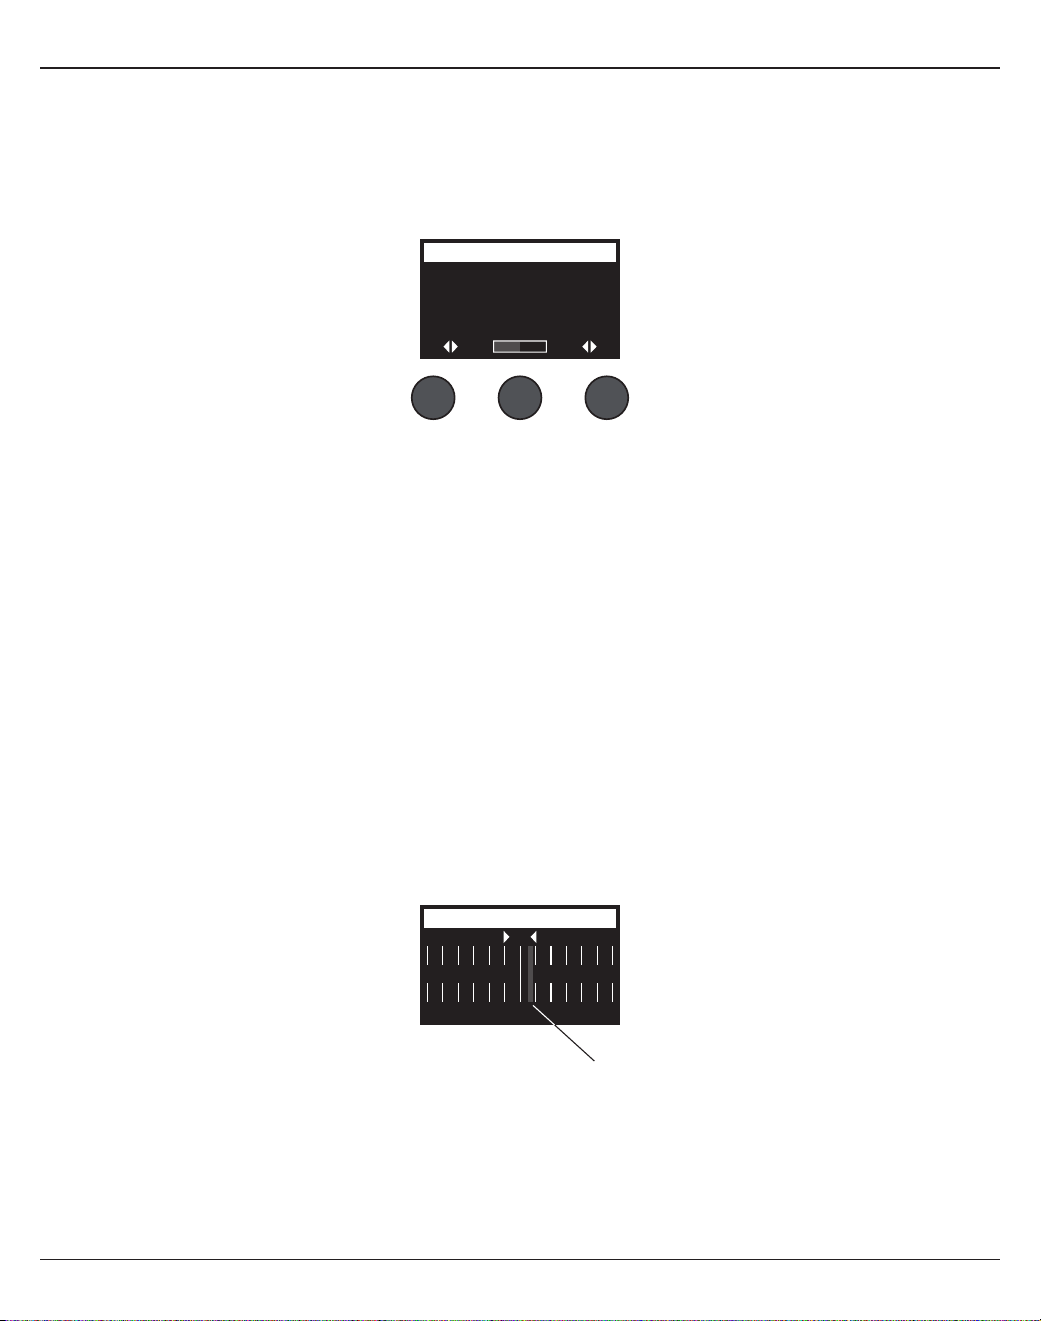
Utilisation
Français - 21
Assignation des signaux d’entrée aux sorties Aux
La fonction Aux permet d’envoyer des signaux sur deux sorties Aux (T4S uniquement) ou quatre sorties Aux (T8S
uniquement), pour divers traitements de signal, enregistrement, applications de sonorisation. Le niveau du signal est
ajustable pour chacune des sorties Aux disponibles:
Remarque: Pour couper (Mute) la sortie Aux, appuyez sur le potentiomètre Level. Appuyez de nouveau sur ce
bouton pour la réactiver.
1. Appuyez sur le potentiomètre Menu (ou tournez-le), puis sélectionnez un départ auxiliaire (Aux Send).
2. Tournez le potentiomètre Level pour régler le niveau de signal prélevé sur le canal sélectionné.
3. Tournez le potentiomètre Tap pour faire défiler le menu Tap et sélectionner le point où le signal est prélevé.
A. Dry: After Preamp– Le signal est prélevé directement au niveau du préampli, donc complètement sec
(aucun traitement).
B. Pre: With EQ & Fx– Le signal est prélevé après passage par le préampli, avec égalisation et eets.
C. Post: After Fader– Le signal est prélevé après son passage par le réglage de volume du canal, donc avec
égalisation et eets.
4. Appuyez sur le bouton Select pour sélectionner le point de prélèvement du signal de départ (Tap), ou sur le bouton
Cancel pour quitter la liste sans changement. Le nom du point de prélèvement sélectionné apparaît en gras.
Ch 1
Menu Tap
Aux
1P
re
Level
50%
Aux 1 Output
Utilisation de l’accordeur
Une fonction d’accordage est disponible sur chaque canal d’entrée. L’acheur indique en bas de l’écran la note
actuelle, en notation anglaise (ici, A3 = La3). Pendant l’accordage, un indicateur de hauteur apparaît sur l’acheur
pour indiquer si la note est trop haute (glissement vers le dièse) ou trop basse (glissement vers le bémol). Réglez la
hauteur de la note afin que le curseur vienne s’aligner au centre de l’écran.
Remarque: Si vous désirez vous accorder en silence, appuyez sur le bouton Mute du canal désiré.
La fonction Transpose permet de modifier la référence de hauteur de deux demi-tons, vers le haut ou vers le bas.
Vous pouvez aussi entrer directement votre hauteur d’accord de référence.
Ch 1
b#
A3
Tuner
Indicateur de
hauteur (Pitch)
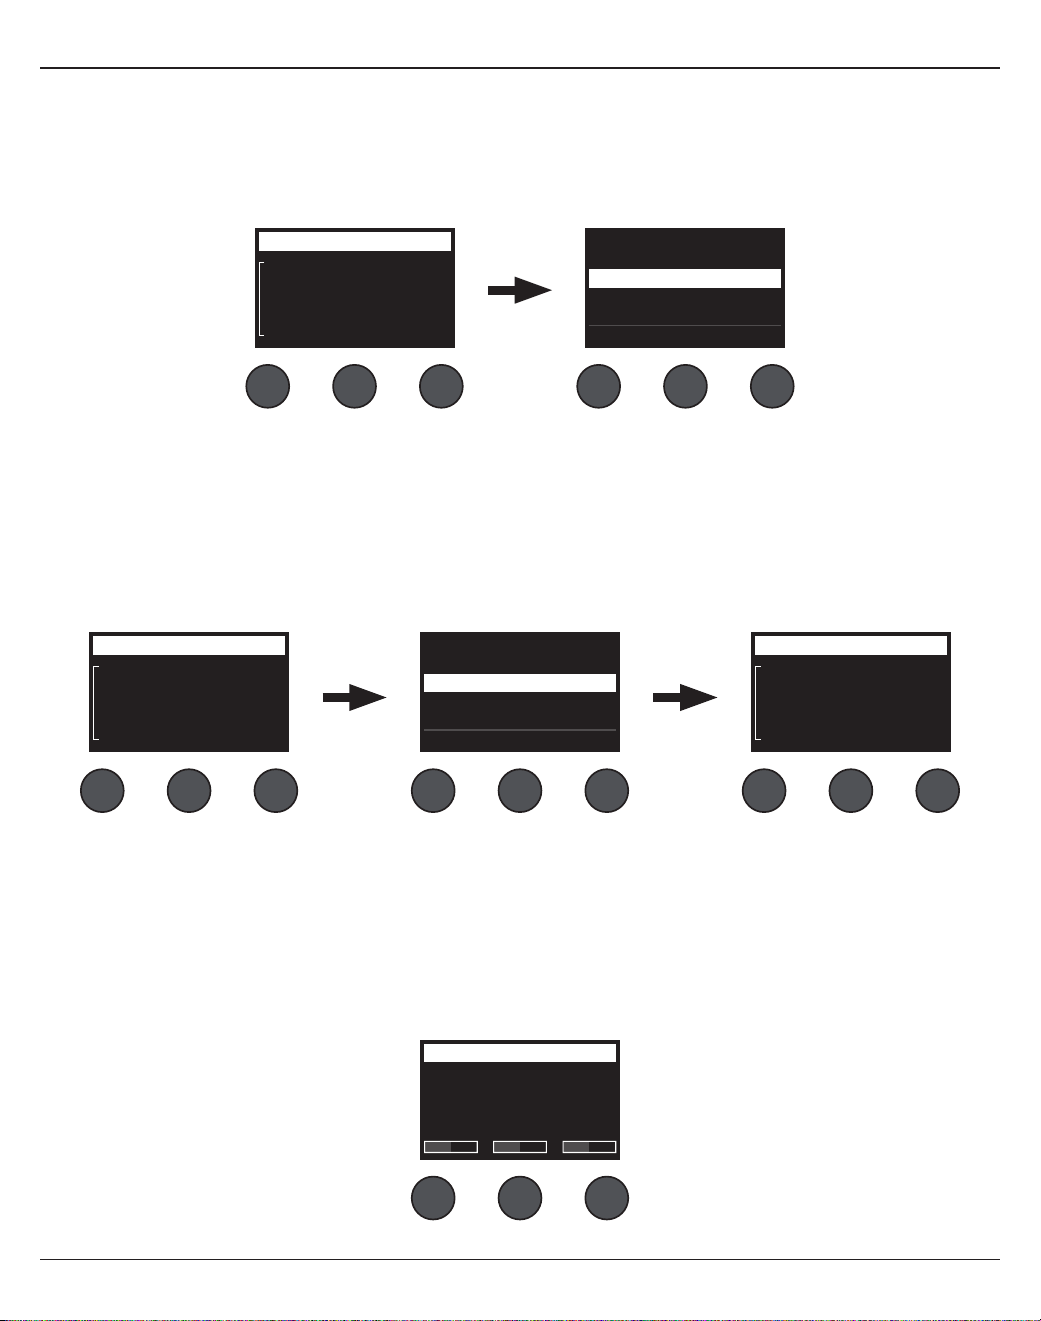
22 - Français
Utilisation
Ch 1
Category
Vocal Mics
ToneMatch
Handheld Mics
Preset
Handheld Mics
Headworn Mics
High Gain: Bright
High Gain: Normal
SelectCancel
Ch 1
Category
Utility
ToneMatch
Flat
Preset
Ch 1
Category
Vocal Mics
ToneMatch
Headworn Mics
Preset
Vocal Mics
Utility
Electric Guitars
Acoustic Guitars
Select Cancel
Tourner Appuyer
AppuyerTourner
Choix d’une présélection ToneMatch®
La fonction ToneMatch permet de sélectionner une présélection ToneMatch spécifique pour votre instrument
ou microphone. Cette technologie exclusive optimise l’égalisation du système afin de préserver le son naturel
caractéristique de chaque instrument ou microphone. Organisées en catégories, les présélections peuvent être
choisies indépendamment pour chaque canal.
1. Tournez le bouton Category pour faire apparaître la liste des catégories et y faire votre choix.
2. Appuyez sur le bouton Select pour valider votre choix, ou sur le bouton Cancel pour quitter la liste sans
changement.
3. Si vous avez appuyé sur le bouton Select tournez le bouton Preset pour voir la liste des présélections et y faire
votre choix.
4. Appuyez sur le bouton Select pour sélectionner votre choix, ou sur le bouton Cancel pour quitter la liste sans
changement.
Ch 1
Low Mid
Handheld Mics
High
0.0db 0.0db 0.0db
zEQ
Réglage de zEQ.
La fonction zEQ utilise la technologie des présélections ToneMatch. Elle permet d’intervenir sur les graves, médiums
et aigus spécifiques à votre instrument ou microphone.
Pour ajuster l’égalisation zEQ, tournez le bouton situé sous la bande de fréquences correspondante.
Remarque: Pour annuler le traitement sur une bande de fréquences individuelle, appuyez sur le bouton
correspondant. Appuyez de nouveau sur ce bouton pour le réactiver.
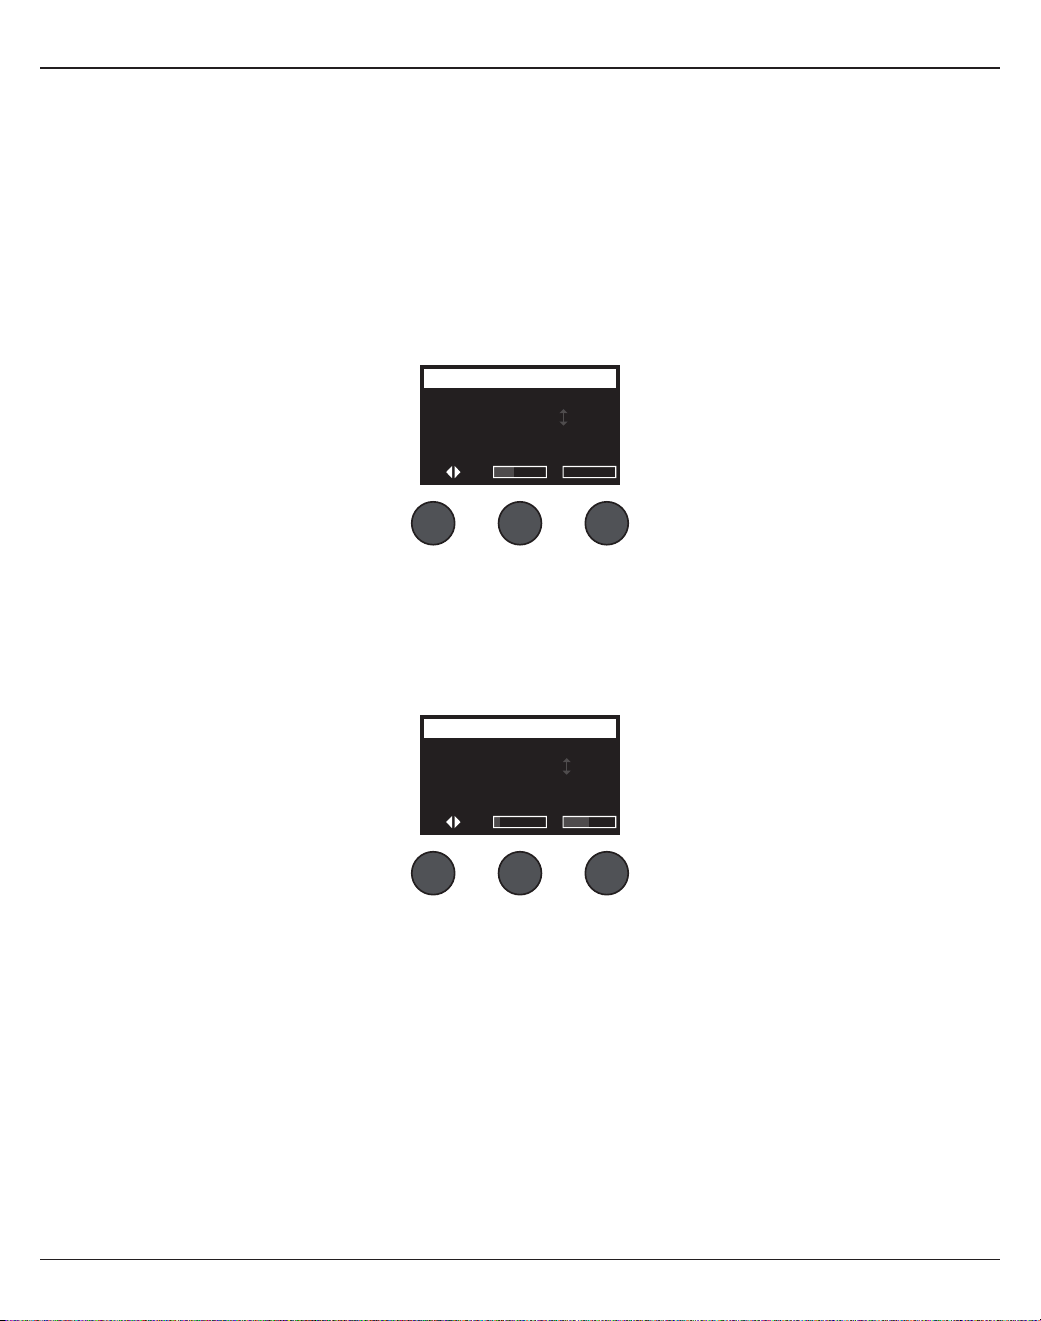
Utilisation
Français - 23
Réglage de Para EQ
La fonction Para EQ propose trois égaliseurs paramétriques, centrés chacun sur une fréquence choisie par l’utilisateur
dans la plage 50Hz– 16kHz.
Remarque: Pour annuler l’eet de la fonction Para EQ, appuyez sur le bouton Select. Appuyez de nouveau sur ce
bouton pour le réactiver.
1. Appuyez sur le bouton Select (ou tournez-le) pour sélectionner la bande de Para EQ 1, 2 ou 3.
2. Tournez le bouton Level pour ajuster le niveau d’amplification ou d’atténuation, de -15dB à +15dB.
3. Tournez le bouton Freq pour ajuster la fréquence centrale entre 50Hz et 16kHz.
4. Appuyez sur le bouton Freq pour passer à la largeur de bande (Width). Tournez le bouton Width pour ajuster la
largeur de la courbe en cloche de part et d’autre de la fréquence centrale, entre 0,20octave et 5octaves.
Ch 1
Select Level
B3
Freq
PEQ 1 -3.4dB 250.0Hz
Parametric EQ
Width
Utilisation des fonctions Compressor/Gate
La fonction Comp/Gate permet d’accéder aux présélections gate, compression, limiteur, anti-siantes (dé-esseur) et
kick drum, avec des paramètres ajustables.
Remarque: Pour désactiver la fonction Comp/Gate, appuyez sur le bouton Type. Appuyez de nouveau sur ce bouton
pour la réactiver.
Remarque: Un seul eet par canal.
1. Tournez le bouton Type pour faire apparaître la liste des eets Comp/Gate et y faire votre choix.
A. Compressor 1: Light– Compresseur préréglé sur un taux faible, valeurs de seuil et de gain variables.
Ecace comme compresseur d’usage général pour la plupart des instruments et des microphones qui
nécessitent un contrôle de niveau minimal.
B. Compressor 2: Medium– Compresseur préréglé sur un taux modéré, valeurs de seuil et de gain variables.
Ecace sur les basses, les guitares, les claviers et les voix qui nécessitent un contrôle de niveau subtil.
C. Compressor 3: Heavy– Compresseur préréglé sur un taux élevé, valeurs de seuil et de gain variables.
Adapté aux instruments forts (cuivres, batterie, etc.) et aux parties vocales nécessitant un contrôle de niveau
plus prononcé.
D. Limiter– Limiteur préréglé sur un taux énergique (∞:1), valeurs de seuil et de gain variables. Adapté aux
instruments très forts (batterie), afin d’éviter toute surcharge du canal par les crêtes du signal audio.
Ch 1
Type Thresh Speed
Gate -80.0dB 50%
Comp/Gate
Ramp

24 - Français
Utilisation
Utilisation de la fonction KickGate
La fonction KickGate est une technologie exclusive Bose® qui permet d’augmenter le niveau d’une grosse caisse sur un
canal, en éliminant tout risque de Larsen sur le microphone. Deux réglages de KickGate sont disponibles dans le menu
Comp/Gate.
1. Connectez le type de microphone approprié.
2. Choisissez une présélection ToneMatch® appropriée.
3. Réglez le potentiomètre de niveau d’entrée Trim jusqu’à ce que les plus énergiques frappes de grosse caisse fassent
clignoter en rouge la LED d’entrée du canal, puis continuez le réglage jusqu’à ce que la LED passe au vert. Vous
avez ainsi optimisé le niveau de Trim pour le canal d’entrée.
4. Sélectionnez Comp/Gate avec le sélecteur rotatif.
5. Tournez le potentiomètre Type pour faire défiler la liste, et sélectionnez KickGate 1: Regular ou KickGate 2: Fast,
puis appuyez sur Select. Choisissez KickGate 2 si vous utilisez une grosse caisse à double pédale.
6. Tout en jouant la grosse caisse, montez le volume jusqu’à un niveau normal pour le concert.
7. Jouez la grosse caisse au niveau le plus bas que vous utiliserez en concert et vérifiez que vous pouvez l’entendre.
8. Tout en jouant doucement, augmentez le niveau de seuil (Thresh) jusqu’à ce que certaines frappes soient coupées.
Baissez alors le niveau de Thresh de 3dB.
9. Tout en jouant la grosse caisse normalement, tournez le bouton Tight dans le sens inverse des aiguilles d’une
montre afin de réduire la vitesse de fermeture et d’ajouter plus d’impact au son. La vitesse de fermeture est réglable
de 0 % (lente) à 100 % (rapide).
E. De-Esser– Compresseur contrôlé par entrée latérale, taux de compression préréglé, avec seuil et gain
variables. Conçu pour réduire les siantes sur les voix.
F. Noise Gate– Noise gate pour élimination de bruits de fond, temps d’ouverture (Attack) rapide, seuil
variable, vitesse de fermeture (Release) variable. Destiné à éliminer les bruits indésirables provenant des
microphones et des instruments.
G. KickGate 1: Regular– Noise gate à temps d’ouverture (Attack) présélectionné, seuil variable et vitesse de
fermeture (Release) variable. Cette technologie exclusive de Bose® est spécifiquement destinée à la grosse
caisse. Ce noise gate d’une grande ecacité assure un gain maximal avant l’apparition du Larsen, ce qui
permet d’obtenir un son de grosse caisse aussi fort que possible dans un système de sonorisation.
H. KickGate 2: Fast– Comme KickGate 1, mais réglé pour des tempos plus rapides. Sélectionnez cette
présélection pour une grosse caisse à double pédale.
2. Appuyez sur le bouton Select pour valider votre choix, ou sur le bouton Cancel pour quitter la liste sans
changement.
3. Compressor 1-3, Limiter, De-Esser: Tournez le potentiomètre Thresh pour régler le niveau du seuil d’entrée
(mise en action), valeurs possibles de -50dB à 0dB. Tournez le potentiomètre Gain pour régler le gain, valeurs
possibles de 0dB à +30,0dB. La barre de gain située au-dessus du bouton indique le niveau de réduction du
gain. Cet achage facilite le réglage du seuil.
Noise Gate: Tournez le potentiomètre Thresh pour régler le niveau du seuil d’entrée (ouverture du noise gate),
valeurs possibles de -90dB à -30dB. Tournez le potentiomètre Speed pour régler la vitesse de fermeture du
noise gate, valeurs possibles de 0 % (la plus rapide) à 100 % (la plus lente). Tournez le potentiomètre Ramp pour
régler la progressivité de mise en action du noise gate, de 0 % (pente horizontale) à 100 % (pente verticale).
KickGate 1-2: Tournez le potentiomètre Thresh pour régler le niveau du seuil d’entrée (ouverture du noise gate),
valeurs possibles de -20dB à 0dB. Tournez le potentiomètre Tight pour régler la précision (vitesse de fermeture
du noise gate), valeurs possibles de 0 % (la plus rapide) à 100 % (la plus lente).

Utilisation
Français - 25
Utilisation des eets de modulation
La fonction Mod permet d’appliquer des eets de modulation.
Remarque: Pour désactiver les eets Mod, appuyez sur le potentiomètre Type. Appuyez de nouveau sur ce bouton
pour les réactiver.
1. Tournez le bouton Type pour voir la liste des eets de modulation et y faire votre choix.
A. Chorus 1: Brite– Eet de chorus scintillant, bien adapté aux instruments acoustiques. Le mix, la profondeur
et la vitesse sont réglables.
B. Chorus 2: Warm–Similaire à Chorus 1 avec un peu moins d’aigus. Le mix, la profondeur et la vitesse sont
réglables. Bien adapté aux guitares électriques et aux basses.
C. Chorus 3: Dark– Similaire à Chorus 2 avec un peu moins d’aigus, tonalité plus sombre. Le mix, la profondeur
et la vitesse sont réglables. Bien adapté aux guitares électriques et aux basses.
D. Flanger 1: Tape– Flanger «bande magnétique», pas de réinjection (feedback). Le mix, la profondeur et la
vitesse sont réglables. Eet bien adapté aux guitares et basses électriques.
E. Flanger 2: Feedback– Comme Flanger 1 mais avec un eet de réinjection (feedback) prédéfini.
F. Phaser 1: Stomp– Eet évoquant une pédale de phasing classique. Balayage sonore ample préréglé,
paramétrage du spectre et du feedback. Eet tout à fait adapté aux guitares/basses électriques et claviers.
G. Phaser 2: Rack– Eet évoquant un phasing en rack traditionnel. Mixage en phase du signal original et du
signal de phasing, paramétrage de la vitesse et du feedback. Eet tout à fait adapté aux guitares/basses
électriques et claviers.
H. Phaser 3: Warm– Eet de phasing de style vintage. Mixage en phase du signal original et du signal de
phasing, paramétrage de la vitesse et du feedback. Eet tout à fait adapté aux guitares/basses électriques
et claviers.
I. Phaser 4: Brite– Eet de phasing sans graves. Mixage en phase du signal original et du signal de phasing,
paramétrage de la vitesse et du feedback. Bien adapté pour les eets avec les guitares électriques et les
claviers.
J. Tremolo– Eet de trémolo classique avec vitesse variable et réglage d’intensité. Eet bien adapté aux
guitares, aux claviers et à l’harmonica.
2. Appuyez sur le bouton Select pour valider votre choix, ou sur le bouton Cancel pour quitter la liste sans
changement.
3. Chorus 1-3, Flanger 1-2: Tournez le bouton Mix pour doser le mélange du signal original et du signal d’eet (après
modulation). Tournez le bouton Depth pour régler la variation de hauteur par rapport au signal original.
Appuyez sur le bouton Depth pour accéder au paramètre Speed. Tournez le bouton Speed pour régler la
fréquence de modulation de hauteur.
Phaser 1-4: Tournez le bouton Speed pour régler la fréquence de modulation de hauteur. Tournez le bouton
Fdbk. pour régler le taux de réinjection du signal modulé.
Tremolo: Tournez le bouton Speed pour régler la vitesse de modulation du volume. Tournez le bouton Depth
pour régler la variation du volume par rapport au signal original.
Ch 1
Type Mix Depth
Chorus1 50% 50%
Modulator
Speed
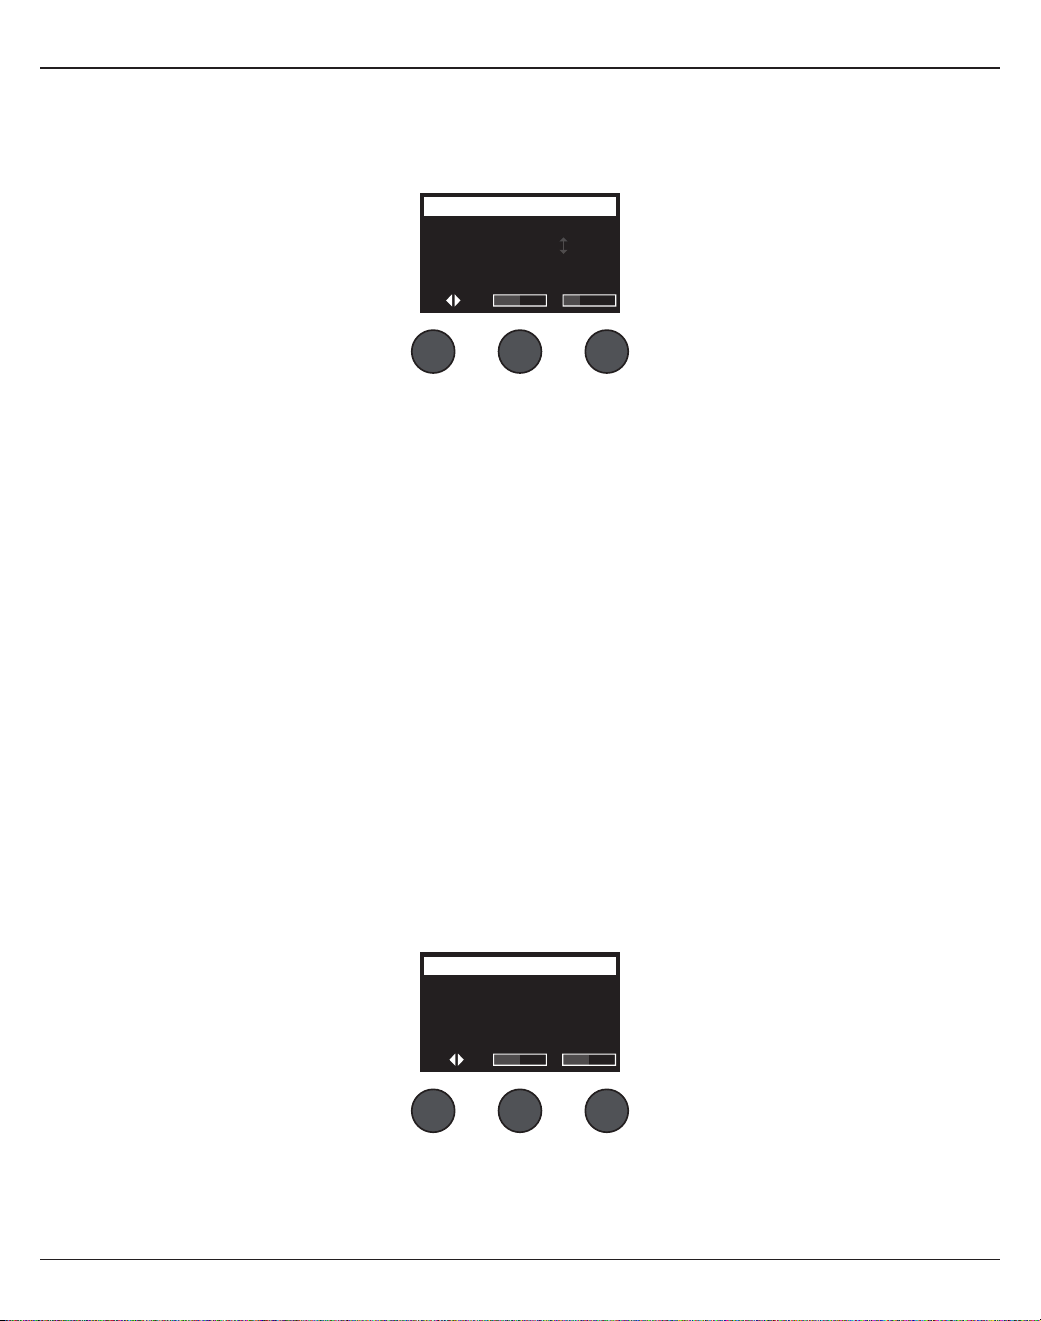
26 - Français
Utilisation
Ch 1
Type Tim
eM
ix
Digital 250ms 30%
Delay
Fdbk.
Ajout de délai
La fonction Delay permet d’appliquer un retard de type numérique, analogique ou bande magnétique.
Remarque: Pour désactiver le délai, appuyez sur la touche Type. Appuyez de nouveau sur ce bouton pour le réactiver.
1. Tournez le bouton Type pour faire apparaître la liste des types de délais et y faire votre choix.
A. Digital Delay– Eet de délai numérique neutre, aux répétitions sans coloration sonore particulière. Paramètres
ajustables: mix, durée et feedback (nombre de répétitions). Bien adapté aux guitares, aux caisses et aux voix.
B. Analog Delay– Eet de délai analogique classique, avec une dégradation sonore progressive des répétitions.
Paramètres ajustables: mix, durée et feedback (nombre de répétitions). Bien adapté aux guitares, aux caisses
et aux voix.
C. Tape Delay– Eet de délai par bande magnétique vintage, dégradation progressive des répétitions plus
prononcée qu’avec le délai analogique. Adapté aux guitares, aux cuivres, à l’harmonica et à la voix.
2. Appuyez sur le bouton Select pour valider votre choix, ou sur le bouton Cancel pour quitter la liste sans
changement.
3. Tournez le potentiomètre Time pour régler la durée de délai, par pas de 5ms. Appuyez en rythme sur le bouton
Time pour entrer directement le tempo du délai désiré (fonction Tap Tempo).
4. Tournez le bouton Mix pour doser le mélange du signal original (0%) et du signal d’eet (100%).
5. Appuyez sur le bouton Mix pour accéder au paramètre Fdbk. Tournez le bouton Fdbk. pour régler la durée de
feedback du délai.
Ajout de réverbération
La fonction Reverb applique une valeur de réverbération ajustable au canal sélectionné. Pour sélectionner le type de
réverbération, voir la section «Sélection d’un type de réverbération» en page27.
Remarque: Pour couper l’eet de réverbération, appuyez sur le bouton Mix. Appuyez de nouveau sur ce bouton pour
le réactiver.
1. Appuyez sur le potentiomètre Menu ou tournez-le pour choisir sur quelle sortie envoyer aussi la réverbération.
2. Tournez le bouton Mix pour doser le mélange du signal original (0%) et du signal de réverbération (100%).
3. Tournez le bouton Bright pour accentuer les aigus de la réverbération appliquée au canal sélectionné.
Ch 1
Mix Bright
50% 50%
Reverb
Menu
Main

Utilisation
Français - 27
Utilisation des fonctions globales
Les fonctions globales (Global) permettent d’accéder à des paramètres agissant sur le fonctionnement général du
mixeur et sur tous ses canaux.
Sélection d’un type de réverbération
La fonction Reverb Type permet de sélectionner le type de réverbération appliqué à tous les canaux d’entrée.
La durée de réverbération (Time) et la balance (Bal) sont ajustables. La balance contrôle la proportion des premières
réflexions et des réflexions tardives.
Remarque: Pour désactiver la réverbération, appuyez sur le bouton Type. Appuyez de nouveau sur ce bouton pour la
réactiver.
1. Sélectionnez Reverb Type avec le sélecteur rotatif.
2. Appuyez sur le potentiomètre Menu ou tournez-le pour choisir sur quelle sortie envoyer aussi la réverbération.
Vous pouvez choisir un type de réverbération diérent pour les sorties principales (Main) ou auxiliaires (Aux).
3. Tournez le potentiomètre Type pour faire apparaître la liste des réverbérations disponibles:
A. Plate– Crée l’ambiance d’une réverbération à plaque, typique d’un studio d’enregistrement. La durée de
réverbération et la balance (rapport entre les premières réflexions et les réflexions tardives) sont réglables.
B. Small– Crée la réverbération typique d’un petit volume. La durée de réverbération et la balance (rapport
entre les premières réflexions et les réflexions tardives) sont réglables.
C. Medium– Crée la réverbération typique d’un volume moyen. La durée de réverbération et la balance
(rapport entre les premières réflexions et les réflexions tardives) sont réglables.
D. Large– Crée la réverbération typique d’un grand volume. La durée de réverbération et la balance (rapport
entre les premières réflexions et les réflexions tardives) sont réglables.
E. Cavern– Crée la réverbération typique d’un très grand volume. La durée de réverbération et la balance
(rapport entre les premières réflexions et les réflexions tardives) sont réglables. Eet de réverbération
unique et intéressant.
4. Tournez le bouton Type pour faire défiler la liste des réverbérations et sélectionner le type désiré.
5. Appuyez sur Type pour valider votre choix.
6. Tourner le potentiomètre Time permet de régler la durée de réverbération du type sélectionné, de la valeur
minimale à la valeur maximale. Pour une valeur de 0%, la durée de réverbération est minimale, et correspond
aux dimensions de local les plus réduites pour le type de réverbération sélectionné. Pour une valeur de 100%,
la durée de réverbération est maximale, et correspond aux dimensions de local les plus grandes pour le type de
réverbération sélectionné. Chaque type de réverbération dispose de sa propre étendue de valeurs de durée de
réverbération, les plus adaptées au type sélectionné. Le paramètre Reverb Decay vous permet de régler la durée
de réverbération dans le cadre de valeurs les plus adaptées au type de réverbération sélectionné.
7. Appuyez sur le bouton Time pour passer à Bal. Tournez le bouton Bal. pour ajuster le rapport entre les premières
réflexions et les réflexions tardives (0% = uniquement les premières réflexions, 100% = uniquement les réflexions
tardives).
All Channels
Menu Type Bal.
Main Medium 50%
Reverb Type
Time

28 - Français
Utilisation
Utilisation des utilitaires du menu Prefs
Les entrées du menu Prefs donnent accès à divers utilitaires système.
1. Sélectionnez Prefs avec le sélecteur rotatif.
2. Tournez le bouton Menu pour faire défiler la liste et sélectionner la fonction voulue. Appuyez sur la touche Select
pour acher l’utilitaire.
• Status– Ache les eets aectés aux canaux d’entrée (visualisation uniquement, modification impossible).
• Input Level– Ache les vu-mètres de niveau d’entrée (avec indicateurs de crêtes) pour tous les canaux
d’entrée. Appuyez sur le bouton Reset pour réinitialiser tous les indicateurs de crêtes. Cet achage est
pratique pour régler le niveau de Trim d’entrée du canal (voir «Optimisation du gain d’entrée et du volume de
sortie) en page17. Appuyez sur le bouton Aux In pour visualiser le niveau sur les entrées auxiliaires (Sur le T8S
uniquement, appuyez sur le bouton Ch 5-8 pour visualiser le niveau des entrées5 à 8).
• Output Level– Visualise les indicateurs de niveau de sortie pour toutes les sorties: Main L, Main R, USB L et
USB R. Appuyez sur le bouton Aux pour visualiser le niveau sur les sorties auxiliaires.
Output Level Preferences
USB L
Main L
Main R
USB R
Menu Rese
tA
ux
Status
Ch 1 Mod
Mod
Mod Dly
Cm
pR
ev
Rev
Rev
CmpCh 2
Ch 3
Ch 4
Menu
Preferences
Cmp = Compressor/Gate
Mod = Modulation
Dly = Delay
Rev = Reverb
Input LevelPreferences
Ch 3
Ch 1
Ch 2
Ch 4
Menu Aux InReset
Indicateur de crêtes
Indicateur de niveau d’entrée

Utilisation
Français - 29
• Master Out EQ– Le Master Out EQ est un égaliseur graphique 6bandes inséré sur la sortie Master Mix.
Choisissez avec le potentiomètre du milieu la bande de fréquences que vous désirez amplifier ou atténuer, puis
ajustez le gain désiré avec le potentiomètre Level (+/–18dB).
• USB to PC– Cette fonction permet d’envoyer la source sélectionnée à l’ordinateur, via les canaux USB droite
et gauche. Les choix de sources sont Ch1-4 (Ch5-8 pour T8S uniquement), Aux In, Master ou Aux Out 1-2
(AuxOut 3-4 pour T8S uniquement).
• USB from PC– Cette fonction permet d’envoyer les signaux des canaux USB droite et gauche provenant de
l’ordinateur vers une destination du mixeur (None = Aucun(e), Aux In = Entrée aux., ou Master).
• USB A-Playback– Lecture de fichiers WAV ou MP3 stockés sur une clé USB insérée dans le port USB Type
A du mixeur. Via le menu, sélectionnez le dossier contenant les fichiers WAV/MP3; choisissez celui que vous
désirez lire, et réglez le niveau en tournant le potentiomètre Level.
+18
+12
+6
0
-6
-12
-18
125HzMenu
Master EQ Preferences
Level
1. Tournez le bouton Left/Right pour sélectionner une source.
2. Appuyez sur le bouton Select pour sélectionner la source, ou sur le bouton
Cancel pour quitter la liste sans modification.
3. Appuyez sur Menu pour retourner dans le menu Prefs.
Left : Master
Right : Master
LeftMenu
USB to PC Preferences
Right
Left : Master
Right : Master
LeftMenu
USB from PC Preferences
Right
1. Tournez le bouton Left/Right pour sélectionner une destination.
2. Appuyez sur le bouton Select pour sélectionner la source, ou sur le
bouton Cancel pour quitter la liste sans modification.
3. Appuyez sur Menu pour retourner dans le menu Prefs.
Tomorrow Is Too late.wav
Sarah.wav
Mistakes for Love.mp3
Sun Behind the Clouds.wav
Hey God Maker. mp3
LevelSelectMenu
30 - Français
Utilisation
• Versions– Fait apparaître le numéro de révision du firmware du DSP.
• ToneMatch– Fait apparaître la liste des groupes de présélection ToneMatch enregistrés dans le T4S/T8S.
Vous pouvez consulter la liste des groupes de présélections les plus récents à l’adresse
www.Bose.com/livesound.
• L1 Power Stand– Lorsque le mixeur est connecté à un socle amplificateur L1® Model 1S/II, la mention
Connected apparaît à l’écran.
Versions
T4S v1.0.0
Menu
Preferences
C: Ovation Guitars
B: Audix Mics.
A: Taylor Guitars
Menu
ToneMatchPreferences
Connected
Menu
L1 Stand Preferences
Chargement et enregistrement de configurations de sessions («scenes»)
Une «scene» est un instantané (snapshot) du statut du mixeur T4S/T8S ToneMatch®.
• Une «scene» contient l’intégralité des paramètres du mixeur ToneMatch ainsi que le statut des boutons Mute,
FXMute et CH Edit
• La sensibilité d’entrée (Trim) des canaux, le réglage de volume de chaque canal, le volume principal (Master),
le volume du casque et la position du commutateur de l’alimentation fantôme ne sont pas enregistrés dans la
«scene».
All Channels
Singer/Songwriter
Load Shared Save
Scenes

Utilisation
Français - 31
Le T4S/T8S intègre trois types de «scenes»:
• (5) Scenes Bose: configurations prédéfinies fournies par Bose, non modifiables. Il est impossible de les modifier ou
de les eacer.
• (10) User Scenes: configurations définies par l’utilisateur, qui peuvent être enregistrées et réutilisées. Vous pouvez
modifier ces configurations autant que vous le souhaitez.
• (1) Shared Scene: configuration définie par l’utilisateur et pouvant être partagée avec d’autres utilisateurs d’un
mixeur T4S/ToneMatch®. Cette configuration peut être transférée sur un ordinateur à l’aide du logiciel de mise à jour
du L1®, disponible à l’adresse www.Bose.com/livesound.
Pour charger une configuration:
1. Sélectionnez Scenes avec le sélecteur rotatif.
2. Tournez le bouton Load pour faire défiler la liste des configurations, puis sélectionnez la configuration voulue.
Le nom de la configuration actuellement chargée apparaît en gras.
3. Appuyez sur le bouton Select pour sélectionner une configuration, ou sur le bouton Cancel pour quitter la liste
sans changement de configuration.
Remarque: L’acheur retourne à l’écran «Scenes» si vous n’appuyez pas sur le bouton Select ou Cancel dans les
10secondes. Aucun changement n’est eectué dans ce cas, et la configuration actuellement chargée apparaît.
4. Si vous appuyez sur Select, la question «Are you sure?» s’ache. Appuyez sur le bouton Yes pour confirmer le
changement de configuration, ou sur le bouton No pour quitter la liste sans changement de configuration.
Remarque: L’acheur retourne à l’écran «Scenes» si vous n’appuyez pas sur le bouton Yes ou No dans les
10secondes. Aucun changement n’est eectué dans ce cas, et la configuration actuellement chargée apparaît.
Pour enregistrer une configuration :
1. Sélectionnez Scenes avec le sélecteur rotatif. La configuration actuellement chargée apparaît.
2. Tournez le bouton Save pour sélectionner la configuration à enregistrer. Appuyez sur la touche Select, ou sur
Cancel pour quitter la liste.
All Channels
Singer/Songwriter
Load Shared Save
Scenes
Remarque: L’acheur retourne à l’écran «Scenes» si vous n’appuyez
pas sur le bouton Select ou Cancel dans les 10secondes. Aucun
changement n’est eectué dans ce cas, et la configuration actuellement
chargée apparaît.
My Scene 01
My Scene 02
My Scene 03
Cancel Select

32 - Français
Utilisation
3. Si vous avez appuyé sur Select, vous pouvez utiliser l’option Rename pour modifier le nom de la configuration, ou
appuyer sur Save pour conserver le nom aché et passer à l’étape4.
Pour modifier le nom de la configuration après l’avoir enregistrée:
Les options suivantes permettent de modifier le nom de la configuration. Après avoir modifié le nom, appuyez sur le
bouton Save et passez à l’étape4.
• Sélectionner et changer des caractères: Dans l’écran «Rename», tournez le bouton Cursor pour sélectionner la
position du caractère à modifier. Tournez ensuite le bouton Select pour changer le caractère.
• Utilisation de la table de caractères: Dans l’écran «Rename», tournez le bouton Cursor pour sélectionner le
caractère à modifier. Appuyez ensuite sur le bouton Select pour acher la table des caractères. Tournez le bouton
Select pour déplacer le curseur vers la gauche ou la droite. Tournez le bouton Up/Dn (haut/bas) pour déplacer le
curseur vers le haut ou le bas. Lorsque le caractère voulu est sélectionné, appuyez sur le bouton Select pour insérer
ce caractère à la position choisie.
• Utilisation des fonctions Clear (eacer), Insert (insérer) et Delete (supprimer): Dans l’écran «Rename screen»,
tournez le bouton Cursor pour positionner le curseur. Appuyez ensuite sur le bouton Cursor pour acher un menu
de fonctions de modification. Tournez le bouton Select pour sélectionner l’option voulue. Appuyez ensuite sur le
bouton Select pour appliquer la fonction.
Clear Character– Eace le caractère sous le curseur en laissant un espace à la place.
Clear All– Eace toute la ligne de texte.
Clear to End– Eace tout le texte à droite du curseur, y compris le caractère
sélectionné.
Insert– Insère un espace à gauche du caractère sélectionné.
Delete– Supprime le caractère et l’espace sous le curseur.
Rename
J
rstuvwxyzABCDEFGHI
123456789, ;/\()|+-
KLMNOPQRSTU VWXYZ0
abcdefgh jklmnopqi
Cancel Up/Dn Select
Scenes
Clear To End
Insert
Clear All
Clear Character
Delete
CancelSelect
Rename
M yScene 01
CursorSave Select
Scenes

Utilisation
Français - 33
4. Lorsque la question «Are you sure?» s’ache, appuyez sur le bouton Yes pour enregistrer la configuration, ou
sur le bouton No pour quitter sans enregistrer.
Partage d’une configuration
Si vous créez une configuration que vous désirez partager avec un autre utilisateur de mixeur T4S/T8S ToneMatch®,
vous pouvez enregistrer cette configuration sous la forme d’une Shared Scene, en l’enregistrant dans l’emplacement
[To Shared Scene]. Le programme de mise à jour du L1® permet de transférer cette configuration partagée sur votre
ordinateur, puis, de là, vers l’ordinateur d’un autre utilisateur de T4S/T8S. L’autre utilisateur de T4S/T8S transférera
alors la configuration sur son mixeur, via le logiciel de mise à jour du L1. Le logiciel de mise à jour du L1 (L1 updater)
est disponible sur la page www.Bose.com/livesound.
Pour enregistrer une configuration partagée:
1. Chargez la configuration à partager (voir «Pour charger une configuration», en page31).
2. Appuyez sur le bouton Save pour acher la liste des configurations.
3. Tournez le bouton Select pour faire défiler la liste et sélectionner l’option [To Shared Scene]. Appuyez sur la
touche Select ou sur Cancel pour quitter la liste.
4. Si vous avez appuyé sur Select, vous pouvez utiliser l’option Rename pour modifier le nom de la configuration
(voir «Pour modifier le nom de la configuration avant de l’avoir enregistrée» en page32), ou passer à l’étape5
pour utiliser le nom existant.
Are You Sure?
YesNo
Remarque: L’acheur retourne à l’écran «Scenes» si vous n’appuyez pas sur le
bouton Select ou Cancel dans les 10secondes. Aucun changement n’est eectué
dans ce cas, et la configuration actuellement chargée apparaît.
[To Shared Scene]
My Scene 10
My Scene 09
Cancel Select
Rename
M yScene 07
CursorSave Select
Scenes
34 - Français
Utilisation
5. Appuyez sur la commande Save pour enregistrer la configuration comme configuration partagée.
6. Lorsque la question «Are you sure?» s’ache, appuyez sur le bouton Yes pour enregistrer la configuration
comme configuration partagée, ou sur le bouton No pour quitter sans l’enregistrer.
Remarque: L’acheur retourne à l’écran «Scenes» si vous n’appuyez pas sur le bouton Yes ou No dans les
10secondes. Aucun changement n’est eectué dans ce cas, et la configuration actuellement chargée apparaît.
7. Appuyez sur le bouton Shared pour confirmer l’enregistrement de la configuration comme configuration partagée.
Remarque: Le T4S/T8S ne permet d’enregistrer qu’une seule configuration partagée. L’enregistrement d’une
configuration partagée remplace toujours la configuration partagée précédente.
Visitez le site www.Bose.com/livesound pour plus de détails concernant l’utilisation de l’application de mise à jour du
système L1® pour transférer des fichiers de configuration de ou vers un ordinateur.
All Channels
Singer/Songwriter
Load Shared Save
Scenes All Channels
My Scene 07
Current Shared Scene:
Back
Scenes
Appuyer

Utilisation
Français - 35
Configurations Bose:
Les cinq fichiers de configuration Bose fournis en exemple peuvent être utilisés comme points de départ. Après
avoir chargé un fichier de configuration Bose, vous pouvez en modifier les paramètres, puis enregistrer la nouvelle
configuration sous forme personnalisée («My Scene») ou partagée («Shared Scene»).
Configuration par défaut
Cette configuration restaure le paramétrage par défaut du mixeur, celui à sa sortie d’usine. Le chargement de cette
configuration eace les éventuels changements apportés à la configuration actuellement chargée.
CH 1-4 (T4S/T8S) CH 5-8 (T8S)
ToneMatch
Active
Utility (Utilitaires)
Flat
zEQ
Bypass
Low Mid High
0dB 0dB 0dB
Para EQ
Bypass
Comp/Gate
Bypass
Chorus1
Mod
Bypass
Chorus1
Delay
(Retard)
Bypass
Digital
Reverb
Bypass
Digital
Aux
Mute
Pre: With EQ & Fx
Paramètres de la section Global
Préférences
Active screen Status
USB to PC Left/Right:Master
USB from PC Left/Right:Master
Master Out Post Master Volume
Reverb Type
Type Medium
Time 50%
Bal 50%
Remarque: Vous trouverez une liste des paramètres de la configuration par défaut, reportez-vous à la section
«Configuration par défaut» en page42.

36 - Français
Utilisation
Singer/Songwriter
Cette configuration est destinée à un chanteur s’accompagnant au clavier ou à la guitare, et éventuellement
accompagné par une piste MP3.
Figure16. Exemple d’installation pour la config. Singer/Songwriter

Utilisation
Français - 37
Microphone Guitare Clavier Basse Entrée aux.
CH1 CH2 CH3 CH4 5/6
ToneMatch
Actif Actif Actif Actif
N.A
Vocal Mics Acoustic Guitars Keyboards Basses
Handheld Mics Steel String w/piezo General Keys Active Bass 1
zEQ
Actif Actif Actif Actif
N/A
Low Mid High Low Mid High Low Mid High Low Mid High
0dB 0dB 0dB 0dB 0dB 0dB 0dB 0dB 0dB 0dB 0dB 0dB
Para EQ Bypass Bypass Bypass Bypass N /A
Comp/Gate
Bypass Bypass Bypass Bypass
N/A
Comp2 Comp2 Comp2 Comp2
Mod
Bypass Bypass Bypass Bypass
N/A
Chorus1 Chorus1 Chorus3 Chorus1
Delay
(Retard)
Bypass Bypass Bypass Bypass
N/A
Digital Digital Digital Digital
Reverb
Active Active Bypass Bypass
N/A
Medium (Global) Medium (Global) Medium (Global) Medium (Global)
Pan/Aux
Center Center Center Center Entrée aux.
AUX 1-2 50% AUX 1-2 50% AUX 1-2 50% AUX 1-2 50% 5 Lvl 6 Lvl
Pre: With EQ & Fx Pre: With EQ & Fx Pre: With EQ & Fx Pre: With EQ & Fx 50% 50%
Paramètres des canaux de la configuration Singer/Songwriter
Paramètres de la section Global
Préférences
Active screen Status
USB to PC Left/Right:Master
USB from PC Left/Right:Master
Master Out Post Master Volume
Reverb Type
Type Medium
Time 50%
Bal 50%
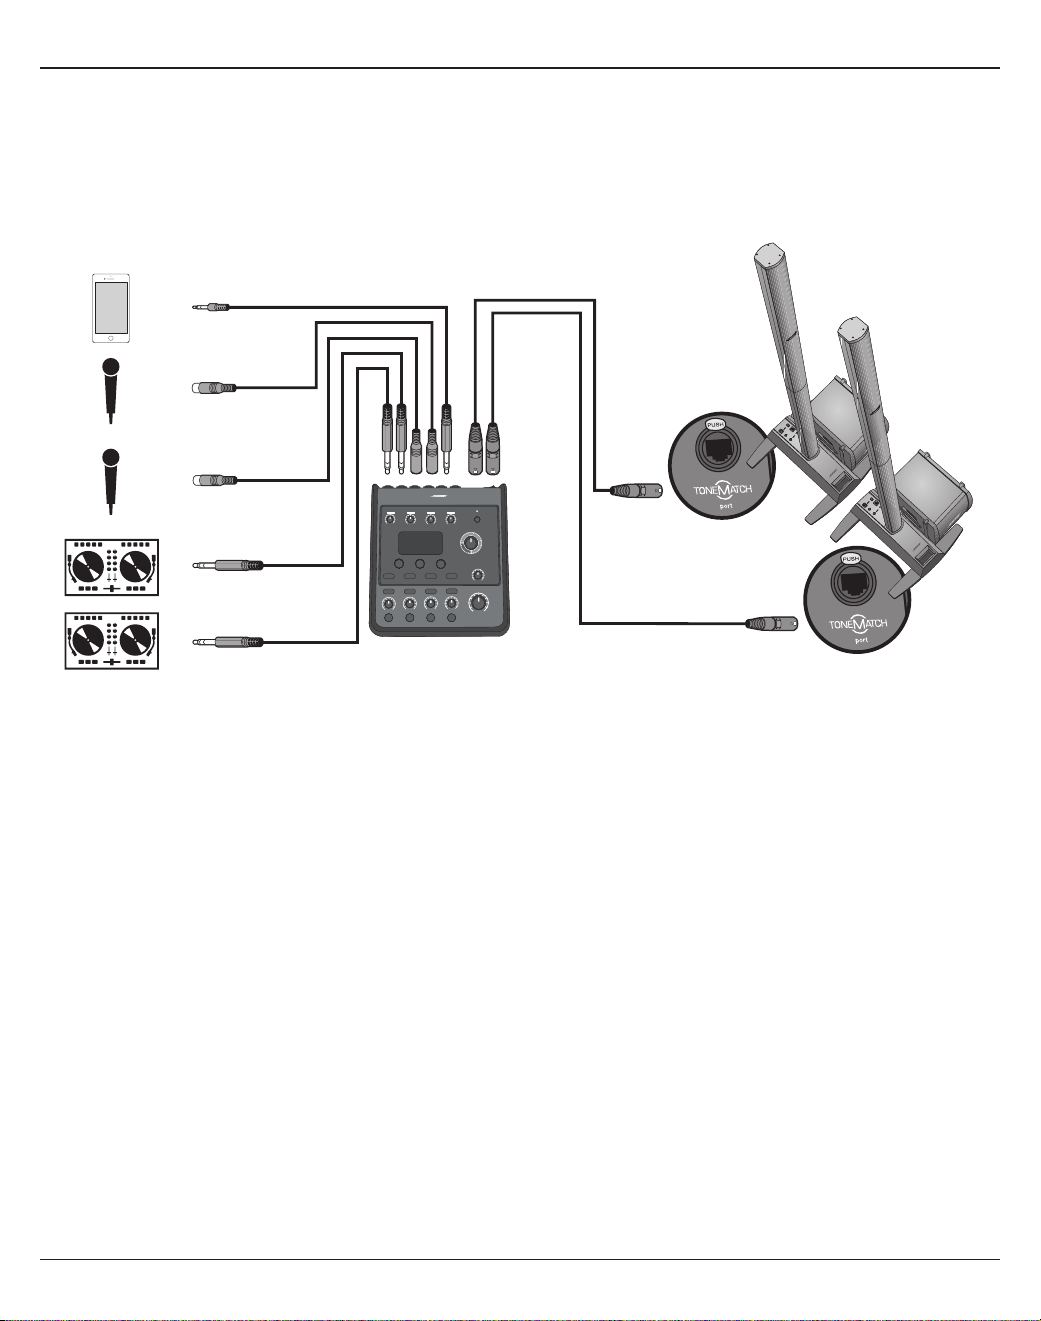
38 - Français
Utilisation
DJ/Playback
La configuration DJ/Playback est destinée à un DJ ou à toute lecture audio. Cette installation fait appel à deux
microphones et à un lecteur MP3, une table de mixage ou un ordinateur.
Figure17. Exemple d’installation pour la config. DJ/Playback
Utilisation
Français - 39
Paramètres des canaux de la configuration DJ/Playback
Paramètres de la section Global
Préférences
Active screen Status
USB to PC Left/Right:Master
USB from PC Left/Right:Master
Master Out Post Master Volume
Reverb Type
Type Medium
Time 50%
Bal 50%
Source 1 Left Source 1 Right Microphone Microphone Aux In
CH1 CH2 CH3 CH4 5/6
ToneMatch
Active Active Active Active
N/A
DJ/Playback DJ/Playback Vocal Mics Vocal Mics
Flat, zEQ Controls Flat, zEQ Controls Handheld Mics Handheld Mics
zEQ
Active Active Active Active
N/ALow Mid High Low Mid High Low Mid High Low Mid High
0dB 0dB 0dB 0dB 0dB 0dB 0dB 0dB 0dB 0dB 0dB 0dB
Para EQ Bypass Bypass Bypass Bypass N/A
Comp/Gate
Bypass Bypass Bypass Bypass
N/A
Limit Limit Comp2 Comp2
Mod
Bypass Bypass Bypass Bypass
N/A
Chorus1 Chorus1 Chorus3 Chorus1
Delay
(Retard)
Bypass Bypass Bypass Bypass
N/A
Digital Digital Digital Digital
Reverb
Bypass Bypass Bypass Bypass
N/A
Medium (Global) Medium (Global) Medium (Global) Medium (Global)
Pan/Aux
Left Right Center Center Aux In
AUX 1-2 50% AUX 1-2 50% AUX 1-2 50% AUX 1-2 50% 5 Lvl 6 Lvl
Pre: With EQ & Fx Pre: With EQ & Fx Pre: With EQ & Fx Pre: With EQ & Fx 50% 50%
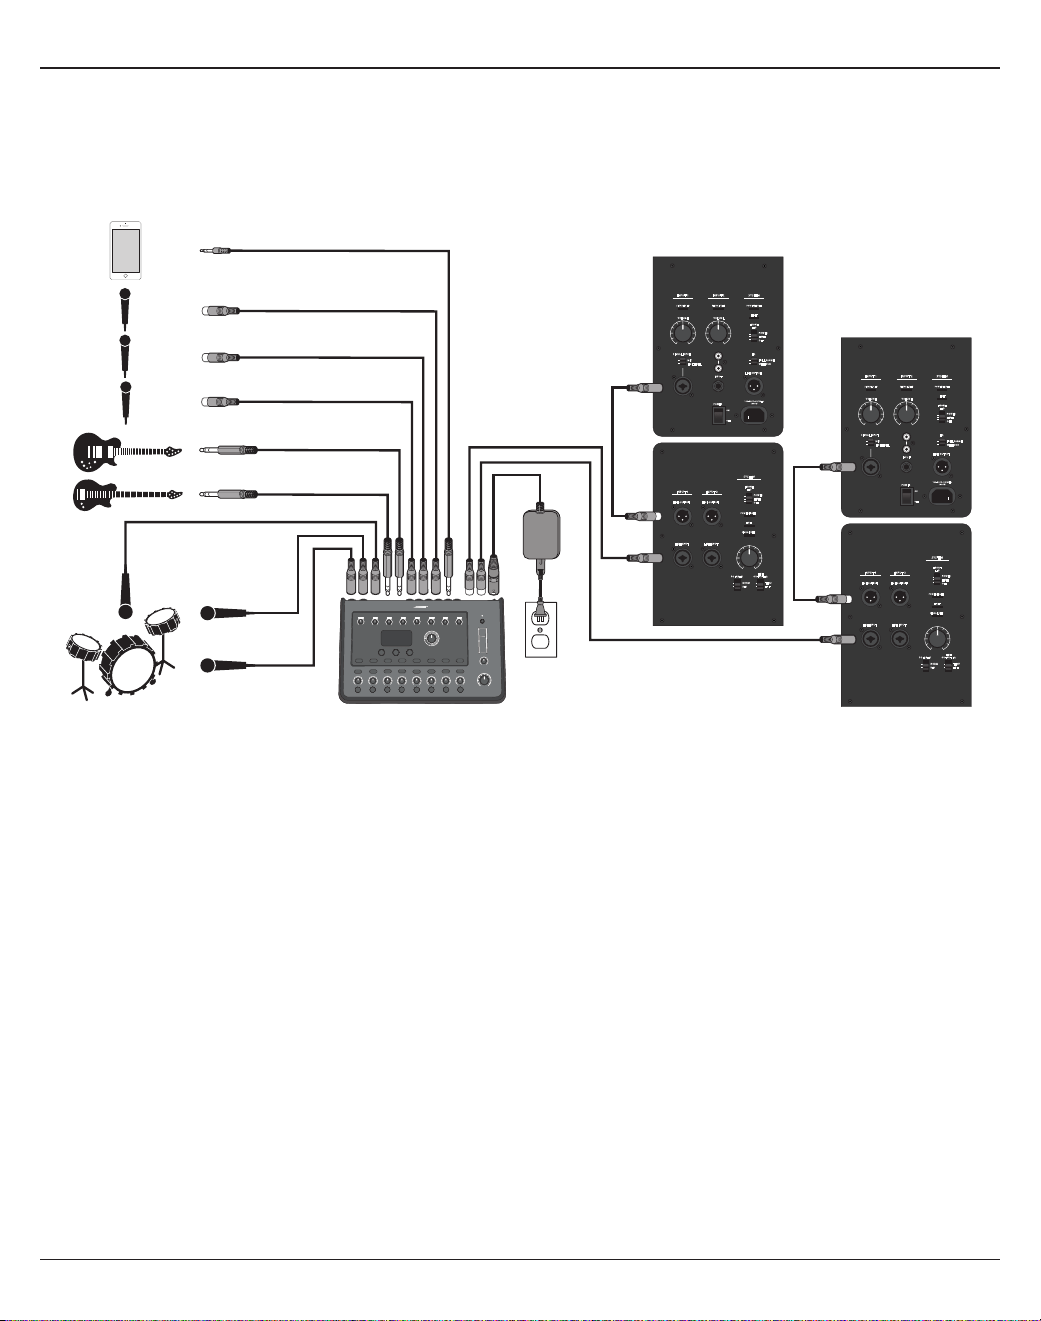
40 - Français
Utilisation
Full Band
Cette configuration est prévue pour une batterie, une basse, une guitare électrique, des voix et un lecteur MP3.
Figure18. Exemple d’installation pour la config. Full Band
SYSTEMINPUT 2INPUT 1
VOLUME VOLUME
FRONT
LED
POWER
LIMIT
OFF
FULL RANGE
WITH SUB
EQ
MIC
LINE LEVEL
SIGNAL INPUT
INPUT
POWER
ON
OFF
100-240V~50/60Hz
1000W
LINE OUTPUT
SIGNAL/CLIP SIGNAL/CLIP POWER/FAULT
LIMIT
SYSTEM
INPUT 2INPUT 1
LINE OUTPUT LINE OUTPUT
LINE INPUT
POWER/FAULT
LIMIT
SIGNAL/CLIP
LINE INPUT
NORM
REV
THRU
HPF
POLARITY
LINE
OUTPUT EQ
POWER
LIMIT
OFF
FRONT
LED
Utilisation
Français - 41
Paramètres des canaux de la configuration Full Band
Paramètres de la section Global
Préférences
Active screen Status
USB to PC Left/Right:Master
USB from PC Left/Right:Master
Master Out Post Master Volume
Reverb Type
Type Medium
Time 50%
Bal 50%
Grosse caisse Overhead Overhead Basse Guitare Microphone Microphone Microphone Entrée aux.
CH1 CH2 CH3 CH4 CH5 CH6 CH7 CH8 9/10
ToneMatch
Active Active Active Active Active Active Active Active
N/A
Percussion Percussion Percussion Basses Electric Guitars Vocal Mics Vocal Mics Vocal Mics
Kick, General General Overhead General Overhead Active Bass 1 Mic’d Amp w/ SM57 Handheld Mics Handheld Mics Handheld Mics
zEQ
Active Active Active Active Active Active Active Active
N/AL M H L M H L M H L M H L M H L M H L M H L M H
0dB 0dB 0dB 0dB 0dB 0dB 0dB 0dB 0dB 0dB 0dB 0dB 0dB 0dB 0dB 0dB 0dB 0dB 0dB 0dB 0dB 0dB 0dB 0dB
Para EQ Bypass Bypass Bypass Bypass Bypass Bypass Bypass Bypass N /A
Comp/Gate
Active Bypass Bypass Active Bypass Bypass Bypass Bypass
N/A
Kick 1 Comp2 Comp2 Comp2 Comp2 Gate Gate Gate
Mod
Bypass Bypass Bypass Bypass Active Bypass Bypass Bypass
N/A
Chorus1 Chorus1 Chorus1 Chorus1 Chorus 1 Chorus 1 Chorus 1 Chorus 1
Delay (Retard)
Bypass Bypass Bypass Bypass Bypass Bypass Bypass Bypass
N/A
Digital Digital Digital Digital Digital Digital Digital Digital
Reverb
Bypass Bypass Bypass Bypass Bypass Active Active Active
N/A
Medium (Global) Medium (Global) Medium (Global) Medium (Global) Medium (Global) Medium (Global) Medium (Global) Medium (Global)
Pan/Aux
Center Center Center Center Center Center Center Center Entrée aux.
AUX 1-4 50% AUX 1-4 50% AUX 1-4 50% AUX 1-4 50% AUX 1-4 50% AUX 1-4 50%
AUX 1-4
50% AUX 1-4 50% 9 Lvl 10 Lvl
Dry: After Preamp Dry: After Preamp Dry: After Preamp Dry: After Preamp Dry: After Preamp Dry: After Preamp Dry: After Preamp Dry: After Preamp 50% 50%

Configuration par défaut
42 - Français
Configuration par défaut
Cette section décrit le paramétrage par défaut du mixeur T4S/T8S, tel qu’à sa sortie d’usine. Si vous souhaitez
restaurer à tout moment ces paramètres par défaut, chargez le fichier de configuration Bose Factory Settings.
Paramètres initiaux Comp/Gate
Type Thresh Gain
Compressor 1: Light -16,0dB 3,0dB
Compressor 2: Medium -16,0dB 5,0dB
Compressor 3: Heavy -16,0dB 8,0dB
Limiter -10,0dB 0dB
De-Esser -10,0dB 0dB
Thresh Speed
Noise Gate -70,0dB 50%
Thresh Tight
KickGate1: Regular -20,0dB 100%
KickGate2: Fast -20,0dB 100%
Paramètres initiaux des eets de modulation
Type Thresh Gain Speed
Chorus 1: Brite 50% 50% 0,50 Hz
Chorus 2: Warm 70% 100% 0,15 Hz
Chorus 3: Dark 25% 25% 3,0 Hz
Flanger 1: Tape 50% 50% 1,00 Hz
Flanger 2: Feedback 50% 100% 2,00 Hz
Speed Feedback
Phaser 1: Stomp 0,50 Hz 0%
Phaser 1: Rack 0,50 Hz -75 %
Phaser 1: Warm 1,00 Hz -26 %
Phaser 1: Bright 0,50 Hz -76 %
Speed Depth
Tremolo 5,00 Hz 50%
Paramètres initiaux du délai
Type Mix Time Feedback
Digital 30% 150 ms 30%
Analog 30% 275 ms 20%
Tape 30% 350 ms 30%
Paramètres initiaux du type de réverbération
Type Bal. Time Time Range
Plate 50% 20% 0 à 4,6s
Small 50% 15% 0 à 0,8s
Medium 50% 25% 0 à 1,9s
Large 50% 50% 0 à 3,5s
Cavern 50% 100% 0 à 7,0s

Français - 43
Entretien
Résolution des problèmes
Si vous rencontrez des problèmes lors de l’utilisation de ce produit, essayez les solutions suivantes. Si vous n’arrivez
toujours pas à résoudre votre problème, recherchez une aide en ligne sur le site www.Bose.com/livesound. Si vous
n’y trouvez pas de réponses à vos questions, veuillez appeler directement le support technique Bose, au
(877) 335-2673.
Problème Mesure corrective
Le T4S/T8S est
branché sur le secteur,
l’interrupteur est en
position de marche,
mais l’appareil n’est pas
alimenté.
• Vérifiez que la prise secteur fonctionne. Branchez une lampe ou un autre appareil sur la
prise, ou testez-la avec un testeur de tension.
Si vous utilisez le T4S avec un système L1® Model II ou 1S:
• Vérifiez que le câble du ToneMatch® est correctement branché au mixeur et au socle
amplificateur du L1.
• Vérifiez que la fiche du cordon d’alimentation du socle amplificateur est bien insérée
dans la prise secteur.
• Vérifiez que le socle amplificateur du L1 est allumé et que sa diode est bleue.
Le T4S/T8S est sous
tension mais il n’y a pas
de son.
• Vérifiez que le réglage de volume principal (Master) n’est pas au minimum.
• Vérifiez que la fonction Mute n’est pas activée pour les canaux d’entrée que vous
voulez entendre.
• Vérifiez que le réglage de volume du canal que vous voulez entendre n’est pas au
minimum.
• Vérifiez que le réglage de la sensibilité d’entrée approprié a été monté susamment
pour que sa diode soit verte (indiquant la présence d’un signal d’entrée fort).
• Consultez les vu-mètres d’entrée et de sortie dans le menu Prefs (Preference) pour
vous assurer de la présence d’un signal en entrée et en sortie.
• Vérifiez que le contrôle du volume n’est pas en position minimum sur votre instrument.
• Connectez votre instrument au mixeur à l’aide d’un autre câble.
• Branchez votre instrument directement au socle amplificateur L1 ou à un autre
amplificateur pour vous assurer que la source fonctionne.
• Débranchez le mixeur et attendez 30secondes. Rallumez ensuite le mixeur.
Si vous utilisez le T4S avec un système L1 Model II ou 1S:
• Débranchez le socle amplificateur, réinsérez la fiche du ToneMatch dans le connecteur
du ToneMatch, et remettez le socle amplificateur sous tension.
• Si possible, essayez un autre câble ToneMatch. Si vous ne disposez pas d’un autre
câble ToneMatch, essayez avec un câble Ethernet standard.
• Connectez la sortie Master du T4S/T8S à l’entrée analogique du socle amplificateur
à l’aide d’un câble jack ¼". Montez le réglage de sensibilité d’entrée du socle
amplificateur et vérifiez qu’il y a du son.
• Vérifiez que la LED du socle amplificateur est bleue. Si la LED est rouge, veuillez
appeler le support technique produit Bose, ligne directe (877) 335-2673.
44 - Français
Entretien
Problème Mesure corrective
Son de qualité médiocre
provenant du microphone ou
del’instrument connecté au
T4S/T8S.
• Vérifiez que des égalisations zEQ ou Para EQ ne sont pas involontairement
appliquées.
• Vérifiez que vous avez choisi une présélection ToneMatch® appropriée à votre
microphone/instrument. Si vous ne souhaitez pas utiliser une présélection
ToneMatch, vérifiez que ToneMatch est réglé sur Flat.
• Vérifiez que des eets (Compression/Gate, Modulation, Délai, Réverbération)
ne sont pas involontairement appliqués sur votre canal d’entrée. Vérifiez dans
le menu Prefs qu’aucun eet n’est activé (Status).
• Vérifiez que le réglage de sensibilité d’entrée du T4S/T8S est ajusté
correctement pour votre microphone ou votre instrument. La LED de signal
doit être verte. Si elle est rouge, diminuez la sensibilité d’entrée (Trim) jusqu’à
ce qu’elle repasse au vert.
• Essayez avec un autre câble relié à votre microphone ou instrument.
• Vérifiez le câble qui relie votre microphone ou votre instrument au mixeur
T4S/T8S. Vérifiez que le câble est bien inséré dans le connecteur de sortie du
microphone ou de l’instrument d’une part, et dans le connecteur d’entrée du
T4S/T8S d’autre part.
• Le cas échéant, vérifiez les réglages de votre microphone ou de votre
instrument.
• Le cas échéant, vérifiez les batteries ou piles de votre microphone ou de votre
instrument.
Aucun eet n’est audible. • Vérifiez que vous avez appuyé sur le bouton CH Edit approprié.
• Vérifiez que la fonction FX Mute n’est pas activée pour le canal en question.
Le T4S/T8S ne répond pas aux
sollicitations sur ses boutons/
potentiomètres.
• Éteignez le mixeur. Attendez 30secondes, puis remettez l’appareil sous
tension.
Le réglage de volume principal
(Master) est sans eet.
• Dans la section Master Out du menu Prefs, vérifiez que la sortie principale
(Master output) est configurée pour fonctionner en mode Post Master Volume.
Aucune source n’est branchée
dans les connecteurs d’entrée
du T4S/T8S, mais un siement
ou un bourdonnement sont
émis par le système L1®.
• Branchez le T4S/T8S et le socle amplificateur L1 sur la même prise secteur.
• À l’aide d’un testeur d’alimentation secteur, testez la prise secteur à laquelle
sont branchés le T4S/T8S et/ou le socle amplificateur L1, afin de vérifier
l’absence de faux contacts ou de branchements inversés (phase, neutre et/ou
terre).
• Si vous utilisez une rallonge électrique, veillez à la tester comme indiqué
précédemment.
Trop ou pas assez de
fréquences basses, moyennes
ou aiguës.
• Vérifiez que des égalisations zEQ ou Para EQ ne sont pas involontairement
appliquées.
• Vérifiez que vous avez bien choisi la présélection ToneMatch appropriée pour
votre microphone ou votre instrument. Si vous ne souhaitez pas utiliser une
présélection ToneMatch, vérifiez que ToneMatch est réglé sur Flat dans la
catégorie Utility.

Français - 45
Entretien
Problème Mesure corrective
Lecture médiocre d’un
enregistrement stéréo à partir
d’un appareil externe (lecteur
de CD, lecteur MP3, etc.).
• Connectez la sortie gauche de l’appareil externe à l’entrée Aux 5 et la sortie
droite à l’entrée Aux 6 (ou 9/10 sur le T8S). Les entrées Aux 5/6 (ou 9/10) sont
conçues pour des sources au niveau ligne.
• Désactivez toute fonction d’amplification des basses ou d’égalisation lorsque
vous utilisez des lecteurs de CD ou MP3.
• Si vous utilisez un logiciel d’enregistrement sur ordinateur, vérifiez la
configuration requise pour ce logiciel. Vous devrez peut-être configurer le
logiciel pour travailler en 48kHz/24bits.
Le microphone provoque un
problème de larsen.
• Orientez le microphone de façon à ce qu’il ne pointe pas directement vers
l’enceinte.
• Essayez un autre microphone.
• Modifiez la position du système L1 et/ou du chanteur sur la scène.
• Augmentez la distance entre le système L1 et le microphone.
• Réduisez les fréquences aiguës (HIGH) en ajustant le zEQ sur le canal du
microphone.
• Essayez de supprimer la fréquence précise qui provoque le larsen en ajustant
la fonction Para EQ sur le canal du microphone.
• Coupez provisoirement tous les eets audio utilisés (modulation, délai,
réverbération) pour voir s’ils contribuent à l’eet larsen.
Le son des sorties auxiliaires est
médiocre.
• Vérifiez que la sortie Aux est prélevée au point désiré pour chaque canal
d’entrée. Veuillez vous référer à la section «Assignation des signaux d’entrée à
la sortie Aux», en page21.
• Vérifiez que chaque entrée envoie un signal du niveau désiré à la sortie Aux.
Impossible de transmettre le
son du T4S/T8S à un ordinateur
via une connexion USB.
• Vérifiez que le câble USB est correctement connecté au mixeur et à
l’ordinateur.
• Essayez d’utiliser un autre câble USB.
• Assurez-vous que le mixeur est sous tension.
• Vérifiez que les canaux d’entrée désirés du mixeur sont bien aectés aux
canaux de sortie gauche et droite sur le port USB. Consultez la section «USB
to PC» dans le menu Prefs.
• Vérifiez que le réglage de la sensibilité d’entrée approprié a été monté
susamment pour que la LED du canal d’entrée soit verte (présence d’un
signal d’entrée fort).
• Consultez les vu-mètres d’entrée et de sortie dans le menu Prefs pour vous
assurer de la présence d’un signal en entrée et en sortie.
• Vérifiez que l’entrée audio sur le port USB de votre ordinateur est
fonctionnelle en y connectant un autre périphérique audio USB.
• Si vous utilisez un logiciel d’enregistrement sur ordinateur, vérifiez la
configuration requise pour ce logiciel. Il peut être nécessaire de configurer le
logiciel pour fonctionner en 48kHz/24bits.
Le T4S/T8S ne «voit»pas la
clé USB.
• Pour déterminer si le problème provient de votre clé USB, connectez-en une
autre.
46 - Français
Entretien
Problème Mesure corrective
Impossible de transmettre le
son d’un ordinateur au T4S/T8S
via une connexion USB.
• Vérifiez que le câble USB est correctement connecté au mixeur et à
l’ordinateur.
• Essayez d’utiliser un autre câble USB.
• Assurez-vous que le mixeur est sous tension.
• Vérifiez que l’ordinateur est en lecture et que sa sortie audio n’est pas
désactivée.
• Vérifiez que le signal USB est correctement aecté à l’entrée désirée du
mixeur. Consultez la section «PC to USB» dans le menu Prefs.
• Vérifiez que le son des canaux d’entrée du mixeur aectés au signal
USB entrant n’est pas coupé avec la fonction Mute et que le volume est
susamment élevé.
• Vérifiez que le réglage de la sensibilité d’entrée approprié a été monté
susamment pour que sa LED soit verte (présence d’un signal d’entrée fort).
• Consultez les vu-mètres d’entrée et de sortie dans le menu Prefs pour vous
assurer de la présence d’un signal en entrée et en sortie.
• Vérifiez que la sortie audio sur le port USB de votre ordinateur est
fonctionnelle en y connectant un autre périphérique audio USB.
• Si vous utilisez un logiciel d’enregistrement sur ordinateur, vérifiez la
configuration requise pour ce logiciel. Il peut être nécessaire de configurer le
logiciel pour fonctionner en 48kHz/24bits.
Nettoyage
• Pour nettoyer le boîtier de l’appareil, utilisez uniquement un chion doux et sec.
• N’utilisez pas de solvants, de produits chimiques, ni de liquides de nettoyage contenant de l’alcool, de l’ammoniac
ou des substances abrasives.
• N’utilisez aucun aérosol à proximité du système et ne laissez aucun liquide pénétrer par une des ouvertures.
Informations techniques
Spécifications mécaniques
T4S T8S
Dimensions (L x P x H) 214mmx184 mmx83mm 214mmx311 mmx83mm
Poids 1,0kg 1,9kg
Spécifications électriques
Convertisseurs A/N, N/A 24bits
Fréquence d’échantillonnage 48kHz
USB 2.0 ou supérieur, câble Type-A vers Type-B, port Type-A et port Type-B
Configuration minimale PC Requiert Windows7 ou version supérieure; macOS10.5 ou version supérieure

Français - 47
Informations supplémentaires
Informations supplémentaires
Reportez-vous à la notice d’utilisation (disponible en ligne sur www.Bose.com) pour plus d’informations sur votre
enceinte (notamment sur les accessoires et pièces de rechange). Pour demander une copie imprimée, utilisez les
numéros de téléphone correspondant à votre pays.
Garantie limitée
Cet appareil est couvert par une garantie limitée. Rendez-vous sur www.pro.Bose.com pour de plus amples informations
concernant la garantie.
Les informations de garantie fournies avec ce produit ne s’appliquent pas en Australie et en Nouvelle-Zélande. Consultez
notre site Web www.bose.com/au/warranty ou www.bose.com/nz/warranty pour plus d’informations sur les conditions
de garantie en Australie et Nouvelle-Zélande.
Date de fabrication
Le huitième chire du numéro de série indique l’année de fabrication; par exemple, «6» correspond à 2006 ou à 2016.
Amériques
(États-Unis, Canada, Mexique, Amérique Centrale,
Amérique du Sud)
Bose Corporation
Framingham, MA 01701 USA
Siège: 508-879-7330
Assistance technique systèmes
professionnels pour les Amériques: 800-994-2673
Australie
Bose Pty Limited
Unit 3/2 Holker Street
Newington NSW Australie
61 2 8737 9999
Belgique
Bose N.V. / S.A
Limesweg 2, 03700
Tongeren, Belgique
012-390800
Chine
Bose Electronics (Shanghai) Co Ltd
25F, L’Avenue
99 Xianxia Road
Shanghai, P.R.C. 200051 Chine
86 21 6010 3800
France
Bose S.A.S
26-28 avenue de Winchester
78100 Saint-Germain-en-Laye, France
01 30 61 63 63
Allemagne
Bose GmbH
Max-Planck Strasse 36D 61381
Friedrichsdorf, Allemagne
06172-7104-0
Hong Kong
Bose Limited
Suites 2101-2105, Tower One, Times Square
1 Matheson Street, Causeway Bay, Hong Kong
852 2123 9000
Inde
Bose Corporation India Private Limited
Salcon Aurum, 3rd Floor
Plot No. 4, Jasola District Centre
New Delhi – 110025, Inde
91 11 43080200
Italie
Bose SpA
Centro Leoni A – Via G. Spadolini
5 20122 Milano, Italie
39-02-36704500
Japon
Bose Kabushiki Kaisha
Sumitomo Fudosan Shibuya Garden Tower 5F
16-17, Nanpeidai-cho
Shibuya-Ku, Tokyo, 150-0036, Japon
81-3-5489-0955
www.bose.co.jp
Pays-Bas
Bose BV
Nijverheidstraat 8 1135 GE
Edam, Pays-Bas
0299-390139
Royaume-Uni
Bose Ltd
1 Ambley Green, Gillingham Business Park
KENT ME8 0NJ
Gillingham, Angleterre
0870-741-4500
Coordonnées des
importateurs
Union européenne
Bose Products B.V., Gorslaan 60, 1441 RG
Purmerend, Pays-Bas
Chine
Bose Electronics (Shanghai) Company Limited,
Part C, Plan 9, No. 353 North Riying Road, China
(Shanghai) Pilot Free Trade Zone
Taïwan
Bose Taiwan Branch, 9F-A1, No. 10, Section 3,
Minsheng East Road, Taipei City 104, Taïwan
Tél: +886-2-2514 7676
Mexique
Bose de México, S. de R.L. de C.V., Paseo de las
Palmas 405-204, Lomas de Chapultepec, 11000
México, D.F.
Tél.: +5255 (5202) 3545
Voir le site Web pour les autres pays
Contact
Rendez-vous sur notre site Web à l’adresse www.Bose.com.

2– Deutsch
Wichtige Sicherheitshinweise
Bitte lesen Sie alle Sicherheitshinweise und
Gebrauchsanleitungen durch und bewahren Sie sie auf.
1. Lesen Sie die folgenden Anweisungen.
2. Bewahren Sie die Anweisungen auf.
3. Beachten Sie alle Warn- und Sicherheitshinweise.
4. Befolgen Sie alle Anweisungen.
5. Verwenden Sie dieses Gerät nicht in der Nähe von Wasser.
6. Reinigen Sie das Gerät nur mit einem sauberen, trockenen Tuch.
7. Achten Sie darauf, dass die Lüftungsönungen nicht blockiert sind. Stellen Sie das Gerät
nur in Übereinstimmung mit den Herstelleranweisungen auf.
8. Verlegen Sie das Netzkabel so, dass es keine Stolpergefahr darstellt und nicht
beschädigt werden kann– insbesondere im Bereich von Steckern und Steckdosen und
dort, wo das Netzkabel aus dem Gerät herausgeführt wird.
9. Verwenden Sie nur Zubehör-/Anbauteile, die vom Hersteller zugelassen sind.
10. Verwenden Sie für das Gerät nur Rollwagen, Ständer, Dreibeine, Halterungen
oder Tische, die vom Hersteller zugelassen sind oder zusammen mit dem Gerät
verkauft werden. Falls Sie einen Rollwagen verwenden, dürfen Sie die Einheit
aus Gerät und Rollwagen nur mit Vorsicht bewegen, damit Verletzungen durch
ein mögliches Umkippen ausgeschlossen sind.
11. Ziehen Sie das Netzkabel bei Gewitter oder bei längerer Nichtbenutzung des Gerätes
aus der Steckdose.
12. Lassen Sie jegliche Reparatur- und Wartungsarbeiten nur von qualifiziertem
Fachpersonal durchführen. Wartungsarbeiten sind in folgenden Fällen nötig: bei
jeglichen Beschädigungen wie z.B. des Netzkabels oder Netzsteckers, wenn
Flüssigkeiten oder Gegenstände in das Gehäuse gelangt sind, das Gerät Regen oder
Feuchtigkeit ausgesetzt wurde, fallen gelassen wurde oder nicht ordnungsgemäß
funktioniert.
WARNHINWEISE:
Dieses Produkt enthält magnetische Materialien. Wenden Sie sich an Ihren Arzt, wenn
Sie wissen möchten, ob dies den Betrieb Ihres implantierten medizinischen Geräts
beeinflussen kann.
• Dieses Produkt ist nicht für die Installation oder Verwendung in Feuchtbereichen (zum
Beispiel Schwimmbädern, Wasserparks, Räume mit Whirlpools, Saunas, Dampfbäder und
Eislaufbahnen) gedacht.
• Um Brände und Stromschläge zu vermeiden, darf dieses Produkt NICHT Regen,
Flüssigkeiten oder Feuchtigkeit ausgesetzt werden. Gilt nicht für Produkte mit
Klassifizierung IPX4 bis IPX9.
• Halten Sie das Produkt von Feuer und Wärmequellen fern. Stellen Sie KEINE brennenden
Kerzen oder ähnliches auf das Gerät oder in die Nähe des Geräts.
• Nehmen Sie KEINE nicht genehmigten Änderungen an diesem Produkt vor.
• Verwenden Sie KEINEN Wechselrichter mit diesem Produkt.
• Verwenden Sie das Produkt NICHT in Fahrzeugen oder Booten.
• Verwenden Sie dieses Produkt nur mit dem im Lieferumfang enthaltenen Netzteil.
• Montieren oder platzieren Sie das Gerät NICHT in der Nähe von Wärmequellen wie
Heizkörpern, Wärmespeichern oder anderen Geräten (auch Verstärkern), die Wärme
erzeugen.
• Bringen Sie das ToneMatch® T4S/T8S Mischpult nicht an einem instabilen Stativ an. Das
Mischpult ist ausschließlich für die Anbringung mit einer ¼-Zoll-Montageschraube (6mm)
vorgesehen und das Stativ muss mindestens ein Gerät mit einem Gewicht von 1,9kg und
einer Gesamtgröße von 214×311×83mm tragen können. Bei Verwendung eines Stativs,
das nicht auf die Größe und Masse des T4S/T8S Mischpults ausgelegt ist, kann es zu
Instabilität und gefährlichen Situationen kommen, die zu Verletzungen führen können.
• Enthält kleine Teile, die verschluckt werden können: Erstickungsgefahr! Nicht
geeignet für Kinder unter drei Jahren.
HINWEISE:
• Die mit diesem System mitgelieferten Lautsprecher- und Verbindungskabel sind nicht für
den Wandeinbau zugelassen. Bitte sehen Sie in Ihren örtlichen Bauvorschriften wegen des
korrekten Kabeltyps nach, der für den Wandeinbau erforderlich ist.
• Falls Sie den Netzstecker oder eine Mehrfachsteckdose verwenden, um das Gerät von der
Stromversorgung zu trennen, sollten Sie sicherstellen, dass Sie jederzeit auf den Stecker
zugreifen können.
• Aufgrund der Belüftungsanforderungen sollten Sie das Produkt nicht in einem
geschlossenen Raum, zum Beispiel in einer Wandnische oder in einem geschlossenen
Schrank, aufstellen.
Gesetzliche Hinweise
Dieses Gerät erfüllt die Bestimmungen in Teil 15 der FCC-Vorschriften und die lizenzfreien
Standards von Industry Canada. Der Betrieb unterliegt den beiden folgenden Bedingungen: (1)
dieses Gerät darf keine Störungen verursachen und (2) dieses Gerät muss jegliche Störungen
tolerieren, einschließlich Störungen, die zu unerwünschten Betriebsstörungen führen.
Dieses Produkt entspricht allen Anforderungen der geltenden EU-Richtlinien. Die
vollständige Konformitätserklärung ist einsehbar unter
www.Bose.com/compliance.
Informationen über Produkte, die elektrische Störungen verursachen (Hinweis zur FCC-
Einhaltung für die USA)
Hinweis: Dieses Gerät wurde geprüft. Es stimmt mit den Grenzwerten für digitale Geräte
der Klasse A gemäß Teil 15 der FCC-Vorschriften überein. Diese Grenzwerte sollen einen
angemessenen Schutz gegen elektromagnetische Störungen beim Betrieb in gewerblicher
Umgebung gewährleisten. Dieses Gerät erzeugt und verwendet Hochfrequenzstrahlung und
kann sie auch aussenden. Daher verursacht das Gerät, wenn die Installation und Benutzung
nicht in Übereinstimmung mit dieser Bedienungsanleitung erfolgt, möglicherweise Störungen
des Funkverkehrs. Beim Betrieb dieses Geräts in Wohngebieten können erhebliche Störungen
des Funkverkehrs verursacht werden. Eventuell daraus entstehende Kosten trägt allein der
Benutzer des Geräts.
Veränderungen am Gerät, die nicht durch die Bose Corporation autorisiert wurden, können zur
Folge haben, dass die Betriebserlaubnis für das Gerät erlischt.
Abgeschirmte Kabel müssen den gesetzlichen Vorschriften entsprechen.
Dieses Produkt erfüllt die kanadische Richtlinie ICES-003, Klasse A.
CAN ICES-3(A)/NMB-3(A)
Dieses Produkt erfüllt alle Anforderungen nach EN55103-2 für elektromagnetische
Verträglichkeit.
Part Name
Toxic or Hazardous Substances and Elements
Names and Contents of Toxic or Hazardous Substances and Elements
PCBs
Metal parts
Plastic parts
Speakers
Cables
This table is prepared in accordance with the provisions of SJ/T 11364.
0: Indicates that said hazardous substance contained in all of the homogenous materials for this part
is below the limit requirement of GB/T 26572.
X: Indicates that said hazardous substance contained in at least one of the homogenous materials
used for this part is above the limit requirement of GB/T 26572.
Lead
(Pb)
Mercury
(Hg)
Cadmium
(Cd)
Hexavalent
(CR(VI))
Polybrominated
Biphenyl (PBB)
Polybrominated
diphenylether
(PBDE)
X
X
00
0
0
0
0
0
0
0
0
0
0
0
0
0
0
0
0
0
0
0
0
0
0
0
0
X
X
Dieses Symbol bedeutet, dass das Produkt nicht mit dem Hausmüll entsorgt
werden darf, sondern bei einer geeigneten Recycling-Sammelstelle abgegeben
werden muss. Die ordnungsgemäße Entsorgung und das Recycling tragen dazu
bei, die natürlichen Ressourcen, die Gesundheit und die Umwelt zu schützen.
Weitere Informationen zur Entsorgung und zum Recycling dieses Produkts
erhalten Sie von Ihrer zuständigen Kommune, Ihrem Entsorgungsdienst oder dem
Geschäft, in dem Sie dieses Produkt gekauft haben.
Von DCE Safety zur Verfügung gestellt

Inhalt
Deutsch– 3
Einführung
Produktübersicht ....................................................................................... 5
Produktmerkmale ................................................................................... 5
Auspacken ............................................................................................ 5
Steuerelemente und Anschlussleisten
T4S ToneMatch® Mischpult .............................................................................. 6
Bedienfeld ......................................................................................... 6
Anschlussleiste ..................................................................................... 7
T8S ToneMatch® Mischpult .............................................................................. 8
Bedienfeld ......................................................................................... 8
Anschlussleiste ..................................................................................... 9
Systemeinrichtung
Abdeckung abnehmen/anbringen .......................................................................10
Montagemöglichkeiten .................................................................................11
T4S/T8S an einem Kamerastativ anbringen ............................................................ 11
T4S über Digitalanschluss verbinden .....................................................................12
T4S/T8S über Analoganschluss verbinden ................................................................13
ToneMatch® Netzteil anschließen .........................................................................14
T4S/T8S mit dem Computer verbinden ...................................................................15
Flash-Laufwerk mit dem T4S/T8S verbinden ..............................................................15
Bedienung
T4S/T8S Display ablesen ................................................................................16
Eingangsverstärkung und Ausgangslautstärke optimieren ..................................................17
Masterlautstärkeregelung ...............................................................................18
Einen Kanal stummschalten ..........................................................................18
Kanaleekte stummschalten .........................................................................18
Drehregler .............................................................................................19
Klang eines Kanals bearbeiten ..........................................................................20
Pan-/AUX-Funktionen ..............................................................................20
Tuner .............................................................................................20
ToneMatch® Preset auswählen .......................................................................22
zEQ anpassen ..................................................................................... 22
Para-EQ anpassen ................................................................................. 23
Kompressor-/Gate-Funktionen ...................................................................... 23
Modulationseekte. . . . . . . . . . . . . . . . . . . . . . . . . . . . . . . . . . . . . . . . . . . . . . . . . . . . . . . . . . . . . . . . . . . . . . . . . . . . . . . . . 25
Delays hinzufügen .................................................................................26
Hall hinzufügen ....................................................................................26

Inhalt
4– Deutsch
Globale Funktionen .................................................................................... 27
Halltyp auswählen ................................................................................. 27
Utilitys in den Systemeinstellungen ..................................................................28
Szenen laden und speichern ........................................................................30
Eine Szene teilen. . . . . . . . . . . . . . . . . . . . . . . . . . . . . . . . . . . . . . . . . . . . . . . . . . . . . . . . . . . . . . . . . . . . . . . . . . . . . . . . . . . 33
Bose Szenen .......................................................................................... 35
Werkseinstellungen ................................................................................35
Singer/Songwriter .................................................................................36
DJ/Playback .......................................................................................38
Full Band .........................................................................................40
Werkseinstellungen
Werkseinstellungen .................................................................................... 42
Pflege und Wartung
Fehlerbehebung ......................................................................................43
Reinigung ............................................................................................46
Technische Daten .....................................................................................46
Zusätzliche Ressourcen
Kontaktinformationen .................................................................................47
Informationen zu Importeuren .......................................................................47
Zusätzliche Informationen ..............................................................................47
Eingeschränkte Garantie ............................................................................ 47
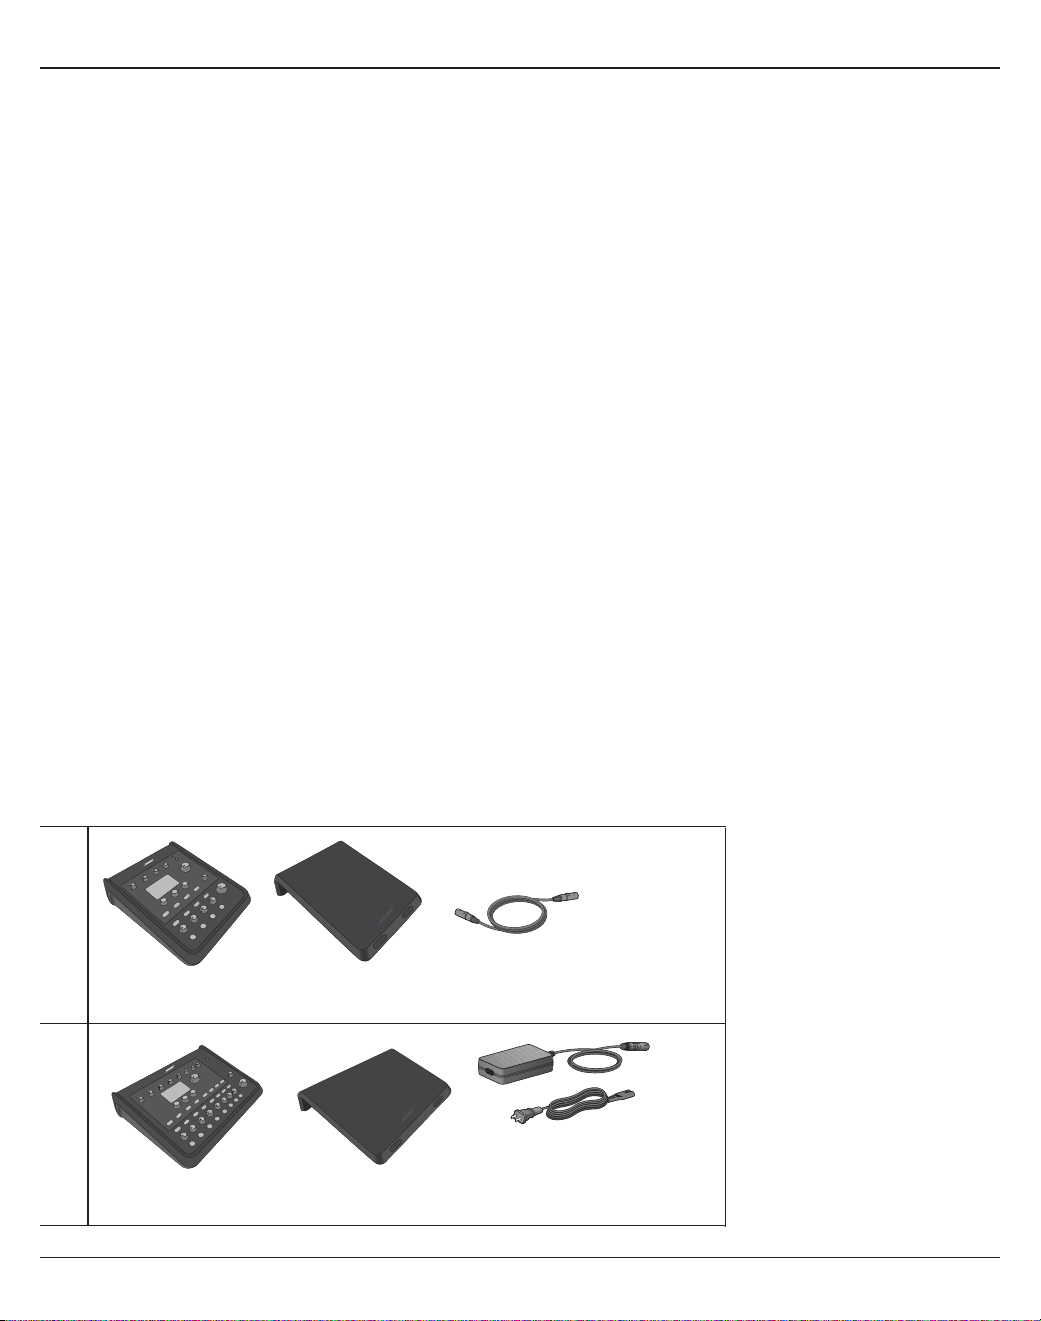
Deutsch– 5
Einführung
Produktübersicht
Die Welt der Musik gehört Ihnen: Die T4S und T8S ToneMatch® Mischpulte bieten Musikern eine kompakte Schnittstelle mit 4bzw. 8Kanälen.
Die leistungsstarken DSP-Engines und die intuitiven Steuerelemente überzeugen mit EQ-, Dynamik- und Eektverarbeitung in Studioqualität.
Mit der integrierten Bose® ToneMatch® Signalverarbeitung und dem zEQ beeindrucken Sie Ihr Publikum, insbesondere im Verbund mit einem
Bose L1 oder F1 System. So behalten Sie jederzeit die durchgehende Kontrolle über den Klang. Diese robusten ToneMatch Mischpulte mit den
grigen Steuerelementen, den leicht ablesbaren LED-Anzeigen und den wiederabrufbaren Szenarien liefern die ideale Grundlage für Ihren
souveränen Auftritt. ToneMatch Mischpulte sind die ultimativen Bühnenbegleiter für jeden Künstler, der etwas auf sich hält.
Produktmerkmale
Leistungsstarke Audioverarbeitung
• Topaktuelle Eekte in Studioqualität mit moderner digitaler
Audioverarbeitung
• Verfügbare Eekte: Kompressor, Limiter, De-Esser, Noise Gate,
Chorus, Flanger, Phaser, Tremolo, Verzögerung, Hall und viele
mehr
• Bose® ToneMatch® Signalverarbeitung für Stimmen und
Instrumente mit naturgetreuem Klang
• zEQ justiert den Klang der ToneMatch-Presets zielgerichtet für
eine schnelle, eektive Anpassung
• Unabhängige ToneMatch, EQ-, Dynamik- und Eekteinstellung
pro Kanal
• Halleekt für AUX-Sends, globaler gemeinsamer Hall über alle
Kanäle hinweg
• Masterausgang-EQ zum Ausgleich der Akustik am
Veranstaltungsort
• Durchgehende Klangoptimierung bei Verwendung im Verbund
mit Bose L1 und F1 Systemen
Mühelose Livesteuerung
• Grige Steuerelemente und klare Anzeigen für Musiker und DJs
im Live-Einsatz
• Schnell erlernbare Bedienelemente
• Tap-Tempo-Delay, Stimmgerät und wiederabrufbare Szenarien
integriert
• Leicht ablesbare LED-Anzeige und beleuchtete Steuerelemente
für die einfache Bedienung auch bei schwachem Bühnenlicht
Anschlüsse auf engstem Raum
• Unvergleichliche Anschluss- und Steuerungsmöglichkeiten in
einem kompakten Digital-Stereo-Mischpult
• Vier (T4S) oder acht (T8S) hochwertige Audio-Vorverstärker mit
XLR-Kombianschlüssen (für Mikrofone oder Instrumente) und
umschaltbarer Phantomspeisung
• Zwei AUX-Eingänge für Zuspielgeräte
• Zwei (T4S) oder vier (T8S) AUX-Sends
• USB-A und USB-B für Wiedergabe über USB-Laufwerk oder als
PC-/Mac-Schnittstelle
• ToneMatch Ausgänge für digitalen Audio- und Stromanschluss
(nur T4S)
• Symmetrische 6,35 mm-Klinken- und (nur T8S) XLR-
Stereoausgänge
• Unabhängiger Kopfhörerausgang
Komfortable Funktionen für jeden Auftritt
• Robustes Gehäuse mit Schutzabdeckung (Magnethalterung) zum
Schutz der Steuerelemente und Anschlüsse
• Mit ToneMatch Kabel zum Anschließen an ein Bose L1 ModelII
oder L1 Model 1S System für digitalen Audio- und Stromanschluss
(T4S) bzw. mit Universalnetzteil (T8S)
• Einsatz an der Unterseite zum Anbringen an handelsübliche
Kameraträger, sodass das ToneMatch Mischpult immer in
Griweite bleibt
T4S ToneMatch Mischpult und Abdeckung ToneMatch Kabel
ToneMatch NetzteilT8S ToneMatch Mischpult und Abdeckung
Eine vollständige Liste der optionalen Zubehör- und Ersatzteile ist unter www.Bose.com zu finden.
Auspacken
Lieferumfang des Mischpults:
T4S
T8S
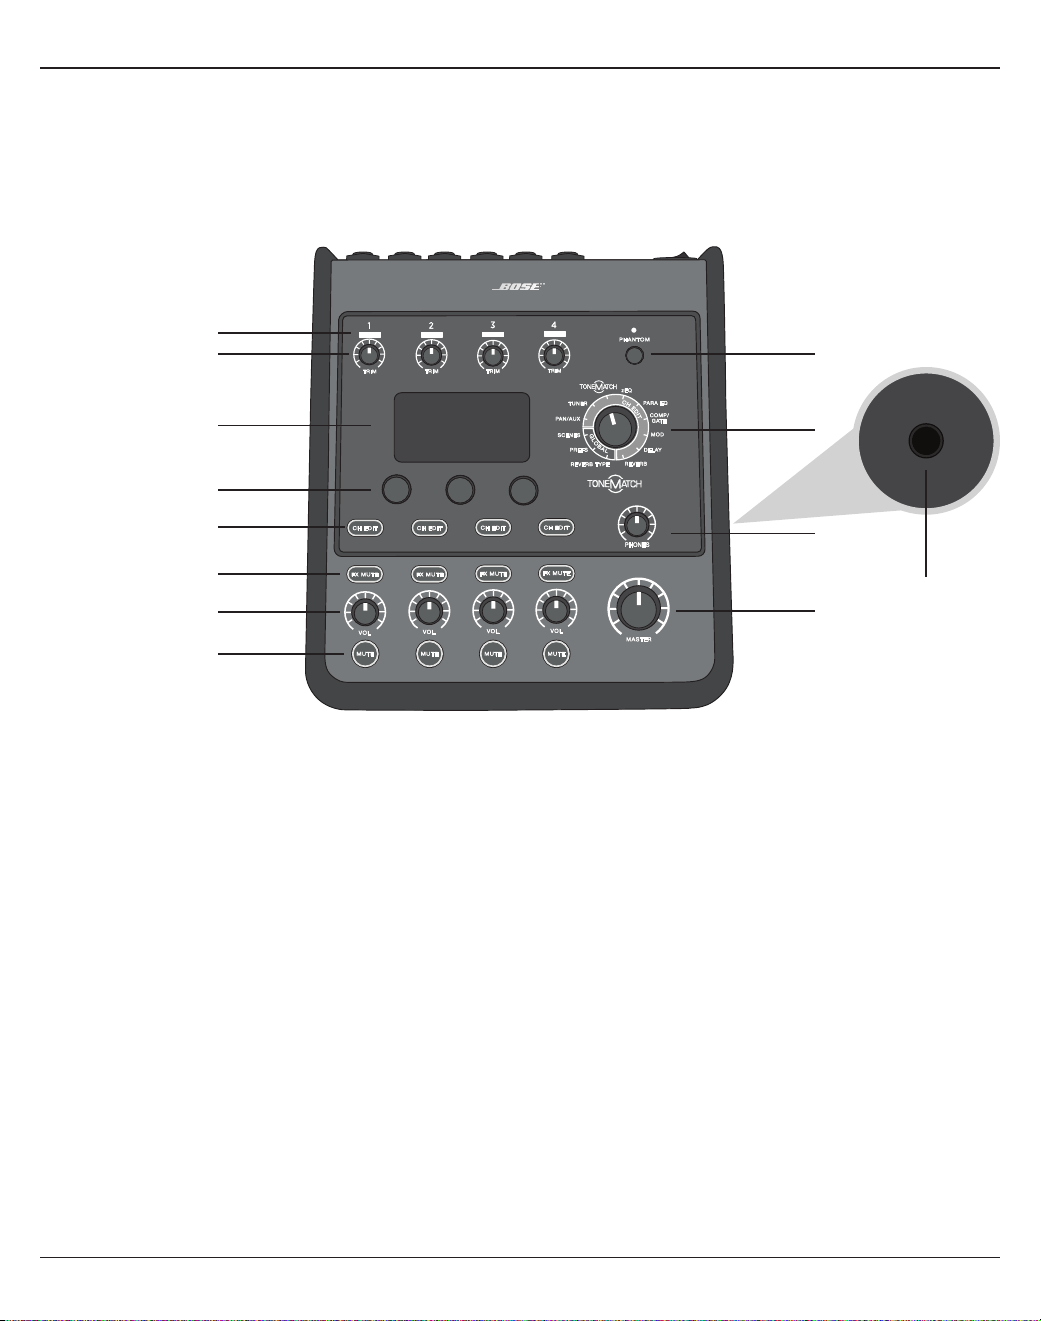
Steuerelemente und Anschlussleisten
6– Deutsch
T4S ToneMatch® Mischpult
Bedienfeld
Abbildung1. T4S Bedienfeld
q EINGANGSSIGNAL-/ÜBERSTEUERUNGSANZEIGEN (1–4): Farbige Darstellung des Eingangssignalmodus.
Grün: Anliegendes Eingangssignal
Rot: Übersteuerung des Eingangs
w TRIMREGLER (1–4): Anpassen der Eingangsempfindlichkeit für den jeweiligen Kanal.
e ANZEIGE: Funktionsmenüs und Systeminformationen.
r EDIT-CONTROL: Drei Regler mit Druck-/Drehfunktion zum Auswählen oder Anpassen von Optionen/Werten in der
Anzeige.
t CH-BEARBEITUNGSTASTEN (1–4): Auswahl des gewünschten Kanals.
y EFFEKT-STUMMSCHALTUNGSTASTEN (1–4): Deaktivieren der Mod-, Delay- und Halleekte im ausgewählten Kanal.
u LAUTSTÄRKEREGLER (1–4): Anpassen der Lautstärke für den jeweiligen Kanal.
i STUMMSCHALTUNGSTASTEN (1–4): Stummschalten der Audioausgabe für den jeweiligen Kanal.
o MASTERLAUTSTÄRKEREGELUNG: Anpassen des Gesamtausgangspegels.
a KOPFHÖRER-LAUTSTÄRKEREGELUNG: Anpassen der Lautstärke für den Kopfhörerausgang.
s DREHREGLER: Einstellen von globalen und kanalspezifischen Parametern (Anpassen mit der Edit-Control).
d PHANTOMSPEISUNGSSCHALTER: Anlegen einer Spannung von +48V an den Eingangskanälen1–4. Wenn eine rote
LED-Anzeige leuchtet, ist die Phantomspeisung aktiviert.
f KOPFHÖRERBUCHSE: Nur für Kopfhörer mit einer Impedanz von mindestens 24Ω.
q
w
i
u
y
t
r
e
d
s
a
o
f
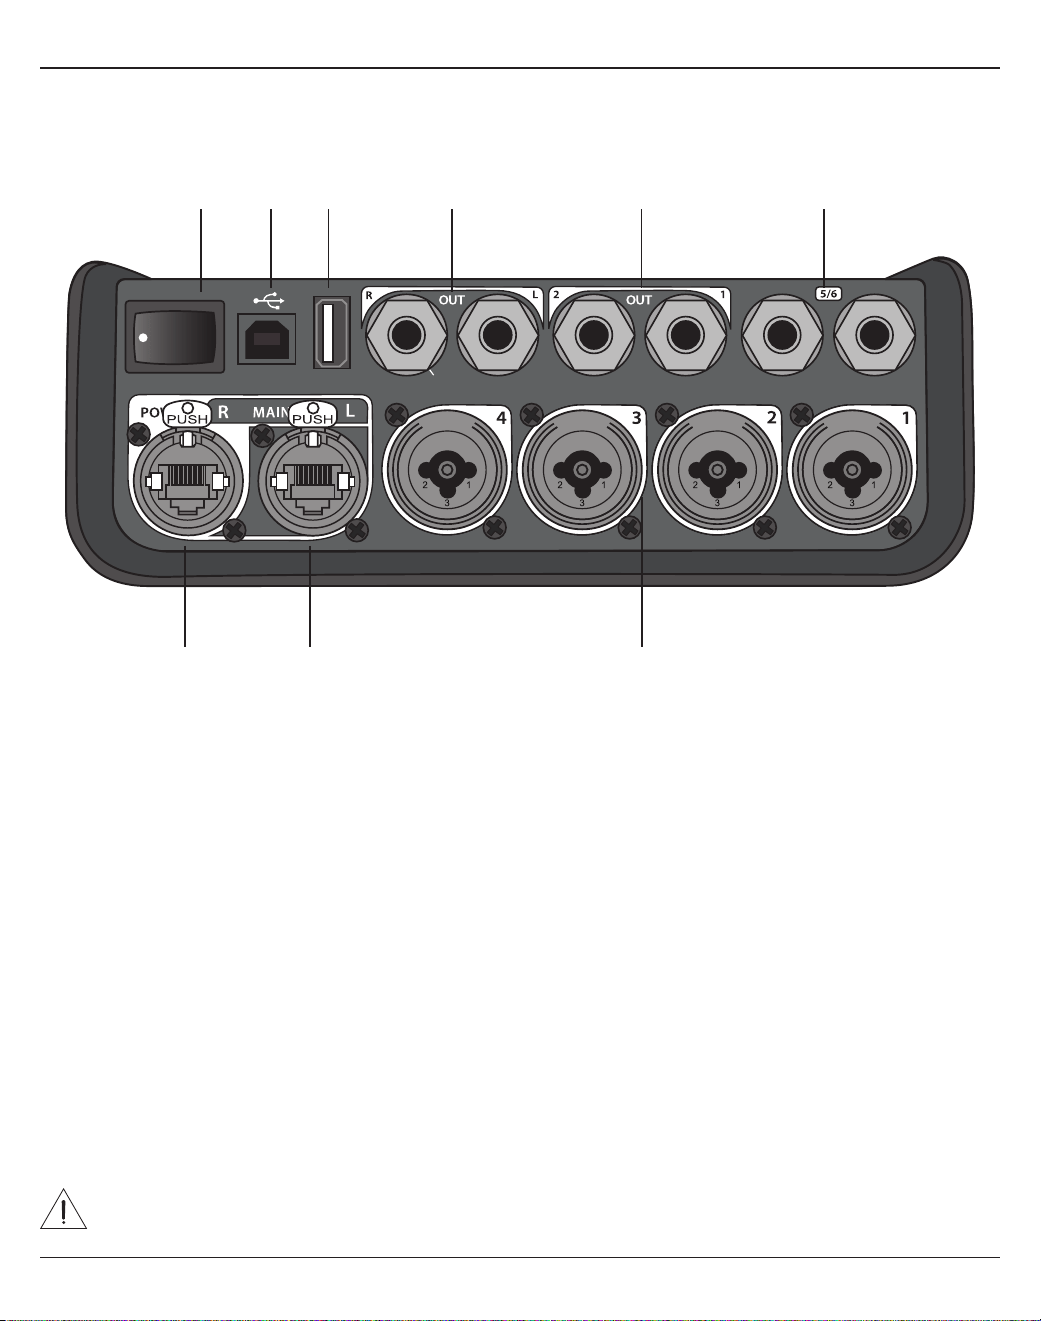
Deutsch– 7
Steuerelemente und Anschlussleisten
Abbildung2. T4S Anschlussleiste
Anschlussleiste
q EIN/AUS-SCHALTER: Ein- und Ausschalten des Mischpults.
w USB2.0 TYPB: USB-Schnittstelle zum Anschließen des Mischpults an den Computer.
e USB2.0 TYPA: USB-Schnittstelle zum Streamen von Audiosignalen von einem Flash-Laufwerk.
r ANALOGE AUSGÄNGE (L/R): Hauptausgang für die analoge Audioausgabe. Für symmetrische oder
asymmetrische Klinkenkabel (6,35mm).
t AUX-AUSGANG: Zwei benutzerdefinierbare Analogausgänge. Konfiguration für Pre-Fader, Post-EQ und Eekte
bzw. Post-Fader-Ausgang möglich. Für symmetrische 6,35 mm-Klinkenkabel.
y AUXIN: Analogeingangskanäle5/6. Für symmetrische oder asymmetrische Klinkenkabel (6,35mm) für Line-Pegel-
Eingänge. Für Stereo-Eingangssignale geeignet.
u EINGÄNGE1–4: Analogeingangskanäle1–4. Für symmetrische XLR-Kabel (für Mikrofone) sowie für symmetrische
oder asymmetrische Klinkenkabel (6,35mm) für hochohmige Eingangssignale wie Gitarren.
i HAUPTDIGITALAUSGANG (L): Digitaler Stereoanschluss für zwei L1® Model 1S/II Systeme. Hinweis: Nur im
Stereobetrieb mit Hauptdigitalausgang (R).
o STROMANSCHLUSS/HAUPTDIGITALAUSGANGR: Digitalausgang für das L1 Model 1S/II System. Stromversorgung
des T4S Mischpults über den Standfuß des L1 Model 1S/II. Mit dem ToneMatch Netzteil (nicht im Lieferumfang
des T4S enthalten) ist auch eine Stromversorgung über die Netzsteckdose möglich. Mit dem im Lieferumfang
enthaltenen ToneMatch® Kabel kompatibel.
VORSICHT: An den ToneMatch Anschluss kann ein handelsüblicher RJ-45-Stecker angeschlossen werden.
Das T4S darf jedoch NICHT mit einem Computer oder einem Telefonnetz verbunden werden.
USB AUDIO
M
( )
MONO
q w
e
r t y
uio

Steuerelemente und Anschlussleisten
8– Deutsch
T8S ToneMatch® Mischpult
Bedienfeld
Abbildung3. T8S Bedienfeld
q EINGANGSSIGNAL-/ÜBERSTEUERUNGSANZEIGEN (1–8): Farbige Darstellung des Eingangssignalmodus.
Grün: Anliegendes Eingangssignal
Rot: Übersteuerung des Eingangs
w TRIMREGLER (1–8): Anpassen der Eingangsempfindlichkeit für den jeweiligen Kanal.
e ANZEIGE: Funktionsmenüs und Systeminformationen.
r EDIT-CONTROL: Drei Regler mit Druck-/Drehfunktion zum Auswählen oder Anpassen von Optionen/Werten in der
Anzeige.
t CH-BEARBEITUNGSTASTEN (1–8): Auswahl des gewünschten Kanals.
y EFFEKT-STUMMSCHALTUNGSTASTEN (1–8): Deaktivieren der Mod-, Delay- und Halleekte im ausgewählten
Kanal.
u LAUTSTÄRKEREGLER (1–8): Anpassen der Lautstärke für den jeweiligen Kanal.
i STUMMSCHALTUNGSTASTEN (1–8): Stummschalten der Audioausgabe für den jeweiligen Kanal.
o MASTERLAUTSTÄRKEREGELUNG: Anpassen des Gesamtausgangspegels.
a KOPFHÖRER-LAUTSTÄRKEREGELUNG: Anpassen der Lautstärke für den Kopfhörerausgang.
s STEREO-AUSGANGSMESSGERÄT: Optische Anzeige des Ausgangspegels.
d DREHREGLER: Einstellen von globalen und kanalspezifischen Parametern (Anpassen mit der Edit-Control).
f PHANTOMSPEISUNGSSCHALTER: Anlegen einer Spannung von +48V an den Eingangskanälen1–8. Wenn eine
rote LED-Anzeige leuchtet, ist die Phantomspeisung aktiviert.
g KOPFHÖRERBUCHSE: Nur für Kopfhörer mit einer Impedanz von mindestens 24Ω.
q
w
i
o
g
a
s
d
f
u
y
t
r
e

Deutsch– 9
Steuerelemente und Anschlussleisten
Abbildung4. T8S Anschlussleiste
Anschlussleiste
q EIN/AUS-SCHALTER: Ein- und Ausschalten des Mischpults.
w USB2.0 TYPB: USB-Schnittstelle zum Anschließen des Mischpults an den Computer.
e USB2.0 TYPA: USB-Schnittstelle zum Streamen von Audiosignalen von einem Flash-Laufwerk.
r ANALOGE AUSGÄNGE (L/R): Hauptausgang für die analoge Audioausgabe. Für symmetrische oder asymmetrische
Klinkenkabel (6,35mm).
t AUX-AUSGANG: Vier benutzerdefinierbare Analogausgänge. Konfiguration für Pre-Fader, Post-EQ und Eekte bzw.
Post-Fader-Ausgang möglich. Für symmetrische oder asymmetrische Klinkenkabel (6,35mm).
y AUXIN: Analogeingangskanäle9/10. Für symmetrische oder asymmetrische Klinkenkabel (6,35mm) für Line-Pegel-
Eingänge. Für Stereo-Eingangssignale geeignet.
u EINGÄNGE1–8: Analogeingangskanäle1–8. Für symmetrische XLR-Kabel (für Mikrofone) sowie für symmetrische
oder asymmetrische Klinkenkabel (6,35mm) für hochohmige Eingangssignale wie Gitarren.
i XLR-STEREOAUSGANG: Stereo-Analogausgang für symmetrische XLR-Kabel.
o DIGITALER STROMANSCHLUSS: Für das ToneMatch Netzteil (siehe „ToneMatch® Netzteil anschließen“ auf Seite14).
HINWEIS: DAS T8S KANN NICHT DIGITAL MIT EINEM L1® MODEL 1S/II VERBUNDEN WERDEN.
VORSICHT: An den ToneMatch Anschluss kann ein handelsüblicher RJ-45-Stecker angeschlossen werden. Das
T8S darf jedoch NICHT mit einem Computer oder einem Telefonnetz verbunden werden.
M
( )
MAIN OUT
USB AUDIO
MONO
q w e r t y
uio

10– Deutsch
Systemeinrichtung
Abdeckung abnehmen/anbringen
Das T4S/T8S ToneMatch® Mischpult wird mit angebrachter Abdeckung auf dem oberen Bedienfeld geliefert. Die
Abdeckung schützt das Bedienfeld beim Transportieren oder Aufbewahren des Mischpults.
So wird die Abdeckung abgenommen:
1. Mit beiden Daumen auf die Aussparungen an der Vorderseite der Abdeckung drücken und die Abdeckung nach
vorne ziehen.
2. Die Abdeckung an der hinteren Kante fassen und abheben.
So wird die Abdeckung angebracht:
1. Die Abdeckung von hinten nach vorn auf das Mischpult aufschieben.
2. Die Magnethalterung der Abdeckung haftet von selbst und rastet am Mischpult ein.
Abbildung5. Abdeckung abnehmen und anbringen
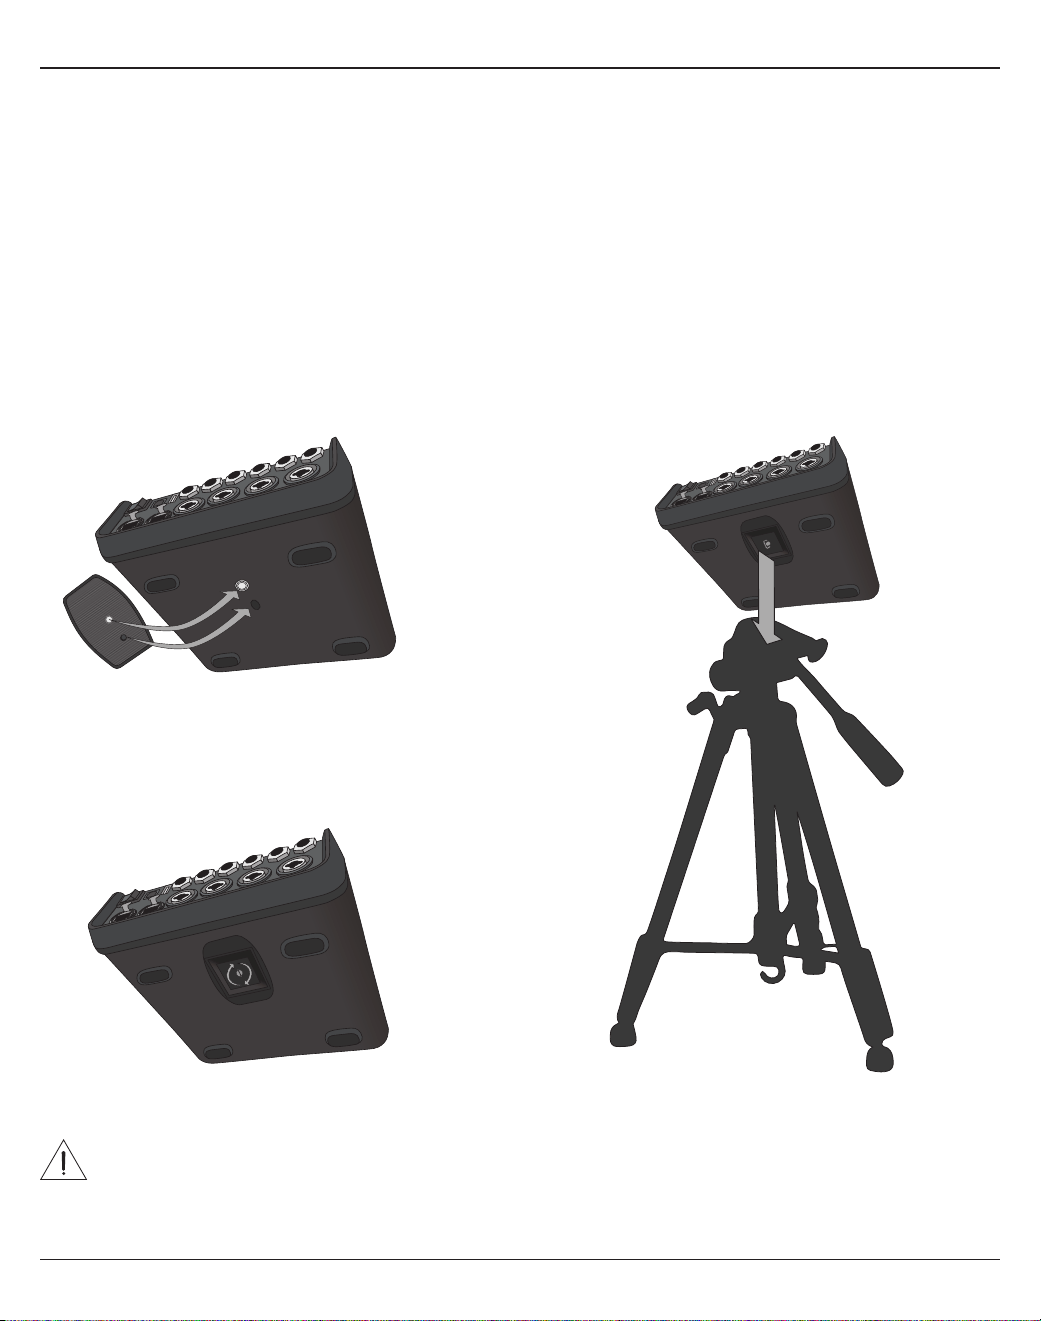
Systemeinrichtung
Deutsch– 11
Abbildung6. Halterung am T4S befestigen Abbildung8. T4S mit Halterung auf dem Stativ anbringen
Abbildung7. Halterung am T4S
Montagemöglichkeiten
Das T4S/T8S ist mit einer ¼-Zoll-Gewindehalterung (6mm) ausgestattet. Das Gerät lässt sich daher an
verschiedenen handelsüblichen Produkten mit einer ¼-Zoll-Montageschraube (6mm) anbringen, beispielsweise an
einem Kamerastativ.
T4S/T8S an einem Kamerastativ anbringen
1. Die Beine des Kamerastativs ausziehen und in der gewünschten Höhe fixieren.
2. Die Halterung oben am Kamerastativ abnehmen und mit der Schraube an der Unterseite des T4S/T8S befestigen.
Die kleine Einkerbung am T4S/T8S mit dem Vorsprung an der Halterung ausrichten. Siehe Abbildung6.
3. Die Halterung mit dem T4S/T8S wieder auf dem Kamerastativ befestigen. Siehe Abbildung8.
HINWEIS: Bringen Sie das ToneMatch® T4S/T8S Mischpult nicht an einem instabilen Stativ an. Das Mischpult ist
ausschließlich für die Anbringung mit einer ¼-Zoll-Montageschraube (6mm) vorgesehen und das Stativ muss
mindestens ein Gerät mit einem Gewicht von 1,9kg und einer Gesamtgröße von 214×311×83mm tragen
können. Bei Verwendung eines Stativs, das nicht auf die Größe und Masse des T4S/T8S Mischpults ausgelegt
ist, kann es zu Instabilität und gefährlichen Situationen kommen, die zu Verletzungen führen können.
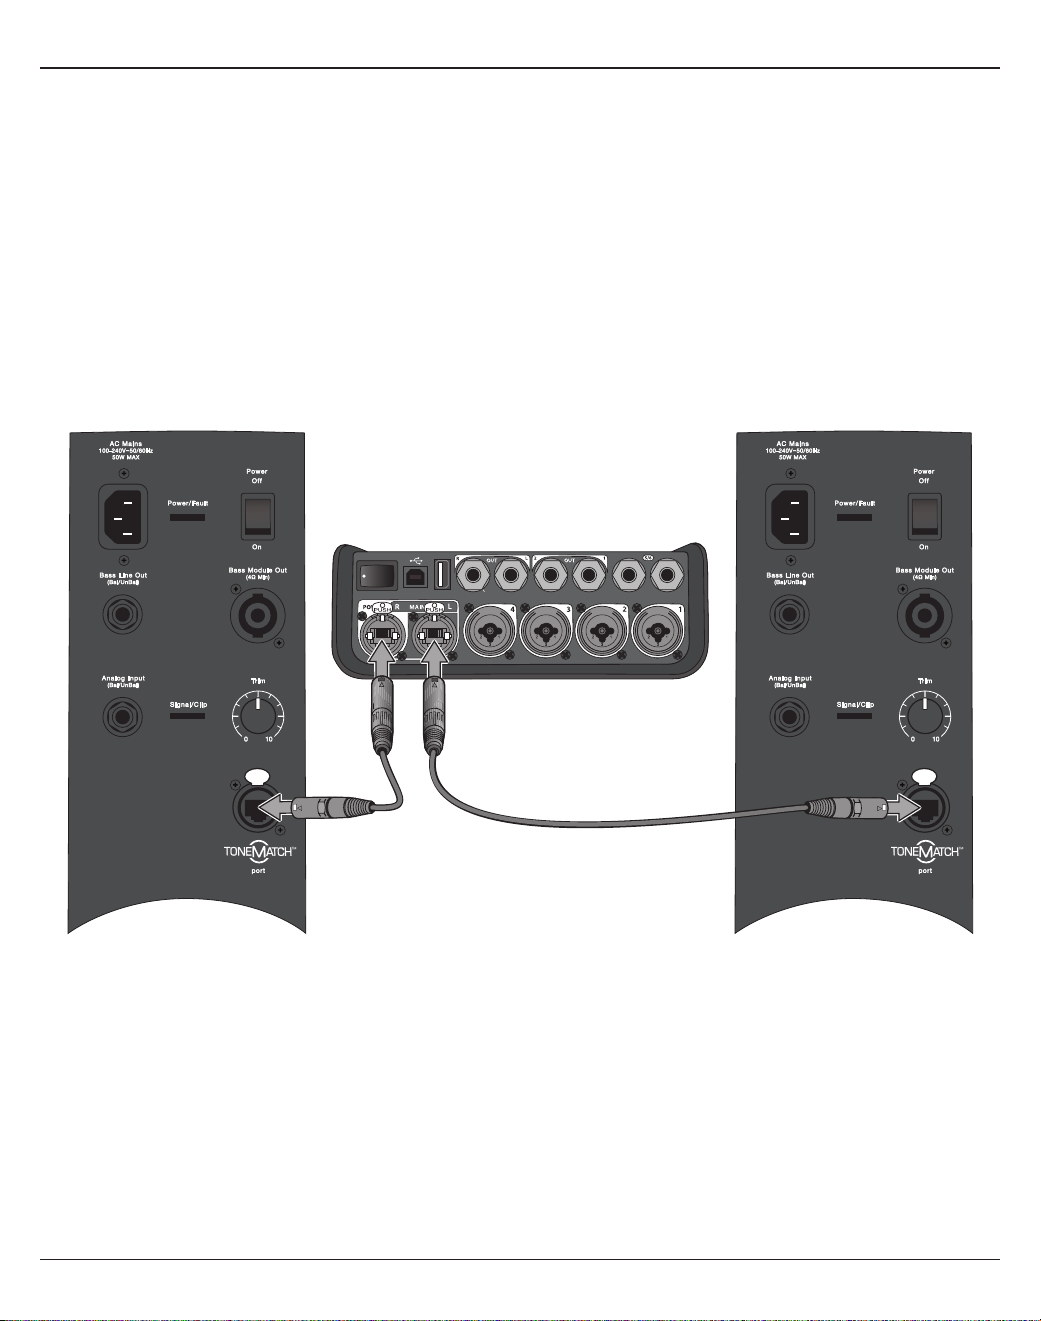
12– Deutsch
Systemeinrichtung
T4S über Digitalanschluss verbinden
1. Das L1 Model 1S/II und das T4S müssen ausgeschaltet sein und die Masterlautstärkeregelung am T4S muss auf
den kleinsten Wert eingestellt sein.
2. Das ToneMatch® Kabel mit dem Stromanschluss/Hauptdigitalausgang(R) am T4S verbinden. Den anderen
Stecker des ToneMatch Kabels mit dem ToneMatch Anschluss am Standfuß verbinden.
Hinweis: Soll das T4S an zwei L1 Model 1S/II Standfüße angeschlossen werden, muss der zweite Standfuß über ein
ToneMatch Kabel mit dem Hauptdigitalausgang(L) am T4S verbunden werden.
3. Zuerst das Mischpult und dann den L1 Model 1S/II Standfuß einschalten.
4. Die Instrumente anschließen und die Pegel einstellen. Siehe „Eingangsverstärkung und Ausgangslautstärke
optimieren“ auf Seite17.
Abbildung9. Zwei L1 Model II Systeme mit Digitalanschluss an einem T4S
USB AUDIO
M
( )
MONO
Hinweis: Das T8S kann nicht digital angeschlossen und nicht über das L1 Model 1S/II mit Strom versorgt werden.

Systemeinrichtung
Deutsch– 13
T4S/T8S über Analoganschluss verbinden
1. Das anzuschließende Gerät und das T4S/T8S müssen ausgeschaltet sein und die Masterlautstärkeregelung am
T4S/T8S muss auf den kleinsten Wert eingestellt sein.
2. Ein oder zwei Geräte über symmetrische XLR-Kabel mit den XLR-Stereoausgängen am T4S/T8S verbinden (siehe
Abbildung10).
Hinweis: Das T4S/T8S kann über ein 6,35 mm-Klinkenkabel (separat erhältlich) am Analogausgang(R) mit einem
Gerät verbunden werden. Den anderen Stecker des Klinkenkabels mit dem Analogeingang des Geräts verbinden.
Soll das T4S/T8S mit zwei Geräten verbunden werden, muss das zweite Gerät über ein 6,35 mm-Klinkenkabel mit
dem Analogausgang(L) am T4S/T8S verbunden werden.
3. Ein ToneMatch® Netzteil mit dem Stromanschluss am T4S/T8S verbinden und an eine Netzsteckdose anschließen.
Siehe „ToneMatch® Netzteil anschließen“ auf Seite14.
4. Zuerst das T4S/T8S Mischpult und dann das Gerät einschalten.
5. Die Instrumente anschließen und die Pegel einstellen. Siehe „Eingangsverstärkung und Ausgangslautstärke
optimieren“ auf Seite17.
Abbildung10. Zwei F1 Systeme mit Analoganschluss an einem T8S
M
( )
MAIN OUT
USB AUDIO
MONO
(
M
US
B AUDI
O
( )
M
M
AIN
O
UT
()
M

14– Deutsch
Systemeinrichtung
ToneMatch® Netzteil anschließen
Das ToneMatch Netzteil versorgt das T4S/T8S Mischpult mit Strom.
1. Das Netzkabel mit dem Stromanschluss am T4S/T8S verbinden.
2. Das Netzkabel an das Netzteil anschließen.
3. Den anderen Stecker des Netzkabels an eine Netzsteckdose anschließen.
4. Den Ein/Aus-Schalter des T4S/T8S in die Position „EIN“ bringen.
Hinweis: Das T8S wird mit dem im Lieferumfang enthaltenen Netzteil betrieben. Im Lieferumfang des T4S ist kein
Netzteil enthalten, da zum Betrieb dieses Geräts kein Netzteil erforderlich ist.
Abbildung11. T4S an die Stromversorgung anschließen
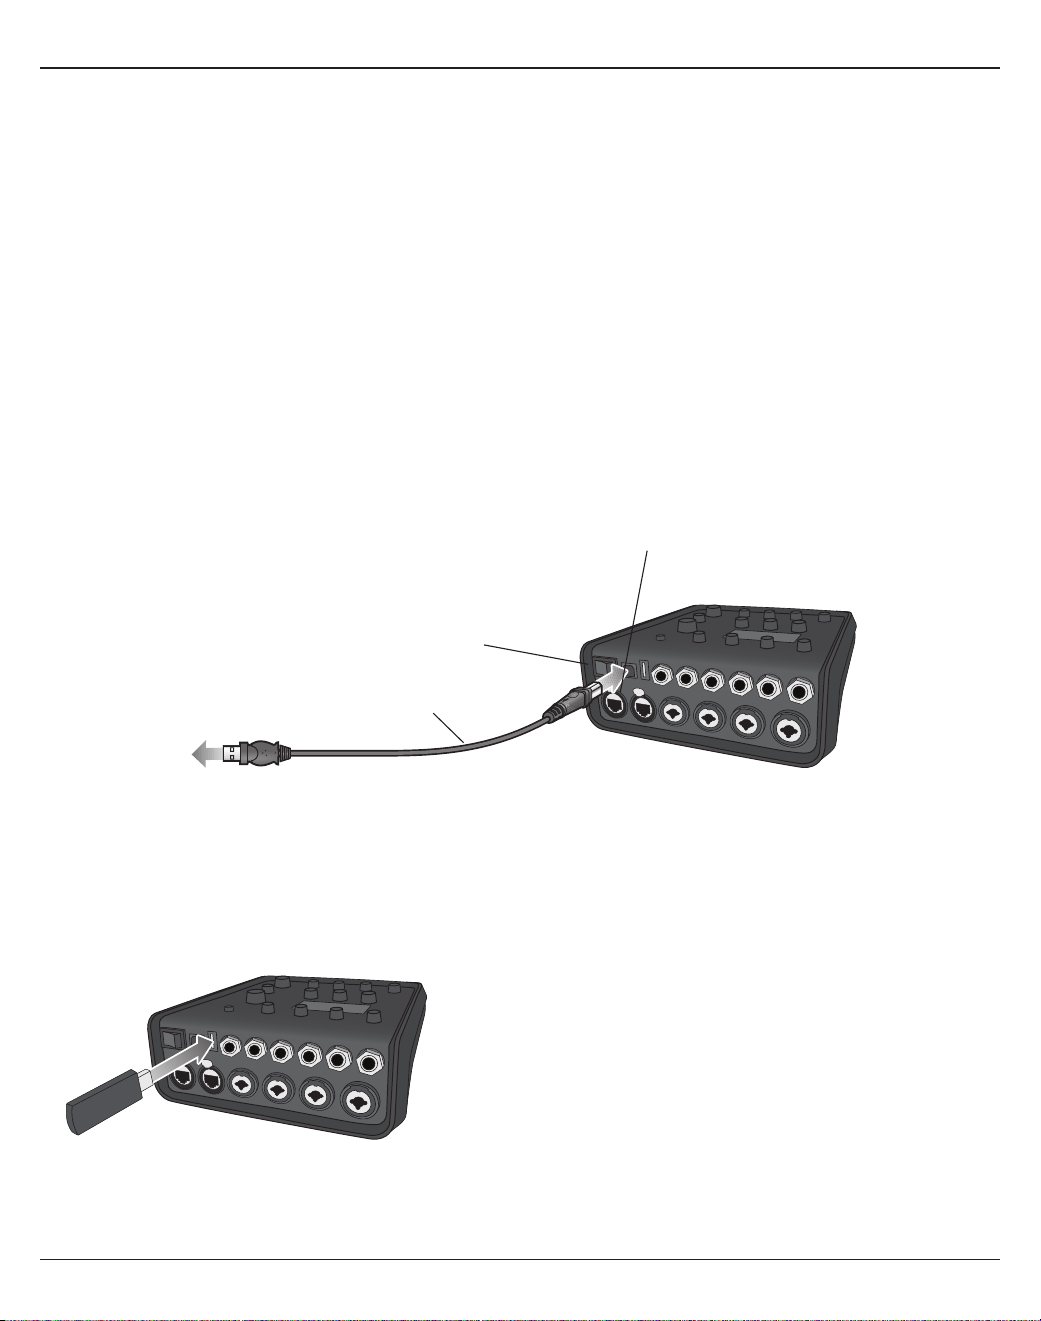
Systemeinrichtung
Deutsch– 15
T4S/T8S mit dem Computer verbinden
Das T4S/T8S lässt sich über den USB-Anschluss mit einem Computer verbinden. So können Auftrittsszenarien
auf einen Computer heruntergeladen oder Systemaktualisierungen installiert werden. Weitere Informationen zum
Aktualisieren des Systems sind unter www.Bose.com/livesound zu finden.
Wenn das T4S/T8S mit einem Computer verbunden ist, kann es als USB-Audiogerät für die Aufnahme/Wiedergabe
fungieren.
Hinweis: Das T4S/T8S wird mit 48kHz/24Bit betrieben. Bei Verwendung einer Aufnahme-Software müssen die
Software-Einstellungen entsprechend für 48kHz/24Bit konfiguriert werden.
Hinweis: Das T4S/T8S wird über ein USB-Kabel (TypA auf TypB, nicht im Lieferumfang enthalten) mit dem
Computer verbunden.
1. Das Mischpult an eine Stromversorgung anschließen (ToneMatch® Netzteil bzw. [nur T4S] L1 Model 1S/II).
2. Das USB-Kabel mit dem USB-2.0-Anschluss (TypB) am Mischpult verbinden (Abbildung12).
3. Den anderen Stecker des USB-Kabels mit einem USB-Anschluss am Computer verbinden.
4. Das Mischpult einschalten.
Abbildung12. USB-Verbindung für T4S
ToneMatch Anschluss: Zu einem L1 Model 1S/II
System oder einem ToneMatch Netzteil
Ein/Aus-Schalter
USB-Kabel
(TypA auf TypB)
Zum USB-
Anschluss am
Computer
Flash-Laufwerk mit dem T4S/T8S verbinden
Zur Wiedergabe von Audio-Tracks über das Mischpult ein USB-2.0/3.0-Flash-Laufwerk mit WAV-/MP3-Dateien mit
dem USB-2.0-Anschluss (TypA) verbinden.
Abbildung13. Flash-Laufwerk mit dem T4S verbinden
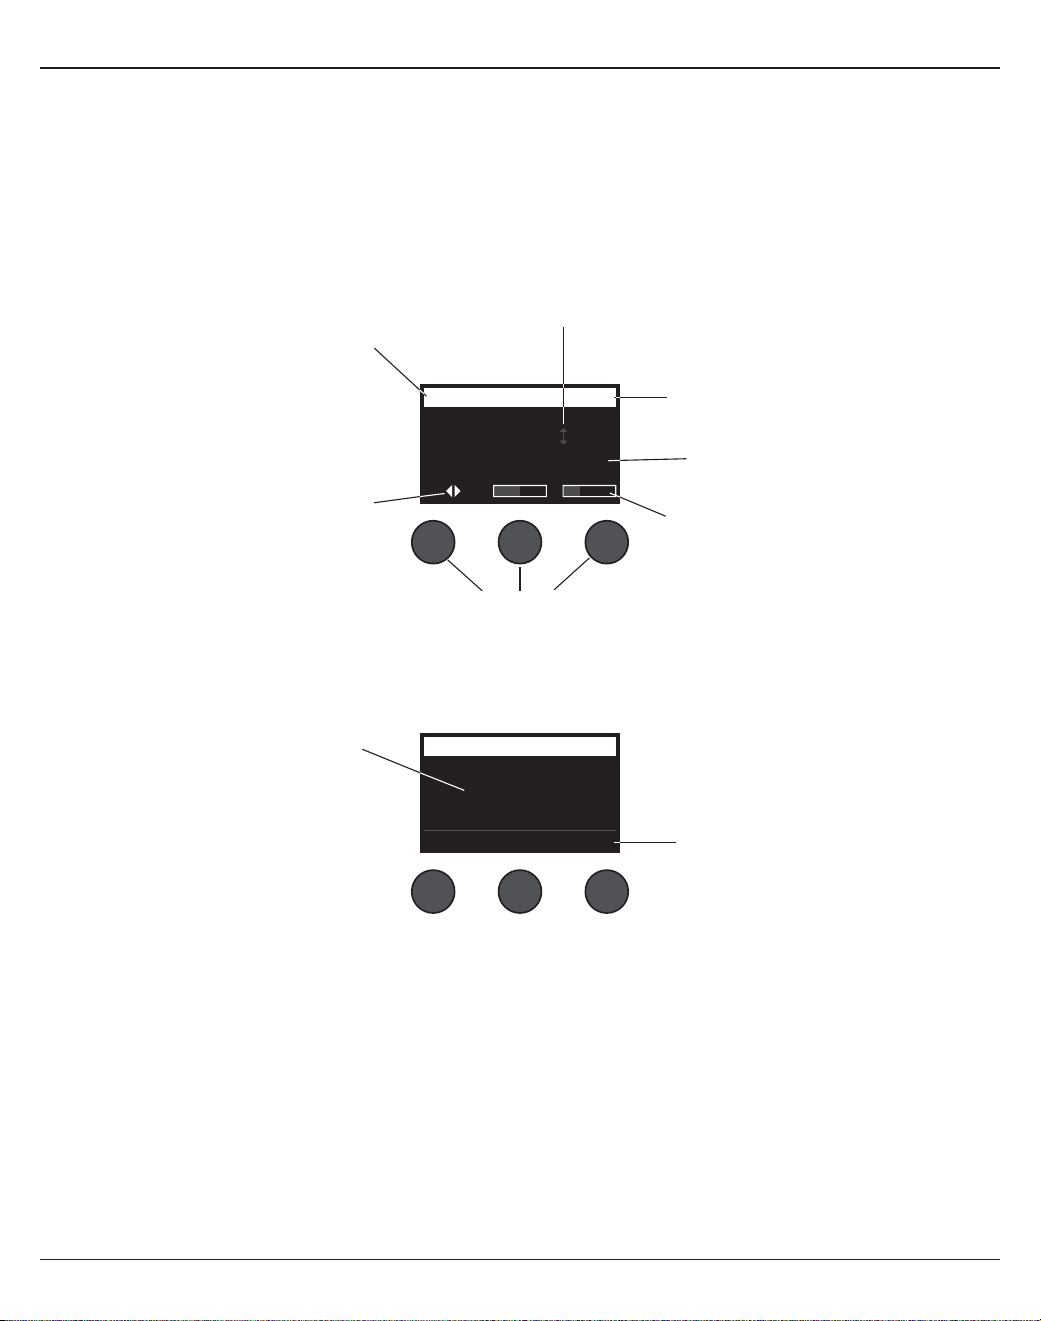
16– Deutsch
Bedienung
T4S/T8S Display ablesen
Über das Display wird das Mischpult bedient. Abbildung14 zeigt ein Beispiel mit Display-Informationen und den
grundlegenden Bedienelementen. Der Inhalt des Displays hängt von der Position des Drehreglers ab.
Abbildung14. Beispiel-Display und grundlegende
Bedienelemente
Ch 1
Type Tim
eM
ix
Digital 250ms 30%
Delay
Fdbk.
All Channels
*Bose Scene 01
Load Shared Save
Scenes
Ausgewählter Kanal
Drücken des Bedienelements schaltet
zwischen den Parametern um
Optische Darstellung des
Parameterwerts
Mit dem Drehregler ausgewählte
Funktion
Name und Einstellungen/
Werte der Parameter
Drehregler/Drucktasten
Drehen des Drehreglers
ändert die Einstellung
Ein Sternchen zeigt an,
dass die geladene Szene
geändert wurde
Drücken des
Bedienelements aktiviert
die Funktion

Bedienung
Deutsch– 17
Eingangsverstärkung und Ausgangslautstärke optimieren
Eine hochwertige Wiedergabe ergibt sich aus der kombinierten Einstellung der Eingangskanalverstärkung, der
Masterlautstärke und der Kanallautstärke. Gehen Sie bei jedem verwendeten Kanal wie folgt vor.
1. Die Masterlautstärkeregelung, die Trimregler und die Lautstärkeregler aller Kanäle müssen auf den kleinsten
Wert eingestellt sein.
2. Die Trimregelung einstellen.
A. Bei Bedarf die Lautstärke des Instruments/der Audioquelle einstellen.
B. Das Instrument/die Audioquelle in gewohnter Weise anspielen/wiedergeben.
C. Den Trimregler langsam im Uhrzeigersinn drehen, bis die Signal-/Übersteuerungsanzeige grün leuchtet.
Wenn die Anzeige rot blinkt oder dauerhaft rot leuchtet, den Trimregler gegen den Uhrzeigersinn drehen
und damit die Einstellung reduzieren.
D. Die Eingangspegel mit den Eingangspegelanzeigen (Seite28) im Menü Prefs (Systemeinstellungen) prüfen.
VORSICHT: Bei Geräten mit Phantomspeisung (+48V), z.B. Kondensatormikrofonen, zunächst die
Phantomspeisung einschalten und dann erst den Trimregler einstellen.
Hinweis: Die Eingangspegelanzeige im Menü Prefs (Systemeinstellungen) hilft beim Einstellen des
Trimpegels (siehe Seite28).
3. Die Masterlautstärkeregelung in die obere Position („12Uhr“) drehen.
4. Die Kanal-Lautstärkeregelung langsam im Uhrzeigersinn auf die gewünschte Lautstärke einstellen.
Input LevelPreferences
Ch 3
Ch 1
Ch 2
Ch 4
Menu Aux InReset
Spitzenpegelanzeige
Eingangspegelanzeige

18– Deutsch
Bedienung
Masterlautstärkeregelung
Die Masterlautstärkeregelung verändert den Gesamtausgangspegel des T4S/T8S ToneMatch® Ausgangs und des
analogen Masterausgangs. Im Normalbetrieb empfiehlt sich die Einstellung der Masterregelung auf die 12-Uhr-
Position. Sobald die Lautstärke für alle Kanäle eingestellt ist, kann die Masterlautstärke entsprechend erhöht oder
verringert werden.
Einen Kanal stummschalten
Die Stummschaltungstasten schalten die Audioausgabe für den jeweiligen Kanal stumm.
• Zum Stummschalten eines Kanals die zugehörige Stummschaltungstaste einmal drücken. Die
Stummschaltungstaste leuchtet weiß und zeigt so, dass der Kanal stummgeschaltet ist. Im Display wird „CH MUTE“
(KANAL STUMM) für diesen Kanal angezeigt.
• Zum Aufheben der Stummschaltung erneut die Stummschaltungstaste drücken. Die Stummschaltungstaste
leuchtet schwächer und zeigt so, dass der Kanal nicht stummgeschaltet ist.
Kanaleekte stummschalten
Die Eekt-Stummschaltungstasten schalten lediglich die Mod-, Delay- und Halleekte im ausgewählten Kanal
stumm. Durch das Stummschalten der Eekte werden die ToneMatch Presets und die zEQ-, Para-EQ und
Kompressor-/Gate-Einstellungen nicht deaktiviert.
• Zum Stummschalten der Eekte in einem Kanal die zugehörige Eekt-Stummschaltungstaste einmal drücken. Die
Eekt-Stummschaltungstaste leuchtet weiß und zeigt so, dass die Kanaleekte stummgeschaltet sind. Im Display
wird „FX MUTE“ (EFFEKTE STUMM) für diesen Kanal angezeigt.
• Zum Aufheben der Stummschaltung erneut die Eekt-Stummschaltungstaste drücken. Die Eekt-
Stummschaltungstaste leuchtet schwächer und zeigt so, dass die Kanaleekte nicht stummgeschaltet sind.
Ch 1
Category
Utility
ToneMatch
CH MUTE
Flat
Preset
Ch 1
Category
Utility
ToneMatch
FX MUTE
Flat
Preset

Bedienung
Deutsch– 19
Drehregler
Der Drehregler bietet Zugri auf die Funktionen des ToneMatch® Mischpultausgangs. Abbildung15 zeigt eine
Übersicht über die neun kanalspezifischen und die drei globalen Funktionen. Das Einstellen der einzelnen Funktionen
wird auf den nachfolgenden Seiten beschrieben.
Abbildung15. Drehregler
Kanalfunktionen
q Pan/AUX: Pan-Funktion, AUX-Eingänge und AUX-Ausgänge.
w Tuner: Feinabstimmung für ein Instrument, das über den ausgewählten Kanal wiedergegeben wird.
e ToneMatch: Proprietäre ToneMatch Presets für bestimmte Instrumente und Mikrofone.
r zEQ: Bestandteil des ausgewählten ToneMatch Presets; Regler für Bass-/Mittel-/Hochfrequenzen des Instruments
oder Mikrofons.
t Para-EQ: Parametrische EQ-Regler für die einzelnen Kanäle.
y Kompressor/Gate: Gate-, Kompressions-, Limiter-, De-Esser- und Bassdrum-Presets mit einstellbaren Parametern.
u Mod: Verschiedene Modulationseekte wie Chorus, Flanger, Phaser und Tremolo.
i Delay: Drei Delay-Arten und Tap-Tempo-Delay.
o Hall: Hall auf einen ausgewählten Kanal anwenden (auch für Main- oder AUX-Sends möglich).
Globale Funktionen
a Halltyp: Ausgewählten Halltyp auf alle Masterausgangskanäle oder AUX-Sends anwenden.
s Systemeinstellungen: Zugri auf die Geräteeinstellungen.
d Szenen: Auftrittsszenen speichern und laden (Momentaufnahme mit den kompletten Einstellungen des Systems).
e
o
y
d
r
a
u
q
t
s
i
w

20– Deutsch
Bedienung
Klang eines Kanals bearbeiten
Die CH-Bearbeitungsfunktionen (Pan/AUX, Tuner, ToneMatch®, zEQ, Para-EQ, Kompressor/Gate, Mod, Delay und Hall)
bieten Einstellungen für ausgewählte Kanäle.
So wird ein Kanal bearbeitet:
1. Die CH-Bearbeitungstaste1, 2, 3, 4 (jeweils T4S und T8S), 5, 6, 7 oder 8 (nur T8S) drücken. Der ausgewählte
Kanal wird oben links im Display angezeigt.
2. Eine CH-Bearbeitungsfunktion mit dem Drehregler auswählen.
3. Die Einstellungen für die Funktion gemäß den nachfolgenden Anweisungen anpassen.
Hinweis: Es kann immer nur ein Kanal bearbeitet werden, nicht mehrere Kanäle gleichzeitig.
Wird eine CH-Bearbeitungstaste gedrückt, so kann nur der ausgewählte Kanal bearbeitet werden.
Pan-/AUX-Funktionen
Mit der Pan-/AUX-Funktion werden die Audiosignale an den Masterausgang (L oder R), den AUX-IN-Regler oder
AUX-Send geleitet.
Pan-Funktion
Mit dem Regler „Pan“ werden die einzelnen Kanäle an die richtige Position im Stereo-Mix gesendet.
1. Den linken Edit-Control-Regler drücken oder drehen und im Menü die Option „Pan“ wählen.
2. Den Regler Pan drehen und den Line-Ausgang von L auf R einstellen.
AUX Input 5/6 (9/10) [AUX-Eingang 5/6 (9/10)]
Über den AUX-Eingang5/6 (9/10) wird eine Line-Pegel-Audioquelle angeschlossen (z.B. ein Mobilgerät).
1. Den linken Regler drücken oder drehen und im Menü die Option „AUX In 5/6“ (AUX-Eingang5/6) wählen.
2. Den Regler 5Lvl (Pegel5) oder 6Lvl (Pegel6) drehen und den Signalpegel für Kanal5 bzw. Kanal6 einstellen.
3. Den Regler 5Lvl (Pegel5) bzw. 6Lvl (Pegel6) drücken und zu 5Pan (Pan-Funktion5) bzw. 6Pan (Pan-
Funktion6) wechseln. Den Regler Pan drehen und die Pan-Funktion von L auf R einstellen.
Ch 1
Menu Pan
Pan
Pan
Ch 1
Menu 5 Pan 6 Lvl
Aux In 50%
Aux Input 5/6
6 Pan5 Lvl
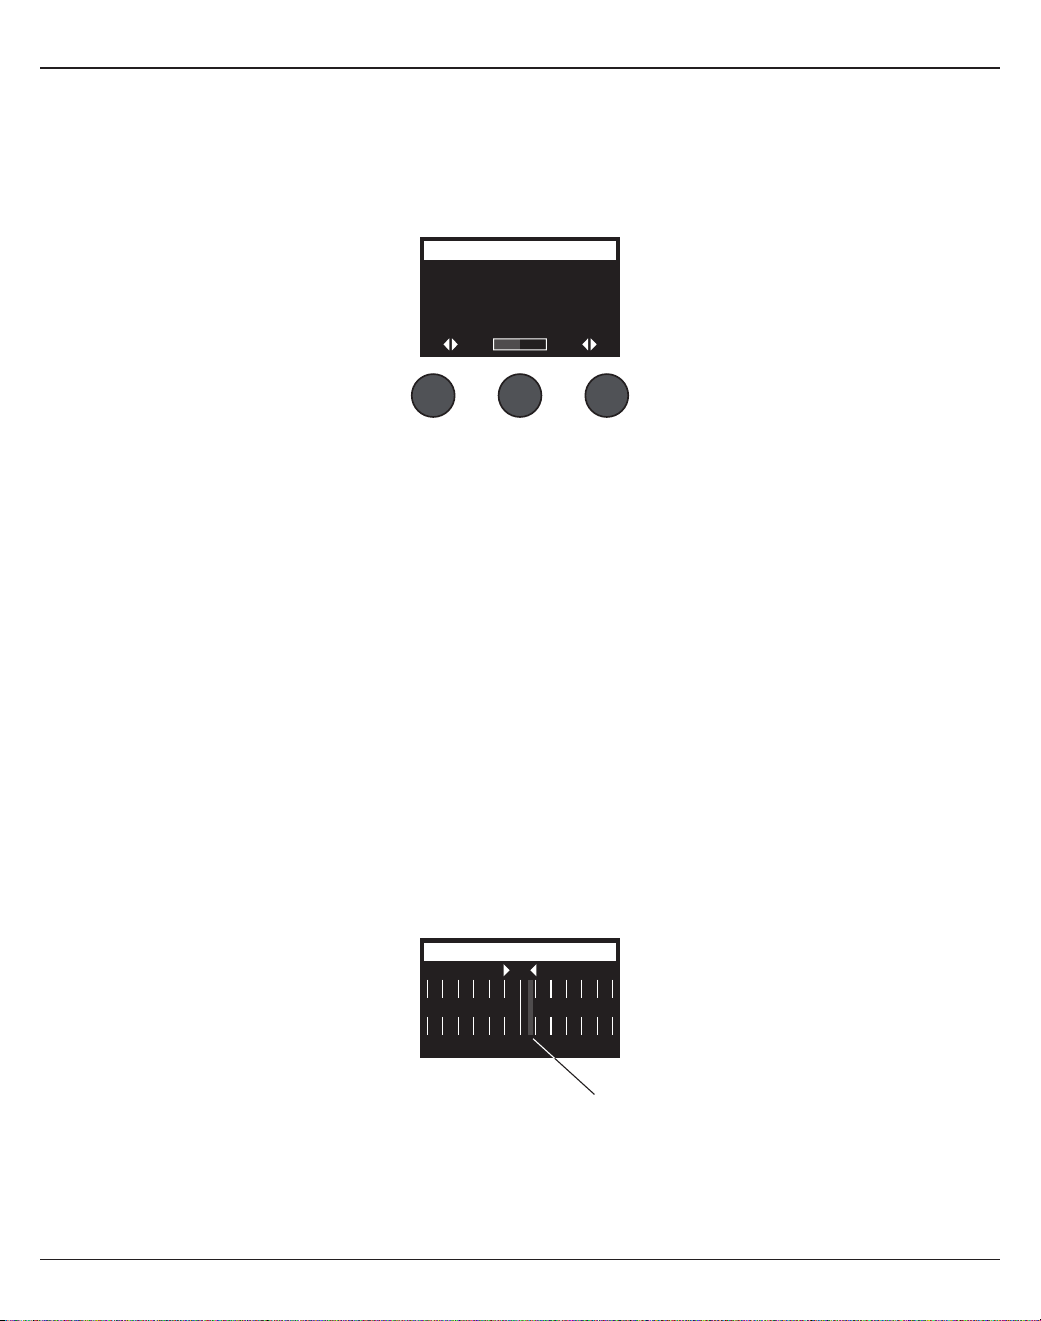
Bedienung
Deutsch– 21
Eingangssignale an AUX-Ausgänge leiten
Die AUX-Funktion sendet Signale für verschiedene Signalverarbeitungs-, Aufnahme- und Beschallungsanwendungen
an zwei AUX-Ausgänge (T4S) bzw. vier AUX-Ausgänge (nur T8S). Der Signalpegel der einzelnen AUX-Ausgänge
kann eingestellt werden:
Hinweis: Zum Stummschalten des AUX-Ausgangs den Regler Level (Pegel) drücken. Zum Aufheben der
Stummschaltung erneut drücken.
1. Den Regler Menu (Menü) drücken oder drehen und einen AUX-Send auswählen.
2. Den Regler Level (Pegel) drehen und den Signalpegel des ausgewählten Kanals einstellen.
3. Den Regler Tap drehen und den gewünschten Tap-Punkt im Tap-Menü markieren.
A. Dry: After Preamp (Trocken: Nach Vorverstärkung)– Das absolut „trockene“ (unverarbeitete) Signal wird
direkt nach der Vorverstärkung weitergeleitet.
B. Pre: With EQ &Fx (Vor: Mit EQ und Eekten)– Das Signal wird nach der Vorverstärkung und
Eektverarbeitung weitergeleitet.
C. Post: After Fader (Nach: Nach Fader)– Das Signal wird nach erfolgter Lautstärkeregelung und Verarbeitung
weitergeleitet.
4. Den Tap-Punkt durch Drücken auf Select (Auswählen) bestätigen oder den Vorgang durch Drücken auf Cancel
(Abbrechen) ohne Änderungen abbrechen. Der Name des derzeit ausgewählten Tap-Punkts wird in fetter Schrift
angezeigt.
Ch 1
Menu Tap
Aux
1P
re
Level
50%
Aux 1 Output
Tuner
Für die einzelnen Eingangskanäle steht jeweils ein unabhängiger Tuner bereit. Unten im Display wird die gespielte
Note angezeigt. Bei der Feinabstimmung wird eine Tonhöhenanzeige im Display eingeblendet, aus der ersichtlich
wird, ob eine erhöhte oder erniedrigte Note vorliegt. Die Tonhöhe des Instruments so einstellen, dass der Cursor in
der Mitte des Displays liegt.
Hinweis: Zur lautlosen Feinabstimmung die Stummschaltungstaste für den entsprechenden Kanal drücken.
Die Referenztonhöhe mit der Transpositionsfunktion um zwei Halbtöne nach oben oder unten verändern oder die
Feinabstimmung anhand der Referenztonhöhe präzise einstellen.
Ch 1
b#
A3
Tuner
Tonhöhenanzeige
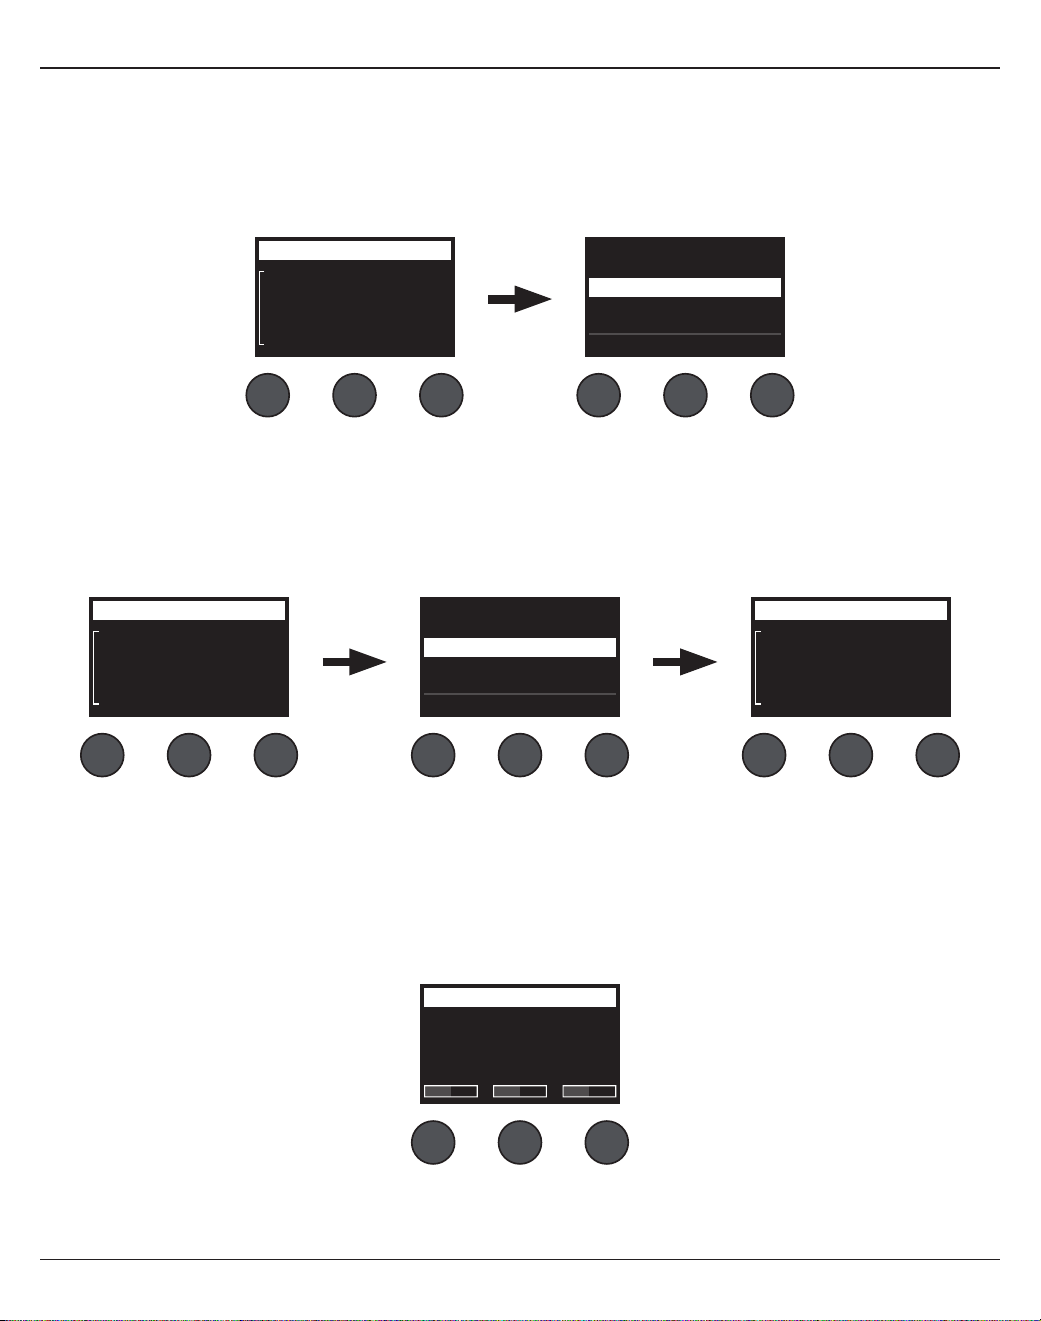
22– Deutsch
Bedienung
zEQ anpassen
Die zEQ-Funktion ist ein Bestandteil der ToneMatch Preset-Technologie. Hiermit werden die Bass-/Mittel-/
Hochfrequenzen des Instruments oder Mikrofons eingestellt.
Zum Einstellen der zEQ den Drehregler unter dem entsprechenden Frequenzband drehen.
Hinweis: Soll ein bestimmtes Frequenzband deaktiviert werden, den zugehörigen Drehregler drücken. Zum Aktivieren
erneut drücken.
ToneMatch® Preset auswählen
Die ToneMatch Funktion bestimmt ein ToneMatch Preset für Ihr Instrument oder Mikrofon. Diese proprietäre
Technologie optimiert die Systementzerrung, sodass der naturgetreue Klang des jeweiligen Instruments oder
Mikrofons erhalten bleibt. Die Presets sind in Kategorien gegliedert und werden für die einzelnen Kanäle unabhängig
festgelegt.
1. Den Drehregler Category (Kategorie) drehen und die gewünschte Option in der Kategorienliste markieren.
2. Die Option durch Drücken auf Select (Auswählen) bestätigen oder die Liste durch Drücken auf Cancel
(Abbrechen) ohne Änderungen schließen.
3. Wenn Select (Auswählen) gedrückt wurde, den Regler Preset drehen und die gewünschte Option in der Preset-
Liste markieren.
4. Die Option mit Select (Auswählen) bestätigen oder die Liste mit Cancel (Abbrechen) ohne Änderungen schließen.
Ch 1
Category
Vocal Mics
ToneMatch
Handheld Mics
Preset
Handheld Mics
Headworn Mics
High Gain: Bright
High Gain: Normal
SelectCancel
Ch 1
Category
Utility
ToneMatch
Flat
Preset
Ch 1
Category
Vocal Mics
ToneMatch
Headworn Mics
Preset
Vocal Mics
Utility
Electric Guitars
Acoustic Guitars
Select Cancel
Drehen Drücken
DrückenDrehen
Ch 1
Low Mid
Handheld Mics
High
0.0db 0.0db 0.0db
zEQ
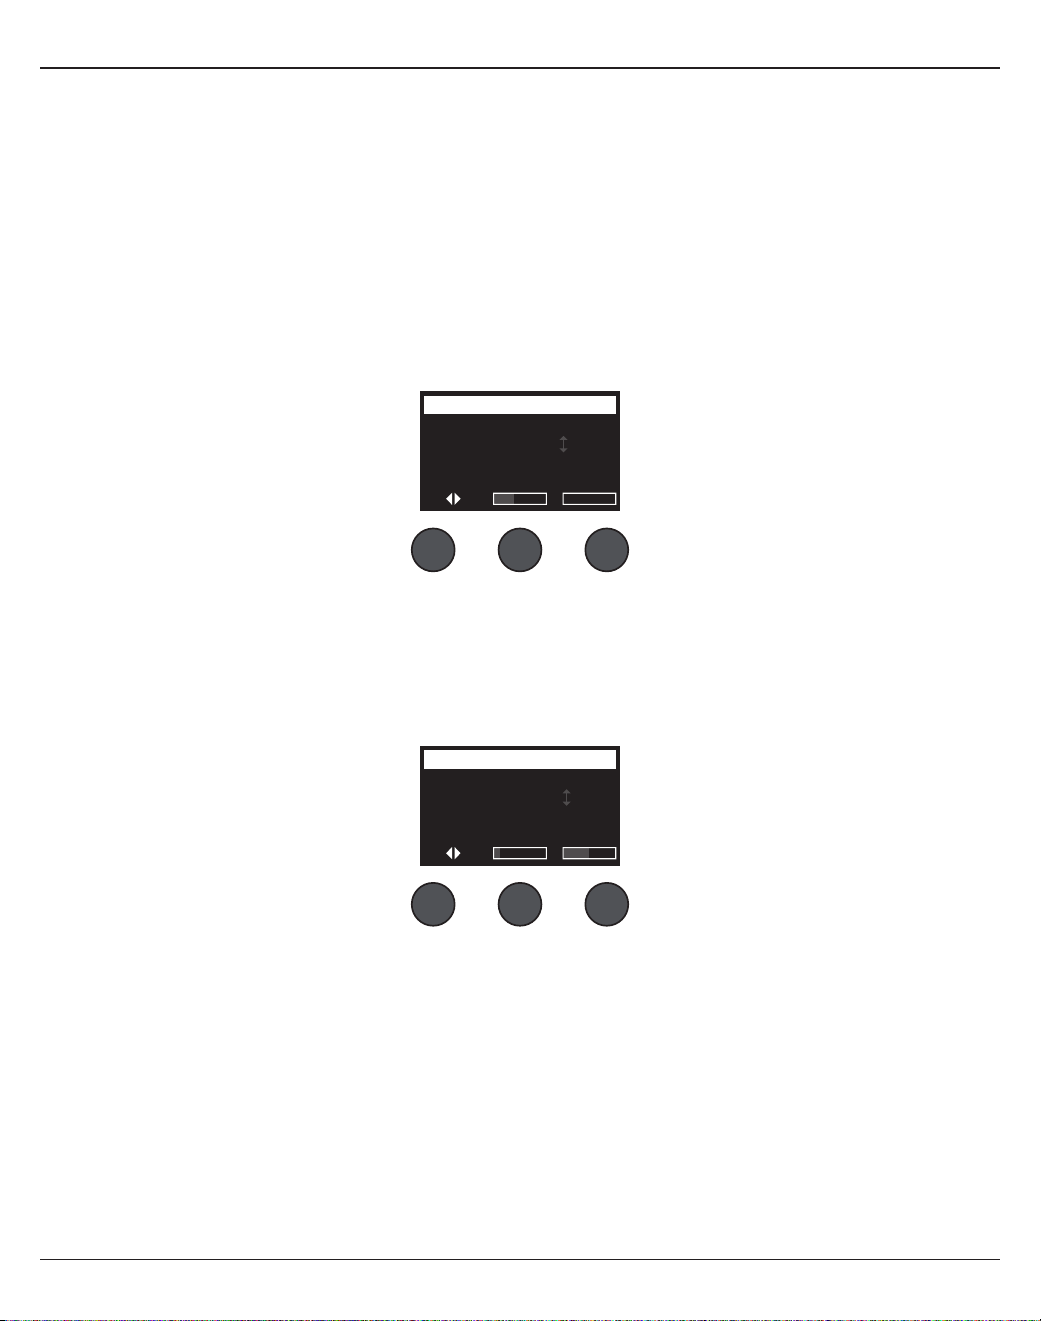
Bedienung
Deutsch– 23
Para-EQ anpassen
Die Para-EQ-Funktion umfasst drei parametrische Entzerrungen für eine benutzerdefinierte Mittenfrequenz zwischen
50Hz und 16kHz.
Hinweis: Sollen die Para-EQ-Einstellungen deaktiviert werden, den Regler Select (Auswählen) drücken. Zum
Aktivieren erneut drücken.
1. Select (Auswählen) drücken oder drehen und das Para-EQ-Band1–3 auswählen.
2. Den Regler Level (Pegel) drehen und den Boost-/Cut-Pegel auf einen Wert zwischen -15dB und +15dB
einstellen.
3. Den Regler Freq (Frequenz) drehen und die Mittenfrequenz auf einen Wert zwischen 50Hz und 16kHz einstellen.
4. Den Regler Freq (Frequenz) drücken und zur Bandbreite wechseln. Den Regler Width (Breite) drehen und die
Breite der Glockenkurve um die Mittenfrequenz auf 0,20Oktaven bis 5,00Oktaven einstellen.
Ch 1
Select Level
B3
Freq
PEQ 1 -3.4dB 250.0Hz
Parametric EQ
Width
Kompressor-/Gate-Funktionen
Die Kompressor-/Gate-Funktion umfasst Gate-, Kompressions-, Limiter-, De-Esser- und Bassdrum-Presets mit einstellbaren
Parametern.
Hinweis: Sollen die Kompressor-/Gate-Einstellungen deaktiviert werden, den Regler Type (Typ) drücken. Zum Aktivieren
erneut drücken.
Hinweis: Es ist nur ein Eekt pro Kanal möglich.
1. Den Drehregler Type (Typ) drehen und die gewünschte Option in der Liste der Kompressor-/Gate-Eekte markieren:
A. Compressor1: Light (Kompressor1: Leicht)– Kompressor mit voreingestelltem niedrigem
Kompressionsverhältnis und variablen Schwellen- und Verstärkungsparametern. Ideal als Allzweckkompressor für
die meisten Instrumente und Mikrofone, bei denen nur eine minimale Pegelkontrolle erforderlich ist.
B. Compressor2: Medium (Kompressor2: Mittel)– Kompressor mit voreingestelltem mittlerem
Kompressionsverhältnis und variablen Schwellen- und Verstärkungsparametern. Ideal für Bässe, Gitarren,
Keyboards und Stimmen, die eine dezente Pegelkontrolle erfordern.
C. Compressor3: Heavy (Kompressor3: Schwer)– Kompressor mit voreingestelltem hohem
Kompressionsverhältnis und variablen Schwellen- und Verstärkungsparametern. Ideal für laute Instrumente (z.B.
Blasinstrumente und Schlagzeug) und kräftige Stimmen, für die eine starke Pegelkontrolle unabdingbar ist.
D. Limiter– Harter Limiter mit voreingestelltem Verhältnis (∞:1) und variablen Schwellen- und
Ch 1
Type Thresh Speed
Gate -80.0dB 50%
Comp/Gate
Ramp

24– Deutsch
Bedienung
KickGate
Die proprietäre Bose® Technologie des KickGates erhöht die Lautstärke einer Bassdrum, ohne dass eine Rückkopplung
mit dem Mikrofon entsteht. Im Kompressor-/Gate-Menü stehen zwei KickGate-Einstellungen zur Auswahl.
1. Ein geeignetes Mikrofon anschließen.
2. Ein passendes ToneMatch® Preset auswählen.
3. Den Trimregler für den Kanaleingang verändern, bis die Eingangskanal-LED bei der lautesten Bassdrum rot
leuchtet. Dann den Trimregler leicht reduzieren, bis die LED grün leuchtet. Damit wird der Trimpegel für den
Kanaleingang optimiert.
4. Die Option Comp/Gate (Kompressor/Gate) mit dem Drehregler auswählen.
5. Den Regler Type (Type) drehen. In der Liste die Option KickGate1: Regular (KickGate1: Normal) oder
KickGate2: Fast (KickGate2: Schnell) markieren und Select (Auswählen) drücken. KickGate2 wählen, wenn eine
Bassdrum mit Doppelfußmaschine verwendet wird.
6. Die Bassdrum spielen und die Lautstärke auf das gewünschte Performance-Level einstellen.
7. Die Bassdrum so leise spielen, wie dies für den Auftritt vorgesehen ist, und prüfen, ob sie noch zu hören ist.
8. Beim leisen Spielen den Pegel für Thresh (Schwelle) anpassen, bis ein Teil der Bassdrum-Schläge abgeschnitten
wird. Dann den Pegel für Thresh (Schwelle) um 3dB vermindern.
9. Die Bassdrum mit normaler Lautstärke spielen. Den Regler Tight (Straheit) gegen den Uhrzeigersinn drehen.
Hiermit wird die Straheit vermindert, und der Klang wird „gewaltiger“. Die Straheit kann auf einen Wert
zwischen 0% (langsam) und 100% (schnell) eingestellt werden.
Verstärkungsparametern. Ideal für sehr laute Instrumente (z.B. Schlagzeug), sodass der Kanal nicht durch
Spitzenpegel überlastet wird.
E. De-Esser– Verketteter Kompressor mit voreingestelltem Kompressionsverhältnis und variablen Schwellen- und
Verstärkungsparametern. Vermindert Zischgeräusche in den Stimmen.
F. Noise Gate– Noise Gate mit voreingestellter kurzer Anstiegszeit, variabler Schwelle und variabler Abfallzeit.
Ideal zum Unterdrücken unerwünschter Geräusche von Mikrofonen und Instrumenten.
G. KickGate 1: Regular (KickGate1: Normal)– Gate mit voreingestellter Anstiegszeit und variablen Schwellen- und
Anstiegszeitparametern. Diese proprietäre Bose® Technologie ist speziell für Bassdrums ausgelegt. Das robuste
Gate erzeugt die maximale Verstärkung ohne Rückkopplung, sodass die Bassdrum über das PA-System so laut
wie möglich wiedergegeben wird.
H. KickGate2: Fast (KickGate2: Schnell)– Wie KickGate1, jedoch für schnelleres Tempo. Diese Einstellung ist bei
einer Bassdrum mit Doppelfußmaschine zu verwenden.
2. Die Option durch Drücken auf Select (Auswählen) bestätigen oder die Liste durch Drücken auf Cancel (Abbrechen)
ohne Änderungen schließen.
3. Kompressor1–3, Limiter, De-Esser: Den Regler Thresh (Schwelle) drehen und die Eingangsschwellenpegel
(Triggerpegel) auf einen Wert zwischen -50dB und 0dB einstellen. Den Regler Gain (Verstärkung) drehen und die
Verstärkung auf einen Wert zwischen 0dB und 30,0dB einstellen. Der Verstärkungsbalken oberhalb des Reglers
zeigt das Ausmaß der Verstärkungsreduktion. Diese Anzeige hilft beim Einstellen des Schwellenwerts.
Noise Gate: Den Regler Thresh (Schwelle) drehen und die Eingangsschwellenpegel (Triggerpegel) auf einen Wert
zwischen -90dB und -30dB einstellen. Den Regler Speed (Geschwindigkeit) drehen und die Schließzeit des Gates
auf einen Wert zwischen 0% (schnell) und 100% (langsam) einstellen. Den Regler Ramp (Rampe) drehen und die
Steigung des Gates auf einen Wert zwischen 0% (horizontal) und 100% (vertikal) einstellen.
KickGate1–2: Den Regler Thresh (Schwelle) drehen und die Eingangsschwellenpegel (Triggerpegel) auf einen Wert
zwischen -20dB und 0dB einstellen. Den Regler Tight (Straheit) drehen und die Straheit (Geschwindigkeit, mit
der das Gate geschlossen wird) auf einen Wert zwischen 0% (langsam) und 100% (schnell) einstellen.

Bedienung
Deutsch– 25
Modulationseekte
Mit der Mod-Funktion werden Modulationseekte angewendet.
Hinweis: Sollen die Mod-Einstellungen deaktiviert werden, den Regler Type (Typ) drücken. Zum Aktivieren erneut drücken.
1. Den Drehregler Type (Typ) drehen und die gewünschte Option in der Liste der Modulationstypen markieren:
A. Chorus1: Brite (Chorus1: Strahlend)– Reichhaltiger, schillender Chorus, ideal für akustische Instrumente. Mit
einstellbaren Mix-, Tiefen- und Geschwindigkeitsparametern.
B. Chorus2: Warm– Ähnlich wie Chorus1, jedoch mit etwas weniger hohen Frequenzen. Mit einstellbaren Mix-,
Tiefen- und Geschwindigkeitsparametern. Ideal für E-Gitarren/E-Bässe.
C. Chorus3: Dark (Chorus3: Dunkel)– Ähnlich wie Chorus2, jedoch mit weniger hohen Frequenzen und
damit einer dunkleren Klangfarbe. Mit einstellbaren Mix-, Tiefen- und Geschwindigkeitsparametern. Ideal für
E-Gitarren/E-Bässe.
D. Flanger1: Tape (Flanger1: Band)– Band-Flanger ohne Rückkopplung. Mit einstellbaren Mix-, Tiefen- und
Geschwindigkeitsparametern. Ideal als Eekt für E-Gitarren/E-Bässe.
E. Flanger2: Feedback (Flanger2: Rückkopplung)– Wie Flanger1, jedoch mit voreingestelltem
Rückkopplungseekt.
F. Phaser1: Stomp (Phaser1: Stampfen)– Klassischer „Stompbox“-Phaser. Mit voreingestelltem breitem Verlauf
und variablen Geschwindigkeits- und Rückkopplungsparametern. Ideal als Eekt für E-Gitarren/E-Bässe und
Keyboards.
G. Phaser2: Rack– Klassischer Rack-Phaser. Mit positivem Mixtyp und variablen Geschwindigkeits- und
Rückkopplungsparametern. Ideal als Eekt für E-Gitarren/E-Bässe und Keyboards.
H. Phaser3: Warm– Klassischer Phaser. Mit positivem Mixtyp und variablen Geschwindigkeits- und
Rückkopplungsparametern. Ideal als Eekt für E-Gitarren/E-Bässe und Keyboards.
I. Phaser4: Brite (Phaser4: Strahlend)– Phaser ohne Bass. Mit positivem Mixtyp und variablen Geschwindigkeits-
und Rückkopplungsparametern. Ideal als Eekt für E-Gitarren und Keyboards.
J. Tremolo– Tremolo-Eekt mit variablen Geschwindigkeits- und Tiefenparametern. Ideal als Eekt für Gitarren,
Keyboards und Mundharmonikas.
2. Die Option durch Drücken auf Select (Auswählen) bestätigen oder die Liste durch Drücken auf Cancel (Abbrechen)
ohne Änderungen schließen.
3. Chorus1–3, Flanger1–2: Den Regler Mix drehen und den gewünschten Mix aus „trockenem“ und moduliertem Signal
einstellen. Den Regler Depth (Tiefe) drehen und die Abweichung der Tonhöhe vom ursprünglichen Eingangssignal
festlegen. Anschließend den Regler Depth (Tiefe) drücken. Der Parameter Speed (Geschwindigkeit) wird angezeigt.
Den Regler Speed (Geschwindigkeit) drehen und die Modulationsgeschwindigkeit der Tonhöhe einstellen.
Phaser1–4: Den Regler Speed (Geschwindigkeit) drehen und die Modulationsgeschwindigkeit der Tonhöhe einstellen.
Den Regler Fdbk. (Rückkopplung) drehen und den Hall für die Modulation einstellen.
Tremolo: Den Regler Speed (Geschwindigkeit) drehen und die Modulationsgeschwindigkeit der Lautstärke einstellen.
Den Regler Depth (Tiefe) drehen und die Abweichung der Lautstärke vom ursprünglichen Eingangssignal festlegen.
Ch 1
Type Mix Depth
Chorus1 50% 50%
Modulator
Speed

26– Deutsch
Bedienung
Ch 1
Type Tim
eM
ix
Digital 250ms 30%
Delay
Fdbk.
Delays hinzufügen
Mit der Verzögerungsfunktion wird eine digitale oder analoge Verzögerung bzw. eine Bandverzögerung eingefügt.
Hinweis: Sollen die Verzögerungseinstellungen deaktiviert werden, den Regler Type (Typ) drücken. Zum Aktivieren erneut
drücken.
1. Den Drehregler Type (Typ) drehen und die gewünschte Option in der Liste der Verzögerungstypen markieren:
A. Digital Delay (Digitale Verzögerung): Direkter digitaler Delay-Eekt, bei dem die Wiederholungen unverfärbt
bleiben. Mit einstellbaren Mix-, Zeit- und Rückkopplungsparametern. Ideal für Gitarren, Schlagzeug und Stimmen.
B. Analog Delay (Analoge Verzögerung): Klassischer analoger Delay-Eekt, bei dem die Wiederholungen
fortlaufend schwächer werden. Mit einstellbaren Mix-, Zeit- und Rückkopplungsparametern. Ideal für Gitarren,
Schlagzeug und Stimmen.
C. Tape Delay (Bandverzögerung): Klassischer Band-Delay-Eekt, bei dem die Wiederholungen noch schwächer
als bei der analogen Verzögerung werden. Ideal für Gitarren, Blasinstrumente, Mundharmonikas und Stimmen.
2. Die Option durch Drücken auf Select (Auswählen) bestätigen oder die Liste durch Drücken auf Cancel (Abbrechen)
ohne Änderungen schließen.
3. Den Regler Time (Zeit) drehen und die Verzögerungszeit in Schritten von 5ms einstellen. Den Regler Time (Zeit)
drücken und das gewünschte Verzögerungstempo eingeben.
4. Den Regler Mix drehen und den gewünschten Mix aus „trockenem“ Signal (0%) und moduliertem Signal (100%)
einstellen.
5. Den Regler Mix drücken. Die Einstellung Fdbk. (Rückkopplung) wird angezeigt. Den Regler Fdbk. drehen und die
Verzögerungsrückmeldung einstellen.
Hall hinzufügen
Die Hallfunktion wendet einen benutzerdefinierbaren Halleekt auf den ausgewählten Kanal an. Anweisungen zum
Auswählen des Halltyps siehe „Halltyp auswählen“ auf Seite27.
Hinweis: Zum Stummschalten der Halleekte den Regler Mix drücken. Zum Aufheben der Stummschaltung erneut drücken.
1. Den Regler Menu (Menü) drücken oder drehen und den Ausgang auswählen, an den der Halleekt gesendet
werden soll.
2. Den Regler Mix drehen und den gewünschten Mix aus „trockenem“ Signal (0%) und moduliertem Signal (100%)
einstellen.
3. Den Regler Bright (Strahlend) drehen und die hohen Frequenzen des Halls für den ausgewählten Kanal
entzerren.
Ch 1
Mix Bright
50% 50%
Reverb
Menu
Main

Bedienung
Deutsch– 27
Globale Funktionen
Die globalen Funktionen umfassen Einstellungen für den allgemeinen Betrieb des Mischpults und aller Kanäle.
Halltyp auswählen
Die Funktion „Reverb Type“ (Halltyp) bestimmt den Halltyp für alle Eingangskanäle. Die Abklingzeit („Time“, Zeit)
und die Balance („Bal“) sind einstellbar. Die Balance regelt das Verhältnis zwischen frühen und späten Reflexionen.
Hinweis: Zum Stummschalten des Halls den Regler Type (Typ) drücken. Zum Aufheben der Stummschaltung erneut
drücken.
1. Die Option Reverb Type (Halltyp) mit dem Drehregler auswählen.
2. Den Regler Menu (Menü) drücken oder drehen und den Ausgang auswählen, an den der Halleekt gesendet
werden soll. An die Main- und AUX-Sends kann jeweils ein anderer Halltyp gesendet werden.
3. Den Regler Type (Typ) drehen und die Liste der Halleekte anzeigen:
A. Plate (Platte): Klanggefühl wie mit einer typischen Studio-Hallplatte. Mit einstellbaren Zeit- und
Balanceparametern (Verhältnis zwischen frühen und späteren Reflexionen).
B. Small (Klein): Klanggefühl wie in einem kleinen Raum. Mit einstellbaren Zeit- und Balanceparametern
(Verhältnis zwischen frühen und späteren Reflexionen).
C. Medium (Mittel): Klanggefühl wie in einem mittelgroßen Raum. Mit einstellbaren Zeit- und
Balanceparametern (Verhältnis zwischen frühen und späteren Reflexionen).
D. Large (Groß): Klanggefühl wie in einem großen Raum. Mit einstellbaren Zeit- und Balanceparametern
(Verhältnis zwischen frühen und späteren Reflexionen).
E. Cavern (Höhle): Klanggefühl wie in einem extrem großen Raum. Mit einstellbaren Zeit- und
Balanceparametern (Verhältnis zwischen frühen und späteren Reflexionen). Einzigartiger, interessanter
Halleekt.
4. Den Regler Type (Typ) drehen und den gewünschten Halltyp in der Liste der Halleekte markieren.
5. Zum Auswählen den Regler Type (Typ) drücken.
6. Durch Drehen des Reglers Time (Zeit) wird die Abklingzeit des ausgewählten Hallmodells eingestellt. Beim
Mindestwert für die Abklingzeit (0%) wird die kleinste Raumgröße simuliert, die für den derzeit ausgewählten
Halltyp bereitsteht, beim Höchstwert (100%) entsprechend die größte verfügbare Raumgröße. Für jeden Halltyp
gelten andere Abklingzeiten, die jeweils für den ausgewählten Modelltyp optimal sind. Mit dem Parameter
„Reverb Decay“ (Hallabklingzeit) lässt sich die Hallzeit zwischen den optimalen Werten für den ausgewählten
Hallmodelltyp einstellen.
7. Den Regler Time (Zeit) drücken und zur Option Bal. (Balance) wechseln. Den Regler Bal. (Balance) drehen und
das Verhältnis zwischen frühen und späten Reflexionen einstellen (0% =nur frühe Reflexionen, 100% =nur
späte Reflexionen).
All Channels
Menu Type Bal.
Main Medium 50%
Reverb Type
Time
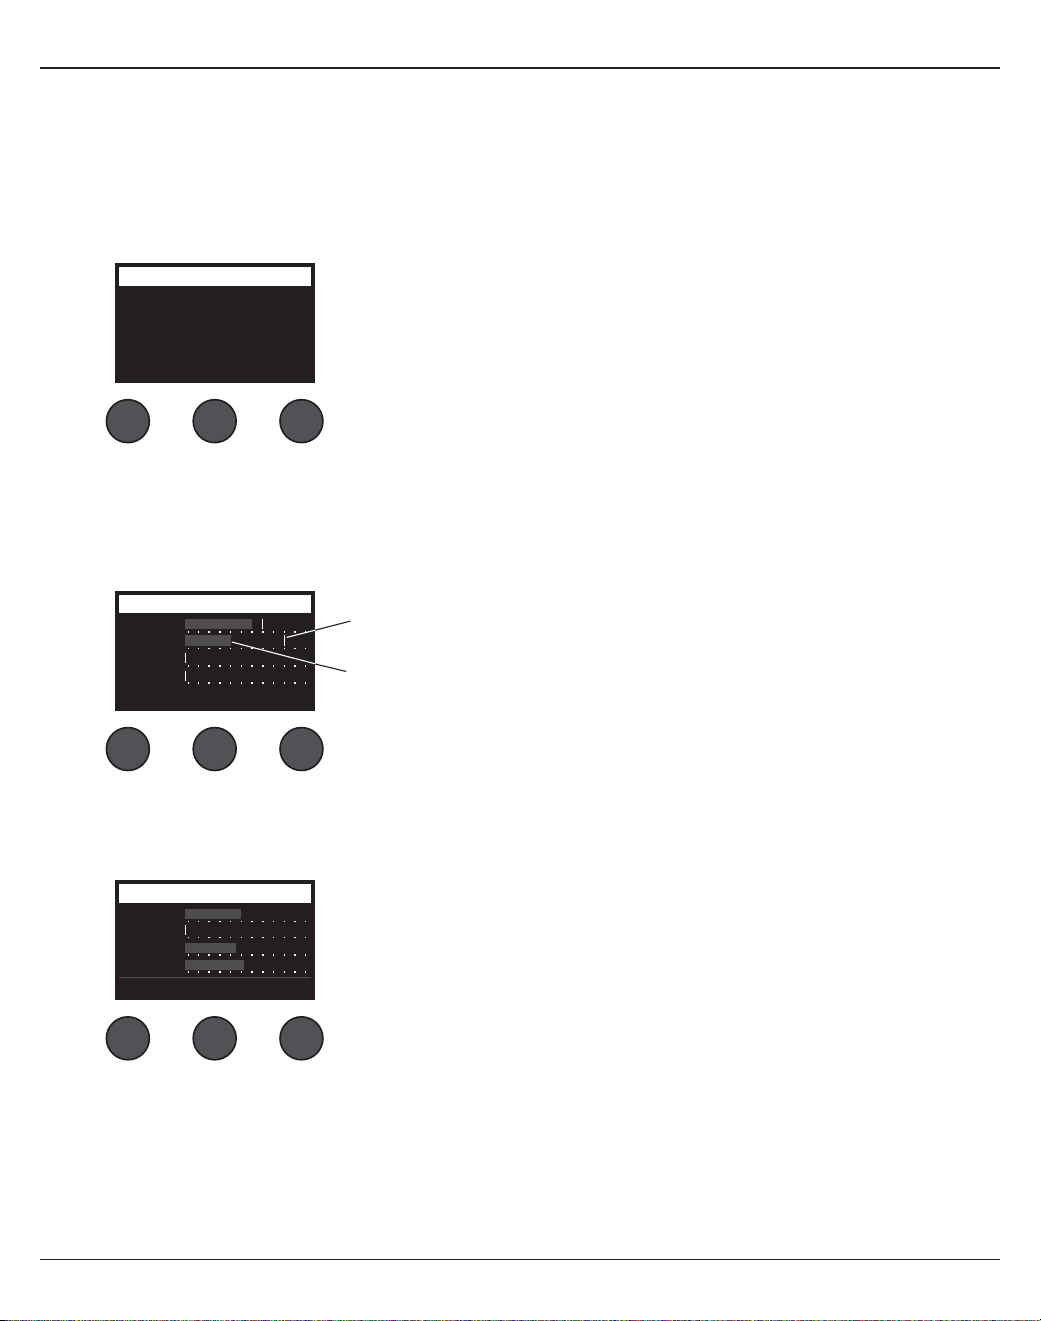
28– Deutsch
Bedienung
Utilitys in den Systemeinstellungen
Die Funktion „Prefs“ umfasst verschiedene Systemeinstellungen.
1. Die Option Prefs (Systemeinstellungen) mit dem Drehregler auswählen.
2. Den Regler Menu (Menü) drehen und die gewünschte Einstellung in der Liste auswählen. Den Regler Select
(Auswählen) drücken. Die ausgewählte Einstellung wird angezeigt:
• Status: Zeigt die Eekte an, die den Eingangskanälen zugewiesen sind (nicht editierbar).
• Input Level (Eingangspegel): Eingangspegelanzeigen mit Spitzenpegelanzeigen für alle Eingangskanäle.
Zum Zurücksetzen aller Spitzenpegelanzeigen den Regler Reset (Zurücksetzen) drücken. Dieses Display hilft
beim Einstellen des Trimpegels für den Kanaleingang (siehe „Eingangsverstärkung und Ausgangslautstärke
optimieren“ auf Seite17). Zum Überwachen des Pegels an den AUX-Eingängen den Regler AUX In drücken.
(Nur beim T8S: Zum Überwachen des Pegels an den Eingängen5–8 den Regler „Ch5–8“ drücken.)
• Output Level (Ausgangspegel): Ausgangspegelanzeigen für alle Ausgänge (Hauptausgang[L],
Hauptausgang[R], USB[L] und USB[R]). Zum Überwachen des Pegels an den AUX-Ausgängen den Regler
AUX drücken.
Output Level Preferences
USB L
Main L
Main R
USB R
Menu Rese
tA
ux
Status
Ch 1 Mod
Mod
Mod Dly
Cm
pR
ev
Rev
Rev
CmpCh 2
Ch 3
Ch 4
Menu
Preferences
Cmp = Compressor/Gate (Kompressor/Gate)
Mod = Modulation
Dly = Delay (Verzögerung)
Rev = Reverb (Hall)
Input LevelPreferences
Ch 3
Ch 1
Ch 2
Ch 4
Menu Aux InReset
Spitzenpegelanzeige
Eingangspegelanzeige
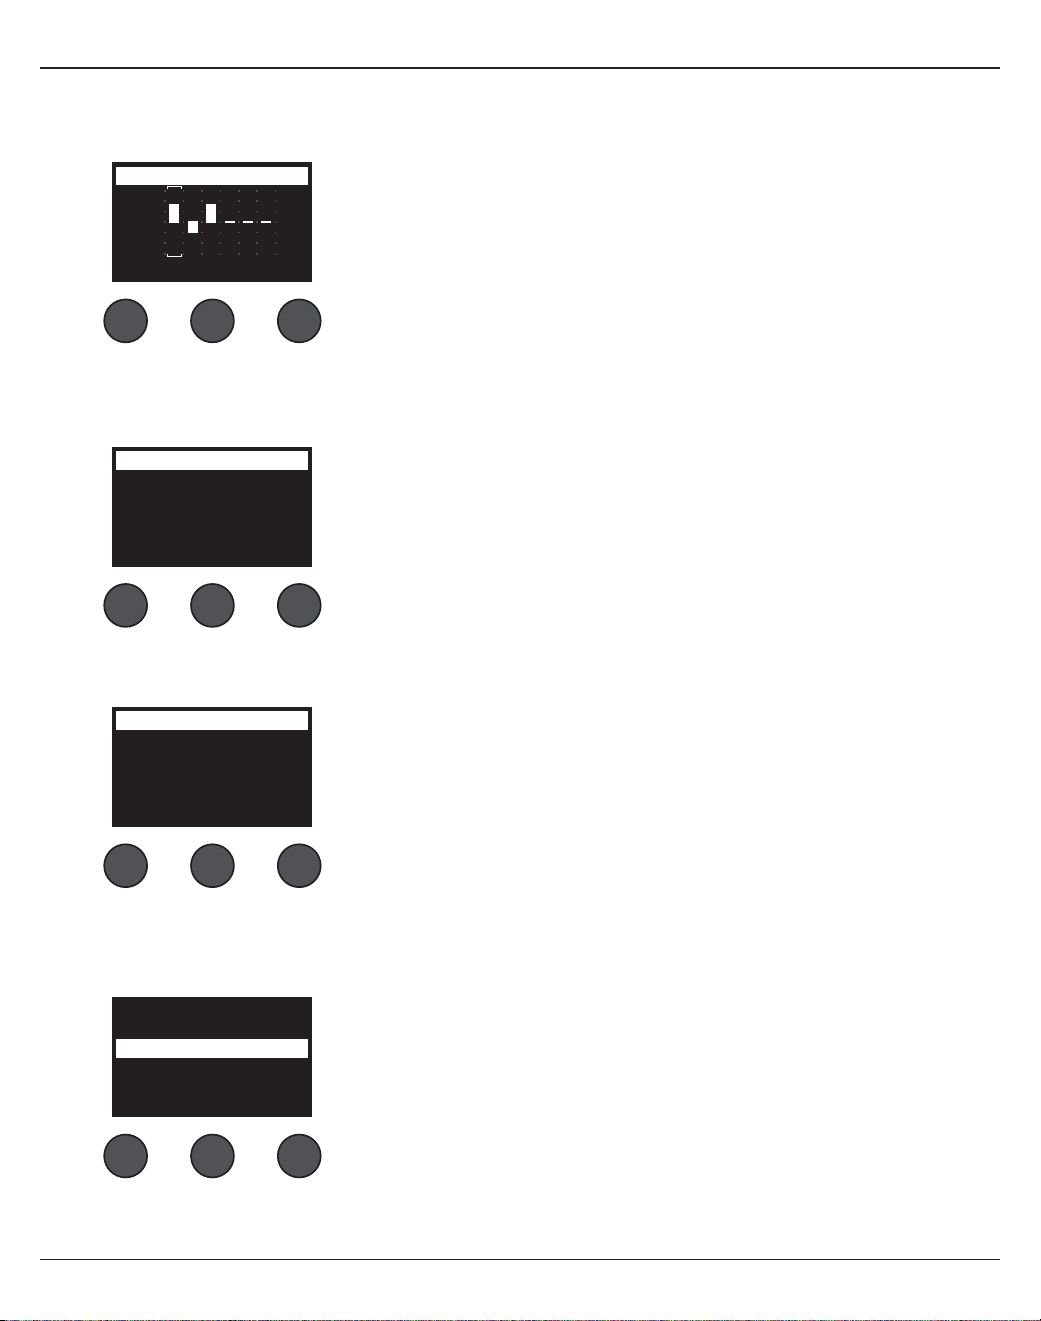
Bedienung
Deutsch– 29
• Master Out EQ (Masterausgang-EQ): Die Masterausgang-EQ besteht aus einem 6-Band-Grafik-Equalizer am
Master-Mixausgang. Den zu verstärkenden oder zu dämpfenden Frequenzbereich mit dem mittleren Regler
auswählen und den Pegel mit dem Regler Level (Pegel) auf einen Wert zwischen +18dB und -18dB einstellen.
• USB TypB to PC (USB Typ B an PC): Ausgewählte Quelle über den linken und rechten USB-Ausgangskanal an
den Computer senden. Mögliche Quellen: „Ch1–4“ (nur T8S: „Ch5–8“), „AUX In“, „Master“ oder „AUX Out 1–2“
(AUX-Ausgang1–2; nur T8S: „AUXOut 3–4“ [AUX-Ausgang3–4]).
• USB TypB from PC (USB Typ B von PC): Linken und rechten USB-Kanal vom Computer an ein bestimmtes Ziel
am Mischpult senden („None“ [Keine], „AUX In“ oder „Master“).
• USB Typ A-Playback (USB Typ A-Wiedergabe): Ein USB Typ A-Flash-Laufwerk anschließen und dort
gespeicherte WAV-/MP3-Dateien wiedergeben. Im Menü den Ordner mit den WAV-/MP3-Dateien auswählen,
die wiederzugebende Datei auswählen und den Pegel durch Drehen des Reglers Level (Pegel) einstellen.
+18
+12
+6
0
-6
-12
-18
125HzMenu
Master EQ Preferences
Level
1. Den Regler Left/Right (Links/Rechts) drehen und eine Quelle markieren.
2. Die Quelle durch Drücken auf Select (Auswählen) bestätigen oder den
Vorgang durch Drücken auf Cancel (Abbrechen) ohne Änderungen
abbrechen.
3. Den Regler Menu (Menü) drehen und zur Menüliste „Prefs“
(Systemeinstellungen) zurückkehren.
Left : Master
Right : Master
LeftMenu
USB to PC Preferences
Right
Left : Master
Right : Master
LeftMenu
USB from PC Preferences
Right
1. Den Regler Left/Right (Links/Rechts) drehen und ein Ziel markieren.
2. Das Ziel durch Drücken auf Select (Auswählen) bestätigen oder den
Vorgang durch Drücken auf Cancel (Abbrechen) ohne Änderungen
abbrechen.
3. Den Regler Menu (Menü) drehen und zur Menüliste „Prefs“
(Systemeinstellungen) zurückkehren.
Tomorrow Is Too late.wav
Sarah.wav
Mistakes for Love.mp3
Sun Behind the Clouds.wav
Hey God Maker. mp3
LevelSelectMenu

30– Deutsch
Bedienung
• Versions (Versionen): Versionsstand der DSP-Firmware.
• ToneMatch: Liste der im T4S/T8S gespeicherten ToneMatch Presets. Die aktuellen Preset-Speicherbanken sind
unter www.Bose.com/livesound zu finden.
• L1 Power Stand (L1 Standfuß): Wenn das System an einen Standfuß des L1® Model1S/II angeschlossen ist, wird
die Meldung Connected (Verbunden) im Display angezeigt.
Versions
T4S v1.0.0
Menu
Preferences
C: Ovation Guitars
B: Audix Mics.
A: Taylor Guitars
Menu
ToneMatchPreferences
Connected
Menu
L1 Stand Preferences
Szenen laden und speichern
Eine Szene ist eine Momentaufnahme mit den kompletten Einstellungen des T4S/T8S ToneMatch® Mischpults.
• Eine Szene umfasst alle ToneMatch Mischpulteinstellungen sowie den Status der Tasten Stummschaltung, Eekt-
Stummschaltung und CH-Bearbeitung.
• Kanal-Trim, Kanallautstärke, Masterlautstärke, Kopfhörerpegel sowie die Stellung des Phantomspeisungsschalters
werden nicht in einer Szene festgehalten.
All Channels
Singer/Songwriter
Load Shared Save
Scenes
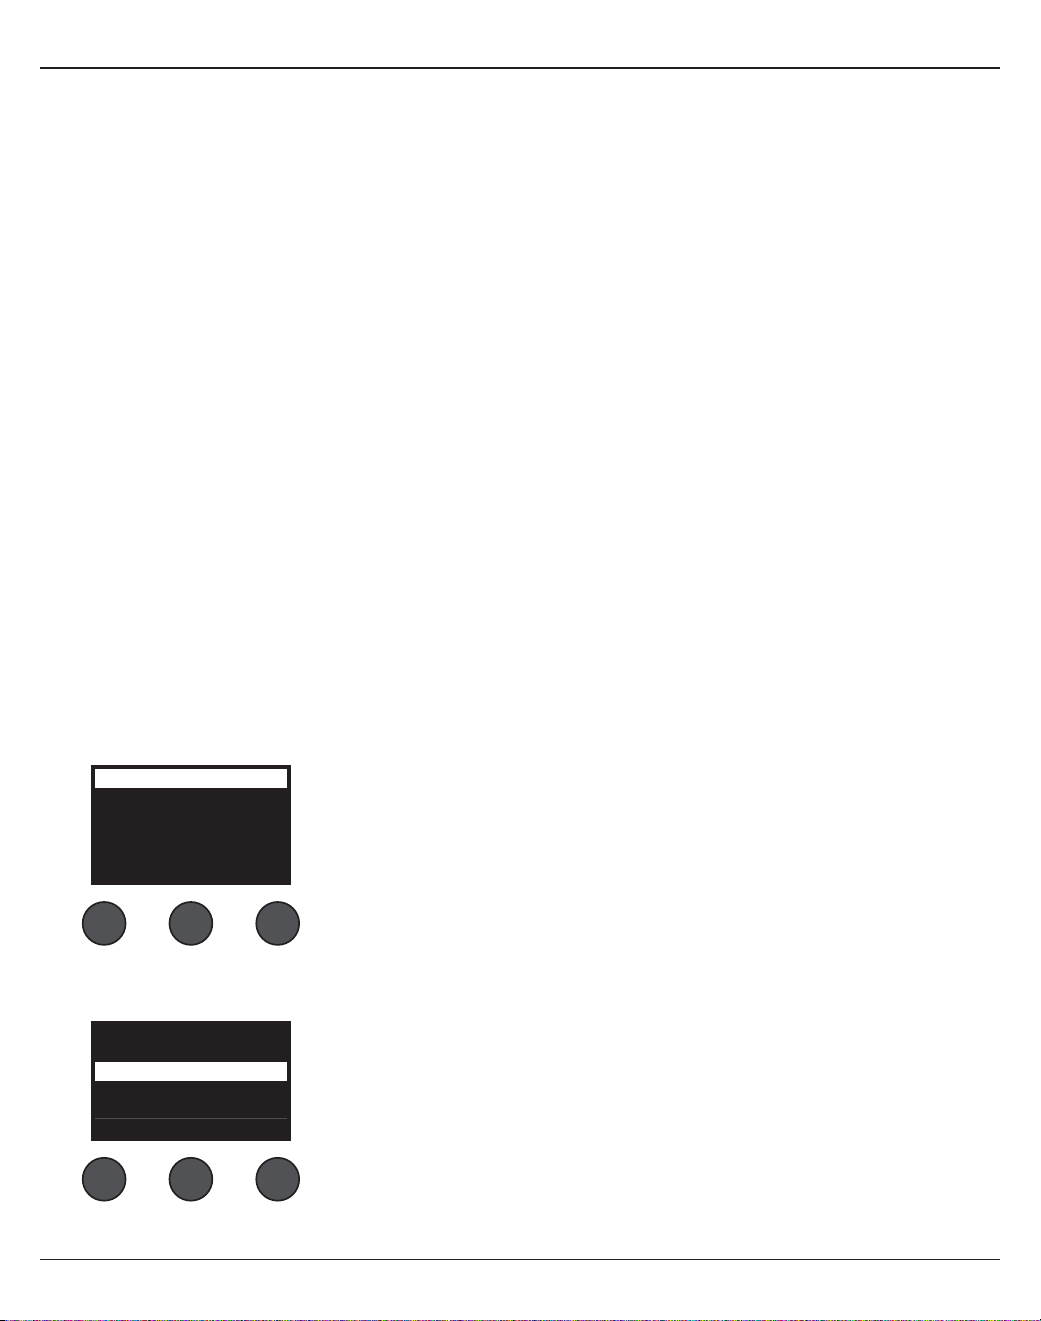
Bedienung
Deutsch– 31
Das T4S/T8S bietet drei Arten von Szenen:
• (5) Bose Szenen: Schreibgeschützte, werkseitig voreingestellte Szenen. Diese Szenen können weder bearbeitet
noch überschrieben werden.
• (10) Benutzerspezifische Szenen: Benutzerdefinierbare Szenen, in denen die am häufigsten verwendeten
Einstellungen gespeichert und abgerufen werden können. Diese Szenen lassen sich beliebig oft überschreiben
(aktualisieren).
• (1) Freigegebene Szene: Benutzerdefinierbare Szene für Einstellungen, die an andere Benutzer mit einem T4S/T8S
ToneMatch® Mischpult weitergegeben werden können. Diese Szene kann über die L1® Updater Software (unter www.
Bose.com/livesound erhältlich) auf einen Computer hochgeladen werden.
So wird eine Szene geladen:
1. Die Option Scenes (Szenen) mit dem Drehregler auswählen.
2. Den Regler Load (Laden) drehen und den Namen der gewünschten Szene in der Liste markieren. Der Name der
derzeit geladenen Szene wird in fetter Schrift angezeigt.
3. Die Szene durch Drücken auf Select (Auswählen) bestätigen oder die Liste durch Drücken auf Cancel
(Abbrechen) ohne Änderungen an der Einstellung schließen.
Hinweis: Wenn der Regler Select (Auswählen) oder Cancel (Abbrechen) nicht innerhalb von 10Sekunden gedrückt
wird, kehrt das Display wieder zum Bildschirm „Scenes“ (Szenen) zurück. Es wird keine Änderung vorgenommen, und
die derzeit geladene Szene wird im Bildschirm angezeigt.
4. Wenn „Select“ (Auswählen) gedrückt wurde, wird die Frage „Are you sure?“ (Sind Sie sicher?) eingeblendet.
Die Szene durch Drücken auf Yes (Ja) laden oder den Vorgang durch Drücken auf Cancel (Abbrechen) ohne
Änderungen an der Szeneneinstellung abbrechen.
Hinweis: Wenn der Regler Yes (Ja) oder No (Nein) nicht innerhalb von 10Sekunden gedrückt wird, kehrt das Display
wieder zum Bildschirm „Scenes“ (Szenen) zurück. Es wird keine Änderung vorgenommen, und die derzeit geladene
Szene wird im Bildschirm angezeigt.
So wird eine Szene gespeichert:
1. Die Option Scenes (Szenen) mit dem Drehregler auswählen. Die derzeit geladene Szene wird angezeigt.
2. Den Regler Save (Speichern) drehen und die zu speichernde Szene markieren. Die Auswahl mit Select
(Auswählen) bestätigen oder die Liste mit Cancel (Abbrechen) schließen.
All Channels
Singer/Songwriter
Load Shared Save
Scenes
Hinweis: Wenn der Regler Select (Auswählen) oder Cancel (Abbrechen)
nicht innerhalb von 10Sekunden gedrückt wird, kehrt das Display wieder zum
Bildschirm „Scenes“ (Szenen) zurück. Es wird keine Änderung vorgenommen,
und die derzeit geladene Szene wird im Bildschirm angezeigt.
My Scene 01
My Scene 02
My Scene 03
Cancel Select
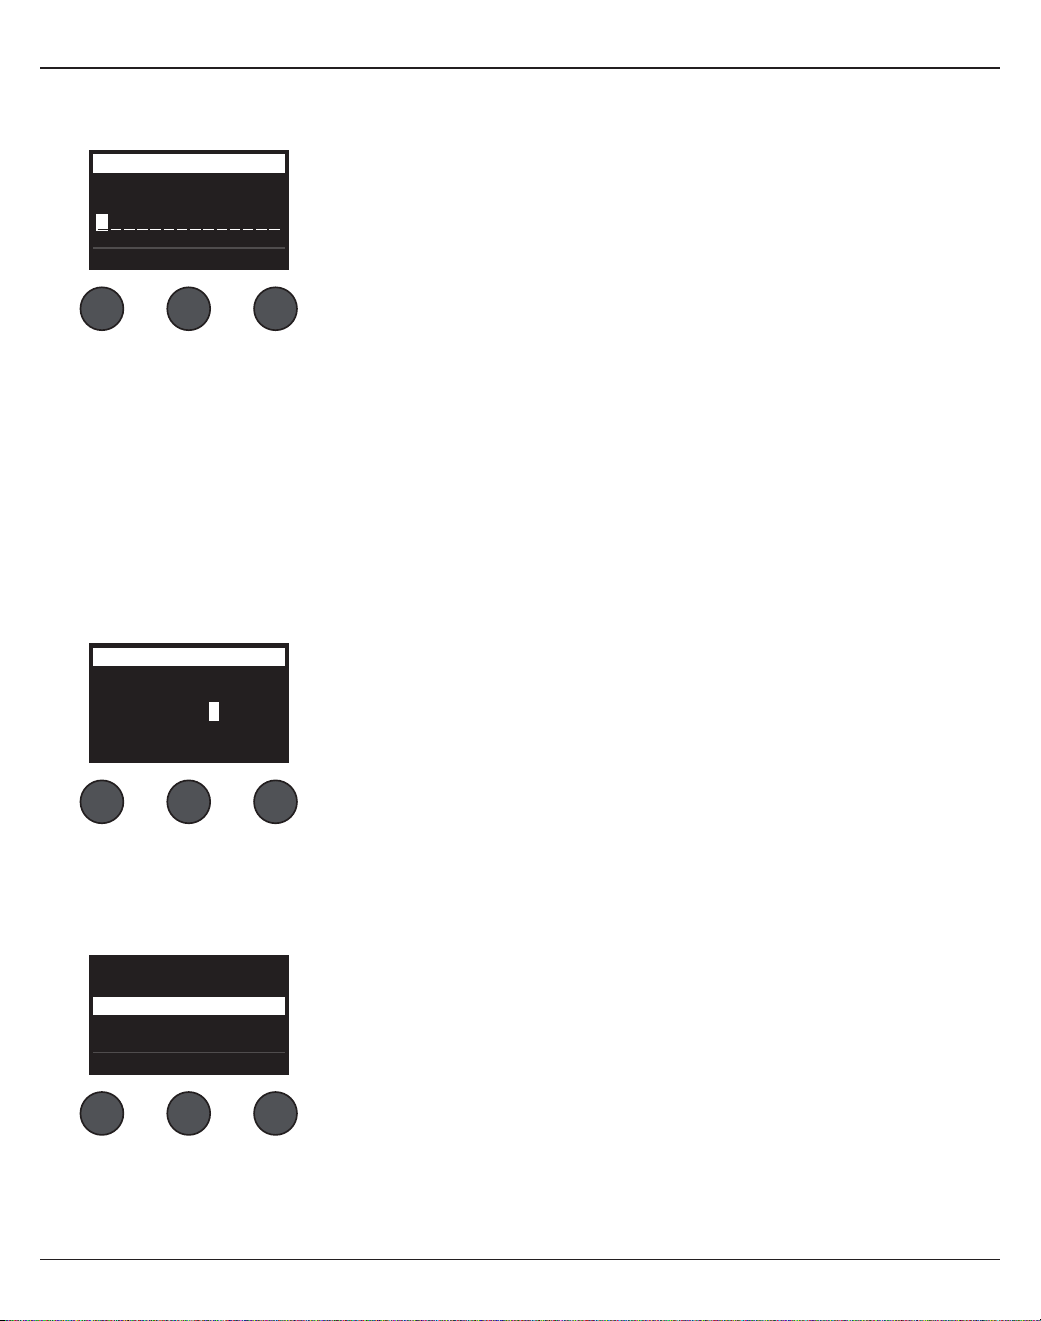
32– Deutsch
Bedienung
3. Wenn Select (Auswählen) gedrückt wurde, den Namen der Szene im Bildschirm „Rename“ (Umbenennen)
ändern. Alternativ Save (Speichern) drücken, den Namen unverändert übernehmen und mit Schritt4 fortfahren.
So wird der Szenenname vor dem Speichern geändert:
Der Szenenname kann mit den nachfolgenden Bearbeitungsoptionen geändert werden. Anschließend den Regler
„Save“ (Speichern) drücken und mit Schritt4 fortfahren.
• Zeichen auswählen und ändern: Im Bildschirm „Rename“ (Umbenennen) den Regler Cursor drehen und das zu
ändernde Zeichen oder die zu ändernde Zeichenposition markieren. Den Regler Select (Auswählen) drehen und das
Zeichen ändern.
• Zeichentabelle: Im Bildschirm „Rename“ (Umbenennen) den Regler Cursor drehen und das zu ändernde Zeichen
markieren. Den Regler Select (Auswählen) drücken. Die Zeichentabelle wird angezeigt. Durch Drehen des Reglers
Select (Auswählen) bewegt sich der Cursor nach links oder rechts. Durch Drehen des Reglers Up/Dn (Nach oben/
unten) bewegt sich der Cursor nach oben oder unten. Das gewünschte Zeichen markieren und Select (Auswählen)
drücken. Das Zeichen wird an der ausgewählten Position übernommen.
• Funktionen zum Entfernen, Einfügen und Löschen: Im Bildschirm „Rename“ (Umbenennen) den Regler Cursor
drehen und den Cursor an die gewünschte Position bringen. Den Regler Cursor drücken. Ein Menü mit besonderen
Bearbeitungsfunktionen wird eingeblendet. Den Regler Select (Auswählen) drehen und die gewünschte Funktion
markieren. Den Regler Select (Auswählen) drücken. Die Funktion wird ausgeführt.
Clear Character (Zeichen entfernen): Das mit dem Cursor markierte Zeichen wird
durch ein Leerzeichen ersetzt.
Clear All (Alle entfernen): Die gesamte Textzeile wird entfernt.
Clear to End (Bis zum Ende entfernen): Der gesamte Text rechts vom Cursor (auch
das markierte Zeichen) wird entfernt.
Insert (Einfügen): Links vom markierten Zeichen wird ein Leerzeichen eingefügt.
Delete (Löschen): Das mit dem Cursor markierte Zeichen und Leerzeichen werden
entfernt.
Rename
J
rstuvwxyzABCDEFGHI
123456789, ;/\()|+-
KLMNOPQRSTU VWXYZ0
abcdefgh jklmnopqi
Cancel Up/Dn Select
Scenes
Clear To End
Insert
Clear All
Clear Character
Delete
CancelSelect
Rename
M yScene 01
CursorSave Select
Scenes

Bedienung
Deutsch– 33
4. Die Frage „Are you sure?“ (Sind Sie sicher?) wird eingeblendet. Die Szene durch Drücken auf Yes (Ja) speichern
oder den Vorgang mit No (Nein) ohne Speichern der Szene abbrechen.
Eine Szene teilen
Soll eine erstellte Szene an einen anderen Benutzer mit T4S/T8S ToneMatch® Mischpult weitergegeben werden,
diese Szene als freigegebene Szene unter [To Shared Scene] (Freigegebene Szene) speichern. Mit dem L1® Updater
die freigegebene Szene auf den Computer hochladen und dann die Datei an den Computer eines anderen T4S/
T8S Benutzers übertragen. Der andere T4S/T8S Benutzer kann die Szene mit dem L1 Updater auf das T4S/T8S
herunterladen. Der L1 Updater ist unter www.Bose.com/livesound zu finden.
So wird eine freigegebene Szene gespeichert:
1. Die freizugebende Szene laden (siehe „So wird eine Szene geladen“ auf Seite31).
2. Den Regler Save (Speichern) drücken. Die Szenenliste wird eingeblendet.
3. Den Regler Select (Auswählen) drehen und die Option [To Shared Scene] (Freigegebene Szene) markieren. Die
Auswahl mit Select (Auswählen) bestätigen oder die Liste mit Cancel (Abbrechen) schließen.
4. Wenn Select (Auswählen) gedrückt wurde, den Namen der Szene im Bildschirm „Rename“ (Umbenennen)
ändern (siehe „So wird der Szenenname vor dem Speichern geändert“ auf Seite32). Soll der bisherige Name
beibehalten werden, stattdessen mit Schritt5 fortfahren.
Are You Sure?
YesNo
Hinweis: Wenn der Regler Select (Auswählen) oder Cancel (Abbrechen)
nicht innerhalb von 10Sekunden gedrückt wird, kehrt das Display wieder zum
Bildschirm „Scenes“ (Szenen) zurück. Es wird keine Änderung vorgenommen, und
die derzeit geladene Szene wird im Bildschirm angezeigt.
[To Shared Scene]
My Scene 10
My Scene 09
Cancel Select
Rename
M yScene 07
CursorSave Select
Scenes
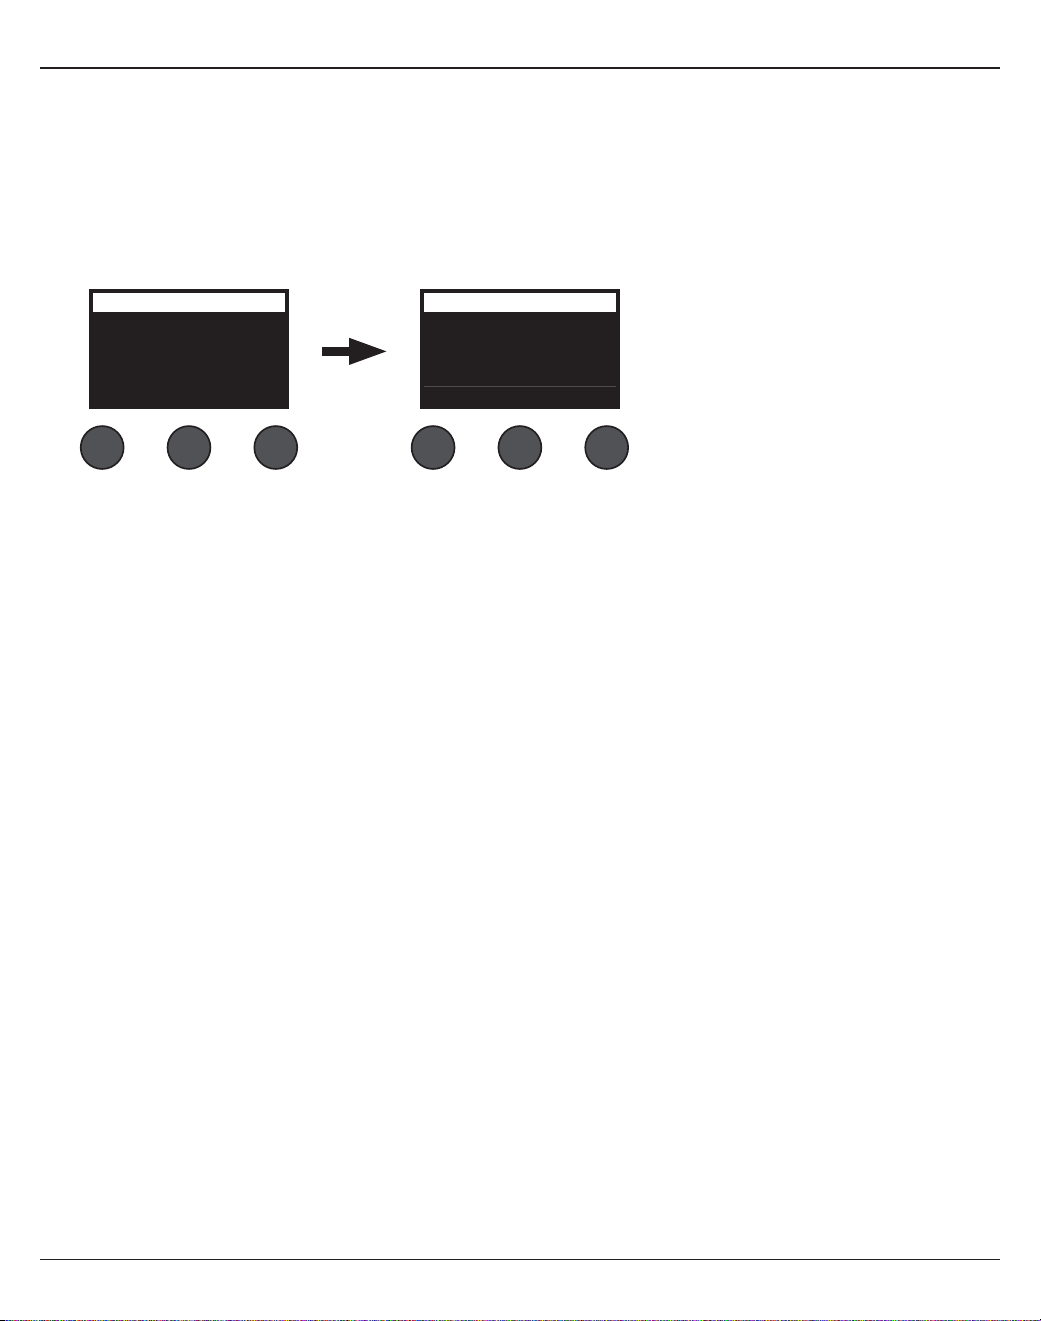
34– Deutsch
Bedienung
5. Den Regler Save (Speichern) drücken. Die Szene wird als freigegebene Szene gespeichert.
6. Die Frage „Are you sure?“ (Sind Sie sicher?) wird eingeblendet. Die Szene durch Drücken auf Yes (Ja) speichern
oder den Vorgang mit No (Nein) ohne Speichern der Szene als freigegebene Szene abbrechen.
Hinweis: Wenn der Regler Yes (Ja) oder No (Nein) nicht innerhalb von 10Sekunden gedrückt wird, kehrt das Display
wieder zum Bildschirm „Scenes“ (Szenen) zurück. Es wird keine Änderung vorgenommen, und die derzeit geladene
Szene wird im Bildschirm angezeigt.
7. Den Regler Shared (Freigegeben) drücken, um zu bestätigen, dass die Szene als freigegebene Szene
gespeichert wird.
Hinweis: Das T4S/T8S bietet nur einen einzigen Speicherplatz für eine freigegebene Szene. Sobald eine Szene als
freigegebene Szene gespeichert wird, wird die zuvor gespeicherte freigegebene Szene überschrieben.
Weitere Informationen zur L1® Updater Anwendung zum Herunterladen von Szenen vom Computer sowie zum
Hochladen von Szenen auf den Computer sind unter www.Bose.com/livesound zu finden.
All Channels
Singer/Songwriter
Load Shared Save
Scenes All Channels
My Scene 07
Current Shared Scene:
Back
Scenes
Drücken

Bedienung
Deutsch– 35
Bose Szenen
Die fünf Bose Szenen dienen als Beispiele und Ausgangspunkt. Nach dem Laden einer Bose Szene ist es möglich, die
Einstellungen zu ändern und die Szene dann als eigene oder freigegebene Szene zu speichern.
Werkseinstellungen
Diese Szene setzt das Mischpult auf die Einstellungen zurück, die im Werk festgelegt wurden. Wenn diese Szene
geladen wird, werden alle Änderungen an der derzeit geladenen Szene aufgehoben.
CH 1–4 (T4S/T8S), CH 5–8 (T8S)
ToneMatch
Aktiv
Utility
Flat
zEQ
Bypass
Niedrig Mittel Hoch
0dB 0dB 0dB
Para-EQ
Bypass
Kompressor/
Gate
Bypass
Chorus1
Mod
Bypass
Chorus1
Delay
Bypass
Digital
Hall
Bypass
Digital
AUX
Mute
Vor: Mit EQ und Eekten
Globale Einstellungen
Systemeinstellungen
Aktiver Bildschirm Status
USB an PC Links/Rechts:Master
USB von PC Links/Rechts:Master
Masterausgang Post-Masterlautstärke
Halltyp
Typ Mittel
Uhrzeit 50%
Balance 50%
Hinweis: Eine Liste der Werkseinstellungen für alle Eekte ist unter „Werkseinstellungen“ auf Seite42 zu finden.

36– Deutsch
Bedienung
Singer/Songwriter
Diese Szene richtet sich an Singer/Songwriter, die Keyboard oder Gitarre spielen und sich gelegentlich von einem
MP3-Track begleiten lassen.
Abbildung16. Beispieleinrichtung für „Singer/Songwriter“
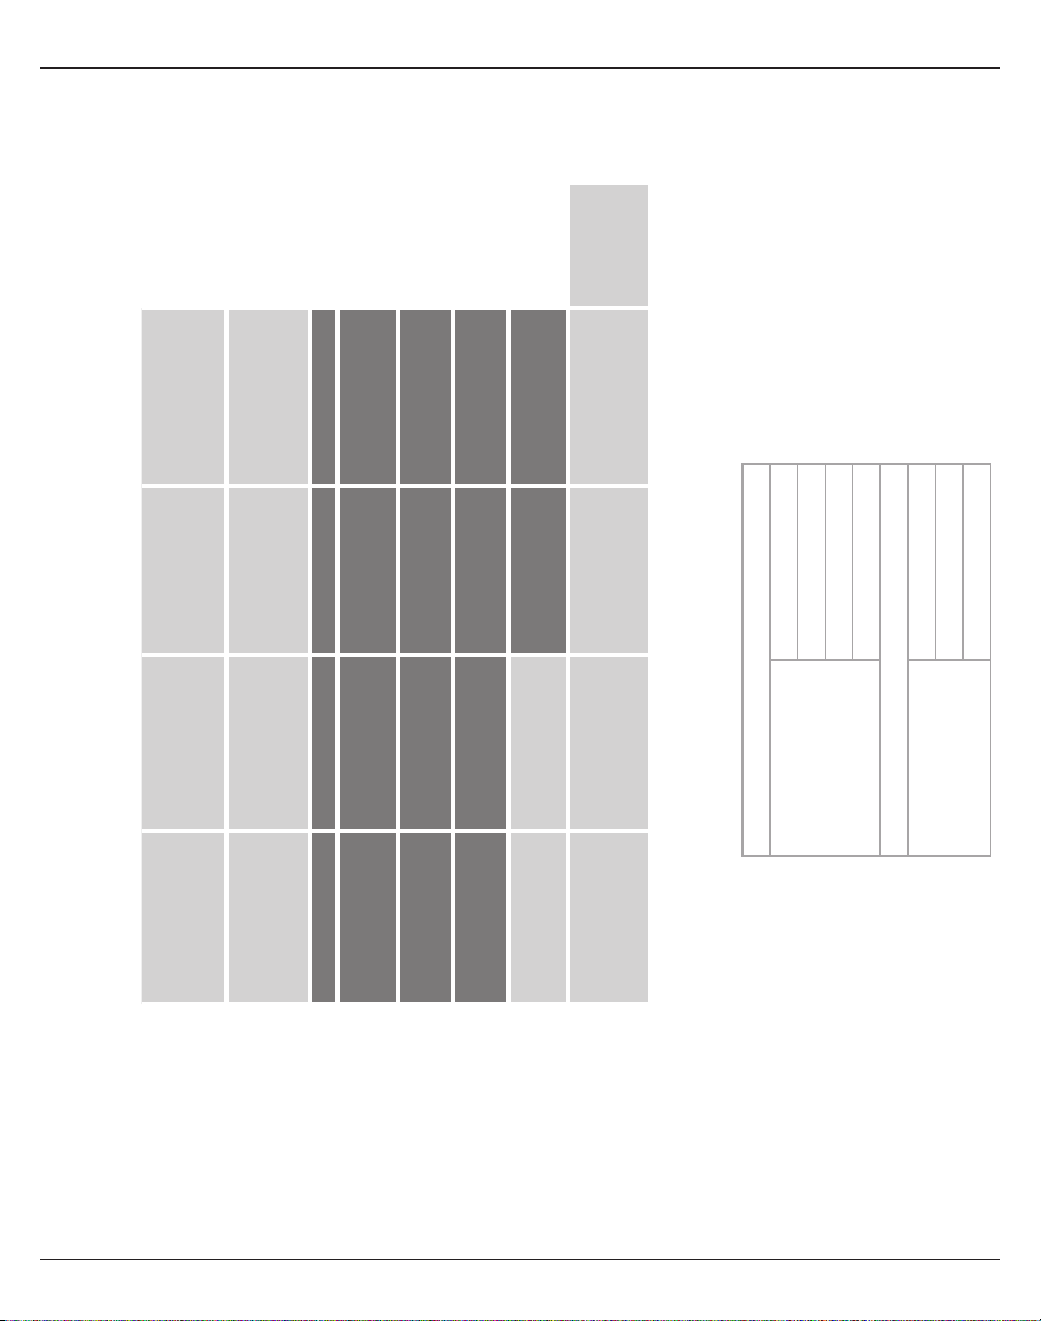
Bedienung
Deutsch– 37
Mikrofon Gitarre Keyboard Bass AUX In
CH1 CH2 CH3 CH4 5/6
ToneMatch
Aktiv Aktiv Aktiv Aktiv
k.A.
Sprachmikrofone Akustikgitarre Keyboards Bässe
Handmikrofone Stahlsaite mit Piezo Allgemeine Tasten Aktiver Bass 1
zEQ
Aktiv Aktiv Aktiv Aktiv
k.A.
Niedrig Mittel Hoch Niedrig Mittel Hoch Niedrig Mittel Hoch Niedrig Mittel Hoch
0dB 0dB 0dB 0dB 0dB 0dB 0dB 0dB 0dB 0dB 0dB 0dB
Para-EQ Bypass Bypass Bypass Bypass k.A.
Kompressor/
Gate
Bypass Bypass Bypass Bypass
k.A.
Kompressor2 Kompressor2 Kompressor2 Kompressor2
Mod
Bypass Bypass Bypass Bypass
k.A.
Chorus1 Chorus1 Chorus3 Chorus1
Delay
Bypass Bypass Bypass Bypass
k.A.
Digital Digital Digital Digital
Hall
Aktiv Aktiv Bypass Bypass
k.A.
Mittel (Global) Mittel (Global) Mittel (Global) Mittel (Global)
Pan/AUX
Center Center Center Center AUX In
AUX 1–2 50% AUX 1–2 50% AUX 1–2 50% AUX 1–2 50% Pegel5 Pegel6
Vor: Mit EQ und Eekten Vor: Mit EQ und Eekten Vor: Mit EQ und Eekten Vor: Mit EQ und Eekten 50% 50%
Kanaleinstellungen für Szene „Singer/Songwriter“
Globale Einstellungen
Systemeinstellungen
Aktiver Bildschirm Status
USB an PC Links/Rechts:Master
USB von PC Links/Rechts:Master
Masterausgang Post-Masterlautstärke
Halltyp
Typ Mittel
Uhrzeit 50%
Balance 50%

38– Deutsch
Bedienung
DJ/Wiedergabe
Die Szene DJ/Wiedergabe eignet sich für DJ-Veranstaltungen und die allgemeine Audiowiedergabe. Diese
Einrichtung umfasst zwei Mikrofone sowie entweder ein Mobilgerät, ein Mischpult oder einen Laptop.
Abbildung17. Beispieleinrichtung für DJ/Wiedergabe in Stereo
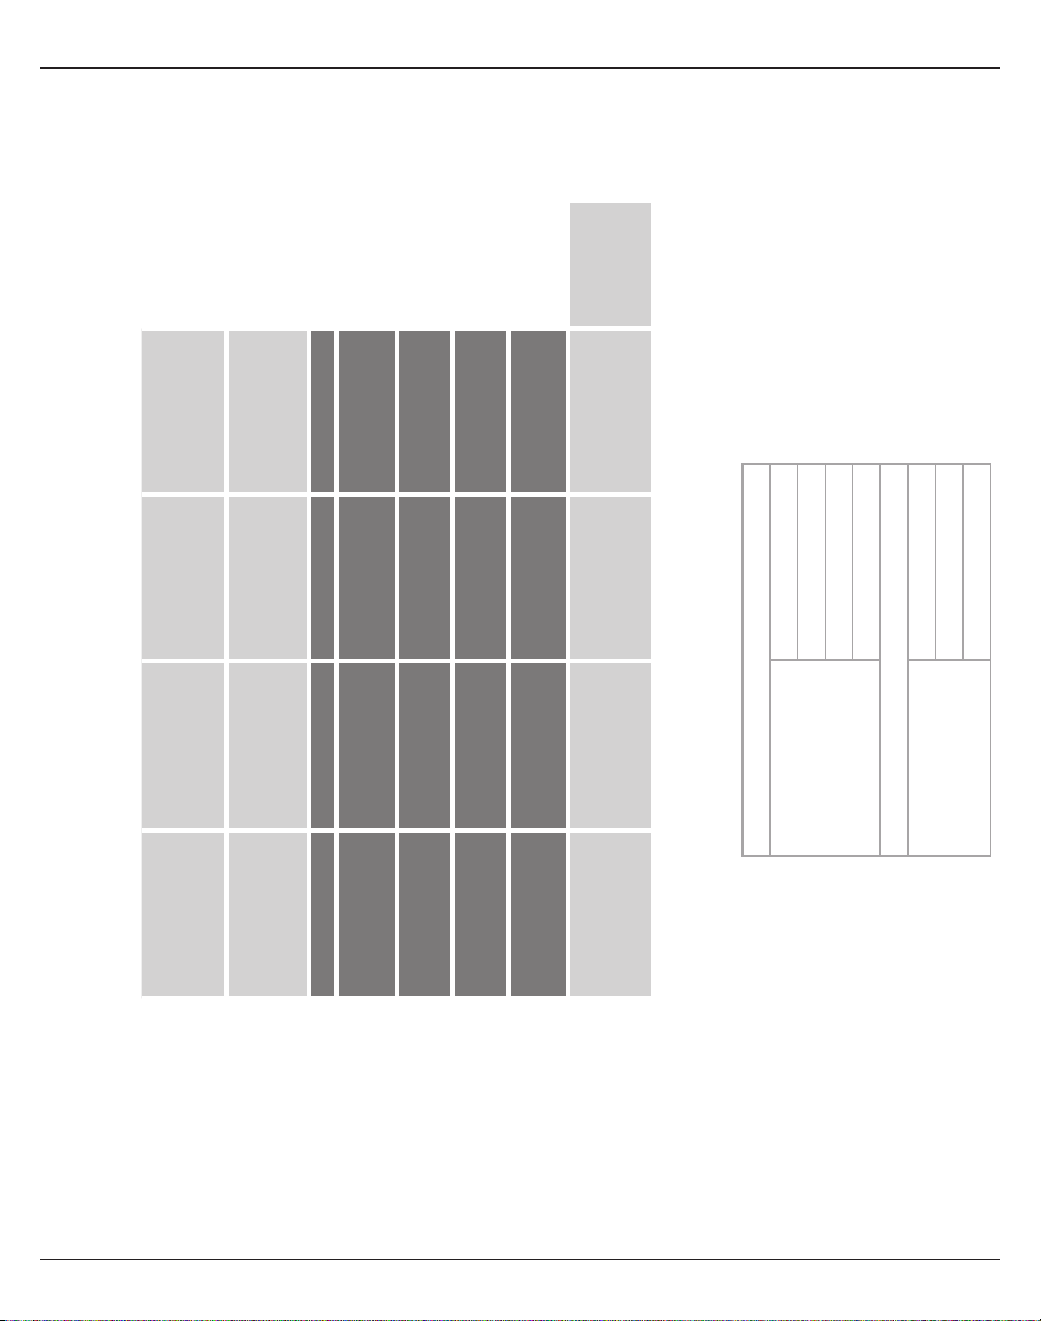
Bedienung
Deutsch– 39
Kanaleinstellungen für Szene DJ/Wiedergabe
Globale Einstellungen
Systemeinstellungen
Aktiver Bildschirm Status
USB an PC Links/Rechts:Master
USB von PC Links/Rechts:Master
Masterausgang Post-Masterlautstärke
Halltyp
Typ Mittel
Uhrzeit 50%
Balance 50%
Quelle1 links Quelle1 rechts Mikrofon Mikrofon AUX In
CH1 CH2 CH3 CH4 5/6
ToneMatch
Aktiv Aktiv Aktiv Aktiv
k.A.
DJ/Wiedergabe DJ/Wiedergabe Sprachmikrofone Sprachmikrofone
Flat, zEQ-Steuerungen Flat, zEQ-Steuerungen Handmikrofone Handmikrofone
zEQ
Aktiv Aktiv Aktiv Aktiv
k.A.Niedrig Mittel Hoch Niedrig Mittel Hoch Niedrig Mittel Hoch Niedrig Mittel Hoch
0dB 0dB 0dB 0dB 0dB 0dB 0dB 0dB 0dB 0dB 0dB 0dB
Para-EQ Bypass Bypass Bypass Bypass k.A.
Kompressor/
Gate
Bypass Bypass Bypass Bypass
k.A.
Limit Limit Kompressor2 Kompressor2
Mod
Bypass Bypass Bypass Bypass
k.A.
Chorus1 Chorus1 Chorus3 Chorus1
Delay
Bypass Bypass Bypass Bypass
k.A.
Digital Digital Digital Digital
Hall
Bypass Bypass Bypass Bypass
k.A.
Mittel (Global) Mittel (Global) Mittel (Global) Mittel (Global)
Pan/AUX
Links Rechts Center Center AUX In
AUX 1–2 50% AUX 1–2 50% AUX 1–2 50% AUX 1–2 50% Pegel5 Pegel6
Vor: Mit EQ und Eekten Vor: Mit EQ und Eekten Vor: Mit EQ und Eekten Vor: Mit EQ und Eekten 50% 50%

40– Deutsch
Bedienung
Ganze Band
Diese Szene ist für Schlagzeug, Bassgitarre, E-Gitarre, Stimmen und MP3-Player ausgelegt.
Abbildung18. Beispieleinrichtung für Schlagzeug und Bass
SYSTEMINPUT 2INPUT 1
VOLUME VOLUME
FRONT
LED
POWER
LIMIT
OFF
FULL RANGE
WITH SUB
EQ
MIC
LINE LEVEL
SIGNAL INPUT
INPUT
POWER
ON
OFF
100-240V~50/60Hz
1000W
LINE OUTPUT
SIGNAL/CLIP SIGNAL/CLIP POWER/FAULT
LIMIT
SYSTEM
INPUT 2INPUT 1
LINE OUTPUT LINE OUTPUT
LINE INPUT
POWER/FAULT
LIMIT
SIGNAL/CLIP
LINE INPUT
NORM
REV
THRU
HPF
POLARITY
LINE
OUTPUT EQ
POWER
LIMIT
OFF
FRONT
LED
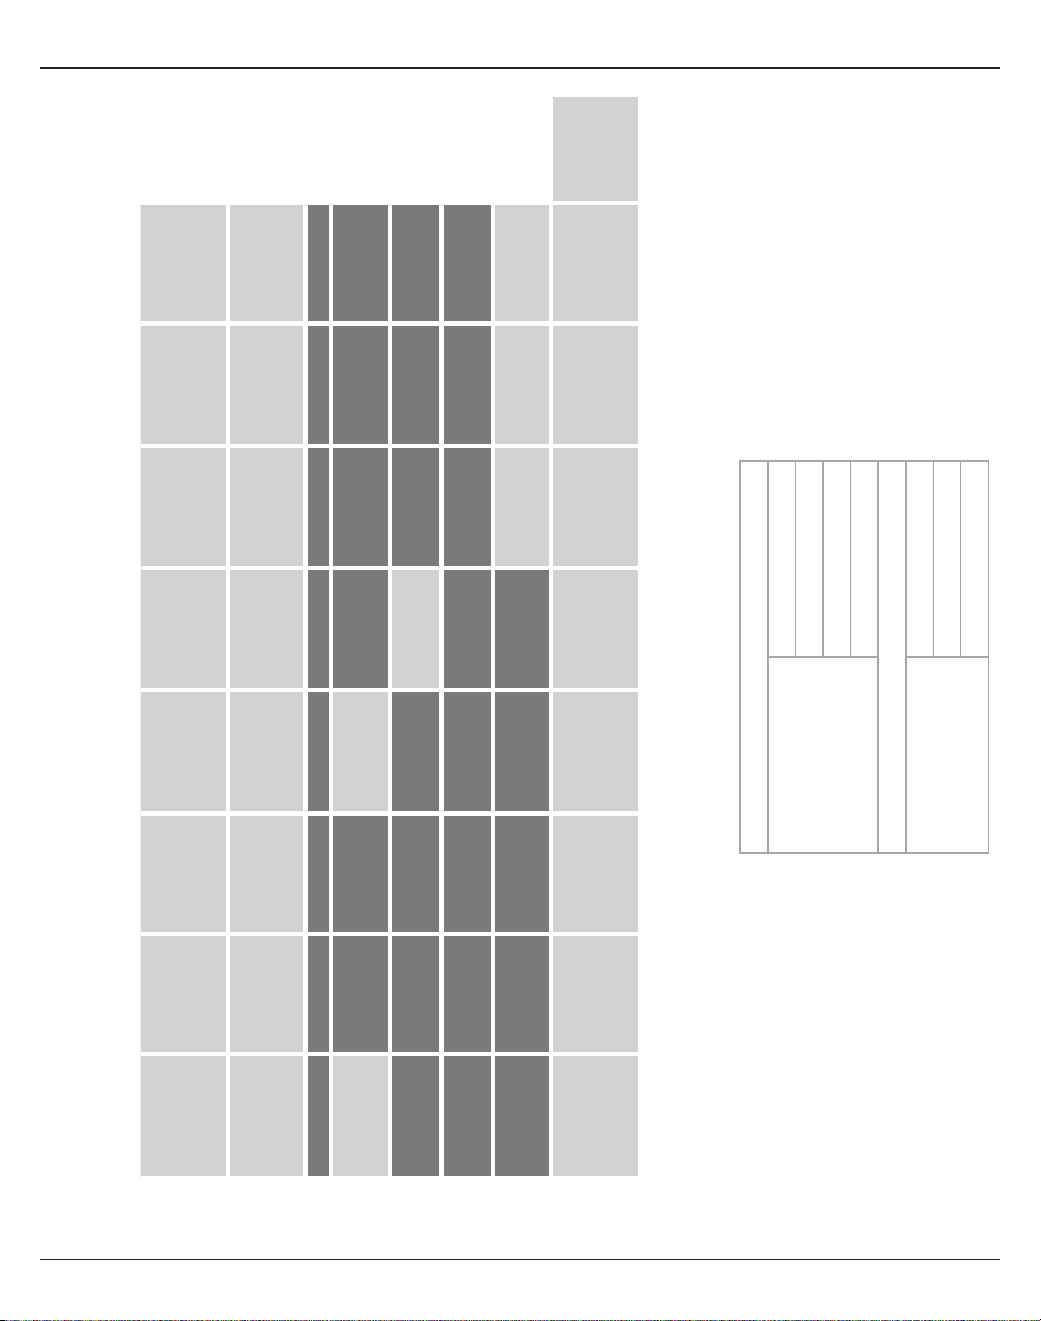
Bedienung
Deutsch– 41
Kanaleinstellungen für Szene Ganze Band
Globale Einstellungen
Systemeinstellungen
Aktiver Bildschirm Status
USB an PC Links/Rechts:Master
USB von PC Links/Rechts:Master
Masterausgang Post-Masterlautstärke
Halltyp
Typ Mittel
Uhrzeit 50%
Balance 50%
Bassdrum Overhead Overhead Bass Gitarre Mikrofon Mikrofon Mikrofon AUX In
CH1 CH2 CH3 CH4 CH5 CH6 CH7 CH8 9/10
ToneMatch
Aktiv Aktiv Aktiv Aktiv Aktiv Aktiv Aktiv Aktiv
k.A.
Percussion Percussion Percussion Bässe E-Gitarren Sprachmikrofone Sprachmikrofone Sprachmikrofone
Kick, allgemein Overhead allgemein Overhead allgemein Aktiver Bass 1 Verstärker mit Mikrofon
SM57
Handmikrofone Handmikrofone Handmikrofone
zEQ
Aktiv Aktiv Aktiv Aktiv Aktiv Aktiv Aktiv Aktiv
k.A.L M H L M H L M H L M H L M H L M H L M H L M H
0dB 0dB 0dB 0dB 0dB 0dB 0dB 0dB 0dB 0dB 0dB 0dB 0dB 0dB 0dB 0dB 0dB 0dB 0dB 0dB 0dB 0dB 0dB 0dB
Para-EQ Bypass Bypass Bypass Bypass Bypass Bypass Bypass Bypass k.A.
Kompressor/
Gate
Aktiv Bypass Bypass Aktiv Bypass Bypass Bypass Bypass
k.A.
Kick1 Kompressor2 Kompressor2 Kompressor2 Kompressor2 Gate Gate Gate
Mod
Bypass Bypass Bypass Bypass Aktiv Bypass Bypass Bypass
k.A.
Chorus1 Chorus1 Chorus1 Chorus1 Chorus1 Chorus1 Chorus1 Chorus1
Delay
Bypass Bypass Bypass Bypass Bypass Bypass Bypass Bypass
k.A.
Digital Digital Digital Digital Digital Digital Digital Digital
Hall
Bypass Bypass Bypass Bypass Bypass Aktiv Aktiv Aktiv
k.A.
Mittel (Global) Mittel (Global) Mittel (Global) Mittel (Global) Mittel (Global) Mittel (Global) Mittel (Global) Mittel (Global)
Pan/AUX
Center Center Center Center Center Center Center Center AUX In
AUX 1–4 50% AUX 1–4 50% AUX 1–4 50% AUX 1–4 50% AUX 1–4 50% AUX 1–4 50% AUX 1–4 50% AUX 1–4 50% Pegel9 Pegel10
Trocken: Nach
Vorverstärkung
Trocken: Nach
Vorverstärkung
Trocken: Nach
Vorverstärkung
Trocken: Nach
Vorverstärkung
Trocken: Nach
Vorverstärkung
Trocken: Nach
Vorverstärkung
Trocken: Nach
Vorverstärkung
Trocken: Nach
Vorverstärkung
50% 50%
Werkseinstellungen
42– Deutsch
Werkseinstellungen
In diesem Abschnitt werden die Einstellungen des T4S/T8S Mischpults beschrieben, die im Werk festgelegt wurden.
Diese Werkseinstellungen auf dem T4S/T8S können jederzeit wiederhergestellt werden. Hierzu die Szene „Bose
Factory Settings“ (Bose Werkseinstellungen) laden.
Werkseinstellungen: Kompressor/Gate
Typ Schwelle Verstärkung
Kompressor1: Leicht -16,0dB 3,0dB
Kompressor2: Mittel -16,0dB 5,0dB
Kompressor3: Schwer -16,0dB 8,0dB
Limiter -10,0dB 0dB
De-Esser -10,0dB 0dB
Schwelle Geschwindigkeit
Noise Gate -70,0dB 50%
Schwelle Straheit
KickGate1: Normal -20,0dB 100%
KickGate2: Schnell -20,0dB 100%
Werkseinstellungen: „Modulator“
Typ Schwelle Verstärkung Geschwindigkeit
Chorus1: Strahlend 50% 50% 0,50 Hz
Chorus2: Warm 70% 100% 0,15 Hz
Chorus3: Dunkel 25% 25% 3,0 Hz
Flanger1: Band 50% 50% 1,00 Hz
Flanger2:
Rückkopplung
50% 100% 2,00 Hz
Geschwindigkeit Feedback
Phaser1: Stampfen 0,50 Hz 0%
Phaser1: Rack 0,50 Hz -75%
Phaser1: Warm 1,00 Hz -26%
Phaser1: Strahlend 0,50 Hz -76%
Geschwindigkeit Tiefe
Tremolo 5,00 Hz 50%
Werkseinstellungen: Delay
Typ Mix Zeit Feedback
Digital 30% 150 ms 30%
analog 30% 275ms 20%
Band 30% 350ms 30%
Werkseinstellungen: Halltyp
Typ Balance Zeit Time Range
(Zeitraum)
Plate (Platte) 50% 20% 0–4,6s
Klein 50% 15% 0–0,8s
Mittel 50% 25% 0–1,9s
Groß 50% 50% 0–3,5s
Höhle 50% 100% 0–7,0s

Deutsch– 43
Pflege und Wartung
Fehlerbehebung
Falls Probleme mit dem Gerät auftreten, die nachfolgenden Lösungsvorschläge beachten. Kann das Problem
nicht behoben werden, sehen Sie zunächst in der Online-Hilfe unter www.Bose.com/livesound nach. Sollten hier
keine Antworten zu finden sein, können Sie sich an den Kundendienst und technischen Support von Bose unter
+4969667786793 wenden.
Problem Lösung
Das T4S/T8S ist an
die Netzsteckdose
angeschlossen, und
der Ein/Aus-Schalter
ist eingeschaltet. Das
System wird jedoch
nicht mit Strom versorgt.
• Funktionsfähigkeit und richtige Montage der Netzsteckdose prüfen. Eine Leuchte oder
ein anderes Gerät an die Netzsteckdose anschließen oder die Netzsteckdose mit einem
Spannungsprüfer testen.
Bei Verwendung des T4S mit einem L1® ModelII oder 1S System:
• Anschluss des ToneMatch® Kabels am Mischpult und am L1 Standfuß prüfen.
• Anschluss des Netzkabels am Standfuß und an der Netzsteckdose prüfen.
• Prüfen, ob der L1 Standfuß eingeschaltet ist und die Betriebsanzeige blau leuchtet.
Das T4S/T8S ist
eingeschaltet. Es ist
jedoch kein Klang zu
hören.
• Prüfen, ob die Masterlautstärkeregelung richtig eingestellt ist.
• Prüfen, ob der oder die gewünschten Eingangskanäle stummgeschaltet sind.
• Prüfen, ob die Lautstärkeregelung für den gewünschten Kanal richtig eingestellt ist.
• Prüfen, ob der Trimregler für den entsprechenden Kanal so eingestellt ist, dass die LED
grün leuchtet (also ein ausreichendes Eingangssignal anliegt).
• Eingangs- und Ausgangspegelanzeigen unter „Prefs“ (Systemeinstellungen) prüfen, ob ein
Signal sowohl am Eingang als auch am Ausgang anliegt.
• Prüfen, ob die Lautstärkeregelung an der Eingangsquelle (Instrument) richtig eingestellt ist.
• Die Eingangsquelle (Instrument) über ein anderes Kabel an das Mischpult anschließen.
• Die Eingangsquelle (Instrument) direkt an den L1 Standfuß oder an einen anderen
Verstärker anschließen und die Funktionsfähigkeit der Quelle prüfen.
• Das Mischpult ausschalten. 30Sekunden abwarten und das Mischpult wieder einschalten.
Bei Verwendung des T4S mit einem L1 ModelII oder 1S System:
• Den Standfuß ausschalten. Das ToneMatch Kabel vom Standfuß trennen, erneut mit dem
ToneMatch Anschluss verbinden und den Standfuß wieder einschalten.
• Probeweise ein anderes ToneMatch Kabel anschließen. Falls kein anderes ToneMatch Kabel
verfügbar ist, ein handelsübliches Ethernet-Kabel anschließen.
• Den T4S/T8S Masterausgang über ein 6,35mm-Klinkenkabel am Analogeingang am
Standfuß anschließen. Den Trimregler des Standfußes einstellen und prüfen, ob ein Ton zu
hören ist.
• Prüfen, ob die Betriebsanzeige am Standfuß blau leuchtet. Wenn die LED rot leuchtet, den
Kundendienst und technischen Support von Bose unter +4969667786793 informieren.

44– Deutsch
Pflege und Wartung
Problem Lösung
Schlechte Klangqualität von
einem mit dem T4S/T8S
verbundenen Mikrofon oder
Instrument.
• Prüfen, ob eine unerwünschte zEQ oder Para-EQ-Entzerrung angewendet wird.
• Prüfen, ob das richtige ToneMatch® Mischpult-Preset für das Mikrofon/
Instrument ausgewählt wurde. Falls kein ToneMatch-Mischpult-Preset verwendet
werden soll, ToneMatch auf „Flat“ einstellen.
• Prüfen, ob unerwünschte Eekte (Kompressor/Gate, Mod, Delay, Hall) auf dem
Eingangskanal angewendet werden. Alle derzeit aktiven Eekte werden im
Menü „Prefs“ (Systemeinstellungen) unter „Status“ angezeigt.
• Prüfen, ob die T4S/T8S Eingangs-Trimregelung richtig für das Mikrofon/
Instrument eingestellt ist. Die Signalanzeige sollte grün leuchten. Falls die
Anzeige rot leuchtet, den Trimpegel vermindern, bis sie grün leuchtet.
• Probeweise ein anderes Mikrofon- oder Instrumentenkabel anschließen.
• Das Kabel zwischen dem Mikrofon/Instrument und dem T4S/T8S Mischpult
prüfen. Anschluss des Steckers am Mikrofon-/Instrumenten-Ausgangsanschluss
und am T4S/T8S Mischpult prüfen.
• Die Einstellungen (falls vorhanden) am Mikrofon oder Instrument prüfen.
• Die Batterien (falls vorhanden) im Instrument oder Mikrofon prüfen.
Es sind keine Eekte zu hören. • Prüfen, ob die richtige CH-Bearbeitungstaste gedrückt wurde.
• Prüfen, ob die Eekt-Stummschaltungstaste für den gewünschten Kanal
gedrückt wurde.
Das T4S/T8S reagiert nicht auf
die Regler.
• Das Mischpult ausschalten. 30Sekunden abwarten und das Mischpult wieder
einschalten.
Die Masterlautstärkeregelung ist
wirkungslos.
• Prüfen, ob der Masterausgang im Menü „Prefs“ (Systemeinstellungen)
unter „Master Out“ (Masterausgang) für „Post Master Volume“ (Post-
Masterlautstärke) konfiguriert wurde.
Am L1® System ist ein leises
Brummen oder Rauschen
hörbar, obwohl keine Geräte mit
den Eingangsanschlüssen des
T4S/T8S verbunden sind.
• Das T4S/T8S und den L1 Standfuß an dieselbe Netzsteckdose anschließen.
• Mit einem Phasenprüfer prüfen, ob die Kontakte (Phase, Neutral und/oder
Erdung) in der Netzsteckdose, an der das T4S/T8S und/oder der L1 Standfuß
angeschlossen ist, vertauscht oder nicht ordnungsgemäß verbunden sind.
• Ein eventuell verwendetes Verlängerungskabel ebenfalls wie beschrieben prüfen.
Zu starke (oder zu
schwache) Bass-, Mittel- oder
Hochfrequenzen.
• Prüfen, ob eine unerwünschte zEQ oder Para-EQ-Entzerrung angewendet wird.
• Prüfen, ob das richtige ToneMatch Mischpult-Preset für das Mikrofon/Instrument
ausgewählt wurde. Falls kein ToneMatch Mischpult-Preset verwendet werden
soll, ToneMatch in der Utility-Kategorie auf Flat einstellen.
Schlechte Wiedergabequalität
einer Stereoaufnahme über
einen CD-Player, einen MP3-
Player oder ein ähnliches Gerät.
• Den linken Kanal des Geräts am AUX-Eingang5 und den rechten Kanal am
AUX-Eingang6 (bzw. 9/10 am T8S) anschließen. Die AUX-Eingänge5/6 (bzw.
9/10) sind für Line-Pegel-Eingänge vorgesehen.
• Bei Verwendung eines CD-Players oder eines Mobilgeräts alle erweiterten
Bass- oder EQ-Funktionen deaktivieren.
• Bei Verwendung von Aufnahme-Software auf einem Computer die Software-
Mindestanforderungen prüfen. Unter Umständen müssen die Software-
Einstellungen für den Betrieb mit 48kHz/24Bit konfiguriert werden.

Deutsch– 45
Pflege und Wartung
Problem Lösung
Am Mikrofon treten
Rückkopplungen auf.
• Das Mikrofon so ausrichten, dass es nicht direkt auf den zugehörigen
Lautsprecher weist.
• Probeweise ein anderes Mikrofon anschließen.
• Das L1 System und/oder den Musiker auf der Bühne anders platzieren.
• Den Abstand zwischen L1 System und Mikrofon vergrößern.
• Die hohen Frequenzen mithilfe der zEQ im Mikrofonkanal vermindern.
• Probeweise eine bestimmte Frequenz ausblenden, die die Rückkopplung unter
Umständen verursacht. Hierzu die Para-EQ am Mikrofonkanal anpassen.
• Vorübergehend alle verwendeten Audioeekte (Mod, Delay, Hall) deaktivieren
und feststellen, ob diese Eekte zum Rückkopplungsproblem beitragen.
AUX-Ausgang klingt nicht richtig. • Prüfen, ob der AUX-Ausgang für den gewünschten Tap-Punkt der einzelnen
Eingangskanäle konfiguriert ist. Siehe „Eingangssignale an AUX-Ausgänge
leiten“ auf Seite21.
• Prüfen, ob die einzelnen Eingänge dem AUX-Ausgang jeweils den
gewünschten Signalpegel zuweisen.
Es können keine Audiosignale
über eine USB-Verbindung vom
T4S/T8S an einen Computer
gesendet werden.
• Anschluss des USB-Kabels am Mischpult und am Computer prüfen.
• Probeweise ein anderes USB-Kabel anschließen.
• Prüfen, ob das Mischpult eingeschaltet ist.
• Prüfen, ob die gewünschten Eingangskanäle des Mischpults dem linken und
rechten USB-Ausgangskanal zugewiesen sind. Siehe „USB to PC“ (USB an PC)
im Menü „Prefs“ (Systemeinstellungen).
• Prüfen, ob der Trimregler für den entsprechenden Eingangskanal so eingestellt
ist, dass die LED grün leuchtet (also ein ausreichendes Eingangssignal anliegt).
• Eingangs- und Ausgangspegelanzeigen unter „Prefs“ (Systemeinstellungen)
prüfen, ob ein Signal sowohl am Eingang als auch am Ausgang anliegt.
• Funktionsfähigkeit des USB-Eingangs am Computer prüfen. Hierzu probeweise
ein anderes USB-kompatibles Audiogerät anschließen.
• Bei Verwendung von Aufnahme-Software auf einem Computer die Software-
Mindestanforderungen prüfen. Unter Umständen müssen die Software-
Einstellungen für den Betrieb mit 48kHz/24Bit konfiguriert werden.
Das T4S/T8S reagiert nicht auf
das Flash-Laufwerk.
• Probeweise ein Flash-Laufwerk einer anderen Marke anschließen und so
feststellen, ob das Problem durch das Flash-Laufwerk verursacht wird.

46– Deutsch
Pflege und Wartung
Problem Lösung
Es können keine Audiosignale
über eine USB-Verbindung von
einem Computer an das T4S/
T8S gesendet werden.
• Anschluss des USB-Kabels am Mischpult und am Computer prüfen.
• Probeweise ein anderes USB-Kabel anschließen.
• Prüfen, ob das Mischpult eingeschaltet ist.
• Prüfen, ob die Wiedergabe am Computer eingeschaltet und die
Audioeinstellung am Computer aktiviert ist.
• Prüfen, ob das USB-Signal den gewünschten Eingängen am Mischpult
zugewiesen ist. Siehe „PC to USB“ (PC an USB) im Menü „Prefs“
(Systemeinstellungen).
• Prüfen, ob die Eingangskanäle am Mischpult, die dem eingehenden USB-
Signal zugewiesen sind, stummgeschaltet sind. Außerdem prüfen, ob die
entsprechenden Lautstärkeregelungen richtig eingestellt sind.
• Prüfen, ob der Trimregler für den entsprechenden Eingangskanal so eingestellt
ist, dass die LED grün leuchtet (also ein ausreichendes Eingangssignal anliegt).
• Eingangs- und Ausgangspegelanzeigen unter „Prefs“ (Systemeinstellungen)
prüfen, ob ein Signal sowohl am Eingang als auch am Ausgang anliegt.
• Funktionsfähigkeit des USB-Ausgangs am Computer prüfen. Hierzu
probeweise ein anderes USB-kompatibles Audiogerät anschließen.
• Bei Verwendung von Aufnahme-Software auf einem Computer die Software-
Mindestanforderungen prüfen. Unter Umständen müssen die Software-
Einstellungen für den Betrieb mit 48kHz/24Bit konfiguriert werden.
Reinigung
• Das Gehäuse nur mit einem weichen, trockenen Tuch reinigen.
• Keine alkohol-, ammoniak- oder schleifmittelhaltigen Lösungsmittel, Chemikalien oder Reinigungsmittel verwenden.
• Keine Sprays in der Nähe des Geräts benutzen und keine Flüssigkeiten in die Önungen gelangen lassen.
Technische Informationen
Mechanik
T4S T8S
Abmessungen (L x B x H) 214mm x184mm x83mm 214mm x311mm x83mm
Gewicht 1,0 kg (2,1lbs) 1,9 kg (4,1lbs)
Elektronik
A/D- und D/A-Konverter 24Bit
Abtastfrequenz 48 kHz
USB 2.0 (oder höher), Typ A- auf Typ B-Kabel, Typ A-Anschluss und Typ B-Anschluss
PC-Mindestanforderungen Microsoft Windows7 (oder höher), Mac OS10.5 (oder höher)

Deutsch– 47
Zusätzliche Informationen
Zusätzliche Informationen
Weitere Informationen zum Produkt (auch Zubehör- und Ersatzteile) sind der Bedienungsanleitung (online unter
www.Bose.com) zu entnehmen.
Eingeschränkte Garantie
Für Ihr Produkt gilt eine eingeschränkte Garantie. Informationen zur Gewährleistung finden Sie unter www.Bose.com.
Die mit dem Produkt mitgelieferten Garantieangaben gelten nicht in Australien und Neuseeland. Nähere
Informationen zu unserer Garantie in Australien und Neuseeland finden Sie auf unserer Website unter
www.bose.com/au/warranty bzw. www.bose.co/nz/warranty.
Herstellungsdatum
Die achte Zier in der Seriennummer gibt das Herstellungsjahr an: „6“ ist 2006 oder 2016.
Nord- und Südamerika
(USA, Kanada, Mexiko, Mittelamerika, Südamerika)
Bose Corporation
Framingham, MA 01701 USA
Corporate Center: 508-879-7330
Americas Professional Systems,
Technischer Support: 800-994-2673
Australien
Bose Pty Limited
Unit 3/2 Holker Street
Newington NSW Australia
61 2 8737 9999
Belgien
Bose N.V. / S.A
Limesweg 2, 03700
Tongeren, Belgien
012-390800
China
Bose Electronics (Shanghai) Co Ltd
25F, L’Avenue
99 Xianxia Road
Shanghai, P.R.C. 200051 China
86 21 6010 3800
Frankreich
Bose S.A.S
26-28 avenue de Winchester
78100 St. Germain en Laye, France
01-30-61-63-63
Deutschland
Bose GmbH
Max-Planck-Straße 36D
61381 Friedrichsdorf, Deutschland
06172-7104-0
Hongkong
Bose Limited
Suites 2101-2105, Tower One, Times Square
1 Matheson Street, Causeway Bay, Hong Kong
852 2123 9000
Indien
Bose Corporation India Private Limited
Salcon Aurum, 3rd Floor
Plot No. 4, Jasola District Centre
New Delhi – 110025, India
91 11 43080200
Italien
Bose SpA
Centro Leoni A – Via G. Spadolini
5 20122 Milano, Italy
39-02-36704500
Japan
Bose Kabushiki Kaisha
Sumitomo Fudosan Shibuya Garden Tower 5F
16-17, Nanpeidai-cho
Shibuya-Ku, Tokyo, 150-0036, Japan
TEL 81-3-5489-0955
www.bose.co.jp
Niederlande
Bose BV
Nijverheidstraat 8 1135 GE
Edam, Nederland
0299-390139
Großbritannien
Bose Ltd
1 Ambley Green, Gillingham Business Park
KENT ME8 0NJ
Gillingham, England
0870-741-4500
Informationen zu Importeuren
Europäische Union
Bose Products B.V., Gorslaan 60, 1441 RG
Purmerend, Niederlande
China
Bose Electronics (Shanghai) Company Limited,
Part C, Plan 9, No. 353 North Riying Road, China
(Shanghai) Pilot Free Trade Zone
Taiwan
Bose Taiwan Branch, 9F-A1, No. 10, Section 3,
Minsheng East Road, Taipei City 104, Taiwan
Tel: +886-2-2514 7676
Mexiko
Bose de México, S. de R.L. de C.V., Paseo de las
Palmas 405-204, Lomas de Chapultepec, 11000
México, D.F.
Tel.: +5255 (5202) 3545
Weitere Länder siehe Website
Kontaktinformationen
Besuchen Sie unsere Website unter www.Bose.com.
2 - Italiano
Informazioni importanti sulla sicurezza
Leggere e conservare tutte le istruzioni per la sicurezza
e per l'uso.
1. Leggere queste istruzioni.
2. Conservare queste istruzioni.
3. Prestare attenzione a tutte le avvertenze.
4. Seguire tutte le istruzioni.
5. Non utilizzare l'apparecchio in prossimità di acqua.
6. Per la pulizia utilizzare un semplice panno asciutto.
7. Non ostruire le aperture di ventilazione. Installare il prodotto in conformità con le
istruzioni fornite dal produttore.
8. Fare in modo che il cavo di alimentazione non venga calpestato o schiacciato,
soprattutto in corrispondenza di spine, prese e nel punto di uscita dall'apparecchio.
9. Utilizzare solo sistemi di fissaggio/accessori specificati dal produttore.
10. Utilizzare solo carrelli, supporti, treppiedi, stae o tavoli specificati dal
produttore o venduti insieme all'apparecchio. Quando si utilizza un carrello,
prestare attenzione durante lo spostamento dell'insieme carrello/apparecchio
per evitare di rovesciarlo causando danni.
11. Scollegare l'apparecchio durante i temporali o quando non utilizzato per lunghi periodi
di tempo.
12. Adarsi a personale qualificato per tutti gli interventi di assistenza. Gli interventi di
assistenza si rendono necessari in caso di danni di qualsiasi tipo all'apparecchio; ad
esempio se il cavo di alimentazione o la spina sono danneggiati, se è stato versato
liquido o sono caduti oggetti sull'apparecchio, se l'apparecchio è stato esposto a pioggia
o umidità, se non funziona normalmente o è caduto.
AVVISI/AVVERTENZE:
Questo prodotto contiene materiale magnetico. Rivolgersi al proprio medico per gli
eventuali eetti del prodotto sui dispositivi medici impiantabili attivi.
• Il prodotto non deve essere installato o utilizzato in aree di servizio o intrattenimento
vicine all'acqua (ad es. piscine coperte, parchi acquatici al chiuso, sale con vasche
riscaldate, saune, bagni turchi e piste di pattinaggio al chiuso).
• Per ridurre il rischio di incendio o scosse elettriche, questo prodotto NON deve essere
esposto a pioggia, liquidi o umidità. Non si applica ai prodotti con grado di protezione
IPX4-9.
• Tenere il prodotto lontano dal fuoco e da fonti di calore. NON collocare sorgenti di fiamme
libere (ad esempio, candele accese) sul prodotto o in prossimità di esso.
• NON apportare alterazioni non autorizzate al prodotto.
• NON utilizzare un power inverter con questo prodotto.
• NON utilizzare all'interno di veicoli o imbarcazioni.
• Utilizzare questo prodotto esclusivamente con l'alimentatore fornito in dotazione.
• NON posizionare o installare la staa o il prodotto in prossimità di fonti di calore, quali
caminetti, termosifoni, radiatori o altri apparati (inclusi amplificatori) che emettano calore.
• Non utilizzare il mixer ToneMatch® T4S/T8S su treppiedi/stativi instabili. Il mixer è
progettato per l'utilizzo solo su supporti con filettatura da 6 mm, con un treppiede/stativo
in grado di sostenere dispositivi di peso pari ad almeno 1,9 kg e dimensioni d'ingombro
pari a 214 x 311 x 83 mm. L'uso di un treppiede/stativo non progettato per supportare le
dimensioni e il peso del mixer T4S/T8S può portare a condizioni di instabilità e pericolo e
causare infortuni.
• Contiene pezzi di piccole dimensioni che possono rappresentare un pericolo di
soocamento. Non adatto per bambini di età inferiore a 3 anni.
NOTE:
• I cavi per diusori e di interconnessione forniti in dotazione con questo sistema non sono
approvati per l'installazione all’interno di muri. Consultare le norme locali per l'edilizia per
individuare i tipi di cavi richiesti per l'installazione all’interno di muri.
• La spina dell'alimentazione o dell'accoppiatore deve essere raggiungibile facilmente e
rapidamente se utilizzata come dispositivo di spegnimento.
• A causa dei requisiti di ventilazione, Bose sconsiglia di posizionare il prodotto in spazi
chiusi o angusti, ad esempio nicchie a parete o armadietti.
Informazioni sulle normative
Questo dispositivo è conforme alla parte 15 delle Norme FCC e agli standard Industry
Canada RSS esenti da licenza. Il funzionamento è soggetto alle due seguenti condizioni: (1) il
dispositivo non può causare interferenze dannose e (2) deve accettare le interferenze ricevute,
incluse quelle che potrebbero causare un funzionamento indesiderato del dispositivo.
Questo prodotto è conforme a tutti i requisiti pertinenti delle direttive UE. La
dichiarazione di conformità completa è disponibile
all'indirizzo www.Bose.com/compliance.
Informazioni sui prodotti che generano interferenze elettriche
(Conformità FCC per gli Stati Uniti)
Nota: questa apparecchiatura è stata sottoposta a collaudo ed è risultata conforme ai limiti
relativi ai dispositivi digitali di Classe A previsti dalla Parte 15 delle norme FCC. Tali limiti sono
stati fissati allo scopo di assicurare un'adeguata protezione da interferenze nocive quando
l'apparecchiatura è utilizzata in un'installazione commerciale. Questa apparecchiatura genera,
utilizza e può irradiare energia a radiofrequenza e, se non installata e utilizzata in conformità
con il manuale di istruzioni, può causare interferenze con le locali comunicazioni radiofoniche.
L'utilizzo di questa apparecchiatura in un'area residenziale può provocare interferenze nocive,
nel qual caso l'utente dovrà adottare misure correttive a proprie spese.
Eventuali modifiche o alterazioni non espressamente approvate da Bose Corporation possono
rendere nulla l'autorizzazione dell'utente all'utilizzo dell'apparecchiatura stessa.
La conformità alle normative richiede l'utilizzo di cavi schermati.
Questo prodotto è conforme alle specifiche canadesi ICES-003 di Classe A.
CAN ICES-3(A)/NMB-3(A)
Il prodotto è conforme a tutti i requisiti di immunità EN55103-2 per ambienti elettromagnetici
di tipo E2.
Part Name
Toxic or Hazardous Substances and Elements
Names and Contents of Toxic or Hazardous Substances and Elements
PCBs
Metal parts
Plastic parts
Speakers
Cables
This table is prepared in accordance with the provisions of SJ/T 11364.
0: Indicates that said hazardous substance contained in all of the homogenous materials for this part
is below the limit requirement of GB/T 26572.
X: Indicates that said hazardous substance contained in at least one of the homogenous materials
used for this part is above the limit requirement of GB/T 26572.
Lead
(Pb)
Mercury
(Hg)
Cadmium
(Cd)
Hexavalent
(CR(VI))
Polybrominated
Biphenyl (PBB)
Polybrominated
diphenylether
(PBDE)
X
X
00
0
0
0
0
0
0
0
0
0
0
0
0
0
0
0
0
0
0
0
0
0
0
0
0
X
X
Questo simbolo indica che il prodotto non deve essere smaltito come rifiuto
domestico, ma consegnato a una struttura di raccolta appropriata per il riciclo. Uno
smaltimento e un riciclo corretti aiutano a preservare le risorse naturali, la salute
e l'ambiente. Per ulteriori informazioni sullo smaltimento e sul riciclo di questo
prodotto, rivolgersi alle autorità locali, al servizio di smaltimento dei rifiuti o al
negozio presso il quale è stato acquistato.
A cura di DCE Safety

Sommario
Italiano - 3
Introduzione
Descrizione generale del prodotto ....................................................................... 5
Caratteristiche del prodotto .......................................................................... 5
Disimballaggio ......................................................................................... 5
Pannelli di controllo e collegamento
Mixer ToneMatch® T4S .................................................................................. 6
Pannello di controllo ................................................................................ 6
Pannello di collegamento ............................................................................ 7
Mixer ToneMatch® T8S .................................................................................. 8
Pannello di controllo ................................................................................ 8
Pannello di collegamento ............................................................................ 9
Configurazione del sistema
Rimozione/installazione della cover ......................................................................10
Opzioni di fissaggio ....................................................................................11
Fissaggio del mixer T4S/T8S su treppiede per foto/videocamera ........................................11
Collegamento del mixer T4S tramite connessione digitale ..................................................12
Collegamento del mixer T4S/T8S tramite connessione analogica. . . . . . . . . . . . . . . . . . . . . . . . . . . . . . . . . . . . . . . . . . . .13
Collegamento dell'alimentatore ToneMatch® ..............................................................14
Collegamento del mixer T4S/T8S al computer ............................................................15
Collegamento di un Flash Drive al mixer T4S/T8S .........................................................15
Funzionamento
Lettura del display del mixer T4S/T8S ....................................................................16
Ottimizzazione del guadagno di ingresso e del volume di uscita ............................................17
Utilizzo del controllo di volume Master ...................................................................18
Disattivazione dell'audio di un canale .................................................................18
Disattivazione degli eetti di un canale ...............................................................18
Utilizzo del selettore rotativo ............................................................................19
Modifica del sound di un canale. . . . . . . . . . . . . . . . . . . . . . . . . . . . . . . . . . . . . . . . . . . . . . . . . . . . . . . . . . . . . . . . . . . . . . . . . 20
Utilizzo delle funzioni Pan/Aux ......................................................................20
Utilizzo dell'accordatore ............................................................................20
Selezione di un preset ToneMatch® ................................................................... 22
Regolazione della funzione zEQ .....................................................................22
Regolazione della funzione Para EQ ................................................................. 23
Utilizzo delle funzioni Compressor/Gate .............................................................. 23
Utilizzo degli eetti di modulazione .................................................................25
Aggiunta di delay ..................................................................................26
Aggiunta di riverbero ..............................................................................26

Sommario
4 - Italiano
Utilizzo delle funzioni globali ........................................................................... 27
Selezione di un tipo di riverbero .....................................................................27
Utilizzo delle utilità Prefs ...........................................................................28
Caricamento e salvataggio di scenari ................................................................30
Condivisione di uno scenario ........................................................................ 33
Scenari Bose ..........................................................................................35
Impostazioni di fabbrica ............................................................................35
Singer/Songwriter .................................................................................36
DJ/Playback .......................................................................................38
Full Band .........................................................................................40
Impostazioni di fabbrica
Impostazioni di fabbrica ...............................................................................42
Manutenzione
Risoluzione dei problemi ...............................................................................43
Pulizia ................................................................................................46
Informazioni tecniche ..................................................................................46
Risorse aggiuntive
Informazioni di contatto ...............................................................................47
Informazioni sugli importatori .......................................................................47
Informazioni aggiuntive ................................................................................47
Garanzia limitata ................................................................................... 47

Italiano - 5
Introduzione
Descrizione generale del prodotto
I mixer ToneMatch® T4S e T8S, compatti a 4 e 8 canali, sono specificatamente progettati per fornire all'artista il pieno controllo della
propria musica. Grazie ai potenti motori DSP e alle intuitive opzioni di controllo, orono EQ, dinamica e processing degli eetti con
qualità da studio. L'integrazione del processing Bose® ToneMatch® e la funzione zEQ garantiscono un sound ottimo, specialmente in
caso di collegamento a un sistema Bose L1 o F1 per il pieno controllo timbrico end-to-end. Questi robusti mixer ToneMatch consentono
performance convincenti, grazie ai controlli tattili, ai display a LED di facile lettura e al richiamo di scenari. I mixer ToneMatch sono i
compagni di palco definitivi per la performance degli artisti.
Caratteristiche del prodotto
Potente elaborazione audio
• Eetti aggiornati in qualità da studio con digital audio
processing evoluto
• Gli eetti includono compressore, limiter, de-esser, noise gate,
chorus, flanger, phaser, tremolo, delay e riverbero
• Elaborazione Bose® ToneMatch® per un suono più naturale da
voci e strumenti
• zEQ focalizza il sound dei preset ToneMatch per apportare
regolazioni ecaci in un attimo
• ToneMatch, EQ, dinamica ed eetti indipendenti per canale
• Riverbero dedicato per le mandate AUX e riverbero condiviso
globale da utilizzare su tutti i canali
• Il master output EQ contribuisce a compensare l'acustica del
locale
• Ottimizzazione completa end-to-end della timbrica se
utilizzato con sistemi Bose S1 ed F1
Controllo fluido in tempo reale
• Comandi tattili e indicatori progettati per l'utilizzo da parte di
musicisti e DJ durante le performance on stage dal vivo
• Interfaccia utente intuitiva
• Funzione tap tempo delay incorporata, accordatore cromatico, e
scenari richiamabili
• Il display a LED e i controlli luminosi sono facili da leggere e
utilizzare, anche su palchi scarsamente illuminati
Alta densità di connessioni disponibili
• Connettività e possibilità di controllo mai viste prima su un
piccolo mixer digitale
• Quattro (T4S) o otto (T8S) preamplificatori audio di alta
qualità con jack combo XLR per microfoni o strumenti, e
phantom power commutabile
• Due ingressi Aux per sorgenti aggiuntive, due (T4S) o quattro
(T8S) mandate Aux
• USB di tipo A e B per la riproduzione da unità USB o
l'interfacciamento con PC/Mac
• Uscite ToneMatch per audio digitale e alimentazione (solo T4S)
• Uscite stereo TRS 1/4" e XLR (solo T8S)
• Uscita indipendente per cua
Pratiche funzioni Gig-Ready
• Robusto box con cover magnetica protettiva per proteggere
controlli e connettori
• Include un cavo ToneMatch per il collegamento a un
sistema Bose L1 Model II o L1 Model 1S per audio digitale e
alimentazione (T4S), oppure un alimentatore universale (T8S)
• L'inserto sul lato inferiore consente di utilizzare gli accessori più
comuni per il montaggio di una foto/telecamera e tenere così il
mixer ToneMatch a portata di mano
Mixer T4S ToneMatch e cover Cavo ToneMatch
Alimentatore ToneMatchMixer T8S ToneMatch e cover
Per un elenco completo dei componenti opzionali e degli accessori, visita www.Bose.com.
Disimballaggio
Vedere la seguente tabella per i contenuti della confezione del mixer:
T4S
T8S

Pannelli di controllo e collegamento
6 - Italiano
Mixer T4S ToneMatch®
Pannello di controllo
Figura 1. Pannello di controllo T4S
q INDICATORI SIGNAL/CLIP (1-4) – Visualizzano lo stato del segnale in ingresso in base al colore:
Verde: indica la presenza di un segnale in ingresso
Rosso: indica clipping sulla sorgente d'ingresso
w CONTROLLI DI TRIM (1-4) - Regolano la sensitività in ingresso per il rispettivo canale.
e DISPLAY – Visualizza i menu delle funzioni e le informazioni sul sistema.
r CONTROLLI DI EDITING – I tre controlli rotativi a pulsante consentono di selezionare o regolare le voci/
i valori che appaiono sul display.
t PULSANTI CH EDIT (1-4) – Selezionano il canale da modificare.
y PULSANTI FX MUTE (1-4) – Escludono gli eetti Mod, Delay e Riverbero sul canale selezionato.
u CONTROLLI DEL VOLUME (1-4) – Regolano il livello del volume per il rispettivo canale.
i PULSANTI MUTE (1-4) – Disattivano l'uscita audio per il rispettivo canale.
o CONTROLLO DI VOLUME MASTER – Regola il livello d'uscita generale.
a CONTROLLO DI VOLUME DELLE CUFFIE – Regola il livello del volume per l'uscita cue.
s SELETTORE ROTATIVO – Consente l'accesso ai parametri globali e relativi ai canali, che vengono regolati
utilizzando i controlli di editing.
d INTERRUTTORE PHANTOM POWER – Alimenta i canali d'ingresso 1-4 a +48 V. L'accensione di un LED rosso indica
l'attivazione della phantom power.
f JACK PER CUFFIE – Da utilizzare esclusivamente con cue con un'impedenza minima di 24 Ω.
q
w
i
u
y
t
r
e
d
s
a
o
f

Italiano - 7
Pannelli di controllo e collegamento
Figura 2. Pannello di collegamento T4S
Pannello di collegamento
q INTERRUTTORE DI ACCENSIONE – Accende e spegne il mixer.
w USB 2.0 TIPO B – Interfaccia USB che consente di collegare il mixer al computer.
e USB 2.0 TIPO A – Interfaccia USB che consente lo streaming audio da un flash drive.
r USCITA ANALOGICA L/R – Uscita analogica principale. Compatibile con cavi con connettori da 6 mm bilanciati
TRS o sbilanciati TS.
t USCITA AUX – Due uscite analogiche definibili dall'utente. Possono essere configurate come uscita pre-fader,
post-EQ ed eetti, o come uscita post-fader. Compatibili con cavi con connettori da 6 mm TRS bilanciati.
y INGRESSO AUX – Canali analogici di ingresso 5/6. Compatibili con cavi con connettori da 6 mm TRS bilanciati o
TS sbilanciati per ingressi a livello linea. Possono essere utilizzati per ingressi di tipo stereo.
u INGRESSI 1-4 – Canali analogici di ingresso 1-4. Compatibili con cavi XLR bilanciati per microfoni o con cavi con
connettori da 6 mm TRS bilanciati o TS sbilanciati per ingressi ad alta impedenza, ad esempio da una chitarra.
i USCITA DIGITAL MAIN L – Collegabile digitalmente in stereo a due sistemi L1® Model 1S/II. Nota: utilizzabile in
stereo esclusivamente con l'uscita Digital Main R.
o PORTA DI ALIMENTAZIONE/USCITA DIGITAL MAIN R – Uscita digitale utilizzata dal sistema L1 Model
1S/II. Alimenta il mixer T4S dalla base di alimentazione L1 Model 1S/II. Può inoltre fornire alimentazione da una
presa AC tramite un alimentatore ToneMatch (non in dotazione con il T4S). Compatibile con il cavo ToneMatch®
fornito in dotazione.
ATTENZIONE: nonostante la porta ToneMatch sia compatibile con un connettore RJ-45 standard,
NON collegare il T4S a una rete di computer o telefonica.
USB AUDIO
M
( )
MONO
q w e r t y
uio

Pannelli di controllo e collegamento
8 - Italiano
Mixer T8S ToneMatch®
Pannello di controllo
Figura 3. Pannello di controllo T8S
q INDICATORI SIGNAL/CLIP (1-8) - Visualizzano lo stato del segnale in ingresso in base al colore:
Verde: indica la presenza di un segnale in ingresso
Rosso: indica clipping sulla sorgente d'ingresso
w CONTROLLI DI TRIM (1-8) - Regolano la sensitività in ingresso per il rispettivo canale.
e DISPLAY – Visualizza i menu delle funzioni e le informazioni sul sistema.
r CONTROLLI DI EDITING – I tre controlli rotativi a pulsante consentono di selezionare o regolare le voci/i valori che
appaiono sul display.
t PULSANTI CH EDIT (1-8) – Selezionano il canale da modificare.
y PULSANTI FX MUTE (1-8) – Escludono gli eetti Mod, Delay e Riverbero sul canale selezionato.
u CONTROLLI DEL VOLUME (1-8) – Regolano il livello del volume per il rispettivo canale.
i PULSANTI MUTE (1-8) – Disattivano l'uscita audio per il rispettivo canale.
o CONTROLLO DI VOLUME MASTER – Regola il livello d'uscita generale.
a CONTROLLO DI VOLUME DELLE CUFFIE – Regola il livello del volume per l'uscita per cue.
s VU METER PER L'USCITA STEREO – Consente di misurare visivamente il livello in uscita.
d SELETTORE ROTATIVO – Consente l'accesso ai parametri globali e relativi ai canali, che vengono regolati
utilizzando i controlli di editing.
f INTERRUTTORE PHANTOM POWER – Alimenta i canali d'ingresso 1-8 a +48 V. L'accensione di un LED rosso indica
l'attivazione della phantom power.
g JACK PER CUFFIE - Da utilizzare esclusivamente con cue con un'impedenza minima di 24 Ω.
q
w
i
o
g
a
s
d
f
u
y
t
r
e
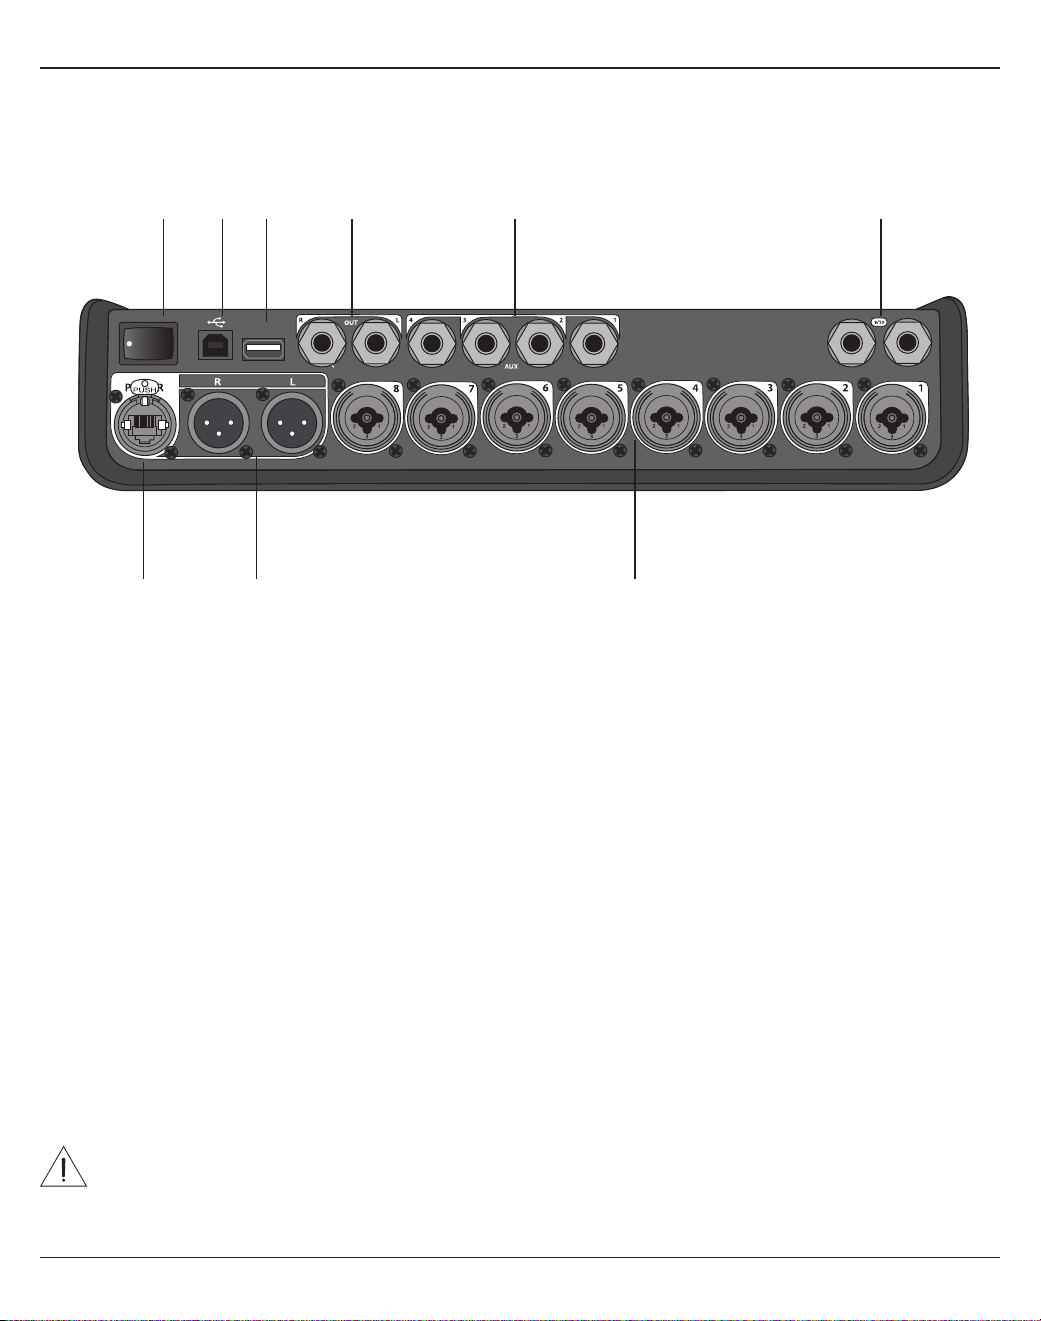
Italiano - 9
Pannelli di controllo e collegamento
Figura 4. Pannello di collegamento T8S
Pannello di collegamento
q INTERRUTTORE DI ACCENSIONE – Accende e spegne il mixer.
w USB 2.0 TIPO B – Interfaccia USB che consente di collegare il mixer al computer.
e USB 2.0 TIPO A – Interfaccia USB che consente lo streaming audio da un flash drive.
r USCITA ANALOGICA L/R – Uscita analogica principale. Compatibile con cavi con connettori da 6 mm bilanciati
TRS o sbilanciati TS.
t USCITA AUX – Quattro uscite analogiche definibili dall'utente. Possono essere configurate come uscita pre-fader,
post-EQ ed eetti, o come uscita post-fader. Compatibile con cavi con connettori da 6 mm TRS bilanciati o
sbilanciati TS.
y INGRESSO AUX – Canali analogici di ingresso 9/10. Compatibili con cavi con connettori da 6 mm TRS bilanciati o
TS sbilanciati con cavi con connettori da 6 mm TRS bilanciati o TS sbilanciati per ingressi a livello linea. Possono
essere utilizzati per ingressi di tipo stereo.
u INGRESSI 1-8 – Canali analogici di ingresso 1-8. Compatibili con cavi XLR bilanciati per microfoni o con cavi con
connettori da 6 mm TRS bilanciati o TS sbilanciati per ingressi ad alta impedenza, ad esempio da una chitarra.
i USCITA STEREO XLR – Uscita analogica stereo. Compatibile con cavi XLR bilanciati per l'uscita stereo.
o PORTA DI ALIMENTAZIONE DIGITALE - Da utilizzare con l'alimentatore ToneMatch (vedere "Collegamento
dell'alimentatore ToneMatch®" a pagina 14).
NOTA: IL MIXER T8S NON È PROGETTATO PER LA CONNESSIONE DIGITALE AL SISTEMA L1® MODEL 1S/II.
ATTENZIONE: nonostante la porta ToneMatch sia compatibile con un connettore RJ-45 standard, NON
collegare il T8S a una rete di computer o telefonica.
M
( )
MAIN OUT
USB AUDIO
MONO
q w e r t y
uio

10 - Italiano
Configurazione del sistema
Rimozione/installazione della cover
Il mixer T4S/T8S viene imballato con la cover installata sul pannello superiore. La cover è progettata per proteggere
il pannello di controllo durante il trasporto o l'immagazzinaggio del mixer.
Per rimuovere la cover:
1. Porre i pollici sulla parte anteriore della cover e farla scorrere in avanti.
2. Aerrare e sollevare la parte posteriore della cover per rimuoverla.
Per installare la cover:
1. Far scorrere la cover sul mixer, dalla parte posteriore verso quella anteriore.
2. La cover magnetica si blocca automaticamente fissandosi al mixer.
Figura 5. Rimozione e installazione della cover

Configurazione del sistema
Italiano - 11
Figura 6. Fissaggio della staa al mixer T4S Figura 8. Montaggio del mixer T4S sul treppiede tramite la staa
Figura 7. Staa fissata al mixer T4S
Opzioni di montaggio
Il mixer T4S/T8S è dotato di un inserto per vite di fissaggio da 6 mm. Ciò ne consente il sostegno su diversi prodotti
che siano dotati di vite di fissaggio da 6 mm, inclusi i treppiedi per foto/videocamere.
Fissaggio del mixer T4S/T8S su treppiede per foto/videocamera
1. Aprire le gambe del treppiede e bloccarlo all'altezza desiderata.
2. Rimuovere la staa dalla parte superiore del treppiede per foto/videocamera e fissarla con la vite alla parte
inferiore del mixer T4S/T8S. Verificare che la piccola rientranza sul mixer T4S/T8S sia perfettamente allineata alla
protuberanza sulla staa. Vedere la Figura 6.
3. Fissare la staa con il mixer T4S/T8S nuovamente sul treppiede. Vedere la Figura 8.
AVVERTENZA: non utilizzare il mixer ToneMatch® T4S/T8S su treppiedi/stativi instabili. Il mixer è progettato
per l'utilizzo solo su supporti con filettatura da 6 mm con un treppiede in grado di sostenere dispositivi di peso
pari ad almeno 1,9 kg e dimensioni d'ingombro pari a 214 x 311 x 83 mm. L'uso di un treppiede non progettato
per supportare le dimensioni ed il peso del mixer T4S/T8S può portare a condizioni di instabilità e pericolo e
causare infortuni.

12 - Italiano
Configurazione del sistema
Collegamento del mixer T4S tramite connessione digitale
1. Verificare che il sistema L1 Model 1S/II e il mixer T4S siano spenti e che il controllo di volume master di
quest'ultimo sia impostato al minimo.
2. Collegare un'estremità del cavo ToneMatch® alla porta di alimentazione/uscita Digital Main R del mixer T4S.
Collegare l'altra estremità del cavo ToneMatch alla porta ToneMatch presente sulla base di alimentazione.
Nota: per collegare il mixer T4S a due basi di alimentazione L1 Model 1S/II, collegare la seconda base di
alimentazione alla porta dell'uscita Digital Main L del mixer T4S con un cavo ToneMatch.
3. Accendere il mixer, quindi accendere la base di alimentazione L1 Model 1S/II.
4. Collegare gli strumenti e regolare i livelli. Vedere "Ottimizzazione del guadagno di ingresso e del volume di
uscita" a pagina17.
Figura 9. Due sistemi L1 Model II collegati a un mixer T4S tramite connessione digitale
USB AUDIO
M
( )
MONO
Nota: non è possibile connettere digitalmente il mixer T8S né alimentarlo dal sistema L1 Model 1S/II.

Configurazione del sistema
Italiano - 13
Collegamento del mixer T4S/T8S tramite connessione analogica
1. Verificare che il dispositivo da collegare e il mixer T4S/T8S siano spenti e che il controllo di volume master di
quest'ultimo sia impostato al minimo.
2. Collegare uno o due dispositivi alle uscite stereo XLR del mixer T8S (vedere la Figura 10) tramite cavi XLR
bilanciati.
Nota: il mixer T4S/T8S può essere collegato a un dispositivo tramite la porta di uscita analogica R con un cavo
con connettore TRS da 6 mm (venduto separatamente). Collegare l'altra estremità del cavo TRS alla porta
d'ingresso analogico del dispositivo. Per collegare il mixer T4S/T8S a due dispositivi, collegare il secondo
dispositivo alla porta di uscita analogica L dell'unità con un cavo TRS da 6 mm.
3. Collegare un alimentatore ToneMatch® alla porta di alimentazione del mixer T4S/T8S e inserirlo in una presa AC
funzionante. Vedere "Collegamento dell'alimentatore ToneMatch®" a pagina14.
4. Accendere il mixer T4S/T8S, quindi il dispositivo collegato.
5. Collegare gli strumenti e regolare i livelli. Vedere "Ottimizzazione del guadagno di ingresso e del volume di
uscita" a pagina17.
Figura 10. Due sistemi F1 collegati a un mixer T8S tramite connessione analogica
M
( )
MAIN OUT
USB AUDIO
MONO
(
M
US
B AUDI
O
( )
M
M
AIN
O
UT
()
M
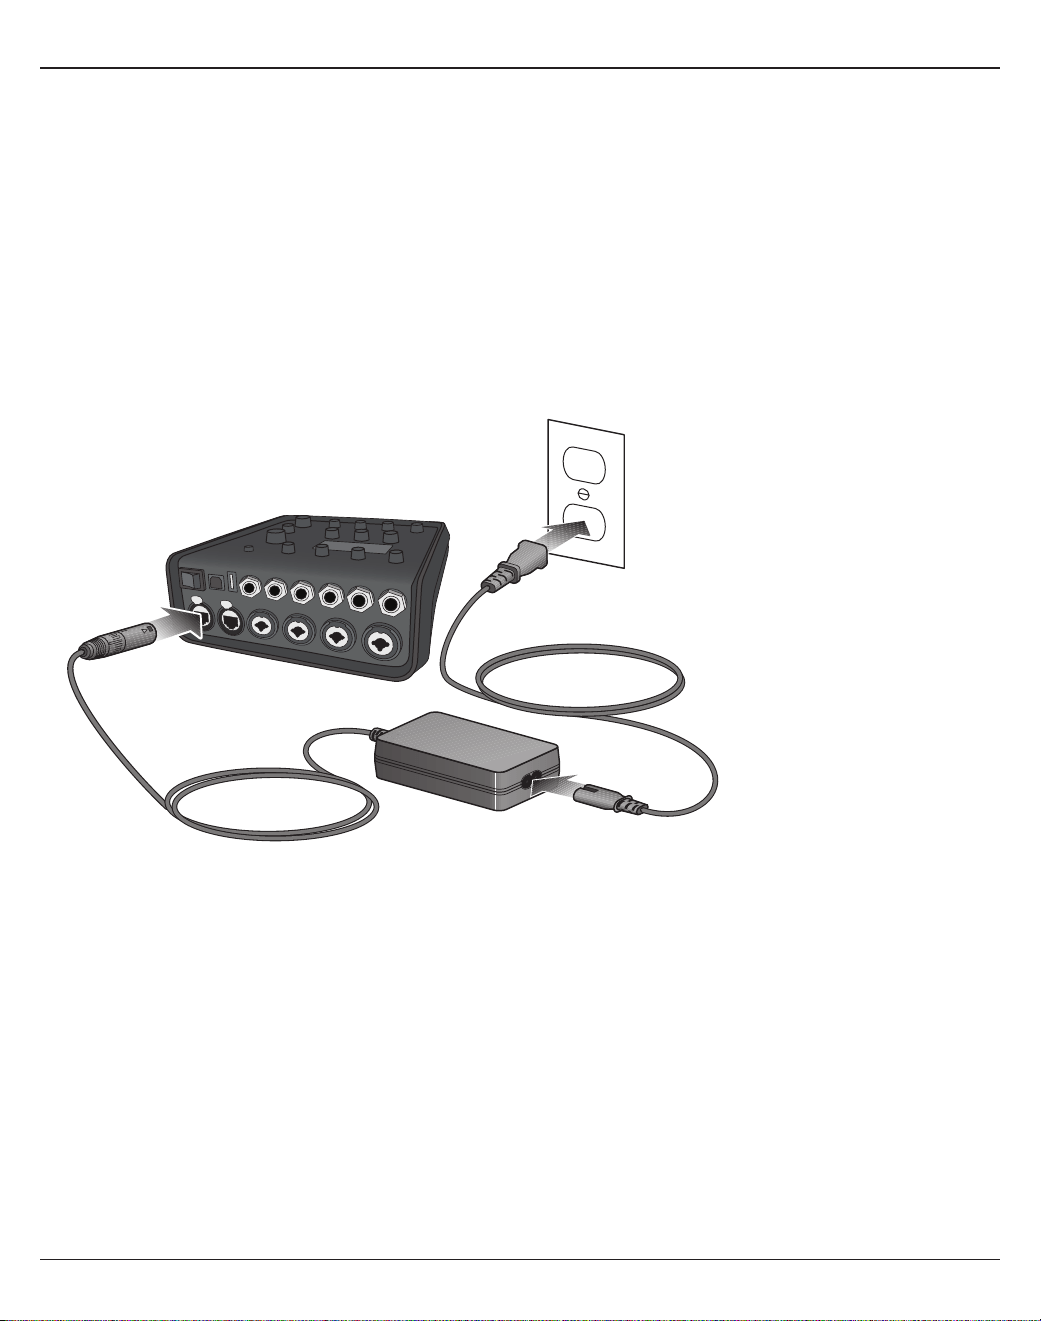
14 - Italiano
Configurazione del sistema
Collegamento dell'alimentatore ToneMatch®
L'alimentatore ToneMatch eroga alimentazione al mixer T4S/T8S.
1. Collegare il cavo dell'alimentatore alla porta di alimentazione del mixer T4S/T8S.
2. Collegare un'estremità del cavo di alimentazione AC all'alimentatore.
3. Collegare l'estremità opposta del cavo di alimentazione a una presa elettrica AC funzionante.
4. Portare l'interruttore di accensione del mixer T4S/T8S in posizione ON.
Nota: l'alimentatore fornito in dotazione col mixer T8S è necessario per utilizzare il prodotto. L'alimentatore non viene
fornito in dotazione col mixer T4S, che non lo richiede.
Figura 11. Collegamento del mixer T4S all'alimentatore
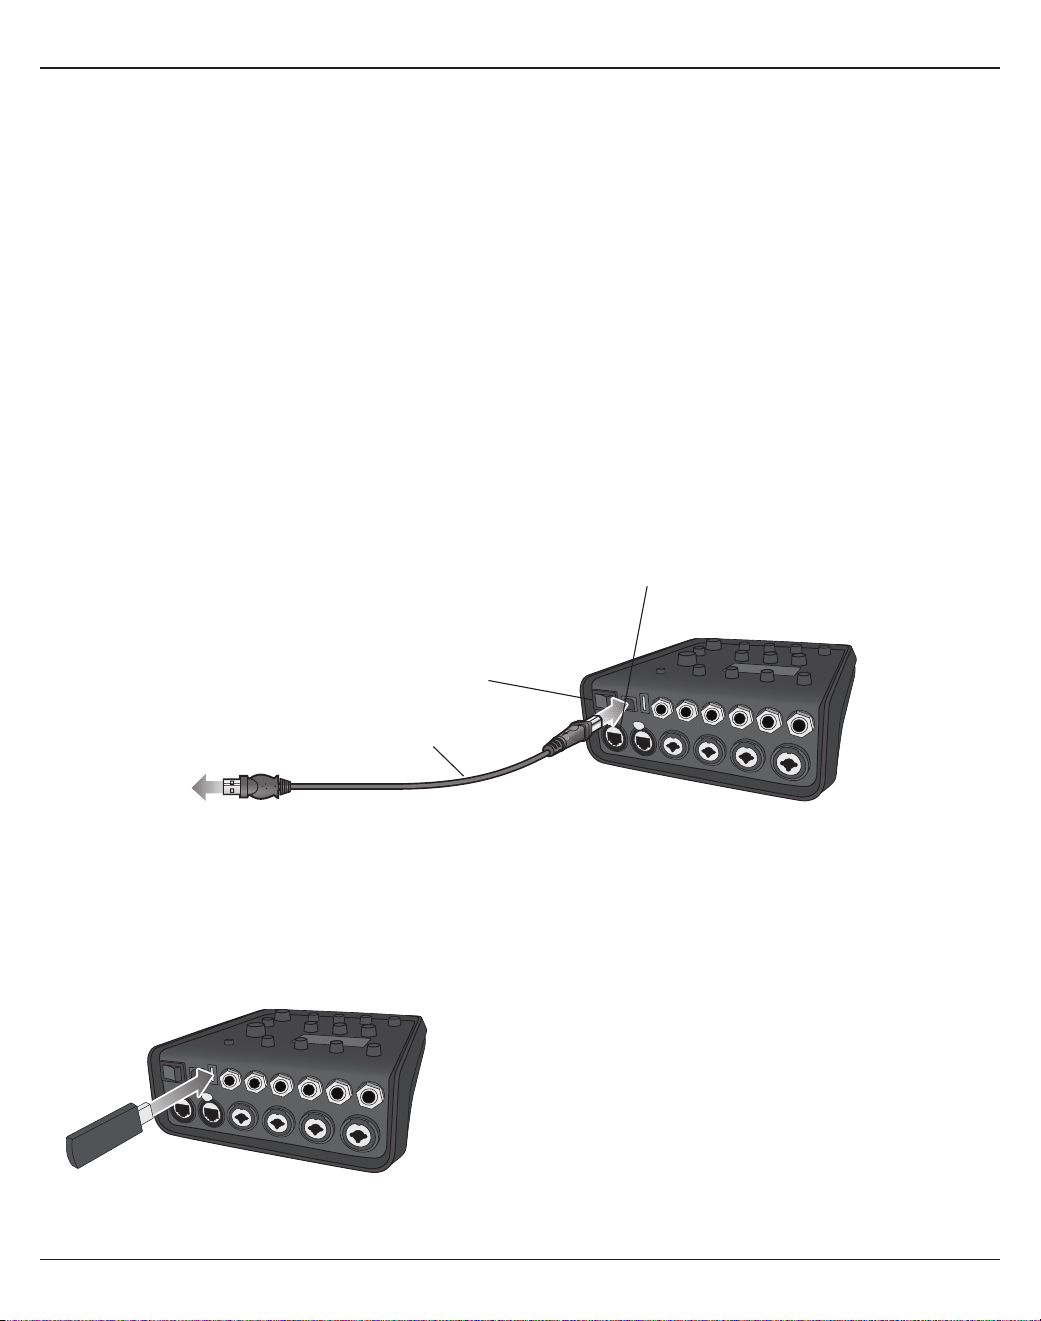
Configurazione del sistema
Italiano - 15
Collegamento del mixer T4S/T8S al computer
Il mixer T4S/T8S è dotato di una porta USB per il collegamento a un computer. Questo consente di scaricare scenari
operativi in un computer o di installare aggiornamenti al sistema. Per ulteriori dettagli sull'aggiornamento del sistema,
visitare il sito www.Bose.com/livesound.
Quando è collegato a un computer, il mixer T4S/T8S può essere utilizzato anche come dispositivo audio USB
generico per la registrazione e la riproduzione.
Nota: il mixer T4S/T8S funziona a 48 kHz/24 bit. Utilizzando il mixer T4S/T8S con software di registrazione, potrebbe
essere necessario configurare il software per il funzionamento a 48 kHz/24 bit.
Nota: per collegare il mixer T4S/T8S al computer, è richiesto un cavo USB (da tipo A a tipo B, non fornito in
dotazione).
1. Collegare il mixer a una sorgente di alimentazione (un alimentatore ToneMatch® per il mixer T4S/T8S o un sistema L1
Model 1S/II, solo per il mixer T4S).
2. Collegare un'estremità del cavo USB alla porta USB 2.0 tipo B del mixer (Figura 12).
3. Collegare l'altra estremità del cavo USB a una porta USB del computer.
4. Accendere il mixer.
Figura 12. Connessione del mixer T4S alla porta USB
Porta ToneMatch – A un sistema L1® Model 1S/II
o a un alimentatore ToneMatch.
Pulsante di accensione
Cavo USB
(da tipo A a tipo B)
Alla porta USB del
computer
Collegamento di un Flash Drive al mixer T4S/T8S
Inserire un'unità flash USB 2.0/3.0 sulla quale siano memorizzati file WAV/MP3 nella porta USB 2.0 tipo A per
riprodurre le tracce audio con il mixer.
Figura 13. Collegamento di un Flash Drive al mixer T4S

16 - Italiano
Funzionamento
Lettura del display del mixer T4S/T8S
Il display è l'interfaccia che consente di utilizzare il mixer. La Figura 14 mostra un esempio delle informazioni
visualizzate sul display e delle convenzioni di funzionamento di base. Il contenuto del display dipende dalla posizione
del selettore rotativo.
Figura 14. Esempio di display e delle convenzioni di
funzionamento
Ch 1
Type Tim
eM
ix
Digital 250ms 30%
Delay
Fdbk.
All Channels
*Bose Scene 01
Load Shared Save
Scenes
Identifica il canale
selezionato
Indica che premendo il controllo è possibile
passare da un parametro all'altro
Rappresentazione grafica del valore
del parametro
Identifica la funzione a cui si accede
tramite il selettore rotativo
Nomi dei parametri e relativi valori/
impostazioni
Controlli rotativi a
pulsante
Questo simbolo indica che
la rotazione del controllo
modifica l'impostazione.
L'asterisco indica che lo
scenario caricato è stato
modificato
Indica che premendo il
controllo verrà attivata la
funzione

Funzionamento
Italiano - 17
Ottimizzazione del guadagno di ingresso e del volume di uscita
La qualità del livello di volume del sistema dipende dalla combinazione tra le regolazioni del guadagno del canale di
ingresso, del volume master e del volume del canale. Procedere come segue per ogni canale utilizzato.
1. Verificare che i controlli di volume Master, Trim e volume del canale siano impostati al minimo.
2. Regolare il controllo di Trim del canale di ingresso.
A. Se è il caso, regolare il volume dello strumento o della sorgente audio al livello desiderato.
B. Suonare lo strumento/riprodurre la sorgente audio fino a raggiungere il livello di prestazioni desiderato.
C. Ruotare lentamente il controllo di Trim in senso orario finché l'indicatore Signal/Clip non si illumina in verde.
Se l'indicatore lampeggia in rosso o diventa rosso fisso, ruotare il controllo di Trim in senso antiorario per
diminuire il livello.
D. Utilizzare gli indicatori del livello di ingresso (pag. 28) nel menu Prefs per controllare i livelli di ingresso.
ATTENZIONE: se si utilizza un dispositivo che richiede la phantom power (+48 V), ad esempio un
microfono a condensatore, premere l'interruttore Phantom power prima di procedere alla regolazione
del controllo di Trim.
Nota: l'indicatore del livello di ingresso nel menu Prefs può essere utile durante la regolazione del livello
di Trim di ingresso (vedere a pag. 28).
3. Impostare il controllo di volume Master in posizione centrale (ore 12).
4. Ruotare lentamente il controllo di volume del canale in senso orario fino a raggiungere il livello desiderato.
Input LevelPreferences
Ch 3
Ch 1
Ch 2
Ch 4
Menu Aux InReset
Indicatore del livello di picco
Indicatore del livello di ingresso

18 - Italiano
Funzionamento
Utilizzo del controllo di volume Master
Il controllo di volume Master regola il livello generale di uscita del T4S/T8S ToneMatch® e dell'uscita Master analogica.
Durante il normale funzionamento, è consigliabile mantenere il controllo Master impostato in posizione centrale
(ore 12). Una volta impostati i livelli di volume per tutti i canali, è possibile alzare o abbassare il volume Master
rispetto a questa posizione.
Disattivazione dell'audio di un canale
I pulsanti Mute consentono di disattivare l'audio del rispettivo canale.
• Per disattivare l'audio di un canale, premere una volta il pulsante Mute. Il pulsante Mute si illumina in bianco per
indicare che l'audio del canale è disattivato. Il display visualizza "CH MUTE" per il rispettivo canale.
• Premere nuovamente il pulsante Mute per riattivare l'audio del canale. Il pulsante Mute si spegne per indicare che
l'audio del canale è attivato.
Disattivazione degli eetti del canale
I pulsanti FX Mute disattivano solo gli eetti Mod, Delay e Riverbero sul rispettivo canale. La disattivazione degli
eetti non esclude i preset ToneMatch né le impostazioni di zEQ, Para EQ e Comp/Gate.
• Per disattivare gli eetti su un canale, premere una volta il pulsante FX Mute. Il pulsante FX Mute si illumina in
bianco per indicare che gli eetti sul canale sono disattivati. Il display visualizza "FX MUTE" per il rispettivo canale.
• Premere nuovamente il pulsante FX Mute per riattivare gli eetti sul canale. Il pulsante FX Mute si spegne per
indicare che gli eetti sul canale sono attivati.
Ch 1
Category
Utility
ToneMatch
CH MUTE
Flat
Preset
Ch 1
Category
Utility
ToneMatch
FX MUTE
Flat
Preset

Funzionamento
Italiano - 19
Utilizzo del selettore rotativo
Il selettore rotativo consente di accedere alle funzioni di uscita del mixer ToneMatch®. Nella Figura 15 sono riepilogate
le nove funzioni relative ai canali e le tre funzioni globali. Le pagine seguenti descrivono come regolare ogni funzione.
Figura 15. Selettore rotativo
Funzioni relative ai canali
q Pan/Aux - Consente l'accesso alla funzione Pan e agli ingressi/alle uscite Aux.
w Tuner - Fornisce informazioni per accordare uno strumento collegato al canale selezionato.
e ToneMatch - Consente l'accesso ai preset ToneMatch proprietari, sviluppati per strumenti e microfoni specifici.
r zEQ - Come parte del preset ToneMatch selezionato, zEQ consente l'accesso ai controlli di regolazione delle
frequenze basse/medie/alte comprese nella gamma dello strumento o del microfono.
t Para EQ - Consente l'accesso ai controlli delle EQ parametriche per canale.
y Comp/Gate - Consente l'accesso ai preset Gate, Compression, Limiter, De-Esser e Kick Drum con parametri
regolabili.
u Mod - Consente l'accesso a diversi eetti di modulazione: chorus, flanger, phaser e tremolo.
i Delay - Consente l'accesso a tre tipi di delay e alla funzione tap tempo delay.
o Reverb - Applica il riverbero al canale selezionato e può essere inviato all'uscita generale o Aux.
Funzioni globali
a Reverb Type - Applica il tipo di riverbero selezionato a tutti i canali di uscita master o a tutte le mandate Aux.
s Prefs - Consente l'accesso a diverse utilità di sistema.
d Scenes - Consente di salvare e caricare scenari operativi (un'istantanea completa dello stato dell'unità).
e
o
y
d
r
a
u
q
t
s
i
w

20 - Italiano
Funzionamento
Modifica del sound di un canale
Le funzioni CH Edit consentono di accedere alle impostazioni che hanno eetto sui canali selezionati. Queste funzioni
sono: Pan/Aux, Tuner, ToneMatch®, zEQ, Para EQ, Comp/Gate, Mod, Delay e Reverb.
Per modificare un canale:
1. Premere il pulsante CH Edit 1, 2, 3, 4, (T4S e T8S) 5, 6, 7, o 8 (solo T8S). Il canale selezionato viene visualizzato
nell'angolo superiore sinistro del display.
2. Selezionare una delle funzioni CH Edit con il selettore rotativo.
3. Regolare le impostazioni per la funzione selezionata in base alle seguenti istruzioni.
Nota: è possibile modificare un solo canale alla volta. Il pulsante CH Edit consente di modificare solo il canale
selezionato.
Utilizzo delle funzioni Pan/Aux
La funzione Pan/Aux consente di inviare l'audio all'uscita master L o R, all'ingresso di controllo Aux o alla mandata Aux.
Utilizzo della funzione Pan
Il controllo Pan consente di inviare ciascun canale allo spazio specifico ad esso assegnato in un mix stereo.
1. Premere o ruotare il controllo di editing di sinistra e selezionare Pan dal menu.
2. Ruotare il controllo Pan per regolare l'uscita line tra L e R.
Ingressi Aux 5/6 (9/10)
L'ingresso Aux 5/6 (9/10) consente di collegare una sorgente stereo a livello linea, ad esempio un dispositivo mobile.
1. Premere o ruotare il controllo di sinistra e selezionare Aux In 5/6 dal menu.
2. Ruotare il controllo 5 Lvl o 6 Lvl per regolare il livello del segnale sul canale 5 o sul canale 6.
3. Premere il controllo 5 Lvl per passare a 5 Pan o 6 Lvl per passare a 6 Pan. Ruotare il controllo Pan per regolare il
pan tra L e R.
Ch 1
Menu Pan
Pan
Pan
Ch 1
Menu 5 Pan 6 Lvl
Aux In 50%
Aux Input 5/6
6 Pan5 Lvl
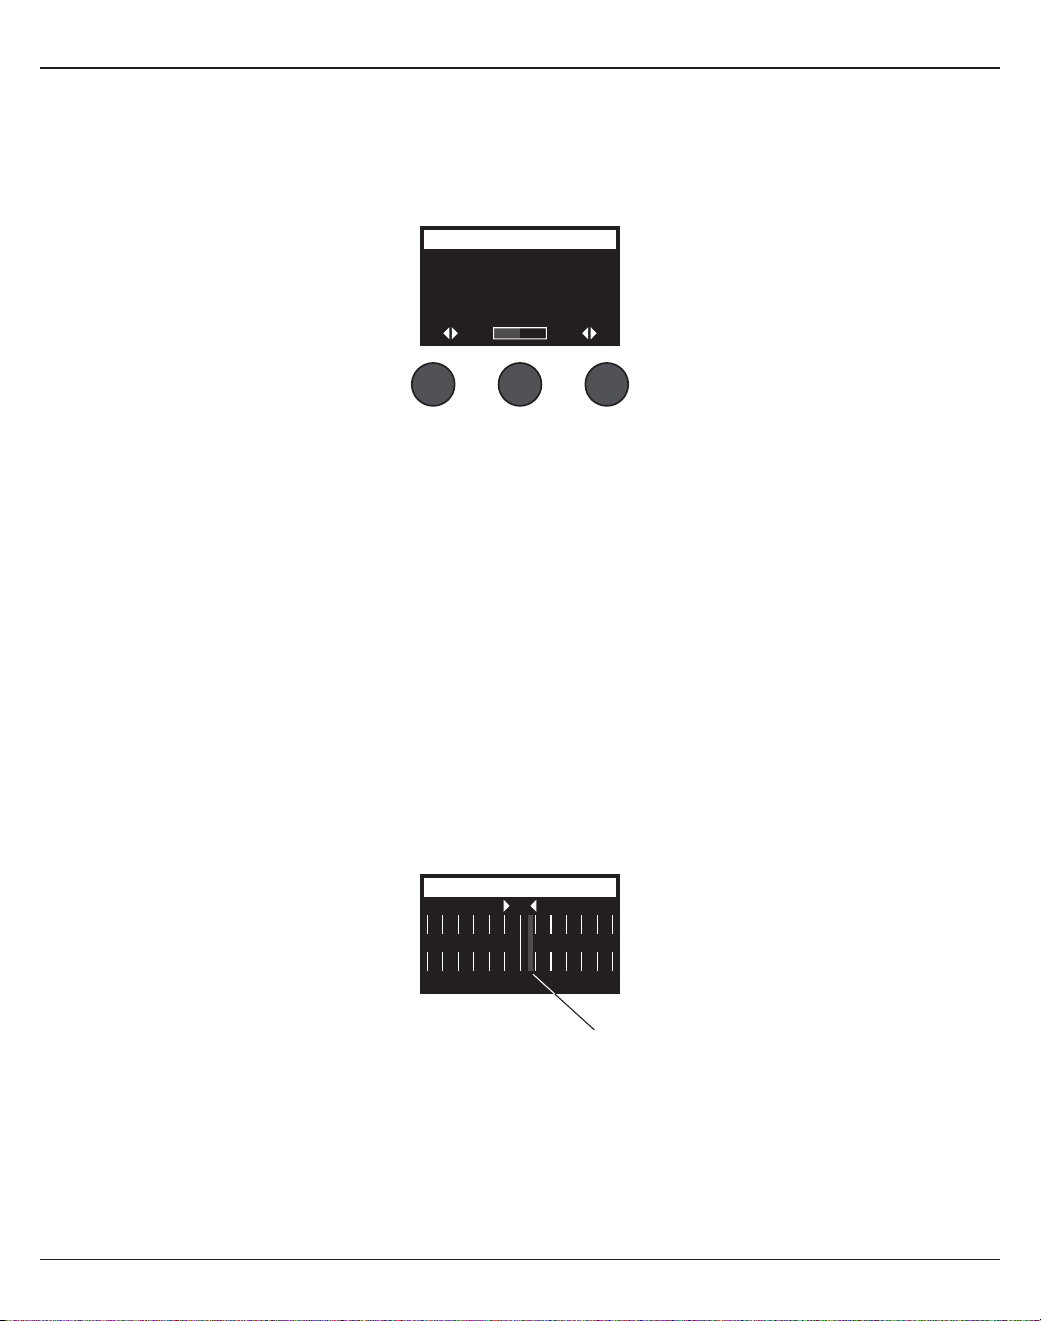
Funzionamento
Italiano - 21
Invio dei segnali di ingresso alle uscite Aux
La funzione Aux consente di inviare i segnali a due (solo T4S) o quattro uscite Aux (solo T8S) per diverse
applicazioni di elaborazione del segnale, registrazione e sound reinforcement. Il livello del segnale è regolabile per
ognuna delle uscite Aux disponibili:
Nota: per disattivare l'uscita Aux, premere il controllo Level. Premerlo nuovamente per riattivarla.
1. Premere o ruotare il controllo Menu e selezionare una mandata Aux.
2. Ruotare il controllo Level per regolare il livello del segnale del canale selezionato.
3. Ruotare il controllo Tap per far scorrere il relativo menu ed evidenziare il punto di accesso desiderato.
A. Dry: After Preamp - Il segnale puro (senza alcuna elaborazione) viene inviato direttamente dalla fase di
preamplificazione.
B. Pre: With EQ & Fx - Il segnale già elaborato viene inviato dalla fase di preamplificazione.
C. Post: After Fader - Il segnale già elaborato viene inviato dopo il controllo di volume del canale.
4. Premere il controllo Select per selezionare il punto di accesso, o Cancel per uscire senza apportare modifiche. Il
nome del punto di accesso selezionato viene visualizzato in grassetto.
Ch 1
Menu Tap
Aux
1P
re
Level
50%
Aux 1 Output
Utilizzo dell'accordatore
Per ogni canale di ingresso è disponibile un accordatore indipendente. Nella parte inferiore del display viene
visualizzata la nota riprodotta dallo strumento. Mentre si accorda lo strumento, sul display appare un indicatore di
intonazione che mostra se la nota sia crescente o calante. Regolare l'intonazione dello strumento in modo che il
cursore sia allineato al centro della schermata.
Nota: per accordare in silenzio, premere il pulsante Mute per il canale desiderato.
Utilizzare la funzione Transpose per modificare l'intonazione di riferimento verso l'alto o verso il basso di due
semitoni. Oppure impostare precisamente l'intonazione desiderata utilizzando quella di riferimento.
Ch 1
b#
A3
Tuner
Indicatore di intonazione
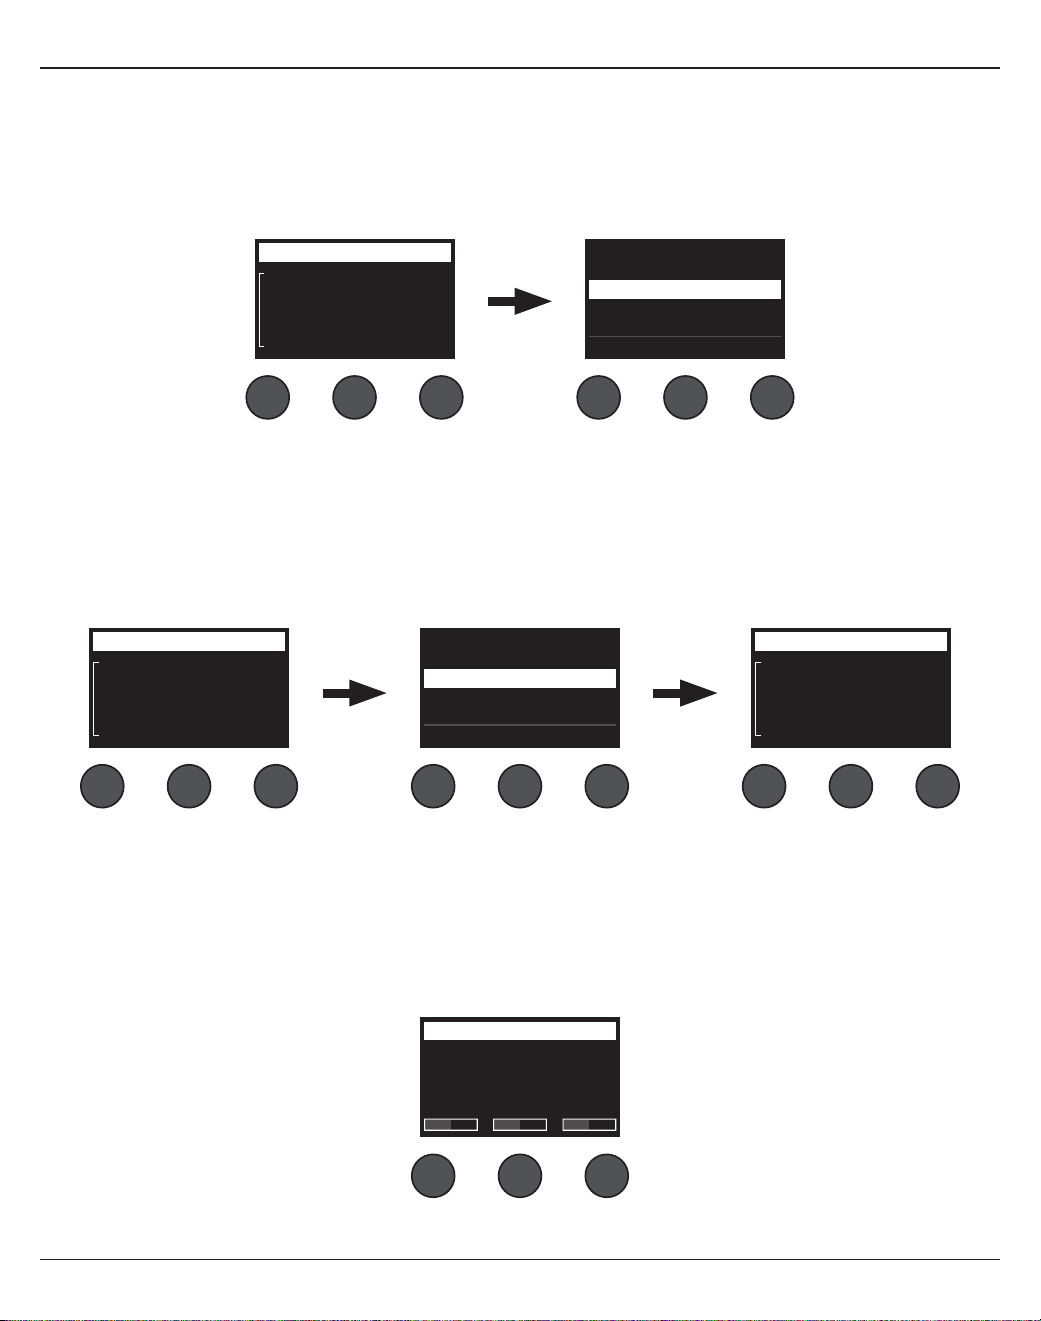
22 - Italiano
Funzionamento
Ch 1
Category
Vocal Mics
ToneMatch
Handheld Mics
Preset
Handheld Mics
Headworn Mics
High Gain: Bright
High Gain: Normal
SelectCancel
Ch 1
Category
Utility
ToneMatch
Flat
Preset
Ch 1
Category
Vocal Mics
ToneMatch
Headworn Mics
Preset
Vocal Mics
Utility
Electric Guitars
Acoustic Guitars
Select Cancel
Ruotare Premere
PremereRuotare
Selezione di un preset ToneMatch®
La funzione ToneMatch consente di selezionare un preset ToneMatch per lo strumento o il microfono desiderato.
Questa tecnologia proprietaria ottimizza l'equalizzazione del sistema per preservare il sound naturale di uno
strumento o di un microfono specifico. I preset sono organizzati per categorie e vengono selezionati separatamente
per ogni canale.
1. Ruotare il controllo Category per accedere all'elenco delle categorie ed evidenziare quella desiderata.
2. Premere il controllo Select per selezionare la voce desiderata, o Cancel per uscire dall'elenco senza apportare
modifiche.
3. Se è stato premuto Select, ruotare il controllo Preset per accedere all'elenco di preset ed evidenziare quello
desiderato.
4. Premere il controllo Select per selezionare la voce desiderata, o Cancel per uscire dall'elenco senza apportare
modifiche.
Ch 1
Low Mid
Handheld Mics
High
0.0db 0.0db 0.0db
zEQ
Regolazione della funzione zEQ
La funzione zEQ fa parte della tecnologia di preset ToneMatch. Consente di regolare le frequenze basse/medie/alte
comprese nella gamma di uno strumento o un microfono.
Per regolare la funzione zEQ, ruotare il controllo posto sotto la corrispondente banda di frequenze.
Nota: per escludere una singola banda di frequenze, premere il controllo corrispondente. Premerlo nuovamente per
riattivarla.
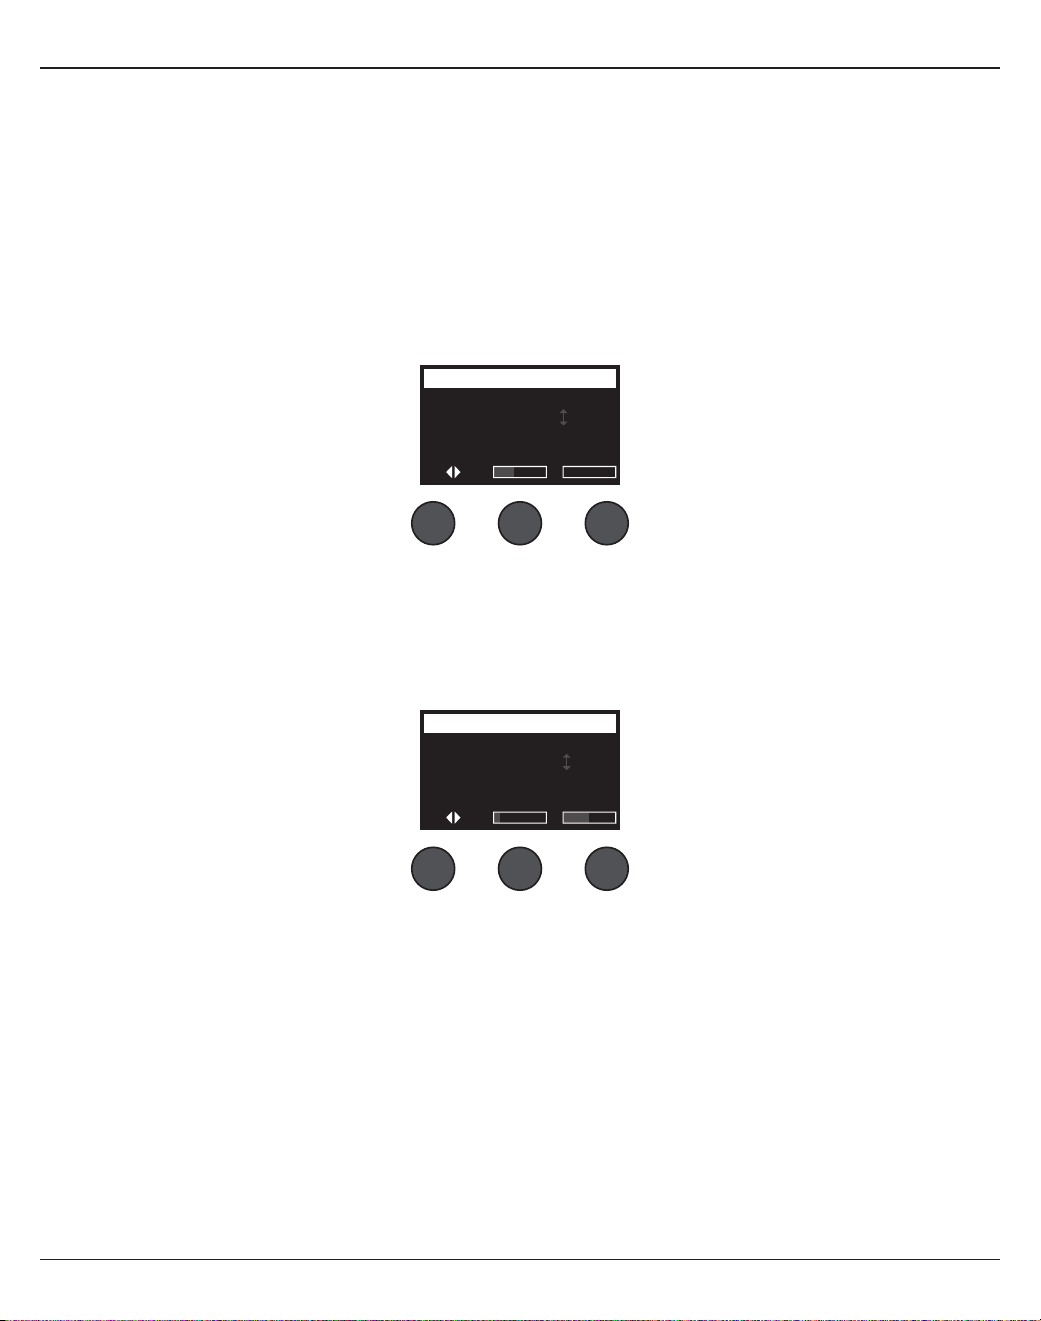
Funzionamento
Italiano - 23
Regolazione della funzione Para EQ
La funzione Para EQ fornisce tre equalizzazioni parametriche centrate su una frequenza specificata dall'utente, entro
la gamma compresa tra 50 Hz e 16 kHz.
Nota: per escludere le impostazioni Para EQ, premere il controllo Select. Premerlo nuovamente per riattivarle.
1. Premere o ruotare il controllo Select e selezionare la banda Para EQ 1-3.
2. Ruotare il controllo Level per regolare il livello di incremento/taglio da -15 dB a +15 dB.
3. Ruotare il controllo Freq per regolare la frequenza centrale da 50 Hz a 16 kHz.
4. Premere il controllo Freq per passare a Width. Ruotare il controllo Width per regolare la larghezza della curva a
campana attorno alla frequenza centrale, da 0,20 ottave a 5,00 ottave.
Ch 1
Select Level
B3
Freq
PEQ 1 -3.4dB 250.0Hz
Parametric EQ
Width
Utilizzo delle funzioni Compressor/Gate
La funzione Comp/Gate fornisce l'accesso ai preset Gate, Compression, Limiter, De-Esser e Kick Drum con parametri
regolabili.
Nota: per escludere le impostazioni Comp/Gate, premere il controllo Type. Premerlo nuovamente per riattivarle.
Nota: solo un eetto per canale.
1. Ruotare il controllo Type per accedere all'elenco degli eetti Comp/Gate ed evidenziare quello desiderato:
A. Compressor 1: Light - Compressore caratterizzato da un basso rapporto di compressione predefinito, con
parametri di soglia e guadagno variabili. Consigliabile come compressore generico per la maggior parte
degli strumenti e dei microfoni che richiedono un livello di controllo minimo.
B. Compressor 2: Medium - Compressore caratterizzato da un moderato rapporto di compressione predefinito,
con parametri di soglia e guadagno variabili. Consigliabile per bassi, chitarre, tastiere e voci che richiedono
un livello di controllo medio.
C. Compressor 3: Heavy - Compressore caratterizzato da un rapporto di compressione elevato predefinito, con
parametri di soglia e guadagno variabili. Consigliabile per strumenti (come corni e tamburi) e voci dal sound
potente, che richiedono un livello di controllo più aggressivo.
D. Limiter - Limiter caratterizzato da un rapporto predefinito (∞:1), con parametri di soglia e guadagno variabili.
Consigliabile per strumenti dal sound molto potente, come la batteria, per impedire che i picchi di segnale
sovraccarichino il canale.
Ch 1
Type Thresh Speed
Gate -80.0dB 50%
Comp/Gate
Ramp

24 - Italiano
Funzionamento
Utilizzo di KickGate
KickGate è una tecnologia proprietaria di Bose® che consente di aumentare il livello di un canale per la cassa della
batteria, eliminando il rischio di feedback dal microfono. Nel menu Comp/Gate sono disponibili due impostazioni di
KickGate.
1. Collegare il tipo di microfono appropriato.
2. Selezionare un preset ToneMatch® appropriato.
3. Regolare il controllo di Trim di ingresso del canale finché solo i colpi più forti della cassa della batteria accendono
il LED rosso del canale di ingresso, quindi continuare la regolazione del controllo finché il LED non diventa verde.
Questa procedura ottimizza il livello di Trim di ingresso del canale.
4. Selezionare Comp/Gate con il selettore rotativo.
5. Ruotare il controllo Type per far scorrere l'elenco ed evidenziare KickGate 1: Regular o KickGate 2: Fast e
premere Select. Scegliere KickGate 2 se si utilizza una cassa con doppio pedale.
6. Mentre si suona la cassa della batteria, aumentare il volume al livello desiderato per la performance.
7. Suonare la cassa della batteria al livello meno potente che verrà utilizzato durante la performance e verificare che
sia udibile.
8. Suonando con poca potenza, aumentare il livello di Thresh finché alcuni colpi di cassa non vengono tagliati.
Ridurre quindi il livello di Thresh di 3 dB.
9. Suonando la cassa della batteria con potenza normale, ruotare il controllo Tight in senso antiorario per ridurre la
velocità di chiusura del gate e dare più "pancia" al sound. La velocità di chiusura del gate è regolabile tra 0% (più
lenta) e 100% (più veloce).
E. De-Esser - Compressore side-chain caratterizzato da un rapporto di compressione predefinito, con
parametri di soglia e guadagno variabili. Progettato per ridurre i sibili nelle voci.
F. Noise Gate - Noise gate caratterizzato da un tempo di attacco predefinito, con soglia e velocità (tempo di
rilascio) variabili. Consigliabile per eliminare i rumori indesiderati prodotti da microfoni e strumenti.
G. KickGate 1: Regular - Gate caratterizzato da un tempo di attacco predefinito, con parametri di soglia e
velocità (tempo di rilascio) variabili. Questa tecnologia proprietaria di Bose® è progettata appositamente per
la cassa della batteria e ore il massimo guadagno possibile prima dell'innesco del feedback, massimizzando
la potenza del sound della cassa attraverso un sistema PA.
H. KickGate 2: Fast - Come il KickGate 1, ma impostato per ritmi più veloci. Questa impostazione è consigliabile
se si utilizza una cassa con doppio pedale.
2. Premere il controllo Select per selezionare la voce desiderata, o Cancel per uscire dall'elenco senza apportare
modifiche.
3. Compressor 1-3, Limiter, De-Esser: ruotare il controllo Thresh per regolare la soglia di ingresso (trigger) tra -50
dB e 0 dB. Ruotare il controllo Gain per regolare il guadagno tra 0 dB e -30,0dB. La barra del guadagno sopra il
controllo mostra la quantità di riduzione del guadagno. Queste informazioni facilitano l'impostazione della soglia.
Noise Gate: ruotare il controllo Thresh per regolare la soglia di ingresso (trigger) tra -90 dB e -30 dB. Ruotare il
controllo Speed per impostare la velocità di chiusura del gate su un valore qualsiasi compreso tra 0% (più veloce)
e 100% (più lento). Ruotare il controllo Ramp per regolare l'inclinazione del gate tra 0% (orizzontale) e 100%
(verticale).
KickGate 1-2: ruotare il controllo Thresh per regolare la soglia di ingresso (trigger) tra -20 dB e 0 dB. Ruotare il
controllo Tight per regolare la velocità di chiusura del gate tra 0% (più lenta) e 100% (più veloce).

Funzionamento
Italiano - 25
Utilizzo degli eetti di modulazione
La funzione Mod consente di applicare eetti di modulazione.
Nota: per escludere le impostazioni Mod, premere il controllo Type. Premerlo nuovamente per riattivarle.
1. Ruotare il controllo Type per accedere all'elenco degli eetti di modulazione disponibili ed evidenziare quello
desiderato:
A. Chorus 1: Brite - Eetto chorus caldo e brillante, consigliabile per strumenti acustici. Include parametri
regolabili per mix, profondità e velocità.
B. Chorus 2: Warm - Simile a Chorus 1, ma con meno frequenze alte. Include parametri regolabili per mix,
profondità e velocità. Consigliabile per chitarre e bassi elettrici.
C. Chorus 3: Dark - Simile a Chorus 2, ma con meno alte frequenze per una tonalità più cupa. Include parametri
regolabili per mix, profondità e velocità. Consigliabile per chitarre e bassi elettrici.
D. Flanger 1: Tape - Eetto flanger del tipo a nastro, privo di feedback. Include parametri regolabili per mix,
profondità e velocità. Consigliabile come eetto per chitarre e bassi elettrici.
E. Flanger 2: Feedback - Identico a Flanger 1, ma con eetto Feedback predefinito.
F. Phaser 1: Stomp - Classico phaser del tipo "stompbox". Caratterizzato da un ampio sweep predefinito, con
parametri di velocità e feedback variabili. Consigliabile come eetto per chitarre e bassi elettrici o tastiere.
G. Phaser 2: Rack - Classico phaser del tipo "rack". Caratterizzato da un mix positivo, con parametri di velocità
e feedback variabili. Consigliabile come eetto per chitarre e bassi elettrici o tastiere.
H. Phaser 3: Warm - Phaser di stile "vintage". Caratterizzato da un mix positivo, con parametri di velocità e
feedback variabili. Consigliabile come eetto per chitarre e bassi elettrici o tastiere.
I. Phaser 4: Brite - Phaser privo di bassi. Caratterizzato da un mix positivo, con parametri di velocità e
feedback variabili. Consigliabile come eetto per chitarre elettriche e tastiere.
J. Tremolo - Eetto tremolo di stile "vintage" con parametri di velocità e profondità variabili. Consigliabile
come eetto per chitarre, tastiere e armoniche a bocca.
2. Premere il controllo Select per selezionare la voce desiderata, o Cancel per uscire dall'elenco senza apportare
modifiche.
3. Chorus 1-3, Flanger 1-2: ruotare il controllo Mix per ottenere il mix desiderato tra il segnale puro (dry) e il segnale
con eetto (wet, elaborato dal modulatore). Ruotare il controllo Depth per regolare la variazione di intonazione
rispetto al segnale originale in ingresso. Premere il controllo Depth per accedere al parametro Speed. Ruotare il
controllo Speed per regolare la velocità di modulazione dell'intonazione.
Phaser 1-4: ruotare il controllo Speed per regolare la velocità di modulazione dell'intonazione. Ruotare il controllo
Fdbk. per regolare il riverbero della modulazione.
Tremolo: ruotare il controllo Speed per regolare la velocità di modulazione del volume. Ruotare il controllo Depth
per regolare la variazione del volume rispetto al segnale in ingresso originale.
Ch 1
Type Mix Depth
Chorus1 50% 50%
Modulator
Speed
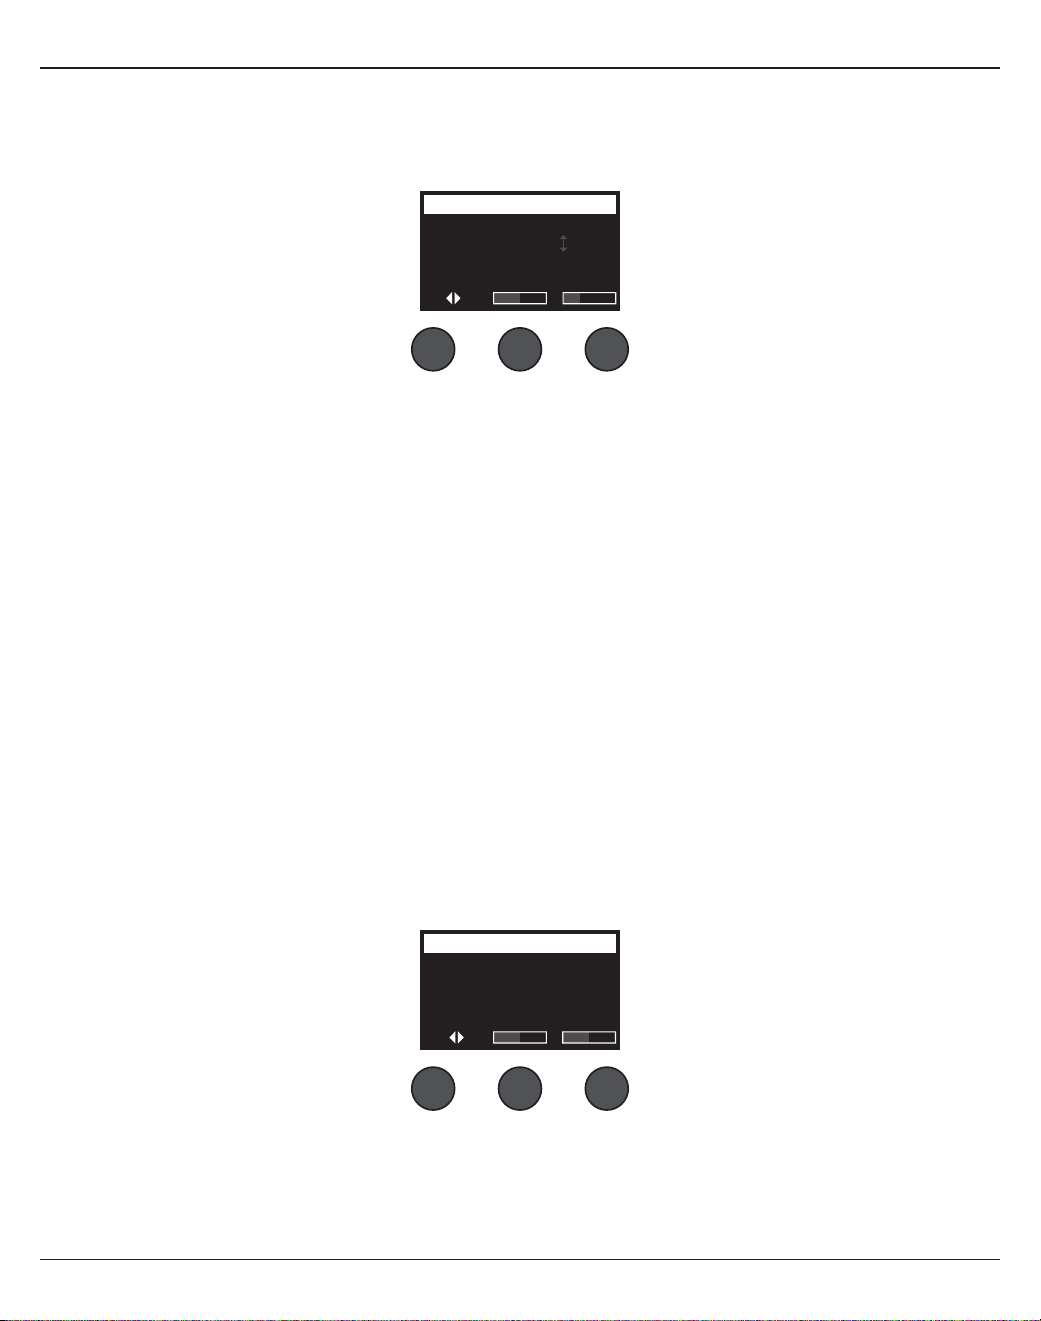
26 - Italiano
Funzionamento
Ch 1
Type Tim
eM
ix
Digital 250ms 30%
Delay
Fdbk.
Aggiunta di delay
La funzione Delay consente di applicare un delay di tipo digitale, analogico o a nastro.
Nota: per escludere le impostazioni Delay, premere il controllo Type. Premerlo nuovamente per riattivarle.
1. Ruotare il controllo Type per accedere all'elenco dei tipi di delay ed evidenziare quello desiderato.
A. Digital Delay - Eetto di delay digitale puro, le cui ripetizioni restano prive di colore. È caratterizzato da
parametri regolabili per il mix, il tempo e il feedback. Consigliabile per chitarre, batterie e voci.
B. Analog Delay - Classico eetto di delay analogico, le cui ripetizioni si deteriorano progressivamente.
È caratterizzato da parametri regolabili per il mix, il tempo e il feedback. Consigliabile per chitarre, batterie
e voci.
C. Tape Delay - Eetto delay a nastro "vintage", le cui ripetizioni si deteriorano ancora di più rispetto all'eetto
Analog Delay. Consigliabile per chitarre, corni, armoniche a bocca e voci.
2. Premere il controllo Select per selezionare la voce desiderata, o Cancel per uscire dall'elenco senza apportare
modifiche.
3. Ruotare il controllo Time per regolare il tempo di delay in incrementi di 5 ms. Premere il controllo Time per
impostare il delay sulla funzione Tap Tempo desiderata.
4.
Ruotare il controllo Mix per impostare il mix desiderato tra il segnale puro (0%) e il segnale con eetto (wet) (100%).
5. Premere il controllo Mix per accedere all'impostazione Fdbk. Ruotare il controllo Fdbk. per regolare il feedback
del delay.
Aggiunta di riverbero
La funzione Reverb applica una quantità di riverbero regolabile dall'utente al canale selezionato. Per selezionare il
tipo di riverbero, vedere "Selezione di un tipo di riverbero" a pag. 27.
Nota: per disattivare gli eetti di riverbero, premere il controllo Mix. Premerlo nuovamente per riattivarli.
1. Premere o ruotare il controllo Menu e selezionare anche a quale uscita inviare il riverbero.
2. Ruotare il controllo Mix per regolare il mix desiderato tra il segnale puro (0%) e il segnale con eetto (wet) (100%).
3. Ruotare il controllo Bright per equalizzare le alte frequenze del riverbero applicato al canale selezionato.
Ch 1
Mix Bright
50% 50%
Reverb
Menu
Main
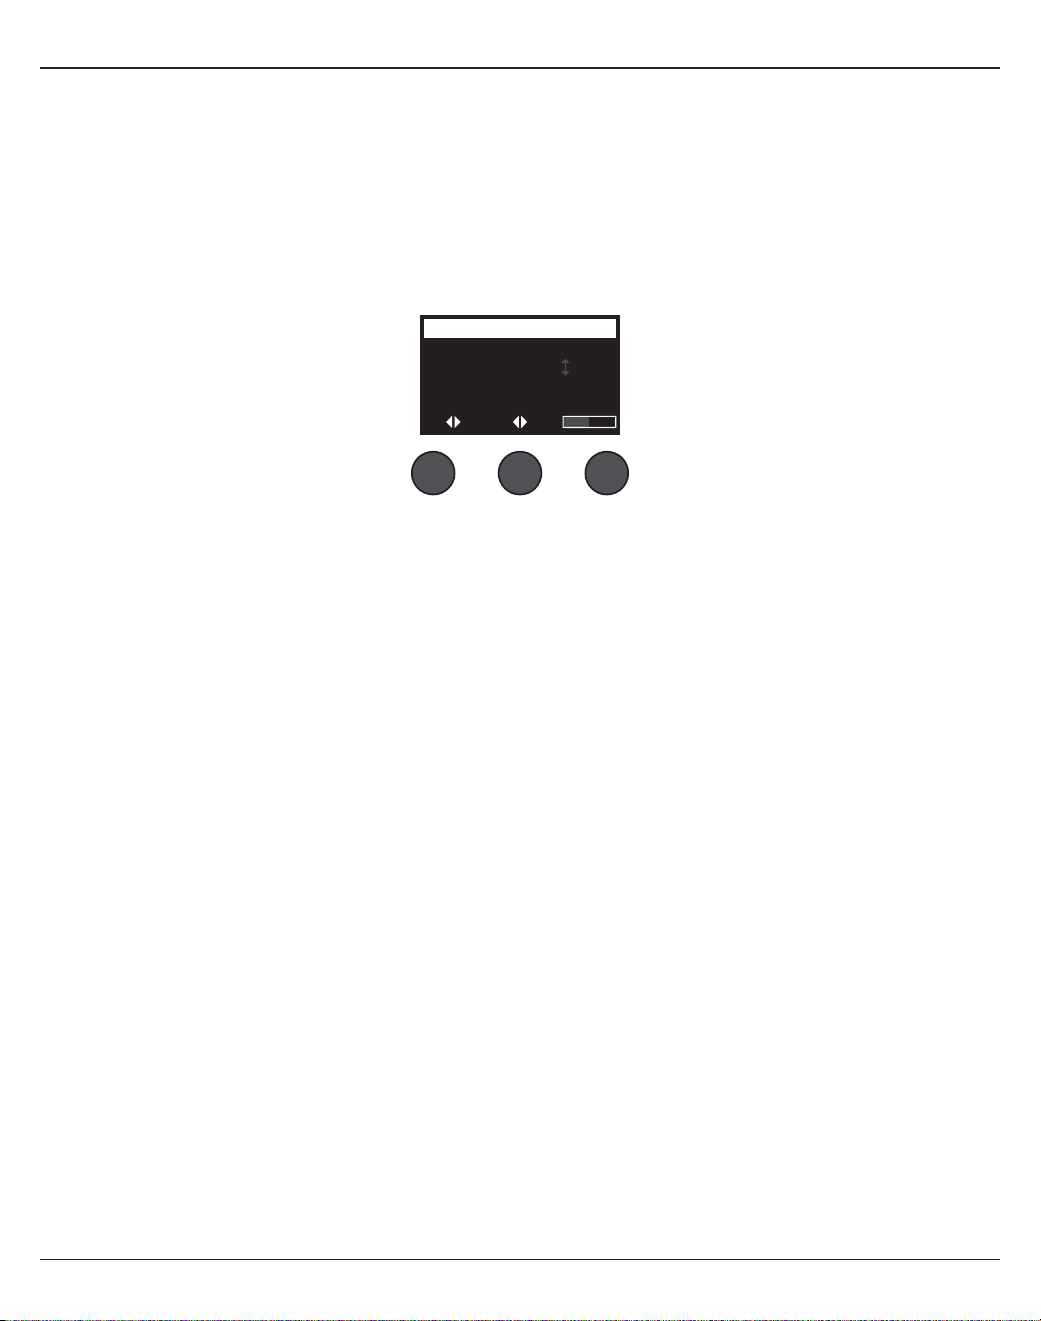
Funzionamento
Italiano - 27
Utilizzo delle funzioni globali
Le funzioni Global consentono di accedere alle impostazioni che agiscono sul funzionamento complessivo del mixer
e di tutti i suoi canali.
Selezione di un tipo di riverbero
La funzione Reverb Type consente di selezionare il tipo di riverbero applicato a tutti i canali di ingresso. Il tempo di
decay (Time) e il bilanciamento (Bal) sono regolabili. Il bilanciamento controlla il rapporto tra le prime riflessioni e le
successive.
Nota: per disattivare il riverbero, premere il controllo Type. Premerlo nuovamente per riattivarlo.
1. Selezionare Reverb Type con il selettore rotativo.
2. Premere o ruotare il controllo Menu e selezionare anche a quale uscita inviare il riverbero. È possibile inviare un
tipo diverso di riverbero alle mandate sia principali Main che Aux.
3. Premere il controllo Type per visualizzare l'elenco di riverberi:
A. Plate - Crea l'ambiente di un tipico riverbero plate da studio. È caratterizzato da parametri regolabili per il
tempo e il bilanciamento (rapporto tra prime riflessioni e successive).
B. Small - Crea l'ambiente di uno spazio di piccole dimensioni. È caratterizzato da parametri regolabili per il
tempo e il bilanciamento (rapporto tra prime riflessioni e successive).
C. Medium - Crea l'ambiente di uno spazio di medie dimensioni. È caratterizzato da parametri regolabili per il
tempo e il bilanciamento (rapporto tra prime riflessioni e successive).
D. Large - Crea l'ambiente di uno spazio di grandi dimensioni. È caratterizzato da parametri regolabili per il
tempo e il bilanciamento (rapporto tra prime riflessioni e successive).
E. Cavern - Crea l'ambiente di uno spazio di dimensioni molto grandi. È caratterizzato da parametri regolabili
per il tempo e il bilanciamento (rapporto tra le prime riflessioni e successive). Un eetto di riverbero
interessante ed esclusivo.
4. Ruotare il controllo Type per far scorrere l'elenco dei riverberi ed evidenziare il tipo desiderato.
5. Premere il controllo Type per eettuare la selezione.
6. La rotazione del controllo Time regola il tempo di decay del riverbero selezionato dal suo valore minimo a quello
massimo. Allo 0%, il tempo di decay sarà al valore minimo e simulerà l'ambiente più piccolo disponibile per il tipo
di riverbero attualmente selezionato. Al 100%, il tempo di decay sarà al valore massimo e simulerà l'ambiente più
grande disponibile per il tipo di riverbero attualmente selezionato. Ciascun tipo di riverbero prevede una gamma
utilizzabile specifica di tempi di decay, ottimizzati per il tipo di modello di riverbero selezionato. Il parametro
Reverb Decay consente di regolare il tempo di riverbero entro le gamme specifiche ottimizzate per il tipo di
modello di riverbero selezionato.
7. Premere il controllo Time per passare a Bal. Ruotare il controllo Bal. per regolare il rapporto tra le prime riflessioni
e la coda delle successive (0% = solo prime riflessioni, 100% = solo la coda delle riflessioni successive).
All Channels
Menu Type Bal.
Main Medium 50%
Reverb Type
Time
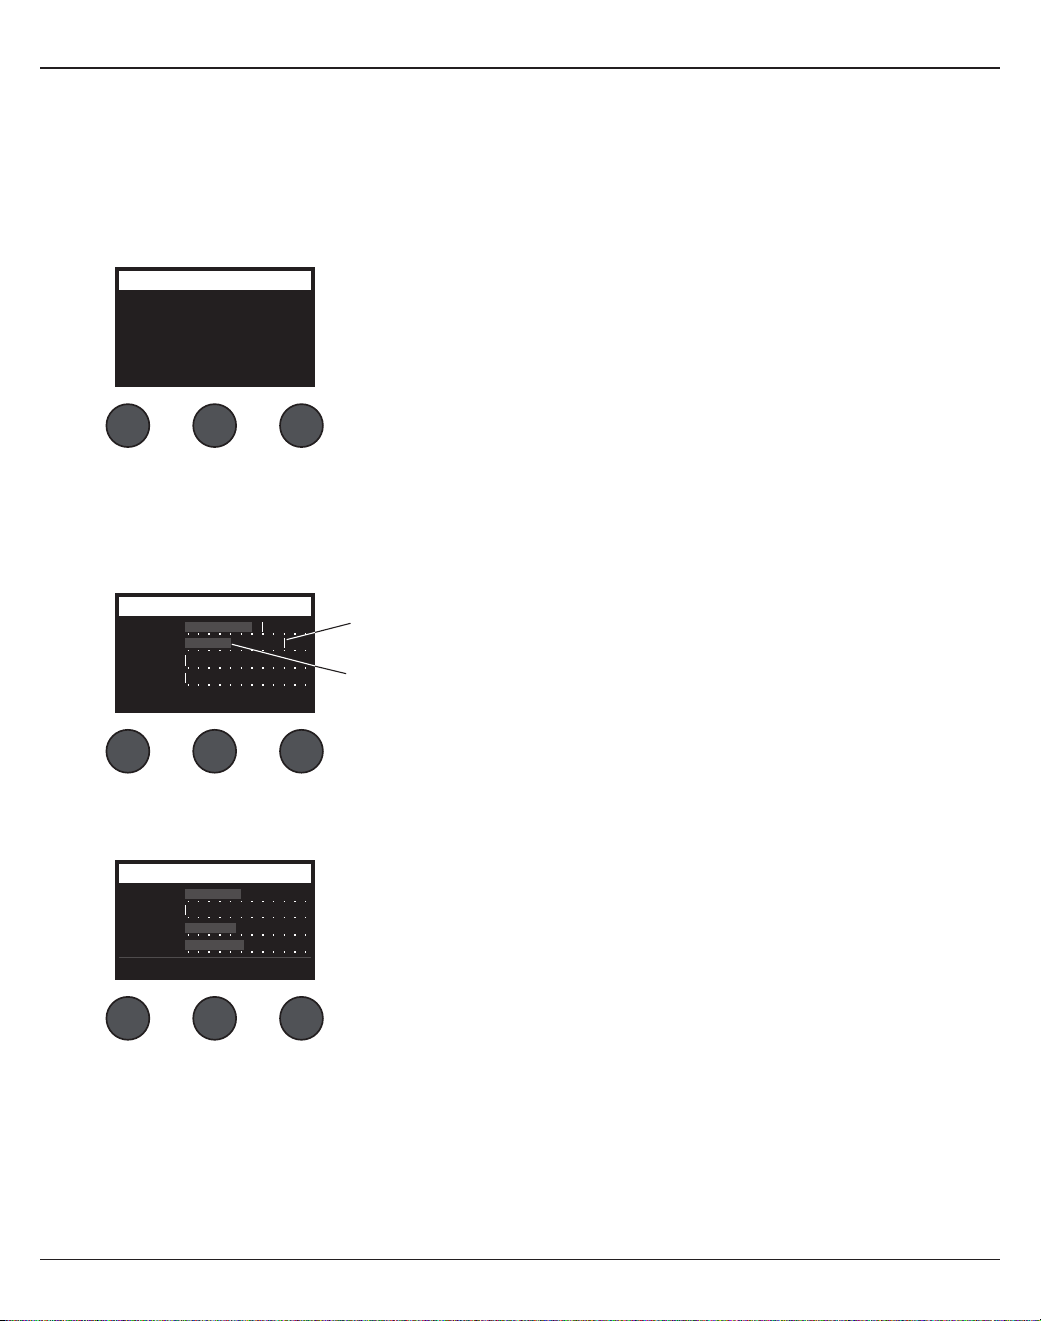
28 - Italiano
Funzionamento
Utilizzo delle utilità Prefs
La funzione Prefs consente di accedere a numerose utilità di sistema.
1. Selezionare Prefs con il selettore rotativo.
2. Ruotare il controllo Menu per far scorrere l'elenco ed evidenziare l'utilità desiderata. Premere il controllo Select
per visualizzare l'utilità:
• Status - Visualizza gli eetti assegnati ai canali di ingresso (solo visualizzazione).
• Input Level - Visualizza gli indicatori del livello di ingresso con indicatori dei picchi di segnale per tutti i
canali di ingresso. Premere il controllo Reset per ripristinare tutti gli indicatori dei picchi di segnale. Questa
visualizzazione è utile per impostare il livello di Trim di ingresso del canale (vedere "Ottimizzazione del
guadagno di ingresso e del volume di uscita" a pag. 17). Premere il controllo Aux In per monitorare il livello
degli ingressi ausiliari (solo per il T8S, premere il controllo Ch 5-8 per monitorare il livello degli ingressi5-8).
• Output Level - Visualizza gli indicatori dei livelli di uscita per tutte le uscite: Main L, Main R, USB L e USB R.
Premere il controllo Aux per monitorare il livello delle uscite ausiliarie.
Output Level Preferences
USB L
Main L
Main R
USB R
Menu Rese
tA
ux
Status
Ch 1 Mod
Mod
Mod Dly
Cm
pR
ev
Rev
Rev
CmpCh 2
Ch 3
Ch 4
Menu
Preferences
Cmp = Compressore/gate
Mod = Modulazione
Dly = Delay
Rev = Riverbero
Input LevelPreferences
Ch 3
Ch 1
Ch 2
Ch 4
Menu Aux InReset
Indicatore del livello di picco
Indicatore del livello di ingresso

Funzionamento
Italiano - 29
• Master Out EQ - Master Out EQ è un equalizzatore grafico a 6 bande che agisce sul master mix in uscita. Col
controllo centrale, selezionare la gamma di frequenze che si desidera incrementare o attenuare ed utilizzare il
controllo Level per regolarne il livello a +/-18dB.
• USB B to PC - Consente di inviare una sorgente selezionata al computer tramite i canali di uscita USB di destra
e di sinistra. È possibile selezionare le sorgenti Ch1-4 (Ch5-8 solo per il T8S), Aux In, Master o Aux Out 1-2
(AuxOut 3-4 solo per il T8S).
• USB B from PC - Consente di inviare i canali USB destro e sinistro dal computer a una destinazione selezionata
sul mixer (None, Aux In o Master).
• USB A-Playback - Collegare un Flash Drive USB tipo A per riprodurre qualsiasi file WAV/MP3 memorizzato
sull'unità stessa. Selezionare dal menu la cartella contenente i file WAV/MP3; selezionare il file da riprodurre e
regolare il livello ruotando il controllo Level.
+18
+12
+6
0
-6
-12
-18
125HzMenu
Master EQ Preferences
Level
1. Ruotare il controllo Left/Right per evidenziare una sorgente.
2. Premere il controllo Select per selezionare la sorgente, o Cancel per uscire
senza apportare modifiche.
3. Ruotare il controllo Menu per tornare all'elenco del menu Prefs.
Left : Master
Right : Master
LeftMenu
USB to PC Preferences
Right
Left : Master
Right : Master
LeftMenu
USB from PC Preferences
Right
1. Ruotare il controllo Left/Right per evidenziare una destinazione.
2. Premere il controllo Select per selezionare la sorgente, o Cancel per uscire
senza apportare modifiche.
3. Ruotare il controllo Menu per tornare all'elenco del menu Prefs.
Tomorrow Is Too late.wav
Sarah.wav
Mistakes for Love.mp3
Sun Behind the Clouds.wav
Hey God Maker. mp3
LevelSelectMenu

30 - Italiano
Funzionamento
• Versions - Visualizza la versione del firmware DSP.
• ToneMatch - Visualizza l'elenco dei banchi di preset ToneMatch memorizzati sul T4S/T8S.
Vedere la pagina www.Bose.com/livesound per i banchi di preset più recenti.
• L1 Power Stand - In caso di collegamento a una base di alimentazione L1® Model 1S/II, il display visualizza
Connected.
Versions
T4S v1.0.0
Menu
Preferences
C: Ovation Guitars
B: Audix Mics.
A: Taylor Guitars
Menu
ToneMatchPreferences
Connected
Menu
L1 Stand Preferences
Caricamento e salvataggio di scenari
Uno scenario è un'istantanea dello stato del mixer ToneMatch® T4S/T8S.
• In uno scenario sono memorizzate tutte le impostazioni del mixer ToneMatch e lo stato dei pulsanti Mute,
FXMute e CH Edit,
• ma non In uno scenario non sono memorizzati il controllo Trim dei canali, i livelli di volume dei canali, il livello di
volume Master o delle cue né la posizione dell'interruttore della phantom power.
All Channels
Singer/Songwriter
Load Shared Save
Scenes
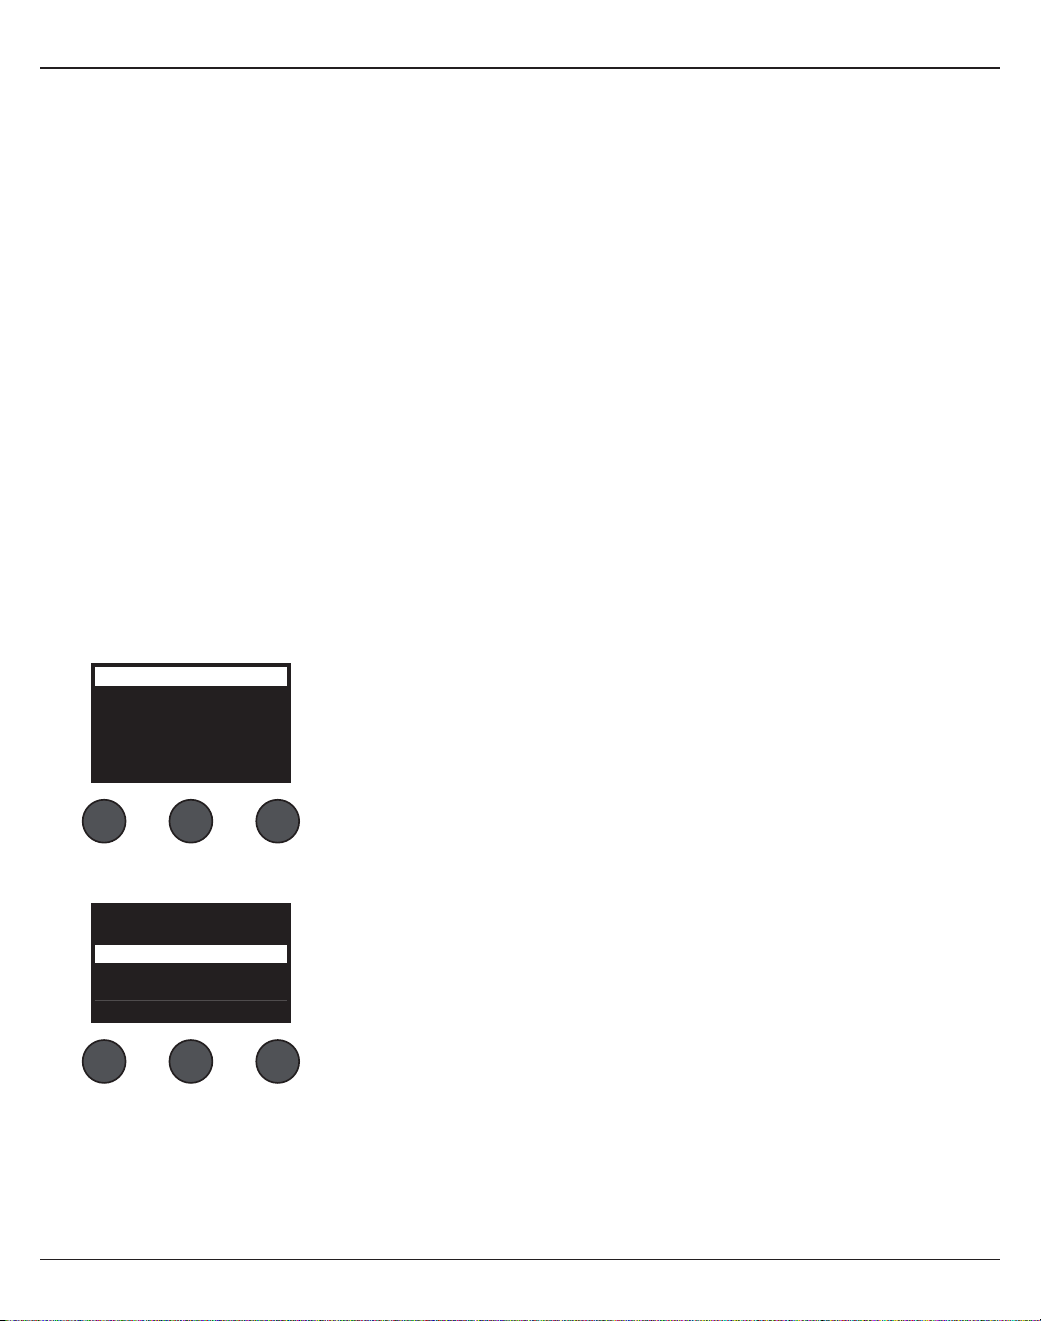
Funzionamento
Italiano - 31
Il T4S/T8S include tre tipi di scenari:
• (5) Scenari Bose: scenari di sola lettura predefiniti in fabbrica. Non è possibile modificarli né sovrascriverli.
• (10) Scenari utente: scenari definibili dall'utente per salvare e richiamare tutte le impostazioni preferite. Questi
scenari possono essere aggiornati e sovrascritti a piacere.
• (1) Scenario condiviso: scenario definibile dall'utente per salvare le impostazioni da condividere con altri utenti
di un mixer ToneMatch® T4S/T8S. Questo scenario può essere caricato su un computer tramite il software di
aggiornamento L1® disponibile all'indirizzo www.Bose.com/livesound.
Per caricare uno scenario:
1. Selezionare Scenes con il selettore rotativo.
2. Ruotare il controllo Load per far scorrere l'elenco di scenari ed evidenziare quello desiderato. Il nome dello
scenario attualmente caricato viene visualizzato in grassetto.
3. Premere il controllo Select per selezionare lo scenario o Cancel per uscire dall'elenco senza modificare
l'impostazione.
Nota: se non si preme il controllo Select o Cancel entro 10 secondi, viene visualizzata nuovamente la schermata
Scenes. Non viene apportata alcuna modifica e lo scenario attualmente caricato viene visualizzato sul display.
4. Se è stato premuto Select, verrà visualizzata la domanda "Are you sure?" (continuare?). Premere il controllo Yes
per caricare lo scenario o No per uscire e lasciare invariate le impostazioni dello scenario.
Nota: se non si preme il controllo Yes o No entro 10 secondi, viene visualizzata nuovamente la schermata Scenes. Non
viene apportata alcuna modifica e lo scenario attualmente caricato viene visualizzato sul display.
Per salvare uno scenario:
1. Selezionare Scenes con il selettore rotativo. Viene visualizzato lo scenario attualmente caricato.
2. Ruotare il controllo Save per evidenziare lo scenario da salvare. Premere Select o Cancel per uscire dall'elenco.
All Channels
Singer/Songwriter
Load Shared Save
Scenes
Nota: se non si preme il controllo Select o Cancel entro 10 secondi,
viene visualizzata nuovamente la schermata Scenes. Non viene
apportata alcuna modifica e la schermata visualizza lo scenario
attualmente caricato.
My Scene 01
My Scene 02
My Scene 03
Cancel Select
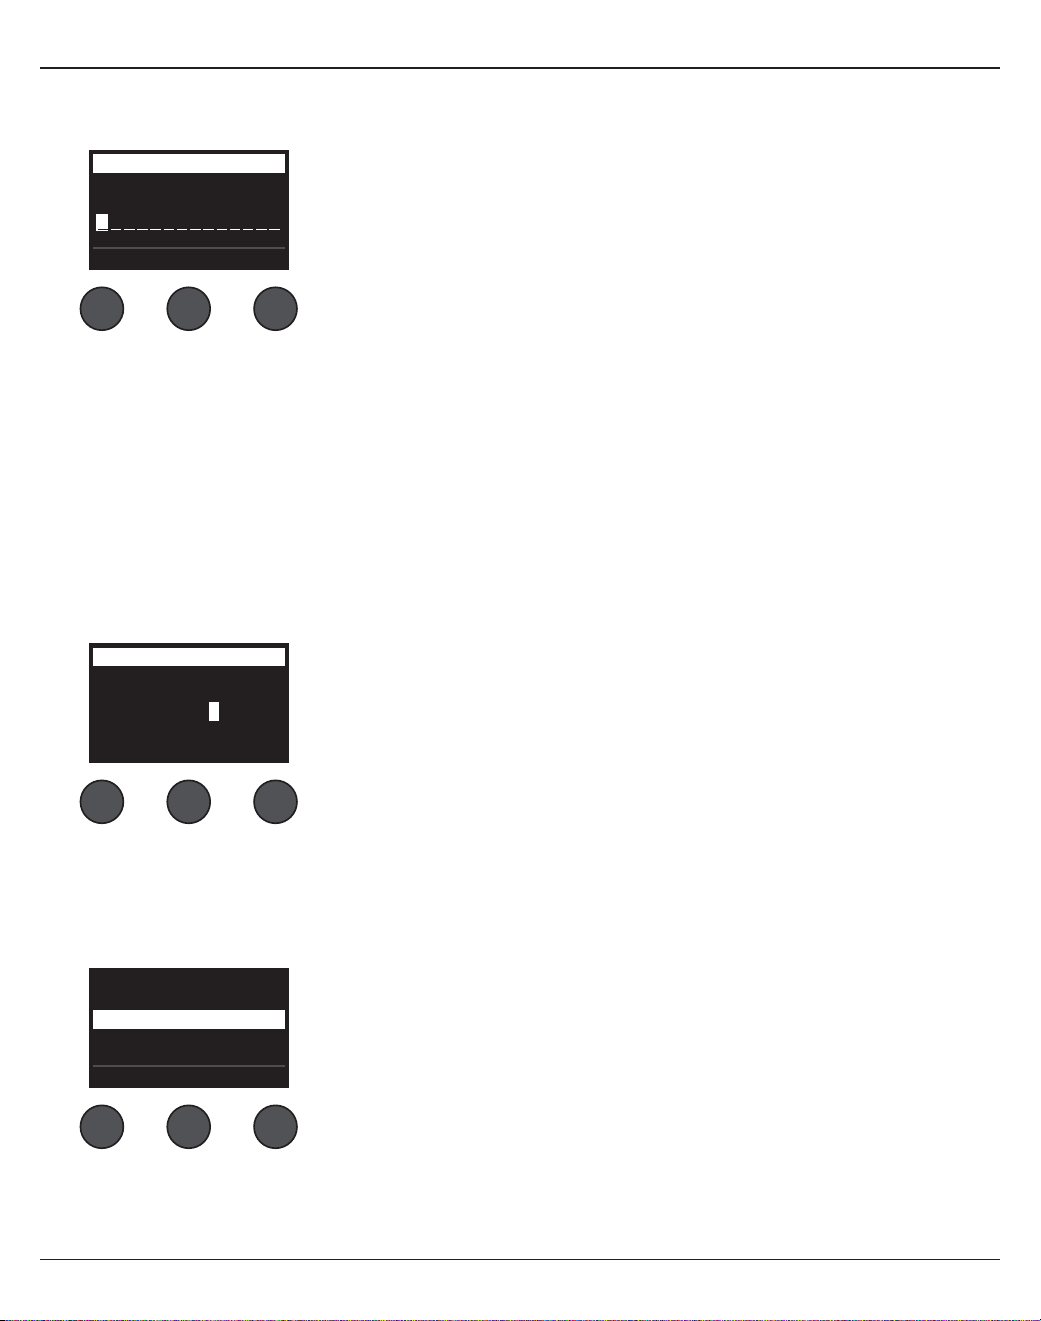
32 - Italiano
Funzionamento
3. Se è stato premuto Select, utilizzare la schermata Rename per modificare il nome dello scenario o premere
Save per utilizzare il nome visualizzato e procedere al punto 4.
Per modificare il nome dello scenario prima di salvarlo:
È possibile utilizzare le seguenti opzioni di modifica per cambiare nome allo scenario. Una volta modificato il nome,
premere il controllo Save e procedere al punto 4.
• Selezione e modifica dei caratteri: mentre è visualizzata la schermata Rename, ruotare il controllo Cursor per
evidenziare il carattere o la posizione del carattere che si desidera modificare. Ruotare quindi il controllo Select per
modificare il carattere.
• Utilizzo della mappa dei caratteri: mentre è visualizzata la schermata Rename, ruotare il controllo Cursor per
evidenziare il carattere da modificare. Ruotare quindi il controllo Select per visualizzare la mappa dei caratteri.
Ruotare il controllo Select per spostare il cursore a sinistra o a destra. Ruotare il controllo Up/Dn per spostare il
cursore in alto o in basso. Quando il carattere desiderato è evidenziato, premere Select per scrivere il carattere nella
posizione selezionata.
• Utilizzo delle funzioni Clear, Insert e Delete: mentre è visualizzata la schermata Rename, ruotare il controllo
Cursor per posizionare il cursore. Premere quindi il controllo Cursor per visualizzare un menu di speciali funzioni di
modifica. Ruotare il controllo Select per evidenziare la funzione desiderata. Ruotare quindi il controllo Select per
eseguire la funzione.
Clear Character - Rimuove il carattere evidenziato dal cursore e lascia uno spazio.
Clear All - Cancella l'intera riga di testo.
Clear to End - Cancella tutto il testo a destra del cursore, incluso il carattere
evidenziato.
Insert - Inserisce uno spazio a sinistra del carattere evidenziato.
Delete - Rimuove il carattere e lo spazio evidenziati dal cursore.
Rename
J
rstuvwxyzABCDEFGHI
123456789, ;/\()|+-
KLMNOPQRSTU VWXYZ0
abcdefgh jklmnopqi
Cancel Up/Dn Select
Scenes
Clear To End
Insert
Clear All
Clear Character
Delete
CancelSelect
Rename
M yScene 01
CursorSave Select
Scenes

Funzionamento
Italiano - 33
4. Alla visualizzazione della domanda "Are You Sure?" (continuare?), premere il controllo Yes per salvare lo scenario
o No per uscire senza salvare lo scenario.
Condivisione di uno scenario
Se si crea uno scenario da condividere con un altro utente di un mixer ToneMatch® T4S/T8S, è possibile salvarlo
come scenario condiviso salvandolo in [To Shared Scene]. Il software di aggiornamento L1® consente poi di caricare
lo scenario condiviso nel computer per poi trasferire il file sul computer di un altro utente di T4S/T8S. Tale utente di
mixer T4S/T8S potrà poi scaricare lo scenario sul suo mixer tramite il software di aggiornamento L1. Il software di
aggiornamento L1 è disponibile all'indirizzo www.Bose.com/livesound.
Per salvare uno scenario condiviso:
1. Caricare lo scenario da condividere (vedere "Per caricare uno scenario" a pag. 31).
2. Premere il controllo Save per accedere all'elenco di scenari.
3. Ruotare il controllo Select per far scorrere l'elenco di scenari ed evidenziare [To Shared Scene]. Premere Select o
Cancel per uscire dall'elenco.
4. Se è stato premuto Select, utilizzare la schermata Rename per modificare il nome dello scenario (vedere
"Per modificare il nome dello scenario prima di salvarlo" a pag. 32) o passare al punto 5 per utilizzare il nome
esistente.
Are You Sure?
YesNo
Nota: se non si preme il controllo Select o Cancel entro 10 secondi, viene
visualizzata nuovamente la schermata Scenes. Non viene apportata alcuna
modifica e la schermata visualizza lo scenario attualmente caricato.
[To Shared Scene]
My Scene 10
My Scene 09
Cancel Select
Rename
M yScene 07
CursorSave Select
Scenes

34 - Italiano
Funzionamento
5. Premere il controllo Save per memorizzare lo scenario come scenario condiviso.
6. Alla visualizzazione della domanda "Are You Sure?" (continuare?), premere il controllo Yes per salvare lo scenario
o No per uscire senza salvare lo scenario come scenario condiviso.
Nota: se non si preme il controllo Yes o No entro 10 secondi, viene visualizzata nuovamente la schermata Scenes. Non
viene apportata alcuna modifica e la schermata visualizza lo scenario attualmente caricato.
7. Premere il controllo Shared per confermare che lo scenario salvato è uno scenario condiviso.
Nota: sul T4S/T8S è disponibile una sola posizione di memorizzazione per uno scenario condiviso. Quando si salva
uno scenario come scenario condiviso, quello precedentemente salvato viene sovrascritto.
Ulteriori dettagli sull'utilizzo del software di aggiornamento L1® per scaricare/caricare scenari dal/sul computer sono
disponibili all'indirizzo www.Bose.com/livesound
All Channels
Singer/Songwriter
Load Shared Save
Scenes All Channels
My Scene 07
Current Shared Scene:
Back
Scenes
Premere

Funzionamento
Italiano - 35
Scenari Bose
I cinque scenari Bose vengono forniti quali esempi utilizzabili dall'utente come punto di partenza. Dopo aver
caricato uno scenario Bose, è possibile modificarne le impostazioni e quindi salvarlo come scenario personalizzato o
condiviso.
Factory Settings (Impostazioni di fabbrica)
Lo scenario Factory Settings consente di ripristinare le impostazioni predefinite di fabbrica del mixer. Quando si
carica questo scenario, vengono cancellate tutte le modifiche apportate in precedenza allo scenario attualmente
caricato.
CH 1-4 (T4S/T8S) CH 5-8 (T8S)
ToneMatch
Active
Utility
Flat
zEQ
Bypass
Low Mid High
0 dB 0 dB 0 dB
Para EQ
Bypass
Comp/Gate
Bypass
Chorus1
Mod
Bypass
Chorus1
Delay
Bypass
Digital
Reverb
Bypass
Digital
Aux
Mute
Pre: With EQ & Fx
Impostazioni globali
Preferences
Active screen Status
USB to PC Left/Right:Master
USB from PC Left/Right:Master
Master Out Post Master Volume
Reverb Type
Type Medium
Time 50%
Bal 50%
Nota: per un elenco delle impostazioni di fabbrica per tutti gli eetti, vedere "Impostazioni di fabbrica" a pag. 42.

36 - Italiano
Funzionamento
Singer/Songwriter (Cantante/cantautore)
Lo scenario Singer/Songwriter è stato sviluppato per un cantante/cantautore che suona una tastiera o una chitarra,
eventualmente accompagnato da una traccia MP3.
Figura 16. Esempio di configurazione per Singer/Songwriter

Funzionamento
Italiano - 37
Microfono Chitarra Tastiera Basso Aux in
CH 1 CH 2 CH 3 CH 4 5/6
ToneMatch
Active Active Active Active
N/A
Vocal Mics Acoustic Guitar Keyboards Basses
Handheld Mics Steel String w/ piezo General Keys Active Bass 1
zEQ
Active Active Active Active
N/A
Low Mid High Low Mid High Low Mid High Low Mid High
0 dB 0 dB 0 dB 0 dB 0 dB 0 dB 0 dB 0 dB 0 dB 0 dB 0 dB 0 dB
Para EQ Bypass Bypass Bypass Bypass N /A
Comp/Gate
Bypass Bypass Bypass Bypass
N/A
Comp2 Comp2 Comp2 Comp2
Mod
Bypass Bypass Bypass Bypass
N/A
Chorus1 Chorus1 Chorus3 Chorus1
Delay
Bypass Bypass Bypass Bypass
N/A
Digital Digital Digital Digital
Reverb
Active Active Bypass Bypass
N/A
Medium (Global) Medium (Global) Medium (Global) Medium (Global)
Pan/Aux
Center Center Center Center Aux in
Aux 1-2 50% Aux 1-2 50% Aux 1-2 50% Aux 1-2 50% 5 Lvl 6 Lvl
Pre: With EQ & Fx Pre: With EQ & Fx Pre: With EQ & Fx Pre: With EQ & Fx 50% 50%
Impostazioni dei canali per lo scenario Singer/Songwriter
Impostazioni globali
Preferences
Active screen Status
USB to PC Left/Right:Master
USB from PC Left/Right:Master
Master Out Post Master Volume
Reverb Type
Type Medium
Time 50%
Bal 50%

38 - Italiano
Funzionamento
DJ/Playback
Lo scenario DJ/Playback è stato sviluppato per eventi con DJ o per qualsiasi esigenza di riproduzione audio.
Con questa configurazione vengono utilizzati due microfoni oltre a un dispositivo mobile, un mixer oppure un laptop.
Figura 17. Esempio di configurazione per DJ/Playback

Funzionamento
Italiano - 39
Impostazioni dei canali per lo scenario DJ/Playback
Impostazioni globali
Preferences
Active screen Status
USB to PC Left/Right:Master
USB from PC Left/Right:Master
Master Out Post Master Volume
Reverb Type
Type Medium
Time 50%
Bal 50%
Sorgente 1 sinistra Sorgente 1 destra Microfono Microfono Aux in
CH 1 CH 2 CH 3 CH 4 5/6
ToneMatch
Active Active Active Active
N/A
DJ/Playback DJ/Playback Vocal Mics Vocal Mics
Flat, zEQ Controls Flat, zEQ Controls Handheld Mics Handheld Mics
zEQ
Active Active Active Active
N/ALow Mid High Low Mid High Low Mid High Low Mid High
0 dB 0 dB 0 dB 0 dB 0 dB 0 dB 0 dB 0 dB 0 dB 0 dB 0 dB 0 dB
Para EQ Bypass Bypass Bypass Bypass N/A
Comp/Gate
Bypass Bypass Bypass Bypass
N/A
Limit Limit Comp2 Comp2
Mod
Bypass Bypass Bypass Bypass
N/A
Chorus1 Chorus1 Chorus3 Chorus1
Delay
Bypass Bypass Bypass Bypass
N/A
Digital Digital Digital Digital
Reverb
Bypass Bypass Bypass Bypass
N/A
Medium (Global) Medium (Global) Medium (Global) Medium (Global)
Pan/Aux
Left Right Center Center Aux in
Aux 1-2 50% Aux 1-2 50% Aux 1-2 50% Aux 1-2 50% 5 Lvl 6 Lvl
Pre: With EQ & Fx Pre: With EQ & Fx Pre: With EQ & Fx Pre: With EQ & Fx 50% 50%

40 - Italiano
Funzionamento
Full Band
Lo scenario Full Band è configurato per una batteria, un basso elettrico, una chitarra elettrica, voce e lettore MP3.
Figura 18. Esempio di impostazione per batteria e basso elettrico
SYSTEMINPUT 2INPUT 1
VOLUME VOLUME
FRONT
LED
POWER
LIMIT
OFF
FULL RANGE
WITH SUB
EQ
MIC
LINE LEVEL
SIGNAL INPUT
INPUT
POWER
ON
OFF
100-240V~50/60Hz
1000W
LINE OUTPUT
SIGNAL/CLIP SIGNAL/CLIP POWER/FAULT
LIMIT
SYSTEM
INPUT 2INPUT 1
LINE OUTPUT LINE OUTPUT
LINE INPUT
POWER/FAULT
LIMIT
SIGNAL/CLIP
LINE INPUT
NORM
REV
THRU
HPF
POLARITY
LINE
OUTPUT EQ
POWER
LIMIT
OFF
FRONT
LED
Funzionamento
Italiano - 41
Impostazioni dei canali per lo scenario Full Band
Impostazioni globali
Preferences
Active screen Status
USB to PC Left/Right:Master
USB from PC Left/Right:Master
Master Out Post Master Volume
Reverb Type
Type Medium
Time 50%
Bal 50%
Cassa Panoramico Panoramico Basso Chitarra Microfono Microfono Microfono Aux in
CH 1 CH 2 CH 3 CH 4 CH 5 CH 6 CH 7 CH 8 9/10
ToneMatch
Active Active Active Active Active Active Active Active
N/A
Percussion Percussion Percussion Basses Electric Guitars Vocal Mics Vocal Mics Vocal Mics
Kick, General General Overhead General Overhead Active Bass 1 Mic'd Amp w/ SM57 Handheld Mics Handheld Mics Handheld Mics
zEQ
Active Active Active Active Active Active Active Active
N/A
L M H L M H L M H L M H L M H L M H L M H L M H
0
dB
0
dB
0 dB 0
dB
0
dB
0
dB
0
dB
0
dB
0 dB 0
dB
0
dB
0
dB
0
dB
0
dB
0
dB
0
dB
0
dB
0 dB 0
dB
0
dB
0
dB
0
dB
0
dB
0
dB
Para EQ Bypass Bypass Bypass Bypass Bypass Bypass Bypass Bypass N /A
Comp/Gate
Active Bypass Bypass Active Bypass Bypass Bypass Bypass
N/A
Kick 1 Comp2 Comp2 Comp2 Comp2 Gate Gate Gate
Mod
Bypass Bypass Bypass Bypass Active Bypass Bypass Bypass
N/A
Chorus1 Chorus1 Chorus1 Chorus1 Chorus 1 Chorus 1 Chorus 1 Chorus 1
Delay
Bypass Bypass Bypass Bypass Bypass Bypass Bypass Bypass
N/A
Digital Digital Digital Digital Digital Digital Digital Digital
Reverb
Bypass Bypass Bypass Bypass Bypass Active Active Active
N/A
Medium (Global) Medium (Global) Medium (Global) Medium (Global) Medium (Global) Medium (Global) Medium (Global) Medium (Global)
Pan/Aux
Center Center Center Center Center Center Center Center Aux in
Aux 1-4 50% Aux 1-4 50% Aux 1-4 50% Aux 1-4 50% Aux 1-4 50% Aux 1-4 50% Aux 1-4 50% Aux 1-4 50% 9 Lvl 10 Lvl
Dry: After Preamp Dry: After Preamp Dry: After Preamp Dry: After Preamp Dry: After Preamp Dry: After Preamp Dry: After Preamp Dry: After Preamp 50% 50%

Impostazioni di fabbrica
42 - Italiano
Impostazioni di fabbrica
In questa sezione vengono descritte le impostazioni del mixer T4S/T8S appena uscito dalla fabbrica. Per ripristinare
in qualsiasi momento queste impostazioni del T4S/T8S, caricare lo scenario Bose Factory Settings.
Impostazioni di fabbrica Comp/Gate
Type Thresh Gain
Compressor 1: Light –16.0 dB 3.0 dB
Compressor 2: Medium –16.0 dB 5.0 dB
Compressor 3: Heavy –16.0 dB 8.0 dB
Limiter –10.0 dB 0 dB
De-Esser –10.0 dB 0 dB
Thresh Speed
Noise Gate –70.0 dB 50%
Thresh Tight
KickGate1: Standard –20.0 dB 100%
KickGate2: Fast –20.0 dB 100%
Impostazioni di fabbrica Modulator
Type Thresh Gain Speed
Chorus 1: Brite 50% 50% 0.50 Hz
Chorus 2: Warm 70% 100% 0.15 Hz
Chorus 3: Dark 25% 25% 3.0 Hz
Flanger 1: Tape 50% 50% 1.00 Hz
Flanger 2: Feedback 50% 100% 2.00 Hz
Speed Feedback
Phaser 1: Stomp 0.50 Hz 0%
Phaser 1: Rack 0.50 Hz –75%
Phaser 1: Warm 1.00 Hz –26%
Phaser 1: Bright 0.50 Hz -76%
Speed Depth
Tremolo 5.00 Hz 50%
Impostazioni di fabbrica Delay
Type Mix Time Feedback
Digital 30% 150 ms 30%
Analog 30% 275 ms 20%
Tape 30% 350 ms 30%
Impostazioni di fabbrica Reverb Type
Type Bal. Time Time Range
Plate 50% 20% 0-4.6 s
Small 50% 15% 0-0.8 s
Medium 50% 25% 0-1.9 s
Large 50% 50% 0-3.5 s
Cavern 50% 100% 0-7.0 s

Italiano - 43
Manutenzione
Risoluzione dei problemi
In caso di problemi durante l'uso del prodotto, prova ad adottare le soluzioni indicate di seguito. Se il problema
persiste, consulta la guida in linea all'indirizzo www.Bose.com/livesound In caso di mancata soluzione del problema,
chiama il team di assistenza tecnica prodotti Bose al numero (877) 335-2673.
Problema Soluzione
Il T4S/T8S è collegato
e acceso ma non è
alimentato.
• Verifica che la presa di corrente sia alimentata. Prova a collegare una lampada o
un'altra apparecchiatura alla stessa presa AC, oppure verificane il funzionamento con
un apposito tester.
Se stai utilizzando il T4S con un sistema L1® Model II o 1S:
• Verifica che il cavo ToneMatch® sia collegato correttamente al mixer e alla base di
alimentazione L1.
• Verifica che il connettore del cavo di alimentazione sia inserito correttamente nella
presa di alimentazione (di rete) AC.
• Verifica che la base di alimentazione L1 sia accesa e che il LED di alimentazione sia blu.
Il T4S/T8S è acceso, ma
il suono è assente.
• Verifica che il controllo di volume Master sia attivato.
• Verifica che i canali di ingresso da ascoltare non siano stati disattivati con il pulsante
Mute.
• Verifica che il controllo del volume del canale da ascoltare sia attivato.
• Verifica che il controllo Trim del canale di ingresso appropriato sia impostato su un
livello suciente ad accendere il LED verde (che indica la presenza di un forte segnale
di ingresso).
• Controlla gli indicatori dei livelli di ingresso e uscita nel menu Prefs (preferenze), per
verificare che il segnale sia presente in ingresso e in uscita.
• Verifica che il controllo del volume sulla sorgente di ingresso (strumento) sia attivato.
• Collega la sorgente di ingresso (strumento) al mixer con un altro cavo.
• Collega la sorgente di ingresso (strumento) direttamente alla base di alimentazione L1
o a un altro amplificatore, per verificare che funzioni.
• Spegni il mixer e attendi 30 secondi, quindi riaccendilo.
Se stai utilizzando il T4S con un sistema L1 Model II o 1S:
• Spegni la base di alimentazione, reinserisci il connettore del cavo ToneMatch nella
porta ToneMatch, quindi riaccendi la base di alimentazione.
• Se disponibile, prova con un altro cavo ToneMatch. Se non è disponibile un altro cavo
ToneMatch, prova con un cavo Ethernet standard.
• Collega l'uscita Master del T4S/T8S all'ingresso analogico della base di alimentazione
con un cavo con connettore phone 1/4". Attiva il controllo Trim della base di
alimentazione e verifica che il suono sia udibile.
• Verifica che il LED di alimentazione sulla base di alimentazione sia blu. Se il LED
è rosso, chiama il team di assistenza tecnica per i prodotti Bose al numero
(877) 335-2673.
44 - Italiano
Manutenzione
Problema Soluzione
Scarsa qualità del suono
emessa da un microfono o uno
strumento collegato al T4S/T8S.
• Verifica che non sia stata applicata un'equalizzazione zEQ o Para EQ
indesiderata.
• Verifica che per il microfono o lo strumento sia stato selezionato un
appropriato preset ToneMatch® sul mixer. Se non desideri utilizzare un
appropriato preset ToneMatch® sul mixer. verifica che la funzione ToneMatch
sia impostata su Flat.
• Verifica che sul canale di ingresso non siano presenti eetti indesiderati
(Comp/Gate, Mod, Delay, Reverb). Controlla nel menu Prefs lo stato di tutti gli
eetti attualmente attivi.
• Controlla che il livello Trim di ingresso del T4S/T8S sia regolato correttamente
per il microfono o lo strumento in uso. Il LED del segnale deve essere verde; se
è rosso, abbassa il livello di Trim finché non diventa verde.
• Prova a collegare il microfono o lo strumento con un altro cavo.
• Controlla il cavo che collega il microfono o lo strumento al mixer T4S/T8S.
Verifica che il connettore del cavo sia completamente inserito nel connettore
di uscita del microfono o dello strumento e nel connettore di ingresso del
T4S/T8S.
• Controlla le impostazioni (se presenti) sul microfono o sullo strumento.
• Controlla le batterie (se presenti) sul microfono o sullo strumento.
Non si sente alcun eetto. • Controlla di avere premuto il pulsante CH Edit corretto.
• Verifica che il pulsante FX Mute non sia stato premuto per il canale in
questione.
I controlli rotativi non hanno
alcun eetto sul T4S/T8S.
• Spegni il mixer. Attendi 30 secondi e riaccendilo.
Il controllo di volume Master
non ha alcun eetto.
• Verifica che per l'uscita Master in Master Out nel menu Prefs sia configurato su
Post Master Volume.
Se ai connettori di ingresso del
T4S/T8S non è collegata alcuna
sorgente audio, il sistema L1®
emette un leggero ronzio o
brusio.
• Collega il T4S/T8S e la base di alimentazione L1 alla stessa presa di corrente AC
(di rete).
• Utilizzando un tester per per prese di corrente, verifica che i contatti della
presa AC a cui sono collegati il T4S/T8S e/o la base di alimentazione L1 non
siano invertiti o interrotti (fase, neutro e/o terra).
• Se stai usando un cavo di prolunga, eettua la stessa verifica anche sul cavo.
Presenza di frequenze basse,
medie o alte eccessive o
insucienti.
• Verifica che non sia stata applicata un'equalizzazione zEQ o Para EQ
indesiderata.
• Verifica che per il microfono o lo strumento sia stata selezionato un
appropriato preset ToneMatch® sul mixer. Se non desideri utilizzare un preset
ToneMatch sul mixer, verifica nella categoria Utility la funzione ToneMatch sia
impostata su Flat.

Italiano - 45
Manutenzione
Problema Soluzione
Riproduzione di scarsa qualità
di una registrazione stereo
tramite lettore CD o MP3 o altro
dispositivo analogo.
• Collega il canale sinistro del dispositivo all'ingresso Aux 5 e il canale destro
all'ingresso Aux 6 (o 9/10 per T8S). Gli ingressi Aux 5/6 (o 9/10) sono
progettati per ingressi a livello linea.
• Quando utilizzi un lettore CD o un dispositivo mobile, disattiva eventuali
funzioni di enfatizzazione dei bassi o di equalizzazione.
• Se utilizzi un software di registrazione su un computer, controlla i requisiti del
software. Potrebbe essere necessario configurare le impostazioni del software
per il funzionamento a 48kHz/24 bit.
Il microfono è soggetto a
feedback.
• Orienta il microfono in modo che non sia rivolto direttamente verso il
rispettivo diusore.
• Collega un altro microfono.
• Prova a riposizionare il sistema L1 e/o il cantante sul palco.
• Aumenta la distanza tra il sistema L1 e il microfono.
• Riduci le alte frequenze (HIGH) regolando lo zEQ sul canale del microfono.
• Prova ad escludere una particolare frequenza che potrebbe causare il
feedback, regolando il valore Para EQ sul canale del microfono.
• Escludi temporaneamente tutti gli eetti audio utilizzati (Mod, Delay, Reverb)
per verificare che non costituiscano una delle cause del feedback.
L'uscita Aux non ha il suono
corretto.
• Verifica se per l'uscita Aux sia configurato il punto di accesso desiderato per
ogni canale di ingresso. Vedi "Invio dei segnali di ingresso alle uscite Aux" a
pag. 21.
• Verifica che ogni ingresso assegni il segnale con il livello desiderato all'uscita
Aux.
Impossibile inviare l'audio del
T4S/T8S a un computer tramite
connessione USB.
• Controlla che il cavo USB sia collegato correttamente al mixer e al computer.
• Prova con un altro cavo USB.
• Verifica che il mixer sia acceso.
• Verifica che i canali di ingresso desiderati del mixer siano assegnati ai canali
di uscita USB di destra e di sinistra. Controlla l'impostazione "USB to PC" nel
menu Prefs.
• Verifica che il livello di Trim del rispettivo canale di ingresso sia impostato ad
un livello suciente ad accendere il LED verde, che indica la presenza di un
forte segnale di ingresso.
• Controlla gli indicatori dei livelli di ingresso e uscita nel menu Prefs per
verificare che il segnale sia presente sia in ingresso che in uscita.
• Verifica che l'ingresso USB del computer funzioni provando a collegare
un'altra periferica audio USB.
• Se utilizzi un software di registrazione su un computer, controlla i requisiti del
software. Potrebbe essere necessario configurare le impostazioni del software
per il funzionamento a 48kHz/24 bit.
Il T4S/T8S non riconosce il
Flash Drive.
• Per verificare che il Flash Drive funzioni correttamente, prova a collegarne uno
di un'altra marca.
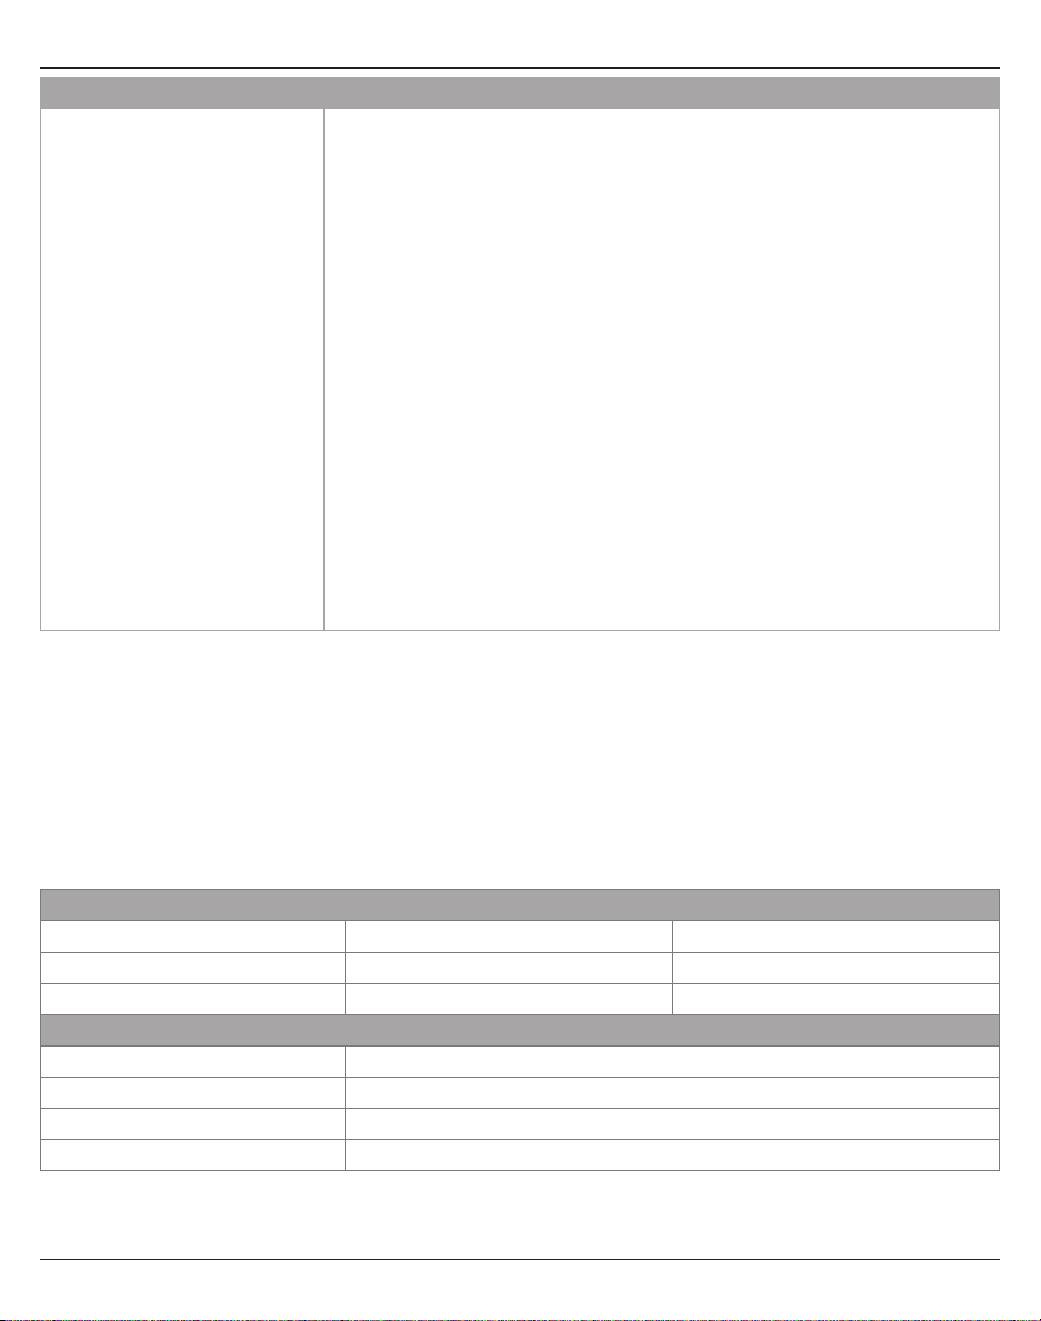
46 - Italiano
Manutenzione
Problema Soluzione
Impossibile inviare l'audio da un
computer al T4S/T8S tramite
una connessione USB.
• Controlla che il cavo USB sia collegato correttamente al mixer e al computer.
• Prova con un altro cavo USB.
• Verifica che il mixer sia acceso.
• Verifica che il computer sia in riproduzione e che l'impostazione audio del
computer non sia disattivata.
• Verifica che il segnale USB sia assegnato agli ingressi desiderati del mixer.
Controlla l'impostazione "PC to USB" nel menu Prefs.
• Verifica che non sia stato premuto il pulsante Mute per i canali di ingresso del
mixer assegnati al segnale USB in ingresso e che i relativi controlli del volume
siano attivati.
• Verifica che il controllo Trim del canale di ingresso appropriato sia impostato
su un livello suciente ad accendere il LED verde, che indicala presenza di un
forte segnale di ingresso.
• Controlla gli indicatori dei livelli di ingresso e uscita nel menu Prefs per
verificare che il segnale sia presente sia in ingresso che in uscita.
• Verifica che l'uscita USB del computer funzioni provando a collegare un'altra
periferica audio USB.
• Se utilizzi un software di registrazione su un computer, controlla i requisiti del
software. Potrebbe essere necessario configurare le impostazioni del software
per il funzionamento a 48kHz/24 bit.
Pulizia
• Utilizza solo un panno morbido e asciutto per pulire la superficie esterna del prodotto.
• Non utilizzare solventi, prodotti chimici o soluzioni detergenti contenenti alcol, ammoniaca o abrasivi.
• Non utilizzare spray vicino al prodotto ed evitare di versare liquidi nelle aperture.
Informazioni tecniche
Parti meccaniche
T4S T8S
Dimensioni (P x L x A) 214 mm x 184 mm x 83 mm 214 mm x 311 mm x 83 mm
Peso 1,0 kg 1,9 kg
Parti elettriche
Conversione A/D e D/A 24 bit
Frequenza di campionamento 48 kHz
USB 2.0 o superiore, cavo da tipo A a tipo B, porta tipo A e porta tipo B
Requisiti di sistema Windows 7 o successivi; Mac OS 10.5 o successivi

Italiano - 47
Informazioni aggiuntive
Informazioni aggiuntive
Consultare il manuale di istruzioni (online all'indirizzo www.Bose.com) per ulteriori informazioni sul prodotto (nonché
su accessori e componenti sostitutivi). Per richiedere una copia cartacea, utilizzare i numeri telefonici forniti.
Garanzia limitata
Questo prodotto è coperto da una garanzia limitata. Visitare l'indirizzo www.pro.Bose.com per i dettagli sulla
garanzia.
Le informazioni sulla garanzia fornite con questo prodotto non sono valide in Australia e Nuova Zelanda.
Per i dettagli sulla garanzia per Australia e Nuova Zelanda, consultare il nostro sito Web all'indirizzo
www.bose.com/au/warranty o www.bose.com/nz/warranty.
Data di produzione
L'ottava cifra del numero di serie corrisponde all'anno di produzione; ad esempio "6" indica 2006 o 2016.
America
(USA, Canada, Messico, America centrale,
Sudamerica)
Bose Corporation
Framingham, MA 01701 USA
Sede centrale: 508-879-7330
Americas Professional Systems,
Assistenza tecnica: 800-994-2673
Australia
Bose Pty Limited
Unit 3/2 Holker Street
Newington NSW Australia
61 2 8737 9999
Belgio
Bose N.V. / S.A
Limesweg 2, 03700
Tongeren, Belgio
012-390800
Cina
Bose Electronics (Shanghai) Co Ltd
25F, L’Avenue
99 Xianxia Road
Shanghai, P.R.C. 200051 Cina
86 21 6010 3800
Francia
Bose S.A.S
26-28 avenue de Winchester
78100 St. Germain en Laye, Francia
01-30-61-63-63
Germania
Bose GmbH
Max-Planck Strasse 36D 61381
Friedrichsdorf, Germania
06172-7104-0
Hong Kong
Bose Limited
Suites 2101-2105, Tower One, Times Square
1 Matheson Street, Causeway Bay, Hong Kong
852 2123 9000
India
Bose Corporation India Private Limited
Salcon Aurum, 3rd Floor
Plot No. 4, Jasola District Centre
New Delhi – 110025, India
91 11 43080200
Italia
Bose SpA
Centro Leoni A – Via G. Spadolini
5 20122 Milano, Italia
39-02-36704500
Giappone
Bose Kabushiki Kaisha
Sumitomo Fudosan Shibuya Garden Tower 5F
16-17, Nanpeidai-cho
Shibuya-Ku, Tokyo, 150-0036, Giappone
TEL 81-3-5489-0955
www.bose.co.jp
Paesi Bassi
Bose BV
Nijverheidstraat 8 1135 GE
Edam, Paesi Bassi
0299-390139
Regno Unito
Bose Ltd
1 Ambley Green, Gillingham Business Park
KENT ME8 0NJ
Gillingham, Inghilterra
0870-741-4500
Informazioni sugli
importatori
Unione Europea
Bose Products B.V., Gorslaan 60, 1441 RG
Purmerend, Paesi Bassi
Cina
Bose Electronics (Shanghai) Company Limited,
Part C, Plan 9, No. 353 North Riying Road, Cina
(Shanghai) Pilot Free Trade Zone
Taiwan
Bose Taiwan Branch, 9F-A1, No. 10, Section 3,
Minsheng East Road, Taipei City 104, Taiwan
Tel: +886-2-2514 7676
Messico
Bose de México, S. de R.L. de C.V., Paseo de las
Palmas 405-204, Lomas de Chapultepec, 11000
Messico, D.F.
Tel.: +5255 (5202) 3545
Per gli altri Paesi, consultare il sito Web.
Recapiti
Visitare il sito Web all'indirizzo www.Bose.com.
2 - Nederlands
Belangrijke veiligheidsinstructies
Lees alle veiligheidsinstructies en de
gebruiksaanwijzing door en bewaar deze.
1. Lees deze instructies door.
2. Bewaar deze instructies.
3. Neem alle waarschuwingen in acht.
4. Volg alle instructies.
5. Gebruik dit apparaat niet in de buurt van water.
6. Alleen met een droge doek reinigen.
7. Zorg dat u de ventilatieopeningen niet blokkeert. Installeer het apparaat volgens de
instructies van de fabrikant.
8. Zorg dat er niet op het netsnoer wordt gestaan of gelopen en dat het niet wordt
afgekneld, met name bij de stekkers en stopcontacten en het punt waar deze uit het
apparaat komen.
9. Gebruik uitsluitend aansluitstukken/accessoires die door de fabrikant worden
gespecificeerd.
10. Gebruik het apparaat uitsluitend in combinatie met het verrijdbare plateau, het
statief, de beugel of de tafel die door de fabrikant worden vermeld of samen
met het apparaat worden verkocht. Als u een verrijdbaar plateau gebruikt,
moet u het apparaat en het plateau voorzichtig verplaatsen zodat deze niet
kunnen omvallen en letsel veroorzaken.
11. Haal de stekker van dit apparaat uit het stopcontact bij onweer of als het langere tijd
niet wordt gebruikt.
12. Laat alle reparaties en onderhoud over aan bevoegde medewerkers. Reparatie is vereist
als het apparaat is beschadigd, zoals wanneer het snoer of de stekker van de voeding is
beschadigd, wanneer er vloeistof in het apparaat is terechtgekomen of voorwerpen in
het apparaat zijn gevallen, wanneer het apparaat is blootgesteld aan regen of vocht, niet
normaal werkt of is gevallen.
WAARSCHUWINGEN:
Dit product bevat magnetisch materiaal. Raadpleeg uw arts om te vragen of dit
invloed kan hebben op uw geïmplanteerde medische hulpmiddel.
• Dit product is niet bedoeld voor installatie of gebruik in overdekte ruimten voor
wateractiviteiten (waaronder overdekte zwembaden, overdekte waterparken,
stoomruimten, sauna’s, bubbelbadkamers en overdekte ijsbanen).
• Om het risico op brand of elektrische schokken te verlagen, mag dit product NIET worden
blootgesteld aan regen, vloeistof of vocht. Niet van toepassing op producten met IPX4-
9-classificatie.
• Houd het product uit de buurt van vuur en warmtebronnen. Plaats GEEN open vlammen,
zoals brandende kaarsen, op of bij het product.
• Er mogen GEEN wijzigingen aan dit product worden aangebracht door onbevoegden.
• Gebruik GEEN omvormer in combinatie met dit product.
• Gebruik het NIET in voertuigen of boten.
• Dit product mag alleen worden gebruikt met de bijgeleverde voeding.
• Plaats of installeer de beugel of het product NIET in de buurt van warmtebronnen,
zoals open haarden, radiatoren, verwarmingsroosters of andere apparaten (waaronder
versterkers) die warmte produceren.
• Gebruik de ToneMatch® T4S/T8S mixer niet in combinatie met een instabiel statief. De
mixer is uitsluitend ontworpen voor gebruik met een schroef van ¼" (6 mm). Het statief
moet een apparaat met een minimaal gewicht van 1,9 kg en een afmeting van 214 x 311 x
83 mm kunnen dragen. Als u een statief gebruikt dat niet is ontworpen voor het gewicht
en de afmetingen van de T4S/T8S mixer, kan dit leiden tot gevaarlijke situaties met
mogelijk letsel tot gevolg.
• Bevat kleine onderdelen die verstikkingsgevaar kunnen vormen. Niet geschikt
voor kinderen jonger dan 3 jaar.
OPMERKINGEN:
• De bij dit systeem geleverde luidsprekerdraad en kabels zijn niet geschikt voor montage in
de muur. Raadpleeg de plaatselijke bouwvoorschriften voor het juiste type bedrading en
kabels voor installatie in een muur.
• Wanneer de stekker of aansluiting van een apparaat als stroomonderbreker wordt
gebruikt, dient deze stroomonderbreker steeds goed bereikbaar te zijn.
• Omwille van de ventilatievereisten raadt Bose af om het product in een besloten ruimte te
plaatsen, zoals in een nis in de muur of een dichte kast.
Wettelijk verplichte informatie
Dit apparaat voldoet aan deel 15 van de FCC-voorschriften en de RSS-norm(en) van Industry
Canada voor vergunningsvrije apparaten. Op het gebruik zijn de volgende twee voorwaarden
van toepassing: (1) Dit apparaat mag geen schadelijke storing veroorzaken, en (2) dit apparaat
moet bestand zijn tegen alle externe storing, waaronder storing die een ongewenste werking
tot gevolg kan hebben.
Dit product voldoet aan alle vereisten van de van toepassing zijnde EU-richtlijnen.
De volledige conformiteitsverklaring kunt u vinden op
www.Bose.com/compliance.
Informatie over producten die elektrische ruis genereren
(FCC Compliance Notice voor de VS)
Opmerking: Dit apparaat is getest en voldoet aan de limieten voor een digitaal apparaat van
de klasse A, volgens deel 15 van de FCC-voorschriften. Deze limieten zijn bedoeld om redelijke
bescherming te bieden tegen schadelijke storing bij installatie in een handelsomgeving. Dit
apparaat genereert en gebruikt radiofrequente energie en kan deze uitstralen en het kan, als
het niet wordt geïnstalleerd en gebruikt volgens de instructies, schadelijke storing veroorzaken
aan radiocommunicatie. Gebruik van dit apparaat in een woonwijk kan schadelijke storing
veroorzaken. In dit geval moet de gebruiker de storing op eigen kosten verhelpen.
Veranderingen of aanpassingen die niet uitdrukkelijk zijn goedgekeurd door Bose Corporation
kunnen leiden tot het vervallen van de bevoegdheid van de gebruiker om dit apparaat te
gebruiken.
Afgeschermde kabels zijn vereist om de regelgeving na te leven.
Dit product voldoet aan de specificaties van de Canadese ICES-003 klasse A.
CAN ICES-3(A)/NMB-3(A)
Dit product voldoet aan alle immuniteitsvereisten van EN55103-2 voor een
E2 elektromagnetische omgeving.
Part Name
Toxic or Hazardous Substances and Elements
Names and Contents of Toxic or Hazardous Substances and Elements
PCBs
Metal parts
Plastic parts
Speakers
Cables
This table is prepared in accordance with the provisions of SJ/T 11364.
0: Indicates that said hazardous substance contained in all of the homogenous materials for this part
is below the limit requirement of GB/T 26572.
X: Indicates that said hazardous substance contained in at least one of the homogenous materials
used for this part is above the limit requirement of GB/T 26572.
Lead
(Pb)
Mercury
(Hg)
Cadmium
(Cd)
Hexavalent
(CR(VI))
Polybrominated
Biphenyl (PBB)
Polybrominated
diphenylether
(PBDE)
X
X
00
0
0
0
0
0
0
0
0
0
0
0
0
0
0
0
0
0
0
0
0
0
0
0
0
X
X
Dit symbool betekent dat het product niet mag worden weggegooid als
huishoudelijk afval en naar een geschikt inzamelpunt voor recycling moet
worden gebracht. Het op de juiste wijze afvoeren en recyclen helpt natuurlijke
hulpbronnen, de menselijke gezondheid en het milieu te beschermen. Voor meer
informatie over het afvoeren en recyclen van dit product neemt u contact op met
de gemeente waar u woont, de afvalverwerkingsdienst of de winkel waar u dit
product hebt gekocht.
Verstrekt door DCE Safety

Inhoud
Nederlands - 3
Inleiding
Productoverzicht ....................................................................................... 5
Productkenmerken .................................................................................. 5
Uitpakken ............................................................................................. 5
Bedienings- en aansluitpanelen
T4S ToneMatch® mixer .................................................................................. 6
Bedieningspaneel ................................................................................... 6
Aansluitpaneel ...................................................................................... 7
T8S ToneMatch® mixer .................................................................................. 8
Bedieningspaneel ................................................................................... 8
Aansluitpaneel ...................................................................................... 9
Opstelling van het systeem
De beschermplaat verwijderen/bevestigen ...............................................................10
Bevestigingsmogelijkheden .............................................................................11
De T4S/T8S op een camerastatief bevestigen .........................................................11
De T4S digitaal aansluiten ...............................................................................12
De T4S/T8S analoog aansluiten .........................................................................13
De ToneMatch®-voeding aansluiten .......................................................................14
De T4S/T8S aansluiten op uw computer ..................................................................15
Een usb-stick aansluiten op de T4S/T8S ..................................................................15
Gebruik
De display van de T4S/T8S aflezen ......................................................................16
De ingangsversterking en het uitgangsvolume optimaliseren ...............................................17
De hoofdvolumeregeling gebruiken ......................................................................18
Een kanaal dempen .................................................................................18
Eecten bij kanalen dempen .........................................................................18
De draaiknop gebruiken ................................................................................19
Het geluid van een kanaal bewerken ....................................................................20
De Pan/Aux-functies gebruiken .....................................................................20
De tuner gebruiken ................................................................................20
Een ToneMatch®-preset selecteren ................................................................... 22
zEQ instellen ...................................................................................... 22
Para EQ instellen ...................................................................................23
Compressor/gate-functies gebruiken ................................................................23
Modulatie-eecten gebruiken ....................................................................... 25
Delay toevoegen ................................................................................... 26
Reverb toevoegen .................................................................................26

Inhoud
4 - Nederlands
Algemene functies gebruiken ...........................................................................27
Een type reverb selecteren .......................................................................... 27
De Prefs-functies gebruiken .........................................................................28
Scènes laden en opslaan ............................................................................30
Een scène delen ...................................................................................33
Bose-scènes ..........................................................................................35
Fabrieksinstellingen ................................................................................35
Singer/Songwriter .................................................................................36
DJ/Playback .......................................................................................38
Volledige band ....................................................................................40
Fabrieksinstellingen
Fabrieksinstellingen ...................................................................................42
Reiniging en onderhoud
Problemen oplossen ...................................................................................43
Schoonmaken ........................................................................................46
Technische informatie .................................................................................46
Verdere informatiebronnen
Contactgegevens .....................................................................................47
Gegevens importeur ...............................................................................47
Aanvullende informatie ................................................................................47
Beperkte garantie .................................................................................. 47

Nederlands - 5
Inleiding
Productoverzicht
Neem de controle over uw muziek in handen met de T4S en T8S ToneMatch® mixers, compacte 4- en 8-kanaals interfaces ontworpen
voor artiesten. Deze mixers zijn voorzien van krachtige DSP-engines en intuïtieve bediening en bieden EQ, dynamiek en eecten van
studiokwaliteit. Geweldig geluid dankzij de ingebouwde Bose® ToneMatch®-verwerking en zEQ, zeker wanneer aangesloten op een Bose L1 of
F1 system voor volledige toonregeling. Sta zelfverzekerd op het podium met deze robuuste ToneMatch mixers met tactiele bediening, goed
afleesbare led-displays en oproepbare scènes. ToneMatch mixers, de ultieme podiumpartners voor artiesten.
Producteigenschappen
Krachtige audioverwerking
• Actuele eecten van studiokwaliteit met geavanceerde digitale
audioverwerking
• Inclusief eecten als compressor, limiter, de-esser, noise gate,
chorus, flanger, phaser, tremolo, delay en reverb
• Bose® ToneMatch®-verwerking voor natuurlijke zang en
instrumenten
• zEQ stelt het geluid van ToneMatch-presets scherp voor snelle,
eectieve aanpassingen
• Onafhankelijke ToneMatch, EQ, dynamiek en eecten per kanaal
• Speciale reverb voor Aux sends en een gedeelde reverb voor alle
kanalen
• EQ op de master helpt bij het compenseren voor de akoestiek van
de locatie
• Volledige toonoptimalisatie in combinatie met Bose L1 en F1
systems
Naadloze livebediening
• Tactiele bediening en indicators ontworpen voor liveoptredens
door muzikanten en dj’s
• Gebruiksvriendelijke interface
• Ingebouwde tempovertraging, chromatische tuner en oproepbare
scènes
• Led-display en verlichte bedieningselementen zijn eenvoudig af te
lezen en te gebruiken, zelfs op donkere podiums
Uitgebreide aansluitmogelijkheden
• Ongeëvenaarde aansluit- en regelmogelijkheden voor een kleine
digitale stereomixer
• Vier (T4S) of acht (T8S) hoogwaardige audiovoorversterkers met
XLR-comboaansluitingen voor microfoons of instrumenten en
schakelbare fantoomvoeding
• Twee aux-ingangen voor extra bronnen, twee (T4S) of vier (T8S)
aux sends
• USB-A en -B voor afspelen vanaf USB-stick of om uw pc/Mac aan
te sluiten
• ToneMatch-uitgangen voor digitale audio en voeding (alleen T4S)
• Gebalanceerde ¼" TRS- en XLR-stereo-uitgangen
(XLR alleen T8S)
• Onafhankelijke hoofdtelefoonuitgang
Handige functies voor optredens
• Robuuste behuizing met magnetische beschermplaat om de
bedieningselementen en aansluitingen te beschermen
• Inclusief een ToneMatch-kabel om een Bose L1 Model II of L1
Model 1S system voor digitale audio en voeding (T4S) aan te
sluiten of inclusief een universele voeding (T8S)
• Statiefaansluiting aan de onderkant om accessoires als
camerastatieven te bevestigen zodat uw ToneMatch binnen
handbereik blijft
T4S ToneMatch mixer en beschermplaat ToneMatch-kabel
ToneMatch-voedingT8S ToneMatch mixer en beschermplaat
Een volledige lijst van optionele apparatuur en accessoires vindt u op www.Bose.com.
Uitpakken
Zie de volgende tabel voor de inhoud van de doos:
T4S
T8S

Bedienings- en aansluitpanelen
6 - Nederlands
T4S ToneMatch® mixer
Bedieningspaneel
Figuur 1. T4S bedieningspaneel
q INGANGSSIGNAAL/CLIPPING-LEDs (1-4) – Geven de status van het ingangssignaal aan met kleuren:
Groen: geeft aan dat er een ingangssignaal is
Rood: geeft aan dat het ingangssignaal clipt (overstuurt)
w TRIM-REGELAARS (1-4) – Hiermee wordt de ingangsgevoeligheid van het desbetreende kanaal ingesteld.
e DISPLAY – Hier worden functiemenu’s en systeeminformatie weergegeven.
r EDIT-KNOPPEN – Met deze drie draai-/drukknoppen kunt u items/waarden die op de display verschijnen selecteren
of instellen.
t CH EDIT-KNOPPEN (1-4) – Hiermee selecteert u het kanaal dat u wilt aanpassen.
y FX MUTE-KNOPPEN (1-4) – Hiermee deactiveert u de eecten Mod, Delay en Reverb voor het geselecteerde kanaal.
u VOLUMEREGELAARS (1-4) – Hiermee stelt u het volume van het desbetreende kanaal in.
i DEMPKNOPPEN (1-4) – Hiermee schakelt u het geluid uit voor het desbetreende kanaal.
o MASTER-VOLUMEKNOP – Hiermee stelt u het algehele uitgangsniveau in.
a HOOFDTELEFOONVOLUMEKNOP – Hiermee past u het niveau van de hoofdtelefoonuitgang aan.
s DRAAIKNOP – Hiermee krijgt u toegang tot zowel de algemene als de kanaalspecifieke parameters.
Deze stelt u in met de daarvoor bedoelde knoppen.
d SCHAKELAAR FANTOOMVOEDING – Hiermee schakelt u +48 V fantoomvoeding in op de ingangskanalen 1-4. Een
rode led geeft aan dat fantoomvoeding is ingeschakeld.
f HOOFDTELEFOONAANSLUITING – Alleen voor gebruik van hoofdtelefoons, met een minimale impedantie van 24 Ω.
q
w
i
u
y
t
r
e
d
s
a
o
f

Nederlands - 7
Bedienings- en aansluitpanelen
Figuur 2. T4S aansluitpaneel
Aansluitpaneel
q AAN/UIT-SCHAKELAAR – Hiermee schakelt u de mixer aan of uit.
w USB 2.0 TYPE B – Een USB-aansluiting waarmee u de mixer kunt aansluiten op uw computer.
e USB 2.0 TYPE A – Een USB-aansluiting waarmee u audio vanaf uw USB-stick kunt streamen.
r ANALOGE L/R-UITGANG – Analoge hoofduitgang. Geschikt voor ¼" gebalanceerde TRS-kabels of
ongebalanceerde TS-kabels.
t AUX-UITGANG – Twee door de gebruiker definieerbare analoge uitgangen. Kunnen worden geconfigureerd voor
een pre-fader, post-EQ en eecten of post-fader-uitgang. Geschikt voor ¼" gebalanceerde TRS-kabels.
y AUX-INGANG – Analoge ingangskanalen 5/6. Geschikt voor ¼" gebalanceerde TRS-kabels of ongebalanceerde
TS-kabels voor lijningangssignaal. Kunnen gebruikt worden voor stereo-ingangssignalen.
u INGANGEN 1-4 – Analoge ingangskanalen 1-4. Geschikt voor gebalanceerde XLR-kabels voor microfoons of ¼"
gebalanceerde TRS-kabels of ongebalanceerde TS-kabels voor ingangssignalen met hoge impedantie, zoals
gitaren.
i DIGITALE HOOFDUITGANG L – Digitale stereoaansluiting voor twee L1® Model 1S/II systems.
Opmerking: Alleen voor stereogebruik met digitale hoofduitgang R.
o VOEDINGSPOORT/DIGITALE HOOFDUITGANG R – Een digitale uitgang die wordt gebruikt door het L1 Model 1S/
II system. Hiermee wordt vermogen van de L1 Model 1S/II power stand naar de T4S mixer geleverd. Hiermee kan
ook vermogen van een stopcontact via een ToneMatch-voeding worden geleverd (niet inbegrepen bij de T4S).
Hierop past de bijgeleverde ToneMatch®-kabel.
WAARSCHUWING: Sluit de T4S NIET aan op een computer- of telefoonnetwerk, ook al is de
ToneMatch-poort geschikt voor een standaard RJ-45-connector.
USB AUDIO
M
( )
MONO
q w e r t y
uio

Bedienings- en aansluitpanelen
8 - Nederlands
T8S ToneMatch® mixer
Bedieningspaneel
Figuur 3. T8S bedieningspaneel
q INGANGSSIGNAAL/CLIPPING-LEDs(1-8) – Geven de status van het ingangssignaal aan met kleuren:
Groen: geeft aan dat er een ingangssignaal is
Rood: geeft aan dat het ingangssignaal clipt (overstuurt)
w TRIM-REGELAARS (1-8) – Hiermee wordt de ingangsgevoeligheid van het desbetreende kanaal ingesteld.
e DISPLAY – Hier worden functiemenu’s en systeeminformatie weergegeven.
r EDIT-KNOPPEN – Met deze drie draai-/drukknoppen kunt u items/waarden die op de display verschijnen selecteren
of instellen.
t CH EDIT-KNOPPEN (1-8) – Hiermee selecteert u het kanaal dat u wilt aanpassen.
y FX MUTE-KNOPPEN (1-8) – Hiermee deactiveert u de eecten Mod, Delay en Reverb voor het geselecteerde kanaal.
u VOLUMEREGELAARS (1-8) – Hiermee stelt u het volume van het desbetreende kanaal in.
i DEMPKNOPPEN (1-8) – Hiermee schakelt u het geluid uit voor het desbetreende kanaal.
o MASTER-VOLUMEKNOP – Hiermee stelt u het algehele uitgangsniveau in.
a HOOFDTELEFOONVOLUMEKNOP – Hiermee past u het niveau van de hoofdtelefoonuitgang aan.
s STEREO-UITGANGSMETER – Hierop kunt u het uitgangsniveau aflezen.
d DRAAIKNOP – Hiermee krijgt u toegang tot zowel de algemene als de kanaalspecifieke parameters. Deze stelt u in
met de daarvoor bedoelde knoppen.
f SCHAKELAAR FANTOOMVOEDING – Hiermee schakelt u +48 V fantoomvoeding in op de ingangskanalen 1-8.
Een rode led geeft aan dat fantoomvoeding is ingeschakeld.
g HOOFDTELEFOONAANSLUITING – Alleen voor gebruik van hoofdtelefoons, met een minimale impedantie van 24 Ω.
q
w
i
o
g
a
s
d
f
u
y
t
r
e
Nederlands - 9
Bedienings- en aansluitpanelen
Figuur 4. T8S aansluitpaneel
Aansluitpaneel
q AAN/UIT-SCHAKELAAR – Hiermee schakelt u de mixer aan of uit.
w USB 2.0 TYPE B – Een USB-aansluiting waarmee u de mixer kunt aansluiten op uw computer.
e USB 2.0 TYPE A – Een USB-aansluiting waarmee u audio vanaf uw USB-stick kunt streamen.
r ANALOGE L/R-UITGANG – Analoge hoofduitgang. Geschikt voor ¼" gebalanceerde TRS-kabels en
ongebalanceerde TS-kabels.
t AUX-UITGANG – Vier door de gebruiker definieerbare analoge uitgangen. Kunnen worden geconfigureerd voor
een pre-fader, post-EQ en eecten of post-fader-uitgang. Geschikt voor ¼" gebalanceerde
TRS-kabels of ongebalanceerde TS-kabels.
y AUX-INGANG – Analoge ingangskanalen 9/10. Geschikt voor ¼" gebalanceerde TRS-kabels of ongebalanceerde
TS-kabels voor lijningangssignaal. Kunnen gebruikt worden voor stereo-ingangssignalen.
u INGANGEN 1-8 – Analoge ingangskanalen 1-8. Geschikt voor gebalanceerde XLR-kabels voor microfoons of ¼"
gebalanceerde TRS-kabels of ongebalanceerde TS-kabels voor ingangssignalen met hoge impedantie, zoals
gitaren.
i XLR-STEREO-UITGANG – Analoge stereo-uitgang. Geschikt voor gebalanceerde XLR-kabels voor stereo-uitgang.
o DIGITALE VOEDINGSPOORT – Voor gebruik met de ToneMatch-voeding (zie ‘De ToneMatch®-voeding aansluiten’
op pagina 14).
Opmerking: De T8S is NIET ontworpen om digitaal op de L1® Model 1S/II te worden aangesloten.
WAARSCHUWING: Sluit de T8S NIET aan op een computer- of telefoonnetwerk, ook al is de ToneMatch-poort
geschikt voor een standaard RJ-45-connector.
M
( )
MAIN OUT
USB AUDIO
MONO
q w e r t y
uio
10 - Nederlands
Opstelling van het systeem
De beschermplaat verwijderen/bevestigen
Wanneer u de T4S/T8S ToneMatch® mixer uit de doos haalt, bevindt zich een beschermplaat op het bovenpaneel.
De plaat is bedoeld om het bedieningspaneel van de mixer te beschermen tijdens het transport of wanneer u deze
ergens opslaat.
Ga als volgt te werk om de beschermplaat te verwijderen:
1. Plaats uw duimen op de uitsparingen aan de voorzijde van de beschermplaat en schuif deze naar voren.
2. Pak de beschermplaat vast aan de achterkant en til deze op om hem te verwijderen.
Ga als volgt te werk om de beschermplaat te bevestigen:
1. Schuif de beschermplaat van achter naar voren over de mixer.
2. De magnetische beschermplaat klikt vanzelf vast op de mixer.
Figuur 5. De beschermplaat verwijderen/bevestigen

Opstelling van het systeem
Nederlands - 11
Figuur 6. Beugel aan T4S bevestigen Figuur 8. T4S aan statief bevestigen met beugel
Figuur 7. Beugel bevestigd aan T4S
Bevestigingsmogelijkheden
De T4S/T8S is voorzien van een ¼" (6 mm) statiefaansluiting. Hiermee kan deze op verschillende verkrijgbare
producten met een bevestigingsschroef van ¼" (6 mm) worden bevestigd, zoals een camerastatief.
De T4S/T8S op een camerastatief bevestigen
1. Schuif de poten van het camerastatief uit en stel deze in op de gewenste hoogte.
2. Verwijder de beugel bovenaan het camerastatief en bevestig deze met de schroef aan de onderzijde van de T4S/
T8S. Zorg ervoor dat de kleine uitsparing in de T4S/T8S en de verhoging op de beugel op één lijn liggen. Zie
figuur 6.
3. Bevestig de beugel met de T4S/T8S aan het camerastatief. Zie figuur 8.
WAARSCHUWING: Gebruik de ToneMatch® T4S/T8S mixer niet in combinatie met een instabiel statief.
De mixer is uitsluitend ontworpen voor gebruik met een schroef van ¼" (6 mm). Het statief moet een apparaat
met een minimaal gewicht van 1,9 kg en een afmeting van 214 x 311 x 83 mm kunnen dragen. Als u een statief
gebruikt dat niet is ontworpen voor het gewicht en de afmetingen van de T4S/T8S mixer, kan dit leiden tot
gevaarlijke situaties met mogelijk letsel tot gevolg.
12 - Nederlands
Opstelling van het systeem
De T4S digitaal aansluiten
1. Zorg ervoor dat de L1 Model 1S/II en T4S zijn uitgeschakeld en dat de Master-volumeregelaar op de T4S dicht
staat.
2. Sluit het ene uiteinde van de ToneMatch®-kabel aan op de voedingspoort/digitale hoofduitgang R van de T4S.
Sluit het andere uiteinde van de ToneMatch-kabel aan op de ToneMatch-poort op de power stand.
Opmerking: Om de T4S op twee L1 Model 1S/II power stands aan te sluiten, moet u een tweede power stand met
een ToneMatch-kabel aansluiten op de digitale hoofduitgang L-poort van de T4S.
3. Schakel eerst de mixer in en vervolgens de L1 Model 1S/II power stand.
4. Sluit uw instrumenten aan en stel de niveaus in. Raadpleeg ‘De ingangsversterking en het uitgangsvolume
optimaliseren’ op pagina 17.
Figuur 9. Twee L1 model II systems digitaal aangesloten op een T4S
USB AUDIO
M
( )
MONO
Opmerking: De T8S kan niet digitaal worden aangesloten en werkt niet met de L1 Model 1S/II.

Opstelling van het systeem
Nederlands - 13
De T4S/T8S analoog aansluiten
1. Zorg ervoor dat het aan te sluiten apparaat en de T4S/T8S zijn uitgeschakeld en dat de Master-volumeregelaar
op de T4S/T8S dicht staat.
2. Sluit een of twee apparaten met gebalanceerde XLR-kabels aan op de XLR-stereo-uitgangen van uw T8S
(zie figuur 10).
Opmerking: De T4S/T8S kan met een ¼" TRS-kabel (afzonderlijk verkrijgbaar) via de analoge R-uitgangspoort op
een apparaat worden aangesloten. Sluit het andere uiteinde van de TRS-kabel aan op de analoge ingangspoort
van het apparaat. Om de T4S/T8S op twee apparaten aan te sluiten, moet u een tweede apparaat met een ¼"
TRS-kabel aansluiten op de analoge L-uitgangspoort van de T4S/T8S.
3. Sluit een ToneMatch®-voeding aan op de voedingspoort van de T4S/T8S en sluit deze vervolgens aan op een
werkend stopcontact. Raadpleeg ‘De ToneMatch®-voeding aansluiten’ op pagina 14.
4. Schakel eerst de T4S/T8S mixer in en vervolgens het apparaat.
5. Sluit uw instrumenten aan en stel de niveaus in. Raadpleeg ‘De ingangsversterking en het uitgangsvolume
optimaliseren’ op pagina 17.
Figuur 10. Twee F1 systems analoog aangesloten op een T8S
M
( )
MAIN OUT
USB AUDIO
MONO
(
M
US
B AUDI
O
( )
M
M
AIN
O
UT
()
M

14 - Nederlands
Opstelling van het systeem
De ToneMatch®-voeding aansluiten
De ToneMatch-voeding levert voeding aan de T4S/T8S mixer.
1. Sluit de voedingskabel aan op de voedingspoort van de T4S/T8S.
2. Sluit het ene uiteinde van het netsnoer aan op de voedingseenheid.
3. Sluit het andere uiteinde van het netsnoer aan op een werkend stopcontact.
4. Zet de aan/uitschakelaar van de T4S/T8S op ON.
Opmerking: De T8S kan niet werken zonder de meegeleverde voeding. De T4S kan zonder netvoeding werken; deze
wordt niet meegeleverd.
Figuur 11. T4S aansluiten op voeding

Opstelling van het systeem
Nederlands - 15
De T4S/T8S aansluiten op uw computer
De T4S/T8S is voorzien van een USB-poort die kan worden aangesloten op uw computer. Hiermee kunt u scènes
downloaden naar een computer of systeemupdates installeren. Ga naar www.Bose.com/livesound voor meer
informatie over het updaten van uw systeem.
Als uw systeem is aangesloten op een computer, kunt u de T4S/T8S ook als standaard-USB-audioapparaat gebruiken
voor opnemen/afspelen.
Opmerking: De T4S/T8S werkt met 48 kHz/24-bit. Wanneer u de T4S/T8S gebruikt in combinatie met
opnamesoftware, moet u de software configureren voor 48 kHz/24-bit.
Opmerking: Om de T4S/T8S aan te sluiten op uw computer hebt u een USB-kabel nodig (type A naar type B, wordt
niet meegeleverd).
1. Sluit de mixer aan op een voedingsbron (ToneMatch®-voeding voor T4S/T8S of een L1 Model 1S/II voor T4S).
2. Sluit het ene uiteinde van de USB-kabel aan op de USB 2.0 type-B-poort van de mixer (figuur 12).
3. Steek het andere uiteinde van de USB-kabel in een USB-poort van uw computer.
4. Schakel de mixer in.
Figuur 12. T4S-aansluiting via USB
ToneMatch-poort – Naar een L1 Model 1S/II
system of een ToneMatch-voeding
Aan/uit-schakelaar
USB-kabel
(type A naar type B)
Naar de
USB-poort van
de computer
Een USB-stick aansluiten op de T4S/T8S
Steek een USB 2.0/3.0-stick met WAV/MP3-bestanden in de USB 2.0 type-A-poort om muzieknummers op uw mixer
af te spelen.
Figuur 13. USB-stick aansluiten op de T4S

16 - Nederlands
Gebruik
De display van de T4S/T8S aflezen
De display biedt een interface om de mixer te bedienen. Figuur 14 toont een voorbeeld van de informatie op de
display en de algemene bediening hiervan. De informatie op de display hangt af van de stand van draaiknop.
Figuur 14. Voorbeeld van display en informatie over
bediening
Ch 1
Type Tim
eM
ix
Digital 250ms 30%
Delay
Fdbk.
All Channels
*Bose Scene 01
Load Shared Save
Scenes
Geeft het geselecteerde
kanaal aan
Geeft aan dat er met het drukken op de bediening
tussen parameters wordt geschakeld
Geeft visueel de waarde van de
parameter weer
Geeft de functie aan die is
geselecteerd met de draaiknop
De namen van parameters en hun
instellingen/waarden
Draai-/drukknoppen
Dit symbool geeft aan dat
met het draaien aan de
bedieningsknop de instelling
wordt gewijzigd
Het sterretje geeft aan
dat de geladen scène is
aangepast
Geeft aan dat met het
drukken op de bediening
de functie wordt
geactiveerd
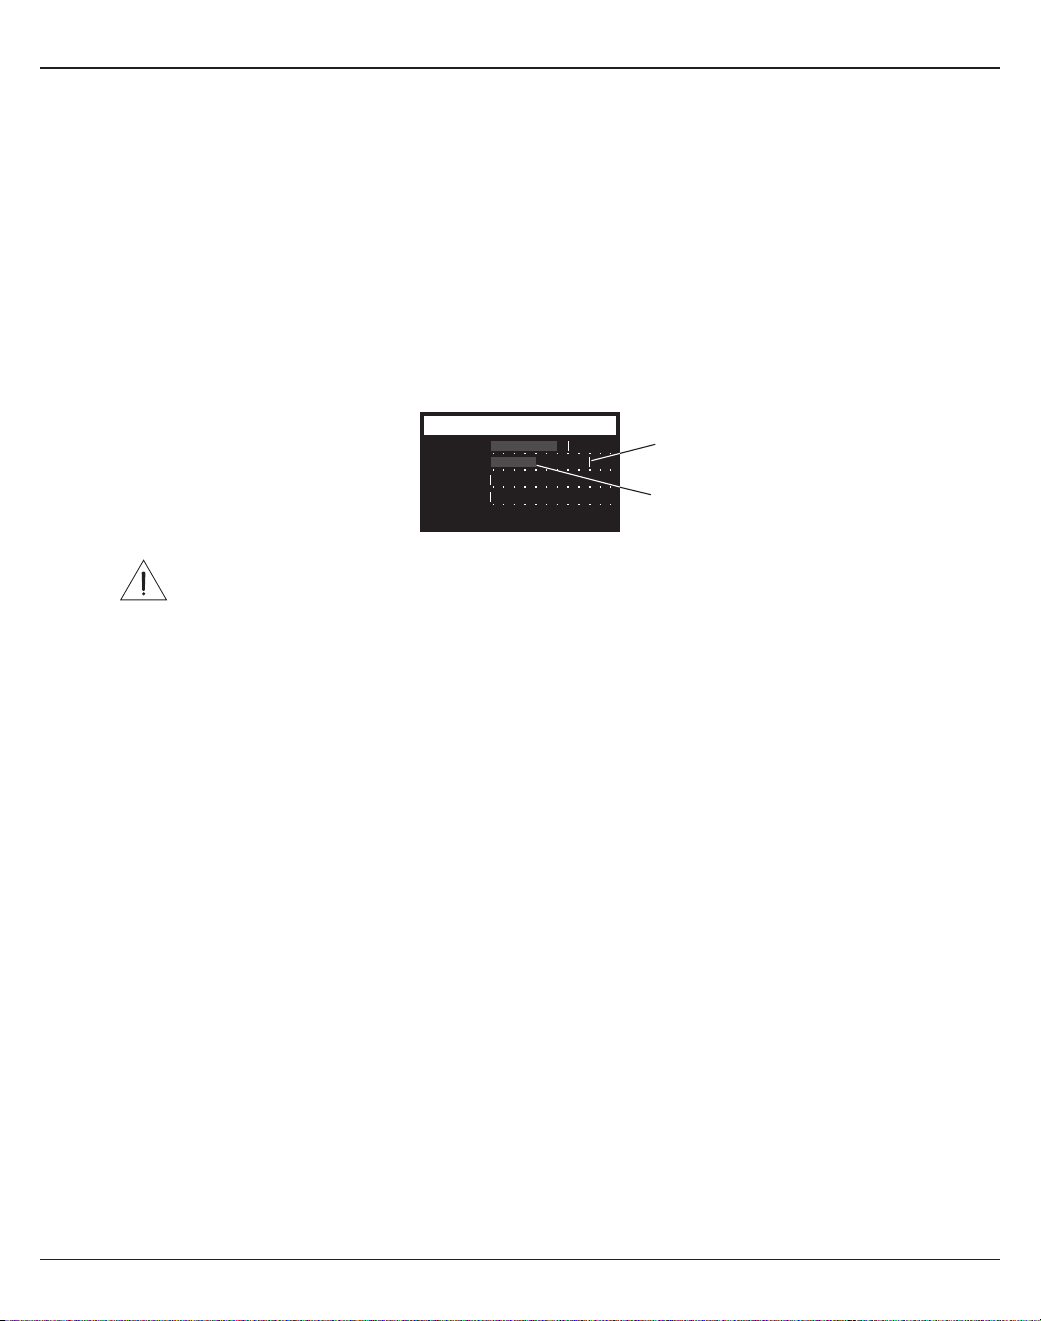
Gebruik
Nederlands - 17
De ingangsversterking en het uitgangsvolume optimaliseren
Voor een hoogwaardig volumeniveau zijn een juiste instelling van de ingangsversterking van het kanaal, het
hoofdvolume en het volume van het kanaal nodig. Ga als volgt te werk bij ieder gebruikt kanaal.
1. Zorg ervoor dat de Master-volumeregelaar en volumeregeling voor Trim en de kanalen dicht staan.
2. Stel de Trim van het ingangskanaal in.
A. Stel, indien van toepassing, het volume van uw instrument/bron in op het gewenste niveau.
B. Speel uw instrument/bron af op het gewenste niveau.
C. Draai de Trim-regelaar langzaam tegen de richting van de klok in totdat het Signal/Clip-lampje groen
brandt. Als het lampje rood knippert of helemaal rood wordt, draait u de Trim-regelaar tegen de klok in om
het niveau te verlagen.
D. Gebruik de ingangsniveaumeters (pagina 28) in het menu Prefs om het ingangsniveau te controleren.
Als u een apparaat gebruikt dat fantoomstroom vereist (+48 V), zoals een condensatormicrofoon,
drukt u de schakelaar Phantom in voordat u de Trim-regelaar instelt.
Opmerking: De ingangsniveaumeter in het menu Prefs kan handig zijn bij het aanpassen van het
Trim-ingangsniveau (zie pagina 28).
3. Draai de Master-volumeregelaar naar midden boven.
4. Draai de kanaalvolumeregelaar met de klok mee totdat het volume het gewenste niveau heeft.
Input LevelPreferences
Ch 3
Ch 1
Ch 2
Ch 4
Menu Aux InReset
Indicator voor maximumniveau
Indicator voor ingangsniveau

18 - Nederlands
Gebruik
De Master-volumeregelaar gebruiken
Met de Master-volumeregelaar stelt u het algehele uitgangsniveau in van de T4S/T8S ToneMatch®-uitgang en de
analoge Master-uitgang. Tijdens normaal gebruik kunt u de Master-regelaar het beste in de stand midden boven
zetten. Nadat u het volumeniveau voor alle kanalen hebt ingesteld, kunt u de Master-regelaar in een hogere of lagere
stand zetten.
Een kanaal dempen
Met de Mute-knoppen kunt u het geluid bij het betreende kanaal uitschakelen.
• Als u een kanaal wilt dempen, drukt u één keer op de knop Mute. De knop Mute wordt helderblauw om aan te
geven dat het kanaal is gedempt. ‘CH MUTE’ wordt op de display bij het betreende kanaal weergegeven.
• Druk nogmaals op de knop Mute om het geluid bij het kanaal weer in te schakelen. De knop Mute brandt minder
helder om aan te geven dat het kanaal niet wordt gedempt.
Eecten bij kanalen dempen
Met de FX Mute-knoppen dempt u alleen de eecten Mod, Delay en Reverb bij het betreende kanaal. Wanneer u
eecten dempt, blijven de ToneMatch presets en de zEQ- Para EQ- en Comp/Gate-instellingen van kracht.
• Als u de eecten bij een kanaal wilt dempen, drukt u één keer op de knop FX Mute. De knop FX Mute wordt wit om
aan te geven dat de eecten bij het kanaal zijn gedempt. ‘FX MUTE’ wordt op de display bij het betreende kanaal
weergegeven.
• Druk nogmaals op de knop FX Mute om de eecten bij het kanaal weer in te schakelen. De knop FX Mute brandt
minder helder om aan te geven dat de eecten bij het kanaal niet zijn gedempt.
Ch 1
Category
Utility
ToneMatch
CH MUTE
Flat
Preset
Ch 1
Category
Utility
ToneMatch
FX MUTE
Flat
Preset

Gebruik
Nederlands - 19
De draaiknop gebruiken
Met de draaiknop kunt u functies van de ToneMatch®-mixeruitgang selecteren. Figuur 15 biedt een overzicht
van de negen kanaalspecifieke functies en de drie algemene functies. Op de volgende pagina’s leest u hoe u de
verschillende functies kunt instellen.
Figuur 15. Draaiknop
Kanaalfuncties
q Pan/Aux – Geeft toegang tot Pan en de Aux-ingangen en -uitgangen.
w Tuner – Biedt informatie voor het stemmen van een instrument dat op het geselecteerde kanaal wordt gespeeld.
e ToneMatch – Geeft toegang tot de ToneMatch-presets die bedoeld zijn voor specifieke instrumenten en
microfoons.
r zEQ – Biedt als onderdeel van de ToneMatch-preset regelaars om lage/middelhoge/hoge frequenties in te stellen
die binnen het bereik van uw instrument of microfoon vallen.
t Para EQ – Biedt parametrische EQ-regeling per kanaal.
y Comp/Gate – Biedt toegang tot presets voor gate, compression, limiter, de-esser en kick-drum met instelbare
parameters.
u Mod – Biedt toegang tot verschillende modulatie-eecten, zoals chorus, flanger, phaser en tremolo.
i Delay – Biedt toegang tot drie soorten delays en delay met tap tempo.
o Reverb – Hiermee wordt reverb op een geselecteerd kanaal toegepast dat naar de hoofduitgang of Aux kan
worden gestuurd.
Algemene functies
a Reverb Type – Hiermee wordt een geselecteerd type reverb op alle hoofduitgangskanalen of Aux sends toegepast.
s Prefs – Biedt toegang tot verschillende systeemfuncties.
d Scenes – Hiermee kunt u scènes opslaan en laden (een momentopname van de algehele status van het apparaat).
e
o
y
d
r
a
u
q
t
s
i
w

20 - Nederlands
Gebruik
Het geluid van een kanaal bewerken
De kanaalbewerkingsfuncties bieden toegang tot instellingen die van invloed zijn op geselecteerde kanalen.
De kanaalbewerkingsfuncties zijn Pan/Aux, Tuner, ToneMatch®, zEQ, Para EQ, Comp/Gate, Mod, Delay en Reverb.
Ga als volgt te werk als u een kanaal wilt bewerken:
1. Druk op de knop CH Edit 1, 2, 3, 4, (T4S en T8S) 5, 6, 7 of 8 (alleen T8S). Het geselecteerde kanaal wordt
weergegeven in de linkerbovenhoek van de display.
2. Gebruik de draaiknop om een van de CH Edit-functies selecteren.
3. Wijzig de instellingen van de functie zoals hierna aangegeven.
Opmerking: U kunt slechts een kanaal tegelijk bewerken. Als u op een CH Edit-knop drukt, kunt u alleen het
geselecteerde kanaal bewerken.
De Pan/Aux-functies gebruiken
Gebruik de Pan/Aux-functie om audio naar de hoofduitgangen L of R, Aux-regelingsingang of Aux send te sturen.
Pan gebruiken
Gebruik de Pan-regelaar om elk kanaal naar de bijbehorende ruimte in een stereomix te sturen.
1. Druk op of draai aan de linkerbewerkingsregelaar en selecteer Pan in het menu.
2. Draai aan de Pan-regelaar om de lijnuitgang aan te passen van L naar R.
Aux-ingang 5/6 (9/10)
Gebruik Aux-ingang 5/6 (9/10) om een lijnstereobron aan te sluiten, zoals een mobiel apparaat.
1. Druk op of draai aan de linkerregelaar en selecteer Aux In 5/6 in het menu.
2. Draai aan de regelaars 5 Lvl of 6 Lvl om het signaalniveau van kanaal 5 of kanaal 6 aan te passen.
3. Druk op 5 Lvl om te wisselen naar 5 Pan en druk op de regelaar 6 Lvl om te wisselen naar 6 Pan. Draai aan de
Pan-regelaar om de Pan aan te passen van L naar R.
Ch 1
Menu Pan
Pan
Pan
Ch 1
Menu 5 Pan 6 Lvl
Aux In 50%
Aux Input 5/6
6 Pan5 Lvl

Gebruik
Nederlands - 21
Ingangssignalen naar de Aux-uitgangen sturen
Met de Aux-functie kunt u signalen naar de twee (alleen T4S) of vier Aux-uitgangen (alleen T8S) sturen om
verschillende signaalverwerkingen, opnamen of geluidsversterkingen toe te passen. Het signaalniveau kan worden
aangepast bij elk van de beschikbare Aux-uitgangen:
Opmerking: Druk op de regelaar Level om de Aux-uitgang te dempen. Druk nogmaals om het dempen op te heen.
1. Druk op of draai aan de regelaar Menu en selecteer een Aux send.
2. Draai aan de regelaar Level om het signaalniveau van het geselecteerde kanaal in te stellen.
3. Draai aan de regelaar Tap om het gewenste aftappunt te selecteren via het menu.
A. Dry: After Preamp – Het volledig droge (niet verwerkte) signaal wordt direct vanuit de voorversterkingsfase
doorgestuurd.
B. Pre: With EQ & Fx – Het signaal wordt na verwerking doorgestuurd vanuit de voorversterkingsfase.
C. Post: After Fader – Het signaal wordt doorgestuurd na de volume-instelling voor het kanaal en na
verwerking.
4. Druk op de regelaar Select om een aftappunt te selecteren of druk op de regelaar Cancel om af te sluiten zonder
iets te veranderen. De naam van het geselecteerde aftappunt wordt weergegeven in vette letters.
Ch 1
Menu Tap
Aux
1P
re
Level
50%
Aux 1 Output
De tuner gebruiken
Voor elk ingangskanaal is een eigen tuner beschikbaar. Onder aan de display wordt de gespeelde noot weergegeven.
Tijdens het stemmen verschijnt er een toonhoogte-indicator op de display die aangeeft of de noot majeur of mineur
is. Stel de toonhoogte van uw instrument zo in dat de cursor in het midden van het scherm staat.
Opmerking: Druk op de knop Mute voor het betreende kanaal om zonder geluidsweergave te stemmen.
Gebruik de functie Transpose om de referentietoonhoogte met twee halve stappen omhoog of omlaag bij te stellen.
Of stel de stemming exact in aan de hand van de referentietoonhoogte.
Ch 1
b#
A3
Tuner
Indicator voor toonhoogte
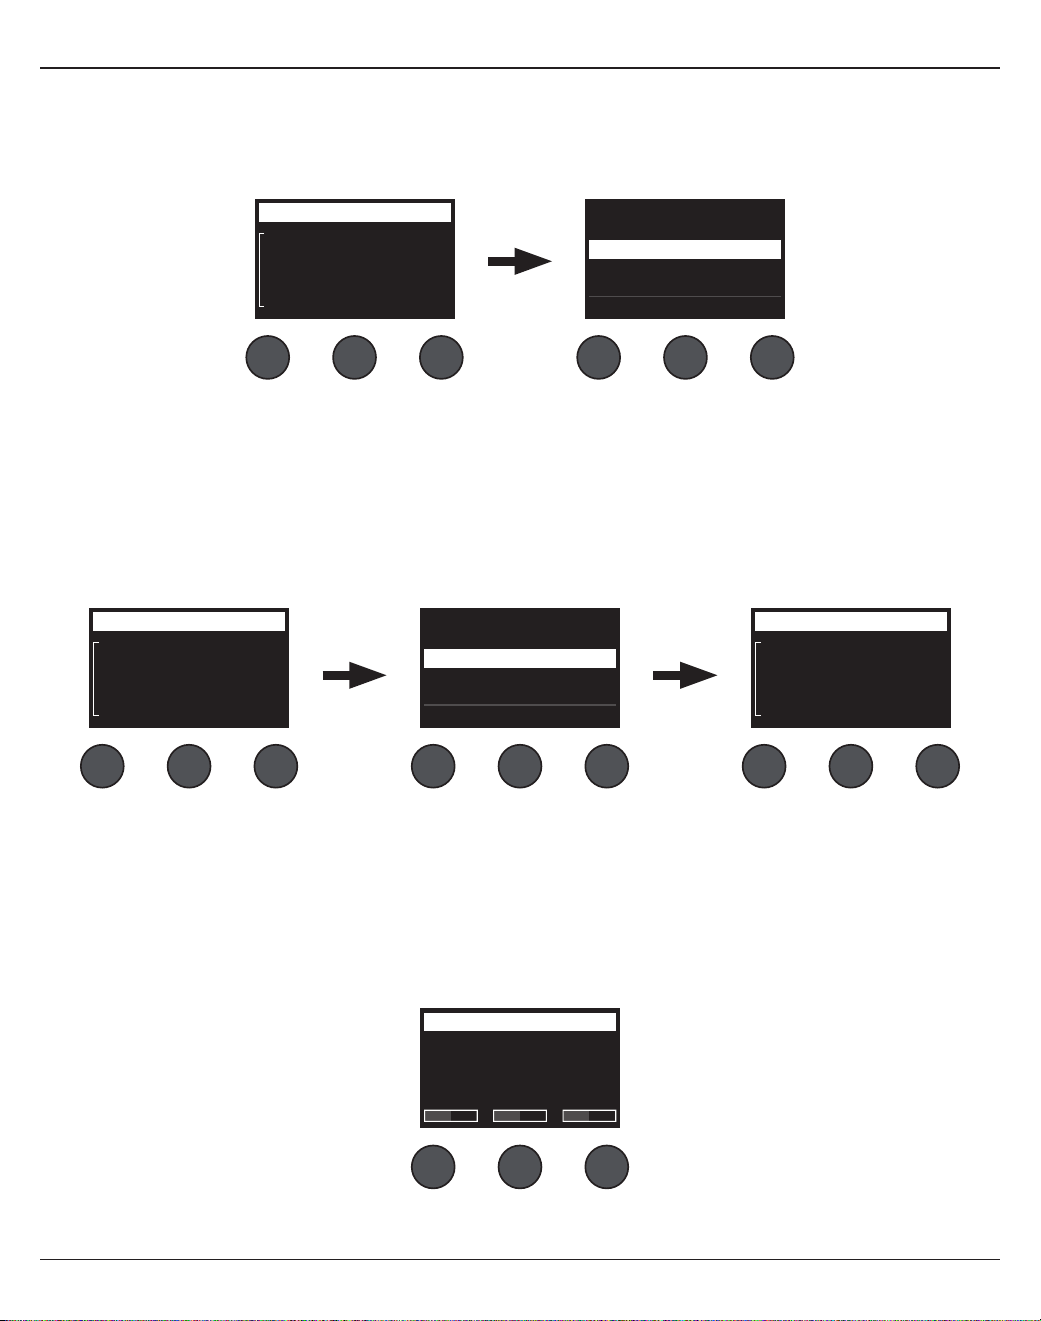
22 - Nederlands
Gebruik
Ch 1
Category
Vocal Mics
ToneMatch
Handheld Mics
Preset
Handheld Mics
Headworn Mics
High Gain: Bright
High Gain: Normal
SelectCancel
Ch 1
Category
Utility
ToneMatch
Flat
Preset
Ch 1
Category
Vocal Mics
ToneMatch
Headworn Mics
Preset
Vocal Mics
Utility
Electric Guitars
Acoustic Guitars
Select Cancel
Draaien Drukken
DrukkenDraaien
Een ToneMatch®-preset selecteren
Met de functie ToneMatch kunt u een preset selecteren voor uw instrument of microfoon. Deze eigen technologie
optimaliseert de systeemequalizer zodat het natuurlijke geluid van uw specifieke instrument of microfoon behouden blijft.
De instrumenten of microfoons worden ingedeeld in categorieën en worden afzonderlijk geselecteerd voor ieder kanaal.
1. Draai aan de regelaar Category om een lijst met categorieën te openen en selecteer uw keuze.
2. Druk op de regelaar Select om een keuze te maken of druk op de regelaar Cancel om de lijst te sluiten zonder
iets te veranderen.
3. Als u op de regelaar Select hebt gedrukt, draait u aan de regelaar Preset om de lijst met presets te openen en uw
keuze te selecteren.
4. Druk op de regelaar Select om een keuze te maken of druk op de regelaar Cancel om de lijst te sluiten zonder
iets te veranderen.
Ch 1
Low Mid
Handheld Mics
High
0.0db 0.0db 0.0db
zEQ
zEQ instellen
De functie zEQ maakt deel uit van de ToneMatch-presettechnologie. Hierdoor kunt u lage/middelhoge/hoge
frequenties instellen die binnen het bereik van uw instrument of microfoon vallen.
Als u zEQ wilt instellen, draait u aan de regelaar onder de bijbehorende frequentieband.
Opmerking: Druk op de bijbehorende regelaar om een afzonderlijke frequentieband te deactiveren. U activeert deze
weer door nogmaals op de knop te drukken.
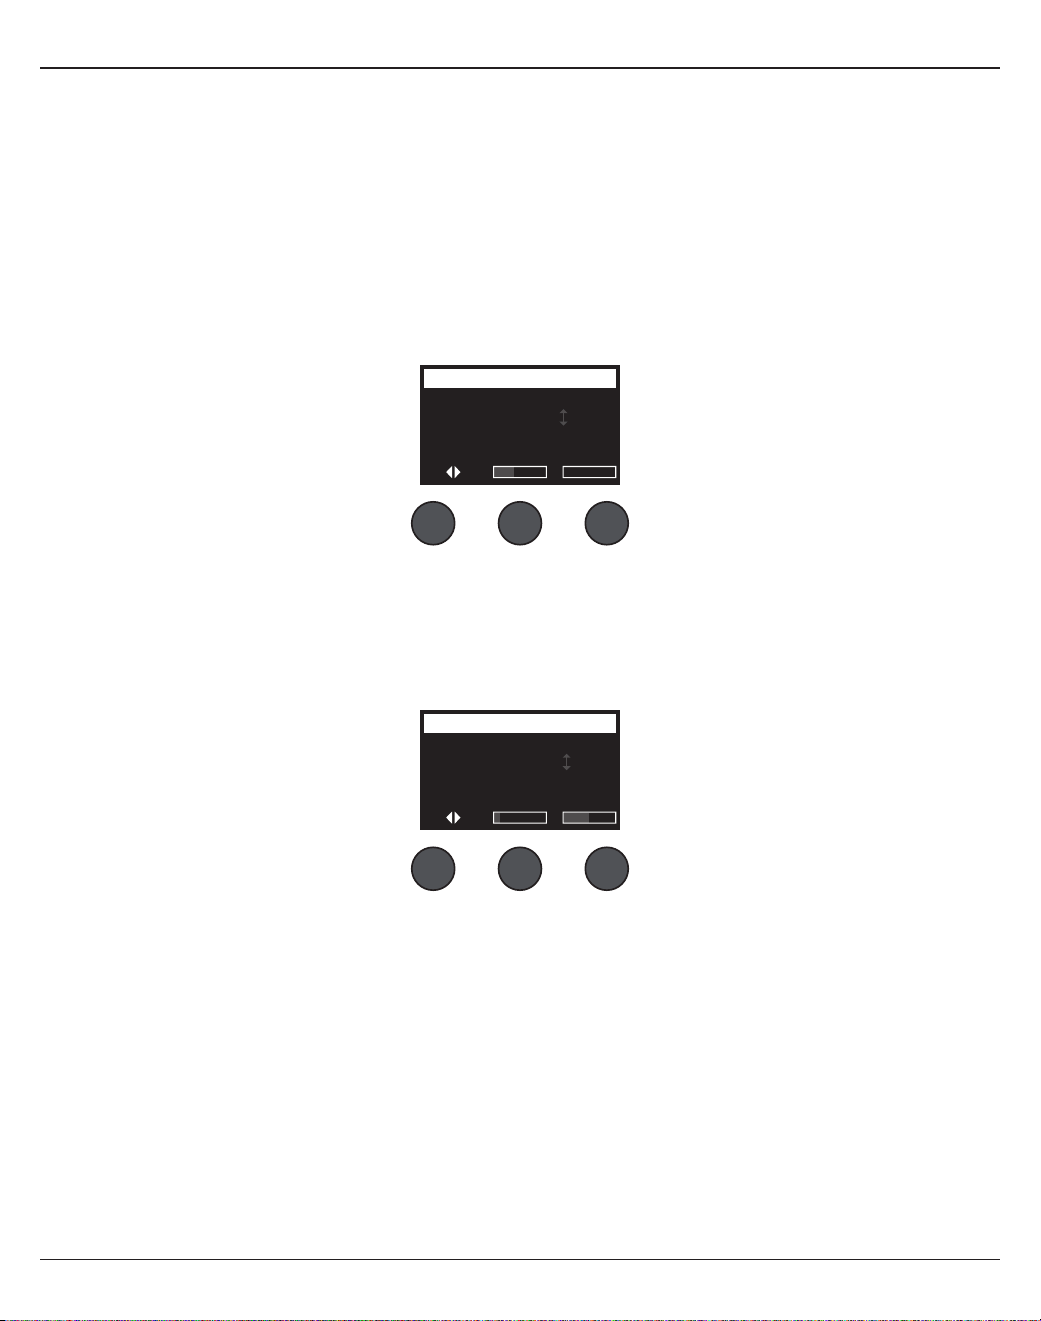
Gebruik
Nederlands - 23
Para EQ instellen
De functie Para EQ biedt drie parametrische equalisaties die gebaseerd zijn op een door de gebruiker opgegeven
frequentie tussen de 50 Hz en 16 kHz.
Opmerking: Druk op de regelaar Select om de Para EQ-instellingen te deactiveren. U activeert deze weer door
nogmaals op de knop te drukken.
1. Druk op of draai aan de regelaar Select en selecteer Para EQ band 1-3.
2. Draai aan de regelaar Level om het boost/cut-niveau in te stellen binnen een bereik van -15 dB tot +15 dB.
3. Draai aan de regelaar Freq om de middenfrequentie in te stellen binnen een bereik van 50 Hz tot 16 kHz.
4. Druk op de regelaar Freq om naar Width te schakelen. Draai aan de regelaar Width om de breedte van de
klokcurve rond de middenfrequentie in te stellen binnen een bereik van 0,20 octaaf tot 5,00 octaaf.
Ch 1
Select Level
B3
Freq
PEQ 1 -3.4dB 250.0Hz
Parametric EQ
Width
Compressor/gate-functies gebruiken
De functie Comp/Gate biedt toegang tot presets voor gate, compression, limiter, de-esser en kick-drum met
instelbare parameters.
Opmerking: Druk op de regelaar Type om de instellingen voor Comp/Gate-instellingen te deactiveren. U activeert
deze weer door nogmaals op de knop te drukken.
Opmerking: Slechts één eect per kanaal.
1. Draai aan de regelaar Type om een lijst te openen met Comp/Gate-eecten en selecteer uw keuze:
A. Compressor 1: Light – Compressie met een preset met een lage compressieverhouding en variabele
drempel- en versterkingsparameters. Is geschikt voor algemeen gebruik voor de meeste instrumenten en
microfoons waarbij slechts een minimale niveauregeling nodig is.
B. Compressor 2: Medium – Compressie met een preset met een gemiddelde compressieverhouding en
variabele drempel- en versterkingsparameters. Geschikt voor bas, gitaar, keyboard en zang die een subtiele
niveauregeling vereisen.
C. Compressor 3: Heavy – Compressie met een preset met een hoge compressieverhouding en variabele
drempel- en versterkingsparameters. Geschikt voor luid klinkende instrumenten zoals hoorn en drums, en
ook voor luide zang waarbij een sterkere niveauregeling nodig is.
D. Limiter – Sterke limiter met een preset voor de verhouding (∞:1) met variabele drempel- en
versterkingsparameters. Geschikt voor luid klinkende instrumenten zoals drums zodat signaalpieken het
kanaal niet overbelasten.
Ch 1
Type Thresh Speed
Gate -80.0dB 50%
Comp/Gate
Ramp

24 - Nederlands
Gebruik
KickGate gebruiken
KickGate is een door Bose® ontwikkelde technologie waarmee u het niveau van een kick-drum-kanaal kunt verhogen
en tegelijkertijd het risico op rondzingen door de microfoon kunt uitsluiten. U kunt kiezen uit twee KickGate-
instellingen in het menu Comp/Gate.
1. Kies het juiste type microfoon.
2. Selecteer een geschikte ToneMatch®-preset.
3. Pas de Trim-regelaar van de kanaalingang aan totdat de hardste kick-drum ervoor zorgt dat de ingangskanaal-
led rood wordt en blijf de regelaar vervolgens bijstellen totdat de led groen wordt. Hiermee optimaliseert u het
Trim-niveau van de kanaalingang.
4. Selecteer Comp/Gate met de draaiknop.
5. Draai aan de regelaar Type om door de lijst te bladeren, selecteer KickGate 1: Regular of KickGate 2: Fast en
druk op Select. Kies KickGate 2 als u een double bass drum-pedaal gebruikt.
6. Terwijl u de kick-drum bespeelt kunt u het volume verhogen tot het gewenste niveau.
7. Bespeel de kick-drum zo zacht als u deze bij een optreden wilt bespelen en controleer of u de kick-drum kunt
horen.
8. Terwijl u het instrument zacht bespeelt, kunt u het niveau Thresh verhogen totdat een aantal van de kick-drum-
slagen wordt afgetopt. Verlaag vervolgens het niveau Thresh met 3 dB.
9. Terwijl u de kick-drum normaal bespeelt, kunt u de regelaar Tight tegen de klok in draaien om de sluitsnelheid te
verminderen en meer ‘donkere’ tonen aan het geluid toe te voegen. De sluitsnelheid kan worden ingesteld op een
waarde van 0 (langzaamst) tot en met 100% (snelst).
E. De-Esser – Compressie met signaalaftakking met een preset voor de compressieverhouding en variabele
drempel-en versterkingsparameters. Bedoeld om sissende geluiden bij zang te verminderen.
F. Noise Gate – Gate voor ruis met een snelle preset voor de attack-tijd, variabele drempel en variabele
snelheid (release-tijd). Geschikt voor het verwijderen van ongewenste ruis bij microfoons en instrumenten.
G. KickGate 1: Regular – Gate met een snelle preset voor de attack-tijd, variabele drempel en release-tijd. Dit is
een eigen technologie van Bose® die speciaal is ontwikkeld voor kick-drums. Deze robuuste gate biedt een
maximale versterking voor feedback, waardoor uw kick-drum zo luid mogelijk klinkt door een PA-systeem.
H. KickGate 2: Fast – Identiek aan KickGate 1 maar geschikt voor snellere tempo’s. Selecteer deze instelling als
u een double bass drum-pedaal gebruikt.
2. Druk op de regelaar Select om een keuze te maken of druk op de regelaar Cancel om de lijst te sluiten zonder
iets te veranderen.
3. Compressor 1-3, Limiter, De-Esser: Draai aan de regelaar Thresh om het ingangsdrempelniveau (trigger) in te
stellen binnen een bereik van -50 dB tot 0 dB. Draai aan de regelaar Gain om de versterking in te stellen binnen
een bereik van 0 dB tot 30,0dB. De balk boven de regelaar laat zien hoeveel de versterking is gereduceerd. De
display helpt bij het instelling van de drempel.
Noise Gate: Draai aan de regelaar Thresh om het ingangsdrempelniveau (trigger) in te stellen binnen een bereik
van -90 dB tot -30 dB. Draai aan de regelaar Speed om de snelheid waarmee de gate sluit in te stellen op een
waarde in het bereik van 0 (snelst) tot en met 100% (langzaamst). Draai aan de regelaar Ramp om de helling van
de gate aan te passen binnen een bereik van 0 (horizontaal) tot en met 100% (verticaal).
KickGate 1-2: Draai aan de regelaar Thresh om het ingangsdrempelniveau (trigger) in te stellen binnen een bereik
van -20 dB tot 0 dB. Draai aan de regelaar Tight om de snelheid waarmee de gate sluit in te stellen op een
waarde van 0% (langzaamst) tot en met 100% (snelst).

Gebruik
Nederlands - 25
Modulatie-eecten gebruiken
Met de functie Mod kunt u modulatie-eecten toepassen.
Opmerking: Druk op de regelaar Type om de Mod-instellingen te deactiveren. U activeert deze weer door nogmaals
op de knop te drukken.
1. Draai aan de regelaar Type om een lijst te openen met modulatiesoorten en selecteer uw keuze:
A. Chorus 1: Brite – ‘Natte, glanzende’ chorus die geschikt is voor akoestische instrumenten. Inclusief instelbare
mix-, diepte- en snelheidsparameters.
B. Chorus 2: Warm – Als Chorus 1, maar heeft wat minder hoge frequenties. Inclusief instelbare mix-, diepte- en
snelheidsparameters. Geschikt voor elektrische gitaar/bas.
C. Chorus 3: Dark – Als Chorus 2, maar heeft veel minder hoge frequenties, zodat er een donkerdere toon
ontstaat. Inclusief instelbare mix-, diepte- en snelheidsparameters. Geschikt voor elektrische gitaar/bas.
D. Flanger 1: Tape – Tape-achtige flanger zonder feedback. Inclusief instelbare mix-, diepte- en
snelheidsparameters. Geschikt als eect bij elektrische gitaar/bas.
E. Flanger 2: Feedback – Als Flanger 1, maar met preset voor Feedback.
F. Phaser 1: Stomp – Klassieke ‘stompbox’-phaser. Beschikt over een preset met een groot frequentiebereik en
variabele snelheids- en feedbackparameters. Geschikt als eect bij elektrische gitaar/bas en keyboard.
G. Phaser 2: Rack – Klassieke ‘rack’-phaser. Hierbij blijft het signaal in fase met het ingangssignaal, met
variabele snelheids- en feedback-parameters. Geschikt als eect bij elektrische gitaar/bas en keyboard.
H. Phaser 3: Warm – Klassieke phaser. Hierbij blijft het signaal in fase met het ingangssignaal, met variabele
snelheids- en feedback-parameters. Geschikt als eect bij elektrische gitaar/bas en keyboard.
I. Phaser 4: Brite – Phaser zonder bas. Hierbij blijft het signaal in fase met het ingangssignaal, met variabele
snelheids- en feedback-parameters. Geschikt als eect bij elektrische gitaar en keyboard.
J. Tremolo – Klassiek type tremolo-eect variabele snelheids- en diepteparameters. Geschikt als eect bij
gitaar, keyboard en harmonica.
2. Druk op de regelaar Select om een keuze te maken of druk op de regelaar Cancel om de lijst te sluiten zonder
iets te veranderen.
3. Chorus 1-3, Flanger 1-2: Draai aan de regelaar Mix om de gewenste mix van ‘droge’ en ‘natte’ signalen in te stellen
(gemoduleerd). Draai aan de regelaar Depth om in te stellen hoeveel de toonhoogte verschilt van het originele
ingangssignaal. Druk op de regelaar Depth om toegang te krijgen tot de parameter Speed. Draai aan de regelaar
Speed om de snelheid in te stellen waarmee de toonhoogte moduleert.
Phaser 1-4: Draai aan de regelaar Speed om de snelheid in te stellen waarmee de toonhoogte moduleert. Draai
aan de regelaar Fdbk. om de galm van de modulatie in te stellen.
Tremolo: Draai aan de regelaar Speed om de snelheid in te stellen waarmee het volume moduleert. Draai aan de
regelaar Depth om in te stellen hoeveel het volume verschilt van het originele ingangssignaal.
Ch 1
Type Mix Depth
Chorus1 50% 50%
Modulator
Speed
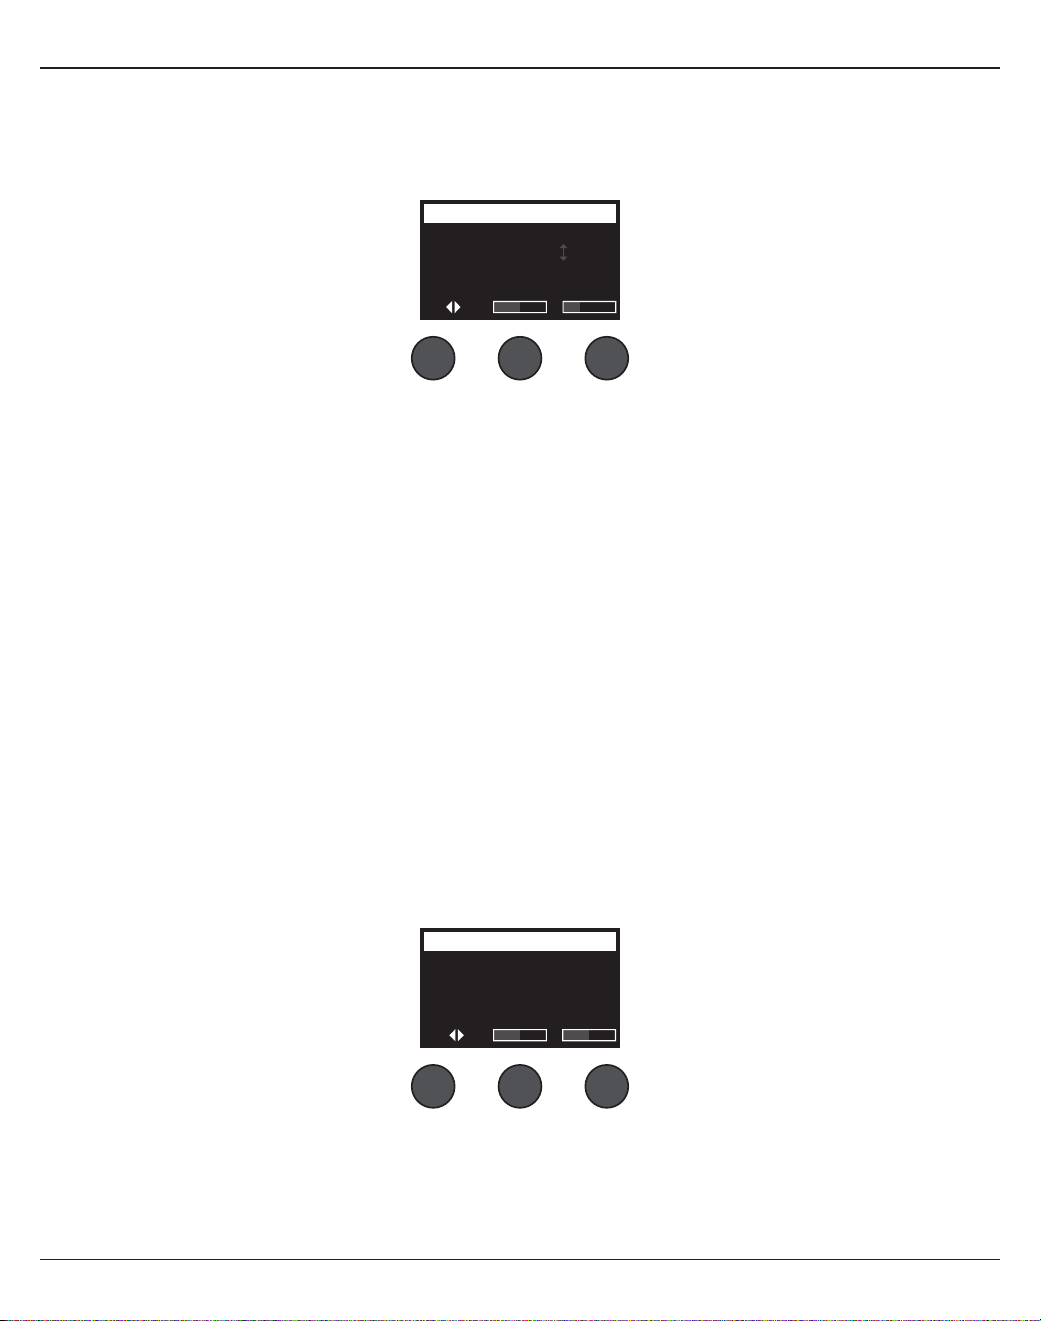
26 - Nederlands
Gebruik
Ch 1
Type Tim
eM
ix
Digital 250ms 30%
Delay
Fdbk.
Delay toevoegen
Met de functie Delay kunt u digitale, analoge of tape-achtige vertragingen toepassen.
Opmerking: Druk op de regelaar Type om de Delay-instellingen te deactiveren. U activeert deze weer door nogmaals
op de knop te drukken.
1. Draai aan de regelaar Type om een lijst te openen met soorten vertragingen en selecteer uw keuze.
A. Digital Delay – Eenvoudig, digitaal vertragingseect waarbij de herhaling onverkleurd blijft. Met instelbare
mix-, diepte- en feedbackparameters. Geschikt voor gitaar, drums en zang.
B. Analog Delay – Klassiek, analoog vertragingseect waarbij de herhalingen voortdurend minder worden. Met
instelbare mix-, diepte- en feedbackparameters. Geschikt voor gitaar, drums en zang.
C. Tape Delay – Klassiek tape-vertragingseect waarbij de herhalingen nog meer verslechteren dan bij Analog
Delay. Geschikt voor gitaar, hoorn, harmonica en zang.
2. Druk op de regelaar Select om een keuze te maken of druk op de regelaar Cancel om de lijst te sluiten zonder
iets te veranderen.
3. Draai aan de regelaar Time om de vertragingstijd met stappen van 5 ms aan te passen. Druk op de regelaar Time
om het gewenste vertragingstempo af te tappen.
4. Draai aan de regelaar Mix om de gewenste mix van ‘droge’ (0%) en ‘natte’ signalen (100%) in te stellen.
5. Druk op de regelaar Mix om toegang te krijgen tot de instelling Fdbk.. Draai aan de regelaar Fdbk. om de
feedback in te stellen.
Reverb toevoegen
Met de functie Reverb past u een zelf instelbare echo toe op het geselecteerde kanaal. Zie ‘Een type reverb
selecteren’ op pagina 27 voor meer informatie over het selecteren van een type reverb.
Opmerking: Druk op de regelaar Mix om de Reverb-eecten te dempen. U schakelt ze weer in door nogmaals op de
knop te drukken.
1. Druk op of draai aan de regelaar Menu en selecteer naar welke uitgang de reverb moet worden gestuurd.
2. Draai aan de regelaar Mix om de gewenste mix van ‘droge’ (0%) en ‘natte’ signalen (100%) in te stellen.
3. Draai aan de regelaar Bright voor equalisatie van de hoogfrequente echo die is toegepast op het geselecteerde
kanaal.
Ch 1
Mix Bright
50% 50%
Reverb
Menu
Main

Gebruik
Nederlands - 27
Algemene functies gebruiken
De functies Global bieden toegang tot instellingen die eect hebben op de algehele bediening van het systeem en
alle kanalen.
Een type reverb selecteren
Met de functie Reverb Type kunt u het type reverb selecteren dat wordt toegepast op alle ingangskanalen.
De verlooptijd (Time) en balans (Bal) zijn instelbaar. De balans regelt de verhouding van vroege tot late
geluidsweerkaatsing.
Opmerking: Druk op de regelaar Type om de Reverb te dempen. U schakelt het weer in door nogmaals op de knop
te drukken.
1. Selecteer Reverb Type met de draaiknop.
2. Druk op of draai aan de regelaar Menu en selecteer naar welke uitgang de reverb moet worden gestuurd. U kunt
verschillende typen reverb naar de hoofduitgang of Aux sends sturen.
3. Draai aan de regelaar Type om de lijst met echo’s weer te geven:
A. Plate – Creëert het idee van een typische studioreverb. Met instelbare tijd- en balansparameters (verhouding
van vroege/latere geluidsweerkaatsing).
B. Small – Creëert het idee van een kleine ruimte. Met instelbare tijd- en balansparameters (verhouding van
vroege/latere geluidsweerkaatsing).
C. Medium – Creëert de omgeving van een middelgrote ruimte. Met instelbare tijd- en balansparameters
(verhouding van vroege/latere geluidsweerkaatsing).
D. Large – Creëert het idee van een grote ruimte. Met instelbare tijd- en balansparameters (verhouding van
vroege/latere geluidsweerkaatsing).
E. Cavern – Creëert het idee van een zeer grote ruimte. Met instelbare tijd- en balansparameters (verhouding
van vroege/latere geluidsweerkaatsing). Een uniek en interessant reverb-eect.
4. Draai aan de regelaar Type om de gewenste reverb in de lijst te selecteren.
5. Druk op de regelaar Type om een keuze te maken.
6. Door aan de regelaar Time te draaien, kunt u de verlooptijd van het geselecteerde reverbmodel instellen van
een minimale tot een maximale verlooptijd. Op 0% staat de verlooptijd op het minimale en wordt met het huidig
geselecteerde type reverb de kleinst beschikbare ruimte nagebootst. Op 100% staat de verlooptijd op het
maximale en wordt met het huidig geselecteerde type reverb de grootst beschikbare ruimte nagebootst. Elk type
reverb bevat een eigen bereik van te gebruiken verlooptijden die het beste werken met het geselecteerde type
model. Met de parameter Reverb Decay kunt u de reverbtijd instellen binnen een bepaald bereik dat het beste
werkt met het geselecteerde type reverbmodel.
7. Druk op de regelaar Time om naar Bal. te schakelen. Draai aan de regelaar Bal. om de verhouding van vroege tot
late weerkaatsing in te stellen (0% = alle vroege weerkaatsingen, 100% = alle late weerkaatsingen).
All Channels
Menu Type Bal.
Main Medium 50%
Reverb Type
Time
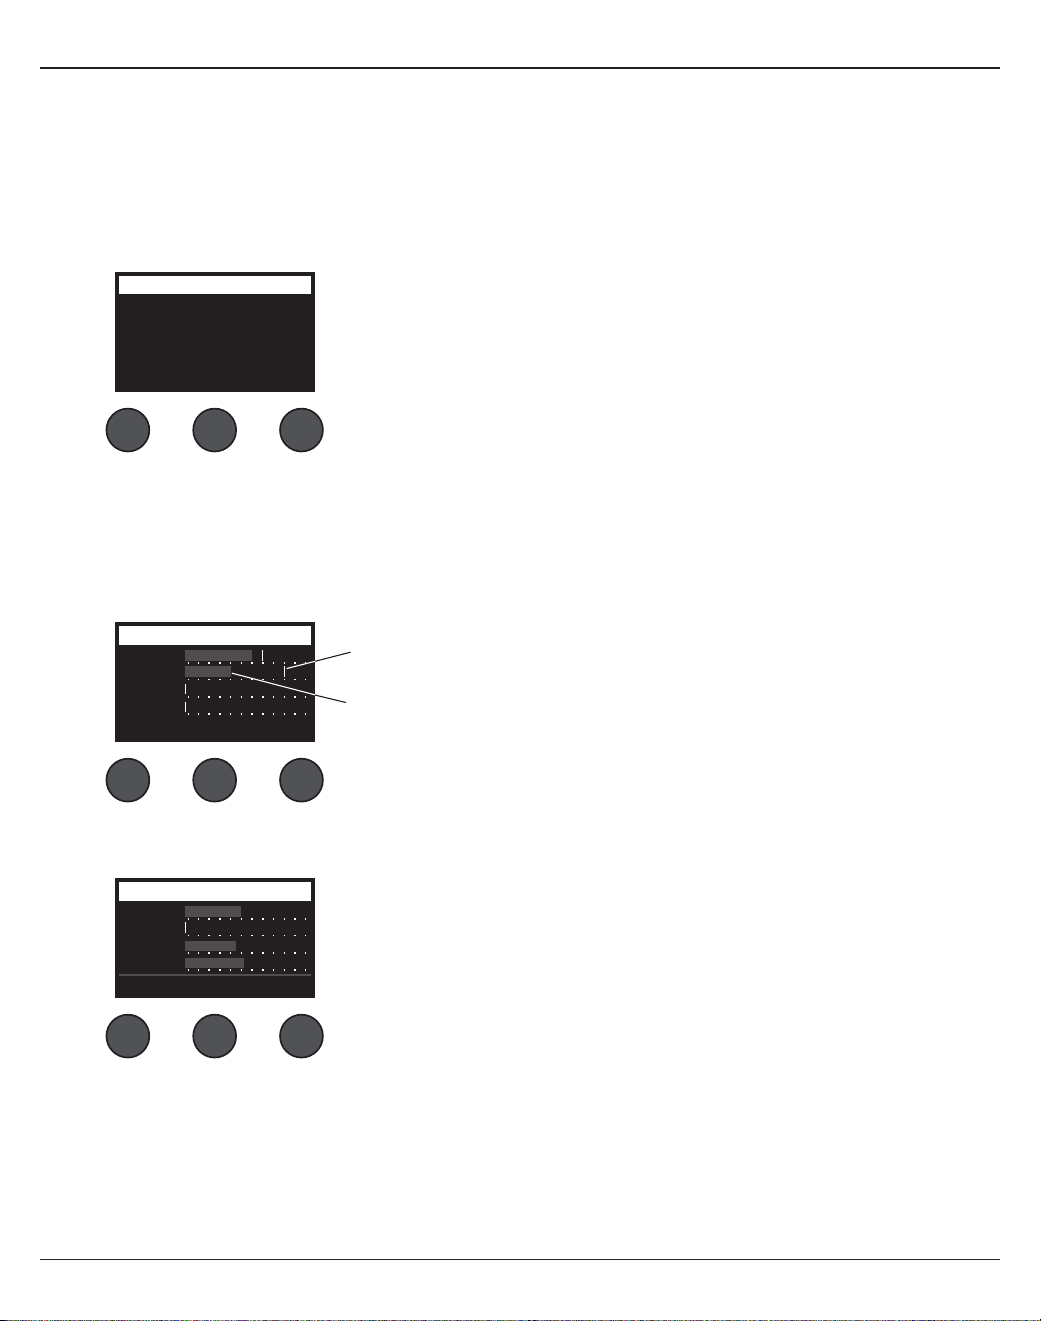
28 - Nederlands
Gebruik
De Prefs-functies gebruiken
Via de functie Prefs hebt u toegang tot verschillende systeemfuncties.
1. Selecteer Prefs met de draaiknop.
2. Draai aan de regelaar Menu om de gewenste functie in de lijst te selecteren. Druk op de regelaar Select om de
functie te openen:
• Status – Toont de eecten van de ingangskanalen (alleen weergave).
• Input Level – Toont meters die het ingangsniveau meten met maximumsignaal-indicators voor alle
ingangskanalen. Druk op de regelaar Reset om alle maximumsignaal-indicators opnieuw in te stellen. De
display is handig voor het instellen van het Trim-niveau van de kanaalingang (zie ‘Ingangsversterking en
het uitgangsvolume optimaliseren’ op pagina 17). Druk op de regelaar Aux In om het niveau van de Aux-
ingangen te controleren. (Alleen voor de T8S: druk op de regelaar Ch 5-8 om het niveau van ingangen 5-8 te
controleren.)
• Output Level – Toont de meter voor het uitgangsniveau voor alle uitgangen: Main L, Main R, USB L en USB R.
Druk op de regelaar Aux om het niveau van de Aux-ingangen te controleren.
Output Level Preferences
USB L
Main L
Main R
USB R
Menu Rese
tA
ux
Status
Ch 1 Mod
Mod
Mod Dly
Cm
pR
ev
Rev
Rev
CmpCh 2
Ch 3
Ch 4
Menu
Preferences
Cmp = Compressor/Gate
Mod = Modulatie
Dly = Delay
Rev = Reverb
Input LevelPreferences
Ch 3
Ch 1
Ch 2
Ch 4
Menu Aux InReset
Indicator voor maximumniveau
Indicator voor ingangsniveau
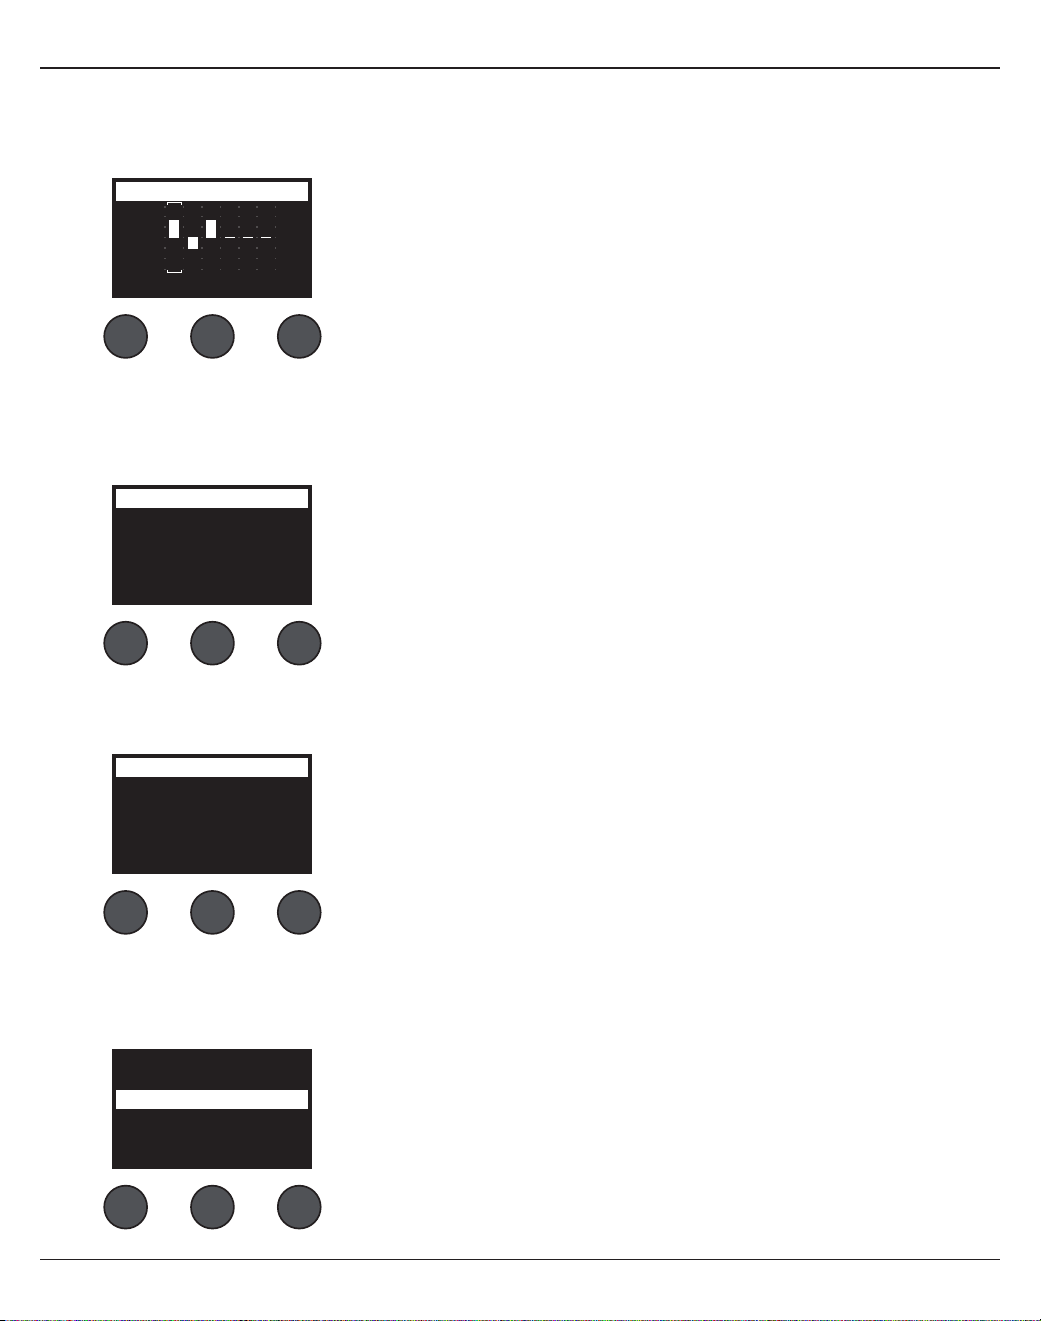
Gebruik
Nederlands - 29
• Master Out EQ – De Master Out EQ is een grafische equalizer met 6 banden die op de hoofdmixuitgang wordt
toegepast. Met de middelste regelaar selecteert u het frequentiebereik dat u wilt versterken of beperken en
met de regelaar Level past u het niveau binnen +/-18dB aan.
• USB B to PC – Hiermee kunt u een geselecteerde bron naar uw computer sturen via de linker- en rechter-
usb-uitgangskanalen. Als bron kunt u kiezen uit Ch1-4 (Ch5-8 alleen voor T8S), Aux In, Master of Aux Out 1-2
(AuxOut 3-4 alleen voor T8S).
• USB B from PC – Hiermee kunt u de linker- en rechter-USB-kanalen van uw computer naar een geselecteerde
mixerbestemming sturen (None, Aux In of Master).
• USB A-Playback – Hiermee kunt u een USB Type-A-stick aansluiten om WAV/MP3-bestanden hierop af te
spelen. Selecteer via het menu de map waarin de WAV/MP3-bestanden zich bevinden, selecteer het af te
spelen bestand en pas het niveau aan door aan de regelaar Level te draaien.
+18
+12
+6
0
-6
-12
-18
125HzMenu
Master EQ Preferences
Level
1. Draai aan de regelaar Left/Right om een bron te selecteren.
2. Druk op de regelaar Select om een bron te selecteren of druk op de
regelaar Cancel om af te sluiten zonder iets te veranderen.
3. Draai aan Menu om terug te gaan naar het menu Prefs.
Left : Master
Right : Master
LeftMenu
USB to PC Preferences
Right
Left : Master
Right : Master
LeftMenu
USB from PC Preferences
Right
1. Draai aan de regelaar Left/Right om een bestemming te selecteren.
2. Druk op de regelaar Select om een bron te selecteren of druk op de
regelaar Cancel om af te sluiten zonder iets te veranderen.
3. Draai aan de regelaar Menu om terug te gaan naar het menu Prefs.
Tomorrow Is Too late.wav
Sarah.wav
Mistakes for Love.mp3
Sun Behind the Clouds.wav
Hey God Maker. mp3
LevelSelectMenu
30 - Nederlands
Gebruik
• Versions – Toont de revisieniveaus van de DSP-firmware.
• ToneMatch – Toont een lijst met ToneMatch-presets die op de T4S/T8S zijn opgeslagen.
Ga naar www.Bose.com/livesound voor de nieuwste presets.
• L1 Power Stand – Wanneer er een L1® Model 1S/II power stand is aangesloten, verschijnt de tekst Connected
op het scherm.
Versions
T4S v1.0.0
Menu
Preferences
C: Ovation Guitars
B: Audix Mics.
A: Taylor Guitars
Menu
ToneMatchPreferences
Connected
Menu
L1 Stand Preferences
Scènes laden en opslaan
Een scène is een momentopname van de status van de T4S/T8S ToneMatch® mixer.
• In een scène zijn alle mixerinstellingen van de ToneMatch en de status van de knoppen Mute, FXMute en CH Edit
opgeslagen.
• Een scène bevat niet de instellingen van de kanaal-trim en het kanaalvolume, het hoofdvolume,
hoofdtelefoonvolume of de stand van de fantoomvoedingsschakelaar.
All Channels
Singer/Songwriter
Load Shared Save
Scenes

Gebruik
Nederlands - 31
De T4S/T8S bevat drie soorten scènes:
• (5) Bose-scènes: Scènes die standaard zijn meegeleverd en niet kunnen worden gewijzigd. Deze kunt u niet
bewerken of overschrijven.
• (10) Gebruikersscènes: Zelfgedefinieerde scènes waarmee u al uw voorkeursinstellingen kunt opslaan en weer kunt
opvragen. U kunt deze scènes zo vaak u wilt wijzigen door ze te overschrijven.
• (1) Gedeelde scènes: Zelfgedefinieerde scènes met instellingen die u wilt delen met andere gebruikers van de
T4S/T8S ToneMatch® mixer. Deze scènes kunnen worden geüpload naar een computer met daarop de
L1®-updatesoftware gebruikt. Deze software kan worden gedownload via www.Bose.com/livesound.
Ga als volgt te werk om een scène te laden:
1. Selecteer Scenes met de draaiknop.
2. Draai aan de regelaar Load om door de lijst met scènes te bladeren en selecteer de gewenste scènenaam.
De naam van de geselecteerde scène wordt weergegeven in vette letters.
3. Druk op de regelaar Select om de scène te selecteren of druk op de regelaar Cancel om de lijst te sluiten zonder
de instelling te veranderen.
Opmerking: Als u niet binnen 10 seconden op Select of Cancel drukt, wordt u automatisch teruggebracht naar het
scènescherm. Er wordt niets gewijzigd en de geladen scène verschijnt op het scherm.
4. Als u op Select hebt gedrukt, verschijnt de vraag ‘Are you sure?’ (Weet u het zeker?). Druk op de regelaar Yes om
de scène te laden of druk op de regelaar No om af te sluiten zonder de scène-instelling te veranderen.
Opmerking: Als u niet binnen 10 seconden op Yes of No drukt, wordt u automatisch teruggebracht naar het
scènescherm. Er wordt niets gewijzigd en de geladen scène verschijnt op het scherm.
Ga als volgt te werk om een scène op te slaan:
1. Selecteer Scenes met de draaiknop. De geladen scène wordt weergegeven.
2. Draai aan de regelaar Save om de scène te selecteren die u wilt opslaan. Druk op Select of Cancel om de lijst te
sluiten.
All Channels
Singer/Songwriter
Load Shared Save
Scenes
Opmerking: Als u niet binnen 10 seconden op Select of Cancel drukt,
wordt u automatisch teruggebracht naar het scènescherm. Er wordt
niets gewijzigd en de geladen scène verschijnt op het scherm.
My Scene 01
My Scene 02
My Scene 03
Cancel Select

32 - Nederlands
Gebruik
3. Als u op Select hebt gedrukt, gebruikt u het scherm Rename om de naam van de scène te bewerken. U kunt ook
op Save drukken om de naam te gebruiken zoals deze wordt weergegeven. Ga vervolgens verder met stap 4.
Ga als volgt te werk om de naam van de scène te veranderen voordat u deze opslaat:
U kunt de volgende opties gebruiken om de naam van de scène te veranderen. Druk op de regelaar Save nadat u de
naam hebt veranderd en ga verder met stap 4.
• Tekens selecteren en wijzigen: Draai in het scherm Rename aan de regelaar Cursor om tekens of tekenposities te
selecteren die u wilt veranderen. Draai vervolgens aan de regelaar Select om het teken te wijzigen.
• De tekenset gebruiken: Draai in het scherm Rename aan de regelaar Cursor om het teken te selecteren dat u wilt
veranderen. Druk vervolgens op de regelaar Select om de tekenset weer te geven. Draai aan de regelaar Select om
de cursor naar links of naar rechts te verplaatsen. Draai aan de regelaar Up/Dn om de cursor naar boven of naar
beneden te verplaatsen. Selecteer het gewenste teken en druk op Select om dat teken op de geselecteerde positie
te plaatsen.
• De functies wissen, invoegen en verwijderen: Draai in het scherm Rename aan de regelaar Cursor om de cursor
naar de gewenste positie te verplaatsen. Druk vervolgens op de regelaar Cursor om een menu met speciale
bewerkingsfuncties te openen. Draai aan de regelaar Select om de gewenste functie te selecteren. Druk vervolgens
op de regelaar Select om de functie uit te voeren.
Clear Character – Verwijdert het geselecteerde teken waardoor er een spatie
ontstaat.
Clear All – Wist de gehele tekstregel.
Clear to End – Wist alle tekst rechts van de cursor, inclusief het geselecteerde
teken.
Insert – Voegt een spatie in links van het geselecteerde teken.
Delete – Verwijdert het geselecteerde teken en de spatie.
Rename
J
rstuvwxyzABCDEFGHI
123456789, ;/\()|+-
KLMNOPQRSTU VWXYZ0
abcdefgh jklmnopqi
Cancel Up/Dn Select
Scenes
Clear To End
Insert
Clear All
Clear Character
Delete
CancelSelect
Rename
M yScene 01
CursorSave Select
Scenes
Gebruik
Nederlands - 33
4. Als de vraag ‘Are you sure?’ (Weet u het zeker?) verschijnt, drukt u op de regelaar Yes om de scène op te slaan of
op No om af te sluiten zonder de scène op te slaan.
Een scène delen
Als u een scène hebt gemaakt die u met andere gebruikers van de T4S/T8S ToneMatch® mixer wilt delen, kunt u
deze scène als gedeelde scène opslaan in het vak [To Shared Scene]. Met de L1®-updatesoftware kunt u de gedeelde
scène uploaden naar uw computer en het bestand vervolgens overbrengen naar de computer van een andere T4S/
T8S-gebruiker. Andere T4S/T8S-gebruikers kunnen de scène vervolgens downloaden naar hun T4S/T8S met de
L1-updatesoftware. De L1-updatesoftware is beschikbaar op www.Bose.com/livesound.
Ga als volgt te werk om een gedeelde scène op te slaan:
1. Laad de scène die u wilt delen (zie ‘Ga als volgt te werk om een scène te laden’ op pagina 31).
2. Druk op de regelaar Save om de lijst met scènes te openen.
3. Draai aan de regelaar Select om door de lijst met scènes te bladeren en selecteer [To Shared Scene]. Druk op
Select of Cancel om de lijst te sluiten.
4. Als u op Select hebt gedrukt, kunt u de naam van de scène wijzigen in het scherm Rename (zie ‘Ga als volgt te
werk om de naam van de scène te veranderen voordat u deze opslaat’ op pagina 32) of ga naar stap 5 als u de
bestaande naam wilt gebruiken.
Are You Sure?
YesNo
Opmerking: Als u niet binnen 10 seconden op Select of Cancel drukt, wordt u
automatisch teruggebracht naar het scènescherm. Er wordt niets gewijzigd en de
geladen scène verschijnt op het scherm.
[To Shared Scene]
My Scene 10
My Scene 09
Cancel Select
Rename
M yScene 07
CursorSave Select
Scenes
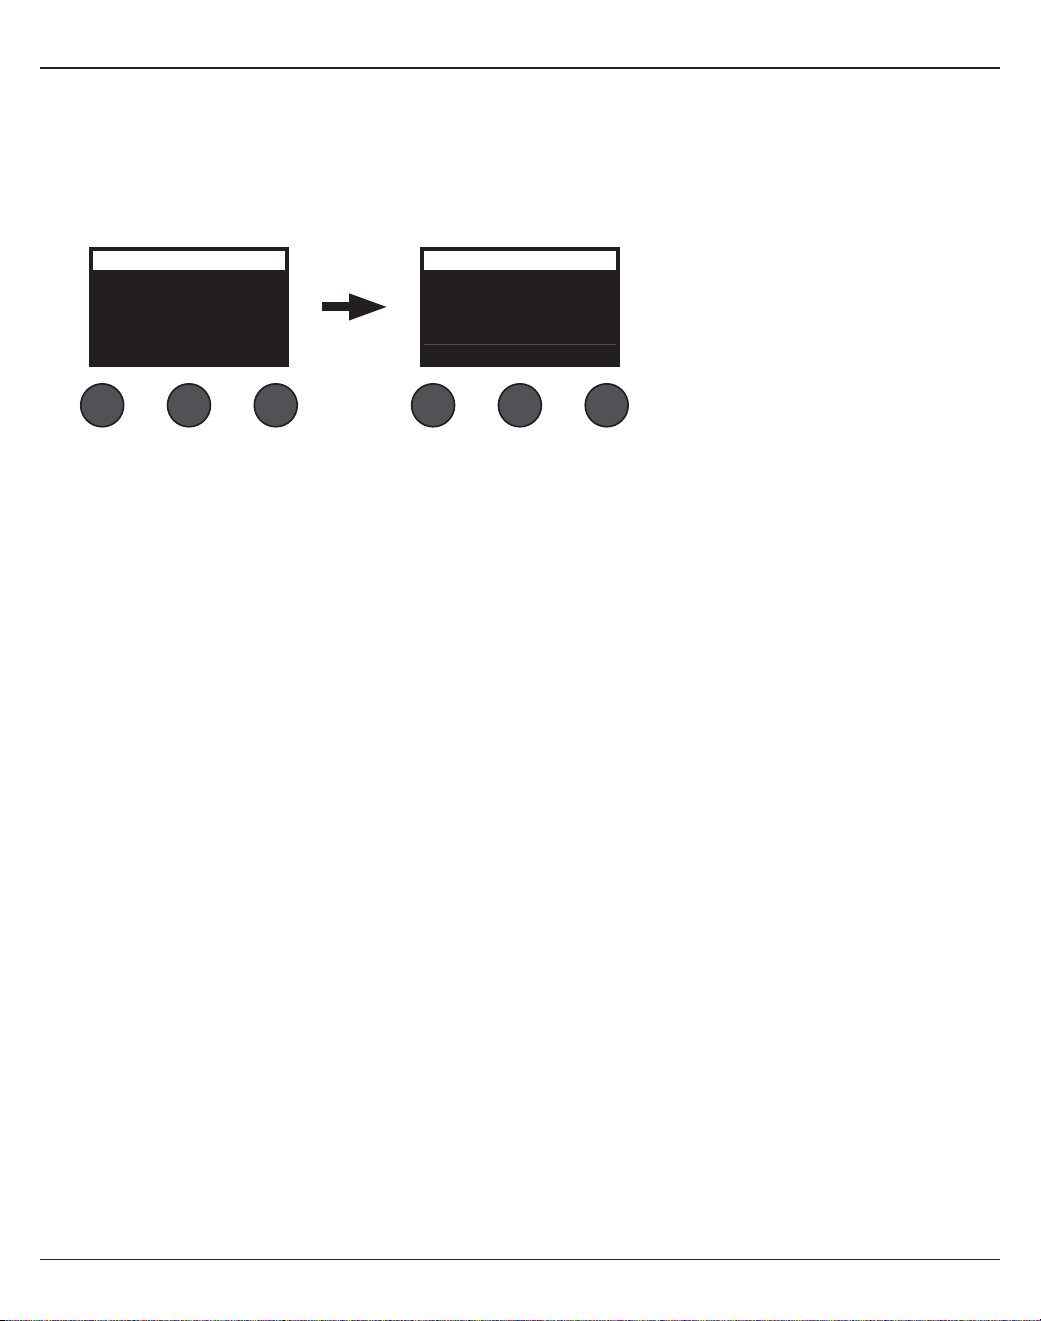
34 - Nederlands
Gebruik
5. Draai aan de regelaar Save om de scène op te slaan als een gedeelde scène.
6. Als de vraag ‘Are you sure?’ (Weet u het zeker?) verschijnt, drukt u op de regelaar Yes om de scène op te slaan of
op No om af te sluiten zonder de scène als gedeelde scène op te slaan.
Opmerking: Als u niet binnen 10 seconden op Yes of No drukt, wordt u automatisch teruggebracht naar het
scènescherm. Er wordt niets gewijzigd en de geladen scène verschijnt op het scherm.
7. Druk op de regelaar Shared om te bevestigen dat u de scène wilt opslaan als een gedeelde scène.
Opmerking: De T4S/T8S heeft slechts één opslagmogelijkheid voor een gedeelde scène. Als een scène opgeslagen
wordt als gedeelde scène wordt een eerder opgeslagen gedeelde scène overschreven.
Ga naar www.Bose.com/livesound voor meer informatie over het gebruik van de L1®-updatesoftware voor het
downloaden en uploaden van scènes naar en van uw computer.
All Channels
Singer/Songwriter
Load Shared Save
Scenes All Channels
My Scene 07
Current Shared Scene:
Back
Scenes
Drukken
Gebruik
Nederlands - 35
Bose-scènes
De vijf Bose-scènes dienen als voorbeeld. U kunt deze als uitgangspunt gebruiken. Na het laden van een Bose-scène
kunt u de instellingen wijzigen en deze vervolgens opslaan als een eigen of een gedeelde scène.
Fabrieksinstellingen
Met deze scène herstelt u de fabrieksinstellingen van de mixer. Als u deze scène laadt, gaan alle eerder aangebrachte
wijzigingen in de geladen scène verloren.
CH 1-4 (T4S/T8S) CH 5-8 (T8S)
ToneMatch
Active
Utility
Flat
zEQ
Bypass
Low Mid High
0 dB 0 dB 0 dB
Para EQ
Bypass
Comp/Gate
Bypass
Chorus1
Mod
Bypass
Chorus1
Delay
Bypass
Digital
Reverb
Bypass
Digital
Aux
Mute
Pre: With EQ & Fx
Algemene instellingen
Voorkeuren
Actief scherm Status
USB to PC Left/Right:Master
USB from PC Left/Right:Master
Master Out Post Master Volume
Reverb Type
Type Medium
Time 50%
Bal 50%
Opmerking: Zie ‘Fabrieksinstellingen’ op pagina 42 voor een lijst met de fabrieksinstellingen voor alle eecten.

36 - Nederlands
Gebruik
Singer/Songwriter
Deze scène is bedoeld voor een singer-songwriter die keyboard of gitaar speelt en soms begeleid wordt door een
MP3-nummer.
Figuur 16. Voorbeeldsituatie voor Singer/Songwriter
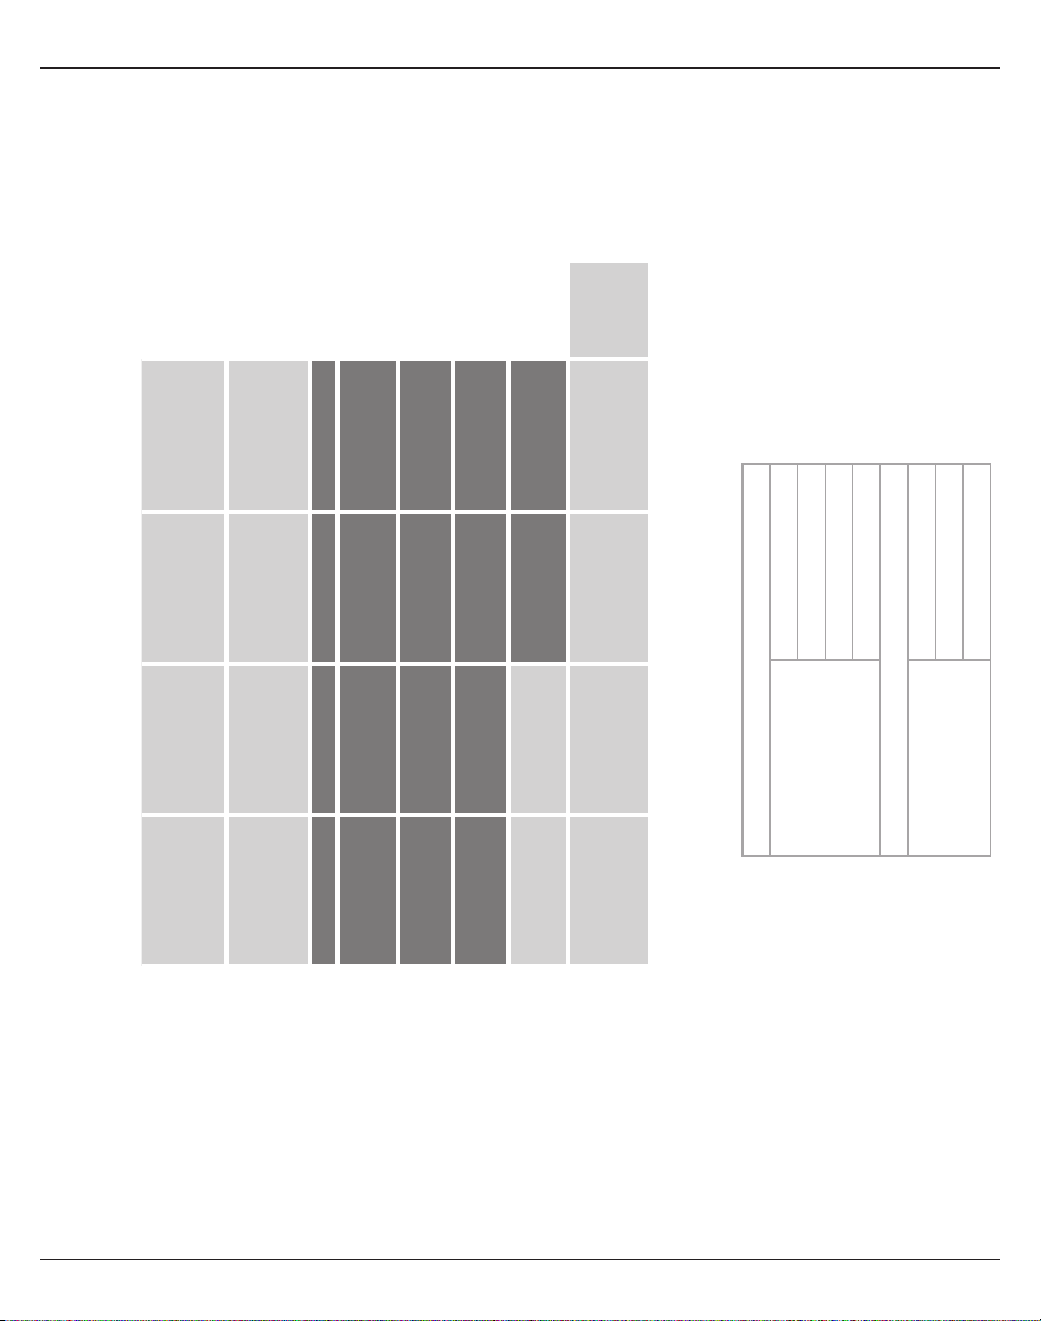
Gebruik
Nederlands - 37
Microfoon Gitaar Keyboard Bas Aux In
CH 1 CH 2 CH 3 CH 4 5/6
ToneMatch
Active Active Active Active
N.v.t.
Vocal Mics Acoustic Guitar Keyboards Basses
Handheld Mics Steel String w/ piezo General Keys Active Bass 1
zEQ
Active Active Active Active
N.v.t.
Low Mid High Low Mid High Low Mid High Low Mid High
0 dB 0 dB 0 dB 0 dB 0 dB 0 dB 0 dB 0 dB 0 dB 0 dB 0 dB 0 dB
Para EQ Bypass Bypass Bypass Bypass N.v.t.
Comp/Gate
Bypass Bypass Bypass Bypass
N.v.t.
Comp2 Comp2 Comp2 Comp2
Mod
Bypass Bypass Bypass Bypass
N.v.t.
Chorus1 Chorus1 Chorus3 Chorus1
Delay
Bypass Bypass Bypass Bypass
N.v.t.
Digital Digital Digital Digital
Reverb
Active Active Bypass Bypass
N.v.t.
Medium (Global) Medium (Global) Medium (Global) Medium (Global)
Pan/Aux
Center Center Center Center Aux In
Aux 1-2 50% Aux 1-2 50% Aux 1-2 50% Aux 1-2 50% 5 Lvl 6 Lvl
Pre: With EQ & Fx Pre: With EQ & Fx Pre: With EQ & Fx Pre: With EQ & Fx 50% 50%
Kanaalinstellingen van de scène Singer/Songwriter
Algemene instellingen
Voorkeuren
Actief scherm Status
USB to PC Left/Right:Master
USB from PC Left/Right:Master
Master Out Post Master Volume
Reverb Type
Type Medium
Time 50%
Bal 50%

38 - Nederlands
Gebruik
DJ/Playback
De scène DJ/Playback is bedoeld voor een dj-event of een andere situatie waarin audio wordt afgespeeld. Hierbij
worden twee microfoons gebruikt plus een mobiel apparaat, mixer of laptop.
Figuur 17. Voorbeeldsituatie voor DJ/Playback
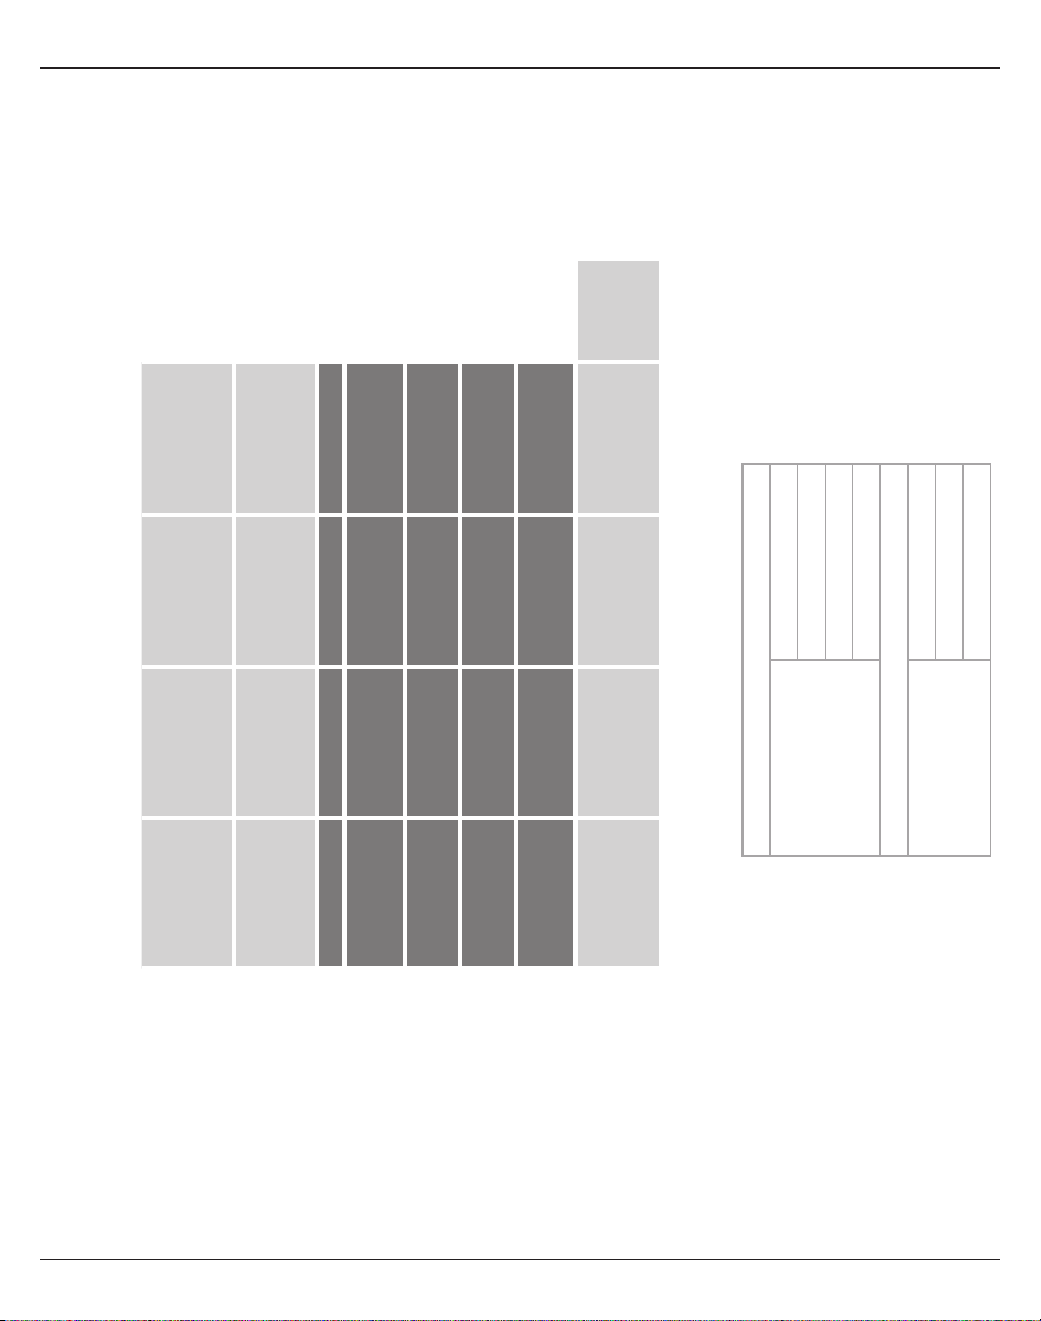
Gebruik
Nederlands - 39
Kanaalinstellingen voor de scène DJ/Playback
Algemene instellingen
Voorkeuren
Actief scherm Status
USB to PC Left/Right:Master
USB from PC Left/Right:Master
Master Out Post Master Volume
Reverb Type
Type Medium
Time 50%
Bal 50%
Bron 1 Links Bron 1 Rechts Microfoon Microfoon Aux In
CH 1 CH 2 CH 3 CH 4 5/6
ToneMatch
Active Active Active Active
N.v.t.
DJ/Playback DJ/Playback Vocal Mics Vocal Mics
Vlakke zEQ-
bedieningselementen
Vlakke zEQ-
bedieningselementen
Handheld Mics Handheld Mics
zEQ
Active Active Active Active
N.v.t.Low Mid High Low Mid High Low Mid High Low Mid High
0 dB 0 dB 0 dB 0 dB 0 dB 0 dB 0 dB 0 dB 0 dB 0 dB 0 dB 0 dB
Para EQ Bypass Bypass Bypass Bypass N.v.t.
Comp/Gate
Bypass Bypass Bypass Bypass
N.v.t.
Limit Limit Comp2 Comp2
Mod
Bypass Bypass Bypass Bypass
N.v.t.
Chorus1 Chorus1 Chorus3 Chorus1
Delay
Bypass Bypass Bypass Bypass
N.v.t.
Digital Digital Digital Digital
Reverb
Bypass Bypass Bypass Bypass
N.v.t.
Medium (Global) Medium (Global) Medium (Global) Medium (Global)
Pan/Aux
Links Rechts Center Center Aux In
Aux 1-2 50% Aux 1-2 50% Aux 1-2 50% Aux 1-2 50% 5 Lvl 6 Lvl
Pre: With EQ & Fx Pre: With EQ & Fx Pre: With EQ & Fx Pre: With EQ & Fx 50% 50%
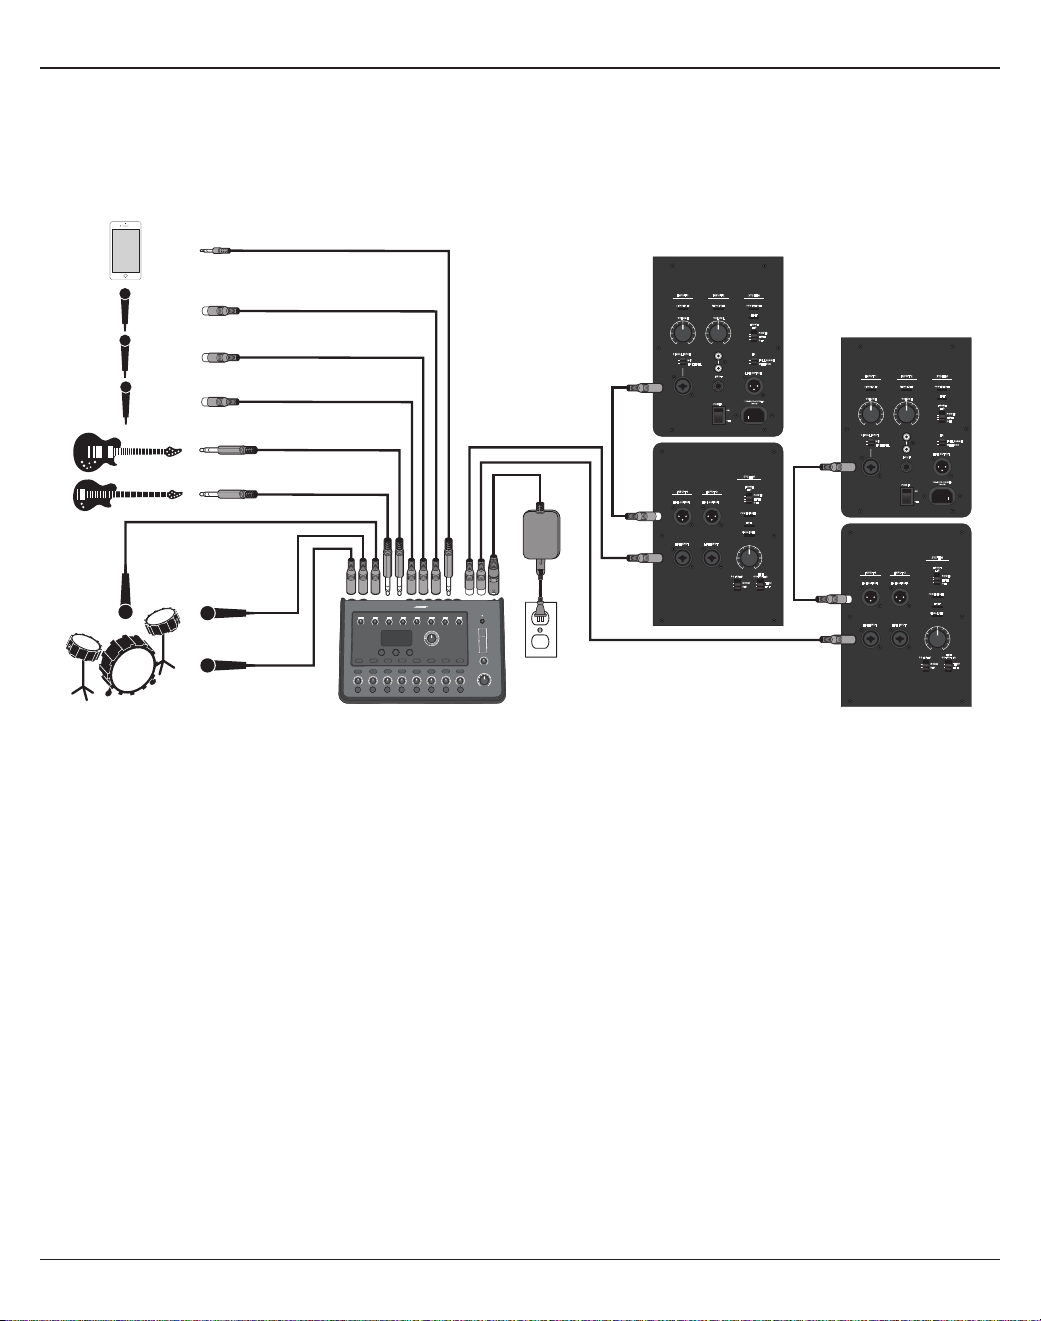
40 - Nederlands
Gebruik
Volledige band
Deze scène is ingesteld voor een drumstel, basgitaar, elektrische gitaar, zang en MP3-speler.
Figuur 18. Voorbeeldsituatie met drums en bas
SYSTEMINPUT 2INPUT 1
VOLUME VOLUME
FRONT
LED
POWER
LIMIT
OFF
FULL RANGE
WITH SUB
EQ
MIC
LINE LEVEL
SIGNAL INPUT
INPUT
POWER
ON
OFF
100-240V~50/60Hz
1000W
LINE OUTPUT
SIGNAL/CLIP SIGNAL/CLIP POWER/FAULT
LIMIT
SYSTEM
INPUT 2INPUT 1
LINE OUTPUT LINE OUTPUT
LINE INPUT
POWER/FAULT
LIMIT
SIGNAL/CLIP
LINE INPUT
NORM
REV
THRU
HPF
POLARITY
LINE
OUTPUT EQ
POWER
LIMIT
OFF
FRONT
LED
Gebruik
Nederlands - 41
Kanaalinstellingen scène Volledige band
Algemene instellingen
Voorkeuren
Actief scherm Status
USB to PC Left/Right:Master
USB from PC Left/Right:Master
Master Out Post Master Volume
Reverb Type
Type Medium
Time 50%
Bal 50%
Kick-drum Overhead Overhead Bas Gitaar Microfoon Microfoon Microfoon Aux In
CH 1 CH 2 CH 3 CH 4 CH 5 CH 6 CH 7 CH 8 9/10
ToneMatch
Active Active Active Active Active Active Active Active
N.v.t.
Percussion Percussion Percussion Basses Electric Guitars Vocal Mics Vocal Mics Vocal Mics
Kick, General General Overhead General Overhead Active Bass 1 Versterker voor
microfoon met
SM57
Handheld Mics Handheld Mics Handheld Mics
zEQ
Active Active Active Active Active Active Active Active
N.v.t.
L M H L M H L M H L M H L M H L M H L M H L M H
0
dB
0
dB
0 dB 0
dB
0
dB
0
dB
0
dB
0
dB
0 dB 0
dB
0
dB
0
dB
0
dB
0
dB
0
dB
0
dB
0
dB
0 dB 0
dB
0
dB
0
dB
0
dB
0
dB
0
dB
Para EQ Bypass Bypass Bypass Bypass Bypass Bypass Bypass Bypass N.v.t.
Comp/Gate
Active Bypass Bypass Active Bypass Bypass Bypass Bypass
N.v.t.
Kick 1 Comp2 Comp2 Comp2 Comp2 Gate Gate Gate
Mod
Bypass Bypass Bypass Bypass Active Bypass Bypass Bypass
N.v.t.
Chorus1 Chorus1 Chorus1 Chorus1 Chorus 1 Chorus 1 Chorus 1 Chorus 1
Delay
Bypass Bypass Bypass Bypass Bypass Bypass Bypass Bypass
N.v.t.
Digital Digital Digital Digital Digital Digital Digital Digital
Reverb
Bypass Bypass Bypass Bypass Bypass Active Active Active
N.v.t.
Medium (Global) Medium (Global) Medium (Global) Medium (Global) Medium (Global) Medium (Global) Medium (Global) Medium (Global)
Pan/Aux
Center Center Center Center Center Center Center Center Aux In
Aux 1-4 50% Aux 1-4 50% Aux 1-4 50% Aux 1-4 50% Aux 1-4 50% Aux 1-4 50% Aux 1-4 50% Aux 1-4 50% 9 Lvl 10 Lvl
Dry: After Preamp Dry: After Preamp Dry: After Preamp Dry: After Preamp Dry: After Preamp Dry: After Preamp Dry: After Preamp Dry: After Preamp 50% 50%
Fabrieksinstellingen
42 - Nederlands
Fabrieksinstellingen
In dit gedeelte vindt u een uitleg over de instellingen van de T4S/T8S mixer zoals deze in de fabriek zijn gedefinieerd.
U kunt de fabrieksinstellingen van de T4S/T8S op elk gewenst moment herstellen door de Bose-scène te laden.
Fabrieksinstellingen voor Comp/Gate
Type Thresh Gain
Compressor 1: Light -16,0 dB 3,0 dB
Compressor 2: Medium -16,0 dB 5,0 dB
Compressor 3: Heavy -16,0 dB 8,0 dB
Limiter -10,0 dB 0 dB
De-Esser -10,0 dB 0 dB
Thresh Speed
Noise Gate -70,0 dB 50%
Thresh Tight
KickGate1: Normaal -20,0 dB 100%
KickGate2: Fast -20,0 dB 100%
Fabrieksinstellingen voor modulatie
Type Thresh Gain Speed
Chorus 1: Brite 50% 50% 0,50 Hz
Chorus 2: Warm 70% 100% 0,15 Hz
Chorus 3: Dark 25% 25% 3,0 Hz
Flanger 1: Tape 50% 50% 1,00 Hz
Flanger 2: Feedback 50% 100% 2,00 Hz
Speed Feedback
Phaser 1: Stomp 0,50 Hz 0%
Phaser 1: Rack 0,50 Hz -75%
Phaser 1: Warm 1,00 Hz -26%
Phaser 1: Helder 0,50 Hz -76%
Speed Depth
Tremolo 5,00 Hz 50%
Fabrieksinstellingen voor Delay
Type Mix Time Feedback
Digital 30% 150 ms 30%
Analog 30% 275 ms 20%
Tape 30% 350 ms 30%
Fabrieksinstellingen voor Reverb Type
Type Bal. Time Time Range
Plate 50% 20% 0-4,6 s
Small 50% 15% 0-0,8 s
Medium 50% 25% 0-1,9 s
Large 50% 50% 0-3,5 s
Cavern 50% 100% 0-7,0 s

Nederlands - 43
Reiniging en onderhoud
Problemen oplossen
Als je problemen ondervindt bij het gebruik van dit product, probeer dan de volgende oplossingen. Kun je het
probleem niet oplossen? Raadpleeg dan www.Bose.com/livesound. Vind je hier geen antwoord op je vragen?
Bel dan het team voor product- en technische ondersteuning van Bose op (877) 335-2673.
Probleem Wat te doen
T4S/T8S is aangesloten
op het stopcontact, de
aan/uit-schakelaar staat
aan, maar er is geen
stroom.
• Controleer of het stopcontact werkt. Probeer een lamp of andere apparatuur op
hetzelfde stopcontact of test het stopcontact met een stopcontacttester.
Als u de T4S gebruikt in combinatie met een L1® Model II of 1S system:
• Zorg ervoor dat de kabel van de ToneMatch® correct is aangesloten op de mixer en de
L1 power stand.
• Controleer of het netsnoer goed is aangesloten op de power stand en het stopcontact.
• Zorg dat de L1 power stand aan staat en dat het aan/uit-lampje blauw is.
T4S/T8S staat aan,
maar er is geen geluid.
• Zorg ervoor dat de Master-volumeregelaar ver genoeg open staat.
• Controleer bij elk ingangskanaal dat u wilt horen of het niet gedempt is.
• Controleer of de volumeregelaar ver genoeg open staat bij het kanaal dat u wilt horen.
• Zorg ervoor dat de Trim-regelaar van het juiste het ingangskanaal zo staat dat de led
groen is (dit geeft aan dat er een sterk ingangssignaal is).
• Controleer de meters voor het ingangs- en uitgangsniveau onder Prefs (voorkeuren)
om er zeker van te zijn dat er een signaal is, zowel bij de ingang als bij de uitgang.
• Zorg dat de volumeregelaar van uw ingangsbron (instrument) in de goede stand staat.
• Sluit uw ingangsbron (instrument) met een andere kabel aan op de mixer.
• Sluit uw ingangsbron (instrument) rechtstreeks aan op het L1 power stand of op een
andere versterker om er zeker van te zijn dat de bron werkt.
• Schakel de mixer uit en wacht 30 seconden. Schakel de mixer weer in.
Als u de T4S gebruikt in combinatie met een L1 Model II of 1S system:
• Zet de power stand uit, sluit de kabel van de ToneMatch aan op de ToneMatch-poort
en zet de power stand weer aan.
• Probeer zo mogelijk een andere ToneMatch-kabel. Als u geen andere ToneMatch-kabel
heeft, probeer het dan met een standaard ethernetstekker.
• Sluit de T4S/T8S Master-uitgang aan op de analoge ingang van de power stand met
behulp van kabel met een ¼" telefoonstekker. Zet de Trim-regelaar van het statief in de
goede stand en controleer of u geluid hoort.
• Controleer of het aan/uit-lampje op de power stand blauw is. Als de led rood is, belt u
het team voor product- en technische ondersteuning van Bose op (877) 335 -2673.
44 - Nederlands
Reiniging en onderhoud
Probleem Wat te doen
Slechte geluidskwaliteit van een
microfoon of instrument dat
aangesloten is op de T4S/T8S.
• Zorg ervoor dat er geen ongewenste zEQ of Para EQ-equalisatie wordt
toegepast.
• Controleer of u de juiste ToneMatch®-mixerpreset voor uw microfoon/
instrument hebt geselecteerd. Als u geen ToneMatch-preset wilt gebruiken,
moet u de ToneMatch instellen op Flat.
• Zorg ervoor dat er geen ongewenste eecten (Comp/Gate, Mod, Delay,
Reverb) zijn ingesteld bij het ingangskanaal. Gebruik de optie Status in het
menu Prefs om te zien welke eecten actief zijn.
• Controleer of de Trim van de T4S/T8S-ingang is afgestemd op uw microfoon/
instrument. Het signaallampje moet groen branden. Als het signaallampje rood
brandt, moet u het Trim-niveau verlagen totdat het groen brandt.
• Probeer een andere microfoon- of instrumentkabel.
• Controleer de kabel waarmee uw microfoon of instrument is aangesloten
op de T4S/T8S mixer. Zorg ervoor dat de kabelstekker volledig in de
uitgangsconnector van de microfoon/het instrument en in de T4S/T8S-ingang
is gestoken.
• Controleer de instellingen (indien aanwezig) van uw microfoon of instrument.
• Controleer de batterijen (indien aanwezig) van uw instrument of microfoon.
Geen eecten hoorbaar. • Controleer of u op de juiste knop CH Edit hebt gedrukt.
• Zorg ervoor dat de knop FX Mute niet is ingedrukt bij het betreende kanaal.
T4S/T8S reageert niet op
regelaars.
• Schakel de mixer uit. Wacht 30 seconden en schakel de mixer weer in.
Hoofdvolumeknop werkt niet. • Controleer of voor de Master-uitgang de optie Post Master Volume is
geselecteerd onder Master Out in het menu Prefs.
Als er niets is aangesloten op
de ingangsconnectors van de
T4S/T8S, klinkt er een licht
bromgeluid of zoemgeluid uit
het L1® system.
• Sluit de T4S/T8S en de L1 power stand aan op hetzelfde stopcontact.
• Gebruik een spanningzoeker en test het stopcontact waarop de T4S/T8S en/
of de L1 power stand is aangesloten op tegencontacten of open contacten
(onder stroom, neutraal en/of aarde).
• Als u een verlengsnoer gebruikt, dient u het snoer op dezelfde manier te
testen als hierboven is beschreven.
Teveel (of niet genoeg) bas,
middelhoge of hoge frequenties.
• Zorg ervoor dat er geen ongewenste zEQ of Para EQ-equalisatie wordt
toegepast.
• Controleer of u de juiste ToneMatch-mixerpreset voor uw microfoon/
instrument hebt geselecteerd. Als u geen ToneMatch-mixerpreset wilt
gebruiken, moet u de ToneMatch instellen op Flat (onder Utility).
Slechte geluidskwaliteit van
stereo-opnames bij gebruik van
een cd-speler, mp3-speler of
een soortgelijk apparaat.
• Sluit het linkerkanaal van het apparaat aan op Aux-ingang 5 en het
rechterkanaal op Aux-ingang 6 (of 9/10 voor T8S). Aux-ingangen 5/6 (of 9/10)
zijn ontworpen voor lijningangen.
• Schakel uitgebreide laag- of EQ-functies uit wanneer u cd-spelers of mobiele
apparaten gebruikt.
• Controleer de softwarevereisten als u opnamesoftware op een computer
gebruikt. U dient de software in te stellen op 48kHz/24-bit.

Nederlands - 45
Reiniging en onderhoud
Probleem Wat te doen
Microfoon heeft last van
feedback.
• Richt de microfoon zo dat deze niet rechtstreeks naar de bijbehorende
luidspreker gericht is.
• Probeer een andere microfoon.
• Probeer een andere positie voor het L1 system en/of zanger op het podium.
• Vergroot de afstand tussen het L1 system en de microfoon.
• Verminder de HOGE frequenties door de zEQ-instelling van het
microfoonkanaal aan te passen.
• Probeer een bepaalde frequentie die het rondzingen zou kunnen veroorzaken
uit te schakelen door de Para EQ-instelling van het microfoonkanaal aan te
passen.
• Deactiveer tijdelijk de gebruikte geluidseecten (Mod, Delay, Reverb) om na te
gaan of deze misschien de oorzaak zijn van het rondzingen.
Aux-uitgang klinkt niet goed. • Controleer bij elk ingangskanaal of de Aux-uitgang is geconfigureerd voor
het gewenste aftappunt. Raadpleeg ‘Ingangssignalen naar de Aux-uitgangen
sturen’ op pagina 21.
• Controleer of bij elke ingang het gewenste signaalniveau voor de Aux-uitgang
wordt gebruikt.
Kan audio niet van de T4S/T8S
overbrengen naar een computer
via een USB-verbinding.
• Controleer of de USB-kabel op de juiste manier is aangesloten op de mixer en
de computer.
• Probeer een andere USB-kabel.
• Controleer of de mixer is ingeschakeld.
• Controleer of de gewenste ingangskanalen van de mixer zijn toegewezen aan
de linker- en rechter-usb-uitgangskanalen. Zie ‘USB to PC’ in het menu Prefs.
• Zorg ervoor dat de Trim-regelaar voor het respectievelijke ingangskanaal
zo is ingesteld dat het groene lampje brandt. Dit geeft aan dat er een sterk
ingangssignaal is.
• Controleer de meters voor het ingangs- en uitgangsniveau onder Prefs om er
zeker van te zijn dat er een signaal is, zowel bij de ingang als bij de uitgang.
• Controleer of de USB-ingang van uw computer functioneert door een ander
usb-audioapparaat aan te sluiten.
• Controleer de softwarevereisten als u opnamesoftware op een computer
gebruikt. U dient de software in te stellen op 48kHz/24-bit.
T4S/T8S reageert niet op
USB-stick.
• Sluit een USB-stick van een ander merk aan om te bepalen of er een probleem
is met uw USB-stick.
46 - Nederlands
Reiniging en onderhoud
Probleem Wat te doen
Kan geen audio van een
computer naar de T4S/T8S
sturen via een USB-verbinding.
• Controleer of de USB-kabel op de juiste manier is aangesloten op de mixer en
de computer.
• Probeer een andere USB-kabel.
• Controleer of de mixer is ingeschakeld.
• Controleer of de computer het doet en of de audio-instelling op de computer
niet is uitgeschakeld.
• Controleer of het USB-signaal naar de gewenste mixeringangen gaat. Zie ‘PC
to USB’ in het menu Prefs.
• Controleer of de ingangskanalen van de mixer die het inkomende USB-signaal
ontvangen niet zijn gedempt en controleer of de volumeregelaars in de goede
stand staan.
• Zorg ervoor dat de Trim-regelaar van het juiste het ingangskanaal zo staat dat
de groene led brandt (dit geeft aan dat er een sterk ingangssignaal is).
• Controleer de meters voor het ingangs- en uitgangsniveau onder Prefs om er
zeker van te zijn dat er een signaal is, zowel bij de ingang als bij de uitgang.
• Controleer of de USB-uitgang van uw computer functioneert door een ander
USB-audioapparaat aan te sluiten.
• Controleer de softwarevereisten als u opnamesoftware op een computer
gebruikt. U dient de software in te stellen op 48kHz/24-bit.
Schoonmaken
• U mag de behuizing van het product uitsluitend schoonmaken met een zachte droge doek.
• Gebruik geen oplosmiddelen, chemicaliën of schoonmaakproducten die alcohol, ammoniak of schuurmiddelen
bevatten.
• Gebruik geen sprays in de buurt van het product en mors geen vloeistoen in de openingen.
Technische informatie
Mechanisch
T4S T8S
Afmetingen (l x b x h) 214 x 184 x 83 mm 214 x 311 x 83 mm
Gewicht 1,0 kg 1,9 kg
Elektrisch
A/D- en D/A-conversie 24-bits
Samplefrequentie 48 kHz
USB 2.0 of nieuwer, Type-A-naar-Type-B-kabel, Type-A-poort en Type-B-poort
Pc-vereisten Microsoft Windows 7 of nieuwer; Mac OS 10.5 of nieuwer

Nederlands - 47
Aanvullende informatie
Aanvullende informatie
Raadpleeg de gebruikershandleiding (online op www.Bose.com) voor meer informatie over uw product (waaronder
accessoires en reserveonderdelen). Als u een gedrukt exemplaar wilt aanvragen, gebruikt u de telefoonnummers die
u hebt ontvangen.
Beperkte garantie
Het product wordt gedekt door een beperkte garantie. Ga naar www.pro.Bose.com voor garantie-informatie.
De bij dit product verstrekte garantie-informatie is niet van toepassing in Australië en Nieuw-Zeeland. Meer info over
de garantie in Australië en Nieuw-Zeeland vindt u op www.bose.com/au/warranty en www.bose.com/nz/warranty.
Fabricagedatum
Het achtste cijfer in het serienummer geeft het fabricagejaar aan. ‘6’ is 2006 of 2016.
Amerika
(VS, Canada, Mexico, Centraal-Amerika,
Zuid-Amerika)
Bose Corporation
Framingham, MA 01701 VS
Corporate Center: 508-879-7330
Americas Professional Systems,
Technische ondersteuning: +1 800 994 26 73
Australië
Bose Pty Limited
Unit 3/2 Holker Street
Newington NSW Australië
+61 2 87 37 99 99
België
Bose N.V. / S.A
Limesweg 2, 3700
+32 12 39 08 00
China
Bose Electronics (Shanghai) Co Ltd
25F, L’Avenue
99 Xianxia Road
Shanghai, Volksrepubliek China 200051 China
+86 21 60 10 38 00
Frankrijk
Bose S.A.S
12 rue de Temara
78100 St. Germain en Laye, Frankrijk
+33 1 30 61 63 63
Duitsland
Bose GmbH
Max-Planck Strasse 36D 61381
Friedrichsdorf, Duitsland
+49 6172 710 40
Hongkong
Bose Limited
Suites 2101-2105, Tower One, Times Square
1 Matheson Street, Causeway Bay, Hongkong
+852 2123 90 00
India
Bose Corporation India Private Limited
Salcon Aurum, 3rd Floor
Plot No. 4, Jasola District Centre
New Delhi – 110025, India
+91 11 43 08 02 00
Italië
Bose SpA
Centro Leoni A – Via G. Spadolini
5 20122 Milaan, Italië
+39 2 36 70 45 00
Japan
Bose Kabushiki Kaisha
Sumitomo Fudosan Shibuya Garden Tower 5F
16-17, Nanpeidai-cho
Shibuya-Ku, Tokio, 150-0036, Japan
+81 3 54 89 09 55
Nederland
Bose Products B.V.
Gorslaan 60 1441 RG
Purmerend, Nederland
0299 39 01 39
Verenigd Koninkrijk
Bose Ltd
1 Ambley Green, Gillingham Business Park
KENT ME8 0NJ
Gillingham, Engeland
+44 0870 741 45 00
Gegevens importeur
Europese Unie
Bose Products B.V., Gorslaan 60, 1441 RG
Purmerend, Nederland
China
Bose Electronics (Shanghai) Company Limited,
Part C, Plan 9, No. 353 North Riying Road, China
(Shanghai) Pilot Free Trade Zone
Taiwan
Bose Taiwan Branch, 9F-A1, No. 10, Section 3,
Minsheng East Road, Taipei City 104, Taiwan
+886 2 25 14 76 76
Mexico
Bose de México, S. de R.L. de C.V., Paseo de las
Palmas 405-204, Lomas de Chapultepec, 11000
México, D.F.
+52 55 52 02 35 45
Raadpleeg de website voor andere landen
Contactgegevens
Ga naar onze website op www.Bose.com.
2-
日本語
安全上の重要な注意事項
安全上の留意項目および使用方法をよく読み、いつでも参照でき
るように保管してください。
1. このガイドをよくお読みください。
2. 必要な時にご覧になれるよう、本書を保管してください。
3. すべての注意事項に留意してください。
4. すべての指示に従ってください。
5. この製品を水の近くで使用しないでください。
6. 清掃の際は乾いた布を使用してください。
7. 通気孔は塞がないでください。製造元の指示に従って設置してください。
8. 電源コードが踏まれたり挟まれたりしないように保護してください。特に電源プラグやテーブルタップ、機
器と電源コードの接続部などにはご注意ください。
9. 必ず製造元より指定された付属品、あるいはアクセサリーのみをご使用ください。
10. 製造元の指定する、または製品と一緒に購入されたカート、スタンド、三脚、ブラケット、台以外
は使用しないでください。カートを使用する場合、製品の載ったカートを移動する際には転倒
による負傷が起きないよう十分注意してください。
11. 雷雨時や長期間使用しない場合は、電源プラグを抜いてください。
12. 修理が必要な際には、カスタマーサービスにお問い合わせください。製品に何らかの損傷が生じた場合、
例えば電源コードやプラグの損傷、液体の侵入や内部への異物の落下、雨や水蒸気との接触、動作の異
常、製品本体の落下などの際には、直ちに電源プラグを抜き、修理をご依頼ください。
警告/注意:
この製品には磁性材料が含まれています。体内に埋め込まれている医療機器への影響については、
医師にご相談ください。.
• この製品は屋内の水を使用するエリア(屋内プール、屋内ウォーターパーク、浴室、サウナ、スチームサウ
ナ、屋内スケートリンクなど)での設置または使用を意図していません。
• 火災や感電を避けるため、雨の当たる場所や液体のある場所、湿度の高い場所で製品を使用しないでくだ
さい。IPX4-9に準拠した製品には適用されません。
• 火気や熱源などの近くで使用しないでください。火の付いたろうそくなどの火気を製品の上や近くに置
かないでください。
• 許可なく製品を改造しないでください。
• インバータ電源は使用しないでください。
• 車内や船上などで使用しないでください。
• この製品は必ず電源が供給されている状態で使用してください。
• 暖炉、ラジエーター、暖房送風口、その他の熱を発する装置(アンプを含む)の近くにブラケットを取り付け
たり、製品を設置したりしないでください。
• ToneMatch® T4S/T8Sミキサーの設置に不安定な三脚(スタンド)を使用しないでください。ミキサーと三
脚(スタンド)は、¼インチ(6 mm)のネジで固定するように設計されています。全体のサイズが214 x 311 x
83 mm、最低重量が1.9 kgのミキサーを確実に保持できる三脚(スタンド)を使用してください。T4S/T8S
ミキサーのサイズと重量を保持できるように設計されていない三脚(スタンド)を使用すると、不安定で危
険な状態となり、負傷につながる可能性があります。
• のどに詰まりやすい小さな部品が含まれています。3歳未満のお子様には適していません。
注記:
• この製品に付属するスピーカーケーブルと機器相互配線用ケーブルは、壁埋め込み用に認可されていませ
ん。隠ぺい配線を行う際は、お住まいの地域の法令等に準拠したケーブルや施工法をご確認ください。詳し
くは専門の施工業者にご相談ください。
• 万一の事故や故障に備えるために、電源プラグはよく見えて容易に手が届く位置にあるコンセントに接
続してください。
• 空気の流れが妨げられる恐れがあるため、製品を壁のくぼみや密閉された家具の中には置かないでく
ださい。
規制に関する情報
This device complies with part 15 of the FCC Rules and with Industry Canada license-exempt
RSS standard(s).Operation is subject to the following two conditions: (1) This device may
not cause harmful interference, and (2) this device must accept any interference received,
including interference that may cause undesired operation.
This product conforms to all applicable EU directive requirements.The complete
Declaration of Conformity can be found at .
www.Bose.com/compliance.
Information About Products That Generate Electrical Noise (FCC Compliance Notice for US)
Note: This equipment has been tested and found to comply with the limits for a Class A
digital device, pursuant to part 15 of the FCC Rules.These limits are designed to provide
reasonable protection against harmful interference when the equipment is operated in a
commercial environment.This equipment generates, uses, and can radiate radio frequency
energy and, if not installed and used in accordance with the instruction manual, may cause
harmful interference to radio communications.Operation of this equipment in a residential area
is likely to cause harmful interference in which case the user will be required to correct the
interference at one’s own expense.
Changes or modifications not expressly approved by Bose Corporation could void the user’s
authority to operate this equipment.
Shielded cables are required to maintain regulatory compliance.
This product complies with the Canadian ICES-003 Class A specifications.
CAN ICES-3(A)/NMB-3(A)
This product meets all EN55103-2 immunity requirements for E2 electromagnetic environment.
Part Name
Toxic or Hazardous Substances and Elements
Names and Contents of Toxic or Hazardous Substances and Elements
PCBs
Metal parts
Plastic parts
Speakers
Cables
This table is prepared in accordance with the provisions of SJ/T 11364.
0: Indicates that said hazardous substance contained in all of the homogenous materials for this part
is below the limit requirement of GB/T 26572.
X: Indicates that said hazardous substance contained in at least one of the homogenous materials
used for this part is above the limit requirement of GB/T 26572.
Lead
(Pb)
Mercury
(Hg)
Cadmium
(Cd)
Hexavalent
(CR(VI))
Polybrominated
Biphenyl (PBB)
Polybrominated
diphenylether
(PBDE)
X
X
00
0
0
0
0
0
0
0
0
0
0
0
0
0
0
0
0
0
0
0
0
0
0
0
0
X
X
この記号は、製品が家庭ごみとして廃棄されてはならず、リサイクル用に適切な収集施設に送る
必要があることを意味しています。適切な廃棄とリサイクルにより、自然資源、人体の健康、環境が
保護されることになります。本製品の廃棄およびリサイクルに関する詳細は、お住まいの自治体、
廃棄サービス、または本製品を購入された店舗にお問い合わせください。
提供
: DCE Safety

目次
日本語
- 3
はじめに
製品概要.5
製品の特長.5
内容物の確認.5
コントロールパネルと接続パネル
T4S ToneMatch®ミキサー.6
コントロールパネル.6
接続パネル.7
T8S ToneMatch®ミキサー .8
コントロールパネル.8
接続パネル.9
システムセットアップ
保護カバーの取り外しと取り付け.10
設置のヒント.11
カメラ用三脚を使ったT4S/T8Sの設置 .11
T4Sのデジタル接続 . 12
T4S/T8Sのアナログ接続 . 13
ToneMatch®パワーサプライとの接続.14
T4S/T8Sとコンピューターの接続.15
T4S/T8Sとフラッシュドライブの接続. 15
操作
T4S/T8Sのディスプレイ表示 .16
入力ゲインと出力ボリュームの最適化. 17
マスターボリュームコントロールの使用.18
チャンネル信号のミュート.18
チャンネルエフェクトのミュート.18
ロータリーセレクターの使用.19
チャンネルサウンドの編集 .20
Pan/Auxの機能を使う.20
チューナーを使う.20
ToneMatch®プリセットを選択する.22
zEQを調整する .22
パラメトリックイコライザーを調整する .23
コンプレッサー/ゲートの機能を使う.23
モジュレーションのエフェクトを使う .25
ディレイを加える.26
リバーブを加える .26

目次
4-
日本語
グローバルファンクションの使用.27
リバーブタイプを選択する.27
Prefsユーティリティを使う.28
シーンの読み込みと保存を行う .30
シーンをシェアする.33
Bose Scene.35
工場出荷時の設定.35
Singer/Songwriter(シンガーソングライター).36
DJ/Playback(DJプレイバック) .38
Full Band(フルバンド).40
工場出荷時の設定
工場出荷時の設定.42
お手入れについて
故障かな?と思ったら.43
お手入れについて.46
技術仕様.46
追加資料
連絡先情報.47
輸入者情報.47
その他の情報 .47
保証.47
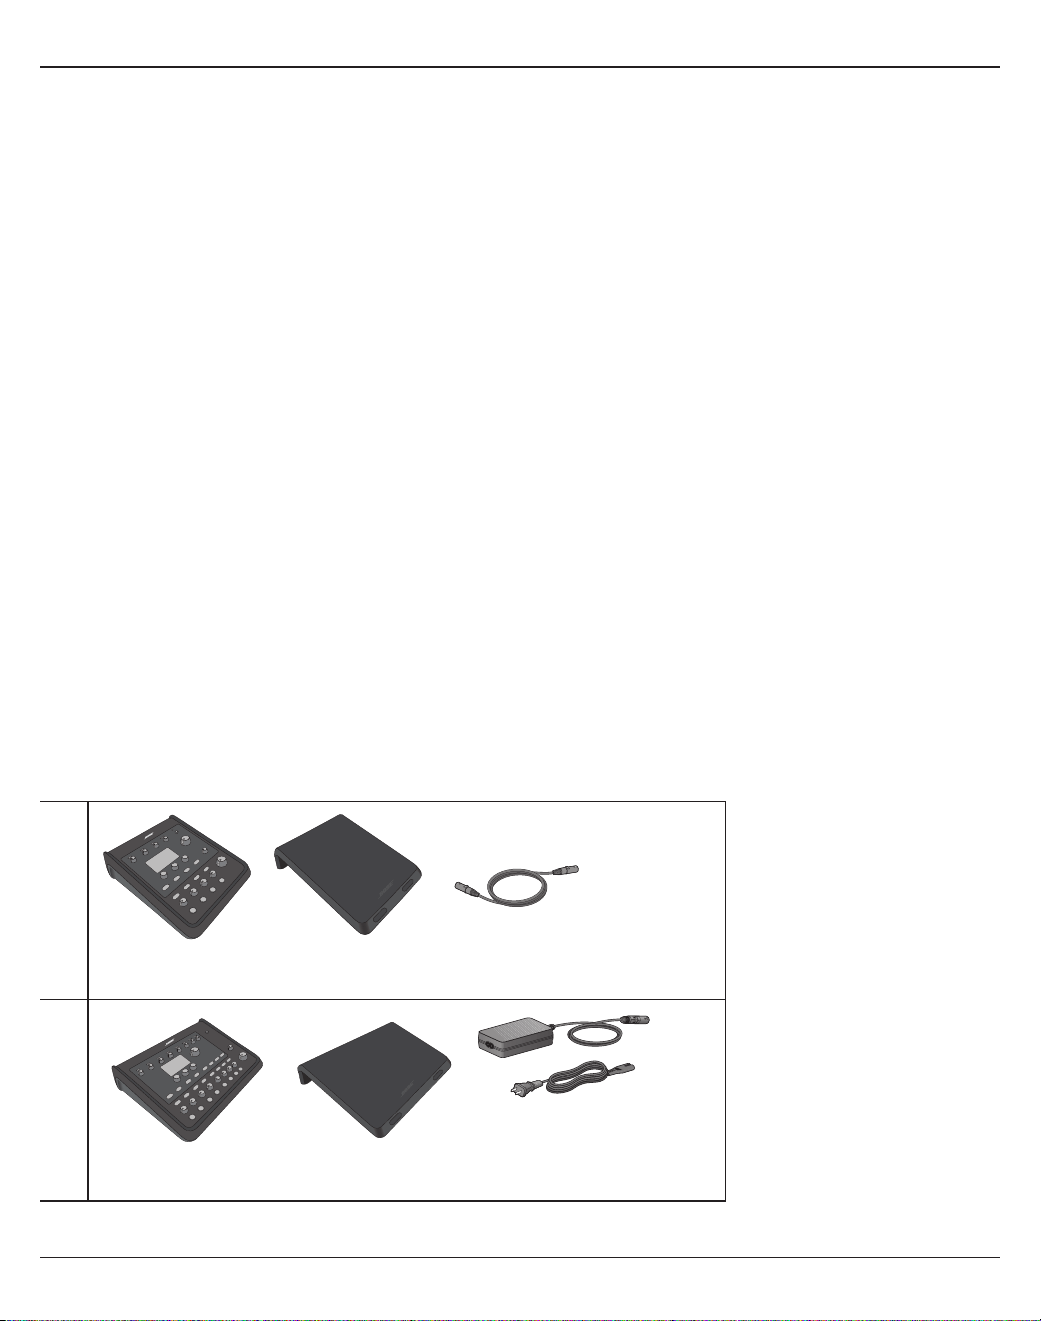
日本語
- 5
はじめに
製品概要
T4S/T8S ToneMatch®ミキサーで音楽を思いのままに。すべてのアーティストのために設計されたコンパクトな4/8チャンネルミキサーです。ボーズの技
術を投入した高性能なDSPエンジンと直感的でわかりやすいユーザーインターフェースからスタジオ並みのイコライザー、ダイナミクス、エフェクトのプロセッ
シングが実現します。zEQと内蔵のBose® ToneMatch®プロセッシングから素晴らしいサウンドが生み出されます。ボーズL1/F1システムと使うと、まさに、細
部まで入念に作り込まれた高品位なサウンドが響き渡ります。ToneMatchミキサーは直接手で操作できるコントロール、見やすいLED、ディスプレイ、シーンリ
コール機能を備え、しかも頑丈です。ステージ上で自信を持ってプレイに集中できます。ToneMatchミキサーはステージ上でパフォーマンスを繰り広げるすべ
てのアーティストにとって究極のミキサーです。
製品の特長
高品位なオーディオプロセッシング
• 先進的なデジタルオーディオプロセッシングによる最新のスタジオ並み
のエフェクト
• コンプレッサー、リミッター、ディエッサー、ノイズゲート、コーラス、フラン
ジャー、フェイザー、トレモロ、ディレイ、リバーブを搭載
• ナチュラルなボーカル、楽器のサウンドを生み出すBose® ToneMatch®
プロセッシング
• ToneMatchプリセットのサウンドを状況に応じて素早く効果的に補正す
るzEQ
• ToneMatch、イコライザー、ダイナミクス、エフェクトの設定はチャンネル
毎に独立
• Aux出力専用のリバーブと全チャンネルで使用するためにグローバルに
設定されるシェアードリバーブ
• マスター出力には会場の音響特性の補正に役立つイコライザーを装備
• ボーズL1/F1システムと組み合わせると、入力から出力まで自由に音質
を調整できる
シームレスなライブのためのコントロール
• ミュージシャンやDJのライブステージのために設計された、手で直接操作
できるコントロールとインジケーター
• すぐに使えるユーザーインターフェース
• タップテンポディレイ、クロマチックチューナー、リコール可能なシーン機
能を搭載
• ほの暗いステージでも読みやすく使いやすいLEDディスプレイと自照式
コントロール
小さいボディーに凝縮された高い接続性
• 小さなデジタルステレオミキサーが持つ、これまでにない高い接続性と多
彩なコントロール
• 4ch(T4S)、8ch(T8S)の入力には高品位オーディオプリアンプを採用
し、マイクと楽器のためのXLRコンボジャック、オンオフ可能なファンタム
電源を搭載
• 2chのAux入力、2ch(T4S)/4ch(T8S)のAux出力を装備
• USBドライブ再生とPC/Macとの接続をサポートするUSB-A、USB-B
端子を装備
• ToneMatch接続によるデジタルオーディオ出力とパワー給電(T4Sのみ)
• バランス¼インチTRSフォーンとXLR(TS8のみ)のステレオ出力
• 独立したヘッドホン出力
ライブ演奏に欠かせないパートナー
• 頑丈なエンクロージャーにマグネット式の保護カバーを装備し、コントロー
ルとコネクターを保護
• Bose L1 Model IIまたはL1 Model 1Sシステムとの間で、デジタルオー
ディオ信号の通信と給電を行うToneMatchケーブルを同梱(T4S)/ユ
ニバーサル電源アダプターを同梱(T8S)
• エンクロージャーの下面に設けられたインサートを利用することにより、
豊富な標準カメラ用マウントアクセサリーで便利に使いやすく設置する
ことが可能
T4S ToneMatchミキサー本体とマグネット式カバー ToneMatchケーブル
ToneMatchパワーサプライT8S ToneMatchミキサー本体とマグネット式カバー
オプションの機器とアクセサリーの詳細については、www.Bose.comをご覧ください。
付属品の確認
付属品に不足がないか、以下の表でご確認ください。
T4S
T8S

コントロールパネルと接続パネル
6-
日本語
T4S ToneMatch® Mixer
コントロールパネル
図1.T4Sコントロールパネル
q 入力信号/クリップLED(1~4)– 入力信号の状態を色で表示します。.
緑色: 入力信号が検出されていることを示します。.
赤色: 入力信号がクリッピングを起こしていることを示します。
w トリムコントロール(1~4)– 各チャンネルの入力感度を調整します。
e ディスプレイ – ファンクションメニュー、システム情報を表示します。
r エディットコントロール – 回転ダイヤル/プッシュボタンの2つの機能を同時に備えた3つのコントロールにより、ディスプレイに表示さ
れる項目/値の選択/調整を行うことができます。
t チャンネルエディットボタン(1~4)– 設定の変更を行うチャンネルを選択します。
y FXミュートボタン(1~4)– 選択したチャンネルのモジュレーション、ディレイ、リバーブのエフェクトをバイパスします。
u ボリュームコントロール(1~4)– 各チャンネルの音量を調整します。
i ミュートボタン(1~4)– 各チャンネルのオーディオ出力をミュートします。
o マスターボリュームコントロール – 最終段の出力レベルを調整します。
a ヘッドホンボリュームコントロール – ヘッドホン出力の音量を調整します。
s ロータリーセレクター – 回転させることで、いろいろなグローバル設定項目、チャンネル設定項目にアクセスすることができます。各設
定項目はエディットコントロールを使用して変更、調整することができます。
d ファンタム電源スイッチ – +48 Vの電圧をch1~ch4入力に供給します。ファンタム電源がオンの時は赤のLEDが点灯します。
f ヘッドホンジャック – ヘッドホンのみ接続可能です。入力インピーダンスが24Ω以上のヘッドホンをご使用ください。
q
w
i
u
y
t
r
e
d
s
a
o
f

日本語
- 7
コントロールパネルと接続パネル
図2.T4S接続パネル
接続パネル
q 電源スイッチ – ミキサーの電源をオンオフします。
w USB2.0(Bタイプ)コネクター – コンピューターとの接続に使用します。
e USB2.0(Aタイプ)コネクター – USBフラッシュドライブに保存されたオーディオソースをストリーミング再生する時に使用します。
r アナログL/R出力 – メインのアナログ出力です。バランス1/4インチTRSフォーンケーブルまたはアンバランスTSフォーンケーブルを
接続します。
t Aux出力 – 2chのユーザー定義可能なアナログ出力です。イコライザーとエフェクトの前、イコライザーとエフェクトの後、フェーダー後
の信号を出力するように構成でき. . ます。バランス1/4インチTRSフォーンケーブルを接続します。
y Aux入力 – アナログ入力(ch5/ch6)です。バランス1/4インチTRSフォーンケーブルまたはアンバランスTSフォーンケーブルを接続
してラインレベルの信号を入力します。ステレオ信号の入力として使用することができます。
u 入力1~4 – アナログ入力(ch1~ch4)です。マイクのバランスXLRケーブル、あるいはギターなどのハイインピーダンス機器に接続し
たバランス1/4インチTRSフォーンケーブル、アンバランスTSフォーンケーブルを接続します。
i デジタルメイン出力L – 2台のL1® Model 1S/II systemとステレオでデジタル接続します。
注
:
ステレオで使うにはデジタルメイン出
力
R
と併用してください。
o
パワーポート/デジタルメイン出力R – L1 Model 1S/II systemと接続するためのデジタル出力です。L1 Model 1S/IIパワースタンドか
らT4Sミキサーに電源を供給します。ToneMatchパワーサプライ(T4Sには付属しておりません)を使用すれば、ACコンセントから電源
を取ることもできます。付属のToneMatch®ケーブルを接続します。
注意
: ToneMatch
ポートには標準の
RJ-45
コネクターを接続することが可能ですが、
T4S
をコンピューターあるいは電話のネット
ワークには接続しないでください。
USB AUDIO
M
( )
MONO
q w
e
r
t
y
y
u
i
o

コントロールパネルと接続パネル
8-
日本語
T8S ToneMatch® Mixer
コントロールパネル
図3.T8Sコントロールパネル
q 入力信号/クリップLED(1~8)– 入力信号の状態を色で表示します。.
緑色: 入力信号が検出されていることを示します。.
赤色: 入力信号がクリッピングを起こしていることを示します。
w トリムコントロール(1~8)– 各チャンネルの入力感度を調整します。
e ディスプレイ – ファンクションメニュー、システム情報を表示します。
r エディットコントロール – 回転ダイヤル/プッシュボタンの2つの機能を同時に備えた3つのコントロールにより、ディスプレイに表示さ
れる項目/値の選択/調整を行うことができます。
t チャンネルエディットボタン(1~8)– 設定の変更を行うチャンネルを選択します。
y FXミュートボタン(1~8)– 選択したチャンネルのモジュレーション、ディレイ、リバーブのエフェクトをバイパスします。
u ボリュームコントロール(1~8)– 各チャンネルの音量を調整します。
i ミュートボタン(1~8)– 各チャンネルのオーディオ出力をミュートします。
o マスターボリュームコントロール – 最終段の出力レベルを調整します。
a ヘッドホンボリュームコントロール – ヘッドホン出力の音量を調整します。
s ステレオ出力メーター - 刻々と変化する出力レベルを視覚的に確認することができます。
d ロータリーセレクター – 回転させることで、いろいろなグローバル設定項目、チャンネル設定項目にアクセスすることができます。各設
定項目はエディットコントロールを使用して調整することができます。
f ファンタム電源スイッチ– +48 Vの電圧をch1~ch8入力に供給します。ファンタム電源がオンの時は赤のLEDが点灯します。
g ヘッドホンジャック – ヘッドホンのみ接続可能です。入力インピーダンスが24Ω以上のヘッドホンをご使用ください。
q
w
i
o
g
a
s
d
f
u
y
t
r
e
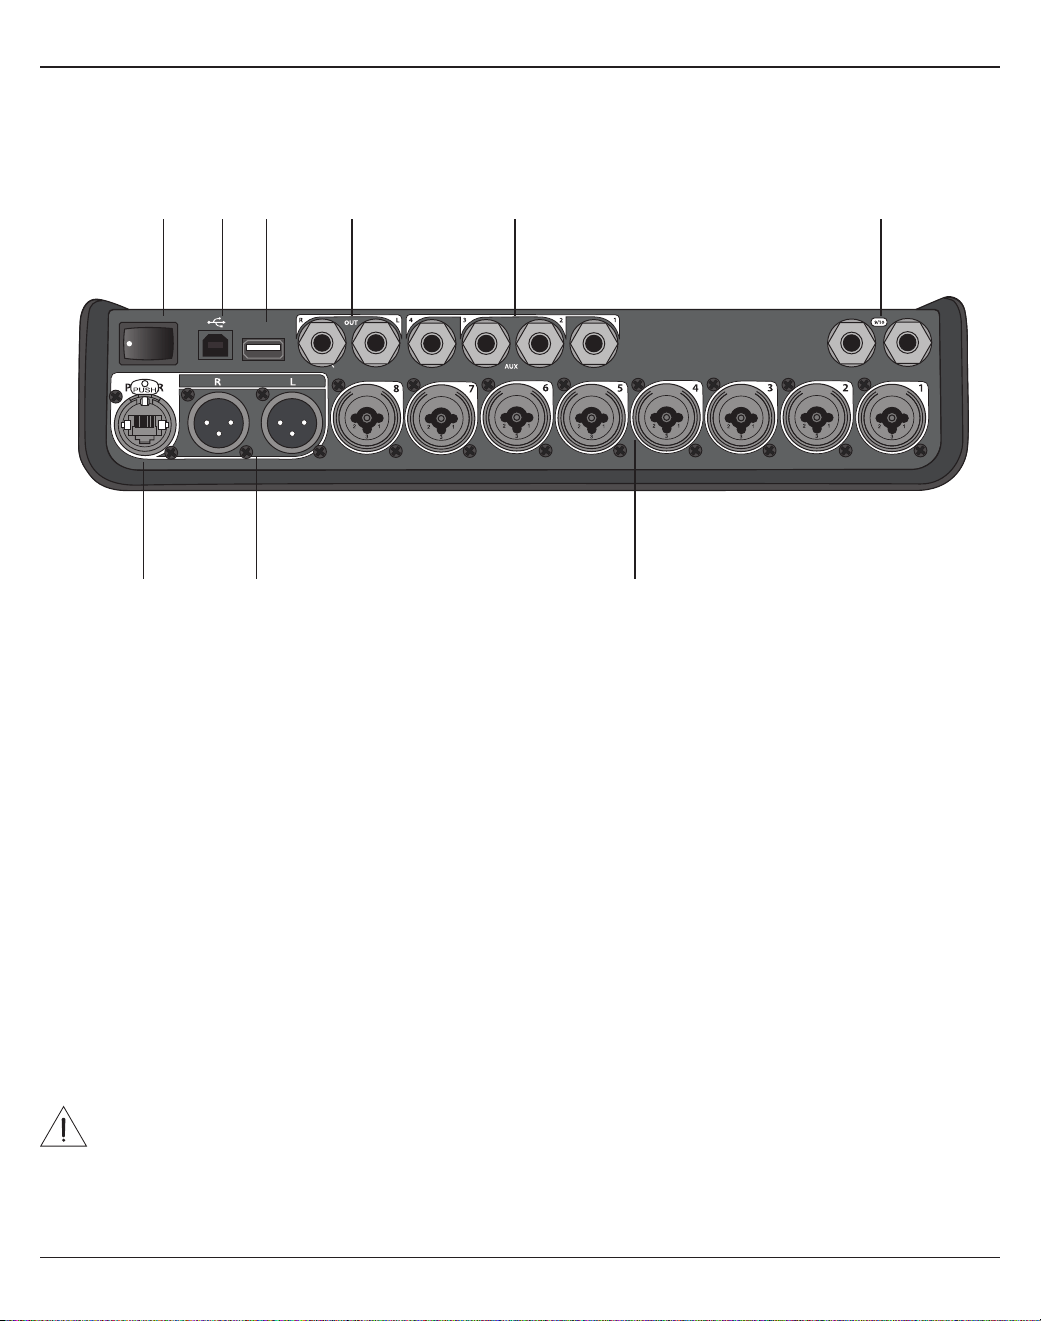
日本語
- 9
コントロールパネルと接続パネル
図4.T8S接続パネル
接続パネル
q 電源スイッチ – ミキサーの電源をオン/オフします。
w USB2.0(Bタイプ)コネクター – コンピューターとの接続に使用します。
e USB2.0(Aタイプ)コネクター – USBフラッシュドライブに保存されたオーディオソースをストリーミング再生する時に使用します。
r アナログL/R出力 – メインのアナログ出力です。1/4インチバランスTRSフォーンケーブルまたはアンバランスTSフォーンケーブルを
接続します。
t AUX出力 – 4chのユーザー定義可能なアナログ出力です。イコライザーとエフェクトの前、イコライザーとエフェクトの後、フェーダー
後の信号を出力するように構成できます。バランスTRSフォーンケーブルまたはアンバランスTSフォーンケーブルを接続します。
y AUX入力 – アナログ入力(ch9/ch10)です。バランスTRSフォーンケーブルまたはアンバランスTSフォーンケーブルを接続してライ
ンレベルの信号を入力します。ステレオ信号の入力として使用することができます。
u 入力1~8 – アナログ入力(ch1~ch8)です。マイクのバランスXLRケーブル、あるいはギターなどのハイインピーダンス機器に接続し
たバランスTRSフォーンケーブル、アンバランスTSフォーンケーブルを接続します。
i XLRステレオ出力 – ステレオのアナログ出力です。ステレオ出力のためには2本のバランスXLRケーブルを接続します。
o デジタルパワーポート – ToneMatchパワーサプライと接続します(詳細については、14ページの「ToneMatch®パワーサプラ
イとの接続」を参照してください)。.
注
: T8S
は
L1® Model 1S/II
とのデジタル接続はサポートしていません。
注意
: ToneMatch
ポートには標準の
RJ-45
コネクターを接続することが可能ですが、
T8S
をコンピューターあるいは電話のネット
ワークには接続しないでください。
M
( )
MAIN OUT
USB AUDIO
MONO
q w e r t y
uio

10-
日本語
システムセットアップ
保護カバーの取り外しと取り付け
梱包箱から取り出したT4S/T8S ToneMatch®ミキサーにはトップパネルの上に保護カバーが取り付けられています。このカバーはミキ
サーの運搬または保管時にコントロールパネルを保護するように設計されています。
保護カバーの取り外し:
1. カバー正面にあるノッチに親指をかけ前方にスライドさせます。
2. カバー後方をつかみ、引き上げて取り外します。
保護カバーの取り付け:
1. カバーをミキサーに沿わせて後方から前方へスライドさせます。
2. マグネットカバーは定位置に引き寄せられミキサーに固定されます。
図5.カバーの取り外しと取り付け
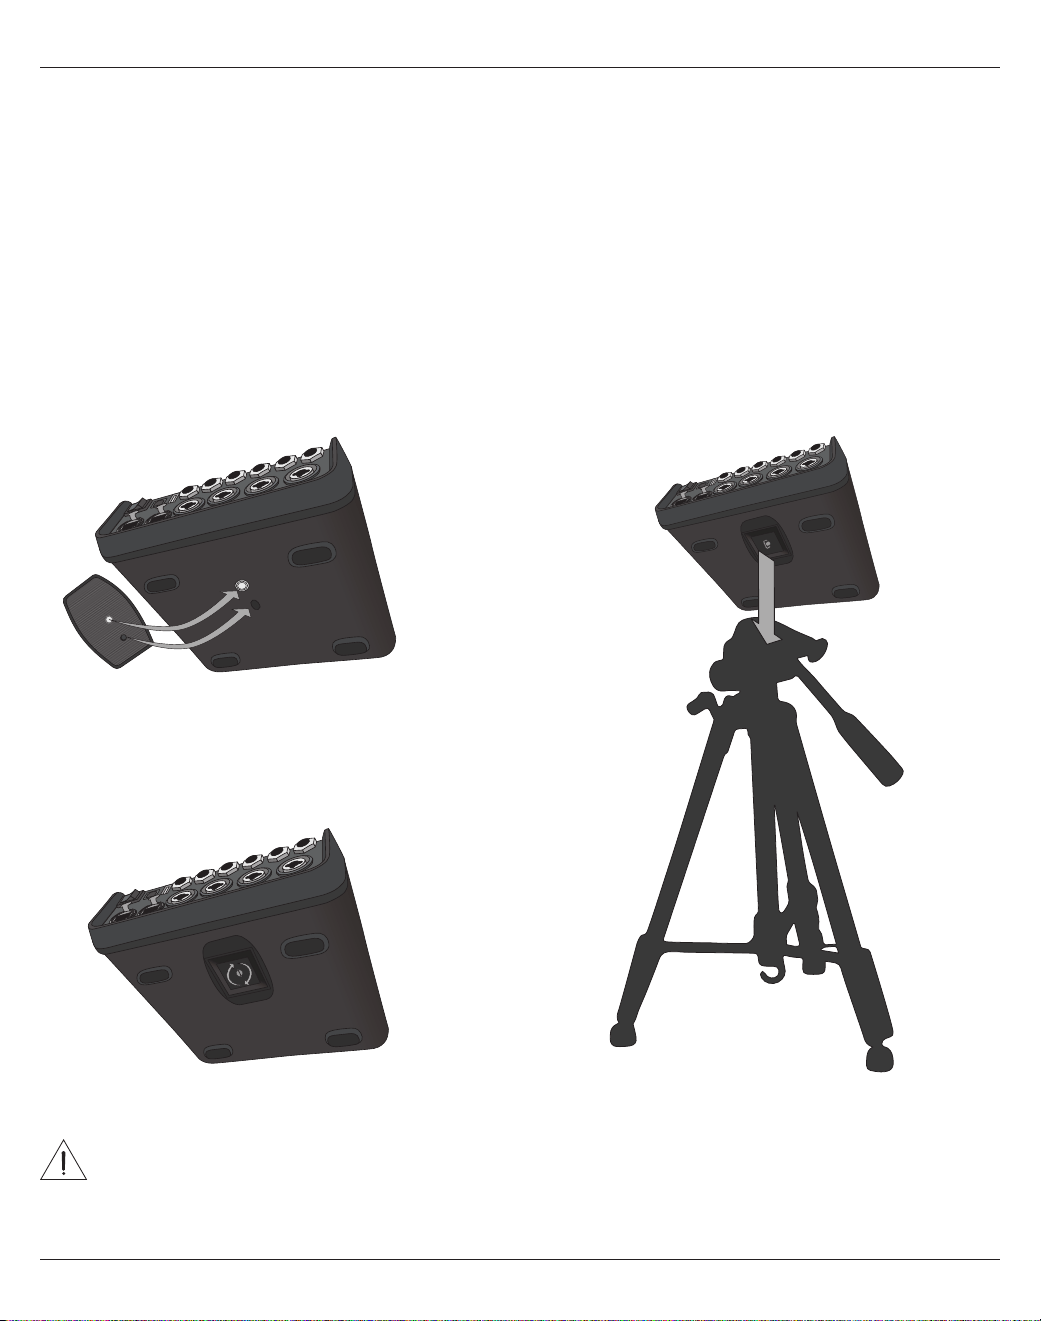
システムセットアップ
日本語
- 11
図6.T4Sへのブラケットの固定 図8.ブラケットを用いたT4Sの三脚への設置
図7.T4Sに装着されたブラケット
設置のヒント
T4S/T8Sには¼インチ(6 mm)ネジでの固定を可能にするインサートが設けられています。このインサートを使用すると、¼インチ(6
mm)ネジで固定するカメラの三脚など市販の数多くの製品にT4S/T8Sを設置することができます。
カメラ用三脚を使ったT4S/T8Sの設置
1. 三脚の脚を広げ高さを調整して固定します。
2. 三脚の上部に付いているブラケットを取り外し、そのブラケットをT4S/T8Sの底部にネジで固定します。T4S/T8Sに設けられた回り
止めの小さなくぼみにブラケットの突起部を合わせるようにします。図6を参照してください。
3. T4S/T8Sを装着したブラケットを三脚に固定します。図8を参照してください。
警告
: ToneMatch® T4S/T8S
ミキサーの設置に不安定な三脚(スタンド)を使用しないでください。ミキサーと三脚(スタンド)
は、
¼
インチ(
6 mm
)のネジで固定するように設計されています。全体のサイズが
214 x 311 x 83 mm
、最低重量が
1.9 kg
のミキ
サーを確実に保持できる三脚(スタンド)を使用してください。
T4S/T8S
ミキサーのサイズと重量を保持できるように設計されて
いない三脚(スタンド)を使用すると、不安定で危険な状態となり、負傷につながる可能性があります。
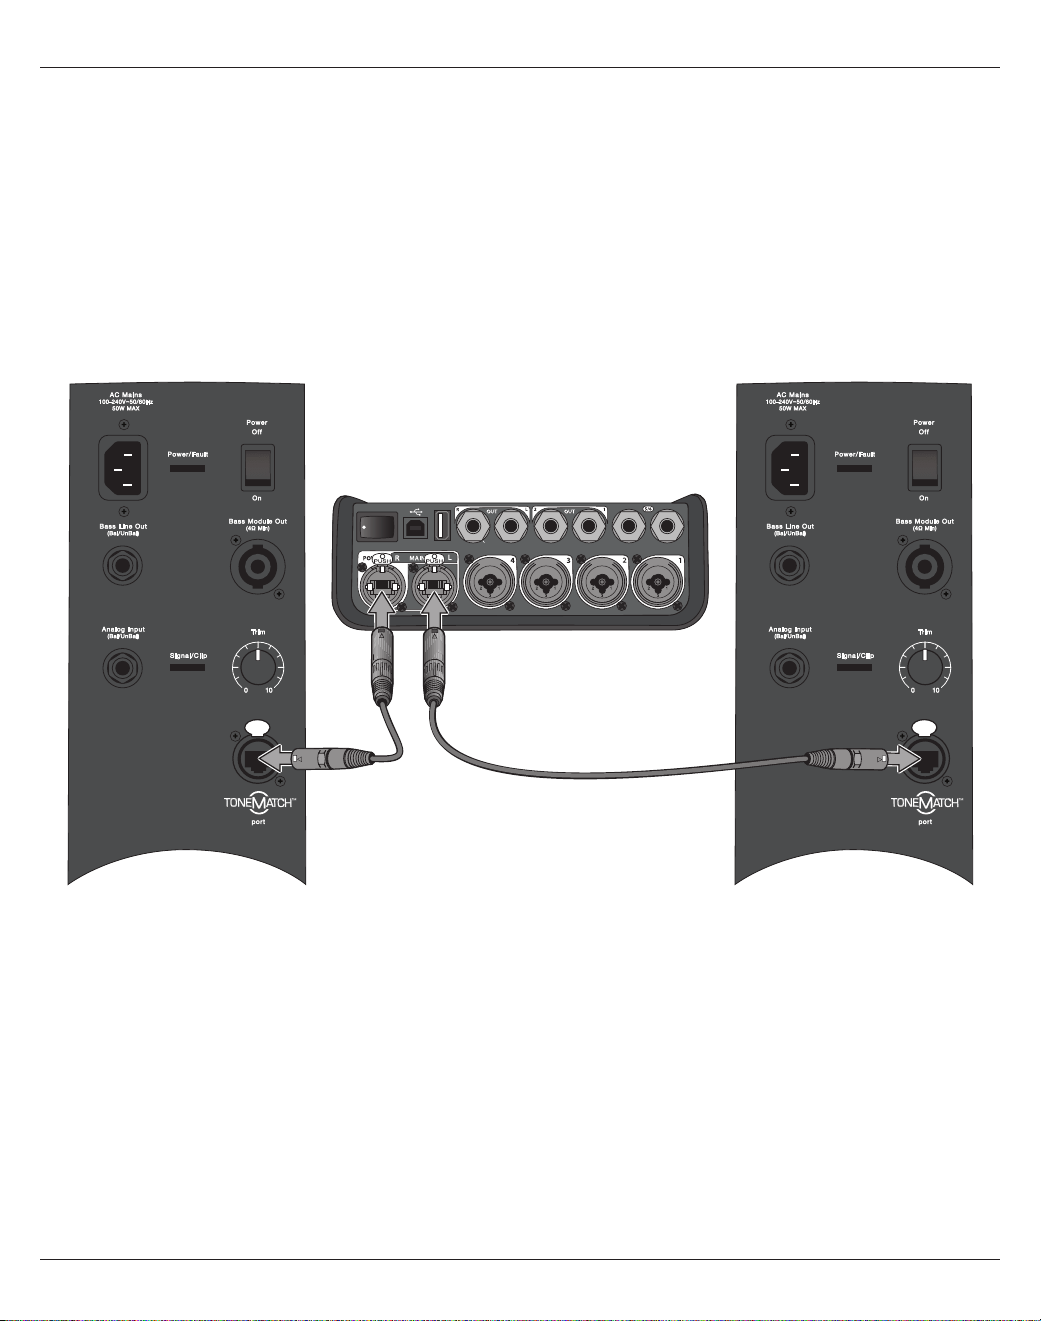
12-
日本語
システムセットアップ
T4Sのデジタル接続
1. L1 Model 1S/IIとT4Sの電源がともにオフであり、T4Sのマスター音量調節が最小の位置にあることを確認します。
2. ToneMatch®ケーブルの片側をT4Sのパワーポート/デジタルメイン出力Rコネクターに接続します。ToneMatchケーブルの反対
側をパワースタンドのToneMatchポートに接続します。.
注
: T4S
を
2
台の
L1 Model 1S/II
パワースタンドと接続する場合は、
2
台目のパワースタンドと
T4S
のデジタルメイン出力
L
コネクター
を
ToneMatch
ケーブルで接続してください。
3. ミキサーの電源を先に入れ、次にL1 Model 1S/IIパワースタンドの電源を入れます。
4. 楽器を接続し、レベル調整を行います。17ページの「入力ゲインと出力ボリュームの最適化」を参照してください。
図9.2台のL1 model II systemにT4Sをデジタルで接続
USB AUDIO
M
( )
MONO
注
: T8S
は
L1 Model 1S/II
とデジタル接続することはできません。また、
L1 Model 1S/II
から
T8S
に給電することもできません。
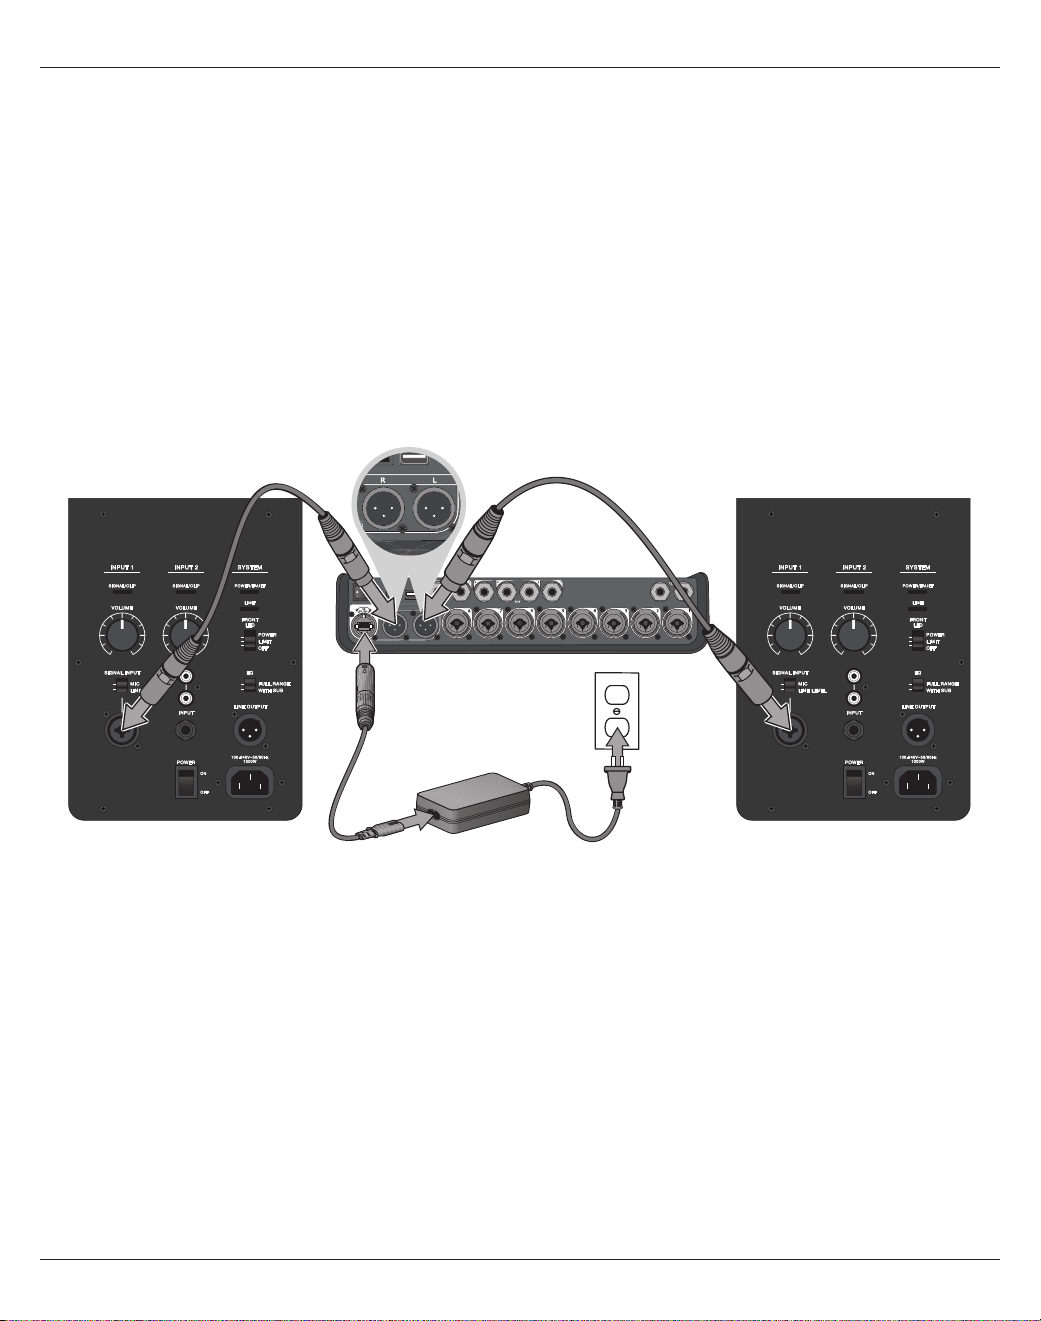
システムセットアップ
日本語
- 13
T4S/T8Sのアナログ接続
1. T4S/T8Sに接続する機器とT4S/T8Sの電源がともにオフであり、T4S/T8Sのマスター音量調整が最小の位置にあることを確認し
ます。
2. T8SのXLRステレオ出力と、1台ないし2台の機器をバランスXLRケーブルで接続します(図10を参照してください)。.
注
: T4S/T8S
はアナログ
R
出力から
TRS
フォーンケーブル(別売)を使って
1
台の機器と接続することも可能です。
TRS
フォーンケーブ
ルの反対側を機器の入力ポートに接続します。
T4S/T8S
を
2
台の機器と接続する場合は、
2
台目の機器を、
TRS
フォーンケーブルを
使って
T4S/T8S
のアナログ
L
出力に接続します。
3. ToneMatch®パワーサプライをT4S/T8Sのパワーポートに接続し、AC電源プラグをコンセントに差し込みます。14ページの
「ToneMatch®パワーサプライとの接続」を参照してください。
4. T4S/T8Sミキサーの電源を先に入れ、次に機器の電源を入れます。
5. 楽器を接続し、レベル調整を行います。17ページの「入力ゲインと出力ボリュームの最適化」を参照してください。
図10.2台のF1システムにT8Sをアナログで接続
M
( )
MAIN OUT
USB AUDIO
MONO
(
M
US
B AUDI
O
( )
M
M
AIN
O
UT
()
M
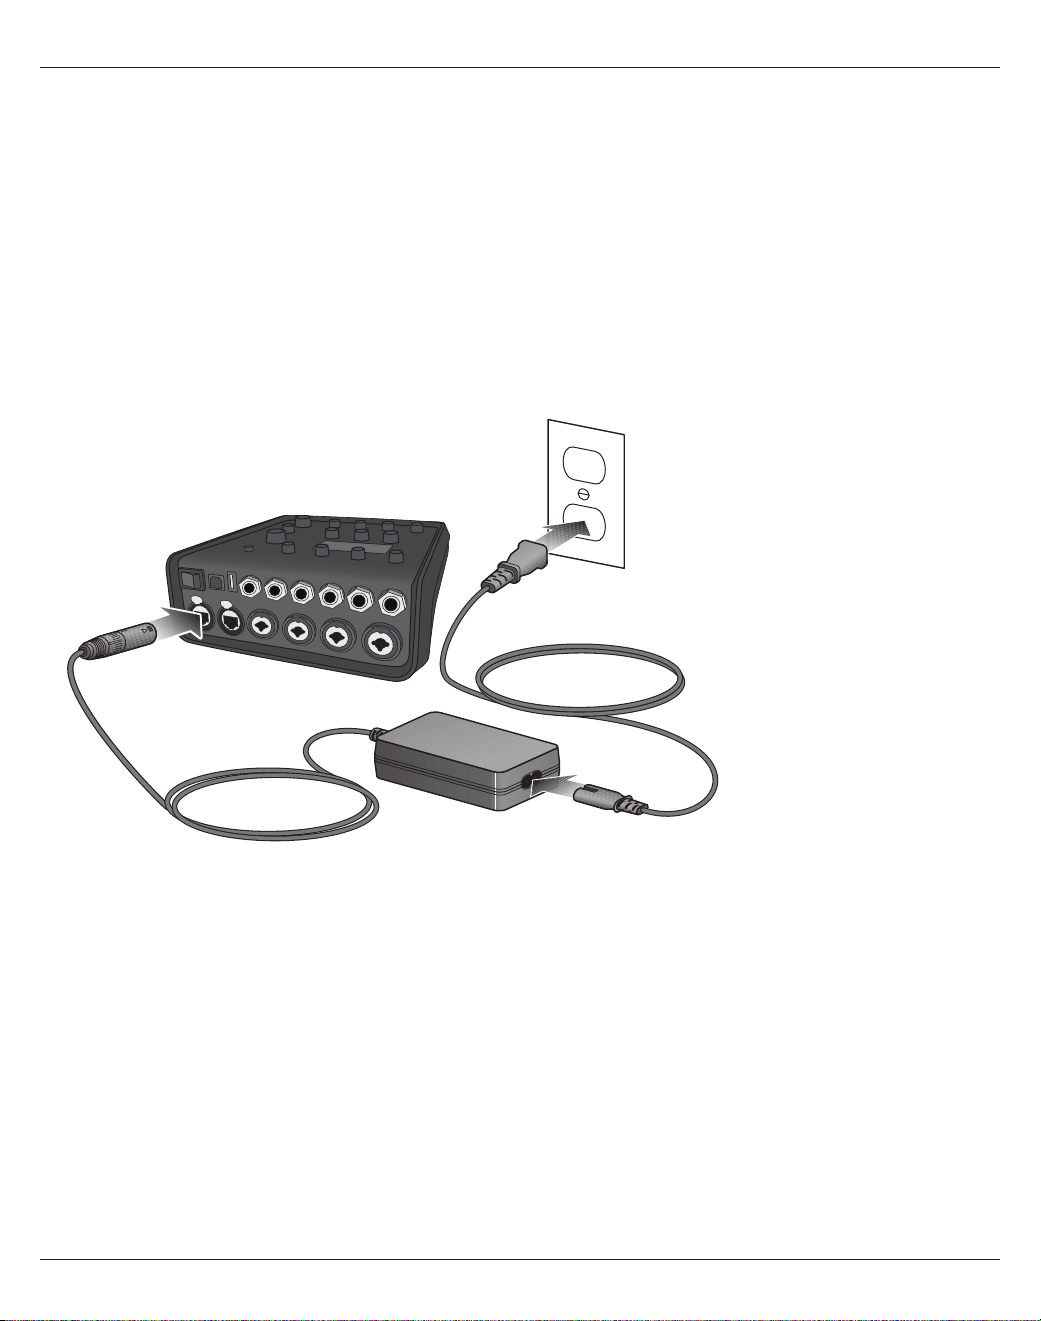
14-
日本語
システムセットアップ
ToneMatch®パワーサプライとの接続
ToneMatchパワーサプライはT4S/T8Sミキサーに電源を供給します。
1. T4S/T8Sパワーポートにパワーサプライケーブルを接続します。
2. AC電源コードの片側をToneMatchパワーサプライに接続します。
3. AC電源コードの反対側を、コンセントに差し込みます。
4. T4S/T8Sの電源スイッチをオンにします。
注
: T8S
に付属の
ToneMatch
パワーサプライは
T8S
の動作に必須です。
ToneMatch
パワーサプライは
T4S
には付属していません。ま
た、
T4S
の動作には必須ではありません。
図11.T4SとToneMatchパワーサプライの接続

システムセットアップ
日本語
- 15
T4S/T8Sとコンピューターの接続
T4S/T8SはUSBポートでコンピューターと接続することができます。これにより、T4S/T8Sで作成したパフォーマンスシーンをコンピュー
ターにダウンロードしたり、T4S/T8Sにシステムアップデートをインストールしたりできます。システムアップデートについての詳しい情報
は、www.Bose.com/livesoundを参照してください。
また、コンピューターと接続したT4S/T8Sはレコーディング/再生用の汎用USBデバイスとして利用することも可能です。
注
: T4S/T8S
は
48 kHz/24
ビットで動作します。コンピューターのレコーディング用ソフトウェアで
T4S/T8S
を使うときは、
48 kHz/24
ビット動作のソフトウェア設定が必要になる場合があります。
注
: T4S/T8S
をコンピューターと接続するには
A-B
タイプの
USB
ケーブル(付属していません)が必要です。
1. ミキサーをパワーソース(ToneMatch®パワーサプライはT4S/T8S対応、L1 Model 1S/IIはT4Sのみに対応)と接続します。
2. USBケーブルの片側のプラグをミキサーのUSB2.0(Bタイプ)ポートに接続します(図12)。
3. USBケーブルの反対側のプラグをコンピューターのUSBポートに接続します。
4. ミキサーの電源を入れます。
図12.T4SとコンピューターのUSB接続
ToneMatchポート - L1 Model 1S/II system、または
ToneMatchパワーサプライと接続します。
電源スイッチ
USBケーブル.
(A-Bタイプ)
コンピューターの
USBポートへ
T4S/T8Sとフラッシュドライブの接続
WAV/MP3のファイルが入ったUSB2.0/3.0規格のフラッシュドライブをT4S/T8SのUSB2.0(Aタイプ)のポートに接続すること
で、WAV/MP3のオーディオトラックをT4S/T8Sで再生することができます。
図13.T4Sとフラッシュドライブの接続

16-
日本語
操作
T4S/T8Sのディスプレイ表示
ディスプレイにはミキサーを操作するときに必要な情報が表示されます。図14はディスプレイの表示の一例で、その表示項目、内容、ユー
ザーインターフェースのためのシンボルといった基本的な約束事についての説明が書かれています。ディスプレイに表示される内容は
ロータリーセレクターの位置に応じて変わります。
図14.ディスプレイ表示の例
Ch 1
Type Tim
eM
ix
Digital 250ms 30%
Delay
Fdbk.
All Channels
*Bose Scene 01
Load Shared Save
Scenes
選択中のチャンネルが表
示されます
コントロールを押すことでパラメーターがトグ
ルすることを示すシンボルです
パラメーターの値が視覚的に表示されます
ロータリーセレクターで選択している機能が
表示されます
パラメーターの名称とその設定、あ
るいは設定値が表示されます
回転ダイヤル/プッシュボタンの両
機能を備えるコントロールです
コントロールを回すことで設定が
変わることを示すシンボルです
アスタリスク(*)はロードされ
ているシーンが更新されてい
ることを示します
対応するコントロールを押すこ
とでその機能が実行されます
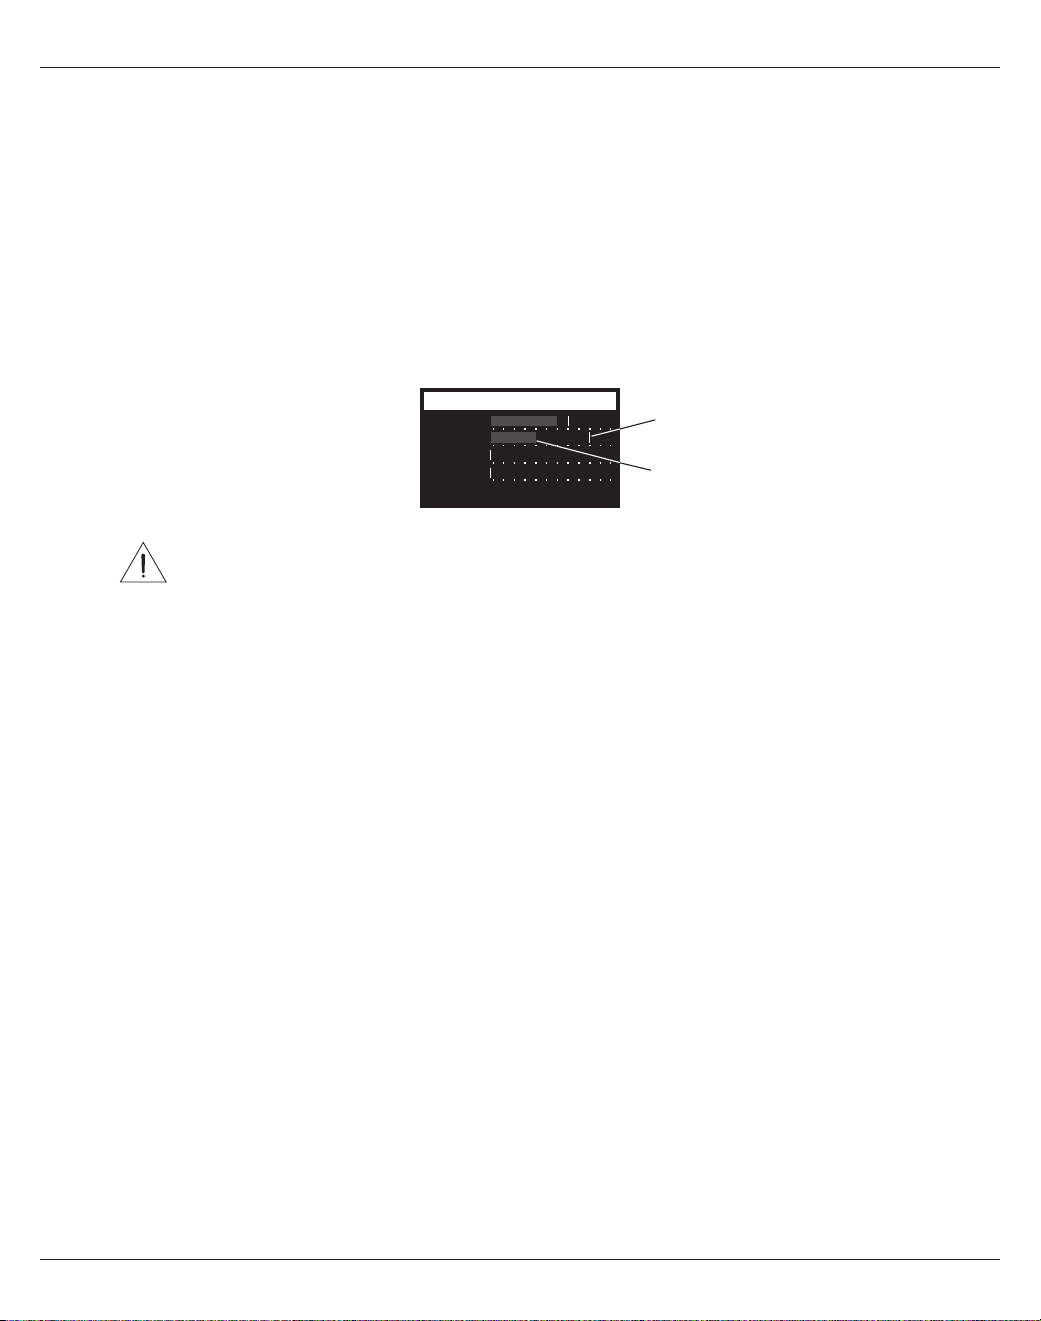
操作
日本語
- 17
入力ゲインと出力ボリュームの最適化
高品質なサウンドを実現するためには、入力チャンネルゲイン(トリム)、チャンネルボリューム、マスターボリュームを一緒に調整する必要
があります。各チャンネルに対して以下の操作を行います。
1. トリム、チャンネルボリューム、マスターボリュームをすべて最小の状態まで絞ります。
2. 入力チャンネルのトリムを調整します。
A. 楽器(音源)に出力ボリューム調整が付いている場合は好みのボリュームに調整してください。
B. ステージで実際にパフォーマンスを行うときの強さで楽器(音源)をプレイします。
C. 入力信号/クリップインジケーターが緑になるまで、トリムコントロールをゆっくりと時計方向に回します。インジケーターが赤
く点滅または点灯する場合は、トリムコントロールを反時計方向に回して信号レベルを小さくします。
D. Prefsメニューから選択できる入力レベルメーター(28ページ)を見て信号レベルを確認します。.
警告
:
コンデンサーマイクなどのファンタム電源(+
48 V
)が必要な機器を使う場合は、ファンタム電源スイッチを押し
た後でトリムコントロールを調整するようにします。.
.
注
: Prefs
メニューから選択できる入力レベルメーターは、トリムレベルを調整するときに役立ちます(
28
ページを参照してくだ
さい)。
3.. マスターボリュームコントロールを時計の12時の位置に合わせます。
4.. 音量が目的のレベルになるまでチャンネルボリュームを時計方向にゆっくりと回します。
Input LevelPreferences
Ch 3
Ch 1
Ch 2
Ch 4
Menu Aux InReset
ピークレベルインジケーター
入力レベルインジケーター
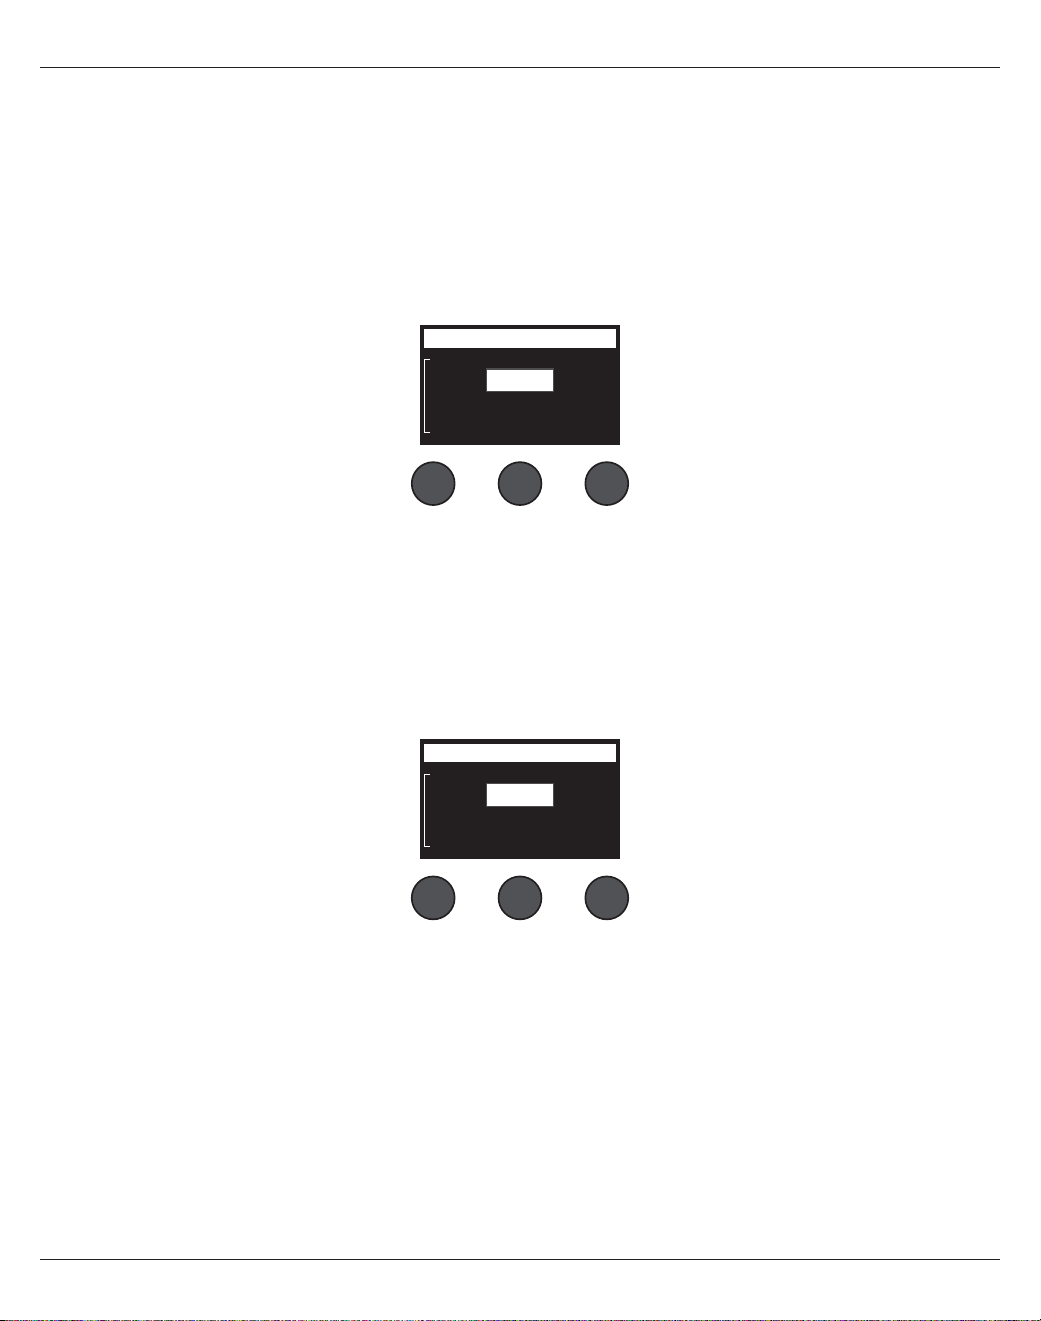
18-
日本語
操作
マスターボリュームコントロールの使用
T4S/T8S ToneMatch®デジタル出力とアナログマスター出力の最終段の信号レベルがマスターボリュームコントロールで調整されま
す。通常動作時は、マスターコントロールを12時の位置にして使うことをお勧めします。すべてのチャンネルの音量の調整が済んだ後は、
マスターボリュームをこの位置から自由に増減させて調整して構いません。
チャンネル信号のミュート
ミュートボタンは対応する各チャンネルのオーディオ信号をミュートします。
• あるチャンネルをミュートするには、対応するミュートボタンを1回押します。ミュートボタンが白く光り、そのチャンネルがミュート状態に
あることが確認できます。各チャンネルのディスプレイ画面には「CH MUTE」と表示されます。
• ミュートボタンをもう1回押すと、そのチャンネルのミュートが解除されます。ミュートボタンが消灯し、そのチャンネルがミュート解除の状
態にあることがわかります。
チャンネルエフェクトのミュート
FXミュートボタンは対応する各チャンネルのモジュレーション、ディレイ、リバーブのエフェクトのみをミュートします。ToneMatchプリセッ
ト、zEQ、パラメトリックイコライザー、コンプレッサー/ゲートの設定はFXミュートではバイパスされません。
• あるチャンネルのエフェクトをミュートするには、対応するFXミュートボタンを1回押します。FXミュートボタンが白く光り、そのチャンネ
ルのエフェクトがミュート状態にあることが確認できます。各チャンネルのディスプレイ画面には「FX MUTE」と表示されます。
• FXミュートボタンをもう1回押すと、そのチャンネルのエフェクトのミュートが解除されます。FXミュートボタンが消灯し、そのチャンネル
のエフェクトのミュートが解除の状態にあることがわかります。
Ch 1
Category
Utility
ToneMatch
CH MUTE
Flat
Preset
Ch 1
Category
Utility
ToneMatch
FX MUTE
Flat
Preset

操作
日本語
- 19
ロータリーセレクターの使用
ロータリーセレクターによりToneMatch®ミキサーに搭載された各種ファンクションにアクセスすることができます。図15は9種類のチャン
ネルファンクションと3種類のグローバルファンクションの概要をまとめたものです。以下のページでは、それぞれのファンクションの使い
方について説明していきます。
図15.ロータリーセレクター
チャンネルファンクション
q Pan/Aux - パン、AUX入力、AUX出力の設定を行います。
w チューナー - 選択したチャンネルに接続された楽器の音程をチューニングすることができます。
e ToneMatch - 楽器やマイクの特性を引き出すボーズの特許技術TONEMATCHプリセットの設定を行います。
r zEQ - ZEQは選択されたTONEMATCHプリセットと連携して動作します。そのプリセットのサウンドが占める周波数帯域を低音/中
音/高音の帯域に分割しイコライズすることができます。
t パラメトリックイコライザー - パラメトリックイコライザーはチャンネル毎に専用に設定することができます。
y コンプレッサー/ゲート - ゲート、コンプレッサー、リミッター、ディエッサー、キックドラムの多くのプリセットを搭載しています。プリセッ
トに含まれる調整可能なパラメーターによりカスタマイズすることができます。
u モジュレーション - コーラス、フランジャー、フェイザー、トレモロといったモジュレーション系のエフェクトを設定することができます。
i ディレイ - 3種類のディレイの他、タップテンポディレイにも対応しています。
o リバーブ - 選択されているチャンネルにリバーブを適用し、メイン出力あるいはAUX出力に送ることができます。
グローバルファンクション
a リバーブタイプ - マスター出力のすべてのチャンネル、あるいはAUX出力に対して適用するリバーブのタイプを設定します。
s Prefs - システムユーティリティにアクセスします。
d シーン - パフォーマンスシーン(ミキサーの設定の完全なスナップショット)の保存/読み込みを行います。
e
o
y
d
r
a
u
q
t
s
i
w
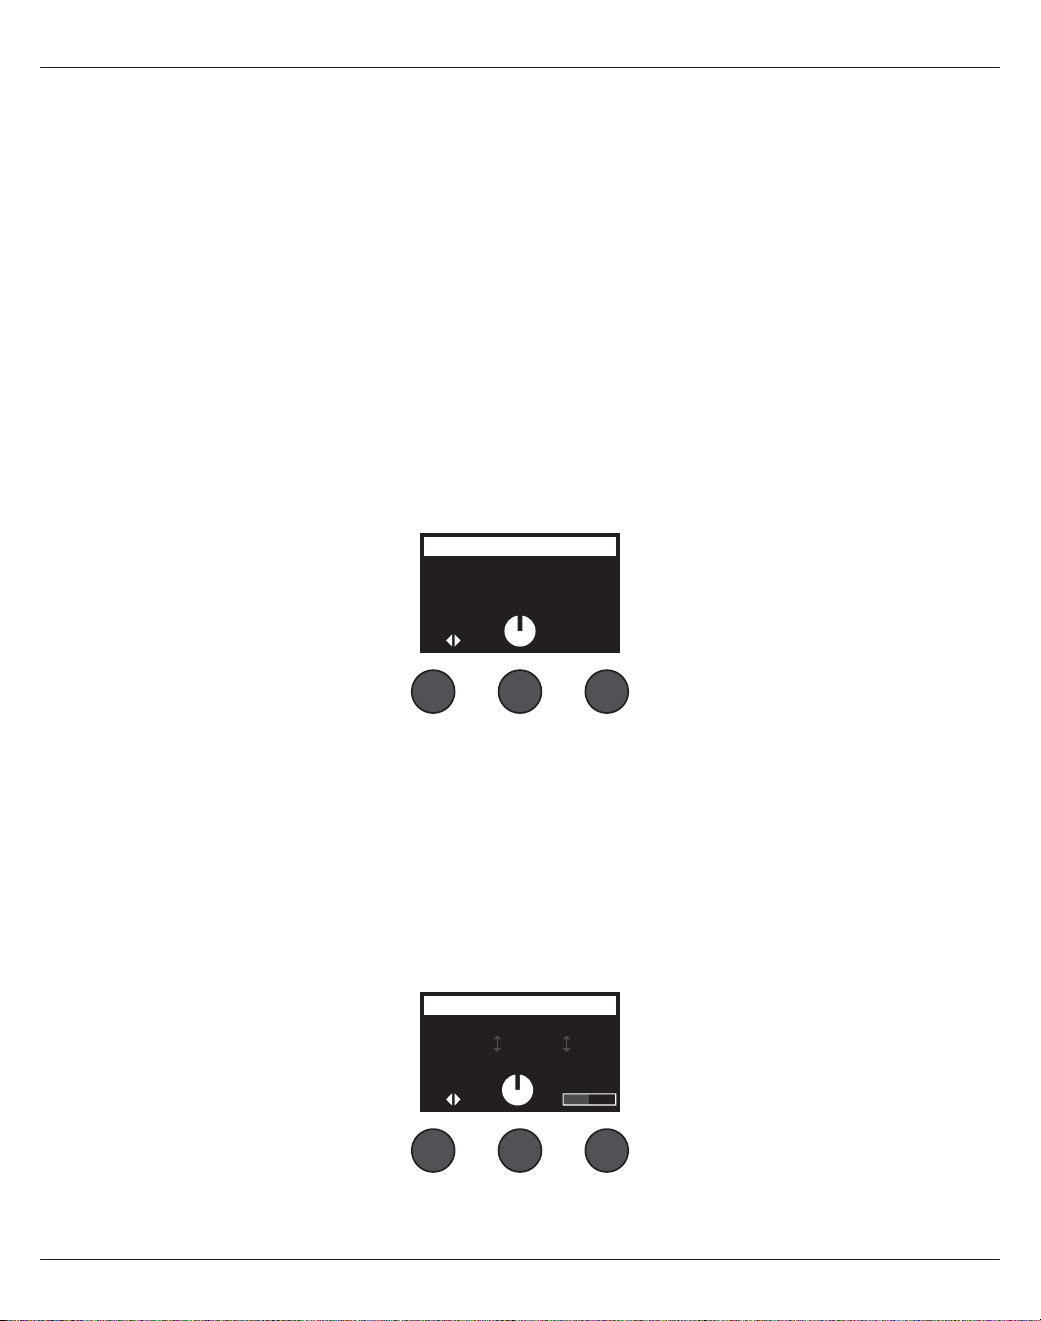
20-
日本語
操作
チャンネルサウンドの編集
チャンネル編集ファンクションにより選択したチャンネルの設定を行うことができます。チャンネル編集ファンクションにはPan/Aux、
チューナー、ToneMatch®、zEQ、パラメトリックイコライザー、コンプレッサー/ゲート、モジュレーション、ディレイ、リバーブの各機能があ
ります。
チャンネルの編集は次の手順で行います。
1. 目的のチャンネルのチャンネルエディットボタンCH Edit 1、 2、3、4、(T4S、T8S)5、6、7、 8(T8Sのみ)を押します。ディスプレイの
左上のコーナー部分に選択したチャンネルが表示されます。
2. ロータリーセレクターを回して、使用するCH Edit(チャンネル編集)ファンクションを選択します。
3. 以下の各チャンネル編集ファンクションの説明を参照して設定を調整していきます。
注
:
一度に編集できるチャンネルは
1
つです。
CH Edit
ボタンを押すことで選択されたチャンネルのみが編集可能になります。
Pan/Auxの機能を使う
Pan/Auxファンクションでオーディオ信号のマスター出力L/Rへのルーティング、Aux入力、Aux出力のコントロールを行うことができます。
Panを使う
Pan(パン)コントロールを使って選択中のチャンネルのオーディオ信号をステレオミックスの中の任意の場所に定位させることができます。
1. 左のエディットコントロールを押すか回して「Pan」を「Menu」から選択します。
2. 「Pan」コントロールを回してLからRの目的の位置にオーディオを定位させます。
Aux入力5/6(9/10)
Aux入力5/6(9/10)を使って、モバイルデバイスなどのラインレベルの信号を入力します。
1. 左のコントロールを押すか回して「Aux In 5/6」を「Menu」から選択します。
2. 「5 Lvl」、「6 Lvl」のコントロールを回すことで、ch5、ch6の信号レベルを調整することができます。
3. 「5 Lvl」のコントロールを押すと「5 Pan」に機能・表示が切り替わります。同様に、「6 Lvl」のコントロールを押すと「6 Pan」に機
能・表示が切り替わります。「Pan」コントロールを回してLからRの目的の位置にオーディオを定位させます。
Ch 1
Menu Pan
Pan
Pan
Ch 1
Menu 5 Pan 6 Lvl
Aux In 50%
Aux Input 5/6
6 Pan5 Lvl

操作
日本語
- 21
入力信号のAux出力へのルーティング
Auxファンクションにより、2chのAux出力(T4S)/4chのAux出力(T8S)への信号のルーティングが可能です。Aux出力は外部機器と
接続してさまざまな信号処理やレコーディング、SRに活用することができます。Aux出力の信号レベルはすべて個別に調整することがで
きます。
注
: Aux
出力をミュートするには、
「Level」
コントロールを押します。コントロールをもう
1
回押すとミュートが解除されます。
1. 「Menu」コントロールを押すか回して信号を送るAux出力を選択します。
2. 「Level」コントロールを回して選択したチャンネルの信号レベルを調整します。
3. 「Tap」コントロールを回してタップメニューをスクロールし、目的のタップポイント(Aux出力に送る信号を引き出す位置)をハイライ
トさせます。
A. Dry: After Preamp – プリアンプ段から完全にドライな(信号処理していない)信号がルーティングされます。
B. Pre: With EQ & Fx – プリアンプ段から信号処理の施された信号がルーティングされます。
C. Post: After Fader – チャンネルボリュームコントロールの後の信号処理の施された信号がルーティングされます。
4. 「Select」コントロールを押してタップポイントを選択します。「Cancel」コントロールを押すと何もしないでそのまま終了します。その
時点で選択されているタップポイントの名前が太字で表示されます。
Ch 1
Menu Tap
Aux
1P
re
Level
50%
Aux 1 Output
チューナーを使う
チャンネル毎に独立したチューナーが装備されています。ディスプレイの下方にチューニングに用いる音名が表示されます。チューニン
グを始めると、ディスプレイにピッチインジケーターが表示され、演奏している音が基準よりも高いのか低いのかを確認することができま
す。カーソルが画面の中央に合うように楽器のピッチを調整します。
注
:
使用しているチャンネルの
Mute
ボタンを押すことで、サイレントチューニングが可能です。
基準ピッチは、Transpose(移調)機能を使って全音階毎に上下させることができます。reference pitch(基準ピッチ)機能で、チューニン
グに使うピッチを正確に設定することもできます。
Ch 1
b#
A3
Tuner
ピッチインジケーター
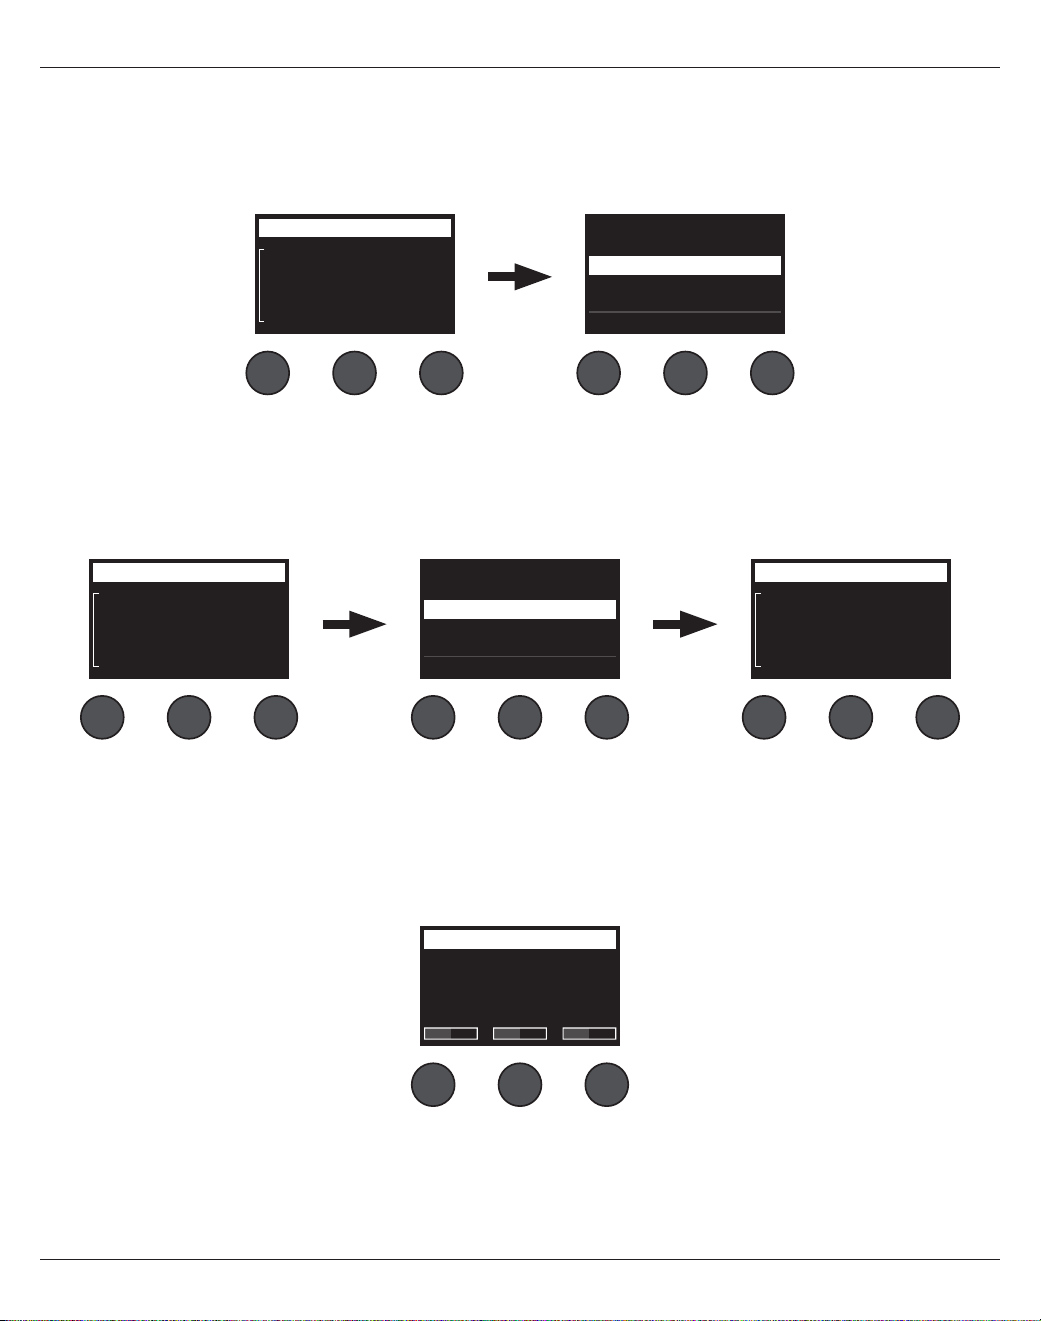
22-
日本語
操作
Ch 1
Category
Vocal Mics
ToneMatch
Handheld Mics
Preset
Handheld Mics
Headworn Mics
High Gain: Bright
High Gain: Normal
SelectCancel
Ch 1
Category
Utility
ToneMatch
Flat
Preset
Ch 1
Category
Vocal Mics
ToneMatch
Headworn Mics
Preset
Vocal Mics
Utility
Electric Guitars
Acoustic Guitars
Select Cancel
回す 押す
押す回す
ToneMatch®プリセットを選択する
ToneMatchファンクションを使って、各チャンネルに接続する楽器、マイクに最適なToneMatchプリセットを選択できます。ボーズの特
許技術のToneMatch®は、楽器やマイクが持つ本来のナチュラルな音色が再現されるようにシステムのイコライズを最適化します。プリ
セットはカテゴリー毎に分類されており、チャンネル毎に独立して選択することができます。
1. 「Category」コントロールを回しカテゴリーリストを表示して該当するカテゴリーをハイライトさせます。
2. 「Select」コントロールを押してカテゴリーを選択します。「Cancel」コントロールを押すと何もしないでそのまま終了します。
3. 「Select」を押した場合は、「Preset」コントロールを回してプリセットリストを表示し、目的のプリセットをハイライトさせます。
4. 「Select」コントロールを押してプリセットを選択します。「Cancel」コントロールを押すと何もしないでそのまま終了します。
Ch 1
Low Mid
Handheld Mics
High
0.0db 0.0db 0.0db
zEQ
zEQを調整する
zEQはToneMatchプリセットの技術に含まれる主要な機能です。zEQを使うと、楽器やマイクのサウンドが占める周波数帯域を低音/
中音/高音の帯域に分けて調整することができます。
zEQを調整するには、周波数帯域表示(「Low」、「Mid」、「High」)の下にあるコントロールを回します。
注
:
対応するコントロールを押すことで、個々の周波数帯域をバイパスすることができます。コントロールをもう
1
回押すとバイパスが解除
されます。
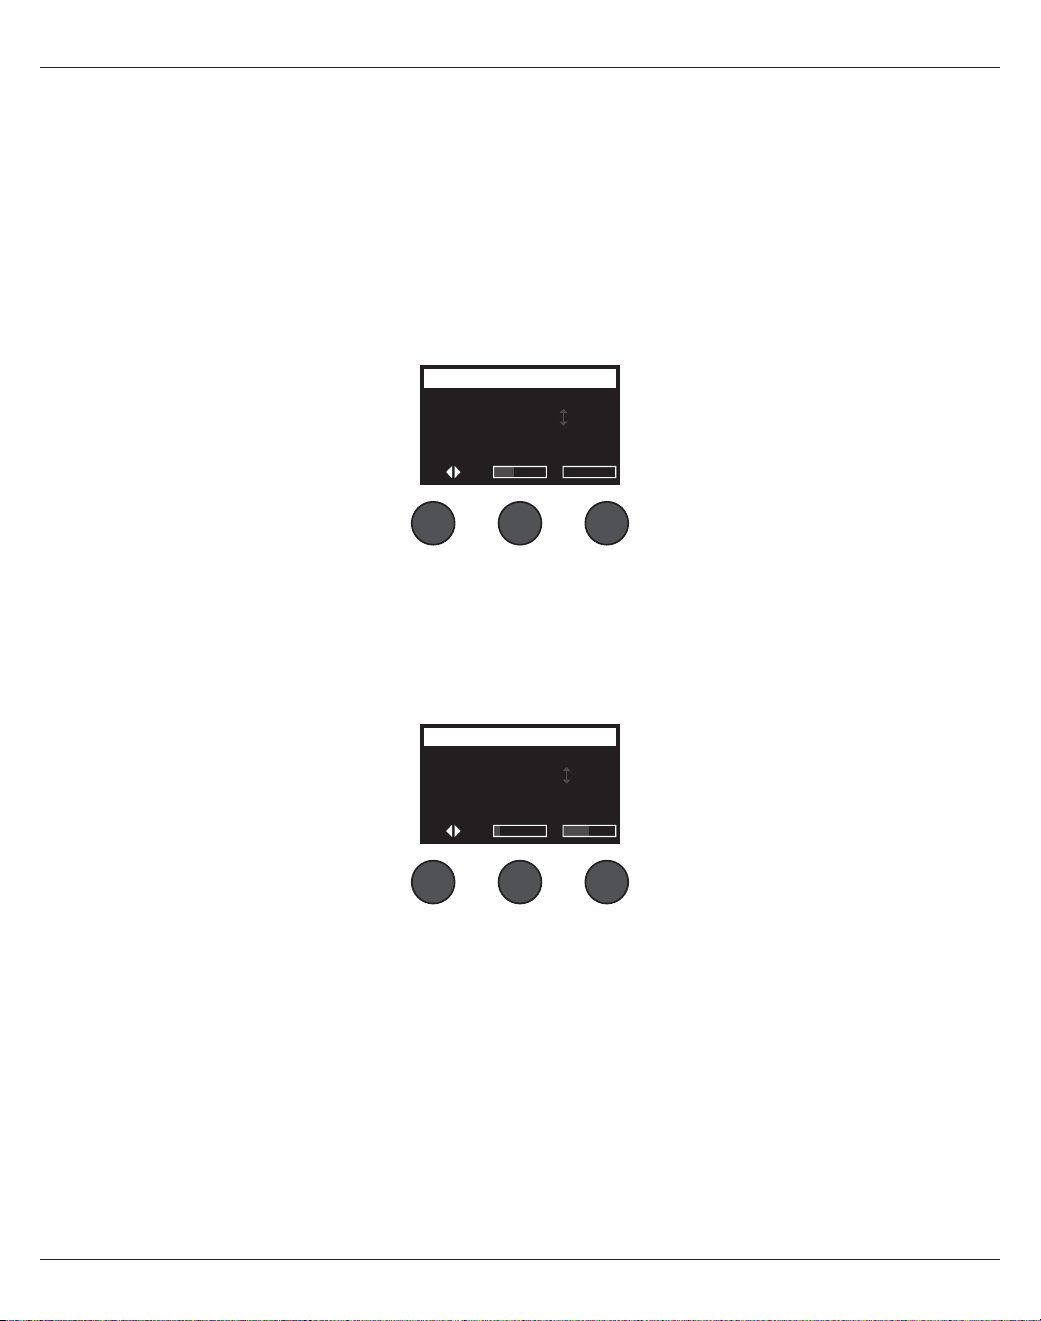
操作
日本語
- 23
パラメトリックイコライザーを調整する
パラメトリックイコライザーのファンクションにより、中心周波数を3つ持つパラメトリックイコライザーを設定できます。3つの中心周波数
は50 Hz~16 kHzの範囲で指定することができます。
注
:
「
Select
」コントロールを押すと、パラメトリックイコライザーの設定がバイパスされます。コントロールをもう
1
回押すとバイパスが解除
されます。
1. 「Select」コントロールを押すか回して、パラメトリックイコライザーのバンド(1~3)を選択します。
2. 「Level」コントロールを回して、-15 dB~+15 dBの範囲でブースト(カット)のレベルを調整します。
3. 「Freq」コントロールを回して、50 Hz~16 kHzの範囲で中心周波数を調整します。
4. 「Freq」コントロールを押すと「Width」に機能・表示が切り替わります。「Width」コントロールを回して、中心周波数の前後のベル
カーブの幅を0.20~5.00オクターブの範囲で調整します。
Ch 1
Select Level
B3
Freq
PEQ 1 -3.4dB 250.0Hz
Parametric EQ
Width
コンプレッサー/ゲートの機能を使う
コンプレッサー/ゲートのファンクションにより、ゲート、コンプレッサー、リミッター、ディエッサー、キックドラムのプリセットにアクセスでき
ます。また、プリセットに含まれる調整可能なパラメーターによりカスタマイズすることができます。
注
:
「
Type
」コントロールを押すと、コンプレッサー/ゲートの設定がバイパスされます。コントロールをもう
1
回押すとバイパスが解除され
ます。.
注
:
設定できるコンプレッサー/ゲートのプリセットはチャンネルあたり
1
つまでです。
1. 「Type」コントロールを回し、コンプレッサー/ゲートのリストを表示して、使いたいエフェクトをハイライトさせます。
A. Compressor 1: Light– プリセットされた低い圧縮比を持つコンプレッサーです。スレッショルドとゲインの調整が可能です。
最小限のコントロールを必要とする多くの楽器やマイクに有効な汎用コンプレッサーとして利用できます。
B. Compressor 2: Medium– プリセットされた適度な圧縮比を持つコンプレッサーです。スレッショルドとゲインの調整が可能
です。レベルの繊細なコントロールが必要なベースやギター、キーボード、ボーカルに有効です。
C. Compressor 3: Heavy– プリセットされた高い圧縮比を持つコンプレッサーです。スレッショルドとゲインの調整が可能で
す。ホーンやドラムなどの大音量の楽器に有効です。より積極的なレベルコントロールが要求される熱いボーカルプレイにも
有効です。
D. Limiter– ハードリミッターです。スレッショルドとゲインの調整が可能です。ドラムのような非常に大きな音を発生する楽器に
有効で、信号のピークによってチャンネルがオーバーロードになることを防ぎます。
E. De-Esser– プリセットされた圧縮比を持つサイドチェインドコンプレッサーで構成されたディエッサーです。スレッショルドとゲ
インの調整が可能です。ボーカルの歯擦音を抑えるように設計されています。
Ch 1
Type Thresh Speed
Gate -80.0dB 50%
Comp/Gate
Ramp

24-
日本語
操作
キックゲートを使う
キックゲートはBose®の特許技術で、マイクからのフィードバックのリスクを排除しつつ、キックドラムチャンネルの音量を上げることを可
能にします。コンプレッサー/ゲートのメニューの中には、2種類のキックゲートの設定が含まれています。
1. キックドラムに適したマイクを接続します。
2. キックドラムに適したToneMatch®プリセットを選択します。
3. チャンネルの入力のトリムコントロールを調整して、最も激しくキックドラムを叩いたときに入力チャンネルのLEDが赤く光る状態に
します。その状態からトリムコントロールの調整を続けLEDが緑になるポイントを探します。これにより、チャンネルの入力トリムレベ
ルが最適化されます。
4. ロータリーセレクターで「Comp/Gate」を選択します。
5. 「Type」コントロールを回して、表示されるリストをスクロールダウンし、「KickGate 1: Regular」または「KickGate 2: Fast」をハイ
ライトして、「Select」コントロールを押します。ツインペダルを使用して演奏するときはKickGate 2を選択してください。
6. キックドラムを演奏してもらい、実際にパフォーマンスを行うときの音量までボリュームを上げていきます。
7. パフォーマンスを行うとき必要な最もソフトな打音が聞こえることを確認します。
8. キックドラムをソフトに演奏してもらい、「Thresh」レベルを上げていくと、ある時点で打音が時々聞こえなくなる状態になります。ここ
から「Thresh」レベルを3 dB下げます。
9. キックドラムを普通に演奏してもらい、「Tight」コントロールを反時計方向に回してタイトネスを緩め、音にボリューム感を加えます。
タイトネスは0%(最もルーズ)~100%(最もタイト)の範囲で設定できます。
F. Noise Gate – プリセットされた速いアタックタイムを持つノイズゲートです。スレッショルドとスピード(リリースタイム)の調整
が可能です。マイクや楽器からの不要なノイズの除去に適しています。
G. KickGate 1: Regular – プリセットされたアタックタイムを持つゲートです。スレッショルドとタイトネス(リリースタイム)の調
整が可能です。キックドラム専用に設計されたBose®の特許技術です。この強固なゲートにより最大音量でもハウリングを生じ
ることはありません。SRシステムを通じてキックドラムの音量を好きなだけ上げられます。
H. KickGate 2: Fast – キックゲート1とほぼ同様ですが、より速いテンポに対して最適化されています。ツインペダルを使って演
奏する場合はこの設定を選択します。
2..「Select」コントロールを押してタイプを選択します。「Cancel」コントロールを押すと何もしないでそのまま終了します。
3.
. コンプレッサー
1
~
3
、リミッター、ディエッサー
: 「Thresh」コントロールを回して、入力のスレッショルド(トリガー)レベルを-50 dB~0
dBの範囲で調整します。「Gain」コントロールを回して、0 dB~30.0 dBの範囲でゲインを調整します。コントロールの上方に表示
されるゲインバーはゲインの削減量を表示します。このゲインバーを参考にスレッショルドを設定します。.
ノイズゲート
: 「Thresh」コントロールを回して、入力のスレッショルド(トリガー)レベルを-90 dB~-30 dBの範囲で調整します。
「Speed」コントロールを回して、ゲートを閉じる速さを0%(最も速い)~100%(最も遅い)の範囲で調整します。「Ramp」コントロー
ルを回して、ゲートのスロープを0%(水平)~100%(垂直)の範囲で調整します。.
キックゲート
1
~
2: 「Thresh」コントロールを回して、入力のスレッショルド(トリガー)レベルを-20 dB~0 dBの範囲で調整します。
「Tight」コントロールを回して、タイトネス(どれだけ急峻にゲートが閉じるか)を0%(最も遅い)~100%(最も速い)の範囲で調整し
ます。
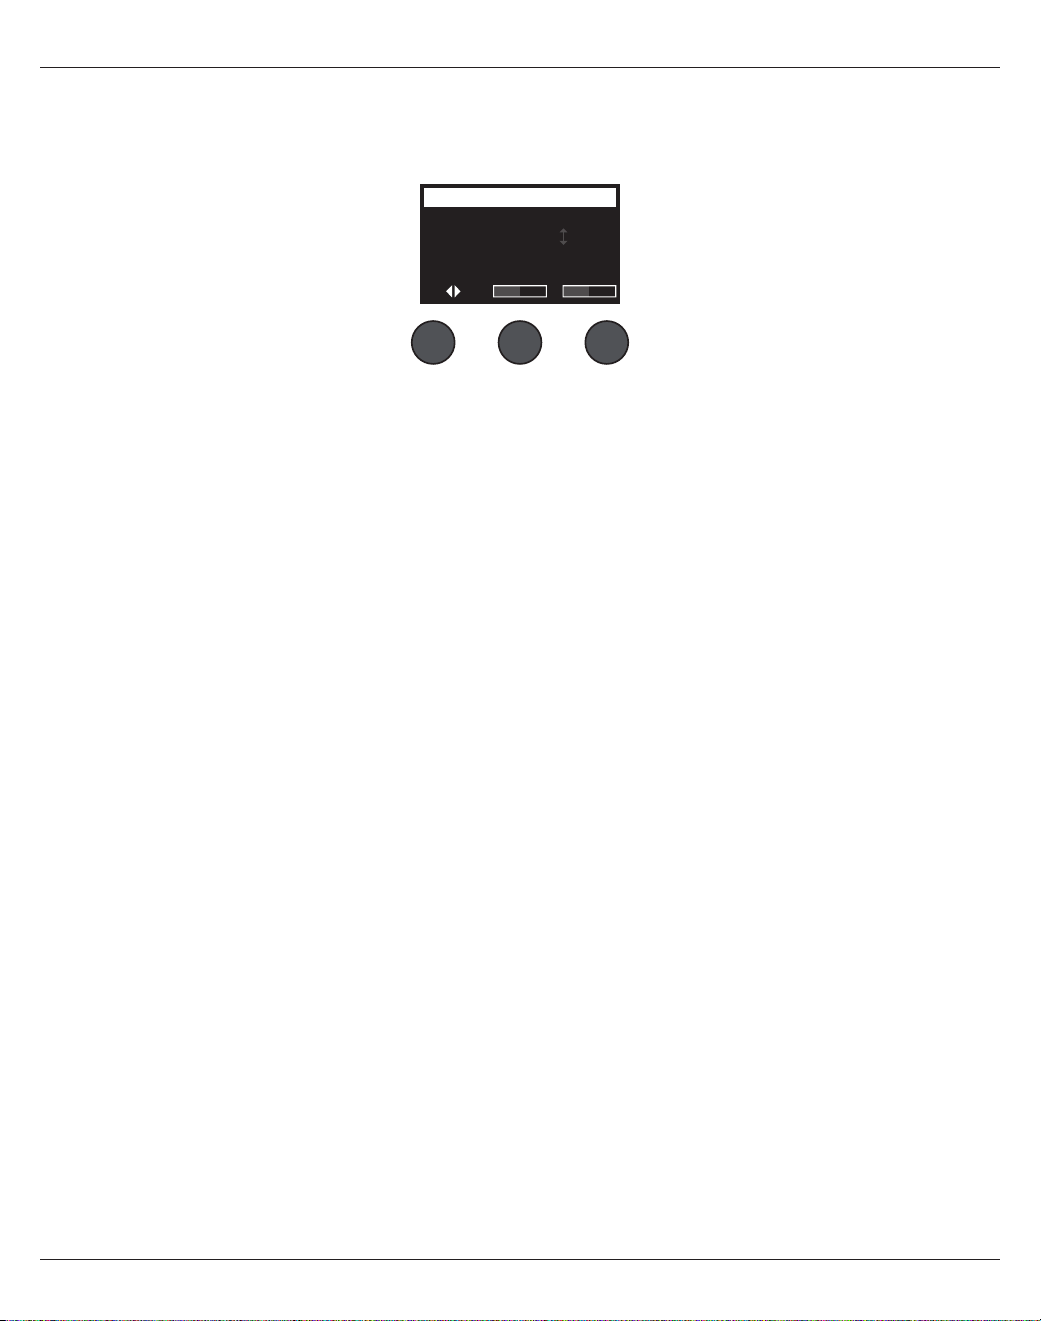
操作
日本語
- 25
モジュレーションのエフェクトを使う
モジュレーションのファンクションでモジュレーションのエフェクトを適用することができます。
注
:
「
Type
」コントロールを押すと、モジュレーションの設定がバイパスされます。コントロールをもう
1
回押すとバイパスが解除されます。
1. 「Type」コントロールを回し、モジュレータータイプのリストを表示して、使いたいエフェクトをハイライトさせます。
A. Chorus 1: Brite – ウェットでかすかに揺らぐコーラスです。アコースティック楽器によく合います。ミックス量、深さ、スピードを
調整することができます。
B. Chorus 2: Warm – コーラス1と似ていますが、高音域が少し減衰します。ミックス量、深さ、スピードを調整することができま
す。エレキギターやベースによく合います。
C. Chorus 3: Dark – コーラス2に似ていますが、さらに高域を減衰させてダークなトーンに仕上げてあります。ミックス量、深さ、
スピードを調整することができます。エレキギターやベースによく合います。
D. Flanger 1: Tape – フィードバックなしのテープスタイルフランジャーです。ミックス量、深さ、スピードを調整することができま
す。エレキギターやベースに乗せるエフェクトとしてよく合います。
E. Flanger 2: Feedback – フランジャー1とほぼ同様ですが、フィードバックエフェクトがプリセットされています。
F. Phaser 1: Stomp – クラッシックな「ストンプボックス」スタイルのフェイザーです。ワイドスイープのフェイザーです。スピード
とフィードバックを調整することができます。エレキギターやベース、キーボードに乗せるエフェクトとしてよく合います。
G. Phaser 2: Rack – クラッシックな「ラック」スタイルのフェイザーです。ポジティブミックスタイプのフェイザーです。スピードと
フィードバックを調整することができます。エレキギターやベース、キーボードに乗せるエフェクトとしてよく合います。
H. Phaser 3: Warm – ヴィンテージスタイルのフェイザーです。ポジティブミックスタイプのフェイザーです。スピードとフィード
バックを調整することができます。エレキギターやベース、キーボードに乗せるエフェクトとしてよく合います。
I. Phaser 4: Brite – 最低音域のないフェイザーです。ポジティブミックスタイプのフェイザーです。スピードとフィードバックを調
整することができます。エレキギターやキーボードに乗せるエフェクトとしてよく合います。
J. Tremolo– ヴィンテージスタイルのトレモロエフェクトです。スピードとデプス(深さ)を調整することができます。ギターやキー
ボード、ハーモニカに乗せるエフェクトとしてよく合います。
2..「Select」コントロールを押してタイプを選択します。「Cancel」コントロールを押すと何もしないでそのまま終了します。
3.
. コーラス
1
~
3
、フランジャー
1
~
2: 「Mix」コントロールを回して、ドライ信号とウェット信号(モジュレータのかかった信号)のミックスを
調整します。「Depth」コントロールを回して、オリジナルの入力信号から変化させるピッチの量を調整します。「Depth」コントロール
を押して「Speed」パラメーターに切り替えます。「Speed」コントロールを回して、ピッチのモジュレーションの速さを調整します。.
フェイザー
1
~
4: 「Speed」コントロールを回して、ピッチのモジュレーションの速さを調整します。「Fdbk.」コントロールを回して、モ
ジュレーションが反響する量を調整します。.
トレモロ
: 「Speed」コントロールを回して、音量のモジュレーションの速さを調整します。「Depth」コントロールを回して、元の入力信
号から変化させる音量の幅を調整します。
Ch 1
Type Mix Depth
Chorus1 50% 50%
Modulator
Speed
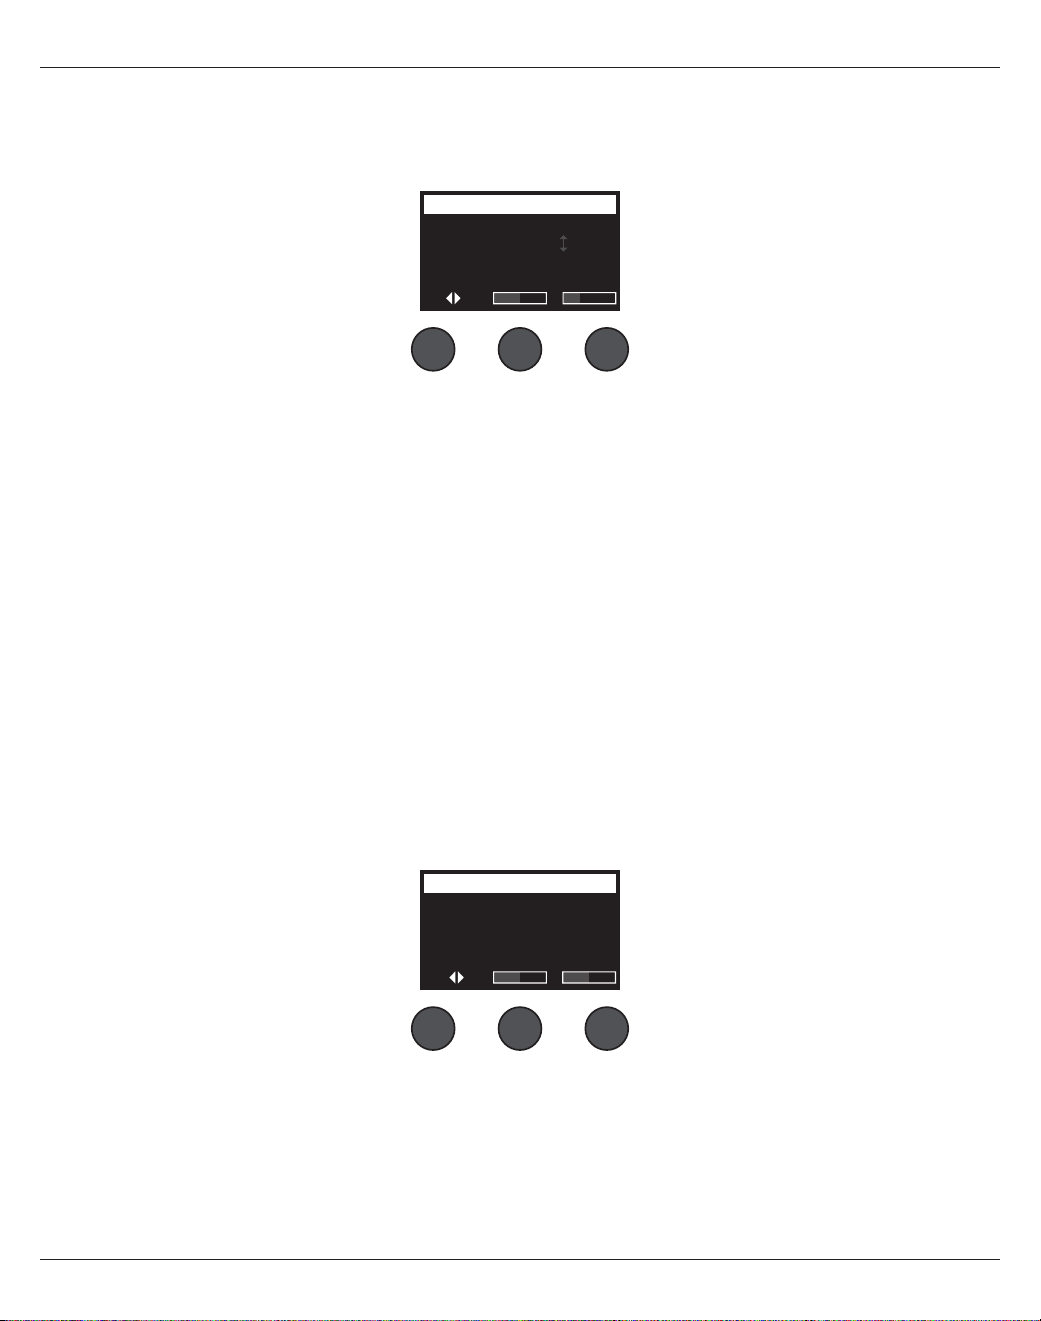
26-
日本語
操作
Ch 1
Type Tim
eM
ix
Digital 250ms 30%
Delay
Fdbk.
ディレイを加える
ディレイのファンクションにより、デジタルスタイル、アナログスタイル、テープスタイルのディレイを適用することができます。
注
:
「
Type
」コントロールを押すと、ディレイの設定がバイパスされます。コントロールをもう
1
回押すとバイパスが解除されます。
1. 「Type」コントロールを回し、ディレイタイプのリストを表示して、使いたいエフェクトをハイライトさせます。
A. Digital Delay – リピートに色付けがないストレートなデジタルディレイのエフェクトです。ミックス量、時間、フィードバックを調
整することができます。ギターやドラム、ボーカルとよく合います。
B. Analog Delay –リピートが時間とともに崩れていくクラッシックなアナログディレイのエフェクトです。ミックス量、時間、フィー
ドバックを調整することができます。ギターやドラム、ボーカルとよく合います。
C. Tape Delay – アナログディレイよりもリピートの崩れが大きいヴィンテージスタイルのテープディレイのエフェクトです。ギ
ターやホーン、ハーモニカ、ボーカルとよく合います。
2..「Select」コントロールを押してタイプを選択します。「Cancel」コントロールを押すと何もしないでそのまま終了します。
3..「Time」コントロールを回して、5 ms単位でディレイ量を調整します。「Time」コントロールを押して、ディレイテンポをタップで入力
することもできます。
4..「Mix」コントロールを回して、ドライ信号(0%)とウェット信号(100%)のミックスを設定します。
5..「Mix」コントロールを押して「Fdbk.」設定に切り替えます。「Fdbk.」コントロールを回して、ディレイフィードバックの量を調整します。
リバーブを加える
リバーブのファンクションにより、選択されているチャンネルにユーザー調整可能な量のリバーブを適用することができます。リバーブの
タイプを選択する方法は、27ページの「リバーブタイプを選択する」を参照してください。
注
:
「
Mix
」コントロールを押すと、リバーブのエフェクトがミュートされます。コントロールをもう
1
回押すとミュートが解除されます。
1. 「Menu」コントロールを押すか回して、リバーブを送る出力を選択します。
2. 「Mix」コントロールを回して、ドライ信号(0%)とウェット信号(100%)のミックスを調整します。
3. 「Bright」コントロールを回して、選択されているチャンネルに適用されるリバーブの高音域をイコライズします。
Ch 1
Mix Bright
50% 50%
Reverb
Menu
Main
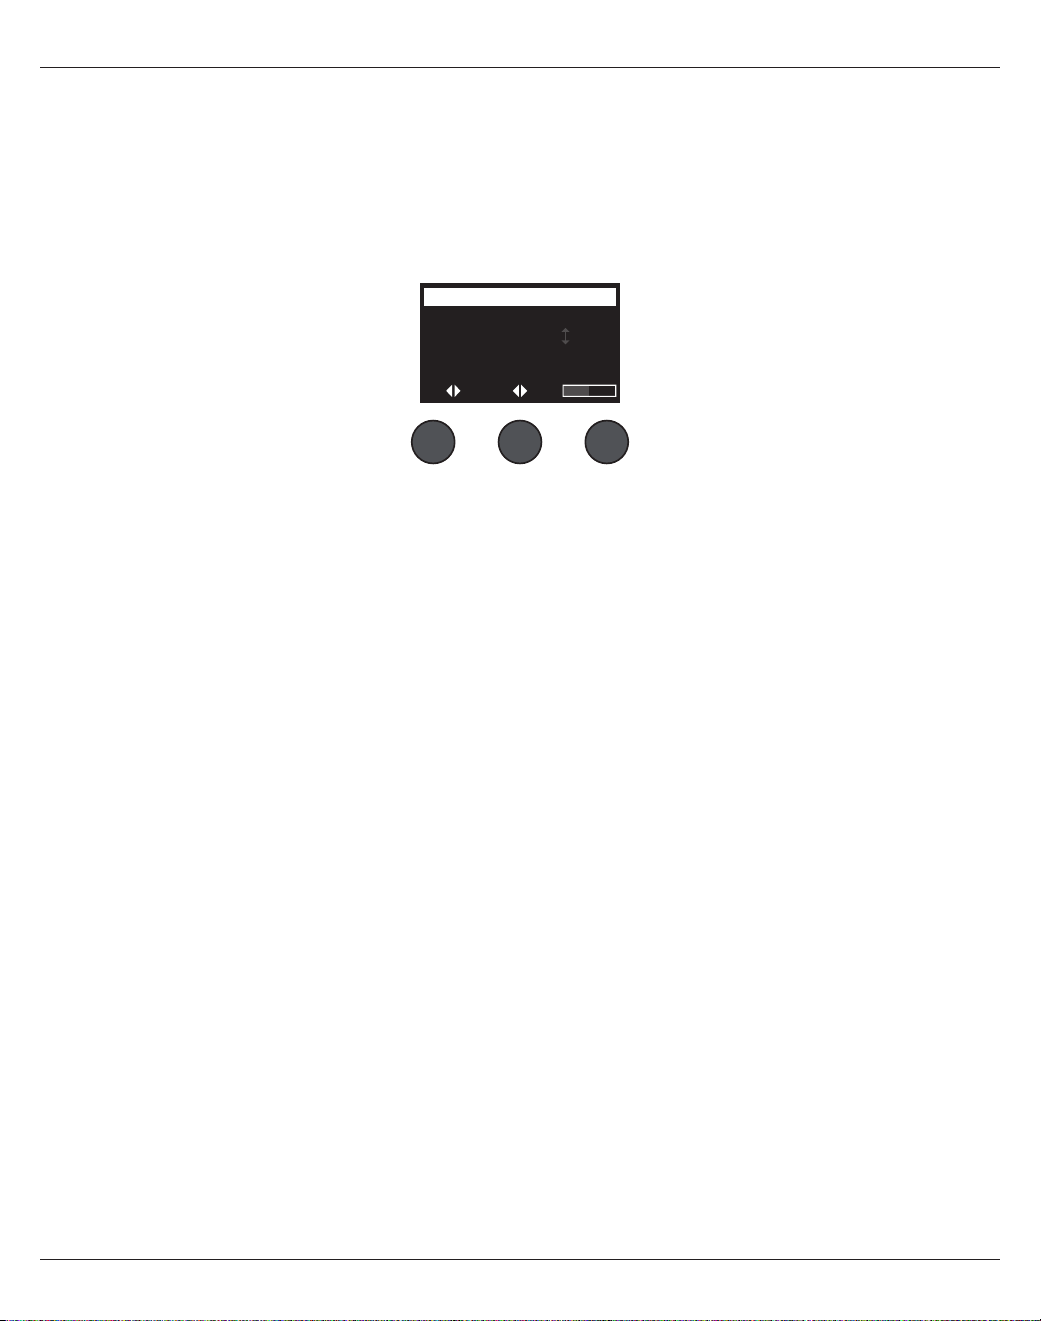
操作
日本語
- 27
グローバルファンクションの使用
グローバルファンクションにより、ミキサー全体の操作、あるいはすべてのチャンネル動作に影響する項目の設定を行うことができます。
リバーブタイプを選択する
リバーブタイプのファンクションにより、すべての入力チャンネルに共通に適用されるリバーブのタイプを選択することができます。減衰
時間(Time)とバランス(Bal)が調整可能です。バランスは近距離反射と遠距離反射のミックス比をコントロールするパラメーターです。
注
:
「
Type
」コントロールを押すと、リバーブがミュートされます。コントロールをもう
1
回押すとミュートが解除されます。
1. ロータリーセレクターで「Reverb Type」を選択します。
2. 「Menu」コントロールを押すか回して、リバーブを送る出力を選択します。メイン出力とAux出力に異なるリバーブを送ることも可能
です。
3. 「Type」コントロールを回し、リバーブのリストを表示させます。
A. Plate – スタジオにある典型的なプレートリバーブのアンビアンスを再現します。時間とバランス(近距離反射と遠距離反射の
ミックス比)が調整可能です。
B. Small – 小さな空間のアンビアンスを再現します。時間とバランス(近距離反射と遠距離反射のミックス比)が調整可能です。
C. Medium – 中くらいの空間のアンビアンスを再現します。時間とバランス(近距離反射と遠距離反射のミックス比)が調整可能
です。
D. Large – 大きな空間のアンビアンスを再現します。時間とバランス(近距離反射と遠距離反射のミックス比)が調整可能です。
E. Cavern(洞窟)– 極めて大きな空間のアンビアンスを再現します。時間とバランス(近距離反射と距離反射のミックス比)が調
整可能です。ユニークで面白いリバーブのエフェクトです。
4..「Type」コントロールを回してリバーブリストをスクロールし、目的のリバーブタイプをハイライトさせます。
5..「Type」コントロールを押して選択します。
6..「Time」コントロールを回すことにより、選択したリバーブモデルの減衰時間を最小~最大の範囲で設定することができます。0%の
設定は減衰時間が最小で、その時に選択されているリバーブタイプに適用可能な最小の空間サイズがシミュレートされます。100%
では、減衰時間が最大で、その時に選択されているリバーブタイプに適用可能な最大の空間サイズがシミュレートされます。それぞ
れのリバーブタイプには設定可能な減衰時間の範囲が設けられており、その範囲で有効に動作します。リバーブの減衰パラメーター
により、選択したリバーブタイプのモデルで最良の動作が保証される明確な範囲内でリバーブ時間の調整を行うことができます。
7..「Time」コントロールを押して「Bal.」コントロールに切り替えます。「Bal.」コントロールを回して、近距離反射と遠距離反射のミックス
比(0% = すべて近距離反射、100% = すべて遠距離反射)を調整します。
All Channels
Menu Type Bal.
Main Medium 50%
Reverb Type
Time
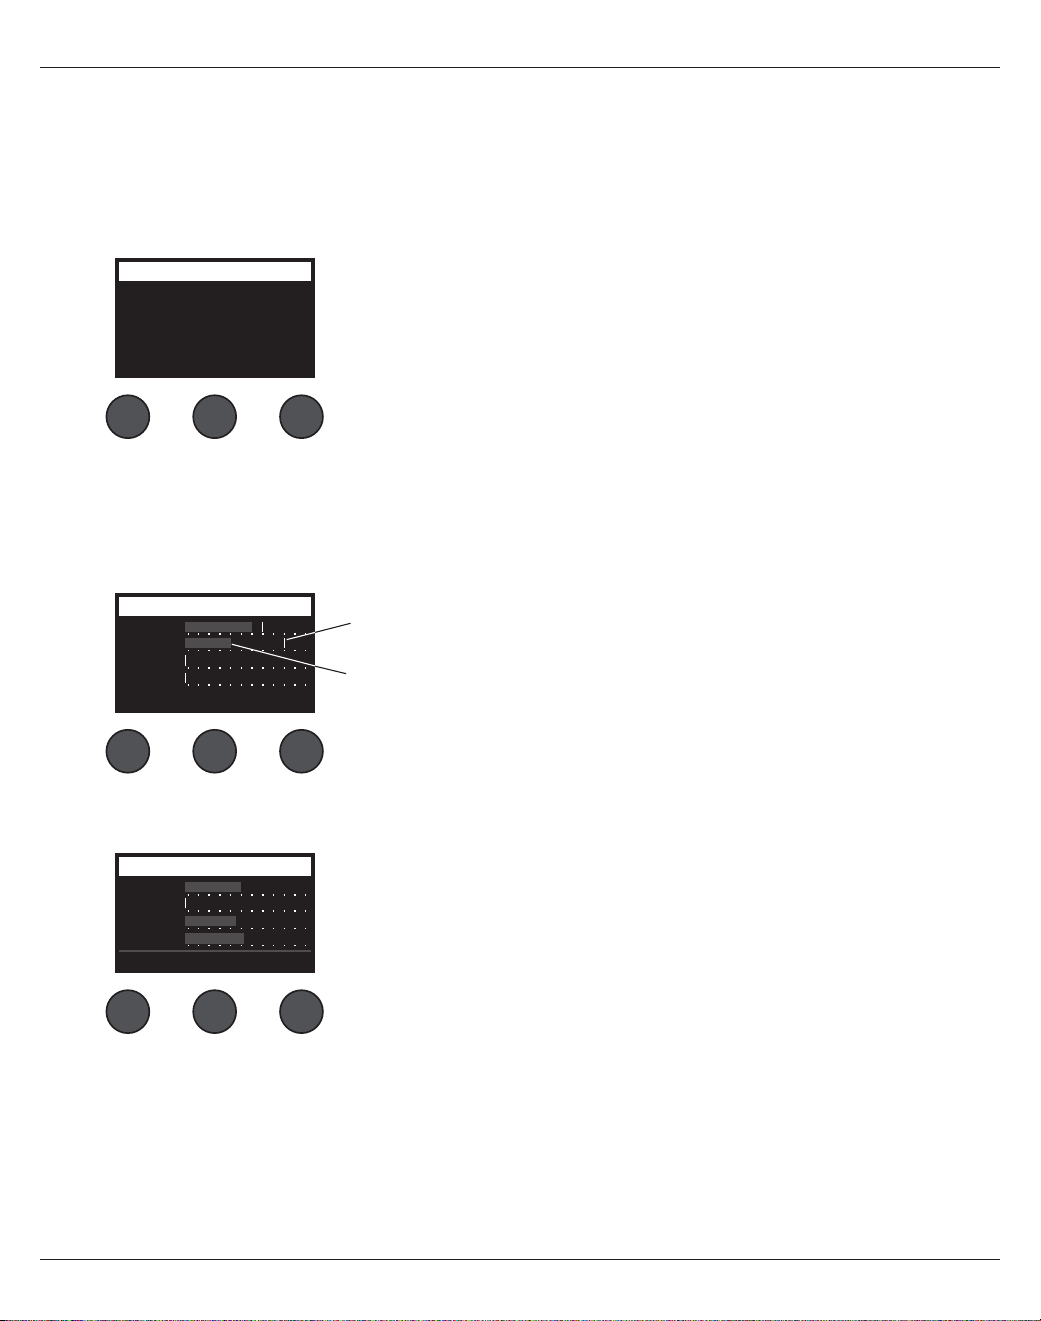
28-
日本語
操作
Prefsユーティリティを使う
Prefsのファンクションにより、システムユーティリティにアクセスすることができます。
1. ロータリーセレクターで「Prefs」を選択します。
2. 「Menu」コントロールを回してリストをスクロールし、目的のーティリティをハイライトさせます。「Select」コントロールを押すと、ユー
ティリティが表示されます。
• Status – 各入力チャンネルに割り当てられているエフェクトを一覧表示します(表示のみ)。
• Input Level – すべての入力チャンネルのピークインジケーター付きレベルメーターを表示します。「Reset」コントロールを押す
と、すべてのピークインジケーターがリセットされます。このレベルメーターはチャンネルの入力トリムコントロールの設定に役立
ちます(17ページの「入力ゲインと出力ボリュームの最適化」を参照してください)。「Aux In」コントロールを押すと、Aux入力のレ
ベルモニター表示に切り替わります(T8Sの場合は、「Ch 5-8」コントロール押すと、ch5~ch8の入力レベルモニター表示に切り
替わります)。
• Output Level – すべての出力のレベルメーターを表示します。メインL、メインR、USB L、USB R出力のレベルメーターが表示
されます。「Aux」コントロールを押すと、Aux出力のレベルモニター表示に切り替わります。
Output Level Preferences
USB L
Main L
Main R
USB R
Menu Rese
tA
ux
Status
Ch 1 Mod
Mod
Mod Dly
Cm
pR
ev
Rev
Rev
CmpCh 2
Ch 3
Ch 4
Menu
Preferences
Cmp = コンプレッサー/ゲート
Mod = モジュレーション
Dly = ディレイ
Rev = リバーブ
Input LevelPreferences
Ch 3
Ch 1
Ch 2
Ch 4
Menu Aux InReset
ピークレベルインジケーター
入力レベルインジケーター
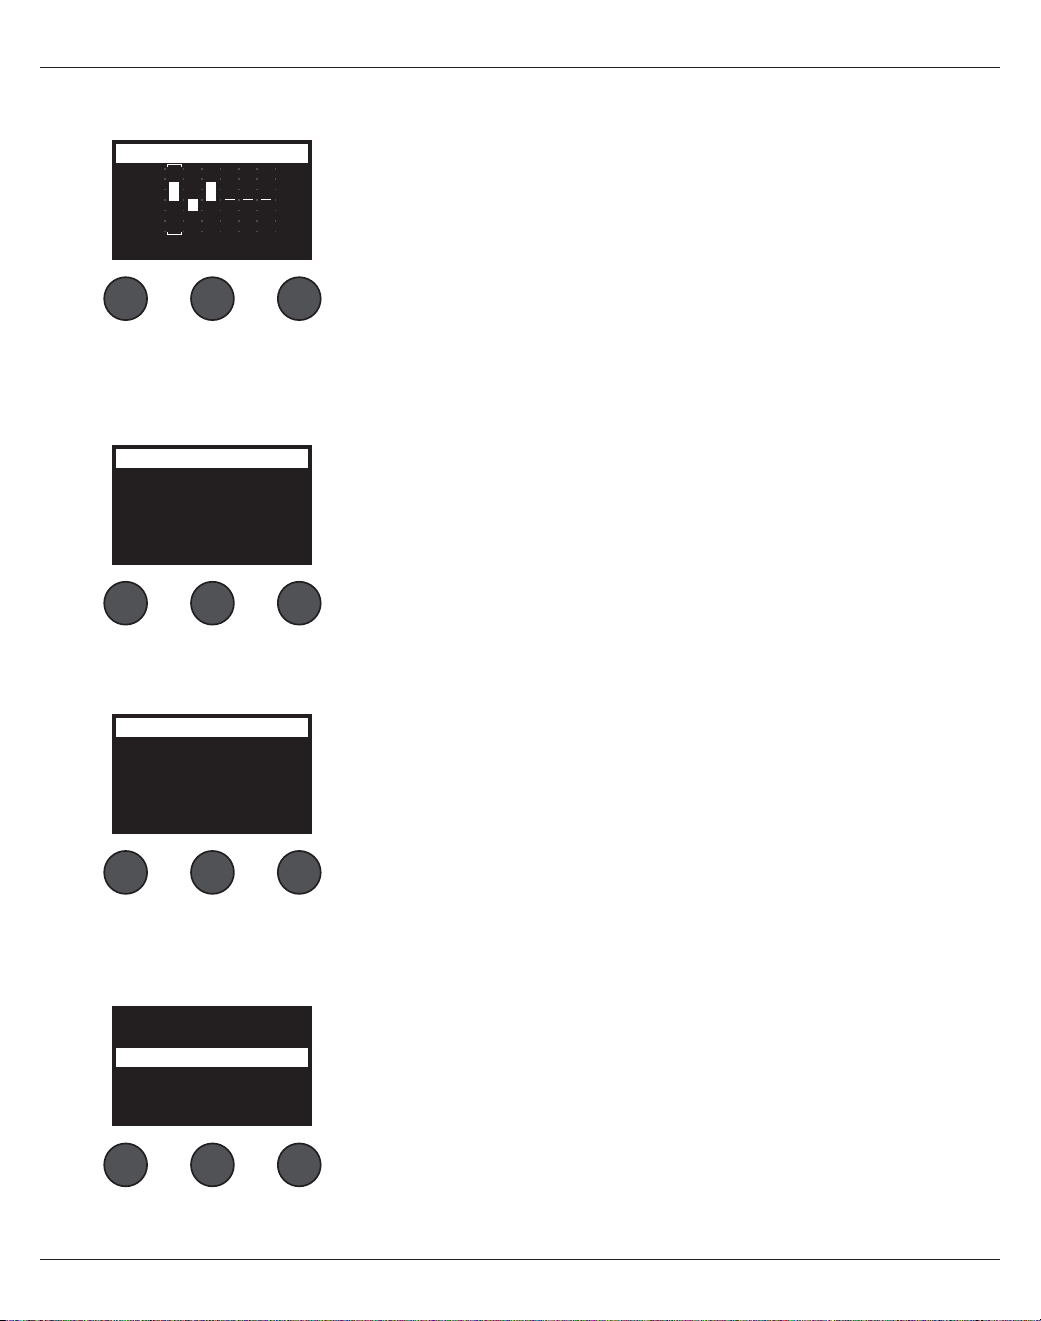
操作
日本語
- 29
• Master Out EQ– マスター出力イコライザーはマスターミックス出力に適用可能な6バンドグラフィックイコライザーです。中央
のコントロールで増幅あるいは減衰させたい周波数バンドを選択し、「Level」コントロールで±18 dBの範囲で調整します。.
• USB B to PC– USBのL/R出力チャンネルを通して、選択したソースをコンピューターに送ることができます。ソースは、ch1~4(T8S
ではこれに加えch5~8)、Aux入力、マスター、Aux出力1~2(T8Sではこれに加えAux出力3~4)から選択することができます。
• USB B from PC – USBのL/R出力チャンネルを通して、コンピューターのソースを選択した送り先に送ることができます。送り
先は、「None」、「Aux In」、「Master」の中から選択できます。
• USB A-Playback– USB(Aタイプ)のフラッシュドライブを接続して、フラッシュドライブに保存されているWAV/MP3のオーディ
オファイルを再生することができます。メニューを使ってWAV/MP3ファイルが入れられているフォルダーを選択し、さらに再生し
たいファイルを選択します。「Level」コントロールを回すことで再生レベルを調整することができます。
+18
+12
+6
0
-6
-12
-18
125HzMenu
Master EQ Preferences
Level
1. 「Left/Right」コントロールを回してソースをハイライトします。
2. 「Select」コントロールを押してソースを選択します。「Cancel」コントロールを押すと何
もしないでそのまま終了します。
3. 「Menu」コントロールを回してPrefsメニューリストに戻ります。
Left : Master
Right : Master
LeftMenu
USB to PC Preferences
Right
Left : Master
Right : Master
LeftMenu
USB from PC Preferences
Right
1. 「Left/Right」コントロールを回して送り先をハイライトします。
2. 「Select」コントロールを押して送り先を選択します。「Cancel」コントロールを押すと
何もしないでそのまま終了します。
3. 「Menu」コントロールを回してPrefsメニューリストに戻ります。
Tomorrow Is Too late.wav
Sarah.wav
Mistakes for Love.mp3
Sun Behind the Clouds.wav
Hey God Maker. mp3
LevelSelectMenu

30-
日本語
操作
• Versions – DSPファームウェアのリビジョンを表示します。
• ToneMatch – T4S/T8Sに保存されているToneMatchプリセットバンクのリストを表示します。プリセットバンクについての最
新の情報は、.www.Bose.com/livesoundを参照してください。
• L1 Power Stand – L1® Model 1S/IIパワースタンドと接続されている時は、画面に「Connected」と表示されます。
Versions
T4S v1.0.0
Menu
Preferences
C: Ovation Guitars
B: Audix Mics.
A: Taylor Guitars
Menu
ToneMatchPreferences
Connected
Menu
L1 Stand Preferences
シーンの読み込みと保存を行う
シーンはT4S/T8S ToneMatch®ミキサーの状態のスナップショットです。
• シーンにはToneMatchミキサーのすべての設定とMute、FXMute、CH Editボタンの状態が記憶されています。
• シーンにはチャンネルトリム、チャンネルの音量、マスター音量、ヘッドホンレベル、およびファンタム電源スイッチの状態は記憶されません。
All Channels
Singer/Songwriter
Load Shared Save
Scenes
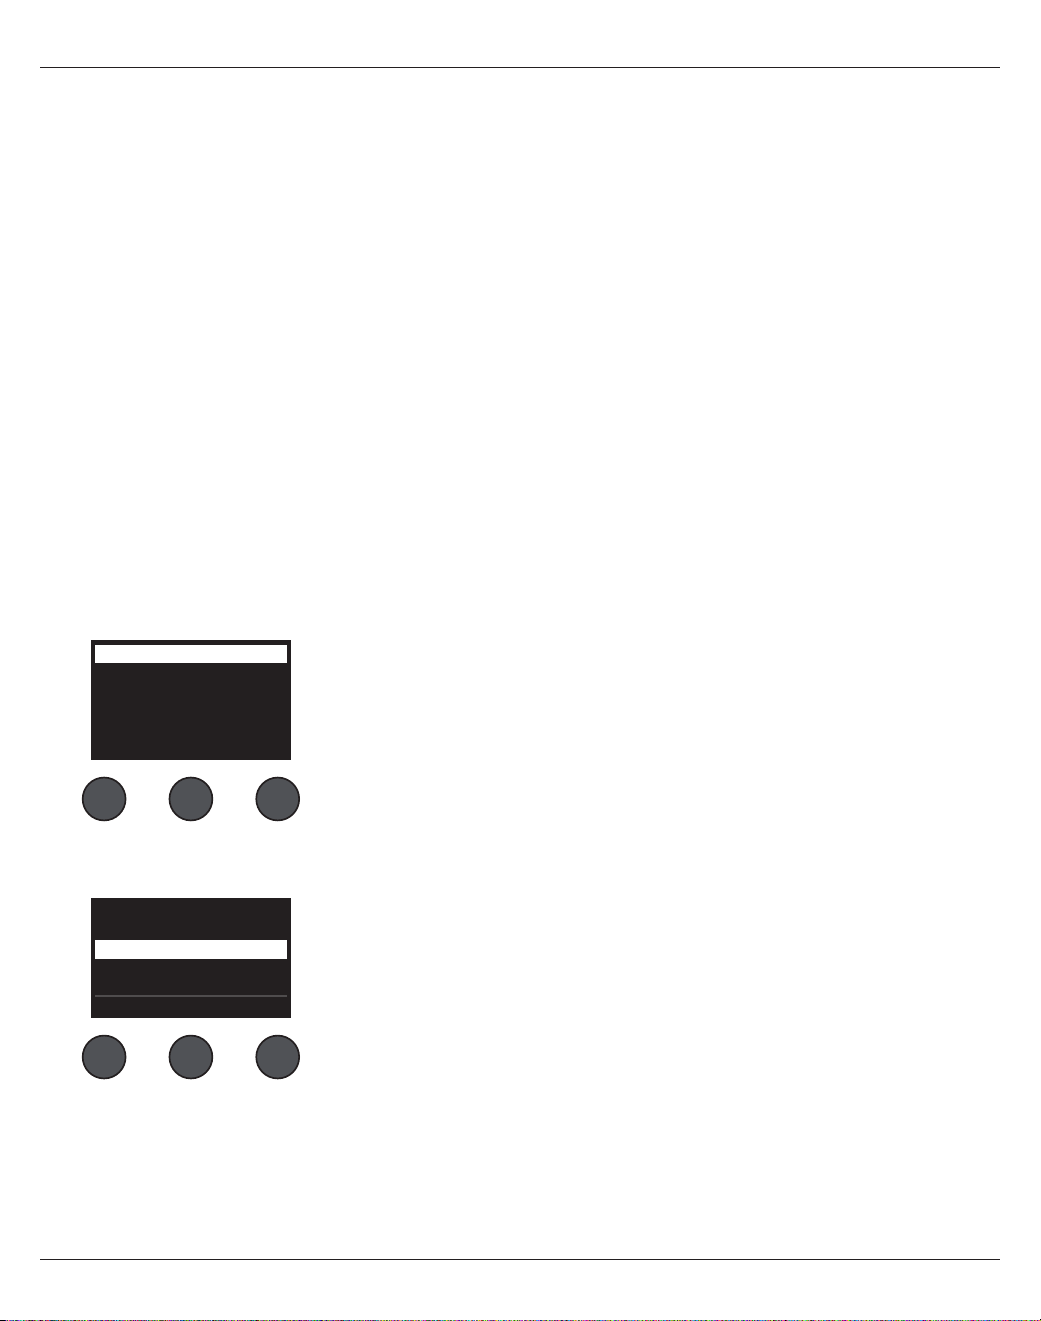
操作
日本語
- 31
T4S/T8Sには3つのタイプのシーンがあります。
• Bose Scene(5シーン): 読み出し専用の工場出荷時にプリセットされたシーンです。編集したり上書きしたりすることはできません。
• ユーザーシーン(10シーン): ユーザー定義可能なシーンで、好みの設定を保存したり呼び出したりすることができます。ユーザーシーン
は必要に応じて何回でも上書きして更新することができます。
• シェアードシーン(1シーン): ユーザー定義可能なシーンで、T4S/T8S ToneMatch®ミキサーの他のユーザーとシェアしたい設定を保存
することができます。シェアードシーンは、L1®アップデーターソフトウェアを使ってコンピューターにアップロードすることができます。こ
のアップデーターソフトウェアは、www.Bose.com/livesoundで入手できます。
シーンの読み込み方法:
1. ロータリーセレクターで「Scenes」を選択します。
2. その時点で読み込まれているシーン名が太字で表示されます。「Load」コントロールを回してシーンリストをスクロールし、目的の
シーン名をハイライトさせます。
3. 「Select」コントロールを押してシーンを選択します。「Cancel」コントロールを押すと何もしないでそのまま終了します。
注
:
「
Select
」あるいは「
Cancel
」コントロールを
10
秒間押さないと、何もしないで元の「
Scenes
」画面に戻ります。何の変更も行われず、
操作前に読み込まれていたシーンがそのまま画面に表示されます。
4. 「Select」コントロールを押した場合は、「Are you sure?」と画面に表示されます。シーンを読み込むためには「Yes」コントロールを
押します。「No」コントロールを押すと、シーンの設定はそのままで、何も変えずに終了します。
注
:
「
Yes
」あるいは「
No
」コントロールを
10
秒間押さないと、何もしないで元の「
Scenes
」画面に戻ります。何の変更も行われず、操作前に
読み込まれていたシーンがそのまま画面に表示されます。
シーンの保存方法:
1. ロータリーセレクターで「Scenes」を選択します。その時点で読み込まれているシーンが表示されます。
2. 「Save」コントロールを回して、保存したいシーンをハイライトさせます。「Select」あるいは「Cancel」を押します。「Cancel」を押した
場合は、リスト表示から抜けて終了します。
All Channels
Singer/Songwriter
Load Shared Save
Scenes
注
:
「
Select
」あるいは「
Cancel
」コントロールを
10
秒間押さないと、何もしないで元
の「
Scenes
」画面に戻ります。何の変更も行われず、操作前に読み込まれていたシー
ンがそのまま画面に表示されます。
My Scene 01
My Scene 02
My Scene 03
Cancel Select
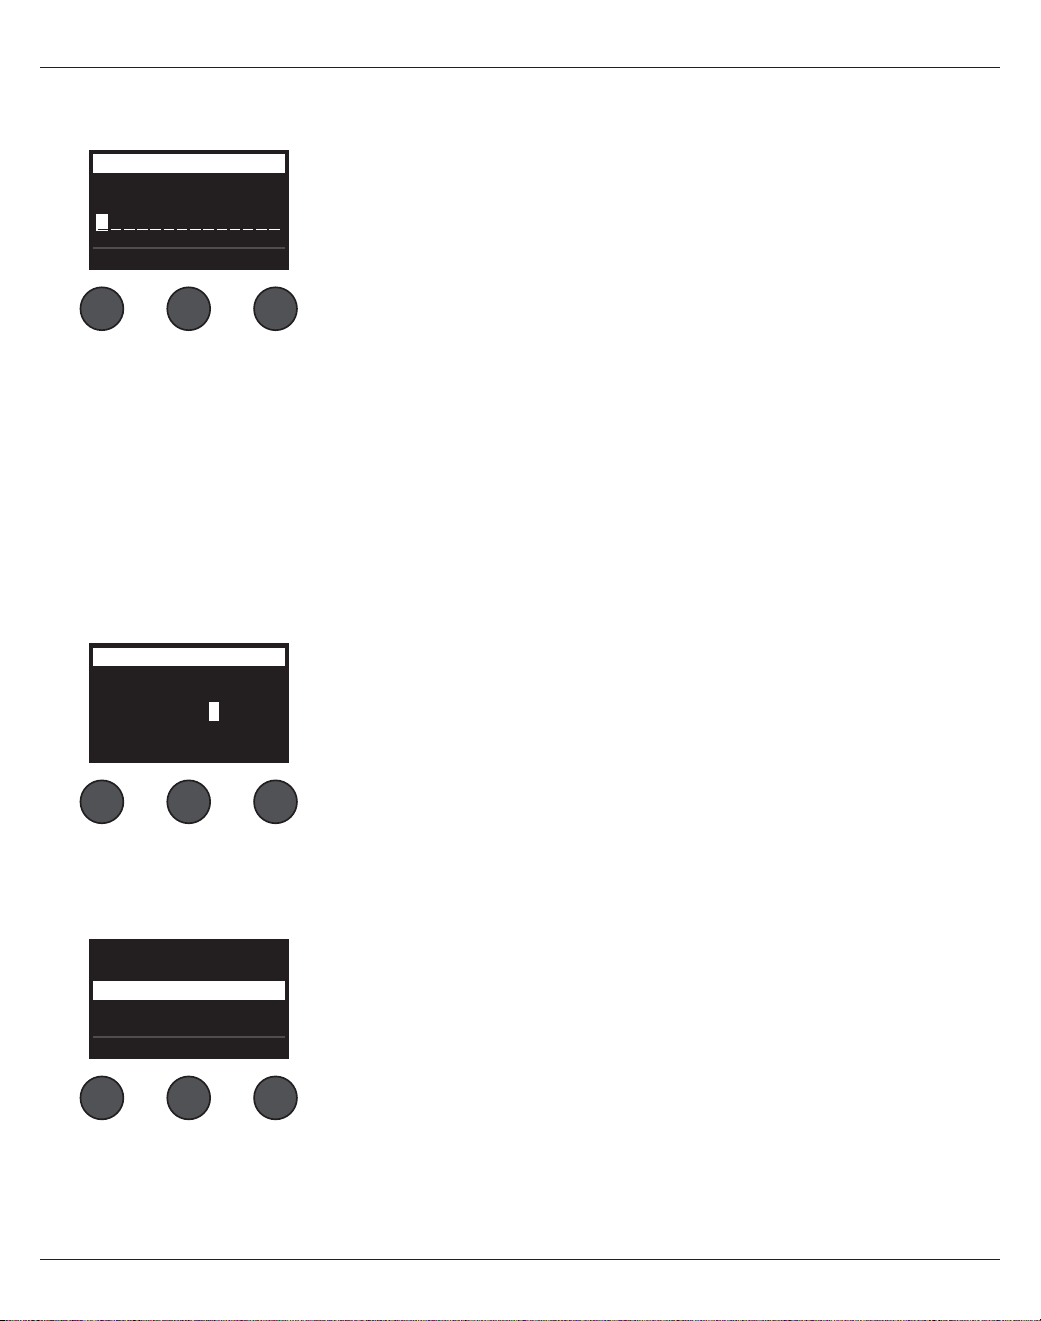
32-
日本語
操作
3. 「Select」を押した場合は、「Rename」画面でシーン名を編集します。「Save」を押すと、その時に表示されている名前を使って手順
4に進みます。
保存する前にシーン名を変更する方法:
シーン名を変更するために、以下の編集オプションが用意されています。シーン名の変更が終わったら、「Save」コントロールを押して手
順4に進みます。
• 文字の選択/変更を行う: 「Rename」画面が表示されている間は、「Cursor」コントロールを回して、シーン名の文字列中のハイライト
を移動させることができます。変更したい文字やスペースにハイライトを移動させてください。「Select」コントロールを回すことで、ハイ
ライト部の文字を変更することができます。
• 文字マップを使う: 「Rename」画面が表示されている間は、「Cursor」コントロールを回して、シーン名の文字列中のハイライトを移動
させることができます。変更したい文字やスペースにハイライトを移動させてください。ここで「Select」コントロールを押すと、文字マッ
プが表示されます。「Select」コントロールを回すと、カーソルを左右に移動させることができます。「Up/Dn」コントロールを回すと、
カーソルを上下に移動させることができます。目的の文字がハイライトされたら「Select」を押します。選択した文字で、シーン名でハイ
ライトしていた元の文字が置き換えられます。
• clear(消去)、insert(挿入)、delete(削除)の機能の使い方: 「Rename」画面が表示されている間に、「Cursor」コントロールを回し
て、カーソル(シーン名の文字列中のハイライト部)を移動させます。「Cursor」コントロールを押すと、編集操作のメニューが表示されま
す。「Select」コントロールを回して、使いたい操作をハイライトします。「Select」コントロールを押すと、その操作が実行されます。
Clear Character – カーソルでハイライトされている文字を消去し、スペースに置き換えます。
Clear All – テキスト行をすべて消去します。
Clear to End – ハイライトされている文字も含めてカーソルより右にあるテキストをすべて消
去します。
Insert – ハイライトされた文字の左に1文字分のスペースを挿入します。
Delete – カーソルでハイライトされた文字、あるいはスペースを削除します。.
Rename
J
rstuvwxyzABCDEFGHI
123456789, ;/\()|+-
KLMNOPQRSTU VWXYZ0
abcdefgh jklmnopqi
Cancel Up/Dn Select
Scenes
Clear To End
Insert
Clear All
Clear Character
Delete
CancelSelect
Rename
M yScene 01
CursorSave Select
Scenes

操作
日本語
- 33
4. 「Are You Sure?」と画面に表示されたときは、「Yes」コントロールを押すことで、そのシーンが保存されます。また、「No」コントロー
ルを押すことで、シーンを保存すること無く終了させることができます。
シーンをシェアする
T4S/T8S ToneMatch®ミキサーの他のユーザーとシェアしたいシーンを作成した場合は、[To Shared Scene]のスロットに保存するこ
とでシェアードシーンとして保存することができます。シェアードシーンは、L1®アップデーターを使ってコンピューターにアップロードするこ
とができます。このアップロードされたシェアードシーンのファイルを他のT4S/T8Sユーザーのコンピューターに送ることでシェアします。
シェアードシーンを送られたユーザーは、L1アップデーターを使って、自分のT4S/T8Sにシェアードシーンをダウンロードすることができま
す。L1アップデーターは、www.Bose.com/livesoundから入手することができます。
シェアードシーンの保存方法:
1. シェアしたいシーンを読み込みます(31ページの「シーンの読み込み方法」を参照してください)。
2. 「Save」コントロールを押してシーンリストを表示します。
3. 「Select」コントロールを回してシーンリストをスクロールし、「[To Shared Scene]」をハイライトさせます。「Select」あるいは
「Cancel」を押します。「Cancel」を押した場合は、リスト表示から抜けて終了します。
4. 「Select」を押した場合は、「Rename」画面でシーン名を編集します(32ページの「保存する前にシーン名を変更する方法」を参照し
てください)。表示されている名前をそのまま使う場合は、手順5に進みます。
Are You Sure?
YesNo
注
:
「
Select
」あるいは「
Cancel
」コントロールを
10
秒間押さないと、何もしないで元の
「
Scenes
」画面に戻ります。何の変更も行われず、操作前に読み込まれていたシーンがそのまま
画面に表示されます。
[To Shared Scene]
My Scene 10
My Scene 09
Cancel Select
Rename
M yScene 07
CursorSave Select
Scenes

34-
日本語
操作
5. 「Save」コントロールを押して、シェアードシーンとして保存します。
6. 「Are You Sure?」と画面に表示されたときは、「Yes 」コントロールを押すことで、そのシーンがシェアードシーンとして保存されます。
また、「No」コントロールを押すことで、そのままシーンを保存しないで終了させることができます。
注
:
「
Yes
」あるいは「
No
」
コントロールを10
秒間
押さないと、何もしないで元の「Scenes」画面に戻ります。
何の変更も行われず、操作前に
読み込まれていたシーンがそのまま画面に表示されます。
7. 「Shared」コントロールを押すことで、シェアードシーンとして保存されているシーンを確認することができます。
注
: T4S/T8S
でシェアードシーンのために用意しているストア領域は
1
つだけです。シーンをシェアードシーンとして保存すると、前回保存
したシェアードシーンは常に上書きされ
T4S/T8S
上から無くなります。
L1アップデーターを使ってコンピューターとシーンのアップロード/ダウンロードを行う方法の詳細については、www.Bose.com/
livesoundを参照してください。
All Channels
Singer/Songwriter
Load Shared Save
Scenes All Channels
My Scene 07
Current Shared Scene:
Back
Scenes
押す

操作
日本語
- 35
Bose Scene
最初の一歩として使えるシーンの例として5つのBose Sceneが用意されています。Bose Sceneを読み込んだ後、設定を変更して、その
変更した設定を「My Scene」や「Shared Scene」として保存できます。
工場出荷時の設定
このシーンはミキサーの設定を工場から出荷された時の設定に戻します。このシーンを読み込むと、現在読み込まれているシーンに対し
て行ったすべての変更が消去されます。
CH 1~4(T4S/T8S) CH 5~8(T8S)
ToneMatch
Active
Utility
Flat
zEQ
Bypass
Low Mid High
0 dB 0 dB 0 dB
Para EQ
Bypass
Comp/Gate
Bypass
Comp1
Mod
Bypass
Chorus1
Delay
Bypass
Digital
Reverb
Bypass
Digital
Aux
Mute
Pre: With EQ & Fx
Global設定
Preferences
Active screen Status
USB to PC Left/Right:Master
USB from PC Left/Right:Master
Master Out Post Master Volume
Reverb Type
Type Medium
Time 50%
Bal 50%
注
:
すべてのエフェクトの、工場出荷時の設定のリストは、
42
ページの「工場出荷時の設定」を参照してください。
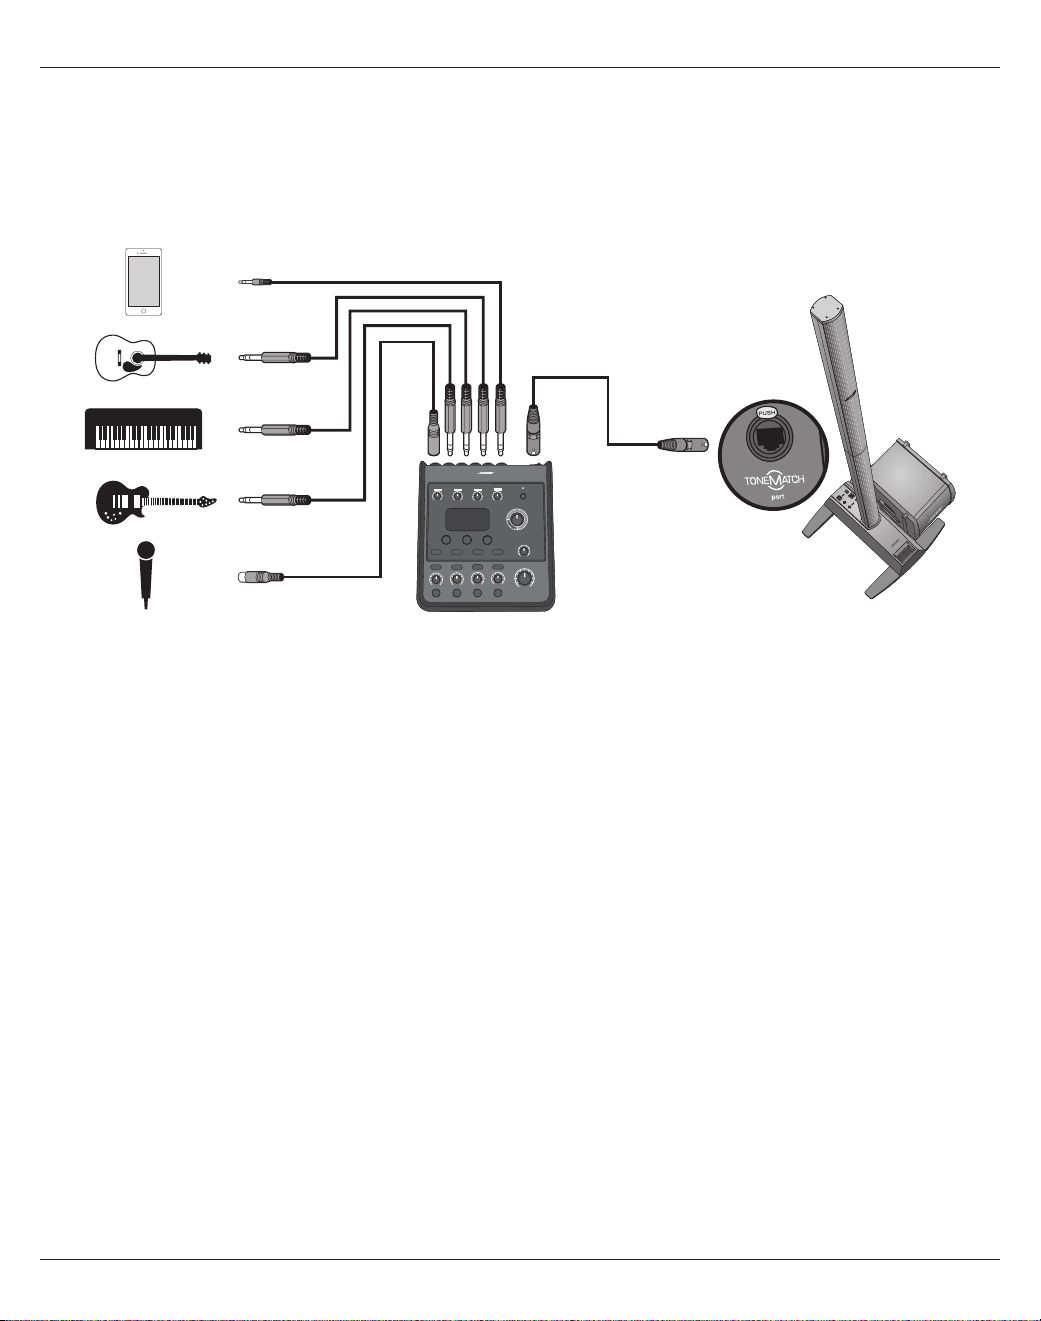
36-
日本語
操作
Singer/Songwriter(シンガーソングライター)
このシーンは、キーボードあるいはギターを演奏し、MP3のトラックで伴奏を流すこともある、そんなシンガーソングライターのためにデザ
インされています。
図16.Singer/Songwriterシーンを使ったセットアップの例

操作
日本語
- 37
マイク ギター キーボード ベース
AUX IN
CH 1 CH 2 CH 3 CH 4 5/6
ToneMatch
Active Active Active Active
N/A
Vocal Mics Acoustic Guitar Keyboards Basses
Handheld Mics Steel String w/ piezo General Keys Active Bass 1
zEQ
Active Active Active Active
N/A
Low Mid High Low Mid High Low Mid High Low Mid High
0 dB 0 dB 0 dB 0 dB 0 dB 0 dB 0 dB 0 dB 0 dB 0 dB 0 dB 0 dB
Para EQ Bypass Bypass Bypass Bypass N /A
Comp/Gate
Bypass Bypass Bypass Bypass
N/A
Comp2 Comp2 Comp2 Comp2
Mod
Bypass Bypass Bypass Bypass
N/A
Chorus1 Chorus1 Chorus3 Chorus1
Delay
Bypass Bypass Bypass Bypass
N/A
Digital Digital Digital Digital
Reverb
Active Active Bypass Bypass
N/A
Medium (Global) Medium (Global) Medium (Global) Medium (Global)
Pan/Aux
Center Center Center Center AUX IN
AUX 1-2 50% AUX 1-2 50% AUX 1-2 50% AUX 1-2 50% 5 Lvl 6 Lvl
Pre: With EQ & Fx Pre: With EQ & Fx Pre: With EQ & Fx Pre: With EQ & Fx 50% 50%
Singer/Songwriterシーンのチャンネル設定
Global設定
Preferences
Active screen Status
USB to PC Left/Right:Master
USB from PC Left/Right:Master
Master Out Post Master Volume
Reverb Type
Type Medium
Time 50%
Bal 50%

38-
日本語
操作
DJ/Playback(DJプレイバック)
DJ/Playbackシーンは、DJイベントやオーディオ再生が必要なパフォーマンスのためにデザインされています。このシーンでは、2本の
マイクの他、モバイルデバイスやDJミキサー、ノートPCなどを接続することが想定されています。
図17.DJ/Playbackシーンを使ったセットアップ(ステレオ)の例
操作
日本語
- 39
DJ/Playbackシーンのチャンネル設定
Global設定
Preferences
Active screen Status
USB to PC Left/Right:Master
USB from PC Left/Right:Master
Master Out Post Master Volume
Reverb Type
Type Medium
Time 50%
Bal 50%
ソース1L(左) ソース1R(右)
マイク マイク
AUX IN
CH 1 CH 2 CH 3 CH 4 5/6
ToneMatch
Active Active Active Active
N/A
DJ/Playback DJ/Playback Vocal Mics Vocal Mics
Flat zEQ Controls Flat zEQ Controls Handheld Mics Handheld Mics
zEQ
Active Active Active Active
N/ALow Mid High Low Mid High Low Mid High Low Mid High
0 dB 0 dB 0 dB 0 dB 0 dB 0 dB 0 dB 0 dB 0 dB 0 dB 0 dB 0 dB
Para EQ Bypass Bypass Bypass Bypass N/A
Comp/Gate
Bypass Bypass Bypass Bypass
N/A
Limit Limit Comp2 Comp2
Mod
Bypass Bypass Bypass Bypass
N/A
Chorus1 Chorus1 Chorus3 Chorus1
Delay
Bypass Bypass Bypass Bypass
N/A
Digital Digital Digital Digital
Reverb
Bypass Bypass Bypass Bypass
N/A
Medium (Global) Medium (Global) Medium (Global) Medium (Global)
Pan/Aux
Left Right Center Center AUX IN
AUX 1-2 50% AUX 1-2 50% AUX 1-2 50% AUX 1-2 50% 5 Lvl 6 Lvl
Pre: With EQ & Fx Pre: With EQ & Fx Pre: With EQ & Fx Pre: With EQ & Fx 50% 50%

40-
日本語
操作
Full Band(フルバンド)
このシーンは、ドラムキット、ベースギター、エレキギター、ボーカル、MP3プレーヤーのためにセットアップされています。
図18.Full Bandシーンを使ったセットアップ(ステレオ)の例
SYSTEMINPUT 2INPUT 1
VOLUME VOLUME
FRONT
LED
POWER
LIMIT
OFF
FULL RANGE
WITH SUB
EQ
MIC
LINE LEVEL
SIGNAL INPUT
INPUT
POWER
ON
OFF
100-240V~50/60Hz
1000W
LINE OUTPUT
SIGNAL/CLIP SIGNAL/CLIP POWER/FAULT
LIMIT
SYSTEM
INPUT 2INPUT 1
LINE OUTPUT LINE OUTPUT
LINE INPUT
POWER/FAULT
LIMIT
SIGNAL/CLIP
LINE INPUT
NORM
REV
THRU
HPF
POLARITY
LINE
OUTPUT EQ
POWER
LIMIT
OFF
FRONT
LED

操作
日本語
- 41
Full Bandシーンのチャンネル設定
Global設定
Preferences
Active screen Status
USB to PC Left/Right:Master
USB from PC Left/Right:Master
Master Out Post Master Volume
Reverb Type
Type Medium
Time 50%
Bal 50%
キックドラム ドラム(オーバー
ヘッド)
ドラム(オーバー
ヘッド)
ベース ギター マイク マイク マイク
AUX IN
CH 1 CH 2 CH 3 CH 4 CH 5 CH 6 CH 7 CH 8 9/10
ToneMatch
Active Active Active Active Active Active Active Active
N/A
Percussion Percussion Percussion Basses Electric Guitars Vocal Mics Vocal Mics Vocal Mics
Kick, General General Overhead General Overhead Active Bass 1 Mic'd Amp w/ SM57 Handheld Mics Handheld Mics Handheld Mics
zEQ
Active Active Active Active Active Active Active Active
N/A
L M H L M H L M H L M H L M H L M H L M H L M H
0
dB
0
dB
0 dB 0
dB
0
dB
0
dB
0
dB
0
dB
0 dB 0
dB
0
dB
0
dB
0
dB
0
dB
0
dB
0
dB
0
dB
0 dB 0
dB
0
dB
0
dB
0
dB
0
dB
0
dB
Para EQ Bypass Bypass Bypass Bypass Bypass Bypass Bypass Bypass N /A
Comp/Gate
Active Bypass Bypass Active Bypass Bypass Bypass Bypass
N/A
Kick 1 Comp2 Comp2 Comp2 Comp2 Gate Gate Gate
Mod
Bypass Bypass Bypass Bypass Active Bypass Bypass Bypass
N/A
Chorus1 Chorus1 Chorus1 Chorus1 Chorus1 Chorus1 Chorus1 Chorus1
Delay
Bypass Bypass Bypass Bypass Bypass Bypass Bypass Bypass
N/A
Digital Digital Digital Digital Digital Digital Digital Digital
Reverb
Bypass Bypass Bypass Bypass Bypass Active Active Active
N/A
Medium (Global) Medium (Global) Medium (Global) Medium (Global) Medium (Global) Medium (Global) Medium (Global) Medium (Global)
Pan/Aux
Center Center Center Center Center Center Center Center AUX IN
AUX 1-4 50% AUX 1-4 50% AUX 1-4 50% AUX 1-4 50% AUX 1-4 50% AUX 1-4 50% AUX 1-4 50% AUX 1-4 50% 9 Lvl 10 Lvl
Dry: After Preamp Dry: After Preamp Dry: After Preamp Dry: After Preamp Dry: After Preamp Dry: After Preamp Dry: After Preamp Dry: After Preamp 50% 50%
工場出荷時の設定
42-
日本語
工場出荷時の設定
工場出荷時のT4S/T8Sミキサーの設定については以下の表を参照してください。T4S/T8Sを以下の工場出荷時の設定に戻すに
は、Bose SceneのFactory Settingsシーンを読み込んでください。
コンプレッサー/ゲートの工場出荷時の設定
Type Thresh Gain
Compressor 1: Light -16.0 dB 3.0 dB
Compressor 2: Medium -16.0 dB 5.0 dB
Compressor 3: Heavy -16.0 dB 8.0 dB
Limiter -10.0 dB 0 dB
De-Esser -10.0 dB 0 dB
Thresh Speed
Noise Gate -70.0 dB 50%
Thresh Tight
KickGate1: Regular -20.0 dB 100%
KickGate2: Fast -20.0 dB 100%
モジュレーションの工場出荷時の設定
Type Thresh Gain Speed
Chorus 1: Brite 50% 50% 0.50 Hz
Chorus 2: Warm 70% 100% 0.15 Hz
Chorus 3: Dark 25% 25% 3.0 Hz
Flanger 1: Tape 50% 50% 1.00 Hz
Flanger 2: Feedback 50% 100% 2.00 Hz
Speed Feedback
Phaser 1: Stomp 0.50 Hz 0%
Phaser 1: Rack 0.50 Hz -75%
Phaser 1: Warm 1.00 Hz -26%
Phaser 1: Bright 0.50 Hz -76%
Speed Depth
Tremolo 5.00 Hz 50%
ディレイの工場出荷時の設定
Type Mix Time Feedback
Digital 30% 150 ms 30%
Analog 30% 275 ms 20%
Tape 30% 350 ms 30%
リバーブタイプの工場出荷時の設定
Type Bal. Time Time Range
Plate 50% 20% 0-4.6 s
Small 50% 15% 0-0.8 s
Medium 50% 25% 0-1.9 s
Large 50% 50% 0-3.5 s
Cavern 50% 100% 0~7.0秒

日本語
- 43
お手入れについて
故障かな?と思ったら
この製品のご使用中に問題が発生した場合は、まず以下の表の内容をご確認ください。問題が解決しない場合は、.
www.Bose.com/livesound のオンラインヘルプをご確認ください。オンラインヘルプで解決策が見つからない場合は、ボーズのユー
ザーサポートセンターまでお電話で直接お問合せください。
問題 確認いただく項目
T4S/T8Sを電源に接続し、
電源スイッチをオンにして
も動作しない。
• お使いのACコンセントに電源がきているか確認します。ACコンセントに照明器具や他の機器を接続
して動作するか試してください。ACコンセントテスターをお持ちの場合は、テスターを使ってコンセン
トの状態を確認してください。
T4SをL1® Model II/1S systemと接続している場合:
• ToneMatch®ケーブルがミキサーとL1パワースタンドに正しく接続されていることを確認します。
• L1の電源コードのプラグがACコンセント側、パワースタンド側、ともに完全に挿入されていることを確
認します。
• L1パワースタンドの電源が入っており、パワーLEDが青く点灯していることを確認します。
T4S/T8Sをオンにしても、
音が出ない。
• マスターボリュームコントロールが絞られていないことを確認します。
• 聴こうとしている入力チャンネルがミュートされていないことを確認します。
• 聴こうとしている入力チャンネルのボリュームコントロールが絞られていないことを確認します。
• 該当する入力チャンネルのトリムコントロールが適切に調整され、LEDが緑(その入力チャンネルの信
号が充分に大きいことを示します)になっていることを確認します。
• Prefsメニューの入力/出力のレベルメーターを利用して、入力段、出力段の信号レベルを確認しま
す。
• 入力ソース(楽器)の出力ボリュームが上げられていることを確認します。
• 入力ソース(楽器)とミキサーを別のケーブルで接続してみます。
• 入力ソース(楽器)をL1パワースタンドや他のアンプに直接接続して、入力ソースが正しく動作してい
ることを確認します。
• ミキサーの電源をオフにして、30秒待ちます。ミキサーの電源を再びオンにします。
T4SをL1® Model II/1S systemと接続している場合:
• パワースタンドの電源を切り、ToneMatchケーブルプラグとToneMatchポートの接続をやり直しま
す。再び、パワースタンドの電源を入れます。
• お手元に別のToneMatchケーブルをお持ちの場合は、そちらで試してみてください。別の
ToneMatchケーブルがない場合は、一般のEthernetケーブルで試してみてください。
• T4S/T8Sのマスター出力をパワースタンドのアナログ入力にフォーンプラグケーブルで接続します。
パワースタンドのトリムコントロールを上げて、音が出ることを確認します。
• パワースタンドのパワーLEDが青く点灯していることを確認します。LEDが赤く点灯している場合は、
ボーズのユーザーサポートセンターまでお電話で直接お問合せください。
44-
日本語
お手入れについて
問題 確認いただく項目
T4S/T8Sに接続したマイクまたは楽
器の音質が悪い。
• 不要なzEQやパラメトリックイコライザーが設定されていないことを確認します。
• マイク/楽器に対して、適切なToneMatch®ミキサープリセットが選択されていることを確
認します。ToneMatchミキサープリセットを使わない場合は、ToneMatchが「Flat」に設定
されていることを確認します。
• 入力チャンネルに不要なエフェクト(コンプレッサー/ゲート、モジュレーション、ディレイ、リ
バーブ)が設定されていないことを確認します。Prefsメニューの「Status」画面で各チャン
ネルのアクティブなエフェクトを確認します。
• マイク/楽器に対して、T4S/T8Sの入力トリムが適切に調整されていることを確認します。
入力信号LEDが緑でなく赤く点灯している場合は、緑になるまでトリムを下げます。
• 別のケーブルでマイク、楽器と接続してみます。
• マイク/楽器とT4S/T8Sミキサーを接続しているケーブルをチェックします。ケーブルのプ
ラグが、マイク/楽器の出力コネクター、T4S/T8Sの入力コネクターに完全に挿入されてい
ることを確認します。
• マイクや楽器に設定項目がある場合は、正しく設定されているか確認します。
• マイクや楽器にバッテリーが使用されている場合は、バッテリーを確認します。
エフェクトがかからない。
• 正しい「CH Edit」ボタンを押したか確認します。
• 問題のチャンネルの「FX Mute」ボタンが押されていないか確認します。
コントロールのつまみを操作しても反
応しない。
• ミキサーの電源をオフにします。30秒待ってからミキサーの電源を再度オンにします。
マスターボリュームコントロールが利
かない。
• Prefsメニューの「Master Out」の設定で、マスター出力が「Post Master Volume」動作に
設定されていることを確認します。
T4S/T8Sの入力に何もつないでい
ないのに、L1®システムからわずかに
ハム(バズ)が聞こえる。
• T4S/T8SとL1パワースタンドの電源を同じACコンセントから取ります。
• ACコンセントテスターを使用して、T4S/T8SとL1パワースタンドが、逆相、あるいはオープ
ンなどの問題があるACコンセントに接続されていないか確認します。
• 電源延長コードを使用している場合は、そのコード内の接続も同様に確認してください。
低域、中域、高域の音のバランスが
良くない。
• 不要なzEQやパラメトリックイコライザーが設定されていないことを確認します。
• マイク/楽器に対して、適切なToneMatch®ミキサープリセットが選択されていることを確
認します。ToneMatchミキサープリセットを使わない場合は、ToneMatchが「Utility」カテ
ゴリーの「Flat」に設定されていることを確認します。
CDやMP3プレーヤーなどの機器を
使ってステレオレコーディングをしま
したが、その再生音質が悪い。
• お使いの機器のLチャンネルをAux5、RチャンネルをAux6(T8Sの場合はAux9とAux10)
の入力に接続します。Aux5/6(9/10)入力はラインレベルの入力として設計されています。
• CDやモバイルデバイスに対しては、イコライザーや低音のブーストは使わないようにしま
す。
• コンピューターでレコーディングソフトウェアを使うときは、ソフトウェアの要件を確認しま
す。48 kHz/24ビット動作のソフトウェア設定が必要になる場合があります。

日本語
- 45
お手入れについて
問題 確認いただく項目
マイクがフィードバックを起こし、ハウ
リングしている。
• 直接スピーカーの方に向けないように、マイクの向きを変更します。
• 別のマイクで試してみます。
• ステージ上のL1システムやボーカリストの位置を変えてみます。
• L1システムとマイクの距離を増やします。
• マイクチャンネルのzEQを使い高域の音を落とします。
• マイクチャンネルでフィードバックを起こしていると思われる特定の周波数を、パラメトリッ
クイコライザーで減衰させることで解消できないか試します。
• 使われているすべてのエフェクト(モジュレーション、ディレイ、リバーブ)を一時的にバイパ
スして、エフェクトがフィードバックの問題に関与していないかを確認します。
Aux出力から音が正しく出力され
ない。
• Aux出力が各入力チャンネルの適切なタップポイントに接続される設定になっているか確
認します。21ページの「入力信号のAux出力へのルーティング」を参照してください。
• 各入力でAux出力への信号レベルが適切に設定されているか確認します。
USB接続でT4S/T8Sからコンピュー
ターにオーディオ信号を送れない。
• USBケーブルがミキサーとコンピューターに正しく接続されていることを確認します。
• 別のUSBケーブルで試してみます。
• ミキサーの電源が入っていることを確認します。
• ミキサーの目的の入力チャンネルがUSBのL/R出力チャンネルにアサインされていること
を確認します。Prefsメニューの「USB to PC」の設定を確認します。
• 各入力チャンネルのトリムレベルが適切に調整され、緑のLEDが点灯し、入力信号レベルが
十分であることを確認します。
• Prefsメニューから入力と出力のレベルメーターを表示して、入力段と出力段の信号を確認
します。
• コンピューターに他のUSB対応オーディオ機器を接続して、コンピューターのUSB入力が正
しく動作していることを確認します。
• コンピューターでレコーディングソフトウェアを使うときは、ソフトウェアの要件を確認しま
す。48 kHz/24ビット動作のソフトウェア設定が必要になる場合があります。
T4S/T8Sにフラッシュドライブを接続
しても反応しません。
• フラッシュドライブ側に問題が無いか見極めるため、異なるブランドのフラッシュドライブを
接続してみます。
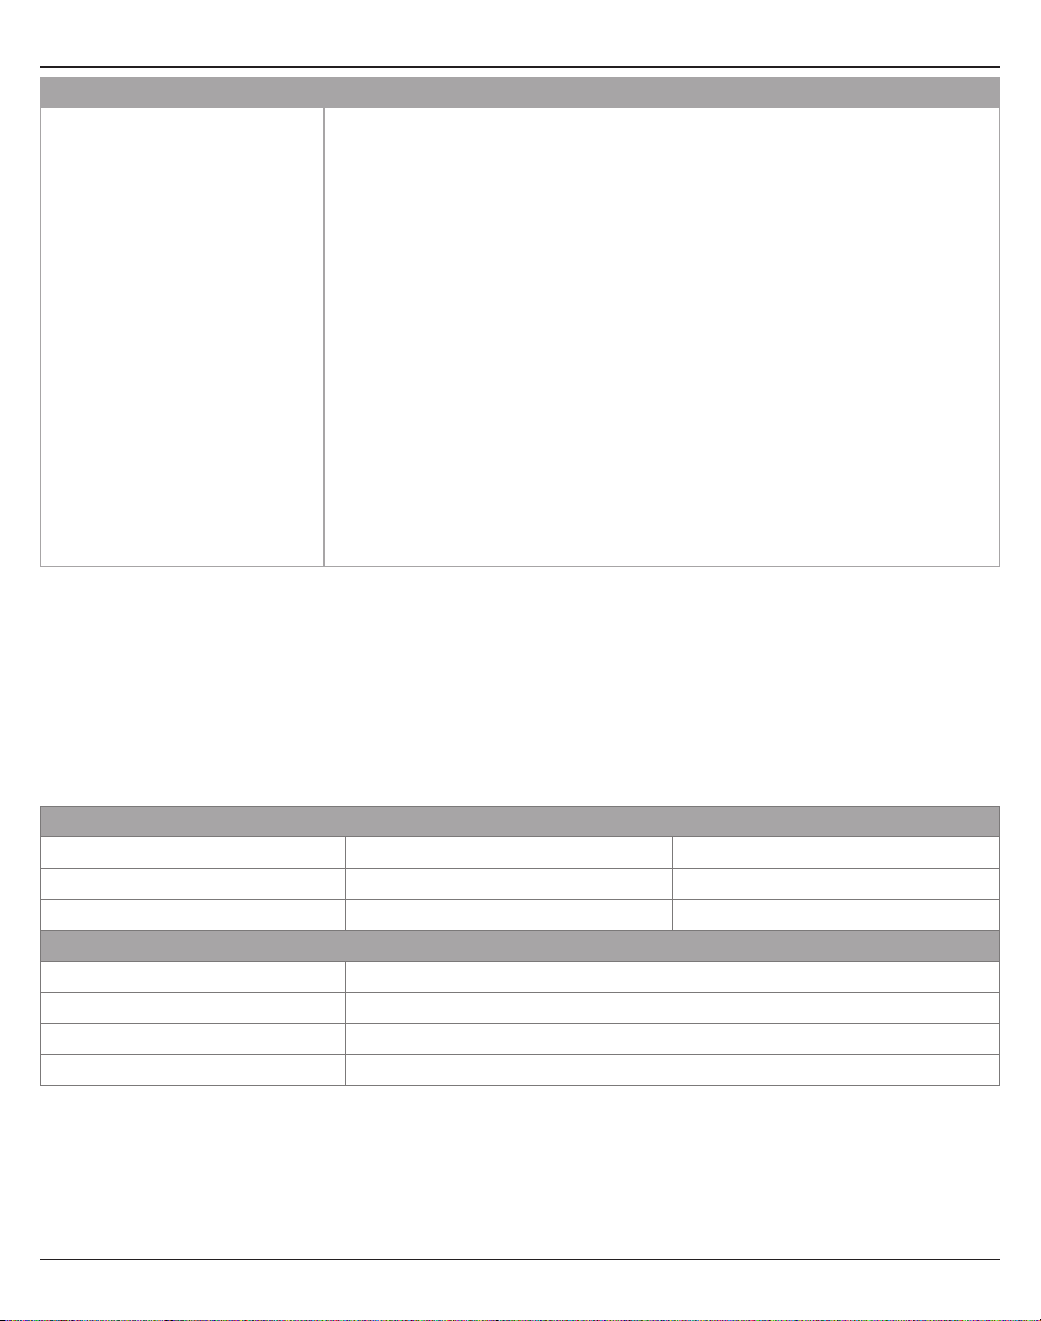
46-
日本語
お手入れについて
問題 確認いただく項目
USB接続でコンピューターからT4S/
T8Sにオーディオ信号を送れない。
• USBケーブルがミキサーとコンピューターに正しく接続されていることを確認します。
• 別のUSBケーブルで試してみます。
• ミキサーの電源が入っていることを確認します。
• コンピューターがオーディオトラックを再生しており、コンピューターのオーディオ設定が無
効になっていないことを確認します。
• USB信号が目的のミキサー入力にアサインされていることを確認します。Prefsメニューの
「PC to USB」の設定を確認します。
• USB信号の入力にアサインされたミキサーの入力チャンネルがミュートされていないこと、
その入力チャンネルのボリュームコントロールが絞られていないことを確認します。
• 該当する入力チャンネルのトリムコントロールが適切に調整され、LEDが緑に点灯(その入
力チャンネルの信号が充分に大きいことを示します)していることを確認します。
• Prefsメニューから入力と出力のレベルメーターを表示して、入力段と出力段の信号を確認
します。
• コンピューターに他のUSB対応オーディオ機器を接続して、コンピューターのUSB出力が正
しく動作していることを確認します。
• コンピューターでレコーディングソフトウェアを使うときは、ソフトウェアの要件を確認しま
す。48 kHz/24ビット動作のソフトウェア設定が必要になる場合があります。
お手入れについて
• 製品本体を拭くときは、必ず乾いた柔らかいクロス(布)を使用してください。
• 溶剤、化学薬品、またはアルコール、アンモニア、研磨剤などを含むクリーニング液は使用しないでください。
• 製品の近くでスプレーを使用しないでください。また開口部に液体をこぼさないでください。
技術情報
機械的仕様
T4S T8S
外形寸法(L x W x H) 214 mm x 184 mm x 83 mm 214 mm x 311 mm x 83 mm
質量
1.0 kg 1.9 kg
電気的仕様
A/DおよびD/A 変換器 24ビット
サンプルレート
48 kHz
USB 2.0以降、ケーブル(A-Bタイプ)、ポート(Aタイプ、Bタイプ)
接続するPCの要件 Microsoft Windows 7以降、Mac OS 10.5以降

日本語
- 47
その他の情報
その他の情報
お使いの製品(アクセサリー、交換パーツを含む)の詳細は、取扱説明書を参照してください。オンライン(pro.Bose.com)で入手できま
す。弊社Webサイトをご参照ください。
保証
保証の内容および条件につきましては、付属の保証書をご覧ください。保証の詳細については、pro.Bose.comにアクセスしてください。
製造日
シリアル番号の8桁目の数字は製造年を表します。「6」は2006年または2016年です。
南北アメリカ
(米国、カナダ、メキシコ、中央アメリカ、南アメリカ).
Bose Corporation.
Framingham, MA 01701 USA.
Corporate Center: 508-879-7330.
Americas Professional Systems, .
Technical Support: 800-994-2673
オーストラリア
Bose Pty Limited.
Unit 3/2 Holker Street.
Newington NSW Australia.
61 2 8737 9999
ベルギー
Bose N.V./ S.A.
Limesweg 2, 03700.
Tongeren, Belgium.
012-390800
中国
Bose Electronics (Shanghai) Co Ltd.
25F, L’Avenue.
99 Xianxia Road.
Shanghai, P.R.C.200051 China.
86 21 6010 3800
フランス
Bose S.A.S.
26-28 avenue de Winchester.
78100 St. Germain en Laye, France.
01-30-61-63-63
ドイツ
Bose GmbH.
Max-Planck Strasse 36D 61381.
Friedrichsdorf, Deutschland.
06172-7104-0
香港
Bose Limited.
Suites 2101-2105, Tower One, Times Square.
1 Matheson Street, Causeway Bay, Hong Kong.
852 2123 9000
インド
Bose Corporation India Private Limited.
Salcon Aurum, 3rd Floor.
Plot No. 4, Jasola District Centre.
New Delhi – 110025, India.
91 11 43080200
イタリア
Bose SpA.
Centro Leoni A – Via G. Spadolini.
5 20122 Milano, Italy.
39-02-36704500
日本
ボーズ合同会社.
〒106-0032.
東京都港区六本木 1-4-5.
アークヒルズサウスタワー 13F.
www.bose.co.jp
オランダ
Bose BV.
Nijverheidstraat 8 1135 GE.
Edam, Nederland.
0299-390139
英国
Bose Ltd.
1 Ambley Green, Gillingham Business Park .
KENT ME8 0NJ.
Gillingham, England.
0870-741-4500
輸入者情報
EU.
Bose Products B.V., Gorslaan 60, 1441 RG
Purmerend, The Netherlands
中国.
Bose Electronics (Shanghai) Company Limited,
Part C, Plan 9, No. 353 North Riying Road, China
(Shanghai) Pilot Free Trade Zone
台湾.
Bose Taiwan Branch, 9F-A1, No. 10, Section 3,
Minsheng East Road, Taipei City 104, Taiwan.
Tel: +886-2-2514 7676
メキシコ.
Bose de México, S. de R.L. de C.V., Paseo de las
Palmas 405-204, Lomas de Chapultepec, 11000
México, D.F..
Tel: +5255(5202) 3545
その他の国については、Webサイトをご覧ください
連絡先情報
次のウェブサイトにアクセスしてください。pro.Bose.com

2 -
简体中文
重要安全说明
请阅读并保留所有安全和使用说明。
1. 请阅读这些说明。
2. 请保留这些说明。
3. 请注意所有警告。
4. 请遵守所有说明。
5. 请勿在近水区域使用本设备。
6. 只能使用干布进行清洁。
7. 请勿堵塞任何通风口。请按照制造商的说明进行安装。
8. 防止踩踏或挤压电源线,尤其是插头、电源插座以及设备上的出口位置。
9. 只能使用制造商指定的附件/配件。
10. 只能使用制造商指定的或随本设备一起销售的推车、支架、三角架、托架或工作
台。如果使用推车,则在移动推车和设备时应格外小心,以免因倾倒而造成伤
害。
11. 在雷雨天气或长时间不用时,请拔下本设备插头。
12. 任何维修事宜均请向专业人员咨询。如果设备有任何损坏,均需进行维修,例如电源线或
插头受损、液体溅入或物体落入设备内、设备受淋或受潮、不能正常工作或跌落。
警告/小心:
本产品含有磁性材料。有关这是否会影响到您的植入式医疗器械,请咨询您的医生。
• 此产品不适合在室内涉水设施区域安装或使用(包括但不限于室内游泳馆、室内水上乐园、
有热水浴缸的房间、桑拿房、蒸汽浴室以及室内溜冰场)。
• 为降低失火或电击风险,请勿使本产品受雨淋、水溅或受潮。不适用于 IPX4-9 产品。
• 请将本产品放置到远离火源和热源的地方。请勿将明火火源(如点燃的蜡烛)置于本产品
上或本产品附近。
• 未经授权切勿改装本产品。
• 请勿将本产品与逆变器配合使用。
• 请勿在汽车或船舶上使用本产品。
• 产品仅使用随附的电源。
• 请勿将支架或产品放置或安装在任何热源旁边,比如火炉、暖气片、热调节装置或其他可产
生热量的设备(包括功放)。
• 请勿在不稳定的三脚架/支架上使用 ToneMatch® T4S/T8S 数字混音台。混音台设计为仅
可在 ¼ 英寸(6 毫米)的螺钉上使用,并且三脚架/支架必须能够支撑重量最低为 1.9 千
克(4.1 磅),整体尺寸为 214 x 311 x 83 毫米(8.4 x 12.25 x 3.25 英寸)的设备。使用
无法承载 T4S/T8S 混音台尺寸和体积的三脚架/支架可能会造成不稳定和危险情况,进而
导致受伤。
• 包含可能导致窒息危险的小部件。不适合 3 岁以下的儿童使用。
注意:
• 本系统随附的扬声器线缆和互连连接线不可用于入墙式安装。请根据当地建筑法规选择正确
的入墙式安装线缆和连接线。
• 如果将电源插头或设备耦合器作为断路设备,那么此类断路设备应当保持可以随时恢复工
作的状态。
• 由于有通风需求,Bose 建议不要将本产品放置在密闭空间中,比如墙洞或封闭式橱柜。
监管信息
本设备符合 FCC 规则第 15 部分的规定和加拿大工业部免许可证 RSS 标准。本设备在操作时
必须满足以下两个条件:(1) 本设备不能造成有害干扰 (2) 本设备必须能够承受接收到的任何干
扰,包括导致意外操作的干扰。
本产品符合所有适用的欧盟指令要求。您可以从网站 www.Bose.com/compliance
找到完整的符合性声明。
产生电噪声的产品相关信息(美国 FCC 合规声明)
注意:本设备已经过测试,符合 FCC 规则第 15 部分有关 A 类数字设备的各项限制。这些限制
旨在提供合理的保护,防止设备在商业环境中运行时产生有害干扰。本设备会产生、使用并辐射
射频能量,如果不按照说明手册安装和使用,则可能会对无线电通讯造成有害干扰。在居民区操
作本设备可能会导致有害干扰,这种情况下,用户需要自行出资排除干扰。
未经 Bose Corporation 明确批准,擅自更改或修改本设备会使用户操作本设备的权利失效。
为保证法规合规,应使用屏蔽连接线。
本产品符合加拿大 ICES-003 A 类规范。
CAN ICES-3(A)/NMB-3(A)
本产品符合针对 E2 电磁环境的所有 EN55103-2 抗扰要求。
Part Name
Toxic or Hazardous Substances and Elements
Names and Contents of Toxic or Hazardous Substances and Elements
PCBs
Metal parts
Plastic parts
Speakers
Cables
This table is prepared in accordance with the provisions of SJ/T 11364.
0: Indicates that said hazardous substance contained in all of the homogenous materials for this part
is below the limit requirement of GB/T 26572.
X: Indicates that said hazardous substance contained in at least one of the homogenous materials
used for this part is above the limit requirement of GB/T 26572.
Lead
(Pb)
Mercury
(Hg)
Cadmium
(Cd)
Hexavalent
(CR(VI))
Polybrominated
Biphenyl (PBB)
Polybrominated
diphenylether
(PBDE)
X
X
00
0
0
0
0
0
0
0
0
0
0
0
0
0
0
0
0
0
0
0
0
0
0
0
0
X
X
此标志表示本产品不得作为生活垃圾丢弃,必须送至相关回收部门回收利用。正确处
理和回收有助于保护自然资源、人类健康和环境。想要获得更多关于此产品的处理和
回收的信息,请联系当地市政当局、垃圾处理服务部门或您购买此产品的商店。
由
DCE
安全部提供

目录
简体中文
- 3
简介
产品概述 .......................................................................................5
产品功能 ....................................................................................5
内含物品 .......................................................................................5
控制和连接面板
T4S ToneMatch® 数字混音台 ......................................................................6
控制面板 ....................................................................................6
连接面板 ....................................................................................7
T8S ToneMatch® 数字混音台 ......................................................................8
控制面板 ....................................................................................8
连接面板 ....................................................................................9
系统设置
移除/安装保护盖 ................................................................................10
安装选择 .......................................................................................11
在摄像机三脚架上安装 T4S/T8S ................................................................11
通过数字端口连接 T4S ........................................................................... 12
通过模拟端口连接 T4S/T8S ...................................................................... 13
连接 ToneMatch® 电源 ........................................................................... 14
连接 T4S/T8S 到电脑 ........................................................................... 15
连接闪存盘到 T4S/T8S .......................................................................... 15
操作
读取 T4S/T8S 显示屏 ........................................................................... 16
优化输入增益和输出音量 ......................................................................... 17
使用主音量控制 ................................................................................. 18
静音通道 ................................................................................... 18
静音通道音效 ............................................................................... 18
使用旋钮选择器 ................................................................................. 19
编辑通道声音 ............................................ ............................... ........20
使用声像调节/辅助功能 Pan/Aux ...............................................................20
使用调谐器 Tuner ............................................................................20
选择 ToneMatch® 预设 .......................................................................22
调整 zEQ ..................................................................................22
调整参量均衡 Para EQ .............................. ..........................................23
使用压缩器/门限功能 Comp/Gate ..............................................................23
使用音效 Mod .............................................. .................................25
添加延时 Delay. . . . . . . . . . . . . . . . . . . . . . . . . . . . . . . . . . . . . . . . . . . . . . . . . . . . . . . . . . . . . . . . . . . . . . . . . . . . . . 26
添加混响 Reverb ............................................................................26

目录
4 -
简体中文
使用全局功能 Global ............................................................................27
选择混响类型 Reverb Type ................. ...................................................27
使用偏好实用程序 Prefs .......................................................................28
加载和保存场景 Scenes .......................................................................30
共享场景 ...................................................................................33
Bose 场景 .....................................................................................35
出厂设置 ...................................................................................35
Singer/Songwriter ..........................................................................36
DJ/Playback ...............................................................................38
Full Band ..................................................................................40
出厂设置
出厂设置 ......................................................................................42
维护与保养
故障排除 ......................................................................................43
清洁 ..........................................................................................46
技术信息 ......................................................................................46
其他资源
联系信息 ......................................................................................47
进口商信息 .................................................................................47
其他信息 ......................................................................................47
有限保修 ...................................................................................47

简体中文
- 5
简介
产品概述
T4S 和 T8S ToneMatch® 数字混音台外形紧凑,具有 4 和 8 通道接口,专为演奏者而设计,让您自如掌控音乐。强劲的 DSP 引擎和直观用
户控件,提供录音室级别的 EQ、动态处理功能和音效处理能力。集成的 Bose® ToneMatch® 处理技术和 zEQ 能够打造出色音质,特别是在
连接到 Bose L1 或 F1 系统时,可以实现全面的端对端音色控制。通过这些坚固的 ToneMatch 数字混音台,您可以使用触觉控件、便于读取
的 LED 显示屏和场景调用功能,在舞台上自信地表演。ToneMatch 数字混音台,表演艺术家梦寐以求的舞台伙伴。
产品特性
强大的音频处理功能
• 通过先进的数字音频处理功能,提供更新的、录音室级别的音效
• 音效包括压缩器、限幅器、咝声消除器、噪声门、合唱、镶边效果
器、移相器、颤音、延时和混响音效
• Bose® ToneMatch® 处理技术,打造自然的人声和乐器声音
• zEQ 集中处理 ToneMatch 预设的声音,可以立即有效调节声音
• 各通道有独立的 ToneMatch、EQ、动态处理和音效
• 辅助输出端使用专属混响,所有通道使用全局共享混响
• 主输出 EQ 帮助补偿场地声学环境
• 和 Bose L1 和 F1 扬声器系统一起使用时,实现全面的端对端音
色优化
无缝的现场控制
• 触觉控件和指示灯设计在现场舞台上供演奏者和 DJ 使用
• 快速学习用户界面
• 内置节拍延时、半音调节器和可调用的场景
• LED 显示屏和亮起的控件即使在光线昏暗的场所也易于读取和
使用
高密度连接
• 小巧的数字立体声混音台,提供强大的连接和控制功能
• 4 个 (T4S) 或 8 个 (T8S) 带有麦克风或乐器 XLR 组合插孔的高
品质音频前置功放和可切换幻象电源
• 2 个辅助输入端连接额外音源,2 个 (T4S) 或 4 个 (T8S) 辅助
输出端
• USB-A 和 USB-B U 盘播放或 PC/Mac 接口
• ToneMatch 数字音频输出和电源(仅 T4S)
• 平衡的 ¼ 英寸 TRS 和 XLR(仅 T8S)立体声输出端
• 独立的耳机输出端
方便的操作功能
• 坚固的外壳外置磁性保护盖以保护控件和接口
• 包含连接 Bose L1 Model II 或 L1 Model 1S 系统数字音频和电源
(T4S) 的 ToneMatch 线缆,或包含 1 个通用电源 (T8S)
• 底部嵌入件允许使用标准摄像机安装配件,以就近安装
ToneMatch 数字混音台
T4S ToneMatch 数字混音台和保护盖 ToneMatch 线缆
ToneMatch 电源T8S ToneMatch 数字混音台和保护盖
如需选装设备和配件的完整列表,请访问 www.Bose.com。
内含物品
参见下表了解混音台包装箱中包含的内容:
T4S
T8S

控制和连接面板
6 -
简体中文
T4S ToneMatch® 数字混音台
控制面板
图 1.T4S 控制面板
q 输入信号/削波 LED (1-4) - 通过颜色显示输入信号状态:
绿色:表示有输入信号
红色:表示输入音源正在削波
w 微调控件 (1-4) - 调整各对应通道的输入灵敏度。
e 显示屏 - 提供功能菜单和系统信息。
r 编辑控件 - 这三个旋转/按压钮控件允许您选择或调整出现在显示屏上的项目/数值。
t 通道编辑按钮 (1-4) - 选择您要修改的通道。
y FX Mute 按钮 (1-4) - 旁通所选通道上的音效、延时和混响音效。
u 音量控件 (1-4) - 调整各对应通道的音量大小。
i 静音按钮 (1-4) - 静音各对应通道的音频输出。
o 主音量控制 - 调整总输出音量。
a 耳机音量控制 - 调整耳机输出的音量大小。
s 旋钮选择器 - 允许访问全局和通道相关参数,可使用编辑控件来调整。
d 幻象电源开关 - 应用 +48V 电源到输入通道 1-4。红色 LED 表示幻象电源打开。
f 耳机插孔 - 仅可搭配耳机使用,最小阻抗 24Ω。
q
w
i
u
y
t
r
e
d
s
a
o
f
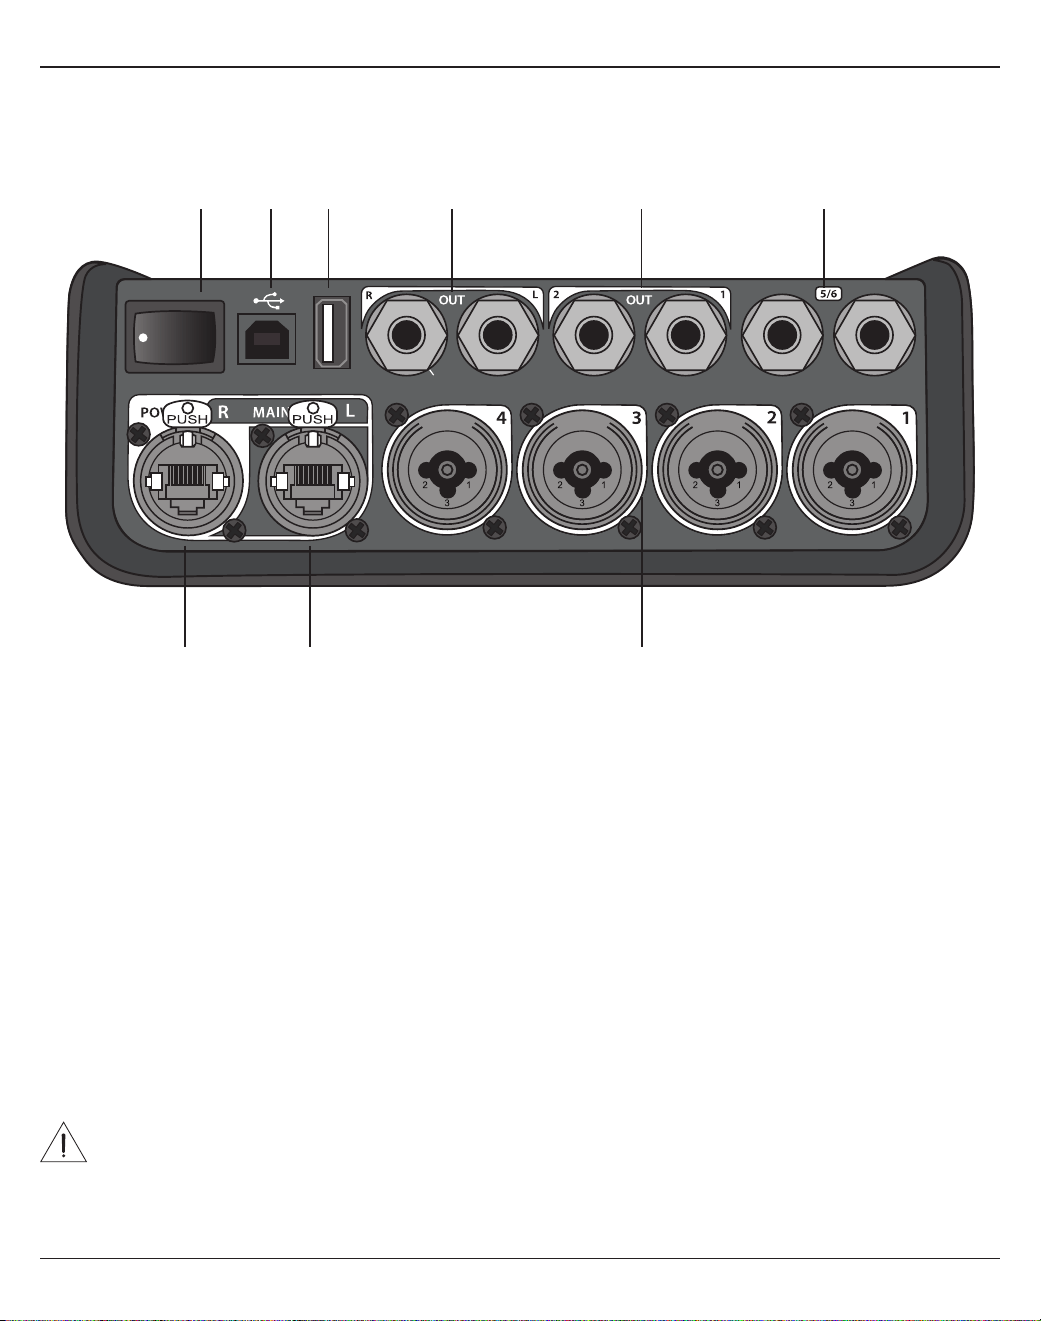
简体中文
- 7
控制和连接面板
图 2.T4S 连接面板
连接面板
q 电源开关 - 打开或关闭混音台。
w USB 2.0 B 型 - 允许将混音台连接到电脑的 USB 接口。
e USB 2.0 A 型 - 允许从闪存盘传输音频的 USB 接口。
r 模拟左/右输出 - 主模拟输出。接受 ¼ 英寸的 TRS 平衡或 TS 非平衡线缆。
t 辅助输出 - 2 个用户可定义的模拟输出。可设置为音量控制器前、均衡器和音效后,或音量控制器后。接受 ¼ 英寸的
TRS 平衡线缆。
y 辅助输入 - 模拟输入通道 5/6。接受 ¼ 英寸的线路电平输入 TRS 平衡或 TS 非平衡线缆。可用于立体声输入信号。
u
输入 1-4 - 模拟输入通道 1-4。接受麦克风 XLR 平衡线缆或 ¼ 英寸的高阻抗输入(如吉他)TRS 平衡或 TS 非平衡线缆。
i 数字主输出(左)- 通过立体声数字端口连接 2 个 L1® Model 1S/II 系统。
注意:仅在立体声模式下,
与数字主输出(右)一起使用。
o 电源端口/数字主输出(右)- 可提供给 L1 Model 1S/II 系统使用的数字输出。通过 L1 Model 1S/II 电源底座为 T4S 混音
台供电。还可通过 ToneMatch 电源(未随附在 T4S 包装中)从交流插座供电。接受随附的 ToneMatch® 线缆。
小心:尽管
ToneMatch
端口接受标准
RJ-45
接口,但是请勿使用此接口将
T4S
连接到电脑或手机网络。
USB AUDIO
M
( )
MONO
q
w
e r t y
uio

控制和连接面板
8 -
简体中文
T8S ToneMatch® 数字混音台
控制面板
图 3.T8S 控制面板
q 输入信号/削波 LED (1-8) - 通过颜色显示输入信号状态:
绿色:表示有输入信号
红色:表示输入音源正在削波
w 微调控件 (1-8) - 调整各对应通道的输入灵敏度。
e 显示屏 - 提供功能菜单和系统信息。
r 编辑控件 - 这三个旋转/按压钮控件允许您选择或调整出现在显示屏上的项目/数值。
t 通道编辑按钮 (1-8) - 选择您要修改的通道。
y FX Mute 按钮 (1-8) - 旁通所选通道上的音效、延时和混响音效。
u 音量控件 (1-8) - 调整各对应通道的音量大小。
i 静音按钮 (1-8) - 静音各对应通道的音频输出。
o 主音量控制 - 调整总输出音量。
a 耳机音量控制 - 调整耳机输出的音量大小。
s 立体声输出电平表 - 允许您目测输出电平。
d 旋钮选择器 - 允许访问全局和通道相关参数,可使用编辑控件来调整。
f 幻象电源开关 - 应用 +48V 电源到输入通道 1-8。红色 LED 表示幻象电源打开。
g 耳机插孔 - 仅可搭配耳机使用,最小阻抗 24Ω。
q
w
i
o
g
a
s
d
f
u
y
t
r
e
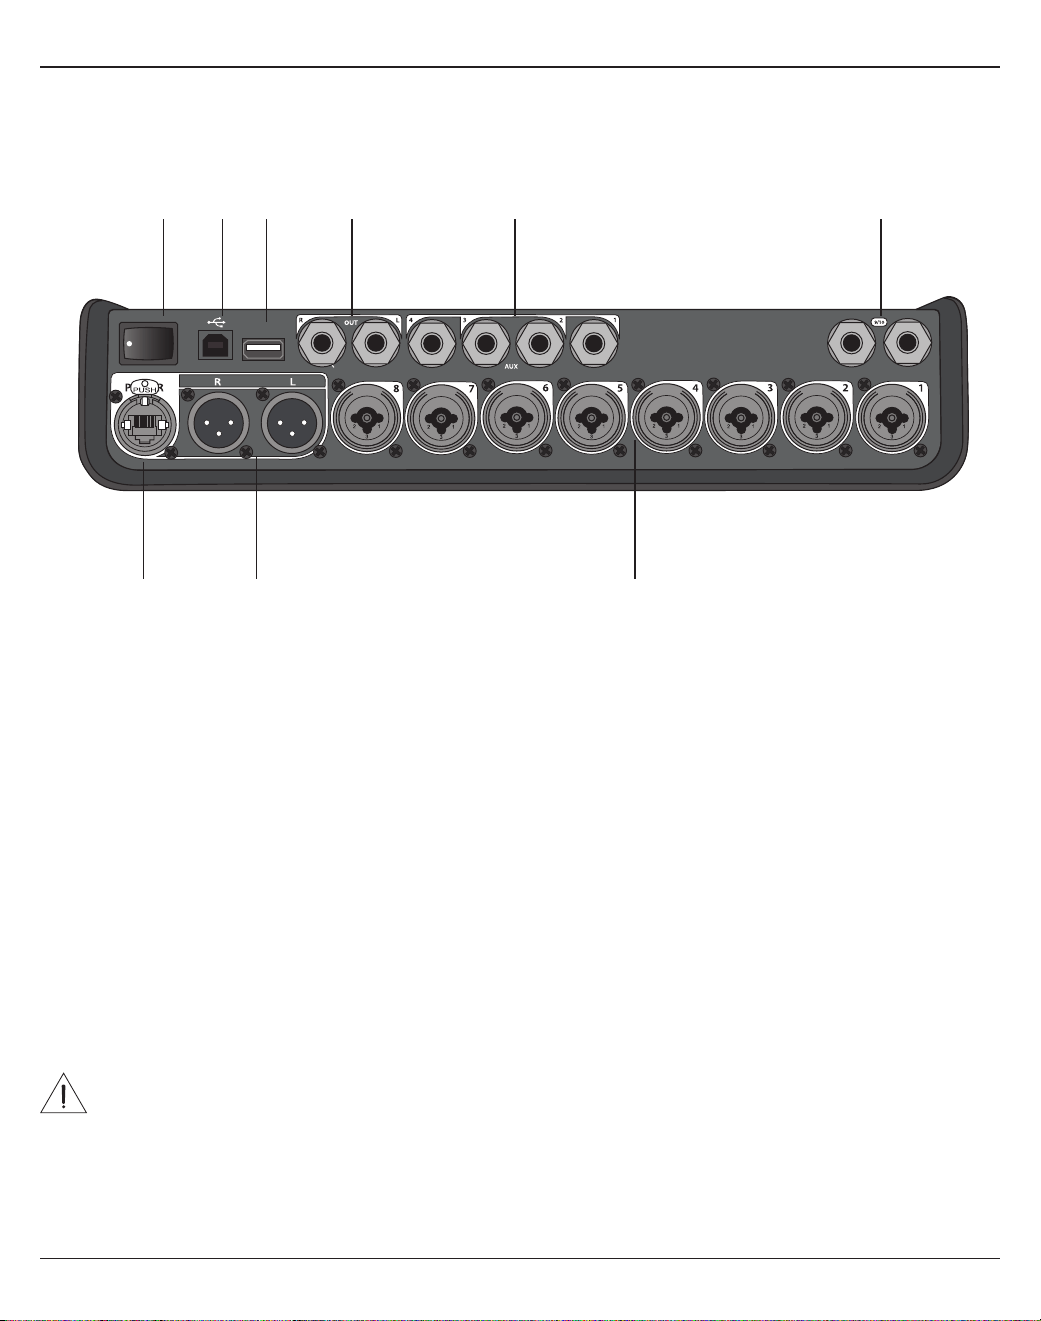
简体中文
- 9
控制和连接面板
图 4.T8S 连接面板
连接面板
q 电源开关 - 打开或关闭混音台。
w USB 2.0 B 型 - 允许将混音台连接到电脑的 USB 接口。
e USB 2.0 A 型 - 允许从闪存盘传输音频的 USB 接口。
r 模拟左/右输出 - 主模拟输出。接受 ¼ 英寸的 TRS 平衡和 TS 非平衡线缆。
t 辅助输出 - 4 个用户可定义的模拟输出。可设置为音量控制器前、均衡器和音效后,或音量控制器后。接受 ¼ 英寸的
TRS 平衡或 TS 非平衡线缆。
y 辅助输入 - 模拟输入通道 9/10。接受 ¼ 英寸的线路电平输入 TRS 平衡或 TS 非平衡线缆。可用于立体声输入信号。
u
输入 1-8 - 模拟输入通道 1-8。接受麦克风 XLR 平衡线缆或 ¼ 英寸的高阻抗输入(如吉他)TRS 平衡或 TS 非平衡线缆。
i XLR 立体声输出 - 立体声模拟输出。接受立体声输出 XLR 平衡线缆。
o 数字电源端口 - 使用 ToneMatch 电源(参见第 14 页上的“连接 ToneMatch® 电源”)。
注意:
T8S
不可通过数字端口连接到
L1® Model 1S/II
。
小心:尽管
ToneMatch
端口接受标准
RJ-45
接口,但是请勿使用此接口将
T8S
连接到电脑或手机网络。
M
( )
MAIN OUT
USB AUDIO
MONO
q
w
e r t y
uio

10 -
简体中文
系统设置
移除/安装保护盖
T4S/T8S ToneMatch® 数字混音台在装入包装箱前已在顶部面板上安装了保护盖。保护盖用于在运输或存放混音台期间对
控制面板进行保护。
移除保护盖:
1. 将拇指放在保护盖前面的缺口上,然后向前滑动保护盖。
2. 抓住保护盖背部,然后抬起以移除保护盖。
安装保护盖:
1. 从后到前,将保护盖盖到混音台上。
2. 磁性保护盖将自行闭合并固定在混音台上。
图 5.移除和安装保护盖
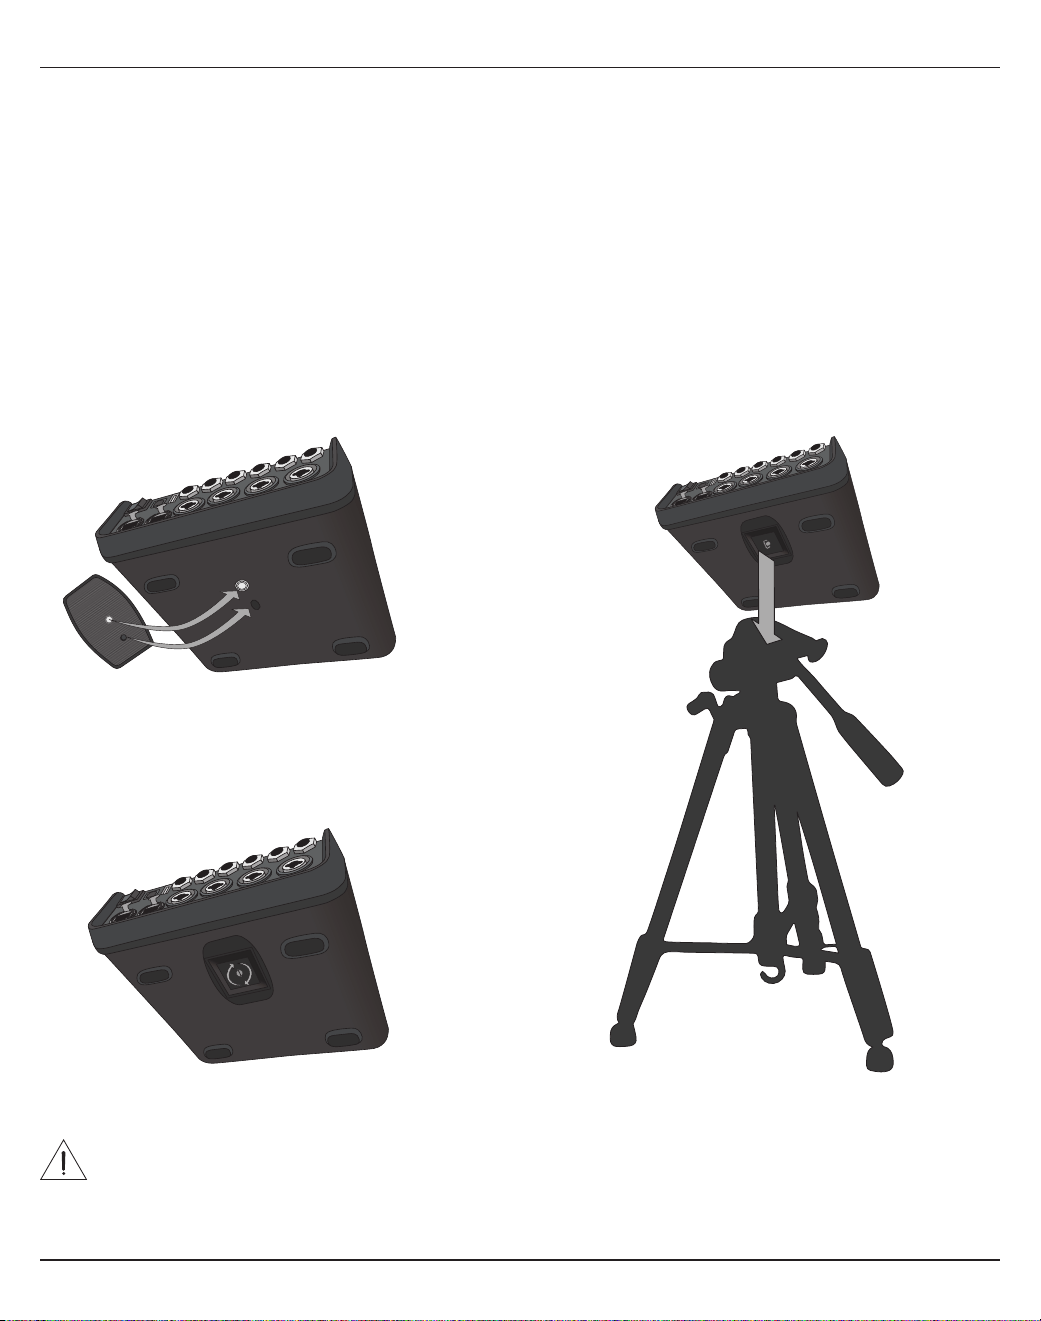
系统设置
简体中文
- 11
图 6.将支架固定在 T4S 上 图 8.使用支架将 T4S 安装到三脚架
图 7.将支架连接到 T4S
安装选择
T4S/T8S 随附 1 个 ¼ 英寸(6 毫米)的安装螺钉嵌入件。这可以使其安装到包含 ¼ 英寸(6 毫米)安装螺钉的许多可用
产品上,包括摄像机三脚架。
在摄像机三脚架上安装 T4S/T8S
1. 撑开摄像机三脚架支腿,然后固定在所需高度。
2. 从摄像机三脚架顶部移除支架,然后用螺钉将支架固定在 T4S/T8S 底部。确保 T4S/T8S 上的小凹口和支架上的凸起
对齐。参见图 6。
3. 将连接了 T4S/T8S 的支架装回到摄像机三脚架上。参见图 8。
警告:请勿在不稳定的三脚架
/
支架上使用
ToneMatch® T4S/T8S
数字混音台。混音台设计为仅可在
¼
英寸(
6
毫
米)的螺钉上使用,并且三脚架
/
支架必须能够支撑重量最低为
1.9
千克(
4.1
磅),整体尺寸为
214 x 311 x 83
毫米
(
8.4 x 12.25 x 3.25
英寸)的设备。使用无法承载
T4S/T8S
混音台尺寸和体积的三脚架
/
支架可能会造成不稳定和
危险情况,进而导致受伤。

12 -
简体中文
系统设置
通过数字端口连接 T4S
1. 确保 L1 Model 1S/II 和 T4S 已切断电源,并且 T4S 主音量控制已设为最低。
2. 将 ToneMatch® 线缆一端插入 T4S 的电源端口/数字主输出(右)。将 ToneMatch 线缆另一端插入电源底座上的
ToneMatch 端口。
注意:要连接
T4S
到
2
个
L1 Model 1S/II
电源底座,请使用
ToneMatch
线缆将第二个电源底座连接到
T4S
上的数字
主输出(左)端口。
3. 打开混音台然后打开 L1 Model 1S/II 电源底座。
4. 连接您的乐器并调整电平。请参阅第 17 页上的“优化输入增益和输出音量”。
图 9.2 个 L1 model II 系统通过数字端口连接到 T4S
USB AUDIO
M
( )
MONO
注意:
T8S
无法进行数字连接,并且无法通过
L1 Model 1S/II
进行供电。

系统设置
简体中文
- 13
通过模拟端口连接 T4S/T8S
1. 确保所连接的设备和 T4S/T8S 已切断电源,并且 T4S/T8S 主音量控制已设为最低。
2. 使用 XLR 平衡电缆,连接一台或两台设备到 T8S 的 XLR 立体声输出(参见图 10)。
注意:使用
¼
英寸的
TRS
电缆(单独出售),可通过模拟(右)输出端口将
T4S/T8S
连接到设备。将
TRS
电缆
的另一端插入设备模拟输入端口。要连接
T4S/T8S
到两台设备,请使用
¼
英寸的
TRS
电缆,将第二台设备连接到
T4S/T8S
的模拟(左)输出端口。
3. 连接 ToneMatch® 电源到 T4S/T8S 的电源端口,然后将其插入通电的交流插座。请参阅第 14 页上的“连接
ToneMatch® 电源”。
4. 打开 T4S/T8S 混音台,然后打开设备。
5. 连接您的乐器并调整电平。请参阅第 17 页上的“优化输入增益和输出音量”。
图 10.2 个 F1 扬声器系统通过模拟端口连接到 T8S
M
( )
MAIN OUT
USB AUDIO
MONO
(
M
US
B AUDI
O
( )
M
M
AIN
O
UT
()
M
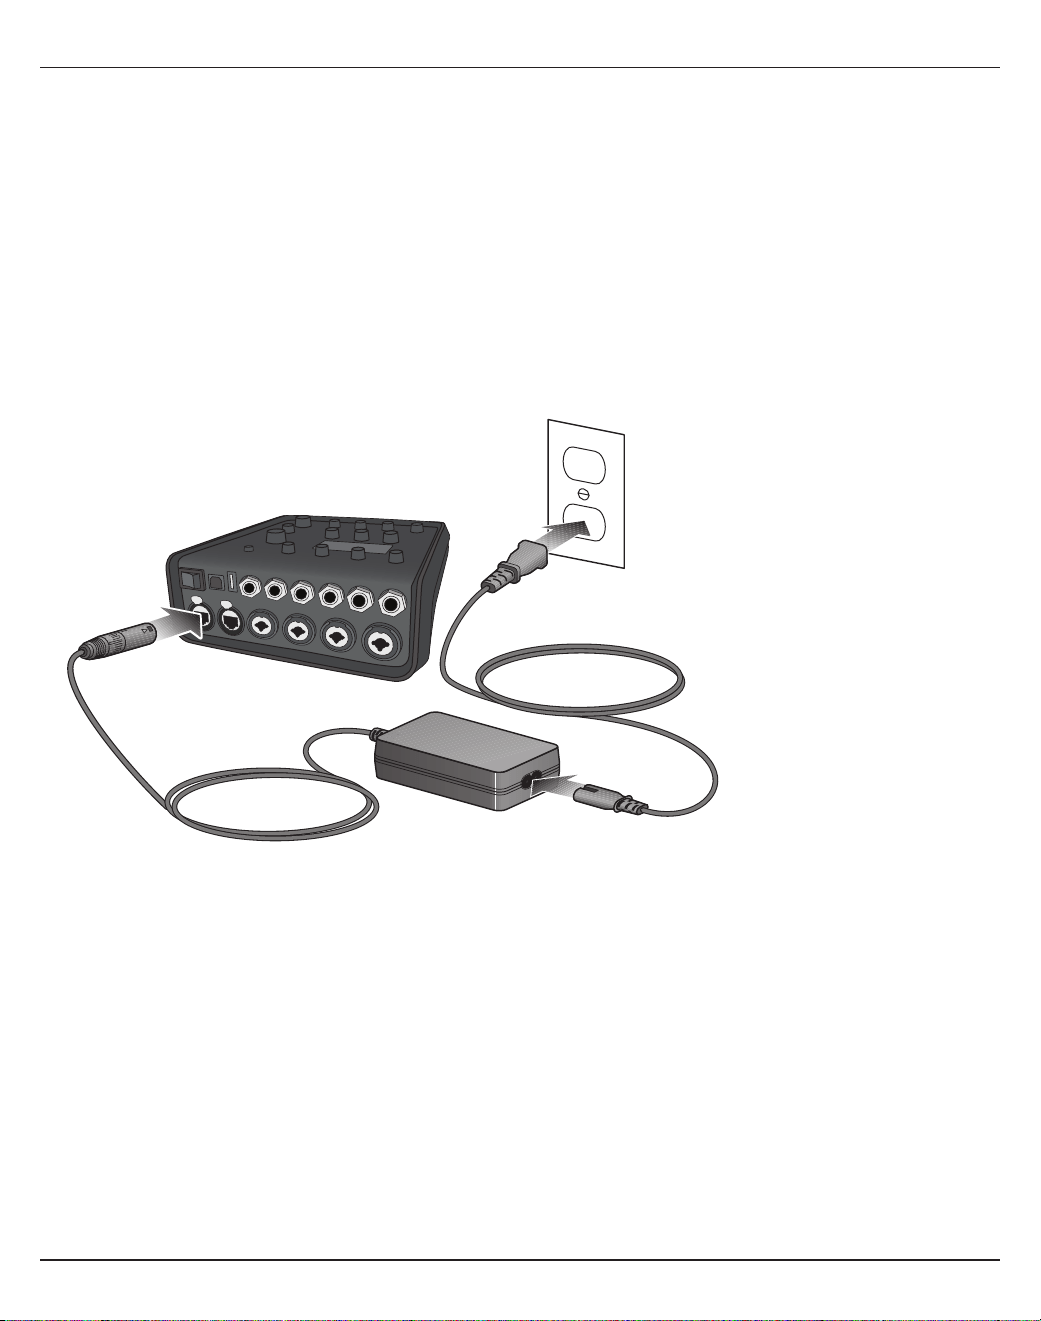
14 -
简体中文
系统设置
连接 ToneMatch® 电源
ToneMatch 电源为 T4S/T8S 混音台供电。
1. 将电源线插入 T4S/T8S 电源端口。
2. 将交流电源线的一端插入电源。
3. 将电源线的另一端插入通电的交流电源插座。
4. 将 T4S/T8S 电源开关切换到“开”的位置。
注意:运行
T8S
需要使用
T8S
随附的电源。
T4S
不随附电源,其运行不需要使用随附电源。
图 11.连接 T4S 到电源

系统设置
简体中文
- 15
连接 T4S/T8S 到电脑
T4S/T8S 配备 USB 端口以便连接电脑。通过该端口,您可以将场景下载到电脑或安装系统更新。请访问
www.Bose.com/livesound 了解有关更新系统的详细信息。
连接到电脑后,您还可以将 T4S/T8S 用作录音/播放音频的通用 USB 音频设备。
注意:
T4S/T8S
运行速度为
48 kHz/24
位。当
T4S/T8S
与录音软件一同使用时,您可能需要将软件配置为
48 kHz/24-bit
。
注意:连接
T4S/T8S
到电脑需要使用
USB
电缆(未提供
A
型转
B
型端口)。
1. 连接混音台到电源(T4S/T8S 适用 ToneMatch® 电源,仅 T4S 适用 L1 Model 1S/II)。
2. 将 USB 电缆的一端插入混音台 USB 2.0 B 型端口(图 12)。
3. 将 USB 线缆的另一端插入电脑上的 USB 端口。
4. 打开混音台。
图 12.T4S 到 USB 端口的连接
ToneMatch 端口 - 连接到 L1 Model 1S/II 系统
或 ToneMatch 电源
电源开关
USB 线缆
(A 型转 B 型端口)
连接到电脑 USB
端口
连接闪存盘到 T4S/T8S
将加载了 WAV/MP3 文件的 USB 2.0/3.0 闪存盘插入 USB 2.0 A 型端口,以播放音频曲目到混音台。
图 13.连接闪存盘到 T4S
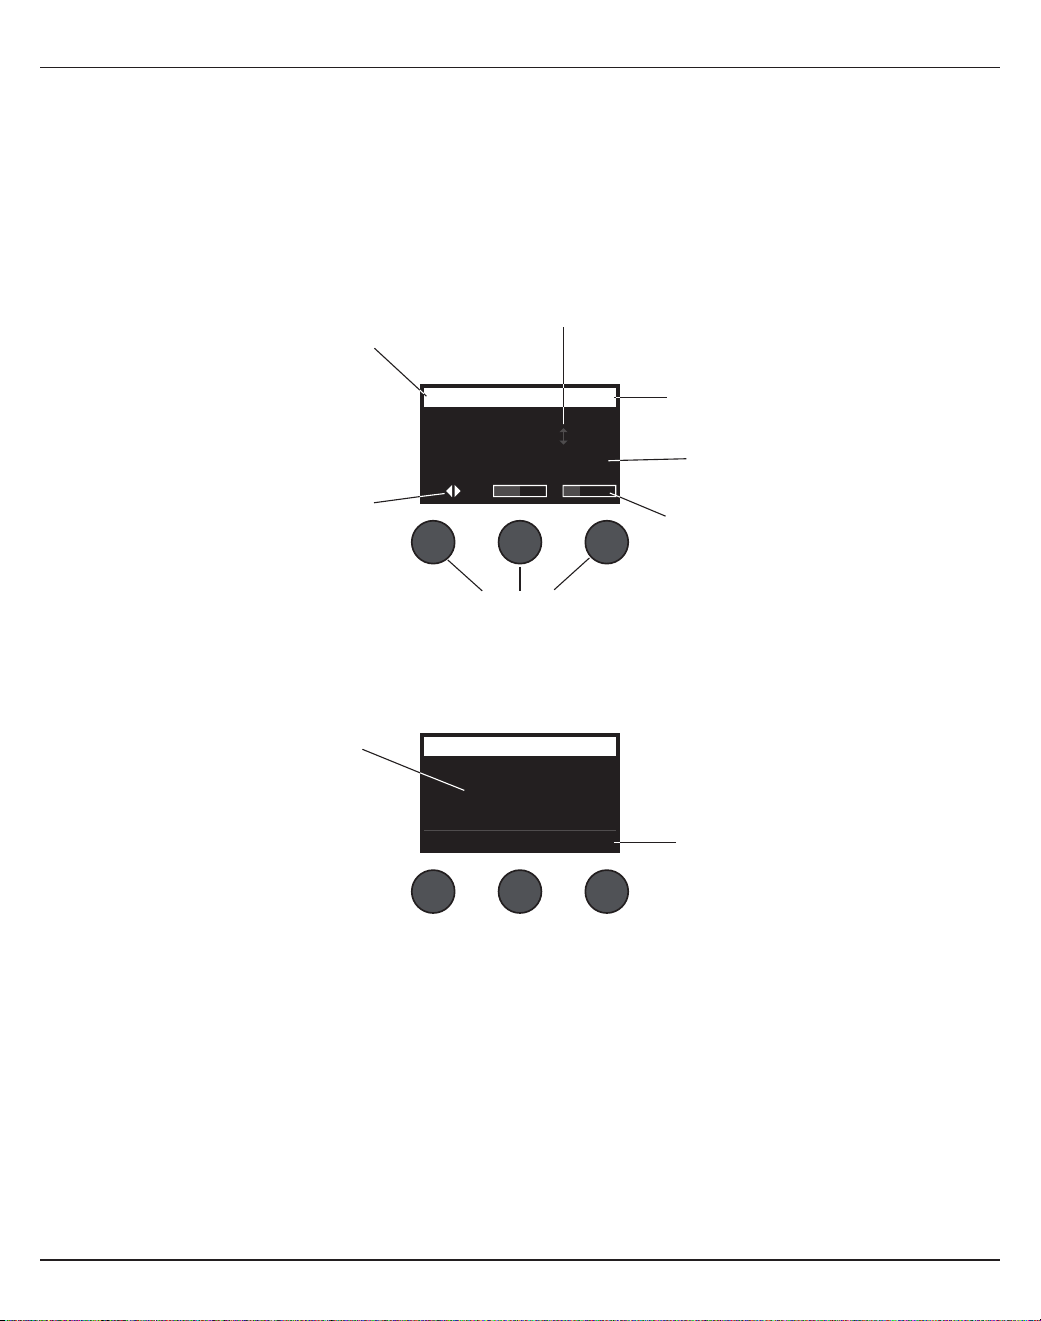
16 -
简体中文
操作
读取 T4S/T8S 显示屏
显示屏为您提供操作混音台的界面。图 14 显示了显示屏信息和基本操作惯例的示例。显示屏内容基于旋钮选择器的位置。
图 14.显示屏和操作惯例示例
Ch 1
Type Tim
eM
ix
Digital 250ms 30%
Delay
Fdbk.
All Channels
*Bose Scene 01
Load Shared Save
Scenes
识别所选通道
表示按下控件可切换参数
参数数值的直观表示
识别旋钮选择器访问的功能
参数名称及其设置/数值
旋转/按钮控件
该符号表示旋转控件可更改
设置。
星号表示加载的场景已更改
表示按下控件可激活功能
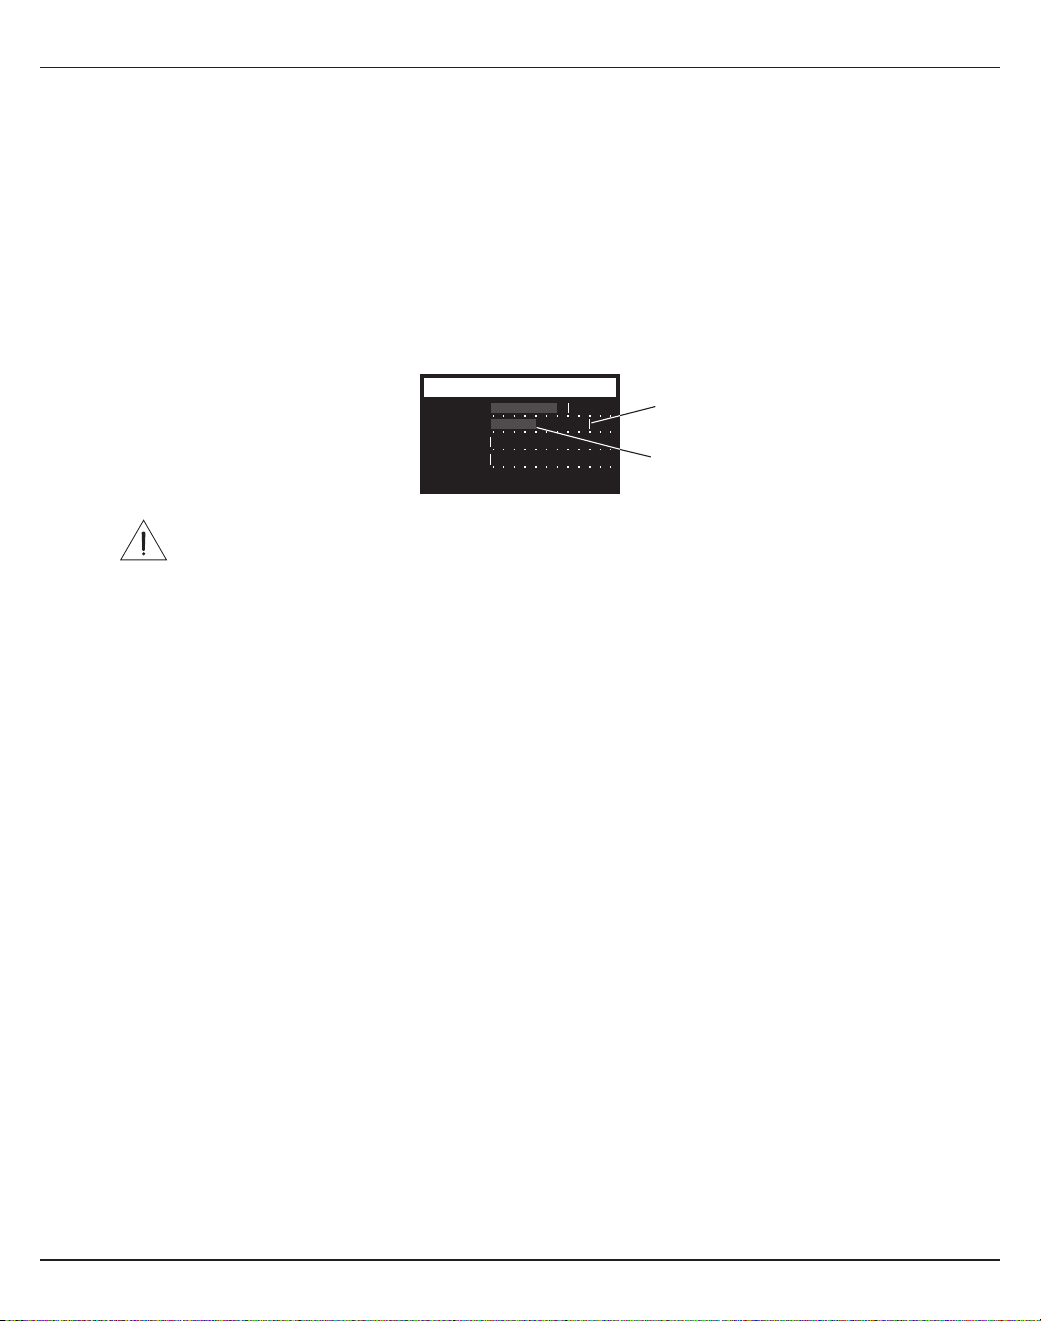
操作
简体中文
- 17
优化输入增益和输出音量
出色的系统音量取决于输入通道增益、主音量和通道音量的综合调整。请对使用的各通道进行如下操作。
1. 确保主音量 Master、输入微调 Trim 和通道音量控件已设置为最低。
2. 调整输入通道微调 Trim。
A. 如可以,请将乐器/音源的音量调整到所需级别。
B. 以正常演奏音量演奏乐器/播放音源。
C. 顺时针缓慢旋转微调 Trim 控件,直至信号/削波指示灯发出绿光。如果指示灯闪烁红色或稳定显示红色,逆时针
旋转微调 Trim 控件以降低音量。
D. 使用偏好 Prefs 菜单中的输入电平表(第 28 页)查看输入电平
小心:如果您正在使用需要幻象电源
(
+
48V)
的设备,如电容式麦克风
,
请在调整微调
Trim
控件之前按
下幻象电源开关。
注意:偏好
Prefs
菜单中的输入电平表可帮助您调整输入微调
Trim
电平(参见第
28
页)。
3. 将主音量 Master 旋钮设置在 12 点钟位置。
4. 顺时针缓慢旋转通道音量控制,直至音量达到所需水平。
Input LevelPreferences
Ch 3
Ch 1
Ch 2
Ch 4
Menu Aux InReset
峰值电平指示灯
输入电平指示灯
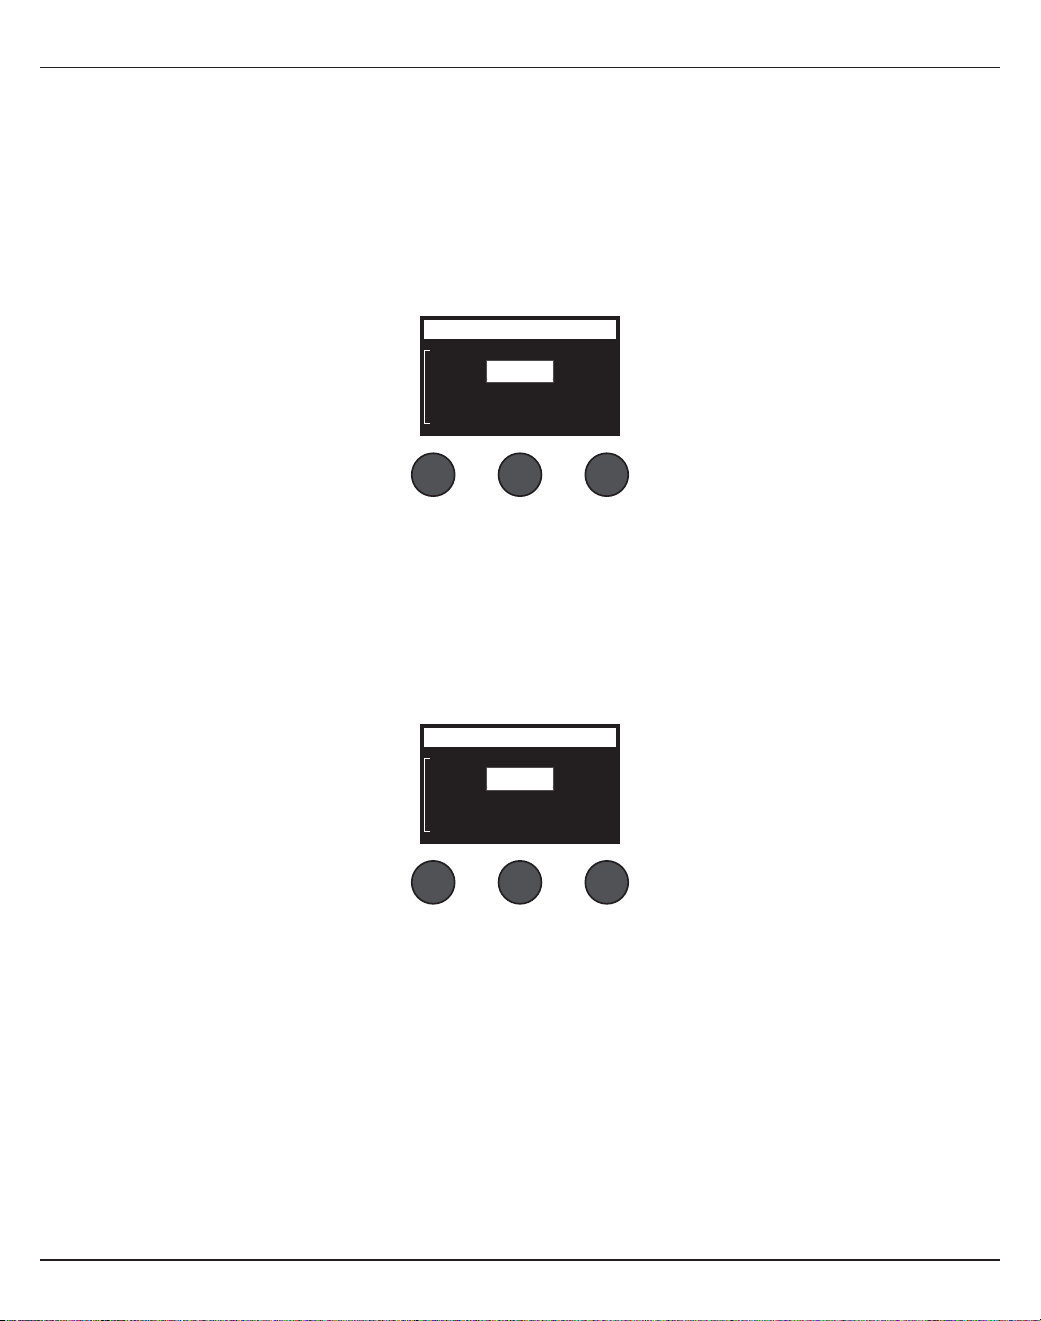
18 -
简体中文
操作
使用主音量控制
主音量 (Master) 旋钮调整 T4S/T8S ToneMatch® 输出和模拟主输出的总输出音量。在正常运行期间,我们建议您将主旋
钮 Master 设置在 12 点钟位置。在为所有通道设置了音量大小后,您可以从此位置调高或调低主音量 (Master) 旋钮。
静音通道
Mute 按钮会静音各对应通道的音频。
• 要静音通道,请按下 Mute 按钮一次。Mute 按钮显示白色表示该通道已静音。显示屏上各对应通道将出现“通道静音
(CH MUTE)”。
• 再次按下 Mute 按钮,取消静音该通道。Mute 按钮变暗表示该通道未静音。
静音通道音效
FX Mute 按钮仅静音各自通道上的音效、延时和混响音效。静音音效不会旁通 ToneMatch 预设、zEQ、Para EQ 和压缩
器/门限设置。
• 要静音通道音效,请按下 FX Mute 按钮一次。FX Mute 按钮显示白色表示通道音效已静音。显示屏上各自通道将出
现“FX 静音 (FX MUTE)”。
• 再次按下 FX Mute 按钮,取消静音通道音效。FX Mute 按钮变暗表示该通道音效未静音。
Ch 1
Category
Utility
ToneMatch
CH MUTE
Flat
Preset
Ch 1
Category
Utility
ToneMatch
FX MUTE
Flat
Preset
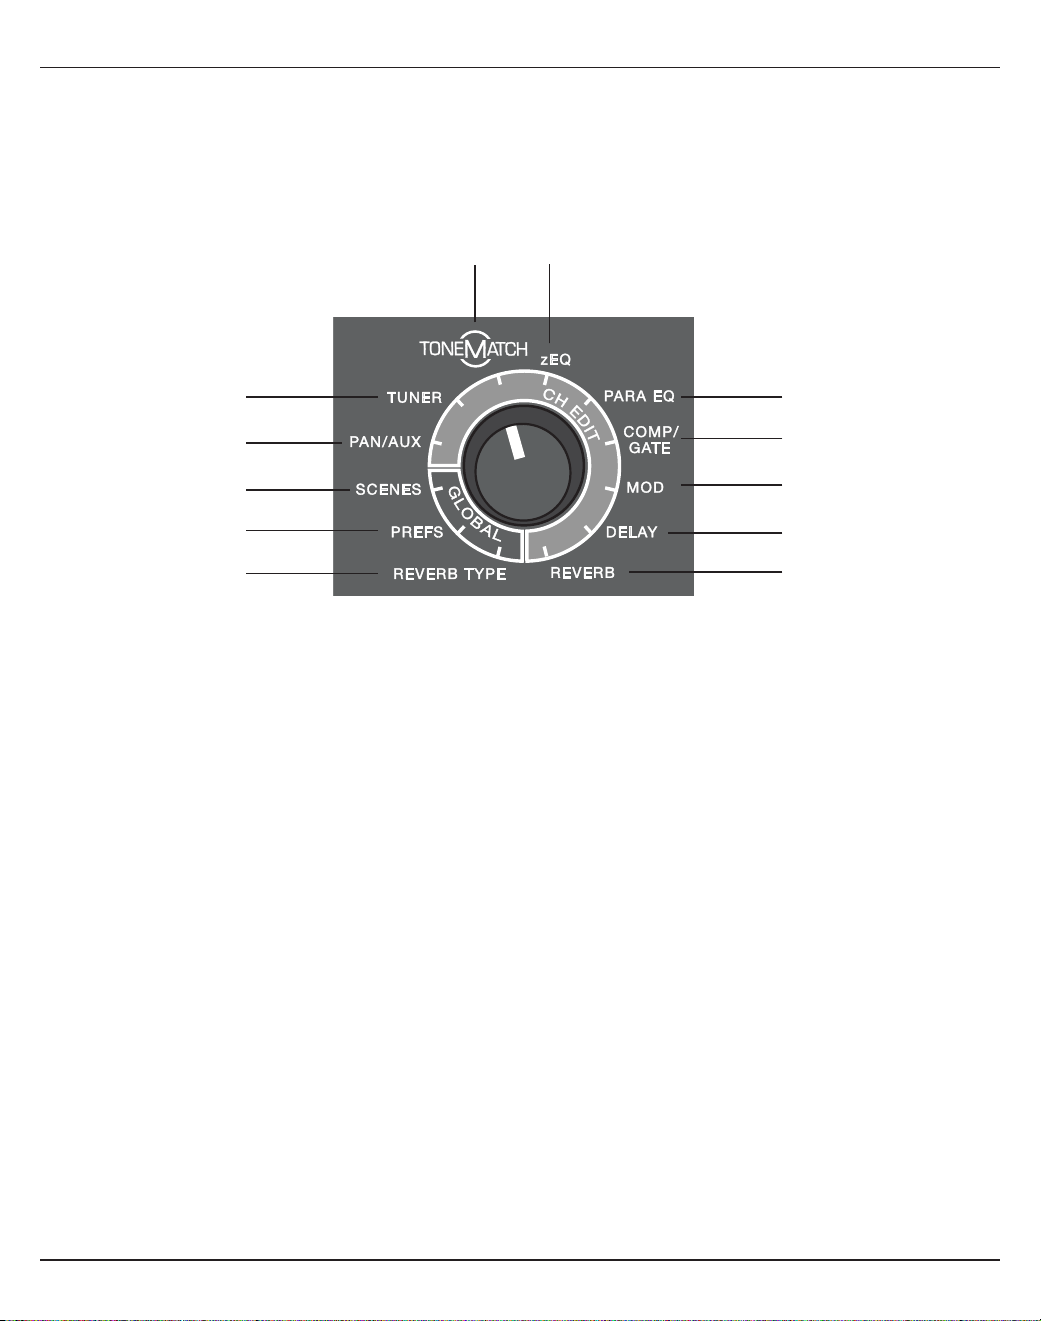
操作
简体中文
- 19
使用旋钮选择器
通过旋钮选择器可访问 ToneMatch® 数字混音台输出的功能。图 15 提供了 9 个通道相关功能和 3 个全局功能的概述。以
下内容将介绍如何调整各功能。
图 15.旋钮选择器
通道功能
q PAN/AUX – 可访问声像调节、辅助输入和辅助输出。
w TUNER - 提供所选通道演奏的乐器的调谐信息。
e TONEMATCH - 访问专为特定乐器和麦克风而设计的专有 TONEMATCH 预设。
r ZEQ - 作为所选 TONEMATCH 预设的一部分,ZEQ 提供控件来调整乐器或麦克风频率范围内的低/中/高频。
t PARA EQ - 提供各通道的参数 EQ 控件。
y COMP/GATE - 访问可调整参数的门限、压缩器、限幅器、咝声消除器和底鼓预设。
u MOD - 访问数个调音音效,如合唱、镶边、移相和颤音。
i Delay - 访问三种类型的延时和轻触节拍延时。
o Reverb - 应用混响到所选通道,可发送至主通道或辅助通道。
全局功能
a Reverb Type - 对所有主输出通道或辅助输出端应用选定的混响类型。
s Prefs - 允许访问数个系统实用程序。
d Scenes - 允许保存和加载性能场景(设备完整状态的快照)。
e
o
y
d
r
a
u
q
t
s
i
w
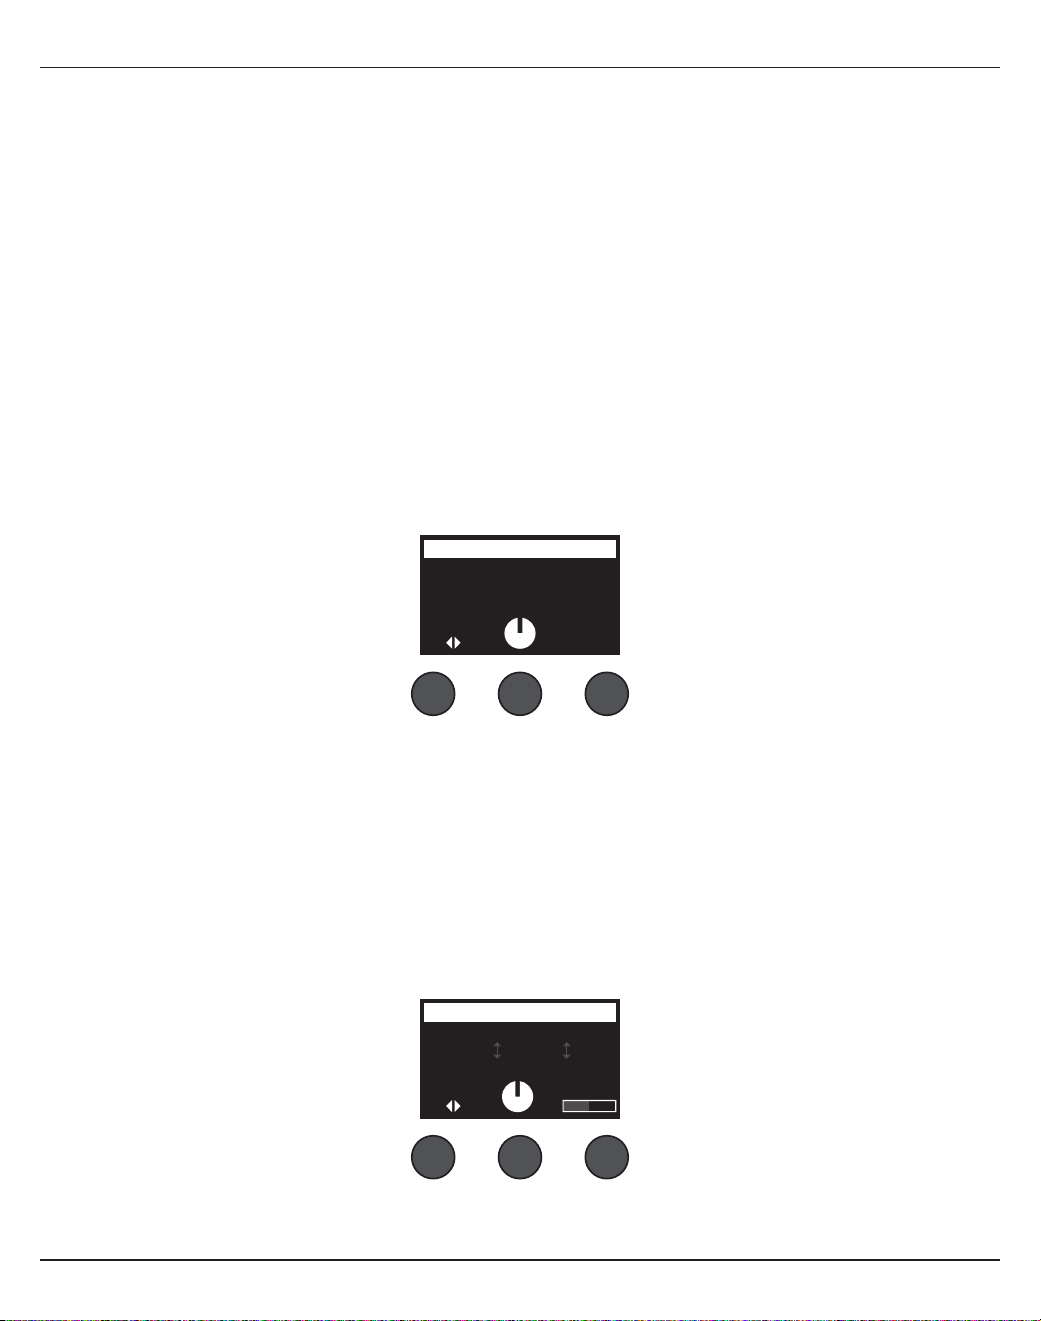
20 -
简体中文
操作
编辑通道声音
通道编辑功能允许访问影响所选通道的设置。通道编辑功能包括声像调节/辅助、调谐器、ToneMatch®、zEQ、Para
EQ、压缩器/门限、音效、延时和混响。
要编辑通道:
1. 按下 CH Edit 1、2、3、4(T4S 和 T8S)5、6、7 或 8(仅 T8S)按钮。所选通道可在显示屏左上角进行查看。
2. 使用旋钮选择器选择一个通道编辑功能。
3. 根据以下说明调整该功能的设置。
注意:您一次仅可以编辑一个通道。按下
CH Edit
按钮将只对所选通道启用编辑功能。
使用声像调节/辅助功能 Pan/Aux
使用声像调节/辅助功能,将音频路由到主输出(左或右)、控制辅助输入或辅助输出。
使用声像调节
使用声像调节控件将各通道的声像定位发送到立体声混音中。
1. 按下或旋转左侧编辑器控件,然后从菜单中选择声像调节。
2. 旋转 Pan 控件即可从左到右调整线路输出。
辅助输入 5/6 (9/10)
使用辅助输入 5/6 (9/10) 连接线路电平立体声音源,如移动设备。
1. 按下或旋转左侧控件,然后从菜单中选择辅助输入 5/6。
2. 旋转 5 Lvl 或 6 Lvl 控件,调整通道 5 或通道 6 的信号电平。
3. 按下 5 Lvl 切换至 5 Pan;按下 6 Lvl 控件切换至 6 Pan。旋转 Pan 控件即可从左到右调整声像。
Ch 1
Menu Pan
Pan
Pan
Ch 1
Menu 5 Pan 6 Lvl
Aux In 50%
Aux Input 5/6
6 Pan5 Lvl
操作
简体中文
- 21
路由输入信号到辅助输出
辅助功能允许您路由信号到 2 个辅助输出(仅 T4S)或 4 个辅助输出(仅 T8S),以进行各种信号处理、录音和扩声应
用。发送给辅助输出的各路信号电平可进行调整:
注意:要静音辅助输出,请按下
Level
控件。再次按下取消静音。
1. 按下或旋转 Menu 控件,然后选择辅助输出端。
2. 旋转 Level 控件,调整所选通道的信号电平。
3. 旋转 Tap 控件,浏览轻触菜单,然后突出显示所需轻触点。
A. Dry:前置功放后 - 直接从前置功放阶段路由完全干(未经处理)信号。
B. Pre:带有 EQ 和 Fx - 从前置功放阶段路由信号,并应用了信号处理。
C. Post:音量控制器后 - 在通道音量控制后路由信号,并应用了信号处理。
4. 按下 Select 控件选择轻触点,或按下 Cancel 控件退出并不做更改。当前所选轻触点的名称将以粗体显示。
Ch 1
Menu Tap
Aux
1P
re
Level
50%
Aux 1 Output
使用调谐器 Tuner
每个输入通道带有独立的调谐器。显示屏底部显示正在演奏的音符。在调谐时,音高指示灯出现在显示屏上,表示音符为降
号还是升号。请调整乐器的音高程度,使光标与屏幕中心对齐。
注意:要旁通调谐,请按下适用通道的
Mute
按钮。
使用 Transpose 功能,将参考音高调高或调低两个半音级。或者使用参考音高精确调谐。
Ch 1
b#
A3
Tuner
音高指示灯
22 -
简体中文
操作
Ch 1
Category
Vocal Mics
ToneMatch
Handheld Mics
Preset
Handheld Mics
Headworn Mics
High Gain: Bright
High Gain: Normal
SelectCancel
Ch 1
Category
Utility
ToneMatch
Flat
Preset
Ch 1
Category
Vocal Mics
ToneMatch
Headworn Mics
Preset
Vocal Mics
Utility
Electric Guitars
Acoustic Guitars
Select Cancel
旋转 按下
按下旋转
选择 ToneMatch® 预设
ToneMatch 功能允许您为乐器或麦克风选择 ToneMatch 预设。该专有技术可优化系统均衡,从而保留特定乐器或麦克风
的自然声音。这些预设被划分为不同的类别,并可针对各通道单独选择。
1. 旋转 Category 控件访问类别列表,然后突出显示您的选择。
2. 按下 Select 控件进行选择,或按下 Cancel 控件退出列表并不做更改。
3. 如果您已经按下 Select,请旋转 Preset 控件访问预设列表,然后突出显示您的选择。
4. 按下 Select 控件进行选择,或按下 Cancel 控件退出列表并不做更改。
Ch 1
Low Mid
Handheld Mics
High
0.0db 0.0db 0.0db
zEQ
调整 zEQ
zEQ 功能是 ToneMatch 预设技术的一部分。该功能允许您调整乐器或麦克风频率范围内的低/中/高频。
要调整 zEQ,请旋转相应频段下的控件。
注意:要旁通某一频段,请按下相应的控件。再次按下可激活该设置。
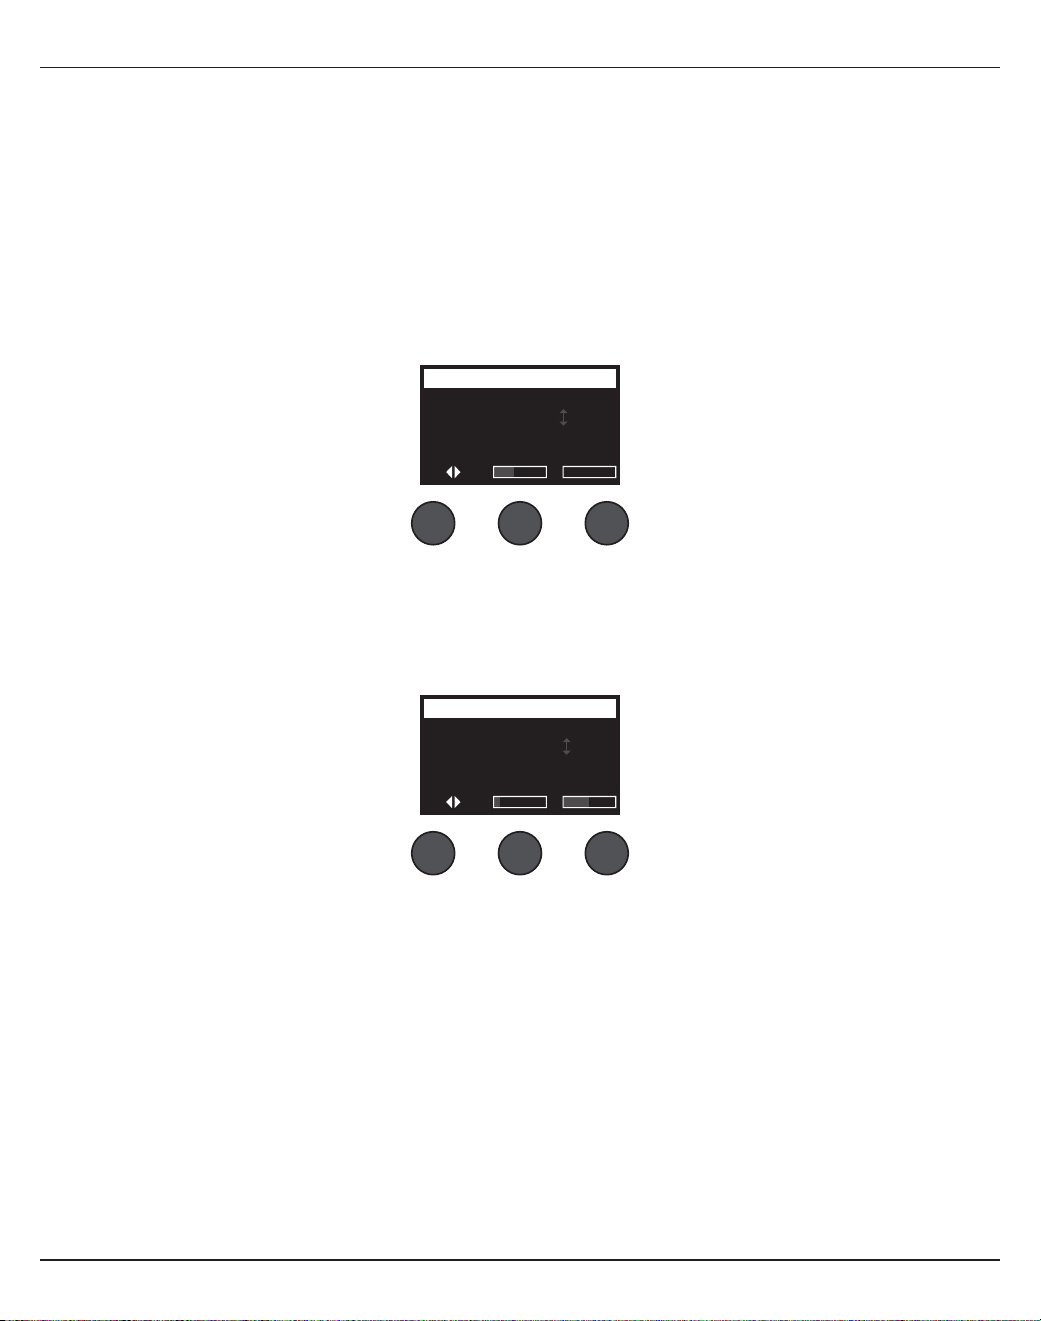
操作
简体中文
- 23
调整参量均衡 Para EQ
Para EQ 功能提供以用户指定频率为中心频率,在 50 Hz 到 16 kHz 范围内的三段参量均衡。
注意:要旁通
Para EQ
设置,请按下
Select
控件。再次按下可激活该设置。
1. 按下或旋转 Select 控件,然后选择 Para EQ 频段 1-3。
2. 旋转 Level 控件调节增加/减少电平,范围从 -15 dB 到 +15 dB。
3. 旋转 Freq 控件调节中心频率,范围从 50 Hz 到 16 kHz。
4. 按下 Freq 控件切换到宽度。旋转 Width 控件,围绕中心频率调节曲线宽度,范围从 0.20 倍频程到 5.00 倍频程。
Ch 1
Select Level
B3
Freq
PEQ 1 -3.4dB 250.0Hz
Parametric EQ
Width
使用压缩器/门限功能 Comp/Gate
使用压缩器/门限功能可以访问可调整参数的门限、压缩器、限幅器、咝声消除器和底鼓预设。
注意:要旁通压缩器
/
门限设置,请按下
Type
控件。再次按下可激活该设置。
注意:每个通道仅提供一种音效。
1. 旋转 Type 控件,访问压缩器/门限音效列表,然后突出显示您的选择:
A. Compressor 1: Light - 该压缩器预设具有低压缩比,阈值和增益可调。作为通用压缩器,可与需要较低电平控制
的大多数乐器和麦克风配合使用。
B. Compressor 2: Medium - 该压缩器预设具有中等压缩比,阈值和增益可调。可与需要精细电平控制的贝斯、吉
他、键盘乐器和人声配合使用。
C. Compressor 3: Heavy - 该压缩器预设具有高压缩比,阈值和增益可调。可与需要更加激烈的电平控制的响亮乐
器(如圆号和鼓)以及强劲人声配合使用。
D. Limiter - 压缩比为 (∞:1) 的限幅器,阈值和增益可调。可与嘹亮乐器(如鼓)配合使用,以防止信号的瞬时峰值
过载。
Ch 1
Type Thresh Speed
Gate -80.0dB 50%
Comp/Gate
Ramp

24 -
简体中文
操作
使用 KickGate
KickGate 是 Bose® 的专有技术,可以提升底鼓通道的电平,同时消除麦克风发出声反馈的风险。“压缩器/门限”菜单中提
供 2 个 KickGate 设置。
1. 连接合适类型的麦克风。
2. 选择合适的 ToneMatch® 预设。
3. 调整通道输入 Trim 控件,直至最响亮的底鼓声使输入通道 LED 灯变为红色,然后继续调整控件直至 LED 灯变为绿
色。该操作可优化通道输入微调电平。
4. 使用旋钮选择器选择压缩器/门限。
5. 旋转 Type 控件,向下滚动列表,然后突出显示 KickGate 1: Regular 或 KickGate 2: Fast,然后按下 Select。使用
低音鼓双踏板时,请选择 KickGate 2。
6. 演奏底鼓时,请增大音量到所需的演奏水平。
7. 以您想要在表演中使用的最轻柔的力度演奏底鼓,然后查看能否听到声音。
8. 在轻柔地演奏时,请增大 Thresh 电平直至一些底鼓声被淹没。然后将 Thresh 电平调低 3 dB。
9. 在正常演奏底鼓的情况下,逆时针旋转 Tight 控件,降低紧张度并为声音添加更多的“隆隆声”。紧张度可从 0%(最
慢)调整到 100%(最快)。
E. De-Esser - 侧链压缩器具有预设压缩比,阈值和增益可调。用于消除人声的咝咝声。
F. Noise Gate - 该噪声门预设具有快速启动时间,阈值和速度(释放时间)可调。非常适合消除麦克风和乐器发出
的不需要的噪声。
G. KickGate 1: Regular - 该门限预设具有固定启动时间,阈值和速度(释放时间)可调。这是 Bose® 专为底鼓而
设计的专有技术。这一强劲的门限在声反馈之前提供最大增益,使底鼓通过扩声系统尽可能发出响亮的声音。
H. KickGate 2: Fast - 与 KickGate 1 相同,但对于更快的节奏做出了调整。如果您使用低音鼓双踏板,请选择此设
置。
2. 按下 Select 控件进行选择,或按下 Cancel 控件退出列表并不做更改。
3.
压缩器
Compressor 1-3
、限幅器
Limiter
、咝声消除器
De-Esser:旋转 Thresh 控件调节输入阈值(触发)电平,
范围从 -50 dB 到 0 dB。旋转 Gain 控件调节增益,范围从 0 dB 到 30.0 dB。控件上方的增益栏显示增益减少的数
量。这一显示可以帮助设置阈值。
噪声门
Noise Gate:旋转 Thresh 控件调节输入阈值(触发)电平,范围从 -90 dB 到 -30 dB。旋转 Speed 控件
设置门限闭合速度,范围从 0%(最快)到 100%(最慢)。旋转 Ramp 控件调节门限斜率,范围从 0%(水平)到
100%(垂直)。
KickGate 1-2:旋转 Thresh 控件调节输入阈值(触发)电平,范围从 -20 dB 到 0 dB。旋转 Tight 控件调节紧张度
(门限可以多快闭合),范围从 0%(最慢)到 100%(最快)。
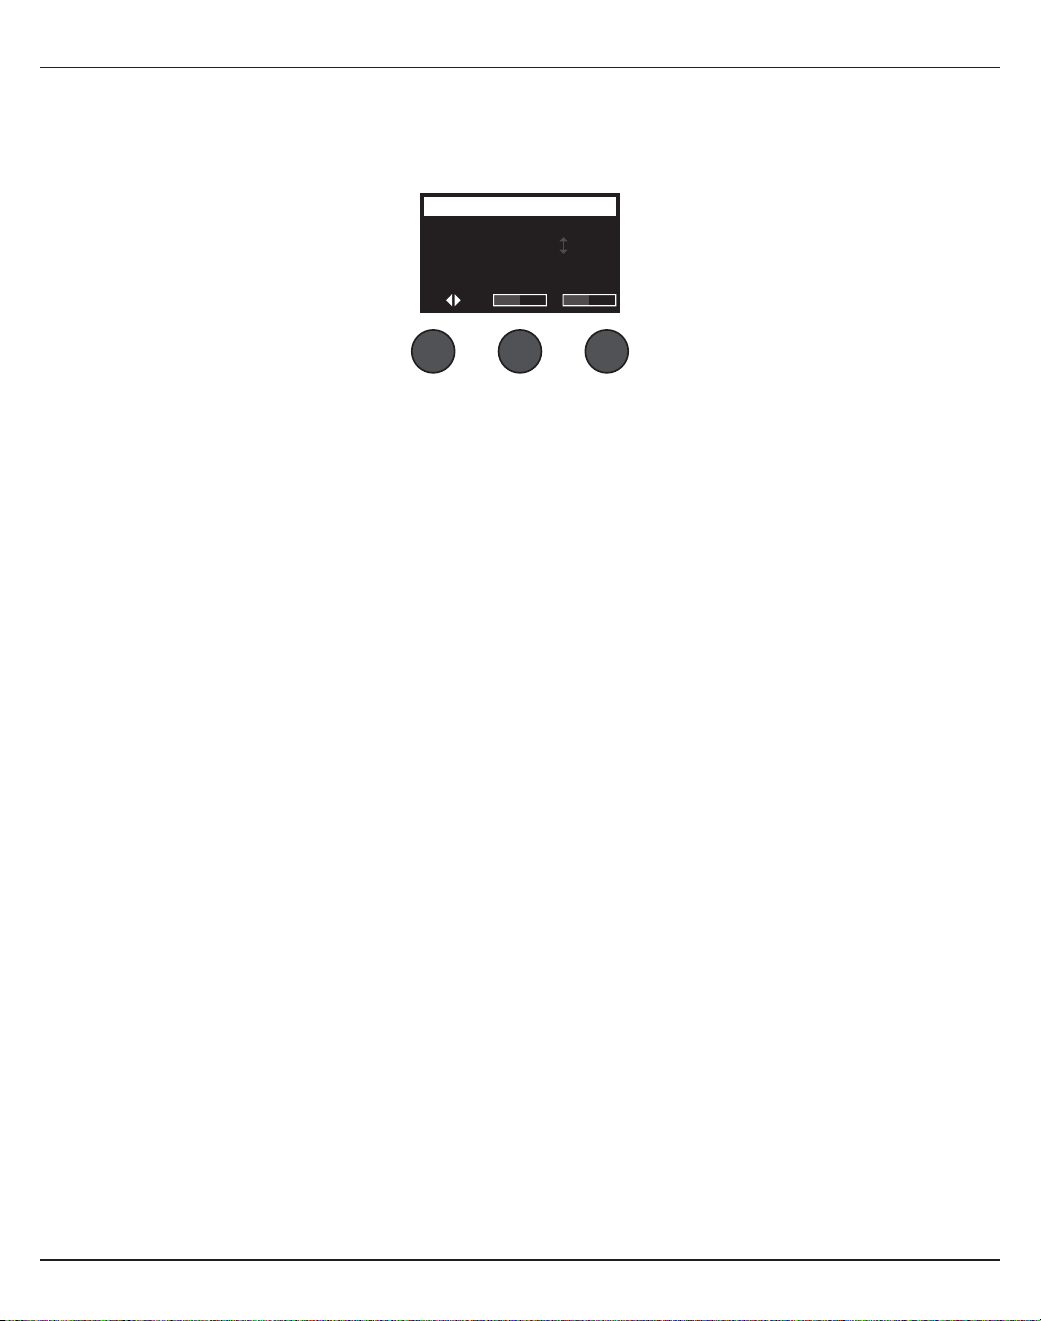
操作
简体中文
- 25
使用音效 Mod
通过 Mod 功能,您可以应用调音音效。
注意:要旁通音效设置,请按下
Type
控件。再次按下可激活该设置。
1. 旋转 Type 控件,访问音效类型列表,然后突出显示您的选择:
A. Chorus 1: Brite - 湿润、闪闪发光的合唱,可与声学乐器配合使用。混音、深度和速度参数可调整。
B. Chorus 2: Warm - 与合唱 1 类似,但高频略低。混音、深度和速度参数可调整。可与电子吉他/贝斯配合使用。
C. Chorus 3: Dark - 与合唱 2 类似,但较暗音色的高频略低。混音、深度和速度参数可调整。可与电子吉他/贝斯
配合使用。
D. Flanger 1: Tape - 磁带类型的镶边效果器,不带反馈。混音、深度和速度参数可调整。非常适合用作电子吉他/
贝斯的音效。
E. Flanger 2: Feedback - 与镶边 1 相同,但该预设中带有反馈音效。
F. Phaser 1: Stomp - 经典的“单块效果器”类型的移相器。具有预设的宽度扫描,速度和反馈音效参数可调。非常适
合用作电子吉他/贝斯和键盘乐器的音效。
G. Phaser 2: Rack - 经典的“机架”类型的移相器。具有正混音类型,速度和反馈音效参数可调。非常适合用作电子
吉他/贝斯和键盘乐器的音效。
H. Phaser 3: Warm - 古典类型的移相器。具有正混音类型,速度和反馈音效参数可调。非常适合用作电子吉他/贝
斯和键盘乐器的音效。
I. Phaser 4: Brite - 不带低音的移相器。具有正混音类型,速度和反馈音效参数可调。非常适合用作电子吉他和键
盘乐器的音效。
J. Tremolo - 古典类型的颤音音效,速度和反馈音效参数可调。非常适合用作吉他、键盘乐器和口琴的音效。
2. 按下 Select 控件进行选择,或按下 Cancel 控件退出列表并不做更改。
3.
合唱
Chorus 1-3
、镶边
Flanger 1-2:旋转 Mix 控件,调整所需的干信号与湿信号(经调音器处理)的混音比例。旋
转 Depth 控件,调整音调从初始输入信号的改变程度。按下 Depth 控件,访问 Speed 参数。旋转 Speed 控件,调
整音调的调音速度。
移相
Phaser 1-4:旋转 Speed 控件,调整音调的调音速度。旋转 Fdbk. 控件,调整音调的混响速度。
颤音
Tremolo:旋转 Speed 控件,调整音量的调音速度。旋转 Depth 控件,调整音量从初始输入信号的改变程度。
Ch 1
Type Mix Depth
Chorus1 50% 50%
Modulator
Speed

26 -
简体中文
操作
Ch 1
Type Tim
eM
ix
Digital 250ms 30%
Delay
Fdbk.
添加延时 Delay
延时功能允许您应用数字、模拟或磁带类型的延时。
注意:要旁通延时设置,请按下
Type
控件。再次按下可激活该设置。
1. 旋转 Type 控件,访问延时类型列表,然后突出显示您的选择。
A. Digital Delay - 直线型数字延时音效,重复部分无声染色。混音、时间和反馈参数可调整。可与吉他、鼓和人声
配合使用。
B. Analog Delay - 经典的模拟延时音效,重复部分不断弱化。混音、时间和反馈参数可调整。可与吉他、鼓和人声
配合使用。
C. Tape Delay - 经典类型的磁带延时音效,重复部分与模拟延时相比弱化更加明显。非常适合吉他、圆号、口琴和
人声。
2. 按下 Select 控件进行选择,或按下 Cancel 控件退出列表并不做更改。
3. 旋转 Time 控件,以 5 毫秒为增量调整延时时间数量。按下 Time 控件,轻触您所需的延时节拍。
4. 旋转 Mix 控件,设置所需的干信号 (0%) 与湿信号 (100%) 的混音比例。
5. 按下 Mix 控件,访问 Fdbk 设置。旋转 Fdbk 控件,调整延时反馈的量。
添加混响 Reverb
混响功能将用户可调整的混响量应用到所选通道。要选择混响类型,请参见第 27 页上的“选择混响类型 Reverb Type”。
注意:要旁通混响音效,请按下
Mix
控件。再次按下取消旁通。
1. 按下或旋转 Menu 控件,然后选择将此混响发送给的输出通道。
2. 旋转 Mix 控件,调整所需的干信号 (0%) 与湿信号 (100%) 的混音比例。
3. 旋转 Bright 控件,调整指定通道混响中的高频的比例。
Ch 1
Mix Bright
50% 50%
Reverb
Menu
Main
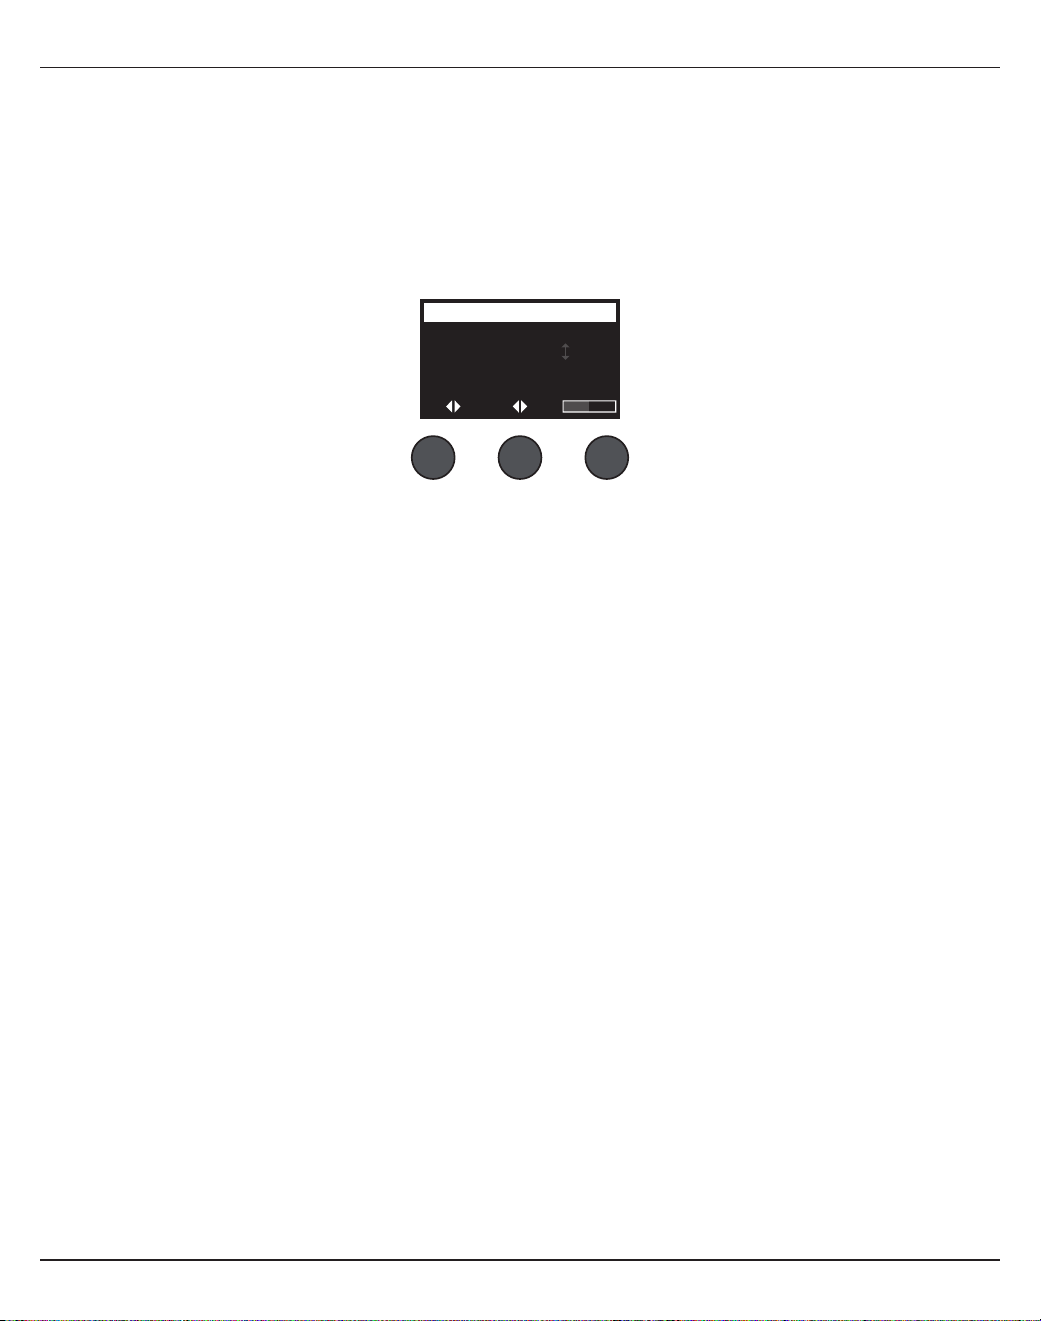
操作
简体中文
- 27
使用全局功能 Global
Global 功能允许访问影响混音台及其所有通道的整体运行的设置。
选择混响类型 Reverb Type
混响类型功能允许您选择应用到所有输入通道的混响类型。衰减时间 (Time) 和平衡 (Bal) 可以调整。平衡可控制早期与后
期反射声的比例。
注意:要旁通混响,请按下
Type
控件。再次按下取消旁通。
1. 使用旋钮选择器选择 Reverb Type。
2. 按下或旋转 Menu 控件,然后选择将此混响发送给的输出通道。您可以发送一个不同的混响类型到主输出端或辅助输
出端。
3. 旋转 Type 控件,显示混响列表:
A. Plate - 创建典型录音室的板式混响环境。时间和平衡(早后期反射声比)参数可调。
B. Small - 创建小型空间环境。时间和平衡(早后期反射声比)参数可调。
C. Medium - 创建中型空间环境。时间和平衡(早后期反射声比)参数可调。
D. Large - 创建大型空间环境。时间和平衡(早后期反射声比)参数可调。
E. Cavern - 创建超大空间环境。时间和平衡(早后期反射声比)参数可调。独特而有趣的混响音效。
4. 旋转 Type 控件以滚动浏览混响列表,并突出显示所需的混响类型。
5. 按下 Type 控件进行选择。
6. 旋转 Time 控件以控制选定混响模型的衰减时间:从最小延迟时间到其最大衰减时间。为 0% 时,衰减时间最短,并模
拟当前选定的混响类型可用的最小房间尺寸。为 100% 时,衰减时间最长,并模拟当前选定的混响类型可用的最大房间
尺寸。每个混响类型都有各自可用的衰减时间范围,能为选定模型类型带来出色效果。混响衰减参数允许您在特定范围
内调整混响时间,以为选定混响模型类型带来出色效果。
7. 按下 Time 控件以切换到 Bal。旋转 Bal. 控件以调整早后期反射声比(0% = 全部为早期反射,100% = 全部为后期反
射)。
All Channels
Menu Type Bal.
Main Medium 50%
Reverb Type
Time
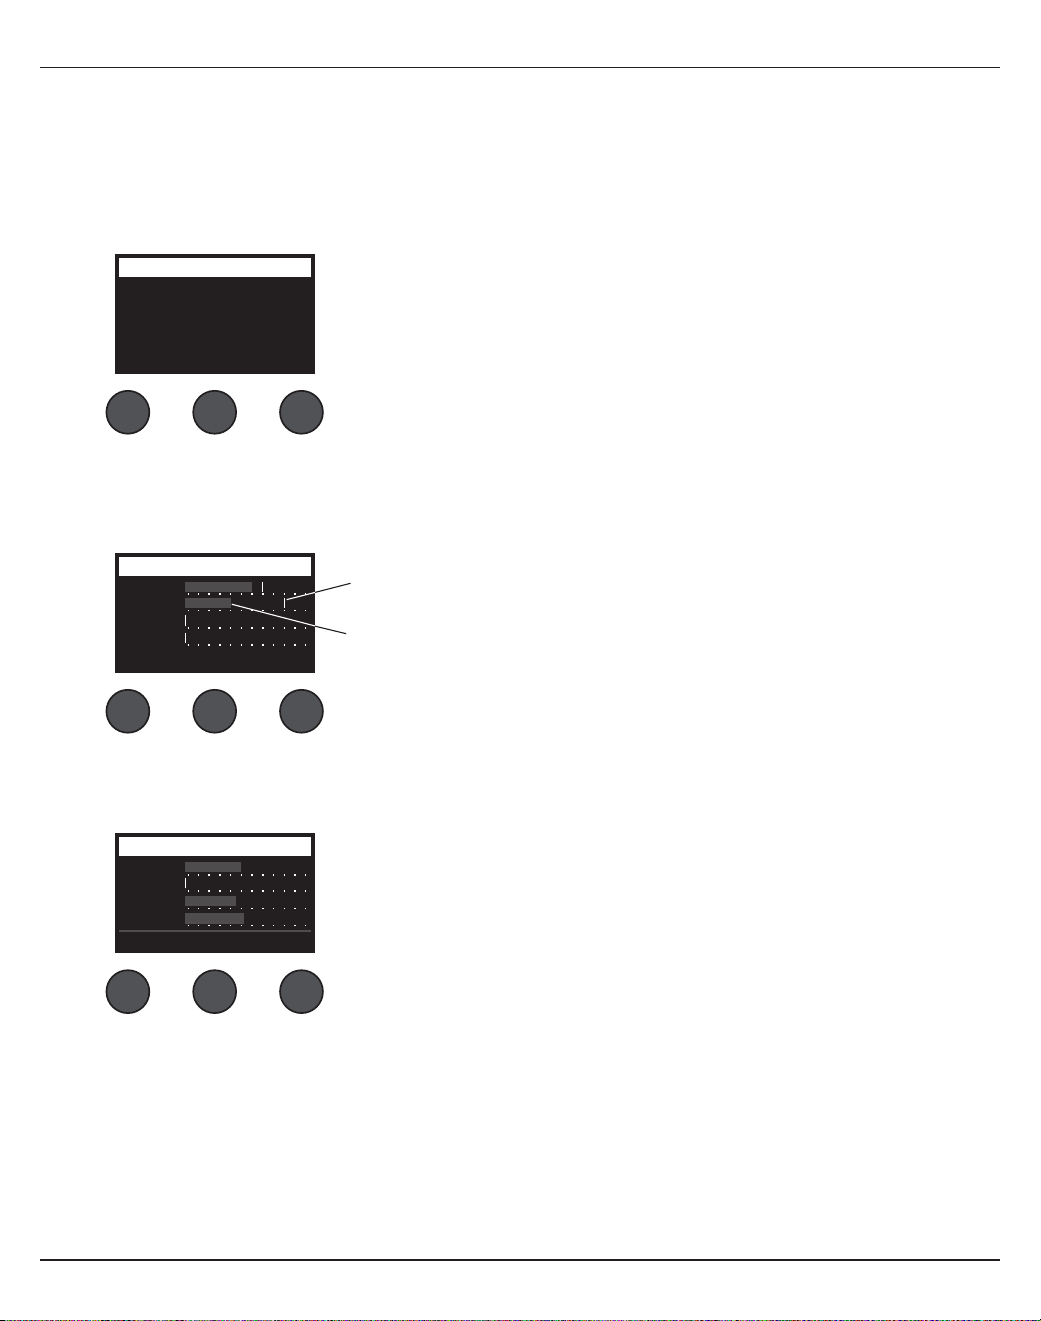
28 -
简体中文
操作
使用偏好实用程序 Prefs
偏好功能允许访问数个系统实用程序。
1. 使用旋钮选择器选择 Prefs。
2. 旋转 Menu 控件以滚动浏览列表,并突出显示所需的实用程序。按下 Select 控件以显示实用程序:
• Status - 显示分配给输入通道的音效(仅供查看)。
• Input Level - 为所有输入通道显示输入电平以及峰值信号指示。按下 Reset 控件以复位所有峰值信号指示灯。该显
示在设置输入通道微调电平时很有用(请参见第 17 页的“优化输入增益和输出音量”)。按下 Aux In 控件以监控辅
助输入的电平(仅适用于 T8S:按下通道 5-8 控件以监控输入 5-8 的电平)。
• Output Level - 显示所有输出通道的输出电平表:Main L、Main R、USB L 和 USB R。按下 Aux 控件以监控辅
助输出的电平。
Output Level Preferences
USB L
Main L
Main R
USB R
Menu Rese
tA
ux
Status
Ch 1 Mod
Mod
Mod Dly
Cm
pR
ev
Rev
Rev
CmpCh 2
Ch 3
Ch 4
Menu
Preferences
Cmp = 压缩器/门限
Mod = 音效
Dly = 延时
Rev = 混响
Input LevelPreferences
Ch 3
Ch 1
Ch 2
Ch 4
Menu Aux InReset
峰值电平指示灯
输入电平指示灯
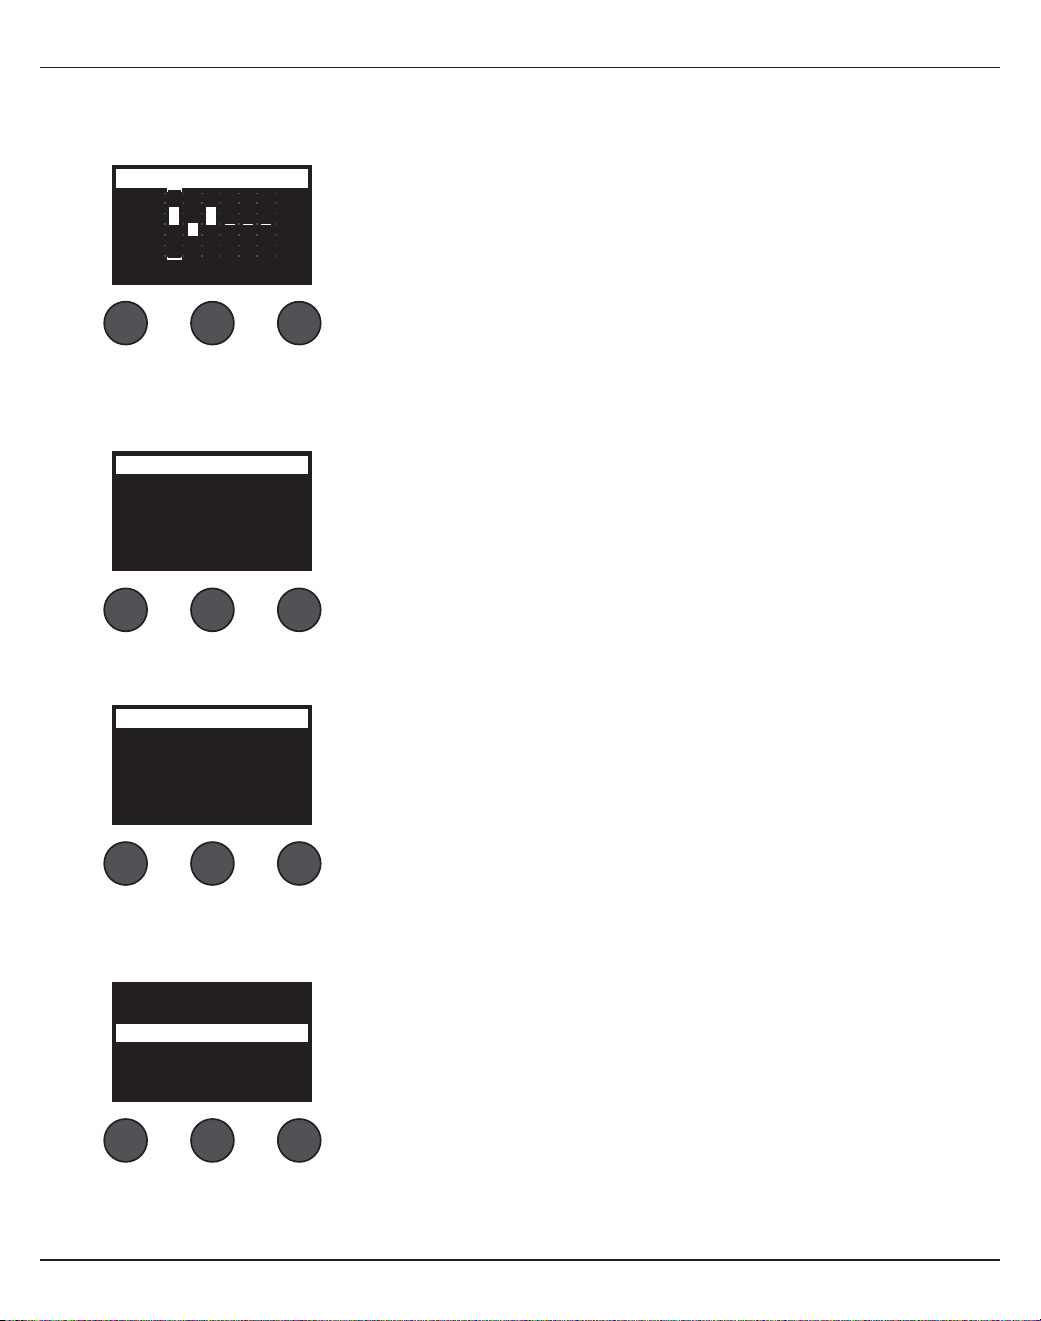
操作
简体中文
- 29
• Master Out EQ - 主输出 EQ 是位于主混合输出通道上的 6 段图示均衡。通过中间控件,选择您想增大或衰减的频
率范围,然后使用 Level 控件调节电平 +/–18dB。
• USB B to PC - 允许您通过 USB 左和右输出通道将选定音源发送到计算机。音源选择包括通道 1-4(仅对于 T8S:
通道 5-8)、辅助输入、主输出或辅助输出 1-2(仅对于 T8S:辅助输出 3-4)。
• USB B from PC - 允许您从计算机将 USB 左和右声道发送到选定的混音台目标(无、辅助输入、或主输出)。
• USB A-Playback - 连接 USB A 型闪存盘以播放任何存储在闪存盘中的 WAV/MP3 文件。使用该菜单选择包含
WAV/MP3 文件的文件夹;选择您想播放的文件,然后通过旋转 Level 控件调节电平。
+18
+12
+6
0
-6
-12
-18
125HzMenu
Master EQ Preferences
Level
1. 旋转Left/Right控件以突出显示音源。
2. 按下Select控件选择音源,或按下Cancel控件退出且不做更改。
3. 旋转Menu以返回偏好菜单列表。
Left : Master
Right : Master
LeftMenu
USB to PC Preferences
Right
Left : Master
Right : Master
LeftMenu
USB from PC Preferences
Right
1. 旋转Left/Right控件以突出显示目标。
2. 按下Select控件选择音源,或按下Cancel控件退出且不做更改。
3. 旋转Menu控件以返回偏好菜单列表。
Tomorrow Is Too late.wav
Sarah.wav
Mistakes for Love.mp3
Sun Behind the Clouds.wav
Hey God Maker. mp3
LevelSelectMenu

30 -
简体中文
操作
• Versions - 显示 DSP 固件的修订版本。
• ToneMatch - 显示存储在 T4S/T8S 中的 ToneMatch 预设库列表。请参考
www.Bose.com/livesound 了解最新预设库。
• L1 电源底座 - 在连接到 L1® Model 1S/II 电源底座时,屏幕上会显示 Connected。
Versions
T4S v1.0.0
Menu
Preferences
C: Ovation Guitars
B: Audix Mics.
A: Taylor Guitars
Menu
ToneMatchPreferences
Connected
Menu
L1 Stand Preferences
加载和保存场景 Scenes
场景是 T4S/T8S ToneMatch® 数字混音台状态的快照。
• 场景将记录所有的 ToneMatch 混音台设置和Mute、FXMute和 CH Edit 按钮的状态。
• 场景不会记录通微调、通道音量大小、主音量大小、耳机音量大小或幻象电源开关的位置。
All Channels
Singer/Songwriter
Load Shared Save
Scenes
操作
简体中文
- 31
T4S/T8S 包括三类场景:
• (5) 个 Bose 场景:只读出厂预设场景。您不能编辑和覆盖它们。
• (10) 个用户场景:用户可定义场景,用于保存和调用您所有喜欢的设置。您可以任意覆盖这些场景以不断更新。
• (1) 个共享场景:用户可定义场景,用于保存您想与其他 T4S/T8S ToneMatch® 数字混音台用户共享的设置。可以使用
从 www.Bose.com/livesound 获取的 L1® 更新软件将该场景上传到计算机。
加载场景:
1. 使用旋钮选择器选择 Scenes。
2. 旋转 Load 控件以滚动浏览场景列表,并突出显示所需的场景名称。当前加载的场景将以粗体显示。
3. 按下Select控件选择场景,或按下Cancel控件退出列表且不做更改。
注意:如果您未在
10
秒内按下
Select
或
Cancel
控件,则显示将返回
“
场景
”
屏幕。未进行任何修改,当前加载的场景将显
示在屏幕上。
4. 如果您按下“选择”,则将显示问题“您确定吗?”。按下 Yes 控件以加载场景,或按下 No 控件退出且不更改场景设置。
注意:如果您未在
10
秒内按下
Yes
或
No
控件,则显示将返回
“
场景
”
屏幕。未进行任何修改,当前加载的场景将显示在屏
幕上。
保存场景:
1. 使用旋钮选择器选择 Scenes。将显示当前加载的场景。
2. 旋转 Save 控件以突出显示您要保存的场景。按下 Select,或按下 Cancel 以退出列表。
All Channels
Singer/Songwriter
Load Shared Save
Scenes
注意:如果您未在
10
秒内按下
Select
或
Cancel
控件,则显示将返回
“
场
景
”
屏幕。未出现任何修改,当前加载的场景将显示在屏幕上。
My Scene 01
My Scene 02
My Scene 03
Cancel Select
32 -
简体中文
操作
3. 如果您按下 Select,请使用“重命名”屏幕编辑场景名称,或按下 Save 以使用该名称显示,然后转至第 4 步。
在保存之前更改场景名称:
您可以使用以下编辑选项更改场景名称。更改名称后,按下 Save 控件并转至第 4 步。
• 选择并更改字符:在显示“重命名”屏幕时,旋转 Cursor 控件以突出显示字符或您想更改的字符位置。然后旋转 Select
控件以更改字符。
• 使用字符映射表:在显示“重命名”屏幕时,旋转 Cursor 控件以突出显示您想更改的字符。然后按 Select 控件以查看字
符映射表。旋转 Select 控件以向左或向右移动光标。旋转 Up/Dn 控件以向上或向下移动光标。当您需要的字符突出显
示时,按下 Select 以在选定位置写下该字符。
• 使用清除、插入和删除功能:在显示“重命名”屏幕时,旋转 Cursor 控件以定位光标。然后按下 Cursor 控件打开特殊编
辑功能菜单。旋转 Select 控件以突出显示您需要的功能。然后按下 Select 控件以执行该功能。
Clear Character - 移除被光标突出显示的字符,然后留下空白区。
Clear All - 清除整行文本。
Clear to End - 清除直到光标右侧的所有文本,包括突出显示的字符。
Insert - 将空格插入到突出显示字符的左侧。
Delete - 移除被光标突出显示的字符和空格。
Rename
J
rstuvwxyzABCDEFGHI
123456789, ;/\()|+-
KLMNOPQRSTU VWXYZ0
abcdefgh jklmnopqi
Cancel Up/Dn Select
Scenes
Clear To End
Insert
Clear All
Clear Character
Delete
CancelSelect
Rename
M yScene 01
CursorSave Select
Scenes

操作
简体中文
- 33
4. 当问题“您确定吗?”显示时,按下 Yes 控件以保存场景,或按下 No 控件,退出且不保存场景。
共享场景
如果您创建场景,且想与其他 T4S/T8S ToneMatch® 数字混音台用户共享,可以通过将其保存到 To Shared Scene 将该场
景保存为共享场景。使用 L1® 更新软件,您可以将共享场景上传到您的计算机,然后将文件传送到其他 T4S/T8S 用户的计算
机。其他 T4S/T8S 用户可以将场景下载到使用 L1 更新软件的 T4S/T8S 中。L1 更新软件可从 www.Bose.com/livesound
获取。
保存共享场景:
1. 加载您想共享的场景(请参阅第 31 页的“加载场景”)。
2. 按下 Save 控件以访问场景列表。
3. 旋转 Select 控件以滚动浏览场景列表,并突出显示 To Shared Scene。按下 Select 或按下 Cancel 以退出列表。
4. 如果您按下 Select,请使用“重命名”屏幕编辑场景名称(请参见第 32 页的“在保存之前更改场景名称”),或者如果您
想使用现有名称请转至第 5 步。
Are You Sure?
YesNo
注意:如果您未在
10
秒内按下
Select
或
Cancel
控件,则显示将返回
“
场景
”
屏幕。
未出现任何修改,当前加载的场景将显示在屏幕上。
[To Shared Scene]
My Scene 10
My Scene 09
Cancel Select
Rename
M yScene 07
CursorSave Select
Scenes

34 -
简体中文
操作
5. 按下 Save 控件以将场景保存为共享场景。
6. 当问题“您确定吗?”显示时,按下 Yes 控件以保存场景,或按下 No 控件,退出且不将场景保存为共享场景。
注意:如果您未在
10
秒内按下
Yes
或
No 控件,则显示将返回“
场景
”
屏幕。未出现任何修改,当前加载的场景将显示在屏
幕上。
7. 按下 Shared 控件以确认场景已保存为共享场景。
注意:
T4S/T8S
仅为共享场景提供一个存储位置。将场景保存为共享场景,通常会覆盖之前保存的共享场景。
关于使用 L1® 更新软件应用程序从计算机下载场景和将其上传到计算机的详细信息,请访问 www.Bose.com/livesound。
All Channels
Singer/Songwriter
Load Shared Save
Scenes All Channels
My Scene 07
Current Shared Scene:
Back
Scenes
按下

操作
简体中文
- 35
Bose 场景
我们提供五个 Bose 场景供您作为入门使用。加载 Bose 场景后,您可以修改设置,然后将其保存为“我的场景”或“共享场景”。
出厂设置
该场景将混音台恢复到其离开工厂时的设置。加载该场景会擦除您之前对当前加载场景所做的任何更改。
通道 1-4 (T4S/T8S) 通道 5-8
(T8S)
ToneMatch
启用
实用程序
平直
zEQ
旁通
低频 中频 高频
0 dB 0 dB 0 dB
Para EQ
旁通
压缩器/门限
旁通
合唱 1
音效
旁通
合唱 1
延时
旁通
数字
混响
旁通
数字
辅助
静音
推子前:配备 EQ 和 FX
全局设置
偏好
屏幕显示 状态
USB 到电脑 左/右:主
电脑至 USB 左/右:主
主输出 主音量推子后
混响类型
类型 中型
时间
50%
平衡
50%
注意:关于所有音效的出厂设置列表,请参阅第
42
页的
“
出厂设置
”
。
36 -
简体中文
操作
Singer/Songwriter
该场景设计用于歌手/作曲家演奏键盘或吉他,且有时通过 MP3 曲目伴奏。
图 16.歌手/作曲家设置示例

操作
简体中文
- 37
麦克风 吉他 键盘 贝斯 辅助输入
通道 1 通道 2 通道 3 通道 4 5/6
ToneMatch
启用 启用 启用 启用
不适用
人声话筒 原声吉他 键盘 贝斯
手持式话筒
钢弦,带 piezo
一般键盘乐器
Active Bass 1
zEQ
启用 启用 启用 启用
不适用低频 中频 高频 低频 中频 高频 低频 中频 高频 低频 中频 高频
0 dB 0 dB 0 dB 0 dB 0 dB 0 dB 0 dB 0 dB 0 dB 0 dB 0 dB 0 dB
Para EQ
旁通 旁通 旁通 旁通
不适用
压缩器/门限
旁通 旁通 旁通 旁通
不适用
压缩器 2 压缩器 2 压缩器 2 压缩器 2
音效
旁通 旁通 旁通 旁通
不适用
合唱 1 合唱 1 合唱 3 合唱 1
延时
旁通 旁通 旁通 旁通
不适用
数字 数字 数字 数字
混响
启用 启用 旁通 旁通
不适用
中型(全局) 中型(全局) 中型(全局) 中型(全局)
声像调节/辅助
中心 中心 中心 中心 辅助输入
辅助 1-2 50% 辅助 1-2 50% 辅助 1-2 50% 辅助 1-2 50% 5 6
推子前:配备 EQ
和 FX
推子前:配备 EQ
和 FX
推子前:配备 EQ
和 FX
推子前:配备 EQ
和 FX
50% 50%
Singer/Songwriter 场景通道设置
全局设置
偏好
屏幕显示 状态
USB 到电脑 左/右:主
电脑至 USB 左/右:主
主输出 主音量推子后
混响类型
类型 中型
时间
50%
平衡
50%

38 -
简体中文
操作
DJ/Playback
DJ/Playback 设计用于 DJ 场景和任何需要音频重放的场景。该设置使用两个麦克风,以及移动设备、混音台或笔记本电
脑中的一种。
图 17.立体声 DJ/Playback 设置示例
操作
简体中文
- 39
DJ/Playback 场景通道设置
全局设置
偏好
屏幕显示 状态
USB 到电脑 左/右:主
电脑至 USB 左/右:主
主输出 主音量推子后
混响类型
类型 中型
时间
50%
平衡
50%
音源 1 左 音源 1 右
麦克风 麦克风 辅助输入
通道 1 通道 2 通道 3 通道 4 5/6
ToneMatch
启用 启用 启用 启用
不适用
DJ/Playback DJ/Playback
人声话筒 人声话筒
降调,zEQ 控制器 降调,zEQ 控制器
手持式话筒 手持式话筒
zEQ
启用 启用 启用 启用
不适用
低频 中频 高频 低频 中频 高频 低频 中频 高频 低频 中频 高频
0 dB 0 dB 0 dB 0 dB 0 dB 0 dB 0 dB 0 dB 0 dB 0 dB 0 dB 0 dB
Para EQ
旁通 旁通 旁通 旁通
不适用
压缩器/门限
旁通 旁通 旁通 旁通
不适用
限幅 限幅
压缩器 2 压缩器 2
音效
旁通 旁通 旁通 旁通
不适用
合唱 1 合唱 1 合唱 3 合唱 1
延时
旁通 旁通 旁通 旁通
不适用
数字 数字 数字 数字
混响
旁通 旁通 旁通 旁通
不适用
中型(全局) 中型(全局) 中型(全局) 中型(全局)
声像调节/辅助
左 右 中心 中心 辅助输入
辅助 1-2 50% 辅助 1-2 50% 辅助 1-2 50% 辅助 1-2 50% 5 6
推子前:配备 EQ
和 FX
推子前:配备 EQ
和 FX
推子前:配备 EQ
和 FX
推子前:配备 EQ
和 FX
50% 50%

40 -
简体中文
操作
Full Band
该场景为架子鼓、低音吉他、电吉他、人声和 MP3 播放器而设置。
图 18.鼓和贝斯设置示例
SYSTEMINPUT 2INPUT 1
VOLUME VOLUME
FRONT
LED
POWER
LIMIT
OFF
FULL RANGE
WITH SUB
EQ
MIC
LINE LEVEL
SIGNAL INPUT
INPUT
POWER
ON
OFF
100-240V~50/60Hz
1000W
LINE OUTPUT
SIGNAL/CLIP SIGNAL/CLIP POWER/FAULT
LIMIT
SYSTEM
INPUT 2INPUT 1
LINE OUTPUT LINE OUTPUT
LINE INPUT
POWER/FAULT
LIMIT
SIGNAL/CLIP
LINE INPUT
NORM
REV
THRU
HPF
POLARITY
LINE
OUTPUT EQ
POWER
LIMIT
OFF
FRONT
LED
操作
简体中文
- 41
Full Band 场景通道设置
全局设置
偏好
屏幕显示 状态
USB 到电脑 左/右:主
电脑至 USB 左/右:主
主输出 主音量推子后
混响类型
类型 中型
时间
50%
平衡
50%
底鼓
Overhead Overhead
贝斯 吉他 麦克风 麦克风 麦克风 辅助输入
通道 1 通道 2 通道 3 通道 4 通道 5 通道 6 通道 7 通道 8 9/10
ToneMatch
启用 启用 启用 启用 启用 启用 启用 启用
不适用
敲打乐器 敲打乐器 敲打乐器 贝斯 电吉他 人声话筒 人声话筒 人声话筒
大鼓,一般 一般架子鼓 一般架子鼓
Active Bass 1 麦克风功放,带
SM57
手持式话筒 手持式话筒 手持式话筒
zEQ
启用 启用 启用 启用 启用 启用 启用 启用
不适用
低
频
中
频
高频 低
频
中
频
高
频
低
频
中
频
高频 低
频
中
频
高
频
低
频
中
频
高
频
低
频
中
频
高频 低
频
中
频
高
频
低
频
中
频
高
频
0
dB
0
dB
0
dB
0
dB
0
dB
0
dB
0
dB
0
dB
0
dB
0
dB
0
dB
0
dB
0
dB
0
dB
0
dB
0
dB
0
dB
0
dB
0
dB
0
dB
0
dB
0
dB
0
dB
0
dB
Para EQ
旁通 旁通 旁通 旁通 旁通 旁通 旁通 旁通
不适用
压缩器/门限
启用 旁通 旁通 启用 旁通 旁通 旁通 旁通
不适用
大鼓 1 压缩器 2 压缩器 2 压缩器 2 压缩器 2
门限 门限 门限
音效
旁通 旁通 旁通 旁通 启用 旁通 旁通 旁通
不适用
合唱 1 合唱 1 合唱 1 合唱 1 合唱 1 合唱 1 合唱 1 合唱 1
延时
旁通 旁通 旁通 旁通 旁通 旁通 旁通 旁通
不适用
数字 数字 数字 数字 数字 数字 数字 数字
混响
旁通 旁通 旁通 旁通 旁通 启用 启用 启用
不适用
中型(全局) 中型(全局) 中型(全局) 中型(全局) 中型(全局) 中型(全局) 中型(全局) 中型(全局)
声像调节/辅助
中心 中心 中心 中心 中心 中心 中心 中心 辅助输入
辅助 1-4 50% 辅助 1-4 50% 辅助 1-4 50% 辅助 1-4 50% 辅助 1-4 50% 辅助 1-4 50% 辅助 1-4 50% 辅助 1-4 50% 9 10
干:前置功放后 干:前置功放后 干:前置功放后 干:前置功放后 干:前置功放后 干:前置功放后 干:前置功放后 干:前置功放后
50% 50%
出厂设置
42 -
简体中文
出厂设置
这部分将描述 T4S/T8S 混音台出厂时的设置。要随时将 T4S/T8S 恢复到出厂设置,请加载 Bose 出厂设置场景。
压缩器/门限出厂设置
类型 阈值 增益
Compressor 1: Light -16.0 dB 3.0 dB
Compressor 2: Medium -16.0 dB 5.0 dB
Compressor 3: Heavy -16.0 dB 8.0 dB
限幅器
-10.0 dB 0 dB
咝声消除器
-10.0 dB 0 dB
阈值 速度
噪声门
-70.0 dB 50%
阈值 紧张度
KickGate1: 常速 -20.0 dB 100%
KickGate2:快速 -20.0 dB 100%
音效出厂设置
类型 阈值 增益 速度
合唱 1:明亮 50% 50% 0.50 Hz
合唱 2:温暖 70% 100% 0.15 Hz
合唱 3:黑暗 25% 25% 3.0 Hz
镶边 1:磁带 50% 50% 1.00 Hz
镶边 2:反馈 50% 100% 2.00 Hz
速度 反馈增益
移相 1:顿足 0.50 Hz 0%
移相 1:机架 0.50 Hz -75%
移相 1:温暖 1.00 Hz -26%
移相 1:光亮 0.50 Hz -76%
速度 深度
颤音
5.00 Hz 50%
延时出厂设置
类型 混音 时间 反馈增益
数字
30% 150 ms 30%
模拟
30% 275 ms 20%
磁带
30% 350 ms 30%
混响类型出厂设置
类型 平衡 时间 时间范围
板式
50% 20% 0-4.6 s
小型
50% 15% 0-0.8 s
中型
50% 25% 0-1.9 s
大型
50% 50% 0-3.5 s
洞穴
50% 100% 0-7.0 s

简体中文
- 43
维护与保养
故障排除
如果您在使用本产品时遇到问题,请尝试以下解决方案。如果仍然未能解决问题,请访问 www.Bose.com/livesound 寻
求在线帮助。如果您在网上没有找到问题的答案,请直接致电 Bose 产品和技术支持团队,电话 (877) 335-2673。
问题 措施
T4S/T8S 已插入,电源
开关已打开,但未通电。
• 确保交流电源插座有电。尝试使用同一个交流电源插座操作指示灯或其他设备,或者使用交
流电源插座测试仪来检测插座。
如果将 T4S 用于 L1® Model II 或 1S 系统:
• 确保 ToneMatch® 线缆已正确连接到混音台和 L1 电源底座。
• 确认电源插头是否已完全插入到电源底座和交流(市电)插座。
• 确保 L1 电源底座已打开,且电源 LED 灯为蓝色。
T4S/T8S 已开启,但没
有声音。
• 确保主音量控制已调高。
• 确认您想收听的输入通道未静音。
• 检查是否已将您想收听通道的音量控制调高。
• 确保已将相应输入通道的“微调”控件调高到足以使 LED 灯变为绿色(表示有足够大的输入
信号)。
• 检查偏好“输入”和“输出”电平表,以确认在输入和输出均有信号。
• 确保已调大输入音源(乐器)的音量。
• 使用其他线缆将输入音源(乐器)连接到混音台。
• 将输入音源(乐器)直接插入到 L1 电源底座或其他功放,以确保音源正常工作。
• 关闭混音台,并等待 30 秒。然后再次打开混音台。
如果将 T4S 用于 L1 II 或 1S 系统:
• 关闭电源底座,将 ToneMatch 线缆插头重新插入到 ToneMatch 端口,然后再次打开电源
底座。
• 尝试其他 ToneMatch 线缆(如果可用)。如果其他 ToneMatch 线缆不可用,尝试标准以
太网线缆。
• 使用 ¼ 英寸的手机插头线将 T4S/T8S 主输出连接到电源底座的模拟输入。调高电源底座
的“微调”控件,确认您可以听到声音。
• 确保电源底座上的 LED 灯为蓝色。如果 LED 灯为红色,请直接致电 Bose 产品和技术支
持团队,电话 (877) 335-2673。
44 -
简体中文
维护与保养
问题 措施
连接到 T4S/T8S 的麦克风或乐器
的声音质量差。
• 确保未应用不需要的 zEQ 或 Para EQ 均衡。
• 确认您已选择麦克风/乐器适用的 ToneMatch® 预设。如果您不想使用
ToneMatch 预设,确保 ToneMatch 已设置为“平直”。
• 确保在您的输入通道上没有不需要的音效(压缩器/门限、音效、延时、混响)。
检查偏好菜单中的状态,当前是否有任何启用的音效。
• 检查 T4S/T8S 的输入“微调”,是否已为麦克风/乐器正确调整。信号 LED 灯应为
绿色,如果 LED 灯为红色,调低“微调”电平直至其变为绿色。
• 尝试使用其他麦克风或乐器线缆。
• 检查将麦克风或乐器连接到 T4S/T8S 混音台的线缆。确保线缆插头已完全插入到
麦克风/乐器的输出接口和 T4S/T8S 的输入接口中。
• 检查麦克风/乐器上的设置(如果有)。
• 检查麦克风/乐器的电池(如果有)。
未听到任何音效。
• 检查您是否按下正确的 CH Edit 按钮。
• 确保未按下相关通道的 FX Mute 按钮。
T4S/T8S 未响应控制旋钮。 • 关闭混音台。等待 30 秒再打开混音台。
主音量控制无效果。
• 确认在“主输出”的偏好菜单中是否已将主输出配置为主音量推子后。
在 T4S/T8S 输入接口中未插入任
何插头时,会听到 L1® 系统发出轻
微的嗡嗡声或蜂鸣声。
• 将 T4S/T8S 和 L1 电源底座插入到相同的交流(市电)插座中。
• 使用交流电源插座测试仪,检测已插入 T4S/T8S 和/或 L1 电源底座的交流电源插
座的触点是否反接或开路(热端、中性端和/或接地)。
• 如果使用延长线,请确保也要按如上所述进行检测。
低音、中音或高音太多(或太少)
。
• 确保未应用不需要的 zEQ 或 Para EQ 均衡。
• 确认您已选择麦克风/乐器适用的 ToneMatch 预设。如果您不想使用 ToneMatch
预设,确保已在“实用程序”类别中将 ToneMatch 设置为“平直”。
使用 CD 播放器、MP3 播放器或
其他类似设备播放立体声录音时声
音质量差。
• 将设备的左声道连接到辅助输入 5,将右声道连接到辅助输入 6(对于 T8S 为
9/10)。辅助输入 5/6(或 9/10)设计用于线路电平输入。
• 在使用 CD 或移动设备时禁用任何扩展低音或均衡器功能。
• 如果您使用计算机上的录音软件,请检查软件的要求。您可能需要将软件配置为
48kHz/24-bit。

简体中文
- 45
维护与保养
问题 措施
麦克风产生啸叫。 • 调节麦克风的位置,不要直接对着各自的扬声器。
• 尝试使用其他麦克风。
• 尝试将 L1 系统放在舞台的其他位置和/或让歌手走到其他位置。
• 增加 L1 系统与麦克风的间距。
• 通过调节麦克风通道的 zEQ 来降低高频。
• 尝试通过调整麦克风通道上的 Para EQ 来消除可能引起啸叫的特定频率。
• 临时旁通所使用的任何音效(音效、延时、混响),以查看其是否可能导致啸叫
问题。
辅助输出听起来有问题。
• 检查是否已为路由至辅助输出的每个输入通道设置为需要的配置。请参阅第 21 页
的“路由输入信号到辅助输出”。
• 确认每个输入是否都已将所需的信号电平分配给辅助输出。
无法通过 USB 连接将 T4S/T8S
音频发送到计算机。
• 检查 USB 连接线是否正确连接到混音台和计算机。
• 尝试不同的 USB 线缆。
• 确保已打开混音台。
• 确认所需的混音台输入通道是否已分配给左和右 USB 输出通道。请参阅“偏好”菜
单中的“USB 到电脑”。
• 确保已将各自输入通道的“微调”电平调高到足以使绿色 LED 灯亮起,这表示有足
够大的输入信号。
• 检查“偏好”菜单中的“输入”和“输出”电平表,以确认在输入和输出均有信号。
• 通过连接到其他兼容 USB 的音频设备,确认计算机 USB 输入正常工作。
• 如果您使用计算机上的录音软件,请检查软件的要求。您可能需要将软件配置为
48kHz/24-bit。
T4S/T8S 未响应闪存盘。
• 为确认您的闪存盘是否有问题,请连接其他品牌的闪存盘
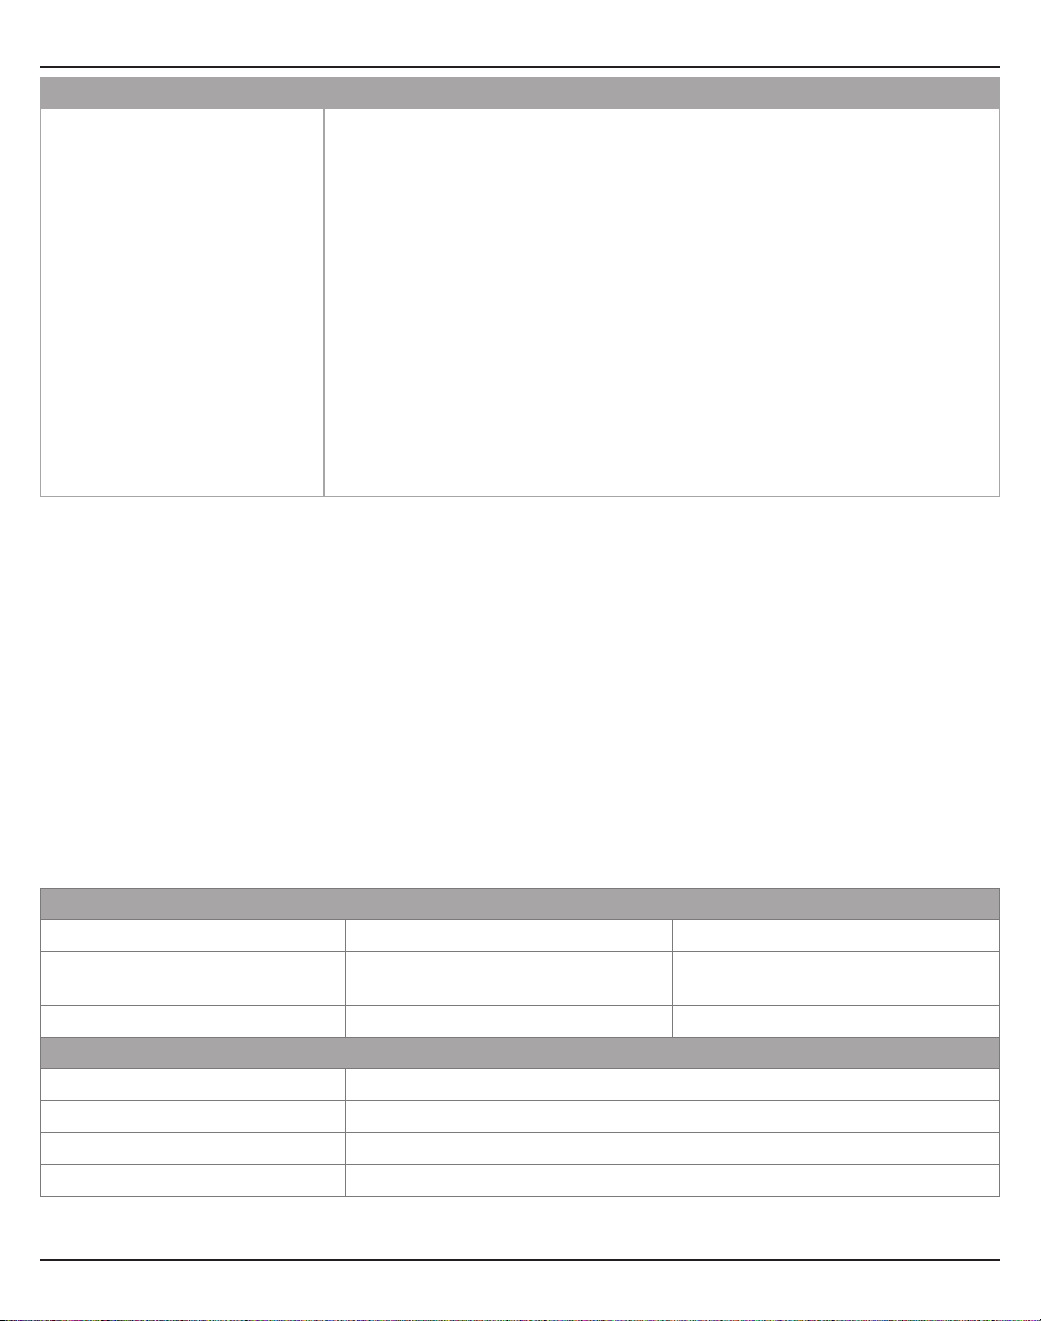
46 -
简体中文
维护与保养
问题 措施
无法通过 USB 连接从计算机向
T4S/T8S 发送音频。
• 检查 USB 连接线是否正确连接到混音台和计算机。
• 尝试不同的 USB 线缆。
• 确保已打开混音台。
• 确认计算机正在播放音频,且计算机上的音频设置未被禁用。
• 检查 USB 信号是否已分配到所需的混音台输入。请参阅“偏好”菜单中的“电脑到
USB”。
• 确认已分配给传入 USB 信号的混音台输入通道未静音,且其音量控制已经调高。
• 确保已将相应输入通道的“微调”控件调高到足以使绿色 LED 灯亮起(表示有足够
大的输入信号)。
• 检查“偏好”菜单中的“输入”和“输出”电平表,以确认在输入和输出均有信号。
• 通过连接到其他兼容 USB 的音频设备,确认计算机 USB 输出正常工作。
• 如果您使用计算机上的录音软件,请检查软件的要求。您可能需要将软件配置为
48kHz/24-bit。
清洁
• 您可以使用干燥的软布清洁产品外壳。
• 请勿使用任何溶剂、化学品或含酒精、氨水、研磨剂的清洁剂。
• 勿在产品附近使用喷雾器,或者让液体溅入到任何开口中。
技术信息
机械
T4S T8S
尺寸(长 x 宽 x 高) 8.4 英寸 x 7.25 英寸 x 3.25 英寸
(214 毫米 x 184 毫米 x 83 毫米)
8.4 英寸 x 12.25 英寸 x 3.25 英寸
(214 毫米 x 311 毫米 x 83 毫米)
重量
2.1 磅(1.0 千克) 4.1 磅(1.9 千克)
电气信息
A/D 和 D/A 转换器 24 位
采样速率
48 kHz
USB 2.0 或更高,A 型到 B 型线缆,A 型端口和 B 型端口
电脑要求
需要 Windows 7 或更高版本;Mac OS 10.5 或更高版本

简体中文
- 47
其他信息
其他信息
有关您的产品的更多信息(包括配件和替换件),请参考用户指南(www.Bose.com 网站在线提供)。若要获取印刷本,
请拨打提供的电话。
有限质保
您的产品享有有限保修。有关保修的详细信息,请访问 www.pro.Bose.com。
本产品的保修信息不适用于澳大利亚和新西兰。有关澳大利亚和新西兰的保修信息,请访问我们的网站 www.bose.com/
au/warranty 或 www.bose.com/nz/warranty。
生产日期
序列号中第八位数字表示生产年份;“6”表示 2006 年或 2016 年。
美洲
(美国、加拿大、墨西哥、中美洲、南美洲)
Bose Corporation
Framingham, MA 01701 USA
企业中心:508-879-7330
美国专业系统,
技术支持:800-994-2673
澳大利亚
Bose Pty Limited
Unit 3/2 Holker Street
Newington NSW Australia
61 2 8737 9999
比利时
Bose N.V./ S.A
Limesweg 2, 03700
Tongeren, Belgium
012-390800
中国
博士视听系统(上海)有限公司
中国上海市
顾戴路 2337 号
丰树商业城塔楼 D 第 6 层邮编 200051
86 21 6010 3800
法国
Bose S.A.S
26-28 avenue de Winchester
78100 St. Germain en Laye, France
01-30-61-63-63
德国
Bose GmbH
Max-Planck Strasse 36D 61381
Friedrichsdorf, Deutschland
06172-7104-0
中国香港
香港铜锣湾勿地臣街 1 号
时代广场 1 座 2101-2105 室
852 2123 9000
印度
Bose Corporation India Private Limited
Salcon Aurum, 3rd Floor
Plot No. 4, Jasola District Centre
New Delhi – 110025, India
91 11 43080200
意大利
Bose SpA
Centro Leoni A – Via G. Spadolini
5 20122 Milano, Italy
39-02-36704500
日本
Bose Kabushiki Kaisha
Sumitomo Fudosan Shibuya Garden Tower 5F
16-17, Nanpeidai-cho
Shibuya-Ku, Tokyo, 150-0036, Japan
电话 81-3-5489-0955
www.bose.co.jp
荷兰
Bose BV
Nijverheidstraat 8 1135 GE
Edam, Nederland
0299-390139
英国
Bose Ltd
1 Ambley Green, Gillingham Business Park
KENT ME8 0NJ
Gillingham, England
0870-741-4500
进口商信息
欧盟
Bose Products B.V., Gorslaan 60, 1441 RG
Purmerend, The Netherlands
中国
博士视听系统(上海)有限公司,中国(上海)自由
贸易试验区日樱北路 353 号,9 号厂房 C 部
中国台湾
Bose 台湾分公司,台湾 104 台北市民生东路三段
10 号,9F-A1
电话:+886-2-2514 7676
墨西哥
Bose de México, S. de R.L. de C.V., Paseo de
las Palmas 405-204, Lomas de Chapultepec,
11000 México, D.F.
电话:+5255 (5202) 3545
有关其他国家/地区,请参见网站
联系信息
访问我们的网站 www.Bose.com。

2-
繁體中文
重要安全指示
請閱讀並保管好所有安全和使用指示。
1. 閱讀這些指示。
2. 保留這些指示。
3. 注意所有警告。
4. 遵守所有指示。
5. 請勿在水邊使用此裝置。
6. 只能用乾布清潔。
7. 請勿堵塞任何通風口。請按照製造商的指示安裝。
8. 防止踩踏或擠壓電源線,尤其是插頭、電源插座以及裝置上的出口位置。
9. 只能使用製造商指定的附件/配件。
10. 只能使用製造商指定或搭配本裝置銷售的推車、支架、三腳架、掛架或工作台。
如果使用推車,則在移動推車/裝置時應格外小心,以避免因傾倒而造成傷害。
11. 在雷雨天氣時或者若長時間不使用,請拔下裝置插頭。
12. 任何維修事宜均請向合格的人員諮詢。如果本裝置有任何損壞,均需進行維修,例如電
源線或插頭受損;液體濺入或物體落入裝置內;本裝置受雨淋或受潮、無法正常運作或
摔落。
警告/小心:
本產品含有磁性材料。請諮詢醫生以瞭解這是否會影響您的植入式醫療設備。
• 本產品並不適合安裝或用於室內有水設施區域 (包括但不限於:室內泳池、室內戲水區、熱
水浴池、桑拿、蒸氣室與室內溜冰場等)。
• 為降低失火或電擊風險,請勿使本產品受到雨淋、液體潑濺或受潮(不適用 IPX4-9 等級
產品)。
• 使產品遠離火源和熱源。請勿將明火火源 (例如點燃的蠟燭) 置於本產品上或本產品附近。
• 未經授權請勿擅自改裝本產品。
• 請勿將功率換流器用於本產品。
• 請勿在汽車或船舶上使用本產品。
• 產品僅使用隨附的電源供應器。
• 請勿將支架或產品放置或安裝在任何熱源附近,如火爐、暖氣片、熱調節裝置或可發熱的其
他裝置 (包括擴大機)。
• 請勿將 ToneMatch® T4S/T8S 混音器裝設於不穩固的三腳架/支架上。本混音器僅適用於
¼ 吋螺絲 (6 公釐),三腳架/支架必須至少能支撐重 1.9 公斤 (4.1 磅) 的設備,而且整體尺
寸為 214 x 311 x 83 公釐 (8.4 x 12.25 x 3.25 吋)。使用非為支撐 T4S/T8S 混音器的大小
和重量所設計的三腳架/支架,可能會造成不穩固的危險狀況,甚至會造成人員受傷。
• 包含可能導致窒息危險的小部件。不適合 3 歲以下的兒童使用。
請注意:
• 本系統隨附的揚聲器線纜和互連纜線不適用於入牆式安裝。請根據當地建築法規選擇正確的
入牆式安裝纜線和連接線。
• 如果是透過電源插頭或裝置耦合器切斷設備電源,那麼切斷電源的設備應當隨時可供使用。
• 為滿足通風需求,Bose 建議不要把產品放置在侷限的空間中,比如壁腔或封閉式櫥櫃。
監管資訊
本設備符合 FCC 規則第 15 部分規定和加拿大工業部免執照 RSS 標準。本設備的運作符合以下
條件:(1) 本設備不會造成有害干擾,(2) 本設備必須承受任何接收到的干擾,包括造成設備無
法正常運作的干擾。
本產品符合所有適用的歐盟指令要求。符合聲明全文載於。
www.Bose.com/compliance
產品電氣雜訊生成相關資訊 (美國 FCC 規範遵循聲明)
請注意:本設備已經過測試,符合 FCC 規則第 15 部分有關 A 類數位設備的各項限制。此類限
制旨在針對設備於商務環境運作時,提供合理保護免受有害干擾。本設備產生、使用並可能輻射
無線射頻能量,如不按照手冊內指示安裝和使用,可能會對無線電通訊造成有害干擾。於住宅區
域中操作本設備可能造成有害干擾,在此情況下,使用者應自行負責修正此類干擾。
未經 Bose Corporation 明確批准,擅自變更或修改本裝置會讓使用者操作本裝置的權利失效。
需使用屏蔽式纜線以維持合規性。
本產品符合加拿大 ICES-003 A 類規範。
CAN ICES-3(A)/NMB-3(A)
本產品符合 E2 電磁環境的所有 EN55103-2 抗擾規範。
Part Name
Toxic or Hazardous Substances and Elements
Names and Contents of Toxic or Hazardous Substances and Elements
PCBs
Metal parts
Plastic parts
Speakers
Cables
This table is prepared in accordance with the provisions of SJ/T 11364.
0: Indicates that said hazardous substance contained in all of the homogenous materials for this part
is below the limit requirement of GB/T 26572.
X: Indicates that said hazardous substance contained in at least one of the homogenous materials
used for this part is above the limit requirement of GB/T 26572.
Lead
(Pb)
Mercury
(Hg)
Cadmium
(Cd)
Hexavalent
(CR(VI))
Polybrominated
Biphenyl (PBB)
Polybrominated
diphenylether
(PBDE)
X
X
00
0
0
0
0
0
0
0
0
0
0
0
0
0
0
0
0
0
0
0
0
0
0
0
0
X
X
此符號表示本產品不得以家庭廢棄物方式丟棄,而應將其送到合適的收集設施進行
回收。妥善處理及回收有助於保護天然資源、人類健康和環境。如欲獲得有關處理
和回收本產品的更多資訊,請聯繫當地政府機關、廢棄物處理服務或您購買本產品
的商家。
由
DCE
安全部門提供

目錄
繁體中文
- 3
簡介
產品概覽 .......................................................................................5
產品特點 ....................................................................................5
開箱 ...........................................................................................5
控制台與連接板
T4S ToneMatch® 混音器 ..........................................................................6
控制台 ......................................................................................6
連接板 ......................................................................................7
T8S ToneMatch® 混音器 ..........................................................................8
控制台 ......................................................................................8
連接板 ......................................................................................9
系統設定
取下/裝上保護蓋 ................................................................................10
安裝選項 .......................................................................................11
將 T4S/T8S 安裝於相機三腳架 ..................................................................11
透過數位連線連接 T4S ........................................................................... 12
透過類比連線連接 T4S/T8S ...................................................................... 13
連接 ToneMatch® 電源供應器 ..................................................................... 14
將 T4S/T8S 連接至您的電腦 ...................................................................... 15
將隨身碟連接至 T4S/T8S ........................................................................ 15
操作
讀取 T4S/T8S 顯示幕 ........................................................................... 16
最佳化輸入增益與輸出音量 .............................................. .......................... 17
使用主音量控制 ................................................................................. 18
使音軌靜音 ................................................................................. 18
使音軌效果靜音 .............................................. ................................ 18
使用旋鈕式選取器 ............................................................................... 19
編輯音軌的聲音 .................................................................................20
使用 Pan/Aux 功能 ..........................................................................20
使用調音器 .................................................................................20
選取 ToneMatch® 預設 .......................................................................22
調整 zEQ ..................................................................................22
調整 Para EQ ...............................................................................23
使用壓縮器/Gate 功能 ........................................................................23
使用調變效果 ...............................................................................25
加入延遲 ...................................................................................26
加入殘響 ...................................................................................26

目錄
4-
繁體中文
使用全域功能 ............................................ ............................... ........27
選取殘響類型 ...............................................................................27
使用偏好設定公用工具 ........................................................................28
載入與儲存場景 .............................................. ................................30
分享場景 ...................................................................................33
Bose 場景 .....................................................................................35
出廠設定 ...................................................................................35
創作歌手 ...................................................................................36
DJ/播放 ...................................................................................38
完整樂團 ...................................................................................40
出廠設定
出廠設定 ......................................................................................42
維護與保養
疑難排解 ......................................................................................43
清潔 ..........................................................................................46
技術資訊 ......................................................................................46
額外資源
聯絡資訊 ......................................................................................47
進口商資訊 .................................................................................47
其他資訊 ......................................................................................47
有限保固 ...................................................................................47
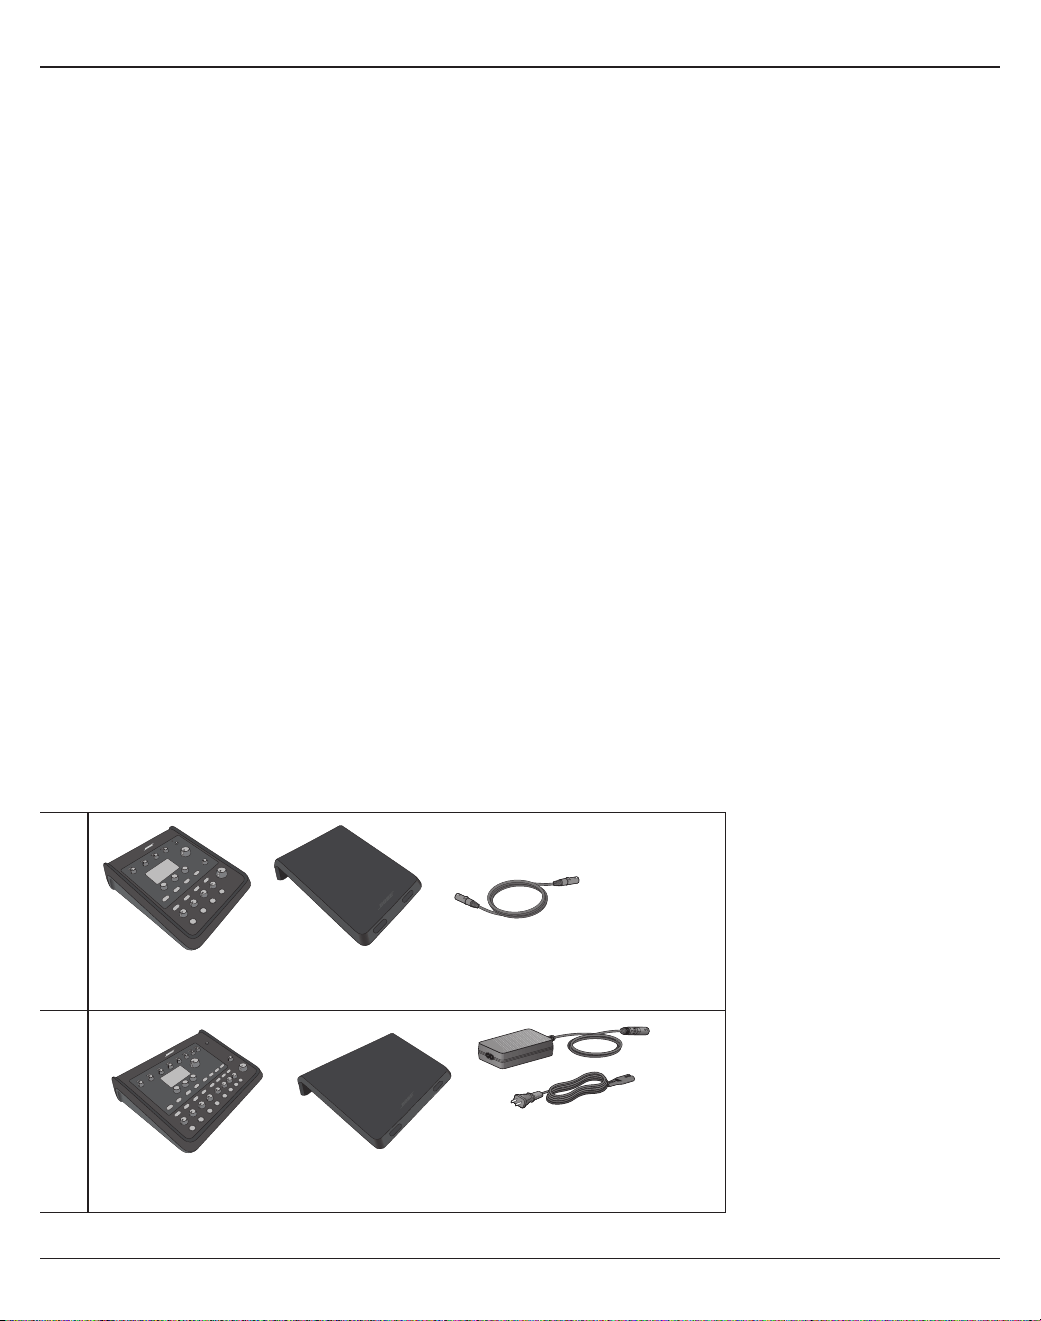
繁體中文
- 5
簡介
產品概覽
T4S 及 T8S ToneMatch® 混音器具備 4、8 音軌的小型介面,專為表演者設計,讓您完全掌握音樂。具備強大的數位訊號處理引擎及易用
的使用者控制功能,可提供錄音室級的 EQ、動態及效果處理。透過內建 Bose® ToneMatch® 處理與 zEQ 提供優異的音質,尤其在連接至
Bose L1 或 F1 揚聲器系統進行完整音調控制時,效果特別明顯。使用堅固耐用的 ToneMatch 混音器,透過觸控、容易讀取的 LED 顯示幕及
場景呼叫,讓您在舞台上的演出充滿自信。ToneMatch 混音器是表演者最出色的舞台夥伴。
產品特點
強大的音訊處理
• 以進階數位音訊處理呈現最先進的錄音室品質效果
• 效果器包括壓縮器、限制器、嘶聲消除器、消噪器、和
聲、Flanger、相位效果器、顫音、延遲和殘響
• Bose® ToneMatch® 可處理自然的人聲與樂器聲
• zEQ 著重於 ToneMatch 預設的聲音以便立即進行有效調整
• 每個音軌皆有獨立的 ToneMatch、EQ、動態及效果
• 專屬的殘響特效可用於 Aux 輔助傳送,全機音軌也均能共享殘響
特效
• 主要輸出 EQ 可協助補償場地音響效果
• 搭配 Bose L1 與 F1 揚聲器系統可達到完整的音調最佳化
無縫現場控制
• 觸控與指示燈的設計特別為音樂家與 DJ 在現場舞台演出所設計
• 快速學習使用者介面
• 內建點擊節奏延遲、半音調音器及可呼叫的場景
• LED 顯示幕與發光的控制項容易讀取及使用,即便舞台上燈光昏
暗也沒問題
高密度連線
• 小型數位立體聲混音器提供前所未有的連線與控制功能
• 四個 (T4S) 或八個 (T8S) 高品質音訊前級與 XLR-combo 複合
插孔,可用於麥克風或樂器以及可開關
• 兩個 Aux 輔助輸入可額外提供兩個 (T4S) 或四個 (T8S) 輔助傳
送訊號源
• USB-A 和 USB-B 可用於 USB 硬碟播放或與 PC/Mac 連線
• ToneMatch 數位音訊輸出與電源 (僅限 T4S)
• 平衡的 ¼ 吋 TRS 與 XLR (僅限 T8S) 立體聲輸出
• 獨立耳機輸出
便利的出廠即用特性
• 堅固耐用的外殼具備磁性保護蓋,有助於保護控制器與接頭
• 隨附 ToneMatch 纜線可連接至 Bose L1 Model II 或 L1 Model 1S
系統以接收數位音訊與電源 (T4S),或隨附通用電源供應器 (T8S)
• 底部插孔可使用標準相機安裝配件,讓您取用 ToneMatch 混音
器時方便輕鬆
T4S ToneMatch 混音器與保護蓋 ToneMatch 纜線
ToneMatch 電源供應器T8S ToneMatch 混音器與保護蓋
如需完整的選用設備與配件清單,請造訪。www.Bose.com
開箱
混音器包裝箱內含物品如下表所示:
T4S
T8S

控制台與連接板
6-
繁體中文
T4S ToneMatch® 混音器
控制台
圖 1.T4S 控制台
q 輸入訊號/過載指示燈(1-4) – 以顏色顯示輸入訊號狀態:
綠燈:表示有輸入訊號。
紅燈:表示輸入訊號源過載
w 微調控制 (1-4) – 調整各音軌的輸入敏感度。
e 顯示幕 – 提供功能選單與系統資訊。
r 編輯控制 – 三個旋鈕/按鍵可供選取或調整顯示幕上的項目/值。
t 音軌編輯按鍵 (1-4) – 選取您要修改的音軌。
y FX 靜音特效按鍵 (1-4) – 在選取的音軌上關閉調變、延遲及殘響效果。
u 音量控制 (1-4) – 調整各音軌的音量。
i 靜音按鍵 (1-4) – 使各音軌的音訊輸出靜音。
o 主音量控制 – 調整整體輸出音量。
a 耳機音量控制 – 調整耳機輸出的音量。
s 旋鈕式選取器 – 可存取全域與音軌相關參數,這些參數可透過編輯控制加以調整。
d 虛擬電源開關 – 將 +48V 電源套用至輸入音軌 1-4。紅色 LED 表示虛擬電源已開啟。
f 耳機插孔 – 僅適用於耳機,最低阻抗 24Ω。
q
w
i
u
y
t
r
e
d
s
a
o
f

繁體中文
- 7
控制台與連接板
圖 2.T4S 連接板
連接板
q 電源開關 – 開啟或關閉混音器電源。
w USB 2.0 TYPE-B – 可用於將混音器連接至電腦的 USB 介面。
e USB 2.0 TYPE-A – 可用於從隨身碟串流音訊的 USB 介面。
r 類比 L/R 輸出 – 主要類比輸出。接受 ¼ 吋 TRS 平衡或 TS 非平衡連接線。
t
輔助輸出 – 兩個使用者可定義的類比輸出。可設定用於推桿前 (Pre-fader)、EQ 後 (Post-EQ) 及效果器,或推桿後
(Post-fader) 輸出。接受 ¼ 吋 TRS 平衡連接線。
y 輔助輸入 – 類比輸入音軌 5/6。接受 ¼ 吋 TRS 平衡或 TS 非平衡連接線以提供線性位準輸入。可用於立體聲輸入訊號。
u 輸入 1-4 – 類比輸入音軌 1-4。接受 XLR 平衡連接線以用於麥克風或 ¼ 吋 TRS 平衡或 TS 非平衡連接線以提供高阻抗輸
入,例如吉他。
i 數位主要輸出 L – 以數位立體聲連接至兩個 L1® Model 1S/II 系統。
請注意:僅適用於主要數位輸出
R
的立體聲。
o 電源連接埠/數位主要輸出 R – L1 Model 1S/II 系統所使用的數位輸出。將電源從 L1 Model 1S/II 功率底座供應至 T4S 混
音器。亦可透過 ToneMatch 電源供應器 (未隨附於 T4S) 從 AC 插座供應電源。接受隨附的 ToneMatch® 纜線。
注意:雖然
ToneMatch
連接埠採用標準
RJ-45
連接器,但切勿將
T4S
透過
RJ-45
連接至電腦或電話網路。
USB AUDIO
M
( )
MONO
q
w
e r t y
uio

控制台與連接板
8-
繁體中文
T8S ToneMatch® 混音器
控制台
圖 3.T8S 控制台
q 訊號/過載指示燈(1-8)– 以顏色顯示輸入訊號狀態:
綠燈:表示有輸入訊號。
紅燈:表示輸入訊號源過載
w 微調控制 (1-8) – 調整各音軌的輸入敏感度。
e 顯示幕 – 提供功能選單與系統資訊。
r 編輯控制 – 三個旋鈕/按鍵可供選取或調整顯示幕上的項目/值。
t 音軌編輯按鍵 (1-8) – 選取您要修改的音軌。
y FX 靜音特效按鍵 (1-8) – 在選取的音軌上關閉調變、延遲及殘響效果。
u 音量控制 (1-8) – 調整各音軌的音量。
i 靜音按鍵 (1-8) – 使各音軌的音訊輸出靜音。
o 主音量控制 – 調整整體輸出音量。
a 耳機音量控制 – 調整耳機輸出的音量。
s 立體聲輸出計 – 可讓您目視查看輸出位準。
d 旋鈕式選取器 – 可存取全域與音軌相關參數,這些參數可透過編輯控制加以調整。
f 虛擬電源開關– 將 +48V 電源套用至輸入音軌 1-4。紅色 LED 表示虛擬電源已開啟。
g 耳機插孔 – 僅適用於耳機,最低阻抗 24Ω。
q
w
i
o
g
a
s
d
f
u
y
t
r
e

繁體中文
- 9
控制台與連接板
圖 4.T8S 連接板
連接板
q 電源開關 – 開啟或關閉混音器電源。
w USB 2.0 Type-B – 可用於將混音器連接至電腦的 USB 介面。
e USB 2.0 Type-A – 可用於從隨身碟串流音訊的 USB 介面。
r 類比 L/R 輸出 – 主要類比輸出。接受 ¼ 吋 TRS 平衡與 TS 非平衡連接線。
t 輔助輸出 – 四個使用者可定義的類比輸出。可設定用於推桿前 (Pre-fader)、EQ 後 (Post-EQ) 及效果器,或推桿後
(Post-fader) 輸出。接受 ¼ 吋 TRS 平衡或 TS 非平衡連接線。
y 輔助輸入 – 類比輸入音軌 9/10。接受 ¼ 吋 TRS 平衡或 TS 非平衡連接線以提供線性位準輸入。可用於立體聲輸入訊號。
u 輸入 1-8 – 類比輸入音軌 1-8。接受 XLR 平衡連接線以用於麥克風或 ¼ 吋 TRS 平衡或 TS 非平衡連接線以提供高阻抗輸
入,例如吉他。
i XLR 立體聲輸出 – 立體聲類比輸出。接受 XLR 平衡連接線用於立體聲輸出。
o 數位電源連接埠 – 搭配 ToneMatch 電源供應器使用 (請參閱第 14 頁「連接 ToneMatch® 電源供應器」)。
請注意:
T8S
的設計無法以數位方式連接至
L1® Model 1S/II
。
注意:雖然
ToneMatch
連接埠採用標準
RJ-45
連接器,但切勿將
T8S
透過
RJ-45
連接至電腦或電話網路。
M
( )
MAIN OUT
USB AUDIO
MONO
q
w
e r t y
uio

10-
繁體中文
系統設定
取下/裝上保護蓋
包裝箱內的 T4S/T8S ToneMatch® 混音器的上方面板已安裝保護蓋。保護蓋的設計是為了在運送中或放置混音器時保護控
制台。
取下保護蓋:
1. 將拇指放在保護蓋正面的凹槽處,然後將保護蓋向前方滑動。
2. 抓住保護蓋的背面將它抬起。
裝上保護蓋:
1. 將保護蓋放在混音器上方,由後向前滑動。
2. 磁性保護蓋將自行卡入定位並固定在混音器上。
圖 5.取下與裝上保護蓋
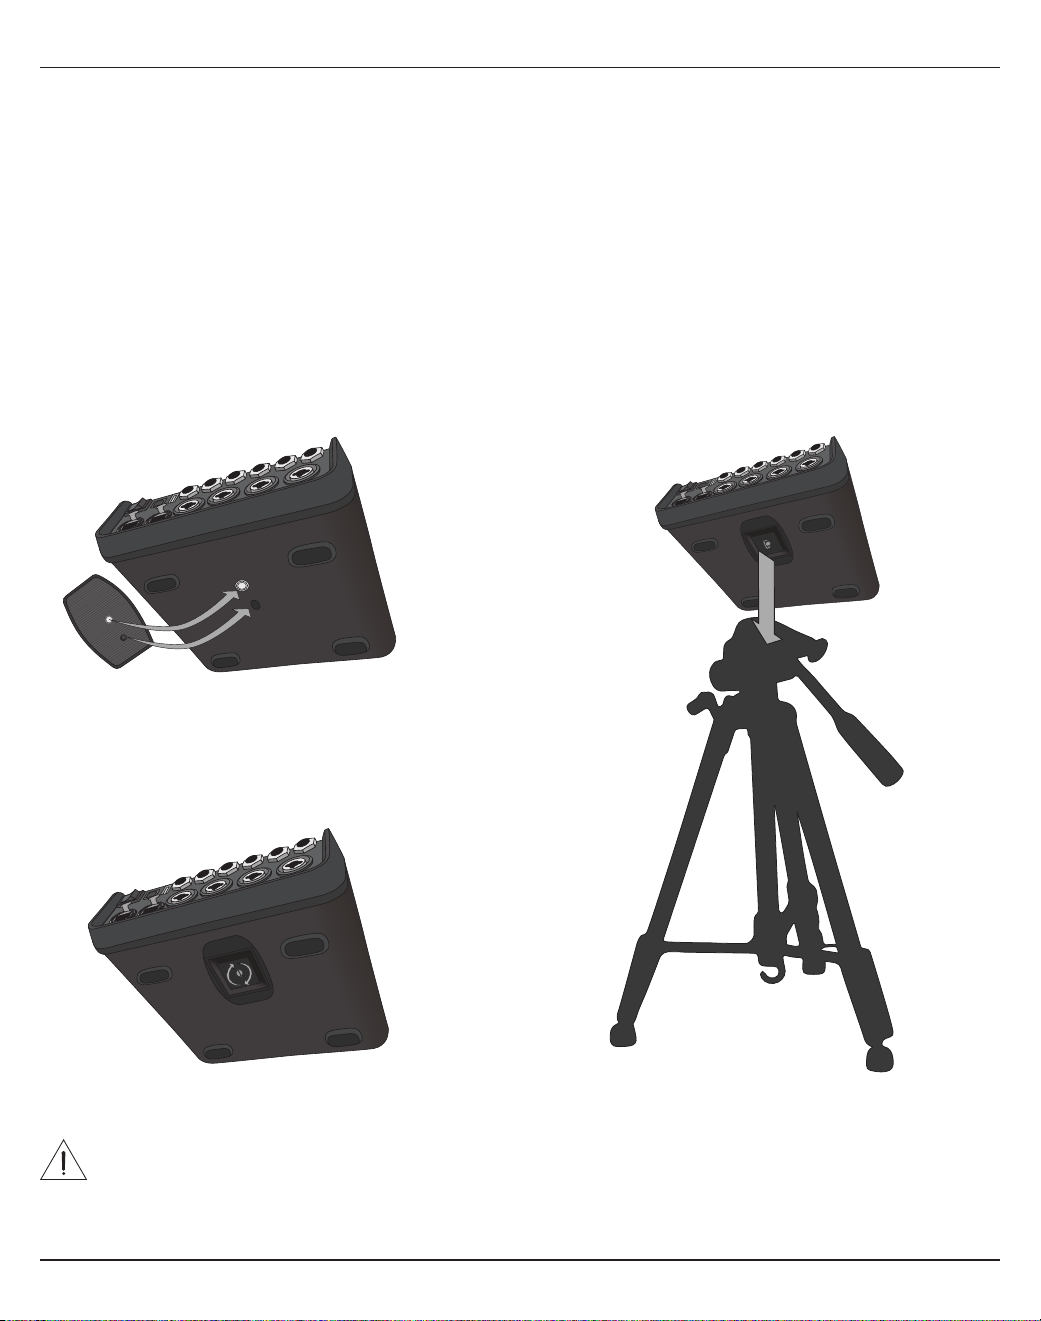
系統設定
繁體中文
- 11
圖 6.將支架固定至 T4S 圖 8.使用支架將 T4S 固定至三腳架
圖 7.支架已安裝至 T4S
安裝選項
T4S/T8S 附帶 ¼ 吋 (6 公釐) 的安裝螺絲孔。使用者可將它安裝至內含 ¼ 吋 (6 公釐) 安裝螺絲的各種產品,包括相機三
腳架。
將 T4S/T8S 安裝於相機三腳架
1. 將相機三腳架的支架伸長,並固定在所需的高度。
2. 從相機三腳架頂端取下支架,然後使用螺絲將支架固定於 T4S/T8S 的底部。請確認 T4S/T8S 上的孔位對齊支架上的
凸起處。請見圖 6。
3. 將支架與 T4S/T8S 固定至相機三腳架。請見圖 8。
警告:請勿將
ToneMatch® T4S/T8S
混音器裝設於不穩固的三腳架
/
支架上。本混音器僅適用於
¼
吋螺絲
(6
公釐
)
,
三腳架
/
支架必須至少能支撐重
1.9
公斤
(4.1
磅
)
的設備,而且整體尺寸為
214 x 311 x 83
公釐
(8.4 x 12.25 x 3.25
吋
)
。使用非為支撐
T4S/T8S
混音器的大小和重量所設計的三腳架
/
支架,可能會造成不穩固的危險狀況,甚至會造
成人員受傷。

12-
繁體中文
系統設定
透過數位連線連接 T4S
1. 請確認 L1 Model 1S/II 與 T4S 的電源已關閉,T4S 主音量控制已設定為最小。
2. 將 ToneMatch® 連接線的一端插入 T4S 的電源連接埠/數位主要輸出 R。將 ToneMatch 連接線另一端插入功率底座
的 ToneMatch 連接埠。
請注意:若要將
T4S
連接至兩個
L1 Model 1S/II
功率底座,請使用
ToneMatch
連接線將第二個功率底座連接至數位
主要輸出
L
連接埠。
3. 開啟混音器電源,然後開啟 L1 Model 1S/II 功率底座電源。
4. 連接您的樂器並調整音量。請參閱第 17 頁「最佳化輸入增益與輸出音量」。
圖 9.兩個 L1 model II 系統透過數位連線連接至 T4S
USB AUDIO
M
( )
MONO
請注意:
T8S
無法以數位方式連接,也無法由
L1 Model 1S/II
供應電源。

系統設定
繁體中文
- 13
透過類比連線連接 T4S/T8S
1. 請確認您所連接的設備與 T4S/T8S 的電源已關閉,T4S/T8S 主音量控制已設定為最小。
2. 使用 XLR 平衡連接線,將一或兩個設備連接至 T8S 的 XLR 立體聲輸出 (請見圖 10)。
請注意:
T4S/T8S
可使用
¼
吋
TRS
連接線
(
另售
)
透過類比
R
輸出連接埠連接至設備。將
TRS
連接線的另一端連接
至設備的類比輸入連接埠。若要將
T4S/T8S
連接至兩個設備,請使用
¼
吋
TRS
連接線,將第二個設備連接至
T4S/
T8S
的類比
L
輸出連接埠。
3. 將 ToneMatch® 電源供應器連接至 T4S/T8S 的電源連接埠,然後插入供電的 AC 插座。請參閱第 14 頁「連接
ToneMatch® 電源供應器」。
4. 開啟 T4S/T8S 混音器的電源,然後開啟設備的電源。
5. 連接您的樂器並調整音量。請參閱第 17 頁「最佳化輸入增益與輸出音量」。
圖 10.兩個 F1 揚聲器系統透過類比連線連接至 T8S
M
( )
MAIN OUT
USB AUDIO
MONO
(
M
US
B AUDI
O
( )
M
M
AIN
O
UT
()
M

14-
繁體中文
系統設定
連接 ToneMatch® 電源供應器
ToneMatch 電源供應器為 T4S/T8S 混音器提供電力。
1. 將電源供應器纜線連接至 T4S/T8S 電源連接埠。
2. 將 AC 電源線的一端插入電源供應器。
3. 將電源線的另一端插入通電的 AC 電源插座。
4. 將 T4S/T8S 電源開關切換至開 (ON) 的位置。
請注意:
T8S
需使用隨附的電源供應器才能運作。
T4S
並無隨附電源供應器,因此無需隨附的電源供應器即可運作
(
在連接
L1 Model 1S/
II的
ToneMatch
連接埠情況下
)
。
圖 11.將 T4S 連接至電源供應器

系統設定
繁體中文
- 15
將 T4S/T8S 連接至您的電腦
T4S/T8S 提供 USB 連接埠以連接至電腦,如此可讓您將表演場景下載至電腦或安裝系統更新。請瀏覽
www.Bose.com/livesound 查看有關更新系統的詳細資訊。
連接至電腦時,您亦可使用 T4S/T8S 做為通用 USB 音訊設備進行錄音/播放。
請注意:
T4S/T8S
以
48 kHz/24
位元運作。使用
T4S/T8S
搭配錄音軟體時,可能需要將軟體設定為以
48 kHz/24
位元
運作
請注意:將
T4S/T8S
連接至電腦時,需要
USB
連接線
(Type-A
至
Type-B
,未隨附於本產品
)
。
1. 將混音器連接至電源 (適用於 T4S/T8S 的 ToneMatch® 電源供應器,或僅適用於 T4S 的 L1 Model 1S/II)。
2. 將 USB 連接線的一端插入混音器的 USB 2.0 Type-B 連接埠 (圖 12)。
3. 將 USB 連接線的另一端插入電腦上的 USB 連接埠。
4. 開啟混音器電源。
圖 12.T4S 與 USB 連線
ToneMatch 連接埠 – 連接至 L1 Model 1S/II 系
統或 ToneMatch 電源供應器
電源開關。
USB 連接線
(Type-A 至 Type-B)
連接至電腦 USB
連接埠
將隨身碟連接至 T4S/T8S
將內含 WAV/MP3 檔案的 USB 2.0/3.0 隨身碟插入 USB 2.0 Type-A 連接埠,將音訊曲目播放至您的混音器。
圖 13.將隨身碟連接至 T4S

16-
繁體中文
操作
讀取 T4S/T8S 顯示幕
顯示幕為您提供操作混音器的介面。圖 14 為顯示幕資訊與基本操作方式範例。顯示幕的內容依據旋鈕式選取器的位置而定。
圖 14.顯示幕與操作方式範例
Ch 1
Type Tim
eM
ix
Digital 250ms 30%
Delay
Fdbk.
All Channels
*Bose Scene 01
Load Shared Save
Scenes
顯示選取的音軌
表示按下控制項可切換不同的參數
以圖像表示參數值
顯示旋鈕式選取器存取的功能
參數名稱及參數設定/值
旋鈕/按鍵控制項
此符號表示旋轉控制項可改
變設定。
星號表示載入的場景已修改
表示按下控制項可啟動
此功能

操作
繁體中文
- 17
最佳化輸入增益與輸出音量
若要從您的系統獲得高品質音量,需倚賴輸入音軌增益、主音量及音軌音量相互調整。針對每個使用的音軌執行下列動作。
1. 請確認主音量、微調 Trim 及音軌音量控制皆設定為最小。
2. 調整輸入音軌的微調 Trim。
A. 如果可以,將您的樂器/訊號源調整至所需的音量。
B. 以表演時的音量演奏您的樂器/訊號源。
C. 順時針慢慢轉動微調 Trim 控制項,直到訊號/過載指示燈亮起綠燈。如果指示燈閃爍紅燈或恆亮紅燈,請逆時針
轉動微調 Trim 控制項以降低音量。
D. 使用偏好設定選單中的輸入位準顯示表 (第 28 頁) 檢查您的輸入位準
注意:如果您要使用需要虛擬電源
(
+
48V)
的設備,例如電容式麥克風,請在調整微調 Trim 控制項之前,
按下虛擬電源開關。
請注意:在調整微調位準時,偏好設定選單中的輸入位準顯示表可提供協助
(
請參閱第
28
頁
)
。
3. 將主音量控制項設定在 12 點鐘的位置。
4. 順時針慢慢轉動音軌音量控制,直到達到所需的音量。
Input LevelPreferences
Ch 3
Ch 1
Ch 2
Ch 4
Menu Aux InReset
峰值位準指示燈
輸入位準指示燈
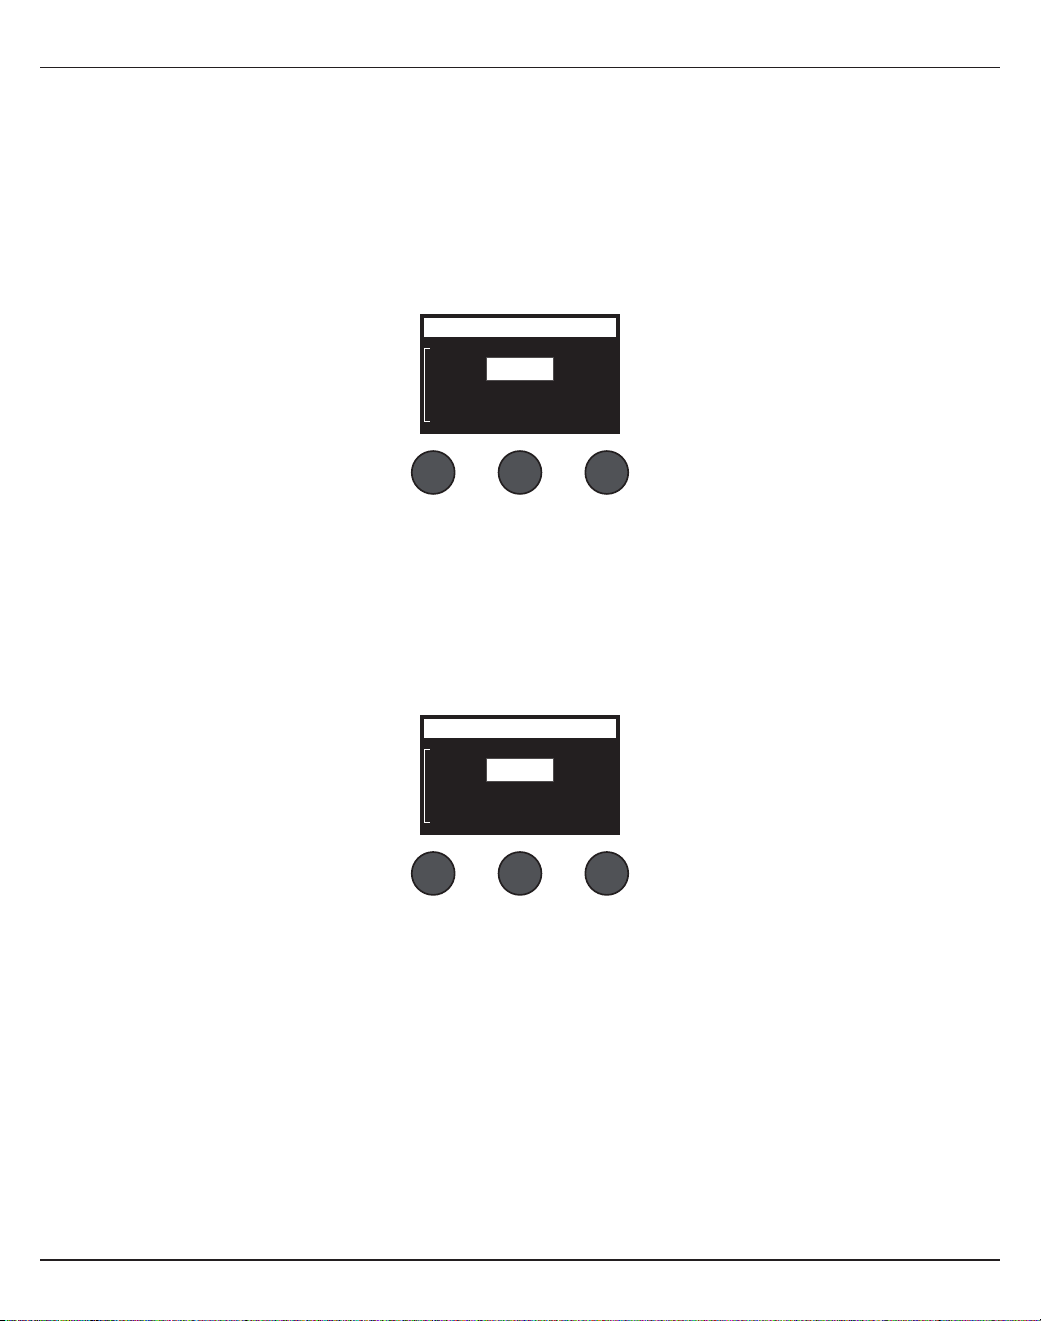
18-
繁體中文
操作
使用主音量控制
主音量控制可調整 T4S/T8S ToneMatch® 輸出與類比主要輸出的整體輸出位準。在正常運作時,建議將主控制設定在 12
點鐘的位置。設定好所有音軌的音量之後,即可從此位置調高或調低主音量。
使音軌靜音
靜音按鍵可使各音軌的音訊靜音。
• 若要使音軌靜音,請按一次靜音按鍵。靜音按鍵亮起白燈表示該音軌已靜音。顯示幕將在個別音軌顯示「CH MUTE」。
• 再次按下靜音按鍵即可取消靜音。靜音按鍵燈光熄滅表示該音軌並非靜音。
使音軌效果靜音
FX 靜音特效按鍵只會使各音軌的調變、延遲及殘響效果關閉。靜音效果不會關閉 ToneMatch 預設、zEQ、Para EQ 及壓
縮器/Gate 設定。
• 若要使音軌的效果關閉,請按一次 FX 靜音特效按鍵。FX 靜音特效按鍵亮起白燈表示該音軌效果已關閉。顯示幕將在個
別音軌顯示「FX MUTE」。
• 再次按下 FX 靜音特效按鍵可將音軌效果打開。靜音特效按鍵燈光熄滅表示該音軌效果並非關閉。
Ch 1
Category
Utility
ToneMatch
CH MUTE
Flat
Preset
Ch 1
Category
Utility
ToneMatch
FX MUTE
Flat
Preset

操作
繁體中文
- 19
使用旋鈕式選取器
旋鈕式選取器可供存取 ToneMatch®混音器輸出的功能。圖 15 提供九個音軌相關功能與三項全域功能的摘要。以下頁面說
明如何調整各項功能。
圖 15.旋鈕式選取器
音軌功能
q Pan/Aux – 可供存取左右平衡 Pan、輔助輸入及輔助輸出。
w 調音器 – 為選擇的音軌提供樂器彈奏的調音功能。
e ToneMatch – 可存取為特定樂器與麥克風設計的專屬 ToneMatch 預設參數。
r zEQ – zEQ 為所選 ToneMatch 預設的一部分,可供調整在您樂器或麥克風頻率範圍內的低/中/高頻率。
t Para EQ – 提供各音軌的參數 EQ 控制。
y 壓縮器/Gate – 提供存取 Gate、壓縮、限制器、嘶聲消除器以及參數可調整的大鼓預設。
u 調變 – 提供存取多種調變效果,例如和聲、Flanger、相位效果器及顫音。
i 延遲 – 提供存取三種延遲類型及 Tap-tempo 延遲。
o 殘響 – 將殘響套用至選取的音軌,可傳送至主要或輔助輸出。
全域功能
a 殘響類型 – 將選取的殘響類型套用所有主要輸出音軌或輔助傳送。
s 偏好設定 – 可存取數種系統公用工具。
d 場景 – 可讓使用者儲存與載入表演場景 (設備完成狀態的快照)。
e
o
y
d
r
a
u
q
t
s
i
w
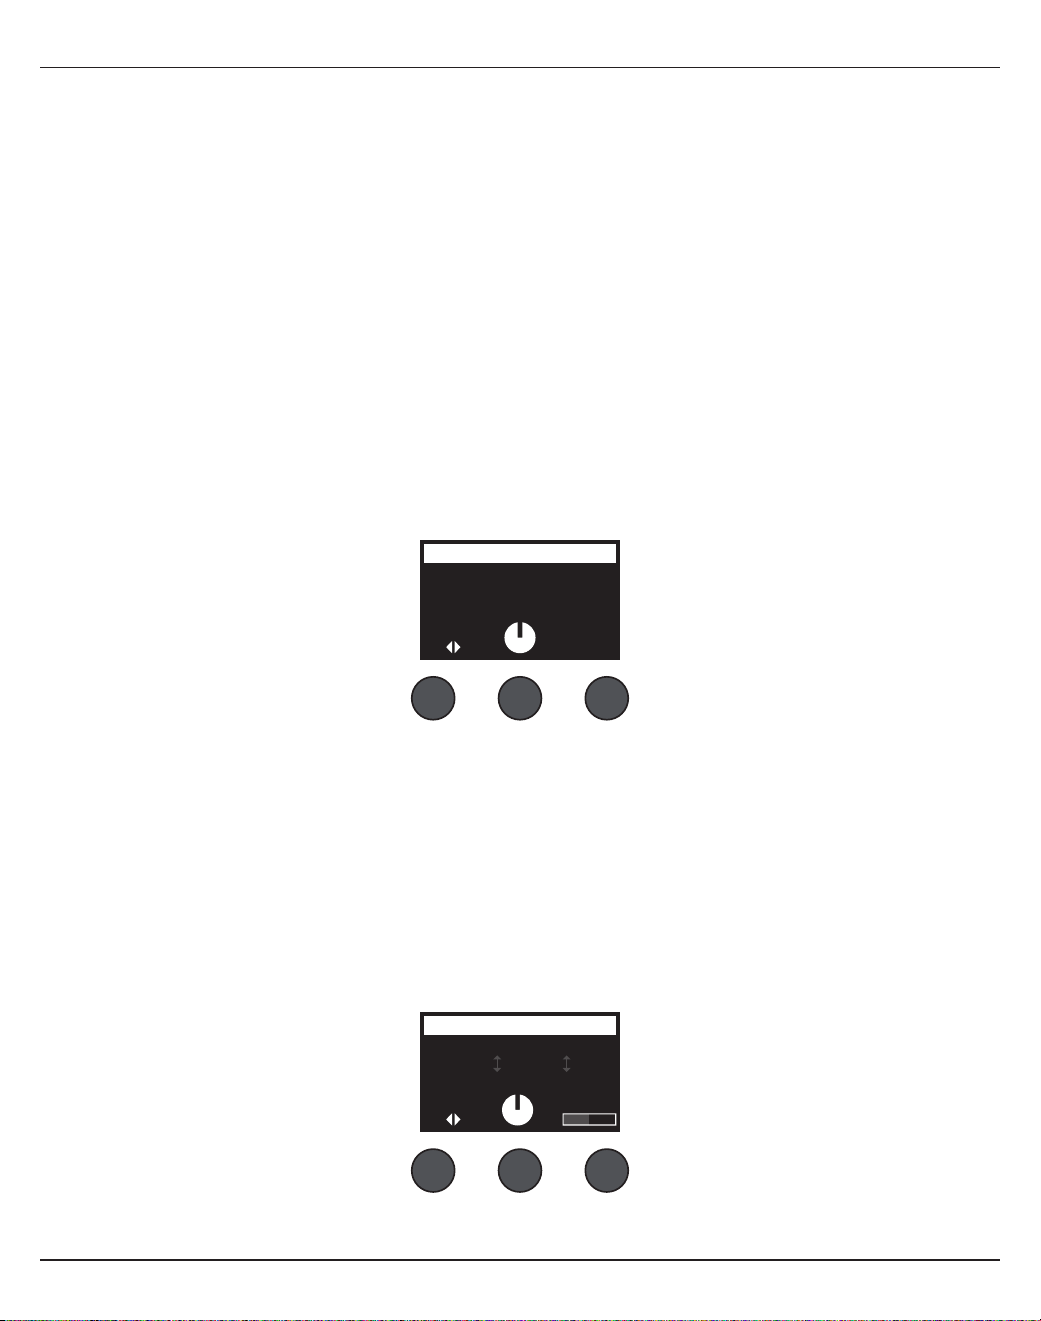
20-
繁體中文
操作
編輯音軌的聲音
音軌編輯功能可存取並編輯所選取音軌的設定。音軌編輯功能為 Pan/Aux、調音器、ToneMatch®、zEQ、 Para EQ、壓
縮器/Gate、調變、延遲及殘響。
若要編輯音軌:
1. 按下音軌編輯 1、2、3、4、(T4S 與 T8S) 5、6、7 或 8 (僅限於 T8S) 按鍵。顯示幕左上角可檢視所選取的音軌。
2. 使用旋鈕式選取器選取一項音軌編輯功能。
3. 使用以下說明,調整該功能的設定。
請注意:您一次只能編輯一個音軌。按下音軌編輯按鍵,僅能編輯所選取的音軌。
使用 Pan/Aux 功能
使用 Pan/Aux 功能將音訊路由至主要輸出 L 或 R、控制輔助輸入或輔助傳送。
使用左右平衡 Pan
使用左右平衡 Pan 控制項,將各音軌傳送至立體聲混音中的獨立位置。
1. 按下或旋轉左側編輯器控制項,然後從選單中選取左右平衡 Pan。
2. 旋轉左右平衡 Pan 控制項以調整從 L 至 R 的線性輸出。
輔助輸入 5/6 (9/10)
使用輔助輸入 5/6 (9/10) 以輸入線性位準立體聲訊號源,例如行動設備。
1. 按下或旋轉左側控制項,然後從選單中選取輔助輸入 5/6。
2. 旋轉 5 Lvl 或 6 Lvl 控制項以調整音軌 5 或音軌 6 的訊號位準。
3. 按下 5 Lvl 以切換至 5 Pan;按下 6 Lvl 控制項以切換至 6 Pan。旋轉左右平衡 Pan 控制項以調整左右平衡 Pan 從 L
至 R。
Ch 1
Menu Pan
Pan
Pan
Ch 1
Menu 5 Pan 6 Lvl
Aux In 50%
Aux Input 5/6
6 Pan5 Lvl
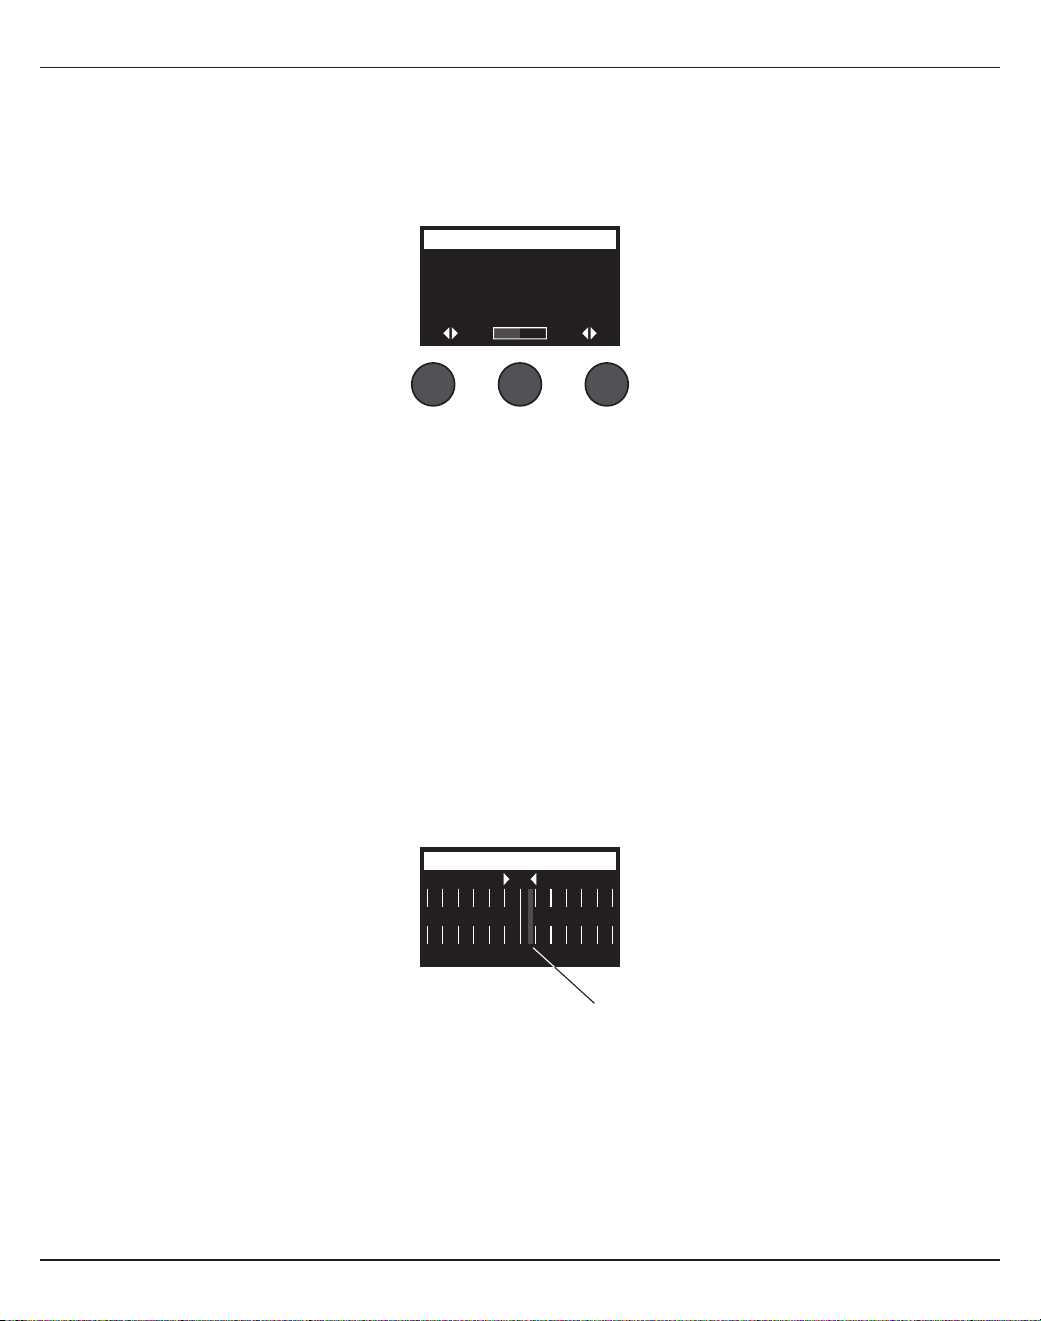
操作
繁體中文
- 21
將輸入訊號路由至輔助輸出
輔助功能可讓您將訊號路由至兩個輔助輸出 (僅限於 T4S) 或四個輔助輸出 (僅限於 T8S),以用於各種訊號處理、錄音及聲
音擴音應用程式。各個可用的輔助輸出皆可調整訊號位準:
請注意:若要使輔助輸出靜音,請按下
Level (
位準
)
控制項。再按下一次即取消靜音。
1. 按下或旋轉 Menu (選單) 控制項,然後選取輔助傳送。
2. 旋轉 Level (位準) 控制項以調整所選取音軌的訊號位準。
3. 旋轉 Tap (點擊) 控制項以捲動點擊選單,然後反白選取所需的點擊點。
A. Dry:前級之後 – 將完全 Dry (未處理) 的訊號直接從前級進行路由。
B. 前:使用 EQ 與 Fx – 訊號進行處理並從前級進行路由。
C. 後:Fader 之後 – 在音軌音量控制套用處理之後進行訊號路由。
4. 按下 Select (選取) 控制項以選取點擊點,或按下 Cancel (取消) 控制項離開不進行變更。目前選取的點擊點名稱會以
粗體字呈現。
Ch 1
Menu Tap
Aux
1P
re
Level
50%
Aux 1 Output
使用調音器
每個輸入音軌皆有獨立的調音器。顯示幕會在底部顯示正在播放的音符。隨著您進行調整,顯示幕上會出現音高指示器,顯
示該音符為升記號或降記號。調整您樂器的音高,使游標對齊螢幕中央。
請注意:若要使調音靜音,請按下該音軌的靜音按鍵。
使用移調功能,將參考音高調高或調低兩個半音,或使用參考音高來精準調整至您的音調。
Ch 1
b#
A3
Tuner
音高指示燈
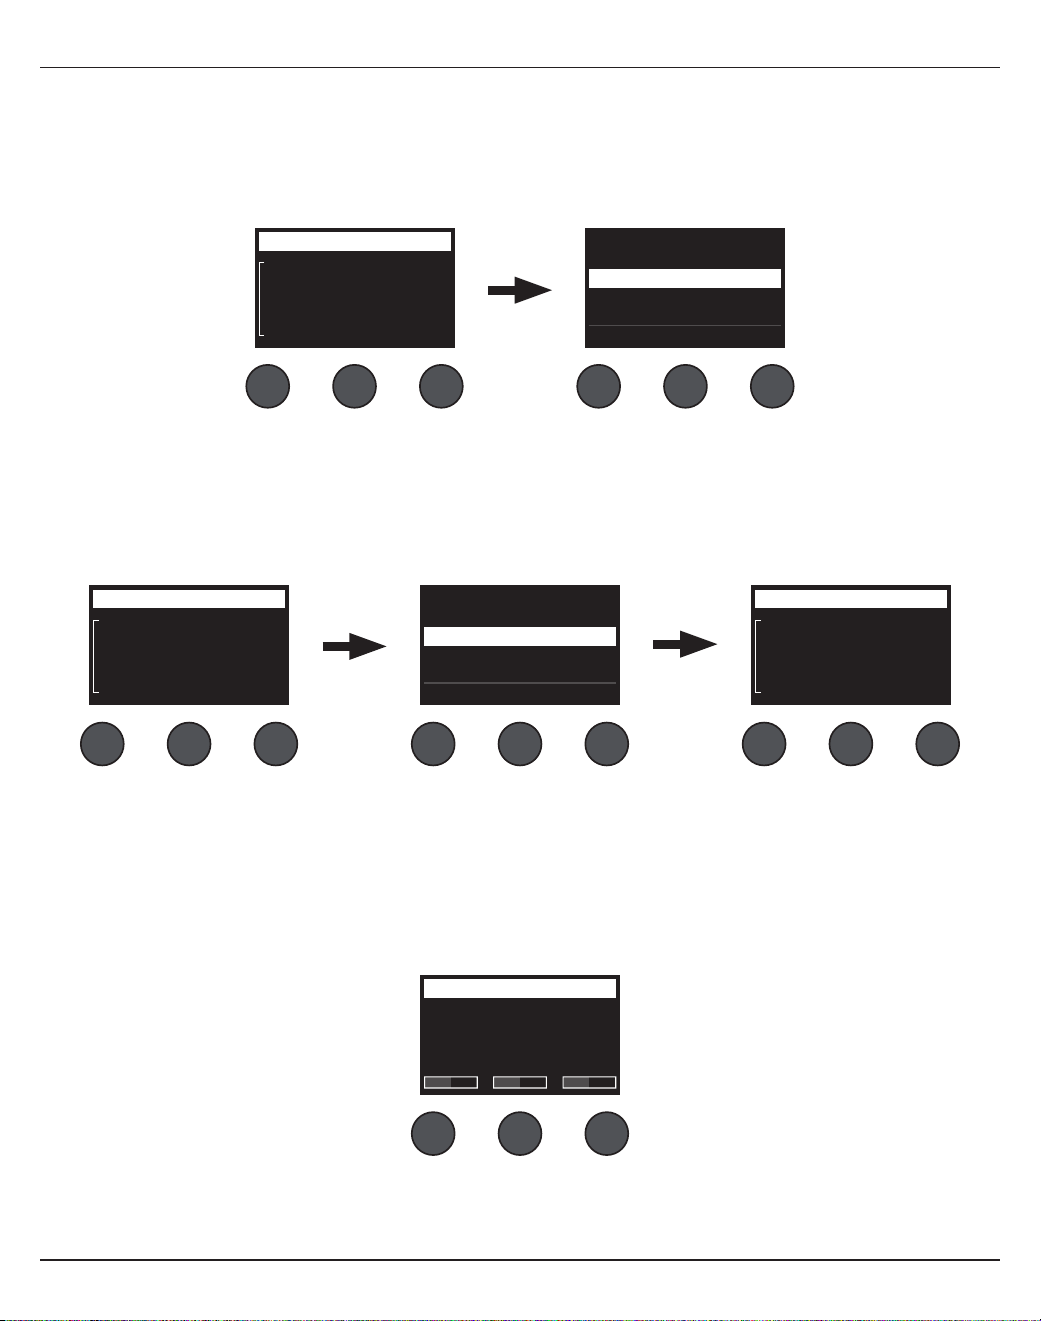
22-
繁體中文
操作
Ch 1
Category
Vocal Mics
ToneMatch
Handheld Mics
Preset
Handheld Mics
Headworn Mics
High Gain: Bright
High Gain: Normal
SelectCancel
Ch 1
Category
Utility
ToneMatch
Flat
Preset
Ch 1
Category
Vocal Mics
ToneMatch
Headworn Mics
Preset
Vocal Mics
Utility
Electric Guitars
Acoustic Guitars
Select Cancel
旋轉
按下
按下旋轉
選取 ToneMatch® 預設
ToneMatch 功能可讓您為樂器或麥克風選取 ToneMatch 預設。此專屬科技可使系統均衡達到最佳化,以保留特定樂器或
麥克風的自然聲音。這些預設分成幾個類別,並可為各音軌選擇不同的預設。
1. 旋轉 Category (類別) 控制項以存取類別清單,然後反白選取您需要的類別。
2. 按下 Select (選取) 控制項以選取您需要的類別,或按下 Cancel (取消) 控制項離開清單,不進行變更。
3. 如果您已按下 Select (選取),請旋轉 Preset (預設) 控制項以存取預設清單並反白選取您想要的類別。
4. 按下 Select (選取) 控制項以選取您需要的類別,或按下 Cancel (取消) 控制項離開清單,不進行變更。
Ch 1
Low Mid
Handheld Mics
High
0.0db 0.0db 0.0db
zEQ
調整 zEQ
zEQ 功能是 ToneMatch 預設科技的一部分,可在您樂器或麥克風頻率範圍內調整低/中/高頻率。
若要調整 zEQ,請旋轉相關頻帶下方的控制項。
請注意:若要關閉各個頻帶,請按下相關控制項。再按下一次即可啟用。
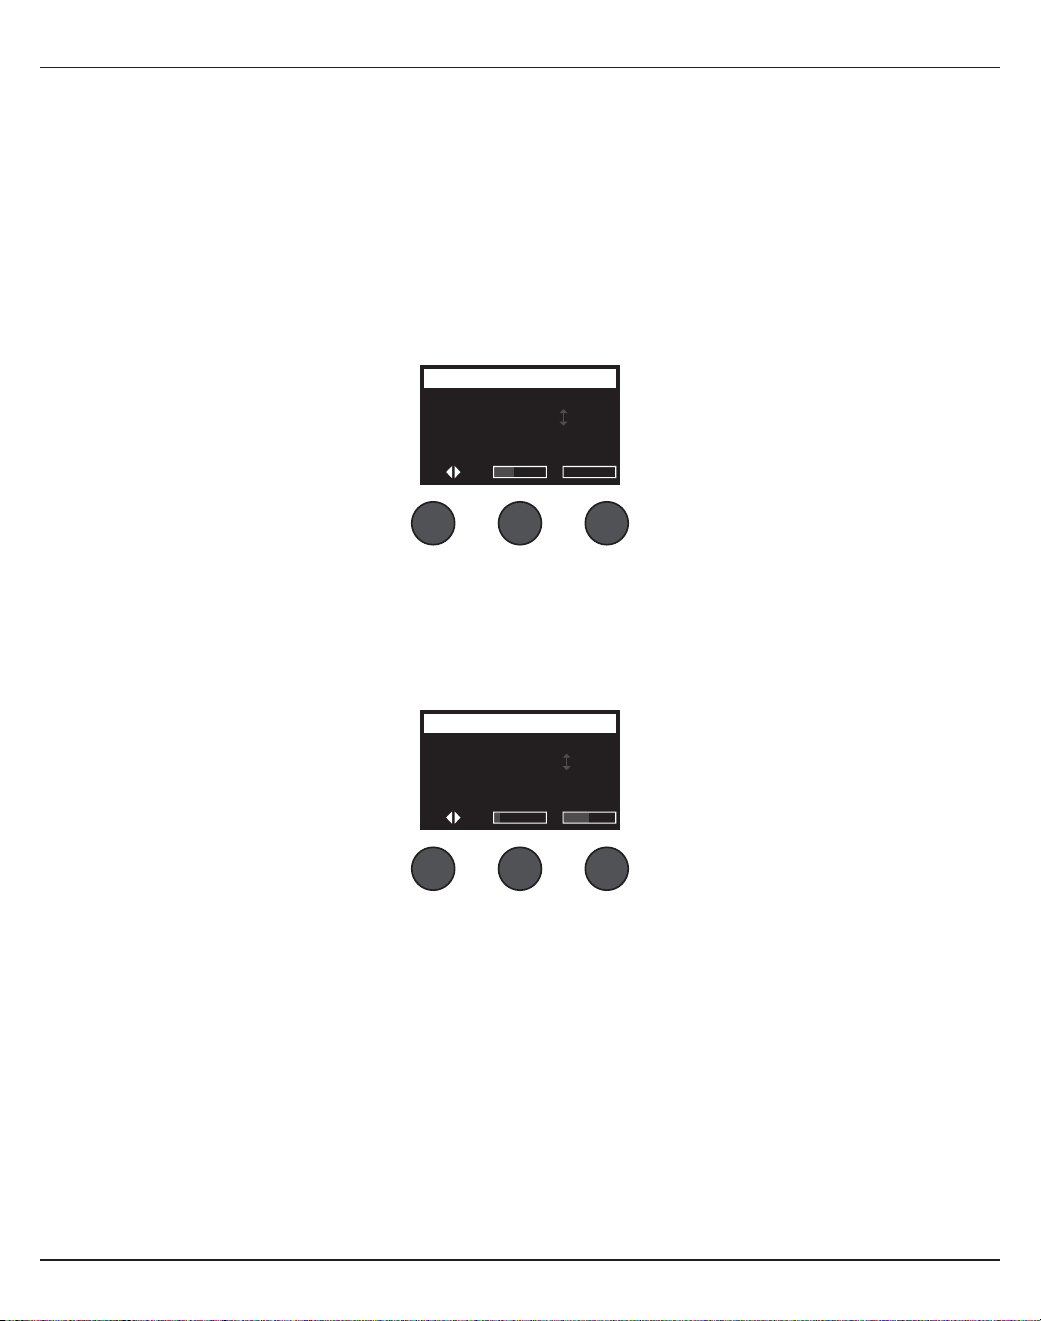
操作
繁體中文
- 23
調整 Para EQ
Para EQ 功能可在使用者於 50 Hz 至 16 kHz 範圍內指定的頻率中,提供三種對準頻率中央的參數均衡。
請注意:若要關閉
Para EQ
設定,請按下
Select (
選取
)
控制項。再按下一次即可啟用。
1. 按下或旋轉 Select (選取) 控制項,然後選取 Para EQ 頻帶 1-3。
2. 旋轉 Level (位準) 控制項以調整增強/削弱位準,範圍在 -15 dB 至 +15 dB 之間。
3. 旋轉 Freq (頻率) 控制項以調整中央頻率,範圍在 50 Hz 至 16 kHz 之間。
4. 按下 Freq (頻率) 控制項以切換至寬度。旋轉 Width (寬度) 控制項以調整中央頻率周圍的鐘形曲線寬度,範圍在
0.20 至 5.00 八度音程之間。
Ch 1
Select Level
B3
Freq
PEQ 1 -3.4dB 250.0Hz
Parametric EQ
Width
使用壓縮器/Gate 功能
壓縮器/閘門功能提供存取 Gate、壓縮、限制器、嘶聲消除器以及參數可調整的大鼓預設。
請注意:若要跳過壓縮器
/Gate
設定,請按下
Type (
類型
)
控制項。再按下一次即可啟用。
請注意:每個音軌只能有一個效果。
1. 旋轉 Type (類型) 控制項以存取壓縮器/Gate 清單,然後反白選取您需要的壓縮器/Gate:
A. 壓縮器 1:輕 – 壓縮器提供預設低壓縮率,包含可變的閾值與增益參數。可做為通用壓縮器使用,適用於大多數需
要較少位準控制的樂器與麥克風。
B. 壓縮器 2:中 – 壓縮器提供預設中壓縮率,包含可變的閾值與增益參數。適用於需要細微位準控制的貝斯、吉
他、鍵盤及人聲。
C. 壓縮器 3:中 – 壓縮器提供預設高壓縮率,包含可變的閾值與增益參數。適用於需要積極位準控制且聲音較大的
樂器 (例如喇叭與鼓),以及較強的人聲。
D. 限制器 – 硬限制器提供預設比率 (∞:1),包含可變的閾值與增益參數。適用於聲音非常大的樂器 (例如鼓),以避
免訊號峰值造成音軌過載。
Ch 1
Type Thresh Speed
Gate -80.0dB 50%
Comp/Gate
Ramp

24-
繁體中文
操作
使用 KickGate
KickGate 是 Bose® 專屬科技,可讓您提高大鼓音軌的位準,同時避免麥克風回授的風險。壓縮器/Gate 選單中提供兩種
KickGate 設定。
1. 連接適當類型的麥克風。
2. 選取適當的 ToneMatch® 預設。
3. 調整音軌輸入 Trim (微調) 控制項,直到最重的大鼓敲擊使輸入音軌 LED 亮起紅燈,然後繼續調整直到 LED 變為綠
燈。如此可最佳化您的音軌輸入微調位準。
4. 使用旋鈕式選取器選取 Comp/Gate (壓縮器/Gate)。
5. 旋轉 Type (類型) 控制項以向下捲動清單,反白選取 KickGate 1: Regular (KickGate 1:正常) 或 KickGate 2: Fast
(KickGate 2:快速),然後按下 Select (選取)。使用雙大鼓踏板時,請選取 KickGate 2。
6. 在踩踏大鼓時將音量提高到您希望的表演位準。
7. 以將在表演時使用的最輕柔位準踩踏大鼓,並確認能夠聽到鼓聲。
8. 在輕輕踩踏時逐漸提高 Thresh (閾值) 位準,直到部分大鼓的聲音被切斷。降低 Thresh (閾值) 位準 3 dB。
9. 正常踩踏大鼓時,逆時針旋轉 Tight (緊度) 控制項來降低緊度,這樣可在聲音中增加更多的「低鳴聲」。緊度可調整
的範圍從 0% (最慢) 至 100% (最快)。
E. 嘶聲消除器 – 側鍊型壓縮器提供預設壓縮率,包含可變的閾值與增益參數。其設計可降低人聲中的嘶聲。
F. 消噪器 – 消噪器提供快速預設起音時間 (Attack Time)、可變閾值及可變速度 (釋放時間),適合消除麥克風與樂
器所發出不必要的噪音。
G. KickGate 1:正常 – Gate 提供預設啟動時間、可變閾值及緊度 (釋放時間) 參數。這是 Bose® 專門針對大鼓而設
計的專屬科技。此強大的 Gate 提供在產生回授前的最大增益,讓您的大鼓可透過 PA 系統發出最大聲音。
H. KickGate 2:快速 – 與 KickGate 1 相同,但調整為適用於更快的節奏。如果您使用雙大鼓踏板,請選取此設定。
2. 按下 Select (選取) 控制項以選取您需要的類別,或按下 Cancel (取消) 控制項離開清單,不進行變更。
3.
壓縮器
1-3
、限制器、嘶聲消除器
:旋轉 Thresh (閾值) 控制項以調整輸入閥值 (觸發器) 位準,範圍在 –50 dB 至 0 dB
之間。旋轉 Gain (增益) 控制項以調整增益,範圍在 0 dB 至 30.0dB 之間。控制項上方的增益條可顯示增益減少的
量。此顯示幕有助於設定閾值。
消噪器
:旋轉 Thresh (閾值) 控制項以調整輸入閥值 (觸發器) 位準,範圍在 -90 dB 至 -30 dB 之間。旋轉 Speed (速度)
控制項以設定 Gate 關閉速度的任何值,範圍從 0% (最快) 至 100% (最慢)。旋轉 Ramp (斜度) 控制項以調整 Gate 的斜
度,範圍從 0% (水平) 至 100% (垂直)。
KickGate 1-2:旋轉 Thresh (閥值) 控制項以調整輸入閥值 (觸發器) 位準,範圍在 -20 dB 至 0 dB 之間。旋轉 Tight
(緊度) 控制項以調整緊度 (Gate 關閉速度),範圍從 0% (最慢) 至 100% (最快)。
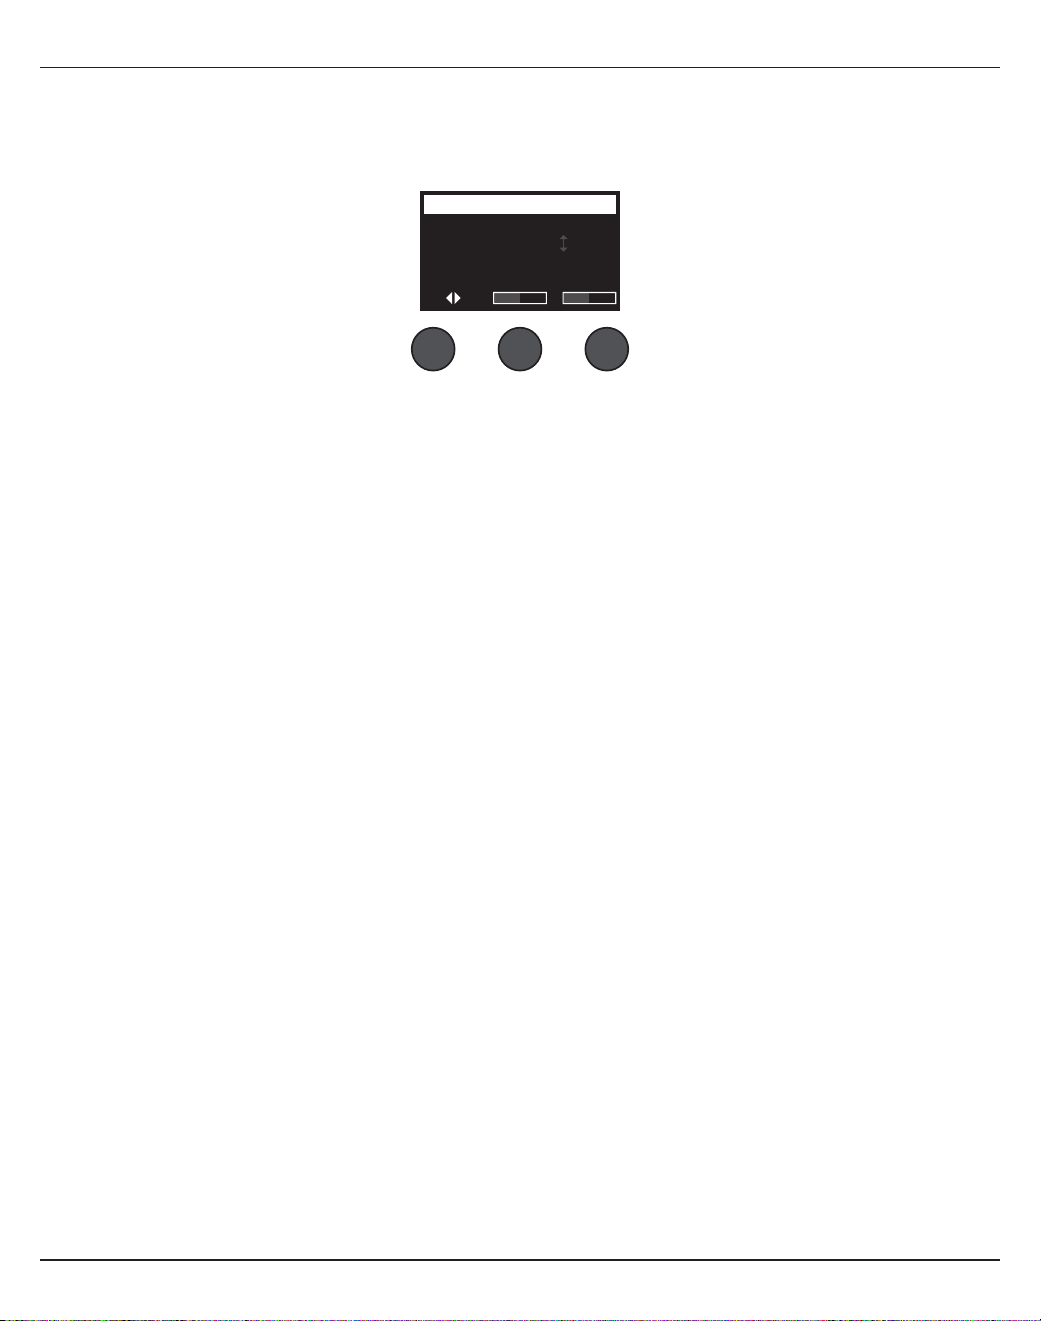
操作
繁體中文
- 25
使用調變效果
調變功能可讓您套用調變效果。
請注意:若要跳過調變設定,請按下
Type (
類型
)
控制項。再按下一次即可啟用。
1. 旋轉 Type (類型) 控制項以存取調變器類型,然後反白選取您需要的類型:
A. 和聲 1:Brite – 適用於原聲樂器具濕度的閃亮和聲,包括可調整的混音、深度及速度參數。
B. 和聲 2:溫暖 – 類似和聲 1,但是頻率稍低,包括可調整的混音、深度及速度參數。適用於電吉他/貝斯。
C. 和聲 3:暗 – 類似和聲 2,但是較暗音調的頻率較低,包括可調整的混音、深度及速度參數。適用於電吉他/貝斯。
D. Flanger 1:Tape – 沒有聲音回授的 Tape 風格 Flanger。包括可調整的混音、深度及速度參數。適合做為電吉
他/貝斯的效果。
E. Flanger 2:聲音回授 – 與 Flanger 1 相同,但有預設的聲音回授效果。
F. 相位效果器 1:Stomp – 經典「stompbox」風格的相位效果器,提供具有可變速度與回授參數的預設寬 Sweep
效果。適合做為電吉他/貝斯與鍵盤的效果。
G. 相位效果器 2:Rack – 經典「rack」風格的相位效果器,提供具有可變速度與回授參數的正向混音類型。適合做
為電吉他/貝斯與鍵盤的效果。
H. 相位效果器 3:溫暖 – Vintage 風格的相位效果器,提供具有可變速度與回授參數的正向混音類型。適合做為電
吉他/貝斯與鍵盤的效果。
I. 相位效果器 4:Brite – 無低音的相位效果器,提供具有可變速度與回授參數的正向混音類型。適合做為電吉他與
鍵盤的效果。
J. Tremolo– 具備可變速度與深度參數的 Vintage 風格顫音效果。適合做為吉他、鍵盤及口琴的效果。
2. 按下 Select (選取) 控制項以選取您需要的類別,或按下 Cancel (取消) 控制項離開清單,不進行變更。
3.
和聲
1-3
、
Flanger 1-2:旋轉 Mix (混音) 控制項,可設定混音從乾的訊號 (未加入效果) (0%) 到溼的訊號 (加入效果)
(100%)。旋轉 Depth (深度) 控制項以調整音高相對於原始輸入訊號的差異程度。按下 Depth (深度) 控制項以存取
Speed (速度) 參數。旋轉 Speed (速度) 控制項以調整音高調變的速度。
相位效果器
1-4:旋轉 Speed (速度) 控制項以調整音高調變的速度。旋轉 Fdbk. (聲音回授) 控制項以調整調變的殘
響程度。
顫音
:旋轉 Speed (速度) 控制項以調整音量調變的速度。旋轉 Depth (深度) 控制項以調整音量相對於原始輸入訊號
的差異程度。
Ch 1
Type Mix Depth
Chorus1 50% 50%
Modulator
Speed
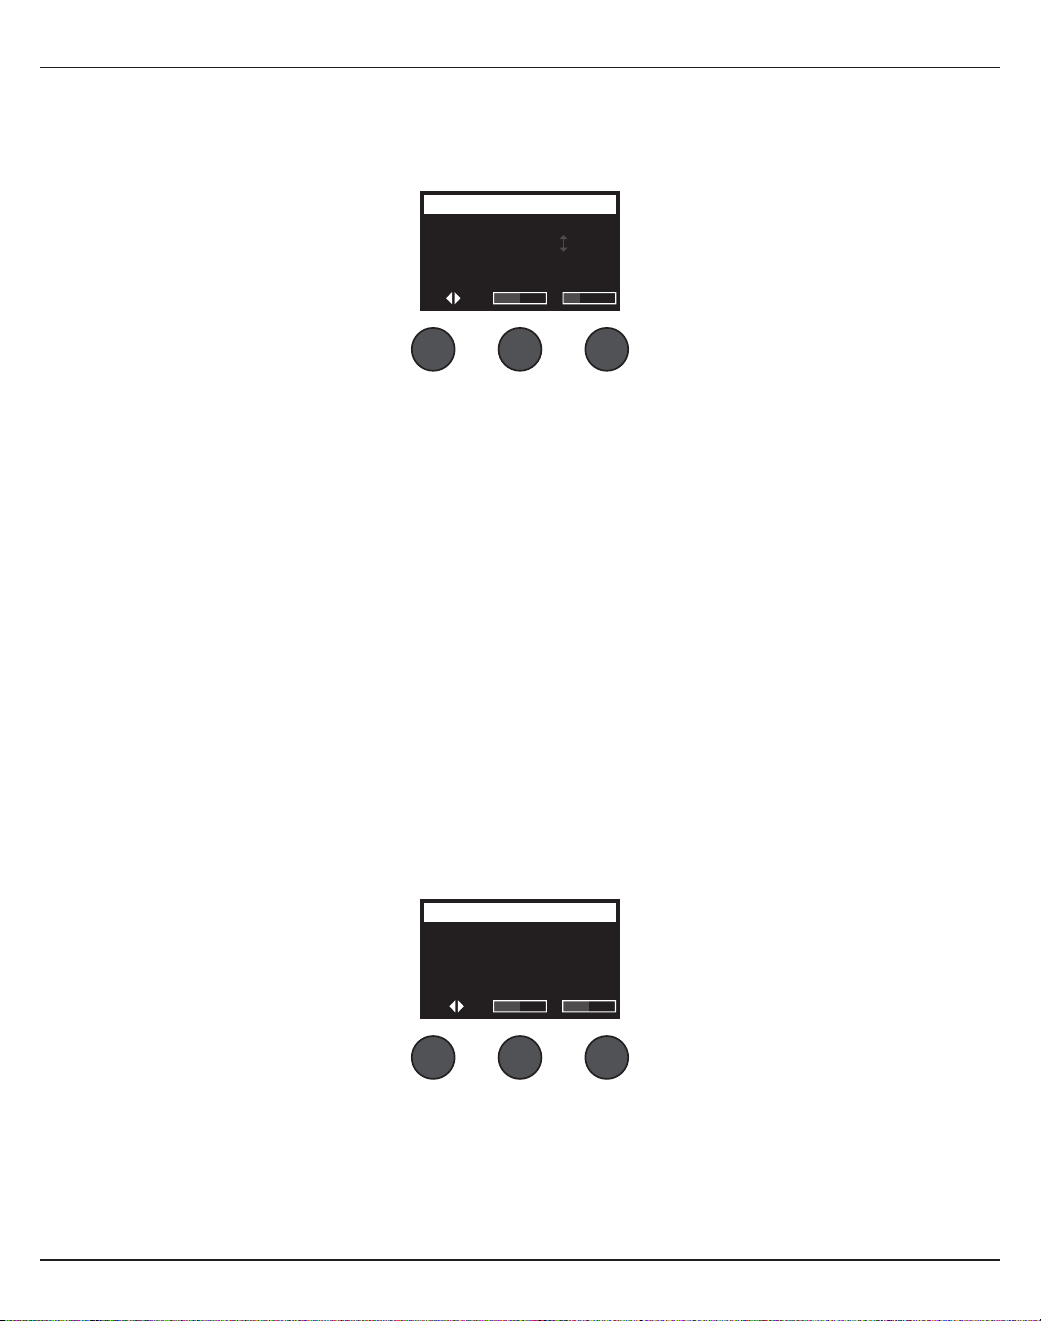
26-
繁體中文
操作
Ch 1
Type Tim
eM
ix
Digital 250ms 30%
Delay
Fdbk.
加入延遲
延遲功能可讓您套用數位、類比或 Tape 風格的延遲。
請注意:若要跳過延遲設定,請按下
Type (
類型
)
控制項。再按下一次即可啟用。
1. 旋轉 Type (類型) 控制項以存取延遲類型清單,然後反白選取您所要的項目。
A. 數位延遲 – 直接數位延遲效果,重複的部分保持不變。具有可調整的混音、時間及聲音回授參數。適合用於吉
他、鼓及人聲。
B. 類比延遲 – 經典類比延遲效果,重複的部分持續降低。具有可調整的混音、時間及聲音回授參數。適合用於吉
他、鼓及人聲。
C. Tape
延遲 – 復古風格 Tape 延遲效果,重複部分的降低程度比類比延遲更高。適合用於吉他、喇叭、口琴及人聲。
2. 按下 Select (選取) 控制項以選取您需要的類別,或按下 Cancel (取消) 控制項離開清單,不進行變更。
3.
旋轉 Time (時間) 控制項以調整延遲時間的長度,以 5 ms 漸增。按下 Time (時間) 控制項以點擊您希望的延遲節奏。
4. 旋轉 Mix (混音) 控制項,可設定混音從乾的訊號 (未加入效果) (0%) 到溼的訊號 (加入效果) (100%)。
5. 按下 Mix (混音) 控制項以存取 Fdbk (聲音回授) 設定。旋轉 Fdbk. (聲音回授) 控制項以調整延遲聲音回授的量。
加入殘響
殘響功能可將使用者可調整的殘響量套用至選取的音軌。若要選取殘響類型,請參閱第 27 頁「選取殘響類型」。
請注意:若要使殘響效果關閉,按下
Mix (
混音
)
控制項。再按下一次即取消靜音。
1. 按下或旋轉 Menu (選單) 控制項,然後選取要將殘響傳送至哪個輸出。
2. 旋轉 Mix (混音) 控制項,將所需原始訊號的混音 (0%) 調整至經處理的訊號 (100%)。
3. 旋轉 Bright (亮度) 控制項以均衡要套用至選取音軌的高頻殘響。
Ch 1
Mix Bright
50% 50%
Reverb
Menu
Main
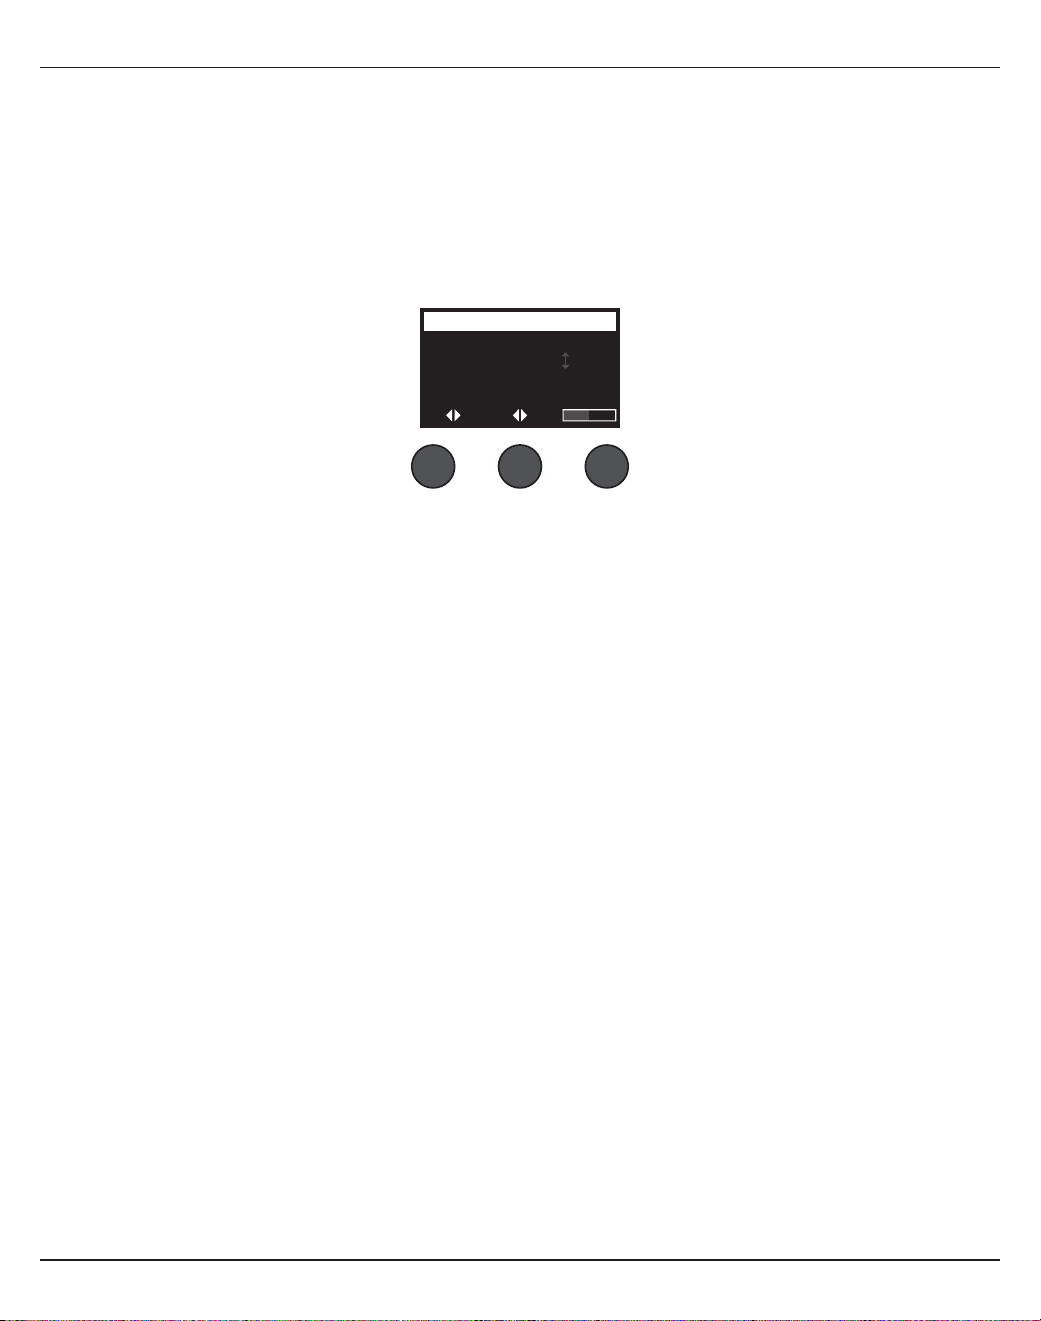
操作
繁體中文
- 27
使用全域功能
全域功能可供存取將影響整體混音器運作及所有音軌的設定。
選取殘響類型
殘響類型功能可讓您選取將套用至所有輸入音軌的殘響類型。衰減時間 (Time) 與平衡 (Bal) 可調整,平衡可控制早期與後
期反射的比率。
請注意:若要使殘響靜音,請按下
Type (
類型
)
控制項。再按下一次即取消靜音。
1. 使用旋鈕式選取器選取 Reverb Type (殘響類型)。
2. 按下或旋轉 Menu (選單) 控制項,然後選取要將殘響傳送至哪個輸出。您可以將不同的殘響類型傳送至主要或輔助傳送。
3. 旋轉 Type (類型) 控制項以顯示殘響清單:
A. 板式 – 建立典型錄音室板式殘響的環境,提供可調整的時間與平衡 (早期/後期反射的比率) 參數。
B. 小 – 建立小型空間的環境。提供可調整的時間與平衡 (早期/後期反射的比率) 參數。
C. 中 – 建立中型空間的環境。提供可調整的時間與平衡 (早期/後期反射的比率) 參數。
D. 大 – 建立大型空間的環境。提供可調整的時間與平衡 (早期/後期反射的比率) 參數。
E. 洞窟 – 建立超大空間的環境。提供可調整的時間與平衡 (早期/後期反射的比率) 參數。獨特有趣的殘響效果。
4. 旋轉 Type (類型) 控制項以捲動殘響清單,然後反白選取所需的殘響類型。
5. 按下 Type (類型) 控制項進行選取。
6. 旋轉 Time (時間) 控制項以控制所選取混聲模式的衰減時間,範圍從最短衰減時間至最長衰減時間。0% 的衰減時間
最短,可模擬目前所選取殘響類型的最小室內空間。100% 的衰減時間最長,可模擬目前所選取殘響類型的最大室內空
間。每種殘響模式皆有其可用的衰減時間範圍,最適合所選取的模式類型。殘響衰減參數可讓您在最適合所選取殘響模
式類型的特定範圍內調整殘響時間。
7. 按下 Time (時間) 控制項以切換至 Bal (平衡)。旋轉 Bal. (平衡) 控制項以調整早期與後期反射比率 (0% = 全部為早期
反射、100% = 全部為後期反射)。
All Channels
Menu Type Bal.
Main Medium 50%
Reverb Type
Time
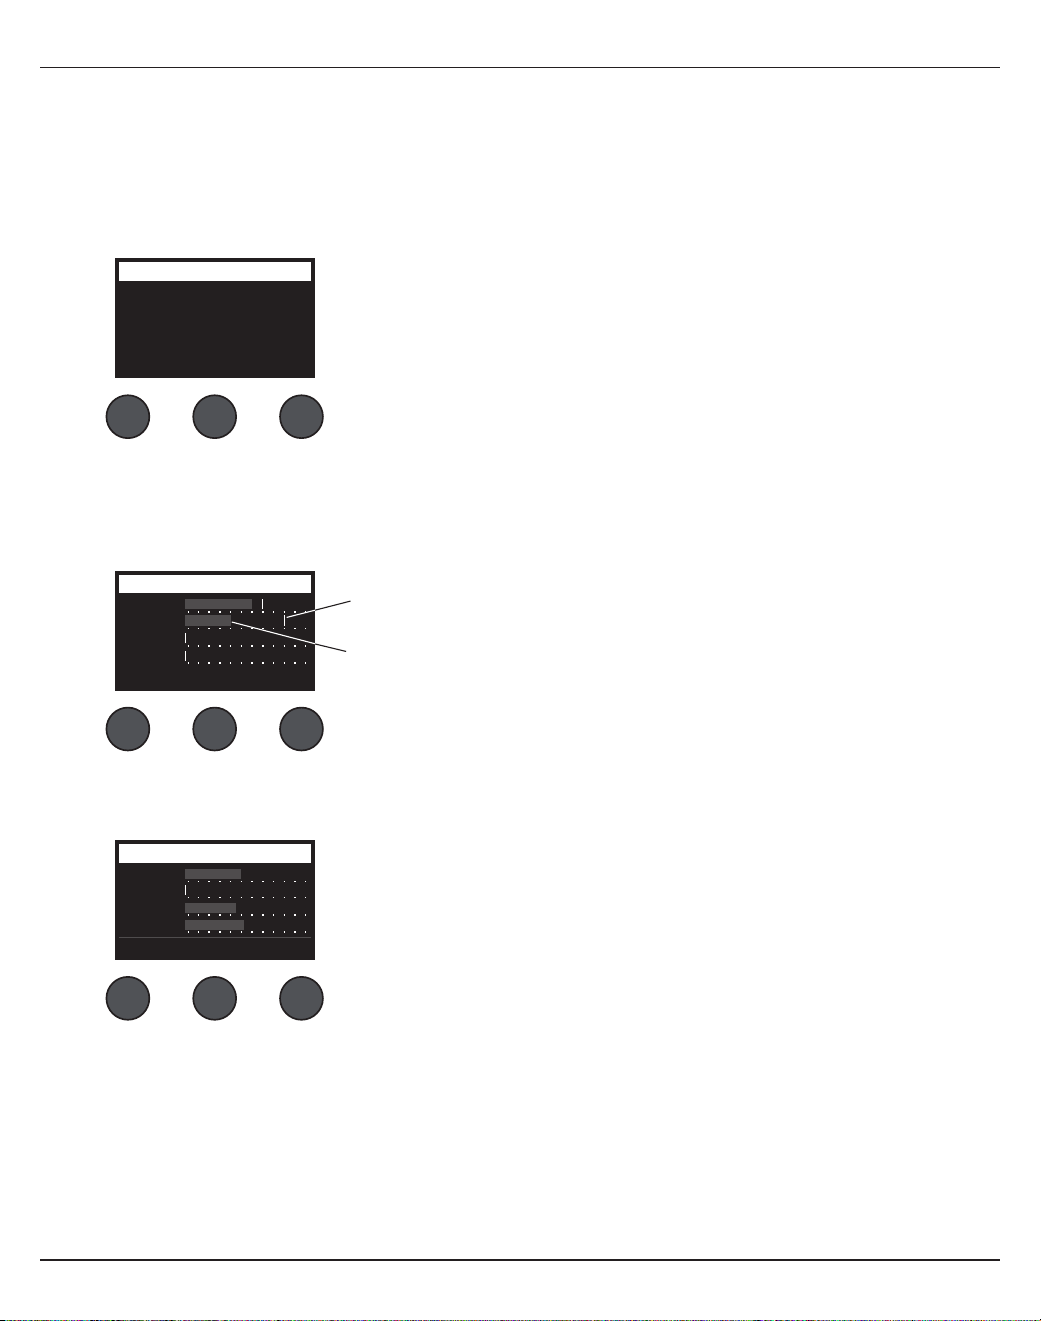
28-
繁體中文
操作
使用偏好設定公用工具
偏好設定功能可存取數種系統公用工具。
1. 使用旋鈕式選取器選取 Prefs (偏好設定)。
1. 旋轉 Menu (選單) 控制項以捲動清單,然後反白選取所需的公用工具。按下 Select (選取) 控制項以顯示公用工具:
• 狀態 – 顯示指派至輸入音軌的效果 (僅供檢視)。
• 輸入位準 – 以峰值訊號指示器顯示所有音軌的輸入位準顯示表。按下 Reset (重置) 控制項以重置所有峰值訊號指示
器。此顯示幕有助於設定音軌輸入微調位準 (請參閱第 17 頁「最佳化輸入增益與輸出音量」)。按下 Aux In (輔助輸
入) 控制項以監聽輔助輸入的位準 (僅適用於 T8S,請按下 Ch 5-8 控制項以監聽輸入 5-8 的位準)。
• 輸出位準 – 顯示所有輸出的輸出位準顯示表:主要 L、主要 R、USB L 及 USB R。按下
Aux (
輔助
)
控制項項以監聽輔
助輸出的位準。
Output Level Preferences
USB L
Main L
Main R
USB R
Menu Rese
tA
ux
Status
Ch 1 Mod
Mod
Mod Dly
Cm
pR
ev
Rev
Rev
CmpCh 2
Ch 3
Ch 4
Menu
Preferences
Cmp = 壓縮器/Gate
Mod = 調變
Dly = 延遲
Rev = 殘響
Input LevelPreferences
Ch 3
Ch 1
Ch 2
Ch 4
Menu Aux InReset
峰值位準指示燈
輸入位準指示燈
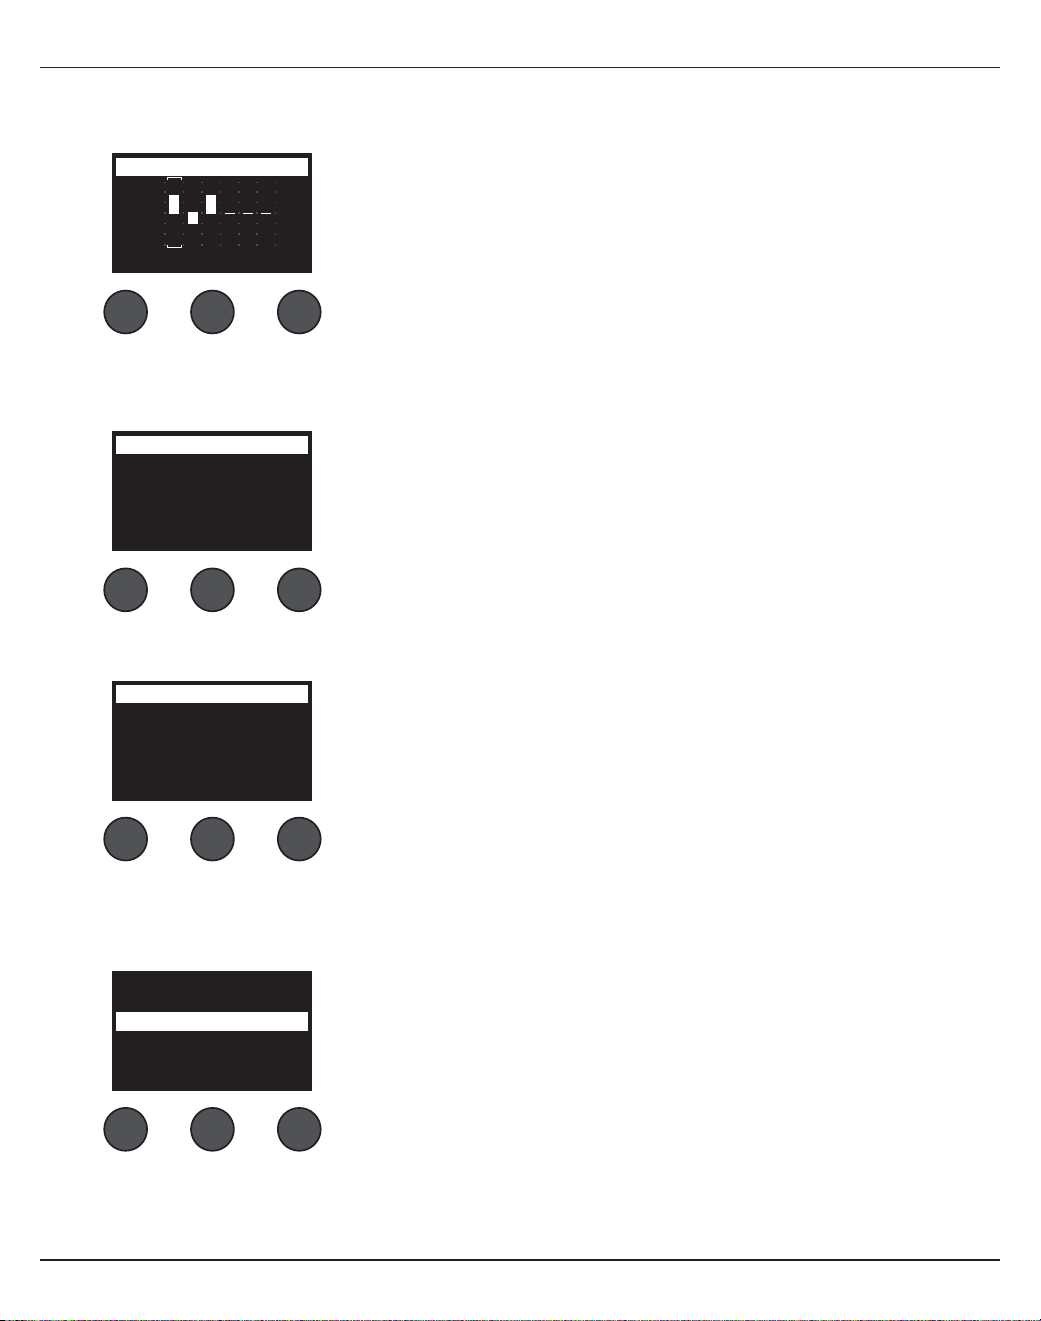
操作
繁體中文
- 29
• 主要輸出 EQ– 主要輸出 EQ 是位於主要混音輸出之上的 6 頻段圖形均衡器。透過中間控制項,選取要增強或衰減的
頻率範圍,然後使用 Level (位準) 控制項以調整位準 +/–18 dB。
• USB B 至 PC– 可讓您透過 USB 左與右輸出音軌,將選取的訊號源傳送至您的電腦。訊號源選擇為 Ch1-4 (Ch5-8
僅適用於 T8S)、輔助輸入、主要或輔助輸出 1-2 (輔助輸出 3-4 僅適用於 T8S)。
• USB B 從 PC – 可讓您從電腦將 USB 左與右音軌傳送至選取的混音器目的地 (無、輔助輸入或主要)。
• USB A-播放– 插入 USB Type-A 隨身碟以播放儲存於隨身碟中的任何 WAV/MP3 檔案。使用選單選取包含 WAV/
MP3 檔案的資料夾,選取要播放的檔案,然後旋轉 Level (位準) 控制項以調整位準。
+18
+12
+6
0
-6
-12
-18
125HzMenu
Master EQ Preferences
Level
1. 旋轉 Left/Right (左/右) 控制項以反白選取訊號源。
2. 按下 Select (選取) 控制項以選取訊號源,或按下 Cancel (取消) 控制項離開
清單,不進行變更。
3. 旋轉 Menu (選單) 以返回偏好設定選單清單。
Left : Master
Right : Master
LeftMenu
USB to PC Preferences
Right
Left : Master
Right : Master
LeftMenu
USB from PC Preferences
Right
1. 旋轉 Left/Right (左/右) 控制項以反白選取目的地。
2. 按下 Select (選取) 控制項以選取訊號源,或按下 Cancel (取消) 控制項離開
清單,不進行變更。
3. 旋轉 Menu (選單) 控制項以返回偏好設定選單清單。
Tomorrow Is Too late.wav
Sarah.wav
Mistakes for Love.mp3
Sun Behind the Clouds.wav
Hey God Maker. mp3
LevelSelectMenu
30-
繁體中文
操作
• 版本 – 顯示數位訊號處理韌體的修訂版本。
• ToneMatch – 顯示儲存於 T4S/T8S 的 ToneMatch 預設集清單。請參閱 www.Bose.com/livesound 以取得最
新的預設集。
• L1 功率底座 – 連接至 L1® Model 1S/II 功率底座時,螢幕上會顯示 Connected (已連接)
Versions
T4S v1.0.0
Menu
Preferences
C: Ovation Guitars
B: Audix Mics.
A: Taylor Guitars
Menu
ToneMatchPreferences
Connected
Menu
L1 Stand Preferences
載入與儲存場景
場景是 T4S/T8S ToneMatch® 混音器狀態的快照。
• 場景可記憶所有 ToneMatch 混音器設定,以及靜音、FX 靜音及音軌編輯按鍵的狀態。
• 場景不會記憶音軌微調、音軌音量位準、主音量位準、耳機位準或虛擬電源開關位置。
All Channels
Singer/Songwriter
Load Shared Save
Scenes
操作
繁體中文
- 31
T4S/T8S 包含三種場景類型:
• (5) Bose 場景:唯讀原廠預設場景,您無法編輯及覆寫這些場景。
• (10) 使用者場景:使用者可定義的場景,可儲存及呼叫您所有愛用的設定。您可以無限次覆寫更新這些場景。
• (1) 共享場景:使用者可定義的場景,可儲存設定您要與其他 T4S/T8S ToneMatch® 混音器使用者共享的設定。使用 L1®
更新工具軟體可將此場景上傳至電腦,請至 www.Bose.com/livesound 下載此軟體。
載入場景:
1. 使用旋鈕式選取器選取 Scenes (場景)。
2. 旋轉 Load (載入) 控制項以捲動場景清單,然後反白選取所需的場景名稱。目前載入的場景名稱會以粗體字呈現。
3. 按下 Select (選取) 控制項以選取場景,或按下 Cancel (取消) 控制項離開清單,不變更場景設定。
請注意:如果您未在
10
秒內按下
Select (
選取
)
或
Cancel (
取消
)
控制項,顯示幕將返回場景畫面。此時將不會進行任何
變更,螢幕上會顯示目前已載入的場景。
4. 如果您按下選取,則會顯示「Are you sure?」(您確定嗎?) 的問題。按下 Yes (是) 控制項以載入場景,或按下 No
(否) 控制項離開清單,不變更場景設定。
請注意:如果您未在
10
秒內按下
Yes (
是
)
或
No (
否
)
控制項,顯示幕將返回場景畫面。此時將不會進行任何變更,螢幕上
會顯示目前已載入的場景。
儲存場景:
1. 使用旋鈕式選取器選取 Scenes (場景)。此時將顯示目前已載入的場景。
2. 旋轉儲存控制項以反白選取您要儲存的場景。按下 Select (選取),或按下 Cancel (取消) 離開清單。
All Channels
Singer/Songwriter
Load Shared Save
Scenes
請注意:如果您未在
10
秒內按下
Select (
選取
)
或
Cancel (
取消
)
控制
項
,顯示幕將返回場景畫面
。此時將不會進行任何變更,螢幕上會顯示目前
已載入的場景。
My Scene 01
My Scene 02
My Scene 03
Cancel Select
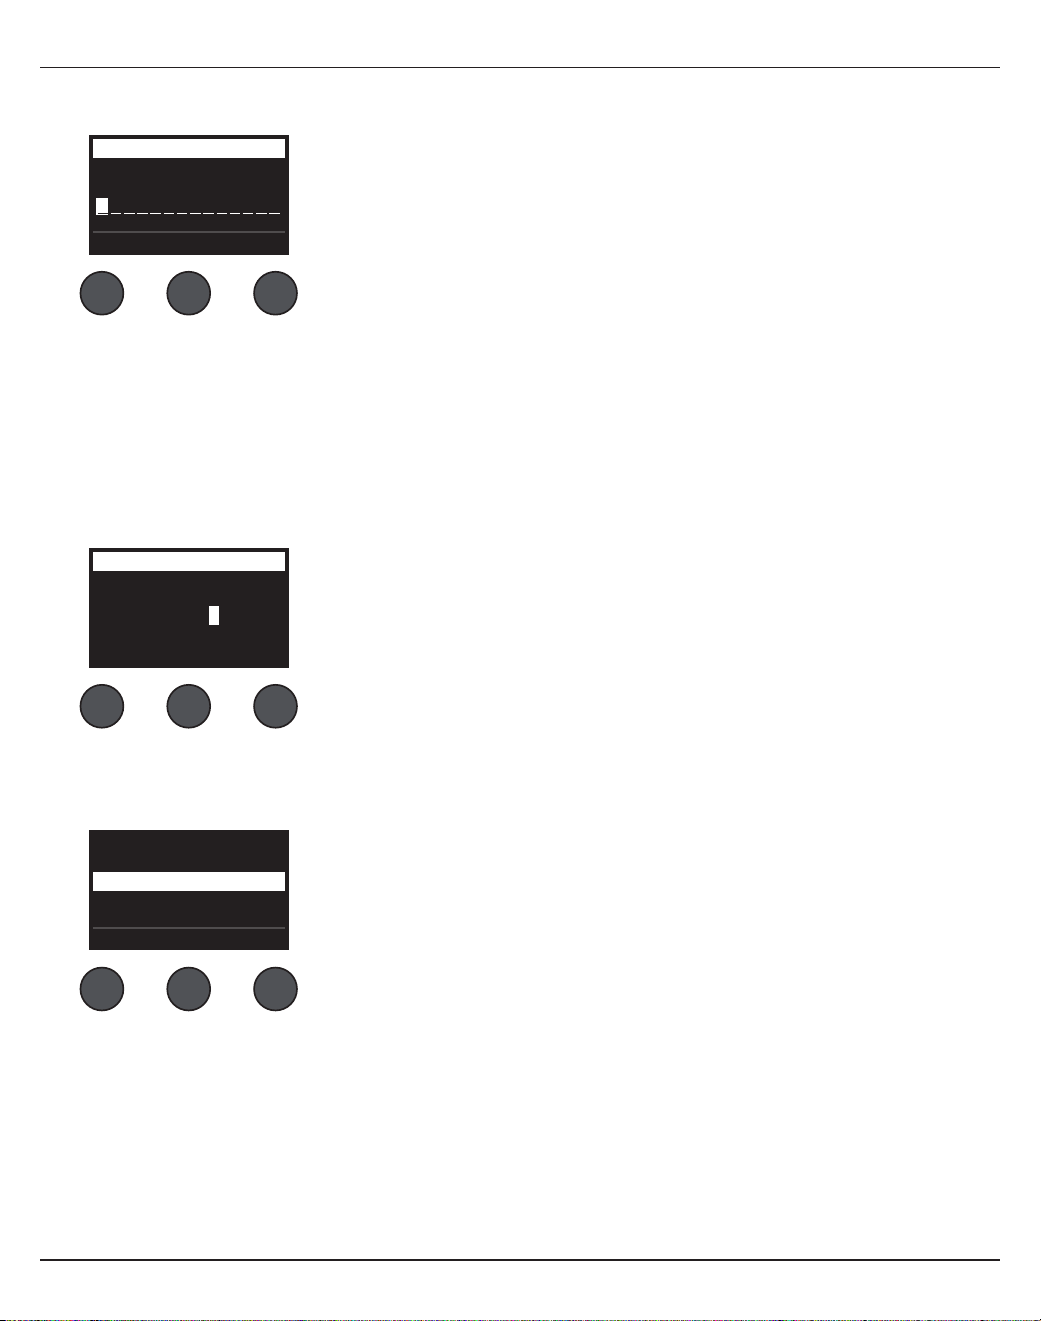
32-
繁體中文
操作
3. 如果您已按下 Select (選取),可使用重新命名畫面以編輯場景名稱,或按下儲存以使用畫面所顯示的名稱,然後前往
步驟 4。
在儲存前變更場景名稱:
您可以使用以下編輯選項來變更場景名稱。變更名稱之後,請按下「Save」(儲存) 控制項,然後前往步驟 4。
• 選取與變更字元:在顯示變更名稱畫面的狀態下,旋轉游標控制項以反白選取您要變更的字元或字元位置。然後旋轉
Select (選取) 控制項以變更字元。
• 使用字元地圖:在顯示變更名稱畫面的狀態下,旋轉游標控制項以反白選取您要變更的字元。然後按下 Select (選取) 控
制項以檢視字元地圖。旋轉 Select (選取) 控制項以向左或向右移動游標。旋轉 Up/Dn (上/下) 控制項以向上或向下移動
游標。反白選取您需要的字元之後,按下 Select (選取) 將該字元寫入所選取的位置。
• 使用清除、插入及刪除功能:在顯示變更名稱畫面的狀態下,旋轉游標控制項以移動游標。然後按下游標控制項以進入特
殊編輯功能選單。旋轉 Select (選取) 控制項以反白選取所需要的功能。然後按下 Select (選取) 控制項以執行功能。
清除字元 – 移除以游標反白選取的字元,並保留空格。
全部清除 – 清除整行文字。
清除至結尾 – 清除游標右側的所有文字,包括反白選取的字元。
插入 – 在反白選取字元的左側插入空格。
刪除 – 移除游標反白選取的字元與空格。
Rename
J
rstuvwxyzABCDEFGHI
123456789, ;/\()|+-
KLMNOPQRSTU VWXYZ0
abcdefgh jklmnopqi
Cancel Up/Dn Select
Scenes
Clear To End
Insert
Clear All
Clear Character
Delete
CancelSelect
Rename
M yScene 01
CursorSave Select
Scenes
操作
繁體中文
- 33
4. 當顯示「Are you sure?」(您確定嗎?) 的問題。按下 Yes (是) 控制項以儲存場景,或按下 No (否) 控制項離開,不
儲存場景。
分享場景
如果您希望與其他 T4S/T8S ToneMatch® 混音器使用者分享您建立的場景,您可以將場景儲存至 [To Shared Scene]
([至分享場景]) 插槽,即可將場景儲存為分享場景。您可以使用 L1® 更新工具,將分享場景上傳至您的電腦,然後將檔案傳
送至其他 T4S/T8S 使用者的電腦。其他 T4S/T8S 使用者即可使用 L1 更新工具,將場景下載至他們的 T4S/T8S。L1 更
新工具可在 www.Bose.com/livesound 取得。
儲存分享場景:
1. 載入您要分享的場景 (請參閱第 31 頁「載入場景」)。
2. 按下 Save (儲存) 控制項以存取場景清單。
3. 旋轉 Select (選取) 控制項以捲動場景清單,然後反白選取 [To Shared Scene] ([至分享場景])。
按下 Select (選取),或按下 Cancel (取消) 離開清單。
4. 如果您已按下 Select (選取),請使用重新命名畫面以編輯場景名稱 (請參閱第 32 頁「在儲存前變更場景名稱」),或
者如果您要使用現有名稱,請前往步驟 5。
Are You Sure?
YesNo
請注意:如果您未在
10
秒內按下
Select (
選取
)
或
Cancel (
取消
)
控制項,顯示幕將
返回場景畫面。此時將不會進行任何變更,螢幕上會顯示目前已載入的場景。
[To Shared Scene]
My Scene 10
My Scene 09
Cancel Select
Rename
M yScene 07
CursorSave Select
Scenes

34-
繁體中文
操作
5. 按下 Save (儲存) 控制項,將場景儲存為分享場景。
6. 當顯示「Are you sure?」(您確定嗎?) 的問題。按下 Yes (是) 控制項以儲存場景,或按下 No (否) 控制項離開,不
儲存為分享場景。
請注意:如果您未在
10
秒內按下
Yes (
是
)
或
No
(
否
)
控制項,顯示幕將返回場景畫面。此時將不會進行任何變更,螢幕上
會顯示目前已載入的場景。
7. 按下 Shared (分享) 控制項以確認將場景儲存為分享場景。
請注意:
T4S/T8S
僅為分享場景提供一個儲存位置。將場景儲存為分享場景,將會覆寫先前已儲存的分享場景。
請參閱 www.Bose.com/livesound 以了解使用 L1® 更新工具應用程式,將場景下載至您的電腦以及從您的電腦上傳場景
的詳細說明。
All Channels
Singer/Songwriter
Load Shared Save
Scenes All Channels
My Scene 07
Current Shared Scene:
Back
Scenes
按下
操作
繁體中文
- 35
Bose 場景
本產品為您提供五種 Bose 場景範例做為起點。載入 Bose 場景之後,可以修改設定,然後儲存為我的場景或分享場景。
出廠設定
此場景可將混音器還原至出廠時的設定。載入此場景將會抹除您在目前已載入的場景上進行的所有變更。
CH 1-4 (T4S/T8S) CH 5-8 (T8S)
ToneMatch
作用中
公用工具
Flat
zEQ
跳過
低 中 高
0 dB 0 dB 0 dB
Para EQ
跳過
壓縮器/Gate
跳過
和聲1
調變
跳過
和聲1
延遲
跳過
數位
殘響
跳過
數位
Aux
靜音
前:使用 EQ 和 Fx
全域設定
偏好設定
作用中 狀態
USB 至 PC 左/右:主
USB 從 PC 左/右:主
主要輸出 後主音量
殘響類型
類型 中
時間
50%
平衡
50%
請注意:如需所有效果的出廠設定清單,請參閱第
42
頁「出廠設定」。

36-
繁體中文
操作
創作歌手
此場景專為演奏鍵盤或吉他,並且有時會使用 MP3 曲目的創作歌手而設計。
圖 16.創作歌手設定範例

操作
繁體中文
- 37
麥克風 吉他 鍵盤 低音 輔助輸入
音軌 1 音軌 2 音軌 3 音軌 4 5/6
ToneMatch
作用中 作用中 作用中 作用中
無
人聲麥克風 原聲吉他 鍵盤 貝斯
手持麥克風
鋼弦,搭配 piezo
一般鍵盤
主動式貝斯 1
zEQ
作用中 作用中 作用中 作用中
無低 中 高 低 中 高 低 中 高 低 中 高
0 dB 0 dB 0 dB 0 dB 0 dB 0 dB 0 dB 0 dB 0 dB 0 dB 0 dB 0 dB
Para EQ
跳過 跳過 跳過 跳過
無
壓縮器/
Gate
跳過 跳過 跳過 跳過
無
壓縮器2 壓縮器2 壓縮器2 壓縮器2
調變
跳過 跳過 跳過 跳過
無
和聲1 和聲1 和聲3 和聲1
延遲
跳過 跳過 跳過 跳過
無
數位 數位 數位 數位
殘響
作用中 作用中 跳過 跳過
無
中 (全域) 中 (全域) 中 (全域) 中 (全域)
Pan/Aux
中央 中央 中央 中央 輔助輸入
輔助 1-2 50% 輔助 1-2 50% 輔助 1-2 50% 輔助 1-2 50% 5 Lvl 6 Lvl
前:使用 EQ 和 Fx 前:使用 EQ 和 Fx 前:使用 EQ 和 Fx 前:使用 EQ 和 Fx 50% 50%
創作歌手場景音軌設定
全域設定
偏好設定
作用中 狀態
USB 至 PC 左/右:主
USB 從 PC 左/右:主
主要輸出 後主音量
殘響類型
類型 中
時間
50%
平衡
50%

38-
繁體中文
操作
DJ/播放
DJ/播放場景專為 DJ 活動或任何音頻播放需求而設計。此設定使用兩個麥克風以及行動設備、混音器或筆記型電腦。
圖 17.立體聲 DJ/播放設定範例

操作
繁體中文
- 39
DJ/播放場景音軌設定
全域設定
偏好設定
作用中 狀態
USB 至 PC 左/右:主
USB 從 PC 左/右:主
主要輸出 後主音量
殘響類型
類型 中
時間
50%
平衡
50%
訊號源 1 左 訊號源 1 右
麥克風 麥克風 輔助輸入
音軌 1 音軌 2 音軌 3 音軌 4 5/6
ToneMatch
作用中 作用中 作用中 作用中
無
DJ/播放 DJ/播放
人聲麥克風 人聲麥克風
低頻音,zEQ 控制 低頻音,zEQ 控制
手持麥克風 手持麥克風
zEQ
作用中 作用中 作用中 作用中
無
低 中 高 低 中 高 低 中 高 低 中 高
0 dB 0 dB 0 dB 0 dB 0 dB 0 dB 0 dB 0 dB 0 dB 0 dB 0 dB 0 dB
Para EQ
跳過 跳過 跳過 跳過
無
壓縮器/
Gate
跳過 跳過 跳過 跳過
無
限制 限制
壓縮器2 壓縮器2
調變
跳過 跳過 跳過 跳過
無
和聲1 和聲1 和聲3 和聲1
延遲
跳過 跳過 跳過 跳過
無
數位 數位 數位 數位
殘響
跳過 跳過 跳過 跳過
無
中 (全域) 中 (全域) 中 (全域) 中 (全域)
Pan/Aux
左 右 中央 中央 輔助輸入
輔助 1-2 50% 輔助 1-2 50% 輔助 1-2 50% 輔助 1-2 50% 5 Lvl 6 Lvl
前:使用 EQ 和 Fx 前:使用 EQ 和 Fx 前:使用 EQ 和 Fx 前:使用 EQ 和 Fx 50% 50%

40-
繁體中文
操作
完整樂團
此場景專為爵士鼓、貝斯、電吉他、人聲及 MP3 播放器而設定。
圖 18.鼓與貝斯的設定範例
SYSTEMINPUT 2INPUT 1
VOLUME VOLUME
FRONT
LED
POWER
LIMIT
OFF
FULL RANGE
WITH SUB
EQ
MIC
LINE LEVEL
SIGNAL INPUT
INPUT
POWER
ON
OFF
100-240V~50/60Hz
1000W
LINE OUTPUT
SIGNAL/CLIP SIGNAL/CLIP POWER/FAULT
LIMIT
SYSTEM
INPUT 2INPUT 1
LINE OUTPUT LINE OUTPUT
LINE INPUT
POWER/FAULT
LIMIT
SIGNAL/CLIP
LINE INPUT
NORM
REV
THRU
HPF
POLARITY
LINE
OUTPUT EQ
POWER
LIMIT
OFF
FRONT
LED
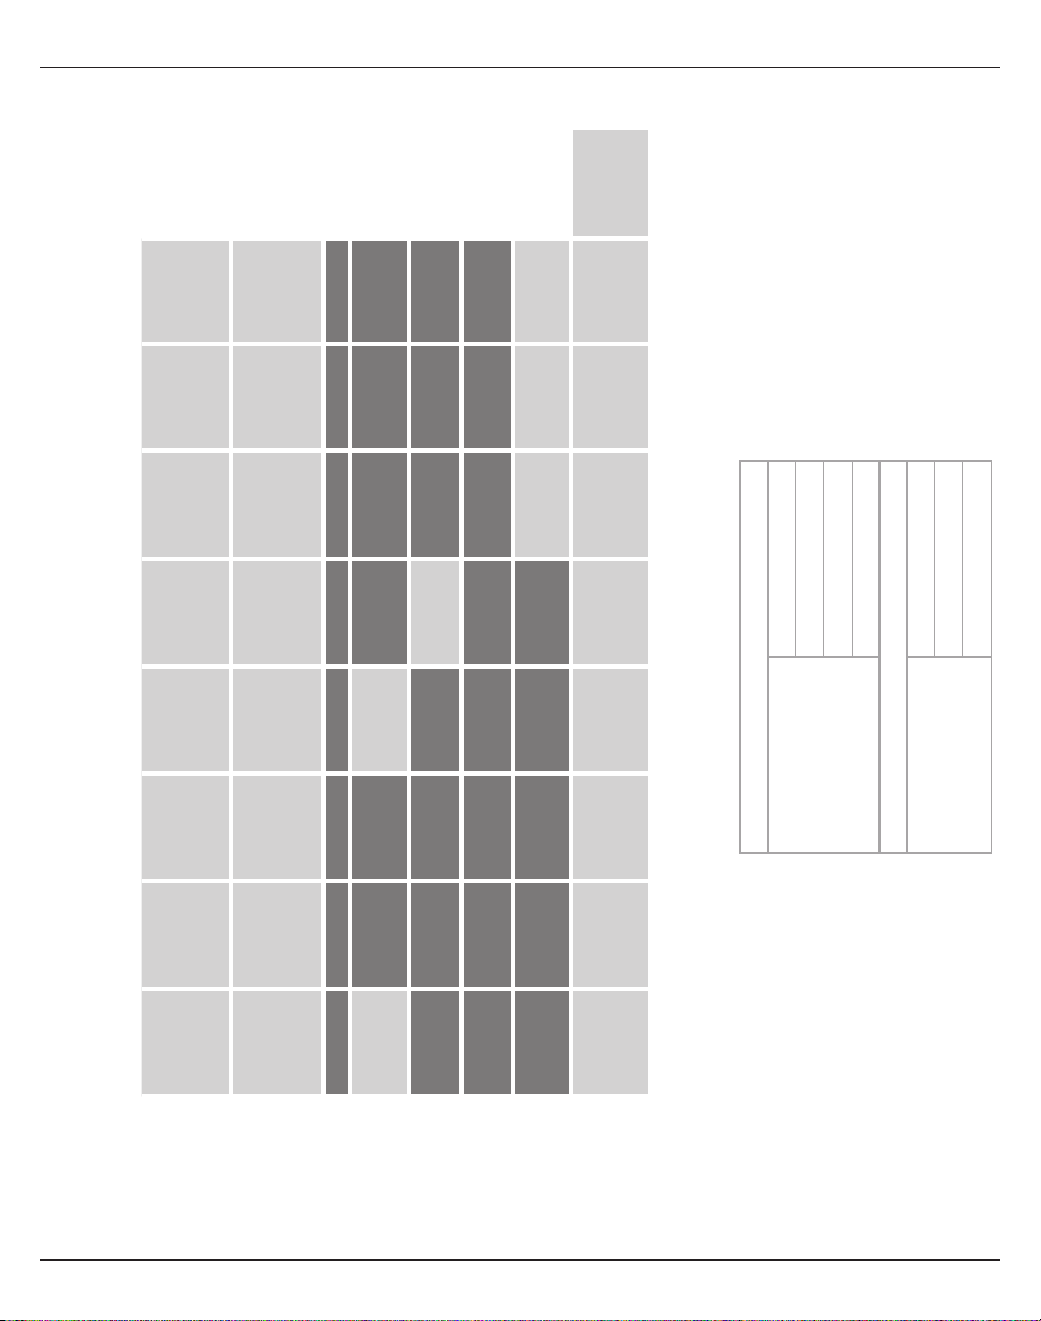
操作
繁體中文
- 41
完整樂團場景音軌設定
全域設定
偏好設定
作用中 狀態
USB 至 PC 左/右:主
USB 從 PC 左/右:主
主要輸出 後主音量
殘響類型
類型 中
時間
50%
平衡
50%
大鼓 全鼓 全鼓 低音 吉他 麥克風 麥克風 麥克風 輔助輸入
音軌 1 音軌 2 音軌 3 音軌 4 音軌 5 音軌 6 音軌 7 音軌 8 9/10
ToneMatch
作用中 作用中 作用中 作用中 作用中 作用中 作用中 作用中
無
打擊樂器 打擊樂器 打擊樂器 貝斯 電吉他 人聲麥克風 人聲麥克風 人聲麥克風
大鼓,一般 全部鼓組高處收音 一般全鼓
主動式貝斯 1 Mic'd 擴大機,搭
配 SM57
手持麥克風 手持麥克風 手持麥克風
zEQ
作用中 作用中 作用中 作用中 作用中 作用中 作用中 作用中
無
L M H L M H L M H L M H L M H L M H L M H L M H
0
dB
0
dB
0
dB
0
dB
0
dB
0
dB
0
dB
0
dB
0
dB
0
dB
0
dB
0
dB
0
dB
0
dB
0
dB
0
dB
0
dB
0
dB
0
dB
0
dB
0
dB
0
dB
0
dB
0
dB
Para EQ
跳過 跳過 跳過 跳過 跳過 跳過 跳過 跳過
無
壓縮器/Gate
作用中 跳過 跳過 作用中 跳過 跳過 跳過 跳過
無
大鼓 1 壓縮器2 壓縮器2 壓縮器2 壓縮器2 Gate Gate Gate
調變
跳過 跳過 跳過 跳過 作用中 跳過 跳過 跳過
無
和聲1 和聲1 和聲1 和聲1 和聲 1 和聲 1 和聲 1 和聲 1
延遲
跳過 跳過 跳過 跳過 跳過 跳過 跳過 跳過
無
數位 數位 數位 數位 數位 數位 數位 數位
殘響
跳過 跳過 跳過 跳過 跳過 作用中 作用中 作用中
無
中 (全域) 中 (全域) 中 (全域) 中 (全域) 中 (全域) 中 (全域) 中 (全域) 中 (全域)
Pan/Aux
中央 中央 中央 中央 中央 中央 中央 中央 輔助輸入
輔助 1-4 50% 輔助 1-4 50% 輔助 1-4 50% 輔助 1-4 50% 輔助 1-4 50% 輔助 1-4 50% 輔助 1-4 50% 輔助 1-4 50% 9 Lvl 10 Lvl
Dry:前級之後 Dry:前級之後 Dry:前級之後 Dry:前級之後 Dry:前級之後 Dry:前級之後 Dry:前級之後 Dry:前級之後 50% 50%
出廠設定
42-
繁體中文
出廠設定
本節說明 T4S/T8S 混音器的出廠設定。若要將 T4S/T8S 還原至出廠設定,您可以隨時載入 Bose 出廠設定場景。
壓縮器/Gate 出廠設定
類型 閾值 增益
壓縮器 1:輕 -16.0 dB 3.0 dB
壓縮器 2:中 -16.0 dB 5.0 dB
壓縮器 3:重 -16.0 dB 8.0 dB
限制器
-10.0 dB 0 dB
嘶聲消除器
-10.0 dB 0 dB
閾值 速度
消噪器
-70.0 dB 50%
閾值 緊度
KickGate1:固定 -20.0 dB 100%
KickGate2:快速 -20.0 dB 100%
調變器出廠設定
類型 閾值 增益 速度
和聲 1:Brite 50% 50% 0.50 Hz
和聲 2:溫暖 70% 100% 0.15 Hz
和聲 3:暗 25% 25% 3.0 Hz
Flanger 1:Tape 50% 50% 1.00 Hz
Flanger 2:回授 50% 100% 2.00 Hz
速度 回授
相位效果器 1:Stomp 0.50 Hz 0%
相位效果器 1:Rack 0.50 Hz -75%
相位效果器 1:溫暖 1.00 Hz -26%
相位效果器 1:亮 0.50 Hz -76%
速度 深度
顫音
5.00 Hz 50%
延遲出廠設定
類型 混音 時間 回授
數位
30% 150 ms 30%
類比
30% 275 ms 20%
Tape 30% 350 ms 30%
殘響類型出廠設定
類型 平衡 時間 時間範圍
板式
50% 20% 0-4.6 秒
小型
50% 15% 0-0.8 秒
中
50% 25% 0-1.9 秒
大型
50% 50% 0-3.5 秒
洞窟
50% 100% 0-7.0 秒

繁體中文
- 43
維護與保養
疑難排解
使用此產品時如遇到問題,請嘗試以下解決方案。如果您仍無法解決問題,請至 www.Bose.com/livesound 尋求線上說
明。如果您在該網頁無法找到問題的解答,請直接撥打 (02) 2514-7977 聯繫 Bose 產品與技術支援團隊。
問題 相應措施
T4S/T8S 已插入電源,
電源開關已開啟,但沒有
電力。
• 請確認 AC 插座是否通電。請嘗試將檯燈或其他設備插入該 AC 插座確認是否能正常運
作,或使用 AC 插座測試器測試該插座。
如果使用 T4S 搭配 L1® Model II 或 1S 系統:
• 請確認 ToneMatch® 連接線已正確連接至混音器與 L1 功率底座。
• 請確認電源線插頭已完全插入功率底座與 AC (電源) 插座。
• 請確認 L1 功率底座已開啟電源,而且電源 LED 亮起藍燈。
T4S/T8S 已開啟,但沒
有聲音。
• 請確認主音量控制已調高。
• 請確認您要聆聽的輸入音軌未設為靜音。
• 請確認您想聽的音軌音量控制已調高。
• 請確認已輸入音軌的微調控制已經充分調高,使 LED 亮起綠燈 (表示有夠強的輸入訊號)。
• 請檢查偏好設定的輸入與輸出位準顯示表,確認輸入與輸出級皆有訊號。
• 請確認輸入訊號源 (樂器) 上的音量控制已調大。
• 使用不同的連接線,將您的輸入訊號源 (樂器) 連接至混音器。
• 將您的輸入訊號源 (樂器) 直接插入 L1 功率底座或不同的擴大機,確認訊號源正常。
• 關閉混音器並等待 30 秒,然後再次開啟混音器。
如果使用 T4S 搭配 L1 Model II 或 1S 系統:
• 關閉功率底座,將 ToneMatch 連接線插頭重新插入 ToneMatch 連接埠,然後再次開啟功
率底座。
• 可能的話,請嘗試使用不同的 ToneMatch 連接線。如果無法取得其他 ToneMatch 連接
線,請嘗試使用標準乙太網路連接線。
• 使用 ¼吋電話插頭連接線,將 T4S/T8S 主要輸出連接至功率底座的類比輸入。開啟功率底
座微調控制,然後確認是否有聽到聲音。
• 請確認功率底座的電源 LED 亮起藍燈。如果 LED 亮起紅燈,請直接撥打 (877) 335-
2673 聯繫 Bose 產品與技術支援團隊。

44-
繁體中文
維護與保養
問題 相應措施
連接至 T4S/T8S 的麥克風或樂器
發出的聲音品質不佳。
• 請確認未套用不必要的 zEQ 或 Para EQ 均衡。
• 確認您已為麥克風/樂器選取適當的 ToneMatch® 混音器預設。如果您不希望使用
ToneMatch 混音器預設,請確認 ToneMatch 已設定為 Flat。
• 請確認您的輸入音軌上是否有不必要的效果 (壓縮器/Gate、調變、延遲、殘響)。
請檢查偏好設定選單中的狀態,確認是否有任何目前已啟用的效果。
• 請確認 T4S/T8S 輸入微調是否已針對您的麥克風/樂器進行適當的調整。訊號
LED 應為綠燈,如果 LED 為紅燈,請降低微調位準,直到變成綠燈。
• 試用不同的麥克風或樂器連接線。
• 請檢查將麥克風或樂器連接至 T4S/T8S 混音器的連接線。請確認連接線插頭已完
全插入麥克風/樂器輸出連接器及 T4S/T8S 輸入連接器。
• 請檢查麥克風或樂器的設定 (若有)。
• 請檢查麥克風或樂器的電池 (若有)。
聽不到任何效果。 • 請確認您已按下正確的音軌編輯按鍵。
• 請確認有問題的音軌並未按下 FX 靜音特效按鍵。
T4S/T8S 沒有回應任何控制鈕。 • 關閉混音器。等待 30 秒,然後再次開啟混音器。
主音量控制沒有效果。 • 在主要輸出的偏好設定中,確認主要輸出已設定為後主音量運作。
雖然 T4S/T8S 輸入連接器未插入
任何設備,但聽到 L1® 系統發出輕
微的哼聲或嗡嗡聲。
• 將 T4S/T8S 與 L1 功率底座插入相同的 AC (電源) 插座。
• 使用 AC 插座測試器,測試 T4S/T8S 及/或 L1 功率底座所插入的 AC 插座為反向
或開放 (火線、中性線和/或地線) 接點。
• 如果使用延長線,請確定以上述方式測試延長線。
低音、中或高頻率過多 (或不足)。 • 請確認未套用不必要的 zEQ 或 Para EQ 均衡。
• 確認您已為麥克風/樂器選取適當的 ToneMatch 混音器預設。如果您不希望使用
ToneMatch 混音器預設,請確定 ToneMatch 在公用工具類別中已設定為 Flat。
使用 CD 播放機、MP3 播放機或
類似設備播放立體聲錄音作品時,
音質不佳。
• 將設備的左音軌連接至輔助輸入 5,將右音軌連接至輔助輸入 6 (使用 T8S 時則使
用 9/10)。輔助輸入 5/6 (或 9/10) 專為線性位準輸入而設計。
• 使用 CD 或行動設備時,請停用任何延長低音或 EQ 功能。
• 如果您在電腦上使用錄音軟體,請檢查軟體的要求條件。您可能必須將軟體設定為
以 48 kHz/24 位元運作。

繁體中文
- 45
維護與保養
問題 相應措施
麥克風造成聲音回授。 • 調整麥克風方向,避免正對相應的揚聲器。
• 試用另一支麥克風。
• 嘗試將 L1 系統擺放在台上其他位置,和/或移動麥克風使用者的位置。
• 拉長 L1 系統和麥克風之間的距離。
• 調整麥克風音軌的 zEQ 以降低高頻。
• 調整麥克風音軌的 Para EQ,嘗試調低造成聲音回授的特定頻率。
• 暫時跳過使用中的任何音頻效果 (調變、延遲、殘響),檢查是否因為這些效果造成
聲音回授的問題。
輔助輸出的聲音不正常。
• 請檢查各個輸入音軌的輔助輸出是否已設定於所需的點擊點。請參閱第 21 頁「將
輸入訊號路由至輔助輸出」。
• 檢查各個輸入是否已將所需的訊號位準指派至輔助輸出。
無法透過 USB 連線將 T4S/T8S
音頻傳送至電腦。
• 請確認 USB 連接線已正確連接至混音器與電腦。
• 嘗試不同的 USB 連接線。
• 請確認已開啟混音器。
• 確認所需的混音器輸入音軌已指派至左與右 USB 輸出音軌。請參閱偏好設定選單
中的「USB 至 PC」。
• 請確認各個輸入音軌的微調位準已充分調高,使 LED 亮起綠燈,表示輸入訊號夠
強。
• 請檢查偏好設定選單中的輸入與輸出位準顯示表,確認輸入與輸出級皆有訊號。
• 藉由連接相容於 USB 的音訊設備,確認電腦的 USB 輸入正常運作。
• 如果您在電腦上使用錄音軟體,請檢查軟體的要求條件。您可能必須將軟體設定為
以 48 kHz/24 位元運作。
T4S/T8S 對隨身碟沒有反應。
• 連接其他品牌的隨身碟,以確定您的隨身碟是否有問題。
46-
繁體中文
維護與保養
問題 相應措施
無法透過 USB 連線將音訊從電腦
傳送至 T4S/T8S。
• 請確認 USB 連接線已正確連接至混音器與電腦。
• 嘗試不同的 USB 連接線。
• 請確認已開啟混音器。
• 確認電腦已在播放,並確認電腦並未停用音訊設定。
• 確認 USB 訊號已指派至所需的混音器輸入。請參閱偏好設定選單中的「PC 至
USB」。
• 確認指派至輸入 USB 訊號的混音器輸入音軌並未靜音,而且已調高其音量控制。
• 請確定輸入音軌的微調控制已充分調高,使 LED 亮起綠燈 (表示有夠強的輸入訊號)
。
• 請檢查偏好設定選單中的輸入與輸出位準顯示表,確認輸入與輸出級皆有訊號。
• 藉由連接相容於 USB 的音訊設備,確認電腦的 USB 輸出正常運作。
• 如果您在電腦上使用錄音軟體,請檢查軟體的要求條件。您可能必須將軟體設定為
以 48 kHz/24 位元運作。
清潔
• 清潔產品外殼時只能使用乾燥的軟布。
• 請勿使用任何溶劑、化學品或含酒精、氨水、研磨劑的清潔劑。
• 請勿在產品附近使用任何噴霧劑,或讓液體濺入任何開口處。
技術資訊
機構外觀
T4S T8S
尺寸 (長 x 寬 x 高) 8.4 吋 x 7.25 吋 x 3.25 吋
(214 公釐 x 184 公釐 x 83 公釐)
8.4 吋 x 12.25 吋 x 3.25 吋
(214 公釐 x 311 公釐 x 83 公釐)
重量
2.1 磅 (1.0 公斤) 4.1 磅 (1.9 公斤)
電氣
A/D 與 D/A 轉換 24 位元
取樣率
48 kHz
USB 2.0 或以上、Type-A 至 Type-B 連接線、Type-A 連接埠與 Type-B 連接埠
個人電腦要求條件
Microsoft Windows 7 或以上版本;Mac OS 10.5 或以上版本

繁體中文
- 47
其他資訊
其他資訊
有關產品的更多資訊 (包括配件和替換零件),請參考使用者指南 (線上版本請參閱 www.Bose.com)。若需紙本版本,請
撥打提供的電話。
有限保固
您的產品享有有限保固。請瀏覽 www.pro.Bose.com 瞭解保固詳細資訊。
本產品的保固資訊並不適用於澳大利亞和紐西蘭。有關澳大利亞和紐西蘭的詳細保固資訊,
請瀏覽 www.bose.com/au/warranty 或 www.bose.com/nz/warranty 網站。
製造日期
序號第八位數代表製造年份;「6」代表 2006 或 2016。
美洲
(美國、加拿大、墨西哥、中美洲、南美洲)
Bose Corporation
Framingham, MA 01701 USA
企業中心:508-879-7330
Americas Professional Systems
技術支援:800-994-2673
澳大利亞
Bose Pty Limited
Unit 3/2 Holker Street
Newington NSW Australia
61 2 8737 9999
比利時
Bose N.V./ S.A
Limesweg 2, 03700
Tongeren, Belgium
012-390800
中國
Bose Electronics (Shanghai) Co Ltd
25F, L’Avenue
99 Xianxia Road
Shanghai, P.R.C.尚嘉中心 25 樓
86 21 6010 3800
法國
Bose S.A.S
26-28 avenue de Winchester
78100 St. Germain en Laye, France
01-30-61-63-63
德國
Bose GmbH
Max-Planck Strasse 36D 61381
Friedrichsdorf, Deutschland
06172-7104-0
中國香港
Bose Limited
香港銅鑼灣勿地臣街 1 號
時代廣場一座 2101-2105 室
852 2123 9000
印度
Bose Corporation India Private Limited
Salcon Aurum, 3rd Floor
Plot No. 4, Jasola District Centre
New Delhi – 110025, India
91 11 43080200
義大利
Bose SpA
Centro Leoni A – Via G. Spadolini
5 20122 Milano, Italy
39-02-36704500
日本
Bose Kabushiki Kaisha
Sumitomo Fudosan Shibuya Garden Tower 5F
16-17, Nanpeidai-cho
Shibuya-Ku, Tokyo, 150-0036, Japan
電話 81-3-5489-0955
www.bose.co.jp
荷蘭
Bose BV
Nijverheidstraat 8 1135 GE
Edam, Nederland
0299-390139
英國
Bose Ltd
1 Ambley Green, Gillingham Business Park
KENT ME8 0NJ
Gillingham, England
0870-741-4500
進口商資訊
歐盟
Bose Products B.V., Gorslaan 60, 1441 RG
Purmerend, The Netherlands
中國
Bose 電子 (上海) 有限公司,中國 (上海) 自由貿易
試驗區,日櫻北路 353 號,9 號廠房 C 部
台灣
Bose 台灣分公司,台灣 104 台北市民生東路三段
10 號,9 樓 A1 室
電話:+886-2-2514 7977
墨西哥
Bose de México, S. de R.L. de C.V., Paseo de
las Palmas 405-204, Lomas de Chapultepec,
11000 México, D.F.
電話:+5255 (5202) 3545
如需其他國家/地區的聯絡資訊,請瀏覽網站
聯絡資訊
請造訪我們的網站。www.Bose.com
ةيبرعلا - 2
ةمسلل ةماه تاداشرإ
.اهب ظافتحاو مادختساو ةمسلا تاداشرإ لك ةءارق ىجر
ُ
ي
1 ..تاداشرا هذه أرقا
2 ..تاداشرا هذهب ظفتحا
3 ..تاريذحتلا لك ىلإ هبتنا
4 ..تاداشرا لك عبتا
5 ..ءاملا نم برقلاب زاهجلا اذه مدختست
6 ..زاهجلا فيظنتل ةفاج شامق ةعطق ىوس مدختست
7 ..ةع
نص
ُ
ملا ةكرشلا تاداشر ا
ً
قفو جتنملا ب
ّ
كر .ةيوهتلل تاحتف يأ دسب مقت
8 . ةطقنو ةيليمكتلا ةزهجا سباقم دنعو سباوقلا دنع اصوصخ ،هيلع طغضلا وأ مادقاب هئطو نم يئابرهكلا كلسلا ةيامحب مق
.زاهجلا نم اهجورخ
9 ..ةع
نص
ُ
ملا ةكرشلا اهددحت يتلا تاقفرملا/تاقحلملا ىوس مدختست
10 . ةكرشلا اهددحت يتلا ةدضنملا وأ تيبثتلا ةفيتك وأ مئاوقلا يثثلا لماحلا وأ لماحلا وأ ةبرعلا عم إ همدختست
ءارج نم ةباصا بنجتل ا
ً
عم زاهجلا/ةبرعلا كيرحت دنع رذحلا
خوت ،ةبرعلا مادختسا دنعو .زاهجلا عم عاب
ُ
ت يتلا وأ ةع
نص
ُ
ملا
.بقنا
11 ..ةليوط تارتفل مادختسا مدع دنع وأ ةيدعرلا فصاوعلا ءانثأ زاهجلا اذه لصفب مق
12 . فلت لثم ،لاكشا نم لكش يأب زاهجلا فلت دنع ةنايصلا ءارجإ بجي .نيلهؤم ةنايص دارفأ ةطساوب ةنايصلا لامعأ لك
ِ
رجأ
هلمع مدع لاح يف وأ ةبوطرلا وأ رطملل هضرعت وأ هيلع ضارغأ طوقس وأ لئاس باكسنا وأ سباقلا وأ ةيئابرهكلا ةيذغتلا كلس
.هطوقس لاح يف وأ يدايتعا لكشب
:تاهيبنت/تاريذحت
يف ةعورزم ةيبط ةزهجأ يأ يف كلذ رثؤيس ناك اذإ ام ةفرعمل كبيبط رشتسا .ةيسيطانغم ةدام ىلع جتنملا اذه ىوتحي
.كمسج
• ،رصحلا لاثملا ليبس ىلع ،كلذ يف امب( ةقلغملا نكاما يف هايملا قفارم لخاد مادختسا وأ بيكرتلل ممصم ريغ جتنملا اذه
جلزتلا تابلحو راخبلا فرغو انواسلا فرغو ةنخاسلا مامحتسا ضاوحأو ةقلغملا ةيئاملا قئادحلاو ةيلخادلا ةحابسلا تامامح
.)ةيلخادلا
• ىلع قبطني .ةبوطرلا وأ لئاوسلا وأ رطملل جتنملا اذه ضيرعت مدع بجي ،ةيئابرهكلا ةمدصلا وأ قيرحلا رطاخم ليلقتل
.9-IPX4 فينصت تاذ تاجتنملا
• جتنملا ىلع ،ةلعتشملا عومشلا لثم ،ةفوشكم بهل رداصم يأ عضو مدع بجي .ةرارحلاو بهللا رداصم نع ا
ً
ديعب جتنملا
ِ
قبأ
.هنم برقلاب وأ
•.جتنملا اذه ىلع اهب ح
ّ
رصم ريغ تيدعت يأ ءارجإب مقت
•.جتنملا ذه عم ةقاطلا ردصمل سكاع مدختست
•.براوقلا نتم ىلع وأ تارايسلا يف جتنملا مدختست
•.جتنملا اذه عم قفرملا ةيئابرهكلا ةيذغتلا ردصم ىوس مدختست
• ةئفدتلا تاحتف وأ ةئفدتلا ةزهجأ وأ دقاوملا لثم ،ةرارحلل رداصم يأ نم برقلاب امهبيكرتب مقت وأ جتنملا وأ ةفيتكلا عضت
.ةرارح اهنع جتني يتلا )توصلا تام
ّ
خضم كلذ يف امب( ةزهجا نم اهريغ وأ
• هتيبثت متيل طقف ممصم جزاملا .رقتسم ريغ مئاوقلا يثث لماح/يداع لماح عم ToneMatch
®
T4S/T8S جزام مدختست
زاهج معد ىلع ةردقلا مئاوقلا يثث لماحلا/يداعلا لماحلا ىدل نوكي نأ بجيو ،)مم 6( ةصوب 1/4 هساقم يغرب مادختساب
ي
ّ
دؤي دقو .)تاصوب 3.25 × 12.25 × 8.4( مم 83 × 311 × 214 يلكلا همجحو )لاطرأ 4.1( مجك 1.9 نع هنزو لقي
مث نمو ،رطخو تابث مدع ةلاح ىلإ هنزوو T4S/T8S جزام مجح ل
ّ
محتل ممصم ريغ مئاوقلا يثث لماح/يداع لماح مادختسا
.تاباصإ عوقو يف ببستت دق
•.تاونس 3 نود ام لافطل بسانم ريغ .قانتخاب ببستت دق ةريغص ءازجأ ىلع جتنملا ىوتحي
:تاظحم
• ةيلحملا ءانبلا نيناوق ةعجارم ىجري .طئاحلا يف بيكرتلل ةدمتعم ريغ ماظنلا اذه يف ةدوجوملا ليصوتلا تبكو ةعامسلا كلس
.طئاحلا يف بيكرتلل بولطملا لبكلاو كلسلل حيحصلا عونلا ةفرعمل
•.ليغشتلل زهاج عضو يف اذه لصفلا زاهج ىلع ظافحلا بجي ،لصف زاهجك زاهجلا ةلصو وأ يسيئرلا ةقاطلا سباق مادختسا دنع
•.ةقلغم ةنازخ يف وأ طئاحلاب فيوجت يف هعضو لثم قيض ناكم يف جتنملا عضوب Bose حصنت ،ةيوهتلا تابلطتمل ا
ً
رظن
ةيميظنتلا تامولعملا
صيخرت نم ىفعملا RSS )ريياعم( رايعم عمو )FCC( ةيلاريديفلا تاصتا ةنجل دعاوق نم 15 ءزجلا عم زاهجلا اذه قفاوتي
لبقي نأ بجيو )2( ،راض لخادت يأ يف زاهجلا اذه ببستي أ بجي )1( :نييلاتلا نيطرشلل ليغشتلا عضخي .Industry Canada
.هيف بوغرم ريغ ليغشت يف ببستي دق يذلا لخادتلا كلذ يف امب هلابقتسا متي لخادت يأ زاهجلا اذه
ىلع قفاوتلل لماكلا نايبلا ىلع روثعلا نكميو .اهب لومعملا يبوروا داحتا هيجوت تابلطتم لك عم جتنملا اذه قفاوتي
.www.Bose.com/compliance
)ةدحتملا تايولل )FCC( ةيلارديفلا تاصتا ةنجل دعاوق عم قفاوتلا راعشإ( ا
ً
يئابرهك ا
ً
شيوشت ثدح
ُ
ت يتلا تاجتنملا لوح تامولعم
ةنجل دعاوق نم 15 ءزجلل ا
ً
قفو كلذو ،A ةئفلا نم يمقر زاهجب ةصاخلا دويقلا عم قفاوتي وهو زاهجلا اذه رابتخا مت :ةظحم
اذهف .ةيراجت ةئيب يف زاهجلا ليغشت دنع را
ّ
ضلا شيوشتلا نم ةلوقعم ةيامح ريفوت ىلإ دويقلا هذه فدهتو .)FCC( ةيلارديفلا تاصتا
متي مل اذإ ةيكلسلا تاصتا ىلع
ّ
راض شيوشت ثودحب ببستي دقو ،اه
ّ
عش
ُ
ي نأ نكميو اهمدختسيو يكلسلا ددرتلا ةقاط د
ّ
لو
ُ
ي زاهجلا
اهدنعو ،
ّ
راض شيوشت ثودح يف ةينكس ةئيب يف زاهجلا اذه ليغشت ببستي نأ لمتحملا نمو .تاميلعتلا ليلدل ا
ً
قفو همادختساو هبيكرت
.ةصاخلا هتقفن ىلع شيوشتلا اذه حيحصت مدختسملا ىلع ن
ّ
يعتيس
ليغشتل مدختسملا صيخرت ءاغلإ ىلإ Bose Corporation ةكرش نم ةحيرص ةقفاوم نودب تيدعت وأ تارييغت يأب مايقلا يدؤي دق
.زاهجلا اذه
.يميظنتلا لاثتما ىلع ظافحلل ةيمحم تبك مادختسا بجي
.A ةئفلاب ةصاخلا ICES-003 ةيدنكلا تافصاوملا عم جتنملا اذه قفاوتي
CAN ICES-3)A( /NMB-3)A(
.E2 ةيسيطانغمورهكلا ةئيبلل EN55103-2 ةعانملا تابلطتم لك عم جتنملا اذه قفاوتي
Part Name
Toxic or Hazardous Substances and Elements
Names and Contents of Toxic or Hazardous Substances and Elements
PCBs
Metal parts
Plastic parts
Speakers
Cables
This table is prepared in accordance with the provisions of SJ/T 11364.
0: Indicates that said hazardous substance contained in all of the homogenous materials for this part
is below the limit requirement of GB/T 26572.
X: Indicates that said hazardous substance contained in at least one of the homogenous materials
used for this part is above the limit requirement of GB/T 26572.
Lead
(Pb)
Mercury
(Hg)
Cadmium
(Cd)
Hexavalent
(CR(VI))
Polybrominated
Biphenyl (PBB)
Polybrominated
diphenylether
(PBDE)
X
X
00
0
0
0
0
0
0
0
0
0
0
0
0
0
0
0
0
0
0
0
0
0
0
0
0
X
X
ةبسانم عيمجت ةأشنم ىلإ هميلست بجي لب ،ةيلزنملا تايافنلا عم جتنملا نم صلختلا مدع بجي هنأ ىلإ زمرلا اذه ريشي
ىلع لوصحلل .ةئيبلاو ناسنا ةحصو ةيعيبطلا دراوملا ةيامح يف ريودتلا ةداعإو ميلسلا صلختلا دعاسيو .هريودت ةداع
نم صلختلا ةمدخ وأ ةيلحملا ةيدلبلاب لصتا ،هريودت ةداعإو جتنملا اذه نم صلختلا ةقيرط لوح تامولعملا نم ديزم
.جتنملا اذه هنم تيرتشا يذلا رجتملا وأ تايافنلا
DCE Safety لبق نم ةرفوتم

تايوتحملا
3 - ةيبرعلا
ةمدقم
5 . . . . . . . . . . . . . . . . . . . . . . . . . . . . . . . . . . . . . . . . . . . . . . . . . . . . . . . . . . . . . . . . . . . . . . . . . . . . . . . . . جتنملا ىلع ةماع ةرظن
5 . . . . . . . . . . . . . . . . . . . . . . . . . . . . . . . . . . . . . . . . . . . . . . . . . . . . . . . . . . . . . . . . . . . . . . . . . . . . . . . . . . . جتنملا تازيم
5 . . . . . . . . . . . . . . . . . . . . . . . . . . . . . . . . . . . . . . . . . . . . . . . . . . . . . . . . . . . . . . . . . . . . . . . . . . . . . . . . . . . . .تايوتحملا غيرفت
مكحتلاو ليصوتلا تاحول
6 . . . . . . . . . . . . . . . . . . . . . . . . . . . . . . . . . . . . . . . . . . . . . . . . . . . . . . . . . . . . . . . . . . . . . . . . . . . . . T4S ToneMatch
®
جزام
6 . . . . . . . . . . . . . . . . . . . . . . . . . . . . . . . . . . . . . . . . . . . . . . . . . . . . . . . . . . . . . . . . . . . . . . . . . . . . . . . . . . . . مكحتلا ةحول
7 . . . . . . . . . . . . . . . . . . . . . . . . . . . . . . . . . . . . . . . . . . . . . . . . . . . . . . . . . . . . . . . . . . . . . . . . . . . . . . . . . . .ليصوتلا ةحول
8 . . . . . . . . . . . . . . . . . . . . . . . . . . . . . . . . . . . . . . . . . . . . . . . . . . . . . . . . . . . . . . . . . . . . . . . . . . . . . T8S ToneMatch
®
جزام
8 . . . . . . . . . . . . . . . . . . . . . . . . . . . . . . . . . . . . . . . . . . . . . . . . . . . . . . . . . . . . . . . . . . . . . . . . . . . . . . . . . . . . مكحتلا ةحول
9 . . . . . . . . . . . . . . . . . . . . . . . . . . . . . . . . . . . . . . . . . . . . . . . . . . . . . . . . . . . . . . . . . . . . . . . . . . . . . . . . . . .ليصوتلا ةحول
ماظنلا دادعإ
10 . . . . . . . . . . . . . . . . . . . . . . . . . . . . . . . . . . . . . . . . . . . . . . . . . . . . . . . . . . . . . . . . . . . . . . . . . . . . . . . . . . .ءاطغلا تيبثت/ةلازإ
11 . . . . . . . . . . . . . . . . . . . . . . . . . . . . . . . . . . . . . . . . . . . . . . . . . . . . . . . . . . . . . . . . . . . . . . . . . . . . . . . . . . . . . تيبثتلا تارايخ
11 . . . . . . . . . . . . . . . . . . . . . . . . . . . . . . . . . . . . . . . . . . . . . . . . . . . . . . . . . . . . . . مئاوقلا يثث اريماك لماح ىلع T4S/T8S تيبثت
12 . . . . . . . . . . . . . . . . . . . . . . . . . . . . . . . . . . . . . . . . . . . . . . . . . . . . . . . . . . . . . . . . . . . . . . . . . . . . . . . . . .ا
ً
يمقر T4S ليصوت
13 . . . . . . . . . . . . . . . . . . . . . . . . . . . . . . . . . . . . . . . . . . . . . . . . . . . . . . . . . . . . . . . . . . . . . . . . . . . . .ا
ً
يرظانت T4S/T8S ليصوت
14 . . . . . . . . . . . . . . . . . . . . . . . . . . . . . . . . . . . . . . . . . . . . . . . . . . . . . . . . . . . . . . . ToneMatch
®
ـل ةيئابرهكلا ةيذغتلا ردصم ليصوت
15 . . . . . . . . . . . . . . . . . . . . . . . . . . . . . . . . . . . . . . . . . . . . . . . . . . . . . . . . . . . . . . . . . . . . . . . . . . . رتويبمكلاب T4S/T8S ليصوت
15 . . . . . . . . . . . . . . . . . . . . . . . . . . . . . . . . . . . . . . . . . . . . . . . . . . . . . . . . . . . . . . . . . . .T4S/T8S ـب لومحم صارقأ كرحم ليصوت
ليغشتلا
16 . . . . . . . . . . . . . . . . . . . . . . . . . . . . . . . . . . . . . . . . . . . . . . . . . . . . . . . . . . . . . . . . . . . . . . . . . . . . . . . T4S/T8S ةشاش ةءارق
17 . . . . . . . . . . . . . . . . . . . . . . . . . . . . . . . . . . . . . . . . . . . . . . . . . . . . . . . . . . . . . . . . . . . . جرخلا توص ىوتسمو لخدلا بسك نيسحت
18 . . . . . . . . . . . . . . . . . . . . . . . . . . . . . . . . . . . . . . . . . . . . . . . . . . . . . . . . . . . . . . . . . يسيئرلا جرخلا توص ىوتسم يف مكحتلا مادختسا
18 . . . . . . . . . . . . . . . . . . . . . . . . . . . . . . . . . . . . . . . . . . . . . . . . . . . . . . . . . . . . . . . . . . . . . . . . . . . . . . . . . .ةانق توص متك
18 . . . . . . . . . . . . . . . . . . . . . . . . . . . . . . . . . . . . . . . . . . . . . . . . . . . . . . . . . . . . . . . . . . . . . . . . . . . . . ةانق تاريثأت توص متك
19 . . . . . . . . . . . . . . . . . . . . . . . . . . . . . . . . . . . . . . . . . . . . . . . . . . . . . . . . . . . . . . . . . . . . . . . . . . . . . . . . .راودلا د
دحملا مادختسا
20 . . . . . . . . . . . . . . . . . . . . . . . . . . . . . . . . . . . . . . . . . . . . . . . . . . . . . . . . . . . . . . . . . . . . . . . . . . . . . . . . . . . ةانق توص ليدعت
20 . . . . . . . . . . . . . . . . . . . . . . . . . . . . . . . . . . . . . . . . . . . . . . . . . . . . . . . . . . . . . . . . . . دعاسملا/يطيحملا جرخلا فئاظو مادختسا
20 . . . . . . . . . . . . . . . . . . . . . . . . . . . . . . . . . . . . . . . . . . . . . . . . . . . . . . . . . . . . . . . . . . . . . . . . . . . . . . . . .فلاوملا مادختسا
22 . . . . . . . . . . . . . . . . . . . . . . . . . . . . . . . . . . . . . . . . . . . . . . . . . . . . . . . . . . . . . . . . . . .ToneMatch
®
ـل قبسملا طبضلا ديدحت
22 . . . . . . . . . . . . . . . . . . . . . . . . . . . . . . . . . . . . . . . . . . . . . . . . . . . . . . . . . . . . . . . . . . . . . . . . . . . . . . . . . . . zEQ طبض
23 . . . . . . . . . . . . . . . . . . . . . . . . . . . . . . . . . . . . . . . . . . . . . . . . . . . . . . . . . . . . . . . . . . . . . . . . . . . ةيرتمارابلا ةنزاوملا طبض
23 . . . . . . . . . . . . . . . . . . . . . . . . . . . . . . . . . . . . . . . . . . . . . . . . . . . . . . . . . . . . . . . . . . . . . . . . ةباوبلا/طغاضلا فئاظو مادختسا
25 . . . . . . . . . . . . . . . . . . . . . . . . . . . . . . . . . . . . . . . . . . . . . . . . . . . . . . . . . . . . . . . . . . . . . . . . . . . . ليدعتلا تاريثأت مادختسا
26 . . . . . . . . . . . . . . . . . . . . . . . . . . . . . . . . . . . . . . . . . . . . . . . . . . . . . . . . . . . . . . . . . . . . . . . . . . . . . . . . . تاريخأت ةفاضإ
26 . . . . . . . . . . . . . . . . . . . . . . . . . . . . . . . . . . . . . . . . . . . . . . . . . . . . . . . . . . . . . . . . . . . . . . . . . . . . . . . . . . .ىدص ةفاضإ

تايوتحملا
ةيبرعلا - 4
27 . . . . . . . . . . . . . . . . . . . . . . . . . . . . . . . . . . . . . . . . . . . . . . . . . . . . . . . . . . . . . . . . . . . . . . . . . . . . . . . .ةماعلا فئاظولا مادختسا
27 . . . . . . . . . . . . . . . . . . . . . . . . . . . . . . . . . . . . . . . . . . . . . . . . . . . . . . . . . . . . . . . . . . . . . . . . . . . . . . . . ىدص عون ديدحت
28 . . . . . . . . . . . . . . . . . . . . . . . . . . . . . . . . . . . . . . . . . . . . . . . . . . . . . . . . . . . . . . . . . . . . . .ةدعاسملا تيضفتلا تاودأ مادختسا
30 . . . . . . . . . . . . . . . . . . . . . . . . . . . . . . . . . . . . . . . . . . . . . . . . . . . . . . . . . . . . . . . . . . . . . . . . . . . . . .اهظفحو دهاشم ليمحت
33 . . . . . . . . . . . . . . . . . . . . . . . . . . . . . . . . . . . . . . . . . . . . . . . . . . . . . . . . . . . . . . . . . . . . . . . . . . . . . . . . . . دهشم ةكراشم
35 . . . . . . . . . . . . . . . . . . . . . . . . . . . . . . . . . . . . . . . . . . . . . . . . . . . . . . . . . . . . . . . . . . . . . . . . . . . . . . . . . . . . . Bose دهاشم
35 . . . . . . . . . . . . . . . . . . . . . . . . . . . . . . . . . . . . . . . . . . . . . . . . . . . . . . . . . . . . . . . . . . . . . . . . . . . . . . . . .عنصملا تادادعإ
36 . . . . . . . . . . . . . . . . . . . . . . . . . . . . . . . . . . . . . . . . . . . . . . . . . . . . . . . . . . . . . . . . . . . . . . . . . . . . . . . . . . نحلملا/ينغملا
38 . . . . . . . . . . . . . . . . . . . . . . . . . . . . . . . . . . . . . . . . . . . . . . . . . . . . . . . . . . . . . . . . . . . . . . . . . . . . . . . . . . . .ليغشت/DJ
40 . . . . . . . . . . . . . . . . . . . . . . . . . . . . . . . . . . . . . . . . . . . . . . . . . . . . . . . . . . . . . . . . . . . . . . . . . . . . . . . . . . لماكلا قاطنلا
عنصملا تادادعإ
42 . . . . . . . . . . . . . . . . . . . . . . . . . . . . . . . . . . . . . . . . . . . . . . . . . . . . . . . . . . . . . . . . . . . . . . . . . . . . . . . . . . . .عنصملا تادادعإ
ةنايصلاو ةيانعلا
43 . . . . . . . . . . . . . . . . . . . . . . . . . . . . . . . . . . . . . . . . . . . . . . . . . . . . . . . . . . . . . . . . . . . . . . . . . . . . اهحصإو ءاطخا فاشكتسا
46 . . . . . . . . . . . . . . . . . . . . . . . . . . . . . . . . . . . . . . . . . . . . . . . . . . . . . . . . . . . . . . . . . . . . . . . . . . . . . . . . . . . . . . . . فيظنتلا
46 . . . . . . . . . . . . . . . . . . . . . . . . . . . . . . . . . . . . . . . . . . . . . . . . . . . . . . . . . . . . . . . . . . . . . . . . . . . . . . . . . . . . . ةينف تامولعم
ةيفاضإ دراوم
47 . . . . . . . . . . . . . . . . . . . . . . . . . . . . . . . . . . . . . . . . . . . . . . . . . . . . . . . . . . . . . . . . . . . . . . . . . . . . . . . . . . . لاصتا تامولعم
47 . . . . . . . . . . . . . . . . . . . . . . . . . . . . . . . . . . . . . . . . . . . . . . . . . . . . . . . . . . . . . . . . . . . . . . . . . . . . . . . دروتسملا تامولعم
47 . . . . . . . . . . . . . . . . . . . . . . . . . . . . . . . . . . . . . . . . . . . . . . . . . . . . . . . . . . . . . . . . . . . . . . . . . . . . . . . . . . . .ةيفاضإ تامولعم
47 . . . . . . . . . . . . . . . . . . . . . . . . . . . . . . . . . . . . . . . . . . . . . . . . . . . . . . . . . . . . . . . . . . . . . . . . . . . . . . . . .دودحملا نامضلا
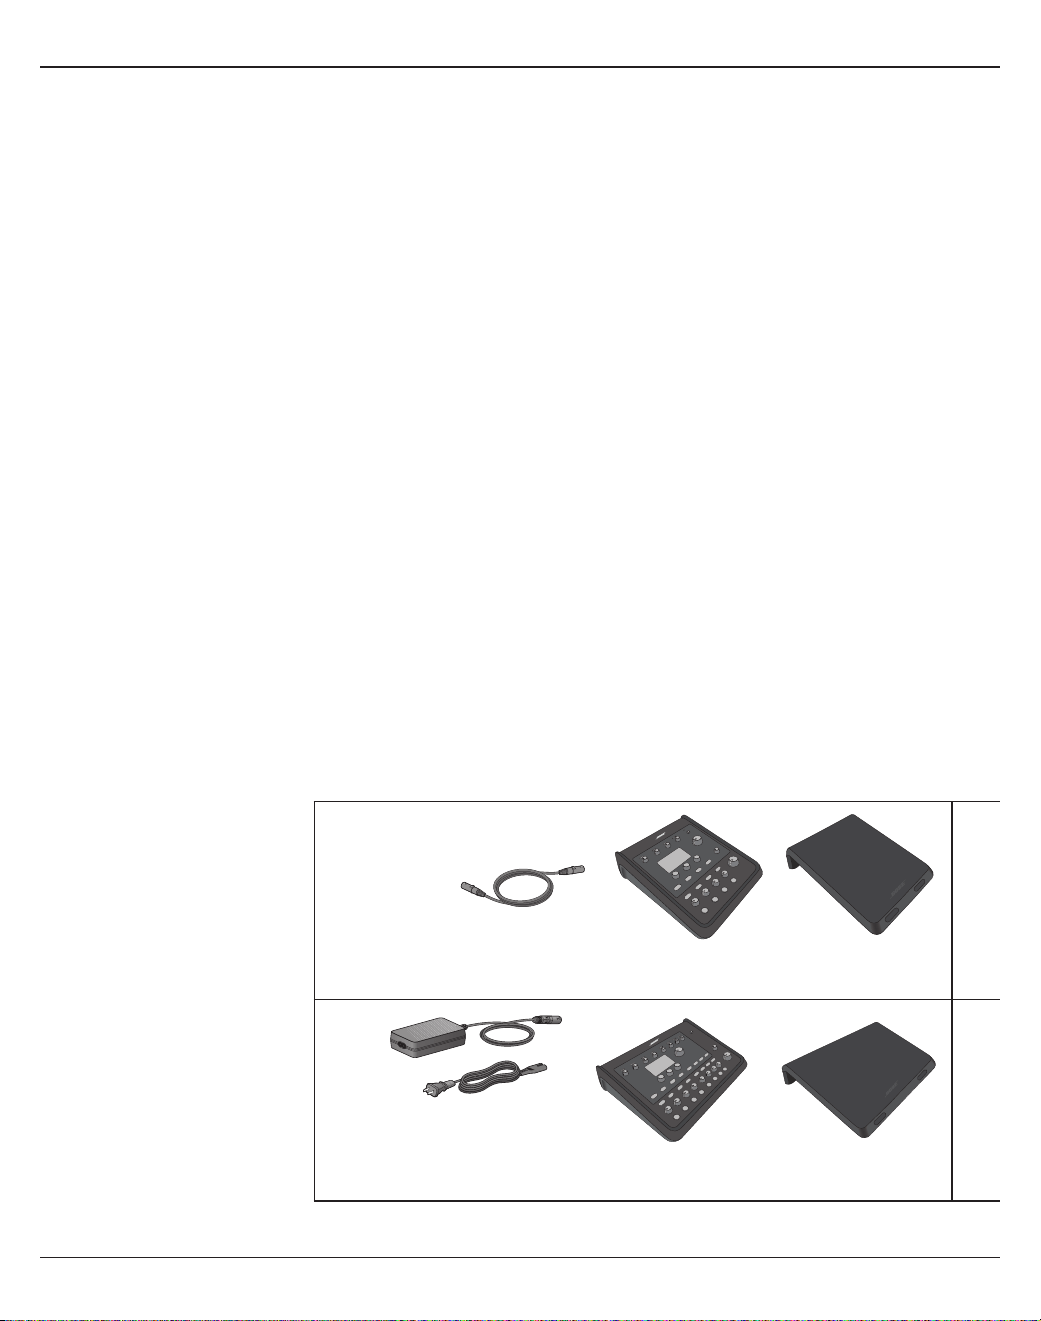
5 - ةيبرعلا
ةمدقم
جتنملا ىلع ةماع ةرظن
رارزأو ةيوق )يمقر تاراشإ جلاعم( DSP تاكرحمب تاجزاملا هذه ديوزتل ا
ً
رظنو .نينانفلل ةممصملا ةريغصلا 8و 4 تاونق تاهجاوو T8S ToneMatch
®
و T4S تاجزام ربع ىقيسوملا يف مكحت
دنع ةصاخ zEQو جمدملا Bose
®
ToneMatch
®
اهمدقي يتلا ةجلاعملا لضفب هتعورب توصلا زيمتيو .تايكيمانيدلاو تارثؤملل ةجلاعمو ويدوتسا ةدوجل ةنزاوم رفوت اهنإف ،مادختسا ةلهس مكحت
ىلع ةقث دهاشملا ركذتستو ةءارقلا ةلهس LED تاشاشو ةيسمل مكحت رارزأ مدختست يتلا ةيوقلا ToneMatch تاجزام ك
ُ
بسك
ُ
تو .تامغنلا يف لماشلا مكحتلا فدهب F1 وأ Bose L1 ماظنب هليصوت
.حرسملا ىلع نينانفلل مها قيفرلا ToneMatch تاجزام دع
ُ
تو .حرسملا
جتنملا تازيم
توصلل ةيوق ةجلاعم
•يمقرلا توصلل ةمدقتم ةجلاعم عم ويدوتسا ةدوجب ةث
دحم تارثؤم
• تقولا ل
ِ
حر
ُ
مو رارقلاو شيوشتلا ةباوبو ضفاخلاو د
ِ
دحملاو طغاضلا تارثؤملا نمضتت
ىدصلاو ريخأتلاو يتوصلا بذبذتلاو راوطا لحر
ُ
مو
•يعيبطلا توصلا تاذ ةيعاقيا تاو تاودل Bose
®
ToneMatch
®
ـب ةجلاعم
• ةلاعف تيدعت ءارج ToneMatch توصل ةقبسملا طباوضلا ىلع ءوضلا zEQ ط
لسي
لقنتلا ءانثأ يف
•ةانق لكل تارثؤمو تايكيمانيدو ةنزاومو لقتسم ToneMatch
•تاونقلا لك ربع همادختس ماع كرتشم ىدصو ةدعاسملا جراخملل صصخم ىدص
• ناكملا تايتوص ضيوعت ىلع يسيئرلا جرخلا ةنزاوم دعاست
•F1و Bose L1 يماظن عم مادختسا دنع تامغنلل لماك لماش نيسحت
سلس رشابم مكحت
• نييقيسوملا ةطساوب حرسملا ىلع رشابملا مادختسل ةممصم ةيسمل مكحت رارزأو تارشؤم
DJو
•ملعتلا ةلهس مدختسم ةهجاو
• اهركذت نكمي دهاشمو ينول فلاومو عاقيا ةعرسل ج
َ
مدم ل
ِ
حر
ُ
م
• ةتفاخ حراسملا ىلع ىتح مادختساو ةءارقلا ةلهس ةئيضم مكحت رارزأو LED ةشاش
ةءاضا
ةفاثكلا يلاع لاصتا
•ريغص يمقر ويرتسا جزام يف مكحتلاو لاصتا ىلع ةقوبسم ريغ ةردق
• ةروطتم XLR سباقم عم ةدوجلا يلاع توصل تامخضم )T8S( ةينامث وأ )T4S( ةعبرأ
ليوحتلل ةلباق ةيفيط ةقاطو تا وأ تانوفوركيملل
•)T8S( ةدعاسم جراخم ةعبرأ وأ )T4S( ناجرخمو ةيفاضإ رداصمل نادعاسم نخدم
•PC/Mac ليصوت وأ USB صارقأ كرحم ليغشتل Bو USB-A
•)طقف T4S( ةقاطلاو يمقرلا توصلل ToneMatch جراخم
•)طقف T8S( ةصوب ¼ ساقم نينزاوتم XLRو TRS ـل ويرتسا جراخم
•ةلقتسم سأر ةعامس جرخ
ةمئملا Gig-Ready تازيم
•تصوملاو مكحتلا رارزأ ةيامحل
ٍ
قاو يسيطانغم ءاطغ عم ةنيتم ةبلع
• 1S زارطلا L1 وأ II زارطلا Bose L1 ماظنب ليصوتلل ToneMatch لبك نمضتي
)T8S(
ً
ماش ةيئابرهك ةيذغت ردصم نمضتي وأ ،)T4S( يمقر توصو ةقاطب عاتمتسل
• جزامب لاصتا ىلع لظتل ةيسايقلا اريماكلا تيبثت تاقحلم مادختسا كل حيتت ةيلفس ةحتف
ToneMatch
ءاطغلاو T4S ToneMatch جزامToneMatch لبك
ـل ةيئابرهكلا ةيذغتلا ردصم
ToneMatch
ءاطغلاو T8S ToneMatch جزام
.www.Bose.com عقوملا ةرايز ىجر
ُ
ي ،ةيرايتخا تاقحلملاو تادعملاب ةلماك ةمئاق ىلع لوصحلل
تايوتحملا غيرفت
:نمضتت يتلا جزاملا ةبلع تايوتحم ىلع فرعتلل يلاتلا لودجلا عجار
T4S
T8S
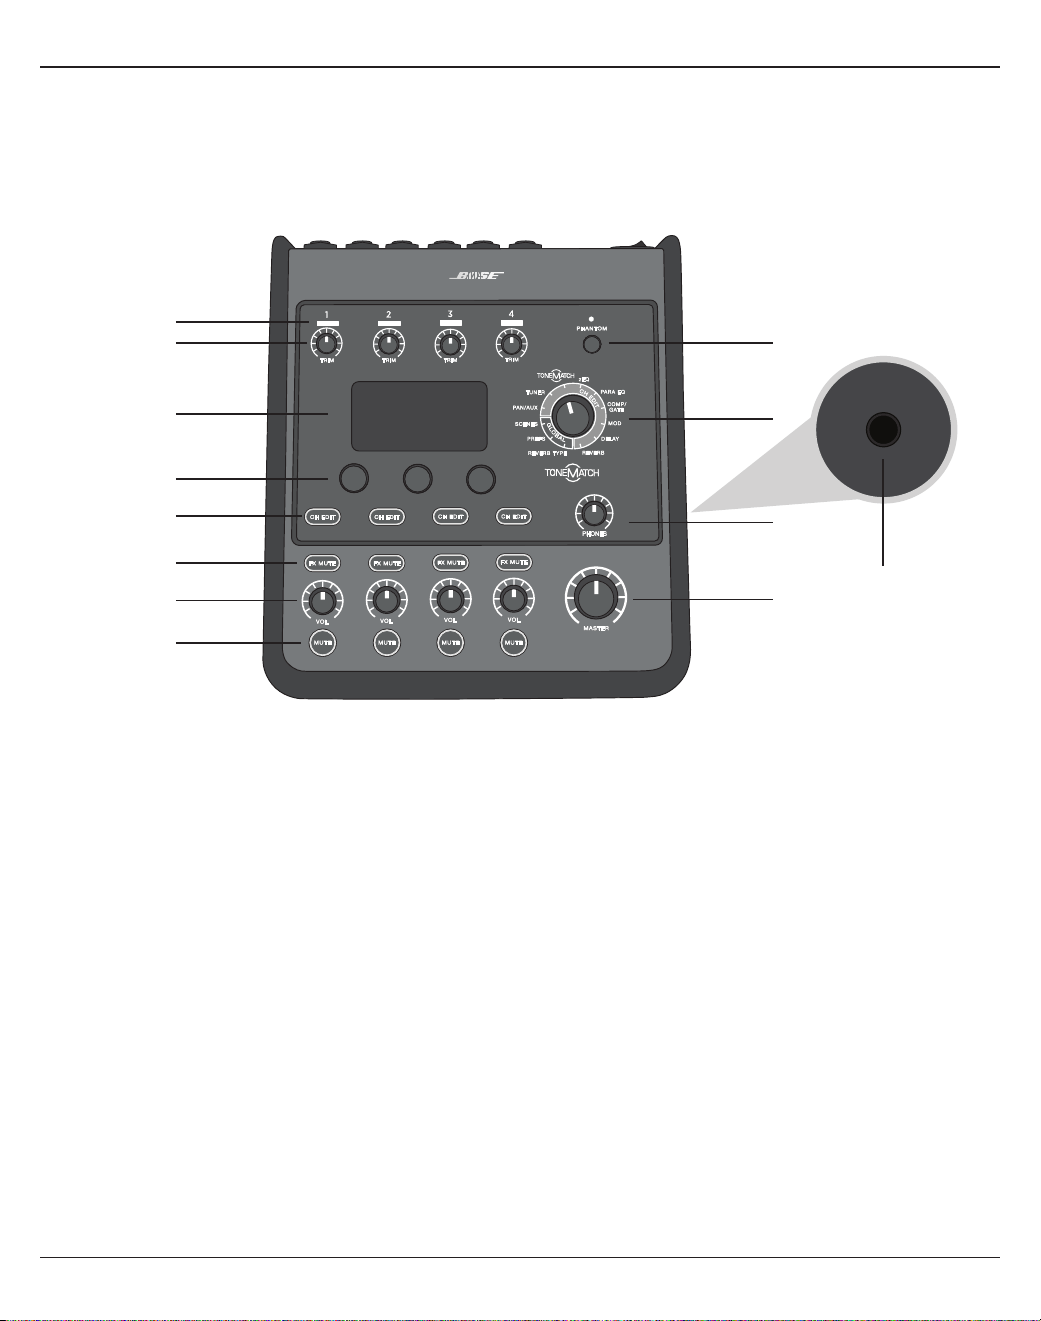
مكحتلاو ليصوتلا تاحول
ةيبرعلا - 6
T4S ToneMatch
®
جزام
مكحتلا ةحول
T4S مكحت ةحول .1 لكشلا
:نولب لخدلا ةراشإ ةلاح ضرع – )4-1( لخدلا ةراشإ/صقلاب صاخلا LED تارشؤم q
لخد ةراشإ دوجو ىلإ ريشي :رضخأ
لخدلا ردصم صاصتقا ىلإ ريشي :رمحأ
.ةلصلا تاذ ةانقلا لخد ةيساسح طبض – )4-1( طبضلا يف مكحتلا رارزأ w
.ماظنلا تامولعمو فئاظولا مئاوق رفوت – ضرعلا ةشاش e
.اهطبض وأ ةشاشلا ىلع رهظت يتلا ميقلا/رصانعلا ديدحت هذه ةثثلا ةيطاغضنا/ةراودلا مكحتلا رارزأ كل حيتت – ليدعتلا يف مكحتلا رارزأ r
.اهليدعت ديرت يتلا ةانقلا ديدحت – )4-1( تاونقلا ليدعت رارزأ t
.ةددحملا ةانقلا يف )Reverb( ىدصلاو )Delay( ريخأتلاو )Mod( ليدعتلا تارثؤم زواجت – )4-1( FX توص متك رارزأ y
.ةلصلا تاذ ةانقلا توص ىوتسم طبض – )4-1( توصلا ىوتسم يف مكحتلا رارزأ u
.ةلصلا تاذ ةانقلا توص جرخ متك – )4-1( توصلا متك رارزأ i
.يلكلا جرخلا ىوتسم طبض – )MASTER( يسيئرلا جرخلا توص ىوتسم يف مكحتلا رز o
.سأرلا ةعامس جرخ توص ىوتسم طبض – سأرلا ةعامس توص ىوتسم يف مكحتلا رز a
.ليدعتلا يف مكحتلا رارزأ مادختساب اهطبض مت يتلا تاونقلاب ةطبترملاو ةماعلا تاملعملا ىلإ لوصولا كل حيتي – راودلا د
دحملا s
.ليغشتلا ديق ةيفيطلا ةقاطلا نأ ىلإ رمحا LED رشؤم ريشيو .تلوف 48 نع ديزت ةقاطب 4-1 لخدلا تاونق د
وزي – ةيفيطلا ةقاطلا حاتفم d
.موأ 24 نع لقت ةمواقم عم طقف سأرلا تاعامس عم مادختسل – سأرلا ةعامس سبقم f
q
w
i
u
y
t
r
e
d
s
a
o
f
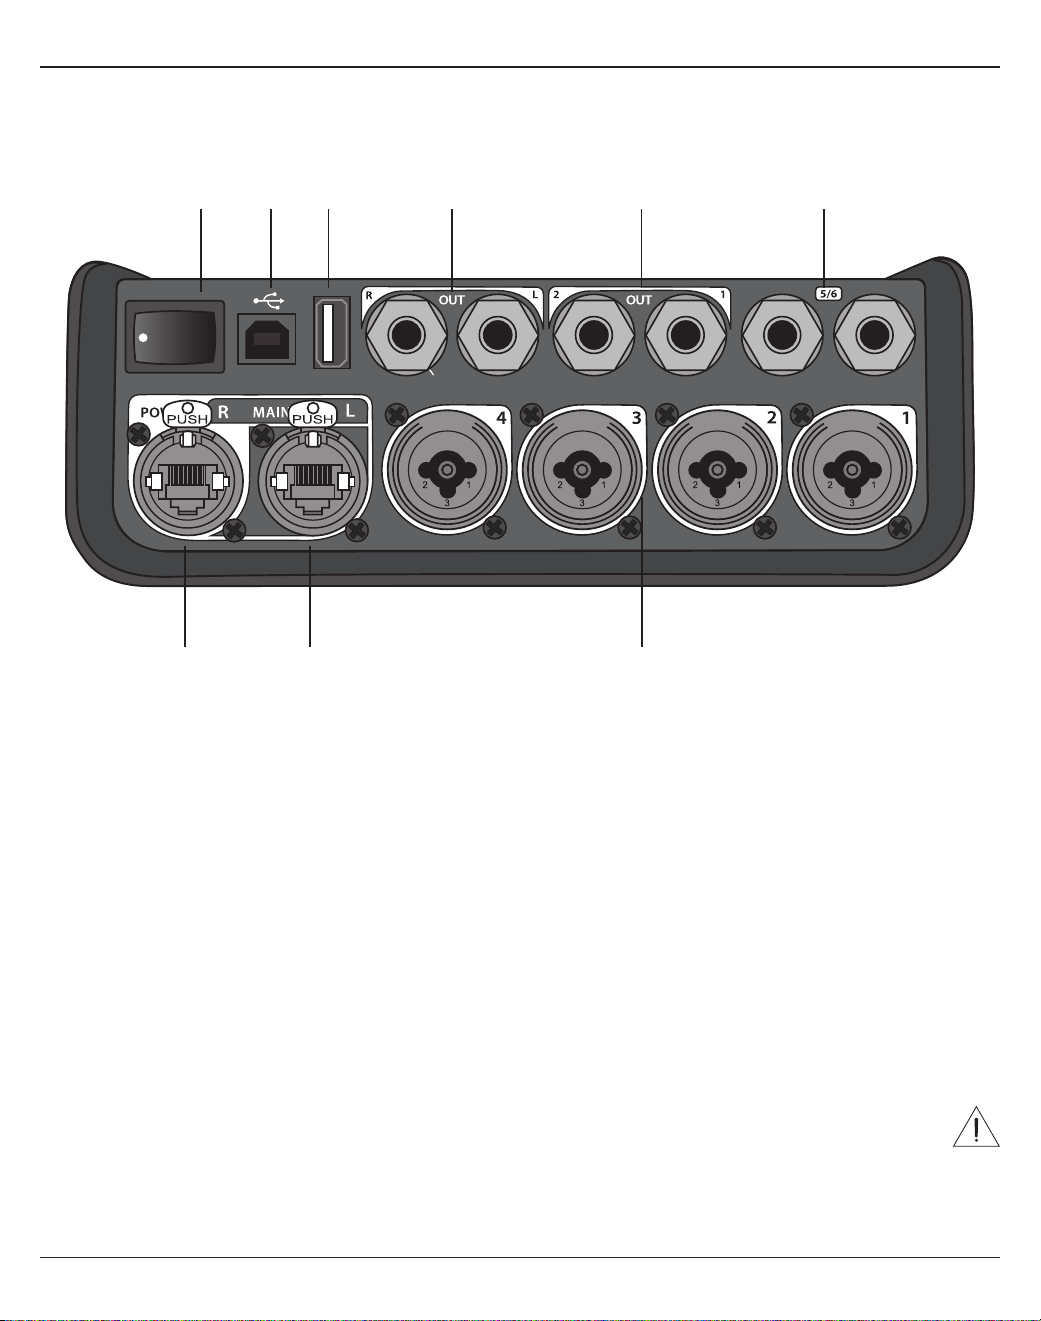
7 - ةيبرعلا
مكحتلاو ليصوتلا تاحول
T4S ليصوت ةحول .2 لكشلا
ليصوتلا ةحول
.هليغشت فاقيإ وأ جزاملا ليغشت – ةقاطلا حاتفم q
.رتويبمكلاب جزاملا ليصوت USB ةهجاو كل حيتت – B عونلا نم USB 2.0 w
.لومحملا صارقا كرحم نم توصلا ثب USB ةهجاو كل حيتت – A عونلا نم USB 2.0 e
.TS عم ةنزاوتم ريغ وأ TRS عم ةنزاوتم ةصوب 1/4 ساقم تبك لبقي .يسيئر يرظانت جرخ – يرظانتلا L/R جرخ r
.قحلا توصلا طباض جرخل وأ تارثؤملاو قحلا نزاوملاو يلوا توصلا طباضل امهتئيهت نكمي .م
ِ
دختسملا ةطساوب امهديدحت نكمي نايرظانت ناجرخم – دعاسم جرخ t
.TRS عم ةنزاوتم ةصوب 1/4 ساقم تبك لبقي
همادختسا نكميو .طخلا ىوتسم ىلع تخدمل TS عم ةنزاوتم ريغ وأ TRS عم ةنزاوتم ةصوب 1/4 ساقم تبك لبقي .6/5 ةيرظانت لخد تاونق – دعاسم لخد y
.ويرتسا لخد تاراش
TS عم ةنزاوتم ريغ وأ TRS عم ةنزاوتم ةصوب 1/4 ساقم تبك وأ تانوفوركيملل ةنزاوتملا XLR تبك لبقت .4-1 ةيرظانت لخد تاونق – 4-1 تاخدا u
.راتيجلا لثم ةمواقملا ةيلاع تخدملل
.R يمقرلا يسيئرلا جرخلا عم ويرتسا عضو يف طقف م
َ
دختس
ُ
ي :ةظحم
. 1S/II زارطلا L1
®
يماظنب ويرتسا عضو يف يمقرلا لاصتا – L يسيئر يمقر جرخ i
ا
ً
ضيأ هنكميو . 1S/II زارطلا L1 ةقاط ةدحو نم ةقاطلاب T4S جزام د
وزيو . 1S/II زارطلا L1 ماظن همدختسي يمقر جرخ – R يمقرلا يسيئرلا جرخلا/ةقاطلا ذفنم o
.قفرملا ToneMatch
®
لبك لبقيو .)T4S عم ق
َ
فرم ريغ( ToneMatch ـل ةيئابرهكلا ةيذغتلا ردصم ربع ددرتم رايت جرخم نم ةقاطلا ريفوت
.فتاه ةكبش وأ رتويبمكب T4S ليصوت بنجت بجي هنإف ،ا
ً
يسايق RJ-45 لصوم لبقي ToneMatch ذفنم نأ نم مغرلاب
:هيبنت
USB AUDIO
M
( )
MONO
q w e r t y
uio
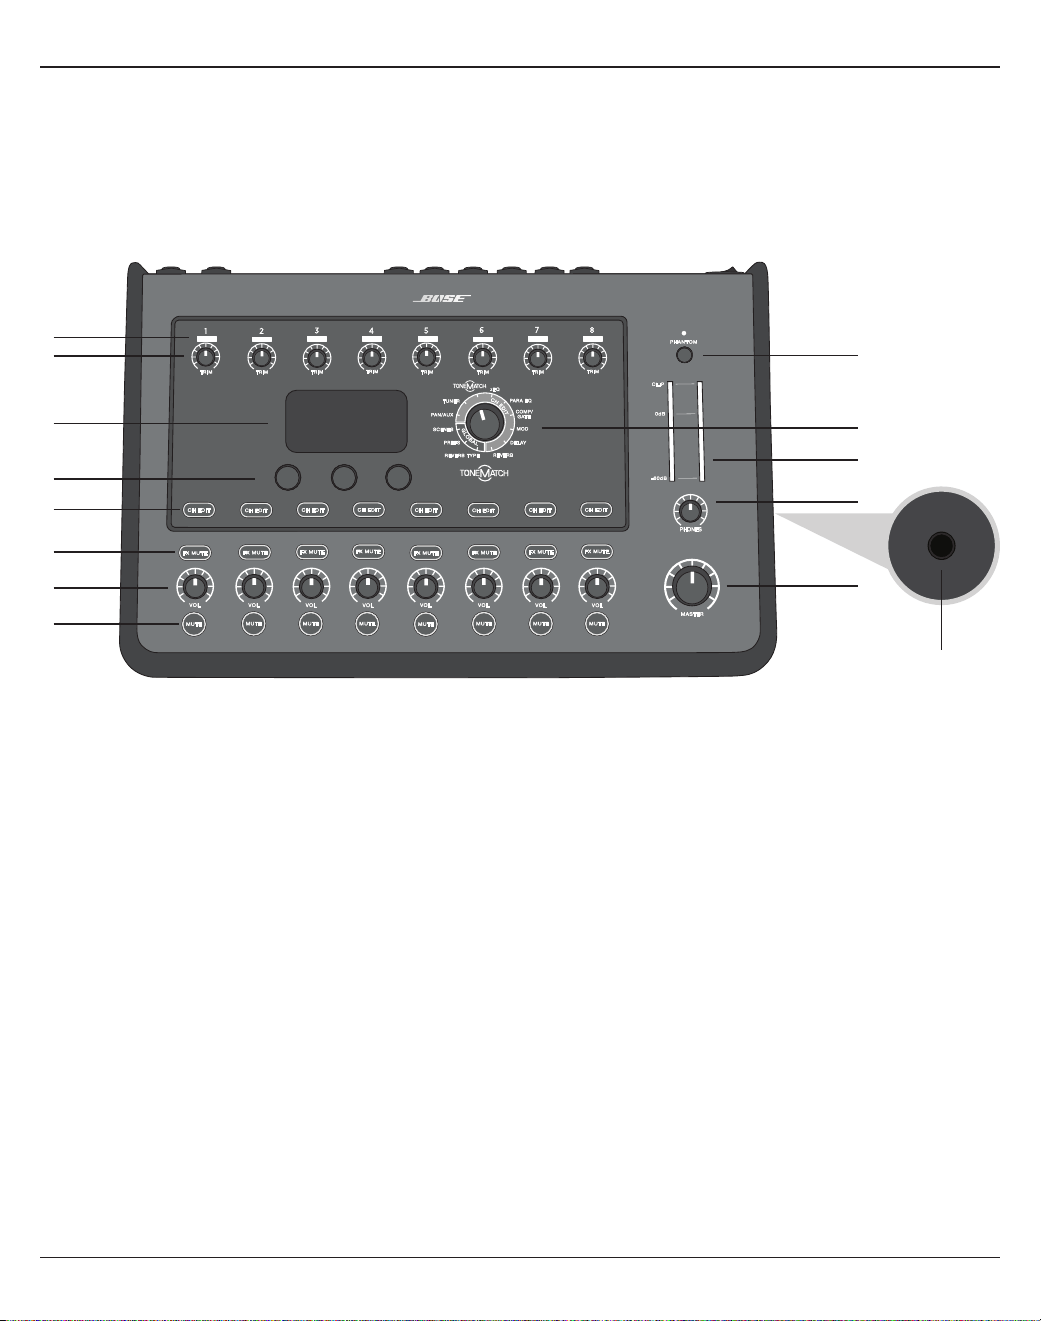
مكحتلاو ليصوتلا تاحول
ةيبرعلا - 8
T8S ToneMatch
®
جزام
مكحتلا ةحول
T8S مكحت ةحول .3 لكشلا
:نولب لخدلا ةراشإ ةلاح ضرع – )8-1( لخدلا ةراشإ/صاصتقاب صاخلا LED تارشؤم q
لخد ةراشإ دوجو ىلإ ريشي :رضخأ
لخدلا ردصم صاصتقا ىلإ ريشي :رمحأ
.ةلصلا تاذ ةانقلا لخد ةيساسح طبض – )8-1( طبضلا يف مكحتلا رارزأ w
.ماظنلا تامولعمو فئاظولا مئاوق رفوت – ضرعلا ةشاش e
.اهطبض وأ ةشاشلا ىلع رهظت يتلا ميقلا/رصانعلا ديدحت هذه ةثثلا ةيطاغضنا/ةراودلا مكحتلا رارزأ كل حيتت – ليدعتلا يف مكحتلا رارزأ r
.اهليدعت ديرت يتلا ةانقلا ديدحت – )8-1( تاونقلا ليدعت رارزأ t
.ةددحملا ةانقلا يف )Reverb( ىدصلاو )Delay( ريخأتلاو )Mod( ليدعتلا تارثؤم زواجت – )8-1( FX توص متك رارزأ y
.ةلصلا تاذ ةانقلا توص ىوتسم طبض – )8-1( توصلا ىوتسم يف مكحتلا رارزأ u
.ةلصلا تاذ ةانقلا توص جرخ متك – )8-1( توصلا متك رارزأ i
.يلكلا جرخلا ىوتسم طبض – )MASTER( يسيئرلا جرخلا توص ىوتسم يف مكحتلا رز o
.سأرلا ةعامس جرخ توص ىوتسم طبض – سأرلا ةعامس توص ىوتسم يف مكحتلا رز a
.ا
ً
يرصب جرخلا ىوتسم سايق ةحاتإ – ويرتسا جرخ سايقم s
.ليدعتلا يف مكحتلا رارزأ مادختساب اهطبض مت يتلا تاونقلاب ةطبترملاو ةماعلا تاملعملا ىلإ لوصولا ةحاتإ – راودلا د
دحملا d
.ليغشتلا ديق ةيفيطلا ةقاطلا نأ ىلإ رمحا LED رشؤم ريشيو .تلوف 48 نع ديزت ةقاطب 8-1 لخدلا تاونق ديوزت – ةيفيطلا ةقاطلا حاتفم f
.موأ 24 نع لقت ةمواقم عم طقف سأرلا تاعامس عم مادختسل – سأرلا ةعامس سبقم g
q
w
i
o
g
a
s
d
f
u
y
t
r
e
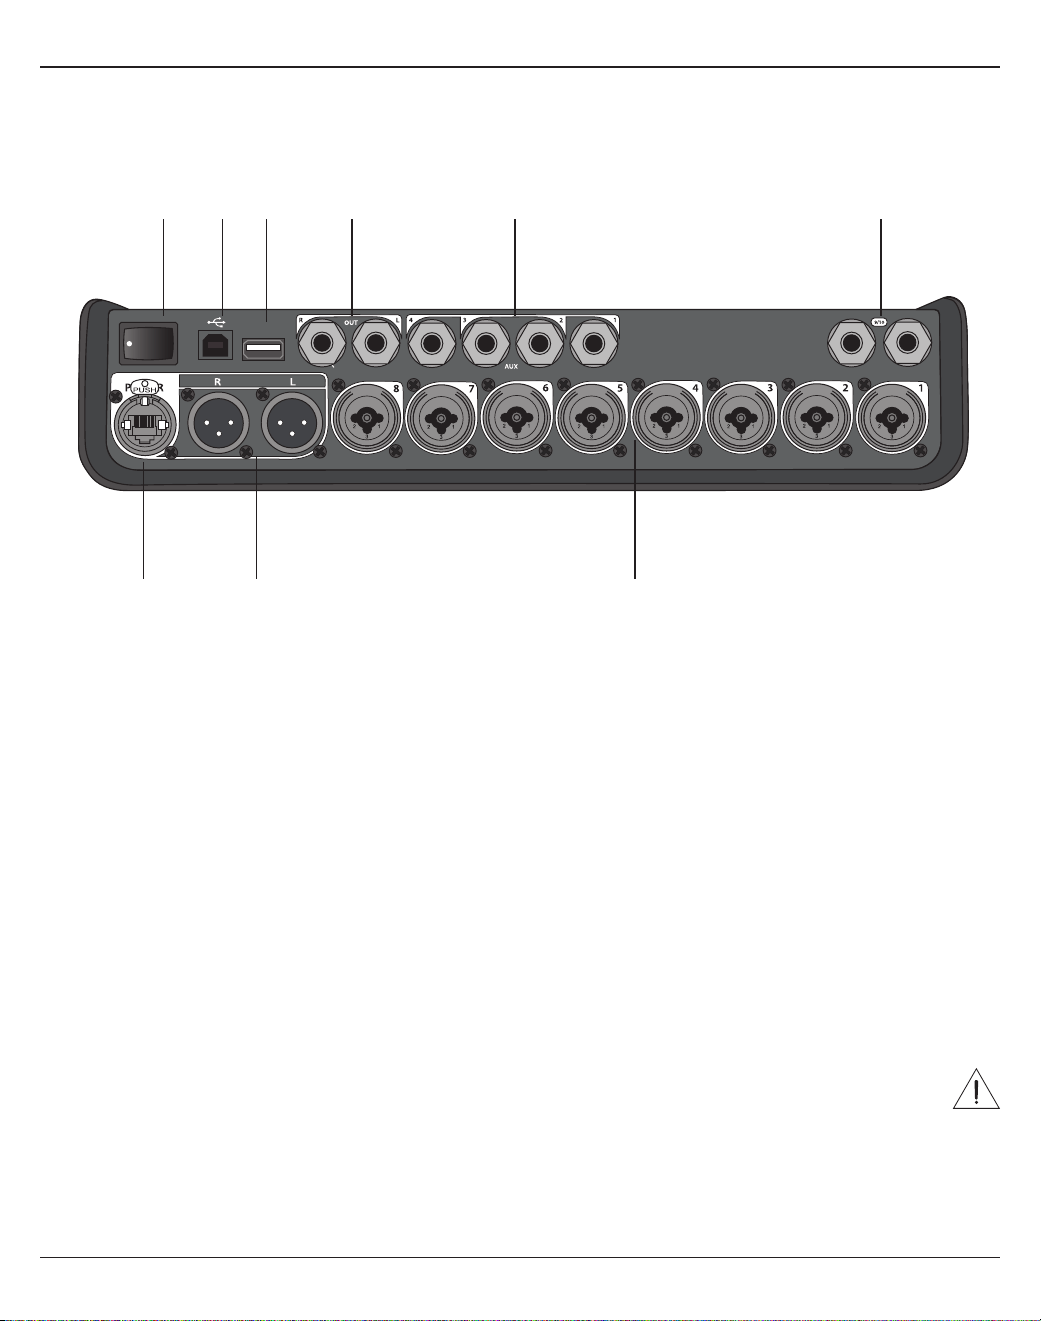
9 - ةيبرعلا
مكحتلاو ليصوتلا تاحول
T8S ليصوت ةحول .4 لكشلا
ليصوتلا ةحول
.هليغشت فاقيإ وأ جزاملا ليغشت – ةقاطلا حاتفم q
.رتويبمكلاب جزاملا ليصوت USB ةهجاو كل حيتت – B عونلا نم USB 2.0 w
.لومحملا صارقا كرحم نم توصلا ثب USB ةهجاو كل حيتت – A عونلا نم USB 2.0 e
.TS عم ةنزاوتم ريغو TRS عم ةنزاوتم ةصوب 1/4 ساقم تبك لبقي .يسيئر يرظانت جرخ – يرظانتلا L/R جرخ r
توصلا طباض جرخل وأ تارثؤملاو قحلا نزاوملاو يلوا توصلا طباضل امهتئيهت نكمي .مدختسملا ةطساوب اهديدحت نكمي ةيرظانت جراخم ةعبرأ – دعاسم جرخ t
.TS عم ةنزاوتم ريغ وأ TRS عم ةنزاوتم ةصوب 1/4 ساقم تبك لبقي .قحلا
همادختسا نكميو .طخلا ىوتسم ىلع تخدمل TS عم ةنزاوتم ريغ وأ TRS عم ةنزاوتم ةصوب 1/4 ساقم تبك لبقي .10/9 ةيرظانت لخد تاونق – دعاسم لخد y
.ويرتسا لخد تاراش
TS عم ةنزاوتم ريغ وأ TRS عم ةنزاوتم ةصوب 1/4 ساقم تبك وأ تانوفوركيملل ةنزاوتملا XLR تبك لبقت .8-1 ةيرظانت لخد تاونق – 8-1 تاخدا u
.راتيجلا لثم ةمواقملا ةيلاع تخدملل
.ويرتسا جرخل XLR عم ةنزاوتم تبك لبقي .يرظانت ويرتسا جرخ – XLR ويرتسا جرخ i
.)14 ةحفصلا يف "ToneMatch
®
ـل ةيئابرهكلا ةيذغتلا ردصم ليصوت" عجار( ToneMatch ـل ةيئابرهكلا ةيذغتلا ردصم عم مادختسل – يمقر ةقاط ذفنم o
. 1S/II زارطلا L1
®
ماظنب ا
ً
يمقر لاصتل ممصم ريغ T8S
:ةظحم
.فتاه ةكبش وأ رتويبمكب T8S ليصوت بنجت بجي هنإف ،ا
ً
يسايق RJ-45 لصوم لبقي ToneMatch ذفنم نأ نم مغرلاب
:هيبنت
M
( )
MAIN OUT
USB AUDIO
MONO
q w e r t y
uio
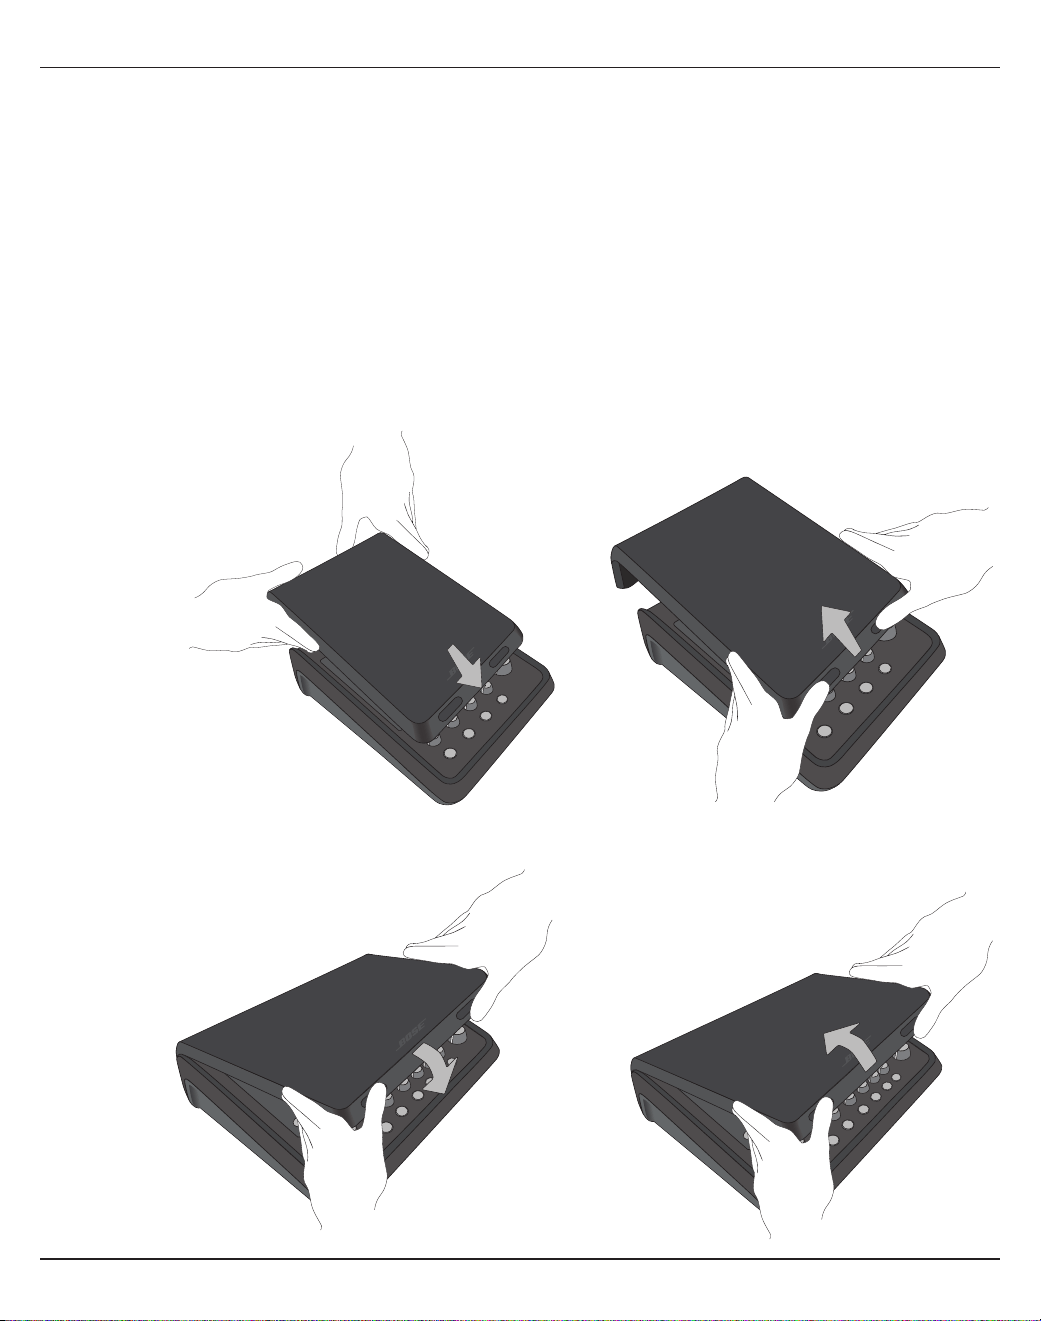
ةيبرعلا - 10
ماظنلا دادعإ
ءاطغلا تيبثت/ةلازإ
.هنيزخت وأ جزاملا لقن ءانثأ مكحتلا ةحول ةيامحل ءاطغلا مم
ُ
ص دقو .ةيولعلا ةحوللا ىلع ت
َ
بثم ءاطغب ا
ً
دوزم ةبلعلا يف T4S/T8S ToneMatch
®
جزام يتأي
:ءاطغلا ةلاز
1 ..مامل ءاطغلا ك
رح مث ءاطغلا ةمدقم يف نيرزلا ىلع كيماهبإ عض
2 ..هتلاز هعفرا مث فلخلا نم ءاطغلاب كسمأ
:ءاطغلا تيبثتل
1 ..ماما ىلإ فلخلا نم جزاملا قوف ءاطغلا عفدا
2 ..هسفن ءاقلت نم ت
ُ
بثيو ءاطغلا يف طنغمملا ءاطغلا قشعتي فوس
هتيبثتو ءاطغلا ةلازإ .5 لكشلا
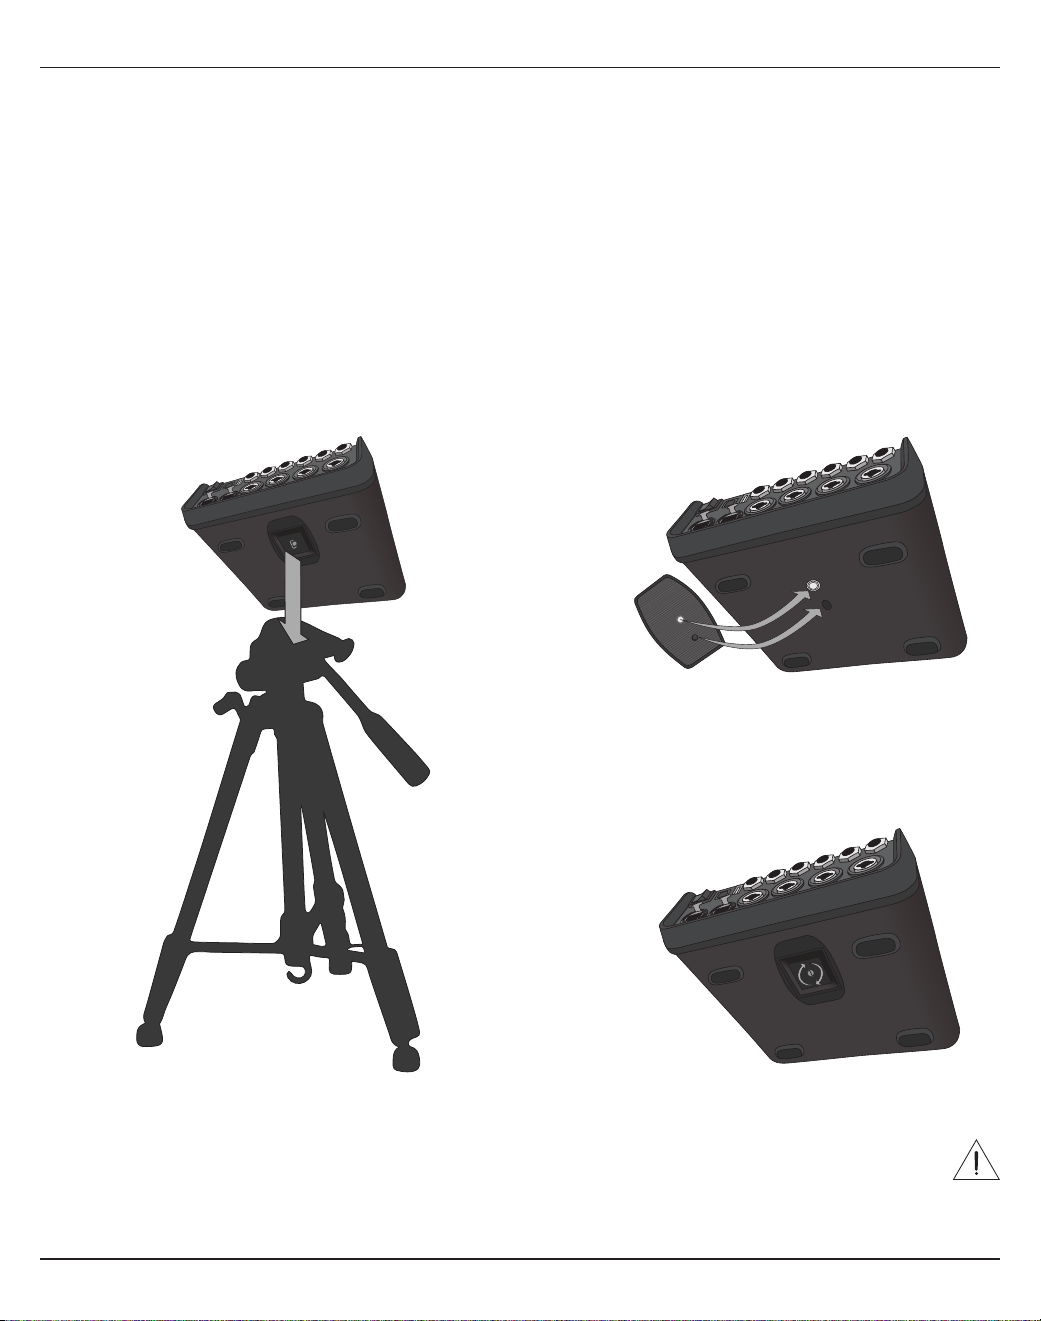
ماظنلا دادعإ
11 - ةيبرعلا
T4S ـب ةفيتكلا تيبثت .6 لكشلاةفيتك مادختساب مئاوقلا يثث لماح ىلع T4S تيبثت .8 لكشلا
T4S ـب ةتبثم ةفيتكلا .7 لكشلا
تيبثتلا تارايخ
،)مم 6( ةصوب 1/4 ساقم تيبثت يغرب نمضتت يتلا ةرفوتملا تاجتنملا نم ددع ىلع هتيبثت حيتي امب .)مم 6( ةصوب 1/4 ساقم تيبثت يغربل ةحتفب ا
ً
دوزم T4S/T8S يتأي
.مئاوقلا يثث اريماك لماح كلذ يف امب
مئاوقلا يثث اريماك لماح ىلع T4S/T8S تيبثت
1 ..بولطملا عافترا ىلع اهت
ِ
بثو مئاوقلا يثث اريماكلا لماح مئاوق ةلاطإب مق
2 . T4S/T8S يف دوجوملا ريغصلا زحلا ةاذاحم نم دكأتو .يغربلا مادختساب T4S/T8S نم يلفسلا ءزجلا يف اهت
ّ
بث مث مئاوقلا يثث اريماكلا لماح ىلعأ نم ةفيتكلا لزأ
.6 لكشلا عجار .ةفيتكلا نم زرابلا ءوتنلا عم
3 ..8 لكشلا عجار .مئاوقلا يثث اريماكلا لماح ىلع T4S/T8S رهظ نوكي ثيحب ةفيتكلا ت
بث
هساقم يغرب مادختساب هتيبثت متيل طقف ممصم جزاملا .رقتسم ريغ مئاوقلا يثث لماح/يداع لماح عم ToneMatch
®
T4S/T8S جزام مدختست :ريذحت
يلكلا همجحو )لاطرأ 4.1( مجك 1.9 نع هنزو لقي زاهج معد ىلع ةردقلا مئاوقلا يثث لماحلا/يداعلا لماحلا ىدل نوكي نأ بجيو ،)مم 6( ةصوب 1/4
جزام مجح ل
ّ
محتل ممصم ريغ مئاوقلا يثث لماح/يداع لماح مادختسا ي
ّ
دؤي دقو .)تاصوب 3.25 × 12.25 × 8.4( مم 83 × 311 × 214
.تاباصإ عوقو يف ببستت دق مث نمو ،رطخو تابث مدع ةلاح ىلإ هنزوو T4S/T8S
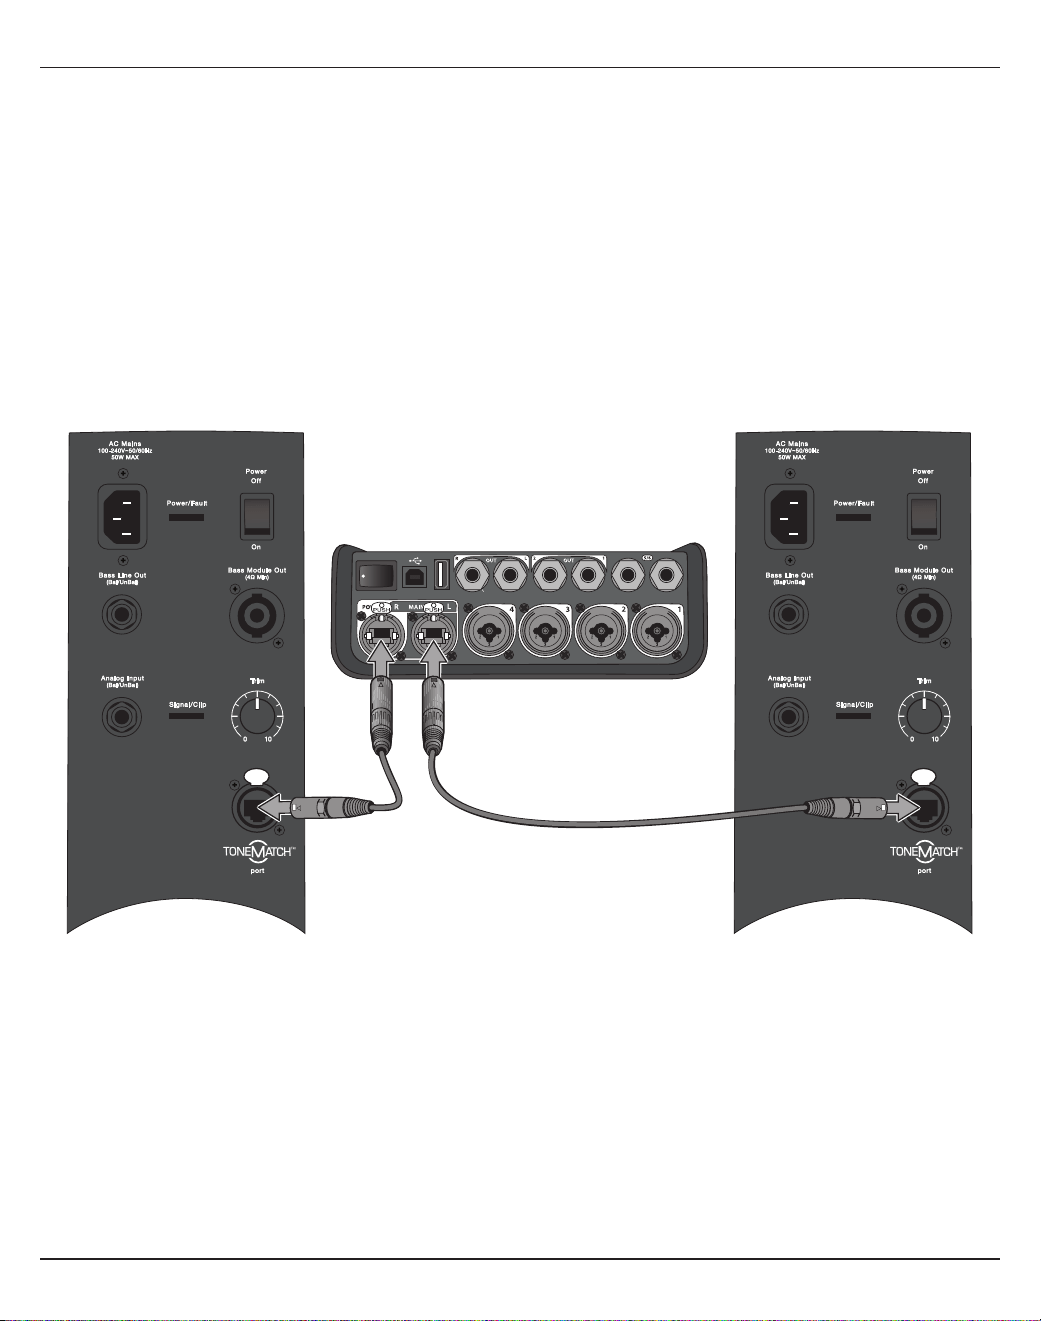
ةيبرعلا - 12
ماظنلا دادعإ
ا
ً
يمقر T4S ليصوت
1 ..ىندا دحلا ىلع T4S ـل يسيئرلا جرخلا توص ىوتسم يف مكحتلا رز طبض نمو T4Sو 1S/II زارطلا L1 ماظن ليغشت فاقيإ نم دكأت
2 . ذفنم يف ToneMatch لبكل رخا فرطلا ليصوتب مق مث .T4S يف R يسيئرلا يمقرلا جرخلا/ةقاطلا ذفنم يف ToneMatch
®
لبك يفرط دحأ ليصوتب مق
.ةقاطلا ةدحوب دوجوملا ToneMatch
لبك مادختساب T4S يف دوجوملا L يسيئرلا يمقرلا جرخلا ذفنمب ىرخأ ةقاط ةدحو ليصوتب مق ، 1S/II زارطلا L1 ماظن ةقاط يتدحوب T4S ليصوتل :ةظحم
.ToneMatch
3 .. 1S/II زارطلا L1 ةقاط ةدحو مث جزاملا ليغشتب مق
4 ..17 ةحفصلا يف "جرخلا توص ىوتسمو لخدلا بسك نيسحت" عجار .توصلا تايوتسم طبضاو تا ليصوتب مق
T4S ـب II زارطلا L1 يماظنل يمقرلا ليصوتلا .9 لكشلا
USB AUDIO
M
( )
MONO
. 1S/II زارطلا L1 ةطساوب هليغشت و ا
ً
يمقر T8S ليصوت نكمي :ةظحم

ماظنلا دادعإ
13 - ةيبرعلا
ا
ً
يرظانت T4S/T8S ليصوت
1 ..ىندا دحلا ىلع T4S/T8S ـل يسيئرلا جرخلا توص ىوتسم يف مكحتلا رز طبض نمو T4S/T8Sو هب لصتت يذلا زاهجلا ليغشت فاقيإ نم دكأت
2 ..)10 لكشلا عجار( T8S ـب ةصاخلا XLR ويرتسا تاجرخمب نيزاهج وأ زاهج ليصوتل XLR عم ةنزاوتم تبك مدختسا
لبكل رخا فرطلا ليصوتب مقو .)لصفنم لكشب عاب
ُ
ي( ةصوب 1/4 ساقم TRS لبك مادختساب يرظانتلا R جرخ ذفنم ربع زاهجب T4S/T8S ليصوت نكمي :ةظحم
ساقم TRS لبك مادختساب T4S/T8S يف يرظانتلا L جرخ ذفنمب رخآ زاهج ليصوتب مق ،نيزاهجلاب T4S/T8S ليصوتلو .زاهجلل يرظانتلا لخدلا ذفنم يف TRS
.ةصوب 1/4
3 . ـل ةيئابرهكلا ةيذغتلا ردصم ليصوت" عجار .رشابم ددرتم رايت جرخم يف هلص مث T4S/T8S ةقاط ذفنمب ToneMatch
®
ـل ةيئابرهك ةيذغت ردصم ليصوتب مق
.14 ةحفصلا يف "ToneMatch
®
4 ..زاهجلا مث T4S/T8S جزام ليغشتب مق
5 ..17 ةحفصلا يف "جرخلا توص ىوتسمو لخدلا بسك نيسحت" عجار .توصلا تايوتسم طبضاو تا ليصوتب مق
T8S ـب ا
ً
يرظانت نصتم F1 اماظن .10 لكشلا
M
( )
MAIN OUT
USB AUDIO
MONO
(
M
US
B AUDI
O
( )
M
M
AIN
O
UT
()
M
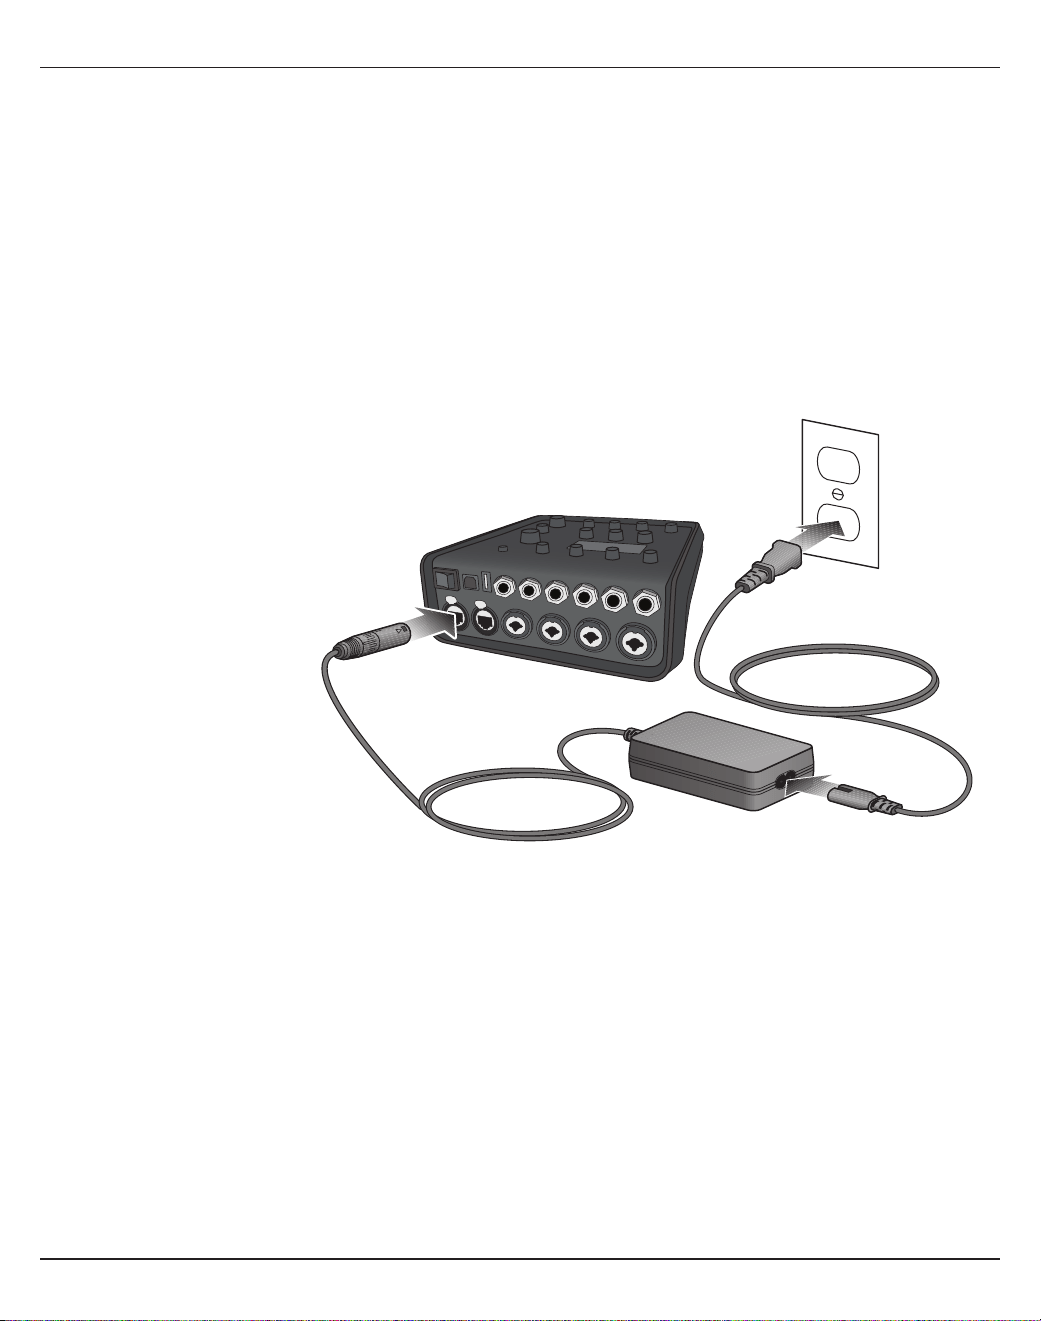
ةيبرعلا - 14
ماظنلا دادعإ
ToneMatch
®
ـل ةيئابرهكلا ةيذغتلا ردصم ليصوت
.ToneMatch ـل ةيئابرهكلا ةيذغتلا ردصم نم ةقاطلاب T4S/T8S جزام دوزتي
1 ..T4S/T8S ةقاط ذفنمب ةيئابرهكلا ةيذغتلا ردصم لبك ليصوتب مق
2 ..ةيئابرهكلا ةيذغتلا ردصمب يئابرهكلا ددرتملا رايتلا كلس يفرط دحأ ليصوتب مق
3 ..رشابملا ددرتملا رايتلا ةقاط جرخمب يئابرهكلا كلسلل رخا فرطلا ليصوتب مق
4 ..)ليغشت( ON عضولا ىلع T4S/T8S ةقاط حاتفم طبضا
.T4S ليغشتل بولطم ريغ وهف مث نمو T4S عم ةيئابرهكلا ةيذغتلا ردصم قافرإ متي ملو .T8S ليغشتل بولطم T8S عم قفرملا ةيئابرهكلا ةيذغتلا ردصم :ةظحم
ةيئابرهكلا ةيذغتلا ردصمب T4S ليصوت .11 لكشلا
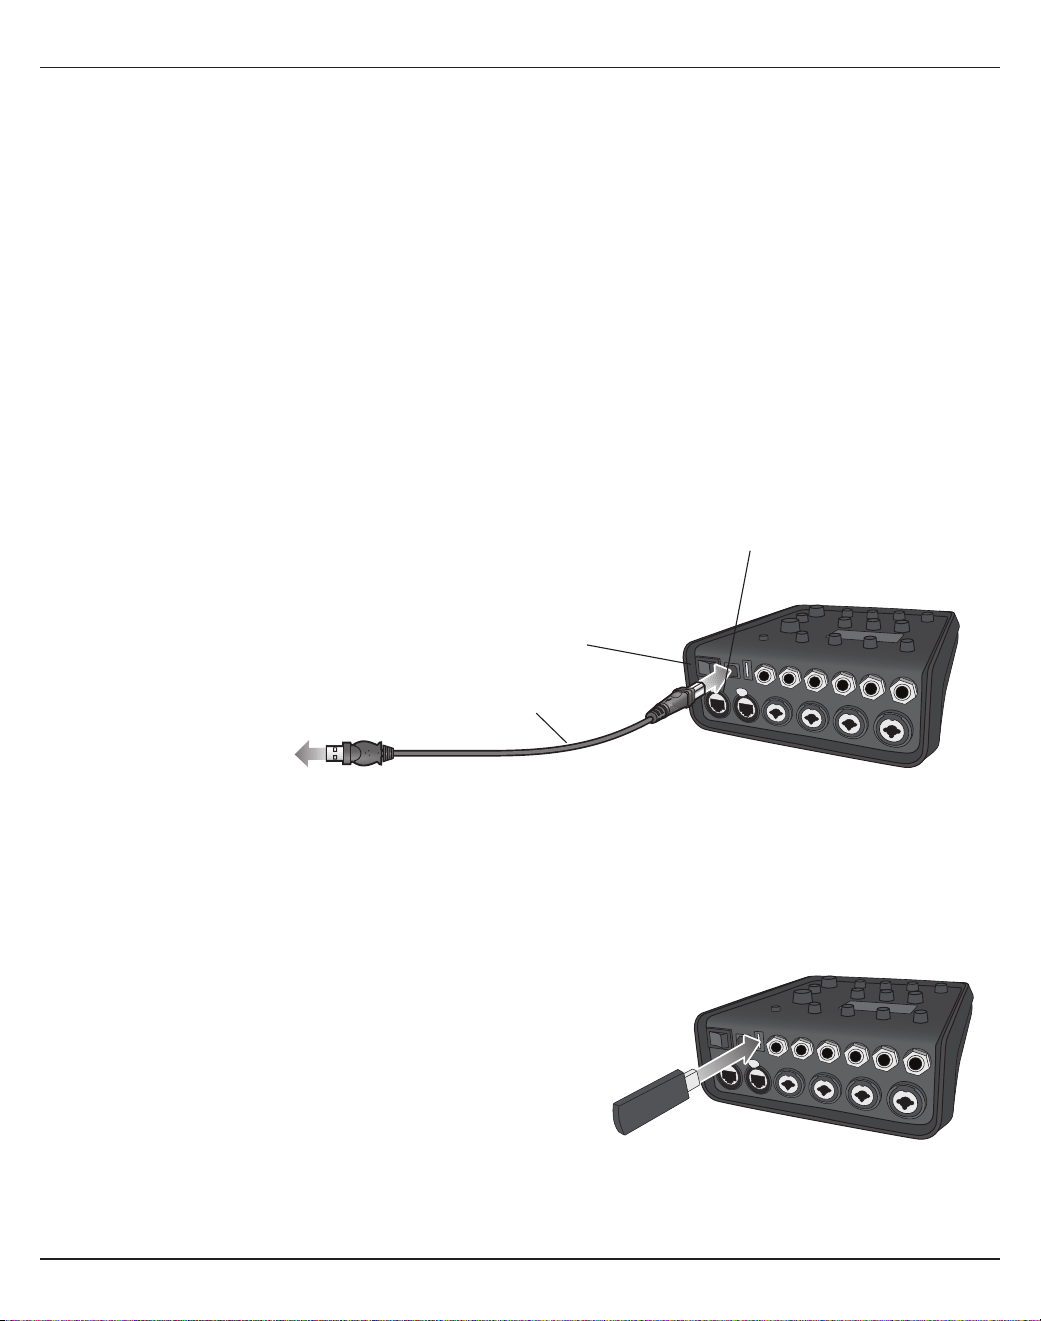
ماظنلا دادعإ
15 - ةيبرعلا
رتويبمكلاب T4S/T8S ليصوت
ةرايز ىجري .ماظنلا تاثيدحت تيبثت وأ رتويبمكلا ىلإ ءادا دهاشم ليزنت كل حيتي امم ،رتويبمكب هليصوتل USB ذفنم T4S/T8S رفوي
.كماظن ثيدحتب ةقلعتملا ليصافتلا ىلع عطل www.Bose.com/livesound
.ليغشتلا/ليجستلل ةماعلا ضارغل USB ـب دوزم توص زاهجك T4S/T8S مادختسا ا
ً
ضيأ كنكمي ،رتويبمكب لاصتا دنع
ةعرسب ليغشتلا بسانتل جماربلا تادادعإ ةئيهت كمزلي ،ليجست جمارب عم T4S/T8S مادختسا دنعف .تب 24/زترهوليك 48 ةعرسب T4S/T8S لمعي :ةظحم
.تب 24/زترهوليك 48
.)ةقفرم ريغ B ىلإ A نم عاونا( USB لبك دوجو مزلي ،رتويبمكلاب T4S/T8S ليصوتل :ةظحم
1 ..)طقف T4S ـل 1S/II زارطلا L1 وأ T4S/T8S ـب صاخ ToneMatch
®
ـل ةيئابرهك ةيذغت ردصم( ةيئابرهك ةيذغت ردصمب جزاملا ليصوتب مق
2 ..)12 لكشلا( جزاملاب صاخلا B عونلا نم USB 2.0 ذفنم يف USB لبك يفرط دحأ ليصوتب مق
3 ..رتويبمكلاب USB ذفنم يف USB لبكل رخا فرطلا ليصوتب مق
4 ..جزاملا ليغشتب مق
USB ـب T4S ليصوت .12 لكشلا
ردصم وأ 1S/II زارطلا L1 ماظن ىلإ – ToneMatch ذفنم
ToneMatch ـل ةيئابرهك ةيذغت
ةقاطلا حاتفم
USB لبك
)B عونلا ىلإ A عونلا(
رتويبمكب USB ذفنم ىلإ
T4S/T8S ـب لومحم صارقأ كرحم ليصوت
.جزاملا ىلع توصلا تاراسم ليغشتل A عونلا نم USB 2.0 ذفنمب WAV/MP3 تافلم هب لومحم 3.0/USB 2.0 صارقأ كرحم ليصوتب مق
T4S ـب لومحم صارقأ كرحم ليصوت .13 لكشلا
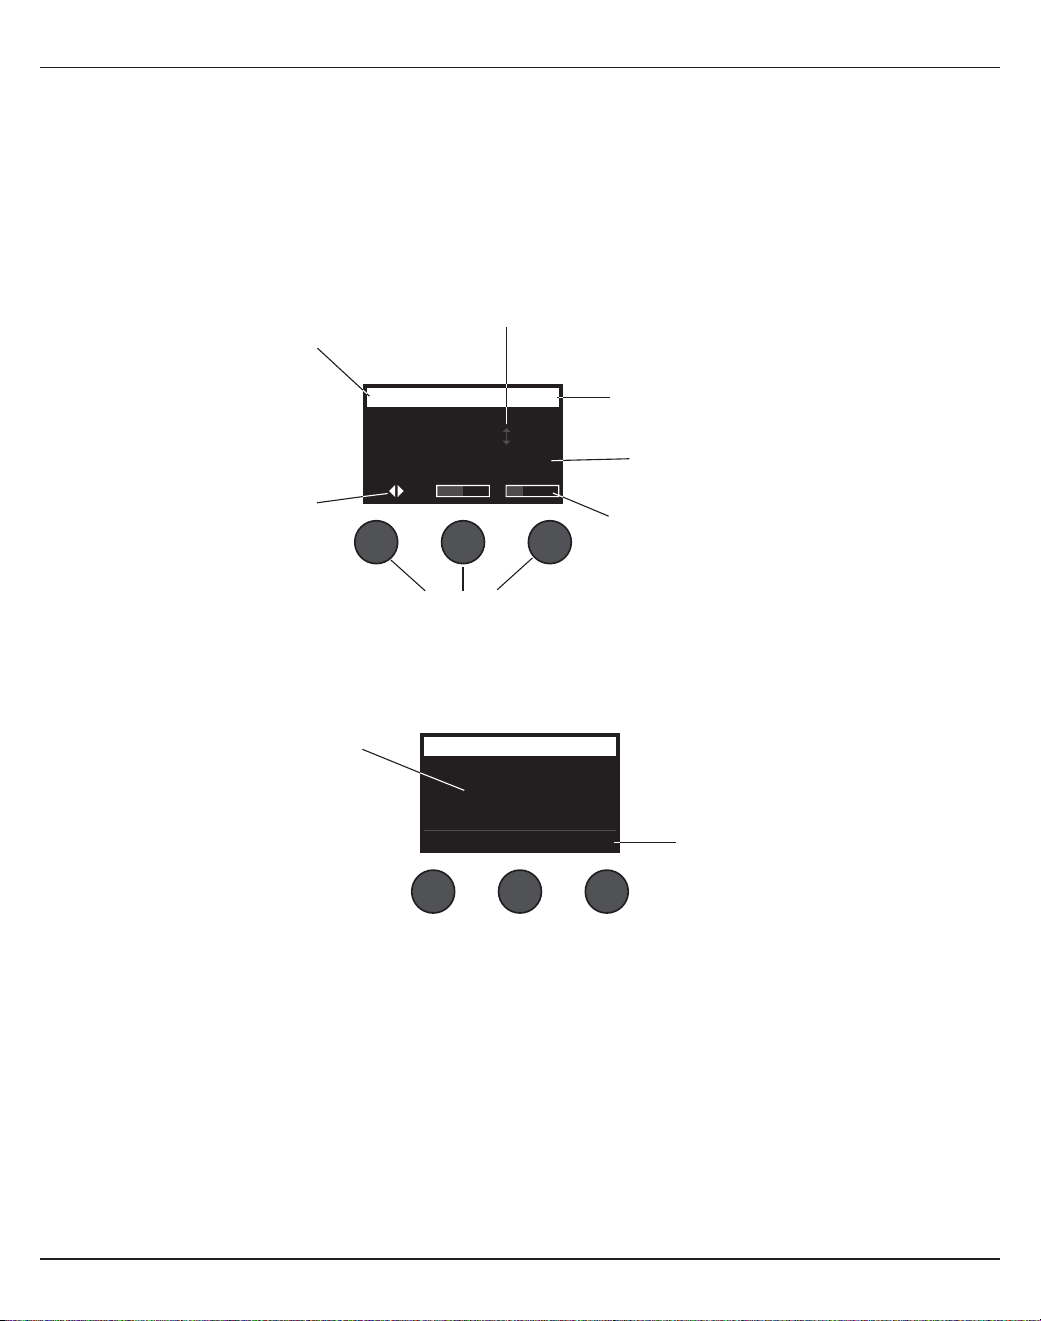
ةيبرعلا - 16
ليغشتلا
T4S/T8S ةشاش ةءارق
.راودلا د
دحملا عضو ىلع ةشاشلا ىوتحم دمتعيو .ةيساسا ليغشتلا تايقافتاو ةشاشلا تامولعمل ا
ً
جذومن 14 لكشلا ضرعيو .جزاملا ليغشتل ةهجاو ةشاشلا كل رفوت
ةيجذومنلا ةشاشلاو ليغشتلا تايقافتا .14 لكشلا
Ch 1
Type Tim
eM
ix
Digital 250ms 30%
Delay
Fdbk.
ةددحملا ةانقلا ىلإ ريشي
تاملعملا نيب ل
دبي مكحتلا رز ىلع طغضلا نأ ىلإ ريشي
ةملعملا ةميقل ا
ً
يرصب ا
ً
ضرع رهظ
ُ
ي
راودلا د
دحملا اهيلإ لصو يتلا ةفيظولا ددحي
اهميق/اهتادادعإو تاملعملا ءامسأ
ةراودلا/ةيطاغضنا مكحتلا رارزأ
مكحتلا رز ريودت نأ ىلإ زمرلا اذه ريشي
.دادعا ر
ّ
يغي
All Channels
*Bose Scene 01
Load Shared Save
Scenes
ليدعت مت دق هنأ ىلإ ةمجنلا ريشت
هليمحت مت يذلا دهشملا
مكحتلا رز ىلع طغضلا نأ ىلإ ريشي
ةفيظولا ط
شني
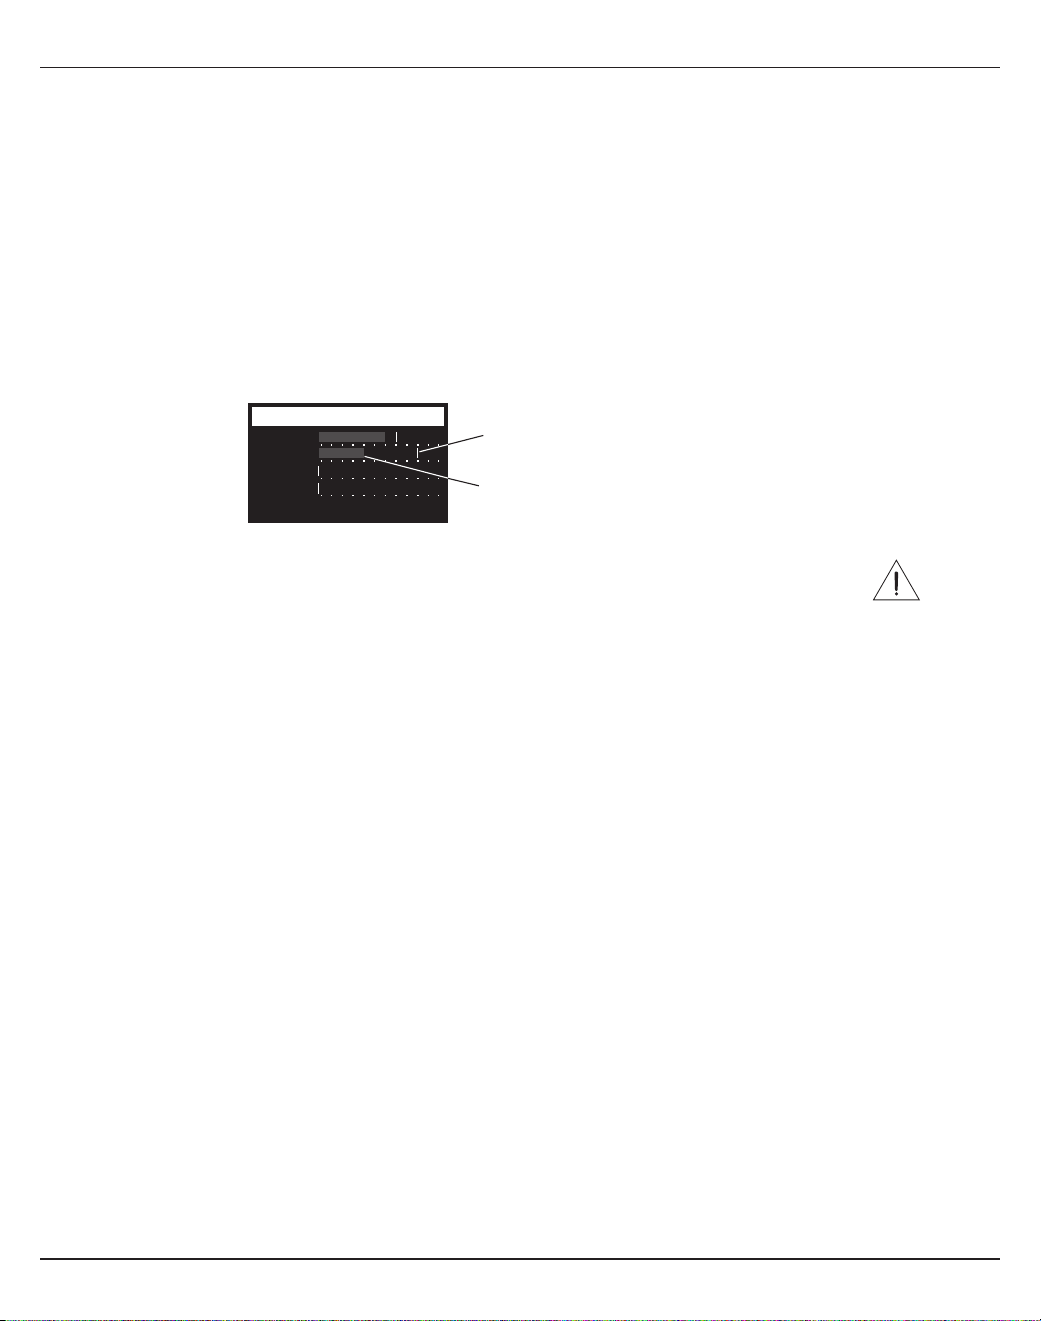
ليغشتلا
17 - ةيبرعلا
جرخلا توص ىوتسمو لخدلا بسك نيسحت
ةانق لكل يلي ام ءارجإب مق .ةانقلا توص ىوتسمو يسيئرلا جرخلا توص ىوتسمو لخدلا ةانق بسك نم لك طبض ىلع كماظن نم ةدوج يذ توص ىوتسم ىلع لوصحلا دمتعي
.ةمدختس
ُ
م
1 ..طبضلاو يسيئرلا جرخلاو ةانقلا توص ىوتسم يف مكحتلا رارزأ نأ نم دكأت
2 ..لخدلا ةانقل طبضلا ليدعتب مق
.أ.نكمأ نإ بولطملا ىوتسملا ىلع ردصملا/ةلا توص طبضا
.ب.ءادا ىوتسمب ردصملا/ةلا ليغشتب مق
.ج ءاضأ وأ رمحا نوللاب ا
ً
ضيمو رشؤملا ردصأ اذإو .رضخا نوللاب ةراشا/صاصتقا رشؤم ءيضي نأ ىلإ ةعاسلا براقع هاجتا يف ءطبب طبضلا مكحتلا رز ردأ
.ىوتسملا ضفخل ةعاسلا براقع نارود هاجتا سكع طبضلا مكحتلا رز ردأف ،تباث رمحأ نولب
.دلخدلا تايوتسم نم ققحتلل تيضفتلا ةمئاق يف )28 ةحفصلا( لخدلا تايوتسم سيياقم مدختسا
رز طبض لبق ةيفيطلا ةقاطلا حاتفم ىلع طغضاف ،فثكم يذ نوفوركيم لثم ،)تلوف 48 نم ربكأ( ةيفيط ةقاط بلطتي ا
ً
زاهج مدختست تنك اذإ
:هيبنت
.طبضلا يف مكحتلا
.)28 ةحفصلا رظنا( لخدلل طبضلا ىوتسم ليدعت دنع ا
ً
ديفم تيضفتلا ةمئاق يف لخدلا ىوتسم سايقم نوكي دق
:ةظحم
.ةعاس 12 عضو ىلع يسيئرلا جرخلا توص ىوتسم يف مكحتلا رز طبضا .3
.بولطملا ىوتسملا ىلإ توصلا لصي ىتح ةعاسلا براقع هاجتا يف ةانقلا توص ىوتسم يف مكحتلا رز ءطبب ردأ .4
Input LevelPreferences
Ch 3
Ch 1
Ch 2
Ch 4
Menu Aux InReset
ةورذلا ىوتسم رشؤم
لخدلا ىوتسم رشؤم

ةيبرعلا - 18
ليغشتلا
يسيئرلا جرخلا توص ىوتسم يف مكحتلا مادختسا
،يعيبطلا ليغشتلا ءانثأ يفو .يرظانتلا يسيئرلا جرخلاو T4S/T8S ToneMatch
®
جرخل يلكلا ىوتسملا طبض ىلع يسيئرلا جرخلا توص ىوتسم يف مكحتلا رز لمعي
وأ يسيئرلا جرخلا توص ىوتسم عفر كنكمي ،تاونقلا عيمج توص تايوتسم طبض درجمبو .ةعاس 12 عضو ىلع ا
ً
طوبضم يسيئرلا جرخلا يف مكحتلا رز لظي نأب ىصوي
.عضولا اذه نع هضفخ
ةانق توص متك
.ةلصلا تاذ ةانقلا توص متك ىلع توصلا متك رارزأ لمعت
• CH" رهظيسو .اهتوص مت
ُ
ك دق ةانقلا نأ ىلإ ريشيل ضيبا نوللاب توصلا متك رز ءيضيو .ةدحاو ةرم توصلا متك رز ىلع طغضا ،تاونقلا ىدحإ توص متكل
.ةلصلا تاذ ةانقلا ةشاش ىلع )ةانقلا توص متك( "MUTE
•.موتكم ريغ ةانقلا توص نأ ىلإ ريشيل ا
ً
تفاخ توصلا متك رز حبصيو .ةانقلا توص متك ءاغل ىرخأ ةرم توصلا متك رز ىلع طغضا
ةانق تاريثأت توص متك
تادادعإ زواجت هيلع بترتي تارثؤملا توص متكو .ةلصلا تاذ ةانقلا يف ىدصلاو ريخأتلاو ليدعتلا تارثؤم توص متك ىلع إ FX توص متك رارزأ لمعت
.ةباوبلا/طغاضلاو Para EQو zEQ تادادعإو ةقبسملا ToneMatch
• مت
ُ
ك دق ةانقلا تارثؤم نأ ىلإ ريشيل ضيبا نوللاب FX توص متك رز ءيضيو .ةدحاو ةرم FX توص متك رز ىلع طغضا ،تاونقلا ىدحإ يف تارثؤملا توص متكل
.ةلصلا تاذ ةانقلا ةشاش ىلع )FX توص متك( "FX MUTE" رهظيسو .اهتوص
•.موتكم ريغ ةانقلا تارثؤم توص نأ ىلإ ريشيل ا
ً
تفاخ FX توص متك رز حبصيو .ةانقلا تارثؤم توص متك ءاغل ىرخأ ةرم FX توص متك رز ىلع طغضا
Ch 1
Category
Utility
ToneMatch
CH MUTE
Flat
Preset
Ch 1
Category
Utility
ToneMatch
FX MUTE
Flat
Preset
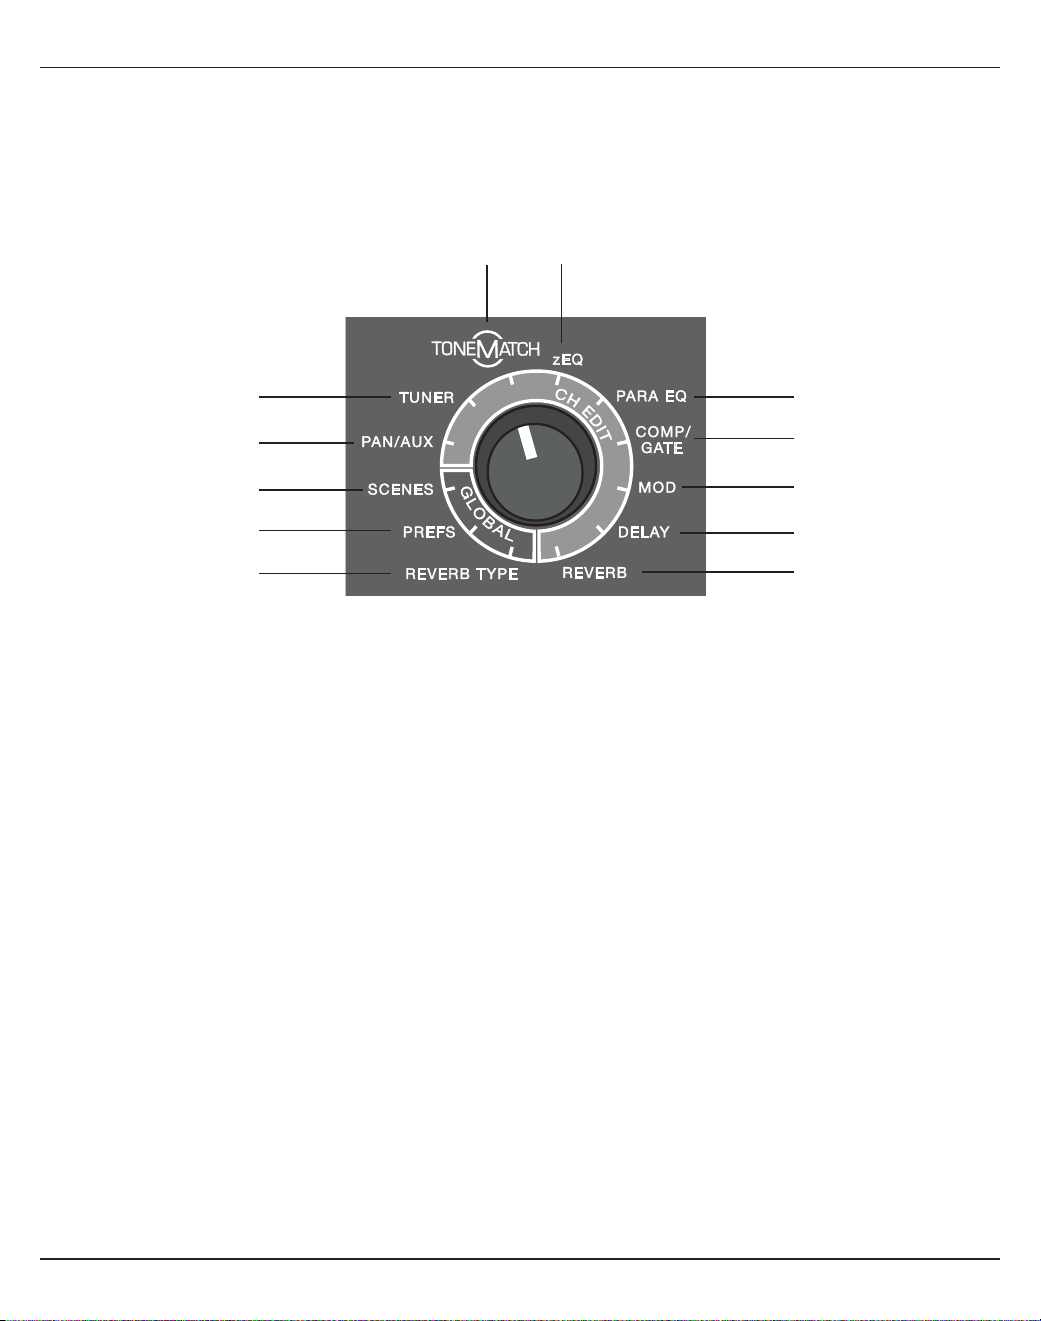
ليغشتلا
19 - ةيبرعلا
راودلا د
دحملا مادختسا
ةيلاتلا تاحفصلا فصتو .ةماع ىرخأ ثثو ةانقلاب ةصاخ فئاظو عستب ا
ً
صخلم 15 لكشلا ضرعيو .ToneMatch
®
جزام جرخ ىلإ لوصولل ةيناكمإ راودلا د
دحملا رفوي
.ةفيظو لك طبض ةيفيك
راودلا د
دحملا .15 لكشلا
ةانقلا فئاظو
.ةيطيحملا جراخملاو ةدعاسملا لخادملاو ةدعاسملا جراخملا ىلإ
ً
وصو رفوت – دعاسملا/يطيحملا جرخلا q
.ةددحملا ةانقلا يف اهليغشت
ٍ
راج ةلآ ةفلاوم تامولعم ضرعي – فلاوملا w
.ةددحم تانوفوركيمو ت ةممصملا ةيكلملا ةلجسم ةقبسملا ToneMatch تادادعإ ىلإ لوصولل ةيناكمإ رفوي – ToneMatch e
.نوفوركيملا وأ ةلا قاطن يف ةعفترملا/ةطسوتملا/ةضفخنملا تاددرتلا طبضل مكحت رارزأ zEQ رفوي ،ToneMatch ـل ددحملا قبسملا دادعا نم ءزجك – zEQ r
.ةانق لكل ةيرتمارابلا ةنزاوملا يف مكحت رارزأ رفوت – ةيرتماراب ةنزاوم t
.طبضلل ةلباق تاملعم لخ نم ةباوبلاو طغاضلاو د
دحملاو ضفاخلاو ريبكلا لبطلل ةقبسملا تادادعا ىلإ لوصولل ةيناكمإ رفوت – طغاضلا/ةباوبلا y
.يتوصلا بذبذتلاو راوطا لحر
ُ
مو تقولا ل
ِ
حر
ُ
مو رارقلا لثم ليدعتلا تاريثأت ىلإ لوصولل ةيناكمإ رفوي – ليدعت u
.عاقيا ةعرسل ل
ِ
حر
ُ
مو تحر
ُ
ملا نم عاونأ ةثث ىلإ لوصولل ةيناكمإ رفوي – ريخأت i
.دعاسملا وأ يسيئرلا جرخلا ىلإ هلاسرإ نكمي ةددحم ةانقل ىدص رفوي – ىدص o
ةماعلا فئاظولا
.ةدعاسملا جراخملا وأ يسيئرلا جرخلا تاونق لكل ىدصلا نم ا
ً
ددحم ا
ً
عون رفوي – ىدصلا عون a
.ةد
ِ
عاسملا ماظنلا تاودأ نم ديدعلا ىلإ لوصولا حيتت – تيضفتلا s
.)لماكلاب ةدحولا ةلاحل ةطقل( اهليمحتو ءادا دهاشم ظفح كل حيتت – دهاشملا d
e
o
y
d
r
a
u
q
t
s
i
w
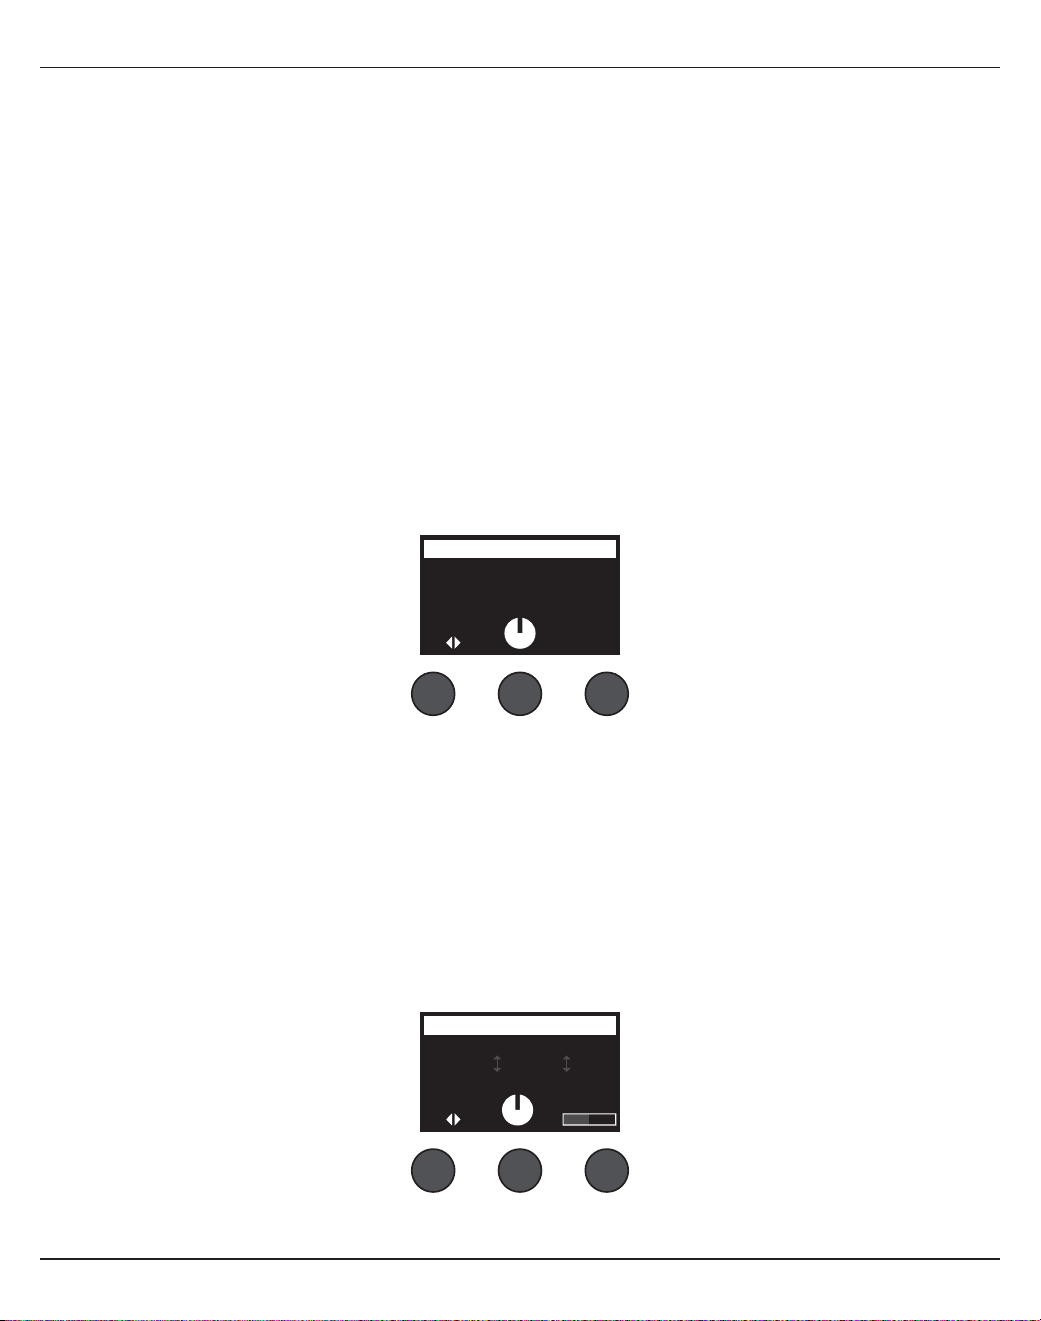
ةيبرعلا - 20
ليغشتلا
ةانق توص ليدعت
ToneMatch
®
و فلاوملاو دعاسملا/يطيحملا جرخلا يف ةانقلا ليدعت فئاظو لثمتتو .ةددحملا تاونقلا ىلع رثؤت يتلا تادادعا ىلإ لوصولا ةانقلا ليدعت فئاظو كل حيتت
.ىدصلاو ريخأتلاو ليدعتلاو ةيرتمارابلا ةنزاوملاو zEQو
:ةانق ليدعتل
1 . ةيولعلا ةيوازلا يف ةددحملا ةانقلا ضرع نكميو .)طقف T8S ـل( 8 وأ 7 وأ 6 وأ 5 وأ )T8Sو T4S ـل( 4 وأ 3 وأ 2 وأ 1 ةانقلا ليدعت ةانقلا ليدعت رز ىلع طغضا
.ةشاشلا نم ىرسيلا
2 ..راودلا د
دحملا مادختساب ةانقلا ليدعت فئاظو ىدحإ ددح
3 ..ةيلاتلا تاداشرا عابتاب ةفيظولا هذه تادادعإ طبضا
.طقف ةددحملا ةانقلا ليدعت حيتي ةانقلا ليدعت رز ىلع طغضلاف ؛طقف ةدحاو ةانق ليدعت ةدحاولا ةرملا يف كنكمي :ةظحم
دعاسملا/يطيحملا جرخلا فئاظو مادختسا
.دعاسملا جرخملا وأ مكحتلاب صاخلا دعاسملا لخدلا وأ R وأ L يسيئرلا جرخلا ىلإ توصلا هيجوتل دعاسملا/يطيحملا جرخلا ةفيظو مدختسا
يطيحم مادختسا
.ويرتسا جزام يف اهل لصفنم ناكم ىلإ ةانق لك لاسر "يطيحم" مكحتلا رز مدختسا
1 ..ةمئاقلا نم "يطيحم" ددح مث هردأ وأ رسيا ل
دعملا يف مكحتلا رز ىلع طغضا
2 ..R ىلإ L نم يطخلا جرخلا طبضل يطيحم مكحتلا رز ردأ
)10/9( 6/5 دعاسملا لخدلا
.لومحم زاهج لثم يطخ ويرتسا ردصم لاخد )10/9( 6/5 دعاسملا لخدلا مدختسا
1 ..ةمئاقلا نم 6/5 دعاسملا لخدلا ددح مث هردأ وأ رسيا مكحتلا رز ىلع طغضا
2 ..6 ةانقلا وأ 5 ةانقلا ةراشإ ىوتسم طبضل 6 Lvl وأ 5 Lvl مكحتلا رز ردأ
3 ..R ىلإ L نم يطيحملا جرخلا طبضل يطيحم مكحتلا رز ردأو . 6 Pan ىلإ ليدبتلل 6 Lvl مكحتلا رز ىلع طغضاو ؛ 5 Pan ىلإ ليدبتلل 5 Lvl ىلع طغضا
Ch 1
Menu Pan
Pan
Pan
Ch 1
Menu 5 Pan 6 Lvl
Aux In 50%
Aux Input 5/6
6 Pan5 Lvl

ليغشتلا
21 - ةيبرعلا
ةدعاسملا جراخملا ىلإ لخدلا تاراشإ هيجوت
تاقيبطت ليجستلاو ةعونتملا تاراشا ةجلاعمل )طقف T8S( ةدعاسم جراخم ةعبرأ وأ )طقف T4S( نيدعاسم نيجرخم ىلإ تاراشا هيجوت دعاسملا جرخلا ةفيظو كل حيتت
:ةحاتملا ةدعاسملا جراخملا عيمجل تاراشا ىوتسم طبض نكميو .توصلا ةيوقت
.توصلا متك ءاغل ىرخأ ةرم هيلع طغضا مث ؛ىوتسملا مكحتلا رز ىلع طغضا ،دعاسملا جرخلا توص متكل :ةظحم
1 .."دعاسم جرخ" ددح مث هردأ وأ ةمئاقلا مكحتلا رز ىلع طغضا
2 ..ةددحملا ةانقلا ةراشإ ىوتسم طبضل ىوتسملا مكحتلا رز ردأ
3 ..ةبولطملا ذخأملا ةطقن زييمتو ذخأملا ةمئاق ربع لقنتلل ذخأم مكحتلا رز ردأ
.أ.يلوا مخضملا نم )ةجلاعم نود نم( لماكلاب تاريثأت يأ اهبحصي يتلا ةراشا هيجوت متي – يلوا مخضملا دعب :ةجلاعم نود نم
.ب.اهل ةجلاعم ءارجإ عم يلوا مخضملا نم ةراشا هيجوت متي – تيبثتو ةنزاوم عم :يلوأ
.ج.اهل ةجلاعم ءارجإ عم ةانقلا توص ىوتسم يف مكحتلا دعب ةراشا هيجوت متي – ففخملا دعب :قح ميخضت
4 ..قماغ طخب ا
ً
يلاح ةددحملا ذخأملا ةطقن مسا رهظي
ٍ
ذئدنعو .رييغت نود نم جورخلل ءاغلإ مكحتلا رز ىلع طغضا وأ ،ذخأملا ةطقن ديدحتل ديدحت مكحتلا رز ىلع طغضا
Ch 1
Menu Tap
Aux
1P
re
Level
50%
Aux 1 Output
فلاوملا مادختسا
ةمغنلا تناك اذإ ام ضرعيل ةشاشلا ىلع توص ةقبط رشؤم رهظي ،ةفلاوملا ءانثأ يفو .لفساب اهضرع متي يتلا ةمغنلا ىلإ ةشاشلا ريشتو .لخد ةانق لك يف لقتس
ُ
م فلاوم رفوتي
.ةشاشلا زكرم عم هسفن ةاذاحم ىلع رشؤملا لمعي ىتح ةلا توص ةقبط طبضا .ةلدتعم مأ ةعفترم
.اهيلع ةفلاوملا قيبطت بجاولا ةانقلل توصلا متك رزلا ىلع طغضا ،ةنكاس ةفلاوم ءارج :ةظحم
.ةيعجرملا توصلا ةقبط مادختساب ةفلاوملا ءارجإ دنع ا
ً
قيقد نك وأ .ةمغن يفصن رادقمب اهضفخ وأ ةيعجرملا توصلا ةقبط عفرل ةمغنلا رييغت ةزيم مدختسا
Ch 1
b#
A3
Tuner
توصلا ةقبط رشؤم
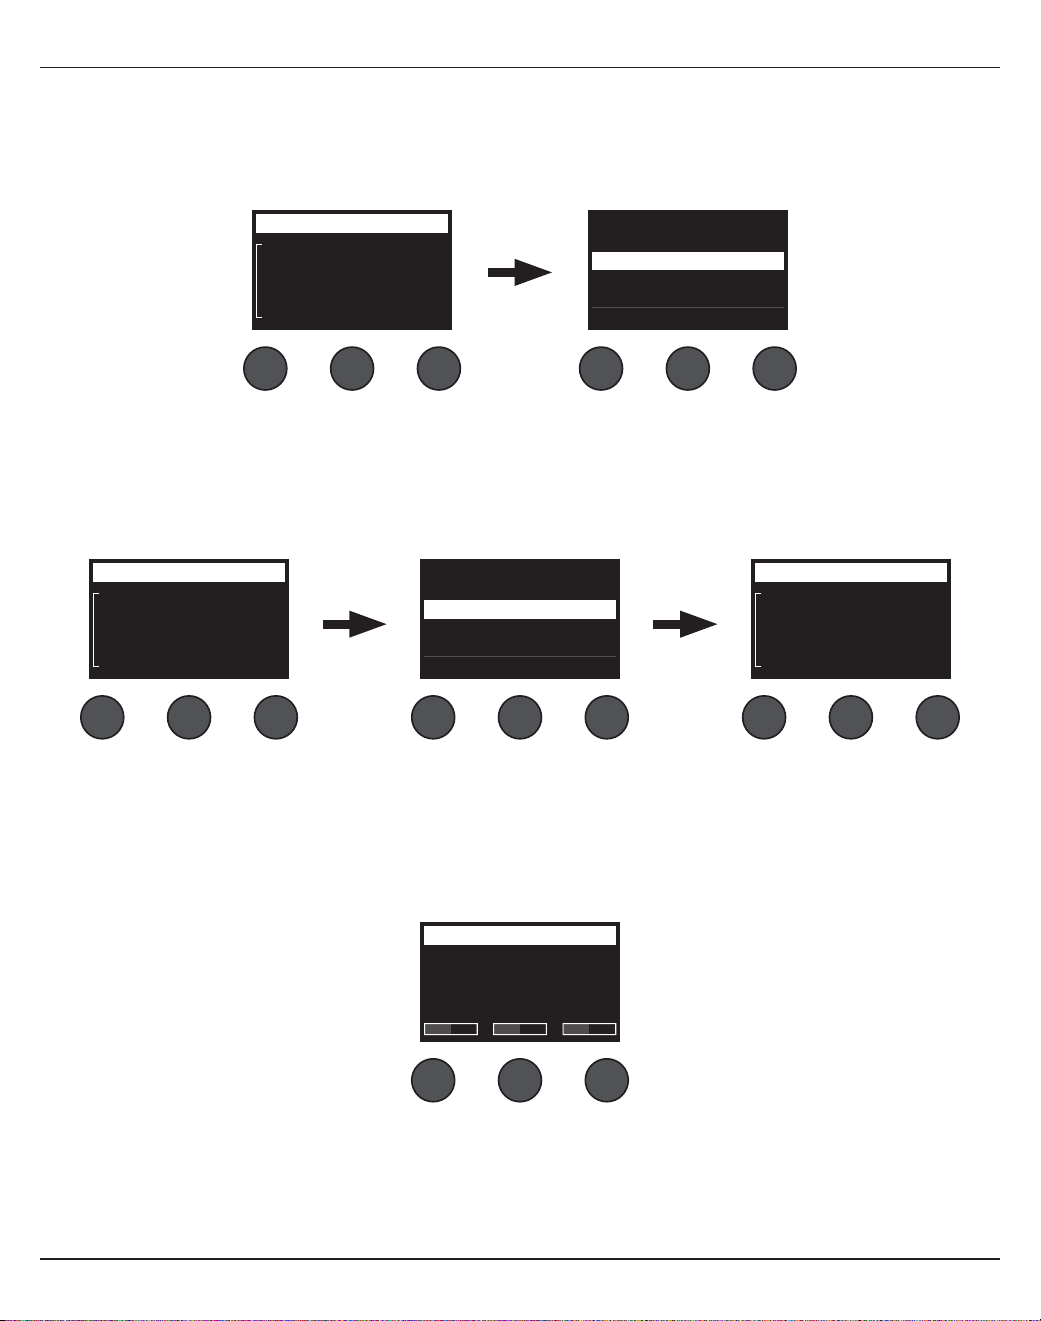
ةيبرعلا - 22
ليغشتلا
ToneMatch
®
ـل قبسملا طبضلا ديدحت
ىلع ظافحلا ىلإ يدؤي امم ماظنلا ةنزاوم نم اهتيكلم ةلجسملا ةينقتلا هذه ن
سحتو .نوفوركيملا وأ ةلل ToneMatch ـل قبسم طبض ديدحت ToneMatch ةفيظو كل حيتت
.ةانق لكل لقتس
ُ
م لكشب اهديدحت متيو تائف ىلإ ةفنص
ُ
م يهو .ددحملا نوفوركيملا وأ ةلل يعيبطلا توصلا
1 ..كرايتخا زييمتو تائفلا ةمئاق ىلإ لوصولل ةئفلا مكحتلا رز ردأ
2 ..رييغت نود نم ةمئاقلا نم جورخلل ءاغلإ مكحتلا رز ىلع طغضا وأ ،كرايتخا ديدحتل ديدحت مكحتلا رز ىلع طغضا
3 ..كرايتخا زييمتو ةقبسملا تادادعا ةمئاق ىلإ لوصولل قبسملا طبضلا مكحتلا رز ردأف ،ديدحت ىلع تطغض اذإ
4 ..رييغت نود نم ةمئاقلا نم جورخلل ءاغلإ مكحتلا رز ىلع طغضا وأ ،كرايتخا ديدحتل "ديدحت" مكحتلا رز ىلع طغضا
Ch 1
Category
Vocal Mics
ToneMatch
Handheld Mics
Preset
Handheld Mics
Headworn Mics
High Gain: Bright
High Gain: Normal
SelectCancel
Ch 1
Category
Utility
ToneMatch
Flat
Preset
Ch 1
Category
Vocal Mics
ToneMatch
Headworn Mics
Preset
Vocal Mics
Utility
Electric Guitars
Acoustic Guitars
Select Cancel
ريودت
طغض
طغض ريودت
Ch 1
Low Mid
Handheld Mics
High
0.0db 0.0db 0.0db
zEQ
zEQ طبض
.كيدل نوفوركيملا وأ ةلا قاطن يف ةعفترملا/ةطسوتملا/ةضفخنملا تاددرتلا طبضب حمست يهف ؛ToneMatch ـل قبسملا طبضلا ةينقت نم ا
ً
ءزج zEQ ةفيظو دع
ُ
ت
.لباقملا ددرتلا قاطن لفسأ دوجوملا مكحتلا رز ردأ ،zEQ طبضل
.هطيشنتل ىرخأ ةرم هيلع طغضا مث ؛لباقملا مكحتلا رز ىلع طغضا ،يدرف ددرت قاطن زواجتل :ةظحم
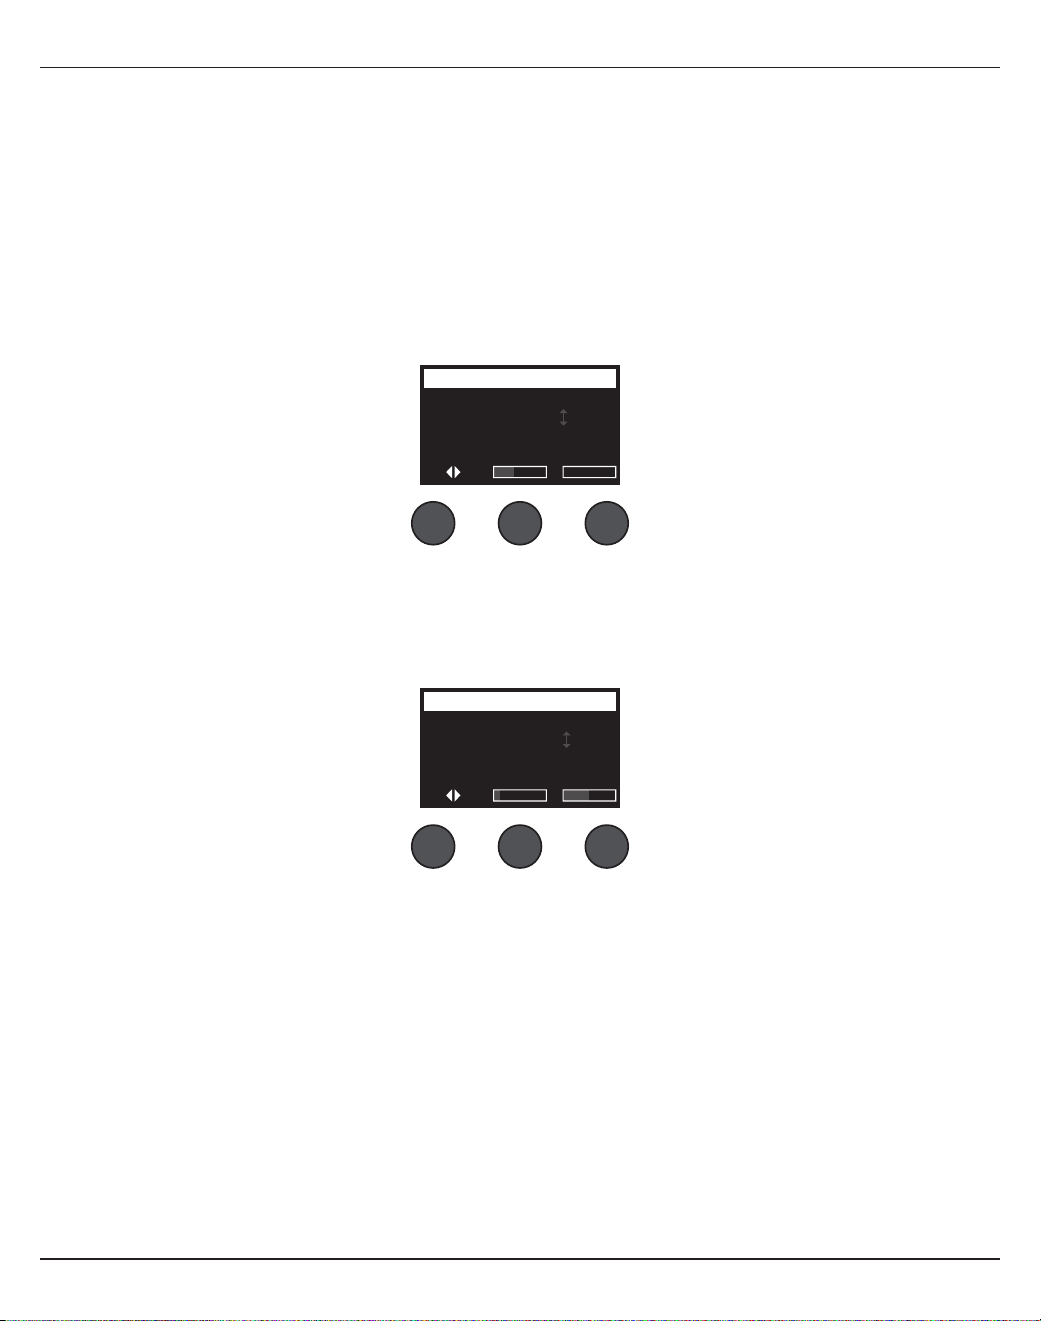
ليغشتلا
23 - ةيبرعلا
ةيرتمارابلا ةنزاوملا طبض
.زترهوليك 16 ىلإ زتره 50 نيب حوارتي قاطن يف مدختسملا هددحي ددرت يف ةزكرمتم ةيرتماراب تانزاوم ثث ةيرتمارابلا ةنزاوملا ةفيظو رفوت
.هطيشنتل ىرخأ ةرم هيلع طغضا مث ؛ديدحت مكحتلا رز ىلع طغضا ،ةيرتمارابلا ةنزاوملا تادادعإ زواجتل :ةظحم
1 ..3-1 ةيرتمارابلا ةنزاوملا قاطن ددح مث ديدحت مكحتلا رز ىلع طغضا
2 ..لبيسيد +15 ىلإ لبيسيد -15 نم ضفخلا/زيزعتلا ىوتسم طبضل ىوتسملا مكحتلا رز ردأ
3 ..زتره 16 ىلإ زتره 50 نم يزكرملا ددرتلا طبضل ددرتلا مكحتلا رز ردأ
4 ..فاتكوأ 5.00 ىلإ فاتكوأ 0.20 نم يزكرملا ددرتلا لوح سرجلا ىنحنم ضرع طبضل ضرعلا مكحتلا رز ردأو .ضرعلا ىلإ ليدبتلل ددرتلا مكحتلا رز ىلع طغضا
Ch 1
Select Level
B3
Freq
PEQ 1 -3.4dB 250.0Hz
Parametric EQ
Width
ةباوبلا/طغاضلا فئاظو مادختسا
.طبضلل ةلباق تاملعم لخ نم ةباوبلاو طغاضلاو د
دحملاو ضفاخلاو ريبكلا لبطلل ةقبسملا تادادعا ىلإ لوصولا ةيناكمإ ةباوبلا/طغاضلا ةفيظو رفوت
.هطيشنتل ىرخأ ةرم هيلع طغضا مث ؛عونلا مكحتلا رز ىلع طغضا ،ةباوبلا/طغاضلا تادادعإ زواجتل :ةظحم
.ةانق لكل طقف دحاو رثؤم :ةظحم
1 .:كرايتخا زييمتو ةباوبلا/طغاضلا تارثؤم ةمئاق ىلإ لوصولل عونلا مكحتلا رز ردأ
.أ مظعم عم ةماعلا ضارغل طغاضك ا
ً
ديج لمعي .بسكلل تاملعمو ةريغتم ةيدح ةميق عم ا
ً
قبسم ةنيعم ةضفخنم طغض ةبسنب زيمتي طغاض – فيفخ :1 طغاضلا
.ىوتسملا يف مكحتلل دح ىندأ بلطتت يتلا تانوفوركيملاو تا
.ب ونايبلاو راتيجلاو ريهجلا تاوصأ عم ا
ً
ديج لمعي .بسكلل تاملعمو ةريغتم ةيدح ةميق عم ا
ً
قبسم ةنيعم ةلدتعم طغض ةبسنب زيمتي طغاض – طسوتم :2 طغاضلا
.ىوتسملا يف ا
ً
قيقد ا
ً
مكحت بلطتت يتلا ةيعاقيا تاو
.ج قوبلا لثم( توصلا ةعفترم تا عم ا
ً
ديج لمعي .بسكلل تاملعمو ةريغتم ةيدح ةميق عم ا
ً
قبسم ةنيعم ةعفترم طغض ةبسنب زيمتي طغاض – ديدش :3 طغاضلا
.ىوتسملا يف ةوق رثكأ ا
ً
مكحت بلطتت يتلا ةيوقلا ةيعاقيا تاو )لبطلاو
.د عنمل ،لبطلا لثم ،ةياغلل توصلا ةعفترم تا عم ا
ً
ديج لمعي .بسكلل تاملعمو ةريغتم ةيدح ةميق عم )1:∞( ا
ً
قبسم ةنيعم ةبسنب زيمتي يوق د
دحم – د
دحملا
.ةانقلا ىلع دئازلا لم
ِ
حلا ةجيتن ةورذلا ىلإ لوصولا نم تاراشا
Ch 1
Type Thresh Speed
Gate -80.0dB 50%
Comp/Gate
Ramp

ةيبرعلا - 24
ليغشتلا
KickGate مادختسا
ةمئاق يف KickGate ـل نادادعإ رفوتيو .نوفوركيملا نم دادترا ثودح عنم عم ريبكلا لبطلا ةانق توص ىوتسم عفر كل حيتت Bose
®
ـل ةكولمم ةينقت نع ةرابع KickGate
.ةباوبلا/طغاضلا
1 ..بسانملا نوفوركيملا عون ليصوتب مق
2 ..ToneMatch
®
ـل ا
ً
بسانم ا
ً
قبسم ا
ً
دادعإ ددح
3 . رز طبض يف رمتسا مث ،رمحا نوللا ىلإ لخدلا ةانقب صاخلا LED رشؤم ليوحت يف ىوقا لبطلا تاوصأ ببستت ىتح ةانقلا لخدب صاخلا طبض مكحتلا رز طبضا
.ةانقلا لخد طبض ىوتسم نيسحت ىلإ اذه يدؤيو .رضخا نوللا ىلإ LED لوحتي ىتح مكحتلا
4 ..راودلا د
دحملا مادختساب ةباوبلا/طغاضلا ددح
5 . دنع KickGate 2 رتخاو .ديدحت ىلع طغضا مث ،عيرس :KickGate 2 وأ يداع :KickGate 1 زييمتب مقو ،ةمئاقلا لفسأ ىلإ ريرمتلل عونلا مكحتلا رز ردأ
.ريهجلا جودزم ريبك لبط ةساود مادختسا
6 ..بولطملا ءادا ىوتسم ىلإ توصلا ىوتسم ةدايزب مق ،ريبك لبط ليغشت دنع
7 ..هايإ كعامس نم ققحت مث ءادا يف همادختسا يونت يذلا ةدح لقا ىوتسملاب ريبكلا لبطلا ليغشتب مق
8 . رادقمب ةيدحلا ةميقلا ىوتسم ضفخب مق مث .ةيتوصلا ريبكلا لبطلا تارثؤم ضعب فقوتت نأ ىلإ ةيدحلا ةميقلا ىوتسم ةدايزب مق ،ضفخنم توص ىوتسمب ليغشتلا دنع
.لبيسيد 3
9 . طبض نكميو .توصلا ىلإ "نينطلا" نم ديزملا فضأ مث ةدشلا ضفخل ةعاسلا براقع نارود هاجتا سكع ةدشلا مكحتلا رز ردأ ،ةيعيبط ةروصب ريبكلا لبطلا ليغشت دنع
.)عرسا( % 100 ىلإ )أطبا( % 0 نم ةدشلا
..ةيعاقيا تا يف ريفصلا ضفخل ممص
ُ
مو .بسكلل تاملعمو ةريغتم ةيدح ةميق عم ا
ً
قبسم ةنيعم ةضفخنم طغض ةبسنب زيمتي ةيبناج لسسب طغاض – ضفاخلا
.و هيف بوغرملا ريغ شيوشتلل ةبسانم يهو .)قطا تقو( ةريغتم ةعرسو ةريغتم ةيدح ةميقو ا
ً
قبسم نيعم عيرس عورش تقوب شيوشت ةباوب – شيوشتلا ةباوب
.تاو تانوفوركيملا نم رداصلا
.ز Bose
®
ـل ةكولمم ةينقت نع ةرابع يهو ،)قطإ تقو( دييقت تاملعمو ةريغتم ةيدح ةميقو ا
ً
قبسم نيعم عورش تقوب زيمتت ةباوب – يداع :KickGate 1
.PA ماظن ربع ناكما ردق ا
ً
عفترم ريبكلا لب
َ
طلا توص لعجي امم ،دادترا لبق بسكلل ىصقا دحلا ةيوقلا ةباوبلا هذه رفوتو .ةصاخ ةفصب ريبكلا لب
َ
طلل ةممص
ُ
مو
.ح.جودزم ريبك لبط ةساود مدختست تنك اذإ دادعا اذه ددح .عرسأ عاقي ةطوبضم اهنكل KickGate 1 هبشت – عيرس :KickGate 2
.رييغت نود نم ةمئاقلا نم جورخلل ءاغلإ مكحتلا رز ىلع طغضا وأ ،كرايتخا ديدحتل ديدحت مكحتلا رز ىلع طغضا .2
طبضل بسكلا مكحتلا رز ردأو .لبيسيد 0 ىلإ لبيسيد -50 نم لخدلل )ليغشت( ةيدحلا ةميقلا ىوتسم طبضل ةيدحلا ةميقلا مكحتلا رز ردأ :
ضفاخلا ،د
دحملا ،3-1 طغاضلا
.3
دادعإ يف ةشاشلا هذه دعاستو .بسكلا ىوتسم يف ضافخنا رادقم مكحتلا رز ىلعأ رهظي يذلا بسكلا طيرش ضرعيو .لبيسيد 30.0 ىلإ لبيسيد 0 نم بسكلا ىوتسم
.ةيدحلا ةميقلا
قغإ ةعرس طبضل ةعرسلا مكحتلا رز ردأ .لبيسيد -30 ىلإ لبيسيد -90 نم لخدلل )ليغشت( ةيدحلا ةميقلا ىوتسم طبضل ةيدحلا ةميقلا مكحتلا رز ردأ :
شيوشتلا ةباوب
.)يسأر( % 100 ىلإ )يقفأ( % 0 نم ةباوبلا ليم طبضل ليملا مكحتلا رز ردأ .)أطبا( % 100 ىلإ )عرسا( % 0 نم ةميق يأ ىلع ةباوبلا
ىدم( ةدشلا طبضل ةدشلا مكحتلا رز ردأ .لبيسيد 0 ىلإ لبيسيد -20 نم لخدلل )ليغشت( ةيدحلا ةميقلا ىوتسم طبضل ةيدحلا ةميقلا مكحتلا رز ردأ :
2-KickGate 1
.)عرسا( % 100 ىلإ )أطبا( % 0 نم )ةباوبلا قغإ ةعرس

ليغشتلا
25 - ةيبرعلا
ليدعتلا تاريثأت مادختسا
.ليدعتلا تاريثأت قيبطت ليدعتلا ةفيظو كل حيتت
.هطيشنتل ىرخأ ةرم هيلع طغضا مث ؛عونلا مكحتلا رز ىلع طغضا ،ليدعتلا تادادعإ زواجتل :ةظحم
1 .:كرايتخا زييمتو ليدعتلا تادحو عاونأب ةمئاق ىلإ لوصولل عونلا مكحتلا رز ردأ
.أ.جزملاو قم
ُ
علاو ةعرسلاب ةصاخ اهطبض نكمي تاملعم نمضتيو ،ةيتوصلا تا عم ا
ً
ديج لمعي بطر قلأتم رارق – حضاو :1 رارقلا
.ب تآ/راتيجلا عم ا
ً
ديج لمعتو .جزملاو قم
ُ
علاو ةعرسلاب ةصاخ اهطبض نكمي تاملعم نمضتيو ،ليلقب ا
ً
عافترا لقأ تاددرت وذ هنكل 1 رارقلا هبشي – لدتعم :2 رارقلا
.ةيئابرهكلا ريهجلا
.ج عم ا
ً
ديج لمعتو .جزملاو قم
ُ
علاو ةعرسلاب ةصاخ اهطبض نكمي تاملعم نمضتيو .دشا تامغنلا عم ا
ً
عافترا لقأ تاددرت وذ هنكل 2 رارقلا هبشي – قماغ :3 رارقلا
.ةيئابرهكلا ريهجلا تآ/راتيجلا
.د رثؤمك ا
ً
ديج لمعيو .جزملاو قم
ُ
علاو ةعرسلاب ةصاخ اهطبض نكمي تاملعم نمضتيو .دادترا يأ هب ثدحي و طيرشلا هبشي تقو ل
ِ
حرم – طيرش :1 تقولا لحرم
.ةيئابرهكلا ريهجلا تآ/راتيجلا يف
..ا
ً
قبسم نيعم يدادترا ريثأت هبحاصي نكل 1 تقولا لحرم هبشي – دادترا :2 تقولا لحرم
.و يف رثؤمك ا
ً
ديج لمعيو .ةريغتملا ةعرسلاو دادترل تاملعم عم ا
ً
قباس نيعم عساو ىدمب زيمتيو .ا
ً
يكيسك عاقيإ قودنص هبشي راوطأ ل
ِ
حرم – عاقيإ :1 راوطا لحرم
.ةيئابرهكلا ريهجلا تآ/راتيجلاو ونايبلا
.ز ونايبلا يف رثؤمك ا
ً
ديج لمعيو .ةريغتملا ةعرسلاو دادترل تاملعم عم يباجيإ عون نم جزمب زيمتيو .ا
ً
يكيسك "
ً
ماح" هبشي راوطأ ل
ِ
حرم – لماح :2 راوطا لحرم
.ةيئابرهكلا ريهجلا تآ/راتيجلاو
.ح ونايبلا يف رثؤمك ا
ً
ديج لمعيو .ةريغتملا ةعرسلاو دادترل تاملعم عم يباجيإ عون نم جزمب زيمتيو .ميدق زارط وذ راوطأ ل
ِ
حرم – لدتعم :3 راوطا لحرم
.ةيئابرهكلا ريهجلا تآ/راتيجلاو
.ط يف رثؤمك ا
ً
ديج لمعيو .ةريغتملا ةعرسلاو دادترل تاملعم عم يباجيإ عون نم جزمب زيمتيو .ريهج توص هبحصي راوطأ ل
ِ
حرم – حضاو :4 راوطا لحرم
.نييئابرهكلا راتيجلاو ونايبلا
.ي.اكينومراهلاو راتيجلاو ونايبلا يف رثؤمك ا
ً
ديج لمعيو .ةريغتملا ةعرسلاو قمعلل تاملعم عم يكيسك يتوص بذبذت – يتوص بذبذت
.رييغت نود نم ةمئاقلا نم جورخلل ءاغلإ مكحتلا رز ىلع طغضا وأ ،كرايتخا ديدحتل ديدحت مكحتلا رز ىلع طغضا .2
ةطساوب ةجلاعم( بولطملا وحنلا ىلع تاريثأت اهبحصي يتلا ةراشاب تاريثأت يأ اهبحصي يتلا ةراشا جزمل جزم مكحتلا رز ردأ :
2-1 تقولا لحرم ،3-1 رارقلا
.3
رز ردأو .ةعرسلا ةملعم ىلإ لوصولل قمعلا مكحتلا رز ىلع طغضاو .ةيلصا لخدلا ةراشإ نع توصلا ةقبط فتخا ىدم طبضل قمعلا مكحتلا رز ردأو .)ل
دعملا
.توصلا ةقبط ليدعت اهب متي يتلا ةعرسلا رادقم طبضل ةعرسلا مكحتلا
.ليدعتلا هردصي يذلا ىدصلا رادقم طبضل دادترا مكحتلا رز ردأو .توصلا ةقبط ليدعت اهب متي يتلا ةعرسلا رادقم طبضل ةعرسلا مكحتلا رز ردأو :
4-1 راوطا ل
ِ
حرم
ةراشإ نع توصلا ىوتسم فتخا ىدم طبضل قمعلا مكحتلا رز ردأو .توصلا ىوتسم ليدعت اهب متي يتلا ةعرسلا رادقم طبضل ةعرسلا مكحتلا رز ردأ :
يتوصلا بذبذتلا
.ةيلصا لخدلا
Ch 1
Type Mix Depth
Chorus1 50% 50%
Modulator
Speed
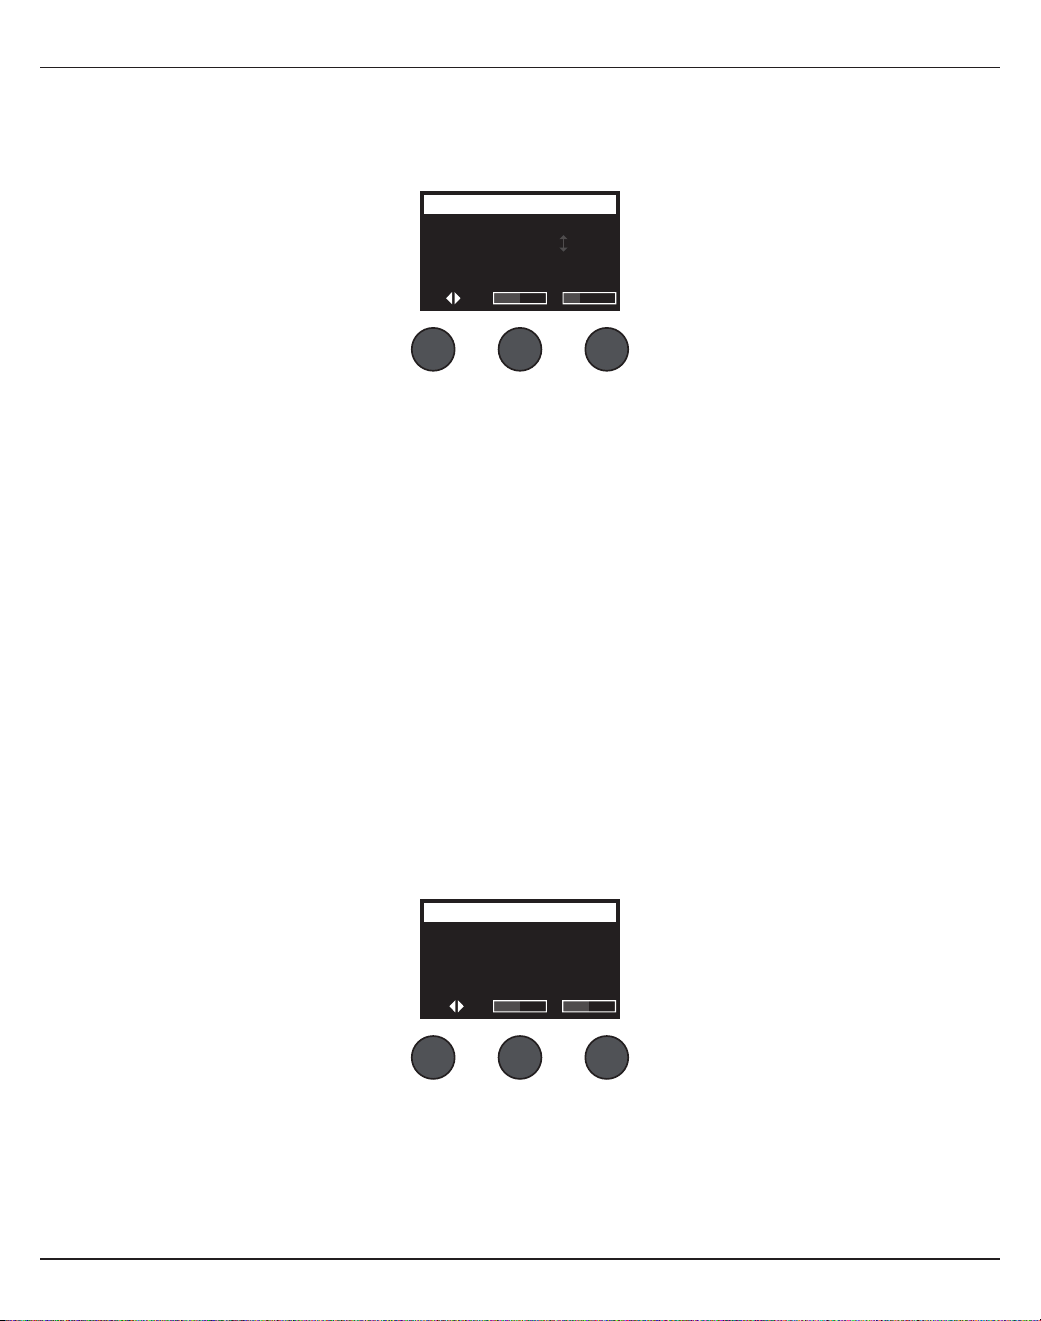
ةيبرعلا - 26
ليغشتلا
Ch 1
Type Tim
eM
ix
Digital 250ms 30%
Delay
Fdbk.
تاريخأت ةفاضإ
.يطيرش ريخأت وأ يرظانت وأ يمقر ريخأت قيبطت ريخأتلا ةفيظو كل حيتت
.هطيشنتل ىرخأ ةرم هيلع طغضا مث ؛عونلا مكحتلا رز ىلع طغضا ،ريخأتلا تادادعإ زواجتل :ةظحم
1 ..كرايتخا زييمتو ريخأتلا عاونأب ةمئاق ىلإ لوصولل عونلا مكحتلا رز ردأ
.أ عم ا
ً
ديج لمعيو .دادتراو تقولاو جزملاب ةصاخ اهطبض نكمي تاملعمب زيمتيو .نول نود نم تاراركتلا لظت امدنع ثدحي رشابم يمقر ريخأت – يمقرلا ريخأتلا
.ةيعاقيا تاو لبطلاو راتيجلا
.ب لمعيو .دادتراو تقولاو جزملاب ةصاخ اهطبض نكمي تاملعمب زيمتيو .روهدتلا يف تاراركتلا رمتست امدنع ثدحي يكيسك يرظانت ريخأت – يرظانتلا ريخأتلا
.ةيعاقيا تاو لبطلاو راتيجلا عم ا
ً
ديج
.ج اكينومراهلاو قوبلاو راتيجلل ديج لكشب بسانم وهو .يرظانتلا ريخأتلا قوفي رادقمب تاراركتلا ةلاح ءوست امدنع ثدحي يكيسك يطيرش ريخأت – يطيرشلا ريخأتلا
.ةيعاقيا تاو
.رييغت نود نم ةمئاقلا نم جورخلل ءاغلإ مكحتلا رز ىلع طغضا وأ ،كرايتخا ديدحتل ديدحت مكحتلا رز ىلع طغضا .2
.ةبولطملا ريخأتلا ةعرس ديدحتل تقولا مكحتلا رز ىلع طغضاو .ةيناث يللم 5 غلبت تادايزب ريخأتلا تقو رادقم طبضل تقولا مكحتلا رز ردأ .3
.)% 100( بولطملا وحنلا ىلع تاريثأت اهبحصي يتلا ةراشاب )% 0( تاريثأت يأ اهبحصي يتلا ةراشا جزمل جزم مكحتلا رز ردأ .4
.لجا دادترا رادقم طبضل دادترا مكحتلا رز ردأو .دادترا دادعإ ىلإ لوصولل جزم مكحتلا رز ىلع طغضا .5
ىدص ةفاضإ
.27 ةحفصلا يف "ىدصلا عون ديدحت" رظنا ،ىدصلا عون ديدحتلو .ةددحملا ةانقلل م
ِ
دختسملا هطبضي يذلا ىدصلا رادقم ىلع ىدصلا ةفيظو قبطنت
.توصلا متك ءاغل ىرخأ ةرم هيلع طغضا مث ؛جزم مكحتلا رز ىلع طغضا ،ىدصلا تارثؤم توص متكل :ةظحم
1 ..هيلإ ىدصلا لاسرإ نيعتي يذلا جرخلا ددح مث هردأ وأ ةمئاقلا مكحتلا رز ىلع طغضا
2 ..)% 100( بولطملا وحنلا ىلع تاريثأت اهبحصي يتلا ةراشاب )% 0( تاريثأت يأ اهبحصي يتلا ةراشا جزمل جزم مكحتلا رز ردأ
3 ..ةددحملا ةانقلا ىلع ق
َ
بطملا ىدصلل ةعفترملا تاددرتلا ةنزاومل عطاس مكحتلا رز ردأ
Ch 1
Mix Bright
50% 50%
Reverb
Menu
Main
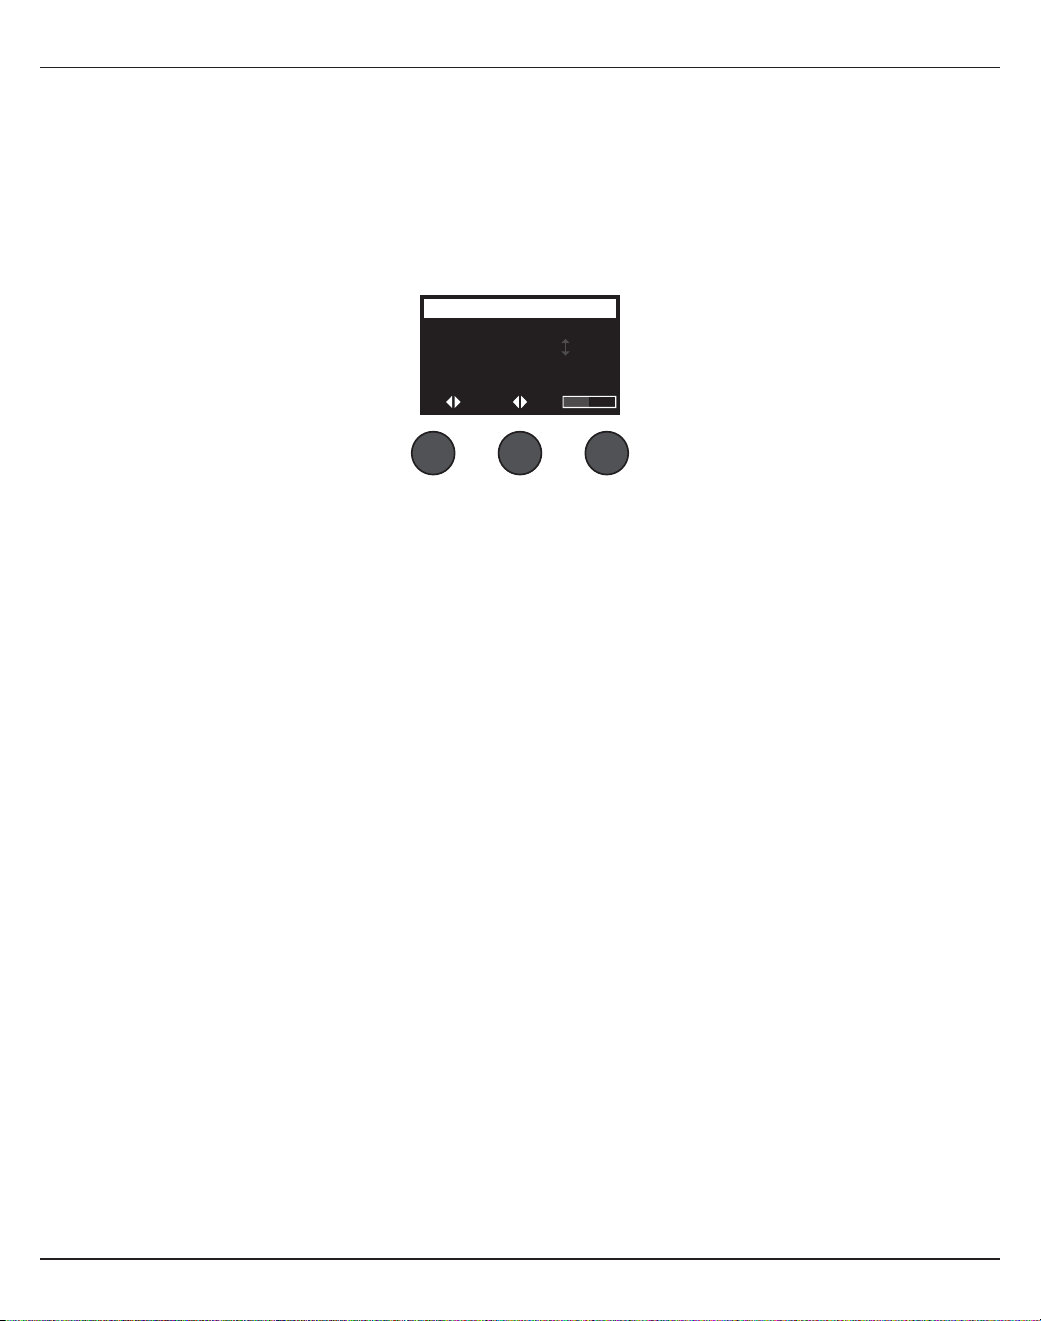
ليغشتلا
27 - ةيبرعلا
ةماعلا فئاظولا مادختسا
.هتاونق عيمجو جزاملل يلكلا ليغشتلا ىلع رثؤت يتلا تادادعا ىلإ لوصولا ةماعلا فئاظولا كل حيتت
ىدصلا عون ديدحت
ةبسن يف ةنزاوملا مكحتتو .)Bal( ةنزاوملاو )Time( ضافخنا تقو طبض نكميو .لخدلا تاونق عيمج ىلع ق
َ
بط
ُ
ملا ىدصلا عون ديدحت ىدصلا عون ةفيظو كل حيتت
.ةرخأتملا ىلإ ةركبملا تاساكعنا
.توصلا متك ءاغل ىرخأ ةرم هيلع طغضا مث ؛عونلا مكحتلا رز ىلع طغضا ،ىدصلا توص متكل :ةظحم
1 ..راودلا د
دحملا مادختساب ىدصلا عون ددح
2 ..ةدعاسملا وأ ةيسيئرلا جراخملا ىلإ فلتخم ىدص عون لاسرإ كنكميو .هيلإ ىدصلا لاسرإ نيعتي يذلا جرخلا ددح مث هردأ وأ ةمئاقلا مكحتلا رز ىلع طغضا
3 .:ىدصلا عاونأب ةمئاق ضرعل عونلا مكحتلا رز ردأ
.أ.)ةرخأتملا/ةركبملا تاساكعنا ةبسن( ةنزاوملاو تقولاب ةصاخ اهطبض نكمي تاملعمب زيمتيو .ويدوتساب يجذومن حطسم ىدصل ا
ً
يطيحم ا
ً
ريثأت ئشني – حطسم
.ب.)ةرخأتملا/ةركبملا تاساكعنا ةبسن( ةنزاوملاو تقولاب ةصاخ اهطبض نكمي تاملعمب زيمتيو .ريغص ناكم يف ا
ً
يطيحم ا
ً
ريثأت ئشني – ريغص
.ج.)ةرخأتملا/ةركبملا تاساكعنا ةبسن( ةنزاوملاو تقولاب ةصاخ اهطبض نكمي تاملعمب زيمتيو .مجحلا طسوتم ناكم يف ا
ً
يطيحم ا
ً
ريثأت ئشني – طسوتم
.د .)ةرخأتملا/ةركبملا تاساكعنا ةبسن( ةنزاوملاو تقولاب ةصاخ اهطبض نكمي تاملعمب زيمتيو .ريبك ناكم يف ا
ً
يطيحم ا
ً
ريثأت ئشني – ريبك
. ا
ً
ريثأت لثميو .)ةرخأتملا/ةركبملا تاساكعنا ةبسن( ةنزاوملاو تقولاب ةصاخ اهطبض نكمي تاملعمب زيمتيو .ةياغلل ريبك ناكم يف ا
ً
يطيحم ا
ً
ريثأت ئشني – ةياغلل ريبك
.ىدصلل ا
ً
ديرفو ا
ً
مهم
.بولطملا ىدصلا عون زييمتو ىدصلا ةمئاق ربع لقنتلل عونلا مكحتلا رز ردأ .4
.ديدحتلل عونلا مكحتلا رز ىلع طغضا .5
هبنيس يذلا ىندا ضافخنا تقو % 0 لثم
ُ
تو .ىصقا هدح ىلإ ىندا هدح نم ددحملا ىدصلا جذومن ضافخنا تقو يف مكحتلا ىلإ تقولا مكحتلا رز ريودت يدؤي .6
عتمتيو .ا
ً
يلاح ددحملا ىدصلا عونل ةحاتملا ربكا ةحاسملا هبنيس يذلا ىصقا ضافخنا تقو % 100 لثم
ُ
ت امنيب .ا
ً
يلاح ددحملا ىدصلا عونل ةحاتملا رغصا ةحاسملا
تاقاطنلا نيب ىدصلا تقو طبض ىدصلا ضافخنا ةملعم كل حيتتو .د
َ
دحملا جذومنلا عون عم لثما لكشلاب لمعت يتلا ضافخنا تاقو هل بسانم قاطنب ىدص عون لك
.ددحملا ىدصلا جذومن عون عم لثما لكشلاب لمعت يتلا ةددحملا
عيمج = % 100 ،ةركبملا تاساكعنا عيمج = % 0( ةرخأتملا ىلإ ةركبملا تاساكعنا طبضل ةنزاوم مكحتلا رز ردأو .ةنزاوم ىلإ ليدبتلل تقولا مكحتلا رز ىلع طغضا .7
.)ةرخأتملا تاساكعنا
All Channels
Menu Type Bal.
Main Medium 50%
Reverb Type
Time
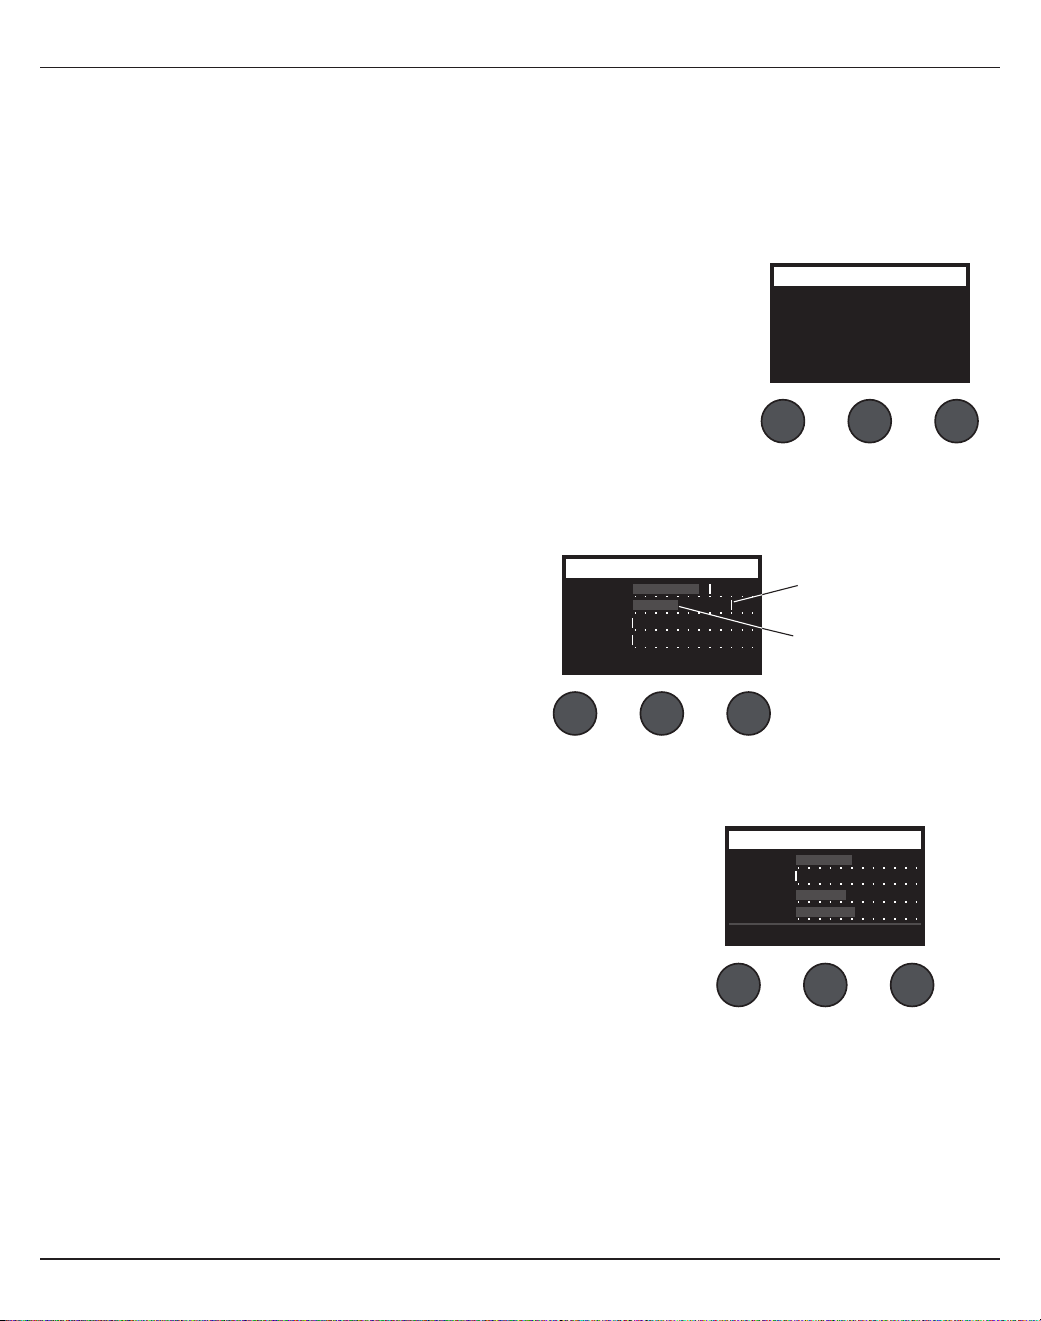
ةيبرعلا - 28
ليغشتلا
ةدعاسملا تيضفتلا تاودأ مادختسا
.ةد
ِ
عاسملا ماظنلا تاودأ نم ديدعلا ىلإ لوصولا تيضفتلا ةفيظو كل حيتت
1 ..راودلا د
دحملا مادختساب تيضفتلا ددح
2 .:ةدعاسملا ةادا ضرعل ديدحت مكحتلا رز ىلع طغضا .ةبولطملا ةدعاسملا ةادا زييمتو ةمئاقلا ربع لقنتلل ةمئاقلا مكحتلا رز ردأ
•.)طقف ضرعلل ةلباقلا( لخدلا تاونقل ةنيعملا تاريثأتلا ضرعت – ةلاحلا
• عيمج نييعت ةداع نييعت ةداعإ مكحتلا رز ىلع طغضا .لخدلا تاونق لكل ةورذلا تاراشإ تارشؤم عم لخدلا ىوتسم سيياقم ضرعي – لخدلا ىوتسم
.)17 ةحفصلا يف "جرخلا توص ىوتسمو لخدلا بسك نيسحت" رظنا( ةانقلا لخد طبض ىوتسم نييعت يف ةديفم ةشاشلا هذه دع
ُ
تو .ةورذلا تاراشإ تارشؤم
.)8-5 لخدلا ىوتسم ةبقارمل 8-Ch 5 مكحتلا رز ىلع طغضا ،طقف T8S ـل( دعاسملا لخدلا ىوتسم ةبقارمل دعاسملا لخدلا مكحتلا رز ىلع طغضا
• ةبقارمل دعاسم مكحتلا رز ىلع طغضا .USB Rو USB Lو Main Rو Main L :جراخملا عيمج جرخ ىوتسم سيياقم ضرعي – جرخلا ىوتسم
.ةدعاسملا جراخملا ىوتسم
Output Level Preferences
USB L
Main L
Main R
USB R
Menu Rese
tA
ux
Status
Ch 1 Mod
Mod
Mod Dly
Cm
pR
ev
Rev
Rev
CmpCh 2
Ch 3
Ch 4
Menu
Preferences
ةباوبلا/طغاضلا = Cmp
ليدعت = Mod
ريخأت = Dly
ىدص = Rev
Input LevelPreferences
Ch 3
Ch 1
Ch 2
Ch 4
Menu Aux InReset
ةورذلا ىوتسم رشؤم
لخدلا ىوتسم رشؤم
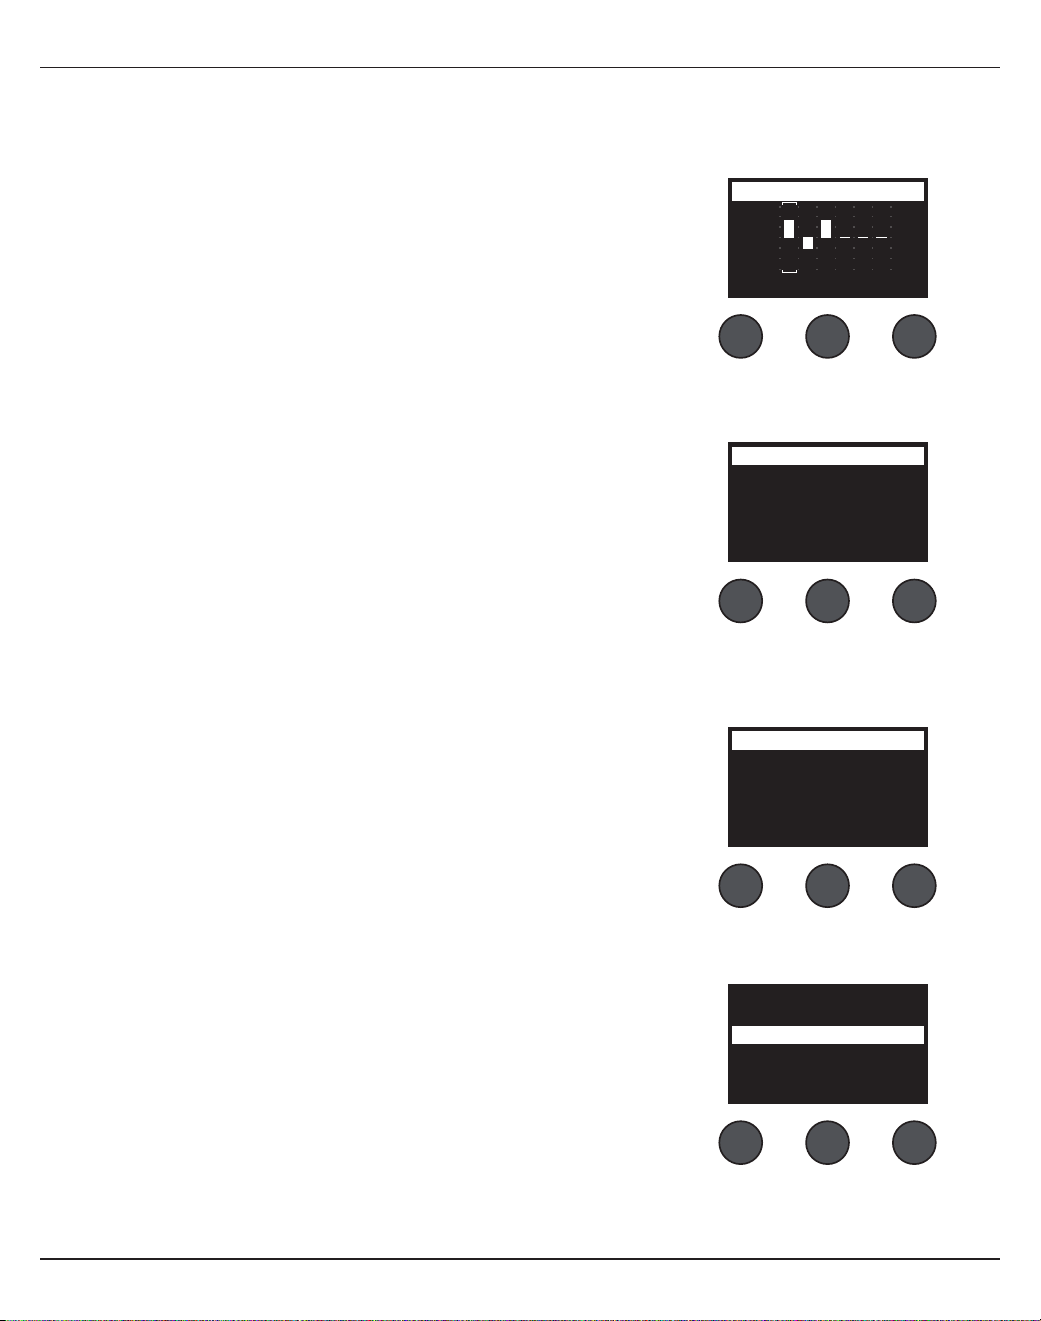
ليغشتلا
29 - ةيبرعلا
• يذلا ددرتلا قاطن ديدحتل طسوا مكحتلا رز مدختسا .يسيئرلا جزاملا جرخ يف دوجوم تاقاطن 6 نم يموسر نزاوم نع ةرابع وه – يسيئرلا جرخلا نزاوم
.لبيسيد 18–/+ ىلع ىوتسملا طبضل ىوتسملا مكحتلا رز مدختسا مث ،هضفخ وأ هزيزعت ديرت
• يف رداصملا تارايتخا لثمتتو .هراسيو USB نيمي جرخلا تاونق ربع يصخش رتويبمك ىلإ ددحم ردصم لاسرإ كل حيتي – يصخش رتويبمك ىلإ USB B
.)طقف T8S ـل 4-3 دعاسم جرخ( 2-1 دعاسم جرخ وأ يسيئر جرخ وأ دعاسم لخد وأ )طقف T8S ـل 8-Ch5( 4-Ch1
• لخد وأ ءيش ( ةددحم جزام ةهجو ىلإ كيدل يصخشلا رتويبمكلا نم هراسي وأ USB نيمي تاونقلا لاسرإ كل حيتي – يصخش رتويبمك نم USB B
.)يسيئر جرخ وأ دعاسم
• ةمئاقلا مدختساو .لومحم صارقأ كرحم ىلع ةنزخم WAV/MP3 تافلم ليغشتل A عونلا نم لومحم USB صارقأ كرحم ليصوت – USB A ـب ليغشت
.ىوتسملا مكحتلا رز ريودت لخ نم ىوتسملا طبضاو هليغشت يف بغرت يذلا فلملا ددح مث ،WAV/MP3 تافلم ىلع يوتحي يذلا دلجملا ديدحتل
+18
+12
+6
0
-6
-12
-18
125HzMenu
Master EQ Preferences
Level
1 ..ردصم زييمتل راسي/نيمي مكحتلا رز ردأ
2 ..رييغت نود نم جورخلل ءاغلإ مكحتلا رز ىلع طغضا وأ ،ردصملا ديدحتل ديدحت مكحتلا رز ىلع طغضا
3 ..تيضفتلا ةمئاق ىلإ عوجرلل ةمئاقلا ردأ
Left : Master
Right : Master
LeftMenu
USB to PC Preferences
Right
Left : Master
Right : Master
LeftMenu
USB from PC Preferences
Right
1 ..ةهجو زييمتل راسي/نيمي مكحتلا رز ردأ
2 ..رييغت نود نم جورخلل ءاغلإ مكحتلا رز ىلع طغضا وأ ،ردصملا ديدحتل ديدحت مكحتلا رز ىلع طغضا
3 ..تيضفتلا ةمئاق ىلإ عوجرلل ةمئاقلا مكحتلا رز ردأ
Tomorrow Is Too late.wav
Sarah.wav
Mistakes for Love.mp3
Sun Behind the Clouds.wav
Hey God Maker. mp3
LevelSelectMenu
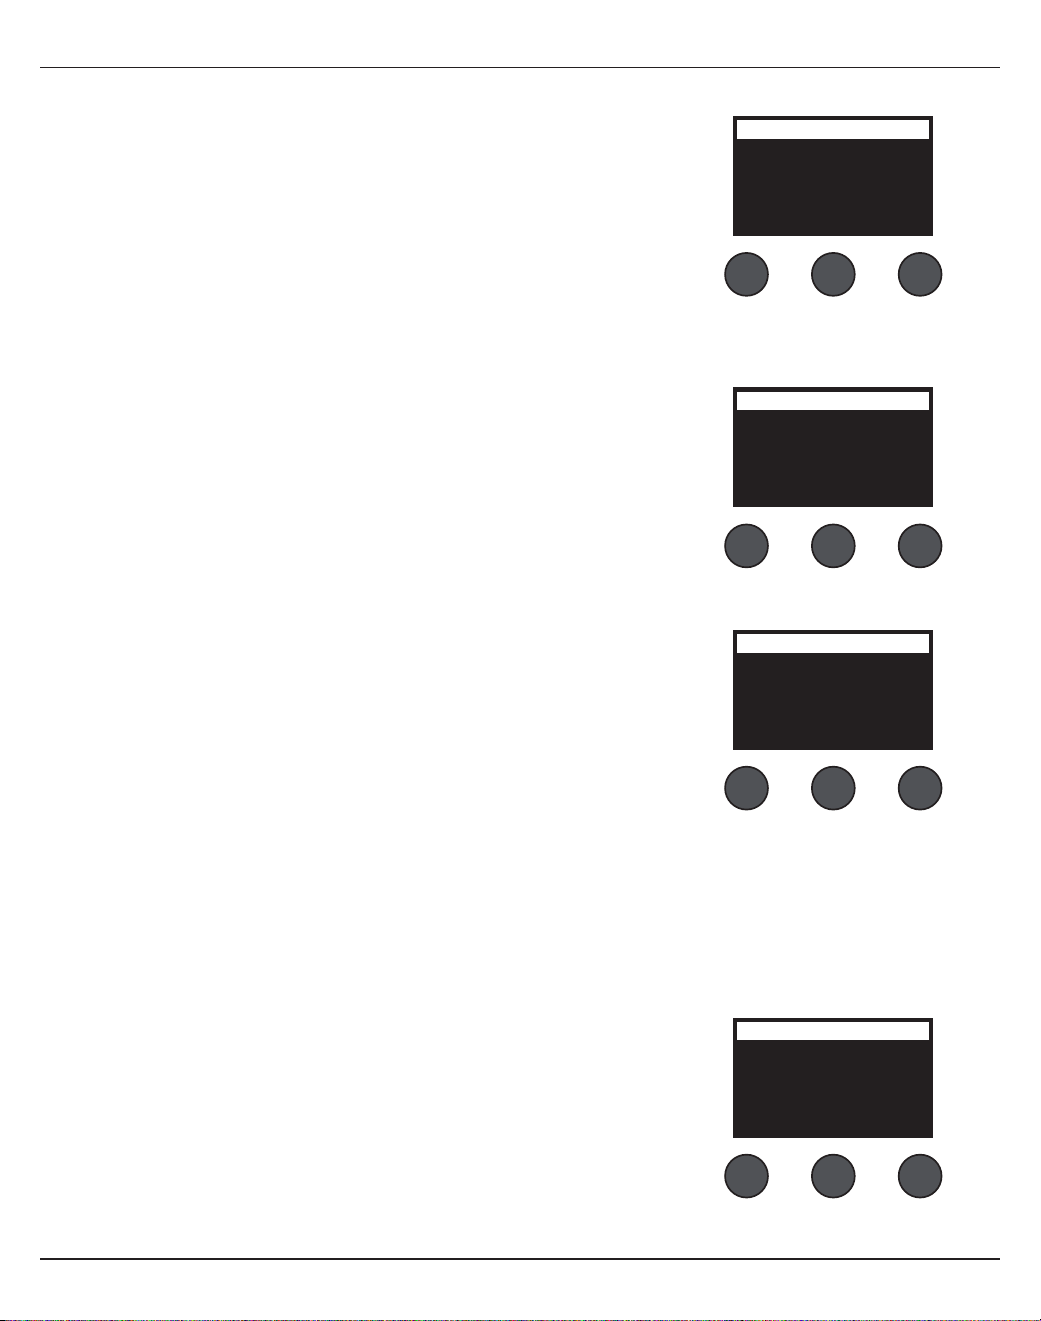
ةيبرعلا - 30
ليغشتلا
•.ةتباثلا DSP جمارب ةعجارم تايوتسم ضرعت – تارادصا
• عجار .T4S/T8S يف ةنزخملا ToneMatch ـل ةقبسملا تادادعا تاعومجمب ةمئاق ضرعي – ToneMatch
.ةقبسملا تادادعا تاعومجم ثدحأ ىلع عطل www.Bose.com/livesound
•.ةشاشلا ىلع لصتم رهظي ، 1S/II زارطلا L1
®
ةقاط ةدحوب ليصوتلا دنع – L1 ةقاط ةدحو
Versions
T4S v1.0.0
Menu
Preferences
C: Ovation Guitars
B: Audix Mics.
A: Taylor Guitars
Menu
ToneMatchPreferences
Connected
Menu
L1 Stand Preferences
اهظفحو دهاشم ليمحت
.T4S/T8S ToneMatch
®
جزام ةلاحل ةطقل نع ةرابع دهشملا
•.ةانقلا ليدعتو FX توص متكو توصلا متك رارزأ ةلاحو ToneMatch جزام تادادعإ عيمج دهشملا ركذتيو
•.ةيفيطلا ةقاطلا ليدبت عضو وأ سأرلا ةعامس ىوتسم وأ يسيئرلا جرخلا توص ىوتسم وأ اهطبض وأ ةانقلا توص تايوتسم دهشملا ركذتي
All Channels
Singer/Songwriter
Load Shared Save
Scenes
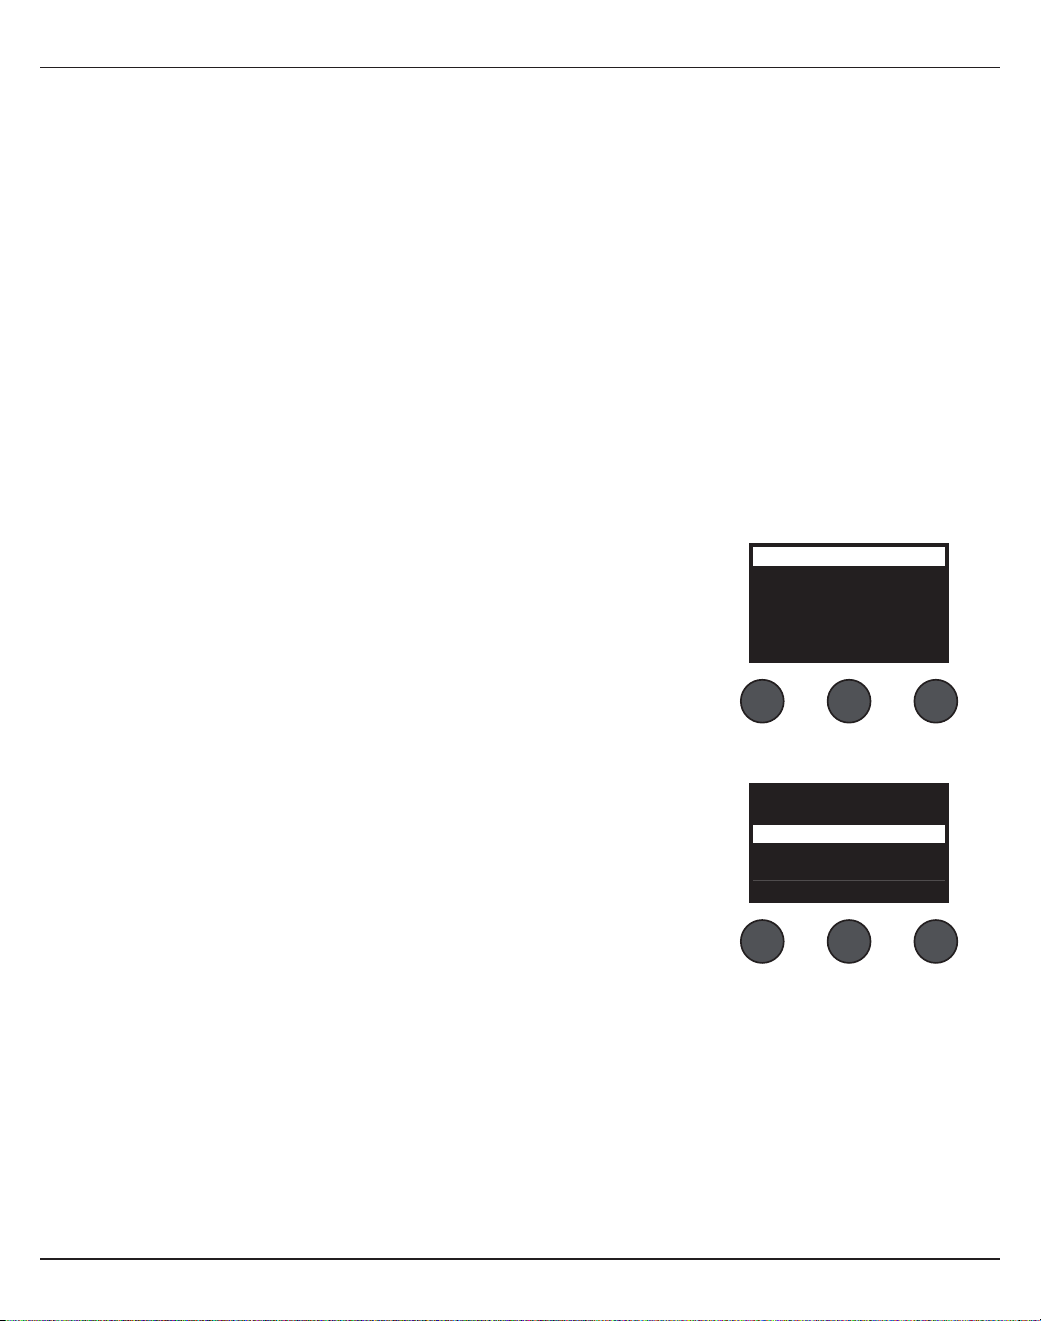
ليغشتلا
31 - ةيبرعلا
:دهاشملا نم عاونأ ةثث T4S/T8S نمضتي
•.اهلادبتسا و اهليدعت كنكمي و .عنصملا يف ا
ً
قبسم ةدعم طقف ةءارقلل دهاشم :Bose دهاشم )5(
•.ديرت امك تارم ةدع اهلادبتساب دهاشملا هذه ثيدحت كنكميو .اهئاعدتساو ةلضفملا تادادعا عيمج ظفحل اهديدحت مدختسملل نكمي دهاشم :م
ِ
دختسملا دهاشم )10(
• اذه ليمحت نكميو .نيرخا T4S/T8S ToneMatch
®
جزام يمدختسم عم اهتكراشمل اهديري يتلا تادادعا ظفحل هديدحت مدختسملل نكمي دهشم :كرتشم دهشم )1(
.www.Bose.com/livesound ىلع رفوتملا L1
®
ثيدحت جمانرب مادختساب رتويبمك ىلإ دهشملا
:دهشم ليمحتل
1 ..راودلا د
دحملا مادختساب دهاشملا ددح
2 ..قماغ طخب ا
ً
يلاح هليمحت مت يذلا دهشملا مسا رهظي
ٍ
ذئدنعو .بولطملا دهشملا مسا زييمتو دهاشملا ةمئاق ربع لقنتلل ليمحت مكحتلا رز ردأ
3 ..رييغت نود نم دادعا كرتو ةمئاقلا نم جورخلل ءاغلإ مكحتلا رز ىلع طغضا وأ ،دهشملا ديدحتل ديدحت مكحتلا رز ىلع طغضا
.ةشاشلا ىلع ا
ً
يلاح ل
َ
محملا دهشملا رهظيو رييغت يأ ءارجإ متي و .
ٍ
ناوث
10 لخ ءاغلإ وأ ديدحت مكحتلا رز ىلع طغضت مل اذإ دهاشملا ةشاشلا ضرعت :ةظحم
4 . نم دهشملا دادعإ كرتو جورخلل مكحتلا رز ىلع طغضا وأ ،دهشملا ليمحتل معن مكحتلا رز ىلع طغضاو ."؟دكأتم تنأ له" لاؤسلا رهظيسف ،"ديدحت" ىلع تطغض اذإو
.رييغت نود
.ةشاشلا ىلع ا
ً
يلاح ل
َ
محملا دهشملا رهظيو رييغت يأ ءارجإ متي و .
ٍ
ناوث
10 لخ وأ معن مكحتلا رز ىلع طغضت مل اذإ "دهاشملا" ةشاشلا ضرعت :ةظحم
:دهشم ظفحل
1 ..ا
ً
يلاح ل
َ
محملا دهشملا ضرع متي
ٍ
ذئدنعو .راودلا د
دحملا مادختساب دهاشملا ددح
2 ..ةمئاقلا نم جورخلل ءاغلإ وأ ديدحت ىلع طغضاو .هظفح ديرت يذلا دهشملا زييمتل ظفح مكحتلا رز ردأ
All Channels
Singer/Songwriter
Load Shared Save
Scenes
ثدحي و
.
ٍ
ناوث
10
لخ
ءاغلإ وأ ديدحت مكحتلا رز ىلع طغضت مل اذإ "دهاشملا" ةشاشلا ضرعت :ةظحم
.ةشاشلا ىلع ا
ً
يلاح ل
َ
محملا دهشملا رهظيو رييغت يأ
My Scene 01
My Scene 02
My Scene 03
Cancel Select
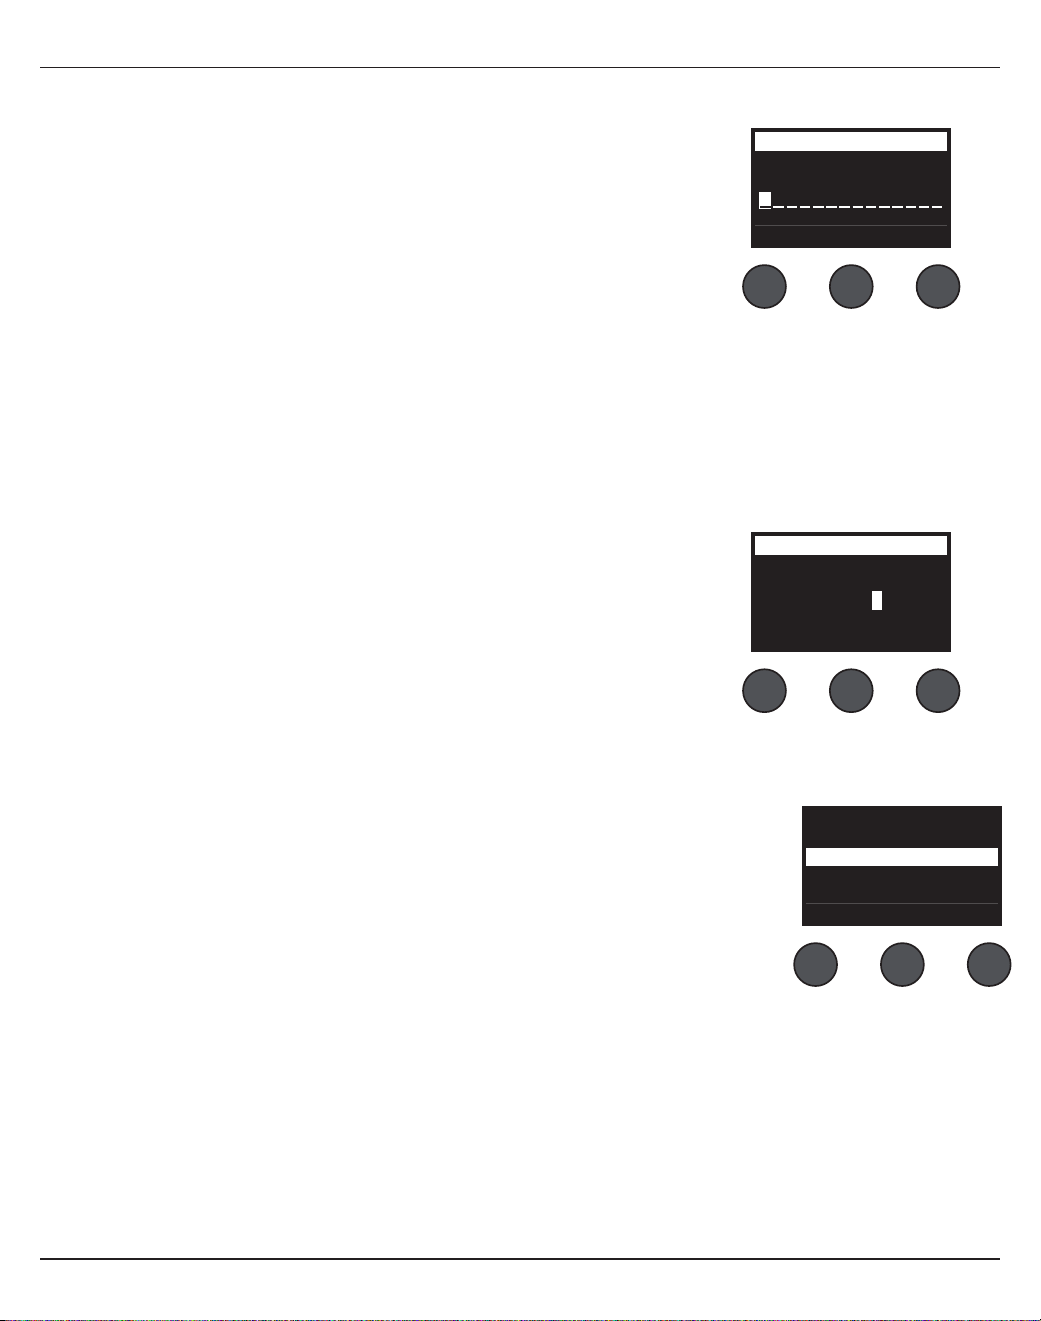
ةيبرعلا - 32
ليغشتلا
3 ..4 ةوطخلا ىلإ لقتنا مث ضورعم وه امك مسا مادختس ظفح ىلع طغضا وأ دهشملا مسا ليدعتل "ةيمستلا ةداعإ" ةشاش مدختساف ،ديدحت ىلع تطغض اذإ
:ظفحلا لبق دهشملا مسا رييغتل
.4 ةوطخلا ىلإ لقتنا مث "ظفح" مكحتلا رز ىلع طغضا ،مسا رييغت دعبو .دهشملا مسا رييغتل ةيلاتلا ليدعتلا تارايخ مادختسا كنكمي
• رييغتل ديدحت مكحتلا رز ردأ مث .هرييغت ديرت يذلا فرحلا عضوم وأ فرحلا زييمتل رشؤملا مكحتلا رز ردأ ،"ةيمستلا ةداعإ" ةشاش ضرع ءانثأ :اهرييغتو فورحلا ديدحت
.فرحلا
• ضرعل ديدحت مكحتلا رز ىلع طغضا مث .هرييغت ديرت يذلا فرحلا زييمتل رشؤملا مكحتلا رز ردأ ،"ةيمستلا ةداعإ" ةشاش ضرع ءانثأ :فرحا عيزوت ططخم مادختسا
فرحلا زييمت دنعو .لفس وأ ىلع رشؤملا كيرحتل لفس/ىلع مكحتلا رز ردأو .نيميلا وأ راسيلل رشؤملا كيرحتل ديدحت مكحتلا رز ردأو .فرحا عيزوت ططخم
.ددحملا عضوملا يف فرحلا اذه ةباتكل ديدحت ىلع طغضا ،هديرت يذلا
• رشؤملا مكحتلا رز ىلع طغضا مث .رشؤملا عضوم ديدحتل رشؤملا مكحتلا رز ردأ ،"ةيمستلا ةداعإ" ةشاش ضرع ءانثأ :فذحلاو جارداو حسملا فئاظو مادختسا
.ةفيظولا ءارج ديدحت مكحتلا رز ىلع طغضا مث .اهديرت يذلا ةفيظولا زييمتل ديدحت مكحتلا رز ردأو .ةصاخلا ليدعتلا فئاظو ةمئاق ىلإ لوصولل
.ةغراف ةحاسم كرتو رشؤملا ةطساوب زيمملا فرحلا ةلاز – فرحلا حسم
.صنلا نم لماك رطس حسم – لكلا حسم
.زيمملا فرحلا كلذ يف امب لماكلاب رشؤملا نيمي ىلع دوجوملا صنلا حسم – ةياهنلا ىتح حسم
.زيمملا فرحلا راسي ىلع ةغراف ةحاسم جاردإ – جاردإ
.رشؤملا ةطساوب ةزيمملا ةحاسملاو فرحلا ةلازإ – فذح
Rename
J
rstuvwxyzABCDEFGHI
123456789, ;/\()|+-
KLMNOPQRSTU VWXYZ0
abcdefgh jklmnopqi
Cancel Up/Dn Select
Scenes
Clear To End
Insert
Clear All
Clear Character
Delete
CancelSelect
Rename
M yScene 01
CursorSave Select
Scenes
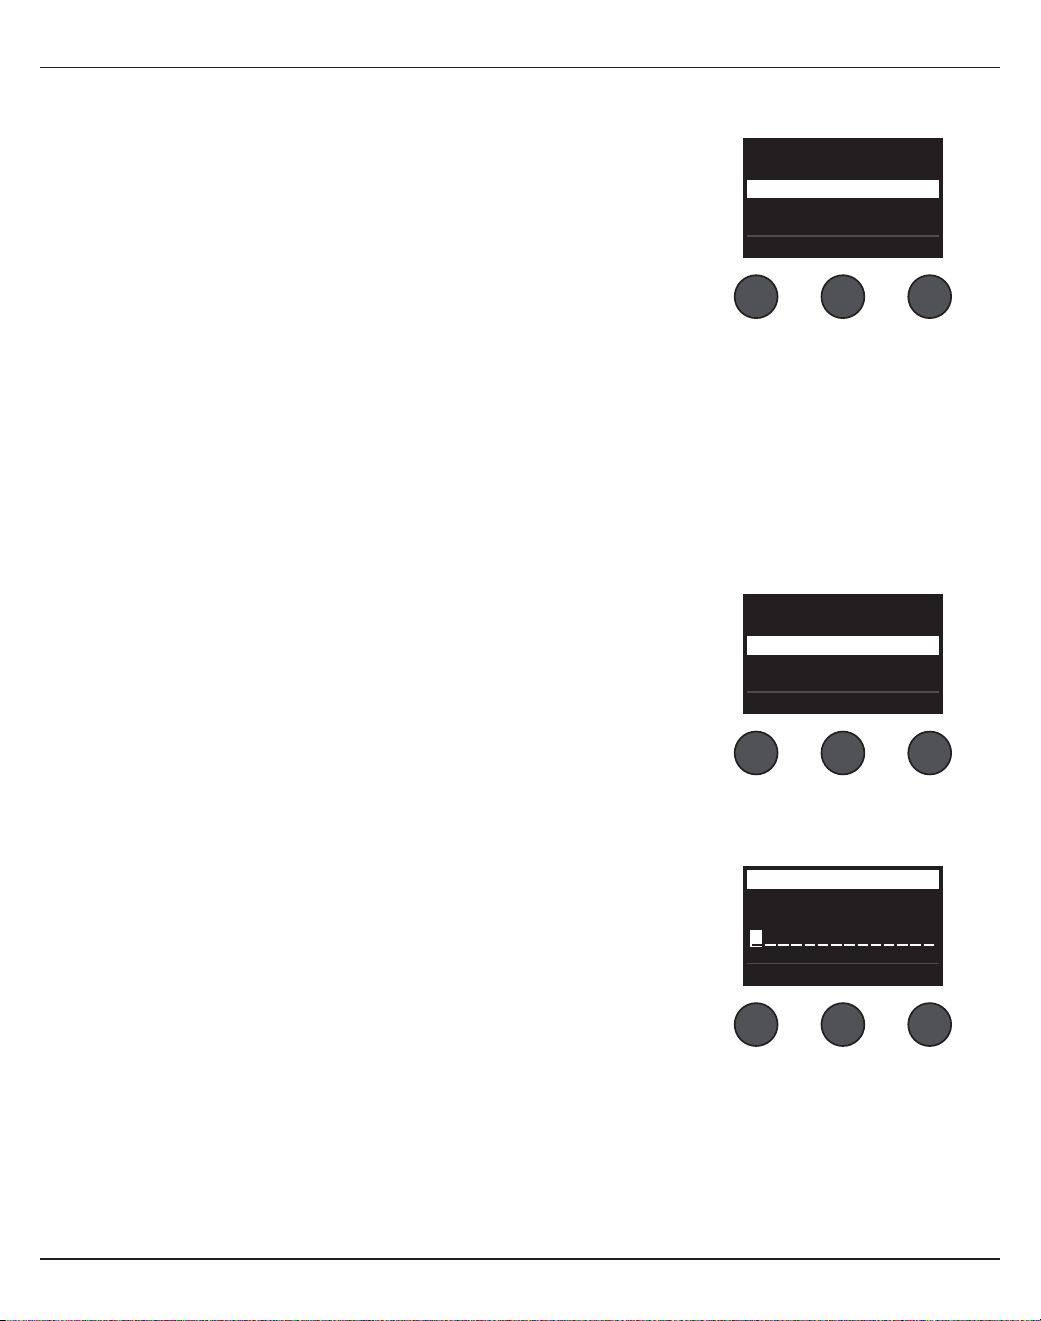
ليغشتلا
33 - ةيبرعلا
4 ..دهشملا ظفح نود نم جورخلل مكحتلا رز ىلع طغضا وأ دهشملا ظفحل معن مكحتلا رز ىلع طغضا ،"دكأتم تنأ له" لاؤسلا رهظي امدنع
دهشم ةكراشم
مادختسابو .]كرتشم دهشم ىلإ[ عقوم يف كرتشم دهشمك دهشملا اذه ظفح كنكميف ،T4S/T8S ToneMatch
®
جزامل رخآ مدختسم عم هتكراشم دوت ا
ً
دهشم تأشنأ اذإ
رخا T4S/T8S مدختسمل نكميو .T4S/T8S ـل رخآ مدختسمب صاخ رتويبمك ىلإ فلملا لقن مث كيدل رتويبمكلا ىلإ كرتشملا دهشملا ليمحت كنكمي ،L1
®
ثيدحت جمانرب
.www.Bose.com/livesound ىلع L1 ثيدحت جمانرب رفوتيو .L1 ثيدحت جمانرب مادختساب T4S/T8S ىلإ دهشملا ليزنت
:كرتشم دهشم ظفحل
1 ..)31 ةحفصلا يف "دهشم ليمحتل" رظنا( هتكراشم ديرت يذلا دهشملا ليمحتب مق
2 ..دهاشملا ةمئاق ىلإ لوصولل ظفح مكحتلا رز ردأ
3 ..ةمئاقلا نم جورخلل ءاغلإ وأ ديدحت ىلع طغضاو .]كرتشم دهشم ىلإ[ زييمتو دهاشملا ةمئاق ربع لقنتلل ديدحت مكحتلا رز ردأ
4 . ديرت تنك اذإ 5 ةوطخلا ىلإ لقتنا وأ )32 ةحفصلا يف "هظفح لبق دهشملا مسا رييغتل" رظنا( دهشملا مسا ليدعتل "ةيمستلا ةداعإ" ةشاش مدختساف ،ديدحت ىلع تطغض اذإ
.دوجوملا مسا مادختسا
Are You Sure?
YesNo
رييغت يأ ثدحي و .
ٍ
ناوث 10 لخ ءاغلإ وأ ديدحت مكحتلا رز ىلع طغضت مل اذإ "دهاشملا" ةشاشلا ضرعت :ةظحم
.ةشاشلا ىلع ا
ً
يلاح ل
َ
محملا دهشملا رهظيو
[To Shared Scene]
My Scene 10
My Scene 09
Cancel Select
Rename
M yScene 07
CursorSave Select
Scenes
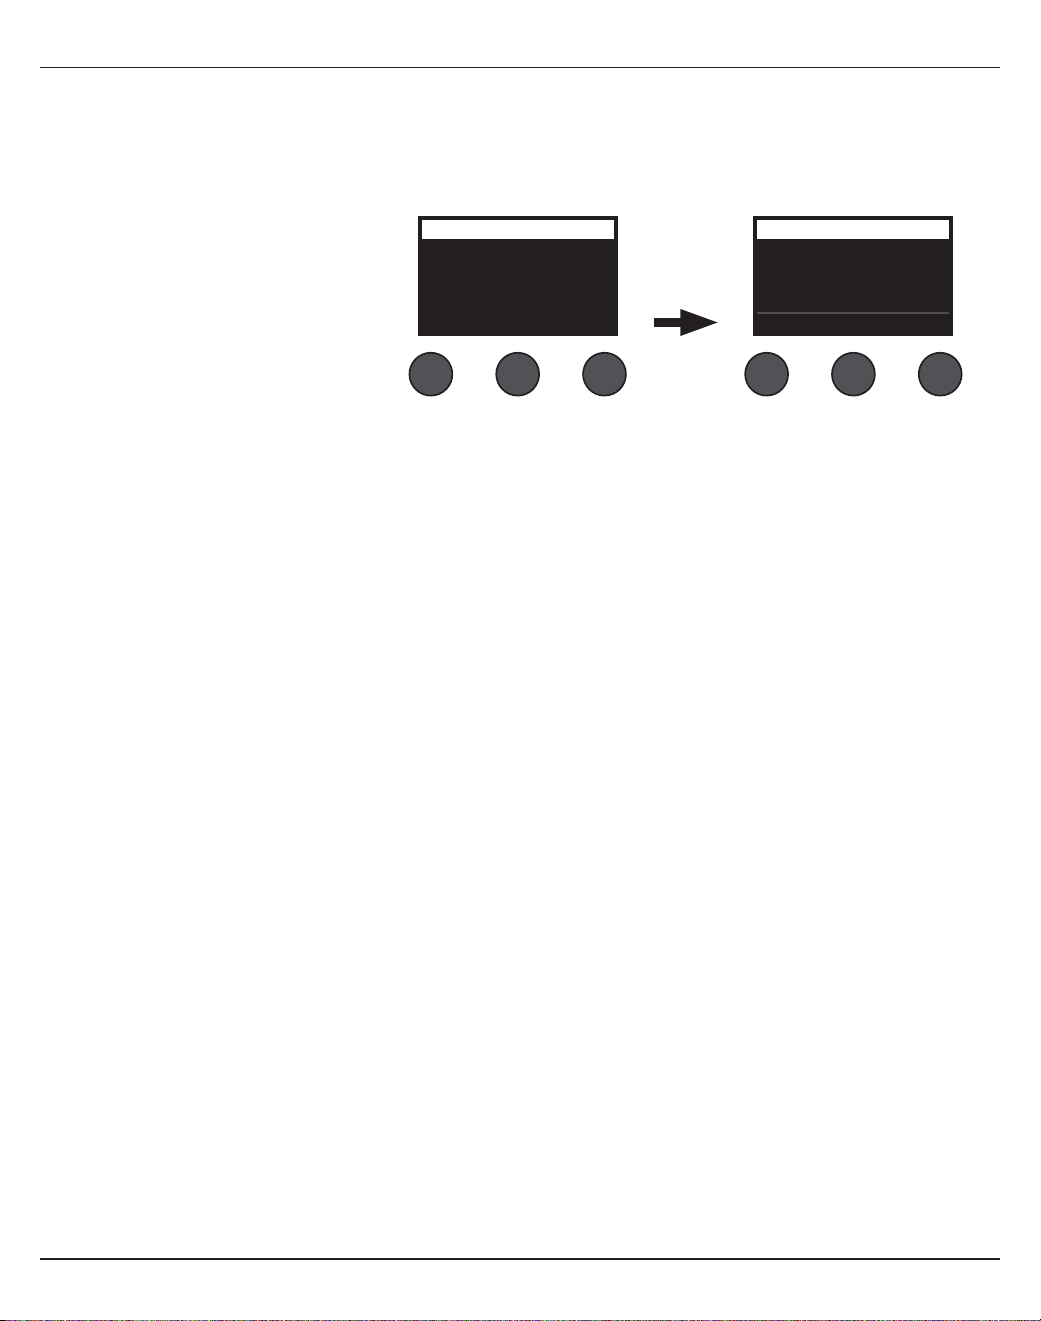
ةيبرعلا - 34
ليغشتلا
5 ..كرتشم دهشمك دهشملا نيزختل ظفح مكحتلا رز ردأ
6 ..كرتشم دهشمك دهشملا ظفح نود جورخلل مكحتلا رز ىلع طغضا وأ دهشملا ظفحل معن مكحتلا رز ىلع طغضا ،"؟دكأتم تنأ له" لاؤسلا رهظي امدنع
.ةشاشلا ىلع ا
ً
يلاح ل
َ
محملا دهشملا رهظيو رييغت يأ ثدحي و
.
ٍ
ناوث
10 لخ وأ معن مكحتلا رز ىلع طغضت مل اذإ "دهاشملا" ةشاشلا ضرعت :ةظحم
7 ..كرتشم دهشمك ظوفحم دهشملا نأ نم دكأتلل كرتشم مكحتلا رز ردأ
.مئاد لكشب ا
ً
قباس ظوفحملا كرتشملا دهشملا لادبتسا ىلإ كرتشم دهشمك دهشم ظفح يدؤيو .كرتشم دهشمل طقف ا
ً
دحاو نيزخت عقوم T4S/T8S رفوي :ةظحم
.هنمو رتويبمكلا ىلإ اهليمحتو دهاشملا ليزنتل L1
®
ثيدحت قيبطت مادختسا ليصافت ىلع عطل www.Bose.com/livesound ةرايز ىجري
All Channels
Singer/Songwriter
Load Shared Save
Scenes All Channels
My Scene 07
Current Shared Scene:
Back
Scenes
طغض
ليغشتلا
35 - ةيبرعلا
Bose دهاشم
."كرتشم دهشم" وأ "يدهشم" مساب اهظفح مث تادادعا ليدعت كنكمي ،Bose دهشم ليمحت دعب .ةيادب ةطقنك اهمادختس ةلثمأك ةسمخلا Bose دهاشم رفوتت
عنصملا تادادعإ
.ا
ً
يلاح ل
َ
محملا دهشملا ىلع اهؤارجإ قبس تارييغت يأ حسم ىلإ دهشملا اذه ليمحت يدؤيو .عنصملا هكرت دنع اهيلع ناك يتلا تادادعا ىلإ جزاملا دهشملا اذه ديعي
CH 1-4 )T4S/T8S( CH 5-8 )T8S(
ToneMatch
طشن
ةدعاسم ةادأ
)حطسم( Flat
zEQ
زواجت
ضفخنمطسوتمعفترم
لبيسيد 0لبيسيد 0لبيسيد 0
ةيرتماراب ةنزاوم
زواجت
ةباوبلا/طغاضلا
زواجت
1 رارقلا
ليدعت
زواجت
1 رارقلا
ريخأت
زواجت
يمقر
ىدص
زواجت
يمقر
دعاسم جرخ
توصلا متك
تيبثتو ةنزاوم عم :يلوأ
ةماعلا تادادعا
تيضفتلا
ةطشن ةشاشةلاحلا
رتويبمك ىلإ USB
يصخش
يسيئر:نيمي/راسي
رتويبمك نم USB
يصخش
يسيئر:نيمي/راسي
يسيئر جرخ يسيئرلا جرخلا توص ىوتسم
قحلا
ىدصلا عون
عونلاطسوتم
تقولا% 50
ةنزاوم% 50
.42 ةحفصلا يف "عنصملا تادادعإ" رظنا ،تارثؤملا لكب ةصاخلا عنصملا تادادعإب ةمئاق ىلع عطل :ةظحم

ةيبرعلا - 36
ليغشتلا
نحلملا/ينغملا
.MP3 راسم ا
ً
نايحأ هبحاصيو راتيج وأ ونايب ىلع فزعي نحلم/
ٍ
نغمل م
َ
مص
ُ
م دهشملا اذه
نحلملا/ينغملاب صاخلا دادعا ىلع لاثم .16 لكشلا
ليغشتلا
37 - ةيبرعلا
نوفوركيمراتيجونايبريهجلادعاسم لخد
1 ةانقلا2 ةانقلا3 ةانقلا4 ةانقلا6/5
ToneMatch
طشنطشنطشنطشن
رفوتم ريغ
ةعونتم ةيتوص عطاقميتوص راتيجونايبريهج تاوصأ
ةعونتم ةلومحم ةزهجأةيطغضورهك ةردق عم ةيندعم راتوأةماع حيتافم1 طشن ريهج
zEQ
طشنطشنطشنطشن
رفوتم ريغ
ضفخنمطسوتمعفترمضفخنمطسوتمعفترمضفخنمطسوتمعفترمضفخنمطسوتمعفترم
0
لبيسيد
لبيسيد 0 0
لبيسيد
لبيسيد 0 0
لبيسيد
لبيسيد 0لبيسيد 0 0
لبيسيد
لبيسيد 0لبيسيد 0لبيسيد 0لبيسيد 0
ةيرتماراب ةنزاومزواجتزواجتزواجتزواجترفوتم ريغ
ةباوبلا/طغاضلا
زواجتزواجتزواجتزواجت
رفوتم ريغ
2 طغاضلا2 طغاضلا2 طغاضلا2 طغاضلا
ليدعت
زواجتزواجتزواجتزواجت
رفوتم ريغ
1 رارقلا1 رارقلا3 رارقلا1 رارقلا
ريخأت
زواجتزواجتزواجتزواجت
رفوتم ريغ
يمقريمقريمقريمقر
ىدص
طشنطشنزواجتزواجت
رفوتم ريغ
)ماع( طسوتم)ماع( طسوتم)ماع( طسوتم)ماع( طسوتم
دعاسم/يطيحم
يزكرميزكرميزكرميزكرمدعاسم لخد
2-1 دعاسم% 502-1 دعاسم% 502-1 دعاسم% 502-1 دعاسم% 50 ىوتسم
5
ىوتسم
6
تيبثتو ةنزاوم عم :يلوأتيبثتو ةنزاوم عم :يلوأتيبثتو ةنزاوم عم :يلوأتيبثتو ةنزاوم عم :يلوأ% 50% 50
نحلملا/ينغملا دهشم ةانق تادادعإ
ةماعلا تادادعا
تيضفتلا
ةطشن ةشاشةلاحلا
يصخش رتويبمك ىلإ USBيسيئر:نيمي/راسي
يصخش رتويبمك نم USBيسيئر:نيمي/راسي
يسيئر جرخقحلا يسيئرلا جرخلا توص ىوتسم
ىدصلا عون
عونلاطسوتم
تقولا% 50
ةنزاوم% 50
ةيبرعلا - 38
ليغشتلا
ليغشت/DJ
.
ً
ومحم رتويبمك وأ ا
ً
جزام وأ
ً
ومحم ا
ً
زاهجو نينوفوركيم دادعا اذه مدختسيو .توص ليغشت ىلإ ةجاحلا دنع وأ DJ تابسانمل ليغشت/DJ دهشم مم
ُ
ص
ويرتسل ليغشت/DJ دادعإ ىلع لاثم .17 لكشلا
ليغشتلا
39 - ةيبرعلا
ليغشت/DJ دهشم ةانق تادادعإ
ةماعلا تادادعا
تيضفتلا
ةطشن ةشاشةلاحلا
يصخش رتويبمك ىلإ USBيسيئر:نيمي/راسي
يصخش رتويبمك نم USBيسيئر:نيمي/راسي
يسيئر جرخقحلا يسيئرلا جرخلا توص ىوتسم
ىدصلا عون
عونلاطسوتم
تقولا% 50
ةنزاوم% 50
راسيلل 1 ردصملانيميلل 1 ردصملانوفوركيمنوفوركيمدعاسم لخد
1 ةانقلا2 ةانقلا3 ةانقلا4 ةانقلا6/5
ToneMatch
طشنطشنطشنطشن
رفوتم ريغ
ليغشت/DJليغشت/DJةعونتم ةيتوص عطاقمةعونتم ةيتوص عطاقم
zEQ يف مكحتلا رارزأ ،لدتعمzEQ يف مكحتلا رارزأ ،لدتعمةعونتم ةلومحم ةزهجأةعونتم ةلومحم ةزهجأ
zEQ
طشنطشنطشنطشن
رفوتم ريغ
ضفخنمطسوتمعفترمضفخنمطسوتمعفترمضفخنمطسوتمعفترمضفخنمطسوتمعفترم
0
لبيسيد
لبيسيد 0 0
لبيسيد
لبيسيد 0 0
لبيسيد
لبيسيد 0لبيسيد 0 0
لبيسيد
لبيسيد 0لبيسيد 0لبيسيد 0لبيسيد 0
ةيرتماراب ةنزاومزواجتزواجتزواجتزواجترفوتم ريغ
ةباوبلا/طغاضلا
زواجتزواجتزواجتزواجت
رفوتم ريغ
ديدحتديدحت2 طغاضلا2 طغاضلا
ليدعت
زواجتزواجتزواجتزواجت
رفوتم ريغ
1 رارقلا1 رارقلا3 رارقلا1 رارقلا
ريخأت
زواجتزواجتزواجتزواجت
رفوتم ريغ
يمقريمقريمقريمقر
ىدص
زواجتزواجتزواجتزواجت
رفوتم ريغ
)ماع( طسوتم)ماع( طسوتم)ماع( طسوتم)ماع( طسوتم
دعاسم/يطيحم
راسينيمييزكرميزكرمدعاسم لخد
2-1 دعاسم
% 50
2-1 دعاسم
% 50
2-1 دعاسم
% 50
2-1 دعاسم
% 50
5 ىوتسم ىوتسم
6
تيبثتو ةنزاوم عم :يلوأتيبثتو ةنزاوم عم :يلوأتيبثتو ةنزاوم عم :يلوأتيبثتو ةنزاوم عم :يلوأ
% 50% 50
ةيبرعلا - 40
ليغشتلا
لماك قاطن
.MP3 لغشمو ةيعاقيا تاو يئابرهكلا راتيجلاو ريهجلا راتيجلاو لبطلا مقطل دهشملا اذه دادعإ متي
ريهجلاو لبطلا دادعإ ىلع لاثم .18 لكشلا
SYSTEMINPUT 2INPUT 1
VOLUME VOLUME
FRONT
LED
POWER
LIMIT
OFF
FULL RANGE
WITH SUB
EQ
MIC
LINE LEVEL
SIGNAL INPUT
INPUT
POWER
ON
OFF
100-240V~50/60Hz
1000W
LINE OUTPUT
SIGNAL/CLIP SIGNAL/CLIP POWER/FAULT
LIMIT
SYSTEM
INPUT 2INPUT 1
LINE OUTPUT LINE OUTPUT
LINE INPUT
POWER/FAULT
LIMIT
SIGNAL/CLIP
LINE INPUT
NORM
REV
THRU
HPF
POLARITY
LINE
OUTPUT EQ
POWER
LIMIT
OFF
FRONT
LED
ليغشتلا
41 - ةيبرعلا
لماكلا قاطنلا دهشم ةانق تادادعإ
ةماعلا تادادعا
تيضفتلا
ةطشن ةشاشةلاحلا
يصخش رتويبمك ىلإ USBيسيئر:نيمي/راسي
يصخش رتويبمك نم USBيسيئر:نيمي/راسي
يسيئر جرخقحلا يسيئرلا جرخلا توص ىوتسم
ىدصلا عون
عونلاطسوتم
تقولا% 50
ةنزاوم% 50
ريبك لبطيولعيولعريهجلاراتيجنوفوركيمنوفوركيمنوفوركيمدعاسم لخد
1 ةانقلا2 ةانقلا3 ةانقلا4 ةانقلا5 ةانقلا6 ةانقلا7 ةانقلا8 ةانقلا10/9
ToneMatch
طشنطشنطشنطشنطشنطشنطشنطشن
رفوتم ريغ
عاقيإعاقيإعاقيإريهج تاوصأيئابرهك راتيجةعونتم ةيتوص عطاقمةعونتم ةيتوص عطاقمةعونتم ةيتوص عطاقم
ماع ،دادتراماع يولعماع يولع1 طشن ريهجMic'd Amp w/ SM57ةعونتم ةلومحم ةزهجأةعونتم ةلومحم ةزهجأةعونتم ةلومحم ةزهجأ
zEQ
طشنطشنطشنطشنطشنطشنطشنطشن
رفوتم ريغ
LMHLMHLMHLMHLMHLMHLMHLMH
لبيسيد 0لبيسيد 0لبيسيد 0لبيسيد 0لبيسيد 0لبيسيد 0لبيسيد 0لبيسيد 0لبيسيد 0لبيسيد 0لبيسيد 0لبيسيد 0لبيسيد 0لبيسيد 0لبيسيد 0لبيسيد 0لبيسيد 0لبيسيد 0لبيسيد 0لبيسيد 0لبيسيد 0لبيسيد 0لبيسيد 0لبيسيد 0
ةيرتماراب ةنزاومزواجتزواجتزواجتزواجتزواجتزواجتزواجتزواجترفوتم ريغ
ةباوبلا/طغاضلا
طشنزواجتزواجتطشنزواجتزواجتزواجتزواجت
رفوتم ريغ
1 دادترا2 طغاضلا2 طغاضلا2 طغاضلا2 طغاضلاةباوبلاةباوبلاةباوبلا
ليدعت
زواجتزواجتزواجتزواجتطشنزواجتزواجتزواجت
رفوتم ريغ
1 رارقلا1 رارقلا1 رارقلا1 رارقلا1 رارقلا1 رارقلا1 رارقلا1 رارقلا
ريخأت
زواجتزواجتزواجتزواجتزواجتزواجتزواجتزواجت
رفوتم ريغ
يمقريمقريمقريمقريمقريمقريمقريمقر
ىدص
زواجتزواجتزواجتزواجتزواجتطشنطشنطشن
رفوتم ريغ
)ماع( طسوتم)ماع( طسوتم)ماع( طسوتم)ماع( طسوتم)ماع( طسوتم)ماع( طسوتم)ماع( طسوتم)ماع( طسوتم
دعاسم/يطيحم
يزكرميزكرميزكرميزكرميزكرميزكرميزكرميزكرمدعاسم لخد
4-1 دعاسم% 504-1 دعاسم% 504-1 دعاسم% 504-1 دعاسم% 504-1 دعاسم% 504-1 دعاسم% 504-1 دعاسم% 504-1 دعاسم% 509 ىوتسم10 ىوتسم
دعب :ةجلاعم نود نم
يلوا مخضملا
دعب :ةجلاعم نود نم
يلوا مخضملا
دعب :ةجلاعم نود نم
يلوا مخضملا
دعب :ةجلاعم نود نم
يلوا مخضملا
دعب :ةجلاعم نود نم
يلوا مخضملا
دعب :ةجلاعم نود نم
يلوا مخضملا
دعب :ةجلاعم نود نم
يلوا مخضملا
دعب :ةجلاعم نود نم
يلوا مخضملا
% 50% 50
عنصملا تادادعإ
ةيبرعلا - 42
عنصملا تادادعإ
ـب ةصاخلا عنصملا تادادعإ ةداعتس .عنصملا هترداغم دنع T4S/T8S جزام تادادعإ مسقلا اذه فصي
.Bose ـل عنصملا تادادعإ دهشم ليمحتب مق ،تقو يأ يف T4S/T8S
ةباوبلا/طغاضلل عنصملا تادادعإ
عونلاةيدحلا ةميقلابسكلا
فيفخ :1 طغاضلالبيسيد 16.0 -لبيسيد 3.0
طسوتم :2 طغاضلالبيسيد 16.0 -لبيسيد 5.0
ليقث :3 طغاضلالبيسيد 16.0 -لبيسيد 8.0
د
دحملالبيسيد 10.0 -لبيسيد 0
ضفاخلالبيسيد 10.0 -لبيسيد 0
ةيدحلا ةميقلاةعرسلا
شيوشتلا ةباوبلبيسيد 70.0 -% 50
ةيدحلا ةميقلاةدشلا
يداع :KickGate1لبيسيد 20.0 -% 100
عيرس :KickGate2لبيسيد 20.0 -% 100
ل
دعملل عنصملا تادادعإ
عونلاةيدحلا ةميقلابسكلاةعرسلا
حضاو :1 رارقلا% 50% 50زتره 0.50
لدتعم :2 رارقلا% 70% 100زتره 0.15
قماغ :3 رارقلا% 25% 25زتره 3.0
طيرش :1 تقولا لحرم% 50% 50زتره 1.00
دادترا :2 تقولا لحرم% 50% 100زتره 2.00
ةعرسلادادترا
عاقيإ :1 راوطا لحرمزتره 0.50% 0
لماح :1 راوطا لحرمزتره 0.50% 75-
لدتعم :1 راوطا لحرمزتره 1.00% 26-
عطاس :1 راوطا لحرمزتره 0.50% 76-
ةعرسلاقمعلا
يتوصلا بذبذتلازتره 5.00% 50
ريخأتلل عنصملا تادادعإ
عونلاجزمتقولادادترا
يمقر% 30ةيناث يللم 150% 30
يرظانت% 30ةيناث يللم 275% 20
طيرش% 30ةيناث يللم 350% 30
ىدصلا عونل عنصملا تادادعإ
عونلاةنزاومتقولاتقولا قاطن
حطسم% 50 % 20
ٍ
ناوث
4.6-0
ريغص% 50 % 15 ةيناث 0.8-0
طسوتم% 50 % 25ةيناث 1.9-0
ريبك% 50% 50
ٍ
ناوث
3.5-0
ةياغلل ريبك% 50% 100
ٍ
ناوث
7.0-0

43 - ةيبرعلا
ةنايصلاو ةياعرلا
اهحصإو ءاطخا فاشكتسا
عقوملا ىلع تنرتنا ربع ةدعاسملا بلطاف ،ةلكشملا لح ىلع رداق ريغ لازت تنك اذإ .جتنملا اذه مادختسا دنع لكاشم فداصت تنك اذإ ةيلاتلا لولحلا ب
ّ
رج
مقرلا ىلع
ً
ةرشابم Bose ىدل ينفلا معدلاو تاجتنملا معد قيرفب لاصتا ىجر
ُ
يف ،كانه كتلئسأ نع تاباجإ ىلع رثعت مل لاح يفو .www.Bose.com/livesound
. )877( 335-2673
ةلكشملالحلا
ةقاطلا حاتفمو لصتم T4S/T8S
دجوت نكل ،ليغشتلا عضو يف
.ةقاط
• ربتخا وأ هسفن ددرتملا رايتلا ذخأم نم ىرخأ تادعم يأ وأ حابصم ليغشت لواح .ددرتملا رايتلا ذخأم يف ءابرهك دوجو نم دكأت
.ددرتملا رايتلا ذخأم رابتخا زاهج مادختساب ذخأملا
: 1S وأ II زارطلا L1
®
ماظن عم T4S مدختست تنك اذإ
•.L1 ةقاط ةدحوو جزاملا نم لكب بسانم لكشب لصتم ToneMatch
®
لبك نأ نم دكأتف
•.)يسيئرلا كلسلا( ددرتملا رايتلا ذخأمو ةقاطلا ةدحو يف ا
ً
مامت ج
َ
رد
ُ
م يئابرهكلا ةقاطلا سباق نأ نم ققحت
•.قرزا نوللاب ءيضي ةقاطلاب صاخلا LED رشؤم نأو ليغشتلا ديق L1 ةقاط ةدحو نأ نم دكأت
نكل ليغشتلا ديق T4S/T8S
.توص ر
ُ
دصي
•.ىلع يسيئرلا جرخلا ىوتسم يف مكحتلا رز ريودت نم دكأت
•.اهتوص متك متي مل اهعامس ديرت يتلا لخدلا )تاونق( ةانق نأ نم ققحت
•.اهعامس ديرت يتلا ةانقلل ىلع "توصلا ىوتسم" مكحتلا رز ريودت نم ققحت
• نوللاب LED رشؤم ءيضي ن يفكي رادقمب ىلع هريودت مت دق ةبسانملا لخدلا ةانقب صاخلا "طبض" مكحتلا رز نأ نم دكأت
.)ةيوق لخد ةراشإ دوجو ىلإ ريشي( رضخا
•.جرخلاو لخدلا يتلحرم يف ةراشإ دوجو نم دكأتلل اهجرخو "تيضفتلا" لخد تايوتسم سيياقم نم ققحت
•.)ةلا( لخدلا ردصم يف ىلع توصلا ىوتسم يف مكحتلا رز ريودت نم دكأت
•.فلتخم لبك مادختساب جزاملاب )ةلا( لخدلا ردصم ليصوتب مق
•.لمعي ردصملا نأ نم دكأتلل فلتخم مخضم وأ L1 ةقاط ةدحوب ةرشابم )ةلا( لخدلا ردصم ليصوتب مق
•.ىرخأ ةرم جزاملا ليغشتب مق مث .ةيناث 30 ةدمل رظتنا مث جزاملا ليغشت فقوأ
: 1S وأ II زارطلا L1 ماظن عم T4S مدختست تنك اذإ
•.ىرخأ ةرم ةقاطلا ةدحو ليغشتب مق مث ،ToneMatch ذفنم يف ToneMatch لبك ليصوت دعأو ،ةقاطلا ةدحو ليغشت فقوأف
•.ا
ً
يسايق تنرثيإ لبك ب
ّ
رجف ،رخآ ToneMatch لبك رفوتي مل اذإو .دجو نإ رخآ ToneMatch لبك ب
ّ
رج
• .ةصوب ¼ ساقم فتاه ليصوت لبك مادختساب ةقاطلا ةدحو يف يرظانتلا لخدلاب T4S/T8S ـل يسيئرلا جرخلا ليصوتب مق
.توص عامس نم ققحت مث ،ةقاطلا ةدحوب صاخلا "طبض" مكحتلا رز ردأو
• ىجريف ،رمحا نوللاب LED ءاضأ اذإو .قرزا نوللاب ءيضي ةقاطلا ةدحو يف ةقاطلاب ةصاخلا LED رشؤم نأ نم دكأت
.ةرشابم )877( 335-2673 مقرلا ىلع Bose تاجتنم معدو ينفلا معدلا قيرفب لاصتا
ةيبرعلا - 44
ةنايصلاو ةياعرلا
ةلكشملالحلا
وأ نوفوركيم نم ةدوجلا ءيدر توص ردصي
.T4S/T8S ـب ةلصتم ةلآ
•.ةيرتمارابلا ةنزاوملا وأ zEQ مادختساب اهيف بوغرم ريغ ةنزاوم قيبطت مدع نم دكأت
• دادعإ مادختسا ديرت نكت مل اذإو .ةلا/نوفوركيملل ToneMatch
®
جزامل ا
ً
بسانم ا
ً
قبسم ا
ً
دادعإ تددح كنأ نم دكأت
."حطسم" ىلع ToneMatch طبض نم دكأتف ،ToneMatch جزامل قبسم
• نم ققحت .لخدلا ةانق يف )ىدصو ريخأتو ليدعتو ،ةباوبلا/طغاضلا( اهيف بوغرم ريغ تارثؤم دوجو مدع نم دكأت
.ا
ً
يلاح ةطشن تارثؤم يأ نع ا
ً
ثحب "تيضفتلا" ةمئاق يف "ةلاحلا"
• ةراشاب صاخلا LED ءيضي نأ بجيو .ةلا/نوفوركيملل بسانم لكشب هطبض مت T4S/T8S لخد نأ نم دكأت
.رضخا نوللاب ءيضي ىتح "طبض" ىوتسملا ضفخاف ،رمحا نوللاب ءاضأ اذإو ،رضخا نوللاب
•.ا
ً
فلتخم نوفوركيم وأ ةلآ لبك ب
ّ
رج
• جرخ لصوم يف ا
ً
مامت جردم لبكلا سباق نأ نم دكأت .T4S/T8S جزامب ةلا وأ نوفوركيملا ليصوت نم ققحت
.T4S/T8S لخد لصومو نوفوركيملا/ةلا
•.)تدجو نإ( ةلا وأ نوفوركيملا تادادعإ نم ققحت
•.)تدجو نإ( ةلا وأ نوفوركيملا تايراطب نم ققحت
.تارثؤم يأ عامس متي مل •."ةانقلا ليدعت" رز ىلع تطغض كنأ نم ققحت
•.ةبولطملا ةانقلل "FX توص متك" رز ىلع طغضت مل كنأ نم دكأت
.مكحتلا ضباقمل بيجتسي T4S/T8S •.ىرخأ ةرم جزاملا ليغشتب مقو ةيناث 30 رظتناو .جزاملا ليغشت فقوأ
يسيئرلا جرخلا توص ىوتسم يف مكحتلا رز
.ريثأت هل سيل
• جرخلا" نمض "تيضفتلا" ةمئاق يف قحلا يسيئرلا توصلا ىوتسم ليغشتل أيهم يسيئرلا جرخلا نأ نم ققحت
."يسيئرلا
لخد تصومب ءيش يأ ليصوت مدع دنع
فيفخ زيزأ وأ نينط عامس متي ،T4S/T8S
.L1
®
ماظن نم
•.هتاذ )يسيئرلا كلسلا( ددرتملا رايتلا ذخأمب L1 ةقاط ةدحوو T4S/T8S ليصوتب مق
• ةقاط ةدحو وأ/و T4S/T8S هب لصتي يذلا ددرتملا رايتلا ذخأم رابتخ ددرتملا رايتلا ذخأم رابتخا زاهج مادختساب
.)ةيضرأ وأ/و ةدياحم وأ/و ةبرهكم( ةحوتفم وأ ةسوكعم سمت طاقن يأ فاشتك L1
•.هعأ حضوملا وحنلا ىلع ا
ً
ضيأ هرابتخا مت كلسلا نأ نم دكأتف ،ةلاطإ كلس مدختست تنك اذإ
تاددرت وأ )
ٍ
فاك ريغ وأ( ةياغلل عفترم ريهج
.قاطنلا ةطسوتم وأ ةعفترم
•.ةيرتمارابلا ةنزاوملا وأ zEQ مادختساب اهيف بوغرم ريغ ةنزاوم قيبطت مدع نم دكأت
• دادعإ مادختسا ديرت نكت مل اذإو .ةلا/نوفوركيملل ToneMatch جزامل ا
ً
بسانم ا
ً
قبسم ا
ً
دادعإ تددح كنأ نم دكأت
."ةدعاسملا ةادا" ةئف يف "حطسم" ىلع ToneMatch طبض نم دكأتف ،ToneMatch جزامل قبسم
مادختساب ويرتسا ليجستل توصلا ءيدر ليغشت
.رخآ زاهج يأ وأ MP3 لغشم وأ CD لغشم
• .)T8S ـل 10/9 وأ( 6 دعاسملا لخدلاب ىنميلا ةانقلاو 5 دعاسملا لخدلاب زاهجلا نم ىرسيلا ةانقلا ليصوتب مق
.طخلا ىوتسم ىلع تاخدل ناممصم )10/9 وأ( 6/5 نادعاسملا ناخداف
•.لومحم زاهج وأ CD مادختسا دنع دتمملا ريهجلاو EQ تازيم ليطعتب مق
• تادادعإ نيوكت ىلإ جاتحت دقو .جمانربلا تابلطتم نم ققحتف ،رتويبمك ىلع ليجست جمانرب مدختست تنك اذإ
.تب 24/زترهوليك 48 ةعرسب ليغشتلل جمانربلا

45 - ةيبرعلا
ةنايصلاو ةياعرلا
ةلكشملالحلا
.نوفوركيملا يف ةدترم ةيذغت دجوي •.هب ةلصلا يذ توصلا ربكم ىلإ ةرشابم ريشي ثيحب نوفوركيملا هيجوتب مق
•.ا
ً
فلتخم ا
ً
نوفوركيم ب
ّ
رج
•.حرسملا ىلع ينغملا وأ/و L1 ماظنل ا
ً
فلتخم ا
ً
عضوم ب
ّ
رج
•.نوفوركيملاو L1 ماظن نيب ةفاسملا ةدايزب مق
•.نوفوركيملا ةانق يف zEQ طبضب ةعفترملا تاددرتلا ضفخا
•.نوفوركيملا ةانق يف Para EQ طبض لخ نم دادترا ببست دق يتلا ةصاخلا تاددرتلا تبك ب
ّ
رج
• ةلكشم يف مهاست تناك ام اذإ ىرتل "ىدص"و "ريخأت"و "ليدعت" ة
َ
مدختس
ُ
م ةيتوص تارثؤم يأ ا
ً
تقؤم زواجت
. مأ دادترا
.ةديج ةلاحب سيل دعاسملا جرخلا نأ ودبي • لخدلا تاراشإ هيجوت" عجار .لخد ةانق لكب ةصاخلا ةبولطملا ذخأملا ةطقنل
ً
أيهم دعاسملا جرخلا ناك اذإ امم دكأت
.21 ةحفصلا يف "دعاسملا جرخلا ىلإ
•.دعاسملا جرخلل بولطملا ةراشا ىوتسم صصخ دق لخد لك نأ نم ققحت
رتويبمك ىلإ T4S/T8S توص لاسرإ رذعتي
.USB ةلصو ربع
•.رتويبمكلاو جزاملاب بسانم لكشب لصتم USB لبك نأ نم ققحت
•.ا
ً
فلتخم USB لبك ب
ّ
رج
•.ليغشتلا ديق جزاملا نأ نم دكأت
• ىلإ USB" عجار .ىنميلاو ىرسيلا USB جرخ تاونقل ةصصخم ةبولطملا جزاملا لخد تاونق نأ نم ققحت
."تيضفتلا" ةمئاق يف "يصخش رتويبمك
• رشؤم ءيضي ن يفكي رادقمب ىلع هريودت مت دق ةلصلا تاذ لخدلا ةانقب صاخلا طبضلا ىوتسم نأ نم دكأت
.ةيوق لخد ةراشإ دوجو ىلإ ريشي امم رضخا نوللاب LED
• لخدلا يتلحرم يف ةراشإ دوجو نم دكأتلل "تيضفتلا" ةمئاق نمض جرخلاو لخدلا تايوتسم سيياقم نم ققحت
.جرخلاو
•.USB عم قفاوتم رخآ توص زاهج ليصوت لخ نم لمعي رتويبمكلاب صاخلا USB لخد نأ نم ققحت
• تادادعإ نيوكت ىلإ جاتحت دقو .جمانربلا تابلطتم نم ققحتف ،رتويبمك ىلع ليجست جمانرب مدختست تنك اذإ
.تب 24/زترهوليك 48 ةعرسب ليغشتلل جمانربلا
صارقا كرحمل بيجتسي T4S/T8S
.لومحملا
• ةيراجت ةمع يذ لومحم صارقأ كرحم ليصوتب مق ،كيدل لومحملا صارقا كرحم يف ةلكشم دوجو نم ققحتلل
ىرخأ
ةيبرعلا - 46
ةنايصلاو ةياعرلا
ةلكشملالحلا
T4S/ ىلإ رتويبمك نم توص لاسرإ رذعتي
.USB ةلصو ربع T8S
•.رتويبمكلاو جزاملاب بسانم لكشب لصتم USB لبك نأ نم ققحت
•.ا
ً
فلتخم USB لبك ب
ّ
رج
•.ليغشتلا ديق جزاملا نأ نم دكأت
•.هب ل
َ
طعم ريغ توصلا دادعإ نأو رتويبمكلا ليغشت نم ققحت
• ةمئاق يف "USB ىلإ يصخش رتويبمك" عجار .ةبولطملا جزاملا تاخد ةصصخم USB ةراشإ نأ نم ققحت
."تيضفتلا"
• ىوتسم يف مكحتلا رارزأ نأو اهتوص متك متي مل ةدراولا USB ةراش ةصصخملا جزاملا لخد تاونق نأ نم ققحت
.ىلع اهريودت مت دق توصلا
• رشؤم ءيضي ن يفكي رادقمب ىلع هريودت مت دق ةبسانملا لخدلا ةانقب صاخلا "طبض" مكحتلا رز نأ نم دكأت
.)ةيوق لخد ةراشإ دوجو ىلإ ريشي( رضخا نوللاب LED
• لخدلا يتلحرم يف ةراشإ دوجو نم دكأتلل "تيضفتلا" ةمئاق نمض جرخلاو لخدلا تايوتسم سيياقم نم ققحت
.جرخلاو
•.USB عم قفاوتم رخآ توص زاهج ليصوت لخ نم لمعي رتويبمكلاب صاخلا USB جرخ نأ نم ققحت
• تادادعإ نيوكت ىلإ جاتحت دقو .جمانربلا تابلطتم نم ققحتف ،رتويبمك ىلع ليجست جمانرب مدختست تنك اذإ
.تب 24/زترهوليك 48 ةعرسب ليغشتلل جمانربلا
فيظنتلا
•.طقف ةمعان ةفاج شامق ةعطق مادختساب جتنملا ةبلع فيظنت كنكمي
•.ةطشاك داوم وأ رداشن وأ لوحك ىلع يوتحت فيظنت ليلاحم وأ ةيئايميك داوم وأ تابيذم يأ مدختست
•.ةحتف يأ يف لئاوسلا باكسناب حمست وأ جتنملا نم برقلاب شر لئاوس يأ مدختست
ةينفلا تامولعملا
ةيكيناكيملا تافصاوملا
T4ST8S
)عافترا × ضرعلا × لوطلا( داعباتاصوب 3.25 × تاصوب 7.25 × تاصوب 8.4
)مم 83 × مم 184 × مم 214(
تاصوب 3.25 × ةصوب 12.25 × تاصوب 8.4
)مم 83 × مم 311 × مم 214(
نزولا)مجك 1.0( لطر 2.1)مجك 1.9( لاطرأ 4.1
ةيئابرهكلا ةقاطلا تامولعم
توصو )A/D( يمقر/يرظانت توص ليوحت
)D/A( يرظانت/يمقر
تب 24
ةنيعلا لدعمزترهوليك 48
USBB عونلاو A عونلا نم ذفنم ،B عونلا ىلإ A عونلا نم لبك ،ىلعأ وأ 2.0
يصخشلا رتويبمكلا تابلطتمىلعأ وأ Mac OS 10.5 ؛ىلعأ وأ Microsoft Windows 7

47 - ةيبرعلا
ةيفاضإ تامولعم
ةيفاضإ تامولعم
ةخسن بلطل .)رايغلا عطقو تاقحلملا كلذ يف امب( كجتنم لوح تامولعملا نم ديزمل )www.Bose.com عقوم ىلع تنرتنا ىلع( كلاملا ليلد ىلإ عوجرلا ىجري
.ةد
ّ
وزملا فتاهلا ماقرأ مادختسا ىجري ،ةعوبطم
دودحملا نامضلا
.نامضلا ليصافت ىلع عطل www.pro.Bose.com عقوملا ةرايزب لضفت .دودحم نامضب جتنملا عتمتي
www.bose.com/au/warranty ىلع انب صاخلا بيولا عقوم عجار .ادنليزوينو ايلارتسأ يف جتنملا اذه عم ةرفوتملا نامضلا تامولعم قبطنت
.ادنليزوينو ايلارتسأ يف نامضلا نع ليصافت ىلع لوصحلل www.bose.com/nz/warranty وأ
عينصتلا خيرات
.2016 وأ 2006 ىلإ "6" مقرلا ريشي ثيح ؛عينصتلا ةنس ىلإ يلسلستلا مقرلا يف نماثلا مقرلا ريشي
ناتكيرما
)ةيبونجلا اكيرمأ ،ىطسولا اكيرمأ ،كيسكملا ،ادنك ،ةدحتملا تايولا(
Bose Corporation
Framingham, MA 01701 USA
Corporate Center: 508-879-7330
Americas Professional Systems,
800-994-2673 :ينفلا معدلا
ايلارتسأ
Bose Pty Limited
Unit 3/2 Holker Street
Newington NSW Australia
61 2 8737 9999
اكيجلب
Bose N.V. / S.A
Limesweg 2, 03700
Tongeren, Belgium
012-390800
نيصلا
Bose Electronics )Shanghai( Co Ltd
25F, L’Avenue
99 Xianxia Road
Shanghai, P.R.C. 200051 China
86 21 6010 3800
اسنرف
Bose S.A.S
26-28 avenue de Winchester
78100 St. Germain en Laye, France
01-30-61-63-63
ايناملأ
Bose GmbH
Max-Planck Strasse 36D 61381
Friedrichsdorf, Deutschland
06172-7104-0
جنوك جنوه
Bose Limited
Suites 2101-2105, Tower One, Times Square
1 Matheson Street, Causeway Bay, Hong Kong
852 2123 9000
دنهلا
Bose Corporation India Private Limited
Salcon Aurum, 3rd Floor
Plot No. 4, Jasola District Centre
New Delhi – 110025, India
91 11 43080200
ايلاطيإ
Bose SpA
Centro Leoni A – Via G. Spadolini
5 20122 Milano, Italy
39-02-36704500
نابايلا
Bose Kabushiki Kaisha
Sumitomo Fudosan Shibuya Garden Tower 5F
16-17, Nanpeidai-cho
Shibuya-Ku, Tokyo, 150-0036, Japan
81-3-5489-0955 فتاهلا
www.bose.co.jp
ادنلوه
Bose BV
Nijverheidstraat 8 1135 GE
Edam, Nederland
0299-390139
ةدحتملا ةكلمملا
Bose Ltd
1 Ambley Green, Gillingham Business Park
KENT ME8 0NJ
Gillingham, England
0870-741-4500
دروتسملا تامولعم
يبوروا داحتا
Bose Products B.V., Gorslaan 60, 1441 RG
Purmerend, The Netherlands
نيصلا
Bose Electronics )Shanghai( Company Limited,
Part C, Plan 9, No. 353 North Riying Road, China
)Shanghai( Pilot Free Trade Zone
ناويات
Bose Taiwan Branch, 9F-A1, No. 10, Section 3,
Minsheng East Road, Taipei City 104, Taiwan
+886-2-2514 7676 :فتاه
كيسكملا
Bose de México, S. de R.L. de C.V., Paseo de las
Palmas 405-204, Lomas de Chapultepec, 11000
México, D.F.
+5255 )5202( 3545 :فتاه
ىرخا نادلبلا يف لاصتا ليصافت ىلع عطل بيولا عقوم عجار
لاصتا تامولعم
.www.Bose.com عقوملا ىلع بيولا ىلع انترايزب لضفت

©2017 Bose Corporation, All rights reserved.
Framingham, MA 01701-9168 USA
www.Bose.com
All trademarks are the property of their respective owners
AM801203 Rev. 00
November 2017