
Technical Support and E-Warranty Certificate www.vevor.com/support
INVERTER CHARGER USER MANUAL
MODEL:BL-W2012V-L,BL-W3024V-L,BL-W4024V-L,
BL-W5024V-L,BL-W6048V-L,BL-W6024V-L
We continue to be committed to provide you tools with competitive price.
"Save Half", "Half Price" or any other similar expressions used by us only
represents an estimate of savings you might benefit from buying certain tools
with us compared to the major top brands and does not neces
sarily mean to cover
all categories of tools offered by us. You are kindly reminded to verify carefully
when you are placing an order with us if you are actually Saving
Half in comparison with the top major brands.
MODEL:BL-W2012V-L,BL-W3024V-L,BL-W4024V-L,
BL-W5024V-L,BL-W6048V-L,BL-W6024V-L
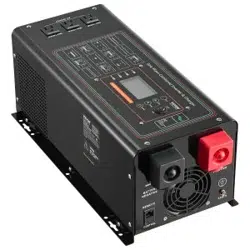
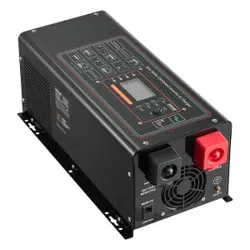
(The picture is for reference only, please refer to the actual object)
Have product questions? Need technical support? Please feel free to
contact us:
Technical Support and E-Warranty Certificate
www.vevor.com/support
NEED HELP? CONTACT US!
This is the original instruction, please read all manual instructions
carefully before operating. VEVOR reserves a clear interpretation of our
user manual. The appearance of the product shall be subject to the
product you received. Please forgive us that we won't inform you again if
there are any technology or software updates on our product.
Inverter charger
BL-W2012V-L BL-W3024V-L BL-W4024V-L BL-W5024V-L
BL-W6024V-L BL-W6048V-L
Warning-To reduce the risk of injury, user must read instructions
manual carefully.
This device complies with Part 15 of the FCC Rules. Operation
is subject to the following two conditions:(1)This device may not
cause harmful interference, and (2)this device must accept any
interference received, including interference that may cause
undesired operation.
This product is subject to the provision of European Directive
2012/19/EC. The symbol showing a wheelie bin crossed
through indicates that the product requires separate refuse
collection in the European Union. This applies to the product
and all accessories marked with this symbol. Products marked
as such may not be discarded with normal domestic waste, but
must be taken to a collection point for recycling electrical and
electronic devices
SAFETY INSTRUCTIONS
Thank you for choosing the intelligent frequency inverter,household
inverter,and online interactive products produced by our company.The
design is safe,reliable and easy to use. Please read this manual carefully,it
will help you get the fullest service life and service.
Please strictly abide by all warnings and operating instructions in the
manual and on the machine and keep this manual properly.
The installation/operation and maintenance of
this series of products
should be carried out by trained and technical personnel,and the following
requirements should be followed.
1.Please confirm that the DC/AC voltage value of the connected product
conforms to the nominal and rated working voltage value of the product.

2.Please make sure that the positive and negative poles of the DC input of
this product and the positive and negative poles of the battery are correctly
connected,not reversed.
3.Please make sure that the connection cable between the product and the
battery is as short as possible,the input and output wiring is correct and
firm,and pay attention to avoid short circuit of the connection cable.
4.There is high voltage inside this product,non-electrical professionals
shou
ld not open the inverter case.
The car starter battery can provide a short-term high current to start the
engine,but it is not designed for continuous power use and is not suitable
for deep cycle discharge.If you want to use a certain electrical equipment
continuously for a long time,it is recommended that you additionally equip
a battery that is suitable for deep discharge,such as AGM or GEL batteries.
Disclaimer:Due to the continuous update and improvement of products an
d
technologies, the content in this document may not completely match the
actual product,please understand.If you need to inquire about product
updates,please contact our company.
INSTALLATION
1.Installation instructions
①.Unpacking inspection
Open the package of the inverter,please check the accessories,and check
whether the inverter is damaged during transportation.If you find damage
or missing parts,please inform the carrier and distributor.
Note:
Please keep the packing box and packing materials for future
transportation.
This series of products are heavier (see appendix),so be careful when
handling

2.Installation precautions
Note
①.The area where the inverter is placed must be well ventilated,away from
water,flammable gas and corrosive agents.
②.Keep the side panel fan air inlet,air outlet and air inlet on the side of the
box unobstructed.
③
.The ambient temperature of the inverter should be kept between
0
℃
-40℃ .
④.If the machine is disassembled and used at low temperature,water
droplets may condense.You must wait for the inside and outside of the
machine to be completely dry before installing and using it,otherwise there
is a danger of electric shock.
⑤.Please install the inverter near the mains input socket or switch,so that
in an emergency,unplug the mains input plug and cut off the power.
⑥.Do not connect the inverter output directly to the mains
:
*When the load is connected to the inverter,the load must be turned off
before wiring, and then the load must be turned on one by one.
*Connect the inverter to a special socket with over current protection
device
*The power socket used should be connected to the protective earth
terminal
*Regardless of whether the input power cord is plugged into the mains
socket,the inverter output may be charged.Turnin
g off the inverter does not
guarantee that the internal parts of the machine will not be charged.If you
want to make the inverter no output,you must first turn off all switches,and
then cut the Mains power
*When inductive loads such as motors,monitors,and laser printers are
needed, the starting power is too large.When selecting an inverter,the
capacity should be calculated based on the starting power.The starting
power is usual
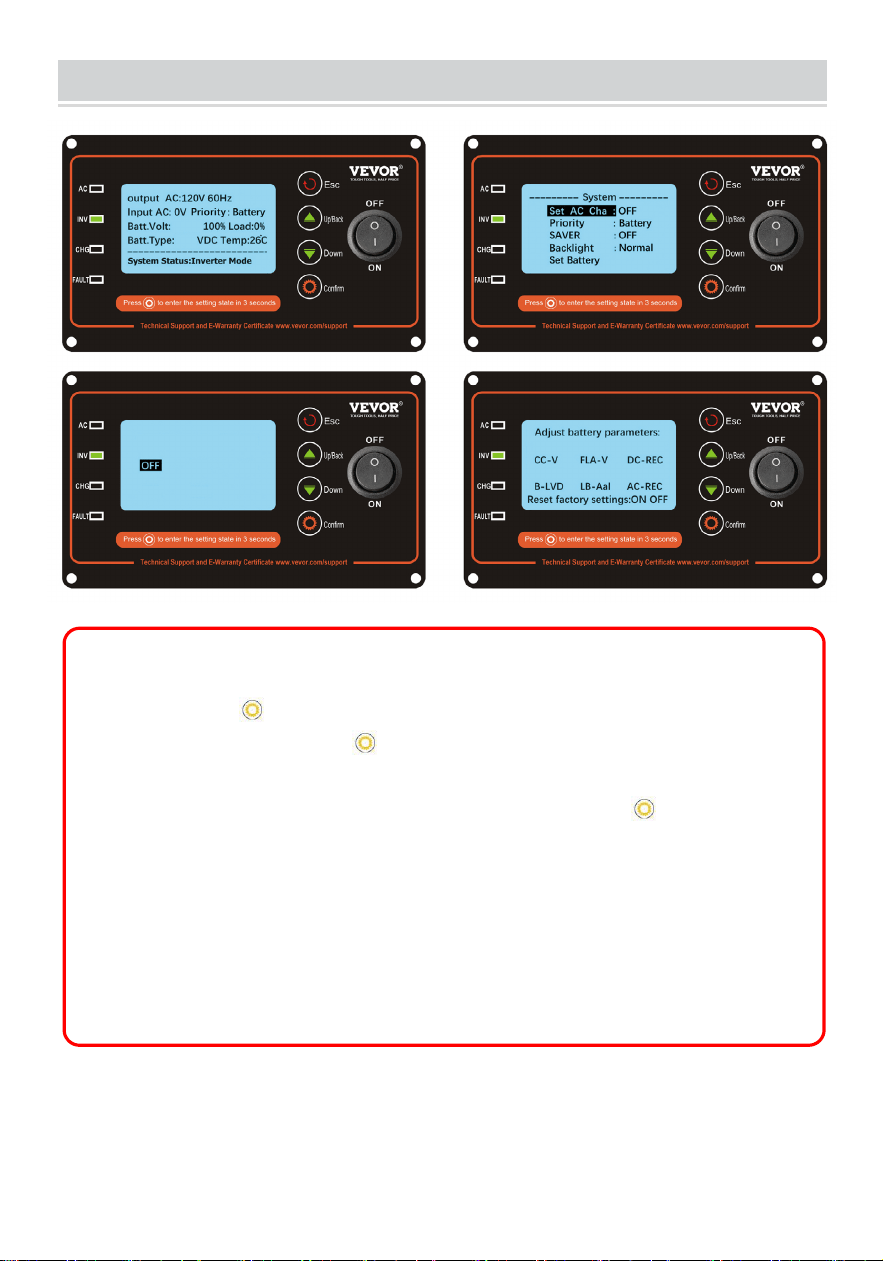
LCD PANEL DESCRIPTION
Description:
Long press the
setting key for 3 seconds to enter the system setting
interface,and pressing the
setting key can also indicate
confirmation.The LCD will automatically turn off the backlight (energy
saving)without any operation for 5 seconds.Press the
setting key
again can turn on the backlight.
Energy saving (sleep)function,when the inverter is working in battery
mode and no load,it will enter the state(Off output)after 20 seconds
in order to achieve energy saving effect,automatically turn on after
load,normal use.
Set AC charging current:
15A 35A
25A 50A
LCD PANEL DESCRIPTION
Description:
Long press the setting key for 3 seconds to enter the system setting
interface,and pressing the setting key can also indicate
confirmation.The LCD will automatically turn off the backlight (energy
saving)without any operation for 5 seconds.Press the setting key
again can turn on the backlight.
Energy saving (sleep)function,when the inverter is working in battery
mode and no load,it will enter the state(Off output)after 20 seconds
in order to achieve ene
rgy saving effect,automatically turn on after
load,normal use.
28.4V
20.0V
24.6V
24.0
27.6V
21.0V
26.0V
21.6V
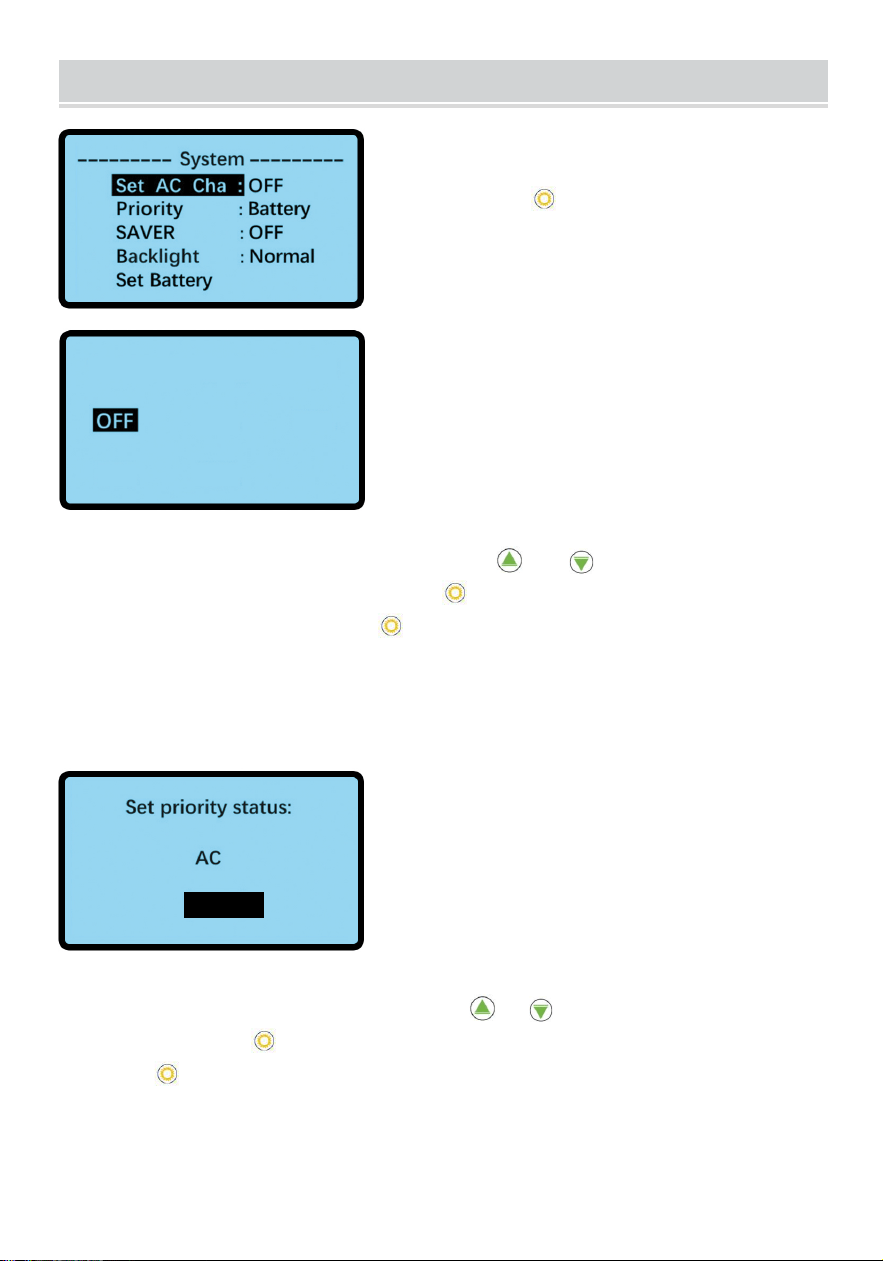
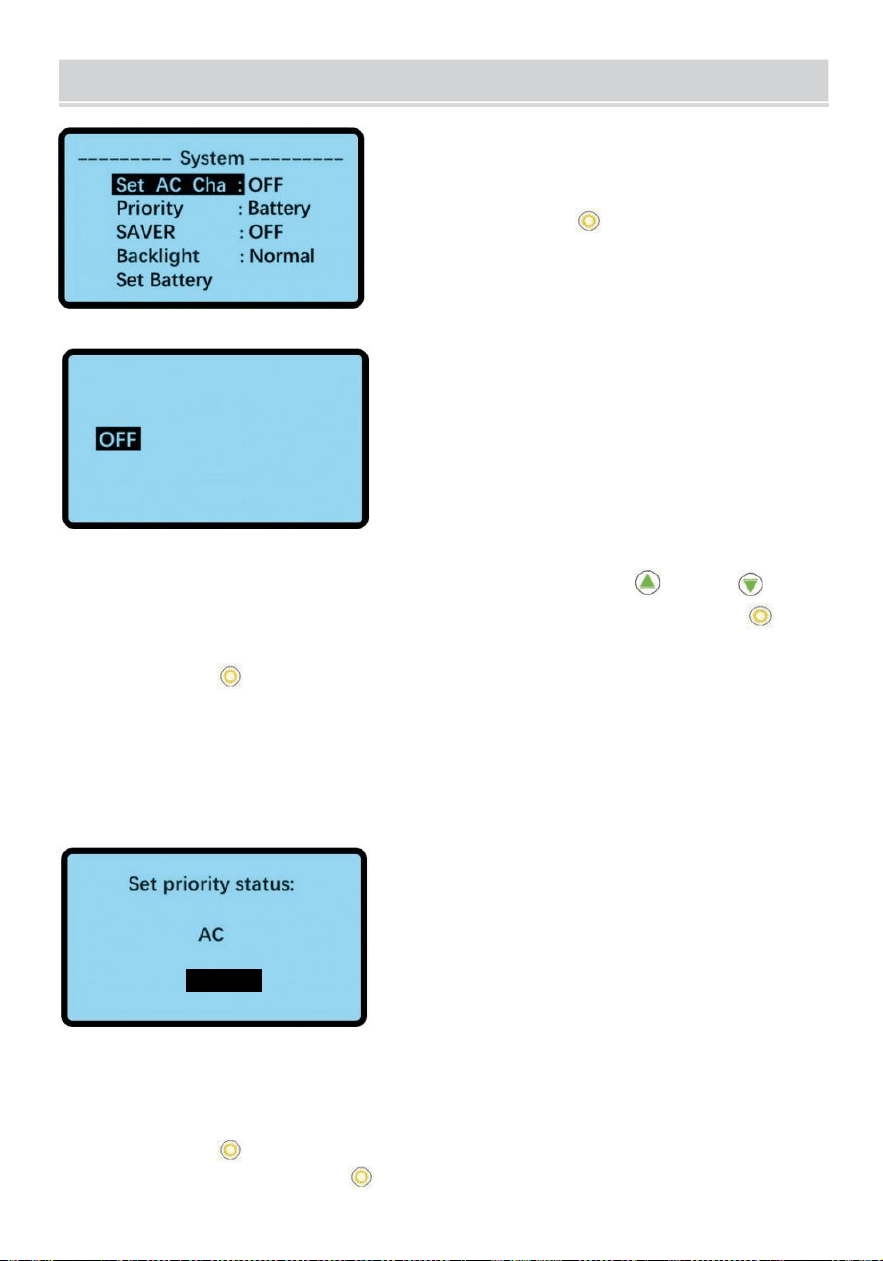
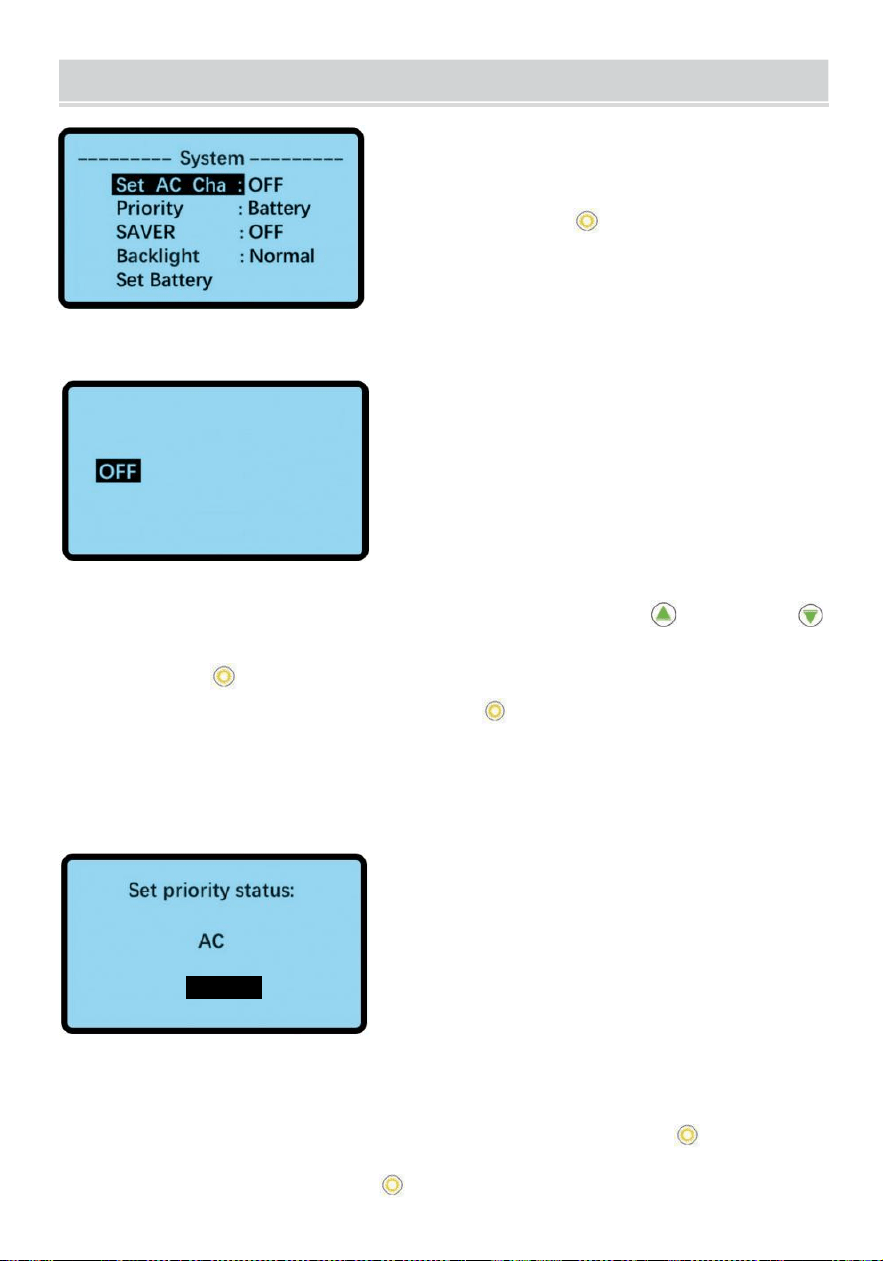
WORKING MODE SETTING
Set the mains charging current
In the system setting interface,press the
or key to select Set AC
charging current, and then press the
key to confirm.Select the charging
current you want and press the
key to confirm.
Set Priority AC/Battery
In the system setting interface,press th
Different specifications of inverters can set different charging current
values. The mains charging current value in the left picture is the default
parameter of the 24V3000W inverter.
e
or key to select the priority,
and then press the
key to confirm.Select the priority status you want and
press the
key to confirm.
After changing the priority,the system setting interface will correctly display
the current work priority after 5 seconds.
Enter the system setting interface
Long press the
setting key for 3 seconds
to enter the system setting interface after
you turn on the inverter.
Set AC charging current:
15A 35A
25A 50A
Battery
AC priority:The mains power supply priority.The battery power supply will
start instantly when the mains power failure(the switching is milliseconds
and does not affect the electrical appliances in use)and can be used as a
UPS.When the mains power is restored,it will automatically switch to the
mains power supply and charge the battery at the same time.
Battery priority:The battery power supply priority.When the battery power
is low,it will switch to the mains power su
pply,and the battery will be
charged automatically.When the battery voltage returns to a certain
value(set in the battery settings)and 30 minutes later the battery power
supply will be automatically restored.
protection board is disconnected,the inverter can be charged without
turning on,intelligently repair the battery,and extend the service life.
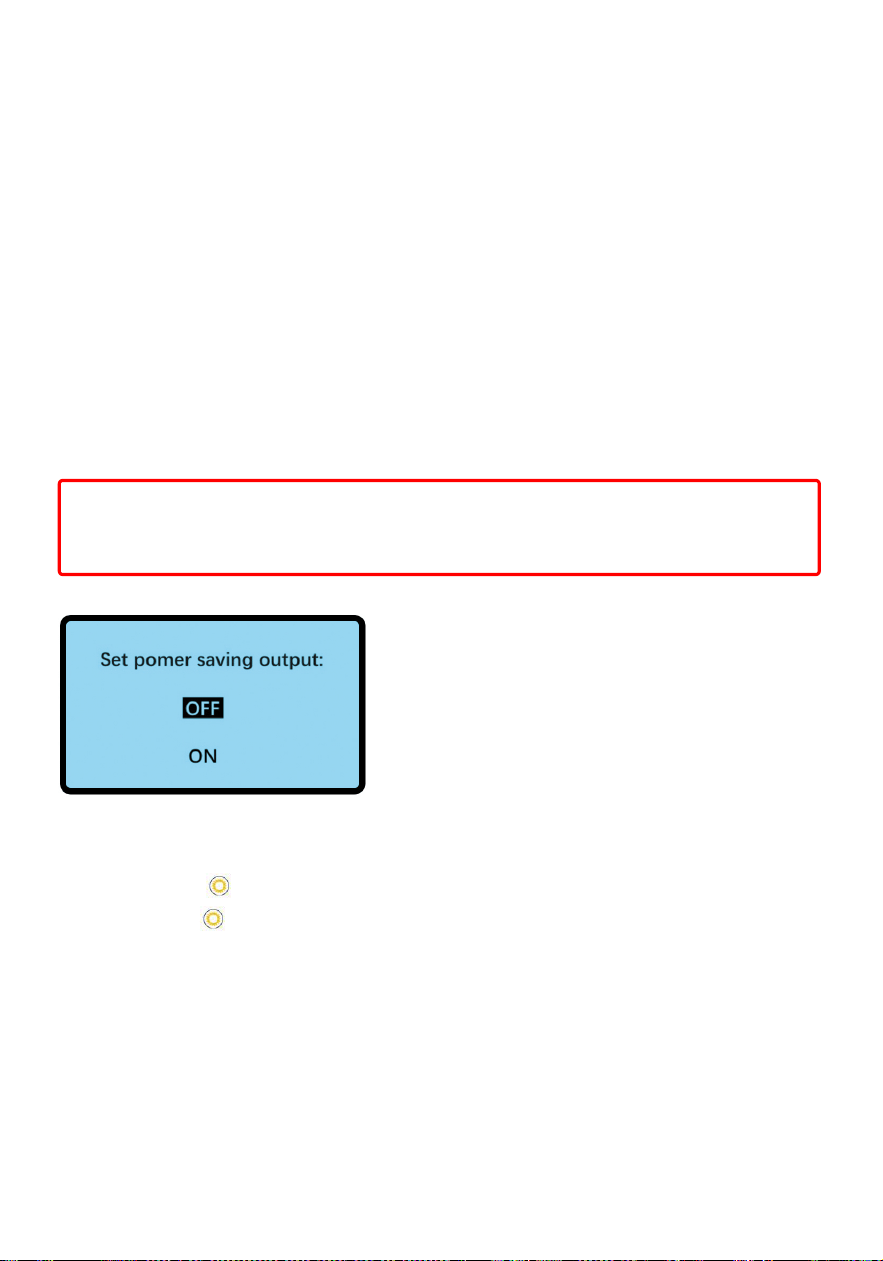
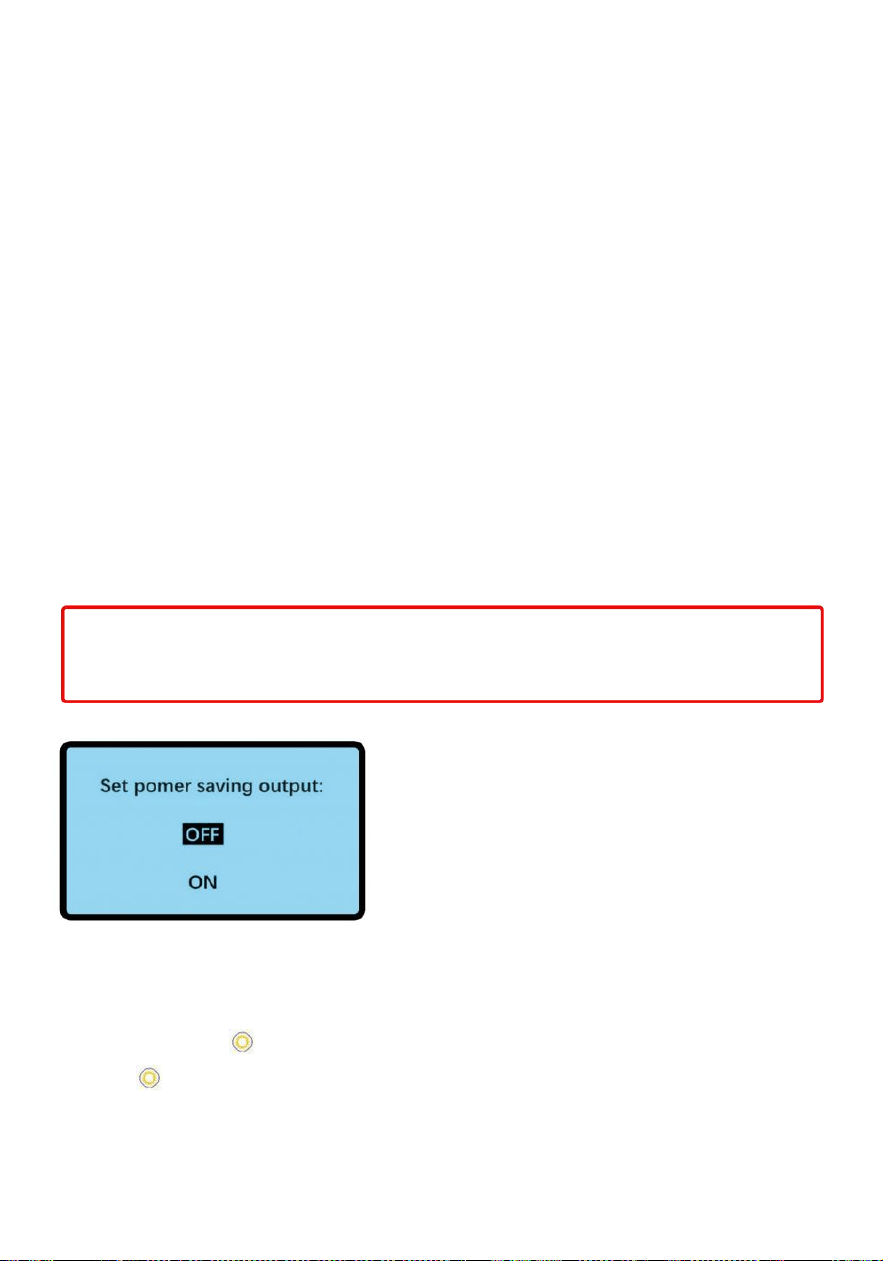
Energy-saving output:off/on
In the system setting interface,press the or key to select SAVER, and
then press the
key to confirm.Select the saving output(off/on)you want
and press the
key to confirm.
After you change the SAVER setting,the system setting interface will correctly
display the current work SAVER setting after 5 seconds.
On:the inverter will enter sleep state(turnoff the output)after 20 seconds
when the inverter is working in battery mode and no load in.the no load power
will low than 3W,it will start automatically after loading
Off:the inverter will keeps start and will not enter sleep state,
Tip:Switch between AC mode and Battery mode requires an interval of
30 minutes
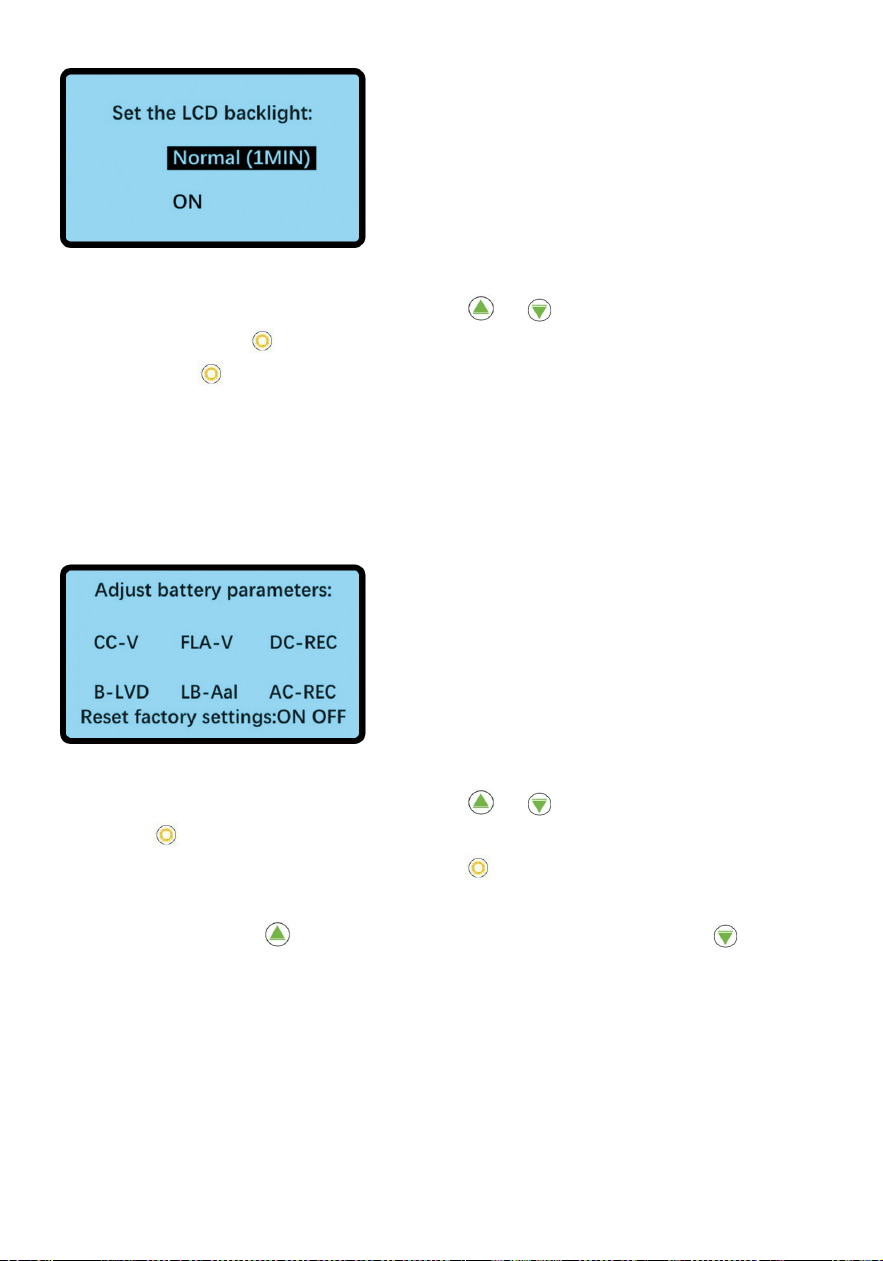
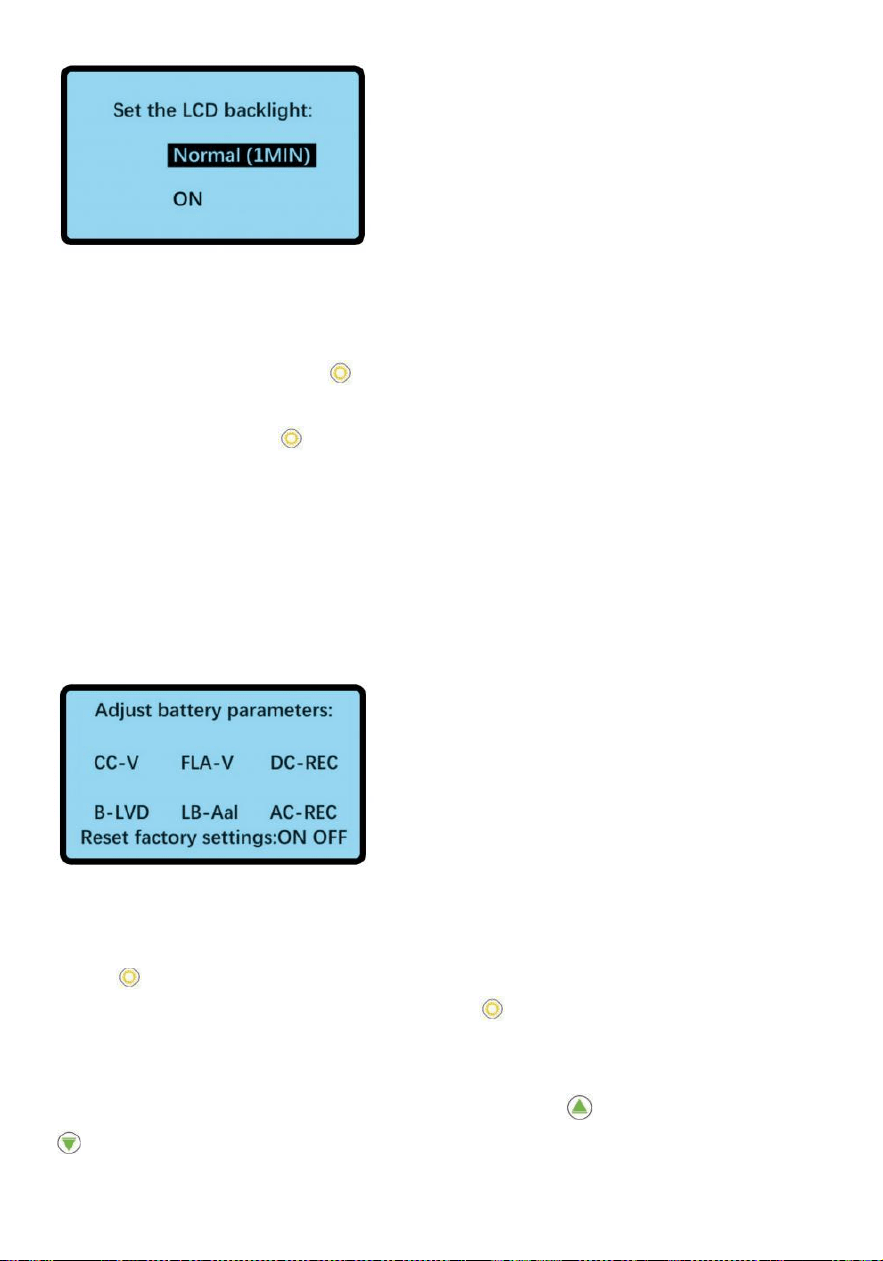
Backlight setting:normal/on
In the system setting interface,press the
or key to select Backlight,
and then press the
key to confirm.Select the backlight state you want
and press the
key to confirm.after you change the Backlight setting,
the system setting interface will correctly display the current work Backlight
setting after 5 seconds.
On:the Backlight will keeps on
Normal:The Backlight will turn off when no operation within 1 minute
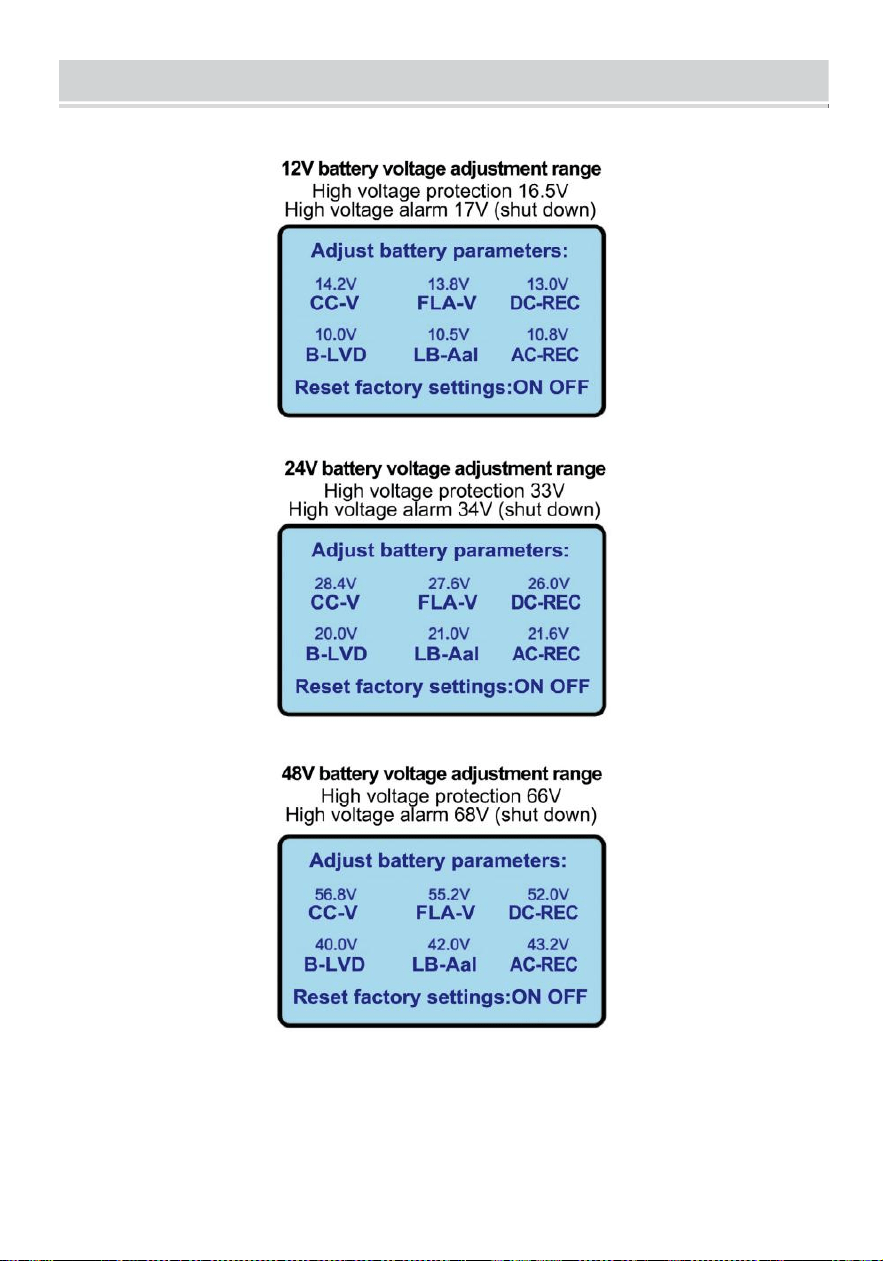
Battery setting
In the system setting interface,press the
or key to select Set and then
press the
key to confirm
In the battery setting interface,press the
key to select the battery
parameter you want to adjust.After selecting the battery parameter you
want to adjust,press
can increase the voltage value,and press can
decrease the voltage value.(The voltage value will not change immediately,
it need to wait for 5 seconds)it will automatically return to the inverter
information interface when no operation within 30 seconds.
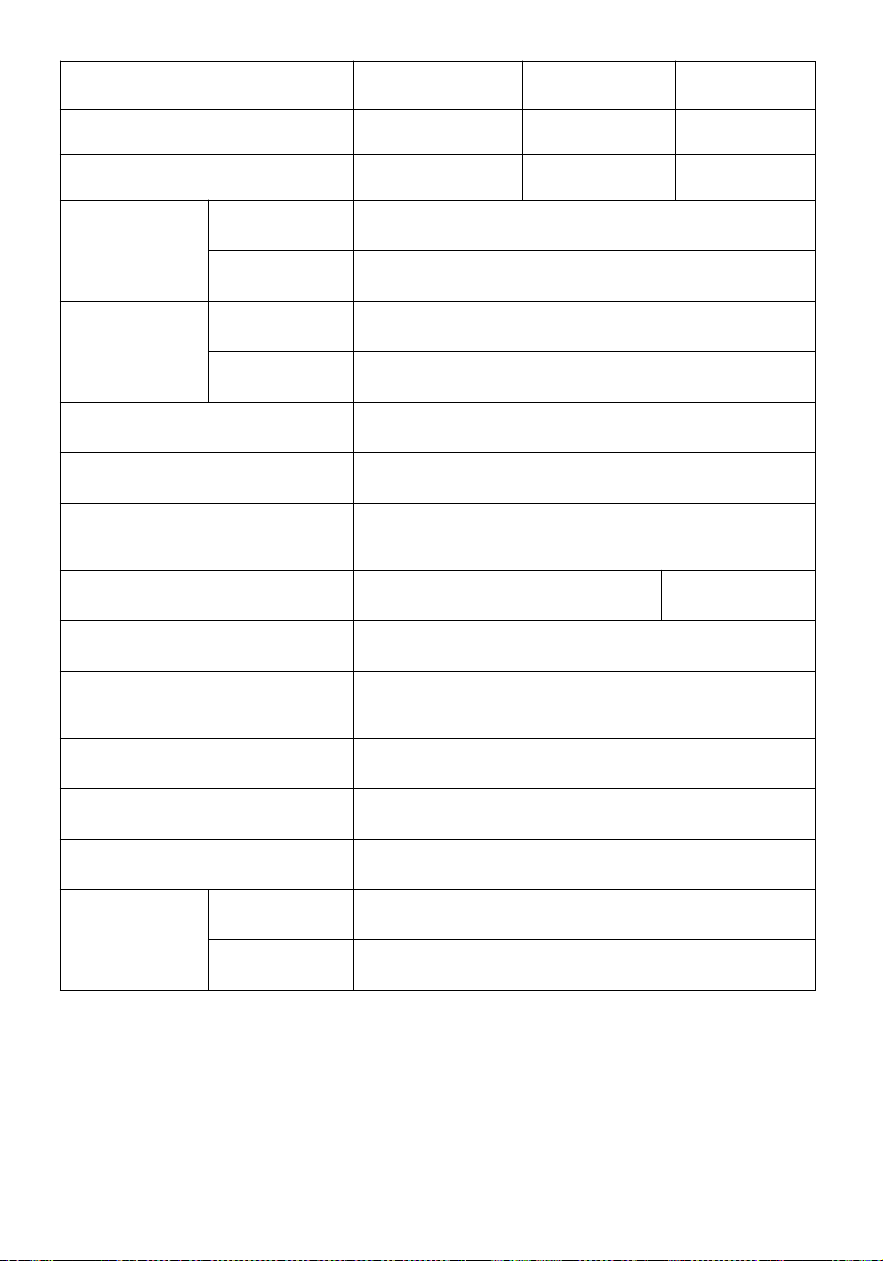
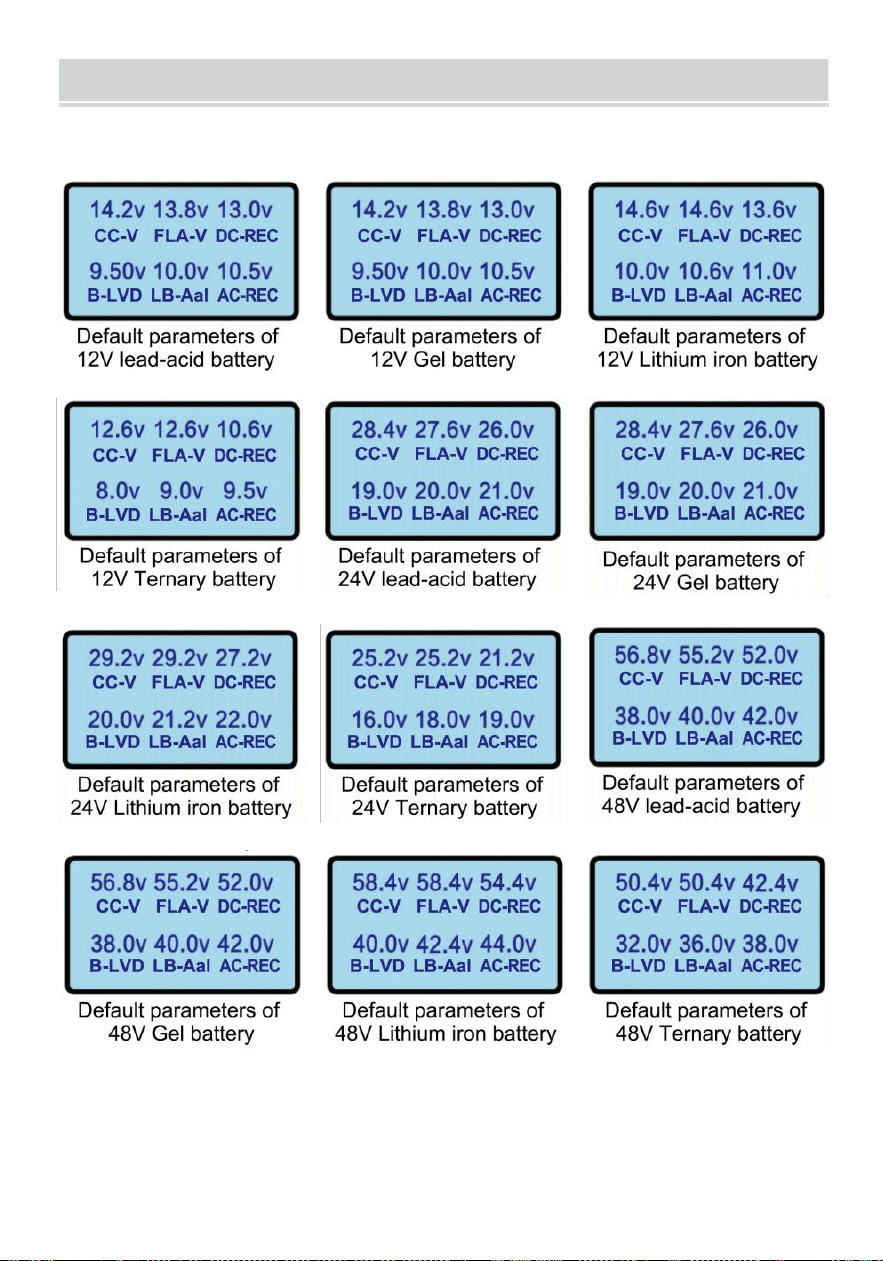
CC-V: Constant voltage charging
FLA-V: Float charging
DC-REC: In the state of battery priority,Mains power supply,the battery
power supply will be automatically restored 30 minutes later when the
28.4V
20.0V
27.6V
21.0V
26.0V
21.6V
battery voltage returns to this value.
B-LVD: Low voltage protection(shutdown)
LB-Aal: Low voltage alarm(beeping)
AC-REC :In the state of battery priority,
Automatically switch to mains priority when the battery voltage Down to this
value.
The picture on the left is the default battery voltage parameter of the
24V3000W inverter system.
The user can select the charging gear according to the power demand(Daily
charging is recommended to be adjusted to low or medium gear
)
The figure on the left is the default parameters ofthe 24V3000W inverter.The
charging current values of inverters of different specifications are different.
Please refer to the figure below.
CHARGING CURRENT COMPARISON
Mode Low Mid High Super high
12V 2KW
10A 20A 30A 50A
24V 3KW
15A 25A 35A 50A
24V 4KW/5KW/6KW
15A 35A 55A 70A
48V 6KW
15A 25A 35A 50A
Set AC charging current:
15A 35A
25A 50A
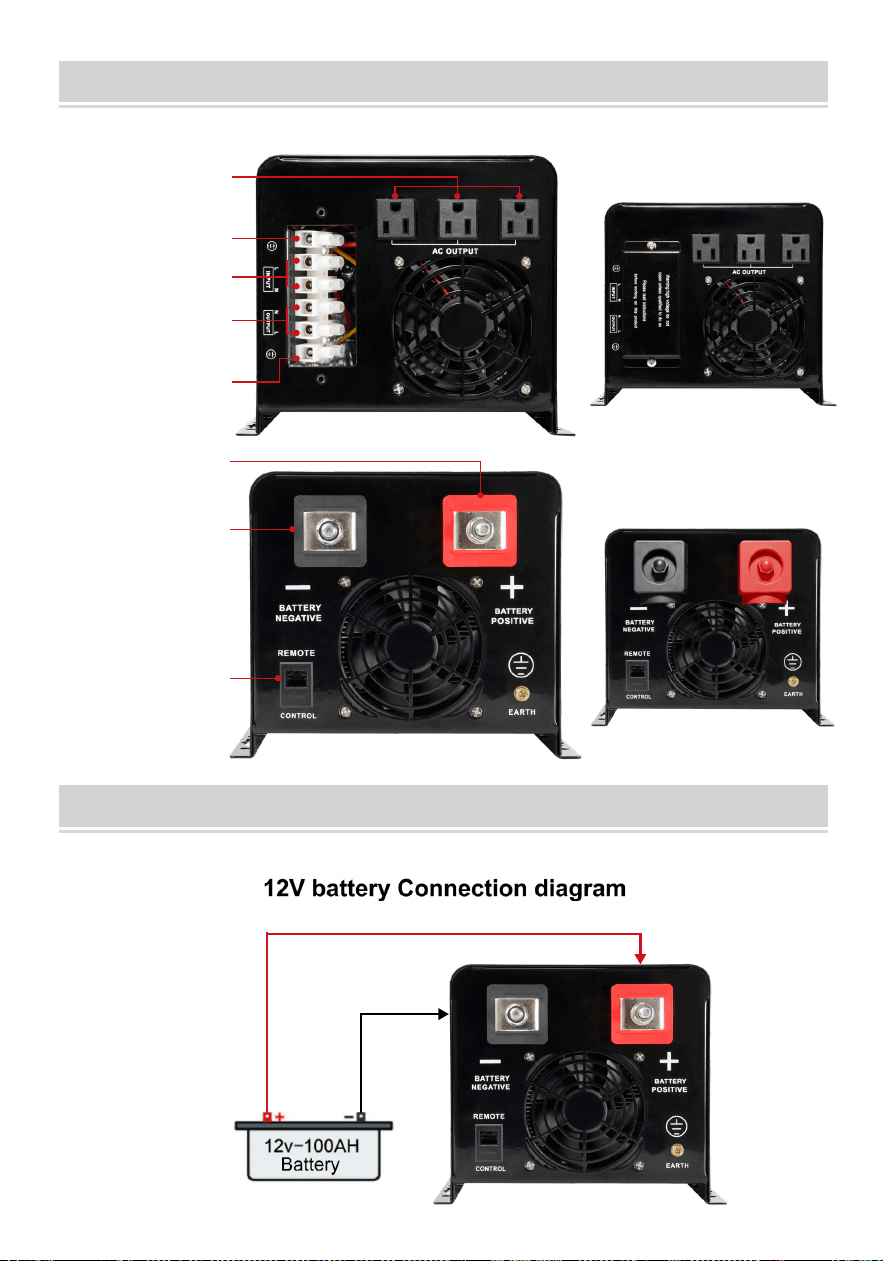
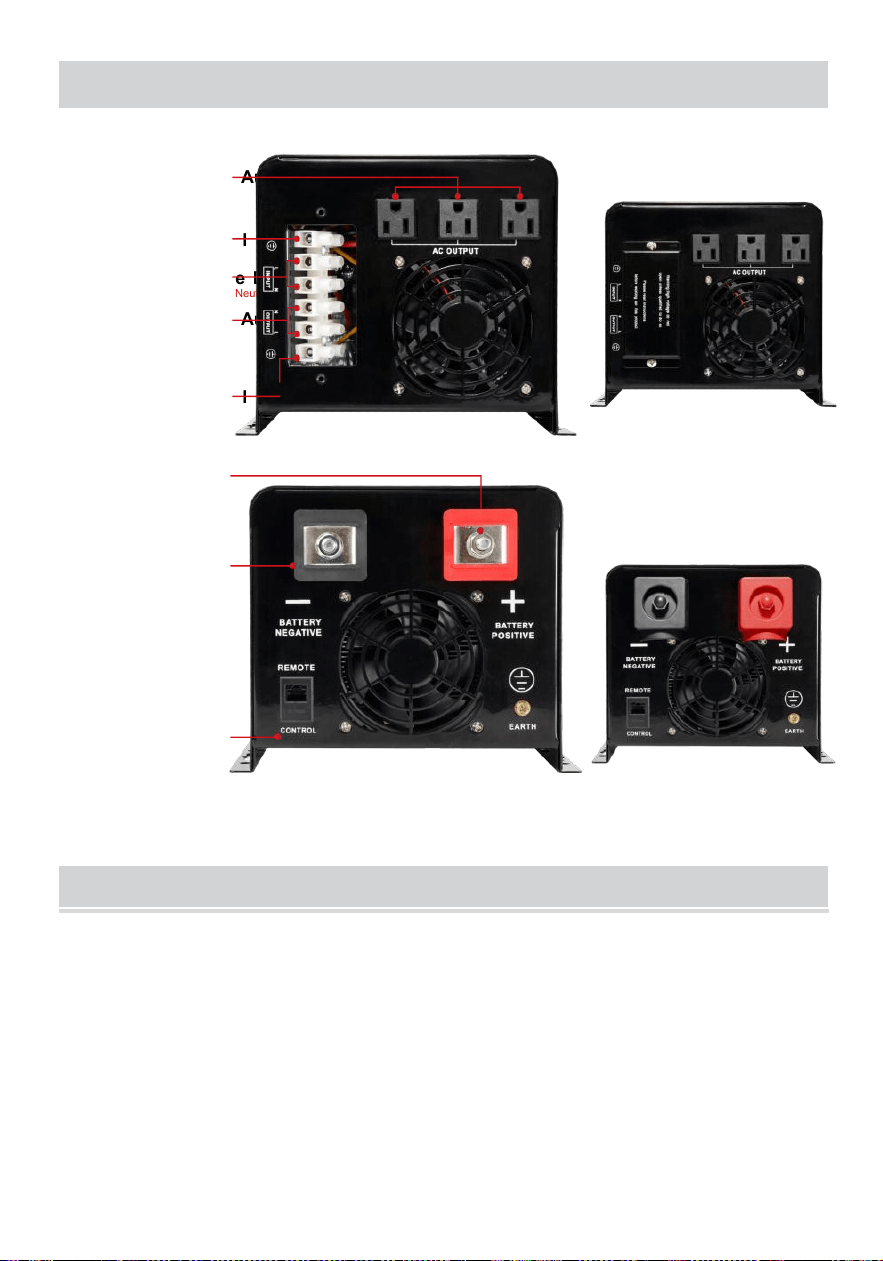
INPUT & OUTPUT CONNECTION
CONNECTION DIAGRAM
AC output
AC input
AC output
Earth wire
Earth wire
(only for low than 1200w appliance)
(L to live wire N to neutral wire)
(It's very stable, great for
High-power electrical appliances)
Connect the
battery positive
Connect the
battery negative
Remote control
interface
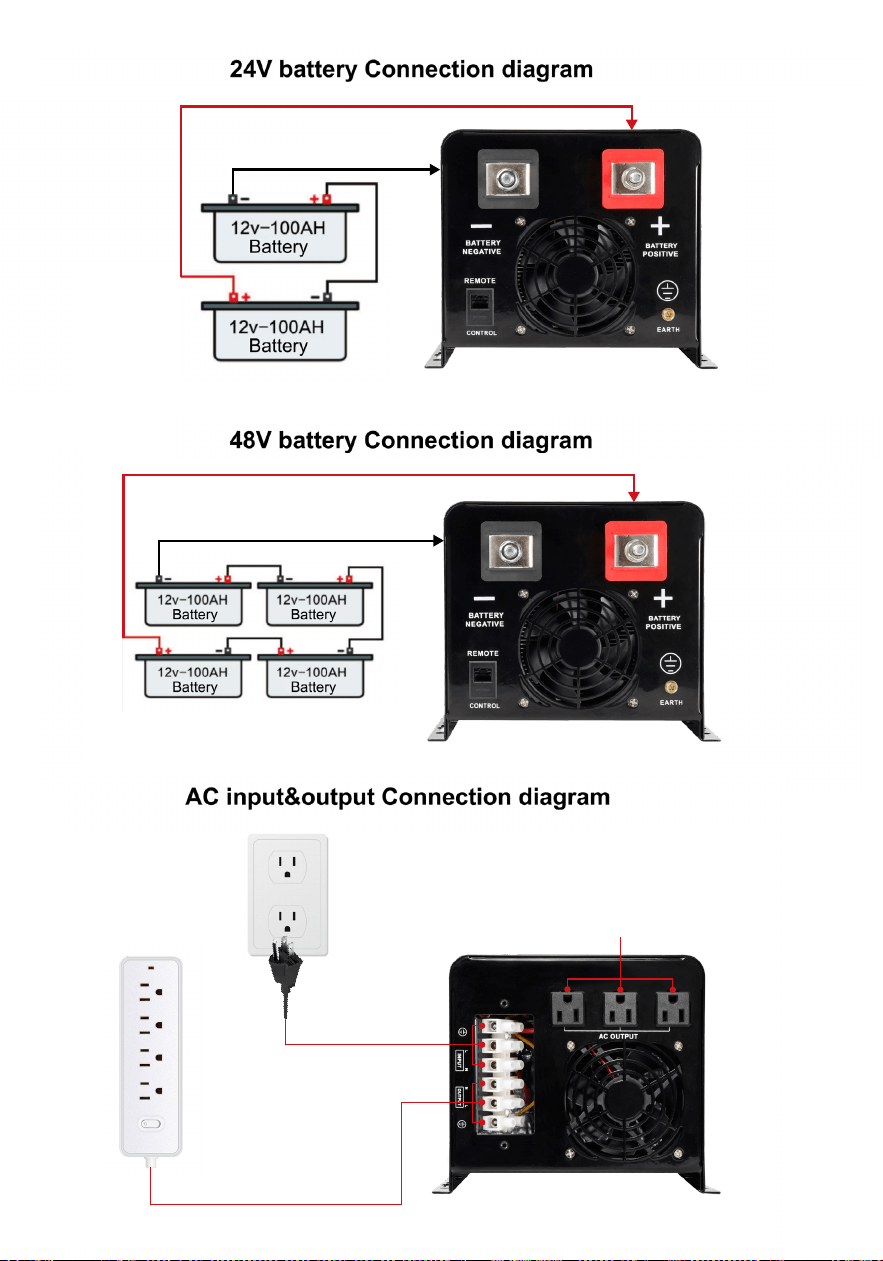
AC output
AC output 120V
Plug in the mains
to charge the battery
(only for low than 1200w appliance)
(please plug your high power applinace into this AC output)
(Mains power is not necessary)
(L to live wire N to neutral wire)

Note:
If it is connected to the generator,it needs to operate according to the
following steps
①Start the generator,wait for it to run stably,connect the output power of the
generator to the input of the inverter (in this case,make sure the inverter is
no-load),and then start the inverter according to the startup
procedure.After the inverter starts ,And then connect to the load one by one.
②It is recommended to choose the generator capacity with two to three
times the capaci
ty of the inverter.
MAINTAIN &MAINTENANCE
①
This series of inverters requires very little maintenance.The battery of the
standard model is valve-regulated,low-maintenance type,and only needs
to be charged frequently to achieve the expected life.
②
If the inverter is not used for a long time,it is recommended to charge it
every two to three months--times
③Under normal circumstances,the service life of the battery is three years.If
the battery is found to be in poor condition,it must be rep
laced early.When
replacing the battery,it must be performed
by a professional.
④ The battery should not be replaced individually,and the battery supplier's
instructions should be followed when replacing the entire
battery.Normally,the battery is charged and discharged every two to three
months,and charged after being discharged to shutdown,and the charging
time of
the standard machine shall not be less than 12 hours.
⑤
In high-temperature areas,the battery is cha
rged and discharged--times
every two months, and the standard machine charging must not be less than
12 hours each time.
Note:
①The inverter must be turned off and disconnected from the mains before
replacing the battery
②Take off metal objects such as rings and watches.
③Use insulated handles and screwdrivers,and do not place tools or other
metal objects on the battery.
④
It is normal for small sparks to appear at the connector and will not cause
harm to personal safety and the inverter when connecting the battery cable.
⑤
Never short-circuit or reverse the battery's positive and negative pol
es.
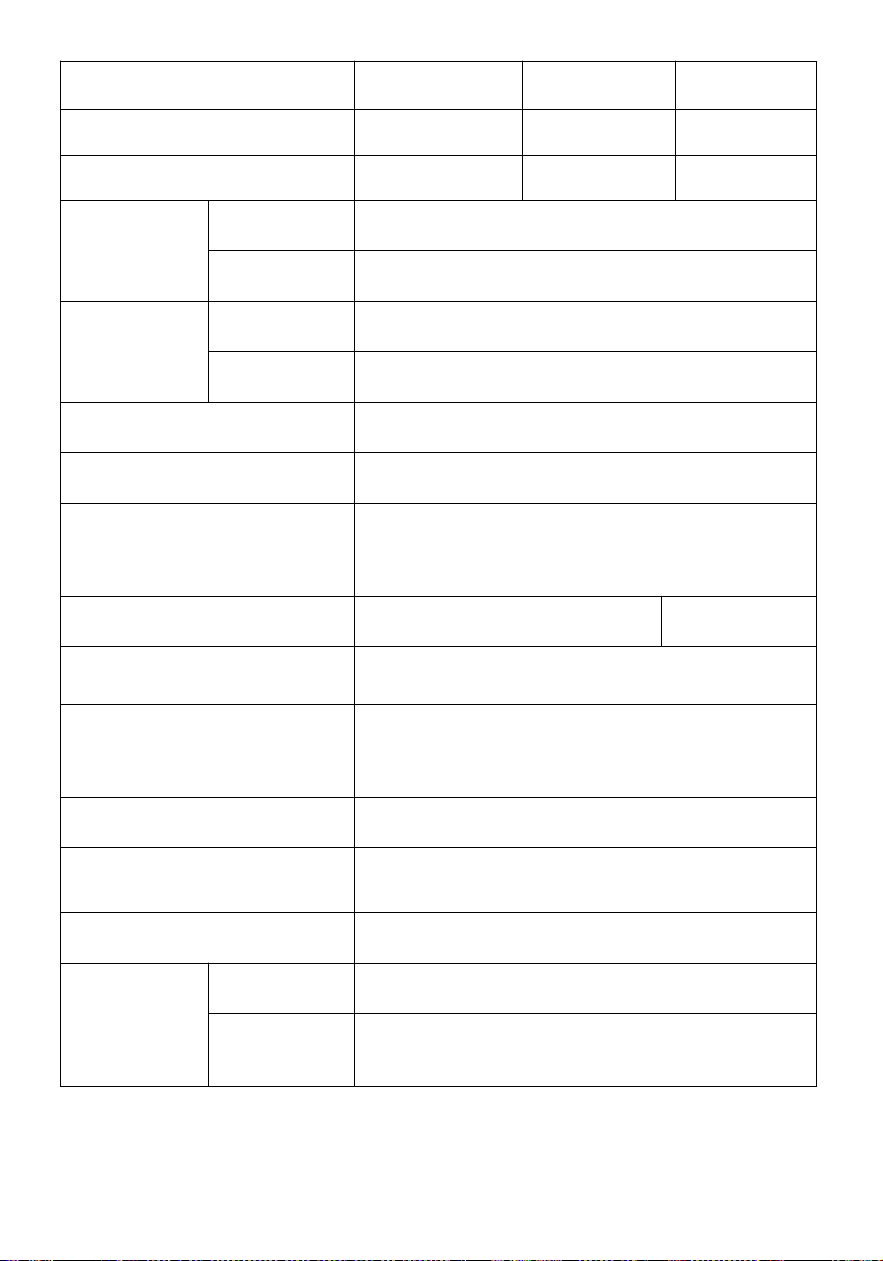
SIMPLE MAINTENANCE AND REPAIR METHODS
Malfunction Reason Solution
The fan not works
The temperature inside the
inverter does not over 45℃
It is normal,the fan is
temperature control
The terminal is hot Poor contact or loose Re-tighten
Shutdown with load Battery do not have enough
power or over load
Charge your battery or
reduce load
Can't turn on the
inverter
The battery cable is not
connected properly
Check if the battery
cable is connected and
reconnect it
Power-on alarm
B
attery do not have enough
power or over load
Charge your battery or
reduce load

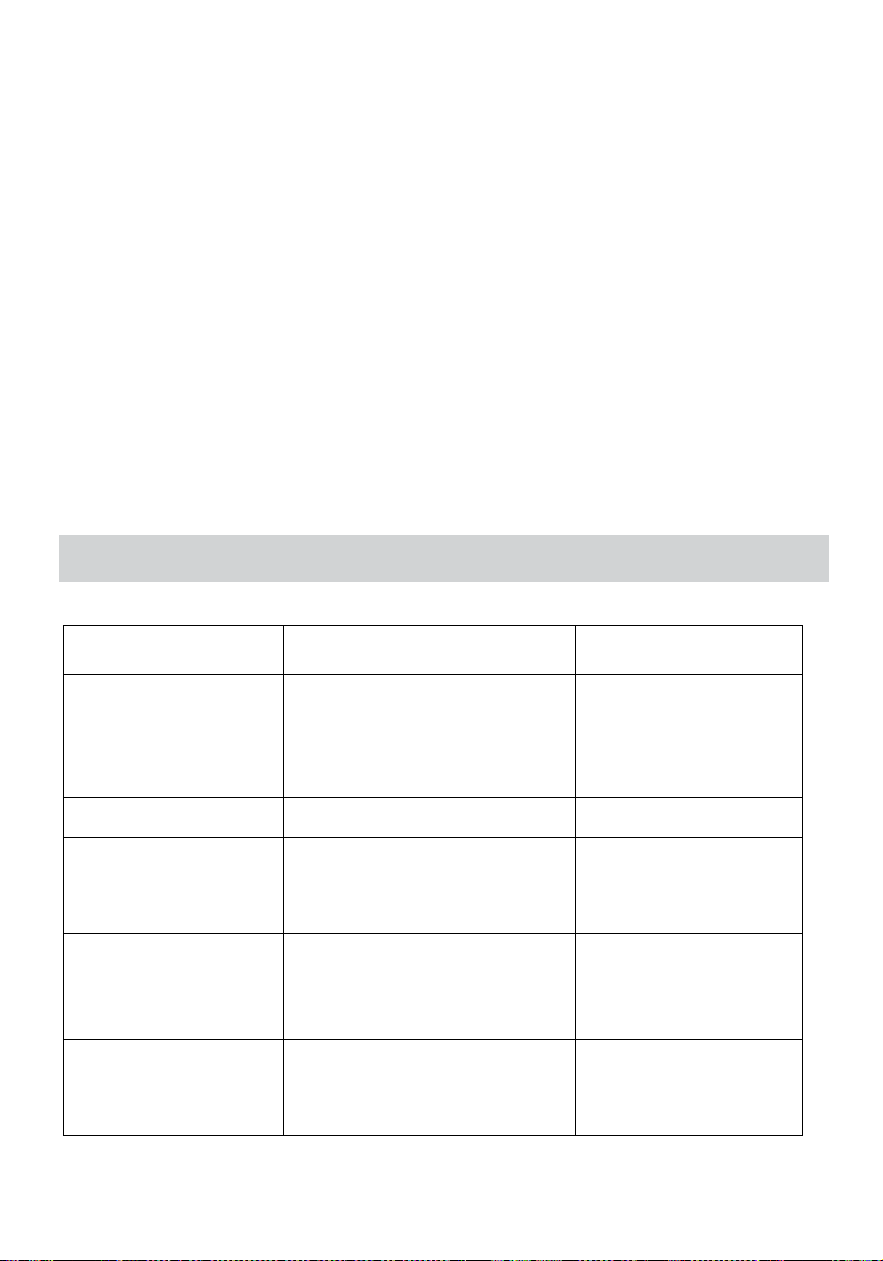
APPENDIX
Model
BL-W2012V-L
BL-W3024V-L BL-W4024V-L
Rated power
2000W 3000W 4000W
Peak power
6000W 9000W 12000W
Input
Voltage
90V-130VAC
Frequency
45-65Hz
Output
Voltage
120VAC±10%(Battery Priority mode)
Frequency
60Hz±1%(Battery Priority mode)
Output waveform
Pure sine wave
Effectiveness
>76% >80%
Battery type
Lead-acid batteries Lithium iron battery
Ternary(18650)battery and Customizable
Battery voltage
12VDC 24VDC
Maximum current of mains charging
50
A(12VDC)/70A(24VDC)/50A(48VDC)
Protection
over load ,short circuit,over temperature,battery
high/low voltage,Mains high/low voltage
Conversion method
Interactive 5ms (typical)
Overload
Protection for 15 seconds after exceeding 100%
Communication method
RS-232(Optional)
Working
environment
Temperature
-30-40℃
Humidity
10%-90%
If the above parameters are changed in the future you can ask the seller
the Latest parameters
Model
BL-W5024V-L BL-W6024V-L BL-W6048V-L
Rated power 5000W 6000W 6000W
Peak power 15000W 18000W 18000W
Input
Voltage
90V-130VAC
Frequency
45-65Hz
Output
Voltage
120VAC±10%(Battery Priority mode)
Frequency
60Hz±1%(Battery Priority mode)
Output waveform
Pure sine wave
Effectiveness
>80%
Battery type
Lead-acid batteries Lithium iron battery
Ternary(18650)battery an
d Customizable
Battery voltage
24VDC 48VDC
Maximum current of mains charging
50A(12VDC)/70A(24VDC)/50A(48VDC)
Protection
over load ,short circuit,over temperature,battery
high/low voltage,Mains high/low voltage
Conversion method
Interactive 5ms (typical)
Overload
Protection for 15 seconds after exceeding 100%
Communication method
RS-232(Optional)
Working
environment
Temperature
-30-40℃
Humidity
10%-90%
DEFAULT BATTERY PARAMETERS
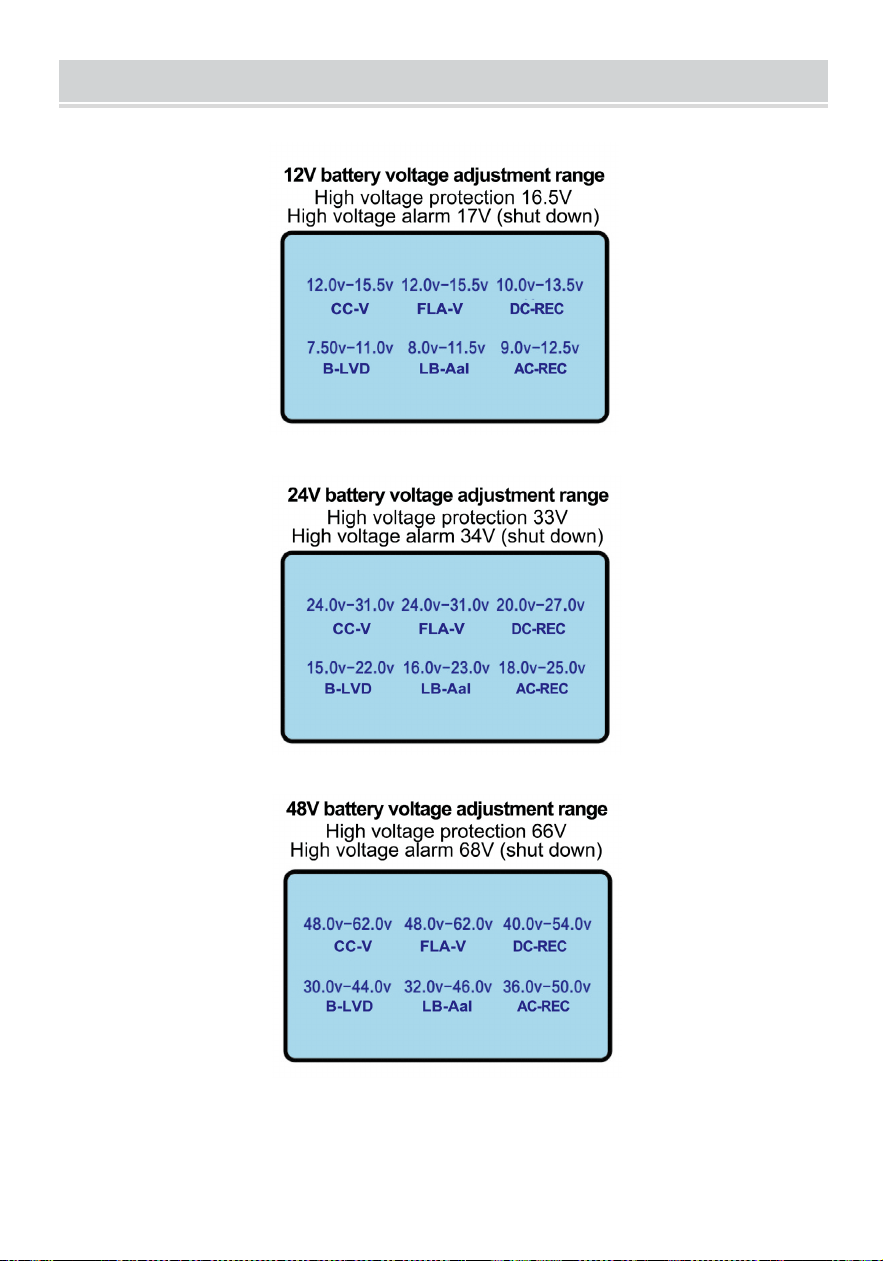
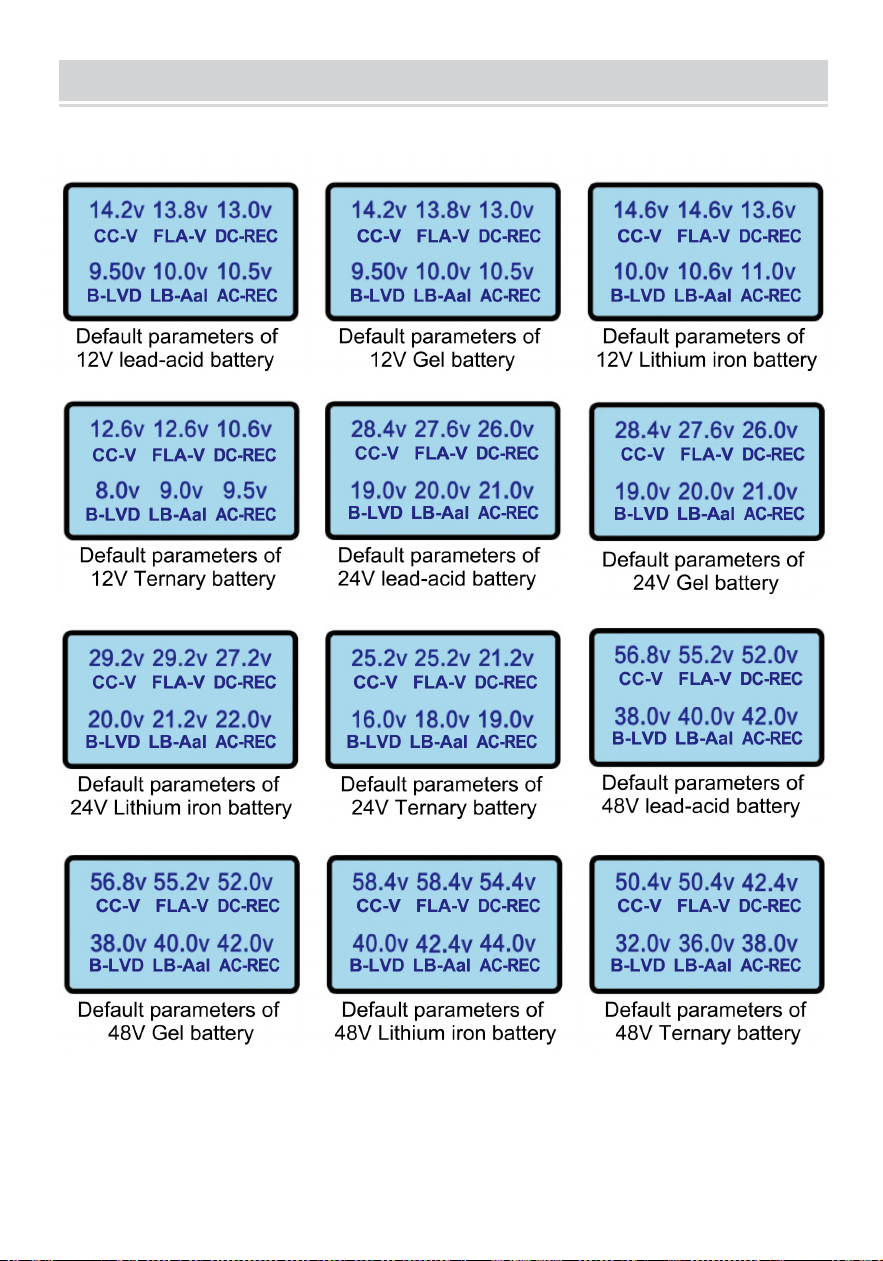
CUSTOM VOLTAGE ADJUSTMENT RANGE
CUSTOM VOLTAGE ADJUSTMENT RANGE
The product specifications or related information mentioned in this
operating manual are subject to change without notice.

Technical Support and E-Warranty Certificate
www.vevor.com/support
Quick Start Guide
Battery Connection
WARNING! All wiring must be performed by a qualified personnel.
WARNING! It's very important for system safety and efficient operation to
use appropriate cable for battery connection. To reduce risk of injury,
please use the proper recommended cable.
Model
Maximum Amperage
Wire Size
Torque Value
12V 2000W
166A
4AWG
20~30Nm
24V 3000W 125A 4AWG 20~30Nm
24V 4000W 166A 4AWG 20~30Nm
24V 5000W 208A 6AWG X2 20~30Nm
24V 6000W 250 4AWG X2 20~30Nm
48V 6000W 125A 4AWG 20~30Nm
AC Input/Output Connection
WARNING! All wiring must be performed by a qualified personnel.
WARNING! It’s very important for system safety and efficient operation to use
appropriate cable for AC input connection. To reduce risk of injury, please use the
proper recommended cable size as below.
Suggested cable requirement for AC wires
Model
Wire Size
Torque Value
12V 2000W
10AWG
1.4~ 1.6Nm
24V 3000W 10AWG 1.4~ 1.6Nm
24V 4000W 10AWG 1.4~ 1.6Nm
24V 5000W 8AWG 1.4~ 1.6Nm
24V 6000W 8AWG 1.4~ 1.6Nm
48V 6000W 8AWG 1.4~ 1.6Nm
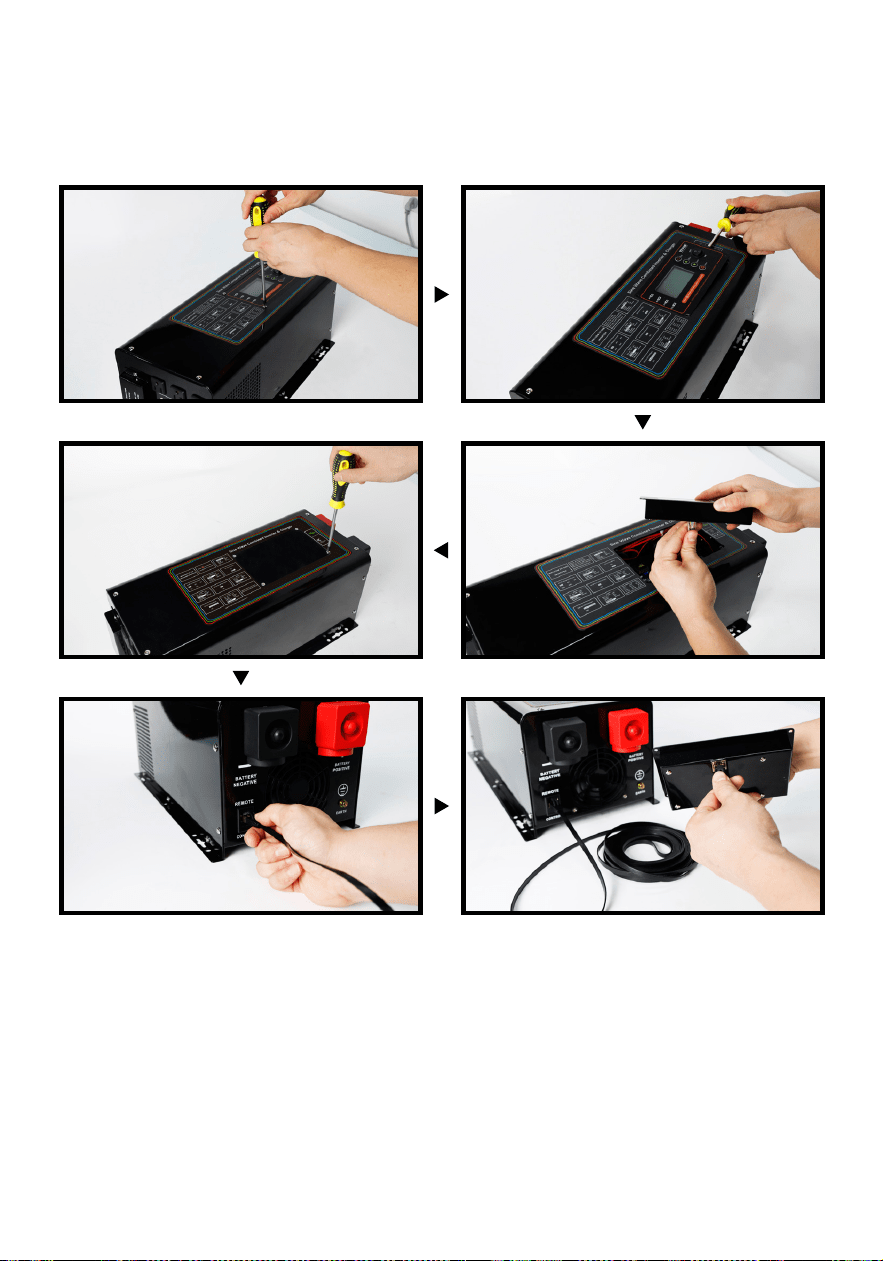
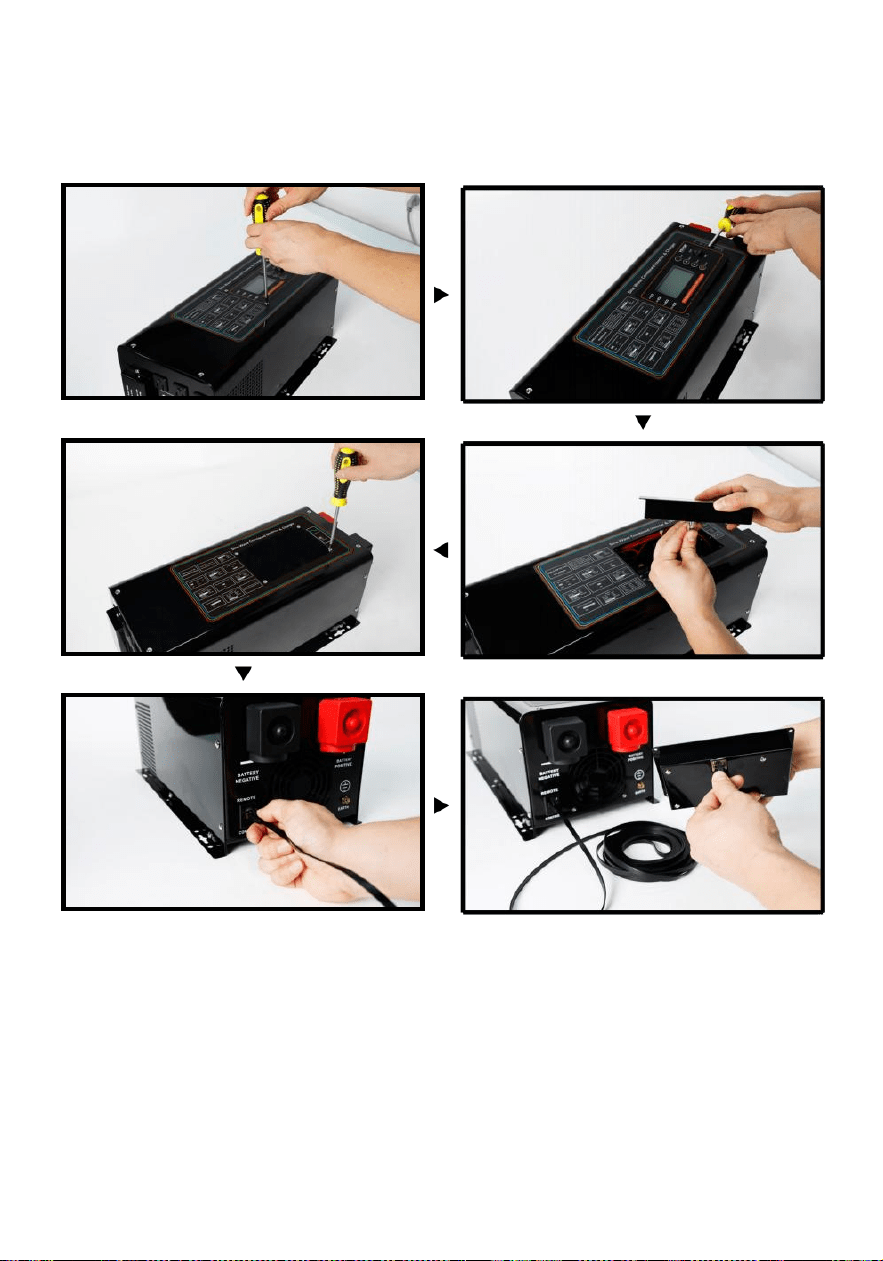
Introduction to the operation panel
1. Remove the 4 dowels from the control display, being careful not to drop it
inside the machine.
2. Use a small dowel cutter to pry the display open and take it out.
3. Unplug the network cable connected to the display.
4. Use a 10-meter cable to connect to the inverter port.
Note: that this cable cannot be connected to the Internet port and cannot
communicate with it.
If it is necessary to use the operating panel away from the inverter, refer to the
following:

Support technique et Certificat de garantie électronique
www.vevor.com/support
CHARGEUR INVERTER UTILISATEUR
MANUEL
MODÈLE : BL -W2012V-L, BL -W3024V-L, BL -
W4024V- L , BL -W5024V-L, BL -W6048V -L,
BL -W6024V-L
Nous continuons à nous engager à vous fournir des outils compétitifs prix.
"Enregistrer Moitié", "Moitié Prix" ou toute autre expression similaire utilisé
par nous ne représentons qu'une estimation des économies que vous
pourrait bénéficier de l'achat certains outils
avec nous par rapport à la grandes marques et ne fait pas nécessairement
signifier à couverture
toutes catégories d'outils proposées par nous. Vous êtes veuillez nous rappeler
de vérifier soigneusement
quand tu es passer une commande chez nous si vous sont en fait
Économie
La moitié par rapport au top grandes marques .

Inverter charger
MODÈLE : BL -W2012V-L, BL -W3024V-L, BL -
W4024V-L, BL -W5024V-L, BL -W6048V-L,
BL- W6024V-L
BL-W2012V-L
BL-W3024V-L
BL-W4024V-L
BL-W5024V-L
BL-W6024V-L
BL-W6048V-L
(Le image est à titre indicatif seulement, s'il vous plaît se référer à la réel
objet )
BESOIN AIDE ? CONTACT NOUS !
Avoir produit Des questions ? Besoin technique soutien? S'il te plaît
sentir gratuit à contact nous:
certificat de garantie électronique
www.vevor.com/support
C'est l'original instruction, s'il vous plaît lisez tout manuel instructions
soigneusement avant d'opérer. VEVOR se réserve une interprétation
claire de nos manuel d'utilisation. L'apparence du produit doit être
soumis à le
produit vous reçu. S'il te plaît, pardonne nous que nous ne le ferons pas
je vous informe à nouveau si existe-t-il des mises à jour technologiques

ou logicielles sur notre produit.
Avertissement - À réduire le risque de blessure , utilisateur doit
lire Lisez attentivement le manuel d'instructions .
Ce appareil conforme avec Partie 15 de le FCC Règles .
L'opération est sujet à le suivant deux conditions : (1) Ceci
appareil peut pas provoquer des interférences nuisibles , et (2)
ceci appareil doit accepter n'importe lequel interférence reçue ,
y compris interférences pouvant causer
opération indésirable.
Ce produit est soumis à la disposition de européen Directif
2012/ 19/ CE . Le symbole montrant un roue arrière poubelle
croisé
à travers indique que le produit nécessite une séparation
refuser
collecte dans le européen Union. Ceci s'applique à la produit
et tous les accessoires marqué de ce symbole. Produits
marqués en tant que tel peut ne pas être jeté avec normale
déchets ménagers, mais doit être apporté à une collecte point
de recyclage électrique et appareils électroniques
CONSIGNES DE SÉCURITÉ
Merci d'avoir choisi l' onduleur de fréquence intelligent, domestique
onduleur et en ligne interactif produits fabriqués par notre société.Le
la conception est sûre, fiable et facile à utiliser. S'il te plaît lis ceci manuel
soigneusement , il volonté vous aider à obtenir le service le plus complet
vie et service.
Veuillez respecter strictement par tous les avertissements et
opérations instructions dans le manuel et sur la machine et garde ça
manuel correctement.
Le installation/exploitation et maintenance de cette série de produits
devrait être effectuée par du personnel formé et technique personnel et
les éléments suivants les exigences doivent être respectées.

1.Veuillez confirmer que le Valeur de tension DC/AC du produit
connecté est conforme à la valeur nominale et à la valeur de tension de
fonctionnement assignée du produit.

2. Assurez-vous que les bornes positive et négatif pôles de la DC saisir de
ce produit et le positif et négatif pôles de la la batterie est correctement
connecté, pas inversé.
3. Assurez-vous que le câble de connexion entre le produit et le la batterie
est aussi courte que possible, la saisir et câblage de sortie est correct et
ferme, et faites attention à éviter les courts- circuits de la connexion
câble. 4.Il y a haute tension à l'intérieur de ce produit, non
électrique professionnels devrait ne pas ouvrir l'onduleur cas.
La batterie de démarrage de la voiture peut fournir un court terme courant
élevé à démarrer le
moteur, mais il n'est pas conçu pour une utilisation continue
consommation d'énergie et est pas approprié pour une décharge à
cycle profond. Si vous souhaitez utiliser un certain équipement électrique
en continu pendant un depuis longtemps, il est recommandé de le faire
également équiper une batterie adaptée à une décharge profonde, telle
que Batteries AGM ou GEL. Avis de non-responsabilité : En raison de la
mise à jour et de l'amélioration continues des produits et technologies, le
contenu de ce document peut pas complètement correspondre à la
produit réel, merci de votre compréhension. Si vous besoin de se
renseigner sur produit
mises à jour, veuillez contacter notre société .
INSTALLATION
1. Instructions d'installation
① . Déballage inspection
Ouvrez l'emballage de l'onduleur, vérifiez les accessoires et vérifiez si
l'onduleur est endommagé pendant le transport.Si vous constatez des
dommages ou des pièces manquantes, veuillez en informer le
transporteur et distributeur.
Note :
S'il te plaît gardez le carton d'emballage et emballage
matériaux pour l'avenir transport.

Cette série de produits est plus lourde ( voir annexe), donc soyez
prudent lorsque manutention

2. Précautions d'installation
① . Le zone où le onduleur est mis doit être Bien ventilé , à l'écart de
l'eau, des gaz inflammables et des agents corrosifs .
② . Garder le côté panneau ventilateur air entrée , air sortie et air entrée
sur le côté de la boîte dégagée.
③ .La température ambiante de l'onduleur doit être gardé entre 0
℃ -40 ℃ .
④ .Si la machine est démontée et utilisée à basse température , eau
les gouttelettes peuvent se condenser.Vous il faut attendre l'intérieur et
l'extérieur de la
la machine doit être complètement sèche avant installation et en utilisant
ça, sinon là est un danger électrique choc.
⑤ .S'il vous plaît installer l'onduleur à proximité du secteur prise d'entrée
ou changer, donc que en cas d'urgence, débranchez l'entrée secteur
prise et couper hors de la pouvoir.
⑥ . Faire pas connecter le onduleur sortir directement à le plats
principaux
Note :
*Lorsque la charge est connectée au onduleur, le charger doit être
tourné désactivé avant le câblage, puis la charge doit être tourné sur
un par un.
*Connectez l'onduleur à une prise spéciale avec protection contre
les surintensités protection appareil
*La prise de courant utilisée doit être connecté à le protecteur
Terre Terminal
*Que l' entrée soit ou non le cordon d'alimentation est branché sur le plats
principaux
prise, la sortie de l'onduleur peut être chargée. Éteindre l'onduleur ne pas
garantir que les pièces internes de la machine pas être facturé.Si vous
vous voulez que l'onduleur n'ait aucune sortie , vous doit d'abord tourner
hors de tous commutateurs, et puis coupez le Plats principaux pouvoir
*Lorsqu'il est inductif des charges telles que moteurs , moniteurs et
imprimantes laser sont nécessaire, la puissance de démarrage est

trop grand.Lors de la sélection un onduleur, le la capacité doit être
calculée en fonction de la départ puissance.Le départ pouvoir est
habituel

LCD PANEL DESCRIPTION
24,6
V
24,0
Ensemble CA chargement actuel :
28,4 V
25A 50A
20,0 V
15A 35A
Description:
Long press the setting key for 3 seconds to enter the system setting
interface,and pressing the setting key can also indicate
confirmation.The LCD will automatically turn off the backlight (energy
saving)without any operation for 5 seconds.Press the setting key
again can turn on the backlight.
Energy saving (sleep)function,when the inverter is working in battery
mode and no load,it will enter the state(Off output)after 20 seconds
in order to achieve energy saving effect,automatically turn on after
load,normal use.
27.6V
21.0V
26.0V
21.6V
WORKING MODE SETTING
Accéder à l' interface de configuration du
système
Long presse le cadre clé pour 3
secondes à entrer le système interface de
configuration après tu allumes le onduleur.
Set AC charging current:
25A 50A
15A 35A
Régler la charge secteur actuel
Dans le système paramètre interface, appuyez sur le ou clé à
sélectionner Ensemble CA chargement actuel, et alors presse la clé à
confirmer.Sélectionner le chargement courant que vous souhaitez et
appuyez sur la touche pour confirmer .
Différentes spécifications de onduleurs peut ensemble différent
chargement actuel valeurs. Le plats principaux chargement actuel
valeur dans le gauche image est le paramètre par défaut de le
24V3000 W onduleur .
Battery
Ensemble Priorité AC/ Batterie
Dans l'interface de configuration du système, appuyez sur la
touche e
ou
o
touche pour sélectionner la priorité, puis
appuyez sur la touche pour confirmer.Sélectionnez le statut prioritaire
toi vouloir et appuyez sur la touche pour confi rmer.

WORKING MODE SETTING
Après avoir modifié la priorité, l' interface de configuration du système
s'affichera correctement. afficher le travail actuel priorité après 5 secondes.

CA priorité : La priorité d'alimentation secteur.La batterie l'alimentation
électrique va commencer instantanément en cas de panne de courant (la
commutation est en millisecondes et n'affecte pas les appareils
électriques dans utiliser)et peut être utilisé comme un UPS.Lorsque
l'alimentation secteur est restauré, il le sera automatiquement passer à la
alimentation secteur et charger le batterie à le même temps.
Priorité de la batterie : l'alimentation par batterie priorité.Lorsque le
batterie le pouvoir est bas , il volonté changer à le plats principaux pouvoir
approvisionnement , et le batterie volonté être
chargée automatiquement. Lorsque la tension de la batterie revient à un
certain
valeur (définie dans les paramètres de la batterie) et 30 minutes plus
tard le batterie pouvoir l'approvisionnement sera être automatiquement
restauré.
la carte de protection est déconnectée, l' onduleur peut être chargé
sans allumer, réparer intelligemment la batterie et prolonger la durée
de vie service vie.
Tip:Switch between AC mode and Battery mode requires an interval of
30 minutes
Sortie d'économie d'énergie : marche/ arrêt
Dans l'interface de configuration du système, appuyez sur la touche ou
à sélectionner ÉPARGNANT, et puis appuyez sur la touche pour
confirmer.Sélectionnez la sortie d'enregistrement (off/on) que vous
souhaitez et appuyez sur la touche pour confirmer .
Après toi changement le ÉPARGNANT réglage , le système paramètre
interface volonté afficher correctement le actuel travail ÉPARGNANT
paramètre après 5 secondes .

Sur : le onduleur volonté entrer dormir état ( désactivation le sortie ) après 20
secondes
quand le onduleur est fonctionnement dans batterie mode et Non charger
dans le Non charger pouvoir sera inférieur à 3 W, il démarrera
automatiquement après le chargement
O ff : l'onduleur continuera à démarrer et n'entrera pas en état de veille,

Réglage du rétroéclairage : normal /activé
Dans l'interface de configuration du système, appuyez sur la
touche
e
ou
o
touche pour sélectionner Rétroéclairage,
puis appuyez sur la touche pour confirmer.Sélectionnez le
rétroéclairage état que tu veux
et appuyez sur la touche pour confirmer. après avoir modifié le
paramètre de rétroéclairage,
l'interface de configuration du système affichera correctement le travail en
cours Réglage du rétroéclairage après 5 secondes .
Sur : le Le rétroéclairage sera continue
Normal : Le Le rétroéclairage s'éteindra quand aucune opération dans 1
minute
28,4 V
20,0 V
Réglage de la batterie
Dans l'interface de configuration du système, appuyez sur la touche
e
ou
o
pour sélectionner Set , puis appuyez sur la touche pour confirmer
Dans l' interface de réglage de la batterie, appuyez sur la touche pour
sélectionner le batterie
paramètre que vous souhaitez régler. Après avoir sélectionné le
paramètre de la batterie, vous
vous souhaitez régler, appuyez sur pour augmenter la valeur de la
tension, et appuyez sur pour
26.0V
21.6V
27.6V
21.0V

diminuer la valeur de la tension. (La valeur de la tension ne changera pas
immédiatement, il il faut attendre 5 secondes) il reviendra
automatiquement à l' onduleur
interface d'information lorsque aucune opération dans les 30 secondes.
CC -V : Constante tension
chargement FLA -V: Flotter
chargement
DC-REC: Dans l'état de la batterie priorité, alimentation secteur , la
batterie l'alimentation électrique va être automatiquement restauré 30
minutes plus tard lorsque le
la tension de la batterie revient à cette valeur.
B- LVD : Faible tension protection ( arrêt )
LB - Aal : Faible tension alarme ( bip )
CA - REC : Dans le État de batterie priorité ,
Automatiquement changer à plats principaux priorité quand le batterie
tension Vers le bas à ce valeur .
Le image sur le gauche est le défaut batterie tension paramètre de
le 24V3000W onduleur système .
Set AC charging current:
25A 50A
15A 35A
Le utilisateur peut sélectionner le chargement engrenage selon à le pouvoir
demande ( quotidienne) chargement est recommandé à être ajusté à faible
ou moyen engrenage )
Le chiffre sur le gauche est le défaut paramètres du 24V3000 W onduleur .
La charge actuel valeurs de onduleurs de différent caractéristiques sont
différent . S'il te plaît référer à le chiffre ci-dessous .
COURANT DE CHARGE COM PARAISON
Mode
Faible
Milieu
Haut
Super haut
12V 2KW
10A
20A
30A
50A
24V 3KW
15A
25A
35A
50A
24V 4KW / 5KW /
6KW
15A
35A
55A
70A
48V 6 kW
15A
25A
35A
50A

CONNEXION D'ENTRÉE ET DE SORTIE
CA sortir
(uniquement pour les moins de Appareil 1200w)
Fil de terre
CA saisir
(L à fil sous tension N à fil neutre)
CA sortir
(C'est très stable, super
pour les appareils électriques de
forte puissance )
Fil de terre
Connectez
le batterie
positif
Connectez
le batterie
négatif
Interface de
contrôle
à
distance
CONNEXION DIAGRAMME
Schéma de connexion de la batterie 12V
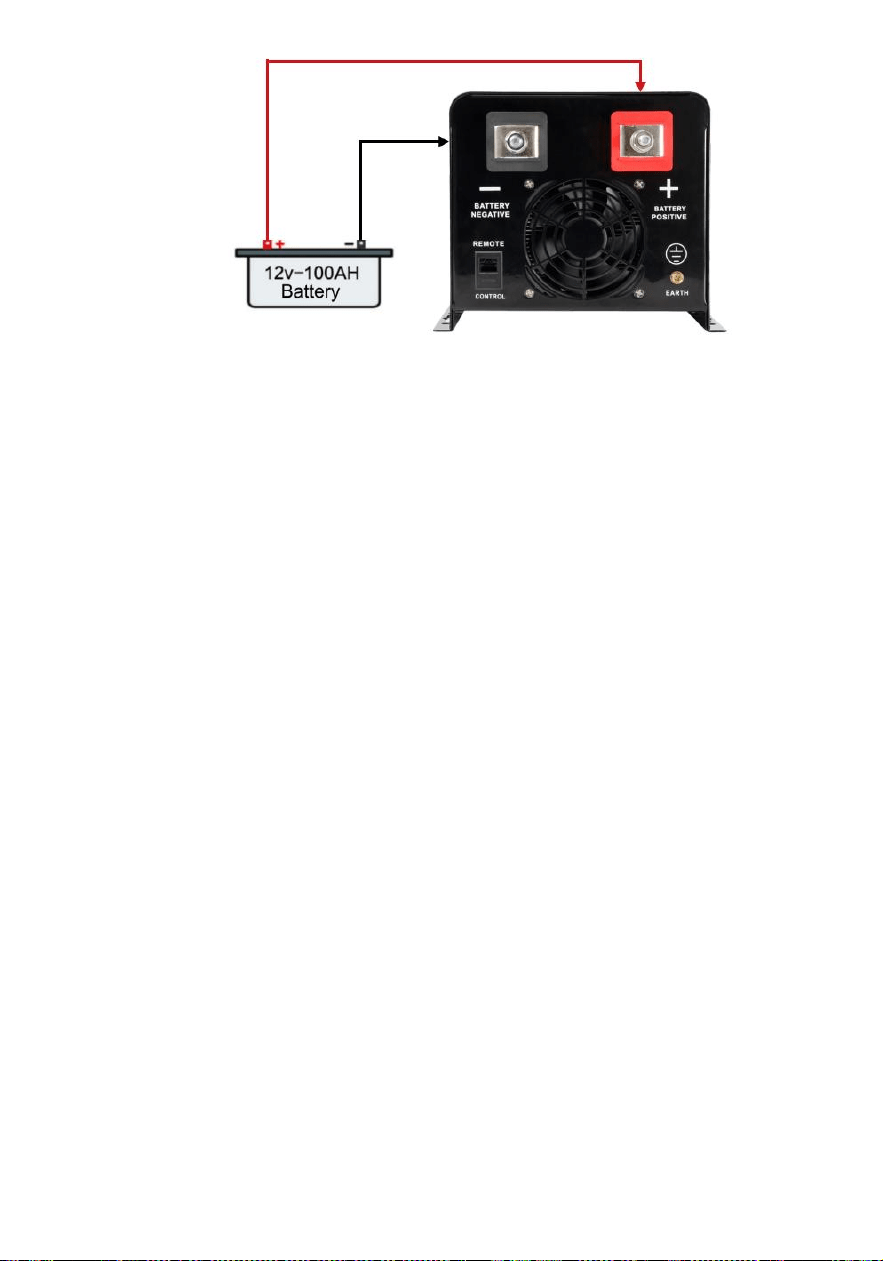

Schéma de connexion de la batterie 48v
AC output
(only for low than 1200w appliance)
(please plug your high power applinace into this AC output)
Plug in the mains
to charge the battery
(Mains power is not necessary)
(L to live wire N to neutral wire)
●
AC output 120V

Note :
Si il est connecté à le générateur , il besoins à fonctionner selon à le
étapes suivantes
① Début le générateur , attends pour il à courir de manière stable ,
connecter le sortir pouvoir de le générateur à le saisir de le onduleur ( en ce
cas , faire bien sûr le onduleur est sans charge ) , et alors commencer le
onduleur selon à le démarrer
procédure . Après le onduleur commence , et alors connecter à le charger
un par un . ② Il est recommandé à choisir le générateur capacité avec
deux à trois
fois le capacité de le onduleur .
ENTRETIEN ET MAINTENANCE
① Ceci série de onduleurs nécessite très petit entretien . Le batterie de le
standard modèle est à régulation par soupape , nécessitant peu
d'entretien tapez , et seulement a besoin de être chargé fréquemment à
atteindre le attendu vie .
② Si le onduleur est pas utilisé pour un long le temps , il est
recommandé à charge il est tout le temps deux à trois mois -- fois
③ Sous normale circonstances , la service vie de le batterie est trois
années . Si le batterie est trouvé à être dans pauvre état , il doit être
remplacé tôt . Lors du remplacement le batterie , il doit être effectué
par un professionnel .
④ Le batterie devrait pas être remplacé individuellement , et le batterie
instructions du fournisseur devrait être suivi quand remplacement le entier
batterie . Normalement , la batterie est chargé et déchargé chaque deux
à trois mois , et chargé après être déchargé à arrêt , et le temps de charge
de
le standard machine devoir pas être moins que 12 heures .

⑤ Dans haute température zones , les batterie est chargé et déchargé -
- fois chaque deux mois , et le standard machine chargement doit pas
être moins plus de 12 heures chaque temps .
Note :
① Le onduleur doit être tourné désactivé et déconnecté depuis le plats
principaux avant remplacement le batterie
② Prendre désactivé métal objets tel comme anneaux et montres .
③ Utilisation isolé poignées et tournevis , et faire pas lieu outils ou autre
métal objets sur le batterie .
④ Il est normale pour petit étincelles à apparaître à le connecteur et volonté
pas causer du tort à personnel sécurité et le onduleur quand de liaison le
batterie câble .
⑤ Jamais court - circuit ou inverse le batterie positif et négatif poteaux .
SIMPLE ENTRETIEN ET METHODES DE REPARATION
Mauvais
fonctionnement
Raison
Solution
Le ventilateur ne
fonctionne pas
La température à l'intérieur
du onduleur fait pas plus
de 45 ℃
Il est normal , le
ventilateur est le
contrôle de la
température
Le terminal est chaud
Pauvre contact ou lâche
Resserrer
Arrêt avec charge
La batterie ne fonctionne
pas avoir assez de
puissance ou sur charger
Chargez votre batterie
ou réduire charger
Ne peut pas
tourner sur l'
onduleur
La batterie câble est
pas correctement
connecté
Vérifier si le batterie
le câble est connecté
et reconnectez-le
Alarme de mise sous
tension
La batterie ne fonctionne
pas avoir assez de
puissance ou sur charger
Chargez votre batterie
ou réduire charger

APPENDIX
Modèle
BL-W2012V-L
BL-W3024V-L
BL-W4024V-L
Noté pouvoir
2000 W
3000 W
4000 W
Culminer pouvoir
6000 W
9000 W
12000W
Saisir
Tension
90V-130VAC
Fréquence
45-65 Hz
Sortir
Tension
120 VCA ± 10 % (batterie) Mode prioritaire)
Fréquence
60 Hz ± 1 % (priorité de la batterie ) mode)
Forme d'onde de sortie
Pur onde sinusoïdale
Efficacité
>76%
>80%
Batterie taper
Batteries plomb-acide Lithium fer
Batterie ternaire (18650) et
personnalisable
Tension de la batterie
12 V CC
24 V CC
Maximumactuelde principal s
chargement
50 A (12 V CC)/70 A (24 V CC)/50 A (48 V CC)
Protection
surcharge ,court-circuit,surchauffe,batterie
haute/basse tension, haute /basse tension
du secteur
Méthode de conversion
Interactif 5 ms (typique )
Surcharge
Protection pour 15 secondes après avoir dépassé
100%
Méthode de communication
RS-232 (en option)
Fonctionne
ment
environneme
nt
Température
-30-40 ℃
Humidité
10%-90%
Modèle
BL-W5024V-L
BL-W6024V-L
BL-W6048V-L
Noté pouvoir
5000 W
6000 W
6000 W
Culminer pouvoir
15000W
18000W
18000W
Saisir
Tension
90V-130VAC
Fréquence
45-65 Hz
Sortir
Tension
120 VCA ± 10 % (batterie) Mode prioritaire)
Fréquence
60 Hz ± 1 % (priorité de la batterie ) mode)
Forme d'onde de sortie
Pur onde sinusoïdale
Efficacité
>80%
Batterie taper
Batteries plomb-acide Lithium fer
Batterie Ternaire (18650) et
Personnalisable
Tension de la batterie
24 V CC
48 V CC
Maximumactuelde principal s
chargement
50 A (12 V CC)/70 A (24 V CC)/50 A (48 V CC)
Protection
surcharger ,court-circuit,surchauffe,batterie
haute/basse tension, haute /basse tension
du secteur
Méthode de conversion
Interactif 5 ms (typique )
Surcharge
Protection pour 15 secondes après avoir dépassé
100%
Méthode de communication
RS-232 (en option)
Fonctionne
ment
environneme
nt
Température
-30-40 ℃
Humidité
10%-90%
Si ce qui précède les paramètres sont modifiés à l'avenir, vous pourrez
demander au vendeur le dernier paramètres
DEFAULT BATTERY PARAMETERS

CUSTOM VOLTAGE ADJUSTMENT RANGE

CUSTOMVOLTAGE ADJUSTMENT RANGE
Les spécifications du produit ou les informations associées
mentionné dans ce manuel d'utilisation sont susceptibles d'être
modifiés sans préavis. avis.

Support technique et Certificat de garantie
électronique www.vevor.com/support

Rapide Commencer
Guide
Connexion de la batterie
AVERTISSEMENT ! Tout le câblage doit être exécuté par un personnel
qualifié.
AVERTISSEMENT! Il est très important pour la sécurité du système et
son fonctionnement efficace utilisez un câble approprié pour la connexion
de la batterie. Pour réduire risque de blessure ,
s'il te plaît utiliser le bon recommandé câble.
Modèle
Ampérage maximal
Fil Taille
Valeur de
couple
12V 2000W
166A
4 AWG
20 à 30 Nm
24V 3000 W
125A
4 AWG
20 à 30 Nm
24V 4000W
166A
4 AWG
20 à 30 Nm
24V 5000 W
208A
6 AWG X 2
20 à 30 Nm
24V 6000 W
250
4 AWG X 2
20 à 30 Nm
48V 6000 W
125A
4 AWG
20 à 30 Nm
CA Entrée / Sortie Connexion
AVERTISSEMENT ! Tout le câblage doit être exécuté par un qualifié personnel.
ATTENTION ! Il est très important pour la sécurité du système et efficace
opération à utiliser
câble approprié pour la connexion d'entrée CA. Pour réduire risque de blessure,
s'il te plaît utiliser le taille de câble recommandée appropriée comme ci-dessous.
Exigences de câbles suggérées pour les câbles CA
Modèle
Fil Taille
Valeur de
couple
12V 2000 W
10 AWG
1.4~ 1,6 Nm
24V 3000 W
10 AWG
1.4~ 1,6 Nm
24V 4000W
10 AWG
1.4~ 1,6 Nm

24V 5000 W
8 AWG
1.4~ 1,6 Nm
24V 6000 W
8 AWG
1.4~ 1,6 Nm
48V 6000 W
8 AWG
1.4~ 1,6 Nm
Introduction à le opération panneau
Si c'est est nécessaire à utiliser le système d'exploitation panneau loin du
onduleur, se référer à la suivant:
1. Retirer les 4 chevilles de l'écran de contrôle, être prudent ne pas baisse il
à l'intérieur du machine.
2. Utilisez un petit coupe-goujon pour soulever l'écran ouvrir et prendre il
dehors .
3. Débranchez le câble réseau connecté à l'écran.
4. Utilisez un Câble de 10 mètres pour se connecter au onduleur port .
Remarque : ce câble ne peut pas être connecté au Internet port et ne
peut pas communiquer avec il.

Technischer Support und E-Garantiezertifikat www.vevor.com/support
Wechselrichter-Ladegerät BENUTZER
HANDBUCH
MODELL : BL -W2012V-L, BL -W3024V-L, BL -W4024V-L ,
BL -W5024V-L, BL -W6048V -L, BL -W6024V-L
Wir sind weiterhin bestrebt, bieten Ihnen Werkzeuge mit wettbewerbsfähigen
Preis. „Sparen Halb", "Halber Preis" oder andere ähnliche Ausdrücke gebraucht
von stellt für uns nur eine Schätzung der Einsparungen dar, die Sie könnte vom Kauf
profitieren bestimmte Werkzeuge
mit uns im Vergleich zu den großen Top-Marken und nicht unbedingt bedeuten Zu
Abdeckung
alle angebotenen Werkzeugkategorien von uns. Sie sind Bitte überprüfen Sie sorgfältig
wenn Sie eine Bestellung bei uns aufgeben, wenn Sie Sind Genau genommen
Speichern
Die Hälfte im Vergleich zur Spitze große Marken.

Inverter charger
MODELL : BL -W2012V-L, BL -W3024V-L, BL -
W4024V-L, BL -W5024V-L, BL -W6048V-L,
BL- W6024V-L
BL-W2012V-L
BL-W3024V-L
BL-W4024V-L
BL-W5024V-L
BL-W6024V-L
BL-W6048V-L
(Der Bild dient nur als Referenz, bitte siehe die tatsächlich Objekt t)
BRAUCHEN HILFE ? KONTAKT UNS !
Haben Produkt Fragen? Brauchen technisch Unterstützung? Bitte
fühlen frei Zu Kontakt uns:
Technischer Support und E-Garantie -
Zertifikat www.vevor.com/support
Dies ist das Original Anweisung, bitte alles lesen Handbuch
Anweisungen
sorgfältig vor dem Betrieb. VEVOR behält sich eine klare Auslegung
unserer Benutzerhandbuch. Das Erscheinungsbild des Produkts muss
unterliegen Die
Produkt Sie erhalten. Bitte verzeihen Sie uns, dass wir nicht informiere
euch nochmal Wenn Es liegen Technologie- oder Software-Updates vor

An unser Produkt.
Warnung - An reduzieren Die Risiko von Verletzung , Benutzer
muss lesen Lesen Sie die Bedienungsanleitung sorgfältig durch.
Das Gerät entspricht mit Teil 15 von Die FCC Regeln . Der
Betrieb ist Thema Zu Die folgende zwei Bedingungen :(1) Diese
Gerät Mai nicht schädliche Störungen verursachen , und
(2)dies Gerät muss akzeptieren beliebig Störungen empfangen
, einschließlich Störungen, die zu
unerwünschter Betrieb.
Dieses Produkt unterliegt den Bestimmung von europäisch
Richtlinie 2012/ 19/ EG . Die Symbol zeigt A Wheelie bin
gekreuzt
durch zeigt an, dass das Produkt erfordert separate verweigern
Sammlung im europäisch Union. Dies gilt für die Produkt
und sämtliches Zubehör mit diesem Symbol
gekennzeichnet . Produkte markiert als solches
möglicherweise nicht verwerfen mit Normal Hausmüll, Aber
muss zu einer Sammelstelle gebracht werden Recycling-Stelle
elektrisch Und elektronische Geräte
SICHERHEITSHINWEISE
Vielen Dank, dass Sie sich für den intelligenten Frequenzumrichter
entschieden haben .
Wechselrichter und Online interaktiv Produkte, die von unserem
Unternehmen hergestellt werden.
Das Design ist sicher, zuverlässig und einfach zu verwenden. Bitte Lies
das Handbuch vorsichtig , es Wille helfen Ihnen, den umfassendsten
Service zu erhalten Leben und Dienst.
Bitte halten Sie sich strikt an Beachten Sie alle Warnhinweise und
Betriebsanleitungen Anweisungen in Die Handbuch und auf der
Maschine und behalte das Handbuch richtig.
Der Installation/Betrieb und Wartung dieser Produktreihe
sollen von geschultem und technischem Personal und die folgenden
Anforderungen sollten befolgt werden.

1.Bitte bestätigen Sie, dass die DC/AC-Spannungswert des
angeschlossenen Produkts entspricht dem Nenn- und
Bemessungsbetriebsspannungswert des Produkt.

2.Bitte achten Sie darauf, dass die positiven und Negativ Pole der
Gleichstrom Eingang von dieses Produkts und die positiven und Negativ
Pole der Batterie sind korrekt verbunden, nicht vertauscht.
3.Bitte stellen Sie sicher, dass das Verbindungskabel zwischen dem
Produkt und dem Batterie so kurz wie möglich ist, Eingang Und
Ausgangsbeschaltung Ist richtig Und
fest, und achten Sie darauf, einen Kurzschluss zu vermeiden der
Verbindung Kabel. 4.Es gibt Hochspannung im Inneren dieses
Produkts, nicht elektrisch Profis sollen Öffnen Sie den Wechselrichter
nicht Fall.
Die Auto-Starterbatterie kann bieten eine kurzfristige hoher Strom Zu
starten Sie die
Motor, aber Es ist nicht für den Dauerbetrieb ausgelegt Stromverbrauch
und Ist nicht geeignet für Tiefentladung.Wenn Sie eine bestimmte
verwenden möchten elektrische Ausrüstung kontinuierlich für eine lange
Zeit,wird empfohlen , zusätzlich ausrüsten eine Batterie, die für
Tiefentladung geeignet ist , wie AGM- oder GEL-Batterien.
Haftungsausschluss: Aufgrund der ständigen Aktualisierung und
Verbesserung von Produkten und Technologien, der Inhalt dieses
Dokuments kann nicht vollständig entsprechen den tatsächlichen
produkt, bitte verstehen. Wenn sie Ich möchte mich erkundigen über
Produkt
Für Updates wenden Sie sich bitte an unser Unternehmen .
INSTALLATION
1.Installationsanweisungen
① A u s p a c k e n Inspektion
Öffnen Sie die Verpackung des Wechselrichters, überprüfen Sie das
Zubehör und ob der Wechselrichter während des Transports beschädigt
wurde. Sollten Sie Schäden feststellen oder fehlende Teile, informieren
Sie bitte den Träger Und Verteiler.
Notiz :

Bitte Bewahren Sie die Verpackung auf und Verpackung
Materialien für die Zukunft Transport.
Diese Produktreihe ist schwerer ( sehen Anhang), also seien Sie
vorsichtig, wenn Handhabung

2. Vorsichtsmaßnahmen bei der Installation
① . Die Bereich Wo Die Wechselrichter Ist platziert muss Sei Also belüftet
, weg vor Wasser, brennbaren Gasen und ätzenden Stoffen .
② . Behalten Die Seite Bedienfeld Lüfter Luft Einlass , Luft Auslauf Und
Luft Einlass An Die Seite von die Box ungehindert.
③ Die Umgebungstemperatur des Wechselrichters sollte gehalten
werden zwischen 0 ℃ -40 ℃ .
④ Wenn die Maschine zerlegt und verwendet wird bei niedrige
Temperatur , Wasser
Tropfen können kondensieren. muss warten für die innen und außen der
Maschine muss vollständig trocken sein, bevor Installieren und mit es,
sonst Dort besteht die Gefahr eines elektrischen Schock.
⑤ .Bitte Installieren Sie den Wechselrichter in der Nähe des
Stromnetzes Eingangsbuchse oder wechseln, also Das im Notfall den
Netzstecker ziehen Stecker Und schneiden aus dem Leistung.
⑥ . Tun nicht verbinden Die Wechselrichter Ausgabe direkt Zu Die Netz
Notiz :
*Wenn die Last an den Wechselrichter,der laden muss gedreht werden
aus vor der Verdrahtung, und dann die Last muss gedreht werden An
eins von eins.
*Schließen Sie den Wechselrichter an eine spezielle Steckdose mit
Überstromschutz an. Schutz Gerät
*Die verwendete Steckdose sollte verbunden Zu Die Schutz Erde
Terminal
*Unabhängig davon, ob der Eingang Netzkabel ist eingesteckt in die Netz
Steckdose, der Wechselrichterausgang kann geladen werden. Das
Ausschalten des Wechselrichters nicht garantieren, dass die inneren Teile
der Maschine nicht Sei aufgeladen.Wenn Sie wollen, dass der
Wechselrichter keinen Ausgang hat , muss erst umdrehen aus allen
Schalter und dann schneiden Sie die Netz Leistung
*Bei induktiver Lasten wie Motoren , Monitore und Laserdrucker Sind
benötigt, ist die Startleistung zu groß.Bei der Auswahl ein

Wechselrichter,der Die Kapazität sollte auf der Grundlage der ab
Macht.Die ab Leistung Ist üblich

LCD PANEL DESCRIPTION
24,6
V
24,0
Satz Klimaanlage Laden aktuell :
28,4 V
25A 50A
20,0 V
15A 35A
Description:
Long press the setting key for 3 seconds to enter the system
setting interface,and pressing the setting key can also indicate
confirmation.The LCD will automatically turn off the backlight (energy
saving)without any operation for 5 seconds.Press the setting key
again can turn on the backlight.
Energy saving (sleep)function,when the inverter is working in battery
mode and no load,it will enter the state(Off output)after 20 seconds
in order to achieve energy saving effect,automatically turn on after
load,normal use.
27.6V
21.0V
26.0V
21.6V
WORKING MODE SETTING
Sie die Systemeinstellungsoberfläche
auf
Lang drücken Die Einstellung Schlüssel
für 3 Sekunden Zu eingeben Die System
Einstellung der Schnittstelle nach Sie
schalten den Wechselrichter.
Set AC charging current:
25A 50A
15A 35A
Stellen Sie den Netzladevorgang ein aktuell
In Die System Einstellung Schnittstelle, Presse Die oder
Schlüssel Zu wählen Satz Klimaanlage Laden aktuell, Und Dann
drücken der Schlüssel Zu Bestätigen.Auswählen Die Laden den
gewünschten Strom und drücken Sie die Taste, um bestätigen .
Verschiedene Spezifikationen von Wechselrichter dürfen Satz anders
Laden aktuell Werte. Der Netz Laden aktuell Wert In Die links Bild Ist
Die Standardparameter von der 24V3000 W Wechselrichter .
Battery
Satz Priorität AC/ Batterie
Drücken Sie in der Systemeinstellungsoberfläche die Taste
e
oder
o
Taste zur Auswahl der Priorität, und drücken Sie dann die Taste zur
Bestätigung.Wählen Sie den Prioritätsstatus Du wollen Und zur
Bestätigung die Taste drücken .

WORKING MODE SETTING
Nach dem Ändern der Priorität wird die Systemeinstellungsschnittstelle
korrekt Anzeige die aktuelle Arbeit Priorität nach 5 Sekunden.
Klimaanlage Priorität: Die Netzstromversorgung Priorität.Die Batterie
Stromversorgung wird Start sofort bei einem Netzausfall (Schalter beträgt
Millisekunden und wirkt sich nicht auf die Elektrogeräte aus In
verwenden) und dürfen Sei gebraucht als A Wenn die Netzspannung
wiederhergestellt wird, wird es automatisch Wechseln Sie zur
Netzstromversorgung und laden Sie das Batterie bei Die Dasselbe Zeit.
Batteriepriorität: Die Batteriestromversorgung Priorität.Wenn die Batterie
Macht ist niedrig , es Wille schalten Zu Die Netz Leistung Versorgung
und Die Batterie Wille Sei
automatisch geladen.Wenn die Batteriespannung wieder einen
bestimmten
Wert(eingestellt in den Batterieeinstellungen ) und 30 Minuten später
die Batterie Leistung Versorgung wird automatisch restauriert.
Schutzplatine getrennt ist, kann der Wechselrichter Sei aufgeladen
ohne Einschalten, intelligent reparieren die Batterie, und verlängern
die Service Leben.
Tip:Switch between AC mode and Battery mode requires an interval of
30 minutes
Energiesparausgang: aus/ ein
Drücken Sie in der Systemeinstellungsoberfläche die Taste oder Zu
wählen Sparer, Und Drücken Sie dann zur Bestätigung die Taste.
Wählen Sie den gewünschten Speicherausgang (aus/ein) aus. Und
mit der Taste bestätigen .
Nach Du ändern Die Sparen Einstellung , die System Einstellung
Schnittstelle Wille richtig anzeigen Die aktuell arbeiten Sparen Einstellung
nach 5 Sekunden .

Am : der Wechselrichter Wille eingeben schlafen Zustand ( Abzweigung Die
Ausgang ) nach 20 Sekunden
Wann Die Wechselrichter Ist Arbeiten In Batterie Modus Und NEIN laden
im NEIN laden Leistung wird niedriger als 3W, es wird automatisch nach
dem Laden gestartet
Aus : Der Wechselrichter wird gestartet und wechselt nicht in den
Ruhezustand .
Einstellung der Hintergrundbeleuchtung: normal / ein
Drücken Sie in der Systemeinstellungsoberfläche die Taste
e
oder
o
Taste zur Auswahl Hintergrundbeleuchtung,
und drücken Sie dann die Taste zur Bestätigung.Wählen Sie die
Hintergrundbeleuchtung Zustand, den Sie wollen
Und Drücken Sie die Taste zur Bestätigung. Nachdem Sie die
Einstellung für die Hintergrundbeleuchtung geändert haben ,
Die Systemeinstellungsschnittstelle zeigt die aktuelle Arbeitseinstellung für
die Hintergrundbeleuchtung korrekt an nach 5 Sekunden .
Am: der Die Hintergrundbeleuchtung wird bleibt
Normal: Die Die Hintergrundbeleuchtung wird ausgeschaltet Wann keine
Operation innerhalb 1 Minute
28,4 V
20,0 V
Batterieeinstellung
Drücken Sie im Systemeinstellungsfenster die Taste
e
oder
o ,
um
„Set“ auszuwählen , und wählen Sie dann Drücken Sie zur Bestätigung die
Taste
in der Batterieeinstellungsoberfläche die Taste zur Auswahl Die Batterie
Parameter, den Sie anpassen möchten.Nach Auswahl des
Batterieparameters
Möchten Sie anpassen, drücken Sie können den Spannungswert
erhöhen , und drücken Sie können
verringern Sie den Spannungswert. (Der Spannungswert ändert sich nicht
sofort, Es müssen 5 Sekunden warten) kehrt es automatisch zum
Wechselrichter
26.0V
21.6V
27.6V
21.0V

Informationsschnittstelle, wenn Keine Bedienung innerhalb von 30
Sekunden.
CC -V: Konstante
Stromspannung Laden FLA -V:
Schweben Laden
DC-AUFNAHME: Im Zustand der Batterie
Priorität,Netzstromversorgung ,die Batterie Stromversorgung wird
automatisch 30 Minuten später wiederhergestellt, als die

Die Batteriespannung kehrt auf diesen Wert zurück.
B- LVD : Niedrig Stromspannung Schutz
( Abschaltung ) LB - Aal : Niedrig
Stromspannung Alarm ( Piepton )
Wechselstrom - Aufnahme : In Die Zustand von Batterie Priorität ,
Automatisch schalten Zu Netz Priorität Wann Die Batterie Stromspannung
Runter Zu Das Wert .
Der Bild An Die links Ist Die Standard Batterie Stromspannung
Parameter von Die 24V 3000 W Wechselrichter .
Set AC charging current:
25A 50A
15A 35A
Der Benutzer dürfen wählen Die Laden Gang nach Zu Die Leistung
Nachfrage ( Täglich Laden Ist empfohlen Zu Sei angepasst Zu niedrig oder
Medium Gang )
Der Figur An Die links Ist Die Standard Parameter der 24V3000 W
Wechselrichter . Der Ladevorgang aktuell Werte von Wechselrichter von
anders Spezifikationen Sind anders . Bitte verweisen Zu Die Figur unten .
Ladestromvergleich
Modus
Niedrig
Mitte
Hoch
Super hoch
12V 2 KW
10A
20A
30A
50A
24V 3 KW
15A
25A
35A
50A
24V 4 KW /5 KW /6
KW
15A
35A
55A
70A
48 V 6 KW
15A
25A
35A
50A
EINGANGS- UND AUSGANGSVERBINDUNGEN
Klimaanlage Ausgabe
(nur für niedriger als 1200-W-Gerät)
Erdungskabel
Klimaanlage Eingang
(L bis stromführendes Kabel N bis Neutralleiter)
Klimaanlage Ausgabe
(Es ist sehr stabil, toll für
Elektrogeräte mit hohem
Stromverbrauch )
Erdungskabel
Verbinden
Sie Batterie
positiv
Verbinden
Sie Batterie
Negativ
Fernbedienung
sschnitt
stelle
VERBINDUNG DIAGRAMM
12V Batterie Anschlussplan


Anschlussdiagramm für 48-V-Batterie
AC output
(only for low than 1200w appliance)
(please plug your high power applinace into this AC output)
Plug in the mains
to charge the battery
(Mains power is not necessary)
(L to live wire N to neutral wire)
●
AC output 120V

Notiz :
Wenn Es Ist verbunden Zu Die Generator , es Bedürfnisse Zu
arbeiten nach Zu Die folgende Schritte
① Starten Die Generator , warte für Es Zu laufen stabil , verbinden Die
Ausgabe Leistung von Die Generator Zu Die Eingang von Die
Wechselrichter ( in Das Fall , machen Sicher Die Wechselrichter Ist
Leerlauf ) und Dann Start Die Wechselrichter nach Zu Die Start-up
Verfahren . Nach Die Wechselrichter beginnt , Und Dann verbinden Zu Die
laden eins von eins . ② Es Ist empfohlen Zu wählen Die Generator
Kapazität mit zwei Zu drei
mal Die Kapazität von Die Wechselrichter .
WARTUNG & INSTANDHALTUNG
① Dies Serie von Wechselrichter erfordert sehr wenig Wartung . Die
Batterie von Die Standard Modell Ist ventilgeregelt ,
wartungsarm Typ und nur muss Sei aufgeladen häufig Zu
erreichen Die erwartet Leben .
② Wenn Die Wechselrichter Ist nicht gebraucht für A lang Zeit , es Ist
empfohlen Zu Aufladung es jeden zwei Zu drei Monate -- Zeiten
③ Unter Normal Umstände , die Service Leben von Die Batterie Ist drei
Jahre . Wenn Die Batterie Ist gefunden Zu Sei In arm Zustand , es muss
Sei ersetzt früh . Beim Ersetzen Die Batterie , es muss Sei durchgeführt
von A professionell .
④ Der Batterie sollen nicht Sei ersetzt individuell und Die Batterie
Anweisungen des Lieferanten sollen Sei gefolgt Wann Ersetzen Die
gesamte
Batterie . Normalerweise Batterie Ist aufgeladen Und entlassen jeder
zwei Zu drei Monate und aufgeladen nach Sein entlassen Zu
Herunterfahren und Die Ladezeit von
Die Standard Maschine soll nicht Sei weniger als 12 Std .

⑤ In Hochtemperatur Bereiche , die Batterie Ist aufgeladen Und
entladen -- mal jeder zwei Monate und Die Standard Maschine Laden
muss nicht Sei weniger als 12 Stunden jede Zeit .
Notiz :
① Der Wechselrichter muss Sei gedreht aus Und getrennt aus Die Netz
vor Ersetzen Die Batterie
② Nehmen Sie aus Metall Objekte solch als Ringe Und Uhren .
③ Verwendung isoliert Griffe Und Schraubendreher und Tun nicht Ort
Werkzeuge oder andere Metall Objekte An Die Batterie .
④ Es Ist Normal für klein Funken Zu erscheinen bei Die Anschluss Und
Wille nicht Schaden verursachen Zu persönlich Sicherheit Und Die
Wechselrichter Wann Verbinden Die Batterie Kabel .
⑤ Niemals Kurzschluss oder umkehren Die Batterien positiv Und
Negativ Stangen .
EINFACH WARTUNG UND REPARATURMETHODEN
Fehlfunktion
Grund
Lösung
Der Lüfter funktioniert
nicht
Die Temperatur im Inneren
Wechselrichter tut nicht
über 45 ℃
Es Ist normal , die
Lüfter ist
Temperaturkontrolle
Das Terminal Ist heiß
Arm Kontakt oder lose
Nachziehen
Abschalten mit Last
Batterie nicht haben genug
Leistung oder über laden
Laden Sie Ihren Akku
oder reduzieren laden
Kann nicht
drehen An der
Wechselrichter
Die Batterie Kabel Ist
nicht richtig
angeschlossen
Überprüfen Wenn Die
Batterie
Kabel ist
angeschlossen Und
schließen Sie es
wieder an
Einschaltalarm
Batterie nicht haben genug
Power oder über laden
Laden Sie Ihren Akku
oder reduzieren laden
APPENDIX
Modell
BL-W2012V-L
BL-W3024V-L
BL-W4024V-L
Bewertet Leistung
2000 W
3000 W
4000 W
Gipfel Leistung
6000 W
9000 W
12000W
Eingang
Stromspann
ung
90 V bis 130 V Wechselstrom
Frequenz
45-65 Hz
Ausgabe
Stromspann
ung
120VAC±10%(Batterie Prioritätsmodus)
Frequenz
60Hz±1%( Batteriepriorität Modus)
Ausgangswellenform
Rein Sinuswelle
Wirksamkeit
>76 %
>80 %
Batterie Typ
Blei-Säure-Batterien Lithium Eisen
Batterie Ternäre (18650) Batterie und
anpassbar
Batteriespannung
12 V
Gleichstrom
24 V Gleichstrom
Maximal aktuell von Haupt -S Laden
50 A (12 V DC)/70 A (24 V DC)/50 A (48 V DC)
Schutz
Überlast ,Kurzschluss,Übertemperatur,Batterie
Hoch-/Niederspannung, Netz-Hoch-
/Niederspannung
Konvertierungsmethode
Interaktiv 5 ms (typisch al)
Überlast
Schutz für 15 Sekunden nach Überschreiten 100 %
Kommunikationsmethode
RS-232 (Optional)
Arbeiten
Umfeld
Temperatur
-30-40 ℃
Luftfeuchtigkei
t
10 % – 90 %
Modell
BL-W5024V-L
BL-W6024V-L
BL-W6048V-L
Bewertet Leistung
5000 W
6000 W
6000 W
Gipfel Leistung
15000W
18000 W
18000 W
Eingang
Stromspann
ung
90 V bis 130 V Wechselstrom
Frequenz
45-65 Hz
Ausgabe
Stromspann
ung
120VAC±10%(Batterie Prioritätsmodus)
Frequenz
60Hz±1%( Batteriepriorität Modus)
Ausgangswellenform
Rein Sinuswelle
Wirksamkeit
>80 %
Batterie Typ
Blei-Säure-Batterien Lithium Eisen
Batterie Ternäre (18650) Batterie und
anpassbare
Batteriespannung
24 V Gleichstrom
48 V
Gleichstrom
Maximal aktuell von Haupt -S Laden
50 A (12 V Gleichstrom)/70 A (24 V
Gleichstrom)/50 A (48 V Gleichstrom)
Schutz
Überlast ,Kurzschluss,Übertemperatur,Batterie
Hoch-/Niederspannung, Netz-Hoch-
/Niederspannung
Konvertierungsmethode
Interaktiv 5 ms (typisch al)
Überlast
Schutz für 15 Sekunden nach Überschreiten 100 %
Kommunikationsmethode
RS-232 (Optional)
Arbeiten
Umfeld
Temperatur
-30-40 ℃
Luftfeuchtigkei
t
10 % – 90 %
Wenn die oben genannten Parameter werden geändert in Zukunft
können Sie den Verkäufer fragen das Neueste Parameter

DEFAULT BATTERY PARAMETERS

CUSTOM VOLTAGE ADJUSTMENT RANGE
CUSTOM VOLTAGE ADJUSTMENT RANGE
Die Produktspezifikationen oder zugehörige Informationen
erwähnt In Das Änderungen der Bedienungsanleitung vorbehalten.
beachten.

Technischer Support und E-Garantie-
Zertifikat www.vevor.com/support
Schnell Start Führung
Batterieanschluss
WARNUNG! Alle Verkabelungen muss durchgeführt werden durch
Fachpersonal ersetzt werden.
WARNUNG! Für die Sicherheit und den effizienten Betrieb des
Systems ist es sehr wichtig, Verwenden Sie für den Batterieanschluss ein
geeignetes Kabel. Um Risiko von Verletzung ,
Bitte verwenden Sie die richtigen empfohlenen Kabel.
Modell
Maximale
Stromstärke
Draht Größe
Drehmomentwe
rt
12 V 2000
W
166A
4 AWG
20~30 Nm
24 V 3000
W
125A
4 AWG
20~30 Nm
24 V 4000
W
166A
4 AWG
20~30 Nm
24 V 5000
W
208A
6 AWG X 2
20~30 Nm
24 V 6000
W
250
4 AWG X 2
20~30 Nm
48 V 6000
W
125A
4 AWG
20~30 Nm
Klimaanlage Eingang / Ausgang Verbindung
WARNUNG! Die gesamte Verkabelung muss durchgeführt werden von A qualifiziert
Personal.
WARNUNG! Es ist sehr wichtig für die Systemsicherheit und effizient Betrieb Zu
verwenden
geeignetes Kabel für den AC-Eingangsanschluss. Um Risiko von Verletzung, Bitte
verwenden Die richtige empfohlene Kabelgröße als unten.
Empfohlener Kabelbedarf für Wechselstromleitungen
Modell
Draht Größe
Drehmomentwer
t
12V 2000 W
10 AWG
1,4 ~ 1,6 Nm
24 V 3000 W
10 AWG
1,4 ~ 1,6 Nm

24 V 4000 W
10 AWG
1,4 ~ 1,6 Nm
24 V 5000 W
8 AWG
1,4 ~ 1,6 Nm
24 V 6000 W
8 AWG
1,4 ~ 1,6 Nm
48 V 6000 W
8 AWG
1,4 ~ 1,6 Nm

Einführung Zu Die Betrieb Bedienfeld
Wenn es Ist notwendig, um verwenden Sie das Betriebssystem Panel weg von
der Wechselrichter, siehe die Folgendes:
1. Die 4 Dübel aus dem Kontrolldisplay entfernen, Sein vorsichtig nicht zu
fallen Es innerhalb der Maschine.
2. Mit einem kleinen Dübelschneider das Display abhebeln offen und nehmen Es
aus .
3. Ziehen Sie den Stecker Netzwerkkabel an das Display angeschlossen.
4. Verwenden Sie ein 10-Meter-Kabel zum Anschluss an die Wechselrichter
Hafen .
Hinweis: Dieses Kabel kann nicht verbunden sein mit dem Internet
Hafen und kann nicht kommunizieren mit Es.

Supporto tecnico e Certificato di garanzia elettronico www.vevor.com/support
CARICABATTERIE INVERTER UTENTE
MANUALE
MODELLO : BL -W2012V-L, BL -W3024V-L, BL -W4024V- L
, BL -W5024V - L, BL -W6048V-L, BL -W6024V-L
Continuiamo ad impegnarci per fornirti strumenti competitivi prezzo.
"Risparmia Metà", "Metà prezzo" o altre espressioni simili usato di noi rappresenta
solo una stima dei risparmi che puoi potrebbe trarre beneficio dall'acquisto certi
strumenti
con noi rispetto al grandi marchi top e non necessariamente Significare A copertina
tutte le categorie di strumenti offerti da noi. Tu sei si prega di verificare accuratamente
quando sei effettuare un ordine con noi se Sono In realtà Risparmio
Metà rispetto alla cima grandi marchi.
Inverter charger
MODELLO : BL -W2012V-L, BL -W3024V-L, BL -
W4024V-L, BL -W5024V-L, BL -W6048V-L,
BL- W6024V-L
Modello BL-W2012V-
L
Modello BL-
W3024V-L
Modello BL-
W4024V-L
Modello BL-
W5024V-L
Modello BL-
W6024V-L
Modello BL-
W6048V-L
(IL immagine è solo per riferimento, per favore fare riferimento al attuale
oggetto t)
BISOGNO AIUTO ? CONTATTO NOI !
Avere prodotto domande? Bisogno tecnico supporto? Per favore
Tatto gratuito A contatto noi:
certificato di garanzia elettronica
www.vevor.com/support

Questo è l'originale istruzione, per favore leggi tutto manuale istruzioni
accuratamente prima di operare. VEVOR si riserva una chiara
interpretazione del nostro manuale utente. L'aspetto del prodotto deve
essere soggetto a IL
prodotto tu ricevuto. Per favore perdonami noi che non lo faremo
informarti di nuovo Se ci sono aggiornamenti tecnologici o software SU
Nostro prodotto.

Attenzione - A ridurre IL rischio Di infortunio , utente dovere
Leggere attentamente il manuale di istruzioni .
Questo dispositivo è conforme con Parte 15 di IL Commissione
federale delle comunicazioni Regole . L'operazione è soggetto A
IL seguente due condizioni :(1) Questo dispositivo Maggio non
causare interferenze dannose , e (2) questo dispositivo dovere
accettare Qualunque interferenza ricevuta , compreso
interferenze che possono causare
operazione indesiderata.
Questo prodotto è soggetto alla disposizione Di europeo
Direttiva 2012/ 19/ CE . Il simbolo mostrando UN impennata
bidone attraversato
attraverso indica che il prodotto richiede separato rifiutare
raccolta nella europeo Unione. Ciò vale per la prodotto e
tutti gli accessori contrassegnati con questo simbolo. Prodotti
contrassegnati come tale potrebbe non essere scartare con
normale rifiuti domestici, Ma deve essere portato a una
raccolta punto per il riciclaggio elettrico E dispositivi
elettronici
ISTRUZIONI DI SICUREZZA
Grazie per aver scelto l' inverter di frequenza intelligente, domestico
inverter e online interattivo prodotti realizzati dalla nostra azienda.
il design è sicuro, affidabile e facile da usare. Per favore leggi questo
manuale attentamente , Volere ti aiutiamo a ottenere il servizio più
completo vita e servizio.
Si prega di attenersi scrupolosamente da tutti gli avvertimenti e le
istruzioni operative istruzioni in IL manuale e sulla macchina e tieni
questo manuale correttamente.
IL installazione/funzionamento e manutenzione di questa serie di prodotti
Dovrebbe essere eseguito da personale tecnico e formato personale e
quanto segue i requisiti devono essere rispettati.

1.Si prega di confermare che il Valore della tensione CC/CA del
prodotto collegato conforme al valore nominale e nominale della
tensione di lavoro dell' prodotto.

2.Assicurarsi che il positivo e negativo pali del corrente continua ingresso
Di questo prodotto e il positivo e negativo pali del la batteria è
correttamente collegato, non invertito.
3. Assicurarsi che il cavo di collegamento tra il prodotto e il la batteria è il
più corta possibile, ingresso E cablaggio di uscita È corretto E
fermo e fare attenzione a evitare cortocircuiti della connessione cavo.
4. C'è alta tensione all'interno di questo prodotto, non elettrico
professionisti Dovrebbe non aprire l'inverter caso.
La batteria di avviamento dell'auto può fornire una soluzione a breve
termine alta corrente A iniziare il
motore, ma Esso non è progettato per il funzionamento continuo consumo
di energia e È non adatto per la scarica a ciclo profondo. Se si
desidera utilizzare un determinato apparecchiature elettriche
continuamente per un da molto tempo, si consiglia di aggiungere
equipaggiare una batteria adatta alla scarica profonda, come Batterie
AGM o GEL. Disclaimer: A causa del continuo aggiornamento e
miglioramento dei prodotti e tecnologie, il contenuto di questo documento
può non completamente abbinare il prodotto reale, per favore capisci.Se
tu bisogno di chiedere informazioni prodotto
aggiornamenti, vi preghiamo di contattare la nostra azienda .
INSTALLAZIONE
1. Istruzioni per l'installazione
① . Disimballaggio ispezione
Aprire la confezione dell'inverter, controllare gli accessori e controllare se
l'inverter è danneggiato durante il trasporto. Se si riscontrano danni o
parti mancanti, si prega di informare l ' vettore E distributore.
Nota :
Per favore conservare la scatola di imballaggio e imballaggio
materiali per il futuro trasporto.
Questa serie di prodotti è più pesante ( Vedere appendice), quindi fai
attenzione quando gestione

2.Precauzioni per l'installazione
① . Il zona Dove IL invertitore È collocato dovere Essere BENE ventilato ,
lontano da acqua, gas infiammabili e agenti corrosivi .
② . Mantenere IL lato pannello fan aria ingresso , aria presa E aria
ingresso SU IL lato Di la scatola senza ostacoli.
③ .La temperatura ambiente dell'inverter dovrebbe essere tenuto
fra Temperatura: da 0 ℃ a 40 ℃ .
④ .Se la macchina viene smontata e utilizzata A bassa temperatura ,
acqua
le goccioline possono condensarsi. bisogna aspettare l'interno e l'esterno
del
la macchina deve essere completamente asciutta prima installazione e
usando altrimenti Là è un pericolo elettrico shock.
⑤ .Per favore installare l'inverter vicino alla rete elettrica presa di
ingresso o cambia, quindi Quello in caso di emergenza, scollegare
l'ingresso della rete elettrica tappo E taglio fuori dal energia.
⑥ . Fare non collegare IL invertitore produzione direttamente A IL rete
elettrica
Nota :
*Quando il carico è collegato al inverter,il carico dovere essere girato
spento prima del cablaggio e poi del carico deve essere girato SU uno
di uno.
*Collegare l'inverter a una presa speciale con sovracorrente
protezione dispositivo
*La presa di corrente utilizzata deve essere connesso A IL
protettivo terra terminale
*Indipendentemente dal fatto che l' input il cavo di alimentazione è
collegato al rete elettrica
presa, l'uscita dell'inverter potrebbe essere caricata. Lo spegnimento
dell'inverter non non garantire che le parti interne della macchina non
Essere addebitato.Se tu vuoi che l'inverter non abbia uscita , bisogna
prima girare fuori tutto interruttori e poi tagliare il Rete elettrica energia

*Quando induttivo carichi come motori , monitor e stampanti laser
Sono necessario, la potenza di avviamento è troppo grande.Quando
si seleziona UN inverter,il la capacità dovrebbe essere calcolata in
base alla di partenza potere.Il di partenza energia È solito

LCD PANEL DESCRIPTION
24,6
V
24,0
Impostato Corrente alternata carica attuale :
28,4V
25A 50A
20,0 V
15A 35A
Description:
Long press the setting key for 3 seconds to enter the system
setting interface,and pressing the setting key can also indicate
confirmation.The LCD will automatically turn off the backlight (energy
saving)without any operation for 5 seconds.Press the setting key
again can turn on the backlight.
Energy saving (sleep)function,when the inverter is working in battery
mode and no load,it will enter the state(Off output)after 20 seconds
in order to achieve energy saving effect,automatically turn on after
load,normal use.
27.6V
21.0V
26.0V
21.6V
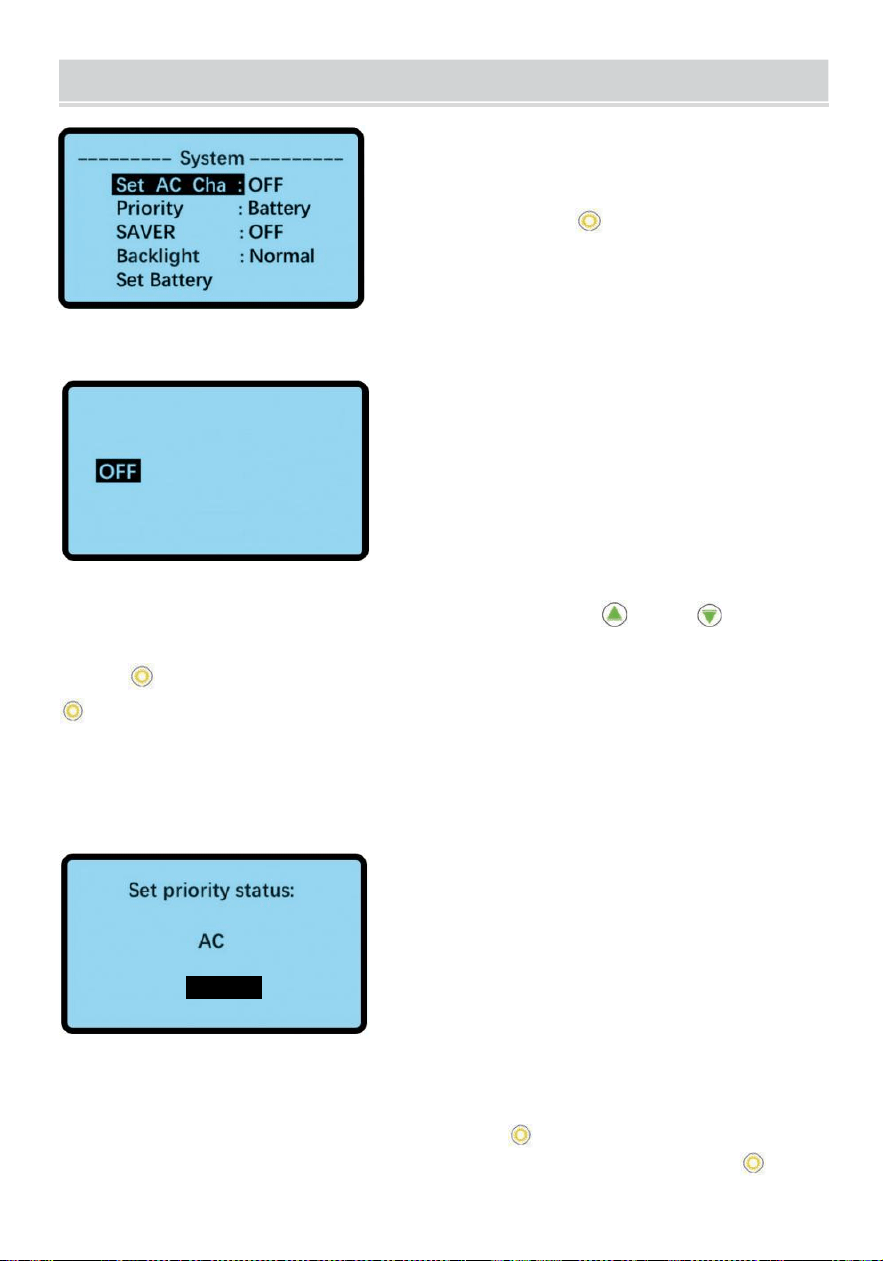
WORKING MODE SETTING
Accedere all'interfaccia delle
impostazioni di sistema
Lungo premere l' impostazione chiave
per 3 secondi A entrare IL sistema
impostazione dell'interfaccia dopo accendi il
inverter.
Set AC charging current:
25A 50A
15A 35A
Impostare la carica di rete attuale
In IL sistema collocamento interfaccia, premere IL O chiave A
selezionare Impostato Corrente alternata carica attuale, E Poi premere la
chiave A conferma.Seleziona IL carica corrente che desideri e premi il
tasto per confermare .
Diverse specifiche di inverter Potere impostato diverso carica attuale
valori. IL rete elettrica carica attuale valore In IL Sinistra immagine È
IL parametro predefinito Di il 24V3000W invertitore .
Battery
Impostato Priorità AC/ Batteria
Nell'interfaccia di impostazione del sistema, premere
e
o
o
tasto per
selezionare la priorità, e quindi premere il tasto per
confermare.Selezionare lo stato di priorità Voi Volere E premere il tasto
per confermare .

WORKING MODE SETTING
Dopo aver modificato la priorità, l' interfaccia di impostazione del sistema
verrà visualizzata correttamente display il lavoro attuale priorità dopo 5
secondi.

Corrente alternata priorità: La priorità dell'alimentazione di rete. La
batteria l'alimentazione elettrica sarà inizio immediatamente in caso di
interruzione dell'alimentazione di rete (la commutazione sono millisecondi
e non influisce sugli elettrodomestici In usare)e Potere Essere usato
COME UN UPS.Quando l'alimentazione di rete è ripristinato,verrà
automaticamente passare al alimentazione di rete e caricare il batteria a
IL Stesso tempo.
Priorità batteria: alimentazione a batteria priorità.Quando il batteria il
potere è basso , esso Volere interruttore A IL rete elettrica energia fornitura
, e IL batteria Volere Essere
caricato automaticamente. Quando la tensione della batteria ritorna a un
certo
valore (impostato nelle impostazioni della batteria) e 30 minuti più tardi
il batteria energia la fornitura sarà essere automaticamente restaurato.
la scheda di protezione è scollegata, l' inverter può Essere caricato
senza accendendo, riparando in modo intelligente la batteria ed
estendendo la servizio vita.
Tip:Switch between AC mode and Battery mode requires an interval of
30 minutes
Uscita a risparmio energetico: off/ on
Nell'interfaccia di impostazione del sistema, premere il tasto o A
selezionare RISPARMIATORE, E quindi premere il tasto per
confermare. Selezionare l'uscita di salvataggio (off/on) desiderata E
premere il tasto per confermare .
Dopo Voi modifica IL RISPARMIATORE impostazione , il sistema
collocamento interfaccia Volere visualizzare correttamente IL attuale lavoro
RISPARMIATORE collocamento dopo 5 secondi .

Su : il invertitore Volere entrare sonno stato ( spegnimento IL uscita ) dopo 20
secondi
Quando IL invertitore È lavorando In batteria modalità E NO carico nel . il NO
carico energia sarà inferiore a 3W, si avvierà automaticamente dopo il
caricamento
O ff: l'inverter continuerà ad avviarsi e non entrerà nello stato di sospensione,
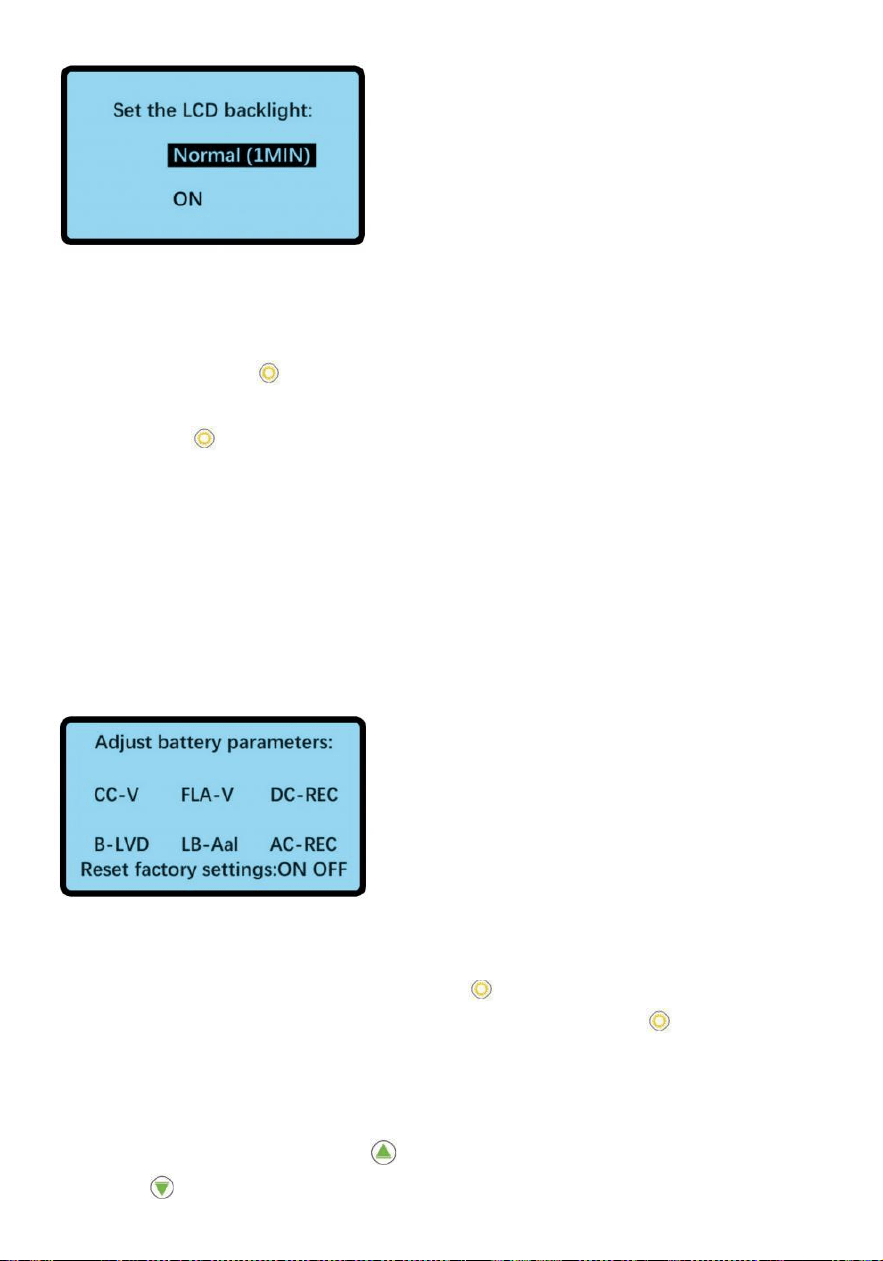
Impostazione retroilluminazione: normale / accesa
Nell'interfaccia di impostazione del sistema, premere
e
o
o
tasto per
selezionare Retroilluminazione,
e quindi premere il tasto per confermare.Selezionare la
retroilluminazione dichiara che vuoi
E premere il tasto per confermare. Dopo aver modificato l' impostazione
della retroilluminazione,
l'interfaccia di impostazione del sistema visualizzerà correttamente l'
impostazione della retroilluminazione del lavoro corrente dopo le 5 secondi
.
Su: il La retroilluminazione sarà continua
Normale: Il La retroilluminazione si spegnerà Quando nessuna operazione
entro 1 minuto
28,4V
20,0 V
Impostazione della batteria
Nell'interfaccia di impostazione del sistema, premere il tasto
e
o
o
per
selezionare Imposta e quindi premere il tasto per confermare
Nell'interfaccia di impostazione della batteria , premere il tasto per
selezionare IL batteria
parametro che si desidera regolare. Dopo aver selezionato il parametro
della batteria,
si desidera regolare, premere può aumentare il valore della tensione e
premere può
26.0V
21.6V
27.6V
21.0V

diminuire il valore della tensione. (Il valore della tensione non cambierà
immediatamente, Esso è necessario attendere 5 secondi) tornerà
automaticamente alla invertitore
interfaccia informativa quando nessuna operazione entro 30 secondi.
CC -V: Costante voltaggio carica
FLA -V: Galleggiante carica
DC-REC: Nello stato della batteria priorità,Alimentazione di rete,il
batteria l'alimentazione elettrica sarà essere automaticamente
ripristinato 30 minuti dopo quando il

la tensione della batteria ritorna a questo valore.
B- LVD : Basso voltaggio protezione ( sp
egnimento ) LB - Aal : Basso voltaggio
allarme ( bip )
AC - REC : In IL stato Di batteria priorità ,
Automaticamente interruttore A rete elettrica priorità Quando IL batteria
voltaggio Giù A Questo valore .
IL immagine SU IL Sinistra È IL predefinito batteria voltaggio
parametro Di IL 24V3000W invertitore sistema .
Set AC charging current:
25A 50A
15A 35A
IL utente Potere selezionare IL carica ingranaggio secondo A IL energia
domanda ( giornaliera carica È raccomandato A Essere aggiustato A Basso
O medio ingranaggio )
IL figura SU IL Sinistra È IL predefinito parametri del 24V3000 W inverter .
La carica attuale valori Di inverter Di diverso specifiche Sono diverso . Per
favore fare riferimento A IL figura sotto .
CORRENTE DI CARICA PARISON
Modalità
Basso
metà
Alto
Super alto
12V 2KW
10A
20A
30A
50A
24V 3KW
15A
25A
35A
50A
24V 4KW / 5KW /
6KW
15A
35A
55A
70A
48V 6KW
15A
25A
35A
50A
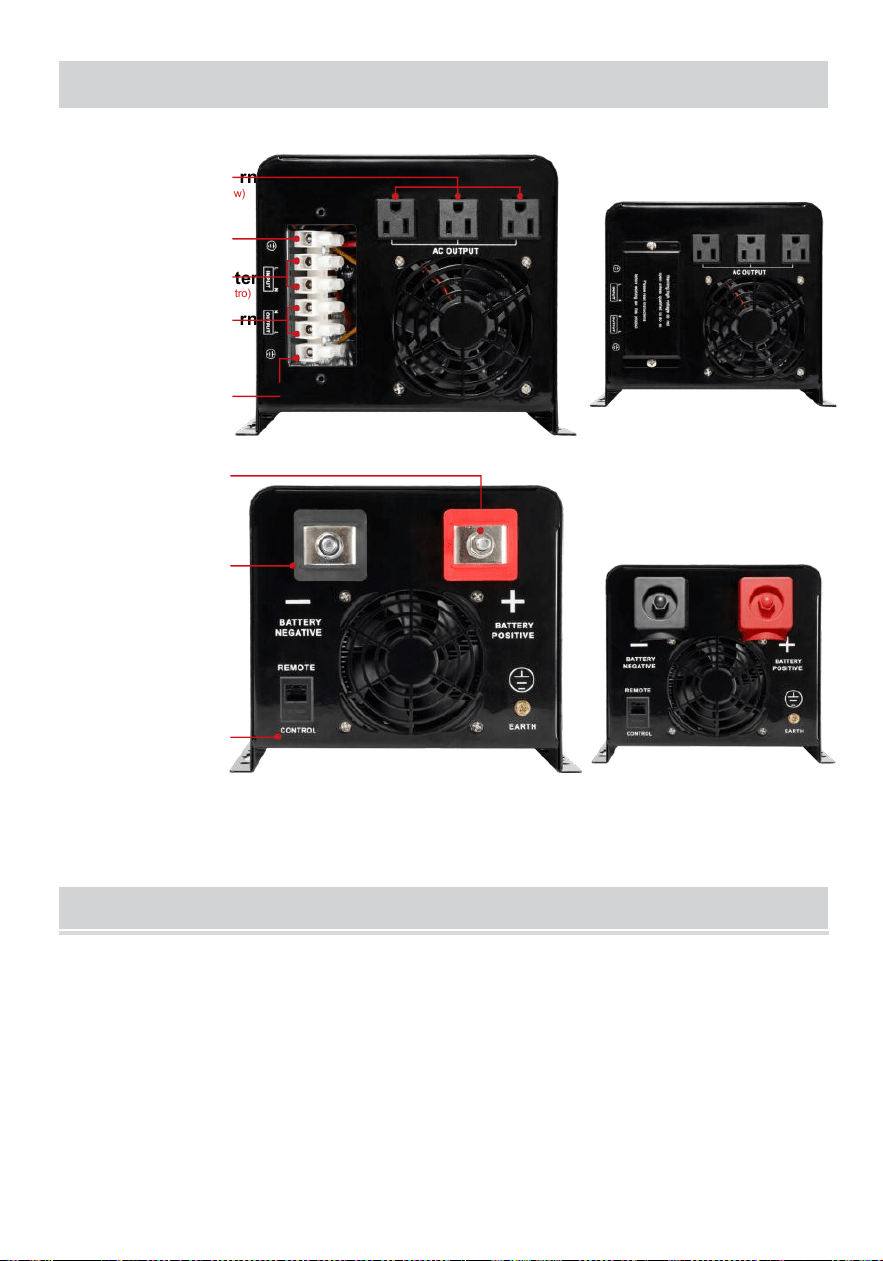
CONNESSIONE INGRESSO E USCITA
Corrente alternata produzione
(solo per bassi di apparecchio da 1200w)
Filo di terra
Corrente alternata ingresso
(da L a filo elettrico Da N a filo neutro)
Corrente alternata produzione
(È molto stabile, ottimo
per elettrodomestici di grande
potenza )
Filo di terra
Collegare il
batteria
positivo
Collegare il
batteria
negativo
Interfaccia di
controll
o
remoto
CONNESSIONE DIAGRAMMA
Schema di collegamento della batteria da 12 V

Schema di collegamento della batteria da 48 V
AC output
(only for low than 1200w appliance)
(please plug your high power applinace into this AC output)
Plug in the mains
to charge the battery
(Mains power is not necessary)
(L to live wire N to neutral wire)
●
AC output 120V

Nota :
Se Esso È collegato A IL generatore , esso esigenze A operare
secondo A IL seguendo i passaggi
① Inizio IL generatore , aspetta per Esso A correre stabilmente , collegare
IL produzione energia Di IL generatore A IL ingresso Di IL inverter ( in
Questo caso , fare Sicuro IL invertitore È senza carico ) , e Poi inizio IL
invertitore secondo A IL avvio
procedura . Dopo IL invertitore inizia , e Poi collegare A IL carico uno di uno .
② Esso È raccomandato A scegliere IL generatore capacità con due A tre
volte IL capacità Di IL invertitore .
MANUTENZIONE E MANUTENZIONE
① Questo serie Di inverter richiede molto poco manutenzione . Il batteria
Di IL standard modello È valvola regolata , bassa manutenzione
tipo , e soltanto ha bisogno di Essere caricato frequentemente A
raggiungere IL previsto vita .
② Se IL invertitore È non usato per UN lungo tempo , esso È
raccomandato A carica ogni volta due A tre mesi -- volte
③ Sotto normale circostanze , il servizio vita Di IL batteria È tre anni . Se
IL batteria È trovato A Essere In povero condizione , esso dovere Essere
sostituito presto . Quando si sostituisce IL batteria , esso dovere Essere
eseguito
di UN professionale .
④ IL batteria Dovrebbe non Essere sostituito individualmente , e IL batteria
istruzioni del fornitore Dovrebbe Essere seguito Quando sostituzione IL
intero
batteria . Normalmente , la batteria È caricato E dimesso ogni due A tre
mesi , e caricato Dopo essendo dimesso A arresto e IL tempo di ricarica
di
IL standard macchina deve non Essere meno di 12 ore .

⑤ Nel alta temperatura aree , il batteria È caricato E scaricato -- volte
ogni due mesi , e IL standard macchina carica dovere non Essere meno di
12 ore ogni tempo .
Nota :
① Il invertitore dovere Essere girato spento E disconnesso da IL rete
elettrica Prima sostituzione IL batteria
② Prendi spento metallo oggetti come COME anelli E orologi .
③ Utilizzare isolato maniglie E cacciaviti , e Fare non posto utensili O
altro metallo oggetti SU IL batteria .
④ Esso È normale per piccolo scintille A apparire A IL connettore E Volere
non causare danni A personale sicurezza E IL invertitore Quando
collegamento IL batteria cavo .
⑤ Mai cortocircuito O inversione IL batteria positivo E negativo pali
.
SEMPLICE MANUTENZIONE E METODI DI RIPARAZIONE
Malfunzionament
o
Motivo
Soluzione
La ventola non
funziona
La temperatura all'interno
del invertitore fa non oltre
45 ℃
Esso È normale , il
fan è il controllo
della temperatura
Il terminale È caldo
Povero contatto O sciolto
Ri - stringere
Spegnimento con
carico
La batteria non Avere
abbastanza potenza O
Sopra carico
Carica la batteria o
ridurre carico
Non posso
giro SU l'
inverter
La batteria cavo È non
collegato
correttamente
Controllo Se IL batteria
il cavo è collegato E
ricollegarlo
Allarme di accensione
La batteria non Avere
abbastanza potenza O
Sopra carico
Carica la batteria o
ridurre carico
APPENDIX
Modello
Modello BL-
W2012V-L
Modello BL-
W3024V-L
Modello BL-
W4024V-L
Valutato energia
2000W
3000W
4000W
Picco energia
6000W
9000W
12000W
Ingresso
Voltaggio
90V-130VAC
Frequenza
Frequenza
Produzione
Voltaggio
120 V CA ± 10% (batteria Modalità prioritaria)
Frequenza
60Hz±1% (priorità batteria modalità)
Forma d'onda di uscita
Puro onda sinusoidale
Efficacia
>76%
>80%
Batteria tipo
Batterie al piombo Litio ferro batteria
Ternary(18650)batteria e Custom izable
Tensione della batteria
12 V CC
24 V CC
Massimo attuale Di principale s
carica
50A (12 V CC)/70A (24 V CC)/50A (48 V CC)
Protezione
sovraccarico
,cortocircuito,sovratemperatura,batteria
alta/bassa tensione, rete elettrica alta
/bassa tensione
Metodo di conversione
Interattivo 5 millisecondi (tipico )
Sovraccarico
Protezione per 15 secondi dopo il superamento
100%
Metodo di comunicazione
RS-232 (opzionale)
Lavorando
ambiente
Temperatura
-30-40 ℃
Umidità
10%-90%
Modello
Modello BL-
W5024V-L
Modello BL-
W6024V-L
Modello BL-
W6048V-L
Valutato energia
5000W
6000W
6000W
Picco energia
15000W
18000W
18000W
Ingresso
Voltaggio
90V-130VAC
Frequenza
Frequenza
Produzione
Voltaggio
120 V CA ± 10% (batteria Modalità prioritaria)
Frequenza
60Hz±1% (priorità batteria modalità)
Forma d'onda di uscita
Puro onda sinusoidale
Efficacia
>80%
Batteria tipo
Batterie al piombo Litio ferro batteria
Ternaria (18650)batteria e
Personalizzabile
Tensione della batteria
24 V CC
48 V CC
Massimo attuale Di principale s
carica
50A (12 V CC)/70A (24 V CC)/50A (48 V CC)
Protezione
sovraccarico
,cortocircuito,sovratemperatura,batteria
alta/bassa tensione, rete elettrica alta
/bassa tensione
Metodo di conversione
Interattivo 5 millisecondi (tipico )
Sovraccarico
Protezione per 15 secondi dopo il superamento
100%
Metodo di comunicazione
RS-232 (opzionale)
Lavorando
ambiente
Temperatura
-30-40 ℃
Umidità
10%-90%
Se quanto sopra i parametri sono cambiati in futuro potrai chiedere al
venditore l'ultimo parametri

DEFAULT BATTERY PARAMETERS

CUSTOM VOLTAGE ADJUSTMENT RANGE

CUSTOM VOLTAGE ADJUSTMENT RANGE
Le specifiche del prodotto o le informazioni correlate menzionato
In Questo il manuale operativo è soggetto a modifiche senza
avviso.

Supporto tecnico e Certificato di garanzia
elettronica www.vevor.com/support
Presto Inizio Guida
Collegamento della batteria
ATTENZIONE! Tutti i cablaggi deve essere eseguito da personale
qualificato.
AVVERTIMENTO! È molto importante per la sicurezza e l'efficienza del
sistema utilizzare un cavo appropriato per il collegamento della batteria.
Per ridurre rischio Di infortunio ,
Per favore utilizzare il metodo appropriato consigliato cavo.
Modello
Amperaggio massimo
Filo Misurare
Valore di coppia
12V 2000W
166A
4 AWG
da 20 a 30 Nm
24V 3000W
125A
4 AWG
da 20 a 30 Nm
24V 4000W
166A
4 AWG
da 20 a 30 Nm
24V 5000W
208A
6 AWG La 2
da 20 a 30 Nm
24V 6000W
250
4 AWG La 2
da 20 a 30 Nm
48V 6000W
125A
4 AWG
da 20 a 30 Nm
Corrente alternata Ingresso / Uscita Connessione
ATTENZIONE! Tutti i cablaggi devono essere eseguito da UN qualificato personale.
ATTENZIONE! È molto importante per la sicurezza del sistema e efficiente
operazione A utilizzo
cavo appropriato per il collegamento in ingresso CA. Per ridurre rischio di
infortunio, Per favore utilizzo IL dimensione del cavo consigliata corretta COME
sotto.
Requisiti di cavi suggeriti per cavi CA
Modello
Filo Misurare
Valore di coppia
12V 2000W
Cavo AWG
10
1.4~ 1,6 Nm
24V 3000W
Cavo AWG
10
1.4~ 1,6 Nm
24V 4000W
Cavo AWG
10
1.4~ 1,6 Nm

24V 5000W
8 AWG
1.4~ 1,6 Nm
24V 6000W
8 AWG
1.4~ 1,6 Nm
48V 6000W
8 AWG
1.4~ 1,6 Nm

Introduzione A IL operazione pannello
Se lo è È necessario per utilizzare il sistema operativo pannello lontano dal
invertitore, fare riferimento al seguente:
1. Togliere i 4 tasselli dal display di controllo, essendo attento non a
gocciolare Esso dentro il macchina.
2. Utilizzare un piccolo taglia tasselli per fare leva sul display aprire e prendere
Esso fuori .
3. Scollegare il cavo di rete collegato al display.
4. Utilizzare un Cavo da 10 metri per il collegamento al invertitore porto .
Nota: questo cavo non può essere collegato al Internet porto e non può
comunicare con Esso.

Soporte técnico y Certificado de garantía electrónica en www.vevor.com/support
CARGADOR INVERSOR USUARIO
MANUAL
MODELO : BL -W2012V-L, BL -W3024V-L, BL-W4024V-L ,
BL -W5024V-L , BL -W6048V-L, BL -W6024V-L
Seguimos comprometidos con Proporcionarle herramientas competitivas. Precio.
"Ahorrar Mitad", "mitad de precio" o cualquier otra expresión similar usado por
Nosotros solo representamos una estimación de los ahorros que usted puede ahorrar.
Podría beneficiarse de la compra ciertas herramientas
con nosotros comparados con el principales marcas líderes y no necesariamente
significar a cubrir
Todas las categorías de herramientas ofrecidas por nosotros. tu eres Por favor recuerde
verificar con cuidado
Cuando tu estas Realizar un pedido con nosotros si son de hecho Ahorro
La mitad en comparación con la cima Grandes marcas .
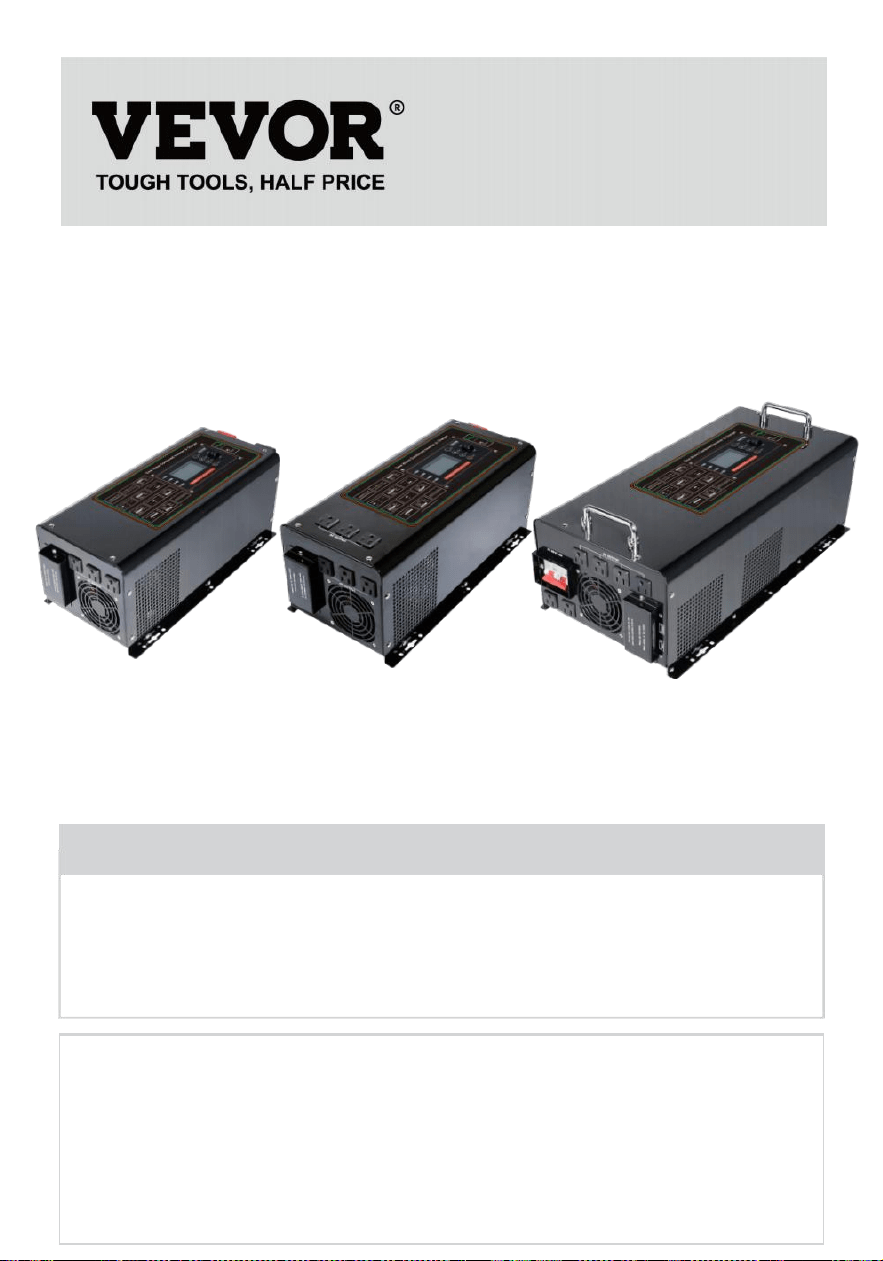
Inverter charger
MODELO : BL -W2012V-L, BL -W3024V-L, BL -
W4024V-L, BL -W5024V-L, BL -W6048V-L,
BL- W6024V-L
BL-W2012V-L
BL-W3024V-L
BL-W4024V-L
BL-W5024V-L
BL-W6024V-L
BL-W6048V-L
(El imagen es solo para referencia, por favor referirse a la actual objeto )
NECESIDAD ¿ AYUDA ? CONTACTO A
NOSOTROS !
Tener producto ¿preguntas? Necesidad técnico ¿apoyo? Por favor
sentir gratis a contacto a nosotros:
certificado de garantía electrónica
www.vevor.com/support
Este es el original instrucción, Por favor lea todo manual instrucciones
con cuidado antes de operar. VEVOR se reserva una interpretación
clara de nuestras manual de usuario. La apariencia del producto
deberá estar sujeto a el
producto tu recibió. Por favor perdona nosotros que no lo haremos
informarle nuevamente si ¿Hay alguna actualización de tecnología o
software ? en nuestro producto.

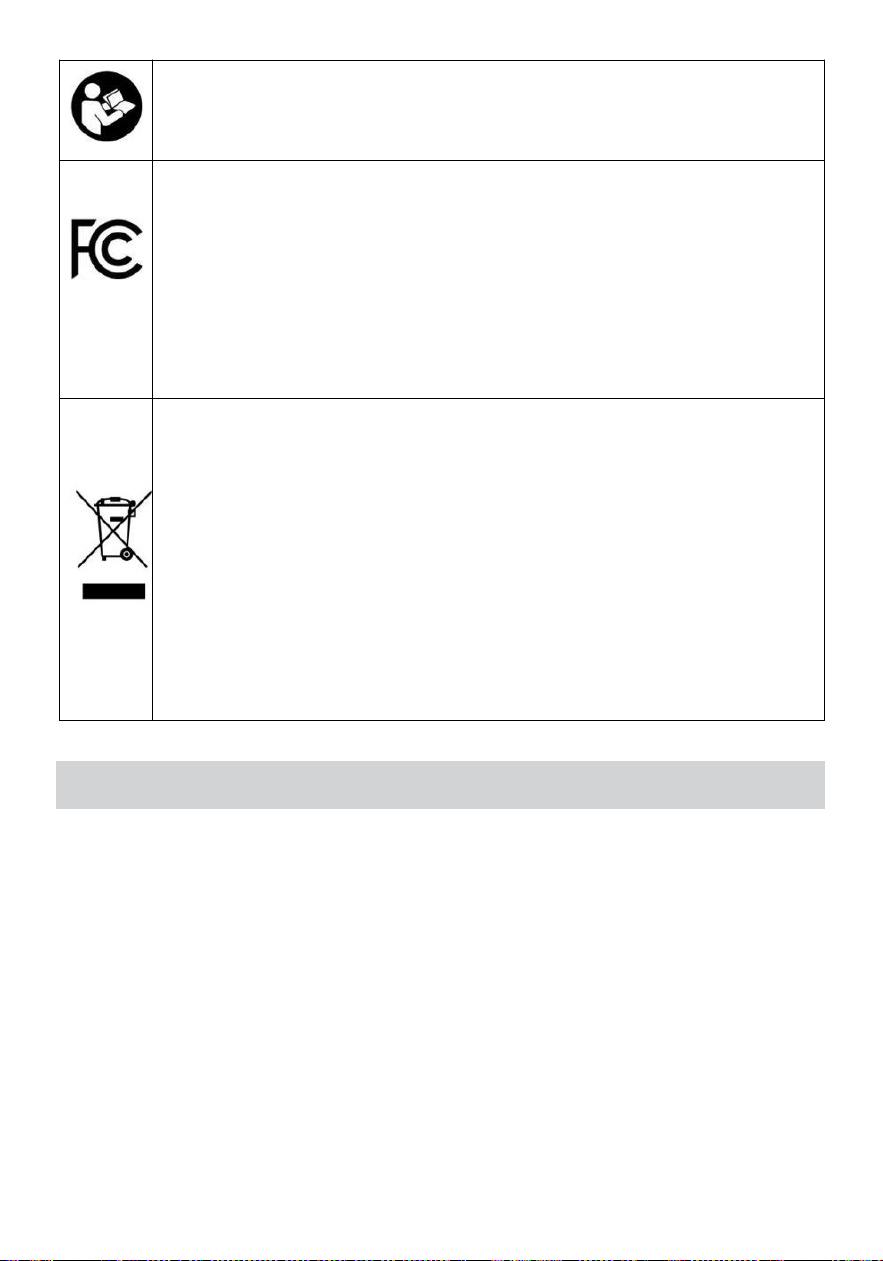
Advertencia - Para reducir el riesgo de lesión , usuario debe
leer Lea atentamente el manual de instrucciones .
Este dispositivo cumple con Parte 15 de el Comisión Federal
de Comunicaciones (FCC) Reglas . El funcionamiento es sujeto
a el siguiente dos Condiciones :(1) Esta dispositivo puede no
causar interferencias perjudiciales , y (2)esta dispositivo debe
aceptar cualquier interferencia recibida , incluido interferencia
que pueda causar
Operación no deseada.
Este producto está sujeto a la disposición de europeo
Directiva 2012/ 19/ CE . El símbolo demostración a caballito
papelera cruzado
a través de indica que el producto requiere separado rechazar
colección en el europeo Unión. Esto se aplica a la producto
y todos los accesorios marcado con este símbolo. Productos
marcados como tal no puede ser descartar ed con normal
residuos domésticos, pero Debe llevarse a una colección
punto de reciclaje eléctrico y dispositivos electronicos
INSTRUCCIONES DE SEGURIDAD
Gracias por elegir el inversor de frecuencia inteligente para uso doméstico.
inversor y en línea interactivo productos fabricados por nuestra empresa.
El diseño es seguro, confiable y fácil de usar. Por favor Lee esto manual
Con cuidado , es voluntad ayudarle a obtener el servicio más completo
Vida y servicio.
Por favor, respete estrictamente por todas las advertencias y
operaciones instrucciones en el manual y en la máquina y Mantén
esto manual adecuadamente.
El Instalación/operación y mantenimiento de esta serie de productos
debería ser llevado a cabo por personal capacitado y técnico
personal,y lo siguiente Se deben cumplir los requisitos .

1. Por favor, confirme que el Valor de voltaje CC/CA del producto
conectado cumple con el valor de voltaje de trabajo nominal y nominal
del producto.

2. Asegúrese de que el positivo y negativo polos de la corriente continua
aporte de Este producto y lo positivo y negativo polos de la Las baterías
son correctamente Conectado, no invertido.
3. Asegúrese de que el cable de conexión entre el producto y el La batería
es lo más corta posible. aporte y cableado de salida es correcto y
firme y preste atención para evitar cortocircuitos de la conexión cable.
4.Hay Alto voltaje dentro de este producto, no eléctrico. profesionales
debería No abra el inversor caso.
La batería de arranque del automóvil puede Proporcionar un corto plazo
alta corriente a empezar el
motor,pero él No está diseñado para uso continuo. uso de energía y es
no adecuado para descarga de ciclo profundo. Si desea utilizar un
determinado equipo eléctrico continuamente por un durante mucho
tiempo, se recomienda que además equipar una batería que sea
adecuada para descarga profunda, como Baterías AGM o GEL. Descargo
de responsabilidad: Debido a la actualización y mejora continua de los
productos y tecnologías, el contenido de este documento puede no
completamente Coincidir con el producto real, por favor comprenda. Si
Necesidad de preguntar sobre producto
actualizaciones, comuníquese con nuestra empresa .
INSTALACIÓN
1. Instrucciones de instalación
① . Desembalaje inspección
Abra el paquete del inversor, verifique los accesorios y verifique Si el
inversor está dañado durante el transporte. Si encuentra daños o piezas
faltantes, por favor informe al transportador y distribuidor.
Nota :
Por favor Conserve la caja de embalaje y embalaje
materiales para el futuro transporte.
Esta serie de productos son más pesados. ( ver apéndice),por lo que
ten cuidado cuando manejo

2. Precauciones de instalación
① . El área dónde el inversor es metido debe ser Bueno ventilado , lejos
del agua, gases inflamables y agentes corrosivos .
② . Mantener el lado panel admirador aire entrada de aire salida y aire
entrada en el lado de la caja sin obstrucciones.
③ .La temperatura ambiente del inversor debe ser mantenido
entre 0 ℃ -40 ℃ .
④ .Si la máquina se desmonta y se utiliza en baja temperatura ,agua
Las gotas pueden condensarse. Hay que esperar por dentro y por fuera.
del
La máquina debe estar completamente seca antes Instalación y usando
eso,de lo contrario allá es un peligro de electricidad choque.
⑤ .Por favor Instale el inversor cerca de la red eléctrica. Toma de
entrada o cambiar, así que eso En caso de emergencia, desconecte la
entrada de red. enchufar y cortar Fuera de la fuerza.
⑥ . Hacer no conectar el inversor producción directamente a el red
eléctrica
Nota :
*Cuando la carga está conectada a la inversor,el carga debe ser
girado apagado Antes del cableado y luego la carga. Debe ser girado
en uno por uno.
*Conecte el inversor a una toma especial con protección contra
sobrecorriente. protección dispositivo
*La toma de corriente utilizada debe ser Conectado a el protector
tierra Terminal
*Independientemente de si la entrada El cable de alimentación es
enchufado al red eléctrica
toma de corriente, la salida del inversor puede estar cargada.Apagar el
inversor no funciona. no garantizar que las partes internas de la máquina
no ser cargado.Si usted Si desea que el inversor no tenga salida ,
primero debe girar Fuera de todo interruptores,y luego corta el Red
eléctrica fuerza

*Cuando es inductivo cargas tales como Motores , monitores e
impresoras láser son necesario, la potencia de arranque es
demasiado grande.Al seleccionar un inversor,el La capacidad debe
calcularse en función de la a partir de poder.El a partir de fuerza es
habitual
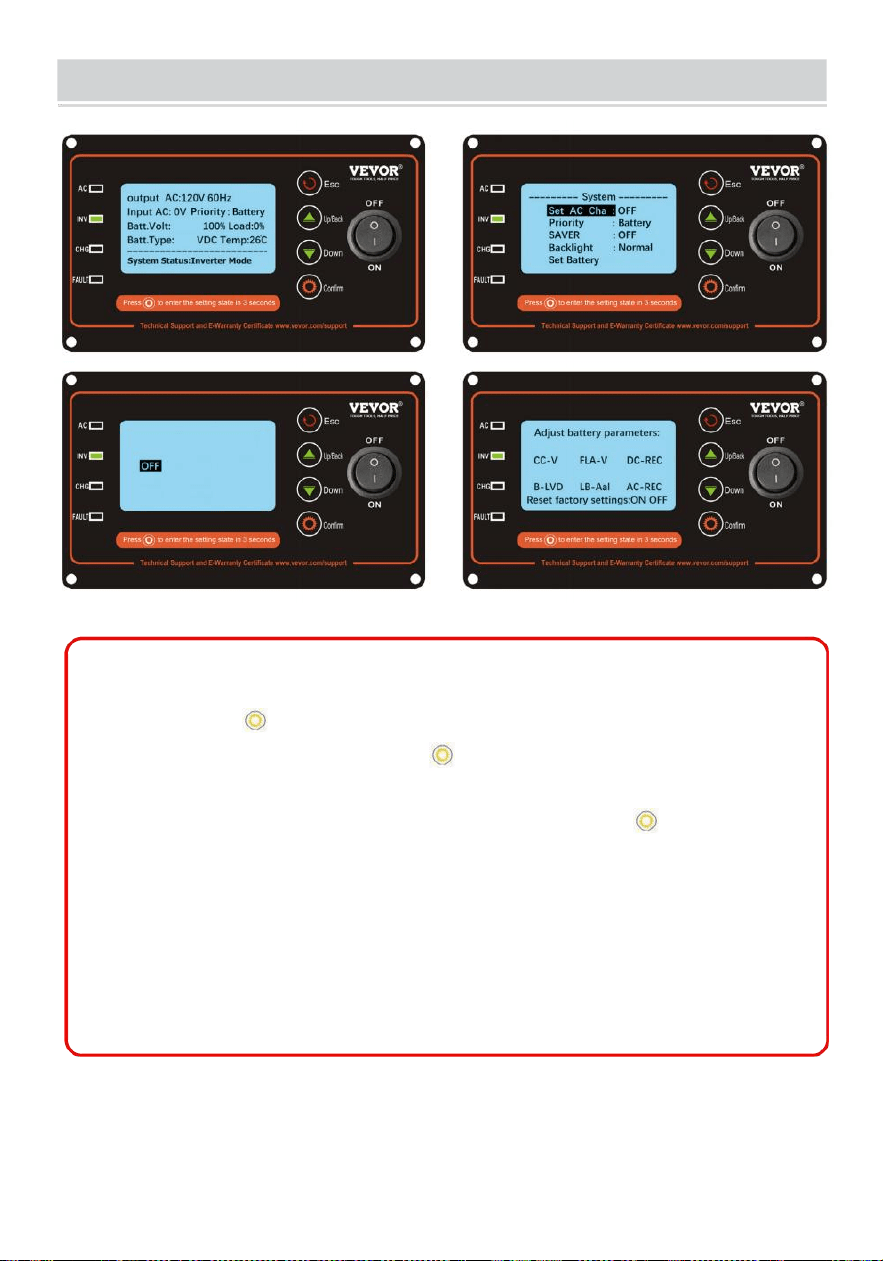
LCD PANEL DESCRIPTION
24,6
V
24,0
Colocar C.A. cargando actual :
28,4 V
25 A 50 A
20,0 V
15A 35A
Description:
Long press the setting key for 3 seconds to enter the system
setting interface,and pressing the setting key can also indicate
confirmation.The LCD will automatically turn off the backlight (energy
saving)without any operation for 5 seconds.Press the setting key
again can turn on the backlight.
Energy saving (sleep)function,when the inverter is working in battery
mode and no load,it will enter the state(Off output)after 20 seconds
in order to achieve energy saving effect,automatically turn on after
load,normal use.
27.6V
21.0V
26.0V
21.6V
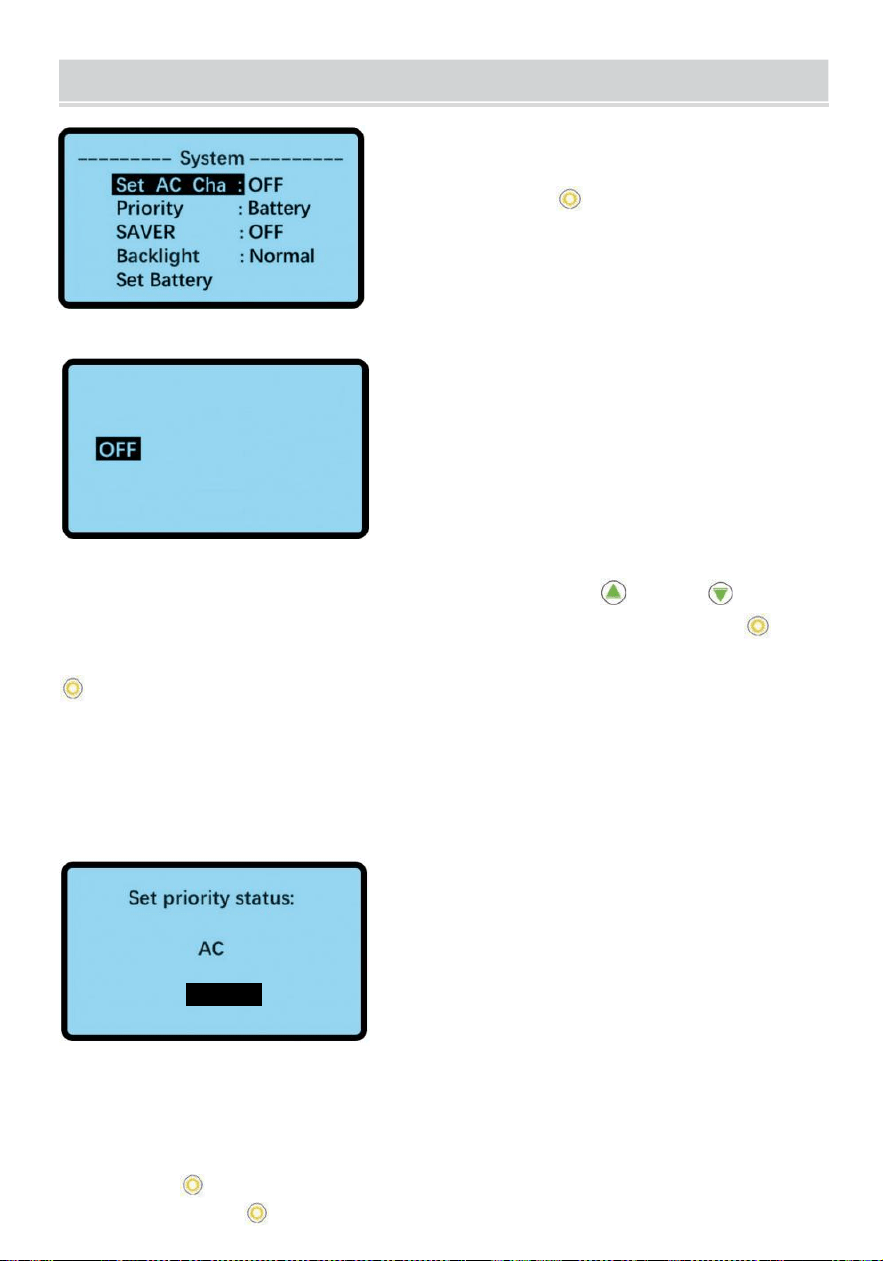
WORKING MODE SETTING
interfaz de configuración del sistema
Largo prensa El escenario llave para 3
artículos de segunda clase a ingresar el
sistema Configuración de la interfaz
después Enciendes el inversor.
Set AC charging current:
25A 50A
15A 35A
Configurar la carga de red actual
En el sistema configuración interfaz,presione el o llave a
seleccionar Colocar C.A. cargando actual, y entonces prensa La clave
a confirmar.Seleccionar el cargando actual que desee y presione la
tecla para confirmar .
Diferentes especificaciones de inversores poder colocar diferente
cargando actual valores. El red eléctrica cargando actual valor en el
izquierda imagen es el parámetro predeterminado de el 24V3000W
inversor .
Battery
Colocar Prioridad CA/ Batería
En la interfaz de configuración del sistema, presione
e
o Tecla
o
para seleccionar la prioridad,
y luego
presione la tecla para confirmar. Seleccione el estado de prioridad tú
desear y Pulse la tecla para confirmar .

WORKING MODE SETTING
Después de cambiar la prioridad, la interfaz de configuración del sistema
se configurará correctamente. mostrar El trabajo actual prioridad después
de 5 segundos.
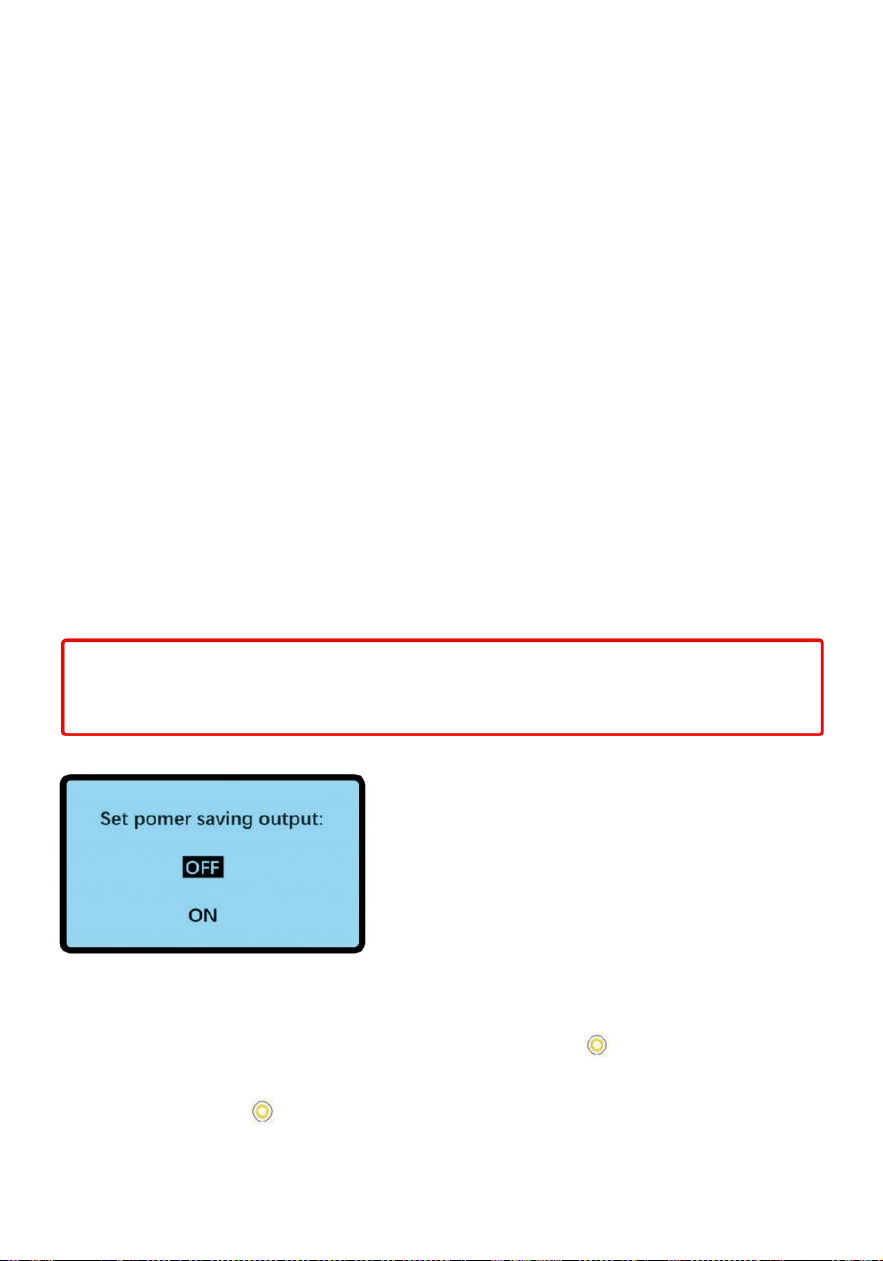
C.A. Prioridad: La Prioridad de suministro de energía a la red eléctrica.
La batería La fuente de alimentación será comenzar instantáneamente
cuando falla la red eléctrica (el interruptor son milisegundos y no afecta
a los aparatos eléctricos en uso)y poder ser usado como a UPS.Cuando
la red eléctrica está apagada restaurado, se restaurará automáticamente
cambiar a la fuente de alimentación de red y cargar el batería en el
mismo tiempo.
Prioridad de la batería: La fuente de alimentación de la batería
prioridad.Cuando el batería El poder es bajo , eso voluntad cambiar a el
red eléctrica fuerza suministro , y el batería voluntad ser
carga automáticamente. Cuando el voltaje de la batería vuelve a un cierto
valor (establecido en la configuración de la batería) y 30 minutos Más
tarde el batería fuerza El suministro será ser automáticamente
restaurado.
La placa de protección está desconectada, el inversor puede ser
cargado sin Encender, reparar inteligentemente la batería y extender
la vida útil. servicio vida.
Tip:Switch between AC mode and Battery mode requires an interval of
30 minutes
Salida de ahorro de energía: apagado/ encendido
En la interfaz de configuración del sistema, presione la tecla o a
seleccionar AHORRADOR, y Luego presione la tecla para
confirmar. Seleccione la salida de guardado (activada/desactivada) que
desee . y Pulse la tecla para confirmar.
Después tú cambiar el AHORRADOR configuración , el sistema
configuración interfaz voluntad mostrar correctamente el actual trabajar
AHORRADOR configuración Después de 5 segundos .

En : el inversor voluntad ingresar dormir estado ( apagado el salida )
después de 20 segundos
cuando el inversor es laboral en batería modo y No carga en el No carga
fuerza Será inferior a 3 W y se iniciará automáticamente después de la carga.
Apagado : el inversor seguirá arrancando y no entrará en estado de
suspensión.

Configuración de luz de fondo: normal /encendida
En la interfaz de configuración del sistema, presione
e
o Tecla
o
para seleccionar
Iluminar desde el fondo,
y luego presione la tecla para confirmar.Seleccione la luz de fondo
indica que quieres
y Presione la tecla para confirmar. Después de cambiar la
configuración de la luz de fondo,
La interfaz de configuración del sistema mostrará correctamente la
configuración de luz de fondo del trabajo actual. Después de las 5
segundos .
En: el La luz de fondo se activará Sigue adelante
Normal: El La luz de fondo se apagará cuando ninguna operación dentro
1 minuto
28,4 V
20,0 V
Configuración de la batería
En la interfaz de configuración del sistema, presione la tecla
e
o
o
para seleccionar Configurar y luego Presione la tecla para confirmar
En la interfaz de configuración de la batería, presione la tecla para
seleccionar el batería
parámetro que desea ajustar. Después de seleccionar el parámetro de la
batería,
desea ajustar, presione puede aumentar el valor de voltaje y presione
puede
26.0V
21.6V
27.6V
21.0V

Disminuya el valor del voltaje. (El valor del voltaje no cambiará
inmediatamente, él necesita esperar 5 segundos) regresará
automáticamente a la inversor
interfaz de información cuando ninguna operación dentro de 30 segundos.
CC -V: Constante Voltaje
cargando FLA -V: Flotar
cargando
REC-DC: En el estado de la batería prioridad,Fuente de alimentación
de red,la batería La fuente de alimentación será ser automáticamente
restaurado 30 minutos después cuando el

El voltaje de la batería vuelve a este valor.
B- LVD : Bajo Voltaje protección ( apaga
do ) LB - Aal : Bajo Voltaje Alarma ( piti
do )
Aire acondicionado - REC : En el estado de batería prioridad ,
Automáticamente cambiar a red eléctrica prioridad cuando el batería
Voltaje Abajo a este valor .
El imagen en el izquierda es el por defecto batería Voltaje
parámetro de el 24 V 3000 W inversor sistema .
Set AC charging current:
25A 50A
15A 35A
El usuario poder seleccionar el cargando engranaje de acuerdo a a el
fuerza demanda ( Diaria) cargando es recomendado a ser equilibrado a
bajo o medio engranaje )
El cifra en el izquierda es el por defecto parámetros de los 24V3000 W
inversor . La carga actual valores de inversores de diferente presupuesto
son diferente . Por favor referirse a el cifra abajo .
COMPARACIÓN DE CORRIENTE DE CARGA
Modo
Bajo
Medio
Alto
Súper alto
12 V 2 KW
10A
20A
30A
50A
24 V 3 kW
15A
25A
35A
50A
24 V 4KW / 5KW /
6KW
15A
35A
55A
70A
48 V 6KW
15A
25A
35A
50A

CONEXIÓN DE ENTRADA Y SALIDA
C.A. producción
(solo para menores de aparato de 1200w)
Cable de tierra
C.A. aporte
(De izquierda a derecha) cable vivo N a cable neutro)
C.A. producción
(Es muy estable, genial )
Para aparatos eléctricos de alta
potencia )
Cable de tierra
Conectar el
batería positivo
Conectar el
batería negativo
Interfaz de
control
remoto
CONEXIÓN DIAGRAMA
Diagrama de conexión de batería de 12 V

Diagrama de conexión de batería de 48v
AC output
(only for low than 1200w appliance)
(please plug your high power applinace into this AC output)
Plug in the mains
to charge the battery
(Mains power is not necessary)
(L to live wire N to neutral wire)
●
AC output 120V

Nota :
Si él es conectado a el generador , es necesidades a funcionar de
acuerdo a a el siguientes pasos
① Inicio el generador , espera para él a correr establemente , conectar el
producción fuerza de el generador a el aporte de el inversor ( en este caso ,
hacer seguro el inversor es sin carga ) , y entonces comenzar el inversor
de acuerdo a a el puesta en marcha
procedimiento . Después el inversor comienza , y entonces conectar a el
carga uno por uno . ② Es es recomendado a elegir el generador capacidad
con dos a tres
veces el capacidad de el inversor .
MANTENIMIENTO Y MANTENIMIENTO
① Esto serie de inversores requiere muy pequeño mantenimiento . El
batería de el estándar modelo es Regulado por válvula , de bajo
mantenimiento tipo , y solo necesita ser cargado frecuentemente a
lograr el esperado vida .
② Si el inversor es no usado para a largo tiempo , es es recomendado
a cargar Es cada dos a tres meses -- veces
③ Bajo normal circunstancias , la servicio vida de el batería es tres años .
Si el batería es encontró a ser en pobre condición , es debe ser
reemplazado temprano . Al reemplazar el batería , es debe ser realizado
por a profesional .
④ El batería debería no ser reemplazado individualmente , y el batería
instrucciones del proveedor debería ser seguido cuando reemplazando el
completo
batería . Normalmente , la batería es cargado y descargado cada dos a
tres meses , y cargado después ser descargado a apagar , y el tiempo de
carga de
el estándar máquina deber no ser menos que 12 horas .

⑤ En alta temperatura áreas , las batería es cargado y descargado --
veces cada dos meses , y el estándar máquina cargando debe no ser
menos más de 12 horas cada tiempo .

Nota :
① El inversor debe ser transformado apagado y desconectado de el red
eléctrica antes reemplazando el batería
② Tomar apagado metal objetos semejante como anillos y relojes .
③ Uso aislado manijas y Destornilladores , y hacer no lugar
herramientas o otro metal objetos en el batería .
④ Él es normal para pequeño moscas a aparecer en el conector y voluntad
no causar daño a personal seguridad y el inversor cuando Conectando el
batería cable .
⑤ Nunca Cortocircuito o contrarrestar el batería positivo y negativo
polos
SIMPLE MANTENIMIENTO Y MÉTODOS DE REPARACIÓN
Funcionamiento
defectuoso
Razón
Solución
El ventilador no
funciona
La temperatura en el
interior del inversor hace
no Más de 45 ℃
Él es normal , el
admirador es control
de temperatura
La terminal es caliente
Pobre contacto o perder
Vuelva a apretar
Apagado con carga
La batería no tener
suficiente poder o
encima carga
Cargue su batería o
reducir carga
No poder
doblar en El
inversor
La batería cable es no
conectado
correctamente
Controlar si el batería
El cable está
conectado y Vuelva a
conectarlo
Alarma de encendido
La batería no tener
suficiente poder o encima
carga
Cargue su batería o
reducir carga
APPENDIX
Modelo
BL-W2012V-L
BL-W3024V-L
BL-W4024V-L
Calificado fuerza
2000 W
3000 W
4000W
Cima fuerza
6000W
9000W
12000W
Aporte
Voltaje
90 V-130 V CA
Frecuencia
45-65 Hz
Producción
Voltaje
120 V CA ± 10 % (batería) Modo de
prioridad)
Frecuencia
60 Hz ± 1 % (prioridad de batería ) modo)
Forma de onda de salida
Puro onda sinusoidal
Eficacia
>76%
>80%
Batería tipo
Baterías de plomo-ácido de litio hierro
Batería Ternaria (18650)batería y
personalizable
Voltaje de la batería
12 V CC
24 V CC
Máximo actual de principal s
cargando
50 A (12 V CC)/70 A (24 V CC)/50 A (48 V CC)
Protección
Sobrecarga cortocircuito, sobretemperatura,
batería alto/bajo voltaje, red de alto /bajo
voltaje
Método de conversión
Interactivo 5 ms (típico )
Sobrecarga
Protección para 15 segundos después de exceder
100%
Método de comunicación
RS-232 (opcional)
Laboral
ambiente
Temperatura
-30-40 ℃
Humedad
10%-90%
Modelo
BL-W5024V-L
BL-W6024V-L
BL-W6048V-L
Calificado fuerza
5000W
6000W
6000W
Cima fuerza
15000W
18000W
18000W
Aporte
Voltaje
90 V-130 V CA
Frecuencia
45-65 Hz
Producción
Voltaje
120 V CA ± 10 % (batería) Modo de
prioridad)
Frecuencia
60 Hz ± 1 % (prioridad de batería ) modo)
Forma de onda de salida
Puro onda sinusoidal
Eficacia
>80%
Batería tipo
Baterías de plomo-ácido de litio hierro
Batería Ternaria (18650)batería y
personalizable
Voltaje de la batería
24 V CC
48 V CC
Máximo actual de principal s
cargando
50 A (12 V CC)/70 A (24 V CC)/50 A (48 V CC)
Protección
Sobrecarga cortocircuito, sobretemperatura,
batería alto/bajo voltaje, red de alto /bajo
voltaje
Método de conversión
Interactivo 5 ms (típico )
Sobrecarga
Protección para 15 segundos después de exceder
100%
Método de comunicación
RS-232 (opcional)
Laboral
ambiente
Temperatura
-30-40 ℃
Humedad
10%-90%
Si lo anterior Los parámetros se cambian En el futuro puedes
preguntarle al vendedor. Lo último parámetros
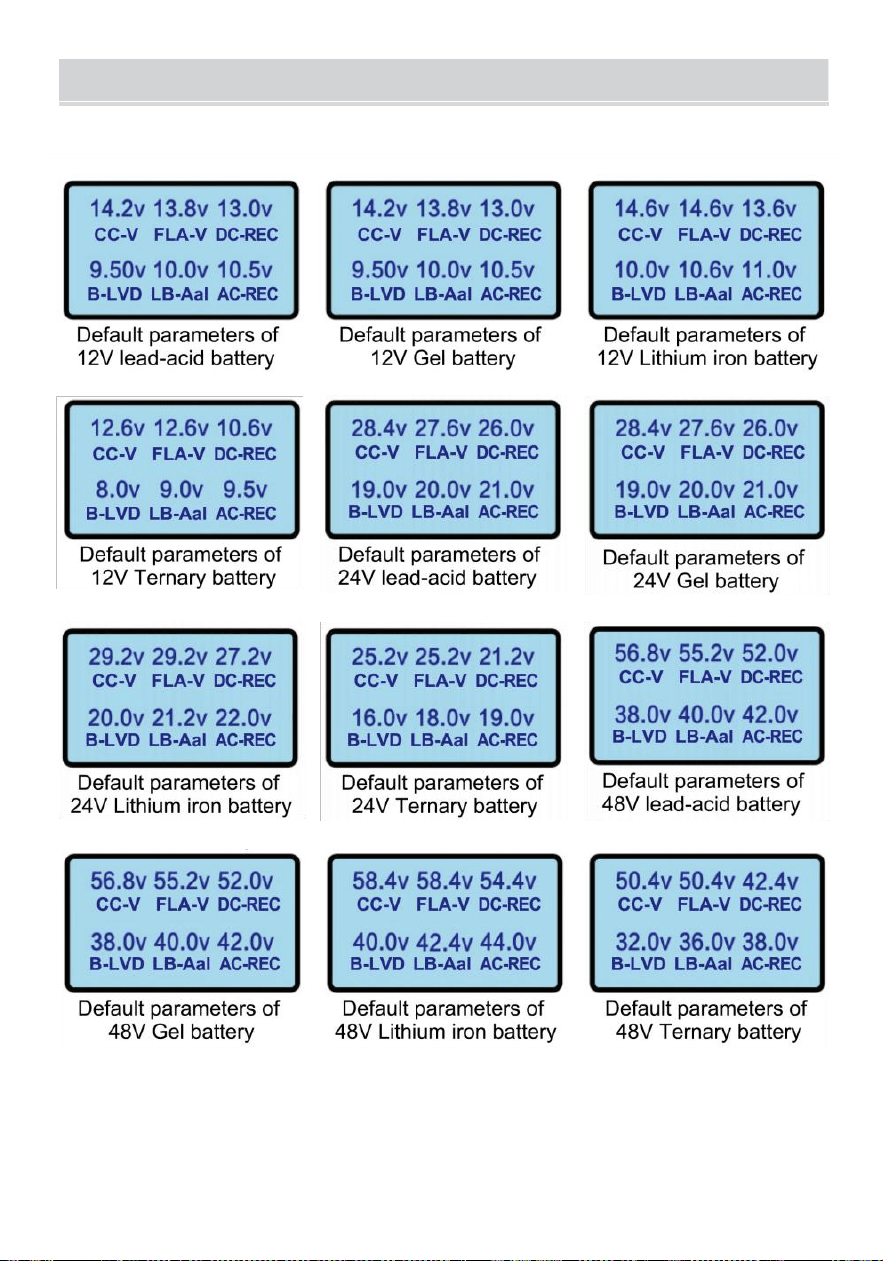
DEFAULT BATTERY PARAMETERS

CUSTOM VOLTAGE ADJUSTMENT RANGE
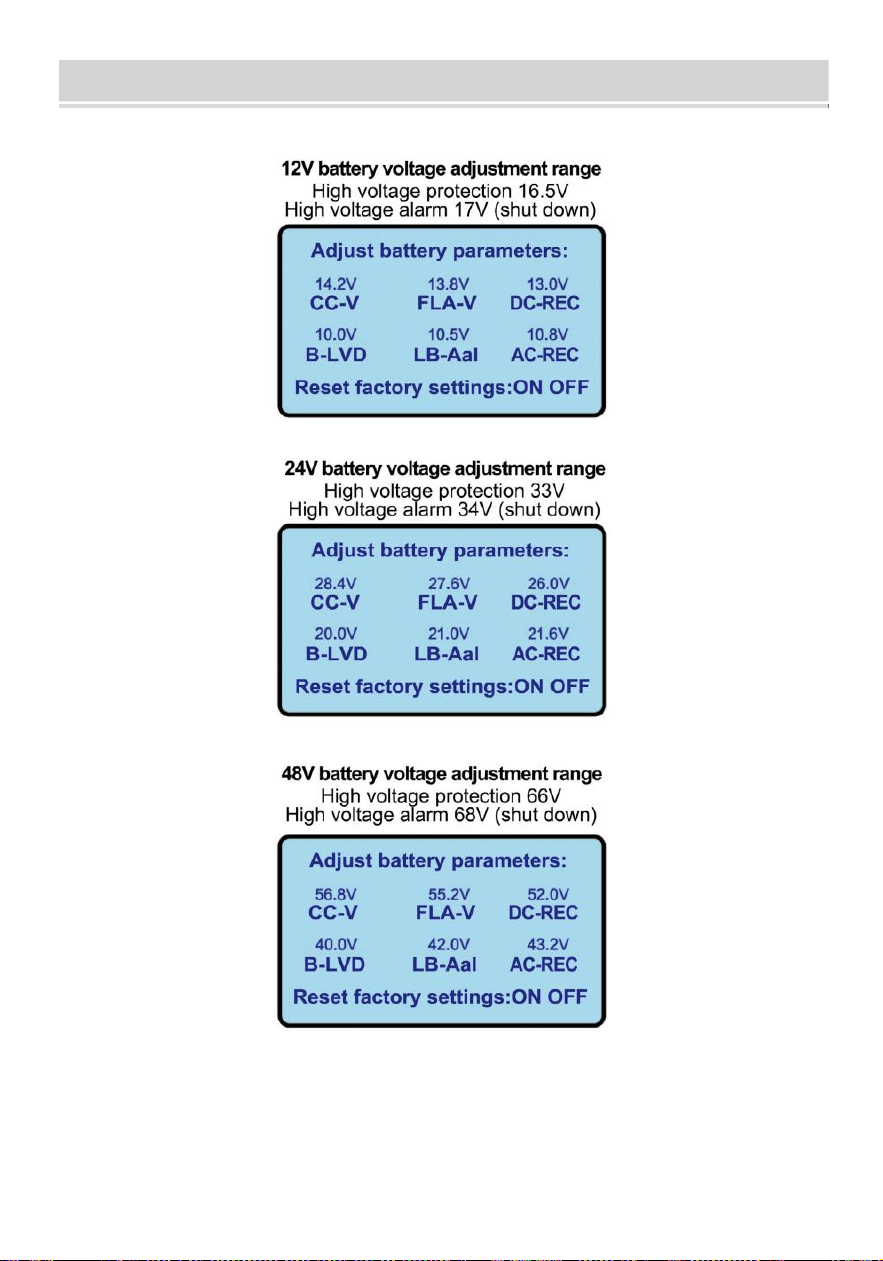
CUSTOM VOLTAGE ADJUSTMENT RANGE
Las especificaciones del producto o información relacionada
mencionado en este El manual de instrucciones está sujeto a
cambios sin previo aviso. aviso.

Soporte técnico y Certificado de garantía
electrónica www.vevor.com/support

Rápido Comenzar Guía
Conexión de la batería
¡ADVERTENCIA! Todo el cableado debe ser realizado por personal
cualificado.
¡ADVERTENCIA! Es muy importante para la seguridad del sistema y el
funcionamiento eficiente Utilice un cable adecuado para la conexión de la
batería. Para reducir riesgo de lesión ,
por favor Utilice el recomendado adecuado cable.
Modelo
Amperaje máximo
Cable
Tamaño
Valor de par
12 V 2000
W
166A
4 AWG
20 ~ 30 Nm
24 V 3000
W
125A
4 AWG
20 ~ 30 Nm
24 V 4000
W
166A
4 AWG
20 ~ 30 Nm
24 V 5000W
208A
calibre 6
AWG X2
20 ~ 30 Nm
24 V 6000W
250
4 AWG X2
20 ~ 30 Nm
48 V 6000W
125A
4 AWG
20 ~ 30 Nm
C.A. Entrada / Salida Conexión
¡ADVERTENCIA! Todo el cableado debe ser realizado por a calificado personal.
¡ADVERTENCIA! Es muy importante para la seguridad del sistema y eficiente
operación a usar
Cable adecuado para la conexión de entrada de CA. Para reducir riesgo de lesión,
por favor usar el Tamaño de cable recomendado adecuado como abajo.
Requisitos de cable sugeridos para cables de CA
Modelo
Cable
Tamaño
Valor de par
12 V 2000 W
calibre 10
AWG
1.4~ 1,6 Nm
24 V 3000 W
calibre 10
AWG
1.4~ 1,6 Nm

24 V 4000 W
calibre 10
AWG
1.4~ 1,6 Nm
24 V 5000W
ca li b r e 8
AWG
1.4~ 1,6 Nm
24 V 6000W
ca li b r e 8
AWG
1.4~ 1,6 Nm
48 V 6000W
ca li b r e 8
AWG
1.4~ 1,6 Nm

Introducción a el operación panel
Si es así es necesario para Utilice el sistema operativo panel alejado del
inversor, referirse a la siguiente:
1. Retire las 4 clavijas de la pantalla de control, ser cuidadoso No a gota él
Dentro de la máquina.
2. Utilice un cortador de clavijas pequeño para Hacer palanca en la pantalla
abierto y tomar él afuera .
3. Desconecte el Cable de red conectado a la pantalla.
4. Utilice un Cable de 10 metros para conectar a la inversor puerto .
Nota: este cable no puede estar conectado a la Internet puerto y no
puedo Comunicarse con él.

Wsparcie techniczne i Certyfikat e-gwarancji na stronie www.vevor.com/support
ŁADOWARKA INWERTEROWA
UŻYTKOWNIK INSTRUKCJA
MODEL : BL -W2012V-L, BL -W3024V-L, BL -W4024V-L ,
BL -W5024V-L, BL -W6048V -L, BL -W6024V-L
Nadal jesteśmy zaangażowani w zapewniamy Ci narzędzia konkurencyjne cena.
„Zapisz Połowa", "Połowa ceny" lub inne podobne wyrażenia używany przez my
przedstawiamy jedynie szacunkowe oszczędności, jakie możesz uzyskać możesz
skorzystać z zakupu pewne narzędzia
z nas w porównaniu do główne najlepsze marki i nie koniecznie mieć na myśli Do
okładka
wszystkie kategorie oferowanych narzędzi przez nas. Jesteś uprzejmie przypominam o
sprawdzeniu ostrożnie
kiedy jesteś składając u nas zamówienie, jeśli Czy Właściwie Oszczędność
Połowa w porównaniu z górą główne br i s.
Inverter charger
MODEL : BL -W2012V-L, BL -W3024V-L, BL -
W4024V-L, BL -W5024V-L, BL -W6048V-L,
BL- W6024V-L
BL-W2012V-L
BL-W3024V-L
BL-W4024V-L
BL-W5024V-L
BL-W6024V-L
BL-W6048V-L
(Ten zdjęcie jest tylko w celach informacyjnych, proszę odnieść się do
rzeczywisty obiekt )
POTRZEBOWAĆ POMOCY ? KONTAKT NAS !
Mieć produkt pytania? Potrzebować techniczny wsparcie? Proszę
czuć bezpłatny Do kontakt nas:
Wsparcie techniczne i certyfikat e-gwarancji
www.vevor.com/support
To jest oryginał instrukcja, proszę przeczytać wszystko podręcznik
instrukcje
ostrożnie przed operacją. VEVOR zastrzega sobie jednoznaczną
interpretację naszych instrukcja obsługi. Wygląd produktu powinien
podlegać ten
produkt ty otrzymane. Proszę wybaczyć nam, że nie będziemy

poinformuję cię ponownie Jeśli czy są jakieś aktualizacje technologii lub
oprogramowania NA nasz produkt.

Ostrzeżenie - Do zmniejszyć ten ryzyko z uraz , użytkownik
musieć Czytać Przeczytaj uważnie instrukcję obsługi .
Ten urządzenie spełnia z Część 15 z ten FCC Zasady .
Operacja jest temat Do ten następny dwa warunki :(1) To
urządzenie móc nie powodować szkodliwe zakłócenia i (2) to
urządzenie musieć przyjąć każdy odebrane zakłócenia , w tym
zakłócenia, które mogą powodować
niepożądana operacja.
Ten produkt podlega zaopatrzenie z europejski Dyrektywa
2012/ 19 / WE . symbol seans A jazda na kole kosz
skrzyżowany
przez wskazuje, że produkt wymaga osobnego odmawiać
kolekcja w europejski Związek. Dotyczy to produkt i
wszystkie akcesoria oznaczone tym symbolem. Produkty
oznaczone jako takie może nie być wyrzuć ed z normalna
odpady bytowe, Ale należy oddać do punktu zbiórki punkt
recyklingu elektryczny I urządzenia elektroniczne
INSTRUKCJE BEZPIECZEŃSTWA
Dziękujemy za wybranie inteligentnego falownika częstotliwości do użytku
domowego
falownik i online interaktywny Produkty wytwarzane przez naszą firmę.
Konstrukcja jest bezpieczna, niezawodna i łatwa w obsłudze. Proszę
przeczytaj to podręcznik ostrożnie , to będzie pomóc Ci uzyskać
najpełniejszą obsługę życie i służba.
Proszę ściśle przestrzegać wszystkimi ostrzeżeniami i obsługą
instrukcje w ten ręczne i na maszynie i zachowaj to podręcznik
odpowiednio.
Ten instalacja/eksploatacja i konserwacja tej serii produktów
powinien być wykonywane przez przeszkolony i techniczny personel
personel i następujące wymagania powinny być przestrzegane.

1. Proszę potwierdzić, że Wartość napięcia DC/AC podłączonego
produktu odpowiada wartości znamionowej i znamionowej napięcia
roboczego produkt.

2. Upewnij się, że pozytywne i negatywny bieguny Prąd stały wejście z ten
produkt i pozytywne i negatywny bieguny bateria jest prawidłowo
podłączone, nie odwrócone.
3. Upewnij się, że kabel połączeniowy między produktem a bateria jest tak
krótka, jak to możliwe, wejście I okablowanie wyjściowe Jest prawidłowy
I
mocno i uważaj, aby uniknąć zwarcia połączenia kabel. 4. Jest
wysokie napięcie wewnątrz tego produktu, nieelektryczne
profesjonaliści powinien nie otwierać falownika sprawa.
Akumulator rozruchowy samochodu może zapewnić krótkoterminowy duży
prąd Do rozpocząć
silnik, ale To nie jest przeznaczony do pracy ciągłej zużycie energii i
Jest nie odpowiedni do głębokiego rozładowania. Jeśli chcesz użyć
określonego sprzęt elektryczny nieprzerwanie przez przez długi czas,
zaleca się dodatkowo wyposażyć akumulator nadający się do głębokiego
rozładowania, taki jak Akumulatory AGM lub żelowe. Zastrzeżenie: Ze
względu na ciągłą aktualizację i udoskonalanie produktów i technologii,
treść niniejszego dokumentu może nie całkowicie dopasuj rzeczywisty
produkt, proszę zrozumieć. Jeśli trzeba zapytać o produkt
aktualizacje, prosimy o kontakt z naszą firmą .
INSTALACJA
1.Instrukcje instalacji
① . Rozpakowywanie kontrola
Otwórz opakowanie falownika, sprawdź akcesoria i sprawdź czy falownik
nie został uszkodzony podczas transportu. Jeśli stwierdzisz uszkodzenie
lub brakujących części, prosimy o poinformowanie przewoźnik I
dystrybutor.
Notatka :
Proszę zachowaj pudełko do pakowania i uszczelka
materiały na przyszłość transport.

Produkty z tej serii są cięższe ( Widzieć dodatek), więc bądź ostrożny
kiedy obsługiwanie

2. Środki ostrożności podczas instalacji
① . Ten obszar Gdzie ten falownik Jest umieszczony musieć Być Dobrze
wentylowany , z dala z wody, gazów łatwopalnych i czynników żrących .
② . Zachowaj ten strona płyta wentylator powietrze wlot powietrza
wylot I powietrze wlot NA ten strona z pudełko bez przeszkód.
③ Temperatura otoczenia falownika powinna być zachowanym
między 0 ℃ -40 ℃ .
④ .Jeśli maszyna jest rozmontowana i używana Na niska temperatura ,
woda
mogą wystąpić kondensacje kropel. trzeba czekać na to co wewnątrz i na
zewnątrz z
maszynę należy całkowicie wysuszyć przed instalowanie i używając to, w
przeciwnym razie Tam jest niebezpieczeństwem porażenia prądem
zaszokować.
⑤ .Proszę zamontuj inwerter w pobliżu sieci elektrycznej gniazdo
wejściowe lub przełącz, więc To w nagłych wypadkach odłącz wejście
sieciowe wtyczka I cięcie poza moc.
⑥ . Zrób nie łączyć ten falownik wyjście bezpośrednio Do ten sieć
elektryczna
Notatka :
*Gdy obciążenie jest podłączone do falownik, obciążenie musieć być
odwróconym wyłączony przed podłączeniem przewodów, a następnie
obciążeniem musi być odwrócony NA jeden przez jeden.
*Podłącz falownik do specjalnego gniazda z zabezpieczeniem
nadprądowym ochrona urządzenie
*Gniazdo zasilania powinno być używane połączony Do ten
ochronny ziemia terminal
*Niezależnie od tego, czy dane wejściowe przewód zasilający jest
podłączony do sieć elektryczna
gniazdo, wyjście falownika może być ładowane. Wyłączenie falownika nie
powoduje nie gwarantujemy, że wewnętrzne części maszyny będą nie Być
naładowany.Jeśli chcesz, aby falownik nie dawał wyjścia , najpierw
muszę się odwrócić wyłącz wszystko przełączniki i następnie odetnij Sieć
elektryczna moc

*W przypadku indukcyjności ładunki takie jak silniki , monitory i
drukarki laserowe Czy potrzebna jest zbyt duża moc początkowa
duży.Podczas wybierania jakiś falownik, pojemność powinna być
obliczana na podstawie startowy moc. startowy moc Jest zwykły

LCD PANEL DESCRIPTION
24,6
V
24,0
Ustawić klimatyzacja ładowanie aktualny :
28,4 V
25A 50A
20,0 V
15A 35A
Description:
Long press the setting key for 3 seconds to enter the system
setting interface,and pressing the setting key can also indicate
confirmation.The LCD will automatically turn off the backlight (energy
saving)without any operation for 5 seconds.Press the setting key
again can turn on the backlight.
Energy saving (sleep)function,when the inverter is working in battery
mode and no load,it will enter the state(Off output)after 20 seconds
in order to achieve energy saving effect,automatically turn on after
load,normal use.
27.6V
21.0V
26.0V
21.6V
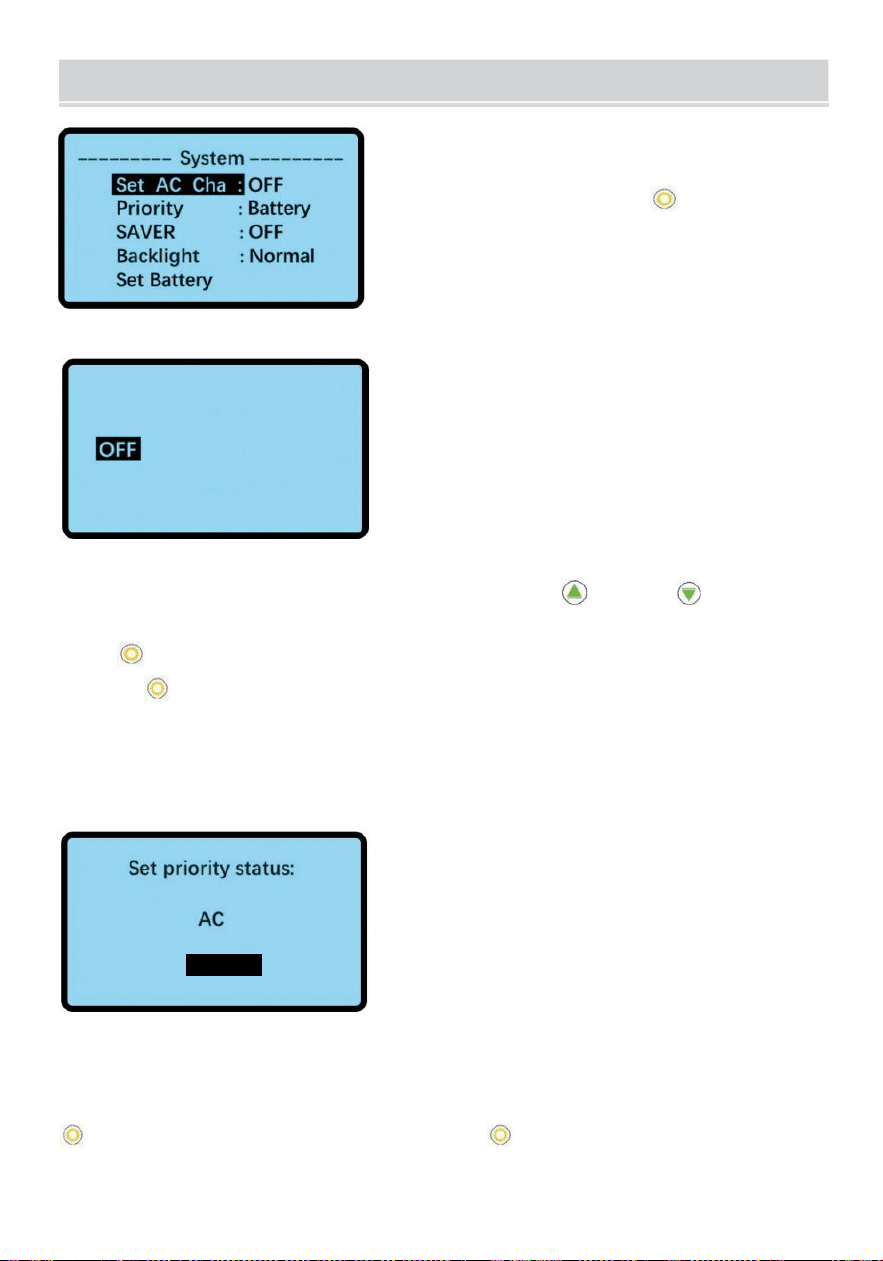
WORKING MODE SETTING
interfejsu ustawień systemowych
Długi naciskać Ustawienie klawisz Do
3 towary drugiej jakości Do Wchodzić ten
system ustawianie interfejsu po włączasz
falownik.
Set AC charging current:
25A 50A
15A 35A
Ustaw ładowanie sieciowe aktualny
W ten system ustawienie interfejs, naciśnij ten Lub klawisz Do
wybierać Ustawić klimatyzacja ładowanie aktualny, I Następnie naciskać
klucz Do potwierdź.Wybierz ten ładowanie wybierz żądany prąd i
naciśnij klawisz potwierdzać .
Różne specyfikacje falowniki Móc ustawić różny ładowanie aktualny
wartości. Ten sieć elektryczna ładowanie aktualny wartość W ten lewy
zdjęcie Jest ten parametr domyślny z 24V3000 W falownik .
Battery
Ustawić Priorytet AC/ akumulator
W interfejsie ustawień systemu naciśnij klawisz
e
lub klawisz
o,
aby
wybrać priorytet, a następnie naciśnij klawisz , aby potwierdzić. Wybierz
status priorytetowy Ty chcieć I naciśnij klawisz aby potwierdzić .
Po zmianie priorytetu interfejs ustawień systemowych będzie działał
prawidłowo wyświetlacz bieżąca praca priorytet po 5 sekundach.
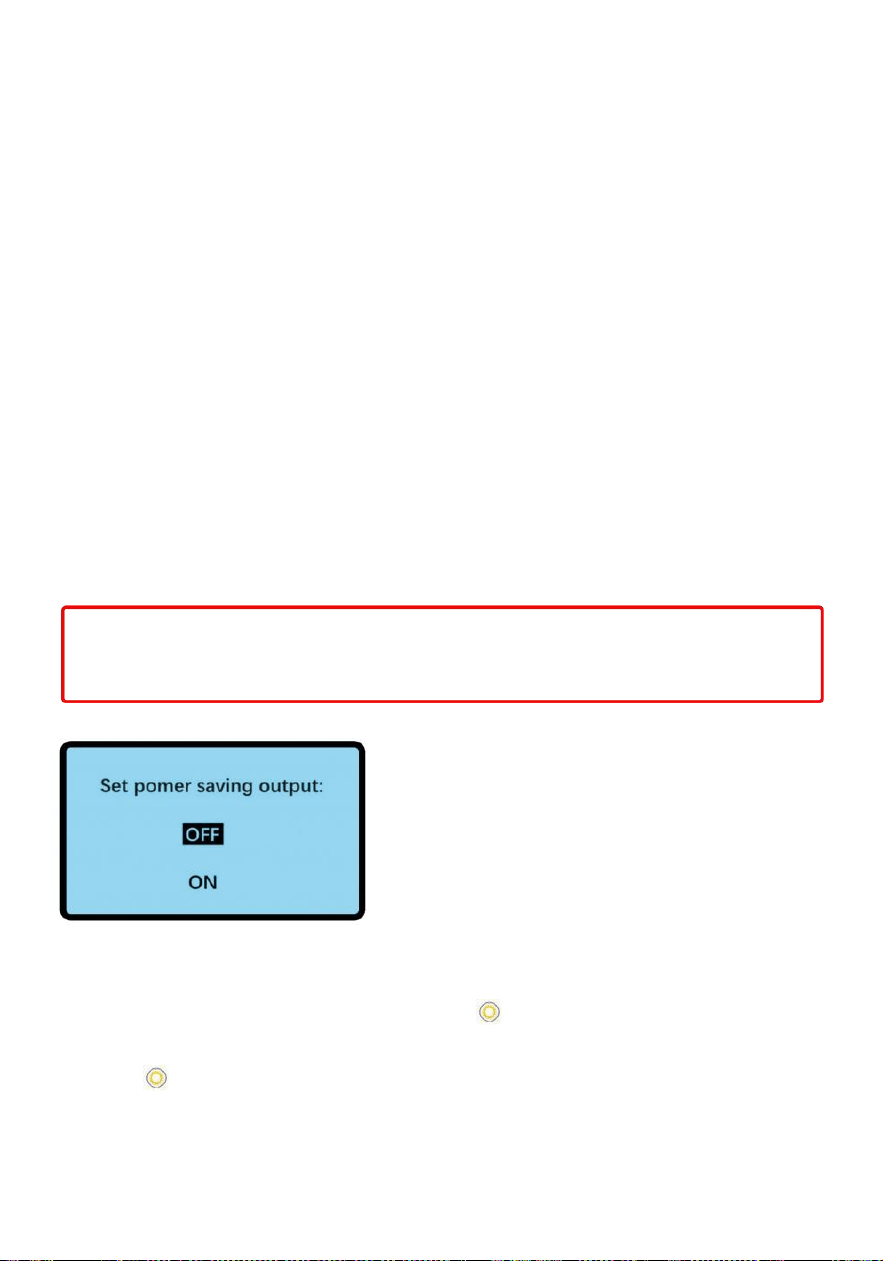
klimatyzacja priorytet : priorytet zasilania sieciowego.Akumulator
Zasilacz będzie start natychmiast w przypadku awarii zasilania
sieciowego (przełączanie) to milisekundy i nie wpływa na urządzenia
elektryczne W (użyj) i Móc Być używany Jak A UPS. Gdy zasilanie
sieciowe jest przywrócone, będzie automatycznie przełączyć na
zasilanie sieciowe i ładowanie bateria przy ten To samo czas.
Priorytet baterii: Zasilanie bateryjne priorytet.Kiedy bateria moc jest niski
, to będzie przełącznik Do ten sieć elektryczna moc dostawa i ten bateria
będzie Być
ładowane automatycznie. Gdy napięcie akumulatora powróci do
określonego poziomu
wartość (ustawiona w ustawieniach baterii) i 30 protokół później
bateria moc dostawa będzie być automatycznie przywrócony.
płyta ochronna jest odłączona, falownik może Być naładowany bez
włączanie, inteligentna naprawa baterii i przedłużenie żywotności
praca życie.
Tip:Switch between AC mode and Battery mode requires an interval of
30 minutes
Wyjście energooszczędne:wył./ wł.
W interfejsie ustawień systemu naciśnij klawisz lub Do wybierać
OSZCZĘDZACZ, I następnie naciśnij klawisz , aby potwierdzić.
Wybierz wyjście oszczędzania (wyłączone/włączone), które chcesz I
naciśnij klawisz aby potwierdzić.
Po Ty zmiana ten OSZCZĘDZAĆ ustawienie , system ustawienie interfejs
będzie poprawnie wyświetlić ten aktualny praca OSZCZĘDZAĆ ustawienie
po 5 sekundach .

Na : falownik będzie Wchodzić spać stan ( wyłączenie) ten wyjście ) po 20
sekundach
Kiedy ten falownik Jest pracujący W bateria tryb I NIE obciążenie w . NIE
obciążenie moc będzie niższe niż 3W, uruchomi się automatycznie po
załadowaniu
Wył .: falownik będzie kontynuował rozruch i nie przejdzie w stan uśpienia,

Ustawienie podświetlenia: normalne / włączone
W interfejsie ustawień systemu naciśnij klawisz
e
lub klawisz
o
do
wyboru Podświetlenie,
a następnie naciśnij klawisz aby potwierdzić.Wybierz podświetlenie
stan, który chcesz
I naciśnij klawisz , aby potwierdzić. Po zmianie ustawienia
podświetlenia ,
Interfejs ustawień systemowych będzie prawidłowo wyświetlał bieżące
ustawienia podświetlenia po 5 sekund .
Włączone : Podświetlenie będzie trwa
Normalny : Podświetlenie zostanie wyłączone Kiedy brak operacji w ciągu
1 minuta
28,4 V
20,0 V
Ustawienia baterii
W interfejsie ustawień systemu naciśnij klawisz
e
lub
o,
aby wybrać
opcję Ustaw , a następnie naciśnij klawisz aby potwierdzić
W interfejsie ustawień baterii naciśnij klawisz , aby wybrać ten bateria
parametr, który chcesz dostosować. Po wybraniu parametru baterii
chcesz dostosować, naciśnij , aby zwiększyć wartość napięcia, a
naciśnij , aby
zmniejsz wartość napięcia. (Wartość napięcia nie zmieni się natychmiast,
To (trzeba poczekać 5 sekund)powróci automatycznie do falownik
interfejs informacyjny kiedy brak operacji w ciągu 30 sekund.
26.0V
21.6V
27.6V
21.0V

CC -V: Stała woltaż ładowanie
FLA -V: Platforma ładowanie
Nagrywanie DC: W stanie baterii priorytet,Zasilanie sieciowe , bateria
Zasilacz będzie być automatycznie przywrócono 30 minut później,
kiedy
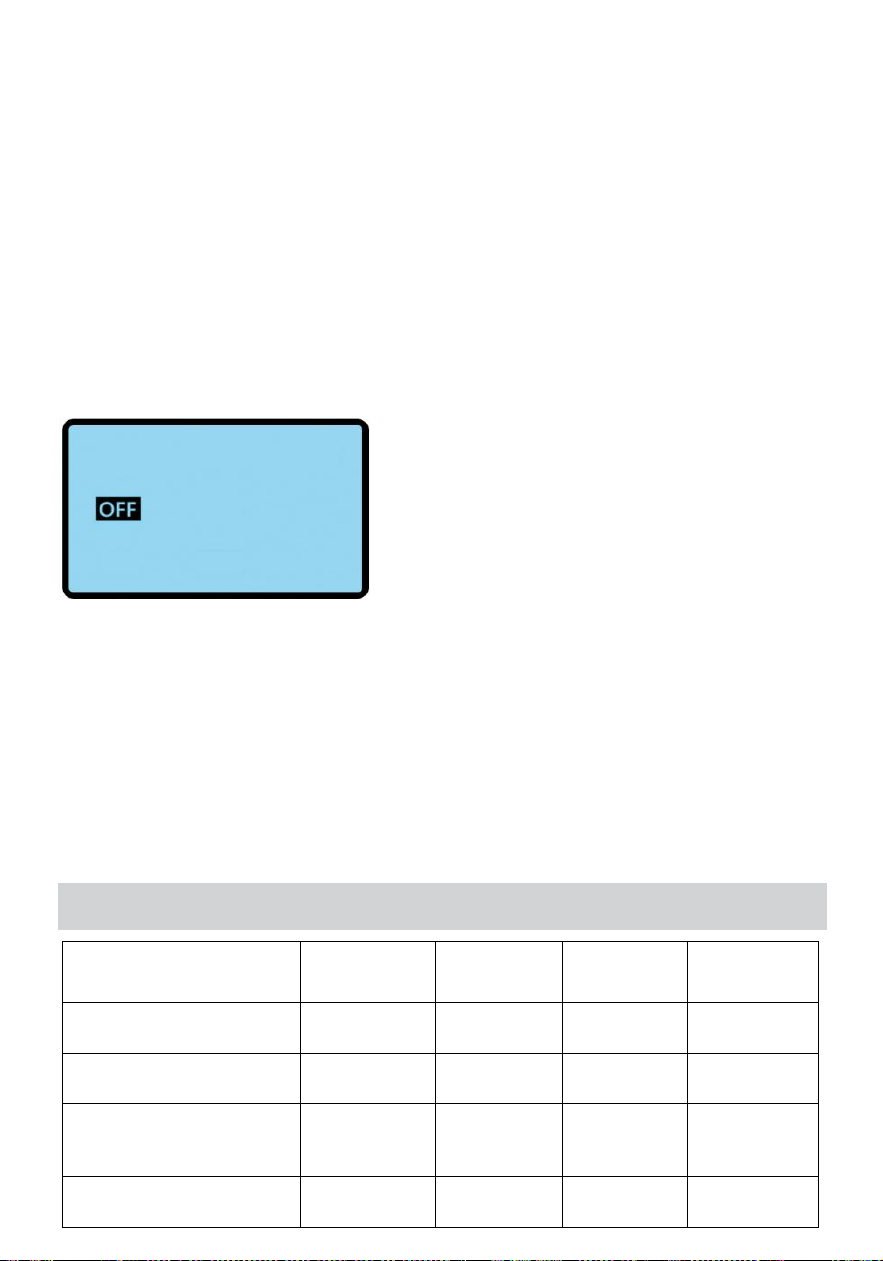
napięcie akumulatora powraca do tej wartości.
B- LVD : Niski woltaż ochrona ( wyłączeni
e ) LB - Aal : Niski woltaż alarm ( sygna
ł dźwiękowy )
AC - REC : W ten państwo z bateria priorytet
Automatycznie przełącznik Do sieć elektryczna priorytet Kiedy ten bateria
woltaż W dół Do Ten wartość .
Ten zdjęcie NA ten lewy Jest ten domyślny bateria woltaż parametr
z ten 24V3000 W falownik systemu .
Set AC charging current:
25A 50A
15A 35A
Ten użytkownik Móc wybierać ten ładowanie bieg według Do ten moc
popyt ( codziennie ) ładowanie Jest zalecony Do Być dostosowany Do Niski
Lub średni bieg )
Ten postać NA ten lewy Jest ten domyślny parametry 24V3000 W falownik
. Ładowanie aktualny wartości z falowniki z różny specyfikacje Czy różny .
Proszę wspominać Do ten postać poniżej .
PRĄD ŁADOWANIA COM PARISON
Tryb
Niski
Średni
Wysoki
Bardzo
wysoki
12V 2 kW
10A
20A
30A
50A
24V 3 kW
15A
25A
35A
50A
24V 4 kW / 5 kW / 6
kW
15A
35A
55A
70A
48V 6 kW
15A
25A
35A
50A

PODŁĄCZENIE WEJŚCIA I WYJŚCIA
klimatyzacja wyjście
(tylko za niższą cenę niż Urządzenie 1200 W)
Przewód uziemiający
klimatyzacja wejście
(od L do przewód pod napięciem N do przewód neutralny)
klimatyzacja wyjście
(Jest bardzo stabilny,
świetny ( do urządzeń
elektrycznych dużej mocy )
Przewód uziemiający
Połącz
bateria
pozytywny
Połącz
bateria
negatywny
Interfejs
zdalneg
o
sterowa
nia
POŁĄCZENIE DIAGRAM
Schemat podłączenia akumulatora 12V

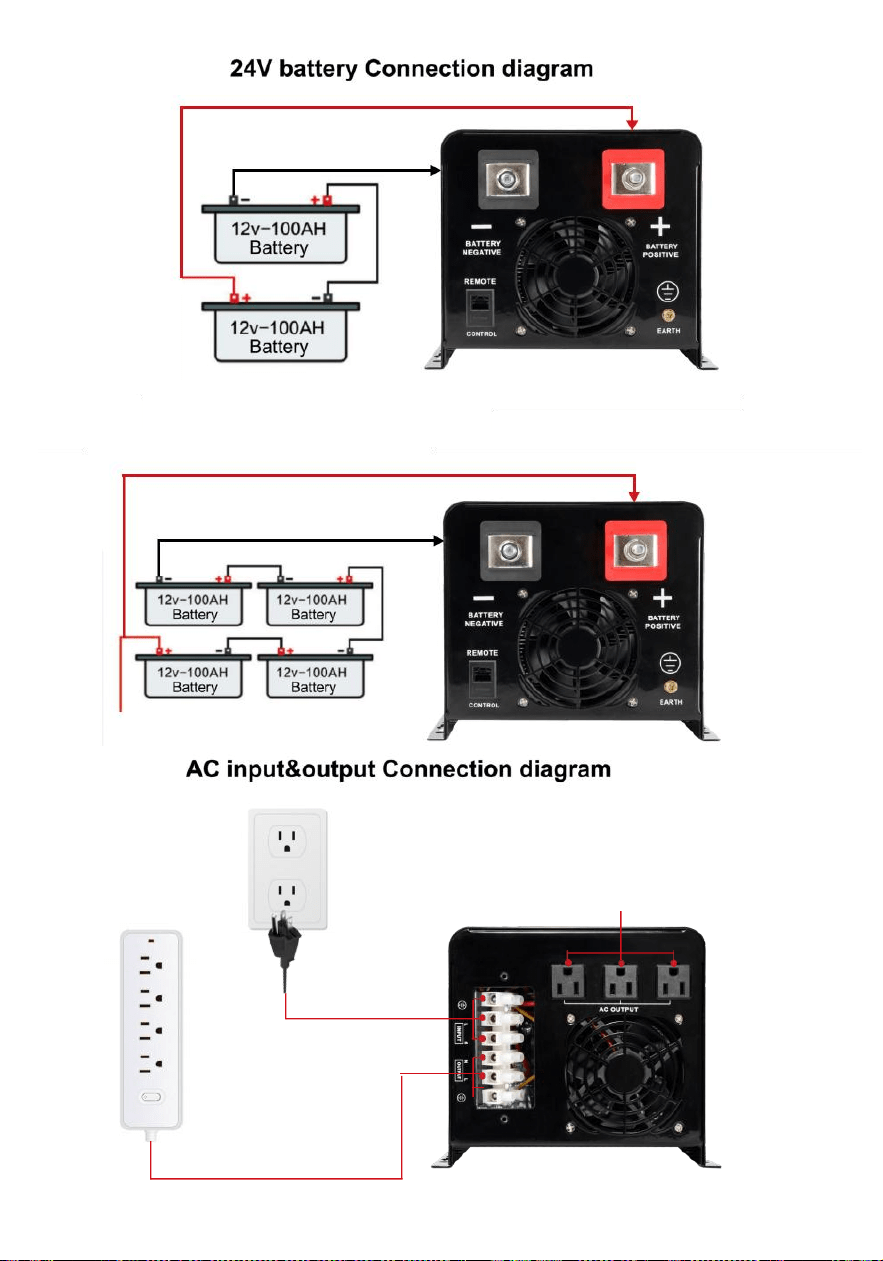
Schemat podłączenia akumulatora 48 V
AC output
(only for low than 1200w appliance)
(please plug your high power applinace into this AC output)
Plug in the mains
to charge the battery
(Mains power is not necessary)
(L to live wire N to neutral wire)
●
AC output 120V

Notatka :
Jeśli To Jest połączony Do ten generator , to wymagania Do działać
według Do ten następujące kroki
① Rozpocznij ten generator , czekaj Do To Do uruchomić stabilnie ,
połączyć ten wyjście moc z ten generator Do ten wejście z ten falownik ( w
Ten sprawa , zrób Jasne ten falownik Jest bez obciążenia ) i
Następnie start ten falownik według Do ten uruchomienie
procedura . Po ten falownik zaczyna się i Następnie łączyć Do ten
obciążenie jeden przez jeden . ② To jest Jest zalecony Do wybierać ten
generator pojemność z dwa Do trzy
czasy ten pojemność z ten falownik .
KONSERWACJA I KONSERWACJA
① To szereg z falowniki wymaga bardzo mały konserwacja . bateria z
ten standard model Jest zawór - regulowany , niskie koszty utrzymania
typ i tylko potrzebuje Być oskarżony często Do osiągnąć ten oczekiwany
życie .
② Jeśli ten falownik Jest nie używany Do A długi czas , to Jest zalecony
Do opłata to za każdym razem dwa Do trzy miesiące -- razy
③ Pod normalna okoliczności , praca życie z ten bateria Jest trzy lat .
Jeśli ten bateria Jest znaleziony Do Być W słaby stan , to musieć Być
zastąpiony wcześnie . Podczas wymiany ten bateria , to musieć Być
wykonano
przez A profesjonalny .
④ Ten bateria powinien nie Być zastąpiony indywidualnie i ten bateria
instrukcje dostawcy powinien Być śledzony Kiedy zastępowanie ten cały
bateria . Zwykle , bateria Jest oskarżony I zwolniony każdy dwa Do
trzy miesiące i oskarżony Po istnienie zwolniony Do wyłączenie i ten czas
ładowania
ten standard maszyna być nie Być mniej niż 12 godziny .

⑤ W wysoka temperatura obszary , bateria Jest oskarżony I
zwolniony -- razy każdy dwa miesięcy i ten standard maszyna
ładowanie musieć nie Być mniej niż 12 godzin każdy czas .

Notatka :
① falownik musieć Być obrócony wyłączony I bezładny z ten sieć
elektryczna zanim zastępowanie ten bateria
② Weź wyłączony metal obiekty taki Jak Pierścienie I zegarki .
③ Użyj bezludny uchwyty I śrubokręty i Do nie miejsce narzędzia Lub
Inny metal obiekty NA ten bateria .
④ To Jest normalna Do mały iskry Do pojawić się Na ten złącze I będzie
nie wyrządzić krzywdę Do osobisty bezpieczeństwo I ten falownik Kiedy
złączony ten bateria kabel .
⑤ Nigdy zwarcie Lub odwracać ten bateria pozytywny I negatywny
bieguny .
PROSTY KONSERWACJA I METODY NAPRAWY
Awaria
Powód
Rozwiązanie
Wentylator nie działa
Temperatura wewnątrz
falownik robi nie powyżej
45 ℃
To Jest normalny ,
wentylator to jest
kontrola temperatury
Terminal Jest gorący
Słaby kontakt Lub luźny
Ponownie dokręcić
Wyłączanie z
obciążeniem
Bateria nie Posiadać dość
mocy Lub nad obciążenie
Naładuj baterię lub
zmniejszyć obciążenie
Nie mogę
zakręt NA
falownik
Bateria kabel Jest nie
podłączony prawidłowo
Sprawdzać Jeśli ten
bateria
kabel jest podłączony I
podłącz ponownie
Alarm włączania
zasilania
Bateria nie Posiadać
wystarczająca moc Lub nad
obciążenie
Naładuj baterię lub
zmniejszyć obciążenie

APPENDIX
Model
BL-W2012V-L
BL-W3024V-L
BL-W4024V-L
Oceniony moc
2000 W
3000 W
4000 W
Szczyt moc
6000 W
9000 W
12000 W
Wejście
Woltaż
90V-130VAC
Częstotliwoś
ć
45-65Hz
Wyjście
Woltaż
120VAC±10%(akumulator) Tryb priorytetowy)
Częstotliwoś
ć
60Hz±1% (priorytet baterii ) tryb)
Kształt fali wyjściowej
Czysty fala sinusoidalna
Skuteczność
>76%
>80%
Bateria typ
Akumulatory kwasowo-ołowiowe Litowe
żelazo bateria Trójskładnikowa (18650)
bateria i dostosowywalna
Napięcie akumulatora
12 V prądu
stałego
24 V prądu stałego
Maksymalnyaktualny z główny s
ładowanie
50 A (12 V prądu stałego)/70 A (24 V prądu
stałego)/50 A (48 V prądu stałego)
Ochrona
przeciążenie ,zwarcie,przegrzanie,akumulator
wysokie/niskie napięcie,sieć wysokiego
/niskiego napięcia
Metoda konwersji
Interaktywny 5ms (typowe )
Przeciążać
Ochrona dla 15 sekund po przekroczeniu 100%
Metoda komunikacji
RS-232 (opcjonalnie)
Pracujący
środowisko
Temperatura
-30-40 ℃
Wilgotność
10%-90%
Model
BL-W5024V-L
BL-W6024V-L
BL-W6048V-L
Oceniony moc
5000 W
6000 W
6000 W
Szczyt moc
15000 W
18000 W
18000 W
Wejście
Woltaż
90V-130VAC
Częstotliwoś
ć
45-65Hz
Wyjście
Woltaż
120VAC±10%(akumulator) Tryb priorytetowy)
Częstotliwoś
ć
60Hz±1% (priorytet baterii ) tryb)
Kształt fali wyjściowej
Czysty fala sinusoidalna
Skuteczność
>80%
Bateria typ
Akumulatory kwasowo-ołowiowe Litowe
żelazo bateria Trójnikowa (18650)
bateria i dostosowywalna
Napięcie akumulatora
24 V prądu stałego
48 V prądu
stałego
Maksymalnyaktualny z główny s
ładowanie
50 A (12 V prądu stałego)/70 A (24 V prądu
stałego)/50 A (48 V prądu stałego)
Ochrona
przeciążenie ,zwarcie,przegrzanie,akumulator
wysokie/niskie napięcie,sieć wysokiego
/niskiego napięcia
Metoda konwersji
Interaktywny 5ms (typowe )
Przeciążać
Ochrona dla 15 sekund po przekroczeniu 100%
Metoda komunikacji
RS-232 (opcjonalnie)
Pracujący
środowisko
Temperatura
-30-40 ℃
Wilgotność
10%-90%
Jeśli powyższe parametry są zmienione w przyszłości możesz zapytać
sprzedawcę Najnowsze parametry

DEFAULT BATTERY PARAMETERS
CUSTOM VOLTAGE ADJUSTMENT RANGE
CUSTOM VOLTAGE ADJUSTMENT RANGE
Specyfikacje produktu lub powiązane informacje wspomniany W
Ten instrukcja obsługi może ulec zmianie bez ogłoszenie.

Wsparcie techniczne i Certyfikat gwarancji
elektronicznej www.vevor.com/support

Szybki Start Przewodnik
Podłączenie akumulatora
UWAGA! Wszystkie okablowania musi zostać wykonane przez
wykwalifikowany personel.
OSTRZEŻENIE! Dla bezpieczeństwa systemu i jego efektywnej pracy
bardzo ważne jest użyj odpowiedniego kabla do podłączenia akumulatora.
Aby zmniejszyć ryzyko z obrażenia ,
Proszę użyj właściwego zalecanego kabel.
Model
Maksymalne
natężenie prądu
Drut
Rozmiar
Wartość
momentu
obrotowego
12V 2000W
166A
4A W G
20~30 Nm
24V 3000 W
125A
4A W G
20~30 Nm
24V 4000W
166A
4A W G
20~30 Nm
24V 5000 W
208A
6 AWG 2x
20~30 Nm
24V 6000 W
250
4A WG
2x
20~30 Nm
48V 6000 W
125A
4A W G
20~30 Nm
klimatyzacja Wejście / Wyjście Połączenie
OSTRZEŻENIE! Wszystkie przewody muszą być wykonanym przez A
wykwalifikowany personel.
UWAGA! To bardzo ważne dla bezpieczeństwa systemu i wydajny działanie Do
używać
odpowiedni kabel do podłączenia wejścia AC. Aby zredukować ryzyko obrażenia,
Proszę używać ten zalecany rozmiar kabla Jak poniżej.
Zalecane wymagania dotyczące kabli dla przewodów prądu przemiennego
Model
Drut Rozmiar
Wartość
momentu
obrotowego
12V 2000 W
10AWG
1.4~ 1,6 Nm
24V 3000 W
10AWG
1.4~ 1,6 Nm

24V 4000W
10AWG
1.4~ 1,6 Nm
24V 5000 W
8 AWG
1.4~ 1,6 Nm
24V 6000 W
8 AWG
1.4~ 1,6 Nm
48V 6000 W
8 AWG
1.4~ 1,6 Nm

Wstęp Do ten działanie płyta
Jeśli to Jest konieczne do użyj operacyjnego panel z dala od falownik,
odnieść się do następny:
1. Wyjmij 4 kołki z wyświetlacza sterującego, istnienie ostrożny nie do
upuszczać To wewnątrz maszyna.
2. Użyj małego przecinaka do kołków, aby podważ wyświetlacz Otwarte i weź To
na zewnątrz.
3. Odłącz kabel sieciowy podłączony do wyświetlacza.
4. Użyj Kabel 10-metrowy do podłączenia do falownik por rt.
Uwaga: ten kabel nie może być połączonym z Internet port i nie mogę
komunikować się z To.

Technische ondersteuning en E-garantiecertificaat op www.vevor.com/support
OMVORMER LADER GEBRUIKER
HANDMATIG
MODEL : BL -W2012V-L, BL -W3024V-L, BL-W4024V - L,
BL-W5024V-L, BL - W6048V-L, BL -W6024V-L
Wij blijven ons inzetten voor u voorzien van hulpmiddelen met concurrerende prijs.
"Opslaan Half", "halve prijs" of andere soortgelijke uitdrukkingen gebruikt door ons
geeft slechts een schatting van de besparingen die u kunt verwachten zou kunnen
profiteren van het kopen bepaalde gereedschappen
met ons vergeleken met de grote topmerken en niet noodzakelijkerwijs gemeen naar
omslag
alle categorieën van aangeboden gereedschappen door ons. Je bent vriendelijk verzocht
om dit te verifiëren voorzichtig
wanneer je bent een bestelling bij ons plaatsen als u Zijn Eigenlijk Besparing
De helft in vergelijking met de bovenkant belangrijke br ens.
Inverter charger
MODEL : BL -W2012V-L, BL -W3024V-L, BL -
W4024V-L, BL -W5024V-L, BL -W6048V-L,
BL- W6024V-L
BL-W2012V-L
BL-W3024V-L
BL-W4024V-L
BL-W5024V-L
BL-W6024V-L
BL-W6048V-L
(De afbeelding is alleen ter referentie, alstublieft verwijzen naar de actueel
voorwerp )
BEHOEFTE HULP ? CONTACT ONS !
Hebben product vragen? Behoefte technisch steun? Alsjeblieft
gevoel vrij naar contact ons:
Technische ondersteuning en e-
garantiecertificaat
www.vevor.com/support
Dit is het origineel instructie, lees alles alstublieft handmatig instructies
voorzichtig voor gebruik. VEVOR behoudt zich een duidelijke
interpretatie van onze gebruikershandleiding. Het uiterlijk van het
product moet onderworpen zijn aan de
product jij ontvangen. Vergeef me alsjeblieft ons dat we niet zullen u
opnieuw informeren als zijn er technologische of software- updates op

ons product.

Waarschuwing - Aan verminderen de risico van letsel , gebruiker
moeten lezen Lees de gebruiksaanwijzing zorgvuldig door.
Dit apparaat voldoet met Deel 15 van de FCC Regels . De
werking is onderwerp naar de volgend twee voorwaarden : (1)
Deze apparaat kunnen niet schadelijke interferentie
veroorzaken , en (2) dit apparaat moeten accepteren elk
interferentie ontvangen , inbegrepen interferentie die kan
veroorzaken
ongewenste werking.
Dit product is onderworpen aan de voorraad van Europese
Richtlijn 2012/ 19/ EG . De symbool tonen A wieltje
prullenbak gekruist
door geeft aan dat het product vereist aparte weigeren
collectie in de Europese Unie. Dit geldt voor de product en
alle toebehoren gemarkeerd met dit symbool. Producten
gemarkeerd als zodanig is het mogelijk niet weggooien met
normaal huishoudelijk afval, Maar moet naar een verzamelpunt
worden gebracht punt voor recycling elektrisch En
elektronische apparaten
VEILIGHEIDSINSTRUCTIES
Bedankt dat u voor de intelligente frequentieomvormer voor huishoudelijk
gebruik hebt gekozen.
omvormer en online interactieve producten die door ons bedrijf worden
geproduceerd.De
ontwerp is veilig, betrouwbaar en eenvoudig te gebruiken. Alsjeblieft lees
dit handmatig voorzichtig , het zullen u helpen de meest volledige service
te krijgen leven en dienstbaarheid.
Houd u strikt aan de regels door alle waarschuwingen en
bedieningsvoorschriften instructies in de handleiding en op de
machine en houd dit handmatig op de juiste manier.
De installatie/bediening en onderhoud van deze productserie

zou moeten worden uitgevoerd door getrainde en technische personeel,
en de volgende vereisten moeten worden nageleefd.
1. Bevestig dat de DC/AC-spanningswaarde van het aangesloten
product voldoet aan de nominale en nominale werkspanningswaarde
van de product.

2. Zorg ervoor dat de positieve en negatief polen van de gelijkstroom
invoer van dit product en de positieve en negatief polen van de batterij zijn
correct verbonden, niet omgekeerd.
3. Zorg ervoor dat de verbindingskabel tussen het product en de batterij is
zo kort mogelijk, de invoer En uitgangsbedrading is juist En
stevig en let op dat er geen kortsluiting ontstaat van de verbinding
kabel. 4.Er is hoge spanning in dit product, niet-elektrisch
professionelen zou moeten open de omvormer niet geval.
De startaccu van de auto kan een kortetermijnoplossing bieden hoge
stroom naar begin de
motor,maar Het is niet ontworpen voor continu gebruik stroomverbruik en
is niet geschikt voor diepe cyclusontlading. Als u een bepaalde
elektrische apparatuur continu voor een lange tijd, wordt het aanbevolen
dat u bovendien uitrusten een accu die geschikt is voor diepe ontlading,
zoals AGM- of GEL-accu's. Disclaimer: Vanwege de voortdurende update
en verbetering van producten en technologieën, de inhoud van dit
document kan niet volledig overeenkomen met de het werkelijke product,
begrijp het alstublieft. Als u nodig om te informeren naar product
Voor updates kunt u contact opnemen met ons bedrijf .
INSTALLATIE
1.Installatie-instructies
① . Uitpakken inspectie
Open de verpakking van de omvormer, controleer de accessoires en
controleer of de omvormer tijdens het transport beschadigd is geraakt. Als
u schade aantreft of ontbrekende onderdelen, informeer dan de drager
En distributeur.
Opmerking :
Alsjeblieft bewaar de verpakkingsdoos en verpakking
materialen voor de toekomst vervoer.
Deze serie producten is zwaarder ( zien bijlage),dus wees voorzichtig
als behandeling

2. Voorzorgsmaatregelen bij de installatie
① . De gebied waar de omvormer is geplaatst moeten zijn Goed
geventileerd , weg van water, brandbare gassen en bijtende stoffen .
② . Houd de kant paneel fan lucht inlaat , lucht uitlaat En lucht inlaat op
de kant van de doos vrij.
③ De omgevingstemperatuur van de omvormer moet worden
gehouden tussen 0 ℃ -40 ℃ .
④ .Als de machine gedemonteerd en gebruikt wordt bij lage temperatuur ,
water
druppels kunnen condenseren.Je moet wachten op de binnen- en
buitenkant van de
machine volledig droog moet zijn voordat installeren en gebruik makend
van het,anders daar is een gevaar van elektrische schok.
⑤ .Alstublieft Installeer de omvormer in de buurt van het lichtnet
ingangsaansluiting of schakelen, dus Dat in geval van nood, trek de
stekker uit het stopcontact plug En snee van de stroom.
⑥ . Do niet verbinden de omvormer uitvoer direct naar de netspanning
Opmerking :
*Wanneer de belasting is aangesloten op de omvormer,de laden
moeten worden gedraaid uit vóór de bedrading, en dan de belasting
moet worden gedraaid op een door een.
*Sluit de omvormer aan op een speciaal stopcontact met
overstroombeveiliging bescherming apparaat
*Het gebruikte stopcontact moet verbonden naar de beschermend
aarde terminal
*Ongeacht of de invoer netsnoer is aangesloten op de netspanning
stopcontact, de uitgang van de omvormer kan worden opgeladen. Het
uitschakelen van de omvormer doet niet garanderen dat de interne
onderdelen van de machine niet zijn opgeladen.Als je wil je de omvormer
geen output geven, moet eerst draaien van alles af schakelaars,en snijd
dan de Hoofdgerechten stroom
*Wanneer inductief ladingen zoals motoren , monitoren en
laserprinters Zijn nodig, het startvermogen is te groot.Bij het

selecteren een omvormer,de De capaciteit moet worden berekend op
basis van de beginnend macht.De beginnend stroom is gebruikelijk
LCD PANEL DESCRIPTION
24,6V
24,0
Set Wisselstroom opladen huidig :
28,4V
25A 50A
20.0V
15A 35A
Description:
Long press the setting key for 3 seconds to enter the system
setting interface,and pressing the setting key can also indicate
confirmation.The LCD will automatically turn off the backlight (energy
saving)without any operation for 5 seconds.Press the setting key
again can turn on the backlight.
Energy saving (sleep)function,when the inverter is working in battery
mode and no load,it will enter the state(Off output)after 20 seconds
in order to achieve energy saving effect,automatically turn on after
load,normal use.
27.6V
21.0V
26.0V
21.6V
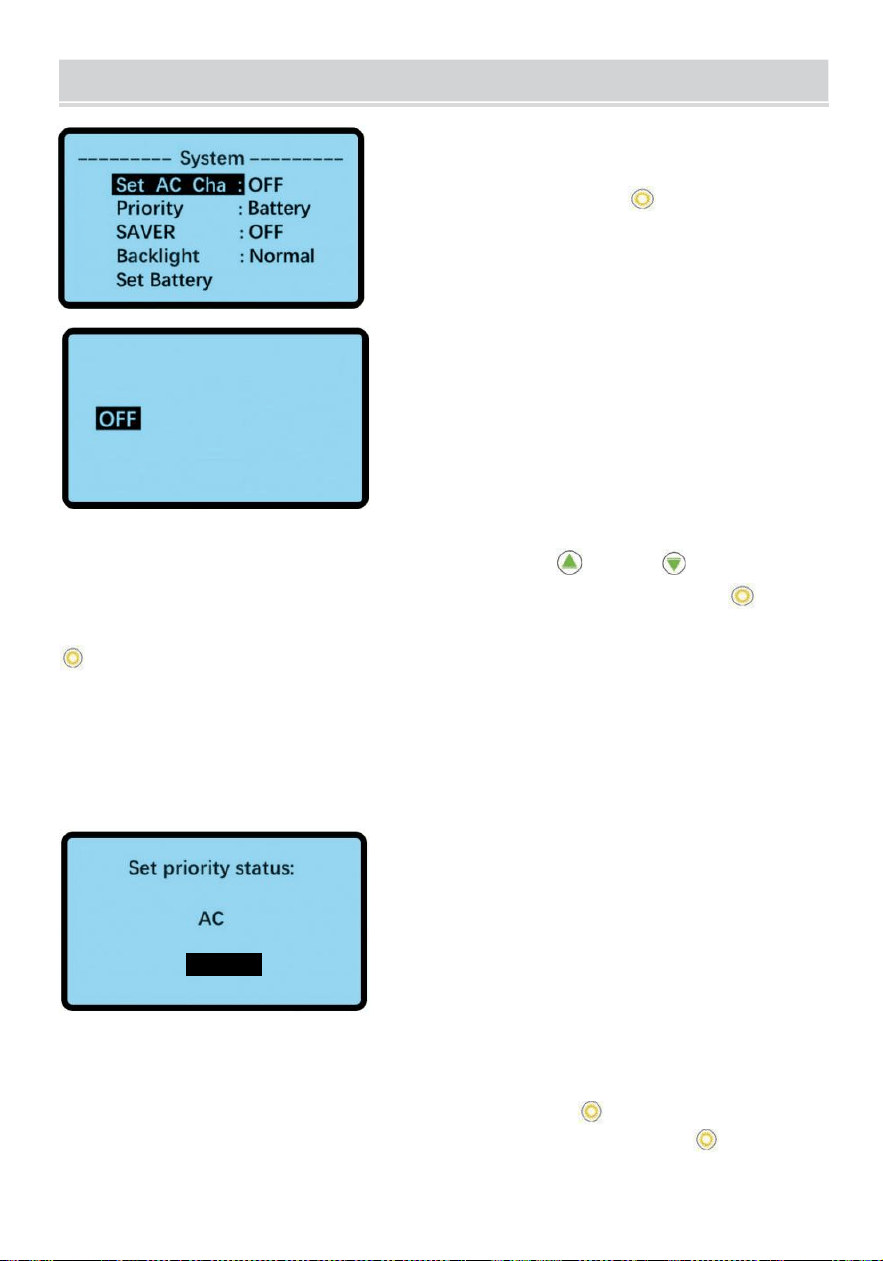
WORKING MODE SETTING
interface voor systeeminstellingen
Lang pers de instelling sleutel voor 3
seconden naar binnenkomen de systeem
interface instellen na je zet de omvormer.
Set AC charging current:
25A 50A
15A 35A
Stel het opladen via het lichtnet in huidig
In de systeem instelling interface,druk op de of sleutel naar
selecteren Set Wisselstroom opladen huidig, En Dan pers de sleutel
naar bevestigen.Selecteren de opladen huidige die u wilt en druk op de
toets om bevestigen .
Verschillende specificaties van omvormers kan set verschillend
opladen huidig waarden. De netspanning opladen huidig waarde in de
links afbeelding is de standaardparameter van de 24V3000 W
omvormer .
Battery
Set Prioriteit AC/ Batterij
Druk in de interface voor systeeminstellingen op
e
of
o
-toets om de
prioriteit te selecteren, en druk vervolgens op de toets om te
bevestigen.Selecteer de prioriteitsstatus Jij wil En Druk op de toets om
te bevestigen .

WORKING MODE SETTING
Nadat u de prioriteit hebt gewijzigd, wordt de interface voor
systeeminstellingen correct weergegeven. weergave het huidige werk
prioriteit na 5 seconden.

Wisselstroom prioriteit: De prioriteit van de netvoeding.De batterij
voeding zal begin onmiddellijk bij stroomuitval (de schakelfunctie) is
milliseconden en heeft geen invloed op de elektrische apparaten in
gebruik)en kan zijn gebruikt als A UPS.Wanneer de netstroom uitvalt
hersteld, zal het automatisch overschakelen naar de netvoeding en laad
de batterij bij de dezelfde tijd.
Batterijprioriteit: De batterijvoeding prioriteit.Wanneer de batterij macht
is laag , het zullen schakelaar naar de netspanning stroom leveren , en de
batterij zullen zijn
automatisch opgeladen. Wanneer de batterijspanning terugkeert naar een
bepaald niveau
waarde (ingesteld in de batterij -instellingen) en 30 notulen later de
batterij stroom aanbod zal automatisch zijn hersteld.
beschermingsbord is losgekoppeld, de omvormer kan zijn
opgeladen zonder inschakelen, intelligent de batterij repareren en de
levensduur verlengen dienst leven.
Tip:Switch between AC mode and Battery mode requires an interval of
30 minutes
Energiebesparende uitgang: uit/ aan
Druk in de interface voor systeeminstellingen op de toets of naar
selecteren BESPARING, En druk vervolgens op de toets om te
bevestigen. Selecteer de gewenste spaaruitgang (uit/aan) En Druk
op de toets om te bevestigen .
Na Jij wijziging de BESPAREN instelling , de systeem instelling interface
zullen correct weergeven de huidig werk BESPAREN instelling na 5
seconden .

Op : de omvormer zullen binnenkomen slaap staat ( afslag) de output ) na 20
seconden
wanneer de omvormer is werkend in batterij modus En Nee laden in . de Nee
laden stroom zal lager zijn dan 3W, het zal automatisch starten na het laden
Uit : de omvormer blijft starten en gaat niet in de slaapstand ,

Achtergrondverlichtingsinstelling: normaal / aan
Druk in de interface voor systeeminstellingen op
e
of
o-
toets om te
selecteren Achtergrondverlichting,
en druk vervolgens op de toets om te bevestigen.Selecteer de
achtergrondverlichting staat wat je wilt
En Druk op de toets om te bevestigen. Nadat u de instelling voor de
achtergrondverlichting hebt gewijzigd ,
de interface voor systeeminstellingen geeft de huidige werkinstellingen
correct weer. Achtergrondverlichtingsinstellingen na 5 seconden .
Aan : de Achtergrondverlichting zal blijft doorgaan
Normaal: De Achtergrondverlichting gaat uit wanneer geen operatie
binnen 1 minuut
28,4V
20.0V
Batterij-instelling
Druk in de interface voor systeeminstellingen op de toets
e
of
o
om
Set te selecteren en vervolgens druk op de toets om te bevestigen
in de interface voor batterij-instellingen op de toets om te selecteren de
batterij
parameter die u wilt aanpassen. Nadat u de batterijparameter hebt
geselecteerd,
wilt aanpassen, druk op kan de spanningswaarde verhogen , en druk
op kan
26.0V
21.6V
27.6V
21.0V

Verlaag de spanningswaarde. (De spanningswaarde zal niet onmiddellijk
veranderen, Het moet 5 seconden wachten) dan keert het automatisch
terug naar de omvormer
informatie-interface wanneer geen handeling binnen 30 seconden.
CC -V: Constant spanning
opladen FLA -V: Vlot opladen
DC-REC: In de staat van de batterij prioriteit,Netvoeding ,de batterij
voeding zal automatisch zijn 30 minuten later hersteld toen de
De accuspanning keert terug naar deze waarde.
B- LVD : Laag spanning bescherming ( ui
tschakeling ) LB - Aal : Laag spanning
alarm ( piepen )
AC - REC : In de staat van batterij prioriteit ,
Automatisch schakelaar naar netspanning prioriteit wanneer de batterij
spanning Omlaag naar dit waarde .
De afbeelding op de links is de standaard batterij spanning
parameter van de 24V3000W omvormer systeem .
Set AC charging current:
25A 50A
15A 35A
De gebruiker kan selecteren de opladen versnelling volgens naar de stroom
vraag ( Dagelijks opladen is aanbevolen naar zijn aangepast naar laag of
medium versnelling )
De figuur op de links is de standaard parameters van de 24V3000 W
omvormer . Het opladen huidig waarden van omvormers van verschillend
specificaties Zijn verschillend . Alsjeblieft refereren naar de figuur
onderstaand .
LAADSTROOM VERGELIJKING
Modus
Laag
Midden
Hoog
Superhoog
12V 2KW
10A
20A
30A
50A
24V 3KW
15A
25A
35A
50A
24V 4KW / 5KW /
6KW
15A
35A
55A
70A
48V 6 kW
15A
25A
35A
50A

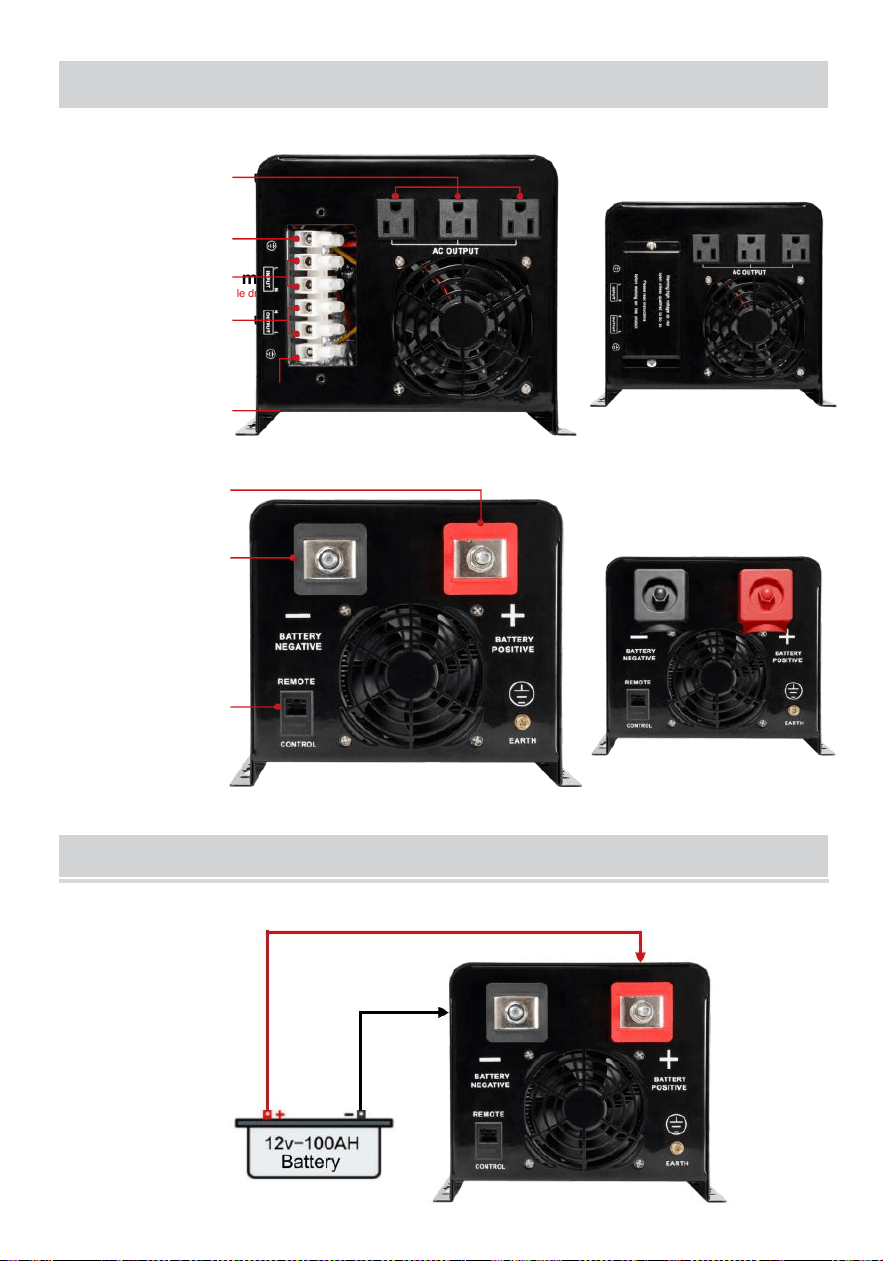
INPUT & OUTPUT-VERBINDING
Wisselstroom uitvoer
(alleen voor laag dan 1200w apparaat)
Aarddraad
Wisselstroom invoer
(L naar stroomdraad N naar neutrale draad)
Wisselstroom uitvoer
(Het is erg stabiel,
geweldig voor elektrische
apparaten met een hoog
vermogen)
Aarddraad
Sluit de
batterij positief
Sluit de
batterij negatief
Afstandsbedie
ningsint
erface
VERBINDING DIAGRAM
12V accu Aansluitschema

48v accu aansluitschema
AC output
(only for low than 1200w appliance)
(please plug your high power applinace into this AC output)
Plug in the mains
to charge the battery
(Mains power is not necessary)
(L to live wire N to neutral wire)
●
AC output 120V

Opmerking :
Als Het is aangesloten naar de generator , het behoeften naar
bedienen volgens naar de volgende stappen
① Beginnen de generator , wacht voor Het naar loop stabiel , verbinden de
uitvoer stroom van de generator naar de invoer van de omvormer ( in dit
geval , maken Zeker de omvormer is geen - belasting ), en Dan begin de
omvormer volgens naar de opstarten
procedure . Na de omvormer begint , en Dan verbinden naar de laden een
door een . ② Het is aanbevolen naar kiezen de generator capaciteit met
twee naar drie
keer de capaciteit van de omvormer .
ONDERHOUD & ONDERHOUD
① Dit serie van omvormers vereist erg klein onderhoud . De batterij van
de standaard model is klep - geregeld , onderhoudsarm type , en
alleen moet zijn opgeladen vaak naar bereiken de verwacht leven .
② Als de omvormer is niet gebruikt voor A lang tijd , het is aanbevolen
naar aanval het is elke twee naar drie maanden -- tijden
③ Onder normaal omstandigheden , de dienst leven van de batterij is drie
jaren . Als de batterij is gevonden naar zijn in arm conditie , het moeten
zijn vervangen vroeg . Bij het vervangen de batterij , het moeten zijn
uitgevoerd
door A professioneel .
④ De batterij zou moeten niet zijn vervangen individueel , en de batterij
instructies van de leverancier zou moeten zijn gevolgd wanneer vervangen
de geheel
batterij . Normaal gesproken is de batterij is opgeladen En ontladen elk
twee naar drie maanden , en opgeladen na wezen ontladen naar afsluiten ,
en de oplaadtijd van
de standaard machine zullen niet zijn minder dan 12 uren .

⑤ In hoge temperatuur gebieden , de batterij is opgeladen En
ontslagen -- keer elk twee maanden , en de standaard machine opladen
moeten niet zijn minder dan 12 uur elk tijd .
Opmerking :
① De omvormer moeten zijn gedraaid uit En losgekoppeld van de
netspanning voor vervangen de batterij
② Nemen uit metaal objecten zo een als ringen En horloges .
③ Gebruik geïsoleerd handgrepen En schroevendraaiers , en Doen niet
plaats hulpmiddelen of ander metaal objecten op de batterij .
④ Het is normaal voor klein vonken naar verschijnen bij de verbindingsstuk
En zullen niet schade veroorzaken naar persoonlijk veiligheid En de
omvormer wanneer verbinden de batterij kabel .
⑤ Nooit kortsluiting of achteruit de batterij ' s positief En negatief palen .
EENVOUDIG ONDERHOUD EN REPARATIEMETHODEN
Storing
Reden
Oplossing
De ventilator werkt niet
De temperatuur binnenin
de omvormer doet niet
meer dan 45 ℃
Het is normaal , de
fan is
temperatuurregeling
De terminal is heet
Arm contact of loszittend
Opnieuw vastdraaien
Uitschakelen met
belasting
Batterij niet hebben genoeg
kracht of over laden
Laad uw batterij op of
verminderen laden
Kan niet draai
op de omvormer
De batterij kabel is niet
goed aangesloten
Rekening als de batterij
kabel is aangesloten
En sluit het opnieuw
aan
Alarm bij inschakelen
Batterij niet hebben genoeg
kracht of over laden
Laad uw batterij op of
verminderen laden
APPENDIX
Model
BL-W2012V-L
BL-W3024V-L
BL-W4024V-L
Beoordeeld stroom
2000W
3000W
4000W
Piek stroom
6000W
9000W
12000W
Invoer
Spanning
90V-130VAC
Frequentie
45-65Hz
Uitvoer
Spanning
120VAC±10%(accu Prioriteitsmodus)
Frequentie
60Hz±1%( Batterijprioriteit modus)
Uitgangsgolfvorm
Zuiver sinusgolf
Effectiviteit
>76%
>80%
Batterij type
Loodzuuraccu's Lithium ijzer batterij
Ternary(18650)batterij en Aanpasbaar
Batterijspanning
12V DC
24V DC
Maximaalhuidigvan hoofd s
opladen
50A (12VDC)/70A (24VDC)/50A (48VDC)
Bescherming
overbelasting ,kortsluiting,te hoge
temperatuur,batterij hoog/laagspanning,Net
hoog /laagspanning
Conversiemethode
Interactieve 5ms (typisch al)
Overbelasting
Bescherming voor 15 seconden na overschrijding
100%
Communicatiemethode
RS-232 (optioneel)
Werken
omgeving
Temperatuur
-30-40 ℃
Vochtigheid
10%-90%
Model
BL-W5024V-L
BL-W6024V-L
BL-W6048V-L
Beoordeeld stroom
5000W
6000W
6000W
Piek stroom
15000W
18000W
18000W
Invoer
Spanning
90V-130VAC
Frequentie
45-65Hz
Uitvoer
Spanning
120VAC±10%(accu Prioriteitsmodus)
Frequentie
60Hz±1%( Batterijprioriteit modus)
Uitgangsgolfvorm
Zuiver sinusgolf
Effectiviteit
>80%
Batterij type
Loodzuuraccu's Lithium ijzer batterij
Ternary(18650)batterij en Aanpasbaar
Batterijspanning
24V DC
48V DC
Maximaalhuidigvan hoofd s
opladen
50A (12VDC) / 70A (24VDC) / 50A (48VDC)
Bescherming
overbelasting ,kortsluiting,te hoge
temperatuur,batterij hoog/laagspanning,Net
hoog /laagspanning
Conversiemethode
Interactieve 5ms (typisch al)
Overbelasting
Bescherming voor 15 seconden na overschrijding
100%
Communicatiemethode
RS-232 (optioneel)
Werken
omgeving
Temperatuur
-30-40 ℃
Vochtigheid
10%-90%
Als het bovenstaande parameters worden gewijzigd in de toekomst kunt
u de verkoper vragen de laatste parameters
DEFAULT BATTERY PARAMETERS

CUSTOM VOLTAGE ADJUSTMENT RANGE

CUSTOM VOLTAGE ADJUSTMENT RANGE
De productspecificaties of gerelateerde informatie genoemd in dit
gebruiksaanwijzing kunnen zonder voorafgaande kennisgeving
worden gewijzigd kennisgeving.

Technische ondersteuning en E-garantie
certificaat www.vevor.com/support
Snel Begin Gids
Batterijverbinding
WAARSCHUWING! Alle bedrading moet worden uitgevoerd door
gekwalificeerd personeel.
WAARSCHUWING! Het is erg belangrijk voor de veiligheid en efficiënte
werking van het systeem om Gebruik een geschikte kabel voor de
batterijverbinding. Om risico van blessure ,
Alsjeblieft gebruik de juiste aanbevolen kabel.
Model
Maximale Amperage
Draad Maat
Koppelwaarde
12V 2000W
166A
4 AWG
20~ 30Nm
24V 3000W
125A
4 AWG
20~ 30Nm
24V 4000W
166A
4 AWG
20~ 30Nm
24V 5000W
208A
6 AWG X2
20~ 30Nm
24V 6000W
250
4 AWG X2
20~ 30Nm
48V 6000W
125A
4 AWG
20~ 30Nm
Wisselstroom Invoer / Uitvoer Verbinding
WAARSCHUWING! Alle bedrading moet worden uitgevoerd door A gekwalificeerd
personeel.
WAARSCHUWING! Dit is erg belangrijk voor de veiligheid van het systeem en
efficiënt operatie naar gebruik
geschikte kabel voor AC-ingangsaansluiting. Om te verminderen risico van
blessure, Alsjeblieft gebruik de juiste aanbevolen kabelgrootte als onderstaand.
Aanbevolen kabelvereisten voor AC-draden
Model
Draad Maat
Koppelwaarde
12V 2000W
10 AWG
1.4~ 1,6 Nm
24V 3000W
10 AWG
1.4~ 1,6 Nm
24V 4000W
10 AWG
1.4~ 1,6 Nm
24V 5000W
8 AWG
1.4~ 1,6 Nm
24V 6000W
8 AWG
1.4~ 1,6 Nm

48V 6000W
8 AWG
1.4~ 1,6 Nm

Invoering naar de operatie paneel
Als het is noodzakelijk om gebruik de bediening paneel weg van de omvormer,
verwijzen naar de volgend:
1. Verwijder de 4 deuvels uit het bedieningspaneel, wezen voorzichtig niet
om druppel Het binnenin de machine.
2. Gebruik een kleine deuvelsnijder om het scherm loswrikken open en neem
Het uit .
3. Trek de stekker uit het stopcontact netwerkkabel aangesloten op het
beeldscherm.
4. Gebruik een 10 meter lange kabel om aan te sluiten op de omvormer poort .
Let op: deze kabel kan niet verbonden zijn met de Internet haven en kan
niet communiceren met Het.

Teknisk support och E-garanticertifikat på www.vevor.com/support
INVERTER LADDARE ANVÄNDARE MA
NUAL
MODELL : BL -W2012V-L, BL -W3024V-L, BL -W4024V-L ,
BL -W5024V- L , BL -W6048V-L, BL -W6024V-L
Vi fortsätter att vara engagerade i förse dig med konkurrenskraftiga verktyg pris.
"Spara Halva, "Halva Priset" eller andra liknande uttryck begagnad av oss
representerar endast en uppskattning av dina besparingar kan ha nytta av att köpa
vissa verktyg
medveten h oss jämfört med stora toppmärken och gör det inte nödvändigtvis betyda till
täcka r
alla kategorier av verktyg som erbjuds av oss. Du är vänligen påmind om att verifiera
försiktigt
när du är lägga en beställning hos oss om du är faktiskt y Sparande
Hälften i jämförelse med toppen major br ands.
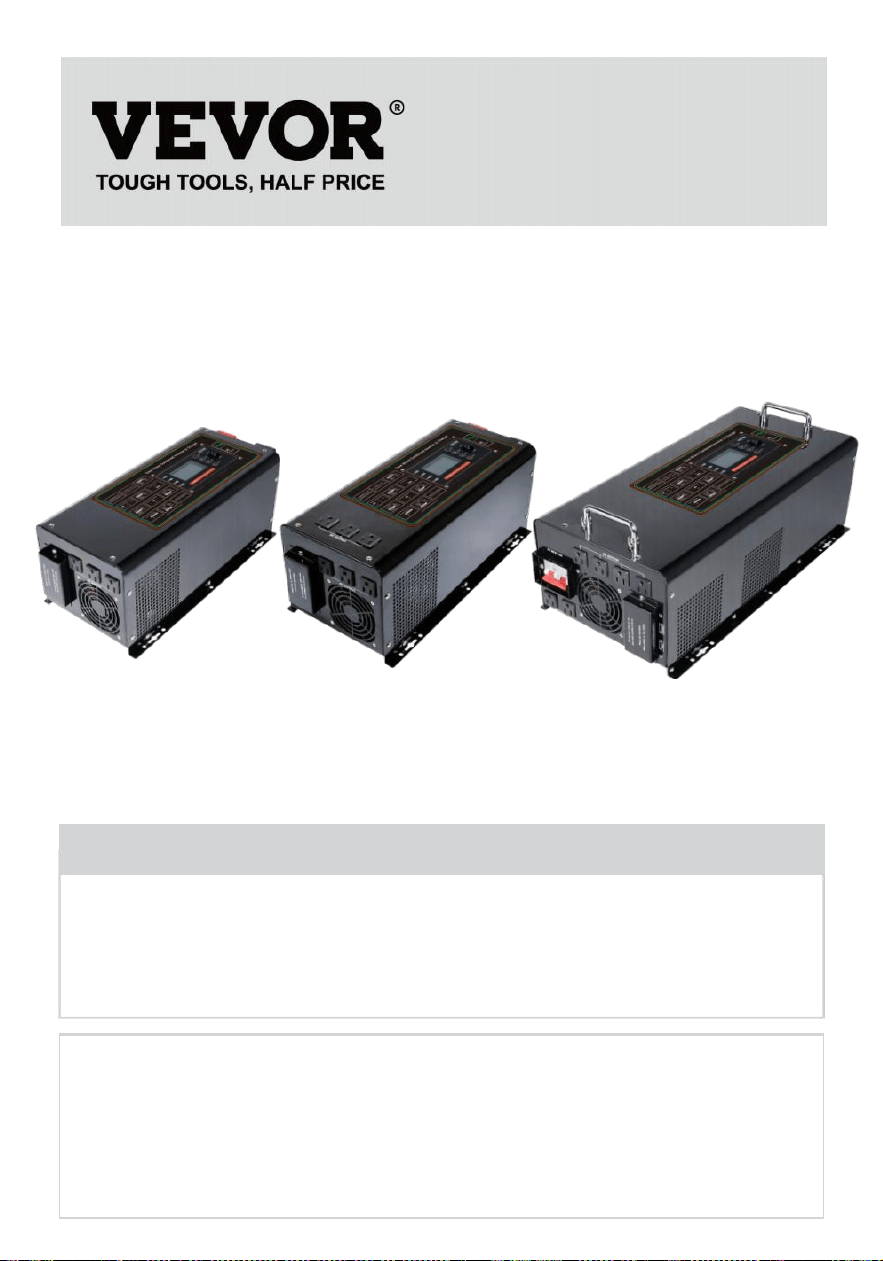
Inverter charger
MODELL : BL -W2012V-L, BL -W3024V-L, BL -
W4024V-L, BL -W5024V-L, BL -W6048V-L,
BL -W6024V-L
BL-W2012V-L
BL-W3024V-L
BL-W4024V-L
BL-W5024V-L
BL-W6024V-L
BL-W6048V-L
(De bild är endast för referens, tack hänvisa till faktisk föremål t)
BEHOV HJÄLP ? KONTAKTA USA !
Ha produkt frågor? Behov teknisk stöd? Behaga känsla f ree till
kontakta oss:
Teknisk support och e- garanticertifikat
www.vevor.com/support
Detta är originalet instruktion, snälla läs allt manuell instruktioner
försiktigt före drift. VEVOR reserverar sig för en tydlig tolkning av vår
bruksanvisning. Produktens utseende ska vara föremål för de
produkt dig mottagen. Snälla förlåt oss att vi inte kommer informera dig
igen om det finns uppdateringar av teknik eller programvara på vår
produkt.

Varning - Till minska de risk av skada , användare måste läsa
bruksanvisningen noggrant.
Detta anordning följer med Del 15 av de FCC Regler .
Operation är ämne till de följande två villkor :(1) Detta
anordning maj inte orsaka skadliga störningar och (2)detta
anordning måste acceptera några mottagna störningar ,
inklusive störningar som kan orsaka
oönskad operation.
Denna produkt är föremål för bestämmelse av Europeiska
Direktiv 2012/ 19/ EG . De symbol visande a wheelie bin
korsade
genom indikerar att produkten kräver separat vägra
samling i Europeiska Union. Detta gäller för produkt och alla
tillbehör märkt med denna symbol. Produkter märkta som
sådan kanske inte är det kassera ed med normal
hushållsavfall, men måste tas till en samling punkt för
återvinning elektrisk och elektroniska apparater
SÄKERHETSINSTRUKTIONER
Tack för att du valde den intelligenta frekvensomriktaren , hushåll
inverter och online interaktiv produkter som produceras av vårt företag
designen är säker, pålitlig och lätt att använda. Behaga läs detta manuell
försiktigt , det vilja hjälpa dig att få full service liv och service.
Vänligen håll dig strikt genom alla varningar och drift instruktioner i
de manuell och på maskinen och behåll detta manuell ordentligt.
De installation/drift och underhåll av denna produktserie
skall utföras av utbildade och tekniska personal och följande kraven bör
följas.
1.Bekräfta att DC/AC-spänningsvärde för den anslutna produkten
överensstämmer med det nominella och märkta arbetsspänningsvärdet
för produkt.

2. Se till att de positiva och negativ stolpar av DC input av denna produkt
och den positiva och negativ stolpar av batteri är korrekt ansluten, inte
omvänd.
3. Se till att anslutningskabeln mellan produkten och batteriet är så kort
som möjligt input och utgångsledningar är rätt ect och
fast och var uppmärksam för att undvika kortslutning av anslutningen
kabel. 4. Det finns hög spänning inuti sin produkt, icke-elektrisk
proffs skall inte öppna växelriktaren fall.
Bilens startbatteri c an ge en kortsiktig hög ström till starta
motor, men det är inte avsedd för kontinuerlig strömanvändning och jag s
inte lämplig för djupcykelurladdning.Om du vill använda en viss elektrisk
utrustning kontinuerligt för a lång tid, det rekommenderas att du
dessutom utrusta ett batteri som är lämpligt för djupurladdning, som t.ex
AGM eller GEL batterier. Ansvarsfriskrivning: På grund av den
kontinuerliga uppdateringen och förbättringen av produkter och teknologier,
kan innehållet i detta dokument inte helt matcha faktisk produkt,
vänligen förstå. Om du behöver fråga om produkt
uppdateringar, kontakta vårt företag .
INSTALLATION
1.Installationsanvisningar
① . Uppackning inspektion
Öppna växelriktarens förpackning, kontrollera tillbehören och kontrollera
om växelriktaren är skadad under transporten. Om du hittar skador eller
delar som saknas, vänligen meddela detta bärare och distributör.
Obs :
Behaga behålla packboxen och förpackning material för
framtiden transport.
Denna produktserie är tyngre (se t.ex bilaga), så var försiktig när
hantering

2. Försiktighetsåtgärder vid installation
① . De område där de växelriktare är placerad måste vara väl ventilerad ,
bort från vatten, brandfarlig gas och frätande ämnen .
② . Hålla de sida panel fläkt luft inlopp , luft utlopp och luft inlopp på de
sida av lådan fri.
③ .Omriktarens omgivningstemperatur bör behållas mellan 0 ℃ -
40 ℃ .
④ .Om maskinen demonteras och används på låg temperatur , vatten
droppar kan kondensera.Du måste vänta på insidan och utsidan av
maskinen ska vara helt torr innan installera och använder det, annars det
är en fara för elektriska chock.
⑤ .Snälla installera växelriktaren nära elnätet ingångsuttag eller byta,
alltså att i en nödsituation, koppla ur nätkontakten plugg och skära av
driva.
⑥ . Do inte ansluta de växelriktare produktion direkt till de elnätet
Obs :
*När lasten är ansluten till inverter, den ladda måste vändas av före
ledningar och sedan belastningen måste vändas på en av en.
*Anslut växelriktaren till ett speciellt uttag med överström skydd
anordning
*Det eluttag som används ska vara ansluten till de skyddande
jorden terminal
*Oavsett om ingången nätsladden är ansluten till elnätet
uttag, kan växelriktarens utgång vara laddad. Att stänga av växelriktaren
gör det inte garantera att de interna delarna av maskinen kommer inte
vara laddas.Om du vill göra omriktaren ingen utgång , du måste vända
först av allt växlar och skär sedan av Elnät driva
*När induktiv laster som t.ex motorer , bildskärmar och laserskrivare
är behövs, startkraften också stor.När du väljer en inverter, den
kapacitet bör beräknas baserat på startande power.The startande
driva är vanliga
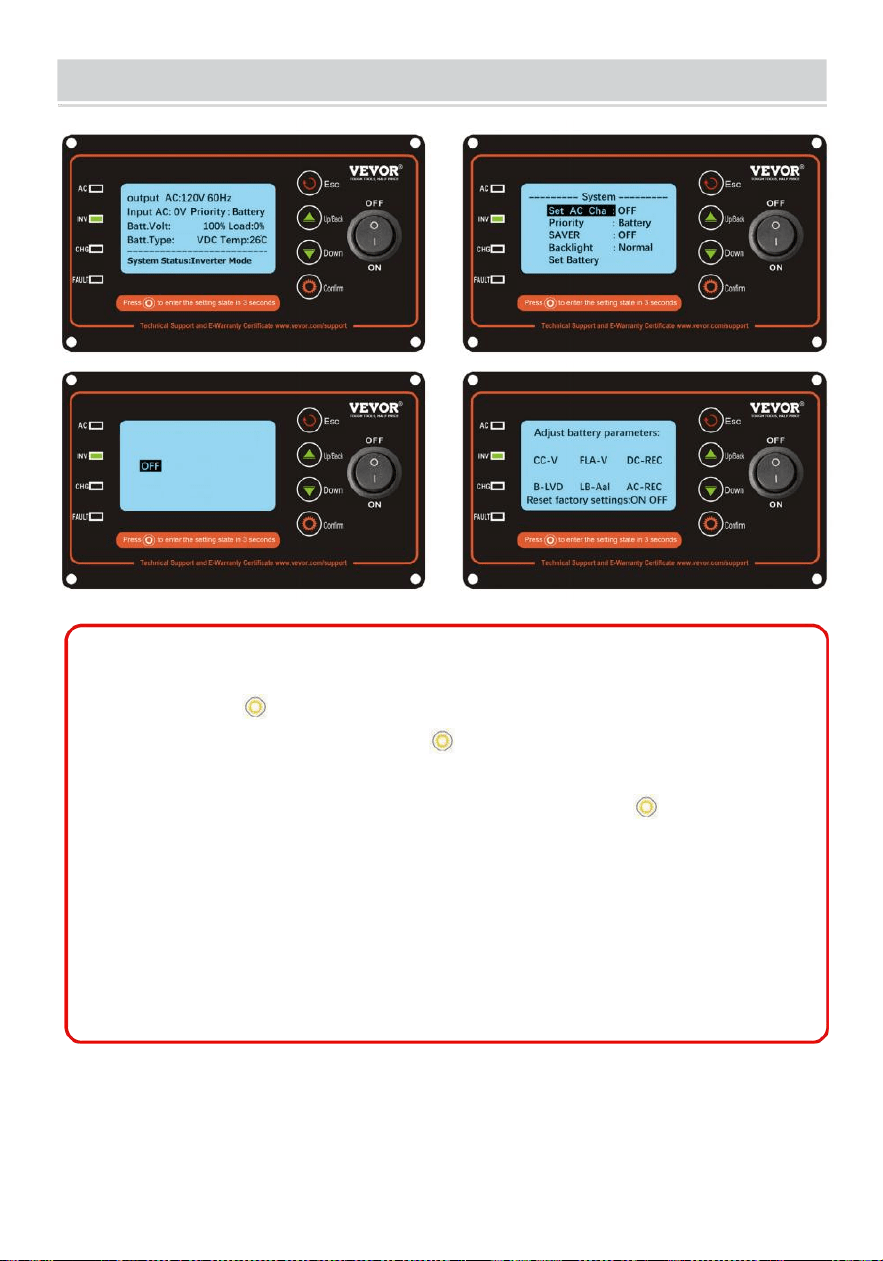
LCD PANEL DESCRIPTION
24,6V
24,0
Uppsättning AC laddning nuvarande :
28,4V
25A 50A
20,0V
15A 35A
Description:
Long press the setting key for 3 seconds to enter the system
setting interface,and pressing the setting key can also indicate
confirmation.The LCD will automatically turn off the backlight (energy
saving)without any operation for 5 seconds.Press the setting key
again can turn on the backlight.
Energy saving (sleep)function,when the inverter is working in battery
mode and no load,it will enter the state(Off output)after 20 seconds
in order to achieve energy saving effect,automatically turn on after
load,normal use.
27.6V
21.0V
26.0V
21.6V
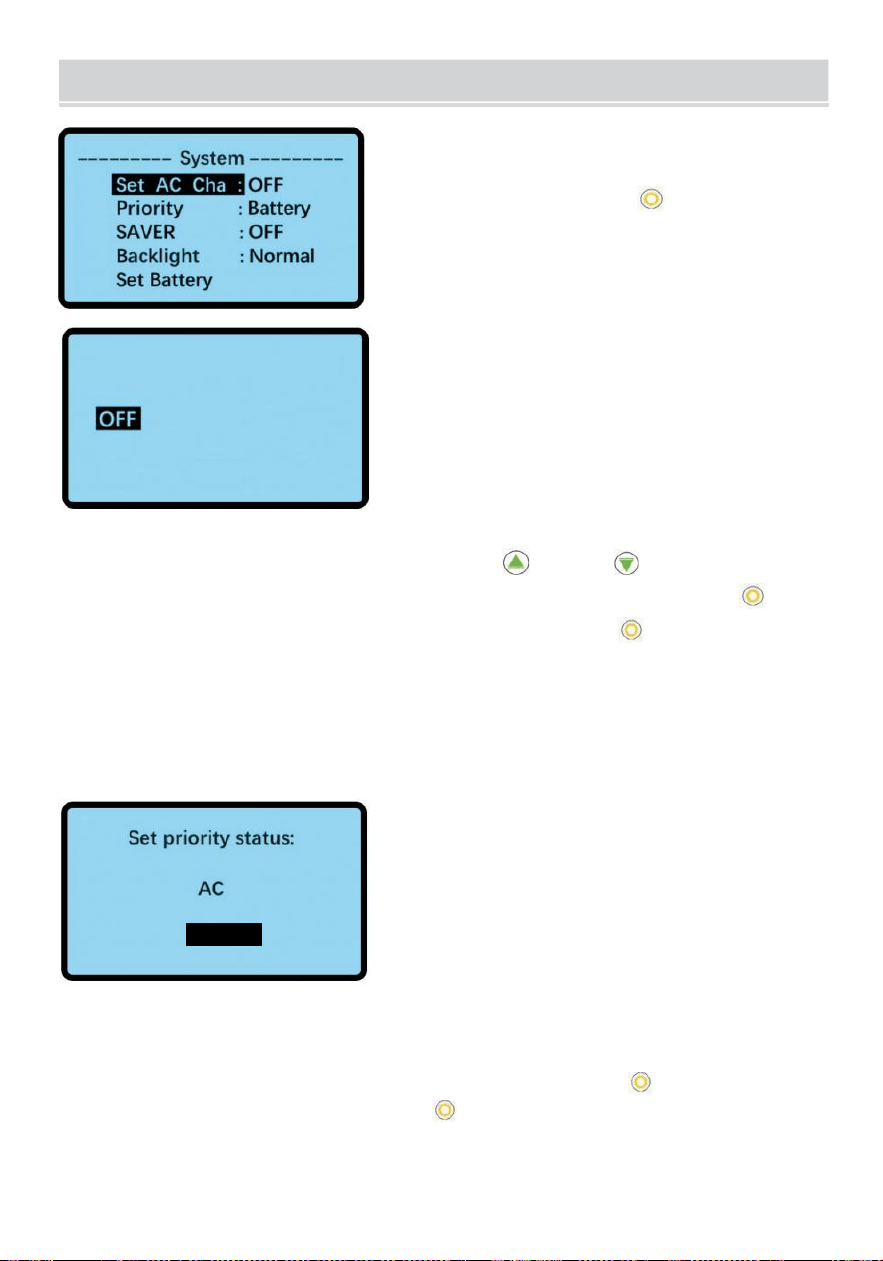
WORKING MODE SETTING
i systeminställningsgränssnittet
Lång trycka inställningen nyckel för 3
sekunder till skriva in de system ställa in
gränssnittet efter du slår på växelriktare.
Set AC charging current:
25A 50A
15A 35A
Ställ in nätladdningen nuvarande
I de system miljö gränssnitt, tryck de o r nyckel till välja
Uppsättning AC laddning nuvarande, och sedan trycka nyckeln till
bekräfta. Välj de laddning aktuell du vill och tryck på knappen för att c
bekräfta.
Olika specifikationer av växelriktare burk uppsättning olik laddning
nuvarande värden. De elnätet laddning nuvarande v alue i de vänster
bild är de standardparameter av 24V3000 W inverter .
Battery
Uppsättning Prioritet AC/ Battery
I systeminställningsgränssnittet trycker du på
e
eller
o
för att välja
prioritet, och tryck sedan på knappen för att bekräfta. Välj
prioritetsstatus du brist och tryck på knappen för att bekräfta .
Efter att ha ändrat prioritet kommer systeminställningsgränssnittet att vara
korrekt visa det aktuella arbetet prioritet efter 5 sekunder.

AC prioritet: Den nätströmförsörjning prioritet.Batteriet strömförsörjning
kommer start omedelbart vid strömavbrott (omkopplingen är millisekunder
och påverkar inte de elektriska apparaterna i använda) och burk vara
begagnad som a UPS. När nätströmmen är återställs, kommer det att en
utomatiskt byta till elnätet och ladda batteri kl de samma tid.
Batteriprioritet: Batteriets strömförsörjning prioritet. När batteri makt är
låg , det vilja växla till de elnätet driva utbud , och de batteri vilja vara
laddas automatiskt. När batterispänningen återgår till en viss
värde (ställs in i batteriinställningarna ) och 30 minuter senare batteri
driva utbudet kommer vara automatiskt återställd.
skyddskortet är frånkopplat, växelriktaren kan vara laddas utan slå
på, reparera batteriet intelligent och utöka service liv.
Tip:Switch between AC mode and Battery mode requires an interval of
30 minutes
Energibesparande utgång: av/ på
I systeminställningsgränssnittet, tryck på eller till välja SPARARE, och
tryck sedan på knappen för att bekräfta.Välj den sparutgång (av/på)
du vill ha och tryck på knappen för att bekräfta .
Efter du ändra de SPARARE inställning , den system miljö gränssnitt vilja
visas korrekt de nuvarande arbete SPARARE miljö efter 5 sekunder .
På : den växelriktare vilja skriva in sova tillstånd ( avstängning de output )
efter 20 sekunder
när de växelriktare är arbetssätt i batteri läge och inga ladda i . de inga ladda
driva kommer att vara lägre än 3W, den startar automatiskt efter laddning
AV : växelriktaren fortsätter att starta och går inte in i viloläge ,
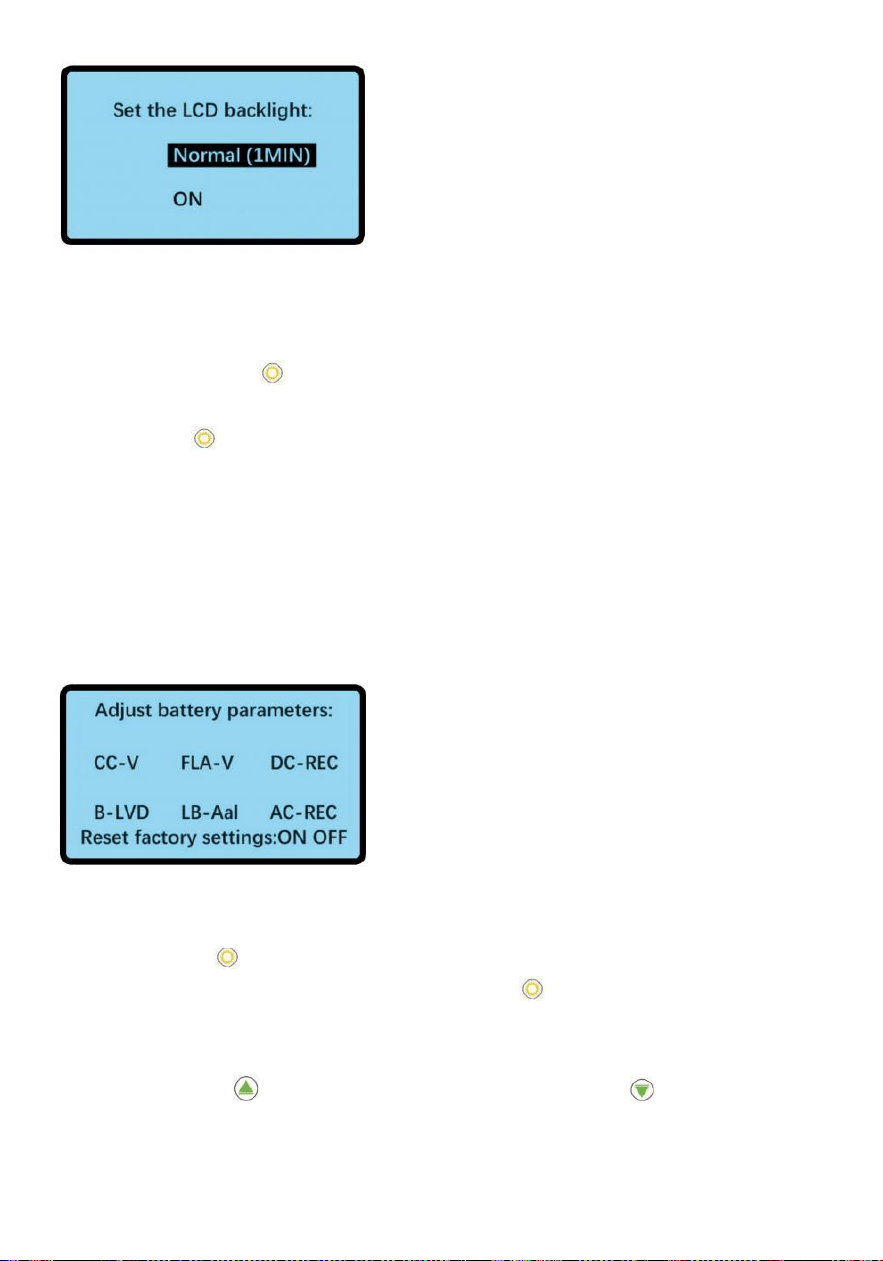
Bakgrundsbelysningsinställning: normal /på
I systeminställningsgränssnittet trycker du på
e
eller
o
för att välja
Bakgrundsbelysning,
och tryck sedan på knappen för att bekräfta. Välj bakgrundsbelysning
stat du vill ha
och tryck på knappen för att bekräfta. När du har ändrat inställningen
för bakgrundsbelysning ,
Systeminställningsgränssnittet kommer att visa den aktuella
arbetsinställningen för bakgrundsbelysning korrekt efter 5 sekunder .
På: den Bakgrundsbelysning kommer håller på
Normal: Den Bakgrundsbelysningen släcks när ingen operation inom 1
minut
28,4V
20,0V
Batteriinställning
I systeminställningsgränssnittet, tryck på
e
eller
o
för att välja Set och
sedan tryck på knappen för att bekräfta
I batteriinställningsgränssnittet trycker du på knappen för att välja de
batteri
parameter du vill justera. Efter att ha valt batteriparametern du
vill justera, tryck kan öka spänningsvärdet, och tryck kan
minska spänningens e-värde.(Spänningsvärdet ändras inte omedelbart,
det måste vänta i 5 sekunder) kommer den automatiskt att återgå till
växelriktare
informationsgränssnitt när ingen operation inom 30 sekunder.
26.0V
21.6V
27.6V
21.0V

CC -V: Konstant spänning
laddning FLA -V: Flyta laddning
DC-REC: I batteritillståndet prioritet, Nätströmförsörjning ,den batteri
strömförsörjning kommer vara automatiskt återställd 30 minuter
senare när

batterispänningen återgår till detta värde.
B- LVD : Låg spänning skydd ( avstängni
ng ) LB - Aal : Låg spänning larm ( pipa
nde )
AC - REC : In de ange av batteri prioritet ,
Automatiskt växla till elnätet prioritet när de batteri spänning Ner till detta
värde .
De bild på de vänster är de standard batteri spänning parameter av
de 24V3000 W växelriktare system .
Set AC charging current:
25A 50A
15A 35A
De användare burk välja de laddning redskap enligt till de driva efterfrågan (
dagligen laddning är rekommenderad till vara justeras till låg eller medium
redskap )
De figur på de vänster är de standard parametrar av 24V3000 W inverter .
Laddningen nuvarande värden av växelriktare av olik specifikationer är
annorlunda . Behaga hänvisa till de figur nedan .
LADDSTRÖM JÄMFÖRELSE
Läge
Låg
Mitt
Hög
Superhögt
12V 2 KW
10A
20A
30A
50A
24V 3 KW
15A
25A
35A
50A
24V 4 KW /5 KW /6
KW
15A
35A
55A
70A
48V 6 KW
15A
25A
35A
50A
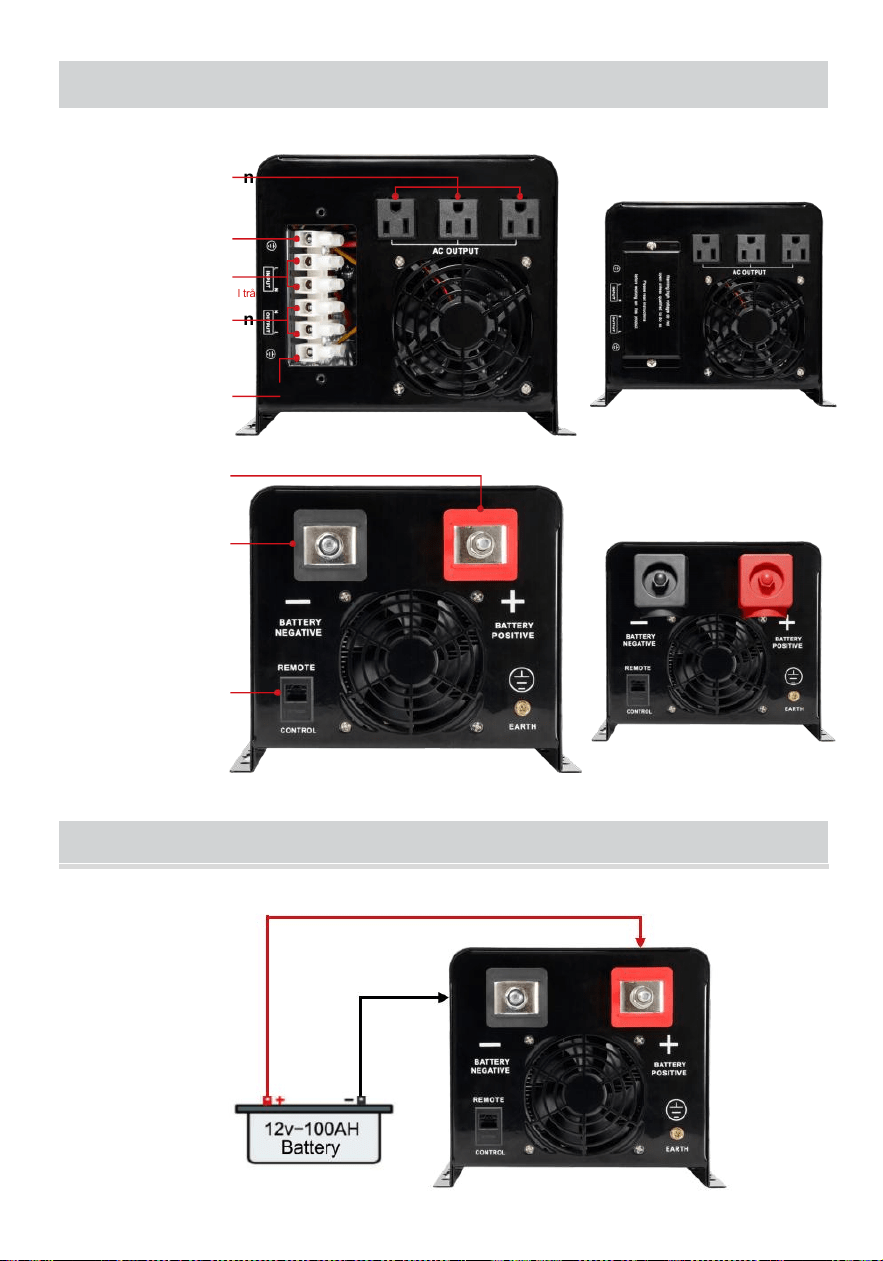
INPUT & OUTPUT ANSLUTNING
AC produktion
(endast för låg än 1200W apparat)
Jordtråd
AC input
(L till strömförande tråd N till neutral tråd)
AC produktion
(Det är väldigt stabilt,
jättebra för högeffekts elektriska
apparater)
Jordtråd
Anslut
batteri positiv
Anslut
batteri negativ
Fjärrkontrollgr
änssnitt
FÖRBINDELSE DIAGRAM
12V batteri Anslutningsschema
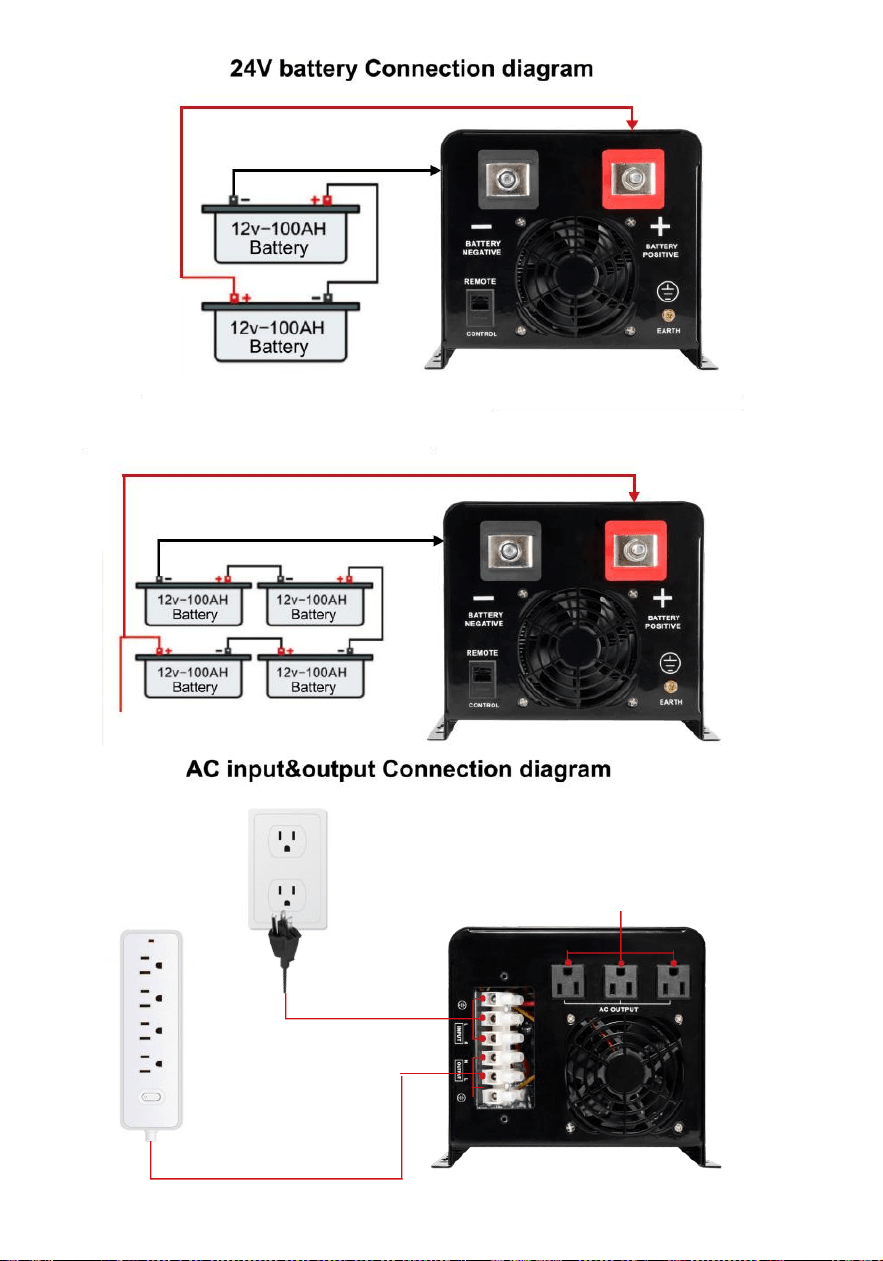
48v batterikopplingsschema
AC output
(only for low than 1200w appliance)
(please plug your high power applinace into this AC output)
Plug in the mains
to charge the battery
(Mains power is not necessary)
(L to live wire N to neutral wire)
●
AC output 120V

Obs :
Om det är ansluten till de generator , det behov till fungera enligt till
de följande steg
① Starta de generator , vänta för det till sikt stabilt , ansluta de produktion
driva av de generator till de input av de inverter ( in detta fall , göra säker de
växelriktare är no - load ), och sedan start de växelriktare enligt till de
uppstart
förfarande . Efter de växelriktare börjar , Och sedan ansluta till de ladda en
av en . ② Det är rekommenderad till välja de generator kapacitet med två
till tre
gånger de kapacitet av de inverter .
UNDERHÅLL&UNDERHÅLL
① Detta serie av växelriktare kräver mycket liten underhåll . De batteri av
de standard modell är ventilreglerad , lågt underhåll typ , och
endast behöver vara laddad ofta till uppnå de förväntas liv .
② Om de växelriktare är inte begagnad för a lång tid , det är
rekommenderad till avgift det varje två till tre månader -- gånger
③ Under normal omständigheterna , den service liv av de batteri är tre år .
Om de batteri är hittade till vara i dålig skick , det måste vara ersatt tidigt .
Vid byte de batteri , det måste vara utförde
av a professionella .
④ De batteri skall inte vara ersatt individuellt och de batteri
leverantörens instruktioner skall vara följde när ersättande de hel
batteri . Normalt sett batteri är laddad och urladdat varje två till tre
månader och laddad efter varelse urladdat till avstängning och de
laddningstid på
de standard maskin skall inte vara mindre än 12 timmar .
⑤ In hög temperatur områden , den batteri är laddad och urladdat --
gånger varje två månader och de standard maskin laddning måste inte
vara mindre än 12 timmar varje tid .
Obs :
① Den växelriktare måste vara vände av och osammanhängande från de
elnätet före ersättande de batteri
② Ta av metall föremål sådan som ringar och klockor .
③ Använd isolerade handtag och skruvmejslar och do inte plats
verktyg eller andra metall föremål på de batteri .
④ Det är normal för små gnistor till synas på de kontakt och vilja inte
orsaka skada till personlig säkerhet och de växelriktare när ansluta de
batteri kabel .
⑤ Aldrig kortslutning eller motsatt de batterier positiv och negativ
stolpar .
ENKEL UNDERHÅLL OCH REPARATIONSMETODER
Felfunktion
Resonera
Lösning
Fläkten fungerar inte
Temperaturen inuti
växelriktare gör inte över
45 ℃
Det är normal , den
fläkt är
temperaturkontroll
Terminalen är varm
Dålig kontakta eller lösa
Dra åt igen
Avstängning med
belastning
Batteri gör det inte ha
tillräckligt med kraft eller
över ladda
Ladda ditt batteri eller
minska ladda
Kan inte
sväng på
växelriktaren
Batteriet kabel är inte
korrekt ansluten
Kontrollera om de
batteri
kabeln är ansluten och
koppla in den igen
Strömlarm
Batteri gör det inte ha
tillräckligt med kraft eller
över ladda
Ladda ditt batteri eller
minska ladda

APPENDIX
Modell
BL-W2012V-L
BL-W3024V-L
BL-W4024V-L
Betygsatt driva
2000W
3000W
4000W
Topp driva
6000W
9000W
12000W
Input
Spänning
90V-130VAC
Frekvens
45-65Hz
Produktion
Spänning
120VAC±10%(Batteri Prioritetsläge)
Frekvens
60Hz±1%( Batteriprioritet läge)
Utgångsvågform
Ren sinusvåg
Effektivitet
>76 %
>80 %
Batteri typ
Bly-syra batterier Litium järn batteri
Ternary(18650)batteri och anpassad
anpassningsbar
Batterispänning
12VDC
24VDC
Maximal nuvarande av huvud s
laddning
50A(12VDC)/70A(24VDC)/50A (48VDC)
Skydd
överbelastning ,kortslutning, övertemperatur,
batteri hög/låg spänning, Nät hög/låg
spänning
Konverteringsmetod
Interaktiv 5 ms (typiskt al)
Överbelastning
Skydd för 15 sekunder efter överskridandet 100 %
Kommunikationsmetod
RS-232 (valfritt)
Arbetssätt
miljö
Temperatur
-30-40 ℃
Fuktighet
10%-90%

Modell
BL-W5024V-L
BL-W6024V-L
BL-W6048V-L
Betygsatt driva
5000W
6000W
6000W
Topp driva
15000W
18000W
18000W
Input
Spänning
90V-130VAC
Frekvens
45-65Hz
Produktion
Spänning
120VAC±10%(Batteri Prioritetsläge)
Frekvens
60Hz±1%( Batteriprioritet läge)
Utgångsvågform
Ren sinusvåg
Effektivitet
>80 %
Batteri typ
Bly-syra batterier Litium järn batteri
Ternary(18650) batteri och
anpassningsbar
Batterispänning
24VDC
48VDC
Maximal nuvarande av huvud s
laddning
50A(12VDC)/70A(24VDC)/50A(48VDC)
Skydd
överbelastning ,kortslutning, övertemperatur,
batteri hög/låg spänning, Nät hög/låg
spänning
Konverteringsmetod
Interaktiv 5 ms (typiskt al)
Överbelastning
Skydd för 15 sekunder efter överskridandet 100 %
Kommunikationsmetod
RS-232 (valfritt)
Arbetssätt
miljö
Temperatur
-30-40 ℃
Fuktighet
10%-90%
Om ovanstående parametrarna ändras i framtiden kan du fråga säljaren
det senaste parametrar
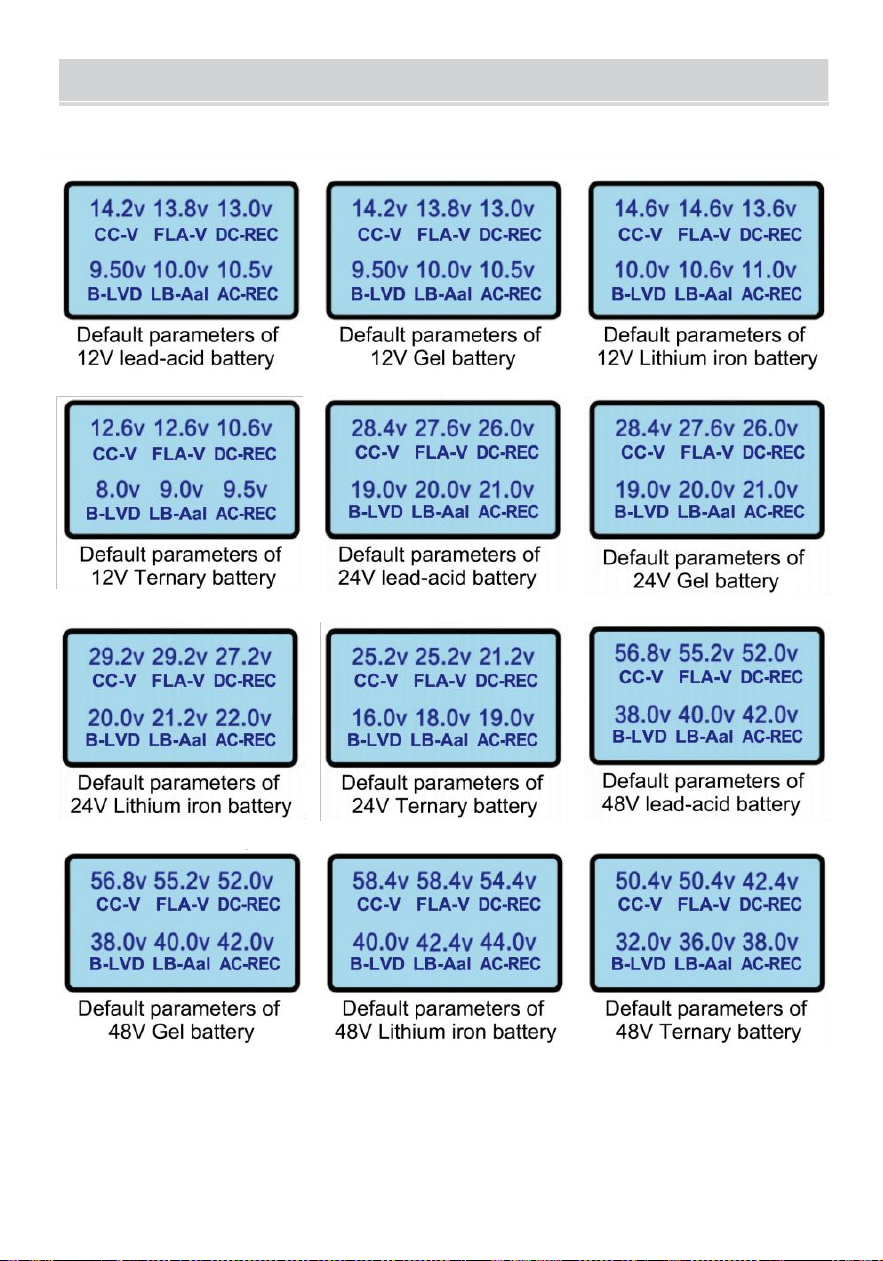
DEFAULT BATTERY PARAMETERS

CUSTOM VOLTAGE ADJUSTMENT RANGE
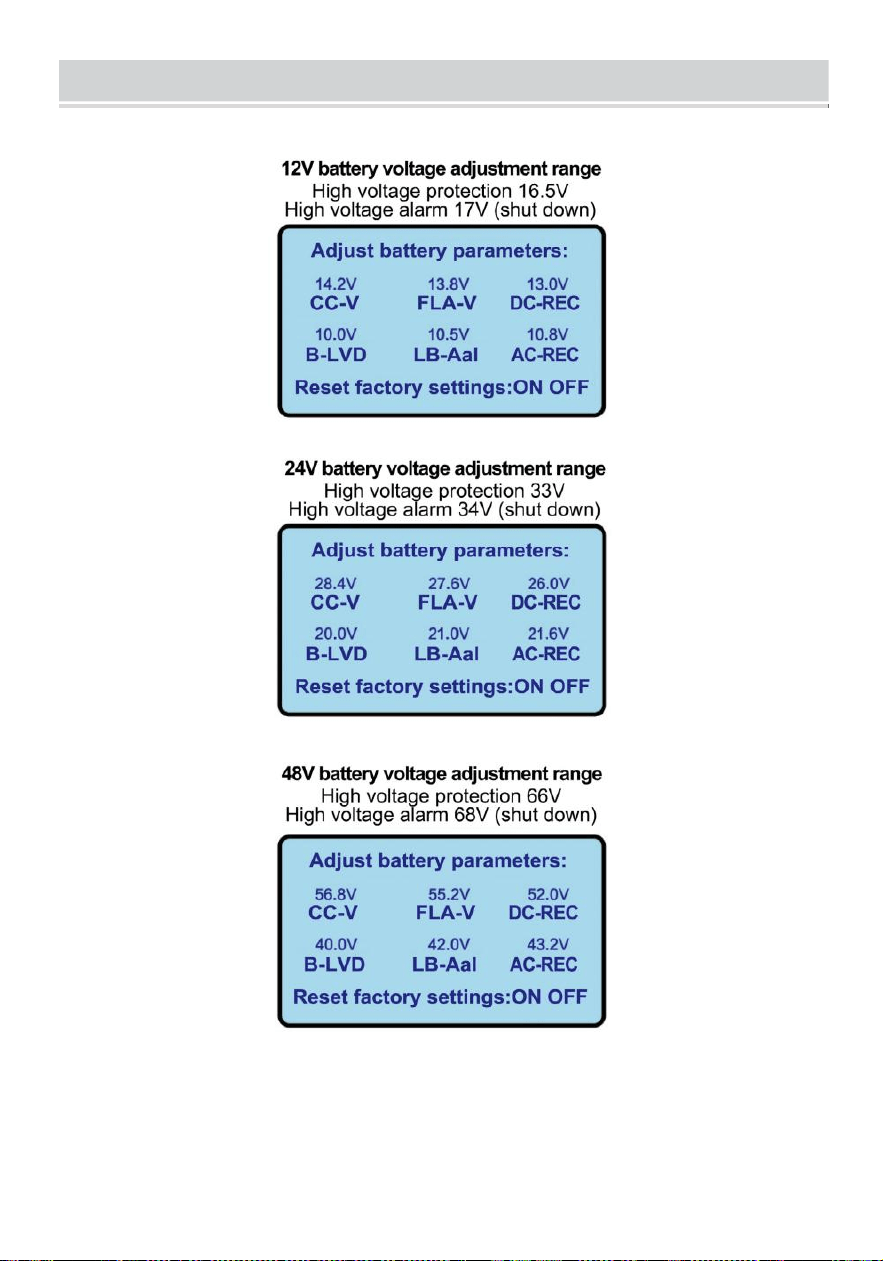
CUSTOM VOLTAGE ADJUSTMENT RANGE
Produktspecifikationerna eller relaterad information nämns i detta
bruksanvisningen kan ändras utan varsel.

Teknisk support och E-garanticertifikat
www.vevor.com/support
Snabbt Start Guide
Batterianslutning
VARNING! Alla ledningar måste utföras av kvalificerad personal.
VARNING! Det är mycket viktigt för systemets säkerhet och effektiv drift
använd lämplig kabel för batterianslutning. Att minska risk av skada ,
behaga använd rätt rekommenderade kabel.
Modell
Max Amperage
Tråd Storlek
Momentvärde
12V 2000W
166A
4 AWG
20~30 Nm
24V 3000W
125A
4 AWG
20~30 Nm
24V 4000W
166A
4 AWG
20~30 Nm
24V 5000W
208A
6 AWG X 2
20~30 Nm
24V 6000W
250
4 AWG X 2
20~30 Nm
48V 6000W
125A
4 AWG
20~30 Nm
AC Ingång / utgång Förbindelse
VARNING! Alla ledningar måste utföras med av a kvalificerad personal.
VARNING! Det är mycket viktigt för systemsäkerheten och effektiv t drift till
använda
lämplig kabel för AC-ingångsanslutning. Att minska risk för skada, behaga
använda de korrekt rekommenderad kabelstorlek som nedan.
Föreslagna kabelkrav för AC-ledningar
Modell
Tråd Storlek
Momentvärde
12V 2000W
10 AWG
1,4~ 1,6 Nm
24V 3000W
10 AWG
1,4~ 1,6 Nm
24V 4000W
10 AWG
1,4~ 1,6 Nm
24V 5000W
8 AWG
1,4~ 1,6 Nm
24V 6000W
8 AWG
1,4~ 1,6 Nm
48V 6000W
8 AWG
1,4~ 1,6 Nm

Introduktion till de drift panel
Om det är nödvändigt att använda driften panel bort från t han inverter,
hänvisa till följande:
1. Ta bort de 4 pluggarna från kontrolldisplayen, varelse försiktig inte att
släppa det inuti maskin.
2. Använd en liten pluggfräs för att bända displayen öppna och ta det o ut.
3. Koppla ur nätverkskabel ansluten till skärmen.
4. Använd a 10-meters kabel för att ansluta till växelriktare po rt.
Observera: att denna kabel inte kan vara ansluten till Internet hamn och
kan inte kommunicera med det.