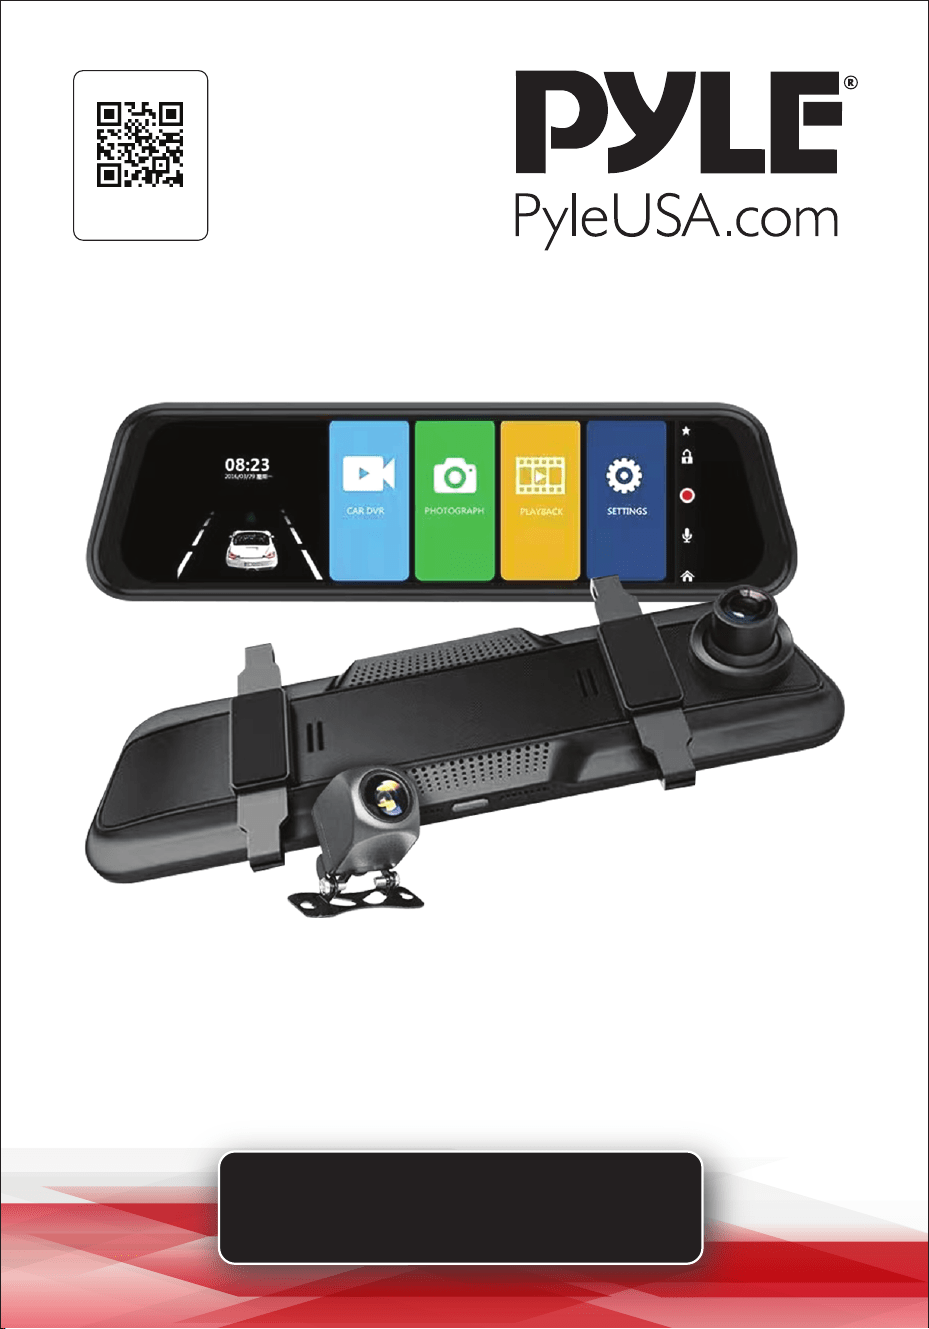
USER GUIDE
1080p Full HD DVR Rearview Mirror
Dual Dash Cam Kit
PLCDVR1000
Visit Our Website
SCAN ME
PyleUSA.com

www.PyleUSA.com
2
READ ALL INSTRUCTIONS CAREFULLY BEFORE USING THIS PRODUCT.
RETAIN THIS OWNER’S MANUAL FOR FUTURE REFERENCE.
FEATURES:
• Full HD 1080p Resolution
• 9.66" -inch Full HD Touch Screen Rearview Mirror
• 9.66" -inches Full HD LED Mirror Monitor
• Dual Dash Cameras (Front & Rear)
• Infrared Night Vision
• Wide Angle Lens
• Motion Detection
• Loop Recording
• Built-in G-Sensor
• Auto Power On/O with AV Signal Detect
• Touchscreen Control
• Wide Temperature Range
• Rearview Mirror Integration
• Auto Switch when Reversing
• AV Input
• HD Video Recording
• Compact and Easy to Install
• PAL/NTSC Compatible
• Front and Rear View 2CH Recording
WHAT’S IN THE BOX
• DVR Mirror Assembly
• Backup Camera
• Car Power Cable
• USB Transfer Cable
• Cig Adapter
California Prop 65 Warning
WARNING:
This product may expose you to chemicals, which is known to
the state of California to cause cancer, birth defects and other
reproductive harm. Do not ingest.
For more info go to: www.P65warnings.ca.gov

www.PyleUSA.com
3
TECHNICAL SPECS:
• DVR Cam Resolution: 1080p / 720p
• View Angle: 120° (Front Camera), 90° (Back Camera)
• Video Resolution: (Front) 1080P:1920x1080+ (Back) 640 x 480 30fps
• Picture Resolution: 12 / 8 / 3 / 2 / 1 MP
• Video Filetype Saved: AVI
• Image Filetype Saved: JPEG
• Loop Recording: 1 / 2 / 3 Minutes
• Date & Time Stamp: ON / OFF
• Micro SD Card Support: Up to 128 GB, Not Included
• Rechargeable Battery: 3.7V Li-iOn, 400 mAh
• Number of Battery: 1
• Battery Construction Material: Lithium Polymer Battery
• Battery Wattage:1.5W
• Battery Weight: 185 g
• Item Weight: 1.54 lbs.
• Dimensions (L x W x H): 12.0'' x 1.6'' x 3.3'' -inches
NOTES
Before starting operation, please read this product manual carefully to understand
the usage of the product and the relevant safety tips and warnings.
After reading, place it in an easily accessible location for reference.
1. Please do not unplug or insert the Micro SD Memory Card while the device is
operating to avoid damage.
2. Ensure the Micro SD Memory Card is inserted in the correct direction.
Inserting it incorrectly may damage both the device and the card.
3. Once the Micro SD Memory Card is inserted, the device will set it as the default
storage location, and existing data on the card may not be accessible.
4. If the Micro SD Memory Card is not compatible with the device, try reinserting
it or replacing it with another card for testing.
5. This device supports a maximum storage capacity of 128GB.
6. When using this device, maintain an operating temperature range of -4°F to
140°F (-20°C to 60°C).
www.PyleUSA.com
4
PRODUCT INTRODUCTION
The dash cam is a device designed to record important information such as
images and sounds during vehicle travel. By installing a camera in your vehicle,
you can capture images of your surroundings and enable real-time recording for
storage. This product records video, images, and sounds throughout your drive,
providing evidence in case of trac accidents, preventing fraudulent claims, and
documenting your driving experiences.
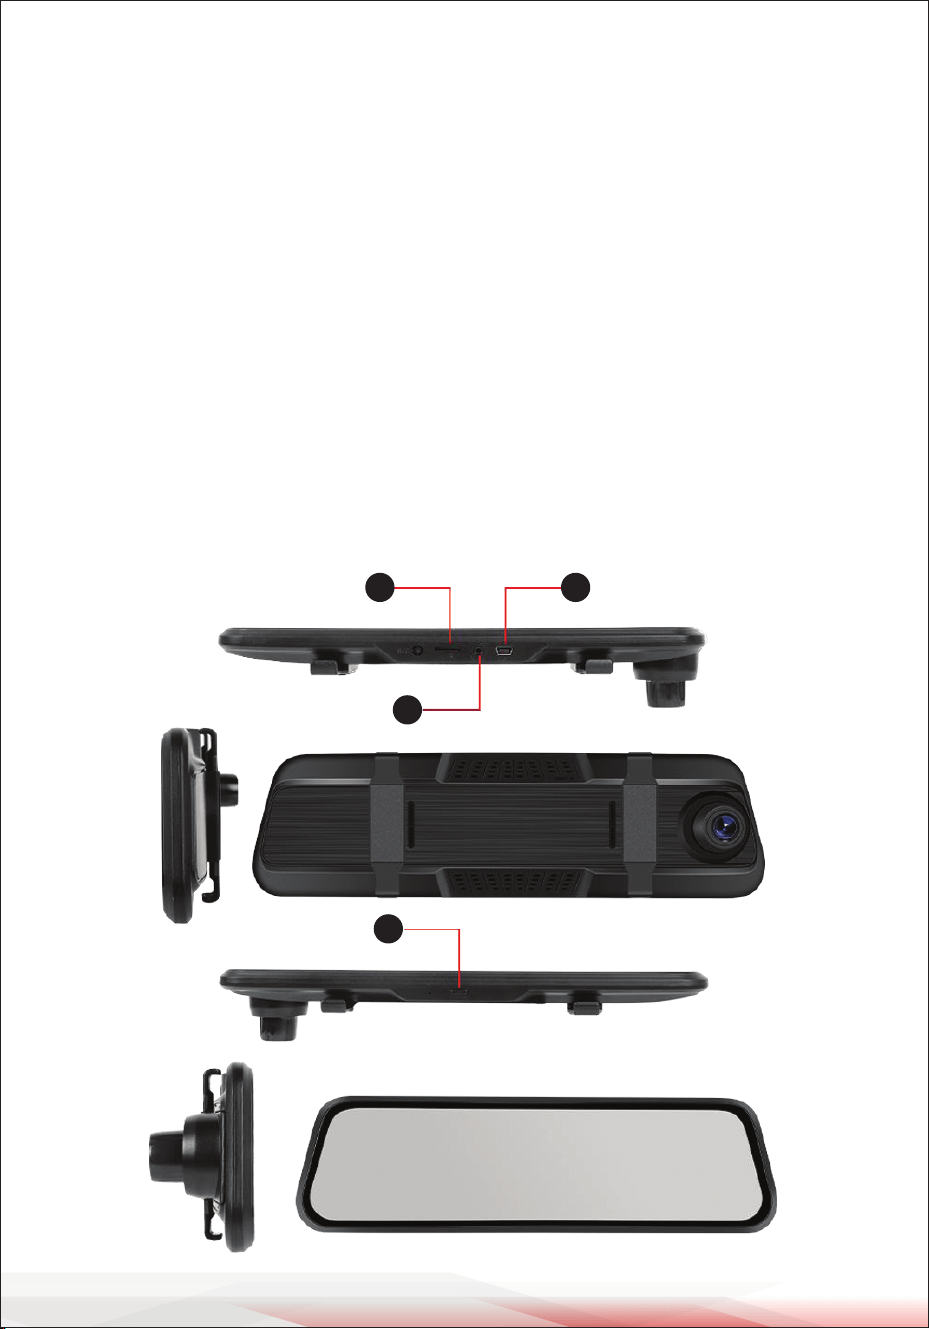
A. Product Display
1. Switch/Power Key
2. AV-IN Pull-Back Interface
3. Micro SD Memory Card Slot
4. USB Interface (for power connection)
3 4
2
1
www.PyleUSA.com
5
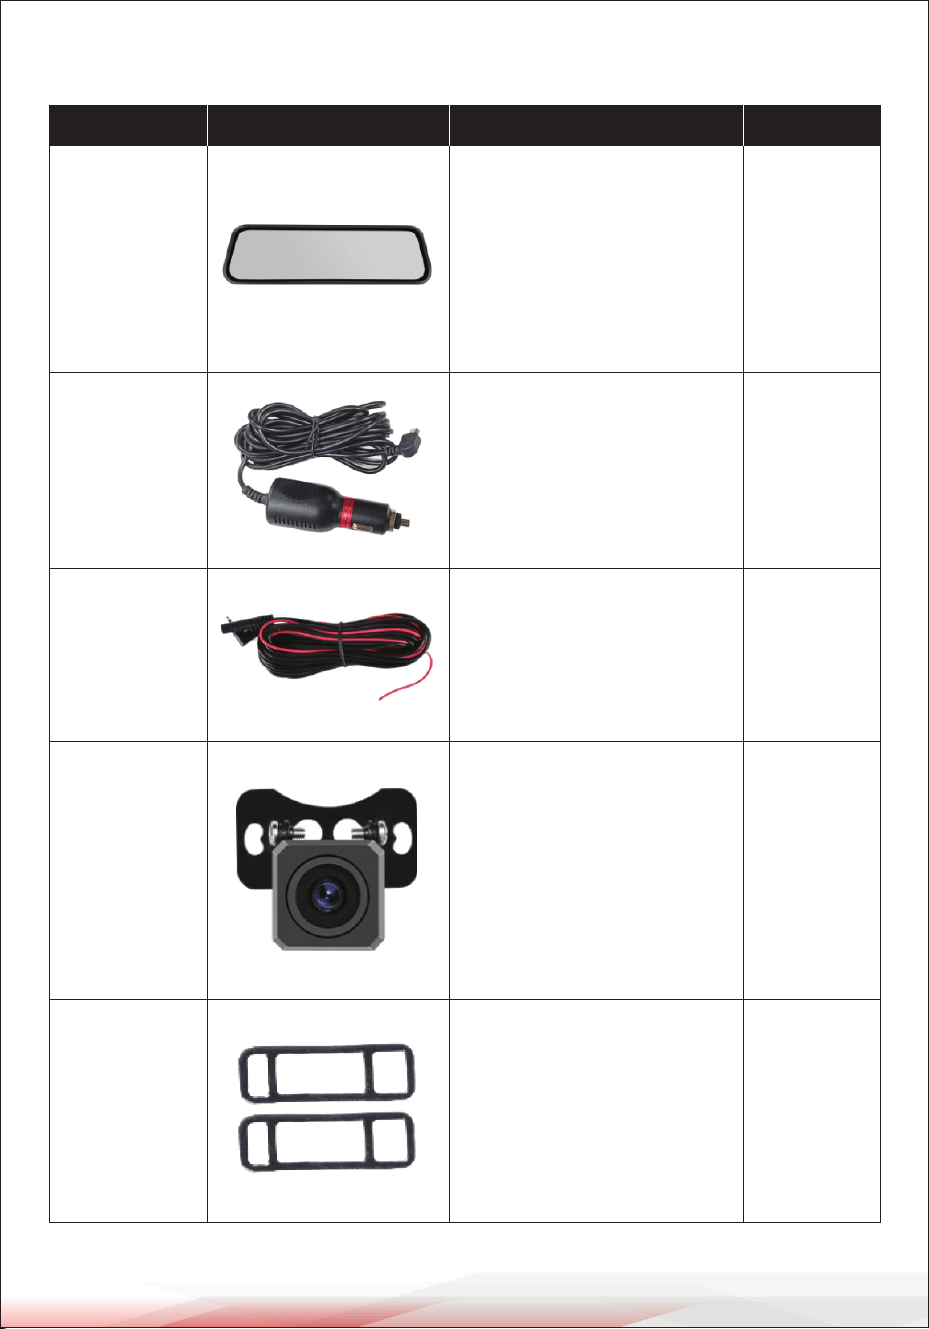
B. Production Composition
Name Image Instruction Quantity
Host
Touchscreen with 1080P or
higher resolution for video
recording, photography,
playback, motion detection,
and collision sensing.
1
11.5 ft (3.5 m)
Power Cord
5V/DC 2A current; cigarette
lighter for power supply
1
18 ft (5.5 m)
Extension
Line
Connects the rearview
camera
1
Rearview
Camera
Captures surveillance video
and footage of the rear of
the vehicle
1
Bandages
Used to mount and secure
the recorder host
1

www.PyleUSA.com
6
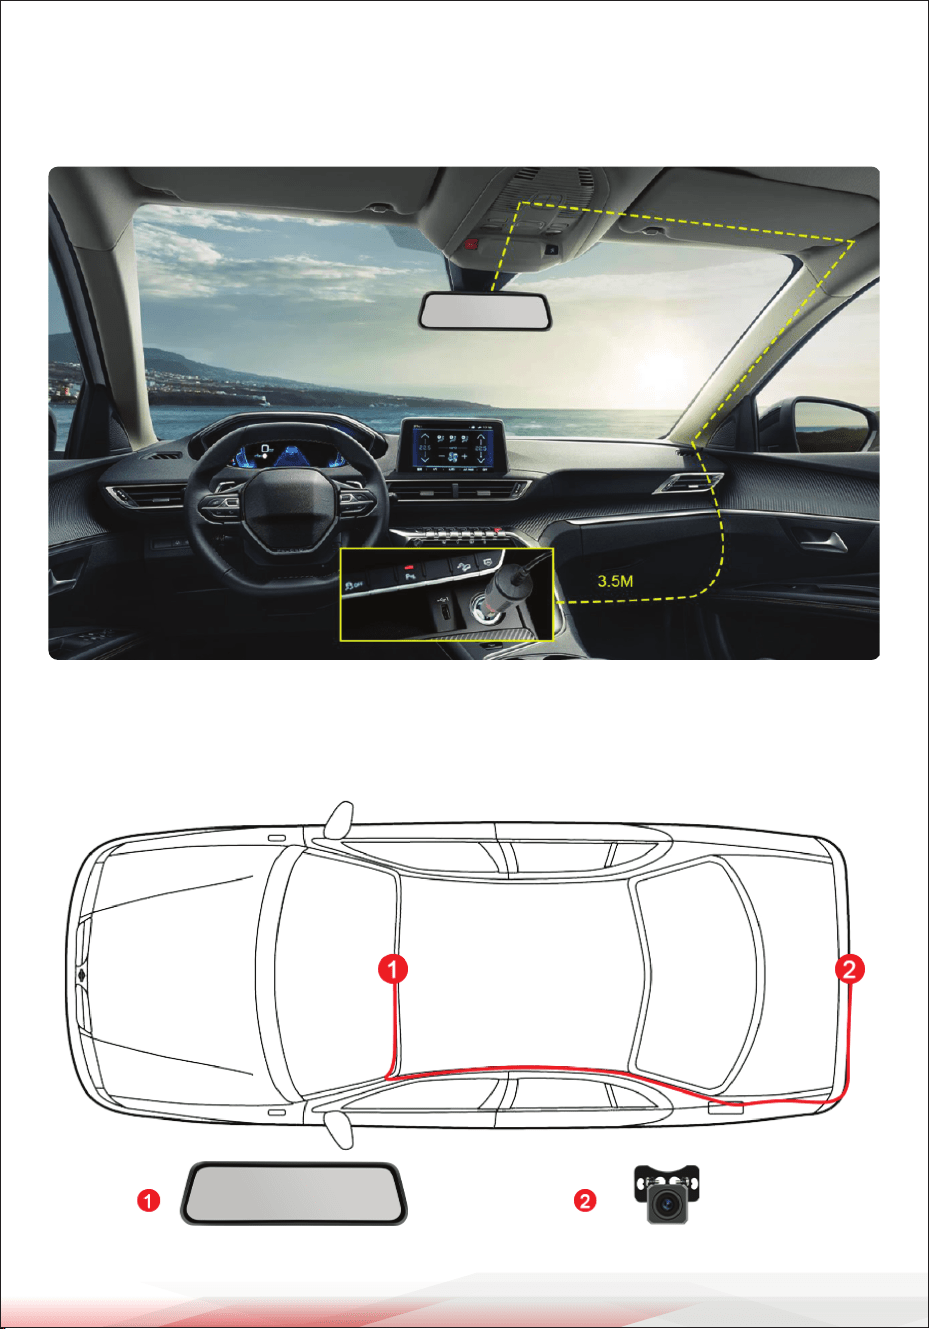
C. Arrangement of Wires

www.PyleUSA.com
7
D. Buttons and Interfaces
Power Button:
• Press and hold for three seconds to manually turn the device on or o.
• Short press to turn the display screen backlight on or o (this does not aect
recording functionality).
Reset Key:
• Use a small pin to press the internal reset button through the reset hole.
• If the device crashes, pressing the reset button will power it o and shut it down.
USB Power Interface:
Connects to a DV 5V power supply or an ACC step-down line.
Rear Camera Interface: Connects to the rear camera.
E. Icon Overview
Icon Application
Tap to switch the screen to the main display.
Tap to adjust the volume level.
Tap to take a photo.
Tap to start or stop recording.
Tap to navigate to the next le or photo.
Tap to navigate to the previous le or photo.
Tap to enter the playback settings menu.
Tap to lock les during recording to prevent overwriting.

www.PyleUSA.com
8
INSTALLATION GUIDE
1. Turn o the car engine.
2. Insert the Micro SD Memory Card into the card slot of the dash cam.
(Note: Please use a high-speed Micro SD Memory Card (Class 10 or above) with
a minimum capacity of 8GB. The device supports up to 128GB.)
3. Secure the dash cam to the car’s original rearview mirror.
4. Plug the car charger into the car's cigarette lighter socket.
www.PyleUSA.com
9
5. Use the charging extension cable to connect the USB interface of the dash cam
to the car charger. Note: While routing the cable, you can lay it along the edge
of the car windshield.)
6. Install the rear camera at the back of the vehicle. Ensure it is oriented correctly
during installation. Route the cable along the roof of the car, then connect the
rear camera plug to the recorder’s AV-IN port.
www.PyleUSA.com
10
7. Adjust the dash cam lens to ensure it is level with the ground.
8. Start the car engine and check if the device is installed correctly.
When properly installed:
• The system operation indicator light will turn on.
• The device will start and enter recording mode, with the recording indicator
light ashing.
• Check if the display screen is functioning normally. If the image is inverted,
please contact customer support promptly.
Note: After installation, format the Micro SD Memory Card using the formatting
option in the device menu before rst use.
SYSTEM SETTINGS
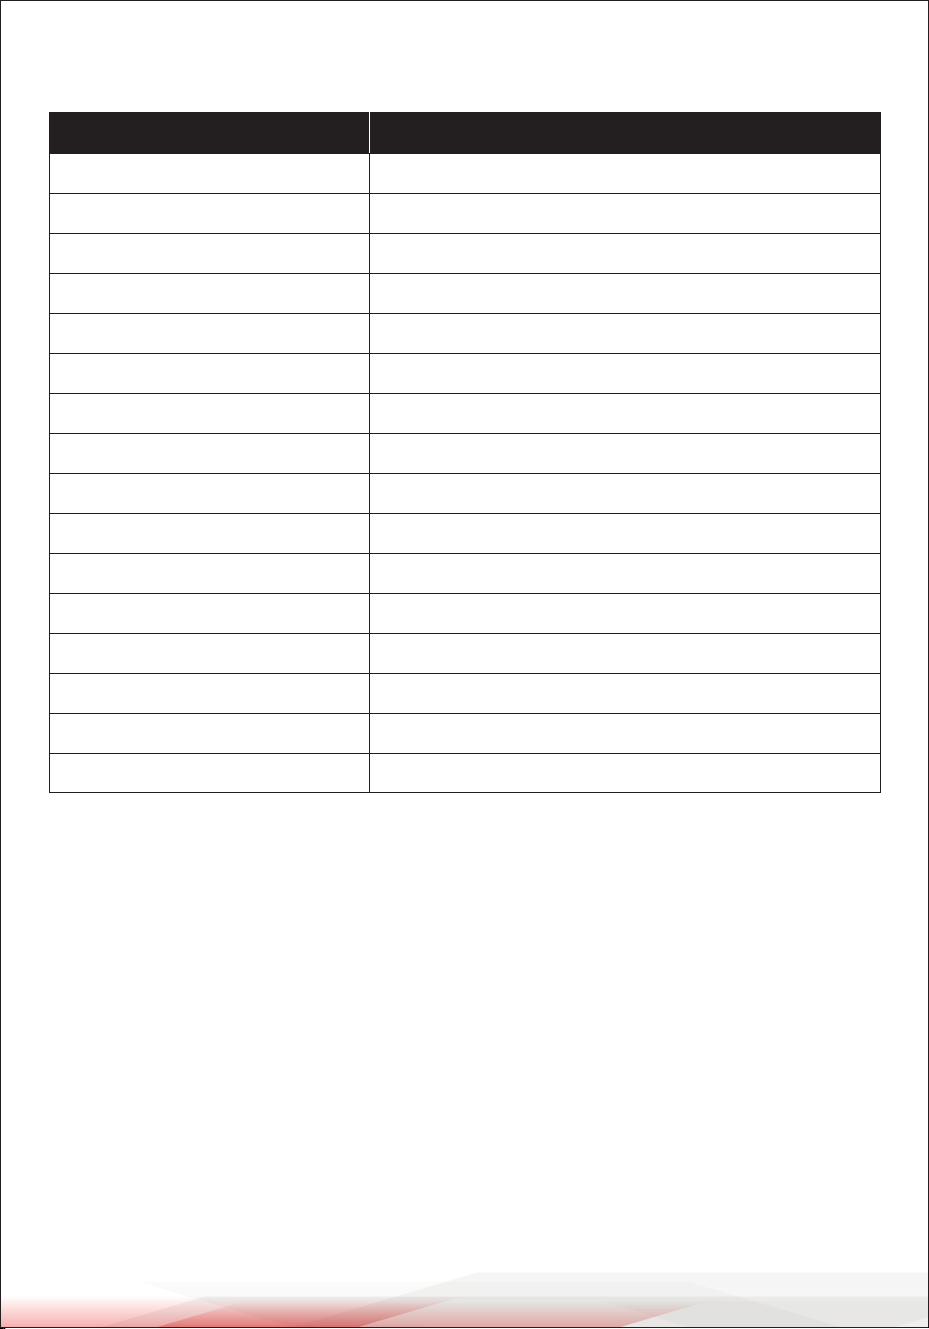
A. Introduction to the Main Menu Page
The main menu page of the dash cam includes the following modes:
• Recording Mode
• Photography Mode
1. Tap the 1 recording button to enter Recording Mode.
2. Tap the 2 photography button to enter Photography Mode.
3. Tap the 3 playback button to enter Playback Mode, where you can view and
play back recorded videos and photos.
4. Tap the 4 settings button to enter Function Setting Mode, where you can adjust
and congure parameters for various functions.
• Playback Mode
• Function Setting Mode
www.PyleUSA.com
11
Function Options
0, 1, 2, 3, 4, 5, 6, 7, 8
1. Volume
1440P, 1296P, 1080P
2. Recording Resolution
12M, 10M, 8M, 5M, 3M, 2M3. Photo Quality
O, 1 minute, 2 minutes, 3 minutes
4. Loop Recording
+2, +5/3, +4/3, +1.0, +2/3, +1/3, +0.0, -1/3, -2/3, -1.0, -4/3, -5/3, -2.05. Exposure Compensation
Close, Open
6. High Denition Night Vision
Close, Open
7. Motion Detection
Close, Open
8. Recording
Cancel, High, Medium, Low
9. Driving Collision Sensitivity
Close, Open
10. Parking Detection
O, 1 minute, 2 minutes, 3 minutes
11. Automatic Screen Shutdown
12 languages, including English, Chinese, French, German, Italian, Spanish, etc.
12. Language
Year, month, day, hour, minute, second (RTC system time setting)
13. Date/Time Settings
Cancel, Conrm
14. Format
Cancel, Conrm
15. Restore Factory Settings
L142_GC2083-7707-20230519
16. Firmware Information
B. System Options Settings
Recommended Settings
We recommend the following conguration for optimal performance:
1. Recording Resolution: Select 1440P for the highest quality.
2. Photo Quality: Choose 8M.
3. Loop Recording: Set to 3 minutes.
4. High Denition Night Vision: Set to on.
5. Recording: Set to on.
6. Driving Collision Sensitivity: Select Low.
7. When driving, turn o the "Motion Detection" and "Parking Detection" functions.
www.PyleUSA.com
12
FUNCTION INTRODUCTION
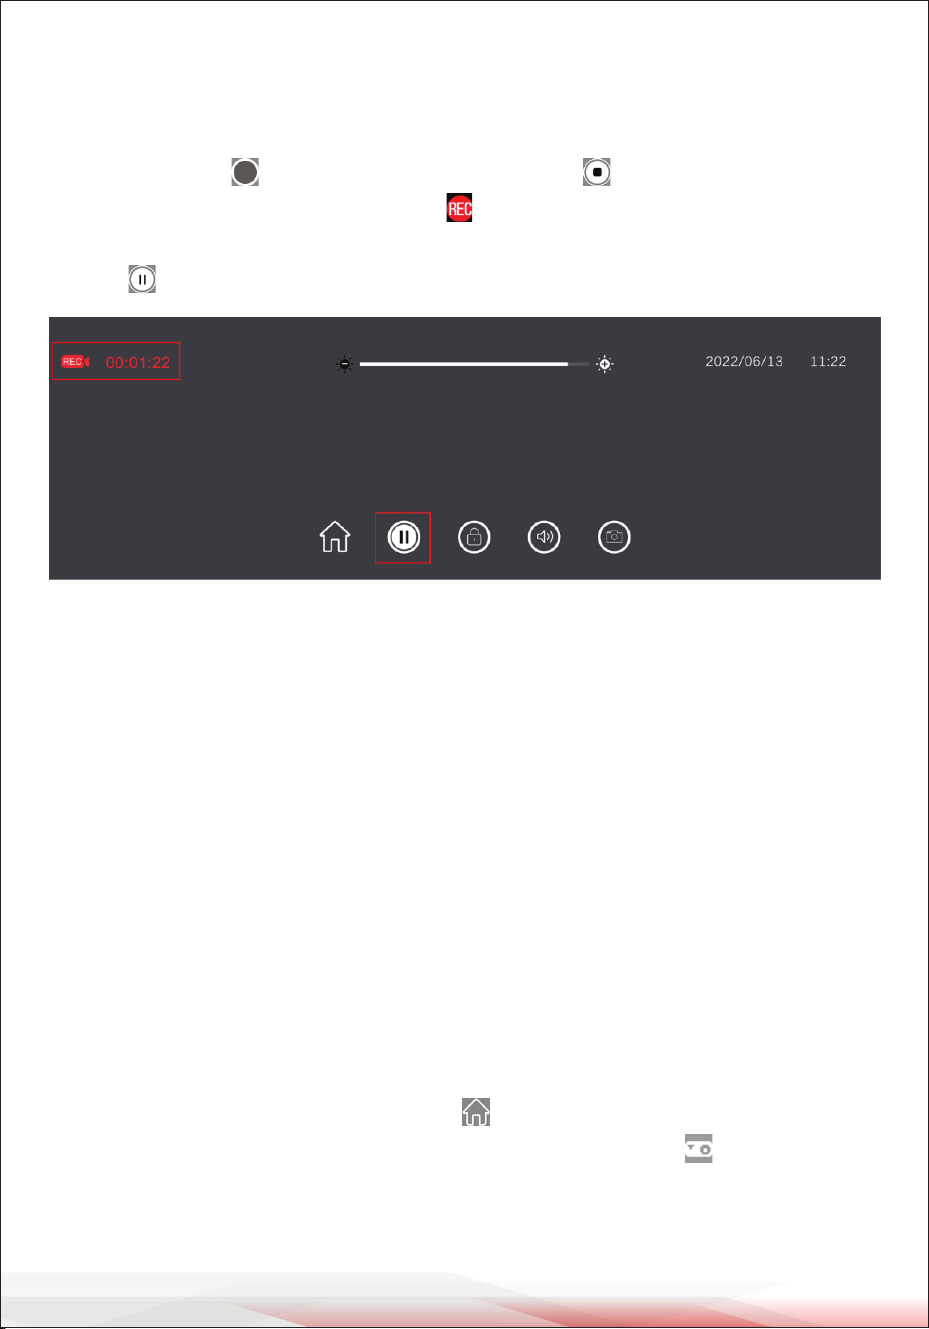
A. Driving Video Recording
From the main menu page, tap to switch to the Driving Video Recording page.
Once you tap the button, the recording function will start, capturing the
dynamics during your drive. A ashing indicator will appear in the upper left
corner of the screen, signifying that recording is in progress. To stop the recording,
tap the button.
While recording, you can also access other functions:
1. If you wish to capture a specic scene, person, vehicle, or other moment during
recording, tap the capture button to save it.
2. Tap the lock button to lock the screen and prevent accidental touch operations
during recording.
3. Tap the volume button to adjust the recorder’s volume.
4. Tap the home button to return to the main menu and enter other function modes.
Note: The recorded video and photo les from both the front and rear cameras are
saved in the "DCIMA folder" and "DCIMB folder" under the "DCIM" directory on the
Micro SD Memory Card.
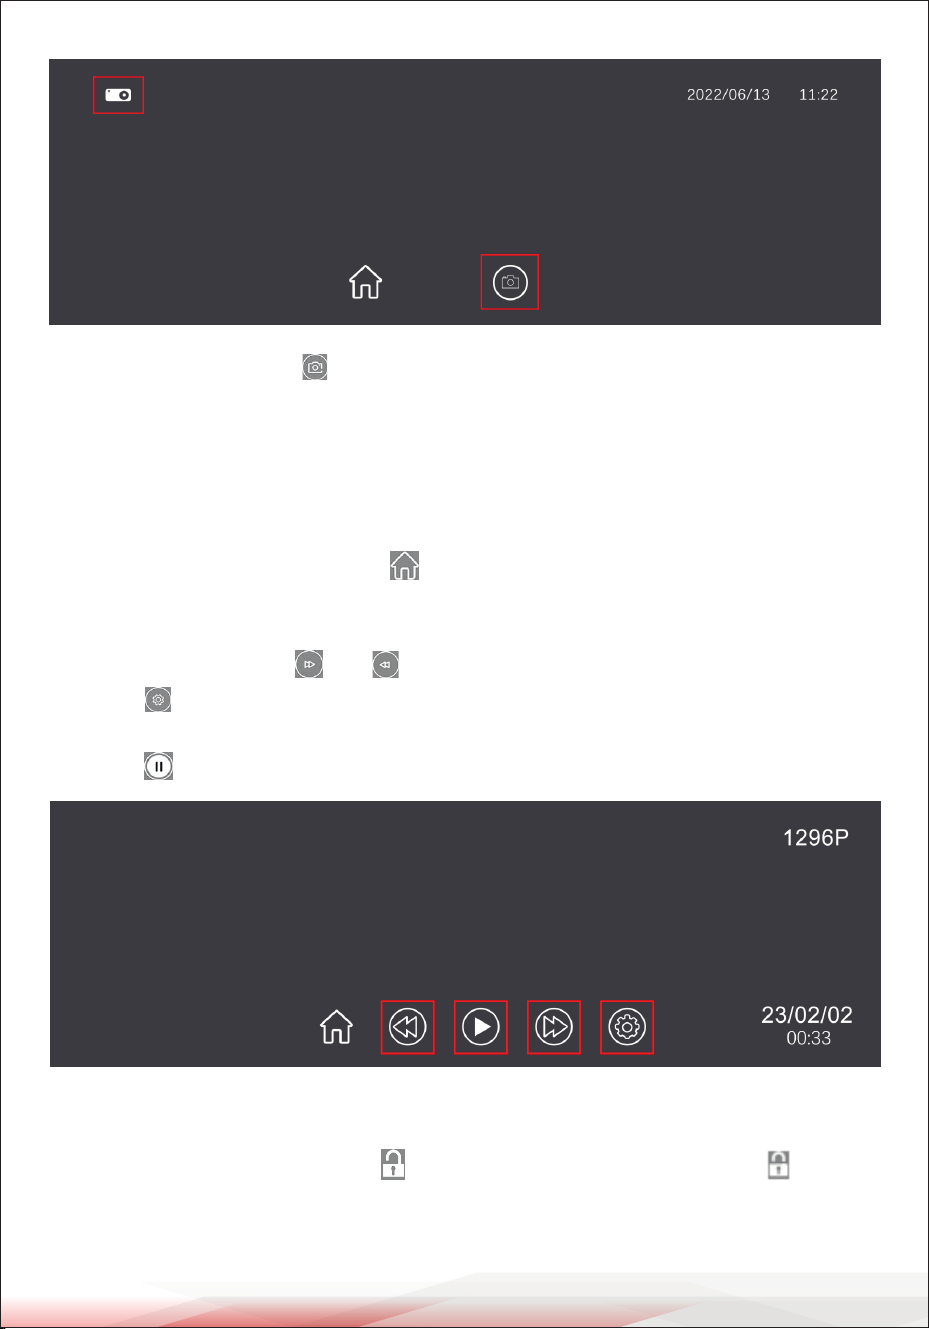
B. Take Photos
When the dash cam is turned on, it will automatically enter Recording Mode.
To switch to Photography Mode, tap the button to go back to the main menu
and then tap the photo button to enter photography mode. A icon will appear
in the upper left corner of the screen, indicating that the photo function is active.
www.PyleUSA.com
13
Note: When you tap the button, a photo preview will appear, and after
approximately 1 second, the photo will be taken. While taking photos, hold the
camera steady to avoid shaking, as movement may aect the image quality.
C. File Playback
When the dash cam is turned on, it will automatically enter Recording Mode. To
switch to Playback Mode, tap the button to go back to the main menu and
select the playback button.
• To browse through the recorded les and photos saved on the Micro SD
Memory Card, tap the and buttons to scroll through the les.
• Tap the button to enter the playback menu, where you can perform actions
such as delete, lock, or unlock recorded videos and photos.
• Tap the button to play or pause the les.
D. One-Click Lock
The One-Click Lock function is available on the Recording Mode page. During
recording, tapping the lock icon will lock the current video, and the icon will
change to indicate that the video has been locked.
Note: Locked les will not be overwritten by future recordings.

www.PyleUSA.com
14
E. Screen Switching
During recording, you can swipe left or right on the screen to switch between the
front and rear camera views or adjust the picture-in-picture settings.
Note:
• When the dash cam is turned on, it automatically enters Recording Mode.
• After completing the wiring setup, the recording screens of both the front and
rear cameras will appear.
• You can easily switch between the front and rear camera views by tapping the
respective screen icons.
F. Time/Date Setting
1. Tap the settings icon on the main menu page to enter the Function Settings Mode.
2. Navigate to General Settings and then select Time/Date Settings.
3. Adjust the time and date as needed.
Note:
Setting the correct time and date is essential for accurately recording evidence in
the event of driving-related incidents.
G. Motion Detection
1. Tap the settings icon on the main menu page to enter the Function Settings Mode.
2. Locate the Motion Detection option and toggle it on or o as needed.
3. To return to the main menu, tap the return icon in the upper left corner of the
screen.
When motion detection is enabled:
• A motion detection indicator will display in the upper left corner of the screen.
• The dash cam will automatically start recording if it detects movement near the
vehicle.
• If no movement is detected, the dash cam will stop recording.
Reminder:
To use the motion detection function for an extended period, ensure the dash cam
remains continuously powered.

www.PyleUSA.com
15
H. Collision Detection
The dash cam is equipped with a built-in collision sensor (G-sensor).
1. Tap the settings icon on the main menu page to enter Function Settings Mode.
2. Scroll down to locate Driving Collision Sensitivity and adjust the settings as
needed.
3. When the G-sensor is enabled, the dash cam automatically locks and saves the
current video if it detects vibrations, such as a collision.
Reminder:
The G-sensor sensitivity can be adjusted to High, Medium, or Low based on your
requirements.
I. Parking Monitoring
1. Tap the settings icon on the main menu page to enter Function Settings Mode.
2. Enable Parking Monitoring in the settings. A "P" icon will appear in the upper-
left corner of the recording interface.
When enabled, if the dash cam detects slight vibrations while the car is o, it will
automatically start recording and lock the video.
• The locked video will not be overwritten.
• The recording will stop automatically after 30 seconds, and the dash cam will
power o.
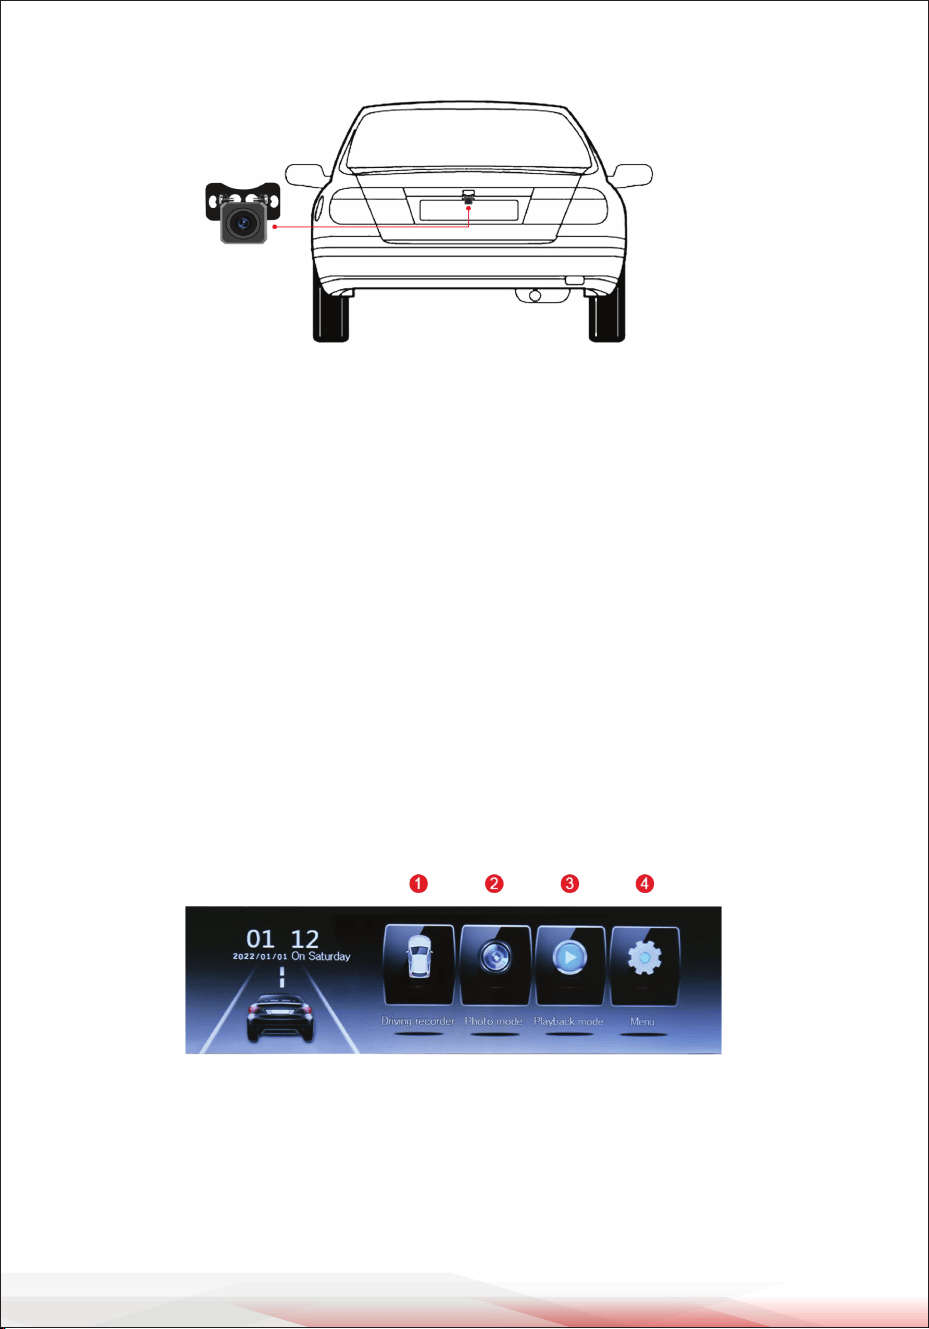
J. Rearview Camera
1. Connect the car charger to the dash cam.
2. Plug the rearview camera cable into the AV-IN jack on the dash cam.
3. Connect the black and red wires of the rear camera to the vehicle's reversing
light.
Once the setup is complete:
• The dash cam will automatically start recording.
• While reversing, the screen will display the rearview image.
• After reversing, it will return to the normal recording mode.
www.PyleUSA.com
16
PRODUCT PARAMETERS
Note: Product design and specications are subject to change without prior notice.
COMMON TROUBLESHOOTING GUIDE
Class Parameter
2 million
Lens eective element
2.5
Aperture
150 degreesCamera Perspective
HD 1080P
Shooting Resolution
MJEPG
Storage Compression
AVI
Video Format
4030 x 3024
Camera Resolution
JPG
Photo Format
30 FPS
Frame Rate
-10°F ~ 158°F (-10°C ~ 70°C)
Storage Temperature
23°F ~ 140°F (-5°C ~ 60°C)
Operating Temperature
15–65% RH
Operating Humidity
Supports Micro SD memory cards (8GB–128GB)
Storage Card Capacity
DC 5V
Working Voltage
2.0A
Working Current
Mini USB DC5V-2.0A
Power Interface
Issue Cause
Card not inserted
No memory card detected,
unable to record
Insert the Micro SD card
Solution
No les
SD card not inserted
Insert the Micro SD card to
record or take photos
Card not inserted
Sensor initialization exception,
unable to record
Insert the Micro SD card
Card error
Incorrect card format
Format the Micro SD card
in the dash cam's menu
SD card is full
Insucient space when
taking photos
Delete or unlock les
to free up space

www.PyleUSA.com
17
Register Product
Thank you for choosing PyleUSA. By registering your product, you
ensure that you receive the full benets of our exclusive warranty
and personalized customer support.
Complete the form to access expert support and to keep your
PyleUSA purchase in perfect condition.
Start Here
PyleUSA.com/pages/register
Model Number:
PLCDVR1000
AFTER-SALES Q&A
1. Why does the dash cam display "Please insert the Micro SD card"?
• Ensure you are using a Class 10 or above Micro SD with 8GB–128GB capacity.
• Format the Micro SD card on the dash cam before rst use.
2. Why are all keys unresponsive when I press the menu button?
• Stop video recording by pressing the power button before accessing the menu.
3. Why does the dash cam stay on/o?
• Check if Parking Monitoring or Motion Detection is enabled. If so, turn them o.
4. Why does the Micro SD card appear full?
• Format the card before rst use and periodically.
• Turn o Parking Monitoring and Motion Detection while driving.
• Adjust the G-sensor sensitivity to low.
5. Why does the dash cam stop recording?
• If the screen saver is enabled, the display will turn o, but recording continues.
• Ensure the Auto Power Supply feature is turned o.
6. Why is the recorded video unclear?
• Remove ngerprints or dirt from the lens and peel o the protective lm.
7. Why can't I delete les on the Micro SD card?
• Locked les must be unlocked or the Micro SD card formatted.
8. Why doesn’t the reverse guidance image appear while reversing?
• Check the wiring and ensure the rear camera's red line is connected to the
backup light's positive pole.
9. How do I view the rear camera footage?
• In playback mode, switch between front camera, rear camera, and photo les
using the up and down buttons.

Questions or Comments?
We are here to help!
Phone: 1.718.535.1800
PyleUSA.com/ContactUs