2960314767_IT/ 03-07-25.(16:04)
IT/EN
Asciugatrice
Manuale utente
Dryer
User Manual
HPT 104D BS IT
Questo prodotto è stato realizzato servendosi delle ultimissime tecnologie in condizioni rispettose dell’ambiente.
Caro cliente,
invitiamo a leggere questa guida prima di utilizzare questo prodotto!
Grazie per aver scelto il Hotpoint Vorremmo che lei potesse raggiungere un livello di efficienza
ottimale da questo prodotto di alta qualità, con una tecnologia all'avanguardia. Assicuratevi di
aver letto e compreso a fondo questa guida e la documentazione supplementare prima dell'uso.
Osservare tutte le avvertenze e le informazioni qui contenute. In questo modo sarà possibile
proteggere sia voi che il vostro prodotto da potenziali danni.
Conservare il manuale. Qualora il prodotto venga ceduto a un’altra persona, consegnare anche
questo manuale.
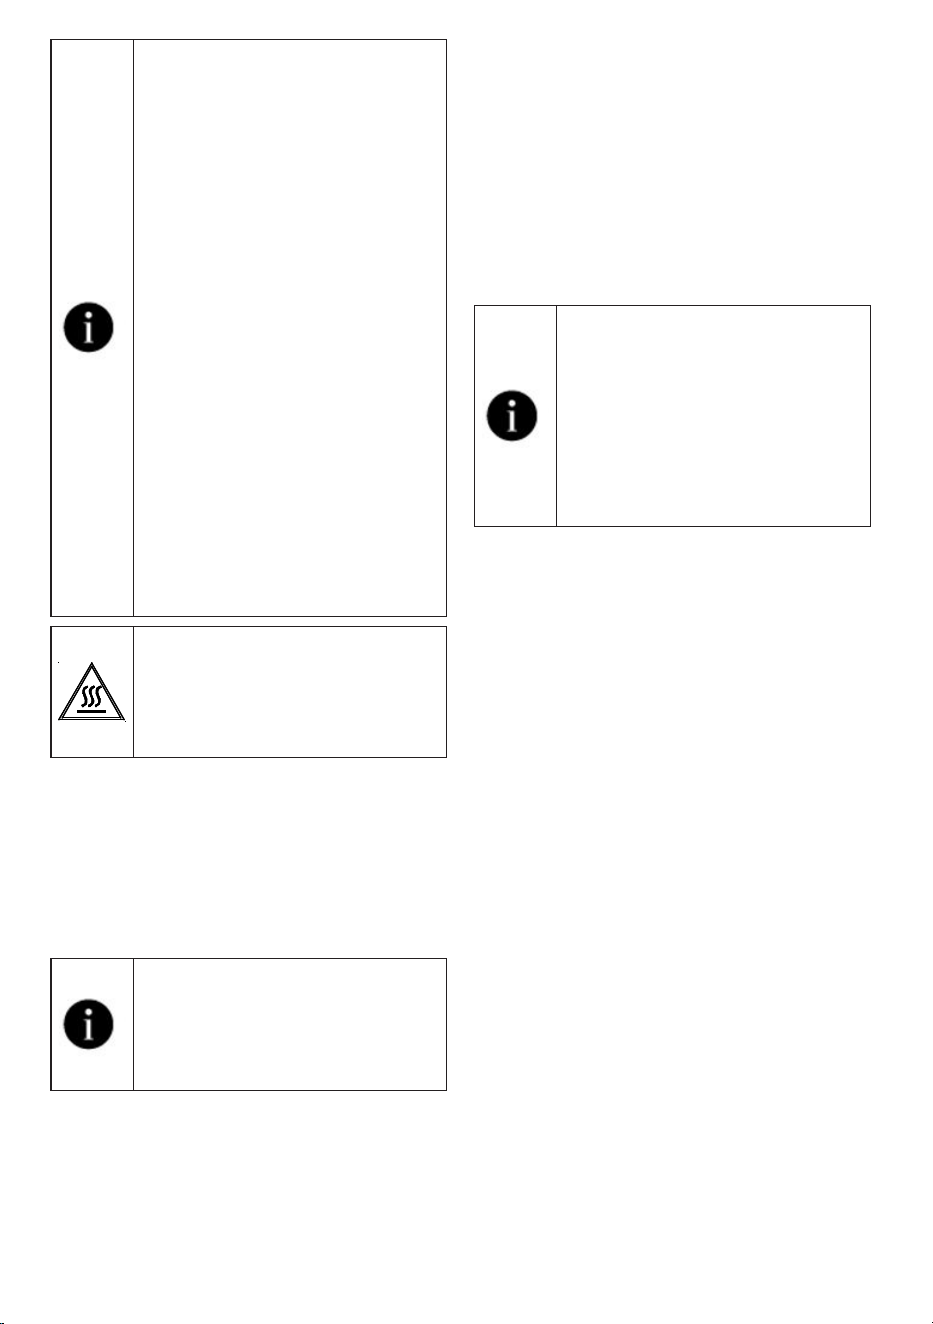
Simboli e note
Nel manuale sono utilizzati i seguenti simboli:
Pericolo che può causare morte o lesioni
Leggere il manuale
Informazioni importanti o consigli utili per l'uso
Attenzione alle superfici calde
B
Avvertenza contro le scosse elettriche
Attenzione al pericolo di radiazioni UV
Attenzione alle scottature
L'imballaggio del prodotto è fatto di materiali riciclabili, in conformità con la Normativa
Ambientale Nazionale.
Attenzione al fuoco
AVVISO Pericolo che può causare danni materiali al prodotto o all'area circostante

1 NORME DI SICUREZZA ...................................................................... 5
2 Istruzioni per l'ambiente ..................................................................... 13
2.1 Rispetto dei regolamenti WEEE e smaltimento dei rifiuti ...................................13
2.2 Informazioni sull'imballaggio ............................................................................13
2.3 Conformità alle norme e informazioni sui test / Dichiarazione di conformità ONU 13
3 La vostra asciugatrice ........................................................................ 14
3.1 Specifiche tecniche .........................................................................................14
3.2 La tua asciugatrice ..........................................................................................15
3.3 Informazioni sull’imballaggio ............................................................................15
4 Installazione ......................................................................................... 16
4.1 Corretto posizionamento per l'installazione ......................................................16
4.2 Rimozione del gruppo di sicurezza usato per la spedizione del prodotto .......... 17
4.3 Collegamento all'acqua ...................................................................................17
4.4 Regolazione dei supporti .................................................................................17
4.5 Spostamento dell'asciugatrice .........................................................................17
4.6 Attenzione al rumore ........................................................................................ 18
4.7 Sostituzione della lampadina ............................................................................18
5 Preparazione ........................................................................................ 19
5.1 Bucato adatto per l'asciugatura in asciugatrice ................................................ 19
5.2 Bucato non adatto all'asciugatura in asciugatrice ............................................19
5.3 Preparare il bucato da asciugare ......................................................................19
5.4 Cosa fare per il risparmio energetico ................................................................ 19
5.5 Capacità di carico corretta ............................................................................... 20

6 Funzionamento del prodotto .............................................................. 21
6.1 Pannello di controllo ........................................................................................21
6.2 Simboli ............................................................................................................21
6.3. Preparazione dell’asciugatrice ........................................................................22
6.4 Selezione programma e tabella di consumo ..................................................... 23
6.5 Funzioni ausiliarie ............................................................................................. 25
6.6 Spie luminose di avvertenza .............................................................................25
6.7 Avvio del programma ....................................................................................... 26
6.8 Blocco bambini ...............................................................................................26
6.9 Modifica del programma dopo che è stato avviato ........................................... 26
6.10 Annullamento del programma ........................................................................27
6.11 Fine del programma .......................................................................................27
6.12 Funzionalità Odore ......................................................................................... 27
6.13 Ciclo PetHairCare ..........................................................................................27
7 Manutenzione e pulizia ...................................................................... 29
7.1 Filtri per lanugine (filtri interni ed esterni) / Pulizia della superficie interna dell’oblò di
caricamento ..........................................................................................................29
7.2 Pulizia del sensore ..........................................................................................30
7.3 Svuotare il serbatoio dell'acqua .......................................................................31
7.4 Pulizia del condensatore ..................................................................................31
8 Guida alla risoluzione dei problemi .................................................. 33
5
Asciugatrice/ Manuale utente
1 NORME DI SICUREZZA
IMPORTANTE: DA LEGGERE E OSSERVARE
Questo simbolo ricorda che è necessario leggere il presente
manuale di istruzioni.Prima di utilizzare l’apparecchio, leggere le seguenti
norme di sicurezza. Conservarle per eventuali consultazioni successive.
Questo manuale e l’apparecchio sono corredati da importanti avvertenze
di sicurezza, da leggere e rispettare sempre. Il fabbricante declina
qualsiasi responsabilità che derivi dalla mancata osservanza delle presenti
istruzioni di sicurezza, da usi impropri dell’apparecchio o da errate
impostazioni dei comandi.
AVVERTENZA:
• Questa icona indica che questo apparecchio utilizza un refrigerante
infiammabile. Se il refrigerante fuoriesce e viene esposto a una fonte di
accensione esterna, sussiste il rischio di incendio.
Questo apparecchio contiene il refrigerante R290, infi ammabile ma
rispettoso dell’ambiente
Tenere i bambini di età inferiore a 3 anni lontani dall’apparecchio.
Senza la sorveglianza costante di un adulto, tenere l’apparecchio
fuori dalla portata dei bambini di età inferiore a 8 anni. L’uso di questo
apparecchio da parte di bambini di età superiore agli 8 anni, di persone
con ridotte capacità fi siche, sensoriali o mentali o di persone sprovviste
di esperienza e conoscenze adeguate è consentito solo con un’adeguata
sorveglianza, o se tali persone siano state istruite sull’utilizzo sicuro
dell’apparecchio e siano consapevoli dei rischi. Non consentire ai bambini
di giocare con l’apparecchio. La pulizia e la manutenzione ordinaria non
devono essere effettuate da bambini senza la supervisione di un adulto.
AVVERTENZA:
Non arrestare l’asciugatrice prima del termine del
ciclo di asciugatura; se ciò fosse necessario, estrarre velocemente tutti i
capi e stenderli per favorire la dispersione del calore.
6
Asciugatrice/ Manuale utente
Gli articoli che sono stati sporcati con sostanze come olio da
cucina, acetone, alcool, benzina, cherosene, smacchiatori, trementina,
cere e rimuovi-cera e articoli come gommapiuma (schiuma di lattice),
cuffie da doccia, tessuti impermeabili, articoli con supporto in gomma
e vestiti o cuscini provvisti di imbottiture in gommapiuma non devono
essere asciugati nell’asciugatrice. Svuotare bene le tasche, soprattutto se
possono contenere accendini e fi ammiferi. Non utilizzare l’asciugatrice se
sono state usate sostanze chimiche per il lavaggio.
Evitare di introdurre nell’asciugatrice capi che presentino residui di
olio, a causa della loro elevata infi ammabilità.
Non forzare l’oblò e non utilizzarlo come gradino.
USO CONSENTITO
ATTENZIONE:
l’apparecchio non è destinato ad essere messo in
funzione mediante un dispositivo di commutazione esterno, ad esempio
un temporizzatore, o attraverso un sistema di comando a distanza
separato.
L’apparecchio è destinato all’uso domestico e ad applicazioni
analoghe, quali: aree di cucina per il personale di negozi, uffici e altri
contesti lavorativi; agriturismi; camere di hotel, motel, bed & breakfast e
altri ambienti residenziali.
Questo apparecchio non è destinato all’uso professionale. Non
utilizzare l’apparecchio all’aperto.
Non conservare sostanze esplosive oppure infi ammabili (ad
es. taniche di benzina o bombolette spray) all’interno o in prossimità
dell’apparecchio, per evitare il pericolo di ince
Non caricare l’apparecchio oltre la capacità massima (kg di
biancheria asciutta) indicata nella tabella dei programmi.
7
Asciugatrice/ Manuale utente
Non asciugare nell’asciugatrice capi che non siano stati lavati.
Assicurarsi che attorno all’asciugatrice non si accumulino pelucchi
o polvere.
Gli ammorbidenti o i prodotti simili devono essere usati nelle
modalità specifi cate nelle relative istruzioni.
Non asciugare eccessivamente gli indumenti.
Non bere, non riutilizzare e non preparare alimenti con acqua
condensata. Può essere dannoso per la salute e causare danni alla
proprietà.
AVVERTENZA:
Non danneggiare i tubi del circuito del refrigerante
dell’apparecchio.
INSTALLAZIONE
Per evitare il rischio di lesioni personali, le operazioni di
movimentazione e installazione dell’apparecchio devono essere eseguite
da almeno due persone. Per evitare rischi di taglio, utilizzare guanti
protettivi per le operazioni di disimballaggio e installazione.
8
Asciugatrice/ Manuale utente
L‘installazione, comprendente anche eventuali raccordi per
l’alimentazione idrica e i collegamenti elettrici, e gli interventi di
riparazione devono essere eseguiti da personale qualifi cato. Non
riparare né sostituire alcuna parte dell’apparecchio, salvo quando specifi
cato nel manuale dell’utente. Tenere i bambini a distanza dal luogo
dell’installazione. Dopo aver disimballato l’apparecchio, assicurarsi che
non sia stato danneggiato durante il trasporto. In caso di problemi,
contattare il rivenditore o il Servizio Assistenza più vicino. A installazione
completata, conservare il materiale di imballaggio (parti in plastica,
polistirolo, ecc.) fuori della portata dei bambini per evitare il rischio di
soffocamento. Per evitare rischi di scosse elettriche, prima di procedere
all’installazione scollegare l’apparecchio dalla rete elettrica. Durante
l’installazione, accertarsi che l’apparecchio non possa danneggiare il
cavo di alimentazione e causare così rischi di scosse elettriche. Attivare
l’apparecchio solo dopo avere completato la procedura di installazione.
AVVERTENZA:
Nell’involucro dell’apparecchio o nella struttura
integrata, mantenere le aperture di ventilazione libere da ostruzioni.
Installare l’asciugatrice in un locale sufficientemente ventilato (porta
aperta, griglia di aerazione o altra apertura di ampiezza superiore a 500
cm2) per evitare il ricircolo dei gas prodotti da apparecchi alimentati da
altri combustibili, inclusi i camini. Se l’asciugatrice è installata sotto un
piano di lavoro, lasciare una distanza di 10 mm tra il pannello superiore
dell’asciugatrice e gli oggetti sovrastanti e una distanza di 15 mm tra i fi
anchi dell’apparecchio e le pareti dei mobili adiacenti.
Assicurarsi che l’apparecchio non sia installato vicino a una fonte di
calore.
L’asciugatrice non deve essere installata in modo tale da impedire
l’apertura completa dello sportello, ad esempio dietro una porta con
serratura, una porta scorrevole o una porta incardinata sul lato opposto a
quello dell’asciugatrice.
9
Asciugatrice/ Manuale utente
L’apparecchio deve essere installato contro una parete per limitare
l’accesso al suo lato posteriore.
Evitare l’uso di tappeti che possano ostruire le aperture di
ventilazione alla base dell’asciugatrice.
Prima di installare l’asciugatrice sopra una lavatrice, contattare il
Servizio Assistenza o un rivenditore autorizzato per richiedere l’elenco
completo dei modelli compatibili. L’installazione a colonna deve essere
obbligatoriamente eseguita tramite un apposito kit disponibile presso il
Servizio Assistenza o i rivenditori autorizzati. Le istruzioni di montaggio
sono fornite insieme al kit.
AVVERTENZE ELETTRICHE
Deve essere possibile scollegare l’apparecchio dalla rete elettrica
disinserendo la spina, se questa è accessibile, o tramite un interruttore
multipolare installato a monte della presa nel rispetto dei regolamenti
elettrici vigenti; inoltre, l’apparecchio deve essere messo a terra in
conformità alle norme di sicurezza elettrica nazionali.
Non utilizzare cavi di prolunga, prese multiple o adattatori. Al
termine dell’installazione, i componenti elettrici non dovranno più essere
accessibili all’utilizzatore. Non utilizzare l’apparecchio quando si è
bagnati oppure a piedi nudi. Non accendere l’apparecchio se il cavo di
alimentazione o la spina sono danneggiati, se si osservano anomalie di
funzionamento o se l’apparecchio è caduto o è stato danneggiato.
Se il cavo di alimentazione è danneggiato, deve essere sostituito
con uno dello stesso tipo dal produttore, da un centro di assistenza
autorizzato o da un tecnico qualifi cato per evitare situazioni di pericolo o
rischi di scosse elettriche.
10
Asciugatrice/ Manuale utente
PULIZIA E MANUTENZIONE
AVVERTENZA:
Per evitare rischi di folgorazione, prima di
qualsiasi intervento di manutenzione accertarsi che l’apparecchio sia
spento e scollegato dall’alimentazione elettrica. Per evitare il rischio
di lesioni personali, utilizzare guanti protettivi (rischio di lacerazione)
e scarpe di sicurezza (rischio di contusione); assicurarsi che qualsiasi
movimentazione sia eseguita da due persone (ridurre il carico); mai
utilizzare pulitrici a getto di vapore (rischio di scosse elettriche). Le
riparazioni non professionali e non autorizzate dal produttore potrebbero
comportare un rischio per la salute e la sicurezza, per il quale il produttore
non può essere ritenuto responsabile. Qualsiasi difetto o danno causato
da riparazioni o interventi di manutenzione non professionali non sarà
coperto dalla garanzia, i cui termini sono descritti nel documento
consegnato con l’unità.
Prima di avviare un ciclo di asciugatura, pulire tutti i fi ltri dai
pelucchi depositati.
Non utilizzare alcuno strumento per pulire il fi ltro secondario, che
potrebbe danneggiare l’apparecchio e causare una perdita di gas.
SMALTIMENTO DEL MATERIALE DI IMBALLAGGIO
l materiale di imballaggio è riciclabile al 100% ed è contrassegnato dal
simbolo del riciclaggio
Le varie parti dell’imballaggio devono pertanto essere smaltite
responsabilmente e in stretta osservanza delle norme stabilite dalle
autorità locali.
11
Asciugatrice/ Manuale utente
SMALTIMENTO DEGLI ELETTRODOMESTICI
Questo prodotto è stato fabbricato con materiale riciclabile o riutilizzabile.
Smaltire il prodotto rispettando le normative locali in materia. Per
ulteriori informazioni sul trattamento, il recupero e il riciclaggio degli
elettrodomestici, contattare l’ufficio locale competente, il servizio di
raccolta dei rifi uti domestici o il negozio presso il quale il prodotto è stato
acquistato. Questo apparecchio è contrassegnato in conformità alla
direttiva europea 2012/19/UE, Rifi uti di apparecchiature elettriche ed
elettroniche (RAEE) e alle norme sui rifi uti di apparecchiature elettriche ed
elettroniche 2013 (e successive modifi che).
Assicurandosi che questo prodotto sia smaltito in modo corretto, l’utente
contribuisce a prevenire le conseguenze negative per l’ambiente e la
salute.
Il simbolo sul prodotto o sulla documentazione di
accompagnamento indica che questo apparecchio non deve
essere smaltito come rifi uto domestico, bensì conferito presso un
centro di raccolta preposto al ritiro delle apparecchiature elettriche
ed elettroniche.
12
Asciugatrice/ Manuale utente
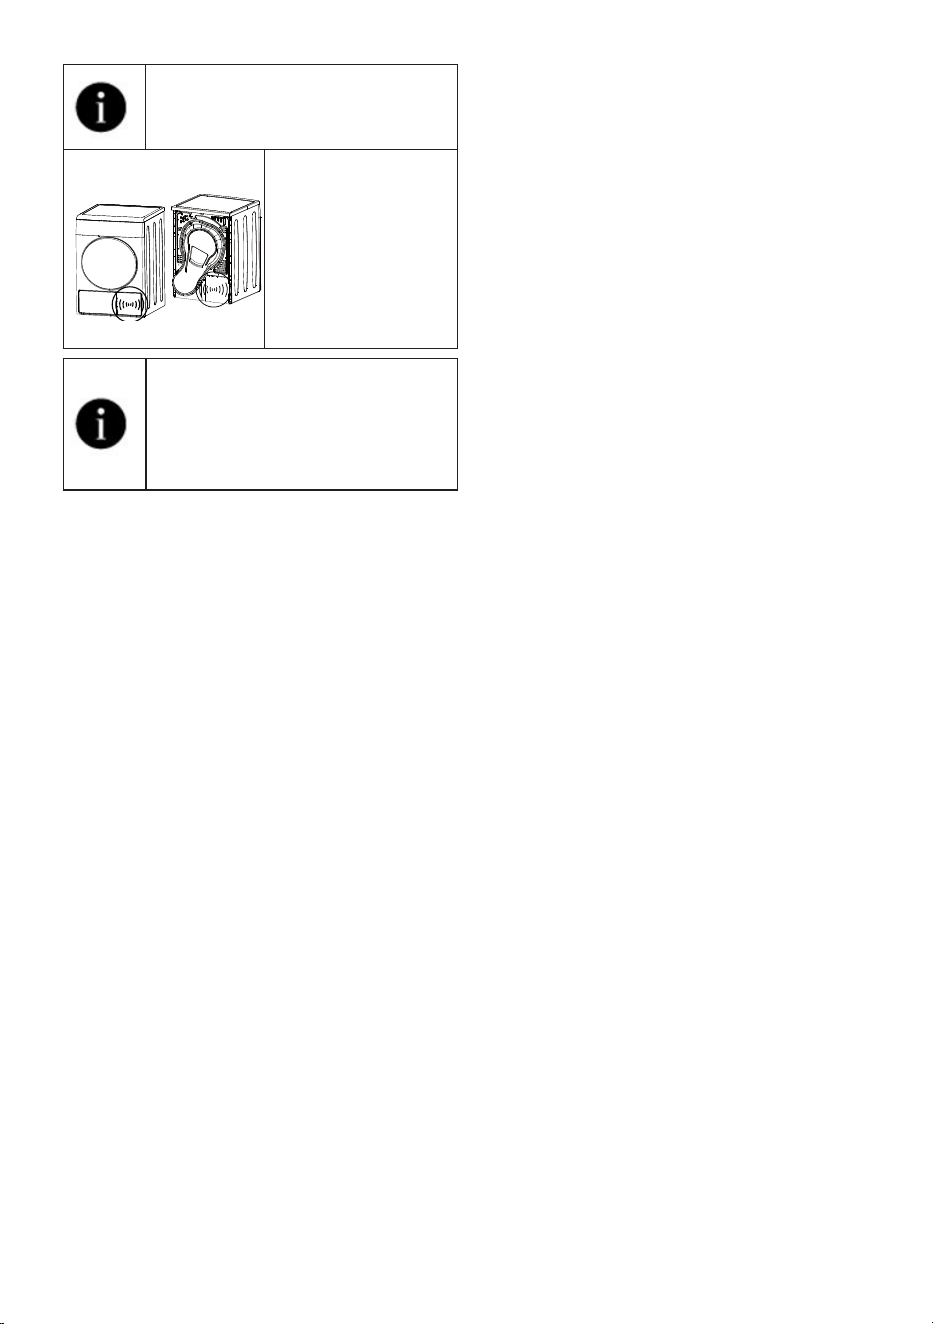
• La lavatrice non può essere messa sopra all’asciugatrice.
Tabella per l’installazione della lavatrice e asciugatrice
Tipo di kit per lo stoccaggio Profondità (TD=Asciugatrice, WM: Lavatrice)
Plastica - 54/60 cm con o senza
cinghia
60 cm TD --> WM≥50 cm / 54 cm TD --> WM>45 cm
Plastica - 46 cm con o senza
cinghia
46cm TD --> WM≥54cm
Con ripiano - 60 cm 60cm TD --> WM≥50cm
Con ripiano - 54 cm 54cm TD --> WM>45cm
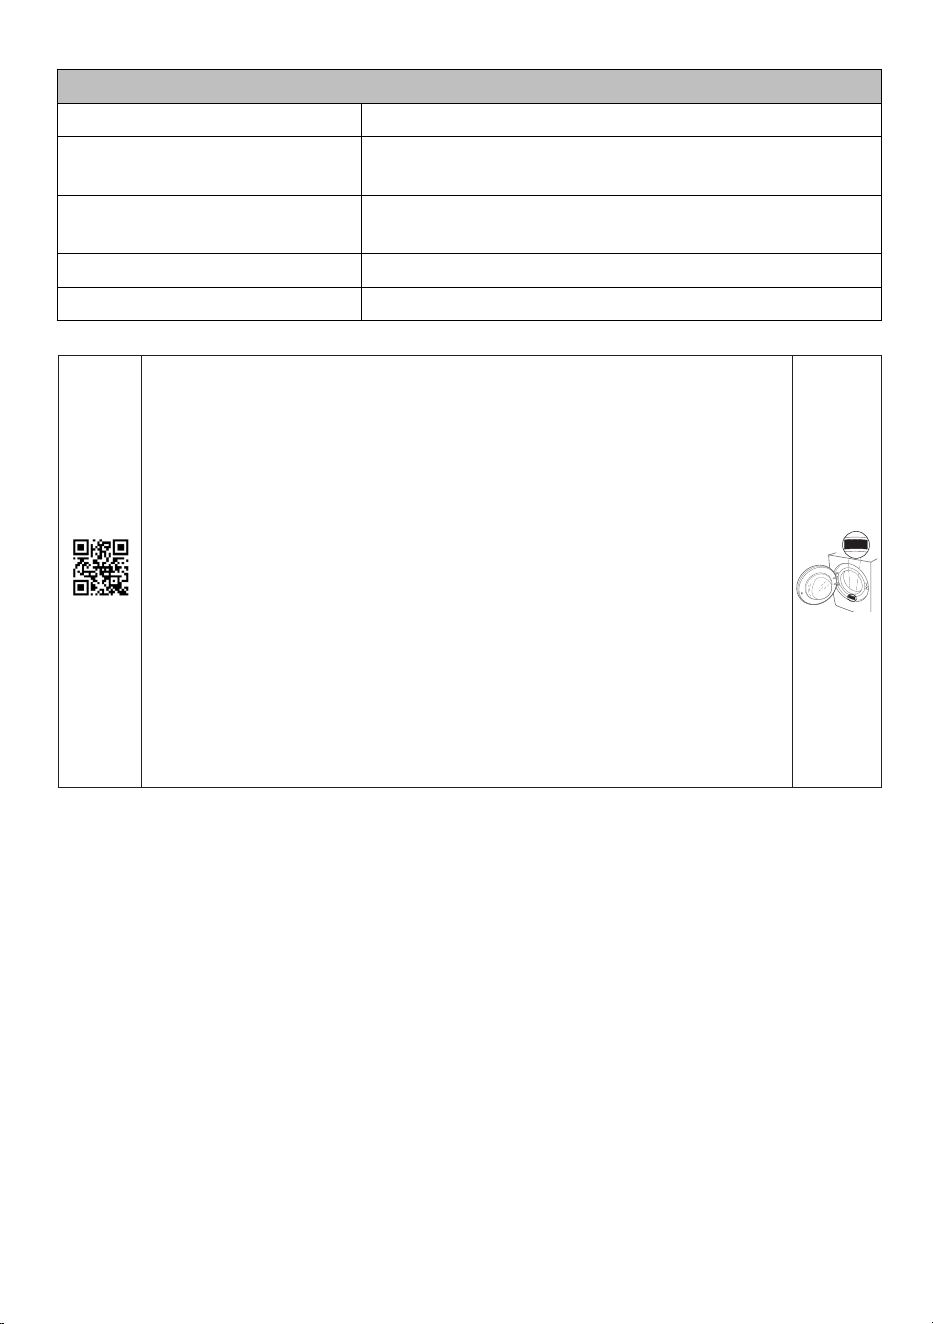
Documentazione normativa,documentazione standard,ordinazione
di pezzi di ricambio e altre informazioni sul prodotto possono
essere reperite:
Utilizzando il codice QR nel proprio apparecchio
Visitando il nostro sito web docs.hotpoint.eu /docs y parts-
selfservice.europeanappliances.com
Oppure, contatare il Servizio Assistenza Tecnica (al numero di telefono
riportato sul libretto di garanzia). Quando si contatta il Servizio Assistenza
Tecnica,fornire i codici presenti sulla targhetta matricola del prodotto.
É possibile trovare maggiori informazioni sul proprio modello online su
https:/eprel.ec.europa.eu/,che é il datebase uffıciale dei prodotti EPRER
dell’Unione Europea.Dopo aver selezionato la categoria di prodotto,inserire
I’identifıcativo del modello del prodotto.
L’identifıcativo del modello é composto da lettere e numeri e si trova sulla
targhetta d’identifıcazione,comeMod. (vedere immagine a destra).
Per ricevere un’assistenza più completa, registrare il prodotto su
www.register10.eu
xxxxxxxxxxxx
13
Asciugatrice/ Manuale utente
2 Istruzioni per l'ambiente
2.1 Rispetto dei regolamenti WEEE e smaltimento dei rifiuti
Questo prodotto non contiene i materiali pericolosi e proibiti indicati nel "Regolamento
sul controllo dei rifiuti di apparecchiature elettriche ed elettroniche" pubblicato dal
Ministero dell'ambiente e dell'urbanizzazione della Repubblica di Turchia. Il prodotto è
conforme alle normative WEEE. Questo prodotto è stato fabbricato con componenti e
materiali di alta qualità riciclabili e riutilizzabili. Non è quindi necessario smaltire questo
prodotto con altri rifiuti domestici al termine del suo ciclo di vita. Portarlo presso un punto di
raccolta per apparecchiature elettriche ed elettroniche. Sarà possibile informarsi in merito a
questi punti di raccolta presso la propria amministrazione locale. Sarà possibile contribuire alla
protezione dell’ambiente e delle risorse naturali consegnando i prodotti usati per il riciclaggio.
Anche l'R290 è un refrigerante infiammabile. Accertarsi quindi che il sistema e i tubi
non vengano danneggiati in fase di funzionamento e di trasporto.
Tenere il prodotto lontano da fonti di calore, altrimenti potrebbe prendere fuoco se
danneggiato.
Non smaltire il prodotto gettandolo nel fuoco.
2.2 Informazioni sull'imballaggio
L'imballaggio del prodotto è realizzato con materiali riciclabili, in conformità con la legislazione
nazionale. Non smaltire i rifiuti di imballaggio con i rifiuti domestici o altri rifiuti, smaltirli nelle aree di
raccolta degli imballaggi specificate dalle autorità locali.
2.3 Conformità alle norme e informazioni sui test
/ Dichiarazione di conformità ONU
Le fasi di sviluppo, produzione e vendita di questo prodotto vengono condotte
in conformità con le regole di sicurezza specificate in tutte le relative istruzioni
dell'Unione Europea.
14
Asciugatrice/ Manuale utente
3 La vostra asciugatrice
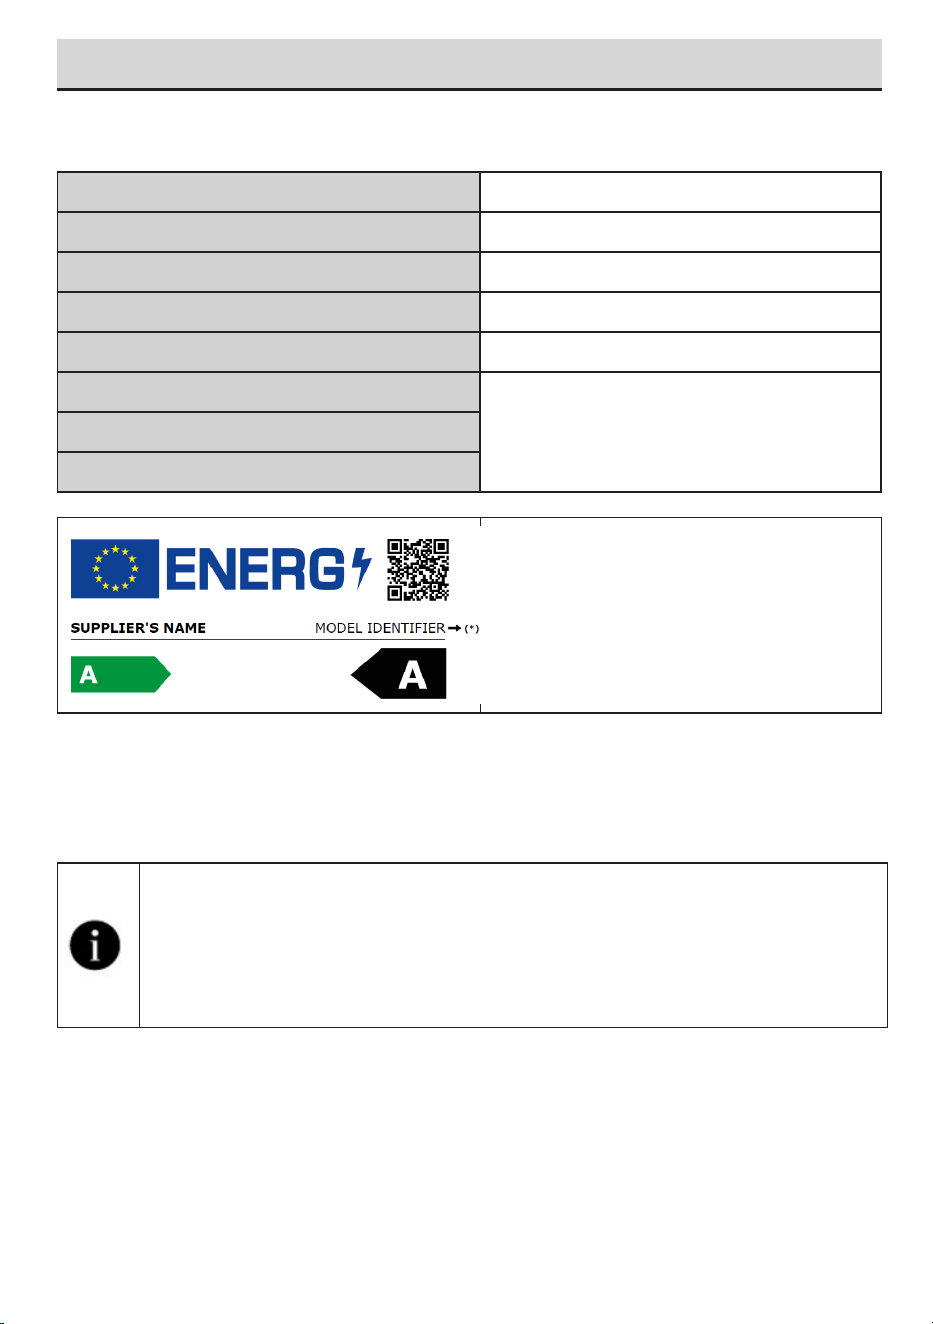
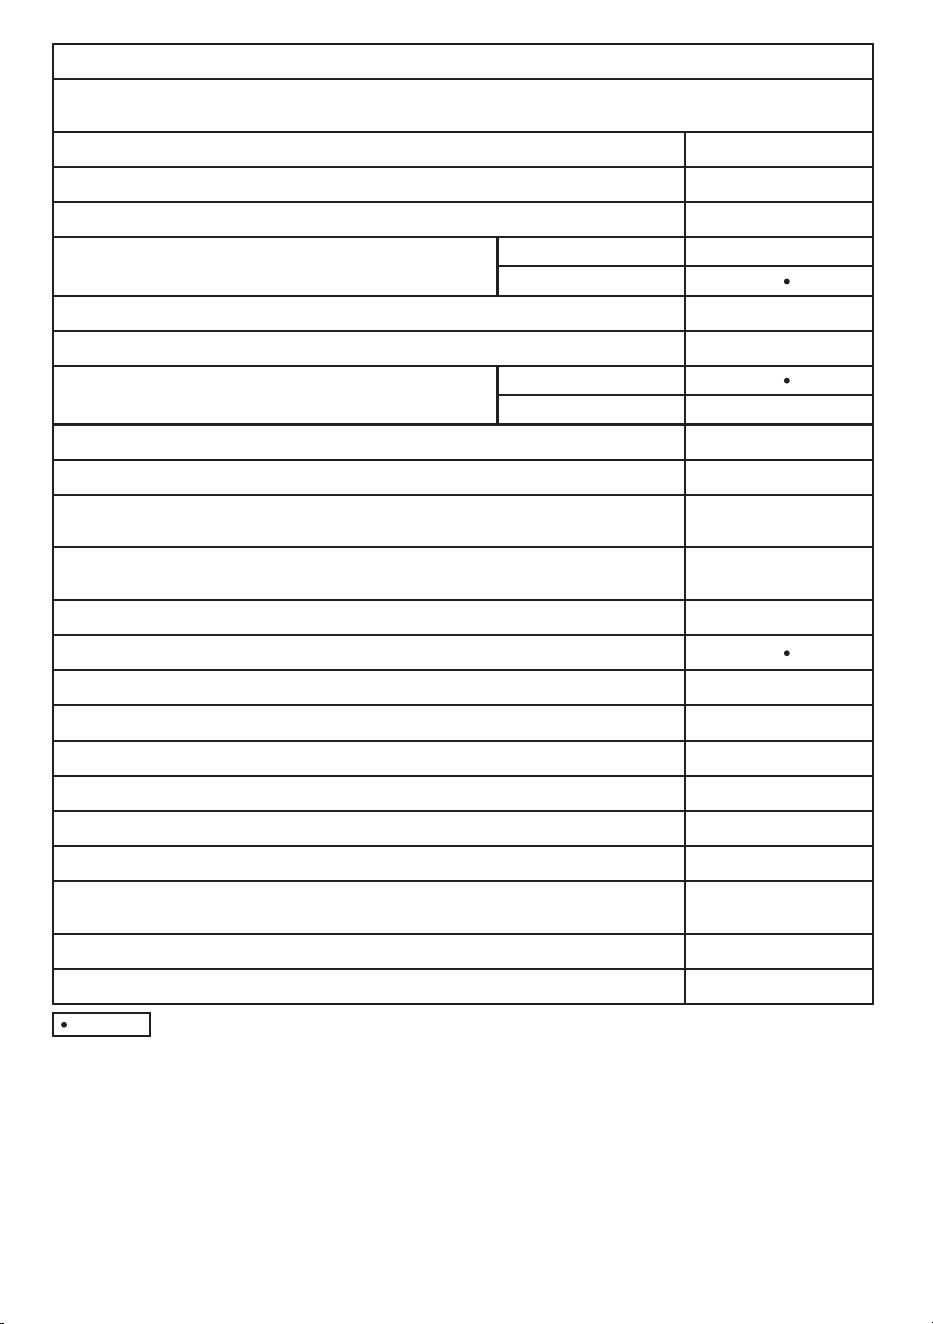
3.1 Specifiche tecniche
Le informazioni sul modello memorizzate
nel database del prodotto possono essere
ottenute entrando nel seguente sito web e
cercando il proprio identificatore di modello (*)
che si trova sull’etichetta energetica.
https://eprel.ec.europa.eu/
* Altezza minima: Altezza con il supporto regolabile chiuso.
Altezza massima: Altezza con il supporto regolabile aperto alla massima altezza.
** Peso del bucato asciutto prima del lavaggio.
*** La targhetta dei dati si trova sotto lo sportello dell'asciugatrice.
Al fine di migliorare la qualità dell'asciugatrice, le specifiche tecniche possono essere
modificate senza preavviso.
Le figure in questo manuale sono schematiche e potrebbero non corrispondere
esattamente al prodotto.
I valori forniti con l'asciugatrice o i documenti di accompagnamento sono letture di
laboratorio secondo le rispettive norme. Questi valori possono differire a seconda
dell'uso e delle condizioni ambientali.
IT
Altezza (regolabile) 84,6 cm / 86,6 cm*
Larghezza 59,8 cm
Profondità 67,2 cm
Capacità (max.) 10 kg**
Peso netto (± %10) 48 kg
Tensione
Vedere etichetta tipo***Ingresso alimentazione nominale
Codice modello
15
Asciugatrice/ Manuale utente
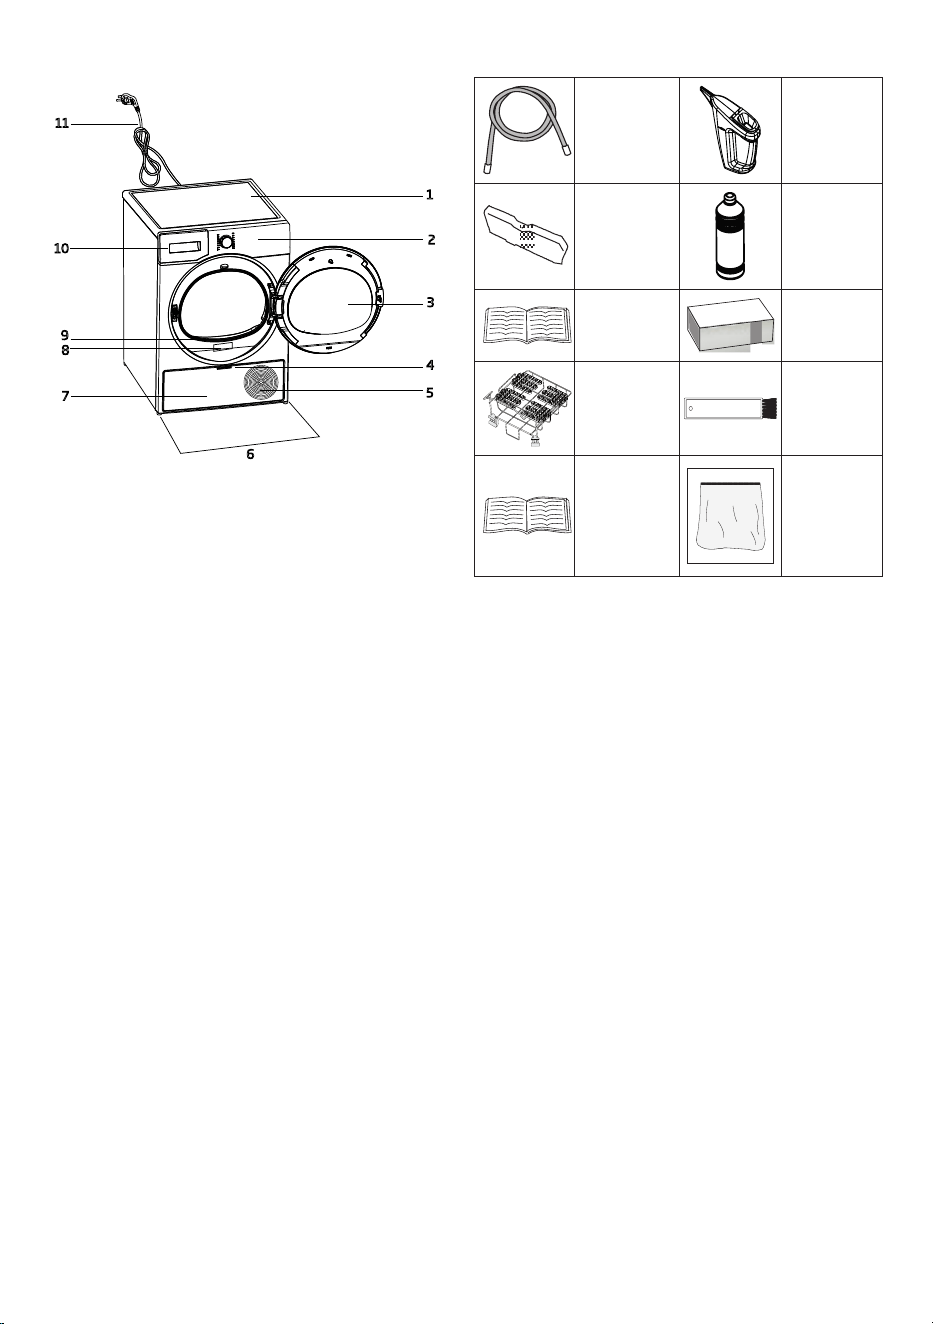
3.2 La tua asciugatrice
11
10
1
2
3
4
5
6
7
8
9
1. Pannello superiore
2. Pannello di controllo
3. Porta di carico
4. Apertura sportello zoccolo
5. Griglie di ventilazione
6. Piedini regolabili
7. Sportello filtro zoccolo
8. Etichetta tipo
9. Filtro lanugine
10. Cassetto del serbatoio dell’acqua
11. Cavo di alimentazione
3.3 Informazioni sull’imballaggio
1. Tubo
di scarico
acqua *
6.
Contenitore
di
riempimento
dell’acqua*
2. Spugna
di ricambio
cassetto
filtro*
7. Acqua
pura*
3. Manuale
dell’Utente
8. Gruppo
capsule
fragranza*
4. Cestello di
asciugatura*
9. Spazzola*
5. Manuale
dell’utente
del
cestello di
asciugatura*
10. Filtro
stoffa*
*Può essere fornito in dotazione con la
macchina, a seconda del modello.
16
Asciugatrice/ Manuale utente
4 Installazione
Leggere come prima cosa le
"Istruzioni di sicurezza"!
Prima di consultare il servizio autorizzato più
vicino per l'installazione dell'asciugatrice,
vedere le informazioni nel manuale d'uso e
assicurarsi che le utenze elettriche e dell'acqua
siano conformi alle richieste. In caso contrario
contattare un elettricista e un idraulico per
rendere questi servizi conformi ai requisiti.
È responsabilità del cliente
preparare il luogo in cui
l'asciugatrice deve essere
collocata e anche l'installazione
dell'alimentazione e delle acque di
scarico.
Controllare che non ci siano danni
sull'asciugatrice prima di installarla.
Se l'asciugatrice è danneggiata, non
farla installare. I prodotti danneggiati
causano un rischio per la sicurezza
dell’utente.
Attendere 12 ore prima di mettere in
funzione l'asciugatrice.
AVVISO
Il prodotto include un agente
refrigerante. Se il prodotto viene
utilizzato subito dopo il suo
trasporto, potrebbe danneggiarsi.
Dopo ogni spostamento, il prodotto
deve essere lasciato riposare per
12 ore.
4.1 Corretto posizionamento
per l'installazione
• Installare l'asciugatrice su una superficie
piana e stabile.
• L’asciugatrice è pesante. Non spostarla
da soli.
• Far funzionare l'asciugatrice in un
ambiente privo di polvere con una buona
ventilazione.
• Lo spazio tra l'asciugatrice e il pavimento
non deve essere ridotto da materiali quali
ad esempio tappeti, pezzi di legno e
fasce.
• Non bloccare le griglie di ventilazione
dell'asciugatrice.
• Non ci devono essere porte che possono
essere bloccate, porte scorrevoli o
porte incernierate vicino all'ambiente
di installazione dell'asciugatrice che
possono bloccare l’apertura dell’oblò di
caricamento.
• Una volta che l'asciugatrice è installata,
le connessioni devono rimanere stabili.
Dopo aver posizionato l'asciugatrice,
assicurarsi che la parete posteriore non
entri in contatto con alcuna estrusione (un
rubinetto dell'acqua, una presa elettrica,
ecc.).
• Posizionare l'asciugatrice con almeno 1
cm di spazio tra il prodotto e i bordi dei
mobili.
• L'asciugatrice è adatta ad essere utilizzato
tra +5°C e +35°C. Se utilizzata al di
fuori di questo range di temperatura,
il suo funzionamento potrebbe essere
compromesso e danneggiato.
• L'asciugatrice non deve essere
posizionata con il lato posteriore contro
una parete.
B
Non appoggiare l'asciugatrice sul
suo cavo di alimentazione.
* Ignorare il seguente avviso se il sistema
del proprio prodotto non contiene R290
L’asciugatrice contiene il refrigerante
R290.*
R290 è un refrigerante ecologico,
ma infiammabile.*
Assicurarsi che l’ingresso dell’aria
dell’asciugatrice sia aperto e ben
ventilato.*
Tenere lontane dall’asciugatrice
potenziali fonti di fiamma viva.*
17
Asciugatrice/ Manuale utente
4.2 Rimozione del gruppo
di sicurezza usato per la
spedizione del prodotto
AVVISO
Togliere il gruppo
di sicurezza usato
per la spedizione
del prodotto prima
di iniziare a usare il
prodotto.
AVVISO
Non lasciare un accessorio o
qualsiasi parte del gruppo di
sicurezza usato per la spedizione
del prodotto all'interno del tamburo.
4.3 Collegamento all'acqua
Invece di scaricare periodicamente l'acqua
accumulata nel serbatoio dell'acqua, è possibile
scaricare tramite il tubo di scarico dell'acqua
fornito con l'asciugatrice.
Collegamento del tubo di
scarico dell'acqua
1
3 4
2
1-2 Rimuovere
il tubo
flessibile dietro
l'asciugatrice
tirandolo
manualmente
da dove è
attaccato.
Non usare un
attrezzo per
rimuovere il
tubo.
3 Inserire un'estremità del tubo di scarico
dell'acqua fornito con l'asciugatrice
nel punto in cui è stato rimosso il tubo
sull'asciugatrice.
4 Fissare l'altra estremità del tubo di scarico
dell'acqua direttamente allo scarico delle
acque reflue o a un lavandino.
AVVISO
Il tubo di scarico dell'acqua deve
essere fissato a un'altezza massima
di 80 cm.
Assicurarsi che il tubo di scarico
dell'acqua non sia attorcigliato,
schiacciato o premuto tra lo scarico
e l'asciugatrice.
Il tubo deve essere collegato per
non essere scollegato dalla sua
posizione. L'acqua fuoriuscita può
causare danni.
Non allungare il tubo di scarico
dell'acqua.
Controllare se l'acqua scorre con un
flusso adeguato. La linea di scarico
non deve essere chiusa o intasata.
Se l’accessorio viene fornito
in dotazione con un pack di
accessori, invitiamo a consultare le
istruzioni dettagliate.
4.4 Regolazione dei supporti
Fino a quando
l’asciugatrice non sta
in piedi in modo piano
e robusto, regolare i
supporti girandoli a
destra e a sinistra.
4.5 Spostamento dell'asciugatrice
• Scaricare completamente l'acqua
nell'asciugatrice.
• Se il prodotto è collegato tramite scarico
diretto, togliere i collegamenti del tubo.
Si consiglia di spostare l'asciugatrice
in posizione verticale. Altrimenti,
inclinarlo verso il lato destro visto dal
davanti e spostare l'asciugatrice.
Attendere 12 ore prima di mettere in
funzione l'asciugatrice.
18
Asciugatrice/ Manuale utente
4.6 Attenzione al rumore
Durante il
funzionamento
del prodotto, il
compressore può
emettere rumori
metallici di tanto in
tanto, non si tratta
di un’anomalia di
funzionamento.
Quando il prodotto è in funzione,
l'acqua accumulata viene pompata
nel serbatoio dell'acqua. È normale
sentire dei suoni di pompaggio
dall'apparecchio durante questa
operazione.
4.7 Sostituzione della lampadina
Se l’asciugatrice ha la lampada di illuminazione
del tamburo;
Consultare il servizio autorizzato per sostituire
la lampadina/LED utilizzata nell'illuminazione
dell'asciugatrice. La lampadina di questo
prodotto non è adatta all'illuminazione
domestica. L'uso previsto di questa lampada
è quello di garantire il caricamento sicuro del
bucato nell'asciugatrice. Le lampade utilizzate
in questo apparecchio sono resistenti a
condizioni fisiche pesanti come ad esempio
temperature superiori a 50°C.
19
Asciugatrice/ Manuale utente
Leggere come prima cosa le
"Istruzioni di sicurezza"!
5.1 Bucato adatto per
l'asciugatura in asciugatrice
AVVISO
Il bucato non sicuro per
l'asciugatrice può danneggiare
l'apparecchio e il bucato stesso
durante l'asciugatura. Attenersi alle
istruzioni sulle etichette del bucato
da asciugare. Asciugare solo il
bucato con la scritta "dry machine
safe - sicuro in asciugatrice" sulle
etichette.
Non asciugare
con asciugatrice
5.2 Bucato non adatto
all'asciugatura in asciugatrice
AVVISO
Gli indumenti intimi con supporti
metallici non devono essere
asciugati in asciugatrice. Se questi
supporti metallici si allentano e si
strappano dall'indumento, si può
danneggiare la macchina.
I tessuti delicati da ricamo, gli
indumenti di cotone e seta, gli
indumenti fabbricati con tessuti
delicati e pregiati, gli indumenti che
non traspirano e le tende di tulle
non devono essere asciugati in
asciugatrice.
5.3 Preparare il bucato da asciugare
AVVISO
Oggetti quali ad esempio monete,
parti metalliche, aghi, chiodi, viti,
pietre ecc. possono danneggiare
il gruppo di tamburi del prodotto o
causare problemi di funzionamento.
Controllare quindi tutto il bucato che
verrà caricato sul prodotto.
Asciugare il bucato con accessori
metallici come le cerniere girandole
al contrario.
Chiudere le cerniere, i ganci e le
chiusure, abbottonare i bottoni
delle coperture, legare le cinture di
tessuto e le cinture del grembiule.
5.4 Cosa fare per il
risparmio energetico
• Usare la massima torcitura possibile
mentre si lava il bucato. Sarà pertanto
possibile ridurre il periodo di asciugatura
oltre che il consumo di energia. Ordinare
il bucato in base al tipo e allo spessore.
Asciugare insieme gli stessi tipi di bucato.
Per esempio, gli asciugamani da cucina e
le tovaglie si asciugano più velocemente
degli asciugamani da bagno.
• Seguire le indicazioni del manuale utente
per la selezione del programma.
• Durante l'asciugatura non aprire l’oblò
di caricamento qualora ciò non sia
necessario. Qualora sia necessario aprire
l’oblò di caricamento, non tenerlo aperto
troppo a lungo.
• Non aggiungere bucato bagnato mentre
l'asciugatrice funziona.
• Pulire il filtro in fibra prima e dopo ogni
sessione di asciugatura.
• Per i modelli a condensazione,
assicuratevi di pulire il condensatore
almeno una volta al mese o dopo ogni 30
sessioni di asciugatura.
5 Preparazione

20
Asciugatrice/ Manuale utente
• Accertarsi che i filtri siano puliti.
Rimandiamo alla sezione “Manutenzione e
pulizia” per ulteriori dettagli in merito.
• Per i modelli con canna fumaria, seguire
le regole di collegamento della canna
fumaria specificate nelle guide e pulire la
canna fumaria.
• Durante la sessione di asciugatura,
ventilare adeguatamente l'ambiente in cui
si trova l'asciugatrice.
• Sui modelli con pompa di calore,
controllate il condensatore almeno ogni
sei mesi e pulitelo se è sporco.
• Il programma Eco è il programma più
efficiente dal punto di vista energetico per
l'asciugatura della biancheria di cotone
bagnata e viene utilizzato per valutare la
conformità alle norme di progettazione
ecologica.
• Tenere l’oblò di caricamento chiuso per
evitare perdite di calore.
5.5 Capacità di carico corretta
AVVISO
Se il bucato
all’interno della
macchina supera la
capacità di carico
massima, potrebbe
non funzionare
come previsto e
potrebbe causare
danni materiali
o danneggiare il
prodotto. Per ogni
programma, attenersi
alla capacità
massima di carico.
• Caricare l'asciugatrice domestica fino alla
capacità massima indicata dal produttore
per i relativi programmi aiuta a risparmiare
energia.
I pesi che seguono sono forniti a titolo
esemplificativo.
Bucato
Peso
indicativo
(g)*
Bucato
Peso
indicativo
(g)*
Biancheria da
letto in cotone
(matrimoniale)
1500
Abito in
cotone
500
Biancheria da letto
(formato singolo)
1000 Abito 350
Lenzuolo da letto
(matrimoniale)
500
Tessuto
jeans
700
Lenzuolo da letto
(singolo)
350
Fazzoletto
(10 pezzi)
100
Tovaglia grande 700 Maglietta 125
Tovaglia piccola 250 Camicetta 150
Tovagliolo da tè 100
Camicia di
cotone
300
Asciugamano da
bagno
700 Camicie 200
Asciugamano 350
*Peso del bucato asciutto prima del lavaggio.
21
Asciugatrice/ Manuale utente
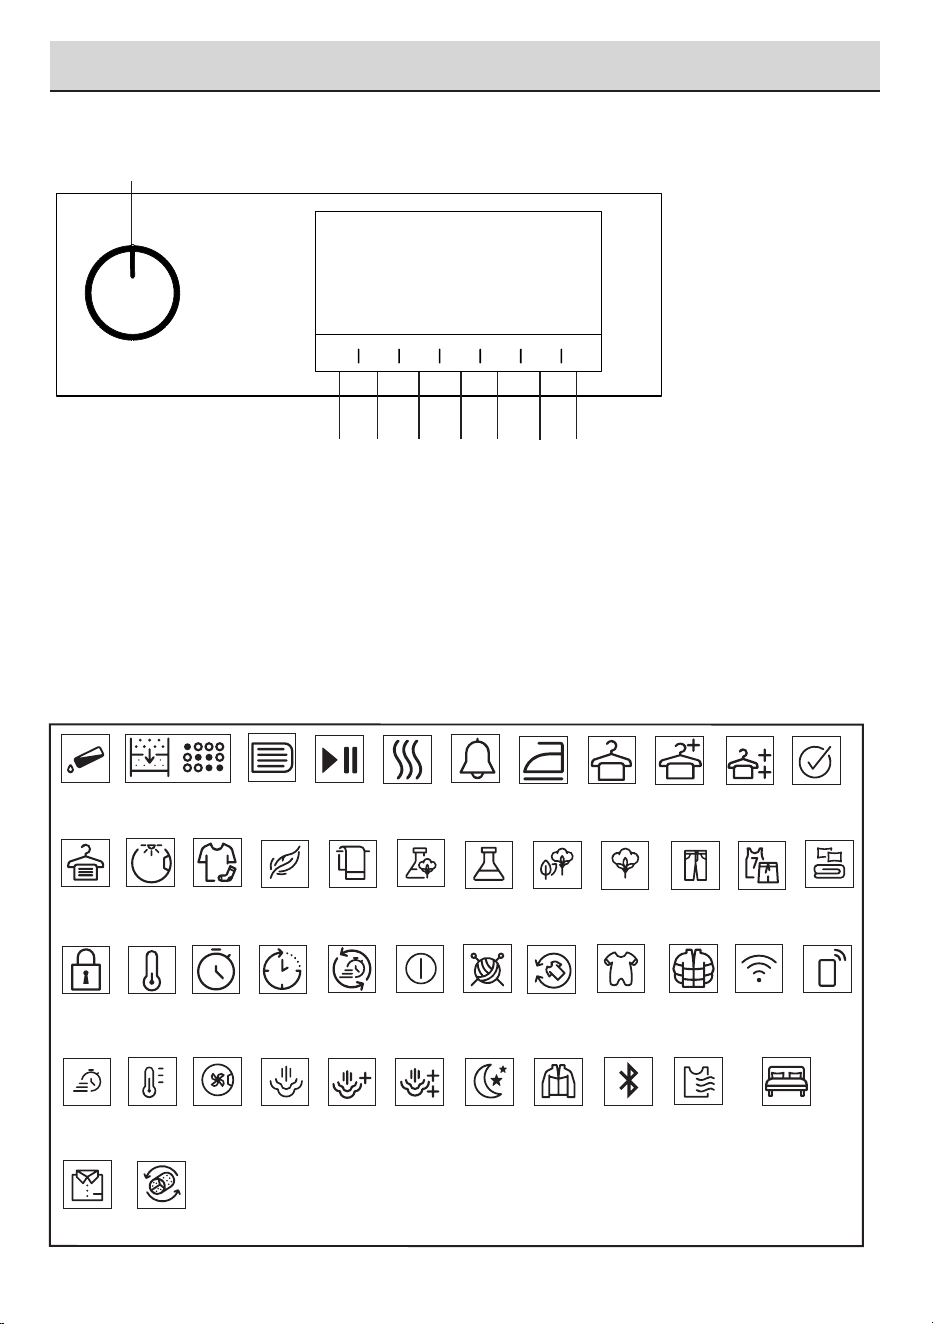
6.1 Pannello di controllo
6 Funzionamento del prodotto
1. Pulsante On/Off/Selezione programma.
2. Pulsante Start / Stand-by.
3. Pulsante di selezione dell'ora di fine.
4. Pulsante di selezione del programma orario.
5. Pulsante di selezione bassa temperatura.
6.2 Simboli
3
4
5
2
6
7
8
1
6. Avviso acustico e pulsante di selezione del
blocco bambini.
7. Pulsante selezione prevenzione pieghe/
Pulsante luce cestello.
8. Pulsante di selezione livello di asciugatura
Pulizia
del filtro
Serbatoio
pieno
Pulizia cassetto
filtro/scambiatore
di calore
Avvia
pausa
annulla
Stiratura
Asciugatura Cicalino Armadio a
secco
Armadio a
secco +
Extra
secco
Fine
Blocco
bambini
Bassa
temperatura
Asciugatura
tempo
Fine tra Asciugatura
rapida
Luce
cestello
Livello di
asciugatura
EasyCare
Delicati
Sintetici
Asciugamani Mix Cottons
Eco
Cotone Eco Jeans Sport
Piumini
Camicie
Express Baby AirFresh Livello
del vapore
Livello
del vapore 1
Livello
del vapore 2
Pulsante
accensione/
spegnimento
Wool protect
Notte
(silenzioso)
Esterno
Baby
Protect+
Piume Wifi
Controllo
da Remoto
Bluetooth Asciugatura
Delicata
Inversione
Tamburo
Biancheria da letto
Anti
piega
22
Asciugatrice/ Manuale utente
6.3. Preparazione dell’asciugatrice
• Collegare l’asciugatrice
• Aprire l’oblò di caricamento.
• Rimuovere eventuali corpi estranei
all'interno.
• Mettere il bucato nell’asciugatrice senza
esagerare a livello di quantità.
• Premere e chiudere l’oblò di caricamento.
AVVISO
Verificare che non vi
sia bucato impigliato
nell’oblò.
Non chiudere l’oblò
di caricamento con
forza.
• Quando si seleziona il programma
desiderato utilizzando il pulsante di
selezione Acceso/Spento/Programma, la
macchina si accenderà.
Selezionare un programma usando
il pulsante di selezione Acceso/
Spento/Programma non significa
che il programma è stato avviato.
Per avviare il programma, premere il
pulsante Start/Stand-by.
23
Asciugatrice/ Manuale utente
6.4 Selezione programma e tabella di consumo
IT
Programmi Descrizione del programma
Capacità (kg)
Velocità centrifuga della
lavatrice (rpm)
Tempo di asciugatura
(minuti)
Cotone
Con questo ciclo si possono asciugare i
tessuti di cotone resistenti al calore. Si sceglie
un'impostazione di asciugatura adeguata allo
spessore del bucato da asciugare e al livello di
asciugatura desiderato.
10 1000 230
Eco
I tessuti di cotone a strato singolo, casual,
vengono asciugati nel modo più economico
possibile.
10 1000 220
Cotone pronto da stirare***
I tessuti di cotone a strato singolo e casual
asciugati un po' umidi, in modo che siano pronti
per la stiratura.
10 1000 160
Sintetici
Con questo ciclo si possono asciugare tutti i
tessuti sintetici. Selezionare un'impostazione di
asciugatura adeguata al livello di asciugatura
desiderato.
6 800 100
Misti
Usare questo programma per asciugare sia
tessuti sintetici che non stingono che in cotone.
Questo programma è adatto a capi sportivi e
da fitness.
6 1000 175
Lana
Usare questo programma per asciugare
indumenti in lana, quali ad esempio felpe, lavati
secondo le istruzioni. Consigliamo di rimuovere
gli indumenti al termine del programma
1,5 600 148
Silenzioso
In questo programma, il livello di rumore emesso
verrà ridotto al minimo. Con questo programma
è possibile asciugare in modo silenzioso capi in
cotone o in tessuti sintetici misti.
8 1000 240
GentleCare
Con questo programma si può asciugare
biancheria delicata o biancheria con il
simbolo del lavaggio a mano (camicette in
seta, biancheria intima leggera, ecc.) a basse
temperature.
4 1200 80
Asciugatura a tempo
PetHairCare
Sarà possibile selezionare i programmi a tempo
fra 10 e 160 minuti fino a raggiungere il livello
di asciugatura desiderato a bassa temperatura.
In questo programma, il funzionamento
dell’asciugatrice dura per il tempo impostato a
prescindere dal livello di asciugatura del bucato.
"PetHairCare" è una funzione di rinfresco il cui
scopo è quello di aiutare a stirare la biancheria
asciutta poco consumata oltre che di ridurre gli
odori presenti nell'aria (sigarette, cibo, ecc.)
- - -
Jeans
Con questo programma si possono asciugare
pantaloni, gonne, camicie o giacche in tessuto
denim.
4 1200 130
Sport
Utilizzatela per asciugare i capi in materiali
sintetici, cotone, tessuti misti o prodotti
impermeabili come giacche funzionali,
impermeabili, ecc. Rivoltateli prima
dell'asciugatura.
2 1000 135
24
Asciugatrice/ Manuale utente
Piumino
È possibile asciugare tessuti imbottiti di piume o
fibre recanti sull'etichetta la dicitura asciugabile
in asciugatrice come un unico pezzo di bucato.
È possibile asciugare piumoni king size, cuscini
o cappotti come un unico pezzo di bucato.
Asciugare tessuti quali giacche e cappotti
rivoltati.
- 800 165
Camicie
Asciuga le camicie in modo più delicato,
diminuendo la formazione di pieghe e facilitando
la stiratura.
1,5 1200 50
Rapido 30’
Utilizzare questo programma per ottenere 2
magliette pronte per essere stirate
0,5 1200 30
Baby
È il programma che permette di asciugare
i prodotti lavati cui assicurare un'igiene
extra (vestiti per bambini, biancheria intima,
asciugamani, ecc.). Assicura un'elevata igiene ai
propri tessuti grazie all'effetto del calore.
5 800 200
Refresh
È possibile usare questo programma per i vestiti
asciutti e il bucato a cui si vuole assicurare
l'igiene senza doverli lavare. Permette un'elevata
igiene ai tessuti asciutti grazie all'effetto del
calore.
1,5 - 120
Valori consumo elettricità
Programmi Capacità (kg)
Velocità
centrifuga della
lavatrice (rpm)
Quantità
approssimativa
di umidità
rimanente
Valore consumo
elettricità kWh
Cotone Asciutto Armadio 10 1000 60% 1,82
Cotone pronto da stirare 10 1000 60% 1,50
Capi sintetici pronti da
indossare
4 800 40% 0,80
"Se si asciuga regolarmente il carico massimo di 10Kg del programma Cotone, si consiglia
di collegare il tubo di scarico per evitare che l'asciugatrice si fermi a metà ciclo per svuotare il
serbatoio" (cfr. paragrafo "Collegamento allo scarico")."
* I valori sopra indicati sono stati specificati in condizioni standard. I valori di consumo possono
variare rispetto ai valori nella tabella a seconda del tipo di bucato, della velocità di centrifuga, delle
condizioni ambientali e dei livelli di tensione.
***Il programma Cotton Iron Dry” può essere impostato selezionando il programma “Cotone” sul
pannello di controllo e quindi scegliendo il livello di asciugatura “Iron Dry” utilizzando il pulsante di
selezione del livello di asciugatura. È possibile identificare il simbolo “Iron Dry” nella sezione 6.2
Simboli.
25
Asciugatrice/ Manuale utente
6.5 Funzioni ausiliarie
Livello di asciugatura
Il pulsante del livello di secchezza è usato per
regolare la secchezza desiderata. La durata
del programma può variare a seconda della
selezione.
Sarà possibile attivare questa
funzione solo prima dell’avvio del
programma.
Prevenzione delle pieghe
È possibile attivare e disattivare la funzione di
prevenzione delle pieghe premendo il pulsante
di selezione di prevenzione delle pieghe. Se
non si toglie il bucato immediatamente dopo il
completamento del programma, si potrà usare
la funzione di prevenzione delle pieghe per
evitare che il bucato si raggrinzisca.
Avviso acustico
L'asciugatrice emette un segnale acustico
quando il programma è terminato. Premere il
pulsante "Avviso acustico" se non si desidera
un avviso acustico. Quando si preme il pulsante
di avviso acustico, la luce si spegne e non
suona al termine del programma.
Sarà possibile selezionare questa
funzione prima o dopo l'avvio del
programma.
Bassa temperatura
Sarà possibile attivare questa funzione solo
prima dell’avvio del programma. Questa
funzione può essere attivata se si desidera
asciugare il bucato ad una temperatura
inferiore. La durata del programma sarà più
lunga dopo la sua attivazione.
Tempo di fine
Sarà possibile ritardare la durata di fine del
programma fino a un massimo di 24 ore grazie
alla funzione durata fine.
1. Aprire l’oblò a mettere il bucato all’interno.
2. Selezionare il programma di asciugatura.
3. Premere il pulsante End Time (Tempo
di fine) e impostare il tempo di partenza
ritardata desiderato. Il LED del tempo
finale si accende. (Quando il pulsante viene
premuto e tenuto premuto, il tempo di fine
procede senza interruzioni).
4. Premere il pulsante Start / Stand-by. Inizia il
conteggio alla rovescia del tempo di fine. Il
simbolo “:” nella parte centrale del tempo di
ritardo visualizzato lampeggia.
Sarà possibile aggiungere o togliere
il bucato entro il tempo di fine. Il
tempo visualizzato è la somma del
tempo di asciugatura normale e del
tempo di fine. Il LED tempo di fine
si spegne al termine del conto alla
rovescia, l’asciugatura inizia e il LED
di asciugatura si accende.
Modifica del tempo di fine
Per modificare la durata durante il conto alla
rovescia:
Mettere in pausa il programma e attivare
il pulsante On/Off/Selezione programma
e annullare il programma. Selezionare il
programma desiderato e ripetere il processo di
selezione dell’End Time (Tempo di fine).
Disattivare la funzione di end time (tempo di
fine)
Per annullare il conto alla rovescia del tempo di
fine e avviare immediatamente il programma:
Mettere in pausa il programma e attivare
il pulsante On/Off/Selezione programma
e annullare il programma. Selezionare il
programma desiderato e premere il pulsante
Start/Pausa.
Luce del cestello.
Premendo questo pulsante è possibile
accendere e spegnere la luce del cestello. La
luce si accende quando si preme il pulsante e si
spegne dopo un certo tempo.
6.6 Spie luminose di avvertenza
Le spie di avvertenza possono
variare a seconda del modello di
asciugatrice che si possiede.
Pulizia del filtro
Al termine del programma la spia per la pulizia
del filtro si accende.
26
Asciugatrice/ Manuale utente
Serbatoio dell'acqua
Se il serbatoio dell'acqua si riempie mentre
il programma continua, la spia di avvertenza
inizia a lampeggiare e l'apparecchiatura passa
in modalità stand-by. In questo caso, svuotare
il serbatoio dell'acqua e avviare il programma
premendo il pulsante Start/Stand-by. La spia di
avvertenza si spegne e il programma riprende.
Pulizia del cassetto filtro/
scambiatore di calore
Il simbolo di avvertenza lampeggia a intervalli
periodici a ricordare che il cassetto filtro deve
essere pulito.
6.7 Avvio del programma
Premere il pulsante Start / Stand-by per avviare
il programma.
Le spie Start/Stand-by e Drying (Asciugatura)
si illuminano a indicare che il programma è
iniziato.
6.8 Blocco bambini
L’asciugatrice è dotata di un blocco bambini
che impedisce l’interruzione del flusso
programma quando vengono premuti dei
pulsanti in fase di funzionamento. Quando il
blocco bambini è attivato, tutti i pulsanti del
pannello tranne il pulsante On/Off/Selezione
programma sono disattivati.
Premere il pulsante Avviso Acustico per 3
secondi per attivare il blocco bambini.
Il blocco bambini deve essere disattivato per
poter avviare un nuovo programma dopo che il
programma attuale finisce o per poter interferire
col programma. Per disattivare il blocco
bambini, tenere premuti gli stessi pulsanti per 3
secondi.
Quando il blocco bambini viene
attivato, la spia di avvertenza del
blocco bambini sullo schermo si
accende.
Quando il Blocco Bambini è attivato:
mentre l’asciugatrice è in funzione oppure
in modalità stand-by, i simboli indicatori non
cambiano se viene modificata la posizione del
pulsante di selezione programma.
Quando l'asciugatrice è in funzione
e il blocco bambini è attivo, se
si gira il pulsante di selezione del
programma, si sente un doppio
bip. Se il blocco bambini viene
disattivato prima che il pulsante di
selezione del programma venga
riportato nella sua posizione
originale, il programma verrà
terminato poiché il pulsante
di selezione del programma è
spostato.
6.9 Modifica del programma
dopo che è stato avviato
Dopo che l’asciugatrice inizia a funzionare, è
possibile modificare il programma selezionato
per l'asciugatura del bucato con un
programma diverso.
• Per esempio, Mettere in pausa il
programma e attivare il pulsante Acceso/
Spento/Selezione Programma per
selezionare il programma Extra Dry
(Extra asciutto) invece di Ironing Dryness
(Asciugatura con stiratura).
• Premere il pulsante Start / Stand-by per
avviare il programma.
Aggiungere e togliere indumenti durante la
fase di stand-by.
Per aggiungere o rimuovere indumenti in
asciugatrice/dall’asciugatrice dopo che è
iniziato il programma di asciugatura:
• Premere il pulsante Start/Stand-by per
mettere l’asciugatrice in modalità Stand-
by. La fase di asciugatura si interrompe.
• Aprire l’oblò di caricamento mentre ci si
trova in stato Stand-by, quindi chiudere
l’oblò dopo aver tolto o aggiunto bucato.
• Premere il pulsante Start / Stand-by per
avviare il programma.
27
Asciugatrice/ Manuale utente
L’aggiunta di bucato dopo
l’inizio della fase di asciugatura
potrebbe causare il mescolamento
del bucato asciutto all’interno
dell’asciugatrice col bucato umido
e lasciare quindi tutto il bucato
leggermente umido al termine della
funzione.
L’aggiunta o la rimozione di
bucato in fase di asciugatura
può essere ripetuta tutte le
volte necessarie, a seconda
delle proprie preferenze. Questa
operazione interrompe tuttavia in
modo continuo l’operazione di
asciugatura aumentando così la
durata del programma e il consumo
di energia. Consigliamo quindi
di aggiungere il bucato prima
dell'inizio del programma.
Qualora venga selezionato un
nuovo programma ruotando
il pulsante di selezione del
programma mentre l’asciugatrice è
in modalità stand-by, il programma
in corso si interrompe.
Non toccare la superficie interna
del tamburo in fase di aggiunta
o estrazione degli indumenti
mentre un programma è in fase
di esecuzione. La superficie del
tamburo è calda.
6.10 Annullamento del programma
Se si vuole annullare il programma e concludere
l'operazione di asciugatura per qualsiasi
motivo dopo che l’asciugatrice ha iniziato a
funzionare, Mettere in pausa il programma e
ruotare il pulsante Acceso/Spento/Selezione
Programma; il programma terminerà.
L’interno dell’asciugatrice è
molto caldo quando viene
annullato il programma in fase
di funzionamento, quindi avviare
il programma “Refresh” per
consentirne il raffreddamento.
6.11 Fine del programma
Quando il programma termina, si accendono
i LED di End/Wrinkle Prevention (Fine/
Prevenzione Pieghe) e il Fibre Filter Cleaning
Warning (avviso di pulizia del filtro fibre)
sull'indicatore di follow-up del programma. Sarà
possibile aprire l’oblò di carico e l'asciugatrice
sarà pronta per un altro carico.
Portare il pulsante di selezione Acceso/Spento/
Programma in posizione Acceso/Spento per
spegnere l'asciugatrice.
Se il bucato non viene tolto dopo
il completamento del programma,
e se la funzione di prevenzione
pieghe è attiva, quest’ultima
funziona per 2 ore al fine di
evitare che il bucato all’interno
dell’apparecchiatura si raggrinzisca.
Il programma muove il bucato a
intervalli di 10 minuti per evitare la
formazione di pieghe.
6.12 Funzionalità Odore
Se l’asciugatrice ha la funzione odori, leggere
il manuale ProScent per utilizzare questa
funzione.
6.13 Ciclo PetHairCare
PetHairCare è un ciclo rinfrescante progettato
per rimuovere i peli di animali domestici
indesiderati (certificato da un istituto
indipendente, punteggio 4,6/5), ridurre gli
odori nell'aria e lisciare delicatamente i capi
asciutti leggermente consumati. Da utilizzare su
biancheria asciutta.
Per rimuovere i peli di animali domestici
Utilizzare con 1-3 capi asciutti e avviare il
programma per 80 minuti.
Per ridurre gli odori e le pieghe
Utilizzare con 1-5 capi asciutti e avviare il
programma per 50 minuti.
Nota: Per i capi che hanno assorbito odori forti,
come profumi, deodoranti o sudore, è meglio
lavarli per eliminare completamente gli odori.
Precauzioni per l'asciugatura
Non utilizzare questa funzione con capi che
hanno accessori appuntiti o duri o capi in pelle.
28
Asciugatrice/ Manuale utente
Riempire il serbatoio dell’acqua
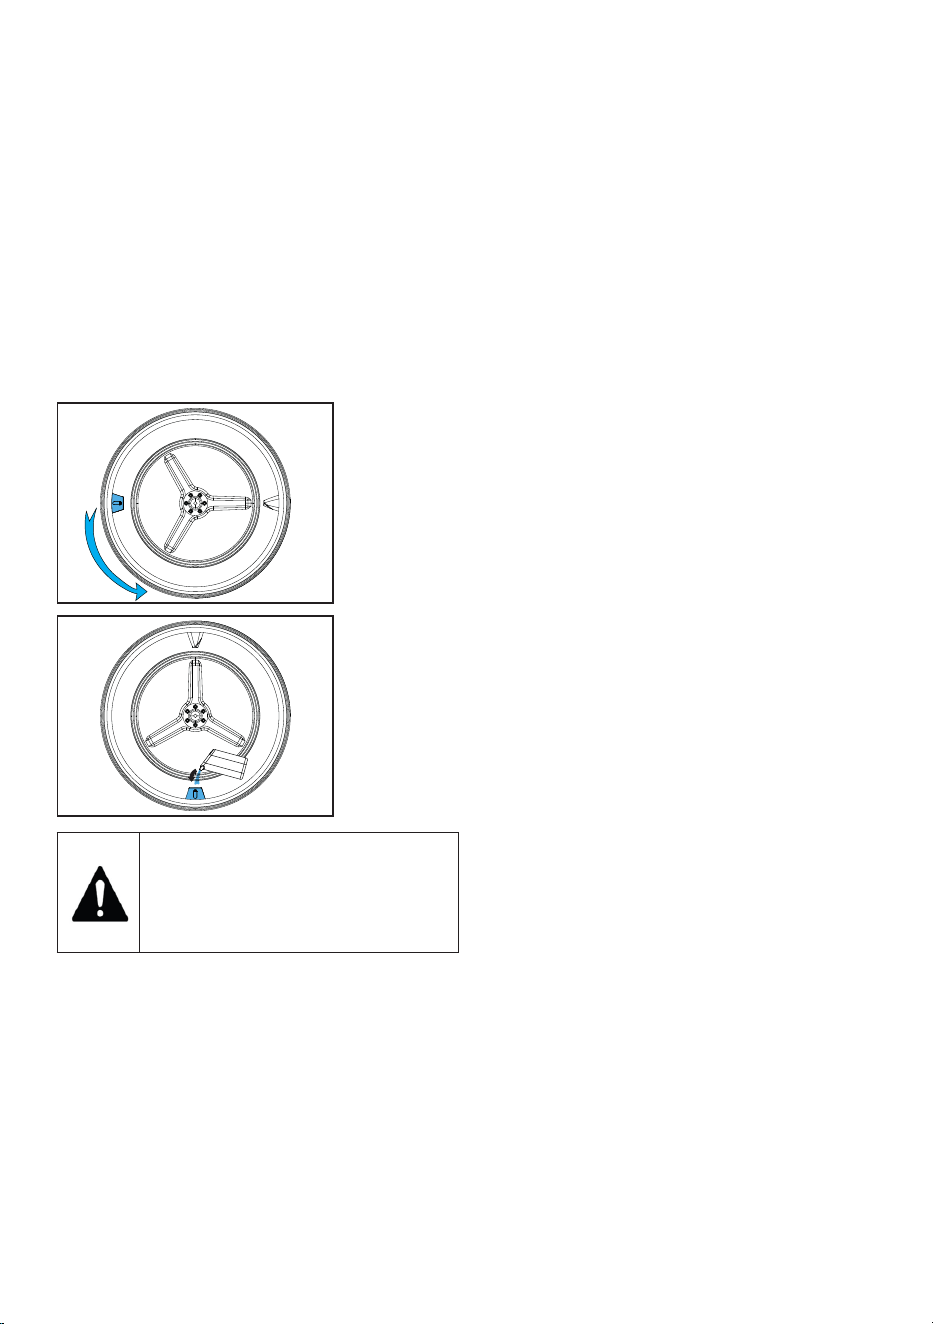
1 aletta blu nella macchina esegue il processo
di irrorazione con acqua del bucato.
Se l'aletta è in alto, è possibile ruotare
manualmente il cestello nella posizione più
bassa e riempire con acqua.
Prima di utilizzare il programma PetHairCare,
l'acqua nel contenitore di riempimento deve
essere versata manualmente nell'ala fino al
livello massimo.
Per eliminare le pieghe si dovrebbe usare acqua
di rubinetto o acqua potabile.
Alcune gocce d'acqua che possono traboccare
dall'aletta durante il riempimento non
causeranno alcun problema.
Non utilizzare additivi o
decalcificanti.
Non si dovrebbero usare prodotti
chimici che possono essere sciolti
con prodotti chimici liquidi e liquidi.
Avvio del programma
L'aletta dovrebbe essere portata nella
posizione più bassa e riempita d'acqua fino
all'area contrassegnata con il contenitore di
riempimento. Sarà necessario selezionare il
programma PetHairCare.
Quando si seleziona il programma, il tempo
indicato sullo schermo apparirà come 10
minuti. Il programma orario viene impostato
sull'ora desiderata premendo il pulsante
di selezione e premendo il pulsante Start/
Standy-By.
Nota importante
Questa funzione non lava i capi. È destinata
a rimuovere i peli di animali domestici,
ridurre al minimo gli odori e rinfrescare i
capi in modo che possano essere indossati
nuovamente.
29
Asciugatrice/ Manuale utente
7 Manutenzione e pulizia
Leggere come prima cosa le
"Istruzioni di sicurezza"!
7.1 Filtri per lanugine (filtri interni
ed esterni) / Pulizia della superficie
interna dell’oblò di caricamento
I capelli e le fibre che si separano dal bucato
durante il processo di asciugatura vengono
raccolti dal filtro lanugine. Una pulizia
insufficiente dei filtri può aumentare la durata
dell'essiccazione e il consumo energetico.
Una pulizia insufficiente dei filtri può causare
l'umidità della biancheria dopo il ciclo di
asciugatura. Durante la pulizia dei filtri, per
evitare che le microplastiche si diffondano nel
sistema idrico utilizzato, è necessario rimuovere
lo sporco e i capelli. Durante la pulizia dei filtri,
l'acqua non deve essere scaricata verso gli
scarichi.
Dopo ogni ciclo di asciugatura,
pulire il filtro per lanugine e la
superficie interna dell’oblò di
caricamento.
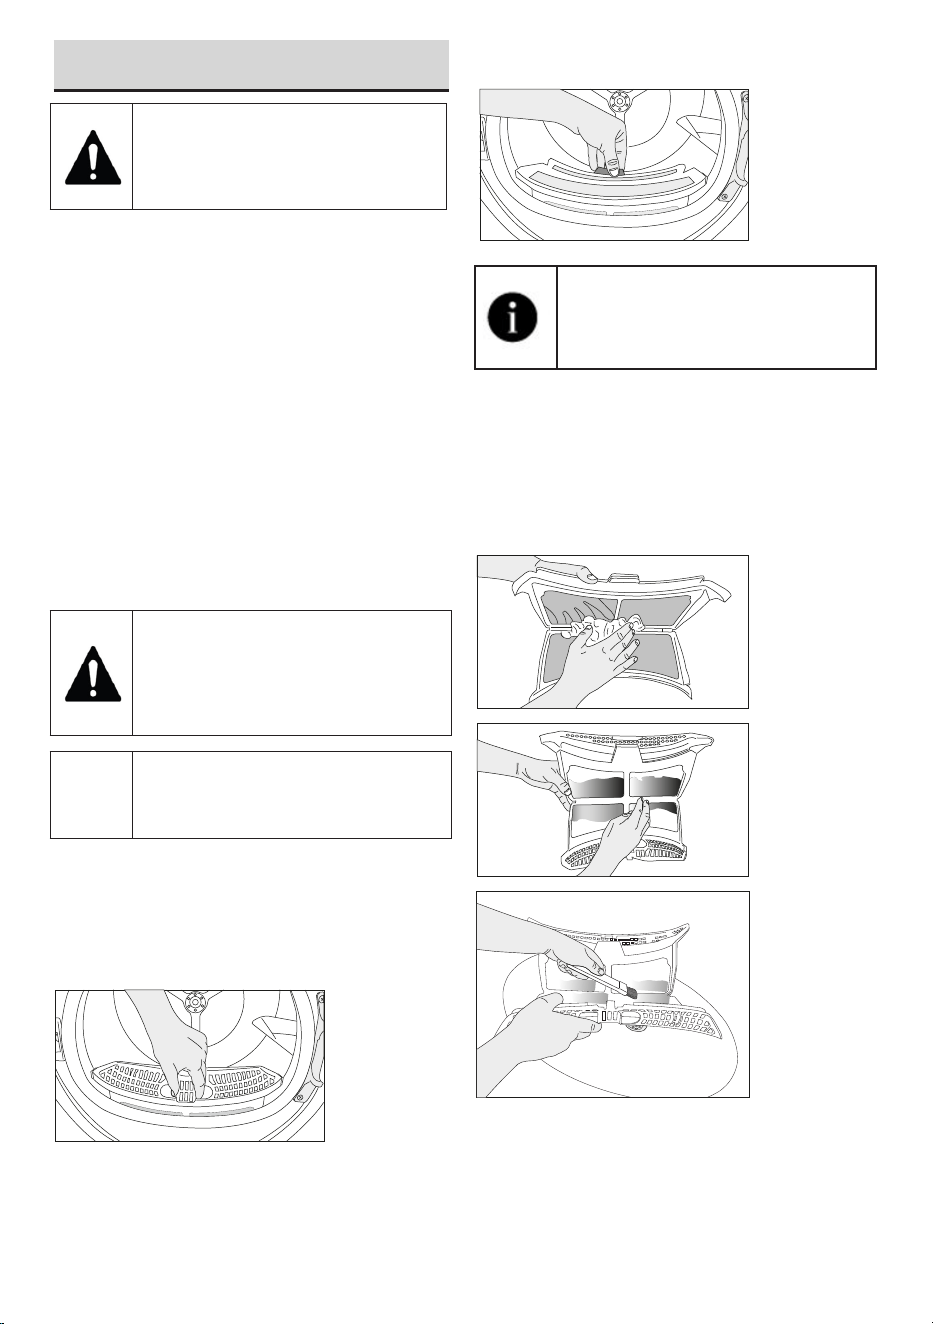
AVVISO
L’ asciugatrice ha 2 filtri lanugine,
uno posto all'interno dell'altro. Non
utilizzare il prodotto senza i filtri
lanugine.
Per pulire il filtro lanugine:
• Aprire l’oblò di caricamento.
• Tenere la prima parte (filtro interno) del filtro
lanugine in due parti e rimuoverlo tirandolo
verso l'alto.
• Rimuovere la seconda parte (filtro esterno)
tirandola verso l'alto.
Verificare che capelli, fibre e batuffoli
di cotone non cadano nella fessura
dove sono installati i filtri.
• Aprire entrambi i filtri lanugine (esterno e
interno) e rimuovere le fibre con le mani
o con la spazzola del deflettore d'aria.
Sarà possibile pulire i capelli nei filtri con
un aspirapolvere. La lanugine deve essere
gettata nel cestino dei rifiuti e non lavata
nello scarico, per evitare di diffondere micro-
plastiche nel sistema dell'acqua usata.
30
Asciugatrice/ Manuale utente
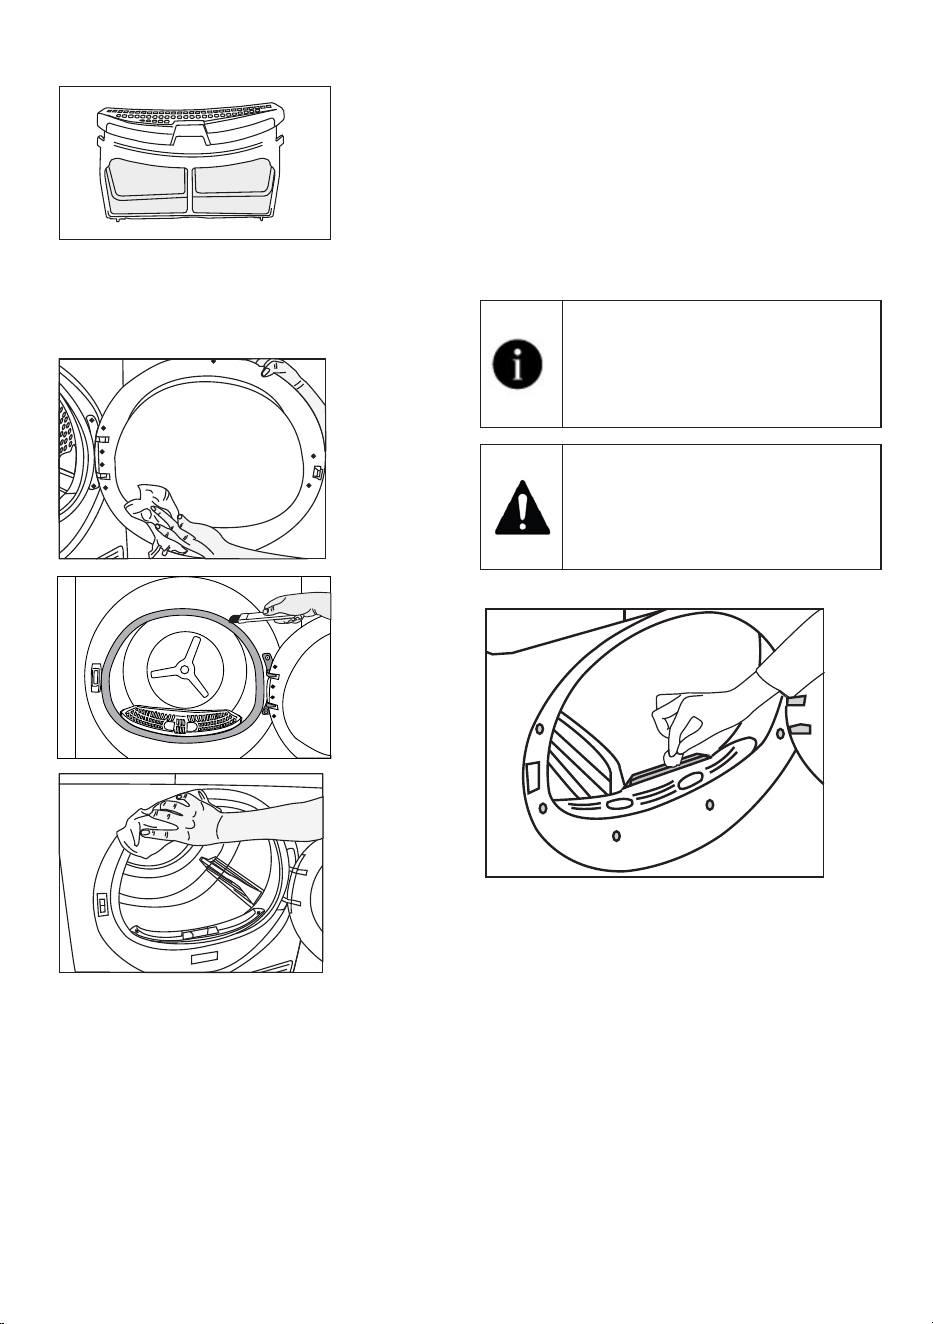
• Inserire i filtri lanugine uno sull'altro e
rimetterli in posizione.
• Pulire la superficie interna dell’oblò di
caricamento e la guarnizione con un panno
morbido e umido o con la spazzola del
deflettore d'aria.
7.2 Pulizia del sensore
L'asciugatrice ha dei sensori di umidità che
rilevano se il bucato è asciutto.
Per pulire i sensori:
Aprire l’oblò di caricamento dell'asciugatrice.
Se la macchina è calda a causa dell'operazione
di asciugatura, attendere che si raffreddi.
Pulire le superfici metalliche del sensore con
un panno morbido inumidito con aceto e poi
asciugare.
Pulire le superfici metalliche del
sensore 4 volte all'anno.
Non utilizzare strumenti metallici
per pulire le superfici metalliche dei
sensori.
A causa del pericolo di incendio e di
esplosione, non utilizzare soluzioni,
materiali di pulizia o strumenti simili
per pulire i sensori.
31
Asciugatrice/ Manuale utente
7.3 Svuotare il serbatoio dell'acqua
Durante l'asciugatura, l'umidità viene rimossa
dal bucato e condensata, poi l'acqua si
accumula nel serbatoio dell'acqua. Svuotare
il serbatoio dell'acqua dopo ogni sessione di
asciugatura.
L'acqua condensata non è acqua
potabile!
Non rimuovere il serbatoio
dell'acqua mentre è in corso un
programma!
Se non si svuota il serbatoio dell'acqua,
durante le successive sessioni di asciugatura
la macchina smetterà di funzionare perché il
serbatoio dell'acqua è pieno e l'icona di avviso
del serbatoio dell'acqua lampeggerà. In questo
caso, svuotare il serbatoio dell'acqua e per
continuare l'operazione di asciugatura, premere
il pulsante Start / Stand-by.
Per scaricare il serbatoio dell'acqua:
Estrarre con attenzione il serbatoio dell'acqua
dal suo cassetto.
Scaricare l'acqua nel serbatoio.
Rimuovere con attenzione il serbatoio
dell'acqua nel cassetto o lo zoccolo base.
Se si accumula lanugine nell'imbuto del
serbatoio dell'acqua, rimuoverle sotto l'acqua
corrente.
Rimettere in posizione il serbatoio dell'acqua.
Se si utilizza l'opzione di scarico
diretto, non è necessario scaricare il
serbatoio dell'acqua.
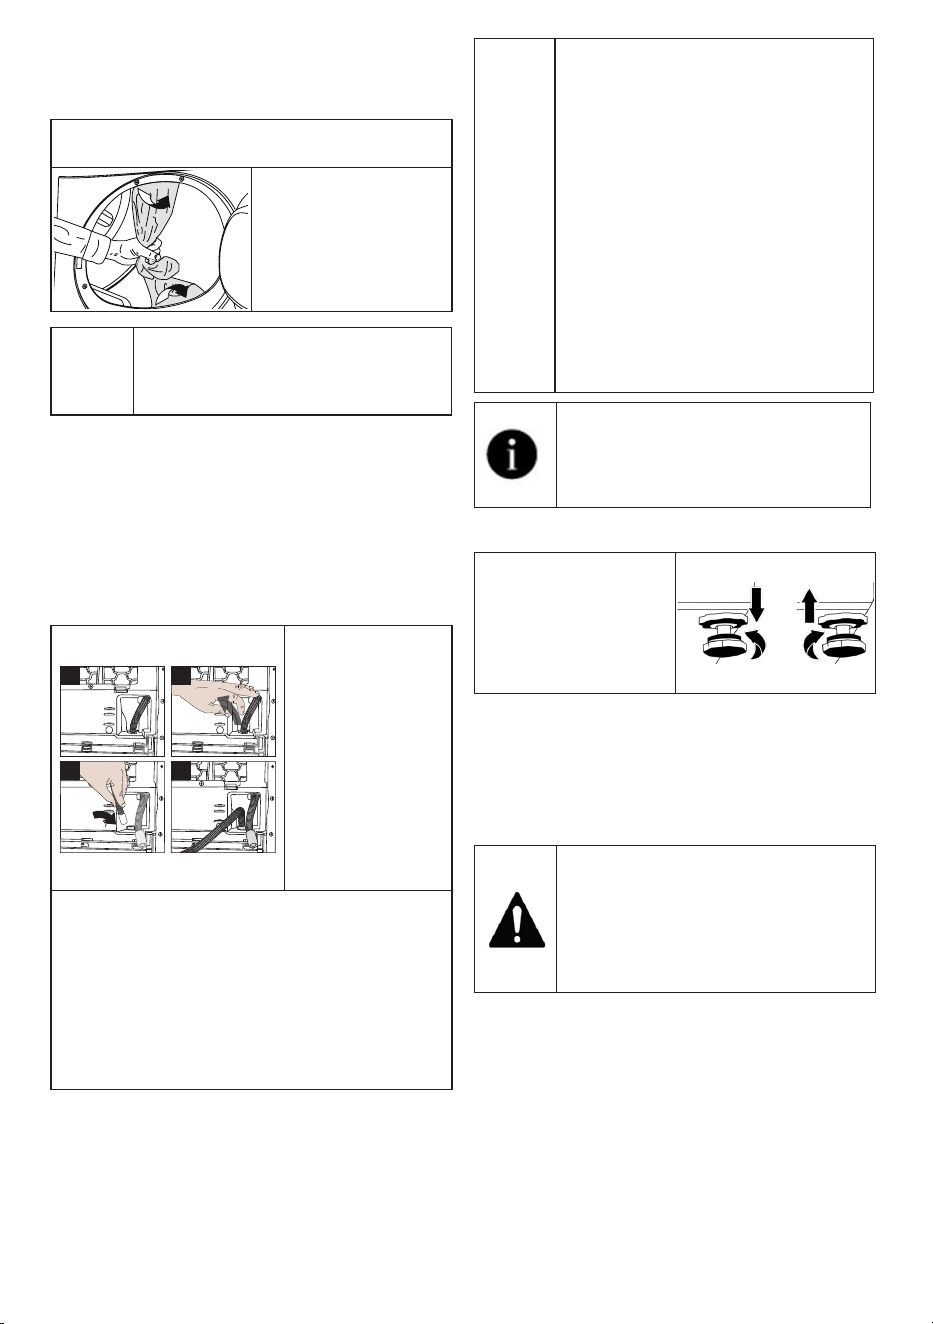
7.4 Pulizia del condensatore
I capelli e le fibre che non sono raccolti dal
filtro lanugine si accumulano sulla superficie
metallica del condensatore dietro il deflettore
dell'aria. Queste fibre devono essere pulite in
modo regolare.
Se l'icona della pulizia del condensatore
lampeggia, controllare la superficie metallica.
Qualora vi siano delle fibre, invitiamo a eseguire
un intervento di pulizia. Deve essere controllato
almeno ogni 6 mesi.
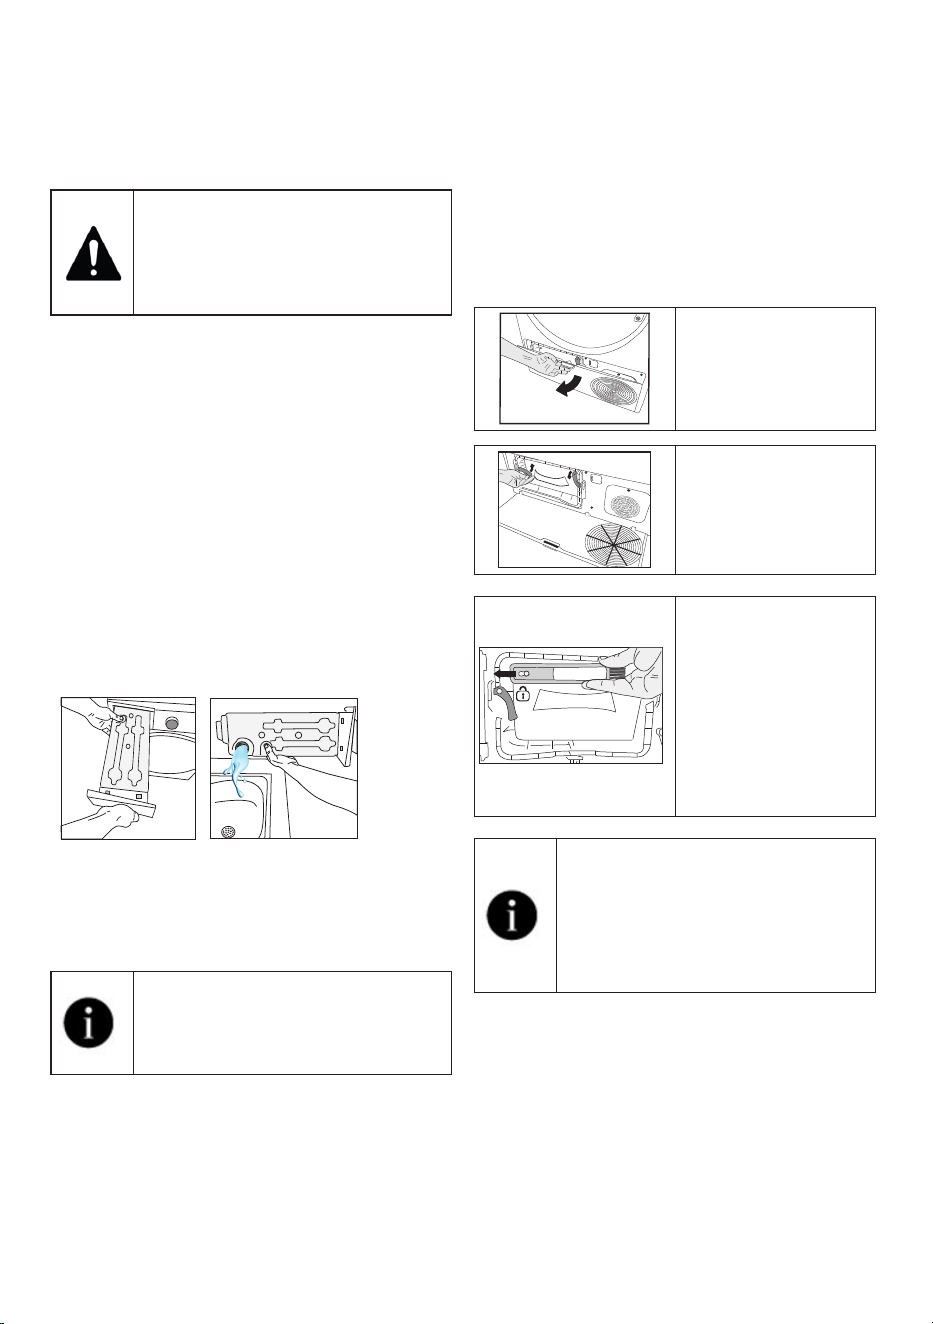
Aprire il pannello
delle dita tirando il
pulsante.
Spostare i fermi per
aprire il coperchio del
deflettore d'aria.
Tirare la spazzola
verso sinistra per
toglierla. Sarà
possibile usare la
spazzola di pulizia
per pulire il filtro, la
superficie metallica di
condensazione e le
fibre accumulate sulla
porta.
La spazzola per la pulizia si trova
all'interno della borsa contenente
la documentazione. Prendere la
spazzola dalla borsa contenente
la documentazione e inserirla al
suo posto sul deflettore d'aria per
riporla.
32
Asciugatrice/ Manuale utente
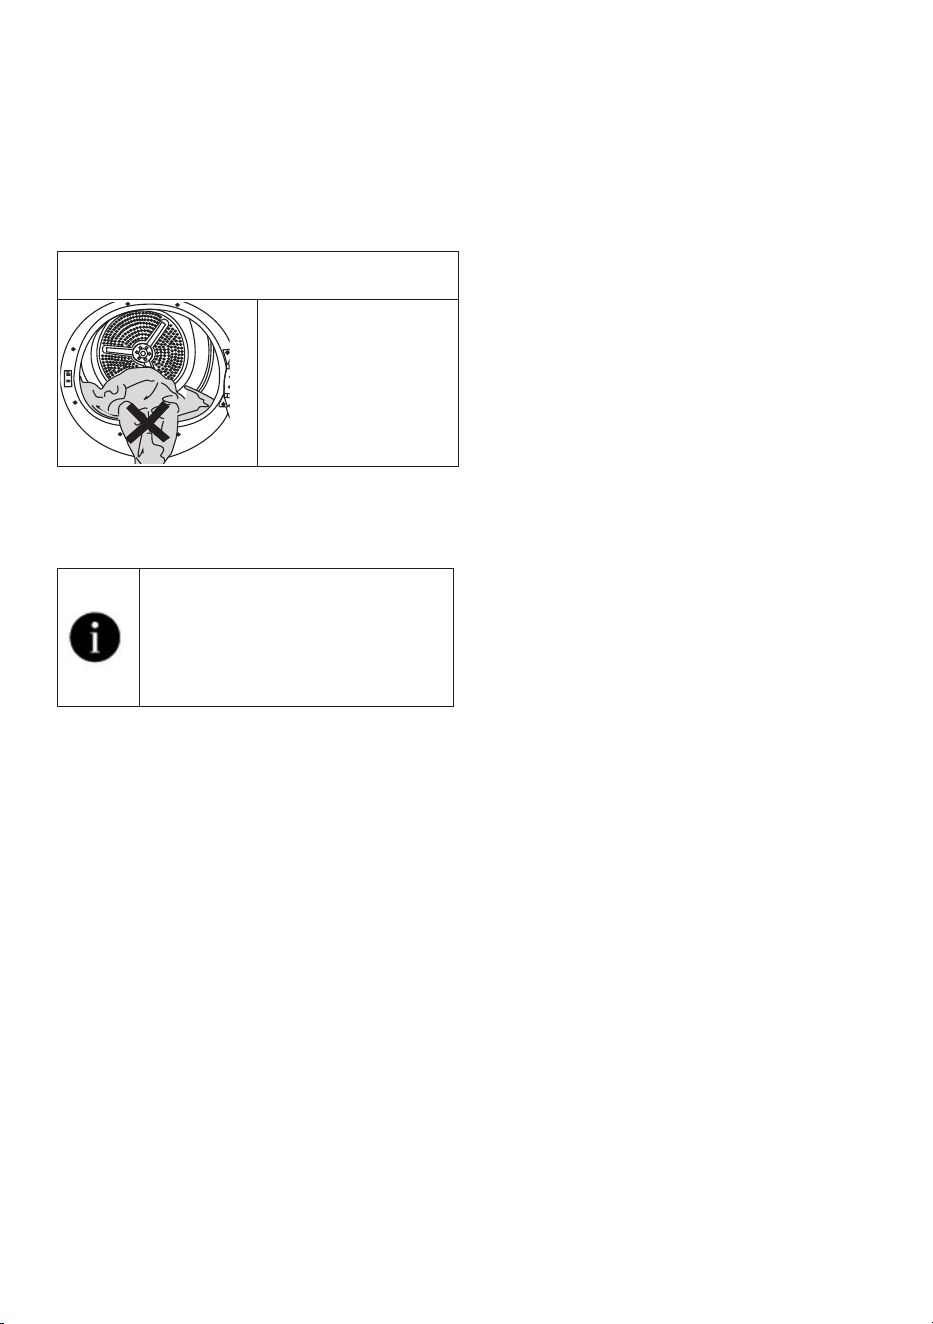
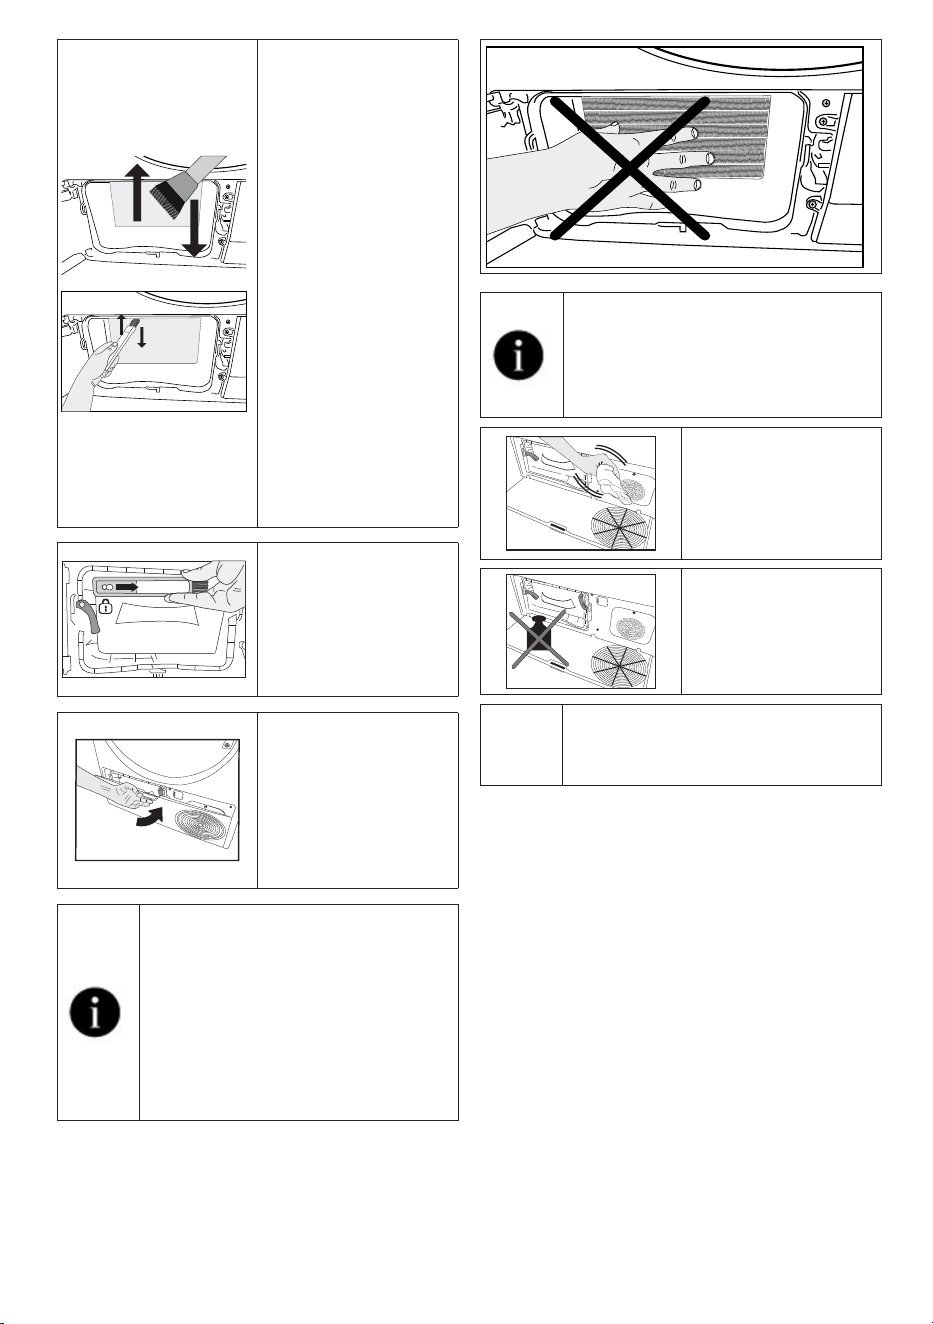
Pulire la fibra sulla
superficie metallica
del condensatore con
un panno umido o la
spazzola sul deflettore
dell'aria in direzione
su - giù. Non pulire
con la direzione
destra-sinistra
perché danneggia le
piastre metalliche del
condensatore.
Sarà possibile usare
un aspirapolvere
con una spazzola
per la pulizia. Se
l'aspirapolvere
non dispone di
una spazzola,
sconsigliamo di usarlo
per la pulizia del
condensatore.
Dopo aver pulito
il filtro, lo sportello
e il condensatore,
trascinare la spazzola
verso destra e
bloccarla al suo
posto.
Dopo aver completato
il processo di pulizia,
rimettere il coperchio
del deflettore dell'aria
in posizione, spostare
i fermi per chiuderlo
e chiudere lo zoccolo
base.
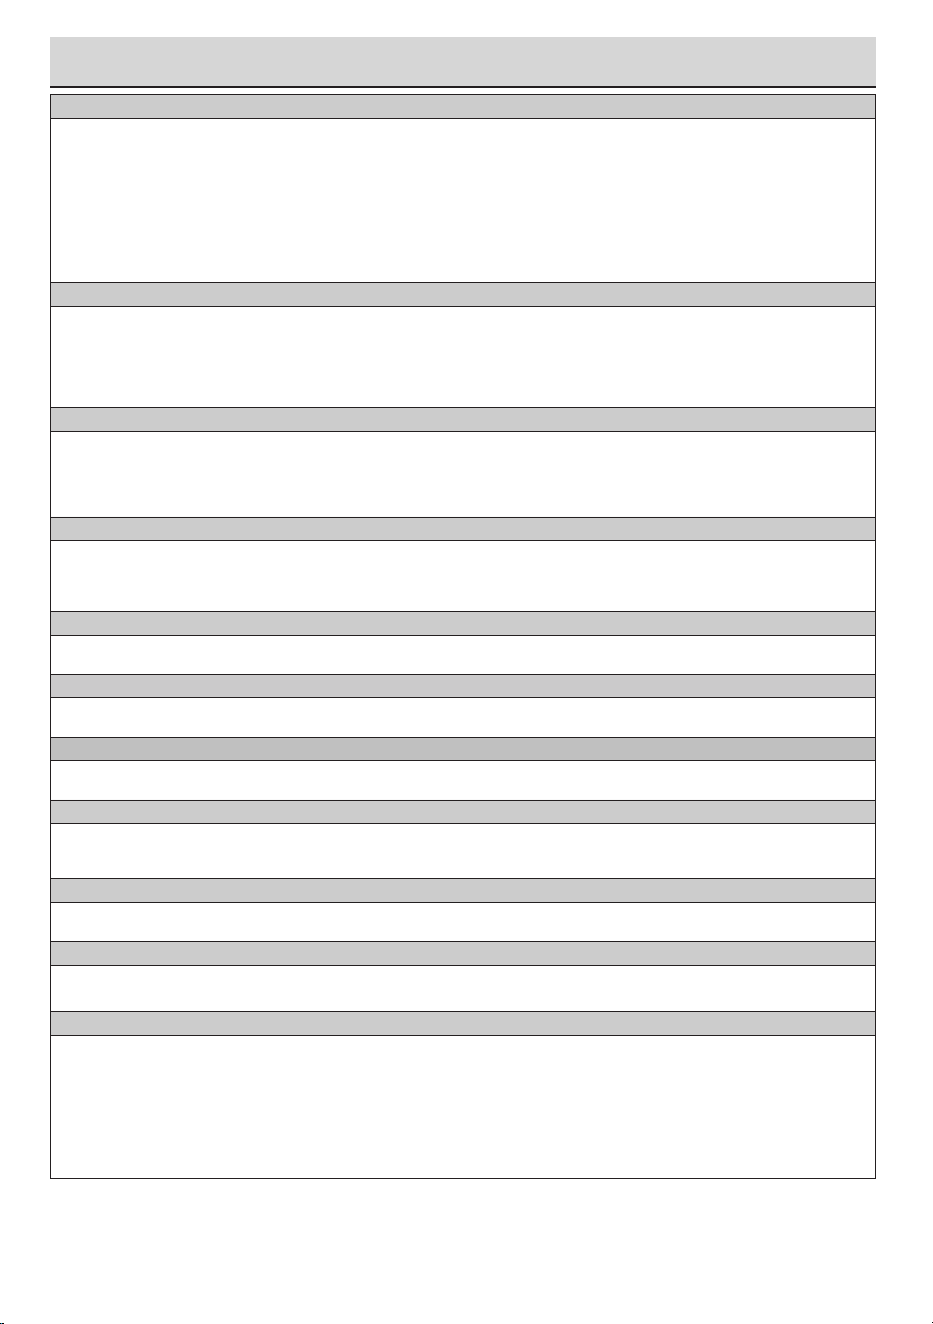
Si può pulire a mano, purché si
indossino guanti protettivi. Non
cercare di pulire a mani nude. Le
alette del condensatore possono
danneggiare le mani. La pulizia da
sinistra a destra può danneggiare
le alette del condensatore.
Questo può portare a problemi di
asciugatura.
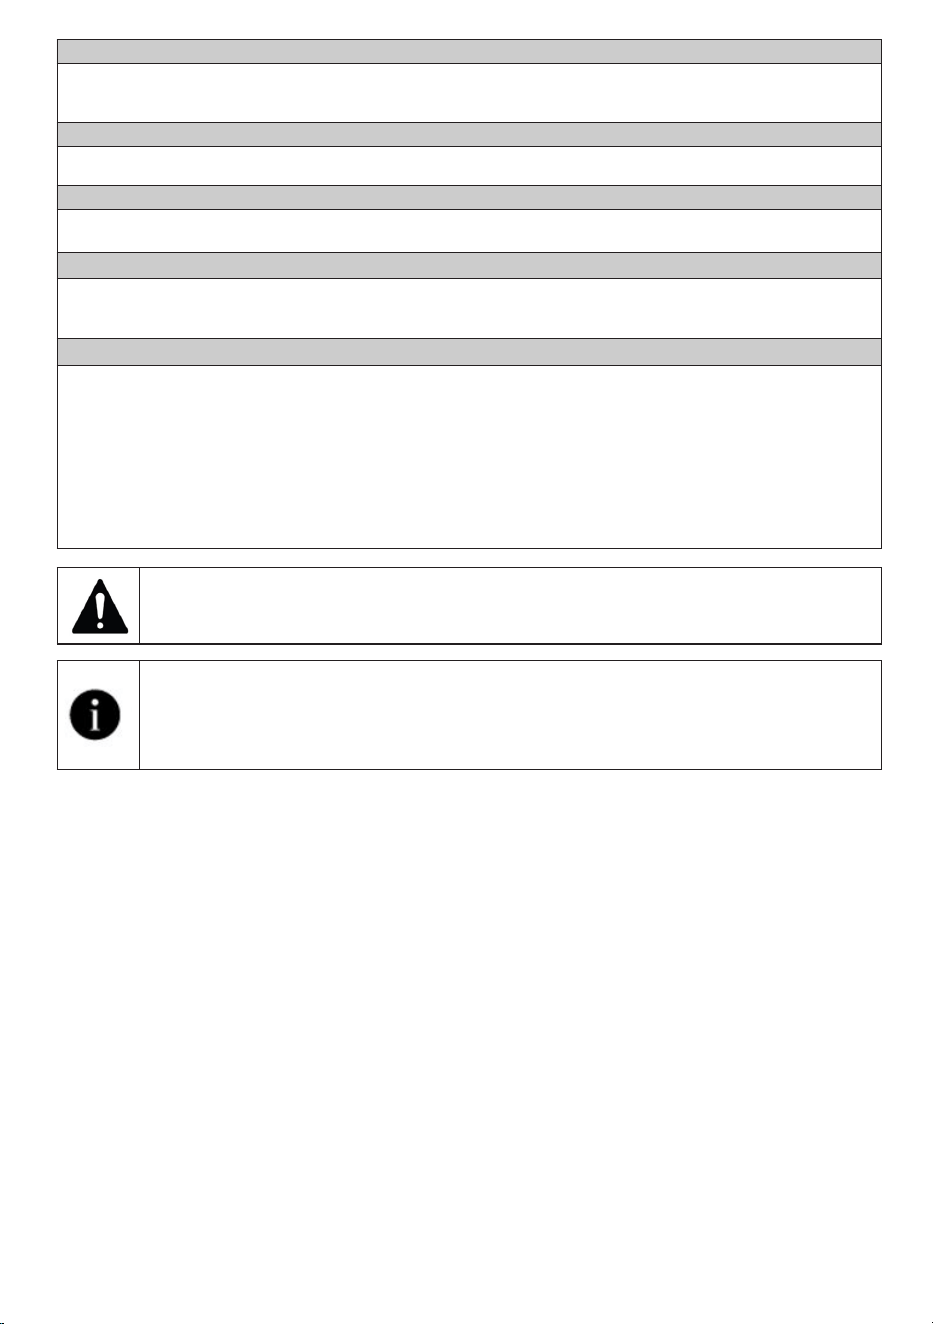
Quando il coperchio del deflettore
dell'aria viene rimosso, è normale
avere acqua nella sezione di plastica
davanti al condensatore.
Qualora venga visto
un accumulo di fibre
sul copriventola e
sulla tavola di fondo,
si prega di rimuoverlo
con un panno.
Non avere peso sullo
zoccolo base pedana
quando è aperto.
AVVISO
Non usare materiali abrasivi o lana
d'acciaio per pulire il tamburo.
33
Asciugatrice/ Manuale utente
8 Guida alla risoluzione dei problemi
Il processo di asciugatura richiede troppo tempo.
I pori del filtro lanugine (filtri interni ed esterni) possono essere ostruiti. >>> Può essere pulito con l'aspirapolvere.
Il lato anteriore del condensatore potrebbe essere ostruito. >>> Pulire il lato anteriore del condensatore.
Le griglie di ventilazione davanti alla macchina potrebbero essere chiuse. >>> Rimuovere qualsiasi oggetto davanti alle griglie di
ventilazione che blocca l'aria.
La ventilazione potrebbe essere insufficiente se l'asciugatrice è installata in uno spazio ridotto. Aprire la porta o le finestre per evitare
che la temperatura dell’acqua raggiunga livelli molto elevati.
Se c'è un sensore di umidità;
Si potrebbe essere accumulato uno strato di calcare sul sensore dell’umidità. >>> Pulire il sensore dell’umidità.
La macchina potrebbe essere sovraccarica di biancheria. >>> Non sovraccaricare eccessivamente l'asciugatrice.
Il bucato potrebbe non essere stato centrifugato abbastanza. >>> Far girare la lavatrice a una velocità maggiore.
Il bucato esce umido dopo l'asciugatura.
Potrebbe non essere stato utilizzato il programma giusto per il tipo di biancheria. >>> Verificare le etichette di manutenzione della
biancheria e selezionare un programma ideale per il tipo di biancheria o utilizzare programmi più lunghi.
I pori del filtro lanugine (filtri interni ed esterni) possono essere ostruiti. >>> Può essere pulito con l'aspirapolvere.
Il lato anteriore del condensatore potrebbe essere ostruito. >>> Pulire il lato anteriore del condensatore.
La macchina potrebbe essere sovraccarica di biancheria. >>> Non sovraccaricare eccessivamente l'asciugatrice.
Il bucato potrebbe non essere stato centrifugato abbastanza. >>> Far girare la lavatrice a una velocità maggiore.
L'asciugatrice non si accende oppure non è possibile avviare il programma. L'asciugatrice non si accende quando è impostata.
La spina di alimentazione potrebbe non essere inserita. >>> Assicurarsi che la spina sia inserita.
L’oblò di caricamento può essere lasciato aperto. >>> Controllare che l’oblò di caricamento sia chiuso correttamente.
È possibile che il programma non sia stato impostato o che non sia stato premuto il tasto Avvio/Pausa. >>> Controllare che il
programma sia stato impostato e che non sia in posizione di Standby.
Il blocco bambini potrebbe essere attivato. >>> Disattivare il blocco bambini.
Il programma è stato interrotto senza motivo.
Forse la porta di caricamento non è stata chiusa in modo corretto. >>> Controllare che l’oblò di caricamento sia chiuso
correttamente.
Ci potrebbe essere un’interruzione dell’alimentazione. >>> Premere il pulsante Start / Standby / Cancel per avviare il programma.
Il serbatoio dell'acqua potrebbe essere pieno. >>> Svuotare del serbatoio dell'acqua.
Il bucato si restringe, si opacizza o si rovina.
È possibile che non sia stato utilizzato il programma adatto al tipo di biancheria. Controllare le etichette di manutenzione sugli
indumenti e selezionare un programma adatto agli indumenti stessi.
Gocciola acqua dall’oblò di caricamento.
La lanugine si potrebbe essere accumulata sulle suprefici interne dell’oblò di caricamento e sulle superfici della guarnizione dell’oblò di
caricamento. >>> Pulire le superfici interne dell’oblò di caricamento e le superfici dell’oblò di caricamento.
L’oblò di caricamento si apre da solo.
Forse la porta di caricamento non è stata chiusa in modo corretto. >>> Spingere l’oblò di caricamento fino a che non si sente un
suono di chiusura.
Il simbolo di avvertenza del serbatoio dell'acqua è acceso/lampeggiante.
Il serbatoio dell'acqua potrebbe essere pieno. >>> Svuotare del serbatoio dell'acqua.
Il tubo di scarico dell’acqua potrebbe essersi piegato. Se il prodotto è collegato direttamente allo scarico
dell'acqua di scarico, controllare il tubo flessibile di scarico dell'acqua.
L'illuminazione all'interno dell'asciugatrice non si accende. (nei modelli con lampade)
L'asciugatrice potrebbe non essere stata accesa con il pulsante On/Off. >>> Controllare che l'asciugatrice sia accesa.
La lampada potrebbe essere rotta. >>> Contattare il Servizio Autorizzato per procedere alla sostituzione della lampada.
L'icona o la spia Anti-Piega è accesa.
Può essere attivata la modalità Anti-Piega che impedisce al bucato nell'asciugatrice di sgualcirsi. >>> Spegnere l'asciugatrice e
togliere il bucato..
L'icona della pulizia del filtro in fibra è accesa
I filtri lanugine (filtro interno ed esterno) potrebbero essere sporchi. >>> Può essere pulito con l'aspirapolvere.
Nei pori del filtro lanugine si può formare uno strato che porta all'intasamento. >>> Può essere pulito con l'aspirapolvere.
Nei pori del filtro lanugine (filtri interni ed esterni) può formarsi uno strato che provoca un intasamento.<<Può essere
pulito con l'aspirapolvere.>>
I filtri lanugine potrebbero non essere a posto. >>> Inserire i filtri interni ed esterni in posizione.
Il tessuto filtrante eco potrebbe non essere installato sulla parte in plastica e la parte anteriore del condensatore
potrebbe essersi intasata.>>>Installareil filtro eco sulla parte in plastica e posizionarlo sull'alloggiamento del filtro.
I filtri eco potrebbero non essere stati sostituiti anche se il simbolo di avvertenza è acceso. "Sostituire il proprio filtro"
34
Asciugatrice/ Manuale utente
La macchina emette un segnale acustico,
I filtri lanugine potrebbero non essere a posto. >>> Inserire i filtri interni ed esterni in posizione.
I filtri della macchina potrebbero non essere stati installati.>>> Installare i filtri lanugine (interni ed esterni) o il filtro
ecologico nel loro alloggiamento.
L'icona di avvertenza del condensatore lampeggia.
Il condensatore può essere intasato da fibre. >>> Pulire il lato anteriore del condensatore.
I filtri lanugine potrebbero non essere a posto. >>> Inserire i filtri interni ed esterni in posizione.
L'illuminazione all'interno dell'asciugatrice si accende. (nei modelli con lampade)
Se l'asciugatrice è collegata alla presa di corrente, si preme il pulsante On/Off e lo sportello è aperto; la luce si accende. >>>
Scollegare l'asciugatrice o portare il pulsante On/Off in posizione Off.
L'icona Wi-Fi lampeggia continuamente. (Modelli con funzione HomeWhiz)
>>> Il prodotto potrebbe non essere collegato alla rete wireless. Seguire le istruzioni per connettersi alla rete. Il
dispositivo che l'apparecchio utilizza per connettersi alla rete potrebbe essere difettoso. Controllare. L'apparecchio
potrebbe non essere connesso alla rete perché fuori dal raggio d'azione del wi-fi..
Se sullo schermo compare la scritta “F L t”, controllare i passaggi seguenti.
I filtri potrebbero essere sporchi. Pulire i filtri interni ed esterni
Nell'area dell’oblò di caricamento, se si utilizzano i doppi filtri interno ed esterno. >>> Assicurarsi che
entrambi i filtri siano installati.
Il lato anteriore del condensatore potrebbe essere sporco. >>> Aprire e controllare la zona di calcio e
assicurarsi che sia pulita.
Consultare la sezione Manutenzione e pulizia.
Gli eventuali corpi estranei devono essere rimossi dal tamburo dell’essiccatore.
I ricambi saranno disponibili per un periodo fino a 10 anni, in base ai requisiti del Regolamento specifico.
Qualora il problema persista dopo aver seguito le istruzioni contenute in questa selezione,
contattare il proprio fornitore oppure un Servizio Autorizzato. Non tentare mai di riparare da
soli un prodotto malfunzionante.
Se si riscontra un problema con qualsiasi parte del tuo dispositivo, puoi richiedere una
sostituzione consultando il servizio autorizzato più vicino con il numero di modello del
dispositivo.
L›utilizzo di parti non originali può causare il malfunzionamento dell›apparecchio.
Il produttore e il distributore non sono responsabili di malfunzionamenti causati da parti non
autentiche.
35
Asciugatrice/ Manuale utente
(4) Scala da G (meno efficiente) a A (più efficiente)
(5) Valore medio previsto — L espresso in dB(A) re 1 pW
WA
(1) Scala da A+++ (più efficiente) a D (meno efficiente)
(2) Consumo energetico basato su 160 cicli di asciugatura del programma cotone standard a carico pieno e parziale e il consumo nelle modalità a bassa potenza.
Il consumo energetico reale per ciclo dipende dal modo di utilizzo dell'apparecchio.
(3) Il programma per l'asciugatura armadio dei capi in cotone utilizzato a carico pieno e parziale è il programma di asciugatura standard a cui fanno riferimento
l'etichetta e la scheda dati, cioè questo programma è adatto per asciugare il normale bucato in cotone ed è quello più efficiente in termini di consumo
energetico per il cotone.
: Sì - : No
Nome fornitore o marchio commerciale
Nome modello
Capacità nominale (kg)
Tipo di asciugatrice a tamburo
Condensatore
Ventilato ad aria
Classe di efficienza energetica
(1)
Consumo energetico annuale (kWh)
(2)
Tipo di controllo
Consumo energetico del programma cotone standard a pieno carico (kWh)
Consumo energetico del programma cotone standard a carico parziale (kWh)
Consumo energetico della modalità off per il programma cotone standard a pieno carico, P (W)
O
Consumo energetico della modalità left-on per il programma cotone standard a pieno carico, P (W)
L
Durata della modalità left-on (min)
Programma cotone standard
(3)
Durata del programma per il programma cotone standard a pieno carico, T (min)
asc.
Durata del programma per il programma cotone standard a carico parziale, T (min)
asc.1/2
Durata prevista del programma per il programma cotone standard a carico pieno e parziale (T )
t
Classe di efficienza condensa
(4)
Efficacia di condensa media del programma cotoni standarda pieno carico, C
asc.
Efficienza condensa media del programma cotone standard a carico parziale, C
asc.1/2
Efficienza condensa prevista del programma cotone standard a carico pieno e parziale, C
t
Livello potenza rumore per il programma cotone standard a pieno carico
(5)
Incassata
SCHEDA PRODOTTO
Conforme al Regolamento delegato della commissione (UE) N. 392/2012
Non-automatico
Automatico
A++
217,0
-
1,82
0,97
0,50
1,00
30
220
166
B
88%
88%
88%
64
-
10.0
125
-
HOTPOINT
HPT 104D BS IT
7188383920
Dear Customer,
Please read this guide prior to use this product!
Thank you for choosing Hotpoint product. We would like you to achieve the optimal efficiency
from this high quality product which been manufactured with state of the art technology. Please
make sure you read and understand this guide and supplementary documentation fully before
use.
Observe all warnings and information herein. Therefore you can protect both yourself and your
product against potential damages.
Keep the manual. Include this guide with the unit if you hand it over to someone else.
Symbols and Remarks
The following symbols are used in the user guide:
Danger that may cause death or injury
Read the manual
Important information or useful usage tips
Warning against hot surfaces
B
Warning against electric shock
Warning against UV Radiation hazard
Warning against scalding
The product's packaging is made of recyclable materials, in accordance with the
National Environment Legislation.
Warning against fire
NOTICE Danger that may cause material damage on the product or surrounding area
This product was manufactured using the latest technology in environmentally friendly conditions.

37
Dryer / User manual
Table Of Contents
1 SAFETY INSTRUCTIONS .................................................................... 39
2 Environmental instructions................................................................. 46
2.1 Compliance with the WEEE Regulations and Waste Disposal ..........................46
2.2 Packaging information .....................................................................................46
2.3 Standard conformity and test information / EU declaration of conformity .........46
3 Your drying machine ........................................................................... 47
3.1 Technical specifications ...................................................................................47
3.2 General appearance ........................................................................................48
3.3 Scope of delivery .............................................................................................48
4 Installation .......................................................................................... 49
4.1 Right place for installation ................................................................................49
4.2 Removing the shipping safety group ................................................................49
4.3 Water connection ............................................................................................50
4.4 Adjusting the stands ........................................................................................50
4.5 Moving the drying machine .............................................................................. 50
4.6 Warning regarding the noise ............................................................................50
4.7 Replacing the lighting bulb ............................................................................... 50
5 Preparation ......................................................................................... 51
5.1 Laundry suitable for drying in drying machine ..................................................51
5.2 Laundry not suitable for drying in drying machine ............................................51
5.3 Preparing the laundry to be dried ..................................................................... 51
5.4 What to do for energy saving ...........................................................................51
5.5 Correct load capacity ......................................................................................52

38
Dryer / User manual
6 Running the product .......................................................................... 53
6.1 Control Panel ................................................................................................... 53
6.2 Symbols ..........................................................................................................53
6.3. Preparation of drying machine ........................................................................54
6.4 Program selection and consumption chart ....................................................... 55
6.5 Auxiliary functions ............................................................................................57
6.6 Warning indicators ...........................................................................................57
6.7 Starting the program ........................................................................................58
6.8 Child Lock .......................................................................................................58
6.9 Changing the program after it is started ...........................................................58
6.10 Cancelling the program ..................................................................................59
6.11 End of program .............................................................................................59
6.12 Odour feature ................................................................................................59
6.13 PetHairCare cycle ..........................................................................................59
7 Maintenance and cleaning ................................................................ 61
7.1 Lint filters (internal and external filters) / Cleaning of the Interior Surface of the
Loading Door ........................................................................................................61
7.2 Cleaning the sensor ........................................................................................ 62
7.3 Emptying the water tank ..................................................................................62
7.4 Cleaning the condenser ................................................................................... 63
8 Troubleshooting ................................................................................. 65
39
Dryer / User manual
1 SAFETY INSTRUCTIONS
IMPORTANT TO BE READ AND OBSERVED
This symbol reminds you to read this instruction manual.
Before using the appliance, read these safety instructions. Keep them
nearby for future reference. These instructions and the appliance itself
provide important safety warnings, to be observed at all times. The
manufacturer declines any liability for failure to observe these safety
instructions, for inappropriate use of the appliance or incorrect setting of
controls.
WARNING:
• This symbol shows that this appliance uses a flammable refrigerant.
If the refrigerant is leaked and exposed to an external ignition source,
there is a risk of fire.
This appliance contains R290 refrigerant that is flammable but
environment-friendly.
Very young children (0-3 years) should be kept away from the
appliance. Young children (3-8 years) should be kept away from the
appliance unless continuously supervised. Children from 8 years old
and above and persons with reduced physical, sensory or mental
capabilities or lack of experience and knowledge can use this appliance
only if they are supervised or have been given instructions on safe use
and understand the hazards involved. Children must not play with the
appliance. Cleaning and user maintenance must not be carried out by
children without supervision.
WARNING:
Never stop a tumble dryer before the end of the
drying cycle unless all items are quickly removed and spread out so that
the heat is dissipated.
40
Dryer / User manual
Items that have been soiled with substances such as cooking oil,
acetone, alcohol, petrol, kerosene, spot removers, turpentine, waxes and
wax removers and items such as foam rubber (latex foam), shower caps,
waterproof textiles, rubber-backed articles and clothes or pillows fitted
with foam rubber pads should not be dried in the tumble dryer. Remove
all objects from pockets, such as lighters and matches. Do not use the
tumble dryer if industrial chemicals have been used to clean it.
Oil-soaked items should not be dried in the tumble dryer due to
their high flammability.
Never open the door forcibly or use it as a step.
PERMITTED USE
CAUTION:
The appliance is not intended to be operated by
means of an external switching device, such as a timer, or separate
remote controlled system.
This appliance is intended to be used in household and similar
applications such as: staff kitchen areas in shops, offices and other
working environments; farm houses; by clients in hotels, motels, bed &
breakfast and other residential environments.
This appliance is not for professional use. Do not use the appliance
outdoors.
Do not store explosive or flammable substances (e.g. gasoline or
aerosol cans) inside or near the appliance - risk of fire.
Do not load the machine above the maximum capacity (kg of dry
cloth) indicated in the programme table.
Do not dry unwashed items in the tumble dryer.
Take care that no lint or dust is accumulated around the dryer.
41
Dryer / User manual
Fabric softeners, or similar products, should be used as specified
by the fabric softener instructions.
Do not overdry the laundry.
Do not drink, reuse or prepare food with condensed water. It can
be harmful to your health and cause property damage.
WARNING:
Do not damage the appliance refrigerant circuit pipes.
INSTALLATION
The appliance must be handled and installed by two or more
persons - risk of injury. Use protective gloves to unpack and install - risk
of cuts.
Installation, including water supply (if any), electrical connections
and repairs must be carried out by a qualifi ed technician. Do not repair
or replace any part of the appliance unless specifi cally stated in the user
manual. Keep children away from the installation site. After unpacking
the appliance, make sure that it has not been damaged during transport.
In the event of problems, contact the dealer or your nearest After-sales
Service. Once installed, packaging waste (plastic, styrofoam parts
etc.) must be stored out of reach of children - risk of suff ocation. The
appliance must be disconnected from the power supply before any
installation operation - risk of electric shock. During installation, make
sure the appliance does not damage the power cable - risk of fi re or
electric shock. Only activate the appliance when the installation has been
completed.
WARNING:
In the appliance enclosure or in the built-in structure,
keep ventilation openings clear of obstruction.
42
Dryer / User manual
Install the dryer in rooms with adequate ventilation (open door,
ventilation grid or slot larger than 500 cm2) in order to avoid the backflow
of gases into the room from appliances burning other fuels, including
open fires. If the dryer is installed under a worktop, provide a distance of
10 mm between the upper panel of the dryer and any objects above it,
and 15 mm between the sides of the appliance and the walls or furniture
units adjacent to it.
Make sure that the appliance is not installed near a heat source.
The appliance must not be installed behind a lockable door, a
sliding door or a door with a hinge on the opposite side to that of the
tumble dryer, in such a way that a full opening of the tumble dryer door is
restricted.
The appliance shall be placed against the wall to limit access to its
rear side.
Take care not to use a carpet which obstructs ventilation openings
in the base of the dryer.
If you want to stack the dryer on a washing machine, first contact
our After-Sales Service or your specialist dealer to verify the complete list
of suitable models. The stacking is only possible if the dryer is attached to
the washing machine by means of the appropriate stacking kit available
through our After-Sales Service or your specialist dealer. Instructions for
the correct assembly are supplied with the stacking kit.
ELECTRICAL WARNINGS
It must be possible to disconnect the appliance from the power
supply by unplugging it if plug is accessible, or by a multi-pole switch
installed upstream of the socket in accordance with the wiring rules and
the appliance must be earthed in conformity with national electrical safety
standards.
43
Dryer / User manual
Do not use extension leads, multiple sockets or adapters.
The electrical components must not be accessible to the user after
installation. Do not use the appliance when you are wet or barefoot. Do
not operate this appliance if it has a damaged power cable or plug, if it is
not working properly, or if it has been damaged or dropped.
If the supply cord is damaged, it must be replaced with an identical
one by the manufacturer, its service agent or similarly qualifi ed persons in
order to avoid a hazard - risk of electric shock..
CLEANING AND MAINTENANCE
WARNING:
Ensure that the appliance is switched off and
disconnected from the power supply before performing any maintenance
operation. To avoid risk of personal injury use protective gloves (risk
of laceration) and safety shoes (risk of contusion); be sure to handle
by two persons (reduce load); never use steam cleaning equipment
(risk of electric shock). Non-professional repairs not authorized by the
manufacturer could result in a risk to health and safety, for which the
manufacturer cannot be held liable. Any defect or damage caused from
non-professional repairs or maintenance will not be covered by the
guarantee, the terms of which are outlined in the document delivered with
the unit.
Make sure that all lint traps are cleaned before starting any drying
cycle.
Do not use any tool to clean the secondary filter, which can
damage the appliance leading to a gas leakage.
44
Dryer / User manual
DISPOSAL OF PACKAGING MATERIALS
The packaging material is 100% recyclable and is marked with the recycle
symbol.
The various parts of the packaging must therefore be disposed of
responsibly and in full compliance with local authority regulations
governing waste disposal.
DISPOSAL OF HOUSEHOLD APPLIANCES
This appliance is manufactured with recyclable or reusable materials.
Dispose of it in accordance with local waste disposal regulations. For
further information on the treatment, recovery and recycling of household
electrical appliances, contact your local authority, the collection service for
household waste or the store where you purchased the appliance. This
appliance is marked in compliance with European Directive 2012/19/EU,
Waste Electrical and Electronic Equipment (WEEE) and with the Waste
Electrical and Electronic Equipment regulations 2013 (as amended).
By ensuring this product is disposed of correctly, you will help prevent
negative consequences for the environment and human health.
The symbol on the product or on the accompanying
documentation indicates that it should not be treated as domestic
waste but must be taken to an appropriate collection center for
the recycling of electrical and electronic equipment.
45
Dryer / User manual
• Washing machine cannot be placed on top of the drying machine.
Installation Table for Washing Machine and Tumble Dryer
Stacking Kit Type Depth Size (TD=Tumble Dryer, WM: Washing Machine)
Plastic - 54/60cm w or w/o belt 60cm TD --> WM≥50cm / 54cm TD --> WM>45cm
Plastic - 46cm w or w/o belt 46cm TD --> WM≥54cm
With Shelf - 60cm 60cm TD --> WM≥50cm
With Shelf - 54cm 54cm TD --> WM>45cm
Policies, standard documentation, ordering of spare parts and
additional product information can be found by:
Using QR code in your appliance.
Visiting our vebsite docs.hotpoint.eu and parts-selfservice.
europeanappliances.com
Alternatively,contact our After-sales Service (See phone number in
the warranty booklet). When contacting our After-sales Service, please
state the codes provided on your product’s identification plate. You can
find more information about your model online at https://eprel.ec.europa.
eu/ which is the offical EU EPREL product database. After selecting the
Product Category, enter the Model Identifier of the product. The Model
Identifier is made up of letters and numbers and can be found on the
identification plate, as Mod. (see image on fhe right).
In order to receive a more complete assistance, please register your
product on www.register10.eu
xxxxxxxxxxxx
46
Dryer / User manual
2 Environmental instructions
2.1 Compliance with the WEEE Regulations and Waste Disposal
This product does not contain the dangerous and prohibited materials indicated in the
“Regulation on The Control of Waste Electrical and Electronic Equipment” published by
Ministry of Environment and Urbanisation of Republic of Turkey. Complies WEEE
Regulations. This product was manufactured from recyclable and reusable high quality
parts and materials. Therefore, do not dispose of this product with other domestic
wastes at the end of its life cycle. Take it to a collection point for electrical and electronic
equipment. You can ask your local administration about these collection points. You can help
protect the environment and natural resources by delivering the used products for recycling.
Also R290 is a flammable refrigerant. Therefore ensure that the system and pipes are
not damaged during operation and transportation.
Keep the product from heat sources, otherwise it may catch fire if damaged.
Do not dispose of the product by throwing it into fire.
2.2 Packaging information
The product’s packaging is made of recyclable materials, in accordance with the National
Legislation. Do not dispose the packaging waste with the household waste or other wastes,
dispose it to the packaging collection areas specified by local authorities.
2.3 Standard conformity and test information
/ EU declaration of conformity
The development, manufacturing and sales phases of this product is conducted in
conformity with the safety rules specified in all related instructions of the European
Union.
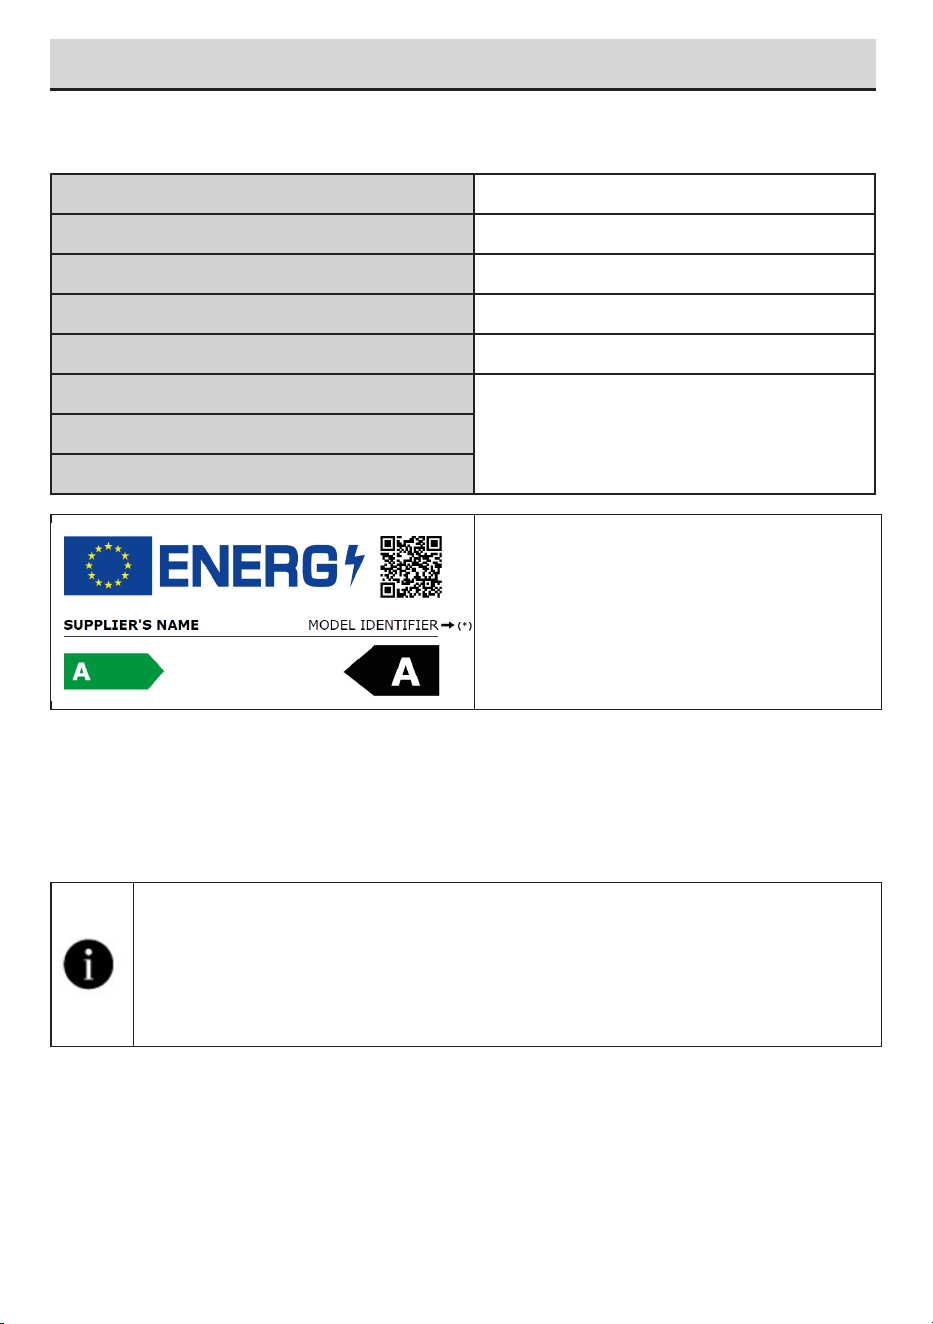
47
Dryer / User manual
3 Your drying machine
3.1 Technical specifications
The model information as stored in the product
database can be reached by entering following
website and searching for your model identifier
(*) found on energy label.
https://eprel.ec.europa.eu/
* Min. height: Height with the adjustable stand closed.
Max. height: Height with the adjustable stand opened at maximum height.
** Weight of dry laundry before washing.
*** Data plate is under the door on the drying machine.
In order to increase the drying machine’s quality, the technical specifications may be
changed without prior notice.
Figures in this manual are schematic and may not exactly match the product.
The values provided with the drying machine or its accompanying documents are
laboratory readings in accordance with the respective standards. These values may
differ depending on the use and ambient conditions.
EN
Height (Min. / Max.) 84,6 cm / 86,6 cm*
Width 59,8 cm
Depth 67,2 cm
Capacity (max.) 10 kg**
Net weight (± %10) 48 kg
Voltage
See type label***Rated power input
Model code
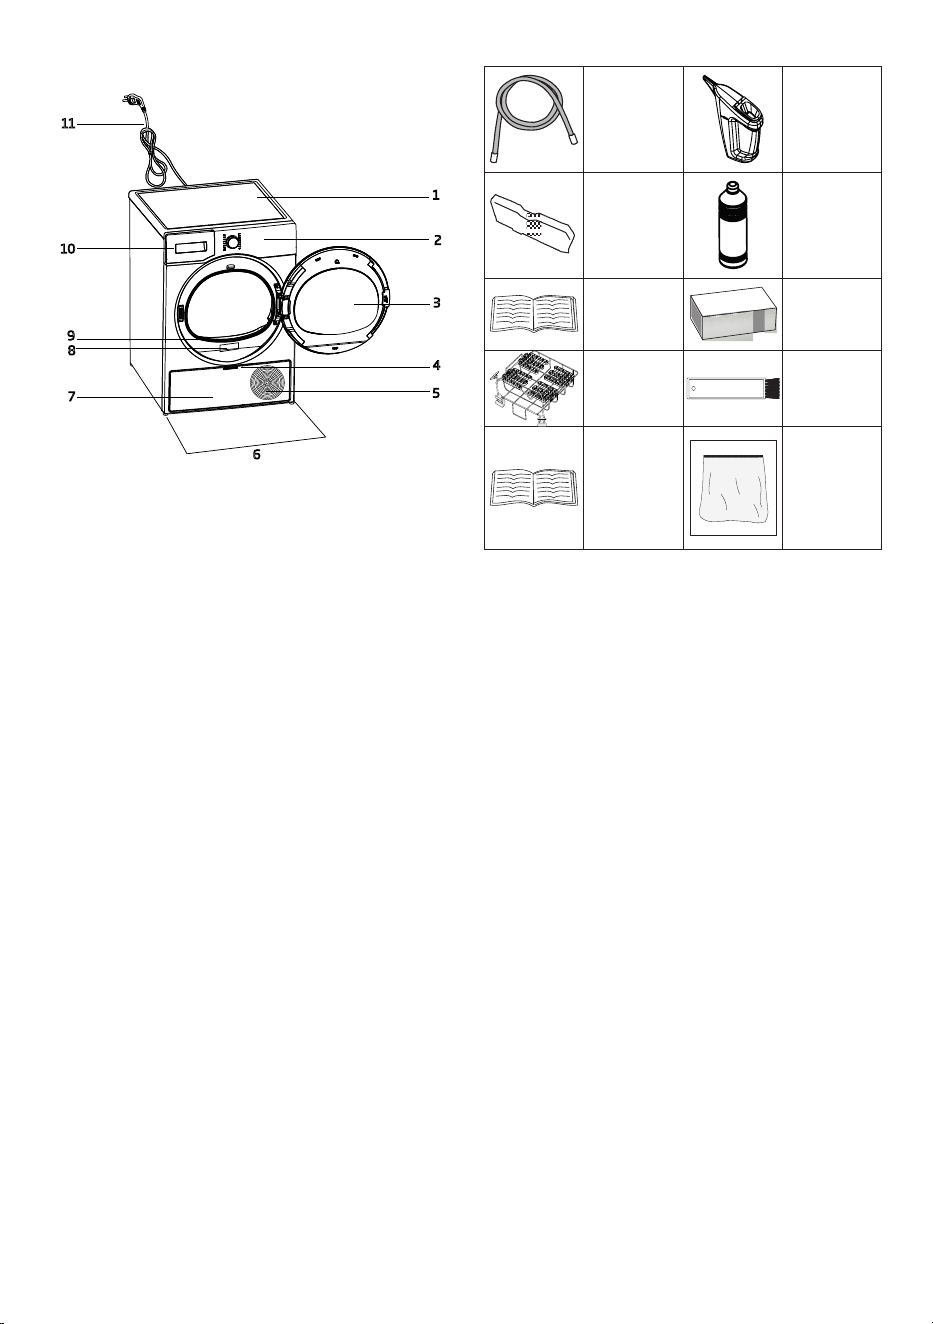
48
Dryer / User manual
3.2 General appearance
11
10
1
2
3
4
5
6
7
8
9
1. Top panel
2. Control panel
3. Loading door
4. Toe board handle
5. Ventilation grids
6. Adjustable feet
7. Toe board
8. Rating plate
9. Lint filter
10. Water tank drawer
11. Power cord
3.3 Scope of delivery
1. Water
discharge
hose*
6. Water
filling cap*
2. Filter
drawer
spare
sponge*
7. Pure
Water*
3. User
Manual
8. Odour
Capsule
Group*
4. Drying
basket*
9. Brush*
5. Drying
basket user
manual*
10. Filter
cloth*
*Optional - may not be included, depends on
model.
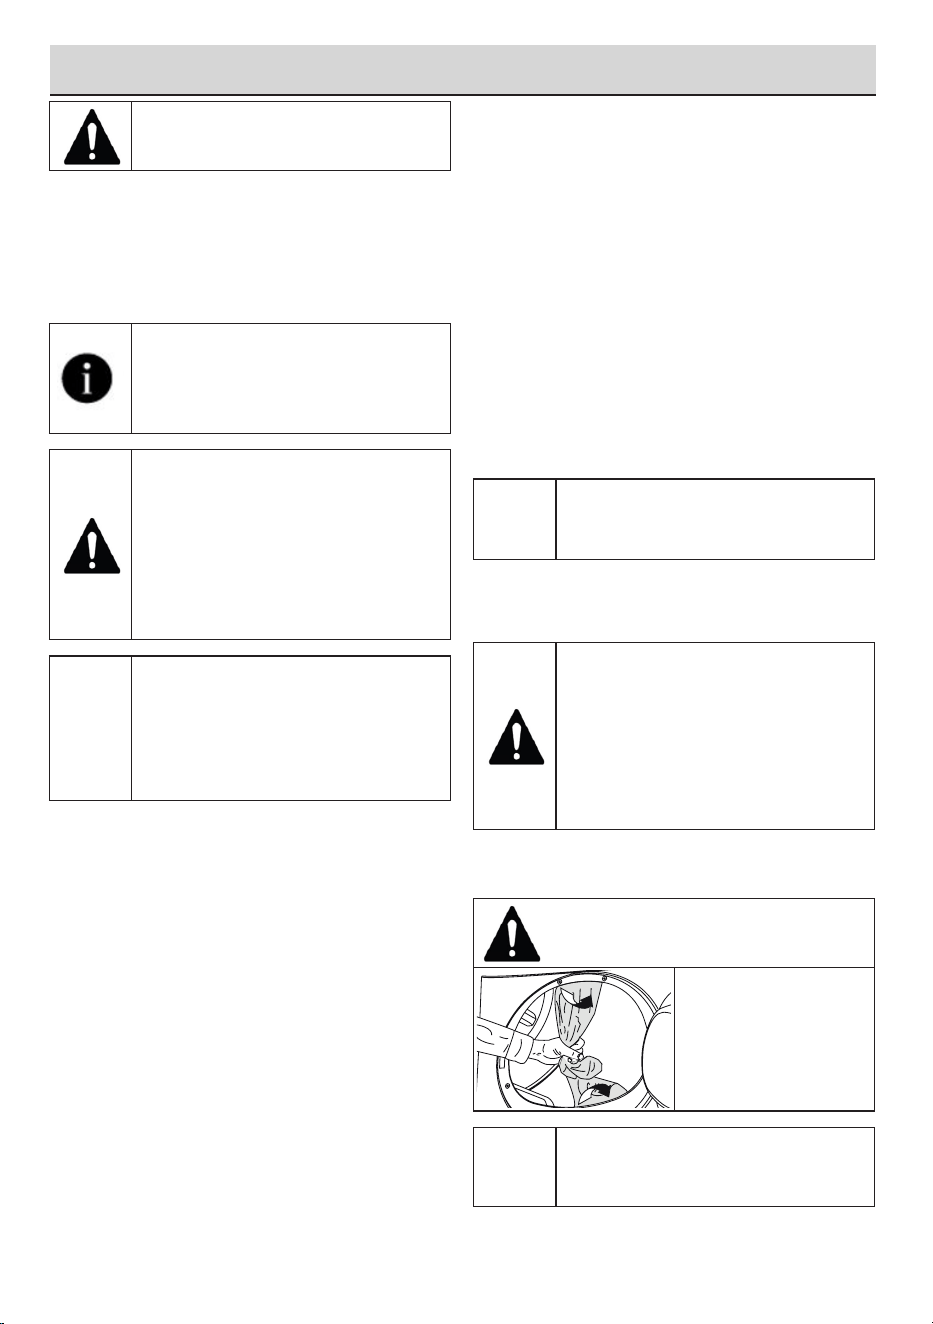
49
Dryer / User manual
4 Installation
Read the “Safety Instructions” first!
Before consulting the nearest Authorized
Service for installing the drying machine, see
the information in the user guide and make sure
the electric and water utilities are as required. If
not, call an electrician and plumber to arrange
the utilities as necessary.
It is customer's responsibility to
prepare the location the drying
machine shall be placed on and
also have power and waste water
installation prepared.
Check for any damage on the
drying machine before installing it. If
drying machine is damaged, do not
get it installed. Damaged products
cause a risk for your safety.
Wait 12 hours prior to operating the
drying machine.
NOTICE
The product includes a cooling
agent and if the product is operated
right after its transported, it may
get damaged. After each time the
product is moved, it shall be left to
rest for 12 hours.
4.1 Right place for installation
• Install the drying machine on a flat and
stable surface.
• Dryer machine is heavy. Do not move it by
yourself.
• Operate the drying machine in an
environment free of dust with good
ventilation.
• The gap between the drying machine and
the floor shall not be reduced via materials
such as rugs, pieces of wood and bands.
• Do not block the ventilation grilles of the
drying machine.
• There shall not be doors that can be
locked, sliding doors or hinged doors near
the installation environment of the drying
machine that may block the loading door
to be opened.
• Once the drying machine is installed,
the connections must stay stable. After
placing the drying machine, ensure that
the back wall does not come in contact
with any extrusion (a water tap, electrical
outlet etc.).
• Place the drying machine with at least 1
cm space between the product and the
furniture edges.
• Your drying machine is suitable to be
operated between +5°C to +35°C. If
operated outside this temperature range,
your drying machine’s operation may be
compromised and get damaged.
• The drying machine shall not be placed
with the back side against a wall.
B
Do not place the drying machine on
its power cord.
* Ignore following warning if your
product’s system does not contains
R290.
Dryer contains R290 refrigerant.*
R290 is an environment-friendly, but
flammable refrigerant.*
Ensure that the air inlet of the dryer
is open and it is well-ventilated.*
Keep potential flame sources away
from the dryer.*
4.2 Removing the
shipping safety group
Remove the shipping
safety group prior to
first use the product.
NOTICE
Do not leave an accessory or any
parts of the shipping safety group
inside the drum.
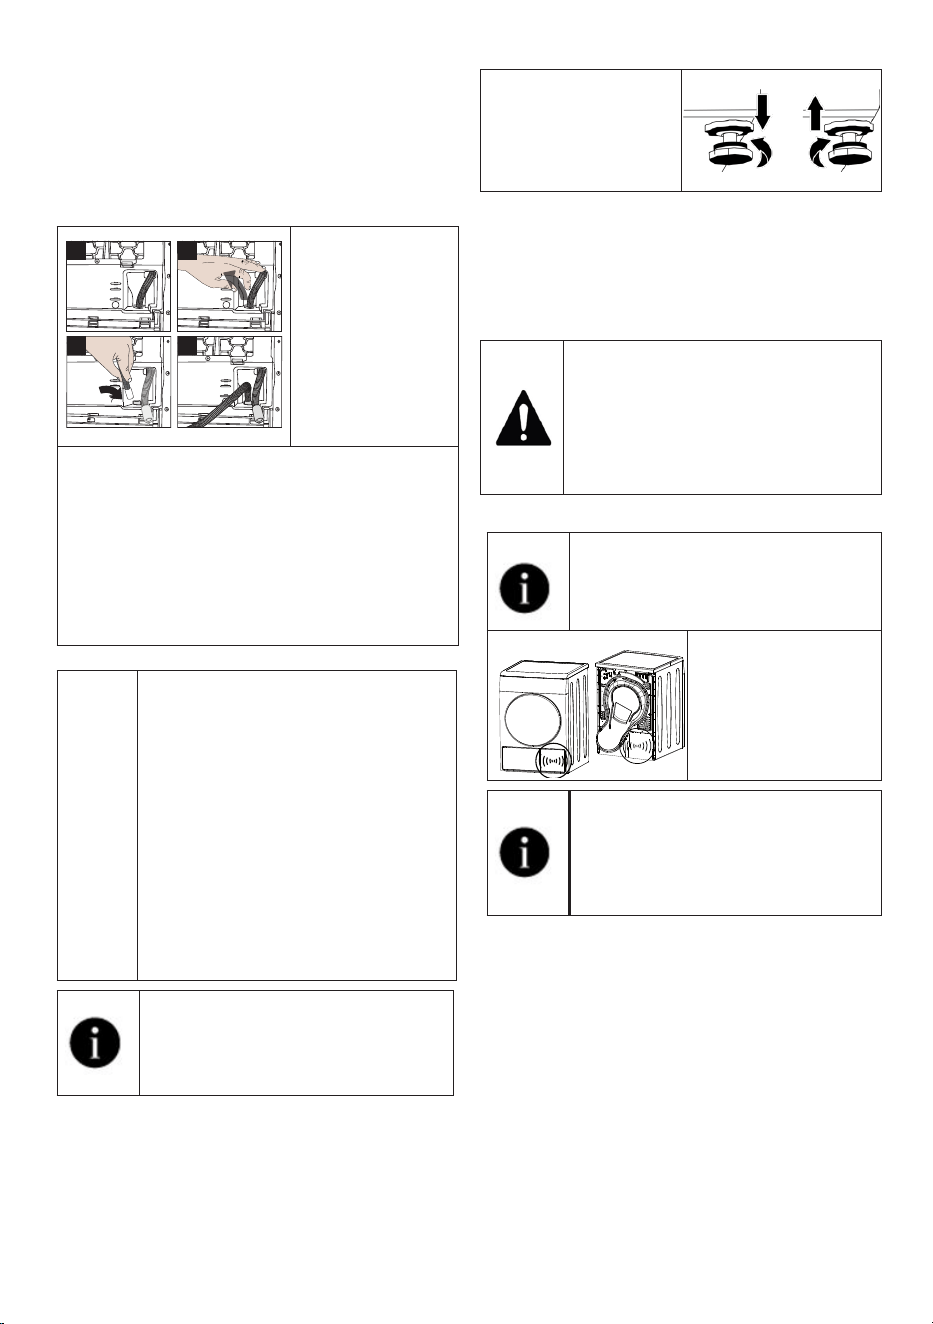
50
Dryer / User manual
4.3 Water connection
Instead of periodically draining the water
accumulated in the water tank, you can
discharge via the water discharge hose
supplied with the drying machine.
Connecting the water
drainage hose
1
3 4
2
1-2 Remove the
hose behind the
drying machine
by pulling it
manually from
where it is
attached. Do
not use a tool
to remove the
hose.
3 Insert one end of the water discharge hose
supplied with the drying machine to where
you have removed the hose on the drying
machine.
4 Fix the other end of the water discharge
hose to directly waste water drainage or a
sink.
NOTICE
The water discharge hose shall be
fixed at maximum 80 cm height.
Ensure that the water discharge
hose do not get kinked, collapsed
or pressed on between the
discharge and the drying machine.
Hose shall be connected not to
be disconnected from its location.
Leaked water may cause damage.
Do not extend the water drainage
hose.
Check whether the water runs at an
appropriate flow. The drainage line
shall not be closed or clogged.
If an accessory package is provided
with your product, check the
detailed instructions.
4.4 Adjusting the stands
Until the drying
machine stands level
and sturdy, adjust
the stands by turning
them left and right.
4.5 Moving the drying machine
• Drain the water in the drying machine
completely.
• If the product is connected via direct
discharge, remove the hose connections.
The drying machine is
recommended to be moved in
upright position. Otherwise, tilt it to
the right side when viewed from the
front and move the drying machine.
Wait 12 hours prior to operating the
drying machine.
4.6 Warning regarding the noise
As the product is
operated, metallic
noises may come
from the compressor
from time to time, it is
normal.
When the product is operated,
the accumulated water is pumped
to the water tank. It is normal to
hear pumping sounds from the
appliance during this operation.
4.7 Replacing the lighting bulb
If your drying machine has drum lighting lamp;
Consult the authorized service to replace the
bulb/LED used in lighting your drying machine.
The bulb in this product is not suitable for home
lighting. The intended use of this lamp is to
ensure safely loading the laundry to the drying
machine. The lamps used in this appliance is
resistant to heavy physical conditions such as
temperatures over 50°C.
51
Dryer / User manual
Read the “Safety Instructions” first!
5.1 Laundry suitable for
drying in drying machine
NOTICE
Laundry that are not drying machine
safe may damage the appliance and
the laundry during drying. Follow
the instructions on the labels on the
laundry to be dried. Only dry the
laundry with “drying machine safe”
written on their labels.
Do not dry
with dryer
5.2 Laundry not suitable for
drying in drying machine
NOTICE
Undergarments with metal supports
shall not be dried in drying machine.
If these metal supports get loose
and ripped from the garment, it may
damage the machine.
Delicate embroidery textiles, cotton
and silk garments, garments
manufactured from delicate and
valuable textiles, non breathing
garments and tulle curtains shall not
be dried in drying machine.
5.3 Preparing the
laundry to be dried
NOTICE
Items such as coins, metal parts,
needles, nails, screws, stones etc.
may damage the drum group of the
product or may cause functional
operation issues. Therefore check
all laundry that will be loaded to the
product.
Dry the laundry with metal
accessories such as zippers by
turning them inside out.
Close the zippers, hooks and
clasps, button up the covers’
buttons, tie textile belts and apron
belts.
5.4 What to do for energy saving
• Use the highest possible wringing option
as you wash the laundry. Therefore you
can reduce the drying period and reduce
energy consumption. Sort the laundry
based on their types and thickness.
Dry same types of laundry together. For
instance kitchen towels and table cloths
dry faster than bathroom towels.
• Follow the recommendations in the user
manual for program selection.
• During drying do not open the loading
door unless necessary. If you are required
to open the loading door, do not keep it
open for too long.
• Do not add wet laundry as the drying
machine operates.
• Clean the Fibre Filter before and after
each drying session.
• For condensation models, be sure to
clean the condenser at least once a
month or after each 30 drying sessions.
• Make sure the filters are clean. Refer to
maintenance and cleaning for details.
• For models with flue, follow the flue
connection rules specified in the guides
and clean the flue.
• During drying session, properly ventilate
the environment in which the drying
machine is in.
• On models with heat pump, check the
condenser at least every six months and
clean it if it is dirty.
5 Preparation
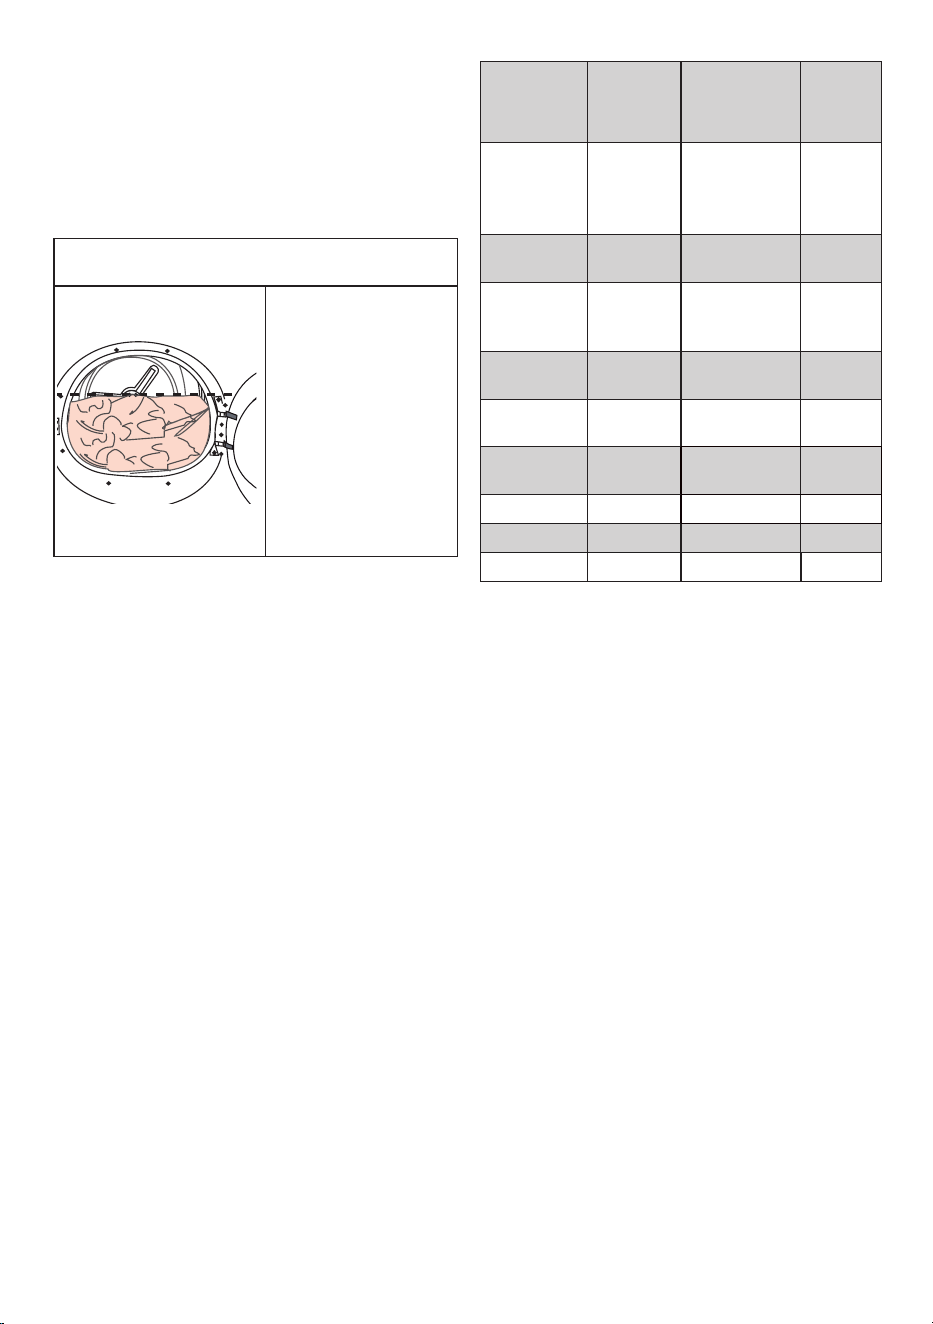
52
Dryer / User manual
• The Eco program is the most energy-
efficient program for drying wet cotton
laundry and is used to assess compliance
with environmentally conscious design
regulations.
• Keep the loading door shut to prevent
heat loss.
5.5 Correct load capacity
NOTICE
If the laundry in the
product exceed
maximum load
capacity, it may not
operate as intended
and may cause
material damage or
damage the product.
For each program,
follow the maximum
load capacity.
• Loading the domestic drying machine up
to the maximum capacity specified by the
manufacturer for the relevant programs
will help save energy.
The weights below are provided as examples.
Laundry
Approx.
weight
(g)*
Laundry
Approx.
weight
(g)*
Cotton
bedding
(double
size)
1500 Cotton dress 500
Bedding
(single size)
1000 Dress 350
Bed sheet
(double
size)
500 Denim 700
Bed sheet
(single size)
350
Handkerchief
(10 pcs)
100
Large table
cloth
700 T-Shirt 125
Small table
cloth
250 Blouse 150
Tea napkin 100 Cotton shirt 300
Bath towel 700 Shirt 200
Hand towel 350
*Weight of dry laundry before washing.
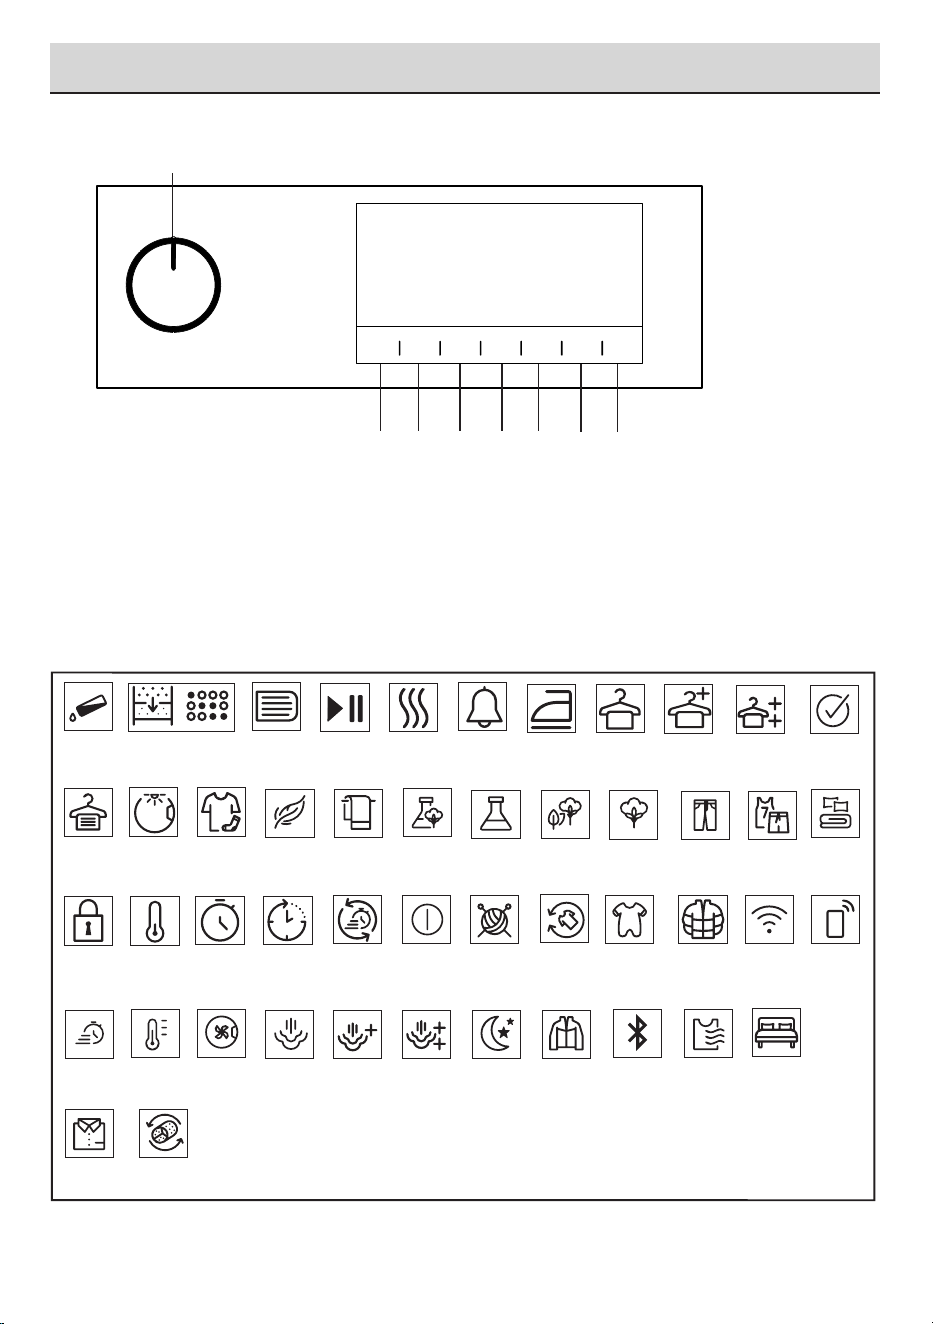
53
Dryer / User manual
6.1 Control Panel
6 Running the product
1. On/Off/Program Selection button.
2. Start / Stand-by button.
3. End time selection button.
4. Time program selection button.
5. Low temperature selection button.
6. Audible warning and child lock selection
button.
7. Wrinkle prevention selection button/ Drum
light button.
8. Dryness level selection button.
6.2 Symbols
Filter
Cleaning
Water tank
Filter drawer /
Heat exchanger
cleaning
Start
pause
cancel
Iron Dry
Drying Buzzer Cupboard
Dry
Cupboard
Dry +
Extra dry End
Anti-
creasing
Child-proof
lock
Low
temperature
TimeDry Ending In RapiDry
Drum
Light
Dryness
Level
EasyCare
Delicates
SyntheticsTowels Mix Cottons
Eco
Cottons Jeans Sport
Duvet
Shirts
Express Extra Heat Refresh Steam Steam
Level 1
Steam
Level 2
On / Off Wool Protect
Night Outdoor
Baby
Protect+
Downwear Wifi
Remote
Control
Bluetooth Gentle
Dry
Reverse
Drum
Bedding
3
4
5
2
6
7
8
1
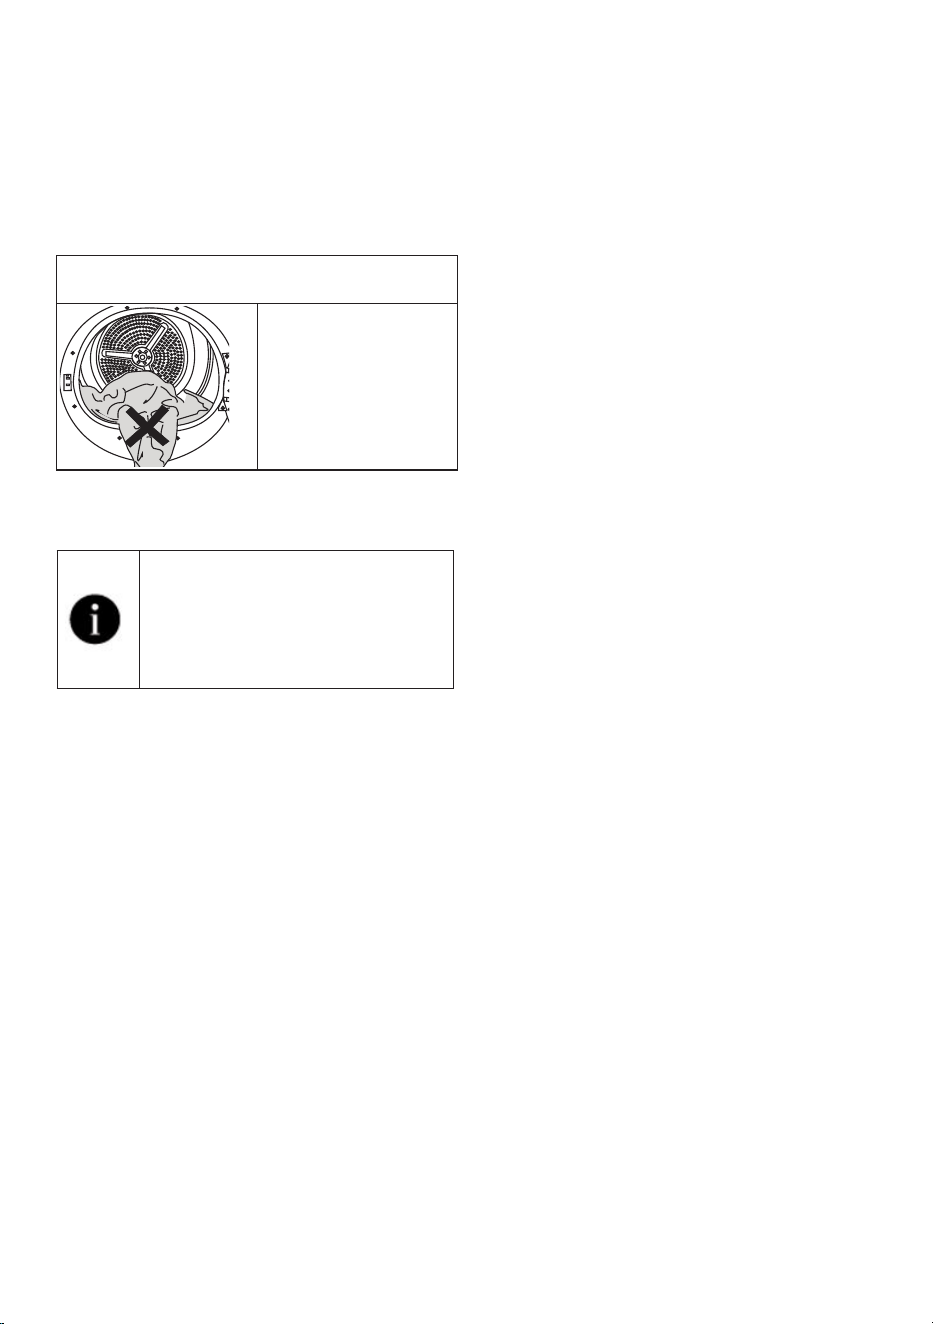
54
Dryer / User manual
6.3. Preparation of
drying machine
• Plug the drying machine.
• Open the loading door.
• Remove any foreign material inside it.
• Place the laundry to the drying machine
without jamming them.
• Push and close the loading door.
NOTICE
Ensure that no
laundry is jammed to
the loading door.
Do not close the
loading door with
force.
• Select the desired program by using
On/Off/Program Selection button, the
machine will turn on.
Selecting the program with the On/
Off/Program Selection button does
not mean that the program started.
Press Start / Stand-by button to
start the program.
55
Dryer / User manual
6.4 Program selection and consumption chart
EN
Programmes Programme Description
Capacity (kg)
Spin speed in
washing machine
(rpm)
Drying Time
(minutes)
Cotton
You can dry your heat-resistant cotton textiles
with this programme. A drying setting suitable for
the thickness of the products to be dried and the
desired level of dryness should be selected.
10 1000 230
Eco
It dries single layer, casual cotton textiles in the
most economical way.
10 1000 220
Cottons Iron dry***
You may dry your cotton laundry to be ironed in
this program to have them slightly damp for ease of
ironing. (Shirt, T-shirt, tablecloth, etc.)
10 1000 160
Synthetics
You can dry all your synthetic textiles with this
programme. A drying setting suitable for the level of
dryness you desire should be selected.
6 800 100
Mixed
Use this programme to dry non-pigmenting
synthetic and cotton laundry items together.Sports
and fitness clothes may be dried with this program.
6 1000 175
Wool
Use this programme to dry woolen garments such
as jumpers that are washed according to the
instructions.It is recomended that garments would
be removed at the end of the programme.
1,5 600 148
Extra silence
In this programme the level of noise emitted to
the ambient will be the lowest.With this program
you can dry your cotton or synthetic blend clothes
quietly.
8 1000 240
Delicates
You may dry your delicate laundry or laundry with
hand wash symbol (silk blouses, thin underwear,
etc.) at low temperature in this program.
4 1200 80
Timed drying
PetHairCare
You may select from time programmes between
10 and 160 minutes to achieve the desired drying
level at low temperature. In this programme, tumble
drier’s operation lasts for the set time independently
from the dryness of laundry.PetHairCare is a
refreshing function making ironing easier on less
worn clothes and reducing odours (cigarette, food
etc.) due to medium air.
- - -
Jeans
You may dry denim pants, skirts, shirts or jackets in
this program.
4 1200 130
Sport
Use it to dry your clothes made of synthetics,
cotton or mixed fabrics or waterproof products
such as functional jacket, raincoat etc. Turn them
inside out prior to drying.
2 1000 135
Duvet
You can dry your feather or fibre filled textile that
bears can be dried in drier label as a single piece of
laundry. You can dry double duvet, pillow or coats
as single piece of laundry. Dry your cloths such as
coats and jackets turned inside out.
- 800 165
56
Dryer / User manual
* Above values have been specified under standard conditions. Consumption values may vary
from the values in the chart depending on laundry type, spin speed, ambient conditions and
voltage levels.
***The “Cotton Iron Dry” program can be set by selecting the “Cotton” program on the control
panel and then choosing the “Iron Dry” drying level using the dryness level selection button. You
can identify the “Iron Dry” symbol in section 6.2 Symbols.
Shirts
It dries the shirts in a more sensitive manner, and
causes less creasing and easier ironing.
1,5 1200 50
Rapid 30’ Use this program to have 2 shirts ready for ironing. 0,5 1200 30
Extra heat
It is the programme that you can dry your washed
products you want to provide with extra hygiene
(baby clothes, underwear, towels, etc.). It provides
high hygiene for your textiles via heat effect.
5 800 200
Refresh
You can use this programme for your dry clothes
and laundry that you want to provide with hygiene
without washing them. It provides high hygiene for
your dry textiles via heat effect.
1,5 - 120
Energy consumption values
Programmes Capacity (kg)
Spin speed in
washing machine
(rpm)
Approximate
amount of remaining
humidity
Energy consumption
value kWh
Cottons Cupboard Dry 10 1000 60% 1,82
Cottons Iron dry 10 1000 60% 1,50
Synthetics Cupboard Dry 4 800 40% 0,80
“If you regularly dry the 10 Kg maximum load of Cottons we suggest to connect the drain
hose to prevent the dryer stopping mid-cycle in order to empty the tank” (see Section
“Connection to the drain”)

57
Dryer / User manual
6.5 Auxiliary functions
Dryness level
Dryness level button is used for adjusting to
desired dryness. Program time may change
depending on the selection.
You can activate this function only
prior to start of program.
Wrinkle prevention
You can turn on and off the wrinkle prevention
function by pressing the wrinkle prevention
selection button. If you will not take the
laundry out immediately after the program has
completed, you may use Wrinkle prevention
function to prevent wrinkling of your laundry.
Audible warning
Drying machine makes an audible warning
when the program is completed. Press the
“Audible Warning” button if you do not want
audible warning. When you press the audible
warning button, the light goes off and it does
not sound when the program is completed.
You can select this function before
the program starts or after the
program starts.
Low temperature
You can activate this function only prior to start
of a program. You can activate this function
if you want to dry your laundry at a lower
temperature. The program duration will be
longer after it becomes activated.
End time
You can delay the end time of the program up
to 24 hours with end time function.
1. Open the loading door and place the
laundry.
2. Select the drying program.
3. Press the End Time selection button and
set the delay time you wish. End time LED
turns on. (When pressed and hold the
button, End Time proceeds non-stop).
4. Press the Start / Stand-by button. End
Time countdown begins. The “:” sign in the
middle of displayed delay time flashes.
You can add or remove laundry
within end time. Displayed time is
the sum of normal drying time and
end time. End Time LED turns off at
the end of countdown, the drying
starts and the drying LED turns on.
Changing the end time
If you want to change the duration during the
countdown:
Pause the program and Turn the On/Off/
Program Selection button and cancel the
program. Select the desired program and
repeat the End Time selection.
Cancelling the end time function
If you want to cancel the end time countdown
and start the program immediately:
Pause the program and Turn the On/Off/
Program Selection button and cancel the
program. Select the desired program and press
the “Start/Pause” button.
Drum Light
You can turn on and off the drum light by
pressing this button. The light turns on when
the button is pressed and turns off after certain
time.
6.6 Warning indicators
Warning indicators may vary
depending on the model of your
drying machine.
Filter cleaning
When the program is completed, the warning
indicator for filter cleaning turns on.
Water tank
If the water tank fills up while the program
continues, the warning indicator starts flashing
and the machine goes into stand-by. In this
case, empty the water tank and start the
program by pressing the Start / Stand-by
button. Warning indicator turns off and program
resumes.
58
Dryer / User manual
Cleaning of filter drawer/
heat exchanger
Warning symbol flashes periodically to remind
that filter drawer must be cleaned.
6.7 Starting the program
Press the Start/Stand-by button to start the
program.
Start/Stand-by and Drying indicators turn on to
show that program started.
6.8 Child Lock
The drying machine has a child lock which
prevents the program flow from being
interrupted when the buttons are pressed
during a program. When the Child Lock is
activated, all buttons on the panel except
the On/Off/Program Selection button are
deactivated.
Press the Audible Warning button for 3
seconds in order to activate the child lock.
The child lock has to be deactivated to be
able to start a new program after the current
program is finished or to be able to interfere
with the program. To deactivate the child lock,
keep the same buttons pressed for 3 seconds.
When the child lock is activated,
the child lock warning indicator on
the screen turns on.
When the child lock is active:
The drying machine runs, or in stand-by state
the indicator symbols will not change upon
changing the position of the program selection
button.
When the drying machine is
operated and the child lock is
active, if the program selection
button is turned, a double beeping
noise will be heard. If the child lock
is deactivated before the program
selection button is turned to its
original place, the program will
be terminated since the program
selection button is displaced.
6.9 Changing the program
after it is started
You can change the program you selected to
dry your laundry with a different program after
the drying machine starts running.
• For example, Pause the program and turn
the On/Off/Program Selection button to
select the Extra Dry program in order to
select the Extra Dry program instead of
Ironing Dryness.
• Press the Start/Stand-by button to start
the program.
Adding and removing clothes during
stand-by
If you want to add or remove clothes to/from
the drying machine after the drying program
starts:
• Press the Start/Stand-by button to put
the drying machine in Stand-by state. The
drying operation stops.
• Open the loading door while in Stand-
by state, and close the door after you
remove or add laundry.
• Press the Start/Stand-by button to start
the program.
Adding laundry after the drying
operation starts may cause the
dried laundry inside the drying
machine to mix with wet laundry
and leave the laundry damp at the
end of operation.
Adding or removing laundry
during drying may be repeated as
many times as you wish. But this
operation continuously interrupts
the drying operation, and thus
increases program duration and
energy consumption. So, it is
recommended to add laundry
before the program starts.
If a new program is selected by
turning the program selection
button while the drying machine is
in stand-by, the running program
terminates.
59
Dryer / User manual
Do not touch the inner surface of
the drum while adding or removing
clothes during a continuing
program. The drum surface is hot.
6.10 Cancelling the program
If you want to cancel the program and
terminate the drying operation for any reason
after the drying machine starts running, Pause
the program and turn the On/Off/Program
Selection button; the program terminates.
The inside of the drying machine
shall be extremely hot when you
cancel the program during machine
operation, so run the refreshing
program to allow it to cool down.
6.11 End of program
When the program ends, the LED’s of End/
Wrinkle Prevention and Fibre Filter Cleaning
Warning on the program follow-up indicator
turn on. Loading door can be opened and
drying machine is ready for another operation.
Turn the On/Off/Program Selection button to
On/Off position in order to turn off the drying
machine.
If the Wrinkle Prevention mode
is active and the laundry is not
removed after the program is
completed, the wrinkle prevention
function activates for 2 hours to
prevent the laundry inside the
machine to get wrinkled. The
program tumbles the laundry with
10-minute intervals to prevent them
from wrinkling.
6.12 Odour feature
If your drying machine has odour feature, read
the ProScent manual to use this feature.
6.13 PetHairCare cycle
PetHairCare is a refreshing cycle designed
to remove unwanted pet hair (certified by an
independent institution, score 4.6/5), reduce
airborne odours, and gently smooth out lightly
worn dry clothes. Used on dry laundry.
For pet hair removal
Use with 1–3 pieces of dry clothing and run the
program for 80 minutes
For odour and wrinkle reduction
Use with 1–5 pieces of dry clothing and run the
program for 50 minutes.
Note: For clothes that have absorbed strong
scents—such as perfumes, deodorants, or
sweat—it’s best to wash them to fully eliminate
odours.
Drying Caution
Do not use this function with items that have
sharp or hard accessories, or those made of
leather.
Filling the water tank
1 blue wing in the machine performs the
process of watering the laundry.
If the wing is on top, you can manually rotate
the drum to the lower position and fill the water.
Before using the PetHairCare program, the
water in the filling container at max. Level must
be filled manually into the wing.
To remove wrinkles, tap or drinking water
should be used.
A few drops of water that may overflow from
the wing during filling will not cause any
problem.
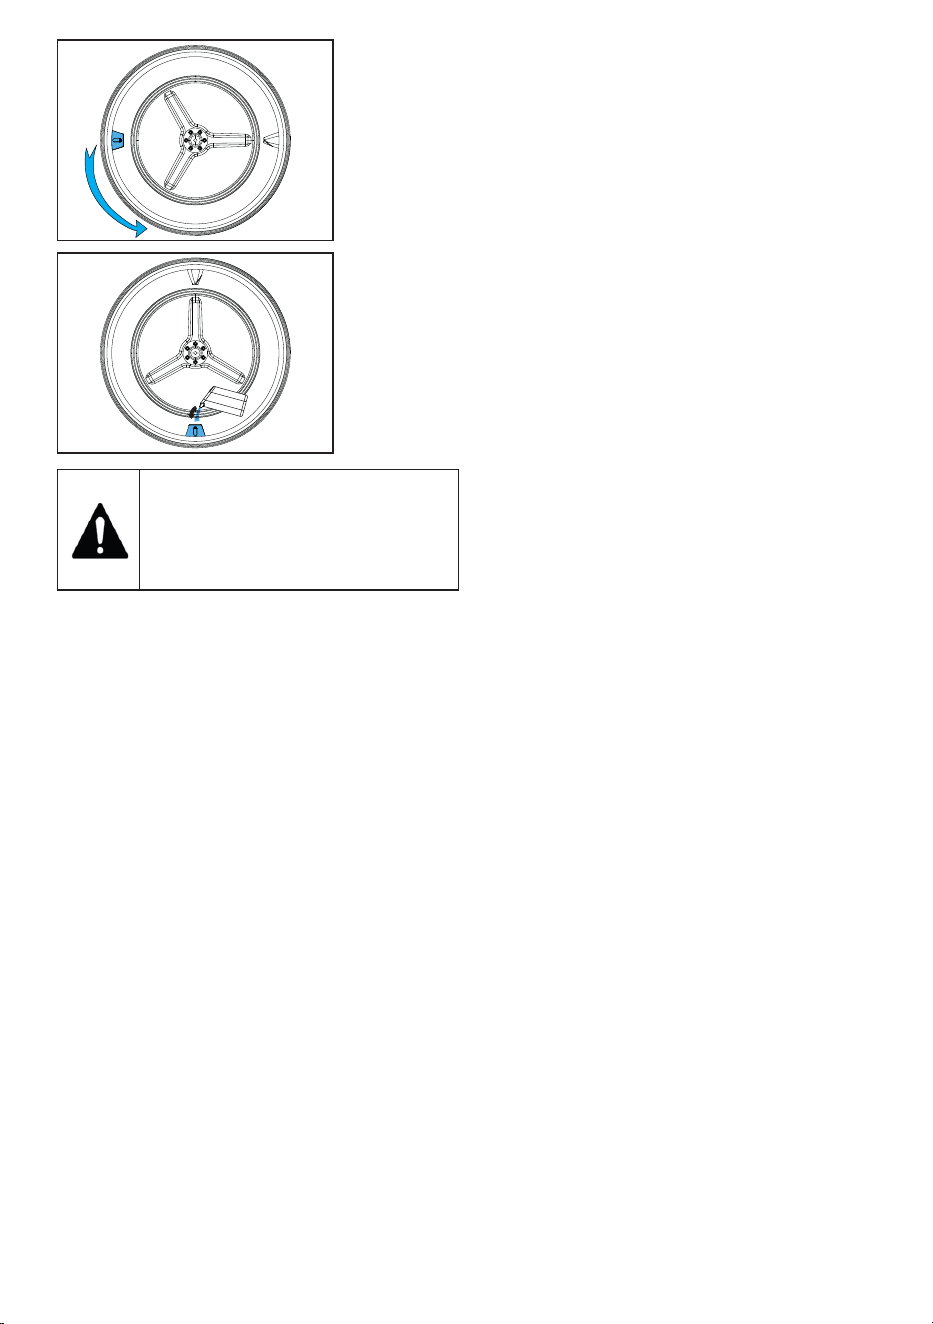
60
Dryer / User manual
Additives or descaling agents
should not be used.
Chemicals that can be dissolved
with liquid chemicals and liquids
should not be used.
Starting the Program
The wing should be brought to the lower
position and should be filled with water up
to the marked area with the filling container.
The PetHairCare program must be selected.
When you select the program, the screen
time will appear as 10 minutes. The time
program is set to the desired time by
pressing the selection button and the Start/
Standy-By button is pressed.
Important Note
This function does not wash clothes. It
is intended to remove pet hair, minimize
odours, and freshen garments so they can
be worn again.
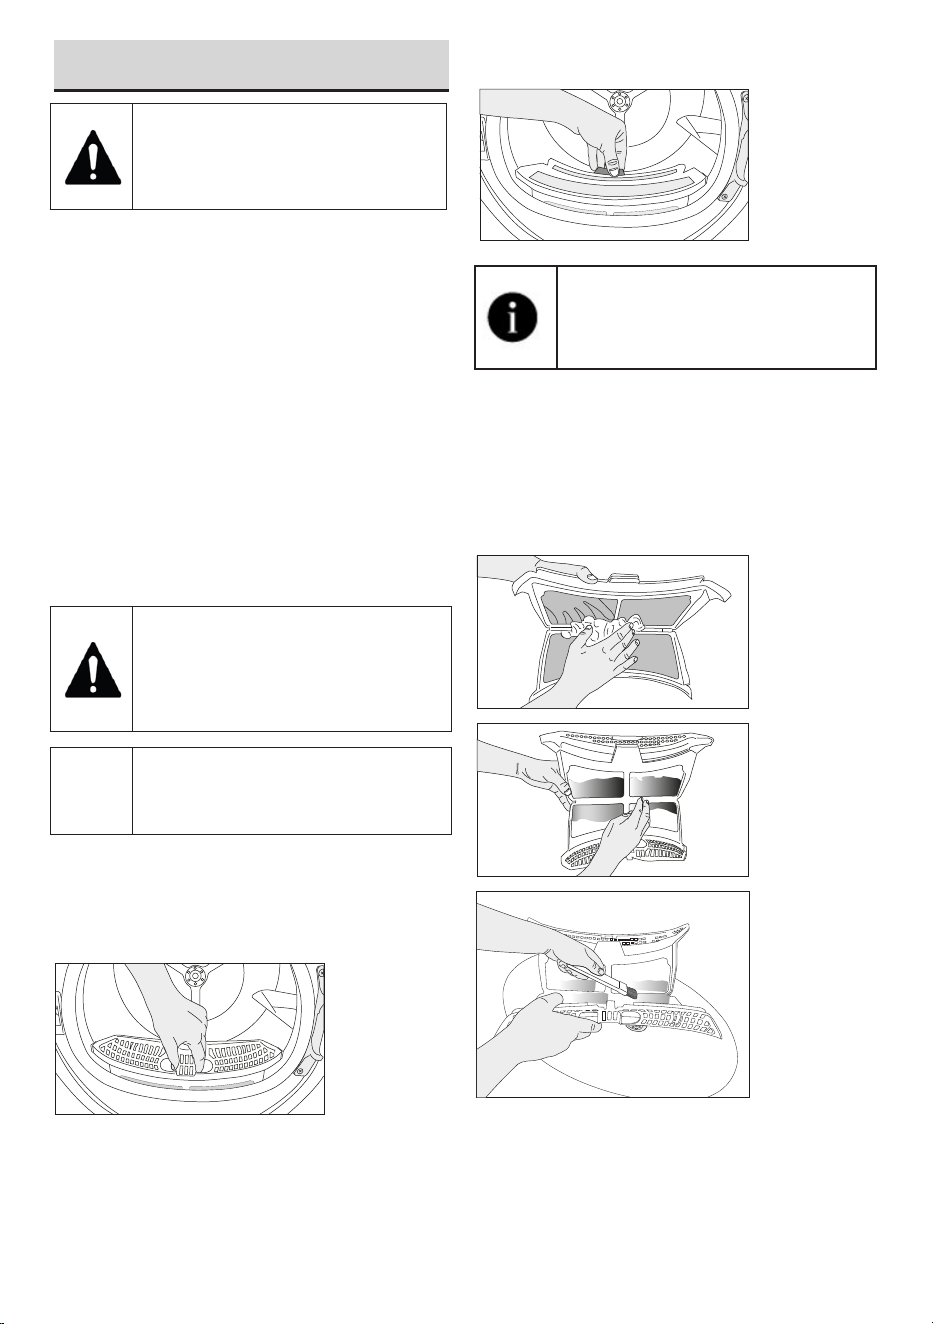
61
Dryer / User manual
7 Maintenance and cleaning
Read the “Safety Instructions” first!
7.1 Lint filters (internal and
external filters) / Cleaning
of the Interior Surface
of the Loading Door
The hair and fibres that are separated from
the laundry during drying process is collected
by the Lint filter. Insufficient cleaning of filters
can increase the drying duration and energy
consumption level.
Insufficient cleaning of filters can cause damp
laundries after drying cycle. While cleaning the
filters, in order to prevent microplastics from
spreading to the water system used, the dirt
and hair should be removed. While cleaning
the filters, the water should not be discharged
towards the drains.
After each drying cycle, clean the
lint filter and the inner surface of the
loading door.
NOTICE
Your drying machine has 2 lint filters
with one placed inside the other. Do
not operate the product without the
lint filters.
To clean the lint filter:
• Open the loading door.
• Hold the first part (inner filter) of the two part
lint filter and remove it by pulling it upwards.
• Remove the second part (outer filter) by
pulling it upwards.
Ensure that hair, fibre and cotton
balls do not fall into the slot where
the filters are installed.
• Open both of the lint filters (outer and inner)
and remove the fibres with your hands or
with the brush on the air deflector. You can
clean the hair in the filters with a vacuum
cleaner. The lint should be thrown in the
garbage bin and not washed through
the drain in order to avoid spreading
microplastics in the used water system.
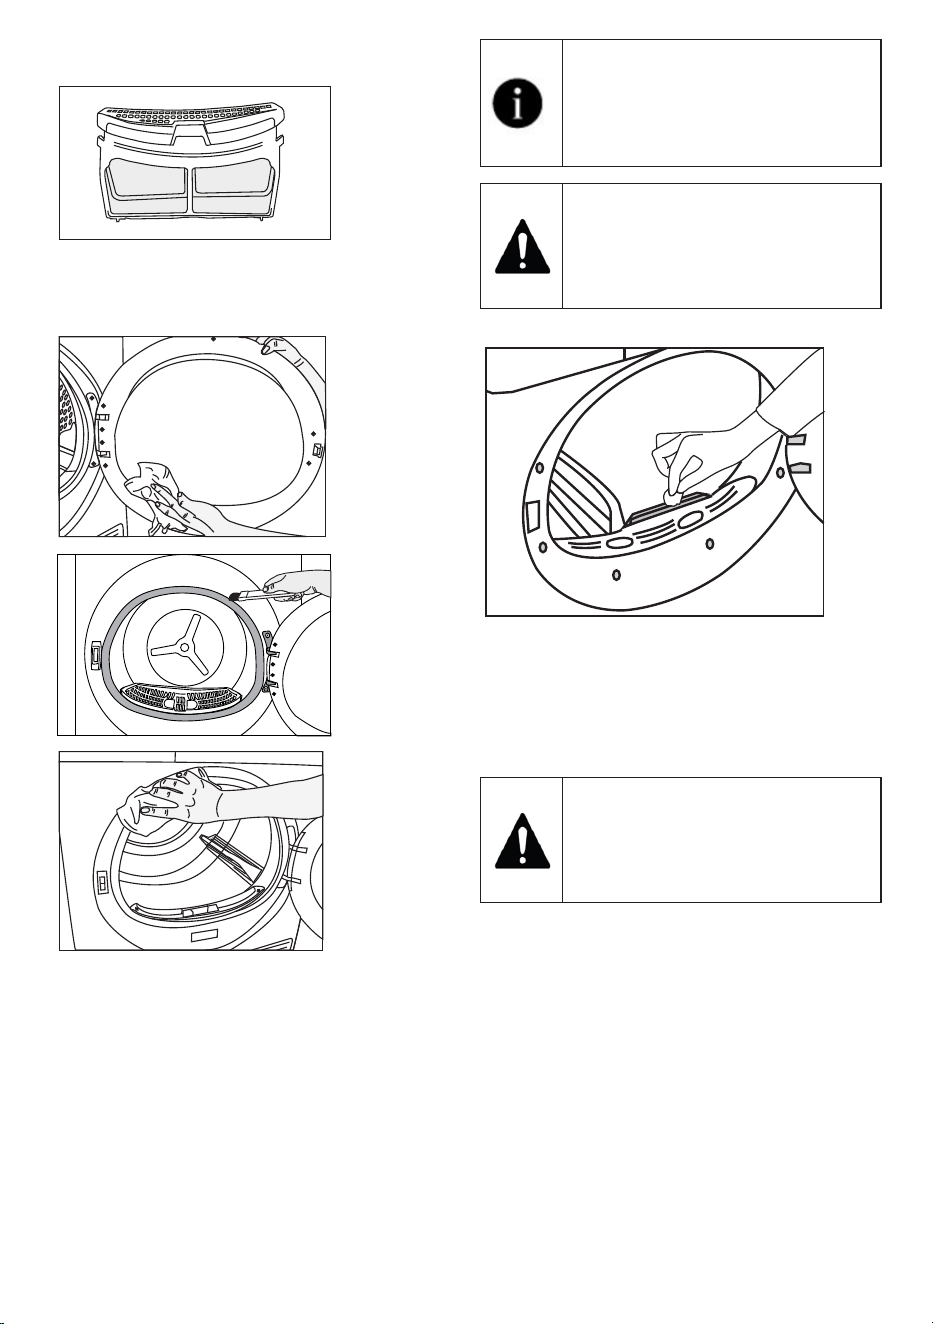
62
Dryer / User manual
• Insert the lint filters on one another and
place it back in its place.
• Clean the inner surface of the loading door
and the gasket with a soft damp cloth or the
brush on the air deflector.
7.2 Cleaning the sensor
The drying machine has humidity sensors that
detect whether the laundry is dry.
To clean the sensors:
Open the drying machine loading door.
If the machine is hot due to drying operation,
wait until it cools.
Clean the metal surfaces of the sensor with a
soft cloth dampened with vinegar and then dry.
Clean the metal surfaces of the
sensor 4 times a year.
Do not use metal tools to clean the
sensors’ metal surfaces.
Due to fire and explosion hazard, do
not use solutions, cleaning materials
or similar tools to clean sensors.
7.3 Emptying the water tank
During drying, the moisture is removed from
the laundry and condensed, then the water is
accumulated in the water tank. Empty the water
tank after each drying session.
Condensed water is not potable
water!
Do not remove the water tank as a
program is running!
If you do not empty the water tank, during the
next drying sessions the machine will stop
operating due to the water tank being full and a
Water Tank warning icon will blink. In this case
empty the water tank and to continue drying
operation, press the Start / Stand-by button.

63
Dryer / User manual
To drain the water tank:
Pull the water tank out from its drawer carefully.
Drain the water in the tank.
Remove the water tank in the drawer or the
kickplate carefully.
If lint builds up in the funnel on the water tank,
remove it under running water.
Place back the water tank.
If direct discharge option is used,
water tank is not required to be
drained.
7.4 Cleaning the condenser
The hair and the fibre that are not collected by
the lint filter accumulates on the metal surface
of the condenser behind the air deflector. These
fibres shall be cleaned regularly.
If the condenser cleaning icon blinks, check
the metal surface. If there is any fibre, clean it. It
must be checked at least every 6 months.
Open the toe board
by pulling its button.
Move the latches to
open the air deflector
lid.
Pull the brush to the
left to remove it. You
can use the cleaning
brush to clean
filter, condensing
metal surface and
accumulated fibre on
the door.
The cleaning brush is inside the
documentation bag. Get your
brush from the documentation bag
and insert it to its place on the air
deflector to store it.
Clean the fibre on the
metal surface of the
condenser with damp
cloth or the brush on
the air deflector in
up - down direction.
Do not clean with
left - right direction
since it will damage
the metal plates of the
condenser.
You can use a
vacuum cleaner with
a brush for cleaning.
If the vacuum cleaner
does not have
a brush, it is not
recommended to be
used for condenser
cleaning.
After cleaning the
filter, door and the
condenser, drag the
brush to the right and
lock it in its place.
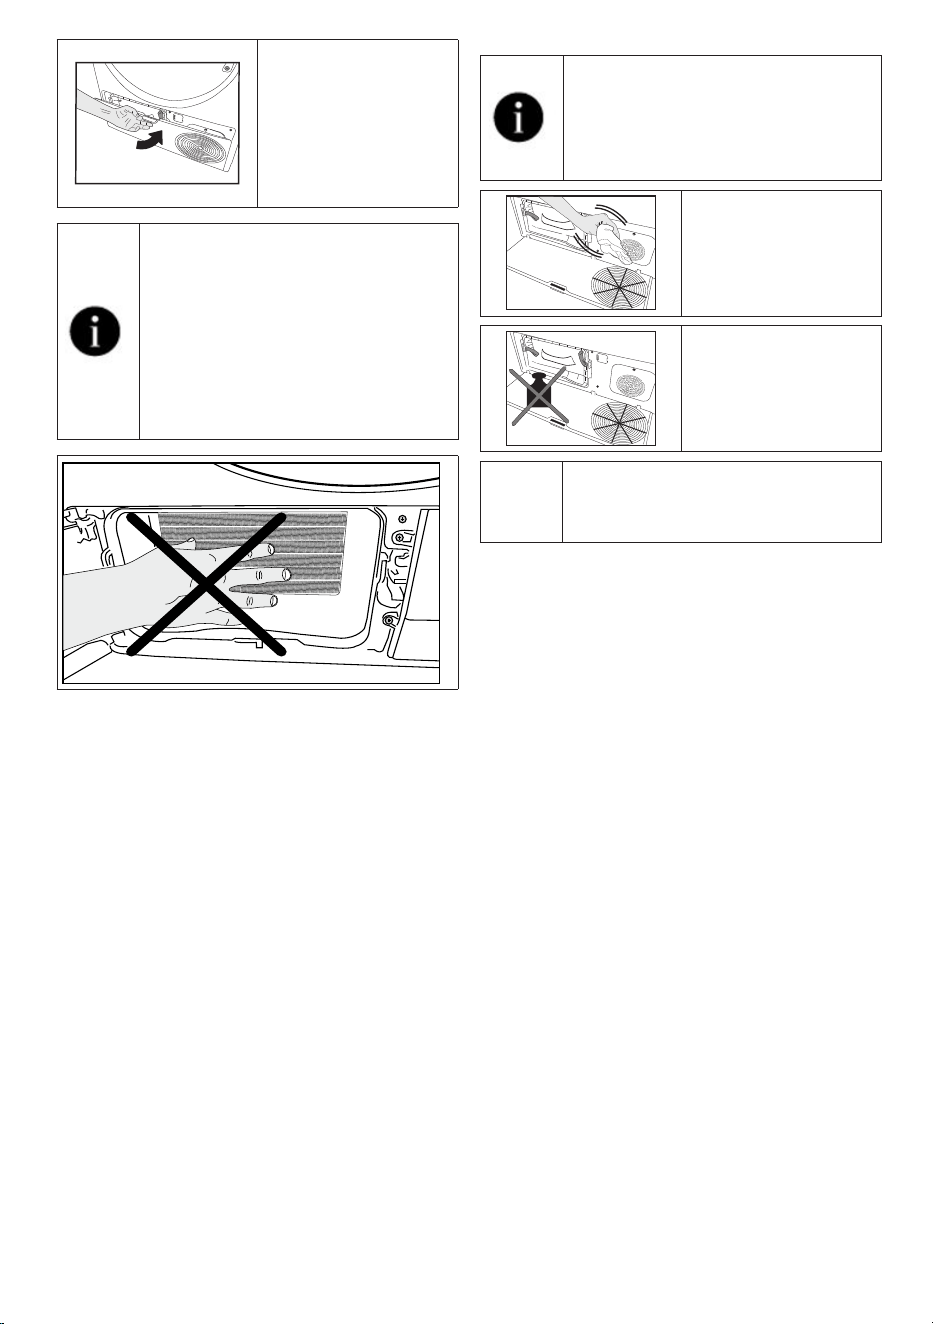
64
Dryer / User manual
After the cleaning
process is completed,
place the air deflector
cover to its place,
move the latches to
close it and close the
toe board.
You can clean by hand, provided
you wear protective gloves. Do not
try to clean with bare hands. The
condenser fins may damage your
hands. Cleaning from left to right
may damage the condenser fins.
This may lead to drying issues.
When the air deflector cover is
removed, it is normal to have water
at the plastic section in front of the
condenser.
If you see fibre
accumulation on the
fan cover and the toe
board, remove with a
cloth.
Do not have weight
on the toe board
when it is open.
NOTICE
Do not use abrasive materials or
steel wool to clean the drum.
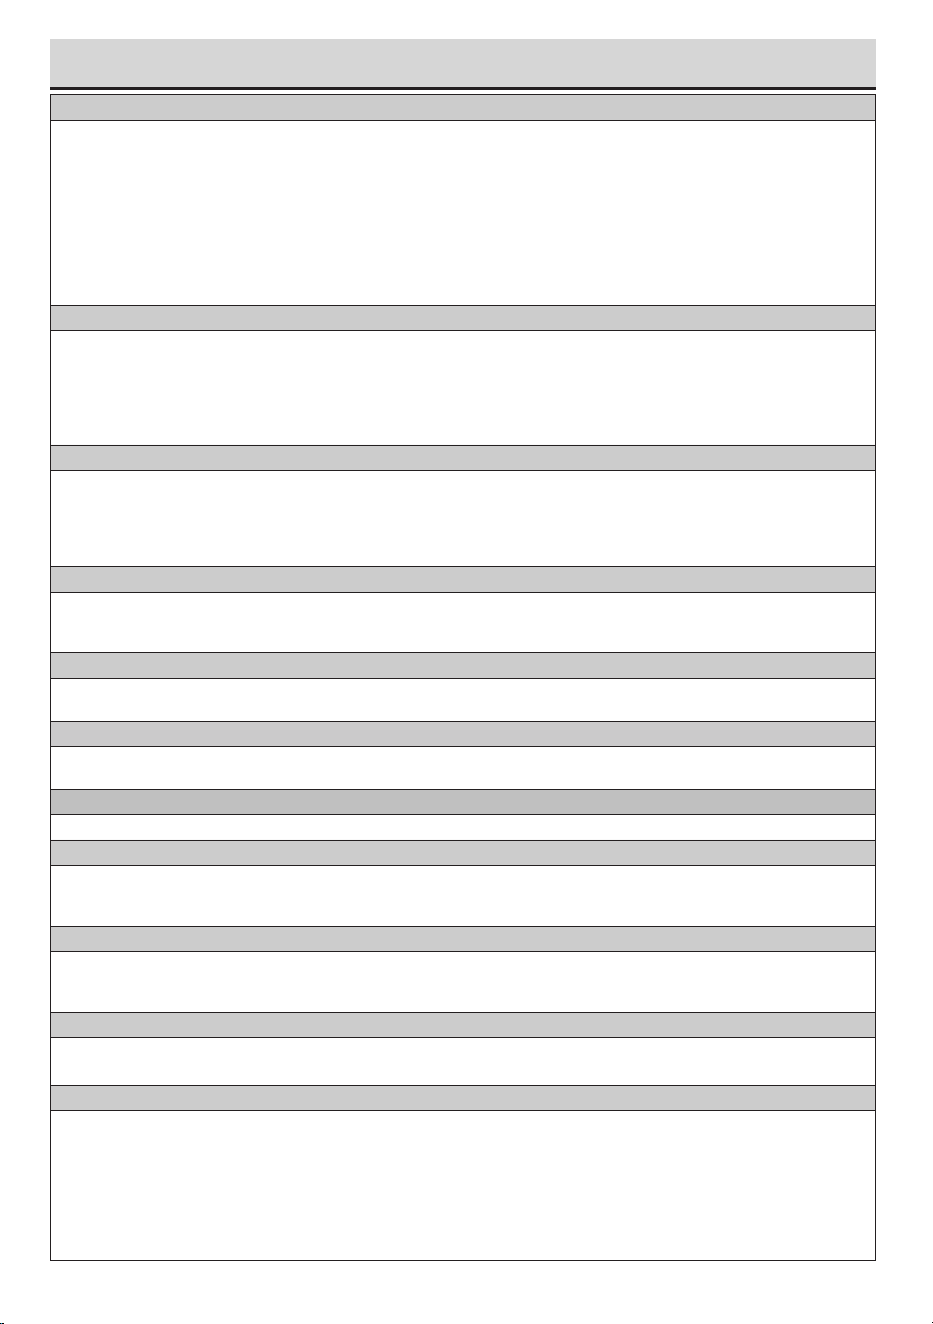
65
Dryer / User manual
8 Troubleshooting
The drying takes too long.
Lint filter (interior and exterior filters) pores may be clogged. >>> Can be cleaned with vacuum cleaner.
The front side of the condenser may be clogged. >>> Clean the front of the condenser.
The ventilation grills in front of the machine might be closed. >>> Remove any object in front of the ventilation grills
that blocks ventilation.
Ventilation may be insufficient if the dryer is installed in a small space. Open the door or windows to prevent the room
temperature from rising very high.
If there is a humidity sensor;
Limescale may have accumulated on the humidity sensor. >>> Clean the humidity sensor.
The machine may be overloaded with laundry. >>> Do not load the drying machine excessively.
The laundry may not have been spun enough. >>> Spin at a higher speed in the washing machine.
The laundry comes out damp after drying.
The right program for the type of laundry might not have been used. >>> Check the care labels on the laundry and
select a program ideal for the kind of laundry or use longer programs.
Lint filter (interior and exterior filters) pores may be clogged. >>> Can be cleaned with vacuum cleaner.
The front side of the condenser may be clogged. >>> Clean the front of the condenser.
The machine may be overloaded with laundry. >>> Do not load the drying machine excessively.
The laundry may not have been spun enough. >>> Spin at a higher speed in the washing machine.
Drying machine does not turn on or program cannot be started. The dryer does not turn on when set.
The power plug may not be plugged in. >>> Make sure the power plug is plugged in.
The loading door may be left open. >>> Make sure that the loading door is properly closed.
The program may not have been set or the Start / Pause button may not have been pressed. >>> Make sure that the
program is set and it is not in Standby position.
Child lock may be activated. >>> Turn off the child lock.
The program was interrupted for no reason.
The loading door might not be closed properly. >>> Make sure that the loading door is properly closed.
There might be a power outage. >>> Press the Start / Standby / Cancel button to start the program.
The water tank may be full. >>> Empty the water tank.
Laundry shrunk, matted or spoiled.
The right program for the type of laundry may not have been used. Check the maintenance labels on the clothes and
select a program suitable for the clothes.
Water is flowing from the loading door.
Lint might have gathered on the inner surfaces of the loading door and on the surfaces of the loading door gasket.
>>> Clean the inner surfaces of the loading door and the loading door gasket surfaces.
The loading door opens by itself.
The loading door might not be closed properly. >>> Push the loading door until the closing sound is heard.
The water tank warning symbol is on/flashing.
The water tank may be full. >>> Empty the water tank.
The water discharge hose might have folded. If the product is connected directly to the water drain check the
water discharge hose.
The lighting inside the drying machine does not turn on. (in models with lamps)
The drying machine might not have been turned on by the On/Off button. >>> Check that the drying machine is
turned on.
Lamp might be broken. >>> Contact Authorized Service to replace the lamp.
Anti-Wrinkle icon or light is lit.
An anti-wrinkle program that prevents the laundry in the dryer from creasing may be activated. >>> Turn the drier off
and remove the laundry.
Fiber filter cleaning icon is lit
Lint filters (interior and exterior filters) may be unclean. >>> Can be cleaned with vacuum cleaner.
A layer may be formed in the lint filter pores, leading to clogging. >>> Can be cleaned with vacuum cleaner.
A layer may be formed in the lint filter (inner and outer filters) pores that leads to clogging.<<Can be cleaned with
vacuum cleaner.>>
Lint filters might not be in place. >>> Insert the interior and exterior filters into their places.
Eco-friendly filter cloth may not be installed on the plastic part, and the front of the condenser may have
clogged.>>>Install the eco-friendly filter to the plastic part and place it on the filter housing.
Eco-friendly filters may not have been replaced, although the warning symbol is illuminated. “Replace your filter.”
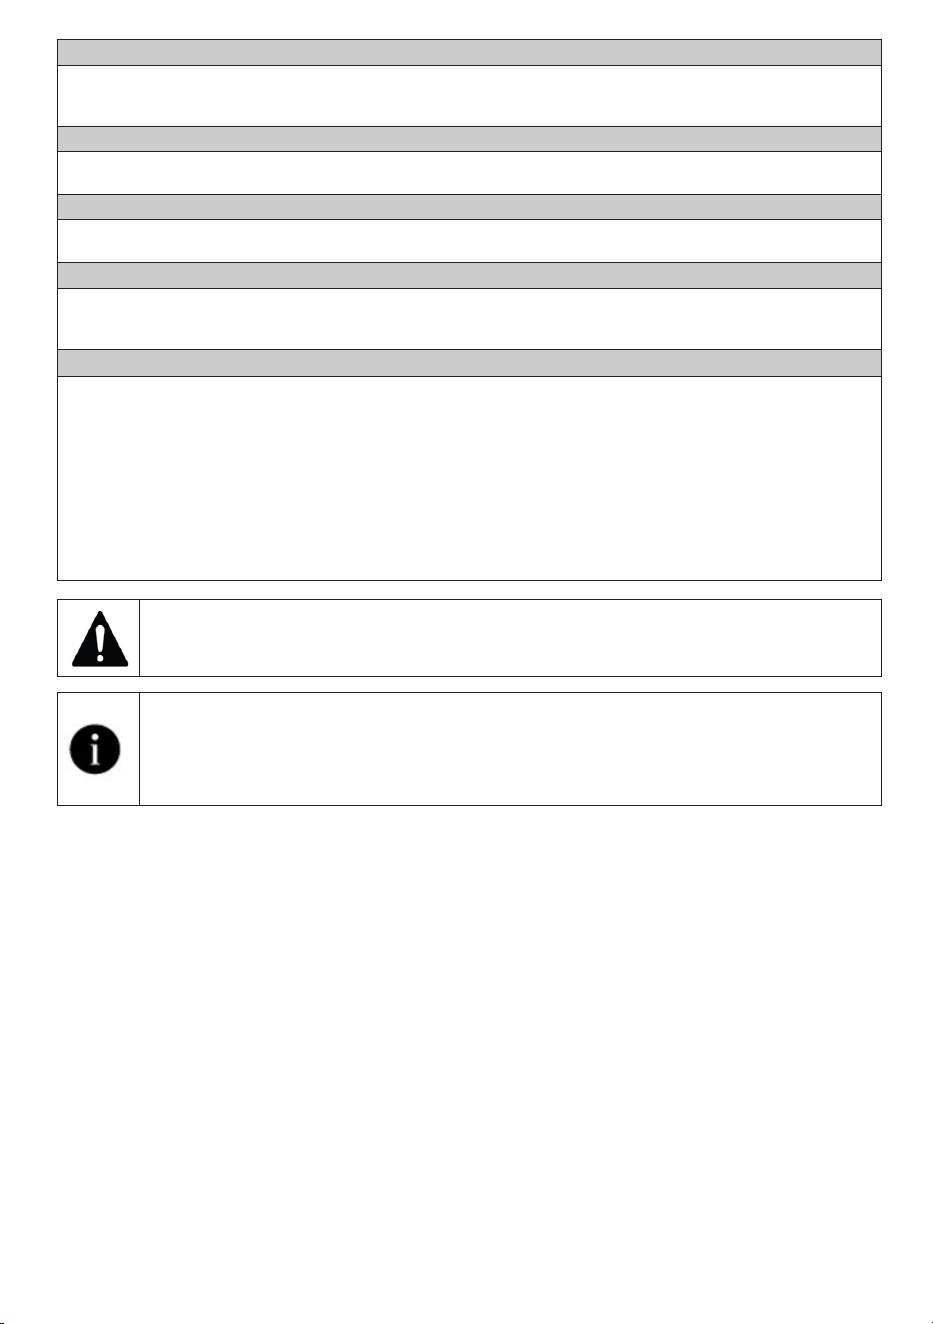
66
Dryer / User manual
The machine gives an audible warning,
Lint filters might not be in place. >>> Insert the interior and exterior filters into their places.
Filters of the machine might not have been installed.>>> Install the lint filters (internal and external) or the
environmentally-friendly filter in their housing.
The condenser warning icon is flashing.
Condenser front may be clogged with fibres. >>> Clean the front of the condenser.
Lint filters might not be in place. >>> Insert the interior and exterior filters into their places.
The lighting inside the drying machine turns on. (in models with lamps)
If the drying machine is plugged to the power outlet, the On/Off button is pressed and the door is open; the light turns
on. >>> Unplug the drying machine or bring the On/Off button to Off position.
Wi-Fi icon flashes continuously. (HomeWhiz Function models)
>>> The product may not be connected to the wireless network. Follow the instructions to connect to the network.
The device the appliance uses to connect to the network may be faulty. Check it. The appliance might not be
connected to the network due to being out of wi-fi range.
Check the steps below if you see "F L t" on the screen.
The filters may be dirty. Clean the internal and external filters
In the loading door area, if you are using the inner and outer dual filters. >>> Make sure that both filters
are installed.
The front side of the condenser may be dirty. >>> Open and check the kick zone and make sure it is
clean.
Check out the Maintenance and Cleaning section.
The foreign objects, if any, should be removed from the drying machine drum,
Spare parts will be available for a period of up to 10 years, according to the specific Regulation
requirements.
If the problem persists after following the instructions in this section, contact your vendor or an
Authorized Service. Never attempt to repair a malfunctioning product yourself.
If you experience a problem with any part of your appliance, you can request a replacement by
consulting the nearest authorised service with the appliance model number.
Operating the appliance with non-genuine parts may cause it to malfunction.
The manufacturer and distributor are not responsible for malfunctions caused by non-genuine
parts.
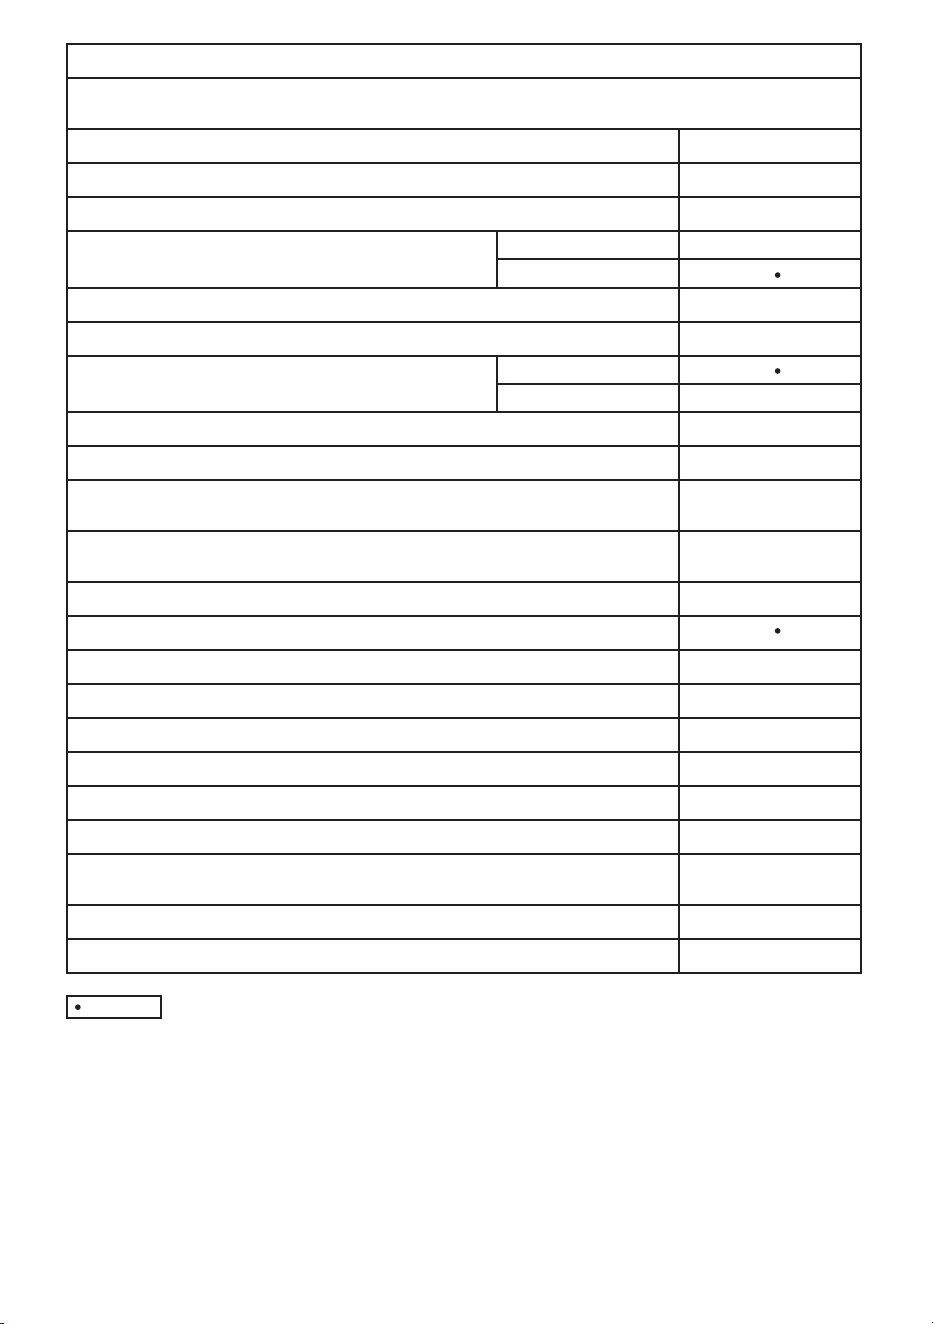
67
Dryer / User manual
(4) Scale from G (lest efficient) to A (most efficient)
(5) Weighted average value — L
WA
expressed in dB(A) re 1 pW
(1) Scale from A+++ (most efficient) to D (least efficient)
(2) Energy consumption based on 160 drying cycles of the standard cotton programme at full and partial load, and the consumption of
the low-power modes. Actual energy consumption per cycle will depend on how the appliance is used.
(3) "Cotton cupboard dry programme" used at full and partial load is the standard drying programme to which the information in the
label and the fiche relates, that this programme is suitable for drying normal wet cotton laundry and that it is the most efficient
programme in terms of energy consumption for cotton
: Yes - : No
Supplier name or trademark
Model name
Rated capacity (kg)
Type of Tumble Dryer
Condenser
Air Vented
Energy efficiency class
(1)
Annual Energy Consumption (kWh)
(2)
Type of Control
Energy consumption of the standard cotton programme at full load (kWh)
Energy consumption of the standard cotton programme at partial load (kWh)
Power consumption of the off-mode for the standart cotton programme at full load, P
O
(W)
Power consumption of the left-on mode for the standart cotton programme at full load, P
L
(W)
The duration of the left on mode (min)
Standard cotton programme
(3)
Programme time of the standard cotton programme at full load, T
dry
(min)
Programme time of the standard cotton programme at partial load, T
dry1/2
(min)
Weighted programme time of the standard cotton programme at full and partial load (T
t
)
Condensation efficiency class
(4)
Average condensation efficiency of the standard cotton programme at full load, C
dry
Average condensation efficiency of the standard cotton programme at partial load, C
dry1/2
Weighted condensation efficiency of the standard cotton programme at full load and partial load, C
t
Sound power level for the standard cotton programme at full load
(5)
Built-in
PRODUCT FICHE
Complying Commission Delegated Regulation (EU) No 392/2012
Non-automatic
Automatic
A++
217,0
-
1,82
0,97
0,50
1,00
30
220
166
B
88%
88%
88%
64
-
10.0
125
-
HOTPOINT
HPT 104D BS IT
7188383920