www.auna-multimedia.com
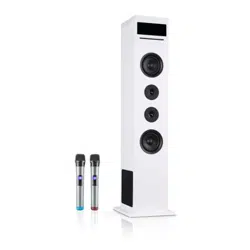
Karaboom 100 Sing
Karaoketurm
Karaoke Tower
Torre karaoke
Tour karaoké
10033249 10033250


3
DE
English 15
Español 25
Français 35
Italiano 45
Sehr geehrter Kunde,
wir gratulieren Ihnen zum Erwerb Ihres Gerätes.
Lesen Sie die folgenden Hinweise sorgfältig durch
und befolgen Sie diese, um möglichen Schäden
vorzubeugen. Für Schäden, die durch Missachtung der
Hinweise und unsachgemäßen Gebrauch entstehen,
übernehmen wir keine Haftung. Scannen Sie den
folgenden QR-Code, um Zugri auf die aktuellste
Bedienungsanleitung und weitere Informationen rund
um das Produkt zu erhalten:
INHALTSVERZEICHNIS
Geräteübersicht 4
Sicherheitshinweise 6
Grundeinstellungen 7
CD-Modus 9
AUX-Modus 10
BT-Modus 10
USB-Modus 11
Karaoke-Modus 11
Technische Daten 11
Spezielle Entsorgungshinweise für Verbraucher in Deutschland 12
Hinweise zur Entsorgung 14
Konformitätserklärung 14

4
DE
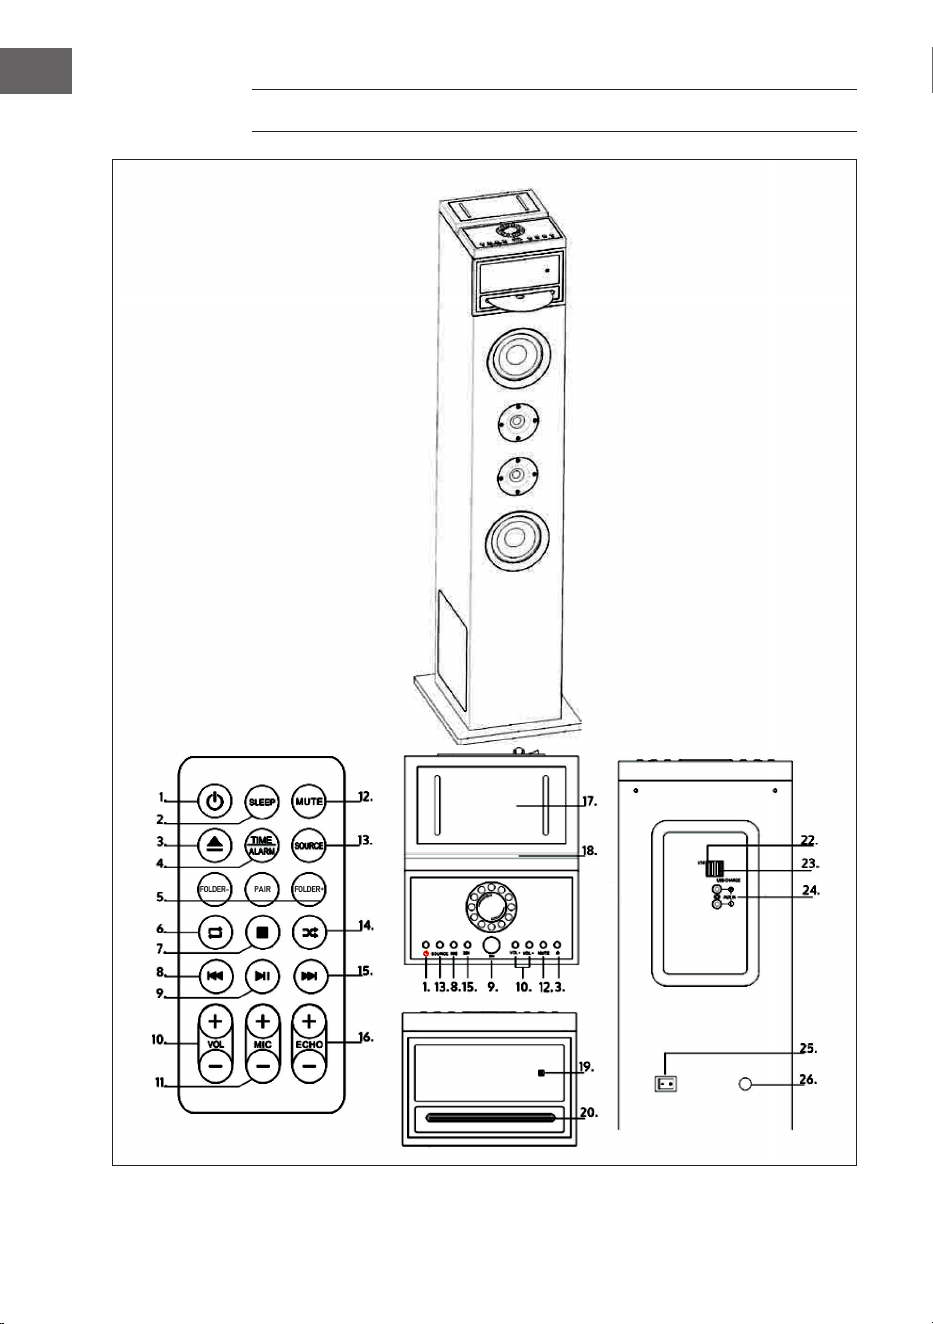
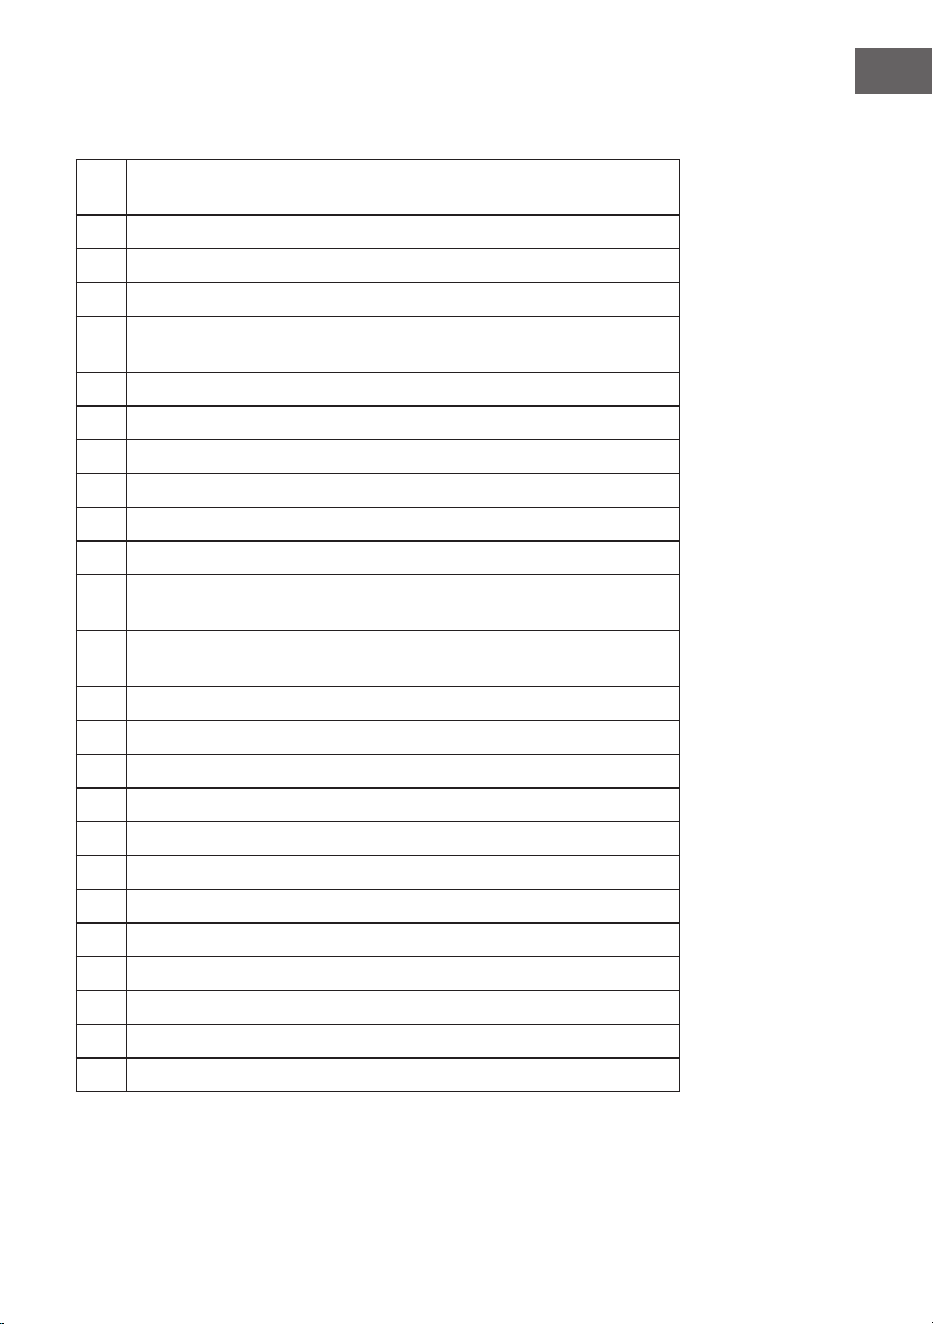
GERÄTEÜBERSICHT

5
DE
1
SLEEP: Wiederholt drücken, um einen Sleeptimer einzustellen. Nach Ablauf
des Timer wird der Turm automatisch ausgeschaltet.
2
POWER/STANDBY: Zum Aus- und Einschalten des Turms
3
CD auswerfen
4
TIME/ALARM: Drücken Sie diese Taste, um einen aktiven Alarm
auszuschalten.
5
FOLDER- (Ordner abwärts) / PAIR (Verbinden im BT-Modus) /
FOLDER+ (Ordner aufwärts)
6
Titel im CD-Modus wiederholen.
7
STOP: Wiedergabe stoppen
8
ZURÜCK: Zum vorherigen Track springen
9
PLAY/PAUSE: Starten oder pausieren Sie die Wiedergabe
10
VOL- / VOL+: Anpassen der Lautstärke
11
MIC- / MIC+: Anpassen der Mikrofon-Lautstärke
12
MUTE: Zum Stummschalten drücken. Drücken Sie die Taste erneut, um die
Stummschaltung wieder aufzuheben.
13
SOURCE: Musikquelle bzw. Modus auswählen: CD, BT, USB oder AUDIO.
14
Titel im CD-Modus zufällig wiederholen.
15
VOR: Zum nächsten Track springen
16
ECHO-/ ECHO+: Anpassen der Mikrofon-Echo-Eekts
17
Smartphone-Halterung
18
Tablet-Halterung
19
LED-Display
20
CD-Einschub
22
USB-Buchse
23
USB-Ladeanschluss
24
AUX-Eingang
25
Strom ein/aus
26
Stromversorgung

6
DE
SICHERHEITSHINWEISE
Allgemeine Hinweise
• Blitzschlag - Wenn Sie das Gerät länger nicht benutzen oder es
gewittert, ziehen Sie den Stecker aus der Steckdose der trennen Sie das
Gerät vom Antennenanschluss. Dadurch werden Schäden am Produkt
durch Blitzschlag und Überspannung vermieden.
• Überlastung - Überlasten Sie keine Steckdosen, Verlängerungskabel
oder integrierten Steckdosen, da dies zu einem Brand oder Stromschlag
führen kann.
• Fremdkörper und Flüssigkeitseintritt - Schieben Sie niemals
Gegenstände jeglicher Art durch Önungen in das Gerät, da sie
gefährliche Spannungspunkte berühren oder Teile kurzschließen
können, die zu einem Brand oder einem elektrischen Schlag führen
könnten. Verschütten Sie niemals Flüssigkeiten jeglicher Art auf dem
Gerät.
• Reparatur und Wartung - Versuchen Sie nicht, dieses Produkt selbst zu
warten, da Sie sich durch das Önen oder Entfernen von Abdeckungen
gefährlichen Spannungen oder anderen Gefahren aussetzen.
Überlassen Sie alle Wartungsarbeiten qualiziertem Servicepersonal.
• Schäden, die einen Service erfordern - Ziehen Sie den Netzstecker aus
der Steckdose und wenden Sie sich an einen qualizierten Fachbetrieb
wenn eine der folgenden Situationen eintritt:
a) Wenn das Netzkabel oder der Stecker beschädigt ist.
b) Wenn Flüssigkeit verschüttet wurde oder Gegenstände auf das
Produkt gefallen sind.
c) Wenn das Produkt Regen oder Wasser ausgesetzt war.
d) Wenn das Produkt heruntergefallen oder beschädigt ist.
e) Wenn das Produkt eine deutliche verringerte Leistung aufweist.
• Ersatzteile - Wenn Ersatzteile benötigt werden, stellen Sie sicher, dass
der Fachbetrieb, der die Teile ersetzt, nur Ersatzteile verwendet, die
vom Hersteller zugelassen sind oder dieselben Eigenschaften wie das
Originalteil haben. Unbefugter Austausch kann zu Feuer, Stromschlag
oder anderen Gefahren führen.
• Wärme - Stellen Sie das Gerät nicht in der Nähe von Wärmequellen
wie Heizkörpern, Heizregistern, Öfen oder anderen Produkten
(einschließlich Verstärkern) aufgestellt.

7
DE
GRUNDEINSTELLUNGEN
Anschluss an das Stromnetz
• Prüfen Sie vor der Benutzung die Spannung auf der Geräteplakette.
Schließen Sie das Gerät nur an Steckdosen an, die der Spannung des
Geräts entsprechen.
• Ziehen sie den Stecker nicht am Kabel aus der Steckdose, sondern
halten Sie ihn beim Abziehen mit der Hand fest.
• Schließen Sie das Gerät erst an das Stromnetz an, wenn Sie es komplett
verkabelt haben.
• Stellen Sie das Gerät so auf, dass Sie jederzeit an den Stecker kommen.
Auto Standby
Wenn Sie Medien von einem angeschlossenen Gerät abspielen, wechselt
das Gerät automatisch in den Standby-Modus, wenn:
• Länger als 10 Minuten keine Taste gedrückt wird.
• Länger als 10 Minuten kein Titel abgespielt wird.
Uhr einstellen
Stecken Sie den Stecker in die Steckdose. Das Display zeigt [00:00] und das
Gerät bendet sich im Standby-Modus. Sie können nun die Uhr einstellen.
1 Drücken Sie auf die Taste TIME. Die Ziern im Display blinken.
2 Benutzen Sie die Taste VOR/ZURÜCK, um die Stunde einzustellen.
Bestätigen Sie die Eingabe, indem Sie auf TIME drücken.
3 Benutzen Sie die Taste VOR/ZURÜCK, um die Minuten einzustellen.
Bestätigen Sie die Eingabe, indem Sie auf TIME drücken.

8
DE
Alarm einstellen
Dieses Gerät kann als Wecker verwendet werden. Als Wecker kann USB
aktiviert werden, das zur Weckzeit startet.
1 Drücken Sie ie Taste STANDBY, um in den Standby-Modus zu wechseln.
2 Versichern Sie sich, dass Sie die Uhr richtig eingestellt haben.
3 Drücken Sie die Taste ALARM. Im Display erscheint ON (ein) und die
Anzeige blinkt. Wählen Sie den Alarm (1 oder 2) aus, den sie einstellen
möchten.
4 Drücken Sie zur Bestätigung die Taste ALARM, die Zeitanzeige blinkt.
5 Drücken Sie wiederholt die Taste VOR/ZURÜCK, um die Stunde
einzustellen. Drücken Sie ALARM zur Bestätigung.
6 Drücken Sie die Taste VOR/ZURÜCK, um die Minute einzustellen.
7 Drücken Sie ALARM zur Bestätigung und dann VOR/ZURÜCK, um als
Wecker USB auszuwählen. Drücken Sie ALARM zur Bestätigung.
8 Sobald der Wecker angeht, steigt die Lautstärke allmählich von 0 auf 20
an.
9 Um den Wecker zu starten, drücken Sie im ausgeschalteten Zustand die
ALARM-Taste. Das Display zeigt ON an. Wählen Sie den gewünschten
Alarm aus und die Alarm-Anzeige blinkt.
10 Drücken Sie die Taste VOR/ZURÜCK bis OFF, um den Alarm
abzubrechen.
Sleeptimer einstellen
Halten Sie die SLEEP-Taste gedrückt, das Display blinkt. Drücken Sie die
SLEEP-Taste, bis auf dem Display die Zeit angezeigt wird, die sie einstellen
möchten. Sie können 10 bis 90 Minuten einstellen. Der eingestellte Wert
blinkt dreimal zur Bestätigung, dann kehrt das Display wieder zur normalen
Anzeige zurück. Wenn Sie den Sleeptimer abbrechen möchten, drücken Sie
auf OFF.

9
DE
CD-MODUS
CD abspielen
1 Drücken Sie wiederholt auf SOURCE und wählen Sie DISK aus.
2 Schieben Sie eine CD mit der bedruckten Seite nach oben in das Fach.
3 Die CD wird normalerweise automatisch abgespielt. Wenn nicht,
drücken Sie auf PLAY/PAUSE.
4 Drücken Sie VOR/ZURÜCK, um zu einem bestimmten Titel zu springen.
CD anhalten / weiter abspielen
1 Drücken Sie während der Wiedergabe auf PLAY/PAUSE, um die CD kurz
anzuhalten.
2 Drücken Sie erneut auf PLAY/PAUSE, um die CD weiter abzuspielen.
Titel wechseln / Lautstärke anpassen
Im CD-Modus
• Drücken Sie auf VOR/ZURÜCK, um den Titel zu wechseln.
• Drücken Sie auf VOLUME +/-, um die Lautstärke anzupassen.
Im MP3- und USB-Modus
• Drücken Sie auf VOR/ZURÜCK, um den Titel
• Drücken Sie auf FOLDER-/FOLDER+, um den Ordner zu wechseln.
• Drücken Sie auf VOLUME +/-, um die Lautstärke anzupassen.
Innerhalb eines Titels suchen
• Halten Sie während der Wiedergabe die Taste VOR/ZURÜCK gedrückt,
um innerhalb eines Titels vor- oder zurückzuspulen.
• Lassen Sie die Taste wieder los, um mit der Wiedergabe fortzufahren.

10
DE
AUX-MODUS
Sie können über dieses Gerät Musik von einem externen Audiogerät
wiedergeben, beispielsweise einem MP3-Player. Dazu benötigen Sie ein
Cinch-Kabel (nicht im Lieferumfang enthalten).
1 Schließen Sie ein Cinch-Kabel an den AUX-Eingang an. Schließen Sie
das andere Ende des Cinch-Kabels an den Audioausgang Ihres DVD-
Players, Ihrer Stereoanlage, Ihres Spielsystems oder Ihres Fernsehers
an.
2 Drücken Sie die POWER-Taste, um den Karaoke-Turm einzuschalten.
3. Drücken Sie die SOURCE-Taste, um in den AUX-Modus zu wechseln.
4. Verwenden Sie die Bedienelemente des angeschlossenen Geräts, um
mit der Wiedergabe zu beginnen.
BT-MODUS
1 Drücken Sie die SOURCE-Taste, um den BT-Modus auszuwählen.
2 Drücken Sie dann die Taste PAIR auf der Fernbedienung. Die LED-
Anzeige leuchtet blau.
3 Schalten Sie BT ein und sorgen Sie dafür, dass Ihr Smart-Gerät
sichtbar ist. Wählen Sie [Neues BT-Gerät hinzufügen] oder [BT-Gerät
einrichten]. Es wird nach BT-Geräten in der Umgebung gesucht Sobald
[KARABOOM 100] in der BT-Liste erscheint, wählen Sie es aus. Wenn Ihr
Gerät Sie zur Eingabe eines Passwortes auordert, geben Sie [0000]
ein. Wenn der Pairing-Versuch fehlschlägt oder die Zeit abgelaufen ist,
starten Sie den Pairing-Vorgang erneut.
4 Nachdem Ihr Gerät und der Turmlautsprecher miteinander verbunden
sind, ist ein Ton zu hören.
5 Stellen Sie sicher, dass die BT-Verbindung zwischen dem Lautsprecher
und dem Smart-Gerät aktiv ist.
6 Drücken Sie die PLAY/PAUSE, um die Wiedergabe zu unterbrechen,
drücken Sie die Taste erneut, um die Wiedergabe fortzusetzen.
Drücken Sie die Taste VOR/ZURÜCK, um zum nächsten Titel oder zum
vorherigen Titel zu springen.
11
DE
USB-MODUS
MP3-Wiedergabe von USB
1 Stecken Sie den USB-Speicher in den USB-Eingang.
2 Drücken Sie auf SOURCE und wählen Sie USB aus. Der erste Titel
startet automatisch. Wenn nicht, drücken Sie auf PLAY/PAUSE.
3 Drücken Sie auf VOR/ZURÜCK, um einen bestimmten Titel
auszuwählen.
4 Drücken Sie auf VOLUME +/-, um die Lautstärke anzupassen.
Laden per USB
Hinten am Gerät bendet sich eine USB-Ladeanschluss, mit der Sie keine
Geräte, wie Smartphones, per USB auaden können.
KARAOKE-MODUS
1 Schrauben Sie den Deckel des Batteriefachs von der Unterseite des
Mikrofons ab und legen Sie zwei Batterien (Typ AA) ein. Schrauben Sie
den Deckel wieder auf.
2 Schieben Sie den Mikrofonschalter in die Position ON.
3. Stellen Sie die Mikrofonlautstärke mit der Fernbedienung ein.
4 Drücken Sie das ECHO +/-, um die Echolautstärke einzustellen.
5. Wählen Sie den gewünschten Gerätemodus und starten Sie die
Wiedergabe.
6 Beginnen Sie zu singen.
7 Wenn Sie mit dem Karaoke fertig sind, denken Sie daran, das Mikrofon
auszuschalten, indem Sie den Schalter auf OFF stellen.
TECHNISCHE DATEN
Artikelnummer 10033249, 10033250
Stromversorgung 220-240 V ~ 50/60 Hz
Gesamtverbrauch 65 W
RMS-Leistung 60 W
Widerstand 8 Ω
S/N-Faktor (A) 75 dB

12
DE
SPEZIELLE ENTSORGUNGSHINWEISE FÜR
VERBRAUCHER IN DEUTSCHLAND
Entsorgen Sie Ihre Altgeräte fachgerecht. Dadurch wird gewährleistet,
dass die Altgeräte umweltgerecht verwertet und negative Auswirkungen
auf die Umwelt und menschliche Gesundheit vermieden werden. Bei der
Entsorgung sind folgende Regeln zu beachten:
• Jeder Verbraucher ist gesetzlich verpichtet, Elektro- und
Elektronikaltgeräte (Altgeräte) sowie Batterien und Akkus
getrennt vom Hausmüll zu entsorgen. Sie erkennen die
entsprechenden Altgeräte durch folgendes Symbol der
durchgestrichene Mülltonne (WEEE-Symbol).
• Sie haben Altbatterien und Altakkumulatoren, die nicht vom Altgerät
umschlossen sind, sowie Lampen, die zerstörungsfrei aus dem
Altgerät entnommen werden können, vor der Abgabe an einer
Entsorgungsstelle vom Altgerät zerstörungsfrei zu trennen.
• Bestimmte Lampen und Leuchtmittel fallen ebenso unter das Elektro-
und Elektronikgesetz und sind dementsprechend wie Altgeräte zu
behandeln. Ausgenommen sind Glühbirnen und Halogenlampen.
Entsorgen Sie Glühbirnen und Halogenlampen bitte über den Hausmüll,
sofern sie nicht das WEEE-Symbol tragen.
• Jeder Verbraucher ist für das Löschen von personenbezogenen Daten
auf dem Elektro- bzw. Elektronikgerät selbst verantwortlich.
Rücknahmepicht der Vertreiber
Vertreiber mit einer Verkaufsäche für Elektro- und Elektronikgeräte von
mindestens 400 Quadratmetern sowie Vertreiber von Lebensmitteln mit
einer Gesamtverkaufsäche von mindestens 800 Quadratmetern, die
mehrmals im Kalenderjahr oder dauerhaft Elektro- und Elektronikgeräte
anbieten und auf dem Markt bereitstellen, sind verpichtet,
1 bei der Abgabe eines neuen Elektro- oder Elektronikgerätes an einen
Endnutzer ein Altgerät des Endnutzers der gleichen Geräteart, das
im Wesentlichen die gleichen Funktionen wie das neue Gerät erfüllt,
am Ort der Abgabe oder in unmittelbarer Nähe hierzu unentgeltlich
zurückzunehmen und
2 auf Verlangen des Endnutzers Altgeräte, die in keiner äußeren
Abmessung größer als 25 Zentimeter sind, im Einzelhandelsgeschäft
oder in unmittelbarer Nähe hierzu unentgeltlich zurückzunehmen; die
Rücknahme darf nicht an den Kauf eines Elektro- oder Elektronikgerätes
geknüpft werden und ist auf drei Altgeräte pro Geräteart beschränkt.

13
DE
• Bei einem Vertrieb unter Verwendung von Fernkommunikationsmitteln
ist die unentgeltliche Abholung am Ort der Abgabe auf Elektro- und
Elektronikgeräte der Kategorien 1, 2 und 4 gemäß § 2 Abs. 1 ElektroG,
nämlich „Wärmeüberträger“, „Bildschirmgeräte“ (Oberäche von mehr
als 100 cm²) oder „Großgeräte“ (letztere mit mindestens einer äußeren
Abmessung über 50 Zentimeter) beschränkt. Für andere Elektro- und
Elektronikgeräte (Kategorien 3, 5, 6) ist eine Rückgabemöglichkeit in
zumutbarer Entfernung zum jeweiligen Endnutzer zu gewährleisten.
• Altgeräte dürfen kostenlos auf dem lokalen Wertstohof oder in
folgenden Sammelstellen in Ihrer Nähe abgegeben werden: www.take-
e-back.de
• Für Elektro- und Elektronikgeräte der Kategorien 1, 2 und 4 bieten
wir auch die Möglichkeit einer unentgeltlichen Abholung am Ort der
Abgabe. Beim Kauf eines Neugeräts haben Sie die Möglichkeit, eine
Altgerätabholung über die Webseite auszuwählen.
• Batterien können überall dort kostenfrei zurückgegeben werden, wo sie
verkauft werden (z. B. Super-, Bau-, Drogeriemarkt). Auch Wertsto- und
Recyclinghöfe nehmen Batterien zurück. Sie können Batterien auch per
Post an uns zurücksenden. Altbatterien in haushaltsüblichen Mengen
können Sie direkt bei uns von Montag bis Freitag zwischen 08:00 und
16:00 Uhr unter der folgenden Adresse unentgeltlich zurückgeben:
Chal-Tec Fulllment GmbH
Norddeutschlandstr. 3
47475 Kamp-Lintfort
• Wichtig zu beachten ist, dass Lithiumbatterien aus Sicherheitsgründen
vor der Rückgabe gegen Kurzschluss gesichert werden müssen (z. B.
durch Abkleben der Pole).
• Finden sich unter der durchgestrichenen Mülltonne auf der Batterie
zusätzlich die Zeichen Cd, Hg oder Pb ist das ein Hinweis darauf, dass
die Batterie gefährliche Schadstoe enthält. (»Cd« steht für Cadmium,
»Pb« für Blei und »Hg« für Quecksilber).
Hinweis zur Abfallvermeidung
Indem Sie die Lebensdauer Ihrer Altgeräte verlängern, tragen Sie dazu
bei, Ressourcen eizient zu nutzen und zusätzlichen Müll zu vermeiden.
Die Lebensdauer Ihrer Altgeräte können Sie verlängern, indem Sie defekte
Altgeräte reparieren lassen. Wenn sich Ihr Altgerät in gutem Zustand
bendet, könnten Sie es spenden, verschenken oder verkaufen.

14
DE
HINWEISE ZUR ENTSORGUNG
Wenn es in Ihrem Land eine gesetzliche Regelung
zur Entsorgung von elektrischen und elektronischen
Geräten gibt, weist dieses Symbol auf dem Produkt
oder auf der Verpackung darauf hin, dass dieses
Produkt nicht im Hausmüll entsorgt werden darf.
Stattdessen muss es zu einer Sammelstelle für
das Recycling von elektrischen und elektronischen
Geräten gebracht werden. Durch regelkonforme
Entsorgung schützen Sie die Umwelt und die
Gesundheit Ihrer Mitmenschen vor negativen
Konsequenzen. Informationen zum Recycling
und zur Entsorgung dieses Produkts, erhalten
Sie von Ihrer örtlichen Verwaltung oder Ihrem
Hausmüllentsorgungsdienst.
Dieses Produkt enthält Batterien. Wenn es in Ihrem
Land eine gesetzliche Regelung zur Entsorgung
von Batterien gibt, dürfen die Batterien nicht im
Hausmüll entsorgt werden. Informieren Sie sich
über die örtlichen Bestimmungen zur Entsorgung
von Batterien. Durch regelkonforme Entsorgung
schützen Sie die Umwelt und die Gesundheit Ihrer
Mitmenschen vor negativen Konsequenzen.
KONFORMITÄTSERKLÄRUNG
Hersteller:
Chal-Tec GmbH, Wallstraße 16, 10179 Berlin,
Deutschland.
Importeur für Großbritannien:
Berlin Brands Group UK Limited
PO Box 42
272 Kensington High Street
London, W8 6ND
United Kingdom
Hiermit erklärt Chal-Tec GmbH, dass der
Funkanlagentyp Karaboom 100 Sing der Richtlinie
2014/53/EU entspricht. Der vollständige Text der
EU-Konformitätserklärung ist unter der folgenden
Internetadresse verfügbar: use.berlin/10033249

15
EN
Dear Customer,
Congratulations on purchasing this equipment.
Please read this manual carefully and take care of the
following hints to avoid damages. Any failure caused
by ignoring the items and cautions mentioned in the
instruction manual is not covered by our warranty and
any liability. Scan the QR code to get access to the
latest user mannual and other information about the
product:
CONTENTS
Product Overview 16
Safety Instructions 18
Basic Settings 19
CD Mode 21
AUX Mode 22
BT Mode 22
USB Mode 23
Karaoke Mode 23
Technical Data 23
Disposal Considerations 24
Declaration of Conformity 24
16
EN
PRODUCT OVERVIEW

17
EN
1
SLEEP: Press repeatedly to set a sleep timer. After the timer expires, the
tower is automatically switched o.
2
POWER/STANDBY: For switching the tower o and on
3
Eject CD
4
TIME/ALARM: Press this button to turn o an active alarm.
5
FOLDER- (folder down) / PAIR (connect in BT mode) /
FOLDER+ (folder up)
6
Repeat track in CD mode.
7
STOP: Stop playback
8
BACK: Skip to previous track
9
PLAY/PAUSE: Start or pause playback
10
VOL- / VOL+: Adjusting the volume
11
MIC- / MIC+: Adjusting the microphone volume
12
MUTE: Press to mute. Press the button again to cancel the mute.
13
SOURCE: Select music source or mode: CD, BT, USB, FM or AUDIO.
14
Repeat tracks randomly in CD mode.
15
FORWARD: Skip to next track
16
ECHO/ ECHO+: Adjusting the Microphone Echo Eects
17
Smartphone cradle
18
Tablet holder
19
LED display
20
CD slot
22
USB port
23
USB charging port
24
AUX input
25
Power on/o
26
Power supply

18
EN
SAFETY INSTRUCTIONS
General information
• Lightning - If you are not going to use the device for a long time or
if there is a storm, disconnect the plug from the electrical outlet and
disconnect the device from the antenna connector. This will avoid
damage to the product that may be caused by lightning or overvoltage.
• Overload - Do not overload power outlets, extension cords, or built-in
power outlets, as this may result in a re or electric shock.
• Foreign objects and liquid - Never push objects of any kind through
openings in the device as they may touch dangerous voltage points or
short out parts, which could result in a re or electric shock. Never spill
liquids of any kind on the device.
• Repairs and maintenance - Do not attempt to service this product
yourself, as opening or removing covers will expose you to dangerous
voltages or other hazards. Leave all maintenance to qualied service
personnel.
• Damage requiring service - Disconnect the power plug from the outlet
and consult a qualied specialist if any of the following conditions
occur:
a) If the power cord or plug is damaged.
b) If liquid has been spilled or objects have fallen onto the product.
c) If the product has been exposed to rain or water.
d) If the product has been dropped or damaged.
e) If the product has a markedly reduced performance.
• Replacement parts - When replacement parts are required, make
sure that the service professional who replaces the parts only uses
replacement parts that have been approved by the manufacturer or
that have the same characteristics as the original part. Unauthorized
replacement may result in re, electric shock or other hazards.
• Heat - Do not place the unit near heat sources such as radiators,
heaters, stoves or other products (including ampliers).

19
EN
BASIC SETTINGS
Connection to the mains supply
• Make sure that the power voltage corresponds to the voltage printed
on the back label.
• Risk of electric shock! When you unplug the AC power cord always pull
the plug from the socket. Never pull the cord.
• Before connecting the AC power cord, ensure you have completed all
other connections.
• Place the unit in the desired position and unravel the mains cable. Insert
the cable into the supply socket and switch on if applicable
Auto Standby
When playing media from a connected device, the Tower automatically
switches to standby if:
• No button is pressed for 10 minutes,
• No audio from a connected device for 10 minutes.
Setting Clock
After the unit is plugged into a mains supply or mains power failure, the
display will show the [00:00] on the LED display. The unit should be in
standby mode to set the current clock.
1 Press TIME button, the digits for the display will blink.
2 Press the FORWARD/BACK button repeatedly until correct hour is set.
3 Press the TIME to conrm the hour setting, the minute digits on the
display will blink.
4 Press the FORWARD/BACK button repeatedly until correct minute is
set. Press the TIME/ALARM to conrm the minute setting.

20
EN
Setting Alarm
This unit can be used as an alarm clock, USB is activated to play at a preset
time.
1 Press the STANDBY switch to switch the unit to standby mode.
2 Make sure that you have set the clock correctly.
3 Press the ALARM button in shutdown state, the display will ash ON to
select setting alarm and the display will blink.
4 Press the ALARM conrm, the time display will blink.
5 Press FORWARD/BACK button repeatedly to set hour. Press ALARM to
conrm.
6 Press FORWARD/BACK to set minute.
7 Press ALARM to conrm, and then press FORWARD/BACK to select
USB status. Press ALARM to conrm.
8 The volume would turn up from 0 to 20 gradually.
9 Press ALARM button in shutdown state, the display will ash ON to
select setting alarm, and the display will blink.
10 Press the FORWARD/BACK button and select OFF to cancel alarm.
Setting Sleeptimer
Press and hold the SLEEP button, the display will blink. Press the button
repeatedly until the display shows the minute you want to set. You can set
10 to 90 minutes. It blinks three times to conrm, and then return to the
interface before. If you want to cancel the sleep mode, press to OFF, after
blanking three times, the sleep mode will cancel.

21
EN
CD MODE
Play a disc (CD, CD-R, CDR/W,)
1 Press SOURCE repeatedly to select DISC source
2 Slot in a disc with the printed side facing upward
3 Play starts automatically, if not, Press PLAY/PAUSE.
4 Press VOLUME +/- adjust the volume.
Pause / resume play
1 During play, press PLAY/PAUSE to pause/resume play.
2 During play, long press FORWARD/BACK button to fast forward/fast
rewind.
Skip to a track
For CD
• Press FORWARD/BACK to select another track.
• Press the VOL+/VOL- to adjust the volume
For MP3 disc and USB
• Press FORWARD/BACK to select a track.
• Press FOLDER-/FOLDER+ to change the folder.
• Press the VOL+/VOL- to adjust the volume.
Search within a track
• During play, press and hold FORWARD/BACK.
• Release to resume normal play.

22
EN
AUX MODE
You can play music from an external audio device, such as an MP3 player.
For this you need a RCA cable (not included).
1 Connect an RCA cable to the Auxiliary Input. Connect the other
end of the RCA cable to the audio output on your DVD player, stereo
system, gaming system or television.
2 Press the power button to turn the unit on.
3 Press the SOURCE button to switch to Aux In mode.
4 Use the controls on the connected device to begin playing audio routed
through the unit.
BT MODE
1 Press the SOURCE button to select BT mode.
2 Then press the PAIR button on the remote control. The LED indicator
lights up blue.
3 Turn on BT connectivity and make your device discoverable. Choose
[add a new BT device] or [setup BT device] on your device. It will start to
search. Once [KARABOOM 100] shows on your device, select it. If your
device prompts you for a pass code, please enter [0000]. If the pairing
attempt fails or times out, please start pairing procedure again.
4 After your device and the tower speaker have connected each
other, a sound can be heard.
5 Make sure the BT connection between the unit and the device is active.
6 Press the Play/Pause button to pause playback, press again to resume
playback and press FORWARD/BACK button to skip forward to next
track or to skip backward to previous track.

23
EN
USB MODE
USB for MP3 playback
1 Plug your USB ash drive to the USB socket.
2 Press SOURCE button to select USB mode, the unit can play
automatically. If not, press PLAY/PAUSE.
3. Press the FORWARD/BACK to select track.
4. Press the VOL+/VOL- to adjust the volume.
USB charging
There is a USB charger on the back of the unit to charge small
devices such as smartphones that can be charged via USB
KARAOKE MODE
1 Unscrew the battery compartment lid from the lower side of the
microphone and insert two batteries (type AA) in the correct polarity as
indicated on the inside. Screw the compartment lid back on,
2 Slide the microphone switch to the ON position.
3 Adjust the microphone volume on remote control.
4 Press the echo +/- to adjusta the echo volume
5 Choose your preferred device mode and start play.
6 Start to sing.
7 W h e n y o u h a v e n i s h e d u s i n g t h e k a r a o k e , r e m e m b e r t o t u r n t h e
microphone o by sliding the switch to the OFF position.
TECHNICAL DATA
Item number 10033249, 10033250
Power supply 220-240 V ~ 50/60 Hz
Total consumption 65 W
RMS power 60 W
Speakers impedance 8 Ω
S/N (A) 75 dB

24
EN
DISPOSAL CONSIDERATIONS
If there is a legal regulation for the disposal of
electrical and electronic devices in your country,
this symbol on the product or on the packaging
indicates that this product must not be disposed of
with household waste. Instead, it must be taken to
a collection point for the recycling of electrical and
electronic equipment. By disposing of it in accordance
with the rules, you are protecting the environment and
the health of your fellow human beings from negative
consequences. For information about the recycling
and disposal of this product, please contact your local
authority or your household waste disposal service.
This product contains batteries. If there is a legal
regulation for the disposal of batteries in your country, the
batteries must not be disposed of with household waste.
Find out about local regulations for disposing of batteries.
By disposing of them in accordance with the rules, you are
protecting the environment and the health of your fellow
human beings from negative consequences.
DECLARATION OF CONFORMITY
Manufacturer:
Chal-Tec GmbH, Wallstrasse 16, 10179 Berlin,
Germany.
Importer for Great Britain:
Berlin Brands Group UK Limited
PO Box 42
272 Kensington High Street
London, W8 6ND
United Kingdom
Hereby, Chal-Tec GmbH declares that the radio
equipment type Karaboom 100 Sing is in compliance with
Directive 2014/53/EU. The full text of the EU declaration
of conformity is available at the following internet
address: use.berlin/10033249
For Great Britain: Hereby, Chal-Tec GmbH declares
that the radio equipment type Karaboom 100 Sing is in
compliance with the relevant statutory requirements. The
full text of the declaration of conformity is available at the
following internet address: use.berlin/10033249
25
ES
Estimado cliente:
Le felicitamos por la adquisición de este producto.
Lea atentamente el siguiente manual y siga
cuidadosamente las instrucciones de uso con el n de
evitar posibles daños. La empresa no se responsabiliza
de los daños ocasionados por un uso indebido del
producto o por haber desatendido las indicaciones de
seguridad. Escanee el código QR para obtener acceso
al manual de usuario más reciente y otra información
sobre el producto:
ÍNDICE DE CONTENIDOS
Vista general del aparato 26
Indicaciones de seguridad 28
Conguraciones básicas 29
Modo cd 31
Modo aux 32
Modo bt 32
Modo usb 33
Modo karaoke 33
Datos técnicos 33
Retirada del aparato 34
Declaración de conformidad 34

26
ES
VISTA GENERAL DEL APARATO

27
ES
1
SLEEP: Pulse repetidamente para ajustar un temporizador de apagado.
Después de que el temporizador expira, la torre se apaga automáticamente.
2
POWER/STANDBY: Para apagar y encender la torre
3
Expulsar el disco compacto
4
TIME/ALARM: Presione este botón para apagar una alarma que esté activa.
5
CARPETA- (carpeta abajo) / PAR (conectar en modo BT) /
FOLDER+ (carpeta arriba)
6
Repita la canción en modo CD.
7
STOP: Detener la reproducción
8
ATRÁS: Saltar a la canción anterior
9
PLAY/PAUSE: Inicia o pausa la reproducción
10
VOL- / VOL+: Ajuste del volumen
11
MIC- / MIC+: Ajuste del volumen del micrófono
12
MUTE: Presione para silenciar el sonido. Pulse el botón de nuevo para
desactivar el silenciamiento.
13
SOURCE: Seleccione la fuente o el modo de música: CD, BT, USB, FM o
AUDIO.
14
Repita las canciones aleatoriamente en el modo CD.
15
ADELANTE: Saltar a la canción siguiente
16
ECHO/ ECHO+: Ajuste de los efectos de eco del micrófono
17
Soporte para el smartphone
18
Soporte para tabletas
19
Pantalla LED
20
Puerta CD
22
Puerto USB
23
Puerto de carga USB
24
Entrada AUX
25
Encender/apagar
26
Suministro de energía

28
ES
INDICACIONES DE SEGURIDAD
Indicaciones generales
• Relámpago - Si no va a utilizar el aparato durante un periodo largo
de tiempo o si hay una tormenta eléctrica, desenchufe el aparato de la
toma de corriente y desconecte el conector de antena. De este modo,
protegerá el aparato de los daños que pueden ocasionar relámpagos y
la sobretensión.
• Sobrecarga - No sobrecargue las tomas de corriente, cables
alargadores o tomas de corriente integradas para evitar el riesgo de un
incendio o de descarga eléctrica.
• Objetos extraños y entrada de líquido - No introduzca objetos de
ningún tipo en las ranuras del aparato, ya que podría tocar elementos
con voltajes peligrosos o piezas salientes que podrían causar un
incendio o una descarga eléctrica. No derrame líquido de ningún tipo
sobre el aparato.
• Reparación y mantenimiento - No intente reparar el aparato usted
mismo, ya que si abre o retira las cubiertas, podría provocar una tensión
peligrosa u otro riesgo. Contacte con un servicio técnico para su
reparación.
• Daños que requieren una reparación - Desconecte el enchufe de
la toma de corriente y póngase en contacto con un servicio técnico
cualicado si:
a) El cable de alimentación o el enchufe está dañado.
b) Se ha derramado líquido o se ha caído un objeto en el interior del
aparato.
c) El producto ha estado expuesto a la lluvia o agua.
d) Se ha dejado caer el producto o está dañado.
e) El rendimiento del producto ha disminuido considerablemente.
• Piezas de repuesto - Si necesita piezas de repuesto, asegúrese de
que el técnico que cambiará las piezas utiliza solamente las piezas
de recambio originales del fabricante o piezas con las mismas
características que las piezas originales. Las piezas no autorizadas
pueden provocar incendios, descargas eléctricas y otros riesgos.
• Calor - No instale el aparato cerca de las fuentes de calor como
radiadores, calentadores, hornos u otros aparatos similares (incluidos
amplicadores).

29
ES
CONFIGURACIONES BÁSICAS
Conexión a la red eléctrica
• Compruebe la tensión en la placa del aparato antes de su uso. Conecte
el aparato sólo a enchufes que correspondan a la tensión del aparato.
• No saque el enchufe de la toma de corriente a través del cable, sino que
sujételo con la mano al extraerlo.
• No conecte el dispositivo a la fuente de alimentación hasta que lo haya
cableado completamente.
• Positione el aparato de tal manera que siempre tenga acceso al
enchufe.
Standby automático
Al reproducir contenidos multimedia desde un dispositivo conectado, la
unidad entra automáticamente en el modo de espera cuando:
• No se pulsa ninguna tecla durante más de 10 minutos.
• No se reproduce ninguna canción durante más de 10 minutos.
Ajuste de la hora
Enchufe la clavija en la toma de corriente. La pantalla muestra[00:00] y la
unidad está en modo de espera. Ahora puede ajustar el reloj.
1. Pulse el botón TIME. Los dígitos de la pantalla parpadean.
2. Utilice el botón ADELANTE / ATRÁS para ajustar la hora. Conrme la
entrada pulsando TIME.
3. Utilice el botón ADELANTE / ATRÁS para ajustar los minutos. Conrme
la entrada pulsando TIME.

30
ES
Ajuste de la alarma
Esta unidad puede ser utilizada como despertador. Como reloj despertador,
se puede activar el USB que arranca a la hora de la alarma.
1. Pulse el botón STANDBY para cambiar al modo de espera.
2. Asegúrese de que ha ajustado el reloj correctamente.
3. Pulse el botón ALARM. La pantalla muestra ON (encendido) y el
indicador parpadea. Seleccione la alarma (1 o 2) que desea congurar.
4. Pulse el botón ALARM para conrmar, la indicación de la hora
parpadeará.
5. Pulse el botón ADELANTE/ATRÁS repetidamente para ajustar la hora.
Pulse ALARM para conrmar.
6. Presione el botón ADELANTE / ATRÁS para ajustar los minutos.
7. Pulse ALARM para conrmar y, a continuación, pulse ADELANTE /
ATRÁS para seleccionar USB como reloj despertador. Pulse ALARM para
conrmar.
8. En cuanto se enciende la alarma, el volumen aumenta gradualmente de
0 a 20.
9. Para activar la alarma, pulse el botón ALARM cuando esté apagado. La
pantalla muestra ON (encendido). Seleccione la alarma deseada y la
pantalla de alarma parpadeará.
10. Presione el botón ADELANTE / ATRÁS hasta que se muestra OFF
(apagado) en la pantalla para cancelar la alarma.
Ajuste del temporizador de apagado
Mantenga pulsado el botón SLEEP y la pantalla parpadeará. Pulse el botón
SLEEP hasta que la pantalla muestre la hora que desea ajustar. Puede
ajustar de 10 a 90 minutos. El valor ajustado parpadea tres veces para
conrmar, luego la pantalla vuelve a la pantalla habitual. Para cancelar el
temporizador de apagado, pulse OFF.

31
ES
MODO CD
Reproducción de CD
1. Pulse SOURCE repetidamente y seleccione DISK.
2. Inserte un CD con la cara impresa hacia arriba en la bandeja.
3. Normalmente, el CD es reproducido automáticamente. Si no es así,
pulse PLAY/PAUSE.
4. Pulse Adelante/Atrás para saltar a una canción especíca.
Pausar/continuar la reproducción del CD
1. Durante la reproducción, pulse PLAY/PAUSE para pausar el CD
brevemente.
2. Pulse PLAY/PAUSE de nuevo para continuar la reproducción del CD.
Cambiar canción/ ajustar volumen
En el modo CD
• Pulse Adelante/Atrás para cambiar la canción.
• Pulse VOLUME +/- para ajustar el volumen.
En el modo MP3 y USB
• Pulse Adelante/Atrás para cambiar la canción.
• Presione FOLDER-/FOLDER+ para cambiar la carpeta.
• Pulse VOLUME +/- para ajustar el volumen.
Búsqueda dentro de un título
• Durante la reproducción, mantenga pulsado el botón Adelante/Atrás
para avanzar o rebobinar rápidamente dentro de una canción.
• Suelte el botón para continuar la reproducción.

32
ES
MODO AUX
Puede reproducir música desde un dispositivo de audio externo, como un
reproductor de MP3. Para esto se necesita un cable RCA (no incluido).
1. Conecte un cable RCA a la entrada AUX. Conecte el otro extremo
del cable RCA a la salida de audio de su reproductor de DVD, equipo
estéreo, sistema de juego o TV.
2. Pulse el botón POWER para encender la torre Karaoke.
3. Pulse el botón SOURCE para cambiar al modo AUX.
4. Utilice los controles del dispositivo conectado para iniciar la
reproducción.
MODO BT
1 Presione el botón SOURCE para seleccionar el modo BT.
2 Luego presione el botón PAIR del control remoto. El indicador LED se
ilumina en azul.
3. Encienda BT y haga visible su dispositivo inteligente. Seleccione
[Añadir nuevo dispositivo BT] o [Congurar dispositivo BT]. El sistema
busca dispositivos BT en el entorno. Cuando aparezca [KARABOOM
100] en la lista BT, selecciónelo. Si el dispositivo le pide una contraseña,
introduzca [0000]. Si el intento de emparejamiento falla o se acaba el
tiempo, reinicie el proceso de emparejamiento.
4. Después de conectar el dispositivo y el altavoz de la torre, oirá un
sonido.
5. Asegúrese de que la conexión BT entre el altavoz y el dispositivo
inteligente está activada.
6. Pulse el botón PLAY/PAUSE para pausar la reproducción, pulse el botón
de nuevo para reanudarla. Pulse el botón Adelante/Atrás para saltar a
la canción siguiente o a la anterior.
33
ES
MODO USB
Reproducción de MP3 desde USB
1. Conecte la unidad de memoria USB al puerto USB.
2. Pulse SOURCE y seleccione USB. El primer título se inicia
automáticamente. Si no es así, pulse PLAY/PAUSE.
3. Pulse ADELANTE/ATRÁS para seleccionar una pista especíca.
4. Pulse VOLUME +/- para ajustar el volumen.
Cargar a través de USB
En la parte posterior del dispositivo hay un puerto de carga USB que le
permite cargar pequeños dispositivos, como teléfonos inteligentes, a través
de USB.
MODO KARAOKE
1. Retire la tapa del compartimento de las pilas de la parte inferior del
micrófono e inserte dos pilas AA. Vuelva a enroscar la tapa.
2. Deslice el interruptor del micrófono a la posición ON.
3. Utilice el control remoto para ajustar el volumen del micrófono.
4. Pulse el botón ECHO +/- para ajustar el volumen del eco.
5. Seleccione el modo de dispositivo deseado e inicie la reproducción.
6. Puede empezar a cantar.
7. Cuando haya terminado el karaoke, recuerde apagar el micrófono
apagando el interruptor a la posición OFF.
DATOS TÉCNICOS
Número de artículo 10033249, 10033250
Suministro eléctrico 220-240 V ~ 50/60 Hz
Consumo total 65 W
Potencia en vatios RMS 60 W
Resistencia 8 Ω
Relación señal/ruido (A) 75 dB

34
ES
RETIRADA DEL APARATO
Si en su país existe una disposición legal relativa a
la eliminación de aparatos eléctricos y electrónicos,
este símbolo estampado en el producto o en
el embalaje advierte que no debe eliminarse
como residuo doméstico. En lugar de ello, debe
depositarse en un punto de recogida de reciclaje
de aparatos eléctricos y electrónicos. Una gestión
adecuada de estos residuos previene consecuencias
potencialmente negativas para el medio ambiente
y la salud de las personas. Puede consultar más
información sobre el reciclaje y la eliminación de este
producto contactando con su administración local o
con su servicio de recogida de residuos.
Este producto contiene baterías. Si en su país existe
una disposición legal relativa a la eliminación de
baterías, estas no deben eliminarse como residuo
doméstico. Infórmese sobre la normativa vigente
relacionada con la eliminación de baterías. Una
gestión adecuada de estos residuos previene
consecuencias potencialmente negativas para el
medio ambiente y la salud de las personas.
DECLARACIÓN DE CONFORMIDAD
Fabricante:
Chal-Tec GmbH, Wallstraße 16, 10179 Berlín, Alemania.
Importador para Gran Bretaña:
Berlin Brands Group UK Limited
PO Box 42
272 Kensington High Street
London, W8 6ND
United Kingdom
Por la presente, Chal-Tec GmbH declara que el
tipo de equipo radioeléctrico Karaboom 100 Sing
es conforme con la Directiva 2014/53/UE. El texto
completo de la declaración UE de conformidad está
disponible en la dirección Internet siguiente: use.
berlin/10033249

35
FR
Cher client,
Toutes nos félicitations pour l’acquisition de ce nouvel
appareil. Veuillez lire attentivement les instructions
suivantes de branchement et d’utilisation an d’éviter
d’éventuels dommages. Le fabricant ne saurait être tenu
pour responsable des dommages dus au non-respect
des consignes de sécurité et à la mauvaise utilisation
de l’appareil. Scannez le QR-Code pour accéder à
la dernière version du mode d‘emploi et à d‘autres
informations concernant le produit:
SOMMAIRE
Aperçu de l‘appareil 36
Consignes de sécurité 38
Réglages de base 39
Mode cd 41
Mode aux 42
Mode bt 42
Mode usb 43
Mode karaoké 43
Fiche technique 43
Conseils pour le recyclage 44
Déclaration de conformité 44

36
FR
APERÇU DE L‘APPAREIL
37
FR
1
SLEEP : Appuyez plusieurs fois pour dénir une minuterie de mise en veille.
Une fois la minuterie expirée, la tour s'éteint automatiquement.
2
POWER/STANDBY : pour allumer et éteindre la tour
3
Ejecter un CD
4
TIME/ALARM : Appuyez sur ce bouton pour désactiver une alarme active.
5
DOSSIER- (déplier) / PAIR (se connecter en mode BT) /
DOSSIER+ (dossier vers le haut)
6
Répéter la piste en mode CD.
7
STOP : arrêter la lecture
8
RETOUR : retourner au titre précédent
9
PLAY/PAUSE: démarrer ou mettre en pause la lecture
10
VOL- / VOL+: ajustement du volume
11
MIC- / MIC+: ajustement du volume du micro
12
MUTE: Appuyez pour couper le son. Appuyez à nouveau pour annuler la
fonction muet.
13
SOURCE : Sélectionnez la source ou le mode de musique: CD, BT, USB, FM
ou AUDIO.
14
Lecture aléatoire de titres en mode CD.
15
AVANCE : passer au titre suivant
16
ECHO-/ ECHO+ : Ajustement de l'eet écho du micro
17
Support de smartphone
18
Support de tablette
19
Ecran LED
20
Tiroir à CD
22
Port USB
23
Port de recharge USB
24
Entrée AUX
25
Alimentation marche/arrêt
26
Alimentation

38
FR
CONSIGNES DE SÉCURITÉ
Consignes générales
• Foudre - Si vous n‘utilisez pas l‘appareil pendant une longue période
ou s‘il y a de l‘orage, débranchez la che de la prise et débranchez
l‘antenne de l‘appareil. Cela évite d‘endommager le produit à cause de
la foudre et des surtensions.
• Surcharge - Ne surchargez pas les prises de courant, les rallonges ou
les prises de courant, car cela pourrait provoquer un incendie ou une
électrocution.
• Corps étranger et insertion de liquides - Ne glissez jamais d‘objets
d‘aucune sorte à travers les ouvertures de l‘appareil, car ils pourraient
toucher des points de tension dangereux ou court-circuiter des
éléments, ce qui pourrait provoquer un incendie ou une électrocution.
Ne renversez jamais de liquides d‘aucune sorte sur l‘appareil.
• Réparation et maintenance - Ne tentez pas de réparer ce produit
vous-même en vous exposant à des tensions dangereuses ou à d‘autres
risques en ouvrant ou en retirant les couvercles. Conez toute la
maintenance à un personnel qualié.
• Dégâts nécessitant une intervention de professionnel - Débranchez
la che de la prise et consultez un spécialiste qualié si l‘une des
situations suivantes se produit :
a) Lorsque le câble secteur ou la che sont endommagés.
b) Lorsque des liquides ont été renversés ou que des objets sont
tombés sur l‘appareil.
c) Lorsque le produit a été exposé à la pluie ou à l‘eau.
d) Lorsque le produit a fait une chute ou a été endommagé.
e) Lorsque le produit a des performances sensiblement réduites.
• Pièces de rechange - Si des pièces de rechange sont nécessaires,
assurez-vous que l‘entreprise spécialisée qui remplace les pièces
n‘utilise que des pièces de rechange approuvées par le fabricant ou qui
ont les mêmes caractéristiques que la pièce d‘origine. Le remplacement
non autorisé peut entraîner un incendie, un choc électrique ou vous
exposer à d‘autres dangers.
• Chaleur - Ne placez pas l‘appareil à proximité de sources de chaleur
telles que des radiateurs, des grilles de chauage, des poêles ou
d‘autres produits (y compris les amplicateurs).

39
FR
RÉGLAGES DE BASE
Branchement sur le secteur
• Vériez la tension sur l‘étiquette de l‘appareil avant utilisation. Ne
branchez l‘appareil que sur des prises correspondant à la tension de
l‘appareil.
• Ne tirez pas sur le câble d‘alimentation pour débrancher la che de la
prise mais prenez la che elle-même.
• Ne connectez l‘appareil que lorsque vous avez eectué tous les
branchements.
• Installez l‘appareil de façon à pouvoir toujours accéder à la prise.
Veille automatique
Lorsque vous lisez du contenu multimédia à partir d’un appareil connecté,
l’appareil passe automatiquement en mode veille lorsque :
• Aucune touche n‘a été utilisée depuis 10 minutes.
• Aucun titre n‘a été lu depuis 10 minutes.
Réglage de l‘heure
Branchez la che dans la prise. L‘écran aiche [00:00] et l‘appareil est en
mode veille. Vous pouvez maintenant régler l‘horloge.
1 Appuyez sur la touche TIME. Les chires à l‘écran clignotent.
2 Utilisez la touche AVANCE/RETOUR pour régler l‘heure. Conrmez
l‘entrée en appuyant sur TIME.
3 Utilisez la touche AVANCE/RETOUR pour régler les minutes. Conrmez
l‘entrée en appuyant sur TIME.

40
FR
Réglage de l‘alarme
Cet appareil peut être utilisé comme réveil. Pour le réveil vous pouvez
activer et faire démarrer l‘USB à l‘heure de l‘alarme.
1. Appuyez sur la touche STANDBY pour passer en mode veille.
2. Assurez-vous d‘avoir correctement réglé l‘horloge.
3. Appuyez sur la touche ALARM. L‘aichage indique ON et l‘aichage
clignote. Sélectionnez l‘alarme (1 ou 2) que vous souhaitez dénir.
4. Appuyez sur la touche ALARM pour conrmer, l‘aichage de l‘heure
clignotera.
5. Appuyez plusieurs fois sur la touche AVANCE/RETOUR pour régler
l‘heure. Appuyez sur ALARM pour conrmer.
6. Appuyez sur la touche AVANCE/RETOUR pour régler les minutes.
7. Appuyez sur ALARM pour conrmer, puis appuyez sur AVANCE ou
RETOUR pour sélectionner USB comme alarme. Appuyez sur ALARM
pour conrmer.
8. Dès que l‘alarme se déclenche, le volume augmente progressivement
de 0 à 20.
9. Pour démarrer l‘alarme, appuyez sur la touche ALARM pendant qu‘il
est éteint. L‘écran aiche ON. Sélectionnez l‘alarme souhaitée et
l‘indicateur d‘alarme clignote.
10. Appuyez sur la touche AVANCE/RETOUR jusqu‘à OFF pour annuler
l‘alarme.
Réglage de l‘arrêt automatique
Maintenez la touche SLEEP, l‘écran clignote. Appuyez sur la touche SLEEP
jusqu‘à ce que l‘écran aiche l‘heure que vous souhaitez dénir. Vous pouvez
régler une durée entre 10 et 90 minutes. La valeur dénie clignote trois
fois pour conrmer, puis l‘aichage revient à la normale. Si vous souhaitez
annuler la minuterie de veille, appuyez sur OFF.

41
FR
MODE CD
Lecture d‘un CD
1 Appuyez plusieurs fois sur SOURCE et choisissez DISK.
2 Insérez un CD avec la face imprimée vers le haut dans le lecteur.
3 Le CD est en principe lu automatiquement. Si ce n‘est pas le cas,
appuyez sur PLAY/PAUSE.
4 Appuyez sur AVANCE/RETOUR pour sauter un titre donné.
Mettre en pause / poursuivre la lecture d‘un CD
1 Pendant la lecture, appuyez sur PLAY/PAUSE pour mettre le CD en
pause.
2 Appuyez de nouveau sur PLAY/PAUSE pour reprendre la lecture du CD.
Changer de titre / ajuster le volume
En mode CD
• Appuyez sur AVANCE/RETOUR pour changer de titre.
• Appuyez sur VOLUME +/- pour ajuster le volume.
En mode MP3 et USB
• Appuyez sur AVANCE/RETOUR pour changer de titre.
• Appuyez sur FOLDER-/FOLDER+ pour modier le dossier.
• Appuyez sur VOLUME +/- pour ajuster le volume.
Recherche à l‘intérieur d‘un titre
• Pendant la lecture, maintenez la touche AVANCE/RETOUR pour
parcourir l‘intérieur d‘un titre vers l‘avant ou l‘arrière.
• Relâchez la touche pour reprendre la lecture normale.

42
FR
MODE AUX
Vous pouvez lire sur cet appareil de la musique à partir d‘un périphérique
audio externe, tel qu‘un lecteur MP3. Vous aurez besoin d‘un câble RCA
(non inclus).
1. Connectez un câble RCA à l‘entrée AUX. Connectez l‘autre extrémité du
câble RCA à la sortie audio de votre lecteur DVD, chaîne stéréo, console
de jeu ou téléviseur.
2. Appuyez sur la touche POWER pour allumer la tour de karaoké.
3. Appuyez sur la touche SOURCE pour accéder au mode AUX.
4. Utilisez les commandes de l‘appareil connecté pour lancer la lecture.
MODE BT
1 Appuyez sur la touche SOURCE pour sélectionner le mode BT.
2 Appuyez ensuite sur le bouton PAIR de la télécommande. L‘indicateur
LED s‘allume en bleu.
3 Activez BT et assurez-vous que votre périphérique intelligent est
visible. Sélectionnez [Ajouter un nouvel appareil BT] ou [Congurer un
appareil BT]. L‘appareil lance la recherche d‘appareils BT à proximité.
Lorsque [KARABOOM 100] apparaît dans la liste BT, sélectionnez-le.
Si votre appareil vous demande un mot de passe, entrez [0000]. Si la
tentative d‘association échoue ou que le délai a expiré, recommencez le
processus d‘appariement.
4 Une fois que votre appareil et l‘enceinte tour sont connectés, vous
entendrez un son.
5 Assurez-vous que la connexion BT entre l‘enceinte et le périphérique
intelligent est active.
6 Appuyez sur PLAY/PAUSE pour interrompre la lecture, appuyez de
nouveau pour reprendre la lecture. Appuyez sur la touche AVANCE/
RETOUR pour passer à la piste suivante ou précédente.
43
FR
MODE USB
Lecture de MP3 par USB
1 Insérez la clé USB dans l‘entrée USB.
2 Appuyez sur SOURCE et sélectionnez USB. La première piste démarre
automatiquement. Sinon, appuyez sur PLAY/PAUSE.
3 Appuyez sur AVANCE/RETOUR pour sélectionner une piste spécique.
4 Appuyez sur VOLUME +/- pour régler le volume.
Recharge par USB
Un port de charge USB se trouve à l‘arrière de l‘appareil, vous pouvez
l‘utiliser pour charger des périphériques, tels que des smartphones, via USB.
MODE KARAOKÉ
1. Dévissez le couvercle du compartiment à piles au bas du microphone et
insérez deux piles AA. Revissez le couvercle.
2. Faites glisser le commutateur du microphone sur la position ON.
3. Ajustez le volume du micro avec la télécommande.
4. Appuyez sur ECHO +/- pour régler le volume de l‘écho.
5. Sélectionnez le mode d‘appareil souhaité et lancez la lecture.
6. Commencez à chanter.
7. Lorsque vous avez terminé le karaoké, n‘oubliez pas d‘éteindre le micro
en réglant le commutateur sur OFF.
FICHE TECHNIQUE
Numéro d'article 10033249, 10033250
Alimentation 220-240 V ~ 50/60 Hz
Consommation totale 65 W
Puissance RMS 60 W
Résistance 8 Ω
Facteur S/N (A) 75 dB

44
FR
CONSEILS POUR LE RECYCLAGE
S‘il existe une réglementation pour l‘élimination ou le
recyclage des appareils électriques et électroniques
dans votre pays, ce symbole sur le produit ou sur
l‘emballage indique que cet appareil ne doit pas
être jeté avec les ordures ménagères. Vous devez le
déposer dans un point de collecte pour le recyclage
des équipements électriques et électroniques.
La mise au rebut conforme aux règles protège
l‘environnement et la santé de vos semblables des
conséquences négatives. Pour plus d‘informations
sur le recyclage et l‘élimination de ce produit, veuillez
contacter votre autorité locale ou votre service de
recyclage des déchets ménagers.
Ce produit contient des piles. S‘il existe une
réglementation pour l‘élimination ou le recyclage
des piles dans votre pays, vous ne devez pas les
jeter avec les ordures ménagères. Renseignez-vous
sur les dispositions locales relatives à la collecte
des piles usagées. La mise au rebut conforme aux
règles protège l‘environnement et la santé de vos
semblables des conséquences négatives.
DÉCLARATION DE CONFORMITÉ
Fabricant :
Chal-Tec GmbH, Wallstraße 16, 10179 Berlin,
Allemagne.
Importateur pour la Grande Bretagne :
Berlin Brands Group UK Limited
PO Box 42
272 Kensington High Street
London, W8 6ND
United Kingdom
Le soussigné, Chal-Tec GmbH, déclare
que l’équipement radioélectrique du type
Karaboom 100 Sing est conforme à la directive
2014/53/UE. Le texte complet de la déclaration UE
de conformité est disponible à l’adresse internet
suivante: use.berlin/10033249

45
IT
Gentile cliente,
La ringraziamo per aver acquistato il dispositivo.
La preghiamo di leggere attentamente le seguenti
istruzioni per l’uso e di seguirle per evitare possibili
danni tecnici. Non ci assumiamo alcuna responsabilità
per danni scaturiti da una mancata osservazione delle
avvertenze di sicurezza e da un uso improprio del
dispositivo. Scansionare il codice QR seguente, per
accedere al manuale d’uso più attuale e per ricevere
informazioni sul prodotto.
INDICE
Descrizione del dispositivo 46
Avvertenze di sicurezza 48
Impostazioni base 49
Modalità cd 51
Modalità aux 52
Modalità bt 52
Modalità usb 53
Modalità karaoke 53
Dati tecnici 53
Smaltimento 54
Dichiarazione di conformità 54

46
IT
DESCRIZIONE DEL DISPOSITIVO

47
IT
1
SLEEP: premere ripetutamente per impostare un timer di spegnimento
automatico. Quando scade il timer, la torre viene spenta automaticamente.
2
POWER/STANDBY: per accendere e spegnere la torre.
3
Togliere il CD.
4
TIME/ALARM: premere per spegnere un timer attivo.
5
FOLDER- (cartella in basso) / PAIR (collegamento in modalità BT) /
FOLDER+ (cartella in alto)
6
Ripetere un titolo in modalità CD.
7
STOP: arrestare la riproduzione.
8
INDIETRO: per passare alla traccia precedente.
9
PLAY/PAUSA: avviare o mettere in pausa la riproduzione.
10
VOL-/VOL+: regolare il volume.
11
MIC-/MIC+: regolare il volume del microfono.
12
MUTE: per attivare la funzione muto. Premere nuovamente per disattivare la
funzione.
13
SOURCE: per selezionare la fonte audio e la modalità: CD, BT, USB, FM o
AUDIO.
14
Ripetizione casuale in modalità CD.
15
AVANTI: passare alla traccia successiva.
16
ECHO-/ECHO+: regolare l’eetto eco del microfono.
17
Supporto per smartphone.
18
Supporto per tablet.
19
Display LED.
20
Vano CD.
22
Ingresso USB.
23
Connessione di carica USB.
24
Ingresso AUX.
25
Corrente on/o.
26
Alimentazione.

48
IT
AVVERTENZE DI SICUREZZA
Avvertenze generali
• Colpo di fulmine – Se il dispositivo non viene utilizzato o c’è un
temporale, staccare la spina dalla presa di corrente e scollegare il
dispositivo dalla connessione dell’antenna. In questo modo si evitano
danni al dispositivo dovuti a colpi di fulmine o sovratensione.
• Sovraccarico – Non sovraccaricare prese elettriche, prolunga o
prese di corrente integrate, in quanto ciò potrebbe causare incendi o
folgorazioni.
• Corpi estranei e liquidi – Non inlare nessun tipo di oggetto nelle
aperture del dispositivo, in quanto si potrebbe entrare in contatto
con pericolosi punti di tensione o causare il cortocircuito di alcune
componenti. Questo potrebbe causare incendi o folgorazioni. Non
rovesciare liquidi sul dispositivo.
• Riparazione e manutenzione – Non cercare di eettuare opere di
manutenzione in modo autonomo, dato che rimuovendo o aprendo
le coperture potrebbero liberarsi tensioni pericolose o insorgere
altri rischi. Lasciare che le opere di manutenzione siano eettuate da
personale tecnico qualicato.
• Danni che necessitano manutenzione – Staccare la spina dalla
presa elettrica e rivolgersi a un’azienda specializzata se si vericano le
seguenti situazioni:
a) Se cavo di alimentazione o spina sono danneggiati.
b) Se sono stati rovesciati liquidi o sono caduti oggetti sopra al
dispositivo.
c) Se il prodotto è stato esposto a pioggia o acqua.
d) Se il prodotto è caduto o è danneggiato.
e) Se il prodotto presenta prestazioni sensibilmente al di sotto della
norma.
• Parti di ricambio – Se sono necessarie parti di ricambio, assicurarsi
che l’azienda specializzata che si occupa della sostituzione utilizzi solo
parti autorizzate dal produttore o con caratteristiche equivalenti alle
parti originali. Una sostituzione non adeguata può causare incendi,
folgorazioni o altri rischi.
• Calore – Non posizionare il dispositivo nei pressi di fonti di calore,
come termosifoni, radiatori convettivi, forni o altri prodotti (inclusi
amplicatori).

49
IT
IMPOSTAZIONI BASE
Collegamento alla rete elettrica
• Prima dell’utilizzo, controllare la tensione sulla targhetta del
dispositivo. Collegare il dispositivo solo a prese elettriche con tensione
corrispondente a quella del dispositivo.
• Non staccare la spina tirando dal cavo, ma impugnando la spina stessa.
• Collegare il dispositivo alla rete elettrica solo dopo aver realizzato tutto
il cablaggio.
• Posizionare il dispositivo in modo che la spina sia accessibile in ogni
momento.
Standby automatico
Se vengono riprodotti le da un dispositivo connesso, il dispositivo passa
automaticamente in standby se:
• Non vengono premuti tasti per più di 10 minuti.
• Non viene riprodotto alcun titolo per più di 10 minuti.
Impostare l’orologio
Collegare la spina alla presa elettrica. Il display mostra [00:00] e il
dispositivo è in standby. Ora è possibile impostare l’orologio.
1. Premere TIME. Le cifre lampeggiano sul display.
2. Utilizzare AVANTI/INDIETRO per impostare l’ora. Confermare con TIME.
3. Utilizzare AVANTI/INDIETRO per impostare i minuti. Confermare con
TIME.

50
IT
Impostare la sveglia
Questo dispositivo può essere utilizzato come sveglia. Come sveglia può
essere attivata la connessione USB, che si avvia all’ora impostata.
1. Premere STANDBY per passare a questa modalità.
2. Assicurarsi che l’ora impostata sia corretta.
3. Premere ALARM. Sul display compare ON (acceso) e l’indicazione
lampeggia. Selezionare la sveglia (1 o 2) che si desidera impostare.
4. Premere ALARM per confermare. L’indicazione dell’ora lampeggia.
5. Premere ripetutamente AVANTI/INDIETRO per impostare l’ora. Premere
ALARM per confermare.
6. Premere ripetutamente AVANTI/INDIETRO per impostare i minuti.
7. Premere ALARM per confermare e poi AVANTI/INDIETRO per
selezionare USB come sveglia. Premere ALARM per confermare.
8. Non appena la sveglia si attiva, il volume aumenta gradualmente da 0 a
20.
9. Per attivare la sveglia, premere ALARM a dispositivo spento. Il display
mostra ON. Selezionare la sveglia desiderata e l’indicazione della
sveglia lampeggia.
10. Premere AVANTI/INDIETRO no a OFF per interrompere la sveglia.
Impostare il timer di autospegnimento
Tenere premuto SLEEP. Il display lampeggia. Premere SLEEP no a
quando sul display comare l’ora che si desidera impostare. Possono
essere impostati 10-90 minuti. Il valore impostato lampeggia tre volte per
la conferma, poi il display torna all’indicazione normale. Se si desidera
interrompere il timer di autospegnimento, premere OFF.

51
IT
MODALITÀ CD
1. Premere più volte SOURCE e selezionare DISK.
2. Inserire un CD nel vano con il lato stampato verso l’alto.
3. Normalmente il CD viene riprodotto automaticamente. In caso
contrario, premere PLAY/PAUSA.
4. Premere AVANTI/INDIETRO per passare a un determinato titolo.
Mettere in pausa/riprodurre un CD
1. Premere PLAY/PAUSA durante la riproduzione per mettere in pausa.
2. Premere nuovamente PLAY/PAUSA per riprendere la riproduzione.
Cambiare titolo/regolare il volume
In modalità CD:
• Premere AVANTI/INDIETRO per cambiare titolo.
• Premere VOLUME+/- per regolare il volume.
In modalità MP3 e USB:
• Premere AVANTI/INDIETRO per cambiare titolo.
• Premere FOLDER-/FOLDER+ per cambiare la cartella.
• Premere VOLUME+/- per regolare il volume.
Ricerca all’interno di un titolo
• Tenere premuto AVANTI/INDIETRO durante la riproduzione per andare
avanti o indietro all’interno di un titolo.
• Lasciare andare il tasto per procedere con la riproduzione.

52
IT
MODALITÀ AUX
Tramite questo dispositivo è possibile riprodurre musica da dispositivi audio
esterni, come ad esempio un lettore MP3. A tal ne, è necessario un cavo
RCA (non incluso in consegna).
1. Collegare il cavo RCA all’ingresso AUX. Collegare l’altra estremità
all’uscita audio del lettore DVD, dell’impianto stereo, della consolle o
del televisore.
2. Premere POWER per accendere la torre karaoke.
3. Premere SOURCE per passare in modalità AUX.
4. Utilizzare gli elementi di controllo del dispositivo connesso per iniziare
la connessione.
MODALITÀ BT
1. Premere il tasto SOURCE per selezionare il modo BT.
2. Poi premere il tasto PAIR sul telecomando. L‘indicatore LED si illumina
in blu.
3. Accendere il BT e assicurarsi che il dispositivo smart sia visibile.
Selezionare [Aggiungere nuovo dispositivo BT] o [Preparare dispositivo
BT]. Inizia la ricerca di dispositivo BT nelle vicinanze. Non appena
compare [KARABOOM 100] nell’elenco BT, selezionarlo. Se viene
richiesta una password, inserire [0000]. Se l’accoppiamento non
riesce o il tempo è scaduto, iniziare di nuovo il procedimento di
accoppiamento.
4. Quando il dispositivo è collegato alla torre karaoke, si sente un suono.
5. Assicurarsi che il collegamento BT tra altoparlante e dispositivo smart
sia attivo.
6. Premere PLAY/PAUSA per interrompere la riproduzione e premerlo
nuovamente per riprenderla. Premere AVANTI/INDIETRO per passare al
titolo precedente o successivo.

53
IT
MODALITÀ USB
Riproduzione di MP3 da USB
1. Inserire la chiavetta USB nell’apposito ingresso.
2. Premere SOURCE e selezionare USB. Il primo titolo si avvia
automaticamente. In caso contrario, premere PLAY/PAUSA.
3. Premere AVANTI/INDIETRO per scegliere un determinato titolo.
4. Premere VOLUME+/- per regolare il volume.
Carica tramite USB
Sul retro del dispositivo si trova una connessione di carica USB, con cui è
possibile caricare piccoli dispositivi, come ad es. smartphone.
MODALITÀ KARAOKE
1. Svitare il coperchio del vano delle batterie sul lato inferiore del
microfono e inserire due batterie (tipo AA). Riavvitare il coperchio.
2. Posizionare l’interruttore del microfono su ON.
3. Regolare il volume del microfono con il telecomando.
4. Premere ECHO+/- per regolare l’eetto eco.
5. Selezionare la modalità desiderata e iniziare la riproduzione.
6. Iniziare a cantare.
7. Una volta nito di utilizzare la funzione karaoke, ricordarsi di spegnere il
microfono posizionando l’interruttore su OFF.
DATI TECNICI
Numero articolo 10033249, 10033250
Alimentazione 220-240 V ~ 50/60 Hz
Consumo totale 65 W
Potenza RMS 60 W
Resistenza 8 Ω
Rapporto segnale rumore (A) 75 dB

54
IT
SMALTIMENTO
Se nel proprio paese si applicano le
regolamentazioni inerenti lo smaltimento di
dispositivi elettrici ed elettronici, questo simbolo
sul prodotto o sulla confezione segnala che questi
prodotti non possono essere smaltiti con i riuti
normali e devono essere portati a un punto di
raccolta di dispositivi elettrici ed elettronici. Grazie
al corretto smaltimento dei vecchi dispositivi si
tutela il pianeta e la salute delle persone da possibili
conseguenze negative. Informazioni riguardanti
il riciclo e lo smaltimento di questi prodotti si
ottengono presso l’amministrazione locale oppure il
servizio di gestione dei riuti domestici.
Il prodotto contiene batterie. Se nel proprio
paese si applicano le regolamentazioni inerenti
lo smaltimento di batterie, non possono essere
smaltite con i normali riuti domestici. Preghiamo
di informarvi sulle regolamentazioni vigenti sullo
smaltimento delle batterie. Grazie al corretto
smaltimento dei vecchi dispositivi si tutela l’ambiente
e la salute delle persone da conseguenze negative.
DICHIARAZIONE DI CONFORMITÀ
Produttore:
Chal-Tec GmbH, Wallstraße 16, 10179 Berlino,
Germania.
Importatore per la Gran Bretagna:
Berlin Brands Group UK Limited
PO Box 42
272 Kensington High Street
London, W8 6ND
United Kingdom
Il fabbricante, Chal-Tec GmbH, dichiara che il tipo
di apparecchiatura radio Karaboom 100 Sing è
conforme alla direttiva 2014/53/UE. Il testo completo
della dichiarazione di conformità UE è disponibile al
seguente indirizzo Internet: use.berlin/10033249