
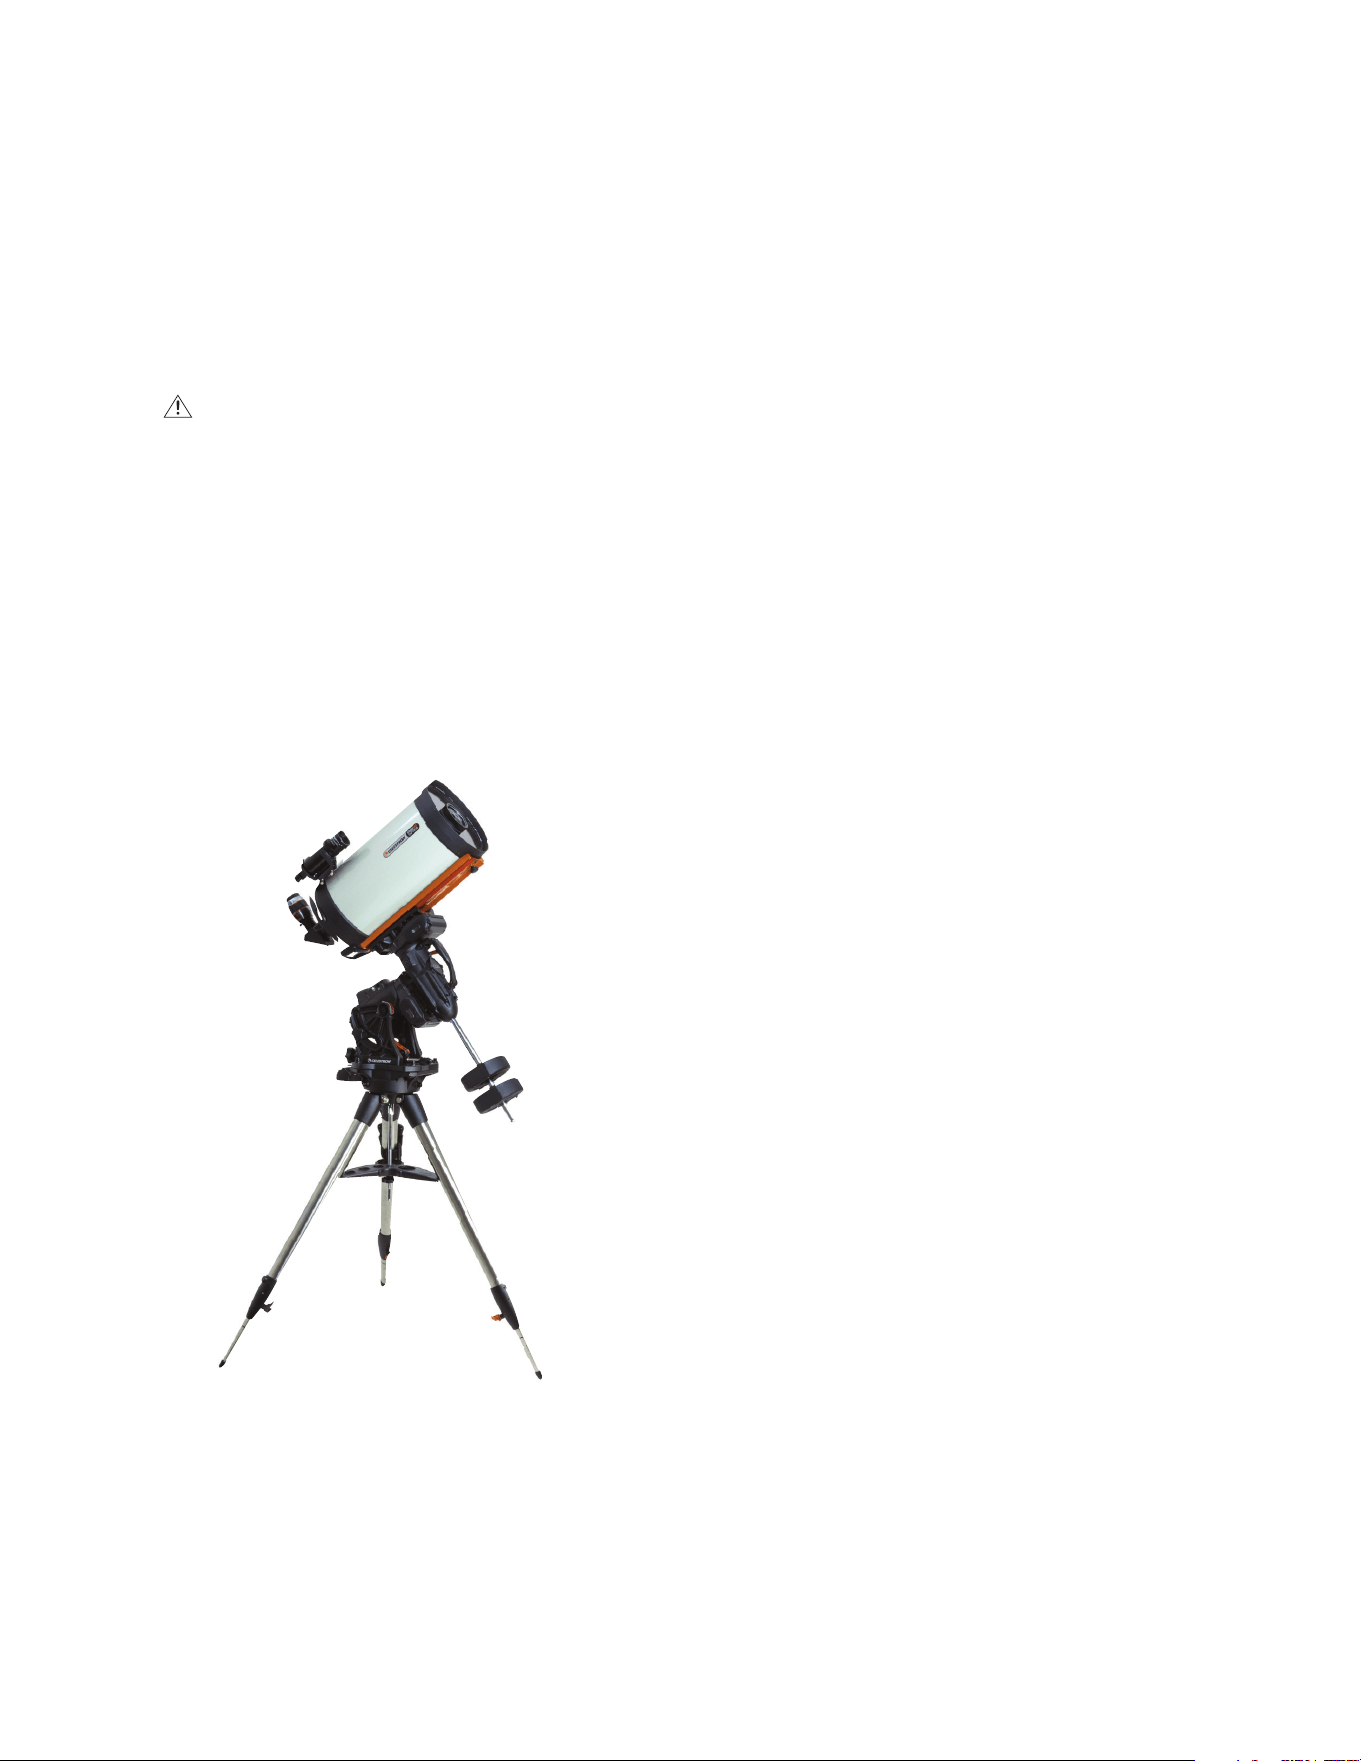
INSTRUCTION MANUAL
Model #91530
GERMAN EQUATORIAL MOUNT SERIES TELESCOPES

2 | ENGLISH

ENGLISH | 3
TABLE OF CONTENTS
Introduction 4
System Requirements 4
Parts List 4
Overview 5
Assembly 7
Basic Usage 9
Polar Align the Mount 10
Precise Polar Alignment 11
Motion Range in Mount 11
Adjusting the Mount for Very High or Low Latitudes 12
USB Port 12
AUX Ports 12
Autoguide Port 12
NexStar+ Hand Control 13
Object Catalog 17
Slewing to an Object 17
Appendix A: Upgrading the Firmware in Your Mount and Hand Control 23
Appendix B: Care and Maintenance 23
4 | ENGLISH
Introduction
Warning
• Never look directly at the Sun with the naked eye or
with a telescope (unless you have the proper solar filter)
Permanent and irreversible eye damage may result
• Never use your telescope to project an image of the Sun
onto any surface Internal heat build-up can damage the
telescope and any accessories attached to it
• Never use an eyepiece solar filter or a Herschel wedge
Internal heat build-up inside the telescope can cause these
devices to crack or break, allowing unfiltered sunlight to
pass through to the eye
• Never leave the telescope unsupervised Make sure an
adult who is familiar with the correct operating procedures
is with your telescope at all times, especially when children
are present
System Requirements
• The CGX requires 12 volts of DC power with at least 4
amperes of current An AC to 12VDC 5A power supply
is available from Celestron and includes a threaded barrel
connector which is recommended Portable 12 volt field
batteries also make suitable power supplies The mount
includes a DC power cable with a cigarette lighter plug
• The telescope must have a dovetail mounting bar that is
either the CG-5/Vixen or CGE/Losmandy D format CGX
can fit either of these sizes on the dovetail saddle
• For best performance, the total telescope payload should
not exceed 55 lbs (25 kg), not including counterweights
• Windows 7/10 for use with the telescope control software
• USB cable with the standard A connector when plugged
into the USB port on the mount (for PC use only)
• Phillips head screwdriver (optional, for gear adjustment
only)
Parts List
Box 1: 91530-1 CGX Equatorial Mount
CGX Equatorial Mount Head
8mm Allen Wrench (captive in rear handle of mount)
Counterweight Shaft and Stop Nut
3 x 8mm socket hex head screws (attaches head to tripod)
12VDC Power Cable
NexStar+ Hand Control
Box 2: CGX Tripod and Counterweights
Tripod
2 x 5 kg (11 lbs ) counterweights
Accessory Tray
Tray knob and washer (threaded onto central column
of tripod)

ENGLISH | 5
Overview
Figure 1.1 Overview
8 mm Allen Wrench
(Located under carry handle)
Dovetail Lock Knobs
Carry Handle
DEC Clutch Lock Lever
R.A. Clutch Lock Lever
Counterweight Shaft
Counterweights
Counterweight Stop Nut
Tripod
Accessory Tray
Hand Control
Dovetail Saddle
Aux 1 & Aux 2 Ports for Hand Control and Accessories
12VDC 4A Power Input
Altitude Lock Knobs (One on each side)
Altitude Adjustment Knob
Azimuth Adjustment Knobs
Carry Handle
On/Off Switch
See fi gure 1.2
8 mm Allen Wrench
(Located under carry handle)
Carry Handle

6 | ENGLISH
Figure 1.2 Overview
Autoguide Port
Belt Drive Windows
USB Port
Latitude Scale
Leg Height Adjustment Lock Levers
Leg Height Index Marks
ENGLISH | 7
Assembly
Unpack all of the contents and follow these steps to
assemble your mount If you purchased the CGX by itself,
the tripod includes two 11 lbs counterweights If you pur-
chased the CGX with a large optical tube, more
weights may be included to achieve balance
Note: The included 8mm Allen wrench is contained under
the rear handle of the mount as shown in Figure 1.1.
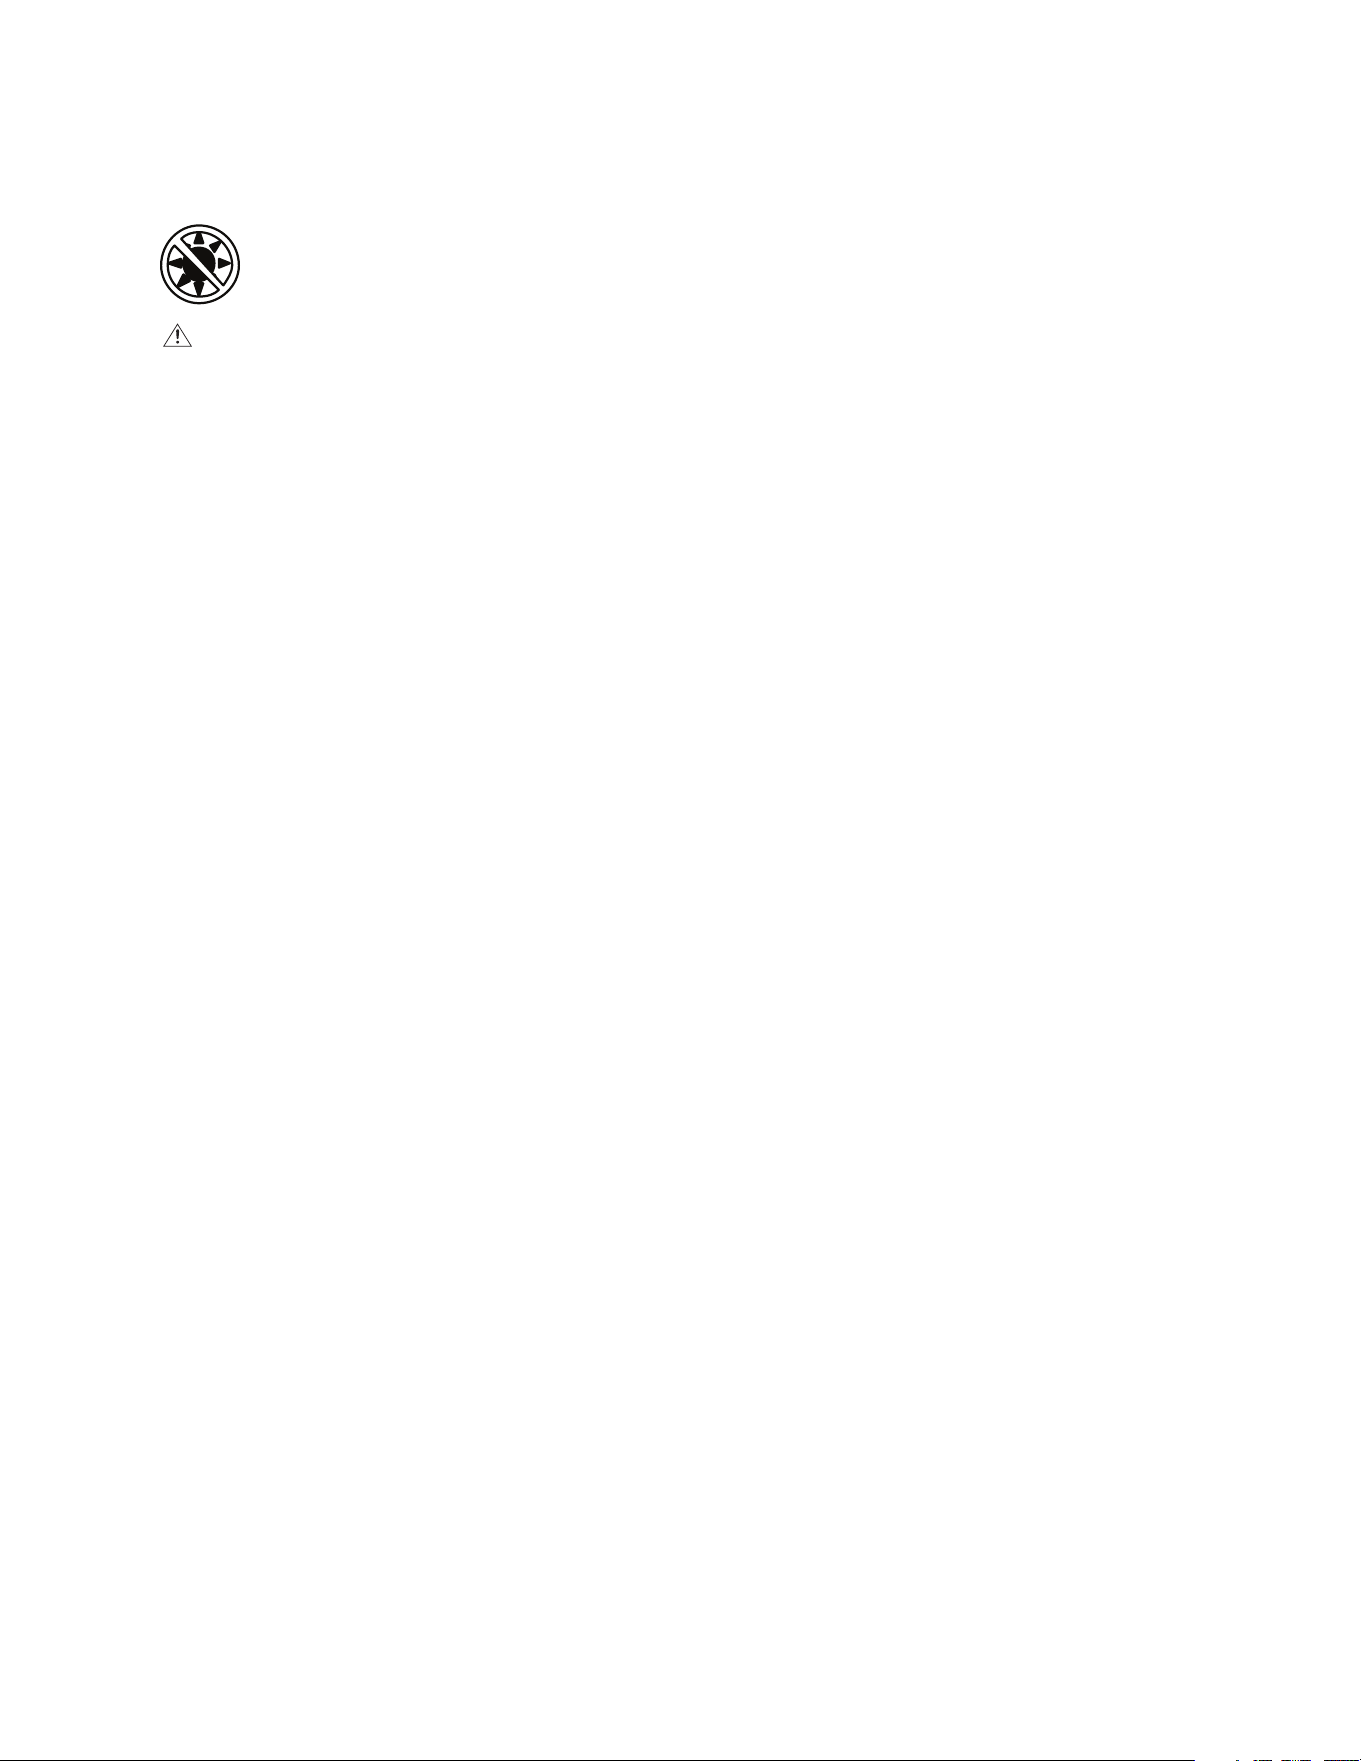
Setup the Tripod
1 Stand the tripod upright and pull the tripod legs apart
until each leg is fully extended
2 Remove the Tripod Support Nut and Washer from the
central column attached to the top of the tripod (Figure
2 1 & 2 2)
3 Place the accessory tray over the central column so
that each of the three arms of the tray is supporting a
tripod leg
4 Thread the nut and washer back onto the threaded
column and firmly tighten into place The accessory
tray should not be able to move against the tripod
(Figure 2 1 & 2 2)
5 Adjust the height of the tripod by loosening the lock
levers on the end of each tripod leg Then adjust the
leg height as needed and retighten the lock levers, one
leg at a time Note that the leg index marks can
be used to easily level the tripod
Attach the Mount to the Tripod
1 Place the head onto the tripod so that it seats securely
into the mating surface
2 For best stability, orient the mount so that the counter-
weight shaft is directly over a tripod leg as shown in
Figures 1 1 and 1 2 Note that you can orient the mount
so the counterweight shaft is between two of the tripod
legs which can be useful in low latitudes, allowing the
counterweights to have more clearance from the tripod
3 Using the included 8 mm Allen wrench (Figure 3) to
tighten the 3 attachment bolts onto the mount
Figure 2.1 Tripod setup
Figure 2.2 Tripod setup
Figure 3 Attaching the mount to the tripod
Accessory Tray
Central
Column
Tripod Support
Nut and Washer
Allen
Wrench
8 | ENGLISH
Roughly Polar Align the Mount
Before more weight is added to the mount and tripod,
roughly position the mount so that it’s pointing north (or
south if in the southern hemisphere), and set to your
latitude Loosen the two altitude lock knobs, then turn the
altitude adjustment knob (Figure 1 1) until you are roughly
set to your latitude indicated on the latitude scale (Figure
1 2), then retighten the altitude lock knobs The scale is
intended for rough polar alignment only A more precise
polar alignment can be achieved later with the assistance
of the computerized hand control
Add the Counterweights
Remove the stop nut at the end of the counterweight shaft,
add the counterweights, then thread the stop nut back on
Keep the Counterweight shaft pointed downward
(Figure 1 1)
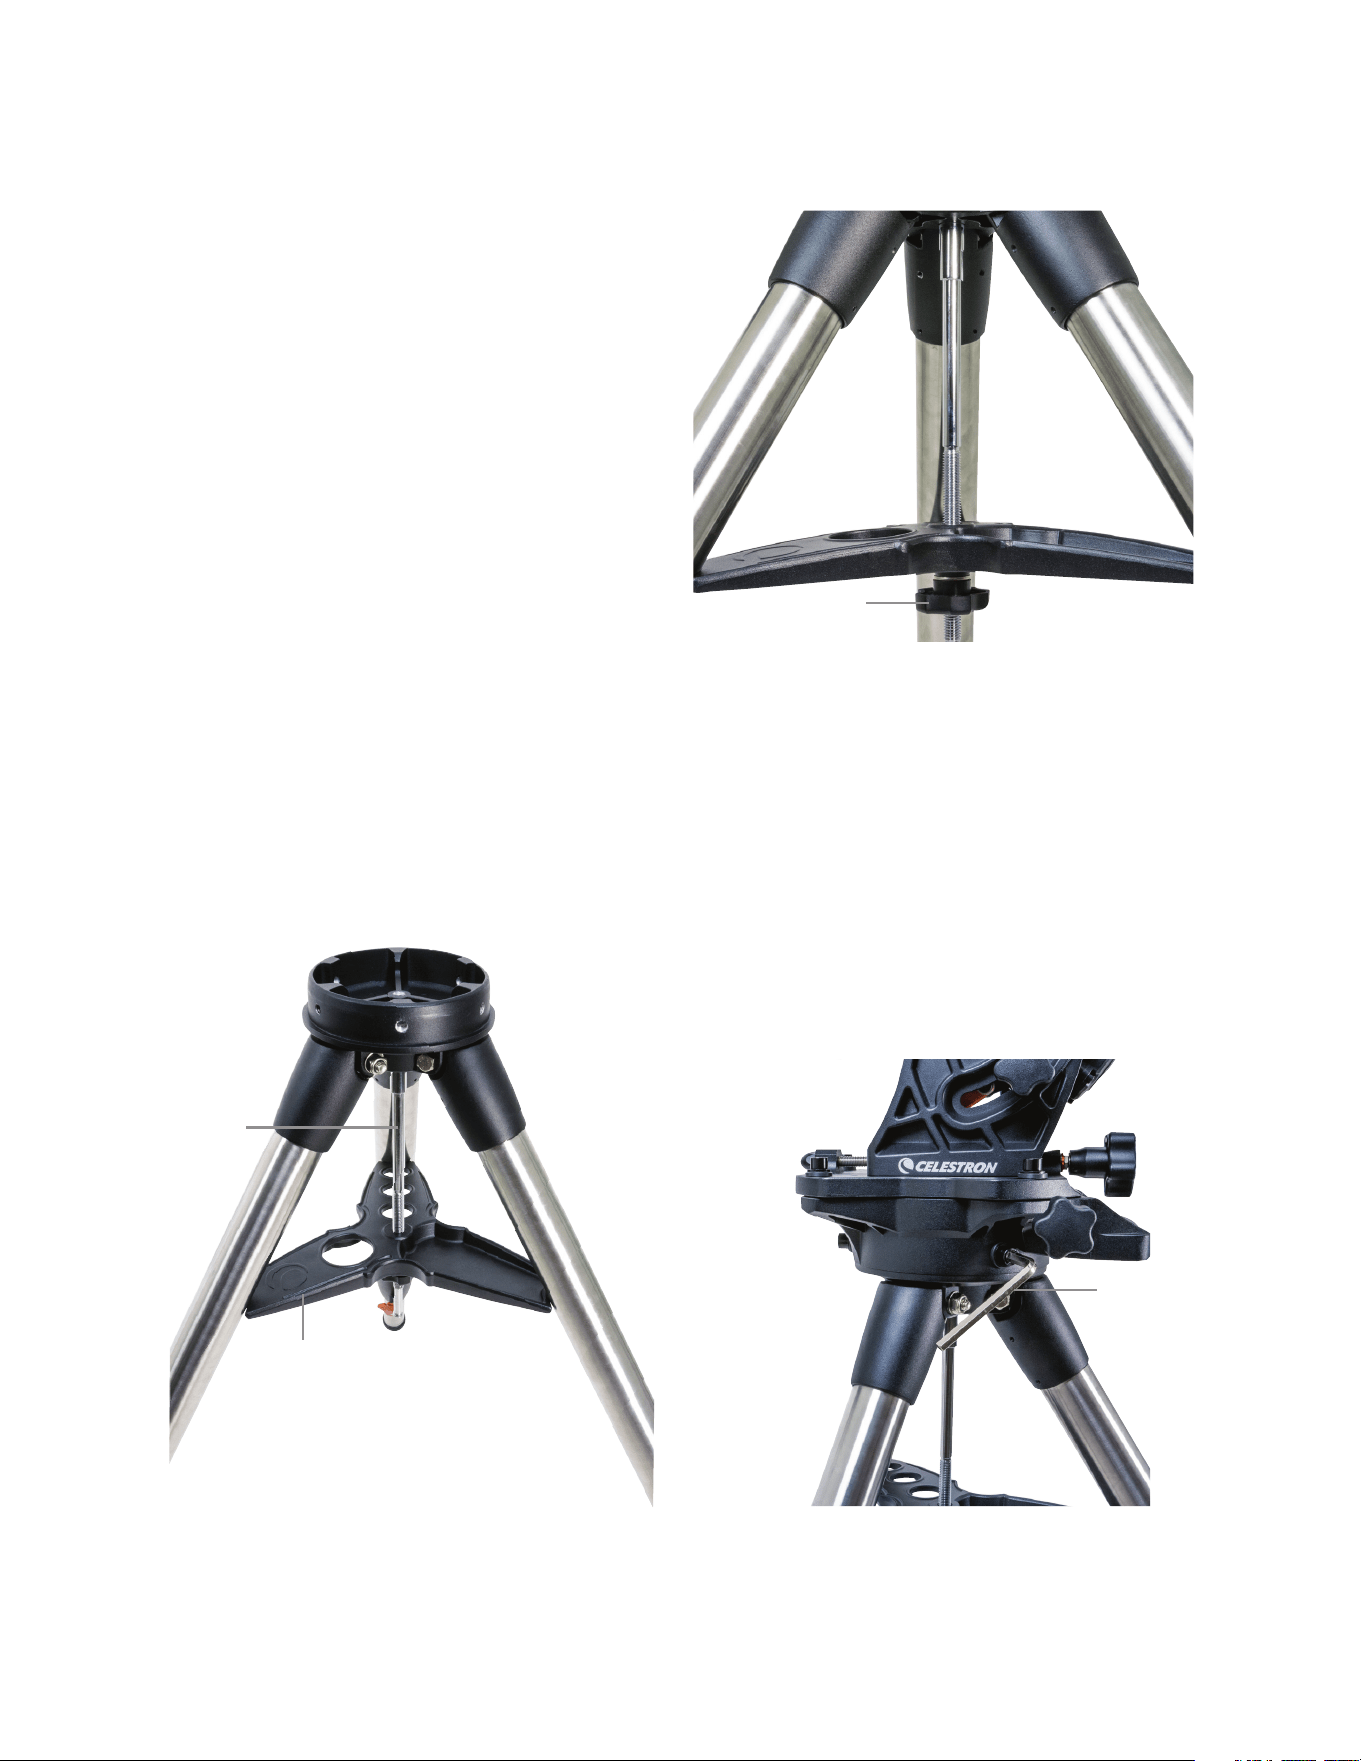
Attach the Telescope to the Mount
1 Make sure both R A and DEC clutch levers are tightened
2 Loosen the dovetail saddle lock knobs enough to allow
the dovetail to fit into the saddle Note the arrow should
be pointing to the same side as the front handle (Figure 4)
3 Slide the telescope’s dovetail bar into the dovetail saddle
of the mount Tighten the telescope in place with the two
lock knobs (Figure 5)
The CGX fits the large Celestron CGE-style dovetail and the
smaller CG-5-style dovetail, also common to the Losmandy D
1
and Vixen-style
2
dovetail
1
Test fit your Losmandy dovetail bar before securing your
telescope to the mount Sizes and dovetail angles across
different manufacturers can vary
2
Test fit your Vixen dovetail bar before securing your
telescope to the mount Be aware that some of the
Vixen-style dovetails are not flat and have different
heights along the bar Depending on the length of the
flat, it can affect the fit onto the dovetail saddle of
the mount
Balance the Mount
Right Ascension Axis: Carefully unlock the clutch lever for R A
and position the counterweight shaft so that it’s horizontal
Without letting go of the telescope, check to see which side
the balance is in favor of Slide the counterweights as needed
so the R A axis does not move when the clutch is unlocked
Declination Axis: With the counterweight shaft still positioned
horizontally, carefully unlock the clutch lever for DEC
and check which way the optical tube is balanced (Figure 6)
Slide the optical tube forward or backward as needed to
achieve balance For large and heavy telescopes, return
the telescope to the home position before loosening the
dovetail saddle lock knobs
Figure 4 Attaching the mount to the tripod
Figure 5 Telescope dovetail securely in place
Figure 6 Balancing the mount
Dovetail
Orientation Arrow
Dovetail
Lock Knobs
ENGLISH | 9
Attach the Hand Control Holster
Wrap the hook & loop strap and holster around the tripod
leg and place the hand control in the holster
Plug in the Hand Control
Plug the supplied NexStar+ hand control into one of the
Aux ports
Warning: Do not plug the hand control into the
Autoguide Port. Damage to the mount or hand control
could occur. Similarly, do not plug an autoguider cable
into the Aux port or damage could occur.
Home Position
The mount is in the “home” position when the counterweight
shaft is pointing downward, and the telescope is pointing
along the polar axis of the mount as pictured in (Figure 7)
The mount’s internal switches will take the mount to its
home position when you power it on (more on that in “Basic
Usage”), but you can still manually position it before powering
on the mount Simply unlock the two lock levers
Basic Usage
With your mount assembled and polar aligned, proceed to
startup the mount:
Powering the Mount
The CGX mount can be powered by the supplied car battery
adapter to a 12VDC battery source that can deliver at least 4
amperes of current Or you may use an optional AC adapter
that delivers 12VDC and 4 amperes of current AC power
adapters with threaded barrel connectors are available
from Celestron
Home Position and Site Information
1 Plug the included NexStar+ Hand Control into one of
the Aux ports You can plug into Aux 1 or Aux 2
2 Plug the power cable into the power input port on the
mount Be sure to secure the power cable with the
threaded barrel connector
3 Turn the power switch on
4 When the hand control displays “CGX Ready”, press
ENTER twice The mount will proceed to move to the
home switch position
5 Select City Database or Custom Site
• In City Database, select the nearest city to your location
• If you choose Custom Site, you will have to enter the
longitude, latitude and time zone of your location
6 Once the location is selected, proceed to enter the date
and time The CGX has a Real-Time Clock (RTC) which
stores the date, time and location information for the next
time you use the mount
Alignment
Prerequisite: The mount must be roughly polar aligned,
with the date, time and location information correctly en-
tered as outlined before this step.
1 For best alignment results, choose Two Star Align and
press ENTER
You can also choose from Solar System, One Star, Last
Align, or Quick Align. The Scroll buttons 6 and 9 on the
keypad are used to scroll through any list selection in the
hand control.
Figure 7 Telescope in the home position
10 | ENGLISH
2 Select the first star from the named star list Use the
Scroll buttons 6 (up) and 9 (down) on the keypad to
scroll through the star names They consist of the brightest
and easiest stars to find Press ENTER when you have
selected a suitable star If your mount is at least roughly
polar aligned, the mount will slew to the approximate
location of the star
The default selection of stars is on the west side of the
meridian. If your sky is obstructed in the west or you wish
to choose from stars on the east side of the meridian, press
the MENU button on the keypad.
3 Using the direction keys, slew to the telescope to the
selected named star and center it in the viewfinder of
your telescope, then press ENTER
The mount will automatically adjust the motor speed for fine
centering
4 Using the direction keys, center the star in the eyepiece of
your telescope and press ALIGN
5 Select a second star from the list and repeat the process
from steps 2-4 When prompted to add a Calibration Star,
you can either press BACK to complete the alignment, or
for best results, proceed to add a calibration star
For best results, add at least one Calibration Star. This
will improve the pointing accuracy of your mount.
6 When prompted to “Add Calibration Star”, choose a star
from the list and press ENTER The mount will slew to the
other side of the meridian to add a calibration star
7 Center and align the star as you did with the first two
alignment stars: Center in the viewfinder, press ENTER,
center the star in your eyepiece, then press ALIGN
8 When prompted to add another calibration star, you may
continue to add more, or press BACK to complete the
alignment
Selecting Objects
Select from the object database categorized by Solar
System, Stars, or Deep Sky Within these menus (on keypad
numbers 1, 2, and 3, you can select by object name or
popular catalog number (such as M42 for Messier 42)
Keypad 6 and 9 (up and down) allows you to scroll through
any list in the hand control Press ENTER to go to the
selected object the list
Example of selecting and slewing to Messier M42 deep
sky object:
• Press DEEP SKY then ENTER
• Scroll down (keypad 9) to Messier and press ENTER
• Press “0-4-2” on the keypad and press ENTER
The SkyTour (keypad 5) is a great way to explore the sky
without consulting a star chart The Tour function will
generate a list of the most interesting objects to observe
for your time and location
Polar Align the Mount
The computerized go-to is capable of locating objects even
if the mount is not perfectly polar aligned However, polar
alignment is necessary to achieve the best tracking accuracy
of your mount And it’s essential to astrophotography When
polar aligned, an Equatorial mount tracks the sky in one motion,
keeping the object centered in the eyepiece or camera
CGX’s polar alignment system consists of an altitude
adjuster and azimuth adjuster (Figure 8)
An optional polar alignment scope is available from Celestron
and attaches to the mount The optional polar axis scope
does not pass through the R A axis because that area is used
for internal cabling If you are not using the optional polar
alignment scope, you can achieve a rough polar alignment by
sighting through the viewfinder of your telescope, and adjust-
ing the mount until you center Polaris in the eyepiece of your
telescope This will get you to within about three-quarters of a
degree within the North Celestial Pole (NCP)
Figure 8 Polar alignment adjustment
Azimuth
Adjustment Knobs
Altitude
Adjustment Knobs
Altitude
Lock Knobs

ENGLISH | 11
Precise Polar Alignment
Celestron’s All-Star Polar Alignment allows you to precisely
polar align your mount without using Polaris or a polar axis
finder This software-assisted polar alignment allows you to
choose a convenient star
Prerequisite: The CGX must be aligned with a Two Star,
One Star, or Solar System Align.
1 Select a suitable bright star from the NexStar hand
control’s database Slew the telescope to the star
2 Press the Align button Select “Polar Align” then “Align
Mount” from the list
3 The telescope will then re-slew to the alignment star and
ask you to center it in the eyepiece in order to “sync” on
the star
4 Press Align and the telescope will slew to the position
that the star should be if it were accurately polar-aligned
5 Use the mount’s altitude and azimuth adjustments to cen-
ter the star in the eyepiece Do not use the direction keys
on the hand control to center the star
6 Press Enter Polar alignment is complete
Motion Range in Mount
Sofware Range
The CGX employs software controlled limit sensors which
detect when the mount has reached near its mechanical
range limit Once the mount reaches the switch, the motor
will decelerate to a stop and a “Limit Switch” warning
message will appear The mount will no longer slew in the
direction of the limit switch until you reverse directions
Mechanical Range
The CGX uses internal cabling so the mount is designed
not to move more than a certain range Both axis are limited
by a hard stop built into the mount This limited range can
also help prevent unintentional interference between your
telescope and the mount or tripod If for any reason the
mount exceeds the software limit switch (or if the clutch is
unlocked and the mount is manually moved), the mount will
halt at the hard stop
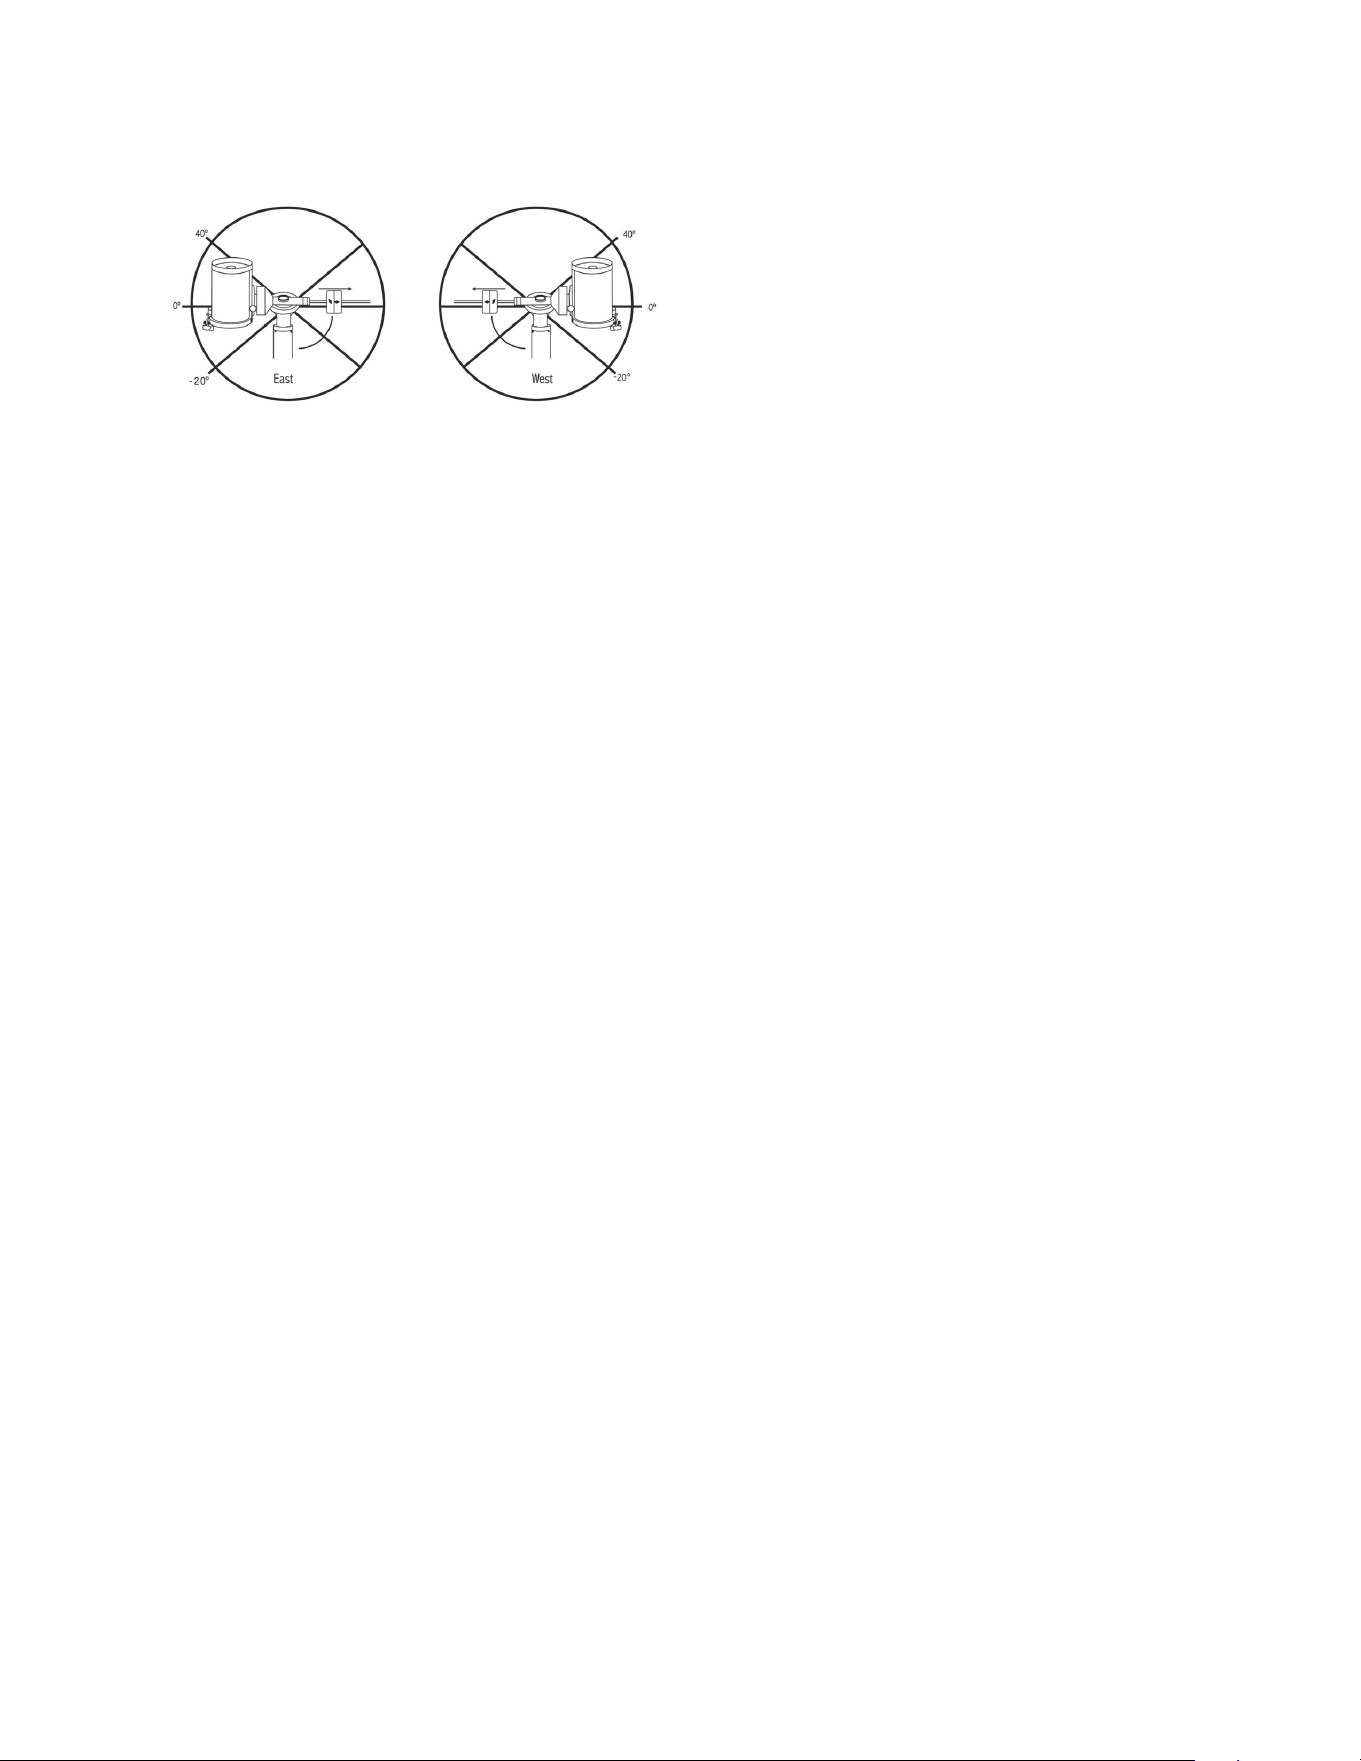
R A limit (Figure 9 1) allows you to track 20º past the
meridian If you leave the mount unattended while it’s
tracking, it will automatically stop before reaching the
mechanical hard stop
DEC limit (Figure 9 2) contains enough slew range to reach
any portion of the sky
Figure 9.1 One side of R.A. mechanical limit
Figure 9.2 One side of DEC mechanical limit

12 | ENGLISH
Adjusting the Mount for Very High
or Low Latitudes
The EQ head can be set on the tripod in three different
positions These three positions can also be used to optimize
the balance over the tripod The mount ships in the center
position which works for latitudes between 20-55º If you
wish to use the mount at latitudes below 20º, shift the
mount forward, if you wish to use above 55º, shift the
mount backward
1 Remove the head from the tripod by removing the 3
socket-head screws
2 Carefully remove the 8 socket head screws located under
the head Once they are removed, the altitude adjustment
mechanism will be the only thing securing the bottom
plate of the EQ head
3 Turn the altitude adjuster knob until the threaded holes on
the bottom of the mount align with the new set of holes
on the bottom plate Shift the plate forward (towards
the counterweight shaft side) if you wish to use at lower
latitudes Shift the plate backward (towards the altitude
adjustment knob) if you wish to use at higher latitudes
(Figure 10)
USB Port
The USB port on the CGX is used to interface with your
PC only for:
1 Use with the dedicated telescope control software
2 Upgrading the motor control firmware in the mount
Simply connect a standard USB A type cable into the USB
port on the mount, and plug into your PC The mount should
automatically install
The USB port on the mount is not intended to be used
with ASCOM or third party telescope control software.
To control the mount via ASCOM, connect your PC to
the NexStar+ hand control’s mini USB port.
Aux Ports
Aux 1 and Aux 2 can be used for the NexStar+ handcontrol,
as well as optional accessories such as the StarSense
AutoAlign and SkyPortal WiFi module
Autoguide Port
The autoguide port should only be used for autoguide
camera relays
CAUTION: Never plug the NexStar+ hand control or other
accessory into the autoguide port. Damage could result.
Figure 10 Changing the mount position on the tripod head
DEFAULT POSITION
BACK POSITION
FRONT POSITION
ENGLISH | 13
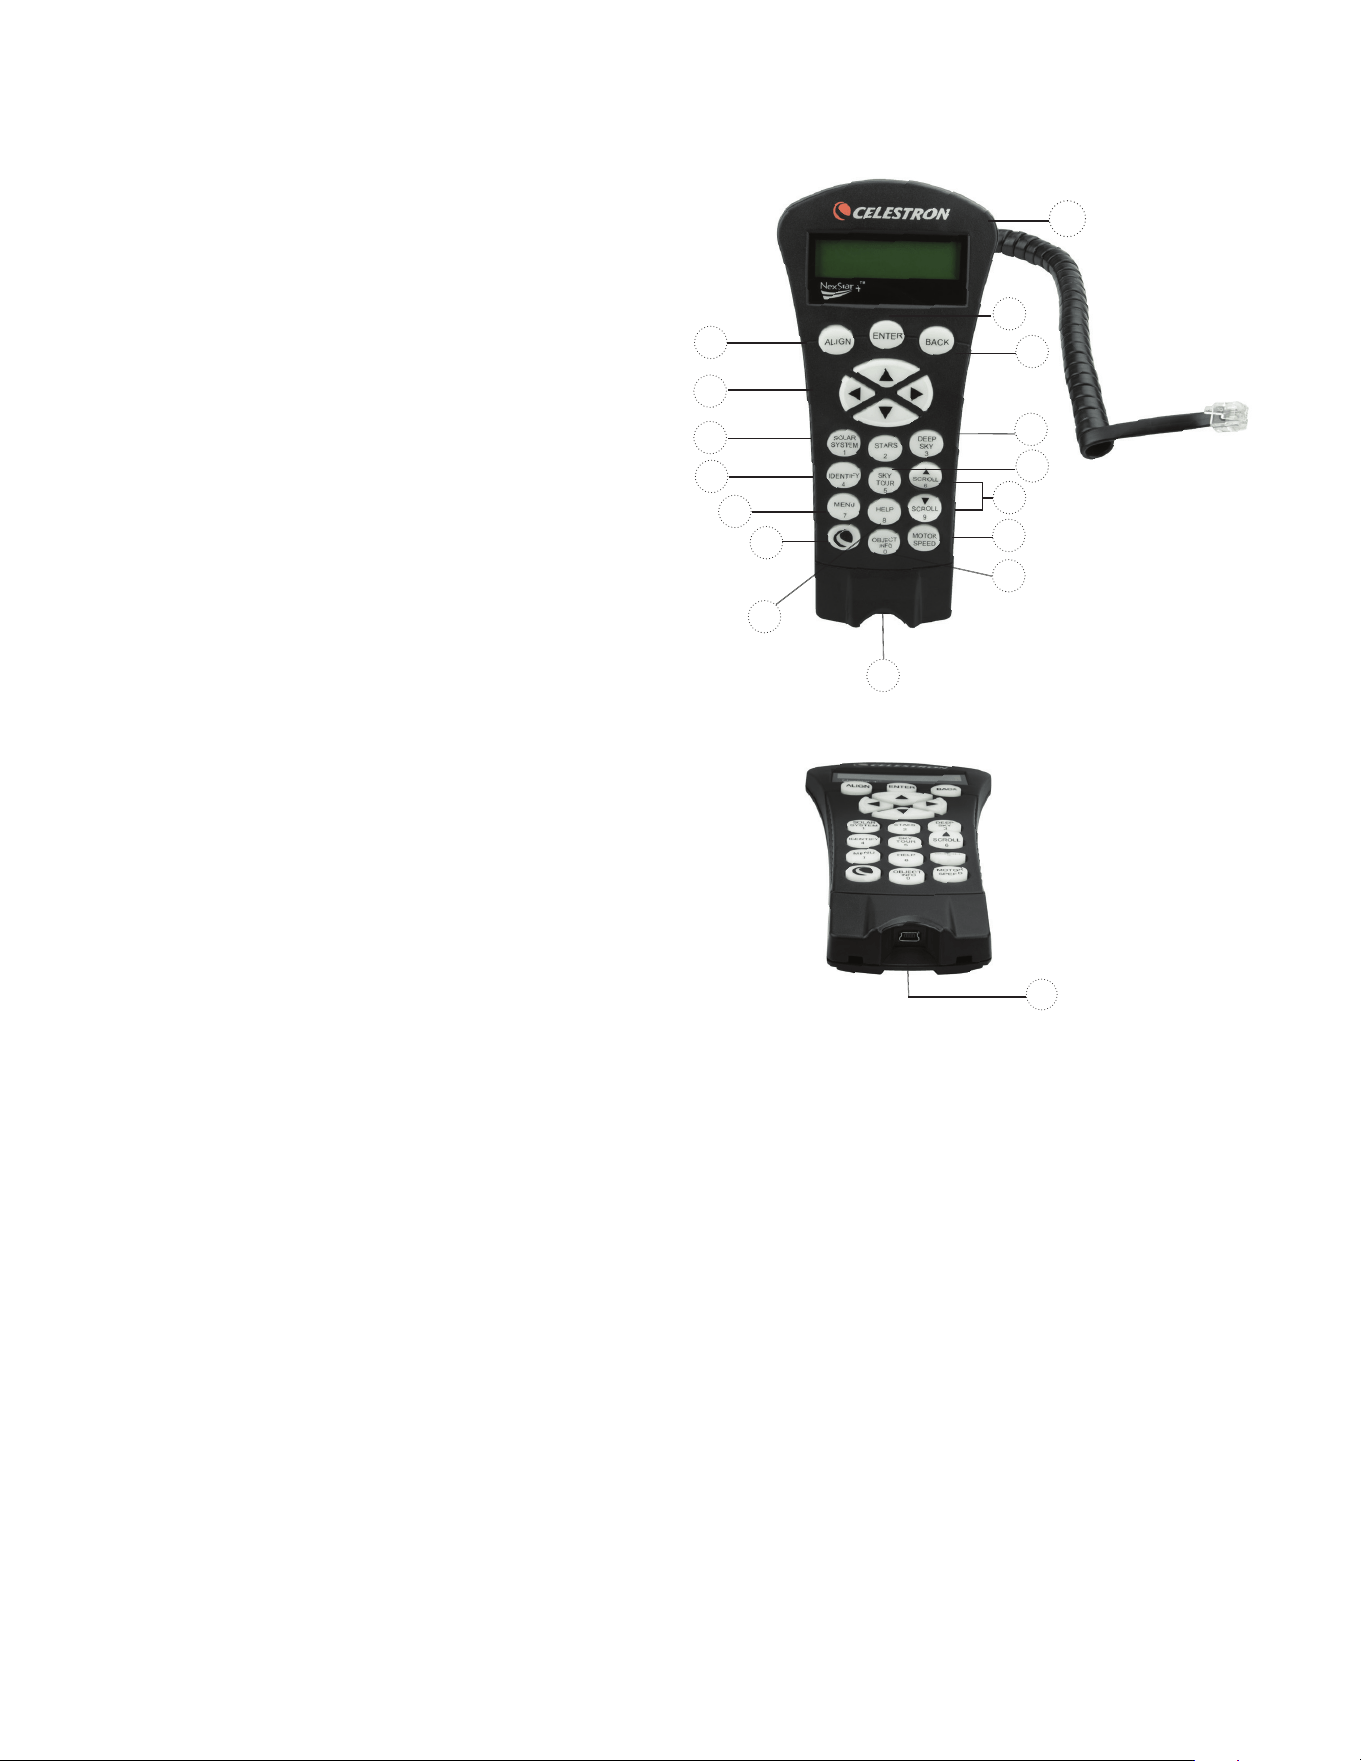
NexStar+ Hand Control
1 Liquid Crystal Display (LCD) Window: Red back-
lighting for comfortable nighttime viewing of telescope
information and scrolling text Remove the clear
protective tape from the screen before use
2 Align: Instructs the telescope to begin the default alignment
procedure It is also used to select star or object as an
alignment position
3 Direction Keys: Allow complete control of your telescope
in any direction Use the direction keys to center objects in
the eyepiece or to manually slew your telescope
4 Catalog Keys: Allow direct access to each of the main
catalogs in the database of thousands of objects
Your telescope contains the following catalogs in its database:
• Solar System- All 7 planets in our Solar System plus
the Moon, Sun and Pluto
• Stars- Custom lists of all the brightest stars, double
stars, variable stars, constellations and asterisms
• Deep Sky- Custom lists of all the best Galaxies,
Nebulae and Clusters, as well as the complete
Messier and select NGC objects
5 Identify: Searches your telescope’s database and
displays the name and offset distances to the nearest
matching objects
6 Menu: Displays setup and utilities functions, such as
tracking rate, user defined objects and others
7 Option (Celestron Logo): Works similar to the SHIFT
key on a keyboard and can be used in combination with
other keys to access more advanced features and
functions to be added with later firmware updates
8 Enter: Pressing ENTER allows you to select any of your
telescope’s functions, accept entered parameters and
slews the telescope to displayed objects
9 Back: Pressing BACK will take you out of the current
menu and display the previous level of the menu path
Press BACK repeatedly to get back to a main menu or
use to erase data entered by mistake
10 Sky Tour: Activates the tour mode, which seeks out all
of the best objects in the sky and automatically slews
your telescope to those objects
11 Scroll Keys: Used to scroll UP and DOWN within any of
the menu lists A double arrow symbol on the right side
of the LCD indicates that the scroll keys can be used to
view additional information The buttons have an angled
shape to make it easier to locate without looking
1
9
8
13
4
12
2
3
4
5
6
7
15
11
10
14
12 Motor Speed: Similar to the Rate Button on the original
NexStar hand control, it allows you to change the motor’s
speed when the direction keys are pressed
13 Object Info: Displays coordinates and valuable infor-
mation about objects selected from your telescope’s
database
14 Mini Usb Port (cable not included): Links to PC to
control telescope with desktop or to perform firmware
updates
15 Help Menu: In future firmware updates, this button will
offer troubleshooting tips For your convenience, it
currently functions as a shortcut to the Messier Catalog
Figure 11
14
Figure 11.2

14 | ENGLISH
Selecting an Object
Once the telescope is properly aligned, you can choose
an object from any of the catalogs in the NexStar+ hand
control’s database The hand control has a key designated
for each category of objects in its database; Solar System
objects, Stars and Deep Sky objects
• Solar System – The Solar System catalog will display
all of the planets (and Moon) in our Solar System that
are currently visible in the sky To allow the Sun to be
displayed as an option in the database, see Allow Sun
option in the Database Setup section of the manual
• Stars – The Stars catalog displays custom lists of all
the brightest stars, double (binary) stars, variable stars,
constellations and selected asterisms
• Deep Sky – The Deep Sky catalog displays a list of all
of the best Galaxies, Nebulae and Clusters, as well as
the complete Messier and select NGC objects There is
also an alphabetical list of all deep sky objects in order by
their common name
Use the SCROLL keys to scroll through the catalogs to
find the object you wish to view When scrolling through
a long list of objects, holding down either the UP or
DOWN key will allow you to scroll through the catalog
at a rapid speed
Slewing to an Object
Once the desired object idisplayed on the hand control
screen, you have two options:
• Press the OBJECT INFO Key. This will give you useful
information about the selected object such as magnitude,
constellation and extended information about the most
popular objects
- Use the UP/DOWN arrow buttons to scroll through
the displayed object info
- Use the BACK button to return to the object database
• Press the ENTER Key. This will automatically slew the
telescope to the coordinates of the object displayed on
the hand control While the telescope is slewing to the
object, the user can still access many of the hand control
functions (such as displaying information about the object)
NOTE: The Messier, NGC and SAO catalogs require
the user to enter a numeric designation. Once you have
selected the appropriate catalog button and selected the
Messier, NGC or SAO catalog, you will see a flashing cur-
sor indicating you are in numeric entry mode.
Enter the catalog number for the object you want to view
Press ENTER to command the telescope to slew to the
object, or hold the OPTION button (the Celestron logo)
and press OBJECT INFO to see information about the
object you selected
CAUTION: Never slew the telescope when someone is
looking into the eyepiece. The telescope can move at fast
slew speeds and may hit an observer in the eye.
Motor Speed Button
The MOTOR SPEED button, similar to the Rate button on
the original NexStar hand control, allows you to instantly
change the speed rate of the motors from high speed slew
rate to precise guiding rate or anywhere in between Each
rate corresponds to a number on the hand control key
pad The number 9 button is the fastest rate (approxi-
mately 3 5° per second, depending on the mount) and is
used for slewing between objects and locating alignment
stars The number 1 button on the hand control is the
slowest rate (half sidereal) and can be used for accurate
centering of objects in the eyepiece
To change the speed of the motors:
• Press the MOTOR SPEED key on the hand control
The LCD will display the current motor speed
• Press the number on the hand control that corresponds
to the desired speed
The hand control has a “double button” feature that allows
you to instantly speed up the motors without having to
choose a speed To use this feature, simply press the arrow
button that corresponds to the direction that you want
to move the telescope While holding that button down,
press the opposite direction button This will increase the
speed to the maximum slew rate
When using the hand control’s up and down direction but-
tons, the slower slew rates (6 and lower) move the motors
in the opposite direction than the faster slew rates (7- 9)
This is done so that an object will move in the appropriate
direction when looking into the eyepiece (i e pressing the
UP arrow button will move the star upwards in the field of
view of the eyepiece) However, if any of the slower slew
rates (rate 6 and below) are used to center an object in
the StarPointer, you may need to press the opposite
directional button to make the telescope move in the
correct direction

ENGLISH | 15
The Hand Control Menu
The “Hand Control” menu allows you to customize certain
features of the NexStar+ hand control To access this menu,
press the MENU button (#7 on the keypad) and use the
scroll buttons to select “Hand Control” and press ENTER
Use the scroll buttons to select from the following options:
• Lights Control: Independently adjust the brightness of the
number keypad and the LCD
• Scrolling Menu: Adjust how fast words move across the
face of the LCD
• Toggle Bold Font: Change the format of the font dis-
played on the LCD from normal to boldface
• Set Contrast: Use the scroll keys to adjust the contrast
of the LCD
• Set Language: Change the displayed language on
the LCD
NOTE: The Set Language feature may also appear the
first time you use your new hand control. You may also
initiate it at any time by holding down the Option button (the
Celestron logo) for 10 seconds while powering up
the telescope.
Alignment Procedures
In order for the telescope to accurately point to objects in the
sky, it must first be aligned with known positions (stars) in the
sky With this information, the telescope can create a model
of the sky, which it uses to locate any object with known
coordinates There are many ways to align your telescope
with the sky depending on what information the user is able
to provide:
• Two Star Align uses the entered time/location information
and allows the user to select which two alignment stars the
telescope will automatically slew to
• One Star Align uses the same time/location information
but only uses one star for alignment
• Solar System Align will display a list of visible daytime
objects (planets and the Moon) available to align the
telescope
• Quick-Align will ask you to input all the same information
as you would for the Two Star Align procedure However,
instead of slewing to the alignment stars for centering and
alignment, the telescope bypasses this step and simply
models the sky based on the information given
• Last Alignment restores your last saved star alignment
and switch position Last Alignment also serves as a good
safeguard in case the telescope should lose power
Two Star Align
Two-Star Align allows the user to select two stars on which
to align the telescope To align your telescope using the
Two-Star Align method:
1 Select Two-Star Align from the alignment choices given
Based on the date and time information entered, the hand
control will automatically select and display a bright star
that is above the horizon
• Press ENTER to select this star as your first alignment
star
• If for some reason the chosen star is not visible (perhaps
behind a tree or building), press BACK to have the
hand control automatically select the next brightest star
• Or you can use the Up/Down keys to browse the entire
Named Star list and select any one of over two hundred
alignment stars
2 Once the telescope is finished slewing to your first
alignment star, the display will ask you to use the arrow
buttons to align the selected star with the cross hairs
in the center of the finderscope When centered in the
finder, press ENTER The display will then instruct you to
center the star in the field of view of the eyepiece When
the star is entered, press ALIGN to accept this star as
your first alignment star
3 After the first alignment star has been entered, the hand
control will automatically select a second alignment star
and have you repeat this procedure for that star When
the telescope has been aligned on both stars, the display
will ask you if you wish to add additional calibration stars
Calibration stars are used to improve the pointing
accuracy of your telescope by compensating for subtle
opto-mechanical misalignments between the telescope
optics and the mount Therefore, it is usually a good idea
to add at least one additional calibration star to improve
the mount’s all-sky pointing accuracy
4 Press ENTER to select a calibration star Select a star the
same way you did with the first two alignment stars and
press ENTER You will notice that all the calibration stars
displayed are located on the opposite side of the side of
the sky (Meridian) as the original alignment stars This is
essential for an accurate calibration of the mount Finally,
you can choose to continue to add additional calibration
stars or Press BACK to complete the alignment
Note: East/West Filtering – In order to ensure the best
possible full-sky pointing accuracy, your computerized mount
automatically filters and chooses its initial alignment stars so
that the first two alignment stars are located on one side
of the Meridian and any calibration stars are on the op-
posite side of the Meridian, as indicated by the “W” or “E”
displayed in the upper-right corner of the LCD. East/West
filtering can be changed simply by pressing the MENU
button at any time during the alignment process.
16 | ENGLISH
Tips for Adding Calibration Stars:
• Although for casual observing it is not necessary to add
calibration stars, it is recommended that you add as many
as three calibration stars for optimal point accuracy
• Choosing calibration stars that are near the celestial
equator offer the better results than stars near the
celestial poles
• Although it is not necessary to use calibration stars if the
telescope mount has not been moved since its original
alignment/calibration, it may be necessary to recalibrate
the telescope if the optical tube has been removed for any
reason
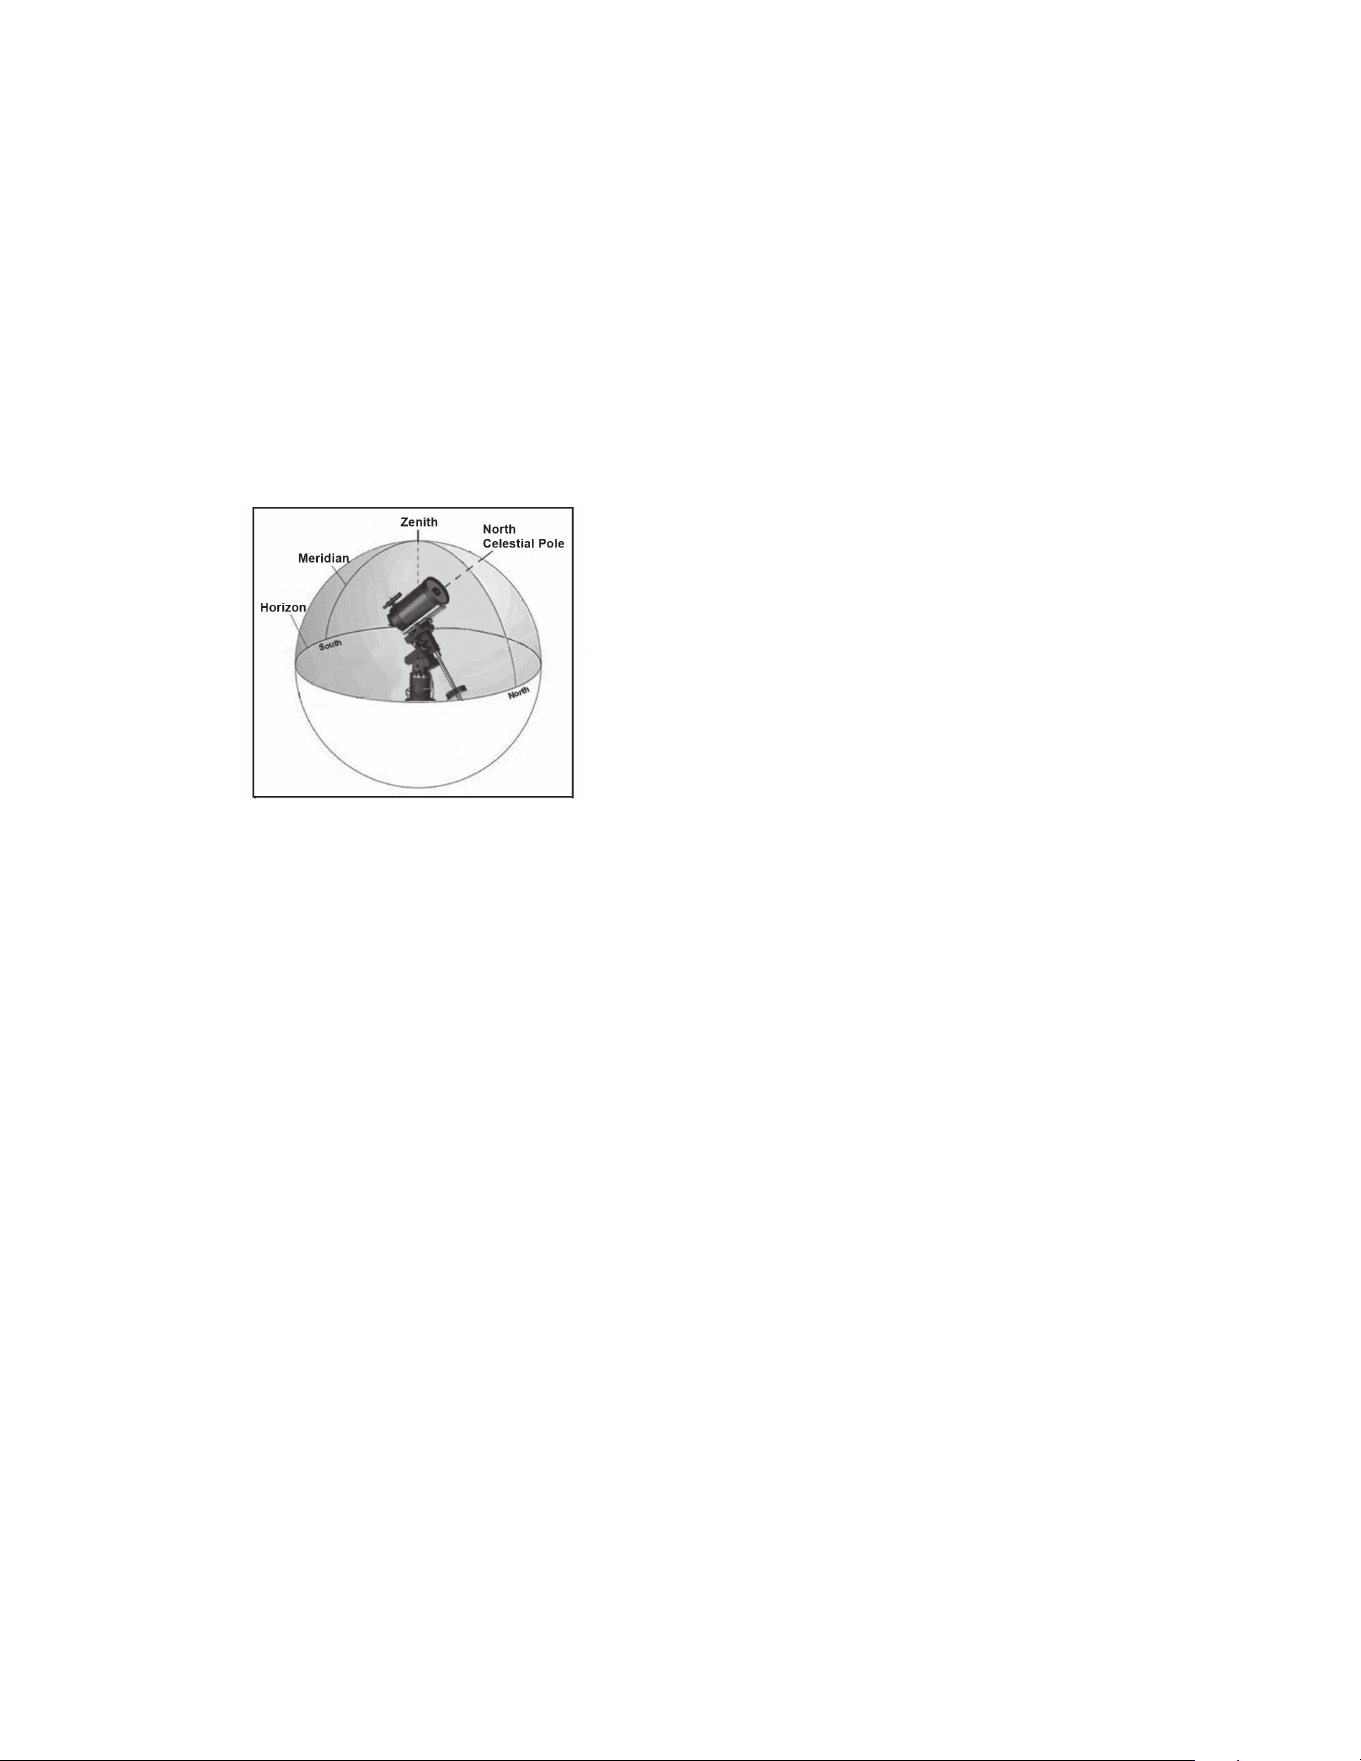
Note: Meridian – The Meridian is an imaginary line in the
sky that starts at the North celestial pole and ends at the
South celestial pole and passes through the zenith. If you are
facing south, the meridian starts from your Southern horizon
and passes directly overhead to the North celestial pole.
Quick-Align
Quick-Align uses all the date and time information entered at
startup to align the telescope However, instead of slewing to
the alignment stars for centering and alignment, the telescope
bypasses this step and simply models the sky based on the
information given This will allow you to roughly slew to the
coordinates of bright objects like the Moon and planets and
provides the telescope with information needed to track
objects in any part of the sky (depending on accuracy of
polar alignment) Quick-Align is not meant to be used to
accurately locate small or faint deep-sky objects or to track
objects accurately for astroimaging
To use Quick-Align, simply select Quick Align from the
alignment options and press ENTER The telescope will
automatically use the entered date/time parameters to align
itself with the sky and display Alignment Successful
Note: Once a Quick-Align has been done, you can use
the Re-alignment feature (see below) to improve your
telescope’s pointing accuracy.
Last Alignment
The Last Alignment method will automatically recall the last
stored index positions to continue using the alignment that
was saved when the telescope was last powered down
This is a useful feature should your telescope accidentally
lose power or be powered down
Re-Alignment
The mount has a re-alignment feature which allows you to
replace any of the original alignment stars with a new star or
celestial object This can be useful in several situations:
• If you are observing over a period of a few hours, you may
notice that your original two alignment stars have drifted
towards the west considerably (Remember that stars are
moving at a rate of 15° every hour) Aligning on a new star
that is in the eastern part of the sky will improve your pointing
accuracy, especially on objects in that part of the sky
• If you have aligned your telescope using the Quick-Align
method, you can use Re-Align to align on actual objects
in the sky This will improve the pointing accuracy of your
telescope without having to re-enter additional information
• If you have used the computer-assisted polar alignment
method and have manually moved the mount, it may be
necessary to re-align the mount for improved pointing
accuracy
To replace an existing alignment star with a new alignment star:
1 Select the desired star (or object) from the database and
slew to it
2 Carefully center the object in the eyepiece
3 Once centered, press the BACK button until you are at
the main menu
4 With CGX Ready displayed, press the ALIGN key on the
hand control to select Alignment Stars from the list of
options
5 The display will then ask you which alignment star you
want to replace Use the UP and Down scroll keys to
select the alignment star to be replaced It is usually best
to replace the star closest to the new object This will
space out your alignment stars across the sky
6 Press ALIGN to make the change

ENGLISH | 17
Object Catalog
Selecting an Object
Once the telescope is properly aligned, you can choose
an object from any of the catalogs in the NexStar+ hand
control’s database The hand control has a key designated
for each category of objects in its database; Solar System
objects, Stars and Deep Sky objects
• Solar System – The Solar System catalog will display
all the planets (and Moon) in our Solar System that are
currently visible in the sky To allow the Sun to be displayed
as a selectable object in the database, see the Sun Menu
option in Scope Setup Menu
• Stars – The Stars catalog displays custom lists of all
the brightest stars, double (Binary) stars, variable stars,
constellations and selected asterisms
• Deep Sky – The Deep Sky catalog displays a list of all
the best Galaxies, Nebulae and Clusters, as well as the
complete Messier and select NGC objects There is also
an alphabetical list of all deep sky objects in order by their
common name
Use the scroll keys to scroll through the catalogs to find the
object you want to view
When scrolling through a long list of objects, holding down
either the UP or DOWN key will allow you to scroll through
the catalog rapidly
Slewing to an Object
Once the desired object is displayed on the hand control
screen, you have two options:
• Press the OBJECT INFO Key. This will give you useful
information about the selected object such as magnitude,
constellation and extended information about the most
popular objects
• Use the UP/DOWN arrow buttons to scroll through the
displayed object info
• Use the BACK button to return to the object database
• Press the ENTER Key. This will automatically slew the
telescope to the coordinates of the object displayed on the
hand control While the telescope is slewing to the object,
the user can still access many of the hand control functions
(such as displaying information about the object)
NOTE: The Messier, NGC and SAO catalogs require the
user to enter a numeric designation. Once you have select-
ed the appropriate catalog button and selected the Messier,
NGC or SAO catalog, you will see a flashing
cursor indicating you are in numeric entry mode. Enter the
catalog number for the object you want to view. Press ENTER
to command the telescope to slew to the object or hold the
OPTION button (the Celestron logo) and press OBJECT
INFO to see information about the object you selected.
CAUTION: Never slew the telescope when someone
is looking into the eyepiece. The telescope can
move at fast slew speeds and may hit an observer
in the eye.
SkyTour Button
The CGX mount includes a tour feature which allows
you to choose from a list of interesting objects
based on the date and time in which you are observing
The automatic tour will display only those objects that are
within your set catalog filters limits To activate the Tour
feature, press the SKY TOUR key on the hand control
1 Press the SKY TOUR button on the hand control
2 Use the SCROLL buttons to select Best of Tonight
3 The CGX mount will automatically slew in azimuth to its
starting position which will help minimize the chance of
wrapping the power cord during the tour
4 The hand control will display the best objects to observe
that are currently in the sky
• To see information and data about the displayed object,
press the OBJECT INFO key Press it once to display
the coordinates of the object Press it again to display
the coordinates of the object Press it again to display
the text description Press BACK to return to the
previous screen
• To slew to the object displayed, press ENTER
• To see the next tour object, press the DOWN key
Identify Button
Pressing the IDENTIFY button will search the mount’s da-
tabase catalogs and display the name and angular distances
to the nearest matching objects from the telescope’s current
location This feature can serve two purposes First, it can be
used to identify an unknown object in the field of view of your
eyepiece Additionally, Identify Mode can be used to find
other celestial objects that are close to the objects you are
currently observing
For example, if your telescope is pointed at the brightest
star in the constellation Lyra, choosing Identify will no doubt
return the star Vega as the star you are observing However,
the Identify feature will also search its NGC and Solar
System databases and display any planets or Deep Sky
objects that are close by In this example, the Ring Nebula
(M57) would display as being approximately 6° away
The brightness and proximity of the objects displayed
can be defined by the user using the Identify Filter under
Telescope Setup
18 | ENGLISH
Direction Buttons
The hand control has four direction buttons in the center
of the hand control which control the telescope motion in
altitude (up and down) and azimuth (left and right) The
telescope can be controlled at nine different speed rates
1 = 2x 6 = 3° / sec
2 = 4x 7 = 1° / sec
3 = 8x 8 = 2° / sec
4 = 16x 9 = 4° / sec
5 = 32x
Motor Speed Button
Pressing the MOTOR SPEED button (12) allows you
to instantly change the speed rate of the motors from
high speed slew rate to precise guiding rate or anywhere
in between Each rate corresponds to a number on the
hand controller key pad The number 9 is the fastest rate
(approximately 4° per second, depending on power source)
and is used for slewing between objects and locating
alignment stars The number 1 on the hand control is the
slowest rate (2x sidereal) and can be used for accurate
centering of objects in the eyepiece To change the speed
rate of the motors:
• Press the MOTOR SPEED key on the hand control
The LCD will display the current speed rate
• Press the number on the hand control that corresponds
to the desired speed
The hand control has a “double button” feature that allows
you to instantly speed up the motors without having to
choose a speed rate To use this feature, simply press the
arrow button that corresponds to the direction that you want
to move the telescope While holding that button down,
press the opposite directional button This will increase the
speed to the maximum slew rate
When using the UP and DOWN buttons on the hand control,
the slower slew rates (6 and lower) move the motors in the
opposite direction than the faster slew rates (7- 9) This is
done so that an object will move in the appropriate direction
when looking into the eyepiece (i e , pressing the up arrow
button will move the star upwards in the field of view of the
eyepiece) However, if any of the slower slew rates (rate 6
and below) are used to center an object in the starpointer,
you may need to press the opposite directional button to
make the telescope move in the correct direction
Help Button
In future firmware updates, this button will offer troubleshooting
tips For your convenience, it currently functions as a shortcut
to the Messier Catalog
Menu Button
The CGX mount contains many user-defined setup
functions designed to give the user control over the
telescopes many features All of the setup and utility features
can be accessed by pressing the MENU key and scrolling
through the options below
Tracking Menu
Tracking Mode – This allows you to change the way the
telescope tracks depending on the type of mount being used
to support the telescope The telescope has three different
tracking modes:
• EQ North – Used to track the sky when the telescope is
polar aligned in the Northern Hemisphere
• EQ South – Used to track the sky when the telescope
is polar aligned in the Southern Hemisphere
• Off – When using the telescope for terrestrial (land)
observation, the tracking can be turned off so that the
telescope never moves
Tracking Rate – In addition to being able to move the
telescope with the hand control buttons, your telescope
will continually track a celestial object as it moves across
the night sky The tracking rate can be changed depending
on what type of object is being observed:
• Sidereal – This rate compensates for the rotation of the
Earth by moving the telescope at the same rate as the
rotation of the Earth, but in the opposite direction When
the telescope is polar aligned, this can be accomplished
by moving the telescope in right ascension only
• Lunar – Used for tracking the Moon when observing the
lunar landscape
• Solar – Used for tracking the Sun when solar observing
with the proper filter
View Time-Site Menu
This menu displays the current time and longitude/latitude
downloaded from the optional SkySync GPS receiver
It will also display other relevant time-site information like
time zone, daylight saving and local sidereal time Local
sidereal time (LST) is useful for knowing the right ascension
of celestial objects that are located on the Meridian at that
time View Time-Site will always display the last saved time
and location entered while it is linking with the GPS Once
current information has been received, it will update the
displayed information If GPS is switched off or not present, the
hand control will only display the last saved time and location
The Hand Control Menu
The “Hand Control” menu allows you to customize certain
features of the NexStar+ hand control To access this menu,
press the MENU button (#7 on the keypad) and use the
scroll buttons to select “Hand Control” and press ENTER

ENGLISH | 19
Use the scroll buttons to select from the following options:
• Lights Control: Independently adjust the brightness of
the number keypad and the LCD
• Scrolling Menu: Adjust how fast words move across the
face of the LCD
• Toggle Bold Font: Change the format of the font
displayed on the LCD from normal to boldface
• Set Contrast: Use the scroll keys to adjust the contrast
of the LCD
• Set Language: Change the displayed language on
the LCD
NOTE: The Set Language feature may also appear the first
time you use your new hand control. You may also initi-
ate it at any time by holding down the Option button (the
Celestron logo) for 10 seconds while powering up the
telescope.
Scope Setup Menu
Setup Time-Site – Allows the user to customize the
telescope’s display by changing time and location
parameters (such as time zone and daylight savings)
Anti-backlash – All mechanical gears have a certain
amount of backlash or play between the gears This play
is evident by how long it takes for a star to move in the
eyepiece when the hand control arrow buttons are pressed
(especially when changing directions) The CGX
anti-backlash feature allows the user to compensate for
backlash by inputting a value which quickly rewinds the
motors just enough to eliminate the play between gears
The amount of compensation needed depends on the
slewing rate selected; the slower the slewing rate the longer
it will take for the star to appear to move in the eyepiece
There are two values for each axis, positive and negative:
• Positive is the amount of compensation applied when you
press the button in order to get the gears moving quickly
without a long pause
• Negative is the amount of compensation applied when you
release the button, winding the motors back in the other
direction to resume tracking
Normally, both values should be the same You will need
to experiment with different values (from 0-99); a value
between 20 and 50 is usually best for most visual observing,
whereas a higher value may be necessary for photographic
guiding
To set the anti-backlash value, scroll down to the anti-backlash
option and press ENTER While viewing an object in the
eyepiece, observe the responsiveness of each of the four
arrow buttons Note which directions you see a pause in the
star movement after the button has been pressed Working
one axis at a time, adjust the backlash settings high enough
to cause immediate movement without resulting in a
pronounced jump when pressing or releasing the button
Now, enter the same values for both positive and negative
directions If you notice a jump when releasing the button but
setting the values lower results in a pause when pressing
the button, use the higher value for positive, but use the
lower value for negative The telescope will remember these
values and use them each time it is turned on until they are
changed
Filter Limits – When an alignment is complete, the telescope
automatically knows which celestial objects are above the
horizon As a result, when scrolling through the database
lists (or selecting the Tour function), the hand control will
display only those objects that are known to be above the
horizon when you are observing You can customize the
object database by selecting altitude limits that are appropriate
for your location and situation For example, if you are
observing from a mountainous location where the horizon
is partially obscured, you can set your minimum altitude limit
to read +20° This will make sure that the hand control only
displays objects that are higher in altitude than 20°
TIP: If you want to explore the entire object database, set
the maximum altitude limit to 90° and the minimum limit to
–90°. This will display every object in the database lists re-
gardless of whether it is visible in the sky from your location.
Direction Buttons – The direction a star appears to move
in the eyepiece changes depending on which side of the
Meridian the telescope tube is on This can create confusion
especially when guiding on a star when doing astroimag-
ing To compensate for this, the direction of the drive control
keys can be changed To reverse the button logic of the hand
control, press the MENU button and select Direction
Buttons from the Utilities menu Use the Up/Down arrow
keys (10) to select either the azimuth (right ascension) or
altitude (declination) button direction and press ENTER
Select either positive or negative for both axes and press
ENTER to save Setting the azimuth button direction to
positive will move the telescope in the same direction that
the telescope tracks (i e , towards the west) Setting the
altitude buttons to positive will move the telescope counter-
clockwise along the DECLINATION axis
GoTo Approach – Lets the user define the direction that
the telescope will approach when slewing to an object This
allows the user the ability to minimize the effects of backlash
when slewing from object to object Just like with Direction
Buttons, setting GoTo Approach to positive will make the
telescope approach an object from the same direction as
tracking (west) for azimuth and counterclockwise in dec-
lination Declination GoTo approach will only apply while the
telescope tube is on one side of the Meridian Once the tube
passes over to the other side of the Meridian, the GoTo
approach will need to be reversed

20 | ENGLISH
To change the GoTo approach direction, simply choose
GoTo Approach from the Scope Setup menu, select either
Altitude or Azimuth approach, choose positive or negative
and press ENTER
HINT: In order to minimize the affect of gear backlash on
pointing accuracy, the settings for Button Direction should
ideally match the settings for GoTo Approach. By default, us-
ing the up and right direction buttons to center alignment stars
will automatically eliminate much of the backlash in the gears.
If you change the GoTo approach of your telescope, it is not
necessary to change the Button Direction as well. Simply take
notice of the direction the telescope moves when complet-
ing its final GoTo approach. If the telescope approaches its
alignment star from the west (negative azimuth) and clock-
wise (negative altitude) then make sure that the buttons used
to center the alignment stars also move the telescope in the
same directions.
Autoguide Rate – Allows the user to set an autoguide
rate as a percentage of sidereal rate This is helpful when
calibrating your telescope to a CCD autoguider for long
exposure astroimaging
Meridian – This feature instructs the mount on how to
respond when it is slewing to objects that are accessible
from both sides of the Meridian The Meridian feature allows
the telescope tube to remain on a desired side of the mount
when slewing, and continue to track according to the R A
slew limits the user has set See R A Limits below The Me-
ridian feature allows for four choices:
• Favor Current – Allows the mount to favor whatever side
of the mount that it is currently on when slewing to objects
close to the Meridian For example, if your R A slew limits
are set to allow the mount to track 10° past the meridian,
then the telescope will continue to stay on its current side
of the Meridian when slewing to objects that are as far as
10° beyond your Meridian
• Favor West – If the target object is accessible from both
sides of the mount, selecting “Favor West” instructs the
mount to point to the object as if it were on the west side
of the meridian The optical tube will then be positioned on
the east side of the mount and pointing west
• Favor East – If the target object is accessible from both
sides of the mount, selecting “Favor East” instructs the
mount to point to the object as if it were on the east side
of the meridian The optical tube will then be positioned on
the west side of the mount and pointing east
• Disable – This is the default setting, which instructs the
mount to always swing around to the other side of the pier
as required to view objects on the opposite side of the
Meridian However, once at the desired object, the mount
will continue to track past the Meridian according to the
R A slew limits that have been set
Mount Settings – Once the mount settings have been
calibrated (see Utilities section below) the values are stored
and displayed in the hand control It is not recommended
that the calibration values be changed However each setting
can be changed if necessary to improve the performance of
the telescope
• Cone Value – This is the cone error value set when
Utilities/Calibrate Mount/DEC Switch – Cone is carried out
• DEC Index – This is the declination index error value that
is stored when calibration stars are added after your initial
star alignment
• R.A. Index – This is the R A index error value set when
Utilities/Calibrate Mount/R A Switch is carried out
R.A. Limits – Sets the limits that the telescope can slew or
track in Right Ascension (R A ) before stopping The slew
limits are represented in degrees and by default set to 0°,
being the position of the telescope when the counterweight
bar is extended out horizontally However, the slew limits can
be customized depending on your needs For example, if
you are using CCD imaging equipment that has cables that
are not long enough to move with the telescope as it slews
across the sky, you can adjust the slew limit on the side of
the mount that is restricted by the cables, and command the
mount the stop slewing before it reaches this point Or if you
are taking an image of an object that has just crossed the
Meridian, you can set the limit to allow the mount to continue
tracking in the same direction past the Meridian without the
need to “flip” the telescope around to the opposite side of
the mount (see Meridian feature above) Using the first example
above, the user could slew the telescope in R A (azimuth)
until it reaches the point that the cables are extended to their
maximum Then by displaying the telescope’s azimuth in this
position (by looking at Get Axis Position under the Utilities
menu) you can determine the telescope’s azimuth at its most
extended position Enter this azimuth reading for either the
maximum or minimum azimuth slew limit to ensure that the
telescope will not slew beyond this point The telescope slew
limits can be set to automatically stop anywhere between
40° above level to 20° below level To set the R A slew limit
select the following:
• R.A. East Limit – Enter a number between +40° to -20°
to define the slew limit when the tube is on the east side of
the mount
• R.A. West Limit – Enter a number between +40° to -20°
to define the slew limit when the tube is on the west side
of the mount
• Disable Limits – This disables any pre-defined values
that have been entered and allows the mount to track the
maximum amount pass the Meridian (i e , -20° on both
sides)
ENGLISH | 21
WARNING: In order for the telescope to be able to slew
to a star from the direction that minimizes the amount of
backlash in the gears, it may be necessary for the telescope
to slew beyond the specified slew limit in order to approach
the star from the correct direction. This can limit your ability
to slew to an object by as much as 6° from the R.A. slew
limit set in the hand control. If this proves to be a problem,
the direction that the telescope takes to center an object can
be changed. To change the telescopes slewing direction, see
GoTo Approach under the Scope Setup menu.
Custom Rate 9 – This allows you to customize the speed at
which the mount slews to a target You can set the R A and
Dec axes individually
Utilities Menu
Scrolling through the MENU (9) options will also provide
access to several advanced utility functions within the
telescope such as; Calibrate Mount, Hibernate as well as
many others
Calibrate Mount – In order to optimize the performance
and pointing accuracy of the telescope, the mount has built-in
calibration routines allowing it to compensate for mechanical
variation inherent in every German equatorial mount Each
calibration is completely automatic and in most cases only
needs to be performed once It is highly recommended that
you take a few minutes to go through the mount calibration
procedures
• R.A. Switch – This procedure records the offset error
when the right ascension index mark is aligned at start-up
Calibrating the R A Index will improve the accuracy of your
initial star alignments when aligning the telescope in the
future
• GoTo Calibration – GoTo Calibration is a useful tool
when attaching heavy visual or photographic accessories
to the telescope GoTo Calibration calculates the amount
of distance and time it takes for the mount to complete
its final slow GoTo when slewing to an object Changing
the balance of the telescope can prolong the time it takes
to complete the final slew GoTo Calibration takes into
account any slight imbalances and changes the final GoTo
distance to compensate
Home Position – The telescope’s “home” position is a
user-definable position that is used to store the telescope
when not in use The home position is useful when storing
the telescope in a permanent observatory facility By default
the Home position is the same as the index position used
when aligning the mount
To set the Home position for your mount, simply use the
arrow buttons on the hand control to move the telescope
mount to the desired position Select the Set option and
press Enter
Select the GoTo option to slew the telescope back to the
Home position at any time
Factory Settings – Returns the hand control to its original
factory settings Parameters such as backlash compensation
values, initial date and time, longitude/latitude, along with
slew and filter limits will be reset However, stored parameters
such as user defined objects will remain saved even when
Factory Settings is selected The hand control will ask you
to press the “0” key before returning to the factory default
setting
Version – Selecting this option will allow you to see the
current version number of the hand control and motor
control The first set of numbers indicate the hand control
software version For the motor control, the hand control
will display two sets of numbers; the first numbers are for
azimuth and the second set are for altitude
Get Axis Position – Displays the relative altitude and
azimuth for the current position of the telescope
GoTo Axis Position – Allows you to enter a specific rela-
tive altitude and azimuth position and slew to it
Hibernate – Hibernate allows the telescope to be completely
powered down and still retain its alignment when turned
back on This not only saves power, but is ideal for those
that have their telescope permanently mounted or leave their
telescope in one location for long periods of time To place
your telescope in Hibernate mode:
1 Select Hibernate from the Utility Menu
2 Move the telescope to a desire position and
press ENTER
3 Power off the telescope Remember to never move
your telescope manually while in Hibernate mode
Once the telescope is powered on again, the display will
read Wake Up After pressing Enter, you have the option of
scrolling through the time/site information to confirm the
current setting Press ENTER to wake up the telescope

22 | ENGLISH
HINT: Pressing BACK at the Wake Up screen allows
you to explore many of the features of the hand control
without waking the telescope up from hibernate mode.
To wake up the telescope after BACK has been pressed,
select Hibernate from the Utility menu and press ENTER.
Do not use the direction buttons to move the telescope
while in hibernate mode.
Sun Menu
For safety purposes, the Sun will not be displayed as a
database object unless it is first enabled To enable the Sun,
go to the Sun Menu and press ENTER The Sun will now
be displayed in the Planets catalog and can be used as an
alignment object when using the Solar System Alignment
method To remove the Sun from displaying on the hand
control, once again select the Sun Menu from the Utilities
Menu and press ENTER
Set Mount Position
The Set Mount Position menu can be used to maintain
your alignment in cases where you wish to disengage the
clutches or similar situation For instance, you might use this
feature if you needed to rebalance the mount after having
completed an alignment To set the mount position, simply
slew to a bright star in the named star list and select Set
Mount Position The hand control will sync on the star by
asking you to center the star in the eyepiece and pressing
the Align button Once synced on the star, you are free to
manually move the mount in both axes in order to rebalance
When you are ready to slew the telescope to your next object,
just remember to manually return the tube to the same bright
star and carefully center it in the eyepiece Using this tool will
invalidate the PEC index
Turn On/Off GPS – If using your telescope with the
optional SkySync GPS accessory, you will need to turn the
GPS on the first time you use the accessory If you want to
use the telescope’s database to find the coordinates of a
celestial object for a future or past dates, you will need to
turn the GPS off in order to manually enter a time other than
the present
Turn On/Off RTC – Allows you to turn off the telescope’s
internal real time clock When aligning, the telescope still
receives time information from the RTC If you want to use
the hand control database to find the coordinates of a
celestial object for a future or past dates, you will need to
turn the RTC off in order to manually enter a time other than
the present
Periodic Error Correction (PEC) – PEC is designed to
improve photographic quality by reducing the amplitude of
the worm gear errors and improving the tracking accuracy of
the drive This feature is for advanced astrophotography and
is used when your telescope is accurately polar aligned
User Objects Menu
Your telescope can store up to 400 different user-defined
objects in its memory The objects can be daytime land
objects or an interesting celestial object that you discover
that is not included in the regular database There are several
ways to save an object to memory depending on what type
of object it is:
GoTo Object: To go to any of the user defined-objects
stored in the database, scroll down to either “GoTo Sky Obj”
or “GoTo Land Obj” and enter the number of the object
you wish to select and press ENTER The telescope will
automatically retrieve and display the coordinates before
slewing to the object
Save Sky Object: Your telescope stores celestial objects
to its database by saving its right ascension and declination
coordinates in the sky This way the same object can be
found each time the telescope is aligned Once a desired
object is centered in the eyepiece, simply scroll to the “Save
Sky Obj” command and press ENTER The display will ask
you to enter a number between 1 and 200 to identify the
object Press ENTER again to save this object to the database
Save Database (Db)
• Object: This feature allows you to create your own custom
tour of database objects by allowing you to record the
current position of the telescope and save the name of the
object by selecting it from any one of the database catalogs
These objects then can be accessed by selecting GoTo
Sky Object
• Enter R.A. - Dec: You can also store a specific set of
coordinates for an object just by entering the R A and
declination for that object Scroll to the “Enter RA-DEC”
command and press ENTER The display will then ask
you to enter first the R A and then the declination of the
desired object
• Save Land Object: The telescope can also be used as
a spotting scope on terrestrial objects Fixed land objects
can be stored by saving their altitude and azimuth relative
to the location of the telescope at the time of observing
Since these objects are relative to the location of the
telescope, they are only valid for that exact location To
save land objects, once again center the desired object in
the eyepiece Scroll down to the “Save Land Obj” command
and press ENTER The display will ask you to enter a
number between 1 and 200 to identify the object Press
ENTER again to save this object to the database
To replace the contents of any of the user defined-objects,
simply save a new object using one of the existing
identification numbers; the telescope will replace the
previous user-defined object with the current one

ENGLISH | 23
Get R.A./DEC - Displays the right ascension and declination
for the current position of the telescope
Goto R.A./Dec - Allows you to input a specific R A and
declination and slew to it
Hint: To store a set of coordinates (R A /Dec) permanently
into the database, save it as a User-Defined Object as
described above
Identify
Identify Mode will search any of the mount’s database
catalogs or lists and display the name and offset distances
to the nearest matching objects This feature can serve two
purposes First, it can be used to identify an unknown object
in the field of view of your eyepiece Additionally, Identify
Mode can be used to find other celestial objects that are
close to the objects you are currently observing For example,
if your telescope is pointed at the brightest star in the
constellation Lyra, choosing Identify and then searching the
Named Star catalog will no doubt return the star Vega as
the star you are observing However, by selecting Identify
and searching by the Named Object or Messier catalogs,
the hand control will let you know that the Ring Nebula (M57)
is approximately 6° from your current position Searching the
Double Star catalog will reveal that Epsilon Lyrae is only 1°
away from Vega To use the Identify feature:
• Press the Menu button and select the Identify option
• Use the Up/Down scroll keys to select the catalog
that you would like to search
• Press ENTER to begin the search
NOTE: Some of the databases contain thousands of
objects and can therefore take several minutes to return the
closest objects.
Precise GoTo
The mount has a Precise Goto function that can assist in
finding extremely faint objects and centering objects closer
to the center of the field of view for astroimaging Precise
GoTo automatically searches out the closest bright star to
the desired object and asks the user to carefully center the
star in the eyepiece The hand control then calculates the
small difference between its GoTo position and its centered
position Using this offset, the mount will then slew to the
desired object with enhanced accuracy
To use Precise GoTo:
1 Press the MENU button and use the Up/Down keys
to select Precise GoTo
• Choose Database to select the object that you want
to observe from any of the database catalogs listed or;
• Choose R A /DEC to enter a set of celestial coordinates
that you wish to slew to
2 Once the desired object is selected, the hand control
will search out and display the closest bright star to
your desired object Press ENTER to slew to the bright
alignment star
3 Use the direction buttons to carefully center the alignment
star in the eyepiece
4 Press ENTER to slew to the desired object
Appendix A:
Upgrading the Firmware in Your
Mount and Hand Control
To check for new firmware updates, refer to this URL:
http://software celestron com/updates/CFM/CFM/
1 Plug your NexStar+ hand control into the AUX1 or
AUX2 port
2 Plug a standard USB B cable from your mount to
your PC
3 Plug power into the CGX and power it on
4 Open Celestron Firmware Manager (CFM)
5 CFM will check your hardware and scan for updates
CFM will automatically determine which components
will require updating
6 Proceed to click “Update” in CFM and allow updates
to complete
Appendix B:
Care and Maintenance
The CGX mount is sturdy and will last many years when
properly cared for
Storage
Although the mount and electronics are designed for
outdoor usage, you should not store the mount outside
unless it’s sheltered by an observatory or storage shelter
of some kind (such as a garage) Constant hot, cold, and
humidity extremes can eventually cause wear to the elec-
tronics, mechanical lubrication and the finish quality of the
mount Store in a sheltered area away from the Sun Keep
in a dry place if possible

24 | ENGLISH
SOLAR WARNING: Never attempt to view the sun through any telescope.
NEED ASSISTANCE? Contact Celestron Technical Support
celestron com/pages/technical-support
©2024 Celestron Celestron and Symbol are trademarks of Celestron, LLC All rights
reserved Celestron com
US: 2835 Columbia Street, Torrance, CA 90503 USA
UK: Unit 2 Transigo, Gables Way, Thatcham RG19 4JZ, United Kingdom
This product is designed and intended for use by those 14 years of age and older
The photographs on this package are for decorative purposes only and are not
intended to represent what will be seen with this product
www celestron com/pages/warranty
Made in China | 09-24
FCC Note: This equipment has been tested and found to comply with the limits
for a Class B digital device, pursuant to part 15 of the FCC Rules These limits
are designed to provide reasonable protection against harmful interference in
a residential installation This equipment generates, uses, and can radiate radio
frequency energy and, if not installed and used in accordance with the instructions,
may cause harmful interference to radio communications However, there is no
guarantee that interference will not occur in a particular installation If this equipment
does cause harmful interference to radio or television reception, which can be
determined by turning the equipment off and on, the user is encouraged to try to
correct the interference by one or more of the following measures:
• Reorient or relocate the receiving antenna
• Increase the separation between the equipment and receiver
• Connect the equipment into an outlet on a circuit different from that to which the
receiver is connected
• Consult the dealer or an experienced radio/TV technician for help

MODE D’EMPLOI
Modèle #91530-1
MONTURE POUR TÉLESCOPES GAMME ÉQUATORIALE ALLEMANDE

2 | FRANÇAIS

FRANÇAIS | 3
TABLE DES MATIÈRES
Introduction 4
Configuration système requise 4
Liste des composants 4
Présentation générale 5
Assemblage 7
Commencer 9
Alignement polaire de la monture 10
Alignement polaire précis 11
Champ de mouvement de la monture 11
Régler la monture pour les latitudes très hautes ou très basses 12
Port USB 12
Port AUX 12
Port Autoguide 12
Commande à main NexStar+ 13
Catalogue des objets 17
Orientation vers un objet 17
Annexe A: Mettre à jour le logiciel interne de votre monture et de votre commande à main 23
Annexe B: Nettoyage et entretien 23

4 | FRANÇAIS
Introduction
Avertissement
• Ne regardez jamais directement le Soleil à l'œil nu
ou avec un télescope, à moins d'utiliser un filtre adapté
Cela pourrait entraîner des lésions oculaires permanentes
et irréversibles
• N'utilisez jamais votre télescope pour projeter une image
du Soleil sur une surface quelconque Une concentration
de chaleur dangereuse peut être générée et endommager
le télescope et les accessoires attachés
• Ne jamais utiliser un filtre solaire d'oculaire ou une cale de
Herschel La concentration de chaleur au sein du télescope
peut entraîner des dommages à ces accessoires, laissant
la lumière du Soleil non filtrée arriver directement à vos yeux
• Ne jamais laisser le télescope sans surveillance Le
télescope doit être supervisé par une personne familia-
risée avec son fonctionnement à tout moment, et plus
spécialement lorsque des enfants sont présents
Configuration Système Requise
• La CGX nécessite une alimentation CC de 12 volts avec
au moins 4 ampères Un adaptateur secteur CA vers CC
12V 5A est vendu par Celestron et inclus un connecteur
fileté, dont l’utilisation est recommandée Des batteries
externes de 12V sont également capables d’alimenter
l’appareil La monture inclus un câble d’alimentation CC
équipé d’une prise allume-cigare
• Le télescope doit être équipé d’une barre de monture
en queue d’aronde de format soit G-5/Vixen ou CGE/
Losmandy D CGX peut recevoir l’une ou l’autre de ces
montures sur la selle de queue d’aronde
• Pour garantir les meilleures performances d’utilisation,
le poids total du télescope avec ses accessoires ne doit
pas dépasser 25 kg (55 lbs), contrepoids non inclus
• Windows 7/10 pour l’utilisation du logiciel de contrôle
du télescope
• Câble USB avec connecteur standard A lorsque branché
dans le port USB de la monture (pour interface avec un
PC seulement)
• Tournevis cruciforme (facultatif, pour réglage des
mécanismes uniquement)
Liste des Composants
Boîte 1 : Monture équatoriale 91530-1 CGX
Tête de monture équatoriale CGX
Clef Allen 8 mm (intégrée à la poignée arrière de la monture)
Barre du contrepoids et boulon d’arrêt
3 vis à tête hexagonale 8mm (pour fixer la tête au trépied)
Câble d’alimentation CC 12V
Commande à main NexStar+
Boîte 2 : Trépied CGX et contrepoids
Trépied
2 contrepoids de 5 kg (11 lbs )
Plateau à accessoires
Molette et rondelle du plateau à accessoires (vissée dans la
colonne centrale du trépied)
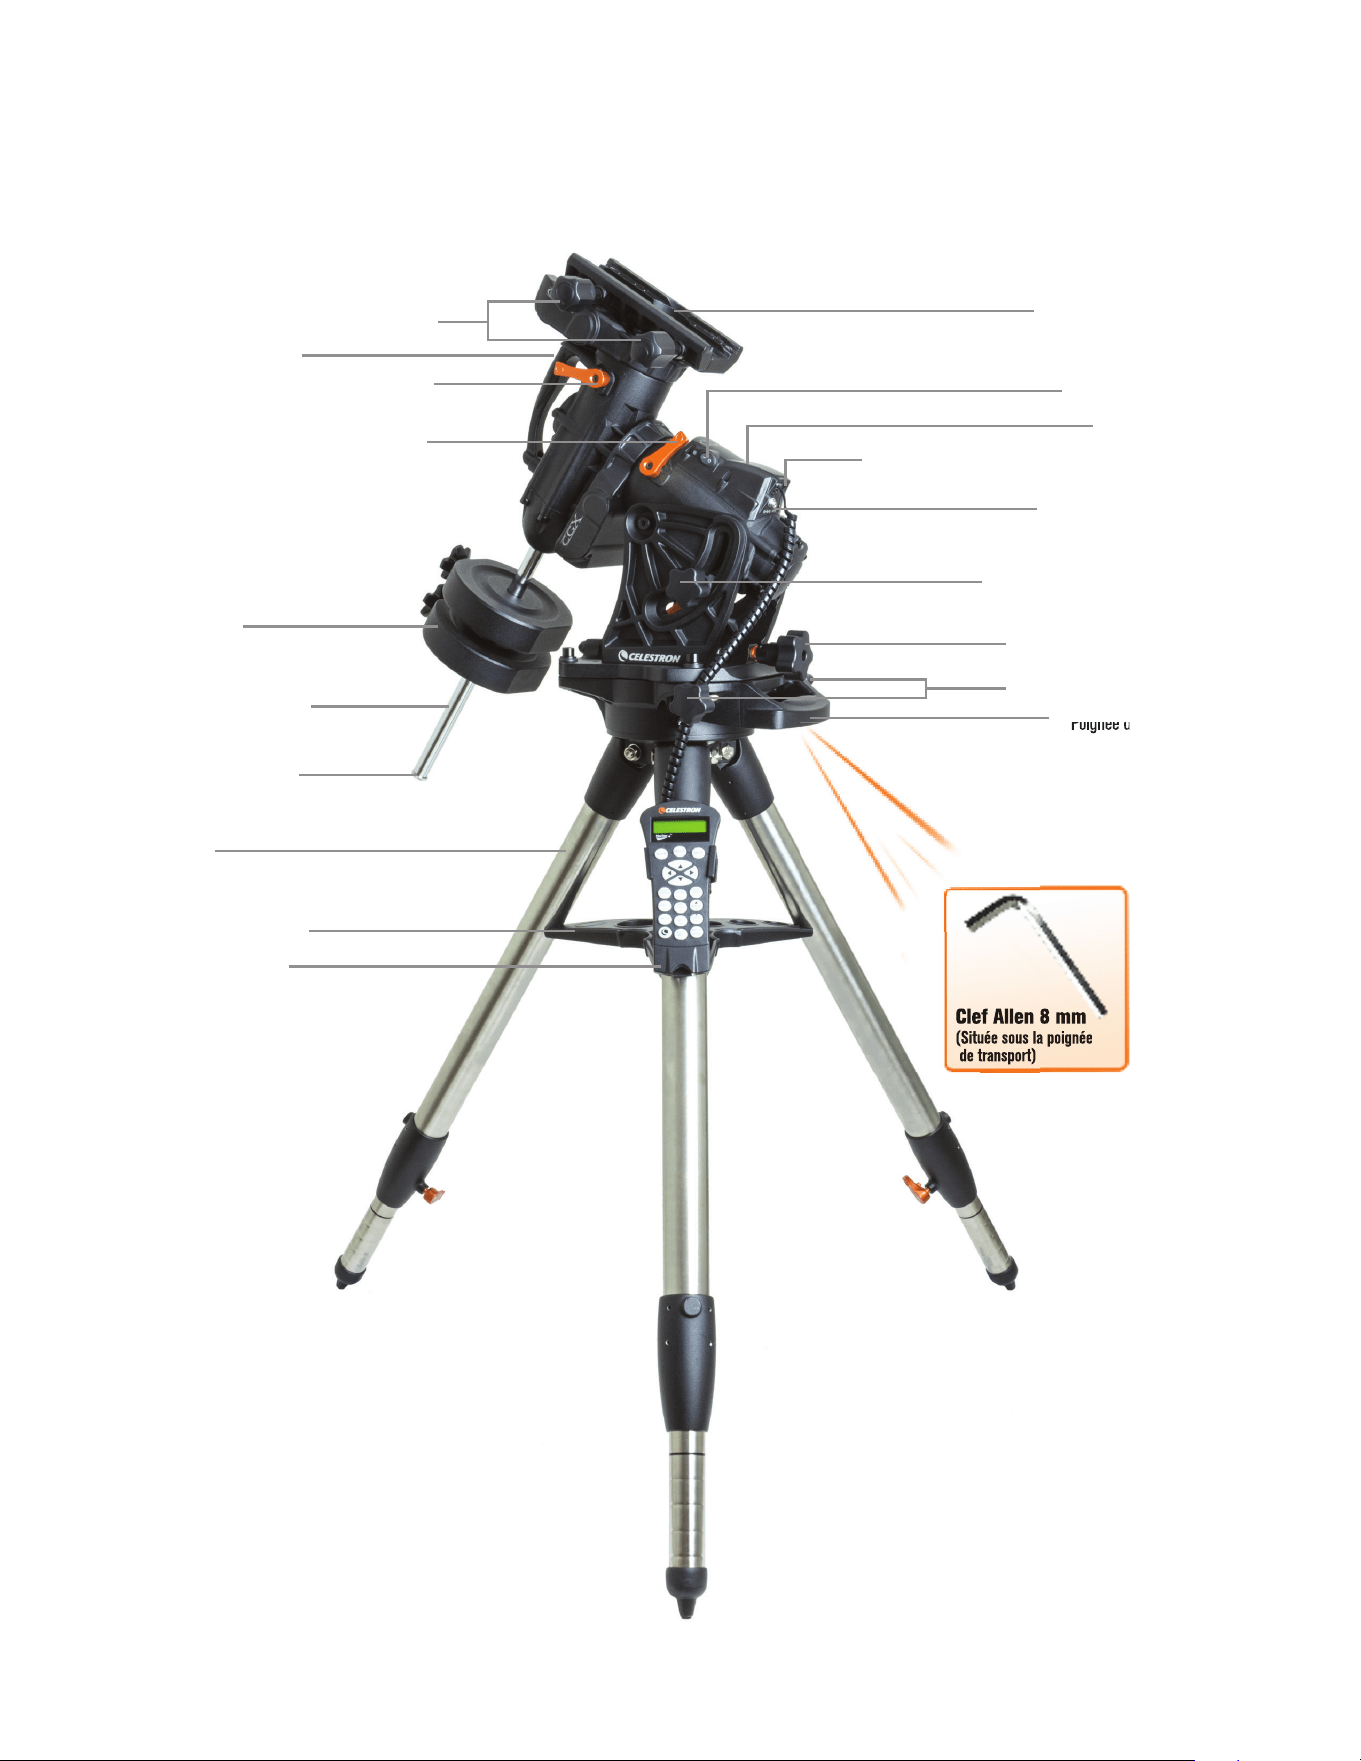
FRANÇAIS | 5
Présentation Générale
Figure 1.1 Présentation générale
Clef Allen 8 mm
(Située sous la poignée
de transport)
Molettes de verrouillage de queue d’aronde
Poignée de transport
Levier de verrouillage du mouvement DEC
Levier de verrouillage du mouvement A.D.
Barre des contrepoids
Contrepoids
Rondelle d’arrêt des
contrepoids
Trépied
Plateau à accessoires
Commande à main
Selle de queue d’aronde
Ports Aux 1 et Aux 2 pour la commande à main et les
accessoires
Alimentation CC 12V 4A
Molettes de verrouillage d’altitude
(un de chaque côté)
Molettes de réglage d’altitude
Molettes de réglage d'azimut
Poignée de transport
Interrupteur On/Off
Voir Figure 1.2
Clef Allen 8 mm
(Située sous la poignée
de transport)
Poignée de transport
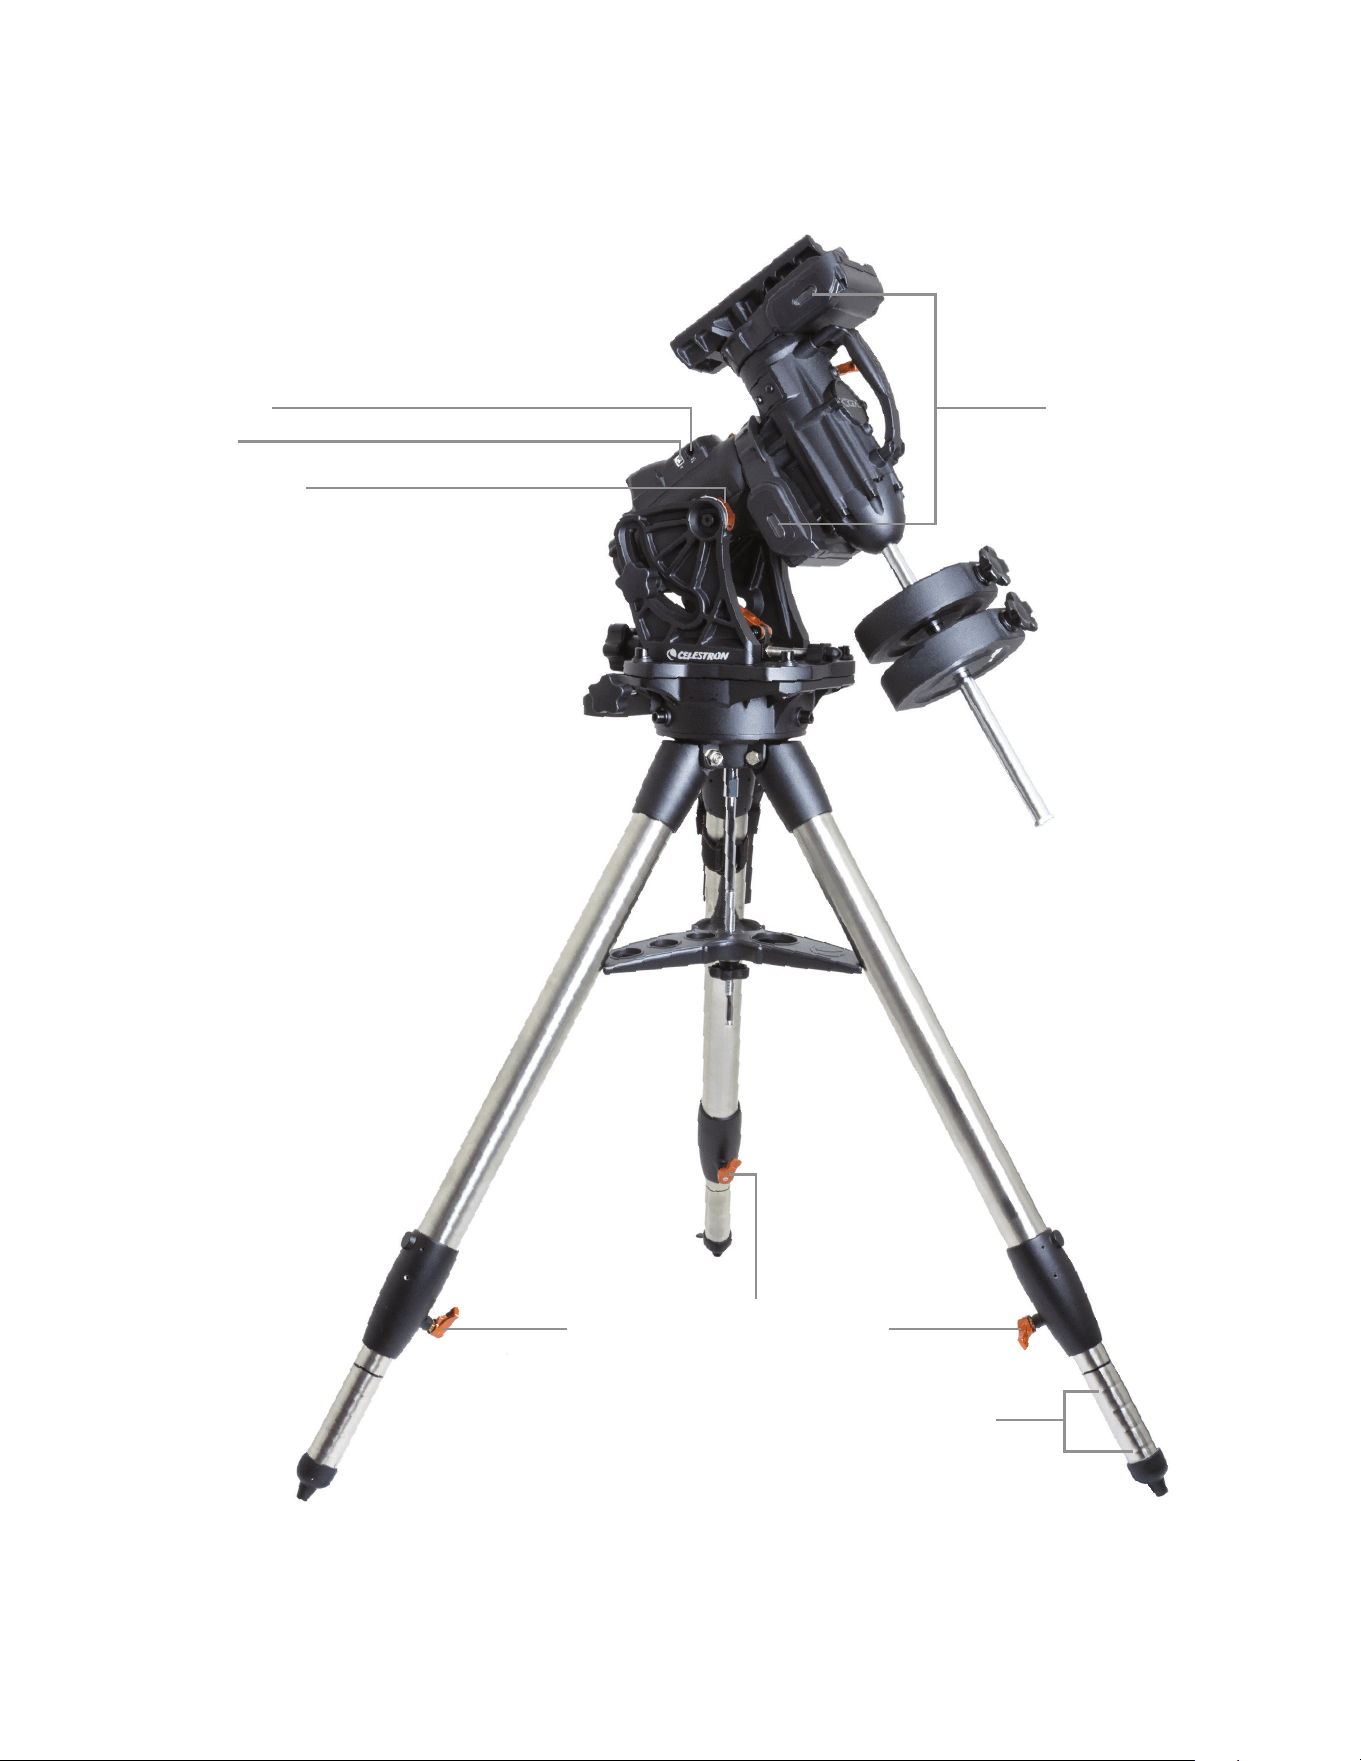
6 | FRANÇAIS
Figure 1.2 Présentation générale
Port Autoguide
Fenêtres d’observation
des courroies
Port USB
Indicateur de latitude
Leviers de verrouillage de la hauteur des pieds
Marques de hauteur de la
hauteur des pieds
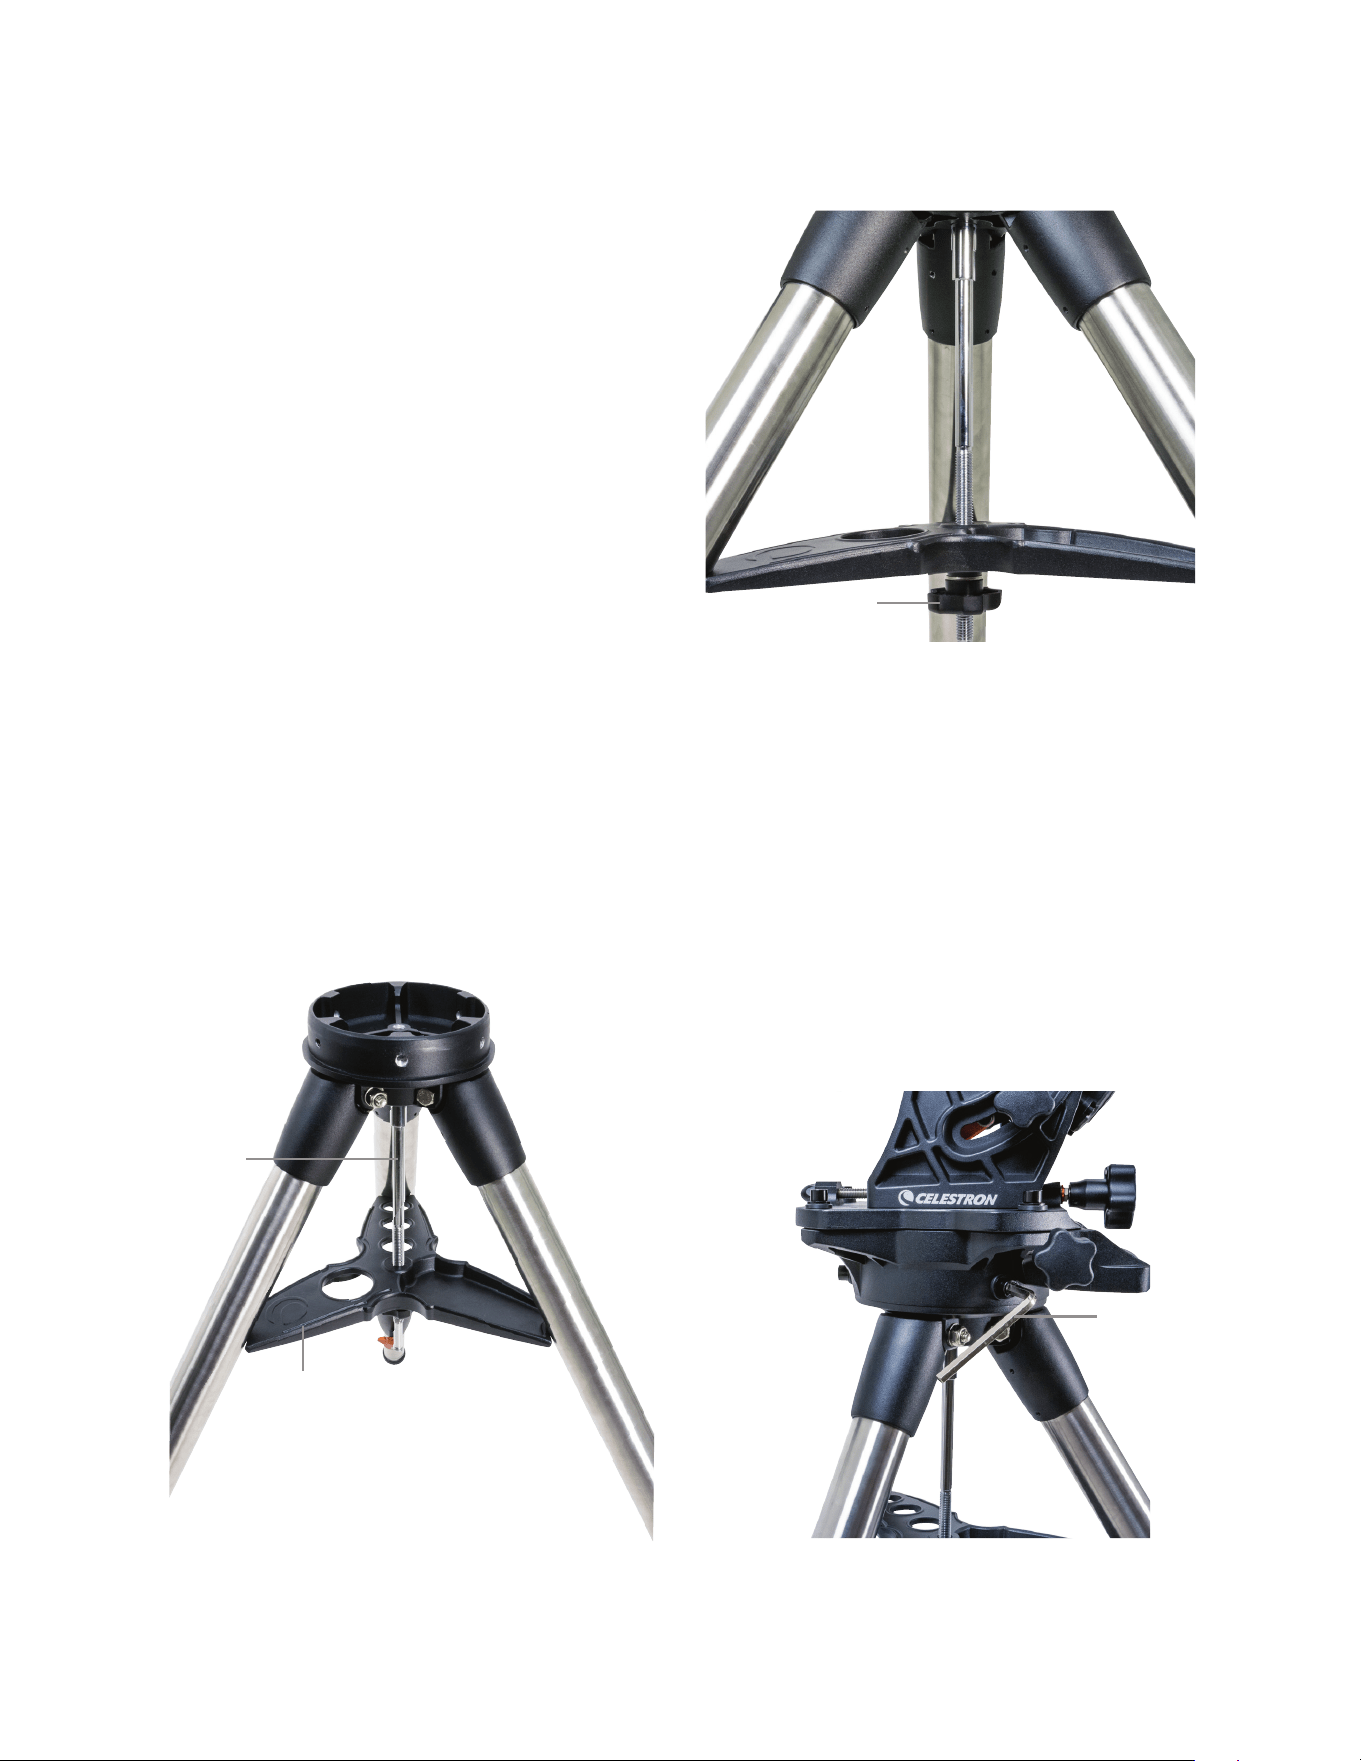
FRANÇAIS | 7
Assemblage
Sortez tout le contenu des boîtes et suivez les étapes
suivantes pour assembler votre monture Si vous avez acheté
la CGX seule, alors le trépied inclus 2 contrepoids de 5 kg
(11 lbs) Si vous avez acheté la CGX avec un tube optique de
grande taille, des poids supplémentaires peuvent être inclus
pour garantir l’équilibre
Note : La clef Allen de 8 mm est présente sous la poignée
arrière de la monture, comme illustré dans la Figure 1.1.
Installation du pied
1 Mettez le trépied à la verticale et étirez les jambes, jusqu'à
ce que chacune soit complètement déployée
2 Retirez l’écrou du support du trépied et la rondelle de la
colonne centrale fixée sur le haut du trépied
(Figure 2 1 & 2 2)
3 Positionnez le plateau à accessoires sur la colonne centrale
de manière à ce que les trois bras du plateau supportent
chacun un pied du trépied
4 Vissez la molette avec la rondelle dans la colonne et serrez
fermement Le plateau à accessoires ne doit pas pouvoir
bouger dans le trépied (Figure 2 1 & 2 2)
5 Réglez la hauteur du trépied en ouvrant les leviers de
verrouillage situées sur le bas du pied du trépied Réglez
ensuite la longueur de chaque pied comme nécessaire puis
resserrez les molettes, une à la fois Les pieds sont pourvus
de marquages, pour vous aider à les mettre à niveau
Fixer la monture à votre trépied
1 Positionnez la tête sur le trépied de manière à ce qu’elle
soit bien posée au niveau de la jonction
2 Pour améliorer la stabilité de l’ensemble, orientez la
monture de manière à ce que la barre des contrepoidsse
trouve au-dessus d’une jambe du trépied, comme illustré
dans les figures Figures 1 1 et 1 2 Notez que vous pouvez
également positionner la barre des contrepoids entre deux
pieds du trépied, ce qui peut se révéler utile sur les basses
latitudes, en donnant plus de liberté de mouvement aux
contrepoids
3 Utilisez la clef Allen de 8 mm (Figure 3) pour serrer les 3
boulons de fixation sur la monture
Figure 2.1 Positionnement du trépied
Figure 2.2 Positionnement du trépied
Figure 3 Fixer la monture à votre trépied
Plateau à accessoires
Colonne
centrale
Molette et rondelle
du support du trépied
Clef
Allen
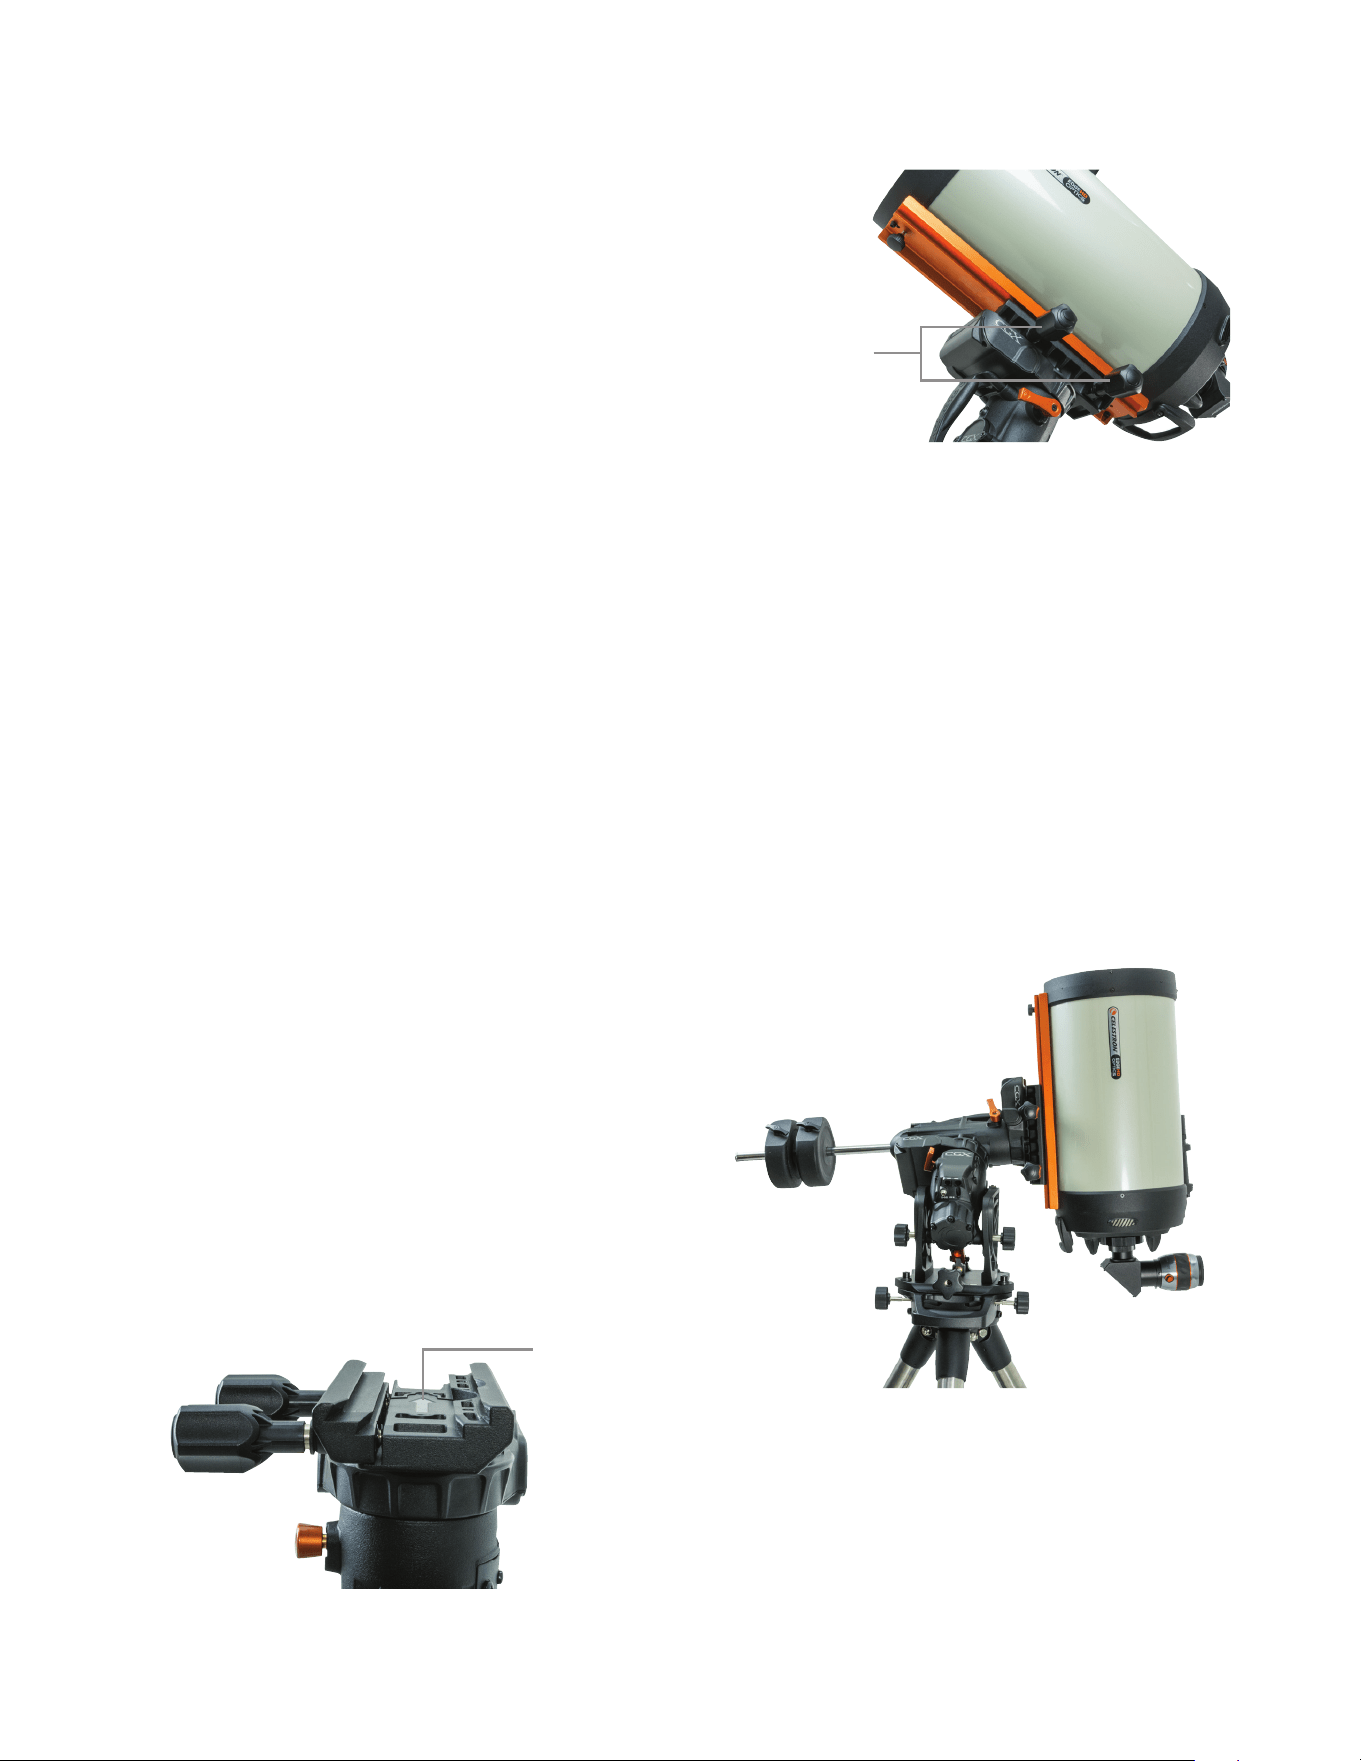
8 | FRANÇAIS
Alignement polaire grossier de la monture
Avant d’ajouter des poids sur le trépied et la monture, positionnez
la monture de manière à ce qu’elle pointe généralement vers le
nord (ou le sud si vous résidez dans l’hémisphère sud), et réglez
votre latitude Desserrez les deux molettes de verrouillage de la
latitude, puis faites tourner la molette de réglage de la latitude
(Figure 1 1) jusqu’à ce vous ayez réglé la latitude dans les environs
de l’information donnée sur l’indicateur de latitude (Figure 1 2)
Resserrez ensuite les molettes de latitude L’indicateur de latitude
est conçu pour permettre un alignement polaire grossier Vous
obtiendrez un alignement polaire plus précis plus tard, avec l’aide
de la commande à main électronique
Ajouter les contrepoids
Retirez le boulon d’arrêt situé à l’extrémité de la barre des contre-
poids, ajoutez les contrepoids, puis revissez le boulon d’arrêt sur
la barre Veillez à ce que la barre de contrepoids pointe toujours
vers le bas (Figure 1,1)
Fixation du tube du télescope sur la monture
1 Assurez-vous que chacun des leviers de verrouillage du
mouvement A D et DEC sont serrés
2 Desserrez les molettes de la selle de queue d’aronde de
manière suffisante pour permettre d’installer la queue d’aronde
sur la selle Assurez-vous d’orienter la flèche dans la même
direction que la poignée avant (Figure 4)
3 Faites glisser la barre en queue d’aronde du télescope sur la
selle de la monture Fixez le télescope avec les deux molettes
de verrouillage (Figure 5)
La CGX peut recevoir la queue d’aronde large de Celestron de
style CGE ainsi que les queues d’aronde de plus petite taille de
styleCG-5, qui sont compatibles avec les queues d’aronde du
style Losmandy D
1
et Vixen
2
1
Vérifiez que votre barre en queue d’aronde de style Losmandy
peut être installée, avant de la fixer de manière plus définitive
Les dimensions et les angles des queues d'aronde de différents
fabricants peuvent varier
2
Vérifiez que votre barre en queue d’aronde de style Vixen peut
être installée, avant de la fixer de manière plus définitive Gardez
à l’esprit que certaines queues d’aronde du style Vixen ne sont
pas plates et que leur épaisseur varie sur la longueur de la
barre Il se peut que la longueur de la section plate peut
affecter son insertion sur la selle de la monture
ÉQUILIBRER LA MONTURE
Axe d'ascension droite : Déverrouillez avec précaution le levier
de verrouillage du mouvement A D et positionnez la barre des
contrepoids à l’horizontal Sans lâcher complètement le télescope,
observez dans quel sens le télescope se penche naturellement
Faites glisser le contrepoids comme requis de manière à ce que le
télescope ne bouge pas de lui-même sur l’axe A D
Axe de déclinaison : En ayant toujours la barre des contrepoids à
l'horizontale, déverrouillez avec précaution le levier de verrouillage
de mouvement DEC et observez dans quel sens le tube optique
penche naturellement (Figure 6) Faites glisser le tube optique
vers l’avant ou vers l’arrière jusqu’à obtention de l’équilibre Si
vous utilisez un grand télescope plus lourd, orientez le télescope
en position d’origine de nouveau avant de desserrer les molettes
de verrouillage de la selle de queue d’aronde
Figure 4 Fixer la monture à votre trépied
Figure 5 Queue d’aronde du télescope fixée de manière correcte
Figure 6 Équilibrage de la monture
Flèche d’orientation
de queue d’aronde
Molettes de
verrouillage
de queue d’aronde
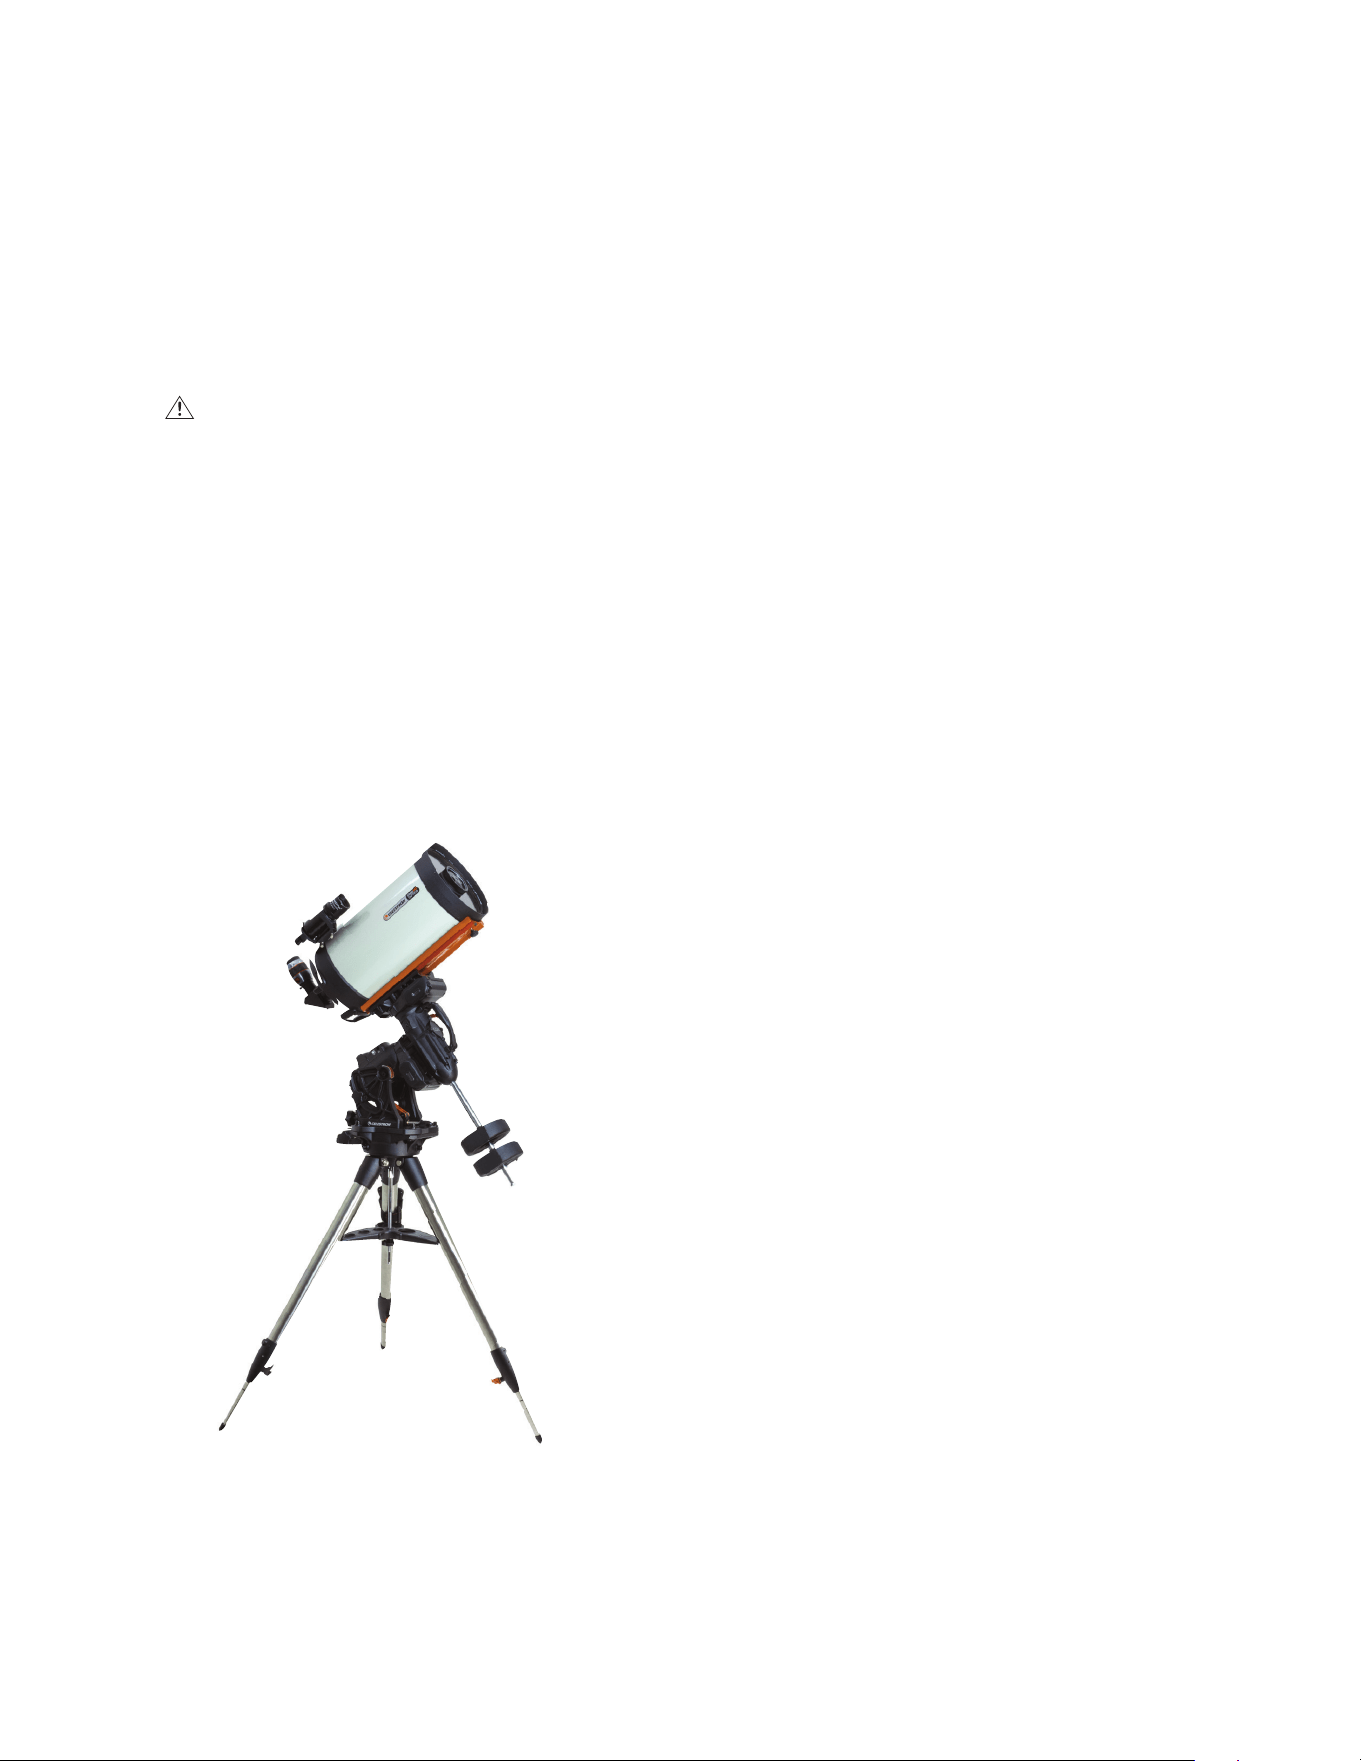
FRANÇAIS | 9
Installation du support de la commande à main
Enroulez la sangle à crochet et boucle autour du pied du
trépied puis placez la commande à main dans le support
Brancher la commande à main
Branchez la commande à main NexStar+ dans l’un des
ports Aux
Avertissement : Ne pas brancher la commande à
main dans le port Autoguide. Cela pourrait endommager la
monture ou la commande à main. De manière similaire, ne
pas brancher de câble d’autoguider dans le port Aux sous
risque de dommages.
Position d'origine
La monture est en position « d’origine » lorsque la barre du
contrepoids est orientée vers le bas et que le télescope est
pointé sur l’axe polaire de la monture, comme illustré dans la
Figure 7 Les moteurs intégrés de la monture la placeront
sur sa position d’origine lorsque vous l’allumez (vous pouvez
en savoir plus dans la section « Commencer »), mais vous
pouvez toujours la positionner manuellement avant d’allumer
la monture Déverrouillez simplement les deux leviers de
verrouillage
Commencer
Maintenant que votre monture est assemblée et alignée sur
l’axe polaire, vous pouvez l’allumer
Allumer la monture
La monture CGX peut être alimentée via l’adaptateur pour
batterie de voiture CC 12V, avec au moins 4 ampères Vous
pouvez également utiliser l’adaptateur secteur facultatif
offrant un courant CC 12V 4A Les adaptateurs secteur à
connecteurs en barillet filetés sont disponibles à la vente
chez Celestron
Position d’origine et informations de site
1 Branchez la commande à main NexStar+ dans l’un des
ports Aux Vous pouvez choisir le port Aux 1 ou Aux 2
2 Branchez le câble d’alimentation dans le port d’alimen-
tation de la monture Veillez à fixer solidement le câble
d’alimentation avec le connecteur en barillet fileté
3 Faites basculer le bouton d’alimentation en position ON
4 Lorsque la commande à main indique « CGX Prêt »,
appuyez sur ENTRÉE deux fois La monture s’oriente
alors sur la position d’origine
5 Sélectionnez votre position depuis la base de données
Villes ou Site personnalisé
• Dans la base de données Villes, sélectionnez la ville la
plus proche de vous
• Si vous sélectionnez Site personnalisé, alors vous
devrez saisir la longitude, la latitude et le fuseau horaire
de votre position
6 Une fois le site définit, définissez la date et l’heure La
CGX est équipée d’un système RTC (Real-Time Clock)
qui mémorise les informations de la date, de l’heure et de
position jusqu’à la prochaine fois que vous utiliserez
la monture
Alignement
Conditions à remplir : La monture doit être généralement
alignée sur l’axe polaire, avec les informations de date,
d’heure et de position saisies comme illustré dans cette étape.
1 Pour obtenir le meilleur alignement possible, choisissez
Alignement deux étoiles puis appuyez sur Entrée
Vous pouvez choisir depuis Système Solaire, Une étoile,
Dernier alignement, Alignement rapide. Les boutons de
défilement 6 et 9 sont utilisés pour faire défiler n’importe
quelle liste affichée sur la commande à main.
Figure 7 Télescope en position d’origine

10 | FRANÇAIS
2 Sélectionnez la première étoile dans la liste des étoiles
nommées Utilisez les boutons de défilement 6 (haut) et
9 (bas) sur le clavier pour faire défiler la liste des étoiles
nommées Ces dernières sont en effet les plus lumi-
neuses et donc les plus simples à trouver Appuyez sur
ENTRÉE lorsque vous avez choisi une étoile adaptée Si
votre monture est au minimum grossièrement alignée sur
l’axe polaire, alors la monture s’orientera approximative-
ment sur l’étoile
La sélection d’étoiles offertes par défaut se trouve à l’ouest
du méridien. Si le ciel est obstrué à l’ouest, vous pouvez
choisir des étoiles présentes à l’est du méridien en
appuyant sur le bouton MENU du pavé numérique.
3 Utilisez les boutons de direction pour orienter le
télescope vers l’étoile nommée sélectionnée et centrez-la
dans le viseur du télescope puis appuyez sur ENTRÉE
La monture ajustera automatiquement la vitesse des moteurs
pour effectuer un centrage précis
4 En utilisant les boutons de direction, centrez l’étoile dans
l’oculaire de votre télescope et appuyez sur ALIGNER
5 Sélectionnez une seconde étoile depuis la liste et répétez
le processus des étapes 2-4 Lorsqu’il vous est deman-
dé d’ajouter une étoile de calibration, vous pouvez soit
appuyer sur RETOUR pour terminer l’alignement, ou pour
obtenir de meilleurs résultats, ajouter une étoile
de calibration
Pour obtenir les meilleurs résultats possibles, ajoutez au
moins une étoile de calibration. Cela améliorera la
précision de pointage de votre monture.
6 Lorsqu’il vous est demandé d’« Ajouter une étoile de ca-
libration », choisissez une étoile dans la liste puis appuyez
sur ENTRÉE La monture s’orientera de l’autre côté du
méridien et ajoutera une étoile de calibration
7 Centrez et alignez l’étoile comme vous l’aviez fait avec les
deux premières étoiles d’alignement : Centrez-la dans le
viseur, appuyez sur ENTRÉE, centrez l’étoile dans l’oculaire
puis appuyez sur ALIGNER
8 Lorsqu’il vous est proposé d’ajouter autre une étoile de
calibration, vous pouvez le faire, ou appuyer sur RETOUR
pour terminer l’alignement
Sélection d'un objet
Sélectionnez dans la base d’objets dans la catégorie
Système Solaire, Étoiles ou Ciel profond Dans ces menus
(boutons 1, 2 ou 3) vous pouvez sélectionner un objet par
son nom ou par son numéro dans un catalogue reconnu (par
exemple M42 pour Messier 42)
Appuyez sur les boutons 6 et 9 (haut ou bas) pour
naviguer dans une liste de la commande à main Appuyez
sur ENTRÉE sélectionner un objet de la liste
Par exemple, pour sélectionner puis orienter sur l’objet
du ciel profond Messier M42 :
• Appuyez sur CIEL PROFOND puis ENTRÉE
• Défilez vers le bas (bouton 9) sur Messier puis appuyez sur
ENTRÉE
• Appuyez sur « 0-4-2 » sur le clavier, puis sur le bouton
ENTRÉE
La fonction Sky Tour (bouton 5) est parfaite pour explorer le
ciel sans avoir à utiliser une charte d’étoiles La fonction Tour
générera une liste des objets les plus intéressants à observer
selon votre position géographique et temporelle
Alignement Polaire de la Monture
La fonction aller à électronique est capable de localiser des
objets, même si la monture n’est pas parfaitement alignée sur
l’axe polaire Cependant, l’alignement polaire est néces-
saire pour garantir le suivi le plus précis possible Ceci est
essentiel en astrophotographie Lorsqu’elle est alignée sur
l’axe polaire, une monture équatoriale peut suivre un objet en
un mouvement unique, en le gardant centré dans l’oculaire
ou la caméra
Le système d’alignement polaire de la CGX se compose
d’un compensateur d'altitude et d’un compensateur d'azimut
(Figure 8)
Un viseur polaire facultatif est disponible chez Celestron et
se fixe sur la monture Le viseur polaire facultatif ne passe
au-travers de l’axe A D parce que cette zone est utilisée pour
le câblage intérieur Si vous n’utilisez pas le viseur polaire
facultatif, vous pouvez effectuer un alignement polaire grossier
en regardant dans le viseur de votre télescope et orienter la
monture jusqu’à ce que Polaris soit centrée dans l’oculaire de
votre télescope Cela garantira que vous-vous trouviez dans
trois quarts d’un degré du Pôle nord céleste (PNC)
Figure 8 Ajustements pour alignement polaire
Molettes de
réglage d'azimut
Molettes de
réglage d’altitude
Molette de verrouillage
d’altitude

FRANÇAIS | 11
Alignement Polaire Précis
La fonction All-Star Polar Alignement de Celestron vous
permet d’effectuer un alignement polaire précis sans utiliser
Polaris ni un viseur polaire Cette méthode d’alignement
polaire assistée par logiciel vous permet de sélectionner
une étoile facile à observer
Conditions à remplir : La CGX doit être alignée avec
Deux étoiles, Une étoile, ou Système Solaire.
1 Sélectionnez une étoile brillante observable dans la base
de données de la commande à main NexStar Orientez le
télescope vers l’étoile
2 Appuyez sur Aligner Sélectionnez « Alignement polaire »
puis « Aligner la monture » depuis la liste
3 Le télescope s’orientera alors sur l’étoile d’alignement et
vous demandera de la centrer dans l’oculaire pour
le « synchroniser » sur l’étoile
4 Appuyez sur Aligner et le télescope pivotera pour pointer
sur la position de l'étoile s'il est correctement aligné
polairement
5 Utilisez les réglages de latitude et d'azimut pour placer
l'étoile au centre de l'oculaire Ne pas utiliser les boutons
de direction de la commande à main pour centrer l'étoile
6 Appuyez sur Entrée L’alignement polaire est terminé
Champ de Mouvement de
la Monture
Limitation de champ logicielle
La CGX utilise une limitation logicielle pour les capteurs qui
détecte lorsque la monture s’approche de ses limites méca-
niques Lorsque la monture atteint le détecteur, les moteurs
ralentissent puis s’arrêtent et le message d’avertissement «
Détecteur de limite » apparaît La monture ne se déplacera
plus dans la direction dont le détecteur a été déclenché
Limitation de champ mécanique
La CGX comporte des câblages internes, elle est donc
conçue pour ne pas pouvoir s’orienter au-delà d’une
certaine limite Chaque axe est limité par un limiteur
matériel Cette limitation de champ de mouvement peut
également aider à réduire les interférences non voulues
entre le télescope et la monture ou le trépied Si pour une
raison inconnue la monture dépasser la limitation logicielle
(ou si les leviers de verrouillage de mouvement sont ouverts
et que la monture est déplacée manuellement), la monture
sera arrêtée par ces limiteurs matériel
Le limiteur A D (Figure 9 1) permet de suivre 20° au-delà
du méridien Si vous ne surveillez pas la monture pendant
qu’elle suit un objet, elle s’arrêtera automatiquement avant
d’atteindre un limiteur matériel
Le limiteur DEC (Figure 9 2) donne assez de champ pour
pivoter vers n’importe quelle portion du ciel
Figure 9.1 Un côté du limiteur A.D. matériel
Figure 9.2 Un côté du limiteur DEC matériel

12 | FRANÇAIS
Régler la Monture Pour les Latitudes
Très Hautes ou Très Basses
La tête équatoriale peut être positionnée de 3 manières sur
le trépied Ces trois positions peuvent également être
utilisées pour optimiser l’équilibre du trépied La monture
est livrée installée sur la position centrale, qui fonctionne
avec les latitudes comprises entre 20 et 55° Si vous souhaitez
utiliser la monture sur des latitudes en dessous de 20°,
déplacez la monture vers l’avant, et si vous souhaiter
observer au-delà de 55°, déplacez-la vers l’arrière
1 Retirez la tête du trépied en retirant les trois vis à
tête creuse
2 Retirez avec précaution les huit vis à tête creuse situées
sous la tête Une fois retirées, le mécanisme de réglage
d’altitude sera la seule chose retenant la tête EQ à la
plaque inférieure
3 Faites tourner la molette de réglage d’altitude jusqu’à
ce que les trous filetés du dessous de la monture soient
alignés sur ceux que vous souhaitez utiliser Déplacez
la plaque vers l’avant (dans la direction du bras des
contrepoids) si vous souhaitez utiliser des latitudes plus
faibles Déplacez la plaque vers l’arrière (dans la direc-
tion opposée au bras des contrepoids) si vous souhaitez
utiliser des latitudes plus élevées (Figure 10)
Port USB
Le port USB de votre CGX est utilisé uniquement pour
interfacer avec un PC pour :
1 Utiliser le logiciel de contrôle du télescope dédié
2 Mettre à jour le logiciel de contrôle des moteurs
Branchez simplement un câble USB de type A entre le port
USB de la monture et un port de votre PC La monture
devrait alors effectuer automatiquement l’installation
Le port USB de la monture n’est pas prévu pour la
connexion avec le logiciel de contrôle ASCOM ou autre
logiciel tierce partie. Pour contrôler votre monture via
ASCOM, connectez votre PC à la commande à main
NexStar+ via le port mini USB.
Ports Aux
Les ports Aux 1 et Aux 2 peuvent être utilisés avec la
commande à main NexStar+, ou avec des accessoires
optiques optionnels comme StarSense AutoAlign et le
module Wi-Fi SkyPortal
Port Autoguide
Le port Autoguide doit être utilisé uniquement avec les relais
de caméra autoguide
ATTENTION: Ne jamais brancher la commande à main
NexStar+ ni un autre accessoire au port autoguide. Cela
pourrait entraîner des dommages.
Figure 10 Changer la position de la monture sur la tête du trépied.
POSITION PAR DÉFAUT
POSITION RETOUR
POSITION AVANT

FRANÇAIS | 13
Commande à Main NexStar+
1 Afficheur à cristaux liquides (LCD) : Rétroéclairage
rouge pour une vision nocturne confortable des informations
du télescope et du déroulement de texte Retirez le film
transparent de l'écran avant d'utiliser
2 Alignement : Indique au télescope de commencer la
procédure d'alignement par défaut Est également utilisé
pour sélectionner une étoile ou objet comme position
d'alignement
3 Boutons de direction : Permet le contrôle complet de
votre télescope dans toute direction Utiliser les clés de
direction pour centrer les objets dans l'oculaire ou pour
orienter manuellement votre télescope
4 Boutons de catalogue : Permet l'accès direct à chacun
des catalogues principaux dans la base de données de
milliers d'objets
Votre télescope contient les catalogues suivants dans sa
base de données :
• Système Solaire- Les 7 planètes de notre système
solaire plus la Lune, le Soleil et Pluton
• Étoiles- Listes personnalisées des étoiles les plus
brillantes, étoiles doubles, étoiles variables, constellations
et astérismes
• Ciel Profond- Listes personnalisées des meilleures
galaxies, nébuleuses et amas ainsi que la totalité du
catalogue Messier et objets de la liste NGC
5 Identifier :Recherche dans la base de données du
télescope et affiche le nom et distances décalées des
objets correspondants les plus proches
6 Menu : Affiche les fonctions de paramétrage et
d'utilitaires, tels que taux de pistage et objets définis
par l'utilisateur et autres
7 Option (Logo Celestron) : Fonctionne comme le bouton
MAJ sur le clavier et peut être utilisée en combinaison
avec d'autres clés pour accéder à d'autres fonctions et
caractéristiques plus avancées à être ajouté lors de mise
à jour future de micrologiciel
8 Entrée : Appuyer sur ENTRÉE vous permet de
sélectionner toute fonction du télescope, d'accepter les
paramètres entrés et orienter le télescope vers les objets
affichés
9 Retour : Retour vous sortira du menu courant et affichera
le précédent niveau du chemin de menu Appuyer sur
RETOUR de manière répétée pour revenir au menu principal
ou pour effacer des données entrées par erreur
10 Sky Tour : Active le mode tour guidé, lequel recherche
tous les meilleurs objets célestes et oriente automatiquement
votre télescope vers ces objets
11 Boutons de défilement : Utilisé pour défiler vers le
HAUT ou le BAS dans toute liste de menu Un symbole
de flèche double à la droite de l'écran signifie que les
touches de défilement peuvent être utilisées pour voir
des informations supplémentaires Les boutons ont
une forme surélevée pour les retrouver facilement
sans regarder
1.
9.
8.
13.
4.
12.
2.
3.
4.
5.
6.
7.
15.
11.
10.
14.
12 Vitesse des moteurs : Semblable au bouton de Taux
sur la commande à main NexStar originale, il permet de
modifier la vitesse du moteur lorsqu'on appuie sur les
clés de direction
13 Informations sur objet : Affiche les coordonnées et
les informations importantes sur les objets sélectionnés
depuis la base de données de votre télescope
14 Port Mini USB (câble non inclus) : Permet d'effectuer
la connexion du télescope pour le contrôler avec le
logiciel installé sur un PC, ou des mises à jour du
micrologiciel
15 Menu d'aide : Dans les mises à jour futures du microlo-
giciel, ce bouton offrira des astuces de dépannage Pour
simplicité, est actuellement utilisé comme raccourci au
catalogue Messier
Figure 11
14.
Figure 11,2

14 | FRANÇAIS
Sélection d'un objet
Dès que le télescope est aligné correctement, vous pouvez
sélectionner un objet dans n'importe quel catalogue de
la base de données de commande à main NexStar+ La
commande à main comporte une touche dédiée à chaque
catégorie d'objets contenus dans sa base de données
Système Solaire, Étoiles et Ciel profond
• Système Solaire – Le catalogue Système Solaire affichera
toutes les planètes (et la Lune) dans notre Système
Solaire qui sont actuellement visibles dans le ciel Pour
permettre au soleil d'être affiché en option dans la base
de données, reportez-vous à l'option Permettre soleil dans
la section Paramètres de base de données du manuel
• Étoiles – Le catalogue Étoiles affiche une liste person-
nalisée des étoiles les plus brillantes, étoiles doubles
(binaires), étoiles variables et astérismes remarquables
• Ciel Profond – Le catalogue Ciel Profond affiche
une liste des meilleures Galaxies, Nébuleuses et amas
d'étoiles, ainsi que le Messier complet et objets NGC
Il existe a également une liste alphabétique de tous les
objets du ciel profond en ordre de nom commun
Utilisez les boutons de défilement pour défiler à travers les
catalogues afin de trouver l'objet que vous désirez obser-
ver Lors d'un défilement à travers une longue liste d'objets,
maintenir enfoncé le bouton HAUT ou BAS vous permettra
de défiler plus rapidement à travers le catalogue
Orientation vers un objet
Dès que l'objet sélectionné est affiché sur l'écran de la
commande à main, vous avez deux options:
• Appuyez sur le bouton INFOS SUR L'OBJET.
Cela vous donnera de l'information utile sur l'objet
sélectionné tel que magnitude, constellation et information
supplémentaire sur les objets les plus populaires
- Utiliser les flèches HAUT/BAS pour faire défiler les
infos sur l'objet sélectionné
- Utiliser le bouton RETOUR pour retourner à la base de
données de l'objet
• Appuyez sur le bouton ENTRÉE. Cela orientera
automatiquement le télescope vers les coordonnées de
l'objet affiché sur la commande Tandis que le télescope
s'oriente vers l'objet, l'utilisateur peut toujours accéder à
plusieurs fonctions de la commande à main (tel qu'afficher
l'information sur l'objet)
NOTE : Les catalogues Messier, NGC et SAO nécessitent
la saisie d’une désignation numérique. Dès que vous avez
appuyé sur le bouton correspondant au catalogue en ques-
tion et sélectionné le catalogue Messier, NGC ou SAO,
vous verrez un curseur clignotant indiquant que vous être
en mode de saisie numérique
Saisissez le numéro de catalogue correspondant à l'objet
que vous désirez voir Appuyer sur ENTRÉE pour faire
orienter le télescope vers l'objet, ou maintenir enfoncé le
bouton OPTION (logo Celestron) et appuyer sur INFO
OBJET pour consulter l'information sur l'objet sélectionné
ATTENTION : Ne faites jamais pivoter le télescope lorsque
quelqu'un est en train de regarder dans l'oculaire. Le
télescope peut se déplacer à haute vitesse et des
blessures pourraient en résulter.
Bouton vitesse du moteur
Le bouton VITESSE DE MOTEUR, semblable au bouton
Taux sur la commande à main NexStar originale, permet
de modifier instantanément la vitesse des moteurs de
taux d'orientation à haute vitesse vers un taux de guidage
précis ou n'importe quel taux entre les deux Chaque taux
correspond à un numéro sur le clavier numérique de la
commande à main Le numéro 9 est le taux le plus rapide
(approximativement 3,5° par seconde, dépendant du
montage) et est utilisé pour s'orienter entre les objets et
localiser les alignements d'étoiles La touche numéro 1 est
la vitesse la plus lente (demi sidéral) et peut être utilisée
pour un centrage précis des objets dans l'oculaire
Pour modifier la vitesse des moteurs:
• Appuyez sur le bouton VITESSE DU MOTEUR sur
la commande à main L'afficheur à cristaux liquides
affichera la vitesse actuelle des moteurs
• Appuyez sur le numéro de la commande à main qui
correspond à la vitesse désirée
La commande à main a une caractéristique «bouton
double» qui permet d'accélérer la vitesse des moteurs sans
avoir à spécifier de vitesse Pour utiliser cette caracté-
ristique, appuyer simplement sur la flèche qui correspond
à la direction d'orientation désirée du télescope Tout en
appuyant sur cette touche, appuyez sur le bouton de navi-
gation opposé Ceci augmentera la vitesse de d'orientation
à son maximum
Lorsque vous utilisez les boutons de direction HAUT/BAS,
les taux d'orientation les plus lents (6 et moins) déplacent
les moteurs en direction opposée des taux d'orientation
plus rapides (7 - 9) Ceci est effectué pour qu'un objet
s'oriente dans la bonne direction lorsque vous regardez dans
l'oculaire (c -à-d appuyer sur la flèche HAUT déplacera
l'étoile vers le haut dans le champ de vision de l'oculaire)
Mais, si vous utilisez l'un des taux de pivot les moins
élevés (6 et moins) pour effectuer le centrage dans le
starpointer, alors vous devrez utiliser les boutons de la
direction opposée

FRANÇAIS | 15
Menu du contrôle manuel
Le menu « Contrôle manuel » vous permet de personnaliser
certaines caractéristiques du contrôle manuel NexStar+
Pour accéder à ce menu, appuyez sur le bouton MENU (#7
sur le pavé numérique) et utilisez les boutons de défilement
pour sélectionner « Contrôle manuel » puis appuyez sur
ENTRÉE Utilisez les boutons de défilement pour choisir
l'une des options suivantes :
• Contrôle d'éclairage : Pour régler de manière indépen-
dante l'éclairage des boutons et de l'écran LCD
• Menu de Défilement : Pour régler la vitesse à laquelle
les mots défilent sur l'écran LCD
• Activer les caractères gras : Pour modifier le format de
police des caractères affichés à l'écran LCD entre normal
et gras
• Définir le Contraste : Utilisez les boutons de défilement
pour régler le contraste de l'écran LCD
• Langue d'interface : Pour modifier le langage d'affichage
de l'écran LCD
NOTE : L'option de langage peut également s'afficher lors
de la première utilisation du contrôle manuel. Cette option
peut également être affichée en maintenant le bouton
Option (le logo Celestron) pendant 10 secondes pendant
l'allumage du télescope.
Procédures d'alignement
Pour que le télescope pointe avec précision vers des objets
dans le ciel, il doit d'abord être aligné sur des positions
connues (étoiles) dans le ciel Avec cette information, le
télescope peut créer un modèle du ciel, qu'il utilise pour
localiser n'importe quel objet avec des coordonnées
connues Il y a plusieurs façons d'aligner votre télescope
avec le ciel selon les informations que l'utilisateur est en
mesure de fournir :
• Alignement deux étoiles utilise les informations
horaires/de lieu et permet à l'utilisateur de choisir les
deux étoiles vers lesquelles le télescope s'orientera auto-
matiquement
• Alignement une étoile utilise les mêmes informations
horaires/de lieu mais n'utilise qu'une étoile pour l'alignement
• L'alignement Solar System affichera une liste des objets
visibles en plein jour (planètes et la Lune) disponibles
actuellement afin d'aligner le télescope
• Alignement Rapide requiert que vous entriez la même
information que vous le feriez avec la procédure Alignement
deux étoiles Cependant, au lieu d'orienter vers des étoiles
d'alignement pour le centrage et l'alignement, le télescope
n'utilise qu'une étoile pour modéliser le ciel selon les
informations saisies
• Dernier alignement permet de recharger automatiquement
le dernier alignement et positionnement effectué La fonc-
tion Dernier alignement est aussi pratique comme sécurité
au cas où le télescope perdrait l'alimentation
Alignement deux étoiles
L'alignement deux étoiles permet à l'utilisateur de sélectionner
deux étoiles avec lesquelles effectuer l'alignement du téles-
cope Pour aligner votre télescope à l'aide de la méthode
deux étoiles :
1 Sélectionner Alignement deux étoiles à partir des options
d'alignement Selon les informations de date et d'heure
saisies, la commande à main sélectionnera et affichera
automatiquement une étoile brillante située au dessus
de l'horizon
• Appuyez sur ENTRÉE pour définir cette étoile comme
première étoile d'alignement
• Si pour une raison ou une autre cette étoile n'est pas
visible (par exemple un arbre ou un bâtiment), appuyez
sur RETOUR pour que la commande à main sélectionne
automatiquement la prochaine étoile brillante
• Vous pouvez également utiliser les touches haut/bas
pour parcourir la liste complète des étoiles nommées,
et ainsi sélectionner n'importe laquelle des deux-cent
étoiles d'alignement disponibles
2 Dès que l'orientation est terminée sur la première étoile,
l'afficheur demander d’utiliser les flèches pour aligner
l'étoile sélectionnée avec la croix de visée au centre du
chercheur Une fois centré dans le chercheur, appuyer sur
ENTRÉE L'afficheur vous demandera alors de centrer
l'étoile dans le champ de vision de l'oculaire Lorsque
l'étoile est centrée, appuyer sur ALIGNER pour accepter
cette étoile en tant que première étoile d'alignement
3 Une fois la première étoile saisie, la commande à main
sélectionnera automatiquement une seconde étoile, et
vous devrez alors effectuer cette procédure de nou-
veau Une fois l'alignement effectué sur les deux étoiles,
l'affichage vous demandera si vous désirez ou non ajouter
des étoiles de calibration additionnelles Les étoiles de
calibration sont utilisées pour améliorer la précision de
pointage de votre télescope en compensant les désali-
gnements mécaniques subtiles entre le système optique
et la monture C'est pourquoi il est en général une bonne
idée d'ajouter au moins une étoile de calibration pour
améliorer la précision d'alignement de la monture sur le ciel
4 Appuyez sur ENTRÉE pour sélectionner l'étoile de
calibration Sélectionnez l'étoile de la même manière que
précédemment avec les deux étoiles d'alignement puis
appuyez sur ENTRÉE Vous remarquerez que toutes les
étoiles de calibration sont situées dans le côté opposé de
ce côté du ciel (méridien) comparé aux étoiles d'aligne-
ment originales Cela est essentiel pour le processus
de calibration précis de la monture Enfin, vous pouvez
choisir d'ajouter plus d'étoiles de calibrations ou appuyer
sur RETOUR pour mettre fin au processus
Note: Filtrage Est/Ouest – pour garantir les meilleures
performances de pointage sur ciel total, votre monture
électronique filtre et sélectionne automatiquement ses
étoiles d'alignement initiales de manière à ce que les deux
premières étoiles d'alignement se trouvent d'un côté du
méridien et que toute autre étoile se trouve à l'opposé du
méridien, comme indiqué par les lettres « O » et « E » dans
le coin supérieur droit de l'écran LCD. Le filtrage Est/Ouest
peut être modifié en appuyant simplement sur le bouton
MENU à tout moment pendant le processus d'alignement.
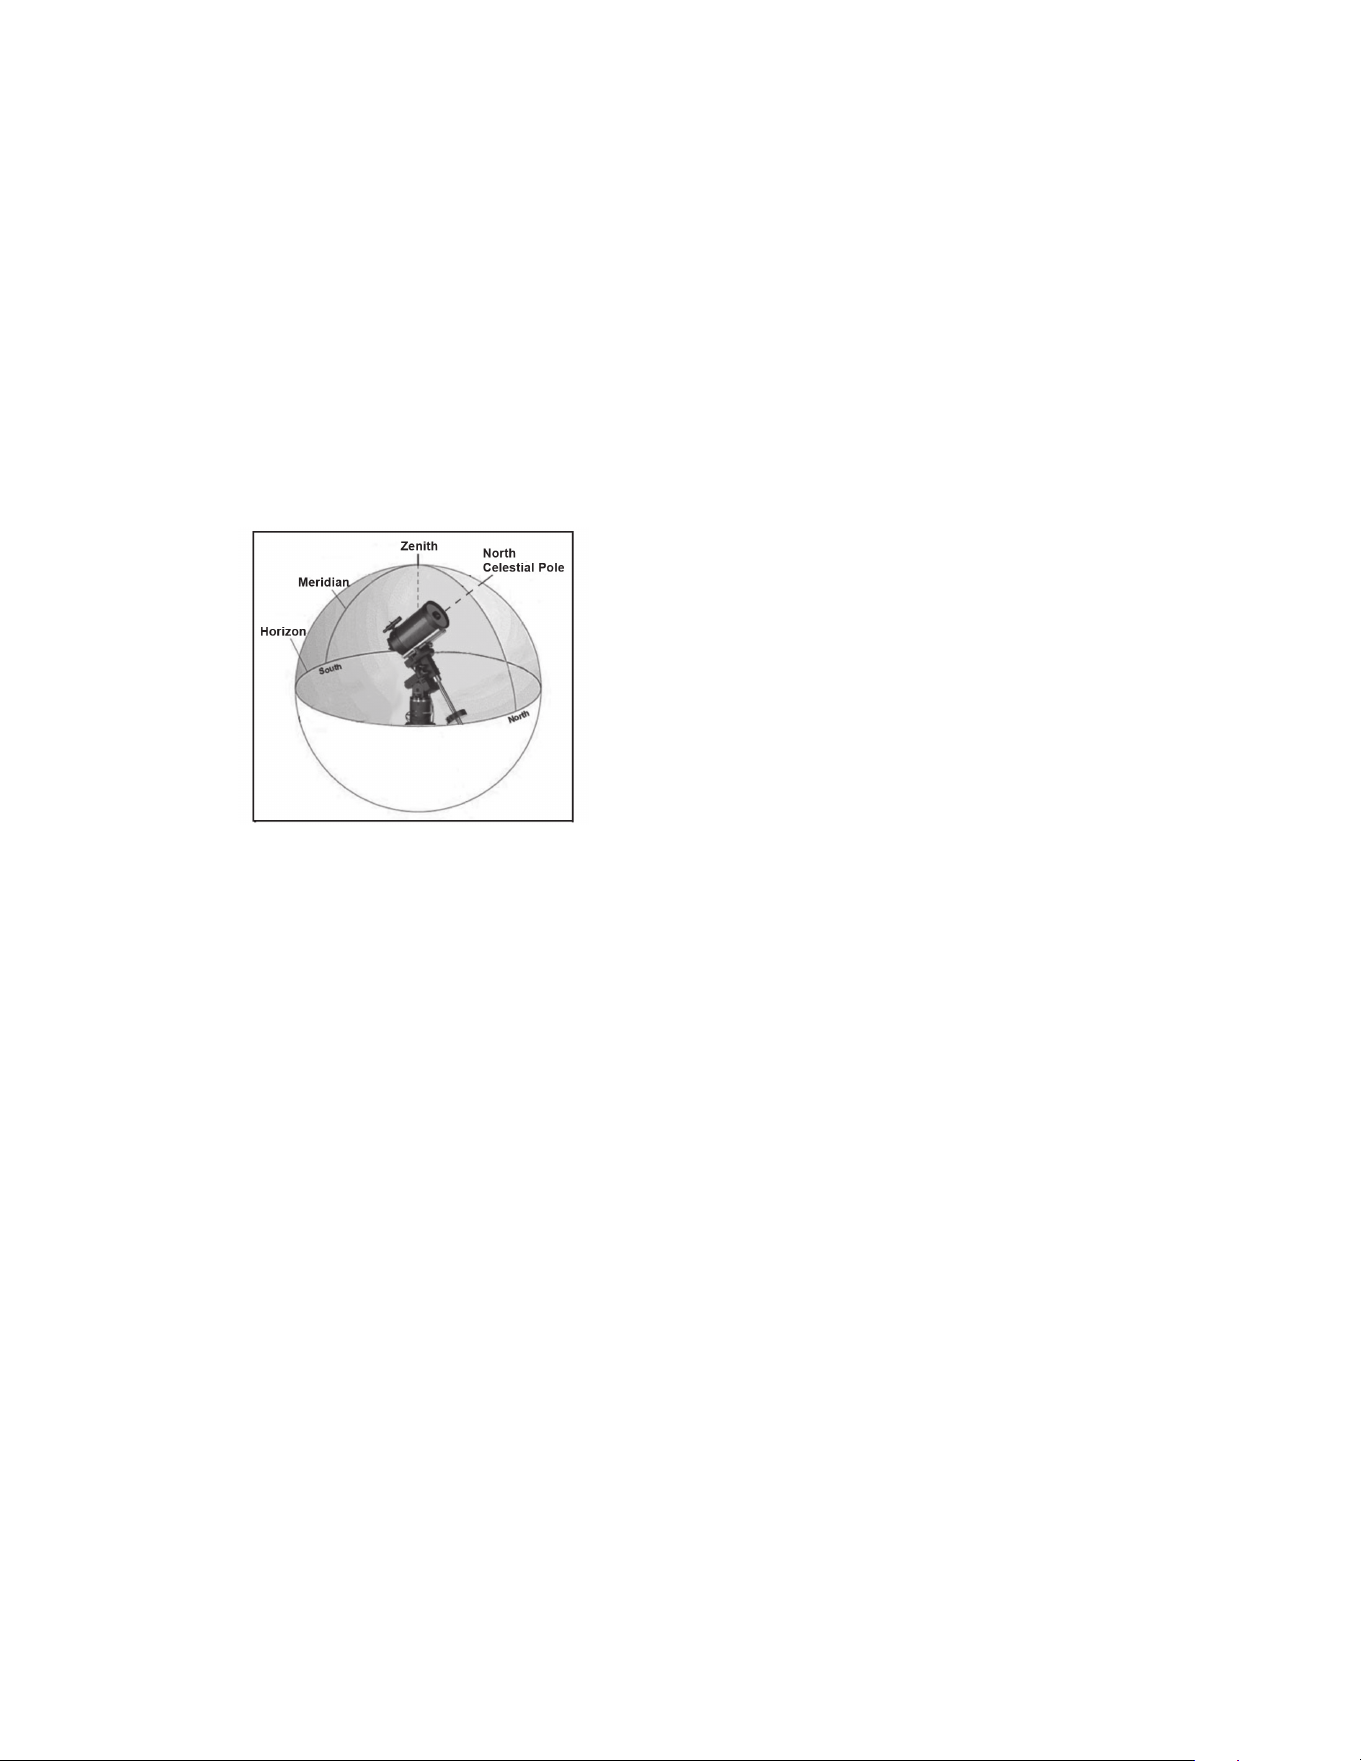
16 | FRANÇAIS
Astuces pour l'ajout d'étoiles de calibration :
• Bien que pour l'observation de divertissement, les étoiles
de calibration supplémentaires ne soient pas nécessaires,
il est recommandé d'en ajouter autant que possible pour
obtenir une précision de pointage optimale
• Les étoiles de calibrations proches de l'équateur céleste
sont plus adéquates que celles situées près des pôles
célestes
• Bien que les étoiles de calibration ne soient pas néces-
saires si la monture n'a pas été déplacée depuis l'ali-
gnement/la calibration initial, il pourrait être nécessaire
d'effectuer la calibration de nouveau si le tube optique à
été déplacé pour quelque raison que ce soit
Note: Méridien - Une ligne de référence imaginaire dans
le ciel qui commence au pôle Nord céleste et se termine au
pôle Sud céleste et passe par le zénith. Si vous êtes face au
sud, le méridien commence à partir de votre horizon sud et
passe directement au-dessus du pôle Nord céleste.
Alignement rapide
L'alignement rapide utilise les informations de date et d'heure
saisies au démarrage pour aligner le télescope Cependant,
au lieu d'orienter vers des étoiles d'alignement pour le cen-
trage et l'alignement, le télescope n'utilise qu'une étoile pour
modéliser le ciel selon les informations saisies Cela vous
permettra d'orienter vers les coordonnées d'objets brillants
comme la Lune et des planètes et donnera au télescope l'in-
formation nécessaire pour suivre les objets dans toute partie
du ciel (selon la précision de l'alignement polaire) Aligne-
ment rapide n'est pas destiné à être utilisé pour localiser de
petits objets ou objets de faible intensité du ciel profond ou
pour suivre précisément des objets pour être photographiés
Pour utiliser Alignement rapide, sélectionnez simplement
Alignement rapide dans la liste des options d'alignement et
appuyez sur ENTRÉE Le télescope utilisera automatique-
ment les paramètres de date et d'heure pour s'aligner sur le
ciel et affichera le message Aligné avec succès
Note: Une fois Quick-Align effectué, vous pouvez utiliser
la fonction de réalignement (voir ci-dessous) pour améliorer
la précision de pointage du télescope.
Dernier alignement
Ma méthode Dernier alignement chargera automatiquement
les dernières positions d'index mémorisées pour continuer
à utiliser l'alignement effectué lorsque le télescope à été
éteint pour la dernière fois Cette fonctionnalité est utile par
exemple en cas de perte d'alimentation accidentelle
Réalignement
La monture possède une fonction de réalignement qui vous
permet de remplacer la(les) étoile(s) d'alignement avec une
nouvelle étoile ou objet céleste Cela peut se révéler utile
dans plusieurs situations:
• Si vous observez depuis quelques heures, vous remarquerez
que vos deux étoiles d'alignement originales se sont
considérablement déplacées vers l'ouest (Rappelez-vous
que les étoiles se déplacent à une vitesse de 15° par
heure) Aligner sur une nouvelle étoile dans la partie est du
ciel améliorera la précision de pointage, spécialement sur
des objets dans cette partie du ciel
• Si vous avez aligné votre télescope en utilisant la méthode
Alignement rapide, vous pouvez utiliser le réalignement
pour aligner vers un objet maintenant visible dans le ciel
Cela améliorera la précision de pointage de votre téles-
cope sans avoir à entrer d'information supplémentaire
• Si vous avez utilisé la fonction d'alignement polaire assistée
par ordinateur et avez déplacé la monture manuellement, il
pourrait être nécessaire d'effectuer la procédure d'aligne-
ment de nouveau
Pour remplacer une étoile d'alignement existante avec une
nouvelle étoile d'alignement:
1 Sélectionner l'étoile souhaitée (ou objet) de la base de
données et orienter vers celui-ci
2 Centrez l'objet avec soin dans l'oculaire
3 Une fois centré, appuyer sur RETOUR pour revenir au
menu principal
4 Une fois le message CGX Prêt affiché, appuyez sur ALI-
GNER pour sélectionner une étoile d'alignement parmi
les options disponibles
5 L'afficheur vous demandera alors quelle étoile d'aligne-
ment vous désirez remplacer Utilisez les touches de
défilement HAUT et BAS pour sélectionner l'étoile
d'alignement à remplacer, et appuyez sur ENTRÉE Il
est préférable de remplacer l'étoile la plus proche du
nouvel objet Cela espacera vos étoiles d'alignement à
travers le ciel
6 Appuyer sur ALIGNER pour effectuer la modification

FRANÇAIS | 17
Catalogue des Objets
Sélectionner un objet
Dès que le télescope est aligné correctement, vous pouvez
sélectionner un objet dans n'importe quel catalogue de la
base de données de commande à main NexStar+ Le bloc
de commande comporte une touche dédiée à chaque caté-
gorie d'objets contenus dans sa base de données : Système
Solaire, étoiles et objets du ciel profond
• Système Solaire – Le catalogue Système Solaire affi-
chera toutes les planètes (et la Lune) dans notre Système
Solaire et qui sont actuellement visibles dans le ciel Pour
activer l'affichage du soleil comme objet sélectionnable
dans la base de données, reportez-vous à l'option Soleil du
menu Télescope
• Étoiles – Le catalogue Étoiles affiche une liste personnali-
sée des étoiles les plus brillantes, étoiles doubles (binaires),
étoiles variables et astérismes remarquables
• Ciel Profond – Le catalogue Ciel Profond affiche une
liste des meilleures Galaxies, Nébuleuses et amas d'étoiles,
ainsi que le Messier complet et objets NGC Il existe a
également une liste alphabétique de tous les objets du ciel
profond en ordre de nom commun
Utilisez les touches de DÉFILEMENT pour défiler à travers
les catalogues afin de trouver l'objet que vous désirez voir
Lors d'un défilement à travers une longue liste d'objets,
maintenir enfoncé le bouton HAUT ou BAS vous permettra
de défiler plus rapidement à travers le catalogue
Orientation vers un objet
Dès que l'objet sélectionné est affiché sur l'écran de la com-
mande à main, vous avez deux options:
• Appuyez sur le bouton INFOS SUR L'OBJET. Cela
vous donnera de l'information utile sur l'objet sélectionné tel
que magnitude, constellation et information supplémentaire
sur les objets les plus populaires
• Utiliser les flèches HAUT/BAS pour défiler à travers
l'info de l'objet sélectionné
• Utiliser le bouton RETOUR pour retourner à la base de
données des objets
• Appuyez sur le bouton ENTRÉE Cela orientera automa-
tiquement le télescope vers les coordonnées de l'objet
affiché sur la commande Tandis que le télescope s'oriente
vers l'objet, l'utilisateur peut toujours accéder à plusieurs
fonctions de la commande à main(tel qu'afficher l'informa-
tion sur l'objet)
NOTE : Les catalogues Messier, NGC et SAO nécessitent
la saisie d’une désignation numérique. Dès que vous
avez appuyé sur le bouton correspondant au catalogue
en question et sélectionné le catalogue Messier, NGC ou
SAO, vous verrez un curseur clignotant indiquant que vous
être en mode de saisie numérique. Saisissez le numéro de
catalogue correspondant à l'objet que vous désirez voir.
Appuyez sur ENTRÉE pour faire orienter le télescope vers
l'objet, ou maintenir enfoncé le bouton OPTION (logo
Celestron) et appuyez sur INFO OBJET pour consulter
l'information sur l'objet sélectionné.
ATTENTION : Ne faites jamais pivoter le télescope
lorsque quelqu'un est entrain de regarder dans
l'oculaire. Le télescope peut se déplacer à haute
vitesse et des blessures pourraient en résulter.
Bouton SkyTour
La monture CGX offre une fonction de tour qui permet
à l'utilisateur de choisir un objet intéressant dans une
liste construite selon la date et l'heure à laquelle vous
observez La visite automatique affichera seulement les
objets contenus dans le catalogue et selon les limites du
filtre personnalisé Pour activer la fonction visite, appuyez sur
SKY TOUR sur la commande à main
1 Appuyez sur le bouton SKY TOUR de la commande à main
2 Utilisez les boutons de DÉFILEMENT pour sélectionner
À ne pas rater cette nuit
3 La monture CGX pivotera automatiquement en azimut
par rapport à sa position d'origine, ce qui aidera à éviter
l'enroulement du câble d'alimentation durant la visite
4 La commande à main affichera les meilleurs objets à
observer qui sont présentement dans le ciel
• Pour obtenir de l'information et données sur l'objet
affiché, appuyer sur INFO OBJET Appuyez une fois
pour afficher les coordonnées de l'objet Appuyez
de nouveau pour afficher les coordonnées de l'objet
Appuyez dessus de nouveau pour afficher le texte
descriptif Appuyez sur RETOUR pour revenir à l'écran
précédent
• Pour orienter le télescope vers l'objet affiché, appuyez
sur ENTRÉE
• Pour voir le prochain objet de la visite, appuyez sur BAS
Bouton d'identification
Appuyez sur le bouton IDENTIFIER pour rechercher dans
le catalogue des bases de données de la monture et afficher
les noms et distances angulaires des objets correspondants
les plus proches, en relation avec la position actuelle Cette
fonction peut être utile dans deux cas Tout d'abord, elle peut
permettre d'identifier un objet non identifié contenu dans le
champ de l'oculaire De plus, le mode Identification peut être
utilisé pour trouver d'autres objets célestes qui sont proches
des objets observés
Par exemple, si votre télescope est pointé sur l'étoile la plus
brillante de la constellation de la Lyre, choisir Identification
la nommera à coup sûr comme Vega Mais, la fonction
IDENTIFIER effectuera aussi une recherche dans le
catalogue NGC et bases de données du Système Solaire
et affichera toute planète ou objet du ciel profond dans son
environnement proche Dans cet exemple, la nébuleuse en
anneau (M57) serait affichée comme se trouvant à environ
6° de distance
La luminosité et proximité des objets affichés peuvent être
définies à l'aide du filtre Identification dans Configuration
du télescope
18 | FRANÇAIS
Touches de direction
La commande à main contient quatre boutons de direction
situés au centre de celui-ci qui contrôlent le déplacement
du télescope en altitude (haut et bas) et azimut (gauche et
droite) La vitesse de mouvement peut être définie selon
9 vitesses
1 = 2x 6 = 3° / sec
2 = 4x 7 = 1° / sec
3 = 8x 8 = 2° / sec
4 = 16x 9 = 4° / sec
5 = 32x
Bouton vitesse du moteur
Le bouton VITESSE DU MOTEUR (12) vous permet
de modifier immédiatement la vitesse de mouvement des
servomoteurs sur une plage allant de haute vitesse à
précision selon la situation Chaque taux correspond à un
numéro du pavé numérique Le numéro 9 est la vitesse la
plus rapide (approximativement 3° par seconde, dépendant
de la source d'alimentation) et est utilisé pour s'orienter entre
les objets et localiser les étoiles d'alignement Le numéro 1
est la vitesse la plus lente (2x sidéral) et peut être utilisé pour
un centrage précis des objets dans l'oculaire Pour modifier
la vitesse des moteurs :
• Appuyez sur le bouton VITESSE DU MOTEUR sur la
commande à main L'écran LCD affiche la vitesse actuelle
• Appuyez sur le numéro de la commande à main qui
correspond à la vitesse désirée
La commande à main a une caractéristique « bouton double
» qui permet d'accélérer la vitesse des moteurs sans avoir à
spécifier la vitesse Pour utiliser cette caractéristique,
appuyer simplement sur la flèche qui correspond à la direc-
tion d'orientation désirée du télescope Tout en maintenant
ce bouton appuyé, pressez la direction opposée Ceci accé-
lérera le pivot à la vitesse maximum
Lorsque vous utilisez les boutons HAUT et BAS de la
commande à main, les taux les moins élevés (6 et moins)
déplacent les moteurs dans la direction opposée de celle
utilisée pour les taux les plus élevés (7 - 9) Ceci est mis
en place pour faire en sorte qu'un objet se déplace dans la
direction appropriée lorsque vous observez par l'oculaire (par
ex , appuyez sur le bouton haut déplacera l'étoile vers le haut
lorsque dans le champ de vision de l'oculaire) Mais, si vous
utilisez l'un des taux de pivot les moins élevés (6 et moins)
pour effectuer le centrage dans le starpointer, alors vous
devrez utiliser les boutons de la direction opposée
Touche Aide
Dans les mises à jour futures du micrologiciel, ce bouton
offrira des astuces de dépannage Pour l'instant, est utilisé
comme raccourci au catalogue Messier
Bouton menu
La monture CGX contient plusieurs fonctions de réglage
définies par l'utilisateur conçues pour donner le contrôle des
différentes fonctions du télescope à l'utilisateur Toutes les
fonctions et outils peuvent être atteintes en appuyant sur
MENU et en faisant défiler pour choisir les options
ci-dessous
Menu Suivi
Mode Suivi - cela permet de choisir la manière dont le
télescope suit un objet selon le type de monture utilisée pour
supporter le télescope Le produit possède trois différents
• EQ Nord - Pour suivre le ciel lorsque le télescope est
aligné dans l'hémisphère nord
• EQ Sud - Pour suivre le ciel lorsque le télescope est
aligné dans l'hémisphère sud
• Désactivé - Lors de l'utilisation du télescope pour obser-
vation terrestre (terrain) la pistage peut être désactivé afin
que le télescope ne bouge pas
Taux de suivi — En plus d'être capable de déplacer le
télescope avec les boutons de la commande à main, votre
télescope suivra continuellement un objet céleste alors qu'il
se déplace dans le ciel nocturne La vitesse de suivi peut
être définie selon le type de l'objet concerné:
• Sidérale - Cette vitesse compense pour la rotation de
la terre en déplaçant le télescope à la même vitesse de
rotation de la terre, mais en direction opposée Lorsque le
télescope est aligné polairement, cela peut être possible
en effectuant un mouvement vertical seulement
• Lunaire – Utilisé pour pister la Lune lors d'observation de
paysage lunaire
• Solaire – Utilisé pour pister le Soleil lors d'observation
solaire en utilisant un filtre solaire adéquat
Menu Afficher heure-site
Ce menu permet d'afficher l'heure actuelle et la longitude et
latitude téléchargées depuis le récepteur GPS optionnel
SkySync Cette option affichera également d'autres
informations relatives à l'heure et à l'emplacement telles
que le fuseau horaire, l'heure d'été et l'heure sidérale
locale L'heure sidérale locale (LST) est utile pour connaître
l'ascension droite des objets célestes qui se trouvent sur le
méridien à ce moment L'option Afficher heure-site affiche
toujours la dernière heure et emplacement saisie pendant
la connexion avec le GPS Une fois les informations
actualisées reçues, alors celles-ci seront mises à jour
sur l'écran Si le GPS est éteint ou non présent, alors la
commande à main n'affichera que la dernière heure et
emplacement saisis en dernier
Menu du contrôle manuel
Le menu « Contrôle manuel » vous permet de personnaliser
certaines caractéristiques du contrôle manuel NexStar+
Pour accéder à ce menu, appuyez sur le bouton MENU
(#7 sur le pavé numérique) et utilisez les boutons de défi-
lement pour sélectionner « Contrôle manuel » puis appuyez
sur ENTRÉE

FRANÇAIS | 19
Utilisez les boutons de défilement pour choisir l'une des
options suivantes :
• Contrôle d'éclairage : Pour régler de manière indépen-
dante l'éclairage des boutons et de l'écran LCD
• Menu de Défilement : Pour régler la vitesse à laquelle
les mots défilent sur l'écran LCD
• Activer les caractères gras : Pour modifier le format de
police des caractères
affichés à l'écran entre normal et gras
• Contraste : Utilisez les boutons de défilement pour
régler le contraste de l'écran LCD
• Langue d'interface : Pour modifier le langage d'affi-
chage de l'écran LCD
NOTE : La fonction de sélection de langage peut ne pas
apparaître lors du premier allumage de la commande à main.
Cette option peut également être affichée en maintenant
le bouton Option (le logo Celestron) pendant 10 secondes
pendant l'allumage du télescope.
Fonctionnalités de Réglage de Télescope
Réglage Heure-Site — Permet à l'utilisateur de personna-
liser l'affichage du télescope en modifiant les paramètres
d'heure et d'emplacement (tel que le fuseau horaire et heure
avancée)
Anti-rebond – Tous les engrenages mécaniques ont un
certain jeu entre les engrenages Ce jeu est évident par le
temps que prend l'étoile à se déplacer dans l'oculaire lors
que les touches fléchées de la commande à main sont ap-
puyées (spécialement lors de changement de directions) La
fonction anti-rebond de l'CGX permet à l'utilisateur de com-
penser le rebond en entrant une valeur qui rappelle rapide-
ment aux moteurs d'éliminer le jeu entre les engrenages Le
montant de compensation nécessaire dépend de la vitesse
de rotation sélectionnée; plus la vitesse de rotation est lente
plus cela prendra de temps pour que l'étoile apparaisse dans
l'oculaire Chaque axe possède deux valeurs, une positive et
une négative
• La valeur positive est la quantité de compensation appli-
quée lorsque vous appuyez sur un bouton pour que les
engrenages bougent rapidement sans délai
• La valeur négative est la quantité de compensation appli-
quée lorsque vous relâchez le bouton, faisant tourner les
engrenages dans le sens opposé pour continuer le suivi
Normalement, chaque mesure doit être identique Vous
devrez expérimenter avec différentes valeurs (de 0 à 99) ;
une valeur entre 20 et 50 est normalement suffisante pour la
plupart des observations visuelles, alors qu'une valeur plus
élevée peut être nécessaire pour le guidage photographique
Pour régler la valeur anti-rebond, défiler vers le bas vers l'option
anti-rebond et appuyer sur ENTRÉE Observez un objet
par l'oculaire et observez la vitesse de réponse de chaque
pression des quatre boutons Prenez note de quels mouve-
ments observent une pause entre la pression sur le bouton
et son déclenchement Testez un axe à la fois, réglez la valeur
anti-rebond de manière à ce que le mouvement soit aussi
immédiat que possible sans pour autant créer un soubresaut
lorsque le bouton est appuyé et relâché Ensuite, saisissez
la même valeur pour les positions positives et négatives Si
vous remarquez un soubresaut lorsque le bouton est relâché,
mais remarquez une pause lorsque la valeur est réduite, uti-
lisez la plus haute valeur en positif et la plus faible valeur en
négatif Le télescope gardera en mémoire ces valeurs et les
utilisera à chaque mise sous tension ou jusqu'à ce qu'elles
soient modifiées
Limites de Filtre — Lorsqu'un alignement est terminé, le
télescope sait automatiquement quels objets célestes se
trouvent au-dessus de l'horizon En conséquence, lors
du défilement à travers les listes de base de données (ou
en sélectionnant la fonction Visite Guidée), la commande à
main affichera seulement les objets qui se trouvent au-des-
sus de l'horizon au moment de l'observation Vous pouvez
personnaliser la base de données d'objets en sélectionnant
les limites d'altitude qui sont appropriés à votre emplacement
et situation Par exemple, si vous faites de l'observation dans
un emplacement montagneux où l'horizon est partiellement
obscurci, vous pouvez fixer votre limite minimum d'altitude
pour qu'elle lise +20° Cela fera en sorte que la commande
à main n'affichera que les objets qui sont supérieurs à 20°
en altitude
CONSEIL : Si vous souhaitez explorer la base de données
d’objets complète, définissez La limite d’altitude sur 90° et
la limite minimum à -90°. Cela affichera tous les objets dans
les liste de base de données indépendamment qu'ils soient
visibles ou non dans le ciel à partir de votre emplacement.
Boutons de direction - La direction dans laquelle une
étoile semble se déplacer dans l'oculaire est fonction de la
position du tube du télescope par rapport au méridien Cela
peut être problématique, particulièrement si vous effectuez
des photos astronomiques Pour compenser, la direction
des boutons de contrôle du moteur peut être modifiée
Pour renverser la logique de la commande à main, appuyez
sur MENU et sélectionnez Boutons de direction du menu
Utilitaires Utilisez les boutons Haut et Bas (10) pour sélec-
tionner les touches d'Azimut (gauche et droit) ou encore les
touches d'Altitude (haut et bas) et appuyez sur ENTRÉE
Sélectionnez soit positif ou négatif pour chaque axe puis
appuyez sur ENTRÉE pour enregistrer Définir la direction de
bouton azimut en positif ne déplacera pas le télescope dans
la même direction que le suivi du télescope (par exemple
vers l'est) Définir les boutons d'altitude en positif ne dépla-
ceront pas le télescope dans le sens anti horaire sur l'axe
de déclinaison
Approche Aller à — Permet à l'utilisateur le soin de définir
la direction du télescope lors de l'orientation vers un objet
Cela permet à l'utilisateur de minimiser les effets de rebond
lors de la rotation d'un objet à un autre Comme dans le cas
des boutons de direction, définir Approche Aller à en positif
fera en sorte que le télescope effectuera une approche sur
un objet dans la même direction que le suivi (ouest) pour
l'azimut et dans le sens anti horaire pour la déclinaison La
déclinaison Approche Aller à ne sera valable que si le tube
du télescope est d'un côté du méridien Une fois que le tube
passe de l'autre côté du méridien, l'Approche GoTo devra
être inversée

20 | FRANÇAIS
Pour modifier la direction d'approche GoTo, simplement
sélectionner GoTo Approach du menu Scope Setup, sélec-
tionner soit l'approche Altitude soit l'approche Azimut, choisir
positif ou négatif et appuyer sur Entrée
ASTUCE : Pour minimiser les effets négatifs du rebond
d'engrenage sur la précision de pointage, le paramètre
de direction de bouton doit idéalement être similaire au
réglage Approche Aller à. Par défaut, les boutons de
direction haut et bas pour centrer sur les étoiles d'aligne-
ment élimineront la majorité de l'effet de rebond dans les
engrenages. Si vous modifiez le réglage Approche Aller à,
il n'est pas nécessaire de modifier également les boutons
de direction. Prenez simplement note de la direction
dans laquelle le télescope se déplace lorsqu'il termine
son Approche Aller à finale. Si le télescope approche son
étoile d'alignement depuis l'ouest (azimut négatif), et dans
le sens horaire (altitude négative), alors veillez à ce que
le centrage sur les étoiles d'alignement s'effectue dans la
même direction dans le télescope.
Taux d'autoguidage – Permet à l'utilisateur de définir un
taux d'autoguidage comme pourcentage de taux sidéral
Cela est utile lorsque vous calibrez votre télescope en tant
qu'autoguideur CCD pour l'imagerie astronomique à longue
exposition
Méridien - Cette fonction permet à la monture de se com-
porter correctement lorsqu'il s'agit de pivoter vers des objets
accessibles depuis chaque côté du méridien La fonction-
nalité Méridien permet au télescope de rester sur un côté
spécifique de la monture pendant son pivotement, et ainsi de
continuer à suivre selon les limites A D définies par l'utilisa-
teur Voir limites A D ci-dessous Le fonctionnalité Méridien
offre quatre choix
• Courant favori - Permet à la monture d'utiliser le côté ac-
tuel en priorité lorsqu'elle s'oriente vers des objets proches
du méridien Par exemple, si vos limites d'orientation A D
est définie pour permettre à la monture de suivre à 10°
après le méridien, alors le télescope restera sur le côté ac-
tuel du méridien pour s'orienter vers des objets se trouvant
au maximum à 10° après le méridien
• Favoriser l'ouest - Si l'objet cible est accessible depuis
chaque côté de la monture, sélectionner l'option « Favori-
ser l'ouest » fait en sorte que la monture pointe vers l'objet
comme si celui-ci se trouvait à l'ouest du méridien Le
tube sera donc positionné sur le côté est de la monture, et
pointera vers l'ouest
• Favoriser l'est - Si l'objet cible est accessible depuis
chaque côté de la monture, sélectionner l'option « Favo-
riser l'est » fait en sorte que la monture pointe vers l'objet
comme si celui-ci se trouvait à l'est du méridien Le tube
sera donc positionné sur le côté ouest de la monture, et
pointera vers l'est
• Désactivé - Ceci est l'option par défaut, qui donne l'ordre
à la monture de pivoter vers le côté opposé pour voir les
objets se trouvant sur le côté opposé du méridien Mais,
une fois l'objet désiré atteint, la monture continuera à pivo-
ter plus loin que le méridien selon les limites d'orientation
A D définies
Réglages de monture - Une fois les réglages de la
monture calibrés (voir la section Utilitaires ci-dessous), les
valeurs sont enregistrées et affichées sur la commande à
main Il est déconseillé de modifier les valeurs de calibration
Mais chaque paramètre peut être modifié si nécessaire pour
améliorer les performances du télescope
• Valeur de cône - Ceci est la valeur d'erreur de cône
définie lorsque les opérations Utilitaires/Calibration de
monture/Interrupteur DEC sont effectuées
• Index DEC - Ceci est la valeur d'erreur d'index de décli-
naison enregistrée lorsque les étoiles de calibration sont
ajoutées après l'alignement sur les étoiles original
• A.D. Index - Ceci est la valeur d'erreur d'index A D définie
lorsque les opérations Utilitaires/Calibration de monture/
A D sont effectuées
A.D. Limites - Permet de définir les limites du télescope
au sein desquelles le télescope peut s'orienter ou suivre en
ascension droite avant de s'arrêter Les limites d'orientation
sont représentées en degrés et sont par défaut définies
sur 0°, qui est la position du télescope lorsque la barre de
contrepoids est étendue horizontalement Cependant, ces
limites peuvent être définies selon vos besoins spécifiques
Par exemple, si vous utilisez un équipement d'imagerie CCD
(Dispositif à transfert de charge) qui est équipé de câbles
qui sont trop courts pour permettre au télescope de pivoter
pour couvrir la totalité du ciel, vous pouvez définir la limite
d'orientation de la monture comme désiré La monture ces-
sera de pivoter avant d'atteindre ce point Ou si vous prenez
une image d'un objet situé juste après le méridien, alors vous
pouvez définir cette limite pour permettre à la monture de
continuer à suivre dans la même direction après le méridien
sans avoir à « basculer » le télescope sur le côté opposé
de la monture (consultez la fonctionnalité Méridien exposée
ci-dessus ) Selon le premier exemple donné ci-dessous,
l'utilisateur pourrait faire pivoter le télescope en A D (azimut)
jusqu'à ce qu'il atteigne le point de tension des câbles maxi-
mum Ensuite, observez la position azimutale du télescope
(en vous reportant à l'option Obtenir la position axiale dans
le menu Utilitaires), vous pouvez déterminer la position du
télescope en azimut dans sa position la plus étendue Saisis-
sez les limites d'orientation azimutale maximum et minimum
pour garantir que le télescope ne se déplacera plus loin que
ce point Les limites d'orientation du télescope peuvent être
définies pour que le télescope s'arrête n'importe où entre
les angles 40° au dessus et 20° au dessous Pour définir les
limites d'orientation R A , sélectionnez les options suivantes :
• A.D. Limite Est – Saisissez un nombre entre +40° et
-20° pour définir la limite d'orientation lorsque le tube est
situé du côté est de la monture
• A.D. Limite Ouest – Saisissez un nombre entre +40° et
-20° pour définir la limite d'orientation lorsque le tube est
situé du côté ouest de la monture
• Désactiver limites - Cela permet d'ignorer toute valeur
précédemment saisie et permet donc à la monture de
suivre au maximum passé le méridien (donc -20° de
chaque côté)

FRANÇAIS | 21
AVERTISSEMENT : Pour permettre au télescope de se
déplacer vers une étoile depuis la direction qui limite la
quantité de rebond dans les engrenages, il pourrait être
nécessaire de faire en sorte que le télescope s'oriente
plus loin que les limites d'orientation saisie pour approcher
l'étoile depuis la direction correcte. Cela pourrait limiter votre
capacité à effectuer l'orientation vers un objet de 6° par rap-
port à la limite d'orientation A.D. définie dans la commande
à main. Si cela est un problème, la directionque le télescope
utiliser pour centrer un objet peut être modifiée. Pour modi-
fier la direction d'orientation du télescope, rendez-vous dans
l'option Approche aller à du menu de Réglage du télescope.
Taux personnalisé 9 - Cela vous permet de personnali-
ser la vitesse à laquelle la monture s'oriente vers une cible
Vous pouvez alors définir les axes A D et DEC de manière
individuelle
Menus Utilitaires
Parcourez le MENU (9) pour avoir accès à une variété d'op-
tions utilitaires avancées du télescope, comme Calibration
de la monture, Hibernation et bien d'autres encore
Calibration de la monture - Pour optimiser les perfor-
mances et la précision de pointage du télescope, la monture
est possède des routines de calibration lui permettant de
compenser les variations mécaniques communes à toute
monture équatoriale Allemande Chaque calibration est com-
plètement automatique et dans la majorité des cas ne doit
être effectuée qu'une fois Nous recommandons fortement
de prendre le temps d'effectuer la calibration de monture
• A.D. Basculement - Cette procédure enregistre la marge
d'erreur de décalage lorsque la marque d'index d'ascension
droite est alignée au démarrage Calibration de A D L'index
améliorera la précision de votre alignement d'origine pour
les alignements du télescope dans le futur
• Calibration Aller à - La calibration aller à est un outil
utile lorsqu'on fixe de lourds accessoires photographiques
au télescope La calibration aller à calcule la distance et
le temps nécessaire à la monture pour compléter son
orientation finale Aller à lors de l'orientation vers un objet
La modification de l'équilibre du télescope peut prolonger
le temps d'orientation complet La calibration Aller à tient
compte de tous les déséquilibres et modifie la distance
Aller à pour compenser
Position d'origine - La position d'« origine » est une posi-
tion personnalisable qui est utiliser pour ranger le télescope
lorsqu'il est inutilisé La position d'origine est utile lorsque le
télescope est rangé dans une installation d'observation per-
manente Par défaut la position d'Origine est la même que
la position d'index utilisée lorsque l'alignement de la monture
est effectué
Pour définir la position d'Origine de votre monture, utilisez
simplement les touches fléchées du contrôle manuel pour
orienter la monture dans la position désirée Sélectionnez
l'option Définir et appuyez sur Entrée
Sélectionnez l'option Aller à pour remettre le télescope en
position d'Origine à tout moment
Réglage d'Usine — Réinitialise la commande à main au
réglage d'usine original Les paramètres tels que valeurs de
compensation de rebond, date et heure initiales, longitude/
latitude ainsi que les limites de filtre et d'orientation seront
réinitialisées Cependant, les paramètres stockés tels que
les objets définis par l'utilisateur resteront intacts même si
Réglage d'Usine est sélectionné La commande à main vous
demandera d'appuyer sur le bouton «0» avant de revenir au
réglage d'usine par défaut
Version — Cette option vous permet de voir la version
courante de la commande à main et du logiciel de contrôle
du moteur Le premier ensemble de numéros indique la
version du logiciel de la commande à main Pour le contrôle
de moteur, la commande à main affichera deux ensembles
de numéros; les premiers numéros sont pour l'azimut et les
deuxièmes pour l'altitude
Obtenir Position de l'Axe — Affiche l'altitude et azimut
relatives pour l'emplacement actuel du télescope
Aller à position de l'axe — Vous permet d'entrer une po-
sition spécifique d'altitude et d'azimut et ensuite de l'orienter
vers ces cordonnées
Hibernation — Hibernation permet au télescope d'être hors
tension et de quand même retenir son alignement lors de la
mise sous tension Cela ne fait pas qu'épargner de l'énergie,
mais est idéal pour ceux laissent leur télescope monté en
tout temps ou qui laissent leur télescope en un emplacement
pour une longue période de temps Pour placer votre téles-
cope en mode Hibernation :
1 Sélectionner Hibernation du Menu Utilitaires
2 Positionnez le télescope à l'emplacement souhaité et
appuyez sur ENTRÉE
3 Éteignez le télescope Rappelez-vous de ne jamais dépla-
cer votre télescope manuellement alors que vous êtes en
mode de Mise en veille prolongée
Dès que le télescope est de nouveau sous tension, l'afficheur
devrait indiquer Réveil Après avoir appuyé sur ENTRÉE,
vous avez l'option de défiler à travers les informations sur les
heures et les sites pour confirmer le réglage actuel Appuyez
sur ENTRÉE pour réveiller le télescope
ASTUCE : Appuyer sur RETOUR à l'écran Réveil vous
permettra d'explorer les différentes fonctions du contrôle

22 | FRANÇAIS
manuel sans avoir à sortir le télescope de son mode d'hi-
bernation. Pour réveiller le télescope après avoir appuyé
sur RETOUR, sélectionnez Hibernation du menu Utilitaires
et appuyez sur ENTRÉE. N'utilisez pas les boutons de
direction pour orienter le télescope pendant le mode de
mise en veille prolongée.
Menu Soleil
Pour des raisons de sécurité, le Soleil ne sera pas affiché
en tant qu'objet de base de données à moins qu'il ne soit
auparavant activé Pour activer le Soleil, aller au menu Sun
et appuyer sur ENTRÉE Le Soleil sera alors affiché dans le
catalogue des Planètes et pourra être utilisé en tant qu'objet
d'alignement lors de l'utilisation de la méthode d'alignement
Système Solaire Pour retirer le Soleil de l'affichage de la
commande à main, encore une fois sélectionner le menu
Soleil du menu des Utilitaires et appuyer sur ENTRÉE
Réglage de position de monture [Set Mount Position]
L'option Position de monture peut être utilisée pour main-
tenir votre alignement si vous devez desserrer les jambes
ou situation similaire Par exemple, cette fonction est utilise
si vous devez équilibrer la monture de nouveau après avoir
effectué un alignement Pour définir la position de la monture,
effectuez un pivot vers une étoile brillante de la liste des
étoiles nommées, et sélectionnez Définir la Position de
monture La commande à main se synchronisera sur l'étoile
en vous demandant de centrer l'étoile dans l'oculaire et en
appuyant sur le bouton Aligner Une fois la synchronisation
effectuée, vous pouvez déplacer la monture sur les deux axes
pour l'équilibrer Une fois prêt à orienter le télescope vers
votre prochain objet, souvenez-vous de centrer l'étoile bril-
lante précédemment utilisée dans l'oculaire avec précision
Cet outil rendra invalide l'index PEC
Activer/désactiver le GPS - Si vous utilisez votre
télescope avec l'accessoire facultatif SkySync GPS, il sera
nécessaire d'activer le GPS lors de la première utilisation
de celui-ci Si vous désirez utiliser la base de données du
télescope pour trouver les coordonnées d'un objet céleste à
une date passée ou future, vous devrez désactiver le module
GPS afin d'être en mesure d'entrer manuellement la date et
heure autre que celle courante
Activer/désactiver RTC (Horloge en temps réel) -
Permet d'activer ou non l'horloge interne en temps réel du
télescope Pendant l'alignement, le télescope reçoit toujours
les informations mises à jour en temps réel de la RTC Si
vous désirez utiliser la base de données contrôle manuel
pour trouver les coordonnées d'un objet céleste à une date
passée ou future, vous devrez désactiver la RTC afin d'être
en mesure d'entrer manuellement la date et heure autre que
celle courante
Correction d'erreur périodique (PEC) - PEC est conçue
pour améliorer la qualité d'imagerie en réduisant l'amplitude
des erreurs introduites par la vis sans fin et ainsi améliorer
la précision du mouvement Cette fonctionnalité est conçue
pour l'astrophotographie avancée et est utilisée lorsque votre
télescope est aligné correctement polairement Pour plus
d'informations sur comment utiliser la PEC, reportez-vous à
la section du manuel concernant l'« Astrophotographie »
Menu des Objets personnalisés
L'appareil peut mémoriser jusqu'à 400 objets personnali-
sés différentes en mémoire Les objets peuvent être des
objets terrestres de jour ou un objet céleste intéressant que
vous avez découvert et qui n'est pas inclus dans la base de
données régulière Il y a plusieurs manières de conserver un
objet en mémoire dépendant du type d'objet :
Aller à l'objet : Pour aller à un objet défini par l'utilisateur
stocké dans la base de données, défiler vers la bas vers «
Aller à objet céleste » ou « Aller à objet terrestre » et entrer le
numéro de l'objet que vous désirez sélectionner et appuyer sur
ENTRÉE La commande à main récupérera automatiquement
et affichera les coordonnées avant de s'orienter vers l'objet
Conserver Objet Céleste (Save Sky Object) : Votre té-
lescope stocke les objets célestes dans sa base de données
en sauvegardant son ascension droite et sa déclinaison dans
le ciel De cette manière le même objet peut être localisé
chaque fois que le télescope est aligné Dès que l'objet
souhaité est centré dans l'oculaire, simplement défiler vers la
commande « Enregistrer objet céleste » et appuyer sur EN-
TRÉE L'afficheur vous demandera d'entre un nombre entre
1 et 1200 pour identifier l'objet Appuyez de nouveau sur
ENTRÉE pour conserver cet objet dans la base de données
Enregistrer dans Base de données (Db)
• Objet : Cette fonction vous permet de créer votre propre
visite guidée d'objets de la base de données en vous
permettant d'enregistrer la position actuelle du télescope et
de sauvegarder le nom de l'objet en le sélectionnant à partir
des catalogues de la base de données Ces objets peuvent
être retrouvés en sélectionnant Aller à objet céleste
• Saisir A.D. - Dec : Vous pouvez également stocker un en-
semble de coordonnées spécifiques d'un objet en entrant
l'ascension droite et la déclinaison pour cet objet Faites
défiler sur la commande «Saisir A D -DEC» et appuyer sur
ENTRÉE L'afficheur vous demandera d'entrer en premier
l'ascension droite et la déclinaison de l'objet souhaité
• Enregistrer objet terrestre : Le télescope peut égale-
ment être utilisé comme une lunette d'observation pour les
objets terrestres Les objets terrestres fixes peuvent être
stocké en conservant leur altitude et azimut relativement à
l'emplacement du télescope au moment de l'observation
Étant donné que ces objets dépendent de l'emplacement
du télescope, ils ne sont valides que pour cet emplace-
ment seulement Pour enregistrer des objets terrestres,
centrez l'objet souhaité dans l'oculaire Défiler vers le bas
à la commande « Enregistrer objet terrestre » et appuyez
sur ENTRÉE L'afficheur vous demandera d'entre un
nombre entre 1 et 200 pour identifier l'objet Appuyez de
nouveau sur ENTRÉE pour conserver cet objet dans la
base de données
Pour remplacer le contenu de tout objet défini par l'utilisateur,
simplement sauvegarder un nouvel objet en utilisant l'un des
numéros d'identification existant ; le télescope remplacera le
précédent objet défini par l'utilisateur par le nouvel objet

FRANÇAIS | 23
Obtenir A.D./DEC — Affiche l'ascension droite et déclinai-
son pour l'emplacement actuel du télescope
Aller à A.D./DEC — Vous permet d'entrer une ascension
droite spécifique et déclinaison et de l'orienter vers celle-ci
Astuce : Pour enregistrer un ensemble de coordonnées
(R A /Dec ) de manière permanente dans la base de don-
nées, enregistrez-le comme Objet personnalisé comme
décrit ci-dessus
Identification
Le mode Identification recherchera dans les listes
ou catalogues de la base de données de la monture
et affichera le nom et distances décalées des objets
correspondants le plus proches Cette fonction peut être
utile dans deux cas Tout d'abord, elle peut permettre
d'identifier un objet non identifié contenu dans le champ de
l'oculaire De plus, le mode Identification peut être utilisé
pour trouver d'autres objets célestes qui sont proches des
objets observés Par exemple, si votre télescope est pointé
vers l'étoile la plus brillante de la constellation Lyra, en
choisissant le mode Identification et ensuite en cherchant
dans le catalogue Étoile Nommée retournera sans aucun
doute l'étoile Véga comme étoile que vous observez
actuellement Cependant, en sélectionnant le mode
Identification et en cherchant dans le catalogue Messier
ou Objet Nommé, la commande à main vous indiquera que
la Nébuleuse de l'Anneau (M57) se trouve à 6° de votre
position présente En cherchant dans le catalogue Étoile
Binaire, vous remarquerez que Epsilon Lyrae se trouve à
1° de Véga Pour utiliser la fonction Identification :
• Appuyez sur le bouton Menu et sélectionnez l'option Identi-
fication
• Utilisez les touches de défilement Haut et Bas pour
sélectionner le catalogue dans lequel vous aimeriez faire
la recherche
• Appuyez sur ENTRÉE pour débuter la recherche
NOTE: Certaines bases de données contiennent des
milliers d’objets et cela pourrait prendre une minute
ou deux avant de revenir à l’objet le plus proche.
Aller à précis
La monture possède une fonction Aller à précise qui peut
vous aider à trouver les objets très pâles et effectuer le
centrage sur un objet précis pour l'astrophotographie Aller
à précis recherche automatiquement l'étoile brillante la plus
proche de l'objet désiré et demande à l'utilisateur d'effectuer
le centrage de l'oculaire avec précision La commande à
main calcule ensuite la petite différence entre la position Aller
à et sa position centrée En utilisant cette différence, la mon-
ture s'oriente ensuite sur l'objet désiré avec une précision
améliorée
Pour utiliser Aller à précis:
1 Appuyer sur le bouton MENU et utiliser les flèches Haut
et Bas pour sélectionner Aller à précis
• Choisissez la base de données pour sélectionner l'objet
que vous désirez observer depuis son contenu ou ;
• Choisissez R A /DEC pour saisir les coordonnées
célestes vers lesquelles s'orienter
2 Une fois l'objet désiré sélectionné, la commande à main
recherchera puis affichera l'étoile la plus proche de votre
objet désiré Appuyez sur ENTRÉE pour orienter vers la
planète brillante d'alignement
3 Utilisez les touches de direction pour centrer l'étoile
d'alignement avec précision dans l'oculaire
4 Appuyez sur ENTRÉE pour orienter vers l'objet désiré
Annexe A:
Mettre à Jour le Logiciel Interne
de Votre Monture et de Votre
Commande à Main
Pour savoir si une nouvelle mise à jour est disponible, consultez
cette URL:
http://software celestron com/updates/CFM/CFM/
1 Branchez la commande à main NexStar+ dans le port
AUX1 ou AUX2
2 Branchez un câble standard USB B entre la monture
et votre PC
3 Branchez puis allumez la CGX
4 Lancez le Gestionnaire des Micrologiciels Celestron (CFM)
5 CFM inspectera votre matériel et recherchera des mises à
jour CFM détectera automatiquement quels composants
doivent être mis à jour
6 Cliquez sur « Mettre à jour » dans CFM et attendez que
les mises à jour se terminent
Annexe B:
Nettoyage et Entretien
La monture CGX est solide et vous accompagnera pendant
de longues années si vous en prenez bien soin
Rangement
Bien que la monture et ses composants électroniques
soient conçus pour une utilisation en extérieur, ne la rangez
pas en extérieur à moins qu’elle ne soit protégée par un
observatoire ou dans un lieu fermé (par exemple dans
un garage) L’exposition constante à la chaleur, au froid
ou à l’humidité peut entraîner l’usure des composants
électroniques, des lubrifiants de la mécanique et de la
surface de la monture Rangez dans un lieu protégé, hors
de la lumière directe du Soleil Ranger dans un lieu sec
autant que possible
24 | FRANÇAIS
AVERTISSEMENT SOLAIRE: N’essayez jamais d’observer le soleil avec un télescope.
BESOIN D’ASSISTANCE ? Contactez l’assistance technique de Celestron
celestron com/pages/technical-support
©2024 Celestron Celestron et le Symbol sont des marques déposées de Celestron, LLC •
Tous droits réservés • Celestron com
US: 2835 Columbia Street, Torrance, CA 90503 É -U
UK: Unit 2 Transigo, Gables Way, Thatcham RG19 4JZ, United Kingdom
Ce produit est conçu et prévu pour être utilisé par des personnes âgées de 14 ans et plus
Les photos illustrant cette boîte sont présentes dans un but décoratif et ne sont pas
représentatives de ce qui peut être observé avec ce produit
www celestron com/pages/warranty
Fabriqué en Chine | 09-24
Remarque FCC: Cet équipement a été testé et jugé conforme aux limites établies
pour un dispositif numérique de classe B, conformément à la partie 15 de la
réglementation de la FCC Ces limites ont étés mises en place pour offrir une
protection raisonnable contre les interférences dans un complexe résidentiel Cet
équipement génère et peut émettre des fréquences radio et, s’il n’est pas installé
et utilisé conformément aux instructions du manuel, peut causer des interférences
nuisibles aux communications radio Mais il n’existe aucune garantie que des
interférences ne seront pas produites dans une installation particulière Si cet
équipement crée des interférences pour la réception radio ou télévisuelle, ce qui peut
être constaté en l’allumant et en l’éteignant, alors il vous est conseillé d’y remédier
d’une des manières suivantes :
• Réorientez ou déplacez l’antenne de réception
• Augmentez la distance séparant l’équipement et le récepteur
• Connectez l’équipement à une prise ou à un circuit différent de celui du récepteur
• Contactez le revendeur ou un technicien radio ou TV d’expérience pour obtenir de
l’assistance
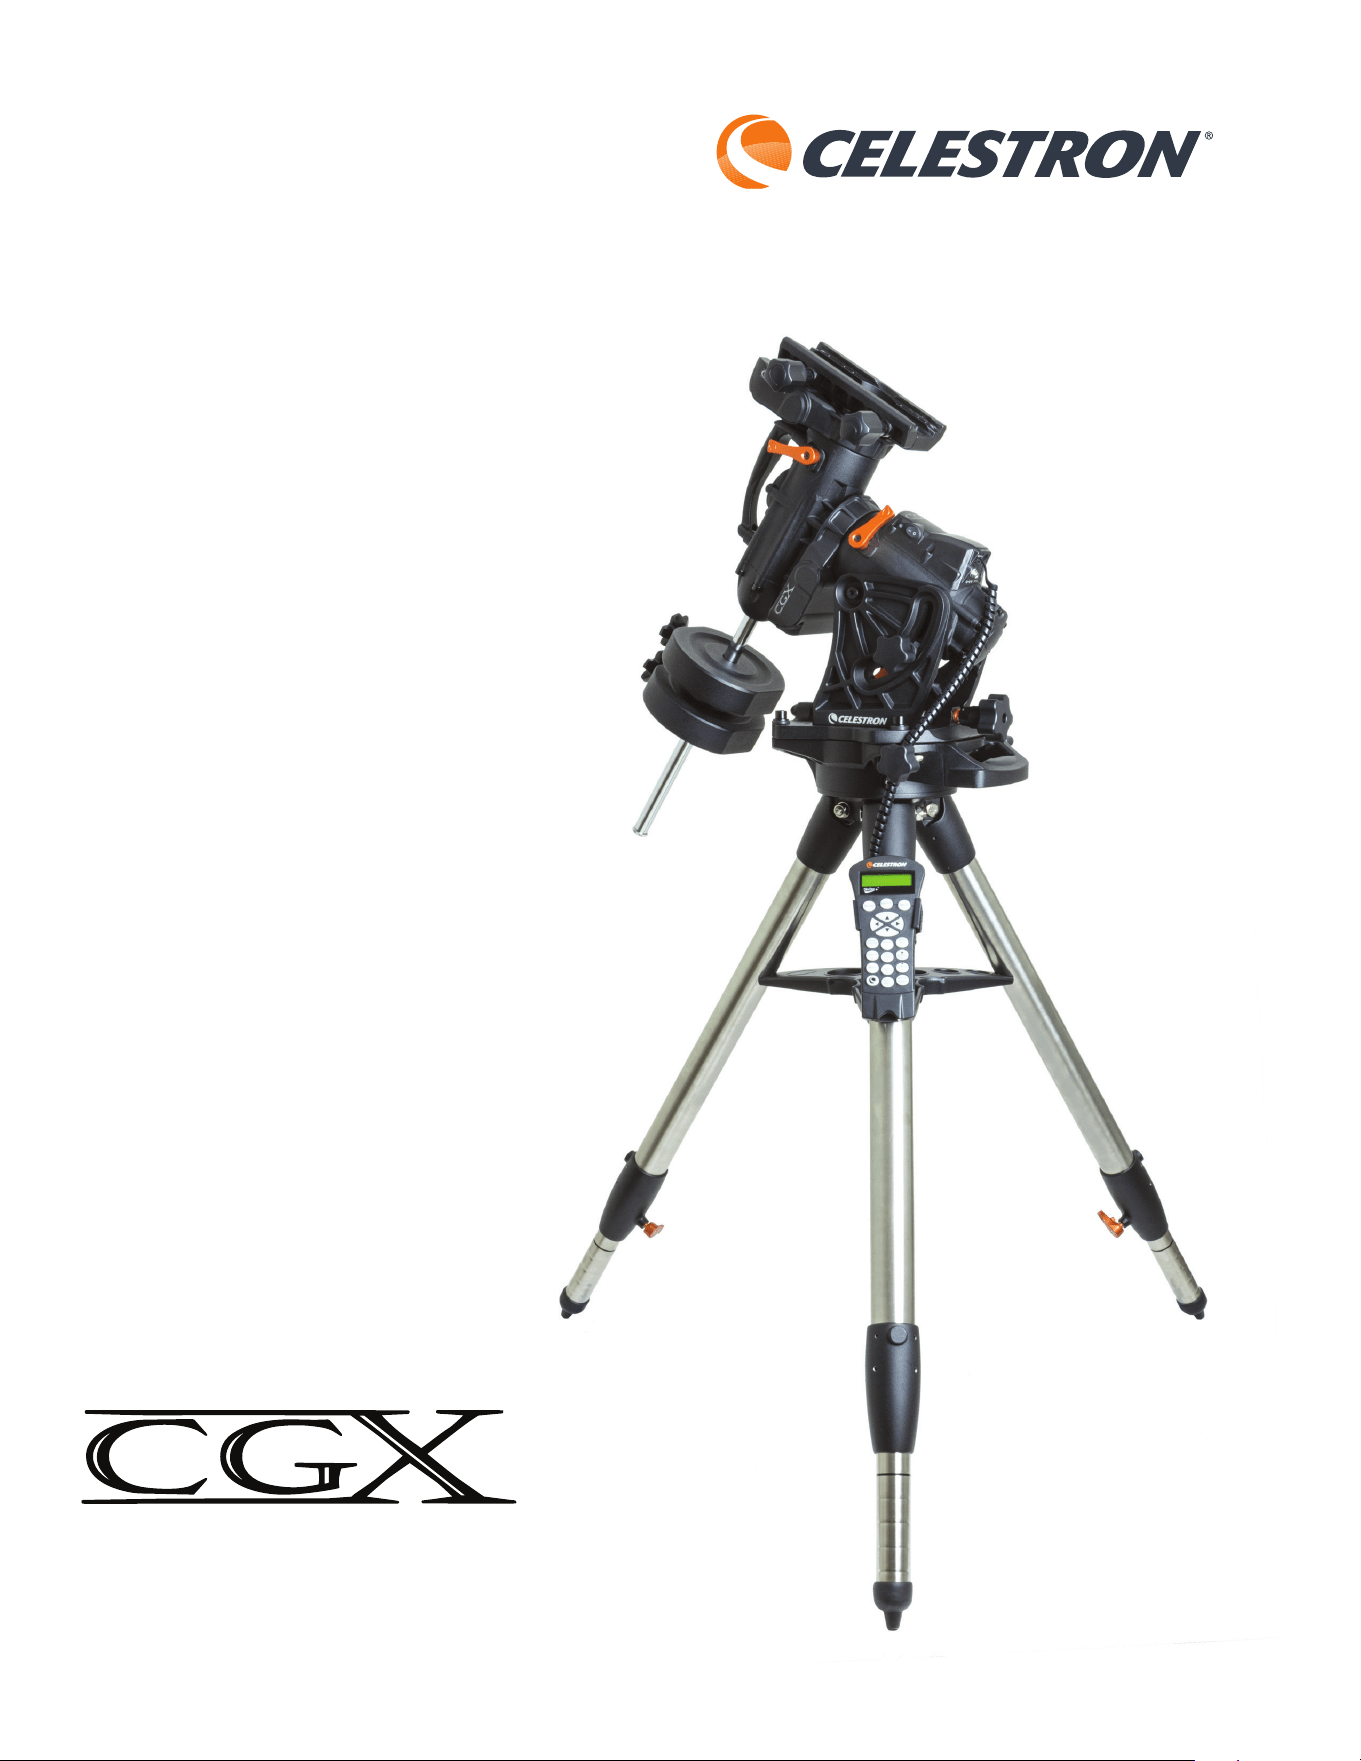
BEDIENUNGSANLEITUNG
Modell 91530-1
TELESKOPE MIT ÄQUATORIALER MONTIERUNG

2 | DEUTSCH

DEUTSCH | 3
INHALTSVERZEICHNIS
Einleitung 4
Systemvoraussetzungen 4
Teileliste 4
Übersicht 5
Zusammenbau 7
Grundlegende Bedienung 9
Polausrichtung der Montierung 10
Präzise Polausrichtung 11
Bewegungsbereich der Montierung 11
Die Montierung auf sehr hohe bzw niedrige Breitengrade einstellen 12
USB-Port 12
AUX-Ports 12
Autoguide-Port 12
NexStar+ Handsteuerung 13
Objektkatalog 17
Zu einem Objekt Schwenken 17
Anhang A: Firmware-Upgrade der Montierung und Handsteuerung 23
Anhang B: Pflege und Instandhaltung 23

4 | DEUTSCH
Einleitung
Warnung
• Niemals mit bloßem Auge oder mit einem Teleskop direkt
in die Sonne schauen (außer bei Verwendung eines
vorschriftsmäßigen Sonnenfilters) Permanente und
irreversible Augenschäden können daraus resultieren
• Das Teleskop keinesfalls zur Projektion eines Sonnenbildes
auf eine Oberfläche verwenden Durch die interne Wär-
meakkumulation können das Teleskop und etwaiges daran
angeschlossenes Zubehör beschädigt werden
• Niemals einen Okularsonnenfilter oder einen Herschelkeil
verwenden Die interne Wärmeakkumulation im Teleskop
kann zu Rissen oder Brüchen dieser Instrumente führen
Dadurch könnte ungefiltertes Sonnenlicht ins Auge gelangen
• Das Teleskop niemals unbeaufsichtigt lassen Sicherstellen,
dass ein mit der korrekten Bedienung Ihres Teleskops
vertrauter Erwachsener ständig präsent ist, besonders bei
der Anwesenheit von Kindern
Systemvoraussetzungen
• Das CGX benötigt 12 Volt Gleichstrom mit mindestens
4 Ampere Celestron bietet eine Wechselstrom- auf
Gleichstromzufuhr von 12 V 5 A sowie einen empfohlenen
Zylinderstecker mit Gewinde an Auch tragbare Feldbat-
terien mit 12 Volt eignen sich als Stromversorgung Die
Montierung umfasst ein Gleichstromkabel mit Stecker für
den Zigarettenanzünder
• Das Teleskop erfordert entweder eine CG-5/Vixen
oder eine CGE/Losmandy D-Schwalbenschwanz-Mon-
tagestange Die CGX eignet sich für beide Größen des
Schwalbenschwanzsattels
• Für eine optimale Leistung sollte die gesamte Teleskop-
Nutzlast ohne Gegengewichte 55 lbs (25 kg), nicht
überschreiten
• Windows 7/10 eignet sich für die Teleskop-Steuerungs-
software
• USB-Kabel mit Standard-A-Stecker bei Anschluss an den
USB-Port der Montierung (nur für den PC)
• Kreuzschlitzschraubendreher (optional, nur für die
Getriebeeinstellung)
Teileliste
Box 1: 91530-1 CGX Äquatorialmontierung
CGX Äquatorialmontierungskopf
8 mm Inbusschlüssel (unverlierbar im hinteren Griff
der Montierung)
Gegengewichtsstange und Anschlagmutter
3 x 8 mm Innensechskantschrauben (zum Anbringen
des Kopfs am Stativ)
12 V DC Stromkabel
NexStar+ Handsteuerung
Box 2: CGX Stativ und Gegengewichte
Stativ
2 x 5 kg (11 lbs) Gegengewichte
Zubehörablage
Drehknopf und Unterlegscheibe der Ablage (mit
Gewinde für die Mittelsäule des Stativs)
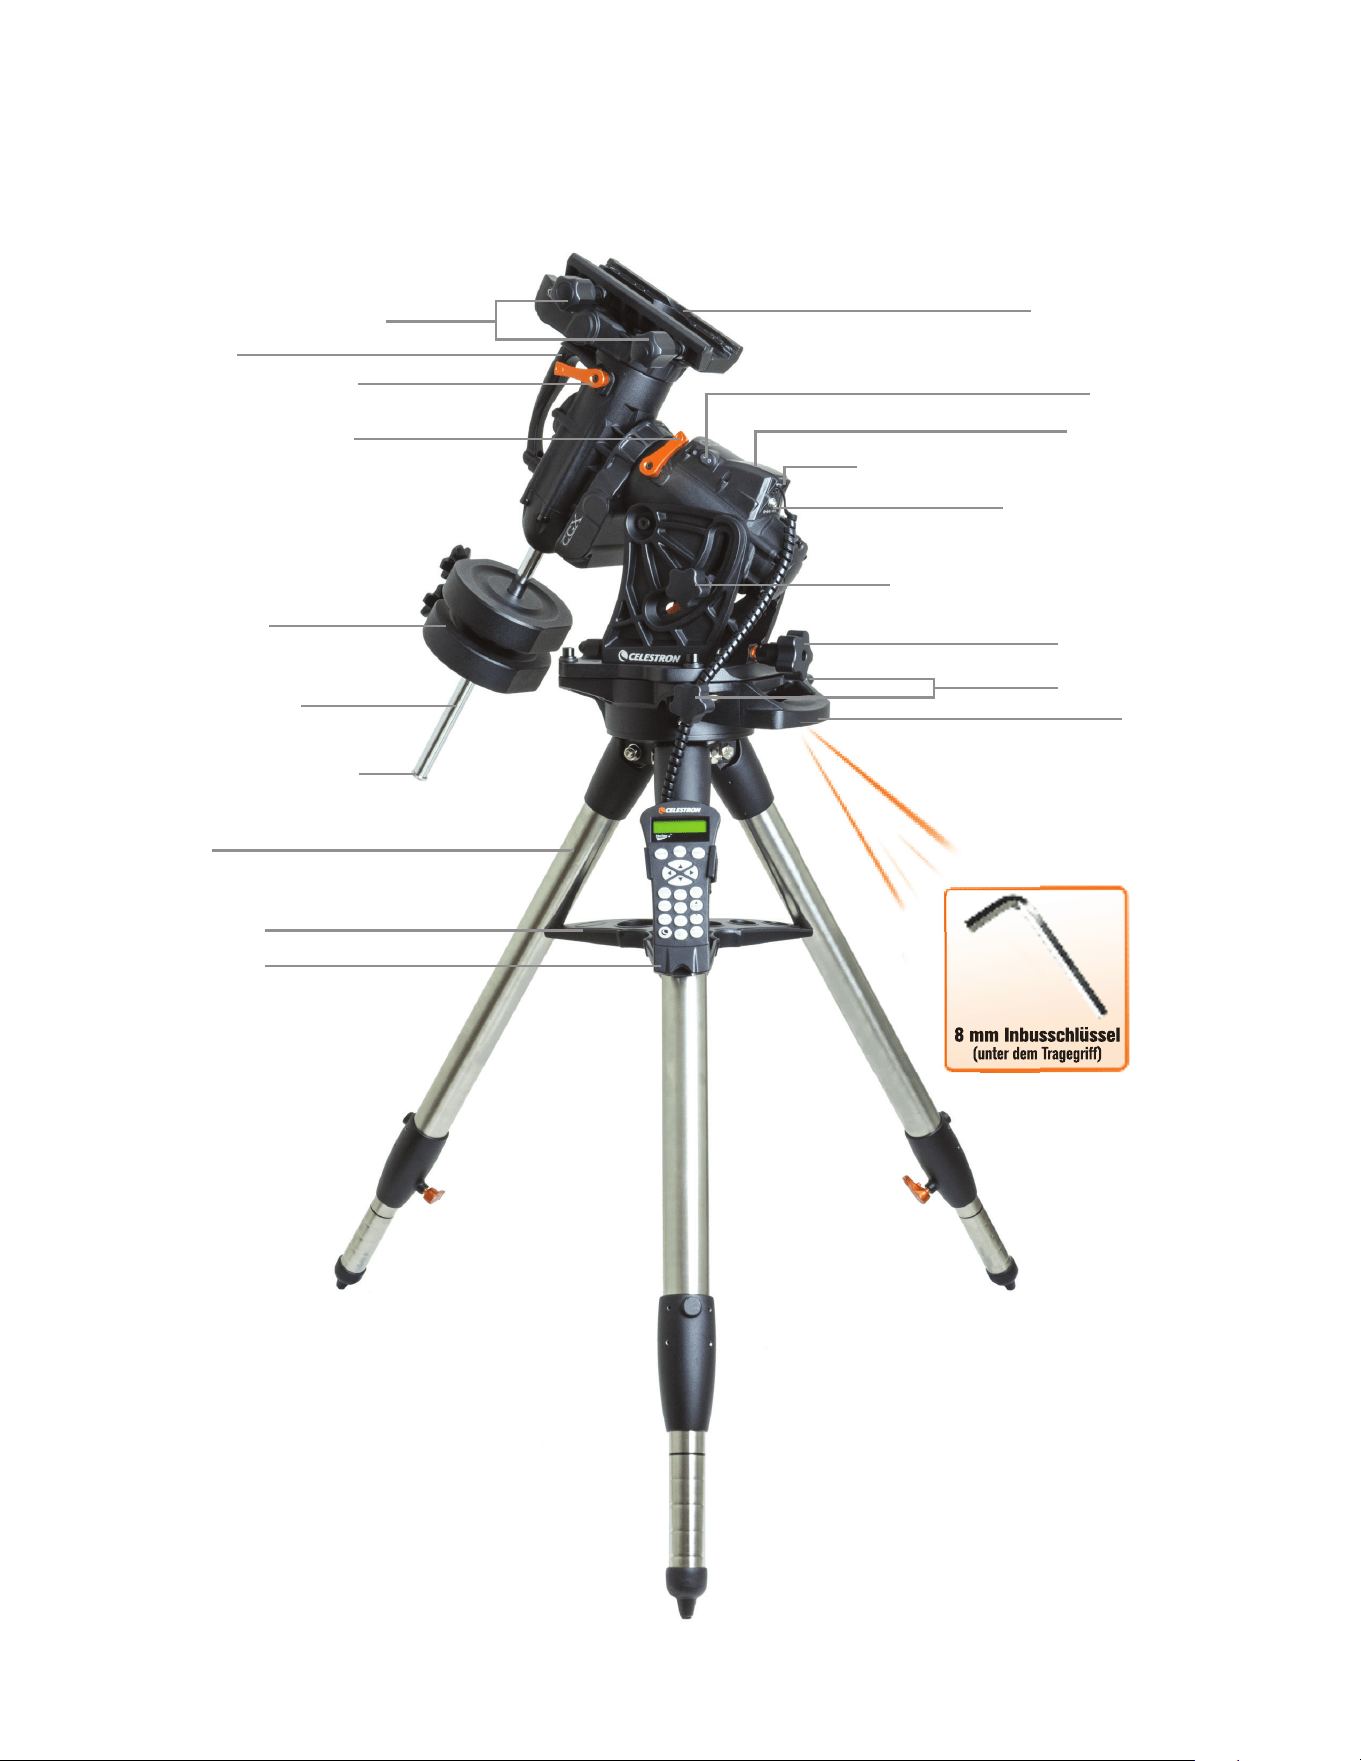
DEUTSCH | 5
Übersicht
Abb. 1.1 Übersicht
8 mm Inbusschlüssel
(unter dem Tragegriff)
Schwalbenschwanz-Arretierungen
Tragegriff
DEK-Kupplungsfeststellhebel
R.A. Kupplungsfeststellhebel
Gegengewichtsschaft
Gegengewichte
Gegengewicht-Anschlagmutter
Stativ
Zubehörablage
Handsteuerung
Schwalbenschwanzsattel
Aux1 und Aux2 Ports für Handsteuerung und Zubehör
12 V DC 4A Eingangsleistung
Breitengrad-Arretierungen (einer auf jeder Seite)
Höhen-Einstellknopf
Azimut-Einstellknopf
Tragegriff
An-/Ausschalter
Siehe Abbildung 1.2
8 mm Inbusschlüssel
(unter dem Tragegriff)
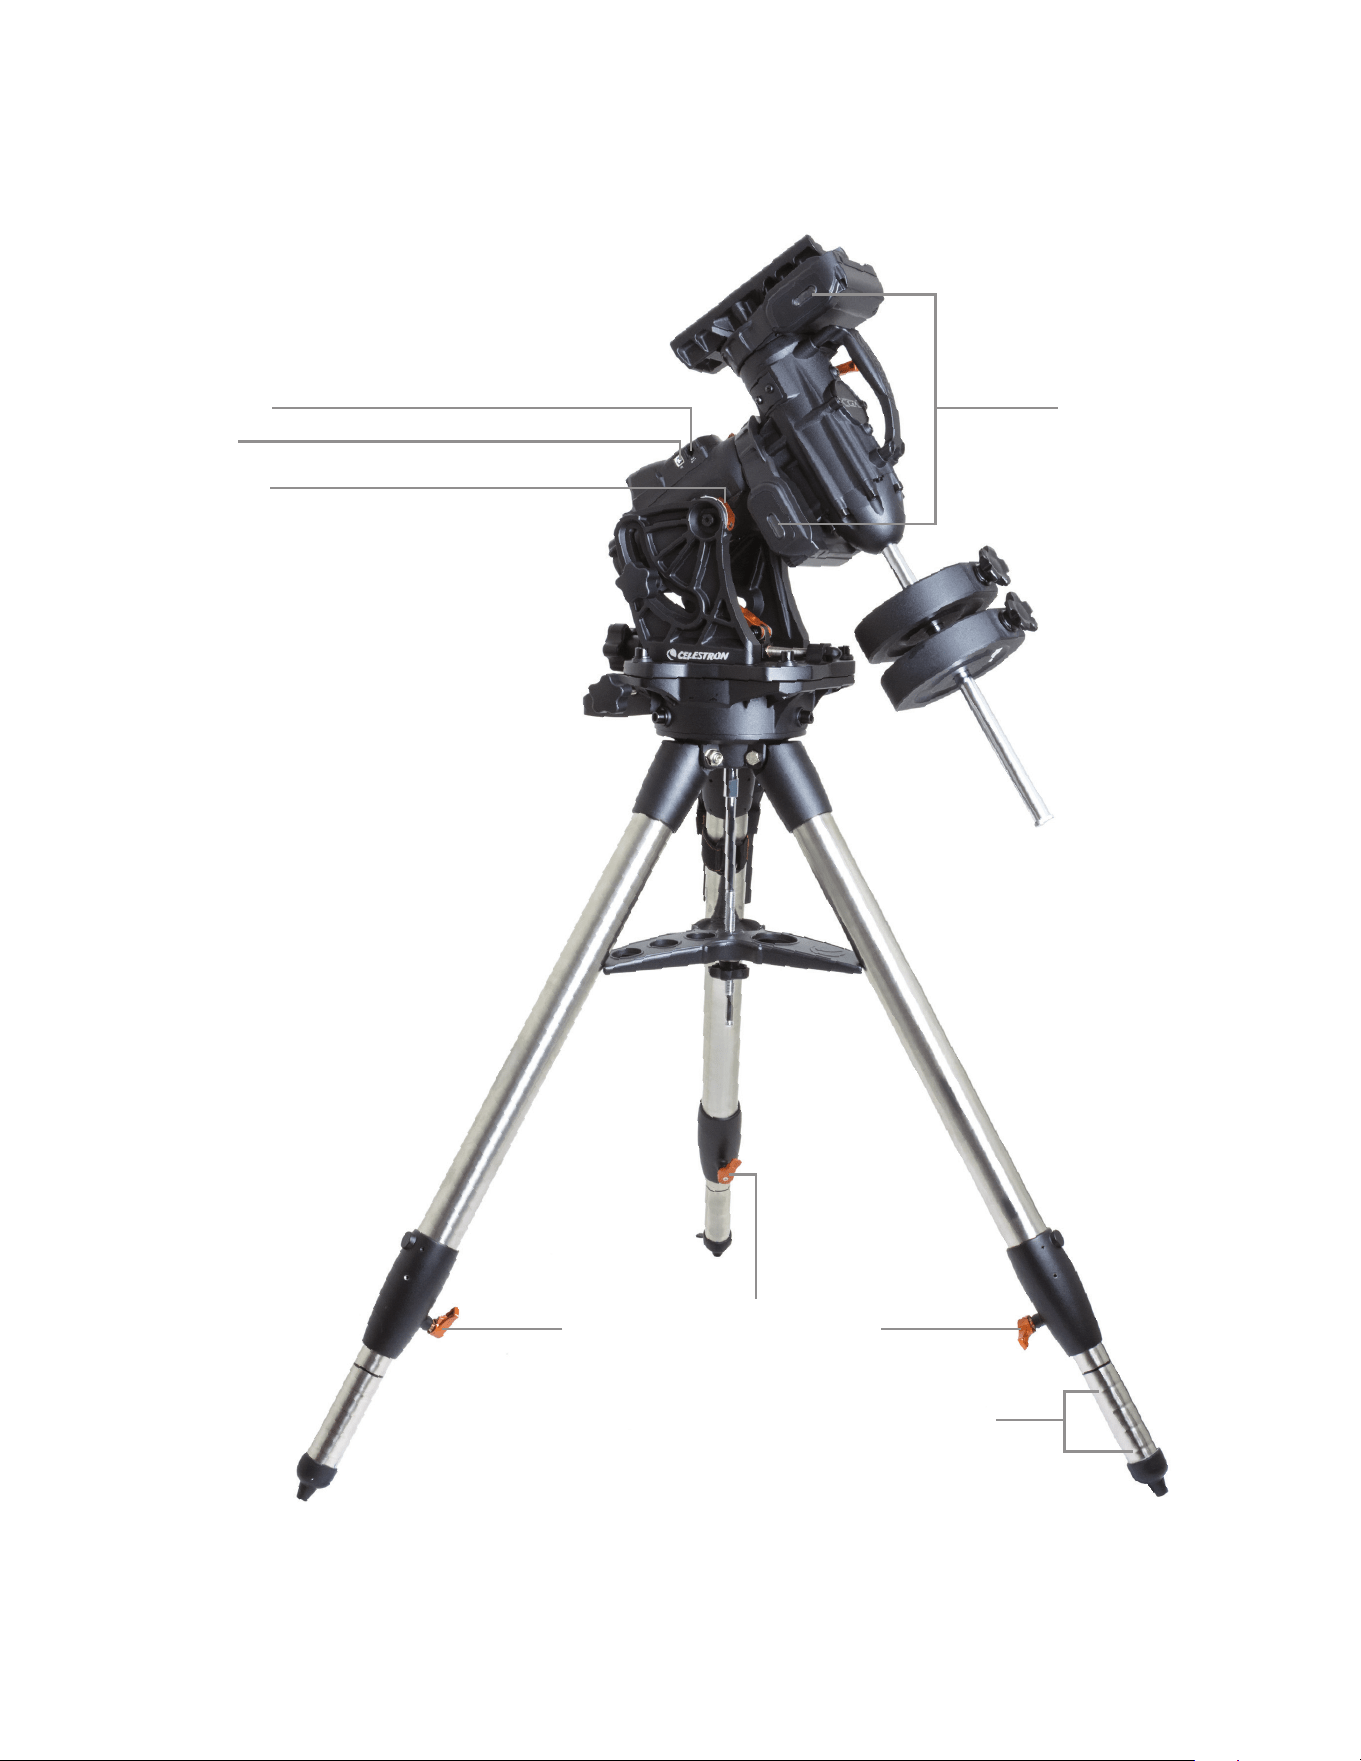
6 | DEUTSCH
Abb. 1.2 Übersicht
Autoguide-Port
Riementriebfenster
USB-Port
Breitenskalen
Feststellhebel für die höhenverstellbaren Beine
Markierungen der höhenverstellbaren Beine
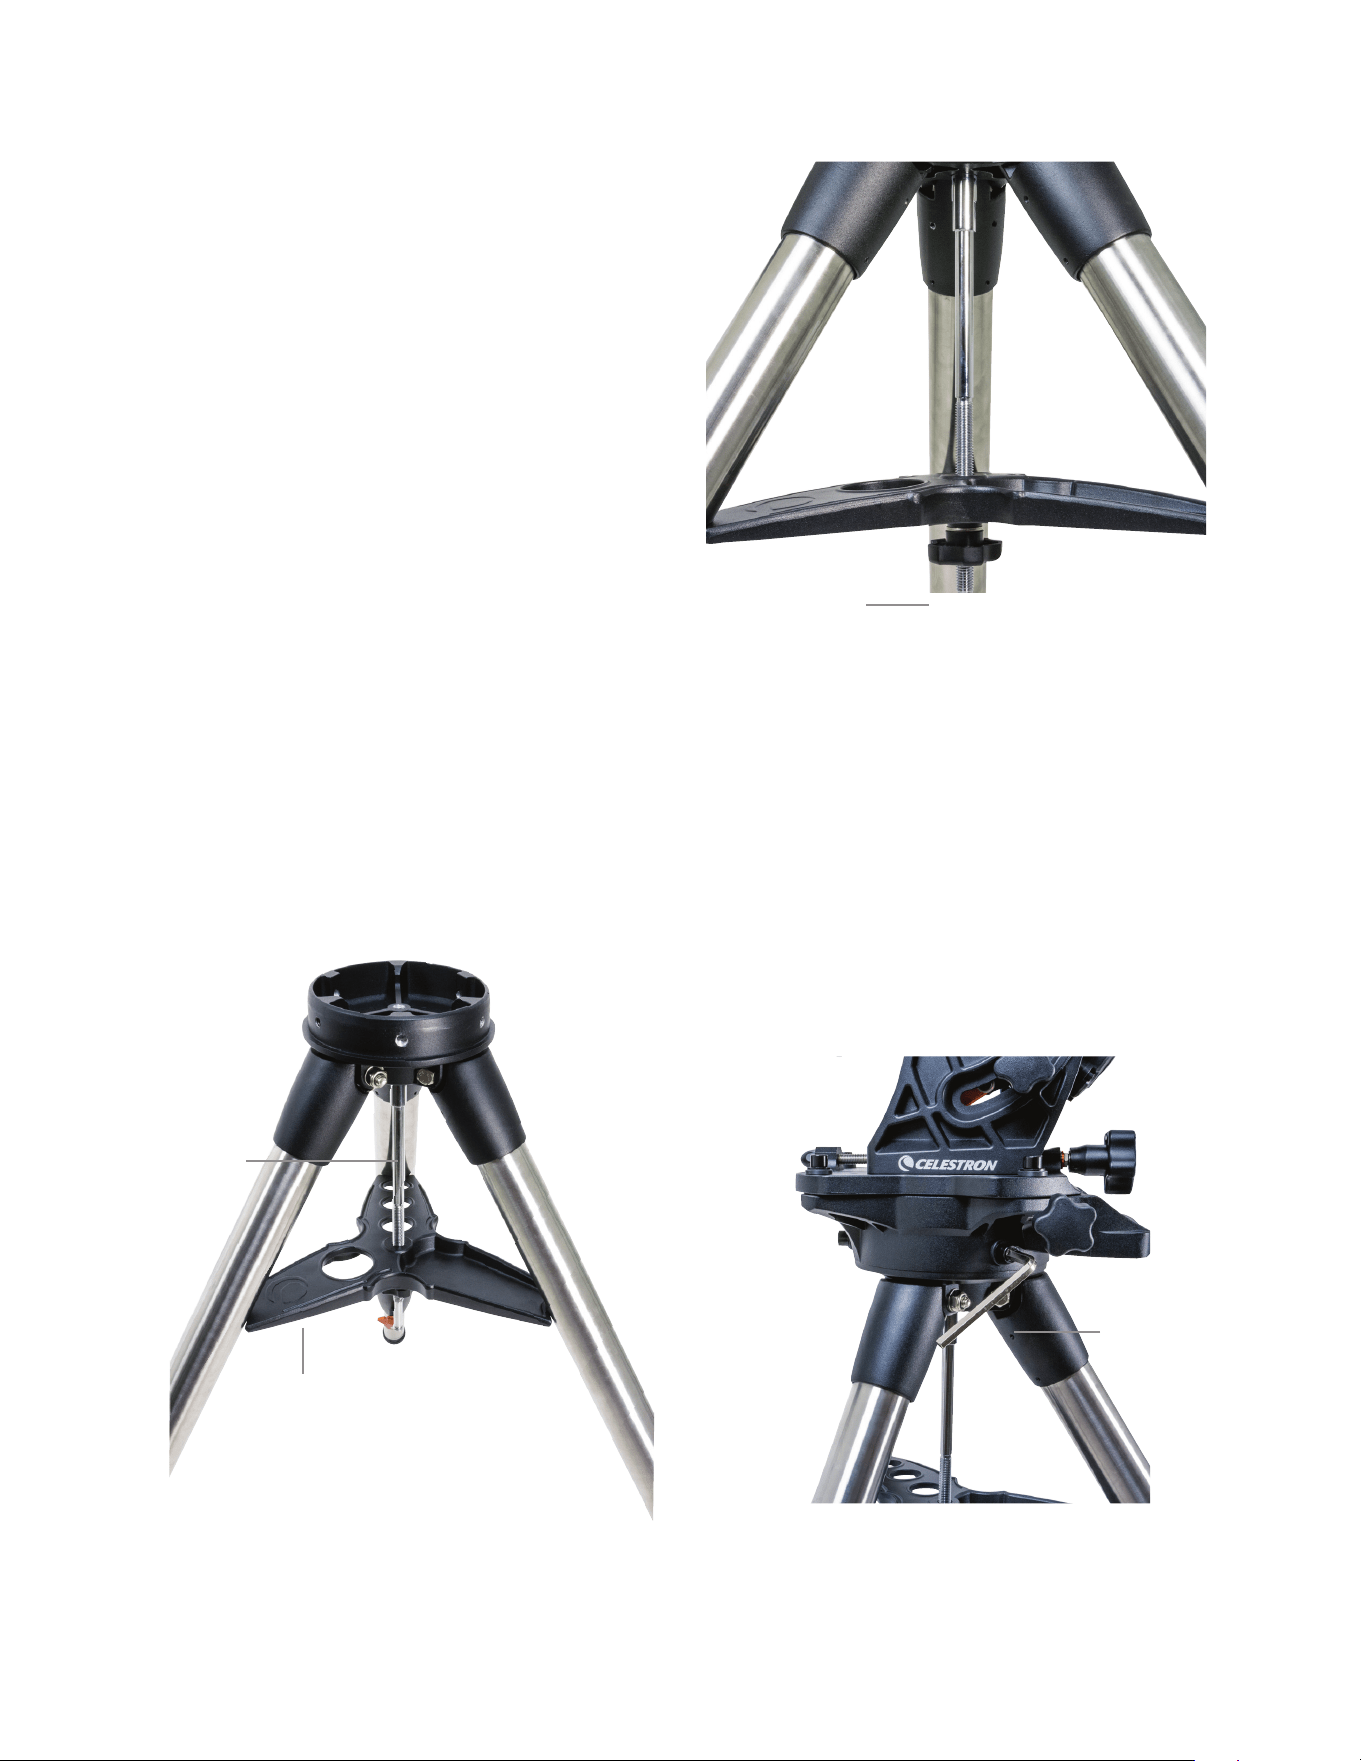
DEUTSCH | 7
Zusammenbau
Alles auspacken und unter Beachtung der nun folgenden
Schritte montieren Wenn Sie die CGX an sich erworben
haben, enthält das Stativ zwei Gegengewichte ja 5 kg Wenn
Sie die CGX mit einem großen optischen Tubus erworben
haben, können weitere Gewichte zum Ausbalancieren
inbegriffen sein
Hinweis: Der im Lieferumfang enthaltene 8-mm-
Inbusschlüssel befindet sich unter dem hinteren Griff
der Halterung, wie in Abbildung 1.1 gezeigt.
Das Stativ aufstellen
1 Stellen Sie das Stativ aufrecht hin und ziehen Sie die Sta-
tivbeine nach außen, bis alle Beine vollständig
ausgezogen sind
2 Nehmen Sie Mutter und Unterlegscheibe oben von der
Mittelsäule ab (Abbildungen 2 1 & 2 2)
3 Schieben Sie die Zubehörablage über die Mittelsäule,
sodass jeder Ablagearm ein Stativbein stützt
4 Mutter und Unterlegscheibe wieder auf die Gewindesäule
aufdrehen und anziehen Die Zubehörablage darf sich nicht
gegen das Stativ bewegen lassen (Abbildungen 2 1 & 2 2)
5 Stellen Sie die Stativhöhe ein, indem Sie die Fest-
stellknöpfe am Ende jedes Stativbeins losdrehen Passen
Sie nun ggf die Länge der Stativbeine an und drehen
Sie die Feststellhebel nacheinander wieder fest Die
Markierungen an jedem Stativbein dienen der leichten
Nivellierung
Die Montierung am Stativ befestigen
1 Platzieren Sie den Kopf so auf dem Stativ, dass er sicher
auf er Gegenfläche sitzt
2 Richten Sie die Montierung für eine optimale Stabilität so
aus, dass die Gegenwelle direkt über einem Stativbein
liegen, wie in den Abbildungen 1 1 und 1 2 gezeigt Beach-
ten Sie, dass Sie die Montierung so ausrichten können,
dass die Gegengewichte zwischen zwei der Stativbeine lie-
gen, was in niedrigen Breiten nützlich sein kann, damit die
Gegengewichte mehr Freiraum zum Stativ aufweisen
3 Mit dem mitgelieferten 8-mm-Inbusschlüssel (Abbildung
3) werden die drei Befestigungsschrauben an der Montie-
rung befestigt
Abbildung 2.1 Stativaufbau
Abbildung 2.2 Stativaufbau
Abbildung 3 Die Montierung am Stativ befestigen
Zubehörablage
Mittelsäule
Mutter und Unterlegscheibe
der Stativhalterung
Inbusschlüssel

8 | DEUTSCH
Grobe Polausrichtung der Montierung
Richten Sie die Montierung grob nach Norden (in der süd-
lichen Hemisphäre nach Süden) aus und stellen Sie Ihre
geografischen Breite ein, bevor Sie Montierung und Stativ
mit zusätzlichen Gewichten versehen Lösen Sie die beiden
Höhen-Arretierknöpfe, drehen Sie den Höheneinstellungs-
knopf (Abbildung 1 1), bis Sie Ihre Breite auf den in der
Breitenskala (Abbildung 1 2) angegebenen Wert eingestellt
haben und ziehen Sie die Arretierknöpfe wieder an Die
Skala ist nur für eine grobe Polausrichtung vorgesehen
Eine genauere polare Ausrichtung kann später mit Hilfe der
computergestützten Hand fest vorgenommen werden
Die Gegengewichte anbringen
Entfernen Sie die Anschlagmutter am Ende der Gegen-
gewichtsstange, bringen Sie die Gegengewichte an und
drehen Sie die Anschlagmutter wieder auf Halten Sie die
Gegengewichtsstange nach unten gerichtet
(Abbildung 1,1)
Anbringen des Teleskops an die Montierung
1 Stellen Sie sicher, dass die R A - und DEK-Kupplungs-
hebel angezogen sind
2 Lösen Sie die Arretierknöpfe des Schwalbenschwanzsat-
tels so weit, dass der Schwalbenschwanz auf den Sattel
geschoben werden kann Beachten Sie, dass der Pfeil
in die gleiche Richtung wie der vordere Handgriff zeigen
soll (Abbildung 4)
3 Schieben Sie die Schwalbenschwanzführung des Tele-
skops auf den Schwalbenschwanzsattel der Montierung
Ziehen Sie das Teleskop mit Hilfe der beiden Verriege-
lungsknöpfe (Abbildung 5) in seiner Position fest
Die CGX eignet sich für den Celestron CGE Schwalben-
schwanz und den kleineren CG-5 Schwalbenschwanz
sowie für den Losmandy D
1
und Vixen
2
Schwalbenschwanz
1
Testen Sie Ihre Losmandy-Schwalbenschwanzführung vor
dem Befestigen Ihres Teleskops an der Montierung auf
einen festen Sitz Die Größen und Schwalbenschwanz-
winkel können von Hersteller zu Hersteller variieren
2
Testen Sie Ihre Vixen-Schwalbenschwanzführung vor dem
Befestigen Ihres Teleskops an der Montierung auf einen
festen Sitz Einige Vixen-Schwalbenschwanzverbindungen
sind nicht flach und haben entlang der Stange unter-
schiedliche Höhen Je nach Länge der flachen Anteile
kann die Passform des Schwalbenschwanzsattels an der
Montierung beeinträchtigt werden
Abbildung 4 Die Montierung am Stativ befestigen
Die Montierung ausbalancieren
Rektaszensionsachse: Vorsichtig den Kupplungshebel für
R A entriegeln und den Schaft des Gegengewichts horizon-
tal ausrichten Prüfen Sie ohne das Teleskop loszulassen,
auf welche Seite sich das Gegengewicht neigt Verschieben
Sie die Gegengewichte ggf , sodass sich die R A -Achse bei
entriegelter Kupplung nicht bewegt
Deklinationsachse: Den Kupplungshebel für DEK bei ho-
rizontalem Gegengewichtsschaft vorsichtig entriegeln und
beobachten, in welche Richtung sich der optische Tubus
ausbalanciert (Abbildung 6) Schieben Sie den optischen
Tubus zum Ausbalancieren nach Bedarf nach vorne oder
hinten Bei großen und schweren Teleskopen sollten Sie
das Teleskop in die Ausgangsposition bringe, bevor Sie die
Arretierknöpfe des Schwalbenschwanzsattels lösen
Abbildung 5 Teleskop-Schwalbenschwanz ausrichten und fixieren
Abbildung 6 Ausbalancieren der Montierung
Schwalbenschwanz-
Ausrichtungspfeil
Schwalbenschwanz-
Arretierungen
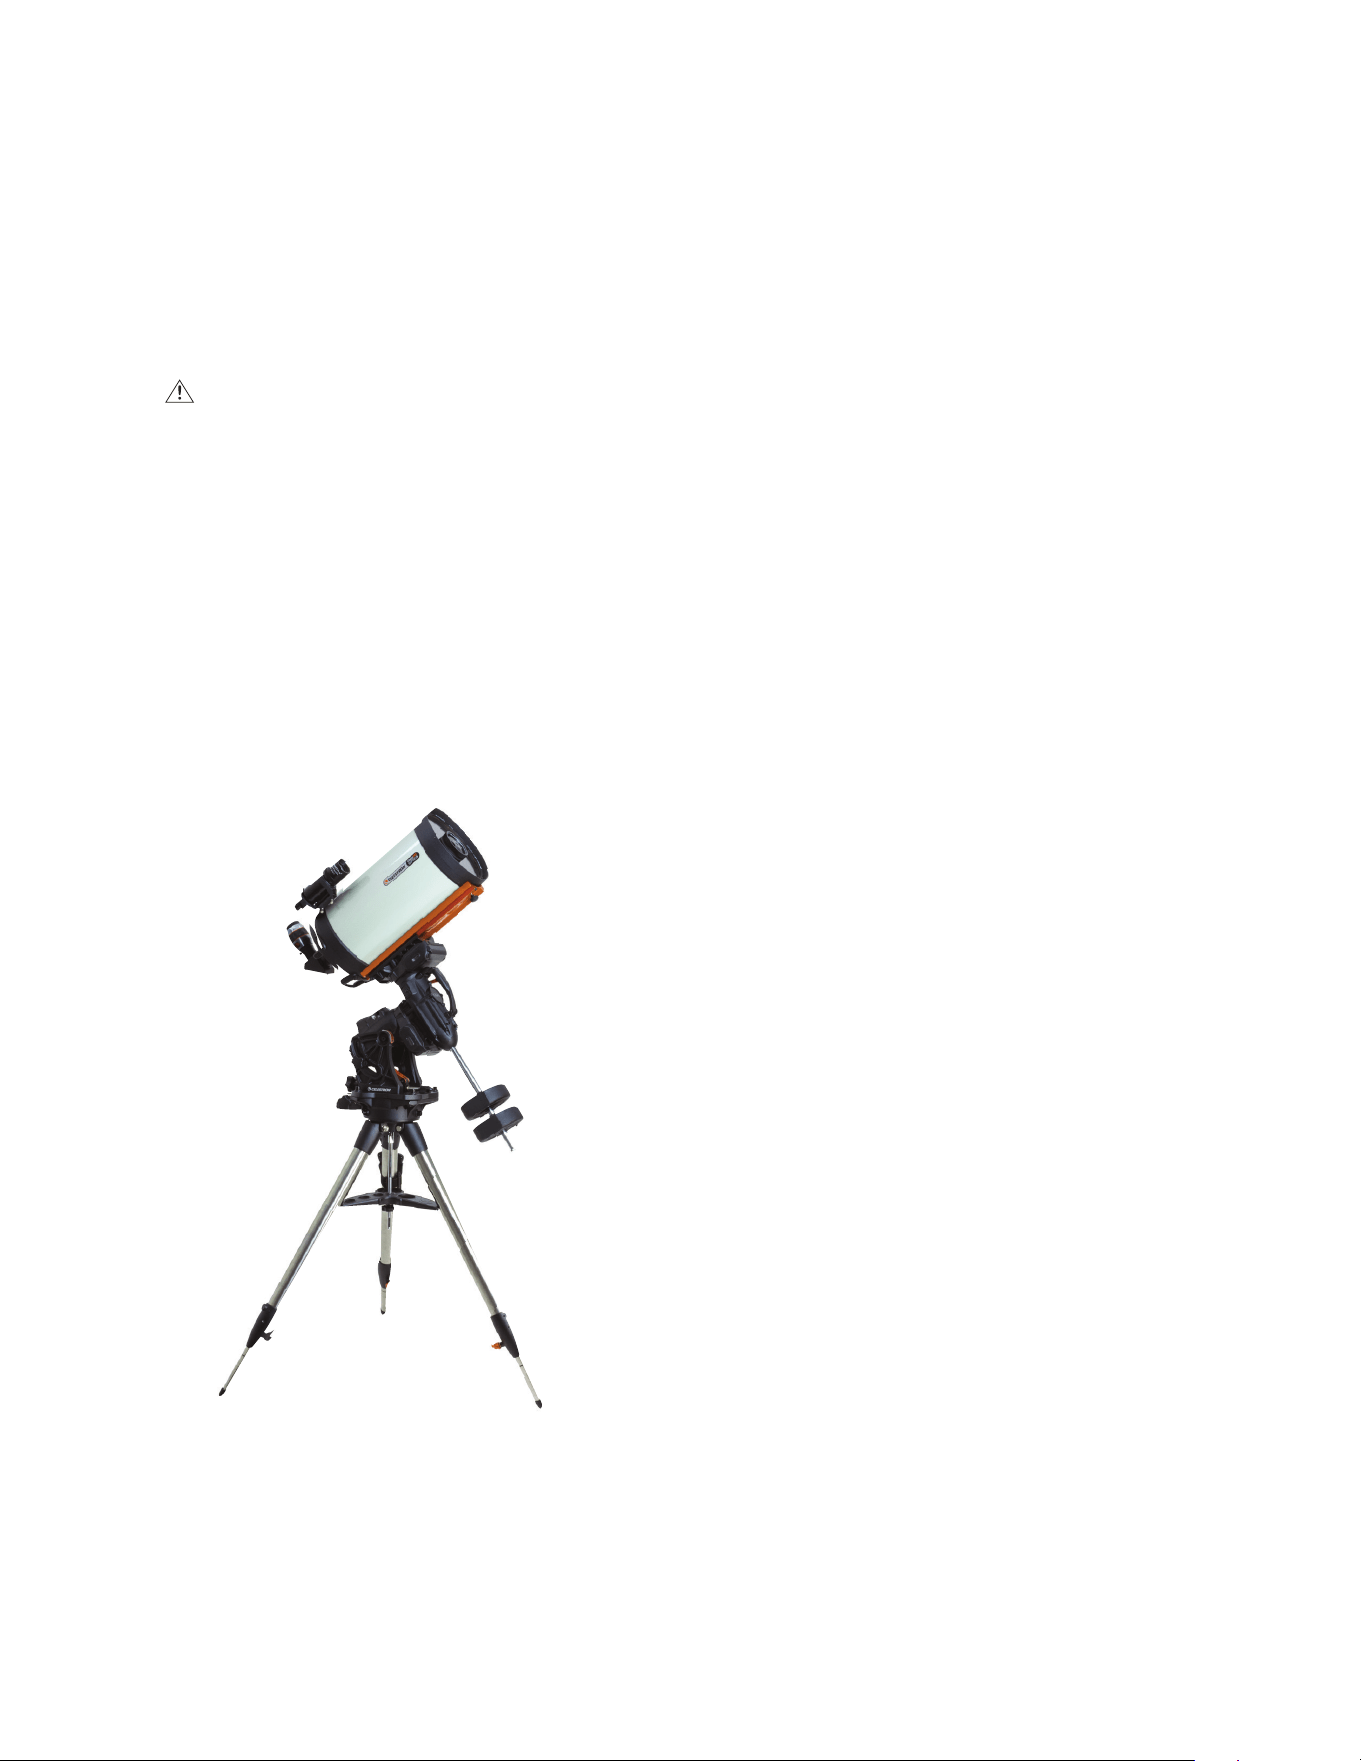
DEUTSCH | 9
Anbringen der Handsteuerungshalterung
Wickeln Sie Klettverschluss und Holster um das Stativ und
legen Sie die Handsteuerung in das Holster
Handsteuerung anschließen
Schließen Sie die mitgelieferte NexStar + Handsteuerung an
einen der Aux-Anschlüsse an
Warnung: Schließen Sie die Handsteuerung nicht an
den Autoguide-Port an. Handsteuerung und Montierung
könnten dadurch Schaden nehmen. In ähnlicher Weise
sollten Sie zur Vermeidung von Beschädigungen das
Autoguider-Kabel nicht an den AUX-Anschluss anschließen.
Ausgangsposition
Die Montierung befindet sich in der Ausgangsposition, wenn
der Gegengewichtsschaft nach unten zeigt und das Teleskop
wie dargestellt entlang der polaren Achse der Montierung
verläuft (Abbildung 7) Die internen Schalter der Montierung
bringen diese beim Einschalten in die Ausgangsposition
(mehr dazu in "Grundlegende Bedienung") Eine manuelle
Ausrichtung ist vor dem Einschalten natürlich auch möglich
Dazu werden einfach die beiden Feststellhebel gelöst
Grundlegende Bedienung
Ist Ihre Montierung zusammengebaut und polar ausgerichtet,
können Sie mit die Montierung einrichten:
Die Montierung stromversorgen
Die CGX-Montierung kann durch den mitgelieferten Autobat-
terieadapter an eine 12VDC Batteriequelle angeschlossen
werden, die mindestens 4 Ampere Strom liefert Alternativ
können Sie einen optionalen Netzadapter mit 12 V DC und 4
Ampere Strom nutzen AC-Netzadapter mit Gewinderohran-
schlüssen werden von Celestron zur Verfügung gestellt
Ausgangsposition und Standortdaten
1 Schließen Sie die mitgelieferte NexStar + Handsteuerung
an einen der Aux-Anschlüsse an Die Anschluss erfolgt
über Aux 1 oder Aux 2
2 Schließen Sie das Stromkabel an den Netzanschluss der
Montierung an Achten Sie darauf, das Netzkabel mit dem
Gewinderohranschluss zu verbinden
3 Den Netzschalter auf einschalten
4 Zeigt die Handsteuerung “CGX Ready” an, zweimal auf
ENTER drücken Die Montierung fährt in die
Ausgangsposition
5 Städte-Datenbank oder benutzerdefinierter Standort
wählen
• Wählen Sie in der Städte-Datenbank den Ihrem Standort
am nächsten liegenden Ort
• Wenn sie benutzerdefinierten Standort auswählen,
müssen Sie Längengrad, Breitengrad und Zeitzone Ihres
Standorts eingeben
6 Nach Eingabe des Standorts werden Datum und Uhrzeit
eingegeben Die CGX verfügt über eine Echtzeituhr
(RTC für Real-Time Clock), die Datum, Uhrzeit und
Standortinformationen für die nächste Verwendung Ihrer
Montierung speichert
Ausrichtung
Voraussetzung: Die Montierung muss grob polar ausge-
richtet sein, damit Datum, Uhrzeit und Standortinformationen
korrekt eingegeben werden können, wie im vorigen Schritt
beschrieben.
1 Wählen Sie für eine optimale Ausrichtung zwei Sternen-
ausrichtungen (Star Align) und drücken Sie auf ENTER
Oder wählen Sie aus Sonnensystem, Ein Stern, Letzte Aus-
richtung oder Schnellausrichtung. Mit den Navigationstasten
6 und 9 auf der Tastatur können Sie durch jede Listenaus-
wahl in der Handsteuerung blättern.
Abbildung 7 Teleskop in der Ausgangsposition

10 | DEUTSCH
2 Wählen Sie den ersten Stern aus der Liste benannter
Sterne Blättern Sie mithilfe der Navigationstasten
6 (aufwärts) und 9 (abwärts) auf der Tastatur durch
die benannten Sterne Sie enthalten den hellsten und
am leichtesten zu findenden Stern Drücken Sie auf
ENTER, wenn Sie einen geeigneten Stern ausgewählt
haben Wenn Ihre Montierung zumindest grob polar
ausgerichtet ist, schwenkt sie in die ungefähre Position
zu diesem Stern
Standardmäßig sind Sterne auf der Westseite des
Meridians ausgewählt. Wenn Ihr Himmel im Westen bedeckt
ist, können Sie Sterne auf der Ostseite des Meridians aus-
wählen. Drücken Sie auf der Tastatur auf die MENÜ-Taste.
3 Schwenken Sie das Teleskop mithilfe der Richtungstasten
zum ausgewählten Stern, zentrieren Sie diesen in der
Mitte des Sucherfernrohr und drücken Sie auf ENTER
Die Montierung passt die Motordrehzahl automatisch für die
Feinabstimmung an
4 Zentrieren Sie den Stern nun im Okular Ihres Teleskops
und drücken Sie auf ALIGN
5 Wählen Sie einen zweiten Stern aus der Liste und wieder-
holen Sie den Vorgang der Schritten 2-4 Wenn Sie dazu
aufgefordert werden, einen Kalibrierungssterne hinzuzu-
fügen, können Sie entweder auf ZURÜCK drücken, um
die Ausrichtung abzuschließen oder optimalerweise einen
Kalibrierungssterne hinzufügen
Fügen Sie für optimale Ergebnisse mindestens einen
Kalibrierungsstern hinzu. Dadurch wird die Zeigegenau-
igkeit Ihres Teleskops erhöht.
6 Wenn Sie dazu aufgefordert werden, einen "Kalibrie-
rungsstern hinzuzufügen", können sie einen Stern aus der
Liste auswählen und auf ENTER drücken Die Montierung
schwenkt nun auf die andere Seite des Meridians, um
einen Kalibrierungsstern hinzuzufügen
7 Dieser Stern wird wie die ersten beiden Ausrichtungsster-
ne zentriert und ausgerichtet: Zentrieren Sie ihn im Sucher,
drücken Sie auf ENTER, zentrieren Sie den Stern nun um
Okular und drücken Sie auf ALIGN
8 Wenn Sie dazu aufgefordert werden, einen weiteren
Kalibrierungssterne hinzuzufügen, können Sie entweder
auf ZURÜCK drücken, um die Ausrichtung abzuschließen
Objekt auswählen
Auswählen können Sie aus der Objektdatenbank, die nach
Sonnensystem, Sternen und extrasolaren Objekten katego-
risiert ist Innerhalb dieser Menüs (auf der Tastatur Nummern
1, 2 und 3 können Sie Objektnamen oder beliebte Katalog-
nummer (wie M42 für Messier 42) auswählen
Mit den Navigationstasten 6 und 9 auf der Tastatur können
Sie durch jede Listenauswahl in der Handsteuerung blättern
ENTER drücken, um das ausgewählte Objekt in der Liste
aufzurufen
Beispiel für die Auswahl und das Schwenken zum extrasolaren
Himmelsobjekt Messier M42
• Drücken Sie auf DEEP SKY und dann auf ENTER
• Blättern Sie nach unten (Tastatur 9) zu Messier und
drücken Sie ENTER
• Drücken Sie "0-4-2" auf der Tastatur und drücken
Sie ENTER
Mit der Himmelstour (Tastatur 5) können Sie den Himmel
erforschen, ohne eine Sternkarte zu konsultieren Die Tour-
Funktion generiert eine Liste der interessantesten Objekte,
die zu Ihrer Zeit an Ihrem Standort zu beobachten sind
Polausrichtung der Montierung
Das computergesteuerte Go-To kann Objekte selbst dann
orten, wenn die Montierung nicht perfekt polar ausgerichtet
ist Allerdings ist die polare Ausrichtung notwendig, um die
beste Nachführgenauigkeit Ihrer Montierung zu erreichen
Und sie ist die Grundlage der Astrofotografie Eine polar
ausgerichtete parallaktische Montierung führt in einer Be-
wegung über den Himmel nach, wobei das Objekt im Okular
oder der Kamera zentriert bleibt
Das Polarausrichtungssystem der CGX besteht aus einer
Höhen- und einer Azimuteinstellung (Abbildung 8)
Celestron bietet einen optionalen Polsucher an, der an
die Montierung angebracht wird Der optionale Polsucher
passiert nicht die R A -Achse, da dieser Bereich der internen
Verkabelung vorbehalten ist Wenn Sie keinen optionalen
Polsucher verwenden, können Sie die grobe polare Ausrich-
tung erzielen, indem Sie durch den Sucher des Teleskops
blicken und Polaris im Okular zentrieren Dies bringt Sie etwa
drei Viertel eines Grade an den nördlichen Himmelspol heran
(NCP für North Celestial Pole)
Abbildung 8 Polarausrichtungseinstellung
Azimut-Einstellknöpfe
Höhen-Einstellknöpfe
Höhenfeststellknöpfe

DEUTSCH | 11
Präzise Polausrichtung
Die All-Star Polar Ausrichtung von Celestron ermöglicht
es Ihnen, Ihre Montierung präzise polar auszurichten, ohne
Polaris oder einen Polsucher zu verwenden Diese Soft-
ware-unterstützte Poljustierung ermöglicht Ihnen die Auswahl
eines geeigneten Sterns
Voraussetzung: Die CGX muss mit an zwei Sternen,
einem Stern, oder der Ausrichtung am Sonnensystem
(Solar System Align) ausgerichtet werden.
1 Wählen Sie einen geeigneten hellen Stern aus der Daten-
bank der NexStar-Handsteuerung aus Schwenken Sie
das Teleskop auf den Stern
2 Drücken Sie auf die ALIGN-Taste Wählen Sie "Polaus-
richtung" und dann "Montierung ausrichten" aus der
Liste aus
3 Das Teleskop schwenkt nun erneut auf den Ausrich-
tungsstern und fordert Sie dazu auf, diesen im Okular zu
zentrieren, damit der Stern "synchronisiert" werden kann
4 Drücken Sie auf Ausrichten, um das Teleskop jetzt in die
Position zu schwenken, in der sich der Stern befinden
sollte, wenn die Polausrichtung exakt ausgeführt wurde
5 Nutzen Sie die Höhen- und Azimutjustierung der Mon-
tierung, um den Stern mittig im Okular zu platzieren Ver-
wenden Sie zum Zentrieren des Sterns jedoch nicht die
Richtungstasten auf der Handsteuerung
6 Drücken Sie auf ENTER Die polare Ausrichtung ist ab-
geschlossen
Bewegungsbereich der
Montierung
Softwarebereich
Die CGX verfügt über eine Software mit Grenzsensoren, die
erkennen, wenn sich die Montierung ihren mechanischen
Grenzen annähert Sobald die Montierung den Schalter
erreicht, bremst der Motor bis zum Stillstand ab und es wird
ein "Endschalter"-Warnhinweis angezeigt Die Montierung
schwenkt nicht weiter in die Richtung des Endschalter, bis
Sie die Richtung umkehren
Mechanischer Bereich
Die CGX verwendet eine interne Verkabelung Damit ist die
Montierung für die Bewegung innerhalb eines bestimmten
Bereichs ausgelegt Beide Achsen werden durch einen
harten Anschlag begrenzt Dieser begrenzte Bereich kann
auch ungewollte Interferenzen zwischen Ihrem Teleskop und
der Halterung oder dem Stativ verhindern Falls die Mon-
tierung aus irgendeinem Grund den Software-Endschalter
überschreitet (oder falls die Kupplung entriegelt ist und die
Montierung manuell bewegt wird), stoppt die Montierung am
harten Anschlag Die RA-Schwenkgrenze (Abbildung 9 1)
ermöglicht das Nachführen von 20º über den Meridian hin-
aus Wenn Sie die nachführende Montierung unbeaufsichtigt
lassen, stoppt sie automatisch, bevor der mechanische harte
Anschlag erreicht ist Die DEK-Schwenkgrenze (Abbildung
9 2) weist genügend Spielraum auf, um auf jeden Teil des
Himmels zu schwenken
Abbildung 9.1 Eine Seite der mechanischen RA-Grenze
Abbildung 9.2 Eine Seite der mechanischen DEK-Grenze
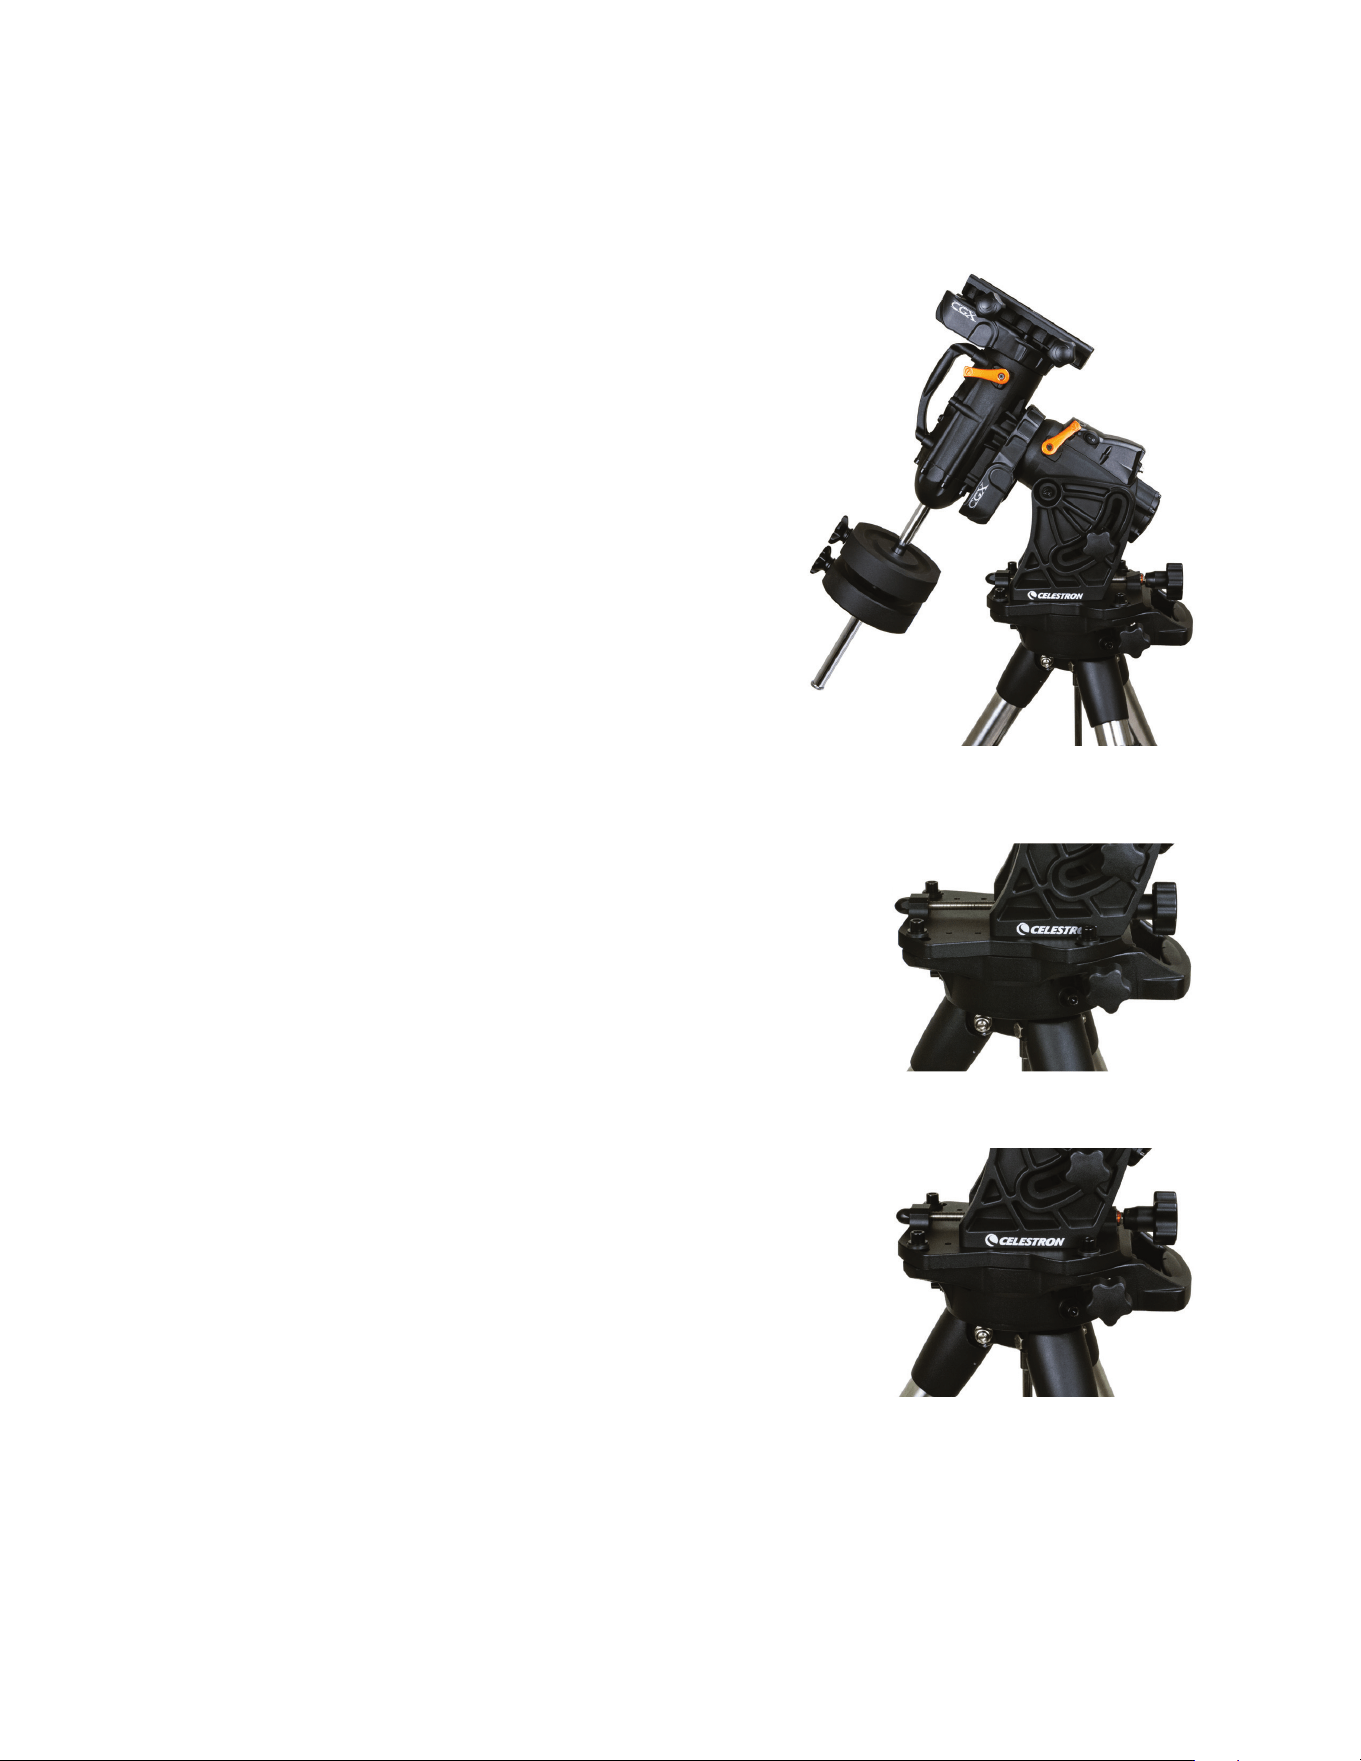
12 | DEUTSCH
Die Montierung auf sehr hohe bzw.
niedrige Breitengrade einstellen
Der EQ-Kopf kann in drei verschiedenen Positionen am Stativ
positioniert werden Diese drei Positionen können auch für
eine optimierte Balance über dem Stativ genutzt werden
Die Montierung wird in der Mittelposition geliefert, was sich
für Breitengrade zwischen 20 und 55° eignet Wenn Sie die
Montierung für Breitengrade unter 20° verwenden möchten,
müssen Sie die Montierung nach vorne schieben Wenn Sie
Breitengrade über 55° anvisieren möchten, muss die Montie-
rung nach hinten geschoben werden
1 Entfernen Sie den Kopf vom Stativ, indem sie die drei
Inbusschrauben entfernen
2 Entfernen Sie vorsichtig die 8 Innensechskantschrauben
unter dem Kopf Sobald sie entfernt sind, sichert nur noch
der Höhenanpassungsmechanismus die Bodenplatte des
EQ-Kopfs
3 Drehen Sie den Höhen-Einstellknopf, bis die Ge-
windebohrungen auf der Unterseite der Montierung
mit denLöchern auf der Bodenplatte eine Linie bilden
Verschieben Sie die Platte nach vorn (in Richtung des
Gegengewichtsschafts), wenn Sie sie für niedrigere
Breiten verwenden möchten Verschieben Sie die Platte
nach hinten (in
Richtung des Höhen-Einstellknopfs), wenn Sie sie für
höhere Breiten verwenden möchten (Abbildung 10)
USB-Port
Der USB-Port der CGX kann nur als Verbindung zu Ihren
PC verwendet werden:
1 Mit der speziellen Teleskop-Steuerungssoftware verwenden
2 Firmware-Upgrade der Motorsteuerung in der Montie-
rung
Einfach ein Standard-USB-A-Typ-Kabel an den USB-Port
der Montierung und an Ihren PC anschließen Die Montie-
rung sollte automatisch installiert werden
Der USB-Port an der Montierung kann nicht mit ASCOM
oder einer Teleskop-Steuerungssoftware eines Dritt-
anbieters verwendet werden. Um die Montierung über
ASCOM zu steuern, müssen Sie Ihren PC an den Mini-
USB-Port der NexStar+ Handsteuerung anschließen.
Aux-Ports
Aux 1 und Aux 2 können für die NexStar+ Handsteuerung
sowie für optionales Zubehör, wie StarSense AutoAlign und
SkyPortal WiFi-Modul verwendet werden
Autoguide-Port
Der Autoguide-Port sollte nur für die Nachführungsrelais der
Kamera verwendet werden
VORSICHT: Schließen Sie niemals die NexStar + Hand-
steuerung oder anderes Zubehör an den Autoguider-Port
an. Dies könnte zu Schäden führen.
Abbildung 10 Ändern der Montierungsposition auf dem Stativkopf
MITTELPOSITION
RÜCKWÄRTSPOSITION
VORWÄRTSPOSITION
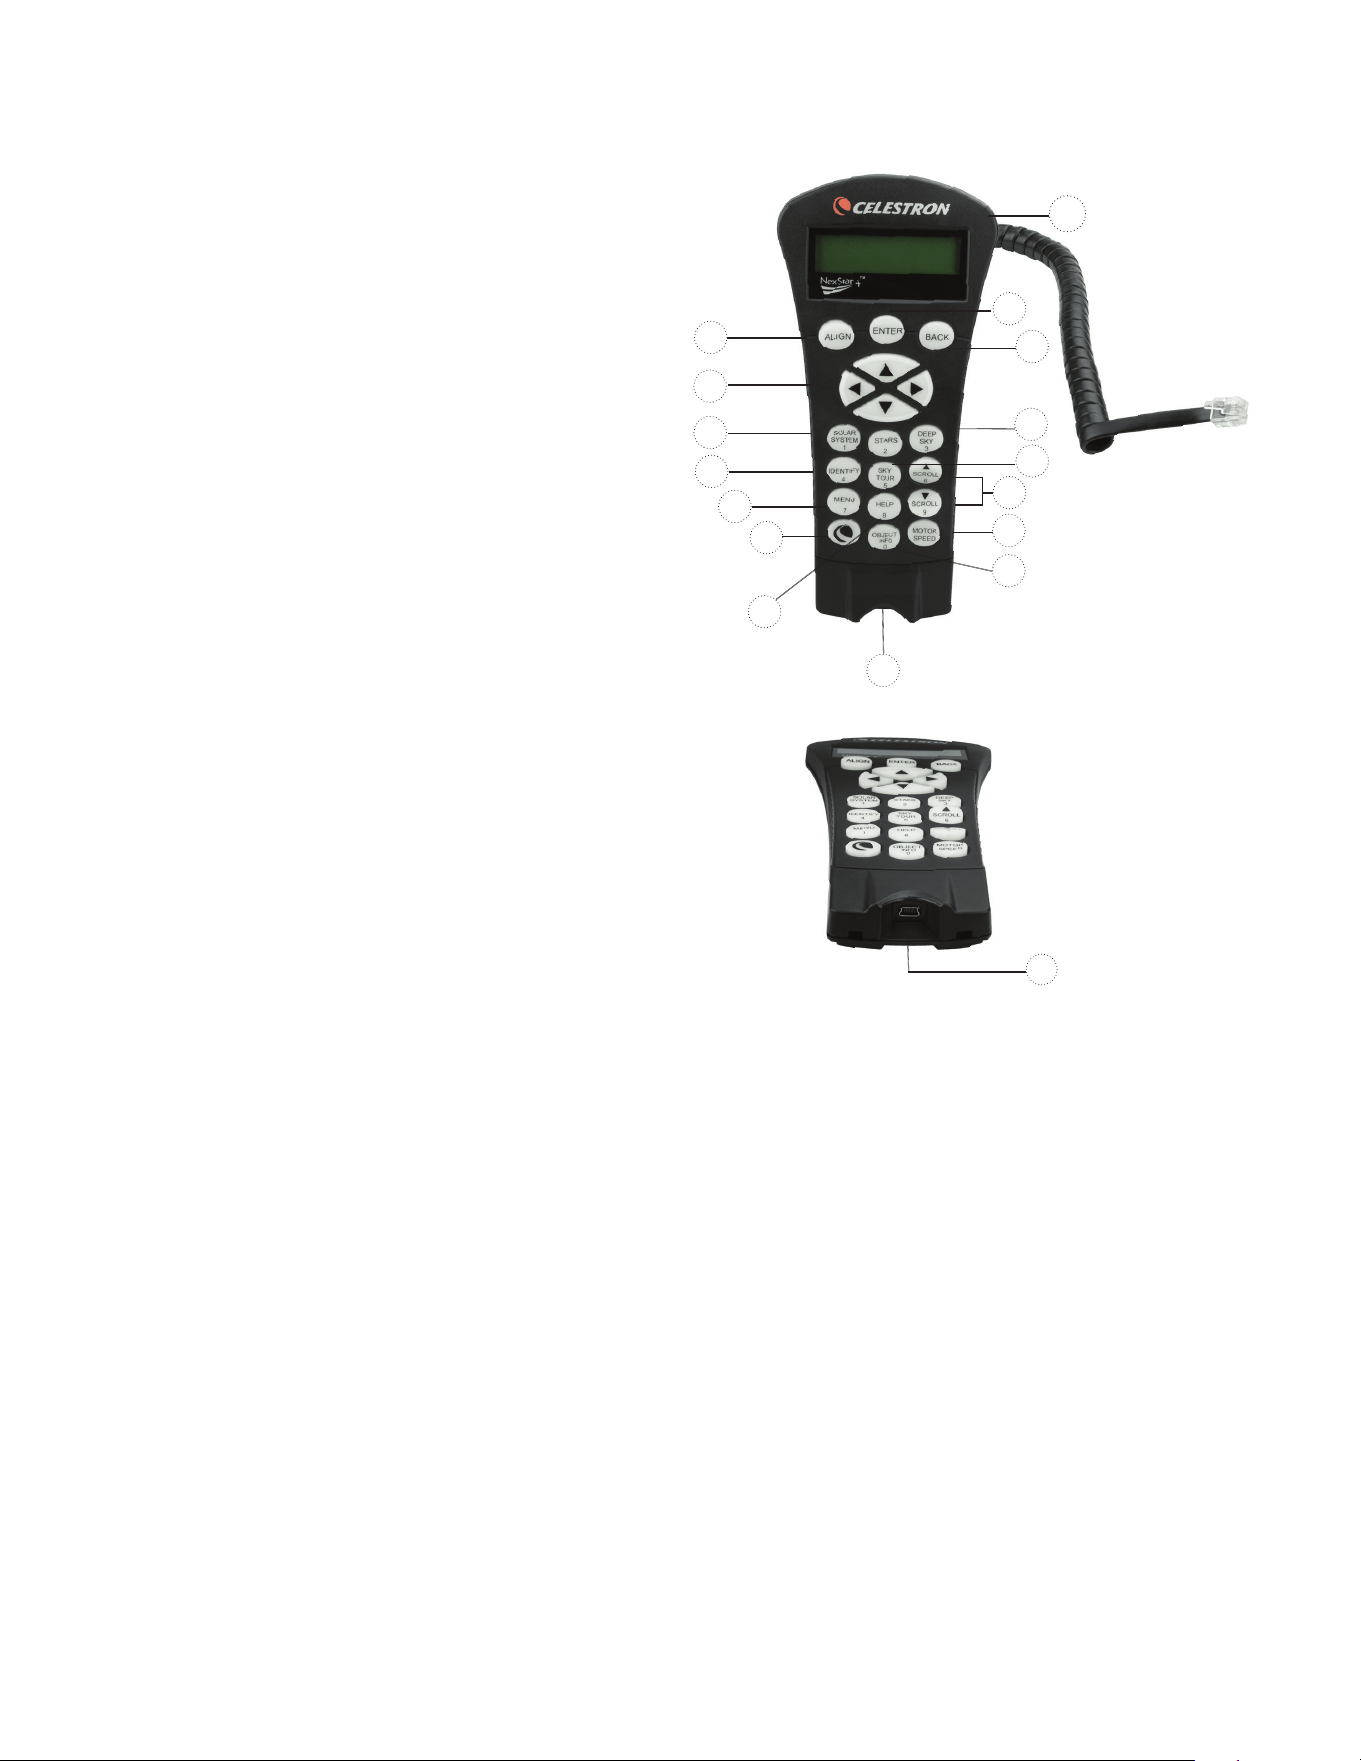
DEUTSCH | 13
NexStar+ Handsteuerung
1 LCD-Anzeigefenster (Flüssigkristallanzeige): Eine rote
Hintergrundbeleuchtung zum bequemen Betrachten der
Teleskopinformationen und zum Scrollen von Text bei
Nacht Entfernen Sie vor Gebrauch den Schutzfilm auf
dem Bildschirm
2 Ausrichtung (Align): Startet die voreingestellte
Ausrichtungsprozedur Dient außerdem zur Auswahl
eines Sterns oder anderen Objekts als Referenzpunkt
für die Ausrichtung
3 Richtungstasten: Ermöglicht die vollständige Kontrolle
des Teleskops in jeder Richtung Verwenden Sie die
Richtungstasten zur Zentrierung von Objekten im
Okular oder um das Teleskop manuell zu schwenken
4 Katalogtasten: Ermöglicht direkten Zugang zu den
Hauptkatalogen in der Datenbank mit Tausenden von
Objekten
Ihr Teleskop enthält die folgenden Kataloge in seiner
Datenbank:
• Sonnensystem- Alle 7 Planeten unseres Sonnensys-
tems, sowie Mond, Sonne und Pluto
• Sterne- benutzerdefinierte Listen der hellsten Sterne,
Doppelsterne, variablen Sterne und Asterismen
• Deep Sky- benutzerdefinierte Listen der schönsten
Galaxien, Nebel und Cluster, sowie die kompletten
Messier- und NGC-Objekte
5 Identifizieren: Durchsucht die Datenbank Ihres Teleskops
und zeigt die Namen und die Offset-Entfernungen zu den
nächstgelegenen passenden Objekten an
6 Menü: Zeigt Einstellungen und Funktionen an, wie Nach-
führungsrate, benutzerdefinierte Objekte und anderes
7 Option (Celestron-Logo): Funktioniert ähnlich wie die
SHIFT-Taste bei einer Tastatur und kann in der Kombi-
nation mit weiteren Tasten verwendet werden, um auf
erweiterte Eigenschaften und Funktionen zuzugreifen
8 Enter: Drücken der EINGABE-Taste ermöglicht die Aus-
wahl einer beliebigen Funktion des Teleskops, akzeptiert
eingegebene Parameter und schwenkt das Teleskop auf
angezeigte Objekte
9 Zurück: Durch Drücken auf ZURÜCK verlassen Sie das
aktuelle Menü, und die vorige Ebene des Menüpfads wird
angezeigt Wiederholtes Drücken der ZURÜCK-Taste
lässt Sie zum Hauptmenü zurückkehren oder löscht ver-
sehentlich eingegebene Daten
10 Himmelstour: Aktiviert den Tour-Modus, der die inter-
essantesten Objekte am Himmel findet und automatisch
das Teleskop auf diese ausrichtet
11 Scrolltasten: Diese Tasten dienen zum Aufwärts- und
Abwärtsscrollen in den Menülisten Ein Doppelpfeilsym-
bol auf der rechten Seite des LCD zeigt an, dass die
Scrolltasten verwendet werden können, um zusätzliche
Informationen anzuzeigen Diese Tasten haben eine
abgeschrägte Form, damit sie auch ohne Hinsehen leicht
bedient werden können
1
9
8
13
4
12
2
3
4
5
6
7
15
11
10
14
12 Motordrehzahl: Ähnlich wie die RATE-Taste der
originalen Handsteuerung ändert diese Taste die Motor-
geschwindigkeit, wenn die Richtungstasten gedrückt
werden
13 Objektinformation: Zeigt Koordinaten und andere
wissenswerte Informationen von Objekten, die aus der
Datenbank ausgewählt wurden
14 Mini-USB-Port (Kabel nicht enthalten): Das Tele-
skop kann über den Anschluss an einen PC mit Desktop
gesteuert werden und Firmware-Updates können aus-
geführt werden
15 Hilfemenü: In zukünftigen Firmware-Updates wird diese
Taste Hinweise zur Problembehandlung geben Zurzeit
dient diese Taste als Kurzwahltaste zum bequemen Auf-
rufen des Messierkatalogs
Abbildung 11
14
Abbildung 11,2

14 | DEUTSCH
Auswahl eines Objekts
Nun da das Teleskop richtig ausgerichtet ist, können Sie ein
Objekt aus einem der Kataloge in der NexStar+ Datenbank
der Handsteuerung auswählen Die Handsteuerung verfügt
über eine Taste, die jeder Objekt-Kategorie in der Daten-
bank zugewiesen wurde: Objekte im Sonnensystem, Sterne
und Deep-Sky- (extrasolare) Objekte
• Sonnensystem – Der Sonnensystem-Katalog zeigt alle
Planeten (und den Mond) in unserem Sonnensystem an,
die derzeit am Himmel sichtbar sind Um zu ermöglichen,
dass die Sonne als Option in der Datenbank angezeigt
wird, siehe die Option „Allow Sun" (Sonne zulassen) im
Abschnitt Datenbank-Setup in der Bedienungsanleitung
• Sterne – Der Sternenkatalog zeigt eine benutzerdefi-
nierte Liste der hellsten Sterne, Doppel- (binäre) Sterne,
variablen Sterne, Konstellationen und ausgewählten
Asterismen an
• Deep-Sky (extrasolarer Himmel) - benutzerdefinierte
Listen der schönsten Galaxien, Nebel und Cluster sowie
die kompletten Messier- und NGC-Objekte Es gibt auch
eine alphabetische Liste aller Deep-Sky-Objekte in der
Reihenfolge ihrer allgemeinen Namen
Mit den SCROLL-Tasten können Sie durch die Kataloge
scrollen, um das gewünschte Objekt zu finden Beim Scrol-
len durch eine lange Liste von Objekten können Sie durch
Gedrückthalten von AUFWÄRTS und ABWÄRTS mit hoher
Geschwindigkeit durch den Katalog scrollen
Schwenken zu einem Objekt
Nachdem das gewünschte Objekt auf dem Display der
Handsteuerung angezeigt wird, haben Sie zwei Möglichkeiten:
• Drücken Sie die Taste OBJECT INFO. Diese zeigt
nützliche Informationen über das ausgewählte Objekt
wie die Sterngröße, die Konstellation und zusätzliche
Informationen über die beliebtesten Objekte, an
- Verwenden Sie die Pfeiltasten AUFWÄRTS/
ABWÄRTS, um durch die angezeigten Objekt-
Informationen zu scrollen
- Das Drücken der ZURÜCK-Taste lässt Sie zur
Objekt-Datenbank zurückkehren
• Drücken der EINGABE-Taste Damit schwenkt das
Teleskop automatisch zu den Koordinaten des Objekts,
das auf der Handsteuerung angezeigt wird Während das
Teleskop zum Objekt schwenkt, kann der Benutzer immer
noch auf viele der Handsteuerungsfunktionen zugreifen
(wie z B Anzeige von Informationen über das Objekt)
HINWEIS: Die Messier- und NGC-Kataloge verlangen
vom Anwender die Eingabe einer numerischen Bezeich-
nung. Wenn Sie die entsprechende Katalog-Taste und den
Messier-, NGC- oder SAO-Katalog gewählt haben, zeigt
ein blinkender Mauszeiger an, dass Sie jetzt im numeri-
schen Eingabe-Modus sind.
Geben Sie die Katalognummer des Objekts ein, das Sie
anzeigen möchten Drücken der EINGABE-Taste schwenkt
das Teleskop auf das Objekt oder halten der OPTION-Tas-
te (das Celestron Logo) und drücken der OBJEKT INFO-
Taste zeigt Informationen über das ausgewählte Objekt an
VORSICHT: Niemals das Teleskop schwenken, wenn
jemand in das Okular schaut. Das Teleskop kann sich mit
schnellen Schwenkbewegungen bewegen und das Auge
des Beobachters verletzen.
Motordrehzahltaste
Die MOTORGESCHWINDIGKEIT-Taste ermöglicht es,
ähnlich wie die Rate-Taste der originalen NexStar Hand-
steuerung, die Schwenkgeschwindigkeit sofort von der
Hochgeschwindigkeits-Schwenkrate auf eine Rate für
präzise Nachführung oder eine beliebige Rate dazwischen
zu ändern Jede Rate entspricht einer Zahl auf der Tasta-
tur der Handsteuerung Die Zahl 9 ist die schnellste Rate
(ca 3,5° pro Sekunde, je nach Montierung) Sie wird zum
Schwenken zwischen Objekten und zur Lokalisierung
von Ausrichtungs-Sternen verwendet Die Zahl 1 auf der
Handsteuerung ist die langsamste Rate (halb-siderisch)
und kann zur präzisen Zentrierung von Objekten im Okular
verwendet werden
Änderung der Geschwindigkeitsrate der Motoren:
• Drücken Sie auf die MOTORDREHZAHL-Taste auf
der Handsteuerung Das LCD zeigt die aktuelle
Motordrehzahl an
• Drücken Sie die Nummer auf der Handsteuerung, die
der gewünschten Drehzahl entspricht
Die Handsteuerung besitzt eine „Doppeltasten"-Funktion
auf, die Ihnen eine sofortige Beschleunigung der Motoren
ermöglicht, ohne dass eine Geschwindigkeitsrate gewählt
werden muss Zur Verwendung dieser Funktion drücken
Sie einfach die Pfeiltaste, die der Richtung entspricht, in
die Sie das Teleskop bewegen möchten Halten Sie diese
Taste gedrückt und drücken Sie die Taste für die entgegen-
gesetzte Richtung Damit wird die Geschwindigkeit auf die
maximale Schwenkrate erhöht
Bei Verwendung der AUFWÄRTS- und ABWÄRTS-Rich-
tungstasten der Handsteuerung bewegen die langsameren
Schwenkraten (6 und darunter) die Motoren in die ent-
gegengesetzte Richtung der schnelleren Schwenkraten
(7 - 9) Das erfolgt, damit sich ein Objekt bei Betrachtung
im Okular in die entsprechende Richtung bewegt (d h
ein Drücken der Aufwärts-Pfeiltaste bewegt den Stern
im Sichtfeld des Okulars nach oben) Wenn jedoch eine
der langsameren Schwenkraten (Rate 6 und darunter)
verwendet wird, um ein Objekt im StarPointer zu zentrie-
ren, müssen Sie möglicherweise die entgegengesetzte
Richtungstaste drücken, um das Teleskop in die richtige
Richtung zu bewegen

DEUTSCH | 15
Das Handsteuerungsmenü
Das Menü „Handsteuerung“ ermöglicht Ihnen die Anpassung
bestimmter Funktionen der NexStar+-Handsteuerung Um
dieses Menü aufzurufen, drücken Sie die MENÜ-Taste (Nr 7
auf der Tastatur), verwenden zur Auswahl der „Handsteue-
rung“ die Scroll-Tasten und drücken auf ENTER Verwenden
Sie die Scroll-Tasten, um eine der folgenden Optionen aus-
zuwählen:
• Beleuchtungssteuerung: Die Helligkeit der Zahlentasta-
tur und des LCDs wird unabhängig voneinander geregelt
• Scroll-Menü: Hiermit wird die Geschwindigkeit, mit der
Worte über das LCD laufen, angepasst
• Fettdruck ändern: Hiermit wird das Schriftformat der
LCD-Anzeige von normal nach fett geändert
• Kontrast einstellen: Über die Scroll-Tasten wird der
LCD-Kontrast angepasst
• Sprache einstellen: Hiermit wird die auf dem LCD an-
gezeigte Sprache geändert
HINWEIS: Die Funktion Sprache einstellen kann auch
erscheinen, wenn Sie Ihre neue Handsteuerung das
erste Mal verwenden. Sie können sie auch zu jeder Zeit
aufrufen, indem Sie die Options-Taste (das Celestron-
Logo) für 10 Sekunden drücken, während das Teleskop
eingeschaltet wird.
Die Ausrichtung vornehmen
Damit das Teleskop präzise auf Objekte im Himmel zeigen
kann, muss es zuerst auf bekannte Positionen (Sterne) am
Himmel ausgerichtet werden Mit diesen Daten kann das
Teleskop ein Modell des Himmels erstellen, das dann zur
Lokalisierung von Objekten mit bekannten Koordinaten ver-
wendet wird Es gibt viele Möglichkeiten, Ihr Teleskop am
Himmel auszurichten; diese hängen davon ab, welche Daten
der Benutzer bereitstellen kann:
• Die Zweisternausrichtung verwendet die gesamten
eingegebenen Zeit-/Standortdaten und ermöglicht dem
Benutzer, zu entscheiden, auf welche beiden Ausrich-
tungssterne das Teleskop automatisch schwenken soll
• Die Einsternausrichtung verwendet die gleichen Zeit-/
Standortdaten, nutzt jedoch nur einen Stern zur
Ausrichtung
• Die Sonnensystemausrichtung zeigt eine Liste sicht-
barer Tagesobjekte an (Planeten sowie den Mond), die für
die Ausrichtung des Teleskops zur Verfügung stehen
• Die Schnell-Ausrichtung fordert Sie zur Eingabe dersel-
ben Daten auf, die auch für die Zweisternausrichtung nötig
wären Das Teleskop überspringt jedoch das Schwenken
auf den Ausrichtungsstern zur Zentrierung und Ausrichtung
und modelliert den Stern einfach aufgrund der vorhande-
nen Daten
• Bei der Letzten Ausrichtung wird Ihre zuletzt gespei-
cherte Sternausrichtung und Schwenkposition wiederher-
gestellt Die Letzte Ausrichtung bietet auch einen guten
Schutz, falls das Teleskop von der Stromversorgung
abgeschnitten wird
Zweisternausrichtung
Die Zweisternausrichtung ermöglicht es dem Benutzer, zwei
Sterne für die Teleskopausrichtung auszuwählen Um Ihr
Teleskop unter Verwendung der Zweisternausrichtungsme-
thode ausrichten:
1 Wählen Sie die Zweisternausrichtung aus den vorhanden
Wahlmöglichkeiten aus Basierend auf den eingegebenen
Datums- und Uhrzeitangaben, wählt die Handsteuerung
automatisch einen hellen Stern über dem Horizont aus
und zeigt diesen an
• Drücken Sie auf ENTER, um diesen Stern als erster
Ausrichtungsstern auszuwählen
• Falls der ausgewählte Stern aus irgendwelchen Grün-
den nicht sichtbar ist (eventuell weil er sich hinter einem
Baum oder Gebäude befindet), auf die ZURÜCK-Tas-
te drücken, damit die Handsteuerung automatisch den
nächsten hellen Stern auswählt
• Oder Sie benutzen die Aufwärts-/Abwärts-Tasten, um
die gesamte Liste benannter Sterne zu durchsuchen und
einen der über zweitausend Ausrichtungssterne auszu-
wählen
2 Sobald das Teleskop die Schwenkbewegung zum ersten
Ausrichtungsstern beendet hat, werden Sie aufgefordert,
den ausgewählten Stern mithilfe der Pfeiltasten auf das
Fadenkreuz in der Mitte des Suchers auszurichten Wenn
dieser im Sucher zentriert ist, können Sie auf ENTER
drücken Nun hilft Ihnen die Anzeige dabei, den Stern
im Sichtfeld des Okulars zu zentrieren Wenn der Stern
eingegeben ist, auf AUSRICHTEN drücken, um diesen
Stern als ersten Ausrichtungsstern zu übernehmen
3 Nachdem der ersten Ausrichtungsstern eingegeben ist,
wählt die Handsteuerung automatisch einen zweiten Aus-
richtungsstern aus, und die Ausrichtung muss für diesen
Stern wiederholt werden Wenn das Teleskop auf beide
Sterne ausgerichtet ist, können Sie weitere Kalibrierungs-
sterne eingeben Kalibrierungssterne werden verwendet,
um die Zeigegenauigkeit Ihres Teleskops zu verbessern,
indem subtile opto-mechanische Fehlausrichtungen
zwischen der Teleskopoptik und der Montierung kompen-
siert werden Daher ist es empfehlenswert, mindestens
einen zusätzlichen Kalibrierungsstern einzugeben, um die
Zeigegenauigkeit der Montierung zu erhöhen
4 Drücken Sie auf ENTER, um einen Kalibrierungsstern
einzugeben Wählen Sie einen Stern genauso wie bei den
ersten beiden Ausrichtungssternen aus und drücken Sie
auf ENTER Sie werden feststellen, dass sich alle ange-
zeigten Kalibrierungssterne auf der Himmelsseite (Meridi-
an) befinden, die den ursprünglichen Ausrichtungssternen
gegenüberliegt Dies ist für eine exakte Kalibrierung der
Montierung entscheidend Schließlich können Sie weitere
Kalibrierungssterne hinzufügen oder auf ZURÜCK drü-
cken, um die Ausrichtung abzuschließen
Anmerkung: Ost-/West-Filter – um die bestmögliche
Zeigegenauigkeit zu gewährleisten, werden die anfänglichen
Ausrichtungssterne von Ihrer computergesteuerte Montie-
rung automatisch gefiltert und ausgewählt, sodass sich die
beiden ersten Ausrichtungssterne auf der einen Seite des
Meridians befinden und alle Kalibrierungssterne auf der
entgegengesetzten Seite des Meridians, wie dies durch
das „W“ bzw. „O“ in der oberen rechten Ecke des LCDs
angezeigt wird. Der Ost-/West-Filter kann geändert werden,
indem zu einer beliebigen Zeit während der Ausrichtung
einfach die MENÜ-Taste gedrückt wird.

16 | DEUTSCH
Tipps zum Hinzufügen von Kalibrierungssternen:
• Obwohl es für gelegentliche Beobachtungen nicht nötig
ist, Kalibrierungssterne hinzuzufügen, ist es dennoch
empfehlenswert, drei Kalibrierungssterne für eine optimale
Zeigegenauigkeit einzugeben
• Wenn Sie Kalibrierungssterne auswählen, die nahe des
Himmelsäquators liegen, erreichen Sie bessere Ergebnisse
als mit Sternen nahe des Himmelspols
• Obwohl es nicht nötig ist, Kalibrierungssterne zu verwen-
den, wenn die Teleskopmontierung seit der ursprünglichen
Ausrichtung/Kalibrierung nicht bewegt wurde, könnte es
doch nötig sein, das Teleskop erneut zu kalibrieren, falls
der Teleskoptubus aus irgendeinem Grund bewegt wurde
Anmerkung: Meridian – Der Meridian ist eine imaginäre
Linie im Himmel, die am nördlichen Himmelspol beginnt,
am südlichen Himmelspol endet und durch den Zenit ver-
läuft. Wenn man sich nach Süden ausrichtet, beginnt der
Meridian am südlichen Horizont und verläuft direkt über dem
Kopf am Himmel zum nördlichen Himmelspol.
Schnell-Ausrichtung
Die Schnell-Ausrichtung nutzt alle Datums- und Uhrzeit-
angaben, die zu Beginn der Ausrichtung des Teleskops
eingegeben wurden Das Teleskop überspringt jedoch das
Schwenken auf den Ausrichtungsstern zur Zentrierung und
Ausrichtung und modelliert den Stern einfach aufgrund
der vorhandenen Daten Auf diese Weise können Sie grob
zu den Koordinaten heller Objekte, wie dem Mond und zu
Planeten, schwenken, und das Teleskop erhält die benötigten
Daten für die Objektnachführung für jeden Himmelsabschnitt
(in Abhängigkeit zur Genauigkeit der Polausrichtung) Die
Schnell-Ausrichtung eignet sich nicht zum exakten Lokali-
sieren kleiner oder lichtarmer Deep-Sky-Objekte oder zum
akkuraten Nachführen von Objekten in der Astrofotografie
Zum Verwenden der Schnellausrichtung einfach die Schnell-
ausrichtung aus den Ausrichtungsoptionen auswählen und
auf ENTER drücken Das Teleskop verwendet automatisch
die eingegeben Werte zu Datum/Uhrzeit, um sich selbst am
Himmel auszurichten und zeigt „Ausrichtung erfolgreich" an
Anmerkung: Wenn eine Schnell-Ausrichtung vorgenommen
wurde, können Sie die Neuausrichtungsfunktion nutzen
(siehe unten), um die Zeigegenauigkeit Ihres Teleskops zu
erhöhen.
Letzte Ausrichtung
Bei der Letzten Ausrichtung werden automatisch die zu-
letzt gespeicherten Indexstandorte aufgerufen, um mit der
Ausrichtung fortzufahren, die beim letzten Ausschalten des
Teleskops gespeichert wurde
Diese Funktion ist nützlich, falls Ihr Teleskop einmal ver-
sehentlich von der Stromversorgung abgeschnitten oder
ausgeschaltet wird
Neuausrichtung
Die Montierung verfügt über die Neuausrichtungsfunktion,
mit der jeder ursprüngliche Ausrichtungsstern durch einen
neuen Stern oder ein anderes Himmelsobjekt ersetzt werden
kann Dies kann unter mehreren Umständen nützlich sein:
• Wenn Sie über mehrere Stunden hinweg beobachten,
könnte Ihnen auffallen, dass Ihre beiden ursprünglichen
Ausrichtungssterne beträchtlich Richtung Westen ab-
gedriftet sind (Bedenken Sie, dass Sterne 15° pro Stunde
wandern) Eine Ausrichtung anhand eines neuen Sterns in
einem östlichen Himmelsteil wird Ihre Zeigegenauigkeit er-
höhen, insbesondere für Objekte in diesem Himmelssektor
• Wenn Sie Ihr Teleskop mithilfe der Schnellausrichtung aus-
gerichtet haben, können Sie die Neuausrichtung nutzen,
um es auf tatsächliche Himmelsobjekte auszurichten
Dadurch wird die Zeigegenauigkeit Ihres Teleskops erhöht,
ohne dass zusätzliche Daten eingegeben werden müssen
• Wenn Sie die computerunterstützte Ausrichtung genutzt
haben und die Montierung manuell bewegt wurde, könnte
es nötig sein, die Montierung für eine erhöhte Zeigegenau-
igkeit neu auszurichten
Einen bestehenden Ausrichtungsstern durch einen neuen
Ausrichtungsstern ersetzen:
1 Wählen Sie den gewünschten Stern (oder das ge-
wünschte Objekt) aus der Datenbank aus und schwenken
Sie darauf zu
2 Zentrieren Sie das Objekt sorgfältig im Okular
3 Drücken Sie nach dem Zentrieren die ZURÜCK-Taste, bis
Sie im Hauptmenü angelangt sind
4 Drücken Sie auf die AUSRICHTEN-Taste, sobald „CGX
bereit“ auf der Handsteuerung angezeigt wird, um Aus-
richtungssterne aus der Liste der Optionen auszuwählen
5 Geben Sie nun einen Ausrichtungsstern zum Ersatz in
die Anzeige ein Benutzen Sie die AUFWÄRTS- und
ABWÄRTS-Tasten, um den für den Austausch vorgese-
henen Ausrichtungsstern auszuwählen Es ist gewöhnlich
am besten, den Stern auszuwählen, der sich dem neuen
Objekt am nächsten befindet Dadurch werden Ausrich-
tungssterne im Himmel ausgeschlossen
6 Drücken Sie zum Übernehmen der Änderungen auf
ALIGN (Ausrichten)

DEUTSCH | 17
Objektkatalog
Auswahl eines Objekts
Nun da das Teleskop richtig ausgerichtet ist, können Sie ein
Objekt aus einem der Kataloge in der NexStar+ Datenbank
der Handsteuerung auswählen Die Handsteuerung verfügt
über eine Taste, die jeder Objekt-Kategorie in der Datenbank
zugewiesen wurde: Objekte im Sonnensystem, Sterne und
Deep-Sky- (extrasolare) Objekte
• Sonnensystem - Der Sonnensystem-Katalog zeigt alle
Planeten (sowie den Mond) in unserem Sonnensystem
an, die derzeit am Himmel sichtbar sind Damit die Sonne
als ein zur Auswahl stehendes Objekt in der Datenbank
angezeigt wird, siehe die Option Sonnenmenü im Menü
Teleskop-Setup
• Sterne – Der Sternenkatalog zeigt eine benutzerdefinierte
Liste der hellsten Sterne, Doppel- (binäre) Sterne, variablen
Sterne, Konstellationen und ausgewählten Asterismen an
• Deep-Sky (extrasolarer Himmel) - benutzerdefinierte Lis-
ten der schönsten Galaxien, Nebel und Cluster sowie die
kompletten Messier- und NGC-Objekte Es gibt auch eine
alphabetische Liste aller Deep-Sky-Objekte in der Reihen-
folge ihrer allgemeinen Namen
Mithilfe der Scrolltasten können Sie durch die Kataloge
blättern, um das gewünschte Objekt zu finden Beim Scrol-
len durch eine lange Liste von Objekten können Sie durch
Gedrückthalten der AUFWÄRTS- und ABWÄRTS-Tasten mit
hoher Geschwindigkeit durch den Katalog blättern
Schwenken zu einem Objekt
Nachdem das gewünschte Objekt auf dem Display der Hand-
steuerung angezeigt wird, haben Sie zwei Möglichkeiten:
• Drücken Sie die Taste OBJECT INFO Diese zeigt
nützliche Informationen über das ausgewählte Objekt wie
die Sterngröße, die Konstellation und zusätzliche Informa-
tionen über die beliebtesten Objekte, an
• Verwenden Sie die Pfeiltasten AUFWÄRTS/AB-
WÄRTS, um durch die angezeigten Objekt-Informatio-
nen zu scrollen
• Das Drücken der ZURÜCK-Taste lässt Sie zur Objekt-
Datenbank zurückkehren
• Drücken der EINGABE-Taste Damit schwenkt das Tele-
skop automatisch zu den Koordinaten des Objekts, das auf
der Handsteuerung angezeigt wird Während das Teleskop
zum Objekt schwenkt, kann der Benutzer immer noch auf
viele der Handsteuerungsfunktionen zugreifen (wie z B
Anzeige von Informationen über das Objekt)
HINWEIS: Die Messier- und NGC-Kataloge verlangen
vom Anwender die Eingabe einer numerischen Bezeich-
nung. Wenn Sie die entsprechende Katalog-Taste und den
Messier-, NGC- oder SAO-Katalog gewählt haben, zeigt ein
blinkender Mauszeiger an, dass Sie jetzt im numerischen
Eingabe-Modus sind. Geben Sie die Katalognummer des
Objekts ein, das Sie anzeigen möchten. Durch Drücken der
ENTER-Taste schwenkt das Teleskop auf das Objekt, und
durch Gedrückthalten der OPTIONS-Taste (das Celestron
Logo) und Drücken der OBJEKTINFO-Taste werden Infor-
mationen über das ausgewählte Objekt angezeigt.
VORSICHT: Niemals das Teleskop schwenken, wenn
jemand in das Okular schaut. Das Teleskop kann
sich mit schnellen Schwenkbewegungen bewegen
und das Auge des Beobachters verletzen.
Himmelstour-Taste
Die CGX-Montierung verfügt über eine Tour-Funktion,
mit welcher der Benutzer automatisch eine Auswahl aus
einer Liste interessanter Objekte auf der Grundlage des
Datums und der Uhrzeit der Beobachtung treffen kann Die
automatische Tour zeigt nur die Objekte an, die innerhalb
Ihrer eingestellten Katalog-Filtergrenzen liegen Um die Tour-
Funktion zu aktivieren, drücken Sie die Taste SKY TOUR auf
der Handsteuerung
1 Drücken Sie auf die HIMMELSTOUR-Taste auf der
Handsteuerung
2 Wählen Sie mit der SCROLL-Taste die Option "Das
Beste von heute Nacht"
3 Die CGX-Montierung schwenkt automatisch azimutal in
die Ausgangsposition, was die Wahrscheinlichkeit mini-
miert, dass sich das Stromversorgungskabel während der
Tour verwickelt
4 Die Handsteuerung zeigt die besten Beobachtungsobjekte
an, die zurzeit am Himmel stehen
• Drücken Sie auf die OBJEKTINFO-Taste, um Informa-
tionen und Daten über die angezeigten Objekte zu er-
halten Einmaliges Drücken zeigt die Objektkoordinaten
an Erneutes Drücken zeigt die Objektkoordinaten an
Drücken Sie die Taste erneut, um die Textbeschreibung
anzuzeigen Drücken Sie auf ZURÜCK, um zum vorheri-
gen Bildschirm zurückzukehren
• Drücken Sie ENTER, um zum angezeigten Objekt zu
schwenken
• Drücken Sie auf die ABWÄRTS-Taste, um das nächste
Tour-Objekt anzuzeigen
Identifizierungstaste
Durch Drücken der Taste IDENTIFIZIEREN werden die
Datenbank-Kataloge der Montierung durchsucht und die Na-
men und Winkeldistanzen der nächstgelegenen passenden
Objekte am aktuellen Standort des Teleskops angezeigt Die-
se Funktion kann zwei Zwecke erfüllen: Erstens kann sie zur
Identifikation eines unbekannten Objekts im Sichtfeld Ihres
Okulars verwendet werden Außerdem kann der Identifizie-
rungsmodus zur Lokalisierung anderer Himmelsobjekte, die
dicht an den gegenwärtig von Ihnen beobachteten Objekten
liegen, verwendet werden
Wenn Ihr Teleskop z B auf den hellsten Stern im Sternbild
Lyra gerichtet ist, können Sie Identifizieren wählen Daraufhin
wird ganz sicher der Stern Vega als der von Ihnen beobach-
tete Stern angeben Jedoch durchsucht die Identifizierungs-
funktion auch seine NGC- und Sonnensystem-Datenbank
und zeigt alle Planeten oder Deep-Sky-Objekte in der Nähe
an In diesem Beispiel wird der Ringnebel (M57) in ungefähr
6° Entfernung angezeigt
Die Helligkeit und Nähe der angezeigten Objekte kann mit-
tels des Identifizierungsfilters unter Teleskop-Setup definiert
werden
18 | DEUTSCH
Richtungstasten
In der Mitte der Handsteuerung befinden sich vier Richtungs-
tasten, die die Höhen- (auf und ab) und Azimut- (links und
rechts) Bewegung des Teleskops steuern Das Teleskop
kann mit neun verschiedenen Geschwindigkeitsraten ge-
steuert werden
1 = 2x 6 = 0,3 °/Sek
2 = 4x 7 = 1 °/Sek
3 = 8x 8 = 2°/Sek
4 = 16-fach 9 = 4°/Sek
5 = 32x
Motordrehzahltaste
Wenn Sie die MOTORDREHZAHL-Taste (12) drücken,
können Sie die Drehzahl der Motoren sofort von einer
Schwenkrate bei hoher Drehzahl auf eine Geschwindigkeit
für präzise Nachführung oder eine Rate dazwischen
ändern Jede Geschwindigkeit entspricht einer Zahl
auf der Tastatur der Handsteuerung Die Zahl 9 ist die
schnellste Geschwindigkeitsrate (ca 4° pro Sekunde, je
nach Energiequelle) Sie wird zum Schwenken zwischen
Objekten und zur Lokalisierung von Ausrichtungssternen
verwendet Die Zahl 1 auf der Handsteuerung entspricht
der langsamsten Geschwindigkeit (halb-siderisch) und kann
zur präzisen Zentrierung von Objekten im Okular verwendet
werden Änderung der Motorendrehzahl:
• Drücken Sie auf die MOTORDREHZAHL-Taste auf der
Handsteuerung Das LCD zeigt die aktuelle Drehzahl an
• Drücken Sie die Nummer auf der Handsteuerung, die der
gewünschten Drehzahl entspricht
Die Handsteuerung verfügt über eine „Doppeltasten“-Funk-
tion, mit der Sie eine sofortige Beschleunigung der Moto-
ren erreichen können, ohne dass eine Drehzahl gewählt
werden muss Zur Verwendung dieser Funktion drücken Sie
einfach die Pfeiltaste, die der Richtung entspricht, in die Sie
das Teleskop bewegen möchten Halten Sie diese Taste
gedrückt und drücken Sie die Taste für die entgegengesetzte
Richtung Damit wird die Geschwindigkeit auf die maximale
Schwenkrate erhöht
Bei Verwendung der AUFWÄRTS- und ABWÄRTS-Tasten
auf der Handsteuerung bewegen die langsameren Schwenk-
raten (6 und darunter) die Motoren in die entgegengesetzte
Richtung der schnelleren Schwenkraten (7 - 9) Das erfolgt,
damit sich ein Objekt bei Betrachtung im Okular in die
entsprechende Richtung bewegt (d h ein Drücken der Auf-
wärts-Pfeiltaste bewegt den Stern im Sichtfeld des Okulars
nach oben) Wenn jedoch eine der langsameren Schwenk-
raten (Rate 6 und darunter) verwendet wird, um ein Objekt
im StarPointer zu zentrieren, müssen Sie möglicherweise die
entgegengesetzte Richtungstaste drücken, um das Teleskop
in die richtige Richtung zu bewegen
Hilfe-Taste
In zukünftigen Firmware-Updates wird diese Taste Hinweise
zur Problembehandlung geben Zurzeit dient diese Taste als
Kurzwahltaste zum bequemen Aufrufen des Messierkatalogs
Menü-Taste
Die CGX-Montierung verfügt über zahlreiche benutzerde-
finierte Setup-Funktionen, die dem Anwender die Kontrolle
über die vielfältigen Eigenschaften des Teleskops geben
sollen Alle Konfigurations- und Hilfefunktionen können durch
Drücken der MENÜ-Taste und Scrollen durch die Optionen
aufgerufen werden
Nachführmenü
Nachführmodus – Hiermit kann die Art der Teleskopnach-
führung in Abhängigkeit zum Montierungstyp, der für das
Teleskop verwendet wird, geändert werden Das Teleskop
verfügt über drei verschiedene Nachführmodi:
• EQ-Nord – wird verwendet, wenn das Teleskop in der
nördlichen Hemisphäre polar ausgerichtet ist und über den
Himmel nachgeführt werden soll
• EQ-Süd – wird verwendet, wenn das Teleskop in der
südlichen Hemisphäre polar ausgerichtet ist und über den
Himmel nachgeführt werden soll
• Aus – wenn das Teleskop für terrestrische (Land-)
Beobachtungen genutzt wird Die Nachführung kann
ausgeschaltet werden, damit sich das Teleskop keinesfalls
bewegt
Nachführgeschwindigkeit - Zusätzlich zum Bewegen
des Teleskops mit den Tasten der Handsteuerung wird Ihr
Teleskop ständig ein Himmelsobjekt nachführen, während es
sich über den Nachthimmel bewegt Die Nachführgeschwin-
digkeit kann je nach dem Typ des beobachteten Objekts
geändert werden:
• Siderisch – Diese Stufe kompensiert die Erdrotation,
indem das Teleskop mit der gleichen Geschwindigkeit wie
die Erdrotation, jedoch in entgegengesetzter Richtung,
bewegt wird Wenn das Teleskop polar ausgerichtet ist,
wird dies erreicht, indem das Teleskop ausschließlich in die
Rektaszension bewegt wird
• Lunar - dient zur Nachführung des Mondes bei Beobach-
tung der Mondoberfläche
• Solar - dient zur Nachführung der Sonne bei Sonnenbe-
obachtungen mit entsprechendem Filter
Uhrzeit-/Standort-Anzeigemenü
Dieses Menü zeigt die aktuelle Uhrzeit sowie die vom
optionalen SkySync-GPS-Empfänger heruntergeladenen
Längen-/Breitengrade an Es werden auch andere relevante
Uhrzeit-/Standort-Daten wie Zeitzone, Sommerzeit und
lokale siderische Zeit angezeigt Die lokale siderische
Zeit (LST) ist sinnvoll, um für Himmelsobjekte, die sich zu
dieser Zeit auf dem Meridian befinden, die Rektaszension
zu bestimmen Die Uhrzeit-/Standort-Anzeige stellt
immer die zuletzt gespeicherte Uhrzeit bzw den zuletzt
gespeicherten Standort dar, der während der Verbindung
zum GPS eingegeben wurde Sobald die aktuellen Daten
empfangen wurden, werden diese aktualisiert Wenn das
GPS ausgeschaltet oder nicht verfügbar ist, zeigt die
Handsteuerung nur die zuletzt gespeicherten Daten zu
Uhrzeit und Standort an
Das Handsteuerungsmenü
Das Menü „Handsteuerung“ ermöglicht Ihnen die Anpassung
bestimmter Funktionen der NexStar+-Handsteuerung Um
dieses Menü aufzurufen, drücken Sie die MENÜ-Taste (Nr
7 auf der Tastatur), verwenden zur Auswahl der „Handsteue-
rung“ die Scroll-Tasten und drücken auf ENTER

DEUTSCH | 19
Verwenden Sie die Scroll-Tasten, um eine der folgenden
Optionen auszuwählen:
• Beleuchtungssteuerung: Die Helligkeit der Zahlentasta-
tur und des LCDs wird unabhängig voneinander geregelt
• Scroll-Menü: Hiermit wird die Geschwindigkeit, mit der
Worte über das LCD laufen, angepasst
• Fettdruck ändern: Hiermit wird das Schriftformat der
LCD-Anzeige von normal nach fett geändert
• Kontrast einstellen: Über die Scroll-Tasten wird der
LCD-Kontrast angepasst
• Sprache einstellen: Hiermit wird die auf dem LCD an-
gezeigte Sprache geändert
ANMERKUNG: Die Funktion Sprache einstellen kann
auch erscheinen, wenn Sie Ihre neue Handsteuerung das
erste Mal verwenden. Sie können sie auch zu jeder Zeit
aufrufen, indem Sie die Options-Taste (das Celestron-
Logo) für 10 Sekunden drücken, während das Teleskop
eingeschaltet wird.
Teleskopsetupmenü
Uhrzeit-/Standorteinstellung – Hier kann der Benutzer
die Teleskopanzeige anpassen, indem er Uhrzeit- und Stand-
ortwerte (wie z B Zeitzone und Sommerzeit) ändert
Getriebespielkompensation - Alle mechanischen Ge-
triebe weisen einen gewissen Nachlauf oder ein Spiel zwi-
schen den Gängen auf Dieses Spiel manifestiert sich in der
Zeitspanne, die zur Bewegung eines Sterns im Okular nötig
ist, wenn die Pfeiltasten auf der Handsteuerung gedrückt
werden (besonders bei Richtungsänderungen) Die Ge-
triebespielausgleichsfunktion des CGX lässt den Benutzer
das Getriebespiel ausgleichen, indem er einen Wert eingibt,
der die Motoren schnell gerade so viel zurückspult, dass das
Spiel zwischen den Gängen eliminiert wird
Das Ausmaß der erforderlichen Kompensation hängt von der
ausgewählten Schwenkrate ab Je geringer die Schwenk-
rate, desto länger dauert es, bis der Stern sich im Okular zu
bewegen scheint Für jede Achse existieren zwei Werte, ein
positiver und ein negativer:
• Als positiv wird das Ausmaß der angewendeten Kompen-
sation bezeichnet, wenn Sie die Taste drücken, damit sich
die Gänge schnell und ohne lange Pause bewegen
• Als negativ wird das Ausmaß der angewendeten Kompen-
sation bezeichnet, wenn Sie die Taste loslassen und die
Motoren in die andere Richtung bewegt werden, um die
Nachführung wieder aufzunehmen
Generell sollten beide Messwerte identisch sein Es wird nö-
tig sein, mit verschiedenen Werten zu experimentieren (von
0 – 99); ein Wert zwischen 20 und 50 ist generell optimal
für die meisten visuellen Betrachtungen, während ein höherer
Wert für fotografische Führungen nötig sein könnte
Zur Einstellung des Getriebespielkompensationswerts
scrollen Sie zur Option Getriebespielkompensation und
drücken ENTER Beobachten Sie, während ein Objekt durch
das Okular betrachtet wird, die Reaktionssensibilität aller vier
Pfeiltasten Achten Sie darauf, bei welcher Richtung eine
Pause in der Sternenbewegung zu verzeichnen ist, nach-
dem die Taste gedrückt wurde Während Sie die Achsen
der Reihe nach einzeln bearbeiten, werden die Getriebe-
spieleinstellungen so weit angepasst, dass eine sofortige
Bewegung ohne nennenswerten Sprung erreicht wird, wenn
die Taste gedrückt oder losgelassen wird Geben Sie nun
die gleichen Werte für die positive und negative Richtung
ein Wenn Sie einen Sprung bemerken, wenn die Taste
losgelassen wird, die Werte jedoch niedriger eingestellt
werden, entsteht beim Tastendruck eine Pause; verwen-
den sie den höheren Wert für positiv und den niedrigeren
Wert für negativ Das Teleskop speichert diese Werte und
verwendet sie jedes Mal, wenn das Teleskop eingeschaltet
wird, bis sie geändert werden
Filtergrenzen – Wenn eine Ausrichtung abgeschlossen ist,
erkennt das Teleskop automatisch, welche Himmelsobjekte
sich über dem Horizont befinden Dadurch zeigt die Hand-
steuerung beim Scrollen durch die Datenbankliste (oder
bei der Auswahl der Tourfunktion) nur jene Objekte an, die
während Ihrer Beobachtung als über dem Horizont stehend
bekannt sind Sie können die Objektdatenbank anpassen,
indem Sie Höhengrenzwerte eingeben, die sich für Ihren
Standort und Ihre Situation eignen Wenn Sie beispielswei-
se von einem bergigen Standort aus beobachten, und der
Horizont teilweise verdeckt ist, können Sie die Mindesthö-
hengrenze auf +20° einstellen Dadurch wird sichergestellt,
dass die Handsteuerung lediglich Objekte anzeigt, die sich in
einer Höhe über 20° befinden
TIPP: Wenn Sie die gesamte Objektdatenbank erkunden
möchten, setzen Sie die maximale Höhengrenze auf 90 °
und die minimale Grenze auf -90 °. Dadurch wird jedes
Objekt angezeigt, das in der Datenbank aufgelistet ist, un-
abhängig davon, ob es von Ihrem Standort aus am Himmel
zu sehen ist.
Richtungstasten – Die Richtung, in die sich ein Stern im
Okular zu bewegen scheint, ändert sich in Abhängigkeit der
Meridianseite, auf der sich der Teleskoptubus befindet Dies
kann zu Verwirrung führen, insbesondere, wenn ein Stern für
die Astrofotografie nachgeführt wird Dies kann kompensiert
werden, indem die Richtung der Antriebssteuerungstasten
geändert wird Um die Tastenlogik der Richtungstasten
umzukehren, drücken Sie die MENÜ-Taste und wählen die
Richtungstasten aus dem Utility-Menü Verwenden Sie die
Aufwärts-/Abwärts-Tasten (10), um entweder die Azimut-
tasten (Rektaszension) oder die Höhentasten (Deklination)
auszuwählen und drücken dann auf ENTER Wählen Sie für
beide Achsen entweder positiv oder negativ und drücken
Sie zum Speichern auf ENTER Wird die Azimut-Tasten-
richtung auf positiv eingestellt, bewegt sich das Teleskop in
die gleiche Richtung, die das Teleskop nachführt (d h nach
Westen) Werden die Höhentasten auf positiv gestellt, be-
wegt sich das Teleskop gegen den Uhrzeigersinn entlang der
DEKLINATIONS-Achse
GoTo-Annäherung – Hiermit kann der Benutzer die
Richtung festlegen, in die sich das Teleskop beim Schwenk
einem Objekt annähert Dadurch kann der Benutzer den
Getriebespieleffekt minimieren, wenn von einem Objekt zum
nächsten geschwenkt wird Genauso wie bei den Richtungs-
tasten nähert sich das Teleskop bei einer GoTo-Annäherung,
die auf positiv eingestellt ist, in gleicher Richtung wie bei der
azimutalen Nachführung (Westen) und in der Deklination
gegen den Uhrzeigersinn an ein Objekt an Die GoTo-An-
näherung in der Deklination wird nur verwendet, während
sich der Teleskoptubus auf einer Seite des Meridians be-
findet Sobald der Tubus auf die andere Seite des Meridians
schwenkt, muss die GoTo-Annäherung umgekehrt werden
Wählen Sie zur Richtungsänderung der GoTo-Annäherung
einfach eine GoTo-Annäherung aus dem Teleskopsetupmenü

20 | DEUTSCH
aus, wählen Sie entweder eine Höhen- oder Azimut-Annä-
herung aus, wählen Sie positiv oder negativ und drücken Sie
auf Enter
HINWEIS: Um den Einfluss des Getriebespiels bei der
Zeigegenauigkeit zu minimieren, sollten die Einstellungen
für die Richtungstasten mit denen der GoTo-Automatik
übereinstimmen. Standardmäßig werden die Richtungs-
tasten Aufwärts und Rechts für das Zentrieren der Aus-
richtungssterne verwendet, was automatisch einen Großteil
des Getriebespiels eliminiert. Wenn Sie die GoTo-Automatik
Ihres Teleskops ändern, ist eine Änderung der Richtungs-
tasten nicht nötig. Achten Sie einfach auf die Richtung, die
das Teleskop nimmt, wenn die letzte Bewegung der GoTo-
Automatik abgeschlossen ist. Wenn sich das Teleskop von
Westen (negativer Azimut) und im Uhrzeigersinn (negative
Höhe) an seinen Ausrichtungsstern annähert, müssen Sie
sicherstellen, dass die zur Zentrierung der Ausrichtungsster-
ne verwendeten Tasten das Teleskop in dieselbe Richtung
bewegen.
Autoguide-Rate – hier kann der Benutzer eine Autoguide-
Rate als Prozentanteil der siderischen Rate einstellen
Dies ist bei der Kalibrierung Ihres Teleskops auf einen
CCD-Autoguider für die Astrofotografie mit langen
Belichtungszeiten nützlich
Meridian – Diese Funktion instruiert die Montierung, wie zu
reagieren ist, wenn auf Objekte zugeschwenkt wird, die von
beiden Seiten des Meridians erreichbar sind Die Meri-
dianfunktion ermöglicht es dem Teleskoptubus, während des
Schwenks auf einer gewünschten Seite der Montierung zu
bleiben und die Nachführung in Übereinstimmung mit den
vom Benutzer eingestellten RA-Schwenkgrenzen auszufüh-
ren Siehe R A Grenzen unten Die Meridianfunktion umfasst
vier Wahlmöglichkeiten:
• Aktuelle Bevorzugung – Hierbei kann die Montierung
die Seite bevorzugen, die jeweils aktuell ist, wenn ein
Objektschwenk nahe des Meridians stattfindet Wenn Ihre
RA-Schwenkgrenzen beispielsweise die Nachführung der
Montierung für 10 ° über dem Meridian erlauben, bleibt
das Teleskop auf der aktuellen Seite des Meridians, wenn
es auf Objekte zuschwenkt, die sich maximal 10 ° jenseits
Ihres Meridians befinden
• Westen bevorzugt – Ist das Zielobjekt von beiden Seiten
der Montierung erreichbar, wird die Montierung durch die
Auswahl „Westen bevorzugt“ angewiesen, das Objekt
soweit anzuzeigen, als würde es sich auf der westlichen
Seite des Meridians befinden Der optische Tubus wird
nun auf der östlichen Seite der Montierung positioniert und
zeigt nach Westen
• Osten bevorzugt – Ist das Zielobjekt von beiden Seiten
der Montierung erreichbar, wird die Montierung durch die
Auswahl „Osten bevorzugt“ angewiesen, das Objekt so-
weit anzuzeigen, als würde es sich auf der östlichen Seite
des Meridians befinden Der optische Tubus wird nun auf
der westlichen Seite der Montierung positioniert und zeigt
nach Osten
• Deaktiviert – Hierbei handelt es sich um die Standardein-
stellung, durch welche die Montierung angewiesen wird,
immer soweit auf die andere Seite umzuschwenken, wie es
zum Anzeigen von Objekten auf der gegenüberliegenden
Meridianseite erforderlich ist Sobald das gewünschte Ob-
jekt erreicht ist, führt die Montierung jedoch entsprechend
den eingestellten RA-Schwenkgrenzen über den Meridian
hinaus nach
Montierungseinstellungen – Sobald die Montierungs-
einstellungen kalibriert sind (siehe nachstehenden Abschnitt
Utilities), werden die Werte in der Handsteuerung gespei-
chert und angezeigt Wir raten davon ab, die Kalibrierungs-
werte zu ändern Jede Einstellung kann jedoch wenn nötig
geändert werden, um die Teleskopleistung zu verbessern
• Konus-Wert – Hierbei handelt es sich um den Konus-
Fehlerwert, der eingestellt wird, wenn Utilities/Montie-
rungskalibrierung/DEK-Schalter - Konus ausgeführt wird
• DEK-Index – Hierbei handelt es sich um den Deklinati-
onsindex-Fehlerwert, der gespeichert wird, wenn Kalib-
rierungssterne nach der anfänglichen Sternenausrichtung
hinzugefügt werden
• RA-Index – Hierbei handelt es sich um den RA-Index-
Fehlerwert, der eingestellt wird, wenn Hilfe/Montierungs-
kalibrierung/RA- Schalter ausgeführt wird
R.A. Grenzwerte – Hier werden die Grenzwerte eingestellt,
die das Teleskop beim Schwenk oder der Nachführung
in Rektaszension (RA) bis zum Stopp erreichen kann Die
Schwenkgrenzen werden in Grad angegeben und sind
standardmäßig auf 0° eingestellt, was die Teleskopposition
darstellt, wenn die Gegengewichtsstange horizontal ausge-
zogen ist Die Schwenkgrenzen können jedoch je nach Ihren
Anforderungen angepasst werden Wenn Sie zum Beispiel
eine Ausrüstung für die CCD-Fotografie benutzen, deren
Kabel nicht lang genug sind, um die Schwenkbewegung
des Teleskops über den Himmel zu ermöglichen, können die
Schwenkgrenzen auf der Montierungsseite, die durch die
Kabellänge eingeschränkt ist, angepasst werden, damit das
Teleskop die Schwenkbewegung stoppt, bevor dieser Punkt
erreicht wird Oder wenn Sie ein Objekt fotografieren, das
gerade den Meridian überschritten hat, können Sie die
Grenzwerte so einstellen, dass der Montierung erlaubt wird,
weiter in diese Richtung über den Meridian hinaus nachzu-
führen, ohne das Teleskop auf die andere Seite der Montie-
rung zu „kippen“ (siehe obenstehende Meridianfunktion) Un-
ter Verwendung des ersten oben genannten Beispiels könnte
der Benutzer das Teleskop in R A (Azimut) schwenken, bis
er den Punkt erreicht, wo die Kabel auf ihre maximale ver-
längert werden Wenn das Teleskop nun den Azimut in dieser
Position anzeigt (wenn Sie unter dem Utility-Menü die Ach-
senposition ablesen), können Sie den Azimut des Teleskops
als Maximalposition festlegen Geben Sie diese Azimutwerte
als Maximal- und Minimal-Azimut-Schwenkgrenzen ein, um
sicherzustellen, dass das Teleskop nicht über diesen Punkt
hinaus schwenkt Die Teleskop-Schwenkgrenzen können so
eingestellt werden, dass an einem beliebigen Punkt zwischen
40 ° über dem Niveau und 20 ° unter dem Niveau automa-
tisch gestoppt wird Zum Einstellen der RA-Schwenkgrenzen
stehen folgende Wahlmöglichkeiten zur Verfügung:
• R A Grenzwert Osten - Geben Sie eine Zahl zwischen
+40° und -20° ein, um die Schwenkgrenze festzulegen,
wenn sich der Tubus auf der östlichen Seite der Montierung
befindet
• R A Grenzwert Westen - Geben Sie eine Zahl zwischen
+40° und -20° ein, um die Schwenkgrenze festzulegen,
wenn sich der Tubus auf der östlichen Seite der Montierung
befindet
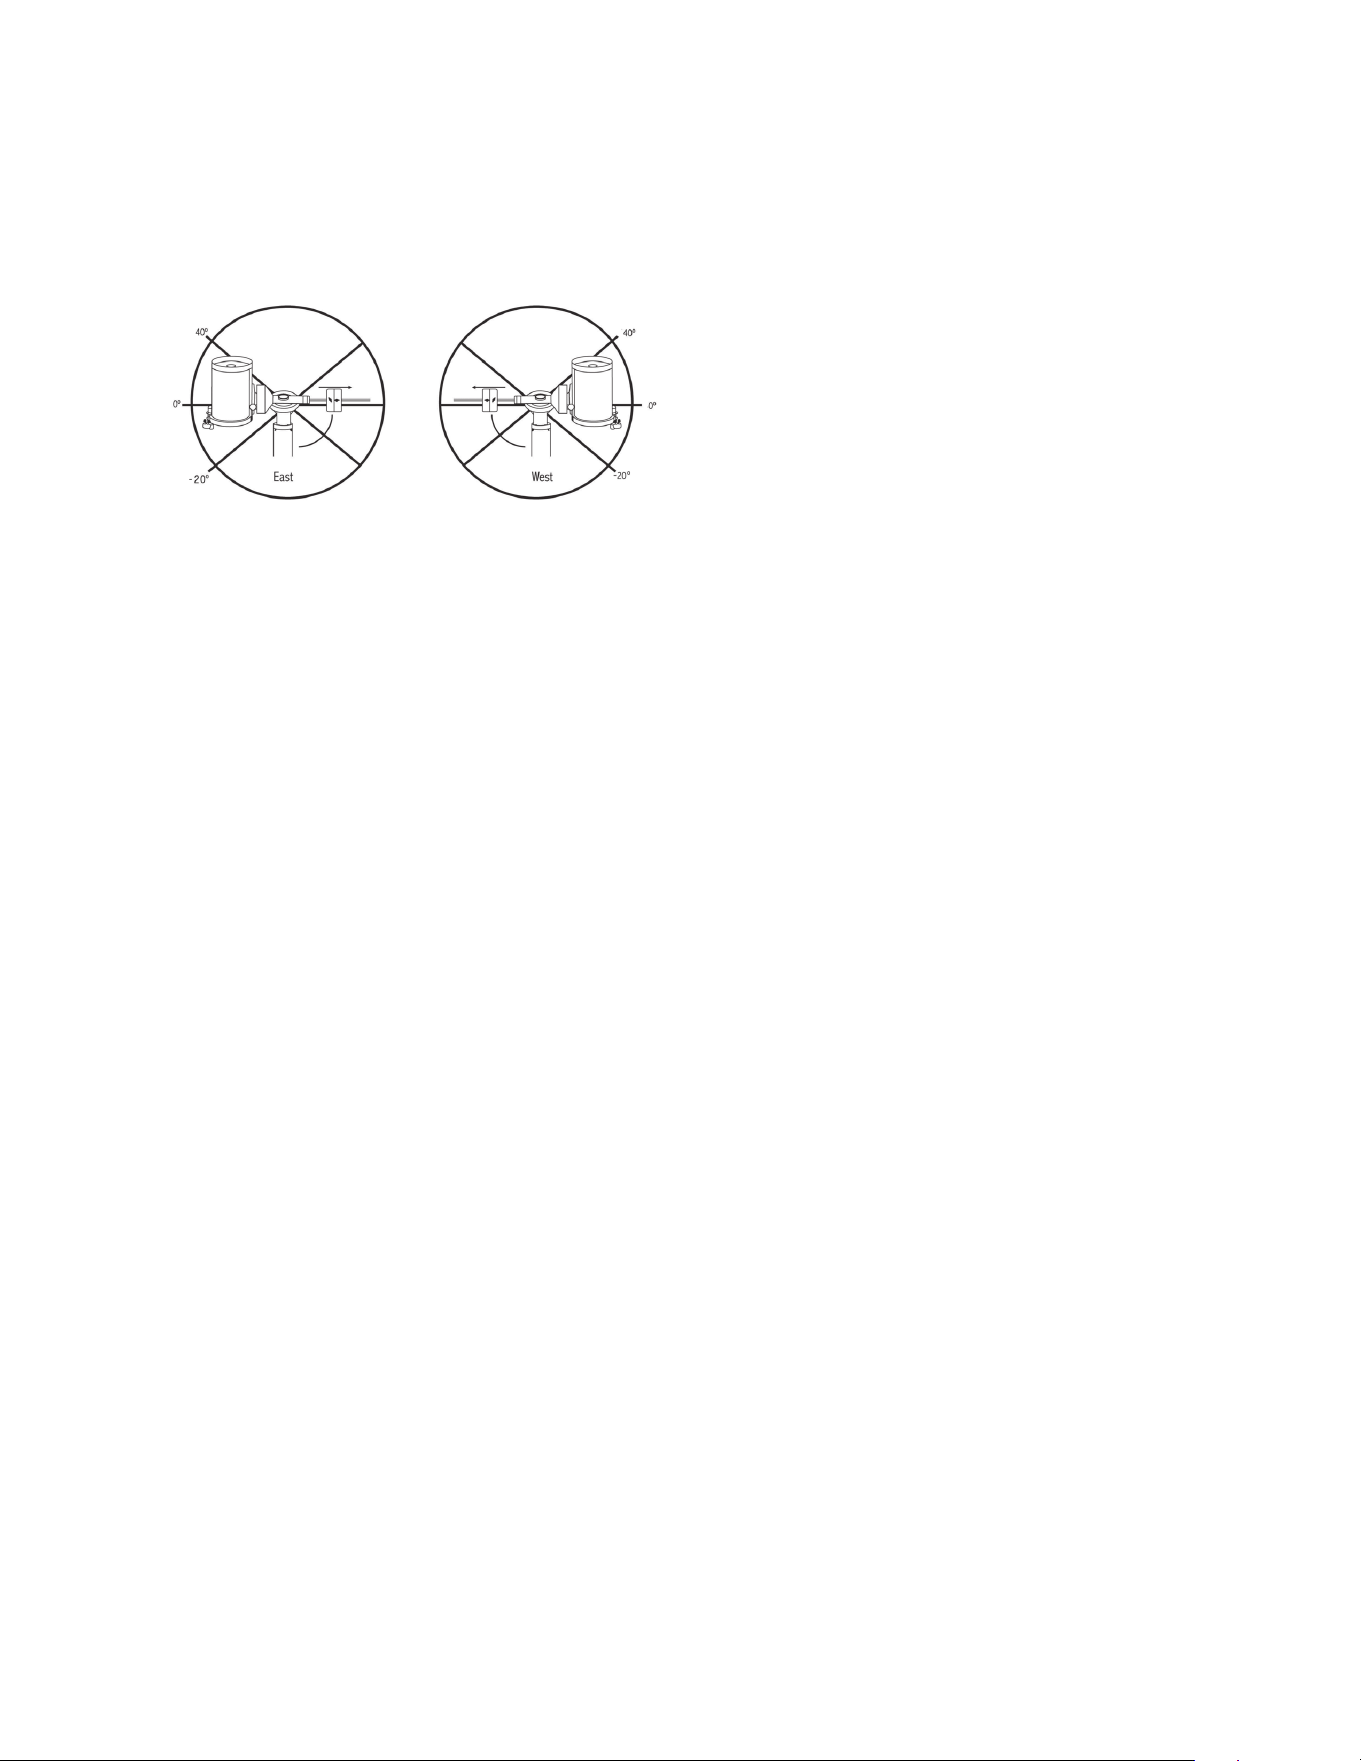
DEUTSCH | 21
• Grenzwerte deaktivieren – Hiermit werden alle vor-
definierten Werte, die eingegeben wurden, deaktiviert,
wodurch die Montierung die maximale Strecke über den
Meridian hinaus (d h -20 ° auf beiden Seiten) nachfüh-
ren kann
WARNUNG: Damit das Teleskop von einer Richtung auf
einen Stern zuschwenken kann, die das Ausmaß des
Getriebespiels minimiert, könnte es nötig sein, dass das
Teleskop über den spezifizierten Grenzwert in der
Schwenkbewegung hinausgeht, damit es sich dem Stern
aus der korrekten Richtung annähern kann. Dadurch sind
Ihre Möglichkeiten, weiter als 6 ° über dem in der Hand-
steuerung eingestellten RA-Schwenkgrenzwert auf ein
Objekt zu schwenken, begrenzt. Wenn dies ein Problem
darstellt, kann die Richtung, in der das Teleskop ein Objekt
zentriert, geändert werden. Zum Ändern der Schwenkrich-
tung des Teleskops, siehe GoTo-Automatik im Teleskop-
Setupmenü.
Benutzerdefinierte Rate 9 – Hiermit können Sie die
Schwenkrate des Teleskops auf ein Ziel hin anpassen Sie
können die RA- und DEK-Achsen separat einstellen
Utility-Menü
Wenn Sie durch die Optionen des MENÜS (9) scrollen,
erhalten Sie auch Zugriff auf verschiedene, fortgeschrittene
Utilityfunktionen des Teleskops, wie z B Montierung kalibrie-
ren, Ruheposition und Vieles mehr
Montierung kalibrieren – Um die Leistung und Zeigege-
nauigkeit des Teleskops zu optimieren, verfügt die Montie-
rung über integrierte Kalibrierungsroutinen zur Kompensation
mechanischer Vibrationen der Deutschen Montierung Jede
Kalibrierung wird vollautomatisch durchgeführt und muss
in den meisten Fällen nur einmal ausgeführt werden Wir
empfehlen dringend, sich ein paar Minuten Zeit zu nehmen,
die Kalibrierungsverfahren durchzulesen
• R A Schalter – Mittels dieses Verfahrens wird der Offset-
fehler aufgezeichnet, wenn die Rektaszensions-Indexmar-
kierung beim Hochfahren ausgerichtet wird Kalibrierung
des R A Indexes erhöht die Genauigkeit Ihrer anfänglichen
Sternausrichtung für spätere Teleskopausrichtungen
• GoTo Kalibrierung - GoTo Kalibrierung ist ein nützliches
Werkzeug, wenn schweres visuelles oder Fotozubehör am
Teleskop befestigt wird Die GoTo-Kalibrierung berechnet
die Distanz und Zeit, die von der Montierung benötigt wird,
um den letzten, langsamen GoTo-Abschnitt zu beenden,
wenn auf ein Objekt zugeschwenkt wird Eine Änderung an
der Teleskopbalance kann die Zeit verlängern, die für den
letzten Schwenk benötigt wird Die GoTo-Kalibrierung be-
rücksichtigt kleinste Ungleichgewichte und Änderungen der
letzten GoTo-Distanz und kompensiert diese
Startposition – Bei der „Startposition“ des Teleskops han-
delt es sich um eine benutzerdefinierte Position, die bei der
Lagerung des Teleskops verwendet wird, wenn dieses nicht
in Gebrauch ist Die Startposition ist nützlich, wenn das Tele-
skop als ständige Sternwarte gelagert wird Standardmäßig
ist die Startposition mit der Indexposition für die Ausrichtung
der Montierung identisch
Zum Einstellen der Startposition Ihrer Montierung verwen-
den Sie einfach die Pfeiltasten auf der Handsteuerung, um
die Teleskopmontierung in die gewünschte Position zu be-
wegen Wählen Sie die Option Einstellen aus und drücken
Sie auf Enter
Wählen Sie die Option GoTo aus, um das Teleskop zu einem
beliebigen Zeitpunkt zurück in die Startposition zu bewegen
Werkseinstellungen – Setzt die Handsteuerung auf die
ursprünglichen Werkseinstellungen zurück Werte wie die
Getriebespielkompensation, anfängliche Daten zu Datum
und Uhrzeit, Längen-/Breitengrade sowie Schwenk- und
Filtergrenzen werden rückgesetzt Gespeicherte Werte, wie
z B benutzerdefinierte Objekte, bleiben jedoch auch bei der
Auswahl der Werkseinstellungen gespeichert Die Hand-
steuerung fordert Sie zum Drücken der „0“-Taste auf, bevor
die Werkseinstellungen aktivierbar werden
Version – Wird diese Option ausgewählt, können Sie die
aktuelle Versionsnummer von Hand- und Motorsteuerung
einsehen Der erste Nummernsatz zeigt die Softwareversion
der Handsteuerung an Für die Motorsteuerung zeigt die
Handsteuerung zwei Nummernsätze an: die ersten Nummern
geben den Azimut und die zweiten die Höhe an
Achsenposition – Hier werden die relativen Werte für
Höhe und Azimut der aktuellen Teleskopposition angezeigt
GoTo-Achsenposition – Hier können Sie eine spezifische
relative Höhen- und Azimut-Position eingeben und darauf
schwenken
Ruheposition – Die Ruheposition ermöglicht es dem
Teleskop, vollständig abzuschalten und dennoch seine Aus-
richtung beizubehalten, wenn es wieder eingeschaltet wird
Dadurch wird nicht nur Energie gespart, sondern es ist auch
ideal für Personen, die ihr Teleskop permanent aufgestellt
lassen oder ihr Teleskop über einen längeren Zeitraum an
einem Standort belassen Aktivieren des Teleskop-Ruhe-
modus:
1 Im Utility-Menü den Ruhemodus auswählen
2 Das Teleskop in die gewünschte Position bringen und
ENTER drücken
3 Das Teleskop ausschalten Achten Sie darauf, das Tele-
skop im Ruhemodus niemals zu bewegen
Sobald das Teleskop erneut eingeschaltet wird, zeigt der
Bildschirm Aufwachen an Nachdem Sie auf Enter gedrückt
haben, haben Sie die Möglichkeit, durch die Uhrzeit-/Stand-
ort-Informationen zu scrollen, um die aktuelle Einstellung
zu bestätigen Drücken Sie auf ENTER, um das Teleskop
aufzuwecken
HINWEIS: Wenn Sie auf dem Aufwach-Bildschirm auf
ZURÜCK drücken, können Sie viele Funktionen der Hand-
steuerung einsehen, ohne das Teleskop aus dem Ruhe-
modus aufzuwecken. Um das Teleskop, nachdem Sie auf
ZURÜCK gedrückt haben, aufzuwecken, wählen Sie im
Utility-Menü Ruheposition aus und drücken auf ENTER. Die

22 | DEUTSCH
Richtungstasten dürfen, während sich das Teleskop im Ru-
hemodus befindet, nicht zum Bewegen verwendet werden.
Sonnenmenü
Aus Sicherheitsgründen wird die Sonne nicht als Daten-
bankobjekt angezeigt, es sei denn, dies wird zuvor aktiviert
Gehen Sie zum Aktivieren der Sonne ins Sonnenmenü und
drücken Sie auf ENTER Die Sonne wird nun im Planeten-
katalog angezeigt und kann als Ausrichtungsobjekt für die
Sonnensystem-Ausrichtung verwendet werden Wählen Sie
zum Entfernen der Sonne aus der Handsteuerungsnzeige
erneut das Sonnenmenü im Utility-Menü aus und drücken
Sie auf ENTER
Einstellen der Montierungsposition
Das Menü zum Einstellen der Montierungsposition kann
verwendet werden, um Ihre Ausrichtung beim Auskuppeln
oder ähnlichen Umständen zu erhalten Sie könnten diese
Funktion beispielsweise nutzen, wenn die Montierung nach
einer vollständigen Ausrichtung neu ausbalanciert werden
muss Schwenken Sie zum Einstellen der Montierungsposi-
tion auf einen hellen Stern in der Liste der benannten Sterne
und wählen Sie Einstellen der Montierungsposition aus Die
Handsteuerung wird mit dem Stern synchronisiert, indem
Sie den Stern im Okular zentrieren und die Ausrichten-Taste
drücken Nach der Synchronisation mit dem Stern können
Sie die Montierung in beiden Achsen manuell bewegen, um
die Balance wiederherzustellen Wenn Sie das Teleskop
auf Ihr nächstes Objekt schwenken möchten, bedenken Sie
bitte, dass Sie den Tubus manuell zum selben hellen Stern
zurückführen müssen, um diesen im Okular zu zentrieren Die
Verwendung dieses Werkzeugs hebt den PEC-Index auf
Das GPS an-/ausschalten – Wenn Sie Ihr Teleskop
zusammen mit dem optionalen SkySync-GPS-Zubehör
verwenden, müssen Sie das GPS bei der ersten Zubehör-
nutzung einschalten Wenn Sie die Datenbank des Teleskops
zum Auffinden der Koordinaten eines Himmelsobjekts zu
einem künftigen oder vergangen Datum nutzen möchten,
müssen Sie das GPS ausschalten, damit Sie eine von der
aktuellen Zeit abweichende Angabe manuell eingeben
können
RTC an-/ausschalten – hiermit können Sie die interne
Echtzeituhr des Teleskops ausschalten Beim Ausrichten
empfängt das Teleskop weiterhin Informationen von der RTC
Wenn Sie die Datenbank des Teleskops zum Auffinden der
Koordinaten eines Himmelsobjekts zu einem künftigen oder
vergangen Datum nutzen möchten, müssen Sie die RTC aus-
schalten, damit Sie eine von der aktuellen Zeit abweichende
Angabe manuell eingeben können
Periodische Fehlerkorrektur (PEC) – Die PEC wurde
konzipiert, um die fotografische Qualität zu verbessern,
indem die Amplitude der Schneckenfehler reduziert und
die Nachführgenauigkeit des Antriebs erhöht wird Diese
Funktion wird bei der fortgeschrittenen Astrofotografie bei
akkurater Polausrichtung Ihres Teleskops verwendet Weitere
Informationen über die PEC-Verwendung finden Sie im Ab-
schnitt „Astrofotografie“ in diesem Handbuch
Menü benutzerdefinierte Objekte
Ihr Teleskop kann bis zu 400 verschiedene benutzerdefinierte
Objekte speichern Bei diesen Objekten kann es sich um von
Ihnen entdeckte terrestrische Tagesobjekte oder interessante
Himmelsobjekte handeln, die nicht in der regulären Daten-
bank vorhanden sind Es gibt verschiedene Wege, ein Objekt
in Abhängigkeit der Art des Objekts zu speichern:
GoTo-Objekt: Gehen Sie zu einem beliebigen benutzerdefi-
nierten Objekt, das in der Datenbank gespeichert ist, scrollen
Sie entweder zu „GoTo-Sky-Obj“ oder „GoTo-Land-Obj “,
geben Sie die Nummer des Objekts ein, das Sie auswählen
möchten und drücken Sie auf ENTER Das Teleskop wird die
Daten automatisch abrufen und die Koordinaten anzeigen,
bevor es auf das Objekt schwenkt
Ein Himmelsobjekt speichern: Ihr Teleskop speichert
Himmelsobjekte nach deren Rektaszensions- sowie De-
klinationskoordinaten im Himmel in die Datenbank ab Auf
diese Weise kann dasselbe Objekt jedes Mal gefunden
werden, wenn das Teleskop ausgerichtet wird Sobald ein
gewünschtes Objekt im Okular zentriert wurde, scrollen Sie
einfach zum Befehl „Himmelsobj speichern“ und drücken auf
ENTER Die Anzeige fordert Sie zur Eingabe einer Nummer
zwischen 1 und 200 auf, um das Objekt zu identifizieren
Drücken Sie erneut auf ENTER, um dieses Objekt in die
Datenbank zu speichern
Datenbank (Db) speichern
• Objekt: Mithilfe dieser Funktion können Sie Ihre eigene
Benutzertour aus Datenbankobjekten anlegen, indem
die aktuelle Teleskopposition zusammen mit dem Namen
eines aus einem beliebigen Datenbankkatalog ausgewähl-
ten Objekts gespeichert wird Auf diese Objekte kann
nun über die GoTo-Himmelsobjekt-Auswahl zugegriffen
werden
• R.A. eingeben - DEK: Sie können auch spezifische Koor-
dinaten für ein Objekt speichern, indem Sie einfach die RA
sowie die Deklination dieses Objekts eingeben Scrollen
Sie zum Befehl „RA-DEK eingeben“ und drücken Sie auf
ENTER Die Anzeige fordert Sie nun dazu auf, zuerst die
RA und anschließend die Deklination des gewünschten
Objekts einzugeben
• Ein terrestrisches Objekt speichern: Das Teleskop
kann auch als Spektiv für terrestrische Objekte genutzt
werden Feststehende terrestrische Objekte können
gespeichert werden, indem relativ zum Standort des
Teleskops zum Betrachtungszeitpunkt Höhe und Azimut
gespeichert werden Da sich diese Objekte relativ zum
Standort des Teleskops befinden, sind deren Daten nur
für exakt diesen Standort gültig Terrestrische Objekte
werden gespeichert, indem das gewünschte Objekt erneut
im Okular zentriert wird Scrollen Sie zum Befehl „Terres-
trisches Obj speichern“ und drücken Sie auf ENTER Die
Anzeige fordert Sie zur Eingabe einer Nummer zwischen 1
und 200 auf, um das Objekt zu identifizieren Drücken Sie
erneut auf ENTER, um dieses Objekt in die Datenbank zu
speichern
Um Inhalte eines beliebigen benutzerdefinierten Objekts
zu ändern, können Sie einfach ein neues Objekt unter der
bereits bestehenden Identifikationsnummer speichern; das
Teleskop ersetzt das vorherige benutzerdefinierte Objekt
durch das aktuelle Objekt

DEUTSCH | 23
RA/DEK aufrufen – Hierbei werden Rektaszension und
Deklination der aktuellen Teleskopposition angezeigt
GoTo-RA/DEK – Sie können eine spezifische RA bzw
Deklination eingeben und darauf schwenken
Hinweis– Um ein Koordinatenpaar (RA/DEK) dauerhaft in
der Datenbank zu speichern, kann es als benutzerdefiniertes
Objekt, wie oben beschrieben, gespeichert werden
Identifizieren
Der Identifizierungsmodus durchsucht einen beliebigen
Datenbankkatalog der Montierung bzw Name und Offset-
Distanzen des nächsten passenden Objekts werden
aufgelistet und angezeigt Diese Funktion kann zwei
Zwecke erfüllen: Erstens kann sie zur Identifikation eines
unbekannten Objekts im Sichtfeld Ihres Okulars verwendet
werden Außerdem kann der Identifizierungsmodus zur
Lokalisierung anderer Himmelsobjekte, die dicht an den
gegenwärtig von Ihnen beobachteten Objekten liegen,
verwendet werden Wenn Ihr Teleskop z B auf den
hellsten Stern im Sternbild Lyra gerichtet ist, können Sie
die Identifizierung wählen Daraufhin wird der Katalog der
benannten Sterne zweifelsohne den Stern Vega als den von
Ihnen beobachtete Stern angeben Wenn Sie Identifizieren
wählen und in den Katalogen nach benannten Objekte bzw
im Messier-Katalog suchen, weist Sie die Handsteuerung
darauf hin, dass sich der Ringnebel (M57) ca 6 ° von
Ihrer aktuellen Position befindet Eine Durchsuchung des
Doppelsternkatalogs ergibt, dass sich Epsilon Lyrae nur 1°
von Vega entfernt befindet
Die Identifizierungsfunktion verwenden:
• Auf die Menütaste drücken und die Option Identifizieren
auswählen
• Die Aufwärts-/Abwärts-Scrolltasten verwenden, um den
Katalog, in dem gesucht werden soll, auszuwählen
• Drücken Sie auf ENTER, um mit der Suche zu beginnen
HINWEIS: Manche Datenbanken umfassen Tausende von
Objekten, und daher kann es einige Minuten dauern, bis das
nächstliegende Objekt aufgerufen wird.
Präzises GoTo
Die Montierung verfügt über eine GoTo-Funktion zum prä-
zisen Annähern, die beim Auffinden extrem lichtschwacher
Objekte sowie bei der Objekt-Zentrierung im Sichtfeld für
die Astrofotografie behilflich ist Diese GoTo-Funktion sucht
automatisch nach dem hellen Stern, der dem gewünschten
Objekt am nächsten liegt, und fordert den Benutzer dazu auf,
den Stern sorgfältig im Objektiv zu zentrieren Die Hand-
steuerung berechnet nun die kleine Differenz zwischen der
GoTo-Position und der zentrierten Position Aufgrund dieser
Aufrechnung schwenkt die Montierung nun mit erhöhter
Genauigkeit auf das gewünschte Objekt
Das präzise GoTo verwenden:
1 Drücken Sie die MENÜ-Taste und wählen Sie mithilfe der
Aufwärts- und Abwärts-Tasten das „Präzises GoTo" aus
• Wählen Sie Datenbank, wenn Sie das Objekt, dass Sie
betrachten möchten, aus einer Datenbankkatalogauflis-
tung auswählen möchten oder;
• Wählen Sie RA/DEK, um ein Himmelskoordinatenpaar
einzugeben, auf das zugeschwenkt werden soll
2 Sobald das gewünschte Objekt ausgewählt ist, wird der
Ihrem gewünschten Objekt am nächsten liegende helle
Stern von der Handsteuerung gesucht und angezeigt
Drücken Sie auf ENTER, um zum hellen Ausrichtungs-
stern zu schwenken
3 Verwenden Sie die Richtungstasten, um den Ausrich-
tungsstern sorgfältig im Okular zu zentrieren
4 Drücken Sie auf ENTER, um auf das gewünschte Objekt
zu schwenken
Anhang A: Firmware-Upgrade der
Montierung und Handsteuerung
Zur Überprüfung von Firmware-Updates siehe bitte diese
URL: http://software celestron com/updates/CFM/CFM/
1 Schließen Sie die mitgelieferte NexStar + Handsteuerung
an einen der Aux-Anschlüsse an
2 Ein Standard-USB-A-Typ-Kabel an die Montierung und
den PC anschließen
3 Die CGX an die Stromversorgung anschließen und ein-
schalten
4 Den Celestron Firmware Manager (CFM) öffnen
5 Der CFM überprüft Ihre Hardware und sucht nach Up-
dates Der CFM bestimmt automatisch, welche Kompo-
nenten eine Aktualisieren benötigen
6 Klicken Sie im CFM auf “Update” und erlauben Sie das
Fertigstellen
Anhang B:
Pflege und Instandhaltung
Die CGX-Montierung ist robust und wird Ihnen bei richtiger
Pflege Jahre Freude bereiten
Lagerung
Obwohl die Montierung sowie die Elektronik für den
Einsatz im Freien entworfen wurde, sollte die Montierung
nicht im Freuen gelagert werden, es sei denn sie ist durch
ein überdachtes Observatorium oder beispielsweise eine
Garage geschützt Wird die Montierung dauerhaft Hitze,
Kälte und Feuchtigkeit ausgesetzt, können Elektronik,
mechanische Schmierung und Oberflächenqualität letztlich
Schaden nehmen An einem überdachten, sonnengeschützten
Ort lagern Möglichst an einem trockenen Platz aufbewahren
24 | DEUTSCH
SOLARWARNUNG: Versuchen Sie niemals, die Sonne durch ein Teleskop zu betrachten.
BRAUCHEN SIE HILFE? Kontaktieren Sie den technischen Support von Celestron
celestron com/pages/technical-support
©2024 Celestron Celestron und Logo sind Marken von Celestron, LLC • Alle
Rechte Vorbehalten • Celestron com
US: 2835 Columbia Street, Torrance, CA 90503 USA
UK: Unit 2 Transigo, Gables Way, Thatcham RG19 4JZ, United Kingdom
Dieses Produkt ist für Personen ab 14 Jahren konzipiert und vorgesehen
Die Fotos auf dieser Verpackung dienen nur dekorativen Zwecken und sollen nicht
darstellen, was zu diesem Produkt gehören wird
www celestron com/pages/warranty
Hergestellt in China | 09-24
FCC Hinweis: Dieses Gerät wurde getestet und entspricht den Grenzwerten
für digitale Geräte der Klasse B in Übereinstimmung mit Artikel 15 der FCC-
Bestimmungen Diese Grenzwerte bieten einen angemessenen Schutz vor
Störungen in Wohnanlagen Dieses Gerät erzeugt, verwendet und strahlt
Hochfrequenzenergie aus und kann den Funkverkehr stören, wenn es nicht gemäß
den Anweisungen installiert und verwendet wird Es kann jedoch nicht garantiert
werden, dass in einer bestimmten Einrichtung keine Störungen auftreten Falls
dieses Gerät Störungen des Radio- oder Fernsehempfangs verursacht, was
durch ein vorübergehendes Ausschalten des Geräts festgestellt werden kann,
wird der Benutzer dazu angehalten, die Störung durch eine oder mehrere der
nachstehenden Maßnahmen zu beheben:
• Die Ausrichtung der Empfangsantenne ändern
• Die Distanz zwischen dem Gerät und dem Empfänger
vergrößern
• Anschluss des Geräts an eine Steckdose, die nicht am selben Stromkreis an-
geschlossen ist, wie die des Empfängers
• Fragen Sie den Händler oder einen erfahrenen Radio-/
Fernsehtechniker um Hilfe

MANUALE D’USO
Modelli 91530-1
TELESCOPI CON MONTATURA EQUATORIALE ALLA TEDESCA

2 | ITALIANO

ITALIANO | 3
INDICE
Introduzione 4
Requisiti di Sistema 4
Elenco Componenti 4
Panoramica 5
Assemblaggio 7
Funzioni di Base 9
Allineamento polare Della Montatura 10
Allineamento Polare di Precisione 11
Raggio di Movimento Sulla Montatura 11
Regolazione della Montatura per Latitudini Molto Alte o Basse 12
Porta USB 12
Porte AUX 12
Porta Autoguida 12
Controllo Manuale NexStar+ 13
Catalogo Degli Oggetti 17
Rotazione Verso un Oggetto 17
Appendice A: Aggiornamento del Firmware della Montatura e Pulsantiera 23
Appendice B: Cura e Manutenzione 23

4 | ITALIANO
Introduzione
Avvertenza
• Non guardare mai direttamente il Sole a occhio nudo o
con un telescopio (a meno che non si disponga del
corretto filtro solare) Ciò potrebbe causare danni
irreversibili agli occhi
• Mai utilizzare il telescopio per proiettare un'immagine del
Sole su una qualsiasi superficie L'accumulo interno di
calore può danneggiare il telescopio e i relativi accessori
ad esso fissati
• Mai utilizzare un filtro solare per oculare o un prisma di
Herschel L'accumulo di calore all'interno del telescopio
può causare l'incrinatura o la rottura di tali dispositivi,
lasciando che la luce solare non filtrata passi attraverso
l'occhio
• Mai lasciare il telescopio incustodito Assicurarsi che
un adulto che abbia familiarità con le procedure di
funzionamento corrette sia sempre presente con il
telescopio, specialmente in presenza di bambini
Requisiti di Sistema
• Il CGX richiede corrente continua a 12 Volt con almeno
4 ampere di corrente Celestron mette a disposizione un
alimentatore c a a 12VDC 5A, includendo un connettore
cilindrico filettato il cui utilizzo è consigliabile Anche le
batterie portatili da 12 volt forniscono un'alimentazione
elettrica adatta La montatura comprende il cavo di
alimentazione c c con spinotto accendisigari
• Il telescopio deve avere una barra di montaggio a coda
di rondine di tipo CG-5/Vixen o CGE/Losmandy D CGX
si adatta bene ad uno di questi formati dei supporti a
coda di rondine
• Per assicurare prestazioni ottimali, il carico utile totale del
telescopio non deve essere superiore a 55 libbre (25 kg),
contrappesi esclusi
• Utilizzare i sistemi operativi Windows 7/10 con il software
di controllo del telescopio
• Cavo USB con connettore standard A quando è collegato
alla porta USB della montatura (solo per PC)
• Cacciavite a stella (opzionale, solo per la regolazione dei
comandi)
Elenco Componenti
Scatola 1: Montatura equatoriale CGX 91530-1
CGX montatura equatoriale testa
8 mm chiave a brugola (in cattività in maniglia posteriore
della montatura)
Barra di contrappeso e dado di arresto
3 viti a testa esagonale incassata da 8 mm (la testa si
attacca al treppiede)
Cavo di alimentazione da 12V DC
Pulsantiera NexStar+
Scatola 2: Treppiede e Contrappesi CGX
Treppiede
2 contrappesi da 5 kg (11 lb)
Vano accessori
Manopola vassoio e rondella (filettata sulla colonna
centrale del treppiede)

ITALIANO | 5
Panoramica
Figura 1.1 Panoramica
8 mm chiave a brugola
(sotto la maniglia di trasporto)
Manopola di blocco a coda di rondine
Maniglia di trasporto
Leva di blocco della frizione di declinazione (DEC)
Ascensione retta Leva di blocco
della frizione
Barra di contrappeso
Contrappesi
Dado di arresto contrappeso
Treppiede
Vano accessori
Pulsantiera
Supporto a coda di rondine
Porte Aux 1 & Aux 2 per pulsantiera ed accessori
Tensione di alimentazione 12VDC
Manopole di blocco altitudine (una per ciascun lato)
Manopole di regolazione dell’altitudine
Manopole di regolazione dell'azimut
Maniglia di trasporto
Interruttore On/Off
(cfr. Figura 1.2).
8 mm
chiave a brugola
(sotto la maniglia di trasporto)
Maniglia di trasporto

6 | ITALIANO
Figura 1.2 Panoramica
Porta Autoguida
Sistema di trasmissione a cinghia
Porta USB
Scala delle latitudini
Leva di blocco gamba per regolare l'altezza
Indice altezza gamba
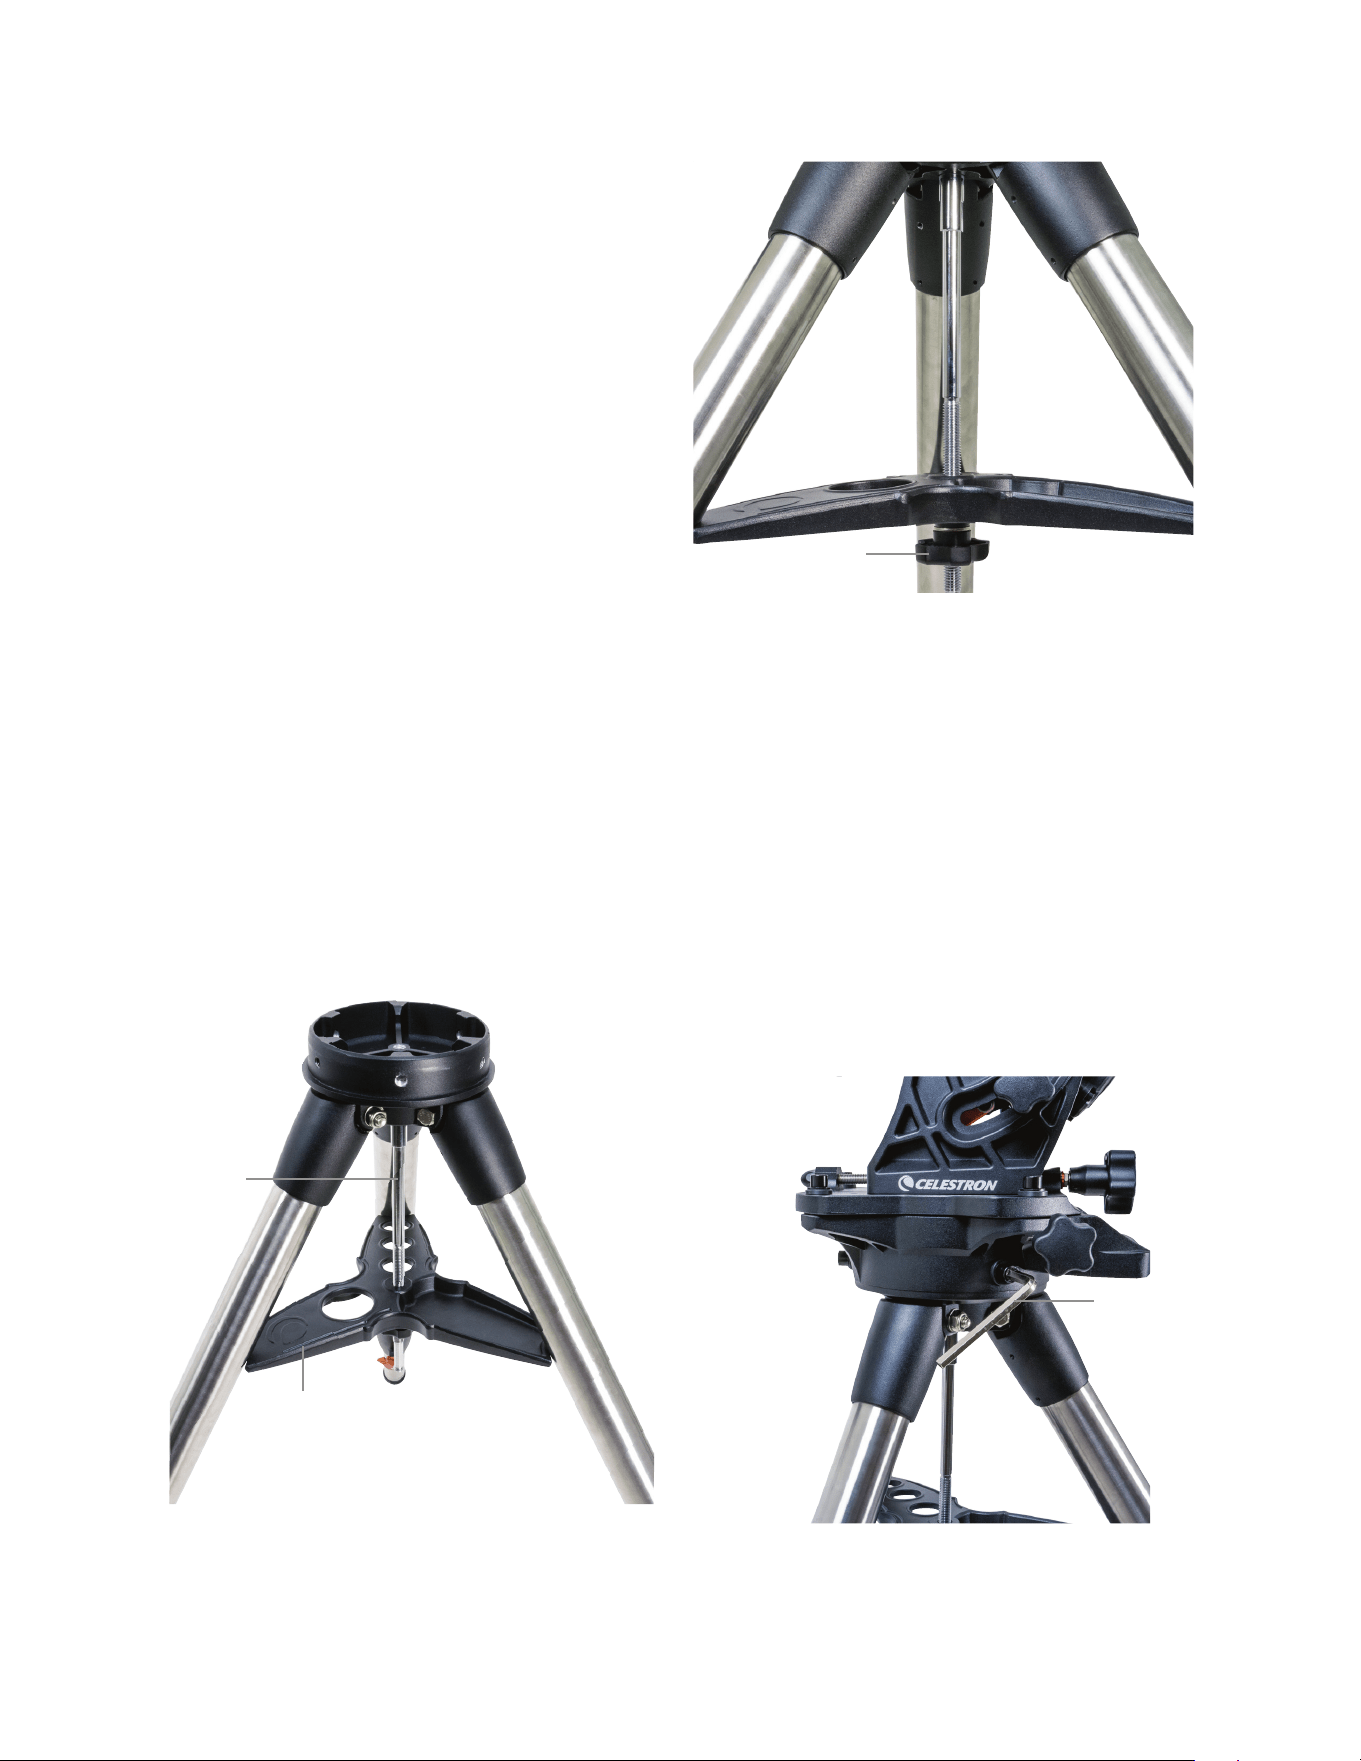
ITALIANO | 7
Assemblaggio
Disimballare tutti i contenuti e seguire la seguente procedura
per assemblare la montatura In caso di acquisto singolo del
CGX, il treppiede include due contrappesi da 11 lb Mentre,
se il CGX è stato acquistato con un grande tubo ottico,
saranno compresi più pesi per raggiungere l'equilibrio
Nota: La chiave a brugola da 8 mm inclusa si trova sotto
a maniglia posteriore della montatura, come mostrato in
Figura 1.1.
Impostare il treppiede
1 Mettere il treppiede in posizione verticale e tirare le
gambe dello stesso verso l’esterno fino a quando non
raggiungeranno l’estensione massima
2 Rimuovere dadi e rondelle di supporto del treppiede
dal colonna centrale fissati sulla parte superiore
(Figure 2 1 e 2 2)
3 Collocare il vano accessori sopra la colonna centrale in
modo che ciascuno dei tre bracci del vassoio sostenga
una gamba del treppiede
4 Infilare il dado e la rondella di nuovo sulla colonna
filettata e serrare saldamente in posizione Il vano
accessori non dovrebbe essere in grado di spostarsi
contro il treppiede (Figure 2 1 e 2 2)
5 Regolare l'altezza del treppiede allentando le manopole
di blocco sull'estremità di ogni gamba del treppiede Poi
regolare l'altezza della gamba secondo le proprie esigenze
e stringere di nuovo le manopole di blocco, una gamba
alla volta Si noti che i contrassegni di riferimento gamba
possono essere utilizzati per livellare facilmente
il treppiede
Fissaggio della montatura al treppiede
1 Mettere la testa sul treppiede in modo che può inserirsi
correttamente nella superficie di accoppiamento
2 Per una migliore stabilità, orientare la montatura in modo
che la barra di contrappeso è posizionata direttamente
sopra la gamba del treppiede, come mostrato nelle
Figure 1 1 e 1 2 Si noti che è possibile orientare la
montatura in modo che la barra di contrappeso sia tra
due delle gambe del treppiede che possono essere utili
a basse latitudini, permettendo ai contrappesi di essere
più distanti dal treppiede
3 Usare la chiave a brugola da 8 mm in dotazione (Figura 3)
per avvitare le 3 viti di fissaggio sulla montatura
Figura 2.1 Configurazione del treppiede
Figura 2.2 Configurazione del treppiede
Figura 3 Fissaggio della montatura al treppiede
Vano accessori
Colonna
centrale
Dadi e rondelle per
fissaggio treppiede
Chiave a brugola

8 | ITALIANO
Allineamento polare parziale della montatura
Prima di caricare ulteriormente la montatura ed il treppiede,
posizionare il supporto più o meno verso nord (o sud se
nell'emisfero australe), e impostare la latitudine Allentare le
due manopole di blocco altitudine, quindi ruotare la manopola
di regolazione altitudine (Figura 1 1) finché la latitudine non
si è parzialmente impostata, come indicato sulla scala della
latitudine (Figura 1 2); quindi serrare nuovamente le manopole
di blocco altitudine La scala è concepita solo per l’allineamento
polare parziale Si potrà raggiungere in seguito l'allineamento
polare più preciso con l'assistenza della pulsantiera
computerizzata
Aggiungere i contrappesi
Rimuovere il dado di arresto alla fine della barra di contrap-
peso, aggiungere i contrappesi, quindi avvitare il dado di
arresto Mantenere la barra di contrappeso puntata verso il
basso (Figura 1 1)
Fissaggio del telescopio alla montatura
1 Assicurarsi che sia le leve di frizione di declinazione
(DEC) che di ascensione retta (AR) vengano strette
2 Allentare le manopole di blocco del supporto a coda di
rondine, abbastanza per permettere alla coda di rondine
di adattarsi al supporto Nota: la freccia deve essere rivolta
verso la stessa parte della maniglia anteriore (Figura 4)
3 Far scorrere la barra a coda di rondine del telescopio
nel supporto a coda di rondine della montatura Fissare
il telescopio in posizione con le due manopole di blocco
(Figura 5)
Il CGX si adatta all'ampia coda di rondine stile CGE Celestron
e a code di rondine più piccole stile CG-5, comune anche per
code di rondine Losmandy D1 e stile Vixen2
1
Verificare la barra a coda di rondine Losmandy prima di
fissare il telescopio alla montatura Misure e angoli della
coda di rondine possono variare tra i diversi produttori
2
Verificare la barra a coda di rondine Vixen prima di fissare il
telescopio alla montatura Si rammenta che alcune code di
rondine stile Vixen non sono piatte e non hanno la stessa
altezza sulla barra A seconda della lunghezza del piano,
l'adattabilità al supporto a coda di rondine della montatura
può risultarne compromessa
Bilanciare la montatura
Asse di ascensione retta: Sbloccare con cautela la leva della
frizione per l'ascensione retta e posizionare la barra di
contrappeso così che sia orizzontale Senza lasciare il
telescopio, controllare da quale lato pende la bilancia Far
scorrere i contrappesi, se necessario, in modo che l'asse di
AR non si muove quando la frizione è sbloccata
Asse di declinazione: Con la barra di contrappeso ancora
in orizzontale, sbloccare con cautela la leva della frizione
di declinazione e controllare in che modo il tubo ottico è
equilibrato (Figura 6) Far scorrere il tubo ottico in avanti
o indietro, secondo necessità, per raggiungere l'equilibrio
Per telescopi grandi e pesanti, riportare il telescopio nella
posizione di riposo prima di allentare le manopole di blocco
del supporto a coda di rondine
Figura 4 Fissaggio della montatura al treppiede
Figura 5 Coda di rondine del telescopio posizionata correttamente
Figura 6 Bilanciare la montatura
Orientamento della freccia
a coda di rondine
Manopola di blocco a coda
di rondine

ITALIANO | 9
Fissaggio della custodia per pulsantiera
Avvolgere il cinturino a strappo e la custodia attorno alla
gamba del treppiede e posizionarvi la pulsantiera al suo
interno
Collegamento pulsantiera
Collegare la pulsantiera NexStar+ in dotazione ad una delle
porte Aux
Avvertenza: Non collegare la pulsantiera alla porta
Autoguida. Potrebbero verificarsi danni alla montatura o alla
pulsantiera. Allo stesso modo, non collegare il cavo autoguida
alla porta AUX, altrimenti potrebbero verificarsi danni.
Posizione iniziale
La montatura si trova in posizione di riposo quando la barra
di contrappeso è rivolta verso il basso, e il telescopio punta
lungo l'asse polare della montatura, come illustrato nella
(Figura 7) Gli interruttori interni della montatura la posizione-
ranno a riposo dopo l'accensione (per ulteriori informazioni
cfr "Funzioni di base"); sarà comunque possibile posizionare
manualmente la montatura prima dell'accensione E’ suffi-
ciente sbloccare le due leve di blocco
Funzioni di Base
Con la montatura assemblata e allineata polarmente, procedere
alla sua messa in servizio:
Accendere la montatura
La montatura CGX può essere alimentato tramite l'adattatore
per batterie auto in dotazione con una batteria da 12VDC in
grado di fornire almeno 4 ampere di corrente Oppure si può
utilizzare l'adattatore CA opzionale che fornisce 12VDC e 4
ampere di corrente Celestron mette a disposizione alimentatori
CA con connettori cilindrici filettati
Posizione iniziale e Informazioni sul sito
1 Collegare la pulsantiera NexStar+ in dotazione ad una
delle porte Aux È possibile collegarla a Aux 1 o Aux 2
2 Collegare il cavo di alimentazione alla porta di tensione
di alimentazione sulla montatura Assicurarsi di fissare il
cavo di alimentazione al connettore cilindrico filettato
3 Accendere l’unità
4 Quando sulla pulsantiera si visualizza “CGX Pronto”,
premere INVIO due volte La montatura procederà a
portarsi sulla posizione iniziale dell'interruttore
5 Selezionare City Database o Custom Site
• In City Database, selezionare la città più vicina alla
propria posizione
• Se si sceglie Custom Site, sarà necessario inserire
longitudine, latitudine e fuso orario della propria posizione
6 Una volta che la posizione è selezionata, impostare la
data e l'ora Il CGX ha un orologio in tempo reale (RTC)
che memorizza la data, l'ora e le informazioni sulla posizione
per il prossimo utilizzo della montatura
Allineamento
Prerequisito: La montatura deve essere allineata
polarmente in maniera parziale, con la data, l'ora e le
informazioni sulla posizione inserite correttamente, come
descritto nel punto precedente.
1 Per ottenere i migliori risultati di allineamento, scegliere
Two Star Align e premere INVIO
Si può scegliere anche Solar System, One Star, Last Align,
o Quick Align. I tasti di scorrimento 6 e 9 sulla tastiera
vengono utilizzati per scorrere qualsiasi selezione elenco
sulla pulsantiera.
Figura 7 Telescopio in posizione iniziale

10 | ITALIANO
2 Selezionare la prima stella dall'apposito elenco delle
stelle Utilizzare i tasti di scorrimento 6 (su) e 9 (giù) sulla
tastiera per selezionare i nomi delle stelle Si tratta delle
stelle più luminose e più facili da trovare Premere INVIO
dopo aver selezionato una stella adatta Se la montatura
è allineata polarmente in maniera parziale, essa ruoterà
verso la posizione approssimativa della stella
La selezione predefinita di stelle si trova sul lato ovest del
meridiano. Se il cielo è ostruito ad Occidente o si desidera
scegliere stelle sul lato est del meridiano, premere il tasto
MENU sulla tastiera.
3 Utilizzando i tasti di direzione, ruotare il telescopio verso
la stella selezionata e centrarla nel mirino, quindi premere
INVIO
La montatura regolerà automaticamente la velocità del
motore per mettere a fuoco
4 Utilizzando i tasti di direzione, mettere a fuoco la stella
nell'oculare del telescopio e premere ALLINEA
5 Selezionare una seconda stella dalla lista e ripetere la
procedura dalla fase 2 al 4 Quando viene richiesto di
aggiungere una stella di calibrazione, è possibile premere
il tasto INDIETRO per completare l'allineamento, o per
risultati ottimali, procedere ad aggiungerla
Per ottenere i migliori risultati, aggiungere almeno una
stella di calibrazione. Ciò migliorerà la precisione di
puntamento della montatura.
6 Quando viene richiesto di “aggiungere stella di calibrazione”,
scegliere una stella dalla lista e premere INVIO La
montatura si sposterà verso l'altro lato del meridiano per
aggiungere la stella di calibrazione
7 Centrare ed allineare la stella così come avete fatto con
le prime due stelle di allineamento: Centrato il mirino,pre-
mere INVIO; centrare la stella nel proprio oculare, quindi
premere ALLINEARE
8 Quando viene richiesto di aggiungere un’altra stella di
calibrazione, è possibile continuare ad aggiungere altre,
o premere INDIETRO per completare l'allineamento
Selezione di oggetti
Selezionare dal database degli oggetti classificati per
Sistema Solare, stelle, o Profondo Cielo All'interno di questi
menu (con i tasti numerici 1, 2, e 3, è possibile selezionare
per nome dell'oggetto o numero di catalogo popolare (quale,
M42 per Messier 42)
I tasti 6 e 9 (su e giù) permettono di scorrere qualsiasi
elenco nella pulsantiera Premere INVIO per passare
all'oggetto selezionato nella lista
Esempio di selezione e di rotazione verso l'oggetto del
profondo cielo Messier M42:
• Premere la funzione PROFONDO CIELO poi INVIO
• Scorrere verso il basso (tastierino 9) per Messier e
premere INVIO
• Premere “0-4-2” sulla tastiera e premere INVIO
La funzione SkyTour (tastierino 5) rappresenta un ottimo
modo per esplorare il cielo senza consultare una mappa
stellare La funzione Tour genererà un elenco degli oggetti
più interessanti da osservare per fuso orario e posizione
geografica
Allineamento Polare della Montatura
Il comando computerizzato Vai-a è in grado di individuare gli
oggetti, anche se la montatura non è perfettamente allineata al
polo Tuttavia, allineamento polare è necessario per raggiungere
una migliore precisione di tracciamento della montatura Ed
è essenziale per la fotografia astronomica Quando è ben
allineata all'asse polare, la montatura equatoriale traccia il
cielo in un unico movimento, mantenendo l'oggetto al centro
dell'oculare o fotocamera
Il sistema di allineamento polare di CGX si compone di un
regolatore per l'altitudine ed uno per l'azimut (Figura 8)
Celestron mette a disposizione un cannocchiale polare
opzionale, che si attacca alla montatura Il cannocchiale
polare opzionale non passa attraverso l'asse di ascensione
retta perché quella zona è utilizzata per il cablaggio interno
Se non si utilizza il cannocchiale polare opzionale, è possibile
ottenere un allineamento polare parziale osservando nel miri-
no del telescopio, e regolando la montatura fino a centrare la
Stella polare dall'oculare del telescopio Ciò ti porterà entro
circa tre quarti di grado all'interno del Polo Nord Celeste (NCP)
Figura 8 Regolazione allineamento polare
Manopole di regolazione
dell'azimut
Manopole di regolazione
dell’altitudine
Manopola di blocco
dell’altitudine

ITALIANO | 11
Allineamento Polare di Precisione
L'allineamento polare totale Celestron consente l'allineamento
polare di precisione della montatura senza l'utilizzo della
Stella polare o cercatore polare L'allineamento polare guidato
dal software consente di scegliere la stella più adatta
Prerequisito: Il CGX deve essere allineato a due stelle, ad
una stella, o al Sistema solare.
1 Selezionare la stella luminosa adatta dal database della
pulsantiera NexStar Ruotare il telescopio verso la stella
2 Premere il tasto ALLINEA Selezionare "Allineamento
polare", quindi "Allineare montatura" dalla lista
3 Il telescopio sarà poi ruotato nuovamente verso la stella di
allineamento e vi chiedo di centrarlo nell'oculare al fine di
"sincronizzarlo" sulla stella
4 Premere Allineare ed il telescopio ruoterà verso la posizione
della stella se fosse allineata al polo con precisione
5 Utilizzare le regolazioni di altitudine e azimut della
montatura per posizionare la stella al centro dell’oculare
Non utilizzare i tasti direzionali sulla pulsantiera per
centrare la stella
6 Premere Invio L’allineamento polare è stato completato
Raggio di Movimento Sulla
Montatura
Raggio Sofware
Il CGX impiega sensori di limite controllati da software che
rilevano quando la montatura sta per raggiungere il limite del
cambio meccanico Una volta che la montatura raggiunge
l'interruttore, il motore decelera fino all'arresto e apparirà un
messaggio di avviso "Finecorsa" La montatura non ruoterà
oltre nella direzione del finecorsa fino a quando la direzione
non verrà invertita
Cambio meccanico
Il CGX utilizza il cablaggio interno in modo che la montatura
è progettata per non muoversi oltre un dato raggio Entrambi
gli assi sono limitati da un punto di arresto integrato nella
montatura Questo limite radiale può anche aiutare a prevenire
le interferenze non intenzionali tra il telescopio e la montatura
o treppiede Se per qualsiasi motivo la montatura supera il
finecorsa software (o se la frizione è sbloccata e la montatura
viene spostata manualmente), essa si fermerà al punto
di arresto
Il limite AR (Figura 9 1) consente di tracciare 20º al di là del
meridiano Se si lascia la montatura incustodita durante la
tracciatura, essa si fermerà automaticamente prima di rag-
giungere il punto di arreso meccanico
Il limite DEC (Figura 9 2) contiene raggio di rotazione suffi-
ciente per raggiungere qualsiasi parte del cielo
Figura 9.1 Un lato del limite meccanico di AR
Figura 9.2 Un lato del limite meccanico di DEC
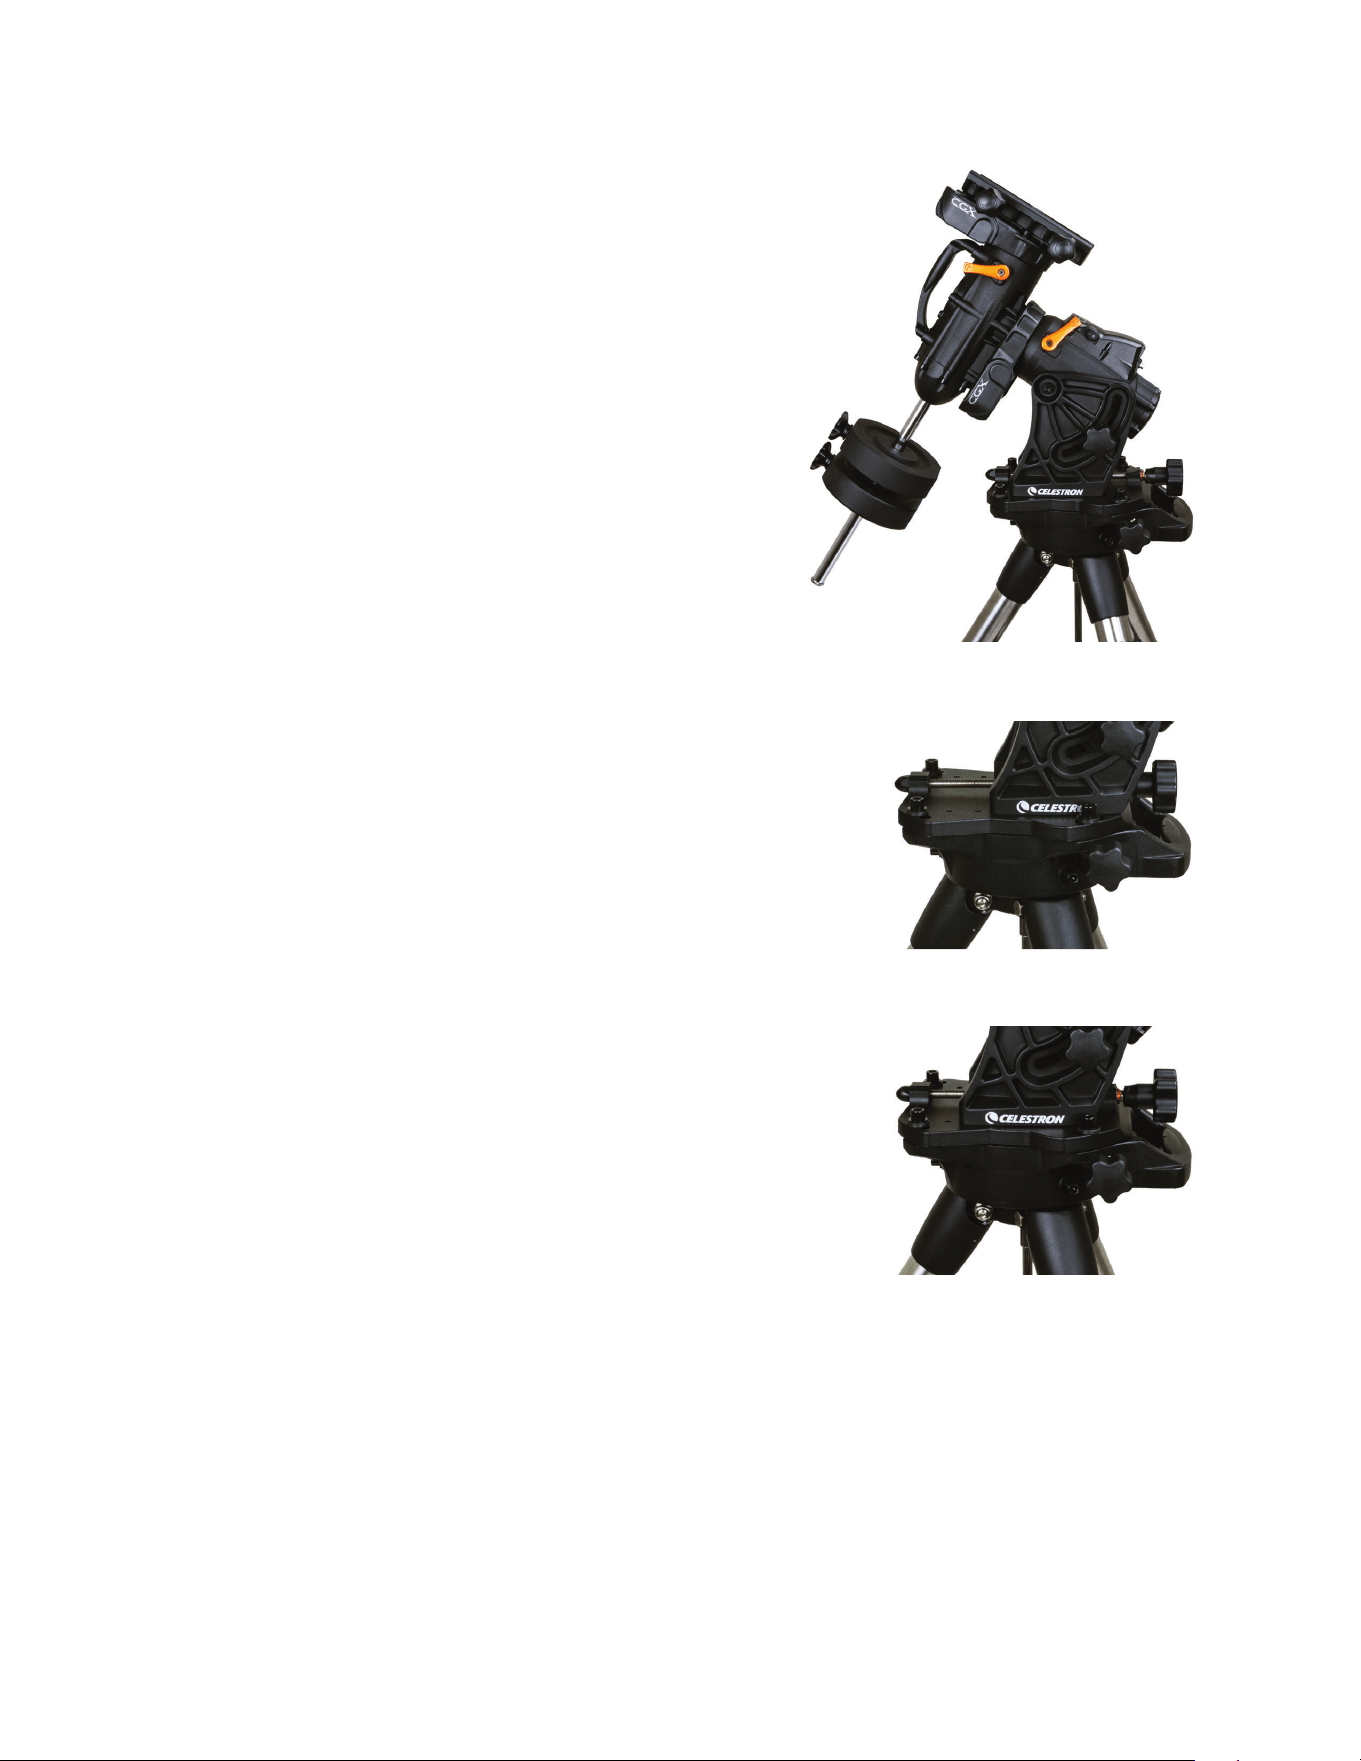
12 | ITALIANO
Regolazione della Montatura per
Latitudini Molto Alte o Basse
La testa EQ può essere impostata sul treppiede in tre
diverse posizioni, le quali possono essere utilizzate anche per
ottimizzare l’equilibrio sul treppiede La montatura è in posi-
zione centrale, operante a latitudini comprese tra 20 e 55º
Se si desidera utilizzare la montatura a latitudini inferiori a
20°, spostare la montatura in avanti, se si desidera utilizzarla
sopra i 55°, spostare la montatura all’indietro
1 Rimuovere la testa dal treppiede togliendo le 3 viti a
testa esagonale
2 Rimuovere con cautela le 8 viti a testa esagonale situate
sotto la testa Al termine, il meccanismo di regolazione
dell'altitudine sarà l'unica cosa a fissare la piastra inferiore
della testa EQ
3 Girare la manopola di regolazione dell'altitudine finché i
fori filettati sul fondo della montatura siano allineati con la
nuova serie di fori presenti sulla piastra inferiore Far
scivolare la piastra in avanti (verso il lato della barra di
contrappeso) per utilizzare a latitudini più basse Far
scivolare la piastra all’indietro (verso la manopola di
regolazione dell’altitudine) per utilizzare a latitudini più
alte (Figura 10)
Porta USB
La porta USB sul CGX viene utilizzata per interfacciarsi con
il PC solo per:
1 Usare con il software di controllo del telescopio dedicato
2 Aggiornare il firmware di controllo del motore sulla
montatura
È sufficiente collegare uno cavo USB standard di tipo A nella
porta USB sulla montatura, e collegare al PC La montatura
si installerà automaticamente
La porta USB sulla montatura non deve essere utilizzata
con software di controllo del telescopio ASCOM o terzi.
Per controllare la montatura via ASCOM, collegare il PC
alla mini porta USB della pulsantiera NexStar+.
Porte Aux
Aux 1 e Aux 2 possono essere utilizzate per la pulsantiera
NexStar+, così come per gli accessori opzionali quali il
modulo StarSense AutoAlign e SkyPortal WiFi
Porta Autoguida
La porta autoguida deve essere utilizzata solo per i relè auto-
guida della telecamera
ATTENZIONE: Non collegare mai la pulsantiera NexStar+
o altro accessorio alla porta autoguida Rischio di danni.
Figura 10 Modifica della posizione della montatura sulla testa del treppiede
POSIZIONE DI PREDEFINITO
POSIZIONE INDIETRO
POSIZIONE AVANTI
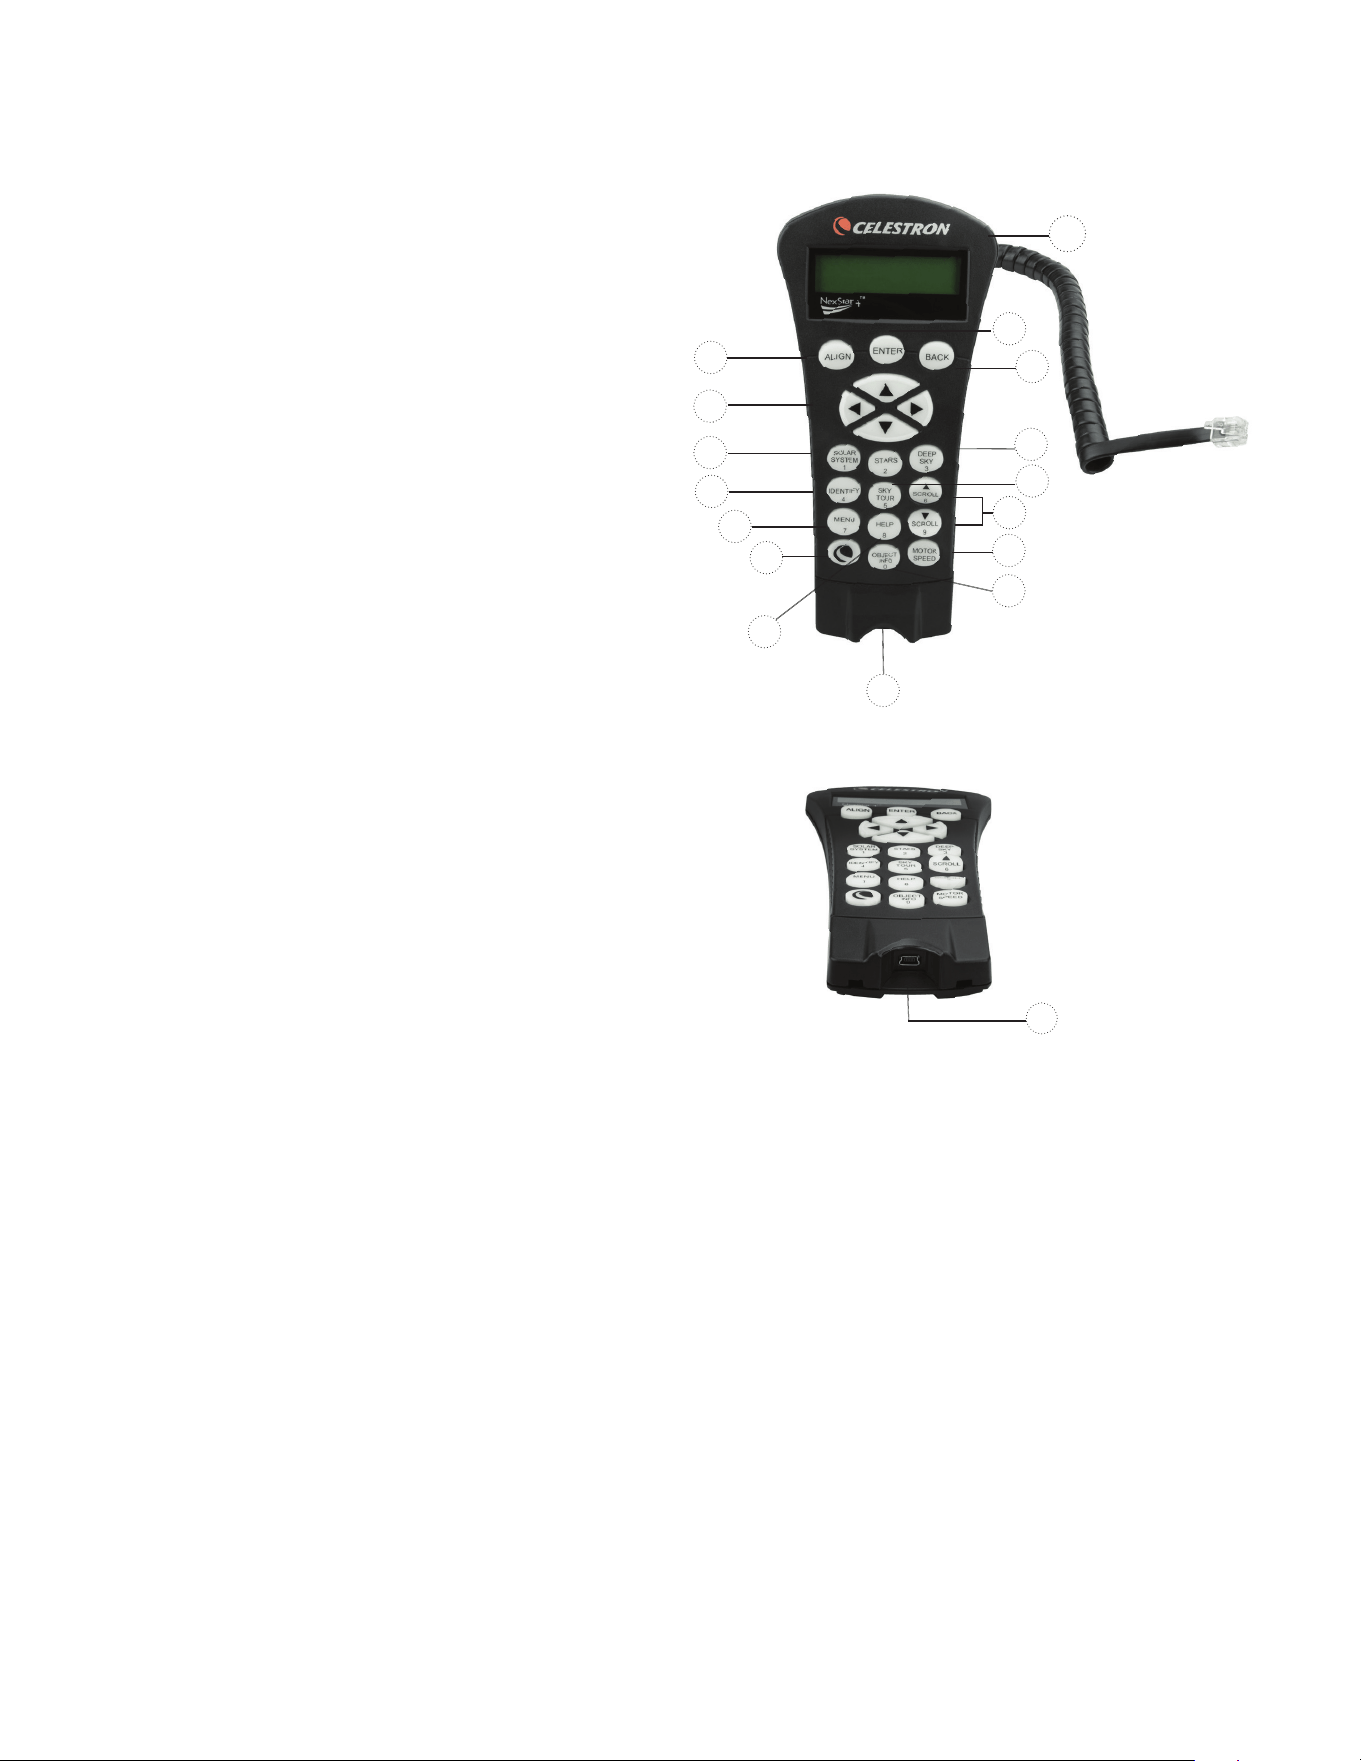
ITALIANO | 13
Controllo Manuale NexStar+
1 Finestra del display a cristalli liquidi (LCD):
Retroilluminazione rossa per una comoda visualizzazione
notturna delle informazioni relative al telescopio e per il
testo a scorrimento Rimuovere il nastro protettivo
trasparente dallo schermo prima dell'uso
2 Allinea: Fornisce istruzioni al telescopio per avviare la
procedura di allineamento predefinita È inoltre utilizzato
per selezionare una stella o un oggetto come posizione
di allineamento
3 Tasti direzionali: Consente il controllo completo del
proprio telescopio in qualsiasi direzione Utilizzare i tasti
direzionali per centrare gli oggetti nell’oculare o per
ruotare manualmente il telescopio
4 Tasti Catalogo: Consentono l’accesso diretto a
ognuno dei cataloghi principali presenti nel database
con migliaia di oggetti
Il telescopio contiene nel proprio database i seguenti
cataloghi:
• Sistema solare- Tutti i 7 pianeti presenti nel nostro
sistema solare più la Luna, il Sole e Plutone
• Stelle- elenchi personalizzati di tutte le stelle, le stelle
doppie, le stelle variabili, le costellazioni e gli asterismi
più luminosi
• Profondo Cielo- Elenchi personalizzati di tutte le
migliori galassie, nebulose e ammassi stellari nonché
gli oggetti Messier e NGC selezionati completi
5 Identifica: Consente di cercare nel database del
telescopio e visualizza il nome e la distanza degli oggetti
corrispondenti più vicini
6 Menu: Visualizza le funzioni di configurazione e di utilità,
quali la velocità di tracciabilità, gli oggetti definiti dall’utente
e altro
7 Opzione (Logo Celestron): Funziona in modo simile
al tasti SHIFT di una tastiera e può essere utilizzato in
combinazione con altri tasti per accedere a funzionalità
e funzioni più avanzate da aggiungere con altri
aggiornamenti del firmware
8 Invio: Il tasto INVIO consente di selezionare qualsiasi
funzione del telescopio, di accettare i parametri immessi
e di ruotare il telescopio verso gli oggetti visualizzati
9 Indietro: Il tasto INDIETRO farà uscire l’utente dal menu
corrente e visualizzerà il livello precedente del percorso
del menu Premere INDIETRO ripetutamente per andare
al menu principale oppure per cancellare i dati inseriti
per sbaglio
10 Sky Tour: consente di attivare la modalità Tour, la quale
cerca tutti i migliori oggetti nel cielo e ruota automatica-
mente il telescopio nella loro direzione
11 Tasti di scorrimento: Utilizzare per scorrere verso
l'ALTO e il BASSO qualsiasi elenco del menu Un sim-
bolo raffigurante una doppia freccia sul lato destro dello
schermo LCD indica che i tasti di scorrimento possono
essere utilizzati per visualizzare informazioni aggiuntive I
tasti hanno una forma con bordi marcati per rendere più
semplice la loro individuazione senza guardare
1
9
8
13
4
12
2
3
4
5
6
7
15
11
10
14
12 Velocità del motore: Simile al tasto Rate (velocità) sulla
pulsantiera NexStar originale, consente di modificare la
velocità del motore una volta premuti i tasti direzionali
13 Info Oggetto: consente di visualizzare le coordinate e le
informazioni importanti relative agli oggetti selezionati dal
database del telescopio
14 Mini Porta Usb (cavo non incluso): Si collega al PC
per controllare il telescopio via desktop o per eseguire gli
aggiornamenti del firmware
15 Menu Help: Nei futuri aggiornamenti del firmware,
questo tasto offrirà suggerimenti per la risoluzione dei
problemi Per comodità, attualmente funziona come
collegamento rapido al Catalogo Messier
Figura 11
14
Figura 11,2

14 | ITALIANO
Selezione di un oggetto
Una volta allineato correttamente il telescopio, è possibile
selezionare un oggetto da uno qualsiasi dei cataloghi
presenti nel database del controllo manuale NexStar+ La
pulsantiera dispone di un tasto dedicato per ciascuna
categoria di oggetti nel database: oggetti del Sistema
solare, Stelle e oggetti del profondo cielo
• Sistema Solare – Il catalogo del Sistema solare visualiz-
zerà tutti i pianeti (e la Luna) presenti nel nostro Sistema
Solare che sono attualmente visibili nel cielo Per consen-
tire che il Sole sia visualizzato come opzione nel database,
vedere l'opzione Consenti Sole nella sezione di Configura-
zione del database nel manuale
• Stelle – Il catalogo delle stelle visualizza un elenco perso-
nalizzato di tutte le stelle, le stelle doppie (binarie), le stelle
variabili, le costellazioni e asterismi più luminosi
• Profondo cielo: il catalogo del Profondo Cielo visualizza
un elenco di tutte le migliori Galassie, Nebulose e Ammassi,
nonché oggetti del catalogo Messier e una selezione di
oggetti del catalogo NGC Vi è inoltre un elenco alfabetico
di tutti gli oggetti del profondo cielo ordinati secondo il
relativo nome comune
Utilizzare i tasti di scorrimento per scorrere i cataloghi e
trovare l’oggetto che si desidera visualizzare Durante lo
scorrimento di un lungo elenco di oggetti, tenere premuti
il tasto SU o il tasto GIÙ per scorrere il catalogo nella
relativa direzione a una velocità più elevata
Rotazione verso un oggetto
Una volta che l’oggetto desiderato sarà visualizzato sullo
schermo della pulsantiera, vi sono due opzioni:
• Premere il tasto INFO OGGETTO. Ciò fornirà informa-
zioni utili in merito all’oggetto selezionato, quali grandezza,
costellazione e informazioni estese in merito agli oggetti
più popolari
- Utilizzare i tasti freccia SU/GIU’ per scorrere lungo le
informazioni dell’oggetto visualizzato
- Utilizzare il tasto INDIETRO per tornare al database
• Premere il tasto INVIO. Ciò farà ruotare automatica-
mente il telescopio alle coordinate dell'oggetto visualizzato
sulla pulsantiera Mentre il telescopio è in fase di rotazione
verso l’oggetto, l’utente può ancora avere accesso a molte
delle funzioni del controllo manuale (quali la visualizzazione
delle informazioni in merito all’oggetto)
NOTA: I cataloghi Messier, NGC e SAO richiedono
all'utente di inserire una designazione numerica. Una volta
selezionato il tasto del catalogo appropriato e selezionato
il catalogo Messier, NGC o SAO, si vedrà un cursore
lampeggiante ad indicare l’accesso alla modalità di
immissione numerica.
Digitare il codice dell'oggetto che si desidera visualizzare
Premere INVIO per comandare al telescopio di ruotare
verso l’oggetto, oppure tenere premuto il tasto OPZIONE
(logo Celestron) e premere il tasto INFO OGGETTO per
vedere le informazioni relative all’oggetto selezionato
ATTENZIONE: mai far ruotare il telescopio mentre qual-
cuno sta guardando nell'oculare. Il telescopio può spostarsi
a velocità di rotazione elevate e può colpire un osservatore
nell'occhio.
Tasto Velocità motore
Il tasto MOTOR SPEED (VELOCITÀ MOTORE), simile al
tasto Rate (Velocità) del controllo manuale NexStar ori-
ginale, consente di modificare istantaneamente la velocità
dei motori da alta velocità di rotazione a velocità di guida
precisa o in qualsiasi intervallo intermedio Ciascuna velocità
corrisponde a un numero sul tastierino della pulsantiera
Il tasto numero 9 è la velocità più elevata (circa 3,5° al
secondo, a seconda della montatura) ed è utilizzato per la
rotazione da un oggetto all’altro e per individuare le stelle di
allineamento Il tasto 1 corrisponde alla velocità più bassa
(metà sidereo) ed è utilizzato per centrare in modo preciso
gli oggetti nell'oculare
Per modificare la velocità dei motori:
• Premere il tasto VELOCITA’ MOTORE sulla pulsantiera
Lo schermo LCD visualizzerà la velocità corrente del
motore
• Premere il numero sulla pulsantiera che corrisponde alla
velocità desiderata
La pulsantiera dispone di una funzione "doppio tasto" che
consente di aumentare istantaneamente la velocità dei
motori senza dover scegliere una velocità Per utilizzare
questa funzione, premere semplicemente il tasto a freccia
che corrisponde alla direzione verso cui si intende spostare
il telescopio Mentre si tiene premuto tale tasto, premere
il tasto direzionale opposto Ciò aumenterà la velocità alla
massima velocità di rotazione
Durante l’utilizzo dei tasti direzionali su e giù del controllo
manuale, le velocità di rotazione inferiori (6 e inferiori)
spostano i motori nella direzione opposta rispetto alle
velocità di rotazione superiori (7-9) Ciò viene fatto in modo
che un oggetto si sposti nella direzione appropriata mentre
si guarda nell'oculare (ad es premere la freccia in alto
sposterà la stella nella parte superiore del campo di visua-
lizzazione dell'oculare) Tuttavia, in caso si usi una qualsiasi
delle velocità di rotazione inferiori (velocità 6 e inferiori) per
centrare un oggetto in StarPointer, potrebbe essere neces-
sario premere il tasto direzionale opposto per far sì che il
telescopio si sposti nella direzione corretta

ITALIANO | 15
Menu della pulsantiera
Il menu “Pulsantiera” consente di personalizzare determinate
funzioni sulla pulsantiera NexStar+ Per accedere a questo
menu, premere il tasto MENU (n 7 sul tastierino) e utilizzare
i tasti di scorrimento per selezionare “Controllo manuale” e
premere INVIO Utilizzare i tasti di scorrimento per selezionare
tra le seguenti opzioni:
• Controllo luci: Regola indipendentemente la luminosità
del tastierino numerico e dello schermo LCD
• Menu Scorrimento: Regola la velocità di scorrimento
delle parole sullo schermo LCD
• Attiva/disattiva grassetto: Modifica il formato del carat-
tere visualizzato sullo schermo LCD da normale a grassetto
• Imposta contrasto: Utilizzare i tasti di scorrimento per
regolare il contrasto dello schermo LCD
• Imposta lingua: Modifica la lingua visualizzata sullo
schermo LCD
NOTA: La funzioni Imposta lingua può anche apparire la prima
volta che si utilizza il nuovo controllo manuale. È anche
possibile avviarla in qualsiasi momento tenendo premuto il
tasto Opzione (con il logo Celestron) per 10 secondi
durante l’accensione del telescopio.
Procedure di allineamento
Affinché il telescopio possa puntare precisamente gli oggetti
nel cielo, esso deve prima allinearsi con posizioni note
(stelle) nel cielo Con questa informazione, il telescopio può
creare un modello del cielo, che utilizzerà per individuare
qualsiasi oggetto con coordinate note Esistono molti modi
per allineare il proprio telescopio con il cielo, a seconda delle
informazioni che l’utente è in grado di fornire:
• L’Allineamento a due stelle utilizza le informazioni di
ora/posizione inserite e consente all’utente di selezionare
due stele di allineamento verso le quali il telescopio ruoterà
automaticamente
• L’Allineamento a una stella utilizza le stesse informa-
zioni di ora/posizione ma utilizza solamente una stella per
l’allineamento
• L’Allineamento con il Sistema Solare visualizzerà un
elenco degli oggetti diurni visibili (pianeti e la Luna)
disponibili per allineare il telescopio
• L’Allineamento rapido chiederà di inserire le stesse
informazioni richieste per la procedura di Allineamento a
due stelle Tuttavia, al posto di ruotare verso le stelle di
allineamento per la procedura di centratura e allineamento,
il telescopio salta questo passaggio e crea semplicemente
un modello del cielo sulla base delle informazioni fornite
• L’ Ultimo allineamento ripristina l’ultimo allineamento
stellare salvato e passa a quella posizione L’Ultimo allinea-
mento serve anche come una buona salvaguardia in caso
il telescopio dovesse perdere potenza
Allineamento a due stelle
L’Allineamento a due stelle consente all’utente di selezionare
due stelle su cui allineare il telescopio Per allineare il tele-
scopio con il metodo Allineamento a 2 Stelle:
1 Selezionare Allineamento a due stele dalle opzioni di
allineamento fornite Sulla base delle informazioni di data
e ora inserite, la pulsantiera selezionerà automaticamente
e visualizzerà una stella luminosa sopra l’orizzonte
• Premere INVIO per selezionare questa stella come
prima stella di allineamento
• Se per qualsiasi ragione la stella scelta non è visibile
(magari perché si trova dietro a un albero o a un edificio),
premere INDIETRO per far selezionare automaticamente
al controllo manuale la successiva stella più luminosa
• Oppure è possibile utilizzare i tasti Su/Giù per scorrere
l’intero elenco delle Stelle aventi un nome e selezionarne
una qualsiasi tra più di duecento stelle di allineamento
2 Una volta il telescopio avrà terminato la rotazione verso la
prima stella di allineamento, lo schermo richiederà di utiliz-
zare i tasti freccia per allineare la stella selezionata con il
reticolo al centro del cercatore di stelle Una volta centrata
nel cercatore, premere INVIO Lo schermo fornirà quindi
istruzioni per centrare la stella nel campo visivo dell’oculare
Una volta centrata la stella, premere ALLINEA per accetta-
re questa stella come prima stella di allineamento
3 Una volta inserita la prima stella di allineamento, la pul-
santiera selezionerà automaticamente una seconda stella
di allineamento e sarà quindi necessario ripetere questa
procedura per tale stella Una volta allineato il telescopio
su entrambe le stelle, lo schermo chiederà se si desidera
aggiungere stelle di calibrazione aggiuntive Le stelle di
calibrazione sono utilizzate per migliorare la precisione di
puntamento del telescopio compensando i sottili disalli-
neamento opto-meccanici tra l’ottica del telescopio e la
montatura Pertanto, è solitamente consigliabile aggiungere
almeno una stella di calibrazione aggiuntiva per migliorare
la precisione di puntamento a tutto cielo della montatura
4 Premere INVIO per selezionare una stella di calibrazione
Selezionare una stella allo stesso modo in cui si sono
selezionate le prime due stelle di allineamento e pre-
mere INVIO Si noterà che tutte le stele di calibrazione
visualizzate sono posizionate sul lato opposto del lato del
cielo (meridiano) come le stelle di allineamento originali
Questo è essenziale per una calibrazione precisa della
montatura Da ultimo, è possibile scegliere di continuare
ad aggiungere stelle di calibrazione aggiuntive, oppure
premere INDIETRO per completare l’allineamento
Nota: Filtraggio Est/Ovest – Al fine di garantire la
precisione di puntamento a tutto cielo migliore possibile, la
montatura computerizzata filtra e sceglie automaticamente le
stelle di allineamento iniziali in modo che le prime due stelle
di allineamento siano posizionate su un lato del meridiano e
le eventuali stelle di calibrazione siano sul lato opposto del
meridiano, secondo quanto indicato dalle lettere “W” o “E”
visualizzate nell‘angolo in alto a destra dello schermo LCD.
Il filtraggio Est/Ovest può essere modificato semplicemente
premendo il tasto MENU in qualsiasi momento durante il
processo di allineamento.
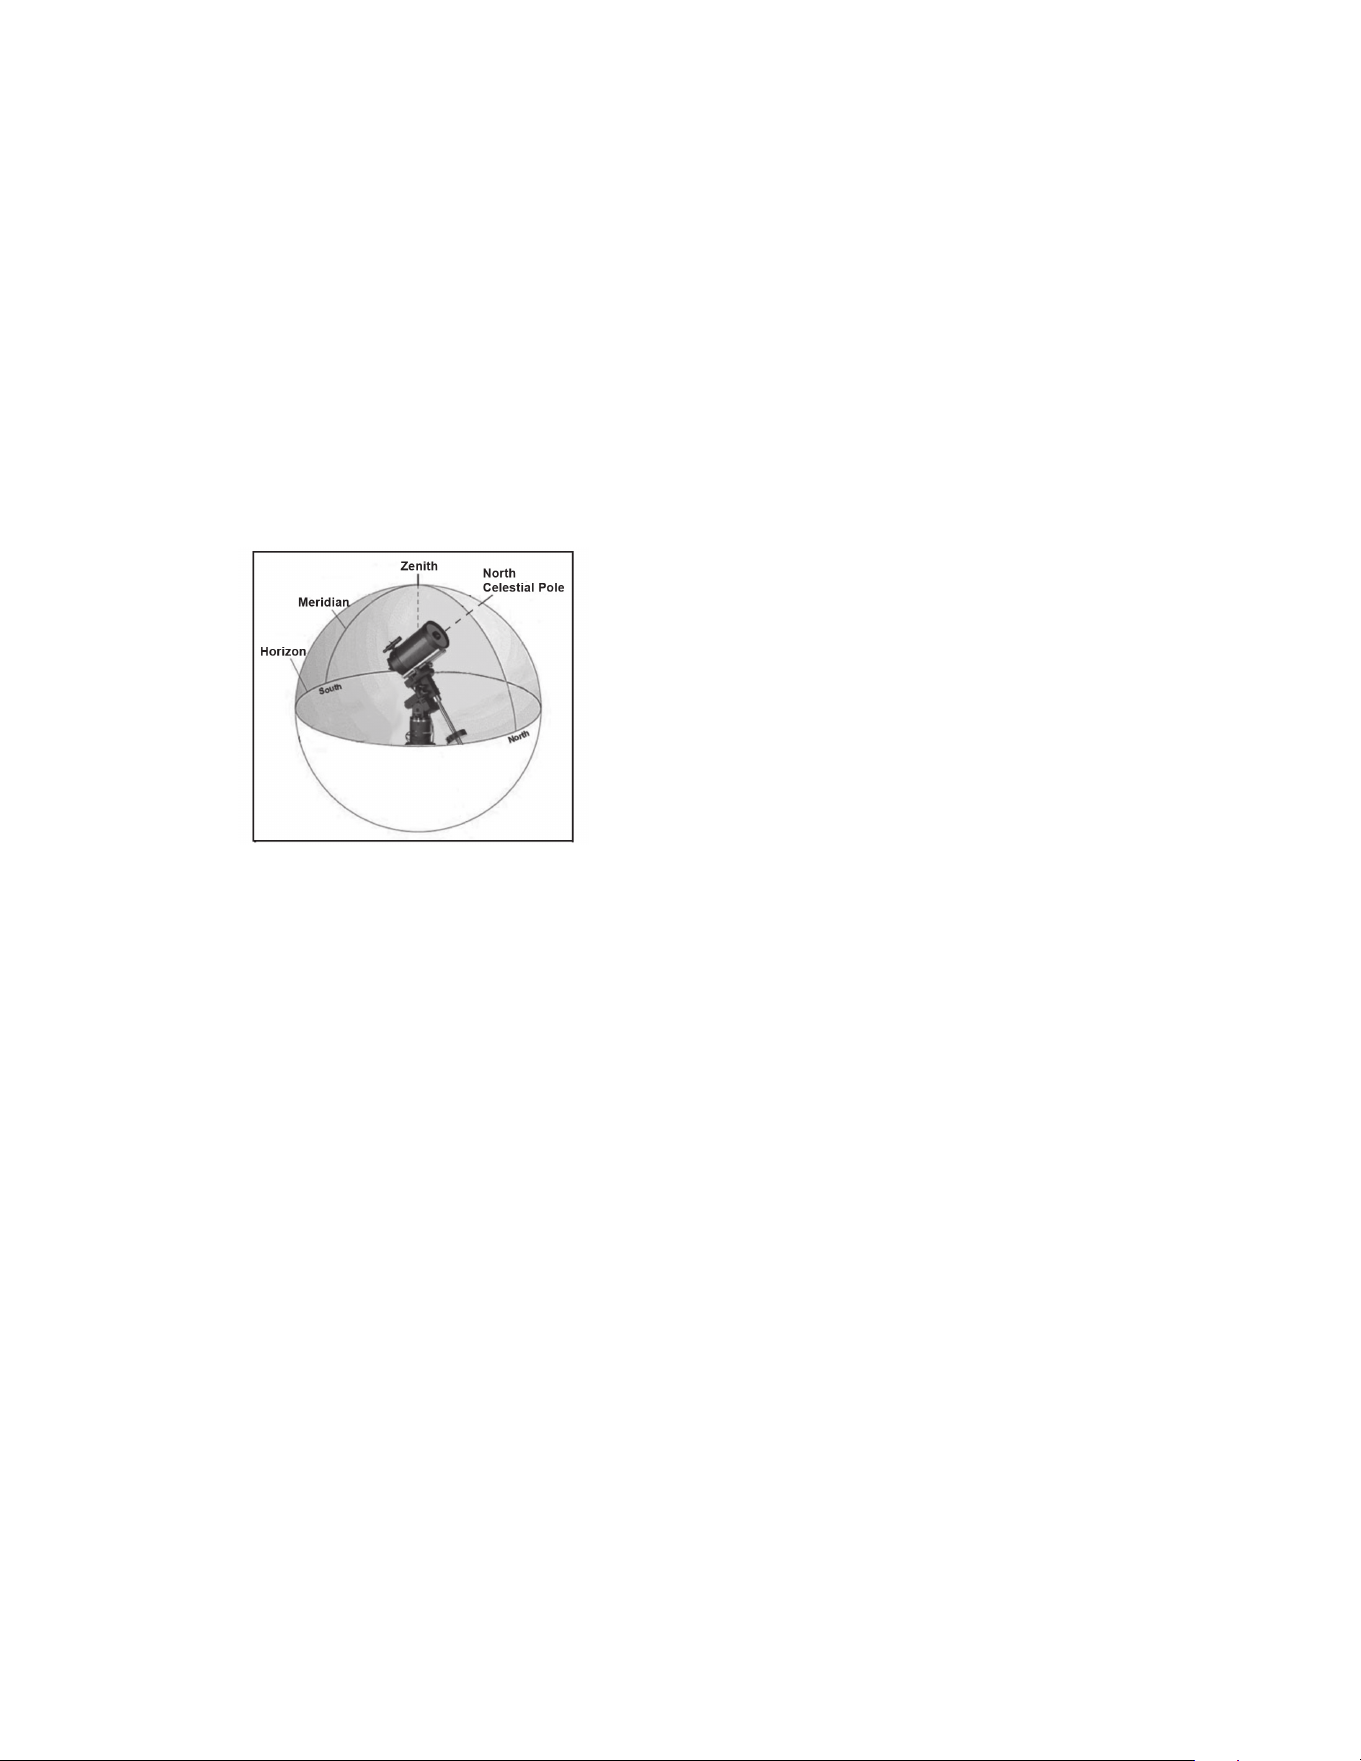
16 | ITALIANO
Suggerimenti per l’aggiunta delle stelle di
calibrazione:
• Sebbene per l’osservazione causale non sia necessario
aggiungere stelle di calibrazione, si consiglia di aggiungere
almeno tre stelle di calibrazione per una precisione di
puntamento ottimale
• La scelta di stelle di calibrazione che siano vicine all’equatore
celeste offre i migliori risultati rispetto alla scelta di stelle
vicino ai poli celesti
• Sebbene non sia necessario utilizzare le stelle di calibra-
zione se la montatura del telescopio non è stata spostata
dall’allineamento/calibrazione originaria, potrebbe essere
necessario ricalibrare il telescopio se il tubo ottico è stato
rimosso per qualsiasi ragione
Nota: Meridiano – il meridiano è una linea immaginaria nel
cielo che inizia dal Polo Nord celeste e termina al Polo Sud
celeste passando attraverso lo zenit. Se si è rivolti verso
sud, il meridiano inizia dall'orizzonte sud e passa direttamente
sopra la testa fino al Polo Nord celeste.
Allineamento rapido
L’Allineamento rapido utilizza tutte le informazioni di data e
ora inserite all’avvio per allineare il telescopio Tuttavia, al
posto di ruotare verso le stelle di allineamento per la proce-
dura di centratura e allineamento, il telescopio salta questo
passaggio e crea semplicemente un modello del cielo sulla
base delle informazioni fornite Ciò consentirà all’utente
di ruotare grossolanamente verso le coordinate di oggetti
luminosi quali la Luna e i pianeti e fornisce al telescopio le
informazioni necessarie per tracciare gli oggetti in qualsiasi
parte del cielo (a seconda della precisione dell’allineamento
polare) L’Allineamento rapido non è destinato a essere usato
per individuare con precisione oggetti del profondo cielo
piccoli o deboli o per tracciare precisamente gli oggetti per
l’acquisizione di immagini astrali
Per utilizzare l’Allineamento rapido, selezionare semplicemente
Allineamento rapido dalle opzioni di allineamento e premere
INVIO Il telescopio utilizzerà automaticamente i parametri
di data/ora inseriti per allinearsi con il cielo e visualizzare la
dicitura “Allineamento riuscito”
Nota: Una volta terminato l'Allineamento Rapido, è
possibile utilizzare la funzione di Riallineamento (vedi sotto)
per migliorare la precisione di puntamento del telescopio.
Ultimo allineamento
Il metodo dell'ultimo allineamento richiamerà automaticamente
le ultime posizioni di indicizzazioni salvate per continuare
a utilizzare l'allineamento che è stato salvato al momento
dell'ultimo spegnimento del telescopio Si tratta di una
funzione utile in caso il telescopio avesse un calo di
alimentazione o dovesse spegnersi accidentalmente
Ri-Allineamento
La montatura dispone di una funzione di ri-allineamento che
consente di sostituire una qualsiasi delle stelle di allineamento
originarie con una nuova stella o oggetto celeste Ciò può
essere utile in varie situazioni:
• Se si esegue un'osservazione in un periodo di qualche
ora, è possibile notare che le due stelle di allineamento
originarie si sono allontanate in modo considerevole verso
ovest (Si ricorda che le stelle si spostano a una velocità di
15° all’ora) L’allineamento su una nuova stella che si trova
sulla parte orientale del cielo migliorerà la precisione di
puntamento, specialmente per gli oggetti che si trovano in
quella parte del cielo
• Se si è allineato il telescopio utilizzando il metodo di
Allineamento rapido, è possibile utilizzare la funzione di
Ri-allineamento per allinearsi su oggetti attuali nel cielo
Ciò migliorerà la precisione di puntamento del telescopio
senza dover inserire nuovamente informazioni aggiuntive
• Se si è utilizzato un metodo di allineamento polare assistito
dal computer e si è spostata manualmente la montatura,
potrebbe essere necessario ri-allineare la montatura per
una migliorata precisione di puntamento
Per sostituire una stella di allineamento esistente con
una nuova:
1 Selezionare la stella desiderata (o l’oggetto) dal database
far ruotare verso di essa il telescopio
2 Centrare con attenzione l'oggetto nell'oculare
3 Una volta centrato, premere il tasto INDIETRO fino a
quando non si arriva al menu principale
4 Quando viene visualizzata la dicitura CGX Pronto, premere
il tasto ALLINEARE sulla pulsantiera per selezionare le
Stelle di allineamento dall’elenco delle opzioni
5 Lo schermo chiederà quindi quale stella di allineamento
si desidera sostituire Utilizzare i tasti di scorrimento Su e
Giù per selezionare le stelle di allineamento da sostituire
Normalmente, è meglio sostituire la stella più vicina al
nuovo oggetto Questo distanzierà le stelle di allineamento
nel cielo
6 Premere ALLINEA per effettuare la modifica

ITALIANO | 17
Catalogo degli Oggetti
Selezione di un oggetto
Una volta allineato correttamente il telescopio, è possibile
selezionare un oggetto da uno qualsiasi dei cataloghi
presenti nel database della pulsantiera NexStar+ La
pulsantiera dispone di un tasto dedicato per ciascuna
categoria di oggetti nel database: oggetti del Sistema
solare, Stelle e oggetti del profondo cielo
• Sistema Solare – Il catalogo del Sistema solare visualiz-
zerà tutti i pianeti (e la Luna) presenti nel nostro Sistema
Solare che sono attualmente visibili nel cielo Per consen-
tire la visualizzazione del Sole come oggetto selezionabile
nel database, vedere l’opzione del Menu Sole nel Menu di
configurazione del telescopio
• Stars (Stelle) –Il catalogo delle stelle visualizza un elenco
personalizzato di tutte le stelle, le stelle doppie (binarie), le
stelle variabili, le costellazioni e asterismi più luminosi
• Profondo cielo – Il catalogo del Profondo Cielo visua-
lizza un elenco di tutte le migliori Galassie, Nebulose e
Ammassi, nonché oggetti del catalogo Messier e una
selezione di oggetti del catalogo NGC Vi è inoltre un elen-
co alfabetico di tutti gli oggetti del profondo cielo ordinati
secondo il relativo nome comune
Utilizzare i tasti di scorrimento per scorrere lungo i cataloghi
per trovare l’oggetto che si desidera visualizzare
Durante lo scorrimento di un lungo elenco di oggetti, tenere
premuti il tasto SU o il tasto GIÙ consentirà di scorrere il
catalogo nella relativa direzione più rapidamente
Rotazione Verso un Oggetto
Una volta che l'oggetto desiderato sarà visualizzato sullo
schermo del controllo manuale, vi sono due opzioni:
• Premere il tasto OBJECT INFO (INFO OGGETTO).
Ciò fornirà informazioni utili in merito all’oggetto seleziona-
to, quali grandezza, costellazione e informazioni estese in
merito agli oggetti più popolari
• Utilizzare i tasti freccia SU/GIÙ per scorrere lungo le
informazioni dell’oggetto visualizzato
• Utilizzare il tasto INDIETRO per tornare al database
degli oggetti
• Premere il tasto INVIO. Ciò farà ruotare automatica-
mente il telescopio alle coordinate dell'oggetto visualizzato
sulla pulsantiera Mentre il telescopio è in fase di rotazione
verso l’oggetto, l’utente può ancora avere accesso a molte
delle funzioni del controllo manuale (quali la visualizzazione
delle informazioni in merito all’oggetto)
NOTA: I cataloghi Messier, NGC e SAO richiedono
all'utente di inserire una designazione numerica. Una volta
selezionato il tasto del catalogo appropriato e selezionato
il catalogo Messier, NGC o SAO, si vedrà un cursore lam-
peggiante ad indicare l’accesso alla modalità di immissione
numerica. Digitare il codice dell'oggetto che si desidera
visualizzare. Premere INVIO per comandare al telescopio di
ruotare verso l’oggetto, oppure tenere premuto il tasto
OPTION (logo Celestron) e premere il tasto OBJECT INFO
per vedere le informazioni relative all’oggetto selezionato.
ATTENZIONE: mai far ruotare il telescopio mentre
qualcuno sta guardando nell'oculare. Il telescopio
può spostarsi a velocità di rotazione elevate e può
colpire un osservatore nell'occhio.
Tasto SkyTour
La montatura CGX include una funzione tour la quale
consente all'utente di scegliere da un elenco di oggetti
interessanti in base alla data e all'ora di osservazione
Il tour automatico visualizzerà solamente quegli oggetti che
si trovano entro i limiti di filtro impostati per il catalogo Per
attivare la funzione tour, premere il tasto SKY TOUR sulla
pulsantiera
1 Premere il tasto SKY TOUR sulla pulsantiera
2 Utilizzare i tasti di SCORRIMENTO per selezionare il
Meglio di Stanotte
3 La montatura CGX ruoterà automaticamente in azimut alla
posizione iniziale la quale contribuirà a ridurre al minimo la
possibilità di attorcigliare il cavo di alimentazione durante
il tour
4 La pulsantiera visualizzerà gli oggetti migliori da osservare
attualmente presenti nel cielo
• Per vedere le informazioni e i dati relativi all’oggetto
visualizzato, premere il tasto INFO OGGETTO
Premerlo una volta per visualizzare le coordinate
dell’oggetto Premerlo nuovamente per visualizzare
le coordinate dell’oggetto Premerlo nuovamente per
visualizzare il testo Premere INDIETRO per ritornare
alla schermata precedente
• Per ruotare verso l'oggetto visualizzato, premere INVIO
• Per vedere l'oggetto successivo del tour, premere il
tasto GIÙ
Tasto Identifica
Premere il tasto IDENTIFICA per cercare nei cataloghi del
database della montatura e visualizzare il nome e la distanza
angolare dagli oggetti corrispondenti più vicini alla posi-
zione corrente del telescopio Questa funzione può essere
utilizzata per due scopi In primo luogo, può essere utilizzata
per identificare un oggetto sconosciuto nel campo visivo
dell'oculare Inoltre, la modalità Identifica può essere utilizzata
per trovare altri oggetti celesti che sono vicini agli oggetti
attualmente in corso di osservazione
Per esempio, se il telescopio è puntato verso la stella piùlum-
inosa nella costellazione di Lira, scegliere il tasto Identifica
ritornerà senza dubbio alla stella Vega come stella di osser-
vazione Tuttavia, la funzione Identifica cercherà inoltre nei
database NGC e del sistema solare e visualizzerà eventuali
pianeti oppure oggetti del profondo cielo che sono vicini
Nell’esempio, la Nebulosa Anello (M57) sarebbe visualizzata
come a una distanza di 6°
La luminosità e la vicinanza degli oggetti visualizzati può
essere definita dall'utente utilizzando il filtro Identifica nelle
Impostazioni del telescopio

18 | ITALIANO
Tasti direzionali
La pulsantiera dispone di quattro tasti direzionali posti al centro
di essa, i quali controllano il movimento del telescopio in al-
titudine (su e giù) e in azimut (sinistra e destra) Il telescopio
può essere controllato a nove diverse velocità
1 = 2x 6 = 3° / sec
2 = 4x 7 = 1° / sec
3 = 8x 8 = 2° / sec
4 = 16x 9 = 4° / sec
5 = 32x
Tasto Velocità motore
Premere il tasto VELOCITA’ MOTORE (12) consente
di modificare istantaneamente la velocità dei motori da
alta velocità di rotazione a velocità di guida precisa o in
qualsiasi punto intermedio Ciascuna velocità corrisponde
a un numero sul tastierino della pulsantiera Il numero 9
è la velocità maggiore (circa 3,5° al secondo, a seconda
della fonte di alimentazione) ed è utilizzate per la rotazione
tra oggetti e il posizionamento dell'allineamento di stelle
Il tasto numero 1 della pulsantiera è la velocità più bassa
(2x siderale) ed è utilizzato per centrare in modo preciso gli
oggetti nell'oculare Per modificare la velocità dei motori:
• Premere il tasto VELOCITA’ MOTORE sulla pulsantiera
Lo schermo LCD visualizzerà la velocità attuale
• Premere il numero sulla pulsantiera che corrisponde alla
velocità desiderata
La pulsantiera dispone di una funzione a "doppio tasto" che
consente di aumentare istantaneamente la velocità dei moto-
ri senza dover scegliere una velocità specifica Per utilizzare
questa funzione, premere semplicemente il tasto a freccia
che corrisponde alla direzione verso cui si intende spostare
il telescopio Mentre si preme tale tasto, premere il tasto
direzionale opposto Ciò aumenterà la velocità alla massima
velocità di rotazione
Durante l'utilizzo dei tasti SU e GIÙ sulla pulsantiera, le velo-
cità di rotazione inferiori (6 e inferiori) spostano i motori nella
direzione opposta rispetto alle velocità di rotazione superiori
(7-9) Ciò viene fatto in modo che un oggetto si sposti nella
direzione appropriata mentre si guarda nell'oculare (ad es ,
premere la freccia in alto sposterà la stella nella parte supe-
riore del campo di visualizzazione dell'oculare) Tuttavia, se
qualsiasi velocità di rotazione inferiore (velocità 6 e inferiore)
è utilizzata per centrare un oggetto nello StarPointer, è pos-
sibile che sia necessario premere il tasto direzionale opposto
per far sì che il telescopio si sposti nella direzione corretta
Tasto Help
Nei futuri aggiornamenti del firmware, questo tasto offrirà
suggerimenti per la risoluzione dei problemi Per comodità,
attualmente funziona come collegamento rapido al Catalogo
Messier
Tasto Menu
La montatura CGX contiene molte funzioni di configurazione
personalizzate ideate per dare all’utente il controllo sulle mol-
te funzioni del telescopio A tutte le funzioni di configurazione
e di utilità è possibile accedere premendo il tasto MENU e
scorrendo le opzioni sottostanti
Menu Tracciatura
Modalità tracciatura - consente di modificare il modo in cui
il telescopio esegue la tracciatura a seconda della tipologia
di montatura utilizzata per supportare il telescopio Il
telescopio dispone di tre diverse modalità di tracciatura:
• Nord EQ – utilizzata per tracciare il cielo quando il tele-
scopio è allineato con i poli nell’Emisfero settentrionale
• Sud EQ – utilizzata per tracciare il cielo quando il
telescopio è allineato con i poli nell’Emisfero meridionale
• Off – quando si usa il telescopio per l’osservazione terrestre
(paesaggio), la tracciatura può essere spenta in modo che
il telescopio non si muova
Velocità di tracciatura – oltre a essere in grado di spostare
il telescopio con i tasti del controllo manuale, il telescopio
traccerà continuamente un oggetto celeste durante il suo
spostamento nel cielo notturno La velocità di tracciatura può
essere modificata a seconda del tipo di oggetto in corso di
osservazione:
• Siderale – Questa velocità compensa la rotazione della
Terra spostando il telescopio alla stessa velocità della
rotazione terrestre, ma in direzione opposta Quando il
telescopio è allineato polarmente, ciò può essere eseguito
spostando il telescopio solamente in ascensione retta
• Lunare – Utilizzata per la tracciatura della Luna durante
l'osservazione del paesaggio lunare
• Solare – Utilizzata per la tracciatura del Sole durante
l'osservazione solare con il filtro appropriato
Menu Visualizza ora-posizione
Questo menu visualizza l’ora corrente e la longitudine/
latitudine scaricate dal ricevitore GPS opzionale SkySync
Visualizzerà anche alter informazioni rilevanti ora-posizione
come il fuso orario, l’ora legale e l’ora locale siderale L’ora
locale siderale (LST) è utile per conoscere l’ascensione
retta degli oggetti celestiali che sono situati sul Meridiano a
quell’ora Visualizza ora-posizione visualizzerà sempre l’ora
e la posizione inserita salvata più recentemente mentre si
college al GPS Una volta ricevute le informazioni correnti,
aggiornerà le informazioni visualizzate Se il GPS è spento
o non presente, la pulsantiera visualizzerà solamente l’ora
e la posizione salvate per ultime
Menu del Controllo manuale
Il menu “Pulsantiera” consente di personalizzare determinate
funzioni sulla pulsantiera NexStar+ Per accedere a questo
menu, premere il tasto MENU (n 7 sul tastierino) e utilizzare
i tasti di scorrimento per selezionare “Controllo manuale” e
premere INVIO

ITALIANO | 19
Utilizzare i tasti di scorrimento per selezionare tra le seguenti
opzioni:
• Controllo luci: Regola indipendentemente la luminosità
del tastierino numerico e dello schermo LCD
• Menu Scorrimento: Regola la velocità di scorrimento
delle parole sullo schermo LCD
• Attiva/disattiva grassetto: Modifica il formato del
carattere visualizzato sullo schermo LCD da normale a
grassetto
• Imposta contrasto: Utilizzare i tasti di scorrimento per
regolare il contrasto dello schermo LCD
• Imposta lingua: Modifica la lingua visualizzata sullo
schermo LCD
NOTA: La funzione Imposta lingua può apparire anche al
primo utilizzo della pulsantiera. È anche possibile avviarla in
qualsiasi momento tenendo premuto il tasto Opzione (con
il logo Celestron) per 10 secondi durante l’accensione del
telescopio.
Menu di configurazione
Configurazione ora-posizione – consente all’utente di
personalizzare lo schermo del telescopio modificando i
parametri di ora e posizione (quali fuso orario e ora legale)
Anti-backlash (Compensazione contraccolpi) –
Tutti gli ingranaggi meccanici hanno una certa quantità di
contraccolpi o movimenti tra gli ingranaggi stessi Questi
movimenti sono evidenti per il tempo necessario a una stella
per spostarsi nell'oculare una volta premuti i tasti freccia del
controllo manuale (specialmente durante i cambiamenti di
direzione) La funzione anti-contraccolpo di CGX consente
all'utente di compensare i contraccolpi inserendo un valore
che sposta velocemente i motori di quel poco che basta per
eliminare i movimenti tra gli ingranaggi La quantità di com-
pensazione necessaria dipende dalla velocità di rotazione
selezionata; più bassa è la velocità di rotazione più tempo ci
impiegherà la stella a spostarsi nell'oculare Sono presenti
due valori per ogni asse, positivo e negativo:
• Quello positivo è la quantità di compensazione applicata
quando si preme il tasto al fine di far muovere rapidamente
gli ingranaggi senza una lunga pausa
• Quello negativo è la quantità di compensazione applicata
quando si rilascia il tasto, facendo tornare in motori indietro
nella direzione opposta per riprendere la tracciatura
Normalmente, entrambi i valori dovrebbero essere uguali
Sarà necessario sperimentare i valori diversi (da 0 a 99); un
valore tra 20 e 50 è normalmente la soluzione ottimale per la
maggior parte delle osservazioni visive, mentre un valore più
elevato potrebbe essere necessario per la guida fotografica
Per impostare il valore anti-contraccolpo, scorrere verso il
basso all'opzione anti-contraccolpo e premere INVIO Mentre
si osserva un oggetto nell’oculare, osservare la reattività di
ciascuno dei quattro tasti freccia Notare in quale direzione
si osserva una pausa nel movimento della stella dopo aver
premuto il tasto Lavorando con un asse per volta, regolare
le impostazioni di contraccolpo a un valore sufficientemente
alto da causare lo spostamento immediato senza comportare
un salto pronunciato quando si preme o si rilascia il tasto
Ora, inserire gli stessi valori per entrambe le direzioni positiva
e negativa Se si nota un salto al momento del rilascio del
tasto ma l’impostazione di valori inferiori comporta una pausa
al premere del tasto, utilizzare il valore più alto per il positivo,
ma il valore più basso per il negativo Il telescopio ricorderà
tali valori e li utilizzerà ogni volta che sarà acceso fino alla
loro modifica
Limiti di filtro - Quando un allineamento è complete, il
telescopio capisce automaticamente quali oggetti celesti si
trovano sopra l’orizzonte Di conseguenza, quando si scorre
lungo gli elenchi del database (oppure si seleziona la funzio-
ne Tour), la pulsantiera visualizzerà solamente quegli oggetti
che sono noti essere sopra l'orizzonte al momento dell'osser-
vazione È possibile personalizzare il database degli oggetti
selezionando i limiti di altitudine appropriati per la propria
posizione e situazione Ad esempio, se si sta osservando
da una zona di montagna dove l'orizzonte è parzialmente
oscurato, è possibile impostare un limite di altitudine minimo
superiore ai 20° Ciò assicura che la pulsantiera visualizzi
solo oggetti che si trovano a un'altitudine superiore ai 20°
CONSIGLIO: Se si desidera esplorare l'intero database
degli oggetti, impostare il limite massimo di altitudine a 90°
e il limite minimo a –90°. In questo modo verranno visua-
lizzati tutti gli oggetti presenti negli elenchi del database, a
prescindere dalla loro visibilità o meno nel cielo in relazione
alla proprio posizione.
Tasti direzionali - La direzione in cui appare una stella
verso cui spostare l’oculare cambia a seconda del lato del
Meridiano su cui si trova il tubo del telescopio Ciò può creare
confusione specialmente quando si guida su una stella o
quando si acquisiscono immagini astrali Per compensare
questo problema, la direzione dei tasti del controllo di guida
può essere modificata Per invertire la logica di pulsante del
controllo manuale, premere il tasto MENU e selezionare Tasti
direzionali dal menu Utilità Utilizzare i tasti freccia Su e Giù
(10) per selezionare sia i tasti dell'azimut (ascensione retta)
sia i tasti dell'altitudine (declinazione), quindi premere INVIO
Selezionare sia positivo o negativo per entrambi gli assi e
premere INVIO per salvare Impostare la direzione del tasto
azimut in positivo farà spostare il telescopio nella stessa
direzione di tracciatura del telescopio (ovvero, verso ovest)
Impostare i tasti di altitudine verso positivo sposterà il tele-
scopio in senso antiorario lungo l’asse di DECLINAZIONE
Approccio VaiA - Consente all’utente di definire la direzione
verso cui si dirigerà il telescopio quando ruota verso un
oggetto Ciò consentirà all’utente di ridurre al minimo gli
effetti del contraccolpo durante la rotazione da oggetto a
oggetto Proprio come accade per i Tasti direzionali,
l’impostazione dell’Approccio VaiA al positivo farà sì che il
telescopio si diriga verso un oggetto dalla stessa direzione
di tracciatura (ovest) per l'azimut e in senso antiorario per
la declinazione L’approccio VaiA declinazione si applicherà
esclusivamente mentre il tubo del telescopio si trova su un
lato del meridiano Una volta che il tubo passerà all’altro lato
del meridiano, l’approccio VaiA dovrà essere invertito

20 | ITALIANO
Per cambiare la direzione dell'approccio VaiA, selezionare
Approccio VaiA dal menu Impostazioni telescopio, poi l'ap-
proccio Altitudine o l'approccio Azimut, ed infine Positivo o
Negativo, quindi premere INVIO
SUGGERIMENTO: Al fine di ridurre al minimo l’effetto
di contraccolpo degli ingranaggi sulla precisione di
puntamento, le impostazioni per i Tasti direzionali devono
idealmente corrispondere alle impostazioni dell’Approccio
VaiA. Per impostazione predefinita, i tasti direzionali su e
destra per centrare le stelle di allineamento elimineran-
no automaticamente gran parte del contraccolpo negli
ingranaggi. Se di modifica l’approccio VaiA del proprio
telescopio, non è necessario modificare anche i Tasti
direzionali. Prendere semplicemente nota della direzione
in cui si sposta il telescopio al completamento dell’ap-
proccio VaiA finale. Se il telescopio si dirige verso la stella
di allineamento partendo da ovest (azimut negativo) e in
senso orario (altitudine negativa), assicurarsi quindi che
i tasti utilizzando per centrare la stella di allineamento si
spostino altresì il telescopio nelle stesse direzioni.
Velocità autoguida - consente all’utente di impostare una
velocità autoguida come percentuale della velocità siderale
Questo è utile al momento di calibrare il telescopio a una
guida automatica CCD per l’acquisizione di immagini astrali
a lunga esposizione
Meridiano - questa funzione fornisce istruzioni alla montatu-
ra su come rispondere quando ruota verso oggetti acces-
sibili da entrambi i lati del meridiano La funzione Meridiano
consente al tubo del telescopio di rimanere su un lato desi-
derato della montatura durante la rotazione, e di continuare
a tracciare in base ai limiti di rotazione di A R che l’utente
ha impostato Cfr Limiti AR sotto La funzione Meridiano
consente quattro opzioni:
• Favorire Corrente – consente alla montatura di favo-
rire qualsiasi lato della montatura che sia attualmente
montato al momento della rotazione degli oggetti vicino
al meridiano Per esempio, se i limiti di rotazione dell’AR
sono impostati per consentire alla montatura di eseguire
la tracciatura di 10° oltre al meridiano, allora il telescopio
continuerà a rimanere sul lato corrente del meridiano al
momento della rotazione verso oggetti che sono distanti
10° oltre il meridiano
• Favorire l’Ovest – se l’oggetto obiettivo è accessibile
da entrambi i lati della montatura, selezionando “Favori-
re l’Ovest” si istruisce la montatura a puntare l’oggetto
come se fosse sul lato ovest del meridiano Il tubo ottico
si posizionerà quindi sul lato est della montatura puntando
verso ovest
• Favorire l’Est – se l’oggetto obiettivo è accessibile da
entrambi i lati della montatura, selezionando “Favorire l’Est”
si istruisce la montatura a puntare l’oggetto come se fosse
sul lato est del meridiano Il tubo ottico si posizionerà quin-
di sul lato ovest della montatura puntando verso est
• Disabilita – questa è l’impostazione predefinita, che
fornisce istruzioni alla montatura per oscillare sempre verso
l’altro lato del pilastro secondo quanto richiesto per visua-
lizzare oggetti sul lato opposto del meridiano Tuttavia, una
volta raggiunto l’oggetto desiderato, la montatura conti-
nuerà a eseguire la tracciatura oltre il meridiano, in base ai
limiti di rotazione della A R impostati
Impostazioni della montatura - una volta calibrate le im-
postazioni della montatura (vedere la sezione Utilità qui di se-
guito) i valori sono salvati e visualizzati nel controllo manuale
Non si consiglia di modificare i valori di calibrazione Tuttavia
ciascuna impostazione può essere modificata se necessario
per migliorare le prestazioni del telescopio
• Valore Cono – questo è il valore di errore del cono impo-
stato quando viene selezionato Utilità/Calibra montatura/
Interruttore DEC – Cono
• Indice DEC – si tratta del valore di errore di indicizzazione
della declinazione che è salvato al momento dell’aggiunta
di stelle di calibrazione dopo l’allineamento di stelle iniziale
• A.R. Indice – questo è il valore di errore di indicizzazione
della A R impostato quando viene selezionato Utilità/Cali-
bra montatura/ Interruttore A R
Limiti dell’AR - imposta i limiti entro i quali il telescopio può
ruotare o eseguire la tracciatura in Ascensione retta (A R )
prima di arrestarsi I limiti di rotazione sono rappresentati in
gradi e per impostazione predefinita sono impostati a 0° es-
sendo la posizione del telescopio quando la barra di contrap-
peso è estesa orizzontalmente Tuttavia, i limiti di rotazione
possono essere personalizzati a seconda delle esigenze
Per esempio, se si sta utilizzando l’attrezzatura per immagini
CCD che dispone di cavi non sufficientemente lunghi da
spostarsi con il telescopio man mano che ruota nel cielo, è
possibile regolare i limiti di rotazione sul lato della montatura
che è limitata dai cavi, e comandare la montatura di interrom-
pere la rotazione prima di raggiungere tale punto Oppure, se
si sta acquisendo un’immagine di un oggetto che ha appena
valicato il meridiano, è possibile impostare il limite per con-
sentire alla montatura di continuare a eseguire la tracciatura
nella stessa direzione oltre al meridiano senza la necessità
di “capovolgere” il telescopio sul lato opposto della monta-
tura (vedere la funzione meridiano di cui sopra) Utilizzando
il primo esempio di cui sopra, l'utente potrebbe spostare il
telescopio in A R (azimut) fino al punto di massima esten-
sione dei cavi Quindi, visualizzando l'azimut del telescopio in
questa posizione (guardando Ottieni posizione asse al menu
Utilità), è possibile determinare l'azimut del telescopio nella
sua posizione più estesa Inserire questa lettura azimut per
entrambi i limite di rotazione massimo o minimo dell'azimut
per garantire che il telescopio non ruoti oltre tale punto I limi-
ti di rotazione del telescopio possono essere impostati per
arrestarsi automaticamente in qualsiasi punto tra i 40° sopra
il livello e i 20° sotto il livello Per impostare i limiti di rotazione
A R selezionare quanto segue:
• Limiti Est dell’A.R. – Inserire un numero compreso tra
+40° e -20° per definire il limite di rotazione quando il tubo
si trova sul lato est della montatura
• Limiti Ovest dell’A.R. – Inserire un numero compreso tra
+40° e -20° per definire il limite di rotazione quando il tubo
si trova sul lato ovest della montatura
• Disabilita limiti – questo disabilita eventuali valori
predefiniti che sono stati inseriti e consente alla montatura
di eseguire la tracciatura per la quantità massima oltre il
meridiano (ovvero, -20° su entrambi i lati)

ITALIANO | 21
AVVERTENZA: Affinché il telescopio sia in grado di
ruotare in direzione di una stella nella direzione che riduce
al minimo la quantità di contraccolpi negli ingranaggi,
potrebbe essere necessario far ruotare il telescopio oltre il
limite di rotazione specificato al fine di raggiungere la stessa
dalla direzione corretta. Questo può limitare la capacità
di rotazione verso un oggetto di almeno 6° dal limite di
rotazione della A.R. impostato nel controllo manuale. Se ciò
dovesse rivelarsi un problema, la direzione che il telescopio
segue per centrare un oggetto può essere modificata. Per
modificare la direzione di rotazione del telescopio, vedere
Approccio VaiA al menu Configurazione.
Velocità personalizzata 9 - Consente all’utente di
personalizzare la velocità con cui la montatura ruota verso
l’obiettivo È possibile impostare gli assi di A R e Dec
individualmente
Menu Utilità
Scorrendo lungo le opzioni del MENU (9) si accederà
anche a varie funzioni di utilità avanzate per il telescopio
quali: Calibra montatura, ibernazione e molte altre
Calibra montatura - al fine di ottimizzare le prestazioni e
la precisione di puntamento del telescopio, la montatura è
dotata di routine di calibrazione integrate che le consento-
no di compensare le variazioni meccaniche inerenti a ogni
montatura equatoriale alla tedesca Ogni calibrazione è
completamente automatica e nella maggior parte dei casi è
necessario eseguirla solamente una volta Si consiglia calda-
mente di impiegare qualche minuto per leggere le procedure
di calibrazione della montatura
• Interruttore A.R. - Questa procedura registra l’errore di
offset quando il segno di indicizzazione dell’ascensione
retta è allineato all’avvio Calibrare l’indice di A R mi-
gliorerà la precisione degli allineamenti di stelle iniziali al
momento dell'allineamento futuro del telescopio
• Calibrazione VaiA – Si tratta di uno strumento utile al
momento del collegamento di pesanti accessori visivi o
fotografici al telescopio La Calibrazione VaiA calcola la
quantità di distanza e il tempo impiegato dalla montatura per
completare la sua rotazione VaiA finale quando ruota verso
un oggetto Modificando il bilanciamento del telescopio è
possibile prolungare il tempo impiegato per completare la
rotazione finale La Calibrazione VaiA tiene in considerazione
eventuali leggeri squilibri e modifiche da compensare nella
distanza VaiA finale
Posizione iniziale – La posizione “iniziale” del telescopio è
una posizione definibile dall’utente utilizzata per conservare il
telescopio quando non è in uso La posizione iniziale è utile al
momento della conservazione del telescopio in una struttura
di osservazione permanente Per impostazione predefinita,
la posizione iniziale è uguale alla posizione di indicizzazione
utilizzata al momento dell’allineamento della montatura
Per impostare la posizione iniziale della montatura, utilizzare
semplicemente i tasti freccia sulla pulsantiera per spostare la
montatura del telescopio alla posizione desiderata Selezio-
nare l’opzione Imposta e premere Invio
Selezionare l’opzione VaiA per ruotare il telescopio alla
posizione iniziale in qualsiasi momento
Impostazioni di fabbrica - Ripristina la pulsantiera alle
impostazioni di fabbrica originali I parametri quali i valori di
compensazione contraccolpi, la data e l’ora iniziali, la
longitudine/latitudine, e i limiti di filtraggio e rotazione saranno
azzerati Tuttavia, i parametri salvati quali gli oggetti definiti
dall’utente, rimarranno salvati anche una volta selezionate le
Impostazioni di fabbrica La pulsantiera chiederà di premere
il tasto “0” prima di tornare alle impostazioni predefinite di
fabbrica
Versione - Selezionando quest’opzione l’utente potrà vedere
il numero di versione corrente del controllo manuale e del
controllo motore La prima serie di numeri indica la versione
del software del controllo manuale Per il controllo motore, la
pulsantiera visualizzerà due serie di numeri: la prima serie di
numeri è per l'azimut mentre la seconda è per l'altitudine
Ottieni posizione asse - Visualizza la relativa altitudine e
all’azimut per la posizione corrente del telescopio
VaiA posizione asse - Consente all’utente di inserire una
posizione specifica relativa all’altitudine e all’azimut e di far
ruotare il telescopio verso essa
Ibernazione - L’ibernazione consente di spegnere comple-
tamente il telescopio e di mantenerne comunque l’alline-
amento al momento della riaccensione Questo non solo
risparmia energia, ma è ideale per coloro che tengono il
proprio telescopio montato permanentemente o lo lasciano
in una posizione per lunghi periodi di tempo Per mettere il
telescopio in modalità Ibernazione:
1 Selezionare Ibernazione dal menu Utilità
2 Muovere il telescopio nella posizione desiderata e
premere INVIO
3 Spegnere il telescopio Ricordarsi di non spostare mai il
telescopio manualmente mentre è in modalità Ibernazione
Una volta riacceso il telescopio, lo schermo visualizzerà la
dicitura Sveglia Dopo aver premuto Invio, l’utente ha la
possibilità di scorrere lungo le informazioni di ora/posizione
per confermare l'impostazione corrente Premere INVIO per
svegliare il telescopio
SUGGERIMENTO: Premendo INDIETRO alla schermata
di Sveglia, l’utente può esplorare molte altre funzione del

22 | ITALIANO
controllo manuale senza svegliare il telescopio dalla modalità
ibernazione. Per svegliare il telescopio dopo aver premuto il
tasto INDIETRO, selezionare Ibernazione dal menu Utilità e
premere INVIO. Non utilizzare i tasti direzionali per spostare
il telescopio mentre è in modalità ibernazione.
Menu Sole
Per ragioni di sicurezza, il Sole non sarà visualizzato tra gli
oggetti presenti nel database a meno che non sia prima
abilitato Per abilitare il Sole, andare al menu Sole e premere
INVIO Il Sole sarà quindi visualizzato nel catalogo dei Pianeti
e può essere utilizzato come oggetto di allineamento quando
si utilizza il metodo di allineamento del Sistema Solare Per
rimuovere il Sole dagli oggetti visualizzati sulla pulsantiera,
selezionare ancora una volta il Menu Sole dal menu Utilità e
premere INVIO
Imposta posizione montatura
Il menu Imposta posizione montatura può essere utilizzato
per mantenere l’allineamento in caso si desideri sganciare le
frizioni o situazioni simili Per esempio, è possibile utilizzare
questa funzione se si desidera bilanciare nuovamente la
montatura dopo aver completato un allineamento Per
impostare la posizione della montatura, farla semplicemente
scorrere verso una stella luminosa contenuta nell’elenco
delle stelle aventi un nome e selezionare Imposta posizione
montatura Il La pulsantiera si sincronizzerà sulla stella
chiedendo all’utente di centrare la stella nell’oculare e di
premere il tasto Allineamento Una volta sincronizzato alla
stella, l’utente è libero di spostare manualmente la montatura
su entrambi gli assi per bilanciare nuovamente la montatura
Quando si è pronto a far ruotare il telescopio all’oggetto
successivo, ricordarsi di far ritornare manualmente il tubo
alla stessa stella luminosa e di centrarla nell’oculare L’uso di
questo strumento invaliderà l’indice PEC
Accendi/Spegni GPS - se si utilizza il telescopio con
l’accessorio GPS SkySync opzionale, sarà necessario
accendere il GPS la prima volta che si usa l’accessorio Se
si desidera utilizzare il database del telescopio per trovare le
coordinate di un oggetto celeste per date passate o future,
sarà necessario spegnere il GPS al fine di inserire manual-
mente un’ora diversa da quella presente
Accendi/spegni RTC - consente all’utente di spegnere
l'orologio in tempo reale interno del telescopio Al momento
dell’allineamento, il telescopio riceve ancora le informazioni dal
RTC Se si desidera utilizzare il database del controllo manuale
per trovare le coordinate di un oggetto celeste per date passate
o future, sarà necessario spegnere il RTC al fine di inserire
manualmente un’ora diversa da quella presente
Correzione errore periodico (PEC) - la PEC è ideata
per migliorare la qualità fotografica riducendo l’ampiezza
degli errori degli ingranaggi a vite senza fine e migliorando la
precisione di tracciatura del motore Questa funzione è de-
dicata alla fotografia astrale avanzata ed è utilizzata quando
il telescopio è allineato precisamente ai poli Per maggiori
informazioni sull'uso della PEC, fare riferimento alla sezione
del manuale dedicata all’“Acquisizione di immagini astrali"
Menu oggetti utente
Il telescopio può salvare fino a 400 diversi oggetti definite
dall’utente nella sua memoria Gli oggetti possono essere
oggetti terrestri diurni oppure un interessante oggetto celeste
scoperto che non è incluso nel database regolare Esistono
vari modi per salvare un oggetto nella memoria a seconda di
quale tipologia di oggetto si tratta:
VaiA Oggetto: Per andare verso qualsiasi oggetti definite
dall’utente salvato nel database, scorrere in “VaiA oggetto
celeste" oppure "VaiA oggetto terrestre" e inserire il numero
dell'oggetto che si desidera selezionare e premere INVIO
Il telescopio recupererà automaticamente e visualizzerà le
coordinate prima di ruotare in direzione di tale oggetto
Salva oggetto celeste: Il telescopio salva oggetti celesti
nel proprio database salvando le relative coordinate di
ascensione retta e di declinazione nel cielo In questo modo
lo stesso oggetto può essere trovato ogni volta che il tele-
scopio è allineato Una volta centrato l’oggetto desiderato
nell’oculare, scorrere semplicemente al comando “Salva
oggetto del cielo” e premere INVIO Lo schermo chiederà
all’utente di inserire un numero tra 1 e 200 per identificare
l’oggetto Premere INVIO nuovamente per salvare l’oggetto
nel database
Salva database (Db)
• Oggetto: Questa funzione consente di creare il proprio
tour personalizzato degli oggetti del database consentendo
all’utente di registrare la posizione corrente del telescopio
e di salvare il nome dell’oggetto selezionandolo da uno
qualsiasi dei cataloghi del database Sarà poi possibile
accedere a questi oggetti selezionando VaiA oggetto
del cielo
• Inserire A.R. - Dec: È altresì possibile salvare una serie
specifica di coordinate per un oggetto semplicemente
inserendo la A R e la declinazione per tale oggetto Scor-
rere al comando “Inserisci AR-DEC” e premere INVIO: Lo
schermo chiederà quindi all’utente di inserire prima la A R
e quindi la declinazione dell’oggetto desiderato
• Salva oggetto terrestre: Il telescopio può altresì essere
utilizzato come cannocchiale per oggetti terrestri Oggetti
terrestri fissi possono essere salvati salvando l’altitudine
e l'azimut relativi alla posizione del telescopio al momento
dell'osservazione Dal momento che tali oggetti sono
relativi alla posizione del telescopio, essi sono validi
esclusivamente per tale posizione esatta Per salvare
oggetti terrestri, centrare ancora una volta l’oggetto
desiderato nell’oculare Scorrere verso il basso e
selezionare il comando “Salva oggetto terrestre”, quindi
premere INVIO Lo schermo chiederà all’utente di inserire
un numero tra 1 e 200 per identificare l’oggetto Premere
INVIO nuovamente per salvare l’oggetto nel database
Per sostituire i contenuti di qualsiasi oggetto definito dall’uten-
te, salvare semplicemente un nuovo oggetto utilizzando uno
dei numeri di identificazione esistenti; il telescopio sostituirà gli
oggetti definiti dall’utente precedenti con quello attuale
Ottieni A.R./DEC - Visualizza l’ascensione retta e la decli-
nazione per la posizione corrente del telescopio

ITALIANO | 23
VaiA A.R./Dec: Consente di inserire una A R specifica e
una declinazione di ruotare in direzione di essa
Suggerimento: Per salvare una serie di coordinate (A R /
Dec) in modo permanente nel database, salvarle come og-
getti definito dall’utente come descritto sopra
Identifica
La modalità Identifica cercherà uno qualsiasi dei cataloghi
o degli elenchi del database della montatura e visualizzerà
il nome e le distanze offset degli oggetti corrispondenti più
vicini Questa funzione può essere utilizzata per due scopi In
primo luogo, può essere utilizzata per identificare un oggetto
sconosciuto nel campo visivo dell'oculare Inoltre, la modalità
Identifica può essere utilizzata per trovare altri oggetti
celesti che sono vicini agli oggetti attualmente in corso di
osservazione Per esempio, se il telescopio è puntato verso
la stella più luminosa nella costellazione di Lira, scegliere
il tasto Identifica e quindi cercare nel catalogo delle Stelle
aventi un nome ritornerà senza dubbio alla stella Vega come
stella di osservazione Selezionando Identifica e cercando
nel catalogo Oggetti identificati oppure nel catalogo Messier,
la pulsantiera indicherà che Nebulosa Anello (M57) si trova
a circa 6° dalla propria posizione corrente Cercando nel
catalogo Double Star (Stelle doppie) si scoprirà che Epsilon
Lyrae si trova a solo 1° da Vega
Per utilizzare la funzione Identifica:
• Premere il tasto Menu e selezionare l’opzione Identifica
• Utilizzare i tasti di scorrimento Su/Giù per selezionare il
catalogo in cui si desidera cercare
• Premere INVIO per iniziare la ricerca
NOTA: Alcuni database contengono migliaia di oggetti e
può quindi richiedere alcuni minuti per restituire gli oggetti
più vicini.
VaiA di precisione
La montatura è dotata di una funzione VaiA di precisione che
può assistere nel trovare oggetti estremamente deboli e nel
centrare gli oggetti più vicino al centro del campo visivo per
l’acquisizione di immagini astrali Il VaiA di precisione cerca
automaticamente la stella luminosa più vicina all’oggetto
desiderato e chiede all’utente di centrare con attenzione la
stella nell’oculare La pulsantiera calcola quindi la piccola
differenza tra la posizione VaiA e la posizione centrata Utiliz-
zando questo offset, la montatura ruoterà quindi all’oggetto
desiderato con una precisione migliorata
Per utilizzare il VaiA di precisione:
1 Premere il tasto MENU e utilizzare i tasti Su/Giù per
selezionare il VaiA di precisione
• Scegliere il database da cui selezionare l’oggetto che
si desidera osservare da uno qualsiasi dei cataloghi
elencati nel database; oppure
• Scegliere A R /DEC per inserire una serie di coordinate
celesti verso cui si desidera far ruotare la montatura
2 Una volta selezionato l’oggetto desiderato, la pulsan-
tiera cercherà e visualizzerà la stella luminosa più vicina
all’oggetto desiderato Premere INVIO per ruotare verso
la stella di allineamento luminosa
3 Utilizzare i tasti direzionali per centrare con attenzione la
stella di allineamento nell’oculare
4 Premere INVIO per ruotare verso l’oggetto desiderato
Appendice A:
Aggiornamento del Firmware del-
la Montatura e Pulsantiera
Per verificare la presenza di nuovi aggiornamenti del firmware,
fare riferimento a questo URL:
http: //software celestron com/updates/CFM/CFM/
1 Collegare la pulsantiera NexStar+ alla porta AUX1 o
AUX2
2 Collegare la montatura con un cavo standard USB di tipo
B al PC
3 Inserire la spina nel CGX e accenderlo
4 Aprire la Gestione Firmware Celestron (CFM)
5 CFM controllerà l'hardware ed eseguirà la scansione
degli aggiornamenti Inoltre, determinerà automaticamente
quali componenti richiedono l'aggiornamento
6 Cliccare su "Aggiorna" in CFM e consentire il
completamentodegli aggiornamenti
Appendice B:
Cura e Manutenzione
La montatura CGX è solida e durerà molti anni se conserva-
ta correttamente
Conservazione
Anche se la montatura e l'elettronica sono progettate per uso
esterno, non è necessario conservare la montatura all'esterno
a meno che non sia riparata da un osservatorio o strutture di
protezione (quali, ad esempio, il garage) Condizioni estreme
di temperatura o umidità possono eventualmente usurare
l'elettronica, la lubrificazione meccanica e la qualità di finitura
della montatura Conservare in luogo al riparo dal sole
Conservare in un luogo asciutto
24 | ITALIANO
AVVERTENZA SOLARE: Non tentare mai di osservare il sole attraverso un telescopio.
HAI BISOGNO DI ASSISTENZA?? Contatta il supporto tecnico Celestron
celestron com/pages/technical-support
©2024 Celestron Celetron e Symbol sono marchi di Celestron, LLC • Tutti i diritti
riservati • Celestron com
US: 2835 Columbia Street, Torrance, CA 90503 Stati Uniti
UK: Unit 2 Transigo, Gables Way, Thatcham RG19 4JZ, United Kingdom
Questo prodotto è progettato per essere utilizzato da persone di età pari o superiore
ai 14 anni
Le fotografie presenti su questa confezione hanno puro scopo decorativo e non
rappresentano ciò che è osservabile con il prodotto
www celestron com/pages/warranty
Prodotto in Cina | 09-24
Nota FCC: La presente apparecchiatura è stata testata ed è risultata conforme ai
limiti imposti per i dispositivi digitali di Classe B, ai sensi della Parte 15 delle Norme
FCC Tali limiti sono stati ideati per fornire un’adeguata protezione nei confronti
di interferenze dannose in installazioni residenziali La presente apparecchiatura
genera, utilizza e può irradiare energia in radio frequenza e, se non installata e
utilizzata conformemente alle istruzioni, può causare interferenze dannose alle
radiocomunicazioni Tuttavia, non esiste alcuna garanzia che l’interferenza non si
verifichi in una particolare installazione Nel caso in cui la presente apparecchiatura
causi interferenze dannose alla ricezione radio o televisiva, il che potrebbe
essere determinato dall’accensione e dallo spegnimento dell’apparecchiatura, l’utente
è incoraggiato a tentare di correggere l’interferenza mediante una o più delle misure
seguenti:
• Riorientare o riposizionare l’antenna di ricezione
• Aumentare la distanza tra l’apparecchiatura e il ricevitore
• Collegare il dispositivo a una presa su un circuito diverso da quello a cui è collegato
il ricevitore
• Consultare il rivenditore o un tecnico radio/TV esperto per
l’assistenza

MANUAL DE INSTRUCCIONES
Modelo #91530-1
TELESCOPIOS DE GAMA DE SOPORTE ECUATORIAL ALEMÁN

2 | ESPAÑOL

ESPAÑOL | 3
ÍNDICE
Introducción 4
Requisitos del Sistema 4
Lista de Piezas 4
Descripción 5
Montaje 7
Uso Básico 9
Alineación Polar del Soporte 10
Alineación Polar Precisa 11
Alcance de Movimiento del Soporte 11
Ajuste del Soporte para Latitudes muy Altas o Bajas 12
Puerto USB 12
Puertos AUX 12
Puerto Autoguide 12
Mando Manual NexStar+ 13
Catálogo de Objetos 17
Desplazarse a un Objeto 17
Apéndice A: Actualización del Firmware del Soporte y el Mando Manual 23
Apéndice B: Cuidados y Mantenimiento 23

4 | ESPAÑOL
Introducción
Advertencia
• No mire nunca directamente al sol con los ojos
descubiertos o un telescopio (a menos que tenga un
filtro solar adecuado) Puede producir daños oculares
permanentes e irreversibles
• No use nunca su telescopio para proyectar una imagen
del Sol sobre ninguna superficie La acumulación interna
de calor puede dañar el telescopio y cualquier accesorio
que tenga instalado
• No use nunca un filtro solar de ocular ni una cuña Herschel
La acumulación interna de calor en el telescopio puede hacer
que los dispositivos se agrieten o rompan, permitiendo
pasar la luz solar sin filtrar hasta el ojo
• No deje nunca el telescopio sin supervisión Asegúrese
de que un adulto familiarizado con los procedimientos de
uso adecuados esté con el telescopio en todo momento,
especialmente en presencia de niños
Requisitos del Sistema
• El CGX precisa de 12 voltios de alimentación CC co al
menos 4 amperios de corriente Dispone de una alimentación
CA a 12VCC 5A de Celestron e incluye un conector de
cañón estriado que se recomienda Las baterías portátiles
de 12 voltios también son alimentaciones adecuadas El
soporte incluye un cable de alimentación CC con una
toma para el encendedor
• El telescopio debe disponer de una barra de montaje
machihembrada que tenga formato CG-5/Vixen o CGE/
Losmandy D El CGX puede adaptarse a ambos tamaños
de soporte machihembrado
• Para obtener el mejor rendimiento, la carga total del
telescopio no debe exceder 55 lbs (25 kg), sin contar
contrapesos
• Windows 7/10 para usar el software de control del
telescopio
• Cable USB con conector A estándar conectado al
puerto USB del soporte (solo para uso con PC)
• Destornillador de cabezal Phillips (opcional, solo para
ajuste de engranaje)
Lista de Piezas
Caja 1: Soporte ecuatorial 91530-1 CGX
Cabezal de soporte ecuatorial CGX
Llave allen de 8mm (encerrada en el mango posterior del
soporte) Eje de contrapeso y rosca de retención
3 x tornillos de cabezal hexagonal de 8mm (fijan el cabezal
al trípode)
Cable de alimentación 12VCC
Mando manual NexStar+
Caja 2: Trípode CGX y contrapesos
Trípode
2 x contrapesos de 5 kg (11 lbs )
Bandeja de accesorios
Mando y arandela de bandeja (enroscada en la columna
central del trípode)

ESPAÑOL | 5
Descripción
Figura 1.1 Vista general
Llave allen
de 8 mm
(situada bajo el asa de transporte)
Mandos de bloqueo de machihembrado
Asa de transporte
Palanca de bloqueo de embrague DEC
R.A. Palanca de bloqueo de embrague
Eje de contrapeso
Contrapeso
Rosca de retención
de contrapeso
Trípode
Bandeja de accesorios
Mando manual
Soporte del machihembrado
Puertos Aux 1 y Aux 2 para el mando
manual y los accesorios
Entrada de alimentación 12VCC 4A
Mandos de bloqueo de altitud (uno en cada lado)
Mando de ajuste de altitud
Mandos de ajuste de azimut
Asa de transporte
Interruptor de encendido/apagado
Consulte la fi gura 1.2
Llave allen
de 8 mm
(situada bajo el asa de transporte)
(situada bajo el asa de transporte)
Asa de transporte

6 | ESPAÑOL
Figura 1.2 Vista general
Puerto Autoguide
Ventanas del
impulsor de correa
Puerto USB
Escalas de latitud
Palancas de bloqueo de ajuste de altura de pata
Marcas de índice de altura de pata
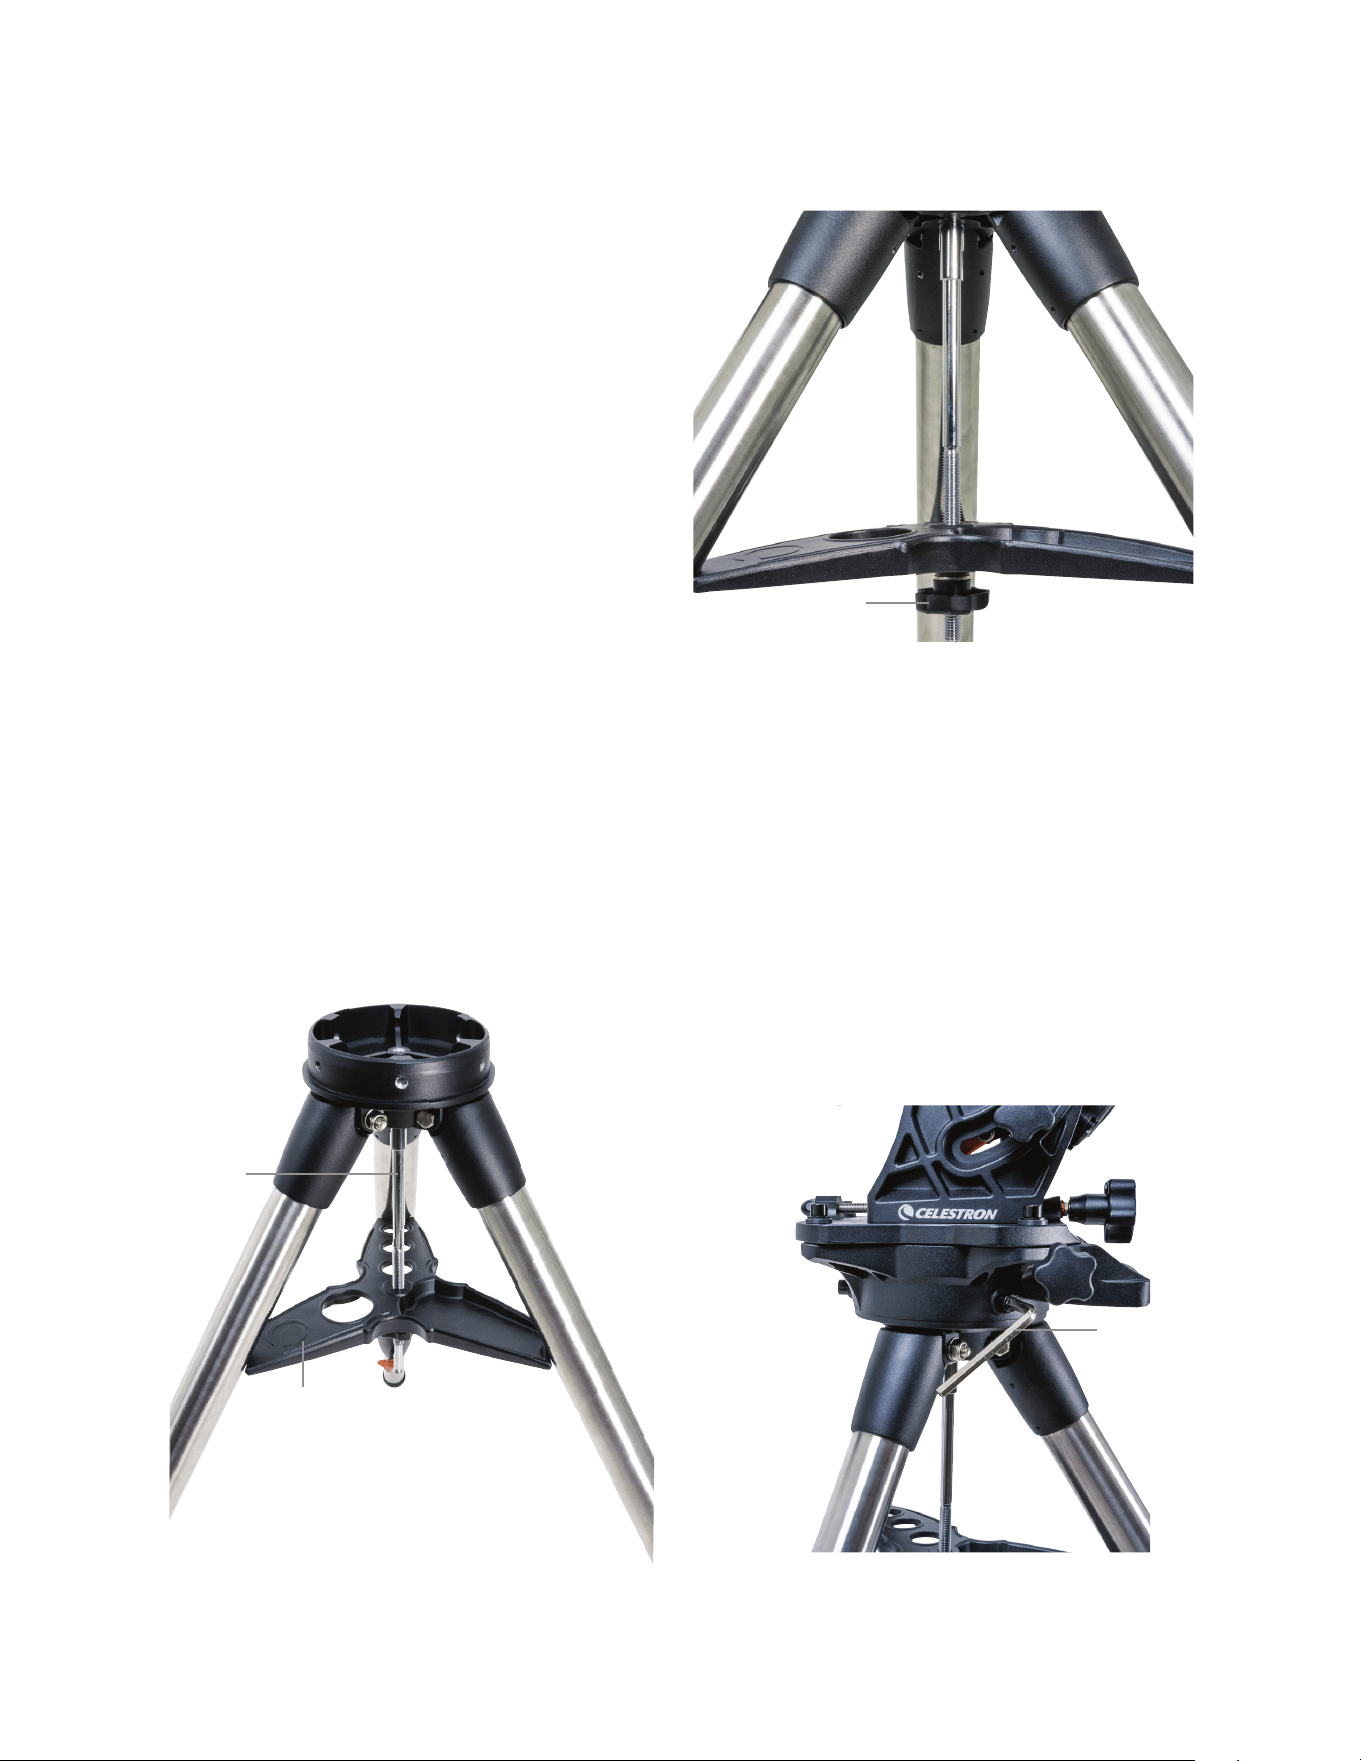
ESPAÑOL | 7
Montaje
Desembale el contenido y siga estos pasos para
montar el soporte Si ha adquirido el CGX solamente, el
trípode incluirá dos contrapesos de 11 lbs (5 kg) Si ha
adquirido el CGX con un tubo óptico grande, pueden
incluirse más contrapesos para lograr el equilibrio
Nota: La llave allen de 8 mm incluida se encuentra bajo
el mango posterior como se indica en la Figura 1.1.
Instalación del trípode
1 Ponga derecho el trípode y separe las patas hasta que
cada pata quede totalmente extendida
2 Retire la rosca de apoyo del trípode y la arandela de la
columna central instalada en la parte superior del trípode
(Figura 2 1 y 2 2)
3 Coloque la bandeja de accesorios sobre la columna
central de forma que cada uno de los tres brazos de la
bandeja soporte una pata del trípode
4 Vuelva a colocar la rosca y la arandela sobre la columna
estriada y apriételas firmemente en posición La bandeja
de accesorios no debería poder moverse en el trípode
(Figura 2 1 y 2 2)
5 Ajuste la altura del trípode aflojando los mandos de blo-
queo del extremo de cada pata del trípode Ajuste la altu-
ra de la pata según sea necesario y vuelva a apretar los
mandos de bloqueo, una pata cada vez Tenga en cuenta
que las marcas de índice de la pata pueden usarse para
nivelar con facilidad el trípode
Instalación del soporte en el trípode
1 Coloque el cabezal sobre el trípode de forma que se
asiente con seguridad en la superficie coincidente
2 Para obtener la mejor estabilidad posible, oriente el
soporte de forma que el eje de contrapeso estédirecta-
mente sobre una pata del trípode como se muestra en las
Figuras 1 1 y 1 2 Observe que puede orientar el soporte
de forma que el eje de contrapeso quede entre dos de
las patas del trípode, lo que puede ser útil en latitudes
bajas, permitiendo que los contrapesos tengan más
espacio respecto al trípode
3 Usando la llave allen de 8mm incluida (Figura 3), apriete
los 3 pernos de fijación del soporte
Figura 2.1 Instalación del trípode
Figura 2.2 Instalación del trípode
Bandeja de accesorios
Columna
central
Rosca y arandela de
soporte de trípode
Llave
allen
Figura 3 Fijación del soporte al trípode
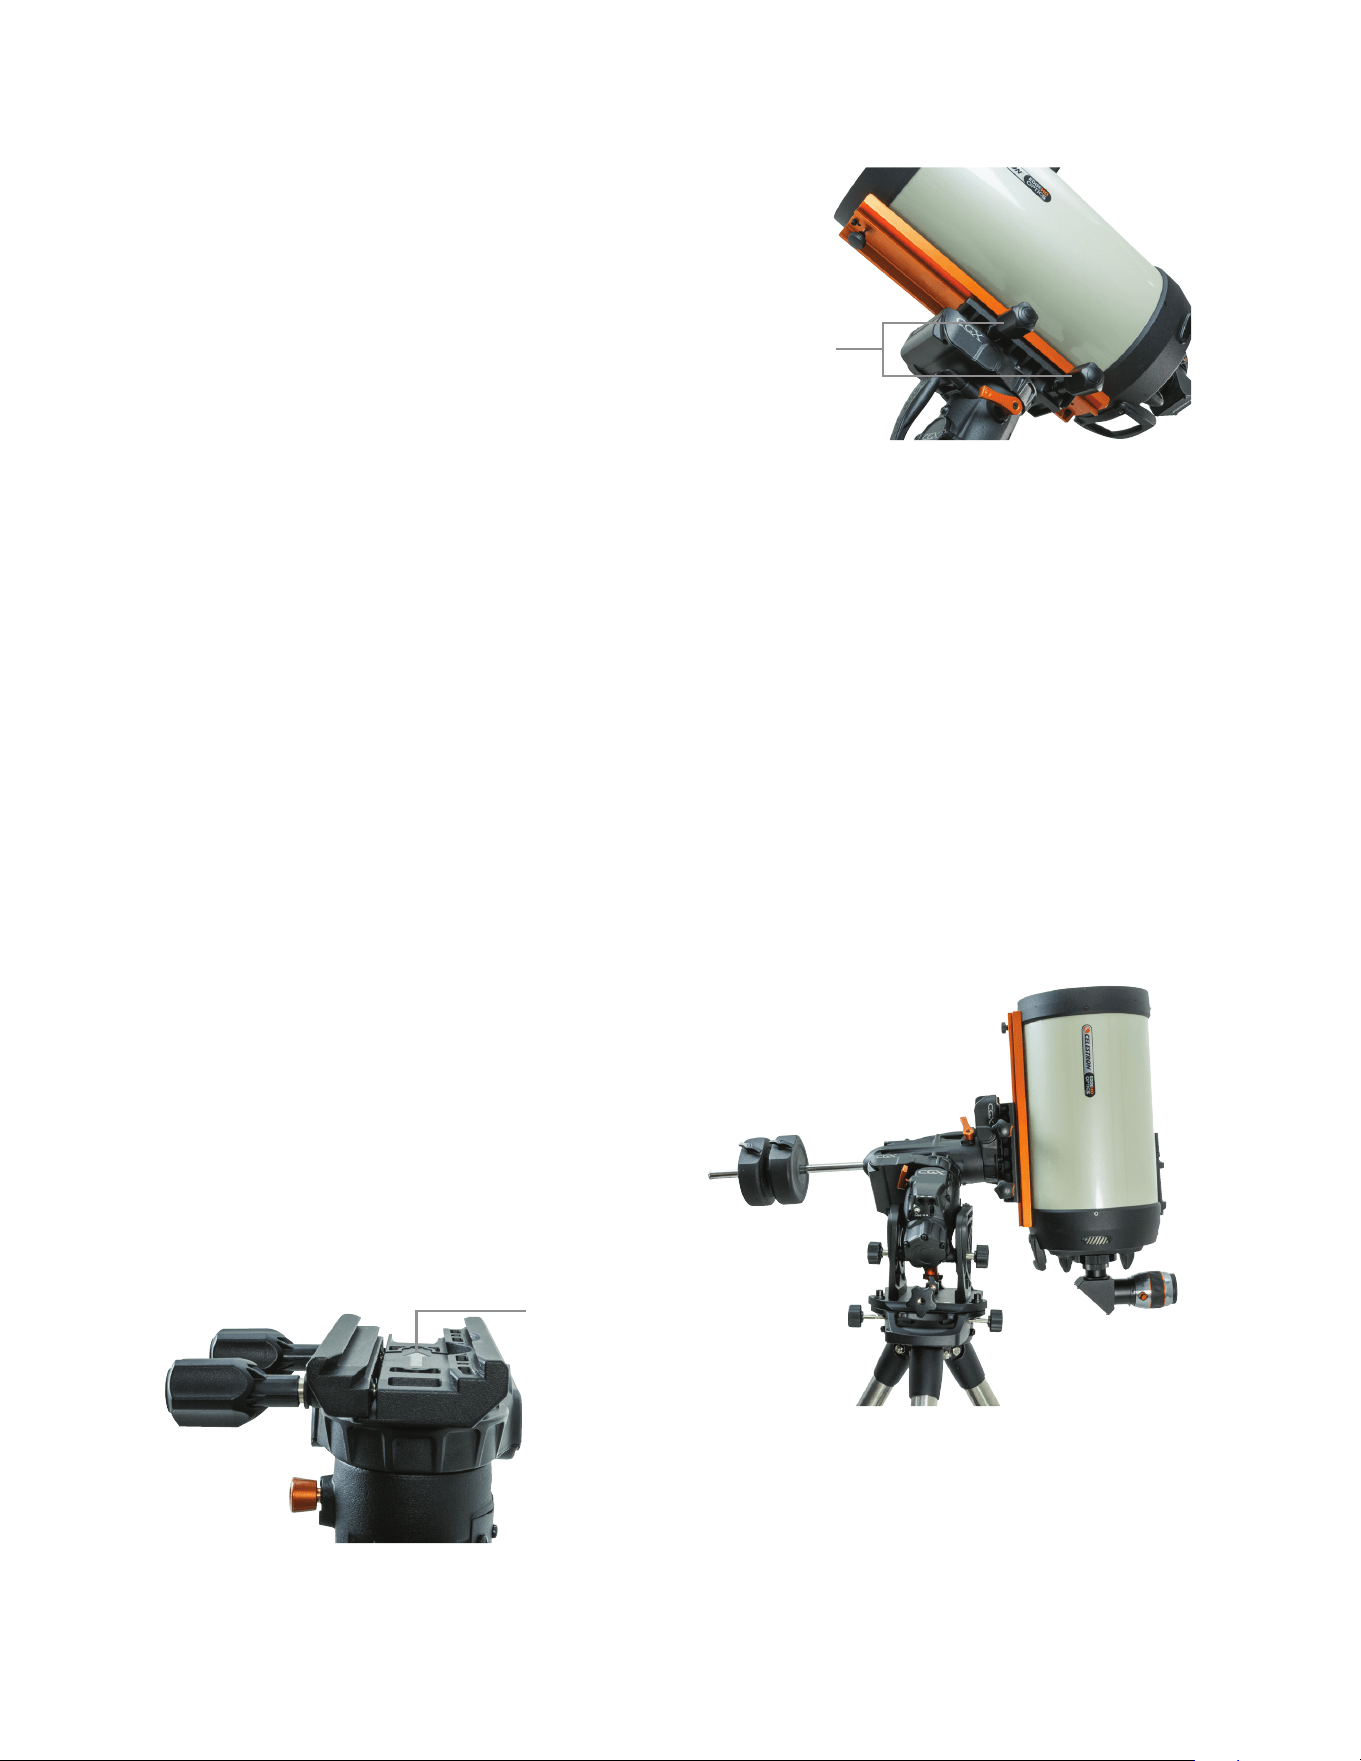
8 | ESPAÑOL
Alineación polar aproximada del soporte
Antes de añadir más peso al soporte y el trípode, coloque de
forma aproximada el soporte, de forma que esté orientado al
norte (o al sur si está en el hemisferio sur) y póngalo en su
latitud Afloje los dos mandos de bloqueo de altitud y gire el
mando de ajuste de altitud (Figura 1 1) hasta que esté apro-
ximadamente en su latitud, indicada en la escala de latitud
(Figura 1 2), y vuelva a fijar los mandos de bloqueo de alti-
tud La escala solamente está pensada para alineación polar
aproximada Puede obtener una alineación polar más precisa
más tarde con ayuda del mando manual informatizado
Añadir contrapesos
Retire la rosca de retención del extremo del eje de contra-
peso, añada los contrapesos, y vuelva a colocar la rosca de
retención Mantenga el eje de contrapeso orientado hacia
abajo (Figura 1 1)
Instalación del telescopio en el soporte
1 Asegúrese de haber fijado las palancas de embrague
R A y DEC
2 Aflloje los mandos de fijación del soporte del machihem-
brado lo suficiente para permitir que el machihembrado
entre en el soporte Tenga en cuenta que la flecha debe
estar orientada hacia el mismo lado que el mango anterior
(Figura 4)
3 Deslice la barra del machihembrado en el soporte del
machihembrado del soporte Fije el telescopio en
posición con los dos mandos de bloqueo (Figura 5)
El CGX encaja en el machihembrado grande de tipo CGE
de Celestron y el machihembrado más pequeño de estilo
CG-5, también habitual en los machihembrados Losmandy
D
1
y de estilo Vixen
2
1
Pruebe el encaje de su machihembrado Losmandy antes
de fijar el telescopio al soporte Los tamaños y ángulos de
machihembrado pueden variar según el fabricante
2
Pruebe el encaje de su machihembrado Vixen antes de fijar
el telescopio al soporte Tenga en cuenta que algunos
de los machihembrados de estilo Vixen no son planos,
y tienen distintas alturas a lo largo de la barra Según la
longitud de la parte plana, puede afectar al encaje en el
soporte del machihembrado del soporte
Figura 4 Fijación del soporte al trípode
Equilibrado del soporte
Eje de ascensión derecha: Suelte cuidadosamente la palanca
de embrague R A y coloque el eje de contrapeso de forma
que quede horizontal Sin soltar el telescopio, compruebe el
lado que favorece el equilibrio Deslice el contrapeso según
sea necesario de forma que el eje R A no se mueva cuando
el embrague esté desbloqueado
Eje de declinación: Con el eje de contrapeso aún horizontal,
suelte cuidadosamente la palanca de embrague para DEC
y compruebe el lado hacia el que está equilibrado el tubo
óptico (Figura 6) Deslice el tubo óptico hacia adelante o
atrás según sea necesario para lograr el equilibrio Para
telescopios grandes y pesados, devuelva el telescopio a la
posición de inicio antes de aflojar los mandos de bloqueo
del soporte del machihembrado
Figura 5 Machihembrado del telescopio asegurado en posición
Figura 6 Equilibrado del soporte
Flecha de orientación
de machihembrado
Mandos de bloqueo
de machihembrado

ESPAÑOL | 9
Instalación del soporte del mando manual
Enrolle la correa con gancho y la funda alrededor de la para
del trípode y coloque el mando manual en la funda
Conexión del mando manual
Conecte el mando manual NexStar+ incluido a uno de los
puertos Aux
Atención: No conecte el mando manual al
puerto Autoguide. Podría dañar el soporte o el mando
manual. Igualmente, no conecte un cable Autoguide
al puerto Aux o podría causar daños.
Posición inicial
El soporte está en la posición "inicio" cuando el eje de
contrapeso esté orientado hacia abajo, y el telescopio
apunte a lo largo del eje polar del soporte como se indica
en la (Figura 7) Los interruptores internos del soporte llevarán
el soporte a su posición inicial cuando lo encienda (para más
información, consulte "Uso básico"), pero aún podrá posicio-
narlo manualmente antes de encender el soporte Solamente
tiene que desbloquear las dos palancas de bloqueo
Uso Básico
Con el soporte montado y con alineación polar, proceda a
encender el soporte:
Alimentación del soporte
El soporte CGX puede alimentarse con el adaptador para
batería de coche incluido con una fuente de batería de
12VCC que pueda entregar al menos 4 amperios de co-
rriente Puede usar un adaptador CA opcional que entrega
12VCC y 4 amperios de corriente Los adaptadores de
alimentación CA con conectores de cañón estriado están
disponibles en Celestron
Posición inical e información de ubicación
1 Conecte el mando manual NexStar+ incluido a uno de
los puertos Aux Puede conectar a Aux 1 o Aux 2
2 Conecte el cable de alimentación al puerto de alimentación
del soporte Asegúrese de fijar el cable de alimentación
con el conector de cañón estriado
3 Encienda el interruptor
4 Cuando el mando manual muestre “CGX Ready”, pulse
dos veces INTRO El soporte procederá a mover a la
posición de conmutación inicial
5 Seleccione Base de datos de ciudades o Ubicación
personalizada
• En la base de datos de ciudades, seleccione la ciudad
más cercana a su ubicación
• Si elige ubicación personalizada, deberá introducir la
longitud, latitud y zona horaria de su ubicación
6 Cuando seleccione la ubicación, proceda a introducir la
fecha y hora El CGX tiene un reloj en tiempo real (RTC)
que guarda la información de fecha, hora y ubicación para
la próxima vez que use el soporte
Alineación
Requisito previo: El soporte debe alinearse de forma
aproximada polar, con la información de fecha, hora y
ubicación introducida correctamente como se indica antes
de este paso.
1 Para obtener los mejores resultados de alineación posibles,
elija Alineación con dos estrellas y pulse INTRO
También puede elegir entre Sistema Solar, Una estrella,
Última Alineación, o Alineación rápida. Los botones de
desplazamiento 6 y 9 del teclado se usan para desplazarse
por cualquier selección de la lista en el mando manual.
Figura 7 Telescopio en posición inicial

10 | ESPAÑOL
2 Seleccione la primera estrella de la lista de estrellas con
nombre Use los botones de desplazamiento 6 (arriba) y
9 (abajo) del teclado para moverse por los nombres de
estrellas Son las estrellas más brillantes y más fáciles de
localizar Pulse INTRO cuando haya elegido una estrella
adecuada Si el soporte tiene como mínimo alineación
polar aproximada, se desplazará hasta la ubicación
aproximada de la estrella
La selección de estrellas por defecto está en el lado oeste
del meridiano. Si hacia el oestre el firmamento está obstrui-
do o desea elegir estrellas del lado este del meridiano, pulse
el botón MENÚ del teclado.
3 Usando las teclas de dirección, desplace el telescopio
a la estrella con nombre seleccionada y céntrela en el
localizador del telescopio y pulse INTRO
El soporte ajustará automáticamente la velocidad del motor
para un centrado preciso
4 Usando las teclas de dirección, centre la estrella en el
ocular del telescopio y pulse ALINEAR
5 Seleccione una segunda estrella de la lista repita los
pasos 2-4 del proceso Cuando se solicite añadir una
estrella de calibración, pulse pulsar ATRÁS para completar
la alineación o, para obtener el mejor resultado posible,
proceder a añadir una estrella de calibración
Para obtener el mejor resultado posible, añada al menos
una estrella de calibración. Mejorará la precisión de
apuntado del soporte.
6 Cuando se solicite "Añadir estrella de calibración", elija
una estrella de la lista y pulse INTRO El soporte se des-
plazará al otro lado del meridiano para añadir una estrella
de calibración
7 Centre y alinee la estrella como lo ha hecho con las dos
primeras estrellas de alineación: Céntrela en el localiza-
dor, pulse INTRO, centre la estrella en el ocular, y pulse
ALINEAR
8 Cuando se solicite añadir otra estrella de calibración
puede seguir añadiendo más o pulsar ATRÁS para
finalizar la alineación
Selección de objetos
Seleccione desde la base de datos de objetos categorizada
por Sistema Solar, estrellas o espacio profundo En estos
menús (con los números del teclado 1, 2 y 3) `puede selec-
cionar por nombre de objeto o número de catálogo popular
(como M42 para Messier 42)
El 6 y 9 del teclado (arriba y abajo) permiten moverse por
cualquier lista del mando manual Pulse INTRO para ir al
objeto seleccionado dela lista
Ejemplo de selección y desplazamiento al objeto
de espacio profundo Messier M42
• Pulse ESPACIO PROFUNDO y a continuación INTRO
• Desplácese hacia abajo (9 en el teclado) hasta Messier y
pulse INTRO
• Pulse “0-4-2” en el teclado y pulse INTRO
Skytour (5 en el teclado) es una forma excelente de explorar
el firmamento sin consultar un mapa celeste La función
Tour generará una lista de los objetos más interesantes que
puede observar según su hora y ubicación
Alineación Polar del Soporte
El navegador informatizado puede localizar objetos aunque el
soporte no tenga una alineación polar perfecta Sin embargo, la
alineación polar es necesaria para obtener la mayor precisión
en el seguimiento del soporte Es esencial para la fotografía
astronómica Cuando tenga alineación polar, un soporte
ecuatorial sigue el firmamento en un movimiento, manteniendo
el objeto centrado en el ocular o la cámara
El sistema de alineación polar CGX consiste en un regulador
de alitud y un regulador de azimut (Figura 8)
Celestron ofrece un catalejo de alineación polar opcional
que se fija al soporte El catalejo de eje polar opcional no
pasa por el eje R A porque dicha área se utiliza para cableado
interno Si no usa el catalejo de alineación polar opcional,
puede obtener una alineación polar aproximada observando
por el localizador del telescopio, y ajustando el soporte hasta
centrar la estrella polar en el ocular del telescopio Hacerlo
le llevará a aproximadamente tres cuartos de grado del Polo
Norte Celeste (NCP)
Figura 8 Regulación de alineación polar
Mandos de
ajuste de azimut
Mandos de
ajuste de altitud
Mandos de
bloqueo de altitud
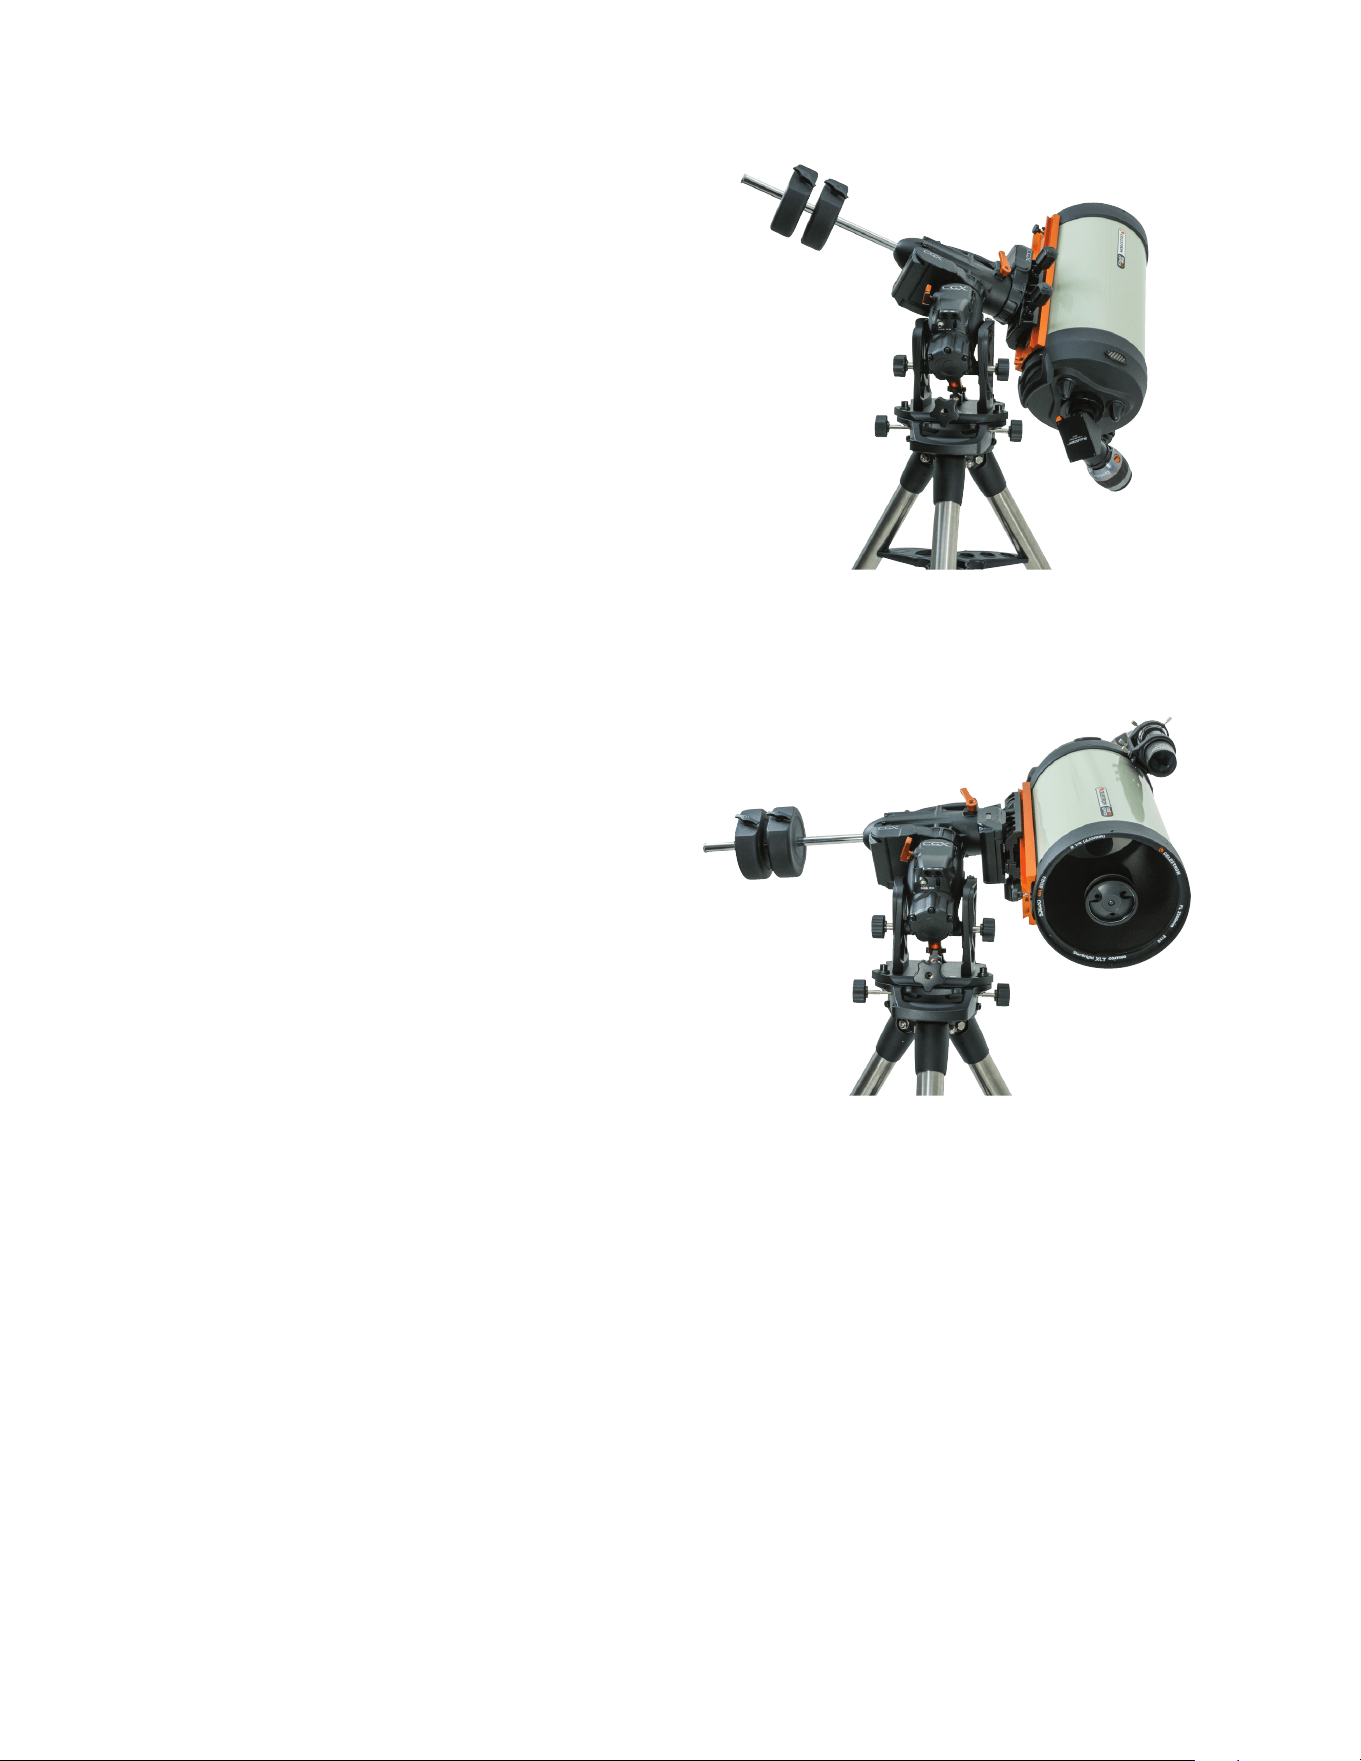
ESPAÑOL | 11
Alineación Polar Precisa
La alineación polar de todas las estrellas de Celestron le
permite alinear con el polo de forma precisa el soporte sin
usar la estrella polar o un localizador de eje polar La alinea-
ción polar con asistencia por software permite elegir una
estrella adecuada
Requisito previo: Debe alinearse el CGX con alineación
de dos estrellas,una estrella, o el Sistema Solar.
1 Seleccione una estrella brillante adecuada en la base de
datos del mando manual NexStar Desplace el telescopio
hasta la estrella
2 Pulse el botón Alinear Seleccione "Alineación polar" y
"Alinear soporte" en la lista
3 El telescopio volverá a desplazarse a la estrella de alinea-
ción y solicitará que la centre en el ocular para "sincroni-
zar" con la estrella
4 Pulse Alinear y el telescopio se desplazará hasta la
posición en la que se encontraría la estrella si tuviera una
alineación polar precisa
5 Use los ajustes de altitud y azimut del soporte para colo-
car la estrella en el centro del ocular No use los botones
de dirección del mando manual para centrar la estrella
6 Pulse Intro La alineación polar ha terminado
Alcance de Movimiento del
Soporte
Alcance de software
El CGX usa sensores de límite controlados por software
que detectan si el soporte ha llegado cerca de su límite de
alcance mecánico Cuando el soporte llega al conmutador, el
motor se ralentizará hasta detenerse y se mostrará un men-
saje de advertencia de "Conmutador de límite" El soporte
dejará de desplazarse en la dirección del conmutador de
límite hasta que invierta la dirección
Alcance mecánico
El CGX usa cableado interno, por lo que el soporte ha sido
diseñado para no moverse más allá de cierto recorrido
Ambos ejes están limitados por una retención integrada
en el soporte Este alcance limitado también ayuda a evitar
interferir accidentalmente entre el telescopio y el soporte o
trípode Si, por cualquier motivo, el soporte supera el conmu-
tador de límite de software (o si se desbloquea el embrague
y se mueve manualmente el soporte), el soporte se detendrá
en la retención
El límite R A (Figura 9 1) permite seguir 20º más allá
del meridiano Si deja el soporte sin supervisión durante el
seguimiento, se detendrá automáticamente antes de llegar a
la retención mecánica
El límite DEC (Figura 9 2) contiene el suficiente alcance de
desplazamiento para llegar a cualquier sección del firmamento
Figura 9.1 Un lado del límite mecánico R.A.
Figura 9.2 Un lado del límite mecánico DEC
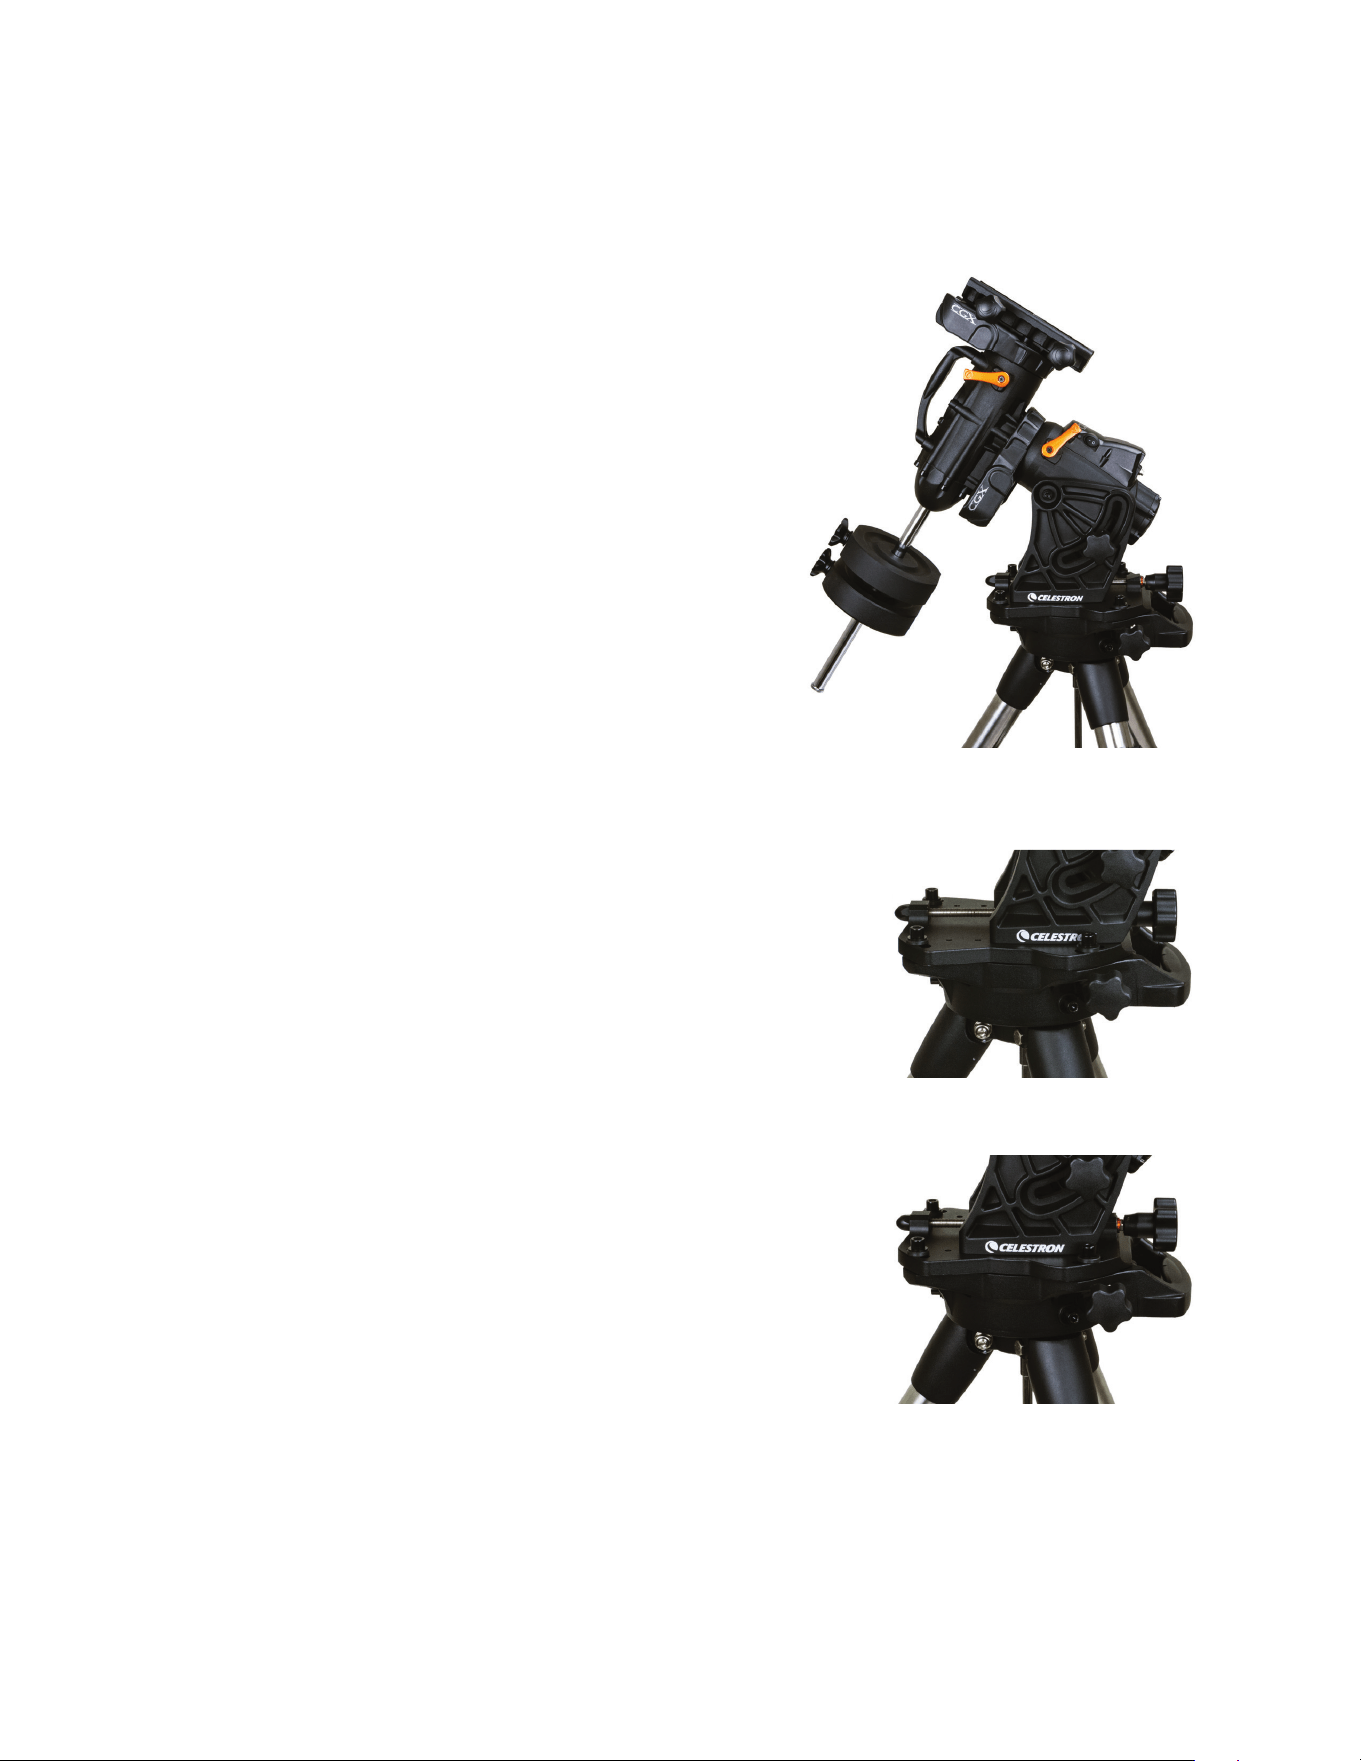
12 | ESPAÑOL
Ajuste del Soporte Para Latitudes
Muy Altas O Bajas
El cabezal EQ puede colocarse sobre el trípode en tres
posiciones distintas Estas tres posiciones pueden usarse
también para optimizar el equilibrio sobre el trípode El
soporte se entrega en posición central, que es útil para
latitudes entre 20-55º Si desea usar el soporte en latitudes
inferiores a 20º, mueva el soporte hacia adelante; si desea
usarlo por encima de 55º, mueva el soporte hacia atrás
1 Retire el cabezal del trípode retirando los 3 tornillos
2 Retire cuidadosamente los 8 tornillos situados bajo el
cabezal Cuando se hayan extraído, el mecanismo de
regulación de altitud será lo único que asegure la placa
inferior del cabezal EQ
3 Gire el mando de regulación de altitud hasta que los
agujeros estriados de la parte inferior del soporte se
alinee con el nuevo grupo de agujeros en la placa inferior
Mueva la placa hacia adelante (en dirección al lado del
eje de contrapeso) si desea usarlo en latitudes más bajas
Mueva la placa hacia atrás (en dirección al mando de
regulación de altitud) si desea usarlo en latitudes más
altas (Figura 10)
Puerto USB
El puerto USB del CGX se usa como interfaz con su PC
solamente para:
1 Usarlo con el software de control del telescopio dedicado
2 Actualizar el firmware del control del motor en el soporte
Conecte un cable estándar USB de tipo A al puerto USB
del soporte, y conéctelo al PC El soporte debería instalarse
automáticamente
El puerto USB del soporte no está pensado para usarse
con ASCOM ni softare de control de telescopios de terce-
ros. Para controlar el soporte con ASCOM, conecte el PC
al puerto mini USB del mando manual NexStar+.
Puertos Aux
Aux 1 y Aux 2 pueden usarse para el mando manual
NexStar+, así como accesorios opcionales, como
StarSense AutoAlign y el módulo WiFi SkyPortal
Puerto Autoguide
El puerto Autoguide solamente debe usarse para relés de
cámara con autoguide
PRECAUCIÓN: No conecte nunca el mando manual
NexStar+ ni otros accesorios al puerto Autoguide. Podría
causar daños.
Figura 10 Cambio de la posición del soporte sobre el cabezal del trípode
POSICIÓN CENTRAL
POSICIÓN HACIA ATRÁS
POSICIÓN HACIA ADELANTE
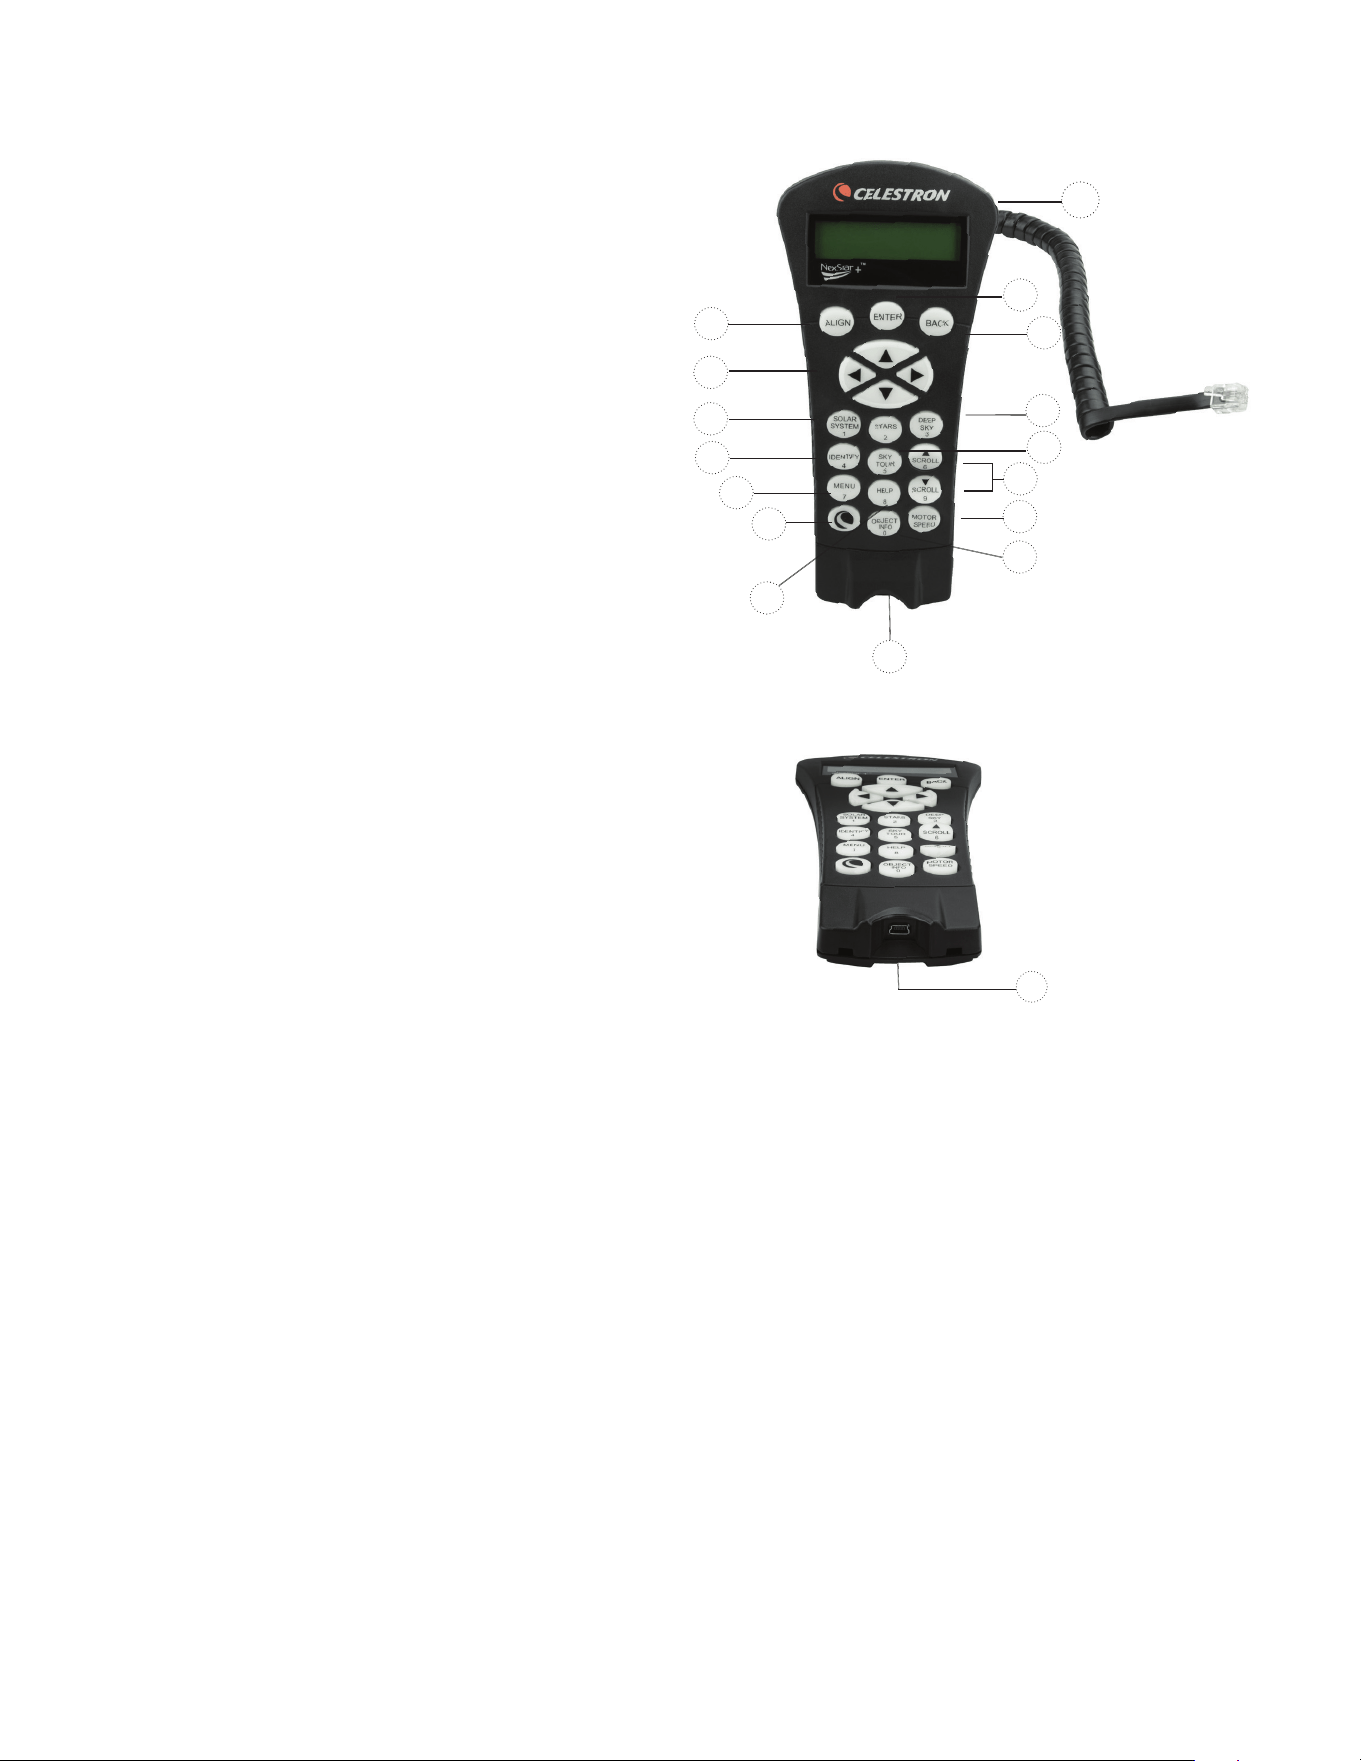
ESPAÑOL | 13
Mando Manual NexStar+
1 Ventana de pantalla de cristal líquido (LCD):
Iluminación roja para un visionado cómodo por la noche
de la información y textos del telescopio Retire la pelñicula
protectora de la pantalla antes del uso
2 Alinear: Indica al telescopio que inicie el proceso de
alineación por defecto También se usa para seleccionar
una estrella u objeto como posición de alineación
3 Teclas de dirección: Permite un control total del
telescopio en cualquier dirección Use las teclas de
dirección para centrar objetos en el ocular o desplazar
manualmente el telescopio
4 Teclas de catálogo: Permite el acceso directo a cada
uno de los catálogos principales de la base de datos de
miles de objetos
Su telescopio contiene los catálogos siguientes en su
base de datos:
• Sistema Solar- Los 7 planetas de nuestro Sistema
Solar más la Luna, el Sol y Plutón
• Estrellas- Listas personalizadas de las estrellas más
brillantes, estrellas dobles, estrellas variables,
constelaciones y asterismos
• Espacio profundo- Listas personalizadas de las mejores
galaxias, Nebulosas y Clústeres, así como el Messier
completo y objetos NGC seleccionados
5 Identificar: Busca en la base de datos de su telescopio
y muestra el nombre y distancias de desvío a los objetos
coincidentes más cercanos
6 Menú: Muestra las funciones de configuración y utilidades,
como la velocidad de seguimiento, objetos definidos por
el usuario y otros
7 Opciones (Logotipo de Celestron): Funciona de forma
parecida a la tecla SHIFT de un teclado y puede usarse
junto con otras teclas para acceder a funciones más
avanzadas y a funciones que se añadirán con
futuras actualizaciones del firmware
8 Intro: Pulsar INTRO le permite seleccionar cualquiera de
las funciones de su telescopio, aceptar los parámetros
introducidos y desplazar el telescopio a objetos mostrados
9 Atrás: Pulsando ATRÁS saldrá del menú actual y mostrará
el nivel anterior de la ruta del menú Pulsar ATRÁS repeti-
damente volverá a un menú principal o puede usarse para
borrar datos introducidos por error
10 Sky Tour: Activa el modo ruta, que busca los mejores
objetos del firmamento y desplaza automáticamente su
telescopio a dichos objetos
11 Teclas de desplazamiento: Se utilizan para despla-
zarse ARRIBA y ABAJO con cualquiera de las listas del
menú Un símbolo de doble flecha en el lado derecho de
la pantalla LCD indica que las teclas de desplazamiento
pueden usarse para ver información adicional Los boto-
nes están en ángulo para localizarlos más fácilmente sin
mirar
1
9
8
13
4
12
2
3
4
5
6
7
15
11
10
14
12 Velocidad del motor: Similar al botón Velocidad del
mando manual NexStar original, le permite cambiar la
velocidad del motor cuando se pulsan las teclas
de dirección
13 Información de objeto: Muestra coordenadas e
información valiosa de objetos seleccionados en la base
de datos del telescopio
14 Puerto mini USB (cable no incluido): Conecta al PC
para controlar el telescopio con un sobremesa o realizar
actualizaciones de firmware
15 Menú de ayuda: En futuras actualizaciones de firmware,
este botón ofrecerá recomendaciones de solución de
problemas Para su comodidad, funciona actualmente
como acceso directo al catálogo Messier
Figura 11
14
Figura 11,2

14 | ESPAÑOL
Seleccionar un objeto
Cuando el telescopio esté correctamente alineado, puede
elegir un objeto de cualquiera de los catálogos de la base
de datos del mando manual NexStar+ El mando manual
tiene una tecla designada para cada categoría de objetos
de su base de datos; objetos del sistema solar, estrellas y
objetos del espacio profundo
• Sistema solar – El catálogo del sistema solar mostrará
todos los planetas (y la Luna) de nuestro sistema solar
actualmente visibles en el firmamento Para permitir mos-
trar el Sol como opción en la base de datos, consulte la
opción Permitir Sol en la sección Configuración de base
de datos del manual
• Estrellas – El catálogo de estrellas muestra listas
personalizadas de las estrellas, estrellas dobles (binarias),
estrellas variables, constelaciones y asterismos
seleccionados más brillantes
• Espacio profundo – El catálogo Espacio profundo
muestra una lista de las mejores galaxias, nebulosas y
clústeres, así como el Messier completo y una selección
de objetos NGC También dispone de una lista alfabética
de los objetos del espacio profundo en orden por su
nombre común
Use las teclas de DESPLAZAMIENTO para moverse por
los catálogos para localizar el objeto que quiera observar
Cuando se desplace por una lista larga de objetos, mantenga
pulsada la tecla ARRIBA o ABAJO para desplazarse por el
catálogo rápidamente
Desplazarse a un objeto
Una vez se muestre el objeto deseado en la pantalla del
mando manual, dispone de dos opciones:
• Pulse la tecla INFORMACIÓN DE OBJETO Le ofrecerá
información útil sobre el objeto seleccionado, como
magnitude, constelación e información extendida sobre
los objetos más populares
- Use los botones de flecha ARRIBA/ABAJO para
moverse por la información del objeto mostrada
- Use el botón ATRÁS para volver a la base de datos
de objetos
• Pulse la tecla INTRO. Desplazará automáticamente el
telescopio a las coordenadas del objeto mostrado en el
mando manual Mientras el telescopio se desplaza al objeto,
el usuario puede acceder a muchas de las funciones del
mando manual (como mostrar información sobre
el objeto)
NOTA: Los catálogos Messier, NGC y SAO necesitan
del uso de una designación numérica. Cuando haya
seleccionado el botón del catálogo correspondiente y
seleccionado el catálogo Messier, NGC o SAO, verá
un cursor parpadeante que indica que está en modo de
introducción numérica
Introduzca el número del catálogo para el objeto que desea
ver Pulse INTRO para ordenar al telescopio que se des-
place al objeto, o mantenga pulsado el botón OPCIÓN (el
logo Celestron) y pulse INFORMACIÓN DE OBJETO para
ver información sobre el objeto que ha seleccionado
PRECAUCIÓN: No desplace nunca el telescopio cuando
alguien esté mirando por el ocular. El telescopio puede
moverse a velocidades elevadas y golpear al usuario en el ojo.
Botón de velocidad del motor
El botón VELOCIDAD DE MOTOR, parecido al botón
Velocidad del mando manual NexStar original, le permite
cambiar instantáneamente la velocidad de los motores, de
una velocidad de desplazamiento rápida a una velocidad de
orientación precisa, o cualquier velocidad intermedia Cada
velocidad se corresponde con un número en el teclado
del mando manual El botón de número 9 es la velocidad
más rápida (aproximadamente 3,5º por segundo, según el
soporte) y se usa para desplazarse entre objetos y localizar
estrellas de alineación El botón número 1 del mando
manual es la velocidad más lenta (mitad de sideral) y puede
usarse para centrar con precisión objetos en el ocular
Para cambiar la velocidad de los motores:
• Pulse la tecla VELOCIDAD DE MOTOR del mando
manual El LCD mostrará la velocidad actual del motor
• Pulse el número del mando manual que se corresponda
con la velocidad deseada
El mando manual tiene una función de “botón doble” que
le permite acelerar inmediatamente los motores sin tener
que elegir una velocidad Para usar esta función, pulse el
botón de flecha que se corresponda con la dirección en
la que quiera mover el telescopio Manteniendo pulsado el
botón, pulse el botón de dirección opuesta Aumentará la
velocidad a la velocidad de desplazamiento máxima
Cuando use los botones de dirección arriba y abajo del
mando manual, las velocidades de desplazamiento más
lentas (6 e inferior) moverán los motores en dirección
opuesta a las velocidades de desplazamiento más altas
(7-9) Esto se hace para que un objeto se mueva en la
dirección correcta cuando se mire en el ocular (por ejem-
plo, pulsar el botón de flecha ARRIBA moverá la estrella
arriba en el campo de visión del ocular) Sin embargo, si
cualquiera de las velocidades más lentas (6 e inferior) se
usan para centrar un objeto en el localizador, puede tener
que pulsar el botón de dirección opuesta para hacer que
el telescopio se mueva en la dirección correcta

ESPAÑOL | 15
Menú del mando manual
El menú "Mando manual" le permite personalizar ciertas
características del mando manual NexStar+ Para acceder al
menú, pulse el botón MENÚ (#7 en el teclado) y use los bo-
tones de desplazamiento para seleccionar “Mando manual”,
y pulse INTRO Use los botones de desplazamiento para
seleccionar entre las opciones siguientes:
• Control de luz: Ajuste independiente del brillo del teclado
numérico y el LCD
• Desplazamiento del menú: Ajusta la velocidad de
movimiento del texto por la pantalla LCD
• Activar negrita: Cambia el formato de la fuente mostrada
en el LCD de normal a negrita
• Establecer contraste: Use las teclas de desplazamiento
para ajustar el contraste del LCD
• Establecer idioma: Cambia el idioma mostrado en el LCD
NOTA: La función Establecer idioma también puede
aparecer la primera vez que use su nuevo mando manual.
También puede iniciarlo en cualquier momento mantenien-
do pulsado el botón Opción (el logo Celestron) durante 10
segundos mientras el telescopio esté encendido.
Procedimiento de alineación
Para que el telescopio apunte con precisión objetos del fir-
mamento, debe alinearse primero con posiciones conocidas
(estrellas) del firmamento Con esta información, el telesco-
pio puede crear un modelo del firmamento, que usa para
ubicar cualquier objeto con coordenadas conocidas Existen
muchas formas de alinear su telescopio con el firmamento
según la información que pueda proporcionar el usuario:
• La Alineación de dos estrellas usa la información de
hora/ubicación introducida y permite al usuario seleccionar
las dos estrellas de alineación a las que se desplazará
automáticamente el telescopio
• La Alineación de una estrella usa la misma información
de hora/ubicación pero solamente usa una estrella para la
alineación
• La alineación de sistema solar mostrará una lista de
objetos diurnos visibles (planetas y la Luna) disponibles
para alinear el telescopio
• El Alineamiento rápido solicitará que introduzca la misma
información que para el procedimiento de alineamiento
de dos estrellas Sin embargo, en lugar de desplazarse a
dos estrellas de alineación para centrado y alineación, el
telescopio ignora este paso y modela el firmamento según
la información proporcionada
• Última alineación restablece la última alineación estelar
y posición guardada La última alineación también sirve
como protección si el telescopio se queda sin alimentación
Alineación de dos estrellas
La alineación de dos estrellas permite al usuario seleccionar
dos estrellas con las que alinear el telescopio Para alinear el
telescopio con el método de alineación de dos estrellas:
1 Seleccione Alineación de dos estrellas en las opciones de
alineamiento mostradas Según la información de fecha y
hora introducida, el mando manual seleccionará y mostrará
automáticamente una estrella brillante sobre el horizonte
• Pulse ENTER para seleccionar esta estrella como
primera estrella de alineación
• Si por algún motivo la estrella elegida no es visible (quizá
tras un árbol o edificio), pulse ANTERIOR para que el
mando manual seleccione automáticamente la siguiente
estrella más brillante
• También puede usar las teclas arriba/abajo para explorar
toda la lista de estrellas con nombre y seleccionar cual-
quiera de las más de doscientas estrellas de alineación
2 Cuando el telescopio termine de desplazarse a la primera
estrella de alineación, la pantalla se solicitará usar los
botones de flecha para alinear la estrella seleccionada
con el puntero del localizador Una vez centrada en el
localizador, pulse ENTER La pantalla le solicitará centrar
la estrella en el campo de visión del ocular Cuando la
estrella esté centrada, pulse ALINEAR para aceptar esta
estrella como primera estrella de alineación
3 Cuando se haya introducido la primera estrella de alinea-
ción, el mando manual seleccionará automáticamente una
segunda estrella de alineación y le hará repetir el proce-
dimiento para ella Cuando el telescopio se haya alineado
con ambas estrellas la pantalla solicitará si desea añadir
estrellas de calibración adicionales Las estrellas de
calibración se usan para mejorar la precisión de apuntado
de su telescopio compensando sutiles desalineaciones
opto- mecánicas entre la óptica del telescopio y el sopor-
te Por lo tanto, normalmente es buena idea añadir al me-
nos una estrella de calibración adicional para mejorar la
precisión de apuntado en todo el firmamento del soporte
4 Pulse INTRO para seleccionar una estrella de calibración
Seleccione una estrella del mismo modo que lo ha
hecho con las primeras dos estrellas de alineación y
pulse ENTER Observará que las estrellas de calibración
mostradas se encuentran en el lado opuesto del lado
del firmamento (meridiano) de las estrellas de alineación
originales Esto es esencial para calibrar con precisión el
soporte Para terminar, puede elegir continuar añadiendo
estrellas de calibración adicionales o pulsar ANTERIOR
para finalizar la alineación
Nota: Filtrado Este/Oeste - Para garantizar la mejor
precisión de apuntado en todo el firmamento, el soporte
informatizado filtra automáticamente y elige sus estrellas de
alineación iniciales de forma que las dos primeras estrellas
de alineación se encuentren en un lado del meridiano y
cualquier estrella de calibrado esté en el lado opuesto del
meridiano, como se indica con ”W" o "E" mostrado en la
esquina superior derecha del LCD. La filtración este/oeste
puede cambiarse pulsando el botón MENÚ en cualquier
momento del proceso de alineación.
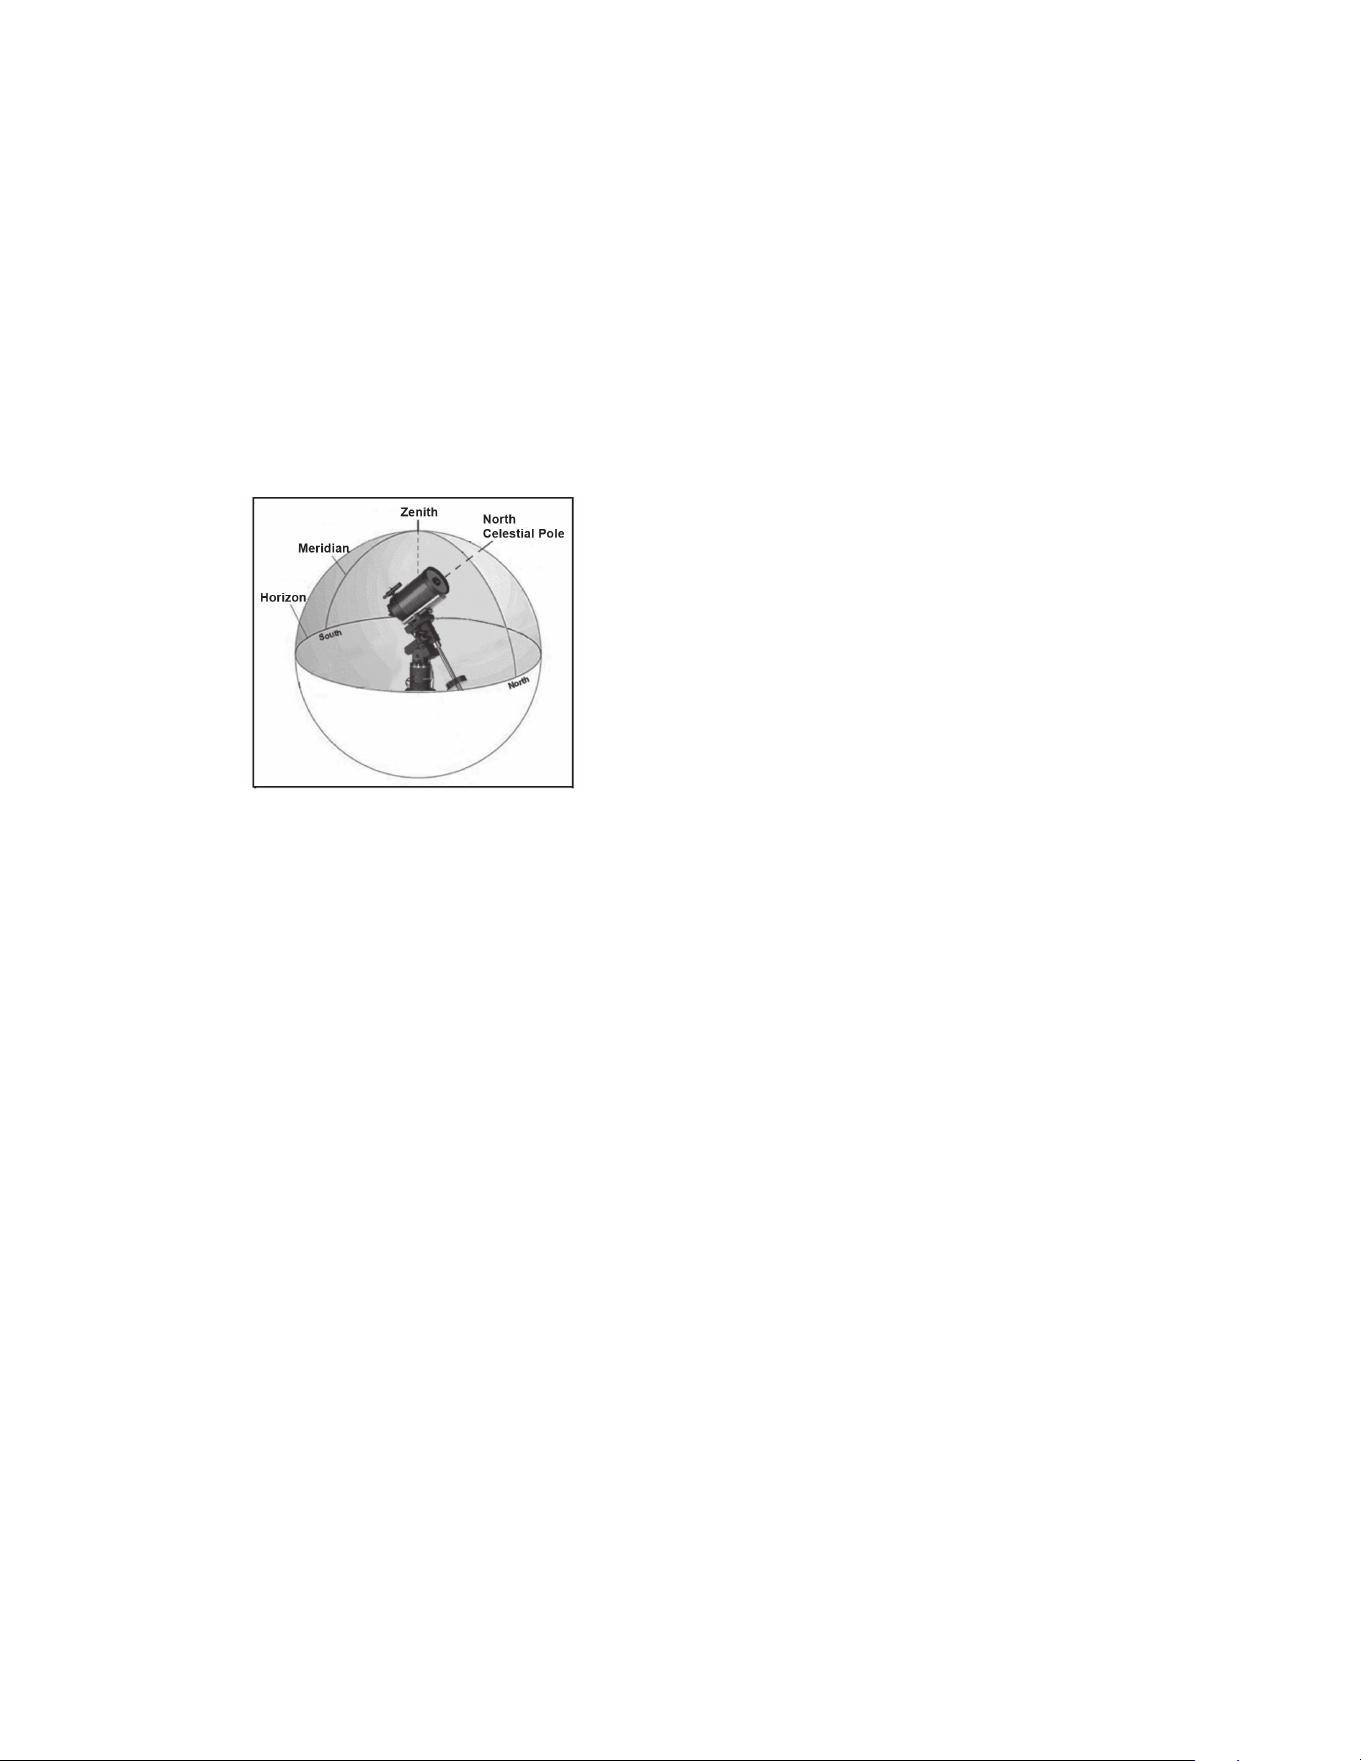
16 | ESPAÑOL
Recomendaciones para añadir estrellas de
calibración:
• Aunque no es necesario añadir estrellas de calibración para
una observación esporádica, se recomienda que añada tres
estrellas de calibración para una precisión óptima
• Elegir estrellas de calibración cerca del ecuador celeste
ofrece mejores resultados que las estrellas cerca de los
polos celestes
• Aunque no es necesario usar estrellas de calibración si el
soporte del telescopio no se ha movido desde su alineación/
calibración original, puede ser necesario recalibrar el tele-
scopio si el tubo óptico se ha retirado por cualquier motivo
Nota: Meridiano – El meridiano es una línea imaginaria
en el firmamento que comienza en el polo norte celeste y
termina en el polo sur celeste, y pasa por el cénit Si está
mirando al sur, el meridiano comienza en su horizonte sur y
pasa directamente por encima hasta el polo norte celeste.
Alineación rápida
La alineación rápida usa la información de fecha y hora
introducida al inicio para alinear el telescopio Sin embargo,
en lugar de desplazarse a dos estrellas de alineación para
centrado y alineación, el telescopio ignora este paso y mo-
dela el firmamento según la información proporcionada Con
ello podrá desplazarse de una forma general a las coorde-
nadas de objetos brillantes, como la Luna y otros planetas, y
le ofrece al telescopio la información necesaria para seguir
objetos en cualquier parte del firmamento (según la precisión
de la alineación polar) La alineación rápida no está pensada
para usarse para localizar con precisión objetos pequeños o
tenues del espacio profundo, ni para realizar el seguimiento
de objetos con precisión para fotografiarlos
Para usar la alineación rápida, seleccione Alineación rápida
en las opciones de alineación y pulse ENTER El telesco-
pio usará automáticamente los parámetros de fecha/hora
introducidos para alinearse con el firmamento y mostrará
Alineación con éxito
Nota: Cuando se haya realizado una alineación rápida,
puede usar la función Realineación (consulte a continuación)
para mejorar la precisión de apuntado del telescopio.
Última alineación
El método de última alineación recuperará automáticamente
las últimas posiciones de índice guardadas para seguir
usando la alineación guardada al apagar por última vez el
telescopio Es una función útil si el telescopio pierde energía
accidentalmente o se apaga
Realinear
El soporte tiene una función de realineación que le permite
sustituir cualquiera de las estrellas de alineación originales
con una nueva estrella u objeto celeste Puede ser útil en
varias situaciones:
• Si observa durante unas horas, puede notar que las dos
estrellas de alineación originales se han desplazado nota-
blemente al oeste (Recuerde que las estrellas se mueven
a una velocidad de 15º por hora) La alineación de una
nueva estrella que esté en la zona este del firmamento me-
jorará la precisión del apuntado, especialmente en objetos
en esa zona del firmamento
• Si ha alineado el telescopio usando el método de alinea-
ción rápida, puede usar la realineación para alinearse con
un objeto real del firmamento Así mejorará la precisión
del telescopio sin tener que volver a introducir información
adicional
• Si ha usado el método de alineación polar asistido infor-
máticamente y ha movido manualmente el soporte, puede
ser necesario realinear el soporte para una precisión de
apuntado mejorada
Para sustituir una estrella de alineación existente por otra
nueva:
1 Seleccione la estrella (u objeto) deseada de la base de
datos y desplácese hasta ella
2 Centre cuidadosamente el objeto en el ocular
3 Una vez centrado, pulse el botón ANTERIOR hasta que
esté en el menú principal
4 Cuando se muestre CGX preparado, pulse la tecla
ALINEAR en el mando manual para seleccionar estrellas
de alineación de la lista de opciones
5 La pantalla le solicitará la estrella de alineación que desea
remplazar Use las teclas de desplazamiento arriba y
abajo para elegir la estrella de alineación a reemplazar Es
preferible sustituir la estrella más cercana al nuevo objeto
Separará las estrellas de alineación en el firmamento
6 Pulse ALINEAR para realizar el cambio

ESPAÑOL | 17
Catálogo de Objetos
Seleccionar un objeto
Cuando el telescopio esté correctamente alineado, puede
elegir un objeto de cualquiera de los catálogos de la base de
datos del mando manual NexStar+ El mando manual tiene
una tecla designada para cada categoría de objetos de su
base de datos; objetos del sistema solar, estrellas y objetos
del espacio profundo
• Sistema solar – El catálogo del sistema solar mostrará
todos los planetas (y la Luna) de nuestro sistema solar ac-
tualmente visibles en el firmamento Para poder mostrar el
Sol como opción en la base de datos, consulte la opción
de Menú solar en el menú de configuración del telescopio
• Estrellas – El catálogo de estrellas muestra listas per-
sonalizadas de las estrellas, estrellas binarias, estrellas
variables, constelaciones y asterismos seleccionados más
brillantes
• Espacio profundo – El catálogo Espacio profundo
muestra una lista de las mejores galaxias, nebulosas y
clústeres, así como el Messier completo y una selección
de objetos NGC También dispone de una lista alfabéti-
ca de los objetos del espacio profundo en orden por su
nombre común
Use las teclas de desplazamiento para desplazarse por los
catálogos para localizar el objeto que quiera ver
Cuando se desplace por una lista larga de objetos, mantenga
pulsada la tecla ARRIBA o ABAJO para desplazarse por el
catálogo rápidamente
Desplazarse a un Objeto
Cuando se muestre el objeto deseado en la pantalla del
mando manual tiene dos opciones:
• Pulse la tecla INFORMACIÓN DE OBJETO Le
ofrecerá información útil sobre el objeto seleccionado,
como magnitude, constelación e información extendida
sobre los objetos más populares
• Use los botones de flecha ARRIBA/ABAJO para
moverse por la información del objeto mostrada
• Use el botón ATRÁS para volver a la base de datos
de objetos
• Pulse la tecla INTRO. Desplazará automáticamente
el telescopio a las coordenadas del objeto mostrado en
el mando manual Mientras el telescopio se desplaza
al objeto, el usuario puede acceder a muchas de las
funciones del mando manual (como mostrar información
sobre el objeto)
NOTA: Los catálogos Messier, NGC y SAO necesitan
del uso de una designación numérica. Cuando haya
seleccionado el botón del catálogo correspondiente y
seleccionado el catálogo Messier, NGC o SAO, verá
un cursor parpadeante que indica que está en modo de
introducción numérica. Introduzca el número del catálogo
para el objeto que desea ver. Pulse ENTER para ordenar
al telescopio que se desplace al objeto, o mantenga pulsado el
botón OPCIÓN (el logo Celestron) y pulse INFORMACIÓN
DE OBJETO para ver información sobre el objeto que ha
seleccionado.
PRECAUCIÓN: No desplace nunca el telescopio
cuando alguien esté mirando por el ocular. El
telescopio puede moverse a velocidades elevadas
y golpear al usuario en el ojo.
Botón SkyTour
El soporte CGX incluye una función de recorrido que
le permite de forma automática elegir entre una lista de
objetos interesantes según la fecha y hora en la que esté
observando El recorrido automático mostrará solamente
los objetos que se encuentren en los límites de filtros
establecidos en el catálogo Para activar la función Tour,
pulse la tecla SKY TOUR en el mando manual
1 Pulse el botón SKY TOUR del mando manual
2 Use los botones DESPLAZAMIENTO para seleccionar
Lo mejor de esta noche
3 El soporte CGX se moverá automáticamente en azimut
hasta su posición inicial, lo que ayudará a minimizar las
posibilidades de enrollar el cable de alimentación durante
el recorrido
4 El mando manual mostrará los mejores objetos que se
puedan observar en ese momento en el firmamento
• Para ver información y datos sobre el objeto mostrado,
pulse la tecla INFORMACIÓN DE OBJETO Púlselo
una vez para mostrar las coordenadas del objeto Púl-
selo otra vez para mostrar las coordenadas del objeto
Púlselo de nuevo para mostrar la descripción textual
Pulse ANTERIOR para volver a la pantalla anterior
• Para desplazarse al objeto mostrado pulse ENTER
• Para ver el siguiente objeto del recorrido, pulse la tecla
ABAJO
Botón Identificar
Pulsar el botón IDENTIFICAR buscará en los catálogos
de la base de datos del soporte y mostrará el nombre y
distancias angulares a los objetos coincidentes más
cercanos a la ubicación actual del telescopio Esta función
puede server para dos fines En primer lugar, puede usarse
para identificar un objeto desconocido en el campo de
visión del ocular Además, el modo identificar puede usarse
para localizar otros objetos celestes cercanos a los objetos
que esté observando
Por ejemplo, si su telescopio está apuntado a la estrella más
brillante de la constelación Lira, elegir Identificar devolverá
sin duda la estrella Vega como la observada Sin embargo,
la función Identificar también buscará en las bases de datos
NGC y del sistema solar y mostrará cualquier planeta u
objeto de espacio profundo cercano En este ejemplo, la Ne-
bulosa del Anillo (M57) se mostraría como aproximadamente
a 6º de distancia El brillo y la proximidad de los objetos
mostrados puede definirse por el usuario usando el Filtro
identificar en Configuración de telescopio

18 | ESPAÑOL
Botones de dirección
El mando manual tiene cuatro botones de dirección en el
centro del mando que controla el movimiento del telescopio
en altitud (arriba y abajo) y azimut (izquierda y derecha) El
telescopio puede controlarse a nueve velocidades distintas
1 = 2x 6 = 3° / s
2 = 4x 7 = 1° / s
3 = 8x 8 = 2° / s
4 = 16x 9 = 4° / s
5 = 32x
Botón de velocidad del motor
El botón VELOCIDAD DE MOTOR (12) le permite
cambiar inmediatamente la velocidad de los motores de
una velocidad de desplazamiento elevada a una velocidad
de guiado precisa, o cualquier punto intermedio Cada
velocidad se corresponde con un número del teclado
del mando manual El número 9 es la velocidad más alta
(aproximadamente 4º por segundo, según la alimentación)
y se usa para desplazarse entre objetos y localizar estrellas
de alineación El botón de número 1 del mando manual es la
velocidad más lenta (2x media sideral) y puede usarse para
un centrado preciso de objetos en el ocular Para cambiar la
velocidad de los motores:
• Pulse la tecla VELOCIDAD DE MOTOR del mando ma-
nual El LCD mostrará la velocidad actual
• Pulse el número del mando manual que se corresponda
con la velocidad deseada
El mando manual tiene una función de "doble botón" que le
permite acelerar inmediatamente los motores sin tener que
elegir una velocidad Para usar esta función, pulse el botón
de flecha que se corresponda con la dirección en la que
quiera mover el telescopio Manteniendo pulsado el botón,
pulse el botón de la dirección opuesta Aumentará la veloci-
dad a la velocidad de desplazamiento máxima
Cuando use los botones de dirección ARRIBA y ABA-
JO del control manual, las velocidades de desplazamiento
más lentas (6 e inferior) moverán los motores en dirección
opuesta que en las velocidades de desplazamiento más
altas (7-9) Esto se hace para que un objeto se mueva en la
dirección correcta cuando se mire en el ocular (por ejemplo,
pulsar la flecha arriba moverá la estrella arriba en el campo
de visión del ocular) Sin embargo, si cualquiera de las
velocidades más lentas (6 e inferior) se usan para centrar un
objeto en el localizador, puede tener que pulsar el botón de
dirección opuesta para hacer que el telescopio se mueva en
la dirección correcta
Botón Ayuda
En futuras actualizaciones de firmware, este botón ofrece-
rá recomendaciones de solución de problemas Para su
comodidad, funciona actualmente como acceso directo al
catálogo Messier
Botón Menú
El soporte CGX contiene muchas funciones de configuración
definidas por el usuario, diseñadas para dar al usuario control
de las muchas funciones del telescopio Puede acceder a
todas las funciones de configuración y utilidades pulsando la
tecla MENÚ y desplazándose por las opciones siguientes
Menú de seguimiento
Modo seguimiento - Le permite cambiar la forma en la que
el telescopio realiza el seguimiento según el tipo de soporte
usado para aguantar el telescopio El telescopio dispone de
tres distintos:
• EQ Norte - Se utiliza para seguir el firmamento cuando el
telescopio tenga alineación polar en el hemisferio norte
• EQ Sur - Se utiliza para seguir el firmamento cuando el
telescopio tenga alineación polar en el hemisferio sur
• Apagado - Cuando se use el telescopio para observación
terrestre (en tierra) puede apagarse el seguimiento de
forma que el telescopio no se mueva
Velocidad de seguimiento - Además de poder mover el
telescopio con los botones del mando manual, su telescopio
seguirá continuamente un objeto celeste a medida que se
mueve por el cielo nocturno La velocidad de seguimiento
puede cambiar según el tipo de objeto observado:
• Sideral - Esta velocidad compensa la rotación de la
Tierra moviendo el telescopio a la misma velocidad que la
rotación, pero en dirección opuesta Cuando el telesco-
pio tiene alineación polar, puede conseguirlo moviendo el
telescopio solamente en ascensión derecha
• Lunar - Utilizado para seguir la Luna cuando observe el
paisaje lunar
• Solar - Usada para seguir el Sol durante la observación
solar con el filtro adecuado
Menú Ver hora-lugar
Este menú muestra la hora actual y la longitud/latitud
descargada del receptor GPS opcional SkySync
También mostrará otra información de hora-lugar
correspondiente como la zona horaria, horario de verano
y hora sideral local La hora sideral local (LST) es útil para
conocer la ascensión correcta de objetos celestes que se
encuentran en el meridiano en ese momento Ver hora-lugar
muestra siempre la última hora y ubicación introducida
cuando tenga conexión con el GPS Cuando se haya recibido
información actualizada, se cambiará la información mostrada
Si el GPS está apagado o no está presente, el mando manual
solamente mostrará la última hora y ubicación guardada
Menú del mando manual
El menú "Mando manual" le permite personalizar ciertas
características del mando manual NexStar+ Para acceder al
menú, pulse el botón MENÚ (#7 en el teclado) y use los
botones de desplazamiento para seleccionar “Mando
manual”, y pulse ENTER

ESPAÑOL | 19
Use los botones de desplazamiento para seleccionar entre
las opciones siguientes:
• Control de luz: Ajuste independiente del brillo del
teclado numérico y el LCD
• Desplazamiento del menú: Ajusta la velocidad de
movimiento del texto por la pantalla LCD
• Activar negrita: Cambia el formato de la fuente mostrada
en el LCD de normal a negrita
• Establecer contraste: Use las teclas de desplazamiento
para ajustar el contraste del LCD
• Establecer idioma: Cambia el idioma mostrado en
el LCD
NOTA: La función Establecer idioma puede aparecer
también la primera vez que use su nuevo mando manual
También puede iniciarlo en cualquier momento mantenien-
do pulsado el botón Opción (el logo Celestron) durante 10
segundos mientras el telescopio esté encendido.
Menú de configuración del telescopio
Configurar hora-lugar – Permite al usuario personalizar la
pantalla del telescopio cambiando los parámetros de hora y
ubicación (como la zona horaria y el horario de verano)
Anti retroceso – Todos los engranajes mecánicos tienen
cierta cantidad de retroceso o juego entre los engranajes
Este juego es evidente en el tiempo que tarda una estrella
en moverse en el ocular cuando se pulsan los botones de
flecha del mando manual (especialmente al cambiar direccio-
nes) La función anti retroceso del CGX permite al usuario
compensar el retroceso introduciendo un valor que retroceda
rápidamente los motores lo justo para eliminar el juego entre
engranajes La cantidad de compensación necesaria depende
de la velocidad de desplazamiento seleccionada; cuanto
más lenta sea la velocidad de desplazamiento más tiempo
tardará la estrella en parecer moverse en el ocular
Dispone de dos valores para cada eje, positivo y negativo:
• Positivo es la cantidad de compensación aplicada cuando
pulse el botón para mover los engranajes rápidamente sin
una pausa prolongada
• Negativo es la cantidad de compensación aplicada cuando
suelte el botón, rebobinando los motores en dirección
contraria para continuar el seguimiento
Normalmente, ambos valores deberían ser idénticos Deberá
experimentar con distintos valores (entre 0-99); un valor
entre 20 y 50 es normalmente preferible para la mayoría
de observaciones visuales, mientras que un valor superior
puede ser necesario como guía para fotografía
Para establecer el valor anti retroceso, desplácese a la opción
anti retroceso y pulse ENTER Cuando esté observando un
objeto en el ocular, observe la respuesta de cada uno de los
cuatro botones de flecha Observe las direcciones en las
que note una pausa en el movimiento estelar tras pulsar el
botón Trabajando en un eje cada vez, ajuste la configuración
de retroceso lo suficientemente alta como para causar un
movimiento inmediato sin resultar en un salto pronunciado
al pulsar o soltar el botón Ahora, introduzca los mismos
valores para las direcciones positiva y negativa Si observa
un salto al soltar el botón pero establecer valores más bajos
resulta en una pausa al pulsarlo, use el valor más alto para
positivo, pero use el más bajo para negativo El telescopio
recordará estos valores y los usará cada vez que se active
hasta que se modifiquen
Límites de filtro – Cuando se complete una alineación,
el telescopio sabrá los objetos celestes que están sobre el
horizonte Como resultado, cuando se desplace por las listas
de la base de datos (o seleccione la función de recorrido),
el mando manual mostrará solamente los objetos que se
sepa que estén sobre el horizonte cuando esté observando
Puede personalizar la base de datos de objetos seleccionando
límites de altitud adecuados para su ubicación y situación
Por ejemplo, si está observando desde una ubicación
montañosa en la que el horizonte esté parcialmente oculto,
puede establecer el límite mínimo de altitud en +20º Esto
garantizará que el mando manual solamente muestre objetos
con una altitud superior a 20º
RECOMENDACIÓN: Si desea explorar toda la base de
datos de objetos, establezca el límite de altitud máxima en
90º y el límite mínimo en -90º. Hacerlo mostrará todos los
objetos en las listas de la base de datos sin importar si es
visible en el firmamento desde su ubicación o no.
Botones de dirección – La dirección en la que parece
moverse una estrella en el ocular cambia según el lado del
meridiando en el que este el tubo del telescopio Puede
crear confusión, especialmente al orientarse a una estrella
cuando esté tomando fotografías Para compensarlo, la
dirección de las teclas de control del motor puede cambiarse
Para invertir la lógica del botón del mando manual, pulse el
botón MENÚ y seleccione los botones de dirección desde el
menú Utilidades Use las teclas de flecha Arriba/Abajo (10)
para seleccionar los botones de azimut (izquierda y derecha)
o los botones de altitud (arriba y abajo) y pulse ENTER
Seleccione positivo o negativo para ambos ejes y pulse
ENTER para guardar Establecer el botón de dirección de
azimut en positivo moverá el telescopio en la misma dirección
que sigue el telescopio (por ejemplo, hacia el oeste)
Establecer los botones de altitud en positivo moverá el
telescopio a la izquierda a lo largo del eje DECLINACIÓN
Aproximación IrA – permite al usuario definir la dirección
en la que se acercará el telescopio cuando se desplace
a un objeto Permite al usuario la capacidad de minimizar
los efectos del retroceso cuando se desplace de objeto a
objeto Al igual que con los botones de dirección, establecer
la aproximación IrA en positivo hará que el telescopio se
aproxime a un objeto desde la misma dirección que el
seguimiento (oeste) para azimut y la la izquierda en decli-
nación El acercamiento IrA de declinación solamente será
aplicable mientras el tubo del telescopio esté en un lado del
meridiano Cuando el tubo pase al otro lado del meridiano, el
acercamiento IrA deberá invertirse

20 | ESPAÑOL
Para cambiar la dirección de ir a aproximación, elija Ir a
aproximación desde el menú Configuración del telescopio,
seleccione la aproximación de altitud o azimut, elija positiva o
negativa y pulse INTRO
Recomendación: Para minimizar el efecto del retroceso
del engranaje en la precisión de apuntado, la configuración
para el botón de dirección debería coincidir con la
configuración del acercamiento IrA. Por defecto, usar los
botones de dirección arriba y derecha para centrar estrellas
de alineación eliminará automáticamente gran parte del
retroceso de los engranajes. Si cambia el acercamiento
IrA de su telescopio, no es necesario cambiar también la
dirección de los botones. Observe la dirección en que se
mueve el telescopio cuando finalice su aproximación IrA
final. Si el telescopio se acerca a su estrella de alineación
desde el oeste (azimut negativo) y a la derecha (altitud
negativa) y asegúrese de que los botones usados para
centrar las estrellas de alineación también muevan el
telescopio en las mismas direcciones.
Velocidad de autoguía – Permite al usuario establecer
una velocidad de autoguía como porcentaje de velocidad
sideral Es útil cuando calibre su telescopio a una autoguía
CCD para una fotografía de larga exposición
Meridiano – Esta función instruye al soporte el modo de
respuesta al moverse a objetos accesibles desde ambos
lados del meridiano La función Meridiano permite al tubo
telescópico permanecer en el lado deseado del soporte
cuando se desplaza, y continuar el seguimiento según los
límites de desplazamiento R A que haya establecido el usua-
rio Consulte Límites R A más adelante La función Meridia-
no permite cuatro elecciones:
• Favorecer actual – Permite al soporte favorecer el lado
del soporte que esté activo actualmente al desplazarse a
objetos cerca del meridiano Por ejemplo, si los límites de
desplazamiento R A se han establecido para permitir que
el soporte siga 10º más allá del meridiando, el telescopio
seguirá en su lado del meridiano actual al desplazarse a
objetos que se encuentren hasta a 10º de su meridiano
• Favorecer oeste – Si el objeto está accesible desde
ambos lados del soporte, seleccionar “Favorecer oeste”
indica al soporte que apunte al objeto como si estuviera en
el lado oeste del meridiano El tubo óptico se colocará en
el lado este del soporte y apuntará al oeste
• Favorecer este – Si el objeto está accesible desde
ambos lados del soporte, seleccionar “Favorecer este”
indica al soporte que apunte al objeto como si estuviera en
el lado este del meridiano El tubo óptico se colocará en el
lado oeste del soporte y apuntará al este
• Desactivar – Es la configuración por defecto, que
instruye al soporte oscilar siempre al otro lado del soporte
según sea necesario para ver objetos en el lado opuesto
del meridiano Sin embargo, cuando esté en el objeto
deseado, el soporte seguirá realizando el seguimiento más
allá del meridiano según los límites de desplazamiento R A
que se hayan establecido
Configuración de soporte – Cuando se haya calibrado
la configuración del soporte (consulte la sección Utilidades
a continuación) los valores se guardan y se muestran en el
mando manual No se recomienda cambiar los valores de ca-
libración Sin embargo, cada configuración puede cambiarse
si es necesario para mejorar el rendimiento del telescopio
• Valor de cono – Es el valor de error de cono establecido
cuando se realiza Utilidades/Calibrar soporte/Conmutador
DEC – Cono
• Índice DEC – Es el valor de error de índice de decli-
nación guardado al añadir estrellas de calibración tras la
alineación estelar inicial
• Índice R.A. – Es el valor de error del índice R A establecido
cuando se realiza Utilidades/Calibrar soporte/
Conmutador R A
Límites R.A. – Establece los límites de ascensión derecha
(R A ) a los que se puede desplazar el telescopio o realizar
seguimiento antes de detenerse Los límites de desplaza-
miento se representan en grados y por defecto se establece
en 0º, que es la posición del telescopio cuando la barra de
contrapeso esté extendida horizontalmente Sin embargo,
los límites de desplazamiento pueden personalizarse según
sus necesidades Por ejemplo, si usa equipo fotográfico
CCD con cables no lo suficientemente largos para moverse
con el telescopio a medida que se desplaza por el firma-
mento, puede ajustar el límite de desplazamiento en el lado
del soporte restringido por los cables, y ordena al soporte
dejar de desplazarse antes de alcanzar este punto Si está
fotografiando un objeto que acaba de cruzar el meridiano,
puede establecer el límite para permitir al soporte continuar
el seguimietno en la misma dirección pasado el meridiano
sin necesidad de "voltear" el telescopio al lado opuesto del
soporte (consulte la función Meridiano anteriormente) Usan-
do el primer ejemplo anterior, el usuario puede desplazar
el telescopio en R A (azimut) hasta que llegue al punto en
que los cables de extiendan al máximo Luego, mostrando el
azimut del telescopio en esta posición (mirando a la posición
Obtener eje en el menú Utilidades) puede determinar el
azimut del telescopio en su posición más extendida Introduzca
esta lectura de azimut para el límite de desplazamiento en
azimut máximo o mínimo para garantizar que el telescopio no
se desplace más allá de este punto Los límites de desplaza-
miento del telescopio pueden establecerse para detenerse
automáticamente en cualquier lugar entre 40º por encima del
nivel y 20º por debajo del nivel Para establecer el límite de
desplazamiento R A seleccione lo siguiente:
• Límite Este R.A. - Introduzca un número entre +40º y
-20º para definir el límite de desplazamiento cuando el tubo
esté en el lado este del soporte
• Límite Oste R.A. - Introduzca un número entre +40º y
-20º para definir el límite de desplazamiento cuando el tubo
esté en el lado este del soporte
• Desactivar límites - Desactiva cualquier valor predefinido
que se haya introducido y permite al soporte seguir la
cantidad máxima más allá del meridiano (por ejemplo, -20º
en ambos lados)
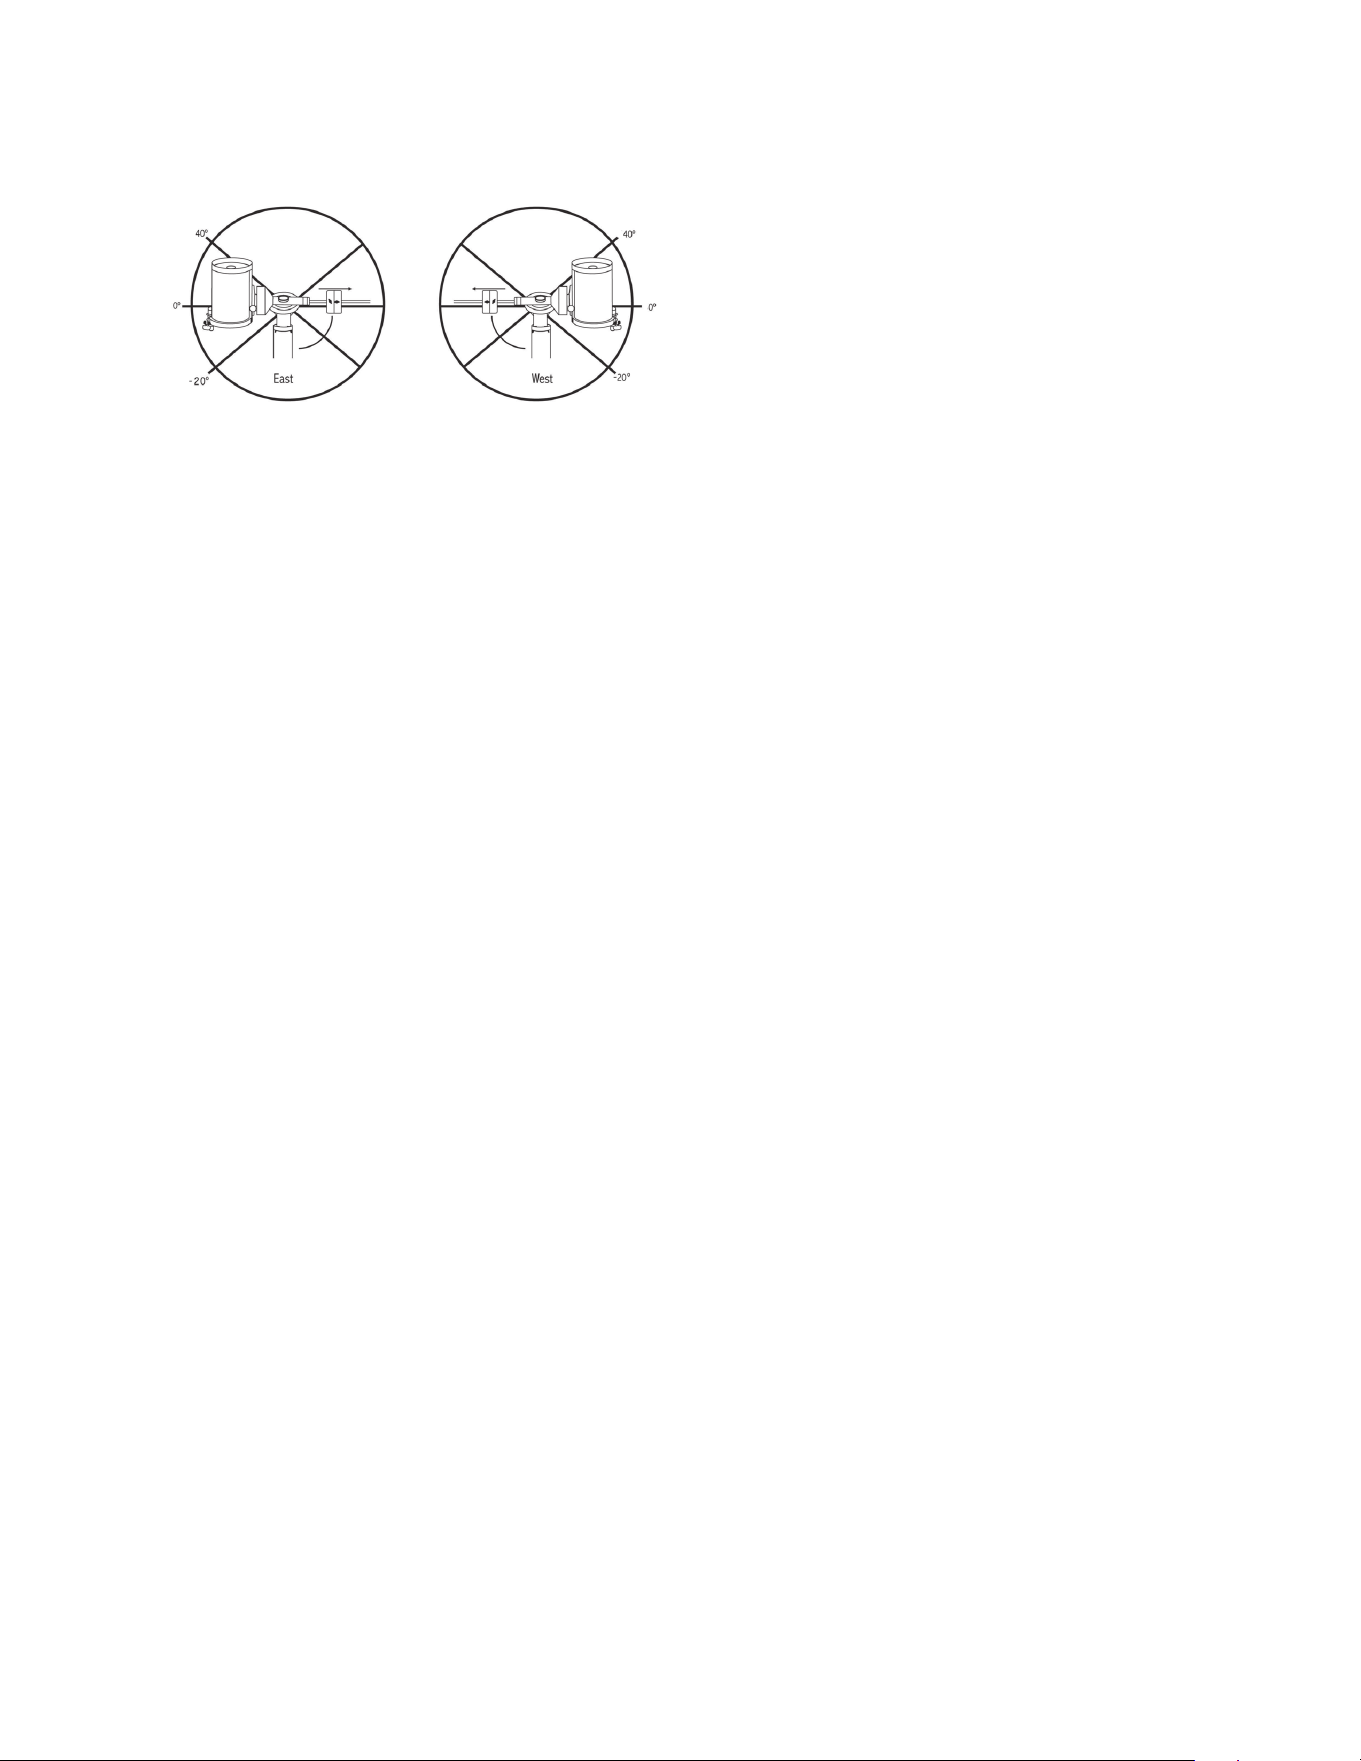
ESPAÑOL | 21
ADVERTENCIA: Para que el telescopio pueda desplazarse
a una estrella desde la dirección que minimice la cantidad
de retroceso en los engranajes, puede ser necesario que
el telescopio se desplace más allá del límite de desplaza-
miento especificado para aproximarse a la estrella desde
la dirección correcta. Esto puede limitar su capacidad de
desplazamiento a un objeto en hasta 6º del límite de des-
plazamiento R.A. en el mando manual. Si demuestra ser un
problema, la dirección que toma el telescopio para centrar
un objeto puede modificarse. Para cambiar la dirección de
desplazamiento del telescopio, consulte Acercamiento IrA
en el menú Configuración del telescopio.
Velocidad personalizada 9 – Permite personalizar la ve-
locidad a la que el soporte se desplaza a un objetivo Puede
establecer los ejes R A y Dec de forma individual
Menú de utilidades
Desplazarse por las opciones del MENÚ (9) también propor-
cionará acceso a diversas funciones de utilidad avanzadas
del telescopio como: calibrar soporte, hibernar y muchas otras
Calibrar soporte – Para optimizar el rendimiento y pre-
cisión de apuntado del telescopio, el soporte tiene rutinas
de calibración integradas que le permiten compensar la
variación mecánica inherente en cualquier soporte ecuatorial
alemán Cada calibracón es totalmente automática y en la
mayoría de casos solamente debe realizarse una vez Se
recomienda encarecidamente que tome unos minutos para
pasar por los procedimientos de calibración del soporte
• Conmutación R.A. – Este procedimiento registra el error
de desvío cuando la marca del índice de ascensión está
alineado en el inicio Calibrar el índice R A mejora la
precisión de su alineación estelar inicial cuando vuelva a
alinear el telescopio
• Calibración IrA – La calibración IrA es una herramienta
útil cuando coloque accesorios visuales o fotográficos
al telescopio La calibración IrA calcula la cantidad de
distancia y tiempo que tarda el soporte en completar su
último IrA lento cuando se desplaza a un objeto Cambiar
el equilibrio del telescopio puede aumentar el tiempo que
tarda en completar el desplazamiento final La Calibración
ir a tiene en cuenta cualquier leve desequilibrio y cambia la
distancia Ir a final para compensar
Posición inicial – La posición “inicial” del telescopio es
una posición definible por el usuario que se usa para guardar
el telescopio cuando no se use La posición inicial es útil
al guardar el telescopio en una instalación de observatorio
permanente Por defecto la posición de inicio es la misma
posición de índice usada al alinear el soporte
Para establecer la posición de inicio de su soporte, use los
botones de flecha del mando manual para mover el soporte
del telescopio a la posición deseada Seleccione la opción
Establecer y pulse Enter Seleccione la opción IrA para
devolver el telescopio a la posición de inicio en cualquier
momento
Configuración de fábrica – Devuelve el mando manual a
su configuración original de fábrica Los parámetros como
la compensación de retroceso, fecha y hora inicial, longitud/
latitud, junto con los límites de desplazamiento y filtro, se
reiniciarán Sin embargo, los parámetros guardados como
objetos definidos por el usuario seguirán guardados aunque
se seleccione Configuración de fábrica El mando manual le
solicitará pulsar la tecla “0” antes de volver a la configura-
ción por defecto de fábrica
Versión - Seleccionar esta opción le permitirá ver el número
de versión del software del mando manual y el control del
motor El primer grupo de números indica la versión de sof-
tware del mando manual Para el control del motor, el mando
manual mostrará dos grupos de números; los primeros
números son para el azimut y los segundos para la altitud
Obtener posición de eje – Muestra la altitud y azimut
relativas para la posición actual del telescopio
Posición de eje IrA – Le permite introducir una posición
de altitud y azimut concreta y desplazarse a ella
Hibernar – Hibernar permite al telescopio apagarse por
completo y seguir alineado al volver a encenderse Así no
solamente ahorra energía, sino que es ideal para tener el
telescopio montado permanentemente o dejar el telescopio
en una ubicación durante periodos largos de tiempo Para
colocar su telescopio en modo Hibernación:
1 Seleccione Hibernar en el menú de utilidades
2 Mueva el telescopio a la posición deseada y pulse
ENTER
3 Apague el telescopio Recuerde no mover nunca el tele-
scopio manualmente cuando esté en modo Hibernación
Cuando el telescopio se encienda de nuevo la pantalla mos-
trará Activar Tras pulsar Intro tiene la opción de desplazarse
por la información de hora/lugar para confirmar la configura-
ción actual Pulse ENTER para activar el telescopio
RECOMENDACIÓN: Pulsar ANTERIOR en la pantalla
de activación le permite explorar muchas de las funciones
del mando manual sin activar el telescopio del modo de hi-

22 | ESPAÑOL
bernación. Para activar el telescopio tras pulsar ANTERIOR,
seleccione Hibernar desde el menú Utilidad y pulse ENTER.
No use los botones de dirección para mover el telescopio
cuando esté en modo hibernación.
Menú Sol
Por motivos de seguridad el Sol no se mostrará como
objeto de la base de datos a menos que esté previamente
habilitado Para activar el Sol, acceda al menú solar y pulse
ENTER El Sol se mostrará en el catálogo de planetas y
puede usarse como objeto de alineación cuando use el
método de alineación de sistema solar Para quitar el Sol de
las indicaciones del mando manual, seleccione de nuevo el
menú solar del menú Utilidades y pulse ENTER
Establecer posición de soporte
El menú Establecer posición de soporte puede usarse para
mantener la alineación en casos en los que desee desacoplar
los enganches o situaciones similares Por ejemplo, puede
usar esta función si necesita reequilibrar el soporte tras
haber completado una alineación Para establecer la
posición del soporte, desplácese a una estrella brillante en
la lista de estrellas con nombre y seleccione Establecer
posición de soporte El mando manual sincronizará en la
estrella solicitando que centre la estrella en el ocular y pulse
el botón Alinear Cuando haya sincronizado en la estrella,
podrá mover manualmente el soporte en ambos ejes para
reequilibrar Cuando esté preparado para desplazar el tele-
scopio al siguiente objeto, recuerde devolver manualmente el
tubo a la misma estrella brillante y centrarla cuidadosamente
en el ocular Usar este herramienta anulará el índice PEC
Activar/desactivar GPS – Si usa su telescopio con el
accesorio GPS opcional SkySync, deberá activar el GPS la
primera vez que use el accesorio Si desea usar la base de
datos del telescopio para localizar las coordenadas de un
objeto celeste para una fecha futura o pasada, deberá apagar
el GPS para introducir manualmente una hora distinta a
la actual
Activar/desactivar RTC – Le permite apagar el reloj en
tiempo real interno del telescopio Al alinear, el telescopio
seguirá recibiendo información de tiempo del RTC Si desea
usar la base de datos del mando manual para localizar las
coordenadas de un objeto celeste para una fecha futura o
pasada, deberá apagar el RTC para introducir manualmente
una hora distinta a la actual
Corrección de error periódica (PEC) – PEC está
diseñada para mejorar la calidad fotográfica reduciendo
la amplitud de los errores de engranajes y mejorando la
precisión de seguimiento del motor Esta función sirve para
astrografía avanzada y se usa cuando su telescopio tiene
alineación polar precisa Para más información sobre el uso
de PEC, consulte la sección del manual sobre “Fotografía
astronómica”
Menú de objetos del usuario
Su telescopio puede guardar hasta 400 objetos distintos
definidos por el usuario en memoria Los objetos pueden
ser objetos terrestres diurnos o un objeto celeste intere-
sante que descubra y no esté incluido en la base de datos
habitual Existen distintas formas de guardar un objeto en
memoria según el tipo de objeto que sea:
Ir a objeto: Para ir a cualquiera de los objetos definidos
por el usuario de la base de datos, desplácese a “IrA Obj
celeste” o “IrA Obj terrestre”, introduzca el número del objeto
que quiera seleccionar y pulse ENTER El telescopio recu-
perará automáticamente y mostrará las coordenadas antes
de desplazarse al objeto
Guardar objeto celeste: Su telescopio guarda objetos
celestes en su base de datos guardando sus coordenadas
de ascensión derecha y declinación correctas en el firma-
mento De este modo se puede encontrar el mismo objeto
cada vez si el telescopio está alineado Cuando se centre el
objeto deseado en el ocular, desplácese al comando “Guar-
dar obj cel ” y pulse ENTER La pantalla le solicitará introdu-
cir un número entre 1 y 200 para identificar el objeto Pulse
ENTER de nuevo para guardar el objeto en la base de datos
Guardar base de datos (BD)
• Objeto: Esta función le permite crear su ruta personaliza-
da de objetos de la base de datos permitiéndole registrar
la posición actual del telescopio y guardar el nombre del
objeto seleccionándolo de cualquiera de los catálogos
de la base de datos Se puede acceder a estos objetos
seleccionando IrA objeto celeste
• Introducir R.A. - Dec: También puede guardar un grupo
concreto de coordenadas para un objeto introduciendo el
R A y la declinación del objeto Desplácese al comando
"Introducir RA-DEC" y pulse ENTER La pantalla le solici-
tará introducir primero el R A y a continuación la declina-
ción del objeto deseado
• Guardar objeto terrestre: El telescopio también puede
usarse como telescopio para objetos terrestres Los
objetos terrestres fijos pueden guardarse mediante su
altitud y azimut relativos a la ubicación del telescopio en
el momento de la observación Como estos objetos son
relativos a la ubicación del telescopio, solamente tienen
validez para esa ubicación exacta Para guardar objetos
celestes, centre de nuevo el objeto deseado en el ocular
Desplácese al comando “Guardar obj terrestre” y pulse
ENTER La pantalla le solicitará introducir un número entre
1 y 200 para identificar el objeto Pulse ENTER de nuevo
para guardar el objeto en la base de datos
Para sustituir el contenido de cualquiera de los objetos defi-
nidos por el usuario, guarde un nuevo objeto usando uno de
los números de identificación existentes; el telescopio susti-
tuirá el objeto definido por el usuario anterior con el actual

ESPAÑOL | 23
Obtener R.A./DEC - Muestra la ascensión derecha y
declinación para la posición actual del telescopio
IR a R.A./DEC - Le permite introducir un R A y declinación
específicos y desplazarse a ellos
Recomendación: Para guardar un grupo de coordenadas
(R.A./Dec) permanentemente en la base de datos, guárdelo
como objeto definido por el usuario del modo descrito
anteriormente.
Identificar
El modo identificación buscará los catálogos o listas de la
base de datos del soporte y mostrará el nombre y distancias
de desvío a los objetos coincidentes más cercanos Esta
función puede server para dos fines En primer lugar, puede
usarse para identificar un objeto desconocido en el campo
de visión del ocular Además, el modo identificar puede
usarse para localizar otros objetos celestes cercanos a los
objetos que esté observando Por ejemplo, si su telescopio
apunta a la estrella más brillante de la constelación de Lira,
elegir Identificar y buscar en el catálogo de estrellas con
nombres devolverá sin duda la estrella Vega como la estrella
que está viendo Sin embargo, seleccionando Identificar y
buscando en los catálogos Objetos con nombre o Messier,
el mando manual le hará saber que la Nebulosa del Anillo
(M57) está a aproximadamente 6º de su posición actual
Buscar en el catálogo Estrellas dobles mostrará que Epsilon
Lyrae solamente está a 1º de distancia de Vega Para usar la
función Identificar:
• Pulse el botón Menú y seleccione la opción Identificar
• Use las teclas de desplazamiento Arriba/Abajo para
seleccionar el catálogo en el que quiera buscar
• Pulse INTRO para iniciar la búsqueda
NOTA: Algunas bases de datos contienen miles de
objetos y, por lo tanto, puede tardar varios minutos en
devolver los objetos más cercanos.
IrA preciso
El soporte tiene una función IrA preciso que puede ayudar
a localizar objetos extremadamente tenues y centrar objetos
más cercanos al centro del campo de visión para fotografía
astronómica IrA preciso busca automáticamente la estrella
brillante más cercana al objeto deseado y solicita al usuario
centrarla cuidadosamente en el ocular El mando manual
calcula la pequeña diferencia entre su posición IrA y su
posición centrada Usando este desvío, el telescopio se
desplazará al objeto deseado con una precisión mejorada
Para usar IrA preciso:
1 Pulse el botón MENÚ y use las teclas arriba /abajo para
seleccionar IrA preciso
• Elija la base de datos para seleccionar el objeto que
quiera observar de cualquiera de los catálogos de base
de datos listados o;
• Elija el R A /DEC para introducir un grupo de
coordenadas celestes a las que se quiera desplazar
2 Cuando se seleccione el objeto deseado, el mando
manual buscará y mostrará la estrella brillante más cercana
al objeto deseado Pulse INTRO para desplazarse a la
estrella brillante de alineación
3 Use los botones de dirección para centrar cuidadosa-
mente la estrella de alineación en el ocular
4 Pulse INTRO para desplazarse al objeto deseado
Apéndice A:
Actualización del Firmware del
Soporte y el Mando Manual
Para comprobar si existen nuevas actualizaciones, consulte
esta URL:
http://software celestron com/updates/CFM/CFM/
1 Conecte su mando manual NexStar+ en el puerto AUX1
o AUX2
2 Conecte un cable USB B estándar entre el soporte y su PC
3 Conecte la alimentación al CGX y enciéndalo
4 Abra el Gestor de firmware Celestron (CFM)
5 CFM comprobará el hardware y buscará actualizaciones
CFM determinará automáticamente los componentes que
precisan de actualización
6 Continúe pulsando “Actualizar” en CFM y deje que se
completen las actualizaciones
Apéndice B:
Cuidados y Mantenimiento
El soporte CGX es resistente y durará muchos años cuando
se cuide adecuadamente
Almacenamiento
Aunque el soporte y la electrónica han sido diseñados
para uso en exteriores, no debe guardar el soporte en el
exterior a menos que esté protegido por un observatorio o
lugar de almacenamiento de algún tipo (como un garaje)
Los extremos de calor, frío y humedad constantes pueden
provocar desgaste en la electrónica, la lubricación mecánica
y la calidad del acabado del soporte Guárdelo en un lugar
protegido, lejos del Sol Guárdelo en un lugar seco en la
medida de lo posible
24 | ESPAÑOL
ADVERTENCIA SOLAR: Nunca intente ver el sol a través de ningún telescopio.
¿NECESITA AYUDA? Comuníquese con el soporte técnico de Celestron
celestron com/pages/technical-support
©2024 Celestron Celestron y su símbolo son marcas comerciales de Celestron,
LLC • Todos los derechos reservados • Celestron com
US: 2835 Columbia Street, Torrance, CA 90503 EE UU
UK: Unit 2 Transigo, Gables Way, Thatcham RG19 4JZ, United Kingdom
Este producto ha sido diseñado y está pensado para ser usado por personas de 14
años o más de edad
Las fotografías de este embalaje tienen fines exclusivamente decorativos y no
pretenden representar lo que se observará con este producto
www celestron com/pages/warranty
Nota FCC: Este equipo ha sido probado y cumple con los límites de un dispositivo digital
de Clase B, según el apartado 15 de las normas FCC Estos límites están diseñados para
proporcionar una protección razonable contra interferencias dañinas en una instalación
doméstica Este equipo genera, usa e irradia energía de radiofrecuencia y, si no se instala
y utiliza de acuerdo con las instrucciones, puede provocar interferencias dañinas en
comunicaciones por radio Sin embargo, no existe ninguna garantía de que no se produzcan
interferencias en una instalación concreta Si este equipo causa interferencias dañinas en la
recepción de radio o televisión, lo que puede determinarse apagando y encendiendo el equipo,
se recomienda al usuario intentar corregir las interferencias con una o varias de las medidas
siguientes:
• Reorientar o recolocar la antena receptora
• Aumentar la separación entre el equipo y el receptor
• Conectar el equipo a una toma de un circuito distinto al que esté conectado el receptor
• Consultar al vendedor o aun técnico experimentado de radio/TV para obtener ayuda