
Technical Support and E-Warranty Certificate www.vevor.com/support
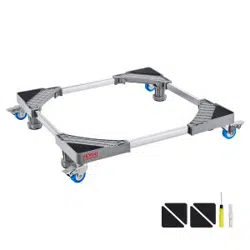
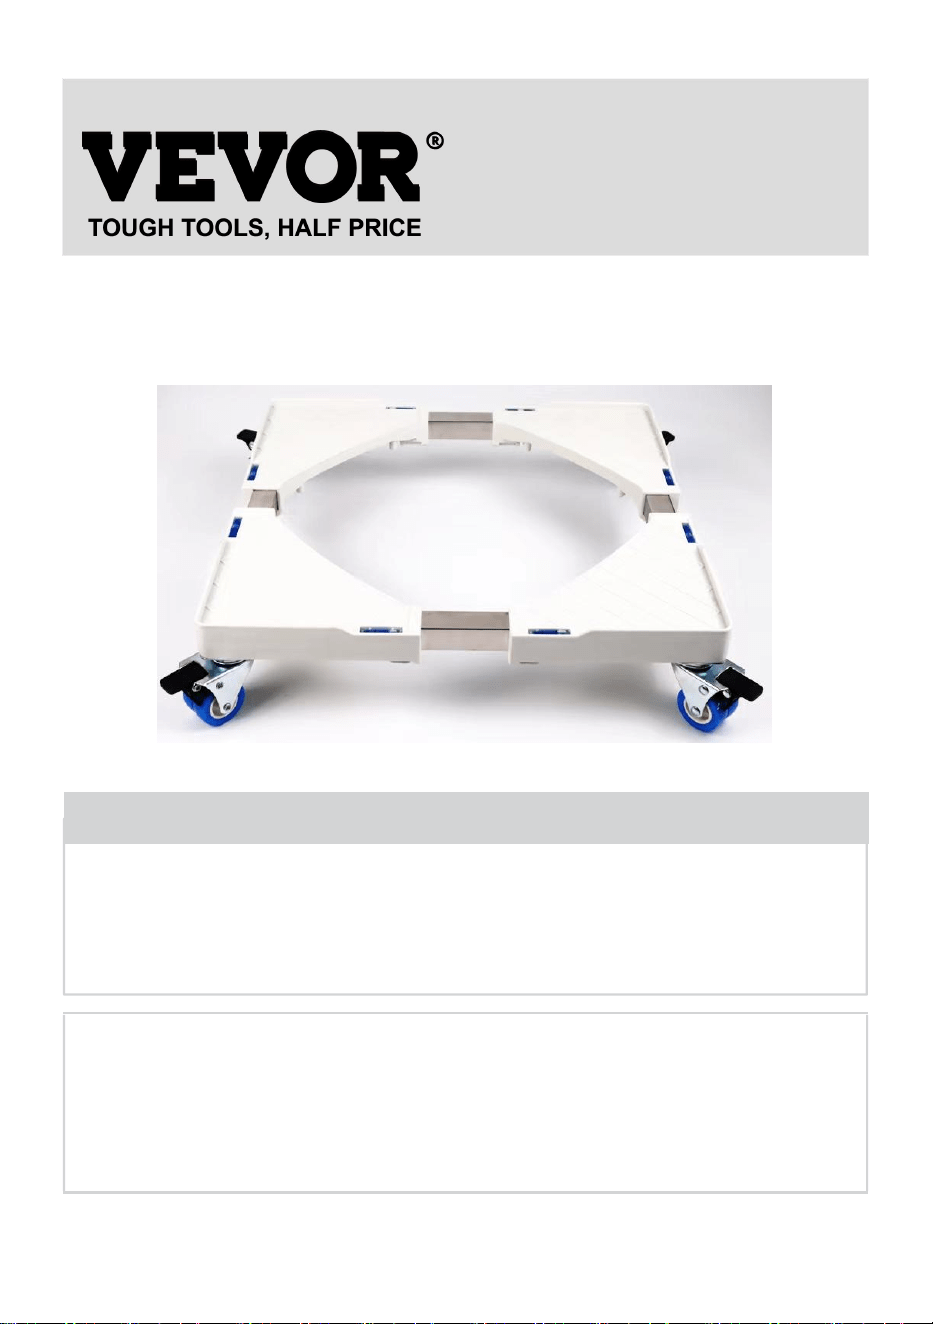
WASHING MACHINE BRACKET
MODEL:YN-WMP05
We continue to be committed to provide you tools with competitive price.
"Save Half", "Half Price" or any other similar expressions used by us only represents an
estimate of savings you might benefit from buying certain tools with us compared to the major
top brands and does not necessarily mean to cover all categories of tools offered by us. You
are kindly reminded to verify carefully when you are placing an order with us if you are
actually saving half in comparison with the top major brands.

- 1 -
MODEL:YN-WMP05
Have product questions? Need technical support? Please feel free to
contact us:
Technical Support and E-Warranty Certificate
www.vevor.com/support
NEED HELP? CONTACT US!
This is the original instruction, please read all manual instructions
carefully before operating. VEVOR reserves a clear interpretation of our
user manual. The appearance of the product shall be subject to the
product you received. Please forgive us that we won't inform you again if
there are any technology or software updates on our product.
- 2 -
Warning:
1.Do not allow children to climb on the unit.
2. Keep children and pets away during assembly.
ASSEMBLY PRECAUTIONS
1. Please assemble the product in strict accordance with the instructions.
Incorrect assembly could be hazardous.
2. Please wear safety goggles and work gloves properly during assembly.
3. Do not try to assemble the product when feeling tired or when under the
influence of alcohol, drugs or medication.
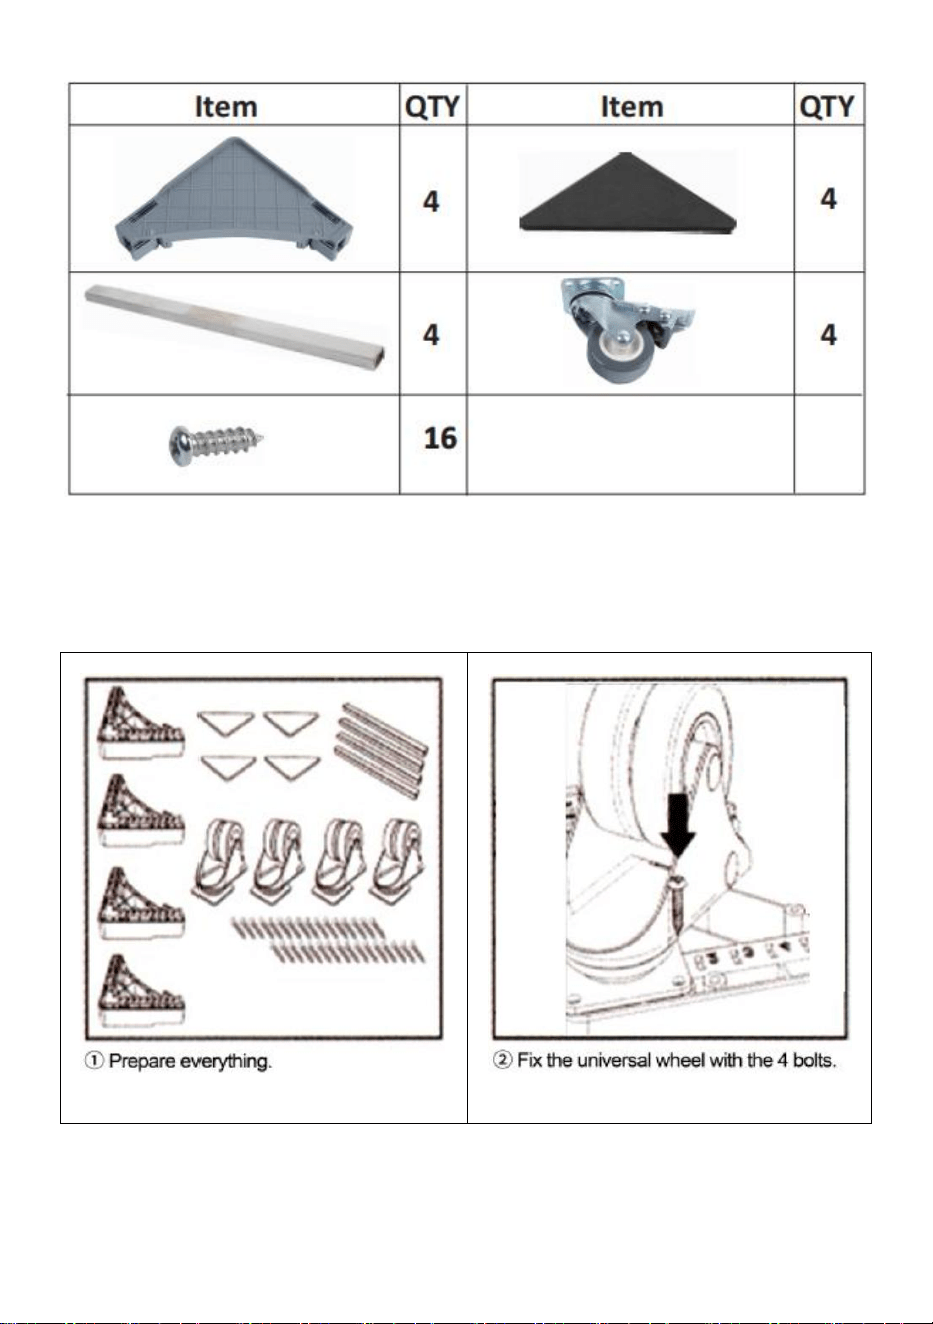
4. Separate and count all parts and hardware.
5. Prepare the following tool: Philips Head Screwdriver.
6. If using power tools, please be careful to slow down and stop when
needed.
7. Two people are required for assembly.
8. Follow the intended uses only. Do not sit or stand on the above.
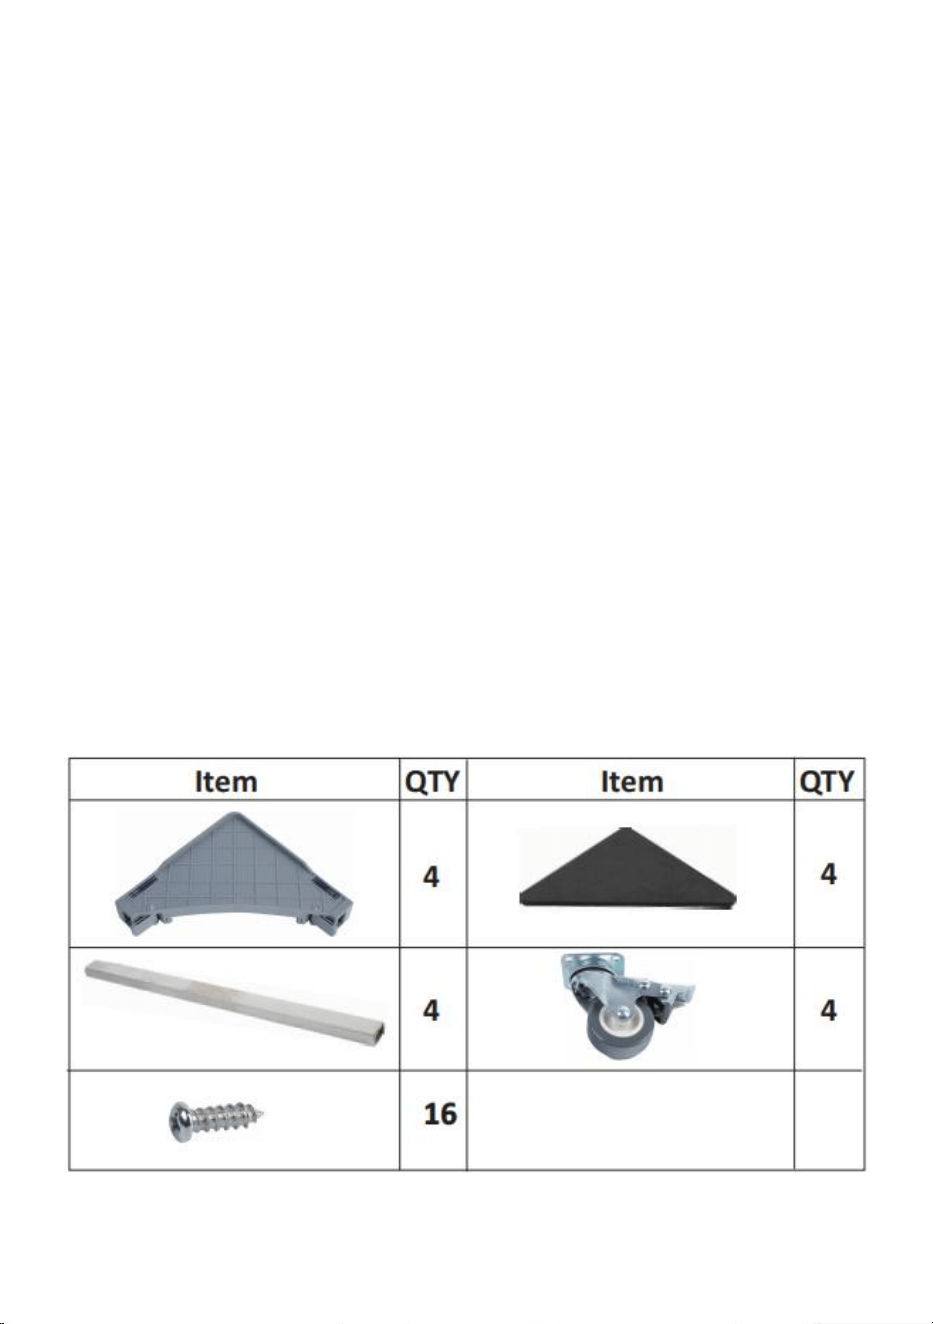
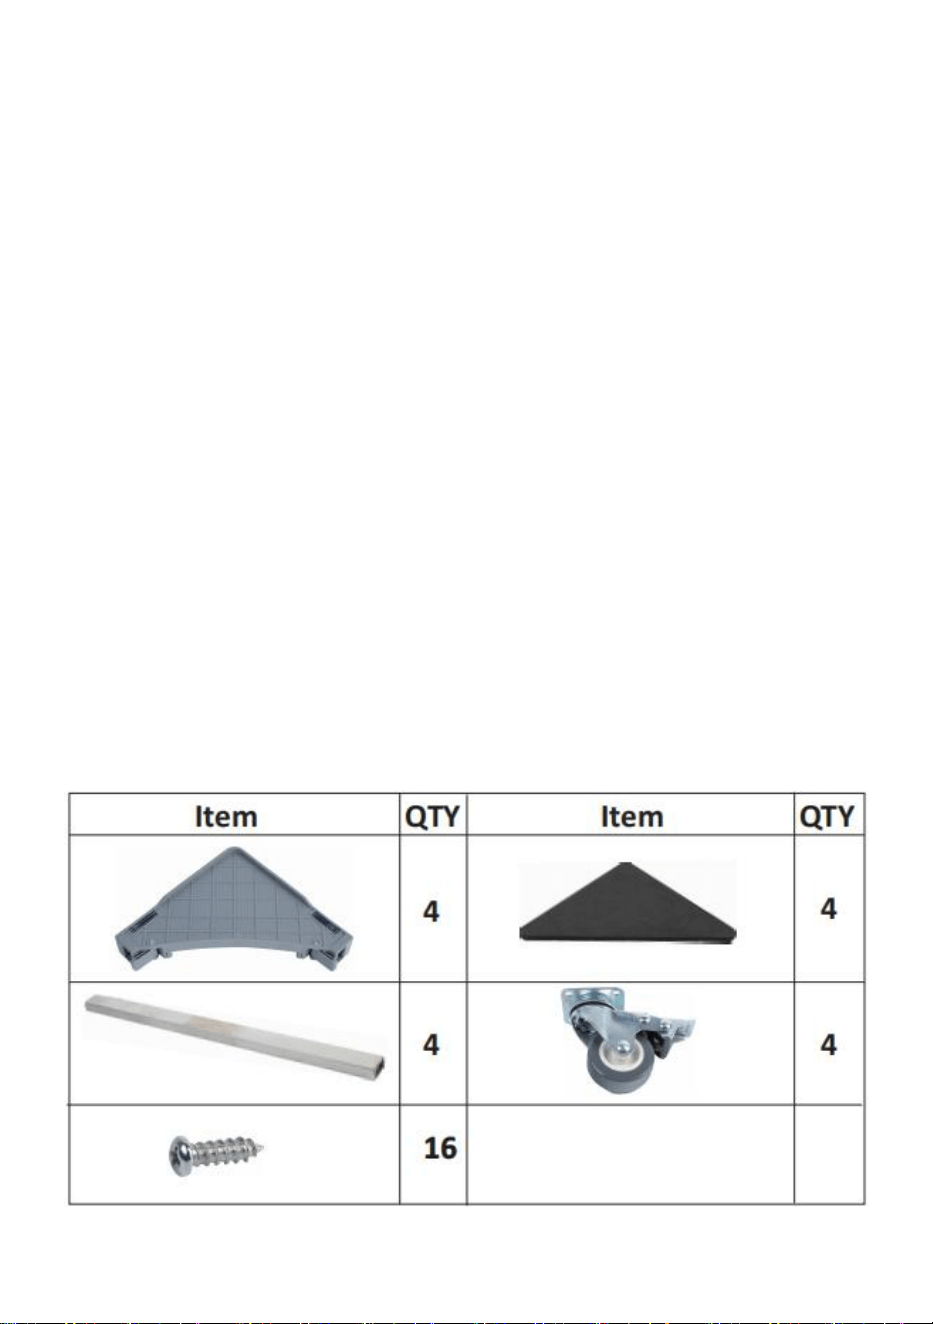
Parts List
- 3 -
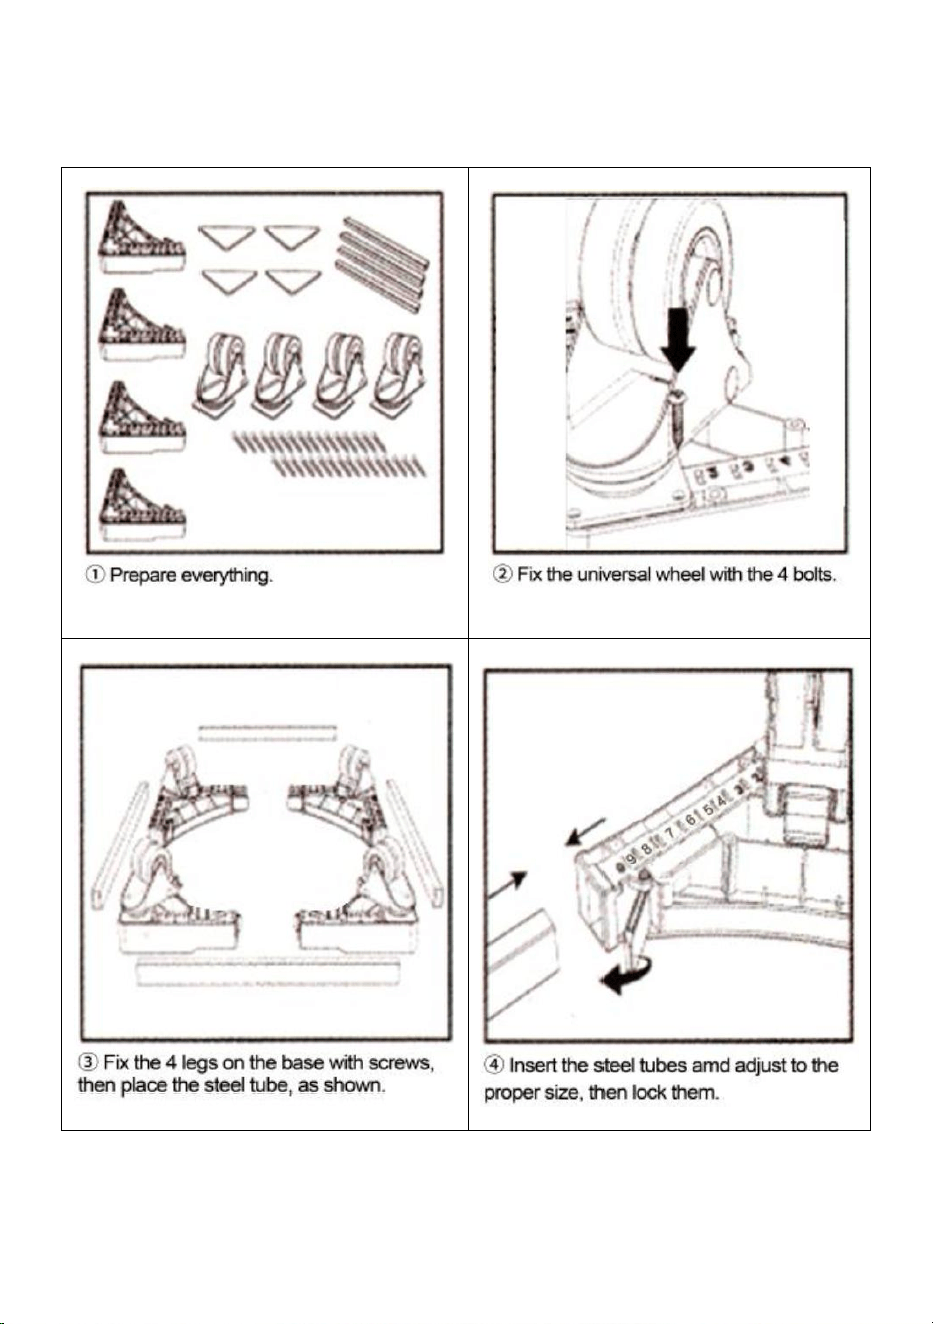
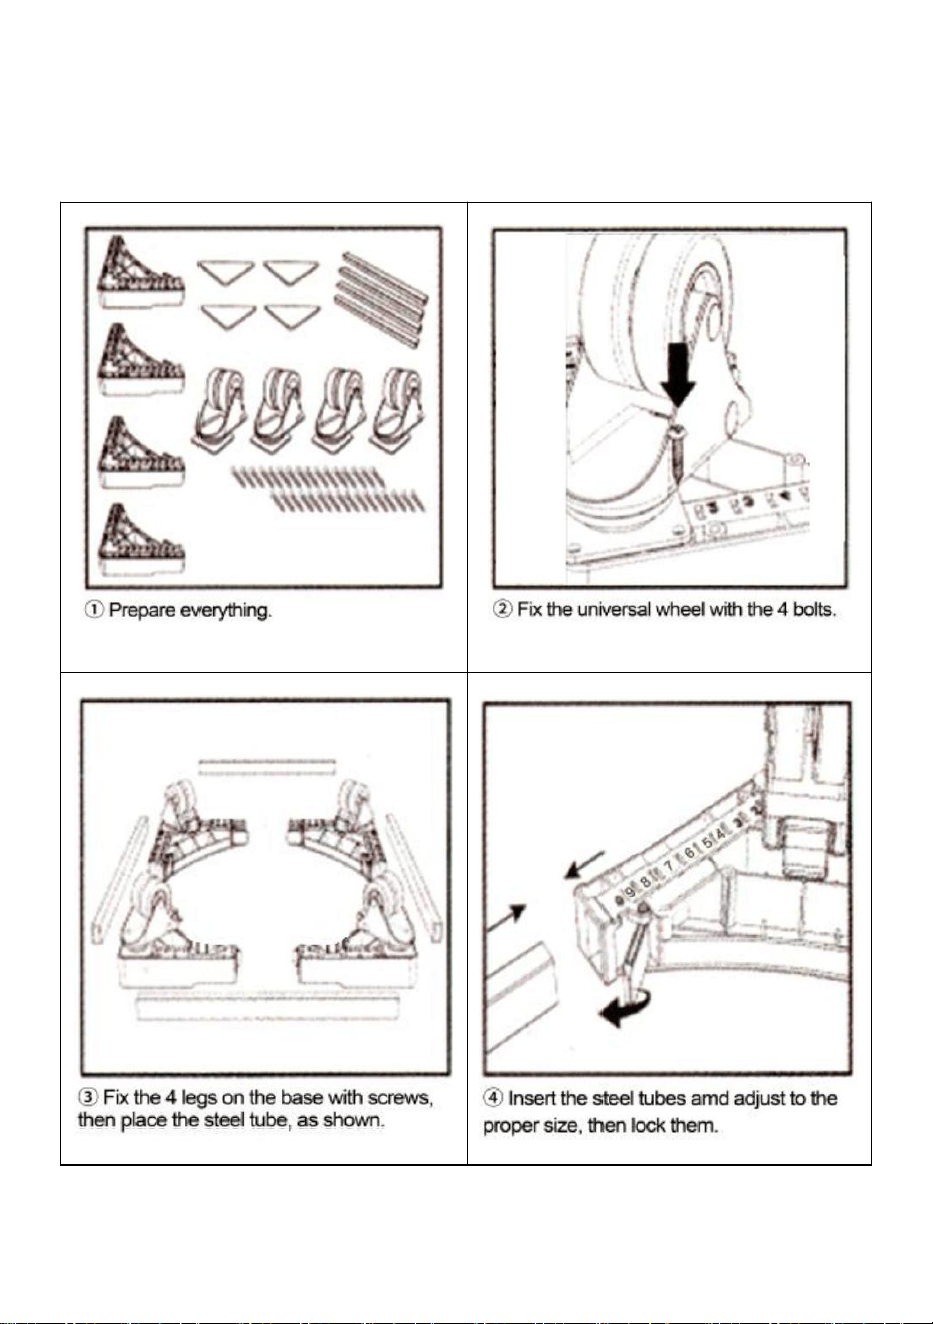
Assemble Steps

- 4 -
Notice
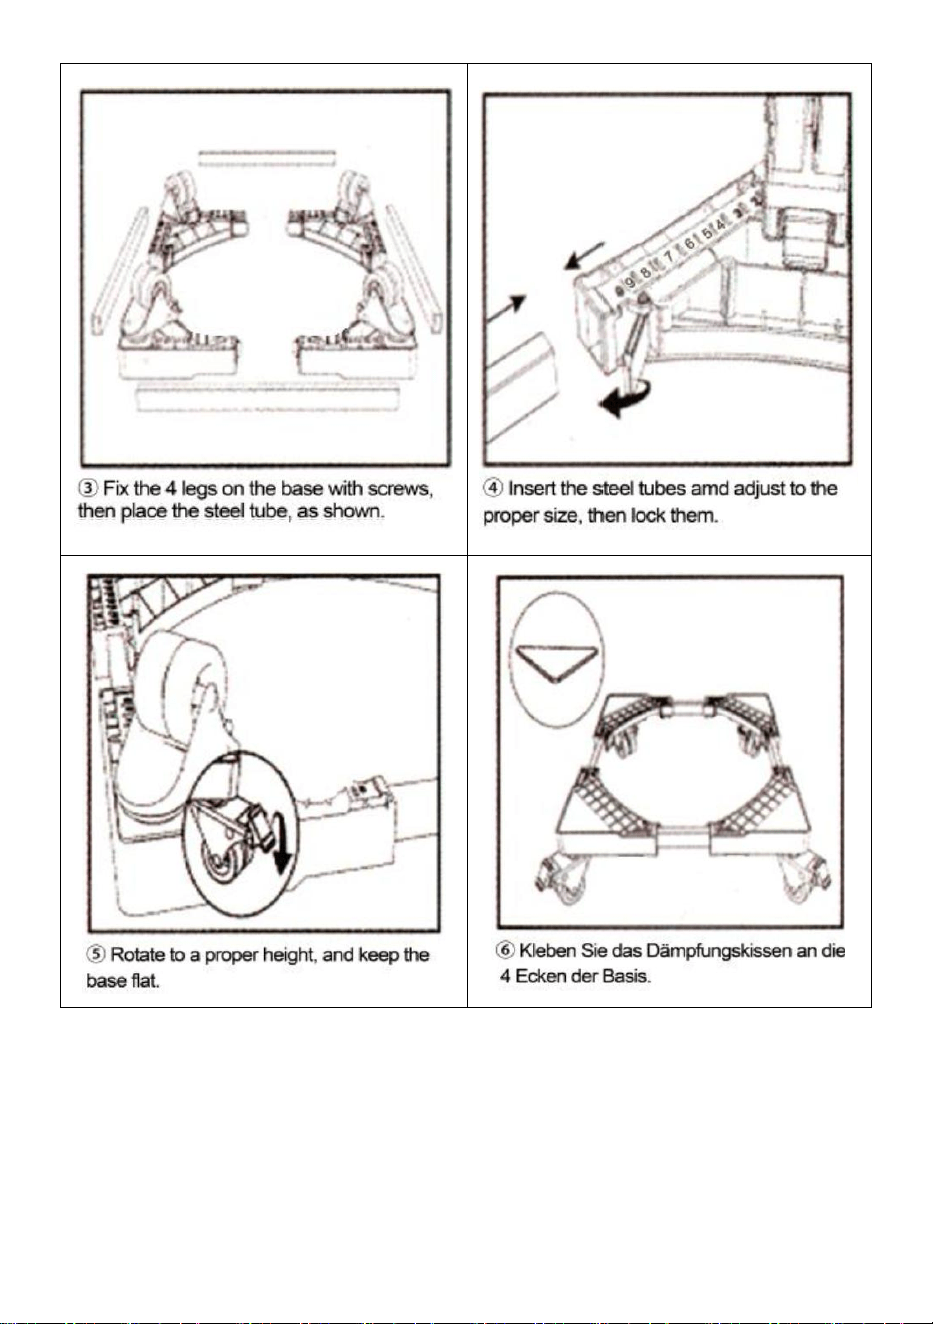
1. It will be easier if you fix 1/2 of the screws first, and then fix all the
screws,when tightening the fixing foot and wheel screws.
2. If you want to adjust the length of the pipes, please adjust the opposite
one at the same time, don’t forget to lock it when you finish it.
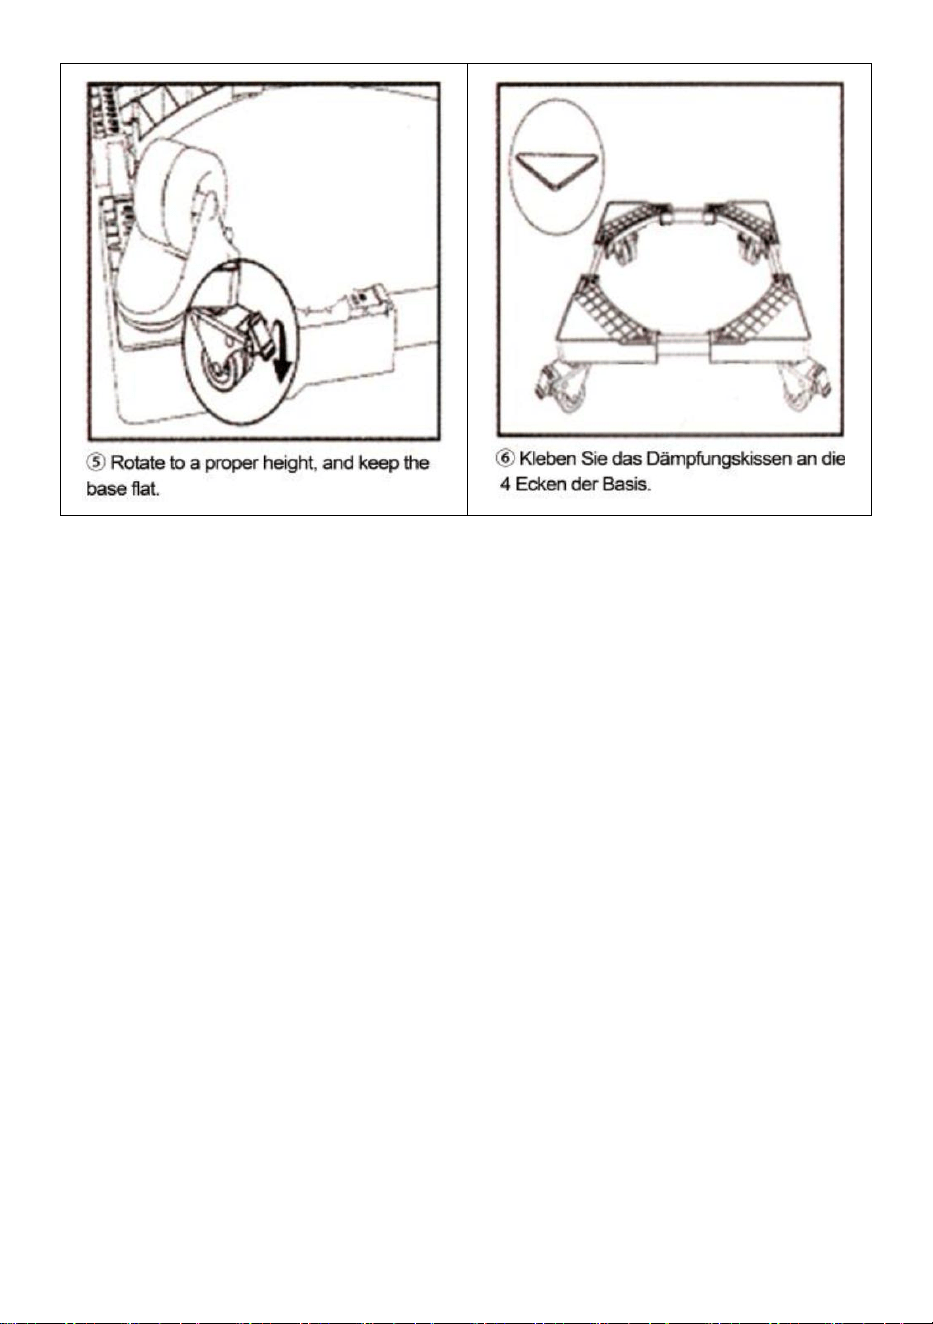
3. If you want to move the mobile base, please adjust the height of the feet
to the shortest before move it. make sure the rotating wheels bear the
weight.
4. When it needs to be fixed, please make sure that the height of the
adjusting lifting wheels are higher than the rotating wheels,and tighten
fixing screws.
5. After adjusting the height of the feet, please tighten the fixing nut, and
lock the lifting wheel height immediately

- 5 -
6. When installing the aluminum pipe, please make sure that the pipe is
inserted into the mold with the same length
7. When adjusting the height of the feet, make sure that the air bubbles in
each horizontal tube remain in the middle.
8.During the assembly of the square tube, the length of the plastic support
legs inserted at both ends should be consistent to avoid uneven stress and
impact on load-bearing.
9.When assembling the support feet, the foot rest should be removed first,
and then the 4 screws that fix the support foot seat should be installed,
otherwise the foot rest will interfere with the screwdriver when directly
assembling the screws.
10.After assembly, when placing the washing machine, it is important to
ensure that all four corners are under stress simultaneously, and the
support rod between the two legs cannot be prioritized for load-bearing.
Address: Baoshanqu Shuangchenglu 803long 11hao 1602A-1609shi
Shanghai
Imported to AUS: SIHAO PTY LTD. 1 ROKEVA STREETEASTWOOD
NSW 2122 Australia
Imported to USA: Sanven Technology Ltd. Suite 250, 9166 Anaheim
Place, Rancho Cucamonga, CA 91730

- 6 -
REP
EC
SHUNSHUN GmbH
Römeräcker 9 Z2021,76351
Linkenheim-Hochstetten,Germany
REP
UK
Pooledas Group Ltd
Unit 5 Albert Edward House, The Pavilions
Preston, United Kingdom
Made In China


- 2 -
Technique Assistance et certificat de garantie électronique
www.vevor.com/support
SUPPORT LAVE-LINGE
MODÈLE:YN-WMP05
We continue to be committed to provide you tools with competitive price.
"Save Half", "Half Price" or any other similar expressions used by us only represents an
estimate of savings you might benefit from buying certain tools with us compared to the major
top brands and does not necessarily mean to cover all categories of tools offered by us. You
are kindly reminded to verify carefully when you are placing an order with us if you are
actually saving half in comparison with the top major brands.

- 3 -

- 1 -
MODÈLE:YN-WMP05
Have product questions? Need technical support? Please feel free to
contact us:
Technical Support and E-Warranty Certificate
www.vevor.com/support
NEED HELP? CONTACT US!
This is the original instruction, please read all manual instructions
carefully before operating. VEVOR reserves a clear interpretation of our
user manual. The appearance of the product shall be subject to the
product you received. Please forgive us that we won't inform you again if
there are any technology or software updates on our product.

- 2 -
Avertissement:
1. Ne laissez pas les enfants grimper sur l'appareil.
2. Éloignez les enfants et les animaux domestiques pendant l'assemblage.
PRÉCAUTIONS DE MONTAGE
1. Veuillez assembler le produit en stricte conformité avec les instructions.
Un assemblage incorrect pourrait être dangereux.
2. Veuillez porter correctement des lunettes de sécurité et des gants de
travail pendant l'assemblage.
3. N'essayez pas d'assembler le produit lorsque vous vous sentez fatigué
ou sous l'influence de l'alcool, de drogues ou de médicaments.
4. Séparez et comptez toutes les pièces et le matériel.
5. Préparez l'outil suivant : Tournevis cruciforme.
6. Si vous utilisez des outils électriques, veillez à ralentir et à vous arrêter
si nécessaire.
7. Deux personnes sont nécessaires pour le montage.
8. Suivez uniquement les utilisations prévues. Ne vous asseyez pas et ne
vous tenez pas debout sur ce qui précède.
Liste des pieces
- 3 -
Assembler les étapes

- 4 -
Avis
1. Ce sera plus facile si vous fixez d'abord la moitié des vis, puis fixez
toutes les vis lors du serrage du pied de fixation et des vis de roue.

- 5 -
2. Si vous souhaitez ajuster la longueur des tuyaux, veuillez ajuster
l'inverse
un en même temps, n'oubliez pas de le verrouiller lorsque vous l'avez
terminé.
3. Si vous souhaitez déplacer la base mobile, veuillez régler la hauteur des
pieds au plus court avant de la déplacer. assurez-vous que les roues en
rotation supportent le poids.
4. Lorsqu'il doit être fixé, assurez-vous que la hauteur des roues de levage
de réglage est supérieure à celle des roues rotatives et serrez les vis de
fixation.
5. Après avoir réglé la hauteur des pieds, veuillez serrer l'écrou de fixation
et verrouiller immédiatement la hauteur de la roue de levage.
6. Lors de l'installation du tuyau en aluminium, assurez-vous que le tuyau
est
inséré dans le moule avec la même longueur
7. Lors du réglage de la hauteur des pieds, assurez-vous que les bulles
d'air
chaque tube horizontal reste au milieu.
8. Lors de l'assemblage du tube carré, la longueur des pieds de support en
plastique insérés aux deux extrémités doit être cohérente pour éviter des
contraintes inégales et des impacts sur la portance.
9. Lors de l'assemblage des pieds de support, le repose-pieds doit d'abord
être retiré, puis les 4 vis qui fixent le siège du pied de support doivent être
installées, sinon le repose-pieds interférera avec le tournevis lors de
l'assemblage direct des vis.
- 6 -
10.Après l'assemblage, lors de la mise en place de la machine à laver, il
est important de s'assurer que les quatre coins sont soumis à des
contraintes simultanément et que la tige de support entre les deux pieds ne
peut pas être prioritaire pour supporter la charge.
Adresse : Baoshanqu Shuangchenglu 803long 11hao 1602A-1609shi
Shanghai
Importé en Australie : SIHAO PTY LTD . 1 ROKEVA STREETASTWOOD
NSW 2122 Australie
Importé aux États-Unis : Sanven Technology Ltd. Suite 250, 9166
Anaheim Place, Rancho Cucamonga, CA 91730
REP
EC
SHUNSHUN GmbH
Römeräcker 9 Z2021,76351
Linkenheim-Hochstetten,Germany
REP
UK
Pooledas Group Ltd
Unit 5 Albert Edward House, The Pavilions
Preston, United Kingdom
Fabriqué en Chine

- 7 -


- 2 -
Technisch Support- und E-Garantie-Zertifikat www.vevor.com/support
WASCHMASCHINENHALTERUNG
MODELL: YN-WMP05
We continue to be committed to provide you tools with competitive price.
"Save Half", "Half Price" or any other similar expressions used by us only represents an
estimate of savings you might benefit from buying certain tools with us compared to the major
top brands and does not necessarily mean to cover all categories of tools offered by us. You
are kindly reminded to verify carefully when you are placing an order with us if you are
actually saving half in comparison with the top major brands.

- 1 -
MODELL: YN-WMP05
Have product questions? Need technical support? Please feel free to
contact us:
Technical Support and E-Warranty Certificate
www.vevor.com/support
NEED HELP? CONTACT US!
This is the original instruction, please read all manual instructions
carefully before operating. VEVOR reserves a clear interpretation of our
user manual. The appearance of the product shall be subject to the
product you received. Please forgive us that we won't inform you again if
there are any technology or software updates on our product.

- 2 -
Warnung:
1. Erlauben Sie Kindern nicht, auf das Gerät zu klettern.
2. Halten Sie Kinder und Haustiere während der Montage fern.
VORSICHTSMASSNAHMEN BEI DER MONTAGE
1. Bitte bauen Sie das Produkt unter strikter Einhaltung der Anweisungen
zusammen. Eine falsche Montage kann gefährlich sein.
2. Bitte tragen Sie bei der Montage ordnungsgemäß eine Schutzbrille und
Arbeitshandschuhe.
3. Versuchen Sie nicht, das Produkt zusammenzubauen, wenn Sie sich
müde fühlen oder unter dem Einfluss von Alkohol, Drogen oder
Medikamenten stehen.
4. Trennen und zählen Sie alle Teile und Hardware.
5. Bereiten Sie das folgende Werkzeug vor: Kreuzschlitzschraubendreher.
6. Wenn Sie Elektrowerkzeuge verwenden, achten Sie bitte darauf,
langsamer zu fahren und bei Bedarf anzuhalten.
7. Für den Aufbau sind zwei Personen erforderlich.
8. Befolgen Sie nur die vorgesehenen Verwendungszwecke. Setzen oder
stehen Sie nicht darauf.
Liste der Einzelteile

- 3 -
Stufen zusammenbauen
- 4 -
Beachten
1. Es ist einfacher, wenn Sie beim Festziehen des Befestigungsfußes und
der Radschrauben zuerst die Hälfte der Schrauben und dann alle

- 5 -
Schrauben befestigen.
2. Wenn Sie die Länge der Rohre anpassen möchten, stellen Sie bitte das
Gegenteil ein
Vergessen Sie nicht, es zu verriegeln, wenn Sie damit fertig sind.
3. Wenn Sie die mobile Basis bewegen möchten, stellen Sie bitte die Höhe
der Füße auf die kürzeste Höhe ein, bevor Sie sie bewegen. Stellen Sie
sicher, dass die rotierenden Räder das Gewicht tragen.
4. Wenn es befestigt werden muss, stellen Sie bitte sicher, dass die Höhe
der verstellbaren Hubräder höher ist als die der rotierenden Räder, und
ziehen Sie die Befestigungsschrauben fest.
5. Nachdem Sie die Höhe der Füße eingestellt haben, ziehen Sie bitte die
Befestigungsmutter fest und arretieren Sie sofort die Höhe des Hubrads
6. Achten Sie bei der Installation des Aluminiumrohrs darauf, dass das
Rohr fest ist
mit gleicher Länge in die Form eingelegt
7. Achten Sie bei der Höhenverstellung der Füße darauf, dass Luft
eindringt
jedes horizontale Rohr bleibt in der Mitte.
8. Bei der Montage des Vierkantrohrs sollte die Länge der an beiden
Enden eingesetzten Kunststoff-Stützbeine gleichmäßig sein, um
ungleichmäßige Belastungen und Stöße auf die Tragfähigkeit zu
vermeiden.
9. Bei der Montage der Stützfüße sollte zuerst die Fußstütze entfernt
werden und dann die 4 Schrauben, die den Stützfußsitz befestigen,
installiert werden, da sonst die Fußstütze beim direkten Zusammenbau der
Schrauben mit dem Schraubendreher in Konflikt gerät.
- 6 -
10. Nach dem Zusammenbau ist beim Aufstellen der Waschmaschine
darauf zu achten, dass alle vier Ecken gleichzeitig belastet werden und die
Stützstange zwischen den beiden Beinen nicht zur Lastaufnahme
priorisiert werden kann.
Adresse: Baoshanqu Shuangchenglu 803long 11hao 1602A-1609shi
Shanghai
Importiert nach AUS: SIHAO PTY LTD . 1 ROKEVA
STREETEASTWOOD NSW 2122 Australien
In die USA importiert: Sanven Technology Ltd. Suite 250, 9166 Anaheim
Place, Rancho Cucamonga, CA 91730
REP
EC
SHUNSHUN GmbH
Römeräcker 9 Z2021,76351
Linkenheim-Hochstetten,Germany
REP
UK
Pooledas Group Ltd
Unit 5 Albert Edward House, The Pavilions
Preston, United Kingdom
In China hergestellt

- 7 -


- 2 -
Tecnico Supporto e certificato di garanzia elettronica www.vevor.com/support
SUPPORTO PER LAVATRICE
MODELLO:YN-WMP05
We continue to be committed to provide you tools with competitive price.
"Save Half", "Half Price" or any other similar expressions used by us only represents an
estimate of savings you might benefit from buying certain tools with us compared to the major
top brands and does not necessarily mean to cover all categories of tools offered by us. You
are kindly reminded to verify carefully when you are placing an order with us if you are
actually saving half in comparison with the top major brands.

- 1 -
MODELLO:YN-WMP05
Have product questions? Need technical support? Please feel free to
contact us:
Technical Support and E-Warranty Certificate
www.vevor.com/support
NEED HELP? CONTACT US!
This is the original instruction, please read all manual instructions
carefully before operating. VEVOR reserves a clear interpretation of our
user manual. The appearance of the product shall be subject to the
product you received. Please forgive us that we won't inform you again if
there are any technology or software updates on our product.

- 2 -
Avvertimento:
1. Non permettere ai bambini di salire sull'unità.
2. Tenere lontani i bambini e gli animali domestici durante il montaggio.
PRECAUZIONI DI MONTAGGIO
1. Si prega di assemblare il prodotto attenendosi rigorosamente alle
istruzioni. Un montaggio errato potrebbe essere pericoloso.
2. Indossare correttamente occhiali protettivi e guanti da lavoro durante il
montaggio.
3. Non tentare di montare il prodotto quando ci si sente stanchi o sotto
l'effetto di alcol, droghe o farmaci.
4. Separare e contare tutte le parti e l'hardware.
5. Preparare il seguente strumento: cacciavite a croce.
6. Se si utilizzano utensili elettrici, fare attenzione a rallentare e fermarsi
quando necessario.
7. Per il montaggio sono necessarie due persone.
8. Seguire solo gli usi previsti. Non sedersi o stare in piedi su quanto sopra.
Elenco delle parti
- 3 -
Assemblare i passaggi
- 4 -
Avviso
1. Sarà più semplice se si fissa prima metà delle viti, quindi si fissano tutte
le viti quando si stringono il piedino di fissaggio e le viti della ruota.
2. Se si desidera regolare la lunghezza dei tubi, regolare il contrario
uno alla volta, non dimenticare di chiuderlo a chiave quando lo finisci.
3. Se si desidera spostare la base mobile, regolare l'altezza dei piedini al
minimo prima di spostarla. assicurarsi che le ruote girevoli sostengano il
peso.
4. Quando è necessario ripararlo, assicurarsi che l'altezza delle ruote di
sollevamento regolabili sia superiore a quella delle ruote rotanti e serrare
le viti di fissaggio.
5. Dopo aver regolato l'altezza dei piedini, stringere il dado di fissaggio e
bloccare immediatamente l'altezza della ruota di sollevamento

- 5 -
6. Quando si installa il tubo in alluminio, assicurarsi che il tubo sia
inserito nello stampo con la stessa lunghezza
7. Quando si regola l'altezza dei piedini, assicurarsi che vi siano bolle
d'aria
ogni tubo orizzontale rimane al centro.
8.Durante l'assemblaggio del tubo quadrato, la lunghezza delle gambe di
supporto in plastica inserite su entrambe le estremità deve essere
coerente per evitare sollecitazioni irregolari e impatti sul carico.
9.Quando si montano i piedini di supporto, è necessario rimuovere prima il
poggiapiedi e poi installare le 4 viti che fissano il sedile del piede di
supporto, altrimenti il poggiapiedi interferirà con il cacciavite durante il
montaggio diretto delle viti.
10.Dopo il montaggio, quando si posiziona la lavatrice, è importante
assicurarsi che tutti e quattro gli angoli siano sollecitati
contemporaneamente e che l'asta di supporto tra le due gambe non possa
avere la priorità come portante.
Indirizzo: Baoshanqu Shuangchenglu 803long 11hao 1602A-1609shi
Shanghai
Importato in AUS: SIHAO PTY LTD . 1 ROKEVA STREETEASTWOOD
NSW 2122 Australia

- 6 -
Importato negli Stati Uniti: Sanven Technology Ltd. Suite 250, 9166
Anaheim Place, Rancho Cucamonga, CA 91730
REP
EC
SHUNSHUN GmbH
Römeräcker 9 Z2021,76351
Linkenheim-Hochstetten,Germany
REP
UK
Pooledas Group Ltd
Unit 5 Albert Edward House, The Pavilions
Preston, United Kingdom
Made in China

- 7 -


- 2 -
Técnico Soporte y certificado de garantía electrónica www.vevor.com/support
SOPORTE PARA LAVADORA
MODELO:YN-WMP05
We continue to be committed to provide you tools with competitive price.
"Save Half", "Half Price" or any other similar expressions used by us only represents an
estimate of savings you might benefit from buying certain tools with us compared to the major
top brands and does not necessarily mean to cover all categories of tools offered by us. You
are kindly reminded to verify carefully when you are placing an order with us if you are
actually saving half in comparison with the top major brands.
- 1 -
MODELO:YN-WMP05
Have product questions? Need technical support? Please feel free to
contact us:
Technical Support and E-Warranty Certificate
www.vevor.com/support
NEED HELP? CONTACT US!
This is the original instruction, please read all manual instructions
carefully before operating. VEVOR reserves a clear interpretation of our
user manual. The appearance of the product shall be subject to the
product you received. Please forgive us that we won't inform you again if
there are any technology or software updates on our product.

- 2 -
Advertencia:
1. No permita que los niños se suban a la unidad.
2. Mantenga alejados a los niños y las mascotas durante el montaje.
PRECAUCIONES DE MONTAJE
1. Ensamble el producto estrictamente de acuerdo con las instrucciones.
El montaje incorrecto podría ser peligroso.
2. Utilice gafas de seguridad y guantes de trabajo correctamente durante
el montaje.
3. No intente montar el producto cuando se sienta cansado o bajo la
influencia del alcohol, drogas o medicamentos.
4. Separe y cuente todas las piezas y herrajes.
5. Prepare la siguiente herramienta: Destornillador Philips.
6. Si utiliza herramientas eléctricas, tenga cuidado de reducir la velocidad
y detenerse cuando sea necesario.
7. Para el montaje se necesitan dos personas.
8. Siga únicamente los usos previstos. No se siente ni se pare sobre lo
anterior.
Lista de partes

- 3 -
Montar pasos

- 4 -
Aviso
1. Será más fácil si fija primero la mitad de los tornillos y luego fija todos
los tornillos, al apretar el pie de fijación y los tornillos de la rueda.

- 5 -
2. Si desea ajustar la longitud de las tuberías, ajuste lo contrario
uno al mismo tiempo, no olvides cerrarlo cuando lo termines.
3. Si desea mover la base móvil, ajuste la altura de los pies al mínimo
antes de moverla. asegúrese de que las ruedas giratorias soporten el
peso.
4. Cuando sea necesario arreglarlo, asegúrese de que la altura de las
ruedas elevadoras de ajuste sea mayor que la de las ruedas giratorias y
apriete los tornillos de fijación.
5. Después de ajustar la altura de los pies, apriete la tuerca de fijación y
bloquee la altura de la rueda elevadora inmediatamente.
6. Al instalar el tubo de aluminio, asegúrese de que el tubo esté
insertado en el molde con la misma longitud
7. Al ajustar la altura de los pies, asegúrese de que las burbujas de aire en
cada tubo horizontal permanece en el medio.
8.Durante el montaje del tubo cuadrado, la longitud de las patas de
soporte de plástico insertadas en ambos extremos debe ser constante
para evitar tensiones desiguales e impactos en la carga.
9. Al ensamblar los pies de soporte, primero se debe quitar el reposapiés y
luego se deben instalar los 4 tornillos que fijan el asiento del pie de soporte;
de lo contrario, el reposapiés interferirá con el destornillador al ensamblar
directamente los tornillos.
10.Después del montaje, al colocar la lavadora, es importante asegurarse
de que las cuatro esquinas estén bajo tensión simultáneamente y que no
se pueda priorizar la barra de soporte entre las dos patas para soportar la
carga.

- 6 -
Dirección: Baoshanqu Shuangchenglu 803long 11hao 1602A-1609shi
Shanghai
Importado a AUS: SIHAO PTY LTD . 1 ROKEVA STREET ASTWOOD
NSW 2122 Australia
Importado a EE. UU.: Sanven Technology Ltd. Suite 250, 9166 Anaheim
Place, Rancho Cucamonga, CA 91730
REP
EC
SHUNSHUN GmbH
Römeräcker 9 Z2021,76351
Linkenheim-Hochstetten,Germany
REP
UK
Pooledas Group Ltd
Unit 5 Albert Edward House, The Pavilions
Preston, United Kingdom
Hecho en china

- 7 -


- 2 -
Techniczny Certyfikat wsparcia i e-gwarancji www.vevor.com/support
WSPORNIK DO PRALKI
MODEL: YN-WMP05
We continue to be committed to provide you tools with competitive price.
"Save Half", "Half Price" or any other similar expressions used by us only represents an
estimate of savings you might benefit from buying certain tools with us compared to the major
top brands and does not necessarily mean to cover all categories of tools offered by us. You
are kindly reminded to verify carefully when you are placing an order with us if you are
actually saving half in comparison with the top major brands.

- 1 -
MODEL: YN-WMP05
Have product questions? Need technical support? Please feel free to
contact us:
Technical Support and E-Warranty Certificate
www.vevor.com/support
NEED HELP? CONTACT US!
This is the original instruction, please read all manual instructions
carefully before operating. VEVOR reserves a clear interpretation of our
user manual. The appearance of the product shall be subject to the
product you received. Please forgive us that we won't inform you again if
there are any technology or software updates on our product.

- 2 -
Ostrzeżenie:
1. Nie pozwalaj dzieciom wspinać się na urządzenie.
2. Podczas montażu trzymaj dzieci i zwierzęta z daleka.
ŚRODKI OSTROŻNOŚCI PRZY MONTAŻU
1. Prosimy o złożenie produktu ściśle według instrukcji. Nieprawidłowy
montaż może być niebezpieczny.
2. Podczas montażu należy nosić okulary ochronne i rękawice robocze.
3. Nie przystępuj do składania produktu będąc zmęczonym, pod wpływem
alkoholu, narkotyków lub leków.
4. Oddziel i policz wszystkie części i osprzęt.
5. Przygotuj następujące narzędzie: Śrubokręt Philips.
6. Jeśli korzystasz z elektronarzędzi, pamiętaj, aby zwolnić i zatrzymać się,
jeśli zajdzie taka potrzeba.
7. Do montażu potrzebne są dwie osoby.
8. Postępuj zgodnie z przeznaczeniem. Nie siadaj ani nie stawaj na
powyższym.
Lista części

- 3 -
Złóż kroki

- 4 -
Ogłoszenie
1. Będzie łatwiej, jeśli najpierw przykręcisz 1/2 śrub, a następnie dokręcisz
wszystkie śruby, dokręcając stopkę mocującą i śruby koła.
2. Jeśli chcesz wyregulować długość rur, wyreguluj odwrotnie
jeden na raz, nie zapomnij zamknąć go, kiedy skończysz.
3. Jeśli chcesz przenieść podstawę mobilną, przed jej przeniesieniem
ustaw wysokość nóżek na najkrótszą. upewnij się, że obracające się koła
wytrzymają ciężar.
4. Jeśli zachodzi potrzeba zamocowania, upewnij się, że wysokość
regulowanych kół podnoszących jest wyższa niż wysokość kół obrotowych
i dokręć śruby mocujące.
5. Po wyregulowaniu wysokości nóżek dokręć nakrętkę mocującą i
natychmiast zablokuj wysokość koła podnoszącego

- 5 -
6. Podczas montażu rury aluminiowej należy upewnić się, że jest ona
prawidłowo zamontowana
włożone do formy o tej samej długości
7. Regulując wysokość nóżek należy zwrócić uwagę, aby do środka
dostały się pęcherzyki powietrza
każda pozioma rura pozostaje na środku.
8. Podczas montażu rury kwadratowej długość plastikowych wsporników
umieszczonych na obu końcach powinna być jednakowa, aby uniknąć
nierównomiernych naprężeń i wpływu na nośność.
9.Przy montażu nóżek należy najpierw zdemontować podnóżek, a
następnie wkręcić 4 śruby mocujące siedzisko podpórki, w przeciwnym
razie podnóżek będzie kolidował ze śrubokrętem przy bezpośrednim
montażu śrub.
10. Po montażu, podczas ustawiania pralki, ważne jest, aby wszystkie
cztery rogi były obciążone jednocześnie, a pręt nośny pomiędzy obiema
nogami nie mógł być traktowany priorytetowo jako nośny.
Adres: Baoshanqu Shuangchenglu 803long 11hao 1602A-1609shi
Szanghaj
Import do AUS: SIHAO PTY LTD . 1 ROKEVA STREETEASTWOOD
NSW 2122 Australia

- 6 -
Import do USA: Sanven Technology Ltd. Suite 250, 9166 Anaheim Place,
Rancho Cucamonga, CA 91730
REP
EC
SHUNSHUN GmbH
Römeräcker 9 Z2021,76351
Linkenheim-Hochstetten,Germany
REP
UK
Pooledas Group Ltd
Unit 5 Albert Edward House, The Pavilions
Preston, United Kingdom
Wyprodukowano w Chinach

- 7 -


- 2 -
Technisch Ondersteuning en e-garantiecertificaat www.vevor.com/support
WASMACHINE BEUGEL
MODEL: YN-WMP05
We continue to be committed to provide you tools with competitive price.
"Save Half", "Half Price" or any other similar expressions used by us only represents an
estimate of savings you might benefit from buying certain tools with us compared to the major
top brands and does not necessarily mean to cover all categories of tools offered by us. You
are kindly reminded to verify carefully when you are placing an order with us if you are
actually saving half in comparison with the top major brands.

- 1 -
MODEL: YN-WMP05
Have product questions? Need technical support? Please feel free to
contact us:
Technical Support and E-Warranty Certificate
www.vevor.com/support
NEED HELP? CONTACT US!
This is the original instruction, please read all manual instructions
carefully before operating. VEVOR reserves a clear interpretation of our
user manual. The appearance of the product shall be subject to the
product you received. Please forgive us that we won't inform you again if
there are any technology or software updates on our product.
- 2 -
Waarschuwing:
1. Laat kinderen niet op het apparaat klimmen.
2. Houd kinderen en huisdieren tijdens de montage uit de buurt.
MONTAGEVOORZORGSMAATREGELEN
1. Monteer het product strikt volgens de instructies. Een onjuiste montage
kan gevaarlijk zijn.
2. Draag tijdens de montage een veiligheidsbril en werkhandschoenen.
3. Probeer het product niet in elkaar te zetten als u zich moe voelt of onder
invloed bent van alcohol, drugs of medicijnen.
4. Scheid en tel alle onderdelen en hardware.
5. Houd het volgende gereedschap gereed: kruiskopschroevendraaier.
6. Als u elektrisch gereedschap gebruikt, zorg er dan voor dat u langzamer
gaat rijden en stopt wanneer dat nodig is.
7. Voor de montage zijn twee personen nodig.
8. Volg uitsluitend het beoogde gebruik. Ga niet op het bovenstaande
zitten of staan.
Onderdelen lijst

- 3 -
Monteer stappen

- 4 -
Kennisgeving
1. Het zal gemakkelijker zijn als u eerst de helft van de schroeven
vastdraait en vervolgens alle schroeven vastdraait, terwijl u de
bevestigingsvoet en de wielschroeven vastdraait.
2. Als je de lengte van de pijpen wilt aanpassen, pas dan het
tegenovergestelde aan
één tegelijk, vergeet niet om het te vergrendelen als u klaar bent.
3. Als u de mobiele basis wilt verplaatsen, stel dan de hoogte van de
voeten zo kort mogelijk in voordat u deze verplaatst. zorg ervoor dat de
draaiende wielen het gewicht dragen.
4. Als het moet worden bevestigd, zorg er dan voor dat de hoogte van de
verstelbare hefwielen hoger is dan de roterende wielen en draai de
bevestigingsschroeven vast.

- 5 -
5. Nadat u de hoogte van de voeten hebt aangepast, draait u de
bevestigingsmoer vast en vergrendelt u de hoogte van het hefwiel
onmiddellijk
6. Zorg er bij het installeren van de aluminium buis voor dat de buis dat is
met dezelfde lengte in de mal gestoken
7. Zorg er bij het verstellen van de hoogte van de voeten voor dat er lucht
naar binnen borrelt
elke horizontale buis blijft in het midden.
8. Tijdens de montage van de vierkante buis moet de lengte van de aan
beide uiteinden geplaatste kunststof steunpoten consistent zijn om
ongelijkmatige spanning en impact op de belasting te voorkomen.
9. Bij het monteren van de steunvoeten moet eerst de voetsteun worden
verwijderd en vervolgens moeten de 4 schroeven waarmee de
steunvoetzitting wordt bevestigd worden geïnstalleerd, anders zal de
voetsteun de schroevendraaier hinderen bij het direct monteren van de
schroeven.
10. Na montage is het bij het plaatsen van de wasmachine belangrijk om
ervoor te zorgen dat alle vier de hoeken tegelijkertijd onder spanning staan
en dat de steunstang tussen de twee poten niet voorrang kan krijgen bij het
dragen.

- 6 -
Adres: Baoshanqu Shuangchenglu 803long 11hao 1602A-1609shi
Shanghai
Geïmporteerd naar AUS: SIHAO PTY LTD . 1 ROKEVA
STREETEASTWOOD NSW 2122 Australië
Geïmporteerd naar de VS: Sanven Technology Ltd. Suite 250, 9166
Anaheim Place, Rancho Cucamonga, CA 91730
REP
EC
SHUNSHUN GmbH
Römeräcker 9 Z2021,76351
Linkenheim-Hochstetten,Germany
REP
UK
Pooledas Group Ltd
Unit 5 Albert Edward House, The Pavilions
Preston, United Kingdom
Gemaakt in China

- 7 -


- 2 -
Teknisk Support och e-garanticertifikat www.vevor.com/support
TVÄTTMASKINSFÄSTE
MODELL: YN-WMP05
We continue to be committed to provide you tools with competitive price.
"Save Half", "Half Price" or any other similar expressions used by us only represents an
estimate of savings you might benefit from buying certain tools with us compared to the major
top brands and does not necessarily mean to cover all categories of tools offered by us. You
are kindly reminded to verify carefully when you are placing an order with us if you are
actually saving half in comparison with the top major brands.

- 1 -
MODELL: YN-WMP05
Have product questions? Need technical support? Please feel free to
contact us:
Technical Support and E-Warranty Certificate
www.vevor.com/support
NEED HELP? CONTACT US!
This is the original instruction, please read all manual instructions
carefully before operating. VEVOR reserves a clear interpretation of our
user manual. The appearance of the product shall be subject to the
product you received. Please forgive us that we won't inform you again if
there are any technology or software updates on our product.

- 2 -
Varning:
1. Låt inte barn klättra på enheten.
2. Håll barn och husdjur borta under monteringen.
FÖRSIKTIGHETSÅTGÄRDER FÖR MONTERING
1. Vänligen montera produkten i strikt enlighet med instruktionerna.
Felaktig montering kan vara farligt.
2. Använd skyddsglasögon och arbetshandskar ordentligt under
monteringen.
3. Försök inte att sätta ihop produkten när du känner dig trött eller är
påverkad av alkohol, droger eller medicin.
4. Separera och räkna alla delar och hårdvara.
5. Förbered följande verktyg: Philips huvudskruvmejsel.
6. Om du använder elverktyg, var noga med att sakta ner och stanna vid
behov.
7. Två personer krävs för montering.
8. Följ endast avsedd användning. Sitt eller stå inte på ovanstående.
Delarlista

- 3 -
Montera steg

- 4 -
Lägga märke till
1. Det blir enklare om du fäster 1/2 av skruvarna först, och sedan fäster alla
skruvarna, när du drar åt fästfoten och hjulskruvarna.
2. Om du vill justera längden på rören, vänligen justera motsatsen
en på samma gång, glöm inte att låsa den när du är klar.
3. Om du vill flytta den mobila basen, vänligen justera höjden på fötterna till
det kortaste innan du flyttar den. se till att de roterande hjulen bär vikten.
4. När den behöver fixas, se till att höjden på de justerbara lyfthjulen är
högre än de roterande hjulen, och dra åt fästskruvarna.
5. Efter att ha justerat höjden på fötterna, dra åt fästmuttern och lås
lyfthjulets höjd omedelbart
6. När du installerar aluminiumröret, se till att röret är
sätts in i formen med samma längd

- 5 -
7. När du justerar höjden på fötterna, se till att luften bubblar in
varje horisontellt rör förblir i mitten.
8. Under monteringen av fyrkantsröret ska längden på plaststödbenen som
är insatta i båda ändar vara konsekvent för att undvika ojämn påfrestning
och påverkan på lastbärandet.
9. Vid montering av stödfötterna ska fotstödet tas bort först, och sedan ska
de 4 skruvarna som fixerar stödfotssätet monteras, annars kommer
fotstödet att störa skruvmejseln vid direktmontering av skruvarna.
10. Efter montering, vid placering av tvättmaskinen, är det viktigt att se till
att alla fyra hörnen är under påfrestning samtidigt och att stödstången
mellan de två benen inte kan prioriteras för bärande.
Adress: Baoshanqu Shuangchenglu 803long 11hao 1602A-1609shi
Shanghai
Importerad till AUS: SIHAO PTY LTD . 1 ROKEVA STREETEASTWOOD
NSW 2122 Australien
Importerad till USA: Sanven Technology Ltd. Suite 250, 9166 Anaheim
Place, Rancho Cucamonga, CA 91730

- 6 -
REP
EC
SHUNSHUN GmbH
Römeräcker 9 Z2021,76351
Linkenheim-Hochstetten,Germany
REP
UK
Pooledas Group Ltd
Unit 5 Albert Edward House, The Pavilions
Preston, United Kingdom
Tillverkad i Kina