1
User Guide
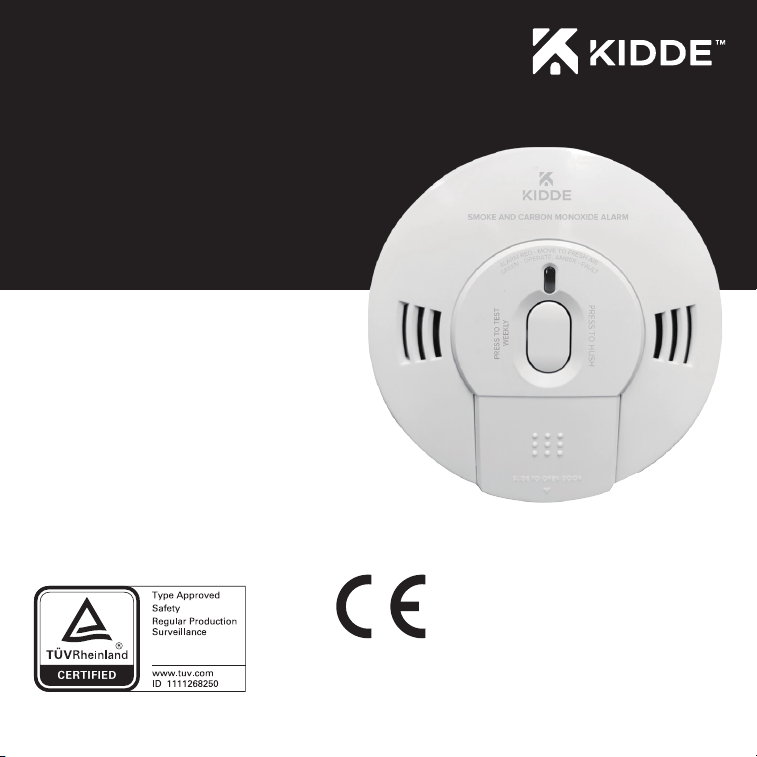
Combination Photoelectric
Smoke & Carbon Monoxide Alarm,
with voice.
Model K10SCO
• Battery powered
• 10-Year alarm life
• Voice alarm plus prompting
EN 50291-1:2018
1008
102.0011
EN14604:2005/AC:2008
23
P/N: 2598-7201- 00

2
Thank You for Purchasing this Kidde Alarm
Powered by two AA batteries, this model features a voice message system and Hush to temporarily silence
nuisance alarms.
Teach children how to respond to the alarm and that they should never play with the unit. This alarm is
designed to detect both smoke and carbon monoxide from any source of combustion in a residential
environment. It is not designed for use in a recreational vehicle (RV) or boat.
Note: Please thoroughly read this user guide and save the document for future reference and to pass on
to any subsequent owner.
IMPoRtANt: Additional markings can be found on the back of the unit.
The manufacturer recommends replacing this alarm ten years from the date code on the side of alarm.
Date Code (on side): ____________________
Date of Purchase: ______________________
Where Purchased: ______________________
Date to Replace: ________________________
Product Support: 0800 917 0722
Please write down the below information
and have this at hand when you call.
ENVIRONMENTAL PROTECTION
Waste electrical products should not be
disposed of with household waste.
Please recycle where facilities exist.
Check with Local Authority or Supplier
for recycling advice.

3
Contents
1. Smoke Alarm: What To Do When the Alarm Sounds............................................................................................................ 4
2. Carbon Monoxide Alarm: What To Do When the Alarm Sounds.................................................................................... 5
3. Other Alarm Visual and Audible Indicators.................................................................................................................................... 6
4. Troubleshooting Guide.............................................................................................................................................................................. 7
5. Introduction, Product Features and Specifications.................................................................................................................. 8
6
. Limitations of Smoke and CO Alarms..............................................................................................................................................10
7
. Recommended Locations for Alarms..............................................................................................................................................12
8. Locations to Avoid.......................................................................................................................................................................................15
9. Installation.........................................................................................................................................................................................................16
10. Operation and Testing............................................................................................................................................................................. 18
11. Recognizing Nuisance Alarms............................................................................................................................................................. 19
12. Battery ................................................................................................................................................................................................................ 20
13. General Carbon Monoxide (CO) Information............................................................................................................................. 21
14. Cleaning Your Alarm.................................................................................................................................................................................. 23
15 Good Safety Habits...................................................................................................................................................................................... 24
16. Service and Warranty................................................................................................................................................................................. 25

4
1. Smoke Alarm: What To Do When the Alarm Sounds
The smoke alarm pattern is three long beeps with voice “Fire! Fire!” repeating. The red LED blinks in sync with beep
pattern.
The smoke alarm takes precedence when both smoke and carbon monoxide are present.
• Alert small children in the home as well as anyone else that might have difficulty recognizing the
importance of the alarm sounding or that might have difficulty leaving the area without help.
• Leave immediately by your escape plan. Every second counts, so don’t waste time getting dressed or
picking up valuables.
• While leaving, don’t open any inside door without first feeling its surface. If hot, or if you see smoke seeping
through cracks, don’t open that door! Instead, use your alternate exit. If the inside of the door is cool, place
your shoulder against it, open it slightly and be ready to slam it shut if heat and smoke rush in.
• If the escape route requires you to go through smoke, stay close to the floor where the air is cleaner. Crawl if
necessary, and breathe shallowly through a cloth, wet if possible.
• Once outside, go to your selected meeting place and make sure everyone is there.
• Call the fire brigade from your mobile phone outside, or from your neighbor’s home-not from yours!
• Don’t return to your home until the fire officials say that it is all right to do so.
Note: See Section RECOGNIZING NUISANCE ALARMS, for nuisance alarm situations.

5
2. Carbon Monoxide Alarm: What To Do When the Alarm Sounds
The carbon monoxide (CO) alarm pattern is four quick beeps with voice “Warning! Carbon Monoxide” repeating
every 5 seconds. The red LED blinks in sync with beep pattern.
wARNING: CARboN MoNoxIde AlARM ACtIvAtIoN INdICAtes the PReseNCe of CARboN
MoNoxIde (Co) At hIGh CoNCeNtRAtIoNs whICh CAN kIll yoU.
Based on recommendations from EN50292, follow these steps if alarm sounds:
1. Keep calm and open all doors and windows. Turn off all fuel-burning appliances if possible. Note: it is possible
that outdoor conditions could influence domestic CO alarms (bad traffic pollution in cold weather, for
example). In these circumstances, the level of indoor CO might actually increase when doors and windows
are opened.
2. If the alarm continues to sound, even after being reset (where appropriate), then evacuate the premises,
alerting other occupants to the risk. Leave doors and windows open. Do not re-enter the premises.
3. Get medical help for anyone suffering the effects of CO poisoning, and advise that CO inhalation is
suspected.
4. Call Gas Emergency Services: 0800 111 999, or your local Gas Safe Registered Engineer:
PHONE NUMBER:
Never restart the source of the CO problem until it has been corrected.
Never ignore the sound of the alarm!
Note: See Section RECOGNIZING NUISANCE ALARMS, for nuisance alarm situations.

6
3. Other Alarm Visual and Audible Indicators
Operational Mode Visual Indications Audible Indications Action/Note:
Normal (standby) Green LED blinks approx every
30 sec.
test (button press
when no alarm
condition is present)
• Test: Red LED blinks in sync with
beep pattern.
• “Push Test Button” when the unit
is powered up, reminding user to
activate the Test Button
• Button press sound
• 3 long beeps, voice "Fire! Fire",
3 long beeps, 4 quick beeps,
voice "Warning, Carbon
Monoxide," 4 quick beeps, single
beep.
Perform button press once
a week to verify proper
alarm operation.
smoke or Co Alarm
Memory (unit has
experienced a smoke
or Co alarm event
within the last hour)
Red LED will ash every 30 sec. After button push, Sounds 3 beeps
when button is pressed. or
“Caution, Carbon Monoxide
previously detected.”
Push button to clear Alarm
Memory.
smoke Alarm hush
Mode
Red LED ashes 3 times, every
4 sec.
After button push,
voice: "Hush Mode Activated."
Smoke alarm pattern stops.
This feature is to be used
only when a known alarm
condition, such as smoke
from cooking, activates
the alarm.
smoke Alarm hush
Mode Canceled
None Voice message "Hush Mode
Canceled."
After 8-10 minutes, the
voice message will occur.
Co alarm reset None After button push: CO alarm
pattern stops.
Unit is conrming if CO is
present or if it experienced
a nuisance situation.
Re-alarm means danger.
Move to fresh air and call
0800 111 999.

7
4. Troubleshooting Guide
3. Other Alarm Visual and Audible Indicators
NOTE: If at any time your alarm fails to operate correctly (erratic or low sound, for example), or if you require further
information, please contact customer support at 0800 917 0722.
Trouble Condition Visual Indications Audible Indications Action:
low battery Amber LED blinks
every 60 sec.
Chirp every 60 sec.
In rst hour: voice every
60 sec: “Low Battery.”
After rst hour: voice every
15mins: “Low Battery.”
* Push button once to silence for 24 hrs.
Note: 30 days after Low Battery begins, the
notications cannot be silenced.
* Replace battery as soon as possible.
smoke fault Mode Amber LED blinks
every 30 sec.
Chirp every 30 sec. * See Cleaning Your Alarm section.
* Push button once to attempt to reset the
unit .
Co fault Mode Amber LED blinks
twice every 30 sec.
Chirp every 30 sec. * See Cleaning Your Alarm section.
* Push button once to attempt to reset the
unit .
end of Unit life Amber LED blinks
twice every
30 sec.
2 Chirps every 30 sec. * Push button once to silence for 24 hrs.
Note: 30 days after End of Unit Life begins,
the notications cannot be silenced.
* Remove, dispose unit, and replace as soon
as possible.

8
5. Introduction, Product Features and Specifications
Introduction
This alarm detects products of combustion using photoelectric technology, and carbon monoxide using an
electrochemical cell. Many times throughout this User Guide, we will refer to Carbon Monoxide as “CO.”
Ten (10) years after the unit was installed, this unit will automatically alert you that it is time to replace the unit.
This is called “End of Unit Life” mode. See Troubleshooting Guide. To help track the life of your alarm, write
the installation date in the space provided on the side of the alarm. A label has provided that has important
information on what to do in case of a CO alarm. Place the label at eye level on a wall near the alarm after it is
mounted.
Product features and specifications:
• Temperature Operating Range: 0 °C to 40 °C
• Humidity Operating Range: up to 90% RH non-condensing
• Audible Alarm: 85+ dB(A) at 3m, 3.0 to 3.5 KHz pulsing alarm, with voice messages “Fire!, Fire !”
and/or “Warning! Carbon Monoxide.”
• Smoke Sensor: Photoelectric
• CO Sensor: Electrochemical
• Voice message system
• Smoke Alarm Hush
• Powered by Two AA batteries
• One large, user- friendly button
• Storage and Transport Conditions: -20° C to +60° C, 5-95%RH (non-condensing)
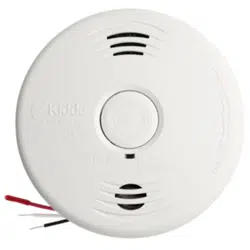
9
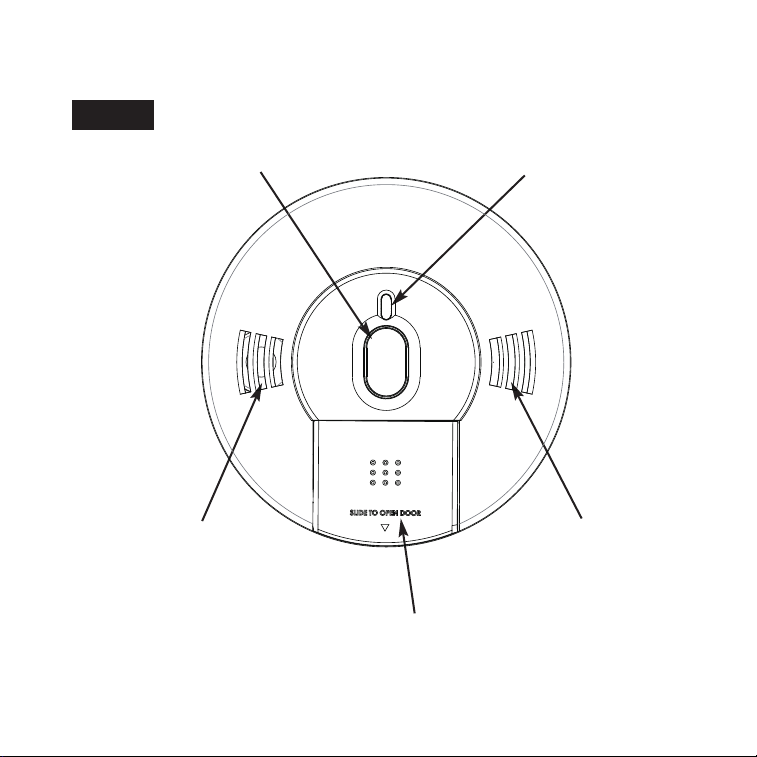
Product View
Test/Reset/Hush
Button
Red LED, Green LED, Amber LED
Battery Compartment
Alarm Sounder
Voice Speaker
Front

10
6. Limitations of Smoke and CO Alarms
wARNING: PleAse ReAd CARefUlly ANd thoRoUGhly
lIMItAtIoNs of sMoke AlARMs
• Life safety from fire in residential occupancies is based primarily on early notification to occupants of the
need to escape, followed by the appropriate egress actions by those occupants.
• Fire warning systems for dwelling units are capable of protecting about half of the occupants in potentially
fatal fires. An alarm may not be effective in some situations, such as during incendiary fires where the fire
grows so rapidly that an occupant’s egress is blocked even with properly located alarms, or when victims
are intimate with the fire (for example, when a person’s clothes catch fire while cooking), too old or young,
or physically or mentally impaired such that they cannot escape even when warned early enough that
escape should be possible. For these people, additional strategies such as protection-in-place or assisted
escape or rescue are necessary.
• A battery powered alarm must have a battery of the specified type, in good condition and installed
properly.
• Smoke alarms must be tested regularly to make sure the battery and the alarm circuits are in good operating
condition.
• Smoke alarms cannot provide an alarm if smoke does not reach the alarm. Therefore, smoke alarms may not
sense fires starting in chimneys, walls, on roofs, on the other side of a closed door or on a different floor.
• If the alarm is located outside the bedroom or on a different floor, it may not wake up a sound sleeper.
• The use of alcohol or drugs may also impair one’s ability to hear the smoke alarm. For maximum protection,
a smoke alarm should be installed in each sleeping area on every level of a home.
• Although a system of smoke, heat, and CO alarms can help save lives by providing an early warning of a fire,
they are not a substitute for an insurance policy. Home owners and renters should have adequate insurance
to protect their lives and property.
• There are situations where an alarm may not be effective to protect against fire. For instance:
a) smoking in bed
b) leaving children home alone
c) cleaning with flammable liquids, such as petrol
This alarm is not intended to alert hearing impaired individuals.

11
wARNING: PleAse ReAd CARefUlly ANd thoRoUGhly
lIMItAtIoNs of Co AlARMs
• IMPORTANT: This alarm is designed to detect carbon monoxide gas from ANY source of combustion. It is
NOT designed to detect any other gas. This alarm has not been tested specifically for use in caravans or
boats. Only CO alarms certified to EN50291-2 are fully approved for this purpose.
CAUtIoN: This alarm will only indicate the presence of carbon monoxide gas at the sensor. Carbon
monoxide gas may be present in other areas. Never restart the source of a CO problem until it has been
fixed. NEVER IGNORE THE ALARM!
wARNING: thIs PRodUCt Is INteNded foR Use IN oRdINARy INdooR ResIdeNtIAl
AReAs. It Is Not desIGNed to MeAsURe CoMPlIANCe wIth CoMMeRCIAl ANd INdUstRIAl
stANdARds. thIs AlARM Is Not sUItAble foR INstAllAtIoN IN hAZARdoUs loCAtIoNs.
IMPoRtANt: thIs CARboN MoNoxIde AlARM Is desIGNed to deteCt CARboN MoNoxIde
fRoM ANy soURCe of CoMbUstIoN INClUdING IMPRoPeR oR MAlfUNCtIoNING APPlIANC-
es. the INstAllAtIoN of thIs devICe shoUld Not be Used As A sUbstItUte foR PRoPeR
INstAllAtIoN, Use ANd MAINteNANCe of fUel bURNING APPlIANCes INClUdING APPRoPRI-
Ate veNtIlAtIoN ANd exhAUst systeMs.
• This alarm does not prevent CO from occurring, nor can it solve any existing CO problem.
wARNING: thIs devICe Is desIGNed to PRoteCt INdIvIdUAls fRoM ACUte effeCts of
CARboN MoNoxIde exPosURe. It MAy Not fUlly sAfeGUARd INdIvIdUAls wIth sPeCIfIC
MedICAl CoNdItIoNs. If IN doUbt, CoNsUlt A MedICAl PRACtItIoNeR. INdIvIdUAls wIth
MedICAl PRobleMs MAy CoNsIdeR UsING wARNING devICes whICh PRovIde AUdIble ANd
vIsUAl sIGNAls foR CARboN MoNoxIde CoNCeNtRAtIoNs UNdeR 30 PPM.
• This alarm has not been investigated for carbon monoxide detection below 50 PPM.
• This alarm requires a continuous supply of electrical power – it will not work without power.

12
7. Recommended Locations for Alarms
7.1 ReCoMMeNded loCAtIoNs foR sMoke AlARMs
Note: According to BS 5839-6, for optimal fire protection: “The greatest benefit to life safety is given by a
full-coverage system. Such a system will give the earliest practicable warning of fire to occupants,
wherever ignition occurs.”
Note: This combination model can satisfy a location requirement for a smoke alarm as well as for a CO
alarm, thus offering space and cost savings. See Figure 7-B for combination location options.
• Locate the first alarm in the immediate area of the bedrooms. Try to monitor the escape routes and
rooms opening into escape routes as the bedrooms are usually farthest from the exit.
• If more than one sleeping area exists, locate additional alarms near each sleeping area. No bedroom
door should be further than 3 m from the nearest alarm.
• Locate additional alarms between every bedroom and every other room in the dwelling (for example,
an office, library, or lounge), other than a toilet, bathroom, or shower room.
• Locate additional alarms to monitor any stairway as stairways act like chimneys for smoke and heat.
• Locate at least one alarm on every floor level, including finished lofts. Locate an alarm between each
staircase and every room, other than a toilet, bathroom or shower room.
• Locate an alarm in every bedroom.
• Locate an alarm in every room where electrical appliances are operated (i.e. portable heaters or humid-
ifiers).
• Locate an alarm in every room where someone sleeps with the door closed. The closed door may
prevent an alarm not located in that room from waking the sleeper.
• Locate one alarm in each principal habitable room.
• If a habitable room is an inner room with no doors or windows through which escape is possible, locate
one alarm in the room used to access that inner room.
• In hallways, corridors, or rooms exceeding 7.5 m in length, no point within the hallway, corridor, or room
should exceed 7.5 m from the nearest alarm.
• Smoke, heat, and combustion products rise to the ceiling and spread horizontally. Mounting the
smoke alarm on the ceiling in the center of the room places it closest to all points in the room. Ceiling
mounting is preferred in ordinary residential construction.

13
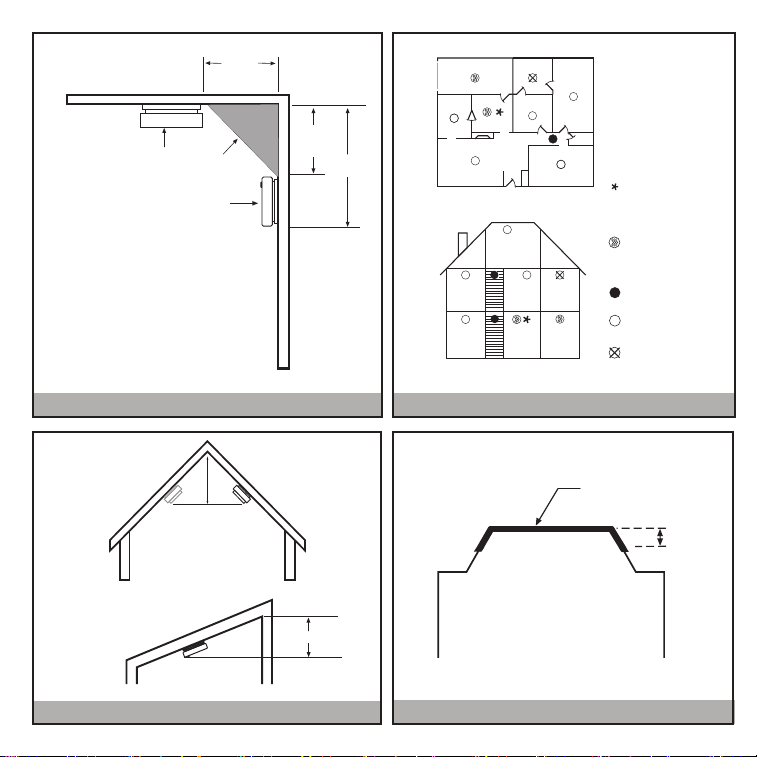
• When mounting an alarm on the ceiling, locate it at a minimum of 300 mm from the side wall or light
fitting. (Figure 7-A)
• Where structural beams create an obstacle to flow of smoke across a ceiling: If the beam is less than 600
mm in depth, install an alarm on the underside of the beam. Otherwise, install an alarm both sides of the
beam, but no closer than twice the depth of the beam, or 500 mm, whichever is less.
• When mounting the alarm on the wall, use an inside wall with the top edge of the alarm at a minimum of
at a minimum of 150 mm below the ceiling, and the bottom edge of the alarm within 300 mm below the
ceiling. (Figure 7-A) The bottom of the alarm should also be above the level of any door opening.
• Install alarms in positions that are reasonably accessible for maintenance.
• Install Smoke Alarms on sloped, peaked or cathedral ceilings within 600 mm of the highest point (measured
vertically). (Figure 7-C)
• Install smoke alarms on the ceiling of tray-shaped ceilings, or within 300 mm of the ceiling. (Figure 7-D)
7.2 ReCoMMeNded loCAtIoNs foR Co AlARMs
Note: CO alarms should be installed following the guidance of relevant local standards, such
as EN 50292.
• Whether the alarm is wall-mounted or ceiling mounted, place the alarm a horizontal distance of between 1
metre and 3 metres from a fuel burning appliance.
• When mounting the alarm on the wall, use an inside wall with the top edge of the alarm at a minimum of
150 mm below the ceiling. The bottom of the alarm should also be at a level greater than the height of any
door or window.
• Locate within hearing distance of bedrooms* and place at sleeping height if a heating appliance is in the
bedroom.
• CO alarms in rooms with sloped ceilings should be located on the high side of the room.
• Ceiling mounted alarms should be at least 300 mm from any wall.
• If there is a partition in the room, locate the alarm on the same side of the partition as the potential source.
* A CO alarm should be installed in all rooms containing a fuel burning appliance. Additional CO alarms
should be installed in rooms where most awake time is spent, in every sleeping area, and on every level of
the home.
14
300 mm
Figure 7-C
Figure 7-D
Figure 7-B
ANYWHERE ALONG
THIS BOLD SURFACE
NEVER HERE
ACCEPTABLE HERE
ACCEPTABLE HERE
CEILING
150 mm
300 mm
SIDE WALL
300 mm
Figure 7-A
600mm
600 mm
Garage
Heat Alarm
(Do not fit combo
CO or Smoke Alarms
in Garage)
Not within 1 m of
appliances (see
Locations to Avoid
section).
Bedroom
Bedroom
Bedroom
Loft Conversion
Bedroom
Bedroom
Bathroom
Bathroom
Garage
Dining
Kitchen
Living Room
Living Room
Kitchen
Do not fit
Smoke Alarms
for minimum protection
Smoke Alarms
for additional protection
SINGLE FLOOR PLAN
MULTI FLOOR PLAN

15
8. Locations to Avoid
• In the garage. Products of combustion are present when you start your motor vehicle.
• Do not install smoke alarms on the walls if the room or hallway exceeds 10 m in both length and breadth, or
exceeds an area of 50 m
2
.
• Do not install alarms adjacent to, or directly above, heaters or air-conditioning vents.
• In very humid areas (above 90% RH, non-condensing), such as bathrooms and shower rooms. Do not install
directly above a sink, or near dishwashers or washing machines. Moisture or steam can cause nuisance
alarms.
• Normal cooking may cause nuisance alarms. If a kitchen alarm is desired, it should be an interconnected heat
alarm.
• Do not install within 2 m of heating or cooking appliances, measured horizontally.
• Do not install outside of the dimensional guidelines given in Figures 7-A, 7-C, and 7-D.
• In an area where the temperature may fall below 0
º
C or rise above 40
º
C such as garages and unfinished
attics.
• Do not install smoke alarms in dusty areas. Dust particles may cause nuisance alarm or failure to alarm.
• In insect-infested areas.
• Within 300 mm of a light fitting, as electronic “noise” generated by the electronics may cause nuisance
alarms.
• Do not install in an enclosed space (cupboard) or where the ventilation openings in the unit could be
impeded by items such as newspapers, table-cloths, furniture, curtains, etc.
• Do not install next to a door, window, extractor fan, flue, chimney, or any other area where high air flow may
occur or the unit may be directly exposed to weather.
• Do not install in locations that are difficult or dangerous to reach for testing or maintenance.
• Do not install DC (battery only) alarms on top of AC electrical junction boxes.
• WARNING: TO REDUCE THE RISK OF FIRE OR ELECTRIC SHOCK, DO NOT EXPOSE THIS PRODUCT
TO RAIN OR MOISTURE.
16
9. Installation
Kidde alarms are not designed, agency tested or certified for recessed mounting and should not be installed in
this manner. Recessed mounting impedes smoke entry into the smoke chamber, which may prevent the alarm
from sounding in a timely manner. This could endanger the lives of occupants in the residence. Kidde alarms are
designed, tested and certified for wall (if applicable) and ceiling surface mount only. Without agency research, we
have no fire test data to support that alarms will perform as required when installed in a recessed manner.
Accordingly, we do not recommend, approve or advise mounting Kidde alarms in recessed configurations.
CAUtIoN: thIs UNIt Is seAled. the CoveR Is Not ReMovAble!
NOTE: THIS ALARM MUST BE INSTALLED BY A COMPETENT PERSON, AND IS TO BE INSTALLED
ACCORDING TO THESE INSTRUCTIONS.
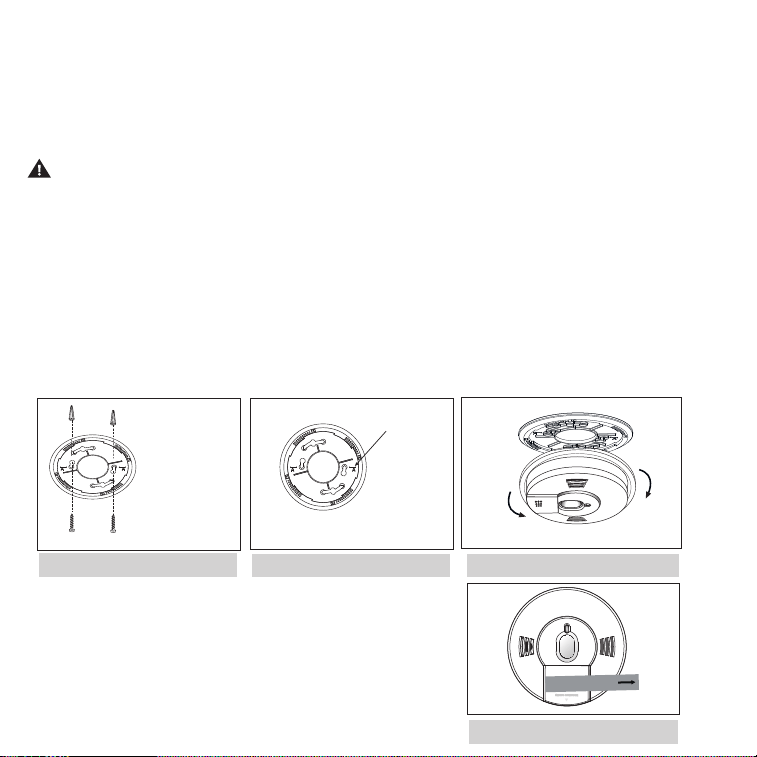
1. To obtain aesthetic alignment of the alarm with the hallway or wall, the “A” line on the mounting bracket should
be parallel with the hallway when ceiling mounting or horizontal when wall mounting.
2. After selecting the proper alarm location as described in “Recommended Locations for Alarms” section,
attach the mounting bracket to the ceiling as shown in Figure 9-A. For wall mounting see Figure 9-B. Place
the mounting bracket on the wall; be sure the “A” line is horizontal (parallel to the floor). Use the screws and
anchors provided to secure the mounting bracket (use 5mm drill bit for anchors). Anchors are not required
for mounting on hard surfaces such as wood.
3. Rotate smoke alarm on the mounting bracket (Figure 9-C).
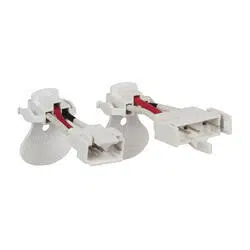
4. Pull out the battery tab on front of battery compartment
to activate the batteries (see Figure 9-D). Battery activation
is confirmed with a beep. If the beep does not occur when the
battery pull tab is removed, remove batteries and reinstall them.
Confirm the battery activation beep. The alarm is now activated!
After installation / activation, test your alarm as described in
Operation and Testing section.
Figure 9-B Figure 9-C
When mounting
in a hallway, the
“A” line should
be parallel with
the hallway.
Alignment Marks
(”A” Line) on
Mounting
bracket
When wall
mounting, the
“A” line should
be horizontal.
A
Figure 9-A
Remove
Install
Figure 9-D
PULL OUT TAB TO ACTIVATE BATTERY
17
wARNING: fAIlURe to PRoPeRly INstAll ANd ACtIvAte thIs AlARM wIll PReveNt
PRoPeR oPeRAtIoN of thIs AlARM ANd wIll PReveNt Its ResPoNse to fIRe hAZARds.
Smoke alarms are not to be used with detector guards unless the combination (alarm and detector guard) has
been evaluated and found suitable for that purpose.
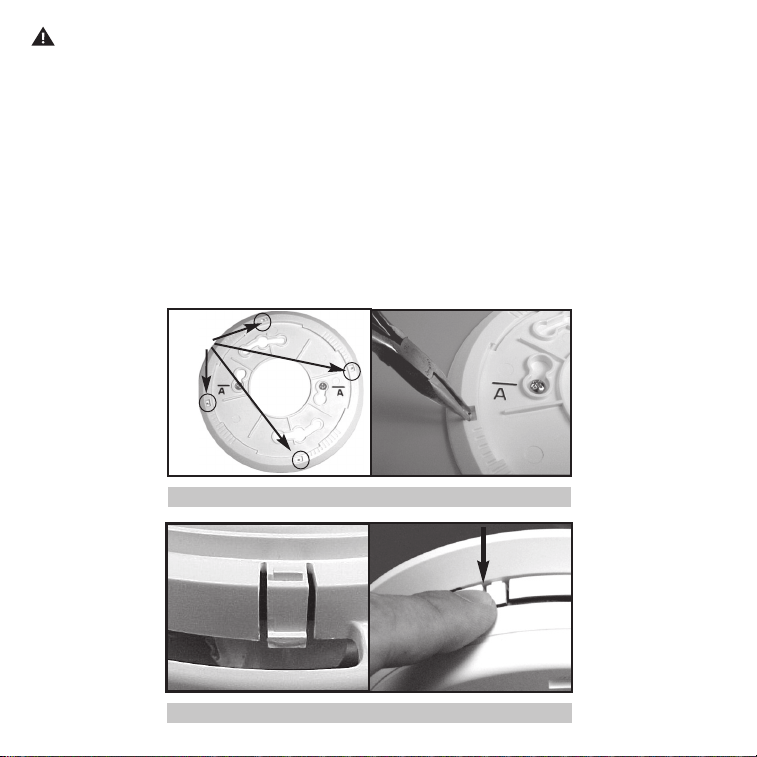
Smoke Alarm Tamper Resist Feature
Tamper-Resist features have been provided. To activate the mounting bracket Tamper-Resist feature break off
the four posts in the square holes in the trim ring (see figure 9-E). When the posts are broken off, the
Tamper-Resist tab on the base is allowed to engage the mounting bracket. Rotate the alarm onto the mount-
ing bracket until you hear the Tamper-Resist tab snap into place, locking the alarm on the mounting bracket.
Using the Tamper-Resist feature will help deter children and others from removing the alarm from bracket.
NOTE: To remove the alarm when the Tamper-Resist tab is engaged, press down on the Tamper-Resist tab,
and rotate the alarm off of the bracket (see figure 9-F).
POSTS
Figure 9-E
Figure 9-F
18
10. Operation and Testing
operation
The alarm is operating once it is activated and testing is complete (see “TESTING” below). When products of
combustion (smoke or CO) are sensed, the unit sounds a loud alarm with voice messages. See Sections 1 and
2 for alarm signal descriptions. In high levels of CO, the unit will go into alarm in a shorter period of time than
at low levels of CO.
testing
Test your alarm weekly, or after returning from a vacation or absence, by pressing and releasing the button
quickly. A quick beep will confirm the button has been pushed followed by voice prompts that will inform you
of the upcoming test sequence. See Other Alarm Visual and Audible Indicators table. The alarm and voice will
sound if the electronic circuitry, horn, speaker, and battery are working. If the alarm or voice does not sound, or
gives erratic or low volume sound, the unit must be replaced.
wARNING: dUe to the loUdNess of the AlARM, AlwAys stANd AboUt 1 MeteR AwAy
fRoM the UNIt oR Use eAR PRoteCtIoN wheN testING.
wARNING: do Not Use AN oPeN flAMe to test yoUR AlARM, yoU CoUld dAMAGe the
AlARM oR IGNIte CoMbUstIble MAteRIAls ANd stARt A stRUCtURe fIRe.
PParts per Million (PPM) of COof
CO
tITime until Alarm
50 60 – 90 Minutes
100 10 – 40 Minutes
300 Must alarm in less than 3 minutes

19
PParts per Million (PPM) of COof
CO
tITime until Alarm
50 60 – 90 Minutes
100 10 – 40 Minutes
300 Must alarm in less than 3 minutes
11. Recognizing Nuisance Alarms
smoke Nuisance
hUsh: If you know why the alarm is sounding, and you can verify that it is not a life threatening situation, you
can push the button on the alarming unit to silence the alarm for 10 minutes. After the Hush period, the smoke
alarm will automatically reset and sound the alarm if particles of combustion are still present. You can use Hush
repeatedly until the air has been cleared of the condition causing the alarm.
Note: If no fire is present, check to see if one of the reasons listed in “Locations to avoid” may have
caused the alarm. If a fire is discovered, get out and call the fire brigade.
This alarm is designed to minimize nuisance alarms. Cigarette smoke will not normally cause the unit to alarm,
unless the smoke is blown directly into the alarm. Combustion particles from cooking may set off the alarm if it
is located too close to a cooking appliance. Large quantities of combustible particles are generated from spills
or when steaming. Using the fan on a range hood which vents to the outside (non-recirculating type) will also
help prevent nuisance alarms from occurring by removing these combustible products from the kitchen.
Carbon Monoxide (Co) Nuisance
Reset: Pushing the button during CO alarm allows the unit to reset calculations and double check for the
presence of CO. If the unit re-alarms, it is sensing high levels of CO which can quickly become a dangerous
situation. Move to fresh air and call 0800 111 999.
wARNING: It Is IMPossIble to deteRMINe the soURCe of A Co AlARM UsING sIGht oR
sMell. AlwAys CoNsIdeR A Co AlARM eveNt As dANGeRoUs.
20
12. Battery
This alarm is powered by 2 AA batteries. Under normal operating conditions, the batteries will last a minimum of one year.
NOTE: Constant exposures to extreme temperatures and humidities may affect battery life.
wARNING: do Not AtteMPt to oPeN the AlARM foR ANy ReAsoN! do Not tRy to
RePAIR the AlARM yoURself.
Alarm Removal
If the tamper-resist feature has been activated, refer to tamper-resist feature description on page 17 for removal
instructions.
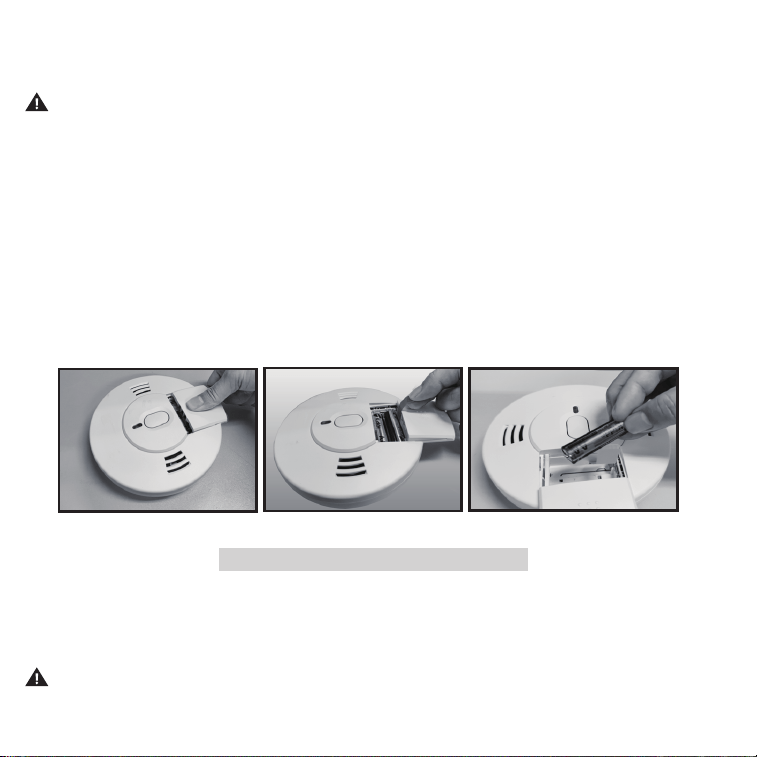
battery Installation and Removal
A: To replace or install the batteries slide the battery door in the direction indicated on the cover
of the alarm.
B: Pull the yellow tab to remove the batteries.
C: When installing a new battery into the battery compartment make sure that the polarity matches the
markings printed on the inside of the battery compartment. Insert battery under plastic bar as
shown below and push down carefully.
A missing or improperly installed battery will prevent the battery door from closing and result in improper
alarm operation.
Replace battery with one of the following approved brands:
Gold Peak 15A; Golden Power GLR6A; Energizer E91
wARNING! Use only the batteries specified. Use of different batteries may have a detrimental effect
on the Smoke/CO alarm.
NOTE: Do not use lithium battery in this unit.
Slide Remove
Insert
Figure 12-A

21
low battery
This alarm is equipped with a low battery monitor circuit. If the battery capacity is nearing the point where it
can no longer provide adequate power for all alarm functions, the low battery condition will occur.
See Troubleshooting Guide. The batteries must be replaced within 30 days of the first occurrence of the “Low
Battery Warning” to provide continuous alarm detection.
wARNING! A depleted battery will render this alarm inoperative.
Chirping: When End of Unit Life or Low Battery chirping begins, you can temporarily silence these chirps
by pressing the button. See Troubleshooting Guide.
wARNING: RePlACe UNIt As sooN As PossIble wheN IN eNd of UNIt lIfe oR low
bAtteRy Mode.
wARNING!: It Is foRbIddeN to dIsPose of A bAtteRy IN A fIRe oR A hot oveN, oR
MeChANICAlly CRUsh oR CUt the bAtteRy. thIs CAN ResUlt IN AN exPlosIoN.
13. General Carbon Monoxide (CO) Information
what is Carbon Monoxide?
Carbon monoxide (CO) is a highly poisonous gas with no taste, colour or smell.
Potential Sources of CO
• Wood-burning stoves
• Gas boilers and fires
• Gas Hobs
• Oil and coal burning appliances
• Portable gas heaters
• Blocked flues and chimneys
• Fumes from integral garages
• Barbecues
• High concentrations of tobacco smoke
This CO alarm is not a substitute for the correct
maintenance of your appliances.
Carbon monoxide can be produced from poorly
burning appliances or from blocked flues and
chimneys.
If your alarm has sounded and you have ventilated the
room, the CO may have dispersed before help arrives.
It is crucial that the source of CO is determined and
appropriate maintenance carried out.

22
The table below shows the effects of different levels of CO poisoning on the body;
NOTE: If you recognise any of the above symptoms consult your Doctor immediately.
NOTE: Young children, elderly and pets are more susceptible to the dangers of CO.
NOTE:
Your Kidde alarm is designed to detect CO gas. It is not designed to detect other gas such as natural gas.
NOTE: This product is intended for use in ordinary family homes. It is not designed to measure compliance with
occupational safety and the HSE.
NOTE: Individuals with certain specific medical conditions may need an alarm that operates below 30ppm.
If this applies consult your Doctor.
IMPORTANT: Ensure that all family members are familiar with the symptoms of CO poisoning and how your
alarm works.
To be safe, know the possible sources of CO in your home. Keep fuel burning appliances and their chimneys and
vents in good working condition. Learn the early symptoms of exposure, and if you suspect CO poisoning, move
outside to fresh air and get emergency help. Your first line of defence is an annual inspection and regular
maintenance of your appliances. Contact a licensed contractor or call your local utility company for assistance.
In rented properties your landlord (or Council/ housing Association), will have an emergency Response
phone number, and be liable for the regular maintenance of their combustion appliances (Gas/lPG/oil/
solid fuel).
PParts per Million (PPM)
of CO
TiEffects on Adults
100 Slight headache, nausea, fatigue (flu-like symptoms)
200 Dizziness and headache within 2 – 3 hours
400
Nausea, frontal headache, drowsiness, confusion and rapid heart rate. Risk to life after
over 3 hours of exposure
800 Severe headaches, convulsions, vital organ failures. Death possible within 2 – 3 hours
Carbon monoxide is a cumulative poison. Long term exposure to low levels may cause symptoms.
This alarm is time-weighted – the higher the level of CO, the sooner it will alarm.
NOTE: The apparatus may respond to brief exhaust gas emissions, for example during the initial start-up of an
appliance. Also, hydrogen acts as an interferent and can arise from some battery charging activities and the
curing of concrete or cement under certain circumstances. Volatile Organic Compounds (VOCs), e.g. alcohols,
which may eventually activate the alarm, can be generated from use of damp-proofing materials or other
coatings containing alkylalkoxysilanes.

23
The table below shows the effects of different levels of CO poisoning on the body;
NOTE: If you recognise any of the above symptoms consult your Doctor immediately.
NOTE: Young children, elderly and pets are more susceptible to the dangers of CO.
NOTE:
Your Kidde alarm is designed to detect CO gas. It is not designed to detect other gas such as natural gas.
NOTE: This product is intended for use in ordinary family homes. It is not designed to measure compliance with
occupational safety and the HSE.
NOTE: Individuals with certain specific medical conditions may need an alarm that operates below 30ppm.
If this applies consult your Doctor.
IMPORTANT: Ensure that all family members are familiar with the symptoms of CO poisoning and how your
alarm works.
To be safe, know the possible sources of CO in your home. Keep fuel burning appliances and their chimneys and
vents in good working condition. Learn the early symptoms of exposure, and if you suspect CO poisoning, move
outside to fresh air and get emergency help. Your first line of defence is an annual inspection and regular
maintenance of your appliances. Contact a licensed contractor or call your local utility company for assistance.
In rented properties your landlord (or Council/ housing Association), will have an emergency Response
phone number, and be liable for the regular maintenance of their combustion appliances (Gas/lPG/oil/
solid fuel).
14. Cleaning Your Alarm
your Alarm should be Cleaned at least once a year
You can clean the interior of your alarm (sensing chamber) by using compressed air or a vacuum cleaner hose
and blowing or vacuuming through the openings around the perimeter of the alarm. The outside of the alarm
can be wiped with a damp cloth. Use only water to dampen the cloth, use of detergents or cleaners could
damage the alarm.
If the alarm is in Fault mode, the alarm may be in need of cleaning. After cleaning, press the button. If the fault
does not clear, the alarm needs to be replaced.
• Never use detergent or other solvents to clean the unit.
• Avoid spraying air freshener, hair spray, or other aerosols near the alarm.
• Do not paint the unit. Paint will seal the vents and interfere with the sensor’s ability to detect smoke and CO.
• Keep away nappy buckets.
• Never attempt to disassemble the unit to clean inside. Altering the alarm in any way may lead to a risk of
electric shock or prevent it from functioning correctly. This action will void your warranty.
• The following substances can affect the CO sensor and may cause false readings and damage to the sensor:
Methane, propane, isobutane, iso-propanol, ethyl acetate, hydrogen sulfide, sulfide dioxides, alcohol based
products, paints, thinner, solvents, adhesives, hair spray, after shave, perfume, and some cleaning agents.
NOTE: there could be other compounds occurring within a particular household which could cause similar
effects.
• Move the Alarm and place in another location prior to performing any of the following:
Staining or stripping wood floors or furniture
Painting
Wall papering
Using adhesives
Storing the unit in a plastic bag during any of the above projects will protect the sensors from damage. When
household cleaning supplies or similar contaminates are used, the area must be well ventilated.
wARNING: ReINstAll the AlARM As sooN As PossIble to eNsURe CoNtINUoUs
PRoteCtIoN.

24
15. Good Safety Habits
develop and Practice a Plan of escape in the event of a fire
Prepare and practice a home escape plan twice a year, including drills at night. Know two ways out of every
room (door & window) and identify a meeting place outside the home where everyone will gather once they
have exited the residence. When two people have reached the meeting place, one should leave to call 999 or
112 while the second person stays to account for additional family members. Establish a rule that once you’re
out, you never re-enter under any circumstance!
WARNING: Experience has shown that children may not be woken by fire alarm tones. It is
important that children are never left alone in a house. Families should have a fire escape plan that
is rehearsed, so that everyone knows how to escape when fire occurs. The immediate priority when
fire occurs is to ensure that any sleeping children are woken from sleep and are immediately taken
to a place of safety outside the property, along with all other occupants. The fire and rescue service
should always be called without delay, no matter how small the fire.
• Make a floor plan indicating all doors and windows and at least two (2) escape routes from each room.
• Familiarize everyone with the sounds of the smoke alarm and train them to leave your home when they
hear it. You may not be able to reach your children. It is important they know what to do.
• Current studies have shown smoke alarms may not awaken all sleeping individuals, and that it is the
responsibility of individuals in the household that are capable of assisting others to provide assistance to
those who may not be awakened by the alarm sound, or to those who may be incapable of safely evacuat-
ing the area unassisted.
ReCoMMeNdAtIoNs
Smoke Detection - Are More Smoke Alarms Desirable? The required number of smoke alarms might not provide
reliable early warning protection for those areas separated by a door from the areas protected by the required
smoke alarms. For this reason, it is recommended that the householder consider the use of additional smoke
alarms for those areas for increased protection. The additional areas include the basement, bedrooms, dining
room, utility room, and hallways not protected by the required smoke alarms. The installation of the smoke
alarms in the kitchen, unfinished attic, or garage is normally not recommended, as these locations occasionally
experience conditions that can result in improper operation.

25
16. Service and Warranty
ten-year limited warranty
KIDDE SAFETY EUROPE LTD warrants to the original purchaser that the enclosed alarm will be free from defects
in material and workmanship or design under normal use and service for a period of ten years from the date of
purchase. The obligation of KIDDE SAFETY EUROPE LTD under this warranty is limited to repairing or replacing
the alarm or any part which we find to be defective in material, workmanship or design (part replacement only,
no installation), free of charge to the customer, upon sending the alarm with proof of date of purchase, postage
and return postage prepaid, to distributor: Warranty Service Department, Kidde Safety Europe Ltd, Ash House,
Littleton Road, Ashford, TW15 1TZ, UK
This warranty shall not apply to the alarm if it has been damaged, modified, abused or altered after the date of
purchase or if it fails to operate due to improper maintenance or inadequate A.C. or D.C. electrical power.
THE LIABILITY OF KIDDE SAFETY EUROPE LTD OR ANY OF ITS PARENT OR SUBSIDIARY CORPORATIONS ARISING
FROM THE SALE OF THIS ALARM OR UNDER THE TERMS OF THIS LIMITED WARRANTY SHALL NOT IN ANY CASE
EXCEED THE COST OF REPLACEMENT OF THE ALARM AND, IN NO CASE, SHALL KIDDE SAFETY EUROPE LTD
OR ANY OF ITS PARENT OR SUBSIDIARY CORPORATIONS BE LIABLE FOR CONSEQUENTIAL LOSS OR DAMAGES
RESULTING FROM THE FAILURE OF THE ALARM OR FOR BREACH OF THIS OR ANY OTHER WARRANTY, EXPRESS OR
IMPLIED, EVEN IF THE LOSS OR DAMAGE IS CAUSED BY THE COMPANY’S NEGLIGENCE OR FAULT.
This warranty does not affect your statutory rights.

26
Kidde Helpline (UK) 0800 917 0722 / (Ireland) 1800 818 601
Emergency Numbers:
Gas Emergency Services 0800 111 999
HETAS (Solid Fuel Emergency) 0845 634 5626
Oftec (oil) 0845 658 5080
Manufactured By:
Walter Kidde Portable Equipment Inc.
1016 Corporate Park Drive, Mebane, NC 27302, USA
Telephone: 0800 917 0722
www.kiddesafetyeurope.co.uk
Made in China
EU Authorised Representative
Carrier Fire & Security B.V.
Kelvinstraat 7
6003 DH Weert, NL
© 2023 Carrier. All rights reserved.