

TFS14H
CONCRETE SAW
Operation Manual
For safe operation follow all safety
precautions in the TFS14H Concrete
Saw Operation Manual. Improper
use can cause serious injury.

3
This manual provides information and procedures to safely operate and maintain this
model. For your own safety and protection from injury, carefully read, understand and
observe the safety instructions described in this manual.
Keep this manual or a copy of it with the machine. If you lose this manual or need an
additional copy, please contact Tomahawk Power LLC or visit www.tomahawk-power.com
This machine is built with user safety in mind; however, it can present hazards if improp-
erly operated and serviced. Follow operating instructions carefully. If you have
questions about operating or servicing this equipment, please contact Tomahawk
Power.
The information contained in this manual is based on machines in production at the
time of publication. Tomahawk Power reserves the right to change any portion of this
information without notice. No part of this publication may be reproduced in any form
or by any means, electronic or mechanical, including photocopying, without express
writ-ten permission from Tomahawk Power.
Any type of reproduction or distribution not authorized by Tomahawk Power rep-
resents an infringement of valid copyrights and will be prosecuted. We expressly reserve
the right to make technical modifications, even without due notice, which aim at
improving our machines or their safety standards.
1. SAFETY INFORMATION
1.1 Safety Precautions
This manual contains DANGER, WARNING, CAUTION, and NOTE callouts which must be
followed to reduce the possibility of personal injury, damage to the equipment, or
improper service.
This is the safety alert symbol. It is used to alert you to potential personal injury
hazards. Obey all safety messages that follow this symbol to avoid possible
injury or death.
DANGER indicates an imminently hazardous situation which, if not avoided, will
result in death or serious injury.
WARNING indicates a potentially hazardous situation which, if not avoided,
could result in death or serious injury.
CAUTION indicates a potentially hazardous situation which, if not avoided, may
result in minor or moderate injury.
DANGER
WARNING
CAUTION

CAUTION: Used without the safety alert symbol, CAUTION indicates a potentially hazard-
ous situation which, if not avoided, may result in property damage.
1.2 Operating Safety
WARNING: Failure to follow instructions in this manual may lead to serious injury or
even death! This machine is to be operated by trained and qualified personnel only! This
machine is for industrial use only. The following safety guidelines should always be used
when operating this concrete floor saw.
1.2.1 General Safety
-DO NOT modify the machine without the prior consent of the manufacturer. We do not
assume responsibility for any accident due to equipment modification.
-NEVER operate the machine for any purpose for which it is not intended.
-NEVER allow anyone to operate the machine without proper training and under 18 years
old. Those who operate the machine must be familiar with the risks and hazards associ-
ated with it.
-ALWAYS operate the machine with all safety devices and guards in place and in working
order.
-DO NOT wear loose fitting clothing that might get caught in the machine.
-DO NOT operate the machine in poorly ventilated spaces. There is a risk of carbon mon-
oxide poisoning.
-ALWAYS wear eye protection, ear protection and steel-toed boots during work.
-DO NOT use the machine if you are experiencing discomfort, cramps, pain, or work
under the influence of drugs or alcohol.
-DO NOT use the machine near flammable material or in explosive atmosphere. The
exhaust pipe can become very hot during operation. Sparks may be emitted from it, and
ignite flammable material.
-ALWAYS check that all controls are functioning properly immediately aer start-up. DO
NOT operate the machine unless all controls operate correctly.
-NEVER operate the machine with the fuel cap loose or missing.
-NEVER touch the engine, exhaust system, muler and cylinder. They are extremely hot
during operation.
-DO NOT touch the V-belt and rotating parts during operation.
-Block the machine when leaving or operating on slopes.
1.2.2 Diamond Blade Safety
-ALWAYS use the appropriate diamond blade for cutting.
-ALWAYS check the diamond blade before using. The blade should exhibit no cracks,
dings, or flaws in the steel centered core and/or rim.
4

5
-Examine blade flanges for damage, excessive wear and cleanliness before mounting
blade. Blade should fit snugly on the sha and against the inside/outside blade flanges.
-Ensure that the blade is marked with an operating speed greater than the blade sha
speed of the saw.
-Only cut material that is specified by the diamond blade. Read the specifications of the
diamond blade to ensure the proper tool has been matched to the material being cut.
-ALWAYS keep blade guards in place. Exposure of the diamond blade must not exceed
180 degrees.
-Ensure that the diamond blade does not come into contact with ground or surface
during transportation. DO NOT drop the diamond blade on ground or surface.
-The engine governor is designed to permit maximum engine speed in a no-load condi-
tion. Speeds that exceed this limit may cause the diamond blade to exceed the maxi-
mum safe allowable speed.
-Ensure that the blade is mounted for proper operating direction.
1.2.3 Transport Safety
-Use the liing bail and appropriate liing equipment to ensure the safe movement of
the saw.
-DO NOT use the handle bars and/or front pointer as liing points.
-NEVER tow the saw behind a vehicle.
-Ensure that both pointer bars are positioned appropriately to minimize their exposure
during transportation.
-Engines tipped to extreme angles may cause oil to move into the cylinder head making
the engine diicult to start.
-NEVER transport the machine with the blade mounted.
1.2.4 Emergency
ALWAYS know the location of the nearest fire extinguisher and first aid kit. Know the
location of the nearest telephone. Also know the phone numbers of the nearest ambu-
lance, doctor and fire department. This information will be invaluable in the case of an
emergency.
1.2.5 Maintenance Safety
-NEVER lubricate components or attempt service on a running machine.

6
-ALWAYS allow the machine a proper amount of time to cool before servicing.
-Keep the machinery in running condition.
-Fix damage to the machine immediately and always replace broken parts.
-Dispose of hazardous waste properly. Examples of potentially hazardous waste are used
motor oil, fuel and fuel filters.
1.3 Operator Safety while Using Internal Combustion Engines
-DO NOT smoke when refueling the engine or operating the machine.
-DO NOT refuel a hot or running engine.
-ALWAYS keep away from all hot or spark-generating objects when refueling the engine.
-ALWAYS refill the fuel tank until the machine has cooled, and in a well-ventilated envi-
ronments.
-DO NOT spill fuel when refueling the engine.
-ALWAYS take care to use the appropriate type of fuel.
-ALWAYS inspect for fuel leakage regularly.
-NEVER perform any work on the machine while it is running. Before performing any
maintenance, stop the engine and disconnect the spark plug wire to prevent accidental
starting.
-Avoid prolonged breathing of exhaust gases.
-ALWAYS transport and handle fuel only when contained in approved safety containers.
-Avoid touching or leaning against hot exhaust pipes.
-Allow the engine to cool before performing any repairs or service.
-ALWAYS keep the area around the muler free of debris such as leaves, paper, cartons,
etc. A hot muler could ignite the debris and start a fire.
7
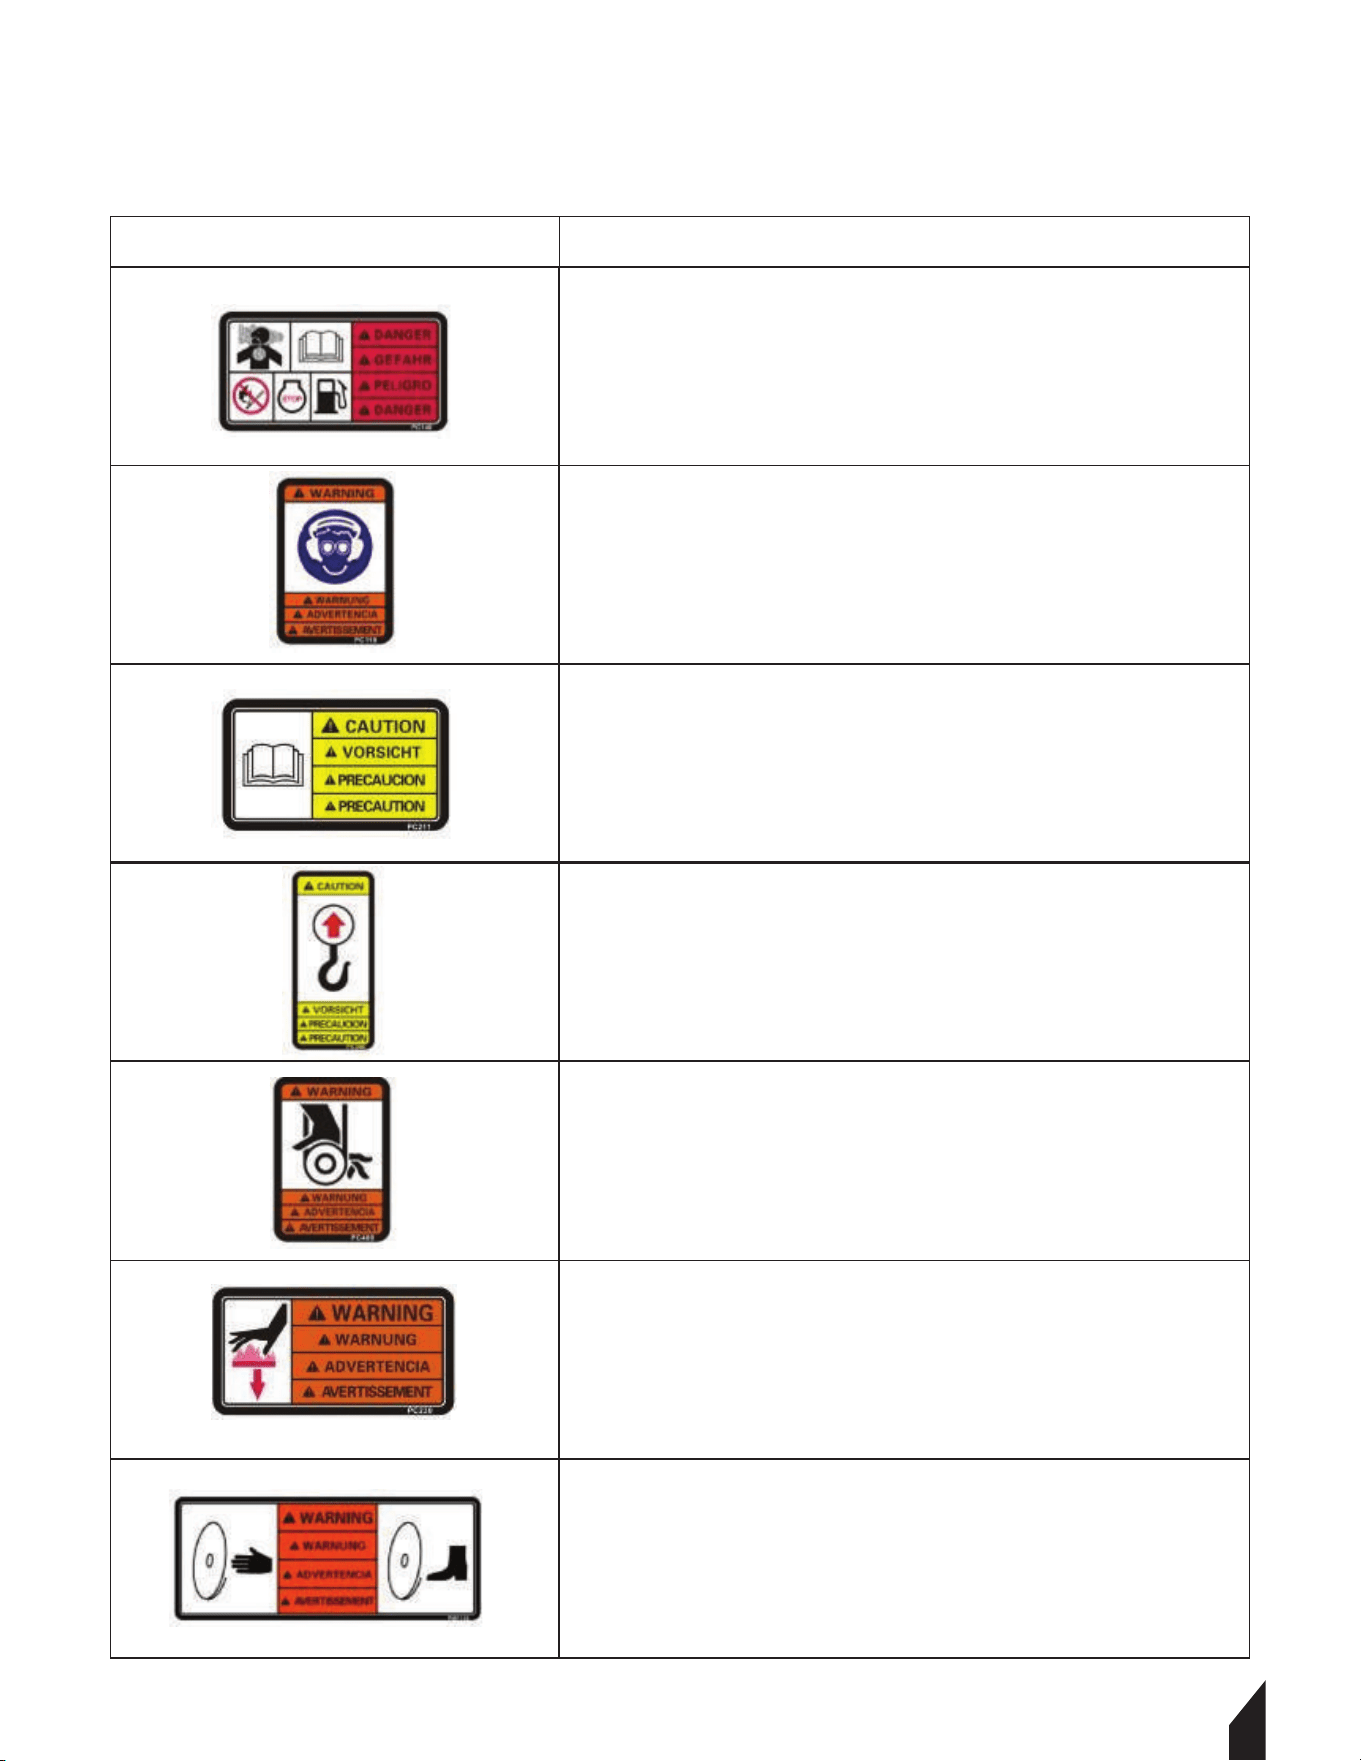
1.4 Safety and Operating Labels
LABEL
MEANING
DANGER! Engine emits carbon monoxide; operate only in
well-ventilated areas. Read the Operator’s Manual for
machine information. No sparks, flames, or burning
objects near the machine. Shut o the engine before refu-
eling. Use only clean, filtered, unleaded gasoline.
WARNING!
Always wear hearing and eye protection when operating
this machine.
CAUTION!
Read and understand the supplied Operator’s Manual
before operating the machine. Failure to do so increase
the risk of injury to yourself or others.
CAUTION!
Liing point.
WARNING!
Injuries to hand may be caused if caught in moving belt.
Always replace belt guard.
WARNING!
Hot surface!
WARNING!
Keep all hands and feet away from the moving saw blade.

8
WARNING!
A nameplate listing the model number and serial number is
attached to each unit. Please record the information found
on this plate so it will be available if the nameplate is lost or
damaged. When requesting service information, the serial
number should be specified in the unit.

9
2.1 Operating Principle
The following instructions were compiled to provide you information on how to obtain
long and trouble free use of the machine. Periodic maintenance of the machine is essen-
tial. Read the manual carefully and thoroughly familiarize yourself with the machine and
all it’s functions. Failure to do so may injure yourself or someone else.
2.2 Delivery Checks
Upon receiving new machine and before putting it into service.
-Read the operation manual completely- it could save a great deal of unnecessary
headaches.
-Read the engine manual supplied.
-Check the general condition of the machine – has it been damaged during delivery?
-Check engine oil level.
-Check fuel level.
Recommended lubricants are detailed in the Care and Maintenance section.
2.3 Installing Blade
-Be certain that the spark plug is disconnected and the saw is unplugged.
-Remove the blade sha nut, and take o the outside blade sha flange.
-Clean o any foreign particles on the clamping surfaces of flanges and on the mounting
surface of the blade.
-Place the blade on the blade sha, lining up the oset drive pin in the blade with the
drive pin in the mounting collar (if the pin system is available on the machine). If your
blade has a directional rotational arrow, position arrow for down cut (diamond tail trail-
ing for down cut).
-Replace the outside blade sha flange on the blade sha. The drive pin on the inside
collar must project through the drive hole in the blade and into the outside collar (if the
pin system is available on the machine).
-Tighten the blade sha nut securely against the star washer and the outside flange,
using the wrench supplied.
-Reconnect the spark plug or (with switch “o”) plug in the electric supply cord.
2.4 Before Starting
Before starting the machine, check the following items:
-All handles are free from grease, oil, and dirt.
-All control levers are in the neutral position.
-All bolted joints are tightened.
-Fuel level.

10
-Water tank level.
-Oil level in the engine.
-Air filter maintenance indicator.
-Check arbors and flanges are clean and undamaged.
-If operating in wet-cutting, check water jets for adequate flow.
-Align pointer with saw blade.
NOTICE: The warranties are VOID if the machine is run without oil.
2.5 To Start
Before starting the machine, operator must know the location and function of all
controls.
1. Open the fuel tap by moving the fuel ON/OFF lever fully to the right.
2. If starting the engine from cold, set the choke ON by moving the
choke lever fully to the left. If restarting a warm engine, the choke is
usually not required. However, if the engine has cooled,
partial choke may be required.
3. Turn the engine ON/OFF switch clockwise to “1” position.
4. Set the throttle to the idle position by moving the throttle lever fully to the right. Do
not start the engine on full throttle, as the compactor will vibrate as soon as the engine
starts.
5. Taking a firm hold of the control handle with one hand, grasp the recoil starter handle
with the other. Pull the recoil starter until engine resistance is felt, then let starter
return.
6. Taking care not to pull the starter’s cord fully out, pull the starter handle briskly.
7. Repeat until the engine fires.
8. Once the engine fires gradually, set the choke lever to the OFF position by moving it to
the right.
9. If the engine fails to fire after several attempts, follow the troubleshooting guide on
page 16.
10. To stop the engine, set the throttle to idle and turn the engine ON /OFF switch coun-
terclockwise to the “0” position.
11. Turn the fuel off.

11
2.6 To Stop
1. Before stopping, idle speed for a few minutes.
2. Leave and/or key in stopping position.
3. Close the fuel valve.
2.7 To Start Cutting
1. Start engine and let engine warm up. All cutting is done at full throttle.
2. Align blade and saw with cut. If wet cutting, open water valve and turn water safety
switch ON.
3. Step on the left side of PEDAL until a “click” is heard, then turn on the WHEEL HANDLE
on the top of the machine to remove the equipment forward and reverse, step down on
the right side of PEDAL to change to the “push” driving system.
4. Lower blade into cut slowly.
5. Cut as fast as blade will allow. If blade misaligns from cut, reduce forward speed or
depth of cut.
6. Use only enough side pressure on saw handles to follow cutting line.

12
2.8 Cutting
Lower the blade into concrete to the required depth by turning the tilt crank counter-
clockwise. Ease the saw slowly forward. Slow forward pressure if the saw begins to stall.
Note: For deeper cuts (4 inches/102mm or more), several cuts should be made in incre-
mental steps of 1-1/2 inch (38mm) to 2 inches (51mm) until the desired depth is reached.
Push the saw steadily forward using the front pointer as a guide. Exert enough forward
pressure so that the engine/motor begins to labor, but does not slow down. If the saw
begins to stall, slow forward movement until full RPM is restored to the blade. If saw
stalls, raise the blade out of the cut before restarting. Avoid excessive side pressure or
twisting of the blade in the cut.
2.9 Belts & Pulleys
Never adjust the V-belts and pulleys when engine is running.
1. The best tension for a v-belt drive is the lowest tension at which the belts will not slip
under full load.
2. Increase tension until the belts are snug in the grooves. Run the drive for about five (5)
minutes to “seat” the belts. Impose the peak load. If the belts slip, tighten them until
they no longer slip at peak load. Most new belts will need additional tensioning aer
seating.
3. Remember, too much tension shortens belt and bearing life.
4. Check the belt tension frequently during the first day of operation. Check the belt
tension periodically thereaer and make any necessary adjustments.
5. The two most common causes of sheave misalignment are:
a) The engine drive sha and the blade sha are not parallel.
b) The pulleys are not located properly on the shas.
13
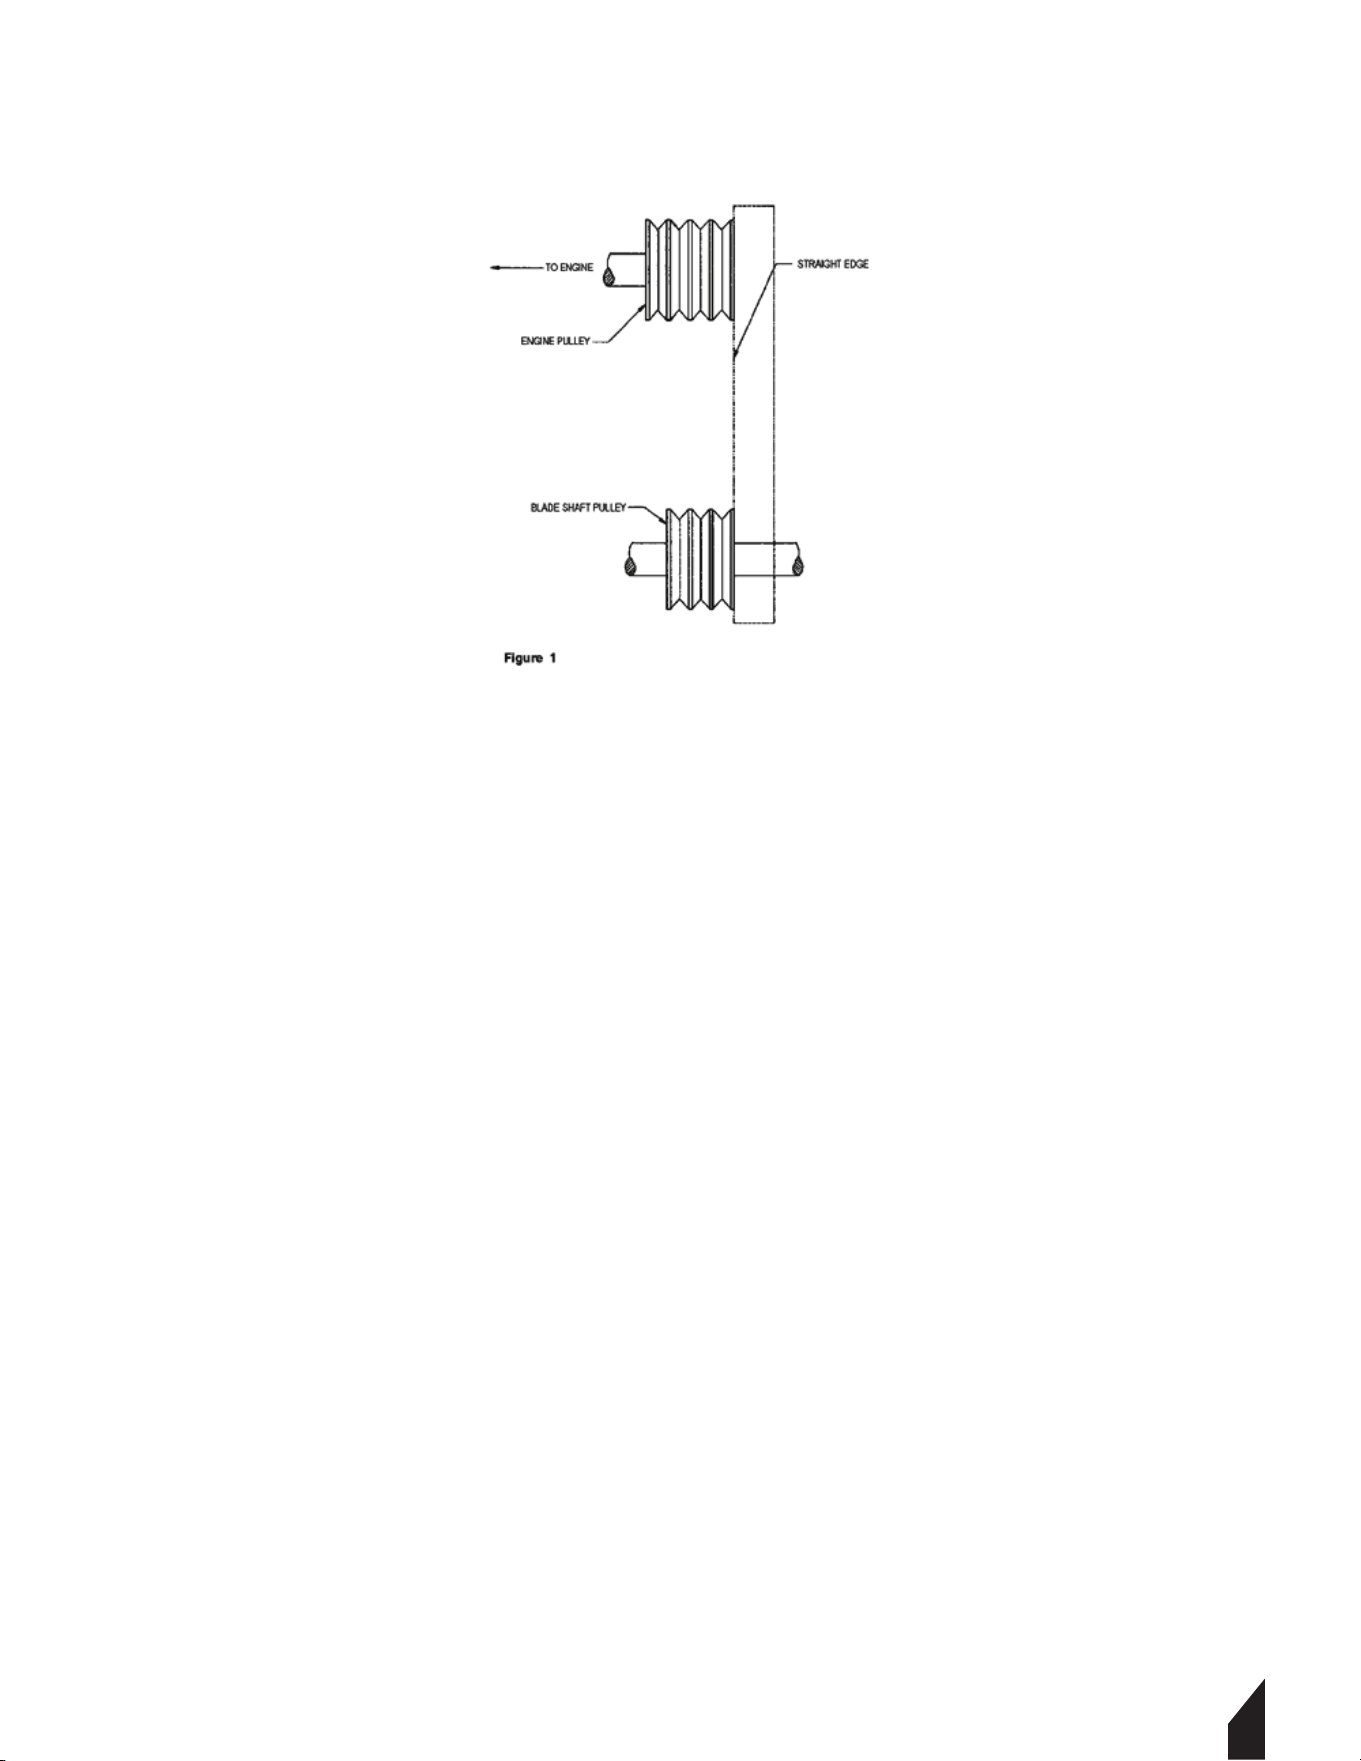
6. To check alignment, use a steel straight edge. See Figure 1.
7. Line up the straight edge along the outside face of both pulleys shown in the drawing.
All pulleys have (2) set screws in the bottom of their grooves. Set screws require thread
locking lock title.
8. Misalignment will show up as a gap between the pulley face and straight edge. Make
sure there is clearance between arbor pulley and saw base on both sides.
2.10 Dry Cutting
-Never operate any saw without safety guards in place.
-Do not exceed maximum operating speed established for blade diameter.
-Do not force blade into material: allow blade to cut at its own speed.
-Do not make long continuous cuts. Never dry cut for more than 30 seconds at a time.
Allow blade to cool.
-Do not cut or grind with side of blade or cut a curve or radius. Do not cut dry with blades
recommended for wet cutting.
-Do not operate saw with blade diameter larger than machine’s capacity.
2.11 Parking Brake
The parking brake is used to ensure that the machine will not roll when not in use.
ALWAYS park the machine on the most level ground.
1. Use the parking brake.
2. Turn o the engine and pull out the ignition key.

14
2.12 Lifting
1. NEVER tow the machine.
2. ONLY use steel ropes or chains for liing.
3. Make sure that the ropes or chains have enough liing capacity to hold the machine
(see the information on the machine plate for weight).
4. ONLY li the machine by the hook on the frame.
5. DO NOT stand or walk under a lied machine.
3. Maintenance
3.1 Periodic Maintenance Schedule
Daily
Check fuel level
Check engine oil level
Inspect air filter. Replace as needed.
Replace the engine oil
Clean air filter, change if necessary
Check the belt for tension and wear
Clean the fuel filter
Change engine oil
Clean spark plug
Check idle setting
Change spark plug
Change air filter
Check the cutting blade for damage
and tightness
Check the direction of rotation arrow of
the cutting blade
Every
20
hours
Every
50
hours
Every
100
hours
Every
300
hours

15
3.2 Lubrication
The long life and successful operation of any machinery is dependent on frequent and
thorough lubrication. Before using the machine, always check the oil and use proper oil
with the correct type and grade as recommended.
NOTICE: DO NOT mix types of engine oil and DO NOT overfill the oil. Damage to the ma-
chine may occur if oils are mixed or overfilled. See Technical Data for oil quantity and
type.
3.3 Spark Plug
Check and clean spark plugs regularly. A fouled, dirty spark plug may cause hard starting
and poor engine performance. Set spark plug gap to recommended clearance. Refer to
engine manual.
The muler and engine cylinder become very hot during operation and
remain hot for a while aer stopping the engine. Allow engine to cool
before removing spark plug.
NOTICE: A loose spark plug can become very hot and may cause engine damage.
3.4 Air Filter
Maintaining a clean engine will extend engine life. Keep air filter clean at all times. Clean
air filter using the recommended solvent daily. See engine manual for proper cleaning
procedure. Let the filter dry before reinstalling.
3.5 Transportation
1. Before transporting the machine, ALWAYS turn o the engine and pull out the key from
the machine.
2. Make sure liing device has enough capacity to hold machine (see identification plate
on machine for weight).
3. Use liing point when liing the machine.
4. Optional trolley wheel is used for short distance transportation.
WARNING

16
SYMPTOM
POSSIBLE CAUSES
SOLUTION
Uneven segment
wear
Segment cracks
(Wet cutting) Insuicient water (Usually
on one side of blade) Equipment defects
also can cause the segments to wear
unevenly.
Saw head is misaligned.
Blade is too hard for material being cut.
Flush water system. Check flow to both
sides of blade. Replace bad bearings,
worn arbor sha or misalignment to
spindle.
Check alignment for squareness, both
vertically and horizontally, of the saw
blade.
3.6 Troubleshooting
Use a blade with a soer bond/matrix.
Segment loss
-Blade overheats because of lack of
coolant (water or air).
-Core is worn from undercutting.
-Defective collars/flanges set blade out
of alignment.
-Blade is too hard for material being cut.
-Blade is cutting out of round, causing a
pounding motion. Improper blade
tension.
-(Wet cutting) Check water lines. Make
sure flow is adequate on both sides of
blade and there are no blockages.
-Use suicient water to flush out the cut.
-(Dry Cutting) Run blade free of cut perio-
dically to air cool.
-Clean collars/flanges or replace if they
are under recommended diameter.
-Use proper blade specification for ma-
terial being cut.
-Replace worn bearings; realign blade
sha or replace worn blade mounting
arbor.
-When ordering blades, match sha
speed of saw.
-Check spindle speed to ensure blade is
running at correct RPM. Avoid twisting
or turning blade in the cut.

17
SYMPTOM
POSSIBLE CAUSES
SOLUTION
Cracks in core
Loss of tension
Blade flutters in cut as a result of losing
blade tension.
Blade specification is too hard for the
material being cut.
Core overheating.
Core overheating as a result of blade
spinning on arbor.
Core overheating from rubbing the ma-
terial being cut.
Unequal pressure at blade clamping
collars/flanges.
Blade is too hard for the material being
cut.
Tighten the blade sha nut. Make sure
blade is running at proper speed and
that drive pin is functioning properly.
Use a soer bond/matrix to eliminate
stress.
Make certain blade RPM is correct.
Check water flow, distribution and lines.
Tighten the blade sha nut. Make certain
the drive pin is functioning.
Properly align the saw to square cut.
Collars/flanges must be identical in
diameter and the recommended size.
Use a soer bond/matrix to reduce stress.
Blade wobbles
Blade is on a damaged or worn saw.
Worn collar.
Blade runs at an incorrect speed.
Collar/flange diameters are not identical.
Blade is bent as a result of dropping or
twisting.
Check for bad bearings, bent sha, or
worn mounting arbor. Check collar/flange
to make sure they are clean, flat and of
correct diameter.
Set engine at proper RPM. Use proper
size blade collars/flanges.
DO NOT use bent blade. Contact blade
manufacturer.
Blade does not cut
Blade is too hard for material being cut.
Blade has become dull. Blade does not
cut material it was specified for.
Select proper blade for material being
cut.
Sharpen by cutting on soer abrasive
material to expose diamonds. If conti-
nually sharpening, the blade is too hard
or the material being cut.
Break-in on the material to be cut. If it
does not dress itself, sharpen as you
would a dull blade.

18
SYMPTOM
POSSIBLE CAUSES SOLUTION
Undercutting the core
Arbor hole out of round
Abrasive wearing of the core faster
than the segments.
Collars/flanges are not properly tightened,
permitting blade to rotate or vibrate on
the sha.
Collars/flanges are worn or dirty. Blade is
not properly mounted.
Use water to flush out fines generated
during cutting.
Use wear-retardant cores.
Make certain the blade is mounted on the
proper sha diameter. Tighten the sha
nut with a wrench to make certain that
the blade is secure.
Clean collars/flanges, make sure they are
not worn.
Tighten arbor nut.
Make sure the pin hole slides over drive
pin.
Blade worn out of round
Sha bearings are worn.
Surges occur because engine is not
properly tuned.
Blade arbor hole is damaged from
incorrectly mounting the blade.
Bond/matrix is too hard for material.
Blade is slipping, wearing one half of
blade more than other.
Install new blade sha bearings or blade
sha, as required.
Tune engine according to manufacturer’s
manual.
DO NOT use if core is worn or arbor hole
damaged. Contact blade manufacturer.
Replace worn sha or mounting arbor
bushing.
Make certain that drive pin is functioning.
Tighten spindle nut.

19
4. TECHNICAL DATA
Engine Make
Honda GX200
Horsepower
6.5 HP
Weight
176 lbs
Max Cutting Depth
4.3 in
Blade Size
12-14 in
Depth Adjustment
Handle Rotation
Driving
Manual Push
Water Tank Capacity
7.5 Gal
Sound Specification (According to 2000/14/EC)
Guaranteed sound power level 108dB(A)
Hand-Arm Vibration Specification (According to ISO 5394, EN 1033 and EN500-4) :
5 m/s2
WARRANTY
Tomahawk Power products are covered by a Warranty for a period of twelve (12) months
from the date of purchase against defects in material or workmanship provided that:
-The product concerned has been operated and maintained in accordance with the oper-
ating instructions.
-Has not been damaged by accident, misuse or abuse.
-Has not been tampered with or repaired by any unauthorized person.
The owner is responsible for the cost of transportation to and from the authorized
repairer and the unit is at the owner’s risk while in transit to and from the repairer.
Impact damage is not covered under warranty. Clutches are not covered under any
warranty.
Engines are oicially guaranteed by Honda.

20
MAINTENANCE RECORD
PREVENTATIVE MAINTENANCE AND ROUTINE SERVICE PLAN
Tomahawk Power’s TFS14 Concrete Saw has been assembled with care and will provide
years of service. Preventive maintenance and routine service are essential to the long
life of your concrete saw. After reading through this manual thoroughly, you will find
that you can do some of the regular maintenance yourself. However, when in need of
parts or major service, be sure to see your dealer. For your convenience we have
provided this space to record relevant data about your concrete saw.
Invoice Number:
Date Purchased:
Serial Number:
Type of Machine:
Dealer Name:
Dealer Phone:
REPLACEMENT PARTS USED MAINTENANCE LOG
PART NO. QTY COST DATE DATE OPERATIONDESCRIPTION


2020
2020
PRODUCT
CATALOG
INVERTER SERIES INVERTER SERIES
HAVE QUESTIONS?
Contact us. We’re here to help!
Email us at [email protected]
3,550 lbs/ft Vibratory Rammer
Part#: TR68H
3.6 HP Honda GXR120 Engine
Easily achieve a 100% compaction rating
3-in-One Fuel System with carburetor protection
13” x 11” plate for narrow trenches and corners
3 Year Engine Warranty & 1 Year Product Warranty
3,400 lbs/ft Plate Compactor
Part#: TPC90H
5.5 HP Honda GX160 Engine
Easily achieve a 100% compaction rating
22” x 20” cold, rolled steel beveled base plate
Includes 3.5 gallon water tank for asphalt compaction
3 Year Engine Warranty & 1 Year Product Warranty
3,000 lbs/ft Plate Compactor
Part#: TPC80
6 HP Kohler Command PRO Engine
Easily achieve a 100% compaction rating
16.5” x 21.5” plate for narrow trenches and corners
Optional Honda Engine model: TPC80H
3 Year Engine Warranty & 1 Year Product Warranty
COMPACTION
6.5 Gal Backpack Concrete Sprayer
Part#: TCS6.5
Maintain constant, adjustable pressure up to 435 PSI
Achieve superior concrete finishes with even spraying
Spray 15,000 sq ft in less than 10 minutes
Compatible with major manufacturer wands
1 Year Product Warranty
1.6 HP Vibratory Concrete Screed
Part#: TVSA-H
1.6 HP Honda GX35 Engine
Aluminum Magnesium blades available from 8ft - 14ft
Finish concrete 4X faster than other screed methods
360° adjustable handle placement
3 Year Engine Warranty & 1 Year Product Warranty
6” Early Entry Green Concrete Saw
Part#: TFS6H
5.5 HP Honda GX160 Engine
Maximum cutting depth of 1 3/16 inches
OSHA compliant vacuum port for dust collection
Includes 6” early entry concrete blade
3 Year Engine Warranty & 1 Year Product Warranty
FINISHING
Part#: TG2000i
2000 Max Watts, 1600 Rated Watts
Run Time of 8 hours on 1 gallon of gas
OSHA and GFCI Compliant
Parallel technology capable for double the power
2 Year Product Warranty
3500 Watt Inverter Generator
Part#: TG3500i
3500 Max Watts, 3000 Rated Watts
Run Time of 20 hours on 3.5 gallon of gas
OSHA and GFCI Compliant
Parallel technology capable for double the power
2 Year Product Warranty
4000 & 7000 Watt Generators
Part#: TG4000 & TG7000
4000 / 7000 Max Watts, 2500 / 5500 Rated Watts
Run Time of 8 hours at 50% Load
OSHA and GFCI Compliant
Wheel kits available for more jobsite portability
2 Year Product Warranty
GENERATORS
2000 Watt Inverter Generator

7500 & 9000 Watt Generators
Part#: TG7500 & TG9000
7500 / 9000 Max Watts, 6500 / 8500 Rated Watts
Run Time of 10 hours at 50% Load
7 gallon fuel tank for extended use
Electric Key Start with battery included on TG9000
2 Year Product Warranty
8” Gas Powered Concrete Scarifier
Part#: TSCAR8H
5.5 HP Honda GX160 Engine
Remove traffic lines at 800 - 1,000 linear ft/hr
Tungsten Carbide Blade Kit Available
OSHA approved dust port for silica vacuum removal
3 Year Engine Warranty & 1 Year Product Warranty
36” & 46” Concrete Power Trowel
Part#: TPT36K & TPT46K
6 HP Kohler CH260 & 9.5 HP Kohler CH395 Engines
Adjust trowel blade pitch from 0-28°
60-115 RPM rotor speed for superior concrete finishes
Includes float pan and trowel blades
3 Year Engine Warranty & 1 Year Product Warranty
2” and 3” Trash Water Pumps
Part#: TW2 & TW3
Moves liquids at a rate up to 9,240 gallons/hour
Handle solids up to 0.6"
Cast iron impeller for smooth performance
6.5 HP engine protected by rugged all purpose frame
1 Year Product Warranty
INVERTER SERIES
120 Amp Portable Welder Generator
Part#: TWG120A
Steady 120 Amp DC welding output
60% Duty Cycle for extended use
Suitable for welding rods from 6010 to 6013
Includes wheel kit for job site portability
2 Year Product Warranty
INVERTER SERIES
210 Amp Portable Welder Generator
Part#: TWG210A
Steady 50 - 210 Amp DC welding output
60% Duty Cycle for extended use
Suitable for welding rods from 6010 to 7024
Electric Key Start with battery included
2 Year Product Warranty
3.7 Gallon 3HP Backpack Fogger
Part#: TMD14
Turbo Boosted Pump with 40ft + Horizontal Reach
Sprays 1 acre in 30 minutes
10X Faster than Manual Pump Sprayers
Converts to Leaf Blower with 200 MPH Air Velocity
1 Year Engine Warranty & 1 Year Product Warranty
5 Gallon 1.8HP Backpack Sprayer
Part#: TPS25
Reach Up to 30ft Horizontal Reach
Sprays 1 acre in 15 minutes
10X Faster than Manual Pump Sprayers
Commercial Grade Pump
1 Year Engine Warranty & 1 Year Product Warranty
4 Gallon 3HP Backpack Spreader
Part#: TGS30
AND MORE WELDING / POWERPEST CONTROL
www.tomahawk-power.com
(866) 577-4476
Reach Up to 30ft Horizontal Reach
Covers 1 acre in less than 30 minutes
20X Faster than Manual Broadcast Spreaders
Converts to Fogger with Liquid Tank Accessory
1 Year Engine Warranty & 1 Year Product Warranty
USE CODE
SAVE10
AT CHECKOUT FOR
10% OFF
YOUR NEXT ORDER*
* Visit www.tomahawk-power.com for terms and conditions. Coupon must be redeemed at checkout at
www.tomahawk-power.com. Coupon may be subject to change and/or expire at any time, without notice.