
Technical Support and E-Warranty Certificate www.vevor.com/support
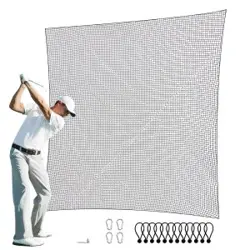
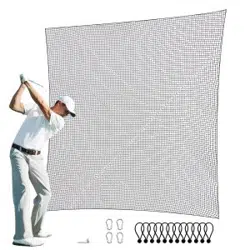
GOLF NET
MODEL: FL-004 / FL-05 /
FL-05A / FL-P255
We continue to be committed to provide you tools with competitive price.
"Save Half", "Half Price" or any other similar expressions used by us only represents an
estimate of savings you might benefit from buying certain tools with us compared to the major
top brands and does not necessarily mean to cover all categories of tools offered by us. You
are kindly reminded to verify carefully when you are placing an order with us if you are
actually saving half in comparison with the top major brands.

- 1 -
MODEL: FL-004 / FL-05 / FL-05A / FL-P255
Have product questions? Need technical support? Please feel free to
contact us:
Technical Support and E-Warranty Certificate
www.vevor.com/support
NEED HELP? CONTACT US!
This is the original instruction, please read all manual instructions
carefully before operating. VEVOR reserves a clear interpretation of our
user manual. The appearance of the product shall be subject to the
product you received. Please forgive us that we won't inform you again if
there are any technology or software updates on our product.
GOLF NET

- 2 -
Warning-To reduce the risk of injury, user must read
instructions manual carefully.
SAFETY WARNINGS AND PRECAUTIONS
Thank you for using this product. In order to make sure that you can
operate the machine correctly, read this instruction carefully before
operation and keep it properly for future reference. Please be sure to read
the precautions and safety rules in this page to ensure your safe use. This
manual will outline safety warnings and precautions, operating,
maintenance and cleaning. The warnings and instructions reviewed in this
manual cannot cover all possible conditions and situations that may occur.
Caution and common sense are not built into this product, since we believe
that the uses will comply with these codes.
Please read ALL the instructions before using your machine.
1. Assemble needs to follow these instructions. Incorrect assembly can be
a hazard. Wear heavy-duty work gloves during assembly.
2. Do not assemble when tired or when under the influence of alcohol,
drugs or medication.
3.Weight, elastic, and other product properties only apply to correctly and
wholly assembled products.
4. Keep the assembly area clean and well-lit.
5. Keep bystanders out of the area during assembly.
6. This is a sports training equipment, not a toy, it needs to be used under
the guidance of a coach.Do not allow children and pets to play alone or
approach this item. Can't Climb Products.
7. Use as intended only. Do not sit or stand on the product.
8. Inspect before every use. Do not use it if parts are loose or damaged.
9. People or objects hanging on the product will cause the product to fall.
10. Pay attention to pedestrians and vehicles when using.
11. Do not apply this unit to any other purposes than the indicated usage.
12. The net cannot place items to avoid damage.
13. Do not use it for commercial purposes.
14. DO NOT CLEAN IT WITH ANY ABRASIVE MATERIAL.

- 3 -
15. Never leave it unattended while in use.
16. Pet urine and feces can damage the product, please keep away.
17. Do not place the product on or near hot air, electric burners or heaters.
Fireworks, cigarettes, flares, and other items can ignite the product. Please
stay away from them.
18. The product should be placed on a flat surface. And it should be
installed in an open and safe place, avoiding places near windows, roads,
railways, rivers, etc.
19. Do not place it in a damp environment.
WARNING:
20. This appliance is not intended for use by young or infirm persons
unless supervised by a responsible person to ensure that they can
use the appliance safely. Young children should be supervised to
ensure that they do not play with the product. Pets should stay away
from the product.
Do not use outdoors in rainy and cloudy days, avoid lightning strikes
and falls. People or pets hanging on the product will cause injury or
death.
WARNING Please follow the instructions to install the product
correctly.
WARNING Incorrect installation can be dangerous.
WARNING Any additional or replacement parts should be obtained
from our company.
WARNING Check regularly that all assembly fittings are tightened
properly.
WARNING Do not use the practice net close to an open fire or other
heat sources.
WARNING Check this product for damaged hardware loose joints
missing parts or sharp edges before assembly and periodically
during use.
WARNING When using a golf practice net, please ensure that no one
is around the product. Note: High-speed golf balls may hurt people.
WARNING Do not use the golf practice net if you can not exactly
follow these instructions.
- 4 -
ASSEMBLY STEPS
1. Please dispose of all plastic bags carefully and keep them away from
children and pet.
2. Check all components provided according to the list in this manual.
Make sure you have all of the parts listed.
3. Although paying particular attention when manufacturing this product,
you must be careful during the assembly process to avoid being scratched
by sharp edges.
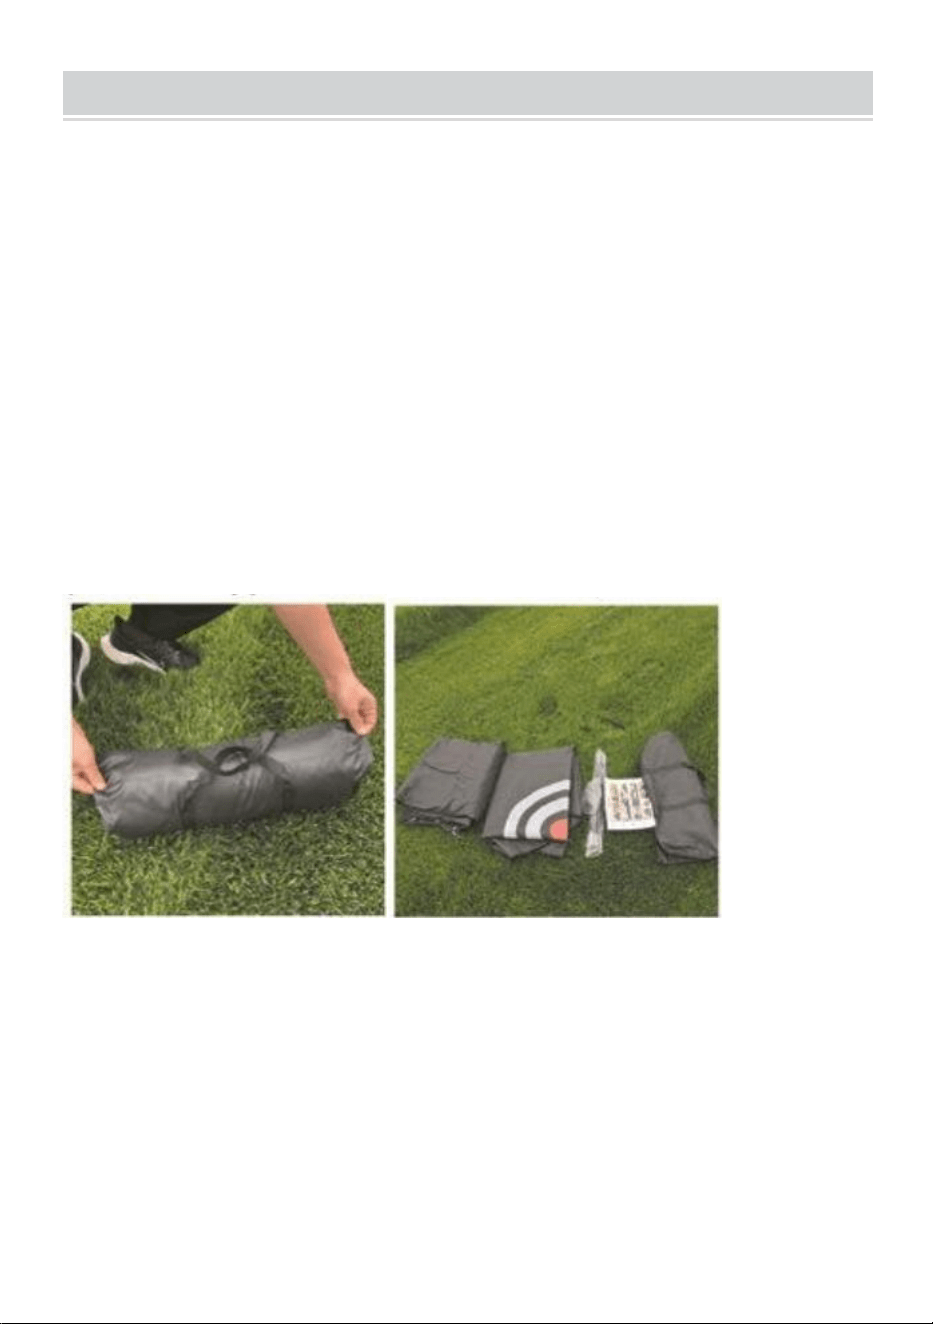
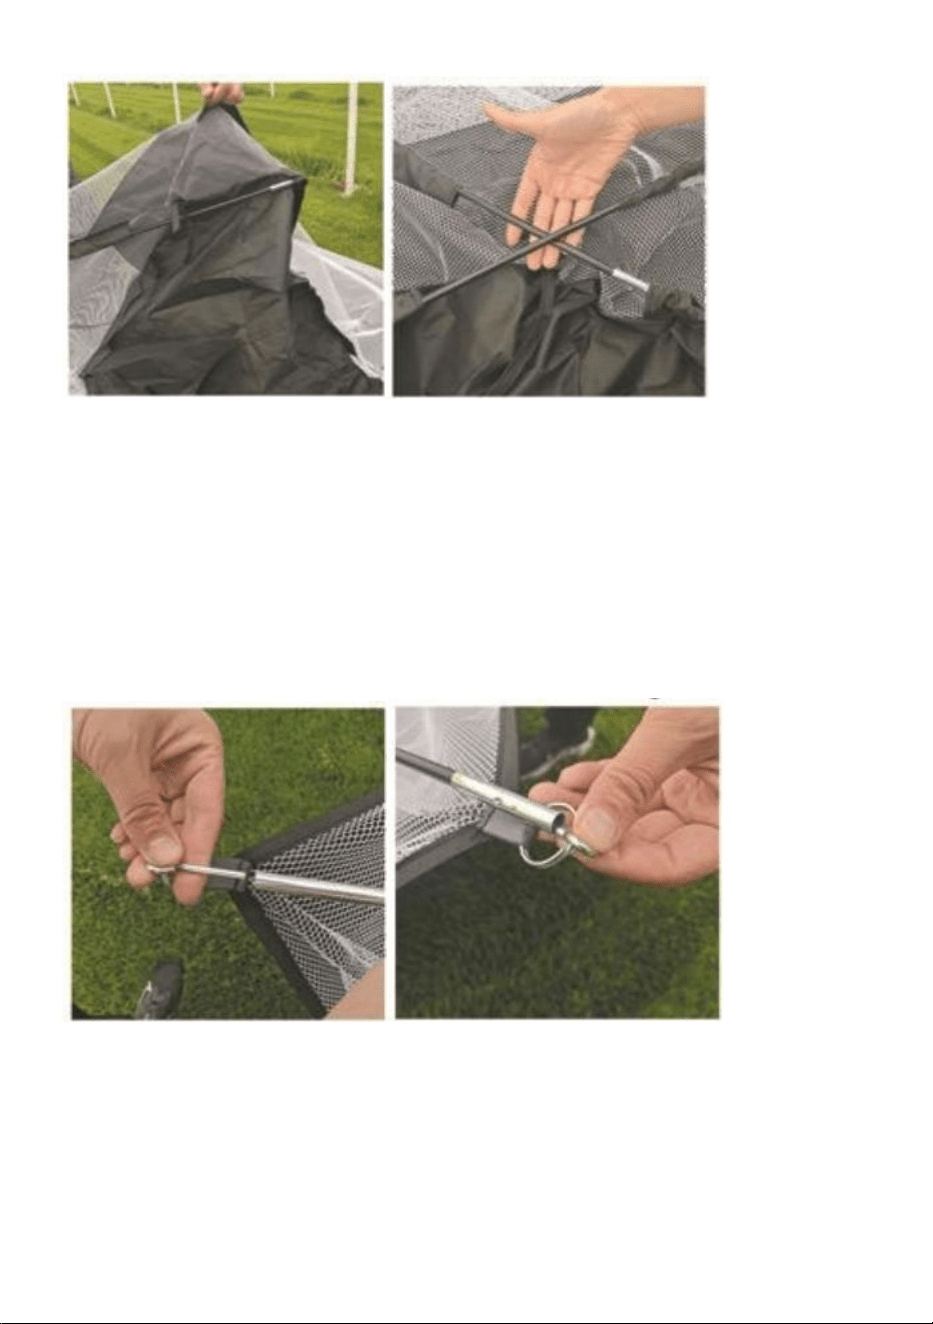
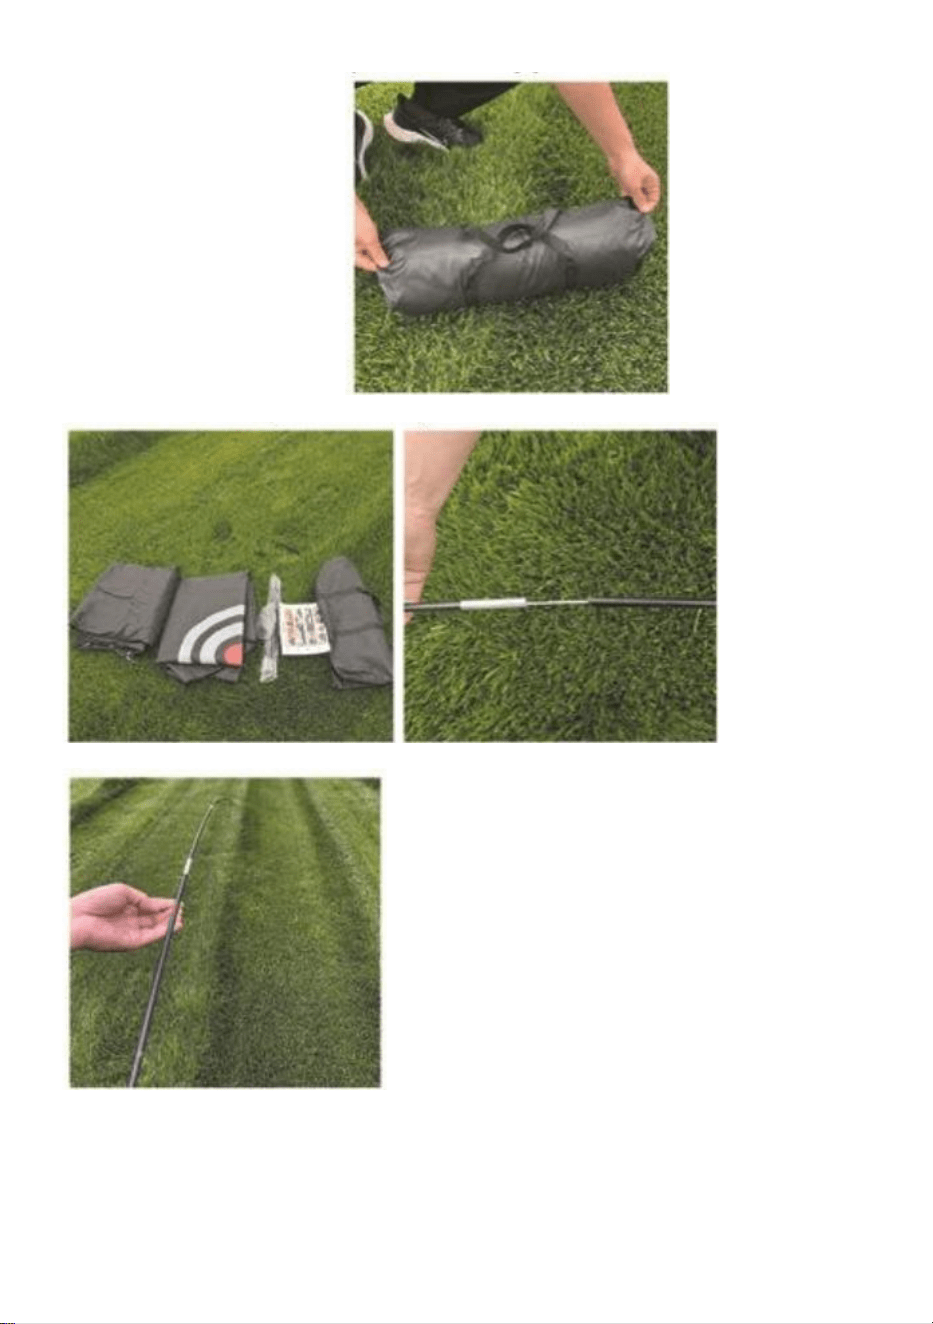
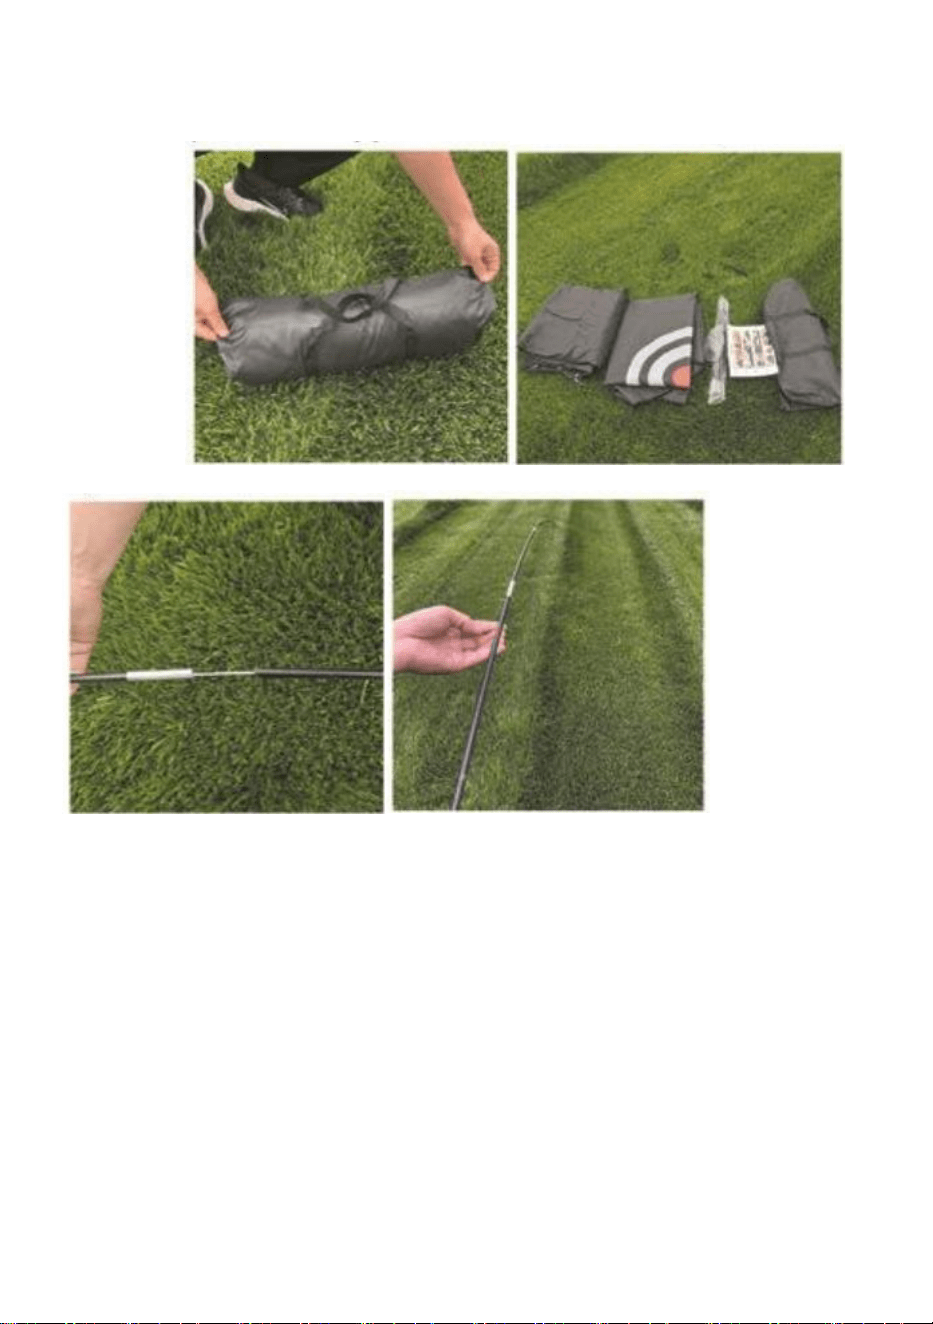
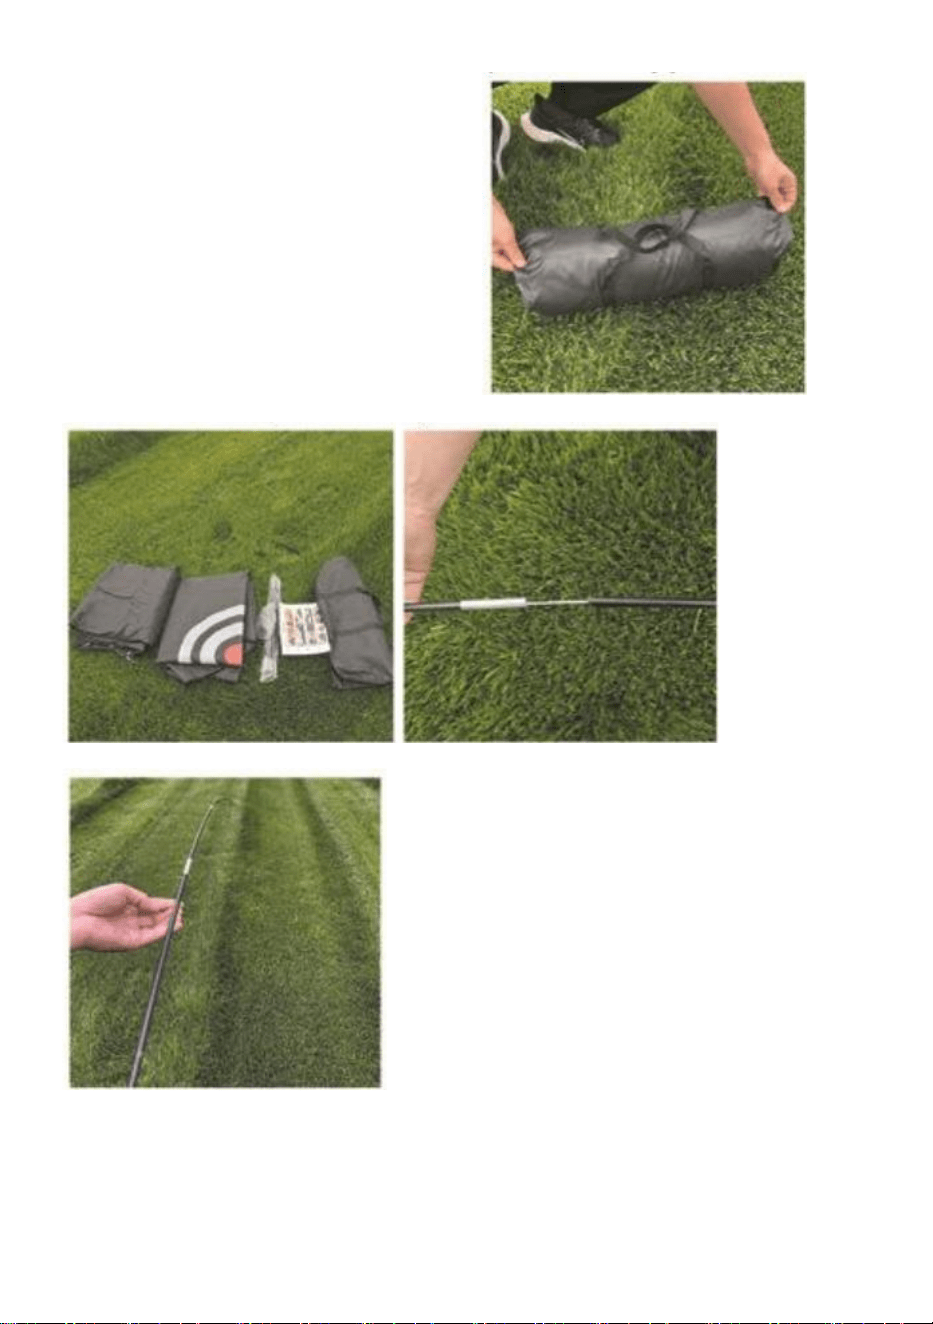
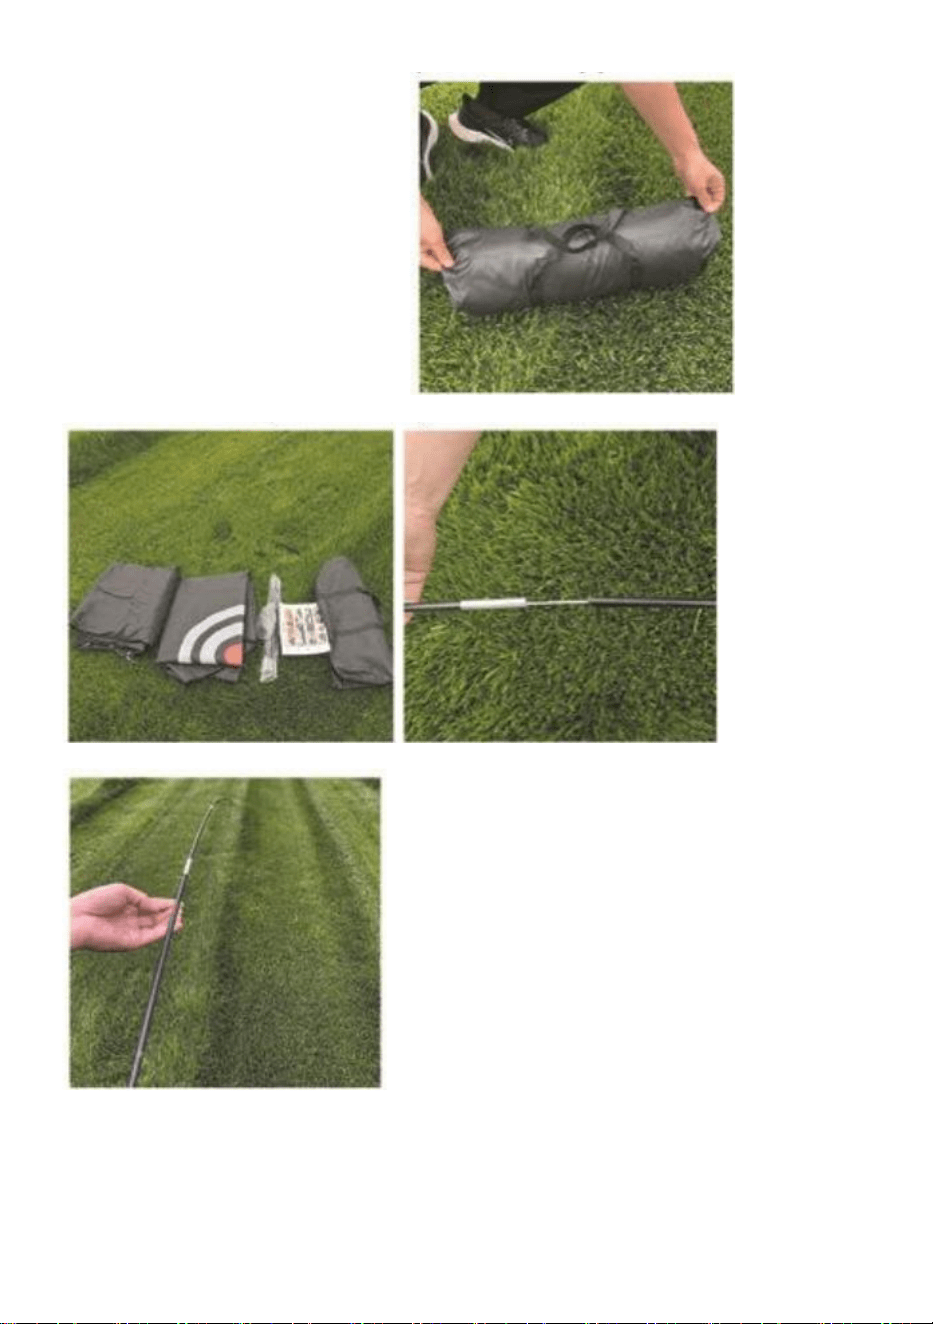
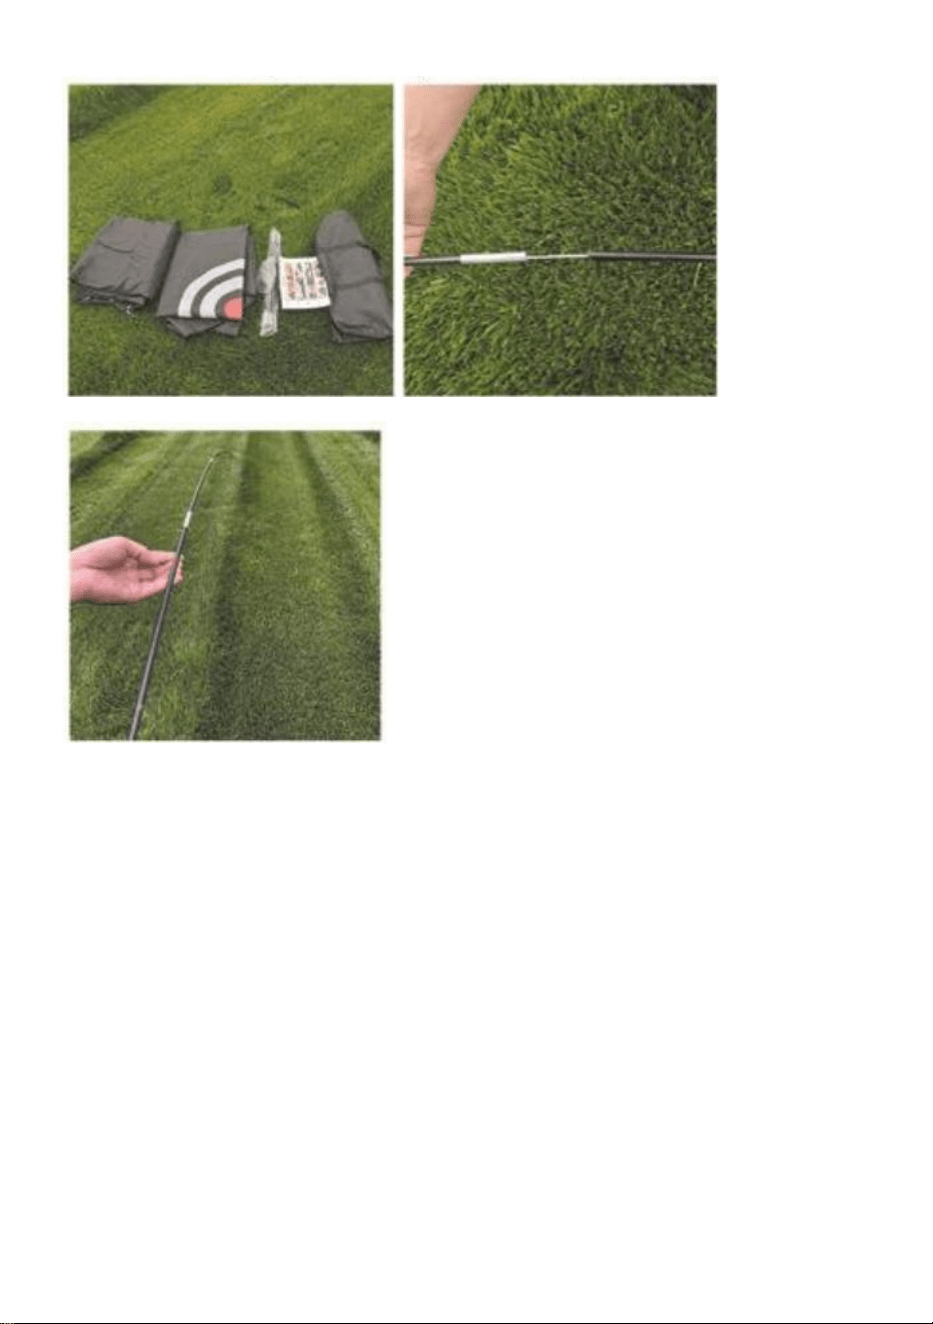
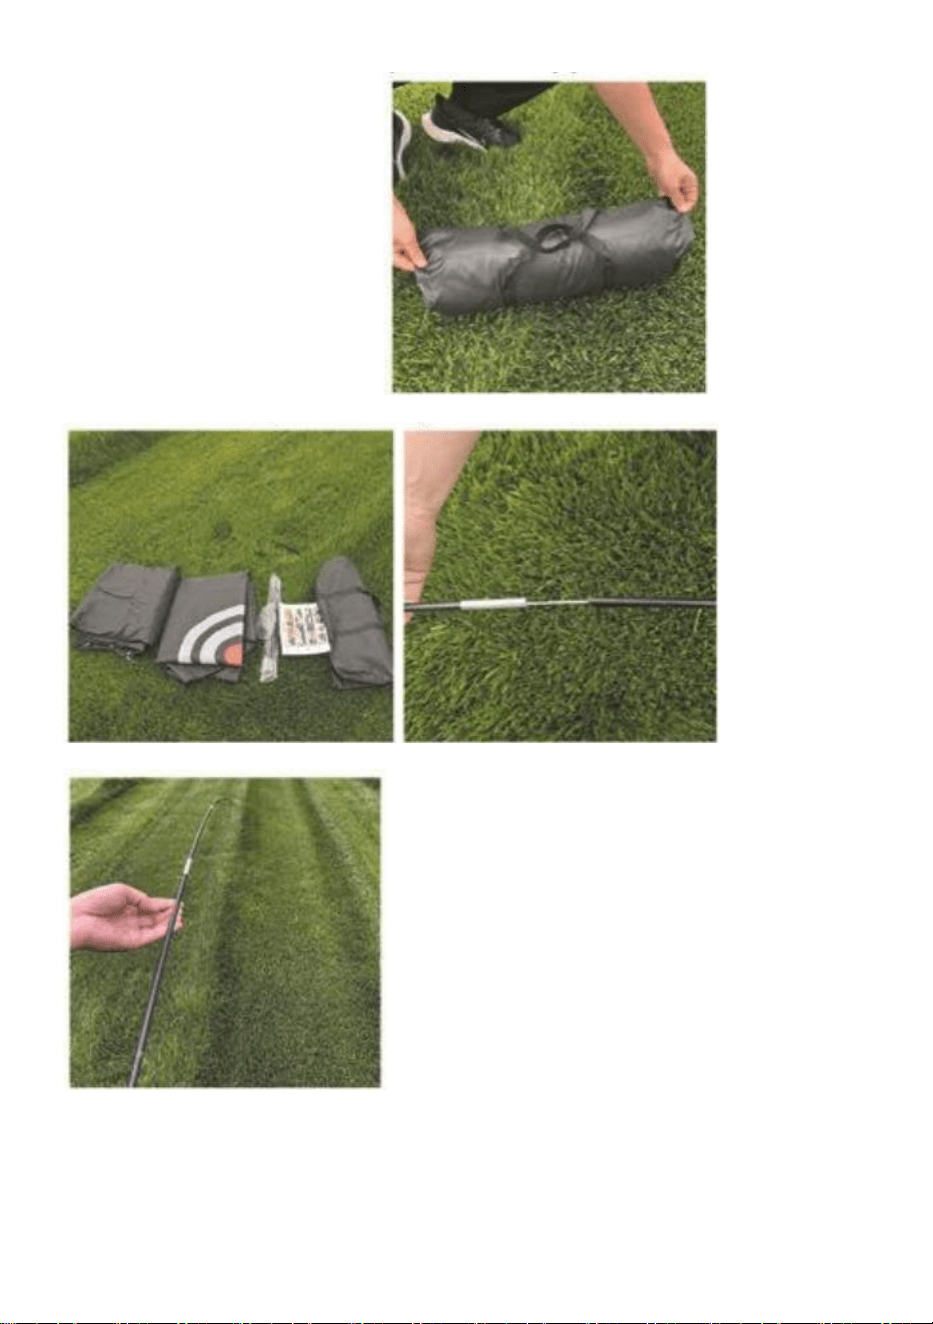
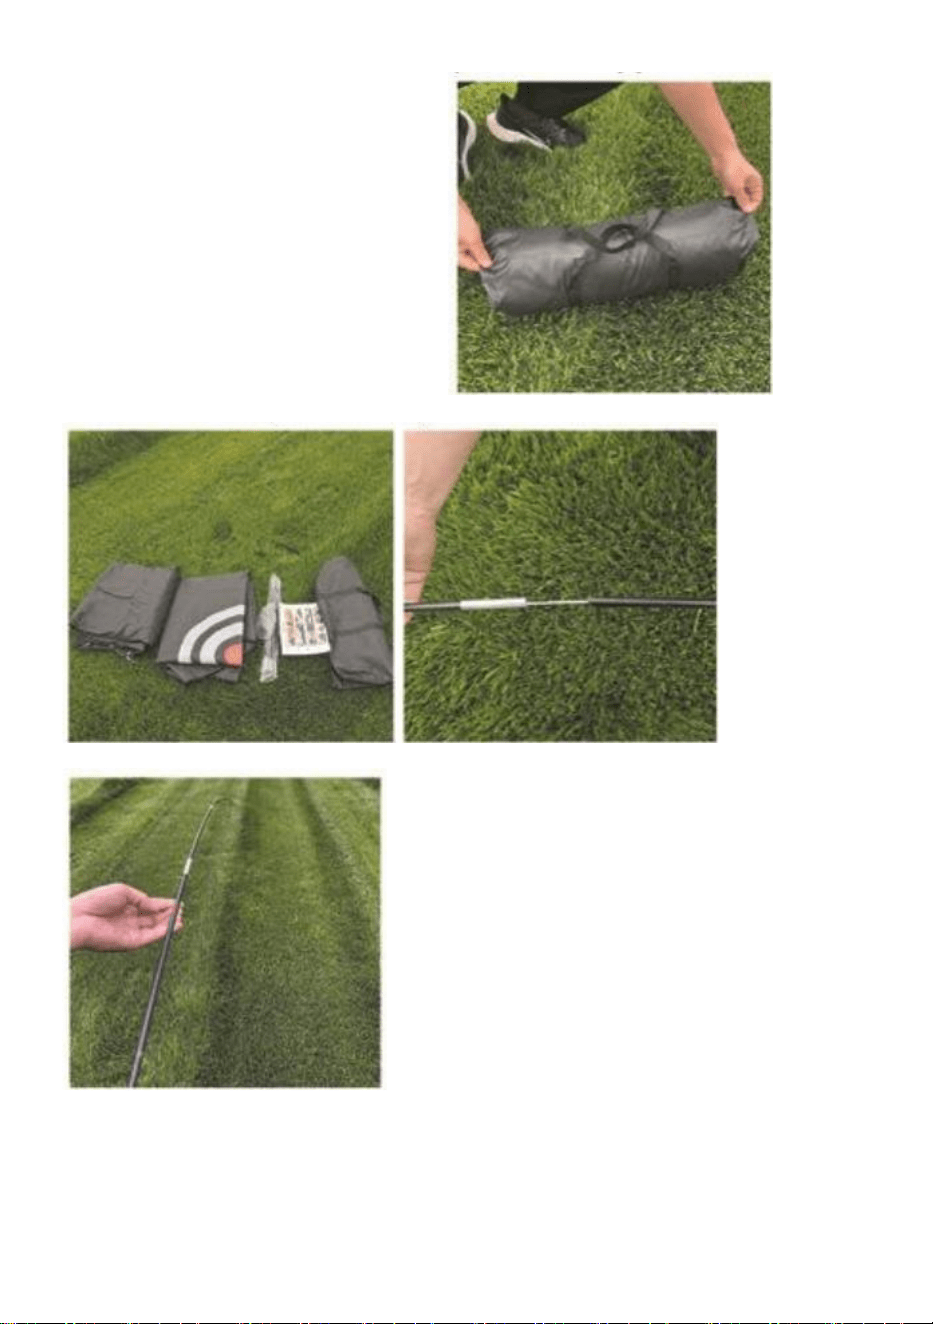
Step1:
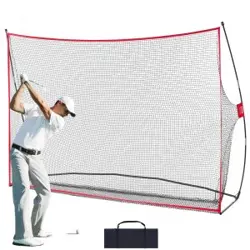
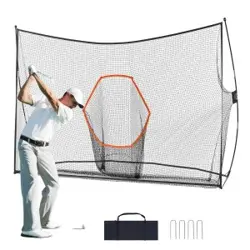
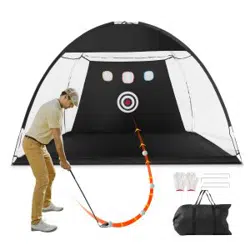
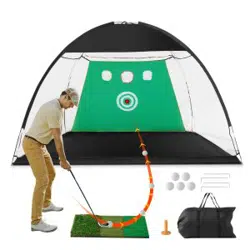
● Open the carry bag and check the items inside,they should be: 2X
extendable fiberglass poles, 1X hanging target, 1 X driving net.Then
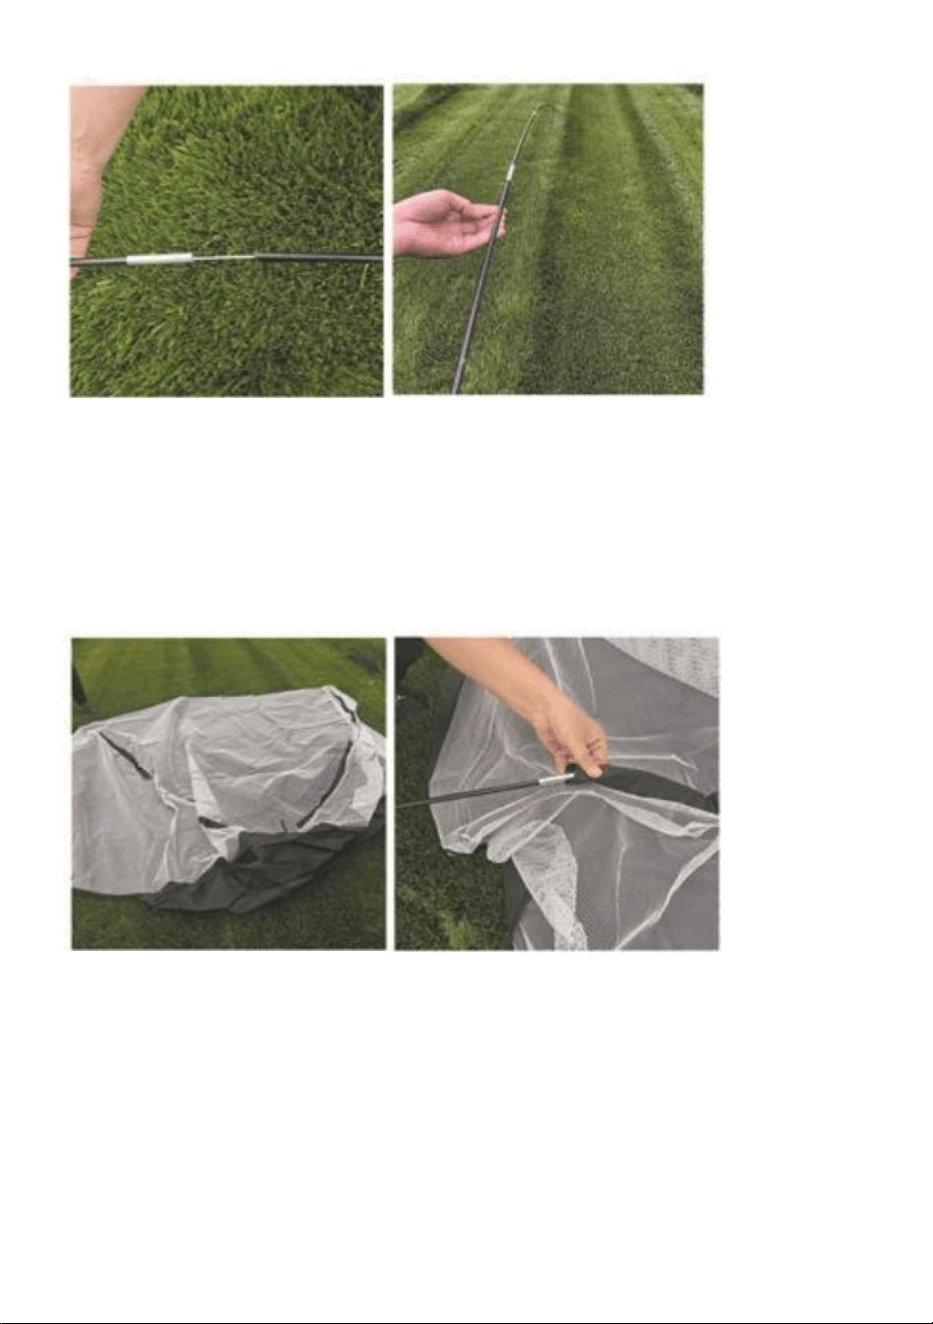
connect the 2 fiberglass poles as shown in the pictures on the right.
● Aligning them horizontally is all you need to do since they will be
connected automatically.
- 5 -
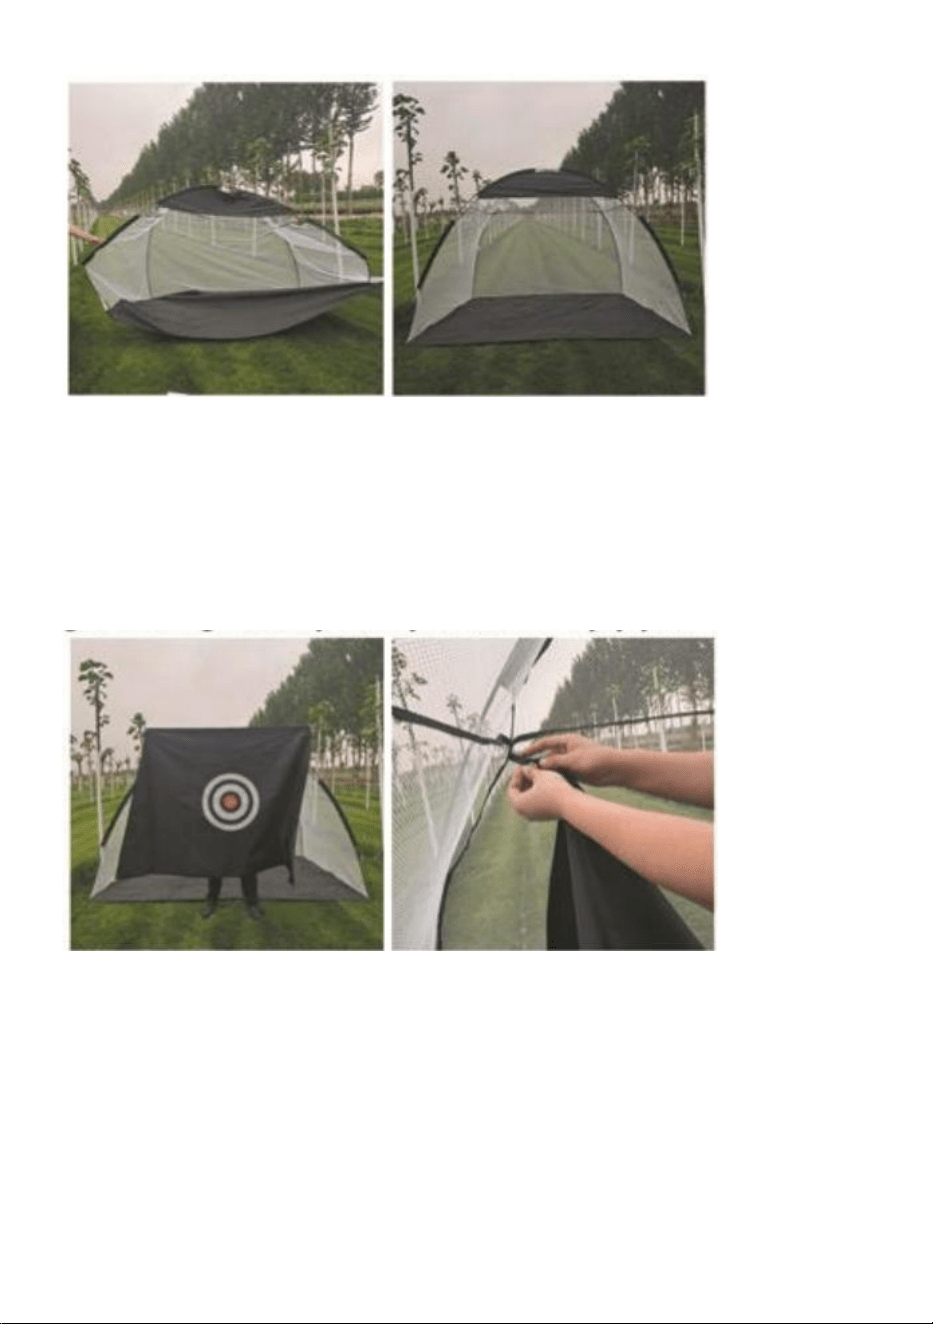
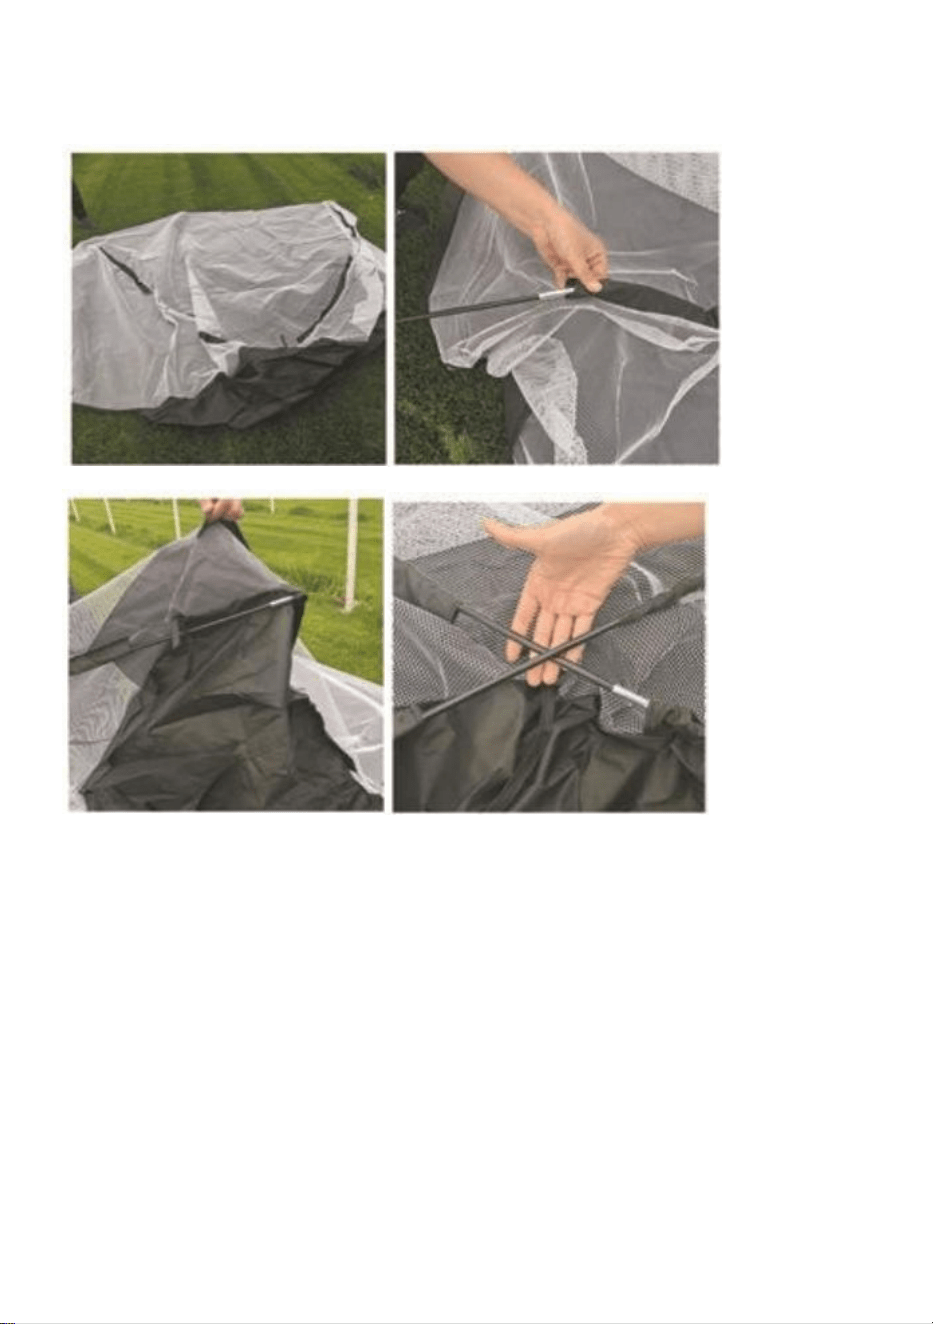
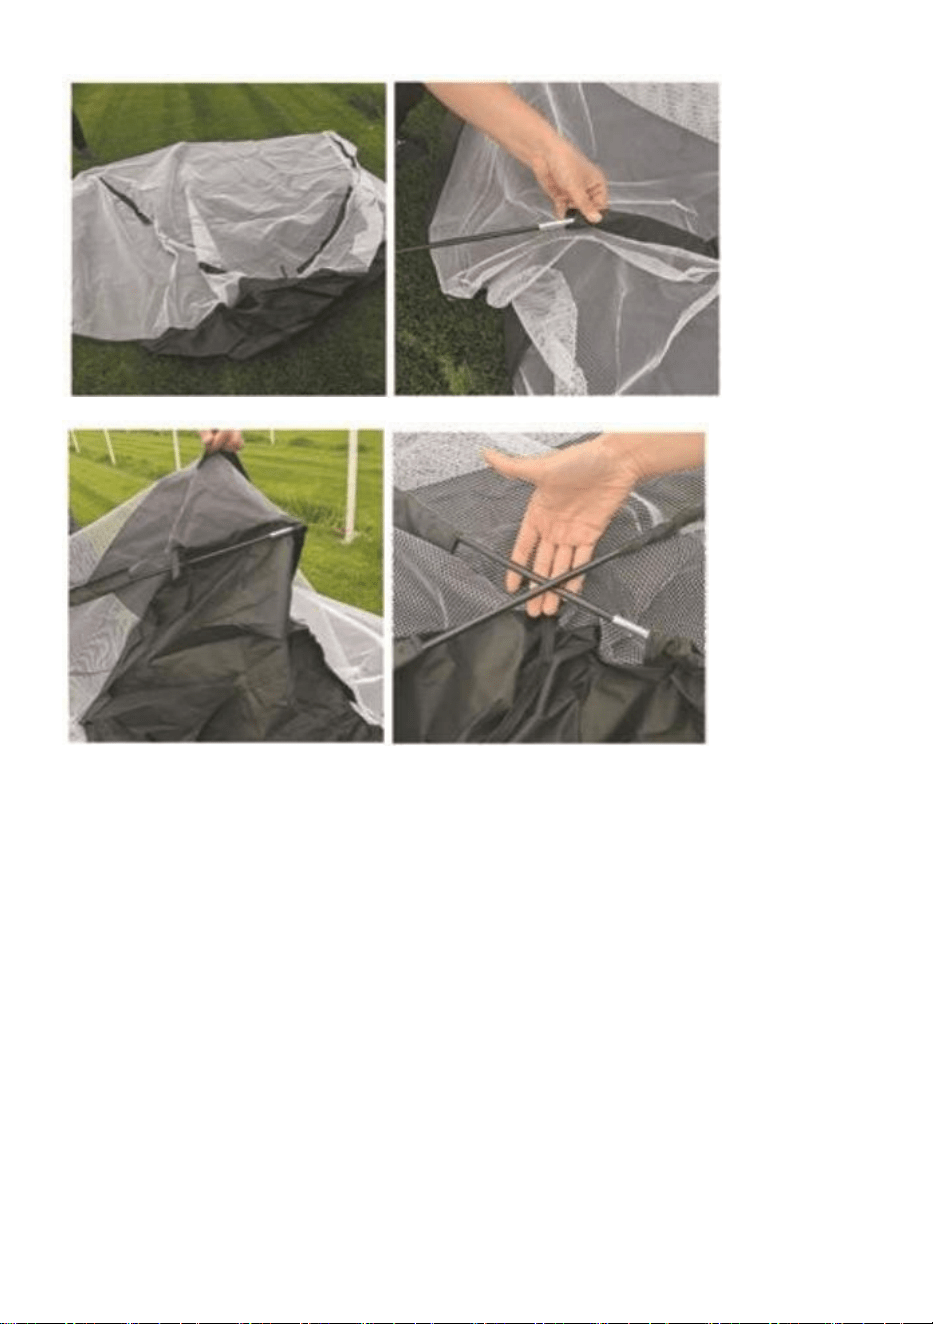
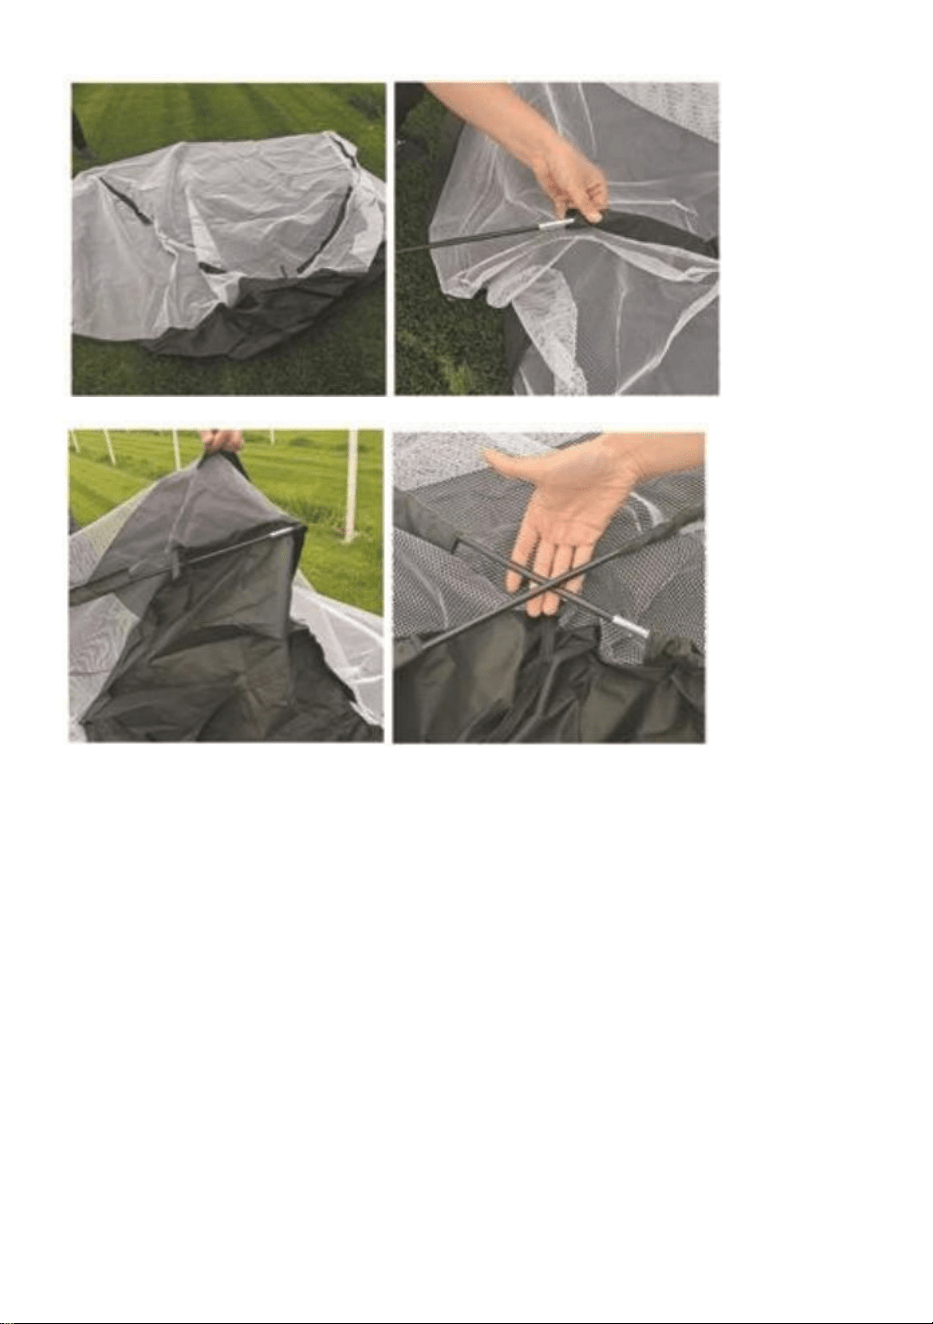
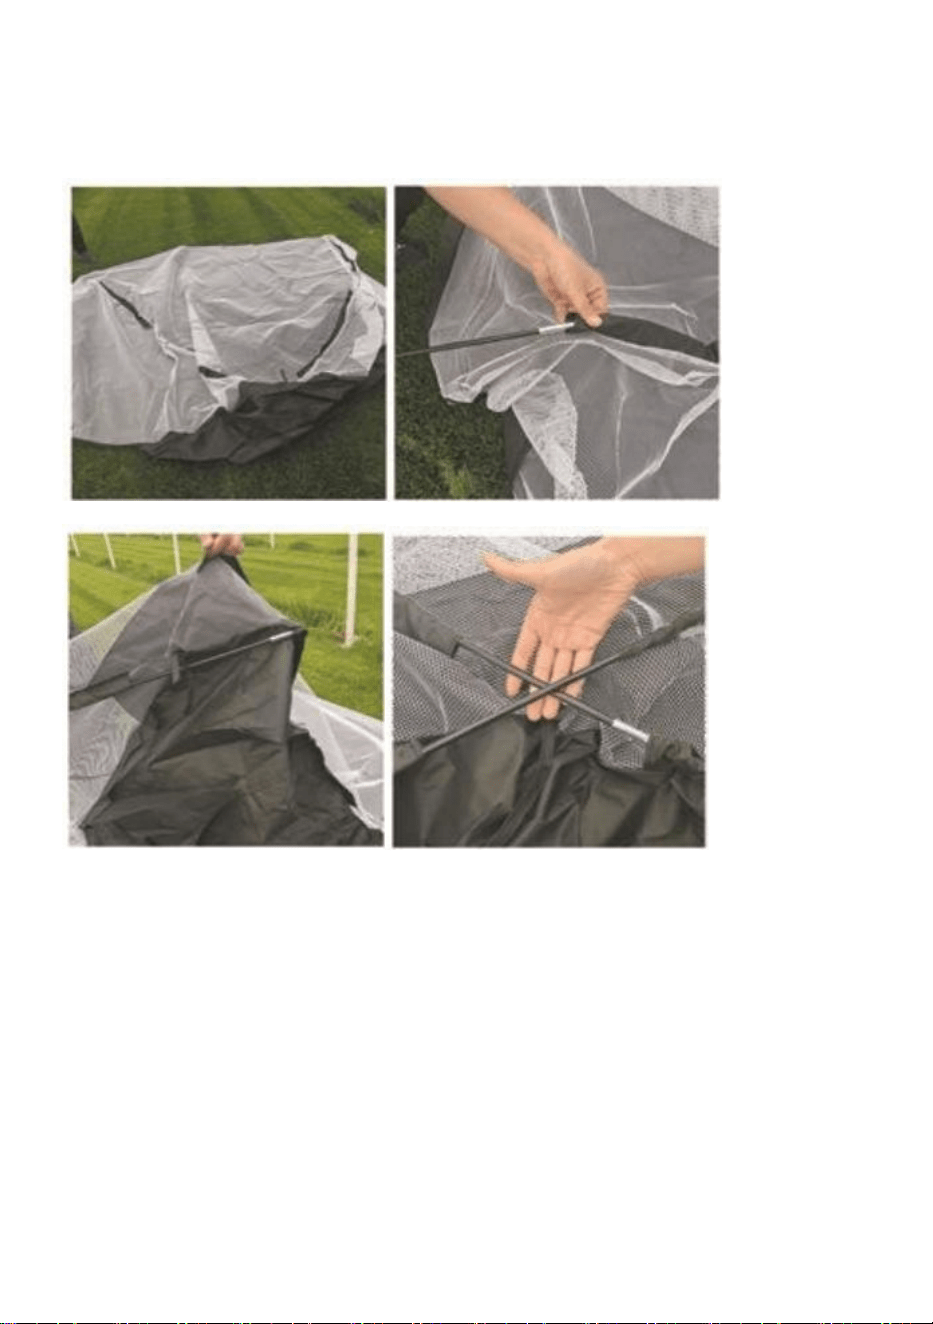
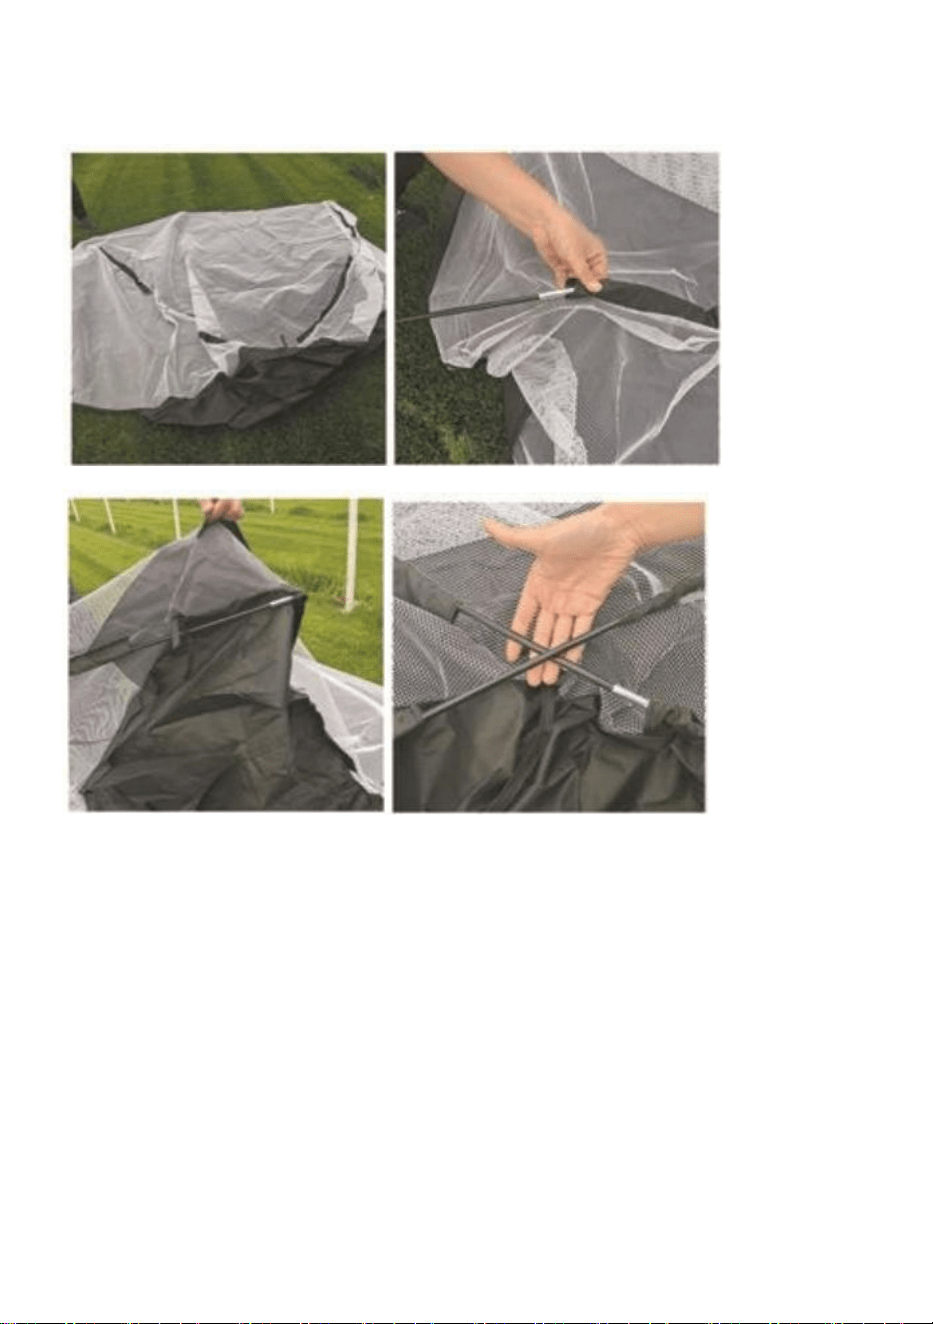
Step2:
● Extend the practice net, then put the 2 fiberglass poles into the holes of
the net and get it through to the other end.After it is done, the 2 fiberglass
poles should appear in the shape of an "X".
- 6 -
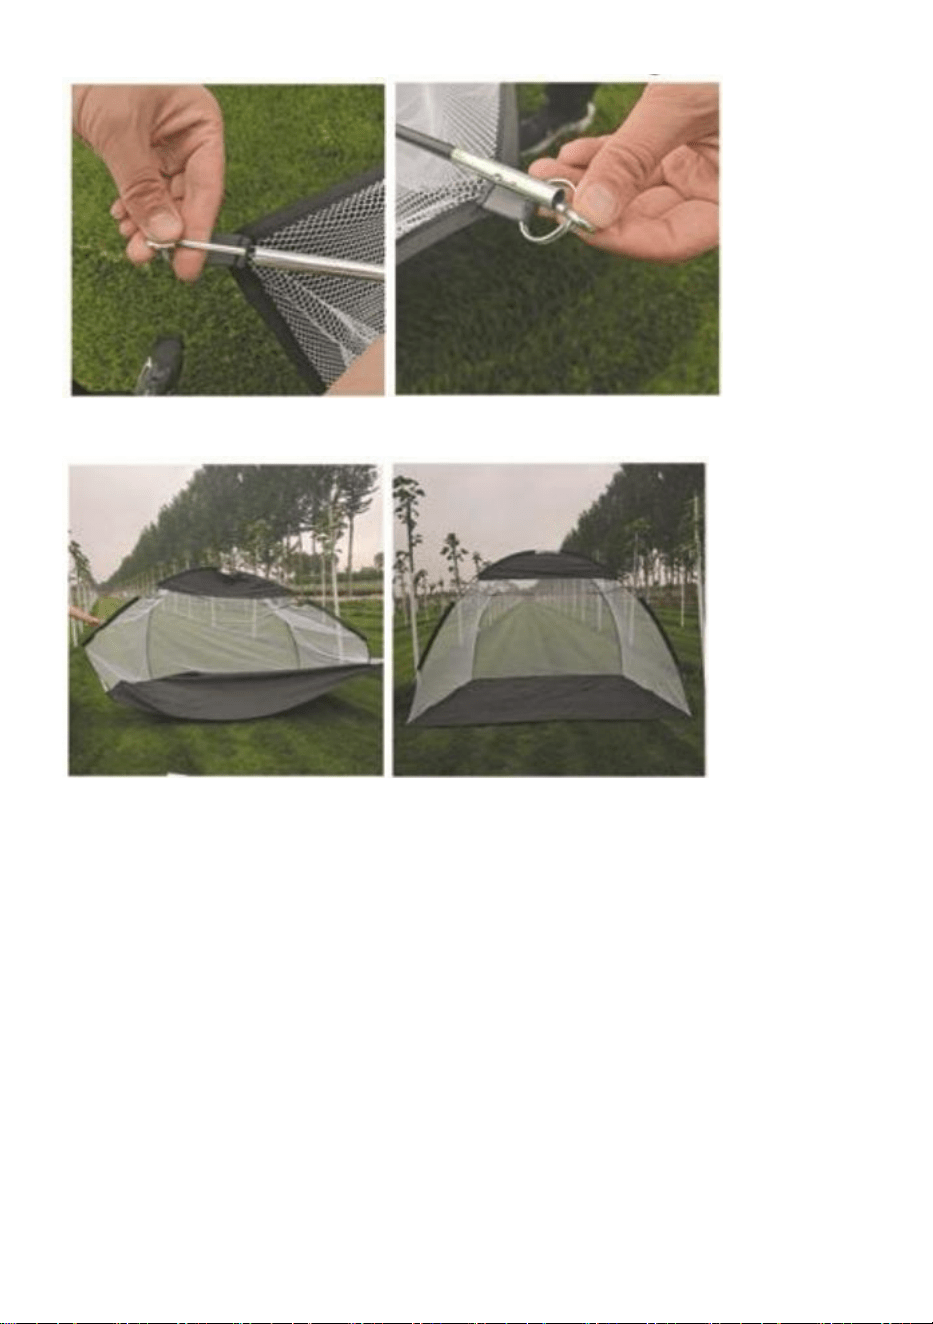
Step3:
● Insert the iron peg (hooked to the iron ring of the practice net) into either
ends of the fiberglass poles, you may find you pushing it in easily at one
end while applying some strength at the other.The principle is bending the
fiberglass poles into "X" shape for support. It is similar to installing a tent to
some extent with no need to worry about a broken fiberglass pole.
- 7 -
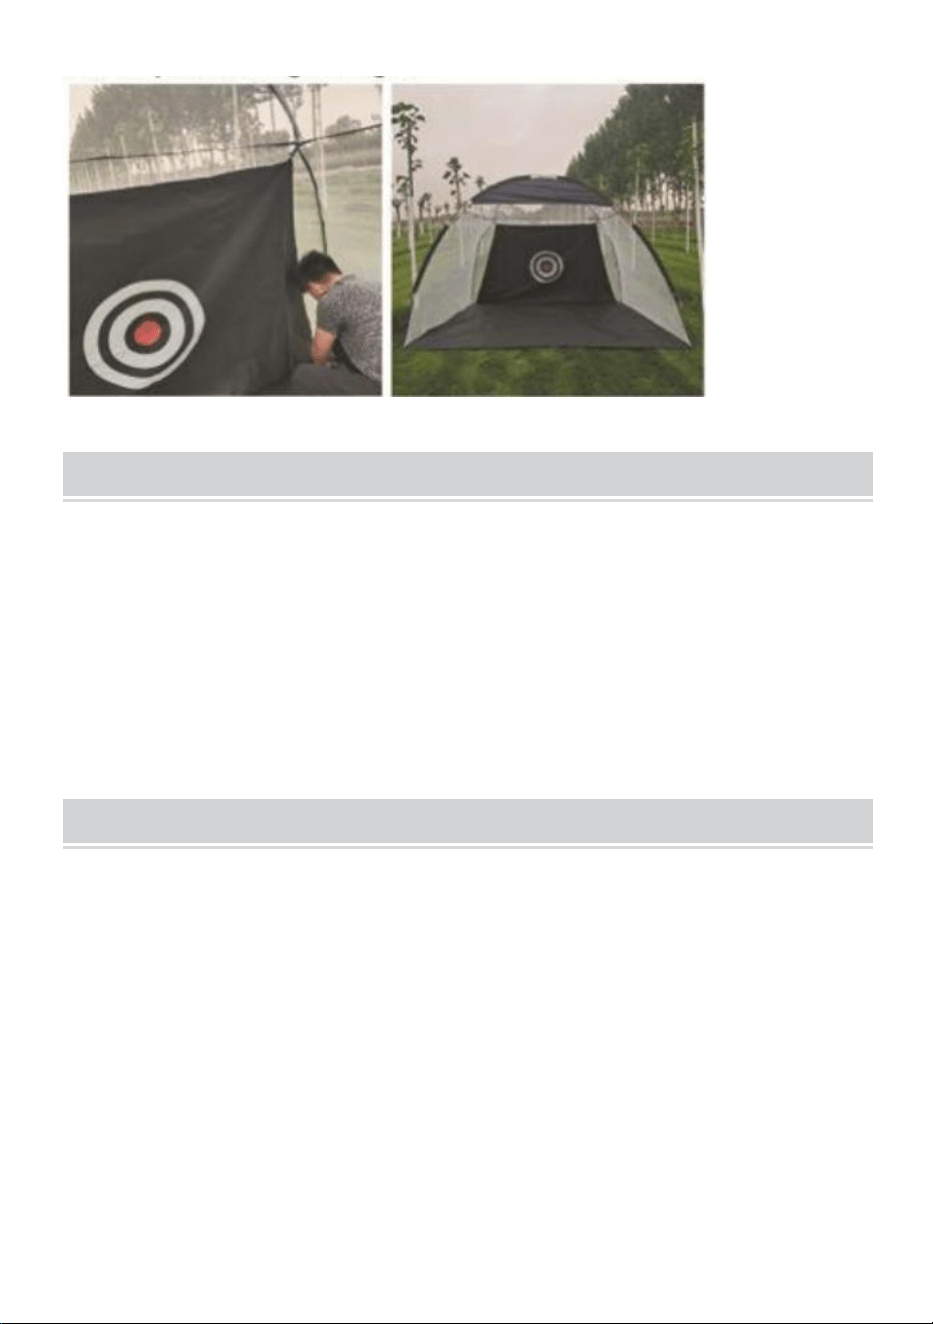
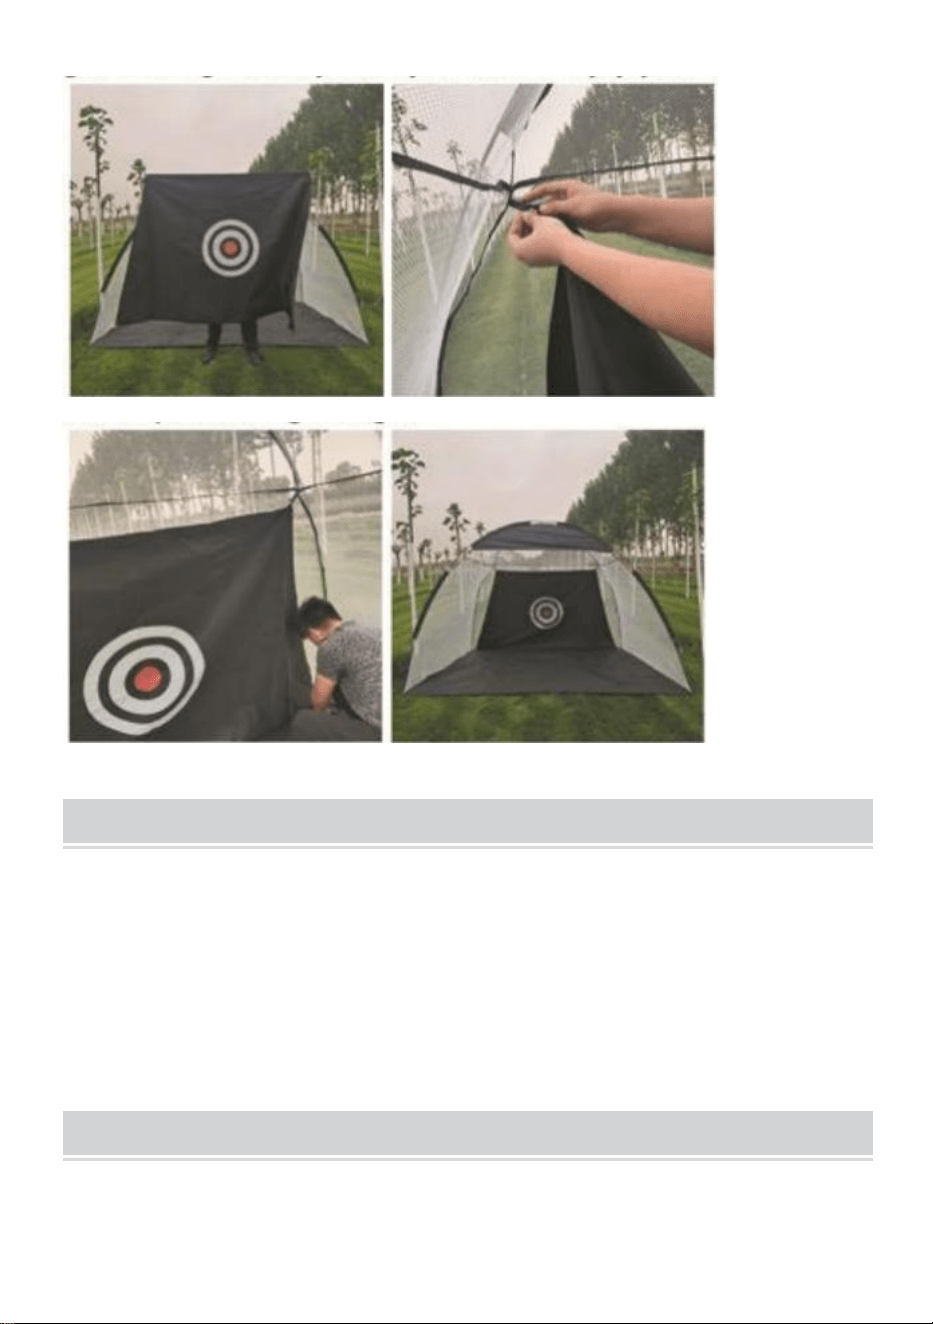
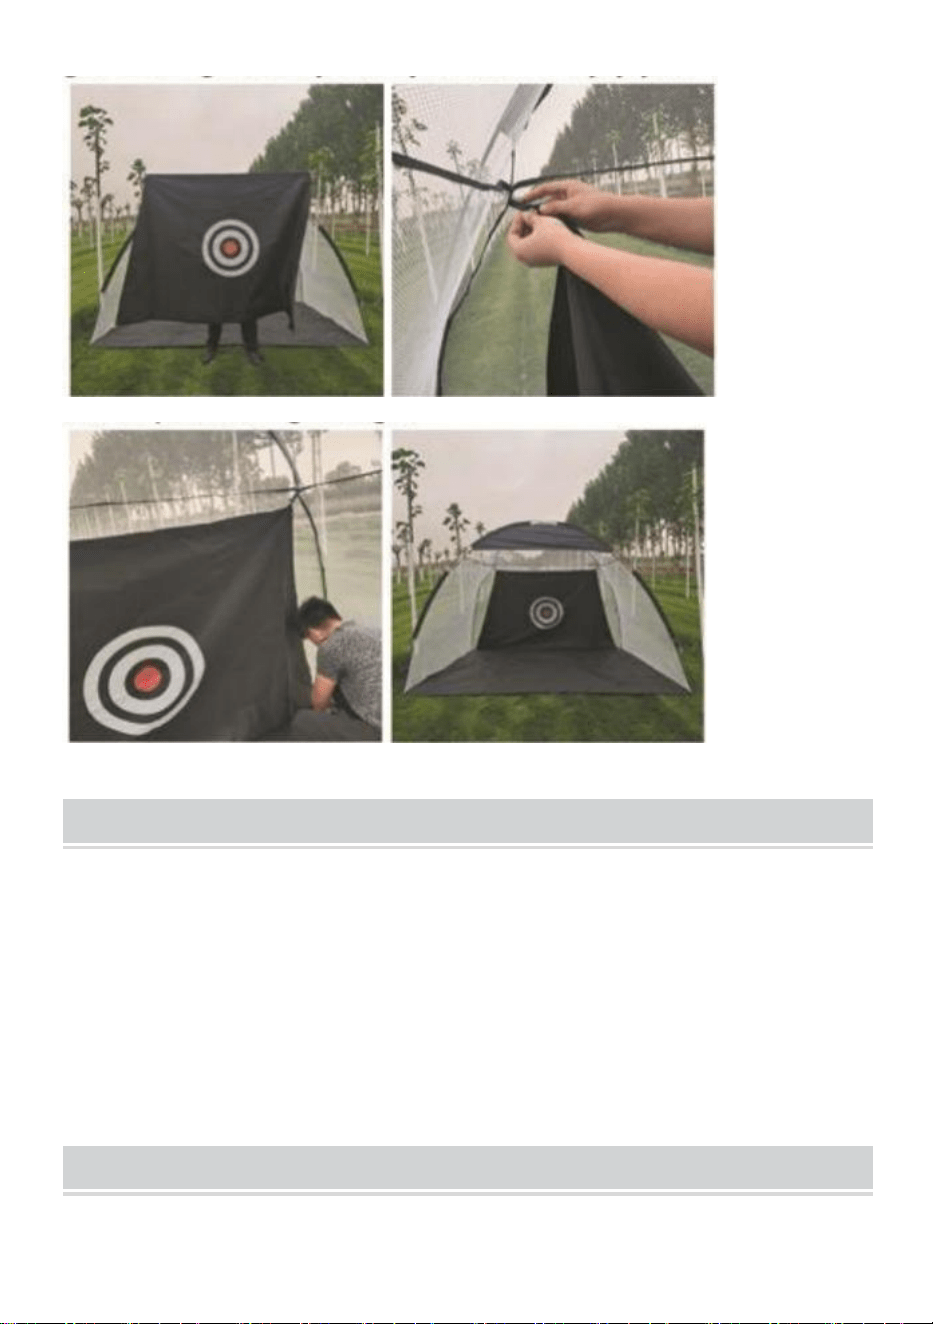
Step4:
● Open the hanging target, buckle the four loops at the four corners to the
plastic buttons on the backdrop. Well done, end of the installment!The
entire process lasts about 10 minutes only.Now you can take your golf
driving net anywhere anytime and enjoy your exclusive person golf club.
- 8 -
CLEANING AND STORAGE
1. Wipe with a soft, dry cloth. Never use an abrasive cleanser or harsh pad.
Be sure to keep the product dry
2. Children are not allowed to wipe the product to avoid tipping and falling
injuries.
3.After disassembling the product, please assemble the parts and
accessories.
TIPS
1. The installation effect of inclined ground nails is better
- 9 -
Manufacturer: Shanghaimuxinmuyeyouxiangongsi
Address: Shuangchenglu 803nong11hao1602A-1609shi, baoshanqu,
shanghai 200000 CN.
Imported to AUS: SIHAO PTY LTD. 1 ROKEVA STREETEASTWOOD
NSW 2122 Australia
Imported to USA: Sanven Technology Ltd. Suite 250, 9166 Anaheim
Place, Rancho Cucamonga, CA 91730
REP
UK
YH CONSULTING LIMITED.
C/O YH Consulting Limited Office 147,
Centurion House, London Road,
Staines-upon-Thames, Surrey, TW18 4AX
REP
EC
E-CrossStu GmbH
Mainzer Landstr.69,
60329 Frankfurt am Main.
Made In China


Techniczny Wsparcie i certyfikat gwarancji elektronicznej www.vevor.com/support
SIATKA GOLFOWA
MODELE: FL-004 / FL-05 /
FL-05A / FL-P255
We continue to be committed to provide you tools with competitive price.
"Save Half", "Half Price" or any other similar expressions used by us only represents an
estimate of savings you might benefit from buying certain tools with us compared to the major
top brands and does not necessarily mean to cover all categories of tools offered by us. You
are kindly reminded to verify carefully when you are placing an order with us if you are
actually saving half in comparison with the top major brands.
- 1 -
MODEL: FL-004 / FL-05 / FL-05A / FL-P255
Have product questions? Need technical support? Please feel free to
contact us:
Technical Support and E-Warranty Certificate
www.vevor.com/support
NEED HELP? CONTACT US!
This is the original instruction, please read all manual instructions
carefully before operating. VEVOR reserves a clear interpretation of our
user manual. The appearance of the product shall be subject to the
product you received. Please forgive us that we won't inform you again if
there are any technology or software updates on our product.
GOLF NET

- 2 -
Ostrzeżenie: Aby zminimalizować ryzyko obrażeń, użytkownik
powinien uważnie przeczytać instrukcję obsługi.
SAFETY WARNINGS AND PRECAUTIONS
Dziękujemy za korzystanie z tego produktu . Aby mieć pewność, że
możesz prawidłowo obsługiwać maszynę, przeczytaj uważnie tę instrukcję
przed rozpoczęciem użytkowania i zachowaj ją na przyszłość . Upewnij się,
że przeczytałeś środki ostrożności i zasady bezpieczeństwa na tej stronie,
aby zapewnić bezpieczne użytkowanie . Niniejsza instrukcja zawiera
ostrzeżenia i środki ostrożności dotyczące bezpieczeństwa, obsługi,
konserwacji i czyszczenia . Ostrzeżenia i instrukcje omówione w niniejszej
instrukcji nie mogą objąć wszystkich możliwych warunków i sytuacji, które
mogą wystąpić . Ostrożność i zdrowy rozsądek nie są wbudowane w ten
produkt, ponieważ uważamy, że użytkownicy będą przestrzegać tych
kodów .
Przed użyciem urządzenia należy przeczytać WSZYSTKIE instrukcje .
1. Montaż musi być zgodny z poniższymi instrukcjami. Nieprawidłowy
montaż może być niebezpieczny. Podczas montażu należy nosić
wytrzymałe rękawice robocze.
2. Nie przychodź na zgromadzenie, jeśli jesteś zmęczony lub pod
wpływem alkoholu, narkotyków lub leków.
3. Waga, elastyczność i inne właściwości produktu obowiązują wyłącznie
w przypadku produktów prawidłowo i w całości zmontowanych .
4. Utrzymuj miejsce zgromadzenia w czystości i zapewnij dobre
oświetlenie.
5. Podczas montażu nie dopuszczać osób postronnych na teren montażu.
6. To jest sprzęt sportowy, nie zabawka, należy go używać pod nadzorem
trenera. Nie pozwalaj dzieciom i zwierzętom bawić się samemu lub zbliżać
się do tego przedmiotu . Produkty nie mogą się wspinać.
7. Stosować wyłącznie zgodnie z przeznaczeniem. Nie siadać ani nie
stawać na produkcie.
8. Przed każdym użyciem sprawdź. Nie używaj, jeśli części są luźne lub
uszkodzone.

- 3 -
9. Zawieszenie się osób lub przedmiotów na produkcie może spowodować
jego upadek .
10. Podczas korzystania z samochodu zwracaj uwagę na pieszych i
pojazdy.
11. Nie należy stosować tego urządzenia do celów innych niż wskazane .
12. Siatka nie może być używana do umieszczania przedmiotów, aby
uniknąć uszkodzeń.
13. Nie należy używać go w celach komercyjnych .
14. NIE CZYŚCIĆ ŻADNYMI MATERIAŁAMI ŚCIERNYMI .
15. Nigdy nie pozostawiaj urządzenia bez nadzoru podczas użytkowania .
16. Mocz i odchody zwierząt domowych mogą uszkodzić produkt, dlatego
należy trzymać je z daleka .
17. Nie umieszczaj produktu na gorącym powietrzu, palnikach
elektrycznych lub grzejnikach ani w ich pobliżu .
Fajerwerki, papierosy, race i inne przedmioty mogą zapalić produkt.
Prosimy trzymać się z daleka ich.
18. Produkt należy umieścić na płaskiej powierzchni . Należy go
zainstalować w otwartym i bezpiecznym miejscu, unikając miejsc w pobliżu
okien, dróg, linii kolejowych, rzek itp.
19. Nie umieszczaj w wilgotnym środowisku .
OSTRZEŻENIE:
20. To urządzenie nie jest przeznaczone do użytku przez osoby młode
lub niedołężne, chyba że są nadzorowane przez odpowiedzialną
osobę, aby zapewnić, że mogą bezpiecznie korzystać z urządzenia.
Małe dzieci powinny być nadzorowane, aby upewnić się, że nie bawią
się produktem . Zwierzęta domowe powinny trzymać się z dala od
produktu.
Nie używaj na zewnątrz w deszczowe i pochmurne dni, unikaj uderzeń
piorunów i upadków . Ludzie lub zwierzęta wiszące na produkcie
mogą spowodować obrażenia lub śmierć .
OSTRZEŻENIE Aby prawidłowo zainstalować produkt, należy
postępować zgodnie z instrukcją.
OSTRZEŻENIE Nieprawidłowa instalacja może być niebezpieczna.

- 4 -
OSTRZEŻENIE Wszelkie dodatkowe lub zamienne części należy
zamawiać w naszej firmie.
OSTRZEŻENIE Regularnie sprawdzaj, czy wszystkie elementy
montażowe są odpowiednio dokręcone.
OSTRZEŻENIE Nie należy używać siatki treningowej w pobliżu
otwartego ognia lub innych źródeł ciepła.
OSTRZEŻENIE Przed montażem i okresowo w trakcie użytkowania
należy sprawdzić, czy produkt nie ma uszkodzonych elementów
montażowych, luźnych połączeń, brakujących części lub ostrych
krawędzi.
OSTRZEŻENIE Podczas korzystania z siatki do ćwiczeń golfowych
upewnij się, że nikt nie znajduje się w pobliżu produktu. Uwaga:
Szybkie piłki golfowe mogą zranić ludzi.
OSTRZEŻENIE Nie używaj siatki do ćwiczeń golfowych, jeśli nie
możesz dokładnie zastosować się do tych instrukcji.
ASSEMBLY STEPS
1. Prosimy o ostrożną utylizację plastikowych toreb i przechowywanie ich
w miejscu niedostępnym dla dzieci i zwierząt domowych.
2. Sprawdź wszystkie dostarczone komponenty zgodnie z listą w tej
instrukcji. Upewnij się, że masz wszystkie wymienione części.
3. Pomimo zachowania szczególnej ostrożności podczas produkcji tego
produktu, należy zachować ostrożność w trakcie montażu, aby uniknąć
zarysowań ostrymi krawędziami.
Krok 1 :
● Otwórz torbę transportową i sprawdź, co się w niej znajduje. Powinny w
niej znajdować się: 2 rozkładane drążki z włókna szklanego, 1 wisząca
tarcza, 1 siatka do jazdy. Następnie połącz 2 drążki z włókna szklanego,
jak pokazano na zdjęciach po prawej stronie.
● Wystarczy, że wyrównasz je poziomo, ponieważ będą zostanie
- 5 -
połączone automatycznie.
Krok 2:
● Rozszerz siatkę ćwiczeniową, Następnie włóż dwa pręty z włókna
- 6 -
szklanego do otworów w siatce i przeciągnij ją na drugi koniec. zrobione, 2
słupy z włókna szklanego powinny mieć kształt "X".
Krok 3:
● Włóż żelazny kołek (zaczepiony o żelazny pierścień siatki treningowej)
do obu końców słupków z włókna szklanego, możesz zauważyć, że łatwo
wpychasz je na jednym końcu, jednocześnie stosując pewną siłę na drugim.
Zasada polega na wygięciu słupków z włókna szklanego w kształt litery „X”
w celu wsparcia. Jest to podobne do instalowania namiotu w pewnym
stopniu bez konieczności martwienia się o złamany słupek z włókna
szklanego.

- 7 -
Krok 4:
● Otwórz wiszącą tarczę, zapnij cztery pętle na czterech rogach do
plastikowych guzików na tle. Dobra robota, koniec instalacji! Cały proces
trwa tylko około 10 minut. Teraz możesz zabrać swoją siatkę golfową w
dowolne miejsce i cieszyć się swoją ekskluzywną osobą klub golfowy.

- 8 -
CLEANING AND STORAGE
1. Przetrzyj miękką, suchą ściereczką. Nigdy nie używaj ściernego środka
czyszczącego ani szorstkiego gąbki. Upewnij się, że produkt jest suchy
2. Dzieciom nie wolno wycierać produktu, aby uniknąć obrażeń
spowodowanych przewróceniem się lub upadkiem .
3. Po rozmontowaniu produktu należy przystąpić do montażu części i
akcesoriów.
TIPS
1. Efekt montażu gwoździ wbitych na pochyłym podłożu jest lepszy

- 9 -
Producent: Shanghaimuxinmuyeyouxiangongsi
Adres: Shuangchenglu 803nong11hao1602A-1609shi, baoshanqu,
szanghaj 200000 CN.
Importowane do AUS: SIHAO PTY LTD. 1 ROKEVA
STREETEASTWOOD NSW 2122 Australia
Importowane do USA: Sanven Technology Ltd. Suite 250, 9166 Anaheim
Place, Rancho Cucamonga, CA 91730
REP
UK
YH CONSULTING LIMITED.
C/O YH Consulting Limited Office 147,
Centurion House, London Road,
Staines-upon-Thames, Surrey, TW18 4AX
REP
EC
E-CrossStu GmbH
Mainzer Landstr.69,
60329 Frankfurt am Main.
Wyprodukowano w Chinach


Technisch Support und E-Garantie-Zertifikat www.vevor.com/support
GOLFNETZ
MODELL: FL-004 / FL-05 /
FL-05A / FL-P255
We continue to be committed to provide you tools with competitive price.
"Save Half", "Half Price" or any other similar expressions used by us only represents an
estimate of savings you might benefit from buying certain tools with us compared to the major
top brands and does not necessarily mean to cover all categories of tools offered by us. You
are kindly reminded to verify carefully when you are placing an order with us if you are
actually saving half in comparison with the top major brands.

- 1 -
MODELL: FL-004 / FL-05 / FL-05A / FL-P255
Have product questions? Need technical support? Please feel free to
contact us:
Technical Support and E-Warranty Certificate
www.vevor.com/support
NEED HELP? CONTACT US!
This is the original instruction, please read all manual instructions
carefully before operating. VEVOR reserves a clear interpretation of our
user manual. The appearance of the product shall be subject to the
product you received. Please forgive us that we won't inform you again if
there are any technology or software updates on our product.
GOLF NET

- 2 -
Warnung: Um das Verletzungsrisiko zu verringern, muss der
Benutzer die Bedienungsanleitung sorgfältig lesen.
SAFETY WARNINGS AND PRECAUTIONS
Vielen Dank, dass Sie dieses Produkt verwenden . Um sicherzustellen,
dass Sie die Maschine richtig bedienen können, lesen Sie diese Anleitung
vor der Inbetriebnahme sorgfältig durch und bewahren Sie sie für spätere
Verwendung auf . Lesen Sie unbedingt die Vorsichtsmaßnahmen und
Sicherheitshinweise auf dieser Seite, um eine sichere Verwendung zu
gewährleisten . In diesem Handbuch werden Sicherheitswarnungen und
Vorsichtsmaßnahmen sowie Bedienung, Wartung und Reinigung
beschrieben . Die in diesem Handbuch beschriebenen Warnungen und
Anweisungen können nicht alle möglichen Bedingungen und Situationen
abdecken, die auftreten können . Vorsicht und gesunder
Menschenverstand sind bei diesem Produkt nicht angebracht, da wir
davon ausgehen, dass die Verwendung diesen Vorschriften entspricht .
Bitte lesen Sie ALLE Anweisungen, bevor Sie Ihre Maschine
verwenden .
1. Beim Zusammenbau müssen diese Anweisungen befolgt werden.
Falscher Zusammenbau kann gefährlich sein. Tragen Sie beim
Zusammenbau strapazierfähige Arbeitshandschuhe.
2. Nicht zusammenbauen, wenn Sie müde sind oder unter dem Einfluss
von Alkohol, Drogen oder Medikamenten stehen.
3. Gewicht, Elastizität und sonstige Produkteigenschaften gelten nur für
korrekt und vollständig montierte Produkte .
4. Halten Sie den Versammlungsbereich sauber und gut beleuchtet.
5. Halten Sie während der Montage unbeteiligte Personen vom Bereich
fern.
6. Dies ist ein Sporttrainingsgerät und kein Spielzeug. Es darf nur unter
Anleitung eines Trainers verwendet werden. Erlauben Sie Kindern und
Haustieren nicht, alleine mit dem Gerät zu spielen oder sich diesem zu
nähern . Das Produkt darf nicht hochklettern.

- 3 -
7. Nur bestimmungsgemäß verwenden. Nicht auf dem Produkt sitzen oder
stehen.
8. Vor jedem Gebrauch überprüfen. Nicht verwenden, wenn Teile lose oder
beschädigt sind.
9. Personen oder Gegenstände, die am Produkt hängen, können dazu
führen, dass das Produkt herunterfällt .
10. Achten Sie bei der Benutzung auf Fußgänger und Fahrzeuge.
11. Verwenden Sie dieses Gerät nicht für andere als die angegebenen
Zwecke .
12. Gegenstände können nicht im Netz platziert werden, um Schäden zu
vermeiden.
13. Verwenden Sie es nicht für kommerzielle Zwecke .
14. REINIGEN SIE ES NICHT MIT SCHLEIFENDEN MATERIALIEN .
15. Lassen Sie das Gerät während des Gebrauchs niemals
unbeaufsichtigt .
16. Urin und Kot von Haustieren können das Produkt beschädigen. Halten
Sie es daher fern .
17. Stellen Sie das Produkt nicht auf oder in die Nähe von heißer Luft,
elektrischen Brennern oder Heizgeräten .
Feuerwerkskörper, Zigaretten, Fackeln und andere Gegenstände können
das Produkt entzünden. Bitte halten Sie sich fern von ihnen.
18. Das Produkt sollte auf einer ebenen Fläche platziert werden . Und es
sollte an einem offenen und sicheren Ort installiert werden. Vermeiden Sie
Orte in der Nähe von Fenstern, Straßen, Eisenbahnen, Flüssen usw.
19. Stellen Sie es nicht in eine feuchte Umgebung .
WARNUNG:
20. Dieses Gerät ist nicht für die Benutzung durch junge oder
gebrechliche Personen bestimmt, es sei denn, sie werden von einer
verantwortlichen Person beaufsichtigt, um sicherzustellen, dass sie
das Gerät sicher benutzen können. Kleine Kinder sollten
beaufsichtigt werden, um sicherzustellen, dass sie nicht mit dem
Produkt spielen . Haustiere sollten sich vom Produkt fernhalten.

- 4 -
. Blitzeinschläge und Stürze vermeiden . Menschen oder Haustiere,
die am Produkt hängen, können Verletzungen oder den Tod
verursachen .
WARNUNG Bitte befolgen Sie die Anweisungen, um das Produkt
korrekt zu installieren.
WARNUNG Eine falsche Installation kann gefährlich sein.
ACHTUNG! Alle Zusatz- und Ersatzteile sollten von unserem
Unternehmen bezogen werden.
WARNUNG Überprüfen Sie regelmäßig, dass alle
Montageverschraubungen ordnungsgemäß festgezogen sind.
WARNUNG Verwenden Sie das Übungsnetz nicht in der Nähe von
offenem Feuer oder anderen Wärmequellen.
WARNUNG Überprüfen Sie dieses Produkt vor der Montage und
regelmäßig während des Gebrauchs auf beschädigte Hardware, lose
Verbindungen, fehlende Teile oder scharfe Kanten.
WARNUNG Achten Sie bei der Verwendung eines Golf-Übungsnetzes
darauf, dass sich niemand in der Nähe des Produkts aufhält. Hinweis:
Hochgeschwindigkeits-Golfbälle können Personen verletzen.
WARNUNG Verwenden Sie das Golf-Übungsnetz nicht, wenn Sie
diese Anweisungen nicht genau befolgen können.
ASSEMBLY STEPS
1. Bitte entsorgen Sie alle Plastiktüten sorgfältig und bewahren Sie sie
außerhalb der Reichweite von Kindern und Haustieren auf.
2. Überprüfen Sie alle mitgelieferten Komponenten anhand der Liste in
diesem Handbuch. Stellen Sie sicher, dass Sie alle aufgeführten Teile
haben.
3. Obwohl bei der Herstellung dieses Produkts besondere Sorgfalt walten
gelassen wurde, müssen Sie beim Zusammenbau vorsichtig sein, um
Kratzer durch scharfe Kanten zu vermeiden.
Schritt 1 :
● Öffnen Sie die Tragetasche und überprüfen Sie den Inhalt. Es sollten
folgende Gegenstände sein: 2 ausziehbare Fiberglasstangen, 1
hängendes Ziel, 1 Fahrnetz. Verbinden Sie dann die beiden
- 5 -
Fiberglasstangen wie in den Bildern rechts gezeigt.
● Sie müssen sie nur horizontal ausrichten, denn sie automatisch
verbunden.
Schritt 2:
● Erweitern Sie das Übungsnetz, Dann stecken Sie die 2 Fiberglasstangen
in die Löcher des Netzes und führen Sie es bis zum anderen Ende durch.
es ist vollbracht, Die beiden Fiberglasstangen sollten die Form eines "X".
- 6 -
Schritt 3:
● Den Eisenstift einstecken (am Eisenring des Übungsnetzes einhaken) in
beide Enden der Fiberglasstangen, Sie werden merken, dass Sie es an
einem Ende leicht hineindrücken können, während Sie am anderen Ende
etwas Kraft anwenden. Das Prinzip besteht darin, die Fiberglasstangen zur
Unterstützung in eine „X“-Form zu biegen. Es ist in gewisser Weise ähnlich
wie das Aufstellen eines Zelts, nur dass Sie sich keine Sorgen um eine
gebrochene Fiberglasstange machen müssen.

- 7 -
Schritt 4:
● Öffnen Sie das hängende Ziel, befestigen Sie die vier Schlaufen an den
vier Ecken an den Plastikknöpfen auf dem Hintergrund. Gut gemacht,
Ende der Folge! Der gesamte Vorgang dauert nur etwa 10 Minuten. Jetzt
können Sie Ihr Golf-Driving-Netz jederzeit und überall mitnehmen und Ihre
exklusive Person genießen. Golfclub.

- 8 -
CLEANING AND STORAGE
1. Mit einem weichen, trockenen Tuch abwischen. Verwenden Sie niemals
ein Scheuermittel oder ein raues Pad. Achten Sie darauf, das Produkt
trocken zu halten.
2. Um Umkipp- und Sturzverletzungen zu vermeiden, dürfen Kinder das
Produkt nicht abwischen .
3. Nachdem Sie das Produkt zerlegt haben, montieren Sie bitte die Teile
und das Zubehör.
TIPS
- 9 -
1. Der Installationseffekt von geneigten Bodennägeln ist besser
Hersteller: Shanghaimuxinmuyeyouxiangongsi
Adresse: Shuangchenglu 803nong11hao1602A-1609shi, baoshanqu,
Shanghai 200000 CN.
Nach AUS importiert: SIHAO PTY LTD. 1 ROKEVA
STREETEASTWOOD NSW 2122 Australien
Importiert in die USA: Sanven Technology Ltd. Suite 250, 9166 Anaheim
Place, Rancho Cucamonga, CA 91730
REP
UK
YH CONSULTING LIMITED.
C/O YH Consulting Limited Office 147,
Centurion House, London Road,
Staines-upon-Thames, Surrey, TW18 4AX
REP
EC
E-CrossStu GmbH
Mainzer Landstr.69,
60329 Frankfurt am Main.
In China hergestellt


Technique Certificat d'assistance et de garantie électronique
www.vevor.com/support
FILET DE GOLF
MODÈLE : FL-004 / FL-05 /
FL-05A / FL-P255
We continue to be committed to provide you tools with competitive price.
"Save Half", "Half Price" or any other similar expressions used by us only represents an
estimate of savings you might benefit from buying certain tools with us compared to the major
top brands and does not necessarily mean to cover all categories of tools offered by us. You
are kindly reminded to verify carefully when you are placing an order with us if you are
actually saving half in comparison with the top major brands.

- 1 -
MODÈLE : FL-004/FL-05/FL-05A/FL-P255.
Have product questions? Need technical support? Please feel free to
contact us:
Technical Support and E-Warranty Certificate
www.vevor.com/support
NEED HELP? CONTACT US!
This is the original instruction, please read all manual instructions
carefully before operating. VEVOR reserves a clear interpretation of our
user manual. The appearance of the product shall be subject to the
product you received. Please forgive us that we won't inform you again if
there are any technology or software updates on our product.
GOLF NET

- 2 -
Avertissement - Pour réduire le risque de blessure, l'utilisateur
doit lire attentivement le manuel d'instructions.
SAFETY WARNINGS AND PRECAUTIONS
Merci d'avoir utilisé ce produit . Afin de vous assurer que vous pouvez
utiliser la machine correctement, lisez attentivement ces instructions avant
de l'utiliser et conservez-les soigneusement pour référence ultérieure .
Veuillez vous assurer de lire les précautions et les règles de sécurité de
cette page pour garantir une utilisation en toute sécurité . Ce manuel décrit
les avertissements et précautions de sécurité, le fonctionnement,
l'entretien et le nettoyage . Les avertissements et instructions examinés
dans ce manuel ne peuvent pas couvrir toutes les conditions et situations
possibles qui peuvent se produire . La prudence et le bon sens ne sont pas
intégrés dans ce produit, car nous pensons que les utilisations seront
conformes à ces codes .
Veuillez lire TOUTES les instructions avant d'utiliser votre machine .
1. L'assemblage doit être effectué conformément aux instructions
ci-dessous. Un assemblage incorrect peut être dangereux. Portez des
gants de travail résistants pendant l'assemblage.
2. Ne montez pas lorsque vous êtes fatigué ou sous l’influence de l’alcool,
de drogues ou de médicaments.
3. Le poids, l'élasticité et les autres propriétés du produit s'appliquent
uniquement aux produits correctement et entièrement assemblés .
4. Gardez la zone de montage propre et bien éclairée.
5. Gardez les spectateurs hors de la zone pendant l’assemblage.
6. Il s'agit d'un équipement d'entraînement sportif, pas d'un jouet, il doit
être utilisé sous la supervision d'un entraîneur. Ne laissez pas les enfants
et les animaux domestiques jouer seuls ou s'approcher de cet article .
Produits impossibles à grimper.
7. Utiliser uniquement comme prévu. Ne pas s'asseoir ni se tenir debout
sur le produit.
8. Inspectez l'appareil avant chaque utilisation. Ne l'utilisez pas si des
pièces sont desserrées ou endommagées.

- 3 -
9. Les personnes ou les objets suspendus au produit provoqueront la
chute du produit .
10. Faites attention aux piétons et aux véhicules lors de l'utilisation.
11. N'utilisez pas cet appareil à d'autres fins que celles indiquées .
12. Le filet ne peut pas placer d'objets pour éviter tout dommage.
13. Ne l'utilisez pas à des fins commerciales .
14. NE LE NETTOYEZ PAS AVEC UN MATÉRIAU ABRASIF .
15. Ne le laissez jamais sans surveillance pendant son utilisation .
16. L'urine et les excréments d'animaux domestiques peuvent
endommager le produit, veuillez les tenir à l'écart .
17. Ne placez pas le produit sur ou à proximité d'appareils à air chaud, de
brûleurs électriques ou de radiateurs .
Les feux d'artifice, les cigarettes, les fusées éclairantes et autres objets
peuvent enflammer le produit. Veuillez vous tenir à l'écart eux.
18. Le produit doit être placé sur une surface plane . Il doit être installé
dans un endroit ouvert et sûr, en évitant les endroits proches des fenêtres,
des routes, des voies ferrées, des rivières, etc.
19. Ne le placez pas dans un environnement humide .
AVERTISSEMENT:
20. Cet appareil n'est pas destiné à être utilisé par des jeunes ou des
personnes handicapées, à moins qu'ils ne soient surveillés par une
personne responsable afin de s'assurer qu'ils peuvent utiliser
l'appareil en toute sécurité. Les jeunes enfants doivent être surveillés
afin de s'assurer qu'ils ne jouent pas avec le produit . Les animaux
domestiques doivent rester à l'écart du produit.
Ne pas utiliser à l'extérieur par temps pluvieux ou nuageux, éviter les
coups de foudre et les chutes . Les personnes ou les animaux
domestiques accrochés au produit peuvent provoquer des blessures
ou la mort .
AVERTISSEMENT Veuillez suivre les instructions pour installer
correctement le produit.
AVERTISSEMENT Une installation incorrecte peut être dangereuse.
ATTENTION Toute pièce supplémentaire ou de rechange doit être
obtenue auprès de notre société.

- 4 -
AVERTISSEMENT Vérifiez régulièrement que tous les accessoires de
montage sont correctement serrés.
AVERTISSEMENT N'utilisez pas le filet d'entraînement à proximité
d'un feu ouvert ou d'autres sources de chaleur.
AVERTISSEMENT Vérifiez ce produit pour déceler tout matériel
endommagé, tout joint desserré, toute pièce manquante ou tout bord
tranchant avant l'assemblage et périodiquement pendant l'utilisation.
AVERTISSEMENT Lorsque vous utilisez un filet d'entraînement de
golf, assurez-vous que personne ne se trouve à proximité du produit.
Remarque : les balles de golf à grande vitesse peuvent blesser les
personnes.
AVERTISSEMENT N'utilisez pas le filet d'entraînement de golf si vous
ne pouvez pas suivre exactement ces instructions.
ASSEMBLY STEPS
1. Veuillez jeter tous les sacs en plastique avec soin et les garder hors de
portée des enfants et des animaux domestiques.
2. Vérifiez tous les composants fournis conformément à la liste figurant
dans ce manuel. Assurez-vous d'avoir toutes les pièces répertoriées.
3. Bien que vous accordiez une attention particulière lors de la fabrication
de ce produit, vous devez être prudent lors du processus d'assemblage
pour éviter d'être rayé par des bords tranchants.
Étape 1 :
● Ouvrez le sac de transport et vérifiez les articles à l'intérieur, ils devraient
être : 2 poteaux extensibles en fibre de verre, 1 cible suspendue, 1 filet de
conduite. Connectez ensuite les 2 poteaux en fibre de verre comme
indiqué sur les images à droite.
● Les aligner horizontalement est tout ce que vous avez à faire car ils le
- 5 -
feront être connecté automatiquement.
Étape 2 :
● Étendez le filet d'entraînement, puis placez les 2 poteaux en fibre de

- 6 -
verre dans les trous du filet et faites-le passer jusqu'à l'autre
extrémité.Après c'est fait, les 2 poteaux en fibre de verre doivent
apparaître sous la forme d'un "X".
Étape 3 :
● Insérer la cheville en fer (accrochée à l'anneau en fer du filet
d'entraînement) En insérant les poteaux en fibre de verre dans les deux
extrémités, vous constaterez peut-être que vous les poussez facilement à
une extrémité tout en appliquant une certaine force à l'autre. Le principe
consiste à plier les poteaux en fibre de verre en forme de « X » pour les
soutenir. C'est similaire à l'installation d'une tente dans une certaine
mesure sans avoir à vous soucier d'un poteau en fibre de verre cassé.

- 7 -
Étape 4 :
● Ouvrez la cible suspendue, attachez les quatre boucles aux quatre coins
aux boutons en plastique de la toile de fond. Bravo, fin de l'installation !
L'ensemble du processus ne dure qu'environ 10 minutes. Vous pouvez
désormais emporter votre filet de golf n'importe où et à tout moment et
profiter de votre personne exclusive club de golf.

- 8 -
CLEANING AND STORAGE
1. Essuyez avec un chiffon doux et sec. N'utilisez jamais de nettoyant
abrasif ou de tampon agressif. Veillez à garder le produit au sec.
2. Les enfants ne sont pas autorisés à essuyer le produit pour éviter tout
basculement ou chute .
3. Après avoir démonté le produit, veuillez assembler les pièces et les
accessoires.
TIPS
1. L'effet d'installation des clous de sol inclinés est meilleur

- 9 -
Fabricant : Shanghaimuxinmuyeyouxiangongsi
Adresse : Shuangchenglu 803nong11hao1602A-1609shi, baoshanqu,
Shanghai 200000 CN.
Importé en Australie : SIHAO PTY LTD. 1 ROKEVA
STREETEASTWOOD NSW 2122 Australie
Importé aux États-Unis : Sanven Technology Ltd. Suite 250, 9166
Anaheim Place, Rancho Cucamonga, CA 91730
REP
UK
YH CONSULTING LIMITED.
C/O YH Consulting Limited Office 147,
Centurion House, London Road,
Staines-upon-Thames, Surrey, TW18 4AX
REP
EC
E-CrossStu GmbH
Mainzer Landstr.69,
60329 Frankfurt am Main.
Fabriqué en Chine


Technisch Ondersteuning en E-garantiecertificaat www.vevor.com/support
GOLFNET
MODEL: FL-004 / FL-05 /
FL-05A / FL-P255
We continue to be committed to provide you tools with competitive price.
"Save Half", "Half Price" or any other similar expressions used by us only represents an
estimate of savings you might benefit from buying certain tools with us compared to the major
top brands and does not necessarily mean to cover all categories of tools offered by us. You
are kindly reminded to verify carefully when you are placing an order with us if you are
actually saving half in comparison with the top major brands.

- 1 -
MODELLEN: FL-004 / FL-05 / FL-05A / FL-P255
Have product questions? Need technical support? Please feel free to
contact us:
Technical Support and E-Warranty Certificate
www.vevor.com/support
NEED HELP? CONTACT US!
This is the original instruction, please read all manual instructions
carefully before operating. VEVOR reserves a clear interpretation of our
user manual. The appearance of the product shall be subject to the
product you received. Please forgive us that we won't inform you again if
there are any technology or software updates on our product.
GOLF NET

- 2 -
Waarschuwing: om het risico op letsel te verkleinen, moet de
gebruiker de gebruiksaanwijzing zorgvuldig lezen.
SAFETY WARNINGS AND PRECAUTIONS
Bedankt voor het gebruik van dit product . Om er zeker van te zijn dat u de
machine correct kunt bedienen, leest u deze instructie zorgvuldig door
voordat u deze gebruikt en bewaart u deze voor toekomstig gebruik . Lees
de voorzorgsmaatregelen en veiligheidsregels op deze pagina om uw
veilige gebruik te garanderen . Deze handleiding beschrijft
veiligheidswaarschuwingen en voorzorgsmaatregelen, bediening,
onderhoud en reiniging . De waarschuwingen en instructies die in deze
handleiding worden besproken, kunnen niet alle mogelijke
omstandigheden en situaties dekken die zich kunnen voordoen .
Voorzichtigheid en gezond verstand zijn niet ingebouwd in dit product,
omdat wij geloven dat het gebruik aan deze codes zal voldoen .
Lees ALLE instructies voordat u uw apparaat gebruikt .
1. Assembleer volgens deze instructies. Onjuiste montage kan gevaarlijk
zijn. Draag stevige werkhandschoenen tijdens de montage.
2. Kom niet bijeen als u moe bent of onder invloed van alcohol, drugs of
medicijnen.
3. Gewicht, elasticiteit en andere producteigenschappen zijn alleen van
toepassing op correct en volledig gemonteerde producten .
4. Zorg ervoor dat de verzamelplaats schoon en goed verlicht is.
5. Houd omstanders uit de buurt tijdens de montage.
6. Dit is een sporttrainingsapparaat, geen speelgoed. Het moet worden
gebruikt onder begeleiding van een coach. Laat kinderen en huisdieren
niet alleen spelen of dit item benaderen . Kan niet klimmen op producten.
7. Gebruik alleen zoals bedoeld. Ga niet op het product zitten of staan.
8. Inspecteer voor elk gebruik. Gebruik het niet als onderdelen los of
beschadigd zijn.
9. Mensen of voorwerpen die aan het product hangen, kunnen ervoor
zorgen dat het product valt .
10. Let op voetgangers en voertuigen bij gebruik.

- 3 -
11. Gebruik dit apparaat niet voor andere doeleinden dan waarvoor het is
aangegeven .
12. Er kunnen geen voorwerpen op het net worden geplaatst om schade te
voorkomen.
13. Gebruik het niet voor commerciële doeleinden .
14. MAAK HET NIET SCHOON MET SCHURENDE MATERIALEN .
15. Laat het apparaat nooit onbeheerd achter terwijl het in gebruik is .
16. Urine en ontlasting van huisdieren kunnen het product beschadigen,
houd het daarom uit de buurt .
17. Plaats het product niet op of in de buurt van hetelucht-, elektrische
kookplaten of verwarmingstoestellen .
Vuurwerk, sigaretten, fakkels en andere voorwerpen kunnen het product
doen ontbranden. Blijf uit de buurt van hen.
18. Het product moet op een vlakke ondergrond worden geplaatst . En het
moet op een open en veilige plek worden geïnstalleerd, waarbij plaatsen in
de buurt van ramen, wegen, spoorwegen, rivieren, enz. moeten worden
vermeden.
19. Plaats het niet in een vochtige omgeving .
WAARSCHUWING:
20. Dit apparaat is niet bedoeld voor gebruik door jonge of zwakke
personen, tenzij onder toezicht van een verantwoordelijke persoon
om ervoor te zorgen dat zij het apparaat veilig kunnen gebruiken.
Jonge kinderen moeten onder toezicht staan om ervoor te zorgen dat
ze niet met het product spelen . Huisdieren moeten uit de buurt van
het product blijven.
Niet buiten gebruiken op regenachtige en bewolkte dagen, vermijd
blikseminslagen en vallen . Mensen of huisdieren die aan het product
hangen, kunnen letsel of de dood veroorzaken .
WAARSCHUWING Volg de instructies om het product correct te
installeren.
WAARSCHUWING Een onjuiste installatie kan gevaarlijk zijn.
WAARSCHUWING Eventuele extra of vervangende onderdelen
dienen bij ons bedrijf te worden aangeschaft.

- 4 -
WAARSCHUWING Controleer regelmatig of alle montageonderdelen
goed vastzitten.
WAARSCHUWING Gebruik het oefennet niet in de buurt van open
vuur of andere warmtebronnen.
WAARSCHUWING Controleer dit product vóór de montage en
regelmatig tijdens het gebruik op beschadigde hardware, losse
verbindingen, ontbrekende onderdelen of scherpe randen.
WAARSCHUWING Wanneer u een golf oefennet gebruikt, zorg er dan
voor dat er niemand in de buurt van het product is. Let op: Hoge
snelheid golfballen kunnen mensen verwonden.
WAARSCHUWING Gebruik het golf oefennet niet als u deze
instructies niet nauwkeurig kunt volgen.
ASSEMBLY STEPS
1. Gooi alle plastic zakken zorgvuldig weg en houd ze buiten bereik van
kinderen en huisdieren.
2. Controleer alle meegeleverde componenten volgens de lijst in deze
handleiding. Zorg ervoor dat u alle vermelde onderdelen hebt.
3. Hoewel u bij de productie van dit product extra voorzichtig moet zijn,
moet u ook voorzichtig zijn tijdens de montage. Zo voorkomt u dat u
krassen oploopt door scherpe randen.
Stap 1 :
● Open de draagtas en controleer de inhoud. Dit zijn: 2x uitschuifbare
glasvezelstokken, 1x hangend doelwit, 1x drijfnet. Verbind vervolgens de 2
glasvezelstokken zoals aangegeven op de afbeeldingen rechts.
● Het enige wat u hoeft te doen, is ze horizontaal uitlijnen, want ze zullen
- 5 -
automatisch worden verbonden.
Stap 2:
● Breid het oefennet uit, steek dan de 2 glasvezelstokken in de gaten van

- 6 -
het net en haal het door naar het andere uiteinde. Daarna het is gedaan,
de 2 glasvezelpalen moeten de vorm hebben van een "X".
Stap 3:
● Plaats de ijzeren pen (vastgehaakt aan de ijzeren ring van het oefennet)
in beide uiteinden van de glasvezelstokken, zult u merken dat u het
gemakkelijk aan één kant erin duwt en aan de andere kant wat kracht zet.
Het principe is om de glasvezelstokken in een "X"-vorm te buigen voor
ondersteuning. Het is vergelijkbaar met het installeren van een tent, tot op
zekere hoogte, zonder dat u zich zorgen hoeft te maken over een
gebroken glasvezelstok.

- 7 -
Stap 4:
● Open het hangende doel, gesp de vier lussen aan de vier hoeken vast
aan de plastic knoppen op de achtergrond. Goed gedaan, einde van de
aflevering! Het hele proces duurt slechts ongeveer 10 minuten. Nu kunt u
uw golf driving net overal en altijd meenemen en genieten van uw
exclusieve persoon golfclub.

- 8 -
CLEANING AND STORAGE
1. Veeg af met een zachte, droge doek. Gebruik nooit een schurend
reinigingsmiddel of een ruwe pad. Zorg ervoor dat het product droog blijft
2. Kinderen mogen het product niet afvegen om te voorkomen dat het
product kantelt of valt .
3. Nadat u het product hebt gedemonteerd, monteert u de onderdelen en
accessoires.
TIPS
1. Het installatie-effect van schuine grondspijkers is beter

- 9 -
Fabrikant: Shanghaimuxinmuyeyouxiangongsi
Adres: Shuangchenglu 803nong11hao1602A-1609shi, baoshanqu,
shanghai 200000 CN.
Geïmporteerd naar AUS: SIHAO PTY LTD. 1 ROKEVA
STREETEASTWOOD NSW 2122 Australië
Geïmporteerd naar de VS: Sanven Technology Ltd. Suite 250, 9166
Anaheim Place, Rancho Cucamonga, CA 91730
REP
UK
YH CONSULTING LIMITED.
C/O YH Consulting Limited Office 147,
Centurion House, London Road,
Staines-upon-Thames, Surrey, TW18 4AX
REP
EC
E-CrossStu GmbH
Mainzer Landstr.69,
60329 Frankfurt am Main.
Gemaakt in China


Teknisk Support och e-garanticertifikat www.vevor.com/support
GOLFNÄT
MODELL: FL-004 / FL-05 /
FL-05A / FL-P255
We continue to be committed to provide you tools with competitive price.
"Save Half", "Half Price" or any other similar expressions used by us only represents an
estimate of savings you might benefit from buying certain tools with us compared to the major
top brands and does not necessarily mean to cover all categories of tools offered by us. You
are kindly reminded to verify carefully when you are placing an order with us if you are
actually saving half in comparison with the top major brands.

- 1 -
MODELL: FL-004 / FL-05 / FL-05A / FL-P255
Have product questions? Need technical support? Please feel free to
contact us:
Technical Support and E-Warranty Certificate
www.vevor.com/support
NEED HELP? CONTACT US!
This is the original instruction, please read all manual instructions
carefully before operating. VEVOR reserves a clear interpretation of our
user manual. The appearance of the product shall be subject to the
product you received. Please forgive us that we won't inform you again if
there are any technology or software updates on our product.
GOLF NET

- 2 -
Varning - För att minska risken för skada måste användaren
läsa instruktionerna noggrant.
SAFETY WARNINGS AND PRECAUTIONS
Tack för att du använder den här produkten . För att försäkra dig om att du
kan använda maskinen korrekt, läs denna instruktion noggrant före
användning och förvara den på rätt sätt för framtida referens . Var noga
med att läsa försiktighetsåtgärderna och säkerhetsreglerna på den här
sidan för att säkerställa din säker användning . Denna handbok kommer att
beskriva säkerhetsvarningar och försiktighetsåtgärder, drift, underhåll och
rengöring . Varningarna och instruktionerna som granskas i denna
handbok kan inte täcka alla möjliga tillstånd och situationer som kan
uppstå . Försiktighet och sunt förnuft är inte inbyggt i denna produkt,
eftersom vi tror att användningen kommer att följa dessa koder .
Läs ALLA instruktionerna innan du använder din maskin .
1. Montering måste följa dessa instruktioner. Felaktig montering kan vara
en fara. Använd kraftiga arbetshandskar vid montering.
2 . Sätt dig inte ihop när du är trött eller påverkad av alkohol, droger eller
mediciner.
3 . Vikt, elastik och andra produktegenskaper gäller endast för korrekt och
helmonterade produkter.
4 . Håll monteringsområdet rent och väl upplyst.
5 . Håll åskådare borta från området under monteringen.
6 . Detta är en träningsutrustning, inte en leksak, den måste användas
under ledning av en tränare. Tillåt inte barn och husdjur att leka ensamma
eller närma sig det här föremålet . Kan inte klättra på produkter.
7 . Använd endast som avsett. Sitt eller stå inte på produkten.
8 . Inspektera före varje användning. Använd den inte om delar är lösa
eller skadade.
9. Människor eller föremål som hänger på produkten kommer att få
produkten att falla .
10. Var uppmärksam på fotgängare och fordon vid användning.

- 3 -
11 . Använd inte denna enhet för andra ändamål än den angivna
användningen .
12. Nätet kan inte placera föremål för att undvika skador.
13. Använd den inte för kommersiella ändamål .
14. RENGÖRA DEN INTE MED NÅGOT SLIPPANDE MATERIAL .
15. Lämna den aldrig utan uppsikt när den används .
16. Urin och avföring från husdjur kan skada produkten, håll undan .
17. Placera inte produkten på eller nära varmluft, elektriska brännare eller
värmare .
Fyrverkerier, cigaretter, bloss och andra föremål kan antända produkten.
Vänligen håll dig borta från dem.
18 . Produkten ska placeras på en plan yta . Och den bör installeras på en
öppen och säker plats, undvik platser nära fönster, vägar, järnvägar, floder,
etc.
19. Placera den inte i en fuktig miljö .
VARNING:
20. Denna apparat är inte avsedd att användas av unga eller
handikappade personer om den inte övervakas av en ansvarig person
för att säkerställa att de kan använda apparaten på ett säkert sätt.
Små barn bör övervakas för att säkerställa att de inte leker med
produkten . Husdjur bör hålla sig borta från produkten.
Använd inte utomhus under regniga och molniga dagar, undvik
blixtnedslag och fall . Människor eller husdjur som hänger på
produkten kommer att orsaka skada eller dödsfall .
VARNING Följ instruktionerna för att installera produkten korrekt.
VARNING Felaktig installation kan vara farligt.
VARNING Alla ytterligare delar eller ersättningsdelar ska erhållas från
vårt företag.
VARNING Kontrollera regelbundet att alla monteringsbeslag är
ordentligt åtdragna.
VARNING Använd inte övningsnätet nära öppen eld eller andra
värmekällor.

- 4 -
VARNING Kontrollera denna produkt för skadad hårdvara, lösa fogar
saknade delar eller vassa kanter före montering och med jämna
mellanrum under användning.
VARNING När du använder ett golfträningsnät, se till att ingen är i
närheten av produkten. Obs: Höghastighetsgolfbollar kan skada
människor.
VARNING Använd inte golfträningsnätet om du inte kan följa dessa
instruktioner exakt.
ASSEMBLY STEPS
1. Kassera alla plastpåsar försiktigt och förvara dem borta från barn och
husdjur.
2. Kontrollera alla komponenter som tillhandahålls enligt listan i denna
manual. Se till att du har alla delarna i listan.
3. Även om du är särskilt uppmärksam när du tillverkar denna produkt,
måste du vara försiktig under monteringsprocessen för att undvika att bli
repad av vassa kanter.
Steg 1 :
● Öppna bärväskan och kontrollera föremålen inuti, de ska vara: 2X
utdragbara glasfiberstolpar, 1X hängande mål, 1 X körnät. Anslut sedan de
2 glasfiberstavarna som visas på bilderna till höger.
● Att justera dem horisontellt är allt du behöver göra eftersom de kommer
att göra det kopplas automatiskt.
- 5 -
Steg 2:
● Förläng övningsnätet, sätt sedan de 2 glasfiberstängerna i hålen på nätet
och få igenom det till andra änden. det är gjort, de 2 glasfiberstolparna ska
visas i form av en "X".
- 6 -
Steg 3:
● Sätt i järnpinnen (hakad på järnringen på övningsnätet) in i vardera
änden av glasfiberstolparna kan du upptäcka att du lätt trycker in den i ena
änden samtidigt som du applicerar lite styrka i den andra. Principen är att
böja glasfiberstolparna till "X"-form för stöd. Det liknar i viss mån att
installera ett tält utan att behöva oroa sig för en trasig glasfiberstång.

- 7 -
Steg 4:
● Öppna det hängande målet, spänn fast de fyra öglorna i de fyra hörnen
till plastknapparna på bakgrunden. Bra jobbat, slutet på avbetalningen!
Hela processen varar endast cirka 10 minuter. Nu kan du ta med ditt
golfnät var som helst när som helst och njuta av din exklusiva person
golfklubb.
- 8 -
CLEANING AND STORAGE
1. Torka av med en mjuk, torr trasa. Använd aldrig ett slipande
rengöringsmedel eller en hård pad. Se till att hålla produkten torr
2. Barn får inte torka av produkten för att undvika tipp- och fallskador .
3. Efter demontering av produkten, vänligen montera delarna och
tillbehören.
TIPS
1. Installationseffekten av lutande markspik är bättre
- 9 -
Tillverkare: Shanghaimuxinmuyeyouxiangongsi
Adress: Shuangchenglu 803nong11hao1602A-1609shi, baoshanqu,
shanghai 200000 CN.
Importerad till AUS: SIHAO PTY LTD. 1 ROKEVA STREETEASTWOOD
NSW 2122 Australien
Importerad till USA: Sanven Technology Ltd. Suite 250, 9166 Anaheim
Place, Rancho Cucamonga, CA 91730
REP
UK
YH CONSULTING LIMITED.
C/O YH Consulting Limited Office 147,
Centurion House, London Road,
Staines-upon-Thames, Surrey, TW18 4AX
REP
EC
E-CrossStu GmbH
Mainzer Landstr.69,
60329 Frankfurt am Main.
Tillverkad i Kina


Técnico Soporte y certificado de garantía electrónica www.vevor.com/support
RED DE GOLF
MODELO: FL-004 / FL-05 /
FL-05A / FL-P255
We continue to be committed to provide you tools with competitive price.
"Save Half", "Half Price" or any other similar expressions used by us only represents an
estimate of savings you might benefit from buying certain tools with us compared to the major
top brands and does not necessarily mean to cover all categories of tools offered by us. You
are kindly reminded to verify carefully when you are placing an order with us if you are
actually saving half in comparison with the top major brands.

- 1 -
MODELO: FL-004 / FL-05 / FL-05A / FL-P255
Have product questions? Need technical support? Please feel free to
contact us:
Technical Support and E-Warranty Certificate
www.vevor.com/support
NEED HELP? CONTACT US!
This is the original instruction, please read all manual instructions
carefully before operating. VEVOR reserves a clear interpretation of our
user manual. The appearance of the product shall be subject to the
product you received. Please forgive us that we won't inform you again if
there are any technology or software updates on our product.
GOLF NET

- 2 -
Advertencia: Para reducir el riesgo de lesiones, el usuario
debe leer atentamente el manual de instrucciones.
SAFETY WARNINGS AND PRECAUTIONS
Gracias por utilizar este producto . Para asegurarse de que puede utilizar
la máquina correctamente, lea atentamente estas instrucciones antes de
utilizarla y guárdelas en un lugar adecuado para futuras consultas .
Asegúrese de leer las precauciones y normas de seguridad de esta página
para garantizar un uso seguro . Este manual describirá las advertencias y
precauciones de seguridad, el funcionamiento, el mantenimiento y la
limpieza . Las advertencias e instrucciones revisadas en este manual no
pueden cubrir todas las posibles condiciones y situaciones que pueden
ocurrir . La precaución y el sentido común no están incorporados en este
producto, ya que creemos que los usos cumplirán con estos códigos .
Lea TODAS las instrucciones antes de utilizar su máquina .
1. Para el montaje, siga estas instrucciones. Un montaje incorrecto puede
suponer un riesgo. Utilice guantes de trabajo resistentes durante el
montaje.
2. No se reúna cuando esté cansado o bajo la influencia del alcohol,
drogas o medicamentos.
3. El peso, la elasticidad y otras propiedades del producto solo se aplican
a productos ensamblados correctamente y completamente.
4. Mantenga el área de reunión limpia y bien iluminada.
5. Mantenga a los transeúntes fuera del área durante el montaje.
6. Este es un equipo de entrenamiento deportivo, no un juguete. Debe
usarse bajo la supervisión de un entrenador. No permita que los niños y
las mascotas jueguen solos ni se acerquen a este artículo . No se pueden
trepar productos.
7. Utilícelo únicamente para el fin previsto. No se siente ni se pare sobre el
producto.
8. Inspeccione el producto antes de cada uso. No lo utilice si hay piezas
sueltas o dañadas.

- 3 -
9. Las personas u objetos que cuelguen del producto pueden provocar que
este se caiga .
10. Preste atención a los peatones y vehículos durante su uso.
11. No utilice esta unidad para ningún otro propósito que el uso indicado .
12. La red no puede colocar objetos para evitar daños.
13. No lo utilice con fines comerciales .
14. NO LO LIMPIE CON NINGÚN MATERIAL ABRASIVO .
15. Nunca lo deje desatendido mientras esté en uso .
16. La orina y las heces de las mascotas pueden dañar el producto,
manténgalas alejadas .
17. No coloque el producto sobre o cerca de fuentes de aire caliente,
quemadores eléctricos o calentadores .
Los fuegos artificiales, los cigarrillos, las bengalas y otros elementos
pueden encender el producto. Manténgase alejado a ellos.
18. El producto debe colocarse sobre una superficie plana y debe
instalarse en un lugar abierto y seguro, evitando lugares cercanos a
ventanas, carreteras, vías de tren, ríos, etc.
19. No lo coloque en un ambiente húmedo .
ADVERTENCIA:
20. Este aparato no está diseñado para que lo utilicen personas
jóvenes o enfermas, a menos que estén bajo la supervisión de una
persona responsable que garantice que pueden utilizar el aparato de
forma segura. Los niños pequeños deben estar supervisados para
garantizar que no jueguen con el producto . Las mascotas deben
mantenerse alejadas del producto.
No lo utilice al aire libre en días lluviosos o nublados, evite las caídas
y los rayos . Si personas o mascotas se cuelgan del producto, esto
puede causar lesiones o la muerte .
ADVERTENCIA Siga las instrucciones para instalar el producto
correctamente.
ADVERTENCIA Una instalación incorrecta puede ser peligrosa.
ADVERTENCIA Cualquier pieza adicional o de repuesto debe
obtenerse de nuestra empresa.

- 4 -
ADVERTENCIA Compruebe periódicamente que todos los accesorios
de montaje estén bien apretados.
ADVERTENCIA No utilice la red de práctica cerca de un fuego abierto
u otras fuentes de calor.
ADVERTENCIA Verifique que este producto no tenga hardware
dañado, uniones flojas, piezas faltantes o bordes afilados antes del
ensamblaje y periódicamente durante el uso.
ADVERTENCIA Al utilizar una red de práctica de golf, asegúrese de
que no haya nadie cerca del producto. Nota: Las pelotas de golf a alta
velocidad pueden lastimar a las personas.
ADVERTENCIA No utilice la red de práctica de golf si no puede seguir
exactamente estas instrucciones.
ASSEMBLY STEPS
1. Deseche todas las bolsas de plástico con cuidado y manténgalas fuera
del alcance de los niños y las mascotas.
2. Compruebe todos los componentes provistos según la lista de este
manual. Asegúrese de tener todas las piezas enumeradas.
3. Aunque se debe prestar especial atención al fabricar este producto, se
debe tener cuidado durante el proceso de montaje para evitar rayarlo con
bordes afilados.
Paso 1 :
● Abra la bolsa de transporte y revise los elementos dentro, deben ser: 2
postes de fibra de vidrio extensibles, 1 objetivo colgante, 1 red de
conducción. Luego, conecte los 2 postes de fibra de vidrio como se
muestra en las imágenes de la derecha.
● Alinearlos horizontalmente es todo lo que necesitas hacer, ya que...
- 5 -
conectarse automáticamente.
Paso 2:
● Ampliar la red de práctica, Luego, coloque los 2 postes de fibra de vidrio
- 6 -
en los agujeros de la red y páselo hasta el otro extremo. Después ya esta
hecho, Los 2 postes de fibra de vidrio deben tener la forma de un
"INCÓGNITA".
Paso 3:
● Inserte la clavija de hierro (enganchada al anillo de hierro de la red de
práctica) En ambos extremos de los postes de fibra de vidrio, es posible
que lo empujes fácilmente en un extremo mientras aplicas algo de fuerza
en el otro. El principio es doblar los postes de fibra de vidrio en forma de
"X" para que sirvan de soporte. Es similar a instalar una carpa hasta cierto
punto, sin necesidad de preocuparse por un poste de fibra de vidrio roto.
- 7 -
Paso 4:
● Abra la diana colgante, abroche los cuatro lazos de las cuatro esquinas
a los botones de plástico del fondo. ¡Bien hecho, fin de la instalación!
Todo el proceso dura solo unos 10 minutos. Ahora puede llevar su red de
golf a cualquier lugar en cualquier momento y disfrutar de su exclusiva red
personal. club de golf.

- 8 -
CLEANING AND STORAGE
1. Limpie con un paño suave y seco. Nunca utilice un limpiador abrasivo ni
una esponja áspera. Asegúrese de mantener el producto seco.
2. No se permite que los niños limpien el producto para evitar que se
vuelque o se caiga .
3. Después de desmontar el producto, vuelva a montar las piezas y los
accesorios.
TIPS
1. El efecto de instalación de los clavos de tierra inclinados es mejor.
- 9 -
Fabricante: Shanghaimuxinmuyeyouxiangongsi
Dirección: Shuangchenglu 803nong11hao1602A-1609shi, baoshanqu,
shanghai 200000 CN.
Importado a AUS: SIHAO PTY LTD. 1 ROKEVA STREETEASTWOOD
NSW 2122 Australia
Importado a EE. UU.: Sanven Technology Ltd. Suite 250, 9166 Anaheim
Place, Rancho Cucamonga, CA 91730
REP
UK
YH CONSULTING LIMITED.
C/O YH Consulting Limited Office 147,
Centurion House, London Road,
Staines-upon-Thames, Surrey, TW18 4AX
REP
EC
E-CrossStu GmbH
Mainzer Landstr.69,
60329 Frankfurt am Main.
Hecho en china


Tecnico Supporto e certificato di garanzia elettronica www.vevor.com/support
RETE DA GOLF
MODELLO: FL-004 / FL-05 /
MODELLO FL-05A / FL-P255
We continue to be committed to provide you tools with competitive price.
"Save Half", "Half Price" or any other similar expressions used by us only represents an
estimate of savings you might benefit from buying certain tools with us compared to the major
top brands and does not necessarily mean to cover all categories of tools offered by us. You
are kindly reminded to verify carefully when you are placing an order with us if you are
actually saving half in comparison with the top major brands.

- 1 -
MODELLO: FL-004 / FL-05 / FL-05A / FL-P255
Have product questions? Need technical support? Please feel free to
contact us:
Technical Support and E-Warranty Certificate
www.vevor.com/support
NEED HELP? CONTACT US!
This is the original instruction, please read all manual instructions
carefully before operating. VEVOR reserves a clear interpretation of our
user manual. The appearance of the product shall be subject to the
product you received. Please forgive us that we won't inform you again if
there are any technology or software updates on our product.
GOLF NET

- 2 -
Attenzione: per ridurre il rischio di lesioni, l'utente deve leggere
attentamente il manuale di istruzioni.
SAFETY WARNINGS AND PRECAUTIONS
Grazie per aver utilizzato questo prodotto . Per assicurarti di poter
utilizzare correttamente la macchina, leggi attentamente queste istruzioni
prima dell'uso e conservale correttamente per riferimento futuro .
Assicurati di leggere le precauzioni e le norme di sicurezza in questa
pagina per garantire un utilizzo sicuro . Questo manuale descriverà le
avvertenze e le precauzioni di sicurezza, il funzionamento, la
manutenzione e la pulizia . Le avvertenze e le istruzioni esaminate in
questo manuale non possono coprire tutte le possibili condizioni e
situazioni che potrebbero verificarsi . Attenzione e buon senso non sono
integrati in questo prodotto, poiché riteniamo che gli utilizzi saranno
conformi a questi codici .
Si prega di leggere TUTTE le istruzioni prima di utilizzare la
macchina .
1. Il montaggio deve seguire queste istruzioni. Un montaggio non corretto
può essere pericoloso. Indossare guanti da lavoro pesanti durante il
montaggio.
2. Non riunirsi quando si è stanchi o sotto l'effetto di alcol, droghe o
medicinali.
3. Il peso, l'elasticità e le altre proprietà del prodotto si applicano solo ai
prodotti assemblati correttamente e completamente .
4. Mantenere l'area di assemblaggio pulita e ben illuminata.
5. Tenere gli astanti fuori dall'area durante l'assemblaggio.
6. Questo è un attrezzo per l'allenamento sportivo, non un giocattolo, deve
essere utilizzato sotto la guida di un allenatore. Non permettere ai bambini
e agli animali domestici di giocare da soli o di avvicinarsi a questo articolo .
Prodotti non adatti all'arrampicata.
7. Utilizzare solo come previsto. Non sedersi o stare in piedi sul prodotto.
8. Ispezionare prima di ogni utilizzo. Non utilizzarlo se le parti sono
allentate o danneggiate.

- 3 -
9. Persone o oggetti appesi al prodotto possono causare la caduta del
prodotto .
10. Prestare attenzione ai pedoni e ai veicoli durante l'utilizzo.
11. Non utilizzare l'unità per scopi diversi da quelli indicati .
12. La rete non può posizionare oggetti per evitare danni.
13. Non utilizzarlo per scopi commerciali .
14. NON PULIRLO CON ALCUN MATERIALE ABRASIVO .
15. Non lasciarlo mai incustodito durante l'uso .
16. L'urina e le feci degli animali domestici possono danneggiare il prodotto,
tenerli lontani .
17. Non posizionare il prodotto sopra o vicino a fonti di aria calda, fornelli
elettrici o caloriferi .
Fuochi d'artificio, sigarette, razzi e altri oggetti possono incendiare il
prodotto. Si prega di stare lontano da loro.
18. Il prodotto deve essere posizionato su una superficie piana . E deve
essere installato in un luogo aperto e sicuro, evitando luoghi vicino a
finestre, strade, ferrovie, fiumi, ecc.
19. Non posizionarlo in un ambiente umido .
AVVERTIMENTO:
20. Questo apparecchio non è destinato all'uso da parte di persone
giovani o inferme, a meno che non siano supervisionate da una
persona responsabile per garantire che possano utilizzare
l'apparecchio in modo sicuro. I bambini piccoli devono essere
sorvegliati per garantire che non giochino con il prodotto . Gli animali
domestici devono stare lontani dal prodotto.
Non utilizzare all'aperto in giornate piovose e nuvolose, evitare
fulmini e cadute . Persone o animali domestici appesi al prodotto
possono causare lesioni o morte .
ATTENZIONE Seguire le istruzioni per installare correttamente il
prodotto.
ATTENZIONE Un'installazione non corretta può essere pericolosa.
ATTENZIONE Eventuali parti aggiuntive o sostitutive devono essere
richieste alla nostra azienda.

- 4 -
ATTENZIONE Controllare regolarmente che tutti i raccordi di
montaggio siano serrati correttamente.
ATTENZIONE Non utilizzare la rete da allenamento vicino a fiamme
libere o altre fonti di calore.
ATTENZIONE Prima del montaggio e periodicamente durante l'uso,
controllare che il prodotto non presenti componenti hardware
danneggiati, giunti allentati, parti mancanti o bordi taglienti.
ATTENZIONE Quando si utilizza una rete da golf per esercitarsi,
assicurarsi che non ci sia nessuno nelle vicinanze del prodotto. Nota:
le palline da golf ad alta velocità possono ferire le persone.
ATTENZIONE Non utilizzare la rete da allenamento per il golf se non
si è in grado di seguire esattamente queste istruzioni.
ASSEMBLY STEPS
1. Si prega di smaltire con cura tutti i sacchetti di plastica e di tenerli
lontano dalla portata dei bambini e degli animali domestici.
2. Controllare tutti i componenti forniti in base all'elenco in questo manuale.
Assicurarsi di avere tutte le parti elencate.
3. Sebbene si presti particolare attenzione durante la fabbricazione di
questo prodotto, è necessario prestare attenzione durante il processo di
assemblaggio per evitare di essere graffiati da bordi taglienti.
Fase 1 :
● Aprire la borsa per il trasporto e controllare il contenuto al suo interno: 2
pali estensibili in fibra di vetro, 1 bersaglio sospeso, 1 rete da tiro. Quindi
collegare i 2 pali in fibra di vetro come mostrato nelle immagini a destra.
● Tutto ciò che devi fare è allinearli orizzontalmente, poiché saranno
- 5 -
essere connesso automaticamente.
Fase 2:
● Estendi la rete di pratica, quindi inserisci i 2 pali in fibra di vetro nei fori
- 6 -
della rete e falla passare fino all'altra estremità.Dopo è fatto, i 2 pali in fibra
di vetro dovrebbero apparire nella forma di un "X".
Fase 3:
● Inserire il piolo di ferro (agganciato all'anello di ferro della rete di pratica)
in entrambe le estremità dei pali in fibra di vetro, potresti scoprire di
spingerlo facilmente da una parte mentre applichi un po' di forza dall'altra.
Il principio è piegare i pali in fibra di vetro a forma di "X" per il supporto. È
simile all'installazione di una tenda in una certa misura senza doverti
preoccupare di un palo in fibra di vetro rotto.

- 7 -
Fase 4:
● Apri il bersaglio sospeso, aggancia i quattro passanti ai quattro angoli ai
bottoni di plastica sullo sfondo. Ben fatto, fine della puntata! L'intero
processo dura solo circa 10 minuti. Ora puoi portare la tua rete da golf
ovunque e in qualsiasi momento e goderti la tua esclusiva persona mazza
da golf.
- 8 -
CLEANING AND STORAGE
1. Strofinare con un panno morbido e asciutto. Non usare mai un
detergente abrasivo o una spugnetta aggressiva. Assicurarsi di mantenere
il prodotto asciutto
2. Non consentire ai bambini di pulire il prodotto per evitare lesioni dovute
a ribaltamento e caduta .
3. Dopo aver smontato il prodotto, rimontare le parti e gli accessori.
TIPS
1. L'effetto di installazione dei chiodi a terra inclinati è migliore

- 9 -
Produttore: Shanghaimuxinmuyeyouxiangongsi
Indirizzo: Shuangchenglu 803nong11hao1602A-1609shi, baoshanqu,
shanghai 200000 CN.
Importato in AUS: SIHAO PTY LTD. 1 ROKEVA STREETEASTWOOD
NSW 2122 Australia
Importato negli USA: Sanven Technology Ltd. Suite 250, 9166 Anaheim
Place, Rancho Cucamonga, CA 91730
REP
UK
YH CONSULTING LIMITED.
C/O YH Consulting Limited Office 147,
Centurion House, London Road,
Staines-upon-Thames, Surrey, TW18 4AX
REP
EC
E-CrossStu GmbH
Mainzer Landstr.69,
60329 Frankfurt am Main.
Made in China