For your safety and continued enjoyment of this product,
always read the instruction book carefully before using.
FastFreeze
™
Ice Cream Maker
ICE-FD10 SERIES
GARANTÍA DE
TRES AÑOS
Instruction
& Recipe Booklet
TRADUCCIÓN AL ESPAÑOL INCLUIDA

2
Important
Safeguards
When using an electrical appliance, basic safety
precautions should always be followed to reduce
the risk of re, electric shock, and/or injury,
including the following:
READ ALL INSTRUCTIONS BEFORE USING.
1. To protect against risk of electric shock, do not
place cord, plug, or motor drive assembly of
appliance in water or any other liquid.
2. This appliance is not intended for use by children
or by persons with reduced physical, sensory, or
mental capabilities, or lack of experience and
knowledge. Close supervision is necessary when
any appliance is used near children. Children
should be supervised to ensure that they do not
play with the appliance.
3. Turn the appliance OFF, then unplug from the
outlet when not in use, before assembling or
disassembling parts, and before cleaning.
To unplug, grasp the plug and pull from
the outlet. Never pull from the power cord.
4. Avoid contact with moving parts. Keep hands,
hair, and clothing, as well as spatulas and other
utensils, away during operation to reduce the risk
of injury and/or damage to the appliance.
5. Do not operate any appliance with a damaged
cord or plug, or after the appliance malfunctions
or is dropped or damaged in any manner. Contact
the manufacturer at their customer service
telephone number for information on
examination, repair, or adjustment.
6. The use of attachments not recommended by
Cuisinart may cause re, electric shock, or risk
of injury.
7. Do not use outdoors.
8. Do not let cord hang over edge of table or
counter, or touch hot surfaces.
9. DO NOT USE SHARP OBJECTS INSIDE THE
DESSERT CUPS.
10. This appliance is for household use. Any servicing
other than cleaning and user maintenance
should be done only by authorized Cuisinart
repair personnel.
11. Do not operate your appliance in an appliance
garage, or under a wall cabinet. When storing in
an appliance garage, always unplug the unit from
the electrical outlet. Not doing so could create a
risk of re, especially if the appliance touches the
walls of the garage or the door touches the unit
as it closes.
12. Do not use appliance for other than its
intended use.
13. Avoid contacting moving parts. Do not attempt to
defeat any safety interlock mechanisms.
14. Do not let cord contact hot surfaces, including
the stove.
Notice
This unit is equipped with a resettable fuse to
protect the motor from overheating. In case of
overload or extreme strain, the motor will stop
running. If this happens, release the power button
and pull the power handle to its original position.
Wait 10 seconds, then try again. If the unit still
doesn’t run, allow it to cool for 15 minutes before
resuming use.

3
Save These
Instructions
For Household
Use Only
Notice
This appliance has a polarized plug (one blade is
wider than the other). To reduce the risk of electric
shock, this plug will t in a polarized outlet only
one way. If the plug does not t fully in the outlet,
reverse the plug. If it still does not t, contact a
qualied electrician. Do not attempt to defeat this
safety feature.
Special Cord Set
Instructions
A short power-supply cord is provided to reduce
the risks resulting from becoming entangled in or
tripping over a longer cord. Longer extension cords
may be used if care is exercised in their use. If a
long polarized extension cord is used, the marked
electrical rating of the extension cord should be at
least as great as the electrical rating of the
appliance, and the longer cord should be arranged
so that it will not drape over the countertop or
tabletop, where it can be pulled on by children or
animals, or tripped over.
Caution
• Do not immerse Power Handle or Mixing Assembly
in water or other liquids.
• To reduce the risk of re or electric shock,
do not disassemble the Power Handle or
Mixing Assembly.
• Repairs should be made only by authorized
personnel.
• Check voltage to be sure that the voltage indicated
on the nameplate agrees with your voltage.
• Never clean with scouring powders or
hard implements.

4
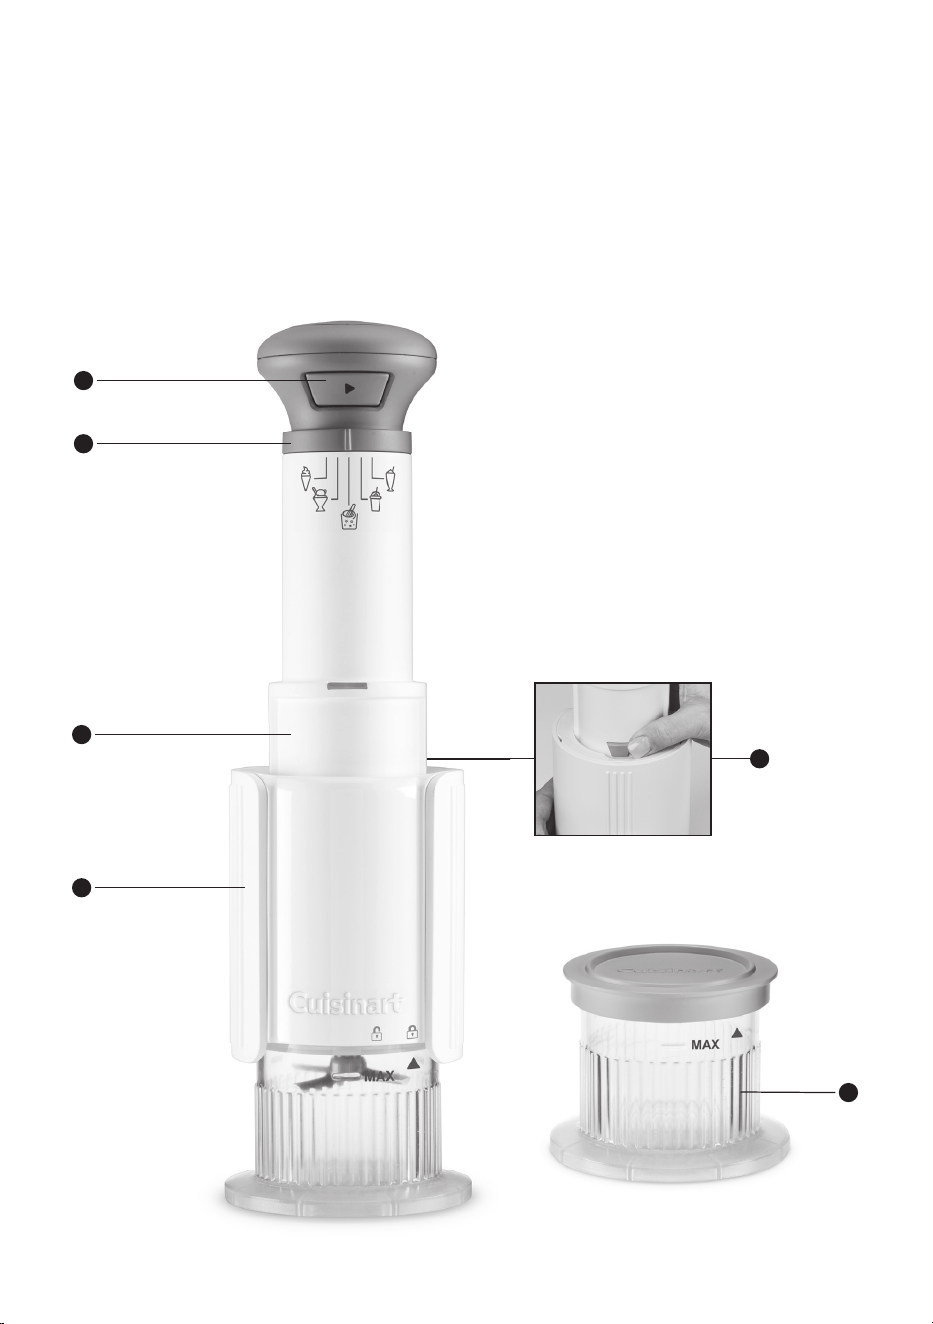
Features and Benefits
1. Manual Power Button
2. Preset Dial (See Understanding the Presets on page 5)
3. Power Handle
4. Mixing Assembly
5. Release Button
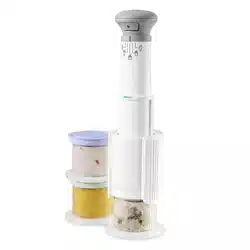
6. Dessert Cups with lids; three ½-pint cups
can be stacked in freezer
1
2
3
4
6
5

5
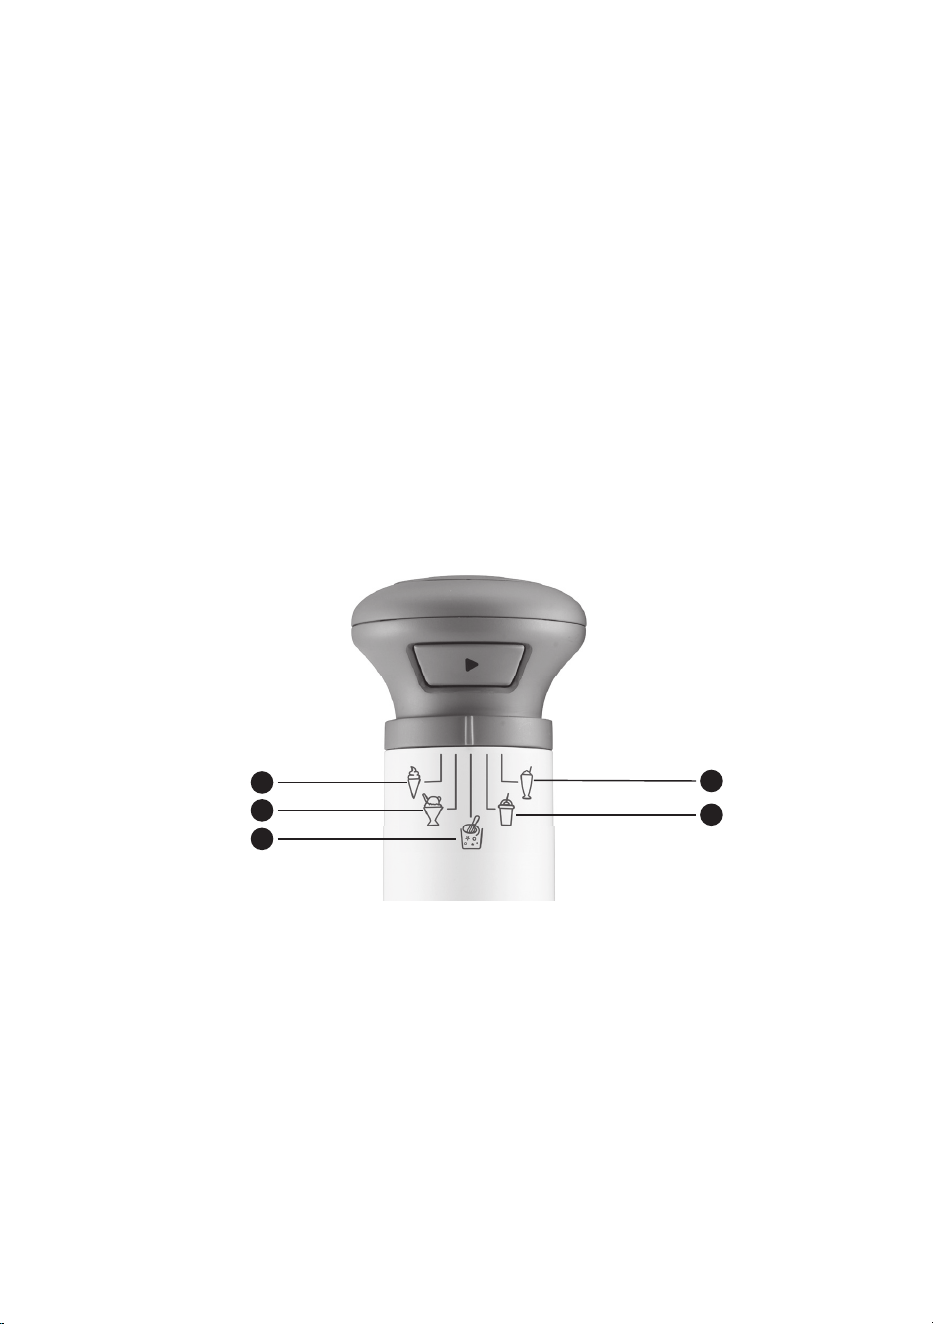
Understanding the Presets
1. Ice Cream:
Use to prepare traditional, scoopable dairy
or nondairy ice cream.
2. Sorbet:
Use to make fruit-based frozen treats.
3. Mix Ins:
Use after processing to customize your treat with
candies, nuts, fresh fruits, or cereal
4. Slushy:
Use to make refreshing fruit-forward
frozen drinks
5. Milkshake:
Use to prepare shakes with store-bought
or homemade ice cream, milk and Mix Ins
if desired.
1
2
3
5
4
6
Before Using for
the First Time
Remove all packaging materials from the ice cream
maker. Wash the dessert cups in warm, soapy water
to remove any dust or residue from the
manufacturing and shipping process. DO NOT
immerse the Power Handle or Mixing Assembly in
water or any other liquid. Wipe them with a moist
cloth. DO NOT clean any of the parts with abrasive
cleaners or hard implements.
Operating Instructions
1. Prepare the base recipe of your choice and
ll dessert cups. (Recipes can be found in the
back of this instruction booklet and at
Cuisinart.com.)
Note: Do not ll past the MAX ll line on the
dessert cup for traditional/juice/noncarbonated
recipes.
Note: For carbonated beverages, use one-third
less liquid than standard ice cream bases.
2. If the base needs to be frozen (ice cream, slushy,
and sorbet), place lid on dessert cup and freeze
on a level surface for at least 24 hours.
Note: Do not process bases that have been
frozen on an angle or unevenly.
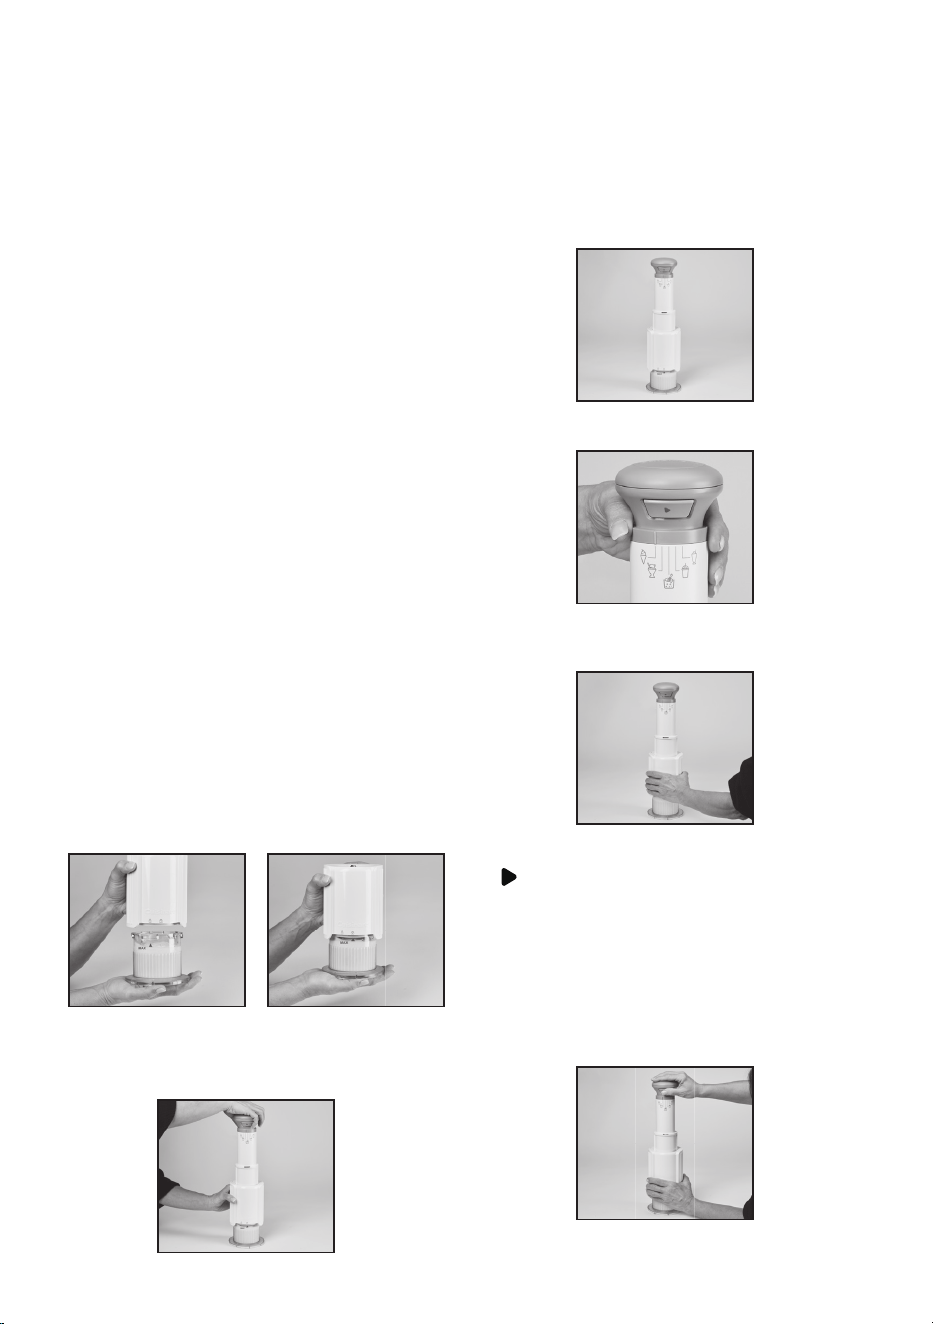
3. When base is ready, remove lid (if used) and
attach cup to mixing assembly, twisting to lock.
Note: Before processing, leave frozen base at
room temperature for up to 10 minutes.
Carbonated beverages should be at room
temperature for 5 minutes.
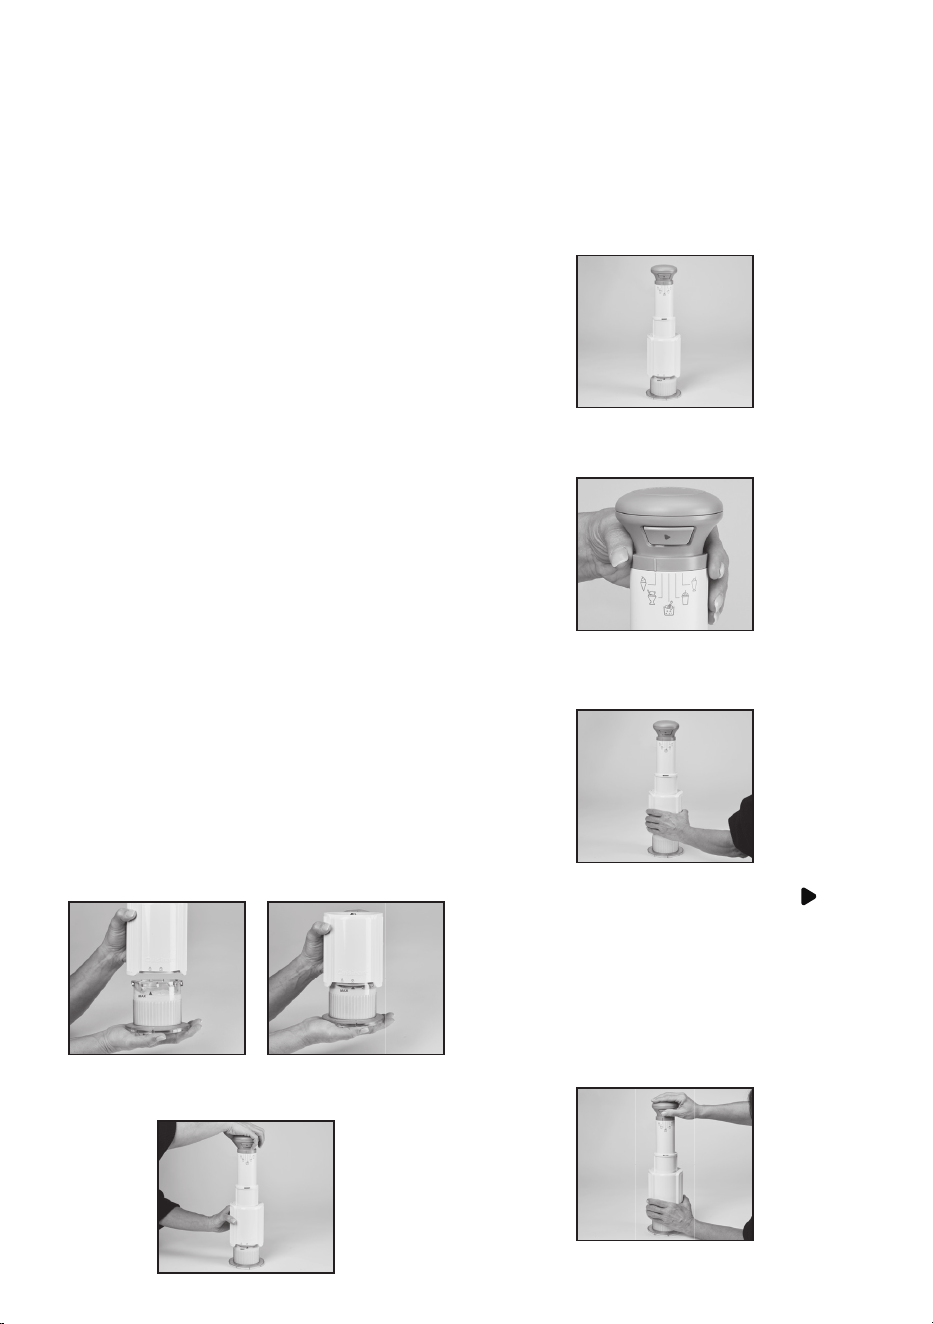
4. For milkshakes and slushy, add ingredients to
dessert cup and attach cup to Mixing Assembly,
twisting to lock (see below).
5. Once the dessert cup is attached to the Mixing
Assembly, attach the Power Handle to the top of
the Mixing Assembly by pressing down until a
clicking sound is heard.
Important: Dessert cup must be attached to the
Mixing Assembly before attaching Power Handle
or unit will not work.
6. Place the assembled unit on a fl at surface in the
upright position.
Note: Ensure dessert cup is locked in
place and cannot rotate in either direction
before processing.
7. Choose your preset by rotating the preset dial.
8. Plug the unit into a power outlet.
9. Hold the mixing assembly with one hand.
10. Use the other hand to rmly grasp the top of the
Power Handle. Press and hold the power button
while applying downward pressure to the top
of the power handle to process treat. The green
light will turn on until you have reached the
bottom of the dessert cup.
Note: Press power button to start motor before
applying any downward force to avoid jamming.
Do not release power button until processing is
complete and power handle is returned to upper
starting position.
7
11. Keep pressing power button and top of power
handle until the green light turns red, indicating
that you have reached the bottom of the
dessert cup.
12. When the light turns red, guide the top of the
power handle upward to its original position
until the red light turns green, then release the
power button.
Note: Processing time will vary depending
on recipe; however, most recipes should take
1-3 minutes. An additional cycle or two may be
required for desired consistency.
Note: If you stop processing in any other position
than the original position, dessert cup will be
hard to remove.
Note: To add mix-ins, remove Power Handle and
dessert cup from mixing assembly. Add mix-in to
cup and then reattach the dessert cup to the
Mixing Assembly and reinstall Power Handle.
Select the Mix Ins preset and then process.
13. When nished, unplug the unit.
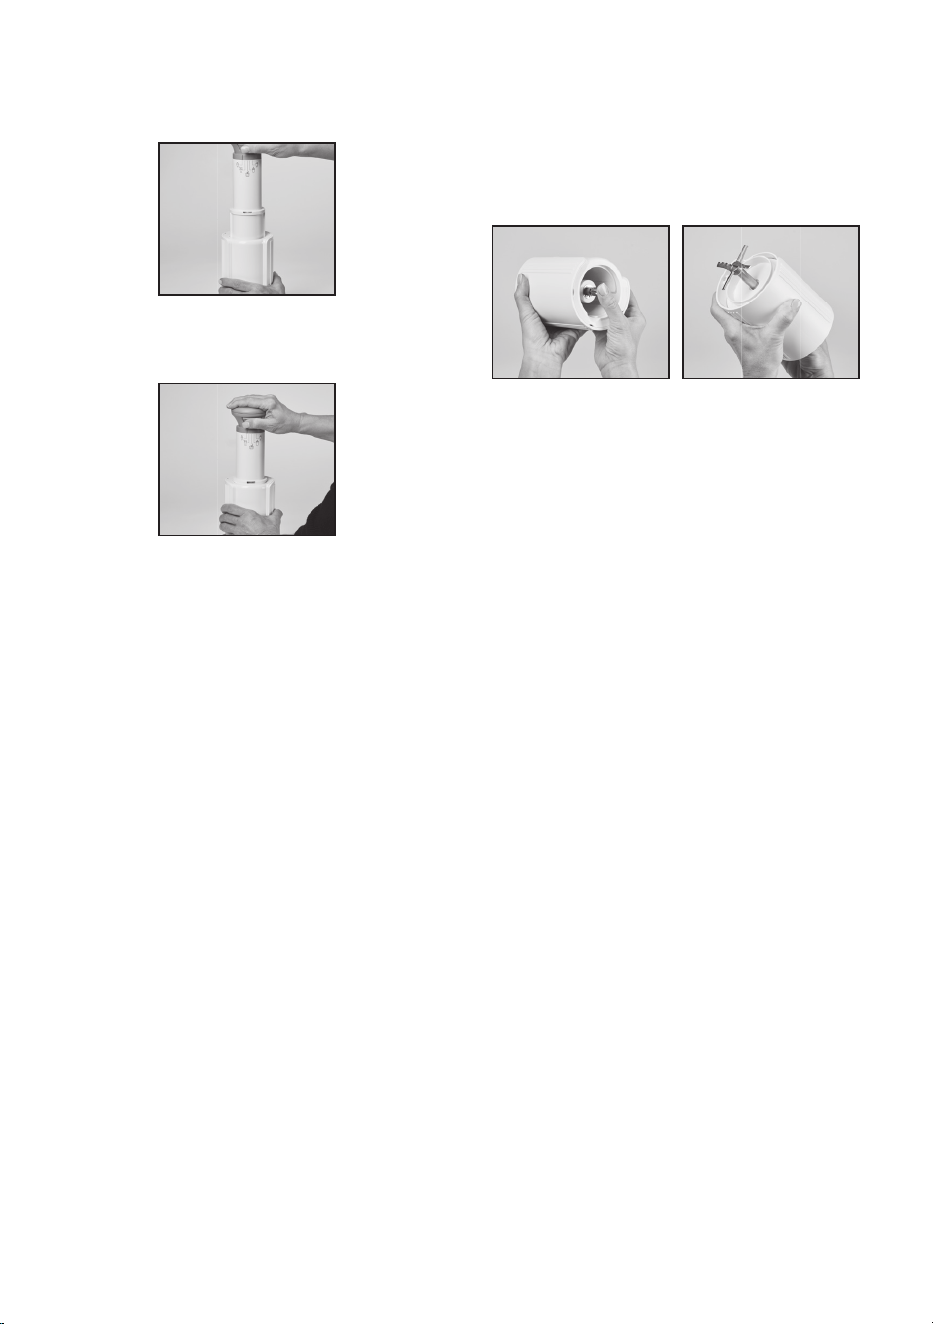
14. Press and hold the release button and lift Power
Handle o the Mixing Assembly.
15. Twist to unlock and remove dessert cup from
Mixing Assembly for nished treat.
Note: Do not touch mixing blade.
Important: This is NOT a blender.
DO NOT use ice cubes or a solid block of ice in
dessert cups.
DO NOT use hard, loose ingredients. Frozen fruits
must be crushed to release juices, then
combined with other ingredients.
Cleaning, Storage, and
Maintenance
Wash the dessert cups in warm soapy water or
top shelf dishwasher.
DO NOT CLEAN WITH ABRASIVE CLEANSERS
OR IMPLEMENTS.
Wipe the Power Handle and Mixing Assembly clean
with damp cloth.
DO NOT immerse the Power Handle or Blending
Assembly in water or other liquids.
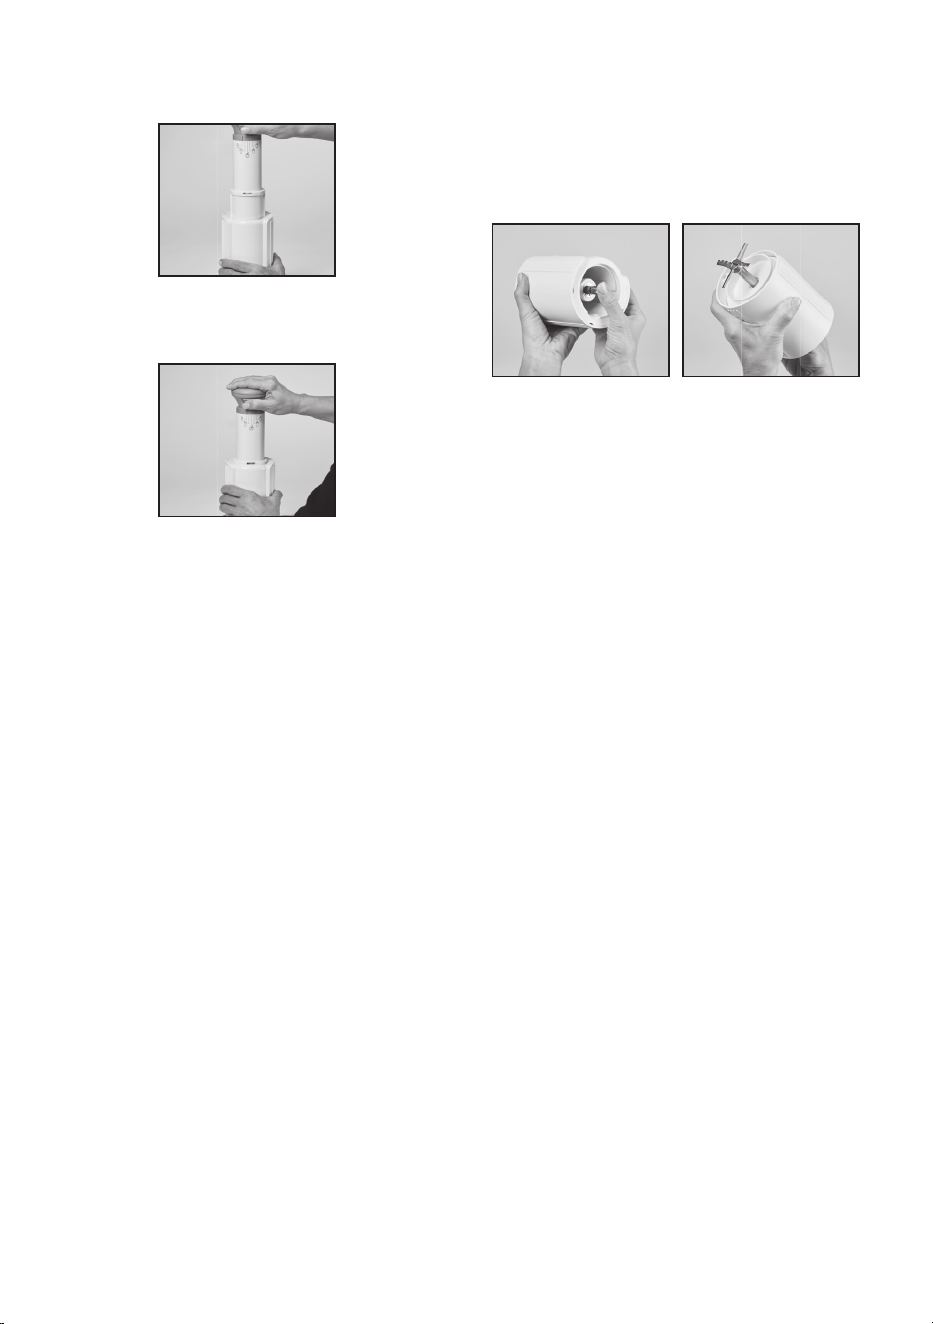
Rinse the mixing assembly in water under tap
water after pressing the blade shaft from the other
side of the blending assembly to expose it
completely, as shown.
Dry all parts thoroughly.
Storage
Keep all parts out of the reach of children.
Dry dessert cups may be stored in the freezer.
DO NOT store Power Handle or Mixing assembly in
the freezer.
Maintenance
Any other servicing should be performed by an
authorized service representative.

8
LIMITED
WARRANTY
Subject to the exclusions and limitations contained
herein, Conair LLC dba Cuisinart (“Cuisinart”)
warrants that the Cuisinart
®
FastFreeze™ Ice Cream
Maker (“Product”) will be free from material defects
in materials and workmanship under normal home
use conditions for a period of THREE (3) years
beginning on the date the Product was purchased in
its original, sealed packaging, unless otherwise
specied in this Limited Warranty. This Limited
Warranty is only for U.S. consumers (dened herein
as purchasers at retail for personal, family, or
household use) who originally purchase the Product
from Cuisinart or an authorized Cuisinart
®
reseller (if
you are unsure whether a retailer or other point of
sale is an authorized or unauthorized Cuisinart
reseller, contact Cuisinart).
This Limited Warranty does NOT cover:
• Normal wear and tear;
• Any Product purchased by commercial purchasers
or for commercial or non-household uses;
• Accessories, parts, or software added to the
Product after the system is shipped from Cuisinart;
• Any costs associated with the replacement or
repair of the Product, including labor, installation,
or other costs incurred by you without prior
Cuisinart approval;
• Damage to the Product, defective conditions, or
nonconformities due to: (1) external causes,
including shipping, accidents, problems with
electrical power (Product designed only for use
with 120-volt outlets), abnormal conditions (such
as mechanical or environmental); (2) usage not in
accordance with Product instructions; (3) misuse,
neglect, unauthorized alteration, unauthorized
repair; and (4) acts of God or other events beyond
Cuisinart’s control;
• Damage caused by you or any nonauthorized third
party, even though necessary repairs and
maintenance might be performed by any company;
• Damage caused by accessories or replacement
parts not specically authorized by Cuisinart; and
• Any Product where the original Product
identication markings (trademark or serial
number) have been removed, altered, or
obliterated.
It is recommended that you visit the website https://
www.cuisinart.com/register-your-product.html for
a fast, ecient way to complete your product
registration. However, product registration does not
eliminate the need for the consumer to maintain the
original proof of purchase in order to obtain the
warranty benets. In the event that you do not have
proof of purchase date, the purchase date for
purposes of this Limited Warranty will be the date
of manufacture.
HASSLE-FREE WARRANTY
If the Product that is the subject of this Limited
Warranty fails during the warranty period for reasons
covered by this Limited Warranty, Cuisinart will, at
its option, repair the Product, replace the Product
with another identical or reasonably equivalent
product, or if Cuisinart is unable to repair or replace
the Product, refund the purchase price, less the
amount directly attributable to the consumer’s prior
usage of the Product. To obtain a return shipping
label, email us at https://www.cuisinart.com/
customer-care/product-assistance/product-
inquiry/, or call our Consumer Service Center
toll-free at 1-800-726-0190 to speak with a
representative.
Upon receipt of the Product, Cuisinart will inspect
the Product and, if required under this Limited
Warranty, attempt to repair, replace, or refund
the Product within thirty (30) days. However, there
may be delays beyond Cuisinart’s control, in which
case that time period may be extended as
reasonably necessary.
IMPORTANT: If the nonconforming Product is to be
serviced by someone other than Cuisinart’s
Authorized Service Center, please remind the
servicer to call our Consumer Service Center at
1-800-726-0190 to ensure that the problem is
properly diagnosed, the Product is serviced with
the correct parts, and the Product is still
under warranty.
CALIFORNIA RESIDENTS ONLY
The THREE (3) year Limited Warranty period begins
on the date the Product was delivered, which may
be dierent than the date the Product was
purchased. California residents also have the option
of obtaining the benets of this Limited Warranty by
bringing the Product to (A) the store where it was
purchased or (B) another retail store that sells
Cuisinart products of the same type. The retail store
shall then, according to its preference, either repair
the Product, refer the consumer to an independent
repair facility, replace the Product with another
identical or reasonably equivalent product, or refund
the purchase price less the amount directly
attributable to the consumer’s prior usage of the
Product. California residents may also, according to
their preference, return nonconforming products
directly to Cuisinart for repair or, if necessary,
replacement with another identical or reasonably
equivalent product by calling our Consumer Service
Center toll-free at 1-800-726-0190. Cuisinart will be
responsible for the cost of such repair, replacement,
and/or shipping and handling for such
nonconforming products under warranty.

9
THIS LIMITED WARRANTY GIVES YOU SPECIFIC
LEGAL RIGHTS, AND YOU MAY ALSO HAVE OTHER
RIGHTS THAT VARY FROM STATE TO STATE OR BY
JURISDICTION. IN THE EVENT THIS LIMITED
WARRANTY IS BREACHED, YOU MAY HAVE CLAIMS
FOR REPLACEMENT, DAMAGES, OR OTHER
PENALTIES.
LIMITATIONS OF LIABILITY/ADDITIONAL LIMITATIONS
AND EXCLUSIONS
ALL EXPRESS AND IMPLIED WARRANTIES ARE
LIMITED IN DURATION TO THE LIMITED WARRANTY
PERIOD. NO WARRANTIES APPLY AFTER THAT
PERIOD. SOME STATES (OR JURISDICTIONS) DO NOT
ALLOW LIMITATIONS ON HOW LONG AN IMPLIED
WARRANTY LASTS, SO THIS LIMITATION MAY NOT
APPLY TO YOU. CUISINART’S RESPONSIBILITY UNDER
THIS OR ANY OTHER WARRANTY, IMPLIED OR
EXPRESS, IS LIMITED TO REPAIR, REPLACEMENT, OR
REFUND, AS SET FORTH ABOVE. THESE REMEDIES
ARE THE SOLE AND EXCLUSIVE REMEDIES FOR ANY
BREACH OF WARRANTY. TO THE MAXIMUM EXTENT
PERMITTED BY LAW, CUISINART IS NOT
RESPONSIBLE FOR ANY DIRECT, INDIRECT, SPECIAL,
INCIDENTAL, OR CONSEQUENTIAL DAMAGES
RESULTING FROM ANY BREACH OF WARRANTY OR
UNDER ANY OTHER LEGAL THEORY (INCLUDING, BUT
NOT LIMITED TO, LOST PROFITS, DOWNTIME, LOSS
OF GOODWILL, DAMAGE TO OR REPLACEMENT OF
EQUIPMENT AND PROPERTY, AND ANY COSTS OF
RECOVERING, REPROGRAMMING, OR REPRODUCING
ANY PROGRAM OR DATA STORED IN OR USED WITH
A SYSTEM CONTAINING THE PRODUCT), EVEN IF
CUISINART HAS BEEN ADVISED OF THE POSSIBILITY
OF SUCH DAMAGES. SOME STATES (OR
JURISDICTIONS) DO NOT ALLOW THE EXCLUSION
OR LIMITATION OF INCIDENTAL OR CONSEQUENTIAL
DAMAGES, SO THE ABOVE LIMITATIONS OR
EXCLUSIONS MAY NOT APPLY TO YOU. ALL EXPRESS
AND IMPLIED WARRANTIES ARE LIMITED IN
DURATION TO THE LIMITED WARRANTY PERIOD. NO
WARRANTIES APPLY AFTER THAT PERIOD. SOME
STATES (OR JURISDICTIONS) DO NOT ALLOW
LIMITATIONS ON HOW LONG AN IMPLIED WARRANTY
LASTS, SO THIS LIMITATION MAY NOT APPLY TO YOU.
This Limited Warranty is issued by:
Conair LLC
1 Cummings Point Road
Stamford, CT 06902
1-800-726-0190

10
Recipes
Simple Vanilla Ice Cream ................................... 11
Chocolate Cookies
and Cream Ice Cream ......................................... 11
Mango Sorbet ........................................................ 11
Banana Split Protein Ice Cream ....................... 11
Pink Lemonade Slushy ....................................... 12
Dulce de Leche Shake ....................................... 12
Blueberry Cheesecake Frozen Yogurt ............ 12
Strawberry Banana Frozen Yogurt .................. 12
Chocolate Protein Ice Cream ........................... 13
Watermelon Shaved Ice .................................... 13
Frozen Matcha Latte ........................................... 13
Cherry Coconut Ice Cream ............................... 13
Recipe Starter Guide
ICE CREAM
¾ cup liquid plus 3 to 4
tablespoons of sugar
SORBET
1 cup fresh fruit mashed or
puréed plus ¼ cup simple syrup
SLUSHY ¾ cup frozen plus ¼ cup liquid
MILKSHAKE
²/3 cup ice cream plus
2 tablespoons liquid

11
Simple Vanilla Ice Cream
The recipe name says it all: These simple ingredients
deliver a tasty frozen treat. Don’t forget the mix-ins!
Makes 2 servings
½ cup heavy cream
¼ cup whole milk
3 tablespoons granulated sugar
1 teaspoon pure vanilla extract
Pinch salt
1. In a small bowl, whisk all ingredients together,
and then pour into a dessert cup and cover.
2. Place in the freezer on a level surface. Freeze for
at least 24 hours.
3. When ready to process, remove from the
freezer, and then let sit at room temperature for
about 10 minutes.
4. Assemble Mixing Assembly and then
Power Handle.
5. Select Ice Cream, and process until desired
consistency.
Chocolate Cookies and
Cream Ice Cream
For a quick chocolate x!
Makes 2 servings
2 tablespoons unsweetened
cocoa powder, sifted
¼ cup whole milk
1½ tablespoons granulated sugar
1½ tablespoons light brown sugar
½ cup heavy cream
1 teaspoon pure vanilla extract
Pinch salt
2 chocolate sandwich cookies,
broken into quarters
1. In a small bowl, whisk the sifted cocoa powder
into the whole milk and whisk together well with
the sugars until dissolved. Stir in the heavy
cream, vanilla and salt; mix well. Pour into a
dessert cup and cover.
2. Place in the freezer on a level surface. Freeze for
at least 24 hours.
3. When ready to process, remove from the freezer,
and then let sit at room temperature for about
10 minutes.
4. Assemble Mixing Assembly and then
Power Handle.
5. Select Ice Cream, and process twice. Disassemble
and add the cookies. Reassemble, select Mix Ins,
and blend once or twice until desired consistency
is achieved.
Mango Sorbet
Replace the mango with your favorite fruit in this
simple fruity treat.
Makes 2 servings
1 cup ripe, fresh mango, cubed
3 tablespoons simple syrup*
½ teaspoon lime juice
Pinch lime zest
Pinch salt
1. Put the mango into a dessert cup and mash it
with a fork on the sides of the cup. Stir in the
simple syrup, lime juice, zest and salt and mix
well. Cover.
2. Place in the freezer on a level surface. Freeze for
at least 24 hours.
3. When ready to process, remove from the freezer,
and then let sit at room temperature for about
10 minutes.
4. Assemble Mixing Assembly and then
Power Handle.
5. Select Sorbet, and process until desired
consistency.
*Simple syrup can easily be made by boiling equal
part sugar and water. Allow to cool before using.
Banana Split Protein Ice Cream
Substitute a nondairy, high-protein vanilla
creamer for the cream and yogurt should a vegan
option be preferred.
Makes 2 servings
1/2 cupheavycream
¼ cup vanilla yogurt
1 small ripe banana
1 serving protein powder
2 tablespoons agave nectar
1 tablespoon chocolate sauce
1. Put the cream, yogurt, banana, protein
powder and agave into a blender jar and blend
together on Low. Pour contents into a dessert
cup and cover.
2. Place in the freezer on a level surface. Freeze for
at least 24 hours.

12
3. When ready to process, remove from the freezer,
and then let sit at room temperature for about
10 minutes.
4. Assemble Mixing Assembly and then
Power Handle.
5. Select Ice Cream, and process until desired
consistency. Disassemble and add the chocolate
sauce. Reassemble, select Mix Ins and blend
once or twice until desired consistency
is achieved.
Pink Lemonade Slushy
The possibility of slushy avors are limitless! Use the
below instructions and swap out your favorite
beverage – still or sparkling!
Makes 1 serving
1 cup raspberry lemonade, divided
1. Put ¾ cup lemonade into a dessert cup
and cover.
2. Place in the freezer on a level surface. Freeze for
at least 24 hours.
3. When ready to process, remove from the freezer,
and then let sit at room temperature for about
10 minutes.
4. Assemble Mixing Assembly and then
Power Handle.
5. Select Slushy, and process once. Disassemble
and add the remaining ¼ cup of lemonade.
Reassemble and process once or twice more,
until desired consistency is achieved.
Dulce de Leche Shake
Dulce de leche is a thick caramel-like treat with Latin
American origins. It can be found in the international
section in most grocery stores.
Makes 1 serving
2/3 cupvanillaicecream
2 tablespoons whole milk
1 tablespoon dulce de leche
1. Place all ingredients into the dessert cup in the
order listed.
2. Assemble Mixing Assembly and then
Power Handle.
3. Select Milkshake, and process until desired
consistency is achieved.
Blueberry Cheesecake
Frozen Yogurt
Sweet, tangy, and creamy—this frozen yogurt is sure
to be a new favorite!
Makes 2 servings
¼ cup nonfat vanilla Greek yogurt
¼ cup frozen blueberries, thawed and mashed
2 ounces cream cheese, room temperature
1 tablespoon granulated sugar
Pinch salt
1 tablespoon heavy cream
½ graham cracker, broken in 2 pieces
1. In a small bowl, whisk all ingredients except for
graham crackers together, and then pour into a
dessert cup and cover.
2. Place in the freezer on a level surface. Freeze for
at least 24 hours.
3. When ready to process, remove from the freezer,
and then let sit at room temperature for about
10 minutes.
4. Assemble Mixing Assembly and then
Power Handle.
5. Select Ice Cream, and process until desired
consistency.
6. Disassemble and add the graham cracker pieces.
Reassemble, select Mix Ins, and process until
desired consistency is achieved.
Strawberry Banana
Frozen Yogurt
The ripe banana sweetens this tangy classic
frozen yogurt.
Makes 2 servings
2 tablespoons whole milk
½ cup whole milk plain Greek yogurt
2 tablespoons granulated sugar
3 fresh strawberries, mashed
1/4 banana,about11/2inches,ripe,mashed
⅛ teaspoonseasalt
1 tablespoon heavy cream
1. In a small bowl, blend all ingredients together,
and then pour into a dessert cup and cover.
2. Place in the freezer on a level surface. Freeze for
at least 24 hours.
3. When ready to process, remove from the freezer,
and then let sit at room temperature for about
10 minutes.

13
4. Assemble Mixing Assembly and then
Power Handle.
5. Select Ice Cream, and process until
desired consistency.
Chocolate Protein Ice Cream
This protein packed ice cream is made of just
two ingredients. The easiest and most delicious way
to meet your protein goals!
Makes 2 servings
½ cup chocolate protein shake beverage
½ cup whole milk plain Greek yogurt
1. In a small bowl, blend all ingredients together,
and then pour into a dessert cup and cover.
2. Place in the freezer on a level surface. Freeze for
at least 24 hours.
3. When ready to process, remove from the freezer,
and then let sit at room temperature for about
10 minutes.
4. Assemble Mixing Assembly and then
Power Handle.
5. Select Ice Cream, and process until desired
consistency.
Watermelon Shaved Ice
This incredibly refreshing shaved ice will have you
feeling like it’s summer all year long.
Makes 2 servings
3/4 cupwatermelon,mashed
2 tablespoons fresh lime juice
Pinch sea salt
1. In a small bowl, blend all ingredients together,
and then pour into a dessert cup and cover.
2. Place in the freezer on a level surface. Freeze for
at least 24 hours.
3. When ready to process, remove from the freezer,
and then let sit at room temperature for about
10 minutes.
4. Assemble Mixing Assembly and then
Power Handle.
5. Select Sorbet, and process until desired
consistency.
Frozen Matcha Latte
Cool down and up your energy all in one frosty treat.
Matcha powder is sold both sweetened and not; be
sure to check the ingredient list before purchasing.
Makes 1 serving
¾ cup oat milk creamer
1 teaspoon unsweetened matcha powder
2 teaspoons honey
Pinch salt
2 tablespoons oat milk creamer
1. Put 2 tablespoons of the oat milk creamer into a
small bowl with the matcha powder. Whisk well
until smooth. Then gradually whisk in the
remaining oat milk, creamer, honey, and salt.
Pour into a dessert cup and cover.
2. Place in the freezer on a level surface. Freeze for
at least 24 hours.
3. When ready to process, remove from the freezer,
and then let sit at room temperature for about
10 minutes. Add the 2 tablespoons of oat
milk creamer.
4. Assemble Mixing Assembly and then
Power Handle.
5. Select Milkshake, and process until desired
consistency.
Cherry Coconut Ice Cream
Cherries impart a beautiful pinkish hue when mixed
with creamy coconut milk. This delicious combination
makes for a great dairy-free treat.
Makes 2 servings
¾ cup canned coconut milk
½ teaspoon pure vanilla extract
3 tablespoons granulated sugar
Pinch sea salt
4 frozen pitted cherries, halved
1. Put the coconut milk, vanilla, sugar, and salt into
a blender jar and blend on Low until smooth (this
can also be blended in a tall measuring cup with
a hand blender).
2. Then pour into a dessert cup and cover.
3. Place in the freezer on a level surface. Freeze for
at least 24 hours.
4. When ready to process, remove from the freezer,
and then let sit at room temperature for about
10 minutes.
5. Assemble Mixing Assembly and then
Power Handle.
6. Select Ice Cream, and process until desired
consistency.
7. Disassemble and add the cherries. Reassemble
select Mix-Ins, and process until desired
consistency is achieved.

14
Notes:

15
Medidas de
Seguridad
Importantes
Al usar aparatos eléctricos, siempre se deben tomar
precauciones básicas de seguridad para reducir el
riesgo de incendio, descarga eléctrica o lesiones,
entre ellas las siguientes:
LEA TODAS LAS INSTRUCCIONES ANTES DEL USO.
1. Para reducir el riesgo de descarga eléctrica, no
sumerja el cable, el enchufe ni el bloque-motor
en agua u otros líquidos.
2. Los niños o las personas que carezcan de la
experiencia o de los conocimientos necesarios
para manipular el aparato, o aquellas cuyas
capacidades físicas, sensoriales o mentales estén
limitadas, no deben usar este aparato. Supervise
el uso del aparato con cuidado cuando sea usado
cerca de niños. No deje que los niños jueguen
con este aparato.
3. Apague y desenchufe el aparato cuando no esté
en uso, antes de instalar/sacar piezas y antes de
limpiarlo.
Para desenchufar, agarre el enchufe y jálelo de la
toma de corriente. Nunca jale el cable.
4. Evite el contacto con las piezas móviles. Para
reducir el riesgo de lesiones personales o daños a
la máquina, mantenga los dedos, cabello, ropa,
espátulas y otros utensilios lejos del aparato
durante el funcionamiento.
5. No use este aparato si el cable o el enchufe
están dañados, si no funciona correctamente, si
está dañado, o después de una caída; Llame al
servicio de atención al cliente del fabricante para
obtener información sobre cómo hacer revisar,
reparar o ajustar el aparato.
6. El uso de accesorios no recomendados por
Cuisinart presenta un riesgo de incendio,
descarga eléctrica o lesiones personales.
7. No lo use en exteriores.
8. No deje que el cable cuelgue de la encimera o de
la mesa, ni que tenga contacto con supercies
calientes.
9. NUNCA INTRODUZCA OBJETOS PUNZANTES/
AFILADOS EN LAS TAZAS DE POSTRE.
10. Este aparato es para uso doméstico solamente.
Toda operación de mantenimiento, excepto la
limpieza y el mantenimiento por parte del
usuario, debe ser llevada a cabo por personal de
servicio autorizado.
11. No haga funcionar el aparato debajo o dentro de
un armario/gabinete. Siempre desenchufe el
aparato antes de almacenarlo en un armario/
gabinete. Dejar el aparato enchufado representa
un riesgo de incendio, especialmente si este toca
las paredes o la puerta del armario/gabinete
cuando se cierra.
12. Solo use este aparato para el uso previsto.
13. Evite el contacto con las piezas móviles. No
intente forzar/modicar los mecanismos de
enclavamiento/bloqueo de seguridad.
14. No deje que el cable tenga contacto con
supercies calientes, incluso la cocina.
Aviso
Este aparato cuenta con un fusible reiniciable que
apaga automáticamente el motor en caso de
recalentamiento. En caso de sobrecarga o esfuerzo
extremo, el motor se apagará. Si esto sucede, suelte
el botón de encendido y jale el pomo a su posición
original. Espere 10 segundos y vuelva a intentarlo. Si
el aparato aún no funciona, deje que se enfríe unos
15 minutos antes de continuar.

16
Guarde estas
Instrucciones
Para Uso
Doméstico
Solamente
Aviso
El cable de este aparato cuenta con un enchufe
polarizado (una pata es más ancha que la otra).
Como medida de seguridad, aquel enchufe se podrá
enchufar de una sola manera en las tomas de
corriente polarizadas. Si el enchufe no entra en la
toma de corriente, inviértalo. Si aun así no entra
completamente, comuníquese con un electricista.
No intente modicar esta función de seguridad.
Instrucciones Especiales
Acerca del Cable
El cable provisto con este aparato es corto, para
reducir el riesgo de que alguien se enganche o
tropiece con un cable más largo. Se puede usar un
alargador, siempre que respete las precauciones
siguientes. La clasicación nominal del alargador
debe ser por lo menos igual a la del aparato. El cable
más largo debe ser acomodado de tal manera que
no cuelgue de la encimera/mesa, donde puede ser
jalado por niños o causar tropiezos.
Precaución
• No sumerja la varilla ni el bloque-motor en agua u
otros líquidos.
• Para reducir el riesgo de incendio o descarga
eléctrica, no desarme la varilla ni el bloque-motor..
• Las reparaciones deben ser realizadas por personal
autorizado.
• Compruebe que el voltaje indicado en la placa de
datos del aparato corresponda con el voltaje de
suministro.
• Nunca limpie el aparato con productos/materiales
abrasivos o utensilios duros.
17
Piezas y Características
1. Botón de encendido
2. Disco de selección de función (detalles en la página siguiente)
3. Varilla
4. Bloque-motor
5. Botón de liberación
6. Tazas de postre: 3 tazas de 8oz (235ml) con tapas; apilables y congelables
1
2
3
4
6
5
18
Funciones
1. Helado:
Use esta función para preparar helados lácteos o
no lácteos tradicionales.
2. Sorbete:
Use esta función para preparar sorbetes de fruta.
3. Ingredientes extra:
Use esta función después del procesado para
añadir ingredientes extra, tales como caramelos,
nueces, frutas frescas o cereales.
4. Granizado:
Use esta función para preparar bebidas heladas a
base de jugo de fruta.
5. Batido de helado:
Use esta función para preparar batido de helado,
usando helado comprado o casero, leche e
ingredientes extra si desea.
1
2
3
5
4
19
Antes del Primer Uso
Retire el aparato del material de embalaje. Lave las
tazas de postre en agua tibia con jabón para quitar
el polvo o cualquier residuo que se hayan
acumulado durante el proceso de fabricación y el
envío. NO sumerja la varilla ni el bloque-motor en
agua u otros líquidos; límpielos con un paño
húmedo. NO limpie ninguna de las piezas del
aparato con limpiadores/materiales abrasivos o
utensilios duros.
Instrucciones de Uso
1. Prepare la base deseada y colóquela en las tazas
de postre. Véase nuestras recetas en la parte
posterior de este manual de instrucciones y en
Cuisinart.com.
Nota: No llene las tazas de postre más allá de la
línea “MAX” para preparar recetas tradicionales/
con jugo.
Nota: Para preparar recetas con bebidas
carbonatadas, use 1/3 menos de líquido que las
bases de helado estándar.
2. Si es necesario congelar la base (helados,
granizados y sorbetes), tape la taza de postre y
congélela, en una super cie plana, por un mínimo
de 24 horas.
Nota: No procese bases que se hayan congelado
en ángulo o de forma irregular.
3. Cuando la base esté lista, quite la tapa
(si la hay) y conecte la taza al bloque-motor,
girando para bloquear.
Nota: Deje entibiar las bases congealdas a
temperatura ambiente por 10 minutos antes de
procesarlas. Deje entibiar las bebidas
carbonatadas por 5 minutos.
4. Para preparar batidos y granizados, simplemente
coloque los ingredientes en la taza de postre y
conecte esta al bloque-motor.
5. Una vez conectada la taza de postre al bloque-
motor, sujete la varilla a este, presionando hasta
que encaje.
Importante: La taza de postre debe estar
conectada al bloque-motor primero. De no ser
así, el aparato no funcionará.
6. Coloque el aparato sobre una super cie plana, en
posición vertical.
Nota: Compruebe que la taza de postre esté
bloqueada y no pueda girar en ninguna dirección
antes de encender el aparato.
7. Gire el disco de selección de función para elegir
la función deseada.
8. Enchufe el aparato en una toma de corriente.
9. Sostenga rmemente el bloque-motor con
una mano.
10. Con la otra mano, agarre rmemente el pomo de
la varilla. Mantenga presionado el botón
y
empuje el pomo hacia abajo para procesar. El
indicador luminoso verde se encenderá y
permanecerá encendido hasta que alcance el
fondo de la taza de postre.
Nota: Espere hasta que el motor se encienda
antes de empujar el pomo. Vuelva el pomo a su
posición original antes de apagar el motor
(soltando el botón de encendido).
20
11. Siga presionado el botón de encendido y el pomo
hasta que la luz verde se ponga roja, lo que indica
que ha llegado al fondo de la taza de postre.
12. Cuando la luz se ponga roja, jale el pomo a
su posición original hasta que la luz se ponga
verde otra vez. A continuación, suelte el botón
de encendido.
Nota: El tiempo de procesado puede variar
dependiendo de la receta. Por lo general, un ciclo
toma 1-3 minutos. Puede que algunas mezclas
requieran 1-2 ciclos adicionales para conseguir la
consistencia deseada.
Nota: Si apaga el aparato antes de volver el pomo
a su posición original, será difícil quitar la taza de
postre.
Nota: Para añadir ingredientes extra, desconecte
la varilla y la taza de postre del bloque-motor.
Agregue los ingredientes extra, vuelva a sujetar la
taza, y conecte la varilla otra vez. Elija la función
“ingredientes extra” y siga procesando.
13. Después de terminar, desenchufe el aparato.
14. Mantenga presionado el botón de liberación de la
varilla y separe la varilla del bloque-motor.
15. Gire la taza de postre para separarla del
bloque-motor.
Nota: Tenga cuidado de no tocar la cuchilla.
Importante: Este aparato no es una licuadora.
NO coloque cubitos/pedazos de hielo en las
tazas de postre.
NO use ingredientes duros, tales como frutas
congeladas. Las frutas congeladas deben
triturarse para liberar el jugo y luego combinarse
con otros ingredientes.
Limpieza, Almacenamiento
y Mantenimiento
Lave las tazas de postre en agua jabonosa tibia o en
la bandeja superior del lavavajillas.
NO USE PRODUCTOS/MATERIALES ABRASIVOS NI
UTENSILIOS DUROS PARA LIMPIAR.
Limpie la varilla y el bloque-motor con un paño
húmedo.
NO sumerja la varilla ni el bloque-motor en agua u
otros líquidos.
Enjuague la cuchilla en agua corriente, presionando
el eje de la cuchilla desde el lado opuesto del
bloque-motor para exponerla completamente, como
se muestra.
Seque todas las piezas con cuidado.
Almacenamiento
Mantenga todas las piezas fuera del alcance de los
niños. Las tazas de postre (secas) pueden guardarse
en el congelador. NO guarde la varilla ni el bloque-
motor en el congelador.
Mantenimiento
Cualquier otro servicio debe ser realizado por un
técnico de servicio autorizado.

21
Garantía
Sujeto a las exclusiones y limitaciones contenidas
en este documento, Conair LLC/Cuisinart
(“Cuisinart”) garantiza que la máquina para hacer
helados FastFreeze
™
de Cuisinart
®
estará libre de
defectos de materiales y fabricación en condiciones
normales de uso doméstico durante un período de
TRES (3) años a partir de la fecha de compra del
Producto en su embalaje original sellado, a menos
que se especique lo contrario en esta Garantía
Limitada. Esta Garantía Limitada es solo para
consumidores de Estados Unidos (denidos aquí
como compradores al por menor para uso personal,
familiar o doméstico) que compren originalmente el
Producto a Cuisinart o a un revendedor autorizado
de Cuisinart. Si no está seguro de si un minorista u
otro punto de venta es un revendedor autorizado de
Cuisinart, póngase en contacto con Cuisinart.
Esta Garantía Limitada NO cubre:
• El desgaste normal;
• Cualquier Producto adquirido por compradores
comerciales o para usos comerciales o no
domésticos;
• Accesorios, piezas o programas añadidos al
Producto después de que Cuisinart lo haya
enviado;
• Cualquier costo asociado con el reemplazo o
reparación del Producto, incluyendo mano de obra,
instalación u otros costos incurridos por usted sin
previa aprobación de Cuisinart;
• Daños, defectos y fallas debidos a: (1) causas
externas, incluyendo el envío, accidentes,
problemas con el suministro eléctrico (el Producto
está diseñado para su uso exclusivo con enchufes
de 120 V), condiciones anormales (como
mecánicas o medioambientales); (2) uso no
conforme a las instrucciones del Producto; (3) uso
indebido, negligencia, alteración no autorizada,
reparación no autorizada; y (4) casos fortuitos u
otros acontecimientos fuera del control de
Cuisinart;
• Daños causados por usted o por terceros no
autorizados, aunque cualquier empresa puede
realizar las reparaciones y el mantenimiento
necesarios;
• Los daños causados por accesorios o repuestos
no autorizados especícamente por Cuisinart
pueden anular esta Garantía Limitada; y
• Cualquier Producto cuyas marcas de identicación
originales (marca comercial o número de serie)
hayan sido retiradas, alteradas o borradas del
Producto.
Se recomienda llenar el formulario de registro
disponible en https://cuisinart.com/register-your-
product.html a n de facilitar la vericación de la
fecha de compra original de este producto. Sin
embargo, no es necesario registrar el producto para
recibir servicio bajo esta garantía. En ausencia de
prueba de la fecha de compra, el período de
garantía será calculado a partir de la fecha de
fabricación del producto.
GARANTÍA SIN DIFICULTADES
Si el Producto objeto de esta Garantía Limitada falla
durante el período de garantía por razones cubiertas
por esta Garantía Limitada, Cuisinart, a su elección,
reparará el Producto, sustituirá el Producto por otro
idéntico o razonablemente equivalente, o si Conair
no puede reparar o sustituir el Producto,
reembolsará al consumidor el precio de compra,
menos la cantidad directamente atribuible al uso
anterior del Producto por parte del consumidor. Para
obtener una etiqueta de devolución, contáctenos,
visitando https://www.cuisinart.com/customer-
care/product-assistance/product-inquiry// o
llamando a nuestro servicio de atención al cliente,
al 1-800-726-0190, para hablar con un
representante.
Tras la recepción del Producto, Cuisinart lo
inspeccionará y, si lo requiere esta Garantía
Limitada, intentará reparar, reemplazar o
reembolsarlo en un plazo de treinta (30) días. No
obstante, pueden producirse retrasos fuera del
control de Cuisinart, en cuyo caso dicho plazo podrá
ampliarse en la medida en que sea razonablemente
necesario.
IMPORTANTE: Si debe llevar el producto defectuoso
a un centro de servicio no autorizado, por favor
informe al personal del centro de servicio que
deben llamar al servicio de atención al cliente de
Cuisinart, al 1-800-726-0190, a n de diagnosticar el
problema correctamente, usar las piezas correctas
para repararlo y comprobar que el producto aún
esté bajo garantía.
RESIDENTES DE CALIFORNIA
El período de Garantía Limitada de TRES (3) años
comienza en la fecha de entrega del Producto, que
puede ser diferente de la fecha de compra del
Producto. Los residentes en California también
tienen la opción de obtener los benecios de esta
Garantía Limitada devolviendo el producto
defectuoso (A) a la tienda donde lo compraron, o (B)
a otra tienda que venda productos Cuisinart
®
del
mismo tipo. La tienda podrá, a su elección, reparar
el producto, referir al consumidor a un centro de
servicio independiente, sustituir el producto por uno
idéntico o razonablemente equivalente, o
reembolsar al consumidor el precio de compra
menos la cantidad directamente atribuible al uso
anterior del producto por el consumidor. Los
residentes de California también pueden, si lo
desean, enviar el producto defectuoso directamente
a Cuisinart para que sea reparado o sustituido por
uno idéntico o razonablemente equivalente. Para
esto, deben llamar a nuestro servicio de atención al
cliente al 1-800-726-0190. Cuisinart será
responsable por los gastos de reparación,

22
reemplazo, manejo y envío de los productos
defectuosos durante el período de garantía.
ESTA GARANTÍA LIMITADA LE OTORGA DERECHOS
LEGALES ESPECÍFICOS, Y TAMBIÉN PUEDE TENER
OTROS DERECHOS QUE VARÍAN DE UN ESTADO A
OTRO O EN FUNCIÓN DE LA JURISDICCIÓN. EN
CASO DE INCUMPLIMIENTO DE ESTA GARANTÍA
LIMITADA, USTED PUEDE RECLAMAR LA
SUSTITUCIÓN, UNA INDEMNIZACIÓN POR DAÑOS Y
PERJUICIOS U OTRAS SANCIONES.
LIMITACIONES DE RESPONSABILIDAD/LIMITACIONES
Y EXCLUSIONES ADICIONALES
TODAS LAS GARANTÍAS EXPRESAS E IMPLÍCITAS
TIENEN UNA DURACIÓN LIMITADA AL PERÍODO DE
GARANTÍA LIMITADA. NO SE APLICARÁ NINGUNA
GARANTÍA DESPUÉS DE ESTE PERÍODO. ALGUNOS
ESTADOS (O JURISDICCIONES) NO PERMITEN
LIMITACIONES EN LA DURACIÓN DE UNA GARANTÍA
IMPLÍCITA, DE MODO QUE LAS LIMITACIONES
MENCIONADAS PUEDEN NO REGIR PARA USTED. LA
RESPONSABILIDAD DE CUISINART BAJO ESTA O
CUALQUIER OTRA GARANTÍA, IMPLÍCITA O EXPRESA,
SE LIMITA A LA REPARACIÓN, SUSTITUCIÓN O
REEMBOLSO, SEGÚN LO ESTABLECIDO
ANTERIORMENTE. ESTOS RECURSOS SON LOS
ÚNICOS Y EXCLUSIVOS EN CASO DE
INCUMPLIMIENTO DE LA GARANTÍA. EN LA MEDIDA
MÁXIMA PERMITIDA POR LA LEY, CUISINART NO SE
HACE RESPONSABLE DE NINGÚN DAÑO DIRECTO,
INDIRECTO, ESPECIAL, INCIDENTAL O
CONSECUENTE RESULTANTE DE CUALQUIER
INCUMPLIMIENTO DE LA GARANTÍA O BAJO
CUALQUIER OTRA TEORÍA LEGAL (INCLUYENDO,
PERO NO LIMITADO A, LUCRO CESANTE, TIEMPO DE
INACTIVIDAD, PÉRDIDA DEL FONDO DE COMERCIO,
DAÑOS O SUSTITUCIÓN DE EQUIPOS Y BIENES, Y
CUALQUIER COSTE DE RECUPERACIÓN,
REPROGRAMACIÓN O REPRODUCCIÓN DE
CUALQUIER PROGRAMA O DATOS ALMACENADOS EN
O UTILIZADOS CON UN SISTEMA QUE CONTENGA EL
PRODUCTO), INCLUSO SI CUISINAART HA SIDO
ADVERTIDO DE LA POSIBILIDAD DE TALES DAÑOS.
ALGUNOS ESTADOS (O JURISDICCIONES) NO
PERMITEN LA EXCLUSIÓN O LIMITACIÓN DE DAÑOS
ESPECIALES, INCIDENTALES O CONSECUENTES, DE
MODO QUE LAS LIMITACIONES MENCIONADAS
PUEDEN NO REGIR PARA USTED. TODAS LAS
GARANTÍAS EXPRESAS E IMPLÍCITAS TIENEN UNA
DURACIÓN LIMITADA AL PERÍODO DE GARANTÍA
LIMITADA. NO SE APLICARÁ NINGUNA GARANTÍA
DESPUÉS DE ESTE PERÍODO. ALGUNOS ESTADOS (O
JURISDICCIONES) NO PERMITEN LIMITACIONES EN
LA DURACIÓN DE UNA GARANTÍA IMPLÍCITA, DE
MODO QUE LAS LIMITACIONES MENCIONADAS
PUEDEN NO REGIR PARA USTED.
Esta Garantía Limitada es emitida por:
Conair LLC
1 Cummings Point Road
Stamford, CT 06902
1-800-726-0190

23
Recetas
Helado de vainilla simple ...............................23
Helado de “galletas y crema”
de chocolate ......................................................23
Sorbete de mango ...........................................24
Helado proteico con sabor
a “banana split” ................................................ 24
Granizado de limonada de frambuesa ........24
Batido de dulce de leche ...............................24
Helado de yogur con sabor a pastel de
queso de arándanos azules ........................... 25
Helado de yogur de fresa y banana .............25
Helado proteico de chocolate ....................... 25
Raspado de sandía ...........................................25
Latte de té matcha helado ............................25
Helado de coco con cerezas .........................26
Proporciones básicas
Helado de Vainilla Simple
El nombre de esta receta lo dice todo: Estos sencillos
ingredientes producen un sabroso postre helado.
¡No olvide los ingredientes extra!
Rinde 2 porciones
½ taza(120ml)decremalíquidaparabatir
(“heavycream”)
¼ taza(60ml)delecheentera
3 cucharadas(35g)deazúcargranulada
1 cucharadita de extracto natural de vainilla
1 pizca de sal
1. Colocar todos los ingredientes en un tazón
pequeño; batir para combinar. Verter en una de
las tazas de postre y tapar.
2. Poner en el congelador, sobre una supercie
plana, y congelar por un mínimo de 24 horas.
3. Sacar de congelador y dejar a temperatura
ambiente por aprox. 10 minutos antes de usar.
4. Conectar la taza de postre al bloque-motor y
sujetar a la varilla.
5. Elegir la función “helado” y procesar hasta
conseguir la consistencia deseada.
Helado de “Galletas y Crema”
de Chocolate
¡Para satisfacer rápidamente sus antojos por
chocolate!
Rinde 2 porciones
2 cucharadasdecacaoenpolvosinazúcar,
tamizado
¼ taza(60ml)delecheentera
1½ cucharadasdeazúcargranulada
1½ cucharadas(35g)deazúcarrubia(azúcarde
cañaintegral)
½ taza(120ml)decremalíquidaparabatir
(“heavycream”)
1 cucharadita de extracto natural de vainilla
1 pizca de sal
2 galletas tipo “sándwiches de chocolate”,
en cuartos
1. Colocar el cacao, la leche y el azúcar en un tazón
pequeño; batir hasta que el azúcar se haya
disuelto. Agregar la crema líquida la vainilla y la
sal; mezclar. Verter en una de las tazas de postre
y tapar.
2. Poner en el congelador, sobre una supercie
plana, y congelar por un mínimo de 24 horas.
HELADO
¾ de taza (175ml) de líquido +
3-4 cucharadas (35-50g)
de azúcar
SORBETE
1 taza (aprox. 250g) de puré de
frutas + ¼ de taza (60ml) de
jarabe simple
GRANIZADO
¾ de taza (175ml) de líquido
congelado + ¼ de taza (60ml)
de líquido refrigerado
BATIDO DE
HELADO
²/3 de taza (160ml) de helado +
2 cucharadas (30ml) de líquido

24
3. Sacar de congelador y dejar a temperatura
ambiente por aprox. 10 minutos antes de usar.
4. Conectar la taza de postre al bloque-motor y
sujetar a la varilla.
5. Elegir la función “helado” y procesar hasta
conseguir la consistencia deseada. Agregar las
galletas. Elegir la función “ingredientes extra” y
procesar brevemente hasta conseguir la
consistencia deseada.
Sorbete de Mango
El mango puede sustituirse por cualquier otra fruta
en este sencillo postre afrutado.
Rinde 2 porciones
1 taza(250g)decubosdemangomaduro
3 cucharadas(45ml)dejarabesimple*
½ cucharada de jugo de lima/limón verde
1 pizca de ralladura de lima/limón verde
1 pizca de sal
1. Colocar el mango en una de las tazas de postre y
aplastarlo con un tenedor. Agregar el resto de los
ingredientes y mezclar bien. Tapar.
2. Poner en el congelador, sobre una supercie
plana, y congelar por un mínimo de 24 horas.
3. Sacar de congelador y dejar a temperatura
ambiente por aprox. 10 minutos antes de usar.
4. Conectar la taza de postre al bloque-motor y
sujetar a la varilla.
5. Elegir la función “sorbete” y procesar hasta
conseguir la consistencia deseada.
*Para preparar jarabe simple, calentar partes iguales
de agua y azúcar hasta que el azúcar se haya
disuelto. Deje enfriar antes de usar.
Helado Proteico con Sabor a
“Banana Split”
Si preere una opción vegana, sustituya la crema
y el yogur por una crema de vainilla no láctea y rica
en proteínas.
Rinde 2 porciones
½ taza(120ml)decremalíquidaparabatir
(“heavycream”)
¼ taza(120ml)deyogurdevainilla
1 banana pequeña madura
1 porción de proteína en polvo
2 cucharadas de néctar de agave
1 cucharada de salsa de chocolate
1. Colocar la crema, el yogurt, la banana y la
proteína en polvo en la jarra de una licuadora;
licuar a velocidad baja. Verter en una de las tazas
de postre y tapar.
2. Poner en el congelador, sobre una supercie
plana, y congelar por un mínimo de 24 horas.
3. Sacar de congelador y dejar a temperatura
ambiente por aprox. 10 minutos antes de usar.
4. Conectar la taza de postre al bloque-motor y
sujetar a la varilla.
5. Elegir la función “helado” y procesar hasta
conseguir la consistencia deseada. Agregar la
salsa de chocolate. Elegir la función “ingredientes
extra” y procesar brevemente hasta conseguir la
consistencia deseada.
Granizado de
Limonada de Frambuesa
Las posibilidades de sabores de granizado son
innitas. ¡Prepare esta receta con su bebida favorita,
sin o con gas!
Rinde 1 porción
1 taza(235ml)delimonadadeframbuesa
1. Colocar ¾ de taza (175ml) de la limonada en una
de las tazas de postre y tapar.
2. Poner en el congelador, sobre una supercie
plana, y congelar por un mínimo de 24 horas.
3. Sacar de congelador y dejar a temperatura
ambiente por aprox. 10 minutos antes de usar.
4. Conectar la taza de postre al bloque-motor y
sujetar a la varilla.
5. Elegir la función “granizado” y procesar. Agregar la
limonada restante y seguir procesando hasta
conseguir la consistencia deseada.
Batido de Dulce de Leche
¡Nada mejor que un batido con sabores
de la infancia!
Rinde 1 porción
2/3 taza(160ml)deheladodevainilla
2 cucharadas(30ml)delecheentera
1 cucharada de dulce de leche
1. Colocar todos los ingredientes en una de las
tazas de postre, en el orden indicado.
2. Conectar la taza de postre al bloque-motor y
sujetar a la varilla.
3. Elegir la función “batido de helado” y procesar
hasta conseguir la consistencia deseada.

25
Helado de Yogur con Sabor
a Pastel de Queso de
Arándanos Azules
Dulce, ácido y cremoso: ¡este yogur helado se
convertirá en su nuevo favorito!
Rinde 2 porciones
¼ taza(60ml)deyogurgriegode
vainilla sin grasa
¼ taza(60g)dearándanosazulescongelados,
descongelados y aplastados
2 onzas(60g)dequesocrema,
a temperatura ambiente
1 cucharada(10g)deazúcargranulada
1 pizca de sal
1 cucharada de crema líquida para batir
(“heavycream”)
½ galleta Graham cracker, en 2 pedazos
1. Colocar todos los ingredientes excepto los
pedazos de galleta en un tazón pequeño; batir
para combinar. Verter en una de las tazas de
postre y tapar.
2. Poner en el congelador, sobre una supercie
plana, y congelar por un mínimo de 24 horas.
3. Sacar de congelador y dejar a temperatura
ambiente por aprox. 10 minutos antes de usar.
4. Conectar la taza de postre al bloque-motor y
sujetar a la varilla.
5. Elegir la función “helado” y procesar hasta
conseguir la consistencia deseada.
6. Agregar los pedazos de galleta. Elegir la función
“ingredientes extra” y procesar hasta conseguir la
consistencia deseada.
Helado de Yogur
de Banana con Fresa
La banana madura endulza este clásico y ácido
yogur helado.
Rinde 2 porciones
2 cucharadas(30ml)delecheentera
½ taza(160ml)deyogurgriegodelecheentera
2 cucharadas(35g)deazúcargranulada
3 fresas frescas, aplastadas
¼ banana maduro, aplastado
⅛ cucharaditadesalmarina
1 cucharada de crema líquida para batir
(“heavycream”)
1. Colocar todos los ingredientes en un tazón
pequeño; batir para combinar. Verter en una de
las tazas de postre y tapar.
2. Poner en el congelador, sobre una supercie
plana, y congelar por un mínimo de 24 horas.
3. Sacar de congelador y dejar a temperatura
ambiente por aprox. 10 minutos antes de usar.
4. Conectar la taza de postre al bloque-motor y
sujetar a la varilla.
5. Elegir la función “helado” y procesar hasta
conseguir la consistencia deseada.
Helado Proteico de Chocolate
Este helado repleto de proteínas lleva solo dos
ingredientes. ¡Es la forma más fácil y deliciosa de
alcanzar sus objetivos proteicos!
Rinde 2 porciones
½ taza de batido proteico de chocolate en polvo
½ taza(120ml)deyogurgriegonaturalde
leche entera
1. Colocar todos los ingredientes en un tazón
pequeño; batir para combinar. A continuación,
verter la mezcla en una de las tazas de postre
y tapar.
2. Poner en el congelador, sobre una supercie
plana, y congelar por un mínimo de 24 horas.
3. Sacar de congelador y dejar a temperatura
ambiente por aprox. 10 minutos antes de usar.
4. Conectar la taza de postre al bloque-motor y
sujetar a la varilla.
5. Elegir la función “helado” y procesar hasta
conseguir la consistencia deseada.
Raspado de Sandía
Este raspado increíblemente refrescante le hará
sentir como si fuera verano todo el año.
Rinde 2 porciones
¾ taza(175ml)depurédesandía
2 cucharadas de jugo de lima/limón verde fresco
1 pizca de sal marina
1. Colocar todos los ingredientes en un tazón
pequeño; batir para combinar. A continuación,
verter la mezcla en una de las tazas de postre
y tapar.
2. Poner en el congelador, sobre una supercie
plana, y congelar por un mínimo de 24 horas.
3. Sacar de congelador y dejar a temperatura
ambiente por aprox. 10 minutos antes de usar.

26
4. Conectar la taza de postre al bloque-motor y
sujetar a la varilla.
5. Elegir la función “sorbete” y procesar hasta
conseguir la consistencia deseada.
Latte de Té Matcha Helado
Refréscate y aumenta tu energía con una sola delicia
helada. El matcha en polvo se vende endulzado y sin
endulzar; asegúrese de comprobar la lista de
ingredientes antes de comprarlo.
Rinde 1 porción
¾ taza(175ml)desustitutodecremadeleche
de avena
1 cucharaditadetématchaenpolvo,sinazúcar
2 cucharaditas de miel
1 pizca de sal
2 cucharadas de sustituto de crema de leche
de avena
1. Colocar 2 cucharadas de sustituto de crema de
leche de avena y el matcha en polvo en un tazón
pequeño; batir hasta conseguir una mezcla
suave. Agregar gradualmente el sustituto de
crema de leche de avena restante, la miel y la
sal. Verter en una de las tazas de postre y tapar.
2. Poner en el congelador, sobre una supercie
plana, y congelar por un mínimo de 24 horas.
3. Sacar de congelador y dejar a temperatura
ambiente por aprox. 10 minutos antes de usar.
Agregar 2 cucharadas de sustituto de crema de
leche de avena.
4. Conectar la taza de postre al bloque-motor y
sujetar a la varilla.
5. Elegir la función “batido” y procesar hasta
conseguir la consistencia deseada.
Helado de Coco con Cerezas
Las cerezas aportan a este helado un hermoso tono
rosado cuando se mezclan con la cremosa leche de
coco. Esta deliciosa combinación es perfecta para
un excelente postre sin lácteos.
Rinde 2 porciones
¾ taza(175ml)delechedecocoenlatada
½ cucharadita de extracto natural de vainilla
3 cucharadas(35g)deazúcargranulada
1 pizca de sal marina
4 cerezas congeladas, partidas a la mitad
1. Colocar la leche de coco, la vainilla, el azúcar y la
sal en la jarra de una licuadora; licuar a velocidad
baja hasta conseguir una mezcla suave.
2. Verter la mezcla en una de las tazas de postre
y tapar.
3. Poner en el congelador, sobre una supercie
plana, y congelar por un mínimo de 24 horas.
4. Sacar de congelador y dejar a temperatura
ambiente por aprox. 10 minutos antes de usar.
5. Conectar la taza de postre al bloque-motor y
sujetar a la varilla.
6. Elegir la función “helado” y procesar hasta
conseguir la consistencia deseada.
7. Agregar las cerezas. Elegir la función
“ingredientes extra” y procesar hasta conseguir la
consistencia deseada.

27
Notas:

©2025 Cuisinart
Glendale, AZ 85307
Printed in China
Impreso en China
25CE200366
IB-18804-ESP