Quick Start Guide
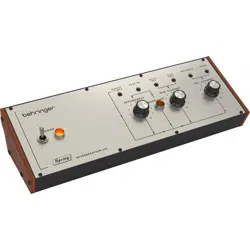
SPRING REVERBERATION 646
Legendary Spring Reverb with Overload Circuit in Eurorack Format
V 2.0

2 3Quick Start GuideSPRING REVERBERATION 646
Terminals marked with
this symbol carry
electrical current of
su cient magnitude to constitute risk
of electric shock. Use only high-quality
professional speaker cables with ¼" TS
or twist-locking plugs pre-installed.
Allother installation or modi cation
should be performed only by
quali edpersonnel.
This symbol, wherever it
appears, alerts you to the
presence of uninsulated
dangerous voltage inside the enclosure
- voltage that may be su cient to
constitute a risk ofshock.
This symbol, wherever it
appears, alerts you to
important operating and
maintenance instructions in the
accompanying literature. Please read
themanual.
Caution
To reduce the risk of
electric shock, do not
remove the top cover (or the rear
section). No user serviceable parts inside.
Refer servicing to quali edpersonnel.
Caution
To reduce the risk of
re or electric shock, do
not expose this appliance to rain and
moisture. Theapparatus shall not
be exposed to dripping or splashing
liquids and no objects lled with
liquids, such as vases, shall be placed
on the apparatus.
Caution
These service instructions
are for use by quali ed
service personnel only. Toreduce
the risk of electric shock do not
perform any servicing other than that
contained in the operation instructions.
Repairshave to be performed by
quali ed servicepersonnel.
Warning
Please refer to the
information on the
exterior of bottom enclosure for
electrical and safety information before
installing or operating the device.
1. Please read and follow all
instructions and warnings.
2. Keep the apparatus away from
water (except for outdoor products).
3. Clean only with dry cloth.
4. Do not block ventilation openings.
Do not install in a con ned space.
Install only according to manufacturer's
instructions.
5. Protect the power cord from
damage, particularly at plugs and
appliance socket.
6. Do not install near any heat
sources such as radiators, heat
registers, stoves or other apparatus
(including ampli ers) that
produce heat.
7. Do not defeat the safety purpose
of the polarized or grounding-type
plug. A polarized plug has two blades
with one wider than the other (only
for USA and Canada). A grounding-
type plug has two blades and a third
grounding prong. The wide blade or
the third prong are provided for your
safety. If the provided plug does not t
into your outlet, consult an electrician
for replacement of the obsolete outlet.
8. Protect the power cord from
damage, particularly at plugs and
appliance socket.
9. Use only attachments and
accessories recommended by the
manufacturer.
10. Use only
speci ed carts,
stands, tripods,
brackets, or tables.
Use caution to
prevent tip-over
when moving the cart/apparatus
combination.
11. Unplug during storms, or if not in
use for a long period.
12. Only use quali ed personnel for
servicing, especially after damage.
13. The apparatus with protective
earthing terminal shall be connected to
a MAINS socket outlet with a protective
earthing connection.
14. Where the MAINS plug or an
appliance coupler is used as the
disconnect device, the disconnect
device shall remain readily operable.
15.
Avoid installing in con ned spaces
like bookcases.
16. Do not place naked ame
sources, such as lighted candles, on the
apparatus.
17. Operating temperature range 5°
to 45°C (41° to 113°F).
Music Tribe accepts no liability for
any loss which may be su ered by
any person who relies either wholly
or in part upon any description,
photograph, or statement contained
herein. Technical speci cations,
appearances and other information
are subject to change without notice.
All trademarks are the property
of their respective owners. Midas,
Klark Teknik, Lab Gruppen, Lake,
Tannoy, Turbosound, TC Electronic,
TC Helicon, Behringer, Bugera, Aston
Microphones and Coolaudio are
trademarks or registered trademarks
of Music Tribe Global Brands Ltd.
© Music Tribe Global Brands Ltd.
2024 All rights reserved.
For the applicable warranty terms and
conditions and additional information
regarding Music Tribe’s Limited
Warranty, please see complete details
online at community.musictribe.
com/support.
LEGAL DISCLAIMER
Important Safety
Instructions
Las terminales marcadas
con este símbolo
transportan corriente
eléctrica de magnitud su ciente como
para constituir un riesgo de descarga
eléctrica. Utilicesolo cables de altavoz
profesionales y de alta calidad con
conectores TS de 6,3 mm o de bayoneta
pre jados. Cualquier otra instalación o
modi cación debe ser realizada
únicamente por un técnicocuali cado.
Este símbolo, siempre que
aparece, leadvierte de la
presencia de voltaje
peligroso sin aislar dentro de la caja;
estevoltaje puede ser su ciente para
constituir un riesgo dedescarga.
Este símbolo, siempre que
aparece, leadvierte sobre
instrucciones operativas y
de mantenimiento que aparecen en la
documentación adjunta. Por favor,
leaelmanual.
Atención
Para reducir el riesgo de
descarga eléctrica, no
quite la tapa (olaparte posterior).
Nohay piezas en el interior del equipo
que puedan ser reparadas por el
usuario. Sies necesario, póngase en
contacto con personal cuali cado.
Atención
Para reducir el riesgo
de incendio o descarga
eléctrica, no exponga este aparato a la
lluvia, humedad o alguna otra fuente
que pueda salpicar o derramar algún
líquido sobre el aparato. Nocoloque
ningún tipo de recipiente para líquidos
sobre elaparato.
Atención
Las instrucciones
de servicio deben
llevarlas a cabo exclusivamente
personal cuali cado. Paraevitar el
riesgo de una descarga eléctrica,
no realice reparaciones que no se
encuentren descritas en el manual de
operaciones. Lasreparaciones deben
ser realizadas exclusivamente por
personalcuali cado.
Advertencia
Consulte la información
en el exterior del recinto
inferior para obtener información
eléctrica y de seguridad antes de
instalar u operar el dispositivo.
1. Por favor, lea y siga todas las
instrucciones y advertencias.
2. Mantenga el aparato alejado
del agua (excepto para productos
diseñados para uso en exteriores).
3. Limpie solo con un paño seco.
4. No obstruya las aberturas de
ventilación. No instale en un espacio
con nado. Instale solo de acuerdo con
las instrucciones del fabricante.
5. Proteja el cable de alimentación
contra daños, especialmente en
los enchufes y en el tomacorriente
del aparato.
6. No lo instale cerca de fuentes
de calor como radiadores, rejillas de
calefacción, estufas u otros aparatos
(incluyendo ampli cadores) que
generen calor.
7. No anule el propósito de
seguridad del enchufe polarizado o del
tipo con toma de tierra. Un enchufe
polarizado tiene dos clavijas, una más
ancha que la otra (solo para EE. UU. y
Canadá). Un enchufe con toma de tierra
tiene dos clavijas y una tercera clavija
de toma de tierra. La clavija ancha o la
tercera clavija se proporcionan para su
seguridad. Si el enchufe suministrado
no encaja en su toma de corriente,
consulte a un electricista para
reemplazar la toma obsoleta.
8. Proteja el cable de alimentación
contra daños, especialmente en los
enchufes y en el tomacorriente del
aparato.
9. Utilice solo accesorios y accesorios
recomendados por el fabricante.
10. Utilice solo
carritos, soportes,
trípodes, soportes
o mesas
especi cados.
Tenga cuidado
para evitar que el carro/ combinación
de aparatos se vuelque al moverlo.
11. Desenchufe durante tormentas
o si no se utiliza durante un largo
período.
12. Solo utilice personal cuali cado
para el servicio, especialmente después
de daños.
13. El aparato con terminal de puesta
a tierra protectora debe conectarse
a un tomacorriente de red con una
conexión de puesta a tierra protectora.
14. Cuando se utilice el enchufe
de red o un acoplador de aparatos
como dispositivo de desconexión, el
dispositivo de desconexión debe seguir
siendo fácilmente operable.
15. Evite la instalación en espacios
con nados como estanterías.
16. No coloque fuentes de llama
desnuda, como velas encendidas, en
el aparato.
17. Rango de temperatura de
funcionamiento de 5°a 45°C
(41°a 113°F).
Music Tribe no admite ningún tipo
de responsabilidad por cualquier
daño o pérdida que pudiera sufrir
cualquier persona por con ar total
o parcialmente en la descripciones,
fotografías o a rmaciones
contenidas en este documento.
Las especi caciones técnicas,
imágenes y otras informaciones
contenidas en este documento están
sujetas a modi caciones sin previo
aviso. Todas las marcas comerciales
que aparecen aquí son propiedad
de sus respectivos dueños. Midas,
Klark Teknik, Lab Gruppen, Lake,
Tannoy, Turbosound, TC Electronic,
TC Helicon, Behringer, Bugera, Aston
Microphones y Coolaudio son marcas
comerciales o marcas registradas
de Music Tribe Global Brands Ltd.
Instrucciones de
seguridad
LIMITED WARRANTY
GARANTÍA LIMITADA
4 5Quick Start GuideSPRING REVERBERATION 646
© Music Tribe Global Brands Ltd.
2024 Reservados todos los derechos.
Si quiere conocer los detalles y
condiciones aplicables de la garantía
así como información adicional sobre
la Garantía limitada de Music Tribe,
consulte online toda la información
en la web community.musictribe.
com/support.
Les points repérés par ce
symbole portent une
tension électrique
su sante pour constituer un risque
d’électrocution. Utilisez uniquement
des câbles d’enceintes professionnels
de haute qualité avec ches Jack mono
6,35 mm ou ches à verrouillages déjà
installées. Touteautre installation ou
modi cation doit être e ectuée
uniquement par un personnel quali é.
Ce symbole avertit de la
présence d’une tension
dangereuse et non isolée à
l’intérieur de l’appareil - elle peut
provoquer des chocs électriques.
Ce symbol signale les
consignes d’utilisation et
d'entretien importantes
dans la documentation fournie. Lisez
les consignes de sécurité du manuel
d’utilisation de l’appareil.
Attention
Pour éviter tout risque
de choc électrique,
ne pas ouvrir le capot de l’appareil
ni démonter le panneau arrière.
L’intérieur de l’appareil ne possède
aucun élément réparable par
l’utilisateur. Laissertoute réparation à
un professionnelquali é.
Attention
Pour réduire les risques
de feu et de choc
électrique, n’exposez pas cet appareil
à la pluie, à la moisissure, auxgouttes
ou aux éclaboussures. Ne posez pas
de récipient contenant un liquide sur
l’appareil (unvase par exemple).
Attention
Ces consignes de
sécurité et d’entretien
sont destinées à un personnel
quali é. Pour éviter tout risque de
choc électrique, n’e ectuez aucune
réparation sur l’appareil qui ne soit
décrite par le manuel d’utilisation.
Les éventuelles réparations doivent
être e ectuées uniquement par un
technicienspécialisé.
Avertissement
Veuillez vous référer aux
informations situées à
l'extérieur du boîtier inférieur pour
obtenir les renseignements électriques
et de sécurité avant d'installer ou
d'utiliser l'appareil.
1. Veuillez lire et suivre toutes les
instructions et avertissements.
2. Éloignez l'appareil de l'eau (sauf
pour les produits conçus pour une
utilisation en extérieur).
3. Nettoyez uniquement avec un
chi on sec.
4. Ne bloquez pas les ouvertures
de ventilation. N'installez pas dans un
espace con né. Installez uniquement
selon les instructions du fabricant.
5. Protégez le cordon d'alimentation
contre les dommages, en particulier
au niveau des ches et de la prise de
l'appareil.
6. N'installez pas près de sources de
chaleur telles que radiateurs, registres
de chaleur, cuisinières ou autres
appareils (y compris les ampli cateurs)
qui produisent de la chaleur.
7. Ne contrecarrez pas le but de
sécurité de la che polarisée ou de type
mise à la terre. Une che polarisée a
deux lames, l'une plus large que l'autre
(uniquement pour les États-Unis et le
Canada). Une che de type mise à la
terre a deux lames et une troisième
broche de mise à la terre. La lame large
ou la troisième broche sont fournies
pour votre sécurité. Si la che fournie
ne s'adapte pas à votre prise, consultez
un électricien pour remplacer la prise
obsolète.
8. Protégez le cordon d'alimentation
contre les dommages, en particulier
au niveau des ches et de la prise de
l'appareil.
9. Utilisez uniquement des
accessoires et des pièces recommandés
par le fabricant.
10. Utilisez
uniquement des
chariots, des
supports, des
trépieds, des
supports ou des
tables spéci és. Faites attention pour
éviter le renversement lors du
déplacement de la combinaison
chariot/appareil.
11.
Débranchez pendant les tempêtes
ou si l'appareil n'est pas utilisé pendant
une longue période.
12. Utilisez uniquement du personnel
quali é pour l'entretien, surtout après
des dommages.
13. L'appareil avec une borne de mise
à la terre protectrice doit être connecté
à une prise secteur avec une connexion
de mise à la terre protectrice.
14. Lorsque la che secteur ou un
coupleur d'appareil est utilisé comme
dispositif de déconnexion, le dispositif
de déconnexion doit rester facilement
utilisable.
15. Évitez l'installation dans
des espaces con nés comme des
bibliothèques.
16. Ne placez pas de sources de
amme nue, telles que des bougies
allumées, sur l'appareil.
17. Plage de température de
fonctionnement de 5°à 45°C
(41°à 113°F).
Music Tribe ne peut être tenu pour
responsable pour toute perte pouvant
être subie par toute personne se
ant en partie ou en totalité à
toute description, photographie
ou a rmation contenue dans ce
document. Les caractéristiques,
l’apparence et d’autres informations
peuvent faire l’objet de modi cations
sans noti cation. Toutes les marques
appartiennent à leurs propriétaires
respectifs. Midas, Klark Teknik,
Lab Gruppen, Lake, Tannoy,
Turbosound, TC Electronic, TC Helicon,
Behringer, Bugera, Aston Microphones
et Coolaudio sont des marques ou
marques déposées de Music Tribe
Global Brands Ltd. © Music Tribe Global
Brands Ltd. 2024 Tous droits réservés.
Pour connaître les termes et conditions
de garantie applicables, ainsi que
les informations supplémentaires et
détaillées sur la Garantie Limitée de
Music Tribe, consultez le site Internet
community.musictribe.com/support.
Die mit dem Symbol
markierten Anschlüsse
führen so viel Spannung,
dassdie Gefahr eines Stromschlags
besteht. Verwenden Sie nur
hochwertige, professionelle
Lautsprecherkabel mit vorinstallierten
6,35 mm MONO-Klinkensteckern oder
Lautsprecherstecker mit
Drehverriegelung. Alle anderen
Installationen oder Modi kationen
sollten nur von quali ziertem
Fachpersonal ausgeführt werden.
Dieses Symbol weist Sie
immer dann darauf hin,
wenn es erscheint, dass im
Inneren des Gehäuses gefährliche
unisolierte Spannung vorhanden ist
– eine Spannung, die ausreichend sein
kann, um ein Stromschlagrisiko
darzustellen.
Dieses Symbol weist Sie an
jeder Stelle, an der es
erscheint, auf wichtige
Betriebs- und Wartungsanweisungen in
der beiliegenden Literatur hin. Bitte
lesen Sie die Bedienungsanleitung.
Vorsicht
Um eine Gefährdung
durch Stromschlag
auszuschließen, darf die
Geräteabdeckung bzw.
Geräterückwandnicht abgenommen
werden. ImInnern des Geräts be nden
sich keine vom Benutzer reparierbaren
Teile. Reparaturarbeiten dürfen
nur von quali ziertem Personal
ausgeführtwerden.
Vorsicht
Um eine Gefährdung
durch Feuer bzw.
Stromschlag auszuschließen, darf
dieses Gerät weder Regen oder
Feuchtigkeit ausgesetzt werden
noch sollten Spritzwasser oder
tropfende Flüssigkeiten in das Gerät
gelangen können. Stellen Sie keine
mit Flüssigkeit gefüllten Gegenstände,
wie z. B. Vasen, aufdasGerät.
Vorsicht
Die Service-Hinweise sind
nur durch quali ziertes
Personal zu befolgen. Umeine
Gefährdung durch Stromschlag zu
vermeiden, führen Sie bitte keinerlei
Reparaturen an dem Gerät durch,
dienicht in der Bedienungsanleitung
beschrieben sind. Reparaturen
sind nur von quali ziertem
Fachpersonaldurchzuführen.
Warnung
Bitte beachten Sie
die Informationen
auf der Außenseite der unteren
Abdeckung bezüglich elektrischer
und sicherheitstechnischer Hinweise,
bevor Sie das Gerät installieren oder in
Betrieb nehmen.
1. Bitte lesen Sie alle Anweisungen
und Warnhinweise sorgfältig durch
und befolgen Sie diese.
2. Halten Sie das Gerät von Wasser
fern (außer bei Produkten für den
Außenbereich).
3. Reinigen Sie nur mit einem
trockenen Tuch.
4. Blockieren Sie nicht die
Belüftungsö nungen. Installieren Sie
das Gerät nicht in einem engen Raum
und nur gemäß den Anweisungen
des Herstellers.
5. Schützen Sie das Netzkabel vor
Beschädigungen, insbesondere an
Steckern und Gerätebuchsen.
6. Installieren Sie das Gerät nicht
in der Nähe von Wärmequellen wie
Heizkörpern, Heizregistern, Öfen
oder anderen Geräten (einschließlich
Verstärkern), die Wärme erzeugen.
7. Heben Sie nicht den
Sicherheitszweck des polarisierten oder
geerdeten Steckers auf. Ein polarisierter
Stecker hat zwei Klingen, von denen
eine breiter ist als die andere (nur für
USA und Kanada). Ein geerdeter Stecker
hat zwei Klingen und einen dritten
Erdungszapfen. Die breite Klinge
oder der dritte Zapfen dienen Ihrer
Sicherheit. Wenn der mitgelieferte
Stecker nicht in Ihre Steckdose passt,
konsultieren Sie einen Elektriker,
um die veraltete Steckdose zu ersetzen.
8. Schützen Sie das Netzkabel vor
Beschädigungen, insbesondere an
Steckern und Gerätebuchsen.
9.
Verwenden Sie nur vom Hersteller
empfohlene Anbaugeräte und
Zubehörteile.
10. Verwenden
Sie nur
spezi zierte
Wagen, Ständer,
Stative,
Halterungen oder
Tische. Achten Sie darauf, dass der
Wagen/Geräte-Kombination beim
Bewegen nicht umkippt.
11. Ziehen Sie bei Gewittern oder bei
längerer Nichtbenutzung den Stecker.
Consignes de sécurité
Wichtige
Sicherheitshinweise
NEGACIÓN LEGAL
GARANTIE LIMITÉE
DÉNI LÉGAL

6 7Quick Start GuideSPRING REVERBERATION 646
12. Lassen Sie nur quali ziertes
Personal für Wartungsarbeiten
arbeiten, besonders nach
Beschädigungen.
13. Das Gerät mit schützendem
Erdungsterminal muss an eine
Steckdose mit schützender
Erdungsverbindung
angeschlossen werden.
14. Wenn der Netzstecker
oder ein Gerätekuppler als
Trennvorrichtung verwendet wird,
muss die Trennvorrichtung leicht
bedienbar bleiben.
15. Vermeiden Sie die Installation in
engen Räumen wie Bücherregalen.
16. Platzieren Sie keine o enen
Flammenquellen, wie brennende
Kerzen, auf dem Gerät.
17. Betriebstemperaturbereich von
5°bis 45°C (41°bis 113°F).
Music Tribe übernimmt keine Haftung
für Verluste, die Personen entstanden
sind, die sich ganz oder teilweise auf
hier enthaltene Beschreibungen,
Fotos oder Aussagen verlassen haben.
Technische Daten, Erscheinungsbild
und andere Informationen können
ohne vorherige Ankündigung geändert
werden. Alle Warenzeichen sind
Eigentum der jeweiligen Inhaber.
Midas, Klark Teknik, Lab Gruppen, Lake,
Tannoy, Turbosound, TC Electronic,
TC Helicon, Behringer, Bugera, Aston
Microphones und Coolaudio sind
Warenzeichen oder eingetragene
Warenzeichen der Music Tribe Global
Brands Ltd. © Music Tribe Global Brands
Ltd. 2024 Alle Rechte vorbehalten.
Die geltenden Garantiebedingungen
und zusätzliche Informationen
bezüglich der von Music Tribe
gewährten beschränkten Garantie
nden Sie online unter community.
musictribe.com/support.
Terminais marcados com o
símbolo carregam
corrente elétrica de
magnitude su ciente para constituir
um risco de choque elétrico. Use apenas
cabos de alto-falantes de alta
qualidade com plugues TS de ¼" ou
plugues com trava de torção
pré-instalados. Todas as outras
instalações e modi cações devem ser
efetuadas por pessoasquali cadas.
Este símbolo, onde quer
que apareça, alerta para a
presença de tensão
perigosa não isolada dentro do
invólucro - uma tensão que pode ser
su ciente para constituir um risco
de choque.
Este símbolo, onde quer
que o encontre, alerta-o
para a leitura das
instruções de manuseamento que
acompanham o equipamento. Por favor
leia o manual deinstruções.
Atenção
De forma a diminuir
o risco de choque
eléctrico, nãoremover a cobertura
(ouasecção de trás). Não existem peças
substituíveis por parte do utilizador no
seu interior. Para esse efeito recorrer a
um técnicoquali cado.
Atenção
Para reduzir o risco de
incêndios ou choques
eléctricos o aparelho não deve ser
exposto à chuva nem à humidade.
Alémdisso, não deve ser sujeito a
salpicos, nem devem ser colocados em
cima do aparelho objectos contendo
líquidos, taiscomojarras.
Atenção
Estas instruções de
operação devem ser
utilizadas, emexclusivo, por técnicos
de assistência quali cados. Para evitar
choques eléctricos não proceda a
reparações ou intervenções, que
não as indicadas nas instruções
de operação, salvo se possuir as
quali -cações necessárias. Para evitar
choques eléctricos não proceda a
reparações ou intervenções, que
não as indicadas nas instruções de
operação. Só o deverá fazer se possuir
as quali caçõesnecessárias.
Aviso
Consulte as informações
na parte externa
do invólucro inferior para obter
informações elétricas e de segurança
antes de instalar ou operar o
dispositivo.
1. Por favor, leia e siga todas as
instruções e advertências.
2. Mantenha o aparelho longe da
água (exceto para produtos destinados
a uso externo).
3. Limpe apenas com um pano seco.
4. Não obstrua as aberturas de
ventilação. Não instale em espaços
con nados. Instale apenas de acordo
com as instruções do fabricante.
5. Proteja o cabo de alimentação
contra danos, especialmente nos plugs
e na tomada do aparelho.
6. Não instale próximo a fontes
de calor, como radiadores, registros
de calor, fogões ou outros aparelhos
(incluindo ampli cadores) que
produzam calor.
7. Não desfaça a nalidade de
segurança da tomada polarizada ou do
tipo com aterramento. Uma tomada
polarizada possui duas lâminas, sendo
uma mais larga que a outra (apenas
para EUA e Canadá). Uma tomada com
aterramento possui duas lâminas e
uma terceira ponta de aterramento.
A lâmina larga ou a terceira ponta são
fornecidas para sua segurança. Se o
plug fornecido não se encaixar na sua
tomada, consulte um eletricista para
substituir a tomada obsoleta.
8. Proteja o cabo de alimentação
contra danos, especialmente nos plugs
e na tomada do aparelho.
9. Use apenas acessórios e
equipamentos recomendados pelo
fabricante.
10. Use apenas
carrinhos,
suportes, tripés,
suportes ou mesas
especi cados.
Tenha cuidado
para evitar tombamentos ao mover a
combinação carrinho/aparelho.
11. Desconecte durante tempestades
ou se não estiver em uso por um longo
período.
12. Use apenas pessoal quali cado
para serviços, especialmente após
danos.
13. O aparelho com terminal de
aterramento protetor deve ser
conectado a uma tomada de corrente
com conexão de aterramento protetor.
14. Quando o plugue de corrente ou
um acoplador de aparelho é usado
como dispositivo de desconexão,
o dispositivo de desconexão deve
permanecer prontamente operável.
15. Evite instalar em espaços
con nados, como estantes.
16. Não coloque fontes de chama nua,
como velas acesas, no aparelho.
17. Faixa de temperatura de operação
de 5°a 45°C (41°a 113°F).
O Music Tribe não se responsabiliza
por perda alguma que possa ser
sofrida por qualquer pessoa que
dependa, seja de maneira completa
ou parcial, de qualquer descrição,
fotogra a, ou declaração aqui
contidas. Dados técnicos, aparências
e outras informações estão sujeitas
a modi cações sem aviso prévio.
Todas as marcas são propriedade
de seus respectivos donos. Midas,
Klark Teknik, Lab Gruppen, Lake, Tannoy,
Turbosound, TC Electronic, TC Helicon,
Behringer, Bugera
, Aston Microphones
e Coolaudio são marcas ou marcas
registradas do Music Tribe Global Brands
Ltd. © Music Tribe Global Brands Ltd.
2024 Todos direitos reservados.
Para obter os termos de garantia
aplicáveis e condições e informações
adicionais a respeito da garantia
limitada do Music Tribe, favor veri car
detalhes na íntegra através do website
community.musictribe.com/support.
I terminali contrassegnati
con il simbolo conducono
una corrente elettrica
su ciente a costituire un rischio di
scossa elettrica. Usareunicamente cavi
per altoparlanti (Speaker) d’elevata
qualità con connettori jack TS da
¼"pre-installati. Ognialtra
installazione o modi ca deve essere
e ettuata esclusivamente da personale
tecnico quali cato.
Questo simbolo, ovunque
appaia, avverte della
presenza di una tensione
pericolosa non isolata all'interno dello
chassis, tensione che può essere
su ciente per costituire un rischio di
scossa elettrica.
Questo simbolo, ovunque
appaia, segnala
importanti istruzioni
operative e di manutenzione nella
documentazione allegata. Si invita a
leggere il manuale.
Attenzione
Per ridurre il rischio di
scosse elettriche, non
rimuovere il coperchio superiore (o la
sezione posteriore). All'interno non ci
sono parti riparabili dall'utente. Per la
manutenzione rivolgersi a personale
quali cato.
Attenzione
Per ridurre il rischio di
incendi o scosse elettriche,
non esporre questo apparecchio a
pioggia e umidità. L'apparecchio non
deve essere esposto a gocciolio o schizzi
di liquidi e nessun oggetto contenente
liquidi, come vasi, deve essere collocato
sull'apparecchio.
Attenzione
Queste istruzioni di
servizio sono destinate
esclusivamente a personale quali cato.
Per ridurre il rischio di scosse
elettriche non eseguire interventi
di manutenzione diversi da quelli
contenuti nel manuale di istruzioni. Le
riparazioni devono essere eseguite da
personale di assistenza quali cato.
Avvertimento
Consultare le informazioni
sulla parte esterna
dell'involucro inferiore per ottenere
informazioni elettriche e di sicurezza
prima di installare o utilizzare
il dispositivo.
1. Si prega di leggere e seguire tutte
le istruzioni e gli avvertimenti.
2. Mantenere l'apparecchio lontano
dall'acqua (tranne che per i prodotti
destinati all'uso all'aperto).
3. Pulire solo con un panno asciutto.
4. Non ostruire le aperture di
ventilazione. Non installare in spazi
ristretti. Installare solo secondo le
istruzioni del produttore.
5. Proteggere il cavo di
alimentazione dai danni,
soprattutto alle spine e alla presa
dell'elettrodomestico.
6. Non installare vicino a fonti di
calore come termosifoni, bocchette
di calore, fornelli o altri apparecchi
(compresi gli ampli catori) che
producono calore.
7. Non eludere lo scopo di sicurezza
della spina polarizzata o della spina con
messa a terra. Una spina polarizzata ha
due lame di cui una più larga dell'altra
(solo per USA e Canada). Una spina con
messa a terra ha due lame e una terza
spina di messa a terra. La lama larga o
la terza spina sono fornite per la vostra
sicurezza. Se la spina fornita non si
adatta alla vostra presa, consultare un
elettricista per la sostituzione della
presa obsoleta.
Instruções de
Segurança Importantes
HAFTUNGSAUSSCHLUSS
BESCHRÄNKTE GARANTIE
LEGAL RENUNCIANTE
GARANTIA LIMITADA
Informazioni importanti
8 9Quick Start GuideSPRING REVERBERATION 646
8. Proteggere il cavo di
alimentazione dai danni,
soprattutto alle spine e alla presa
dell'elettrodomestico.
9. Utilizzare solo accessori e
attrezzature raccomandati dal
produttore.
10. Utilizzare
solo carrelli,
supporti,
treppiedi, sta e o
tavoli speci cati.
Prestare
attenzione per evitare il ribaltamento
durante lo spostamento della
combinazione carrello/apparecchio.
11. Scollegare durante le tempeste
o se non viene utilizzato per un lungo
periodo.
12. Utilizzare solo personale
quali cato per la manutenzione,
specialmente dopo danni.
13. L'apparecchio con terminale di
messa a terra protettiva deve essere
collegato a una presa di corrente
con connessione di messa a terra
protettiva.
14. Se la spina di rete o un
accoppiatore dell'elettrodomestico
viene utilizzato come dispositivo
di disconnessione, il dispositivo
di disconnessione deve rimanere
facilmente utilizzabile.
15. Evitare l'installazione in spazi
ristretti come librerie.
16. Non posizionare fonti di
amma nuda, come candele accese,
sull'apparecchio.
17. Intervallo di temperatura di
funzionamento da 5°a 45°C
(da 41°a 113°F).
Music Tribe non si assume alcuna
responsabilità per eventuali danni
che possono essere subiti da chiunque
si a di in tutto o in parte a qualsiasi
descrizione, fotogra a o dichiarazione
contenuta qui. Speci che tecniche,
aspetti e altre informazioni sono
soggette a modi che senza preavviso.
Tutti i marchi sono di proprietà
dei rispettivi titolari. Midas, Klark
Teknik, Lab Gruppen, Lake, Tannoy,
Turbosound, TC Electronic, TC Helicon,
Behringer, Bugera, Aston Microphones
e Coolaudio sono marchi o marchi
registrati di Music Tribe Global Brands
Ltd. © Music Tribe Global Brands Ltd.
2024 Tutti i diritti riservati.
Per i termini e le condizioni di garanzia
applicabili e le informazioni aggiuntive
relative alla garanzia limitata di Music
Tribe, consultare online i dettagli
completi su community.musictribe.
com/support.
Aansluitingen die
gemerkt zijn met het
symbool voeren een
zodanig hoge spanning dat ze een
risico vormen voor elektrische
schokken. Gebruikuitsluitend
kwalitatief hoogwaardige, in de handel
verkrijgbare luidsprekerkabels die
voorzien zijn van ¼"TS stekkers.
Laatuitsluitend gekwali ceerd
personeel alleoverige installatie- of
modi catiehandelingenuitvoeren.
Dit symbool waarschuwt
u, waar het ook verschijnt,
voor de aanwezigheid van
ongeïsoleerde gevaarlijke spanning
binnenin de behuizing - spanning die
voldoende kan zijn om een risico op
elektrische schokken te vormen.
Dit symbool wijst u altijd
op belangrijke bedienings
- en
onderhoudsvoorschriften in de
bijbehorende documenten. Wijvragen
u dringend de handleiding te lezen.
Attentie
Verwijder in geen
geval de bovenste
afdekking (vanhet achterste gedeelte)
anders bestaat er gevaar voor een
elektrische schok. Hetapparaat bevat
geen te onderhouden onderdelen.
Reparatiewerkzaamheden mogen
uitsluitend door gekwali ceerd
personeel uitgevoerdworden.
Attentie
Om het risico op brand
of elektrische schokken
te beperken, dient u te voorkomen
dat dit apparaat wordt blootgesteld
aan regen en vocht. Hetapparaat
mag niet worden blootgesteld aan
neerdruppelend of opspattend water
en er mogen geen met water gevulde
voorwerpen – zoals een vaas – op het
apparaat wordengezet.
Attentie
Deze
onderhoudsinstructies
zijn uitsluitend bedoeld voor
gekwali ceerd onderhoudspersoneel.
Omelektrische schokken te
voorkomen, mag u geen andere
onderhoudshandelingen
verrichten dan in de
bedieningsinstructies vermeld staan.
Reparatiewerkzaamheden
mogen alleen uitgevoerd worden door
gekwali ceerd onderhoudspersoneel.
Waarschuwing
Raadpleeg de informatie
op de buitenkant van de
onderste behuizing voor elektrische
en veiligheidsinformatie voordat u het
apparaat installeert of bedient.
1. Gelieve alle instructies en
waarschuwingen zorgvuldig te lezen
en op te volgen.
2. Houd het apparaat uit de buurt
van water (behalve voor producten
bedoeld voor gebruik buitenshuis).
3. Reinig alleen met een droge doek.
4. Blokkeer de ventilatieopeningen
niet. Installeer niet in een afgesloten
ruimte. Installeer alleen volgens de
instructies van de fabrikant.
5. Bescherm de voedingskabel
tegen schade, vooral bij stekkers en het
stopcontact van het apparaat.
6. Installeer niet in de buurt van
warmtebronnen zoals radiatoren,
warmte registers, fornuizen of andere
apparaten (inclusief versterkers) die
warmte produceren.
7. Hef het veiligheidsdoel van de
gepolariseerde of geaarde stekker
niet op. Een gepolariseerde stekker
heeft twee pennen waarvan één
breder is dan de andere (alleen
voor de VS en Canada). Een geaarde
stekker heeft twee pennen en een
derde aardingspen. De brede pen of
de derde pen zijn voor uw veiligheid.
Als de meegeleverde stekker niet in
uw stopcontact past, raadpleeg dan
een elektricien om het verouderde
stopcontact te vervangen.
8. Bescherm de voedingskabel
tegen schade, vooral bij stekkers en het
stopcontact van het apparaat.
9. Gebruik alleen accessoires en
apparatuur die door de fabrikant
worden aanbevolen.
10. Gebruik
alleen
gespeci ceerde
karren, stands,
statieven, beugels
of tafels. Wees
voorzichtig om kantelen te voorkomen
bij het verplaatsen van de kar/
apparaatcombinatie.
11. Trek de stekker uit tijdens stormen
of als het apparaat gedurende lange
tijd niet wordt gebruikt.
12. Gebruik alleen gekwali ceerd
personeel voor onderhoud, vooral na
schade.
13. Het apparaat met een
beschermende aardingsaansluiting
moet worden aangesloten op een
stopcontact met een beschermende
aardingsverbinding.
14. Als de stekker van het stopcontact
of een apparaatkoppeling als het
ontkoppelingsapparaat wordt gebruikt,
moet het ontkoppelingsapparaat
gemakkelijk bedienbaar blijven.
15. Vermijd installatie in afgesloten
ruimtes zoals boekenkasten.
16. Plaats geen open vlambronnen,
zoals brandende kaarsen, op
het apparaat.
17. Bedrijfstemperatuurbereik van
5°tot 45°C (41°tot 113°F).
Music Tribe aanvaardt geen
aansprakelijkheid voor enig verlies
dat kan worden geleden door een
persoon die geheel of gedeeltelijk
vertrouwt op enige beschrijving,
foto of verklaring hierin. Technische
speci caties, verschijningen en
andere informatie kunnen zonder
voorafgaande kennisgeving worden
gewijzigd. Alle handelsmerken zijn
eigendom van hun respectievelijke
eigenaren. Midas, Klark Teknik, Lab
Gruppen, Lake, Tannoy, Turbosound,
TC Electronic, TC Helicon, Behringer,
Bugera, Aston Microphones en
Coolaudio zijn handelsmerken of
gedeponeerde handelsmerken
van Music Tribe Global Brands Ltd.
© Music Tribe Global Brands Ltd.
2024 Alle rechten voorbehouden.
Voor de toepasselijke
garantievoorwaarden en aanvullende
informatie met betrekking tot de
beperkte garantie van Music Tribe,
zie de volledige details online op
community.musictribe.com/support.
Uttag markerade med
symbolen leder elektrisk
strömstyrka som är
tillräckligt stark för att utgöra en risk
för elchock. Använd endast
högkvalitativa, kommersiellt
tillgängliga högtalarkablar med
förhandsinstallerade ¼"TS-kontakter.
Allannan installering eller modi kation
bör endast utföras av
kompetentpersonal.
Denna symbol, var den än
förekommer, varnar för
närvaron av farlig,
oisolerad spänning inuti höljet -
spänning som kan vara tillräcklig för att
utgöra en risk för stöt.
Den här symbolen
hänvisar till viktiga
punkter om användning
och underhåll i den medfölljande
dokumentationen. Varvänlig och läs
bruksanvisningen.
Försiktighet
Minska risken för
elektriska stötar genom
att aldrig ta av höljet upptill på
apparaten (ellerta av baksidan).
Inuti apparaten nns det inga delar
som kan repareras av användaren.
Endastkvali cerad personal får
genomföra reparationer.
Försiktighet
För att minska risken
för brand och elektriska
stötar ska apparaten skyddas mot
regn och fukt. Apparaten går inte
utsättas för dropp eller spill och
inga vattenbehållare som vaser etc.
fårplaceras på den.
Försiktighet
Serviceinstruktionen
är enbart avsedd
för kvali cerad servicepersonal.
Föratt undvika risker genom
elektriska stötar, genomför inga
reparationer på apparaten, vilka inte
är beskrivna i bruksanvisningen.
Endast kvali cerad fackpersonal får
genomförareparationerna.
Varning
Vänligen se informationen
på utsidan av bottenhöljet
för elektrisk och säkerhetsinformation
innan du installerar eller använder
enheten.
Belangrijke
veiligheidsvoorschriften
DISCLAIMER LEGALE
GARANZIA LIMITATA
Viktiga
säkerhetsanvisningar
WETTELIJKE ONTKENNING
BEPERKTE GARANTIE
10 11Quick Start GuideSPRING REVERBERATION 646
1. Vänligen läs och följ alla
instruktioner och varningar noggrant.
2. Håll apparaten borta från vatten
(utom för utomhusprodukter).
3. Rengör endast med en torr trasa.
4. Blockera inte
ventilationsöppningarna. Installera
inte i trånga utrymmen. Installera
endast enligt tillverkarens anvisningar.
5. Skydda nätkabeln från
skador, särskilt vid kontakter och
apparatkontakten.
6. Installera inte nära värme källor
som element, värmeregistrar, spisar
eller andra apparater (inklusive
förstärkare) som producerar värme.
7. Förstör inte säkerhetsfunktionen
hos den polariserade eller jordade
kontakten. En polariserad kontakt har
två blad varav ett är bredare än det
andra (endast för USA och Kanada).
En jordad kontakt har två blad och
en tredje jordningsstift. Det breda
bladet eller det tredje stiftet är till för
din säkerhet. Om den medföljande
kontakten inte passar i ditt uttag,
kontakta en elektriker för att byta ut
det föråldrade uttaget.
8. Skydda nätkabeln från
skador, särskilt vid kontakter och
apparatkontakten.
9. Använd endast tillbehör och
tillbehör som rekommenderas av
tillverkaren.
10. Använd
endast
speci cerade
vagnar, ställ, stativ,
fästen eller bord.
Var försiktig för att
förhindra vältningsrisk när du yttar
vagnen/apparatkombinationen.
11. Koppla ur under åskväder eller
om enheten inte används under en
längre tid.
12. Använd endast kvali cerad
personal för service, särskilt efter
skador.
13. Apparaten med
skyddsjordanslutning ska
anslutas till ett vägguttag med
skyddsjordanslutning.
14. Om nätkontakten eller en
apparatkoppling används som
frånkopplingsanordning måste
frånkopplingsanordningen vara lätt
åtkomlig.
15. Undvik installation i trånga
utrymmen som bokhyllor.
16. Placera inte öppna lågor, som
tända ljus, på apparaten.
17. Driftstemperaturområde 5° till
45°C (41° till 113°F).
Music Tribe tar inget ansvar för någon
förlust som kan drabbas av någon
person som helt eller delvis förlitar
sig på någon beskrivning, fotogra
eller uttalande som nns här.
Tekniska speci kationer, utseenden
och annan information kan ändras
utan föregående meddelande. Alla
varumärken tillhör respektive ägare.
Midas, Klark Teknik, Lab Gruppen,
Lake, Tannoy, Turbosound, TC
Electronic, TC Helicon, Behringer,
Bugera, Aston Microphones och
Coolaudio är varumärken eller
registrerade varumärken som tillhör
Music Tribe Global Brands Ltd.
© Music Tribe Global Brands Ltd.
2024 Alla Rättigheter reserverade.
För tillämpliga garantivillkor och
ytterligare information om Music
Tribes begränsade garanti, se
fullständig information online på
community.musictribe.com/support.
Terminale oznaczone
symbolem przenoszą
wystarczająco wysokie
napięcie elektryczne, aby stworzyć
ryzyko porażenia prądem. Używaj
wyłącznie wysokiej jakości fabrycznie
przygotowanych kabli z
zainstalowanymi wtyczkami ¼"TS.
Wszystkie inne instalacje lub
mody kacje powinny być wykonywane
wyłącznie przez wykwali kowany
personel techniczny.
Ten symbol, gdziekolwiek
się pojawi, informuje Cię o
obecności nieizolowanego
niebezpiecznego napięcia wewnątrz
obudowy - napięcia, które może
stanowić ryzyko porażenia.
Ten symbol informuje o
ważnych wskazówkach
dotyczących obsługi i
konserwacji urządzenia w dołączonej
dokumentacji. Proszę przeczytać
stosowne informacje w instrukcji
obsługi.
Uwaga
W celu wyeliminowania
zagrożenia porażenia
prądem zabrania się zdejmowania
obudowy lub tylnej ścianki urządzenia.
Elementyznajdujące się we wnętrzu
urządzenia nie mogą być naprawiane
przez użytkownika. Naprawymogą
być wykonywane jedynie przez
wykwali kowanypersonel.
Uwaga
W celu wyeliminowania
zagrożenia porażenia
prądem lub zapalenia się urządzenia
nie wolno wystawiać go na działanie
deszczu i wilgotności oraz dopuszczać
do tego, aby do wnętrza dostała się
woda lub inna ciecz. Nie należy stawiać
na urządzeniu napełnionych cieczą
przedmiotów takich jak np. wazony
lub szklanki.
Uwaga
Prace serwisowe mogą
być wykonywane jedynie
przez wykwali kowany personel.
Wcelu uniknięcia zagrożenia porażenia
prądem nie należy wykonywać
żadnych manipulacji, które nie
są opisane w instrukcji obsługi.
Naprawywykonywane mogą być
jedynie przez wykwali kowany
personeltechniczny.
Ostrzeżenie
Przed zainstalowaniem
lub uruchomieniem
urządzenia prosimy zajrzeć do
informacji umieszczonej na
zewnętrznej części dolnej obudowy
dotyczącej informacji elektrycznych i
bezpieczeństwa.
1. Proszę przeczytać i ścisłe
przestrzegać wszystkich instrukcji i
ostrzeżeń.
2. Trzymaj urządzenie z dala
od wody (z wyjątkiem produktów
przeznaczonych do użytku na
zewnątrz).
3. Czyść tylko suchą szmatką.
4. Nie blokuj otworów
wentylacyjnych. Nie instaluj w
zamkniętym miejscu. Instaluj tylko
zgodnie z instrukcjami producenta.
5. Zabezpiecz przewód zasilający
przed uszkodzeniem, zwłaszcza przy
wtyczkach i gnieździe urządzenia.
6. Nie instaluj w pobliżu
źródeł ciepła, takich jak grzejniki,
rejestratory ciepła, kuchenki lub inne
urządzenia (w tym wzmacniacze),
które generują ciepło.
7. Nie unieważniaj celu
bezpieczeństwa wtyczki
spolaryzowanej lub wtyczki z
uziemieniem. Wtyczka spolaryzowana
ma dwie wtyczki, z których jedna
jest szersza niż druga (tylko dla USA
i Kanady). Wtyczka z uziemieniem
ma dwie wtyczki i trzeci bolc
uziemiający. Szeroka wtyczka lub
trzeci bolc są dostarczone dla Twojego
bezpieczeństwa. Jeśli dostarczona
wtyczka nie pasuje do Twojej
gniazdka, skonsultuj się z elektrykiem
w celu wymiany przestarzałego
gniazdka.
8. Zabezpiecz przewód zasilający
przed uszkodzeniem, zwłaszcza przy
wtyczkach i gnieździe urządzenia.
9. Używaj tylko akcesoriów
i dodatków zalecanych przez
producenta.
10. Używaj
tylko określonych
wózków, stojaków,
statywów,
uchwytów lub
stolików. Uważaj, aby uniknąć
przewrócenia wózka/kombinacji
urządzenia podczas przemieszczania.
11. Odłączaj w czasie burz lub jeśli
urządzenie nie jest używane przez
długi okres.
12. Korzystaj tylko z
kwali kowanego personelu do
serwisowania, zwłaszcza po
uszkodzeniach.
13. Urządzenie z zabezpieczonym
terminalem uziemiającym powinno
być podłączone do gniazdka
sieciowego z połączeniem
ochronnym.
14. Jeśli wtyczka sieciowa lub
złącze urządzenia jest używane jako
urządzenie odłączające, urządzenie
odłączające powinno pozostać łatwo
dostępne.
15. Unikaj instalacji w zamkniętych
miejscach, takich jak biblioteczki.
16. Nie umieszczaj źródeł otwartego
ognia, takich jak palące się świeczki,
na urządzeniu.
17. Zakres temperatury pracy od 5°
do 45°C (od 41° do 113°F).
Music Tribe nie ponosi
odpowiedzialności za jakiekolwiek
straty, które mogą ponieść osoby,
które polegają w całości lub w
części na jakimkolwiek opisie,
fotogra i lub oświadczeniu
zawartym w niniejszym dokumencie.
Specy kacje techniczne, wygląd i
inne informacje mogą ulec zmianie
bez powiadomienia. Wszystkie
znaki towarowe są własnością ich
odpowiednich właścicieli. Midas,
Klark Teknik, Lab Gruppen, Lake,
Tannoy, Turbosound, TC Electronic,
TC Helicon, Behringer, Bugera, Aston
Microphones i Coolaudio są znakami
towarowymi lub zastrzeżonymi
znakami towarowymi rmy Music
Tribe Global Brands Ltd. © Music Tribe
Global Brands Ltd. 2024 Wszystkie
prawa zastrzeżone.
Aby zapoznać się z obowiązującymi
warunkami gwarancji i dodatkowymi
informacjami dotyczącymi
ograniczonej gwarancji Music Tribe,
zapoznaj się ze wszystkimi szczegółami
w trybie online pod adresem
community.musictribe.com/support.
感電の.恐れがあり
ますので、カバーや
その他の部品を取り
外したり、開けたりしないで
ください。高品質なプロ用ス
ピーカーケーブル (
¼" TS 標準
ケーブルおよびツイスト ロッ
キング プラグケーブル) を使
用してください。
このシンボルは、ど
こに現れても、筐体
内部に絶縁のない危
険な電圧が存在しており、こ
れは感電の危険性を構成する
可能性があることを示してい
ます。
火事および感電の危
険を防ぐため、
本装置を水分や湿気
のあるところには設置しない
で下さい。装置には決して水
分がかからないように注意
し、花瓶など水分を含んだも
のは、装置の上には置かない
ようにしてください。
注意
このマークが表示さ
れている箇所には、内部に高圧
電流が生じています。手を触れ
ると感電の恐れがあります。
Ważne informacje o
bezpieczeństwie
FRISKRIVNINGSKLAUSUL
BEGRÄNSAD GARANTI
ZASTRZEŻENIA PRAWNE
OGRANICZONA GWARANCJA
安 全にお 使い いた だくために
12 13Quick Start GuideSPRING REVERBERATION 646
注意
取り扱いとお手入れ
の方法についての重要な説明
が付属の取扱説明書に記載さ
れています。ご使用の前に良
くお読みください。
注意
これらのサービス指
示は、有資格のサー
ビス担当者のみが使用するた
めのものです。操作説明書に
含まれているもの以外のサー
ビスを行わないでください。
修理は有資格のサービス担当
者によって行われなければな
りません。
警告
デバイスの取り付け
または操作を行う前
に、電気および安全に関する
情報については、底部の外装
に記載されている情報を参照
してください。
1. すべての指示と警告を
注意深く読み、従ってくだ
さい。
2. 装 置を 水 から離してくださ
い( 屋 外 用 の 製 品 を 除 く ) 。
3. 乾いた布でしか清掃しない
でください。
4. 換気口を塞がないでくだ
さ い 。密 閉 さ れ た ス ペ ー ス に は
取 り 付 け な い で く だ さ い 。必 ず
製 造 元 の 指 示に 従って取り 付 け
てください 。
5. 電源コードを特にプラグや
アプライアンスの差込口で損傷
から守 ってください 。
6. 暖 房 器 、ヒ ー タ ー 、ス ト ー
ブ 、ア ン プ な ど 発 熱 す る 機 器
の近くには 取り付けないでく
ださい。
7. 偏光または接地型プラグ
の安 全目的を妨げないでくださ
い 。偏 光 プ ラ グ は 片 方 が も う 一
方 よ り 幅 が 広 い も の で す( ア メ
リカとカナダ専用)。接地型プラ
グは二 本 の刃と三 本目のアース
プ ラ グ が つ い て い ま す 。幅 の 広
い刃または三本目のプラグは安
全のために設けられています。
提供されたプラグがコンセント
に合わない場合は、電気技師に
相 談して陳 腐 化したコン セント
を交 換してください 。
8. 電源コードを特にプラグや
アプライアンスの差込口で損傷
から守 ってください 。
9. 製 造元が推 奨するアタッチ
メントやアクセサリーだけを 使
用してください 。
10. 指定され
たカート、スタ
ン ド 、三 脚 、ブ
ラ ケ ッ ト 、ま た
はテ ーブルだけ
を 使 用してくだ
さい。カート/装置の組み合わ
せを移動する際には倒れないよ
うに 注 意してください 。
11. 嵐時や長期間使用しな
い場合はプラグを抜いてくだ
さい。
12. 特 に 損 傷 後 は 、修 理 に は
資 格 の あ る 専 門 家 を利 用してく
ださい。
13. 保 護アース 端 子のある装
置 は 、保 護 ア ー ス 接 続 の あ る メ
インの電源コンセントに接続し
てください 。
14. メインプラグまたはアプ
ライアンスコプラが切断装置
と し て 使 用 さ れ る 場 合 、切 断 装
置は操作可能でなければなり
ません。
15. 書棚などの密閉された空
間には設 置しないでください。
16. ろうそくなどの明火を装置
に置かないでください。
17. 動作温度範囲は 5° から
45°C までです (41° から 113°F)。
ここに含まれる記述、写真、
意見の全体または一部に依拠
して、いかなる人が損害を生じ
させた場合にも、Music Tribe は
一切の賠償責任を負いませ
ん。技術仕様、外観およびそ
の他の情報は予告なく変更
になる場合があります。商
標はすべて、それぞれの所有
者に帰属します。
Midas、Klark
Teknik
、 Lab Gruppen、Lake、Tannoy、
Turbosound、TC Electronic、TC Helicon、
Behringer、Bugera、Aston Microphones
および Coolaudio は Music Tribe
Global Brands Ltd.
の商標または-登
録商標です。© Music Tribe Global
Brands Ltd. 2024
無断転用禁止。
適用される保証条件と
Music Tribe の限定保証に関する
概 要 に つ い て は 、オ ン ラ イ ン 上
community.musictribe.com/support
にて詳細をご確認ください 。
产品输出端子带有此
标志表示此端子具有
大电流, 存在触电危
险。 仅限使用带有
¼ " TS 或扭锁
式插头的高品质专业扬声器线。
与这些端子连接的外部导线需
要由经过指导的人员来安装和
使用厂家提供的导线或指定的
导线。
此标志提醒您, 产品
内存在未绝缘的危险
电压,
有触电危险。
此标志提醒您查阅所
附的重要的使用及维
修说明。 请阅读有关
手册。
小心
为避免着火或触电危
险, 请勿将此产品置
于雨淋或潮湿中。 此产品也不可
受液体滴溅, 盛有液体的容器也
不可置于其上, 如花瓶等。
小心
维修说明仅是给合格
的专业维修人员使用
的。 为避免触电危险, 除了使用
说明书提到的以外, 请勿进行任
何其他维修。 所有维修均须由合
格的专业人员进行操作。
1. 请阅读, 保存, 遵守所有的
说明, 注意所有的警示。
2. 请勿在靠近水的地方使用
本产品。
3. 请用干布清洁本产品。
4. 请勿堵塞通风孔, 安装本产
品时请遵照厂家的说明, 通风孔
不要覆盖诸如报纸, 桌布和窗帘
等物品而妨碍通风。
5. 请勿将本产品安装在热源附
近, 如暖气片, 炉子或其它产生
热量的设备 (包括功放器)。 产品
上不要放置裸露的火焰源, 如点
燃的蜡烛。
6. 如果产品附带接地插头, 请
勿移除接地插头的安全装置, 接
地插头是由火线和零线两个插
片及一个接地插片构成。 如随货
提供的插头不适合您的插座, 请
找电工更换一个合适的插座。
7. 妥善保护电源线, 使其不被
践踏或刺破, 尤其注意电源插头,
多用途插座接设备连接处。
8. 请只使用厂家指定的附属设
备和配件。
9. 请只使用厂
家指定的或随
货销售的手推
车, 架子, 三角
架, 支架和桌子
等。 若使用手推
车来搬运设备, 请注意安全放置
设备, 以避免手推车和设备倾倒
而受伤。
10. 遇闪电雷鸣或长期不使用本
设备时, 请拔出电源插头。
11. 如果电源线或电源插头受
损, 液体流入或异物落入设备内,
设备遭雨淋或受潮, 设备不能正
常运作或被摔坏等, 设备受损需
进行维修时, 所有维修均须由合
格的维修人员进行维修。
12. 如果产品附带接地插头, 本
产品应当连接到带保护接地连
接的电网电源输出插座上, 确
保连接电源时一定有可靠的接
地保护。
13. 若电源插头或器具耦合器
用作为断路装置, 应当保证它们
处于随时可方便操作状态。
14. 本产品仅适合
用于海拔
2000 米以
下和非热带气候条
件下的地区。
对于任何因在此说明书提到
的全部或部份描述、 图片或
声明而造成的损失,
Music Tribe
不负任何责任。 技术参数和外
观若有更改, 恕不另行通知。
所有的商标均为其各自所有者
的财产。 Midas, Klark Teknik, Lab
Gruppen, Lake, Tannoy, Turbosound,
TC Electronic, TC Helicon, Behringer,
Bugera, Aston Microphones
和
Coolaudio
是 Music Tribe Global
Brands Ltd.
公司的商标或注册商
标。 © Music Tribe Global Brands Ltd.
2024
版权所有。
有关音乐集团保修的适用条
款及其它相关信息, 请登陆
community.musictribe.com/support
网站查看完整的详细信息。
法的放棄
限定保証
法律声明
保修条款
重要的安全须知
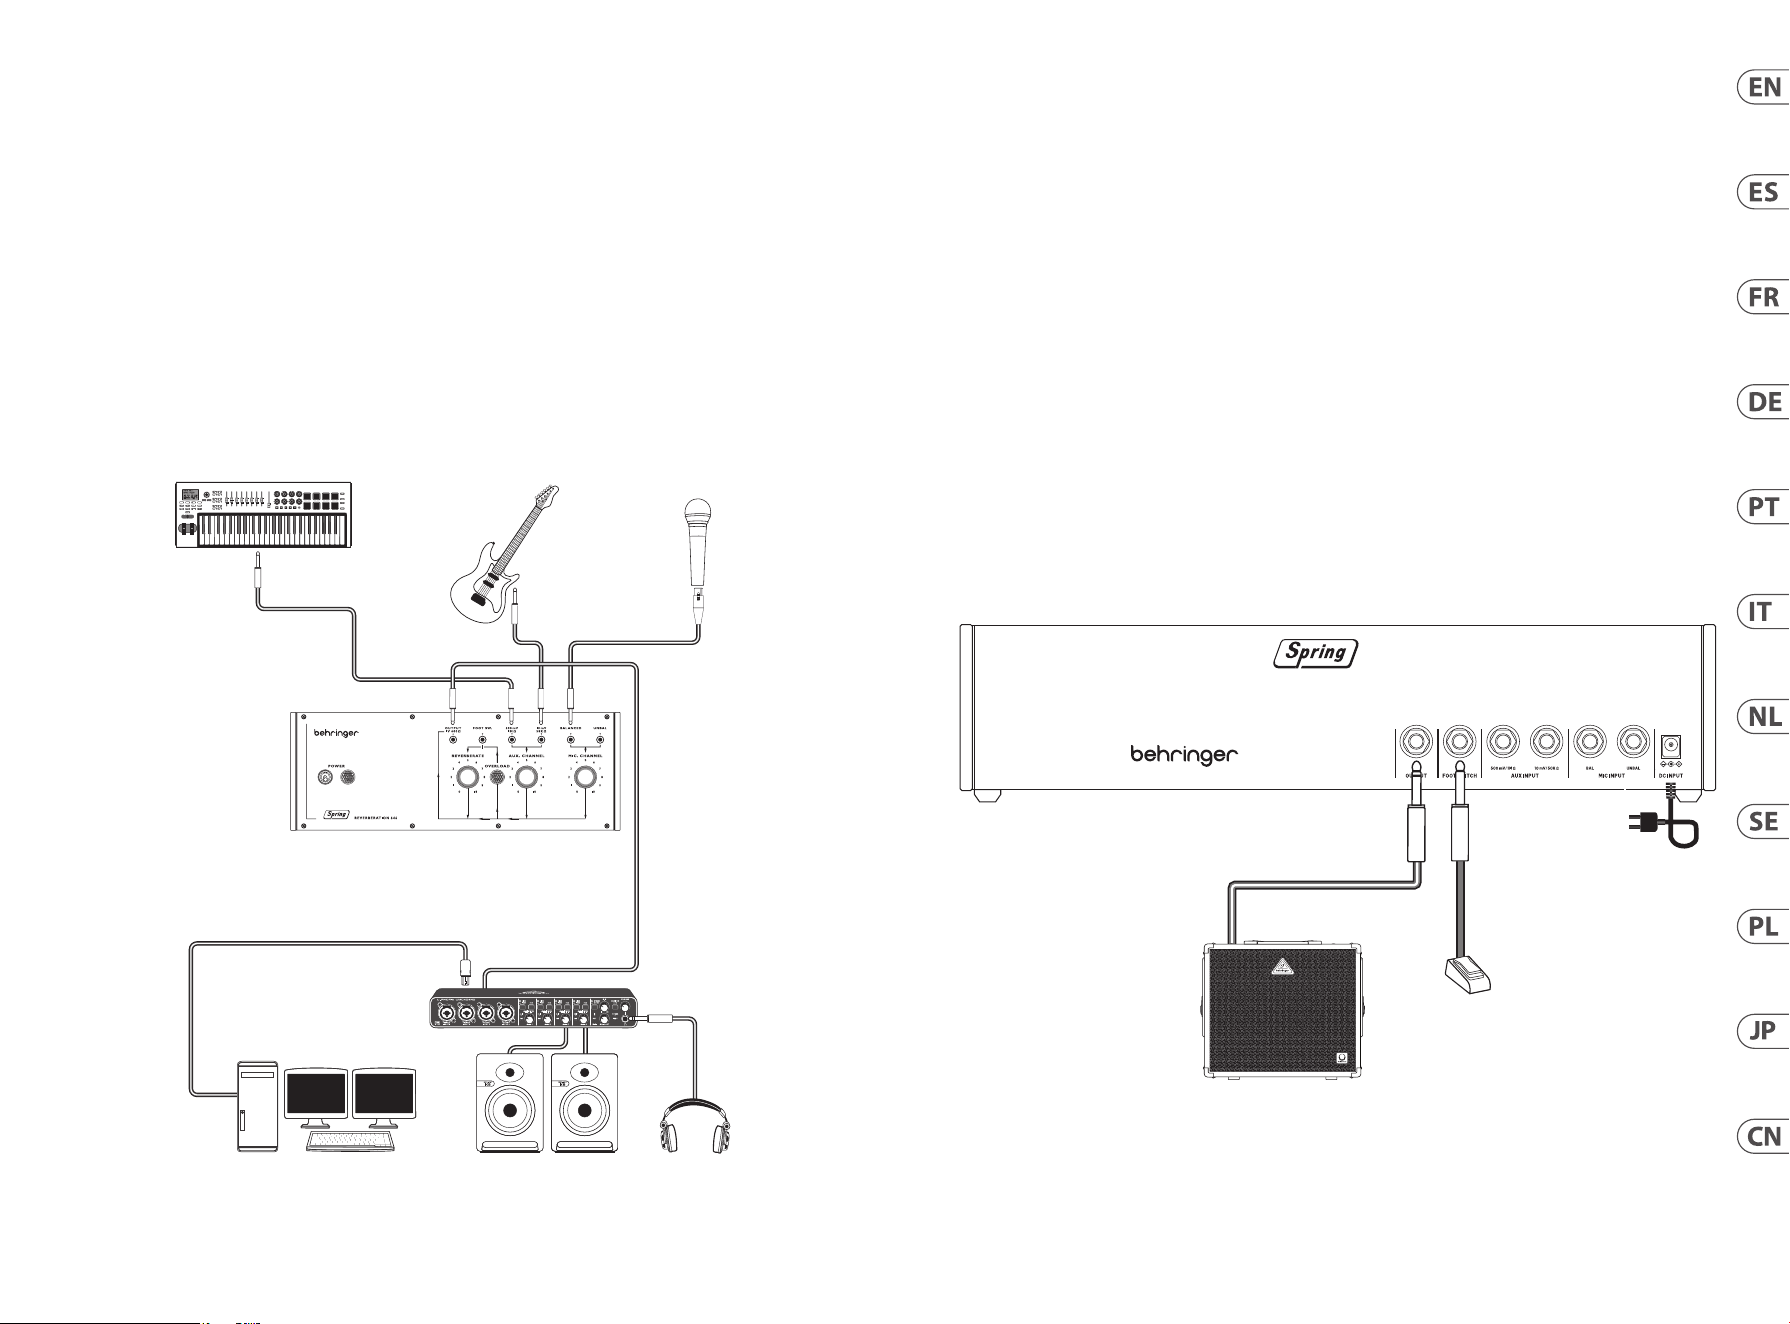
SPRING REVERBERATION 646 Hook-Up
MIDI Keyboard
AUDIO OUT
Desktop Computer HeadphonesStudio Monitors
Audio Interface
USB B
USB A
Guitar
Microphone
Footswitch
Keyboard Amplier
Power
Adapter
(EN) Step 1: Hook-Up
(ES) Paso 1: Conexión
(FR) Etape 1 : Connexions
(DE) Schritt 1: Verkabelung
(PT) Passo 1: Conexões
(IT) Passo 1: Allacciare
(NL) Stap 1: Aansluiten
(SE) Steg 1: Anslutning
(PL) Krok 1: Podłączeni
(JP) ステップ 1: フックアップ
(CN) 第一步: 连接应用
14 15Quick Start GuideSPRING REVERBERATION 646
SPRING REVERBERATION 646 Controls
(EN) Step 2: Controls
SPRING LINES
We recommend that the Spring Type 646 is mounted in a place where it will not be knocked or subject to vibration to avoid unwanted
noise from the spring lines.
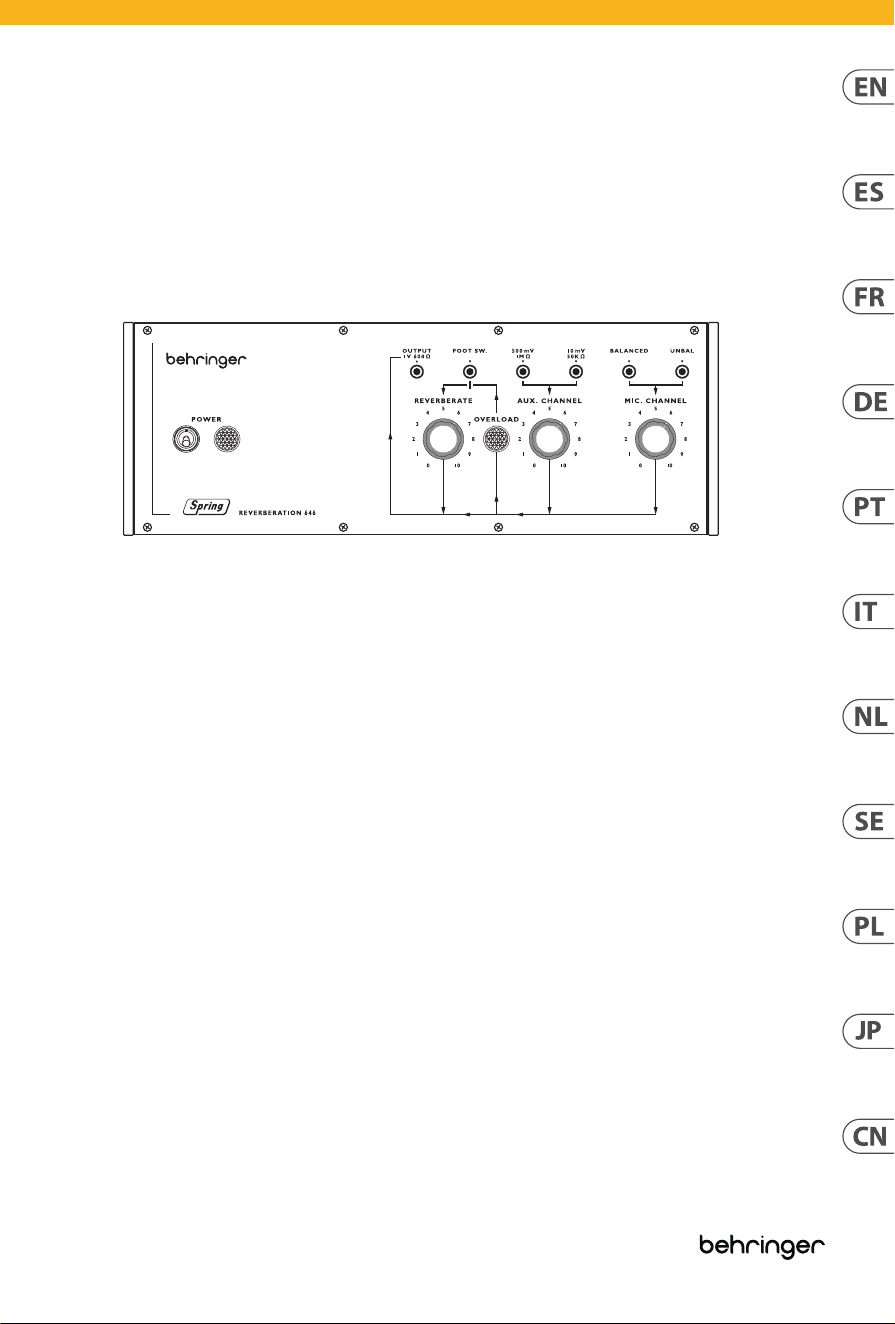
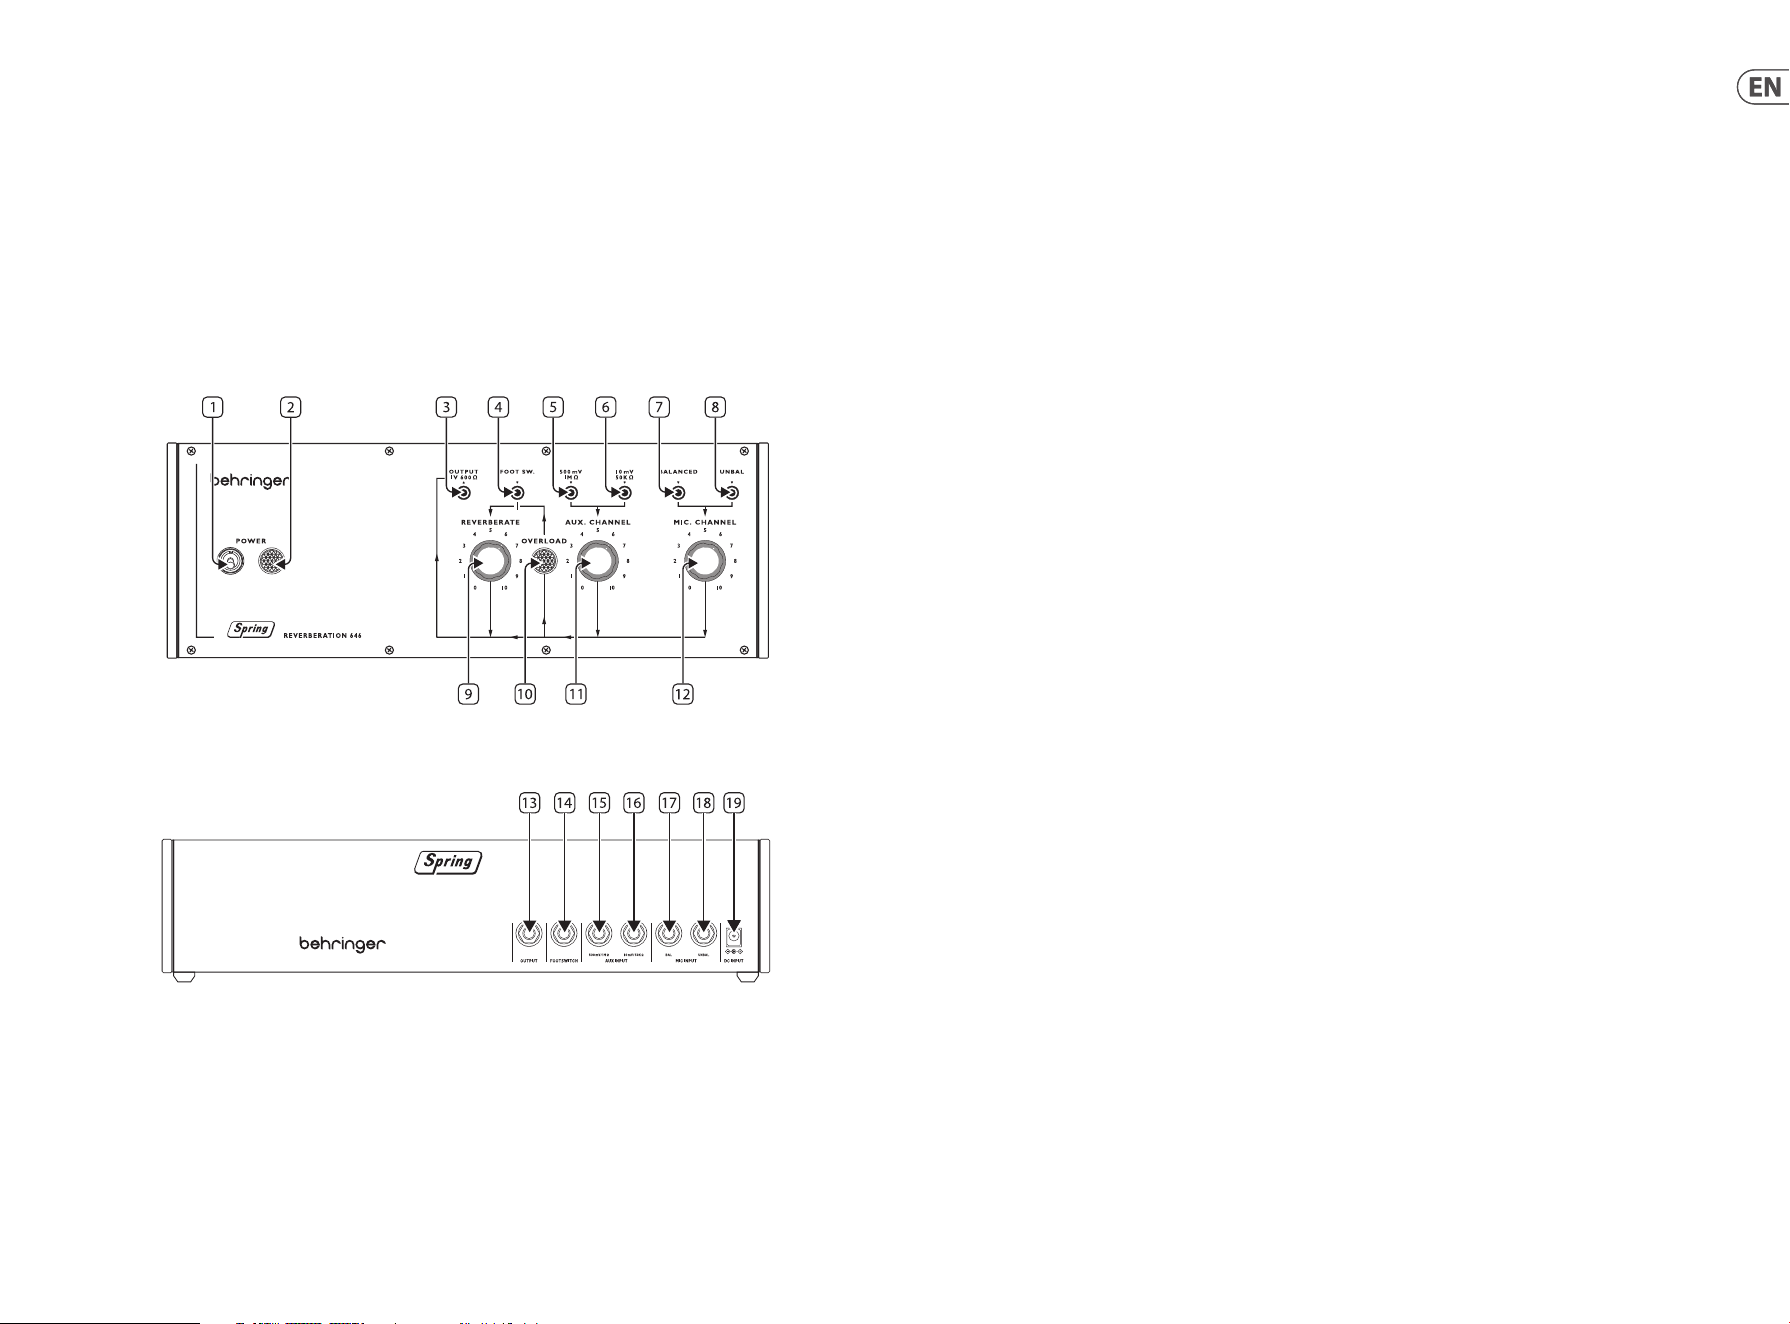
Top Panel
1. POWER SWITCH
2. POWER INDICATOR
3. OUTPUT SOCKET – use this 3.5 mm TS jack socket to connect the Type 646 to ampliers, mixing desks or audio interfaces.
4. FOOTSWITCH INPUT – use this socket to connect a suitable footswitch to bypass the reverberation eect.
5. HIGH LEVEL LINE INPUT – use this socket to connect high level audio sources such as keyboards or mixing desks to the Type 646.
6. LOW LEVEL LINE INPUT – use this socket to connect low level audio sources such as guitars to the Type 646.
7. BALANCED MICROPHONE INPUT – use this socket to connect balanced microphones to the Type 646.
8. UNBALANCED MICROPHONE INPUT – use this socket to connect unbalanced microphones to the Type 646.
9. REVERBERATE – use this control to set the reverberation output level.
10. OVERLOAD INDICATOR – this indicator lights up when a signal on either input is overloading.
11. AUX CHANNEL – use this control to set the input level for line sources connected to the auxiliary channel.
12. MIC CHANNEL – use this control to set the input level for microphone(s) connected to the microphone channel.
Back Panel
13. OUTPUT SOCKET – use this 6.35 mm TS jack socket to connect the Type 646 to ampliers, mixing desks or audio interfaces.
Duplicates socket 3 on top panel.
14. FOOTSWITCH INPUT – use this socket to connect a suitable footswitch to bypass the reverberation eect. Duplicates socket 4 on
top panel.
15. HIGH LEVEL LINE INPUT – use this socket to connect high level audio sources such as keyboards or mixing desks to the Type 646.
Duplicates socket 5 on top panel.
16. LOW LEVEL LINE INPUT – use this socket to connect low level audio sources such as guitars to the Type 646. Duplicates socket 6 on
top panel.
17. BALANCED MICROPHONE INPUT – use this socket to connect balanced microphones to the Type 646. Duplicates socket 7 on
top panel.
18. UNBALANCED MICROPHONE INPUT – use this socket to connect unbalanced microphones to the Type 646. Duplicates socket 8 on
top panel.
19. DC POWER INPUT – use this socket to connect the supplied 12 V DC power supply.
16 17Quick Start GuideSPRING REVERBERATION 646

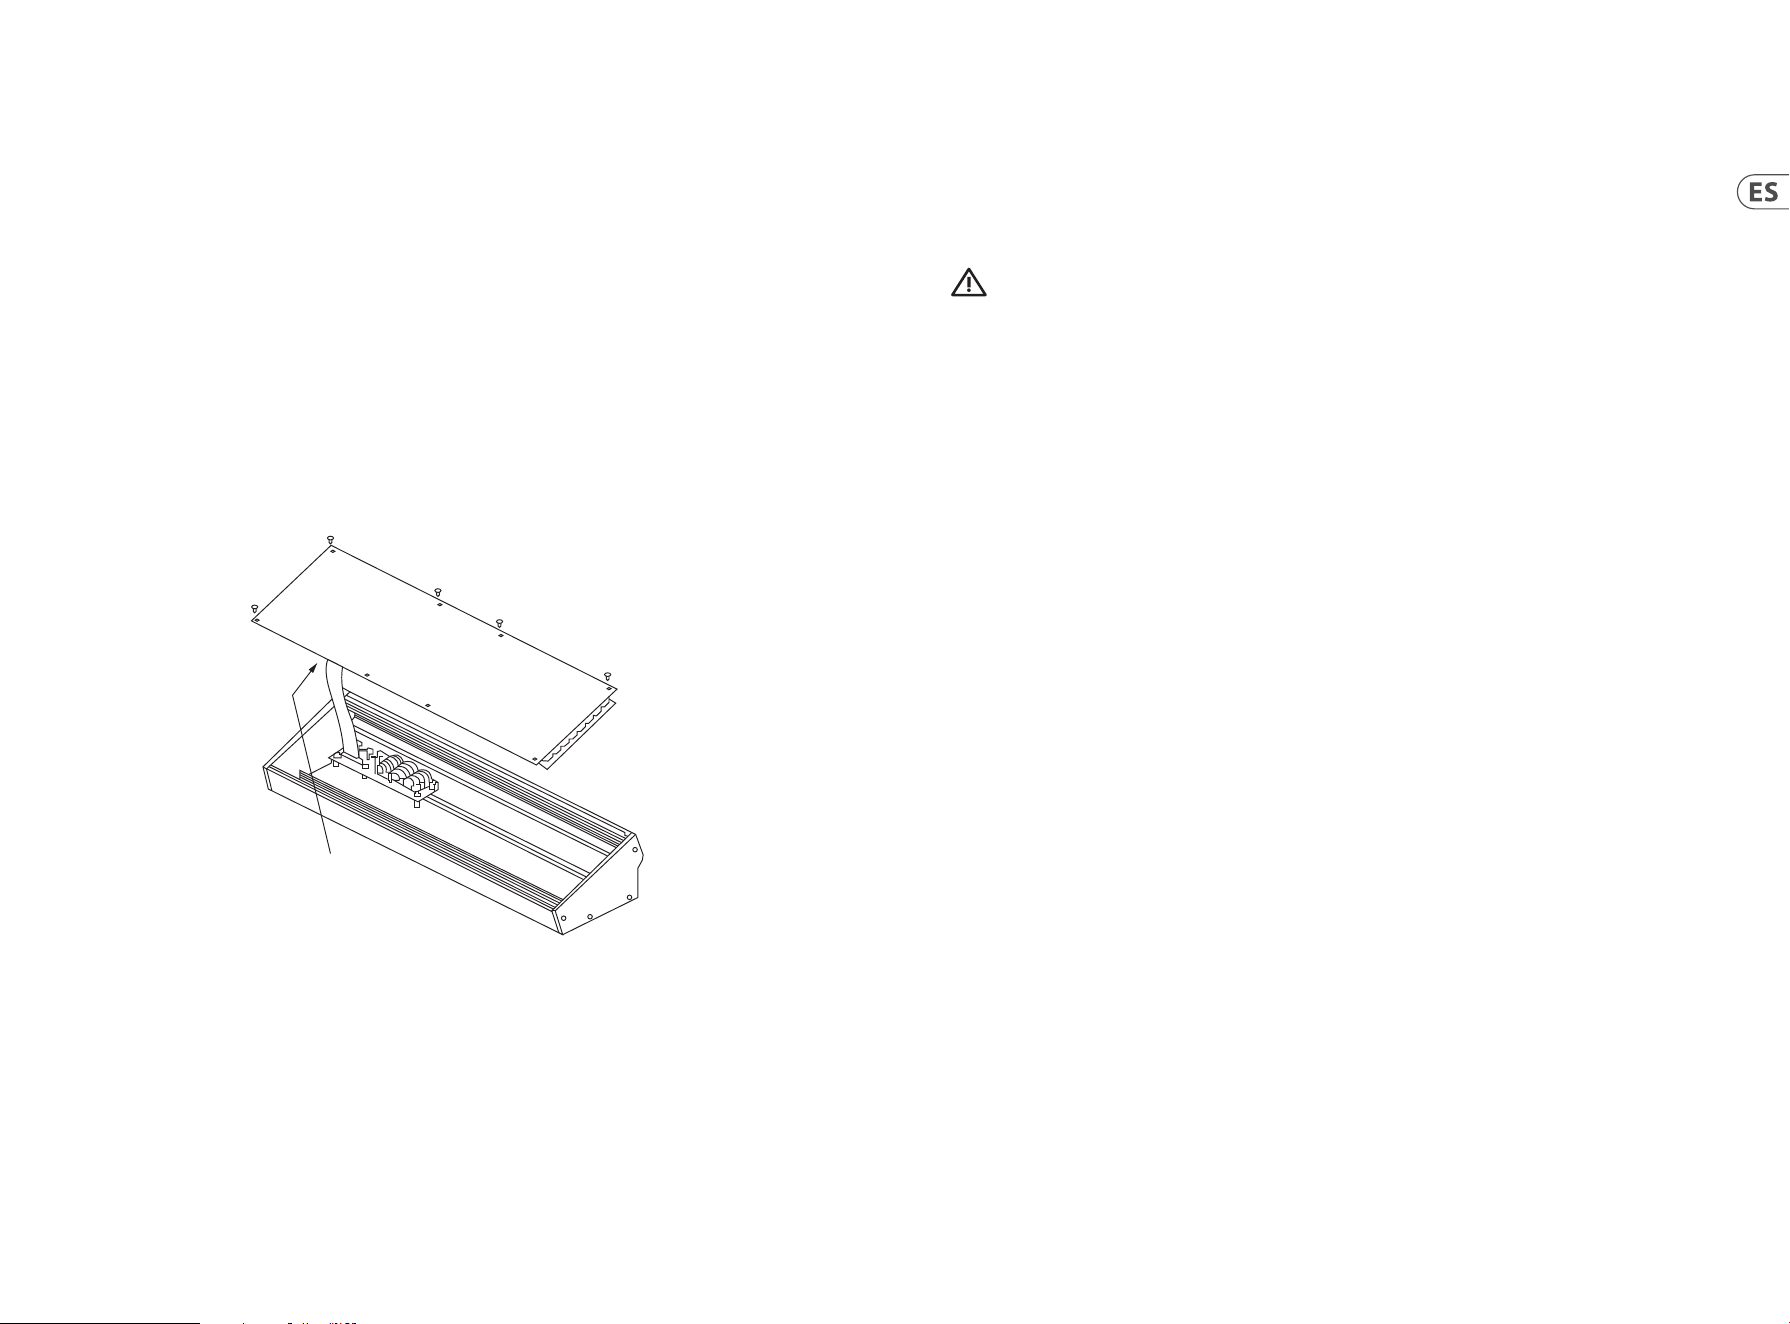
(EN) Eurorack Installation
The Spring Type 646 can be taken out of its factory chassis and tted into a standard Eurorack case (not supplied).
We recommend that this procedure is carried out only by an experienced service technician to prevent personal injury or damage to
the Spring Type 646. The Eurorack case will need to have a suitable power supply with enough capacity to power the Spring Type 646.
Consumption is 1 amp at 12 V DC.
A 10 pin to 16 pin adapter ribbon cable is supplied with the Spring Type 646.
Please ensure that the Eurorack case will supply ±12 V DC and ground to the correct pins, and that the cable is at the correct orientation
before proceeding.
Procedure
Please follow all steps in the correct order.
1. Disconnect the power and all other connections to the Spring Type 646.
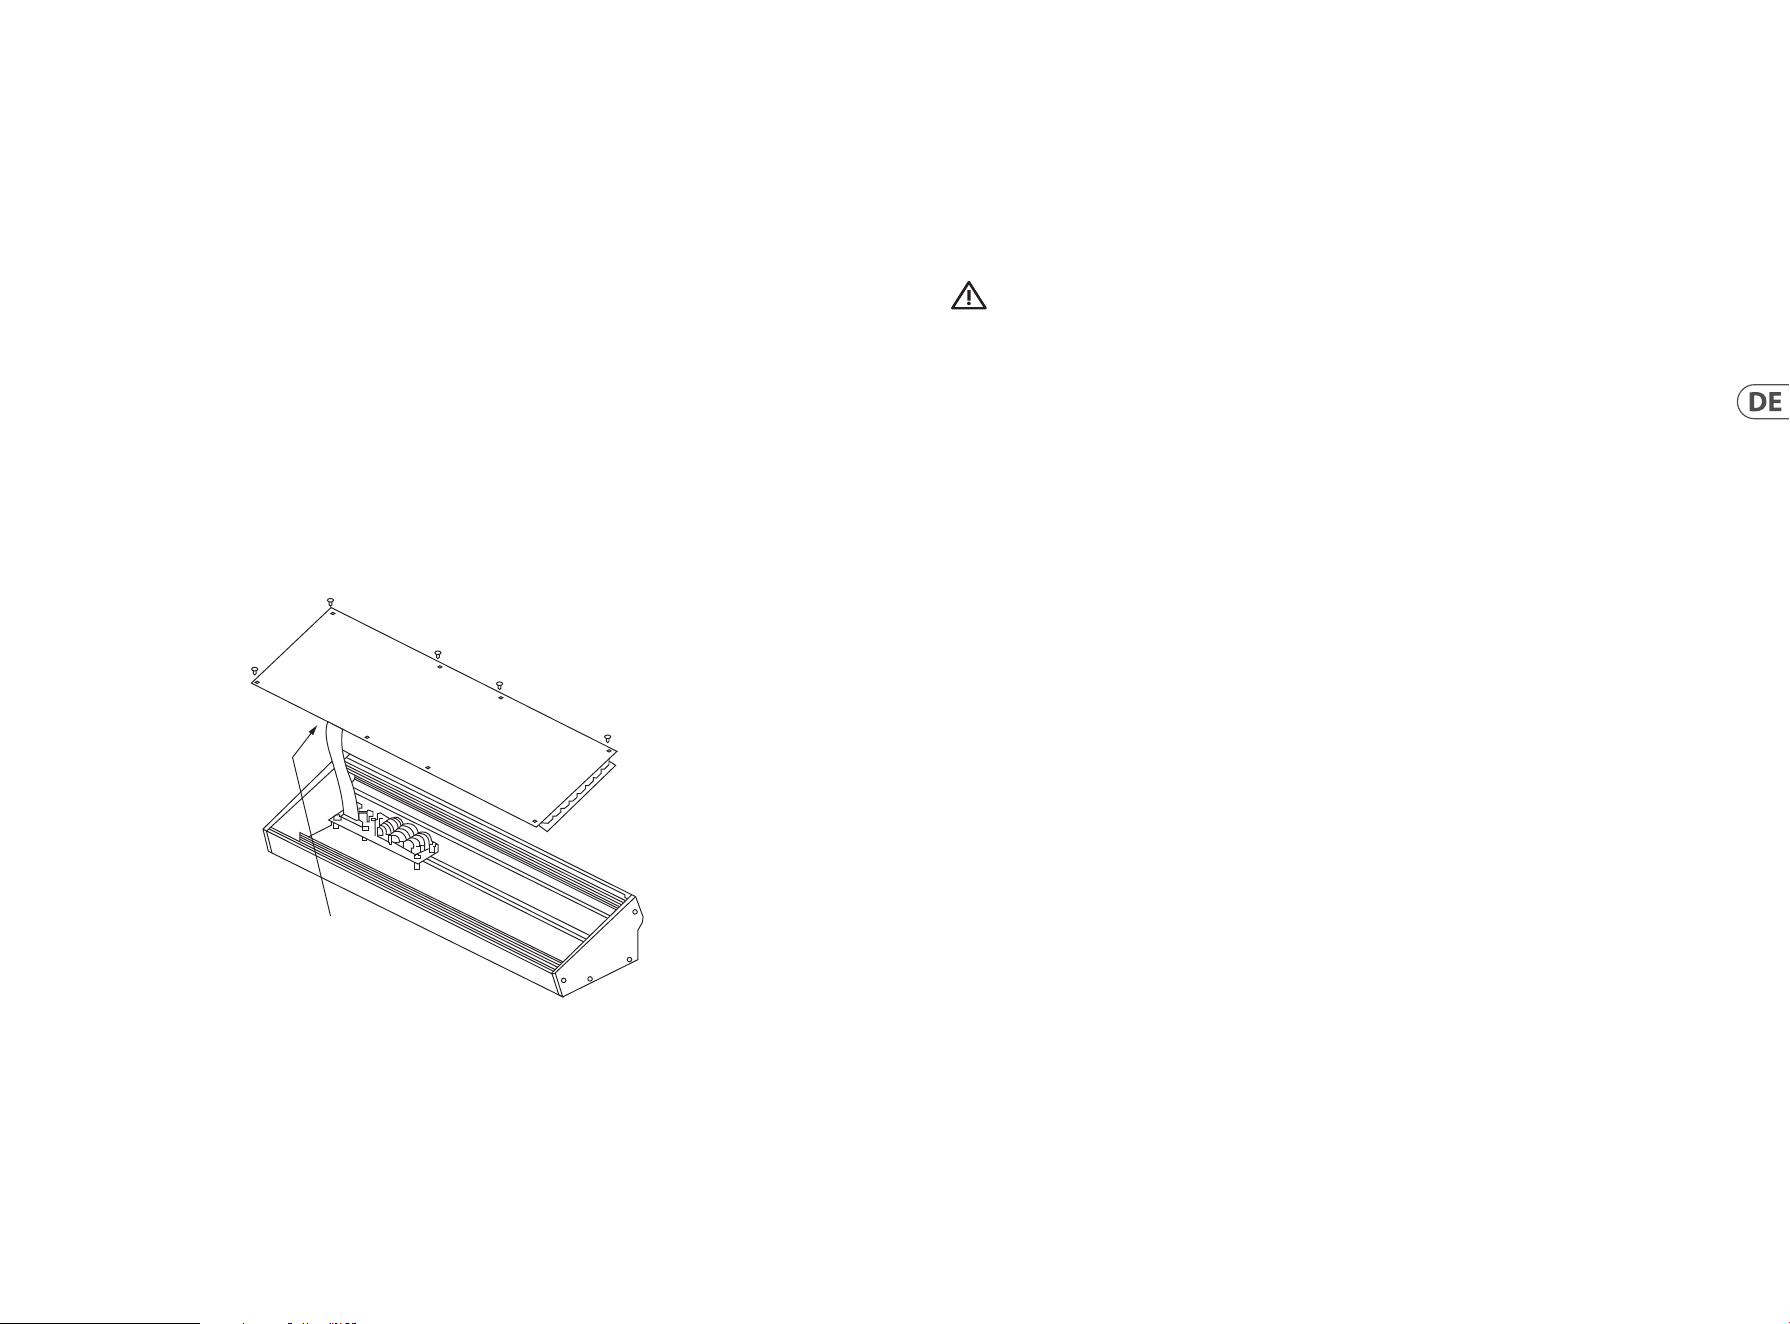
2. Undo the eight screws on the top panel as shown. There is no need to undo any other screw.
3. Carefully lift the top panel assembly, and turn it over so that the PCB is facing upwards. Be careful not to pull the ribbon cable from
the lower side of the main PCB.
4. Disconnect the 24 pin ribbon cable from the main PCB of the Spring Type 646 and remove the assembly from the chassis.
Disconnect from
Main PCB
5. Store the chassis assembly and power supply in a safe, dry place.
6. Securely connect the 10 pin end of the supplied ribbon cable adapter to the main PCB of the Spring Type 646.
7. Having ensured that your Eurorack case is isolated from the mains connect the 16 pin end of the ribbon cable to a spare outlet
in the case.
8. Secure the Spring Type 646 to the case using the eight panel screws.
9. Perform a full safety test before using the Spring Type 646.
(EN) Step 3: Getting Started
SPRING REVERBERATION 646 Getting started
OVERVIEW
This ‘getting started’ guide will help you set up your Spring Type 646 and briey introduce its capabilities.
CONNECTION
To connect the Spring Type 646 to your system, please consult the connection guide earlier in this document.
HARDWARE SETUP
Make all the connections in your system. Keep the Spring Type 646 power turned o when making any connections.
Ensure your sound system is turned down.
Turn on the Spring Type 646 before turning on any power ampliers and turn it o last. This will help prevent any turn on or turn o “pops
or thumps” in your speakers.
WARM UP TIME
We recommend leaving 15 minutes or more time for the Spring Type 646 to warm up before recording or live performance. (Longer if it
has been brought in from the cold). This will allow the precision analog circuits time to reach their normal operating temperature and
tuned performance.
18 19Quick Start GuideSPRING REVERBERATION 646

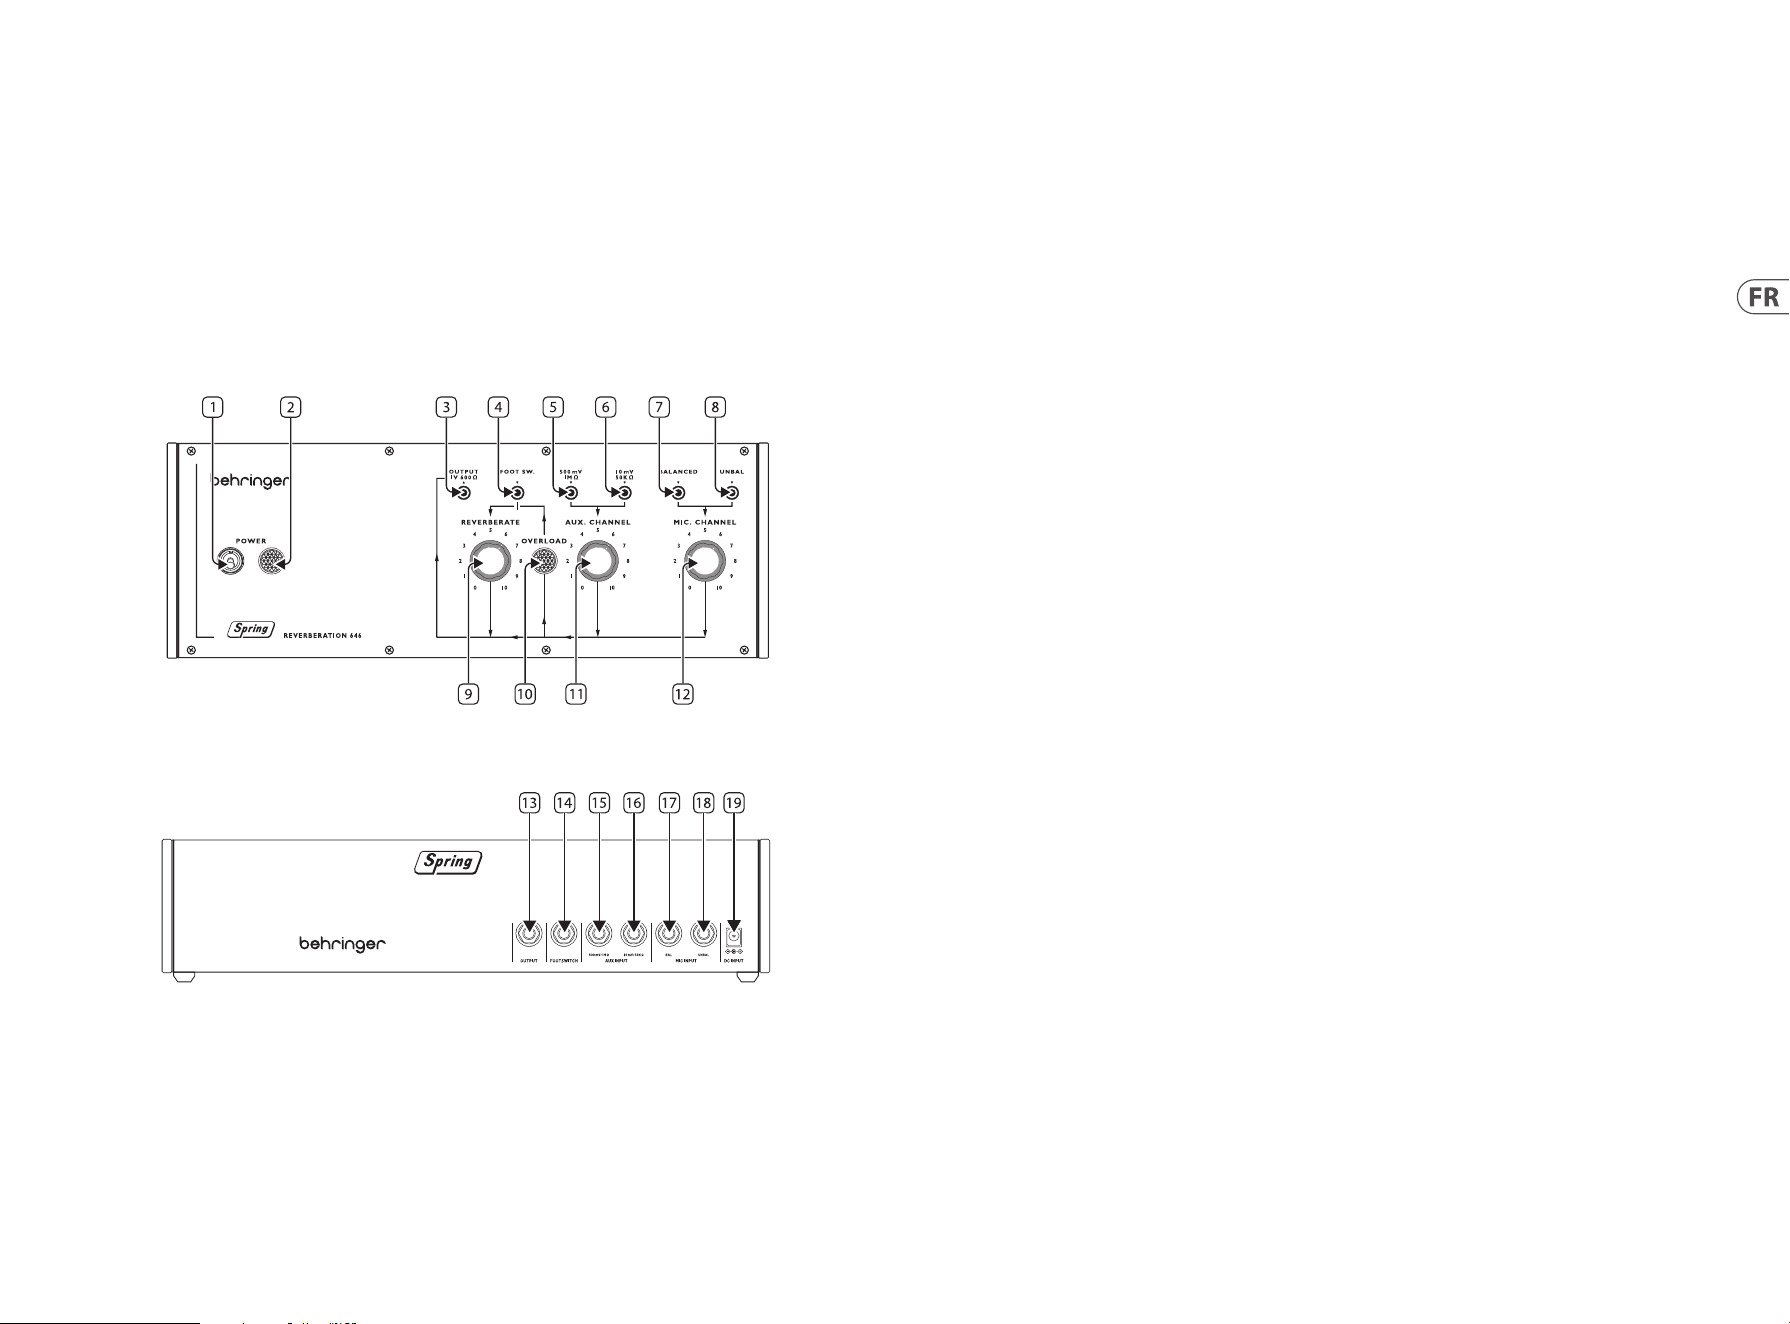
SPRING REVERBERATION 646 Controles
20 21Quick Start GuideSPRING REVERBERATION 646
(ES) Paso 2: Controles
MUELLES
Le recomendamos que instale el Spring Type 646 en una ubicación en la que no quede sujeto a vibraciones o golpes para evitar ruidos no
deseados de sus muelles.
Panel superior
1. POWER SWITCH
2. POWER INDICATOR
3. OUTPUT SOCKET – use esta toma de tipo TS de 3.5 mm para conectar el Type 646 a amplicadores, mesas de mezclas o
interfaces audio.
4. FOOTSWITCH INPUT – use esta toma para conectar un pedal de disparo adecuado para activar la anulación o bypass del efecto de
reverberación.
5. HIGH LEVEL LINE INPUT – use esta toma para conectar al Type 646 fuentes audio de nivel alto como pueden ser un teclado o una
mesa de mezclas.
6. LOW LEVEL LINE INPUT – use esta toma para conectar al Type 646 fuentes audio de bajo nivel como guitarras.
7. BALANCED MICROPHONE INPUT – use esta toma para conectar al Type 646 micrófonos balanceados.
8. UNBALANCED MICROPHONE INPUT – use esta toma para conectar al Type 646 micrófonos no balanceados.
9. REVERBERATE – use este control para ajustar el nivel de salida de la reverberación.
10. OVERLOAD INDICATOR – este piloto se ilumina cuando hay una señal que sobrecarga en alguna de las entradas.
11. AUX CHANNEL – use este control para ajustar el nivel de entrada de las fuentes de línea conectadas en el canal auxiliar.
12. MIC CHANNEL – use este control para ajustar el nivel de entrada del micrófono (o los micrófonos) conectado
al canal de micrófono.
Panel trasero
13. OUTPUT SOCKET – use esta toma de tipo TS de 6.3 mm para conectar el Type 646 a amplicadores, mesas de mezclas o
interfaces audio. Esta toma duplica la toma 3 del panel superior.
14. FOOTSWITCH INPUT – use esta toma para conectar un pedal de disparo adecuado para activar la anulación o bypass del efecto de
reverberación. Esta toma duplica la toma 4 del panel superior.
15. HIGH LEVEL LINE INPUT – use esta toma para conectar al Type 646 fuentes audio de nivel alto como pueden ser un teclado o una
mesa de mezclas. Esta toma duplica la toma 5 del panel superior.
16. LOW LEVEL LINE INPUT – use esta toma para conectar al Type 646 fuentes audio de bajo nivel como guitarras. Esta toma duplica la
toma 6 del panel superior.
17. BALANCED MICROPHONE INPUT – use esta toma para conectar al Type 646 micrófonos balanceados. Esta toma duplica la toma 7
del panel superior.
18. UNBALANCED MICROPHONE INPUT – use esta toma para conectar al Type 646 micrófonos no balanceados. Esta toma duplica la
toma 8 del panel superior.
19. DC POWER INPUT – use esta toma para conectar el adaptador de corriente de 12 V DC incluido.
SPRING REVERBERATION 646 Puesta En Marcha
22 23Quick Start GuideSPRING REVERBERATION 646
(ES) Instalación de Eurorack
El Spring Type 646 puede sacarse de su chasis de fábrica y colocarse en una caja Eurorack estándar (no suministrada).
Recomendamos que este procedimiento se lleve a cabo solo por un técnico de servicio experimentado para evitar lesiones personales
o daños en el Spring Type 646. El caso Eurorack tendrá que tener una fuente de alimentación adecuada con capacidad suciente para
alimentar el Spring Type 646. El consumo es de 1 amperios a 12 V CC.
Con el Spring Type 646 se suministra un cable de cinta adaptador de 10 pines a 16 pines.
Asegúrese de que la caja Eurorack suministrará ±12 V DC y toma a tierra a los pines correctos, y que el cable está en la orientación
correcta antes de continuar.
Procedimiento
Por favor, siga todos los pasos en el orden correcto.
1. Desconecte la alimentación y todas las demás conexiones al Spring Type 646.
2. Deshaga los ocho tornillos del panel superior como se muestra. No hay necesidad de deshacer ningún otro tornillo.
3. Levante cuidadosamente el conjunto del panel superior y déjelo girar para que la PCB esté orientada hacia arriba. Tenga cuidado de
no tirar del cable de cinta de la parte inferior de la PCB principal.
4. Desconecte el cable de cinta de 24 pines de la PCB principal del Spring Type 646 y retire el conjunto del chasis.
5. Guarde el conjunto del chasis y la fuente de alimentación en un lugar seguro y seco.
6. Conecte de forma segura el extremo de 10 pines del adaptador de cable de cinta suministrado a la PCB principal del
Spring Type 646.
7. Después de haberse asegurado de que su caja Eurorack está aislada de la red, conecte el extremo de 16 pines del cable de cinta a una
toma de corriente de repuesto en la caja.
8. Asegure el Spring Type 646 a la caja con los ocho tornillos del panel.
9. Realice una prueba de seguridad completa antes de usar el Spring Type 646.
Disconnect from
Main PCB
(ES) Paso 3: Puesta En Marcha
VISION GENERAL
Esta guía de “introducción” le ayudará a congurar su Spring Type 646 y presentará brevemente sus capacidades.
CONEXION
Para conectar el Spring Type 646 a su sistema, consulte la guía de conexión anteriormente en este documento.
CONFIGURACIÓN DE HARDWARE
Realice todas las conexiones en su sistema. Mantenga la potencia Spring Type 646 apagada al realizar cualquier conexión.
Asegúrese de que el sistema de sonido esté desactivado.
Encienda el Spring Type 646 antes de encender los amplicadores de potencia y apague en último lugar. Esto ayudará a evitar que se
enciendan o apaguen los “estallidos o golpes” en los altavoces.
TIEMPO DE CALENTAMIENTO
Recomendamos dejar 15 minutos o más de tiempo para que el Spring Type 646 se caliente antes de la grabación o la actuación en vivo.
(Más tiempo si ha sido traído del frío.) Esto permitirá que los circuitos analógicos de precisión alcancen su temperatura de funcionamiento
normal y un rendimiento ajustado.
24 25Quick Start GuideSPRING REVERBERATION 646
SPRING REVERBERATION 646 Réglages
(FR) Etape 2 : Réglages
RESSORTS
Nous vous recommandons d’installer le Spring Type 646 dans un endroit à l’abris des chocs et des vibrations an d’éviter les bruits
indésirables provoqués par les ressorts.
Face supérieure
1. POWER SWITCH
2. POWER INDICATOR
3. OUTPUT SOCKET – cette embase MiniJack asymétrique permet de connecter le Type 646 à un ampli, une console de mixage ou une
interface audio.
4. FOOTSWITCH INPUT – cette embase permet de connecter un contacteur au pied adapté pour désactiver l’eet de réverbération.
5. HIGH LEVEL LINE INPUT – cette embase permet de connecter des sources audio à haut niveau comme par exemple un clavier ou une
console de mixage.
6. LOW LEVEL LINE INPUT – cette embase permet de connecter des sources audio bas niveau comme par exemple une guitare.
7. BALANCED MICROPHONE INPUT – cette embase permet de connecter un micro symétrique.
8. UNBALANCED MICROPHONE INPUT – cette embase permet de connecter un micro asymétrique.
9. REVERBERATE – ce potentiomètre permet de régler le niveau de sortie de la réverbération.
10. OVERLOAD INDICATOR – il s’allume lorsqu’un signal fait saturer l’une des entrées.
11. AUX CHANNEL – permet de régler le niveau d’entrée des sources niveau ligne connectées au canal auxiliaire.
12. MIC CHANNEL – permet de régler le niveau d’entrée du(des) micro(s) connecté(s) au canal micro.
Face arrière
13. OUTPUT SOCKET – cette embase Jack 6,35 mm asymétrique permet de connecter le Type 646 à un ampli, une console de mixage ou
une interface audio. Elle a la même fonction que l’embase 3 de la face supérieure.
14. FOOTSWITCH INPUT – cette embase permet de connecter un contacteur au pied adapté pour désactiver l’eet de réverbération.
Elle a la même fonction que l’embase 4 de la face supérieure.
15. HIGH LEVEL LINE INPUT – cette embase permet de connecter des sources audio à haut niveau comme par exemple un clavier ou une
console de mixage. Elle a la même fonction que l’embase 5 de la face supérieure.
16. LOW LEVEL LINE INPUT – cette embase permet de connecter des sources audio bas niveau comme par exemple une guitare. Elle a la
même fonction que l’embase 6 de la face supérieure.
17. BALANCED MICROPHONE INPUT – cette embase permet de connecter un micro symétrique. Elle a la même fonction que l’embase
7 de la face supérieure.
18. UNBALANCED MICROPHONE INPUT – cette embase permet de connecter un micro asymétrique. Elle a la même fonction que
l’embase 8 de la face supérieure.
19. DC POWER INPUT – cette embase permet de connecter l’adaptateur secteur 12 V fourni.
26 27Quick Start GuideSPRING REVERBERATION 646
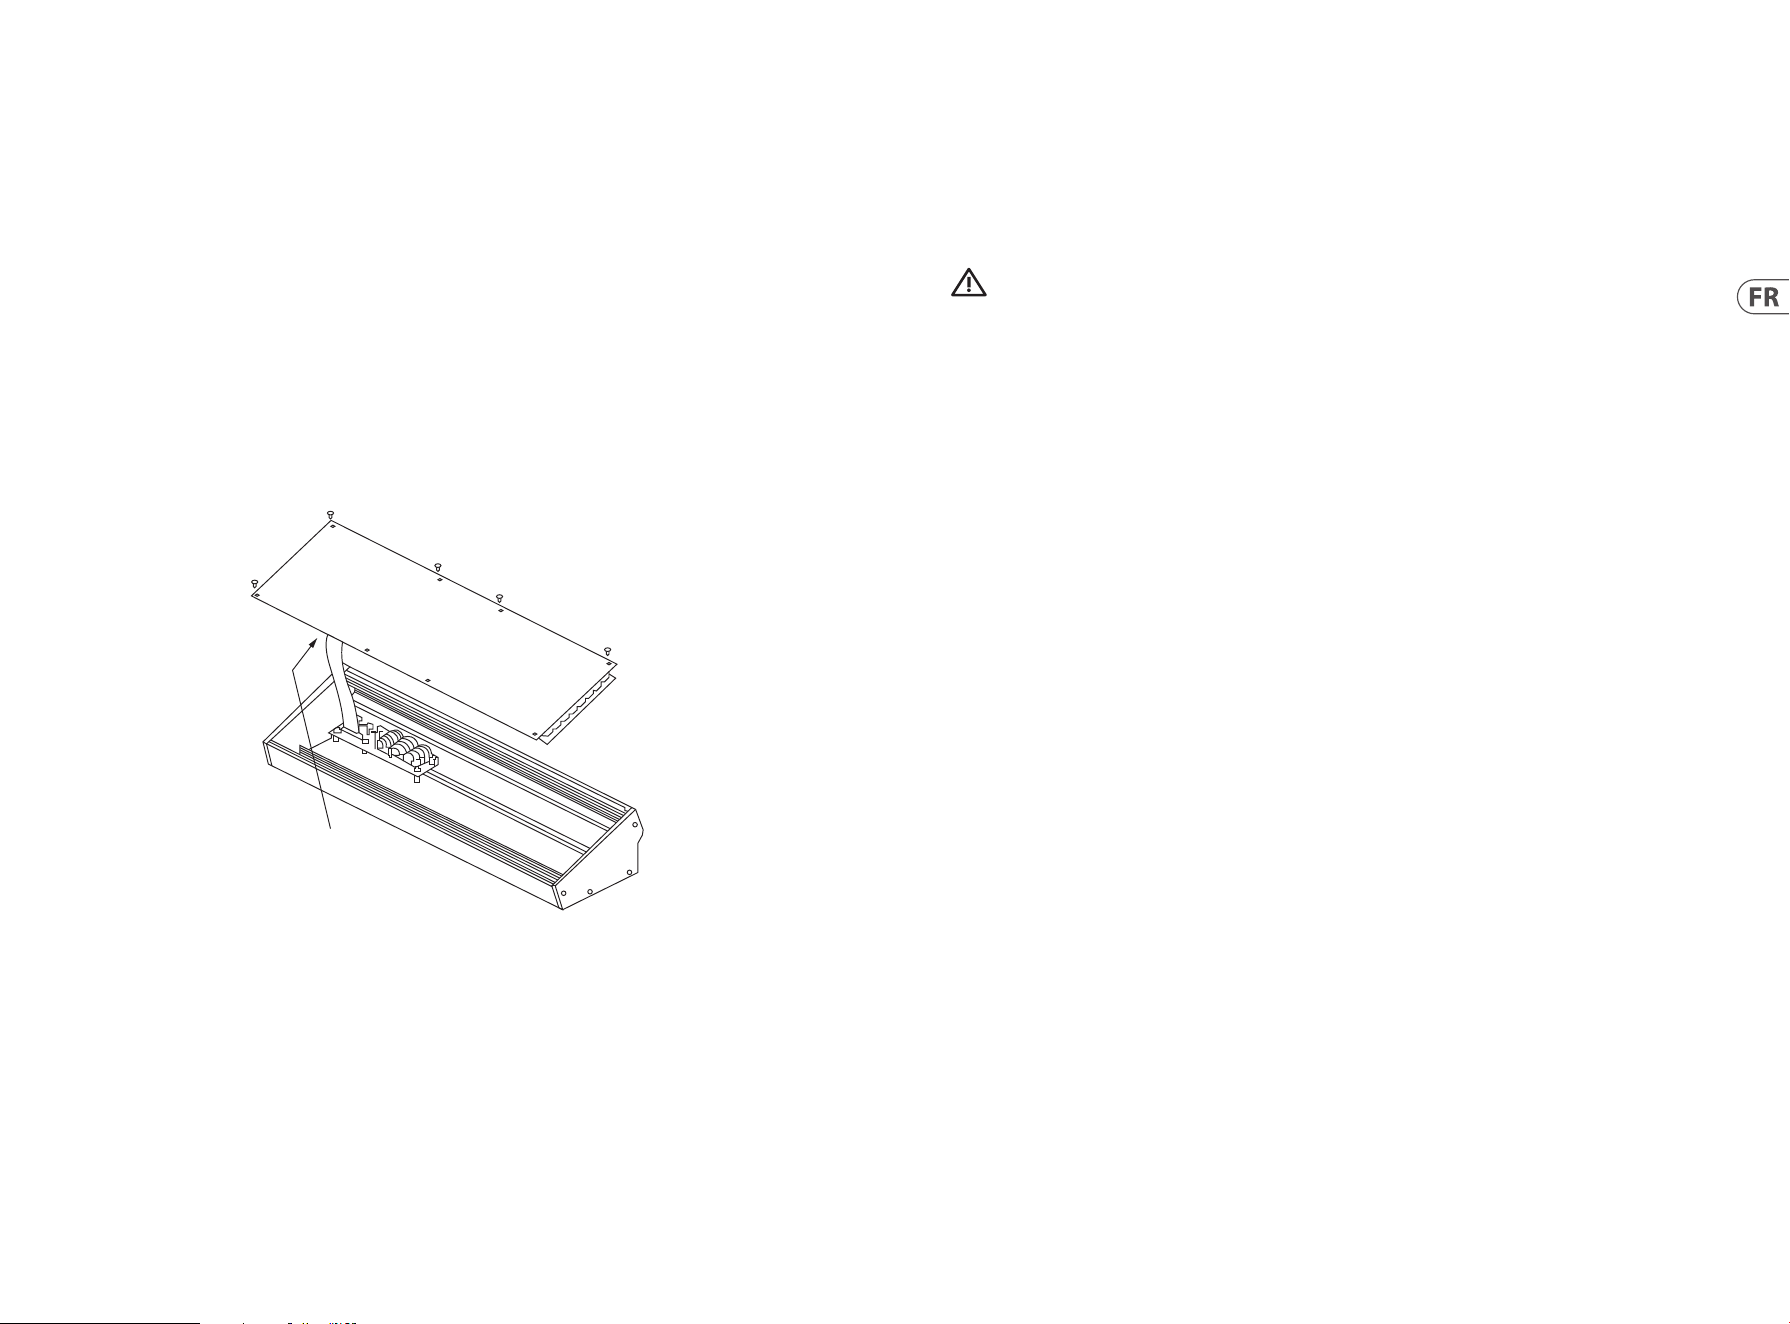
(FR) Installation d’Eurorack
Le Spring Type 646 peut être sorti de son châssis d’usine et monté dans un boîtier Eurorack standard (non fourni).
Nous recommandons que cette procédure soit eectuée uniquement par un technicien de service expérimenté pour prévenir les blessures
corporelles ou les dommages au Spring Type 646. Le boîtier Eurorack devra disposer d’une alimentation électrique appropriée avec une
capacité susante pour alimenter le Spring Type 646. La consommation est de 1 ampère à 12 V CC.
Un câble ruban d’adaptateur de 10 broches à 16 broches est fourni avec le Spring Type 646.
Veuillez vous assurer que le boîtier Eurorack fournira ±12 V CC et se mettra à la terre aux broches correctes, et que le câble est à la bonne
orientation avant de continuer.
Procédure
1. Débranchez l’alimentation et toutes les autres connexions au Spring Type 646.
2. Défaire les huit vis sur le panneau supérieur comme indiqué. Il n’est pas nécessaire d’annuler une autre vis.
3. Soulevez soigneusement l’ensemble du panneau supérieur et retournez-le de sorte que le PCB soit orienté vers le haut. Veillez à ne
pas tirer le câble ruban de la face inférieure du PCB principal.
4. Déconnectez le câble ruban à 24 broches du PCB principal du Spring Type 646 et retirez l’ensemble du châssis.
5. Rangez le châssis et le bloc d’alimentation dans un endroit sûr et sec.
6. Connectez en toute sécurité l’extrémité à 10 broches de l’adaptateur de câble ruban fourni au PCB principal du Spring Type 646.
7. Après vous être assuré que votre boîtier Eurorack est isolé du secteur, connectez l’extrémité à 16 broches du câble ruban à une prise
de rechange dans le boîtier.
8. Fixez le Spring Type 646 au boîtier à l’aide des huit vis du panneau.
9. Eectuez un test de sécurité complet avant d’utiliser le Spring Type 646.
Disconnect from
Main PCB
SPRING REVERBERATION 646 Mise En Oeuvre
(FR) Etape 3 : Mise En Oeuvre
APERCU
Ce guide de mise en route vous aidera à congurer votre Spring Type 646 et à présenter brièvement ses capacités.
CONNEXION
Pour connecter le Spring Type 646 à votre système, consultez le guide de connexion plus haut dans ce document.
CONFIGURATION MATÉRIELLE
Eectuez toutes les connexions de votre système. Gardez le Spring Type 646 power désactivé lors de l’établissement de connexions.
Assurez-vous que votre système audio est éteint.
Allumez le Spring Type 646 avant d’allumer les amplicateurs de puissance et éteignez-le en dernier. Cela aidera à empêcher toute mise
sous ou désactiver les «pops ou les bruits sourds» dans vos haut-parleurs.
TEMPS D’ÉCHAUFFEMENT
Nous vous recommandons de laisser 15 minutes ou plus pour le Spring Type 646 pour vous échauer avant l’enregistrement ou la
performance en direct. (Plus longtemps s’il a été apporté du froid.) Cela permettra aux circuits analogiques de précision d’atteindre leur
température de fonctionnement normale et leurs performances réglées.

28 29Quick Start GuideSPRING REVERBERATION 646
(DE) Schritt 2: Bedienelemente
FEDERHALL-PRODUKTLINIE
Wir empfehlen, den Spring Type 646 an einem Ort zu installieren, an dem er keinen Stößen oder Vibrationen ausgesetzt ist,
um unerwünschte Geräusche der Hallfedern zu vermeiden.
Oberseite
1. POWER SWITCH
2. POWER INDICATOR
3. OUTPUT SOCKET – Über diese 3,5 mm TS-Buchse können Sie den Type 646 mit Verstärkern, Mixern oder
Audio-Interfaces verbinden.
4. FOOTSWITCH INPUT – An diese Buchse können Sie einen geeigneten Fußschalter anschließen, um den Reverb-
Eekt zu umgehen.
5. HIGH LEVEL LINE INPUT – Über diese Buchse können Sie hochpegelige Audioquellen wie Keyboards oder Mixer an den
Type 646 anschließen.
6. LOW LEVEL LINE INPUT – Über diese Buchse können Sie niedrigpegelige Audioquellen wie Gitarren an den
Type 646 anschließen.
7. BALANCED MICROPHONE INPUT – Über diese Buchse können Sie symmetrische Mikrofone an den Type 646 anschließen.
8. UNBALANCED MICROPHONE INPUT – Über diese Buchse können Sie unsymmetrische Mikrofone an den
Type 646 anschließen.
9. REVERBERATE – Mit diesem Regler stellen Sie den Ausgangspegel des Reverb-Eekts ein.
10. OVERLOAD INDICATOR – Diese Anzeige leuchtet, wenn ein Signal an einem der beiden Eingänge überlastet ist.
11. AUX CHANNEL – Mit diesem Regler stellen Sie den Eingangspegel von Line-Quellen ein, die an den Aux-Kanal
angeschlossen sind.
12. MIC CHANNEL – Mit diesem Regler stellen Sie den Eingangspegel von Mikrofonen ein, die an den Mic-Kanal angeschlossen sind.
Rückseite
13. OUTPUT SOCKET – Über diese 6,3 mm TS-Buchse können Sie den Type 646 mit Verstärkern, Mixern oder
Audio-Interfaces verbinden. Kopie des vorderseitigen Ausgangs (3).
14. FOOTSWITCH INPUT – An diese Buchse können Sie einen geeigneten Fußschalter anschließen, um den Reverb-Eekt
zu umgehen. Kopie des vorderseitigen Eingangs (4).
15. HIGH LEVEL LINE INPUT – Über diese Buchse können Sie hochpegelige Audioquellen wie Keyboards oder Mixer an den
Type 646 anschließen. Kopie des vorderseitigen Eingangs (5).
16. LOW LEVEL LINE INPUT – Über diese Buchse können Sie niedrigpegelige Audioquellen wie Gitarren an den
Type 646 anschließen. Kopie des vorderseitigen Eingangs (6).
17. BALANCED MICROPHONE INPUT – Über diese Buchse können Sie symmetrische Mikrofone an den Type 646 anschließen. Kopie des
vorderseitigen Eingangs (7).
18. UNBALANCED MICROPHONE INPUT – Über diese Buchse können Sie unsymmetrische Mikrofone an den Type 646 anschließen.
Kopie des vorderseitigen Eingangs (8).
19. DC POWER INPUT – An diese Buchse schließen Sie den mitgelieferten 12 V-Adapter an.
SPRING REVERBERATION 646 Bedienelemente
SPRING REVERBERATION 646 Erste Schritte
30 31Quick Start GuideSPRING REVERBERATION 646
(DE) Eurorack Installation
Das Spring Type 646 kann aus dem werkseitigen Chassis entnommen und in ein Standard-Eurorack-Gehäuse
(nicht im Lieferumfang enthalten) eingebaut werden.
Wir empfehlen, dass dieses Verfahren nur von einem erfahrenen Servicetechniker durchgeführt wird, um Personenschäden oder Schäden
am Spring Type 646 zu vermeiden. Das Eurorack-Gehäuse muss über ein geeignetes Netzteil mit ausreichender Kapazität verfügen, um
das Spring Type 646 mit Strom zu versorgen. Der Verbrauch beträgt 1 Ampere bei 12 V DC.
Ein 10-poliges auf 16-poliges Adapterbandkabel wird mit dem Spring Type 646 geliefert.
Bitte stellen Sie sicher, dass das Eurorack-Gehäuse ±12 V DC liefert und die richtigen Pins erdet und dass sich das Kabel in der richtigen
Ausrichtung bendet, bevor Sie fortfahren.
Verfahren
Bitte folgen Sie allen Schritten in der richtigen Reihenfolge.
1. Trennen Sie die Stromversorgung und alle anderen Verbindungen zum Spring Type 646.
2. Machen Sie die acht Schrauben auf der Oberseite wie gezeigt rückgängig. Es ist nicht notwendig, eine andere Schraube rückgängig
zu machen.
3. Heben Sie die obere Panel-Baugruppe vorsichtig an und drehen Sie sie um, sodass die Leiterplatte nach oben zeigt. Achten Sie darauf,
das Flachbandkabel nicht von der Unterseite der Hauptplatine zu ziehen.
4. Trennen Sie das 24-polige Flachbandkabel von der Hauptplatine des Spring Type 646 und entfernen Sie die Baugruppe
aus dem Gehäuse.
5. Bewahren Sie die Gehäusebaugruppe und das Netzteil an einem sicheren, trockenen Ort auf.
6. Verbinden Sie das 10-polige Ende des mitgelieferten Flachbandkabeladapters sicher mit der Hauptplatine des Spring Type 646.
7. Nachdem Sie sichergestellt haben, dass Ihr Eurorack-Gehäuse vom Stromnetz isoliert ist, verbinden Sie das 16-polige Ende des
Flachbandkabels mit einer Ersatzsteckdose im Gehäuse.
8. Befestigen Sie das Spring Type 646 mit den acht Plattenschrauben am Gehäuse.
9. Führen Sie vor der Verwendung des Spring Type 646 einen vollständigen Sicherheitstest durch.
Disconnect from
Main PCB
(DE) Schritt 3: Erste Schritte
ÜBERBLICK
Dieser Leitfaden “Erste Schritte” hilft Ihnen bei der Einrichtung Ihres Spring Type 646 und stellt kurz seine Funktionen vor.
VERBINDUNG
Um das Spring Type 646 mit Ihrem System zu verbinden, lesen Sie bitte die Verbindungsanleitung weiter oben in
diesem Dokument.
HARDWARE-EINRICHTUNG
Stellen Sie alle Verbindungen in Ihrem System her. Lassen Sie die Spring Type 646 Power ausgeschaltet, wenn Sie
Verbindungen herstellen.
Stellen Sie sicher, dass Ihr Soundsystem ausgeschaltet ist.
Schalten Sie das Spring Type 646 vor dem Einschalten aller Endstufen ein und schalten Sie es zuletzt aus. Dies wird dazu beitragen,
das Ein- oder Ausschalten von “Pops oder Schlägen” in Ihren Lautsprechern zu verhindern.
AUFWÄRMZEIT
Wir empfehlen, 15 Minuten oder mehr Zeit für die Spring Type 646 zu lassen, um sich vor der Aufnahme oder Live-Performance
aufzuwärmen. (Länger, wenn es aus der Kälte gebracht wurde.) Auf diese Weise können die analogen Präzisionsschaltungen ihre normale
Betriebstemperatur und abgestimmte Leistung erreichen.

32 33Quick Start GuideSPRING REVERBERATION 646
(PT) Passo 2: Controles
LINHAS DE MOLA
Recomendamos que o Spring Tipo 646 seja montado em um local onde ele não possa ser derrubado ou esteja sujeito a vibrações para
evitar ruídos indesejados nas linhas mola.
Painel Superior
1. POWER SWITCH
2. POWER INDICATOR
3. OUTPUT SOCKET – use essa tomada TS de 3.5 mm para conectar a amplicadores tipo 646, mesas de mixagem ou
interfaces de áudio.
4. FOOTSWITCH INPUT – use esta tomada para conectar um pedal adequado para ignorar o efeito de reverberação.
5. HIGH LEVEL LINE INPUT – use esta tomada para conectar fontes de áudio de nível alto como teclados ou mesas de
mixagem ao 646.
6. LOW LEVEL LINE INPUT – use esta tomada para conectar fontes de áudio de nível baixo, como guitarras, ao 646.
7. BALANCED MICROPHONE INPUT – use esta tomada para conectar microfones balanceados ao 646.
8. UNBALANCED MICROPHONE INPUT – use esta tomada para conectar microfones não balanceados ao 646.
9. REVERBERATE – use este controle para ajustar o nível de saída de reverberação.
10. OVERLOAD INDICATOR – este indicador acende quando um sinal em uma das entradas está sobrecarregado.
11. AUX CHANNEL – use este controle para ajustar o nível de entrada para fontes de linha conectadas ao canal auxiliar.
12. MIC CHANNEL – use este controle para ajustar o nível de entrada para microfone(s) conectados ao canal Microfone.
Painel Traseiro
13. OUTPUT SOCKET – use essa tomada TS de 6.35 mm para conectar a amplicadores tipo 646, mesas de mixagem ou interfaces
de áudio. Duplica a tomada 3 no painel superior.
14. FOOTSWITCH INPUT – use esta tomada para conectar um pedal adequado para ignorar o efeito de reverberação. Duplica a tomada
4 no painel superior.
15. HIGH LEVEL LINE INPUT – use esta tomada para conectar fontes de áudio de nível alto como teclados ou mesas de mixagem
ao 646. Duplica a tomada 5 no painel superior.
16. LOW LEVEL LINE INPUT – use esta tomada para conectar fontes de áudio de nível baixo, como guitarras, ao 646. Duplica a tomada
6 no painel superior.
17. BALANCED MICROPHONE INPUT – use esta tomada para conectar microfones balanceados ao 646. Duplica a tomada 7 no painel
superior.
18. UNBALANCED MICROPHONE INPUT – use esta tomada para conectar microfones não balanceados ao 646. Duplica a tomada 8 no
painel superior.
19. DC POWER INPUT – use esta tomada para conectar a fonte de alimentação DC de 12 V.
SPRING REVERBERATION 646 Controles

SPRING REVERBERATION 646 Primeiros Passos
34 35Quick Start GuideSPRING REVERBERATION 646
(PT) Instalação Eurorack
A Spring Type 646 pode ser retirada do seu chassis de fábrica e montada numa caixa eurorack normalizada (não fornecida).
Recomendamos que este procedimento seja realizado apenas por um técnico de assistência experiente para evitar ferimentos pessoais
ou danos no Spring Type 646. O caso Eurorack terá de dispor de uma fonte de alimentação adequada, com capacidade suciente para
alimentar o Spring Type 646. O consumo é de 1 amp a 12 V DC.
É fornecido um cabo de ta adaptador de 10 pinos a 16 pinos com o Spring Type 646.
Certique-se de que a caixa eurorack fornecerá ±12 V DC e moído aos pinos corretos, e que o cabo está na orientação correta antes
de prosseguir.
Procedimento
Por favor, siga todos os passos na ordem correta.
1. Desligue a energia e todas as outras ligações ao Spring Type 646.
2. Desfaça os oito parafusos no painel superior, como mostrado. Não há necessidade de desfazer qualquer outro parafuso.
3. Levante cuidadosamente o conjunto do painel superior e vire-o de modo a que o PCB que virado para cima. Tenha cuidado para não
puxar o cabo da ta do lado inferior do PCB principal.
4. Desligue o cabo de ta de 24 pinos do PCB principal do Spring Type 646 e retire o conjunto do chassis.
5. Guarde o conjunto do chassis e a alimentação elétrica num local seguro e seco.
6. Ligue de forma segura a extremidade de 10 pinos do adaptador de ta fornecido ao PCB principal do Spring Type 646.
7. Depois de ter assegurado que a sua caixa Eurorack está isolada da rede, ligue a extremidade de 16 pinos do cabo da ta a uma saída
sobressalente na caixa.
8. Fixe a Spring Type 646 na caixa utilizando os oito parafusos de painel.
9. Efetuar um teste de segurança completo antes de utilizar o Spring Type 646.
Disconnect from
Main PCB
(PT) Passo 3: Primeiros Passos
VISÃO GERAL
Este guia de “começar” irá ajudá-lo a congurar o seu Spring Type 646 e introduzir brevemente as suas capacidades.
LIGAÇÃO
Para ligar o Spring Type 646 ao seu sistema, consulte o guia de ligação mais cedo neste documento.
CONFIGURAÇÃO DE HARDWARE
Faça todas as ligações no seu sistema. Mantenha a Spring Type 646 se ao estroe-se quando estroe quaisquer ligações.
Certique-se de que o seu sistema de som está desligado.
Ligue o Spring Type 646 antes de ligar os amplicadores de alimentação e desligá-lo por último. Isto ajudará a evitar qualquer ligação ou
desligar “pops ou toques” nos altifalantes.
TEMPO DE AQUECIMENTO
Recomendamos que se desfaça 15 minutos ou mais para que o Spring Type 646 que se aqueça antes de gravar ou fazer uma performance
ao vivo. (Mais tempo se tiver sido trazido do frio.) Isto permitirá que os circuitos analógicos de precisão atinjam a sua temperatura normal
de funcionamento e o seu desempenho anado.
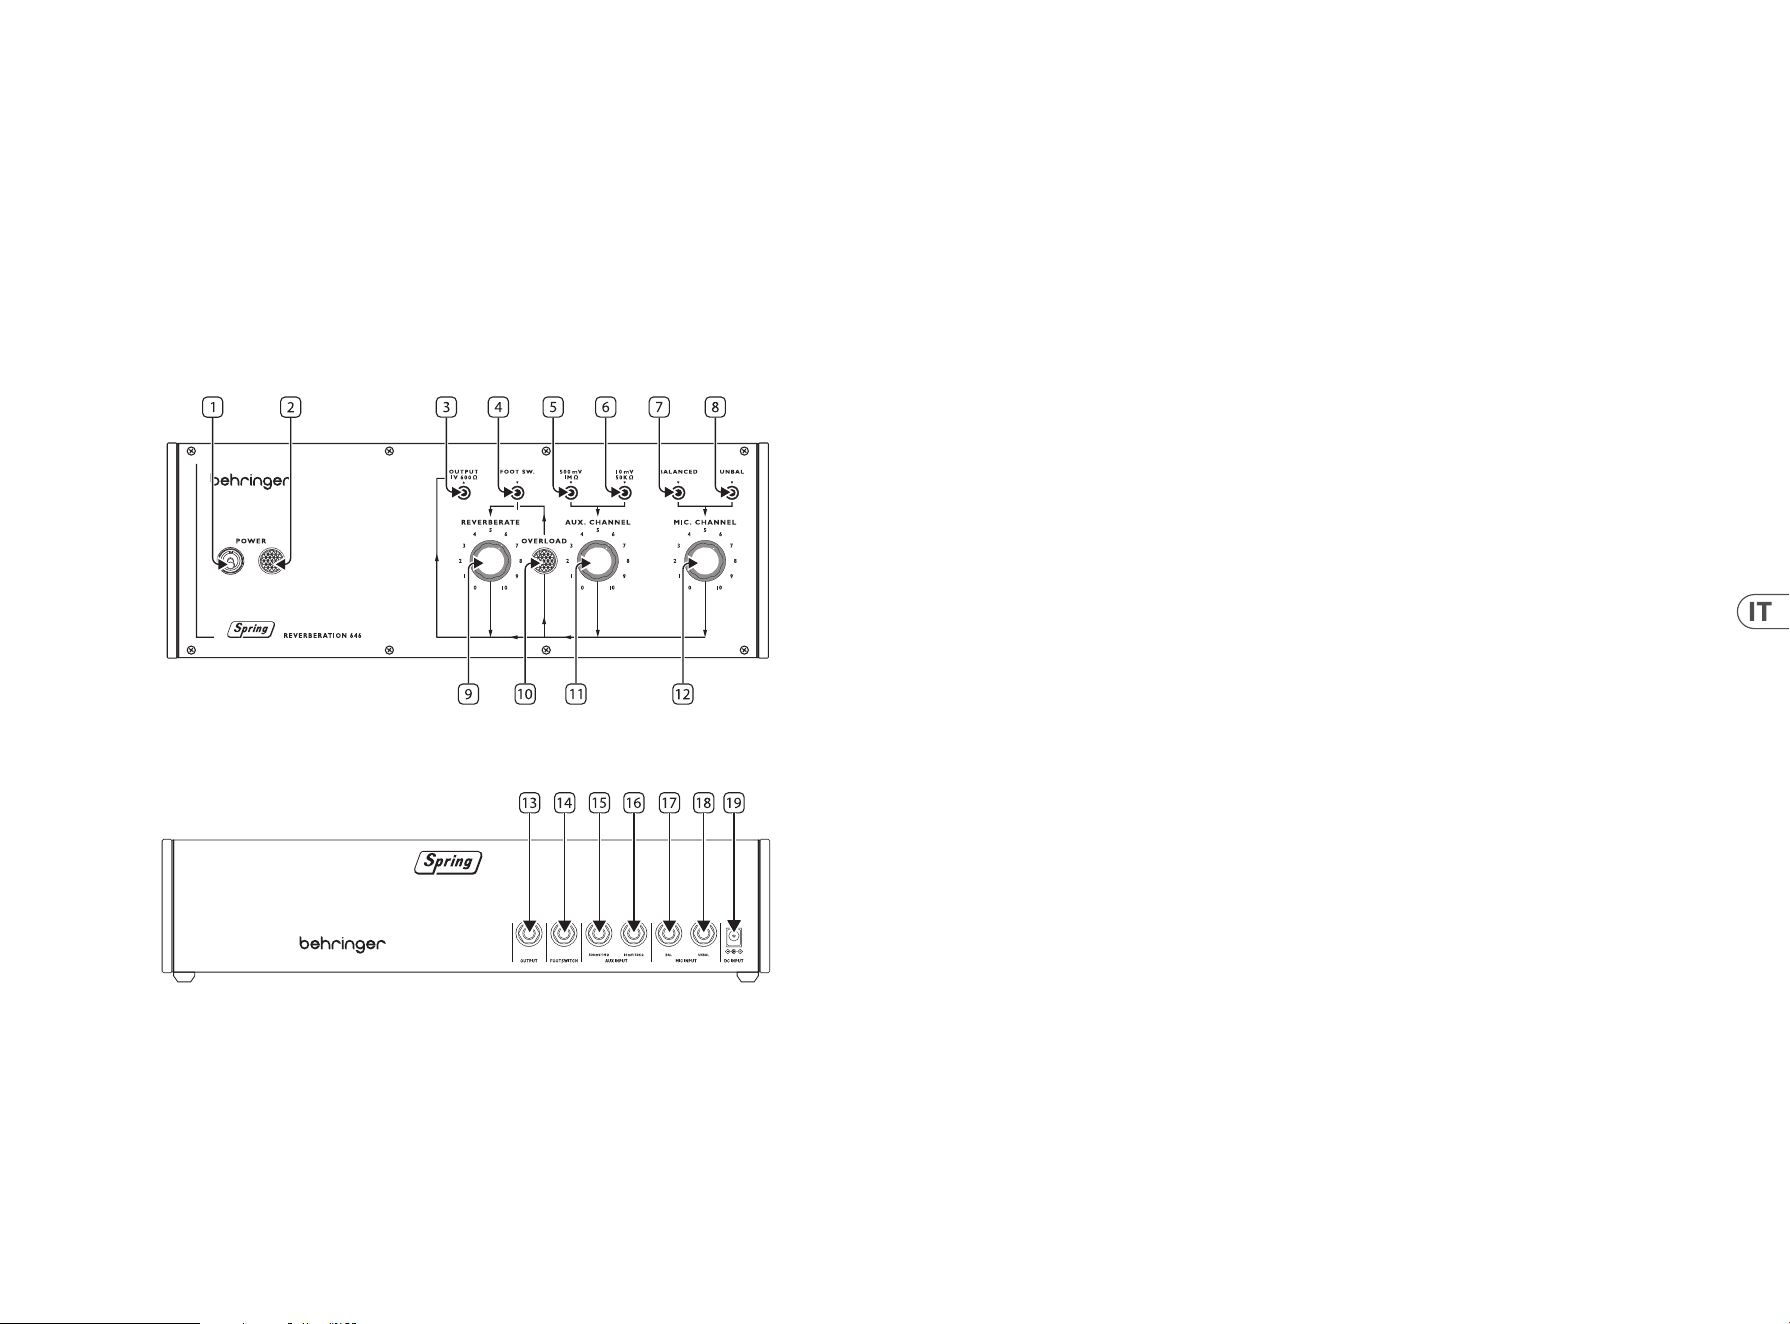
36 37Quick Start GuideSPRING REVERBERATION 646
(IT) Passo 2: Controlli
LINEA SPRING
Raccomandiamo di collocare/montare il Spring Type 646 in un luogo dove non sarà urtato o soggetto a vibrazioni per evitare rumori
indesiderati dalle molle.
Pannello superiore
1. POWER SWITCH
2. POWER INDICATOR
3. OUTPUT SOCKET – usate questo mini-jack sbilanciato da 3,5 mm per collegare il Type 646 ad amplicatori, mixer o
interfacce audio.
4. FOOTSWITCH INPUT – usate questa presa per il collegamento di un pedale per il bypass dell’unità di riverbero.
5. HIGH LEVEL LINE INPUT – usate questa presa per collegare al Type 646 sorgenti audio di livello alto,
come tastiere o mixer.
6. LOW LEVEL LINE INPUT – usate questa presa per collegare al Type 646 sorgenti audio di livello basso, come chitarre.
7. BALANCED MICROPHONE INPUT – usate questa presa per collegare microfoni bilanciati al Type 646.
8. UNBALANCED MICROPHONE INPUT – usate questa presa per collegare microfoni sbilanciati al Type 646.
9. REVERBERATE – usate questo controllo per impostare il livello di uscita del riverbero.
10. OVERLOAD INDICATOR – questo indicatore si illumina quando il segnale di qualsiasi ingresso è in sovraccarico.
11. AUX CHANNEL – usate questo controllo per impostare il livello di ingresso delle sorgenti di linea collegate al canale aux.
12. MIC CHANNEL – usate questo controllo per impostare il livello di ingresso del/dei microfono/i collegati al canale del microfono.
Pannello posteriore
13. OUTPUT SOCKET – usate questa presa jack sbilanciata da 6,35 mm per collegare il Type 646 ad amplicatori, mixer o
interfacce audio. Duplica la presa 3 del pannello superiore.
14. FOOTSWITCH INPUT – usate questa presa per il collegamento di un pedale per il bypass dell’unità di riverbero. Duplica la presa 4
del pannello superiore.
15. HIGH LEVEL LINE INPUT – usate questa presa per collegare al Type 646 sorgenti audio di livello alto, come tastiere o mixer. Duplica
la presa 5 del pannello superiore.
16. LOW LEVEL LINE INPUT – usate questa presa per collegare al Type 646 sorgenti audio di livello basso, come chitarre. Duplica la
presa 6 del pannello superiore.
17. BALANCED MICROPHONE INPUT – usate questa presa per collegare microfoni bilanciati al Type 646. Duplica la presa 7 del pannello
superiore.
18. UNBALANCED MICROPHONE INPUT – usate questa presa per collegare microfoni sbilanciati al Type 646. Duplica la presa 8 del
pannello superiore.
19. DC POWER INPUT – usate questa presa per collegare l’alimentatore in dotazione da 12 V in c.c..
SPRING REVERBERATION 646 Controlli
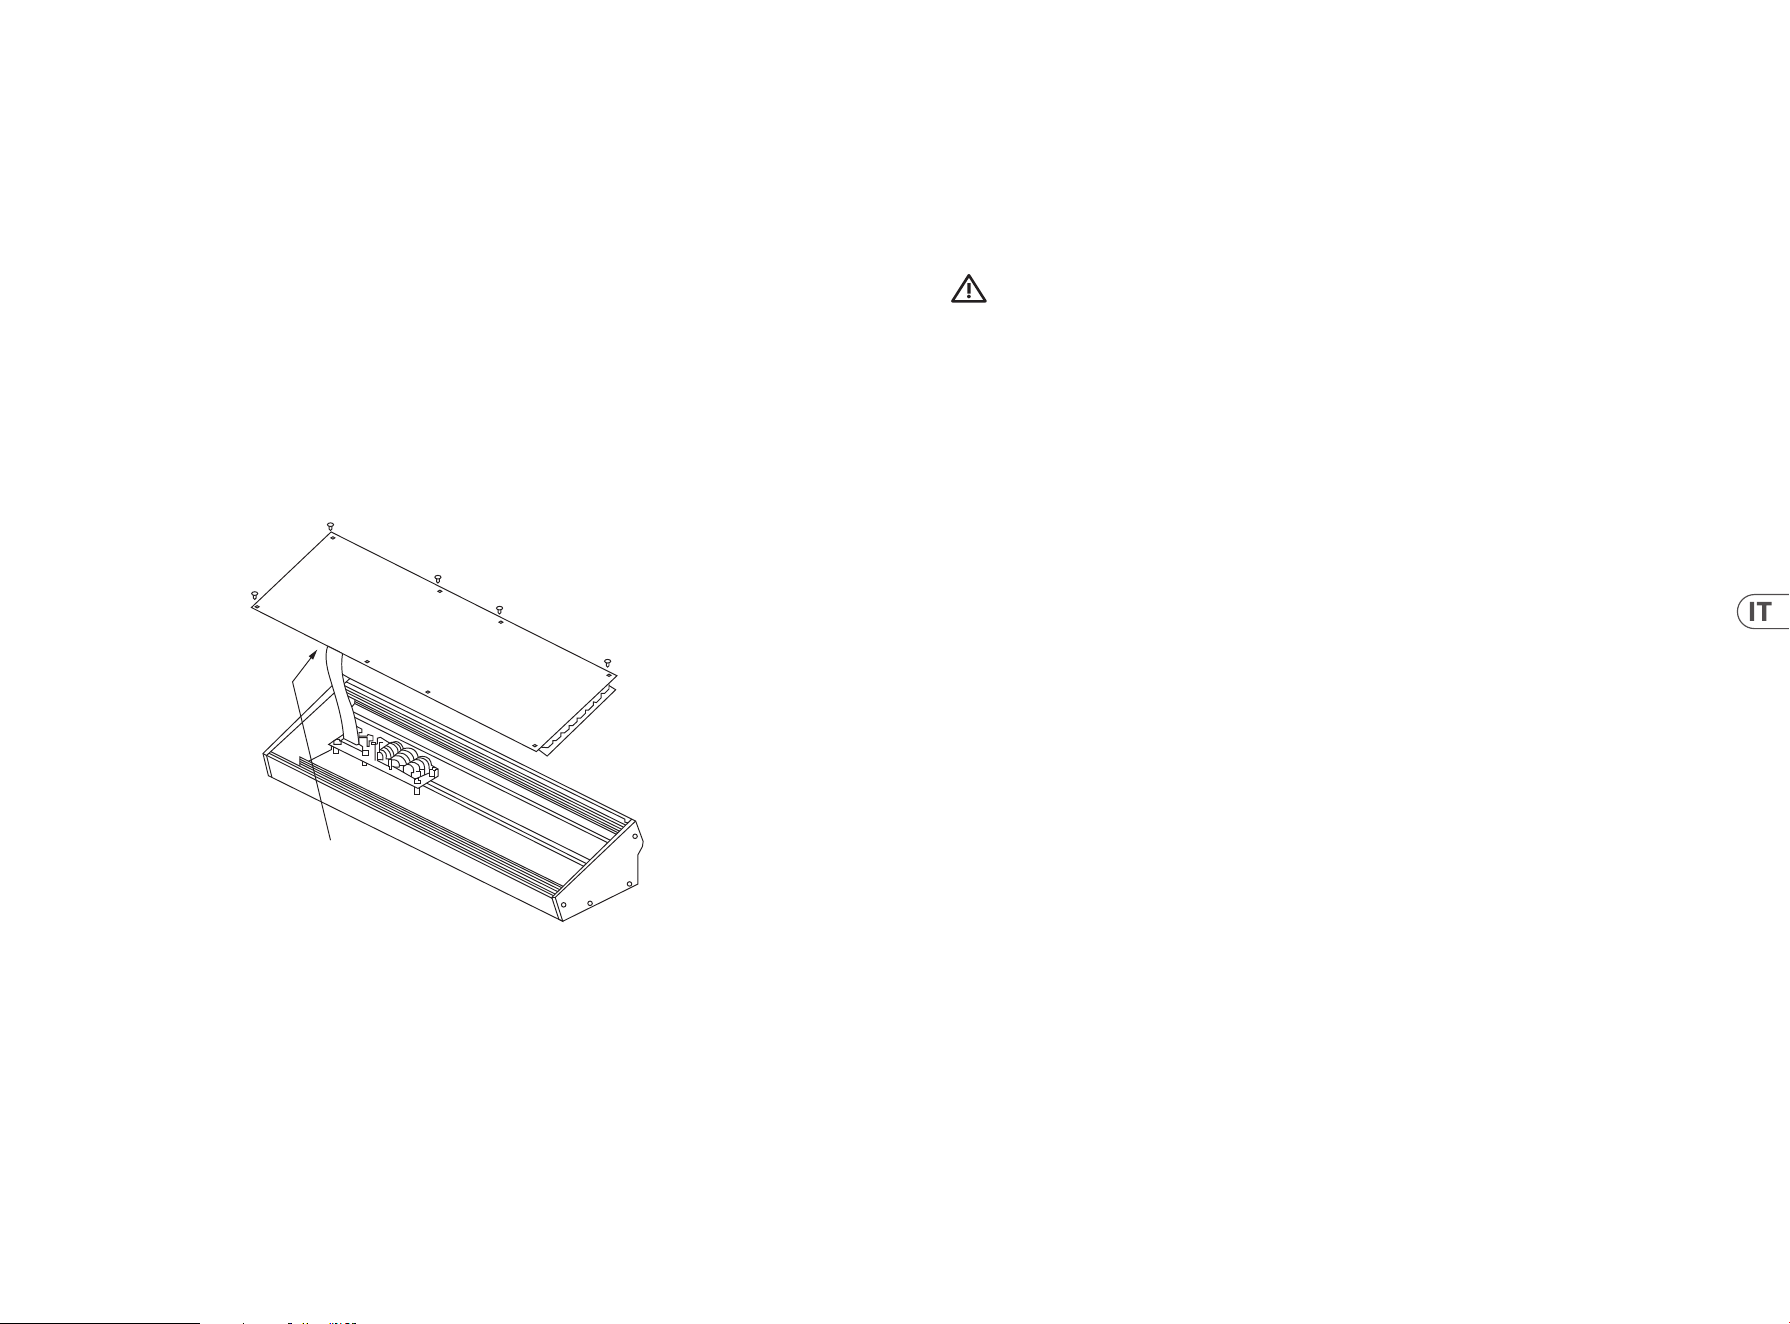
38 39Quick Start GuideSPRING REVERBERATION 646
(IT) Installazione di Eurorack
Il Spring Type 646 può essere tolto dal telaio di fabbrica e inserito in una custodia Eurorack standard (non fornita).
Si consiglia che questa procedura sia eseguita solo da un tecnico di assistenza esperto per prevenire lesioni personali o danni al Spring
Type 646. Il caso Eurorack dovrà avere un alimentatore adeguato con capacità suciente per alimentare il Spring Type 646.
Il consumo è di 1 ampere a 12 V DC.
Un cavo a nastro da 10 pin a 16 pin viene fornito con il Spring Type 646.
Assicurarsi che la custodia Eurorack fornirà ±12 V DC e terra ai perni corretti e che il cavo sia all’orientamento corretto prima di procedere.
Procedimento
Si prega di seguire tutti i passaggi nell’ordine corretto.
1. Scollegare l’alimentazione e tutte le altre connessioni Spring Type 646.
2. Annulla le otto viti sul pannello superiore come mostrato. Non è necessario annullare qualsiasi altra vite.
3. Sollevare con cura l’assieme del pannello superiore e capovolto in modo che il PCB sia rivolto verso l’alto. Fare attenzione a non
estrarre il cavo a nastro dal lato inferiore del PCB principale.
4. Scollegare il cavo a nastro a 24 pin dal PCB principale del Spring Type 646 e rimuovere l’assieme dallo chassis.
5. Conservare l’assemblaggio del telaio e l’alimentazione in un luogo sicuro e asciutto.
6. Collegare in modo sicuro l’estremità a 10 pin dell’adattatore per cavi a nastro in dotazione al PCB principale del
Spring Type 646.
7. Dopo aver assicurato che la custodia Eurorack sia isolata dalla rete, collegare l’estremità a 16 pin del cavo a nastro a una presa di
ricambio nella custodia.
8. Fissare il Spring Type 646 alla custodia utilizzando le otto viti del pannello.
9. Eseguire un test di sicurezza completo prima di utilizzare il Spring Type 646.
Disconnect from
Main PCB
(IT) Passo 3: Iniziare
PANORAMICA
Questa guida introduttiva ti aiuterà a congurare il tuo Spring Type 646 e a introdurne brevemente le capacità.
CONNESSIONE
Per collegare il Spring Type 646 al sistema, consultare la guida alla connessione più indietro in questo documento.
CONFIGURAZIONE HARDWARE
Eettuare tutte le connessioni nel sistema. Mantenere Spring Type 646 interno disattivato quando si eettuano connessioni.
Assicurarsi che il sistema audio sia spento.
Accendere il Spring Type 646 prima di accendere eventuali amplicatori di potenza e spegnerlo per ultimo. Ciò aiuterà a prevenire
qualsiasi accende o spegnimento di “pop o tonf” negli altoparlanti.
TEMPO DI RISCALDAMENTO
Si consiglia di lasciare 15 minuti o più di tempo per il Spring Type 646 per riscaldarsi prima della registrazione o delle esibizioni dal
vivo. (Più a lungo se è stato portato dal freddo.) Ciò consentirà ai circuiti analogici di precisione di raggiungere la normale temperatura
operativa e le prestazioni sintonizzate.
SPRING REVERBERATION 646 Iniziare
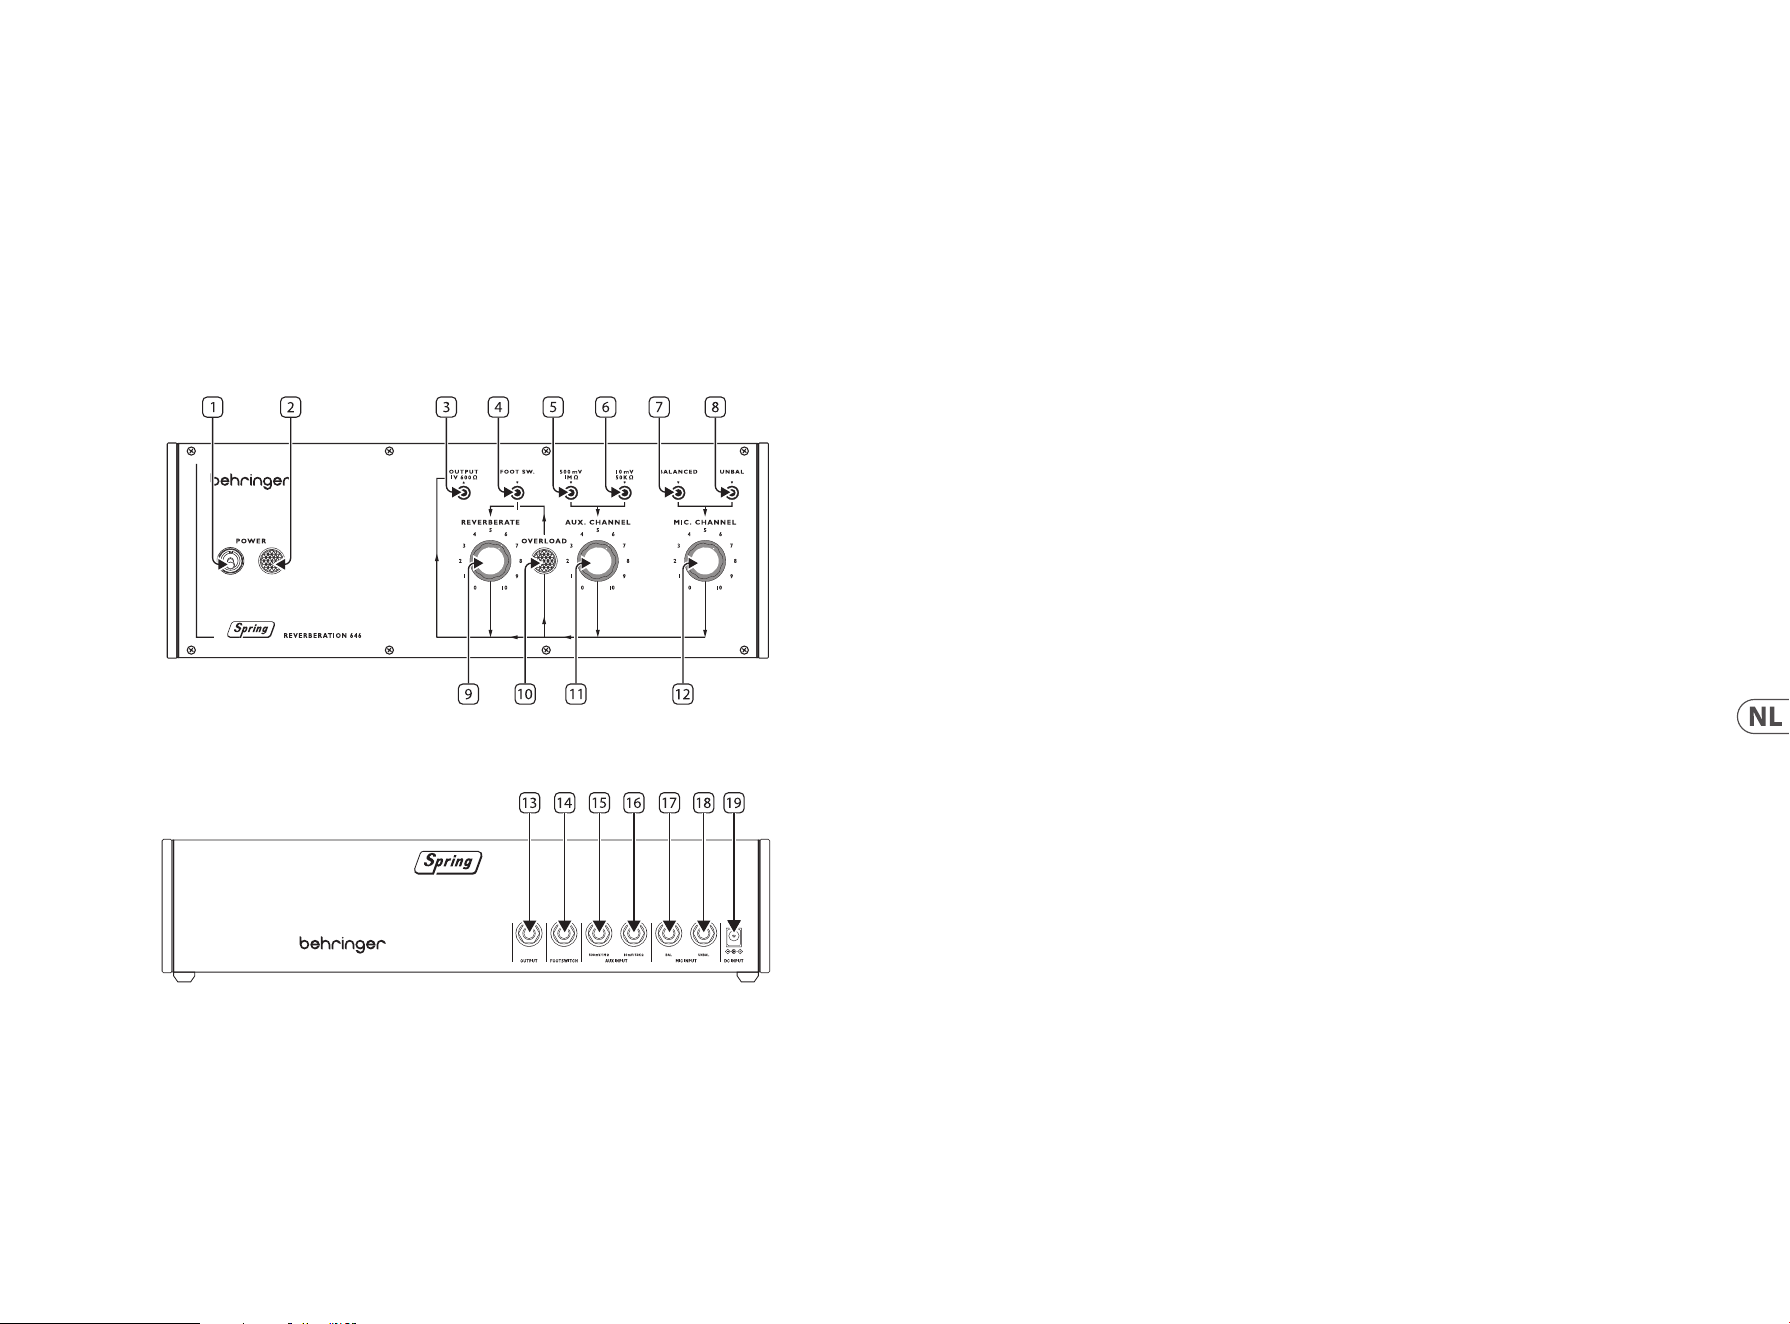
40 41Quick Start GuideSPRING REVERBERATION 646
(NL) Stap 2: Bediening
NAGALMVEREN
Wij adviseren om de Spring Type 646 op een locatie te plaatsen waar er niet tegen wordt gestoten of waar hij onderhevig is
aan trillingen, om ongewenst geluid uit de nagalmveren te voorkomen.
Bovenpaneel
1. POWER SWITCH
2. POWER INDICATOR
3. OUTPUT SOCKET – usate questo mini-jack sbilanciato da 3,5 mm per collegare il Type 646 ad amplicatori,
mixer o interfacce audio.
4. FOOTSWITCH INPUT – Gebruik deze aansluiting om een geschikte voetschakelaar aan te sluiten om het nagalmeect
te bypassen.
5. HIGH LEVEL LINE INPUT – Gebruik deze aansluiting om audiobronnen met een hoog niveau op de Type 646 aan te sluiten, zoals
keyboards of mengtafels.
6. LOW LEVEL LINE INPUT – Gebruik deze aansluiting om audiobronnen op laag niveau op de Type 646 aan te sluiten,
zoals gitaren.
7. BALANCED MICROPHONE INPUT – gebruik deze aansluiting om gebalanceerde microfoons op de Type 646 aan te sluiten.
8. UNBALANCED MICROPHONE INPUT – Gebruik deze aansluiting om ongebalanceerde microfoons op de Type 646 aan te sluiten.
9. REVERBERATE – Gebruik deze regelaar om het uitgangsniveau van de nagalm in te stellen.
10. OVERLOAD INDICATOR – Deze indicator licht op als één van de ingangen wordt overbelast.
11. AUX CHANNEL – Gebruik deze regelaar om het ingangsniveau in te stellen voor lijnbronnen die op het auxiliary-kanaal
zijn aangesloten.
12. MIC CHANNEL – Gebruik deze regelaar om het ingangsniveau in te stellen voor microfoon(s) die op het microfoonkanaal
zijn aangesloten.
Achterpaneel
13. OUTPUT SOCKET – Gebruik deze 6,35 mm mono jackaansluiting om de Type 646 aan te sluiten op versterkers, mengtafels of audio-
interfaces. Dubbelt aansluiting 3 op bovenpaneel.
14. FOOTSWITCH INPUT – Gebruik deze aansluiting om een geschikte voetschakelaar aan te sluiten om het nagalmeect
te bypassen. Dubbelt aansluiting 4 op bovenpaneel.
15. HIGH LEVEL LINE INPUT – Gebruik deze aansluiting om audiobronnen met een hoog niveau op de Type 646 aan te sluiten, zoals
keyboards of mengtafels. Dubbelt aansluiting 5 op bovenpaneel.
16. LOW LEVEL LINE INPUT – Gebruik deze aansluiting om audiobronnen op laag niveau op de Type 646 aan te sluiten, zoals gitaren.
Dubbelt aansluiting 6 op bovenpaneel.
17. BALANCED MICROPHONE INPUT – gebruik deze aansluiting om gebalanceerde microfoons op de Type 646 aan te sluiten. Dubbelt
aansluiting 7 op bovenpaneel.
18. UNBALANCED MICROPHONE INPUT – Gebruik deze aansluiting om ongebalanceerde microfoons op de Type 646 aan te sluiten.
Dubbelt aansluiting 8 op bovenpaneel.
19. DC POWER INPUT – Gebruik deze aansluiting om de meegeleverde 12 V gelijkstroomnetadapter aan te sluiten.
SPRING REVERBERATION 646 Bediening
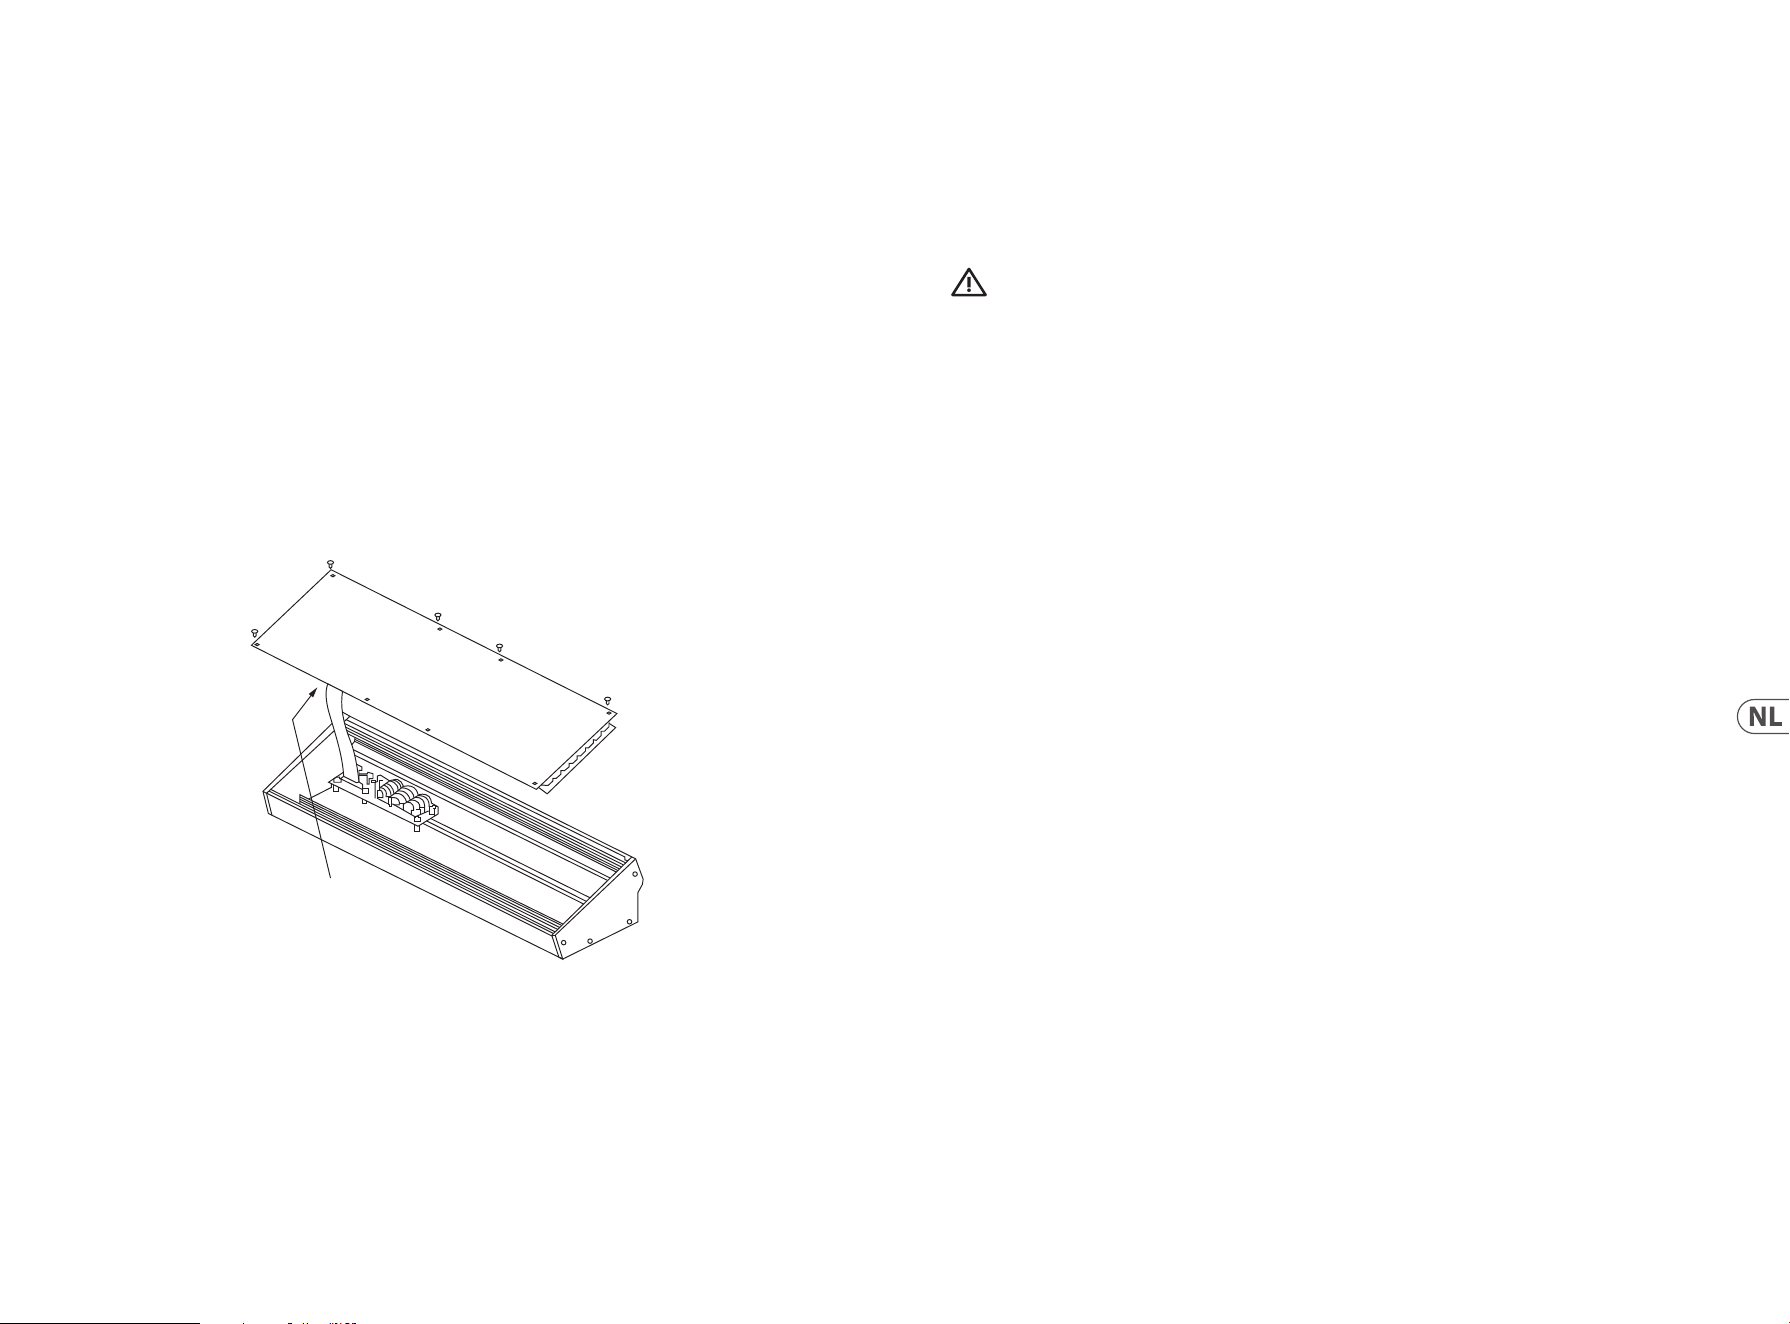
42 43Quick Start GuideSPRING REVERBERATION 646
(NL) Eurorack Installatie
De Spring Type 646 kan uit het fabriekschassis worden gehaald en in een standaard Eurorack-koer worden gemonteerd
(niet meegeleverd).
Wij raden u aan deze procedure alleen uit te voeren door een ervaren servicemonteur om persoonlijk letsel of schade aan de Spring Type
646 te voorkomen. De Eurorack-behuizing moet een geschikte voeding hebben met voldoende capaciteit om de <MODULE van stroom te
voorzien>. Verbruik is 1 amp bij 12 V DC.
Bij de Type 646 wordt een 10-pins tot 16-polige adapterlintkabel meegeleverd>.
Zorg ervoor dat de Eurorack-behuizing ±12 V DC levert en op de juiste pinnen wordt geslepen, en dat de kabel in de juiste richting is
voordat u verdergaat.
Procedure
Volg alle stappen in de juiste volgorde.
1. Koppel de stroom en alle andere aansluitingen op de Spring Type 646 los.
2. Draai de acht schroeven op het bovenpaneel los zoals afgebeeld. Het is niet nodig om een andere schroef los te maken.
3. Til de montage van het bovenpaneel voorzichtig op en draai deze om zodat de printplaat naar boven is gericht. Zorg ervoor dat u de
lintkabel niet van de onderkant van de hoofdprint trekt.
4. Koppel de 24-polige lintkabel los van de hoofdprint van de Spring Type 646en verwijder de montage van het chassis.
5. Bewaar de chassisassemblage en voeding op een veilige, droge plaats.
6. Sluit het 10-polige uiteinde van de meegeleverde lintkabeladapter veilig aan op de hoofdprint van de Spring Type 646.
7. Nadat u ervoor hebt gezorgd dat uw Eurorack-behuizing is geïsoleerd van het lichtnet, sluit u het 16-polige uiteinde van de lintkabel
aan op een extra stopcontact in de behuizing.
8. Bevestig de Spring Type 646aan de behuizing met behulp van de acht paneelschroeven.
9. Voer een volledige veiligheidstest uit voordat u de Spring Type 646 gebruikt.
Disconnect from
Main PCB
(NL) Stap 3: Aan De Slag
OVERSICHT
Deze ‘aan de slag’-gids helpt u bij het instellen van uw Spring Type 646 en introduceert kort de mogelijkheden ervan.
VERBINDING
Raadpleeg de verbindingshandleiding eerder in dit document om de Spring Type 646 op uw systeem aan te sluiten.
HARDWARE-INSTALLATIE
Maak alle verbindingen in uw systeem. Houd de Spring Type 646 vermogen uitgeschakeld bij het maken van verbindingen.
Zorg ervoor dat uw geluidsinstallatie is uitgeschakeld.
Schakel de Spring Type 646 voor het inschakelen van eindversterkers en zet deze als laatste uit. Dit voorkomt dat “pops or thumps” in uw
luidsprekers wordt in- of uitgeschakeld.
OPWARMTIJD
We raden aan om 15 minuten of meer tijd te laten voor de Spring Type 646 om op te warmen voor opname of live optreden.
(Langer als het uit de kou is binnengebracht.) Hierdoor kan de precisie analoge circuits tijd om hun normale bedrijfstemperatuur en
afgestemde prestaties te bereiken.
SPRING REVERBERATION 646 Aan De Slag
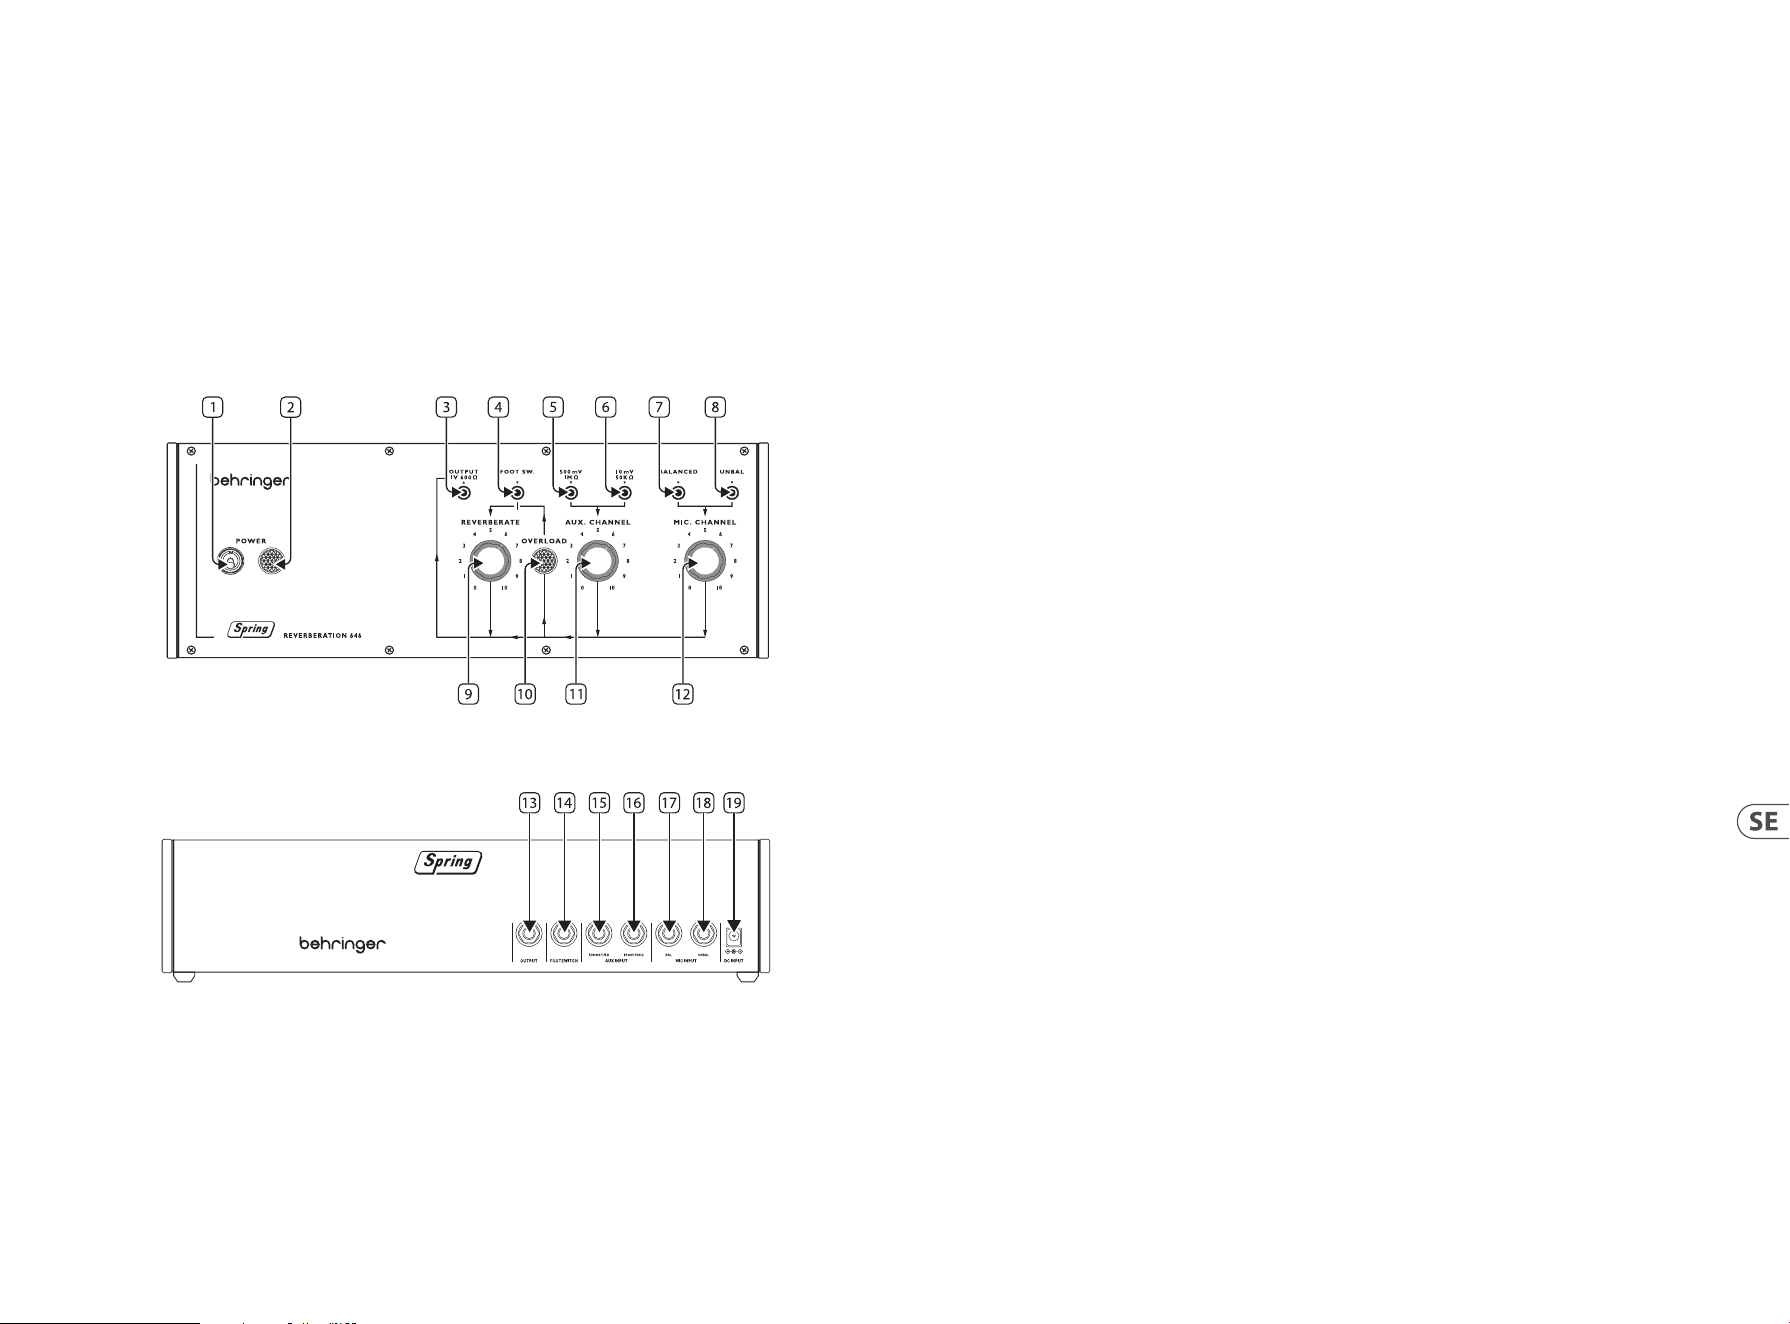
44 45Quick Start GuideSPRING REVERBERATION 646
(SE) Steg 2: Kontroller
SPIRALFJÄDRAR
Vi rekommenderar att Spring Type 646-enheten monteras på en plats där den inte utsätts för slag eller vibrationer, så att oönskade ljud
från spiralädrarna kan undvikas.
Övre panel
1. POWER SWITCH
2. POWER INDICATOR
3. OUTPUT SOCKET – använd detta 3,5 mm TS-uttag för att ansluta Type 646 till förstärkare, mixerbord eller ljudkort.
4. FOOTSWITCH INPUT – använd detta uttag för att ansluta en lämplig fotomkopplare för att koppla förbi reverbeekten.
5. HIGH LEVEL LINE INPUT – använd detta uttag för att ansluta högnivåljudkällor såsom klaviaturinstrument eller mixerbord
till Type 646.
6. LOW LEVEL LINE INPUT – använd detta uttag för att ansluta lågnivåljudkällor såsom gitarrer till Type 646.
7. BALANCED MICROPHONE INPUT – använd detta uttag för att ansluta balanserade mikrofoner till Type 646.
8. UNBALANCED MICROPHONE INPUT – använd detta uttag för att ansluta obalanserade mikrofoner till Type 646.
9. REVERBERATE – använd denna kontroll för att ställa in reverbets utgångsnivå.
10. OVERLOAD INDICATOR – denna indikator tänds när en signal överbelastar någon av ingångarna.
11. AUX CHANNEL – använd denna kontroll för att ställa in ingångsnivån för linjekällor anslutna till auxiliary-kanalen.
12. MIC CHANNEL – använd denna kontroll för att ställa in ingångsnivån för mikrofon(er) som ansluts till mikrofonkanalen.
Bakre panel
13. OUTPUT SOCKET – använd detta 6,35 mm TS-uttag för att ansluta Type 646 till förstärkare, mixerbord eller ljudkort. Duplicerar
uttag 3 på övre panel.
14. FOOTSWITCH INPUT – använd detta uttag för att ansluta en lämplig fotomkopplare för att koppla förbi reverbeekten. Duplicerar
uttag 4 på övre panel.
15. HIGH LEVEL LINE INPUT – använd detta uttag för att ansluta högnivåljudkällor såsom klaviaturinstrument eller mixerbord
till Type 646. Duplicerar uttag 5 på övre panel.
16. LOW LEVEL LINE INPUT – använd detta uttag för att ansluta lågnivåljudkällor såsom gitarrer till Type 646. Duplicerar uttag 6
på övre panel.
17. BALANCED MICROPHONE INPUT – använd detta uttag för att ansluta balanserade mikrofoner till Type 646. Duplicerar uttag 7 på
övre panel.
18. UNBALANCED MICROPHONE INPUT – använd detta uttag för att ansluta obalanserade mikrofoner till Type 646. Duplicerar uttag
8 på övre panel.
19. DC POWER INPUT – använd detta uttag för att ansluta den medföljande 12 V DC-strömförsörjningsenheten.
SPRING REVERBERATION 646 Kontroller
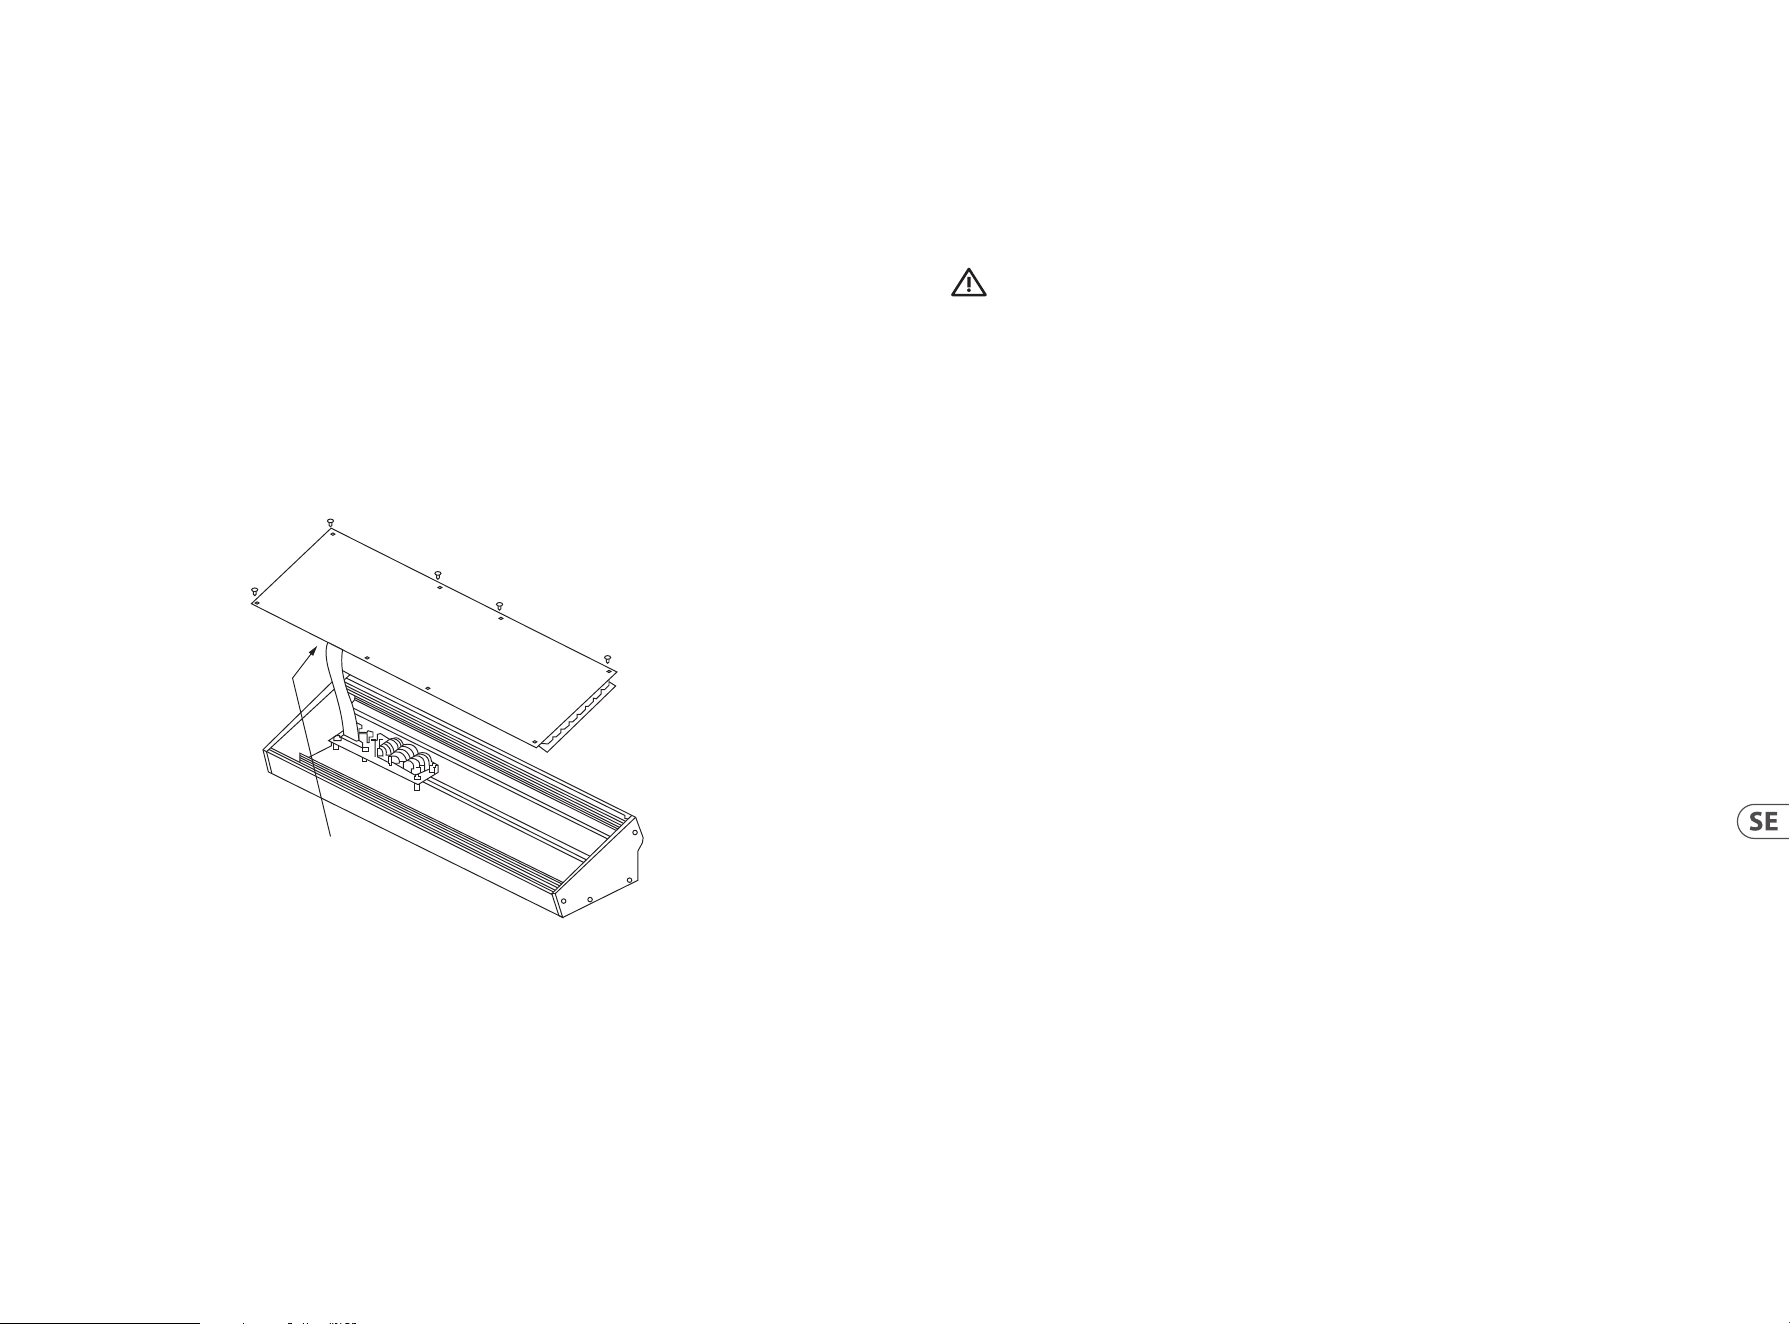
46 47Quick Start GuideSPRING REVERBERATION 646
(SE) Eurorack Installation
Den Spring Type 646 kan tas ut ur sitt fabrikschassi och monteras i ett standard Eurorack-fodral (medföljer ej).
Vi rekommenderar att denna procedur endast utförs av en erfaren servicetekniker för att förhindra personskador eller skador på Spring
Type 646. Eurorack-fallet måste ha en lämplig strömförsörjning med tillräcklig kapacitet för att driva Spring Type 646. Förbrukningen är
1 ampere vid 12 V DC.
En 10-stifts till 16 stifts adapterbandkabel levereras med Spring Type 646.
Se till att Eurorack-fodralet levererar ±12 V DC och jord till rätt stift och att kabeln är i rätt riktning innan du fortsätter.
Procedur
Följ alla steg i rätt ordning.
1. Koppla bort strömmen och alla andra anslutningar till Spring Type 646.
2. Lossa de åtta skruvarna på den övre panelen enligt bilden. Det nns ingen anledning att lossa någon annan skruv.
3. Lyft försiktigt upp den övre panelenheten och vänd den så att kretskortet är vänd uppåt. Var försiktig så att du inte drar bandkabeln
från undersidan av huvud-PCB.
4. Koppla bort bandkabeln på 24 stift från huvud-PCB:n på Spring Type 646 och ta bort enheten från chassit.
5. Förvara chassienheten och strömförsörjningen på en säker och torr plats.
6. Anslut den 10-poliga änden av den medföljande bandkabeladaptern till huvudkortet på Spring Type 646.
7. Efter att ha sett till att ditt Eurorack-fodral är isolerat från elnätet ansluts bandkabelns 16-stiftsände till ett extrauttag i fodralet.
8. Fäst Spring Type 646 fodralet med hjälp av åtta panelskruvarna.
9. Utför ett fullständigt säkerhetstest innan du använder Spring Type 646.
Disconnect from
Main PCB
(SE) Steg 3: Komma igång
OVERBLICK
Den här “komma igång”-guiden hjälper dig att ställa in Spring Type 646 och kortfattat presentera dess funktioner.
SAMBAND
För att ansluta Spring Type 646 till ditt system, se anslutningsguiden tidigare i detta dokument.
MASKINVARUINSTÄLLNINGAR
Gör alla anslutningar i systemet. Håll Spring Type 646 kraft avstängd när du gör några anslutningar.
Se till att ljudsystemet är av stängt.
Slå på Spring Type 646 för att slå på eventuella eektförstärkare och stänga av den sist. Detta hjälper till att förhindra att du slår på eller
stänger av “pops or thumps” i högtalarna.
UPPVÄRMNINGSTID
Vi rekommenderar att du lämnar 15 minuter eller mer tid för Spring Type 646 att värma upp innan du spelar in eller live-prestanda.
(Längre om det har tagits in från kylan.) Detta gör att precisionsanalogkretsarna kan nå sin normala driftstemperatur och
inställda prestanda.
SPRING REVERBERATION 646 Aan De Slag
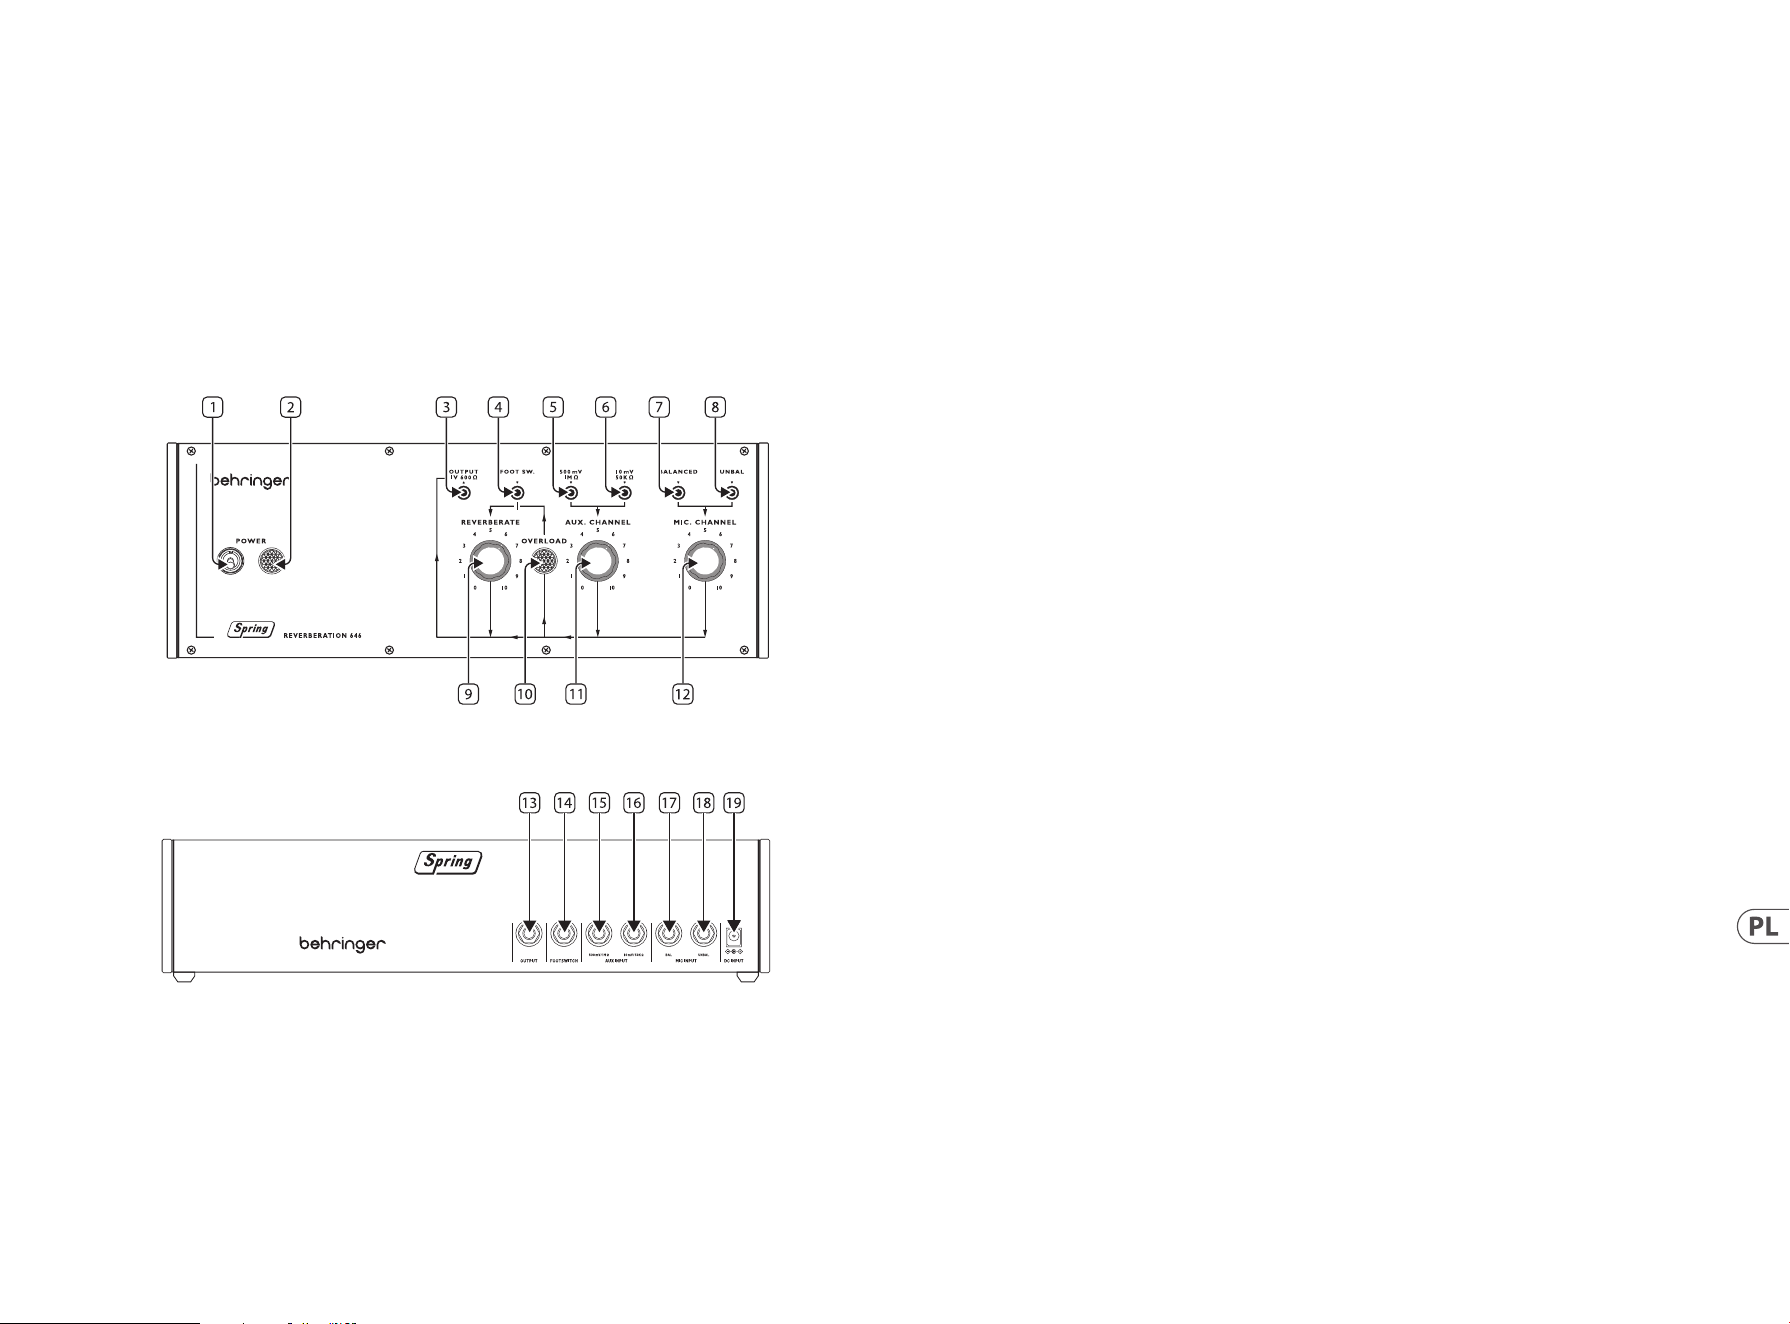
48 49Quick Start GuideSPRING REVERBERATION 646
(PL) Krok 2: Sterowanica
LINIE SPRĘŻYN
Zalecamy zamontowanie Spring Type 646 w miejscu, gdzie będzie chroniony przed przewróceniem lub wibracjami, aby uniknąć
niepożądanego hałasu z linii sprężyn.
Górny panel
1. POWER SWITCH
2. POWER INDICATOR
3. OUTPUT SOCKET – użyj tego złącza 3.5 mm TS, aby podłączyć Typ 646 do wzmacniaczy, konsoli mikserskich lub
interfejsów audio.
4. FOOTSWITCH INPUT – użyj tego złącza, aby podłączyć odpowiedni przełącznik nożny, pozwalający na wyłączenie
efektu pogłosu.
5. HIGH LEVEL LINE INPUT – użyj tego złącza, aby podłączyć źródła audio wysokiego poziomu, jak keyboardy lub
konsole mikserskie, do Typu 646.
6. LOW LEVEL LINE INPUT – użyj tego złącza, aby podłączyć źródła audio niskiego poziomu, takie jak gitary, do Typu 646.
7. BALANCED MICROPHONE INPUT – użyj tego złącza, aby podłączyć zbalansowane mikrofony do Typu 646.
8. UNBALANCED MICROPHONE INPUT – użyj tego złącza, aby podłączyć niezbalansowane mikrofony do Typu 646.
9. REVERBERATE – użyj tego pokrętła, aby ustawić poziom wyjściowy pogłosu.
10. OVERLOAD INDICATOR – zapala się, gdy sygnał przy którymś z wejść powoduje przeciążenie.
11. AUX CHANNEL – użyj tej regulacji, aby ustawić poziom wejściowy źródeł liniowych podłączonych do kanału AUX.
12. MIC CHANNEL – użyj tej regulacji, aby ustawić poziom wejściowy dla mikrofonu(ów) podłączonego do kanału mikrofonowego.
Tylny Panel
13. OUTPUT – użyj tego złącza 6.35 mm TS, aby podłączyć Typ 646 do wzmacniaczy, konsoli mikserskich lub
interfejsów audio. Duplikuje złącze 3 na górnym panelu.
14. FOOTSWITCH INPUT – użyj tego złącza, aby podłączyć odpowiedni przełącznik nożny, pozwalający na wyłączenie
efektu pogłosu. Duplikuje złącze 4 na górnym panelu.
15. HIGH LEVEL LINE INPUT – użyj tego złącza, aby podłączyć źródła audio wysokiego poziomu, jak keyboardy lub konsole mikserskie,
do Typu 646. Duplikuje złącze 5 na górnym panelu.
16. LOW LEVEL LINE INPUT – użyj tego złącza, aby podłączyć źródła audio niskiego poziomu, takie jak gitary, do Typu 646. Duplikuje
złącze 6 na górnym panelu.
17. BALANCED MICROPHONE INPUT – użyj tego złącza, aby podłączyć zbalansowane mikrofony do Typu 646. Duplikuje złącze 7 na
górnym panelu.
18. UNBALANCED MICROPHONE INPUT – użyj tego złącza, aby podłączyć niezbalansowane mikrofony do Typu 646. Duplikuje złącze 8
na górnym panelu.
19. DC POWER INPUT – użyj tego złącza, aby podłączyć dostarczony zasilacz 12 V DC.
SPRING REVERBERATION 646 Sterowanica
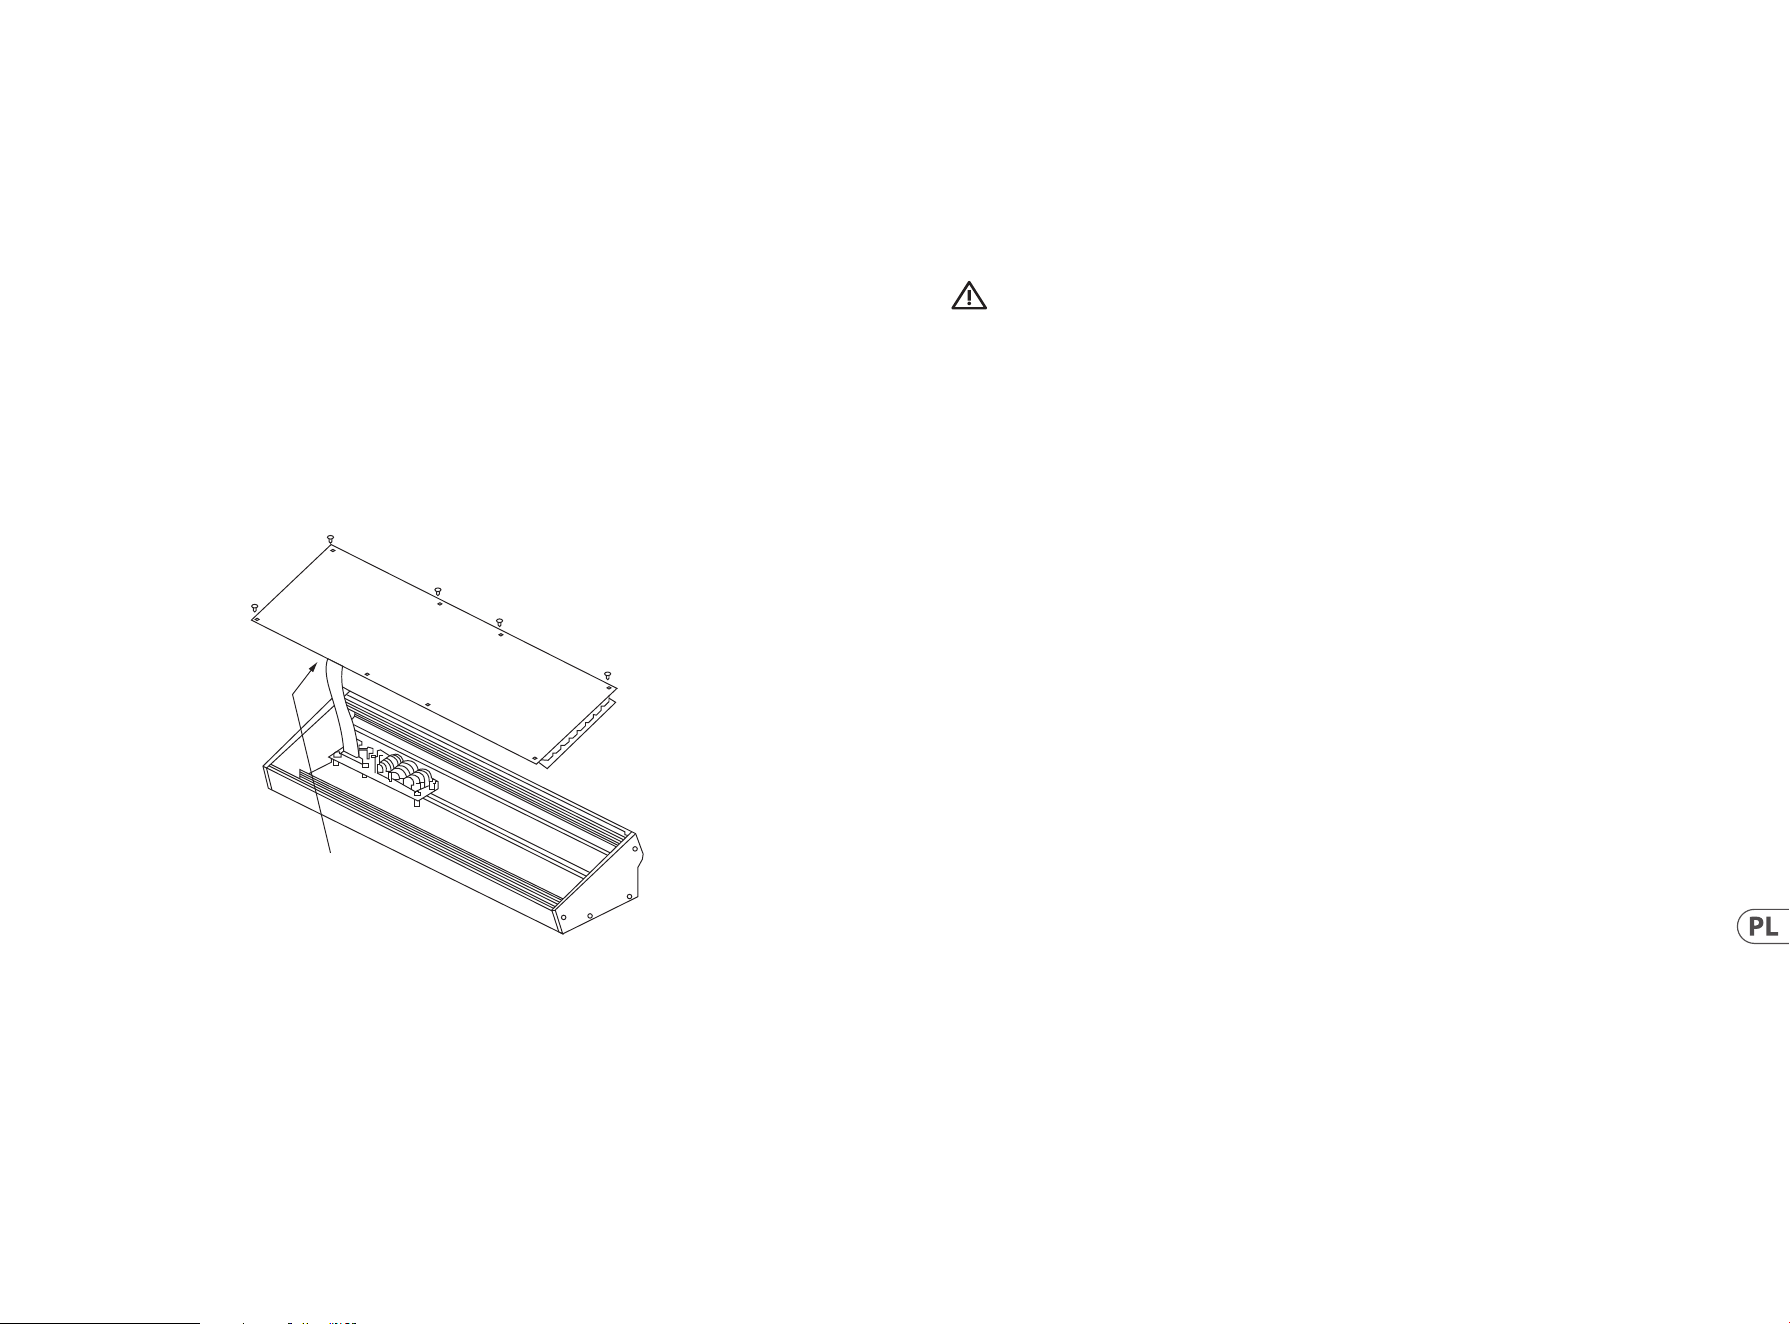
50 51Quick Start GuideSPRING REVERBERATION 646
(PL) Instalacja Eurorack
Spring Type 646 można wyjmować z fabrycznego podwozia i zamontować w standardowej obudowie Eurorack (nie dostarczona).
Zaleca się, aby ta procedura była wykonywana tylko przez doświadczonego technika serwisowego, aby zapobiec uszkodzeniu ciała lub
uszkodzeniu Spring Type 646. Obudowa Euroracka będzie musiała posiadać odpowiedni zasilacz o wystarczającej pojemności do zasilania
Spring Type 646. Zużycie wynosi 1 amp przy 12 V DC.
Kabel taśmowy adaptera o przekątniu 10-16-stykowym jest dostarczany z Spring Type 646.
Przed kontynuowaniem należy upewnić się, że obudowa Euroracka dostarcza ±12 V DC i szlifowana do odpowiednich styków, a kabel jest
we właściwej orientacji.
Procedura
Wykonaj wszystkie kroki w odpowiedniej kolejności.
1. Odłącz zasilanie i wszystkie inne połączenia z Spring Type 646.
2. Cofnij osiem śrub na górnym panelu, jak pokazano na rysunku. Nie ma potrzeby cofania innych śrub.
3. Ostrożnie unieś górny zespół panelu i obróć go tak, aby płytka drukowana była skierowana do góry. Uważaj, aby nie wyciągnąć kabla
taśmowego z dolnej strony głównej płytki drukowanej.
4. Odłącz 24-pinowy kabel taśmowy od głównej płytki drukowanej Spring Type 646 i zdejmij zespół z obudowy.
5. Montaż obudowy i zasilacz należy przechowywać w bezpiecznym, suchym miejscu.
6. Bezpiecznie podłącz 10-pinowy koniec dołączonego adaptera do kabli taśmowych do głównej płytki drukowanej
Spring Type 646.
7. Po upewnieniu się, że etui Eurorack jest odizolowane od sieci, podłącz 16-pinowy koniec kabla taśmowego do zapasowego
gniazdka w obudowie.
8. Zabezpieczyć Spring Type 646 do obudowy za pomocą ośmiu śrub panelowych.
9. Przed użyciem Spring Type 646 należy wykonać pełny test bezpieczeństwa.
Disconnect from
Main PCB
(PL) Krok 3: Pierwsze Kroki
PRZEGLĄD
Ten “wprowadzenie” przewodnik pomoże Ci skongurować Spring Type 646 i krótko przedstawić swoje możliwości.
POŁĄCZENIE
Aby podłączyć Spring Type 646 do systemu, zapoznaj się z przewodnikiem po połączeniach we wcześniejszej
części tego dokumentu.
KONFIGURACJA SPRZĘTU
Nawiązuj wszystkie połączenia w systemie. Podczas wykonywania jakichkolwiek połączeń należy wyłączyć Spring Type 646 power.
Upewnij się, że system dźwiękowy jest wyłączony.
Włącz Spring Type 646 przed włączeniem wzmacniaczy mocy i wyłącz je jako ostatnie. Pomoże to zapobiec włączaniu lub wyłączaniu
“wyskakuje lub thumps” w głośnikach.
CZAS ROZGRZEWANIA
Zalecamy pozostawienie 15 minut lub więcej czasu na Spring Type 646 do rozgrzewania przed nagraniem lub występem na żywo.
(Dłużej, jeśli został przywieziony z zimna.) Pozwoli to na osiągnięcie normalnej temperatury pracy i dostrojonej wydajności precyzyjnych
obwodów analogowych.
SPRING REVERBERATION 646 Aan De Slag
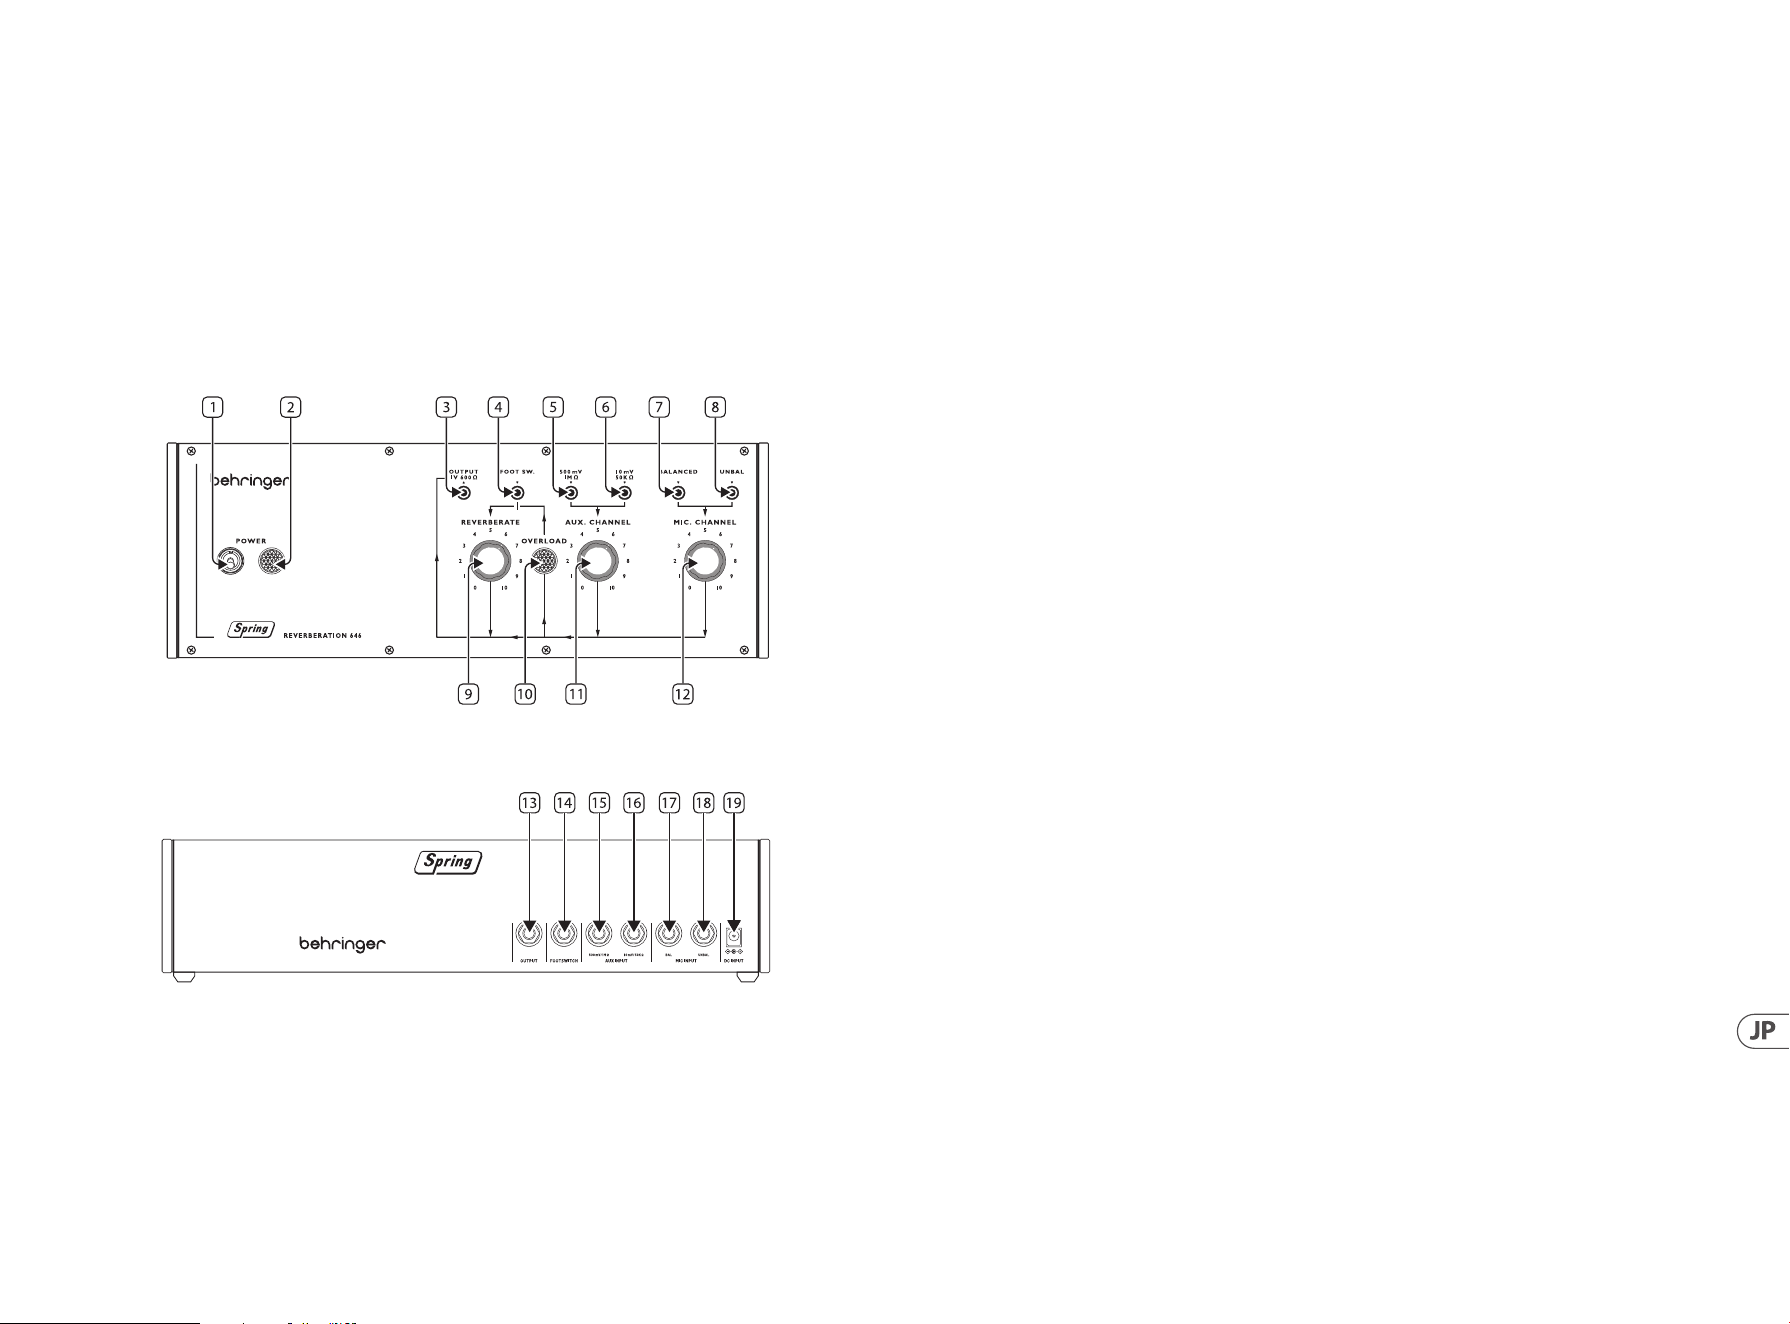
52 53Quick Start GuideSPRING REVERBERATION 646
SPRING REVERBERATION 646 コントロール
ステップ 2: コントロール
スプリングライン
何かがぶつかった衝撃や振動により、スプリングライン(ばね列)に起因する意図せぬノイズが発生しない
よう、Spring Type 646 をマウント設置の上ご使用になることをお勧めします。
トップパネル
1. POWER SWITCH( 電 源 )ス イ ッ チ
2. POWER INDICATOR 電源インジケーター
3. OUTPUT( 出 力 )ソ ケ ッ ト – Type 646 をアンプリファー、ミキシングデスクまたはオーディオインターフェイスに接
続する際に使用する、3.5 mm TS ジャックソケットで す。
4. FOOTSWITCH INPUT(フットスイッチ入 力)– 適合するフットスイッチを接 続し、リバーブレーション効果のバイパ
スに使 用 するソケ ットで す。
5. HIGH LEVEL LINE INPUT(ハイレベル ライン入力)– キーボードやミキシングデスクなどのハイレベルオーディオ
ソースを Type 646 に接続する際に使用するソケットです。
6. LOW LEVEL LINE INPUT(ローレベル ライン入力)– ギターなどのローレベルオーディオソースを Type 646 に接続
する際に使 用するソケットです。
7. BALANCED MICROPHONE INPUT(マイクロフォン バランス入力)– Type 646 に、マイクロフォンをバランス接続する
際 に 使 用 するソケットで す。
8. UNBALANCED MICROPHONE INPUT(マイクロフォン アンバランス入力)– Type 646 に 、マ イ ク ロ フ ォ ン を ア ン バ ラ ン
ス接続する際に使用するソケットです。
9. REVERBERATE(リバーブレート)– リバーブレーション出力レベルの設 定に使用するコントロール
です。
10. OVERLOAD(過入 力インジケーター)– いずれかの入力端子が過入力になっている際に点灯するインジケ
ーターで す。
11. AUX CHANNEL(AUX チャンネル)– AUX チャンネルに接続したラインソースの、入力レベルの設 定に使用するコン
トロールです。
12. MIC CHANNEL(マイクチャンネル)– マイクロフォン チ ャンネ ル に 接 続 したマイクロフォンの入 力レ ベル を設 定 す
る際 に使 用するコントロールで す。
背面パネル
13. OUTPUT( 出 力 )ソ ケ ッ ト – Type 646 をアンプリファー、ミキシングデスクまたはオーディオインターフェイスに接
続する際に使用する、3.5 mm TS ジャックソケットで す。トップパ ネル のソケット 3 の 複 製です。
14. FOOTSWITCH INPUT(フットスイッチ入 力)– 適合するフットスイッチを接続し、リバーブレーション効果をバイパ
スする 際 に使 用 するソケットです。トップパ ネル のソケット 4 の 複 製で す。
15. HIGH LEVEL LINE INPUT(ハイレベルライン入 力)– キーボードやミキシングデスクなどのハイレベルオーディオソ
ースを Type 646 に 接 続 する 際 に使 用 するソケットです。トップパ ネル のソケット 5 の 複 製 です。
16. LOW LEVEL LINE INPUT(ローレ ベルライン入 力)– ギターなどのローレベルオーディオソースを Type 646 に接続す
る際 に使 用 するソケットです。トップパ ネル のソケット 6 の 複 製です。
17. BALANCED MICROPHONE INPUT – Type 646 にバランスマイクロフォンを接続する際に使 用するソケットです。トップ
パ ネル のソケット 7 の 複 製で す。
18. UNBALANCED MICROPHONE INPUT – Type 646 にアンバランスマイクロフォンを接続する際に使用するソケットで
す 。ト ッ プ パ ネ ル の ソ ケ ッ ト 8 の 複 製です。
19. DC POWER INPUT(DC 電源入力)– 付属の 12 V DC 電源サプライを接 続する際に使用するソケット
です。
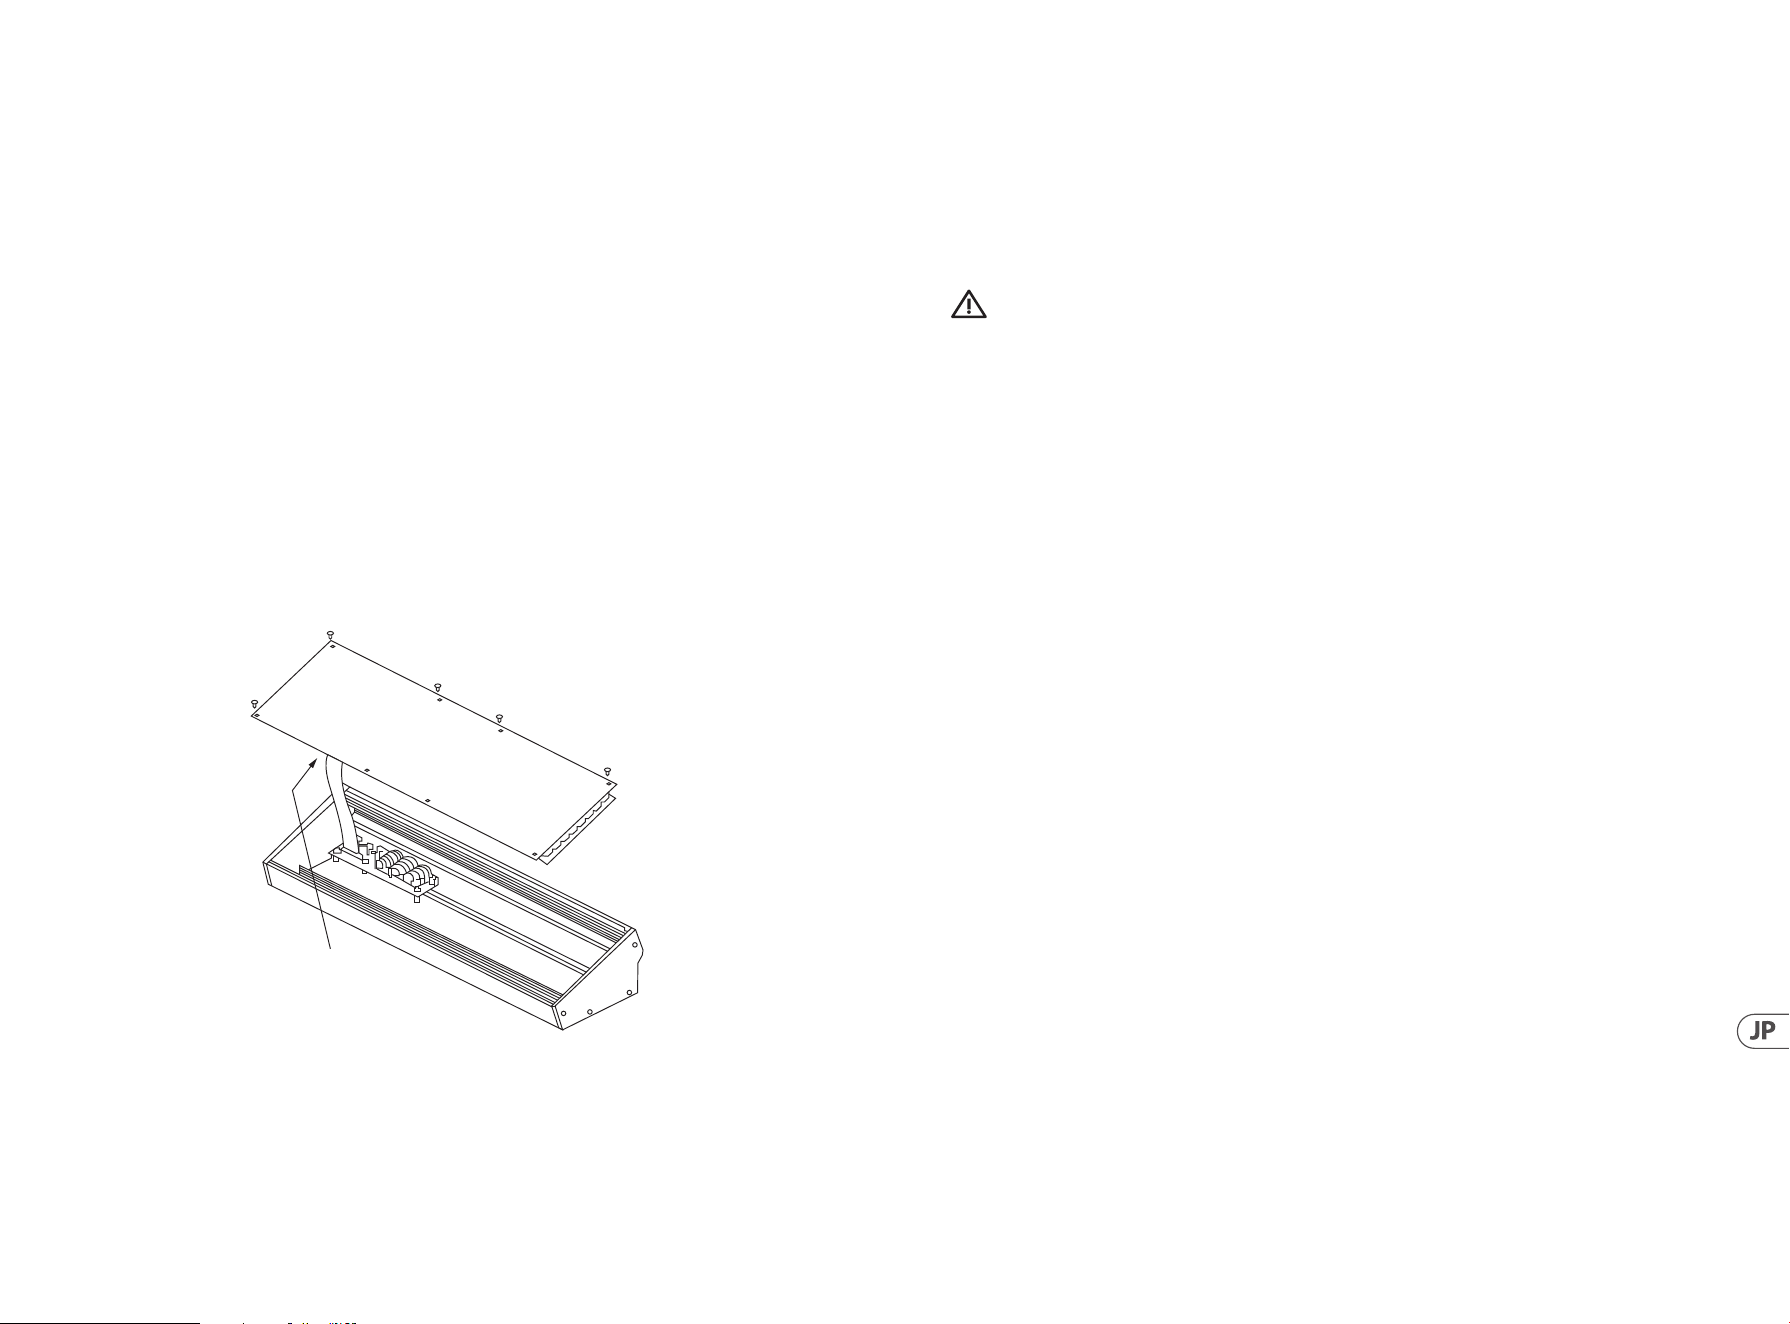
54 55Quick Start GuideSPRING REVERBERATION 646
ユーロラック のインストール
グランピ アンタイプ 646 は、工場のシャーシから取り出し、標準のユーロラックケース(付属していない)に取り付け
ることが で きます。
この手順は、グランピアンタイプ 646 への人身傷害または損傷を防ぐために、経験豊富なサービス技術者によって
のみ行うことをお勧めします。 ユーロラックケースは、 グランピアンタイプ 646 に電力を供給するのに十 分な容
量を備えた適切な電源を必要とします。消費は 12 V DC で 1 アンペア です。
10 ピンから 16 ピ ン の ア ダ プ タ リ ボ ン ケ ー ブ ル は 、グ ラ ン ピ ア ン タ イ プ 646 に付 属してい ます。
進む前に、Eurorack ケースが ±12 V DC と接地を正しいピンに供給し、ケーブルが正しい向きであることを確認して
ください。
プロシージャ
すべての手順を正しい順序で実行してください。
1. グランピ アンタイプ 646 への電 源 および そ の 他 の 接 続 をすべ て外します。
2. 図に示すように、上部パネルの 8 本のネジを元に戻します。 他のねじを元に戻す必要はありま
せん。
3. 慎重にトップパネルアセンブリを持ち上げ、PCB が上向きになるようにひっくり返します。メイン PCB の下側から
リボンケーブルを引っ張らないように注意してください。
4. 24 ピ ンリボ ンケーブル を グランピ アンタイプ 646 のメイン PCB から外し、シャーシからアセンブリを取り外し
ます。
5. シャーシアセンブリと電源を安全で乾燥した場所に保管します。
6. 付属 のリボ ンケーブルアダ プタの 10 ピン 端子を、グランピアンタイプ 646 のメイン PCB にしっかりと接 続し
ます。
7. Eurorack ケースがメインから分離されていることを確認し、リボンケーブルの 16 ピンエンドをケースのスペアコ
ンセントに接 続します。
8. 本 の パ ネ ル ネ ジ を 使 用 し て 、グ ラ ン ピ ア ン タ イ プ 646 を ケースに 固定します。
9. モジュールを使用する前に、完全な安全性テストを実行します。
Disconnect from
Main PCB
SPRING REVERBERATION 646 はじめに
ステップ 3: はじめに
概要
この「はじめに」ガイドは、グランピアンタイプ 646 を 設 定 し 、そ の 機 能 を 簡 単 に 紹 介 す る の に 役 立 ち ま す 。
接続
グランピ アンタイプ 646 をシステムに接続するには、このドキュメントの前の接続ガイドを参照してくだ
さい。
ハードウェアの セットアップ
システム内のすべての接続を確 立します。接 続を行う場 合は、グランピアンタイプ 646 電源をオフにし
てください 。
サウンドシステムの電源がオフになっていることを確認します。
パワーアンプをオンにする前にグランピアンタイプ 646 をオンにし、最 後に電 源を 切ります。これにより、スピーカ
ーの「ポップまたはサウンド」のオン/オフを防ぐことができます。
ウォームアップ時間
グランピ アンタイプ 646 が ウォ ーム アップ するま で に 15 分以上の時間を残してから、レコーディングやライブパフ
ォーマンスを行うことをお 勧めします。(寒さから持ち込まれた場 合は長く。これにより、高精 度アナログ 回路が 通
常の動作温度に達し、性能を調整することができます。
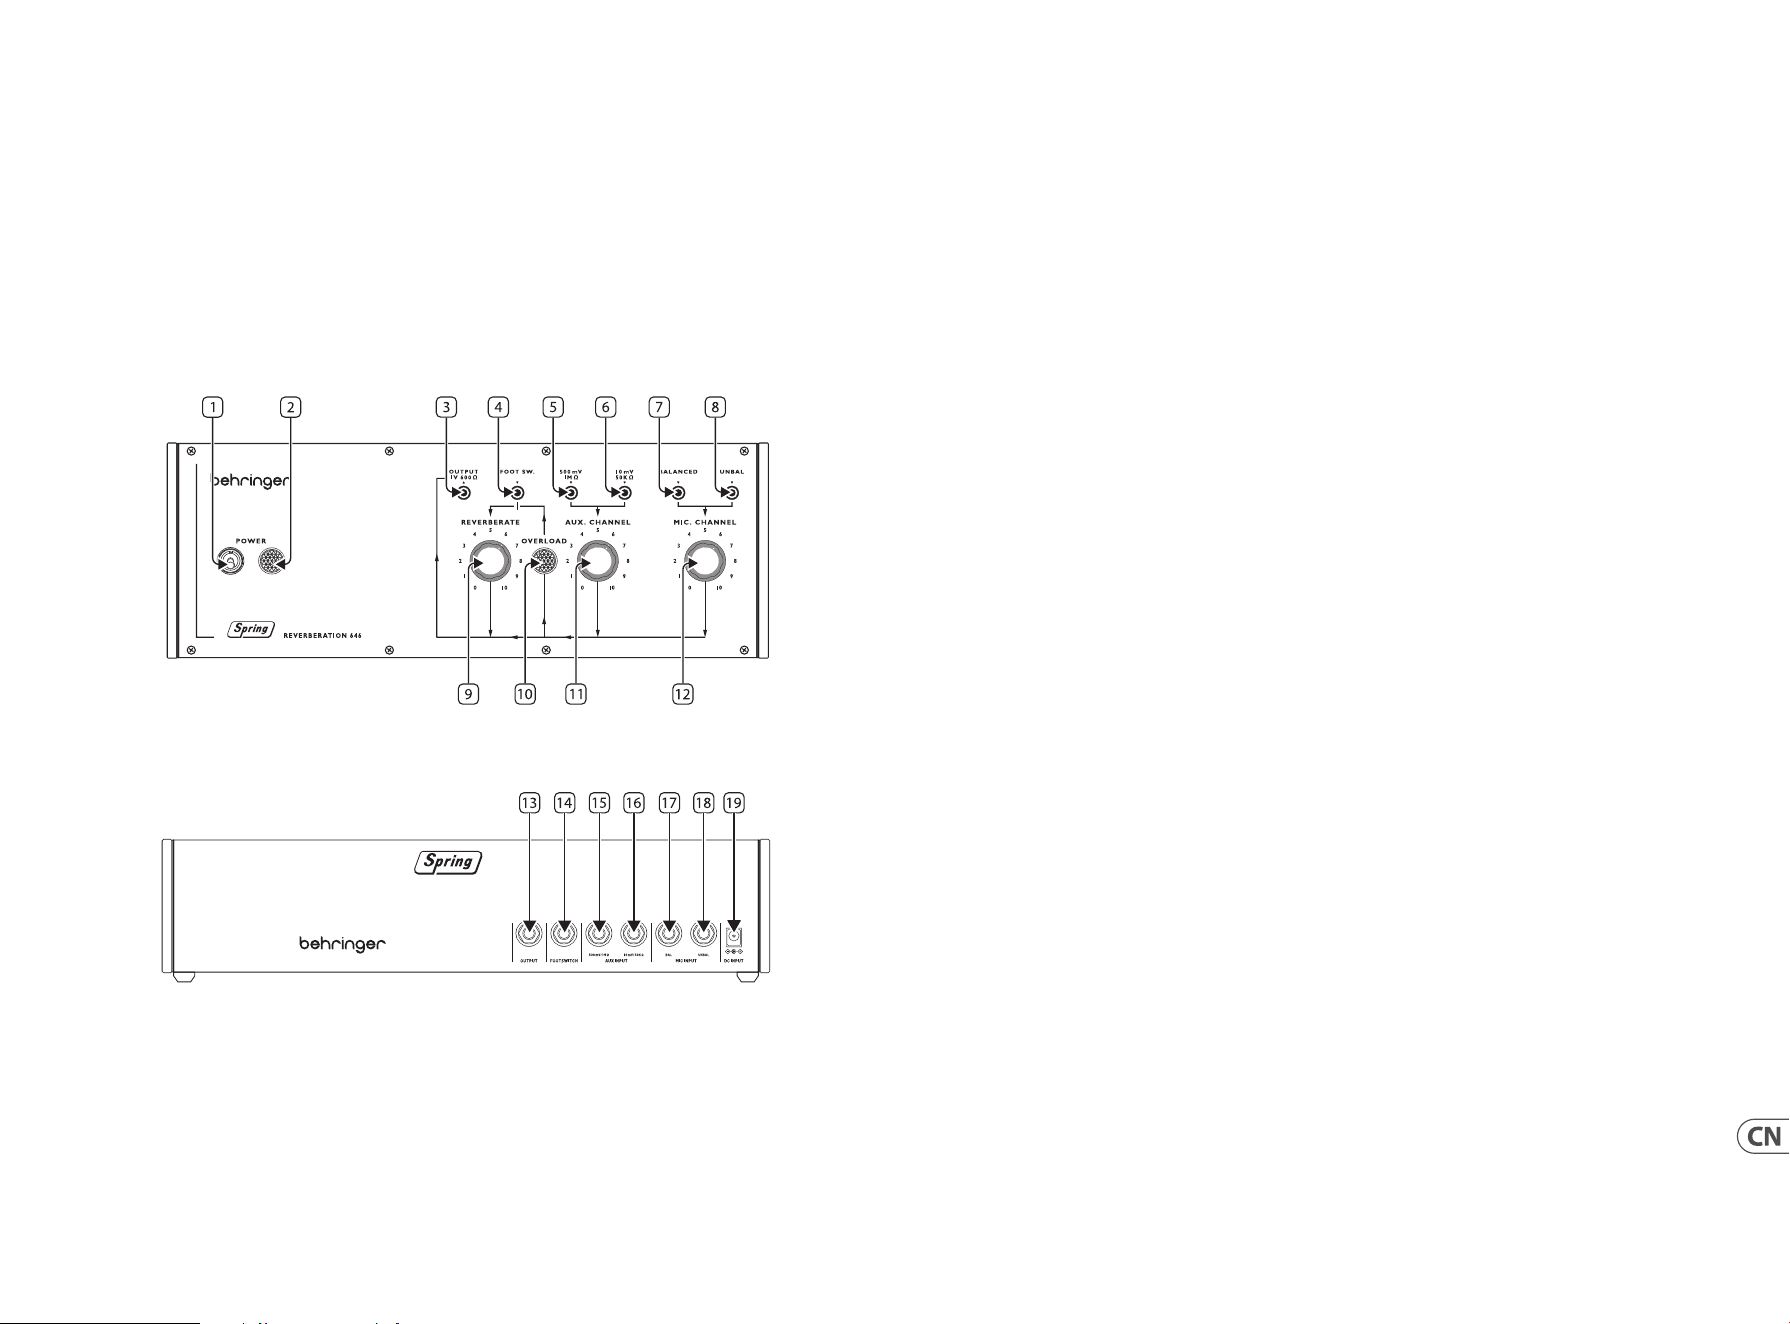
56 57Quick Start GuideSPRING REVERBERATION 646
SPRING REVERBERATION 646 控制
第二步: 控制
弹簧线
我们建议将 Spring 646 型安装在不会受到撞击或振动的地方, 以避免弹簧线发出不必要的噪音。
顶面板
1. 电源开关 (POWER SWITCH)
2. 电源指示灯 (POWER INDICATOR)
3. 输出插口 (OUTPUT SOCKET) - 使用此 3.5 mm 单声道插座将 646 型连接到放大器、
混音台或音频界面。
4. 踏板开关输入 (FOOTSWITCH INPUT) - 使用此插座连接合适的踏板开关来旁路混响效果。
5. 高电平线路输入 (HIGH LEVEL LINE INPUT) - 使用此插座将键盘或混音台等高电平音频源连接到
646 型。
6. 低电平线路输入 (LOW LEVEL LINE INPUT) - 使用此插座将低电平音频源, 如吉他连接到 646 型。
7. 平衡麦克风输入 (BALANCED MICROPHONE INPUT) - 使用此插座将平衡麦克风连接到 646 型。
8. 非平衡麦克风输入 (UNBALANCED MICROPHONE INPUT) - 使用此插座将非平衡的麦克风连接到
646 型。
9. 混响 (REVERBERATE) - 使用此控制设置混响输出水平。
10. 超载指示灯 (OVERLOAD INDICATOR) - 当任一输入上的信号超载时, 此指示灯会亮起。
11. 辅助通道 (AUX CHANNEL) - 使用此控制为连接到辅助通道的线路源设置输入电平。
12. 麦克风通道 (MIC CHANNEL) - 使用此控制设置连接到麦克风通道的麦克风的输入电平。
后面板
13. 输出插口 (OUTPUT SOCKET) - 使用此 6.35 mm 单声道插座将 646 型连接到放大器、混音台或音频
界面。 与顶面板上的插口 3 重复。
14. 踏板开关输入 (FOOTSWITCH INPUT) - 使用此插座连接合适的踏板开关来旁路混响效果。
与顶面板上的插口 4 重复。
15. 高电平线路输入 (HIGH LEVEL LINE INPUT) - 使用此插座将键盘或混音台等高电平音频源连接到
646 型。 与顶面板上的插口 5 重复。
16. 低电平线路输入 (LOW LEVEL LINE INPUT) - 使用此插座将低电平音频源, 如吉他连接到 646 型。
与顶面板上的插口 6 重复。
17. 平衡麦克风输入 (BALANCED MICROPHONE INPUT) - 使用此插座将平衡麦克风连接到 646 型。
与顶面板上的插口 7 重复。
18. 非平衡麦克风输入 (UNBALANCED MICROPHONE INPUT) - 使用此插座将非平衡的麦克风连
接到 646 型。 与顶面板上的插口 8 重复。
19. 直流电源输入 (DC POWER INPUT) - 使用此插座连接随附的 12 伏直流电源。
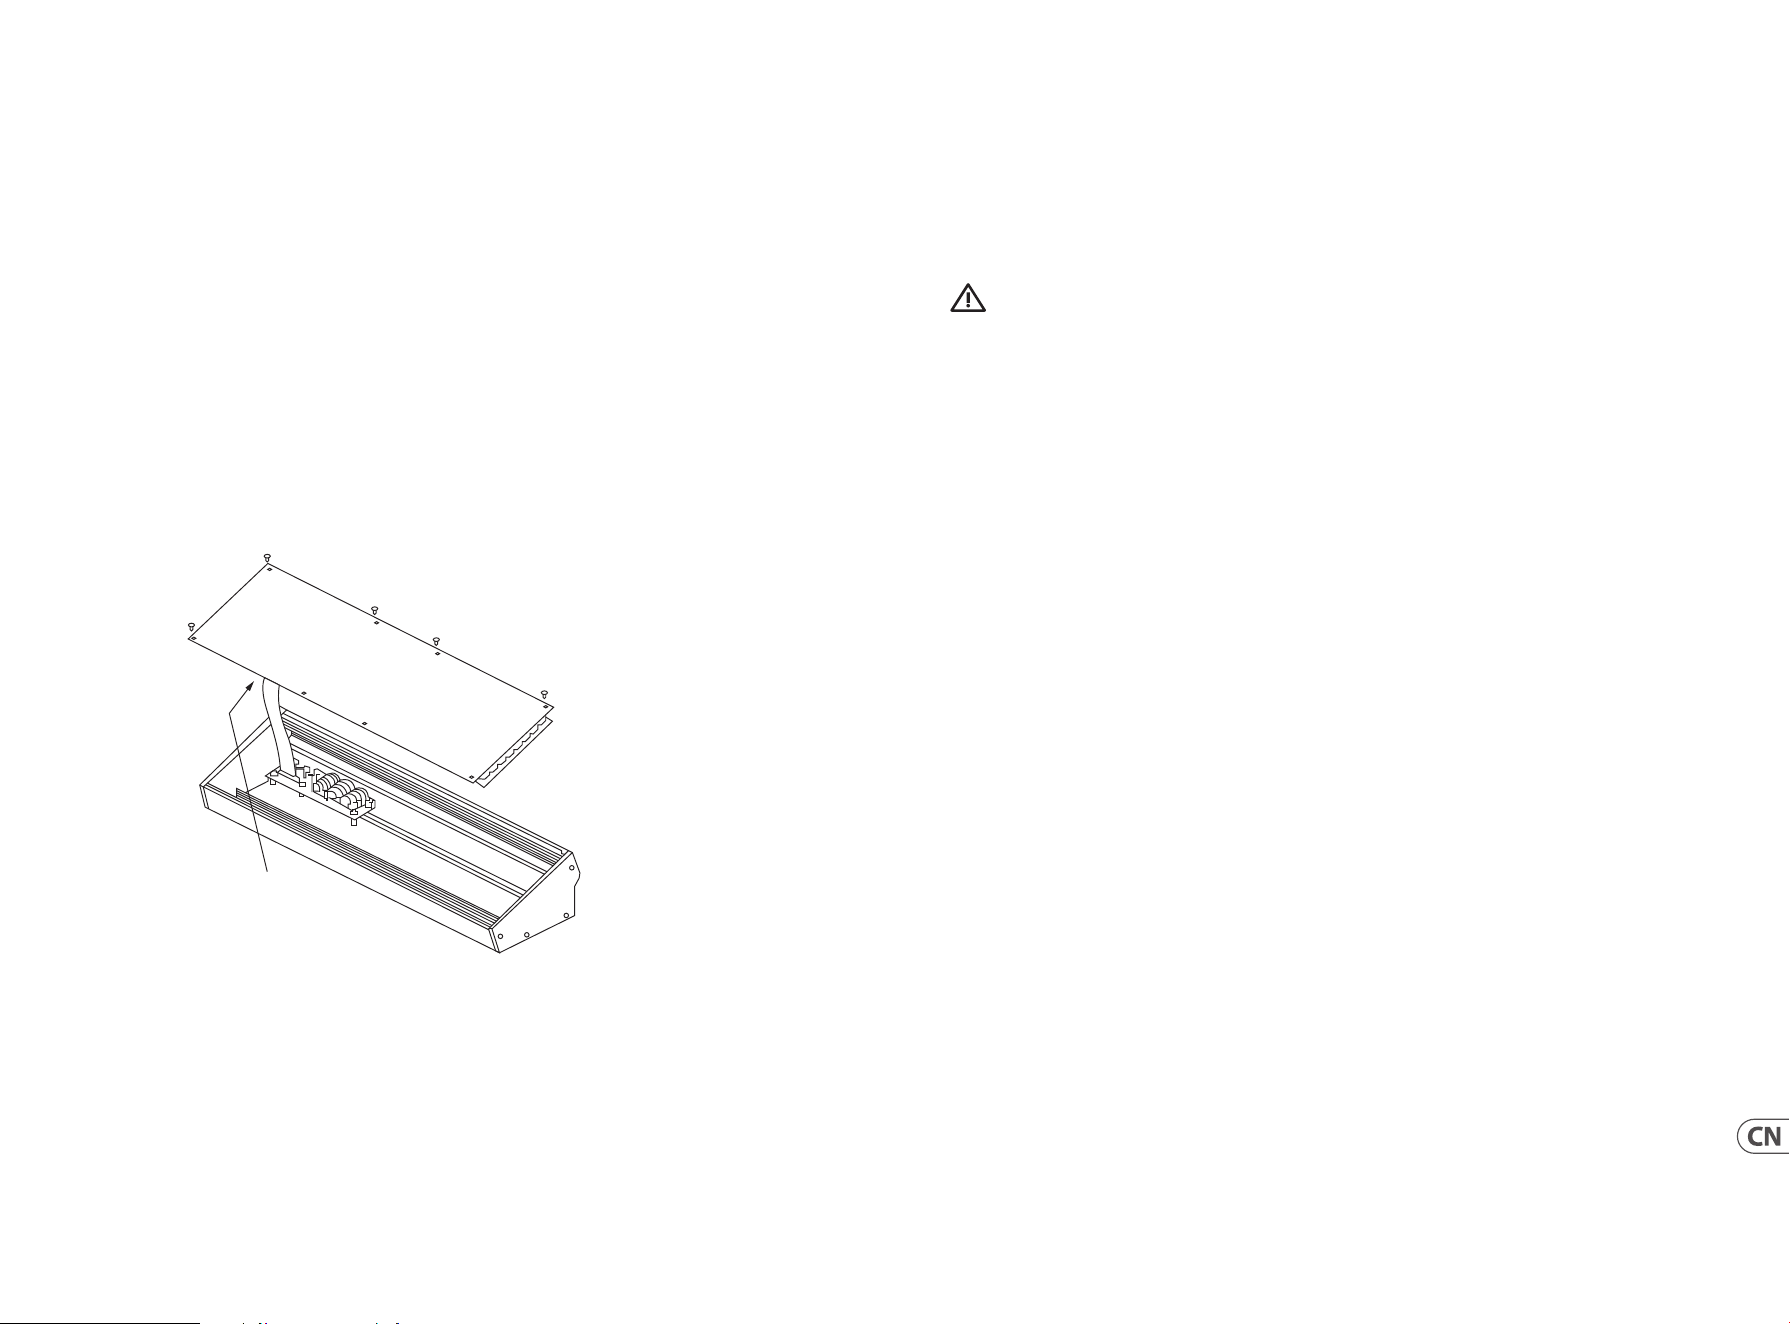
58 59Quick Start GuideSPRING REVERBERATION 646
SPRING REVERBERATION 646 使用
第三步: 使用
概述
此 “开始” 指南将帮助您设置格兰皮安类型 646 并简要介绍其功能。
连接
要将格兰皮安类型 646 连接到您的系统, 请在本文档的前面咨询连接指南。
硬件设置
使系统中的所有连接。 在连接时保持格兰皮安类型 646 电源关闭。
确保您的音响系统被关闭。
打开格兰皮安类型 646, 然后打开任何电源放大器, 并将其关闭最后。 这将有助于防止扬声器中的任何打开或关闭
“弹出或砰砰声”。
加热时间
我们建议留下 15 分钟或更长时间, 让格兰皮安类型 646 在录制或现场表演前热身。 (如果它已经从寒冷中带进来的
时间更长)。 这将使精密模拟电路的时间达到其正常的工作温度和调整性能。
欧洲拉克 安装
格兰皮安类型 646 可以从工厂底盘中取出, 并安装到标准 Eurorack 外壳 (未提供) 中。
我们建议, 此程序仅由经验丰富的服务技术人员执行, 以防止对格兰皮安类型 646 造成人身伤害
或损坏。 Eurorack 案例需要有一个合适的电源, 有足够的容量为 格兰皮安 646 型供电。 消费是1放大一在 12 V 直流。
格兰皮安类型 646 提供 10 针至 16 针适配器带状电缆。
请确保 Eurorack 案例将向正确的引脚提供 ±12 V DC 和接地, 并且电缆在继续前处于正确的方向。
程序
1. 请按照正确的顺序遵循所有步骤。
2. 断开电源和所有其他连接到格兰皮安类型 646。
3. 撤消顶部面板上的八个螺钉 (如图所示)。 没有必要撤消任何其他螺丝钉。
4. 小心地抬起顶部面板 组件, 并 将其翻过来, 使多氯联苯朝上。 小心 不要将带状电缆从主多氯联苯的下侧拉出。
5. 将底盘装配和电源存放在安全干燥的地方。
6. 安全地将所提供的带状电缆适配器的 10 个针 端连接到格兰皮安类型 646 的主要多氯联苯。
7. 确保将 Eurorack 外壳与电源分离, 将带状电缆的 16 针端连接到案例中的备用插座。
8. 使用八个面板螺丝将格兰皮安类型 646 固定 到箱子上 。
9. 使用模块之前执行完整的安全测试。
Disconnect from
Main PCB
Specications
Inputs
Balanced Microphone x 2 25 Ω 20 µv sensitivity
Unbalanced Microphone x 2
25 Ω 20 µv sensitivity
High Level Auxilliary x 2 1 MΩ 500 mv sensitivity
Low Level Auxilliary x 2 50 kΩ 10 mv sensitivity
Outputs
Unbalanced line level x 2
600 Ω -8 dBm Program Level
+2 dBm Maximum Level
Controls
Switches Power (top panel)
Knobs
Reverberate
Aux Channel
Mic Channel
Sockets Mute Footswitch x 2
Specications
Frequency Response ±2 dB 35 Hz - 20 kHz
Reverberation Delay 29 - 37 ms nominal
Reverberation Time 2 seconds at 300 Hz
Reverberation Response ±3 dB 100 Hz - 6 kHz
Size
37.37 x 13.56 x 8.64 cm
(14.71 x 5.34 x 3.40")
72 hp when in Eurorack
Weight 1.58 kg (3.48 lbs)
Consumption 1000 mA 12 V DC
60 61Quick Start GuideSPRING REVERBERATION 646
输入
平衡麦克风 x 2 25 Ω 20 μv 灵敏度
非平衡麦克风 x 2 25 Ω 20 μv 灵敏度
高电平辅助 x 2
1 MΩ 500 mv 灵敏度
低电平辅助 x 2
50 kΩ 10 mv 灵敏度
输出
非平衡线路电平 x 2
600 Ω - 8 dBm 曲目电平
+2 dBm 最大电平
控制
开关 电源
旋钮
混响
辅助通道
麦克风通道
插座
静音踏板开关 x 2
技术指标
频率响应
±2 db 35 Hz - 20 KHz
混响延迟
标称 29 - 37 ms
混响时间
300 Hz 时为 2 秒
混响响应
±3 dB 100 Hz
- 6 KHz
尺寸
37.37 x 13.56 x 8.64 cm
(14.71 x 5.34 x 3.40 ")
装入 Eurorack 时 72 hp
重量
1.58 kg (3.48 lbs)
消费
1000 mA 12 V DC
技术参数
Other important information
1. Register online.
Pleaseregister your new Music Tribe
equipment right after you purchase it by
visiting musictribe.com. Registeringyour
purchase using our simple online
form helps us to process your repair
claims more quickly and eciently.
Also, read the terms and conditions of
our warranty, ifapplicable.
2. Malfunction. Should your
Music Tribe Authorized Reseller not be
located in your vicinity, you may contact
the Music Tribe Authorized Fulller for
your country listed under “Support” at
musictribe.com. Shouldyour country
not be listed, pleasecheck if your
problem can be dealt with by our
“OnlineSupport” which may also be
found under “Support” at musictribe.
com. Alternatively, please submit an
online warranty claim at musictribe.com
BEFORE returning theproduct.
3. Power Connections.
Beforeplugging the unit into a power
socket, please make sure you are using
the correct mains voltage for your
particular model. Faulty fuses must be
replaced with fuses of the same type and
rating withoutexception.
1. Registro online.
Lerecomendamos que registre su nuevo
aparato Music Tribe justo después de
su compra accediendo a la página web
musictribe.com. Elregistro de su compra
a través de nuestro sencillo sistema
online nos ayudará a resolver cualquier
incidencia que se presente a la mayor
brevedad posible. Además,aproveche
para leer los términos y condiciones
de nuestra garantía, siesaplicable en
sucaso.
2. Averías. En el caso de que
no exista un distribuidor Music Tribe
en las inmediaciones, puede ponerse
en contacto con el distribuidor Music
Tribe de su país, queencontrará dentro
del apartado “Support” de nuestra
página web musictribe.com. En caso
de que su país no aparezca en ese
listado, acceda a la sección “Online
Support” (quetambiénencontrará
dentro del apartado “Support” de
nuestra páginaweb) y compruebe si su
problema aparece descrito y solucionado
allí. Deforma alternativa, envíenos a
través de la página web una solicitud
online de soporte en periodo de garantía
ANTES de devolvernoselaparato.
3. Conexiones de
corriente. Antes de enchufar este
aparato a una salida de corriente,
asegúrese de que dicha salida sea
del voltaje adecuado para su modelo
concreto. En caso de que deba sustituir
un fusible quemado, deberáhacerlo
por otro de idénticas especicaciones,
sinexcepción.
1. Enregistrez-vous
enligne. Prenezle temps
d’enregistrer votre produit Music Tribe
aussi vite que possible sur le site Internet
musictribe.com. Lefait d’enregistrer le
produit en ligne nous permet de gérer
les réparations plus rapidement et plus
ecacement. Prenezégalement le
temps de lire les termes et conditions de
notregarantie.
2. Dysfonctionnement. Si
vous n’avez pas de revendeur Music
Tribe près de chez vous, contactez le
distributeur Music Tribe de votre pays:
consultez la liste des distributeurs de
votre pays dans la page “Support” de
notre site Internet musictribe.com.
Si votre pays n’est pas dans la liste,
essayez de résoudre votre problème
avec notre “aideen ligne” que vous
trouverez également dans la section
“Support” du site musictribe.com.
Vouspouvez également nous faire
parvenir directement votre demande de
réparation sous garantie par Internet sur
le site musictribe.com AVANT de nous
renvoyer leproduit.
3. Raccordement au
secteur. Avant de relier cet
équipement au secteur, assurez-vous
que la tension secteur de votre région
soit compatible avec l’appareil. Veillez à
remplacer les fusibles uniquement par
des modèles exactement de même taille
et de même valeur électrique — sans
aucuneexception.
Important information Aspectos importantes
Informations importantes
1. Online registrieren.
Bitteregistrieren Sie Ihr neues
Music Tribe-Gerät direkt nach dem
Kauf auf der Website musictribe.com.
WennSie Ihren Kauf mit unserem
einfachen online Formular registrieren,
könnenwir Ihre Reparaturansprüche
schneller und ezienter bearbeiten.
Lesen Sie bitte auch unsere
Garantiebedingungen, fallszutreend.
2. Funktionsfehler. Sollte sich
kein Music Tribe Händler in Ihrer Nähe
benden, können Sie den Music Tribe
Vertrieb Ihres Landes kontaktieren, der
auf musictribe.com unter „Support“
aufgeführt ist. Sollte Ihr Land nicht
aufgelistet sein, prüfen Sie bitte, ob Ihr
Problem von unserem „Online Support“
gelöst werden kann, den Sie ebenfalls
auf musictribe.com unter „Support“
nden. Alternativ reichen Sie bitte
Ihren Garantieanspruch online auf
musictribe.com ein, BEVOR Sie das
Produktzurücksenden.
3. Stromanschluss. Bevor
Sie das Gerät an eine Netzsteckdose
anschließen, prüfen Sie bitte, obSie die
korrekte Netzspannung für Ihr spezielles
Modell verwenden. Fehlerhafte
Sicherungen müssen ausnahmslos durch
Sicherungen des gleichen Typs und
Nennwerts ersetztwerden.
1. Registre-se online.
Porfavor, registreseu novo
equipamento Music Tribe logo após
a compra visitando o site musictribe.
com Registrar sua compra usando nosso
simples formulário online nos ajuda
a processar seus pedidos de reparos
com maior rapidez e eciência. Além
disso, leia nossos termos e condições de
garantia, caso sejanecessário.
2. Funcionamento
Defeituoso. Casoseufornecedor
Music Tribe não esteja localizado nas
proximidades, vocêpode contatar
um distribuidor Music Tribe para o
seu país listado abaixo de “Suporte”
emmusictribe.com. Se seu país não
estiver na lista, favor checar se seu
problema pode ser resolvido com o
nosso “SuporteOnline” que também
pode ser achado abaixo de “Suporte”em
musictribe.com. Alternativamente,
favorenviar uma solicitação de garantia
online em musictribe.com ANTES da
devolução doproduto.
3. Ligações. Antes de ligar a
unidade à tomada, assegure-se de
que está a utilizar a voltagem correcta
para o modelo em questão. Osfusíveis
com defeito terão de ser substituídos,
sem qualquer excepção, porfusíveis do
mesmo tipo e correntenominal.
1. Registratevi online.
Vi invitiamo a registrare il nuovo
apparecchio Music Tribe subito
dopo averlo acquistato visitando
musictribe.com. La registrazione
dell'acquisto tramite il nostro semplice
modulo online ci consente di elaborare
le richieste di riparazione in modo più
rapido ed eciente. Leggete anche
i termini e le condizioni della nostra
garanzia, qualora applicabile.
2. Malfunzionamento.
Nel caso in cui il rivenditore autorizzato
Music Tribe non si trovi nelle vostre
vicinanze, potete contattare il Music
Tribe Authorized Fulller per il vostro
paese, elencato in “Support” @
musictribe.com. Se la vostra nazione non
è elencata, controllate se il problema
può essere risolto tramite il nostro
“Online Support”che può anche essere
trovato sotto “Support” @ musictribe.
com. In alternativa, inviate una richiesta
di garanzia online su musictribe.com
PRIMA di restituire il prodotto.
3. Collegamento
all'alimentazione. Prima di
collegare l'unità a una presa di corrente,
assicuratevi di utilizzare la tensione di
rete corretta per il modello specico. I
fusibili guasti devono essere sostituiti,
senza eccezioni, con fusibili dello stesso
tipo e valore nominale.
Weitere wichtige
Informationen
Outras Informações
Importantes
Informazioni importanti
62 63Quick Start GuideSPRING REVERBERATION 646
Other important information
1. Registreer online.
Registreer uw nieuwe Music Tribe-
apparatuur direct nadat u deze hebt
gekocht door naar musictribe.com te
gaan. Door uw aankoop te registreren
via ons eenvoudige online formulier,
kunnen wij uw reparatieclaims sneller
en eciënter verwerken. Lees ook de
voorwaarden van onze garantie, indien
van toepassing.
2. Storing. Mocht uw
door Music Tribe geautoriseerde
wederverkoper niet bij u in de buurt zijn
gevestigd, dan kunt u contact opnemen
met de door Music Tribe Authorized
Fulller voor uw land vermeld onder
“Support” op musictribe.com. Als uw
land niet in de lijst staat, controleer dan
of uw probleem kan worden opgelost
door onze "Online Support", die u
ook kunt vinden onder "Support" op
musictribe.com. U kunt ook een online
garantieclaim indienen op musictribe.
com VOORDAT u het product retourneert.
3. Stroomaansluitingen.
Voordat u het apparaat op een
stopcontact aansluit, moet u ervoor
zorgen dat u de juiste netspanning voor
uw specieke model gebruikt. Defecte
zekeringen moeten zonder uitzondering
worden vervangen door zekeringen van
hetzelfde type en dezelfde waarde.
1. Registrera online.
Registrera din nya Music Tribe-
utrustning direkt efter att du köpt den
genom att besöka musictribe.com.
Att registrera ditt köp med vårt enkla
onlineformulär hjälper oss att behandla
dina reparationsanspråk snabbare och
mer eektivt. Läs också villkoren i vår
garanti, om tillämpligt.
2. Fel. Om din Music Tribe-
auktoriserade återförsäljare inte nns i
din närhet kan du kontakta Music Tribe
Authorized Fulller för ditt land listat
under “Support” på musictribe.com.
Om ditt land inte är listat, kontrollera
om ditt problem kan hanteras av
vår “Onlinesupport” som också nns
under “Support” på musictribe.com.
Alternativt kan du skicka in ett online-
garantianspråk på musictribe.com
INNAN du returnerar produkten.
3. Strömanslutningar. Innan
du ansluter enheten till ett eluttag, se till
att du använder rätt nätspänning för just
din modell. Felaktiga säkringar måste
bytas ut mot säkringar av samma typ
och märkning utan undantag.
1. Zarejestrować online.
Zarejestruj swój nowy sprzęt Music Tribe
zaraz po zakupie na stronie musictribe.
com. Zarejestrowanie zakupu za pomocą
naszego prostego formularza online
pomaga nam szybciej i efektywniej
rozpatrywać roszczenia dotyczące
naprawy. Przeczytaj również warunki
naszej gwarancji, jeśli dotyczy.
2. Awaria. Jeśli Twój
autoryzowany sprzedawca Music Tribe
nie znajduje się w pobliżu, możesz
skontaktować się z autoryzowanym
dostawcą Music Tribe dla swojego kraju,
wymienionym w sekcji „Wsparcie” na
stronie musictribe.com. Jeśli Twojego
kraju nie ma na liście, sprawdź, czy Twój
problem może zostać rozwiązany przez
nasze „Wsparcie online”, które można
również znaleźć w sekcji „Wsparcie” na
stronie musictribe.com. Alternatywnie,
prześlij zgłoszenie gwarancyjne online
na musictribe.com PRZED zwrotem
produktu.
3. Połączenia zasilania.
Przed podłączeniem urządzenia do
gniazdka sieciowego upewnij się, że
używasz odpowiedniego napięcia
sieciowego dla danego modelu.
Wadliwe bezpieczniki należy bez
wyjątku wymienić na bezpieczniki tego
samego typu i wartości.
Belangrijke informatie Viktig information Ważna informacja
1. ヒューズの格納部 / 電圧
の選択: ユニットをパワーソケ
ットに接続する前に、各モデ
ルに対応した正しい主電源を
使用していることを確認して
ください。ユ ニットによって
は、230 V と 120 V の 2 つの違
うポジションを切り替えて使
う、ヒューズの格納部を備え
ているものがあります。正し
くない値のヒューズは、絶対
に適切な値のヒューズに交換
されている必要がありま す。
2. 故障: Music Tribe ディーラ
ーがお客様のお近くにないと
きは、musictribe.com の “Support”
内に列記されている、お客
様の国の Music Tribe ディスト
リビューターにコンタクトす
ることができます。お 客様
の国がリストにない場合は、
同じ musictribe.com の “Support”
内にある “OnlineSupport” でお客
様の問題が処理できないか、
チェックしてみてください。
あるいは、商品を返送する前
に、musictribe.com で、オンラ
インの保証請求を要請してく
ださい。
3. 電源接続: 電源ソケットに
電源コードを接続する前に、
本製品に適切な電圧を使用し
ていることをご確認くださ
い。不具合が発生したヒュー
ズは必ず電圧および電流、種
類が同じヒューズに交換する
必要があります。
1. 在线注册。 请购买 Music Tribe
产品后立即在 musictribe.com 网站
注册。 网页上有简单的在线注册
表格。 这有助于我们更快更有效
率地处理您维修等事宜。 请阅读
保修的相关条款及条件。
2. 无法正常工作。 若您的
Music Tribe 产品无法正常工作,
我们会为您尽快修复。 请联
系您购买产品的销售商。 若你
所在地区没有 Music Tribe 销售
商, 请联系 musictribe.com 网站的
“WHERETOBUY” 一栏下的所列出
的子公司或经销商。
3. 电源连接。 将本设备连接电
源前, 请确保使用的电压正确。
保险丝需要更换时, 必须使用相
同型号及定额的保险丝。
その他の重要な情報
其他的重要信息
64 65Quick Start GuideSPRING REVERBERATION 646
FEDERAL COMMUNICATIONS
COMMISSION COMPLIANCE
INFORMATION
Behringer
SPRING REVERBERATION 646
Responsible Party Name: Music Tribe Commercial NV Inc.
Address: 122 E. 42nd St.1,
8th Floor NY, NY 10168,
United States
Email Address: [email protected]
SPRING REVERBERATION 646
This equipment has been tested and found to comply with
the limits for a Class B digital device, pursuant to part
15 of the FCC Rules. These limits are designed to provide
reasonable protection against harmful interference in
a residential installation. This equipment generates,
uses and can radiate radio frequency energy and, if not installed
and used in accordance with the instructions, may cause harmful
interference to radio communications. However, there is no
guarantee that interference will not occur in a particular installation.
If this equipment does cause harmful interference to radio or
television reception, which can be determined by turning the
equipment o and on, the user is encouraged to try to correct the
interference by one or more of the following measures:
• • Reorient or relocate the receiving antenna.
• • Increase the separation between the equipment and receiver.
• • Connect the equipment into an outlet on a circuit dierent
from that to which the receiver is connected.
• • Consult the dealer or an experienced
radio/TV technician for help.
This equipment complies with Part 15 of the FCC rules. Operation
is subject to the following two conditions:
(1) this device may not cause harmful interference, and
(2) this device must accept any interference received, including
interference that may cause undesired operation.
Important information:
Changes or modications to the equipment not expressly
approved by Music Tribe can void the user’s authority to
use the equipment.
Hereby, Music Tribe declares that this product is in compliance with
Directive 2014/35/EU, Directive 2014/30/EU, Directive 2011/65/EU and
Amendment 2015/863/EU, Directive 2012/19/EU, Regulation 519/2012
REACH SVHC and Directive 1907/2006/EC.
Full text of EU DoC is available at https://community.musictribe.com/
EU Representative: Music Tribe Brands DK A/S
Address: Gammel Strand 44, DK-1202 København K, Denmark
UK Representative: Music Tribe Brands UK Ltd.
Address: 8
th
Floor, 20 Farringdon Street London EC4A 4AB,
United Kingdom
Correct disposal of this product: This symbol indicates
that this product must not be disposed of with
household waste, according to the WEEE Directive
(2012/19/EU) and your national law. This product
should be taken to a collection center licensed for the
recycling of waste electrical and electronic
equipment (EEE). The mishandling of this type of
waste could have a possible negative impact on the environment and
human health due to potentially hazardous substances that are
generally associated with EEE. At the same time, your cooperation in
the correct disposal of this product will contribute to the ecient use
of natural resources. For more information about where you can take
your waste equipment for recycling, please contact your local city
oce, or your household waste collection service.
66 67SPRING REVERBERATION 646

We Hear You