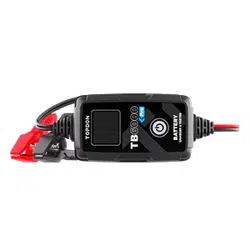

USER MANUALBattery Charger & Battery Tester


CONTENTS
Safety Is Always
the First Priority!
Section 4
How to Conduct a
Battery Test?
Section 2
Product Overview &
Software Downloading
Section 6
Warranty
DE
31
44
34
47
33
45
38
EN
5
18
8
21
7
19
12
FR
49
62
52
65
51
63
56
ES
67
80
70
83
69
81
74
IT KR JP
103 121 141
116 134 154
106 124 144
119 137 157
105 123 143
117 135 155
110 128 148
85
98
88
101
87
99
92
PT
Section 1
What's in the Box?
Section 5
FAQ
Section 3
How to Charge a
Battery?

4
ENGLISH
5
SAFETY IS ALWAYS THE FIRST
PRIORITY!
For your safety, the safety of others, the
product, and the vehicle you are working
on, PLEASE, CAREFULLY READ AND MAKE
SURE YOU FULLY UNDERSTAND ALL THE
SAFETY INSTRUCTIONS AND MESSAGES
ON THIS MANUAL. Given the TB6000Pro
is a combination of battery tester and
battery charger, YOU MUST READ THE
VEHICLE'S SERVICE MANUAL, THE BATTERY
MANUFACTURER’S SPECIFIC PRECAUTIONS
FOR THE BATTERY and follow said
precautions and instructions before and
during any test or service procedure.
READ ALL INSTRUCTIONS BEFORE
USING
ONLY OPERATE THE TEST IN A WELL-
VENTILATED AREA since the vehicle
produces carbon monoxide, a toxic and
poisonous gas, and particulate matter
when the engine is running.
ALWAYS BE AWARE OF MOVING PARTS
(such as coolant fans, pulleys, belts) since
they spin or turn at high speeds when the
engine is running.
ALWAYS WEAR APPROVED SAFETY EYE
PROTECTION to prevent damage from
sharp objects and caustic liquids.
DO NOT TOUCH HOT ENGINE PARTS to
prevent severe burns. The engine parts
become very hot when the engine is
running.

6
ALWAYS SHIFT THE GEAR TO P (FOR
AUTOMATIC TRANSMISSION) OR TO
NEUTRAL (FOR MANUAL TRANSMISSION)
AND MAKE SURE THE PARKING BRAKE IS
ENGAGED.
ALWAYS USE A DIGITAL MULTIMETER WITH
AT LEAST 10 MEGOHMS OF IMPEDANCE
when conducting electrical tests on
vehicles to prevent causing damage to on-
board electronic components.
NO SMOKING ANYWHERE NEAR THE
VEHICLE when testing. The fuel and battery
vapors are highly ammable.
DO NOT CUT THE PRODUCTS CORDS OR
SUBMERGE THEM IN WATER. The product
is an electrical device that can cause shock
and severe burns.
WARNING: Battery acid is extremely
corrosive. If acid gets into your eyes, FLUSH
THEM THOROUGHLY WITH COLD RUNNING
WATER FOR AT LEAST 20 MINUTES AND
SEEK MEDICAL ATTENTION IMMEDIATELY.
If battery acid gets on your skin or clothing,
WASH IT IMMEDIATELY WITH A SOLUTION
OF WATER AND BAKING SODA.

7
SECTION 1
WHAT'S IN THE BOX?
TB6000Pro
User Manual

8
SECTION 2
PRODUCT OVERVIEW &
SOFTWARE DOWNLOADING
1. 6 Battery Charging Modes: Under the standalone
mode, TB6000Pro provides with you 6 different modes
12V/6A Norm, 12V/1A Repair, 12V/6A Supply, 12V/3A Small,
12V/6A Lithium-ion battery, 6V/3A Norm. (See gure 2.1.1)
Once the charger is connected to the phone via BT, you
can customize the charging process and parameters.
(For details, please refer to Section 3)
Product Overview

9
Figure 2.1.1
7
6
5
1
2
3
4

10
2. Charging Status Indicator: Once the adapter is
plugged into the socket and you've conrmed the
charging mode, the indicator will light up and remain
still, otherwise it remains off.
3. Bluetooth Connection Status Indicator: If the
TB6000Pro is under standalone mode and not paired
to any phones, the Bluetooth indicator will keep
ashing. Once it is paired, the indicator remains still.
4. Charging Steps Indicator: It shows you exactly which
step you are in among the 9 charging steps.
5. Real-time Charging Voltage and Current: It presents
you with the real-time charging current and voltage.
The parameter refreshes every 2 seconds
.
When the following errors occur, it will display the
corresponding error code:
Er1: Short circuit or reverse polarity
Er2: Overtemperature
Er3: Charging timeout
Er4: Battery is damaged, please switch to 12V Supply
mode to attempt to recover the battery.
Er5: Wrong mode, please select 12V charging mode.
6. Battery Charging Progress
7. Mode Button: Press the Mode button to toggle among
charging modes. After a charging mode is selected,
charging will start automatically within 3 seconds.
Note: The charger will resume charging using the
previous mode when it is powered on again.
·
Please unplug the adapter before conducting the battery tests
and make sure the clamps are properly connected to the battery
terminals.
How to Download and Connect the TB6000Pro to
Your Phone?

11
• Please turn on the Bluetooth before setting up the
connection.
• YOU CAN ONLY SET UP THE BLUETOOTH IN THE
TB6000Pro APP
1. Download and install the app
Option 1 Scan QR code
For both iOS and Android, you can open the camera on
your phone and scan the QR code below to download
the app.
Note: Please ensure that you have enabled the "Scan
QR Codes" feature for your phone's camera in Settings.
Option 2 Go to App Store / Google Play
For iOS: Search for "BatteryLab" in App Store to
download the app.
For Android: Search for "TB6000Pro" in Google Play to
download the app.

12
2. To connect your phone with TB6000Pro via Bluetooth,
you need to turn on the Bluetooth in Settings.
3. Or you can turn on the Bluetooth in Control Center or
Notication Panel.
4. Open the TB6000Pro APP and tap the Bluetooth icon
to establish connection with the unit.
To understand the 6 charging modes please refer to the
chart below (Figure 3.1.1)
SECTION 3
HOW TO CHARGE A
BATTERY?

13
Charge 12V Wet, Gel, MF, Cal,
EFB, and AGM batteries through
9-step smart charging.
Charge 6V Wet, Gel, MF, Cal,
EFB, and AGM batteries through
9-step smart charging.
Charge 12V li-ion batteries,
including lithium iron phosphate
(LiFePO4).
Provide an output supply of a
constant voltage of 13.5V and a
maximum current of 6A (81W).
If the battery is damaged or Er4
error is reported, you can select
this mode to recover battery
charging.
Repair old or sulfated batteries
through small current and pulse
current.
Charge 12V Wet, Gel, MF, Cal,
EFB, and AGM batteries with
a small capacity of up to 50Ah
through 9-step smart charging.
Mode
12V/6A
Norm
6V/3A
Norm
12V/3A
Small
12V/6A
Lithium-
ion Battery
12V/1A
Repair
12V/6A
Supply
14.2V
7.1V
14.2V
14.6V
14.2V
13.5V
Max.
Voltage
Denition
Figure 3.1.1
To understand the 9-Step Smart Charging please refer
to gure 3.1.2

14
Figure 3.1.2

15
12V/6A
NORM
>2V OK
>2V OK
2-10.2V
1.5-3A
10.2-11.8V
1.5A
11.8V
1.5-4.5A
11.8-13.5V
6A
13.5-14.0V
4.5-3A
14.0V
3-1.5A
14.0-14.2V
0.8A
14.2-12.8V
0A
14.2-12.8V..
0A-0.8A...
14.2-12.8V..
0A-0.4A...
7.1-6.4V..
0A-0.4A...
-
-
12V/3A
SMALL
>2V OK
2-10.2V
0.8-1.5A
10.2-11.8V
0.8A
11.8V
0.8-2.3A
11.8-13.5V
3A
13.5-14.0V
2.3-1.5A
14.0V
1.5-0.8A
14.0-14.2V
0.4A
14.2-12.8V
0A
6V/3A
NORM
>2V OK
2-5.1V
0.8-1.5A
-
5.1-5.9V
0.8A
2-10.6V
1.5A
5.9V
0.8-2.3A
10.6V
1.5-4.5A
5.9-6.8V
3A
10.6-13.9V
6A
6.8-7.0V
2.3-1.5A
13.9-14.6V
4.5-3A
7.0V
1.5-0.8A
14.6V
0.75A-0A
7.0-7.1V
0.4A
7.1-6.4V
0A
12V/1A
REPAIR
>2V OK
2-14.2V
1A
14.2V
0-1A
2h Max
-
12V/6A
LITHIUM
12V/6A
SUPPLY
13.5V
6A MAX

16
Standalone Charging Mode
1. When TB6000Pro is connected to the power supply,
the charging modes will keep ashing. Press the Mode
Button to toggle between the modes.
2. Once you've selected the mode, charging will start
automatically within 3 seconds.
1. Check the battery’s initial state, voltage, state of
charging and state of health to ensure the stability of
the battery before charging.
2. Charge the battery with pulse current to breakdown
the sulfates that have built up over time in the aging
battery to extend life.
3. Charge the battery with low current to prepare for the
high-current charging.
4. Charge the battery with three stages of constant
current that gradually rise to optimize charging.
5. Charge the battery with preset current until it reaches
80%.
6. Trickle charge the battery until it reaches 90%.
7. Remain the voltage at preset value until the charging
current drops to 12.5% of the maximum value and
keep charging the power to 95%.
8. Charge at 12.5% of the preset maximum current until
the battery is charged to 100%.
9. Check if the voltage is lower than preset value. If it is,
turn back to step 8.

17
Bluetooth Charging Mode
1. Once you've conrmed the preparation steps are done,
plug the adapter into a wall outlet and attach the
clamps to the battery terminals.
2. Open the TB6000Pro, tap Smart Charging/Quick
Charging.
Smart Charging:
Under this mode, battery test is automatically
performed before and after charging. Simply enter
basic battery information and select the desired
charging mode, then tap Start charging. A charging
report will be automatically generated during the
process.
Note:
1. Smart Charging is only applicable to 12V lead-acid
batteries (Li-ion or 6V batteries are not supported).
2. To ensure accuracy of test results, only use the
battery clamps to connect to the battery terminals
under Smart Charging mode.
Quick Charging:
Under this mode, 6 charging modes are available,
as well as Manual Mode. You can choose the preset
charging mode to charge directly, or customize the
charging mode according to the condition of the
battery.
3. Follow the on-screen instructions on the app to
complete the battery charging process.

18
SECTION 4
HOW TO CONDUCT A
BATTERY TEST?
• The battery testing function is only applicable to 12V
lead-acid batteries.
• The included ring terminal harness is not compatible
with battery testing. Only use the battery clamps to
connect to the battery terminals when conducting a
battery test.
1. Tap Test Management, then tap Battery Test.
2. Follow the on-screen instructions on the app to
conduct the battery test.

19
SECTION 5
FAQ
Q: How to select the charging mode?
A: Please select the charging mode according to the
battery type and capacity. We recommend that the
current value should not be greater than 20% of the
battery capacity value. For example, for a 20Ah battery,
we recommend that the current is not greater than
4A.
Q: Will TB6000Pro stop charging automatically after the
battery is fully charged?
A: Yes. TB6000Pro adopts 9-step smart charging. When
the battery is fully charged, it will automatically stop
charging without the risk of overcharging. If you still
leave the battery connected, the charger will keep
monitoring the battery status and will automatically
start charging when the battery voltage falls below its
target threshold.
Q: Can TB6000Pro charge multiple batteries
simultaneously?
A: Yes. Please correctly connect these batteries in series
or parallel before charging. If you have questions
about the connection, you can consult the battery
manufacturer or contact us for help.
Q: Is REPAIR mode applicable to all battery types?
A: No, it can't be used for lithium batteries. However, it is
applicable to all types of lead-acid batteries.
Q: Why can't some batteries be used normally after
repair?
A: Please consult the battery manufacturer whether the
battery is completely damaged and whether it can be
repaired.
Q: Why can't some batteries be charged?

20
A: Generally, a 12V battery with a voltage lower than
8.5V is damaged and cannot be charged normally. If
the battery is damaged or Er4 error is reported, you
can select the 12V Supply mode to recover battery
charging.
Q: Why does battery voltage drop to about 13V after it is
charged to above 14V (or when charging stops)?
A: The voltage of a fully-charged 12V lead-acid battery
is between 12.8V and 13.4V. For effective charging,
the battery voltage will reach between 14V and 14.4V
during charging time. Therefore, battery voltage will
drop to about 12.8V to 13.4V when charging stops (or
when charging enters Step 9).
After the battery is fully charged, the charger will
resume charging with a small current if the battery
voltage is detected to drop to 12.8V. You can also
change the resume charging voltage of Lead-acid
Battery mode in Step 9 of the Expert Mode.
Q: The TB6000Pro Bluetooth cannot be found or
connected?
A: Check if the Bluetooth icon on the charger screen
ashes.
If it ashes, turn on Location Services and Bluetooth
on your phone (which is necessary for getting the
available Bluetooth devices). Then open the app and
tap the Bluetooth icon to establish connection.
If it remains still, the charger has been connected to
another device.

21
SECTION 6
WARRANTY
TOPDON's Three Years Limited Warranty
TOPDON warrants to its original purchaser that the
company's products will be free from defects in material
and workmanship for 36 months from the date of
purchase (Warranty Period).
For the defects reported during the Warranty Period,
TOPDON will either repair or replace the defective part
or product according to its technical support analysis
and conrmation.
TOPDON shall not be liable for any incidental or
consequential damages arising from the device's use,
misuse, or mounting.
Some states do not allow limitation on how long an
implied warranty lasts, so the above limitations may not
apply to you.
This limited warranty is void under the following
conditions:
• Misused, disassembled, altered or repaired by
unauthorized stores or technicians.
• Careless handling and operation's violation.
Notice: All information in this manual is based on the
latest information available at the time of publication
and no warranty can be made for its accuracy or
completeness. TOPDON reserves the right to make
changes at any time without notice.

22
SECTION 7
FCC
This device complies with Part 15 of the FCC Rules. Its
operation is subject to the following two conditions:
(1) this device may not cause harmful interference, and
(2) this device must accept any interference received,
including interference that may cause undesired
operation. Changes or modications not expressly
approved by the party responsible for compliance could
void the user's authority to operate the equipment.
Note: This equipment has been tested and found to
comply with the limits for a Class B digital device,
pursuant to Part 15 of the FCC Rules.
These limits are designed to provide reasonable
protection against harmful interference in a residential
installation.
This equipment generates, uses and can radiate radio
frequency energy and, if not installed and used in
accordance with the instructions, may cause harmful
interference to radio communications.
However, there is no guarantee that interference will not
occur in a particular installation.
If this equipment does cause harmful interference to
radio or television reception, which can be determined
by turning the equipment on and off, the user is
encouraged to try to correct the interference by one or
more of the following measures:
• Reorient or relocate the antenna.
• Increase the distance between the equipment and
receiver.
• Connect the equipment into an outlet on a circuit
different from the one connected to the receiver.
• Consult a dealer or an experienced radio/TV technician
for help.

23
1.Please read the below information carefully.
2.Please do not expose to moisture.
3.The switching adapter shall be installed according to
specication.
4.The max ambient temperature should not exceed
25°C.
5.The apparatus shall not be exposed to dripping or
splashing and that no objects lled with liquid shall be
placed on the apparatus.
6.The main plug of this adaptor is used as disconnect
device, the disconnect device shall remain readily
operable.
7.For indoor use only.
8.Polarity of output plug: Center is anode.
9.This switching adapter is not intended to be repaired
by service personal in case of failure or component
defect or damaged cord, the adapter should be
scrapped.
10.This product must not be disposed together with the
domestic waste. This product has to be disposed at an
authorized place for recycling of electrical and electronic
appliances. By collecting and recycling waste, you help
save natural resources, and make sure the product is
disposed in an environmental friendly and healthy way.

24
IMPORTANT SAFETY WARNINGS
* Use of an attachment not recommended or sold by the
battery charger manufacturer may result in a risk of re,
electric shock, or injury to persons.
* To reduce risk of damage to electric plug and cord, pull
by plug rather than cord when disconnecting charger.
* An extension cord should not be used unless absolutely
necessary. Use of improper extension cord could result
in a risk of re and electric shock. If an extension cord
must be used, make sure:
a) That pins on plug of extension cord are the same
number, size, and shape as those of plug on charger;
b) That extension cord is properly wired and in good
electrical condition; and
c) That wire size is large enough for ac ampere rating of
charger as specied in Table
* Do not operate charger if it has received a sharp blow,
been dropped, or otherwise damaged in any way; take it
to a qualied serviceman.
* Do not disassemble charger; take it to a qualied
serviceman when service or repair is required. Incorrect
reassembly may result in a risk of electric shock or re.
* To reduce risk of electric shock, unplug charger from
outlet before attempting any maintenance or cleaning.
Turning off controls will not reduce this risk.
* The appliance is not to be used by persons (including
children) with reduced physical, sensory or mental
capabilities, or lack of experience and knowledge, unless
they have been given supervision or instruction.
PREPARING TO CHARGE
a) If necessary to remove battery from vehicle to charge,
always remove grounded terminal from battery rst.
Make sure all accessories in the vehicle are off, so as not
to cause an arc.
b) Be sure area around battery is well ventilated while
battery is being charged.
c) Clean battery terminals. Be careful to keep corrosion
from coming in contact with eyes.
d) Add distilled water in each cell until battery acid

25
reaches level specied by battery manufacturer. Do not
overll. For a battery without removable cell caps, such
as valve regulated lead acid batteries, carefully follow
manufacturer’s recharging instructions.
e) Study all battery manufacturer’s specic precautions
while charging and recommended rates of charge.
f) Determine voltage of battery by referring to car
owner’s manual and make sure that output voltage
selector switch is set at correct voltage. If charger has
adjustable charge rate, charge battery initially at lowest
rate.
CHARGER LOCATION
a) Locate charger as far away from battery as dc cables
permit.
b) Never place charger directly above battery being
charged; gases from battery will corrode and damage
charger.
c) Never allow battery acid to drip on charger when
reading electrolyte specic gravity or lling battery.
d) Do not operate charger in a closed-in area or restrict
ventilation in any way.
e) Do not set a battery on top of charger.
DC CONNECTION PRECAUTIONS
a) Connect and disconnect dc output clips only after
setting any charger switches to “off” position and
removing ac cord from electric outlet. Never allow clips
to touch each other.
FOLLOW THESE STEPS WHEN BATTERY IS OUTSIDE
VEHICLE. A SPARK NEAR THE BATTERY MAY CAUSE
BATTERY EXPLOSION. TO REDUCE RISK OF A SPARK
NEAR BATTERY:
a) Check polarity of battery posts. POSITIVE (POS,
P, +) battery post usually has a larger diameter than
NEGATIVE (NEG, N, –) post.
b) Attach at least a 24-inch-long 6-gauge (AWG)
insulated battery cable to NEGATIVE (NEG, N, –) battery
post.
c) Connect POSITIVE (RED) charger clip to POSITIVE
(POS, P, +) post of battery.

26
d) Position yourself and free end of cable as far away
from battery as possible – then connect NEGATIVE
(BLACK) charger clip to free end of cable.
e) Do not face battery when making nal connection.
f) When disconnecting charger, always do so in reverse
sequence of connecting procedure and break rst
connection while as far away from battery as practical.
g) A marine (boat) battery must be removed and
charged on shore. To charge it on board requires
equipment specially designed for marine use.
PERSONAL PRECAUTIONS
a) Consider having someone close enough by to come
to your aid when you work near a lead-acid battery.
b) Have plenty of fresh water and soap nearby in case
battery acid contacts skin, clothing, or eyes.
c) Wear complete eye protection and clothing
protection. Avoid touching eyes while working near
battery.
d) If battery acid contacts skin or clothing, wash
immediately with soap and water. If acid enters eye,
immediately ood eye with running cold water for at
least 10 minutes and get medical attention immediately.
e) NEVER smoke or allow a spark or ame in vicinity of
battery or engine.
f) Be extra cautious to reduce risk of dropping a metal
tool onto battery. It might spark or short-circuit battery
or other electrical part that may cause explosion.
g) Remove personal metal items such as rings, bracelets,
necklaces, and watches when working with a lead-acid
battery. A lead-acid battery can produce a short-circuit
current high enough to weld a ring or the like to metal,
causing a severe burn.
h) Use charger for charging a LEAD-ACID battery
only. It is not intended to supply power to a low
voltage electrical system other than in a starter-motor
application. Do not use battery charger for charging
dry-cell batteries that are commonly used with home
appliances. These batteries may burst and cause injury
to persons and damage to property.
i) NEVER charge a frozen battery.

27
FOLLOW THESE STEPS WHEN BATTERY IS INSTALLED
IN VEHICLE. A SPARK NEAR BATTERY MAY CAUSE
BATTERY EXPLOSION. TO REDUCE RISK OF A SPARK
NEAR BATTERY:
a) Position ac and dc cords to reduce risk of damage by
hood, door, or moving engine part.
b) Stay clear of fan blades, belts, pulleys, and other parts
that can cause injury to persons.
c) Check polarity of battery posts. POSITIVE (POS, P, +)
battery post usually has larger diameter than NEGATIVE
(NEG, N,–) post.
d) Determine which post of battery is grounded
(connected) to the chassis. If negative post is grounded
to chassis (as in most vehicles), see (e). If positive post is
grounded to the chassis, see (f).
e) For negative-grounded vehicle, connect POSITIVE
(RED) clip from battery charger to POSITIVE (POS, P, +)
ungrounded post of battery. Connect NEGATIVE (BLACK)
clip to vehicle chassis or engine block away from battery.
Do not connect clip to carburetor, fuel lines, or sheet-
metal body parts. Connect to a heavy gage metal part of
the frame or engine block.
f) For positive-grounded vehicle, connect NEGATIVE
(BLACK) clip from battery charger to NEGATIVE (NEG, N,
–) ungrounded post of battery. Connect POSITIVE (RED)
clip to vehicle chassis or engine block away from battery.
Do not connect clip to carburetor, fuel lines, or sheet-
metal body parts. Connect to a heavy gage metal part of
the frame or engine block.
g) When disconnecting charger, turn switches to off,
disconnect AC cord, remove clip from vehicle chassis,
and then remove clip from battery terminal.
h) See operating instructions for length of charge
information.
WARNING – RISK OF EXPLOSIVE GASES.
a) WORKING IN VICINITY OF A LEAD-ACID BATTERY IS
DANGEROUS. BATTERIES GENERATE EXPLOSIVE GASES
DURING NORMAL BATTERY OPERATION. FOR THIS
REASON, IT IS OF UTMOST IMPORTANCE THAT YOU
FOLLOW THE INSTRUCTIONS EACH TIME YOU USE THE

28
CHARGER.
b) To reduce risk of battery explosion, follow these
instructions and those published by battery
manufacturer and manufacturer of any equipment you
intend to use in vicinity of battery. Review cautionary
marking on these products and on engine.
The instructions for a battery charger
For all grounded cord-connected battery chargers:
GROUNDING AND AC POWER CORD CONNECTION
INSTRUCTIONS – Charger should be grounded to reduce
risk of electric shock. Charger is equipped with an
electric cord having an equipment-grounding conductor
and a grounding plug. The plug must be plugged into
an outlet that is properly installed and grounded in
accordance with all local codes and ordinances.

29

30
DEUTSCH
31
SICHERHEIT STEHT IMMER AN
ERSTER STELLE!
Für Ihre Sicherheit, die Sicherheit anderer,
des Produkts und des Fahrzeugs, an
dem Sie arbeiten, LESEN SIE BITTE
SORGFÄLTIG UND STELLEN SIE SICHER,
DASS SIE ALLE SICHERHEITSHINWEISE
UND MITTEILUNGEN IN DIESEM
HANDBUCH VOLLSTÄNDIG VERSTEHEN.
Da der TB6000Pro eine Kombination aus
Batterietester und Batterieladegerät ist,
MÜSSEN SIE DAS WARTUNGSHANDBUCH
DES FAHRZEUGS UND DIE SPEZIFISCHEN
VORSICHTSMASSNAHMEN DES
BATTERIEHERSTELLERS FÜR DIE BATTERIE
LESEN und diese Vorsichtsmaßnahmen
und Anweisungen vor und während eines
Test- oder Serviceverfahrens befolgen.
LESEN SIE ALLE ANWEISUNGEN VOR
DEM GEBRAUCH
FÜHREN SIE DEN TEST NUR IN EINEM GUT
BELÜFTETEN BEREICH DURCH, da das
Fahrzeug Kohlenmonoxid, ein toxisches
und giftiges Gas, und Feinstaub erzeugt,
wenn der Motor läuft.
ACHTEN SIE IMMER AUF BEWEGLICHE
TEILE (wie Kühlmittelgebläse,
Riemenscheiben, Riemen), da sie sich
drehen oder mit hoher Geschwindigkeit
drehen, wenn der Motor läuft.
TRAGEN SIE IMMER ZUGELASSENEN
SICHERHEITS-AUGENSCHUTZ, um Schäden
durch scharfe Gegenstände und ätzende
Flüssigkeiten zu vermeiden.
32
SCHALTEN SIE IMMER AUF P (BEIM
AUTOMATIKGETRIEBE) ODER AUF
NEUTRAL (BEIM SCHALTGETRIEBE) UND
VERGEWISSERN SIE SICH, DASS DIE
FESTSTELLBREMSE ANGEZOGEN IST.
VERWENDEN SIE IMMER EIN DIGITALES
MULTIMETER MIT MINDESTENS 10 MGOHM
IMPEDANZ, wenn Sie elektrische Tests an
Fahrzeugen durchführen, um Schäden an
den elektronischen Komponenten an Bord
zu vermeiden.
RAUCHEN SIE NICHT IN DER NÄHE DES
FAHRZEUGS während des Testens. Die
Kraftstoff- und Batteriedämpfe sind leicht
entzündlich.
SCHNEIDEN SIE DIE PRODUKTKABEL NICHT
DURCH UND TAUCHEN SIE SIE NICHT IN
WASSER. Es ist ein elektrisches Gerät, das
einen elektrischen Schlag und schwere
Verbrennungen verursachen kann.
WARNUNG: Batteriesäure ist extrem
ätzend. Wenn Säure in Ihre Augen gelangt,
SPÜLEN SIE DIESE GRÜNDLICH FÜR
MINDESTENS 20 MINUTEN MIT KALTEM
WASSER AUS UND SUCHEN SIE SOFORT
EINEN ARZT AUF. Wenn Batteriesäure auf
Ihre Haut oder Kleidung gelangt, WASCHEN
SIE SIE SOFORT MIT EINER LÖSUNG AUS
WASSER UND BACKSODA.
BERÜHREN SIE HEISSE MOTORTEILE NICHT,
um schwere Verbrennungen zu vermeiden.
Die Motorteile werden bei laufendem Motor
sehr heiß.

33
ABSCHNITT 1
WAS IST IN DER BOX?
TB6000Pro
Benutzerhandbuch

34
ABSCHNITT 2
PRODUKTÜBERSICHTEN &
SOFTWARE-DOWNLOAD
1. 6 Akkulademodi: Im Standalone-Modus bietet Ihnen
TB6000Pro 6 verschiedene Modi: 12V/6A Norm, 6V/3A
Norm, 12V/3A Klein, 12V/6A Lithium-Ionen-Akku, 12V/1A
Reparatur, 12V/6A Versorgung. (Siehe Abbildung
2.1.1) Sobald das Ladegerät über BT mit dem Telefon
verbunden ist, können Sie den Ladevorgang und die
Parameter anpassen. (Einzelheiten siehe Abschnitt 3)
Produktübersichten

35
Abbildung 2.1.1
7
6
5
1
2
3
4

36
2. Ladestatusanzeige: Sobald der Adapter in die
Steckdose eingesteckt ist und Sie den Lademodus
bestätigt haben, leuchtet die Anzeige auf und bleibt
still, sonst bleibt sie aus.
3. Bluetooth-Verbindungsstatusanzeige: Wenn sich der
TB6000Pro im Standalone-Modus bendet und mit
keinem Telefon gekoppelt ist, blinkt die Bluetooth-
Anzeige weiter. Sobald es gekoG30:G34
4. Ladestufenanzeige: Sie zeigt Ihnen genau an, in
welchem Schritt Sie sich unter den 9 Ladestufen
benden.
5. Ladespannung und -strom in Echtzeit: Zeigt Ihnen
den Ladestrom und die Ladespannung in Echtzeit an.
Der Parameter wird alle 2 Sekunden aktualisiert.
Wenn die folgenden Fehler auftreten, wird der
entsprechende Fehlercode angezeigt:
Er1: Kurzschluss oder Verpolung
Er2: Übertemperatur
Er3: Ladezeitüberschreitung
Er4: Batterie ist beschädigt, bitte wechseln Sie in
den 12-V-Versorgungsmodus, um zu versuchen, die
Batterie wiederherzustellen.
Er5: Falscher Modus, bitte wählen Sie den
12-V-Lademodus.
6. Ladefortschritt des Akkus
.
7. Modus-Taste: Drücken Sie auf MODE , um zwischen
den Lademodi umzuschalten. Nachdem der
Lademodus ausgewählt wurde, beginnt der
Ladevorgang automatisch innerhalb von 3 Sekunden.
Notiz: Das Ladegerät setzt den Ladevorgang im
vorherigen Modus fort, wenn es wieder eingeschaltet
wird.
·
Bitte ziehen Sie den Adapter ab, bevor Sie die Batterietests
durchführen, und stellen Sie sicher, dass die Klemmen richtig mit
den Batterieklemmen verbunden sind.

37
• Bitte schalten Sie Bluetooth ein, bevor Sie die
Verbindung herstellen.
• SIE KÖNNEN BLUETOOTH NUR IN DER TB6000Pro-APP
EINRICHTEN
Wie lade ich den TB6000Pro herunter und verbinde
ihn mit meinem Telefon?
1. Laden Sie die App herunter und installieren Sie sie
Option 1 QR-Code scannen
Für iOS und Android können Sie die Kamera auf Ihrem
Telefon öffnen und den QR-Code unten scannen, um
die App herunterzuladen.
Hinweis: Bitte stellen Sie sicher, dass Sie die Funktion
"QR-Codes scannen" für die Kamera Ihres Telefons in
den Einstellungen aktiviert haben.
Option 2 Gehen Sie zum App Store / Google Play
Für iOS: Suchen Sie im App Store nach „BatteryLab“,
um die App herunterzuladen.
Für Android: Suchen Sie in Google Play nach
„TB6000Pro“, um die App herunterzuladen.

38
2. Um Ihr Telefon mit TB6000Pro über Bluetooth zu
verbinden, müssen Sie es in den Einstellungen
aktivieren.
3. Oder Sie können Bluetooth im Kontrollzentrum oder
im Benachrichtigungsfeld einschalten.
4. Öffnen Sie die TB6000Pro-APP und tippen Sie auf
das Bluetooth-Symbol, um eine Verbindung mit dem
Gerät herzustellen.
Zum Verstehen von 6 Lademodi beziehen Sie sich bitte
auf die folgende Tabelle (Abbildung 3.1.1)
ABSCHNITT 3 WIE LADE ICH
EINE BATTERIE AUF?

39
Abbildung 3.1.1
Zum Verstehen vom 9-stugen Intelligenten Laden
beziehen Sie sich auf Abbildung 3.1.2.
Es lädt 12V-Nass-, Gel-
, MF-, Cal-, EFB- und AGM-
Batterien durch intelligentes
Laden in 9 Schritten.
Es lädt 6V-Nass-, Gel-,
MF-, Cal-, EFB- und AGM-
Batterien durch intelligentes
Laden in 9 Schritten.
Es lädt 12V-Li-Ionen-Akkus,
einschließlich Lithium-Eisen-
Phosphat (LiFePO4).
Stellen Sie eine
Ausgangsversorgung mit einer
konstanten Spannung von
13,5 V und einem maximalen
Strom von 6 A (81 W) bereit.
Wenn die Batterie beschädigt
ist oder ein Er4-Fehler gemeldet
wird, können Sie diesen Modus
auswählen, um das Laden der
Batterie wiederherzustellen.
Es repariert alte oder
sulfatierte Batterien
durch Schwachstrom und
Impulsstrom.
Es lädt 12V-Nass-, Gel-
, MF-, Cal-, EFB- und AGM-
Batterien mit einer kleinen
Kapazität von bis zu 50 Ah
durch intelligentes Laden in
9 Schritten.
Modus
12V/6A Norm
6V/3A Norm
12V/3A Klein
12V/6A
Lithium-
Ionen-Akku
12V/1A
Reparatur
12V/6A
Versorgung
Max.
Stromsp-
annung
Denition
14.2V
7.1V
14.2V
14.6V
14.2V
13.5V

40
Abbildung 3.1.2

41
12V/6A
NORM
>2V OK
>2V OK
2-10.2V
1.5-3A
10.2-11.8V
1.5A
11.8V
1.5-4.5A
11.8-13.5V
6A
13.5-14.0V
4.5-3A
14.0V
3-1.5A
14.0-14.2V
0.8A
14.2-12.8V
0A
14.2-12.8V..
0A-0.8A...
14.2-12.8V..
0A-0.4A...
7.1-6.4V..
0A-0.4A...
-
-
12V/3A
Klein
>2V OK
2-10.2V
0.8-1.5A
10.2-11.8V
0.8A
11.8V
0.8-2.3A
11.8-13.5V
3A
13.5-14.0V
2.3-1.5A
14.0V
1.5-0.8A
14.0-14.2V
0.4A
14.2-12.8V
0A
6V/3A
NORM
>2V OK
2-5.1V
0.8-1.5A
-
5.1-5.9V
0.8A
2-10.6V
1.5A
5.9V
0.8-2.3A
10.6V
1.5-4.5A
5.9-6.8V
3A
10.6-13.9V
6A
6.8-7.0V
2.3-1.5A
13.9-14.6V
4.5-3A
7.0V
1.5-0.8A
14.6V
0.75A-0A
7.0-7.1V
0.4A
7.1-6.4V
0A
12V/1A
Reparatur
>2V OK
2-14.2V
1A
14.2V
0-1A
2h Max
-
12V/6A
LITHIUM
12V/6A
Versorgung
13.5V
6A MAX

42
Standalone-Lademodus
1. Wenn TB6000Pro mit der Stromversorgung
verbunden ist, blinken die Lademodi weiter. Drücken
Sie die Moduswechseltaste, um zwischen den Modi
1. Überprüfen Sie den Anfangszustand, die Spannung,
den Ladezustand und den Gesundheitszustand der
Batterie, um die Stabilität der Batterie vor dem Laden
sicherzustellen.
2. Laden Sie die Batterie mit Impulsstrom auf, um die
Sulfate abzubauen, die sich im Laufe der Zeit in der
alternden Batterie angesammelt haben, um die
Lebensdauer zu verlängern.
3. Laden Sie die Batterie mit niedrigem Strom auf, um
das Hochstromladen vorzubereiten.
4. Laden Sie die Batterie mit drei Stufen konstanten
Stroms auf, die allmählich ansteigen, um den
Ladevorgang zu optimieren.
5. Laden Sie die Batterie mit voreingestelltem Strom auf,
bis er 80% erreicht.
6. Erhaltungsladung der Batterie, bis sie 90% erreicht.
7. Belassen Sie die Spannung auf dem voreingestellten
Wert, bis der Ladestrom auf 12,5 % des Maximalwerts
abfällt, und laden Sie die Leistung weiter auf 95 % auf.
8. Laden Sie mit 12,5 % des voreingestellten
Maximalstroms, bis die Batterie zu 100 % aufgeladen
ist.
9. Überprüfen Sie, ob die Spannung niedriger als der
voreingestellte Wert ist. Wenn dies der Fall ist, gehen
Sie zurück zu Schritt 8.

43
Bluetooth-Lademodus
1. Sobald Sie bestätigt haben, dass die
Vorbereitungsschritte abgeschlossen sind, stecken Sie
den Adapter in eine Steckdose und befestigen Sie die
Clips an den Batterieanschlüssen.
2. Öffnen Sie den TB6000Pro, tippen Sie auf Intelligentes
Auaden/Schnelles Auaden
•Intelligentes Auaden:
In diesem Modus wird vor und nach dem Laden
automatisch ein Batterietest durchgeführt. Geben Sie
einfach grundlegende Akkuinformationen ein und
wählen Sie den gewünschten Lademodus aus,
tippen Sie dann auf Starten von Ladevorgang.
Während des Vorgangs wird automatisch ein
Ladebericht erstellt.
Notiz:
1. Intelligentes Auaden ist nur für 12-V-Blei-Säure-
Batterien geeignet (Li-Ion- oder 6-V-Batterien werden
nicht unterstützt).
2. Um die Genauigkeit der Testergebnisse zu
gewährleisten, benutzen Sie im Intelligenten
Auaden-Modus nur die Batterieklemmen zum
Anschließen an die Batteriepole.
•Schnelles Auaden:
In diesem Modus stehen 6 Lademodi sowie
der DIY-Modus zur Verfügung. Sie können den
voreingestellten Lademodus auswählen, um direkt
aufzuladen, oder den Lademodus entsprechend dem
Zustand der Batterie anpassen.
3. Befolgen Sie die Anweisungen auf dem Bildschirm in
der App, um den Ladevorgang abzuschließen.
umzuschalten.
2. Nachdem Sie den Modus ausgewählt haben, beginnt
der Ladevorgang automatisch innerhalb von 3
Sekunden.

44
ABSCHNITT 4
WIE FÜHRE ICH EINEN
BATTERIETEST DURCH?
• Die Batterietestfunktion gilt nur für 12-V-Blei-Säure-
Batterien.
• Der mitgelieferte Ringklemmen-Kabelbaum ist
nicht kompatibel mit Batterietests. Benutzen Sie
die Batterieklemmen nur zum Anschließen an die
Batteriepole, wenn Sie einen Batterietest durchführen.
1. Tippen Sie auf Testverwaltung und dann auf
Batterietest.
2. Befolgen Sie die Anweisungen auf dem Bildschirm in
der App, um den Batterietest durchzuführen.

45
ABSCHNITT 5
FAQ
F: Wie wähle ich den Lademodus aus?
A: Bitte wählen Sie den Lademodus entsprechend
dem Batterietyp und der Kapazität aus. Es wird
empfohlen, dass der Stromwert nicht größer als 20 %
des Batteriekapazitätswerts sein sollte. Beispielsweise
empfehlen wir für eine 20-Ah-Batterie, dass der Strom
nicht größer als 4 A ist.
F: Wird der Ladevorgang des TB6000Pro automatisch
beendet, nachdem die Batterie vollständig aufgeladen
ist?
A: Ja. TB6000Pro übernimmt 9-stuges intelligentes
Laden. Wenn die Batterie vollständig aufgeladen ist,
stoppt er automatisch den Ladevorgang, ohne dass
das Risiko einer Überladung besteht. Wenn Sie die
Batterie weiterhin angeschlossen lassen, überwacht
das Ladegerät weiterhin den Batteriestatus und
beginnt automatisch mit dem Ladevorgang, wenn die
Batteriespannung unter den Zielschwellenwert fällt.
F: Kann TB6000Pro mehrere Batterien gleichzeitig
laden?
A: Ja. Bitte verbinden Sie diese Batterien vor dem Laden
korrekt in Reihe oder parallel. Wenn Sie Fragen zum
Anschluss haben, können Sie den Batteriehersteller
kontaktieren oder uns um Hilfe bitten.
F: Gilt der REPARATUR-Modus für alle Batterietypen?
A: Nein, es kann nicht für Lithiumbatterien benutzt
werden. Sie ist jedoch auf alle Typen von Blei-Säure-
Batterien anwendbar.
F: Warum können einige Batterien nach der Reparatur
nicht normal verwendet werden?
A: Bitte kontaktieren Sie den Batteriehersteller, ob
die Batterie vollständig beschädigt ist und repariert

46
werden kann.
F: Warum können manche Batterien nicht aufgeladen
werden?
A: Im Allgemeinen ist eine 12-V-Batterie mit einer
Spannung von weniger als 8,5 V beschädigt und kann
nicht normal aufgeladen werden.Wenn die Batterie
beschädigt ist oder ein Er4-Fehler gemeldet wird,
können Sie den 12-V-Versorgungsmodus auswählen,
um die Batterieladung wiederherzustellen.
F: Warum fällt die Batteriespannung auf etwa 13 V ab,
nachdem sie auf über 14 V geladen wurde (oder wenn
der Ladevorgang stoppt)?
A: Die Spannung einer voll aufgeladenen 12-V-Blei-
Säure-Batterie liegt zwischen 12,8 V und 13,4 V. Für
eine effektive Ladung erreicht die Batteriespannung
während der Ladezeit zwischen 14 V und 14,4 V. Daher
fällt die Batteriespannung auf etwa 12,8 V ab auf 13,4
V, wenn der Ladevorgang stoppt (oder wenn der
Ladevorgang in Schritt 9 übergeht).
Nachdem die Batterie vollständig geladen ist,
nimmt das Ladegerät den Ladevorgang mit
einem kleinen Strom wieder auf, wenn die
Batteriespannung auf 12,8 V abfällt. Sie können auch
die Wiederaufnahmespannung des Blei-Säure-
Batteriemodus in Schritt 9 des Expertenmodus
ändern.
F: Das TB6000Pro Bluetooth kann nicht gefunden oder
verbunden werden?
A: Überprüfen Sie, ob das Bluetooth-Symbol auf
dem Ladebildschirm blinkt.
Wenn es blinkt, schalten Sie Ortungsdienste und
Bluetooth auf Ihrem Telefon ein (was erforderlich ist,
um die verfügbaren Bluetooth-Geräte zu erhalten).
Öffnen Sie dann die App und tippen Sie auf das
Bluetooth-Symbol, um die Verbindung herzustellen.
Wenn es still bleibt, wurde das Ladegerät an ein
anderes Gerät angeschlossen.

47
ABSCHNITT 6
GARANTIE
TOPDONs eingeschränkte dreijährige Garantie
TOPDON garantiert seinem ursprünglichen Käufer,
dass die Produkte des Unternehmens für 36 Monate ab
Kaufdatum frei von Material- und Verarbeitungsfehlern
sind (Garantiezeitraum).
Für die während der Garantiezeit gemeldeten Mängel
wird TOPDON das defekte Teil oder Gerät gemäß seiner
Analyse und Bestätigung des technischen Supports
entweder reparieren oder ersetzen.
TOPDON haftet nicht für Neben- oder Folgeschäden, die
durch den Gebrauch, den Missbrauch oder die Montage
des Geräts entstehen.
Einige Staaten erlauben keine Begrenzung der Dauer
einer stillschweigenden Garantie, sodass die oben
genannten Einschränkungen möglicherweise nicht auf
Sie zutreffen.
Diese eingeschränkte Garantie erlischt unter den
folgenden Bedingungen:
• Missbrauch, Demontage, Änderung oder Reparatur
durch nicht autorisierte Geschäfte oder Techniker.
• Unachtsame Handhabung und Verletzung des
Betriebs.
Notiz: Alle Informationen in dieser Anleitung basieren
auf den neuesten Informationen, die zum Zeitpunkt
der Veröffentlichung verfügbar waren, und es kann
keine Garantie für ihre Genauigkeit oder Vollständigkeit
übernommen werden. TOPDON behält sich das Recht
vor, jederzeit ohne Vorankündigung Änderungen
vorzunehmen.

48
FRANÇAIS

49
LA SÉCURITÉ EST TOUJOURS
LA PRIORITÉ !
Pour votre sécurité, celle des autres, du
produit et du véhicule sur lequel vous
travaillez, VEUILLEZ LIRE ATTENTIVEMENT
ET VOUS ASSURER DE BIEN COMPRENDRE
TOUTES LES INSTRUCTIONS ET MESSAGES
DE SÉCURITÉ DE CE MANUEL. Le
TB6000Pro étant une combinaison de
testeur et de chargeur de batterie, VOUS
DEVEZ LIRE LE MANUEL D'ENTRETIEN DU
VÉHICULE, LES PRÉCAUTIONS SPÉCIFIQUES
DU FABRICANT DE BATTERIES POUR LA
BATTERIE et suivre lesdites précautions
et instructions avant et pendant toute
procédure de test ou d'entretien.
LISEZ TOUTES LES INSTRUCTIONS
AVANT UTILISATION
N'EFFECTUEZ LE TEST QUE DANS UN
ESPACE BIEN VENTILÉ car le véhicule
produit du monoxyde de carbone, un gaz
toxique et toxique, et des particules lorsque
le moteur tourne.
FAITES TOUJOURS ATTENTION AUX
PIÈCES EN MOUVEMENT (telles que les
ventilateurs de refroidissement, les poulies,
les courroies) car elles tournent à grande
vitesse lorsque le moteur tourne.
PORTEZ TOUJOURS UNE PROTECTION
ORIENTALE DE SÉCURITÉ APPROUVÉE pour
éviter les dommages causés par les objets
pointus et les liquides caustiques.
50
PASSEZ TOUJOURS LA VITESSE EN P (POUR
LA TRANSMISSION AUTOMATIQUE) OU AU
POINT MORT (POUR LA TRANSMISSION
MANUELLE) ET ASSUREZ-VOUS QUE LE
FREIN DE STATIONNEMENT EST ENGAGÉ.
UTILISEZ TOUJOURS UN MULTIMÈTRE
NUMÉRIQUE D'UNE IMPÉDANCE D'AU
MOINS 10 MEGOHMS pour effectuer des
tests électriques sur les véhicules an
d'éviter d'endommager les composants
électroniques embarqués.
NE FUMEZ PAS à proximité du véhicule
pendant les tests. Les vapeurs de
carburant et de batterie sont hautement
inammables.
AVERTISSEMENT : L'acide de la batterie est
extrêmement corrosif. Si l'acide pénètre
dans vos yeux, rincez-les abondamment
à l'eau froide courante pendant au moins
20 minutes et consultez un médecin
immédiatement. Si l'acide de la batterie
entre en contact avec votre peau ou vos
vêtements, LAVEZ-LES IMMÉDIATEMENT
AVEC UNE SOLUTION D'EAU ET DE
BICARBONATE DE SODIUM.
NE COUPEZ PAS LES CORDONS DU
PRODUIT NI LES IMMERGER DANS L'EAU.
Le produit est un appareil électrique qui
peut provoquer des chocs et des brûlures
graves.
NE TOUCHEZ PAS LES PIÈCES CHAUDES DU
MOTEUR pour éviter de graves brûlures. Les
pièces du moteur deviennent très chaudes
lorsque le moteur tourne.

51
SECTION 1
QU'Y A-T-IL DANS LA BOÎTE ?
TB6000Pro
Manuel d'utilisation

52
SECTION 2
PRÉSENTATIONDES
PRODUITS ET
TÉLÉCHARGEMENT DES
LOGICIELS
1. 6 modes de charge de la batterie : En mode autonome,
le TB6000Pro vous propose 6 modes différents : Norme
12V/6A, Norme 6V/3A, Petit 12V/3A, Batterie lithium-ion
12V/6A, Réparation 12V/1A, Alimentation 12V/6A. (Voir
gure 2.1.1) Une fois le chargeur connecté au téléphone
via BT, vous pouvez personnaliser le processus et les
paramètres de charge. (Pour plus de détails, veuillez
vous référer à la section 3)
Aperçu des produits

53
Figure 2.1.1
7
6
5
1
2
3
4

54
2. Indicateur d'état de charge : Une fois que l'adaptateur
est branché sur la prise et que vous avez conrmé le
mode de charge, le voyant s'allume et reste immobile,
sinon il reste éteint.
3. Indicateur d'état de la connexion Bluetooth : Si le
TB6000Pro est en mode autonome et n'est jumelé à
aucun téléphone, l'indicateur Bluetooth continue de
clignoter. Une fois qu'il est apparié, l'indicateur reste
immobile.
4. Indicateur d'étapes de charge : Il vous indique
exactement à quelle étape vous vous trouvez parmi les
9 étapes de charge.
5. Tension et courant de charge en temps réel : Il vous
présente le courant et la tension de charge en temps
réel. Ce paramètre est actualisé toutes les 2 secondes.
Lorsque les erreurs suivantes se produisent, il afche
le code d'erreur correspondant :
Er1 : Court-circuit ou inversion de polarité
Er2 : Surchauffe
Er3 : Temps de charge dépassé
Er4 : La batterie est endommagée, veuillez passer en
mode d'alimentation 12 V pour tenter de récupérer la
batterie.
Er5 : Mauvais mode, veuillez sélectionner le mode de
charge 12 V.
6. Progression de la charge de la batterie
7. Bouton Mode: Appuyez sur MODE pour basculer entre
les modes de charge. Une fois le mode de charge
sélectionné, la charge démarre automatiquement
dans les 3 secondes.
Remarque: Le chargeur reprendra la charge en
utilisant le mode précédent lorsqu'il sera remis sous
tension.
·
Veuillez débrancher l'adaptateur avant d'effectuer les tests
de batterie et assurez-vous que les pinces sont correctement
connectées aux bornes de la batterie.

55
1. Télécharger et installer l'application
Option 1 scanner le Code QR
Pour iOS et Android, vous pouvez allumer l'appareil
photo de votre téléphone et scanner le Code QR ci -
dessous pour télécharger l'application.
Remarque: Assurez - vous d'avoir activé la fonction
"Scan QR code" pour l'appareil photo de votre
téléphone dans "Paramètres".
Option 2 Accédez à l'App Store / Google Play
Pour iOS : recherchez « BatteryLab » dans l'App Store
pour télécharger l'application.
Pour Android : recherchez « TB6000Pro » dans Google
Play pour télécharger l'application.
• Veuillez activer le Bluetooth avant d'établir la
connexion.
• VOUS POUVEZ UNIQUEMENT CONFIGURER LE
BLUETOOTH DANS L'APPLICATION TB6000Pro
Comment télécharger et connecter le TB6000Pro à
votre téléphone ?

56
2. Pour connecter votre téléphone à TB6000Pro via
Bluetooth, vous devez l'activer dans les paramètres.
3. Vous pouvez également activer le Bluetooth dans le
Centre de contrôle ou le Panneau de notication.
4. Ouvrez l'APP TB6000Pro et appuyez sur l'icône
Bluetooth pour établir la connexion avec l'unité.
Pour comprendre les 6 modes de charge, veuillez vous
référer au tableau ci-dessous (Figure 3.1.1)
SECTION 3 COMMENT
CHARGER UNE BATTERIE ?

57
Figure 3.1.1
Pour comprendre les 9 étapes de la charge intelligente,
veuillez vous référer à la gure 3.1.2.
Chargez des batteries 12V
humides, gel, MF, Cal, EFB
et AGM grâce à une charge
intelligente en 9 étapes.
Chargez des batteries 6V
humides, gel, MF, Cal, EFB
et AGM grâce à la charge
intelligente en 9 étapes.
Chargez les batteries 12V li-
ion, y compris le phosphate
de fer lithié (LiFePO4).
Fournissez une alimentation
de sortie d'une tension
constante de 13,5 V et un
courant maximum de 6
A(81 W). Si la batterie est
endommagée ou si une
erreur Er4 est signalée, vous
pouvez sélectionner ce
mode pour récupérer la
charge de la batterie.
Réparez les batteries
anciennes ou sulfatées
grâce au courant faible et au
courant pulsé.
Chargez des batteries 12V
humidest, gel, MF, Cal, EFB,
et AGM avec une petite
capacité jusqu'à 50Ah par
une charge intelligente en 9
étapes.
Mode
Norme
12V/6A
Norme
6V/3A
Petit
12V/3A
Batterie
lithium-ion
12V/6A
Réparation
12V/1A
Alimenta-
tion
12V/6A
Voltage
Max.
Dénition
14.2V
7.1V
14.2V
14.6V
14.2V
13.5V

58
Figure 3.1.2

59
Norme
12V/6A
>2V OK
>2V OK
2-10.2V
1.5-3A
10.2-11.8V
1.5A
11.8V
1.5-4.5A
11.8-13.5V
6A
13.5-14.0V
4.5-3A
14.0V
3-1.5A
14.0-14.2V
0.8A
14.2-12.8V
0A
14.2-12.8V..
0A-0.8A...
14.2-12.8V..
0A-0.4A...
7.1-6.4V..
0A-0.4A...
-
-
Petit
12V/3A
>2V OK
2-10.2V
0.8-1.5A
10.2-11.8V
0.8A
11.8V
0.8-2.3A
11.8-13.5V
3A
13.5-14.0V
2.3-1.5A
14.0V
1.5-0.8A
14.0-14.2V
0.4A
14.2-12.8V
0A
Norme
6V/3A
>2V OK
2-5.1V
0.8-1.5A
-
5.1-5.9V
0.8A
2-10.6V
1.5A
5.9V
0.8-2.3A
10.6V
1.5-4.5A
5.9-6.8V
3A
10.6-13.9V
6A
6.8-7.0V
2.3-1.5A
13.9-14.6V
4.5-3A
7.0V
1.5-0.8A
14.6V
0.75A-0A
7.0-7.1V
0.4A
7.1-6.4V
0A
Réparation
12V/1A
>2V OK
2-14.2V
1A
14.2V
0-1A
2h Max
-
Batterie
lithium-
ion 12V/6A
Alimen-
tation
12V/6A
13.5V
6A MAX

60
1. Vériez l'état initial de la batterie, sa tension, son état
de charge et son état de santé pour vous assurer de la
stabilité de la batterie avant de la charger.
2. Chargez la batterie avec un courant pulsé pour
décomposer les sulfates qui se sont accumulés au
l du temps dans la batterie vieillissante an de
prolonger sa durée de vie.
3. Chargez la batterie avec un courant faible pour
préparer la charge à courant élevé.
4. Chargez la batterie avec trois étapes de courant
constant qui augmentent progressivement pour
optimiser la charge.
5. Chargez la batterie avec un courant prédéni jusqu'à
ce qu'elle atteigne 80 %.
6. Chargez la batterie au fur et à mesure jusqu'à ce
qu'elle atteigne 90 %.
7. Maintenez la tension à la valeur prédénie jusqu'à ce
que le courant de charge tombe à 12,5 % de la valeur
maximale et continuez à charger la batterie jusqu'à 95
%.
8. Chargez à 12,5 % du courant maximal prédéni jusqu'à
ce que la batterie soit chargée à 100 %.
9. Vériez si la tension est inférieure à la valeur
prédénie. Si c'est le cas, retournez à l'étape 8.
Mode de chargement autonome
1. Lorsque TB6000Pro est connecté à l'alimentation
électrique, les modes de charge continuent de
clignoter. Appuyez sur le bouton de changement de
mode pour passer d'un mode à l'autre.

61
Mode de charge Bluetooth
1. Une fois que vous avez conrmé que les étapes de
préparation sont effectuées, branchez l'adaptateur sur
une prise murale et xez les pinces aux bornes de la
batterie.
2. Ouvrez le TB6000Pro, appuyez sur le bouton
Chargement intelligent/Chargement rapide.
•Chargement intelligent :
Dans ce mode, un test de la batterie est
automatiquement effectué avant et après la charge. Il
suft d'entrer les informations de base sur la batterie
et de sélectionner le mode de charge souhaité, puis
de toucher Démarrer la charge. Un rapport de charge
sera
automatiquement généré pendant le processus.
Remarque :
1. Le Chargement intelligent n'est applicable qu'aux
batteries plomb -acide de 12 V (les batteries Li-ion ou 6
V ne sont pas prises encharge).
2. Pour garantir la précision des résultats de test,
utilisez uniquement les pinces de batterie pour
vous connecter aux bornes de la batterie en mode
Chargement intelligent.
•Chargement rapide :
Dans ce mode, 6 modes de charge sont disponibles,
ainsi que le mode DIY. Vous pouvez choisir le mode
de charge prédéni pour charger directement, ou
personnaliser le mode de charge en fonction de l'état
de la batterie.
3. Suivez les instructions sur l'écran de l'application pour
terminer le processus de charge de la batterie.
2. Une fois que vous avez sélectionné le mode, la charge
démarre automatiquement dans les 3 secondes.

62
3. Suivez les instructions sur l'écran de l'application pour
terminer le processus de charge de la batterie.
SECTION 4
COMMENT EFFECTUER UN
TEST DE BATTERIE ?
• La fonction de test des batteries n'est applicable
qu'aux batteries au plomb de 12V.
• Le harnais de terminaison annulaire inclus n'est pas
compatible avec le test de la batterie. N'utilisez que les
pinces de batterie pour vous connecter aux bornes de
la batterie lorsque vous effectuez un test de batterie.
1. Appuyez sur Gestion des tests, puis sur Test de la
batterie.
2. Suivez les instructions sur l'écran de l'application pour
tester la batterie.

63
SECTION 5
FAQ
Q: Comment sélectionner le mode de charge ?
R: Veuillez sélectionner le mode de charge en fonction
du type et de la capacité de la batterie. Nous
recommandons que la valeur du courant ne soit pas
supérieure à 20 % de la valeur de la capacité de la
batterie. Par exemple, pour une batterie de 20Ah, nous
recommandons que le courant ne soit pas supérieur à
4A.
Q: Le TB6000Pro s'arrêtera-t-il de charger
automatiquement une fois la batterie complètement
chargée ?
R: Oui. Le TB6000Pro adopte un système de charge
intelligent en 9 étapes. Lorsque la batterie est
entièrement chargée, elle s'arrête automatiquement
sans risque de surcharge. Si vous laissez toujours la
batterie connectée, le chargeur continuera à surveiller
l'état de la batterie et commencera automatiquement
la charge lorsque la tension de la batterie passera sous
le seuil cible.
Q: Le TB6000Pro peut-il charger plusieurs batteries
simultanément ?
R: Oui. Veuillez connecter correctement ces batteries en
série ou en parallèle avant de les charger. Si vous avez
des questions concernant la connexion, vous pouvez
consulter le fabricant de la batterie ou nous contacter
pour obtenir de l'aide.
Q: Le mode RÉPARATION est-il applicable à tous les
types de batterie ?
R: Non, il ne peut pas être utilisé pour les batteries au
lithium. Cependant, il est applicable à tous les types
de batteries au plomb.
Q: Pourquoi certaines batteries ne peuvent-elles pas être

64
utilisées normalement après réparation ?
R: Veuillez consulter le fabricant de la batterie pour
savoir si la batterie est complètement endommagée
et si elle peut être réparée.
Q: Pourquoi certaines batteries ne peuvent-elles pas être
chargées ?
R: En général, une batterie de 12V dont la tension est
inférieure à 8,5 V est endommagée et ne peut pas être
chargée normalement. Si la batterie est endommagée
ou si une erreur Er4est signalée, vous pouvez
sélectionner le mode Alimentation 12V pour récupérer
la charge de la batterie.
Q: Pourquoi la tension de la batterie chute-t-elle à
environ 13V après avoir été chargée à plus de 14V (ou
lorsque la charge s'arrête) ?
R: La tension d'une batterie au plomb de 12V
entièrement chargée se situe entre 12,8V et 13,4V.
Pour une charge efcace, la tension de la batterie
doit atteindre entre 14V et 14,4V pendant le temps
de charge. Par conséquent, la tension de la batterie
baissera à environ 12,8V à 13,4V lorsque la charge
s'arrêtera (ou lorsque la charge entrera dans l'étape 9).
Une fois la batterie complètement chargée, le
chargeur reprendra la charge avec un faible courant si
la tension de la batterie est détectée comme tombant
à 12,8V. Vous pouvez également modier la tension de
reprise de charge du mode Batterie plomb-acide à
l'étape 9 du mode Expert.
Q: Le Bluetooth du TB6000Pro ne peut être trouvé ou
connecté ?
R: Vériez si l'icône Bluetooth sur l'écran du
chargeur clignote.
Si elle clignote, activez les services de localisation et
Bluetooth sur votre téléphone (ce qui est nécessaire
pour obtenir les périphériques Bluetooth disponibles).
Ensuite, ouvrez l'application et appuyez sur l'icône
Bluetooth pour établir la connexion.
Si elle reste immobile, cela signie que le chargeur a

65
SECTION 6
GARANTIE
Garantie limitée de trois ans de TOPDON
TOPDON garantit à son acheteur d'origine que les
produits de la société seront exempts de défauts de
matériaux et de fabrication pendant 36 mois à compter
de la date d'achat (période de garantie).
Pour les défauts signalés pendant la période de garantie,
TOPDON réparera ou remplacera la pièce ou le produit
défectueux selon l'analyse et la conrmation de son
support technique.
TOPDON ne sera pas responsable des dommages
accessoires ou indirects résultant de l'utilisation, de la
mauvaise utilisation ou du montage de l'appareil.
Certains états n'autorisent pas la limitation de la durée
d'une garantie implicite, les limitations ci-dessus
peuvent donc ne pas s'appliquer à votre cas.
Cette garantie limitée est nulle dans les conditions
suivantes :
• Mauvaise utilisation, démontage, modication ou
réparation par des magasins ou des techniciens non
autorisés.
• Manipulation négligente et violation des règles de
fonctionnement.
Avis : Toutes les informations contenues dans ce manuel
sont basées sur les dernières informations disponibles au
moment de la publication et aucune garantie ne peut
être donnée quant à leur exactitude ou leur exhaustivité.
TOPDON se réserve le droit d'apporter des modications
à tout moment sans préavis.
été connecté à un autre appareil.

66
ESPAÑOL

67
¡LA SEGURIDAD ES SIEMPRE
LA MÁXIMA PRIORIDAD!
Para tu seguridad, la seguridad de
otras personas, el producto y el
vehículo que está operando, LEE
CUIDADOSAMENT Y ASEGÚRESE DE
ENTENDER COMPLETAMENTE TODAS
LAS INSTRUCCIONES E INFORMACIONES
DE SEGURIDAD EN ESTE MANUAL, Dado
que TB6000Pro es una combinación de
un probador de baterías y un cargador de
baterías, USTED DEBE LEER EL MANUAL
DE MANTENIMIENTO DEL VEHÍCULO,
LAS PRECAUCIONES ESPECÍFICAS DEL
FABRICANTE DE BATERÍAS PARA LA
BATERIÍA y seguir las precauciones e
instrucciones anteriores antes y durante
cualquier procedimiento de prueba o
mantenimiento.
LEA TODAS LAS INSTRUCCIONES
ANTES DE USAR
SOLO OPERE LA PRUEBA EN UN ÁREA BIEN
VENTILADA ya que el vehículo produce
monóxido de carbono, un gas tóxico y
venenoso, y partículas cuando el motor
está funcionando.
SIEMPRE TENGA EN CUENTA LAS
PARTED MÓVILES (como ventiladores de
refrigerante, poleas, correas) ya que giran o
giran a altas velocidades cuando el motor
está funcionando.
SIEMPRE USE PROTECCIÓN OCULAR DE
SEGURIDAD APROBADA para evitar daños
por objetos alados y líquidos cáusticos.
68
SIEMPRE CAMBIE EL ENGRANAJE A P
(PARA TRANSMISIÓN AUTOMÁTICA) O A
NEUTRAL (PARA TRANSMISIÓN MANUAL)
Y ASEGÚRESE DE QUE EL FRENO DE
ESTACIONAMIENTO ESTÉ ACTIVADO.
SIEMPRE USE UN MULTÍMETRO DIGITAL
CON AL MENOS 10 MEGOHMS DE
IMPEDANCIA al realizar pruebas eléctricas
en los vehículos para evitar daños a los
componentes electrónicos a bordo.
NO SE PUEDE FUMAR EN NINGÚN LUGAR
CERCA DEL VEHÍCULO cuando se prueba.
Los vapores de combustible y batería son
altamente inamables.
ADVERTENCIA: el ácido de la batería es
extremadamente corrosivo. Si el ácido se
mete en los ojos, ENJUAGUE BIEN CON
AGUA DE CORRIENTE FÍA DURANTE AL
MENOS 20 MINUTOS Y BUSQUE ATENCIÓN
MÉDICA INMEDIATAMENTE. SI EL ÁCIDO
DE LA BATERÍA SE PONE EN LA PIEL O LA
ROPA, LÁVELA INMEDIATAMENTE CON
UNA SOLUCIÓN DE AGUA Y BICARBONATO
DE SODIO.
NO CORTE LOS CABLES DE LOS
PRODUCTOS NI LOS SUMERJA EN EL AGUA.
El producto es un dispositivo eléctrico
que puede causar choque y quemaduras
severas.
NO TOQUE LAS PIEZAS DEL MOTOR
CALIENTE para evitar quemaduras severas.
Las piezas del motor se calientan mucho
cuando el motor está funcionando.

69
SECCIÓN 1
¿QUÉ HAY EN LA CAJA?
TB6000PRO
Manual de Usuario

70
SECCIÓN 2
DESCRIPCIÓN GENERAL DE
PRODUCTOS Y DESCARGA DE
SOFTWARE
1. 6 Modos de carga de la batería: bajo el modo
independiente, TB6000Pro le proporciona 6 modos
diferentes de 12V/6A Normal, 6V/3A Normal, 12V/3A
Bajo, 12V/6A Batería de iones de litio, 12V/1A Reparación,
12V/6A Suministro. (Consulte la Figura 2.1.1) Una vez
que el cargador esté conectado al teléfono a través
de BT, puede personalizar el proceso de carga y los
parámetros. (Para más detalles, consulte la Sección 3)
Resúmenes de productos

71
Figura 2.1.1
7
6
5
1
2
3
4

72
2. Indicador de estado de carga: Una vez que el
adaptador esté conectado al enchufe y ha conrmado
el modo de carga, el indicador se iluminará y
permanecerá quieto, de lo contrario permanece
apagado.
3. Indicador de Estado de Conexión Bluetooth: si
el TB6000Pro está en modo independiente y no
está emparejado con ningún teléfono, el indicador
Bluetooth seguirá parpadeando. Después del
emparejamiento, el indicador permanece inmóvil.
4. Indicador de Paso de Carga: Ésto muestra
exactamente dónde está en los nueve pasos de carga.
5. Tensión y Corriente de Carga en tiempo real: ésto
muestra la corriente y tensión de carga en tiempo real.
Este parámetro se actualiza cada 2 segundos.
Cuando ocurran los siguientes errores, mostrará el
códigode error correspondiente:
Er1: Cortocircuito o polaridad inversa
Er2: Sobretemperatura
Er3: Tiempo de espera de carga
Er4: La batería está dañada, cambie al modo de
suministro de 12V para intentar recuperar la batería.
Er5: Modo incorrecto, seleccione el modo de carga de
12V.
6. Progreso de Carga de Batería
7. Botón modo: Presiona MODE para alternar entre los
modos de carga. Después de seleccionar el modo de
carga, la carga comenzará automáticamente en 3
segundos.
Nota: El cargador reanudará la carga utilizando el
modo anterior cuando se encienda de nuevo.
·
Desenchufe el adaptador antes de realizar las pruebas de
batería y asegúrese de que las abrazaderas estén conectadas
correctamente a los terminales de la batería.

73
• Por favor, encienda Bluetooth antes de establecer una
conexión.
• SÓLO PUEDE CONFIGURAR EL BLUETOOTH EN LA
APLICACIÓN TB6000Pro
¿Cómo puede Descargar TB6000Pro y Conectarlo a Su
Teléfono?
1. Descargar e instalar la aplicación
Opción 1 escanear el Código QR
Para iOS y android, puede encender la Cámara en
su teléfono y escanear el Código QR de abajo para
descargar la Aplicación.
Nota: asegúrese de que ha activado la función
"escanear Código qr" para la Cámara del teléfono
móvil en la "conguración".
Opción 2 ir a App Store / Google Play
Para iOS: busque "BatteryLab" en App Store para
descargar la aplicación.
Para Android: busque "TB6000Pro" en Google Play
para descargar la aplicación.

74
2. Para conectar su teléfono a TB6000Pro a través de
Bluetooth, debe encenderlo en la Conguración.
3. O puedes activar Bluetooth en el Centro de Control o
en el Panel de Noticación.
4. Abra la aplicación TB6000Pro y toque el icono de
Bluetooth para establecer la conexión con la unidad.
Para los seis modos de carga, consulte la siguiente tabla
(Figura 3.1.1).
SECCIÓN 3
CÓMO CAMBIAR LA BATERÍA

75
Figura 3.1.1
Para una Carga Inteligente de 9 pasos, consulte la gura
3.1.2.
Carga baterías húmedas, gel,
MF, Cal, EFB y AGM de 12V a
través de una carga inteligente
de 9 pasos.
Carga baterías húmedas, gel,
MF, Cal, EFB y AGM de 6V a
través de una carga inteligente
de 9 pasos.
Carga baterías de iones de litio
de 12V, incluido el fosfato de
hierro y litio (LiFePO4).
Proporcione un suministro de
salida de un voltaje constante
de 13,5V y una corriente máxima
de 6A (81W). Si la batería está
dañada o se informa un error
Er4, puede seleccionar este
modo para recuperar la carga
de la batería.
Repara baterías viejas o
sulfatadas a través de pequeña
corriente y corriente de pulso.
Carga baterías húmedas, gel,
MF, Cal, EFB y AGM de 12V con
una pequeña capacidad de
hasta 50Ah a través de una
carga inteligente de 9 pasos.
Modo
12V/6A
Normal
6V/3A
Normal
12V/3A Bajo
12V/6A
Batería de
iones de
litio
12V/1A
Repar-
ación
12V/6A
Suministro
Voltaje
Máx.
Denición
14.2V
7.1V
14.2V
14.6V
14.2V
13.5V

76
Figura 3.1.2

77
12V/6A
Normal
>2V OK
>2V OK
2-10.2V
1.5-3A
10.2-11.8V
1.5A
11.8V
1.5-4.5A
11.8-13.5V
6A
13.5-14.0V
4.5-3A
14.0V
3-1.5A
14.0-14.2V
0.8A
14.2-12.8V
0A
14.2-12.8V..
0A-0.8A...
14.2-12.8V..
0A-0.4A...
7.1-6.4V..
0A-0.4A...
-
-
12V/3A
Bajo
>2V OK
2-10.2V
0.8-1.5A
10.2-11.8V
0.8A
11.8V
0.8-2.3A
11.8-13.5V
3A
13.5-14.0V
2.3-1.5A
14.0V
1.5-0.8A
14.0-14.2V
0.4A
14.2-12.8V
0A
6V/3A
Normal
>2V OK
2-5.1V
0.8-1.5A
-
5.1-5.9V
0.8A
2-10.6V
1.5A
5.9V
0.8-2.3A
10.6V
1.5-4.5A
5.9-6.8V
3A
10.6-13.9V
6A
6.8-7.0V
2.3-1.5A
13.9-14.6V
4.5-3A
7.0V
1.5-0.8A
14.6V
0.75A-0A
7.0-7.1V
0.4A
7.1-6.4V
0A
12V/1A
Reparación
>2V OK
2-14.2V
1A
14.2V
0-1A
2h Max
-
12V/6A
Batería de
iones de
litio
12V/6A
Sumin-
istro
13.5V
6A MAX

78
1. Comprobar el estado inicial, el voltaje, el estado de
carga y el estado de salud de la batería antes de
cargar para asegurar la estabilidad de la batería.
2. Cargar la batería con corriente de pulso para
descomponer el sulfato acumulado con el tiempo
en la batería envejecida y prolongar la vida útil de la
batería.
3. Use una pequeña corriente para cargar la batería y
prepararse para una gran corriente.
4. Cargar con corriente constante en tres etapas,
aumentando gradualmente para optimizar la carga.
5. Cargar la batería con corriente predeterminada hasta
que alcance el 80%.
6. Cargar lentamente la batería hasta que alcance el
90%.
7. Mantener el voltaje en el valor predeterminado hasta
que la corriente de carga caiga al 12,5% del valor
máximo y continuar cargando al 95%.
8. Cargar al 12,5% de la corriente máxima predeterminada
hasta que la batería se cargue al 100%.
9. Comprobar si el voltaje está por debajo del valor
predeterminado. En caso armativo, vuelva al paso 8.
Modo de Carga Independiente
1. Cuando TB6000Pro está conectado a la fuente de
alimentación, los modos de carga se mantendrán
parpadeando. Presione el botón Interruptor de modo
para alternar entre los modos.
2. Una vez que haya seleccionado el modo, la carga
comenzará automáticamente en 3 segundos.

79
Modo de Carga Bluetooth
1. Una vez que haya conrmado que los pasos de
preparación están realizados, conecte el adaptador a
una toma de corriente y conecte las abrazaderas a los
terminales de la batería.
2. Abra el TB6000Pro, toque Carga Inteligente/Carga
Rápida.
• Carga inteligente:
En este modo, la prueba de la batería se realiza
automáticamente antes y después de la carga.
Simplemente ingrese la información básica de la
batería y seleccione el modo de carga deseado,
luego toque Comenzar para cargar. Se generará
automáticamente un informe de carga durante el
proceso.
Nota:
1. La carga inteligente solo se aplica a baterías de
plomo-ácido de 12V (las baterías de iones de litio o de
6V no soncompatibles).
2. Para garantizar la precisión de los resultados de
la prueba, utilice únicamente las abrazaderas de la
batería para conectar los terminales de la batería en el
modo de carga inteligente.
•Carga Rápida:
En este modo, hay 6 modos de carga disponibles, así
como el modo DIY. Usted puede elegir el modo de
carga predeterminado para cargar directamente o
personalizar el modo de carga según el estado de la
batería.
3. siga las instrucciones en la pantalla de la aplicación
para completar el proceso de carga de la batería.

80
SECCIÓN 4
¿CÓMO REALIZAR UNA
PRUEBA DE BATERÍA?
• La función de prueba de batería solo es aplicable para
baterías de ácido de plomo de 12V.
• El Arnés de cableado de terminal circular incluido
no es compatible con la prueba de la batería. Utilice
únicamente las pinzas de la batería para conectar los
terminales de la batería cuando realice una prueba de
la batería.
1. Toque Gestión de pruebas, luego toque Prueba de
batería.
2. siga las instrucciones en la pantalla de la aplicación
para realizar la prueba de la batería.

81
SECCIÓN 5
PREGUNTAS FRECUENTES
P: ¿Cómo seleccionar el modo de carga?
R: Por favor, elija el modo de carga de acuerdo al tipo
y la capacidad de la batería. Recomendamos que el
valor actual no sea superior al 20% de la capacidad
de la batería. Por ejemplo, para una batería de 20 Ah,
recomendamos una corriente no superior a 4A.
P: ¿El TB6000Pro se detendrá automáticamente
después de que la batería esté completamente
cargada?
R: Sí. TB6000Pro utiliza una carga inteligente de 9 pasos.
Cuando la batería está completamente cargada, se
detiene automáticamente sin riesgo de sobrecarga.
Si la batería sigue conectada, el cargador seguirá
monitoreando el Estado de la batería y comenzará
a cargar automáticamente cuando el voltaje de la
batería esté por debajo de su umbral objetivo.
P: ¿Puede el TB6000pro cargar varias baterías al mismo
tiempo?
R: Sí. Conecte correctamente estas baterías en serie o
en paralelo antes de cargar. Si tiene alguna pregunta
sobre la conexión, consulte con el fabricante de
baterías o póngase en contacto con nosotros para
obtener ayuda.
P: ¿Es el modo de servicio adecuado para todos los tipos
de baterías?
R: No, no se puede utilizar en baterías de litio. Sin
embargo, es adecuado para todos los tipos de baterías
de plomo-ácido.
P: ¿Por qué algunas baterías no funcionan
correctamente después del mantenimiento?
R: Por favor, consulte al fabricante de baterías si la
batería está completamente dañada y puede ser

82
reparada.
P: ¿Por qué algunas baterías no se pueden cargar?
R: Por lo general, las baterías de 12v con un voltaje
inferior a 8,5v se dañan y no pueden cargarse
normalmente. Si la batería está dañada o se informa
un error Er4, usted puede seleccionar el modo de
suministro de 12V para recuperar la carga de la batería.
P: ¿Por qué el voltaje de la batería cae a
aproximadamente 13V después de que se carga por
encima de 14V (o cuando se detiene la carga)?
R: El voltaje de una batería de plomo-ácido de 12V
completamente cargada está entre 12.8V y 13.4V. Para
una carga efectiva, el voltaje de la batería alcanzará
entre 14V y 14.4V durante el tiempo de carga. Por lo
tanto, el voltaje de la batería caerá a aproximadamente
12.8V a 13.4V cuando se detenga la carga (o cuando la
carga entre en el Paso 9).
Después de que la batería esté completamente
cargada, el cargador reanudará la carga con una
pequeña corriente si se detecta que el voltaje de la
batería cae a 12.8V. También puede cambiar el voltaje
de carga reanudado del modo batería de plomo-
ácido en el paso 9 del modo experto.
P: ¿El TB6000Pro Bluetooth no se puede encontrar o
conectar?
R: Compruebe si el icono de Bluetooth en la pantalla
del cargador parpadea.
Si parpadea, activa los Servicios de ubicación y
Bluetooth en el móvil (que es necesario para obtener
los dispositivos Bluetooth disponibles). Y abre la app y
toca el ícono de Bluetooth para establecer la conexión.
Si permanece quieto, el cargador se ha conectado a
otro dispositivo.

83
SECCIÓN 6
GARANTÍA
Garantía limitada de tres años de TOPDON
TOPDON garantiza a su comprador original que los
productos de la empresa estarán libres de defectos de
material y mano de obra durante 36 meses a partir de la
fecha de compra (Período de garantía).
Para los defectos reportados durante el período de
garantía, TOPDON analizará y conrmará, reparará o
reemplazará las piezas o productos defectuosos de
acuerdo con su soporte técnico.
TOPDON no será responsable de ningún daño
accidental o consecuente causado por el uso, mal uso o
instalación del dispositivo.
Algunos Estados no permiten restricciones a la duración
de la garantía implícita, por lo que estas restricciones
pueden no aplicarse a usted.
Esta garantía limitada no es válida en los siguientes
casos:
• Uso indebido, desmontaje, modicación o reparación
de tiendas o técnicos no autorizados.
• Manejo de errores e irregularidades operativas.
Nota: Toda la información contenida en este manual se
basa en la información más reciente disponible en el
momento de su publicación y no garantiza su exactitud
o exhaustividad. TOPDON se reserva el derecho de
cambiarla en cualquier momento sin previo aviso.

84
PORTUGUÊS
85
A SEGURANÇA É SEMPRE A
PRIMEIRA PRIORIDADE!
Para a segurança sua, a dos outros,
do produto, e do veículo em que
está a trabalhar, POR FAVOR, LEIA
CUIDADOSAMENTE E TEJA CERTEZA QUE
COMPREENDE TODAS AS INSTRUÇÕES
E MENSAGENS DE SEGURANÇA NESTE
MANUAL. Dado que a TB6000Pro é uma
combinação de testador de bateria e
carregador de bateria, VOCÊ DEVE LER
O MANUAL DE SERVIÇO DO VEÍCULO,
AS PRECAUÇÕES ESPECÍFICAS DO
FABRICANTE DA BATERIA e seguir as
referidas precauções e instruções antes e
durante qualquer procedimento de teste
ou serviço.
LER TODAS AS INSTRUÇÕES ANTES
DE USAR
OPERAR O TESTE APENAS NUMA ÁREA
BEM-VENTILADA, uma vez que o veículo
produz monóxido de carbono, um gás
tóxico e venenoso, e material particulado
quando o motor está em funcionamento.
ESTAR SEMPRE ATENTO ÀS PARTES MÓVEIS
(tais como ventoinhas de refrigeração,
polias, correias) uma vez que rodam ou
giram a alta velocidade quando o motor
está em funcionamento.
USAR SEMPRE PROTEÇÃO DOS OLHOS
DE SEGURANÇA APROVADA para prevenir
danos causados por objetos cortantes e
líquidos cáusticos.

86
TROCAR SEMPRE A MUDANÇA PARA P
(PARA TRANSMISSÃO AUTOMÁTICA) OU
PARA NEUTRO (PARA TRANSMISSÃO
MANUAL) E GARANTIR QUE O TRAVÃO DE
ESTACIONAMENTO ESTÁ ENGATADO.
UTILIZAR SEMPRE UM MULTIMETRO
DIGITAL COM PELO MENOS 10 MEGOHMS
DE IMPEDÊNCIA ao realizar testes elétricos
em veículos para evitar causar danos a
componentes eletrónicos a bordo.
NÃO FUMAR EM QUALQUER LUGAR PERTO
DO VEÍCULO durante os testes. Os vapores
do combustível e da bateria são altamente
inamáveis.
AVISO: O ácido da bateria é extremamente
corrosivo. Se o ácido entrar em contacto
com os seus olhos, ENXAGUÁ-LOS
COMPLETAMENTE COM ÁGUA CORRENTE
FRIA DURANTE PELO MENOS 20 MINUTOS
E PROCURAR IMEDIATAMENTE CUIDADOS
MÉDICOS. Se o ácido da bateria se
agarra à sua pele ou roupa, LAVA-SE
IMEDIATAMENTE COM UMA SOLUÇÃO DE
ÁGUA E BEBIDA SODA.
NÃO CORTAR OS CORDÕES DOS
PRODUTOS NEM SUBMERGIR OS MESMOS
EM ÁGUA. O produto é um dispositivo
elétrico que pode causar choques e
queimaduras graves.
NÃO TOQUE PARTES QUENTES DO MOTOR
para prevenir queimaduras graves. As
partes do motor cam muito quentes
quando o motor está em funcionamento.

87
SEÇÃO 1
O QUE ESTÁ NA CAIXA?
TB6000Pro
Manual do Utilizador

88
SEÇÃO 2
PANORÂMICA
DOS PRODUTOS E
DESCARREGAMENTO DE
SOFTWARE
1. 6 Modos de Carregamento de Bateria: No modo
autónomo, a TB6000Pro fornece-lhe 6 modos
diferentes 12V/6A Norma, 6V/3A Norma, 12V/3A
Pequeno, 12V/6A Baterias de lítio-íon, 12V/1A Reparação,
12V/6A Abastecimento. (Veja gura 2.1.1) Uma vez
ligado o carregador ao telefone através de BT, pode
personalizar o processo de carregamento e os
parâmetros. (Para detalhes, consulte a secção 3)
Visão Geral do Produto

89
Figura 2.1.1
7
6
5
1
2
3
4

90
2. Indicador do estado de carregamento: Quando o
adaptador estiver ligado à tomada e tiver conrmado
o modo de carregamento, o indicador acender-se-á
e permanecerá imóvel, caso contrário permanece
desligado.
3. Indicador do estado da ligação Bluetooth: Se o
TB6000Pro estiver em modo autónomo e não estiver
emparelhado com nenhum telefone, o indicador
Bluetooth continuará a piscar. Uma vez emparelhado,
o indicador permanece ainda.
4. Indicador de Passos de Carregamento: Mostra
exatamente qual o passo em que se encontra entre os
9 passos de carregamento.
5. Tensão e corrente de carregamento em tempo real:
Apresenta-lhe a corrente e a tensão de carregamento
em tempo real. O parâmetro atualiza-se a cada 2
segundos.
Quando os seguintes erros ocorrerem, exibirá o código
de erro correspondente:
Er1: Curto-circuito ou polaridade inversa
Er2: Sobretemperatura
Er3: Tempo limite de carga
Er4: A bateria está danicada, mudar
para o modo de alimentação de 12V para tentar
recuperar a bateria.
Er5: Modo errado, por favor seleccionar o modo de
carregamento de 12V.
6. Progresso do Carregamento da Bateria
7. Botão de Modo: Pressione MODO para alternar entre
os modos de carregamento. Depois que o modo de
carregamento for selecionado, o carregamento será
iniciado automaticamente em 3 segundos.
Nota: O carregador retomará o carregamento usando
o modo anterior quando for ligado novamente.
·
Desligue o adaptador antes de realizar os testes de bateria e
certique-se de que os grampos estão devidamente ligados aos
terminais da bateria.

91
1. Baixe e instale o aplicativo
Opção 1 Digitalizar o código QR
Para iOS e Android, você pode abrir a câmera no seu
telefone e digitalizar o código QR abaixo para baixar o
aplicativo.
Nota: Certique-se de ter ativado o recurso "Digitalizar
códigos QR" para a câmera do seu telefone em
Congurações.
Opção 2 Vá para App Store/Google Play
Para iOS: pesquise “BatteryLab” na App Store para
baixar o aplicativo.
Para Android: pesquise “TB6000Pro” no Google Play
para baixar o aplicativo.
• Por favor, ligue o Bluetooth antes de estabelecer a
ligação.
• VOCÊ PODE APENAS ESTABELECER O BLUETOOTH
NO APP TB6000Pro
Como descarregar e ligar o TB6000Pro ao seu
telefone?

92
2. Para ligar o seu telefone ao TB6000Pro via Bluetooth,
é necessário que o ligue em Denições.
3. Ou pode ligar o Bluetooth no Centro de Controlo ou
Painel de Noticação.
4. Abra o APP TB6000Pro e toque no ícone Bluetooth
para estabelecer ligação com a unidade.
Para compreender os 6 modos de carregamento,
consulte a tabela abaixo (Figura 3.1.1)
SEÇÃO 3 COMO CARREGAR
UMA BATERIA?

93
Figura 3.1.1
Para compreender os 9 modos de carregamento
inteligente, consulte a gura 3.1.2
Carregar baterias 12V Wet,
Gel, MF, Cal, EFB, e AGM
através de carregamento
inteligente em 9 etapas.
Carregar baterias 6V Wet,
Gel, MF, Cal, EFB, e AGM
através de carregamento
inteligente de 9 etapas.
Carregar baterias de iões de
lítio de 12V, incluindo fosfato
de lítio de ferro (LiFePO4).
Forneça uma tensão de
saída constante de 13,5V e
uma corrente máxima de
6A(81W). Se abateria estiver
danicada ou se for
comunicado um erro Er4,
pode seleccionar
este modo para recuperar o
carregamento da bateria.
Reparar baterias velhas
ou sulfatadas através de
pequena corrente e corrente
de pulso.
Carregar baterias de 12V
Wet, Gel, MF, Cal, EFB, e
AGM com uma pequena
capacidade até 50Ah através
de carregamento inteligente
de 9 etapas.
Modo
12V/6A
Norma
6V/3A
Norma
12V/3A
Pequeno
12V/6A
Baterias de
lítio-íon
12V/1A
Reparação
12V/6A
Abastec-
imento
Voltagem
Máx.
Denição
14.2V
7.1V
14.2V
14.6V
14.2V
13.5V

94
Figura 3.1.2

95
12V/6A
Norma
>2V OK
>2V OK
2-10.2V
1.5-3A
10.2-11.8V
1.5A
11.8V
1.5-4.5A
11.8-13.5V
6A
13.5-14.0V
4.5-3A
14.0V
3-1.5A
14.0-14.2V
0.8A
14.2-12.8V
0A
14.2-12.8V..
0A-0.8A...
14.2-12.8V..
0A-0.4A...
7.1-6.4V..
0A-0.4A...
-
-
12V/3A
Pequeno
>2V OK
2-10.2V
0.8-1.5A
10.2-11.8V
0.8A
11.8V
0.8-2.3A
11.8-13.5V
3A
13.5-14.0V
2.3-1.5A
14.0V
1.5-0.8A
14.0-14.2V
0.4A
14.2-12.8V
0A
6V/3A
Norma
>2V OK
2-5.1V
0.8-1.5A
-
5.1-5.9V
0.8A
2-10.6V
1.5A
5.9V
0.8-2.3A
10.6V
1.5-4.5A
5.9-6.8V
3A
10.6-13.9V
6A
6.8-7.0V
2.3-1.5A
13.9-14.6V
4.5-3A
7.0V
1.5-0.8A
14.6V
0.75A-0A
7.0-7.1V
0.4A
7.1-6.4V
0A
12V/1A
Reparação
>2V OK
2-14.2V
1A
14.2V
0-1A
2h Max
-
12V/6A
Baterias de
lítio-íon
12V/6A
Abaste
-cimento
13.5V
6A MAX

96
1. Vericar o estado inicial da bateria, tensão, estado de
carga e estado de saúde para assegurar a estabilidade
da bateria antes de a carregar.
2. Carregar a bateria com corrente de pulso para quebrar
os sulfatos que se acumularam ao longo do tempo na
bateria envelhecida para prolongar a sua vida útil.
3. Carregar a bateria com corrente fraca para se preparar
para a carga de alta corrente.
4. Carregar a bateria com três fases de corrente
constante que aumentam gradualmente para
otimizar o carregamento.
5. Carregar a bateria com corrente predenida até
atingir 80%.
6. Carregar a bateria com corrente trickle até atingir os
90%.
7. Manter a tensão no valor pré-denido até a corrente
de carga cair para 12,5% do valor máximo e continuar
a carregar a energia até 95%.
8. Carregar a 12,5% da corrente máxima pré-denida até
a bateria ser carregada a 100%.
9. Vericar se a tensão é inferior ao valor pré-denido. Se
for voltar ao passo 8.

97
Modo de Encantamento Autónomo
Modo de Carregamento Bluetooth
1. Quando o TB6000Pro é ligado à fonte de alimentação,
os modos de carregamento continuarão a piscar.
Premir o botão de mudança de modo para alternar
entre os modos.
2. Uma vez que o modo tenha sido selecionado, o
carregamento será iniciado automaticamente em 3
segundos.
1. Uma vez que tenha conrmado as etapas de
preparação, ligue o adaptador a uma tomada de
parede e prenda os grampos aos terminais da bateria.
2. Abra o TB6000Pro, toque no botão de Carregamento
Inteligente/Carregamento Rápido.
•Carregamento Inteligente:
Sob este modo, o teste de bateria é automaticamente
realizado antes e depois do carregamento. Basta
introduzir a informação básica da bateria e seleccionar
o modo de carregamento desejado, depois tocar em
Iniciar o carregamento. Será gerado automaticamente
um relatório de carga durante o processo.
Nota:
1. O carregamento inteligente só é aplicável a baterias
de chumbo-ácido de 12V (baterias de iões de lítio ou
6V não são suportadas).
2. Para garantir a precisão dos resultados dos testes,
utilizar apenas os grampos de bateria para ligar aos
terminais da bateria em modo de Carregamento
Inteligente.
•Carregamento rápido:
Sob este modo, estão disponíveis 6 modos de
carregamento, bem como o modo de bricolage. É
possível escolher o modo de carregamento

98
predenido para carregar diretamente, ou
personalizar o modo de carregamento de acordo com
o estado da bateria.
3. Siga as instruções na tela do aplicativo para concluir o
processo de carregamento da bateria.
SEÇÃO 4
COMO REALIZAR UM TESTE
DE BATERIA?
• A função de teste de baterias só é aplicável a baterias
de chumbo-ácido de 12V.
• O chicote de os do terminal do anel incluído não é
compatível com testes da bateria. Utilize apenas os
grampos de bateria para ligar aos terminais da bateria
ao realizar um teste de bateria.
1. Toque em Gestão de Teste, depois em Teste de Bateria.
2. Siga as instruções na tela do aplicativo para realizar o
teste da bateria.

99
SEÇÃO 5
FAQ
P: Como seleccionar o modo de carregamento?
R: Seleccione o modo de carregamento de acordo com
o tipo e capacidade da bateria. Recomendamos que
o valor actual não deve ser superior a 20% do valor da
capacidade da bateria. Por exemplo, para uma bateria
de 20Ah, recomendamos que a corrente não seja
superior a 4A.
P: TB6000Pro irá parar de carregar automaticamente
depois de a bateria estar completamente carregada?
R: Sim. TB6000Pro adopta um carregamento inteligente
de 9 etapas. Quando a bateria estiver completamente
carregada, irá parar automaticamente de carregar
sem o risco de sobrecarga. Se mesmo assim deixar a
bateria ligada, o carregador continuará a monitorizar
o estado da bateria e começará automaticamente a
carregar quando a voltagem da bateria cair abaixo do
seu limiar alvo.
P: TB6000Pro pode carregar várias baterias
simultaneamente?
R: Sim. Por favor, ligue corretamente estas baterias em
série ou em paralelo antes de as carregar. Se tiver
dúvidas sobre a ligação, pode consultar o fabricante
da bateria ou contactar-nos para obter ajuda.
P: O modo REPAIR será aplicável a todos os tipos de
bateria?
R: Não, não pode ser utilizado para baterias de lítio. No
entanto, é aplicável a todos os tipos de baterias de
chumbo-ácido.
P: Porque é que algumas baterias não podem ser usadas
normalmente após reparação?
R: Por favor consulte o fabricante da bateria se a bateria
está completamente danicada e se pode ser

100
reparada.
P: Porque é que algumas baterias não podem ser
carregadas?
R: Geralmente, uma bateria de 12V com uma voltagem
inferior a 8,5V é danicada e não pode ser carregada
normalmente.Se a bateria estiver danicada ou se for
comunicado um erro Er4, pode seleccionar o modo de
alimentação de 12V para recuperar o carregamento da
bateria.
P: Por que a voltagem da bateria cai para cerca de 13V
após ser carregada acima de 14V (ou quando a carga
pára)?
R: A voltagem de uma bateria de chumbo-ácido de 12V
totalmente carregada está entre 12,8V e 13,4V. Para um
carregamento efetivo, a voltagem da bateria atingirá
entre 14V e 14.4V durante o tempo de carregamento.
Portanto, a voltagem da bateria cairá para cerca de
12,8V a 13,4V quando a carga parar (ou quando a carga
entrar no Passo 9).
Depois que a bateria estiver totalmente carregada,
o carregador retomará a carga com uma pequena
corrente se a voltagem da bateria cair para 12.8V. Você
também pode mudar a voltagem de carregamento de
Modo Bateria de Chumbo-ácido no Passo 9 do Modo
Expert.
P: O TB6000Pro Bluetooth não pode ser encontrado ou
conectado?
R: Verique se o ícone do Bluetooth na tela do
carregador pisca.
Se ele piscar, ligue o Location Services e o Bluetooth
em seu telefone (o que é necessário para obter
os dispositivos Bluetooth disponíveis). Então abra
o aplicativo e toque no ícone do Bluetooth para
estabelecer a conexão.
Se ele permanecer imóvel, o carregador foi conectado
a outro dispositivo.

101
SEÇÃO 6
GARANTIA
Garantia limitada de três anos da TOPDON
A TOPDON garante ao seu comprador original que
os produtos da empresa estarão livres de defeitos de
material e mão de obra por 36 meses a partir da data de
compra (Período de Garantia).
Para os defeitos comunicados durante o Período de
Garantia, TOPDON reparará ou substituirá a peça ou
produto defeituoso de acordo com a sua análise e
conrmação de suporte técnico.
TOPDON não será responsável por quaisquer danos
incidentais ou consequentes decorrentes do uso do
dispositivo, má utilização, ou montagem do dispositivo.
Alguns estados não permitem limitações quanto
à duração de uma garantia implícita, pelo que as
limitações acima mencionadas podem não se aplicar ao
utilizador.
Esta garantia limitada é nula sob as seguintes condições:
• Utilização indevida, desmontada, alterada ou reparada
por lojas ou técnicos não autorizados.
• Manuseamento descuidado e violação da operação.
Aviso: Toda a informação neste manual é baseada
na última informação disponível no momento da
publicação e não pode ser dada qualquer garantia pela
sua exatidão ou integralidade. TOPDON reserva-se o
direito de fazer alterações em qualquer altura sem aviso
prévio.

102
ITALIANO

103
LA SICUREZZA È SEMPRE LA
PRIMA PRIORITÀ!
Per la vostra sicurezza, quella degli altri,
del prodotto e del veicolo su cui state
lavorando, LEGGERE ATTENTAMENTE
E ACCERTARSI DI COMPRENDERE
COMPLETAMENTE TUTTE LE ISTRUZIONI
E I MESSAGGI DI SICUREZZA CONTENUTI
IN QUESTO MANUALE. Dato che il
TB6000Pro è una combinazione di tester
batteria e caricabatteria, È NECESSARIO
LEGGERE IL MANUALE DI SERVIZIO DEL
VEICOLO, LE PRECAUZIONI SPECIFICHE
DEL PRODUTTORE DELLA BATTERIA PER
LA BATTERIA e seguire tali precauzioni
e istruzioni prima e durante qualsiasi
procedura di prova o servizio.
LEGGERE TUTTE LE ISTRUZIONI
PRIMA DELL'USO
ESEGUIRE IL TEST SOLO IN UN'AREA BEN
VENTILATA poiché il veicolo produce
monossido di carbonio, un gas tossico e
velenoso, e particolato quando il motore è
in funzione.
FARE SEMPRE ATTENZIONE ALLE PARTI IN
MOVIMENTO (come ventole del liquido di
raffreddamento, pulegge, cinghie) poiché
girano o girano ad alta velocità quando il
motore è in funzione.
INDOSSARE SEMPRE PROTEZIONE OCCHI
APPROVATA per evitare danni da oggetti
appuntiti e liquidi caustici.
104
PORTARE SEMPRE LA MARCIA IN P (PER
CAMBIO AUTOMATICO) O IN FOLLE (PER
CAMBIO MANUALE) E ASSICURARSI CHE IL
FRENO DI STAZIONAMENTO SIA INSERITO.
UTILIZZARE SEMPRE UN MULTIMETRO
DIGITALE CON ALMENO 10 MEGOHM
DI IMPEDENZA quando si effettuano
prove elettriche sui veicoli per evitare di
danneggiare i componenti elettronici di
bordo.
VIETATO FUMARE OVUNQUE VICINO AL
VEICOLO durante il test. Il carburante e
i vapori della batteria sono altamente
inammabili.
ATTENZIONE: L'acido della batteria è
estremamente corrosivo. Se l'acido
viene a contatto con gli occhi, FARLI
ACCURATAMENTE CON ACQUA CORRENTE
FREDDA PER ALMENO 20 MINUTI E
CHIEDERE IMMEDIATAMENTE UN MEDICO.
Se l'acido della batteria viene a contatto
con la pelle o con i vestiti, LAVARE
IMMEDIATAMENTE CON UNA SOLUZIONE
DI ACQUA E BIcarbonato di sodio.
NON TAGLIARE I CAVI DEI PRODOTTI E
NON IMMERGERLI IN ACQUA. Il prodotto
è un dispositivo elettrico che può causare
scosse elettriche e gravi ustioni.
NON TOCCARE LE PARTI CALDE DEL
MOTORE per evitare gravi ustioni. Le parti
del motore diventano molto calde quando
il motore è in funzione.

105
SEZIONE 1
COSA C'È NELLA SCATOLA?
TB6000Pro
Manuale d'uso

106
SEZIONE 2
PANORAMICA DEL
PRODOTTO E DOWNLOAD
DEL SOFTWARE
1. 6 modalità di ricarica della batteria: nella modalità
autonoma, TB6000Pro offre 6 diverse modalità
Standard 12V/6A, Standard 6V/3A, Piccola 12V/3A ,
Batteria agli ioni di litio 12V/6A, Riparazione 12V/1A ,
Alimentazione 12V/6A. (Vedere gura 2.1.1) Una volta
che il caricabatterie è collegato al telefono tramite
BT, è possibile personalizzare il processo di ricarica ei
parametri. (Per i dettagli, fare riferimento alla Sezione 3)
Panoramica dei prodotti
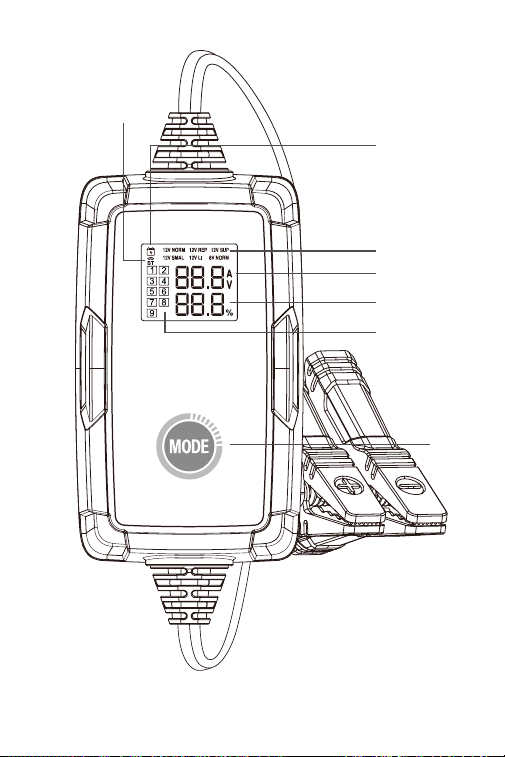
107
Figura 2.1.1
7
6
5
1
2
3
4

108
2. Indicatore dello stato di carica: una volta che
l'adattatore è collegato alla presa e hai confermato
la modalità di carica, l'indicatore si accende e rimane
fermo, altrimenti rimane spento.
3. Indicatore di stato della connessione Bluetooth: se il
TB6000Pro è in modalità autonoma e non è associato
a nessun telefono, l'indicatore Bluetooth continuerà a
lampeggiare. Una volta accoppiato, l'indicatore rimane
fermo.
4. Indicatore delle fasi di ricarica: ti mostra esattamente
in quale fase ti trovi tra le 9 fasi di ricarica.
5. Tensione e corrente di carica in tempo reale: ti
presenta la corrente e la tensione di carica in tempo
reale. Il parametro si aggiorna ogni 2 secondi.
Quando si vericano i seguenti errori, viene visualizzato
il codice di errore corrispondente:
Er1: cortocircuito o inversione di polarità
Er2: Sovratemperatura
Er3: Timeout di carica
Er4: La batteria è danneggiata, passare alla modalità
di alimentazione a 12 V per tentare di recuperare la
batteria.
Er5: Modalità errata, selezionare la modalità di carica a
12 V.
6. Avanzamento della ricarica della batteria
7. Pulsante Modalità: Premere MODE per passare
da una modalità di carica all'altra. Dopo aver
selezionato la modalità di ricarica, la ricarica si avvierà
automaticamente entro 3 secondi.
Nota: Il caricabatterie riprenderà a caricarsi utilizzando
la modalità precedente quando verrà riacceso.
·
Scollegare l'adattatore prima di eseguire i test della batteria
e assicurarsi che i morsetti siano collegati correttamente ai
terminali della batteria.
109
• Attivare il Bluetooth prima di congurare la
connessione.
• PUOI CONFIGURARE IL BLUETOOTH SOLO NELL'APP
TB6000Pro
Come scaricare e collegare il TB6000Pro al telefono?
1. Scaricare e installare l'app
Opzione 1 Scansione del codice QR
Per iOS e Android, puoi aprire la fotocamera sul tuo
telefono e scansionare il codice QR qui sotto per
scaricare l'app.
Nota: Assicurarsi di aver abilitato la funzione
"Scansiona codici QR" per la fotocamera del telefono in
Impostazioni.
Opzione 2 Vai su App Store/Google Play
Per iOS: cerca "BatteryLab" nell'App Store per scaricare
l'app.
Per Android: cerca "TB6000Pro" in Google Play per
scaricare l'app.

110
2. Per connettere il telefono con TB6000Pro tramite
Bluetooth è necessario accenderlo nelle Impostazioni.
3. Oppure puoi attivare il Bluetooth nel Centro di
controllo o nel pannello delle notiche.
4. Aprire l'APP TB6000Pro e toccare l'icona Bluetooth
per stabilire la connessione con l' unità.
Per comprendere le 6 modalità di ricarica fare
riferimento alla tabella sottostante (Figura 3.1.1)
SEZIONE 3 COME CARICARE
UNA BATTERIA?

111
Figura 3.1.1
Per comprendere la ricarica intelligente in 9 fasi, fare
riferimento alla gura 3.1.2
Carica batterie da 12V a
umido, Gel, MF, Cal, EFB e
AGM attraverso una ricarica
intelligente in 9 fasi.
Carica batterie da 6V a
umido, Gel, MF, Cal, EFB e
AGM attraverso una ricarica
intelligente in 9 fasi.
Carica batterie agli ioni di
litio da 12V, incluso il litio
ferro fosfato (LiFePO4).
Fornisce un'alimentazione
in uscita con una tensione
costante di 13,5 V e una
corrente massima di 6
A (81 W). Se la batteria
è danneggiata o viene
segnalato un errore Er4, è
possibile selezionare questa
modalità per recuperare la
carica
della batteria.
Ripara batterie vecchie o
solfatate con corrente ridotta
e corrente a impulsi.
Carica batterie da 12V a
umido, Gel, MF, Cal, EFB
e AGM con una piccola
capacità no a 50 Ah grazie
alla ricarica intelligente in 9
fasi.
Modo
Standard
12V/6 A
Standard
6V/3A
Piccola
12V/3A
Batteria agli
ioni di litio
12V/6A
Ripara-
zione
12V/1A
Aliment-
azione
12V/6A
Voltagem
Máx.
Denição
14.2V
7.1V
14.2V
14.6V
14.2V
13.5V

112
Figura 3.1.2

113
Standard
12V/6A
>2V OK
>2V OK
2-10.2V
1.5-3A
10.2-11.8V
1.5A
11.8V
1.5-4.5A
11.8-13.5V
6A
13.5-14.0V
4.5-3A
14.0V
3-1.5A
14.0-14.2V
0.8A
14.2-12.8V
0A
14.2-12.8V..
0A-0.8A...
14.2-12.8V..
0A-0.4A...
7.1-6.4V..
0A-0.4A...
-
-
Piccola
12V/3A
>2V OK
2-10.2V
0.8-1.5A
10.2-11.8V
0.8A
11.8V
0.8-2.3A
11.8-13.5V
3A
13.5-14.0V
2.3-1.5A
14.0V
1.5-0.8A
14.0-14.2V
0.4A
14.2-12.8V
0A
Standard
6V/3A
>2V OK
2-5.1V
0.8-1.5A
-
5.1-5.9V
0.8A
2-10.6V
1.5A
5.9V
0.8-2.3A
10.6V
1.5-4.5A
5.9-6.8V
3A
10.6-13.9V
6A
6.8-7.0V
2.3-1.5A
13.9-14.6V
4.5-3A
7.0V
1.5-0.8A
14.6V
0.75A-0A
7.0-7.1V
0.4A
7.1-6.4V
0A
Ripara-
zione
12V/1A
>2V OK
2-14.2V
1A
14.2V
0-1A
2h Max
-
Batteria
agli ioni di
litio
12V/6A
Aliment-
azione
12V/6A
13.5V
6A MAX

114
1. Controllare lo stato iniziale, la tensione, lo stato di
carica e lo stato di salute della batteria per garantire la
stabilità della batteria prima di caricarla.
2. Caricare la batteria con corrente a impulsi per
abbattere i solfati che si sono accumulati nel tempo
nella batteria che invecchia per prolungarne la durata.
3. Caricare la batteria con corrente bassa per prepararsi
alla carica ad alta corrente.
4. Caricare la batteria con tre stadi di corrente costante
che aumentano gradualmente per ottimizzare la
carica.
5. Caricare la batteria con la corrente preimpostata no a
raggiungere l'80%.
6. Carica di mantenimento la batteria no a raggiungere
il 90%.
7. Mantenere la tensione al valore preimpostato nché
la corrente di carica non scende al 12,5% del valore
massimo e continuare a caricare la potenza al 95%.
8. Caricare al 12,5% della corrente massima preimpostata
no a quando la batteria non viene caricata al 100%.
9. Vericare se la tensione è inferiore al valore
preimpostato. Se è tornare al passaggio 8.

115
Modalità di ricarica autonoma
Modalità di ricarica Bluetooth
1. Quando TB6000Pro è collegato all'alimentazione, le
modalità di ricarica continueranno a lampeggiare.
Premere il pulsante di commutazione modalità per
passare da una modalità all'altra.
2. Dopo aver selezionato la modalità, la ricarica si avvierà
automaticamente entro 3 secondi.
1. Dopo aver vericato che i passaggi di preparazione
sono stati completati, collegare l'adattatore a una
presa a muro e collegare i morsetti ai terminali della
batteria.
2. Aprire il TB6000Pro, toccare Ricarica Intelligente/
Ricarica Rapida.
·Ricarica intelligente:
In questa modalità, il test della batteria viene
eseguito automaticamente prima e dopo la carica.
È sufciente inserire le informazioni di base sulla
batteria e selezionare la modalità di carica desiderata,
quindi toccare Avvia carica. Durante il processo verrà
generato automaticamente un rapporto di carica.
Nota:
1. La ricarica intelligente è applicabile solo alle batterie
al piombo-acido da 12 V (le batterie agli ioni di litio o
da 6 V non sono supportate).
2. Per garantire l'accuratezza dei risultati dei test,
utilizzare solo i morsetti della batteria per collegarsi
ai terminali della batteria in modalità Ricarica
Intelligente.
·Ricarica rapida:
In questa modalità sono disponibili 6 modalità
di carica, oltre alla modalità fai da te". È possibile

116
scegliere la modalità di carica preimpostata per
caricare direttamente o personalizzare la modalità di
carica in base alle condizioni della batteria.
3. Seguire le istruzioni visualizzate sull'app per
completare il processo di ricarica della batteria.
SEZIONE 4
COME CONDURRE UN TEST
DELLA BATTERIA?
• La funzione di test della batteria è applicabile solo alle
batterie al piombo-acido da 12V.
• L'imbracatura del terminale dell'anello incluso non è
compatibile con il test della batteria. Quando si esegue
un test dellabatteria, utilizzare solo i morsettidella
batteria per collegarli aiterminali della stessa.
1. Toccare Gestione test, quindi toccare Test batteria.
2. Seguire le istruzioni visualizzate sull'app per effettuare
il test della batteria.

117
SEZIONE 5
DOMANDE FREQUENTI
D: Come selezionare la modalità di ricarica?
R: Selezionare la modalità di ricarica in base al tipo e
alla capacità della batteria. Si consiglia che il valore
della corrente non sia superiore al 20% del valore della
capacità della batteria. Ad esempio, per una batteria
da 20Ah, consigliamo che la corrente non sia superiore
a 4A.
D: TB6000Pro smetterà di caricarsi automaticamente
dopo che la batteria è completamente carica?
R: Sì. TB6000Pro adotta la ricarica intelligente in 9 fasi.
Quando la batteria è completamente carica, smetterà
automaticamente di caricarsi senza il rischio di
sovraccarico. Se si lascia ancora la batteria collegata,
il caricabatterie continuerà a monitorare lo stato della
batteria e inizierà automaticamente a caricarsi quando
la tensione della batteria scende al di sotto della soglia
target.
D: TB6000Pro può caricare più batterie
contemporaneamente?
R: Sì. Si prega di collegare correttamente queste batterie
in serie o in parallelo prima della ricarica. In caso di
domande sulla connessione, è possibile consultare il
produttore della batteria o contattarci per assistenza.
D: La modalità RIPARAZIONE è applicabile a tutti i tipi di
batteria?
R: No, non può essere utilizzato per le batterie al litio.
Tuttavia, è applicabile a tutti i tipi di batterie al piombo.
D: Perché alcune batterie non possono essere utilizzate
normalmente dopo la riparazione?
R: Consultare il produttore della batteria se la batteria è
completamente danneggiata e se può essere riparata.

118
D: Perché alcune batterie non possono essere caricate?
R: Generalmente, una batteria da 12V con una tensione
inferiore a 8,5V è danneggiata e non può essere
caricata normalmente.Se la batteria è danneggiata o
viene segnalato un errore Er4, è possibile selezionare
la modalità di alimentazione a 12 V per ripristinare la
carica della batteria.
D: Perché la tensione della batteria scende a circa 13
V dopo che è stata caricata a oltre 14 V (o quando la
carica si interrompe)?
R: La tensione di una batteria al piombo-acido da 12 V
completamente carica è compresa tra 12,8 V e 13,4 V.
Per una carica efcace, la tensione della batteria deve
raggiungere una tensione compresa tra 14V e 14,4V
durante la carica. Pertanto, la tensione della batteria
scenderà a circa 12,8V - 13,4V quando la carica si
interrompe (o quando la carica entra nella Fase 9).
Dopo che la batteria è stata completamente caricata,
il caricabatterie riprenderà la carica con una bassa
corrente se la tensione viene rilevata scendere a 12,8V.
È inoltre possibile modicare la tensione di ripresa
della carica della modalità Batteria al piombo nella
Fase 9 della modalità Esperto.
D: Non è possibile trovare o collegare il Bluetooth della
TB6000Pro ?
R: Controllare se l'icona Bluetooth sullo schermo del
caricatore lampeggia.
Se lampeggia, attivare i Servizi di localizzazione
e il Bluetooth sul telefono (necessari per rilevare
i dispositivi Bluetooth disponibili). Quindi aprire
l'applicazione e toccare l'icona Bluetooth per stabilire
una connessione.
Se l'icona rimane ssa, il caricabatterie è stato
collegato a un altro dispositivo.

119
SEZIONE 6
GARANTIA
Garanzia limitata di tre anni di TOPDON
TOPDON garantisce al suo acquirente originale che
i prodotti dell'azienda saranno esenti da difetti di
materiale e lavorazione per 36 mesi dalla data di
acquisto (Periodo di garanzia).
Per i difetti segnalati durante il periodo di garanzia,
TOPDON riparerà o sostituirà la parte o il prodotto
difettoso in base all'analisi e alla conferma del supporto
tecnico.
TOPDON non sarà responsabile per eventuali danni
incidentali o consequenziali derivanti dall'uso, uso
improprio o montaggio del dispositivo.
Alcuni stati non consentono limitazioni sulla durata
di una garanzia implicita, pertanto le limitazioni di cui
sopra potrebbero non essere applicabili all'utente.
Questa garanzia limitata è nulla nelle seguenti
condizioni:
• Usato in modo improprio, smontato, alterato o riparato
da negozi o tecnici non autorizzati.
• Manipolazione negligente e violazione dell'operazione.
Avviso: tutte le informazioni contenute in questo
manuale si basano sulle ultime informazioni disponibili
al momento della pubblicazione e non può essere fornita
alcuna garanzia per la sua accuratezza o completezza.
TOPDON si riserva il diritto di apportare modiche in
qualsiasi momento senza preavviso.

120

121
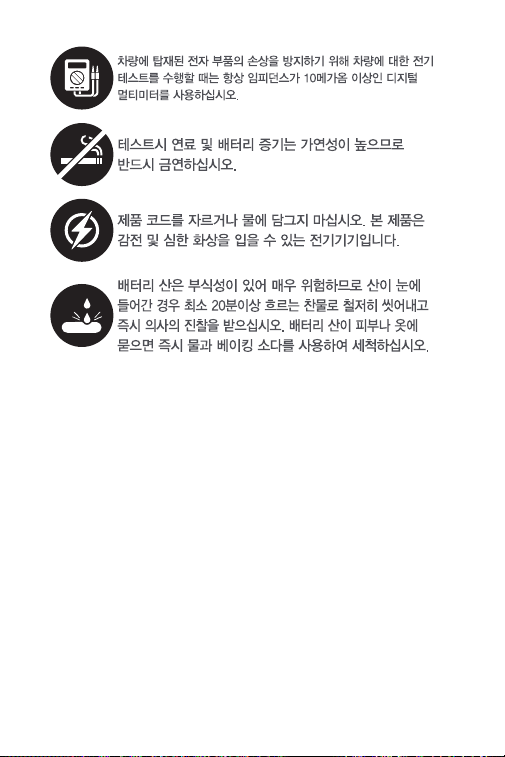
122

123
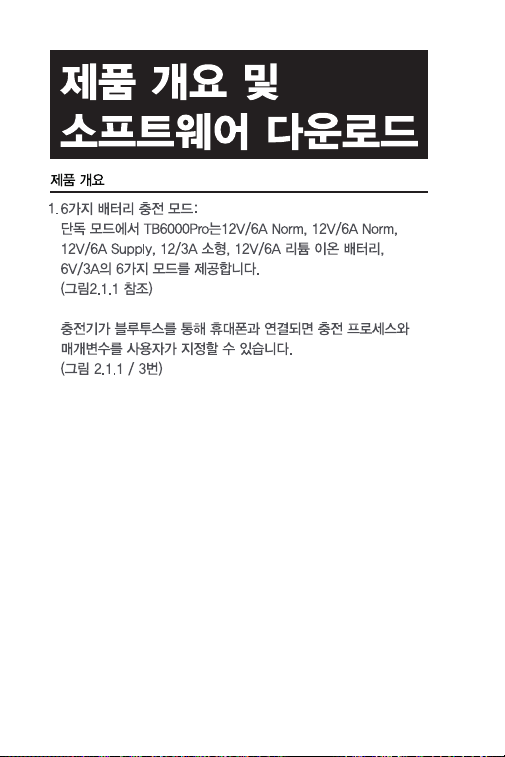
124
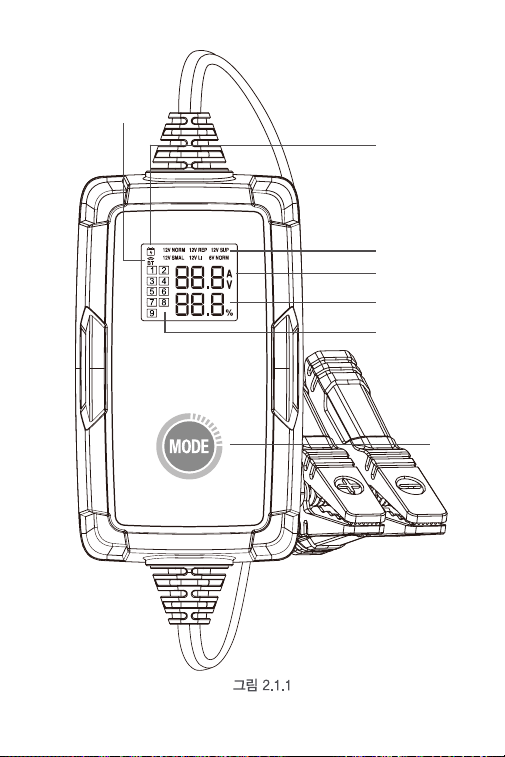
125
7
6
5
1
2
3
4
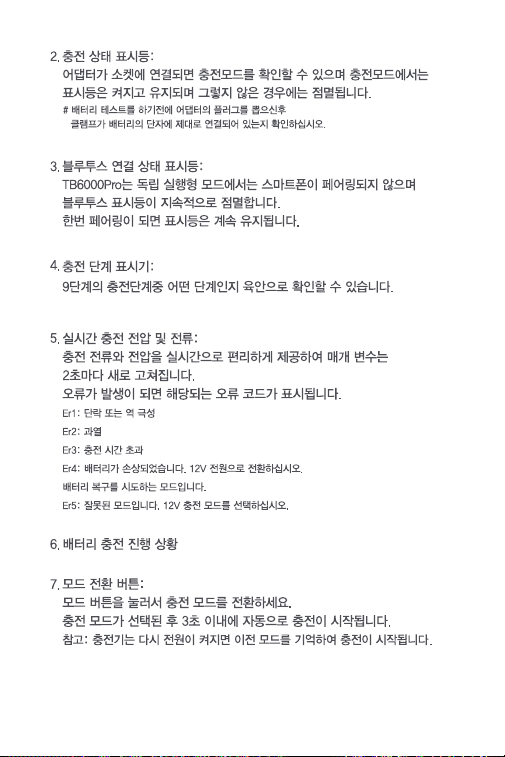
126
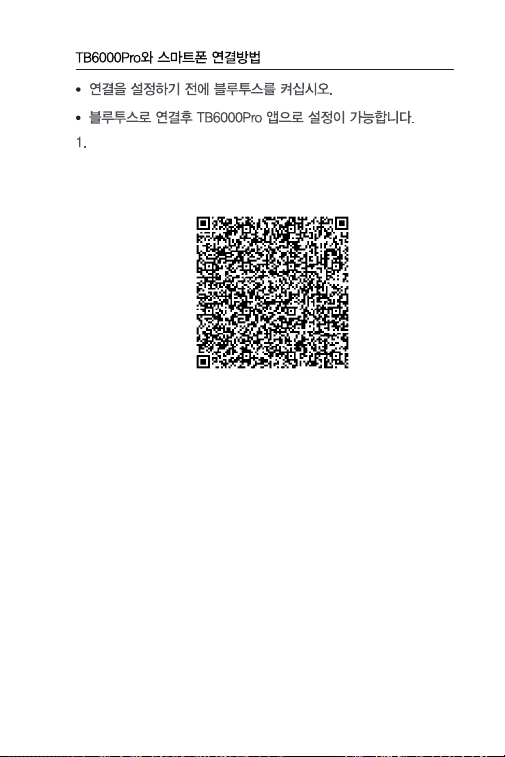
127
2 가지 방법으로 앱을 다운로드후 설치하십시오 .
옵션 1 QR 코드 스캔
iOS 와 Android 기종의 휴대폰 모두 카메라를 실행후 QR 코
드를 스캔하여 앱을 다운로드 하십시오 .
참고 : 설정에서 휴대폰 카메라의 "QR 코드 스캔 " 기능이 활
성화했는지 확인하십시오 .
옵션 2 앱 스토어 / 구글플레이에서 다운로드
iOS 의 경우 : 앱 스토어에서 "BatteryLab" 을 검색하여 앱
을 다운로드 하십시오 .
Android 의 경우 : 구글 플레이에서 "TB6000Pro" 를 검색
하여 앱을 다운로드 하십시오 .
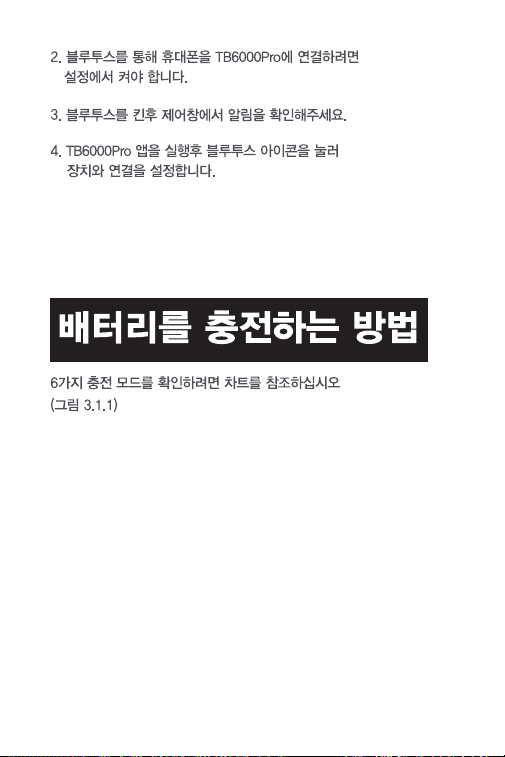
128
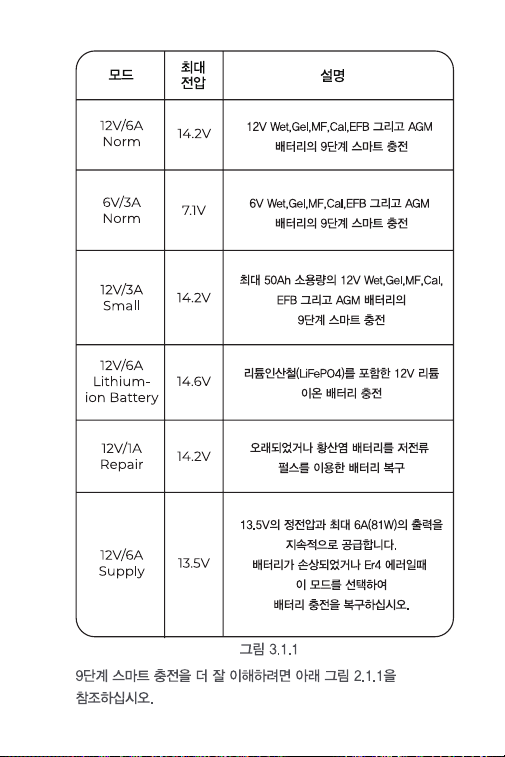
129
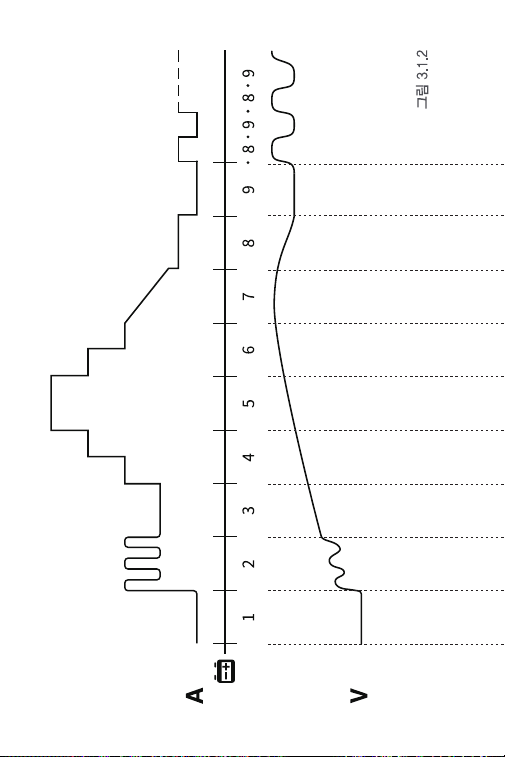
130

131
Standard
12V/6A
>2V OK
>2V OK
2-10.2V
1.5-3A
10.2-11.8V
1.5A
11.8V
1.5-4.5A
11.8-13.5V
6A
13.5-14.0V
4.5-3A
14.0V
3-1.5A
14.0-14.2V
0.8A
14.2-12.8V
0A
14.2-12.8V..
0A-0.8A...
14.2-12.8V..
0A-0.4A...
7.1-6.4V..
0A-0.4A...
-
-
Piccola
12V/3A
>2V OK
2-10.2V
0.8-1.5A
10.2-11.8V
0.8A
11.8V
0.8-2.3A
11.8-13.5V
3A
13.5-14.0V
2.3-1.5A
14.0V
1.5-0.8A
14.0-14.2V
0.4A
14.2-12.8V
0A
Standard
6V/3A
>2V OK
2-5.1V
0.8-1.5A
-
5.1-5.9V
0.8A
2-10.6V
1.5A
5.9V
0.8-2.3A
10.6V
1.5-4.5A
5.9-6.8V
3A
10.6-13.9V
6A
6.8-7.0V
2.3-1.5A
13.9-14.6V
4.5-3A
7.0V
1.5-0.8A
14.6V
0.75A-0A
7.0-7.1V
0.4A
7.1-6.4V
0A
Ripara-
zione
12V/1A
>2V OK
2-14.2V
1A
14.2V
0-1A
2h Max
-
Batteria
agli ioni di
litio
12V/6A
Aliment-
azione
12V/6A
13.5V
6A MAX
132
133
3 앱의 화면 지시에 따라 배터리 충전 프로세스를 완료합니다
134
앱의 화면 지시에 따라 배터리 테스트를 진행합니다 .
135
136
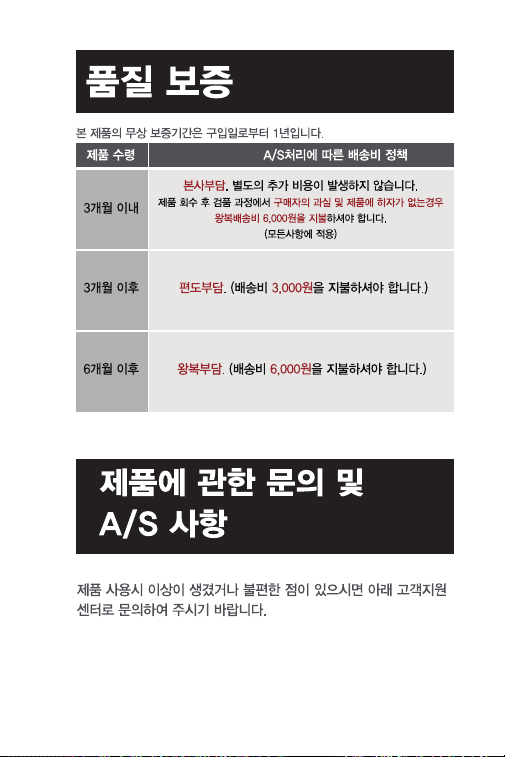
137

138

139

140
日本语
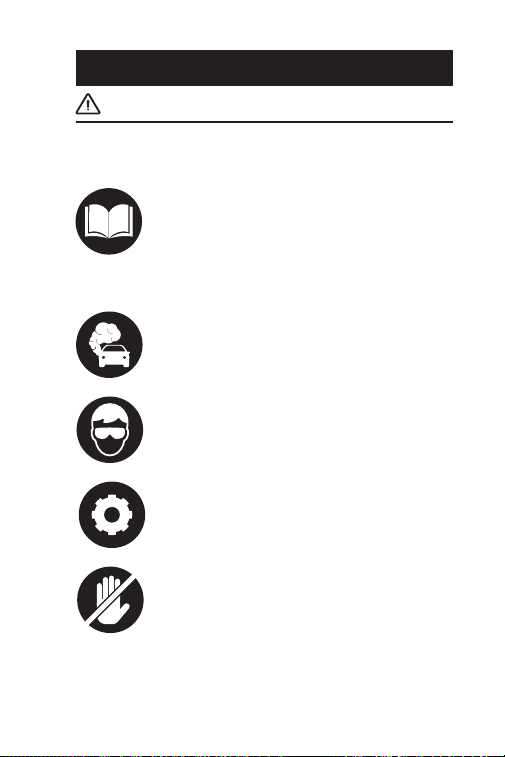
141
安全は永遠に一番大切なものです!
お客様の安全、他人の安全、そして操縦している
車両の安全のために、このマニュアルのすべての
安全についての説明と情報をよく読んでいるとと
もに、完全に理解していることを確認してくださ
い。 車両のサービスマニュアル、バッテリーメー
カーのバッテリーに関する特定の注意事項を読み、
そして、テストまたはサービス手順の前および最
中に、上記の注意事項と指示に従う必要がありま
す。
使用する前に説明をお読みください
エンジンが作動している時、車両は一酸化炭素、
有毒なガス、および粒子状物質を生成するため、
換気の良い場所しかテストをしません。
可動部品(クーラントファン、プーリー、ベルト
など)は、エンジンの回転中に高速で回転または
動くため、常に注意してください。
鋭利な物体や腐食性液体による損傷を防ぐために、
常に承認された安全眼保護具を着用してください。
重度の火傷を防ぐために、高温のエンジンに触れ
ないでください。エンジンが回転しているとき、
エンジンは非常に熱くなってきます。
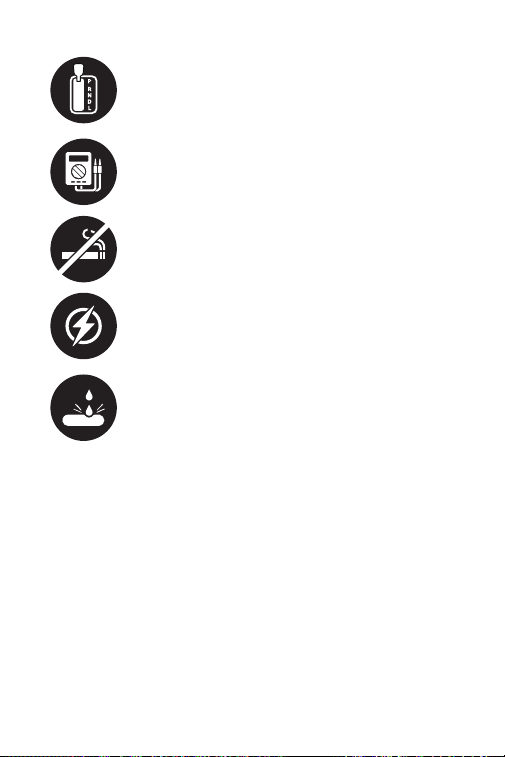
142
常にシフト位置を P(自動変速機の場合)またはニ
ュートラル(手動変速機の場合)に変更し、パー
キングブレーキの係合を確保します。
車両で電気テストを行う場合は、車載電子部品へ
の損傷を防ぐために、インピーダンスが少なくと
も 10 メガオームのデジタルマルチメータを使用す
る必要があります。
テスト中は、車両の近くで喫煙しないでください。
燃料とバッテリーの蒸気は可燃性が高いです。
製品のコードを切ったり、水に浸したりしないで
ください。この製品は、感電や重度の火傷を引き
起こす可能性があります。
警告:バッテリーの酸は非常に腐食性があるから、
目に入った場合は、少なくとも 20 分間、冷水で十
分に洗い流し、直ちに医師の診察を受けてくださ
い。バッテリーの酸が肌や衣服に付着した場合は、
すぐに水と炭酸水で洗ってください。

143
セクション1
その箱には何が入っていますか。
TB6000Pro
ユーザーマニュアル

144
セクション 2
製品概要 & ソフトウェア・ダウン
ロード
1.6 のバッテリー充電モード : スタンド・アロンモードでは、
TB6000Pro は 6 種のモードを提供します。 12V/6A 標準、
12V/1A 修理、12V/6A 電源、12V/3A 小、 12V/6A リチウムイ
オン電池、6V/3A 標準。( 図 2.1.1 参照 ) 充電器がブルー・テ
ィースを介して電話に接続されたら、 充電プロセスとパラメ
ータをカスタマイズすることができます。 ( 詳細はセクショ
ン 3 を参照 )
製品概要

145
図 2.1.1
7
6
5
1
2
3
4

146
2. 充電状態基準:アダプタがソケットに接続され、充電モード
を確認すると、インジケータが点灯してオンのままになりま
す。それ以外の場合はオフのままです。
3. ブルートゥース接続状態のインジケータ:TB6000Pro がスタ
ンドアローンモードで、どの携帯電話ともペアリングされて
いない場合は、ブルートゥースインジケータが点滅し続けま
す。ペアリングされると、インジケータは静止したままにな
ります。
4. 充電ステップのインジケータ:それはあなたが 9 ステップの
充電ステップのうちのどのステップにいるかを正確に示しま
す。
5. リアル・タイムの充電電圧と電流:もし充電電流と充電電圧
をリアルタイムで表示します。 パラメータは 2 秒ごとに更
新されます。 以下のエラーが発生した場合は、対応するエラ
ーコードが表示されます:
Er1: 短絡または逆極性
Er2: 過温度
Er3: 充電タイムアウト(超過)
Er4: バッテリが損傷している場合、12 v 電源モードに切り替
えてバッテリを回復してください。
Er5: モードが間違っている場合は、12 v 充電モードを選択し
てください。
6. バッテリの充電進捗
7. モードボタン:モードボタンを押して充電モードを切り替え
ることができます。充電モードを選択すると、3 秒以内に自
動的に充電が開始されます。
注:電源が再びオンになると、充電器は以前のモードを使用
して充電を再開します。
· バッテリーテストを実施する前に、アダプターを抜いてください。また、
クランプをバッテリーターミナルに適切に接続してください。
どのように TB6000Pro をダウンロードして、携帯電話に接続
しますか。

147
• 接続設定の前にブルートゥースの電源をオンにてください。
• TB6000Pro アプリ内でのみブルートゥースを設定できます。
1. アプリをダウンロードしてインストールします
オプション 1 QR コードをスキャンします
iOS と Android の両方で、携帯電話のカメラを開き、以下の
QR コードをスキャンしてアプリをダウンロードできます。
注 : 設定で携帯電話のカメラの「QR コードのスキャン」機
能が有効になっていることを確認してください。
オプション 2 App Store / Google Play に移動します
iOS の場合 : App Store で「BatteryLab」を検索して、アプ
リをダウンロードします。
Android の場合:Google Play で「TB6000Pro」を検索し、
アプリをダウンロードしてください。

148
2.TB6000Pro とスマートフォンをブルートゥース経由で接続す
るには、[ 設定 ] でブルートゥースをオンにする必要があり
ます。
3. または、コントロール・センターまたは通知パネルでブルー
トゥースをオンにすることができます。
4.TB6000Pro APP を開き、ブルートゥースアイコンをタップし
てユニットとの接続を確立します。
6 つの充電モードについて理解するには、以下の図を参照して
ください ( 図 3.1.1)。
セクション 3 バッテリーを充電す
る方法はなんでしょうか ?

149
9ステップのスマート充電によって、
12V の Wet、Gel、MF、Cal、EFB と
AGM バッテリーを充電します。
9ステップのスマート充電によって、
6V の Wet、Gel、MF、Cal、EFB と
AGM バッテリーを充電します。
リン酸鉄リチウム (LiFePO4) を含む
12 v のリチウムイオン電池を充電し
ます。
出力電源は定電圧 13.5 v、最大電
流 6 a (81 w) です。バッテリーが損
傷している、または Er4 エラーが出
た場合、このモードを選択してバッ
テリー充電を回復することができま
す。
小さな電流とパルス電流で古いまた
は硫酸化されたバッテリを修復しま
す。
9ステップのスマート充電によって、
最大 50 ah の小容量で 12 v の Wet、
Gel、MF、Cal、EFB と AGM バッテ
リーを充電します。
モード
12V/6A
標準
6V/3A
標準
12V/3A
小
12V/6A
リチウムイ
オン電池
12V/1A
修理
12V/6A
電源
14.2V
7.1V
14.2V
14.6V
14.2V
13.5V
マックス
電圧
定義
図 3.1.1
図 3.1.2 を参照して 9 ステップのスマート充電を理解してくだ
さい。

150
図 3.1.2

151
12V/6A
NORM
>2V OK
>2V OK
2-10.2V
1.5-3A
10.2-11.8V
1.5A
11.8V
1.5-4.5A
11.8-13.5V
6A
13.5-14.0V
4.5-3A
14.0V
3-1.5A
14.0-14.2V
0.8A
14.2-12.8V
0A
14.2-12.8V..
0A-0.8A...
14.2-12.8V..
0A-0.4A...
7.1-6.4V..
0A-0.4A...
-
-
12V/3A
SMALL
>2V OK
2-10.2V
0.8-1.5A
10.2-11.8V
0.8A
11.8V
0.8-2.3A
11.8-13.5V
3A
13.5-14.0V
2.3-1.5A
14.0V
1.5-0.8A
14.0-14.2V
0.4A
14.2-12.8V
0A
6V/3A
NORM
>2V OK
2-5.1V
0.8-1.5A
-
5.1-5.9V
0.8A
2-10.6V
1.5A
5.9V
0.8-2.3A
10.6V
1.5-4.5A
5.9-6.8V
3A
10.6-13.9V
6A
6.8-7.0V
2.3-1.5A
13.9-14.6V
4.5-3A
7.0V
1.5-0.8A
14.6V
0.75A-0A
7.0-7.1V
0.4A
7.1-6.4V
0A
12V/1A
REPAIR
>2V OK
2-14.2V
1A
14.2V
0-1A
2h Max
-
12V/6A
LITHIUM
12V/6A
SUPPLY
13.5V
6A MAX

152
スタンド・アロン充電モード
1.TB6000Pro を電源に接続すると、充電モードが点滅し続けま
す。 モード・スイッチ・ボタンを押して、モードを切り替え
ます。
2. モードを選択したら、3 秒以内に自動的に充電が開始されま
す。
1. 充電前にバッテリーの安定性を確保するために、バッテリー
の初期状態、電圧、充電状態、健康状態を確認してください。
2. バッテリをパルス電流で充電し、経年劣化したバッテリ内に
蓄積した 硫酸塩を分解して寿命を延長します。
3. 低電流でバッテリを充電し、大電流充電に準備します。
4.3 ステップの定電流でバッテリを充電し、それを徐々に上昇
させて充電を最適化します。
5. バッテリを設定電流で 80% に達するまで充電します。
6.90% に達するまでバッテリをトリクルリー充電します。
7. 充電電流が最大値の 12.5% に低下するまでに電圧を設定値
のままにし、95% まで充電を続けます。
8 バッテリが 100% に充電されるまで、設定最大電流の 12.5%
で充電します。
9. 電圧が設定値を下回っていないか確認します。設定地を下回
る場合は、ステップ 8 に戻ります。

153
ブルー・ティース充電方式
1. 準備が完了したことを確認したら、アダプターを壁におるコ
ンセントに差し込み、クランプをバッテリー端子に取り付け
ます。
2. TB6000Pro を開き、スマート充電 / クイック充電をタップし
ます。
スマート充電:
このモードでは、充電前後に自動的にバッテリテストを行い
ます。 基本的なバッテリ情報に入り、希望の充電モードを選
択し、 「充電を開始」をタップするだけです。 充電レポートは、
充電中に自動的に生成されます。
注:
1. スマート充電は 12 v の鉛蓄電池にのみ適用可能です ( リ
チウムイオンまたは 6 v 電池は対象外です )。
2. 試験結果の正確性を確保するため、バッテリ・クランプ
を使用してスマート充電モードでバッテリ端子に接続してく
ださい。
快速充電
このモードでは、6 つの充電モードと DIY モードが利用可能
です。 プリセット充電モードを選択して直接充電すること
も、 バッテリーの状態に応じて充電モードをカスタマイズす
ることもできます。
3. アプリケーション画面の指示に従って、バッテリ充電プロセ
スを完了します。

154
セクション 4
バッテリー・テストの方法はなんで
しょうか ?
• バッテリー・テスト機能は 12 v 鉛蓄電池のみに適用。
• 付属のリング端子ハーネスはバッテリテストと互換性があり
ません。バッテリー・テストの際は、バッテリー・クランプ
を使用してバッテリー端子に接続してください。
1.「テスト管理」をタップし、次は「バッテリー・テスト」を
タップします。
2. アプリケーション画面の指示に従ってバッテリテストを行い
ます。

155
セクション 5
FAQ
Q: 充電モードの選択方法はなんでしょうか ?
A: バッテリーの種類や容量に応じて充電モードを選択してくだ
さい。電流値はバッテリ容量値の 20% を超えないようにす
ることをお勧めします。たとえば、20Ah バッテリの場合、
電流は 4A 以下にすることをお勧めします。
Q:TB6000Pro はバッテリーが完全に充電された後、自動的に
充電を停止しますか ?
A: そうです。TB6000Pro は 9 ステップのスマート充電を採用
します。バッテリーが完全に充電されると、過充電の危険性
なく自動的に充電を停止します。 それでもバッテリを接続し
たままにしておくと、充電器はバッテリの状態を監視し続け、
バッテリ電圧が目標スレッショルドを下回ると自動的に充電
を開始します。
Q:TB6000Pro は複数の電池を同時に充電できますか ?
A: そうです。これらの電池を直列または並列に正しく接続して
から充電してください。 接続についてご不明な点がございま
したら、バッテリーメーカーにお問い合わせいただくか、弊
社までお問い合わせください。
Q: 修理モードはすべてのバッテリータイプに適用できますか ?
A: リチウム電池には使えません。しかし、すべてのタイプの鉛
蓄電池に適用できます。
Q: 修理後、一部のバッテリーが正常に使用できないのはなぜで
すか ?
A: 電池が完全に破損していないか、修理できるかどうかは電池
メーカーにお問い合わせください。
Q: 充電できない電池があるのはなぜですか ?
A: 一般的に、8.5 v より低い電圧の 12 v バッテリは損傷したら、
正常に充電することができません。バッテリが損傷している、
または Er4 エラーが出た場合、12 v 電源モードを選択してバ
ッテリ充電を回復することができます。

156
Q:14 v 以上に充電された後 ( または充電が停止したとき )、バ
ッテリ電圧が約 13 v に低下するのはなぜですか ?
A: 完全充電された 12 v 鉛蓄電池の電圧は 12.8 v ~ 13.4 v です。
バッテリ電圧は充電時間中に 14 v ~ 14.4 v の間にし、充電を
効率的にします。 したがって、充電が停止するとき ( または
充電がステップ 9 に入るとき )、 バッテリ電圧は約 12.8 v ~
13.4 v に低下します。 バッテリが完全に充電された後、バッ
テリ電圧が 12.8 v まで低下することが検出される と、充電
器は小さな電流で充電を再開します。エキスパートモードの
ステップ 9 で鉛蓄電池モードの充電再開電圧を変更すること
もできます。
Q:TB6000Pro ブルートゥースが発見できない、または接続で
きないことはなぜですか。
A: 充電器画面のブルートゥースのアイコンが点滅しているかを
確認します。 点滅したら、携帯電話の位置情報サービスとブ
ルートゥースをオンにします ( 利用 可能なブルートゥースデ
バイスを取得するために必要です )。 次に、アプリを開き、
ブルートゥースのアイコンをタップして接続を確立します。
それでも動作しない場合は、充電器が別のデバイスに接続し
てください。

157
セクション 6
保証
TOPDON の 1 年間の限定保証
TOPDON は、購入日から 12 ヶ月以内(保証期間)に材料とプ
ロセスが欠陥がないことを元の購入者に保証します。
保証期間内に報告された欠陥について、TOPDON は技術サポー
トに基づいて欠陥部品や製品の修理または交換を分析および確
認します。
TOPDON は、デバイスの使用、誤用、や取り付けによる付随的
または結果的な損害に対して責任を持っていません。
TOPDON 保証ポリシーと現地の法律は何かの競合がある場合
は、現地の法律に準拠してください。
次の場合は、この限定保証は無効です。
• 無許可店舗や技術者による誤用、取り外し、変更、修理
• 不注意な処理や不適切な操作
知らせこのマニュアルのすべての情報は、出版時に利用可能な
最新の情報に基づいて、正確性や完全性は保証されていません。
TOPDON は予告ないで変更する権利を保持しています。

158
安全上の注意
1. この注意事項をよくお読みください。
2. 本製品を湿気のある場所に置かないでください。
3. 電源は仕様に合ったものを使用してください。
4. 使用条件の整わない場所に放置しないでください。本製品の
使用環境温度は 25℃以下です。(标黄的温度以实际产品温度为
准)
5. 本製品を水滴のかかる場所に設置しないでください。
6. 本製品は主電源コンセントの近くに設置し、遮断装置として
のコンセントに容易に手が届くようにしてください。
7. 屋内での使用のみのために。
8. 出力プラグの極性:センターは、陽極である。
9. このスイッチングモード電源は、故障や部品不良の場合には、
サービスパーソナルによって修復されるものではない。
10. 本製品は、家庭ごみと一緒に廃棄してはならない。本製品は、
電気 · 電子機器のリサイクルのために承認された場所に配置す
る必要があります。 廃棄物を回収 · リサイクルすることで、天
然資源を節約し、必ず製品が環境に優しく、健康的な方法で配
置されていることを確認。

159
Scan the QR code for more support!