
Technical Support and E-Warranty Certificate www.vevor.com/support
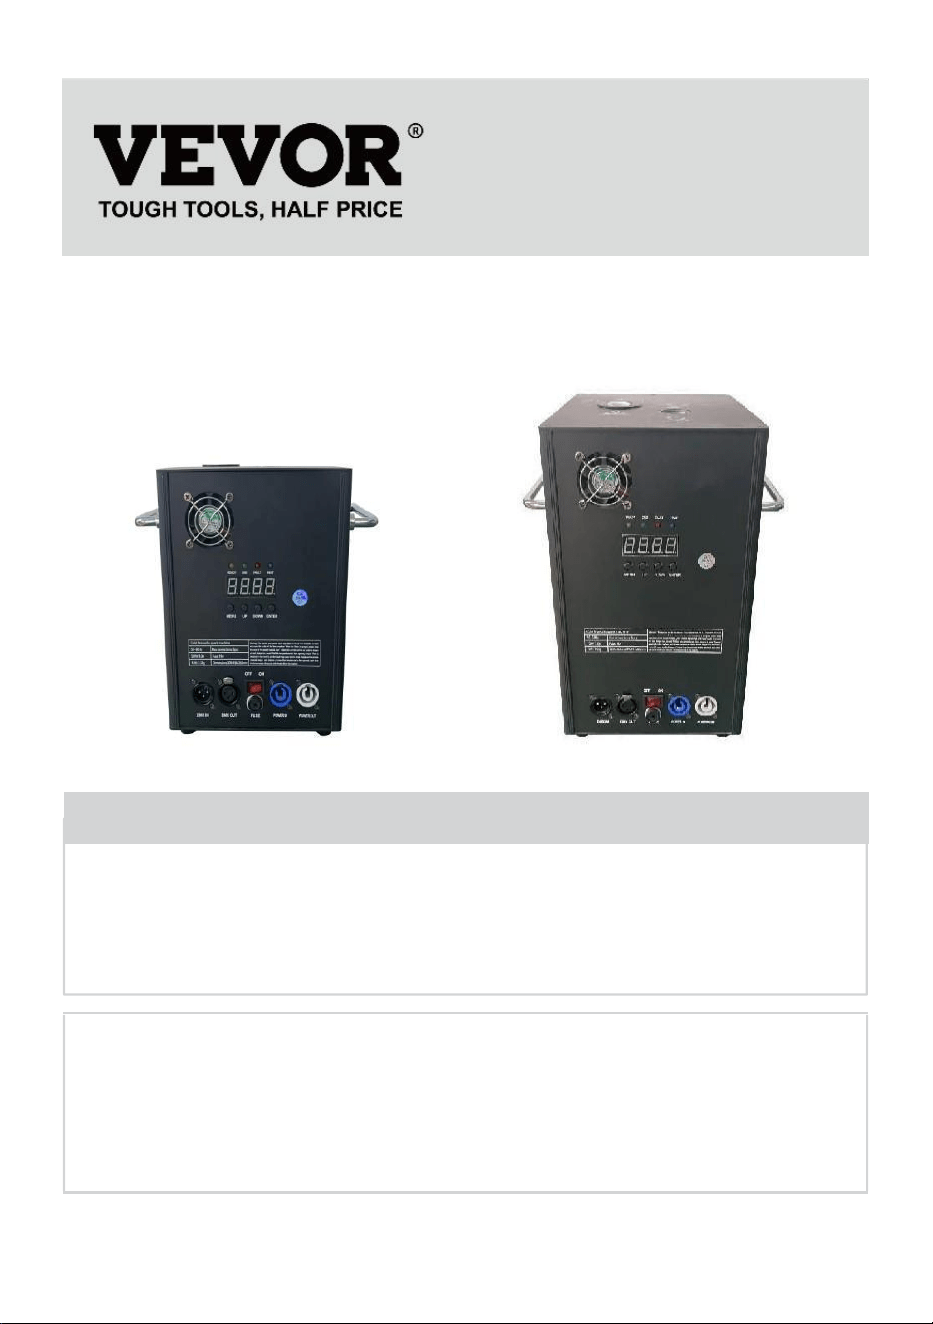
COLD SPARK MACHINE
MODEL:BJY-PHJ500u1/BJY-PHJ500u2/BJY-PHJ700u1/BJY-PHJ700u2
We continue to be committed to provide you tools with competitive price.
"Save Half", "Half Price" or any other similar expressions used by us only represents an
estimate of savings you might benefit from buying certain tools with us compared to the major
top brands and does not necessarily mean to cover all categories of tools offered by us. You
are kindly reminded to verify carefully when you are placing an order with us if you are
actually saving half in comparison with the top major brands.
- 1 -
MODEL:
BJY-PHJ500u1 / BJY-PHJ500u2 BJY-PHJ700u1 / BJY-PHJ700u2
Have product questions? Need technical support? Please feel free to
contact us:
Technical Support and E-Warranty Certificate
www.vevor.com/support
NEED HELP? CONTACT US!
This is the original instruction, please read all manual instructions
carefully before operating. VEVOR reserves a clear interpretation of our
user manual. The appearance of the product shall be subject to the
product you received. Please forgive us that we won't inform you again if
there are any technology or software updates on our product.
COLD SPARK
MACHINE

- 2 -
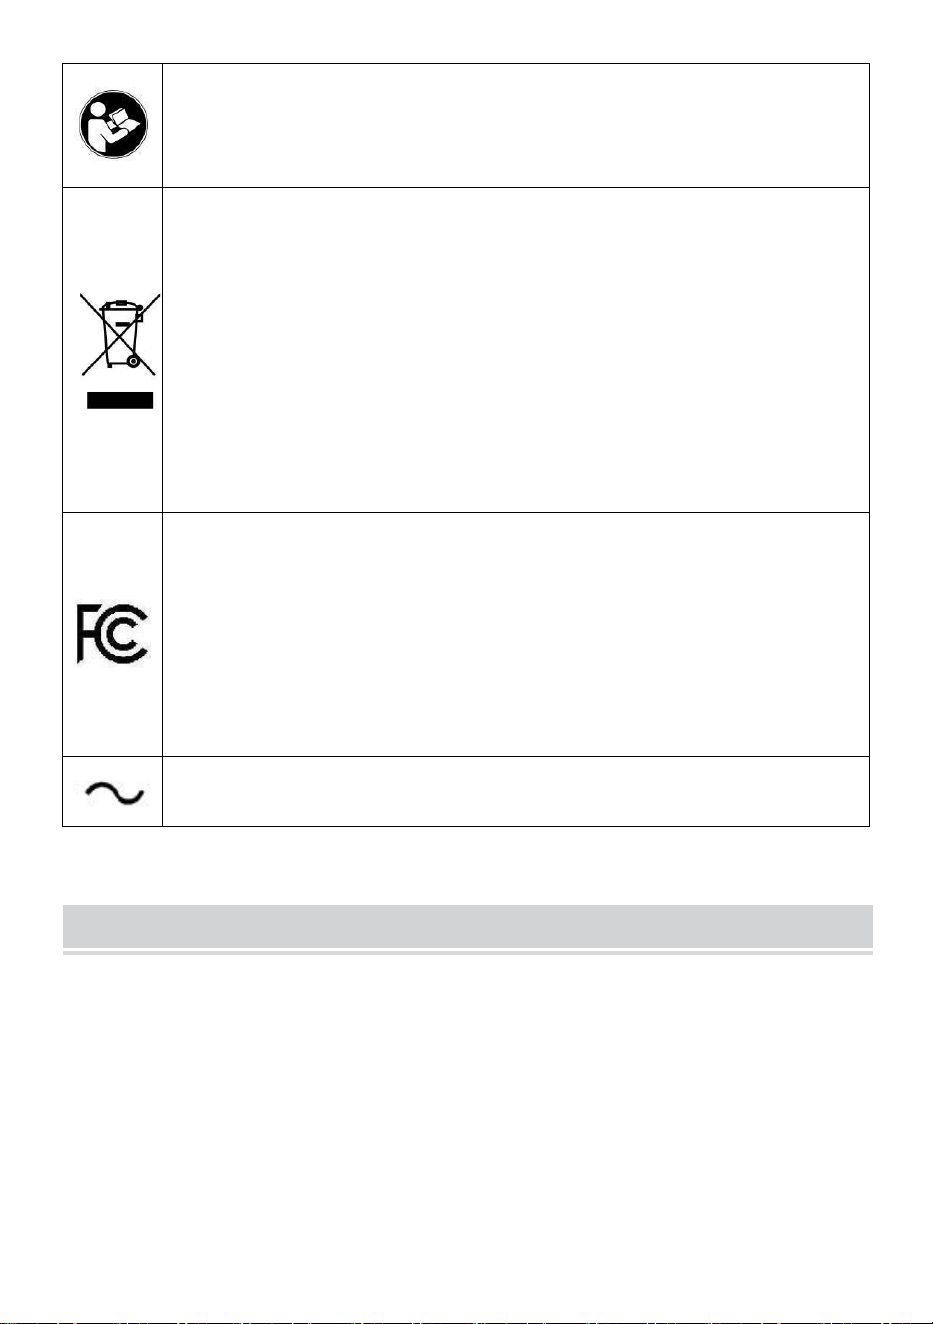
Warning-To reduce the risk of injury, user must read instructions
manual carefully.
CORRECT DISPOSAL
This product is subject to the provision of European Directive
2012/19/EC. The symbol showing a wheelie bin crossed
through indicates that the product requires separate refuse
collection in the European Union. This applies to the product
and all accessories marked with this symbol. Products marked
as such may not be discarded with normal domestic waste but
must be taken to a collection point for recycling electrical and
electronic devices.
FCC statement:
This device complies with Part 15 of the FCC Rules. Operation
is subject to the following two conditions:(1)This device may not
cause harmful interference, and (2)this device must accept any
interference received, including interference that may cause
undesired operation.
Alternating current
SAFETY INSTRUCTIONS AND OPERATING INSTRUCTIONS
1.Please make sure the Ti composite powder is dry enough before you
add it. The powder must be clean, with small particles, without too much
impurity.
2.When you don't use the machine for a long time to keep the powder from
dampness, please pour out the powder and keep it sealed for reserve.
3.When the machine is powered on, there is a danger of electric shock
and high-temperature burns. Please do not attempt to open the machine or
disassemble and debug any part of the machine.

- 3 -
4.Keep the electronic fireworks machine dry, please do not use it in rainy
or snowy days.
5.Fix the device with the screw holes on the bracket. Make sure the
equipment is securely fastened to prevent vibration and movement during
operation, and always check that the structure supporting the equipment is
strong enough to withstand equipment that is at least 10 times the weight
of the equipment.
6.The equipment must be fixed by professionals in places out of reach of
people, and no one can pass under or over the crosswalk.
7.Note: There is a danger of explosion if the battery is improperly placed.
Only replace the same or equivalent types.
8.If you are in doubt about whether the battery has been swallowed or
Introduced to other parts of the body, contact a doctor immediately. Before
cleaning the device, disconnect it from the mains if connected. Do not use
harsh cleaners. Wipe off dust or dirt from the product with a clean cloth. We
are not responsible for damage caused by incorrect handling, improper use
or wear and tear, We reserve the right to make technical modifications.
9.The consumable cover at the top of the equipment must be closed to
prevent accidental ejection. Consumables should be stored in a dry and
sealed environment to prevent moisture.
10.Before and after the performance, you should observe whether there
are nodules in the nozzle. If so, it needs to be cleaned up. These modules
will affect the fireworks effect and even damage the spark machine.
11.A single electronic fireworks power cord (sprayer power cord) can only
be connected in series for up to 6 groups. Too much series connection can
lead to damage or fire.
12.The maximum run time is 5 minutes. Reusable, but should not overheat
the machine. Movement and handling of the machine while in use is
prohibited.
13.When loading consumables, make sure that the machine is turned off.
After putting it away, please cover it to prevent the garbage from falling into
the feed inlet and causing the machine to be blocked.
14.Prevent anything from entering the nozzle, clear obstructions before

- 4 -
operation
15.To avoid fire or electric shock hazards, do not expose this device to rain
or moisture.During operation, make sure that there are no flammable
objects near the equipment.
16.Install the equipment in a well-ventilated place, at least 50cm away
from any surface. Make sure the ventilation slots are not blocked.
17.Disconnect the equipment from the power supply before any operation
or maintenance.
18.If something goes wrong, stop the equipment immediately and don't
repair it yourself. Improper maintenance will lead to damage and failure.
Contact technical support for approval. Only use the same spare parts as
the original ones to ensure that the power cord is not blocked or damaged.
19.Replace the fuse: unplug the device from the power supply. Remove
the fuse holder from its original position with a screwdriver. Remove the
blown fuse and replace it with a fuse with the same characteristics.
Re-screw the screws to connect the equipment to the power supply.
20.Warning: If the fuse is still blown after replacing it, please stop using it.
Please contact customer support for further instructions. Continued use
may cause serious damage.
21.Warning about remote control batteries: Used batteries should not be
thrown away with household waste, but should be collected at a separate
collection point.
SAVE THESE INSTRUCTIONS
Precautions:
• After use, the consumables must be cleaned for 30 seconds by pressing
the "D" button!
• Stop heating operation if fireworks are not sprayed for a long time
• Prohibition of letting the machine tip over.
• Do not touch the nozzle with your hands.
• Prohibition of continuous work with the machine for 30 minutes.
• The fireworks machine must be idle for 2 minutes without powder after
each use.
- 5 -
• The powder in the powder tank should be cleaned and poured out for
recycling in time,and should not be piled up.
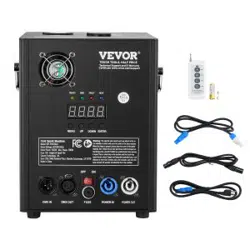
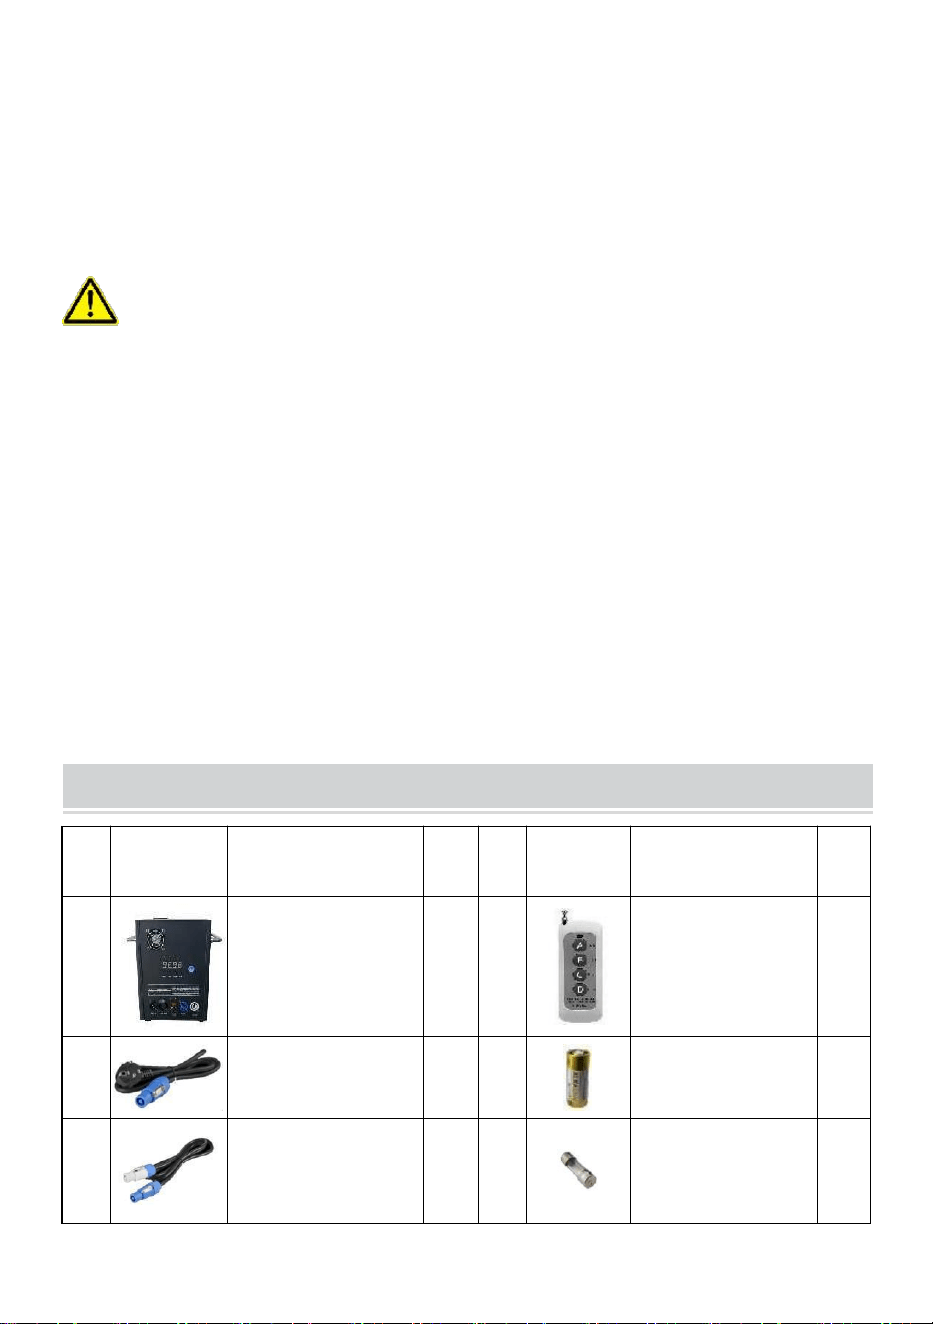
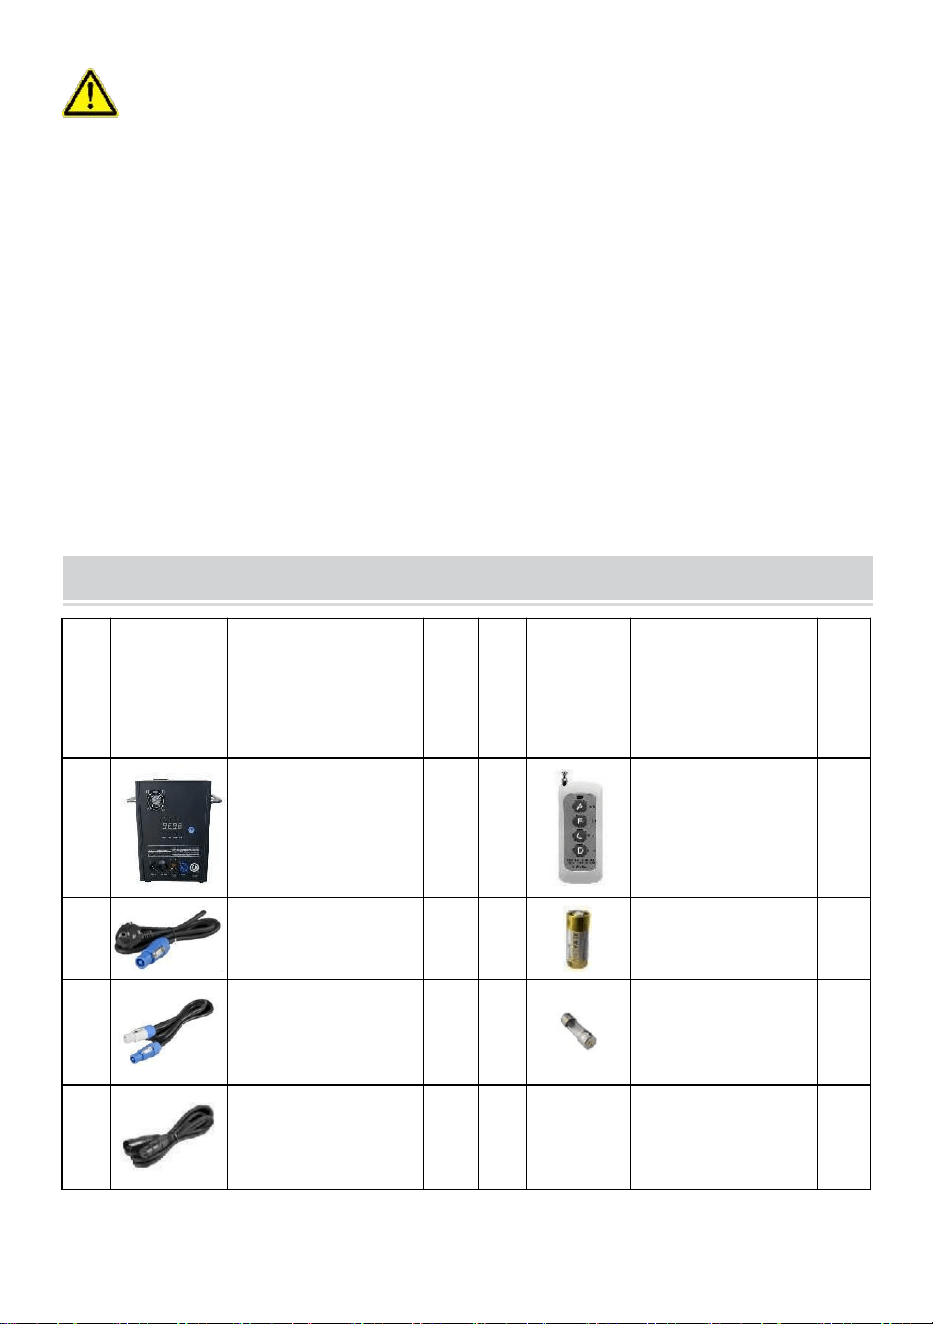
PACKING LIST
NO
PICTURE
NAME
QT
Y
NO
PICTUR
E
NAME
QT
Y
A
Cold Spark
Machine
1
E
Remote Control
1
B
Power Line
1
F
Battery
1
C
Power Cable
1
G
Fuse
1
D
DMX Signal
Cable
1
The above list is for each inner box.
TECHNICAL PARAMETERS
Model
BJY-
PHJ500u1
BJY-
PHJ500u2
BJY-
PHJ700u1
BJY-
PHJ700u2
Rated
Voltage
AC120V
60Hz
AC220-240V
50Hz/60Hz
AC120V
60Hz
AC220-240V
50Hz/60Hz
Rated
Power
500W
500W
700W
700W
Fuse
15A
10A
15A
10A
- 6 -
Pre-Heating
Time
<3min
<3min
<3min
<3min
Height of
Spark
4m
4m
5m
5m
Wireless
Controller
W-3+W-8
W-3+W-8
W-3+W-8
W-3+W-8
Display
Screen
Board
LED
LED
LED
LED
DMX Range
1-512
1-512
1-512
1-512
Inject
Powder
Ti
Composite
Ti
Composite
Ti
Composite
Ti
Composite
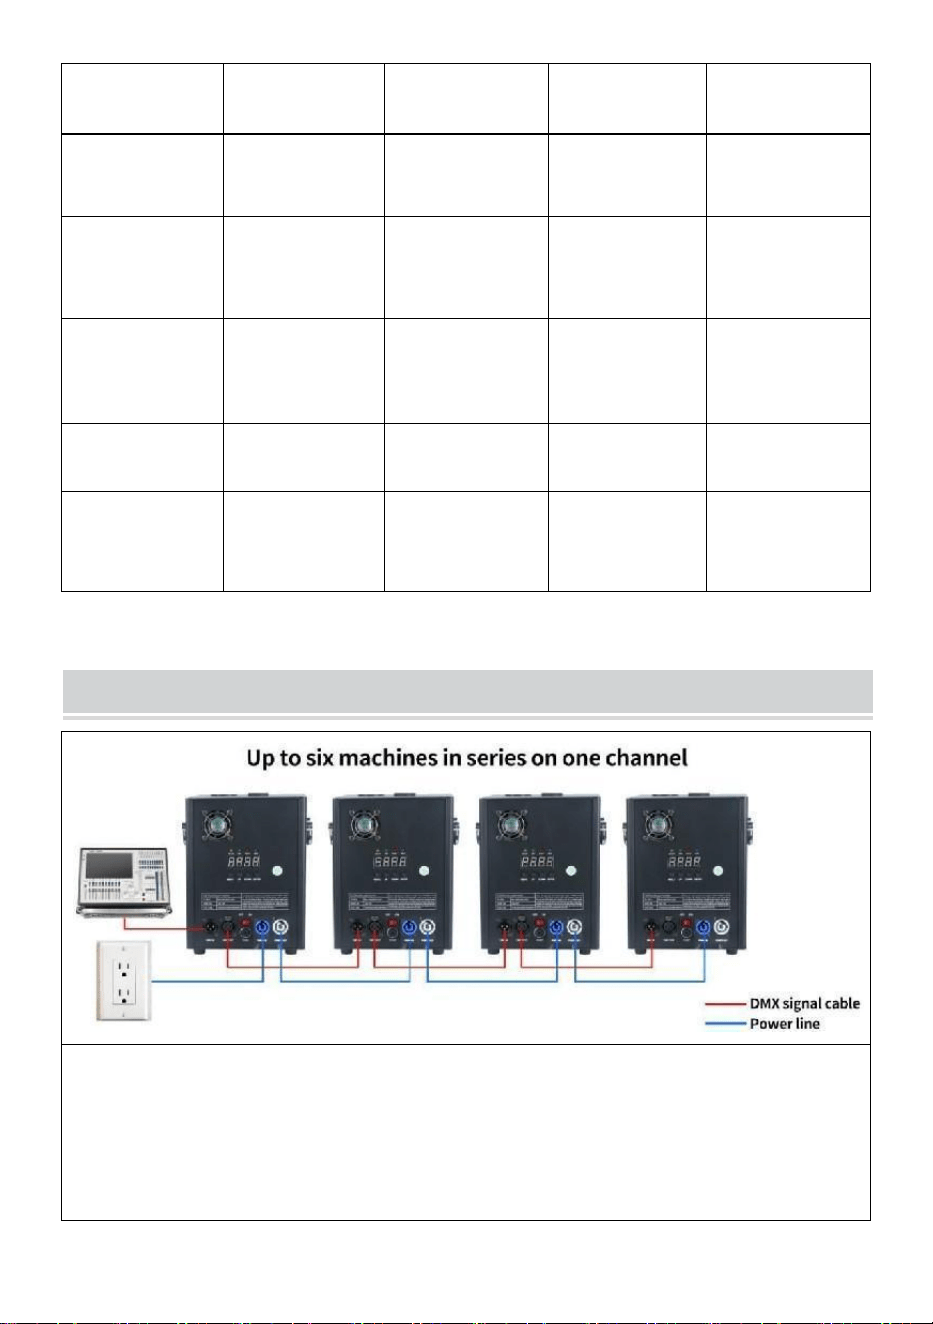
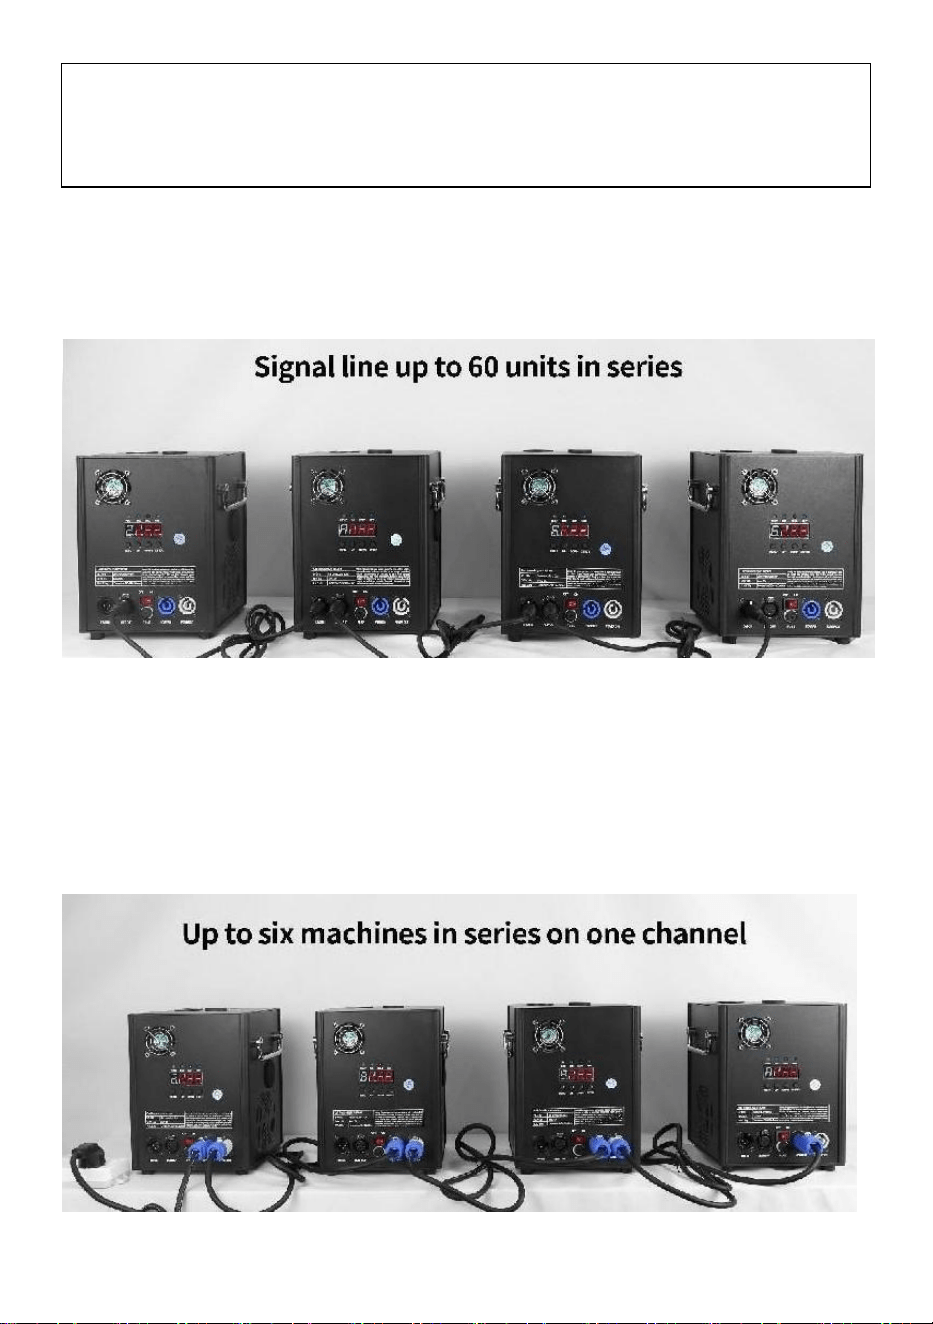
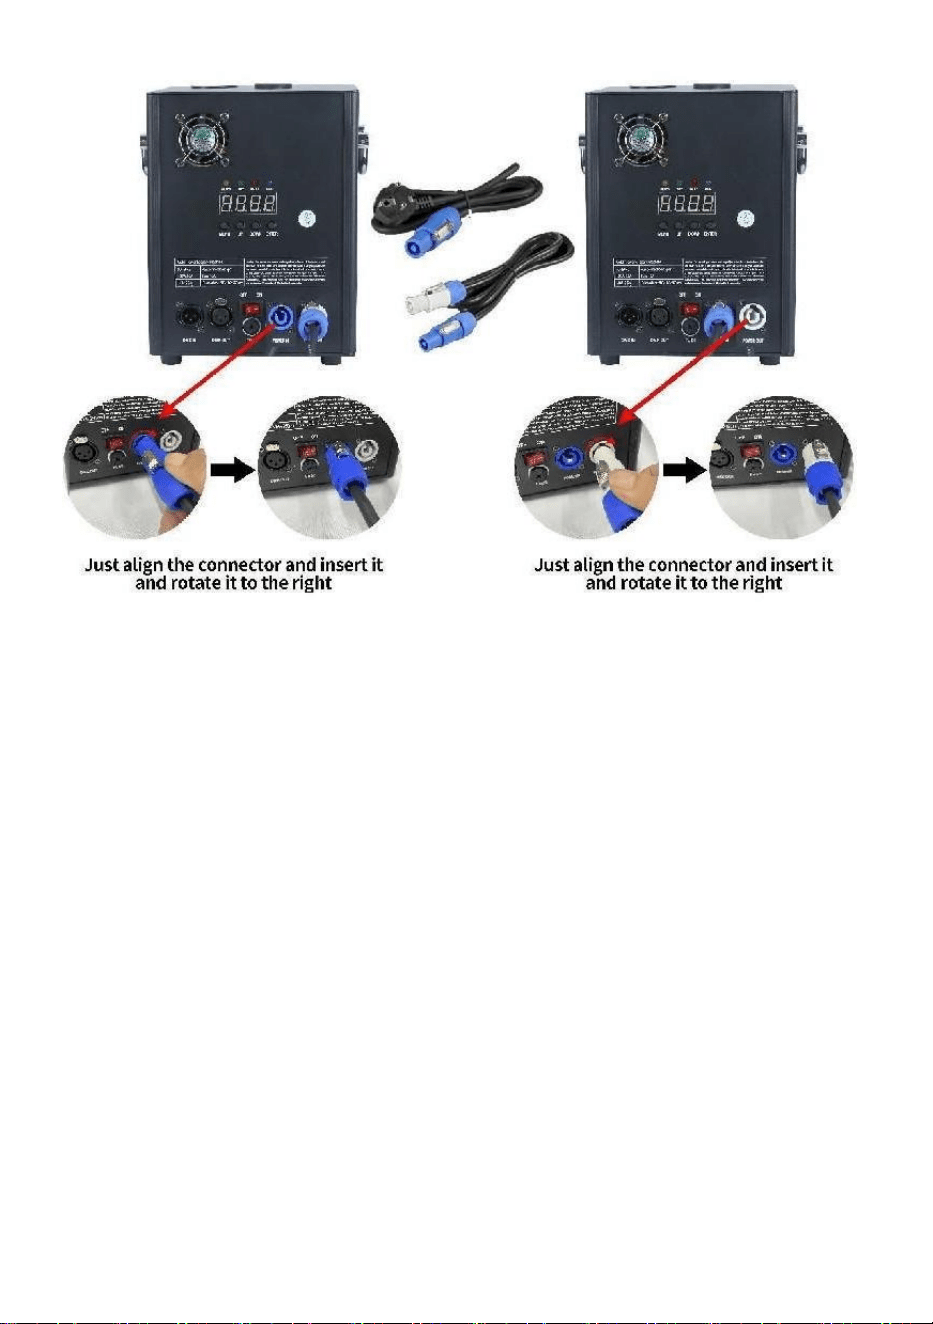
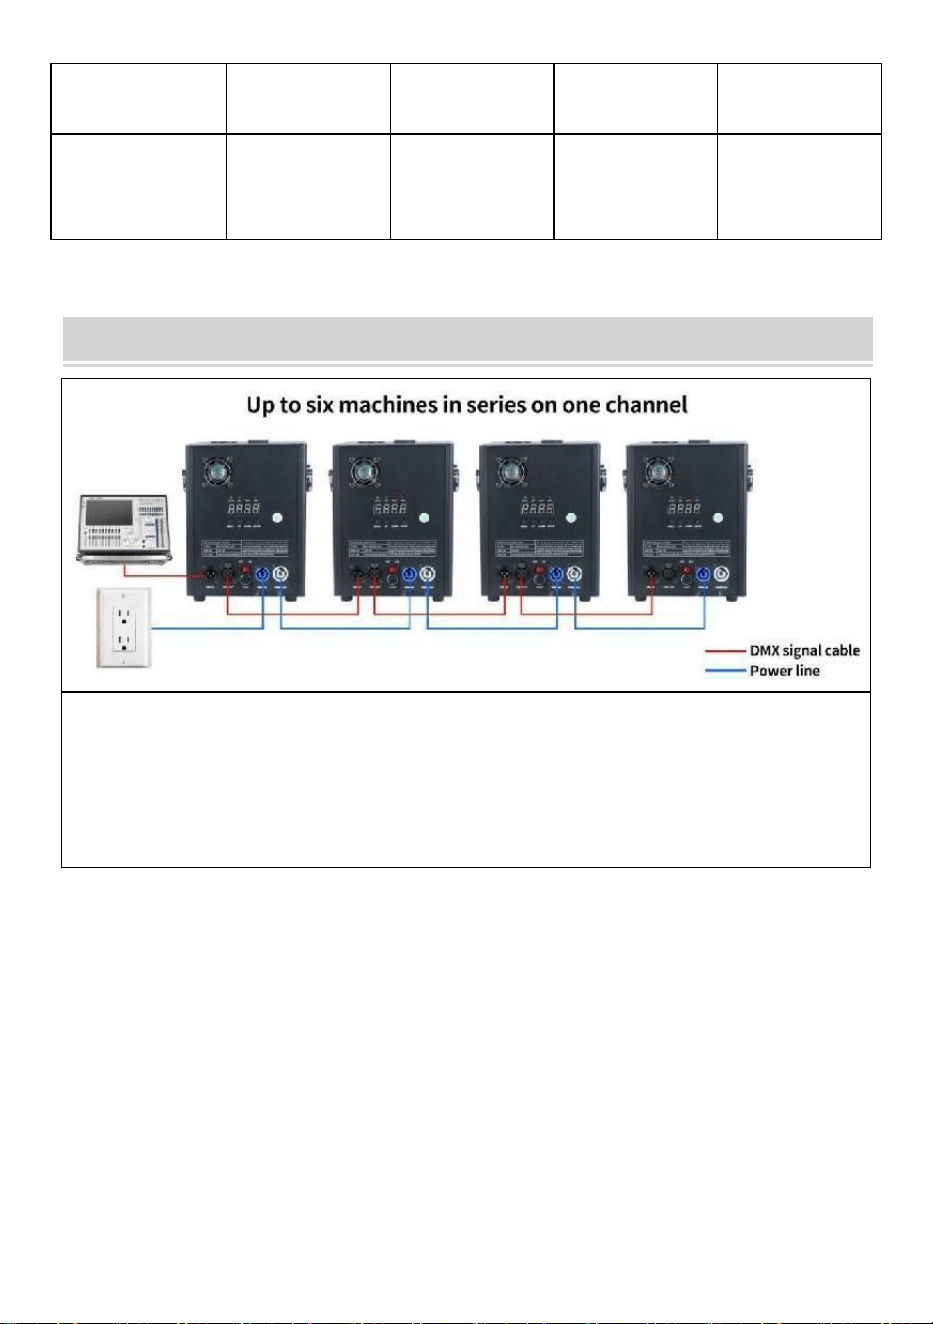
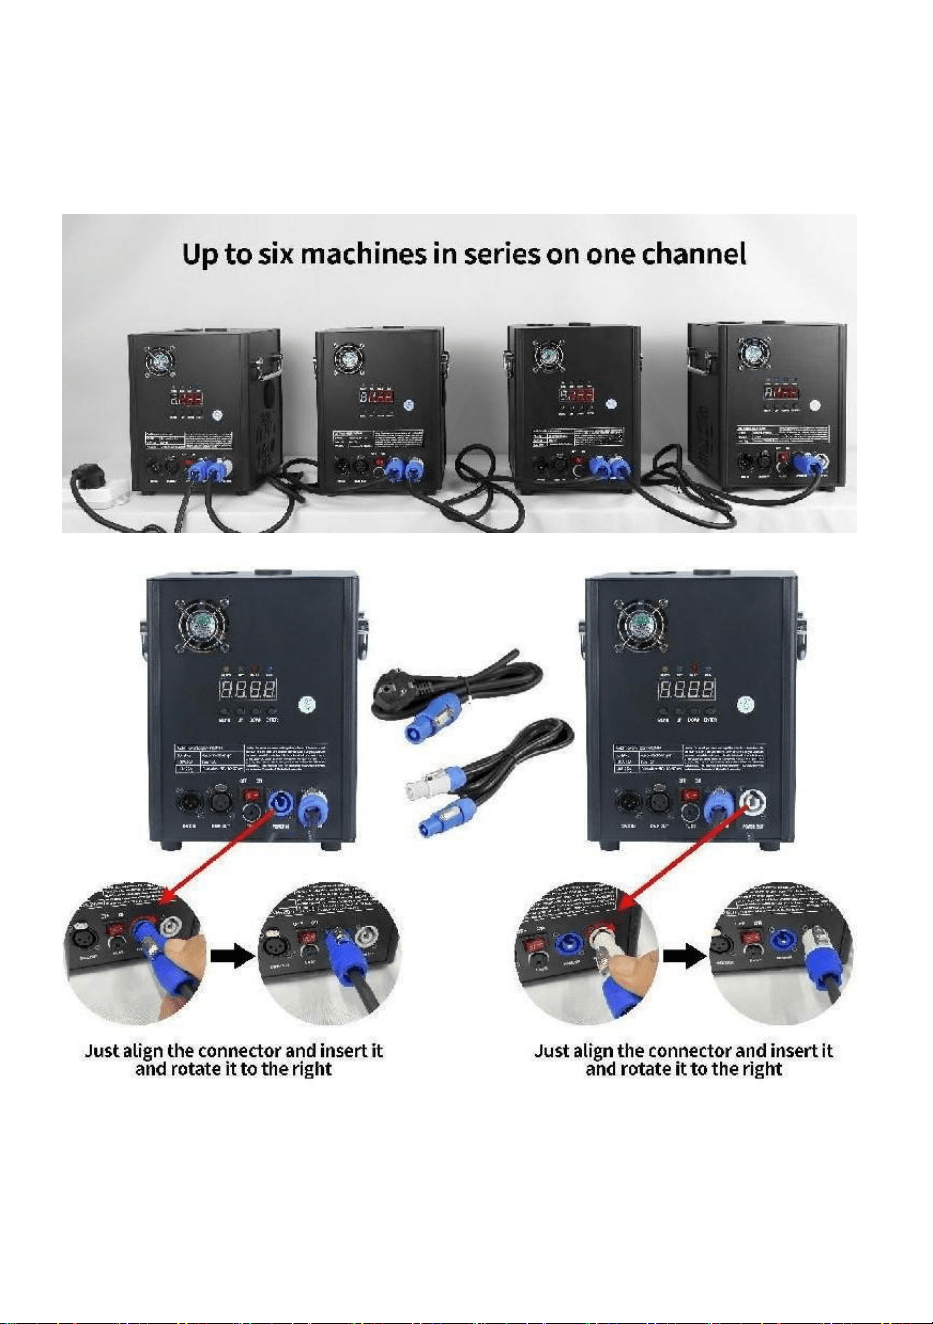
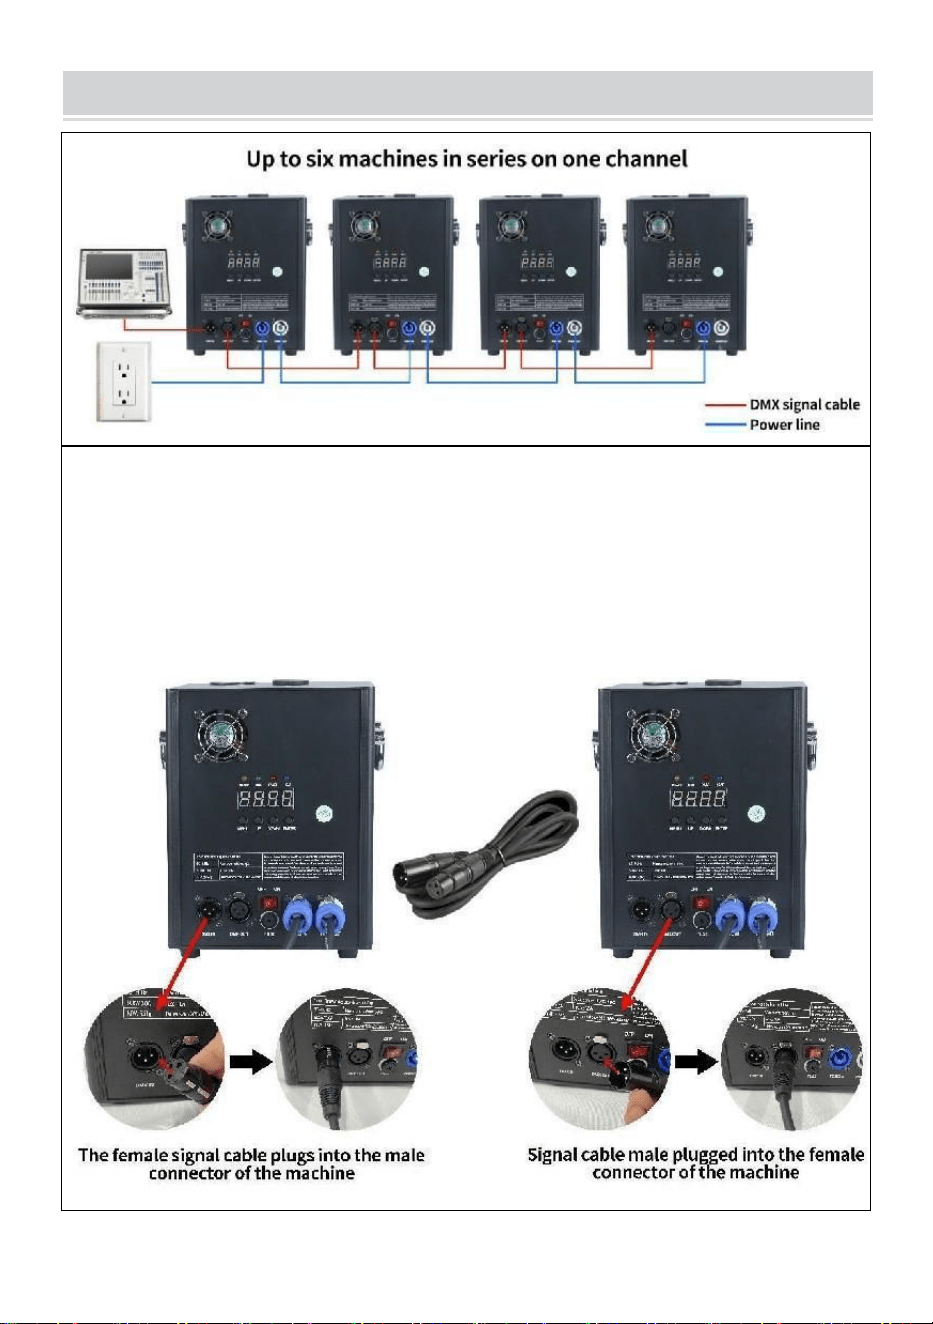
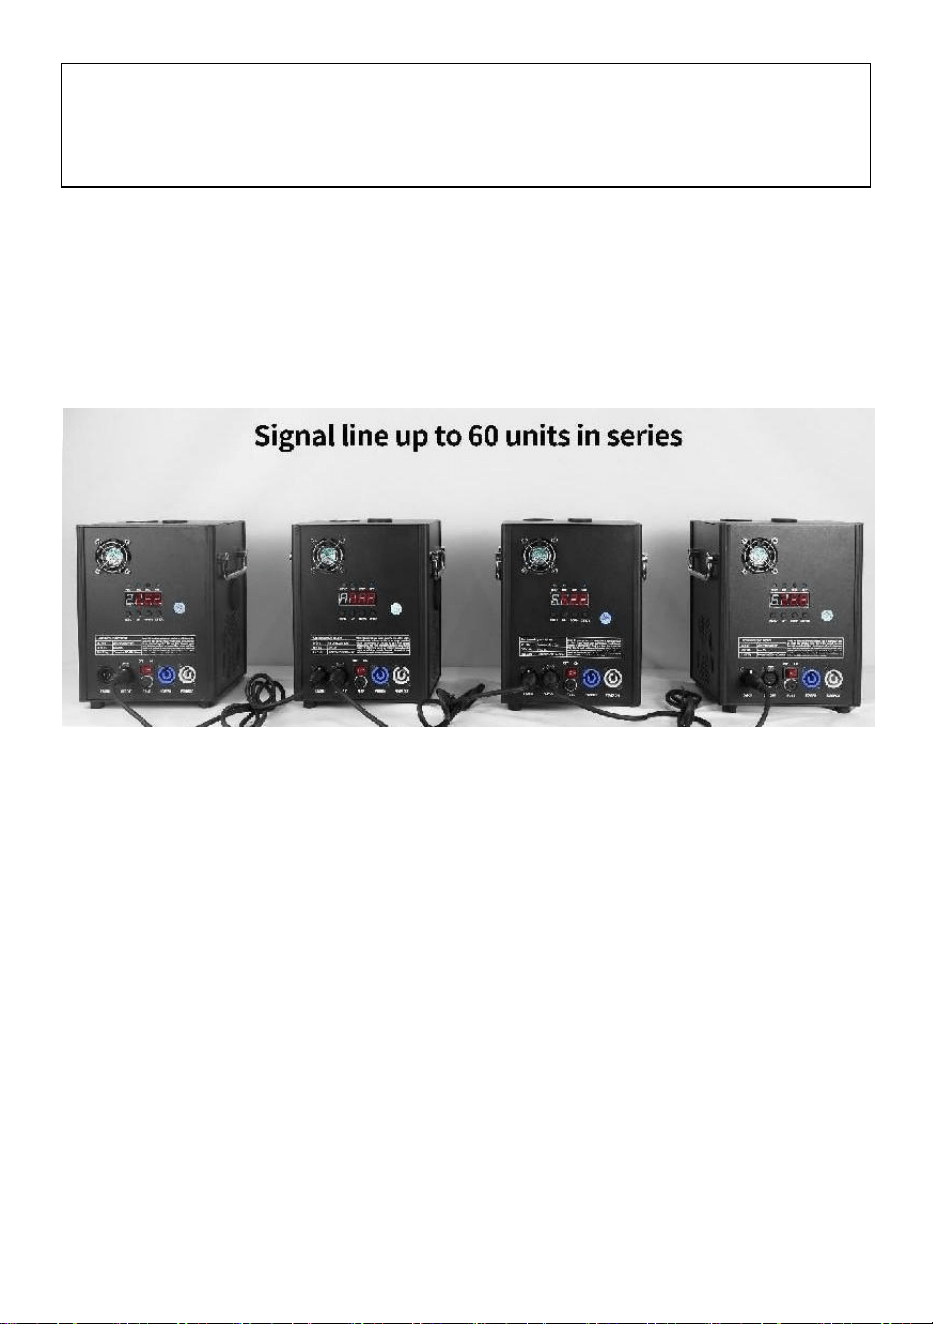
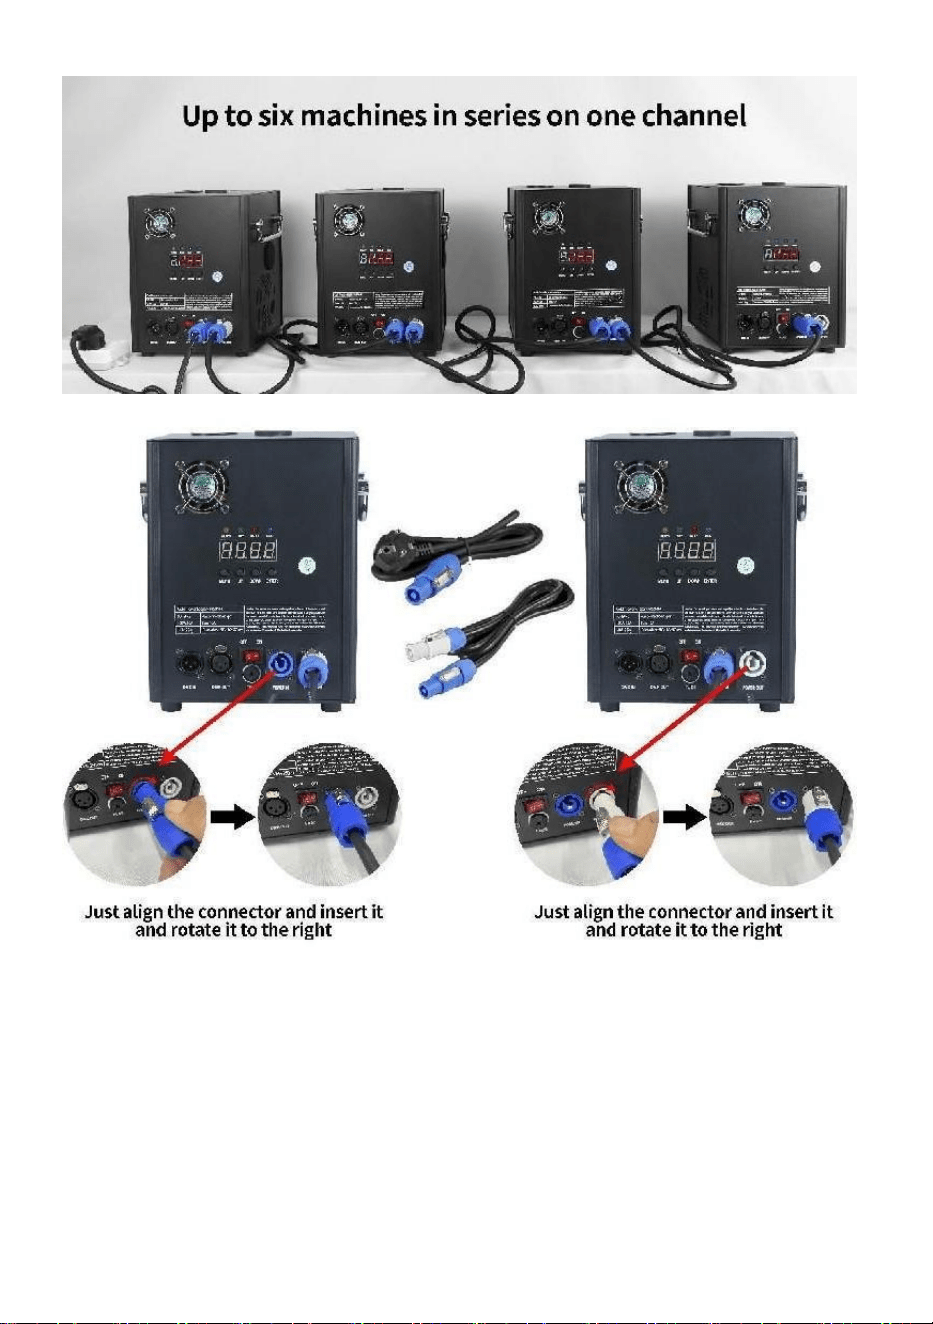
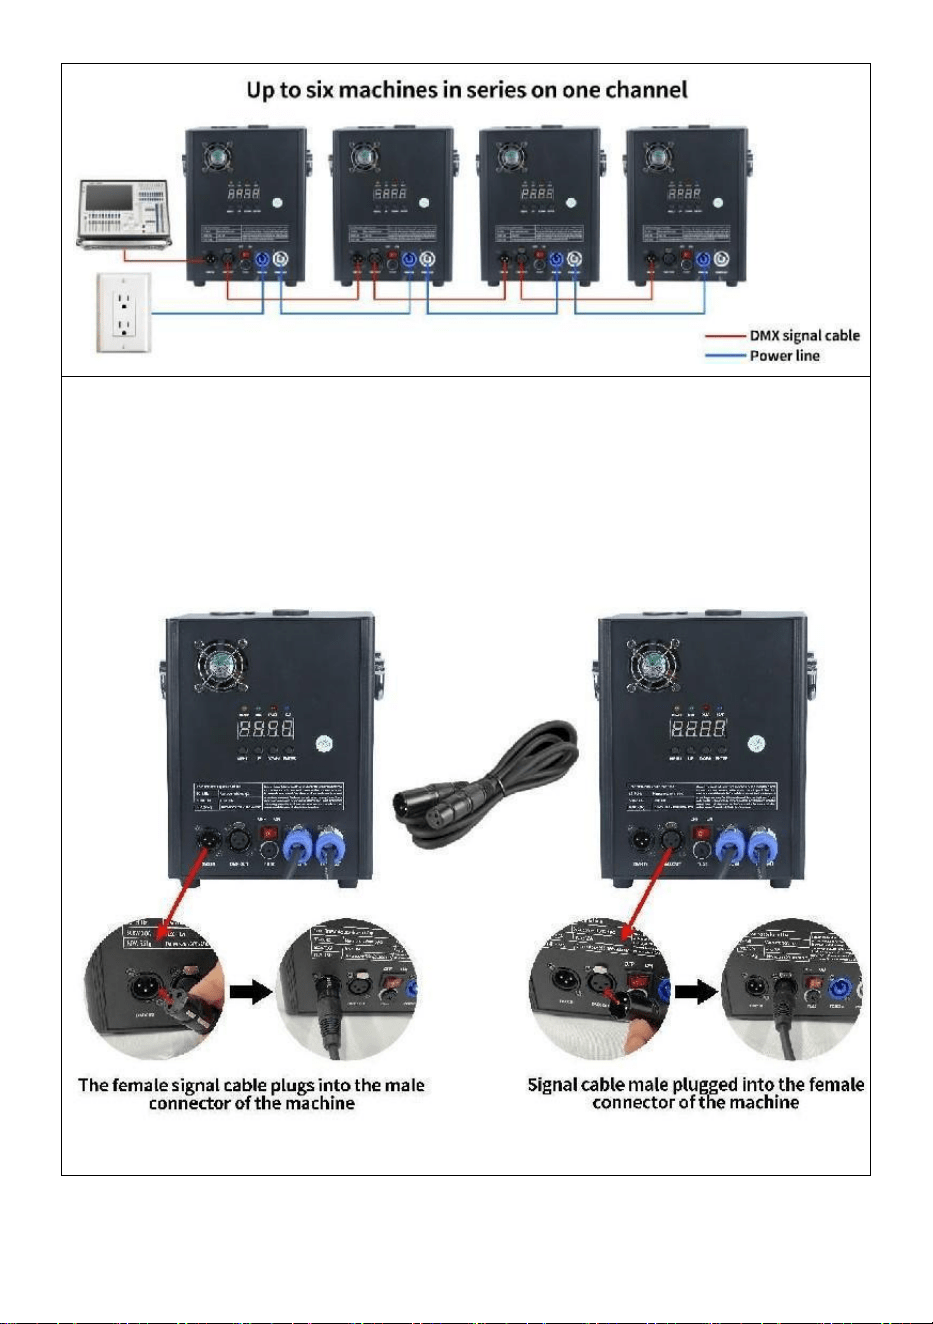
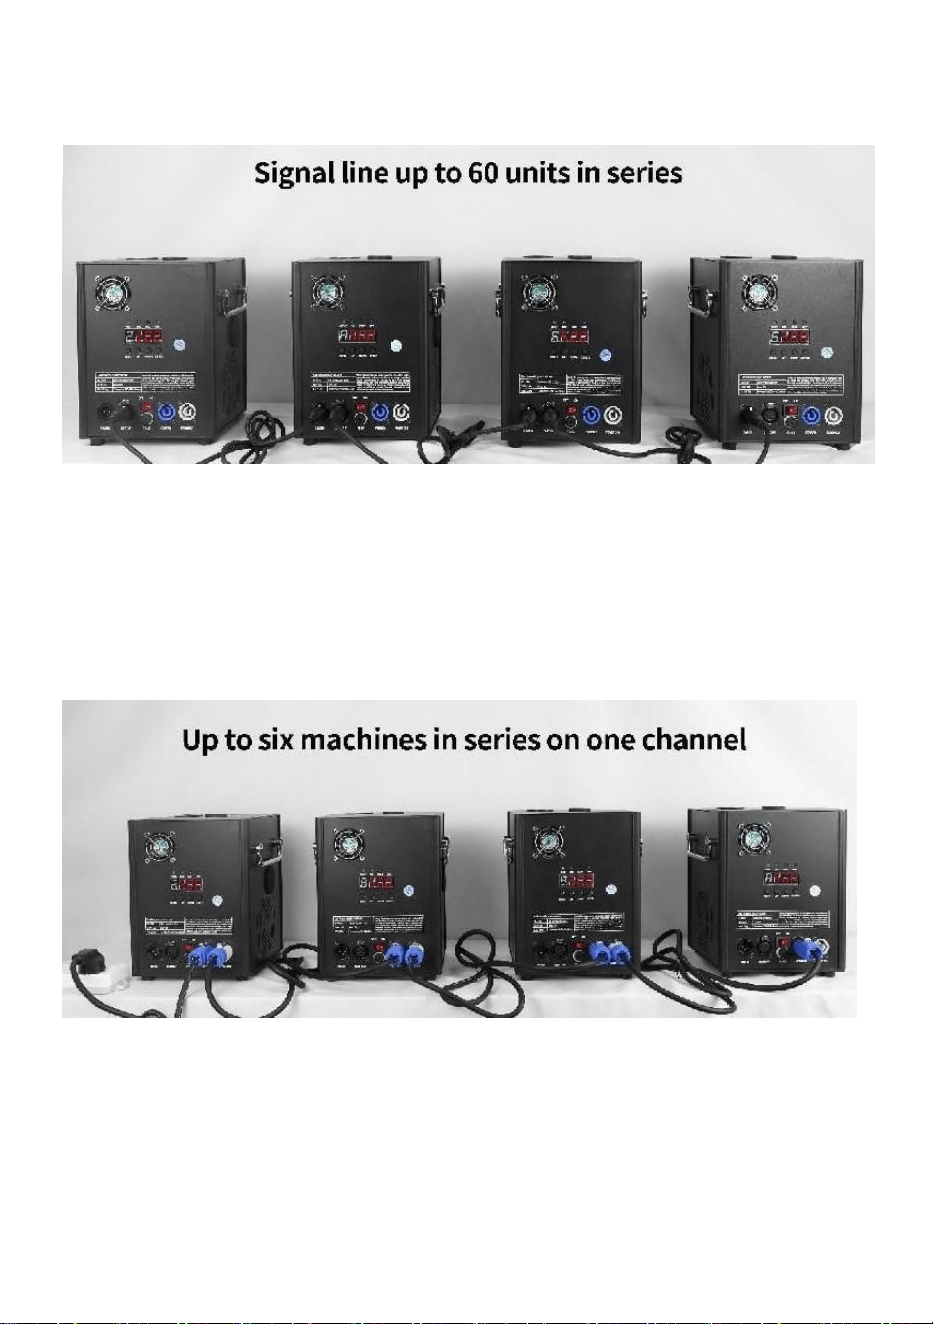
METHOD OF INSTALLATION
This machine supports DMX512 signal control, just connect it to the
console for control.
A single cold spark machine power cord (sprayer power cord) can only
be connected in series for up to 6 groups. Too much series connection
can lead to damage or fire.

- 7 -
can lead to damage or fire.
A.Signal series connection schematic:
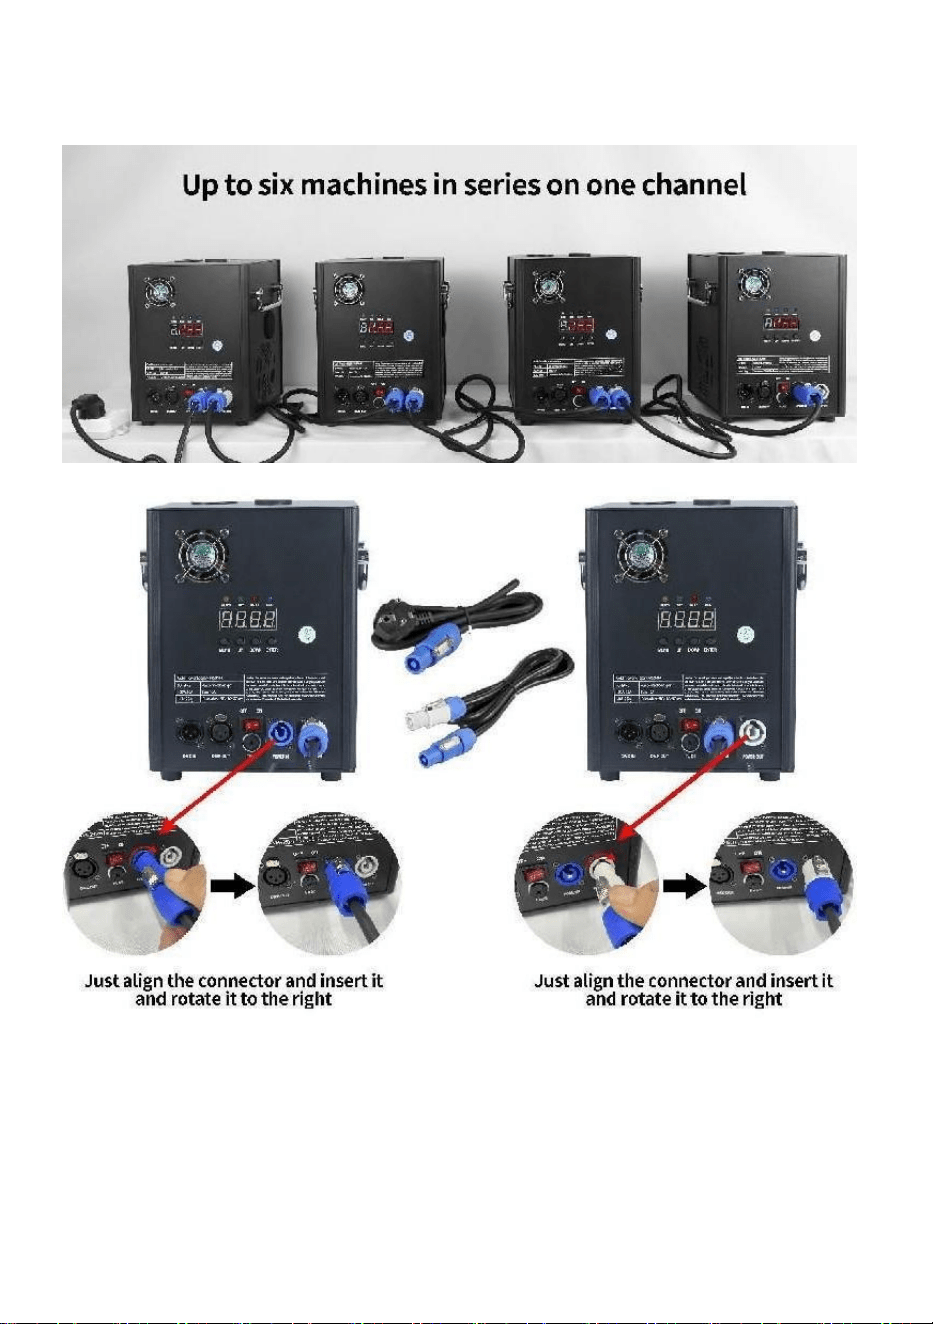
- 8 -
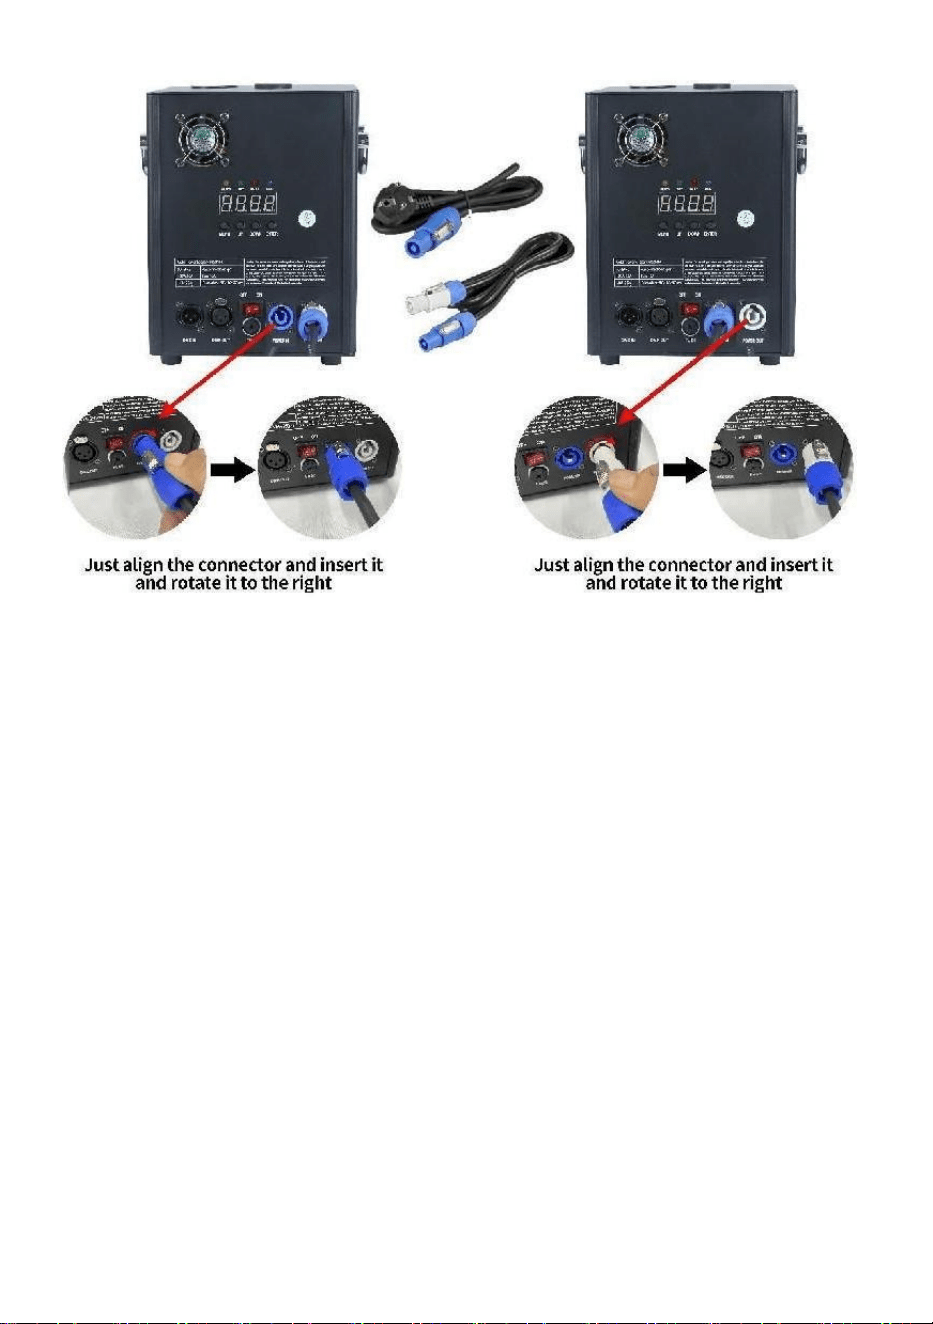
B.Power supply series connection schematic:
- 9 -
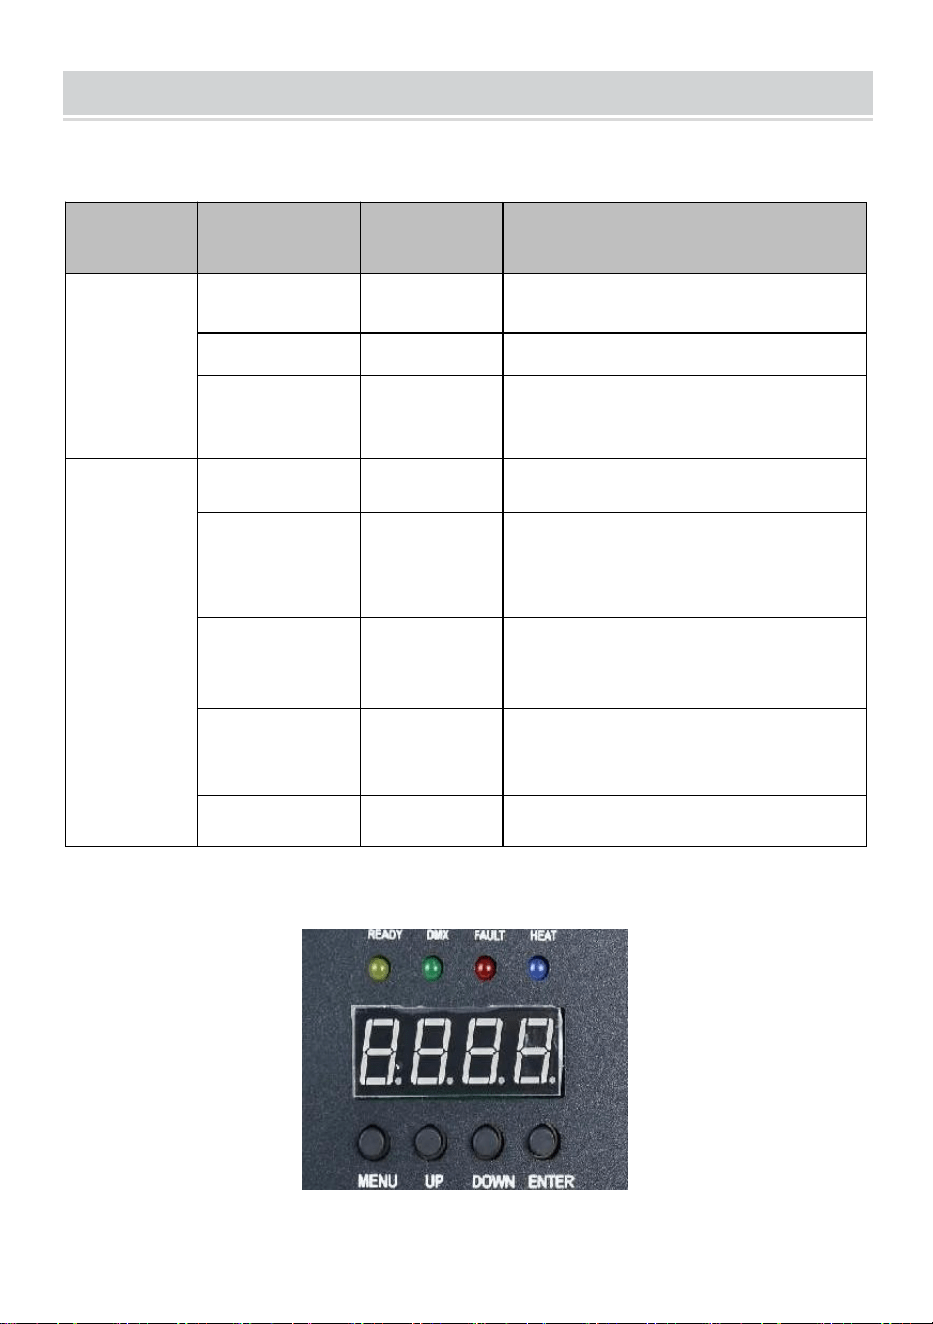
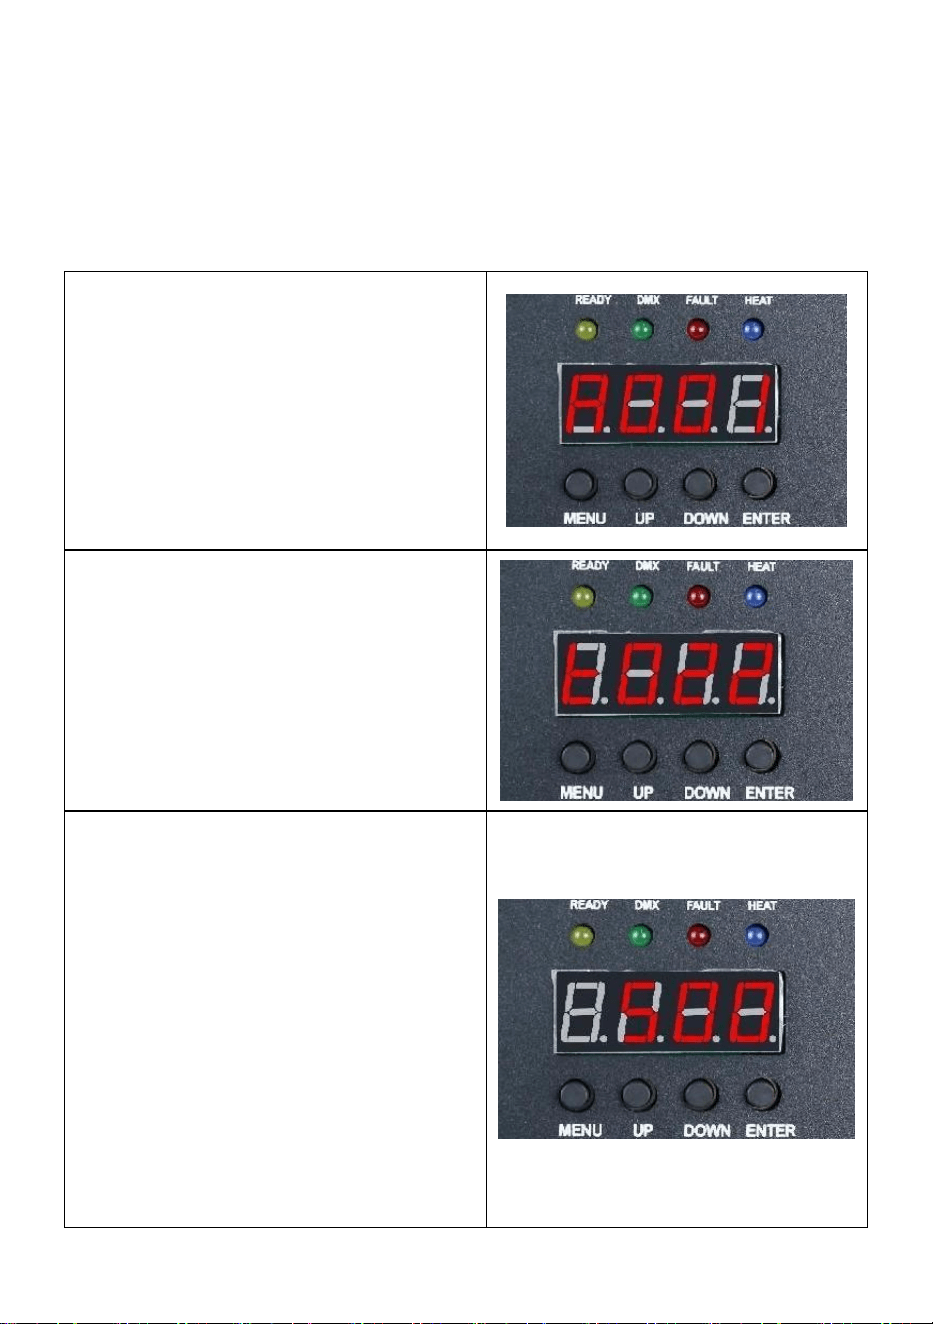
DESCRIPTION
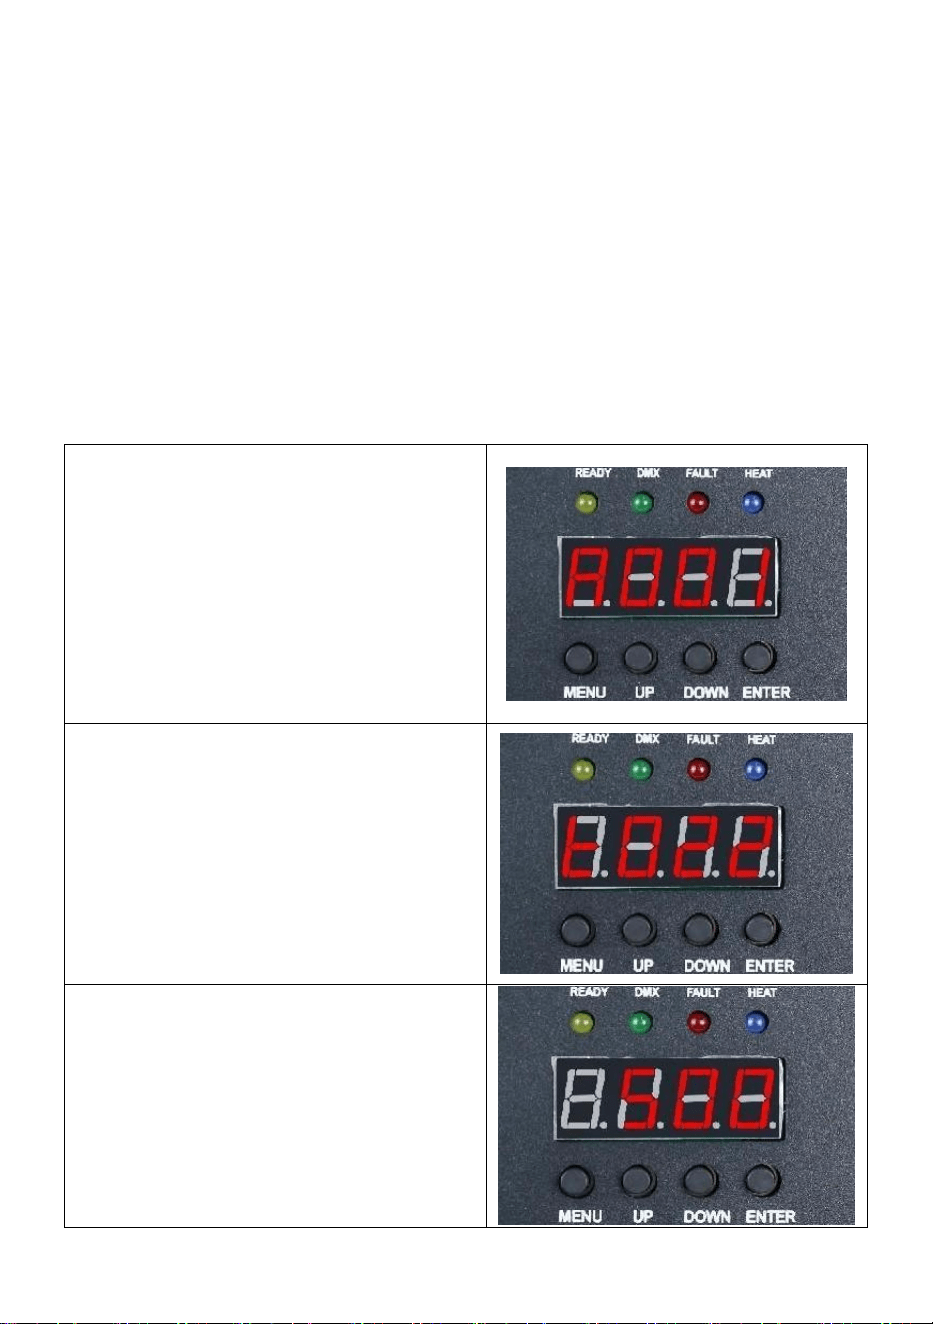
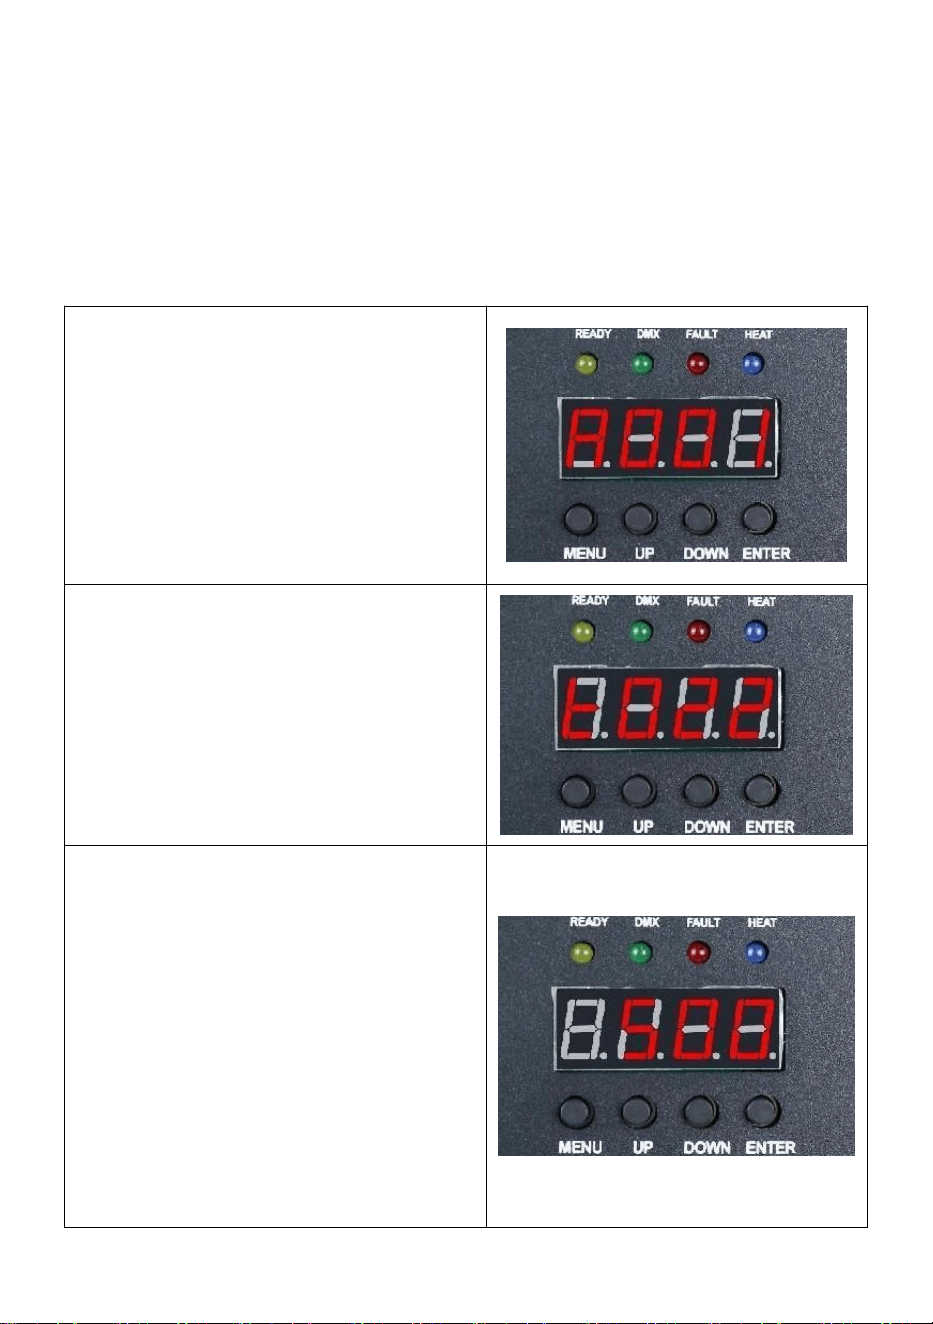
Ⅰ.Channel instructions
Channel
Control
function
Numerical
values
Digital tube display
1
Preheat off
000~010
A001 DMX address code
Invalid
011~239
Preheat to
open
240~255
Displays the current
temperature value
2
close
000~015
OFF
Spray flower
height 1
015~074
F1(Only valid if it reaches
operating
temperature)
Spray height
2
075~134
F2(needs to reach operating
temperature to be effective)
Spray height
3
135~194
F3(need to reach operating
temperature to be effective)
Clear stock
195~255
CLE Clearings
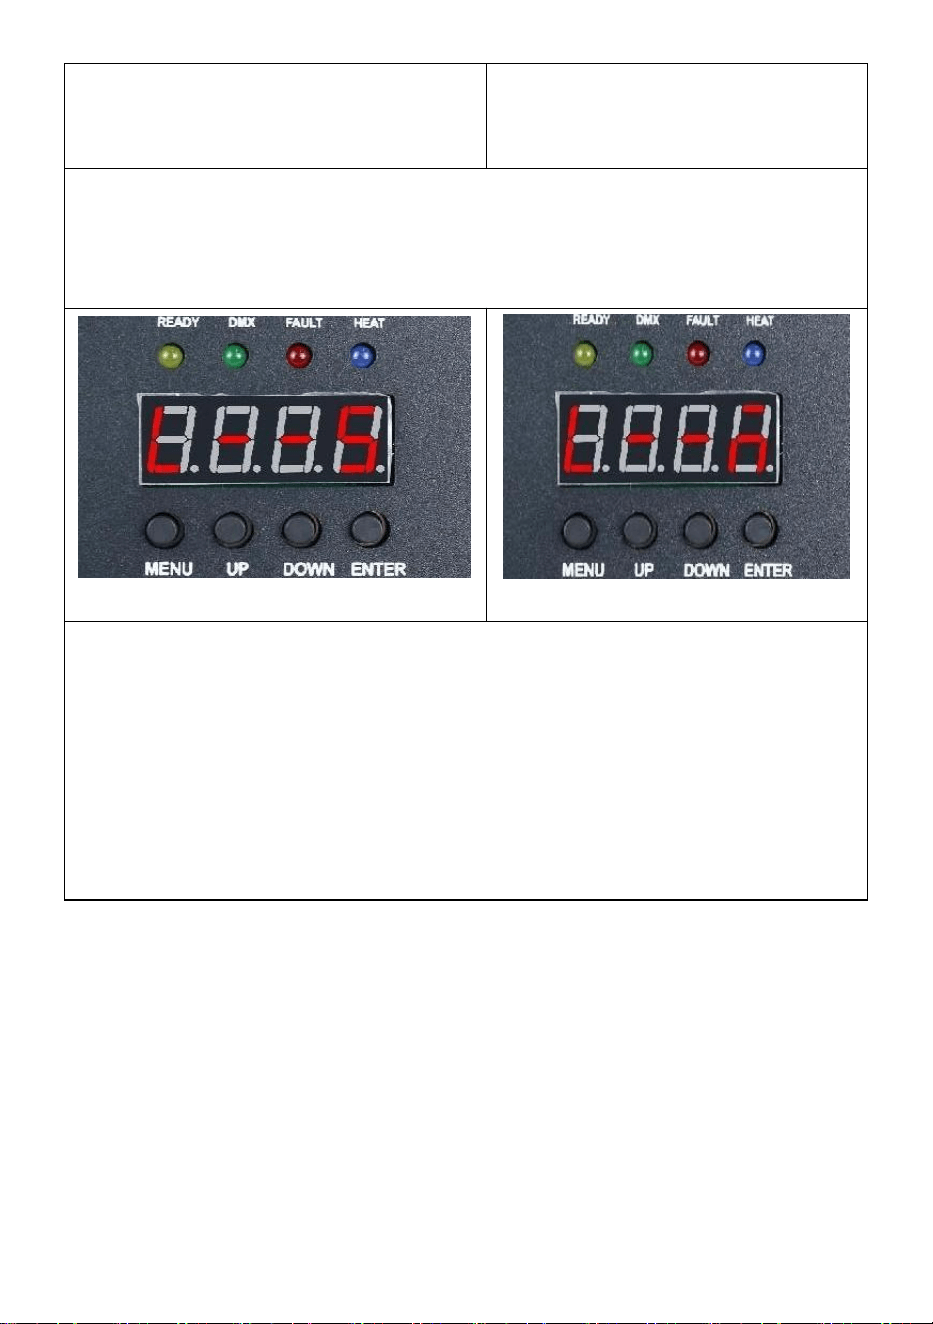
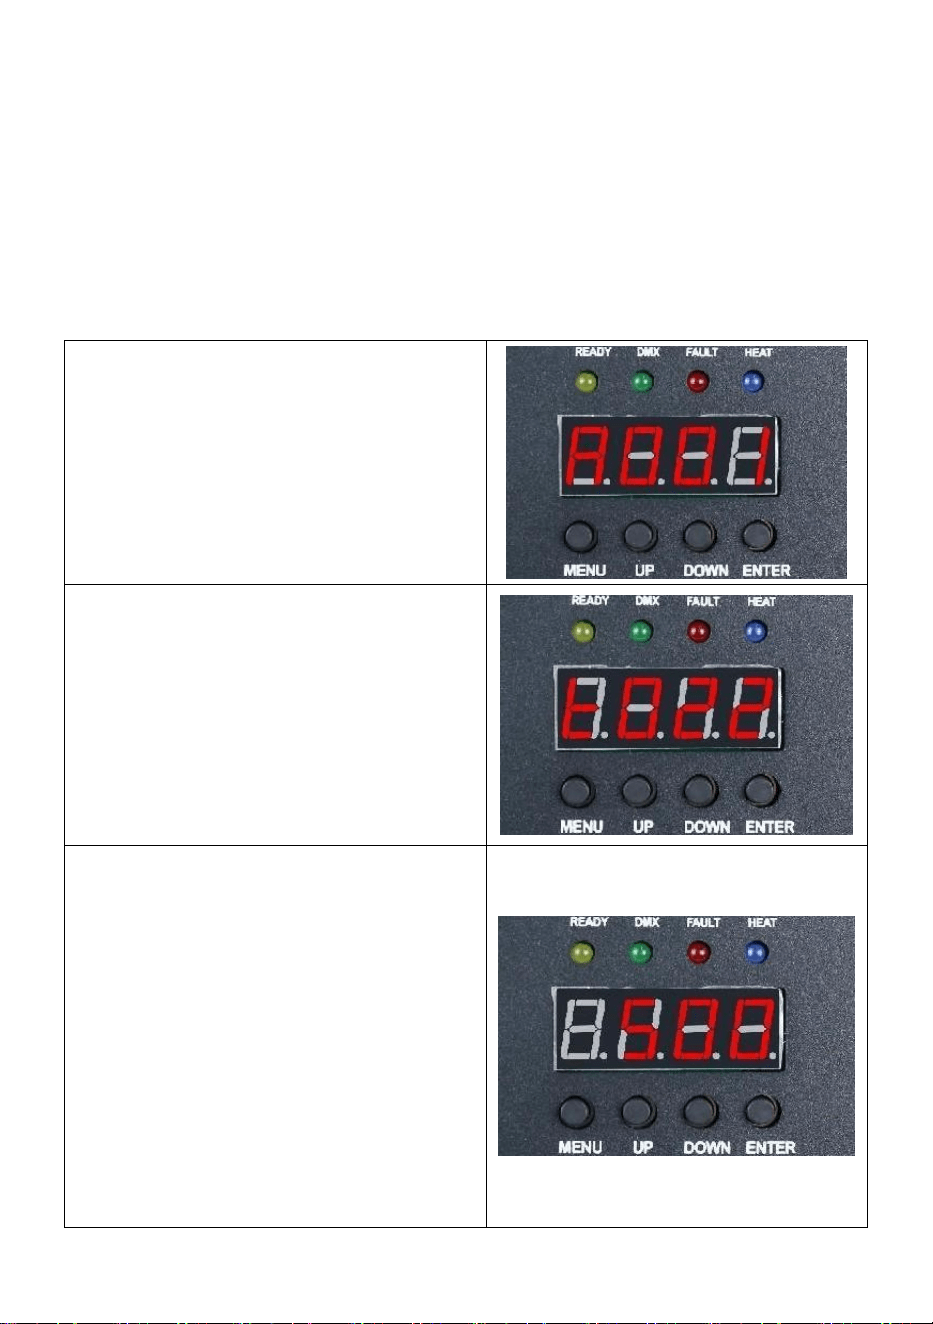
Ⅱ.Panel description

- 10 -
1.Key description
Keys from left to right order: Menu -> Up -> Down -> Confirm
1)Menu: Switch menu interface, next menu
2)On: can be used as a menu switch, the previous menu; When the
confirm key is pressed into the upward add, in the DMX address code
interface, the address code upward add; In the working temperature setting
interface, the working temperature is added up.
3)Down: when the confirm key is pressed down, in the DMX address code
interface, the address code is reduced down; In the working temperature
setting interface, the working temperature is reduced down.
4)Confirm: The interface enters the setting state, and the current interface
can add or subtract the value. (Only valid in address code, working
temperature).
2.indicator light description
1)Yellow light: light up when there is an error, such as a problem with
temperature control detection, or a problem with heating.
2)Green light: on indicates that there is DMX signal, off for signal
disconnection
3)Red light: it is always on when heating
4)Blue light: The light indicates that the temperature heating is completed
and the working temperature has been reached.
3.Interface description (Press menu key or up key to
switch interface)
- 11 -
Address code interface:
Operation instructions: Press the
confirm key to enter the editing, you
can select the address code
001-512, and then press the confirm
key to exit the address code editing.
Temperature interface:
Operation description: The current
interface can not be operated, only
do real-time display of the current
temperature status.
Operating temperature setting
interface:
Operation instructions: Set the
working temperature, when the
temperature is heated to the current
temperature can be sprayed
operation; Click the confirm key to
enter the editing, you can choose the
temperature range of 480-550
degrees, and then click the confirm
key to exit the editing state.
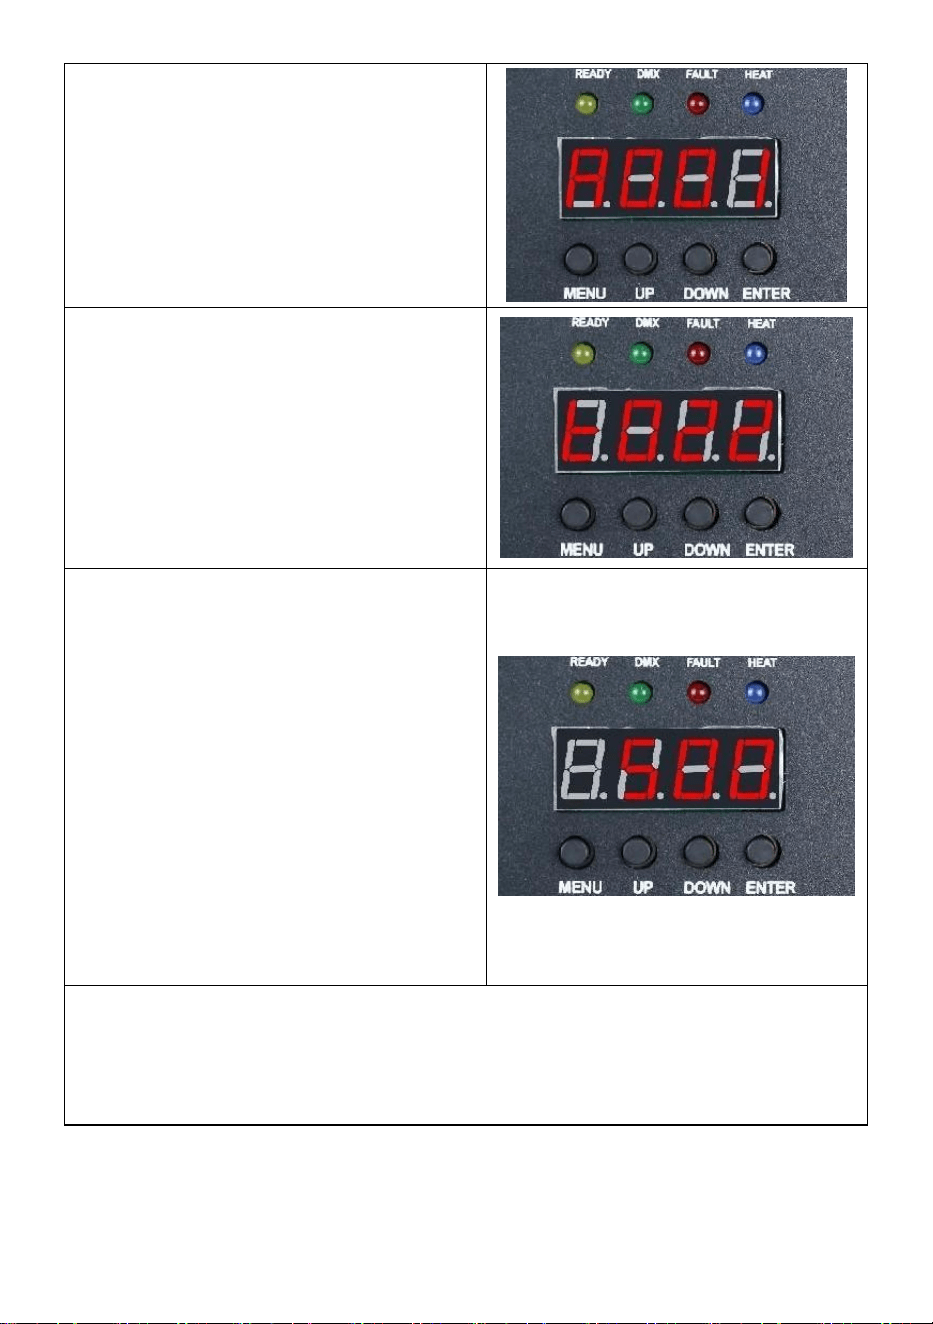
Wireless interface:
Friendly Reminder:
When using multiple machines in a series, please designate one of the
machines as the host. Here are the setup instructions.
- 12 -
Slave interface
Host interface
Operation instructions: The code interface display as shown in figure
"Slave interface", after the successful code interface display as shown
in figure "Host interface"; When setting the master, you can operate
the "ENTER" button to select the master/slave state of the machine. If
you need to set it as the host, the setting interface is shown in Figure
"Host interface", and the current machine has been set as the host.
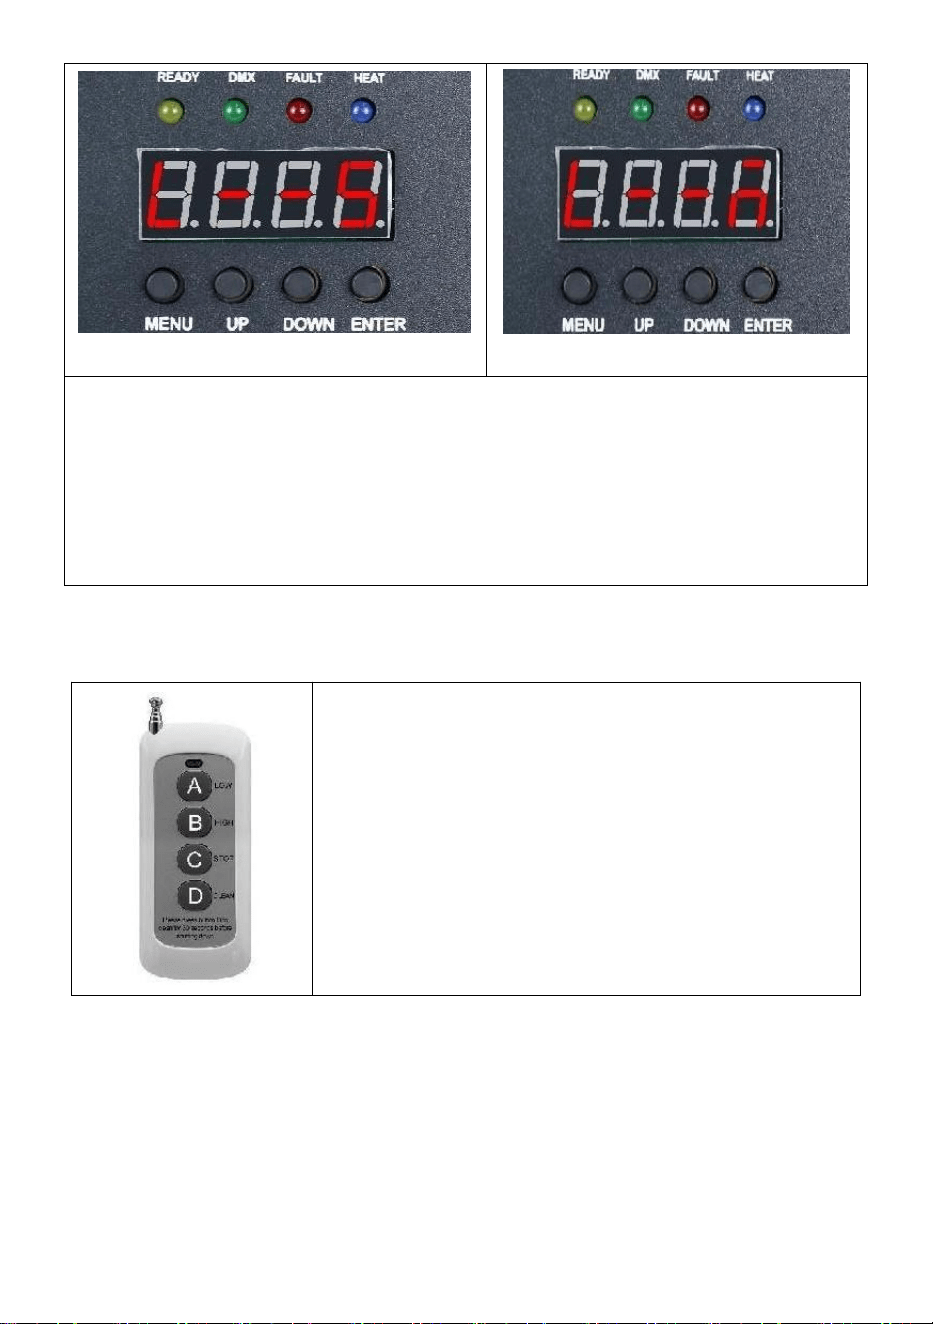
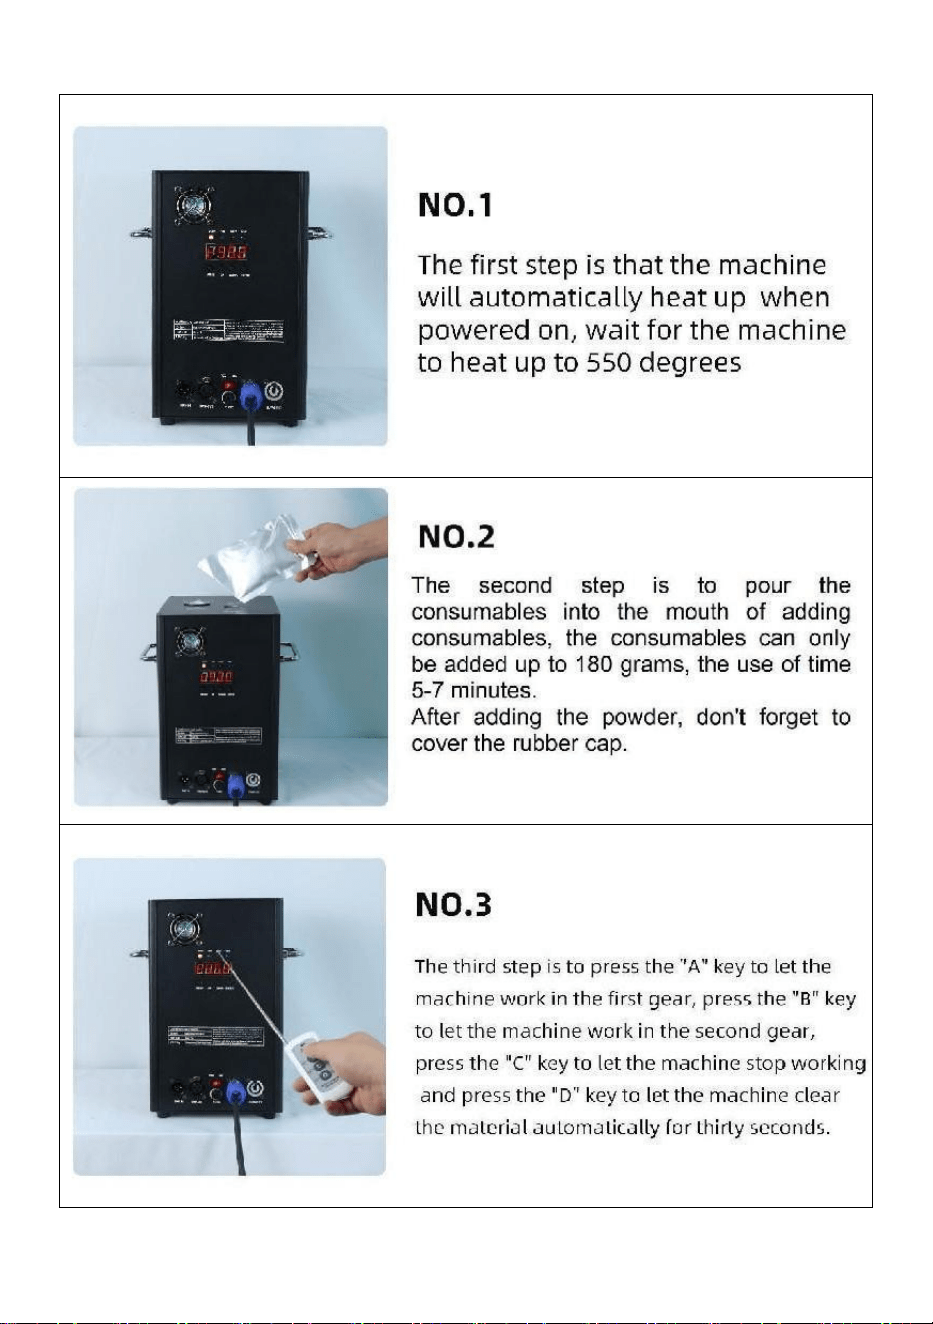
Ⅲ.Remote control Instructions
A:Low Range;
B:High-Grade;
C:Stop;
D:Material Cleaning;

- 13 -
Ⅵ.Machine operation step by step

- 14 -
Made In China


- 16 -
Technique Assistance et certificat de garantie électronique
www.vevor.com/support
MACHINE À ÉTINCELLES FROIDES
MODÈLE : BJY-PHJ500u1
/BJY-PHJ500u2/BJY-PHJ700u1/BJY-PHJ700u2
We continue to be committed to provide you tools with competitive price.
"Save Half", "Half Price" or any other similar expressions used by us only represents an
estimate of savings you might benefit from buying certain tools with us compared to the major
top brands and does not necessarily mean to cover all categories of tools offered by us. You
are kindly reminded to verify carefully when you are placing an order with us if you are
actually saving half in comparison with the top major brands.

- 17 -

- 1 -
MODÈLE:
BJY-PHJ500u1 / BJY-PHJ500u2 BJY-PHJ700u1 / BJY-PHJ700u2
Have product questions? Need technical support? Please feel free to
contact us:
Technical Support and E-Warranty Certificate
www.vevor.com/support
NEED HELP? CONTACT US!
This is the original instruction, please read all manual instructions
carefully before operating. VEVOR reserves a clear interpretation of our
user manual. The appearance of the product shall be subject to the
product you received. Please forgive us that we won't inform you again if
there are any technology or software updates on our product.
COLD SPARK
MACHINE

- 2 -
Avertissement : Pour réduire le risque de blessure, l'utilisateur
doit lire attentivement le manuel d'instructions.
ÉLIMINATION CORRECTE
Ce produit est soumis aux dispositions de la directive
européenne 2012/19/CE. Le symbole représentant une
poubelle barrée indique que le produit nécessite une collecte
sélective des déchets dans l'Union européenne. Ceci
s'applique au produit et à tous les accessoires marqués de ce
symbole. Les produits marqués comme tels ne peuvent pas
être jetés avec les ordures ménagères normales mais doivent
être déposés dans un point de collecte pour le recyclage des
appareils électriques et électroniques.
Déclaration FCC :
Cet appareil est conforme à la partie 15 des règles FCC. Son
fonctionnement est soumis aux deux conditions suivantes : (1)
Cet appareil ne doit pas provoquer d'interférences nuisibles et
(2) cet appareil doit accepter toute interférence reçue, y
compris les interférences susceptibles de provoquer un
fonctionnement indésirable.
Courant alternatif
SAFETY INSTRUCTIONS AND OPERATING INSTRUCTIONS
1. Veuillez vous assurer que la poudre composite Ti est suffisamment
sèche avant de l'ajouter. La poudre doit être propre, avec de petites
particules, sans trop d'impuretés.
2. Lorsque vous n'utilisez pas la machine pendant une longue période pour
protéger la poudre de l'humidité, veuillez verser la poudre et la conserver
scellée pour la réserver.

- 3 -
3. Lorsque la machine est sous tension, il existe un risque de choc
électrique et de brûlures à haute température . N'essayez pas d'ouvrir la
machine ou de la démonter et déboguer n’importe quelle partie de la
machine.
4. Gardez la machine à feux d'artifice électronique au sec, veuillez ne pas
l'utiliser sous la pluie ou la neige. jours.
5. Fixez l'appareil avec les trous de vis sur le support. Assurez-vous que
l'équipement est solidement fixé pour éviter les vibrations et les
mouvements pendant le fonctionnement, et toujours vérifier que la
structure supportant l'équipement est suffisamment solide pour résister un
équipement qui pèse au moins 10 fois son poids.
6. Le matériel doit être fixé par des professionnels dans des endroits hors
de portée des personnes, et personne ne peut passer sous ou au-dessus
du passage pour piétons.
7. Remarque : Il existe un risque d'explosion si la batterie n'est pas
correctement placée. Seulement remplacer les mêmes types ou des types
équivalents.
8. Si vous avez des doutes quant à savoir si la pile a été avalée ou
introduite dans d'autres parties du corps, contactez immédiatement un
médecin. Avant de nettoyer le appareil, débranchez-le du secteur s’il est
connecté. N'utilisez pas de nettoyants agressifs. Essuyer Retirez la
poussière ou la saleté du produit avec un chiffon propre. Nous ne sommes
pas responsables de dommages causés par une mauvaise manipulation,
une mauvaise utilisation ou l'usure, Nous nous réservons le droit
d’apporter des modifications techniques.
9. Le couvercle des consommables situé en haut de l'équipement doit être
fermé pour éviter toute éjection accidentelle. Les consommables doivent
être stockés dans un environnement sec et scellé pour éviter l'humidité.
dix. Avant et après la représentation, vous devez observer s'il y a des
nodules dans la buse. Si c'est le cas, il faut le nettoyer. Ces modules
affecteront l'effet du feu d'artifice et endommageront même la machine à
étincelles.
11. Un seul cordon d'alimentation pour feux d'artifice électroniques

- 4 -
(cordon d'alimentation pour pulvérisateur) ne peut être connecté qu'en
série pour un maximum de 6 groupes. Une connexion en série trop
importante peut entraîner des dommages ou un incendie.
12. La durée maximale d'exécution est de 5 minutes. Réutilisable, mais ne
doit pas surchauffer le machine. Le déplacement et la manipulation de la
machine pendant son utilisation sont interdits.
13. Lors du chargement des consommables, assurez-vous que la machine
est éteinte. Après l'avoir rangé, veuillez le couvrir pour éviter que les
déchets ne tombent dans l'entrée d'alimentation et bloquent la machine.
14. Empêchez quoi que ce soit de pénétrer dans la buse, éliminez les
obstructions avant l'utilisation
15. Pour éviter tout risque d'incendie ou de choc électrique, n'exposez pas
cet appareil à la pluie ou à l'humidité. Pendant le fonctionnement,
assurez-vous qu'il n'y a pas d'objets inflammables à proximité de l'appareil.
équipement.
16. Installez l'équipement dans un endroit bien ventilé, à au moins 50 cm
de tout surface. Assurez-vous que les fentes d'aération ne sont pas
obstruées.
17. Débranchez l'équipement de l'alimentation électrique avant toute
opération ou entretien.
18. En cas de problème, arrêtez immédiatement l'équipement et ne le
réparez pas vous-même. Un entretien inapproprié entraînera des
dommages et des pannes. Contactez le support technique pour
approbation. Utilisez uniquement les mêmes pièces de rechange que
celles d'origine pour vous assurer que le cordon d'alimentation n'est pas
bloqué ou endommagé.
19. Remplacez le fusible : débranchez l'appareil du secteur. Retirez le
porte-fusible de sa position d'origine à l'aide d'un tournevis. Retirez le
fusible grillé et remplacez-le par un fusible présentant les mêmes
caractéristiques. Revissez les vis pour connecter l'équipement à
l'alimentation électrique.
20. Attention : si le fusible est toujours grillé après l'avoir remplacé,
veuillez cesser de l'utiliser. Veuillez contacter le service client pour obtenir
- 5 -
des instructions supplémentaires. Une utilisation continue peut causer de
graves dommages.
21. Avertissement concernant les piles de la télécommande : les piles
usagées ne doivent pas être jetées avec les ordures ménagères, mais
doivent être collectés dans un point de collecte séparé .
CONSERVEZ CES INSTRUCTIONS
Précautions:
• Après utilisation, les consommables doivent être nettoyés pendant 30
secondes en appuyant sur le bouton « D »!
• Arrêtez le fonctionnement du chauffage si les feux d'artifice ne sont pas
projetés pendant une longue période.
• Interdiction de faire basculer la machine .
• Ne touchez pas la buse avec vos mains .
• Interdiction de travailler en continu avec la machine pendant 30 minutes .
• La machine à feux d'artifice doit rester inactive pendant 2 minutes sans
poudre après chaque utilisation .
• La poudre dans le réservoir de poudre doit être nettoyée et versée
pendant recyclage à temps et ne doit pas être empilé .
PACKING LIST
NO
N
IMAGE
NOM
QT
É
NO
N
IMAGE
NOM
QT
É
UN
Machine à
étincelles froides
1
E
Télécommande
1
B
Ligne électrique
1
F
Batterie
1
C
Câble
d'alimentation
1
g
Fusible
1

- 6 -
D
Câble de signal
DMX
1
La liste ci-dessus concerne chaque boîte intérieure .
TECHNICAL PARAMETERS
Modèle
BJY-
PHJ500u1
BJY-
PHJ500u2
BJY-
PHJ700u1
BJY-
PHJ700u2
Tension
nominale
AC120V
60Hz
AC220-240V
50Hz/60Hz
AC120V
60Hz
AC220-240V
50Hz/60Hz
Puissance
nominale
500W
500W
7 00W
7 00W
Fusible
1 5 Un
1 0 A
1 5 Un
1 0 A
Temps de
préchauffage
<3min
<3min
<3min
<3min
Hauteur de
l'étincelle
4m
4m
5m
5m
Contrôleur
sans fil
W-3+W-8
W-3+W-8
W-3+W-8
W-3+W-8
Panneau
d'écran
d'affichage
DIRIGÉ
DIRIGÉ
DIRIGÉ
DIRIGÉ
Gamme DMX
1-512
1-512
1-512
1-512
Injecter de la
poudre
Ti
Composite
_
Ti
Composite _
Ti
Composite
_
Ti
Composite _

- 7 -
METHOD OF INSTALLATION
Cette machine prend en charge le contrôle du signal DMX512,
connectez-la simplement à la console pour le contrôle.
Un seul cordon d'alimentation pour machine à étincelles froides (cordon
d'alimentation pour pulvérisateur) ne peut être connecté qu'en série pour
un maximum de 6 groupes. Trop de connexion en série peut entraîner
des dommages ou un incendie.
- 8 -
peut entraîner des dommages ou un incendie.
A. Schéma de connexion en série de signaux :
B. Schéma de connexion en série
d'alimentation :
- 9 -

- 10 -
DESCRIPTION
Ⅰ. Instructions de chaîne
Canal
Contrôle
fonction
Valeurs
numériques
Affichage numérique à
tubes
1
Préchauffer
000~010
A001 Code d'adresse DMX
Invalide
011~239
Préchauffer
pour ouvrir
240~255
Affiche la valeur actuelle de la
température
2
fermer
000~015
DÉSACTIVÉ
Pulvérisation
hauteur de
fleur 1
01 5 ~0 74
F1 (Valable uniquement s'il
atteint le fonctionnement
température)
Hauteur de
pulvérisation
2
0 75 ~ 134
F2 (doit atteindre la
température de
fonctionnement pour être
efficace)
Hauteur de
pulvérisation
3
1 35 ~ 194
F3 (besoin d'atteindre la
température de
fonctionnement pour être
efficace)
Effacer le
stock
1 95 ~ 255
Compensations CLE
Ⅱ. Description du panneau

- 11 -
1. Description des clés
Touches de gauche à droite : Menu -> Haut -> Bas -> Confirmer
1) Menu : changer d'interface de menu, menu suivant
2) On : peut être utilisé comme commutateur de menu, le menu précédent ;
Lorsque la touche de confirmation est enfoncée dans l'ajout vers le haut,
dans l'interface du code d'adresse DMX, le code d'adresse s'ajoute vers le
haut ; Dans l'interface de réglage de la température de travail, la
température de travail est additionnée.
3) Bas : lorsque la touche de confirmation est enfoncée, dans l'interface du
code d'adresse DMX, le code d'adresse est réduit ; Dans l'interface de
réglage de la température de travail, la température de travail est réduite.
4) Confirmer : l'interface entre dans l'état de réglage et l'interface actuelle
peut ajouter ou soustraire la valeur. (Uniquement valable en code adresse,
température de fonctionnement) .
2. description du voyant
1) Lumière jaune : s'allume en cas d'erreur, comme un problème de
détection du contrôle de la température ou un problème de chauffage.
2) Lumière verte : allumée indique qu'il y a un signal DMX, éteinte pour la
déconnexion du signal
3) Lumière rouge : elle est toujours allumée lors du chauffage
4) Lumière bleue : La lumière indique que le chauffage est terminé et que
la température de fonctionnement a été atteinte.
- 12 -
3. Description de l'interface (appuyez sur la touche
menu ou sur la touche haut pour changer d'interface)
Interface du code d'adresse :
Instructions d'utilisation : appuyez
sur la touche de confirmation pour
entrer dans l'édition, vous pouvez
sélectionner le code d'adresse
001-512, puis appuyez sur la touche
de confirmation pour quitter l'édition
du code d'adresse.
Interface de température :
Description de
l'opération : L'interface actuelle ne
peut pas être utilisée, elle affiche
uniquement en temps réel l'état
actuel de la température.
Interface de réglage de la
température de fonctionnement :
Instructions d'utilisation : Réglez la
température de fonctionnement,
lorsque la température est chauffée
à la température actuelle, vous
pouvez pulvériser l'opération ;
Cliquez sur la touche de
confirmation pour entrer dans
l'édition, vous pouvez choisir la
plage de température de 480 à 550
degrés, puis cliquez sur la touche de
- 13 -
confirmation pour quitter l'état
d'édition.
Interface sans fil :
Petit rappel:
Lorsque vous utilisez plusieurs machines en série, veuillez désigner
l'une des machines comme hôte. Voici les instructions de configuration .
Interface esclave
Interface hôte
Instructions d'utilisation: L' affichage de l'interface de code comme
indiqué dans la figure « Interface esclave », après l'affichage réussi de
l'interface de code comme indiqué dans la figure « Interface hôte » ;
Lors du réglage du maître, vous pouvez utiliser le bouton « ENTER »
pour sélectionner l'état maître/esclave de la machine. Si vous devez le
définir comme hôte, l'interface de configuration est affichée dans la
figure " Interface hôte ", et la machine actuelle a été définie comme
hôte.
Ⅲ. Télécommande contrôle _ Instructions

- 14 -
A : Gamme basse ; _
B : Haute qualité ; _ _
C : Arrêtez ;
D : Nettoyage des matériaux ;

- 15 -
Ⅵ. Fonctionnement de la machine étape par étape

- 16 -
Fabriqué en Chine


- 18 -
Technisch Support- und E-Garantie-Zertifikat www.vevor.com/support
KALTFUNKENMASCHINE
MODELL: BJY-PHJ500u1
/BJY-PHJ500u2/BJY-PHJ700u1/BJY-PHJ700u2
We continue to be committed to provide you tools with competitive price.
"Save Half", "Half Price" or any other similar expressions used by us only represents an
estimate of savings you might benefit from buying certain tools with us compared to the major
top brands and does not necessarily mean to cover all categories of tools offered by us. You
are kindly reminded to verify carefully when you are placing an order with us if you are
actually saving half in comparison with the top major brands.

- 19 -

- 1 -
MODELL:
BJY-PHJ500u1 / BJY-PHJ500u2 BJY-PHJ700u1 / BJY-PHJ700u2
Have product questions? Need technical support? Please feel free to
contact us:
Technical Support and E-Warranty Certificate
www.vevor.com/support
NEED HELP? CONTACT US!
This is the original instruction, please read all manual instructions
carefully before operating. VEVOR reserves a clear interpretation of our
user manual. The appearance of the product shall be subject to the
product you received. Please forgive us that we won't inform you again if
there are any technology or software updates on our product.
COLD SPARK
MACHINE
- 2 -
Warnung: Um das Verletzungsrisiko zu verringern, muss der
Benutzer die Bedienungsanleitung sorgfältig lesen.
RICHTIGE ENTSORGUNG
Dieses Produkt unterliegt den Bestimmungen der europäischen
Richtlinie 2012/19/EG. Das Symbol einer durchgestrichenen
Mülltonne weist darauf hin, dass das Produkt in der
Europäischen Union einer getrennten Müllsammlung bedarf.
Dies gilt für das Produkt und alle Zubehörteile, die mit diesem
Symbol gekennzeichnet sind. Als solche gekennzeichnete
Produkte dürfen nicht über den normalen Hausmüll entsorgt
werden, sondern müssen an einer Sammelstelle für das
Recycling von Elektro- und Elektronikgeräten abgegeben
werden.
FCC-Erklärung:
Dieses Gerät entspricht Teil 15 der FCC-Bestimmungen. Der
Betrieb unterliegt den folgenden beiden Bedingungen: (1)
Dieses Gerät darf keine schädlichen Störungen verursachen
und (2) dieses Gerät muss alle empfangenen Störungen
akzeptieren, einschließlich Störungen, die einen
unerwünschten Betrieb verursachen können.
Wechselstrom
SAFETY INSTRUCTIONS AND OPERATING INSTRUCTIONS
1. Bitte stellen Sie sicher , dass das Ti-Verbundpulver trocken genug ist,
bevor Sie es hinzufügen. Das Pulver muss sauber sein, mit kleinen
Partikeln und ohne zu viele Verunreinigungen.
2. Wenn Sie die Maschine längere Zeit nicht benutzen, gießen Sie das
Pulver bitte aus und bewahren Sie es verschlossen auf, um es vor

- 3 -
Feuchtigkeit zu schützen.
3. Wenn die Maschine eingeschaltet ist, besteht die Gefahr eines
Stromschlags und von Verbrennungen durch hohe Temperaturen . Bitte
versuchen Sie nicht, die Maschine zu öffnen oder zu zerlegen Debuggen
Sie jeden Teil der Maschine.
4. Bewahren Sie das elektronische Feuerwerksgerät trocken auf. Bitte
verwenden Sie es nicht bei Regen oder Schnee Tage.
5. Befestigen Sie das Gerät mit den Schraubenlöchern an der Halterung.
Stellen Sie sicher, dass die Ausrüstung vorhanden ist Sicher befestigt, um
Vibrationen und Bewegungen während des Betriebs zu verhindern, und
zwar immer Überprüfen Sie, ob die Struktur, die das Gerät trägt, stark
genug ist, um dem standzuhalten Ausrüstung, die mindestens das
10-fache ihres Gewichts wiegt.
6.Die Ausrüstung muss von Fachleuten an Orten befestigt werden, die für
Menschen unzugänglich sind Niemand kann unter oder über dem
Zebrastreifen hindurchgehen.
7. Hinweis: Es besteht Explosionsgefahr, wenn die Batterie falsch
eingesetzt wird. Nur Ersetzen Sie gleiche oder gleichwertige Typen.
8. Wenn Sie Zweifel haben, ob die Batterie verschluckt oder in andere
Körperteile gelangt ist, wenden Sie sich sofort an einen Arzt. Vor dem
Reinigen des Trennen Sie das Gerät vom Stromnetz, sofern es
angeschlossen ist. Verwenden Sie keine scharfen Reinigungsmittel.
Wischen Entfernen Sie Staub oder Schmutz mit einem sauberen Tuch vom
Produkt. Wir sind nicht verantwortlich dafür Schäden, die durch
unsachgemäße Behandlung, unsachgemäßen Gebrauch oder Abnutzung
entstehen, behalten wir uns vor das Recht auf technische Änderungen.
9. Die Verbrauchsmaterialabdeckung oben am Gerät muss geschlossen
sein, um ein versehentliches Herauswerfen zu verhindern.
Verbrauchsmaterialien sollten in einer trockenen und geschlossenen
Umgebung gelagert werden, um Feuchtigkeit zu vermeiden.
10. Vor und nach dem Auftritt sollten Sie beobachten, ob sich Knötchen in
der Düse befinden. Wenn ja, muss es bereinigt werden. Diese Module
beeinträchtigen den Feuerwerkseffekt und beschädigen sogar die

- 4 -
Funkenmaschine.
11. Ein einziges elektronisches Feuerwerksnetzkabel (Sprühernetzkabel)
kann nur für bis zu 6 Gruppen in Reihe geschaltet werden. Zu viel
Reihenschaltung kann zu Schäden oder Bränden führen.
12. Die maximale Laufzeit beträgt 5 Minuten. Wiederverwendbar, sollte
aber nicht überhitzt werden Maschine. Das Bewegen und Hantieren der
Maschine während des Betriebs ist verboten.
13. Stellen Sie beim Laden von Verbrauchsmaterialien sicher, dass die
Maschine ausgeschaltet ist. Bitte decken Sie es nach dem Verstauen ab,
um zu verhindern, dass Müll in den Zufuhreinlass fällt und die Maschine
verstopft.
14. Verhindern Sie, dass etwas in die Düse gelangt, und beseitigen Sie
Hindernisse vor dem Betrieb
15. Um die Gefahr von Bränden oder Stromschlägen zu vermeiden, setzen
Sie dieses Gerät weder Regen noch Feuchtigkeit aus. Stellen Sie während
des Betriebs sicher, dass sich keine brennbaren Gegenstände in der Nähe
befinden Ausrüstung.
16. Installieren Sie das Gerät an einem gut belüfteten Ort mit einem
Abstand von mindestens 50 cm Oberfläche. Stellen Sie sicher, dass die
Lüftungsschlitze nicht blockiert sind.
17. Trennen Sie das Gerät vor jedem Betrieb vom Stromnetz bzw
Wartung.
18. Wenn etwas schief geht, stoppen Sie das Gerät sofort und reparieren
Sie es nicht selbst. Unsachgemäße Wartung führt zu Schäden und
Ausfällen. Wenden Sie sich zur Genehmigung an den technischen Support.
Verwenden Sie nur die gleichen Ersatzteile wie die Originalteile, um
sicherzustellen, dass das Netzkabel nicht blockiert oder beschädigt wird.
19. Ersetzen Sie die Sicherung: Trennen Sie das Gerät vom Stromnetz.
Entfernen Sie den Sicherungshalter mit einem Schraubendreher aus
seiner ursprünglichen Position. Entfernen Sie die durchgebrannte
Sicherung und ersetzen Sie sie durch eine Sicherung mit den gleichen
Eigenschaften. Schrauben Sie die Schrauben wieder fest, um das Gerät
an die Stromversorgung anzuschließen.
- 5 -
20. Warnung: Wenn die Sicherung nach dem Austausch immer noch
durchgebrannt ist, verwenden Sie sie bitte nicht mehr. Für weitere
Anweisungen wenden Sie sich bitte an den Kundendienst. Bei
fortgesetzter Verwendung kann es zu schweren Schäden kommen.
21. Warnung vor Fernbedienungsbatterien: Gebrauchte Batterien dürfen
nicht weggeworfen werden zusammen mit dem Hausmüll, sollte aber an
einer separaten Sammelstelle gesammelt werden .
ANLEITUNG AUFBEWAHREN
Vorsichtsmaßnahmen:
• Nach Gebrauch müssen die Verbrauchsmaterialien 30 Sekunden lang
durch Drücken der Taste „D“ gereinigt werden!
• Unterbrechen Sie den Heizbetrieb, wenn längere Zeit kein Feuerwerk
versprüht wird
• Verbot, die Maschine umkippen zu lassen .
• Berühren Sie die Düse nicht mit Ihren Händen .
• Verbot des ununterbrochenen Arbeitens mit der Maschine für 30
Minuten .
• Danach muss die Feuerwerksmaschine 2 Minuten ohne Pulver im
Leerlauf stehen jede Verwendung .
• Das Pulver im Pulvertank sollte gereinigt und ausgegossen werden
rechtzeitig recyceln und nicht aufstapeln .
PACKING LIST
NEI
N
BILD
NAME
ME
NG
E
NEI
N
BILD
NAME
ME
NG
E
A
Kalte
Funkenmaschine
1
E
Fernbedienung
1

- 6 -
B
Stromleitung
1
F
Batterie
1
C
Stromkabel
1
G
Sicherung
1
D
D MX-
Signalkabel
1
Die obige Liste gilt für jede Innenbox .
TECHNICAL PARAMETERS
Modell
BJY-
PHJ500u1
BJY-
PHJ500u2
BJY-
PHJ700u1
BJY-
PHJ700u2
Nennspannu
ng
AC120V
60Hz
AC220-240
V
50Hz/60Hz
AC120V
60Hz
AC220-240
V
50Hz/60Hz
Nennleistun
g
500W
500W
7 00 W
7 00 W
Sicherung
1 5 A
10 A _
1 5 A
10 A _
Vorheizzeit
<3min
<3min
<3min
<3min
Höhe des
Funkens
4m
4m
5m
5m
Drahtloser
Controller
W-3+W-8
W-3+W-8
W-3+W-8
W-3+W-8
Bildschirmpl
atine
LED
LED
LED
LED
- 7 -
DMX-Bereic
h
1-512
1-512
1-512
1-512
Pulver
injizieren
Ti -
Verbundwer
kstoff
Ti -
Verbundwer
kstoff
Ti -
Verbundwer
kstoff
Ti -
Verbundwer
kstoff
METHOD OF INSTALLATION
Dieses Gerät unterstützt die DMX512-Signalsteuerung. Schließen Sie es
zur Steuerung einfach an die Konsole an.
Ein einzelnes Kaltfunken-Netzkabel (Spritzgerät-Netzkabel) kann nur für
bis zu 6 Gruppen in Reihe geschaltet werden. Zu viel Reihenschaltung
kann zu Beschädigungen oder Bränden führen.

- 8 -
kann zu Beschädigungen oder Bränden führen.
A. Schematische Signalreihenschaltung :
- 9 -
B. Schaltplan für die Reihenschaltung der
Stromversorgung:

- 10 -
DESCRIPTION
Ⅰ. Kanalanweisungen
Kanal
Kontrolle
Funktion
Zahlenwerte
Digitale Röhrenanzeige
1
Vorheizen
000~010
A001 DMX-Adresscode
Ungültig
011~239
Zum Öffnen
vorheizen
240~255
Zeigt den aktuellen
Temperaturwert an
2
schließen
000~015
AUS
Blütenhöhe 1
sprühen
01 5 ~0 74
F1 (Nur gültig, wenn der
Betriebszustand erreicht ist
Temperatur)
Sprühhöhe 2
0 75 ~ 134
F2 (muss die
Betriebstemperatur
erreichen, um wirksam zu
sein)
Sprühhöhe 3
1 35 ~ 194
F3 (muss die
Betriebstemperatur
erreichen, um wirksam zu
sein)
Lagerbestand
löschen
1 95 ~ 255
CLE-Clearings
Ⅱ. Panelbeschreibung

- 11 -
1. Tastenbeschreibung _
Reihenfolge der Tasten von links nach rechts: Menü -> Aufwärts ->
Abwärts -> Bestätigen
1) Menü: Menüoberfläche wechseln, nächstes Menü
2) Ein: kann als Menüschalter verwendet werden, das vorherige Menü;
Wenn die Bestätigungstaste gedrückt wird, wird in der
DMX-Adresscode-Schnittstelle der Adresscode nach oben hinzugefügt. In
der Arbeitstemperatur-Einstellschnittstelle wird die Arbeitstemperatur
addiert.
3) Nach unten: Wenn die Bestätigungstaste nach unten gedrückt wird,
wird in der DMX-Adresscode-Schnittstelle der Adresscode nach unten
reduziert; In der Arbeitstemperatur-Einstellschnittstelle wird die
Arbeitstemperatur gesenkt.
4) Bestätigen: Die Schnittstelle wechselt in den Einstellungsstatus und die
aktuelle Schnittstelle kann den Wert addieren oder subtrahieren. (Nur
gültig im Adresscode, Arbeitstemperatur) .
2. Beschreibung der Anzeigeleuchte
1) Gelbes Licht: Leuchtet auf, wenn ein Fehler vorliegt, z. B. ein Problem
mit der Erkennung der Temperaturregelung oder ein Problem mit der
Heizung.
2) Grünes Licht: Ein zeigt an, dass ein DMX-Signal vorhanden ist, aus,
wenn das Signal unterbrochen ist
- 12 -
3) Rotes Licht: Es leuchtet beim Heizen immer
4) Blaues Licht : Das Licht zeigt an, dass die Temperaturerwärmung
abgeschlossen ist und die Arbeitstemperatur erreicht wurde.
3. Schnittstellenbeschreibung (Drücken Sie die
Menütaste oder die Aufwärtstaste, um die Schnittstelle
zu wechseln)
Adresscode-Schnittstelle:
Bedienungsanleitung: Drücken Sie
die Bestätigungstaste, um die
Bearbeitung aufzurufen. Sie können
den Adresscode 001-512 auswählen
und dann die Bestätigungstaste
drücken, um die Bearbeitung des
Adresscodes zu verlassen.
Temperaturschnittstelle:
Funktionsbeschreibung: Die aktuelle
Schnittstelle kann nicht bedient
werden, sondern zeigt nur den
aktuellen Temperaturstatus in
Echtzeit an.
Schnittstelle zur Einstellung der
Betriebstemperatur:
Bedienungsanleitung: Stellen Sie die
Arbeitstemperatur ein. Wenn die
Temperatur auf die aktuelle
Temperatur erhitzt wird, kann der
Sprühvorgang durchgeführt werden.
- 13 -
Klicken Sie auf die
Bestätigungstaste, um die
Bearbeitung aufzurufen. Sie können
den Temperaturbereich von 480–550
Grad auswählen und dann auf die
Bestätigungstaste klicken, um den
Bearbeitungsstatus zu verlassen.
Drahtlose Schnittstelle:
Freundliche Erinnerung:
Wenn Sie mehrere Maschinen in Reihe verwenden, legen Sie bitte eine
der Maschinen als Host fest. Hier finden Sie die
Einrichtungsanweisungen .
Slave-Schnittstelle
Host-Schnittstelle
Bedienungsanleitungen: Die Anzeige der Code-Schnittstelle erfolgt
wie in der Abbildung „ Slave-Schnittstelle “ dargestellt, nach
erfolgreicher Anzeige der Code-Schnittstelle wie in der Abbildung „
Host-Schnittstelle “ dargestellt; Beim Einstellen des Masters können
Sie mit der Taste „ ENTER “ den Master/Slave-Status der Maschine
auswählen. Wenn Sie ihn als Host festlegen müssen, wird die
Einstellungsoberfläche in Abbildung „ Host-Schnittstelle “ angezeigt
und der aktuelle Computer wurde als Host festgelegt.
Ⅲ. Fernbedienung Kontrolle _ Anweisungen

- 14 -
A : Niedrige Reichweite ; _
B : Hochwertig ; _ _ _
C : Stopp ;
D : Materialreinigung ; _

- 15 -
Ⅵ. Maschinenbedienung Schritt für Schritt

- 16 -
In China hergestellt


- 18 -
Tecnico Supporto e certificato di garanzia elettronica www.vevor.com/support
MACCHINA A SCINTILLA FREDDA
MODELLO: BJY-PHJ500u1
/BJY-PHJ500u2/BJY-PHJ700u1/BJY-PHJ700u2
We continue to be committed to provide you tools with competitive price.
"Save Half", "Half Price" or any other similar expressions used by us only represents an
estimate of savings you might benefit from buying certain tools with us compared to the major
top brands and does not necessarily mean to cover all categories of tools offered by us. You
are kindly reminded to verify carefully when you are placing an order with us if you are
actually saving half in comparison with the top major brands.

- 19 -

- 1 -
MODELLO:
BJY-PHJ500u1 / BJY-PHJ500u2 BJY-PHJ700u1 / BJY-PHJ700u2
Have product questions? Need technical support? Please feel free to
contact us:
Technical Support and E-Warranty Certificate
www.vevor.com/support
NEED HELP? CONTACT US!
This is the original instruction, please read all manual instructions
carefully before operating. VEVOR reserves a clear interpretation of our
user manual. The appearance of the product shall be subject to the
product you received. Please forgive us that we won't inform you again if
there are any technology or software updates on our product.
COLD SPARK
MACHINE
- 2 -
Avvertenza: per ridurre il rischio di lesioni, l'utente deve leggere
attentamente il manuale di istruzioni.
CORRETTO SMALTIMENTO
Questo prodotto è soggetto alle disposizioni della Direttiva
Europea 2012/19/CE. Il simbolo del bidone della spazzatura
barrato indica che nell'Unione Europea il prodotto richiede la
raccolta differenziata dei rifiuti. Ciò vale per il prodotto e tutti gli
accessori contrassegnati da questo simbolo. I prodotti
contrassegnati come tali non possono essere smaltiti con i
normali rifiuti domestici ma devono essere portati in un punto di
raccolta per il riciclaggio di dispositivi elettrici ed elettronici.
Dichiarazione FCC:
Questo dispositivo è conforme alla Parte 15 delle norme FCC.
Il funzionamento è soggetto alle seguenti due condizioni: (1)
Questo dispositivo non può causare interferenze dannose e (2)
questo dispositivo deve accettare qualsiasi interferenza
ricevuta, comprese le interferenze che potrebbero causare un
funzionamento indesiderato.
Corrente alternata
SAFETY INSTRUCTIONS AND OPERATING INSTRUCTIONS
1. Si prega di assicurarsi che la polvere del composito Ti sia
sufficientemente asciutta prima di aggiungerla. La polvere deve essere
pulita, con particelle piccole, senza troppe impurità.
2. Quando non si utilizza la macchina per un lungo periodo, per
proteggere la polvere dall'umidità, versare la polvere e tenerla sigillata per
riserva.
3. Quando la macchina è accesa, esiste il pericolo di scosse elettriche e

- 3 -
ustioni da alta temperatura . Si prega di non tentare di aprire la macchina o
di smontarla eseguire il debug di qualsiasi parte della macchina.
4. Mantenere la macchina elettronica per fuochi d'artificio asciutta, non
utilizzarla in caso di pioggia o neve giorni.
5. Fissare il dispositivo con i fori per le viti sulla staffa. Assicurati che
l'attrezzatura lo sia fissato saldamente per evitare vibrazioni e movimenti
durante il funzionamento, e sempre verificare che la struttura che sostiene
l'apparecchiatura sia sufficientemente robusta per resistere attrezzature
che pesano almeno 10 volte il peso dell'attrezzatura.
6. L'attrezzatura deve essere fissata da professionisti in luoghi fuori dalla
portata delle persone, e nessuno può passare sotto o sopra le strisce
pedonali.
7. Nota: se la batteria non è posizionata correttamente sussiste il pericolo
di esplosione. Soltanto sostituire i tipi uguali o equivalenti.
8. In caso di dubbi sul fatto che la batteria sia stata ingerita o introdotta in
altre parti del corpo, contattare immediatamente un medico. Prima di pulire
il dispositivo, scollegarlo dalla rete elettrica se collegata. Non utilizzare
detergenti aggressivi. Pulire rimuovere la polvere o lo sporco dal prodotto
con un panno pulito. Non ne siamo responsabili danni causati da
manipolazione errata, uso improprio o usura, ci riserviamo il diritto di
apportare modifiche tecniche.
9. Il coperchio dei materiali di consumo nella parte superiore
dell'apparecchiatura deve essere chiuso per evitare l'espulsione
accidentale. I materiali di consumo devono essere conservati in un
ambiente asciutto e sigillato per prevenire l'umidità.
10. Prima e dopo lo spettacolo, dovresti osservare se ci sono noduli
nell'ugello. Se è così, è necessario ripulirlo. Questi moduli influenzeranno
l'effetto dei fuochi d'artificio e danneggeranno persino la macchina delle
scintille.
11. Un singolo cavo di alimentazione per fuochi d'artificio elettronici (cavo
di alimentazione dello spruzzatore) può essere collegato in serie solo per
un massimo di 6 gruppi. Un collegamento in serie eccessivo può causare
danni o incendi.

- 4 -
12. Il tempo di esecuzione massimo è di 5 minuti. Riutilizzabile, ma non
dovrebbe surriscaldare il macchina. È vietato spostare e maneggiare la
macchina durante l'uso.
13. Quando si caricano i materiali di consumo, assicurarsi che la
macchina sia spenta. Dopo averlo riposto, coprirlo per evitare che i rifiuti
cadano nell'ingresso di alimentazione e causino il blocco della macchina.
14. Evitare che qualsiasi cosa entri nell'ugello, eliminare le ostruzioni
prima dell'uso
15. Per evitare rischi di incendio o scosse elettriche, non esporre questo
dispositivo alla pioggia o all'umidità. Durante il funzionamento, assicurarsi
che non vi siano oggetti infiammabili vicino al attrezzatura.
16. Installare l'apparecchiatura in un luogo ben ventilato, ad almeno 50
cm di distanza da qualsiasi cosa superficie. Assicurarsi che le fessure di
ventilazione non siano ostruite.
17. Scollegare l'apparecchiatura dalla rete elettrica prima di qualsiasi
operazione o manutenzione.
18. Se qualcosa va storto, fermare immediatamente l'attrezzatura e non
ripararla da soli. Una manutenzione impropria porterà a danni e guasti.
Contattare il supporto tecnico per l'approvazione. Utilizzare solo pezzi di
ricambio uguali a quelli originali per garantire che il cavo di alimentazione
non sia bloccato o danneggiato.
19. Sostituire il fusibile: scollegare il dispositivo dall'alimentazione.
Rimuovere il portafusibile dalla sua posizione originale con un cacciavite.
Rimuovere il fusibile bruciato e sostituirlo con uno con le stesse
caratteristiche. Riavvitare le viti per collegare l'apparecchiatura
all'alimentazione.
20. Avvertenza: se il fusibile continua a bruciarsi dopo averlo sostituito,
smettere di usarlo. Si prega di contattare l'assistenza clienti per ulteriori
istruzioni. L'uso continuato può causare gravi danni.
21. Avvertenza sulle batterie del telecomando: le batterie usate non
devono essere gettate via con i rifiuti domestici, ma devono essere raccolti
in un punto di raccolta separato .
CONSERVA QUESTE ISTRUZIONI

- 5 -
Precauzioni:
• Dopo l'uso, i materiali di consumo devono essere puliti per 30 secondi
premendo il pulsante "D"!
• Interrompere il funzionamento del riscaldamento se i fuochi d'artificio non
vengono spruzzati per un lungo periodo
• Divieto di ribaltamento della macchina .
• Non toccare l'ugello con le mani .
• Divieto di lavoro continuativo con la macchina per 30 minuti .
• La macchina per i fuochi d'artificio deve rimanere inattiva per 2 minuti
senza polvere ogni utilizzo .
• La polvere nel serbatoio della polvere deve essere pulita e versata
riciclaggio in tempo e non dovrebbe essere ammucchiato .
PACKING LIST
NO
IMMAGIN
E
NOME
QU
AN
TIT
À
NO
IMMAGI
NE
NOME
QU
AN
TIT
À
UN
Macchina a
scintilla fredda
1
E
Telecomando
1
B
Linea elettrica
1
F
Batteria
1
C
Cavo di
alimentazione
1
G
Fusibile
1
D
Cavo di segnale
DMX
1

- 6 -
L'elenco sopra è per ciascuna scatola interna .
TECHNICAL PARAMETERS
Modello
BJY-
PHJ500u1
BJY-
PHJ500u2
BJY-
PHJ700u1
BJY-
PHJ700u2
Tensione
nominale
CA 120 V
60 Hz
CA
220-240 V
50 Hz/60
Hz
CA 120 V
60 Hz
CA
220-240 V
50 Hz/60
Hz
Potenza
nominale
500W
500W
700 W
700 W
Fusibile
15A _ _
10A _ _
15A _ _
10A _ _
Tempo di
preriscaldamento
<3min
<3min
<3min
<3min
Altezza della
scintilla
4m
4m
5m
5m
Controller senza
fili
W-3+W-8
W-3+W-8
W-3+W-8
W-3+W-8
Scheda dello
schermo di
visualizzazione
GUIDATO
GUIDATO
GUIDATO
GUIDATO
Gamma DMX
1-512
1-512
1-512
1-512
Iniettare la
polvere
Ti
Composito
_
Ti
Composito
_
Ti
Composito
_
Ti
Composito
_
- 7 -
METHOD OF INSTALLATION
Questa macchina supporta il controllo del segnale DMX512, basta
collegarla alla console per il controllo.
Un singolo cavo di alimentazione della macchina a scintilla fredda (cavo
di alimentazione dello spruzzatore) può essere collegato in serie solo per
un massimo di 6 gruppi. Troppi collegamenti in serie può causare danni o
incendi.
- 8 -
può causare danni o incendi.
A. Schema di collegamento in serie del
segnale :
B. Schema di collegamento in serie
dell'alimentatore:
- 9 -

- 10 -
DESCRIPTION
Ⅰ. Istruzioni del canale
Canale
Controllo
funzione
Valori
numerici
Display digitale a tubo
1
Preriscaldamento
spento
000~010
A001 Codice indirizzo DMX
Non valido
011~239
Preriscaldare per
aprire
240~255
Visualizza il valore della
temperatura attuale
2
vicino
000~015
SPENTO
Altezza del fiore
spray 1
01 5 ~0
74
F1(Valido solo se raggiunge
operativo
temperatura)
Altezza spruzzo
2
075 ~
134 _
F2 (deve raggiungere la
temperatura operativa per
essere efficace)
Altezza spruzzo
3
1 35 ~
194
F3 (è necessario raggiungere
la temperatura operativa per
essere efficace)
Cancella
magazzino
1 95 ~
255
Compensazioni CLE
Ⅱ. Descrizione del pannello

- 11 -
1. Descrizione chiave
Tasti da sinistra a destra: Menu -> Su -> Giù -> Conferma
1) Menu: cambia l'interfaccia del menu, il menu successivo
2) On: può essere utilizzato come interruttore di menu, il menu precedente;
Quando si preme il tasto di conferma per aggiungere verso l'alto,
nell'interfaccia del codice indirizzo DMX, il codice indirizzo viene aggiunto
verso l'alto; Nell'interfaccia di impostazione della temperatura di lavoro, la
temperatura di lavoro viene sommata.
3) Giù: quando si preme il tasto di conferma, nell'interfaccia del codice
indirizzo DMX, il codice indirizzo viene ridotto; Nell'interfaccia di
impostazione della temperatura di lavoro, la temperatura di lavoro viene
ridotta.
4) Conferma: l'interfaccia entra nello stato di impostazione e l'interfaccia
corrente può aggiungere o sottrarre il valore. (Valido solo in codice
indirizzo, temperatura di lavoro) .
2. descrizione della spia
1) Luce gialla: si accende quando si verifica un errore, come un problema
con il rilevamento del controllo della temperatura o un problema con il
riscaldamento.
2) Luce verde: accesa indica la presenza del segnale DMX, spenta per
disconnessione del segnale
3) Luce rossa: è sempre accesa durante il riscaldamento
- 12 -
4) Luce blu : La luce indica che il riscaldamento della temperatura è
completato e che è stata raggiunta la temperatura di lavoro.
3. Descrizione dell'interfaccia (premere il tasto menu o
il tasto su per cambiare interfaccia)
Interfaccia del codice indirizzo:
Istruzioni operative: premere il tasto
conferma per accedere alla
modifica, è possibile selezionare il
codice indirizzo 001-512, quindi
premere il tasto conferma per uscire
dalla modifica del codice indirizzo.
Interfaccia di temperatura:
Descrizione dell'operazione:
L'interfaccia attuale non può essere
utilizzata, ma solo la visualizzazione
in tempo reale dello stato attuale
della temperatura.
Interfaccia di impostazione della
temperatura operativa:
Istruzioni per l'uso: impostare la
temperatura di lavoro, quando la
temperatura viene riscaldata alla
temperatura corrente è possibile
spruzzare l'operazione; Fare clic sul
tasto di conferma per accedere alla
modifica, è possibile scegliere
l'intervallo di temperatura di 480-550
gradi, quindi fare clic sul tasto di

- 13 -
conferma per uscire dallo stato di
modifica.
Interfaccia senza fili:
Promemoria amichevole:
Quando si utilizzano più macchine in serie, designare una delle
macchine come host. Ecco le istruzioni per la configurazione .
Interfaccia schiava
Interfaccia ospite
Istruzioni operative: L' interfaccia del codice viene visualizzata come
mostrato nella figura " Interfaccia slave ", dopo l'avvenuta
visualizzazione dell'interfaccia del codice come mostrato nella figura "
Interfaccia host "; Quando si imposta il master, è possibile utilizzare il
pulsante " ENTER " per selezionare lo stato master/slave della
macchina. Se è necessario impostarlo come host, l'interfaccia di
impostazione è mostrata nella Figura " Interfaccia host " e la macchina
corrente è stata impostata come host.
Ⅲ. A distanza controllo _ Istruzioni

- 14 -
A : Gamma bassa ; _
B : Alta qualità ; _ _
C : Interrompi ;
D : Materiale C appoggiato;

- 15 -
Ⅵ. Funzionamento della macchina passo dopo passo

- 16 -
Made in China


- 18 -
Técnico Soporte y certificado de garantía electrónica www.vevor.com/support
MÁQUINA DE CHISPA FRÍA
MODELO: BJY-PHJ500u1
/BJY-PHJ500u2/BJY-PHJ700u1/BJY-PHJ700u2
We continue to be committed to provide you tools with competitive price.
"Save Half", "Half Price" or any other similar expressions used by us only represents an
estimate of savings you might benefit from buying certain tools with us compared to the major
top brands and does not necessarily mean to cover all categories of tools offered by us. You
are kindly reminded to verify carefully when you are placing an order with us if you are
actually saving half in comparison with the top major brands.

- 19 -

- 1 -
MODELO:
BJY-PHJ500u1 / BJY-PHJ500u2 BJY-PHJ700u1 / BJY-PHJ700u2
Have product questions? Need technical support? Please feel free to
contact us:
Technical Support and E-Warranty Certificate
www.vevor.com/support
NEED HELP? CONTACT US!
This is the original instruction, please read all manual instructions
carefully before operating. VEVOR reserves a clear interpretation of our
user manual. The appearance of the product shall be subject to the
product you received. Please forgive us that we won't inform you again if
there are any technology or software updates on our product.
COLD SPARK
MACHINE

- 2 -
Advertencia: para reducir el riesgo de lesiones, el usuario debe
leer atentamente el manual de instrucciones.
ELIMINACIÓN CORRECTA
Este producto está sujeto a las disposiciones de la Directiva
Europea 2012/19/CE. El símbolo que muestra un contenedor
con ruedas tachado indica que el producto requiere recogida
selectiva de basura en la Unión Europea. Esto se aplica al
producto y a todos los accesorios marcados con este símbolo.
Los productos marcados como tales no podrán desecharse
junto con la basura doméstica normal, sino que deberán
llevarse a un punto de recogida para el reciclaje de aparatos
eléctricos y electrónicos.
Declaración de la FCC:
Este dispositivo cumple con la Parte 15 de las normas de la
FCC. El funcionamiento está sujeto a las dos condiciones
siguientes: (1) Este dispositivo no puede causar interferencias
dañinas y (2) este dispositivo debe aceptar cualquier
interferencia recibida, incluidas las interferencias que puedan
causar un funcionamiento no deseado.
Corriente alterna
SAFETY INSTRUCTIONS AND OPERATING INSTRUCTIONS
1. Asegúrese de que el polvo compuesto de Ti esté lo suficientemente
seco antes de agregarlo. El polvo debe estar limpio, con pequeñas
partículas, sin demasiadas impurezas.
2. Cuando no utilice la máquina durante un período prolongado para
evitar que el polvo se humedezca, vierta el polvo y manténgalo sellado
como reserva.

- 3 -
3. Cuando la máquina está encendida, existe peligro de descarga
eléctrica y quemaduras por altas temperaturas . No intente abrir la
máquina ni desmontarla ni depurar cualquier parte de la máquina.
4.Mantenga seca la máquina de fuegos artificiales electrónicos, no la use
en días lluviosos o nevados. días.
5. Fije el dispositivo con los orificios para tornillos del soporte. Asegúrese
de que el equipo esté bien sujeto para evitar vibraciones y movimientos
durante el funcionamiento, y siempre Verifique que la estructura que
soporta el equipo sea lo suficientemente fuerte para soportar equipo que
sea al menos 10 veces el peso del equipo.
6. Los equipos deben ser fijados por profesionales en lugares fuera del
alcance de las personas, y nadie puede pasar por debajo o por encima del
paso de peatones.
7. Nota: Existe peligro de explosión si la batería no se coloca
correctamente. Solo reemplazar tipos iguales o equivalentes.
8. Si tiene dudas sobre si la batería ha sido ingerida o introducida en
otras partes del cuerpo, comuníquese con un médico de inmediato. Antes
de limpiar el dispositivo, desconéctelo de la red eléctrica si está conectado.
No utilice limpiadores fuertes. Limpiar Quite el polvo o la suciedad del
producto con un paño limpio. No somos responsables de daños causados
por manipulación incorrecta, uso inadecuado o desgaste, nos reservamos
el derecho a realizar modificaciones técnicas.
9. La cubierta de consumibles en la parte superior del equipo debe estar
cerrada para evitar una expulsión accidental. Los consumibles deben
almacenarse en un ambiente seco y sellado para evitar la humedad.
10. Antes y después de la actuación, se debe observar si hay nódulos en
la boquilla. Si es así, es necesario limpiarlo. Estos módulos afectarán el
efecto de los fuegos artificiales e incluso dañarán la máquina de chispa.
11. Un solo cable de alimentación de fuegos artificiales electrónicos
(cable de alimentación del rociador) solo se puede conectar en serie para
hasta 6 grupos. Demasiada conexión en serie puede provocar daños o
incendios.
12. El tiempo máximo de ejecución es de 5 minutos. Reutilizable, pero no

- 4 -
debe sobrecalentarse. máquina. Está prohibido mover y manipular la
máquina mientras está en uso.
13. Al cargar consumibles, asegúrese de que la máquina esté apagada.
Después de guardarlo, cúbralo para evitar que la basura caiga en la
entrada de alimentación y bloquee la máquina.
14. Evite que algo entre en la boquilla, elimine las obstrucciones antes de
la operación.
15. Para evitar riesgos de incendio o descarga eléctrica, no exponga este
dispositivo a la lluvia o la humedad. Durante el funcionamiento, asegúrese
de que no haya objetos inflamables cerca del equipo.
dieciséis. Instale el equipo en un lugar bien ventilado, al menos a 50 cm de
cualquier superficie. Asegúrese de que las ranuras de ventilación no estén
bloqueadas.
17. Desconecte el equipo de la fuente de alimentación antes de cualquier
operación o mantenimiento.
18. Si algo sale mal, detenga el equipo inmediatamente y no lo repare
usted mismo. Un mantenimiento inadecuado provocará daños y fallos.
Póngase en contacto con el soporte técnico para su aprobación. Utilice
únicamente los mismos repuestos que los originales para asegurarse de
que el cable de alimentación no quede bloqueado o dañado.
19. Reemplace el fusible: desconecte el dispositivo de la fuente de
alimentación. Retire el portafusibles de su posición original con un
destornillador. Retire el fusible quemado y sustitúyalo por un fusible de las
mismas características. Vuelva a atornillar los tornillos para conectar el
equipo a la fuente de alimentación.
20. Advertencia: Si el fusible aún está fundido después de reemplazarlo,
deje de usarlo. Comuníquese con el servicio de atención al cliente para
obtener más instrucciones. El uso continuo puede causar daños graves.
21. Advertencia sobre las pilas del mando a distancia: Las pilas usadas
no deben desecharse con la basura doméstica, pero debe recogerse en
un punto de recogida selectiva .
GUARDA ESTAS INSTRUCCIONES
- 5 -
Precauciones:
• Después de su uso, los consumibles deben limpiarse durante 30
segundos presionando el botón "D"!
• Detenga la operación de calefacción si no se rocían fuegos artificiales
durante un período prolongado
• Prohibición de dejar caer la máquina .
• No toque la boquilla con las manos .
• Prohibición de trabajo continuo con la máquina durante 30 minutos .
• La máquina de fuegos artificiales debe estar inactiva durante 2 minutos
sin pólvora después cada uso .
• El polvo en el tanque de polvo debe limpiarse y vaciarse para Reciclar a
tiempo y no debe acumularse .
PACKING LIST
NO
IMAGEN
NOMBRE
CA
NTI
DA
D
NO
IMAGE
N
NOMBRE
CA
NTI
DA
D
A
Máquina de
chispa fría
1
mi
Control remoto
1
B
Línea eléctrica
1
F
Batería
1
C
Cable de energía
1
GR
AM
O
Fusible
1
D
Cable de señal
MX
1

- 6 -
La lista anterior es para cada cuadro interior .
TECHNICAL PARAMETERS
Modelo
BJY-
PHJ500u1
BJY-
PHJ500u2
BJY-
PHJ700u1
BJY-
PHJ700u2
Tensión nominal
CA 120 V
60 Hz.
CA
220-240 V
50 Hz/60
Hz.
CA 120 V
60 Hz.
CA
220-240 V
50 Hz/60
Hz.
Potencia nominal
500W
500W
7 00W
7 00W
Fusible
1 5 A
10 A _
1 5 A
10 A _
Tiempo de
precalentamiento
<3min
<3min
<3min
<3min
Altura de la
chispa
4m
4m
5m
5m
Control
inalámbrico
W-3+W-8
W-3+W-8
W-3+W-8
W-3+W-8
Tablero de
pantalla de
visualización
CONDUJO
CONDUJO
CONDUJO
CONDUJO
Rango DMX
1-512
1-512
1-512
1-512
inyectar polvo
compuesto
de ti
compuesto
de ti
compuesto
de ti
compuesto
de ti
METHOD OF INSTALLATION
- 7 -
Esta máquina admite control de señal DMX512, simplemente conéctela
a la consola para controlarla.
Un solo cable de alimentación de máquina de chispa fría (cable de
alimentación de pulverizador) solo se puede conectar en serie para
hasta 6 grupos. Demasiada conexión en serie puede provocar daños o
un incendio.
puede provocar daños o un incendio.
- 8 -
A. Esquema de conexión en serie de señales :
B. Esquema de conexión en serie de la fuente
de alimentación:
- 9 -

- 10 -
DESCRIPTION
Ⅰ. Instrucciones del canal
Canal
Control
función
Valores
numéricos
Pantalla de tubo digital
1
Precalentar
apagado
000~010
A001 Código de dirección
DMX
Inválido
011~239
Precalentar
para abrir
240~255
Muestra el valor de
temperatura actual.
2
cerca
000~015
APAGADO
Pulverizar
altura de flor
1
01 5 ~0 74
F1(Sólo válido si alcanza el
nivel de funcionamiento
temperatura)
Altura de
pulverización
2
0 75 ~ 134
F2 (necesita alcanzar la
temperatura de
funcionamiento para que sea
efectivo)
Altura de
pulverización
3
1 35 ~ 194
F3 (es necesario alcanzar la
temperatura de
funcionamiento para que sea
efectivo)
Limpiar
existencias
1 95 ~ 255
Compensaciones CLE
Ⅱ. Descripción del panel

- 11 -
1. Descripción clave
Teclas de izquierda a derecha: Menú -> Arriba -> Abajo -> Confirmar
1) Menú: Cambiar interfaz de menú, siguiente menú
2) Encendido: se puede utilizar como interruptor de menú, el menú
anterior; Cuando se presiona la tecla de confirmación para agregar hacia
arriba, en la interfaz de código de dirección DMX, el código de dirección se
agrega hacia arriba; En la interfaz de configuración de la temperatura de
trabajo, se suma la temperatura de trabajo.
3) Abajo: cuando se presiona la tecla de confirmación, en la interfaz del
código de dirección DMX, el código de dirección se reduce; En la interfaz
de configuración de la temperatura de trabajo, la temperatura de trabajo se
reduce.
4) Confirmar: la interfaz ingresa al estado de configuración y la interfaz
actual puede sumar o restar el valor. (Solo válido en código de dirección,
temperatura de trabajo) .
2. descripción de la luz indicadora
1) Luz amarilla: se enciende cuando hay un error, como un problema con
la detección del control de temperatura o un problema con la calefacción.
2) Luz verde: encendida indica que hay señal DMX, apagada por
desconexión de señal
3) Luz roja: siempre está encendida cuando se calienta
4) Luz azul : La luz indica que se completó el calentamiento de la
- 12 -
temperatura y se alcanzó la temperatura de trabajo.
3. Descripción de la interfaz (presione la tecla de menú
o la tecla arriba para cambiar de interfaz)
Interfaz de código de dirección:
Instrucciones de operación:
Presione la tecla de confirmación
para ingresar a la edición, puede
seleccionar el código de dirección
001-512 y luego presione la tecla de
confirmación para salir de la edición
del código de dirección.
Interfaz de temperatura:
Descripción de la operación: La
interfaz actual no se puede operar,
solo muestra en tiempo real el
estado de temperatura actual.
Interfaz de ajuste de temperatura
de funcionamiento:
Instrucciones de operación:
Establezca la temperatura de
trabajo, cuando la temperatura se
caliente a la temperatura actual se
puede pulverizar la operación; Haga
clic en la tecla de confirmación para
ingresar a la edición, puede elegir el
rango de temperatura de 480 a 550
grados y luego haga clic en la tecla

- 13 -
de confirmación para salir del estado
de edición.
Interfaz inalámbrica:
Recordatorio amistoso:
Cuando utilice varias máquinas en una serie, designe una de las
máquinas como host. Aquí están las instrucciones de configuración .
interfaz esclava
Interfaz de host
Instrucciones de operación: La interfaz de código se muestra como
se muestra en la figura " Interfaz esclava ", después de que la interfaz
de código se muestre correctamente como se muestra en la figura "
Interfaz de host "; Al configurar el maestro, puede operar el botón "
ENTER " para seleccionar el estado maestro/esclavo de la máquina. Si
necesita configurarlo como host, la interfaz de configuración se muestra
en la Figura " Interfaz de host ", y la máquina actual se ha configurado
como host.
Ⅲ. Remoto control _ Instrucciones

- 14 -
A : rango bajo ; _
B : Alto grado ; _ _
C : Detener ;
D : Limpieza del material ;
- 15 -
Ⅵ. Operación de la máquina paso a paso.

- 16 -
Hecho en china


- 18 -
Techniczny Certyfikat wsparcia i e-gwarancji www.vevor.com/support
MASZYNA Z ZIMNĄ ISKRĄ
MODELU: BJY-PHJ500u1
/BJY-PHJ500u2/BJY-PHJ700u1/BJY-PHJ700u2
We continue to be committed to provide you tools with competitive price.
"Save Half", "Half Price" or any other similar expressions used by us only represents an
estimate of savings you might benefit from buying certain tools with us compared to the major
top brands and does not necessarily mean to cover all categories of tools offered by us. You
are kindly reminded to verify carefully when you are placing an order with us if you are
actually saving half in comparison with the top major brands.

- 19 -
- 1 -
MODEL:
BJY-PHJ500u1 / BJY-PHJ500u2 BJY-PHJ700u1 / BJY-PHJ700u2
Have product questions? Need technical support? Please feel free to
contact us:
Technical Support and E-Warranty Certificate
www.vevor.com/support
NEED HELP? CONTACT US!
This is the original instruction, please read all manual instructions
carefully before operating. VEVOR reserves a clear interpretation of our
user manual. The appearance of the product shall be subject to the
product you received. Please forgive us that we won't inform you again if
there are any technology or software updates on our product.
COLD SPARK
MACHINE

- 2 -
Ostrzeżenie — aby zmniejszyć ryzyko obrażeń, użytkownik
musi uważnie przeczytać instrukcję obsługi.
PRAWIDŁOWA UTYLIZACJA
Ten produkt podlega przepisom Dyrektywy Europejskiej
2012/19/WE. Symbol przekreślonego kosza na śmieci
oznacza, że produkt wymaga selektywnej zbiórki śmieci na
terenie Unii Europejskiej. Dotyczy to produktu i wszystkich
akcesoriów oznaczonych tym symbolem. Produktów
oznaczonych jako takie nie można wyrzucać razem ze
zwykłymi odpadami domowymi, lecz należy je przekazać do
punktu zbiórki w celu recyklingu urządzeń elektrycznych i
elektronicznych.
Oświadczenie FCC:
To urządzenie jest zgodne z częścią 15 przepisów FCC.
Działanie podlega następującym dwóm warunkom: (1) to
urządzenie nie może powodować szkodliwych zakłóceń oraz
(2) to urządzenie musi akceptować wszelkie odbierane
zakłócenia, w tym zakłócenia, które mogą powodować
niepożądane działanie.
Prąd przemienny
SAFETY INSTRUCTIONS AND OPERATING INSTRUCTIONS
1. Przed dodaniem upewnij się, że proszek kompozytowy Ti jest
wystarczająco suchy . Proszek musi być czysty, z małymi cząsteczkami,
bez nadmiernych zanieczyszczeń.
2. Jeśli nie używasz urządzenia przez dłuższy czas, aby zapobiec
zawilgoceniu proszku, wysyp proszek i przechowuj go szczelnie
zamknięty.

- 3 -
3. Gdy maszyna jest włączona, istnieje niebezpieczeństwo porażenia
prądem elektrycznym i oparzeń wysokotemperaturowych . Proszę nie
próbować otwierać maszyny ani jej demontować debugować dowolną
część maszyny.
4. Utrzymuj elektroniczną maszynę do sztucznych ogni w suchym miejscu,
nie używaj jej w czasie deszczu lub śniegu dni.
5. Zamocuj urządzenie za pomocą otworów na śruby znajdujących się na
wsporniku. Upewnij się, że sprzęt jest bezpiecznie zamocowane, aby
zapobiec wibracjom i ruchom podczas pracy, i zawsze sprawdź, czy
konstrukcja podtrzymująca sprzęt jest wystarczająco mocna, aby
wytrzymać sprzętu o wadze co najmniej 10-krotności ciężaru sprzętu.
6. Sprzęt musi być naprawiany przez profesjonalistów w miejscach
niedostępnych dla ludzi, oraz nikt nie może przechodzić pod lub nad
przejściem dla pieszych.
7. Uwaga: Nieprawidłowe umieszczenie baterii grozi eksplozją. Tylko
zastąpić te same lub równoważne typy.
8. W przypadku wątpliwości, czy bateria została połknięta lub dostała się
do innych części ciała, należy natychmiast skontaktować się z lekarzem.
Przed czyszczeniem urządzenia, odłącz je od sieci, jeśli jest podłączone.
Nie używaj ostrych środków czyszczących. Wytrzeć usuń kurz lub brud z
produktu czystą szmatką. Nie jesteśmy odpowiedzialni za uszkodzeń
spowodowanych nieprawidłową obsługą, niewłaściwym użytkowaniem lub
zużyciem. Zastrzegamy prawo do zmian technicznych.
9. Pokrywa materiałów eksploatacyjnych na górze urządzenia musi być
zamknięta, aby zapobiec przypadkowemu wyrzuceniu. Materiały
eksploatacyjne należy przechowywać w suchym i zamkniętym
pomieszczeniu, aby zapobiec zawilgoceniu.
10. Przed i po wykonaniu należy obserwować czy w dyszy nie znajdują się
guzki. Jeśli tak, trzeba to posprzątać. Moduły te wpłyną na efekt
sztucznych ogni, a nawet uszkodzą maszynę iskrową.
11. Pojedynczy przewód zasilający elektroniczne fajerwerki (przewód
zasilający opryskiwacza) można połączyć szeregowo wyłącznie w
maksymalnie 6 grupach. Zbyt duże połączenie szeregowe może prowadzić

- 4 -
do uszkodzenia lub pożaru.
12. Maksymalny czas działania wynosi 5 minut. Nadaje się do
wielokrotnego użytku, ale nie powinien przegrzewać maszyna. Zabrania
się przemieszczania i manipulowania maszyną podczas jej użytkowania.
13. Podczas ładowania materiałów eksploatacyjnych upewnij się, że
urządzenie jest wyłączone. Po odłożeniu należy je przykryć, aby zapobiec
przedostawaniu się śmieci do wlotu paszy i zablokowaniu maszyny.
14. Nie dopuścić do przedostania się jakichkolwiek przedmiotów do dyszy,
przed rozpoczęciem pracy usunąć przeszkody
15. Aby uniknąć ryzyka pożaru lub porażenia prądem, nie wystawiaj
urządzenia na działanie deszczu ani wilgoci. Podczas pracy upewnij się,
że w pobliżu urządzenia nie znajdują się żadne łatwopalne przedmioty.
sprzęt.
16. Zainstaluj urządzenie w dobrze wentylowanym miejscu, w odległości
co najmniej 50 cm od wszelkich urządzeń powierzchnia. Upewnij się, że
szczeliny wentylacyjne nie są zablokowane.
17. Przed jakąkolwiek operacją należy odłączyć urządzenie od zasilania
konserwacja.
18. Jeśli coś pójdzie nie tak, natychmiast zatrzymaj urządzenie i nie
naprawiaj go samodzielnie. Niewłaściwa konserwacja doprowadzi do
uszkodzeń i awarii. Skontaktuj się z pomocą techniczną w celu uzyskania
zatwierdzenia. Używaj wyłącznie tych samych części zamiennych, co
oryginalne, aby mieć pewność, że przewód zasilający nie zostanie
zablokowany ani uszkodzony.
19. Wymienić bezpiecznik: odłączyć urządzenie od źródła zasilania. Za
pomocą śrubokręta wyjmij oprawkę bezpiecznika z pierwotnej pozycji.
Wyjmij przepalony bezpiecznik i zastąp go bezpiecznikiem o tych samych
właściwościach. Ponownie dokręć śruby, aby podłączyć sprzęt do źródła
zasilania.
20. Ostrzeżenie: Jeśli po wymianie bezpiecznik nadal się przepala,
przestań go używać. Aby uzyskać dalsze instrukcje, skontaktuj się z
obsługą klienta. Dalsze użytkowanie może spowodować poważne
uszkodzenia.
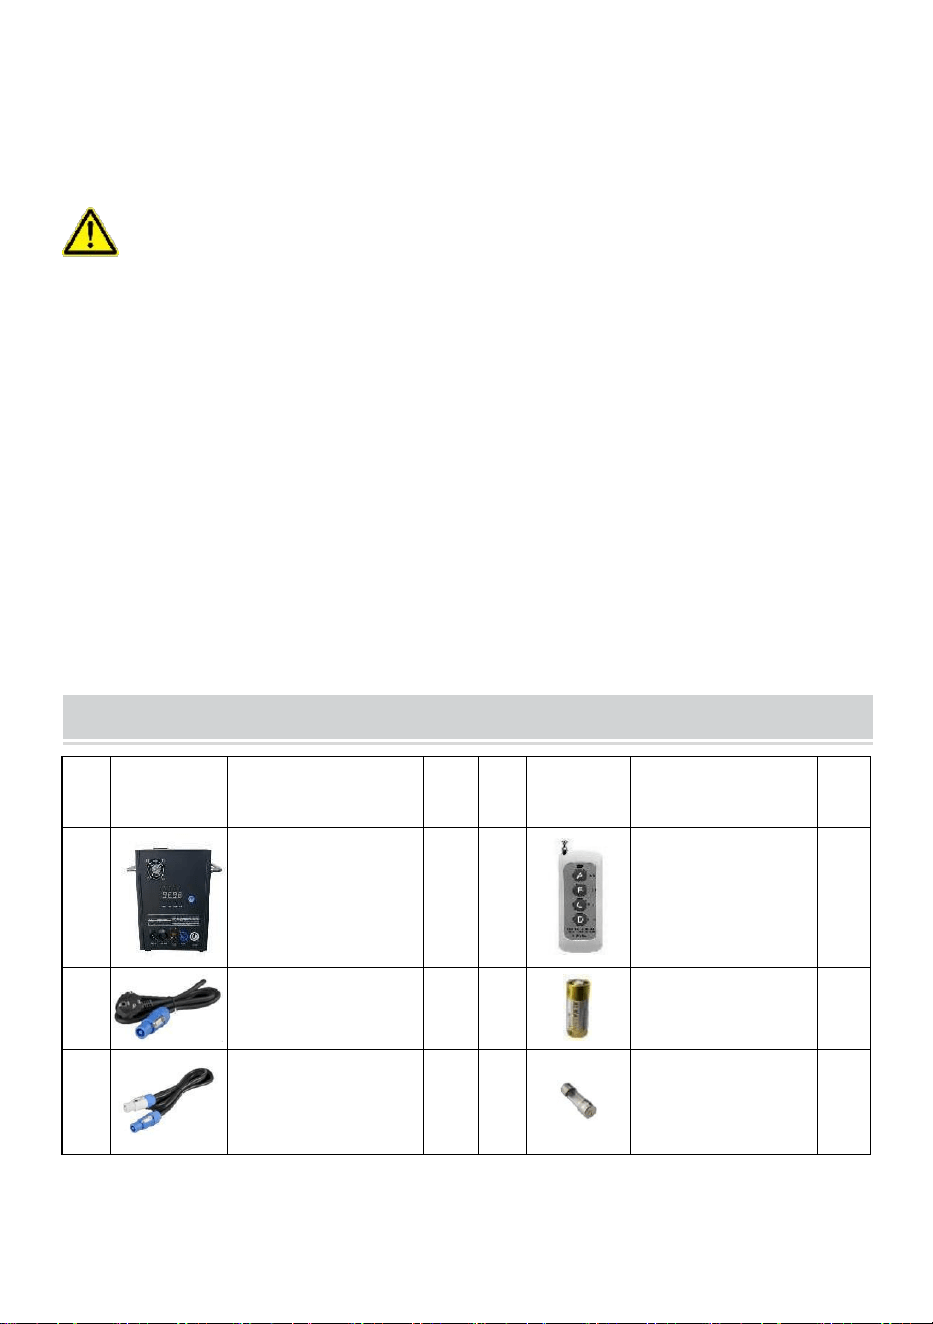
- 5 -
21. Ostrzeżenie dotyczące baterii do pilota zdalnego sterowania: Zużytych
baterii nie należy wyrzucać z odpadami domowymi, lecz należy je zbierać
w wydzielonym punkcie zbiórki .
ZACHOWAJ TE INSTRUKCJE
Środki ostrożności:
• Po użyciu elementy eksploatacyjne należy czyścić przez 30 sekund,
naciskając przycisk „D”!
• Zatrzymaj ogrzewanie, jeśli przez dłuższy czas nie będą strzelane
sztuczne ognie
• Zakaz przewracania się maszyny .
• Nie dotykaj dyszy rękami .
• Zakaz ciągłej pracy maszyną przez 30 minut .
• Maszyna do sztucznych ogni musi być przez 2 minuty bezczynna i
pozbawiona proszku każde użycie .
• Proszek znajdujący się w zbiorniku proszku należy oczyścić i wysypać
recyklingu w odpowiednim czasie i nie należy ich gromadzić w stosach.
PACKING LIST
NIE
ZDJĘCIE
NAZWA
ILO
ŚĆ
NIE
ZDJĘCI
E
NAZWA
ILO
ŚĆ
A
Maszyna z zimną
iskrą
1
mi
Pilot
1
B
Linia napięcia
1
F
Bateria
1
C
Przewód
zasilający
1
G
Bezpiecznik
1

- 6 -
D
Kabel sygnałowy
DMX
1
Powyższa lista dotyczy każdego pudełka wewnętrznego .
TECHNICAL PARAMETERS
Model
BJY-
PHJ500u1
BJY-
PHJ500u2
BJY-
PHJ700u1
BJY-
PHJ700u2
Napięcie
znamionowe
AC120 V 60
Hz
AC 220-240
V 50 Hz/60
Hz
AC120 V 60
Hz
AC 220-240
V 50 Hz/60
Hz
Moc
znamionowa
500 W
500 W
7 00 W
7 00 W
Bezpiecznik
1 5 A
10 A _
1 5 A
10 A _
Czas
wstępnego
nagrzewania
<3min
<3min
<3min
<3min
Wysokość
Iskry
4m
4m
5 m
5 m
Kontroler
bezprzewod
owy
W-3+W-8
W-3+W-8
W-3+W-8
W-3+W-8
Płyta ekranu
wyświetlacz
a
PROWADZ
ONY
PROWADZ
ONY
PROWADZ
ONY
PROWADZ
ONY
Zakres DMX
1-512
1-512
1-512
1-512
Wstrzyknąć
proszek
Kompozyt Ti
_
Kompozyt Ti
_
Kompozyt Ti
_
Kompozyt Ti
_
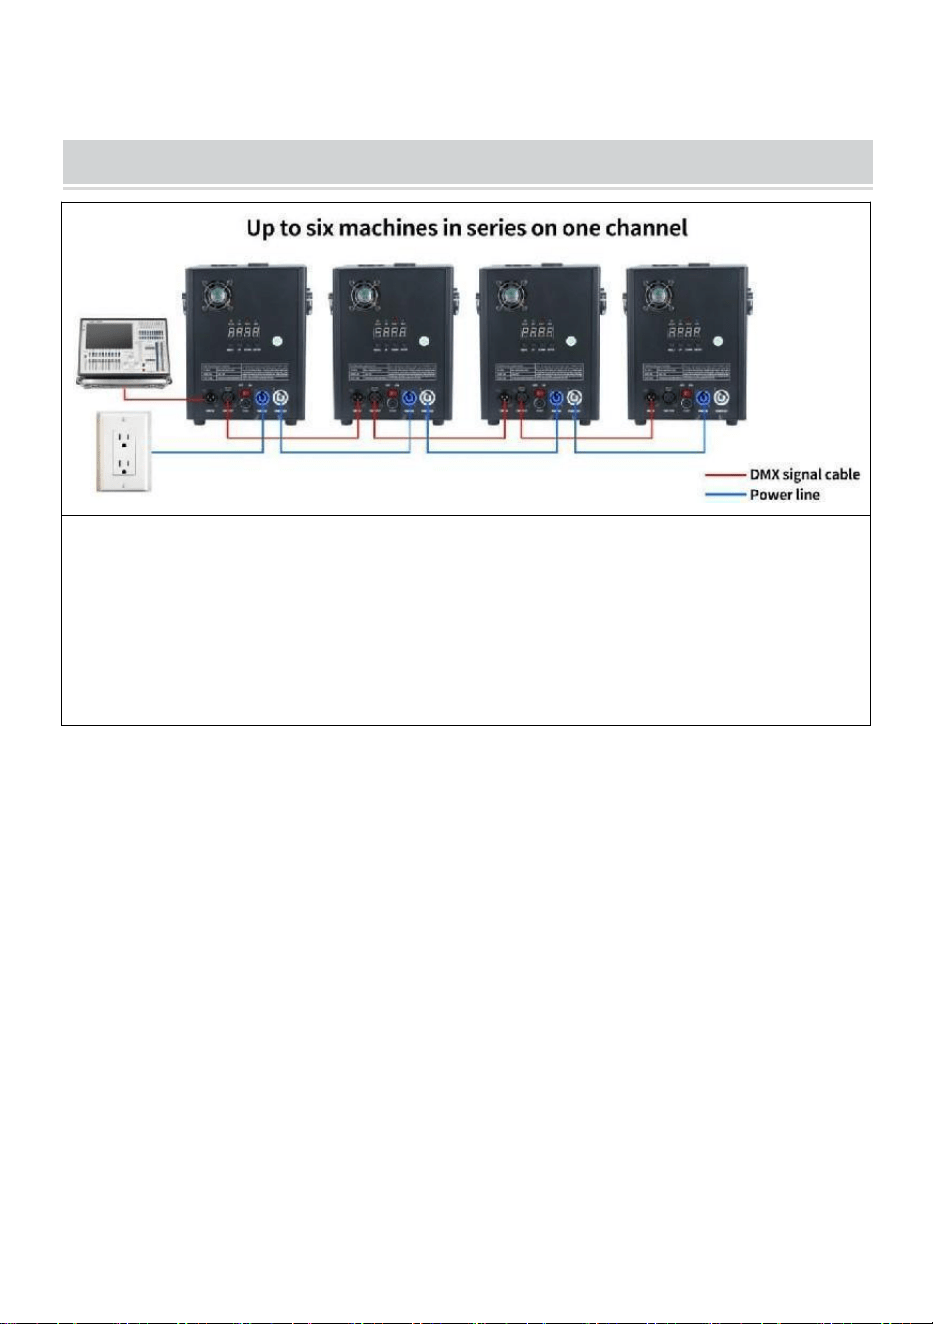
- 7 -
METHOD OF INSTALLATION
To urządzenie obsługuje sterowanie sygnałem DMX512, wystarczy
podłączyć je do konsoli w celu sterowania.
Pojedynczy przewód zasilający maszyny z zimną iskrą (przewód
zasilający opryskiwacza) można połączyć szeregowo wyłącznie w
maksymalnie 6 grupach. Za dużo połączenia szeregowego może
spowodować uszkodzenie lub pożar.
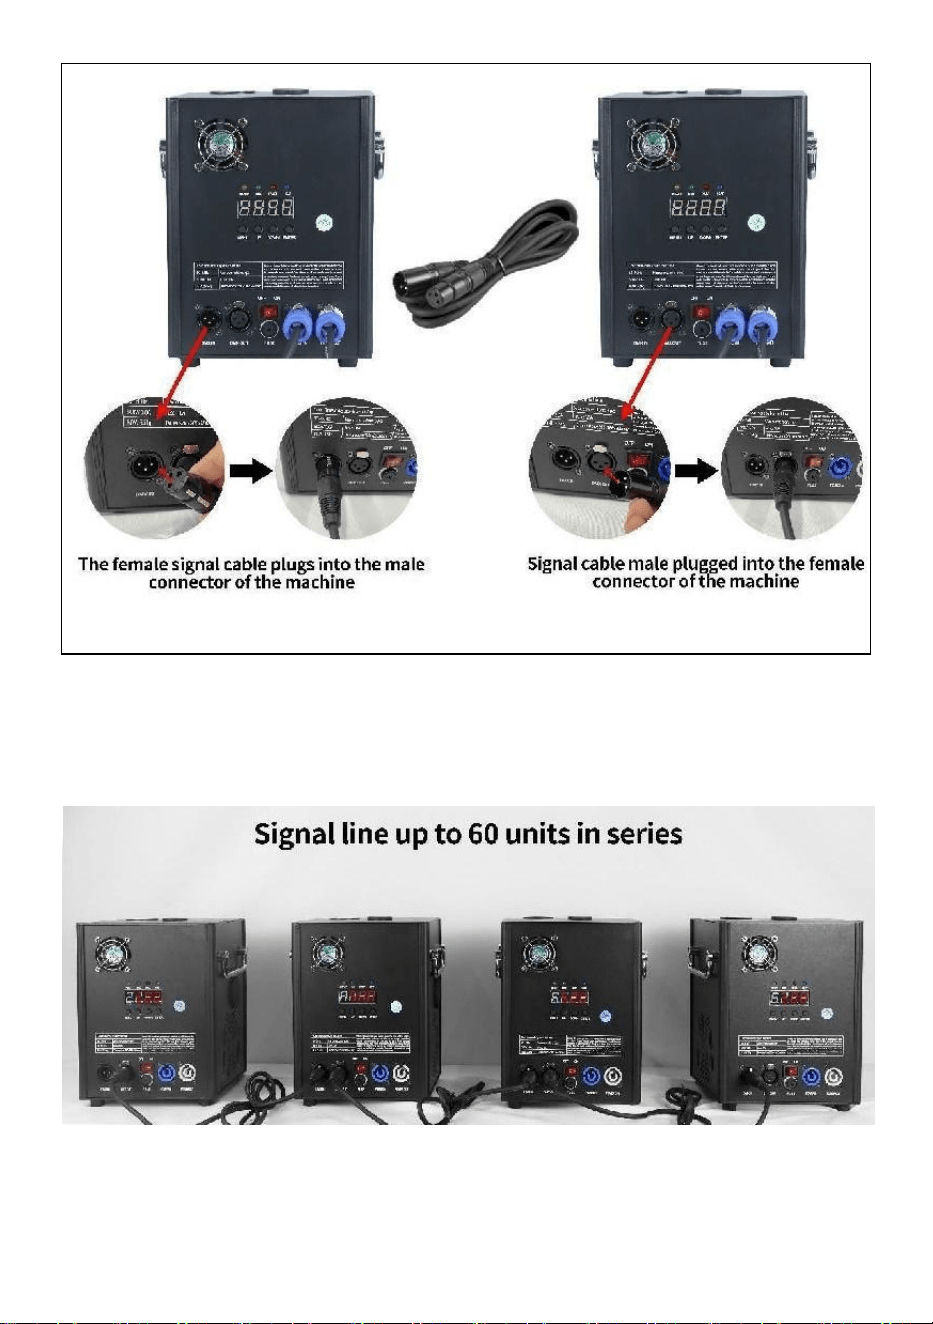
- 8 -
może spowodować uszkodzenie lub pożar.
A. Schemat połączenia szeregowego sygnału :
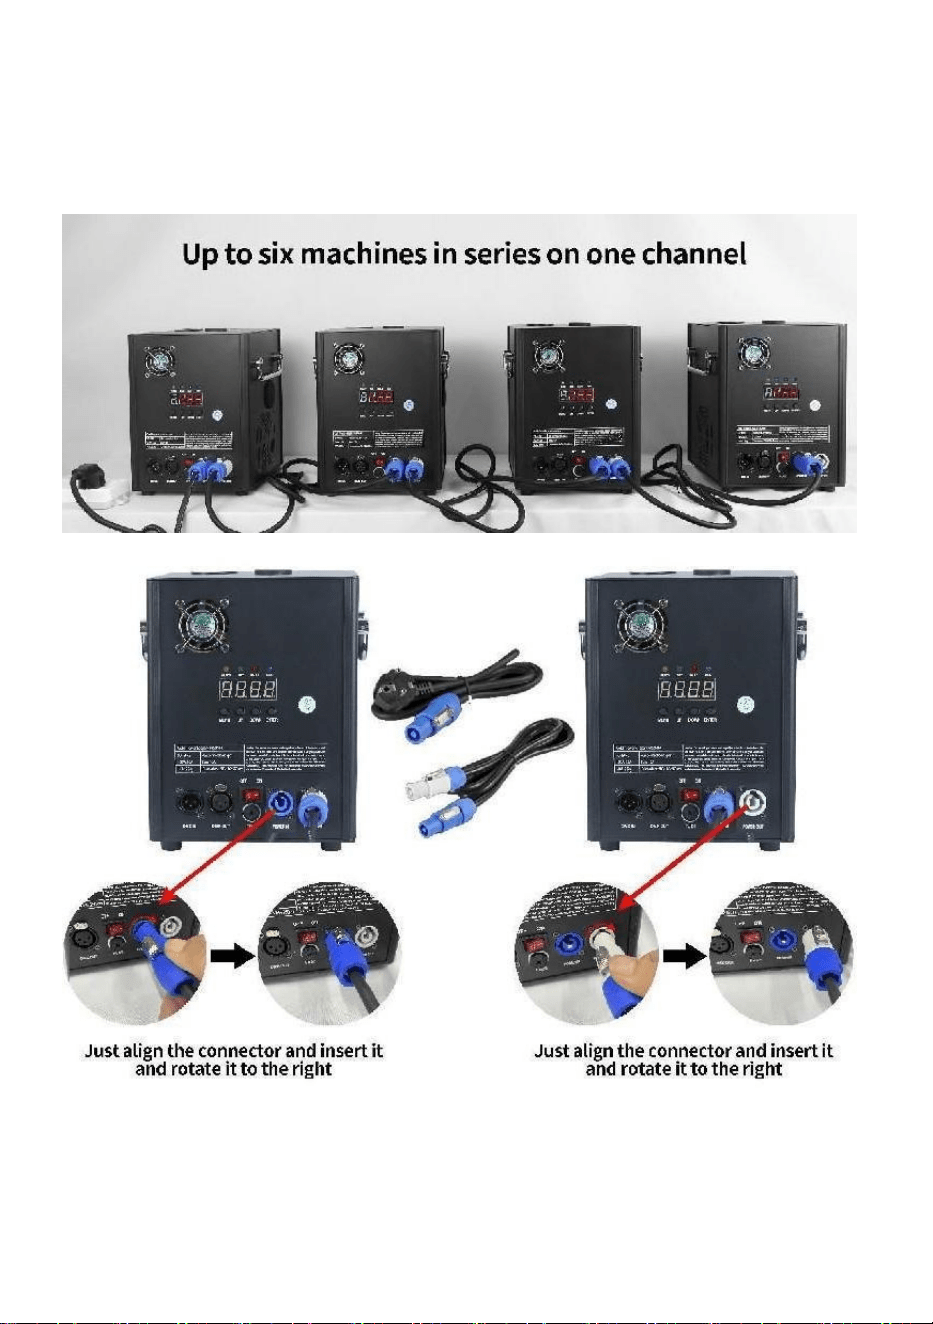
- 9 -
B. Schemat podłączenia szeregowego
zasilacza:

- 10 -
DESCRIPTION
Ⅰ. Instrukcje dotyczące kanału
Kanał
Kontrola
funkcjonować
Wartości
liczbowe
Cyfrowy wyświetlacz
lampowy
1
Rozgrzej się
000 ~ 010
A001 Kod adresowy DMX
Nieważny
011~239
Rozgrzej, aby
otworzyć
240~255
Wyświetla aktualną wartość
temperatury
2
zamknąć
000 ~ 015
WYŁĄCZONY
Wysokość
kwiatu oprysku
1
01 5 ~0
74
F1 (ważne tylko wtedy, gdy
osiągnie poziom operacyjny ).
temperatura)
Wysokość
natrysku 2
0 75 ~
134
F2 (musi osiągnąć
temperaturę roboczą, aby było
skuteczne)
Wysokość
natrysku 3
1 35 ~
194
F3 (aby było skuteczne,
należy osiągnąć temperaturę
roboczą)
Wyczyść
zapasy
1 95 ~
255
Rozliczenia CLE
Ⅱ. Opis panelu

- 11 -
1. Kluczowy opis
Klawisze od lewej do prawej: Menu -> W górę -> W dół -> Potwierdź
1) Menu: Zmień interfejs menu, następne menu
2) On: może być używany jako przełącznik menu, poprzedniego menu;
Kiedy klawisz potwierdzenia zostanie wciśnięty podczas dodawania w górę,
w interfejsie kodu adresu DMX, kod adresu będzie dodany w górę; W
interfejsie ustawień temperatury roboczej temperatura robocza jest
sumowana.
3) W dół: po naciśnięciu klawisza potwierdzenia, w interfejsie kodu
adresowego DMX, kod adresowy zostaje zmniejszony; W interfejsie
ustawień temperatury roboczej temperatura robocza jest obniżana.
4) Potwierdź: interfejs wchodzi w stan ustawień, a bieżący interfejs może
dodawać lub odejmować wartość. (Dotyczy tylko kodu adresowego i
temperatury roboczej) .
2. opis kontrolki
1) Żółte światło: zapala się, gdy wystąpi błąd, taki jak problem z
wykryciem kontroli temperatury lub problem z ogrzewaniem.
2) Zielone światło: włączone oznacza obecność sygnału DMX, wyłączone
w przypadku rozłączenia sygnału
3) Czerwone światło: jest zawsze włączone podczas ogrzewania
4) Niebieskie światło : Światło wskazuje, że nagrzewanie zostało
zakończone i osiągnięta została temperatura robocza.
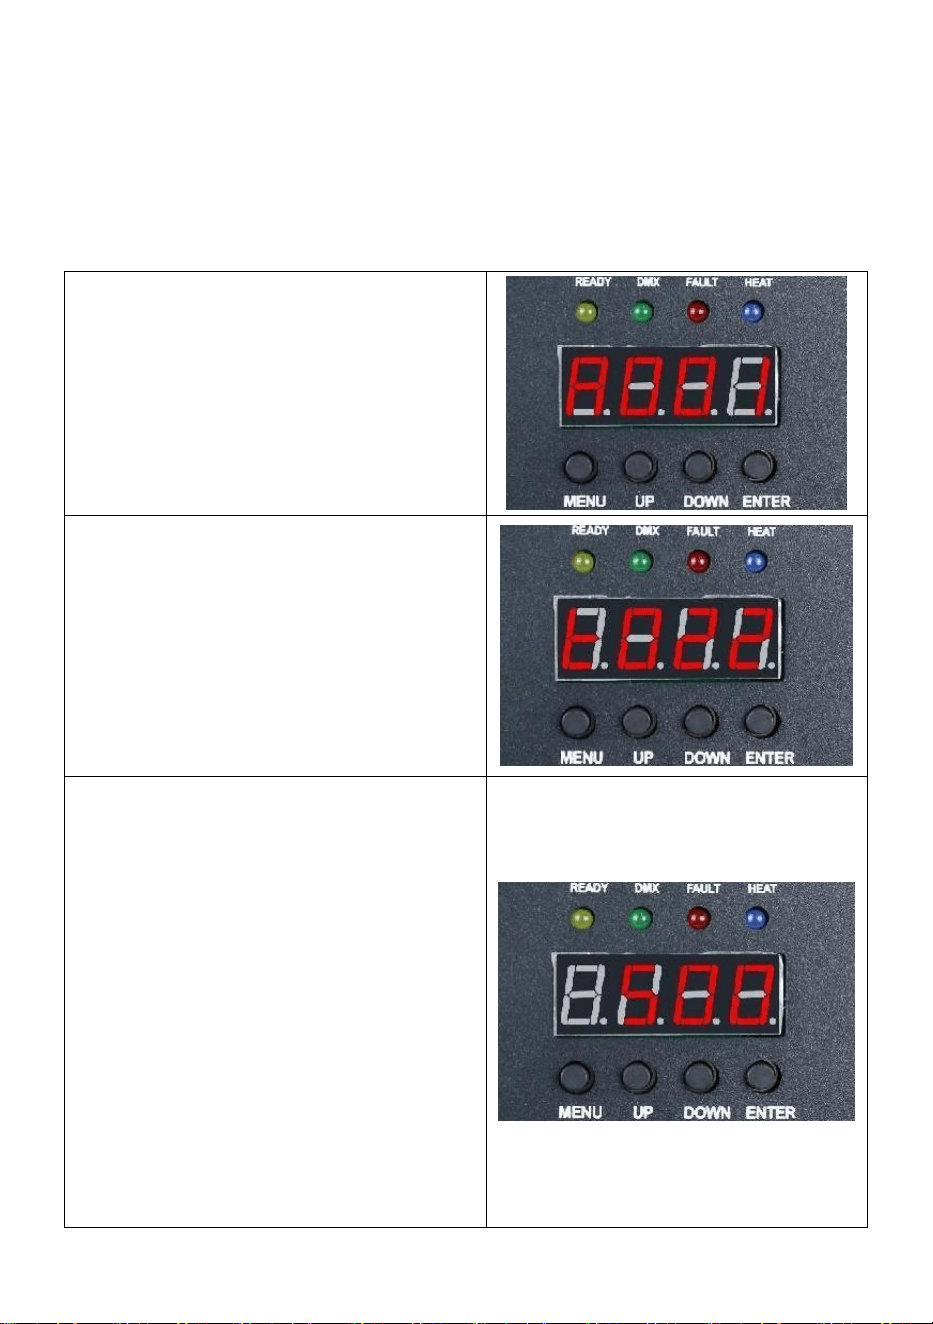
- 12 -
3. Opis interfejsu (naciśnij klawisz menu lub klawisz „
w górę”, aby przełączyć interfejs)
Interfejs kodu adresu:
Instrukcja obsługi: Naciśnij klawisz
potwierdzenia, aby wejść do edycji,
możesz wybrać kod adresu 001-512,
a następnie naciśnij klawisz
potwierdzenia, aby wyjść z edycji
kodu adresu.
Interfejs temperaturowy:
Opis operacji: Nie można
obsługiwać bieżącego interfejsu,
można jedynie wyświetlać w czasie
rzeczywistym aktualny stan
temperatury.
Interfejs ustawień temperatury
roboczej:
Instrukcja obsługi: Ustaw
temperaturę roboczą, po podgrzaniu
do aktualnej temperatury można
wykonać natryskiwanie; Kliknij
klawisz potwierdzenia, aby wejść do
edycji, możesz wybrać zakres
temperatur 480-550 stopni, a
następnie kliknij klawisz
potwierdzenia, aby wyjść ze stanu
edycji.
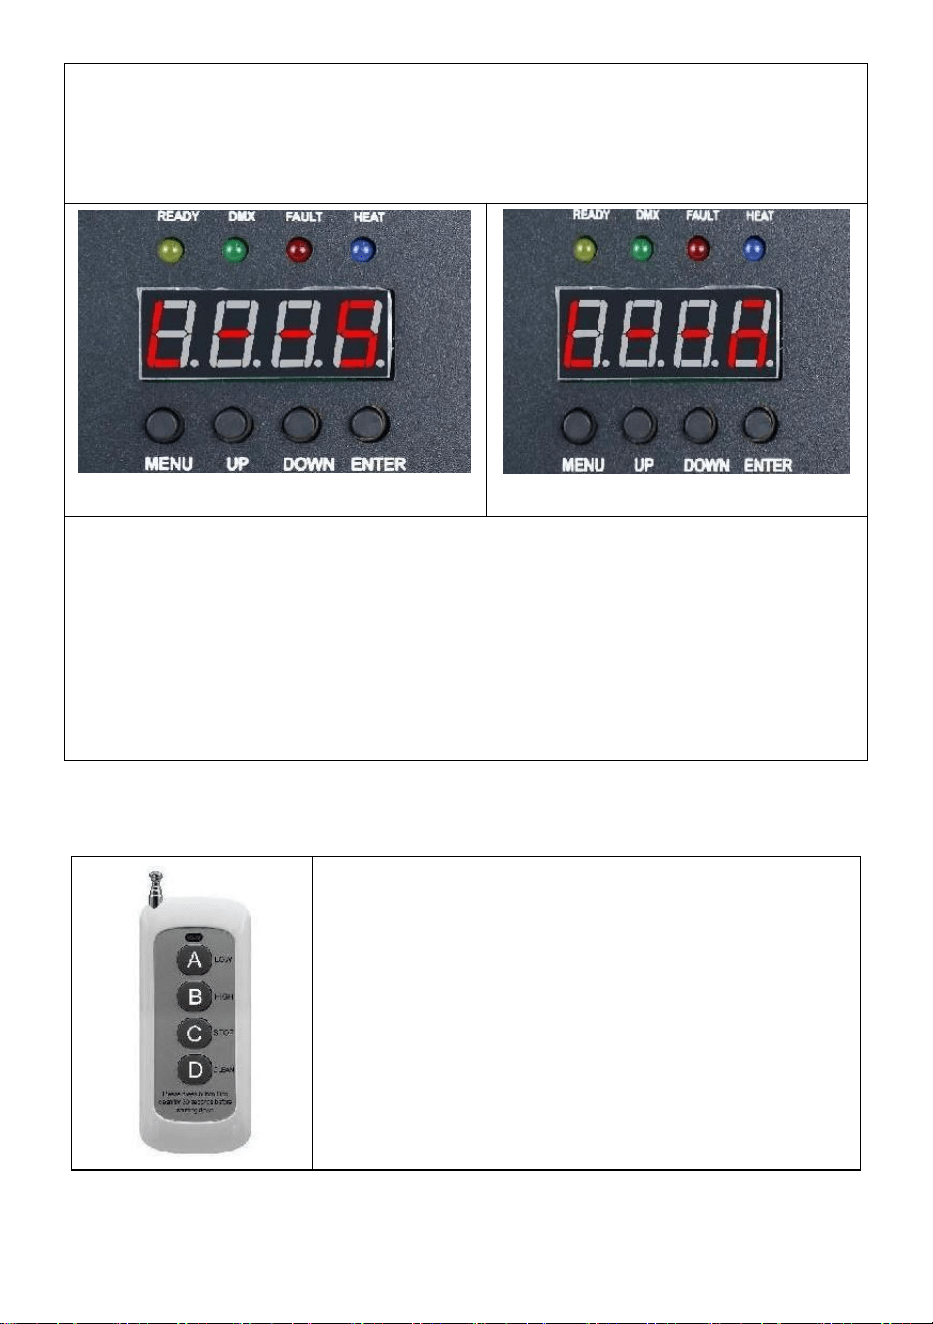
- 13 -
Interfejs bezprzewodowy:
Przyjazne przypomnienie:
W przypadku korzystania z wielu maszyn szeregowo należy wyznaczyć
jedną z maszyn jako hosta. Oto instrukcje konfiguracji .
Interfejs niewolnika
Interfejs hosta
Instrukcja obsługi: Wyświetlenie interfejsu kodowego , jak pokazano
na rysunku „ Interfejs Slave ”, po pomyślnym wyświetleniu interfejsu
kodowego, jak pokazano na rysunku „ Interfejs hosta ”; Podczas
ustawiania urządzenia głównego można nacisnąć przycisk „ ENTER ”,
aby wybrać stan urządzenia nadrzędnego/podrzędnego. Jeśli chcesz
ustawić go jako hosta, interfejs ustawień pokazano na rysunku „
Interfejs hosta ”, a bieżąca maszyna została ustawiona jako host.
Ⅲ. Zdalny kontrola rol Instrukcje
Odp .: Niski zakres ; _
B : Wysoka klasa ; _ _
C : Przestań ;
D : Materiał C pochylony;
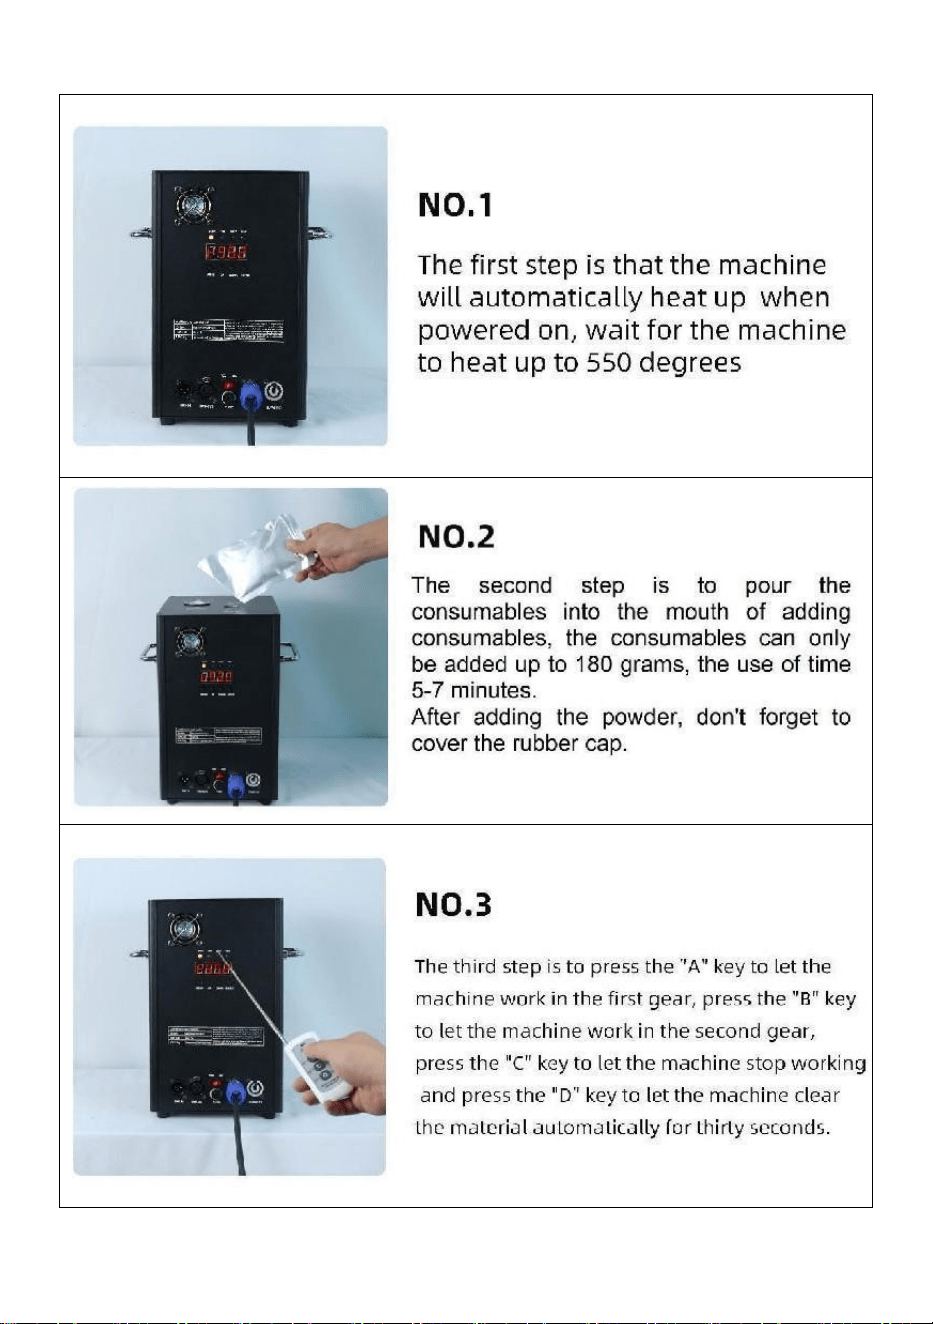
- 14 -
Ⅵ. Obsługa maszyny krok po kroku
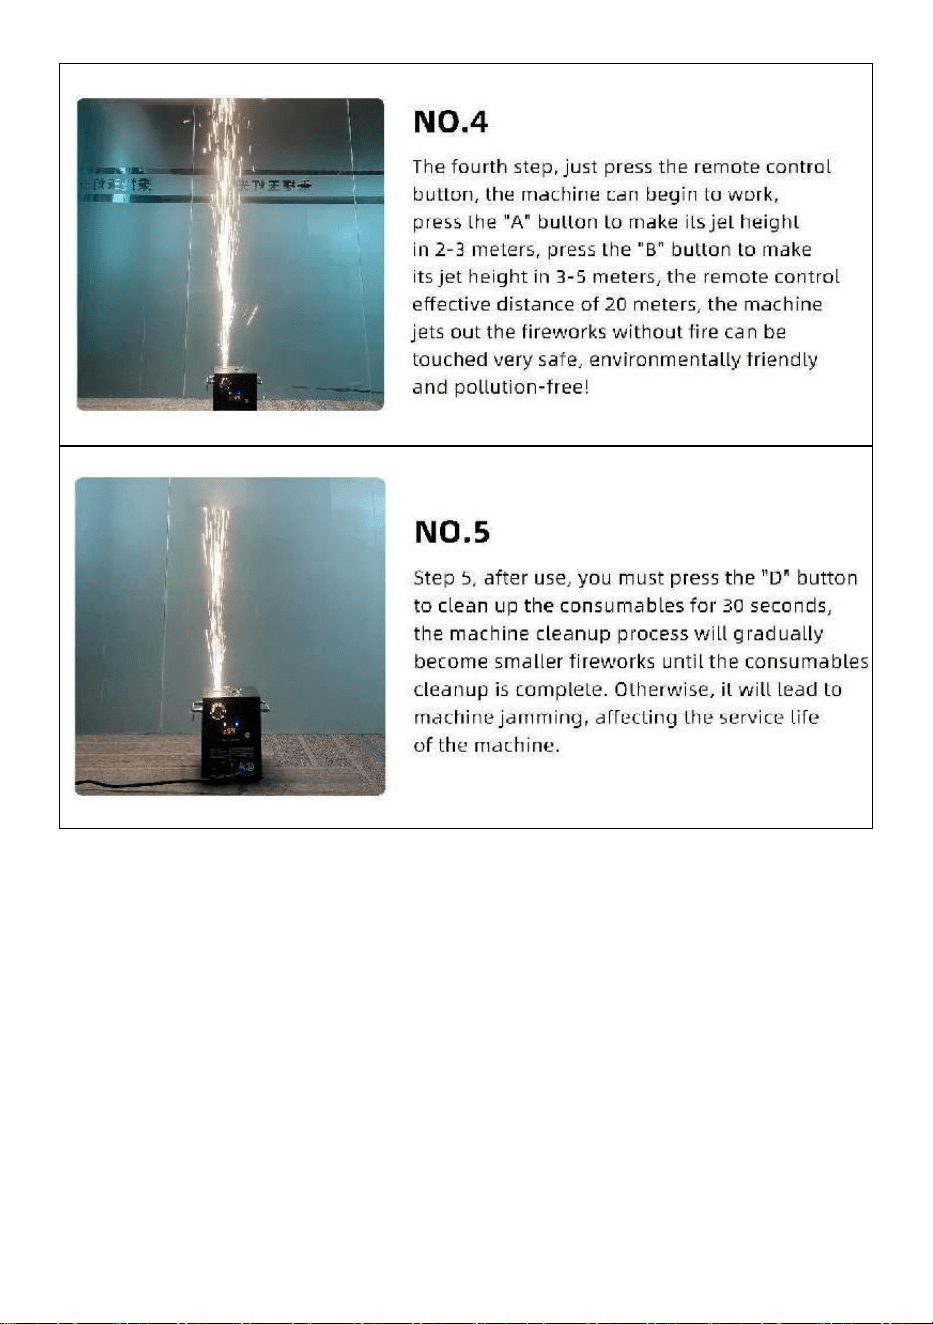
- 15 -
Wyprodukowano w Chinach


- 17 -
Technisch Ondersteuning en e-garantiecertificaat www.vevor.com/support
KOUDE VONKMACHINE
MODEL: BJY-PHJ500u1
/BJY-PHJ500u2/BJY-PHJ700u1/BJY-PHJ700u2
We continue to be committed to provide you tools with competitive price.
"Save Half", "Half Price" or any other similar expressions used by us only represents an
estimate of savings you might benefit from buying certain tools with us compared to the major
top brands and does not necessarily mean to cover all categories of tools offered by us. You
are kindly reminded to verify carefully when you are placing an order with us if you are
actually saving half in comparison with the top major brands.

- 18 -

- 1 -
MODEL:
BJY-PHJ500u1 / BJY-PHJ500u2 BJY-PHJ700u1 / BJY-PHJ700u2
Have product questions? Need technical support? Please feel free to
contact us:
Technical Support and E-Warranty Certificate
www.vevor.com/support
NEED HELP? CONTACT US!
This is the original instruction, please read all manual instructions
carefully before operating. VEVOR reserves a clear interpretation of our
user manual. The appearance of the product shall be subject to the
product you received. Please forgive us that we won't inform you again if
there are any technology or software updates on our product.
COLD SPARK
MACHINE

- 2 -
Waarschuwing-Om het risico op letsel te verminderen, moet de
gebruiker de handleiding zorgvuldig lezen.
CORRECTE VERWIJDERING
Dit product valt onder de bepalingen van de Europese richtlijn
2012/19/EG. Het symbool met een doorgestreepte
afvalcontainer geeft aan dat het product in de Europese Unie
een aparte afvalinzameling vereist. Dit geldt voor het product
en alle accessoires die met dit symbool zijn gemarkeerd.
Producten die als zodanig zijn gemarkeerd mogen niet met het
normale huisvuil worden weggegooid, maar moeten naar een
inzamelpunt voor recycling van elektrische en elektronische
apparaten worden gebracht.
FCC-verklaring:
Dit apparaat voldoet aan Deel 15 van de FCC-regels. Het
gebruik is onderworpen aan de volgende twee voorwaarden:
(1) Dit apparaat mag geen schadelijke interferentie
veroorzaken, en (2) dit apparaat moet alle ontvangen
interferentie accepteren, inclusief interferentie die een
ongewenste werking kan veroorzaken.
Wisselstroom
SAFETY INSTRUCTIONS AND OPERATING INSTRUCTIONS
1. Zorg ervoor dat het Ti - composietpoeder droog genoeg is voordat u het
toevoegt. Het poeder moet schoon zijn, met kleine deeltjes, zonder al te
veel onzuiverheden.
2. Als u de machine langere tijd niet gebruikt om het poeder tegen vocht te
beschermen, giet het poeder dan uit en bewaar het afgesloten als reserve.
3. Wanneer de machine is ingeschakeld, bestaat er gevaar voor een

- 3 -
elektrische schok en brandwonden door hoge temperaturen . Probeer niet
de machine te openen of te demonteren en debug elk onderdeel van de
machine.
4. Houd de elektronische vuurwerkmachine droog, gebruik hem niet bij
regen of sneeuw dagen.
5. Bevestig het apparaat met de schroefgaten op de beugel. Zorg ervoor
dat de apparatuur dat is stevig vastgemaakt om trillingen en beweging
tijdens het gebruik te voorkomen, en altijd controleer of de structuur die de
apparatuur ondersteunt sterk genoeg is om weerstand te bieden
apparatuur die minstens 10 keer het gewicht van de apparatuur weegt.
6. De apparatuur moet door professionals worden gerepareerd op plaatsen
buiten het bereik van mensen, en niemand kan onder of over het zebrapad
passeren.
7. Let op: Er bestaat explosiegevaar als de batterij niet op de juiste manier
wordt geplaatst. Alleen vervang dezelfde of gelijkwaardige typen.
8. Als u twijfelt of de batterij is ingeslikt of in andere delen van het lichaam
is terechtgekomen, neem dan onmiddellijk contact op met een arts.
Voordat u de apparaat, koppel het dan los van het elektriciteitsnet als het is
aangesloten. Gebruik geen agressieve schoonmaakmiddelen. Veeg
verwijder stof en vuil van het product met een schone doek. Wij zijn er niet
verantwoordelijk voor schade veroorzaakt door onjuiste behandeling,
oneigenlijk gebruik of slijtage behouden wij ons voor het recht om
technische wijzigingen aan te brengen.
9. Het deksel voor verbruiksartikelen aan de bovenkant van het apparaat
moet gesloten zijn om onbedoeld uitwerpen te voorkomen.
Verbruiksartikelen moeten in een droge en afgesloten omgeving worden
bewaard om vocht te voorkomen.
10. Voor en na de uitvoering moet u observeren of er knobbeltjes in het
mondstuk zitten. Als dat zo is, moet het worden schoongemaakt. Deze
modules beïnvloeden het vuurwerkeffect en beschadigen zelfs de
vonkenmachine.
11. Eén enkel elektronisch vuurwerksnoer (spuitsnoer) kan slechts in serie
worden aangesloten voor maximaal 6 groepen. Te veel serieschakeling

- 4 -
kan leiden tot schade of brand.
12. De maximale looptijd bedraagt 5 minuten. Herbruikbaar, maar mag niet
oververhitten machine. Het verplaatsen en hanteren van de machine
tijdens gebruik is verboden.
13. Zorg er bij het laden van verbruiksartikelen voor dat de machine is
uitgeschakeld. Nadat u het hebt opgeborgen, dient u het af te dekken om
te voorkomen dat het afval in de invoeropening valt en de machine
blokkeert.
14. Voorkom dat er iets in het mondstuk terechtkomt, verwijder obstakels
vóór gebruik
15. Om brand of elektrische schokken te voorkomen, mag u dit apparaat
niet blootstellen aan regen of vocht. Zorg er tijdens het gebruik voor dat er
geen brandbare voorwerpen in de buurt van het apparaat zijn. apparatuur.
16. Installeer de apparatuur op een goed geventileerde plaats, op minimaal
50 cm afstand van andere apparaten oppervlak. Zorg ervoor dat de
ventilatiesleuven niet geblokkeerd zijn.
17. Koppel de apparatuur los van de voeding voordat u enige bediening
uitvoert of onderhoud.
18. Als er iets misgaat, stop dan onmiddellijk de apparatuur en repareer
deze niet zelf. Onjuist onderhoud leidt tot schade en uitval. Neem contact
op met de technische ondersteuning voor goedkeuring. Gebruik alleen
dezelfde reserveonderdelen als de originele om ervoor te zorgen dat het
netsnoer niet geblokkeerd of beschadigd raakt.
19. Vervang de zekering: haal de stekker van het apparaat uit het
stopcontact. Verwijder de zekeringhouder uit zijn oorspronkelijke positie
met een schroevendraaier. Verwijder de doorgebrande zekering en
vervang deze door een zekering met dezelfde kenmerken. Draai de
schroeven opnieuw vast om het apparaat op de voeding aan te sluiten.
20. Waarschuwing: Als de zekering na het vervangen nog steeds kapot is,
stop dan met het gebruik ervan. Neem contact op met de
klantenondersteuning voor verdere instructies. Voortgezet gebruik kan
ernstige schade veroorzaken.
21. Waarschuwing voor batterijen van de afstandsbediening: Gebruikte
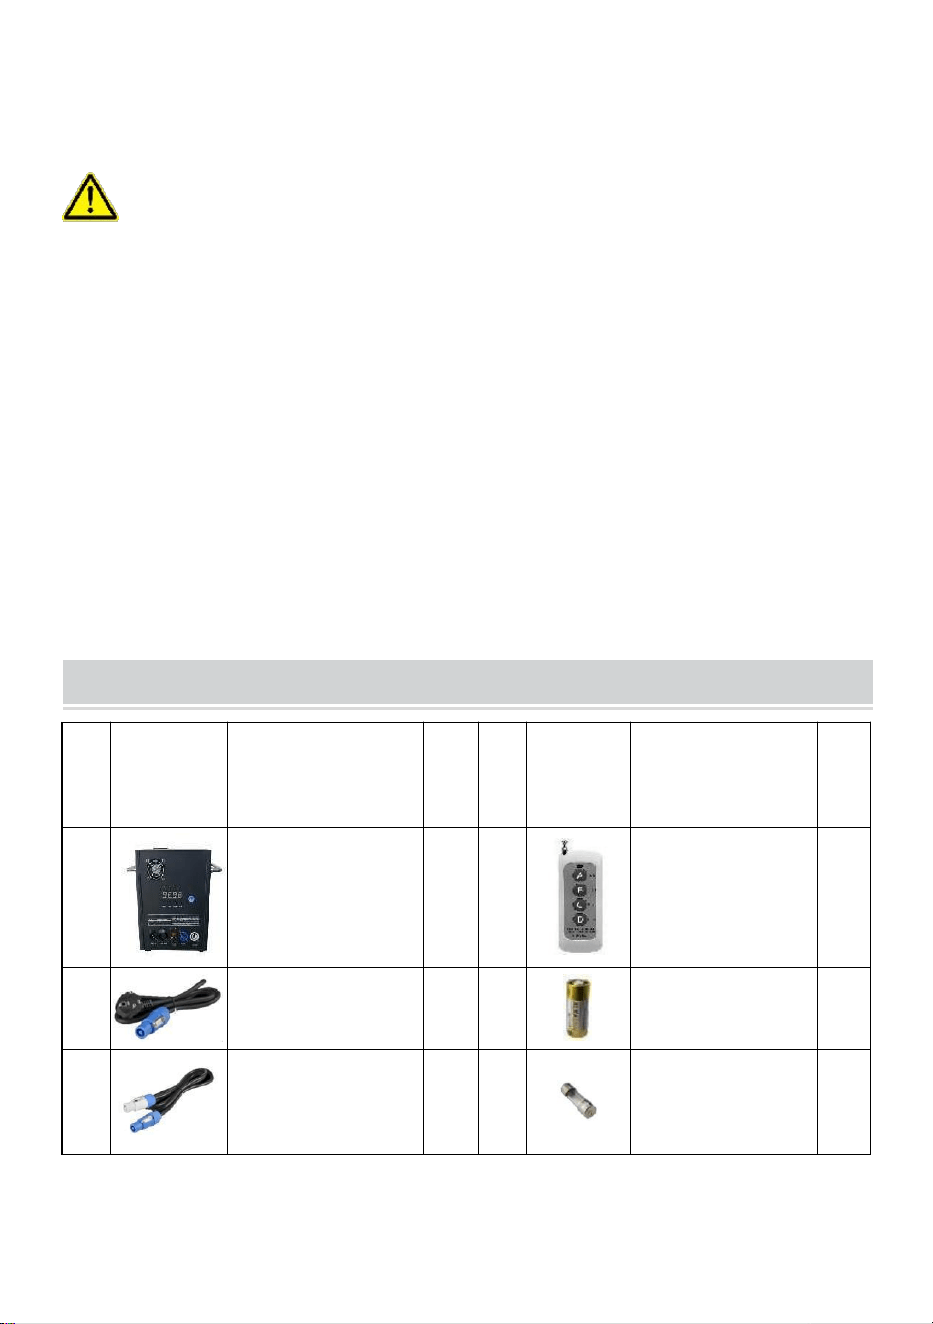
- 5 -
batterijen mogen niet worden weggegooid met huishoudelijk afval, maar
moet op een apart inzamelpunt worden ingezameld .
BEWAAR DEZE INSTRUCTIES
Voorzorgsmaatregelen:
• Na gebruik moeten de verbruiksartikelen gedurende 30 seconden worden
gereinigd door op de knop "D" te drukken!
• Stop met het verwarmen als er langere tijd geen vuurwerk wordt
afgestoken
• Verbod om de machine te laten kantelen .
• Raak het mondstuk niet met uw handen aan .
• Verbod op continu werken met de machine gedurende 30 minuten .
• De vuurwerkmachine dient daarna 2 minuten stil te staan zonder poeder
elk gebruik .
• Het poeder in de poedertank moet worden gereinigd en uitgegoten
recycling in de tijd, en mag niet worden opgestapeld .
PACKING LIST
NE
E
AFBEEL
DING
NAAM
AA
NT
AL
NE
E
AFBEE
LDING
NAAM
AA
NT
AL
A
Koude
vonkmachine
1
E
Afstandsbedieni
ng
1
B
Hoogspanningslij
n
1
F
Accu
1
C
Stroomkabel
1
G
Samensmelten
1

- 6 -
D
D MX-
signaalkabel
1
De bovenstaande lijst geldt voor elke binnendoos .
TECHNICAL PARAMETERS
Model
BJY-
PHJ500u
1
BJY-
PHJ500u2
BJY-
PHJ700u
1
BJY-
PHJ700u2
Nominale spanning
AC120V
60Hz
AC220-240
V
50Hz/60Hz
AC120V
60Hz
AC220-240
V
50Hz/60Hz
Nominaal
vermogen
500W
500W
7 00W
7 00W
Samensmelten
1 5 A
10 A _
1 5 A
10 A _
Voorverwarmingstij
d
<3min
<3min
<3min
<3min
Hoogte van vonk
4m
4m
5m
5m
Draadloze
controller
W-3+W-8
W-3+W-8
W-3+W-8
W-3+W-8
Schermbord
weergeven
LED
LED
LED
LED
DMX-bereik
1-512
1-512
1-512
1-512
Poeder injecteren
Ti
Composi
et _
Ti
Composiet
_
Ti
Composi
et _
Ti
Composiet
_
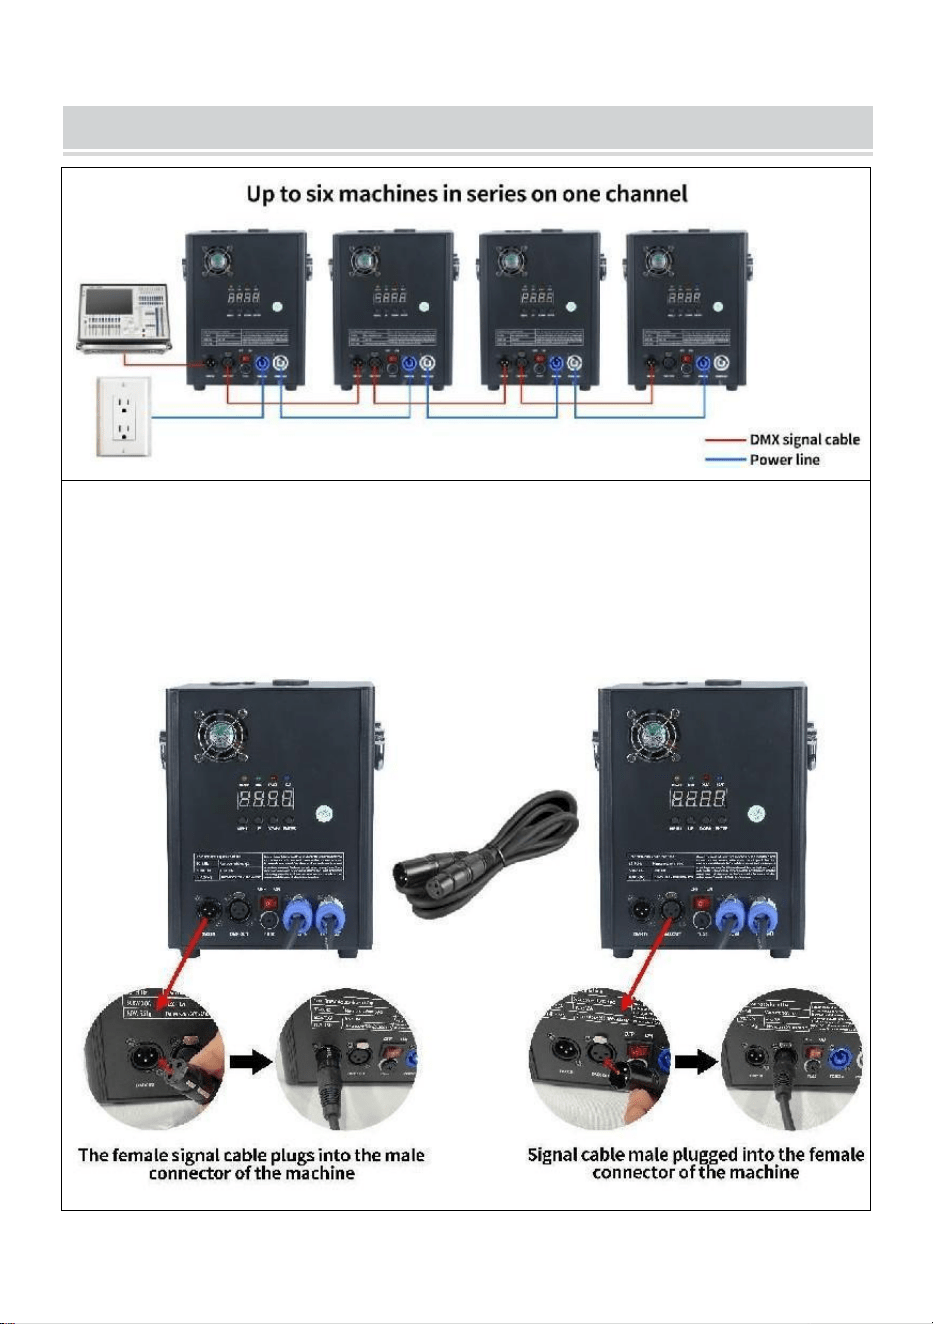
- 7 -
METHOD OF INSTALLATION
Deze machine ondersteunt DMX512-signaalbesturing, sluit hem gewoon
aan op de console voor bediening.
Eén enkele koudevonkmachinevoedingskabel (sproeiervoedingskabel)
kan slechts in serie worden aangesloten voor maximaal 6 groepen. Te
veel serieschakeling kan leiden tot schade of brand.
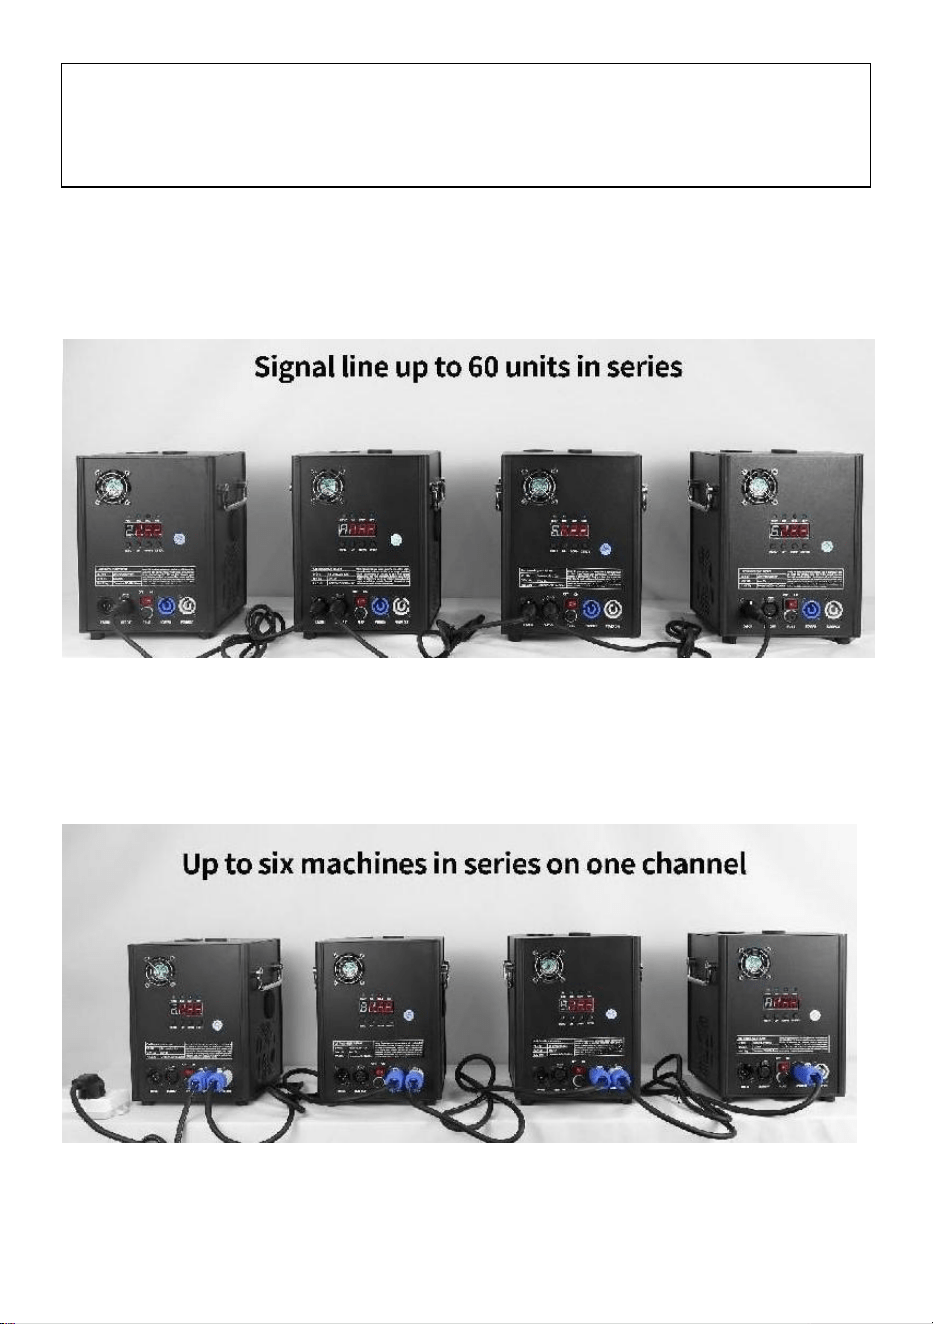
- 8 -
kan leiden tot schade of brand.
A. Schema signaalserieschakeling :
B. Schema voor serieschakeling voeding:
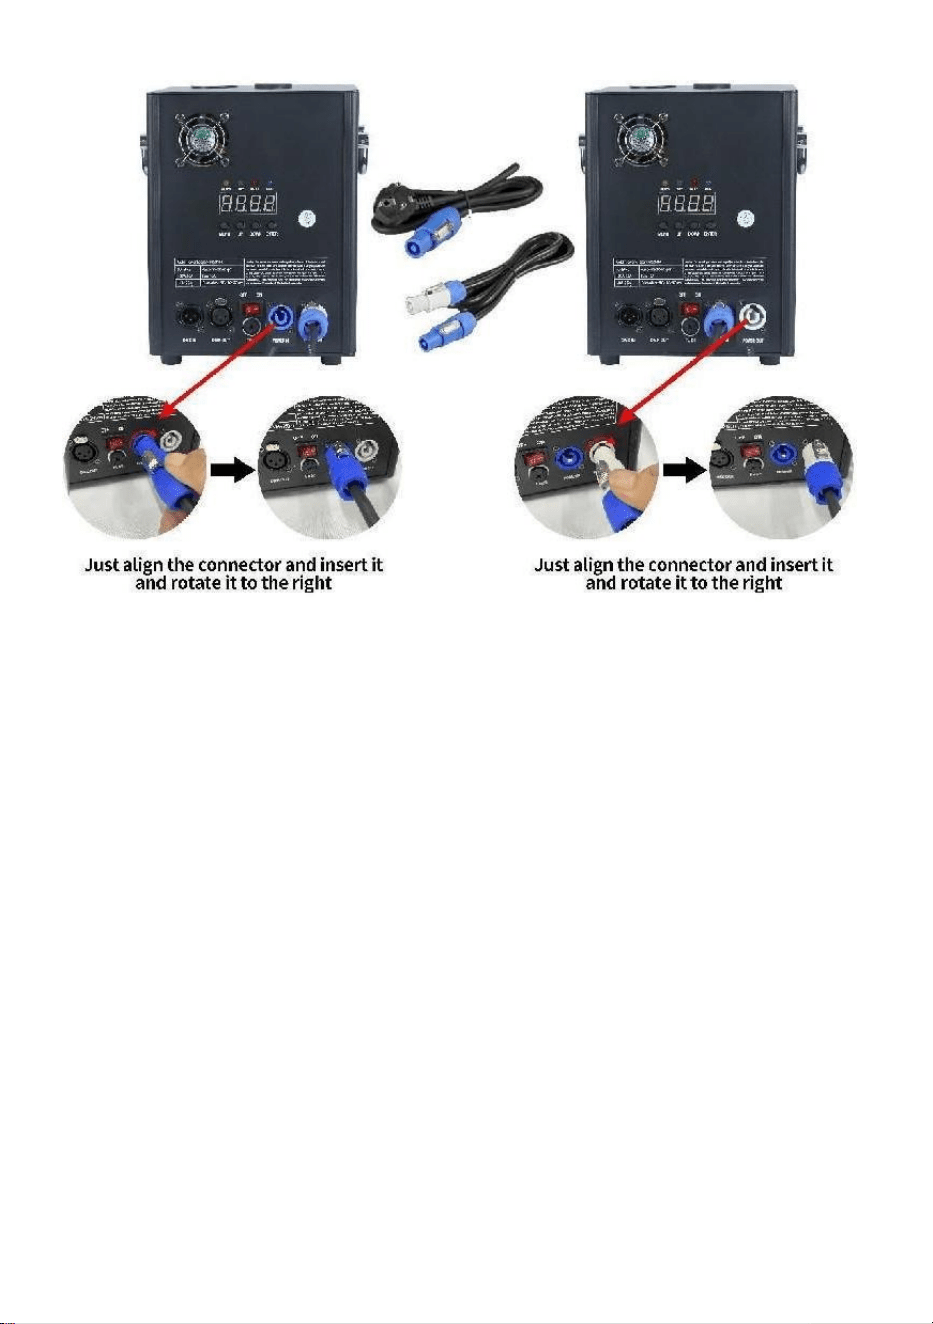
- 9 -

- 10 -
DESCRIPTION
Ⅰ. Kanaalinstructies
Kanaal
Controle
functie
Numerieke
waarden
Digitale buizenweergave
1
Voorverwarmen
uit
000~010
A001 DMX-adrescode
Ongeldig
011~239
Voorverwarmen
om te openen
240~255
Geeft de huidige
temperatuurwaarde weer
2
dichtbij
000~015
UIT
Spuitbloemhoogte
1
01 5 ~0 74
F1(Alleen geldig als de
operationele g wordt bereikt
temperatuur)
Spuithoogte 2
0 75 ~ 134
F2 (moet de
bedrijfstemperatuur
bereiken om effectief te
zijn)
Spuithoogte 3
1 35 ~ 194
F3 (moet de
bedrijfstemperatuur
bereiken om effectief te
zijn)
Duidelijke
voorraad
1 95 ~ 255
CLE-opruimingen
Ⅱ. Paneelbeschrijving

- 11 -
1. Toetsbeschrijving _
Toetsen van links naar rechts: Menu -> Omhoog -> Omlaag ->
Bevestigen
1) Menu: Menu-interface wijzigen, volgend menu
2) Aan: kan worden gebruikt als menuschakelaar, naar het vorige menu;
Wanneer de bevestigingstoets in de opwaartse add-on wordt gedrukt,
wordt in de DMX-adrescode-interface de adrescode opwaarts toegevoegd;
In de interface voor het instellen van de werktemperatuur wordt de
werktemperatuur opgeteld.
3) Omlaag: wanneer de bevestigingstoets wordt ingedrukt, wordt in de
DMX-adrescode-interface de adrescode verlaagd; In de interface voor het
instellen van de werktemperatuur wordt de werktemperatuur verlaagd.
4) Bevestigen: de interface gaat naar de instellingsstatus en de huidige
interface kan de waarde optellen of aftrekken. (Alleen geldig in adrescode,
werktemperatuur) .
2. Beschrijving van het indicatielampje
1) Geel lampje: gaat branden als er een fout is, zoals een probleem met
de detectie van de temperatuurregeling of een probleem met de
verwarming.
2) Groen lampje: aan geeft aan dat er een DMX-signaal is, uit als het
signaal wordt verbroken
3) Rood lampje: brandt altijd tijdens het verwarmen
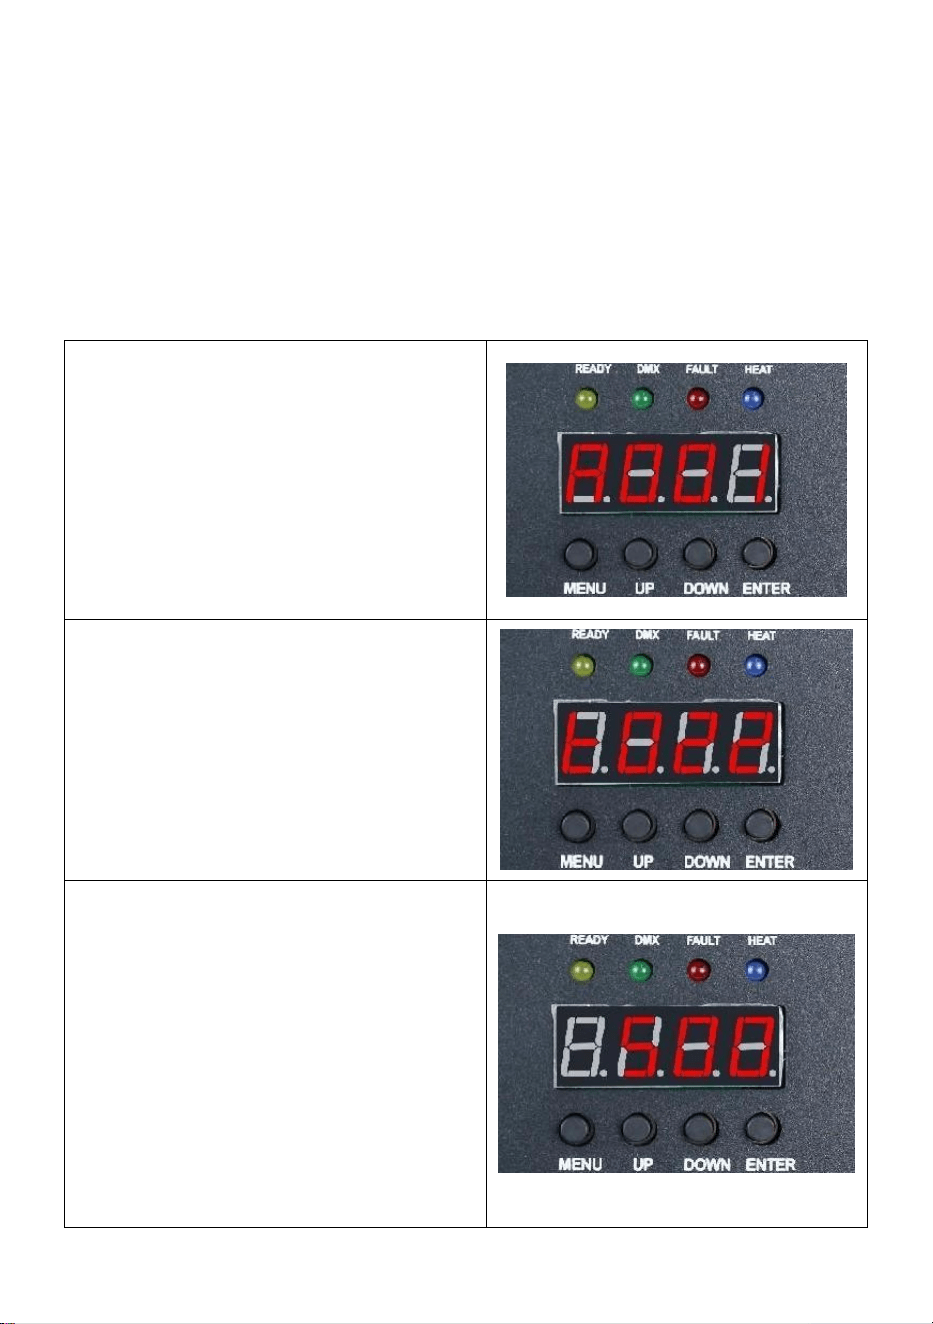
- 12 -
4) Blauw licht : het licht geeft aan dat de temperatuurverwarming is
voltooid en de werktemperatuur is bereikt.
3. Interfacebeschrijving (Druk op de menutoets of de
omhoog-toets om van interface te wisselen)
Adrescode-interface:
Bedieningsinstructies: Druk op de
bevestigingstoets om het bewerken
te openen. U kunt de adrescode
001-512 selecteren en vervolgens
op de bevestigingstoets drukken om
het bewerken van de adrescode te
verlaten.
Temperatuurinterface:
Werkingsbeschrijving: De huidige
interface kan niet worden bediend,
maar geeft alleen realtime weergave
van de huidige temperatuurstatus.
Interface voor het instellen van de
bedrijfstemperatuur:
Gebruiksinstructies: Stel de
werktemperatuur in, wanneer de
temperatuur wordt verwarmd tot de
huidige temperatuur kan worden
gespoten; Klik op de
bevestigingstoets om de bewerking
te starten. U kunt het
temperatuurbereik van 480-550
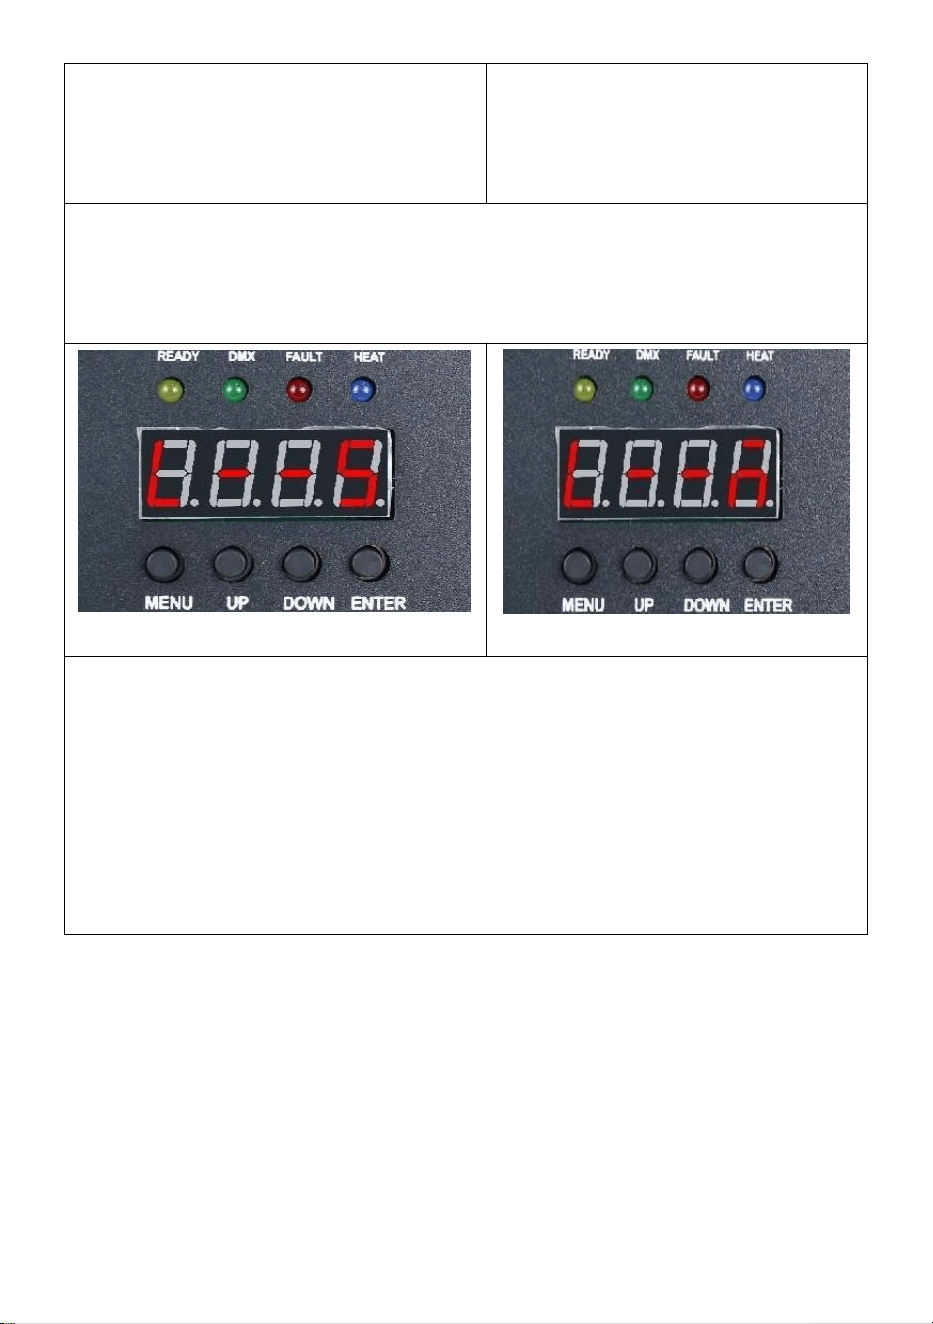
- 13 -
graden kiezen en vervolgens op de
bevestigingstoets klikken om de
bewerkingsstatus te verlaten.
Draadloze interface:
Vriendelijke herinnering:
Wanneer u meerdere machines in een serie gebruikt, wijs dan één van
de machines aan als host. Hier vindt u de installatie-instructies .
Slave-interface
Host-interface
Gebruiksaanwijzing: De code-interface wordt weergegeven zoals
weergegeven in afbeelding " Slave-interface ", na de succesvolle
code-interfaceweergave zoals weergegeven in afbeelding "
Host-interface "; Bij het instellen van de master kunt u de " ENTER
"-knop gebruiken om de master/slave-status van de machine te
selecteren. Als u deze als host moet instellen, wordt de
instellingeninterface weergegeven in figuur " Hostinterface ", en is de
huidige machine ingesteld als host.
Ⅲ. Op afstand controle _ Instructies

- 14 -
A : Laag bereik ; _
B : Hoogwaardige ; _ _ _
C : Stop ;
D : Materiaal reinigen ;
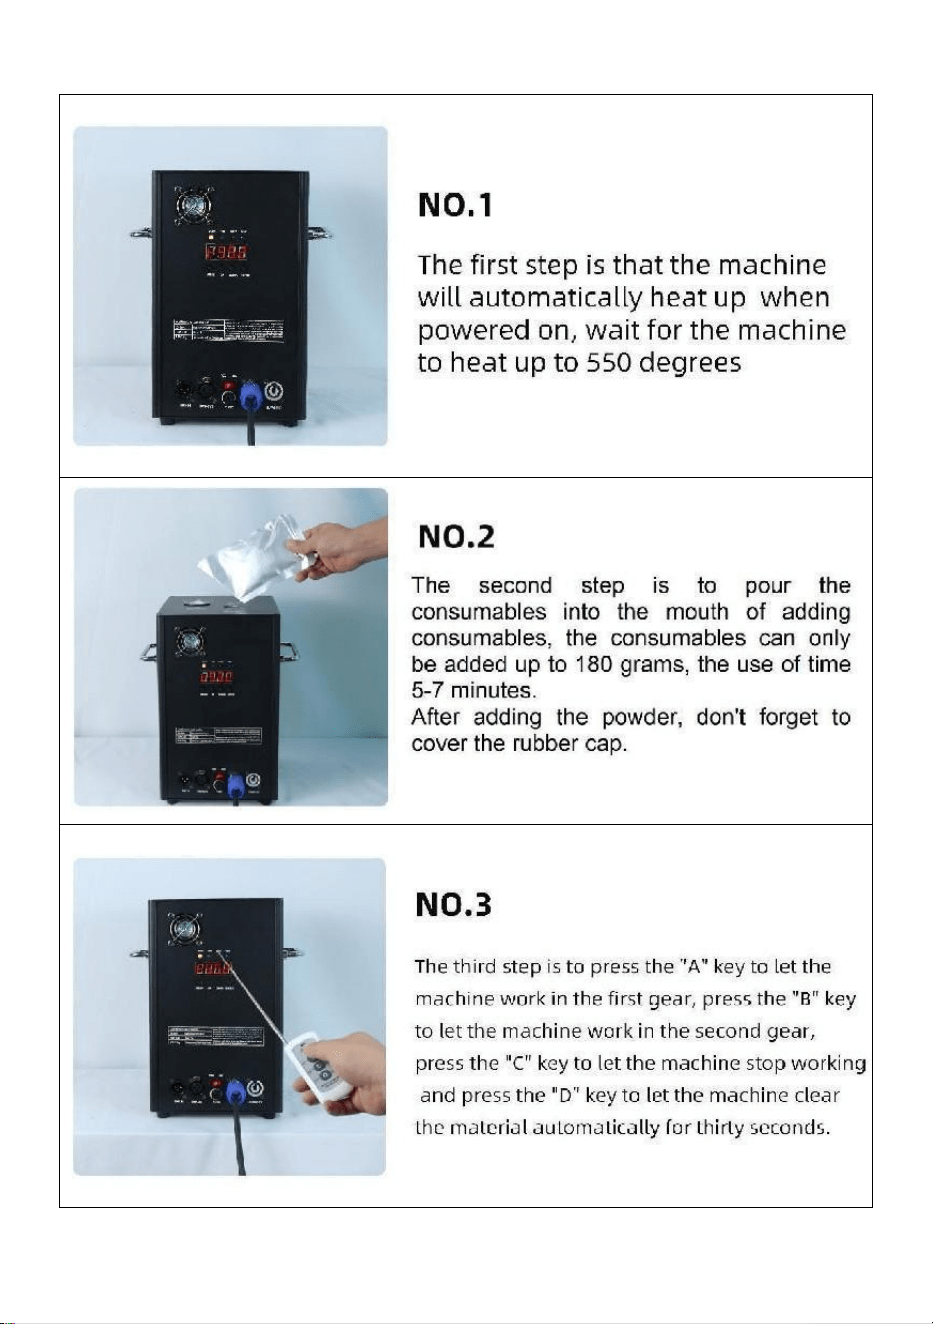
- 15 -
Ⅵ. Machinebediening stap voor stap

- 16 -
Gemaakt in China


- 18 -
Teknisk Support och e-garanticertifikat www.vevor.com/support
KALL GNISTA MASKIN
MODELL: BJY-PHJ500u1
/BJY-PHJ500u2/BJY-PHJ700u1/BJY-PHJ700u2
We continue to be committed to provide you tools with competitive price.
"Save Half", "Half Price" or any other similar expressions used by us only represents an
estimate of savings you might benefit from buying certain tools with us compared to the major
top brands and does not necessarily mean to cover all categories of tools offered by us. You
are kindly reminded to verify carefully when you are placing an order with us if you are
actually saving half in comparison with the top major brands.

- 19 -

- 1 -
MODELL:
BJY-PHJ500u1 / BJY-PHJ500u2 BJY-PHJ700u1 / BJY-PHJ700u2
Have product questions? Need technical support? Please feel free to
contact us:
Technical Support and E-Warranty Certificate
www.vevor.com/support
NEED HELP? CONTACT US!
This is the original instruction, please read all manual instructions
carefully before operating. VEVOR reserves a clear interpretation of our
user manual. The appearance of the product shall be subject to the
product you received. Please forgive us that we won't inform you again if
there are any technology or software updates on our product.
COLD SPARK
MACHINE
- 2 -
Varning - För att minska risken för skada måste användaren
läsa instruktionerna noggrant.
KORREKT AVFALLSHANTERING
Denna produkt omfattas av bestämmelserna i det europeiska
direktivet 2012/19/EC. Symbolen som visar en soptunna
korsad anger att produkten kräver separat sophämtning i EU.
Detta gäller för produkten och alla tillbehör märkta med denna
symbol. Produkter märkta som sådana får inte kasseras
tillsammans med vanligt hushållsavfall utan måste lämnas till
en insamlingsplats för återvinning av elektriska och
elektroniska apparater.
FCC uttalande:
Denna enhet uppfyller del 15 av FCC-reglerna. Driften är
föremål för följande två villkor: (1) Den här enheten får inte
orsaka skadliga störningar och (2) den här enheten måste
acceptera alla mottagna störningar, inklusive störningar som
kan orsaka oönskad funktion.
Växelström
SAFETY INSTRUCTIONS AND OPERATING INSTRUCTIONS
1. Se till att Ti - kompositpulvret är tillräckligt torrt innan du lägger till det.
Pulvret måste vara rent, med små partiklar, utan för mycket föroreningar.
2. När du inte använder maskinen under en längre tid för att hålla pulvret
från fukt, vänligen häll ut pulvret och håll det förseglat för reserv.
3. När maskinen är påslagen finns det risk för elektriska stötar och
brännskador vid höga temperaturer . Försök inte att öppna maskinen eller
ta isär och felsöka någon del av maskinen.
4. Håll den elektroniska fyrverkerimaskinen torr, använd den inte i regn

- 3 -
eller snö dagar.
5.Fäst enheten med skruvhålen på fästet. Se till att utrustningen är säkert
fäst för att förhindra vibrationer och rörelser under drift, och alltid
kontrollera att strukturen som stöder utrustningen är stark nog att stå emot
utrustning som är minst 10 gånger utrustningens vikt.
6. Utrustningen ska fixeras av fackmän på platser utom räckhåll för
människor, och ingen kan passera under eller över övergångsstället.
7. Obs: Det finns risk för explosion om batteriet är felaktigt placerat.
Endast ersätta samma eller likvärdiga typer.
8. Om du är osäker på om batteriet har svalts eller förts in i andra delar av
kroppen, kontakta omedelbart en läkare. Innan du rengör koppla bort
enheten från elnätet om den är ansluten. Använd inte starka
rengöringsmedel. Torka ta bort damm eller smuts från produkten med en
ren trasa. Vi är inte ansvariga för skador orsakade av felaktig hantering,
felaktig användning eller slitage, Vi reserverar oss rätten att göra tekniska
ändringar.
9. Förbrukningsskyddet på toppen av utrustningen måste vara stängt för
att förhindra oavsiktlig utmatning. Förbrukningsvaror bör förvaras i en torr
och förseglad miljö för att förhindra fukt.
10. Före och efter föreställningen bör du observera om det finns knölar i
munstycket. Om så är fallet måste det städas upp. Dessa moduler kommer
att påverka fyrverkerieffekten och till och med skada gnistmaskinen.
11. En enda elektronisk fyrverkeripjässladd (nätsladd för sprayer) kan
endast anslutas i serie för upp till 6 grupper. För mycket seriekoppling kan
leda till skador eller brand.
12. Den maximala körtiden är 5 minuter. Återanvändbar, men bör inte
överhettas maskin. Rörelse och hantering av maskinen under användning
är förbjuden.
13. När du laddar förbrukningsvaror, se till att maskinen är avstängd. Efter
att ha lagt undan den, vänligen täck över den för att förhindra att skräpet
faller in i matningsinloppet och orsakar att maskinen blockeras.
14. Förhindra att något kommer in i munstycket, rensa bort hinder före
användning

- 4 -
15. För att undvika risk för brand eller elektriska stötar, utsätt inte denna
enhet för regn eller fukt. Se till att det inte finns några brännbara föremål i
närheten av Utrustning.
16. Installera utrustningen på en väl ventilerad plats, minst 50 cm från
någon yta. Se till att ventilationsöppningarna inte är blockerade.
17. Koppla bort utrustningen från strömförsörjningen före all användning
eller underhåll.
18. Om något går fel, stoppa utrustningen omedelbart och reparera den
inte själv. Felaktigt underhåll leder till skador och fel. Kontakta teknisk
support för godkännande. Använd endast samma reservdelar som de
ursprungliga för att säkerställa att nätsladden inte är blockerad eller
skadad.
19. Byt ut säkringen: koppla bort enheten från strömförsörjningen. Ta bort
säkringshållaren från sitt ursprungliga läge med en skruvmejsel. Ta bort
den trasiga säkringen och byt ut den mot en säkring med samma
egenskaper. Skruva tillbaka skruvarna för att ansluta utrustningen till
strömförsörjningen.
20. Varning: Om säkringen fortfarande är trasig efter att den har bytts ut,
vänligen sluta använda den. Kontakta kundsupport för ytterligare
instruktioner. Fortsatt användning kan orsaka allvarlig skada.
21. Varning om fjärrkontrollbatterier: Använda batterier ska inte slängas
med hushållsavfall, men ska samlas in på en separat insamlingsplats .
SPARA DESSA INSTRUKTIONER
Försiktighetsåtgärder:
• Efter användning måste förbrukningsvarorna rengöras i 30 sekunder
genom att trycka på "D"-knappen!
• Stoppa uppvärmningen om fyrverkerier inte sprutas under en längre tid
• Förbud mot att låta maskinen välta .
• Rör inte munstycket med händerna .
• Förbud mot kontinuerligt arbete med maskinen i 30 minuter .
• Fyrverkerimaskinen ska stå på tomgång i 2 minuter utan pulver efter varje
användning .
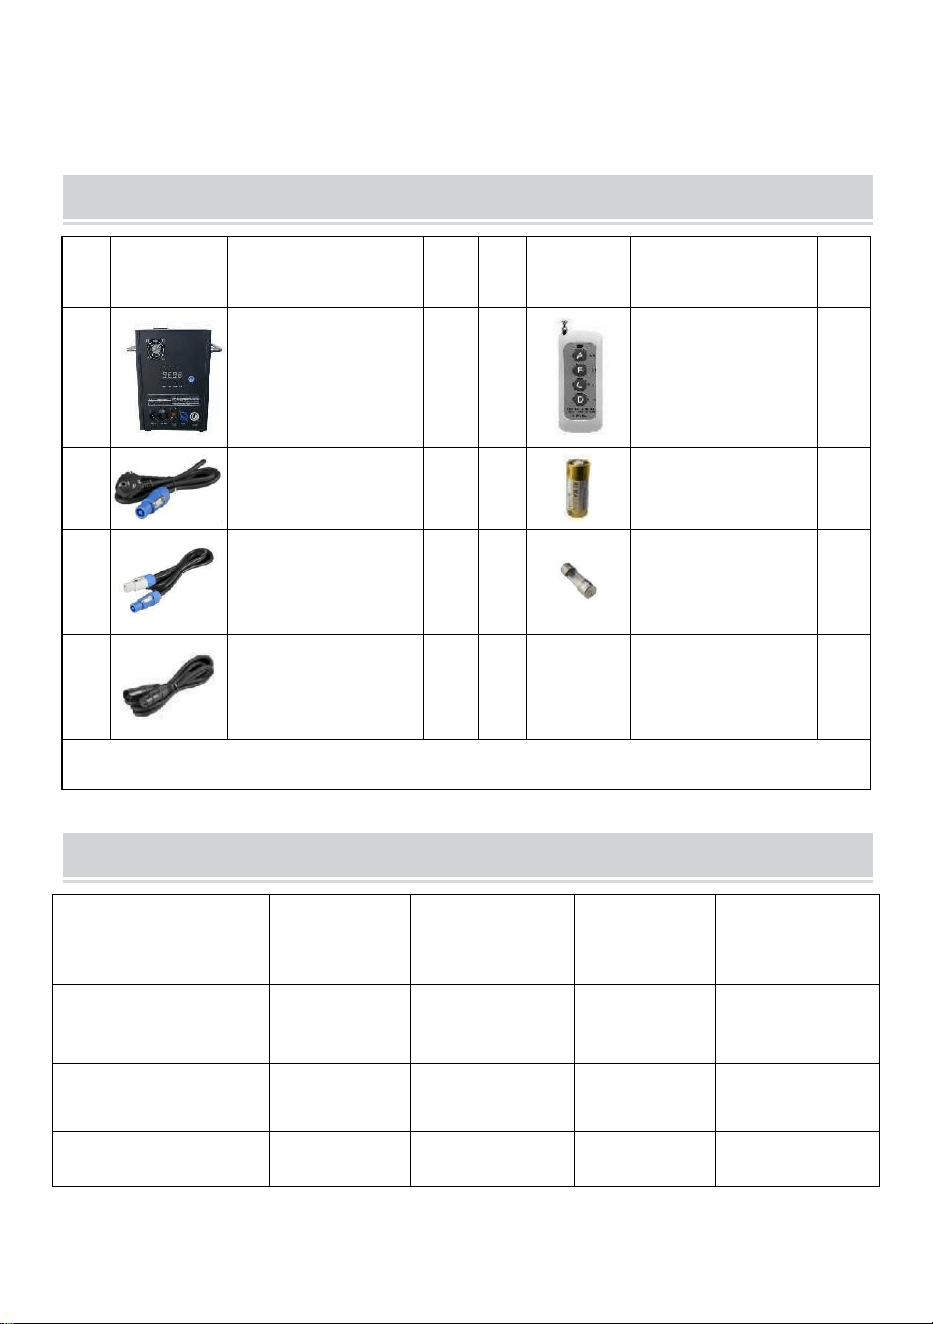
- 5 -
• Pulvret i pulvertanken ska rengöras och hällas ut för återvinning i tid, och
bör inte staplas upp p.
PACKING LIST
NE
J
BILD
NAMN
AN
TAL
NE
J
BILD
NAMN
AN
TAL
A
Cold Spark
Machine
1
E
Fjärrkontroll
1
B
Kraftledning
1
F
Batteri
1
C
Kraftledning
1
G
Säkring
1
D
D MX signalkabel
1
Listan ovan är för varje innerlåda .
TECHNICAL PARAMETERS
Modell
BJY-
PHJ500u1
BJY-
PHJ500u2
BJY-
PHJ700u1
BJY-
PHJ700u2
Märkspänning
AC120V
60Hz
AC220-240V
50Hz/60Hz
AC120V
60Hz
AC220-240V
50Hz/60Hz
Nominell effekt
500W
500W
7 00W
7 00W
Säkring
1 5 A
10 A _
1 5 A
10 A _
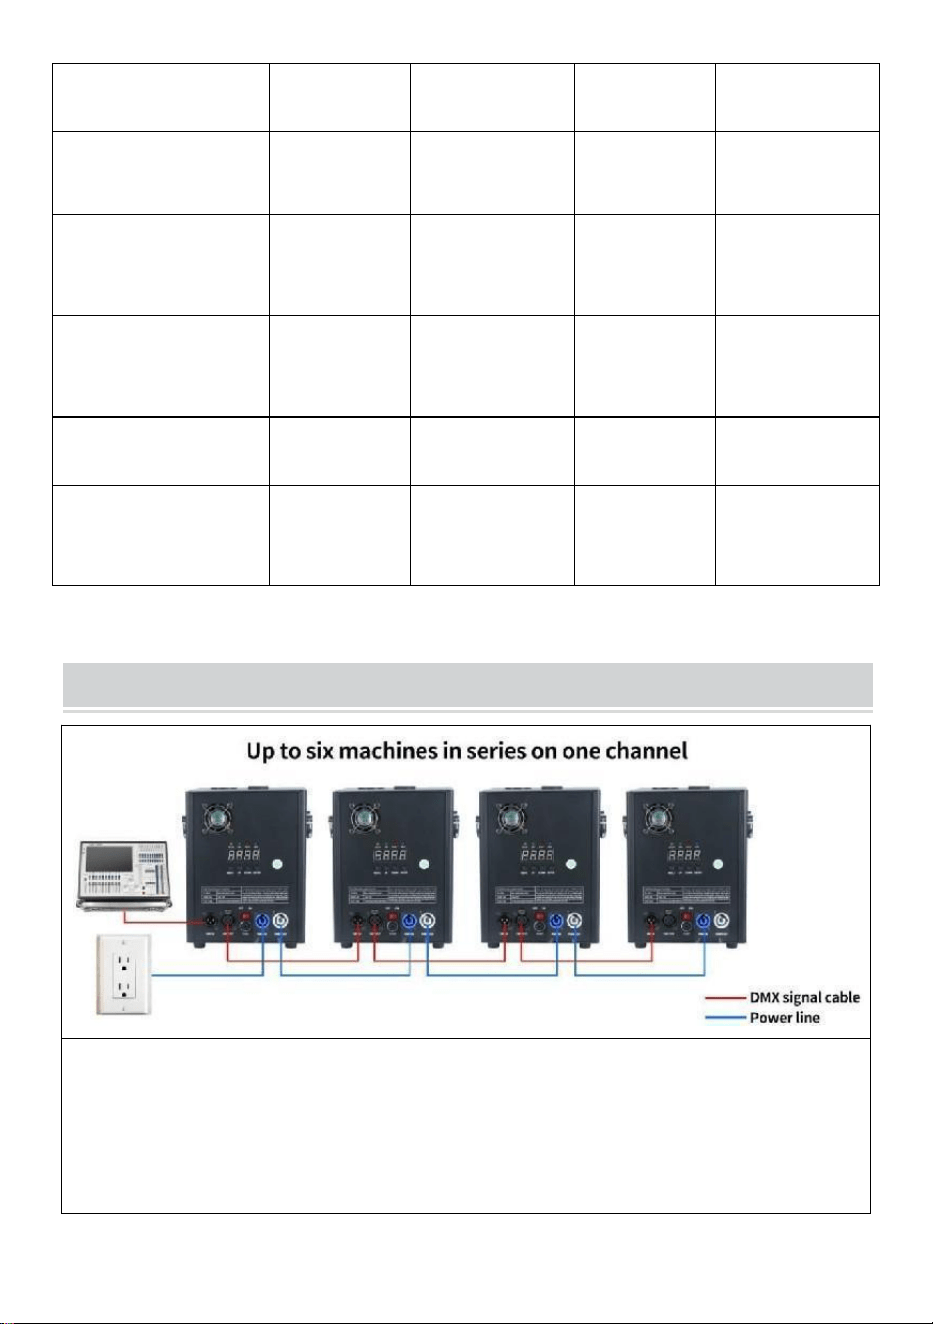
- 6 -
Förvärmningstid
<3 min
<3 min
<3 min
<3 min
Sparks höjd
4m
4m
5m
5m
Trådlös kontroll
W-3+W-8
W-3+W-8
W-3+W-8
W-3+W-8
Display Skärm
Board
LED
LED
LED
LED
DMX-intervall
1-512
1-512
1-512
1-512
Injicera pulver
Ti C
omposit
Ti C omposit
Ti C
omposit
Ti C omposit
METHOD OF INSTALLATION
Denna maskin stöder DMX512-signalkontroll, anslut den bara till
konsolen för kontroll.
En enda strömsladd för en kall gnistmaskin (sprutanslutning) kan endast
anslutas i serie för upp till 6 grupper. För mycket seriekoppling kan leda
till skada eller brand.
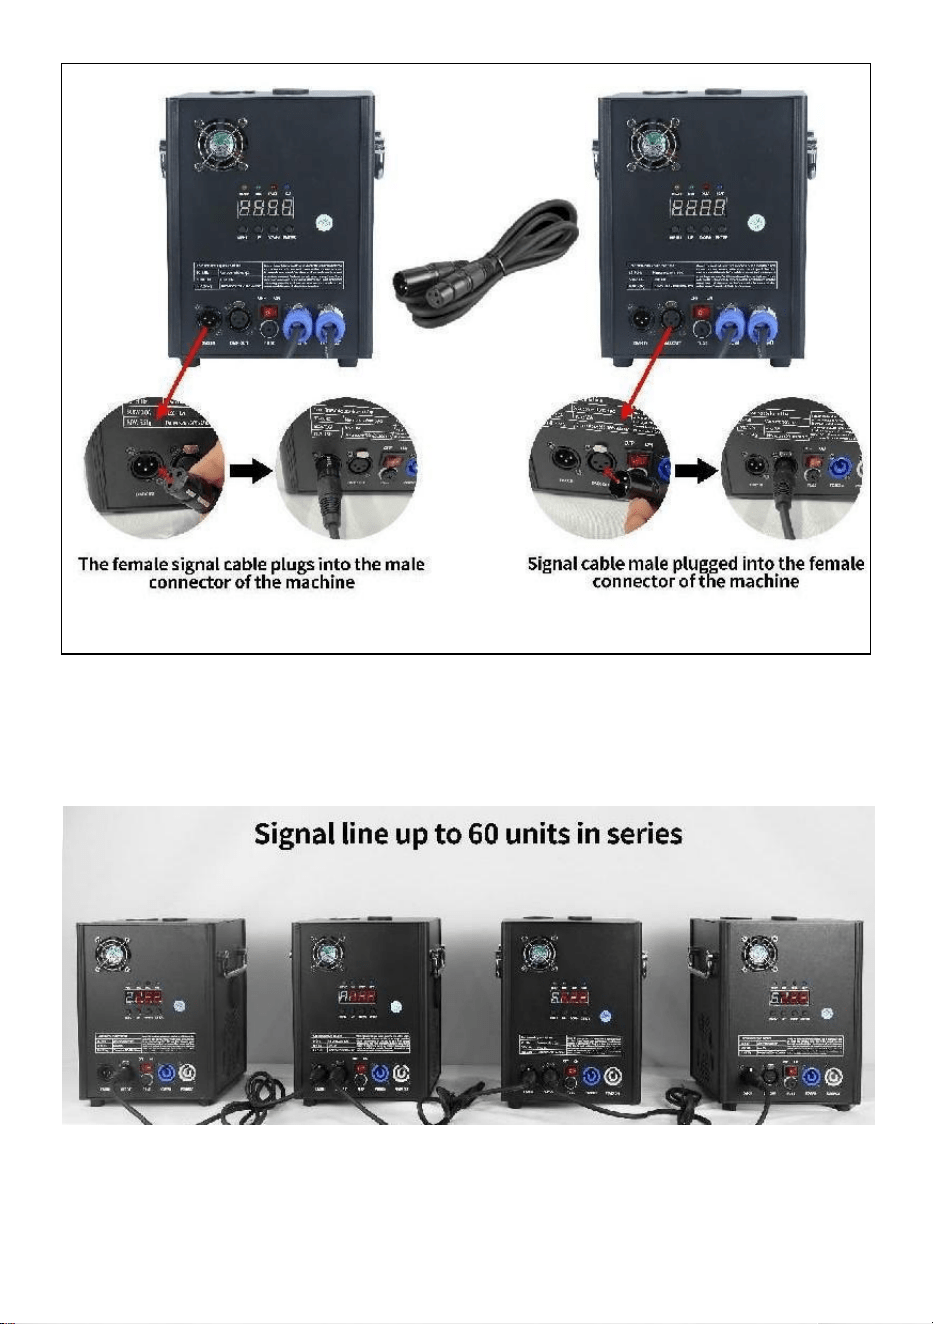
- 7 -
kan leda till skada eller brand.
A. Anslutningsschema för signalserier :
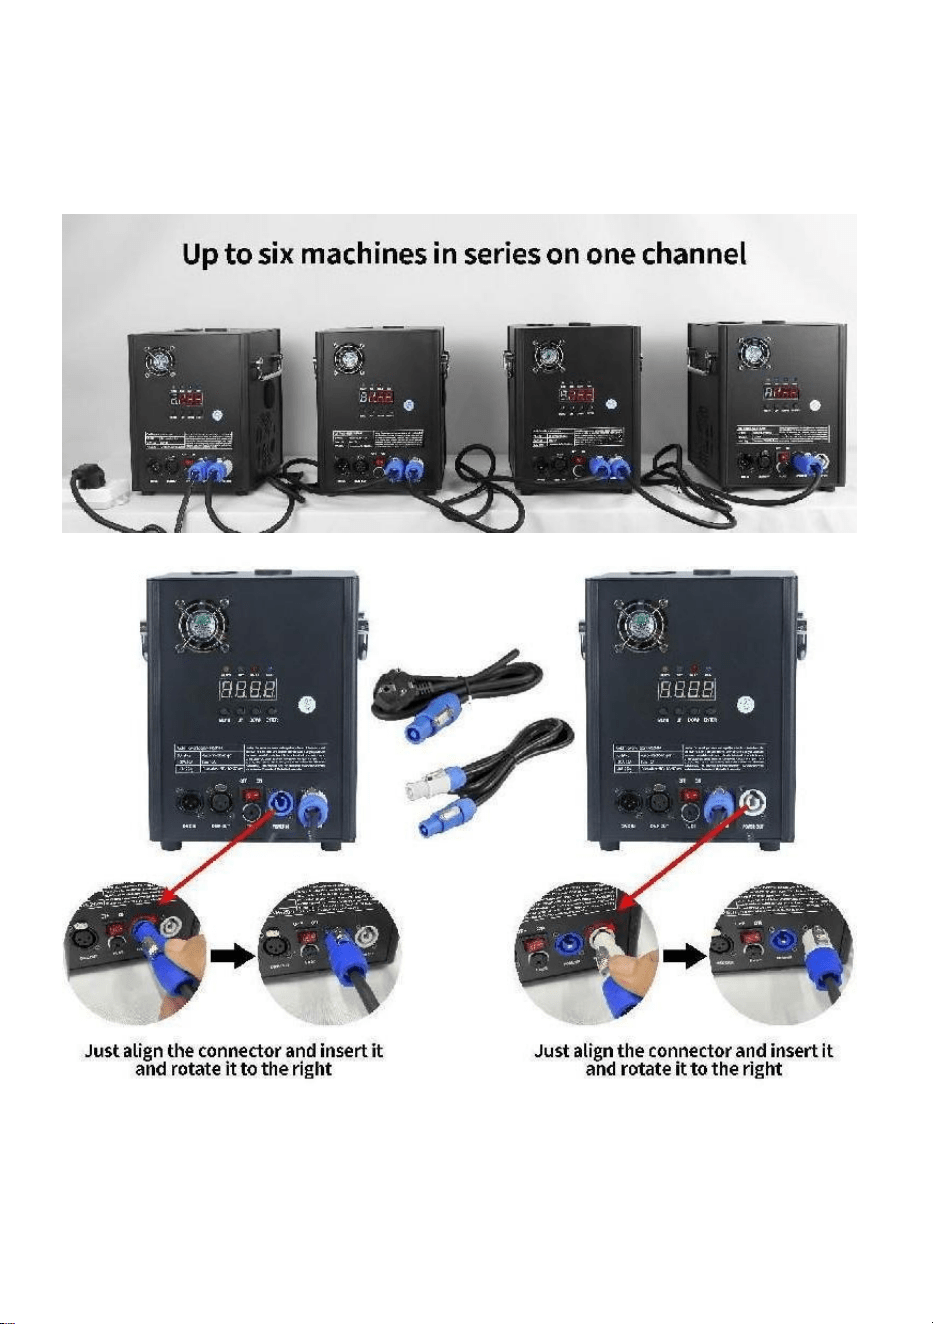
- 8 -
B. Anslutningsschema för
strömförsörjningsserien:
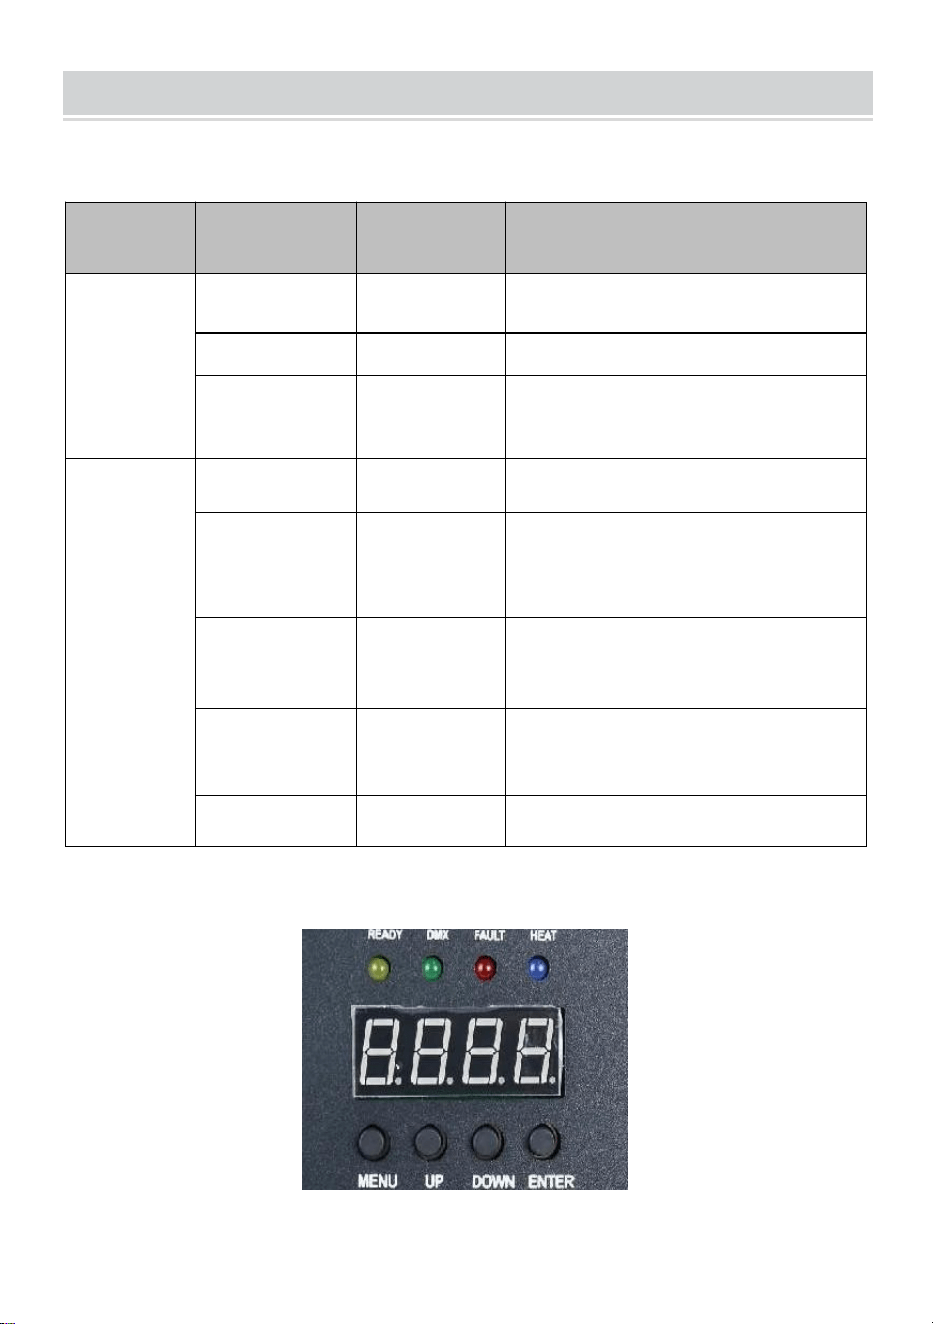
- 9 -
DESCRIPTION
Ⅰ. Kanalinstruktioner
Kanal
Kontrollera
fungera
Numeriska
värden
Digital rördisplay
1
Förvärm av
000~010
A001 DMX adresskod
Ogiltig
011~239
Förvärm för
att öppna
240~255
Visar aktuellt temperaturvärde
2
stänga
000~015
AV
Spraya
blommans
höjd 1
01 5 ~ 0 74
F1(Gäller endast om den når
drift
temperatur)
Sprayhöjd 2
0 75 ~ 134
F2 (måste nå driftstemperatur
för att vara effektiv)
Sprayhöjd 3
1 35 ~ 194
F3 (måste nå driftstemperatur
för att vara effektiv)
Klart lager
1 95 ~ 255
CLE Clearings
Ⅱ. Panelbeskrivning

- 10 -
1. Nyckelbeskrivning _
Tangenter från vänster till höger ordning: Meny -> Upp -> Ner ->
Bekräfta
1) Meny: Byt menygränssnitt, nästa meny
2) På: kan användas som menyväljare, föregående meny; När
bekräftelsetangenten trycks in i den uppåtgående adderingen, i
DMX-adresskodsgränssnittet, adderas adresskoden uppåt; I gränssnittet
för inställning av arbetstemperatur läggs arbetstemperaturen ihop.
3) Ner: när bekräftelseknappen trycks ner, i DMX-adresskodsgränssnittet,
reduceras adresskoden nedåt; I gränssnittet för inställning av
arbetstemperatur sänks arbetstemperaturen.
4) Bekräfta: Gränssnittet går in i inställningsläget, och det aktuella
gränssnittet kan lägga till eller subtrahera värdet. (Gäller endast i
adresskod, arbetstemperatur) .
2. beskrivning av indikatorlampan
1) Gul lampa: tänds när det finns ett fel, till exempel ett problem med
temperaturkontrolldetektering eller ett problem med uppvärmning.
2) Grönt ljus: tänd indikerar att det finns DMX-signal, av för signalavbrott
3) Rött ljus: det är alltid på vid uppvärmning
4) Blått ljus : Ljuset indikerar att temperaturuppvärmningen är klar och
arbetstemperaturen har uppnåtts.
3. Gränssnittsbeskrivning (Tryck på menyknappen
eller upp-knappen för att byta gränssnitt)
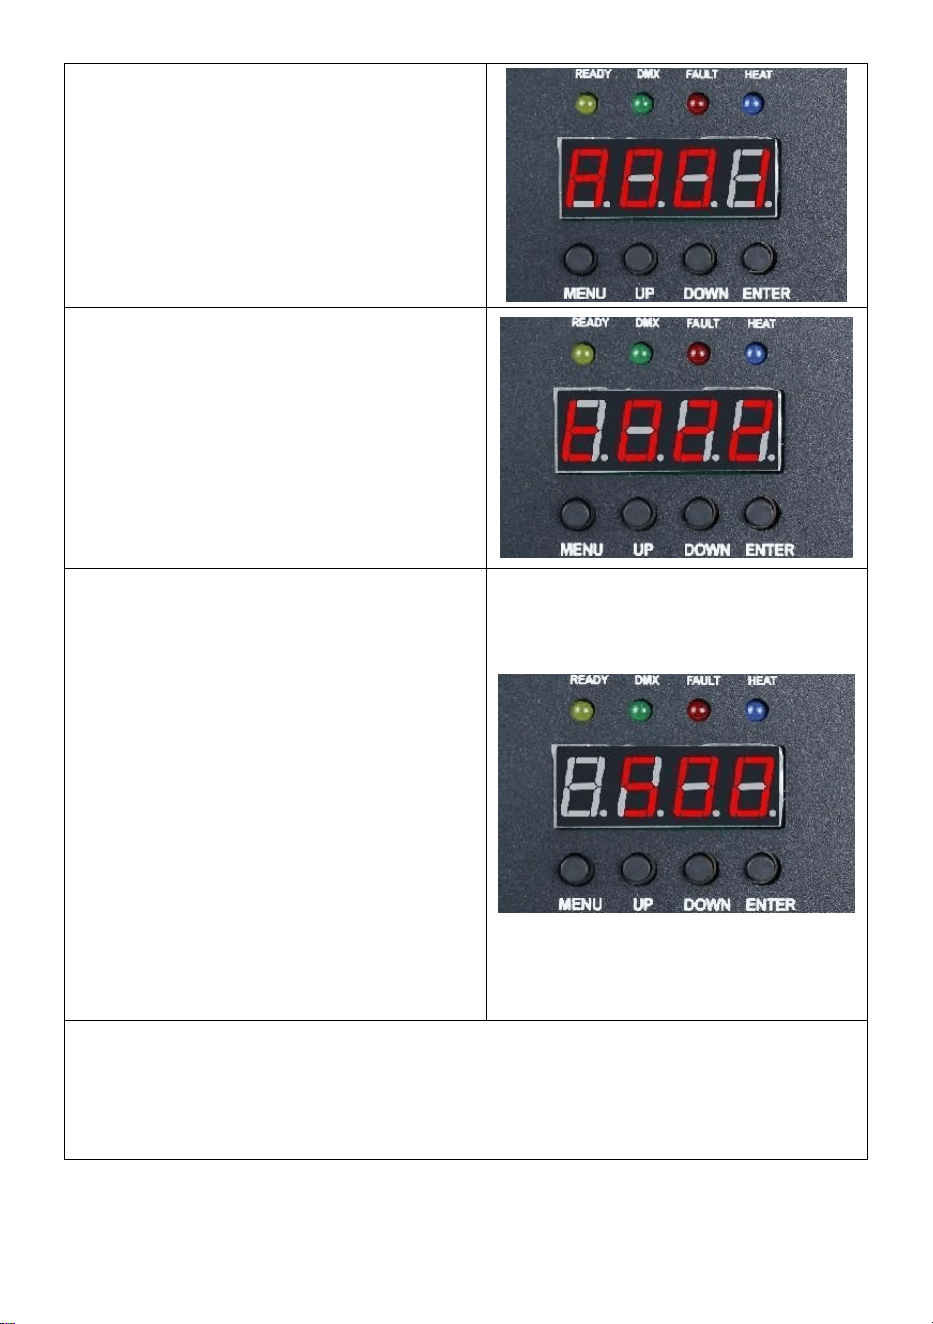
- 11 -
Adresskodsgränssnitt:
Användningsinstruktioner: Tryck på
bekräftelseknappen för att gå in i
redigeringen, du kan välja
adresskoden 001-512 och tryck
sedan på bekräftelseknappen för att
avsluta adresskodsredigeringen.
Temperaturgränssnitt:
Funktionsbeskrivning: Det aktuella
gränssnittet kan inte användas, bara
visa i realtid aktuell
temperaturstatus.
Inställningsgränssnitt för
drifttemperatur:
Driftinstruktioner: Ställ in
arbetstemperaturen, när
temperaturen värms upp till den
aktuella temperaturen kan sprutas
drift; Klicka på bekräftelsetangenten
för att gå in i redigeringen, du kan
välja temperaturintervallet 480-550
grader och klicka sedan på
bekräftelsetangenten för att lämna
redigeringsläget.
Trådlöst gränssnitt:
Vänlig påminnelse:
När du använder flera maskiner i en serie, ange en av maskinerna som
värd. Här är installationsinstruktionerna .
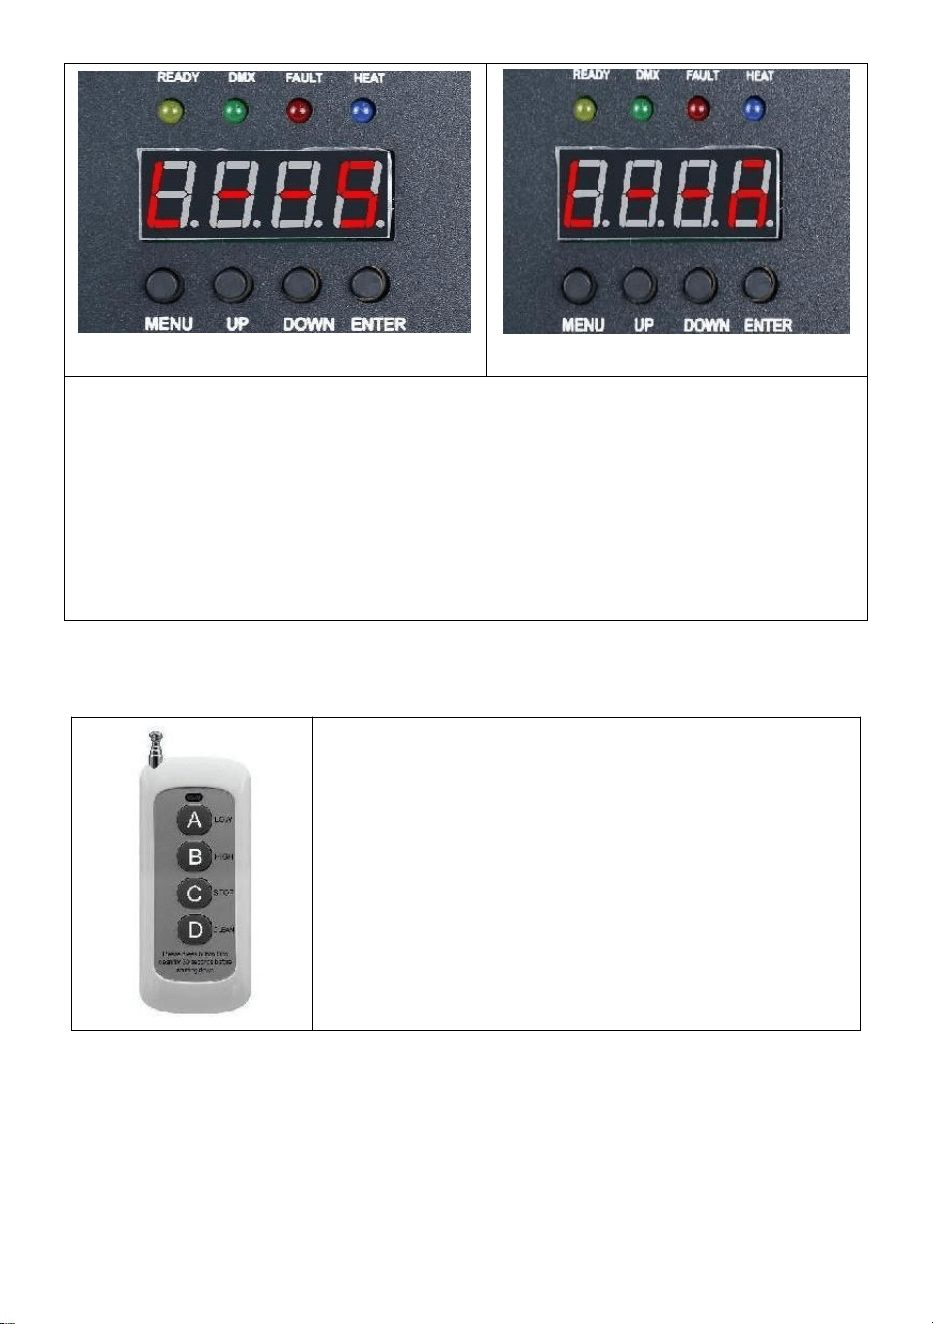
- 12 -
Slavgränssnitt
Värdgränssnitt
Driftinstruktioner: Kodgränssnittsvisningen som visas i figur "
Slavgränssnitt ", efter den framgångsrika kodgränssnittsvisningen som
visas i figur " Värdgränssnitt" ; När du ställer in mastern kan du
använda knappen " ENTER " för att välja maskinens
master/slave-tillstånd. Om du behöver ställa in den som värd, visas
inställningsgränssnittet i figur " Värdgränssnitt ", och den aktuella
maskinen har ställts in som värd.
Ⅲ. Avlägsen forts roll Instruktioner
A : Låg r angel ;
B : Hög klass ; _ _
C : Sluta !
D : Material C lutning;

- 13 -
Ⅵ. Maskindrift steg för steg

- 14 -
Tillverkad i Kina